
NIMU-01
COMMERCIAL ICE MAKER
User Manual
SKU: CIM007-66SI-USEH
1-833-362-2655(US)
https://euhomy.com


THANK YOU
for purchasing the Euhomy ice maker
RECORD THIS INFORMATION
CUSTOMER SERVICE
JOIN US
ACTIVATE YOUR WARRANTY
Scan the QR code using
a mobile device
Model Number _________________
Serial Number __________________
Date of Purchase ________________
Store of Purchase ________________
(Keep receipt)
1-833-362-2655(US)
euhomyofficial
Euhomy_global
euhomy
EuhomyOfficial
https://euhomy.com
For car refrigerators, it’s usually on the bottom
or side. If you can’t find it, don’t worry — it
won’t affect your warranty registration.
Check the back or side of the
machine for the serial number
on the nameplate.
NIMU-01
TIP
https://euhomy.com/pages/activate-warranty
SCAN HERE to share tips, get
support,and connect with fellow
enthusiasts!


Important Safety Instructions
Key Components and Structure
Control Panel and Display Overview
Installation Guide
Clean Your Ice Maker
FAQs
Troubleshooting
Specifications
Warranty Policy
01
04
05
07
12
11
13
15
17
19
20
Cleaning Your Ice Maker before Using
For the First Time
Preparing Your Ice Maker For Long-Term
Storage Or Relocation

IMPORTANT SAFETY INSTRUCTIONS
When using electrical appliances, basic safety precautions should be followed to
reduce the risk of fire, electric shock, and injury to persons or property. Read all
instructions before using any appliance.
Use this appliance only for its intended purpose as described in this owner’s manual.
This ice-maker must be properly installed in accordance with the installation instruc-
tions before it is used.
This unit must be positioned so that the plug is accessible. DO NOT run cord over
carpeting or other heat insulators. DO NOT cover the cord. Keep cord away from
traffic areas, and do not submerge in water. No other appliance should be plugged
into the same outlet, and be sure that the plug is fully inserted into the receptacle.
We do not recommend the use of an extension cord as it may overheat and cause a
risk of fire. If you must use an extension cord, use a No.14AWG minimum size, rated
no less than 1875 watts.
If the power supply cord is damaged, it must be replaced by the manufacturer or its
service agent or a similarly qualified person to avoid a hazard.
Disconnect the power plug before cleaning or servicing the appliance. If for any
reason this product requires maintenance, we strongly recommend that a certified
technician perform the service.
Never unplug your unit by pulling on the power cord. Always grasp the plug firmly
and pull straight out from the outlet.
DO NOT use your unit outdoors. Keep the unit away from direct sunlight.
Make sure there is at least 2 inches of space between the back of your unit and the
wall and keep the front free. Keep ventilation opening in the appliance enclosure, or
in the built-in structure, clear of obstruction.
DO NOT tip or slant the unit, which will cause excessive noise and make abnormally
sized ice cubes. And more seriously, it may cause water to leak from the unit.
If the unit is brought in from outside in the winter, give it a few hours to warm up to
room temperature before plugging it in.
DO NOT use liquids other than water to make ice cubes.
DO NOT clean your ice maker with flammable fluids. The fumes can create a fire
hazard or explosion.
1.
2.
3.
4.
5.
6.
7.
8.
9.
10.
11.
12.
13.
01

WARNINGS
WARNING: This appliance must be earthed. Use the proper power source according
to the nameplate.
WARNING: Keep ventilation openings, in the appliance enclosure or in the built-in
structure, clear of obstruction.
WARNING: DO NOT damage the refrigerant circuit.
WARNING: This appliance is not intended for use by persons (including children) with
reduced physical, or mental capabilities, or lack of experience and knowledge, unless
they have been given supervision or instruction concerning the use of the appliance
by a person responsible for their safety.
WARNING: Children should be supervised to ensure that they do not play with the
appliance.
WARNING: This appliance must be earthed; use the 110-120V/60Hz earthed power
supply.
WARNING: DO NOT store explosive substances such as aerosol cans with a flamma-
ble propellant in this appliance.
DANGER- Risk of Fire or Explosion. Flammable Refrigerant Used. DO NOT use a
mechanical device to defrost the ice maker. DO NOT puncture refrigerant tubing.
CAUTION- Risk of Fire or Explosion. Flammable Refrigerant Used. Consult repair
manual/ owner’s guide before attempting to install or service this product. All safety
precautions must be followed.
CAUTION- Risk of Fire or Explosion. Dispose of property in accordance with federal or
local regulations. Flammable refrigerant used.
CAUTION- Risk of Fire or Explosion. Due to puncture of refrigerant tubing; Follow
handing instructions carefully. Flammable refrigerant used.
The ice maker should be installed in accordance with the safety standard for refrigera-
tion systems ASHRAE15. The ice maker shall not be installed in corridors or hallways
of public buildings.
If the unit requires maintenance, replacing with like components and servicing shall
be done by factory authorized service personnel so as to minimize the risk of possible
ignition due to incorrect parts or improper service.
1.
2.
3.
4.
5.
6.
7.
8.
9.
10.
11.
12.
13.
02

WARNING: Keep ventilation openings, in the appliance enclosure or in the built-in
structure, clear of obstruction.
WARNING: This appliance is intended to be used in household and similar applica-
tions.
To avoid a hazard due to instability of the the appliance, it must be placed on an even,
flat surface.
14.
15.
16.
03
SCAN HERE to watch the installation, usage,
cleaning videos and more information.

① Reservoir
② Door
③ Drain Plug
④ Ice Bin
⑤ Handle
⑥ Control Panel
⑦ Air outlet
⑧ Water Draining Port
Plugged with a cap. When you install the machine, unplug the cap
and connect the grey drain pipe.
⑨ Water inlet port for water supply
Use to connect the water supply pipe.
KEY COMPONENTS AND STRUCTURE
Accessories
04
1
2
3
4
5
6
7
8
9
1 x Grey Water Drain Pipe (2 meters long)
1 x White Water Supply Pipe (Φ6.35mm x 3m)
1 x Water Quick Connector (4 Ways to 2 Ways)
1 x Rubber Gasket 2 x Blue Hose Clamps 1x Ice Scoop
1xWater Reservior Sealing Gasket (replacement)
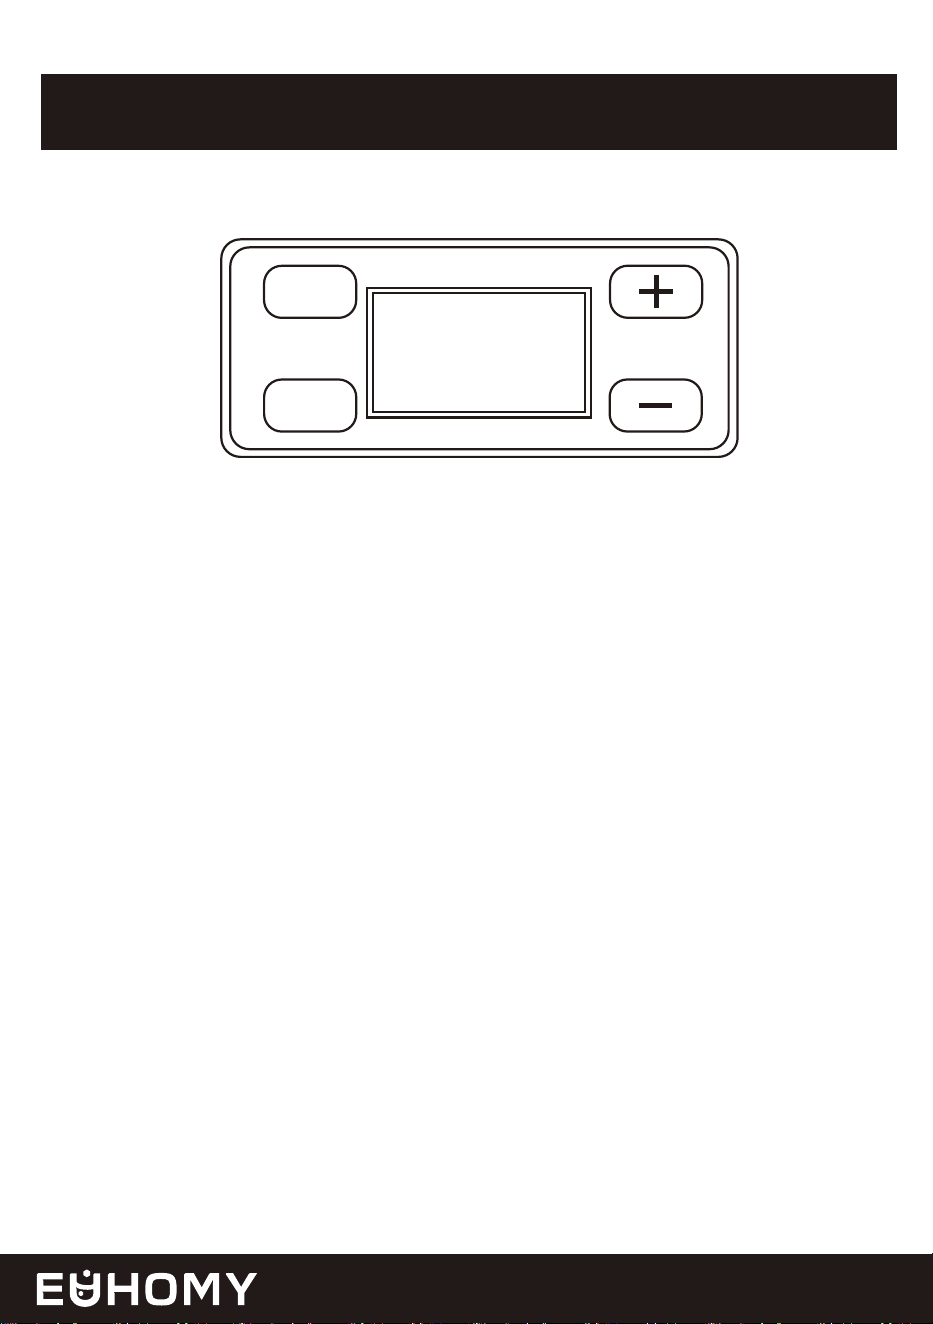
CONTROL PANEL AND DISPLAY OVERVIEW
05
TIMER
CLEAN
ON/OFF
Press Once: Access the Timer Setting program.
Press and Hold (5+ Seconds): In standby mode, start the Cleaning program.
Press once to turn on the machine when it is off.
Press once to turn off the machine when it is making ice or running in cleaning mode.
If a timer is set, press once to cancel the timer setting.
Adjust Timer Delay: Press to increase or decrease by 1 hour per press.
Switch Temperature Units: Press and hold the "+" buttons for 5 seconds to toggle between
Fahrenheit (℉) and Celsius (℃).
"TIMER/CLEAN" Button
"ON/OFF" Button
"+" and "-" Buttons
06
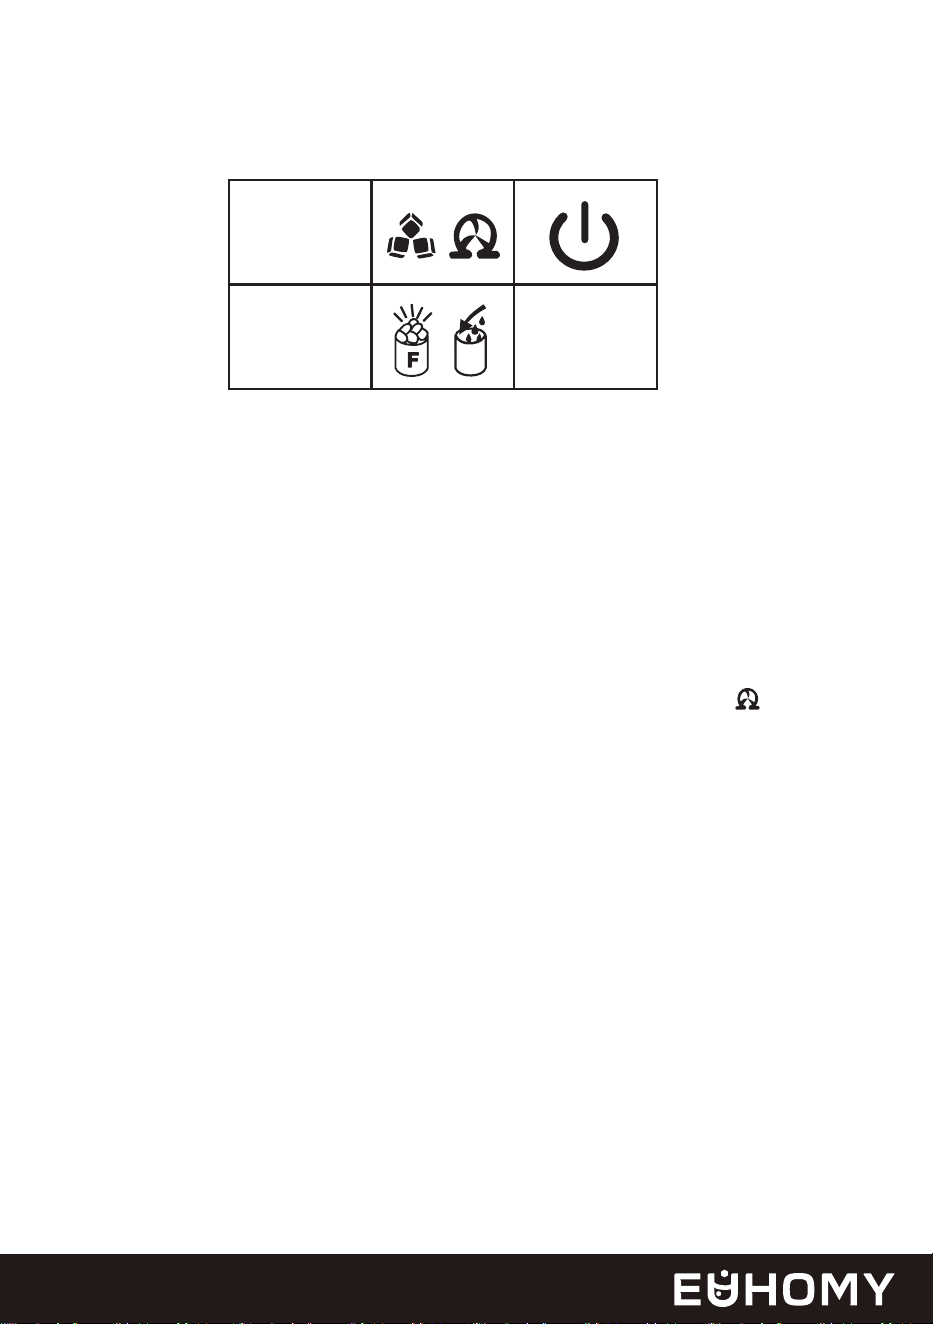
LCD Display Guide
Environmental Temperature
• The panel shows the environmental temperature in Fahrenheit (displayed as "F").The
environmental temperature can’t switch.
Ice-Making and Deicing Symbol
• When the symbol rotates, the machine is making ice.
• When the symbol keep light, the ice bin is full, and the machine is stopping the process.
Automatic Self-Cleaning Symbol
• Default cleaning time is 15 minutes. When the machine is stand by, Hold the TIMER/CLEAN
button for more than 5 seconds to start the self-cleaning program. And the symbol rotates,
and the countdown begins (e.g., 15M).
Power On/Off Symbol
• The symbol lights up when the machine is on. If it flashes, the machine is in standby mode.
Error Code Display
• E1: Ice-making malfunction.
• E2: Ambient temperature sensor fails when the symbol is always on. Or the ice full probe
fails when the symbol flashes.
Water Flow and Water Shortage Symbol
• A flashing arrow indicates water is flowing into the machine.
• A steady symbol indicates a water shortage.
Ice Full Alarm
• Alerts when the ice bin is full. Timely removing ice resumes ice-making; prolonged inactivity
stops ice-making and melts the ice to extend product lifespan.
• If F is displayed alone, it means that the infrared detects that the ice is full.
• If the ice bucket is displayed alone, it means that the probe detects that the ice bin is full.
• If both are displayed at the same time, it means that both the infrared and the probe detect
that the ice bin is full.
1.
2.
3.
4.
5.
6.
7.
1 2 3 4
5678
1
2
M
F
M
H
88
88
E

Side View (inch)
50 mm
INSTALLATION GUIDE
07
Settings Display
• H (Timer): 1-24H. In standby, press Timer and "+" to set the start delay (e.g., "1H" = starts in
1 hour). During ice-making, press Timer and "+" to set the stop delay (e.g., "1H" = stops in 1
hour).
8.
1. Setup the Ice Maker
A. Unpack and Inspect
Remove all exterior and interior packaging. Confirm all accessories are included: instruction
manual, ice scoop, white water inlet pipe, 4-way to 2-way water quick connector, water
draining pipe, etc. If anything is missing, contact our customer service. (email
[email protected] or call us at +1-833-362-2655).
B. Prepare the Ice Maker
Remove any tape securing the door, inner cabinet, and ice scoop. Clean the inner cabinet and
ice scoop with a damp cloth.
C. Position the Ice Maker
Place the unit on a level, flat surface away from direct sunlight and heat sources (e.g., stove,
furnace, radiator). Ensure a clearance of at least 25 cm (10 inches) at the air outlet and allow
5 cm (2 inches) between the left/right sides and the wall.
D. Allow Refrigerant to Settle
If the unit was tipped during shipping or transportation, let it sit upright for 24 hours to allow
the refrigerant to settle before plugging it in.
E. Plug Accessibility
Position the appliance so that the plug is easily accessible.

08
2. Install the Handle
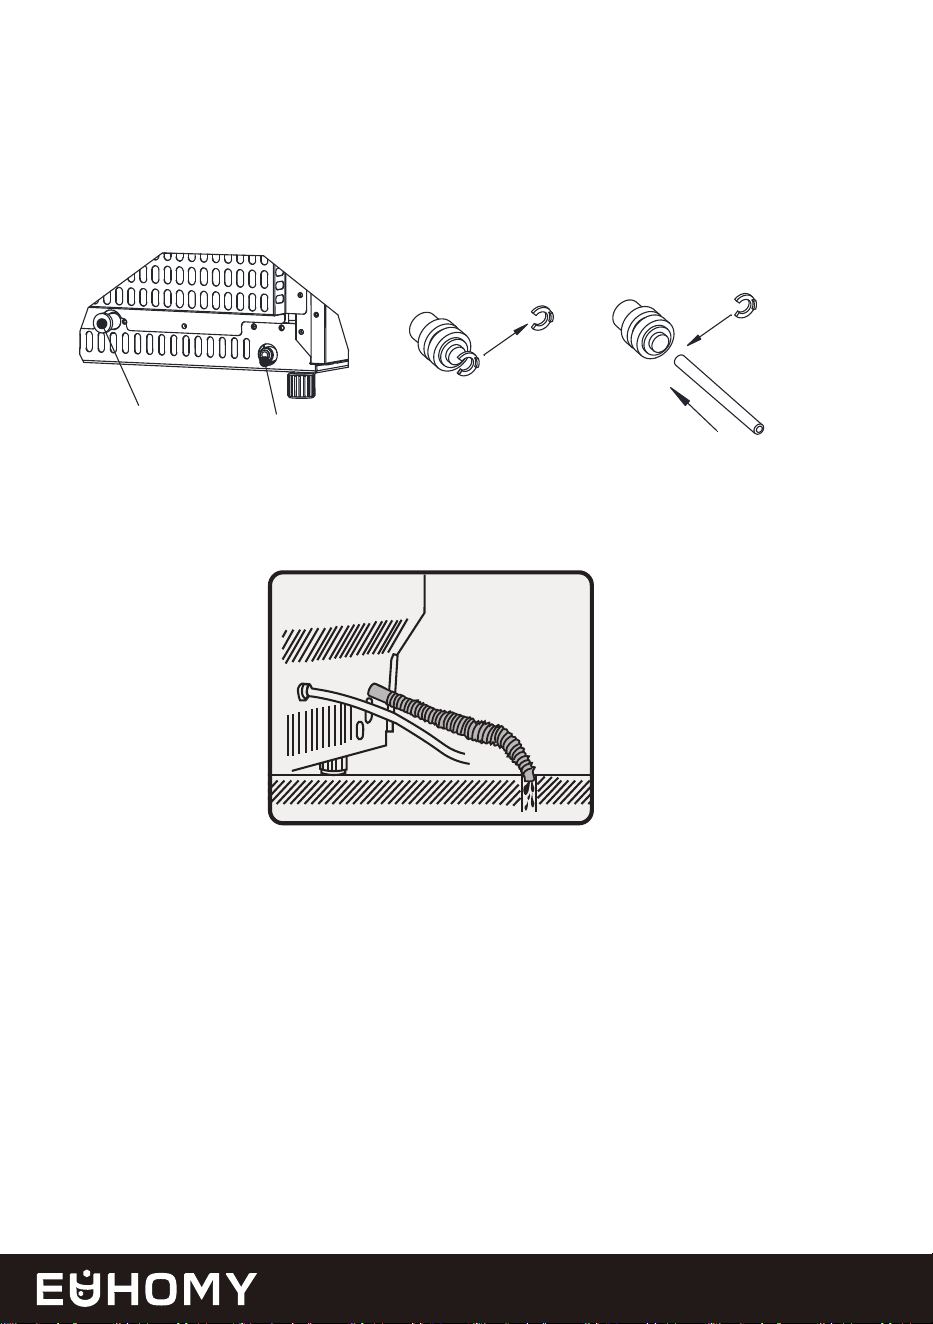
3. Connecting the Water Supply Hose
A. Install the Screws
Open the accessories supply and locate the two screws, then screw into the screw holes.
A. Prepare the Water Inlet Port
Locate the water inlet port for water supply at the back of the unit (marked as "B" in the
illustration). Remove the clipper attached to the port by pressing the outer circle of the port
with one hand.
B. Align the Handle
Align the door handle with the screw hole.
C. Tighten the Screws
Find the hexagonal screw and tighten it in the specified position.
TIPS
1. This ice maker is not designed for outdoor use. Maintain the room and inlet water
temperature as specified to ensure optimal performance.
2. Ensure unobstructed ventilation at the front of the unit, with at least 25cm (10
inches) of clearance. Allow 5 cm (2 inches) of space at the back, top, and sides
for proper air circulation. DO NOT place any objects on top of the ice maker.
3. Follow the recommended spacing dimensions for adequate ventilation and to
allow the unit to be pulled forward for servicing.
4. The ideal ambient temperature is between 50°F and 90°F. Operating outside this
range may affect performance or ice-making efficiency. This unit must be
installed in an area protected from the elements, such as wind, rain, water spray,
or drips.
5. A continuous water supply with a pressure of 0.04-0.6 Mpa is required. The water
temperature should be between 41℉ and 77℉ for best results.
09
4.Connecting the Water Drain Pipe
B. Attach the Water Hose
Insert one end of the white water hose firmly into the water inlet port, ensuring it is secure.
Reattach the clipper to lock the hose in place. Your water supply connection is now complete.
A. Prepare the Water Drainage Port
Locate the black-colored drainage cap (marked as "A" in the illustration). Remove it carefully.
*Please ensure the drain pipe lower than the water drainage port.
B. Attach the Drain Pipe
Connect the provided grey drainage pipe to the exposed drainage port. Ensure the other end
of the pipe is securely connected to your main water drainage system.
STEP 1: Remove the tape
Remove the clipper first
STEP 2:Insert the water tube
Water inlet port on the
unit back
Then install the
clip back
Insert water tube
inward completely
White water tube
(accessory)
A
B
10
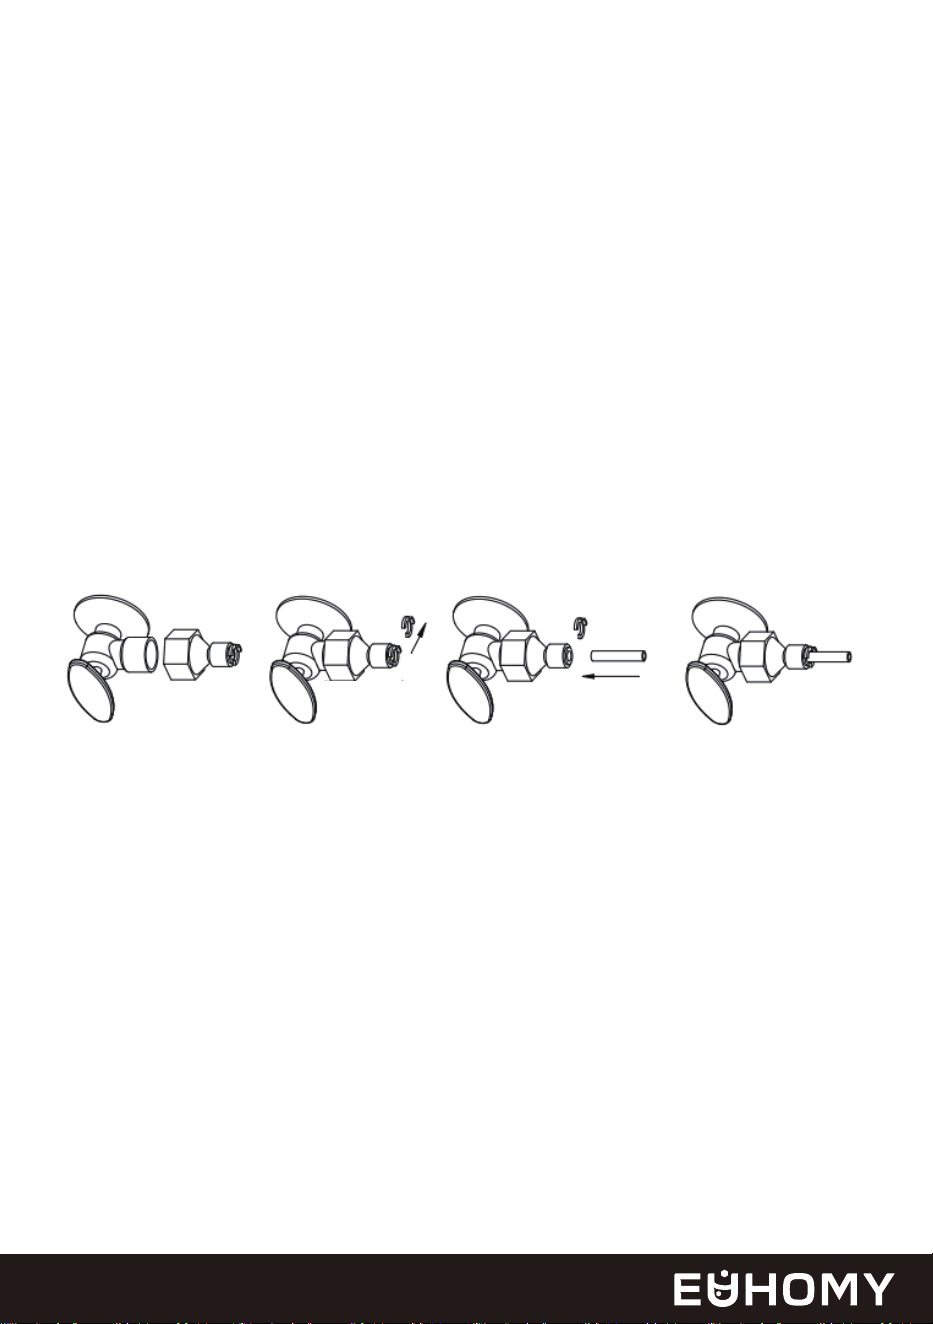
5.Connecting the Water Hose to the Faucet
A. Install the Quick-Connector
Attach the supplied quick-connector to the water faucet by screwing it on tightly.
B. Connect the Water Hose
Remove the clipper from the quick-connector. Insert the free end of the water supply hose
into the quick-connector port until it fits securely. Reattach the clipper to lock the connection
in place.
Important: Ensure the water pressure of the main supply system is between 0.04 MPa and 0.6
MPa for proper operation.
*The drain pipes must all be lower than the drain outlet, and the length of the drain pipes can
be appropriately cut according to usage.
STEP 1: Qucik-connector and
the water faucet
step 2: Screw the quick-connector on the
water faucet by the screw thread, and
remove the clipper
STEP 3: Insert the waterhose
completely Push inwards
STEP 4: Install back the clipper
Remove the
clipper
Push inwards

CLEANING YOUR ICE MAKER BEFORE
USING FOR THE FIRST TIME
11
Use a diluted detergent, warm water, and a soft cloth to clean the ice maker.
Thoroughly clean all inner parts that come into contact with water.
* We highly recommend using our cleaning solution for product maintenance.
Initial Cleaning
Pull the water drainpipe of the water reservoir (indicated as "3" in the above illustration) to
drain the clean water from the reservoir.
Clean the inner ice-storing cabinet and all inner parts until they are completely clean.
Drain the water from the water drain port located at the back of the unit (indicated as "8” in
the above illustration).
Draining and Rinsing
Reinstall the water drain plug of the water reservoir and the cap of the unit’s water drain port.
Failure to do so may result in the unit not making ice properly.
Reassembly
After cleaning, it is recommended to discard the ice cubes made during the first 10 minutes
of the ice-making cycle.
Discard the First Batch of Ice
Dry the ice maker’s interior and exterior with a clean, soft cloth.
Final Step

12
Dry Completely: Ensure the ice maker is completely dry before storing.
Cover: Use a plastic bag to cover the ice maker, protecting it from dust.
Ice Only: Use the ice storage bin exclusively for ice. Avoid storing other items like bottles or cans.
Mild Detergent: When cleaning the exterior, use a mild detergent and warm water. Avoid abrasive
cleaners. Never use abrasive cleaning agents.
Stainless Steel Care: If your ice maker has stainless steel components, clean them with a stainless
steel cleaner and a soft cloth.
If your ice maker will not be used for an extended period or if it needs to be moved to a
different location, it's essential to prepare it correctly. Follow these steps:
Remove All Ice: Empty the ice bin. Wait 2 hours for the ice on the evaporator to fully melt.
Power Off: Unplug the ice maker from the power source.
Turn Off Water Supply: Shut off the water supply to the ice maker.
Disconnect Water Line: Disconnect the water line connected to the ice maker.
Drain Water Tank: Pull out the water drain plug from the water reservoir, marked as “3” in the
illustration above, to drain the water from the water reservoir.
Drain Water Pump: Drain any remaining water from the water pump and drain plug.
Leave Door Open: Prop the door open to allow for air circulation and to prevent mold.
Unplug Before Cleaning: Always unplug the ice maker before cleaning.
Avoid Harsh Chemicals: Please use a specialized ice machine cleaner for the best performance.
Avoid using harsh chemicals, including alcohol, vinegar, or other acids, as they can damage
the evaporator and shorten the life of the unit’s life.
Clean Condenser Coil: Clean the condenser coil at least once a year to ensure optimal
performance.
Deep Clean Before Storage: If the ice maker has been sitting idle for a long time, thoroughly
clean it before using it again.
Step 1: Drain All Water
Step 2: Clean and Maintain
Step 3: Store Properly
Daily Use Tips
PREPARING YOUR ICE MAKER FOR
LONG-TERM STORAGE OR RELOCATION

13
1. Clean the door and cabinet using our cleaning solution for optimal maintenance.
2. Avoid using solvent-based or abrasive cleaners.We strongly recommend using our cleaning
solution for product maintenance.
3. Use a soft sponge to clean, then rinse thoroughly with clean water.
4. Wipe dry with a soft, clean towel to prevent water spots.
5. Stainless steel models can discolor when exposed to chlorine gas.
General Cleaning
1. Disconnect power: Unplug the ice maker from the power source.
2. Clean the bin: Wipe down the inside of the bin with our cleaning solution.
3. Rinse: Thoroughly rinse the bin with clean, cold water.
4. Reconnect power: Plug the ice maker back in.
Cleaning the Ice Storage Bin
Cleaning the Ice Making Parts
CLEAN YOUR ICE MAKER
1. Disconnect power: Unplug the ice maker.
2. Remove the drain plug: Wait until all the water has completely drained. Once draining is
finished, securely reinstall the drain plug securely back into place.
3. Clean the water reservoir and other parts: Use both thumbs to open the transparent
window. Thoroughly clean all the inner parts that come into contact with water. Appropriate
amounts of acetic acid solution have been added at the marked locations. After cleaning,
carefully reinstall the transparent windows. To prevent water leakage, ensure it is properly
and securely fitted.
4. Start the clean program:Press the cleaning button on the operation panel for more than
5 seconds to start the cleaning program, and the cleaning will end after 15 minutes. Pull the
drain plug to drain the cleaned water in the water reservoir.
Prepare for a second round of cleaning to drain out the remaining acetic acid solution. Start
the cleaning program, which will be completed in approximately 15 minutes. Once finished,
press the power button to begin the ice-making process.

14
Clean the ice shovel, ice bin, water reservoir, and run the self-cleaning program to clean
the surface of the evaporator every week. Operate the cleaning program.
Weekly Cleaning
Every 2 months, deep clean all parts that come into contact with water or ice, including the
ice storage bin, water reservoir, door, evaporator, water pump, and silicone tube.
It is recommended to have a professional technician perform this cleaning.
When the unit is taken out of service, its disposal and the handling of its
materials must comply with national regulations.
Bi-Monthly Cleaning
CORRECT DISPOSAL OF THIS PRODUCT
1. Avoid harsh chemicals: DO NOT use harsh chemicals or abrasive cleaners on any part
of the ice maker. These can damage the surface and affect the taste of the ice.
2. Regular cleaning: For optimal performance, clean your ice maker regularly.
3. By following these simple steps, you can keep your ice maker clean and hygienic, ensuring
that you always have a supply of fresh, clean ice.
Note:
UP UP
aoeticacid

15
FAQs
1. How often should I clean my ice maker?
2. How do I clean the ice maker?
3.Can I put milk and juice into the reservoir to make ice cubes?
4.Why do my ice cubes melt quickly?
Daily Cleaning
• In standby mode, press and hold the "TIMER/CLEAN" button for 5 seconds to activate the
Cleaning Mode.
• After draining the water, return the drainage plug (on the right side of the water tank) to its
normal position. Repeat cleaning if needed.
Deep Cleaning
Turn off the water supply and drain the water box. Dilute the acetic acid and pour it into the
water box. Then start the cleaning mode. After cleaning is complete, remove the drain plug
to empty the water box, refill it with clean water, and run the cleaning mode twice. After that,
you can resume ice production, but please discard the ice produced in the first 15 minutes.
Using liquids other than water to make ice cubes is not recommended. Our research has
found that the particles in milk and beverages can easily block the pump and reduce its
service life. Also, the protein in milk is prone to calcification, which chemically reacts with
the PU water pipe inside the machine, causing it to break and making the product unable
to continue working.
The ice maker does not have a refrigeration function. High ambient temperatures, especially
in summer, can accelerate melting.
• Close the door to maintain the internal.
• Place a fan near the machine to disperse heat.
• For long-term storage, transfer ice cubes to a refrigerator/freezer.
5.Why does the ice cubes have a plastic smell?
The ice cube itself has no taste. If you think there is a plastic smell, try to clean the inside of
the machine with our cleaning solution, then run a few cycles, and finally rinse with distilled
water. Discard the first batch of ice to ensure no cleaning solution residue remains.
To ensure optimal performance, clean your ice maker at least once a week, depending on
usage. Regular cleaning prevents scale buildup, which can block the pump and cause the
machine to malfunction.

16
For further support, feel free to reach out to the Euhomy support team!
1-833-362-2655(US)
https://euhomy.com
10.Why does the machine make crushed ice, not nugget ice?
Try Resetting the machine: Unplug it for 2 hours, then plug it back in. Contact the Euhomy
Team if these steps don't resolve the issue.
6.Why is water leaking from the machine?
It may be that the tube inside the machine came loose during transport. You can remove
the back cover and reconnect the tube yourself. If you are unsure how to do this, please
contact our team. We will refer you to a professional video to help you solve the problem.
7.Does it make ice automatically and stop when the ice bin is full?
Our ice maker is equipped with a sensor that automatically stops ice production when the
ice bin is full.
8.Why is the ice maker white instead of stainless steel?
The machine is made of stainless steel but has a white protective film to prevent scratches
and fingerprints. If you prefer the stainless steel appearance, simply peel off the protective
film.
9.Why is there water flowing but not making ice?
If the ambient temperature and the refrigeration pipe are in good working order, it is likely
that the refrigerant within the machine has experienced a leak. Please provide us with a
video or photo of the issue to assist you further. The Euhomy Team will be happy to offer
guidance and support.
17
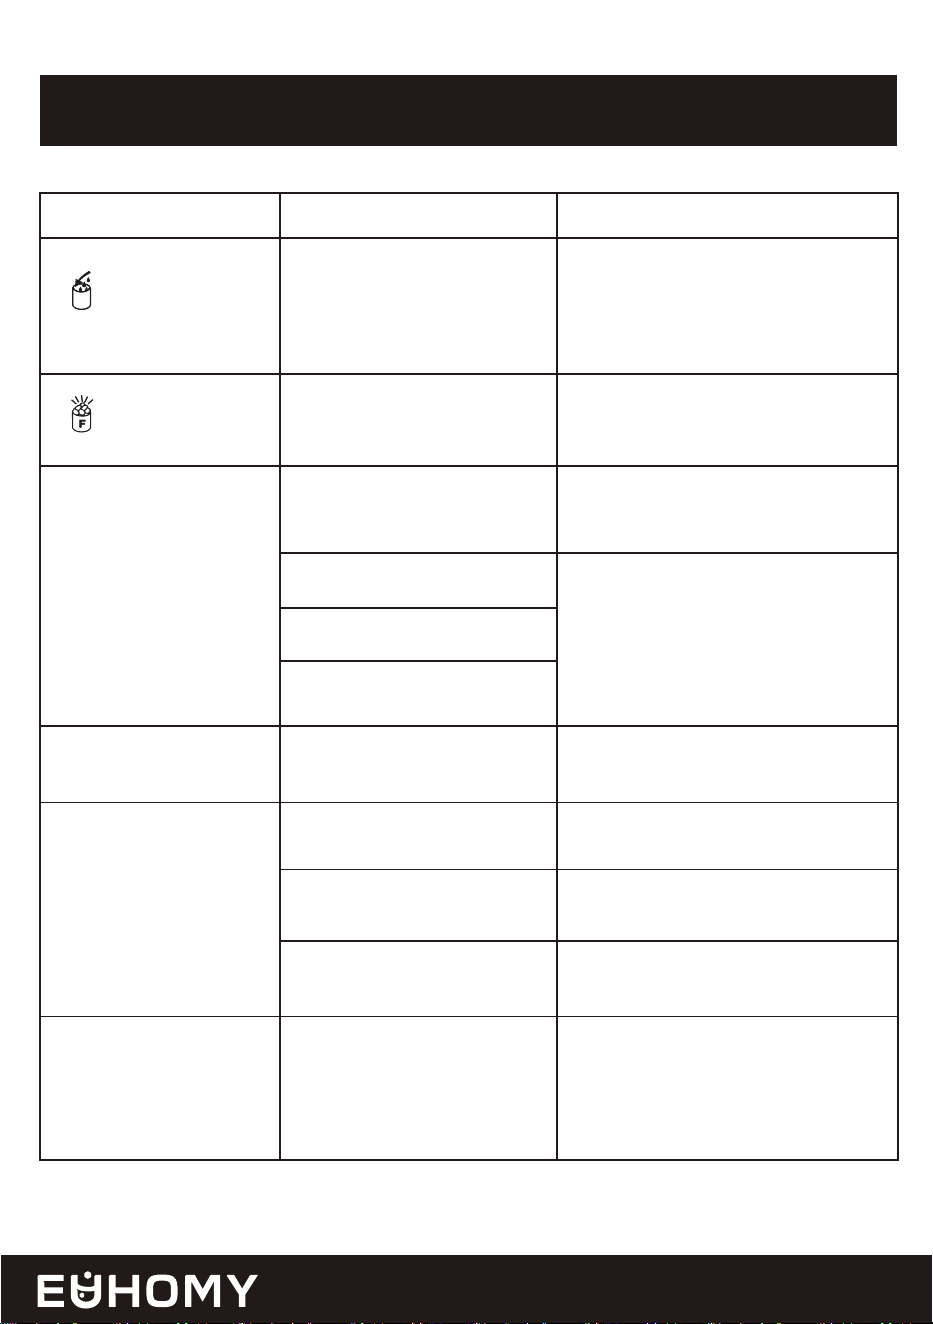
TROUBLESHOOTING
Problem Possible Cause Solution
" " indicator is on.
" " indicator is on.
Making Ice too slowly
Plastic pieces in the
water/ice
No water supply.
Check the main water supply
pressure or check whether the water
supply hose is blocked, adding the
water pressure or cleaning the hose
if necessary.
Remove the ice cube or switch the
empty ice tank from the bottom to
the top.
Please run the ice maker below 90℉
ambient and pour colder water into
the tank.
Please contact
Hot air outlet must have at least 10
inches of ventilation distance.
Water temperature requirement
between 41-77℉.
Please contact
Please contact
The upper ice tank is full of
ice cubes.
Ambient temperature or
water temperature in inner
tank is too high.
Press the ON/OFF button twice and
restart the ice making program; if
this problem persists, please contact
Refrigerant liquid leakage
Motor cover is broken
Pipe in the cooling system is
blocked
The environmental tempera-
ture sensor is damaged
Hot air outlet is blocked by
something
Water temperature in inner
tank is too high.
Refrigeration system
malfunction
Internal parts damaged
E1
E2
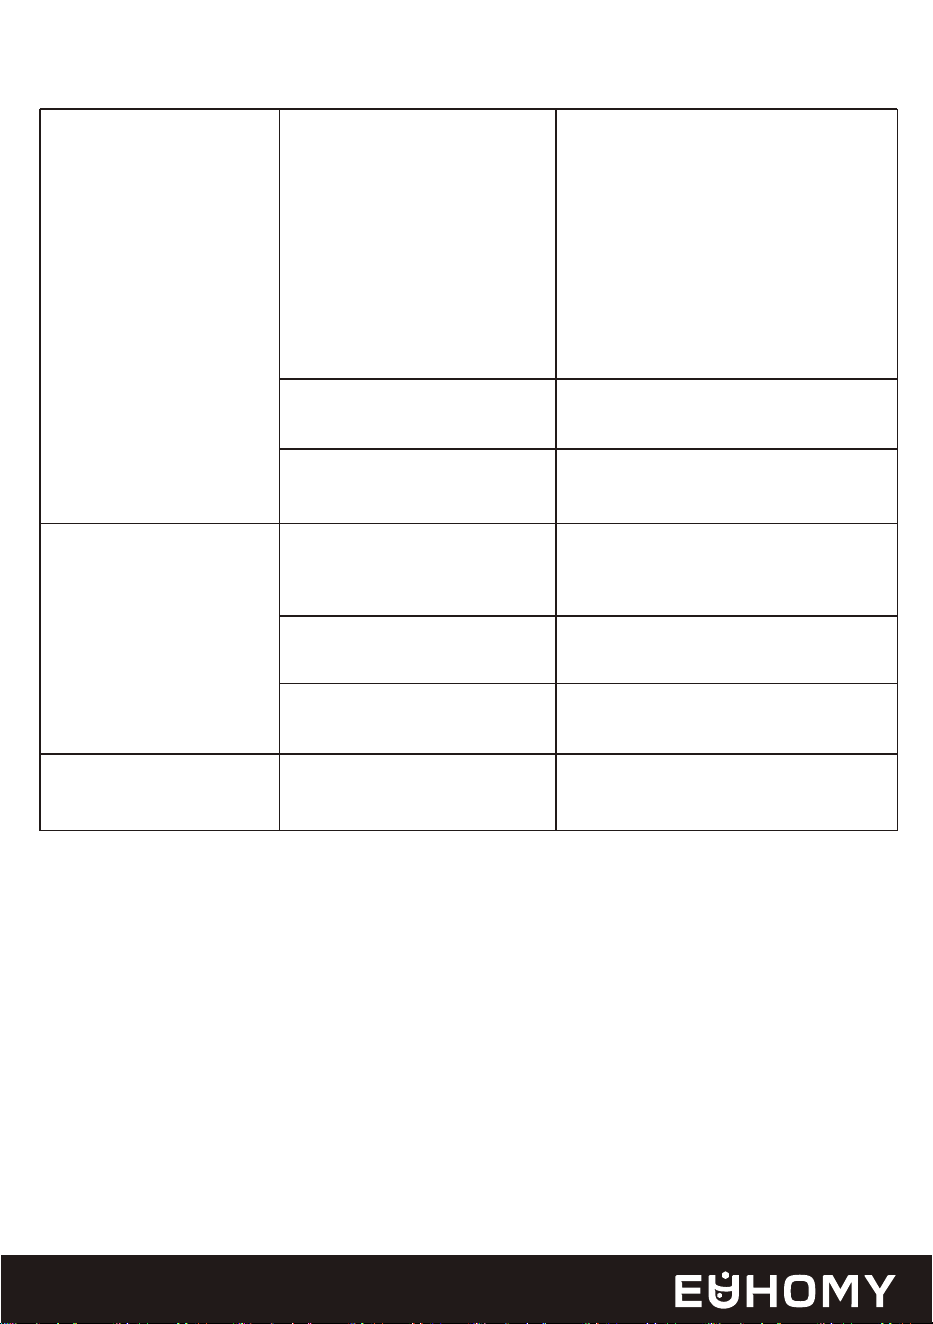
18
Water leakage
Ice-making cycle is
normal,but no ice forms.
Ice maker noise
Our machine uses gravity drainage.
We recommend connecting the
drainage pipe to a floor drain. This
way, the drainage pipe will slope
downward, ensuring water can drain
correctly and not remain inside the
machine. Alternatively, you could
elevate the machine so its drainage
outlet is higher than your home's
drainage outlet.
Please contact
Please contact
Please contact
Please contact
Please contact
Ideal room temperature is below 90
℉. Ideal water temperature is 41-77
℉.
Drain pipe is not in place
correctly
Pipe joint in the appliance
may be loose
The seal has reached service
life
Room temperature or water
temperature in inner tank is
too high
Refrigerant leak in cooling
system
Pipe in the cooling system is
blocked
Ice Maker Compressor Noise:
Quiet when self-cleaning
19
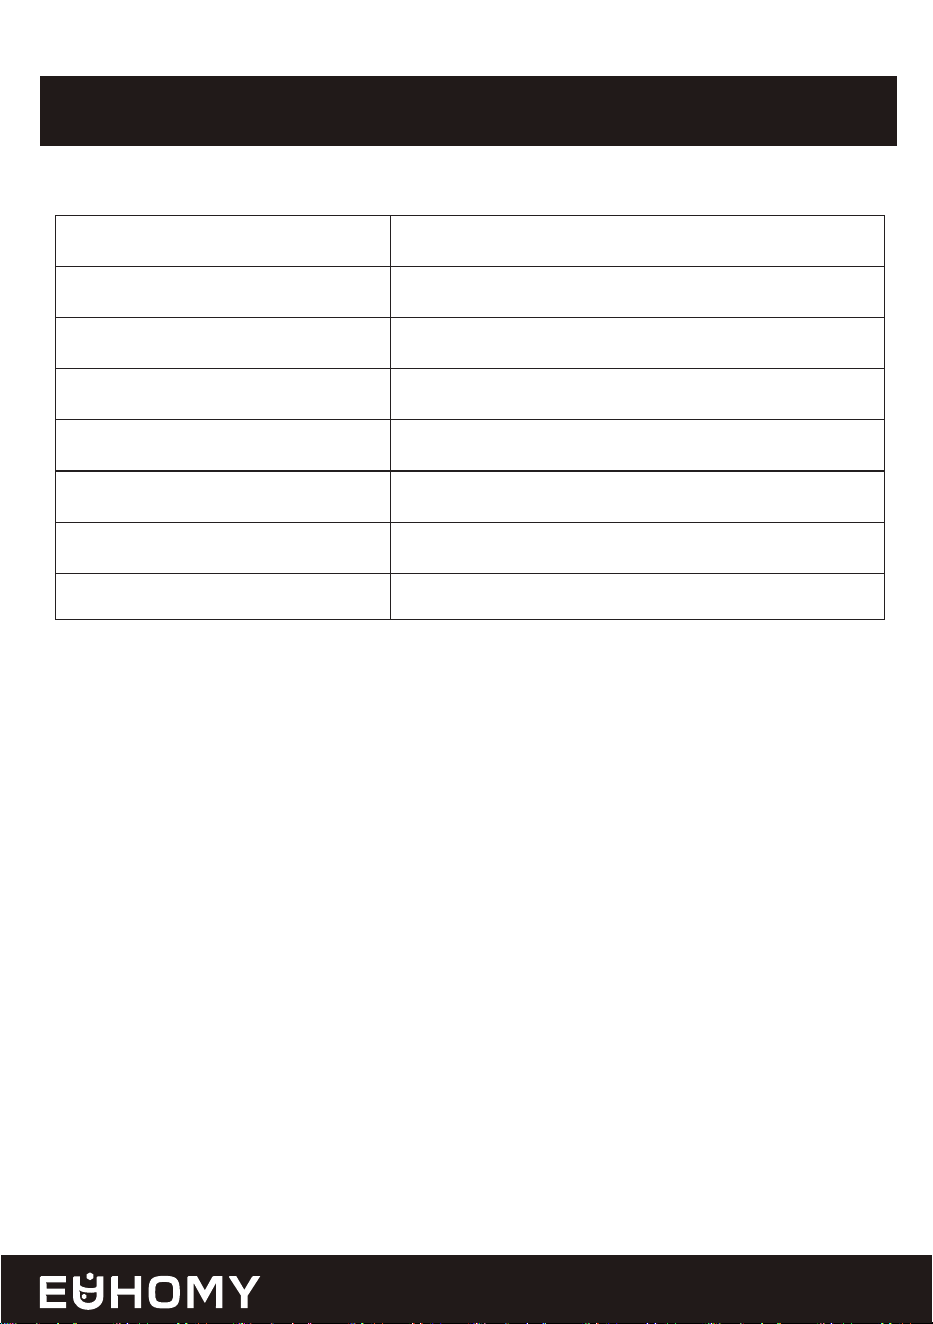
SPECIFICATIONS
Specification
SKU
Model
Refrigerant
Voltage/Frequency
Rated Ice-Making Power/Current
Product Dimensions
Net/Gross Weight
Value
CIM007-66SI-USEH
NIMU-01
R290 1.34Oz/38g
115V/60HZ
3.6A
15.1*18.1*32.7 in
60/68.6lbs

WARRANTY POLICY
20
Euhomy 1-Year Limited Warranty
What is covered?
Euhomy is dedicated to delivering top-notch products and outstanding customer service.
We back our products 100% and are here to support you every step of the way.
To activate your warranty, please visit https://euhomy.com
To request customer service, feel free to contact us anytime!
The One-Year (1) Limited Warranty is valid for purchases from this website or official
Euhomy purchase channels such as Amazon, TikTok, and Walmart. It covers the original
owner and product only, and it isn’t transferable. For purchases made through unauthorized
resellers, we recommend you contact them directly. Euhomy guarantees the unit is free of
material and workmanship defects for one year from the purchase
date, as long as it's used under normal household conditions and maintained per the User
Manual. This is subject to certain conditions and exclusions as follows:
If the original unit or non-wearable parts are found defective, as determined by Euhomy,
we will arrange repair or replace it within one year from the purchase date. If you receive a
replacement unit, the warranty lasts for the remainder of the original warranty.
For further support, feel free to reach out to the Euhomy support team!
1-833-362-2655(US) [email protected]
Business Time: Mon to Fri, 9 AM- 6 PM (ET)
https://euhomy.com

21
What is not covered?
Feel free to contact us anytime with any issues.
How to get service?
(a) Normal wear and tear on the unit or parts, as well as any parts lost or damaged due to
human factors after delivery; replacement parts are available for purchase. Feel free to
contact us using the methods provided below.
(b) Damage from misuse, mishandling, accidents, or not following the operating instruc-
tions.
(c) Damage caused by exposure to liquids other than water or foreign substances.
(d) Repairs or modifications not performed by Euhomy.
(e) Use in commercial settings or non-household environments (except for commercial
models).
If your appliance isn't working properly or if you need any assistance, we offer several
ways for you to get in touch with us.
You can reach us by calling 1-833-362-2655 or emailing [email protected] directly.
For specific product categories, we also offer potential upgrades to enhance your warranty
to our VIP service.Our phone lines are open from Mon to Fri, 9 AM - 6 PM (ET), and we
normally respond to emails and forms within 24 business hours. To help us assist you
better, we recommend that you register your product online at 1-833-362-2655 and have
the appliance with you when you call us. If you reach out via email, sometimes our emails
might end up in your spam folder, so please check there to make sure you don’t miss our
response. The proof of purchase will be needed when you request a warranty service.
In addition to our one-year warranty, we offer lifetime technical support. After the
warranty expires, you can arrange for service at an additional cost.