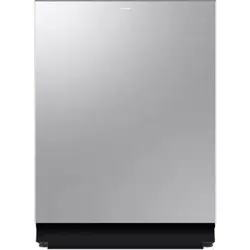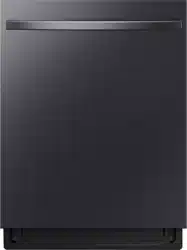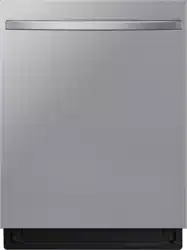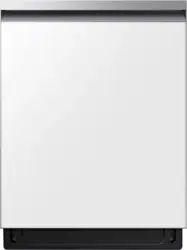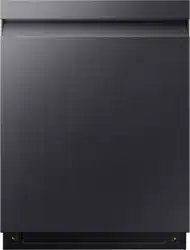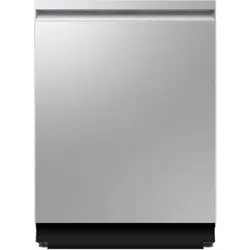
Dishwasher
User manual
DW90F89*****
Scan the QR code* or visit
www.samsung.com/span
to view our helpful
How-to Videos and Live Shows
* Requires reader to be installed on your smartphone.
bit.ly/samsungdishwashers
Untitled-1 1Untitled-1 1 2024-12-04 12:08:352024-12-04 12:08:35

English2
Contents
Safety information 4
What you need to know about the safety instructions 4
Important safety symbols 4
California Proposition 65 Warning 5
Important safety instructions 5
Before using your dishwasher 7
Regulatory notice 8
Product overview 10
Dishwasher at a glance 10
Before you start 12
Unpacking your dishwasher 12
Unsuitable items for the dishwasher 12
Basic use of racks 13
Detergent compartment 25
Rinse aid compartment 27
SmartThings 28
Open Source announcement 31
Using Bixby Voice Recognition 32
Operations 33
Control panel 33
Cycle overview 35
Operating a cycle 36
Settings 37
Special features 40
Maintenance 42
Cleaning 42
Long-term care 48
Troubleshooting 49
Checkpoints 49
Information codes 51
Untitled-1 2Untitled-1 2 2024-12-04 12:08:352024-12-04 12:08:35

English 3
Appendix 53
Cycle chart 53
Helping the environment 55
Specifications 55
Warranty 56
Warranty (U.S.A) 56
Warranty (CANADA) 59
Untitled-1 3Untitled-1 3 2024-12-04 12:08:352024-12-04 12:08:35
SAVE THESE INSTRUCTIONS
English4
Safety information
Congratulations on your new Samsung dishwasher. This manual contains important information on the
installation, use, and care of your appliance. Please take time to read this manual to take full advantage of
your dishwasher’s many benefits and features.
What you need to know about the safety instructions
Warnings and Important Safety Instructions in this manual do not cover all possible conditions and
situations that may occur. It is your responsibility to use common sense, caution, and care when installing,
maintaining, and operating your dishwasher.
Important safety symbols
What the icons and signs in this user manual mean:
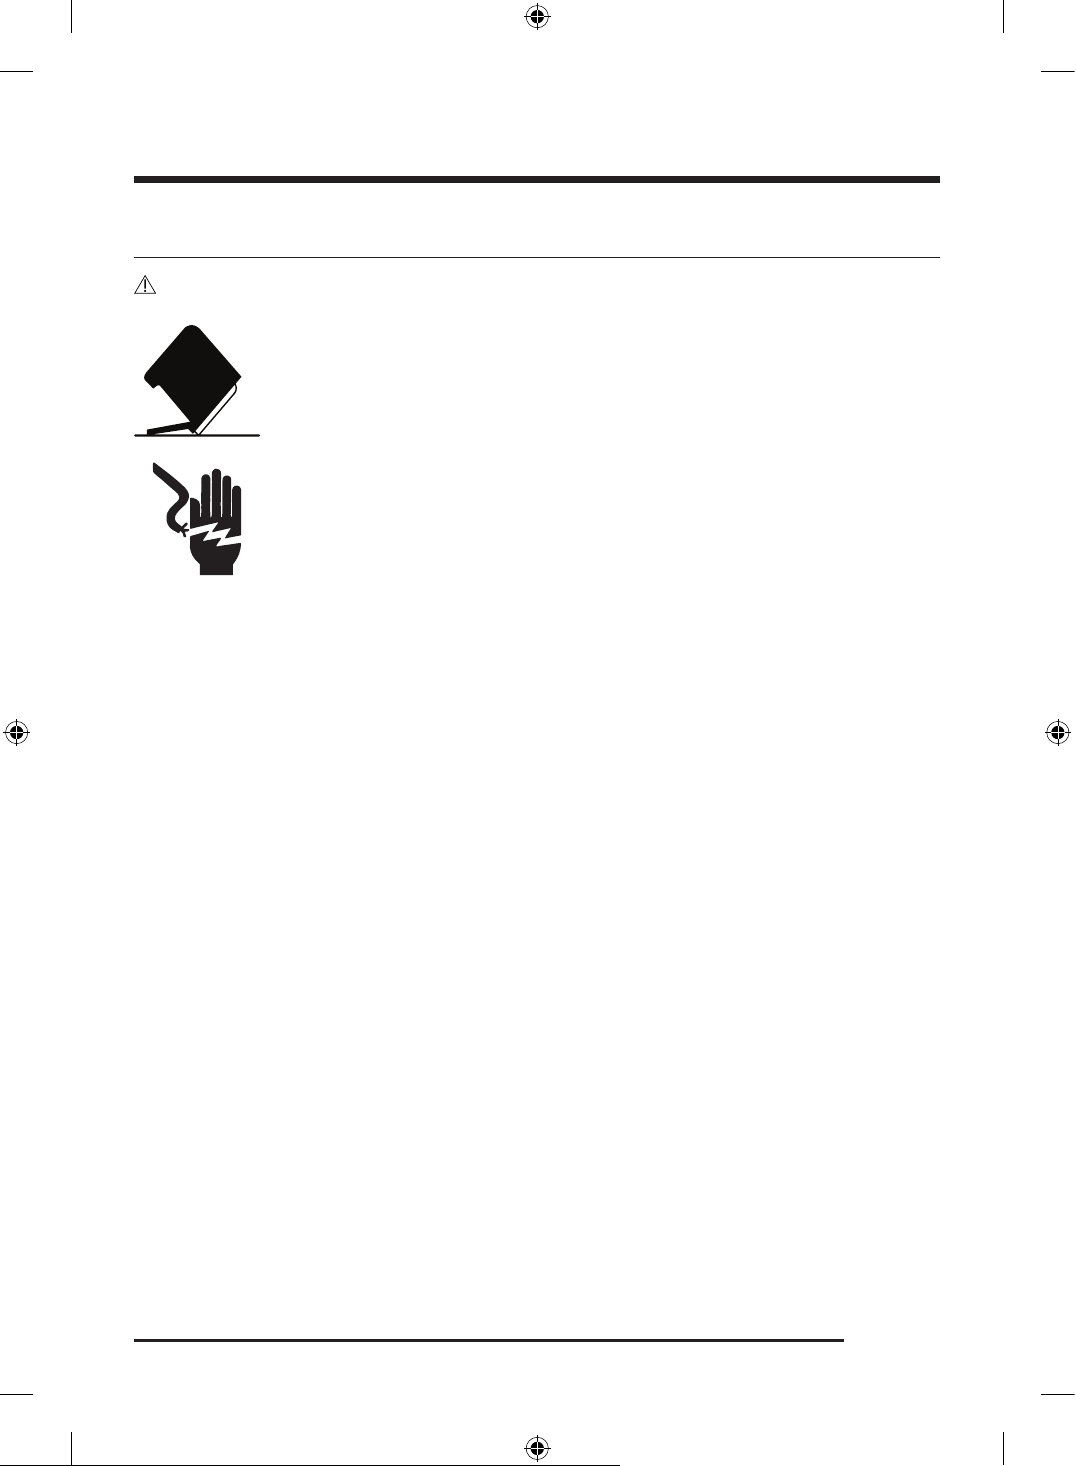
WARNING
Hazards or unsafe practices that may result in severe personal injury or death.
CAUTION
Hazards or unsafe practices that may result in minor personal injury or property damage.
NOTE
Indicates that a risk of personal injury or material damage exists.
These warning signs are here to prevent injury to you and others.
Please follow them explicitly.
After reading this section, keep it in a safe place for future reference.
Untitled-1 4Untitled-1 4 2024-12-04 12:08:362024-12-04 12:08:36

SAVE THESE INSTRUCTIONS
English 5
California Proposition 65 Warning
WARNING
Cancer and Reproductive Harm - www.P65Warnings.ca.gov
Important safety instructions
WARNING
When using your dishwasher, follow basic precautions, including the following:
1. Read all instructions before using the dishwasher.
2. Use the dishwasher only for its intended function.
3. Use only detergents or wetting agents recommended for use in a dishwasher and keep them out of the
reach of children.
4. When loading items to be washed:
- locate sharp items so that they are not likely to damage the door seal, and
- load sharp knives with the handles up to reduce the risk of cut-type injuries.
5. Do not wash plastic items unless they are marked “dishwasher safe” or the equivalent. For plastic items
not so marked, check the manufacturer’s recommendations.
6. Do not touch the HEATING ELEMENT during or immediately after use.
7. Do not operate your dishwasher unless all ENCLOSURE panels are properly in place.
8. Do not tamper with the controls.
9. Do not abuse, sit on, or stand on the door or dish rack of the dishwasher.
10. To reduce the risk of injury, do not allow children to play in or on the dishwasher.
11. Under certain conditions, hydrogen gas may be produced in a hot-water system that has not been used
for two weeks or more. HYDROGEN GAS IS EXPLOSIVE. If the hot-water system has not been used for
such a period, before using the dishwasher turn on all hot-water faucets and let the water flow from
each for several minutes. This will release any accumulated hydrogen gas. As the gas is flammable, do
not smoke or use an open flame during this time.
12. Remove the door to the washing compartment when removing an old dishwasher from service or
discarding it.
CAUTION
• After unpacking the dishwasher, keep the packaging out of the reach of children.
• The dishwasher is extremely heavy. Do not attempt to move or carry the dishwasher by yourself. Two or
more people are needed to move a dishwasher and avoid potential injuries.
• As with any equipment using electricity, water, and moving parts, potential hazards exist.
• Do not install the dishwasher near electrical components. Keep the dishwasher away from open flames.
Untitled-1 5Untitled-1 5 2024-12-04 12:08:362024-12-04 12:08:36

SAVE THESE INSTRUCTIONS
Safety information
English6
• Install and level your dishwasher on an a solid, level surface with no carpets floor that can support its
weight.
• Your dishwasher must be properly grounded. Never connect it to an ungrounded outlet. See page 7 for
more information on grounding your dishwasher.
• Connect the ground wire to the green ground connector in the terminal box.
• After the dishwasher is installed, check that the drain hose is properly connected and that there is no
leakage from the hose connectors. If the drain hose is loose, it may cause property damage.
• The water supply line is susceptible to breakage. As time goes by, it becomes less flexible. Check the
line periodically. If it is swollen, torn, cut, or there is a water leak, replace it immediately.
• To safely operate this appliance, familiarize yourself with its operations and exercise care when using it.
• Do not put gasoline, solvents, or other flammable materials inside the dishwasher. Do not wash dishes
exposed to these materials.
• Keep your dishwasher detergent out of the reach of children. Detergent has an adverse effect on human
organs. It contains elements for polishing and is corrosive. Avoid letting the detergent come into
contact with your skin and eyes.
• Do not push or place pressure on the door when it is open, as this may damage the dishwasher or cause
harm.
• Do not allow children to play in or on the dishwasher. They may harm themselves or damage the
dishwasher.
• Disconnect the power cord (or set the circuit breaker to off) before servicing your dishwasher.
• Do not repair, replace, or service any part of your dishwasher yourself. Disassembly, repairs, and
modifications are permitted by authorized service technicians only. Work done by an unauthorized
person may void your warranty.
• Before disposing of your dishwasher, remove the door of the washing compartment or the door latch so
that children or small animals cannot get trapped inside.
• If the dishwasher is left unused for an extended period of time, turn off the water supply.
• This dishwasher is intended for residential use only.
• Always be caution when using remote control. You may be exposed to security risks during use, and
usage-related problems may also arise due to Internet connectivity issues or incorrect settings.
• Please do not operate the product with living beings (such as a person or an animal) or items that may
cause water leakage or explosion.
Untitled-1 6Untitled-1 6 2024-12-04 12:08:362024-12-04 12:08:36
SAVE THESE INSTRUCTIONS
English 7
Before using your dishwasher
WARNING
Tip-Over Hazard
• Do not use the dishwasher until it is correctly installed.
• Do not push down on the dishwasher door when it is open.
• Do not place excessive weight on the dishwasher door when it is open.
Electric Shock Hazard
Failure to follow these instructions can result in death, fire, or electric shock:
• Electrically ground the dishwasher.
• Connect the ground wire to the green ground connector in the junction box.
• Do not use an extension cord.
Untitled-1 7Untitled-1 7 2024-12-04 12:08:372024-12-04 12:08:37

SAVE THESE INSTRUCTIONS
Safety information
English8
Regulatory notice
FCC Notice
FCC CAUTION:
Any changes or modifications not expressly approved by the party responsible for compliance could void
the user’s authority to operate the equipment.
This device complies with Part 15 of FCC Rules. Operation is Subject to following two conditions:
1. This device may not cause harmful interference, and
2. This device must accept any interference received including interference that cause undesired
operation.
For products sold in the US and Canadian markets, only channels 1–11 are available. You cannot select any
other channels.
FCC STATEMENT:
This equipment has been tested and found to comply within the limits for a Class B digital device, pursuant
to part 15 of the FCC Rules. These limits are designed to provide reasonable protection against harmful
interference in a residential installation.
This equipment generates, uses, and can radiate radio frequency energy and, if not installed and used in
accordance with the instructions, may cause harmful interference to radio communications. However, there
is no guarantee that interference will not occur in a particular installation. If this equipment does cause
harmful interference to radio or television reception, which can be determined by turning the equipment
off and on, the user is encouraged to try to correct the interference by one or more of the following
measures:
• Reorienting or relocating the receiving antenna
• Increasing the separation between the equipment and receiver
• Connecting the equipment to an outlet that is on a different circuit than the radio or TV.
• Consulting the dealer or an experienced radio/TV technician for help.
Untitled-1 8Untitled-1 8 2024-12-04 12:08:372024-12-04 12:08:37

SAVE THESE INSTRUCTIONS
English 9
FCC RADIATION EXPOSURE STATEMENT:
This equipment complies with FCC radiation exposure limits set forth for an uncontrolled environment.
This equipment should be installed and operated so there is at least 8 inches (20 cm) between the radiator
and your body. This device and its antenna(s) must not be co-located or operated in conjunction with any
other antenna or transmitter.
IC Notice
The term “IC” before the radio certification number only signifies that Industry Canada technical
specifications were met. Operation is subject to the following two conditions: (1) this device may not cause
interference, and (2) this device must accept any interference, including interference that may cause
undesired operation of the device.
This Class B digital apparatus complies with Canadian ICES-003.
Cet appareil numérique de la classe B est conforme á la norme NMB-003 du Canada.
For products sold in the US and Canadian markets, only channels 1–11 are available. You cannot select any
other channels.
IC RADIATION EXPOSURE STATEMENT:
This equipment complies with IC RSS-102 radiation exposure limits set forth for an uncontrolled
environment. This equipment should be installed and operated so there is at least 8 inches (20 cm)
between the radiator and your body. This device and its antenna(s) must not be co-located or operated in
conjunction with any other antenna or transmitter.
Untitled-1 9Untitled-1 9 2024-12-04 12:08:372024-12-04 12:08:37
English10
Product overview
Dishwasher at a glance
03
04
06
02
07
05
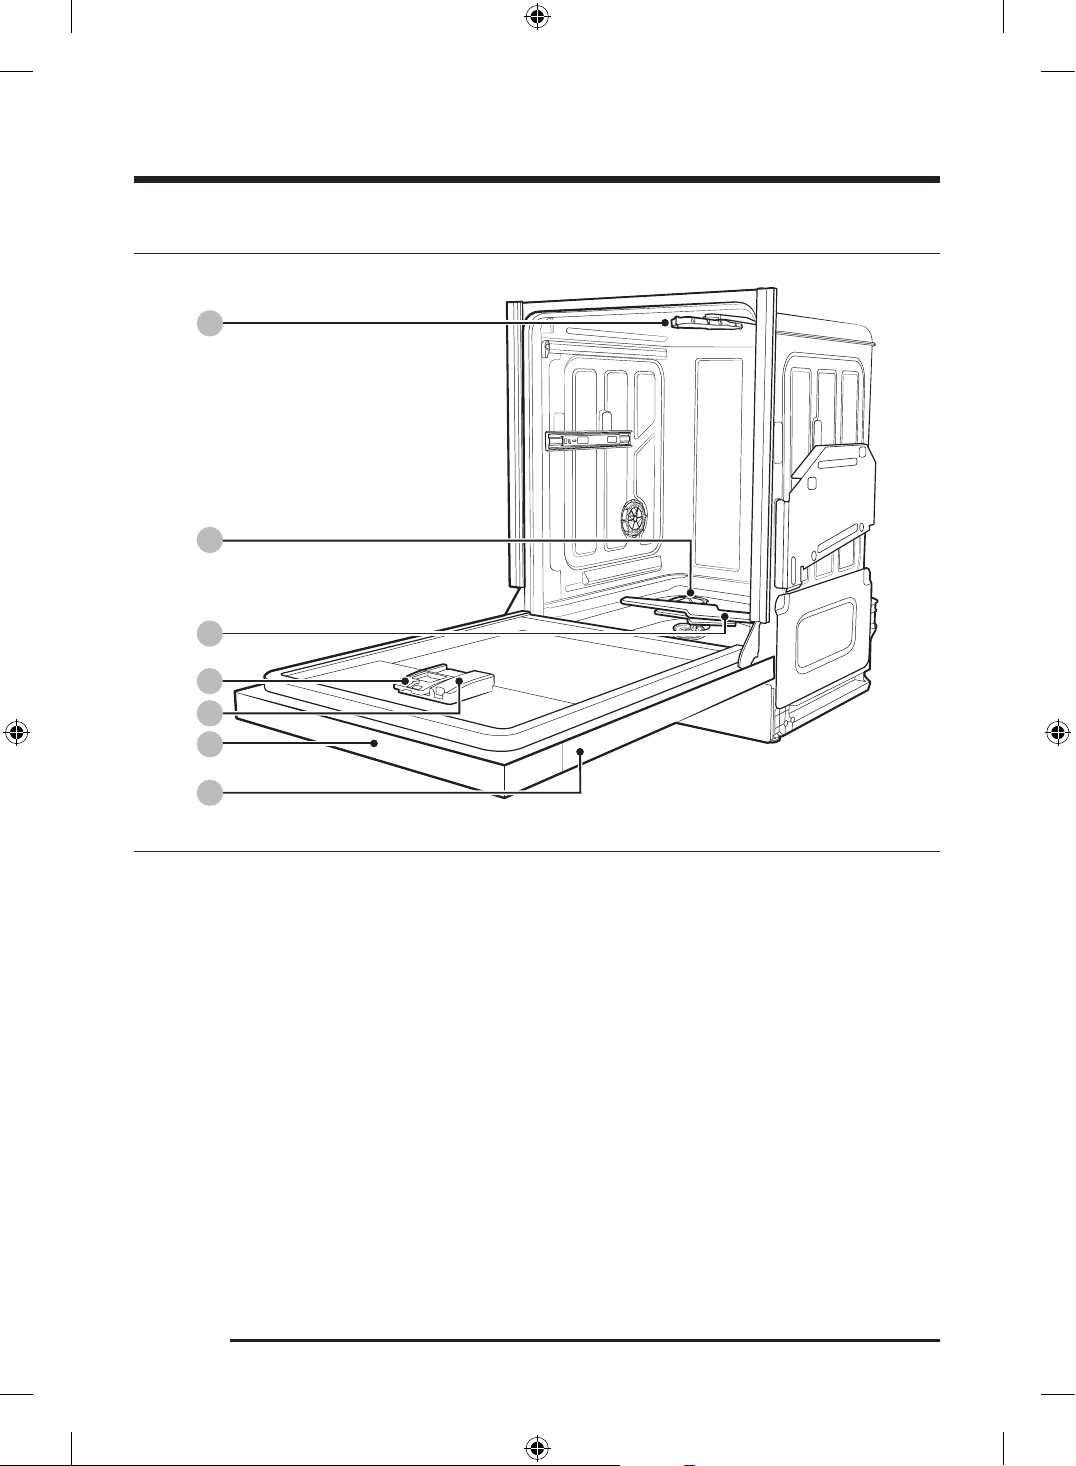
01
01 Top spray arm 02 Storm Wash+ nozzle 03 Bottom spray arm
04 Detergent compartment 05 Rinse aid compartment 06 Control panel
07 Door
Untitled-1 10Untitled-1 10 2024-12-04 12:08:372024-12-04 12:08:37
English 11
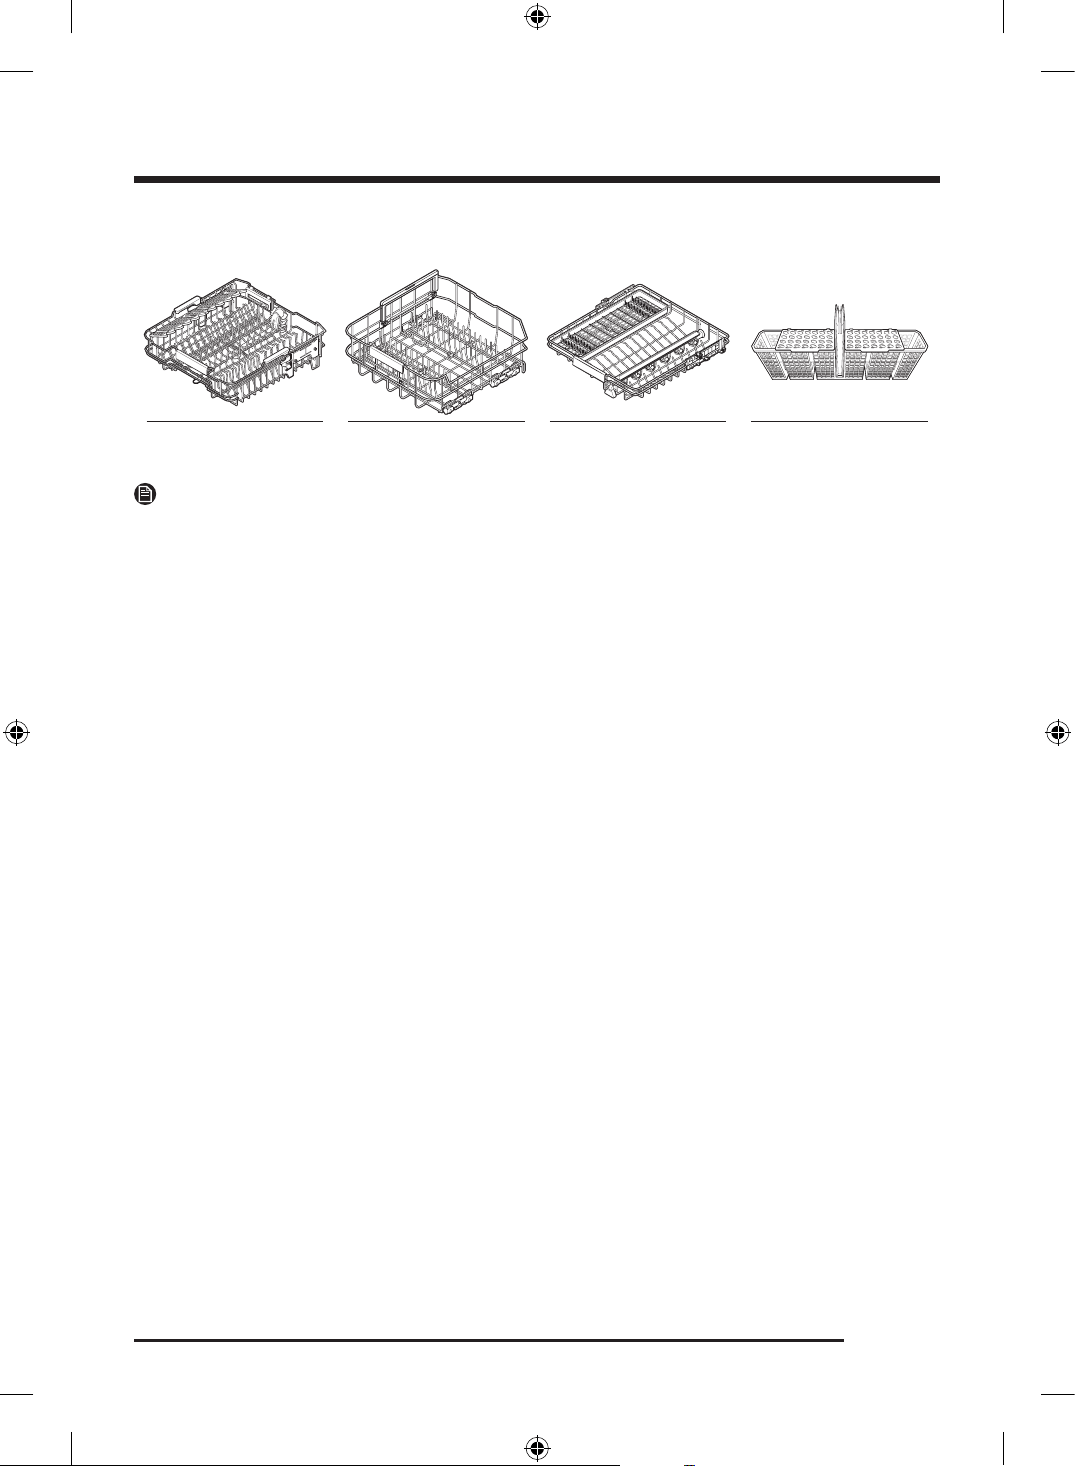
Accessories
Upper rack Lower rack 3rd rack Cutlery basket
NOTE
• Depending on the models, the actual appearance of the product and its parts may differ from the
figures.
• Ensure that you have the user manual, installation manual, kick plate, and all accessories provided for
the installation. (Refer to the Installation manual for a detailed list of provided parts.)
Untitled-1 11Untitled-1 11 2024-12-04 12:08:382024-12-04 12:08:38

English12
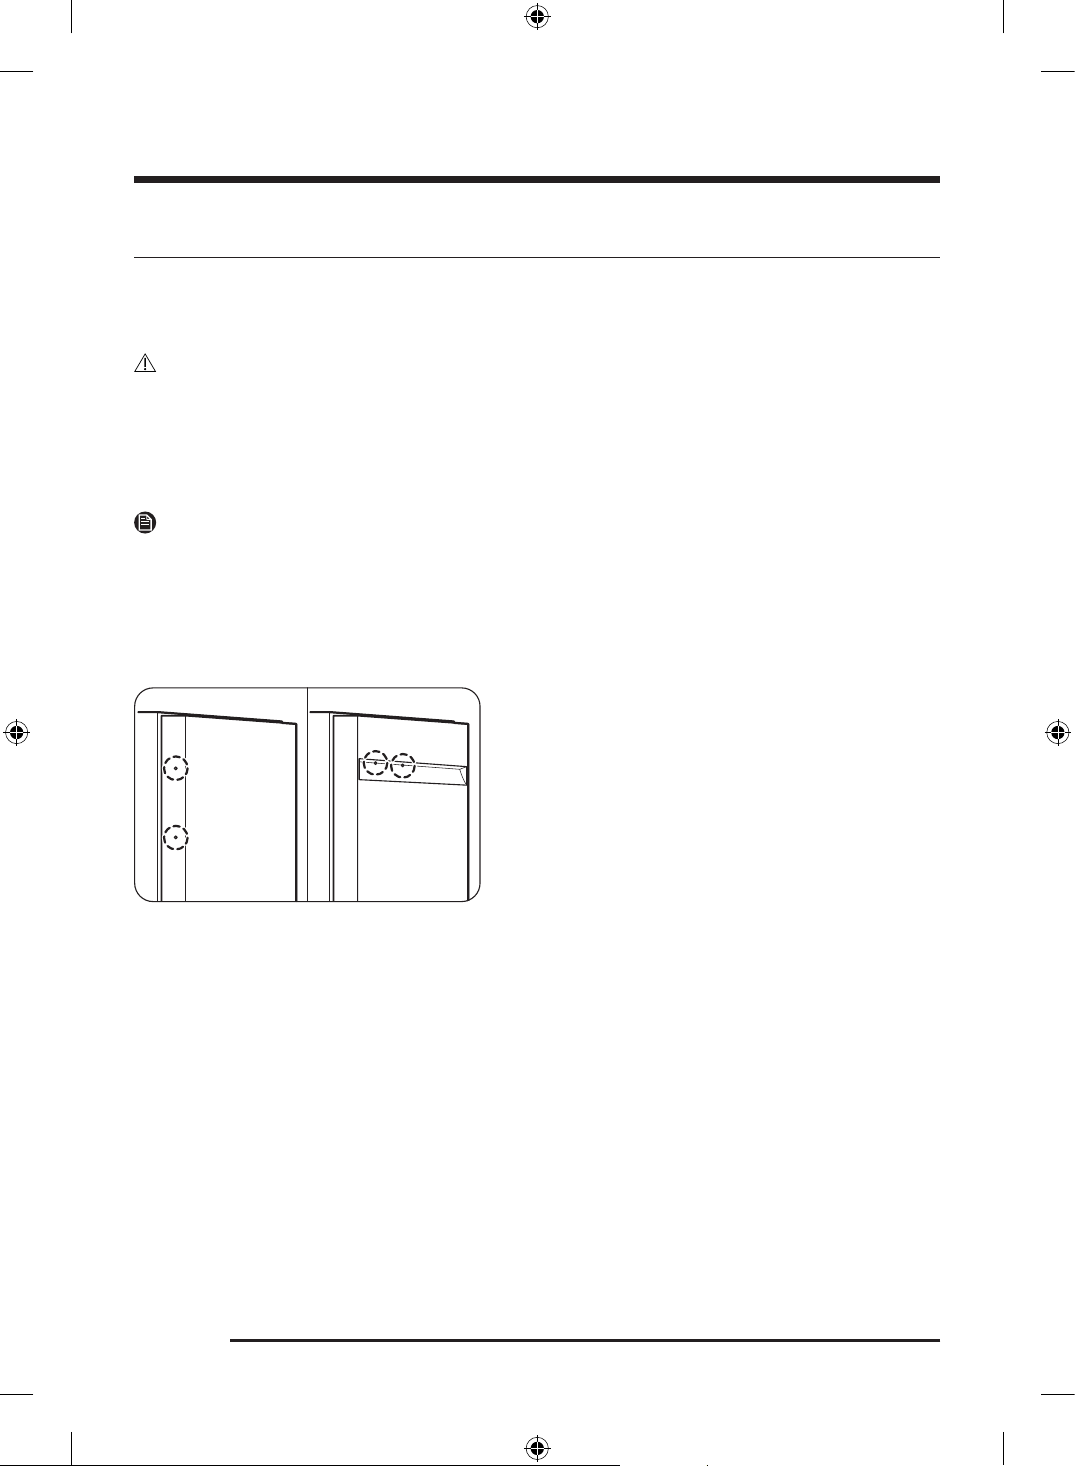
Before you start
Be sure to have your installer follow these instructions closely so that your new dishwasher works properly
and you’re not at risk of injury when washing dishes.
Unpacking your dishwasher
• Once your new dishwasher has been delivered, carefully unpack it and check for any damage. If the
dishwasher has been damaged, note it on the waybill and keep a copy. Do not install the dishwasher,
and contact Samsung Customer Service.
• If there is no damage to the product, you can proceed with the installation. If you are going to install it
yourself, make sure to read through the installation manual and follow the instructions.
• After unpacking your dishwasher, keep the packaging out of the reach of children to ensure their safety.
Unsuitable items for the dishwasher
WARNING
Only wash items such as glass, porcelain, and cutlery which the manufacturer declares as dishwasher safe.
Do not wash aluminum (for example grease filters). The dishwasher may damage aluminum, or in extreme
cases, cause a severe chemical reaction.
Do not wash the following items in the dishwasher.
• Copper, brass, tin, ivory, and aluminum items or items with adhesive
• Non-heat resistant plastics
• Craft items, antiques, valuable vases, and decorative glassware
• Pottery or glazed-ceramic items
• Wooden or silver tableware or items that include wooden or silver parts
• Delicate glassware or glassware containing lead crystal. Clouding may occur on the glassware after
frequent washing
CAUTION
• Do not wash items covered with ash, sand, wax, lubricating grease, or paint. These materials will
damage the dishwasher. Ash does not dissolve and will spread inside the dishwasher.
• Remove food remains such as bones, fruit seeds, etc., and waste such as toothpicks, paper napkins, etc.
from your dishes. Food remains and waste can make noise, cause the dishwasher to malfunction, and
damage your dishes and dishwasher.
NOTE
Silverware that has contacted food containing sulfur may become discolored. Food with sulfuric content
includes egg yolks, onions, mayonnaise, mustard, fish, fish brine, and marinades.
Untitled-1 12Untitled-1 12 2024-12-04 12:08:392024-12-04 12:08:39

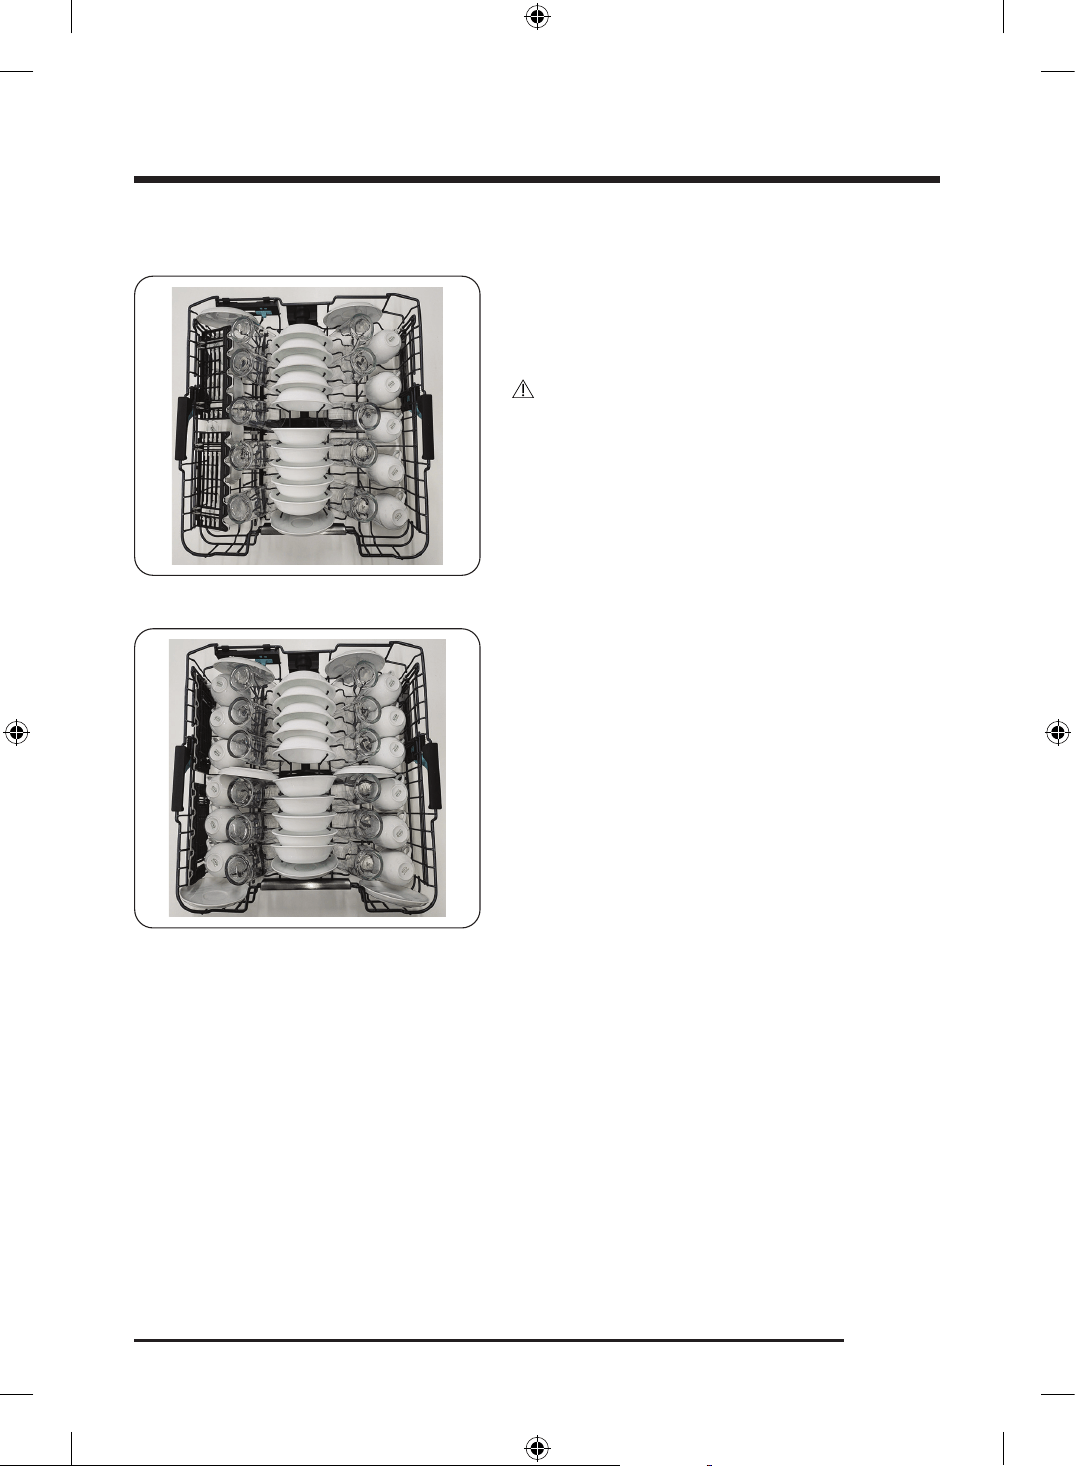
English 13
Basic use of racks
NOTE
Depending on the models, the actual appearance of the racks and the loading method may differ from the
figures.
Loading the lower rack
10 place settings
• Lower rack is for loading large items such as pots,
pans, lids, serving dishes, and bowls.
- Place the items in a way that water could easily
flow out.
- You can also use the lower rack to load smaller
items using the folding tines and glass supports.
- You can lift the upper rack to gain more space to
load larger items.
12 place settings
Untitled-1 13Untitled-1 13 2024-12-04 12:08:412024-12-04 12:08:41
Before you start
English14
A
B
C
D
D
D
A. 3rd rack
B. Upper rack
C. Lower rack
D. Spray arm
CAUTION
• Make sure the loaded items do not interfere with the
rotation of the middle and bottom spray arms.
- Check the rotation of the spray arms for any
interference with your hand before starting the
dishwasher.
Loading the Storm Wash+ Area
For more effective cleaning, load larger items into the
Storm Wash+ area on the left side of the lower rack
(Dotted area in the figure). When you select Storm
Wash+, the dishwasher supplies additional power to
reinforce the water jet in the Storm Wash+ area.
Untitled-1 14Untitled-1 14 2024-12-04 12:08:412024-12-04 12:08:41
English 15
Loading the upper rack
10 place settings
• The upper rack is for small plates, mugs, glasses, and
plastic items.
- You can adjust the position of the upper rack to
use the internal space flexibly.
CAUTION
• Make sure the loaded items do not interfere with the
rotation of the middle spray arm.
- Check the rotation of the spray arm with your
hand before starting the dishwasher.
• When loading items, completely pull out the upper
rack to prevent bumping the items to the counter
while loading.
12 place settings
Untitled-1 15Untitled-1 15 2024-12-04 12:08:442024-12-04 12:08:44
Before you start
English16
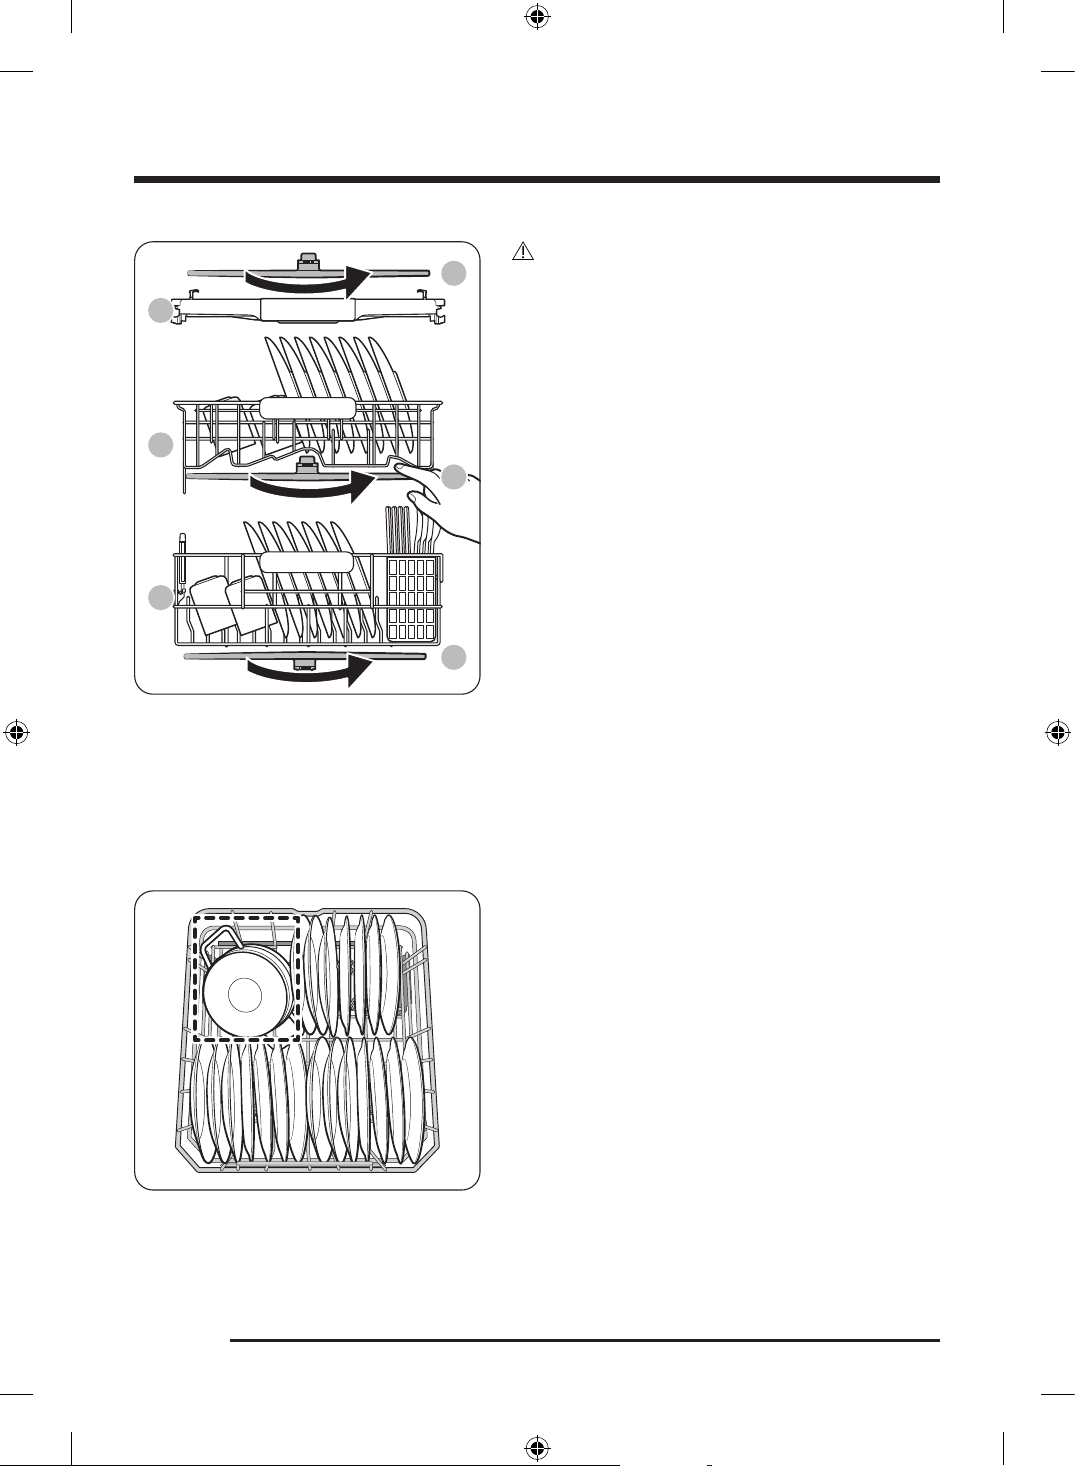
Using the guide tines
You can use the upper rack’s guide tines to load items
onto the upper rack in various ways. Move the slider to
the right or left to adjust the guide tines suitable for
loading the following items.
• Right: Standard wine glasses or brandy glasses
• Left: Standard wine glasses or shorter wine glasses
Loading the 3rd rack (Applicable models only)
You can load flatware on the left side of the rack and
cups and glasses (that are shorter than 6 inches) on the
right side of the rack.
NOTE
Load cups and glasses with their openings facing the cup
wash spray nozzle for effective cleaning.
Untitled-1 16Untitled-1 16 2024-12-04 12:08:452024-12-04 12:08:45

English 17
Loading the cutlery basket
You can use the cutlery basket with the lids open or
closed.
10 place settings
Close the lids and place knives, spoons, or forks into the
holes on the lids to prevent chipping and discoloration.
12 place settings
NOTE
Do not let any items extend through the bottom. Do not load chopsticks in the cutlery basket. Load
chopsticks on the 3rd rack.
Untitled-1 17Untitled-1 17 2024-12-04 12:08:472024-12-04 12:08:47
Before you start
English18
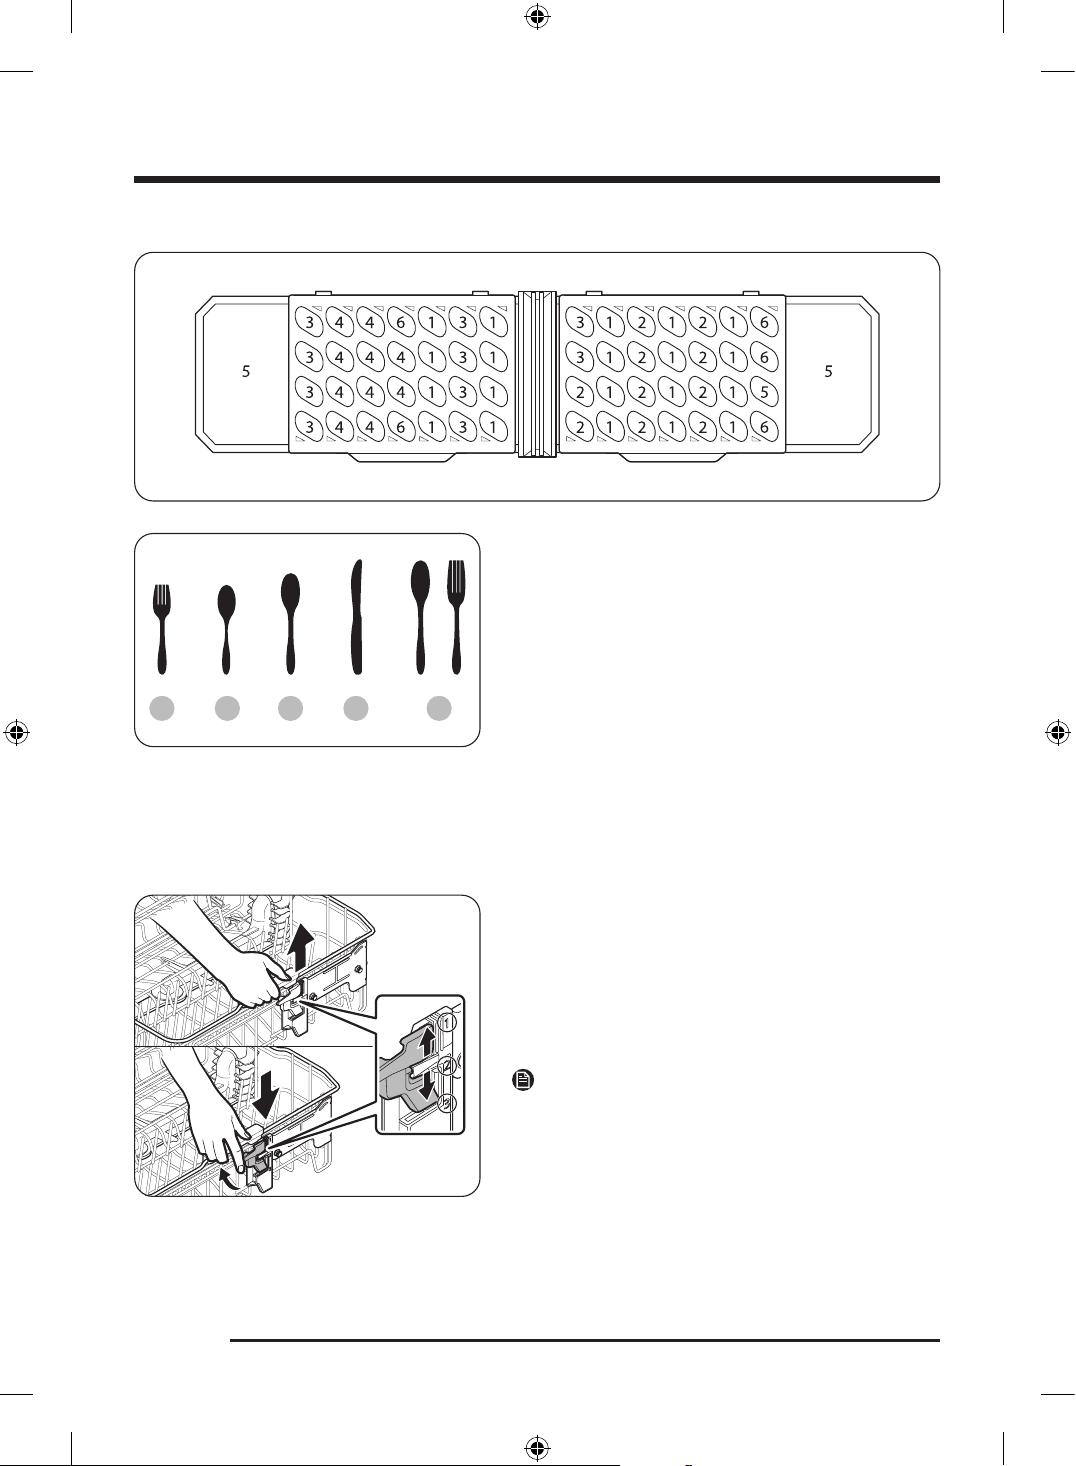
Recommended placement of items in the cutlery basket
1 2 3 4 5
1. Forks
2. Teaspoons
3. Dinner spoons
4. Knives
5. Serving spoons and Serving forks
6. Remaining items
Adjusting the position of the upper rack
You can adjust the position of the upper rack to adjust the loading space according to the items you load to
the upper and lower racks.
• To raise the upper rack, hold the handles on both
sides of the rack and gently lift it upward until it
locks into the desired position.
• To lower the upper rack, hold the handles on both
sides and press the levers beneath the handles while
gently lowering the rack until it locks into the desired
position.
NOTE
You can adjust the upper rack’s height from 3 different
levels.
Untitled-1 18Untitled-1 18 2024-12-04 12:08:482024-12-04 12:08:48
English 19
CAUTION
• Adjust the upper rack position before loading items
into the rack to prevent damaging the items.
• You must level the left and right sides of the upper
rack. Otherwise, the dishwasher door may not close
properly or the dishwasher may not wash properly.
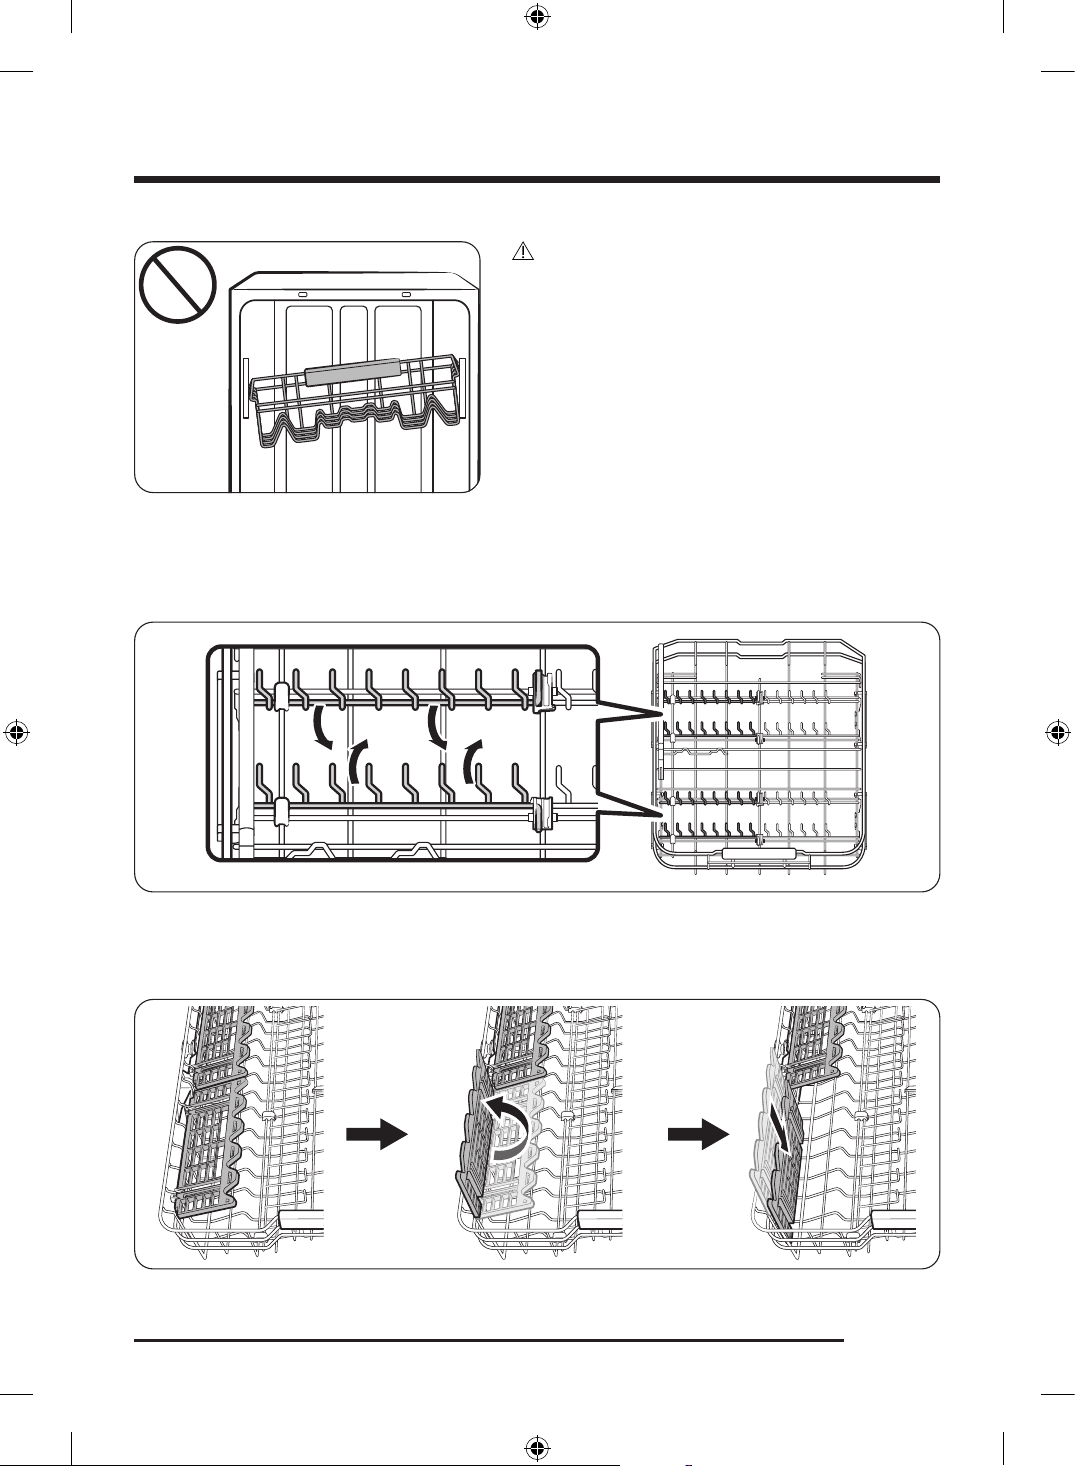
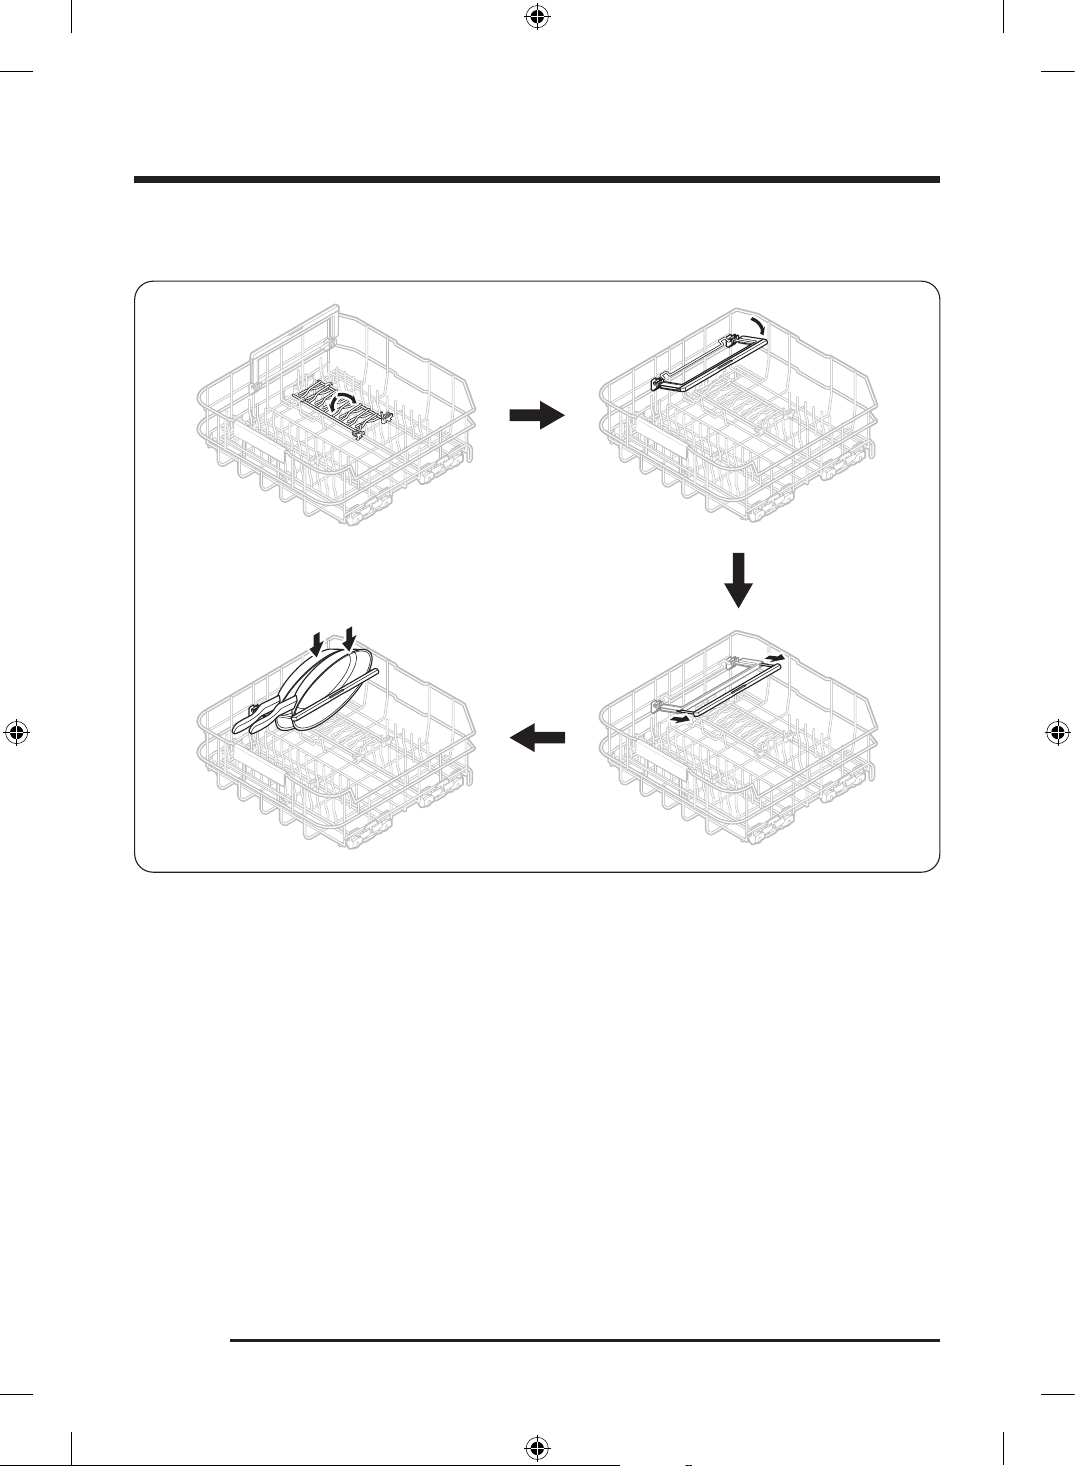
Using the tines
Fold or unfold the tines depending on the items you load.
Fold them for better stacking of pots and pans and unfold them to load items such as dishes.
Using the glass support
The glass support is especially suited for wine glasses. Hang wine glasses onto the pegs of the glass
support. Fold the glass support back when it is not being used.
Untitled-1 19Untitled-1 19 2024-12-04 12:08:492024-12-04 12:08:49
Before you start
English20
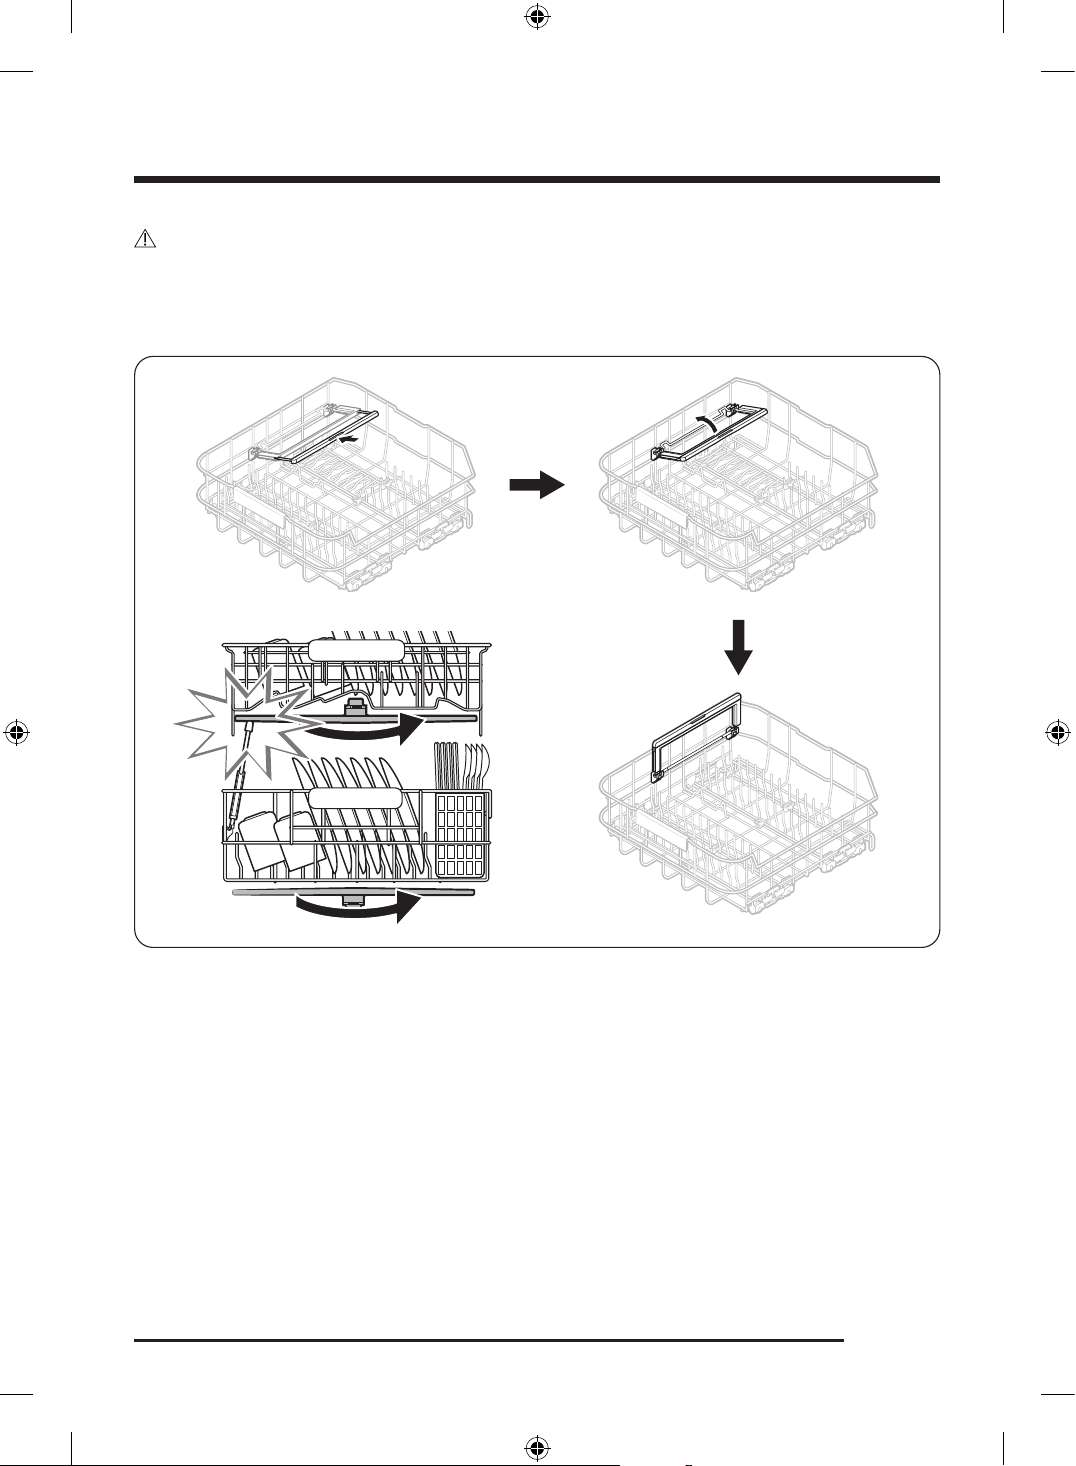
Using the pan holder
You can use the pan holder to load your pans. Fold down the tines and then lower the pan holder.
Untitled-1 20Untitled-1 20 2024-12-04 12:08:492024-12-04 12:08:49
English 21
CAUTION
When not using the pan holder, first push the extended part back in, then fold up the pan holder. If the
extended part is not pushed in before folding up the pan holder, it may interfere with the middle spray
arm’s rotation, preventing proper cleaning. Before operating the dishwasher, manually rotate the middle
spray arm to ensure items and pan holder are not interfering with the middle spray arm’s rotation.
Untitled-1 21Untitled-1 21 2024-12-04 12:08:492024-12-04 12:08:49
Before you start
English22
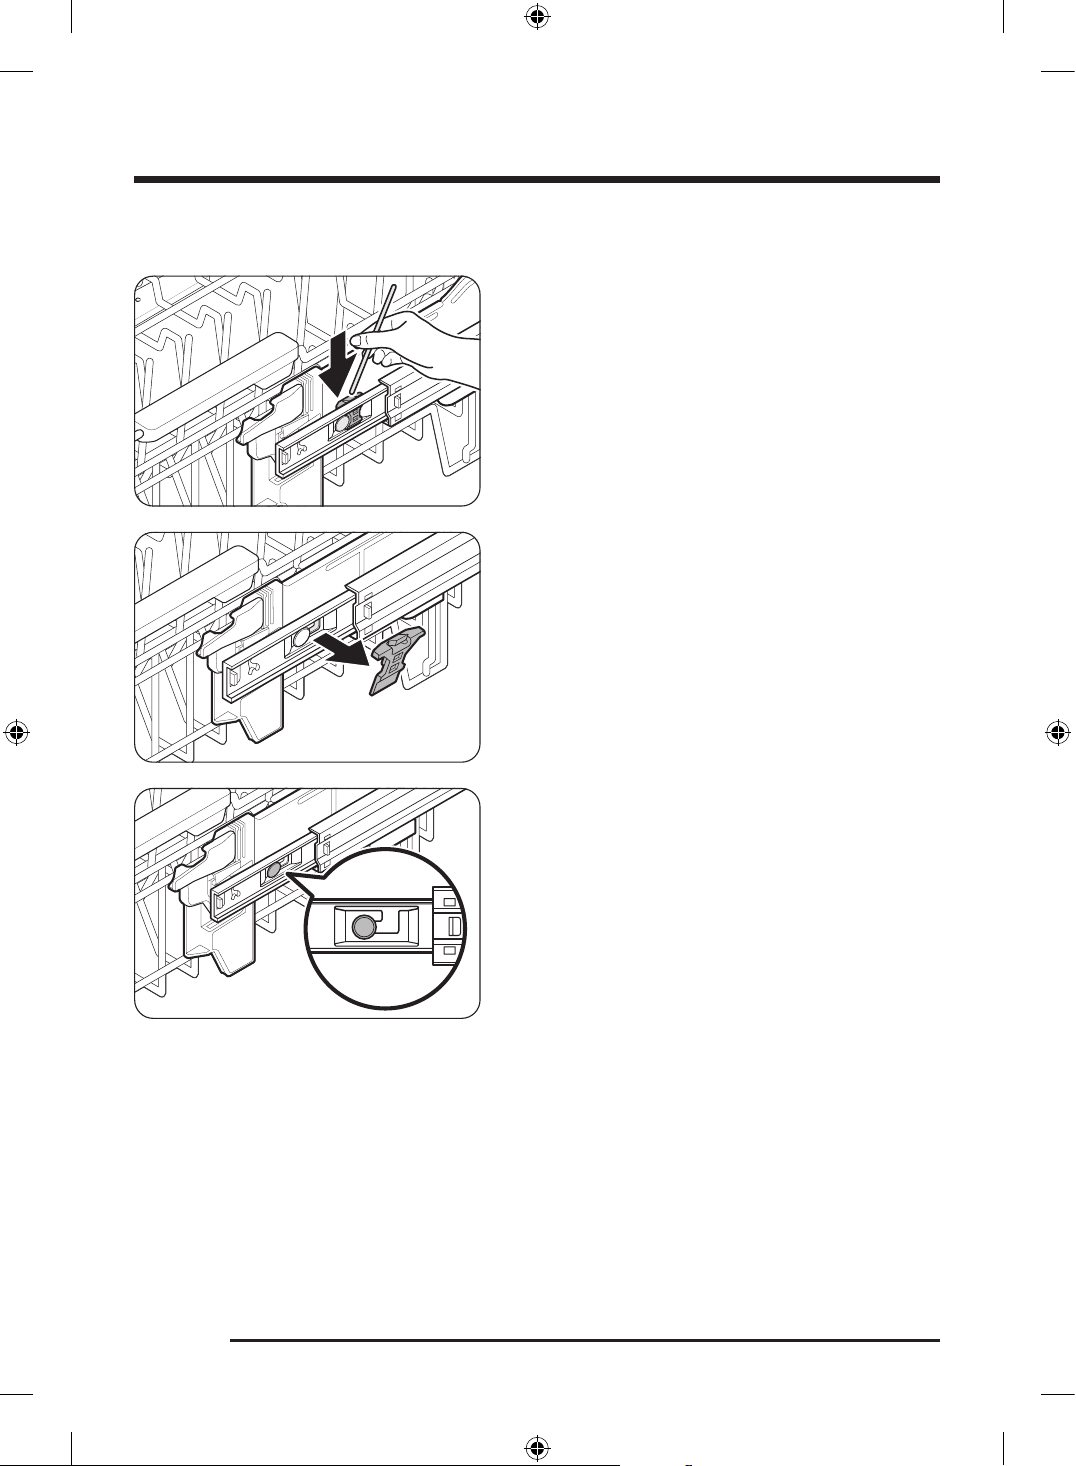
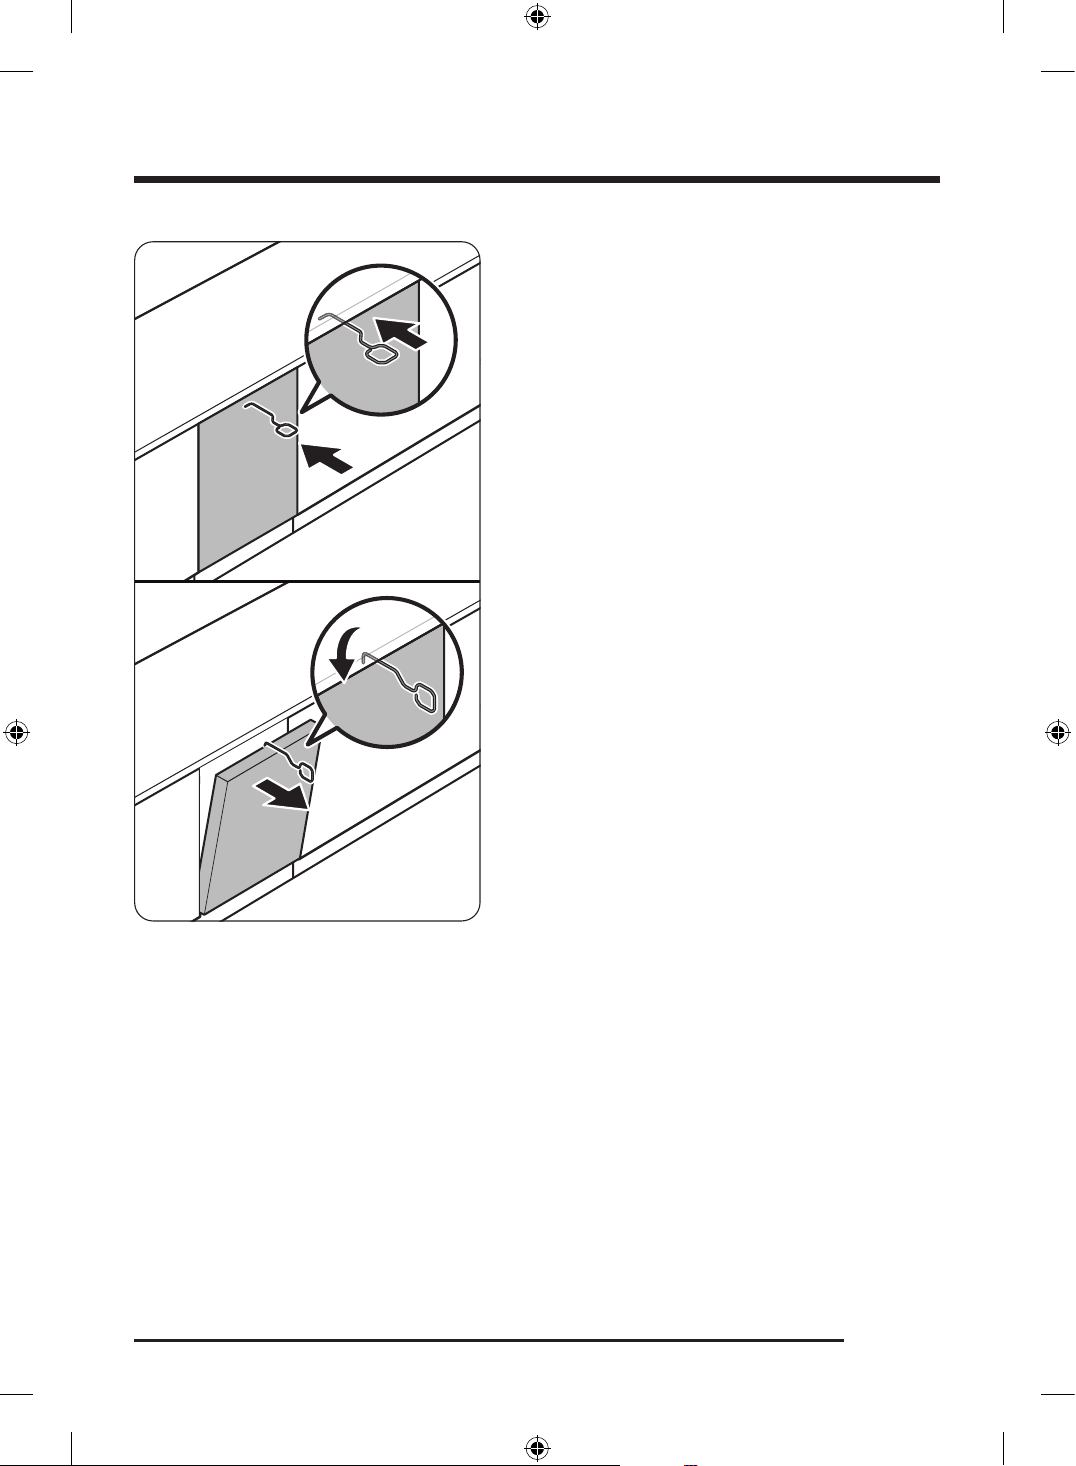
Removing the upper rack
1. Push the hook on the rail holder (on left and right
sides).
2. Remove the rail holder from the rail (on left and right
sides).
3. Check the position of the shaft on the rail bracket.
Untitled-1 22Untitled-1 22 2024-12-04 12:08:502024-12-04 12:08:50
English 23
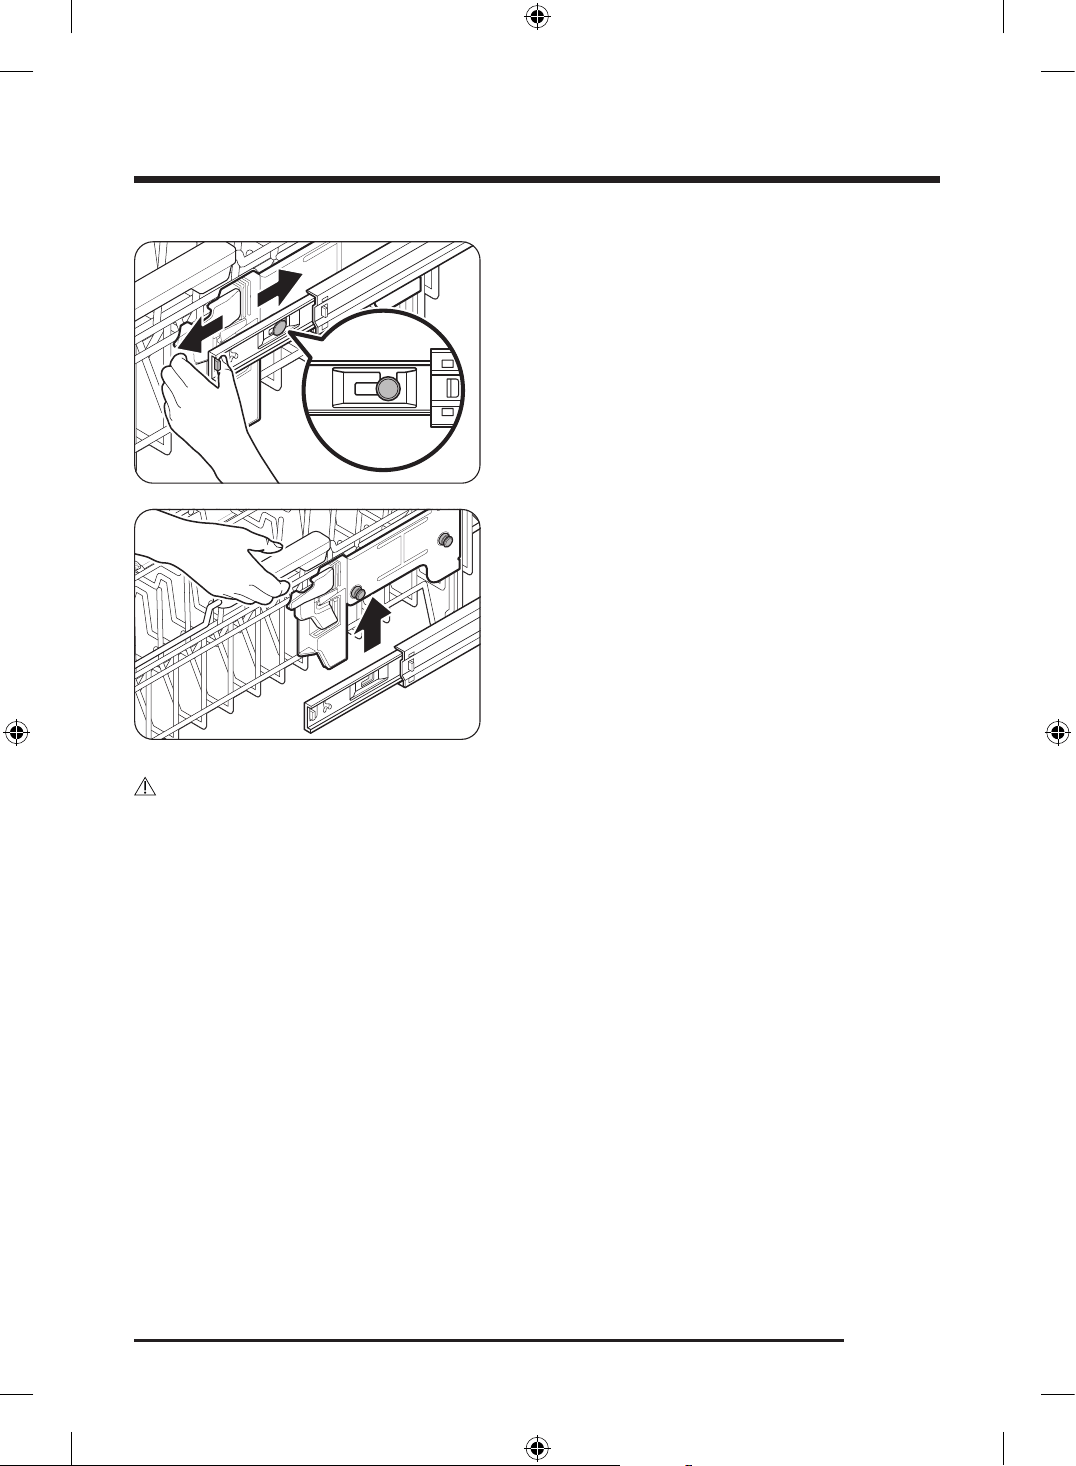
4. Slide the upper rack so that the shaft is positioned at
end of the rail bracket.
5. Lift the upper rack to remove.
CAUTION
• Do not operate the dishwasher without the upper rack. Otherwise, noises occur and the dishwasher
does not operate properly.
• Because the upper rack is removable, insert the upper rack properly to ensure the dishwasher operates
normally.
• Be careful not to lose the rail holders during this process.
Untitled-1 23Untitled-1 23 2024-12-04 12:08:502024-12-04 12:08:50
Before you start
English24
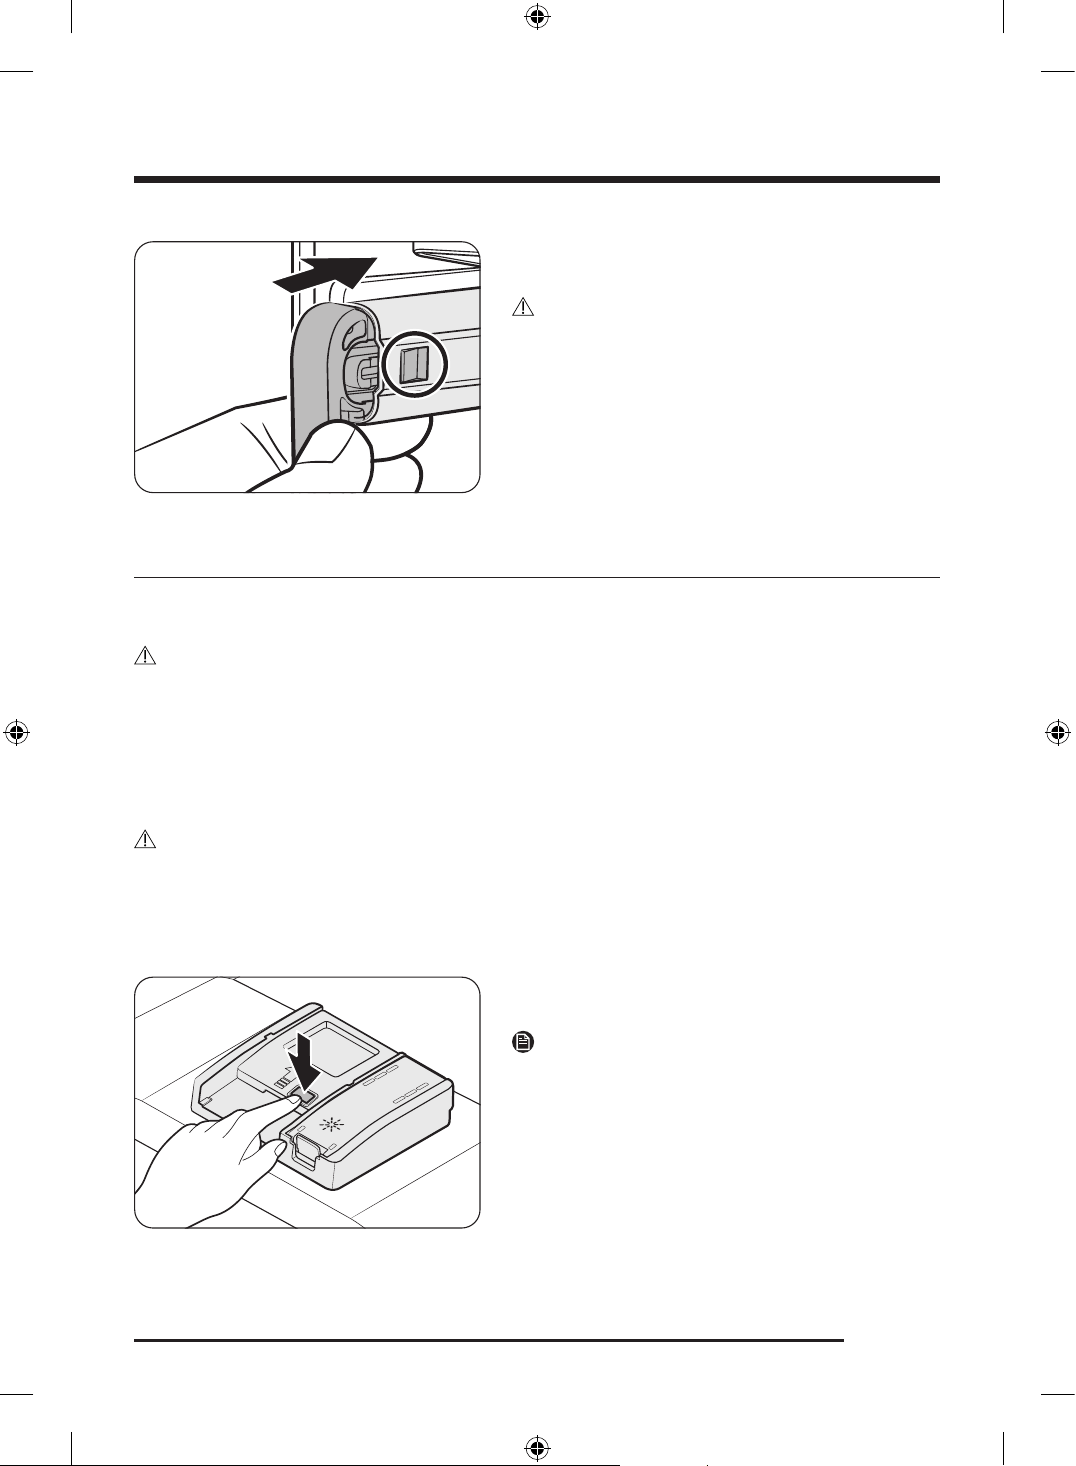
Removing the 3rd Rack
A
1. Facing the dishwasher, pull out the 3rd rack fully and
slightly push back until the handles (A) line up with
the front side of the rack.
2. A small indentation is located on the inner side of the
handle. This indentation engages with the lock tab
that secures the handle onto the rack support.
3. While pushing down on the handle lock tab, pull out
the handle towards you until it is removed.
4. Repeat this process on the other side.
5. When the handles are removed, remove the 3rd rack
from the dishwasher.
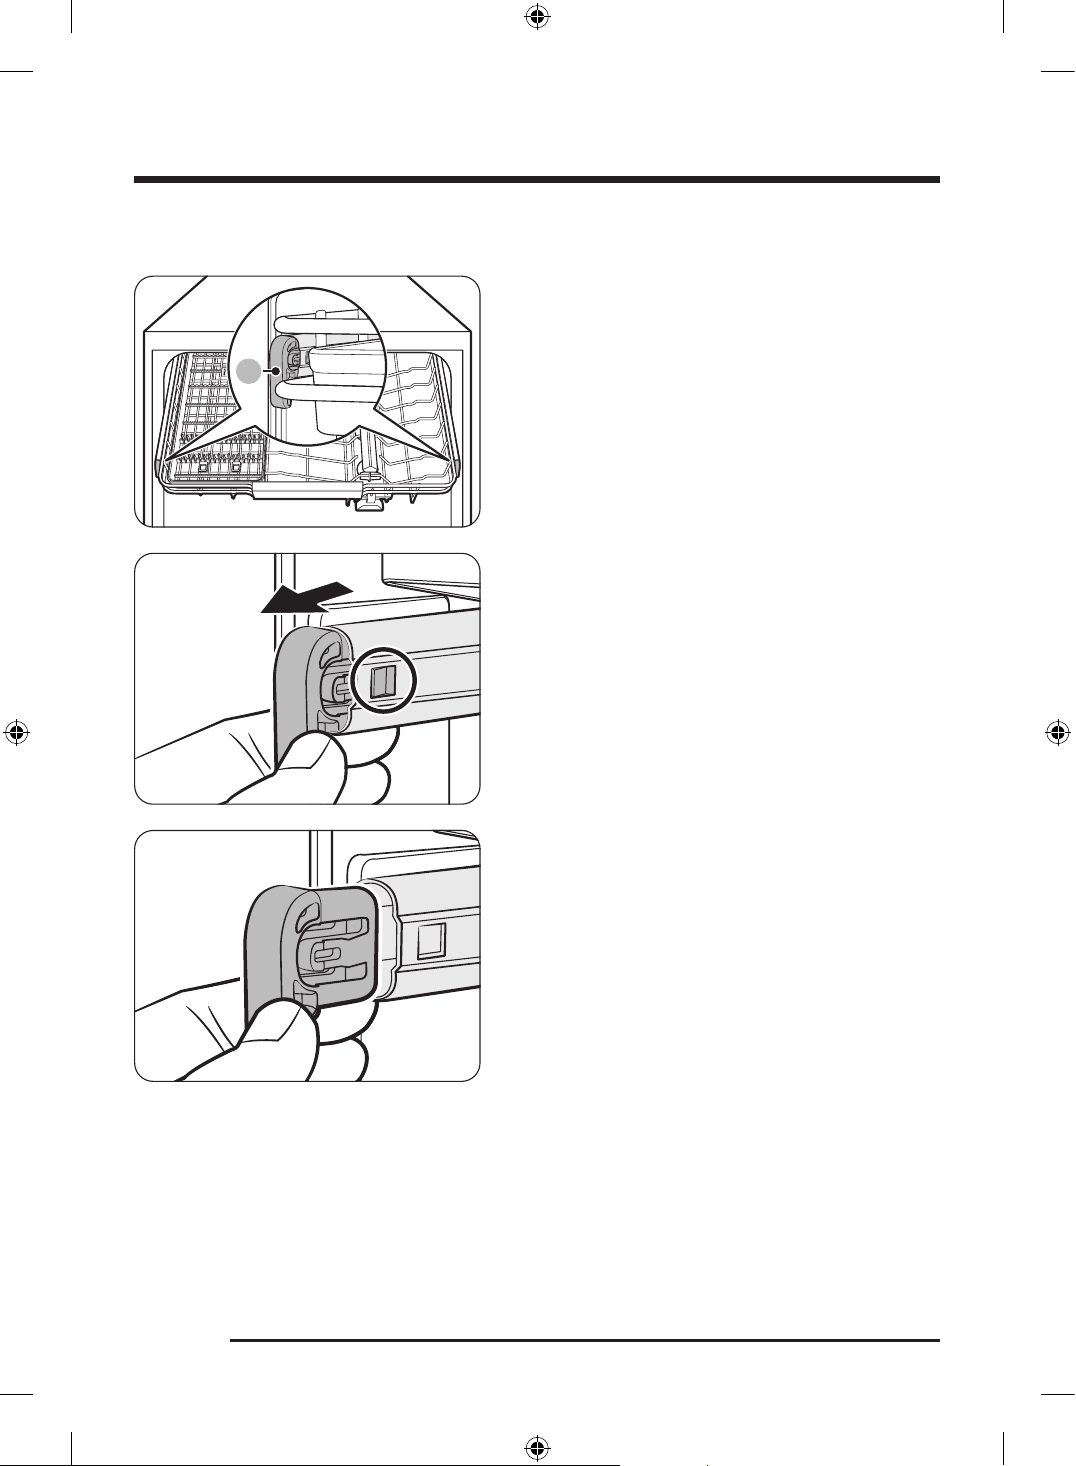
Untitled-1 24Untitled-1 24 2024-12-04 12:08:512024-12-04 12:08:51
English 25
6. Reverse the order of removal to re-insert the 3rd
rack.
CAUTION
Make sure the hook-shaped part of the handle faces
downward and the handle lock (circled part in the figure)
re-engages when reinserting the handle into the rail.
Detergent compartment
You must put detergent into the detergent compartment before every cycle. Put a recommended amount
of detergent for the selected cycle for the best performance.
WARNING
• Do not consume dishwasher detergent. Avoid breathing in detergent fumes.
- Dishwasher detergent contains irritants and caustic chemicals that can induce respiratory
conditions.
- If you have consumed dishwasher detergent or inhaled detergent fumes, seek medical attention
immediately.
• Keep dishwasher detergent out of children’s reach.
CAUTION
Use dishwasher detergent only. Other types of detergent produce excessive foam, which may decrease the
dishwasher’s performance or cause it to malfunction.
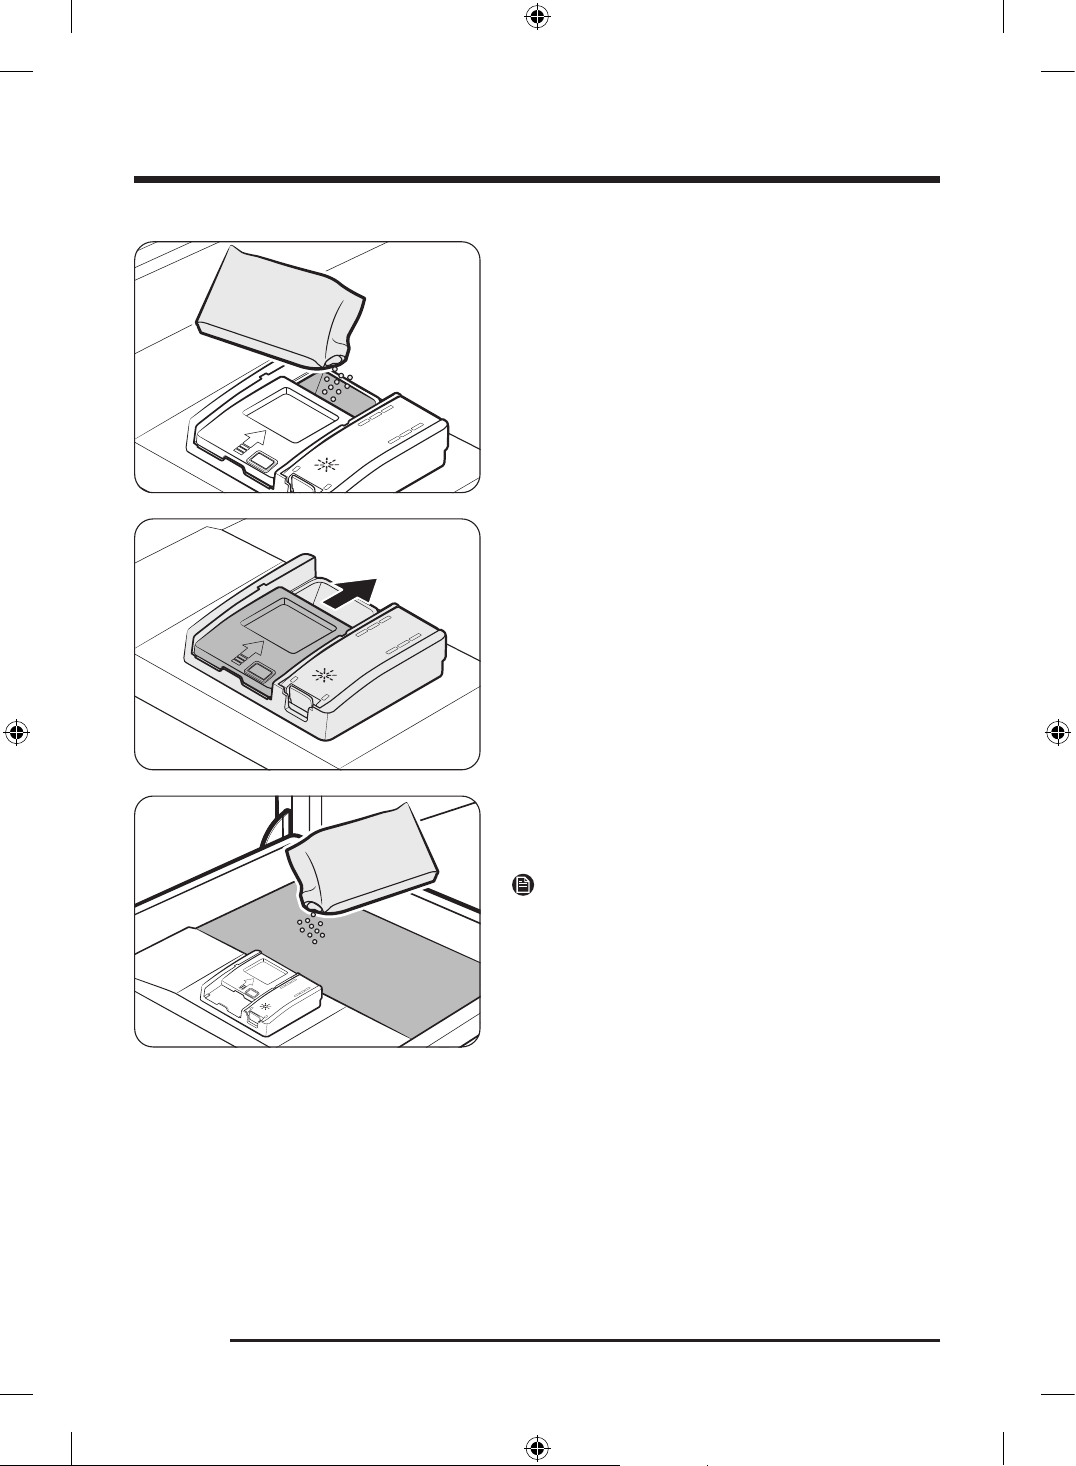
Filling the detergent
1. Press the button on the detergent compartment
cover to open the detergent compartment cover.
NOTE
The cover remains open at the end of a cycle.
Untitled-1 25Untitled-1 25 2024-12-04 12:08:512024-12-04 12:08:51
Before you start
English26
2. Add the recommended amount of detergent into the
detergent compartment.
3. Slide the cover in the direction of the arrow to close
it.
4. If the items are heavily soiled, pour a small amount of
detergent onto the door for the pre-wash process to
get better cleaning results.
NOTE
The cover opens automatically to dispense the detergent
during the wash.
Untitled-1 26Untitled-1 26 2024-12-04 12:08:522024-12-04 12:08:52
English 27
Rinse aid compartment
• Rinse aid improves the drying performance of the dishwasher.
• Refill the rinse aid compartment when you get a rinse refill alert message on the control panel.
• Only use a liquid rinse aid. A Powdered rinse aid will clog the opening of the compartment causing the
dishwasher to malfunction.
• You can set the desired amount of rinse aid to dispense during each cycle. (Refer to the Settings menu
section for more information.)
CAUTION
• Do not apply any type of detergent to the rinse aid compartment.
• Do not excessively fill the rinse aid compartment as it may overflow during a cycle.
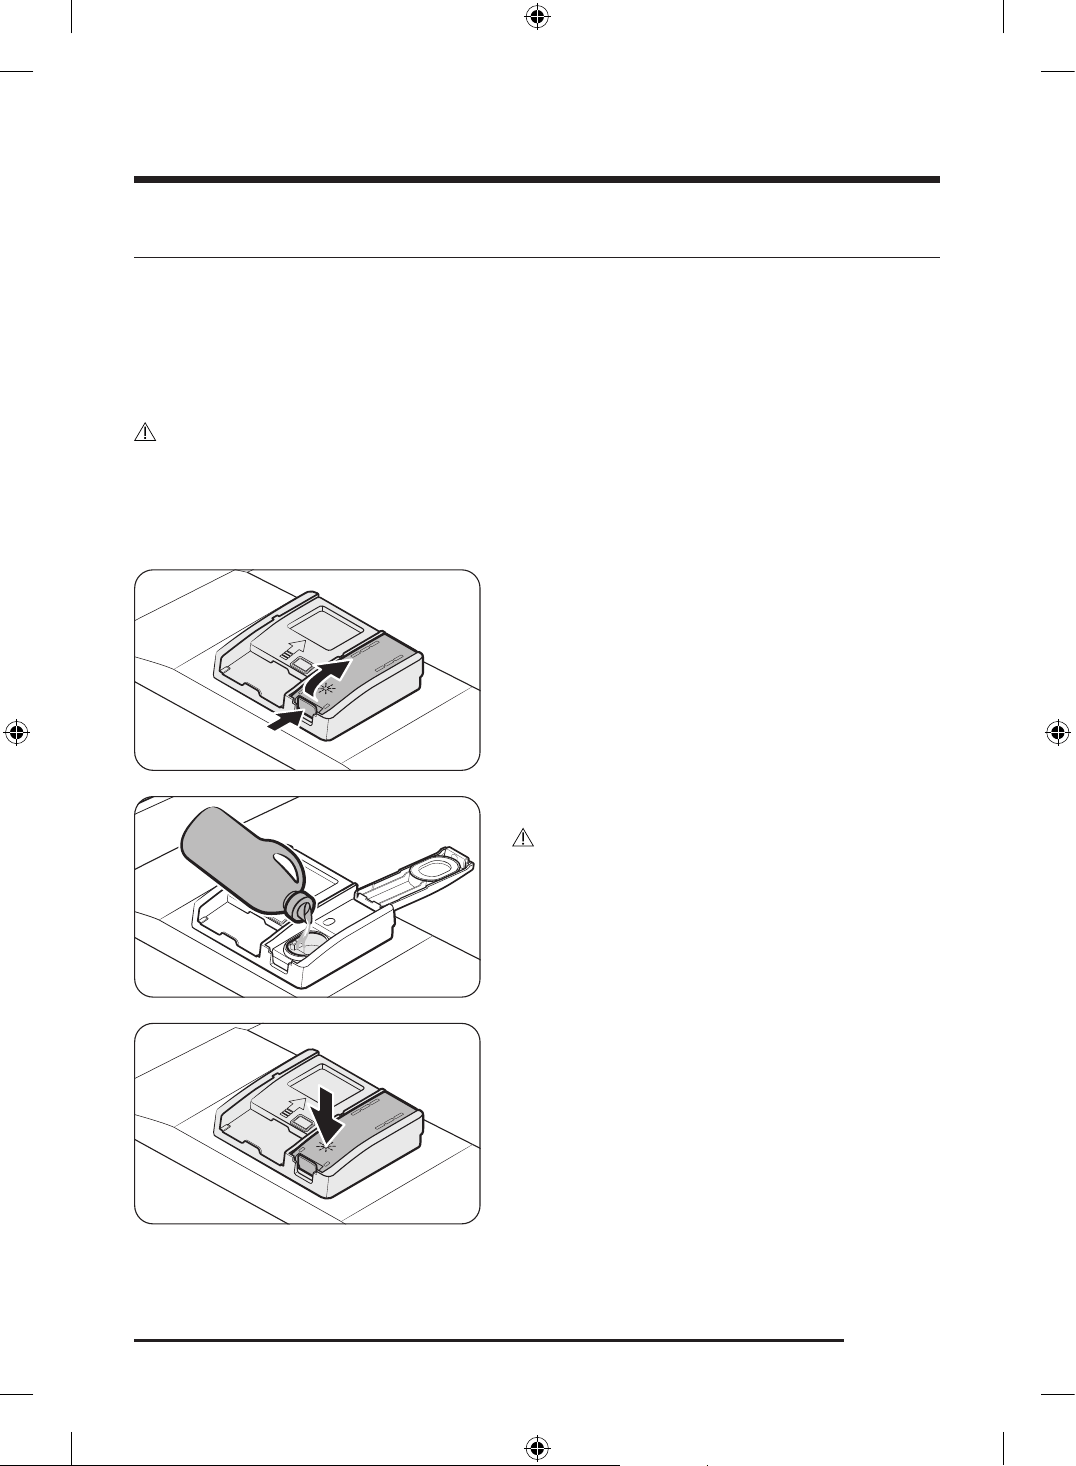
Filling the rinse aid
1. Open the rinse aid compartment cover.
2. Fill the rinse aid compartment with the rinse aid.
CAUTION
Do not fill the rinse aid over the max line in the
compartment. Excess rinse aid can overflow during the
wash cycle.
3. Close the rinse aid compartment cover.
Untitled-1 27Untitled-1 27 2024-12-04 12:08:522024-12-04 12:08:52

Before you start
English28
SmartThings
Wi-Fi connection
On your phone, go to Settings and connect to your home Wi-Fi network.
Download
On an app market (Google Play Store, Apple App Store, Samsung Galaxy Apps), find the SmartThings app
with the search term “SmartThings”. Download and install the app on your device.
NOTE
• The SmartThings app is designed for Android 8.0 or later, IOS 13.0 or later.
• For improved performance, the SmartThings app is subject to change without notice, or discontinued
support according to the manufacturer’s policy.
Log in
You must first log into SmartThings with your Samsung account. To create a new Samsung account, follow
the instructions on the app. You don’t need a separate app to create your account.
NOTE
If you have a Samsung account, use the account to log in. A registered Samsung phone user can log in
automatically.
To register your device to SmartThings
1. Make sure your phone is connected to a wireless network.
2. Run SmartThings on your phone.
3. When a message of “ A new device is found.”, select Add.
4. If no message appears, select + and select your dishwasher in a list of devices available. If your
dishwasher is not listed, select Device Type > Specific Device Model, and then add your dishwasher
manually.
5. Follow the on-screen instructions to complete the connection process for your dishwasher. Touch and
hold Smart Control ( ) for more than 5 seconds until the “ AP” message appears on the display. Your
dishwasher will be registered with the app.
6. When the process is complete, your dishwasher will appear in the list of devices on your SmartThings
App.
7. Tap the dishwasher icon to open the dishwasher page.
8. When a network connection is established, the Wi-Fi icon lights up on your dishwasher.
Untitled-1 28Untitled-1 28 2024-12-04 12:08:532024-12-04 12:08:53

English 29
Dishwasher app
Integrated control: You can monitor and control your dishwasher both at home and on the go.
• Select the dishwasher icon on SmartThings. The dishwasher page appears.
• Check the operation status or notifications related to your dishwasher, and change options or settings if
necessary.
NOTE
• This device is designed for household use only (Class B), and can be used in all residential areas.
• This device may cause wireless interference, and neither the manufacturer nor the installer of this
device can provide a safety measure of any kind.
• Recommended encryption methods are WPA/TKIP and WPA2/AES . Newly developed Wi-Fi protocols or
unapproved Wi-Fi protocols are not supported.
• The reception sensitivity of a wireless network may be affected by surrounding wireless environments.
• If your Internet provider has registered the MAC address of your PC or the modem module for
permanent use, your Samsung dishwasher fails to connect to the Internet. If this happens, contact your
Internet provider.
• The Internet firewall may interrupt your Internet connection. If this happens, contact your Internet
provider.
• If Internet failure continues after following the measurement of your Internet provider, contact a local
Samsung retailer or service center.
• For installing wired and wireless routers, refer to the user manual of the router you use.
• Samsung dishwasher supports the Wi-Fi 2.4 GHz protocols.
• Samsung dishwasher supports the IEEE802.11 b/g/n (2.4 GHz), Soft-AP protocols. ( IEEE802.11n is
recommended)
• An unapproved wired/wireless router may fail to connect to Samsung dishwasher.
• The SmartThings app is available on Android devices with OS 8.0 or higher and iOS devices with iOS 13
or higher. The app is optimized for Samsung phones.
• Some functions of the app may operate differently on third-party devices.
• The app is subject to change without notice for improved performance.
• In addition, further updates on the app or the function in the app may stop caused by usability and
security reasons, even if updates are currently supported on your OS.
• You can easily install the SmartThings app or use the product with your phone by scanning the QR code
on the attached label.
Untitled-1 29Untitled-1 29 2024-12-04 12:08:532024-12-04 12:08:53
Before you start
English30
SmartThings functions
Category Function Description
Monitoring
Washing status
You can check the current cycle and its options, and
the remaining cycle time.
Smart Control The Smart Control status is shown for the dishwasher.
Energy monitoring Use this to monitor the energy consumption status.
Control
Start / Pause / Cancel
Select a cycle and necessary options, and then select
Start / Pause / Cancel to start an operation, to stop
temporarily, or to cancel the current operation.
My Favorite
Add frequently used cycles and options to My Favorite
for later use.
Delay Start
Set Delay Start to start the cycle at a scheduled time
(up to 24 hours).
Notification
Cycle completed Notifies you when the current cycle is complete.
Detergent Notifies you if the dishwasher is out of rinse aid.
Washing Recipe Cycle recommendation
Recommends the best cycle with optimal options for
loaded dishes.
Homecare Wizard Maintenance
The wizard features a device management service and
a user guide.
AI Energy AI Energy
You can turn on or off the AI Energy Mode under
the Energy menu in the SmartThings app. When
you operate the dishwasher after turning on the AI
Energy Mode, the AI Energy Mode indicator appears
on the SmartThings app or the dishwasher’s control
panel. The AI Energy function adjusts the operating
temperature according to your usage conditions to
save energy.
Untitled-1 30Untitled-1 30 2024-12-04 12:08:532024-12-04 12:08:53
English 31
Open Source announcement
The software included in this product contains open source software.
The following URL http://opensource.samsung.com/opensource/SMART_TP1_0/seq/0 leads to open source
license information as related to this product.
Security updates information
Security updates are provided to strengthen the security of your device and protect your personal
information. For more information on security updates, visit https://security.samsungda.com.
• The website supports only some languages.
Untitled-1 31Untitled-1 31 2024-12-04 12:08:532024-12-04 12:08:53
Before you start
English32
Using Bixby Voice Recognition
This feature allows you to operate the product through voice commands. To activate Bixby, say "Hi, Bixby,"
and then give your desired command. The product will respond with voice guidance.
Bixby will exit standby mode after a certain time if no command is given.
CAUTION
• Performance may be affected by the user's voice, speech style, pronunciation, and surrounding
environment.
• When using the voice recognition function, speak louder than the surrounding sounds.
• To use the voice recognition function, stand within 1 meter of the product, reduce background noise, and
speak clearly and loudly toward the built-in microphone.
NOTE
• The voice recognition function may not be supported depending on the model.
• The location of the microphone may vary depending on the model.
Voice Commands
Refer to the following voice commands available for use with the dishwasher.
• Power on the dishwasher
• Power off the dishwasher
• Open the dishwasher door
• Start the dishwasher
• Start the dishwasher on [cycle name] course/cycle
• Start the dishwasher with frequently used course
• Set the dishwasher on [cycle name] course/cycle
• Tell me the available course/cycles in dishwasher
• Set [option name] option to the dishwasher
• Cancel [option name] option to the dishwasher
• Cancel the dishwasher's course/cycle
• Pause the dishwasher
• Tell me the remaining time of dishwasher
• Tell the current course/cycle for dishwasher
• Tell me the progress of dishwasher
• Tell me the status of dishwasher
• Turn on the volume of dishwasher
• Turn off the volume of dishwasher
• Turn up the volume of Bixby
• Turn down the volume of Bixby
• Tell me the serial no. of dishwasher
Untitled-1 32Untitled-1 32 2024-12-04 12:08:532024-12-04 12:08:53
English 33
Operations
Control panel
01 02 02
03
05 06 07 08 0904
01 Power • Tap this button to turn the dishwasher on or off.
02 Left/Right • Use these buttons to navigate through the cycles or options.
03 Display
• You can check various information on the display.
- The display shows the selected cycle, options, alert message, and
related information.
04 Start
• Tap this button to start the operation or to confirm a selection.
- Cancel & Drain: Touch and hold this button for 3 seconds to cancel
the current cycle and drain the dishwasher.
05 Storm Wash+
• Tap this button to turn the Storm Wash+ function on or off.
- Use this function to wash pots, pans, durable serving bowls, and
other large, heavily soiled, hard-to-clean dishes.
- Load the items face down in the rear-left side of the lower basket,
where the Storm Wash+ nozzle is underneath.
06 Sanitize
• Tap this button to turn the Sanitize function on or off.
- Use this function to increase the water temperature to 167 °F
(75 °C) in the final rinse cycle for high-temperature sanitization.
- If you turn on the Sanitize function, the Sanitize lamp blinks
when the water temperature reaches the sanitary temperature
(over 155 °F (68 °C)) and the lamp remains on until the Sanitize
function ends.
- If you open the door, the Sanitize lamp will blink.
NOTE
• Only sanitizing cycles have been designed to meet the requirements
for soil removal and sanitization efficacy in NSF 184. Certified
residential dishwashers are not intended for licensed food
establishments.
• For the Sanitize mode, the amount of detergent as 3/4 oz (20 g) in
Main wash dispenser and 1/3 oz (10 g) on the door for pre-wash is
used.
Untitled-1 33Untitled-1 33 2024-12-04 12:08:542024-12-04 12:08:54
Operations
English34
07 SmartDry
• Tap this button to add the SmartDry process. The Smart Dry
process uses a built-in heater to circulate warm air for better drying
performance.
- This option is not available for some cycles.
• You can select from 3 different levels. Each time you tap this button
the option changes in the following order.
- Low , High , MAX , Off
- MAX takes the longest operation time.
CAUTION
• Do not open the door during the SmartDry process because the
internal temperature becomes very hot during the process.
• Do not touch the bowl inside the dishwasher or the hot air outlet
right after using the SmartDry option as they may still be hot.
• Do not block the hot air outlet. Blocking the air outlet could cause
poor hot air circulation during the SmartDry process.
• Try loading the heat-sensitive items as far away from the hot air
outlet as possible.
• For the best drying result, keep the Does per Rinse option enabled
while using the SmartDry option.
NOTE
SmartDry Low condition is the recommended for regular use to
completely wash a full load of normally soiled dishes.
08 Settings
• Tap this button to enter the settings menu.
- Refer to the Settings menu section for details.
- You can change various settings.
09 Smart Control
• You can turn the Smart Control on or off.
- Turning on the Smart Control allows remote access to the
dishwasher.
Untitled-1 34Untitled-1 34 2024-12-04 12:08:542024-12-04 12:08:54
English 35
Cycle overview
AI Wash
• This cycle automatically detects the soil level of your items and adjusts
the washing process accordingly. Additionally, AI optimizes the number of
rinses during the cycle to ensure the best cleaning results. The wash time
may increase if the AI adjusts options such as the number of rinses during
operation.
NOTE
The number of rinse processes is available only when the dishwasher is
connected to Wi-Fi.
Normal
• This is a standard cycle for normally soiled items.
- The energy-usage label is based on this cycle.
Heavy • This cycle is for cleaning heavily soiled items.
Delicate
• Select this cycle for lightly soiled, fragile items such as glasses.
- The item must be dishwasher-safe.
Express 60’ • This cycle is for cleaning the items quickly in about an hour.
Self Clean
• This cycle is for cleaning the inside of the dishwasher.
• Do not operate this cycle with the racks loaded with any items. Empty the
dishwasher before running this cycle.
NOTE
Use this cycle to clean the inside of the dishwasher after using the dishwasher
20 times, or once every month.
Pre Blast
• This cycle is for roughly and quickly dislodging large food debris to prevent
caking.
NOTE
No detergent or rinse aid is used in this cycle.
Pots & Pans • Ideal for cleaning cookware such as pots and pans that are heavily soiled.
Plastic
• Suitable for cleaning plastic dishes that are sensitive to heat and
temperature.
Babycare
• Use this cycle to rinse dishes with high-temperature water before drying.
• No detergent is used in this cycle.
Untitled-1 35Untitled-1 35 2024-12-04 12:08:542024-12-04 12:08:54

Operations
English36
Operating a cycle
1. Open the door, and then load the dishwasher. Make sure to remove food remains and waste on the
dishes.
- Do not load the dishwasher if you are going to use the Self Clean cycle.
2. Add detergent into the detergent compartment. For better results, add rinse aid into the rinse aid
compartment.
3. Tap Power to turn on the dishwasher.
4. Tap the or buttons to select the desired cycle.
5. Select the desired additional functions.
- Tap Storm Wash+, Sanitize, or SmartDry to enable or disable each function.
- Some functions may not be available depending on the selected cycle.
6. Tap Start , and then close the door.
- The dishwasher starts the cycle after draining for a few seconds.
NOTE
• To cancel the cycle, touch and hold Start for 3 seconds.
• To resume after you have opened the door to stop the dishwasher while operating, simply close the
door.
Untitled-1 36Untitled-1 36 2024-12-04 12:08:552024-12-04 12:08:55

English 37
Settings
You can change your settings to your preference according to the following instructions.
1. Tap Settings.
2. Tap or to navigate through the settings menu.
3. Tap Start to select. Refer to the Settings menu section for detailed instructions on changing each
setting.
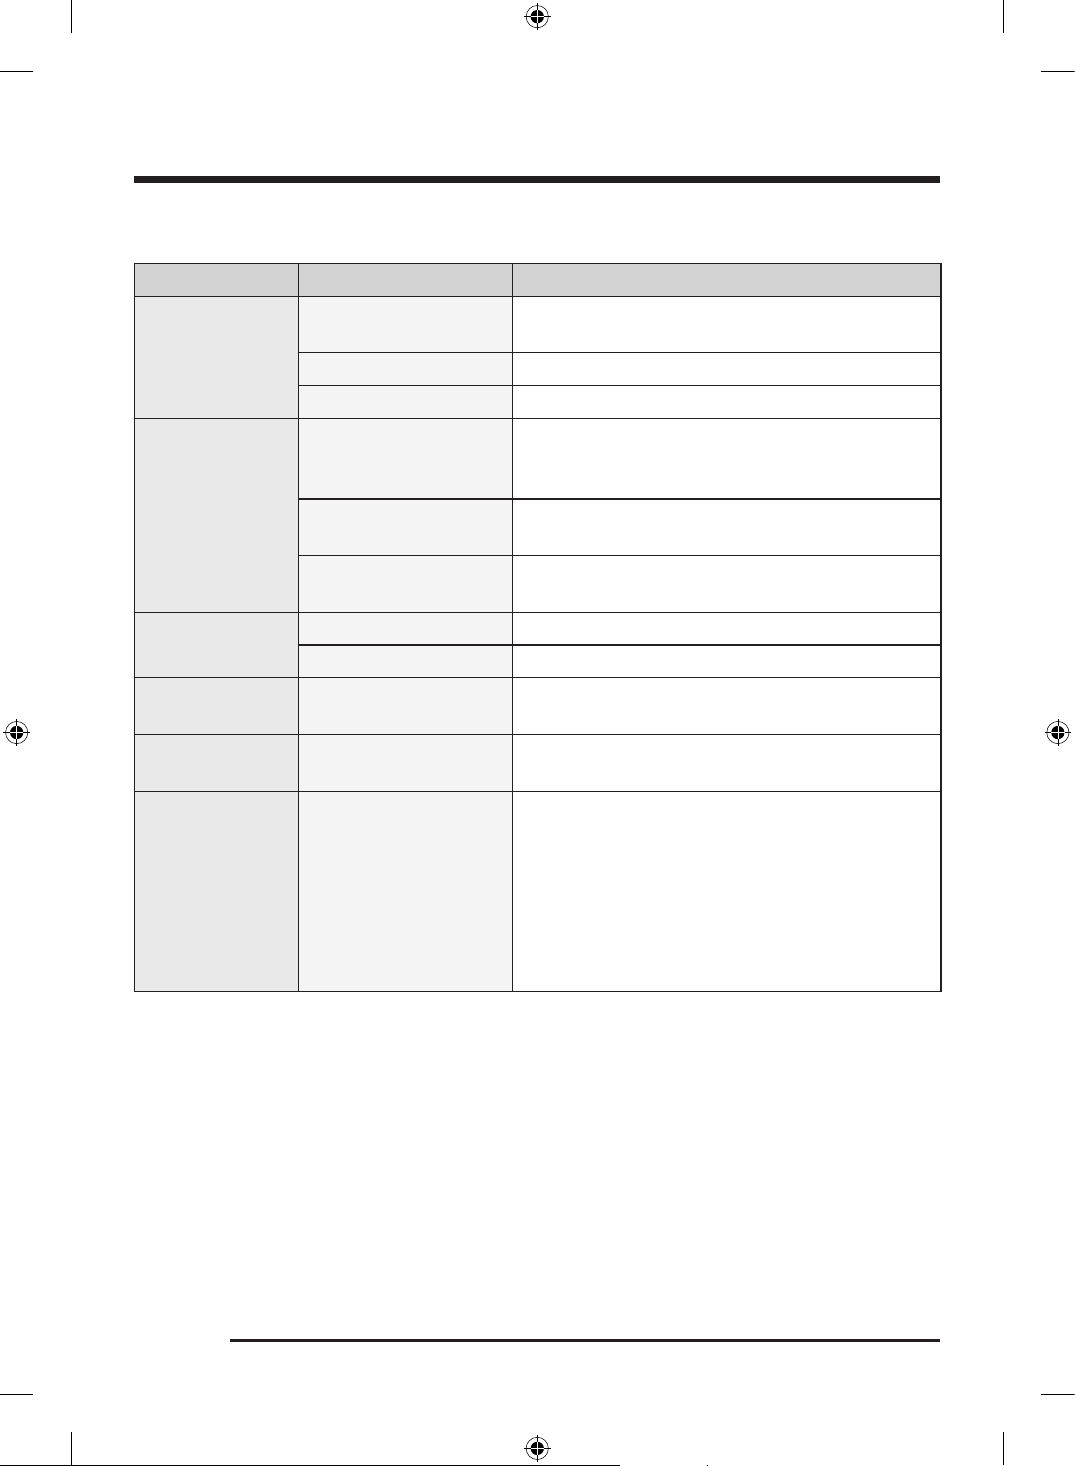
Settings menu
Setting Description / Setting instruction
Delay Start
You can start the dishwasher operation at a desired time. Select from 1 to
24 hours to delay the start of the dishwasher.
1. Tap or to select the desired time.
2. Tap Start to save.
- You can tap Settings to cancel the setting.
NOTE
You must select the desired wash cycle before setting Delay Start .
Dose Per Rinse
You can set the desired amount of rinse aid to dispense during each cycle.
1. Tap or to select the desired amount.
2. Tap Start to save.
- The setting is canceled automatically if you do not tap Start within a
few seconds.
NOTE
To disable the rinse aid refill notification, set this function to off.
Auto Release Dry
You can set the dishwasher to open the door automatically at the end of the
wash cycle for better drying results.
1. Tap or to select On or Off.
2. Tap Start to save.
- The setting is canceled automatically if you do not tap Start within a
few seconds.
NOTE
• If you enable this function, the door opens automatically at the end of the
wash cycle. When the Auto Release Dry function activates at the end of a
cycle, do not block or close the door.
• Turn on this function for better drying results.
Untitled-1 37Untitled-1 37 2024-12-04 12:08:552024-12-04 12:08:55
Operations
English38
Setting Description / Setting instruction
My Cycles
You can select to show or hide some of the cycles on the list.
1. Tap or to move up or down the list of cycles.
2. Tap Start to show or hide the selected cycle.
- Checked cycles will be shown and the unchecked ones will be hidden on
the list of cycles.
- The Normal cycle cannot be hidden from the list.
3. Tap Settings to save.
AI Pattern
Conveniently use the cycles that you use frequently. You can set your
dishwasher to remember the frequently used cycles and settings and display
them in frequently used order.
1. Tap or to select On or Off.
2. Tap Start to save.
- The setting is canceled automatically if you do not tap Start within a
few seconds.
Lock
To prevent children from playing with the dishwasher, enable this function to
lock all the buttons except for Power and Settings.
• Tap Start to enable Lock .
- To disable Lock , touch and hold Settings for 3 seconds.
NOTE
Turning off the dishwasher does not disable this function. You must touch and
hold Settings for 3 seconds to manually disable the function.
System Settings
You can change various system settings.
1. Tap or navigate through the System Settings menu.
2. Tap Start to select.
3. Change the setting based on the setting you selected.
- Refer to the following instructions for specific settings.
Auto Open
Door
You can select the sensitivity level required to open the door
when using the Auto Open Door function.
1. Tap or to select Light pressure, Medium pressure, or
Firm pressure.
2. Tap Start to save.
Volume
You can change the volume of the sound.
1. Tap or to select Mute, Minimum, Normal or
Maximum.
2. Tap Start to save.
- The setting is canceled automatically if you do not tap
Start within a few seconds.
Untitled-1 38Untitled-1 38 2024-12-04 12:08:552024-12-04 12:08:55
English 39
Setting Description / Setting instruction
System Settings
Microphone
You can turn the microphone on or off.
1. Tap or to select On or Off.
2. Tap Start to save.
- The setting is canceled automatically if you do not tap
Start within a few seconds.
NOTE
This setting must be turned on to use the Bixby Voice
Recognition function. (Refer to the Using Bixby Voice
Recognition section for more information on the Bixby Voice
recognition function.)
Temp Unit
You can change the temperature unit.
1. Tap or to select °F or °C.
2. Tap Start to save.
- The setting is canceled automatically if you do not tap
Start within a few seconds.
Language
You can change the system language.
1. Tap or to select the desired language.
2. Tap Start to save.
- The setting is canceled automatically if you do not tap
Start within a few seconds.
Wi-Fi
You can turn the dishwasher’s Wi-Fi on or off.
1. Tap or to select On or Off.
2. Tap Start to save.
- The setting is canceled automatically if you do not tap
Start within a few seconds.
Factory Reset
You can reset the dishwasher to the factory setting.
1. Tap or to select Reset or Cancel.
2. Tap Start to confirm.
Untitled-1 39Untitled-1 39 2024-12-04 12:08:562024-12-04 12:08:56
Operations
English40
Special features
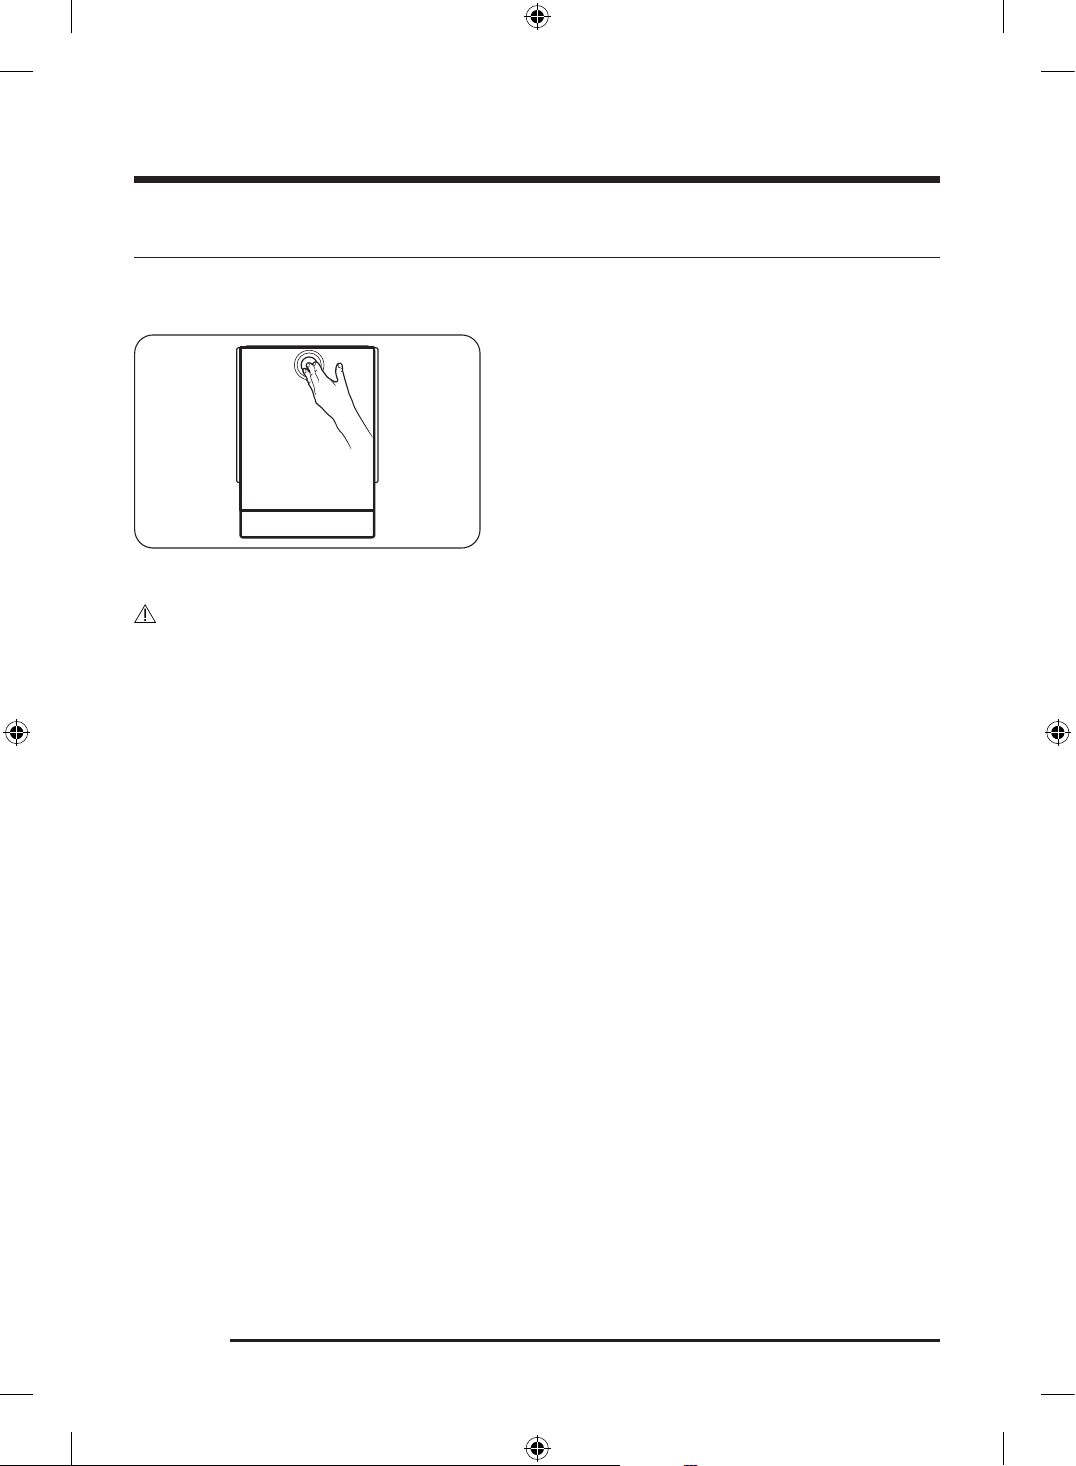
Auto Open Door function (Applicable models only)
1. Gently press and release the center of the top part
of the door. The door will then automatically open
slightly.
- You can adjust the sensitivity level for this
function under Settings > System Settings > Auto
Open Door.
2. When the door slightly opens, hold the top part of
the door and fully open it.
- The door does not close automatically. Close the
door manually after use.
CAUTION
• Do not push or force stop the door while it is opening automatically. It may cause the product to
malfunction.
• If the door resists opening after repeated door opening, wait for about a minute and then try again.
(It may be hard to open the door immediately after closing it due to air pressure change inside the
dishwasher which occurs when you open and close the door.)
• You can activate the Auto Open Door function by Bixby.
- Be careful when using the function through Bixby because the door may open automatically, but
does not close automatically.
- We suggest using Bixby for opening the door only when you are nearby the product.
Untitled-1 40Untitled-1 40 2024-12-04 12:08:562024-12-04 12:08:56
English 41
If you are unable to use the Auto Open Door function
because of a power failure or other reasons, use the
provided Emergency handle to open the door manually.
Untitled-1 41Untitled-1 41 2024-12-04 12:08:562024-12-04 12:08:56

English42
Maintenance
Cleaning
Keep the dishwasher clean to improve performance, reduce unnecessary repairs, and lengthen its lifecycle.
Exterior
Clean spills on the surface of the dishwasher immediately. Use a soft, damp cloth on the control panel to
gently wipe away spills and dust.
If you see white stains on the control panel, clean them using a detergent containing citric acid.
CAUTION
• Do not use benzene, wax, thinner, chlorine bleach, alcohol, or other chemical substances. These
materials may discolor the surface of the dishwasher and cause stains.
• The dishwasher has electric parts inside. Do not spray water directly onto the dishwasher. Protect
electrical components from water.
• For a stainless-steel door panel, clean using a stainless steel cleaner for home appliances and a clean,
soft cloth.
Interior
Clean the interior of the dishwasher on a regular basis to remove any dirt or food particles. Wipe inside
the dishwasher and inside the door with a wet dishcloth. To maintain optimum cleanliness, recommended
running the Self Clean cycle periodically with the dishwasher empty.
To keep the cutlery pad clean, turn it over after each use. To remove white spots and odors from the cutlery
pad, run the Self Clean cycle with the dishwasher empty and no detergent until the cutlery pad flushes.
Then, stop the cycle and put an 8-ounce cup of white vinegar into the lower basket. Close the door, and
then resume the cycle.
Use a damp cloth to remove lime scale or grease deposits inside the dishwasher.
Alternatively, apply some detergent, and then run an empty cycle using the highest rinse temperature.
CAUTION
Do not remove the front seal (the long rubber seal enclosing the opening of the dishwasher). The seal
keeps the inner side of the dishwasher sealed.
Untitled-1 42Untitled-1 42 2024-12-04 12:08:562024-12-04 12:08:56
English 43
Spray arms
To prevent the spray arms from being clogged or if the spray arms are clogged, remove and clean each
spray arm. Use caution when removing the spray arms as they may break.
NOTE
If the water holes on the spray arms are clogged, use a
thin pointed tool to unclog the holes.
Top spray arm
A
1. Open the door.
2. Remove the upper rack.
- Refer to the Removing the upper rack section for
detailed instructions.
- The top spray arm is attached to the top interior
wall.
- If your model has a 3rd rack, pull it out to access
the top spray arm.
3. Hold the handle (A), and then push it to the right to
release the top spray arm.
4. Unclog and clean the spray arm.
5. Reinsert the spray arm, and then push the handle (A)
to the left to tighten it.
6. Rotate the spray arm to make sure it is correctly
assembled.
Untitled-1 43Untitled-1 43 2024-12-04 12:08:572024-12-04 12:08:57
Maintenance
English44
Cup wash spray nozzle
1. Release the hook at the front of the cup wash spray
nozzle.
2. Slide the nozzle toward the rear to remove it from
the 3rd rack.
3. Unclog and clean the nozzle.
4. Assemble the nozzle.
- Secure the rear hook (as shown in the figure) by
attaching it to the 3rd rack, then slide the nozzle
back into place until it clicks securely.
Middle spray arm
A
1. Open the door, and then pull out the upper rack.
- The middle spray arm is attached underneath the
upper rack.
2. Hold the handle (A), and then push it to the right to
release the middle spray arm.
3. Unclog and clean the spray arm.
4. Reinsert the spray arm, and then push the handle (A)
to the left to tighten it.
5. Rotate the spray arm to make sure it is correctly
assembled.
Untitled-1 44Untitled-1 44 2024-12-04 12:08:572024-12-04 12:08:57
English 45
Bottom spray arm
1. Open the door.
2. Remove the lower rack.
- The bottom spray arm is attached to the bottom
interior wall.
3. Pull the bottom spray arm to remove it.
4. Unclog and clean the spray arm.
5. Reinsert the spray arm.
6. Rotate the spray arm to make sure it is correctly
assembled.
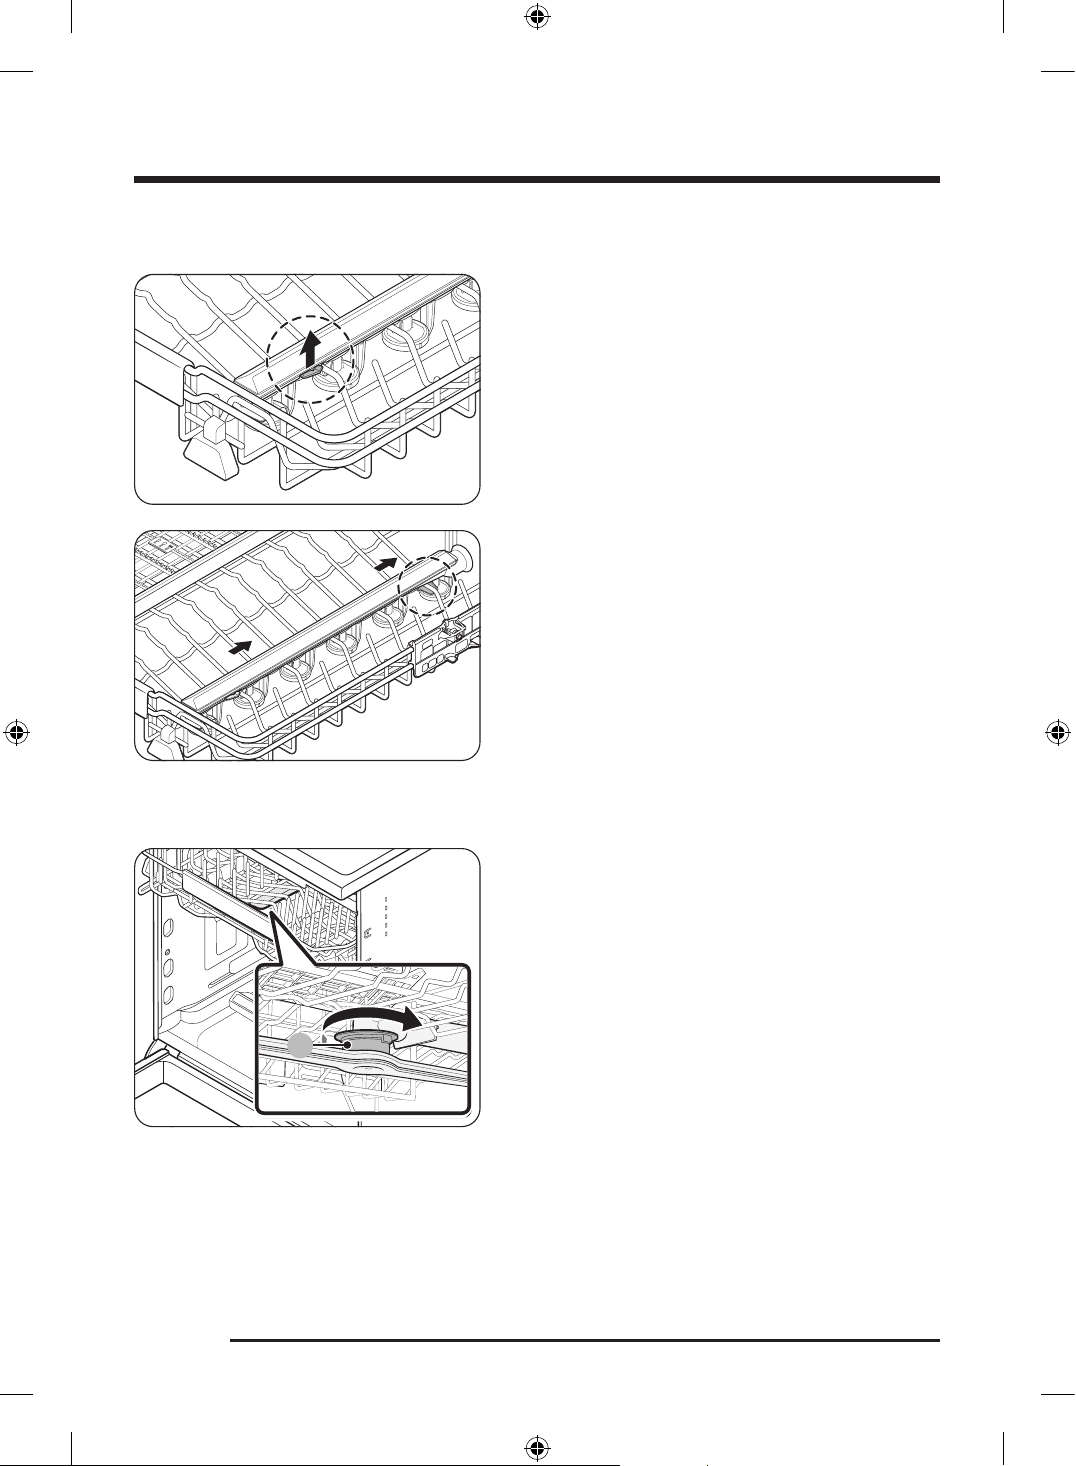
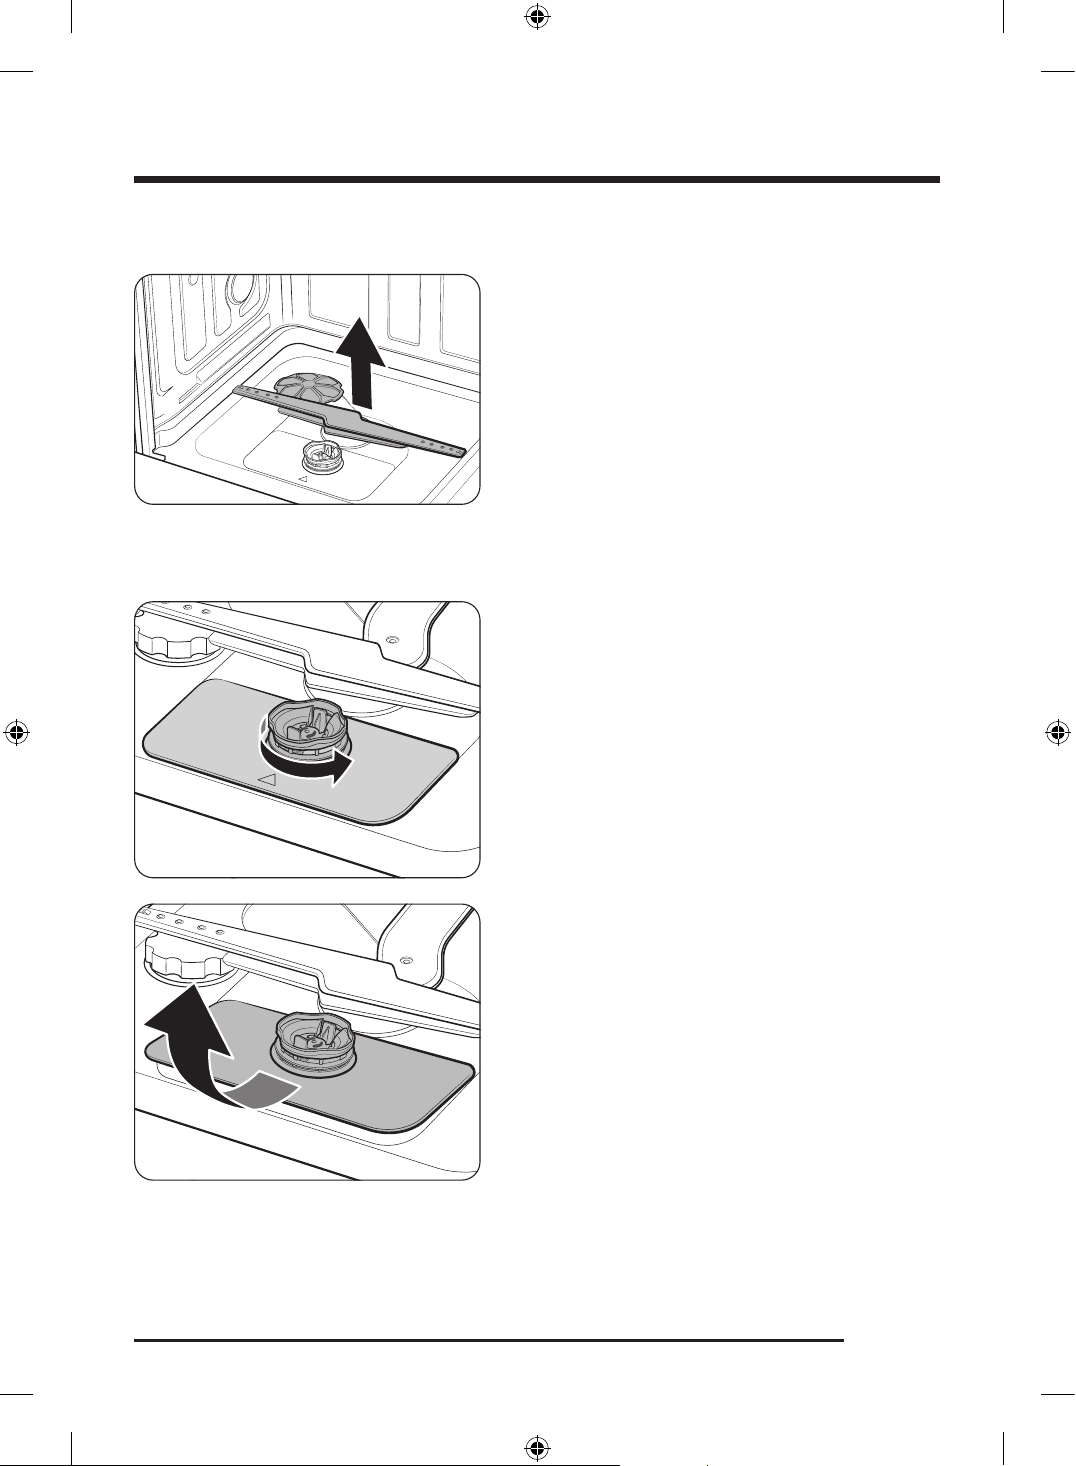
Filters
1. Open the door, and then remove the lower rack.
2. Turn the coarse filter counterclockwise to unlock the
assembled filters.
3. Lift the assembled filters and remove them from the
bottom of the dishwasher.
Untitled-1 45Untitled-1 45 2024-12-04 12:08:582024-12-04 12:08:58
Maintenance
English46
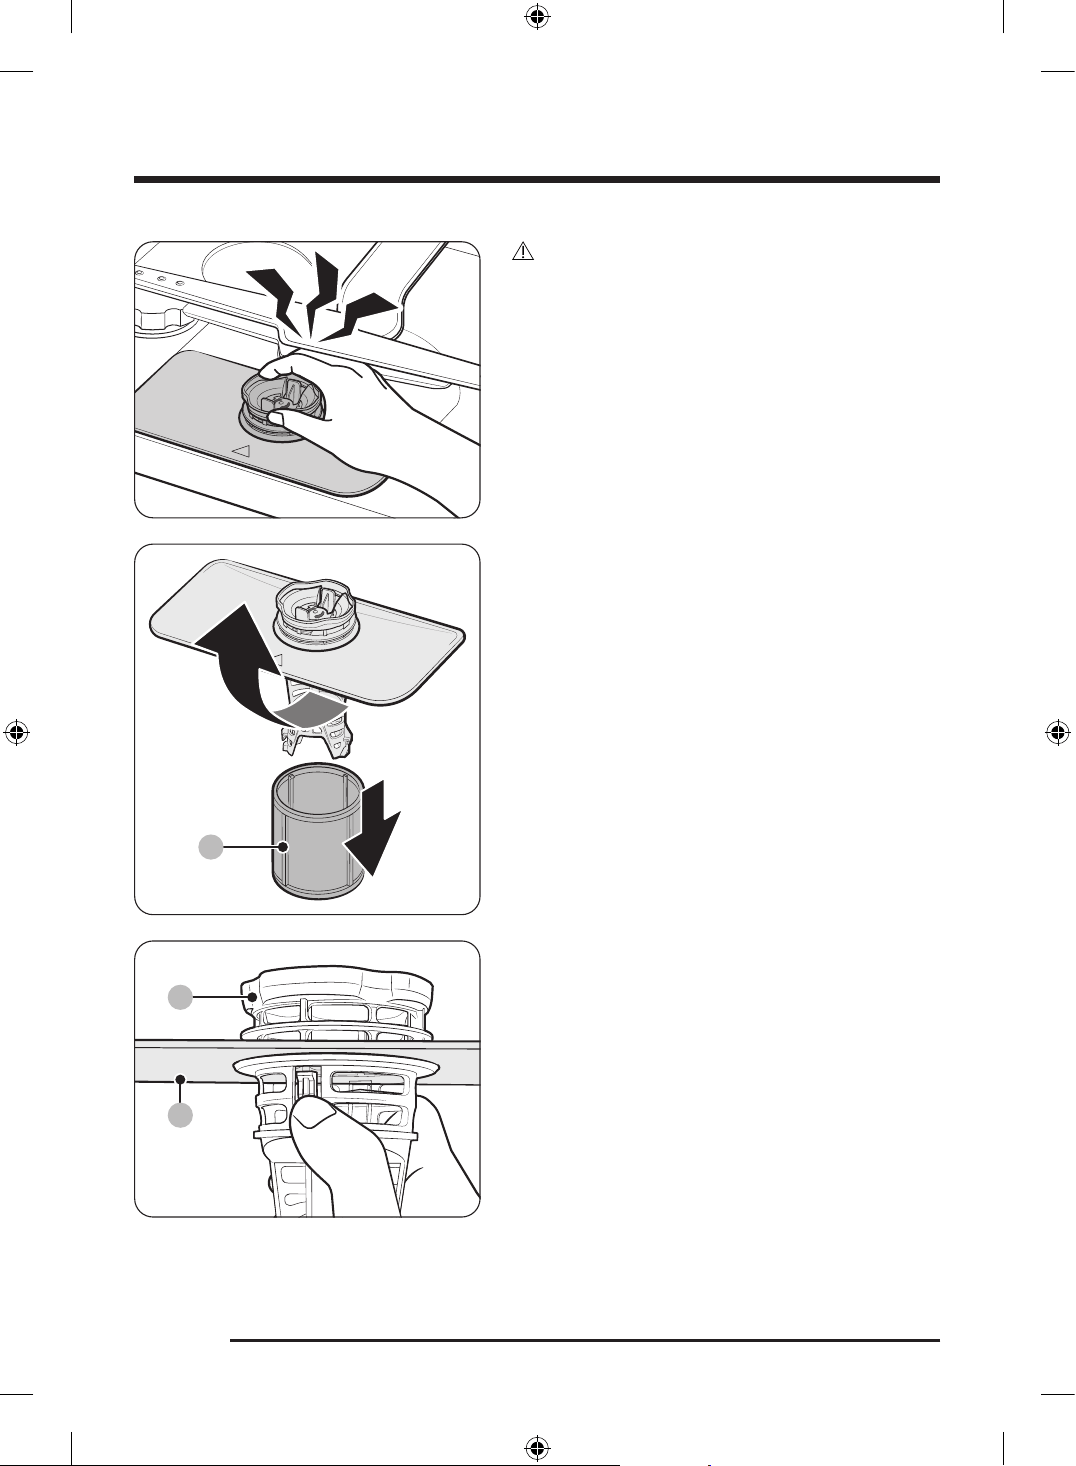
CAUTION
Watch your hand when removing the filters. Your hand
could get caught between the bottom spraying arm and
the filters.
A
4. Disassemble the micro filter (A).
B
C
5. Disassemble the coarse filter (B) and the fine filter
(C).
- While pressing the two release tabs on the coarse
filter (B), lift it to remove.
Untitled-1 46Untitled-1 46 2024-12-04 12:08:592024-12-04 12:08:59
English 47
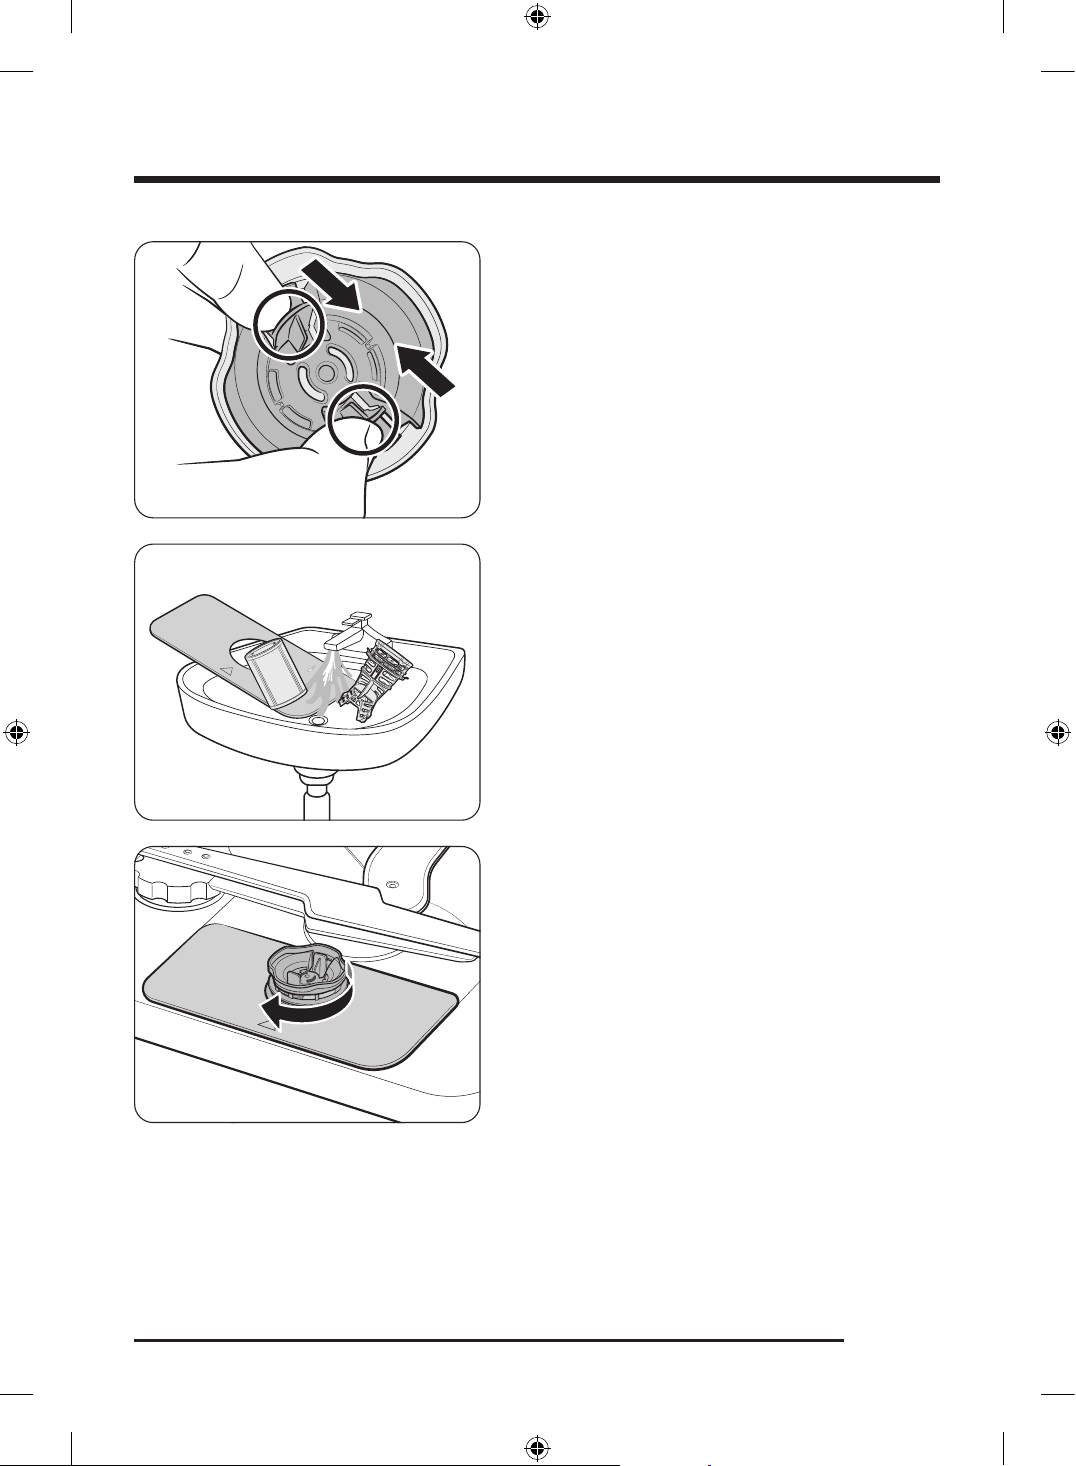
6. Remove the coarse filter cap.
- While pressing the two release tabs on the cap,
lift to remove it.
7. Thoroughly clean all the disassembled filters in
running water.
8. Dry the filters before putting them back into the
dishwasher.
9. Assemble all the filters and put them back into the
dishwasher.
10. Turn the filter handle clockwise to lock the filters.
Untitled-1 47Untitled-1 47 2024-12-04 12:08:592024-12-04 12:08:59
Maintenance
English48
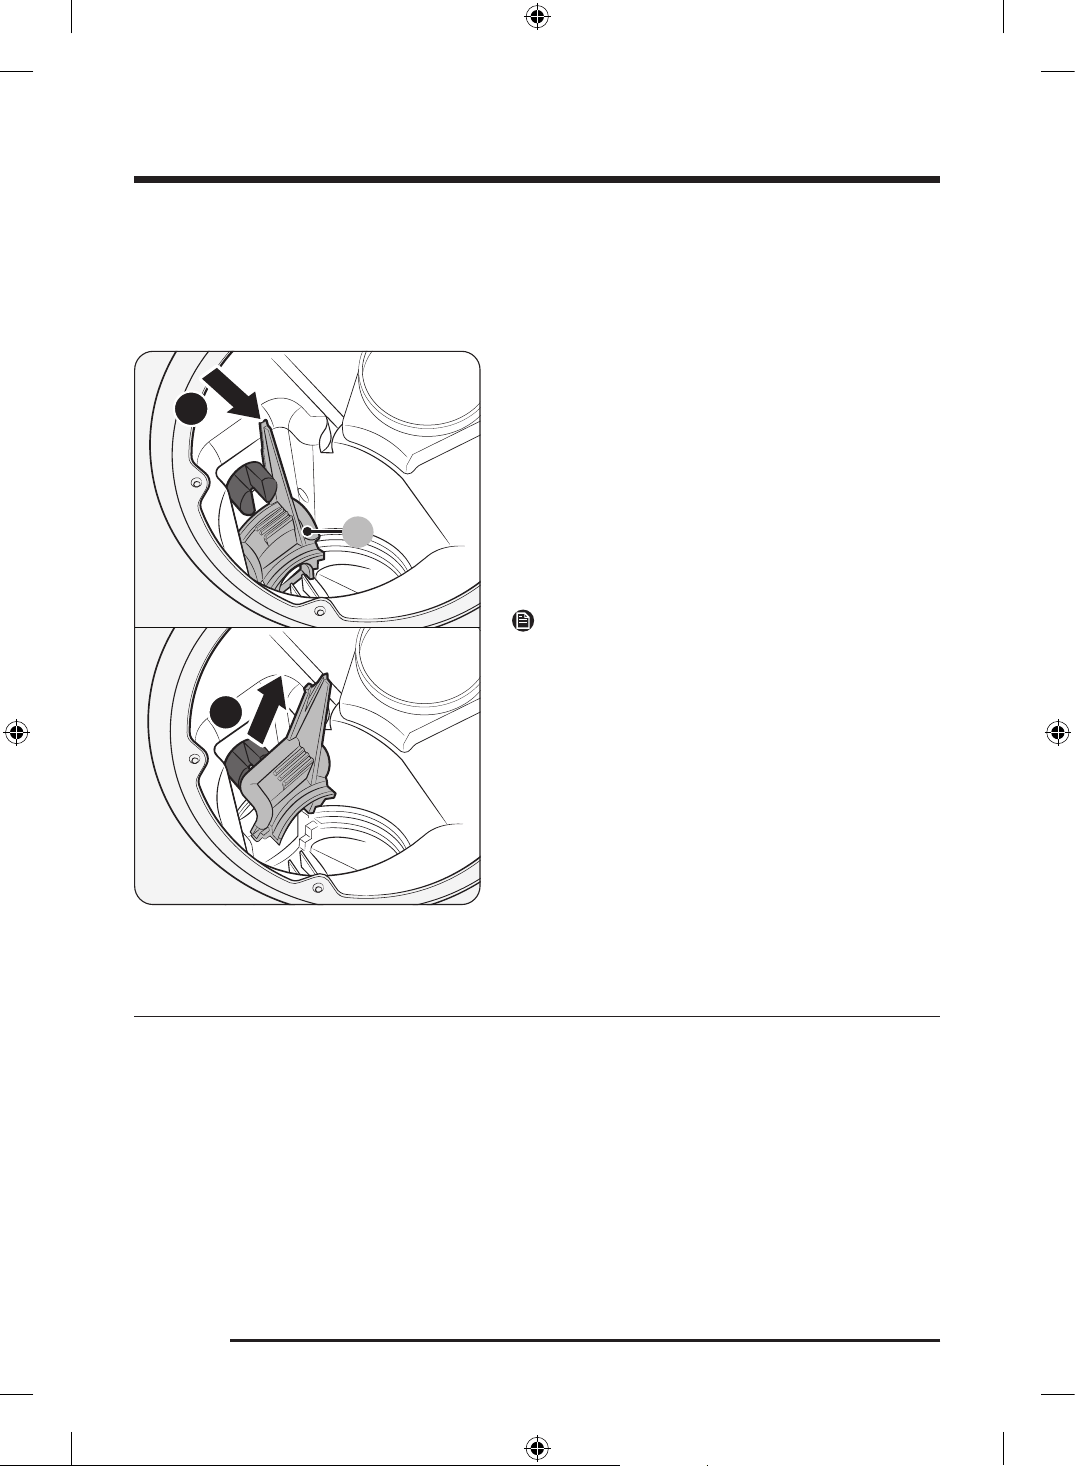
Drain pump
If the dishwasher displays 5C and fails to drain or there is an abnormal noise coming from the drain
pump, you must unclog and clean the drain pump according to the following instructions. (Refer to the
Information codes section for more information on the code displayed on the control panel.)
1
2
A
A. Drain pump cover
1. Remove the lower rack.
2. Refer to the Filters section to remove the filters.
3. Remove the drain pump cover.
- Push the handle in the direction of the arrow (1),
and then pull it up (2).
4. Check the pump’s impeller, and then clean it
thoroughly.
5. Put the drain pump cover in the reversed order of
removal.
- Make sure you hear a clicking sound.
NOTE
The 5C error code may occur when the drain pump is
missing or incorrectly assembled. Make sure the drain
pump is correctly assembled.
Long-term care
If you will not use the dishwasher for an extended period of time, first drain the unit completely, and then
disconnect the water hose. Shut off the water supply valve and the circuit breaker. Water remaining in the
hoses or the internal components can damage the dishwasher.
Untitled-1 48Untitled-1 48 2024-12-04 12:09:002024-12-04 12:09:00
English 49
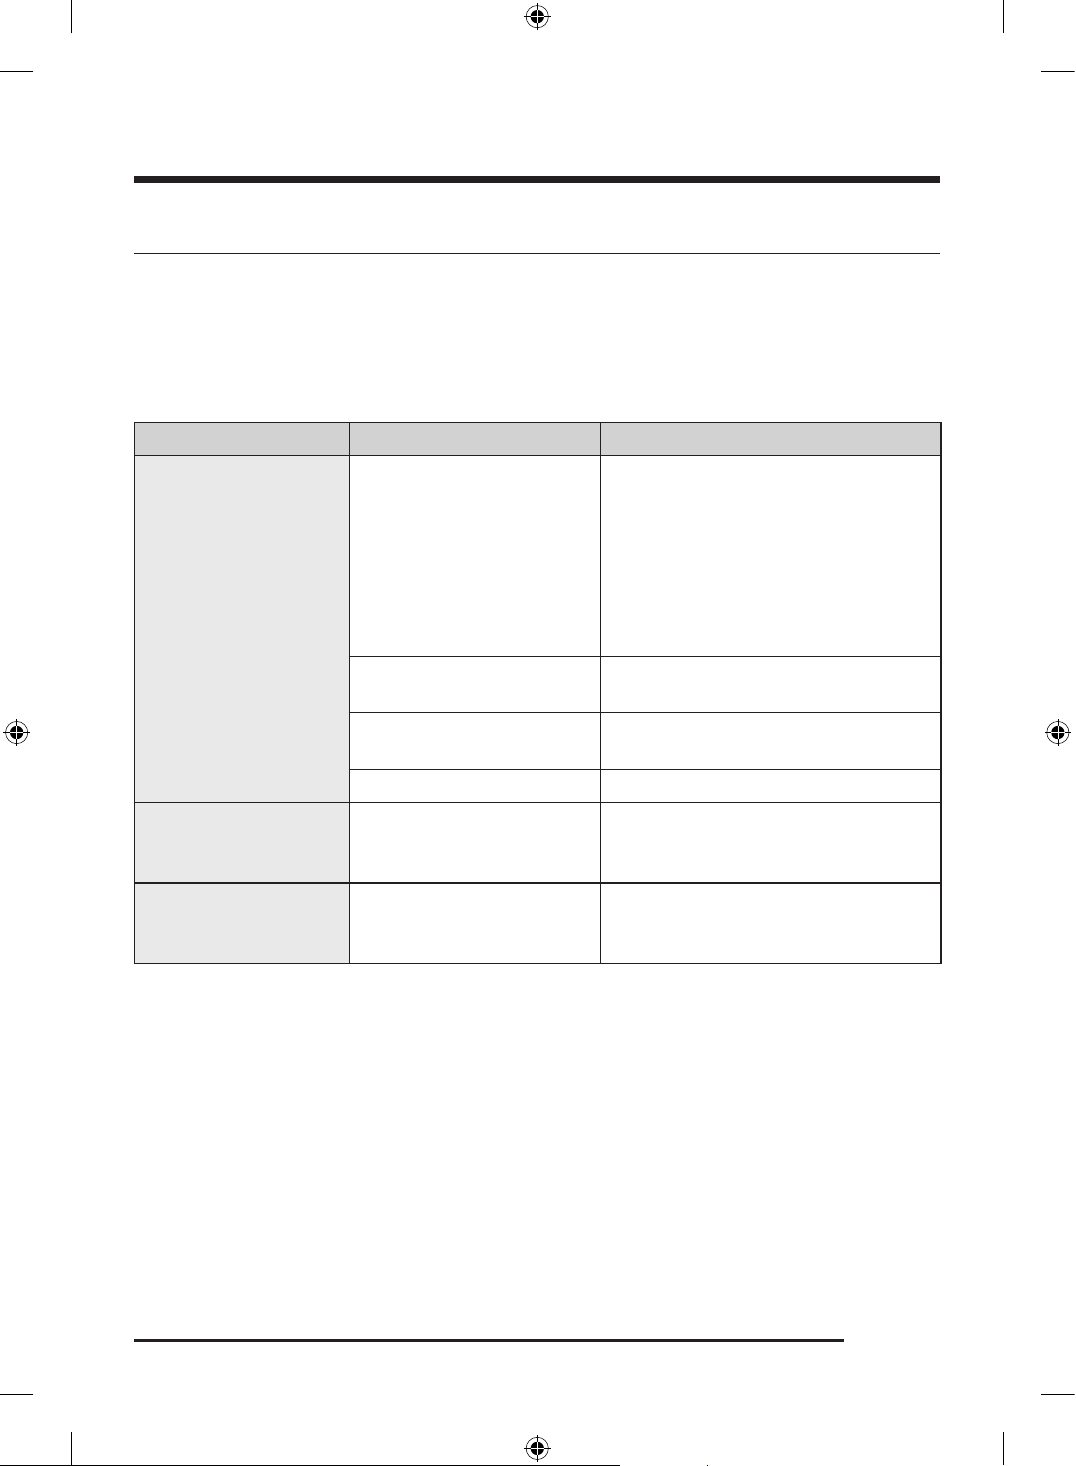
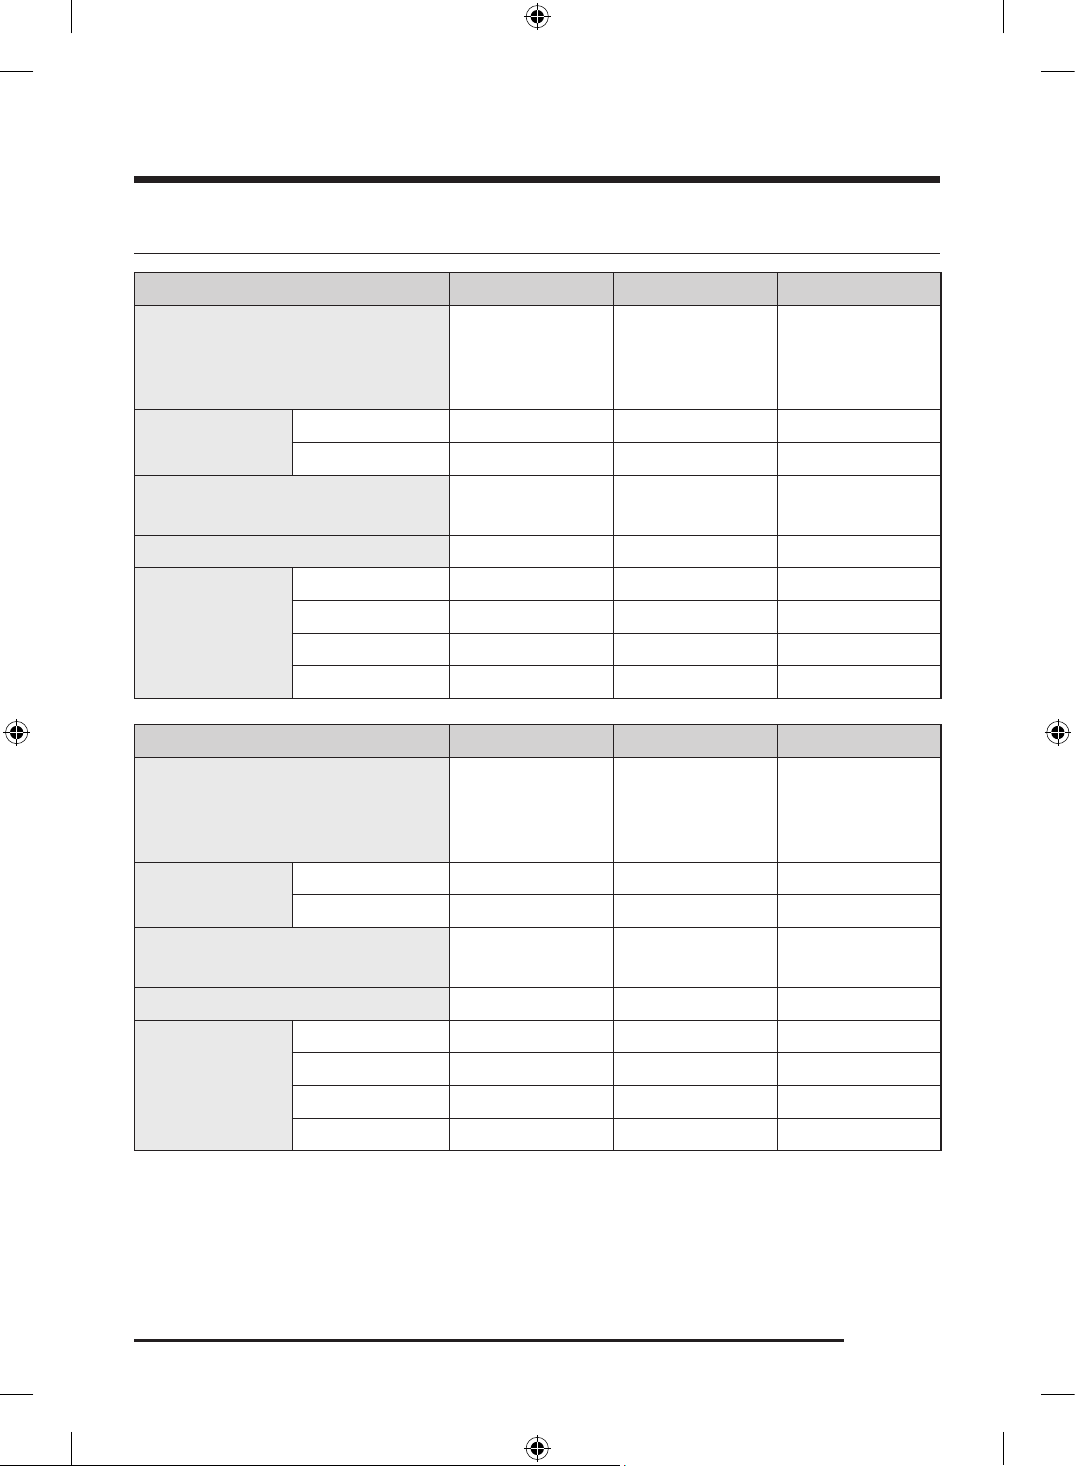
Troubleshooting
Checkpoints
If you encounter an issue with the dishwasher, first check the table below and try the suggestions.
Following the repair by a non-authorized service provider, self-repair, or non-professional repair of the
product, Samsung is not liable for any damage to the product, any injury, or any other product safety issue
caused by any attempt to repair the product that does not carefully follow these repair and maintenance
instructions. Any damage to the product caused by an attempt to repair the product by any person other
than a Samsung-certified service provider will not be covered by the warranty.
Symptom Possible cause Action
The dishwasher does not
start.
The door is not completely
closed.
• Make sure the door is latched and
completely closed.
• Make sure the middle spray arm water
supply tube is properly connecting to
the water outlet at the rear interior
wall.
• Make sure the upper rack is properly
inserted.
The power cord is not
connected.
• Connect the power cord.
Water is not being supplied.
• Make sure the water supply valve is
open.
The control panel is locked. • Disable the Lock function.
The dishwasher has bad
odors.
Water remains from the
previous cycle.
• With the dishwasher empty, add
detergent, and then run the Heavy
cycle.
Water remains in the
dishwasher after a cycle
has finished.
The drain hose is kinked or
clogged.
• Straighten and unclog the drain hose.
Untitled-1 49Untitled-1 49 2024-12-04 12:09:002024-12-04 12:09:00
Troubleshooting
English50
Symptom Possible cause Action
Food remains on dishes.
An incorrect cycle was
selected.
• Select a cycle according to the soil
level of the dishes as instructed in this
manual.
The filters are clogged or not
correctly fastened.
• Clean the filters.
• Make sure the filters are correctly
fastened.
An insufficient amount of
detergent was used.
• Use the correct amount of detergent
for each load.
The water pressure is low.
• Make sure the pressure is between 20
and 120 psi (between 140 and 830 kPa).
The spray arms are clogged. • Clean and unclog the spray arms.
Dishes are improperly loaded
or overloaded.
• Arrange the dishes so they do not
interfere with the spray arms or the
detergent dispenser.
Dishes are not dried well
enough.
The rinse aid compartment is
empty.
• Fill the rinse aid into the rinse aid
compartment.
Not enough rinse aid was
used.
• Change the Dose per Rinse setting.
Too many dishes were loaded.
• Overloading may reduce the drying
performance. Load your dishes as
recommended.
Glasses and cups spilled water
onto other dishes while being
unloaded.
• Empty the lower rack first, and then
the upper rack. This will avoid water
dripping from the upper rack onto the
dishes in the lower rack.
Multiple detergent tablet is
used.
• Add the SmartDry process in MAX
level.
A cycle with a low rinse
temperature was used.
• Add the SmartDry process in Max level.
If your model does not support the
SmartDry function, add the Sanitize
option.
Untitled-1 50Untitled-1 50 2024-12-04 12:09:002024-12-04 12:09:00
English 51
Symptom Possible cause Action
The dishwasher is too
noisy.
The detergent compartment
is opened to dispense the
detergent.
• This is normal.
The drain pump is operating. • This is normal.
The dishwasher is not level. • Make sure the dishwasher is level.
The spray arm bumps
against the dishes, creating a
chopping sound.
• Rearrange the dishes.
A layer of the yellow or
brown stain remains on
dishes.
Coffee and tea soils.
• Use a cycle with a higher temperature
water.
The display is not turning
on.
The power cord is not
connected.
• Check power supply is present.
The spray arms do not
rotate smoothly.
The spray arms are clogged
with food particles.
• Clean the spray arms.
The dishwasher bubbles
up and the foam remains
too much on the front.
Regular detergent was
used instead of dishwasher
detergent.
• Always use dishwasher detergent.
• Turn the dishwasher off and remove
the bubbles.
Information codes
If the dishwasher fails to operate, you may see an information code on the display. Check the table below
and try the suggestions.
Code Action
1C
Detergent check
Check if regular detergent was used, and make sure to use dishwasher-
specific detergent. If suds remain after using a regular detergent, remove
them by supplying and draining water until removed. If the issue continues,
contact a local Samsung service center.
3C
Washing pump check
• Abnormal working with washing pump. If the issue continues, contact a
local Samsung service center.
Untitled-1 51Untitled-1 51 2024-12-04 12:09:002024-12-04 12:09:00
Troubleshooting
English52
Code Action
4C
Water supply check
• Check if the water supply valve is closed, if the water supply is
suspended, or if the water inlet valve or line is frozen or clogged by
foreign particles. If the issue continues, contact a local Samsung service
center.
5C
Check the drain pump cover
• Check if the drain pump cover is missing or incorrectly assembled.
Drain pump check
• Check the drain pump and drain pipe. If it is jammed, clean it. If the issue
continues, contact a local Samsung service center.
HC
High-temperature heating check
• Functional check. With the dishwasher empty, add detergent, and then
run a cycle. If the issue continues, go to your home’s circuit breaker
panel, and set the dishwasher’s circuit breaker switch to off. Contact a
Samsung service center.
HC4
Check if the dry heater is overheated
• Turn off the dishwasher and restart it. If the issue continues, contact a
local Samsung service center.
LC
Leakage check
• Close the water supply valve. Go to your home’s circuit breaker panel and
set the dishwasher’s circuit breaker switch to off. Contact the installer to
repair. If the issue continues, contact a local Samsung service center.
PC
Zone wash function check
• Functional check. Turn off the dishwasher and try to start it again. If the
issue continues, contact a local Samsung service center.
9C9
The IPM is overheating
• Unplug the appliance and contact a local Samsung service center.
ACM
External memory communication error within the SUB (Panel)
• Turn off the power and contact a local Samsung service center.
Untitled-1 52Untitled-1 52 2024-12-04 12:09:002024-12-04 12:09:00
English 53
Appendix
Cycle chart
Cycle AI wash Normal Heavy
Cycle sequence
Prewash >
Mainwash > Rinse
> Hot Rinse > Dry
> End
Prewash >
Mainwash > Rinse
> Hot Rinse > Dry
> End
Prewash >
Mainwash > Rinse
> Hot Rinse > Dry
> End
Temp [°F (°C)]
Main wash 131-149 (55-65) 113-144 (45-62) 149 (65)
Hot rinse 131-149 (55-65) 126-140 (52-60) 145 (63)
Water consumption [gal (ℓ)]
2.5-4.5
(9.6-17.0)
2.5-5.0
(9.4-19.0)
5.2
(19.7)
Cycle time (min) 79-125 108-119 137
Available Options
Sanitize O O O
Smart Dry O O O
Storm wash O O O
Delay Start O O O
Cycle Delicate Express 60’ Preblast
Cycle sequence
Prewash >
Mainwash > Rinse
> Hot Rinse > Dry
> End
Mainwash > Rinse
> Hot Rinse > Dry
> End >
Prewash > End
Temp [°F (°C)]
Main wash 122 (50) 131 (55) -
Hot Rinse 131 (55) 131 (55) -
Water consumption [gal (ℓ)]
3.2
(12.3)
2.9
(11.0)
1.1
(4.0)
Cycle time (min) 100 60 11
Available Options
Sanitize X O X
Smart Dry O O X
Storm wash X O X
Delay Start O O O
Untitled-1 53Untitled-1 53 2024-12-04 12:09:002024-12-04 12:09:00
Appendix
English54
Cycle SelfClean PotsPans
Cycle sequence
Mainwash > Rinse > Hot Rinse
> Dry > End
Prewash > Mainwash > Rinse >
Hot Rinse > Dry > End
Temp [°F (°C)]
Main wash 167 (75) 158 (70)
Hot Rinse 149 (65) 149 (65)
Water consumption [gal (ℓ)]
3.2
(12.1)
5.4
(20.4)
Cycle time (min) 105 146
Available Options
Sanitize X O
Smart Dry X O
Storm wash X O
Delay Start O O
Cycle Plastic BabyCare
Cycle sequence
Mainwash > Rinse > Hot Rinse
> Dry > End
Hot Rinse > Dry > End
Temp [°F (°C)]
Main wash 140 (60) -
Hot Rinse 140 (60) 163 (73)
Water consumption [gal (ℓ)]
3.4
(12.9)
1.0
(3.9)
Cycle time (min) 94 89
Available Options
Sanitize X X
Smart Dry O O
Storm wash X X
Delay Start O O
• When you select the Auto or Normal cycle, running the Prewash and Rinse cycles depends on the soil
level of the load.
• The water consumption and wash time varies depending on the steps or options you add, and on the
pressure and temperature of the supplied water.
Untitled-1 54Untitled-1 54 2024-12-04 12:09:002024-12-04 12:09:00
English 55
Helping the environment
• Your dishwasher is manufactured from recyclable materials. If you decide to dispose of it, please
observe local waste disposal regulations. Cut off the power cord so that the appliance cannot be
connected to a power source.
• Remove the door so that animals and small children cannot get trapped inside the appliance.
• Do not exceed the detergent quantities recommended in the detergent manufacturers’ instructions.
Specifications
MODEL DW90F89P0USR / DW90F89T0U12 / DW90F89T0UMT / DW90F89T0USR
Type Built-in Dishwasher
Power 120 V / 60 Hz AC only, 15 A circuit breaker
Wash capacity 16 place settings
Used water pressure 20-120 psi (140-830 kPa)
Rated power uasge
Wash Motor 60-100 W
Heater 1100 W
Dimensions
(Width × Depth ×
Height)
23
7
/ 8 x 25 x 33
7
/ 8 in. (606 x 635 x 860 mm)
Weight
(Unpacked)
DW90F89P0USR : 93.7 Ib (42.5 kg)
DW90F89T0U12 : 94.8 Ib (43 kg)
DW90F89T0UMT / DW90F89T0USR : 88.18 Ib (40 kg)
Untitled-1 55Untitled-1 55 2024-12-04 12:09:002024-12-04 12:09:00

English56
Warranty
Warranty (U.S.A)
SAMSUNG DISHWASHER
LIMITED WARRANTY TO ORIGINAL CONSUMER PURCHASER WITH PROOF OF PURCHASE AND/OR PROOF
OF DELIVERY
This SAMSUNG brand product, as supplied and distributed by SAMSUNG ELECTRONICS AMERICA, INC.
(SAMSUNG) and delivered new, in the original carton to the original consumer purchaser, is warranted by
SAMSUNG against manufacturing defects in materials or workmanship for the following limited warranty
periods, starting on the date of delivery to the original consumer purchaser:
One (1) year parts and labor
Five (5) years, Printed Circuit Board, Racking and Stainless Door Liner & Tub for leakage (Parts Only)
This limited warranty is valid only on products purchased and used in the United States that have been
installed, operated, and maintained according to the instructions attached to or furnished with the product.
To receive warranty service, the purchaser must contact SAMSUNG at the address or phone number
provided below for problem determination and service procedures. Warranty service can only be performed
by a SAMSUNG authorized service center. The original dated bill of sale and/or proof of delivery must be
presented upon request to SAMSUNG or SAMSUNG’s authorized service center to receive warranty service.
SAMSUNG will provide in-home service within the contiguous United States during the warranty period
at no charge, subject to availability of SAMSUNG authorized servicers within the customer’s geographic
area. If the product is located in an area where service by a SAMSUNG authorized servicer is not available,
you may be responsible for a trip charge or required to bring the product to a SAMSUNG authorized service
center for service.
To receive in-home service, product must be unobstructed and accessible to the service agent.
During the applicable warranty period, a product will be repaired, replaced, or the purchase price refunded,
at the sole option of SAMSUNG. SAMSUNG may use new or reconditioned parts in repairing a product, or
replace the product with a new or reconditioned product. Replacement parts and products are warranted
for the remaining portion of the original product’s warranty or ninety (90) days, whichever is longer. All
replaced parts and products are the property of SAMSUNG and you must return them to SAMSUNG.
Untitled-1 56Untitled-1 56 2024-12-04 12:09:002024-12-04 12:09:00

English 57
This limited warranty covers manufacturing defects in materials or workmanship encountered in normal
household, noncommercial use of this product and shall not cover the following: damage that occurs
in shipment, delivery, installation, and uses for which this product was not intended; damage caused by
unauthorized modification or alteration of the product; product where the original factory serial numbers
have been removed, defaced, changed in any way, or cannot be readily determined; cosmetic damage
including scratches, dents, chips, and other damage to the product’s finishes; damage caused by abuse,
misuse, pest infestations, accident, fire, floods, or other acts of nature or God; damage caused by use of
equipment, utilities, services, parts, supplies, accessories, applications, installations, repairs, external
wiring or connectors not supplied or authorized by SAMSUNG; damage caused by incorrect electrical
line current, voltage, fluctuations and surges; damage caused by failure to operate and maintain the
product according to instructions; in-home instruction on how to use your product; and service to correct
installation not in accordance with electrical or plumbing codes or correction of household electrical or
plumbing (that is house wiring, fuses, or water inlet hoses).
The cost of repair or replacement under these excluded circumstances shall be the customer’s
responsibility.
Visits by an authorized servicer to explain product functions, maintenance or installation are not covered
by this limited warranty. Please contact SAMSUNG at the number below for assistance with any of these
issues.
EXCLUSION OF IMPLIED WARRANTIES
IMPLIED WARRANTIES, INCLUDING THE IMPLIED WARRANTIES OF MERCHANTABILITY OR FITNESS FOR
A PARTICULAR PURPOSE, ARE LIMITED TO ONE YEAR OR THE SHORTEST PERIOD ALLOWED BY LAW.
Some states do not allow limitations on how long an implied warranty lasts, so the above limitations or
exclusions may not apply to you. This warranty gives you specific rights, and you may also have other rights,
which vary from state to state.
Untitled-1 57Untitled-1 57 2024-12-04 12:09:002024-12-04 12:09:00

Warranty
English58
LIMITATION OF REMEDIES
YOUR SOLE AND EXCLUSIVE REMEDY IS PRODUCT REPAIR, PRODUCT REPLACEMENT, OR REFUND OF
THE PURCHASE PRICE AT SAMSUNG’S OPTION, AS PROVIDED IN THIS LIMITED WARRANTY. SAMSUNG
SHALL NOT BE LIABLE FOR SPECIAL, INCIDENTAL OR CONSEQUENTIAL DAMAGES, INCLUDING BUT NOT
LIMITED TO TIME WAY FROM WORK, HOTELS AND/OR RESTAURANT MEALS, REMODELING EXPENSES,
LOSS OF REVENUE OR PROFITS, FAILURE TO REALIZE SAVINGS OR OTHER BENEFITS REGARDLESS OF
THE LEGAL THEORY ON WHICH THE CLAIM IS BASED, AND EVEN IF SAMSUNG HAS BEEN ADVISED OF
THE POSSIBILITY OF SUCH DAMAGES. Some states do not allow exclusion or limitation of incidental or
consequential damages, so the above limitations or exclusions may not apply to you. This warranty gives
you specific rights, and you may also have other rights, which vary from state to state.
SAMSUNG does not warrant uninterrupted or error-free operation of the product. No warranty or
guarantee given by any other person, firm, or corporation with respect to this product shall be binding on
SAMSUNG.
To obtain warranty service, please contact SAMSUNG at:
In USA
Samsung Electronics America, Inc.
85 Challenger Road
Ridgefield Park, NJ 07660
1-800-SAMSUNG (726-7864)
www.samsung.com/us/support
Untitled-1 58Untitled-1 58 2024-12-04 12:09:002024-12-04 12:09:00

English 59
Warranty (CANADA)
SAMSUNG DISHWASHER
LIMITED WARRANTY TO ORIGINAL PURCHASER
This SAMSUNG brand product, as supplied and distributed by SAMSUNG ELECTRONICS CANADA, INC.
(SAMSUNG) and delivered new, in the original carton to the original consumer purchaser, is warranted by
SAMSUNG against manufacturing defects in materials and workmanship for a limited warranty period of:
One (1) year parts and labor
Five (5) years, Printed Circuit Board, Racking and Stainless Door Liner & Tub for leakage (Parts Only)
This limited warranty begins on the original date of purchase, and is valid only on products purchased
and used in the Canada. To receive warranty service, the purchaser must contact SAMSUNG for problem
determination and service procedures. Warranty service can only be performed by a SAMSUNG authorized
service center. The original dated bill of sale must be presented upon request as proof of purchase to
SAMSUNG or SAMSUNG’s authorized service center. SAMSUNG will provide in-home service during the
warranty period at no charge, subject to availability within the contiguous Canada.
In home service is not available in all areas. To receive in-home service, product must be unobstructed and
accessible to the service agent.
SAMSUNG will repair, replace, or refund this product at our option and at no charge as stipulated herein,
with new or reconditioned parts or products if found to be defective during the limited warranty period
specified above. All replaced parts and products become the property of SAMSUNG and must be returned
to SAMSUNG. Replacement parts and products assume the remaining original warranty, or ninety (90)
days, whichever is longer.
This limited warranty covers manufacturing defects in materials and workmanship encountered in normal,
noncommercial use of this product and shall not apply to the following: damage that occurs in shipment;
delivery and installation; applications and uses for which this product was not intended; altered product
or serial numbers; cosmetic damage or exterior finish; accidents, abuse, neglect, fire, water, lightning,
or other acts of nature or God; use of products, equipment, systems, utilities, services, parts, supplies,
accessories, applications, installations, repairs, external wiring or connectors not supplied or authorized
by SAMSUNG that damage this product or result in service problems; incorrect electrical line voltage,
fluctuations and surges; customer adjustments and failure to follow operating instructions, maintenance
and environmental instructions that are covered and prescribed in the instruction book; product removal
and reinstallation; problems caused by pest infestations. This limited warranty does not cover problems
resulting from incorrect electric current, voltage or supply, light bulbs, house fuses, house wiring, cost of
a service call for instructions, or fixing installation errors. SAMSUNG does not warrant uninterrupted or
error-free operation of the product.
Untitled-1 59Untitled-1 59 2024-12-04 12:09:002024-12-04 12:09:00

Warranty
English60
EXCEPT AS SET FORTH HEREIN, THERE ARE NO WARRANTIES ON THIS PRODUCT EITHER EXPRESS OR
IMPLIED, AND SAMSUNG DISCLAIMS ALL WARRANTIES INCLUDING, BUT NOT LIMITED TO, ANY IMPLIED
WARRANTIES OF MERCHANTABILITY, INFRINGEMENT OR FITNESS FOR A PARTICULAR PURPOSE. NO
WARRANTY OR GUARANTEE GIVEN BY ANY PERSON, FIRM, OR CORPORATION WITH RESPECT TO THIS
PRODUCT SHALL BE BINDING ON SAMSUNG. SAMSUNG SHALL NOT BE LIABLE FOR LOSS OF REVENUE
OR PROFITS, FAILURE TO REALIZE SAVINGS OR OTHER BENEFITS, OR ANY OTHER SPECIAL, INCIDENTAL
OR CONSEQUENTIAL DAMAGES CAUSED BY THE USE, MISUSE, OR INABILITY TO USE THIS PRODUCT,
REGARDLESS OF THE LEGAL THEORY ON WHICH THE CLAIM IS BASED, AND EVEN IF SAMSUNG HAS BEEN
ADVISED OF THE POSSIBILITY OF SUCH DAMAGES.
NOR SHALL RECOVERY OF ANY KIND AGAINST SAMSUNG BE GREATER IN AMOUNT THAN THE PURCHASE
PRICE OF THE PRODUCT SOLD BY SAMSUNG AND CAUSING THE ALLEGED DAMAGE.
WITHOUT LIMITING THE FOREGOING, PURCHASER ASSUMES ALL RISK AND LIABILITY FOR LOSS, DAMAGE,
OR INJURY TO PURCHASER AND PURCHASER’S PROPERTY AND TO OTHERS AND THEIR PROPERTY
ARISING OUT OF THE USE, MISUSE, OR INABILITY TO USE THIS PRODUCT. THIS LIMITED WARRANTY
SHALL NOT EXTEND TO ANYONE OTHER THAN THE ORIGINAL PURCHASER OF THIS PRODUCT, IS
NONTRANSFERABLE AND STATES YOUR EXCLUSIVE REMEDY.
Some states or provinces do not allow limitations on how long an implied warranty lasts, or the exclusion
or limitation of incidental or consequential damages, so the above limitations or exclusions may not apply
to you. This warranty gives you specific rights, and you may also have other rights, which vary from state to
state or province to province.
To obtain warranty service, please contact SAMSUNG at:
In CANADA
Samsung Electronics Canada Inc.
2050 Derry Road West
Mississauga, Ontario L5N 0B9 Canada
1-800-SAMSUNG (726-7864)
www.samsung.com/ca/support (English)
www.samsung.com/ca_fr/support (French)
Untitled-1 60Untitled-1 60 2024-12-04 12:09:012024-12-04 12:09:01

Memo
Untitled-1 61Untitled-1 61 2024-12-04 12:09:012024-12-04 12:09:01

Memo
Untitled-1 62Untitled-1 62 2024-12-04 12:09:012024-12-04 12:09:01

Memo
Untitled-1 63Untitled-1 63 2024-12-04 12:09:012024-12-04 12:09:01
QUESTIONS OR COMMENTS?
COUNTRY CALL OR VISIT US ONLINE AT
U.S.A 1-800-SAMSUNG (726-7864) www.samsung.com/us/support
CANADA 1-800-Samsung (726-7864)
www.samsung.com/ca/support (English)
www.samsung.com/ca_fr/support (French)
Untitled-1 64Untitled-1 64 2024-12-04 12:09:012024-12-04 12:09:01