
Technical Support and E-Warranty Certificate
www.vevor.com/support
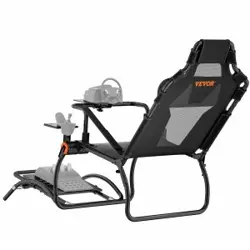
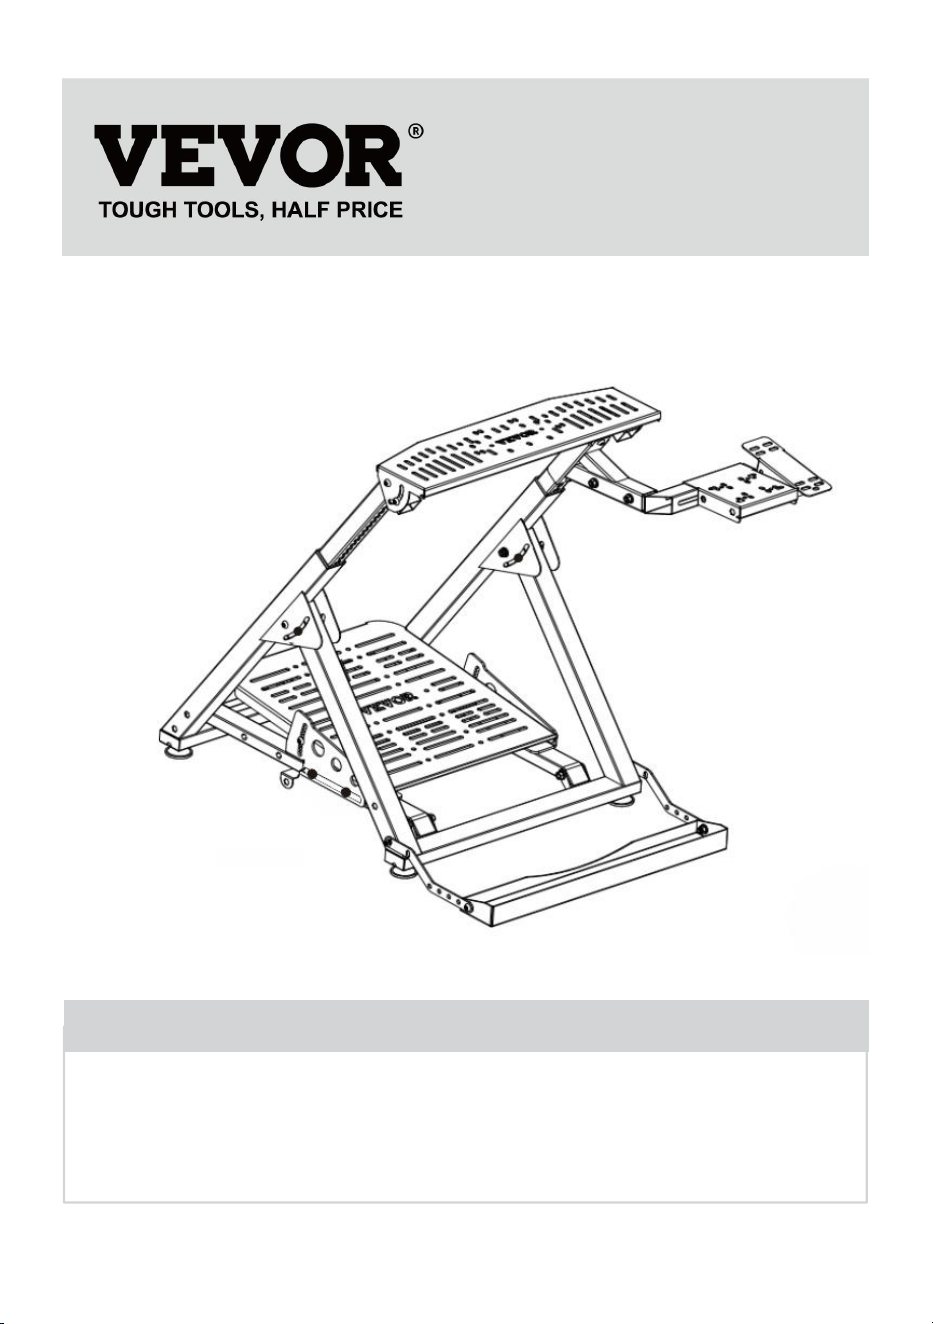
STEERING WHEEL STAND
MODEL: WS-P02
We continue to be committed to provide you tools with competitive price.
"Save Half", "Half Price" or any other similar expressions used by us only represents an
estimate of savings you might benefit from buying certain tools with us compared to the major
top brands and does not necessarily mean to cover all categories of tools offered by us. You
are kindly reminded to verify carefully when you are placing an order with us if you are
actually saving half in comparison with the top major brands.
- 1 -
MODEL: WS-P02
Have product questions? Need technical support? Please feel free to
contact us:
Technical Support and E-Warranty Certificate
www.vevor.com/support
NEED HELP? CONTACT US!
STEERING WHEEL
STAND
- 2 -
This is the original instruction, please read all manual instructions
carefully before operating. VEVOR reserves a clear interpretation of our
user manual. The appearance of the product shall be subject to the
product you received. Please forgive us that we won't inform you again if
there are any technology or software updates on our product.
Warning-To reduce the risk of injury, user must read
instructions manual carefully.
Attentions
Please install and use the stand according to instruction .
Please install moderately, avoid strong vibration .
Don't keep in humid conditions, high temperature or a dusty location .
The product structure is flexible, wear work gloves during assembly.
please take care of hurting hand when installation.
Children should under adult's supervision when using the product.
Save the manual.
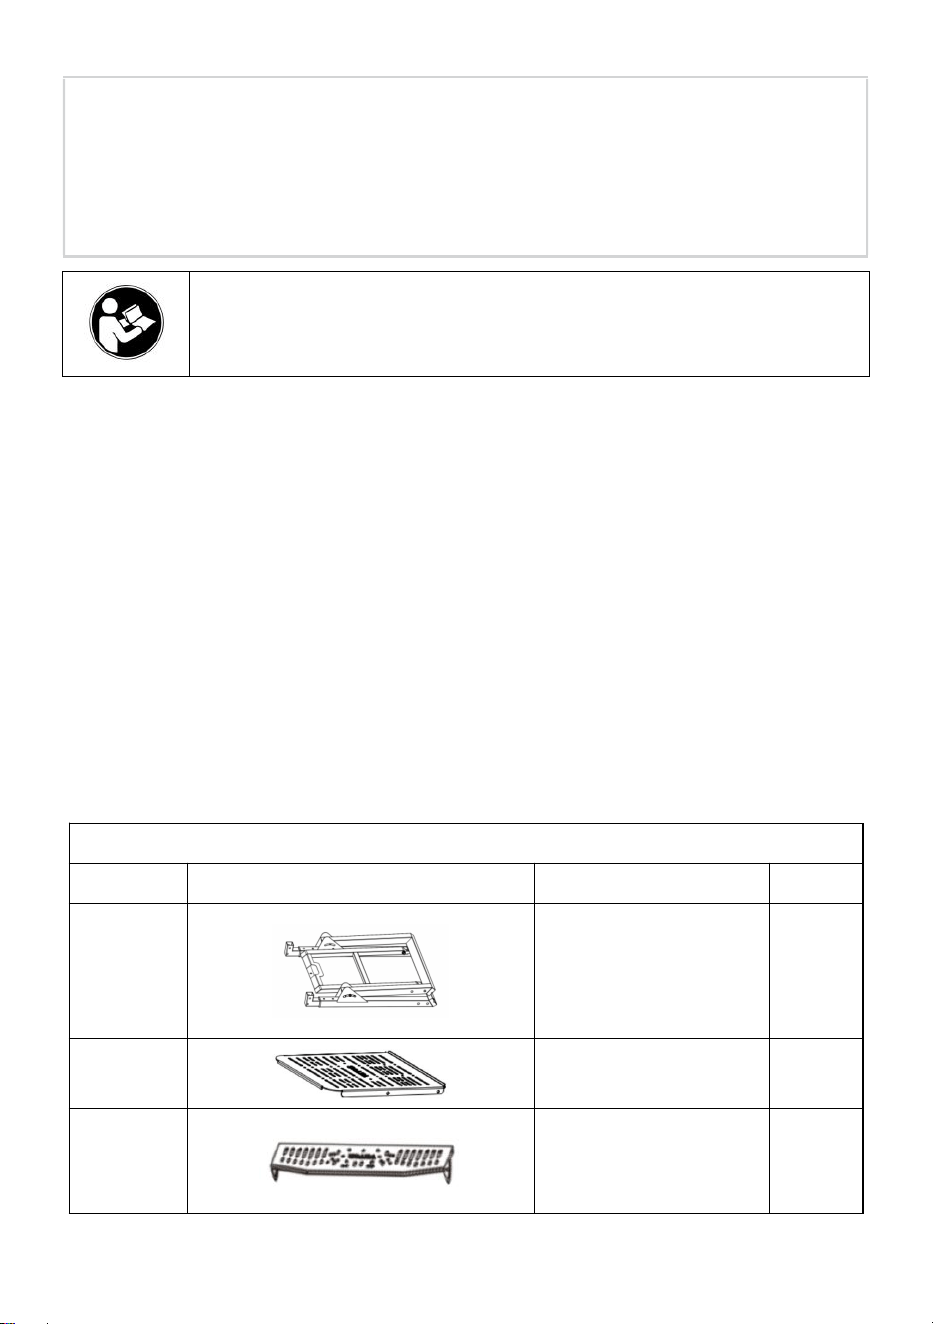
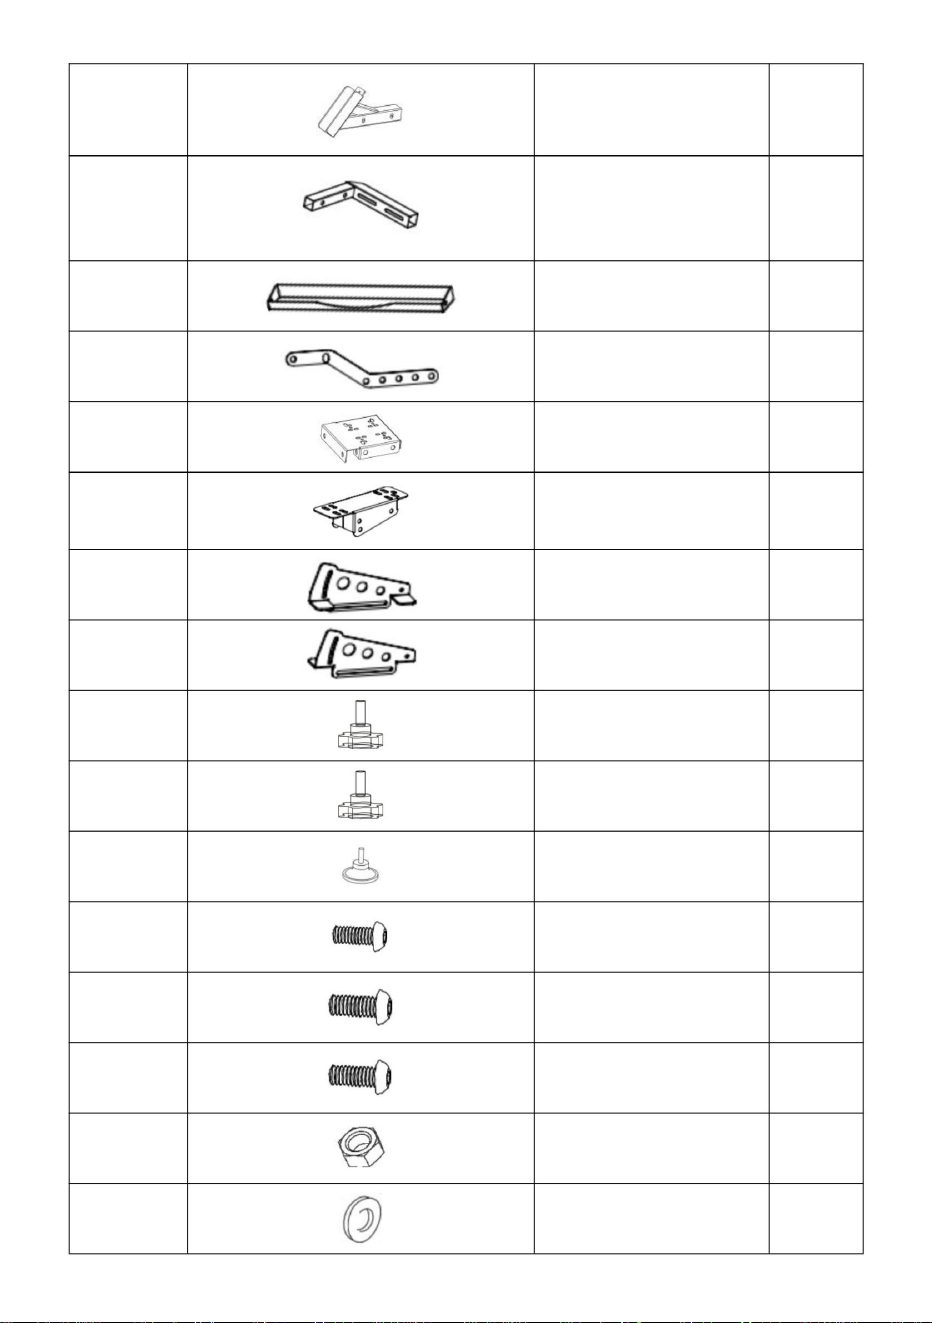
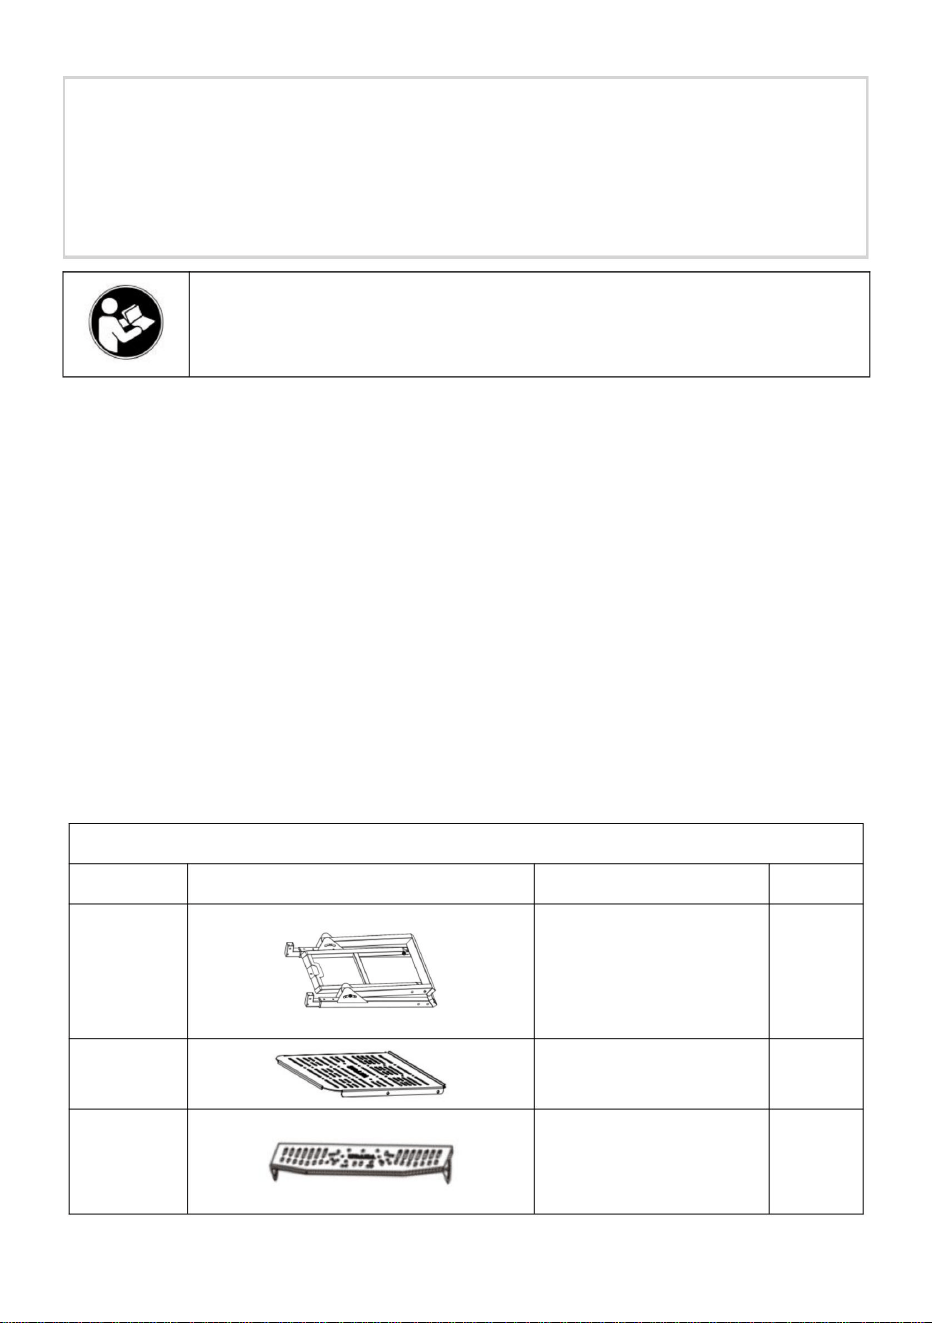
Part List
Code
Picture
Name
QTY.
1
Wheel Stand
1
2
Pedal Plate
1
3
Wheel Plate
1
- 3 -
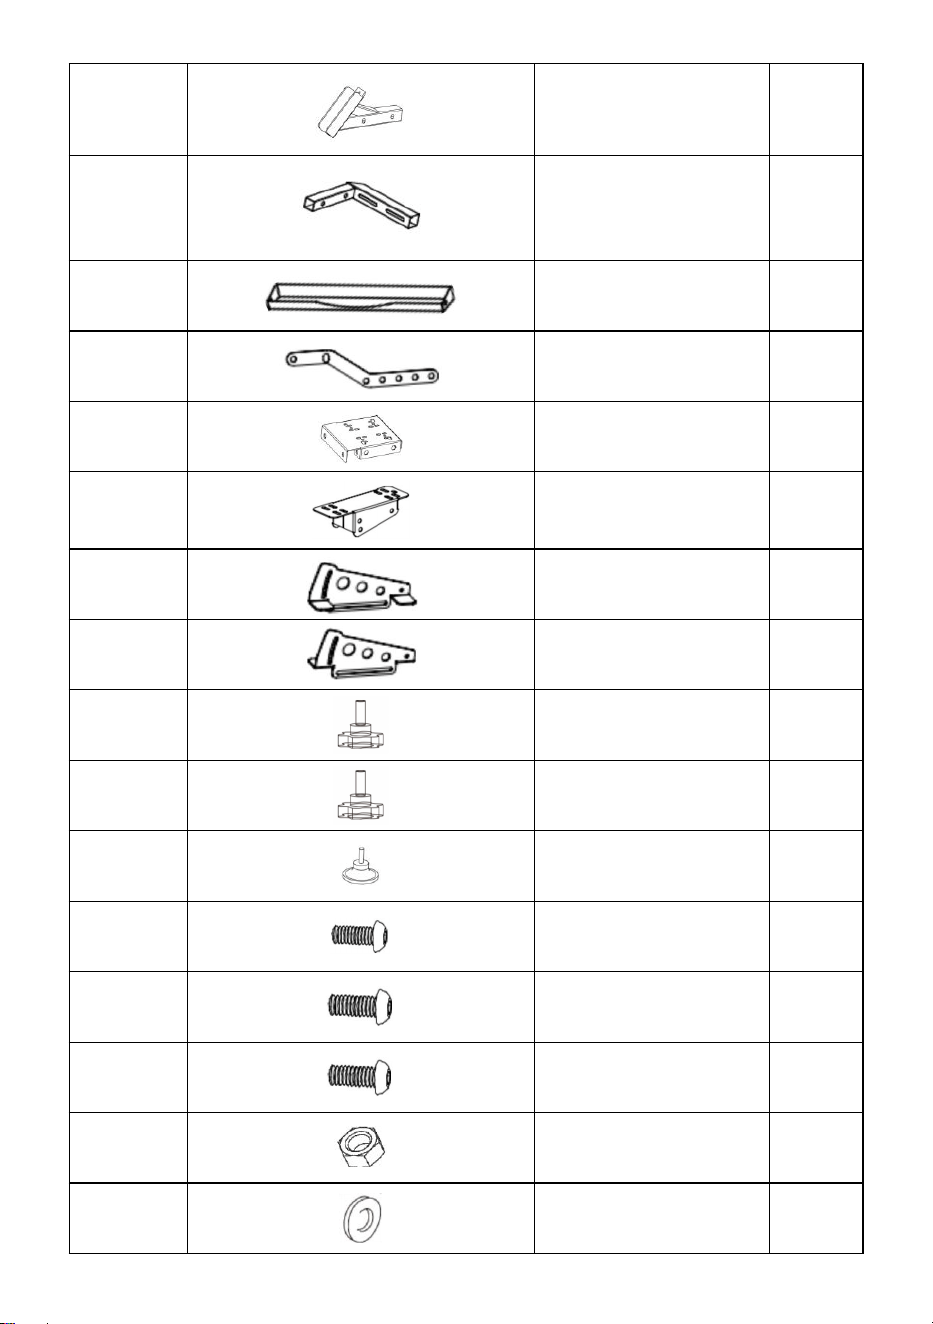
4
Shifter Mounting
Arm
1
5
Shifter Arm
1
6
Gaming Chair
Cradle
1
7
Cradle Bracket
2
8
Shifter Plate
1
9
Hand Brake Plate
1
10
Right Pedal Plate
Bracket
1
11
Left Pedal Plate
Bracket
1
12
Knob 32-M8*20
1
13
Knob 38-M8*20
4
14
Feet
4
15
Screw M6*16
12
16
Screw M8*16
18
17
Screw M8*50
6
18
Nut M6
12
19
Washer 8
22
- 4 -
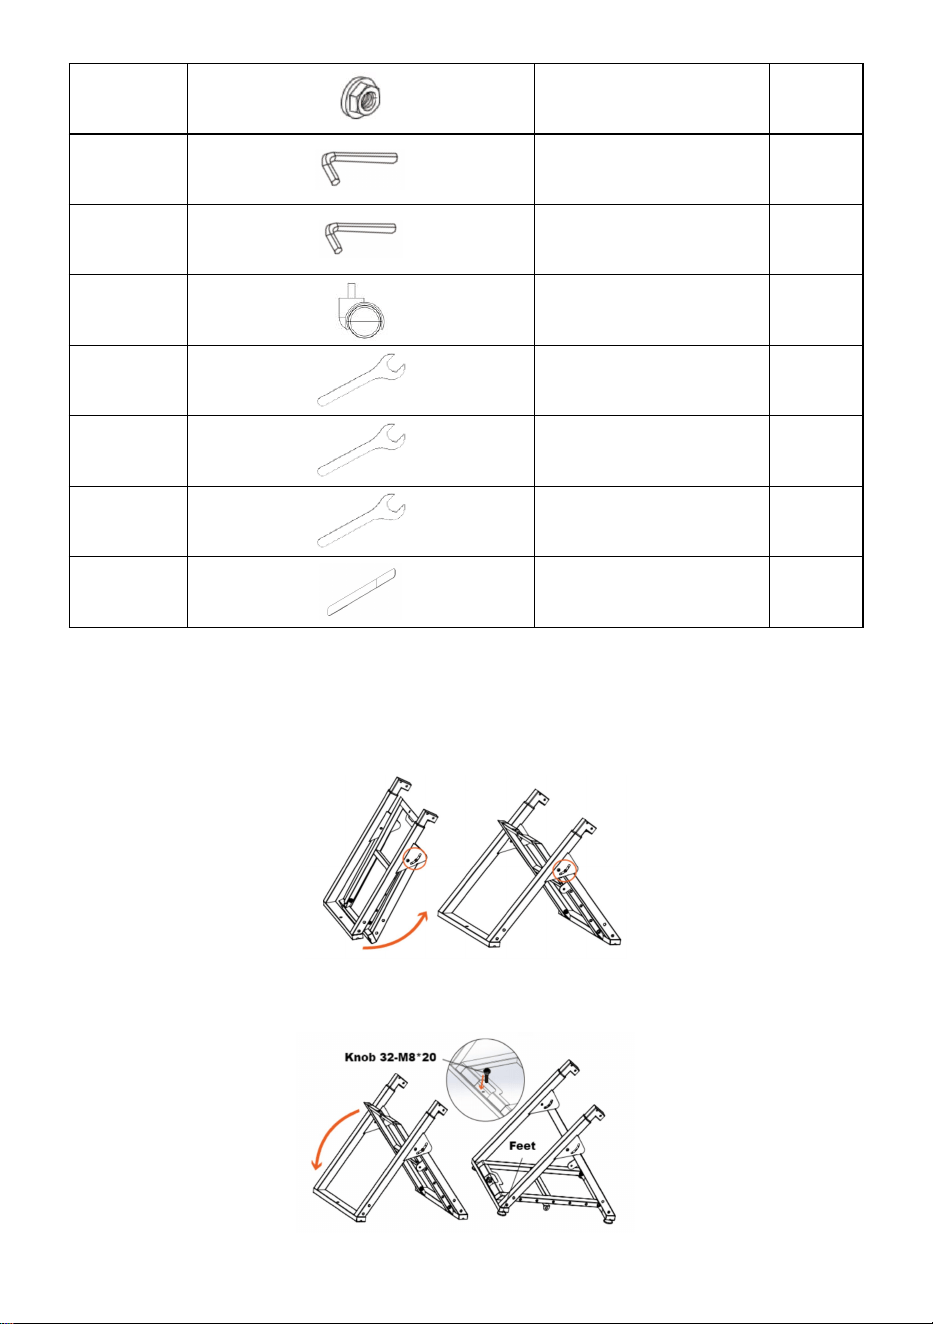
Note:12pcs screws M6*16、6pcs nuts M6 and 2pcs Universal Casters
are complimentary.
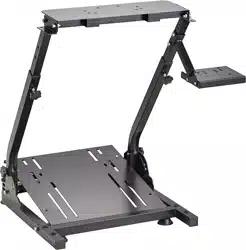
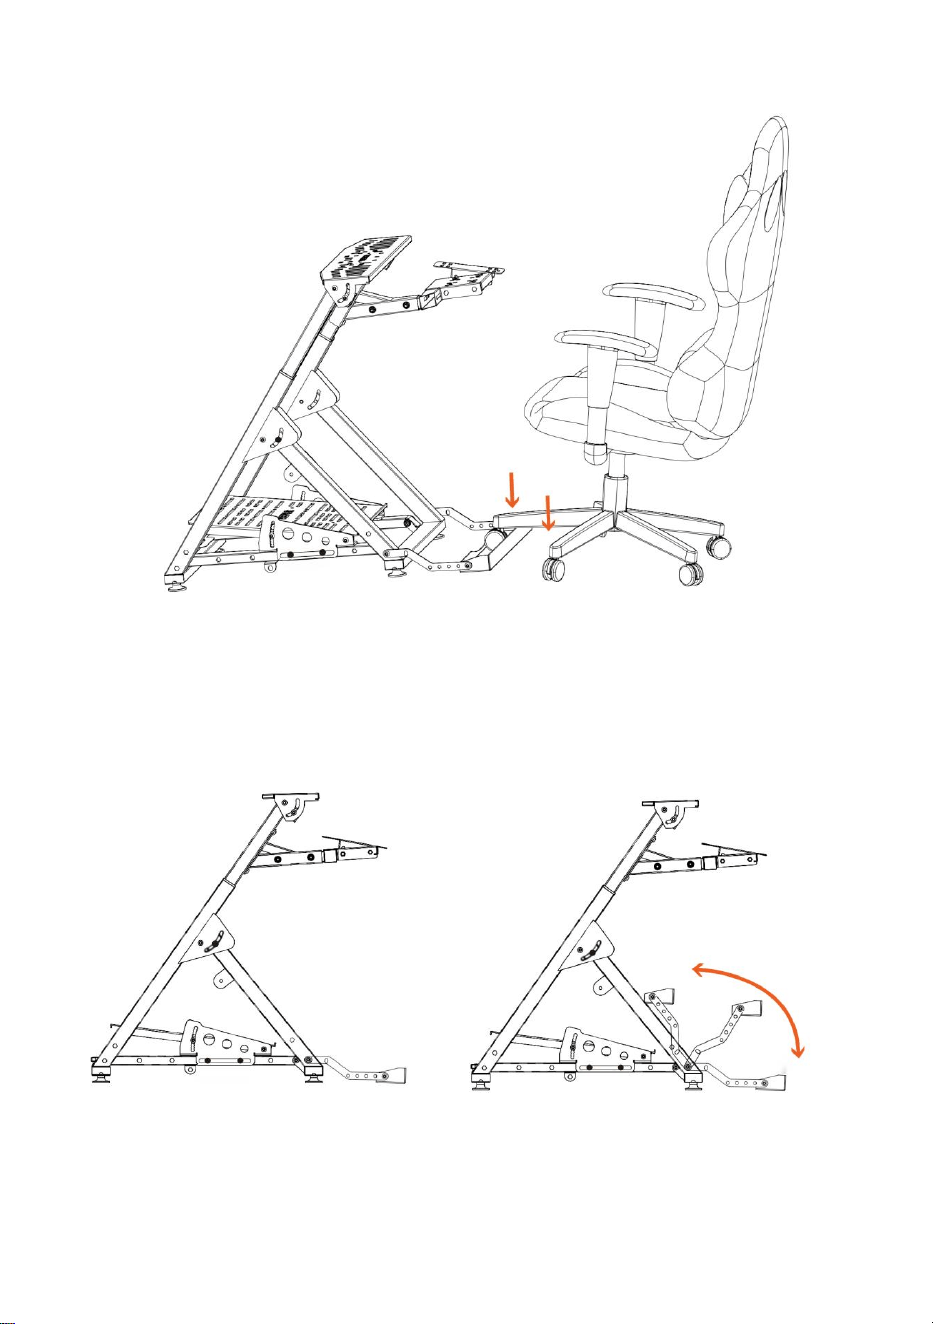
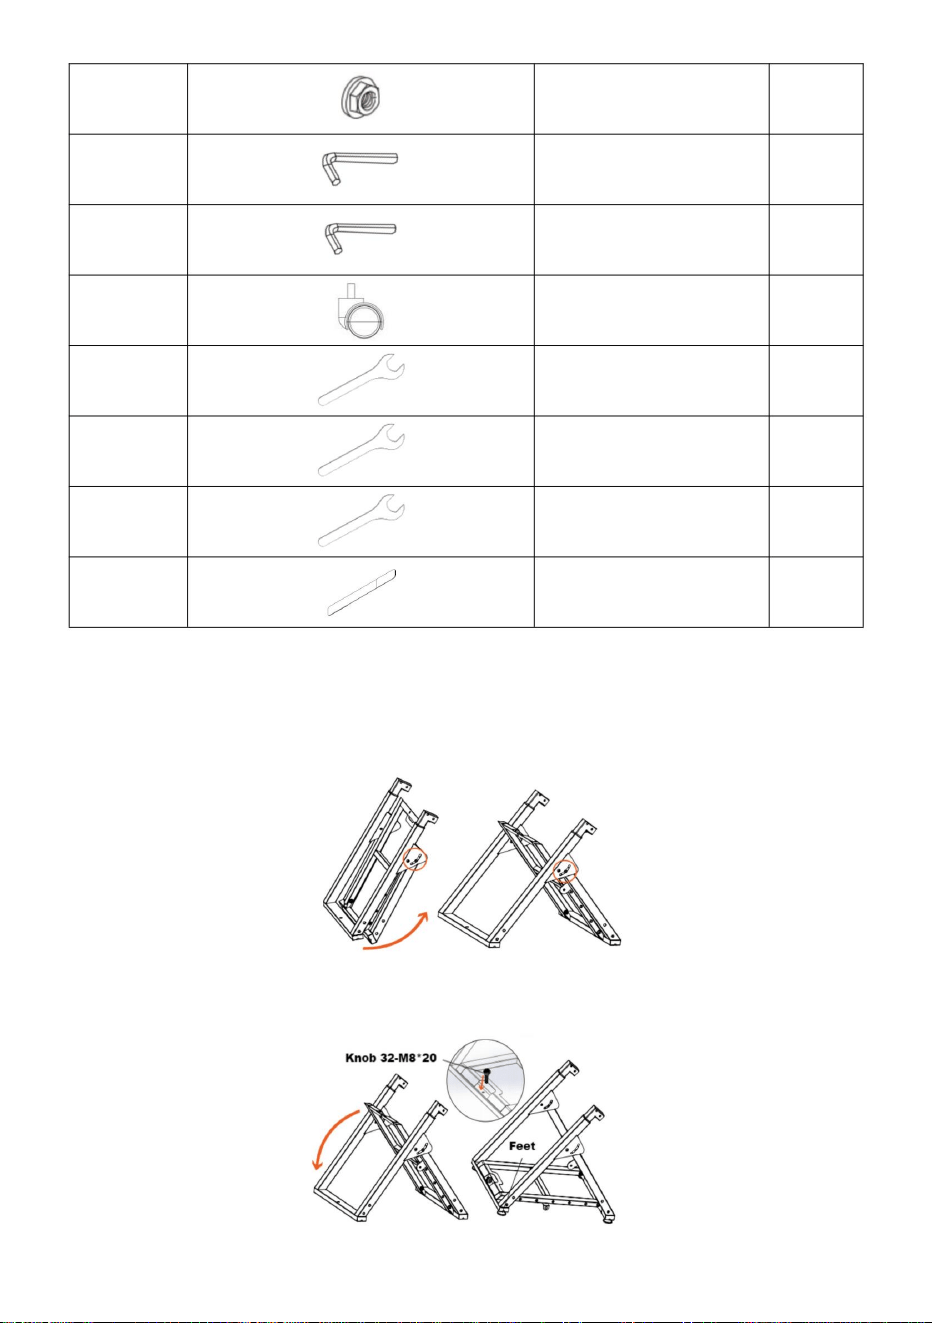
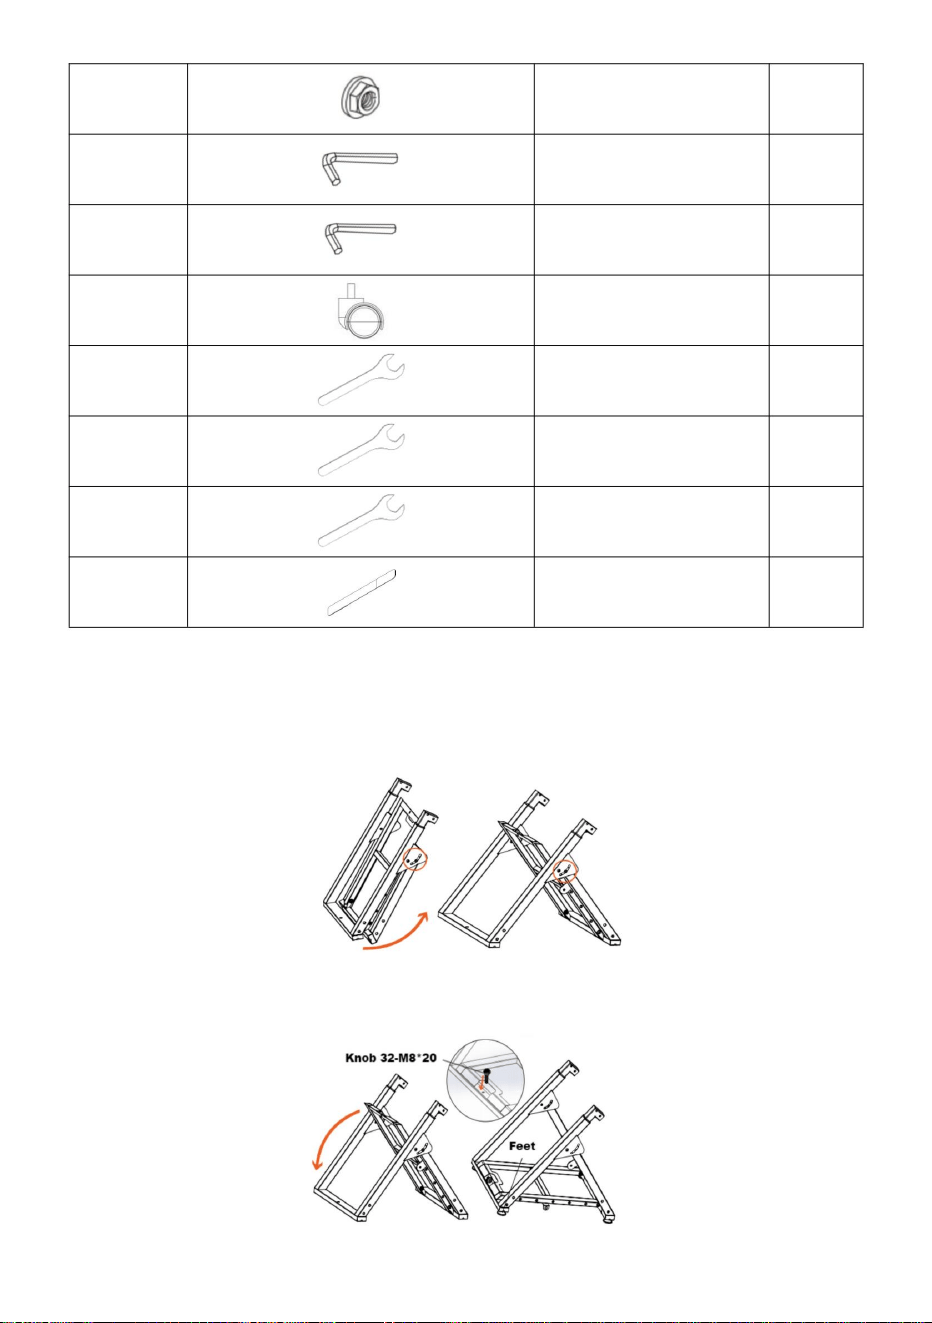
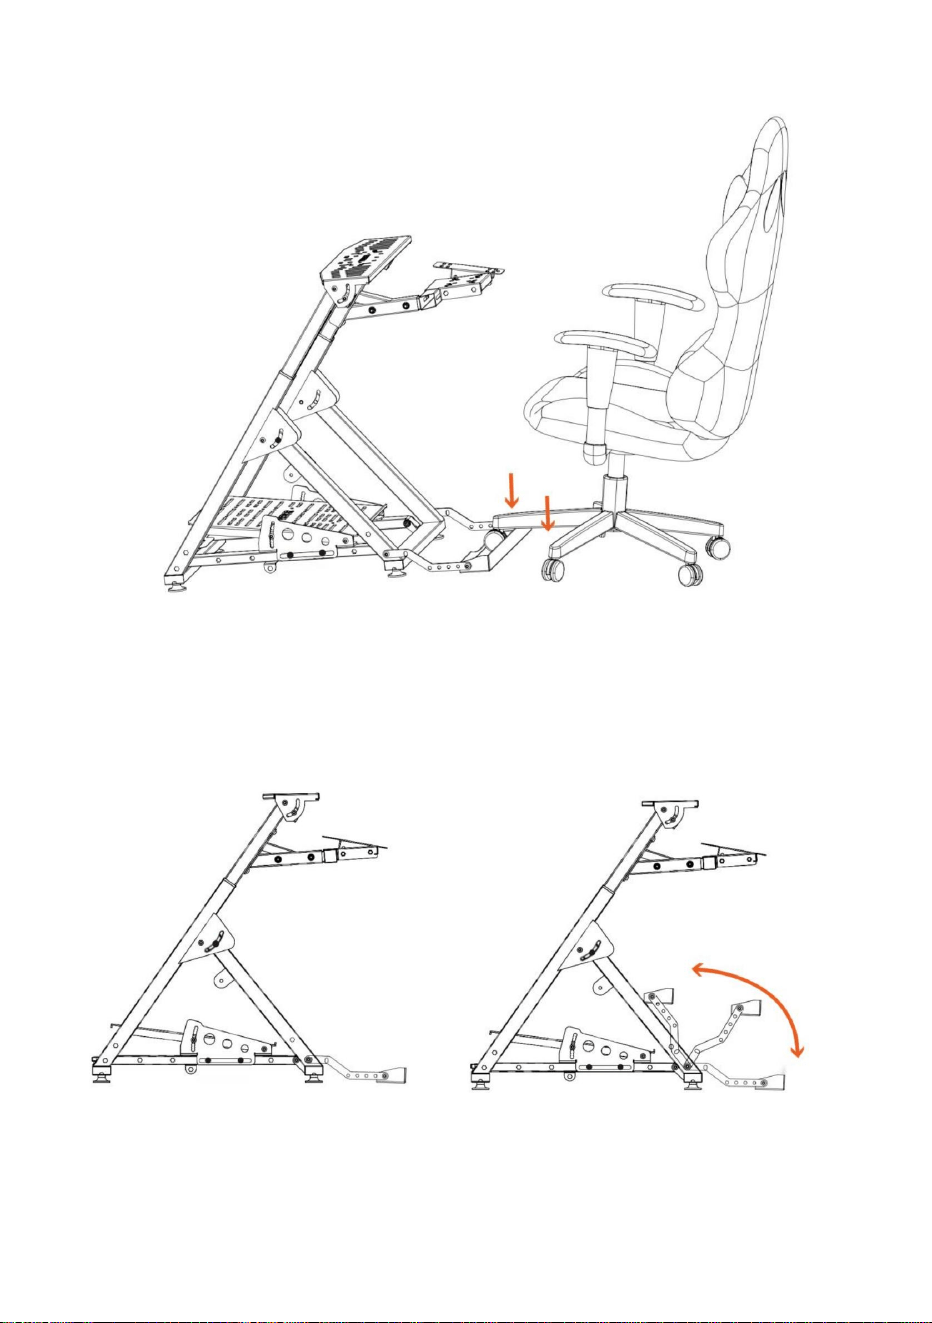
STEP 1:Loosen the two knobs circled to unfold wheel stand.
STEP 2:Cut the plastic ties ,then lay down the pedal frame and
reinstall the twist knob at the front of the pedal.And install the feet.
20
Nut M8
6
21
Hex key 4
1
22
Hex key 5
1
23
Universal Casters
2
24
Wench 10
1
25
Wench 12
1
26
Wench 13
1
27
Binding Strap
6
- 5 -
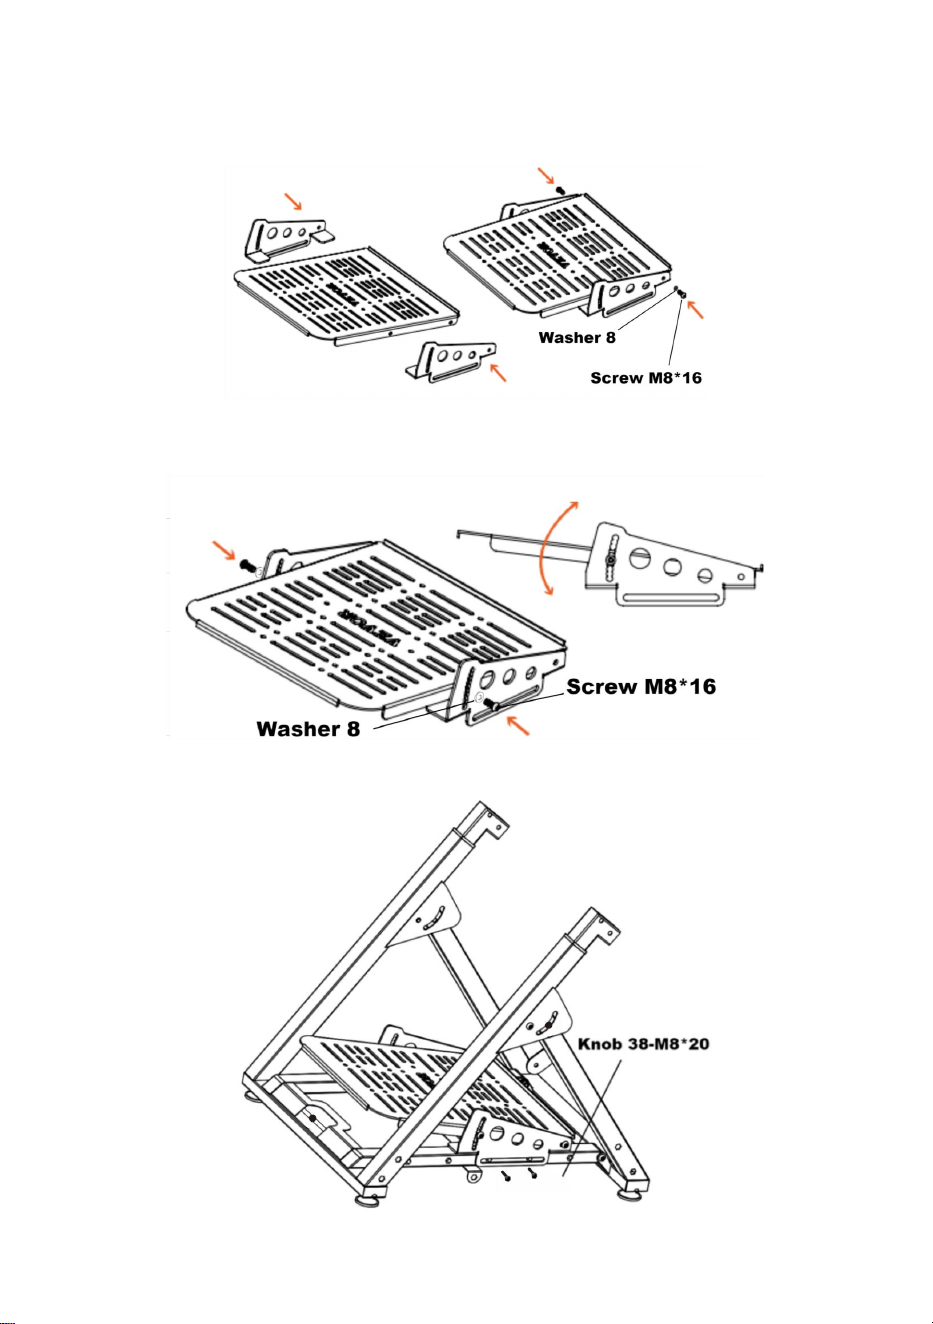
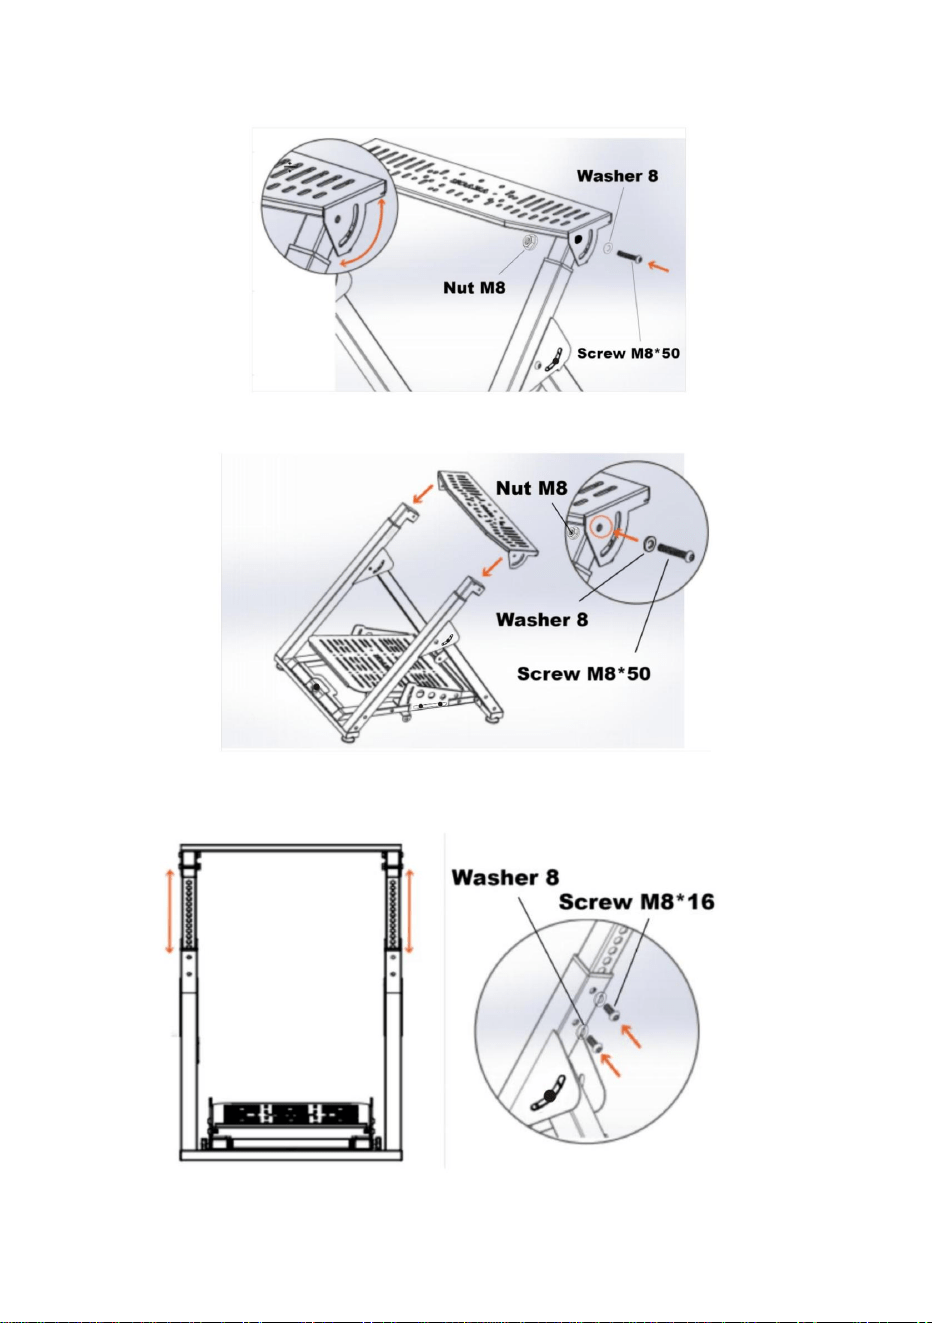
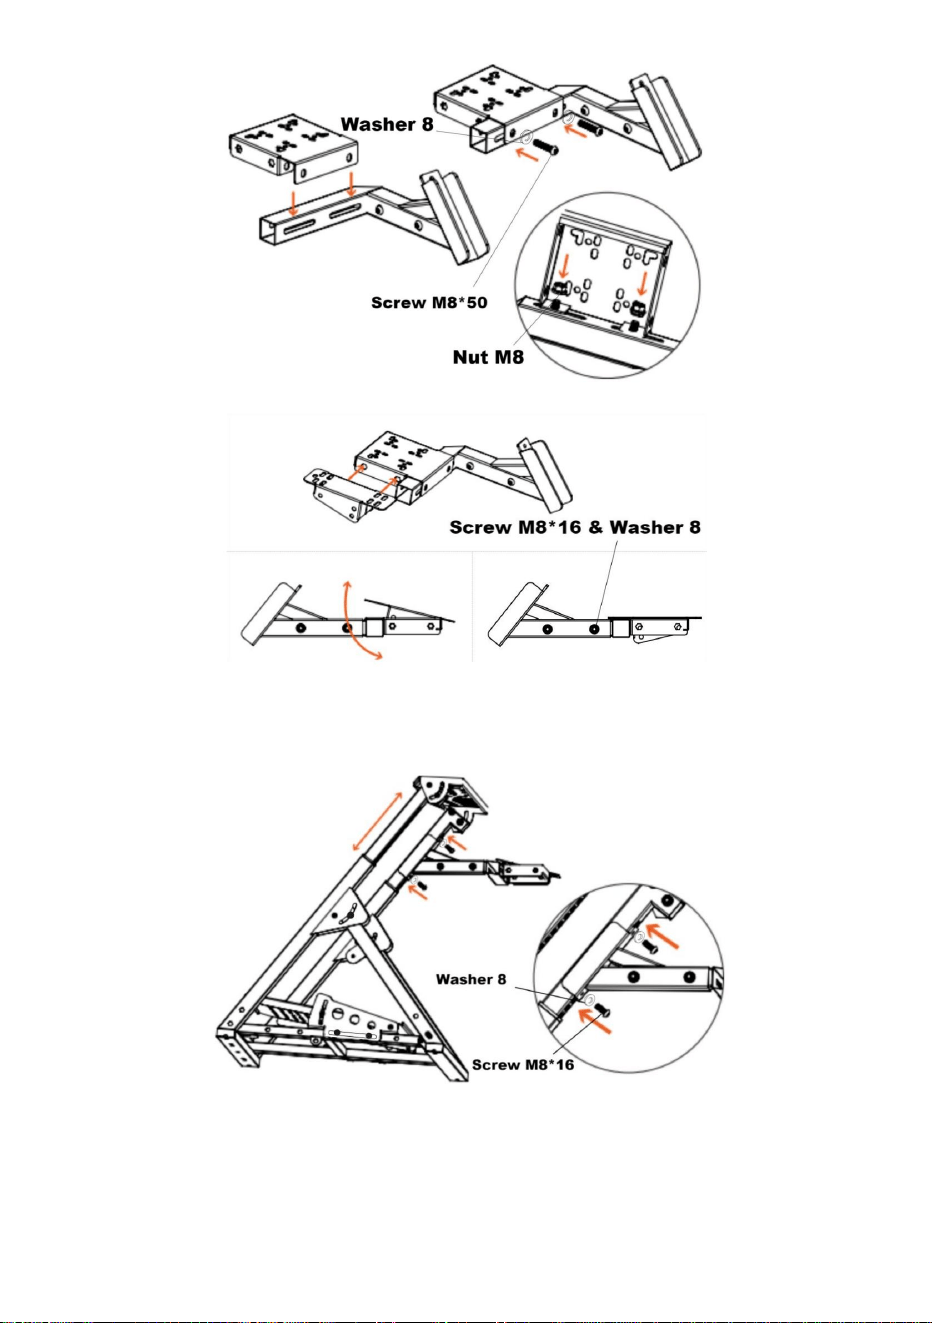
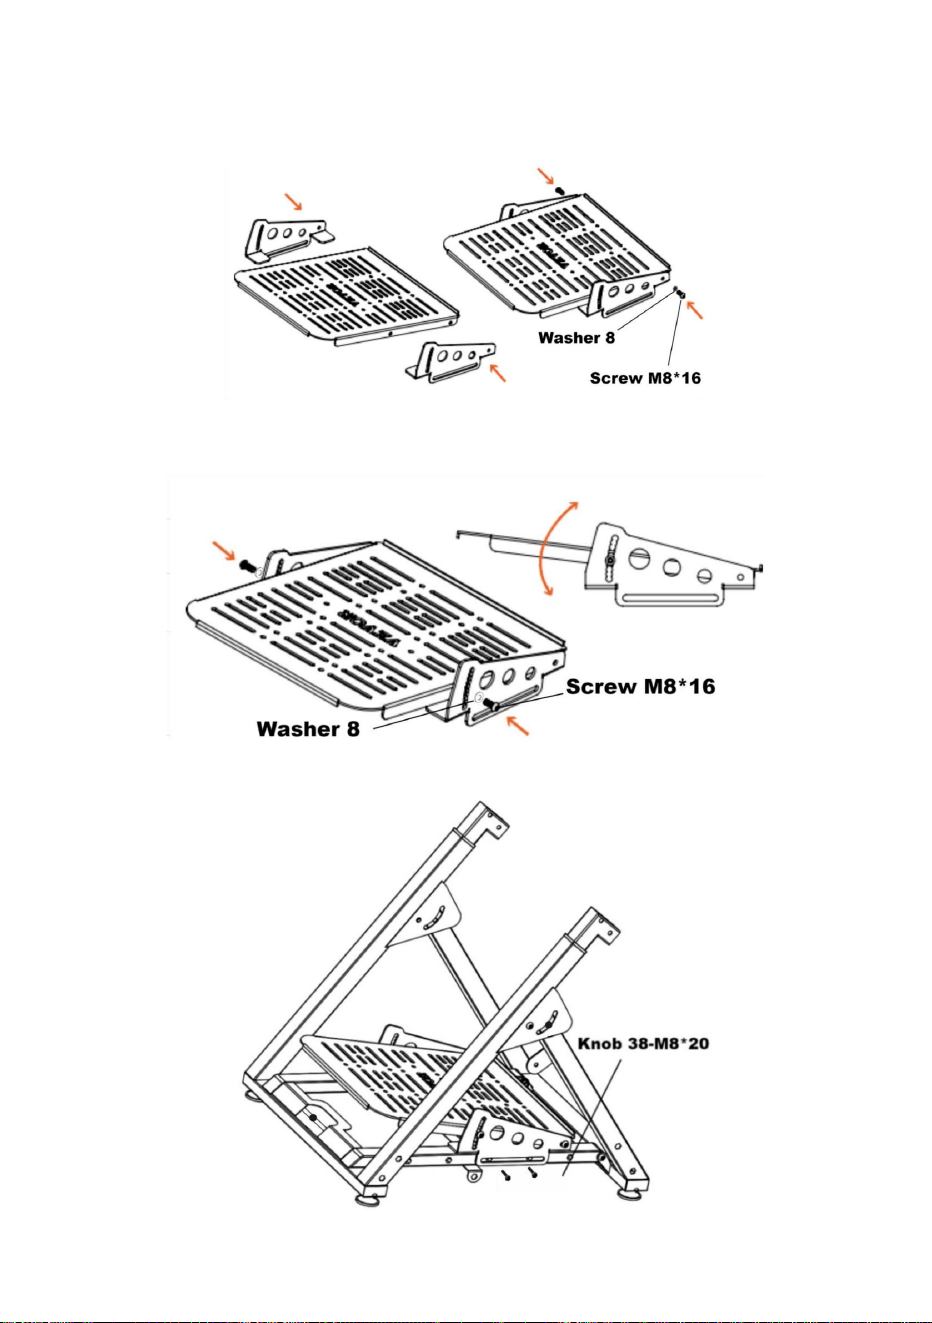
STEP 3:Line up the back holes on the pedal plate with the back holes
on the pedal brackets and bolt through using 2 x M8*16 screws and
washers.
STEP 4:Adjust the pedal plate to your desired angle and bolt through
the front holes using 2 x M8*16 screws and washers.
STEP 5:
- 6 -
STEP 6:
STEP 7:
STEP 8:
STEP 9:

- 7 -
STEP 10:
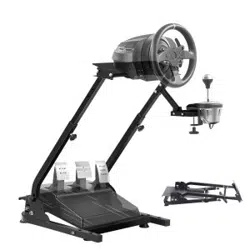
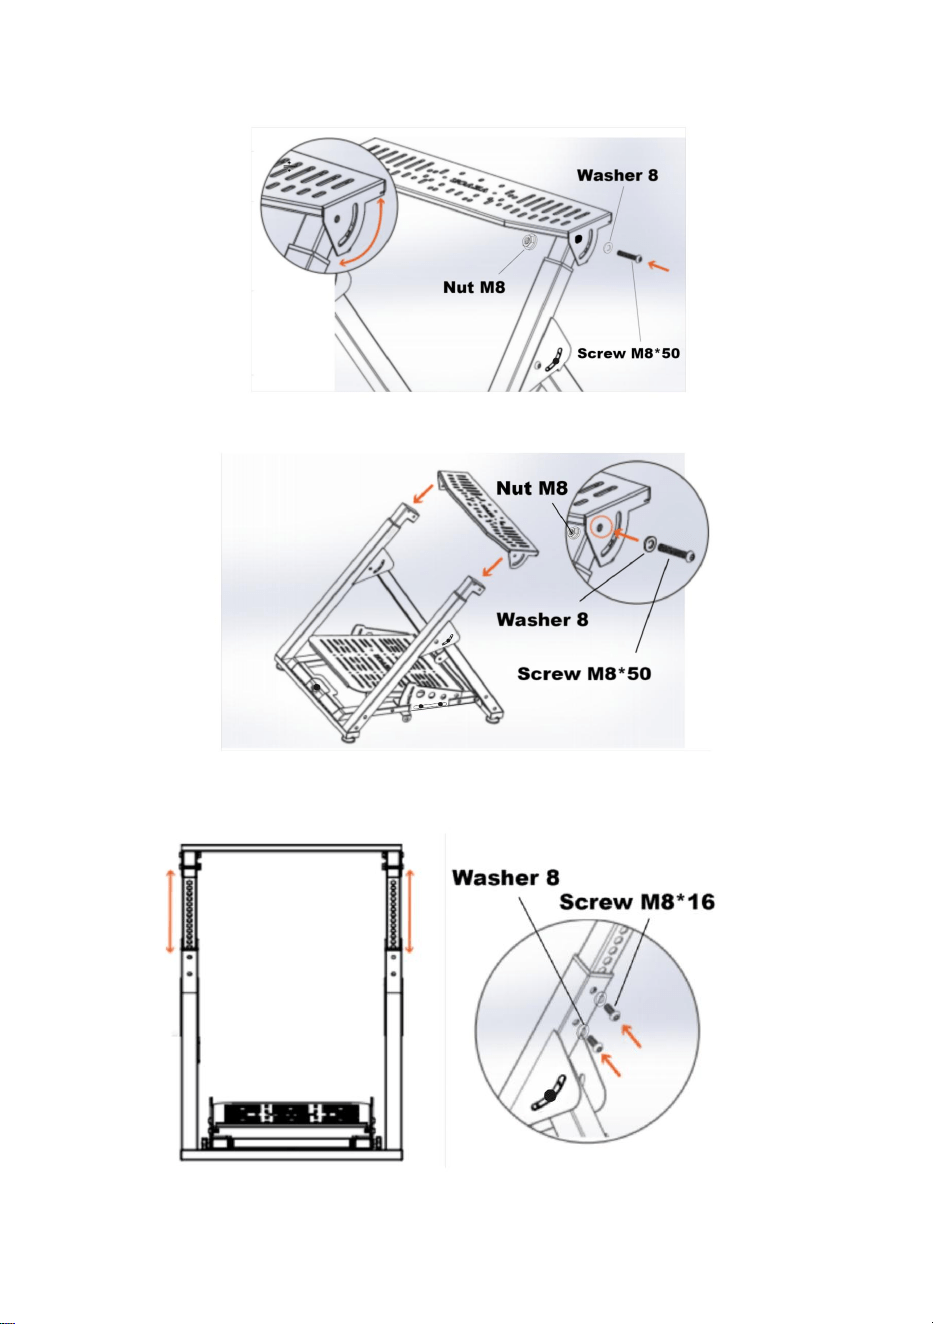
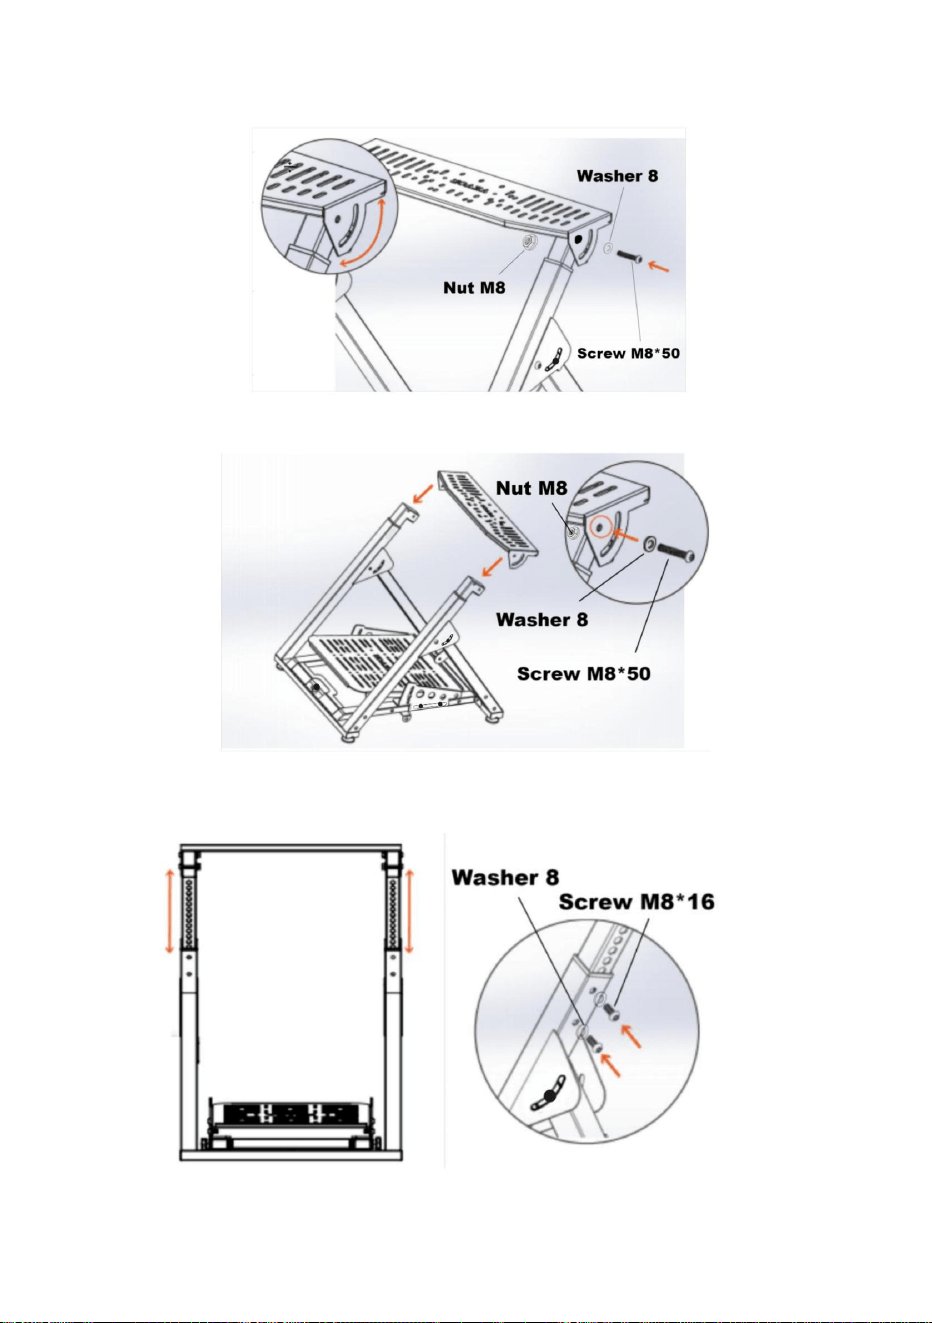
STEP 11: Line up the holes on the Shifter Mounting Arm with the
threaded inserts on the vertical post choose your desired height
securing with 2x M8*16mm screws and washers.
STEP 12:
- 8 -
STEP 13:
- 9 -
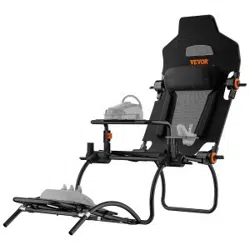
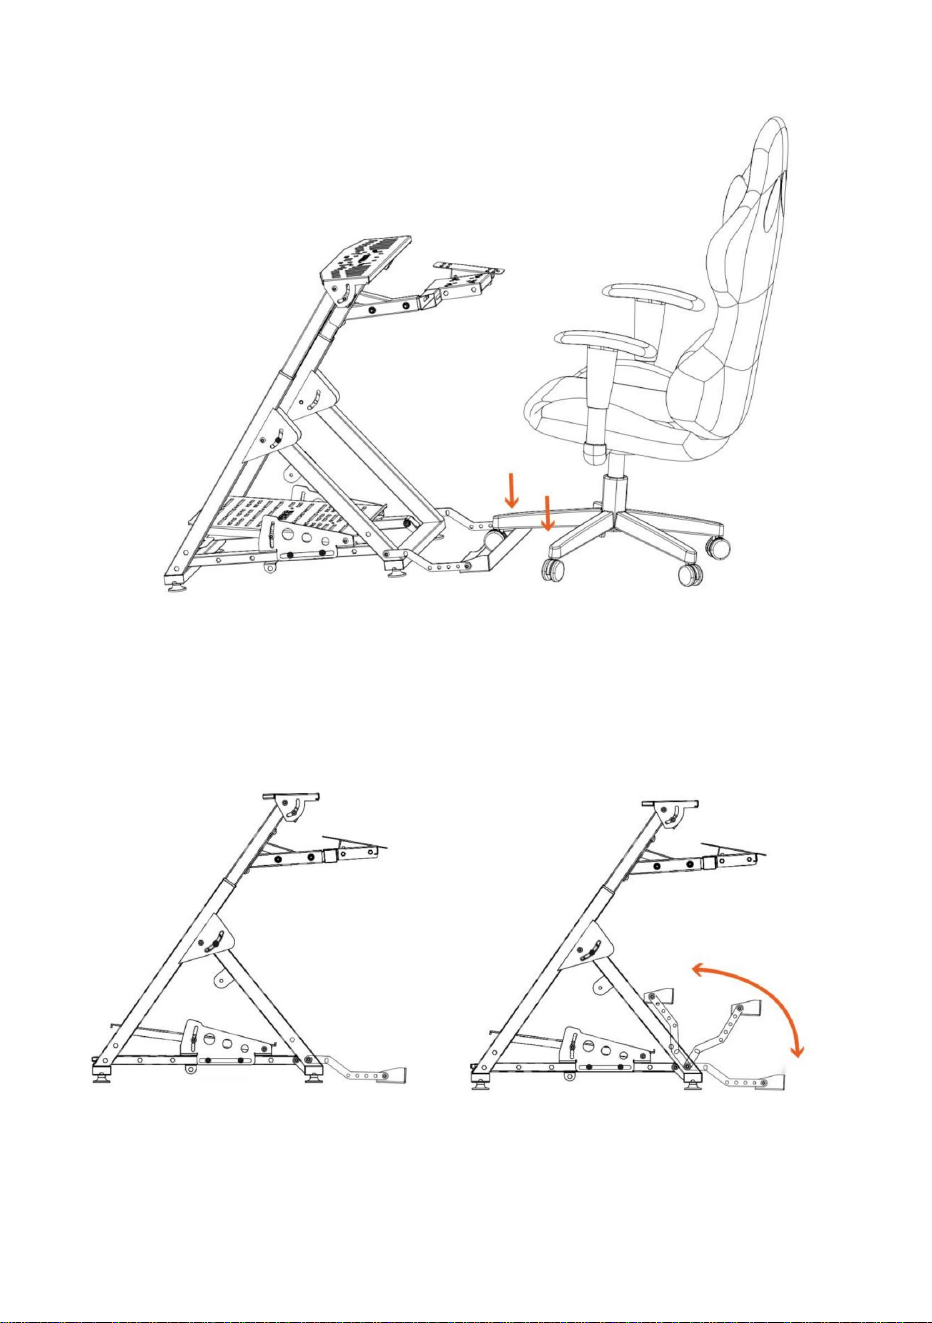
STEP 14: Seat Placement
STEP 15: Stow away the Gaming Chair Cradle as shown to allow easy
folding of the stand for storage.
- 10 -
Manufacturer: Shanghaimuxinmuyeyouxiangongsi
Address: Shuangchenglu 803nong11hao1602A-1609shi, baoshanqu,
shanghai 200000 CN.
Imported to AUS: SIHAO PTY LTD. 1 ROKEVA STREETEASTWOOD
NSW 2122 Australia
Imported to USA: Sanven Technology Ltd. Suite 250, 9166 Anaheim
Place, Rancho Cucamonga, CA 91730
REP
EC
E-CrossStu GmbH
Mainzer Landstr.69, 60329 Frankfurt am Main.
REP
UK
YH CONSULTING LIMITED.
C/O YH Consulting Limited Office 147, Centurion
House, London Road, Staines-upon-Thames, Surrey,
TW18 4AX


MODÈLE:WSP02
«Économisezlamoitié»,«Moitiéprix»outouteautreexpressionsimilaireutiliséeparnousnereprésente
qu'uneestimationdeséconomiesquevouspourriezréaliserenachetantcertainsoutilscheznousparrapport
auxgrandesmarquesetnecouvrepasnécessairementtouteslescatégoriesd'outilsquenousproposons.
Nousvousrappelonsdebienvouloirvérifiersoigneusementlorsquevouspassezunecommandechez
noussivouséconomisezréellementlamoitiéparrapportauxgrandesmarques.
Nouscontinuonsànousengageràvousfournirdesoutilsàdesprixcompétitifs.
SUPPORTDEVOLANT
Assistancetechniqueetcertificatdegarantie
électroniquewww.vevor.com/support
Machine Translated by Google

Vousavezdesquestionssurnosproduits?Vousavezbesoind'assistancetechnique?
N'hésitezpas
ànouscontacter:Assistancetechniqueetcertificatdegarantie
électroniquewww.vevor.com/support
MODÈLE:WSP02
RESTER
VOLANT
BESOIND'AIDE?CONTACTEZNOUS!
1
Machine Translated by Google

Conservezlemanuel.
2
Attention
Nepasconserverdansdesconditionshumides,àhautetempératureoudansunendroitpoussiéreux.
1
Plaquedepédale
produitquevousavezreçu.Veuilleznousexcuser,nousnevousinformeronsplussi
Listedespièces
2
manueld'utilisation.L'apparenceduproduitestsoumiseàla
AvertissementPourréduirelerisquedeblessure,l'utilisateurdoitlire
Code
3
ilyadesmisesàjourtechnologiquesoulogiciellessurnotreproduit.
Image
QTÉ.
1
1
Lisezattentivementlemanueld'instructions.
Nom
Plaquederoue
Supportderoue
attentivementavantd'utiliser.VEVORseréserveuneinterprétationclairedenos
Lastructureduproduitestflexible,portezdesgantsdetravailpendantl'assemblage.Veuillez
faireattentionànepasvousblesserlamainlorsdel'installation.
Lesenfantsdoiventêtresouslasurveillanced'unadultelorsdel'utilisationduproduit.
1
Veuillezinstalleretutiliserlesupportconformémentauxinstructions.Veuillez
l'installeravecmodération,évitezlesfortesvibrations.
Ceciestl'instructionoriginale,veuillezliretouteslesinstructionsdumanuel
Machine Translated by Google

3
12
Rondelle8
1
Plaquedechangementdevitesse
Plaquedepédalegauche
4
18
22
Bras
1
Bouton32M8*20
9
1
Berceau
Pieds
VisM6*16
VisM8*50
ÉcrouM6
7
4
Plaquedepédaledroite
12
5
13
2
1
Chaisedejeu
10
Support
14
16
17
19
4
11
Plaquedefreinàmain
6
6
Montagedulevierdevitesses
Support
1
Supportdeberceau
1
1
15
Brasdelevierdevitesse
8
12
1
Bouton38M8*20
VisM8*16
18
Machine Translated by Google

4
22
25
Remarque:12visM6x16,6écrousM6et2roulettesuniverselles
ÉcrouM8
Roulettesuniverselles
ÉTAPE1:Desserrezlesdeuxboutonsentouréspourdéplierlesupportderoue.
1
Fille13
1
2
6
1
CléAllen4
Fille10
Fille12
CléAllen5
Sangledefixation
sontcomplémentaires.
ÉTAPE2:Coupezlesattachesenplastique,puisposezlecadredelapédaleet
26
23
20
27
21
24
réinstallezleboutonrotatifàl'avantdelapédale.Etinstallezlespieds.
1
1
6
Machine Translated by Google

5
ÉTAPE4:Ajustezlaplaquedepédaleàl'anglesouhaitéetboulonnezlaàtraverslestrousavantàl'aidede2
visM8*16etrondelles.
ÉTAPE3:Alignezlestrousarrièredelaplaquedepédaleaveclestrousarrièredessupportsdepédaleet
boulonnezàl'aidede2visM8*16etrondelles.
ÉTAPE5:
Machine Translated by Google
6
ÉTAPE8:
ÉTAPE7:
ÉTAPE6:
ÉTAPE9:
Machine Translated by Google

7
ÉTAPE11:Alignezlestrousdubrasdemontagedulevierdevitessesavecles
insertsfiletéssurlepoteauvertical,choisissezlahauteursouhaitéeetfixezleavec
2visetrondellesM8*16mm.
ÉTAPE10:
ÉTAPE12:
Machine Translated by Google

8
ÉTAPE13:
Machine Translated by Google
9
ÉTAPE15:Rangezlesupportdechaisedejeucommeindiquépourpermettreunpliagefaciledusupport
pourlestockage.
ÉTAPE14:Placementdusiège
Machine Translated by Google

REPRÉSENTANTDUROYAUMEUNI
REPRÉSENTANTDELACE
ImportéauxÉtatsUnis:SanvenTechnologyLtd.Suite250,9166Anaheim
NSW2122Australie
Lieu,RanchoCucamonga,CA91730
MainzerLandstr.69,60329FrancfortsurleMain.
ImportéenAustralie:SIHAOPTYLTD.1ROKEVASTREETEASTWOOD
ECrossStuGmbH
Adresse:Shuangchenglu803nong11hao1602A1609shi,baoshanqu,shanghai
200000CN.
Fabricant:Shanghaimuxinmuyeyouxiangongsi
Maison,LondonRoad,StainesuponThames,Surrey,
A/SYHConsultingLimitedBureau147,Centurion
TW184AX
YHCONSULTINGLIMITÉE.
10
Machine Translated by Google


MODELL: WS-P02
LENKRADSTÄNDER
Technischer Support und E-Garantie-Zertifikat
www.vevor.com/support
„Sparen Sie die Hälfte“, „Halber Preis“ oder andere ähnliche Ausdrücke, die wir verwenden, stellen nur eine
Schätzung der Ersparnis dar, die Sie beim Kauf bestimmter Werkzeuge bei uns im Vergleich zu den großen
Topmarken erzielen können, und decken nicht unbedingt alle von uns angebotenen Werkzeugkategorien ab. Wir
möchten Sie freundlich daran erinnern, bei Ihrer Bestellung bei uns sorgfältig zu prüfen, ob Sie im Vergleich
zu den großen Topmarken tatsächlich die Hälfte sparen.
Wir sind weiterhin bestrebt, Ihnen Werkzeuge zu wettbewerbsfähigen Preisen anzubieten.
Machine Translated by Google

- 1 -
STAND
LENKRAD
Brauchen Sie Hilfe? Kontaktieren Sie uns!
Haben Sie Fragen zum Produkt? Benötigen Sie technischen Support? Bitte kontaktieren Sie
uns:
Technischer Support und E-Garantie-Zertifikat www.vevor.com/
support
MODELL: WS-P02
Machine Translated by Google

Aufmerksamkeiten
Bewahren Sie das Handbuch auf.
sorgfältig vor der Inbetriebnahme. VEVOR behält sich eine klare Auslegung unserer
ÿ Die Produktstruktur ist flexibel. Tragen Sie während der Montage Arbeitshandschuhe.
Achten Sie bei der Montage darauf, dass Sie Ihre Hände nicht
verletzen. ÿ Kinder sollten das Produkt nur unter Aufsicht eines Erwachsenen verwenden.
Benutzerhandbuch. Das Erscheinungsbild des Produkts unterliegt den
1
2
Produkt, das Sie erhalten haben. Bitte haben Sie Verständnis, dass wir Sie nicht erneut informieren, wenn
Stückliste
Pedalplatte
es gibt Technologie- oder Software-Updates für unser Produkt.
Bild
1
Warnung-Um das Verletzungsrisiko zu verringern, muss der Benutzer
Code
3
Lesen Sie die Bedienungsanleitung sorgfältig durch.
Name
Radplatte
MENGE.
1
ÿ Bitte installieren und verwenden Sie den Ständer gemäß der Anleitung. ÿ
Bitte installieren Sie ihn maßvoll und vermeiden Sie starke Vibrationen.
1
Nicht an einem feuchten Ort, bei hohen Temperaturen oder an einem staubigen Ort aufbewahren.
Dies ist die Originalanleitung. Bitte lesen Sie alle Anweisungen im Handbuch.
Radständer
- 2 -
Machine Translated by Google
- 3 -
5
2
10
13
Schraube M6*16
16
Mutter M6
19
4
7
Rechte Pedalplatte
12
Arm
1
1
Wiege
9
Knopf 32-M8*20
Füße
Schraube M8*50
1
Schaltplatte
Linke Pedalplatte
4
Schalthebel
8
1
Knopf 38-M8*20
Schraube M8*16 18
12
Unterlegscheibe 8
22
1
Halterung für Wiege
Klammer
1
1
15
Handbremsplatte
11
4
12
6
18
Schalthebelmontage
Gaming Stuhl
1
Klammer
6
14
17
Machine Translated by Google

- 4 -
Inbusschlüssel 4
Dirne 10
Bindeband
6
2
1
Mutter M8
Universalrollen
Dirne 13
1
1
SCHRITT 1: Lösen Sie die beiden eingekreisten Knöpfe, um den Radständer auszuklappen.
22
25
Hinweis: 12 Stück Schrauben M6 x 16, 6 Stück Muttern M6 und 2 Stück Universalrollen
1
1
6
21
24
27
Bringen Sie den Drehknopf an der Vorderseite des Pedals wieder an und montieren Sie die Füße.
26
SCHRITT 2: Schneiden Sie die Plastikbänder ab, legen Sie dann den Pedalrahmen hin und
20
Inbusschlüssel 5
Dirne 12
sind kostenlos.
23
Machine Translated by Google

- 5 -
SCHRITT 4: Stellen Sie die Pedalplatte auf den gewünschten Winkel ein und schrauben Sie sie mit
2 x M8*16 Schrauben und Unterlegscheiben durch die vorderen Löcher.
SCHRITT 3: Richten Sie die hinteren Löcher der Pedalplatte an den hinteren Löchern der
Pedalhalterungen aus und schrauben Sie sie mit 2 x M8*16-Schrauben und Unterlegscheiben
fest.
SCHRITT 5:
Machine Translated by Google

- 6 -
SCHRITT 8:
SCHRITT 9:
SCHRITT 7:
SCHRITT 6:
Machine Translated by Google

- 7 -
SCHRITT 12:
SCHRITT 10:
SCHRITT 11: Richten Sie die Löcher am Schalthebel-Montagearm mit den Gewindeeinsätzen
am vertikalen Pfosten aus, wählen Sie die gewünschte Höhe und befestigen Sie sie mit 2
x M8 x 16 mm Schrauben und Unterlegscheiben.
Machine Translated by Google

- 8 -
SCHRITT 13:
Machine Translated by Google

- 9 -
SCHRITT 15: Verstauen Sie die Gaming Chair Cradle wie gezeigt, damit Sie den Ständer
einfach zusammenklappen und verstauen können.
SCHRITT 14: Sitzplatzierung
Machine Translated by Google

UK REP
Vertreter der EG
Importiert in die USA: Sanven Technology Ltd. Suite 250, 9166 Anaheim
Ort, Rancho Cucamonga, CA 91730
E-CrossStu GmbH
C/O YH Consulting Limited Office 147, Centurion
Nach AUS importiert: SIHAO PTY LTD. 1 ROKEVA STREETEASTWOOD
NSW 2122 Australien
Adresse: Shuangchenglu 803nong11hao1602A-1609shi, baoshanqu,
Shanghai 200000 CN.
Hersteller: Shanghaimuxinmuyeyouxiangongsi
YH CONSULTING LIMITED.
TW18 4AX
Mainzer Landstr.69, 60329 Frankfurt am Main.
Haus, London Road, Staines-upon-Thames, Surrey,
- 10 -
Machine Translated by Google


MODELLO: WS-P02
"Risparmia la metà", "Metà prezzo" o qualsiasi altra espressione simile da noi utilizzata rappresenta
solo una stima del risparmio che potresti ottenere acquistando determinati utensili con noi rispetto ai
principali marchi principali e non significa necessariamente coprire tutte le categorie di utensili da noi
offerti. Ti ricordiamo gentilmente di verificare attentamente quando effettui un ordine con noi se
stai effettivamente risparmiando la metà rispetto ai principali marchi principali.
Continuiamo a impegnarci per fornirvi strumenti a prezzi competitivi.
SUPPORTO PER VOLANTE
Supporto tecnico e certificato di garanzia
elettronica www.vevor.com/support
Machine Translated by Google
Hai domande sul prodotto? Hai bisogno di supporto tecnico? Non esitare a contattarci:
Supporto
tecnico e certificato di garanzia elettronica www.vevor.com/
support
MODELLO: WS-P02
HAI BISOGNO DI AIUTO? CONTATTACI!
VOLANTE
IN PIEDI
- 1 -
Machine Translated by Google
Salva il manuale.
- 2 -
Attenzioni
manuale utente. L'aspetto del prodotto sarà soggetto alla
Supporto per ruota
attentamente prima di operare. VEVOR si riserva una chiara interpretazione del nostro
ÿ La struttura del prodotto è flessibile, indossare guanti da lavoro durante il montaggio.
Fare attenzione a non ferirsi le mani durante l'installazione. ÿ I
bambini devono utilizzare il prodotto solo sotto la supervisione di un adulto.
1
ÿ Installare e utilizzare il supporto secondo le istruzioni. ÿ Installare con
moderazione, evitare forti vibrazioni.
Questa è l'istruzione originale, si prega di leggere tutte le istruzioni del manuale
Non conservare in condizioni di umidità, temperature elevate o luoghi polverosi.
QTY.
1
1
attentamente il manuale di istruzioni.
Nome
Piastra della ruota
Attenzione: per ridurre il rischio di lesioni, l'utente deve leggere
Codice
3
ci sono aggiornamenti tecnologici o software sul nostro prodotto.
Immagine
1
Piastra del pedale
prodotto che hai ricevuto. Perdonaci se non ti informeremo di nuovo se
Elenco delle parti
2
Machine Translated by Google

12
Braccio del cambio
8
Vite M8*16
1
Manopola 38-M8*20
1
15
18
Rondella 8
Staffa
1
Staffa di supporto
1
Montaggio del cambio
6
4
Piastra freno a mano
11
12
6
1
Sedia da gioco
Staffa
14
5
17
13
2
10
16
19
Piastra del pedale destro
4
7
12
Vite M6*16
Dado M6
Manopola 32-M8*20
Culla
9
Piedi
Vite M8*50
Braccio
1
1
1
Piastra del cambio
Piastra pedale sinistro
4
18
22
- 3 -
Machine Translated by Google

1
1
6
Reinstallare la manopola girevole nella parte anteriore del pedale e installare i piedini.
27
21
24
20
23
26
FASE 2: Tagliare le fascette di plastica, quindi adagiare il telaio del pedale e
Ragazza 12
Chiave esagonale 5
sono gratuiti.
Chiave esagonale 4
Ragazza 10
Cinghia di legatura
1
6
2
FASE 1: Allentare le due manopole cerchiate per aprire il cavalletto.
1
1
Dado M8
Ruote universali
Ragazza 13
22
25
Nota: 12 viti M6*16, 6 dadi M6 e 2 ruote universali
- 4 -
Machine Translated by Google

- 5 -
FASE 4: Regolare la piastra del pedale all'angolazione desiderata e avvitarla attraverso
i fori anteriori utilizzando 2 viti M8*16 e rondelle.
FASE 3: Allinea i fori posteriori sulla piastra del pedale con i fori posteriori sulle staffe
del pedale e avvitali utilizzando 2 viti M8*16 e rondelle.
PASSO 5:
Machine Translated by Google

- 6 -
PASSO 8:
PASSO 7:
PASSO 6:
PASSO 9:
Machine Translated by Google

- 7 -
FASE 11: Allineare i fori sul braccio di montaggio del cambio con gli inserti
filettati sul montante verticale; scegliere l'altezza desiderata fissando con 2
viti M8*16mm e rondelle.
PASSO 10:
PASSO 12:
Machine Translated by Google

- 8 -
PASSO 13:
Machine Translated by Google

- 9 -
FASE 15: Riporre il supporto della sedia da gaming come mostrato in figura per poterlo
ripiegare facilmente e riporlo.
FASE 14: Posizionamento del sedile
Machine Translated by Google

- 10 -
Importato negli USA: Sanven Technology Ltd. Suite 250, 9166 Anaheim
Nuovo Galles del Sud 2122 Australia
Luogo, Rancho Cucamonga, CA 91730
C/O YH Consulting Limited Ufficio 147, Centurion
Importato in AUS: SIHAO PTY LTD. 1 ROKEVA STREETEASTWOOD
E-CrossStu GmbH
Indirizzo: Shuangchenglu 803nong11hao1602A-1609shi, baoshanqu,
shanghai 200000 CN.
Produttore: Shanghaimuxinmuyeyouxiangongsi
CONSULENZA YH LIMITATA.
TW184AX
Mainzer Landstr.69, 60329 Francoforte sul Meno.
Casa, London Road, Staines-upon-Thames, Surrey,
RAPPRESENTANZA DEL REGNO UNITO
Rappresentante della CE
Machine Translated by Google


SOPORTEPARAVOLANTE
"Ahorrelamitad","mitaddeprecio"ocualquierotraexpresiónsimilarqueutilicemossolorepresenta
unaestimacióndelahorroquepodríaobteneralcomprarciertasherramientasconnosotrosencomparación
conlasprincipalesmarcasynonecesariamentesignificaquecubratodaslascategoríasdeherramientas
queofrecemos.Lerecordamosque,alrealizarunpedidoconnosotros,verifiquecuidadosamentesi
realmenteestáahorrandolamitadencomparaciónconlasprincipalesmarcas.
Seguimoscomprometidosabrindarleherramientasaprecioscompetitivos.
MODELO:WSP02
Soportetécnicoycertificadodegarantía
electrónicawww.vevor.com/support
Machine Translated by Google

1
¿NECESITASAYUDA?¡CONTÁCTANOS!
VOLANTE
PARARSE
¿Tienepreguntassobreelproducto?¿Necesitaasistenciatécnica?Nodudeenponerseen
contactocon
nosotros:Asistenciatécnicaycertificadodegarantíaelectrónica
www.vevor.com/support
MODELO:WSP02
Machine Translated by Google

Atenciones
2
Guardeelmanual.
Instaleyutiliceelsoportedeacuerdoconlasinstrucciones.Instalecon
moderación,evitevibracionesfuertes.
productoquerecibiste.Porfavor,perdónanospornoinformartenuevamentesi
Listadepiezas
1
2
manualdeusuario.Laaparienciadelproductoestarásujetaalas
Placadepedal
3
Advertencia:Parareducirelriesgodelesiones,elusuariodebeleer
Código Imagen
¿Hayalgunaactualizacióntecnológicaodesoftwareennuestroproducto?
1
CANTIDAD.
1
Leaatentamenteelmanualdeinstrucciones.
Nombre
antesdeoperar.VEVORsereservaunainterpretaciónclaradenuestras
Laestructuradelproductoesflexible,useguantesdetrabajoduranteelensamblaje.Tenga
cuidadodenolastimarselasmanosdurantelainstalación.Los
niñosdebenestarbajolasupervisióndeunadultocuandoutilicenelproducto.
1
Soportederueda
Estassonlasinstruccionesoriginales,leatodaslasinstruccionesdelmanual.
Nologuardeencondicionesdehumedad,altastemperaturasoenlugarespolvorientos.
Placaderueda
Machine Translated by Google

3
8
Perilla38M8*20
1
Placadecambio
Placadelpedalizquierdo
4
18
Lavadora8
22
Perilla32M8*20
Cuna
9
Brazo
1
1
7
4
Placadelpedalderecho
12
Pies
TornilloM8*50
TornilloM6*16
13
2
5
10
16
TuercaM6
19
17
1
Sillaparajuegos
Soporte
Montajedelapalancadecambios
6
14 4
11
Placadefrenodemano
6
18
1
Soporte
1
Soportedecuna
1
15
12
12
TornilloM8*16
1
Brazodecambio
Machine Translated by Google
4
1
22
25
Nota:12tornillosM6x16,6tuercasM6y2ruedasuniversales.
PASO1:Aflojelasdosperillasmarcadasconuncírculoparadesplegarelsoportedelarueda.
1
1
TuercaM8
Ruedasuniversales
Moza13
2
6
1
Moza10
Llavehexagonal4
Correadeencuadernación
Moza12
Llavehexagonal5
songratuitos.
20
23
PASO2:Cortelasatadurasdeplástico,luegocoloqueelmarcodelpedaly
26
Vuelvaainstalarlaperillagiratoriaenlapartedelanteradelpedaleinstalelospies.
27
21
24
6
1
Machine Translated by Google

5
PASO5:
PASO3:Alineelosorificiostraserosdelaplacadelpedalconlosorificiostraserosdelos
soportesdelpedalyatorníllelosusando2tornillosM8*16yarandelas.
PASO4:Ajustelaplacadelpedalalángulodeseadoyatorníllelaatravésdelosorificios
frontalesusando2tornillosM8*16yarandelas.
Machine Translated by Google

6
PASO8:
PASO9:
PASO7:
PASO6:
Machine Translated by Google
PASO11:Alineelosorificiosenelbrazodemontajedelapalancade
cambiosconlosinsertosroscadosenelpostevertical,elijalaaltura
deseadayasegurecon2tornillosM8*16mmyarandelas.
PASO10:
PASO12:
7
Machine Translated by Google

PASO13:
8
Machine Translated by Google

PASO15:Guardelabasedelasilladejuegocomosemuestraparapermitirplegar
fácilmenteelsoporteparaguardarlo.
PASO14:Colocacióndelasiento
9
Machine Translated by Google

10
ImportadoaEE.UU.:SanvenTechnologyLtd.Suite250,9166Anaheim
Lugar,RanchoCucamonga,CA91730
ECrossStuGmbH
MainzerLandstr.69,60329FráncfortdelMeno.
ImportadoaAustralia:SIHAOPTYLTD.1ROKEVASTREETEASTWOOD
NuevaGalesdelSur2122Australia
Dirección:Shuangchenglu803nong11hao1602A1609shi,baoshanqu,
shanghai200000CN.
Fabricante:Shanghaimuxinmuyeyouxiangongsi
Casa,LondonRoad,StainesuponThames,Surrey,
TW184AX
YHCONSULTINGLIMITADA.
C/OYHConsultingLimitedOficina147,Centurion
REPRESENTANTEDELREINOUNIDO
REPRESENTANTECE
Machine Translated by Google


MODEL: WS-P02
„Oszczędź połowę”, „Połowa ceny” lub inne podobne wyrażenia używane przez nas stanowią
jedynie szacunkowe oszczędności, jakie możesz uzyskać, kupując u nas określone narzędzia w
porównaniu z głównymi markami i niekoniecznie oznaczają one objęcie wszystkich kategorii narzędzi
oferowanych przez nas. Uprzejmie przypominamy, aby dokładnie sprawdzić, czy składając u nas
zamówienie faktycznie oszczędzasz połowę w porównaniu z głównymi markami.
Nadal staramy się oferować Państwu narzędzia w konkurencyjnych cenach.
PODSTAWKA POD KIEROWNICĘ
Wsparcie techniczne i certyfikat gwarancji
elektronicznej www.vevor.com/support
Machine Translated by Google
Masz pytania dotyczące produktu? Potrzebujesz wsparcia technicznego? Skontaktuj się z
nami: Wsparcie
techniczne i certyfikat E-Gwarancji www.vevor.com/support
MODEL: WS-P02
POTRZEBUJESZ POMOCY? SKONTAKTUJ SIĘ Z NAMI!
KIEROWNICA
PODSTAWKA
- 1 -
Machine Translated by Google
Zapisz instrukcję.
- 2 -
Uprzejmości
instrukcja obsługi. Wygląd produktu podlega
Stojak na koła
przed rozpoczęciem użytkowania należy dokładnie zapoznać się z treścią niniejszego Regulaminu. VEVOR zastrzega sobie prawo do jednoznacznej interpretacji naszych
Konstrukcja produktu jest elastyczna, podczas montażu należy założyć rękawice robocze.
Podczas instalacji należy uważać na zranione ręce. Dzieci
powinny korzystać z produktu pod nadzorem osoby dorosłej.
1
Proszę zainstalować i używać stojaka zgodnie z instrukcją. Proszę
zainstalować z umiarem, unikać silnych wibracji.
To jest oryginalna instrukcja, proszę przeczytać wszystkie instrukcje w podręczniku
Nie przechowywać w wilgotnych warunkach, wysokiej temperaturze lub w miejscach zakurzonych.
ILOŚĆ.
1
1
uważnie przeczytaj instrukcję obsługi.
Nazwa
Płyta koła
Ostrzeżenie – aby zmniejszyć ryzyko obrażeń, użytkownik musi przeczytać
Kod
3
czy w naszym produkcie pojawiły się jakieś aktualizacje technologii lub oprogramowania.
Zdjęcie
1
Płytka pedałowa
produkt, który otrzymałeś. Przepraszamy, że nie poinformujemy Cię ponownie, jeśli
Lista części
2
Machine Translated by Google

- 3 -
5
14
13
2
10
16
17
19
Prawa płytka pedału
4
7
12
Śruba M6*16
Nakrętka M6
Gałka 32-M8*20
Kolebka
9
Stopy
Śruba M8*50
Ramię
1
1
1
Płytka zmiany biegów
Lewa płytka pedału
4
18
22
12
Ramię zmiany biegów
8
Śruba M8*16
1
Gałka 38-M8*20
1
15
18
Podkładka 8
Nawias
1
Uchwyt kołyski
1
Montaż dźwigni zmiany biegów
6
4
Płyta hamulca ręcznego
11
12
6
1
Fotel gamingowy
Nawias
Machine Translated by Google
- 4 -
Klucz imbusowy 4
Dziewczyno 10
Pasek wiążący
1
6
2
KROK 1: Aby rozłożyć stojak na koła, poluzuj dwa zaznaczone kółkami pokrętła.
1
1
Nakrętka M8
Uniwersalne kółka
Dziewczyno 13
22
25
Uwaga: 12 śrub M6*16, 6 nakrętek M6 i 2 uniwersalne kółka
1
1
6
zamontuj ponownie pokrętło obrotowe z przodu pedału i zamontuj stopki.
27
21
24
20
23
26
KROK 2: Odetnij plastikowe opaski zaciskowe, a następnie połóż ramę pedału i
Dziewczyno 12
Klucz imbusowy 5
są bezpłatne.
Machine Translated by Google

KROK 4: Ustaw płytę pedału pod żądanym kątem i przykręć ją przez przednie otwory za pomocą
2 śrub M8*16 i podkładek.
KROK 3: Dopasuj tylne otwory w płycie pedału do tylnych otworów w uchwytach pedałów i
przykręć je za pomocą 2 śrub M8*16 z podkładkami.
KROK 5:
- 5 -
Machine Translated by Google

KROK 8:
KROK 7:
KROK 6:
KROK 9:
- 6 -
Machine Translated by Google

KROK 11: Dopasuj otwory w ramieniu montażowym dźwigni zmiany biegów
do gwintowanych wkładek na pionowym słupku, wybierz żądaną wysokość
i zabezpiecz ją za pomocą 2 śrub M8*16 mm i podkładek.
KROK 10:
KROK 12:
- 7 -
Machine Translated by Google

KROK 13:
- 8 -
Machine Translated by Google
KROK 14: Ustawienie miejsc
KROK 15: Złóż podstawkę pod fotel gamingowy w sposób pokazany na zdjęciu, aby umożliwić
łatwe złożenie podstawki w celu przechowywania.
- 9 -
Machine Translated by Google

REP WIELKIEJ BRYTANII
Przedstawiciel UE
Importowane do USA: Sanven Technology Ltd. Suite 250, 9166 Anaheim
NSW 2122 Australia
Miejsce, Rancho Cucamonga, CA 91730
Mainzer Landstr.69, 60329 Frankfurt nad Menem.
Importowane do AUS: SIHAO PTY LTD. 1 ROKEVA STREETEASTWOOD
E-CrossStu GmbH
Adres: Shuangchenglu 803nong11hao1602A-1609shi, baoshanqu, szanghaj
200000 CN.
Producent: Shanghaimuxinmuyeyouxiangongsi
Dom, London Road, Staines-upon-Thames, Surrey,
TW18 4AX
YH CONSULTING LIMITED.
C/O YH Consulting Limited Biuro 147, Centurion
- 10 -
Machine Translated by Google


MODEL: WS-P02
STUURWIELSTANDAARD
Technische ondersteuning en e-garantiecertificaat
www.vevor.com/support
"Save Half", "Half Price" of andere soortgelijke uitdrukkingen die wij gebruiken, geven alleen een schatting van de
besparingen die u kunt behalen door bepaalde gereedschappen bij ons te kopen in vergelijking met de grote topmerken
en betekent niet noodzakelijkerwijs dat alle categorieën gereedschappen die wij aanbieden, worden gedekt. Wij
herinneren u eraan om zorgvuldig te controleren of u daadwerkelijk de helft bespaart in vergelijking met de grote
topmerken wanneer u een bestelling bij ons plaatst.
Wij streven er voortdurend naar om u gereedschappen tegen concurrerende prijzen te leveren.
Machine Translated by Google

Heeft u vragen over het product? Heeft u technische ondersteuning nodig? Neem dan gerust
contact met
ons op: Technische ondersteuning en E-garantiecertificaat
www.vevor.com/support
MODEL: WS-P02
STELLAGE
STUUR
HULP NODIG? NEEM CONTACT MET ONS OP!
- 1 -
Machine Translated by Google

Bewaar de handleiding.
Aandacht
zorgvuldig door voordat u gaat werken. VEVOR behoudt zich een duidelijke interpretatie van onze
ÿ De productstructuur is flexibel, draag werkhandschoenen tijdens de montage. Wees voorzichtig
dat u uw handen niet bezeert tijdens de installatie. ÿ Kinderen
moeten het product onder toezicht van een volwassene gebruiken.
gebruikershandleiding. Het uiterlijk van het product is onderworpen aan de
1
2
product dat u hebt ontvangen. Vergeef ons dat we u niet opnieuw zullen informeren als
Onderdelenlijst
Pedaalplaat
er technologische of software-updates voor ons product zijn.
Afbeelding
1
Waarschuwing - Om het risico op letsel te verminderen, moet de gebruiker de volgende informatie lezen:
Code
3
Lees de gebruiksaanwijzing zorgvuldig door.
Naam
Wielplaat
AANTAL.
1
ÿ Installeer en gebruik de standaard volgens de instructies. ÿ Installeer de standaard
voorzichtig en vermijd sterke trillingen.
1
Niet bewaren op een vochtige plek, bij een hoge temperatuur of op een stoffige plek.
Dit is de originele instructie, lees alle instructies in de handleiding
Wielstandaard
- 2 -
Machine Translated by Google

- 3 -
10
Gaming stoel
1
Beugel
13
14
16
17
Handremplaat
11
4
6
19
Shifter-montage
6
1
Wiegbeugel
Beugel
1
1
15
12
Schakelarm
8
1
Knop 38-M8*20
Schroef M8*16
18
12
Ring 8
1
Schakelplaat
Linker pedaalplaat
4
18
22
Arm
1
1
Wieg
9
Knop 32-M8*20
Voeten
Schroef M6*16
Schroef M8*50
Moer M6
4
7
Rechter pedaalplaat
12
5
2
Machine Translated by Google

- 4 -
Bindband
Inbussleutel 5
Meid 12
zijn gratis.
26
STAP 2: Knip de plastic banden door en leg het pedaalframe neer.
20
23
21
24
27
Plaats de draaiknop weer terug aan de voorkant van het pedaal. En monteer de voeten.
1
1
6
22
25
Let op: 12 stuks schroeven M6*16, 6 stuks moeren M6 en 2 stuks universele wielen
Moer M8
Universele wielen
Meid 13
1
1
STAP 1: Draai de twee omcirkelde knoppen los om de wielstandaard uit te klappen.
6
2
1
Inbussleutel 4
Meid 10
Machine Translated by Google
- 5 -
STAP 4: Stel de pedaalplaat in op de gewenste hoek en bevestig deze door de voorste
gaten met 2 x M8*16 schroeven en ringen.
STAP 3: Lijn de achterste gaten op de pedaalplaat uit met de achterste gaten op de
pedaalbeugels en schroef ze vast met 2 x M8*16 schroeven en ringen.
STAP 5:
Machine Translated by Google

- 6 -
STAP 7:
STAP 9:
STAP 8:
STAP 6:
Machine Translated by Google

- 7 -
STAP 11: Lijn de gaten in de schakelarm uit met de
schroefdraadbussen op de verticale paal. Kies de gewenste
hoogte en bevestig met 2x M8*16mm schroeven en ringen.
STAP 10:
STAP 12:
Machine Translated by Google

- 8 -
STAP 13:
Machine Translated by Google

- 9 -
STAP 15: Berg de Gaming Chair Cradle op zoals afgebeeld, zodat u de standaard
eenvoudig kunt opvouwen en opbergen.
STAP 14: Plaatsing van de stoel
Machine Translated by Google

EC-REP
VK REP
Geïmporteerd naar de VS: Sanven Technology Ltd. Suite 250, 9166 Anaheim
Plaats, Rancho Cucamonga, CA 91730
E-CrossStu GmbH
YH CONSULTING LIMITED.
Geïmporteerd naar AUS: SIHAO PTY LTD. 1 ROKEVA STREETEASTWOOD
NSW 2122 Australië
Adres: Shuangchenglu 803nong11hao1602A-1609shi, baoshanqu, shanghai
200000 CN.
Fabrikant: Shanghaimuxinmuyeyouxiangongsi
C/O YH Consulting Limited Kantoor 147, Centurion
Huis, London Road, Staines-upon-Thames, Surrey,
TW18 4AX
Mainzer Landstr.69, 60329 Frankfurt am Main.
- 10 -
Machine Translated by Google


MODELL: WS-P02
RATTSTÄLL
Teknisk support och e-garanticertifikat
www.vevor.com/support
"Spara hälften", "halva priset" eller andra liknande uttryck som används av oss representerar
bara en uppskattning av besparingar du kan dra nytta av att köpa vissa verktyg hos oss jämfört med
de stora toppmärkena och betyder inte nödvändigtvis att täcka alla kategorier av verktyg som erbjuds
av oss. Du påminns vänligen om att noggrant kontrollera när du gör en beställning hos oss om
du faktiskt sparar hälften i jämförelse med de främsta stora varumärkena.
Vi fortsätter att vara engagerade i att ge dig verktyg till konkurrenskraftiga priser.
Machine Translated by Google

MODELL: WS-P02
Har du produktfrågor? Behöver du teknisk support? Kontakta oss gärna: Teknisk support och
e-
garanticertifikat www.vevor.com/support
STÅ
RATT
BEHÖVER HJÄLP? KONTAKTA OSS!
- 1 -
Machine Translated by Google

Spara manualen.
Uppmärksamhet
noggrant innan användning. VEVOR reserverar sig för en tydlig tolkning av vår
ÿ Produktstrukturen är flexibel, använd arbetshandskar vid montering. vänligen ta hand
om skadade händer vid installation. ÿ Barn bör under vuxens
uppsikt när de använder produkten.
bruksanvisning. Produktens utseende ska vara beroende av
1
2
Dellista
produkt du fått. Förlåt oss att vi inte kommer att informera dig igen om
Pedalplatta
det finns någon teknik eller mjukvaruuppdateringar på vår produkt.
Bild
1
Varning - För att minska risken för skada måste användaren läsa
Koda
3
bruksanvisningen noggrant.
Namn
Hjulplatta
ANTAL.
1
ÿ Installera och använd stativet enligt instruktionerna. ÿ Installera måttligt,
undvik starka vibrationer.
1
Detta är den ursprungliga instruktionen, läs alla manualer
Förvara inte i fuktiga förhållanden, höga temperaturer eller en dammig plats.
Hjulställ
- 2 -
Machine Translated by Google

10
Spelstol
1
Konsol
13
14
16
17
Handbromsplatta
11
4
6
19
Shifter montering
6
1
Vaggfäste
Konsol
1
1
15
12
Växlararm
8
1
Vred 38-M8*20
Skruv M8*16
18
12
Bricka 8
1
Växelplatta
Vänster pedalplatta
4
18
22
Ärm
1
1
Vagga
9
Vred 32-M8*20
Fötter
Skruv M6*16
Skruv M8*50
Mutter M6
4
7
Höger pedalplatta
12
5
2
- 3 -
Machine Translated by Google

Bindningsrem
Insexnyckel 5
Wench 12
är gratis.
26
STEG 2: Klipp av plastbanden, lägg sedan ner pedalramen och
20
23
21
24
27
Sätt tillbaka vridknappen på framsidan av pedalen. Och installera fötterna.
1
1
6
22
25
Obs: 12 st skruvar M6*16, 6st muttrar M6 och 2st universalhjul
Mutter M8
Universal hjul
Wench 13
1
1
STEG 1: Lossa de två rattarna inringade för att fälla ut hjulstativet.
6
2
1
Insexnyckel 4
Wench 10
- 4 -
Machine Translated by Google

- 5 -
STEG 4: Justera pedalplattan till önskad vinkel och skruva genom de främre hålen med 2 x
M8*16 skruvar och brickor.
STEG 3: Rikta in de bakre hålen på pedalplattan med de bakre hålen på pedalfästena och
skruva igenom med 2 x M8*16 skruvar och brickor.
STEG 5:
Machine Translated by Google
- 6 -
STEG 8:
STEG 9:
STEG 7:
STEG 6:
Machine Translated by Google

- 7 -
STEG 11: Rikta in hålen på växelmonteringsarmen med de gängade
insatserna på den vertikala stolpen och välj önskad höjdsäkring
med 2x M8*16 mm skruvar och brickor.
STEG 10:
STEG 12:
Machine Translated by Google
- 8 -
STEG 13:
Machine Translated by Google

- 9 -
STEG 15: Ställ undan Gaming Chair Cradle som visas för att göra det enkelt att fälla
ihop stativet för förvaring.
STEG 14: Sätesplacering
Machine Translated by Google
UK REP
EC REP
Importerad till USA: Sanven Technology Ltd. Suite 250, 9166 Anaheim
Place, Rancho Cucamonga, CA 91730
E-CrossStu GmbH
C/O YH Consulting Limited Office 147, Centurion
Importerad till AUS: SIHAO PTY LTD. 1 ROKEVA STREETEASTWOOD
NSW 2122 Australien
Adress: Shuangchenglu 803nong11hao1602A-1609shi, baoshanqu,
shanghai 200000 CN.
Tillverkare: Shanghaimuxinmuyeyouxiangongsi
YH CONSULTING LIMITED.
TW18 4AX
Mainzer Landstr.69, 60329 Frankfurt am Main.
House, London Road, Staines-upon-Thames, Surrey,
- 10 -
Machine Translated by Google