Technical Support and E-Warranty Certificate www.vevor.com/support
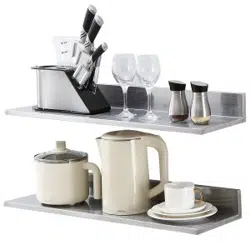
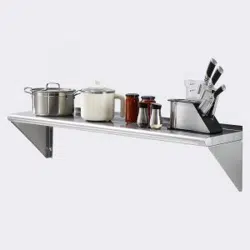
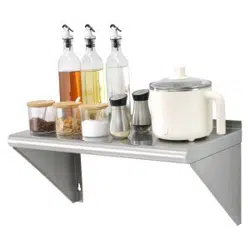
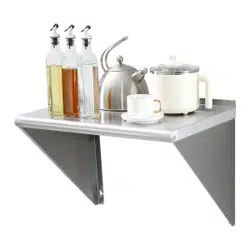
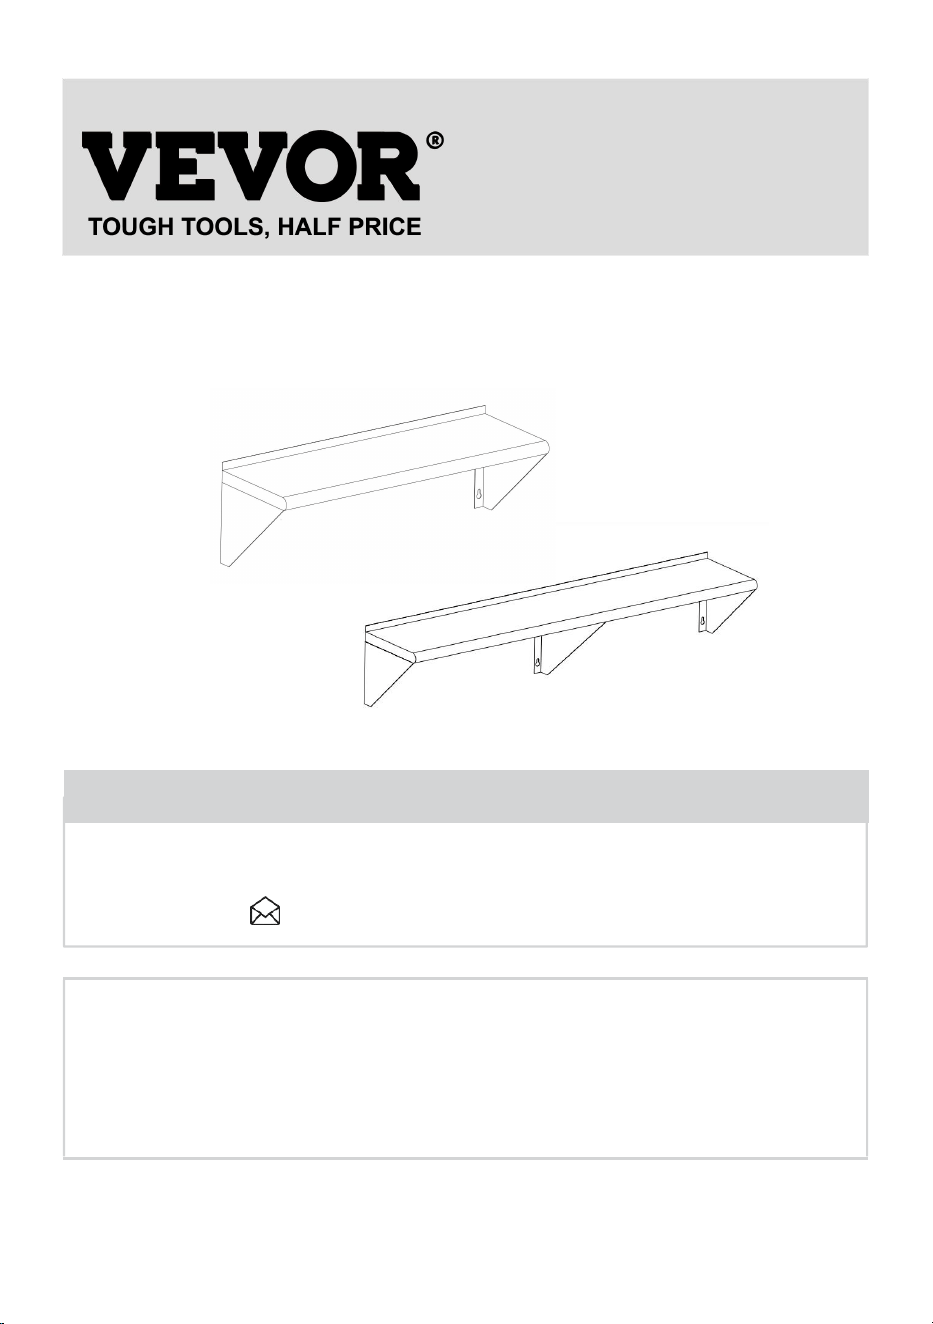
STAINLESS STEEL WALL SHELF
USER MANUAL
We continue to be committed to provide you tools with competitive price.
are kindly reminded to verify carefully when you are placing an order with us if you are
actually saving half in comparison with the top major brands
"Save Half", "Half Price" or any other similar expressions used by us only represents an
estimate of savings you might benefit from buying certain tools with us compared to the major
top brands and does not necessarily mean to cover all categories of tools offered by us. You
.

1
Thanks for purchasing one of our products, please read carefully the assembly
instructions before the installation.
This installation is for stainless steel wall shelf with 2 lower supports and 3 lower
supports
Have product questions? Need technical support? Please feel free to
contact us:
Technical Support and E-Warranty Certificate
www.vevor.com/support
NEED HELP? CONTACT US!
This is the original instruction, please read all manual instructions
carefully before operating. VEVOR reserves a clear interpretation of our
user manual. The appearance of the product shall be subject to the
product you received. Please forgive us that we won't inform you again if
there are any technology or software updates on our product.
STAINLESS STEEL WALL SHELF

2
PRODUCT PARAMETERS
ASSEMBLY PRECAUTIONS
Mode
1. Assemble needs to follow these instructions. Incorrect assembly can be
a hazard.
2. Wear safety goggles and heavy-duty work gloves during assembly.
3. Do not assemble when tired or under the influence of alcohol,
l Product Size/inch Loading Capacity/Max
WMS1224 12*24 230 lb
WMS1236 12*36 250 lb
WMS1248 12*48 280 lb
WMS1260 12*60 315 lb
WMS1436 14*36 300 lb
WMS1448 14*48 350 lb
WMS1460 14*60 400 lb
WMS1824 18*24 300 lb
WMS1848 18*48 400 lb
WMS1860 18*60 450 lb
WMS1872 18*72 500 lb
3
drugs or medication.
4. Weight capacity and other product capabilities apply to a properly and
completely assembled product only.
5. Keep the assembly area clean and well-lit.
6. Keep bystanders out of the area during assembly.
7. Requires two people for assembly.
USE PRECAUTIONS
WARNING: TO PREVENT SERIOUS INJURY AND DEATH FROM
TIPPING:
1. This product is not a toy. Do not allow children to play with or approach
this item.
2. Use as intended only. Do not sit or stand on the product.
3. Inspect before every use. Do not use it if parts are loose or damaged.
4.
Use on flat, level, and hard surfaces only
.
5. Do not exceed the listed weight capacity. Tighten all knobs securely
before applying load. Be aware of dynamic loading! The sudden load
movement may briefly create an excess load, causing product failure.
4
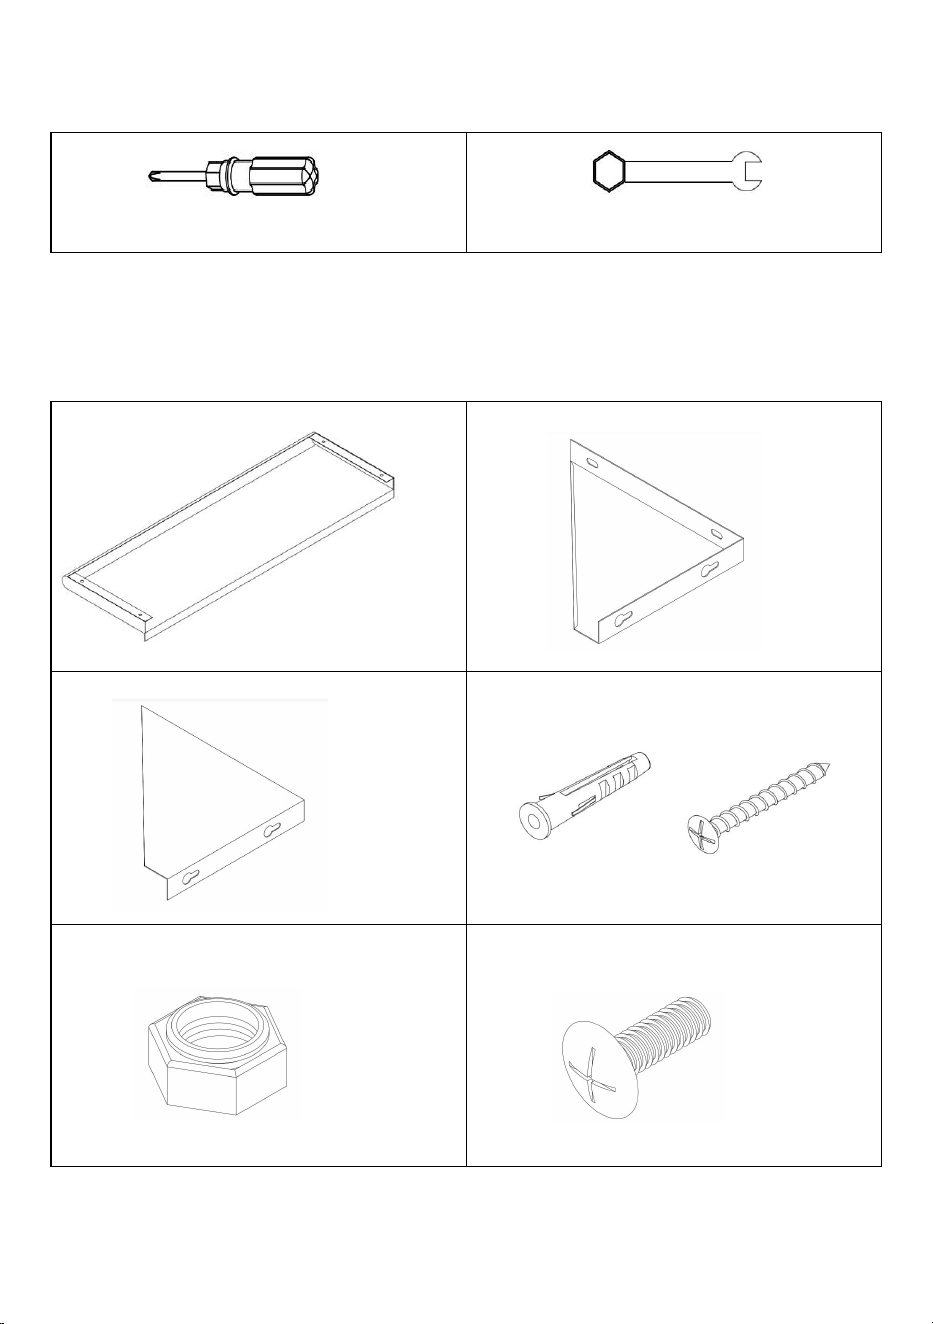
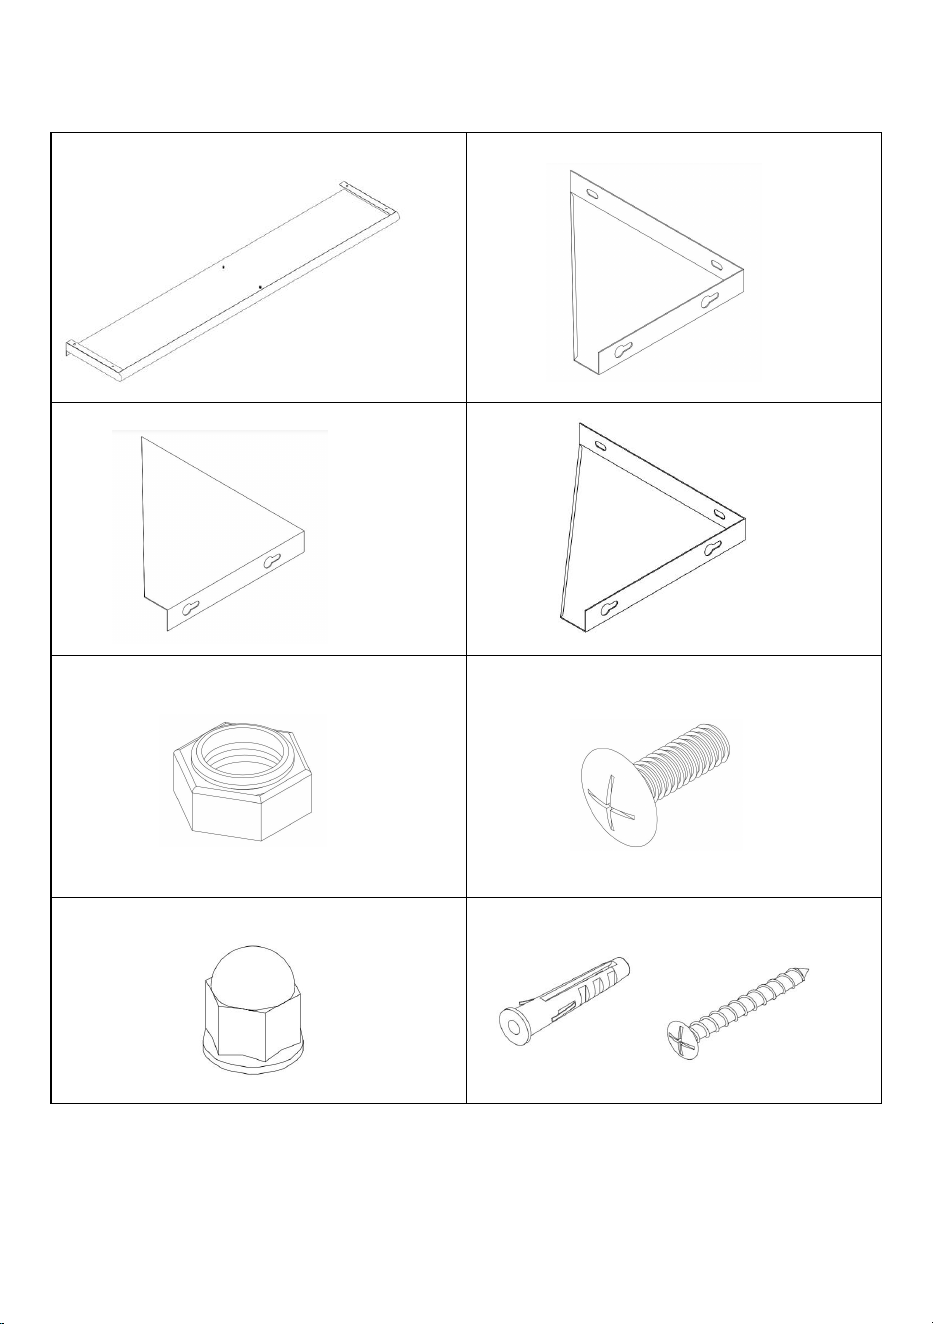
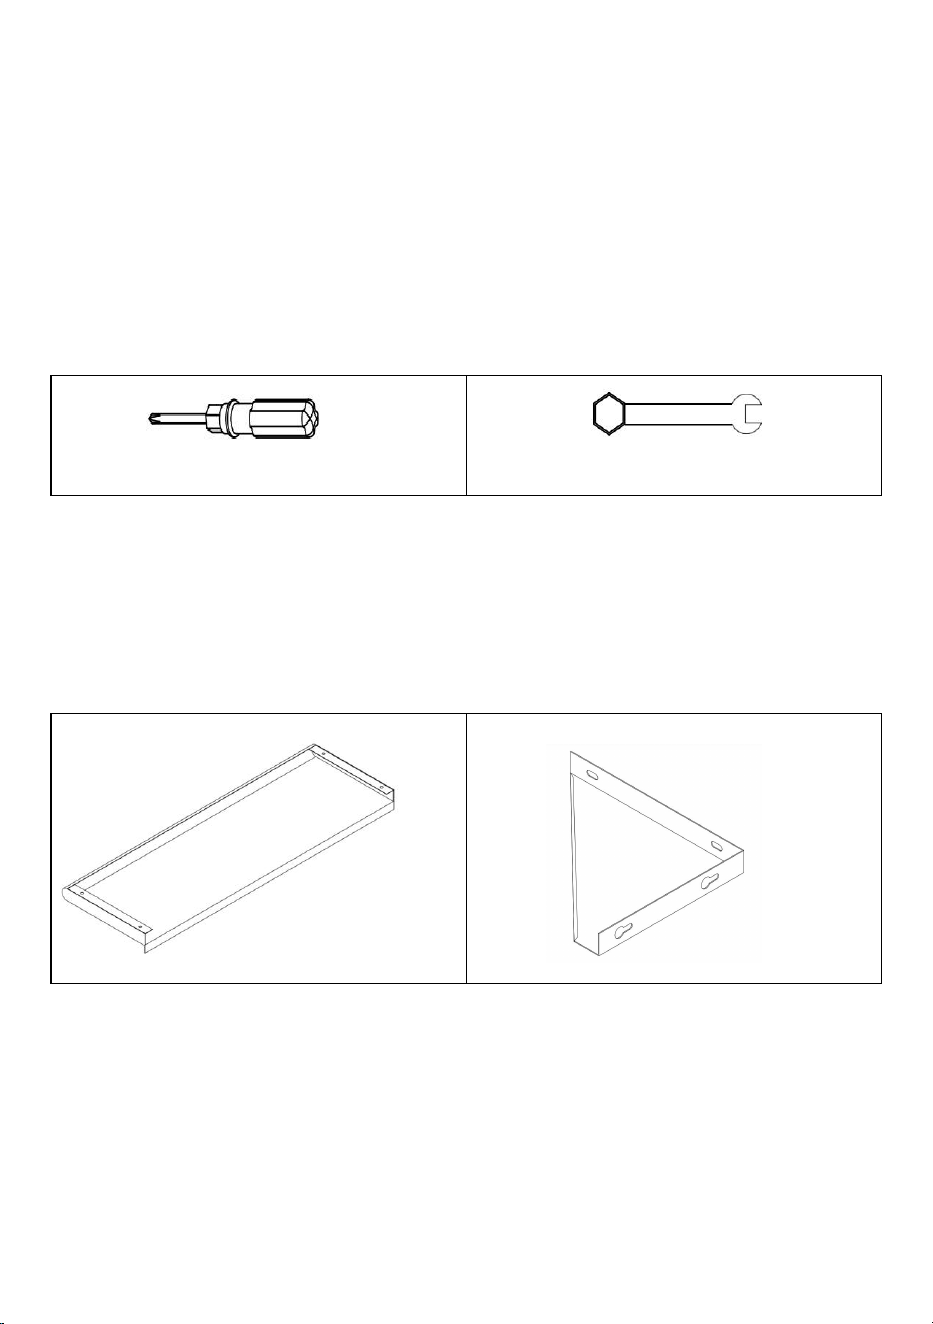
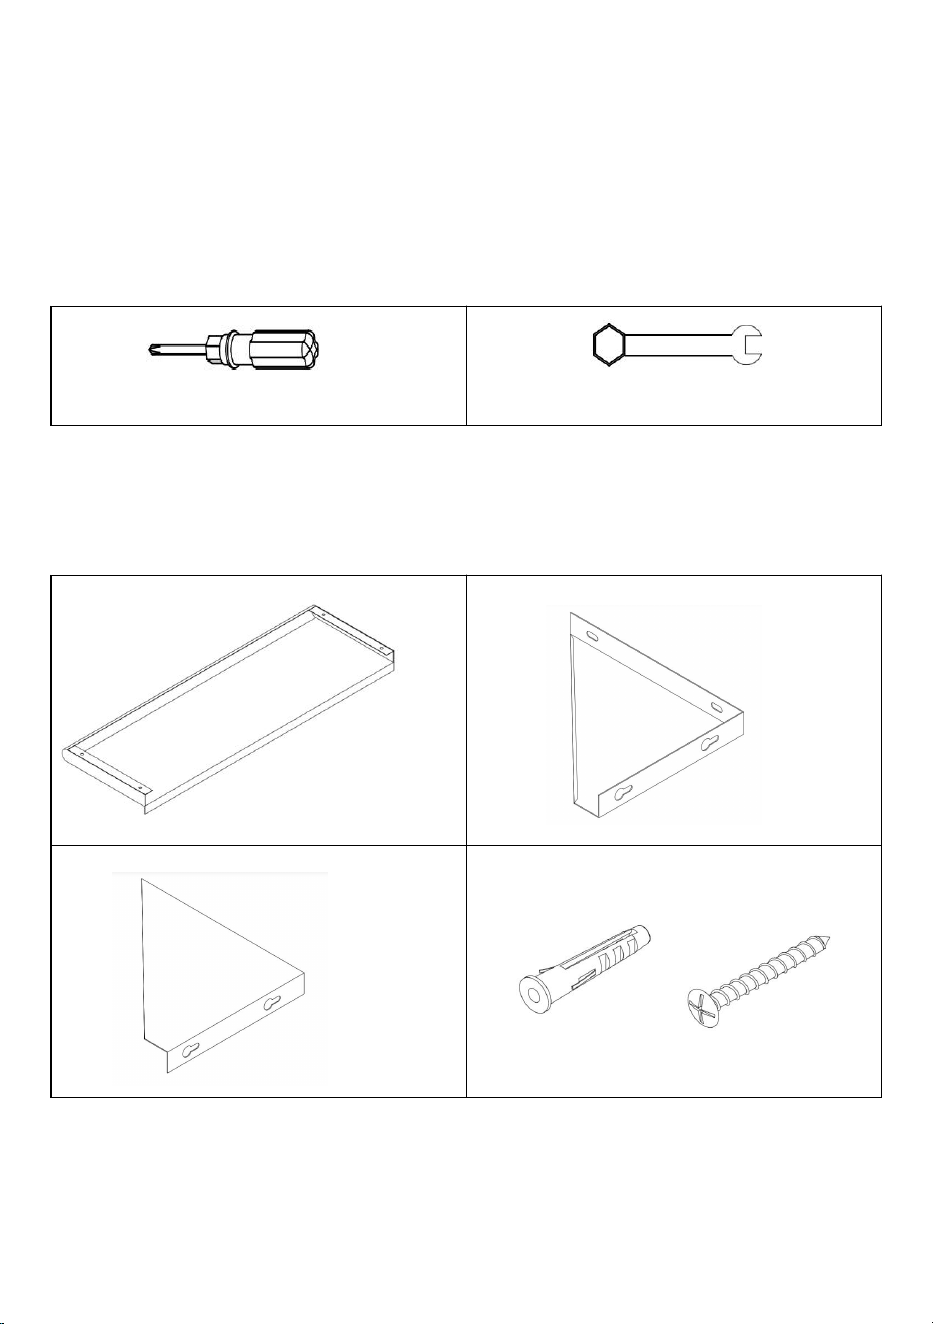
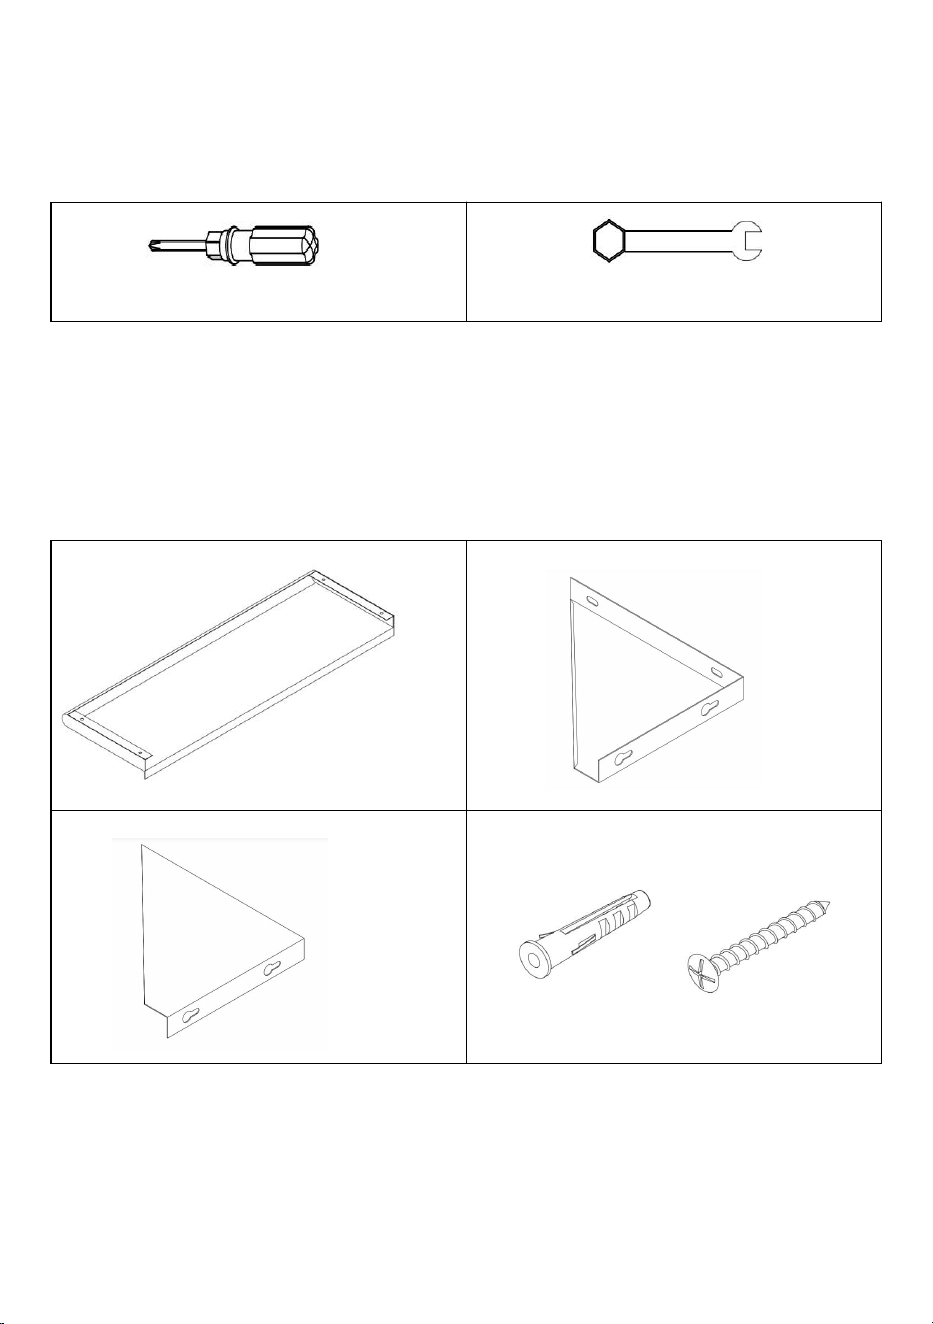
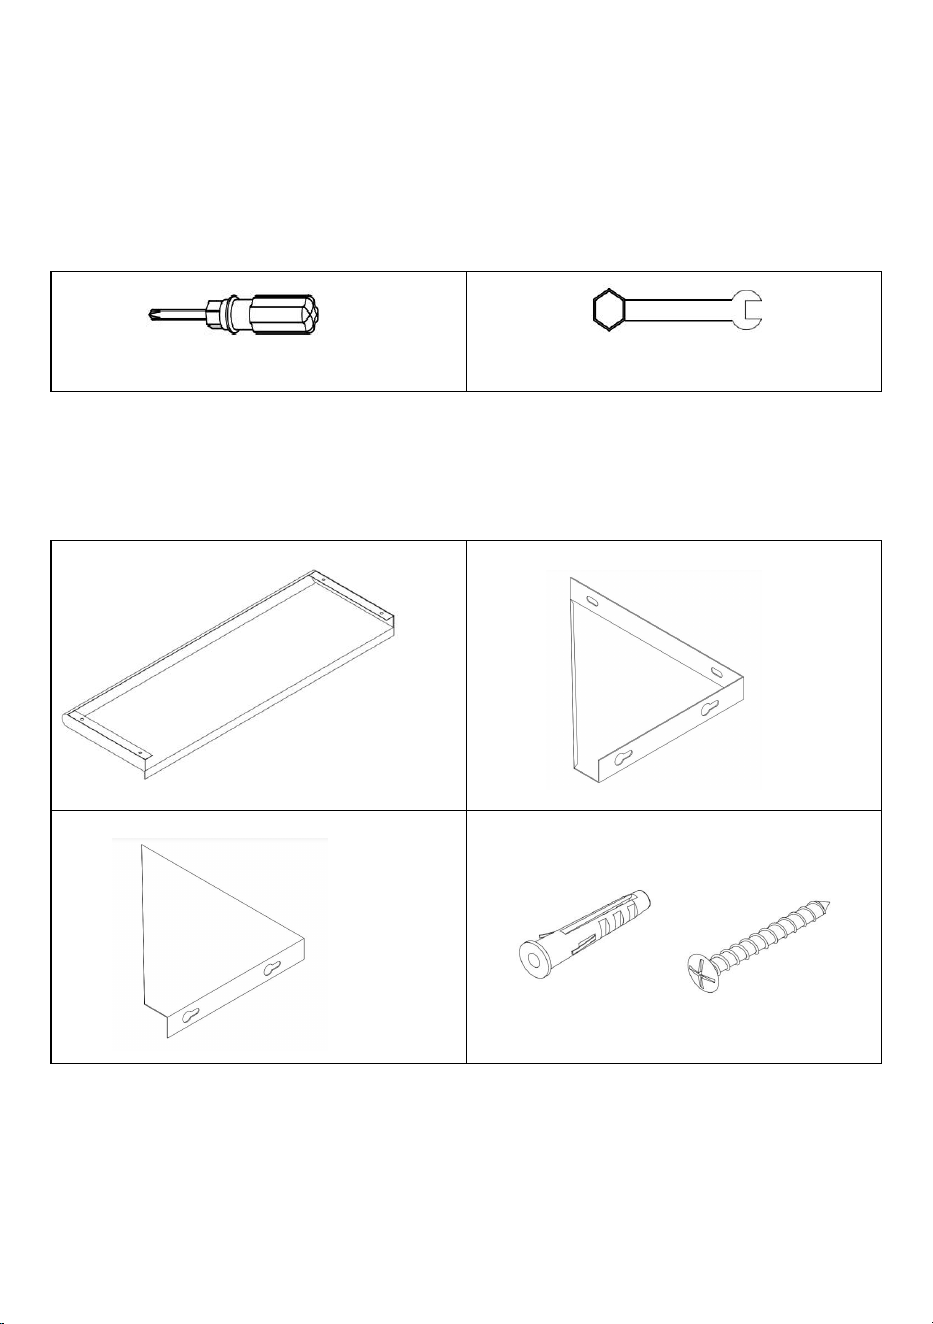
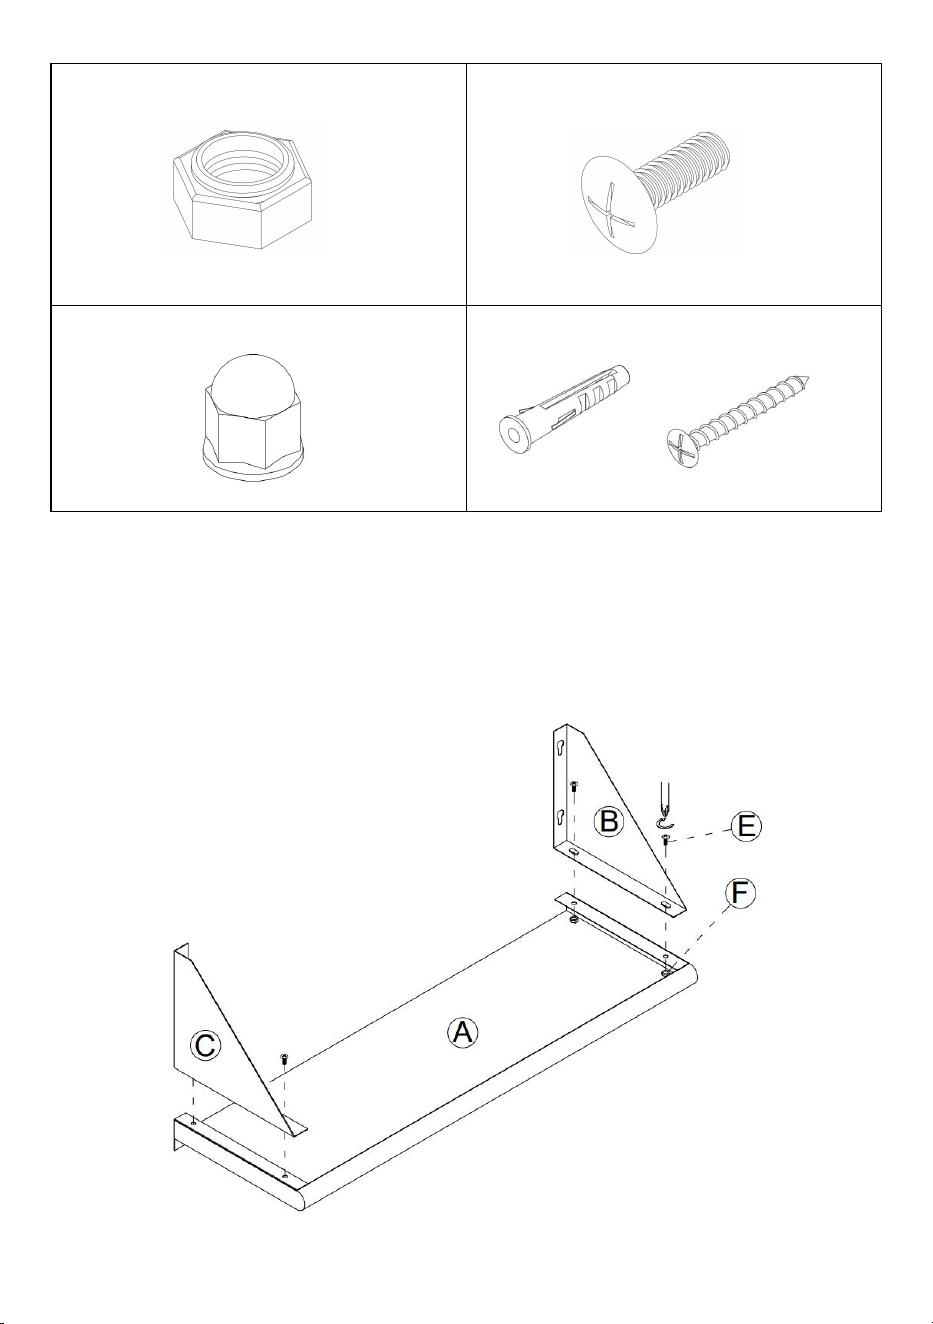
TOOLS REQUIRED
PARTS LIST(2 lower supports)
NOTE: Part not shown to actual size.
Allen Wrench( not Included)
Allen Wrench( not Included)
X1
A
X1
X1
X4
C
D
E
B
F
X4
X4
5
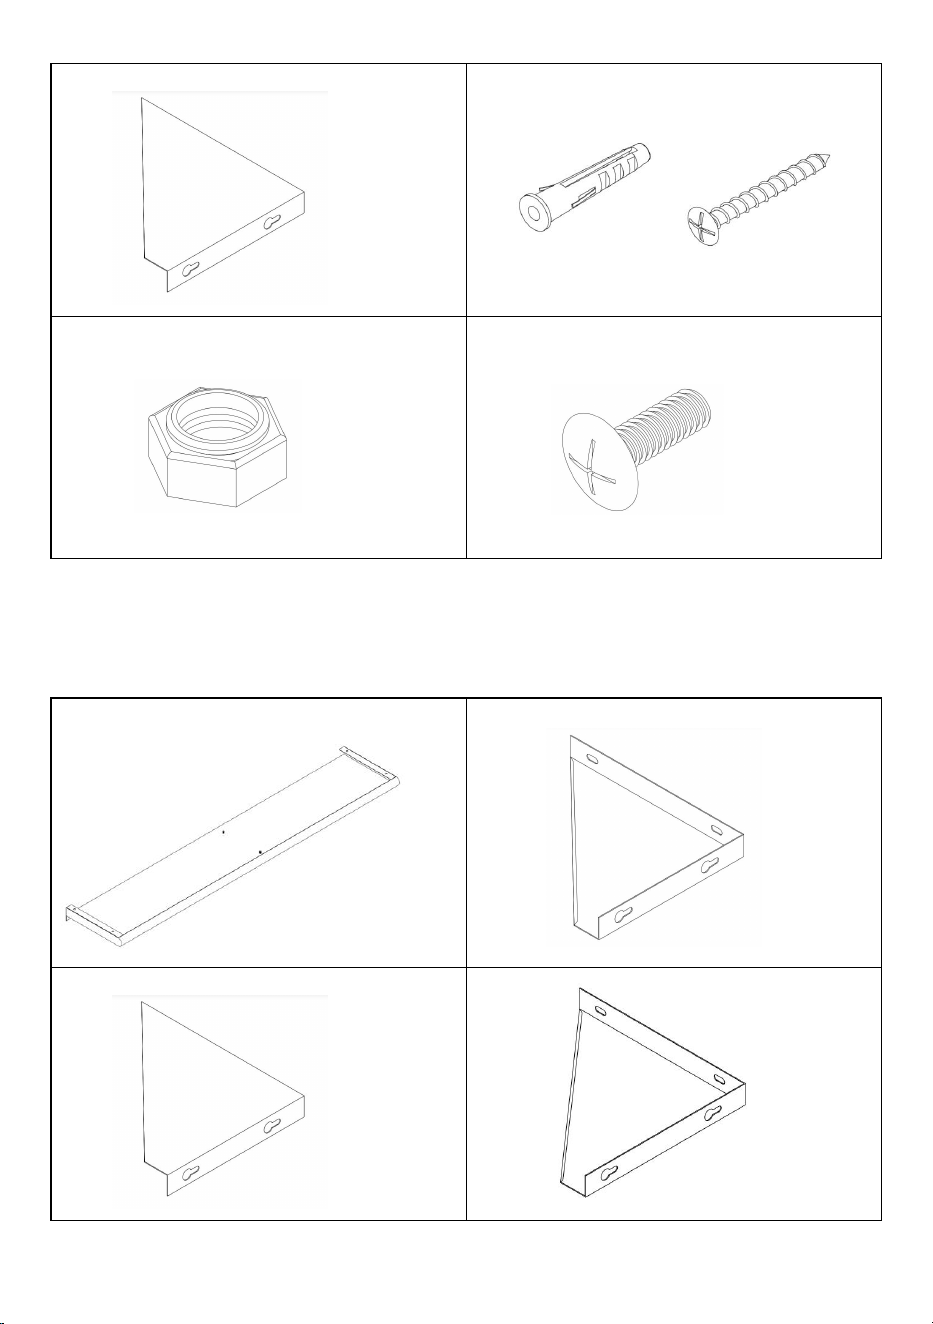
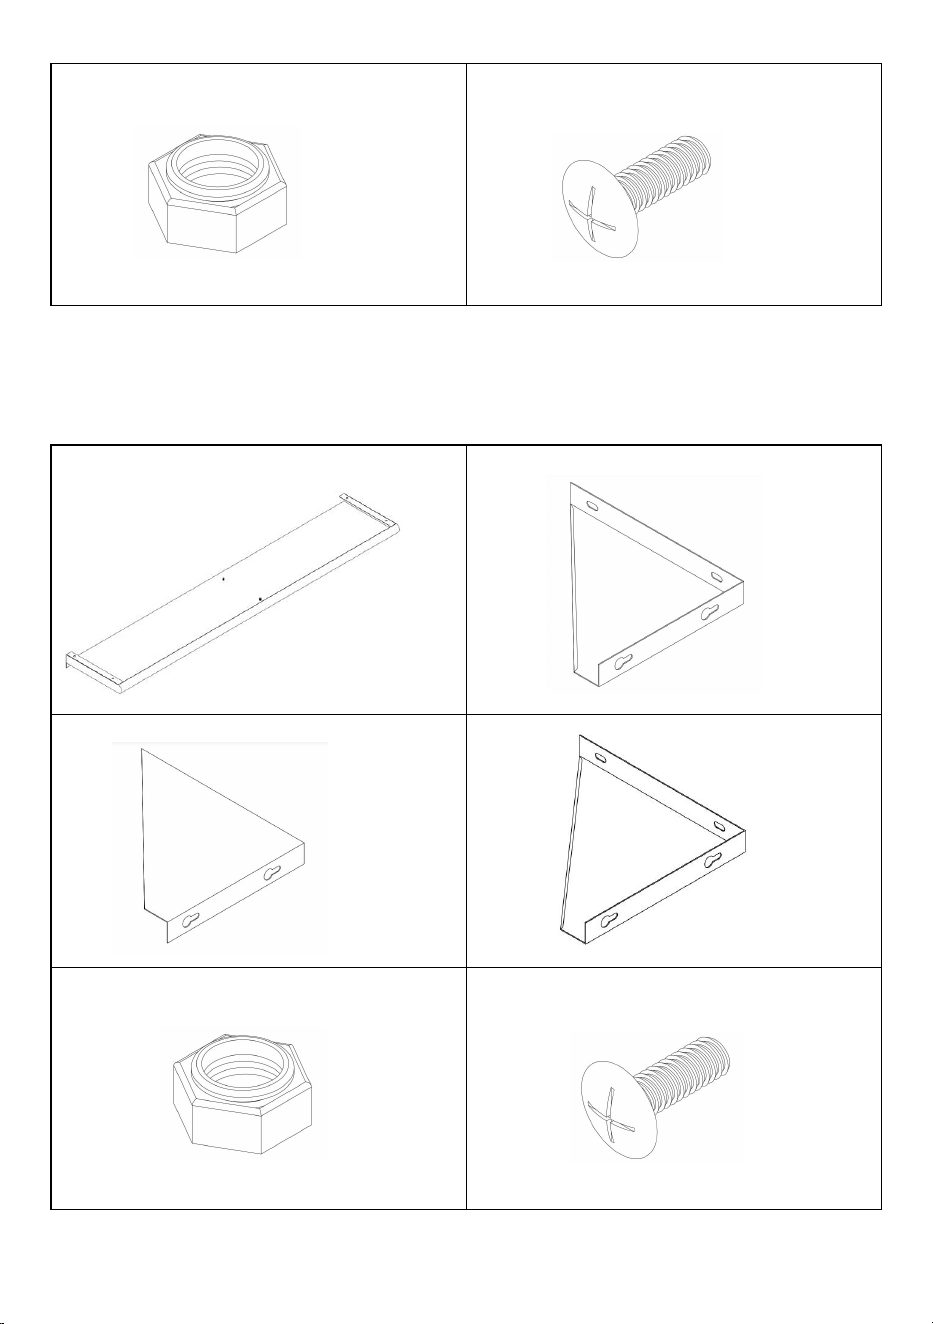
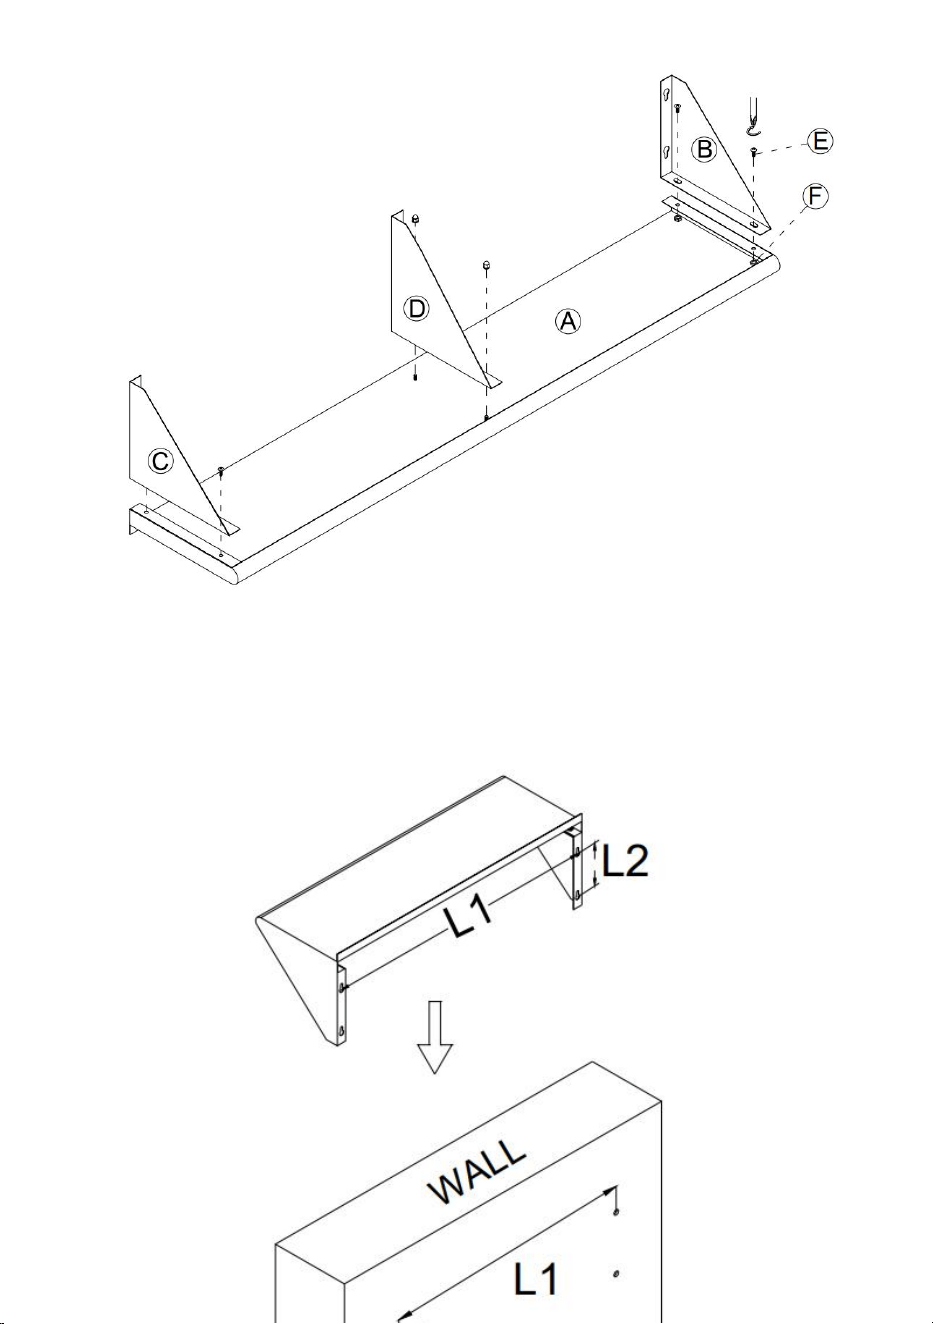
PARTS LIST(3 lower supports)
X1
A
X1
C
H
D
E
B
F
X4
X6
X1
X1
X4
G
X3
6
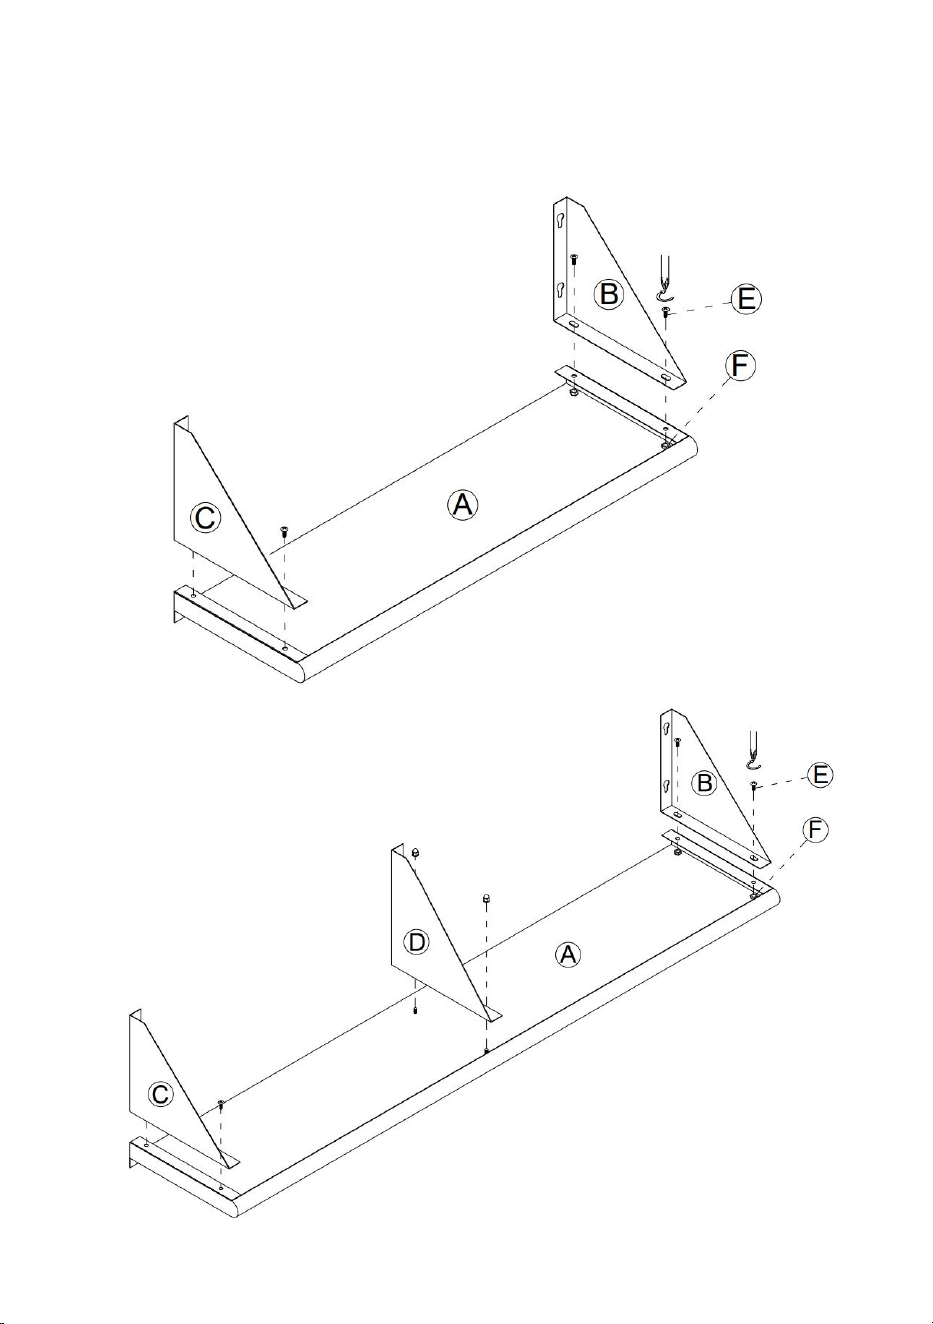
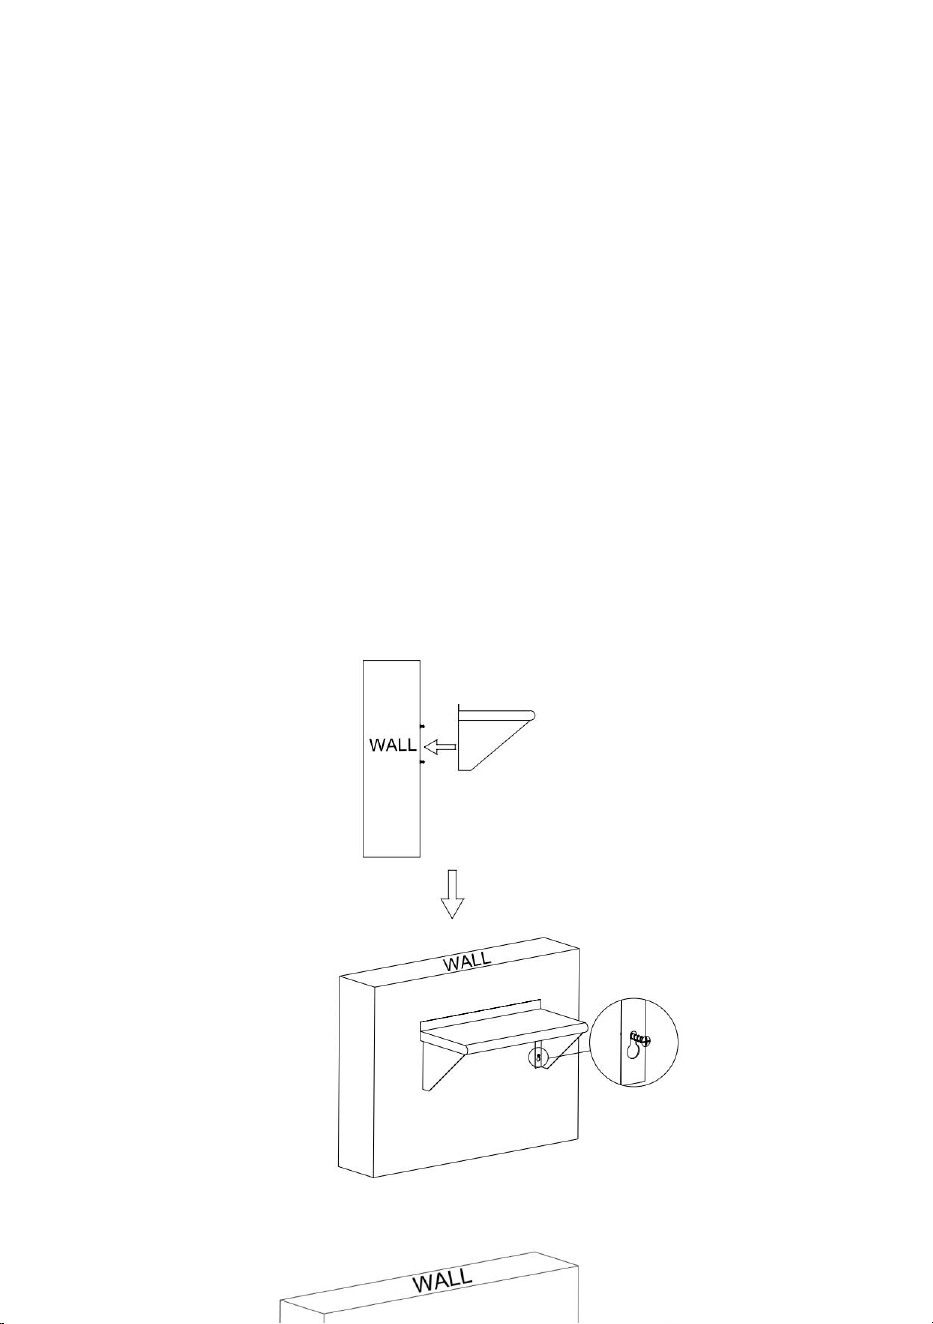
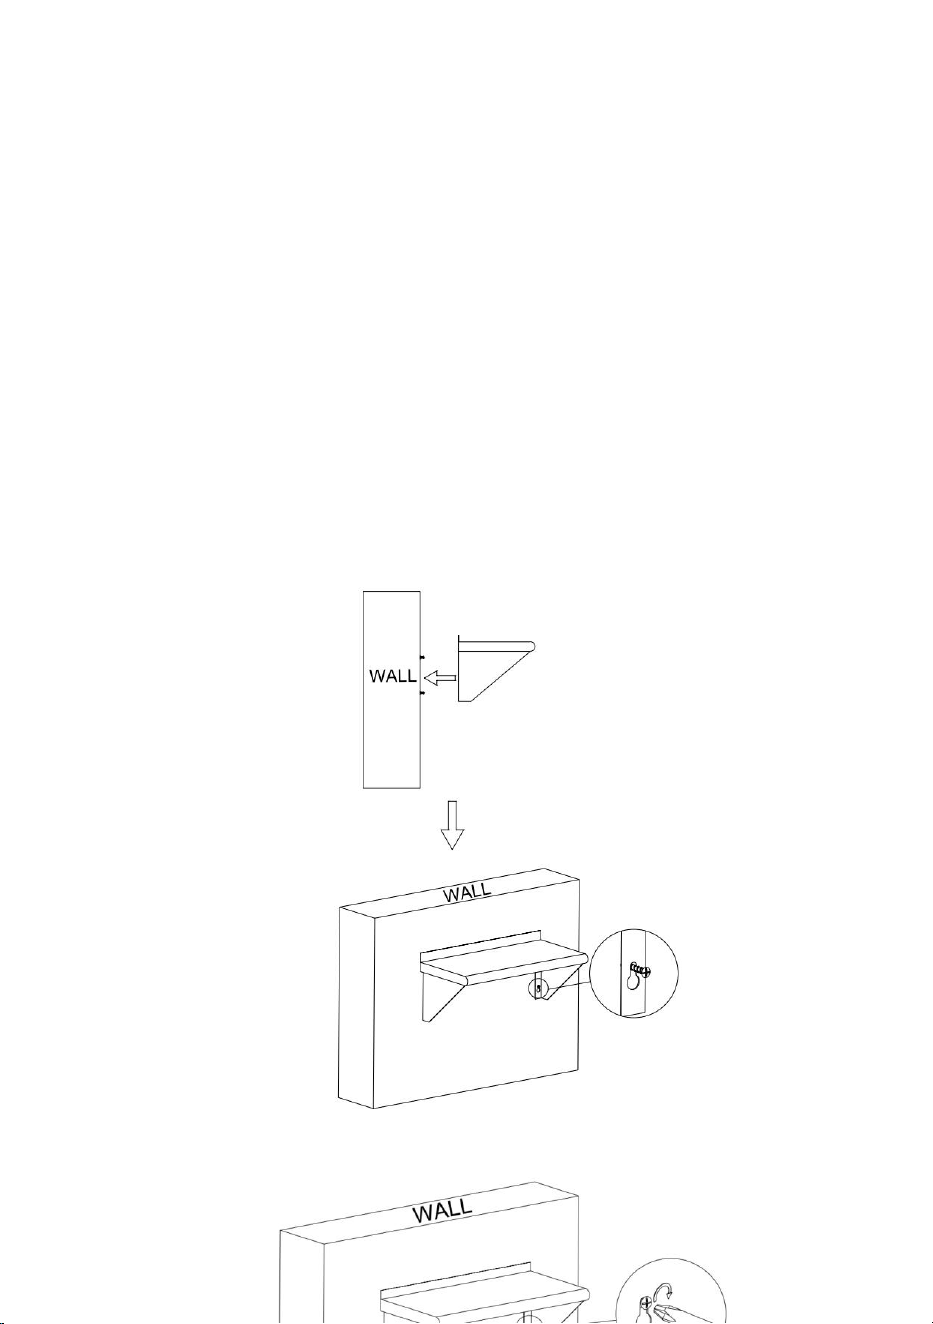
ASSEMBLY STEPS
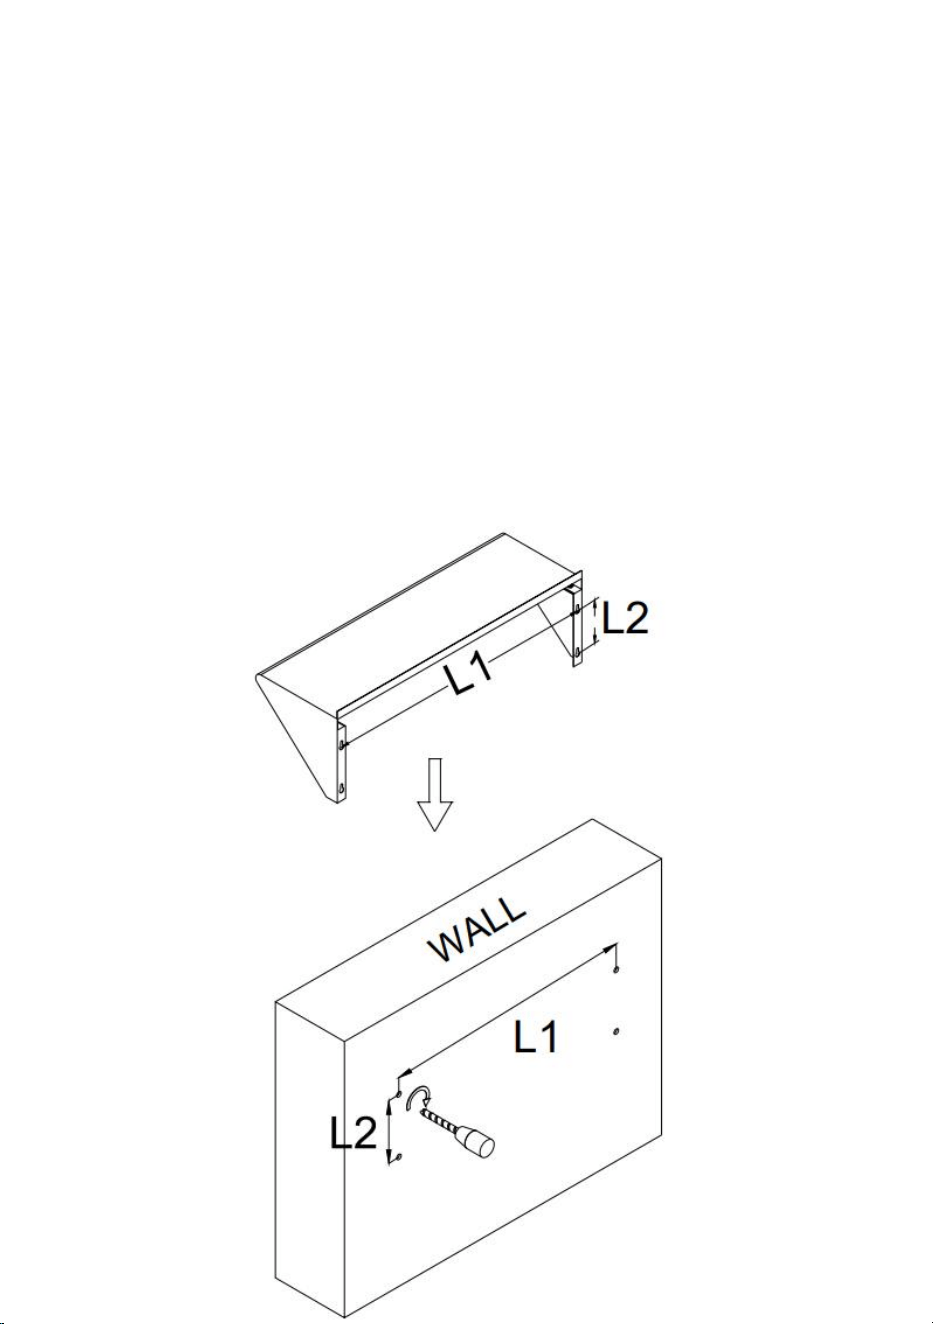
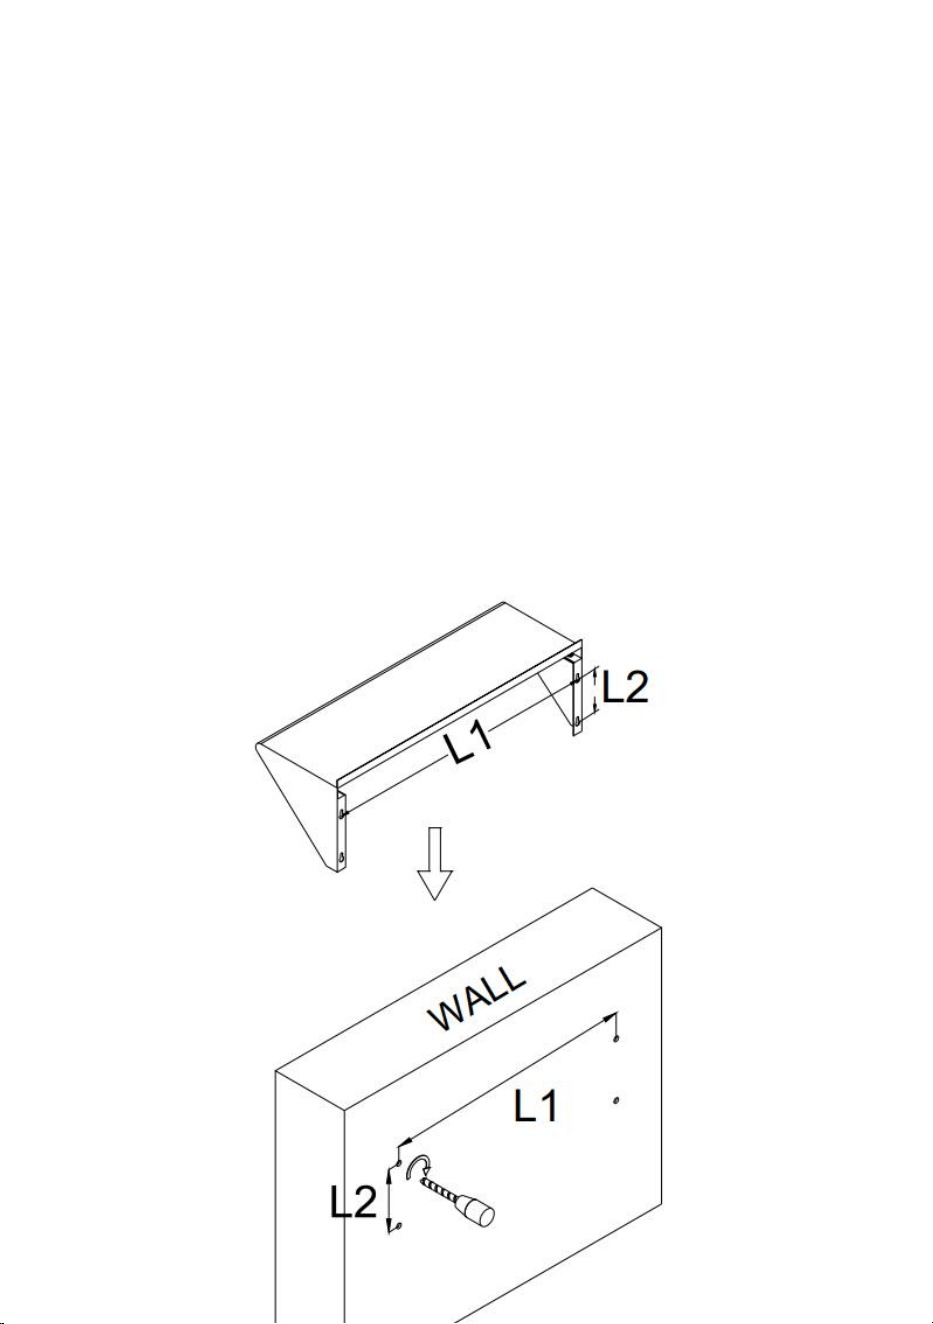
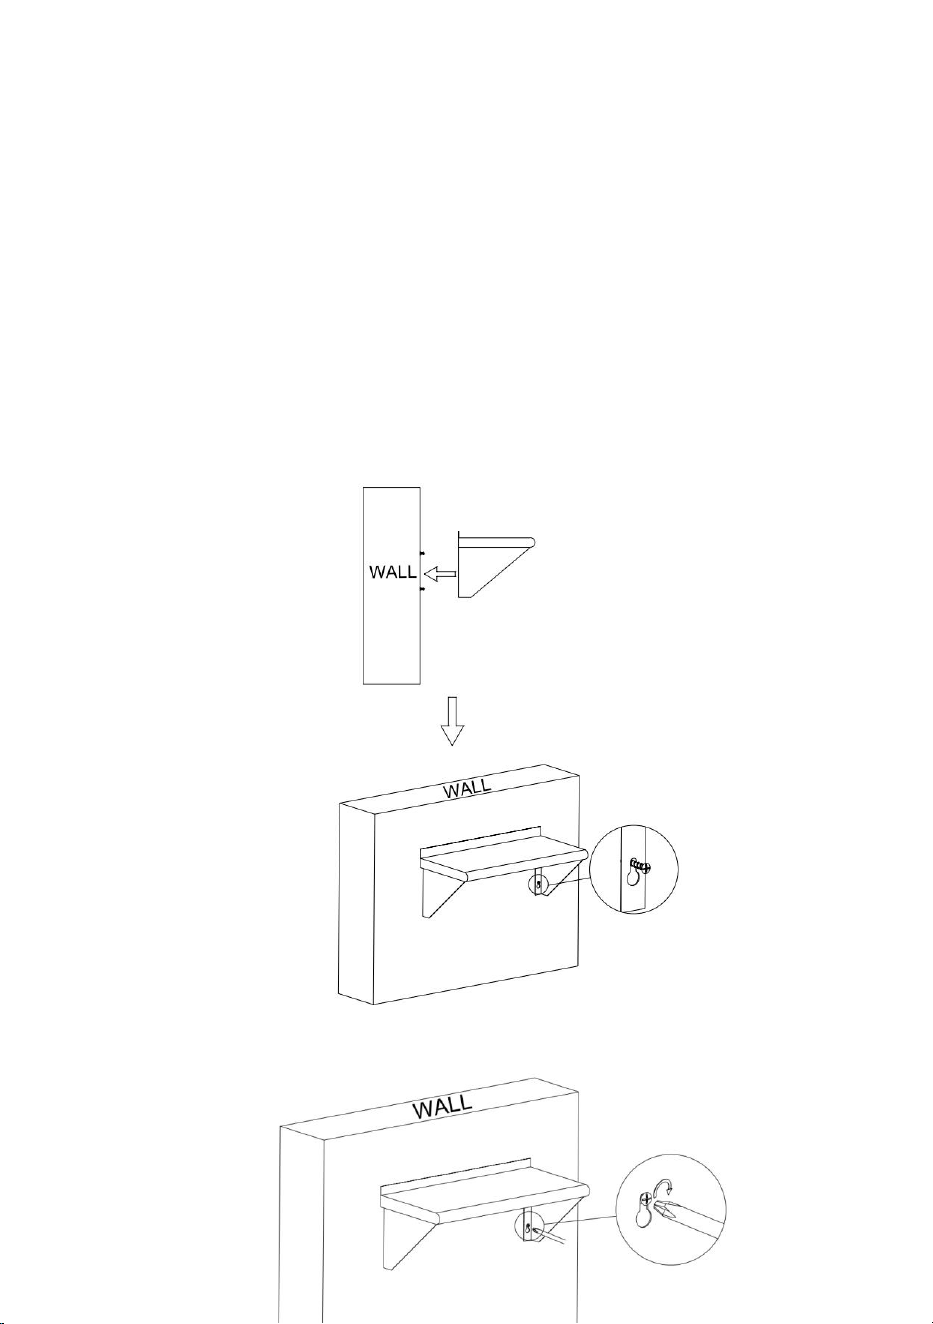
1、Lock the support frames on Top
Ⓖ
7
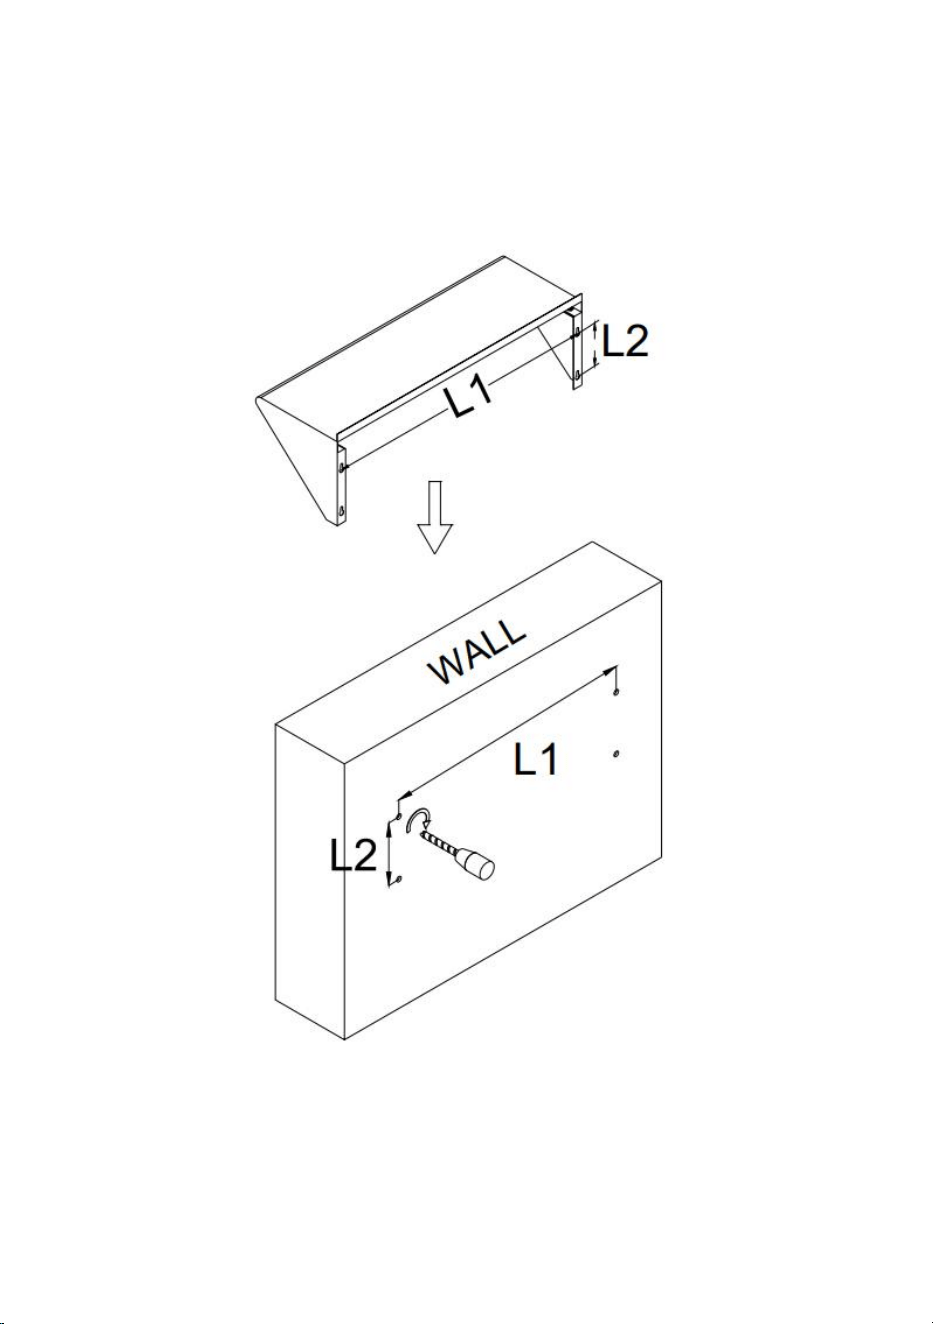
2. Measure the distance between the support frame holes
3、Punch on the wall the distance is L1 and L2
8
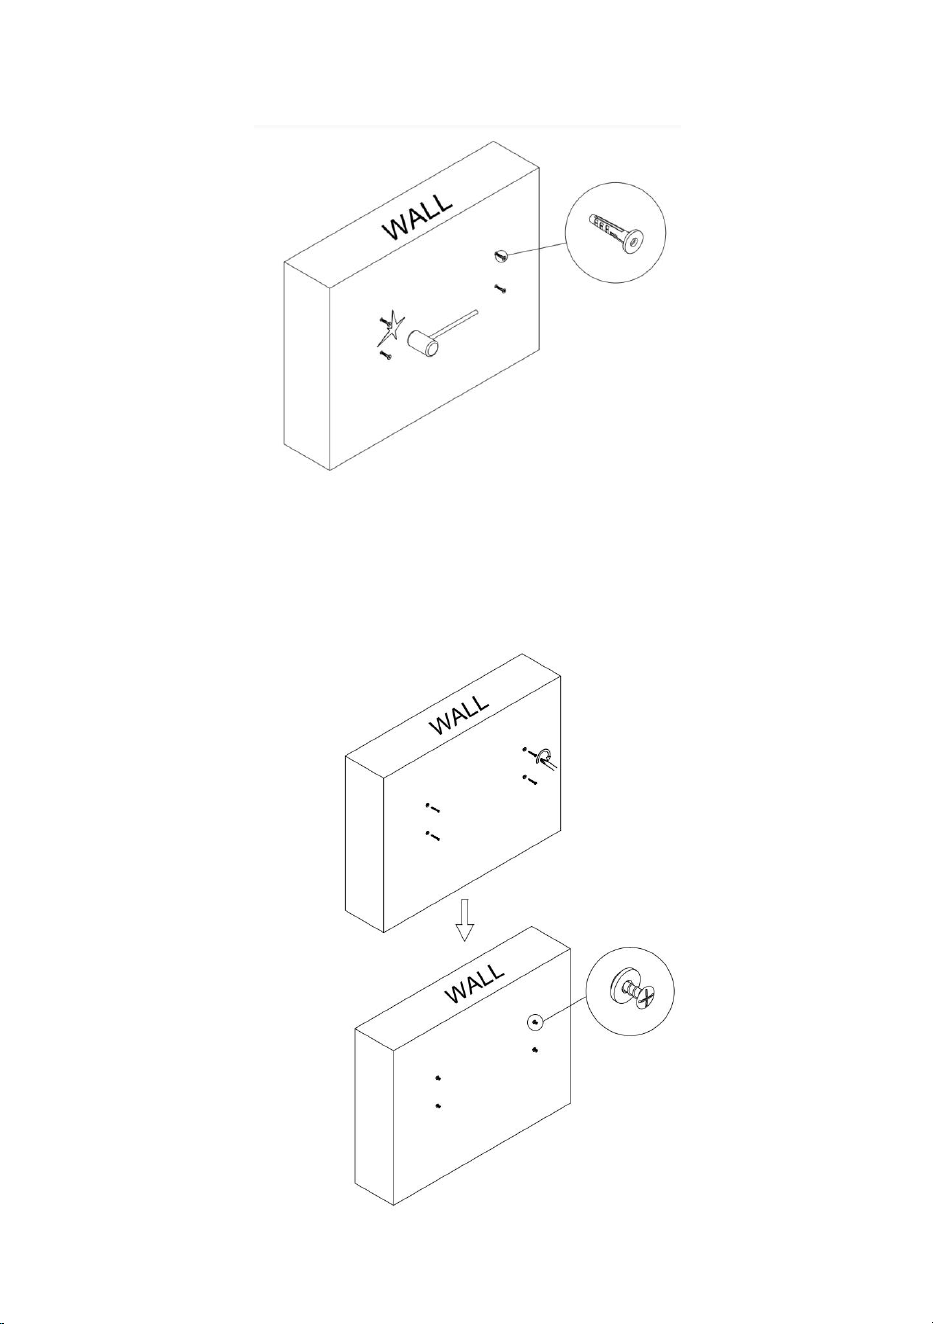
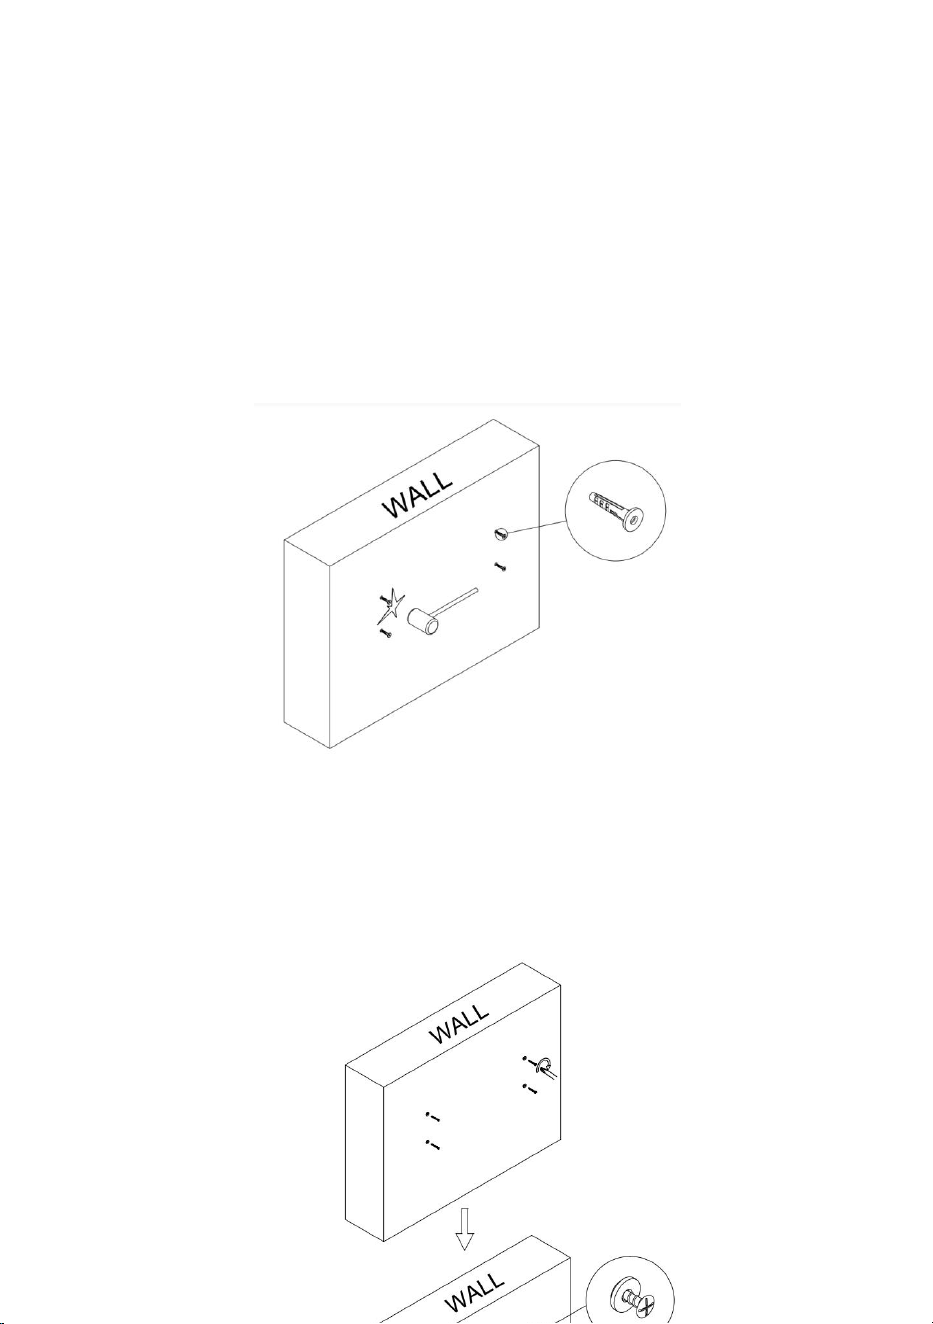
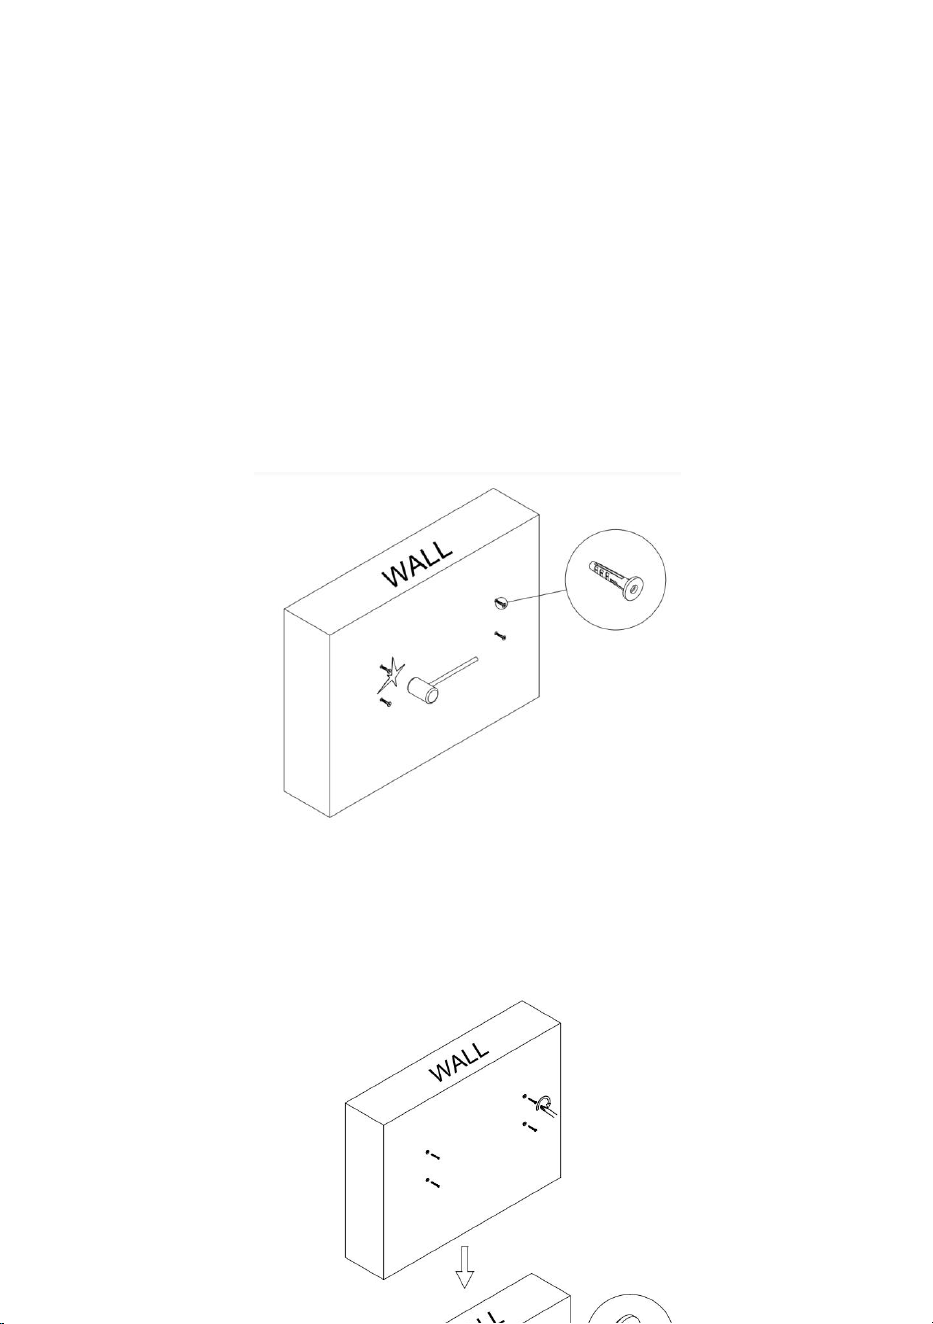
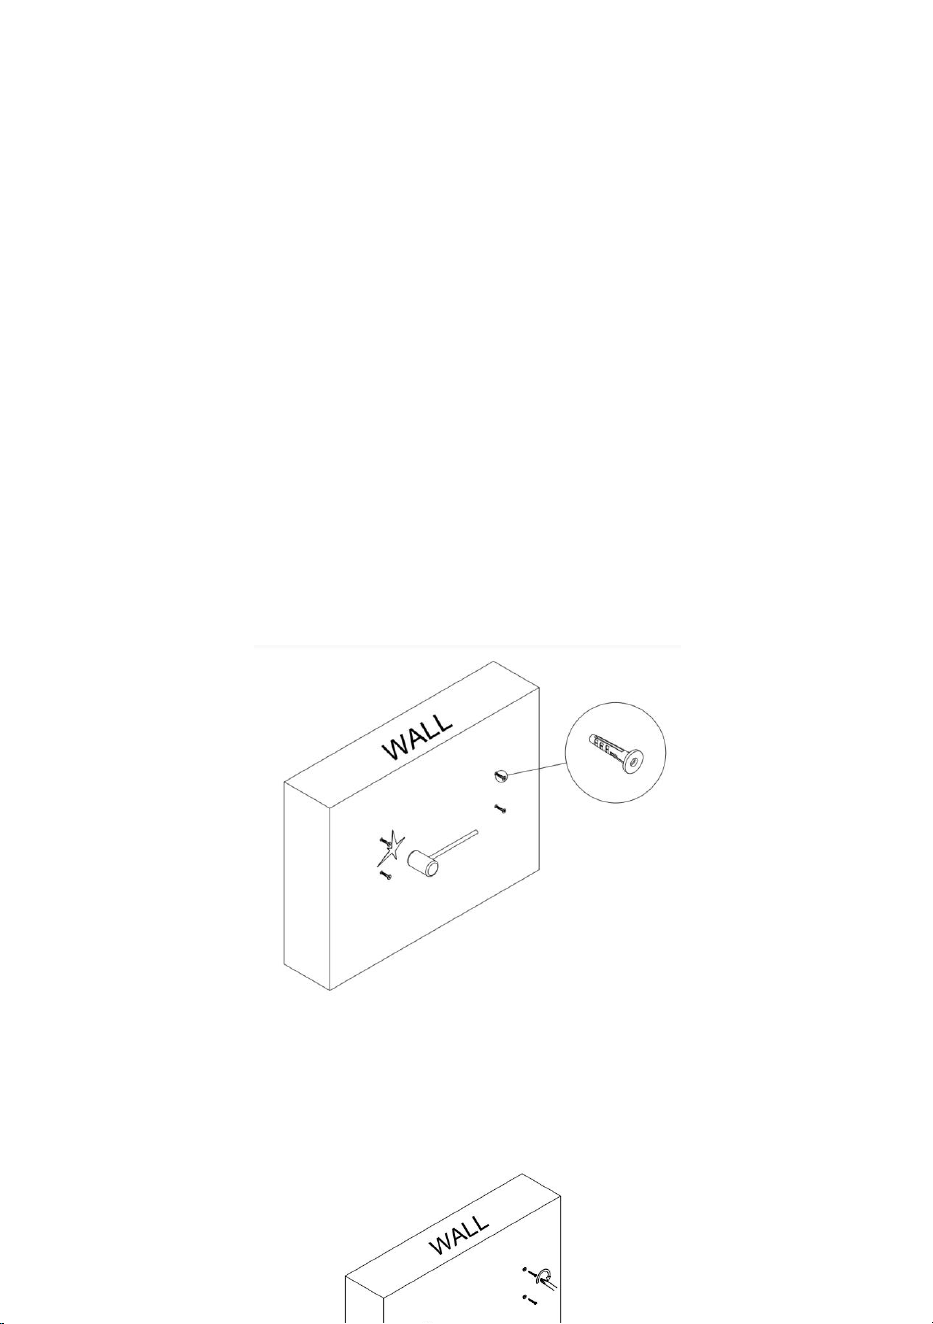
4、Knock the plastic parts into the hole on the wall
5、Screw the screw into the plastic parts, do not screw it to
the bottom of the 10mm distance
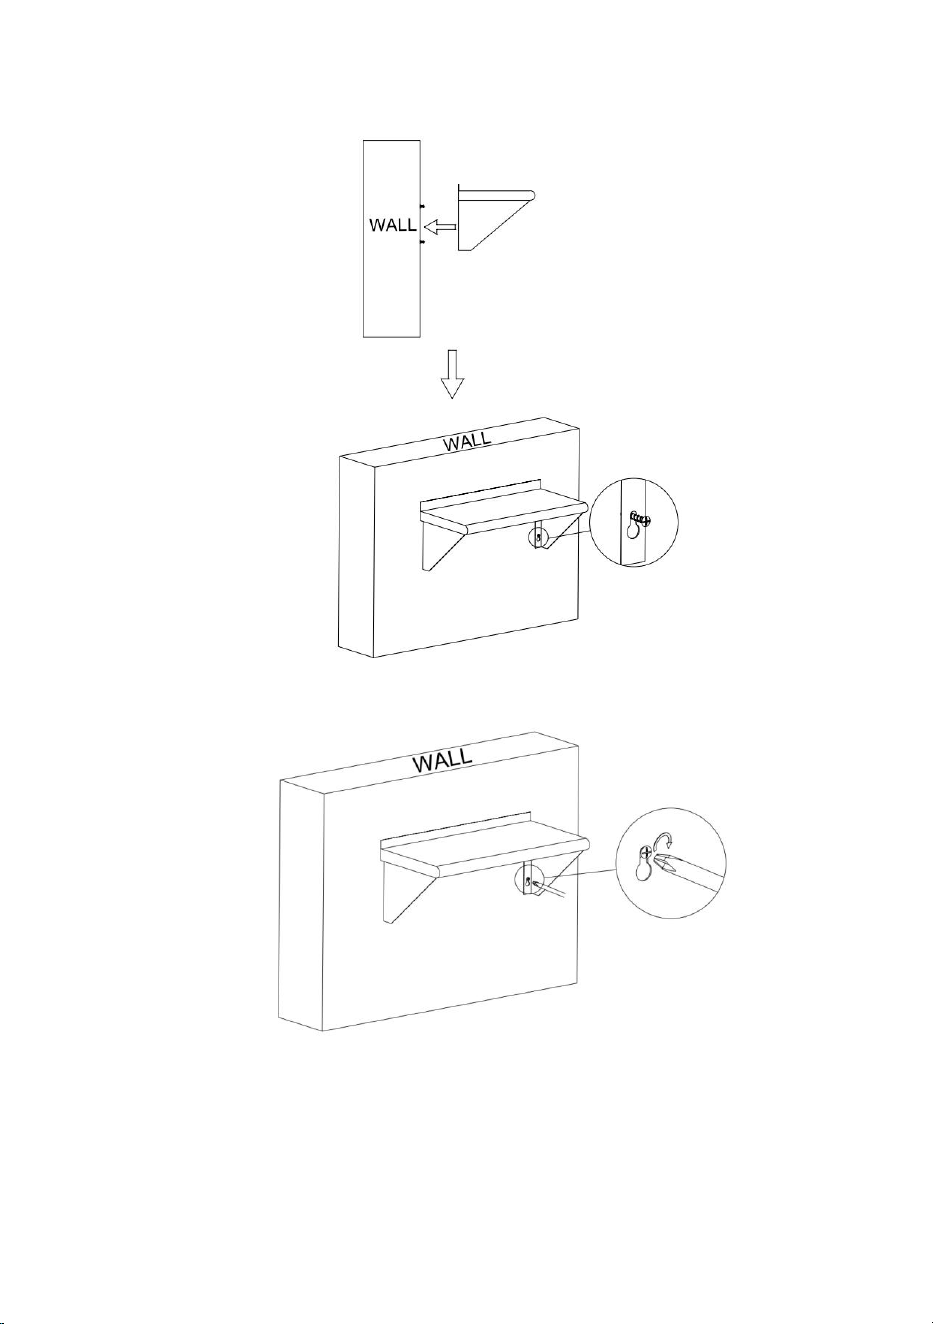
9
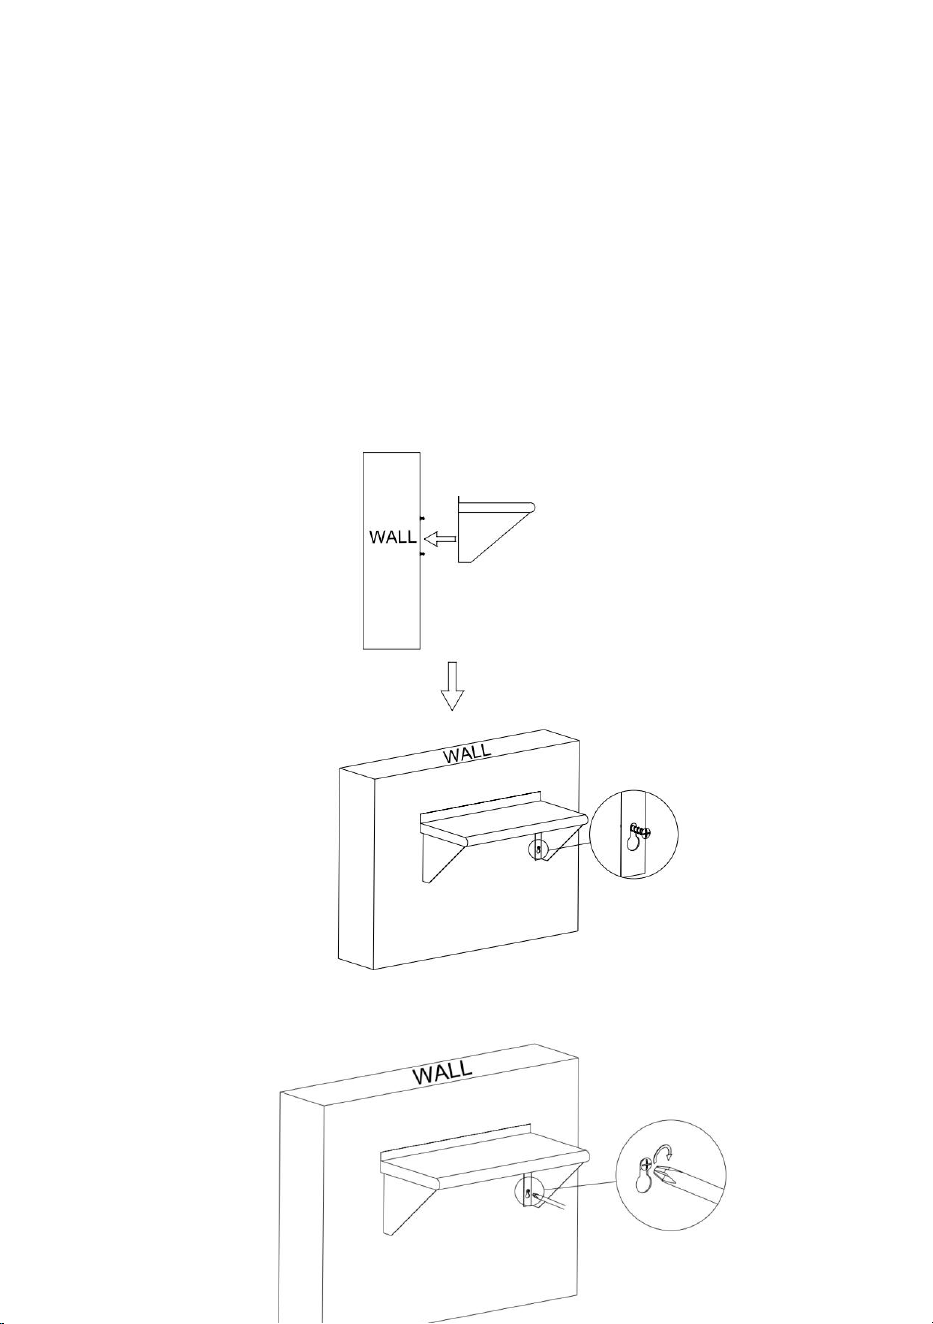
6、Hang the Top on the screw
7、Tighten the screw
Cleaning
-For cleaning, wipe the surface with a damp (not wet) cloth or wipe dry
with a clean lint free cotton cloth.


Techniczny Wsparcie i certyfikat gwarancji elektronicznej www.vevor.com/support
PÓŁKA ŚCIENNA ZE STALI
NIERDZEWNEJ
INSTRUKCJA obsługi
We continue to be committed to provide you tools with competitive price.
"Save Half", "Half Price" or any other similar expressions used by us only represents an
estimate of savings you might benefit from buying certain tools with us compared to the major
top brands and doses not necessarily mean to cover all categories of tools offered by us. You
are kindly reminded to verify carefully when you are placing an order with us if you are
actually saving half in comparison with the top major brands.

1
Dziękujemy za zakup jednego z naszych produktów. Przed instalacją prosimy o
dokładne zapoznanie się z instrukcją montażu .
Ta instalacja dotyczy półki ściennej ze stali nierdzewnej z 2 dolnymi wspornikami i
3 dolnymi wspornikami
Have product questions? Need technical support? Please feel free to
contact us:
CustomerService@vevor.com
NEED HELP? CONTACT US!
This is the original instruction, please read all manual instructions
carefully before operating. VEVOR reserves a clear interpretation of our
user manual. The appearance of the product shall be subject to the
product you received. Please forgive us that we won't inform you again if
there are any technology or software updates on our product.
STAINLESS STEEL WALL SHELF

2
PARAMETRY PRODUKTU
ŚRODKI OSTROŻNOŚCI PODCZAS
MONTAŻU
1. Montaż musi być zgodny z poniższymi instrukcjami. Nieprawidłowy
montaż może być niebezpieczny.
Model
Produkt Rozmiar / cal
Załadunek Pojemność /
maks.
WMS1224
12*24
230 funtów
WMS1236
12*36
250 funtów
WMS1248
12*48
280 funtów
WMS1260
12*60
315 funtów
WMS1436
14*36
300 funtów
WMS1448
14*48
350 funtów
WMS1460
14*60
400 funtów
WMS1824
18*24
300 funtów
WMS1848
18*48
400 funtów
WMS1860
18*60
450 funtów
WMS1872
18*72
500 funtów

3
2. Podczas montażu należy nosić okulary ochronne i solidne rękawice
robocze.
3. Nie przychodź na spotkania, jeśli jesteś zmęczony lub pod wpływem
alkoholu, narkotyków lub leków.
4. Podane parametry dotyczące nośności i innych parametrów produktu
odnoszą się wyłącznie do produktu prawidłowo i kompletnie
zmontowanego.
5. Utrzymuj miejsce zgromadzenia w czystości i zapewnij dobre
oświetlenie.
6. Podczas montażu nie dopuszczaj osób postronnych na teren montażu.
7. Do montażu potrzebne są dwie osoby.
ŚRODKI OSTROŻNOŚCI
OSTRZEŻENIE: ABY ZAPOBIEC POWAŻNYM OBRAŻENIOM I
ŚMIERCI SPOWODOWANEJ PRZEWRÓCENIEM:
1. Ten produkt nie jest zabawką. Nie pozwalaj dzieciom bawić się tym
przedmiotem ani zbliżać się do niego.
2. Używać wyłącznie zgodnie z przeznaczeniem. Nie siadać ani nie stawać
na produkcie.
3. Przed każdym użyciem sprawdź. Nie używaj, jeśli części są luźne lub
uszkodzone.
4.
Stosować wyłącznie na płaskich, równych i twardych powierzchniach
.
5. Nie przekraczaj podanego udźwigu. Przed zastosowaniem obciążenia
dokręć mocno wszystkie pokrętła. Uważaj na obciążenie dynamiczne!
Nagły ruch obciążenia może na krótko spowodować nadmierne obciążenie,
powodując awarię produktu.
4
WYMAGANE NARZĘDZIA
LISTA CZĘŚCI (2 dolne wsporniki)
NOTATKA: Część nie jest pokazana w rzeczywistych
rozmiarach.
Allen Wrench( not Included)
Allen Wrench( not Included)
X1
A
X1
X1
X4
B
5
LISTA CZĘŚCI (3 dolne wsporniki)
X1
C
D
E
F
X4
X4
A
X1
C
D
B
X4
X1
X1

6
KROKI MONTAŻU
1、 Zablokuj ramy podporowe na górze
H
E
F
X6
X4
G
X3

7
2. Zmierz odległość między otworami ramy nośnej
3. Uderz w ścianę, odległość wynosi L1 i L2
Ⓖ

8
4、 Włóż plastikowe części do otworu w ścianie
5. Wkręć śrubę do plastikowych części, nie wkręcaj jej do
dolnej części w odległości 10 mm
9
6. Zawieś górę na śrubie
7、Dokręć śrubę

10
Czyszczenie
- Do czyszczenia należy przecierać powierzchnię wilgotną (nie mokrą)
szmatką lub wycierać do sucha czystą, bawełnianą szmatką, która nie
pozostawia włókien.


Technisch Support und E-Garantie-Zertifikat www.vevor.com/support
WANDREGAL AUS EDELSTAHL
Benutzerhandbuch
We continue to be committed to provide you tools with competitive price.
"Save Half", "Half Price" or any other similar expressions used by us only represents an
estimate of savings you might benefit from buying certain tools with us compared to the major
top brands and doses not necessarily mean to cover all categories of tools offered by us. You
are kindly reminded to verify carefully when you are placing an order with us if you are
actually saving half in comparison with the top major brands.

1
Vielen Dank für den Kauf eines unserer Produkte. Bitte lesen Sie die
Montageanleitung vor der Installation sorgfältig durch .
Diese Montage ist für Edelstahl-Wandregale mit 2 unteren Stützen und 3 unteren
Stützen
Have product questions? Need technical support? Please feel free to
contact us:
CustomerService@vevor.com
NEED HELP? CONTACT US!
This is the original instruction, please read all manual instructions
carefully before operating. VEVOR reserves a clear interpretation of our
user manual. The appearance of the product shall be subject to the
product you received. Please forgive us that we won't inform you again if
there are any technology or software updates on our product.
STAINLESS STEEL WALL SHELF
2
PRODUKTPARAMETER
VORSICHTSMASSNAHMEN BEI DER
MONTAGE
1. Beim Zusammenbau müssen diese Anweisungen befolgt werden. Ein
falscher Zusammenbau kann gefährlich sein.
Modell
Produkt Größe / Zoll
Laden Kapazität / Max
WMS1224
12*24
230 Pfund
WMS1236
12*36
250 Pfund
WMS1248
12*48
280 Pfund
WMS1260
12*60
315 Pfund
WMS1436
14*36
300 Pfund
WMS1448
14*48
350 Pfund
WMS1460
14*60
400 Pfund
WMS1824
18*24
300 Pfund
WMS1848
18*48
400 Pfund
WMS1860
18*60
450 Pfund
WMS1872
18*72
500 Pfund
3
2. Tragen Sie während der Montage eine Schutzbrille und strapazierfähige
Arbeitshandschuhe.
3. Nicht montieren, wenn Sie müde sind oder unter dem Einfluss von
Alkohol, Drogen oder Medikamenten stehen.
4. Gewichtskapazität und andere Produkteigenschaften gelten nur für ein
ordnungsgemäß und vollständig montiertes Produkt.
5. Halten Sie den Versammlungsbereich sauber und gut beleuchtet.
6. Halten Sie während der Montage unbeteiligte Zuschauer vom Bereich
fern.
7. Für die Montage sind zwei Personen erforderlich.
VORSICHTSMASSNAHMEN BEIM
GEBRAUCH
WARNUNG: UM SCHWERE VERLETZUNGEN UND TOD DURCH
KIPPEN ZU VERMEIDEN:
1. Dieses Produkt ist kein Spielzeug. Erlauben Sie Kindern nicht, mit
diesem Produkt zu spielen oder sich ihm zu nähern.
2. Nur bestimmungsgemäß verwenden. Nicht auf dem Produkt sitzen oder
stehen.
3. Vor jedem Gebrauch überprüfen. Nicht verwenden, wenn Teile lose oder
beschädigt sind.
4.
Nur auf flachen, ebenen und harten Oberflächen verwenden
.
5. Überschreiten Sie nicht die angegebene Gewichtskapazität. Ziehen Sie
alle Knöpfe fest an, bevor Sie eine Last aufbringen. Achten Sie auf
dynamische Belastung! Die plötzliche Lastbewegung kann kurzzeitig eine
Überlastung erzeugen und zu einem Produktausfall führen.
4
BENÖTIGTES WERKZEUG
TEILELISTE (2 untere Stützen)
NOTIZ: Teil nicht in Originalgröße dargestellt.
Allen Wrench( not Included)
Allen Wrench( not Included)
X1
A
X1
X1
X4
C
D
B
X4
X4

5
TEILELISTE (3 untere St
ü
tzen)
X1
E
F
A
X1
C
D
E
B
F
X4
X6
X1
X1
X4

6
MONTAGEANLEITUNG
1. Verriegeln Sie die Stützrahmen oben
H
Ⓖ
G
X3

7
2. Messen Sie den Abstand zwischen den Löchern des
Stützrahmens
3. Schlag gegen die Wand, der Abstand beträgt L1 und L2
8
4. Schlagen Sie die Kunststoffteile in das Loch an der
Wand
5. Schrauben Sie die Schraube in die Kunststoffteile,
schrauben Sie sie nicht bis zum Boden des 10 mm
Abstands
9
6. Hängen Sie das Oberteil auf auf der Schraube
7、Schraube festziehen

10
Reinigung
- Wischen Sie die Oberfläche zum Reinigen mit einem feuchten (nicht
nassen) Tuch ab oder reiben Sie sie mit einem sauberen, fusselfreien
Baumwolltuch trocken.


Technique Certificat d'assistance et de garantie électronique
www.vevor.com/support
ÉTAGÈRE MURALE EN ACIER
INOXYDABLE
MANUEL D' utilisation
We continue to be committed to provide you tools with competitive price.
"Save Half", "Half Price" or any other similar expressions used by us only represents an
estimate of savings you might benefit from buying certain tools with us compared to the major
top brands and doses not necessarily mean to cover all categories of tools offered by us. You
are kindly reminded to verify carefully when you are placing an order with us if you are
actually saving half in comparison with the top major brands.

1
Merci d'avoir acheté l'un de nos produits, veuillez lire attentivement les instructions
de montage avant l'installation .
Cette installation est destinée à une étagère murale en acier inoxydable avec 2
supports inférieurs et 3 supports inférieurs
Have product questions? Need technical support? Please feel free to
contact us:
CustomerService@vevor.com
NEED HELP? CONTACT US!
This is the original instruction, please read all manual instructions
carefully before operating. VEVOR reserves a clear interpretation of our
user manual. The appearance of the product shall be subject to the
product you received. Please forgive us that we won't inform you again if
there are any technology or software updates on our product.
STAINLESS STEEL WALL SHELF

2
PARAMÈTRES DU PRODUIT
PRÉCAUTIONS D'ASSEMBLAGE
1. L'assemblage doit être effectué conformément aux instructions
ci-dessous. Un assemblage incorrect peut être dangereux.
2. Portez des lunettes de sécurité et des gants de travail résistants
Modèle
Produit Taille / pouce
Chargement Capacité /
Max
WMS1224
12*24
230 livres
WMS1236
12*36
250 livres
WMS1248
12*48
280 livres
WMS1260
12*60
315 livres
WMS1436
14*36
300 livres
WMS1448
14*48
350 livres
WMS1460
14*60
400 livres
WMS1824
18*24
300 livres
WMS1848
18*48
400 livres
WMS1860
18*60
450 livres
WMS1872
18*72
500 livres
3
pendant l’assemblage.
3. Ne montez pas lorsque vous êtes fatigué ou sous l'influence de l'alcool,
de drogues ou de médicaments.
4. La capacité de poids et les autres capacités du produit s'appliquent
uniquement à un produit correctement et complètement assemblé.
5. Gardez la zone de montage propre et bien éclairée.
6. Gardez les spectateurs hors de la zone pendant le montage.
7. Nécessite deux personnes pour l'assemblage.
PRÉCAUTIONS D'EMPLOI
AVERTISSEMENT: POUR ÉVITER LES BLESSURES GRAVES ET
LA MORT RÉSULTANT DU BASCULEMENT :
1. Ce produit n'est pas un jouet. Ne laissez pas les enfants jouer avec ou
s'en approcher.
2. Utiliser uniquement comme prévu. Ne pas s'asseoir ni se tenir debout
sur le produit.
3. Inspectez l'appareil avant chaque utilisation. Ne l'utilisez pas si des
pièces sont desserrées ou endommagées.
4.
Utiliser uniquement sur des surfaces planes, nivelées et dures
.
5. Ne dépassez pas la capacité de charge indiquée. Serrez fermement
tous les boutons avant d'appliquer la charge. Soyez attentif à la charge
dynamique ! Le mouvement soudain de la charge peut brièvement créer
une charge excessive, provoquant une défaillance du produit.
4
OUTILS REQUIS
LISTE DES PIECES (2 supports inférieurs)
NOTE: Pièce non représentée à la taille réelle.
Allen Wrench( not Included)
Allen Wrench( not Included)
X1
A
X1
X1
X4
C
D
B
X4
X4
5
LISTE DES PIECES (3 supports inf
é
rieurs)
X1
E
F
A
X1
C
D
E
B
F
X4
X6
X1
X1
X4

6
É
TAPES D'ASSEMBLAGE
1、 Verrouillez les cadres de support sur le dessus
H
Ⓖ
G
X3
7
2. Mesurer la distance entre les trous du cadre de support
3、 Frappez le mur, la distance est L1 et L2

8
4、 Enfoncez les pièces en plastique dans le trou du mur
5、 Vissez la vis dans les pièces en plastique, ne la vissez
pas au fond de la distance de 10 mm

9
6、 Accrochez le haut sur la vis
7、Serrer la vis

10
Nettoyage
-Pour le nettoyage, essuyez la surface avec un chiffon humide (pas
mouillé) ou essuyez avec un chiffon en coton propre non pelucheux.


Technisch Ondersteuning en E-garantiecertificaat www.vevor.com/support
WANDPLANK VAN ROESTVRIJ STAAL
Gebruikershandleiding
We continue to be committed to provide you tools with competitive price.
"Save Half", "Half Price" or any other similar expressions used by us only represents an
estimate of savings you might benefit from buying certain tools with us compared to the major
top brands and doses not necessarily mean to cover all categories of tools offered by us. You
are kindly reminded to verify carefully when you are placing an order with us if you are
actually saving half in comparison with the top major brands.

1
Hartelijk dank voor uw aankoop van een van onze producten. Lees de
montage-instructies zorgvuldig door voordat u met de installatie begint .
Deze installatie is voor een roestvrijstalen wandplank met 2 onderste steunen en 3
onderste steunen
Have product questions? Need technical support? Please feel free to
contact us:
CustomerService@vevor.com
NEED HELP? CONTACT US!
This is the original instruction, please read all manual instructions
carefully before operating. VEVOR reserves a clear interpretation of our
user manual. The appearance of the product shall be subject to the
product you received. Please forgive us that we won't inform you again if
there are any technology or software updates on our product.
STAINLESS STEEL WALL SHELF

2
PRODUCTPARAMETERS
MONTAGEVOORZORGSMAATREGELEN
1. Assembleer volgens deze instructies. Onjuiste montage kan gevaarlijk
zijn.
2. Draag tijdens de montage een veiligheidsbril en stevige
werkhandschoenen.
Model
Product Maat / inch
Laden Capaciteit / Max.
WMS1224
12*24
230 pond
WMS1236
12*36
250 pond
WMS1248
12*48
280 pond
WMS1260
12*60
315 pond
WMS1436
14*36
300 pond
WMS1448
14*48
350 pond
WMS1460
14*60
400 pond
WMS1824
18*24
300 pond
WMS1848
18*48
400 pond
WMS1860
18*60
450 pond
WMS1872
18*72
500 pond

3
3. Kom niet bijeen als u moe bent of onder invloed van alcohol, drugs of
medicijnen.
4. Het draagvermogen en andere producteigenschappen gelden alleen
voor een correct en volledig gemonteerd product.
5. Zorg ervoor dat de verzamelplaats schoon en goed verlicht is.
6. Houd omstanders uit de buurt tijdens de montage.
7. Voor de montage zijn twee personen nodig.
GEBRUIK VOORZORGSMAATREGELEN
WAARSCHUWING: OM ERNSTIG LETSEL EN DE DOOD DOOR
KANTELEN TE VOORKOMEN:
1. Dit product is geen speelgoed. Laat kinderen niet met dit item spelen of
in de buurt ervan komen.
2. Gebruik alleen zoals bedoeld. Ga niet op het product zitten of staan.
3. Inspecteer voor elk gebruik. Gebruik het niet als onderdelen los of
beschadigd zijn.
4.
Alleen gebruiken op vlakke, vlakke en harde oppervlakken
.
5. Overschrijd de vermelde gewichtscapaciteit niet. Draai alle knoppen
stevig vast voordat u de belasting aanbrengt. Wees u bewust van
dynamische belasting! De plotselinge belastingbeweging kan kortstondig
een overmatige belasting creëren, waardoor het product defect raakt.
4
BENODIGDE GEREEDSCHAPPEN
ONDERDELENLIJST (2 onderste steunen)
OPMERKING: Onderdeel niet op ware grootte
weergegeven.
Allen Wrench( not Included)
Allen Wrench( not Included)
X1
A
X1
X1
X4
C
D
B
X4
X4

5
ONDERDELENLIJST (3 onderste steunen)
X1
E
F
A
X1
C
D
E
B
F
X4
X6
X1
X1
X4

6
MONTAGESTAPPEN
1. Vergrendel de steunframes aan de bovenkant
H
Ⓖ
G
X3

7
2. Meet de afstand tussen de gaten van het steunframe
3. Sla op de muur, de afstand is L1 en L2
8
4. Sla de plastic onderdelen in het gat in de muur
5. Schroef de schroef in de kunststof onderdelen, maar
schroef hem niet tot aan de onderkant van de 10 mm
afstand
9
6、 Hang de bovenkant op op de schroef
7、Draai de schroef vast

10
Schoonmaak
- Voor het reinigen veegt u het oppervlak af met een vochtige (geen
natte) doek of droogt u het af met een schone, pluisvrije katoenen doek.


Teknisk Support och e-garanticertifikat www.vevor.com/support
VÄGGHYLLA AV ROSTFRI STÅL
Användarmanual
We continue to be committed to provide you tools with competitive price.
"Save Half", "Half Price" or any other similar expressions used by us only represents an
estimate of savings you might benefit from buying certain tools with us compared to the major
top brands and doses not necessarily mean to cover all categories of tools offered by us. You
are kindly reminded to verify carefully when you are placing an order with us if you are
actually saving half in comparison with the top major brands.
1
Tack för att du köpte en av våra produkter, läs noggrant igenom
monteringsanvisningen innan installationen .
Denna installation är för vägghylla i rostfritt stål med 2 nedre stöd och 3 nedre stöd
Have product questions? Need technical support? Please feel free to
contact us:
CustomerService@vevor.com
NEED HELP? CONTACT US!
This is the original instruction, please read all manual instructions
carefully before operating. VEVOR reserves a clear interpretation of our
user manual. The appearance of the product shall be subject to the
product you received. Please forgive us that we won't inform you again if
there are any technology or software updates on our product.
STAINLESS STEEL WALL SHELF

2
PRODUKTPARAMETRAR
FÖRSIKTIGHETSÅTGÄRDER FÖR
MONTERING
1. Montering måste följa dessa instruktioner. Felaktig montering kan vara
en fara.
Modell
Produkt Storlek / tum
Belastning Kapacitet / Max
WMS1224
12*24
230 lb
WMS1236
12*36
250 lb
WMS1248
12*48
280 lb
WMS1260
12*60
315 lb
WMS1436
14*36
300 lb
WMS1448
14*48
350 lb
WMS1460
14*60
400 lb
WMS1824
18*24
300 lb
WMS1848
18*48
400 lb
WMS1860
18*60
450 lb
WMS1872
18*72
500 lb

3
2. Använd skyddsglasögon och kraftiga arbetshandskar vid montering.
3. Sätt dig inte ihop när du är trött eller påverkad av alkohol, droger eller
mediciner.
4. Viktkapacitet och andra produktegenskaper gäller endast en korrekt och
färdigmonterad produkt.
5. Håll monteringsområdet rent och väl upplyst.
6. Håll åskådare borta från området under monteringen.
7. Kräver två personer för montering.
ANVÄND FÖRSIKTIGHETSÅTGÄRDER
VARNING: FÖR ATT FÖRHINDRA ALLVARLIGA SKADA OCH
DÖDSFALL VID VÄLLNING:
1. Denna produkt är inte en leksak. Låt inte barn leka med eller närma sig
detta föremål.
2. Använd endast på avsett sätt. Sitt eller stå inte på produkten.
3. Inspektera före varje användning. Använd den inte om delar är lösa eller
skadade.
4.
Använd endast på plana, jämna och hårda ytor
.
5. Överskrid inte den angivna viktkapaciteten. Dra åt alla knoppar
ordentligt innan du applicerar belastning. Var uppmärksam på dynamisk
laddning! Den plötsliga laströrelsen kan kortvarigt skapa en överbelastning,
vilket kan orsaka produktfel.

4
VERKTYG KRÄVS
DELLISTA (2 nedre stöd)
NOTERA: Del visas inte i verklig storlek.
Allen Wrench( not Included)
Allen Wrench( not Included)
X1
A
X1
X1
X4
C
D
B
X4
X4

5
DELLISTA (3 nedre st
ö
d)
X1
E
F
A
X1
C
D
E
B
F
X4
X6
X1
X1
X4
6
MONTERINGSSEG
1、 Lås stödramarna på toppen
H
Ⓖ
G
X3

7
2. Mät avståndet mellan stödramens hål
3、 Slå på väggen, avståndet är L1 och L2
8
4、 Slå in plastdelarna i hålet på väggen
5、 Skruva fast skruven i plastdelarna, skruva inte fast den
i botten på 10 mm avståndet
9
6、 Häng toppen på skruven
7、Dra åt skruven

10
Rengöring
-För rengöring, torka av ytan med en fuktig (inte våt) trasa eller torka
av med en ren luddfri bomullstrasa.


Técnico Soporte y certificado de garantía electrónica www.vevor.com/support
ESTANTE DE PARED DE ACERO
INOXIDABLE
MANUAL DE usuario
We continue to be committed to provide you tools with competitive price.
"Save Half", "Half Price" or any other similar expressions used by us only represents an
estimate of savings you might benefit from buying certain tools with us compared to the major
top brands and doses not necessarily mean to cover all categories of tools offered by us. You
are kindly reminded to verify carefully when you are placing an order with us if you are
actually saving half in comparison with the top major brands.

1
Gracias por adquirir uno de nuestros productos, lea atentamente las instrucciones
de montaje antes de la instalación .
Esta instalación es para estante de pared de acero inoxidable con 2 soportes
inferiores y 3 soportes inferiores.
Have product questions? Need technical support? Please feel free to
contact us:
CustomerService@vevor.com
NEED HELP? CONTACT US!
This is the original instruction, please read all manual instructions
carefully before operating. VEVOR reserves a clear interpretation of our
user manual. The appearance of the product shall be subject to the
product you received. Please forgive us that we won't inform you again if
there are any technology or software updates on our product.
STAINLESS STEEL WALL SHELF
2
PARÁMETROS DEL PRODUCTO
PRECAUCIONES DE MONTAJE
1. Para el montaje, siga estas instrucciones. Un montaje incorrecto puede
suponer un riesgo.
2. Use gafas de seguridad y guantes de trabajo resistentes durante el
montaje.
Modelo
Producto Tamaño /
pulgada
Cargando Capacidad /
Máx.
WMS1224
12*24
230 libras
WMS1236
12*36
250 libras
WMS1248
12*48
280 libras
WMS1260
12*60
315 libras
WMS1436
14*36
300 libras
WMS1448
14*48
350 libras
WMS1460
14*60
400 libras
WMS1824
18*24
300 libras
WMS1848
18*48
400 libras
WMS1860
18*60
450 libras
WMS1872
18*72
500 libras

3
3. No se reúna cuando esté cansado o bajo la influencia del alcohol,
drogas o medicamentos.
4. La capacidad de peso y otras capacidades del producto se aplican
únicamente a un producto ensamblado de forma correcta y completa.
5. Mantenga el área de reunión limpia y bien iluminada.
6. Mantenga a los transeúntes fuera del área durante el montaje.
7. Requiere dos personas para el montaje.
PRECAUCIONES DE USO
ADVERTENCIA: PARA EVITAR LESIONES GRAVES Y LA
MUERTE POR VUELCO:
1. Este producto no es un juguete. No permita que los niños jueguen con
este artículo ni se acerquen a él.
2. Utilícelo únicamente para el fin previsto. No se siente ni se pare sobre el
producto.
3. Inspeccione el producto antes de cada uso. No lo utilice si hay piezas
sueltas o dañadas.
4.
Úselo únicamente en superficies planas, niveladas y duras
.
5. No exceda la capacidad de peso indicada. Apriete bien todas las perillas
antes de aplicar la carga. ¡ Tenga cuidado con la carga dinámica! El
movimiento repentino de la carga puede crear brevemente un exceso de
carga, lo que provocará una falla del producto.
4
HERRAMIENTAS NECESARIAS
LISTA DE PIEZAS (2 soportes inferiores)
NOTA: Pieza no mostrada en tamaño real.
Allen Wrench( not Included)
Allen Wrench( not Included)
X1
A
X1
X1
X4
C
D
B
X4
X4

5
LISTA DE PIEZAS (3 soportes inferiores)
X1
E
F
A
X1
C
D
E
B
F
X4
X6
X1
X1
X4

6
PASOS DE MONTAJE
1、 Bloquee los marcos de soporte en la parte superior
H
Ⓖ
G
X3
7
2. Mida la distancia entre los orificios del marco de
soporte
3、 Golpea la pared, la distancia es L1 y L2
8
4、 Golpee las piezas de plástico en el orificio de la pared.
5、 Atornille el tornillo en las piezas de plástico, no lo
atornille hasta el fondo de la distancia de 10 mm.
9
6、 Cuelgue la parte superior en el tornillo
7、Apriete el tornillo

10
Limpieza
-Para limpiar, limpie la superficie con un paño húmedo (no mojado) o
seque con un paño de algodón limpio y sin pelusa.


Tecnico Supporto e certificato di garanzia elettronica www.vevor.com/support
MENSOLA DA PARETE IN ACCIAIO INOX
MANUALE D' uso
We continue to be committed to provide you tools with competitive price.
"Save Half", "Half Price" or any other similar expressions used by us only represents an
estimate of savings you might benefit from buying certain tools with us compared to the major
top brands and doses not necessarily mean to cover all categories of tools offered by us. You
are kindly reminded to verify carefully when you are placing an order with us if you are
actually saving half in comparison with the top major brands.
1
Grazie per aver acquistato uno dei nostri prodotti. Vi preghiamo di leggere
attentamente le istruzioni di montaggio prima dell'installazione .
Questa installazione è per mensola a muro in acciaio inox con 2 supporti inferiori e
3 supporti inferiori
Have product questions? Need technical support? Please feel free to
contact us:
CustomerService@vevor.com
NEED HELP? CONTACT US!
This is the original instruction, please read all manual instructions
carefully before operating. VEVOR reserves a clear interpretation of our
user manual. The appearance of the product shall be subject to the
product you received. Please forgive us that we won't inform you again if
there are any technology or software updates on our product.
STAINLESS STEEL WALL SHELF
2
PARAMETRI DEL PRODOTTO
Modello
Prodotto Dimensioni /
pollice
Caricamento Capacità /
Massima
Numero di
modello:
WMS1224
12*24
230 libbre
Numero di
modello:
WMS1236
12*36
250 libbre
Numero di
modello:
WMS1248
12*48
280 libbre
Modello
WMS1260
12*60
315 libbre
Numero di
modello:
WMS1436
14*36
300 libbre
Numero di serie:
WMS1448
14*48
350 libbre
Numero di
modello:
WMS1460
14*60
400 libbre
Numero di
modello:
WMS1824
18*24
300 libbre
Numero di serie:
WMS1848
18*48
400 libbre
Modello
WMS1860
18*60
450 libbre
Numero di
modello:
18*72
500 libbre
3
PRECAUZIONI DI MONTAGGIO
1. Il montaggio deve seguire queste istruzioni. Un montaggio non corretto
può essere pericoloso.
2. Durante il montaggio, indossare occhiali protettivi e guanti da lavoro
resistenti.
3. Non riunirsi quando si è stanchi o sotto l'effetto di alcol, droghe o
farmaci.
4. La capacità di peso e le altre caratteristiche del prodotto si applicano
solo a un prodotto correttamente e completamente assemblato.
5. Mantenere l'area di assemblaggio pulita e ben illuminata.
6. Tenere gli astanti fuori dall'area durante l'assemblea.
7. Richiede due persone per il montaggio.
PRECAUZIONI D'USO
AVVERTIMENTO: PER PREVENIRE LESIONI GRAVI E MORTALI
DOVUTE AL RIBALTAMENTO:
1. Questo prodotto non è un giocattolo. Non permettere ai bambini di
giocare con questo articolo o di avvicinarsi ad esso.
WMS1872

4
2. Utilizzare solo come previsto. Non sedersi o stare in piedi sul prodotto.
3. Ispezionare prima di ogni utilizzo. Non utilizzarlo se le parti sono
allentate o danneggiate.
4. Utilizzare solo su superfici piane, livellate e dure .
5. Non superare la capacità di peso indicata. Serrare saldamente tutte le
manopole prima di applicare il carico. Fare attenzione al carico dinamico! Il
movimento improvviso del carico può creare brevemente un carico
eccessivo, causando il guasto del prodotto.
STRUMENTI NECESSARI
ELENCO PARTI (2 supporti inferiori)
NOTA: Parte non mostrata nelle dimensioni reali.
Allen Wrench( not Included)
Allen Wrench( not Included)
X1
A
X1
X1
X4
B

5
ELENCO PARTI (3 supporti inferiori)
X1
C
D
E
F
X4
X4
A
X1
C
D
B
X4
X1
X1
6
FASI DI MONTAGGIO
1、 Bloccare i telai di supporto in alto
H
E
F
X6
X4
G
X3
7
2. Misurare la distanza tra i fori del telaio di supporto
3、 Pugno sul muro, la distanza è L1 e L2
Ⓖ
8
4、 Inserire le parti in plastica nel foro sul muro
5、 Avvitare la vite nelle parti in plastica, non avvitarla sul
fondo della distanza di 10 mm

9
6、 Appendere la parte superiore sulla vite
7、Stringere la vite

10
Pulizia
- Per la pulizia, passare la superficie con un panno umido (non
bagnato) oppure asciugarla con un panno di cotone pulito e privo di
pelucchi.