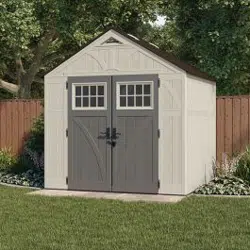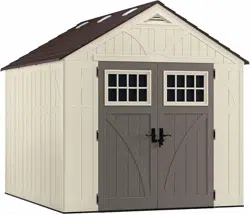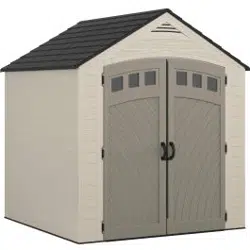

BMS7705
VistaTM
Storage
Shed
ASSEMBLY
INSTRUCTIONS
Tools
Required
6'
INCLUDED
IN
KIT
Easy
Bolt
Driver
0
2024
Suncast
Corporation,
Batavia,
IL
0660233A

Thank
you
for
purchasing
this
Suncast®
product.
Register
within
90
days
of
purchase
to
activate
Warranty!
Registration
is
not
required
for
products
with
a
warranty
term
of
90
days
or
less.
1.
Verify
warranty
term
of
your
product
by
visiting
www/suncast.com/warranty
(products
with
a
warranty
term
of
90
days
or
less
do
not
require
registration)
2.
Complete
registration:
fill
out the
form
and
upload
a
copy
of
your
receipt
by
visiting
https://support.suncast.com
or
scanning
the
OR
code
Have
Questions?
For
product
questions,
assembly
assistance,
replacement
parts
and
more:
ht
-
tps://support.suncast.com
Suncast
Corporation
Customer
Care
701
N.
Kirk
Road,
Batavia,
IL
60510
1-800-846-2345
1-630-381-6309

A
Before
you
Begin...
•
Consult
your
local
authorities
for
any
permits
required
to
construct
shed.
Prior
to
the
construction
of
your
shed,
check
with
the
local
building
code
official
to
review
any
required
permits
or
building
limitations.
• A
level
and
sturdy
foundation
is
required
before
shed
construction
can
begin.
Site
preparation
information
is
available
later
in
this
manual.
A
foundation
that
differs
from
the
specifications
within
this
manual
could
prevent
proper
assembly
and
may
damage
parts.
•
Read
instructions
thoroughly
prior
to
assembly.
This
kit
contains
parts
that
can be
damaged
if
assembled
incorrectly
or
in
the
wrong
sequence.
•
Please
follow
instructions.
Suncast
is
not
responsible
for
replacing
parts
lost
or
damaged
due
to
incorrect
assembly.
• •
-
Indicates
at
least
1
additional
adult
is
needed
to
complete
this
step.
) ?
t
Indicates
caution
is
recommended
when
using
a
power
drill.
IMPORTANT
IF
FOUNDATION
IS
REQUIRED,
COMPLETE
SITE
PREPARATION
AND
FOUNDATION
CONSTRUCTION
BEFORE
UNPACKING
ALL
PARTS.
OPEN
ALL
BOXES
FIRST
AND
NEATLY
LAYOUT
PARTS.
SMALL
PARTS
MAY
BE
CONTAINED
IN
EACH
BOX.
PLEASE
REFERENCE
THE
PARTS
LIST
WITHIN
THIS
MANUAL
TO
VERIFY
ALL
PARTS
ARE
PRESENT.
A
Caution
•
Power
tools
can
apply
excessive
torque
resulting
in
damage
to
the
product.
If
you
choose
to
use
a
power
dril
to
assemble
the
product,
Suncast
recommends
using
a
variable
speed,
cordless
drill
with
a
variable
clutch set
at
the
lowest
setting.
A #
2
Phillips
driver
bit
is
compatible
with
the
hardware
provided.
Suncast
makes
no
guarantee
that
following
this
recommendation
will
prevent
damage
to
the
product.
Damage
to
parts
due
to
over-
torque
are
not
covered
under
Suncast's
limited
warranty.
•
Proper
site
preparation
is
required.
•
Shed
not
intended
for
storage
of
flammable,
caustic
or
corrosive
materials.
•
Shed
not
intended
for
habitation
or
for
use by
children.
•
DO
NOT
stand,
sit,
or
store
items
on
the
storage
shed
roof.
•
DO
NOT
place
near
objects
that
are hot
or
can
become
hot.
•
Heavy
articles
should
not
be
leaned
against
the
walls,
as
this
may
cause
panel
distortion
and
permanent
damage.
•
Suncast
is
not
responsible
for
damage
caused
by
weather
or
misuse.
•
This
kit
contains
parts
with
sharp
edges.
Please
be
careful
when
handling,
use
of
work
gloves
is
recommended.
•
WHEN
DRILLING
THROUGH
METAL,
beware
of
burrs,
shavings
and
other
sharp
edges.
Safety
glasses
are
strongly
recommended.
•
DO
NOT
place
in
areas near
highly
reflective
surfaces (
Note:
Low-
E
windows
are
more
reflective
than
standard
windows
and
may
affect
the
longevity
of
the
product).
•
Product
is
water
resistant
and
now
waterproof.
Locate
unit
away
from
gutter
and
down
spouts
for
optimal
performance.
3

A
Care &
Maintenance
•
At
regular
intervals,
inspect
your
shed
to
make
sure
that
assembly
integrity
has
been
maintained.
Repair
or
replace
broken
parts
immediately.
•
Periodically
check
that
the
location
you
have
chosen
to set
your
shed
is
still
level.
•
Keep
roof
clean
of
snow
and
leaves.
•
To
maintain
the
look
of
your
product,
we
recommend
cleaning
it
at
regular
intervals
with
mild
soap
and
water.
DO
NOT
use
bleach,
ammonia,
or
other
caustic
cleaners,
and
DO
NOT
use
stiff
bristle
brushes.
Failure
to
perform
cleaning
at
regular
intervals
could
result
in
permanent
staining
of
the
plastic.
This
type
of
damage
is
not
covered
under
warranty.
A
Assembly
Day
Tips
•
DO
NOT
attempt
to
assemble
on
a
day
with
strong
winds.
•
Set
aside
appropriate
amount
of
time
to
completely
assemble
shed.
An
incomplete
shed
assembly
may
pose
a
safety
hazard.
•
Make
sure
you
have
assistance
nearby
to
lift
and
secure
parts
in
place.
•
Once
roof
is
assembled,
a
flashlight
may
be
of
use
when
assembling
smaller
components
inside
shed.
•
DO
NOT
use
a
torque
wrench
or
hand
drill
to
tighten
Easy
bolts.
Use
provided
Easy
Bolt Driver
ONLY.
•
Suncast
provides
extra
hardware
for
small
fasteners
for
customer
convenience.
In
some
cases,
there
will
be
extra
small
fasteners
once
the
assembly
is
complete.
Note:
This
product
contains
parts
that
are
used
in
different
orientations
to
construct
the
shed.
Please
take
note
of
the
orientation
of
the
parts
shown
throughout
this
instruction
manual.
Failure
to
follow
instructions
could
result
in
damage
to
parts.
Suncast
is
not
responsible
for
replacing
parts
lost
or
damaged
due
to
incorrect
assembly.
4

Parts -
Walls
and
Floors
IMPORTANT
COMPLETE
SITE
PREPARATION
AND
FOUNDATION
CONSTRUCTION
BEFORE
UNPACKING
ALL
PARTS.
OPEN
ALL
BOXES
FIRST
AND
NEATLY
LAYOUT
PARTS.
SMALL
PARTS
MAY
BE
CONTAINED
IN
EACH
BOX.
PLEASE
REFERENCE
THE
PARTS
LIST
WITHIN
THIS
MANUAL
TO
VERIFY
ALL
PARTS
ARE
PRESENT.
o
OB00433XXA
Left
Front
o
OB00435XXC
0
Back
Left
Corner
OB00434XXB
Side
Panel
x2
OB0043110A
Front
Floor
OB0043210
Rear
Floor
OB00438XXA
Right Front
o
OB00436XXB
Back
Panel
x2
OB00437)«
Back
Right
Corner
5

Parts -
Doors
o
OB00923XX
Left
Door
o
0464269A
Door
Window
0440919
Window
Gasket
x2
- 0
OB00924XX
Right
Door
6

Parts -
Headers
OB00444XX
Front
Header
o
OB00445)0(B
Rear
Header
7

Parts -
Roof
o
OB00452)0(A
Rear
Roof
Peak
o
OB00934XX
Left
Roof
x2
OB00443XM
Front
Roof
Peak
OB00935XX
Right
Roof
x2
8

Parts -
Steel
3
3
3
3
o
3
si
à
1MPG00003
Truss
Bracket
1MPG00001
Header
Bracket
x2
ci)
*0440631 *
1MPG00004
D-
Ring
Truss
Strap
x2 x2
J
,
o
[1
[1
BB
-
7.
à
1MRG01010
1MRG02001
1MRG02002 1MRG09012 1MRG05004 1MRG04002
1MRG06001
82.25"
Ridge
Beam
62"
Header
Beam
57"
Header
Beam
41" [-
Bracket
45.64"
Truss
Leg
40.75"
Side
Adapter
40.65"
Truss
x8
x2 x2
Cross
Beam
x2
Kit #
0860021G
9

Parts -
Hardware
OMP000002 —
Metal
Hinge
Plate
x6
0480340 —
Hardware
Bag
.25
x
2"
Hex
Bolt
x4
.25"
Locking
Nut
x6
.25 -
20
x
1"
Hex
Bolt
x2
0480375 (
x2) —
Hardware
Bag
.625"
Screw
x105 (
per
bag)
0480374 —
Hardware
Bag
.25
x
2"
Hex
Bolt
x2
.25"
Locking
Nut
x2
0480337 —
Hardware
Bag
o
.25
x .
75"
Screw
x6
.25"
Locking
Nut
x6
0480452 —
Hardware
Bag
#8
x .
625
Screw
x9
Hardware
Bag
Easy
Bolt
x31
*Easy
Driver
0480438 —
Hardware
Bag
#10
x .
75"
Screw
x22
#10
Rubber
Sealing
Washer
x22
Hardware
shown
at
actual
size (*
unless
otherwise
noted).
Extra
hardware
provided.
Not
all
are
used.
10

Parts -
Door
Handle
Kit
0463282
0102354XX
Right
handle
0102353XX
Left
handle
0480370 — Hardware
Bag
#10
x
1"
Fender
Washer
x4
#10
x
2.25"
Pan
Head
Screw
x4
Hardware
shown
at
actual
size (*
unless
otherwise
noted).
Extra
hardware
provided.
Not
all
are
used.
11

Site
Preparation
and
Platform
Construction
Materials
NOT
supplied
with
Shed
Kit
Important:
•
Site
preparation
is
required
for
this
shed.
Placing
the
shed on
a
properly
constructed,
square,
flat,
smooth
and
level
foundation,
as
described
below,
is
required.
Without
a
properly
constructed
foundation,
settling
will
eventually
occur,
causing
distortion
and
damage
to
the
shed.
Suncast
is
not
responsible
for
replacing
parts
damaged
or
property
lost
due
to incorrect
foundation
construction
or
improper
assembly.
Warranty
requires
a
properly
constructed
foundation
to
which
the
shed
must
be
anchored
as
instructed
below.
•
Complete
the
site
preparation
and
foundation
construction
before
unpacking
parts
and
beginning
assembly.
For
tips
on
site
preparation,
go
to
www.suncast.com,
consult
retailer,
or
local
code.
Site
Preparation
1.
Consult
your
local
authorities
for
building
codes
and
covenants
before
beginning
foundation
or
erecting
shed.
2.
Before
any
digging,
check
with
local
utilities
to
determine
location
of
buried
cables,
pipes,
etc.
3.
Decide
which
type
of
foundation
is
most
suitable
for
your
installation.
The
foundation
surface
must be
square,
flat,
smooth
and
level.
Follow
the
below
guidelines
for
foundation
options.
4.
Complete
the
foundation
preparations
as
follows:
• A
vapor
barrier
may
be
applied
over
the
foundation
to
prevent
excessive
condensation
in
the
shed.
Follow
local
building
codes
for
a
proper
vapor
barrier.
•
The
ground
should
slope
away
from
the
foundation area
to
provide
drainage.
•
Placing
the
shed
on
surfaces
made
of
materials
such
as
patio
blocks
or
pavers
is
not
acceptable
for
long-term
support
structure
or
smooth
surface.
Use
of
these
will
void
the
warranty.
Concrete
Slab
•
Construct
a
slab
of
at
least
4"
thickness.
•
The
use
of
reinforcement
bar
is
recommended.
•
For
foundations
larger
than
specified
below, the
shed
must
rest
on
a
continuous,
level
portion
of
the
concrete
slab
Shed
Footprint
(for
both
concrete
and
wood)
Front
<,D
"
Dimensions
shown
are
minimal
for
proper
fit
of
the
shed.
Wood
Platform
•
Use
exterior
grade
wood.
•
Set
the
wood
platform
on
deck
footing
blocks
or
full
footing.
Front
Anchoring
the
Floor
Panels
to
the
Foundation
is
required
after
shed assembly
is
complete.
•
Shed
floor
panels
include
flattened
areas
where
anchors
or
lag
screws
are
to
be
secured.
These
flat
areas
must
be
drilled
through
prior
to
securing
the
floor
panels
to
the
foundation.
•
The
shed
must
be
secured
to
a
continuous
concrete
slab
using
3/8"
masonry
anchors
with
1"
washers (
hardware
not
included).
8
masonry
anchors
are
required
for
the
Suncast
BMS7705
Shed.
Anchor
section
example
•
The
shed
must
be
secured
to
a
wood
platform
using
1/4"-3/8"
x
3"
lag
screws
with
1"
washers (
hardware
not
included).
8
lag
screws
are
required
for
the
Suncast
BMS7705
Shed.
Note:
Shed
floor
fastening
locations
are
designed
to
align
with
the
under-
structure
layout.
Be
sure
the
front
of
the
floor
panels
are
oriented
correctly
on
the
platform
to
ensure
lag
bolts
engage
with
the
under-
structure.
12

Site
Preparation
and
Platform
Construction (
continued)
Materials
NOT
supplied
with
Shed
Kit
Wood
platform
critical
spacing
•
Check
all
critical
spacing
measurements
carefully.
-01
15
1/2"
14"
14" 14"
À
7
1/4"
30"
4
851/4'
11
3/8"
$
30"
FRONT
1 1
Wood
platform
materials
list
Item
Qty
Size
A 1
37
1/4"
x
84
3/4"
x
3/4"
B 1
48"
x
84
3/4"
x
3/4"
C
2
2"
x
6"
x
84
3/4"
D 4
2"
x
6"
x
12
1/2"
E 7
2"
x
6"
x
82
1/4"
F 4
2"
x
6"
x
11
3/4"
•
Please
note,
2 x 6
dimensional
lumber
is
actually
1/2"
smaller
than
noted
sizes.
Dimensions
given
presume
standard
1.5"
x
5.5"
actual
size
lumber.
Lumber
dimensions
can
vary.
Check
lumber
dimensions
before
cutting
and
make
appropriate
adjustments
to
achieve
given
dimensions.
Cut
sizes
are
actual
size.
84
3/4"
6
5/8"
4 -f
13

Pre-
Assembly -
Doors
Power
tools
can
apply
excessive
torque
resulting
in
damage
to
the
product.
If
you
choose
to
use
a
power
drill
to
assemble
the
product,
Suncast
recommends
using
a
variable
speed,
cordless
drill
with
a
variable
clutch
set
at
the
lowest
setting.
A #
2
Phillips
driver
bit
is
compatible
with
the
hardware
provided.
Suncast
makes
no
guarantee
that
following
this
recommendation
will
prevent
damage
to
the
product.
Damage
to
parts
due
to
over-
torque
are
not
covered
under
Suncast's
limited-
warranty.
Remove
protective
wrapping
and
separate
door
windows
(
R).
Separate
the
2
window
gaskets
(
P)
and
peel
off
backing.
Place
right
door
(
K)
on
flat
surface,
facing
down.
Starting
at
the
top-
center
of
the
window,
press
one
end
of
the
gasket
(
P)
into
the
channel
and
work
around
the
window.
DO
NOT
STRETCH
GASKET
Trim
any
excess
gasket
with
scissors.
Lay
1
door
window
(
R)
over
the
window
opening.
Secure
window
with
13
screws
(
NN).
Repeat
for
left
door
(
J)
and
remaining
door
window
(
R).
At
top
interior
side
of
left
door
(
J),
attach
D-
ring
slide
bolt
(
0)
with
4
screws
(
DOD)
through
provided
holes.
14
At
bottom
interior
side
of
left
door
(
J),
attach
D-
ring
slide bolt
(0)
with
4
screws
(
DOD)
through
provided
holes.

Pre-
Assembly -
Header
Slide
header
bracket
(
U)
under
tabs
on
inside
peak
of
front
header
(
G)
and
secure
with
2
screws
(
NN).
DO
NOT
over
tighten
screws.
Lay
front
header
(
G)
on
ground
with
lettering
side
facing
up.
Place
front
header
beam (
X,57")
into
pocket
on
inside
of
front
header
(
G).
Attach
with
6
screws
(
NN).
DO
NOT
over
tighten
screws.
Repeat
for
rear
header
(
H)
and
rear
header
beam
(
EEE,62").
15

Pre-
Assembly -
Roof
and
Truss
Attach
truss
bracket
(
Z)
to
end
of
1
truss
leg
(
Y)
with
1
bolt
(
KK)
and
locking
nut
(
LL).
Repeat
for
second
truss
leg
(
Y).
Attach
2
truss
cross
beams
(
CC)
to
2
truss
legs
(
Y)
using
2
hex
bolts
(
JJ)
and
locking
nuts
(
LL).
Stand
truss
and
check
cross
beam
is
level.
Place
side
adaptor
(
BB)
at
end
of
left
truss
leg
(
Y).
Secure
adaptor
with
1
bolt
(
JJ)
and
nut
(
LL).
Repeat
for
other
truss
leg.
16

Align
tab
on
bottom
right
side
of
left
front
corner
(
B)
with
slot
on
front
floor
(
A).
Lower
panel
into slot
and
lock
in
place
by
sliding
panel
toward
outside
of
floor.
Note:
Use
a
rubber
mallet
to "
push"
left
front
corner
(
B)
into
locked
position.

Tip
left
front
corner
(
B)
outward
slightly
and
bend
corner
hinge.
Before
proceeding,
make
sure
corner
is
square (
top
view)
where
it
meets
the
floor
and
that
panel
is
flush
(side
view)
with
floor.
Tip
left
front
corner
(
B)
back
to
vertical
position
and
align
lower
tabs
on
right
side
with
slots
in
floor.
Note:
You
will
hear
a
snap
when
tab
is
fully
engaged.
18

Align
tabs
on
bottom
of
side
panel
(
N)
with
slots
along
front
and
rear
floors.
Lower
panel
into
slots
and
lock
in
place
by
sliding
panel
toward
front
corner.
Note:
Use
a
rubber
mallet
to "
push"
side
panel
(
N)
into
locked
position.
Secure
side
panel
with
4
easy
bolts
(
RR),
working
from
floor
to
roof.
DO
NOT
use
torque
wrench.
Use
easy
bolt
easy
driver
(
SS)
and
hand
tighten.
Easy
bolt
head
will
be
flush
when
fully
seated.
DO
NOT
over
tighten
easy
bolts.
19


Place
front
header
(
G)
over
door
opening
and
fit
two
protruding
support
legs
into
pockets
molded
in
front
corners.
Secure
front
header
using
2
screws
(
NN)
in
each
front
corner.
Place
rear
header
(
H)
over
back
walls
and
fit
four
protruding
support
legs
into
pockets
molded
in
back
walls.
Secure
rear
header
using
8
screws
(
NN).

Raise
ridge
beam
(
S)
up
and
into
rear
header
bracket.
Secure
with
1
bolt
(
JJ)
and
nut
(
LL).
Repeat
with
front
header
bracket.
Note:
Make
sure
open
end
of
ridge
beam
faces
down.
Note:
Alignment
of
ridge
beam
to
bracket
may
require
header
panels
to
be pushed
inwards
or
outwards
slightly
as
ridge
beam
is
slid
into
place.
Attach
truss
strap
(
DD)
to
side
adaptor
bracket
(
BB)
and
truss
leg
(
Y)
with
2
screws
(
NN).
Repeat
for
remaining
truss
strap.
Attach
truss
bracket
(
Z)
to ridge
beam
(
S)
with
1
screw
(
NN).
22

Assembly -
Roof
Place
the
front
roof
peak
(
Q)
onto
a
right
roof
panel
(
M).
Secure
with
5
rubber washers (
UU)
and
sealing
screws
(
TT).
Repeat
for
rear roof
peak
(
W)
and
right
roof
panel
(
M).
Note:
Rubber
side
of
washer
should
be
against
plastic
panel.
Before
proceeding,
locate
and
identify
the
six
slots
on
interior
side
of
left
roof
panels
(
L).
Before
proceeding,
locate
and
identify
the
five
slots
on
interior
side
of
right
front
(
M,Q)
and
right
rear (
M,VV)
roof
panel
assemblies.
23

Before
proceeding,
locate
and
identify
six
front
header
tabs
and
six
rear
header
tabs.
Press
edge
of
left
roof
(
L)
into
channel
on
truss
leg
(
Y).
Slide
left
roof
(
L)
down
towards
the
outside
of
shed.
Lay
left
roof
(
L)
directly
over
three
tabs
on
left
side
of
front
header
(
G).
With
left
roof
slots
seated
over/on
header
tabs,
check
alignment
in
all
three
spots.
24

Lay
right
roof (
M)
with
front
roof
peak (
Q)
directly
over
three
tabs
on
right
side
of
front
header (
G).
With
right
roof
slots
seated
over/on
header
tabs,
check
alignment
in
all
three
spots.

Repeat
steps 29-31
for
remaining
right
roof
panel
(
M)
and
rear roof
peak
(
W).
From
outside
of
shed,
pull
down
right
front
roof
(
M)
to
align
with
tabs
on
right
front
corner
(
F)
and
side
panel
(
N).
From
inside
of
shed,
secure
roof
to
panels
with
4
screws
(
NN).
Repeat
to
secure
the
remaining
three
roof
panels.
Push
down
the
right
roof
panels
with
roof
peaks
from
outside.
From
inside
shed,
secure
roof
peaks
to
left
roof
panels
together
using
10
rubber
sealing
washers (
UU)
and
10
sealing
screws
(
TT).
Repeat
for
left
roof
panels.
Secure
the
right
side
of
the
roof
to
both
sides
of
right
truss
leg
using
8
screws
(
NN).
Repeat
for
the
left
side
of
the
roof.
IMPORTANT:
The
top
set
of
screws
secure
the
roof
peak
(Q)
to
truss.
26

Raise
L-
bracket (
AA)
into
position
against
middle
of
roof
panel.
Slide
L-
bracket (
AA)
into
front
header
and
secure
to
underside
of
truss
leg
with
1
screw (
NN).

With
metal hinge
plates
in
open
position,
slide
one
hinge
over
each
hinge
receptacle
on
inside of
right
front
panel.
Note:
Use
a
rubber
mallet
if
necessary.
Stand
right
door
(
K)
upright
with
three
hinge
mounts
facing
right.
Slide
1
metal hinge
plate
(
II)
up
onto
each
hinge
mount.
Rotate
hinges
to
outside
of
door.
Secure
each
metal
hinge
plate
with
1
screw
(
00)
and
nut
(
PP).
Repeat
Steps
39-41
for
left
door
(
J).

1
1/2"
Max.
J` (
12.7
cm)
Max.
(7.6
cm)
5/16"
(12.7
cm)
Attach
a
5/16"
padlock (
not provided)
to
secure
shed.
Note:
To
maintain
warranty
coverage,
the
product
should
be
padlocked
at
all
times
when
not
in
use.
From
the
outside
of
doors,
insert
door
handle (
VV,VVW)
stems
into
holes
of
left
and
right
doors.
On
inside
of
doors,
place
washers (
YY) on each
door
handle
stem,
and
secure
each
with
1
screw (
ZZ).
W1234567
I
22074153220
DO
NOT
REMOVE
I
NO
REMOVER
Patents,
www.suncast.com
The
label
located
on
the
inside
of
the
door
contains
information
regarding
your
product.
The
OR
code
is
a
direct
link
to
the
product
registration
page
on
the
Suncast
website.
The
codes
at
the
bottom
of
the
label
are
specifically
related
to
your
product.
Please
have
these
numbers
available
should
you
need
to
contact
Suncast.
29

30

31

sunmest