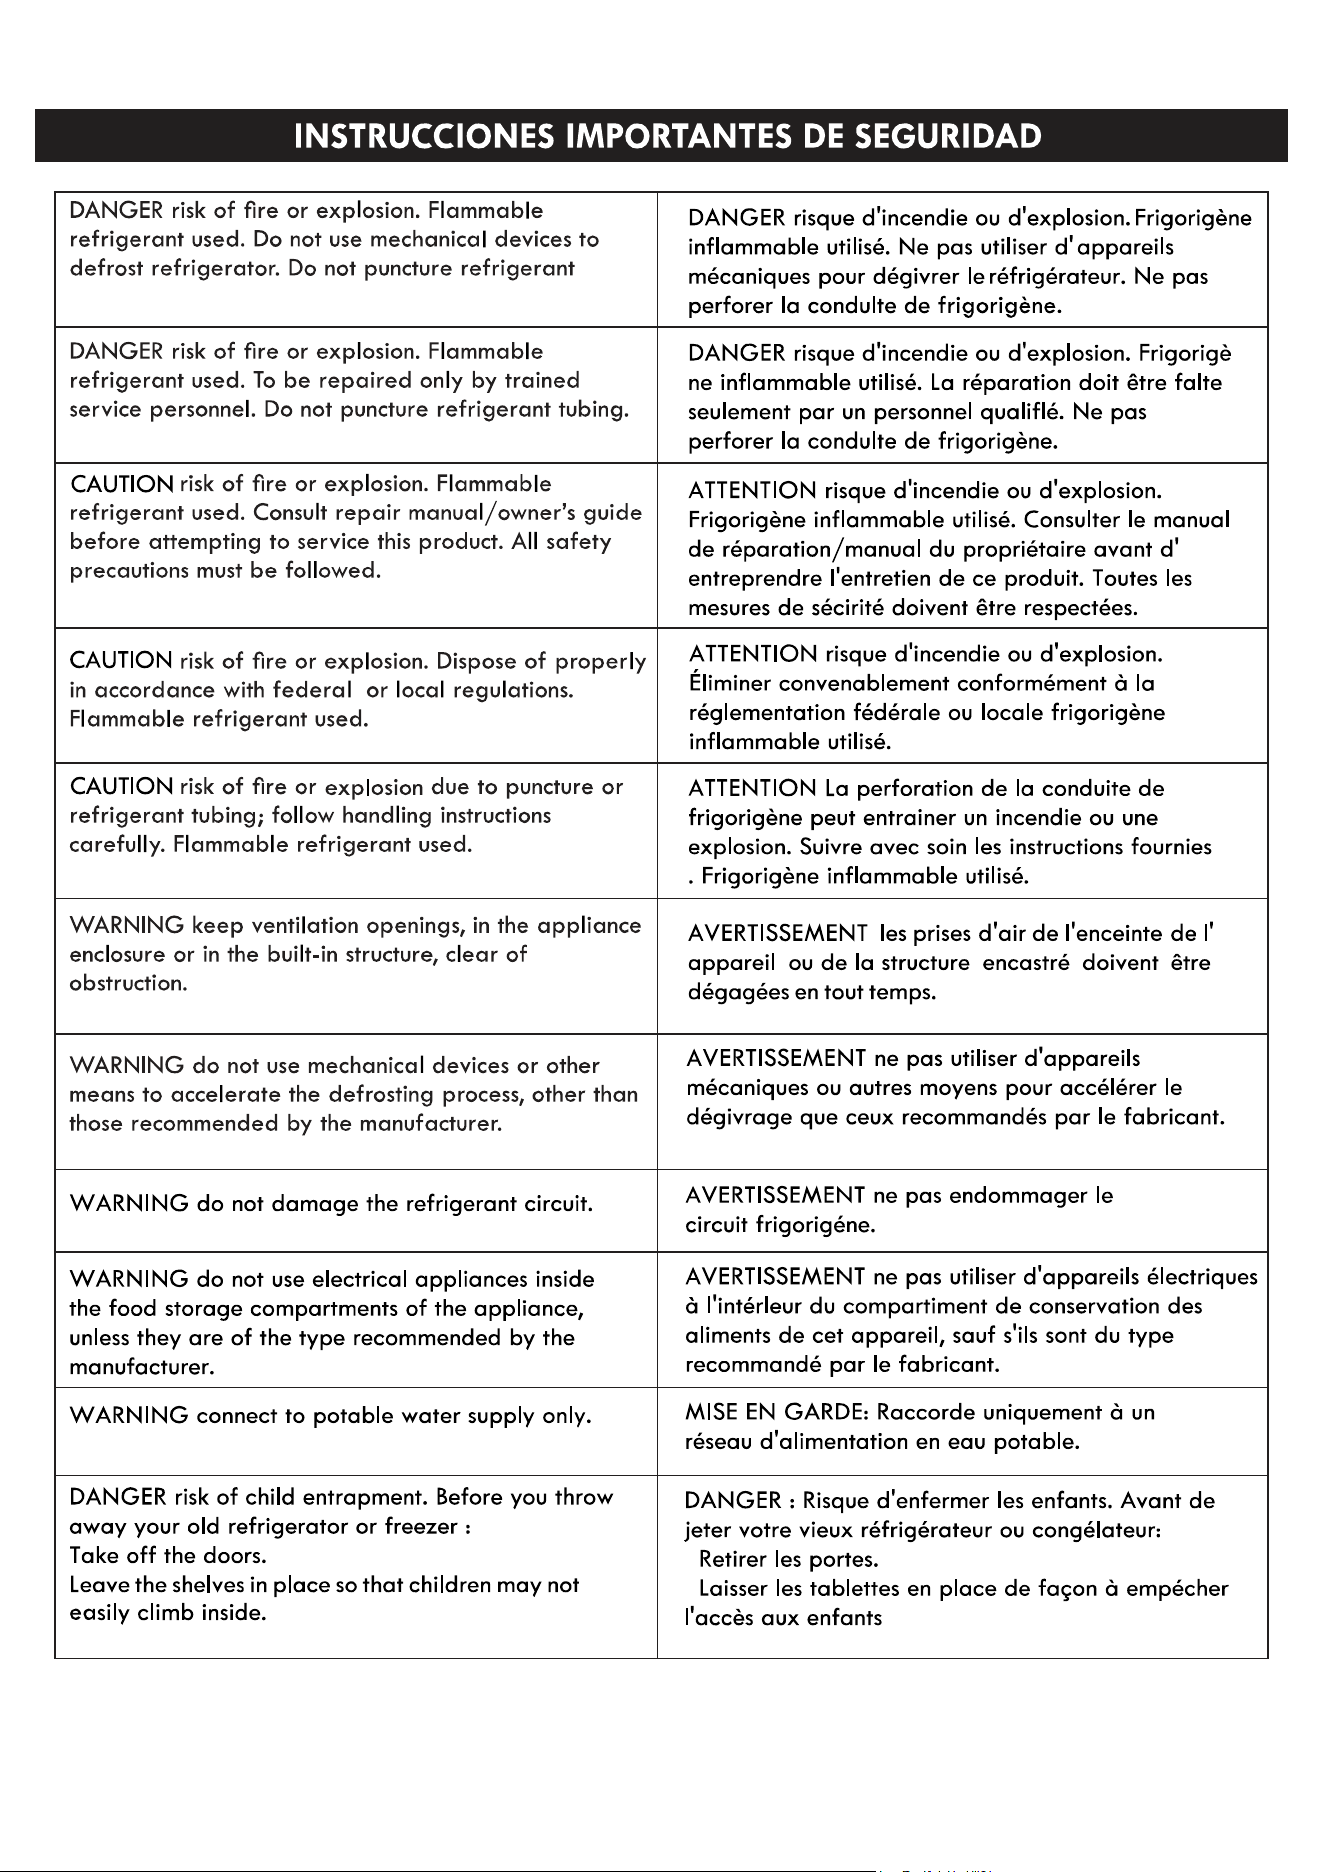
18cf
6231#, 7231#
21 cf 6133#, 7133#
7
8
24
25
21
Food Storage
19-20
Refrigerator Features
22-23
Refrigerator Care
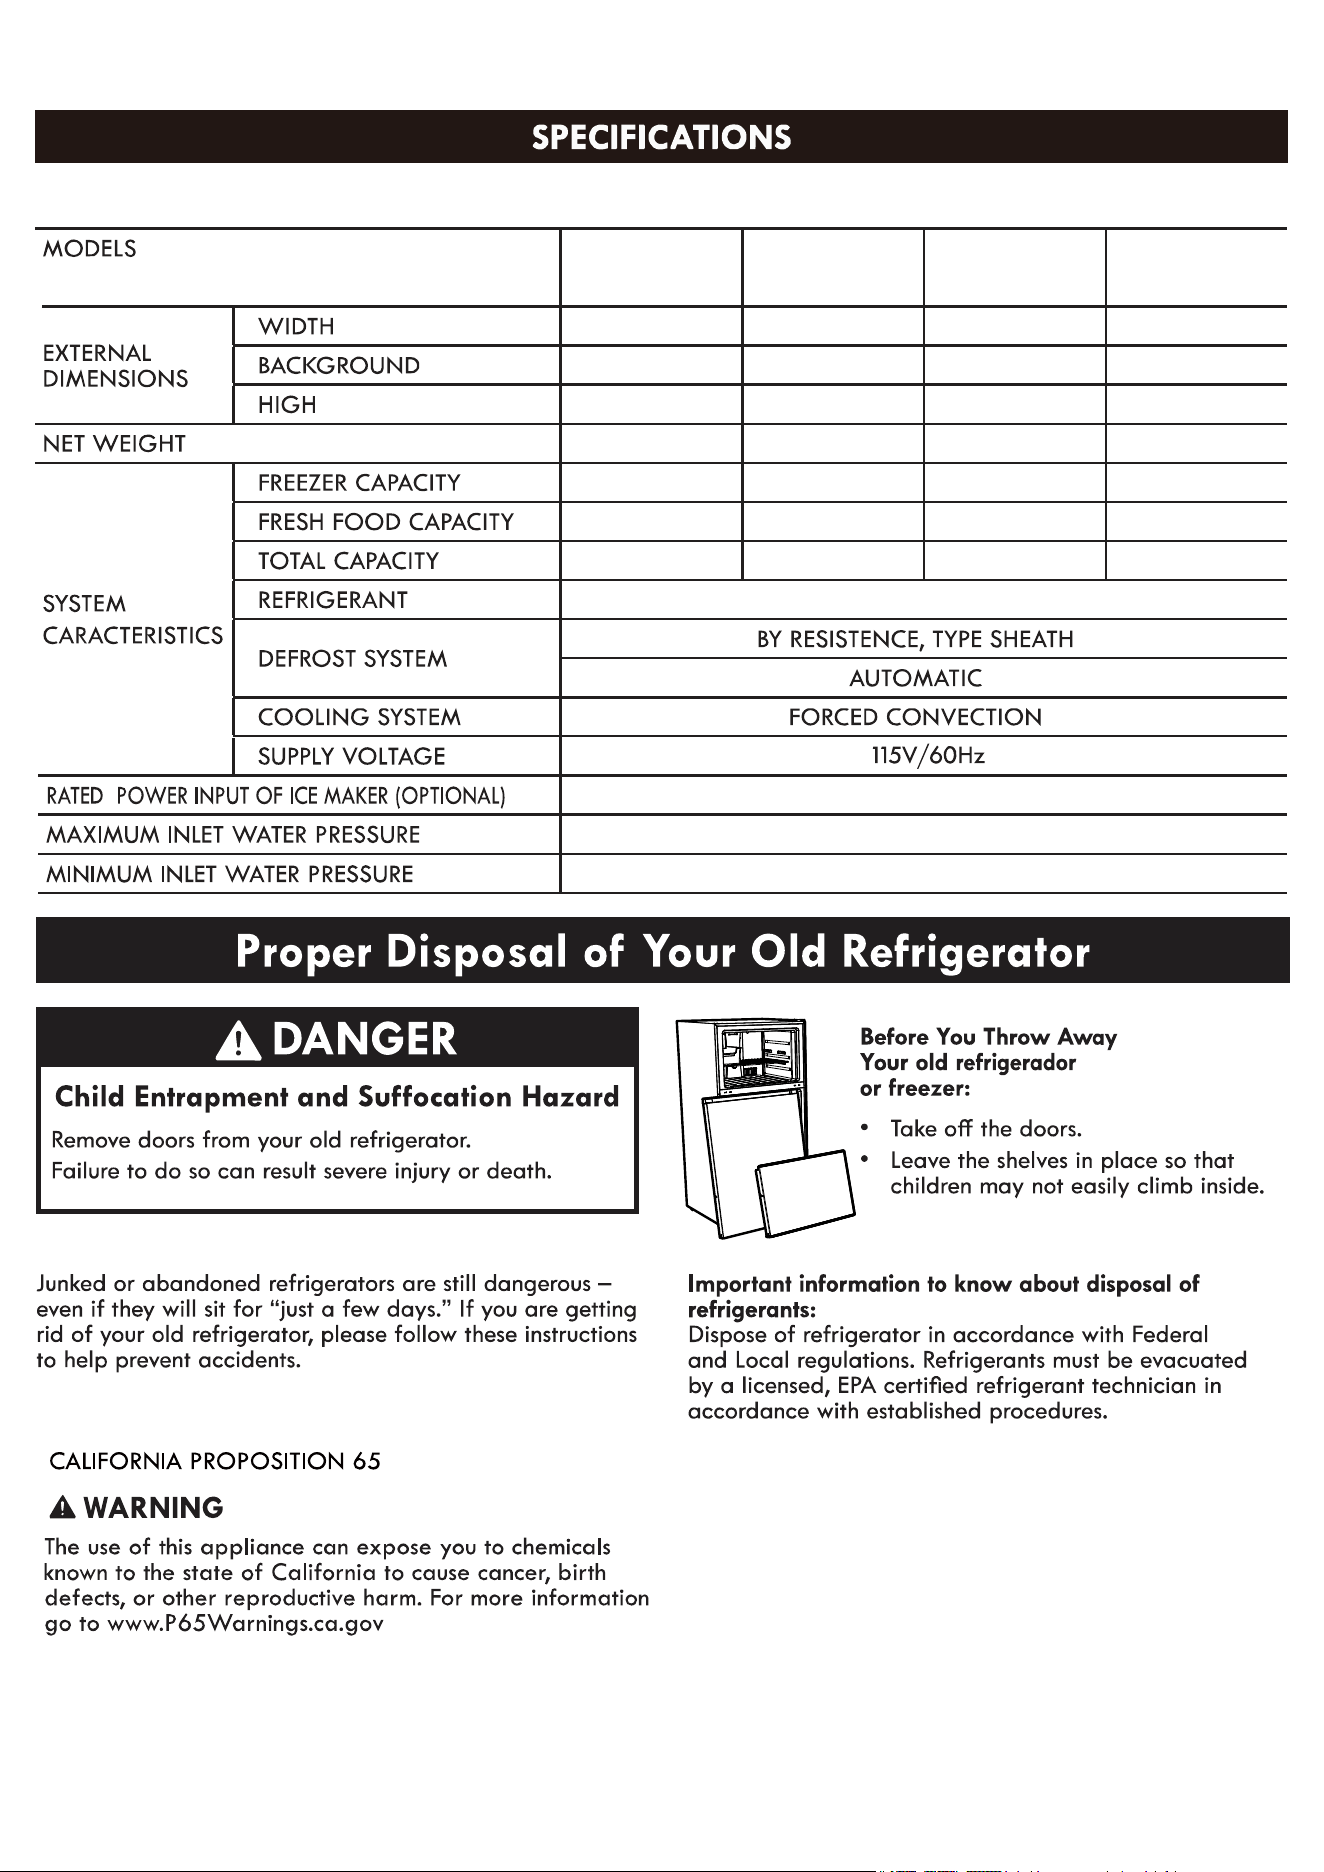
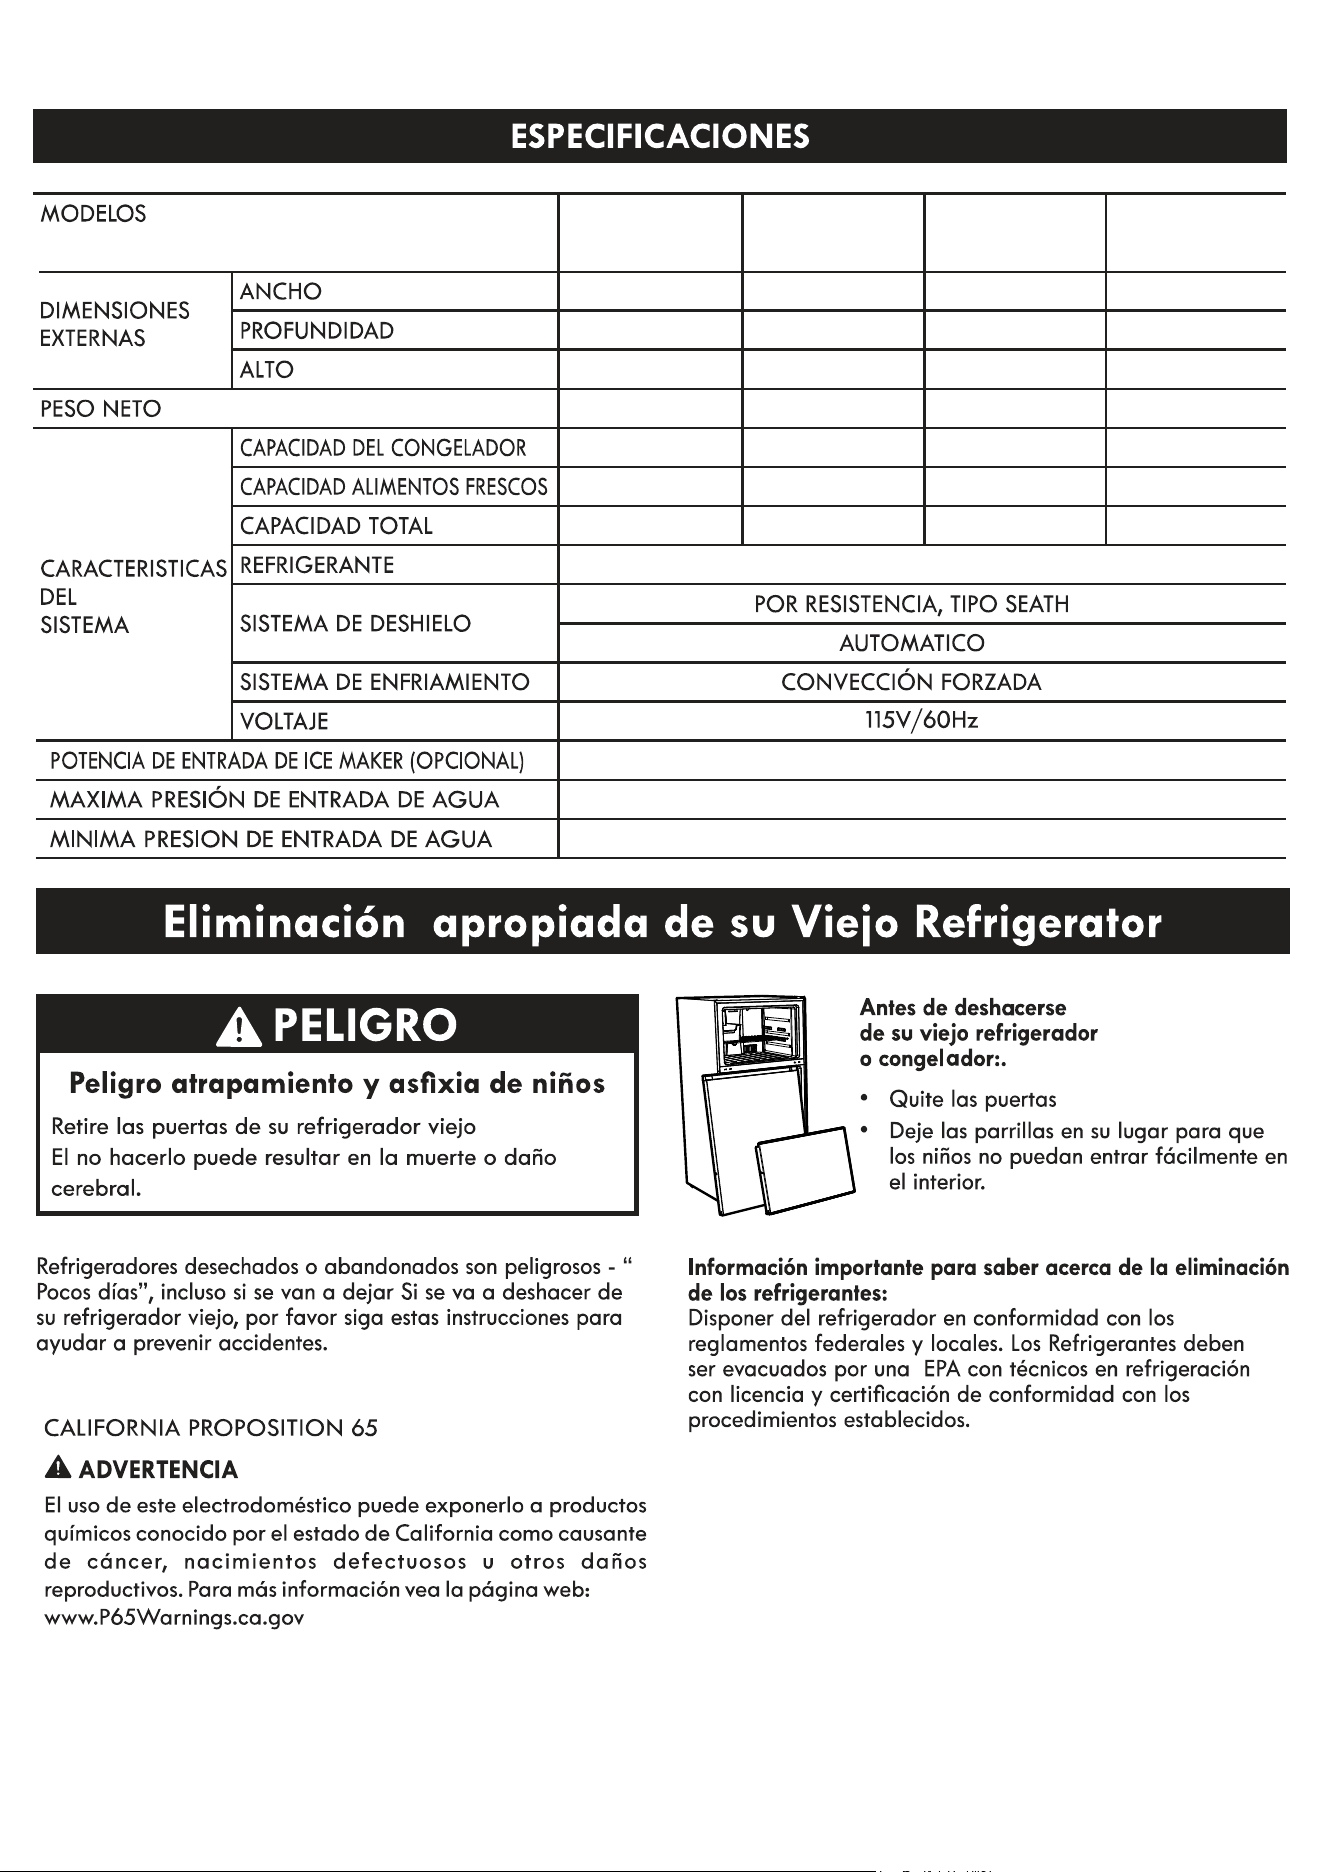
Specifications
0
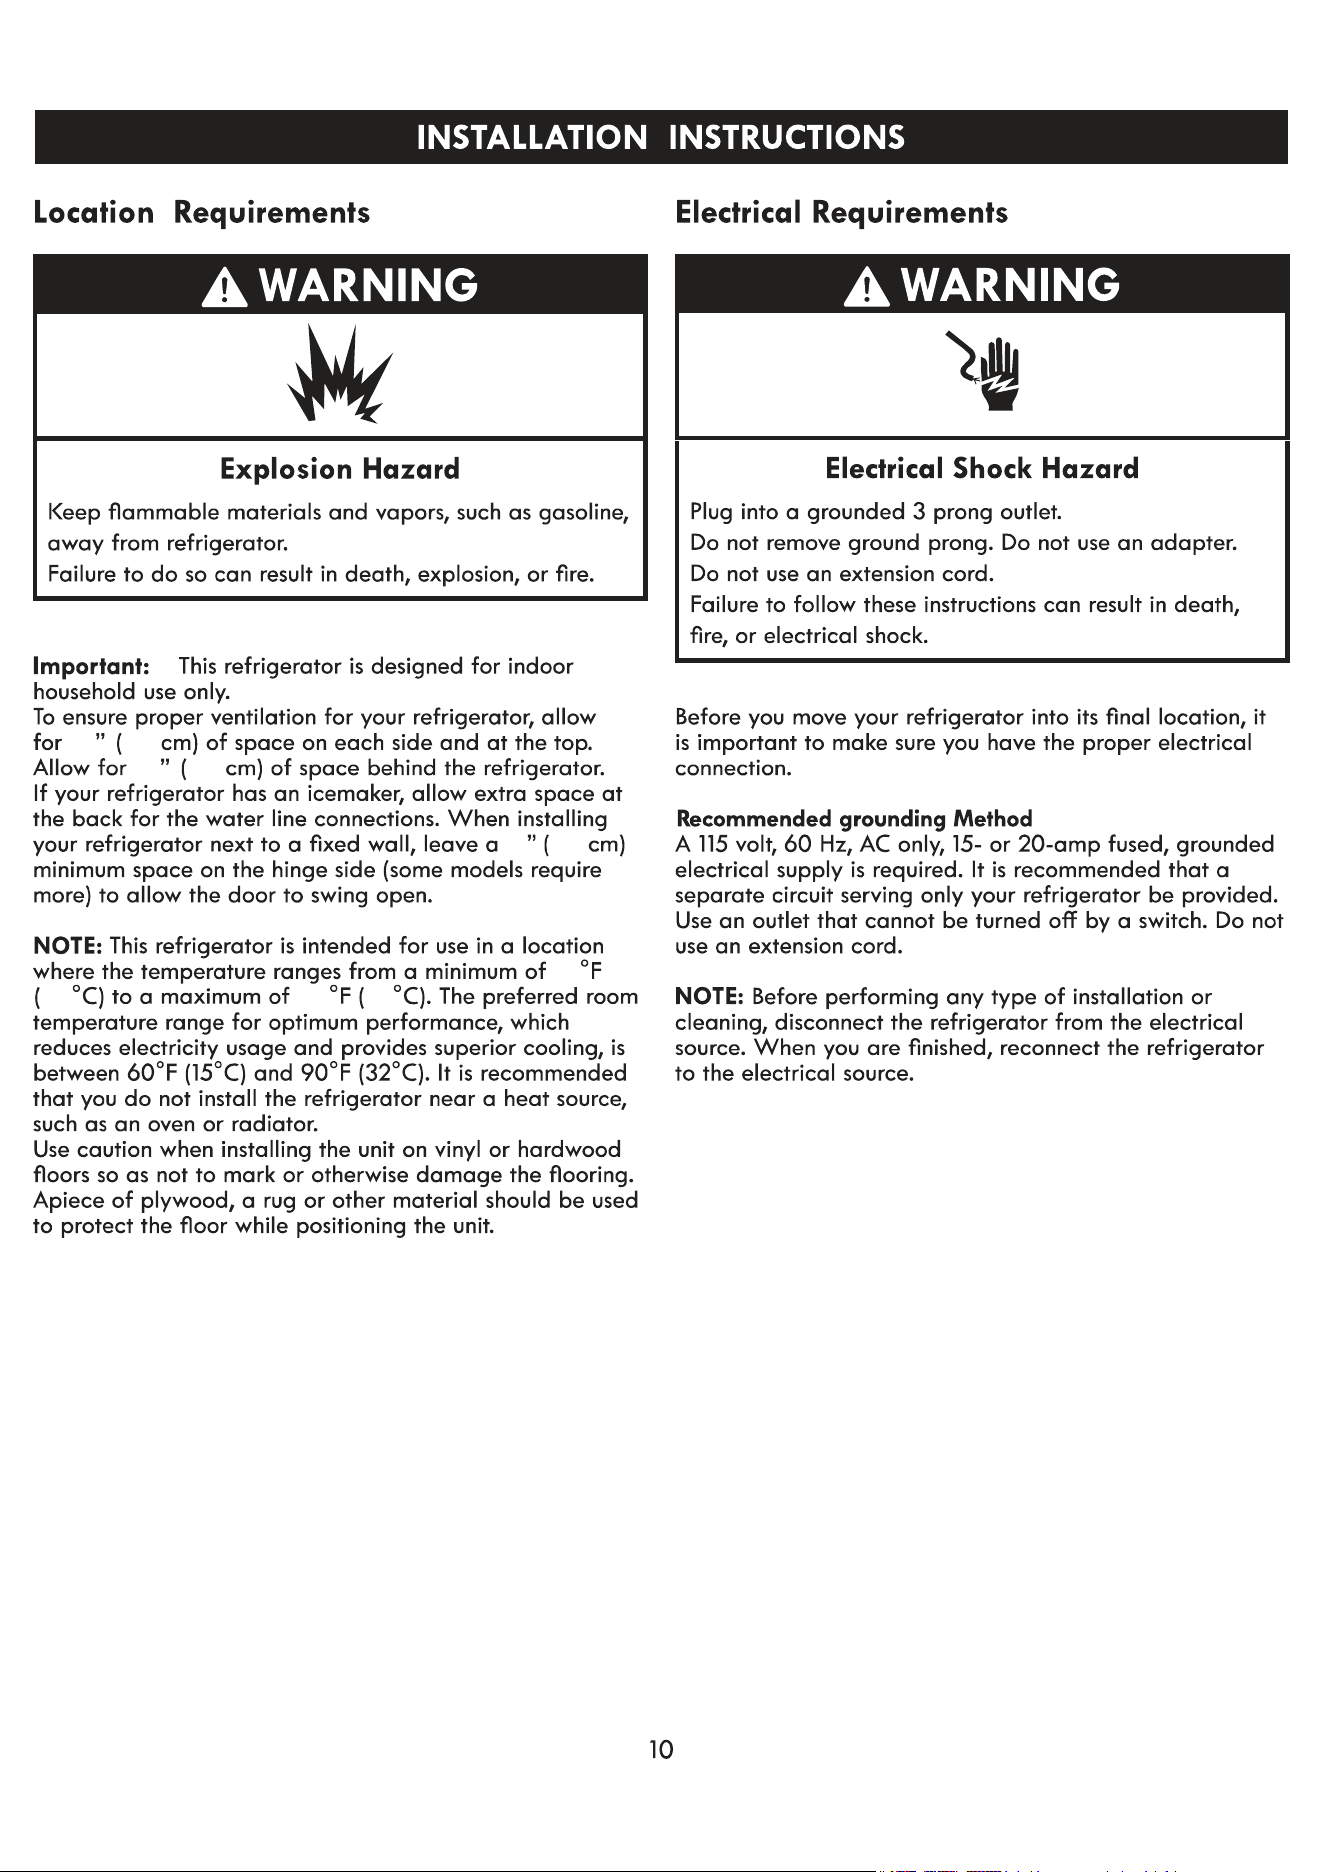
Installation Instructions
11
1512
19
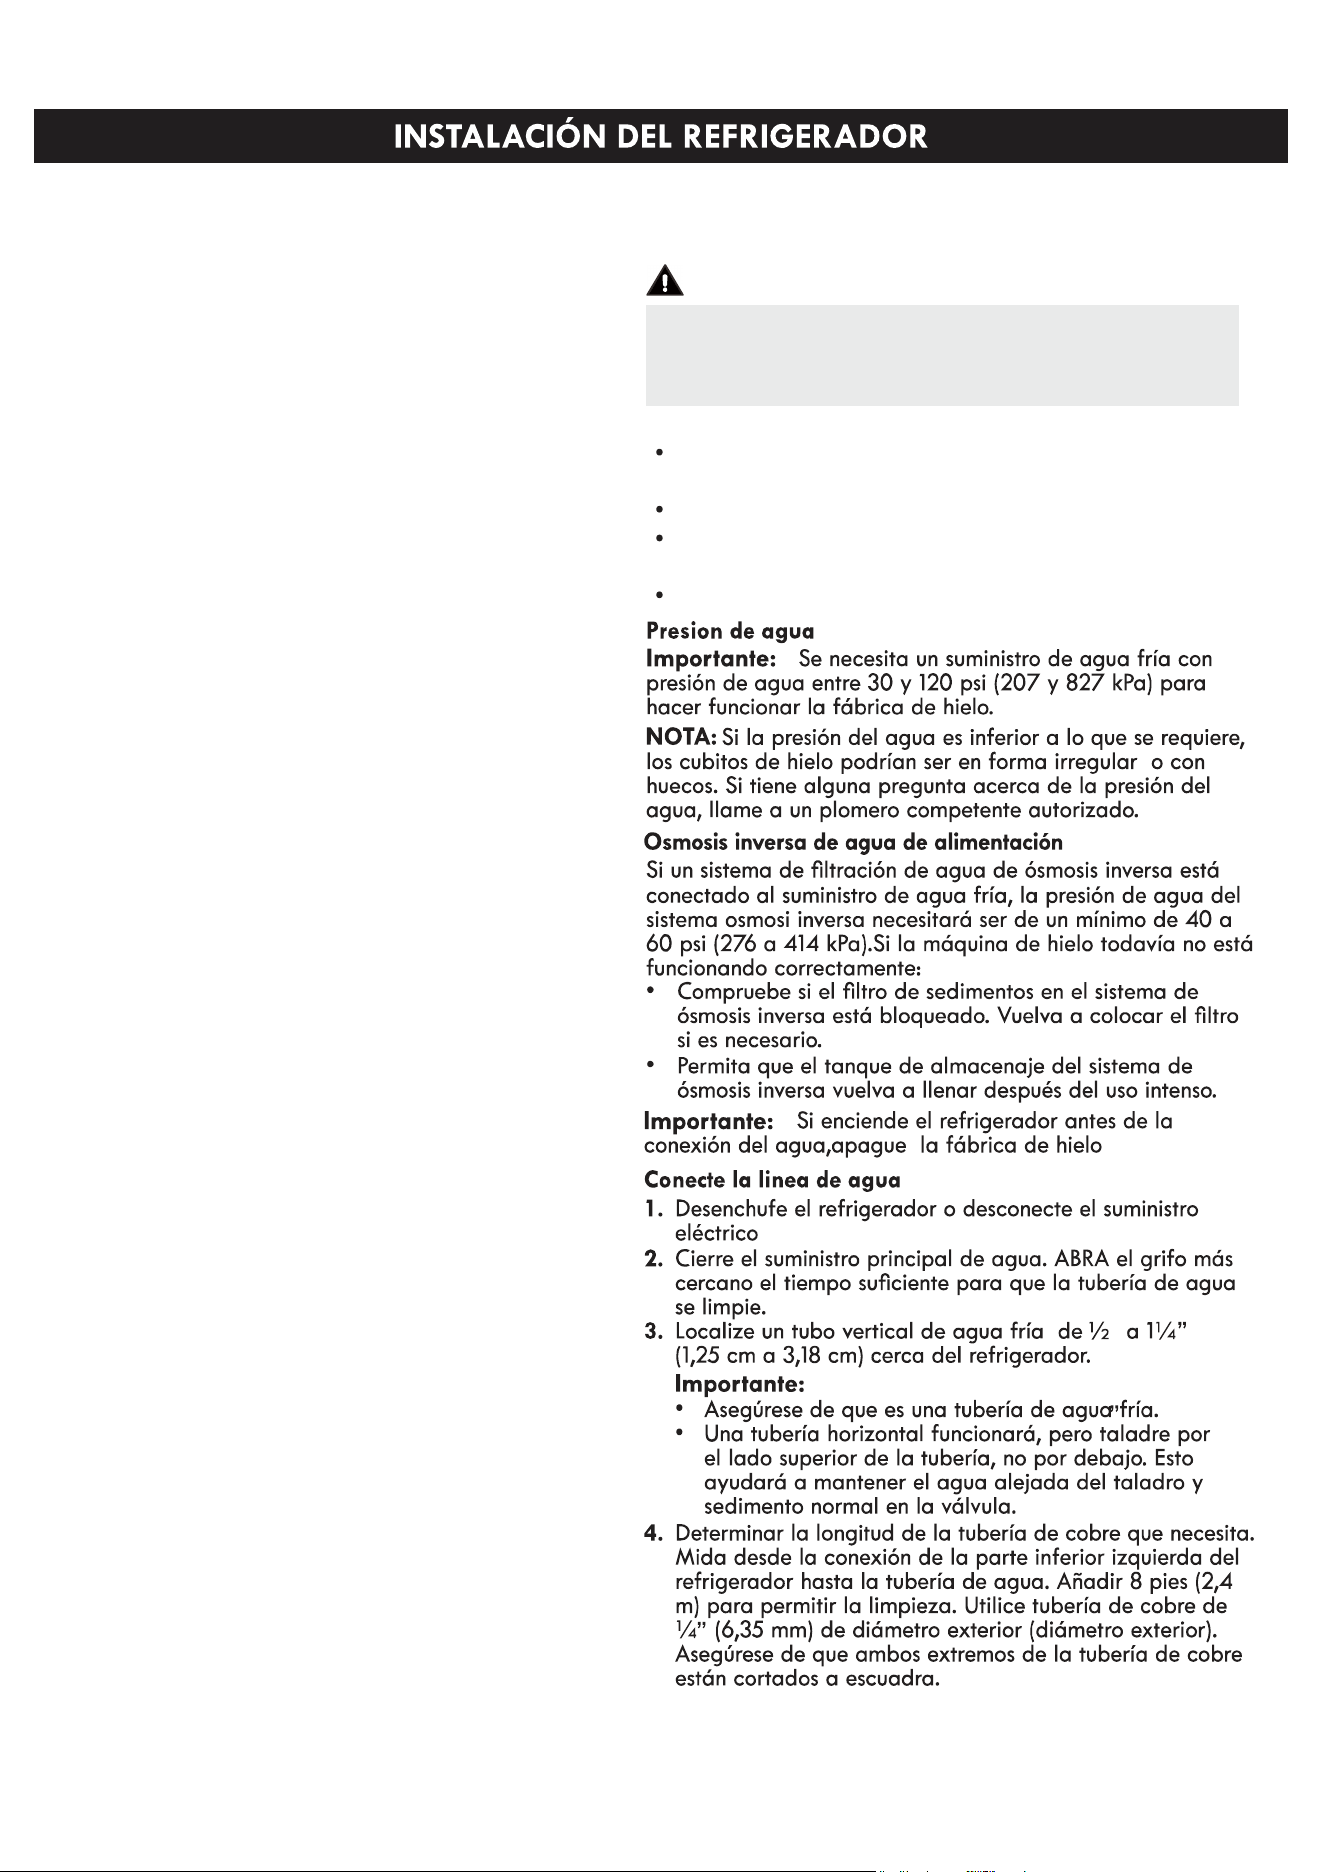
Connect the Water Supply(optional)
12-13
Removing/Replacing,Level Refigerator,
Door Swapping Left And Right
14-15
16-18
Before Use 16
Ice Maker 17
Refrigerator Use 16
Controls 18
3
4
899.6231#
29.5 in
30.75 in
66.38 in
163 lbs
4.3 cu ft
13.9 cu ft
18.2 cu ft
29.5 in
30.75 in
66.38 in
166 lbs
4.2 cu ft
13.9 cu ft
18.1 cu ft
32.7 in
30.75 in
66.38 in
176 lbs
4.9 cu ft
15.6 cu ft
20.5 cu ft
32.7 in
30.75 in
66.38 in
179 lbs
4.8 cu ft
15.6 cu ft
20.4 cu ft
R600a
160W
827 kPa(120psi)
138 kPa(20psi)
899.7231# 899.6133# 899.7133#
* This instruction manual refers to several models. Features my vary according to model
8

9
100
3
7.6
7.6
3
7.6
3
3810
50
11
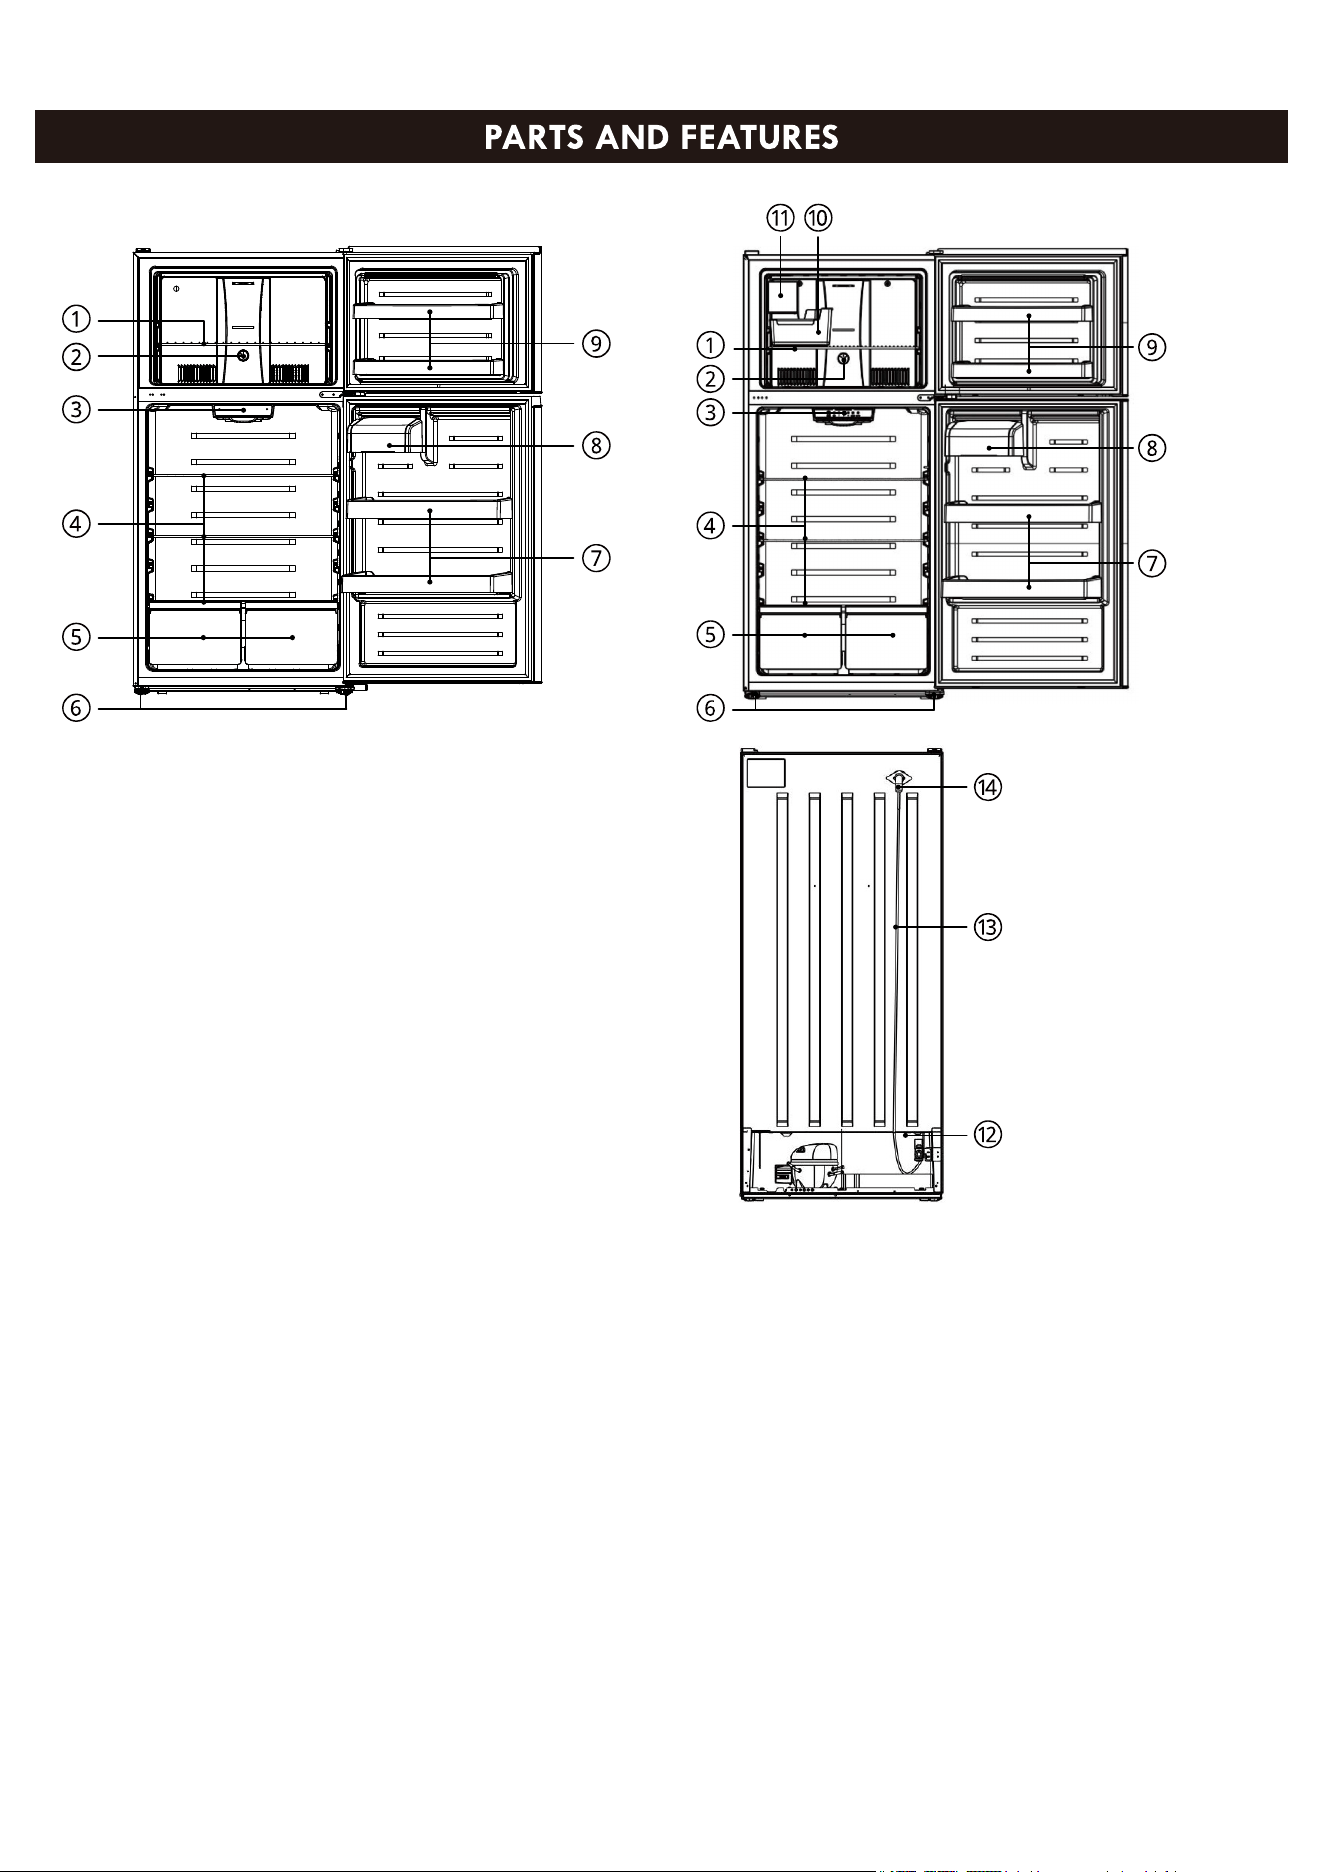
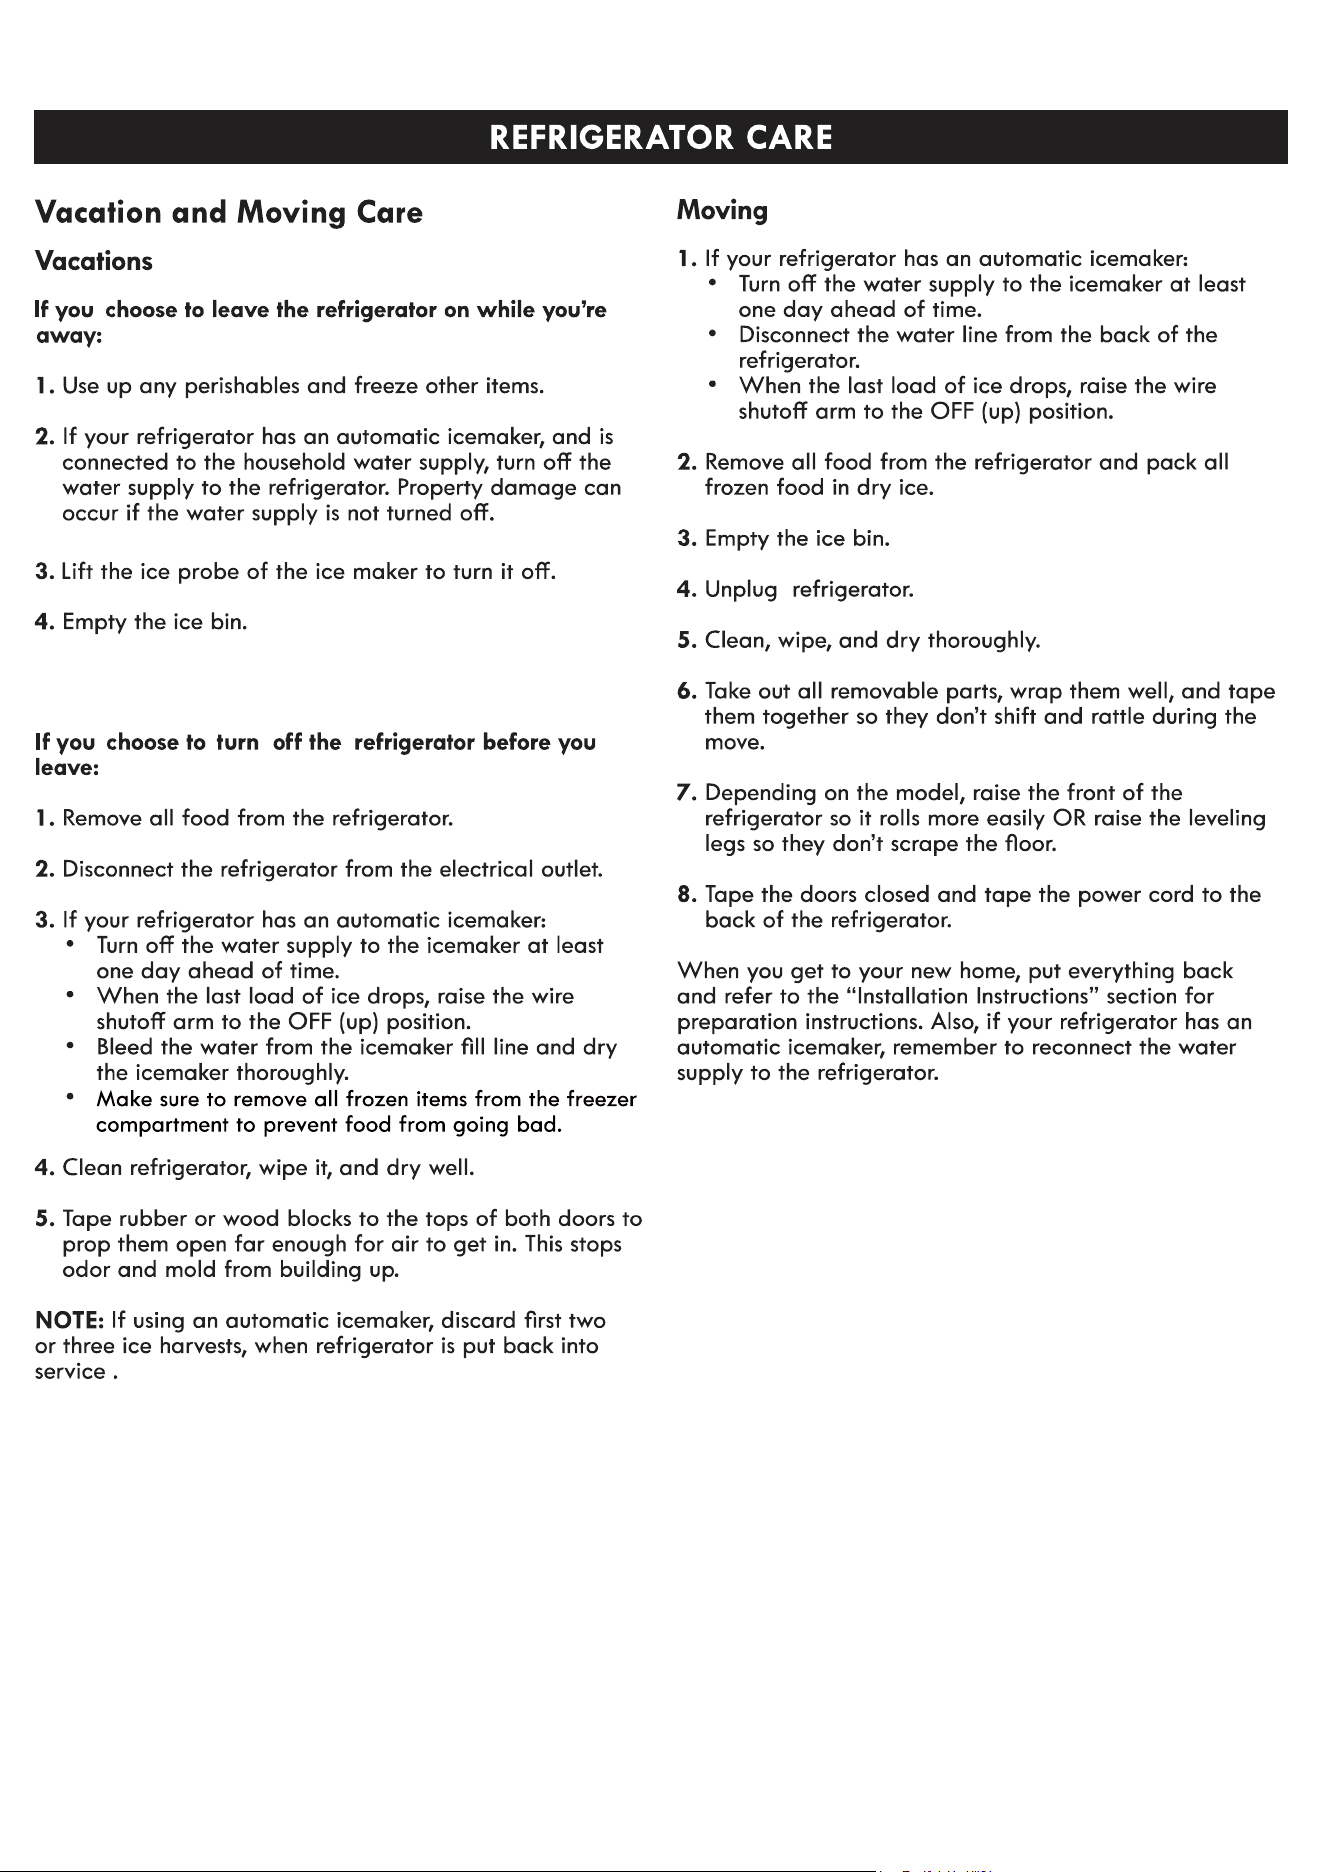
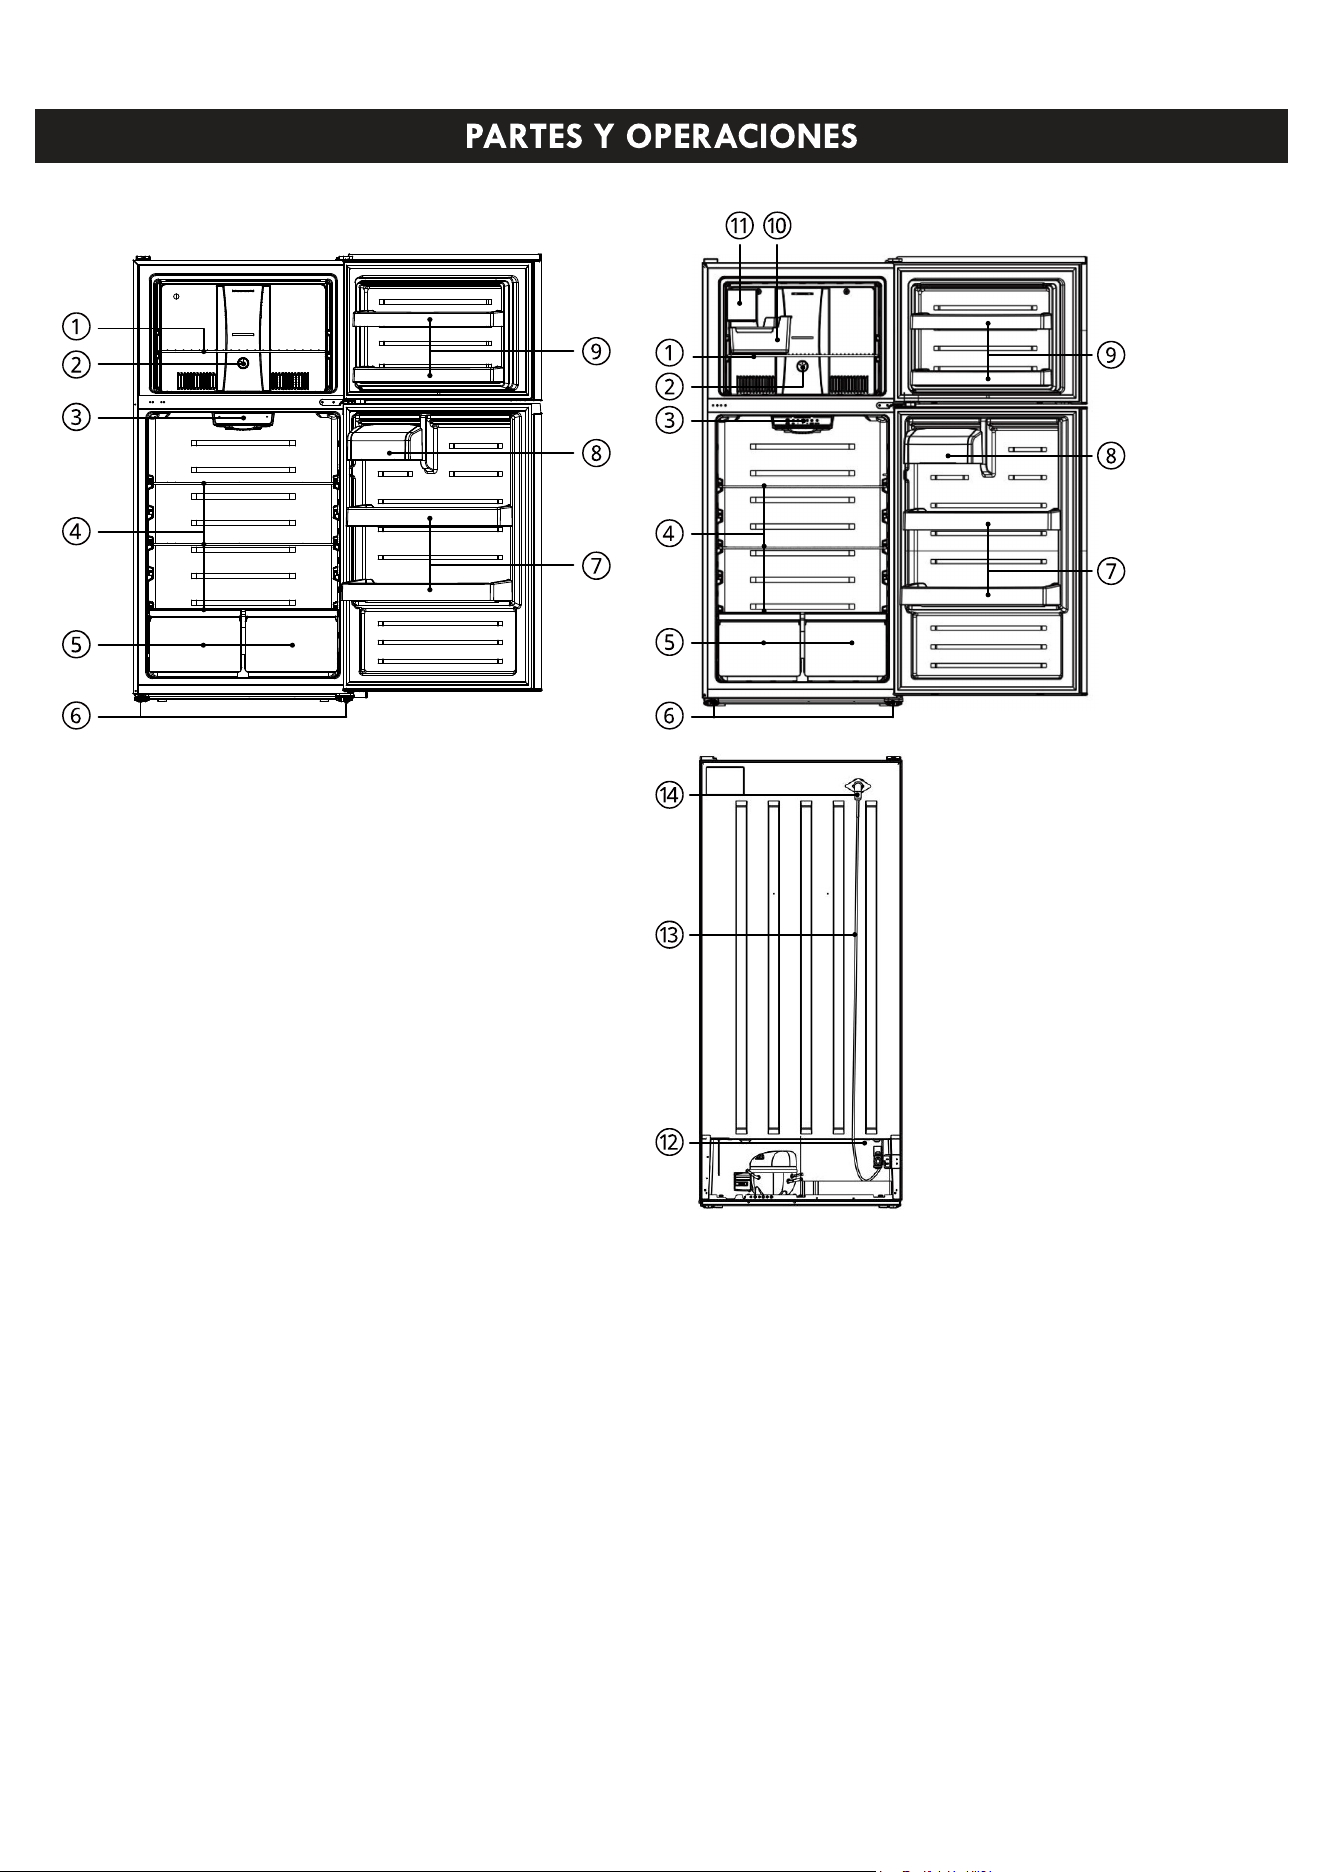
1. Shelves
2. Freezer control
3. Refrigerator control
4. Shelves
5. Crisper drawers
6. Leveling feet
Wheels
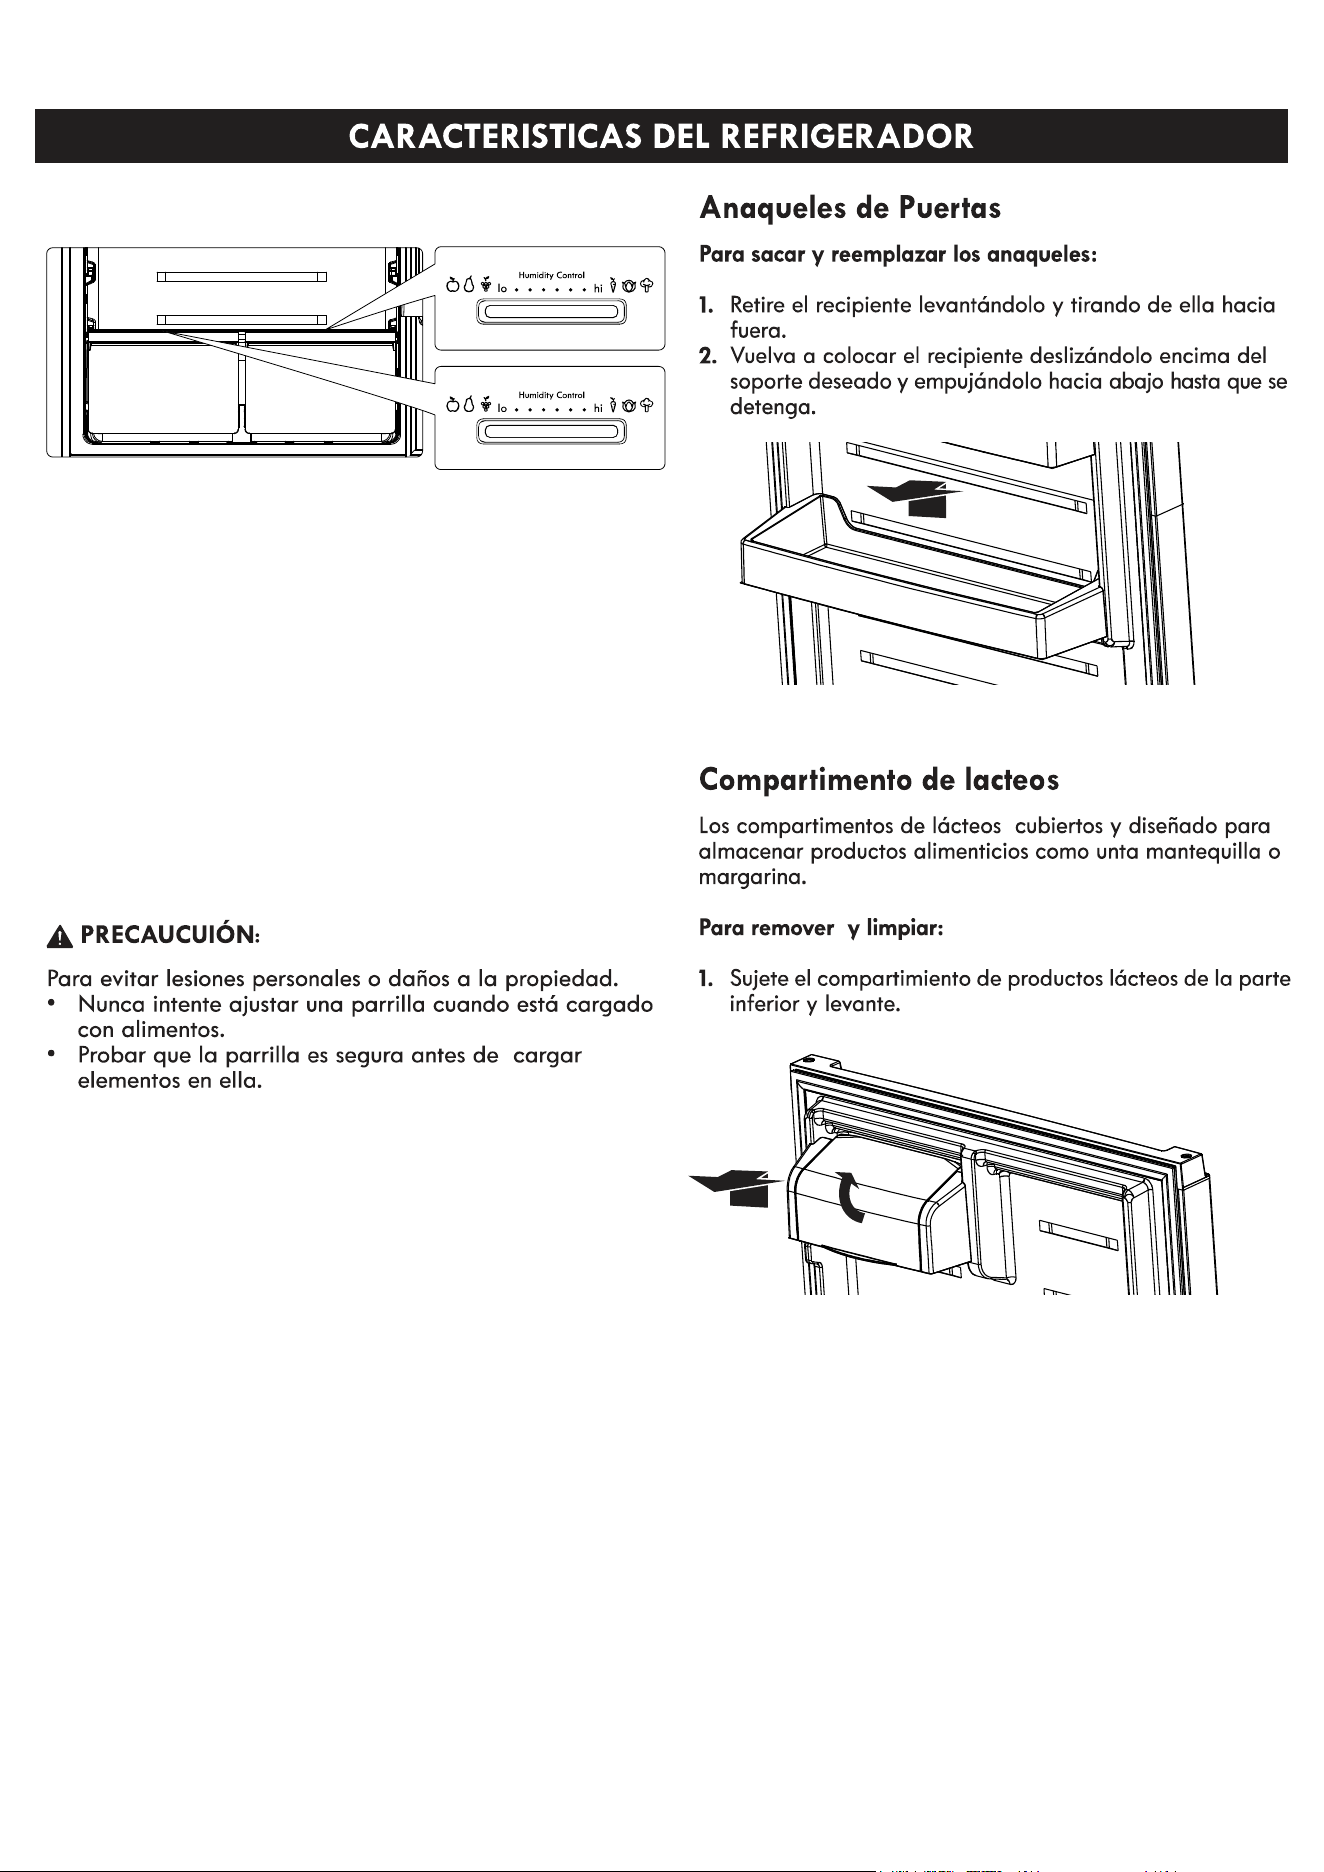
7. Door bins
8. Dairy bin
9. Door bins
1. Shelves
2. Freezer control
3. Refrigerator control
4. Shelves
5. Crisper drawers
6. Leveling feet
Wheels
7. Door bins
8. Dairy bin
9. Door bins
10. Icebucket
11. Icemaker
12. WaterValve
13. Tube Assembly
14. Tube

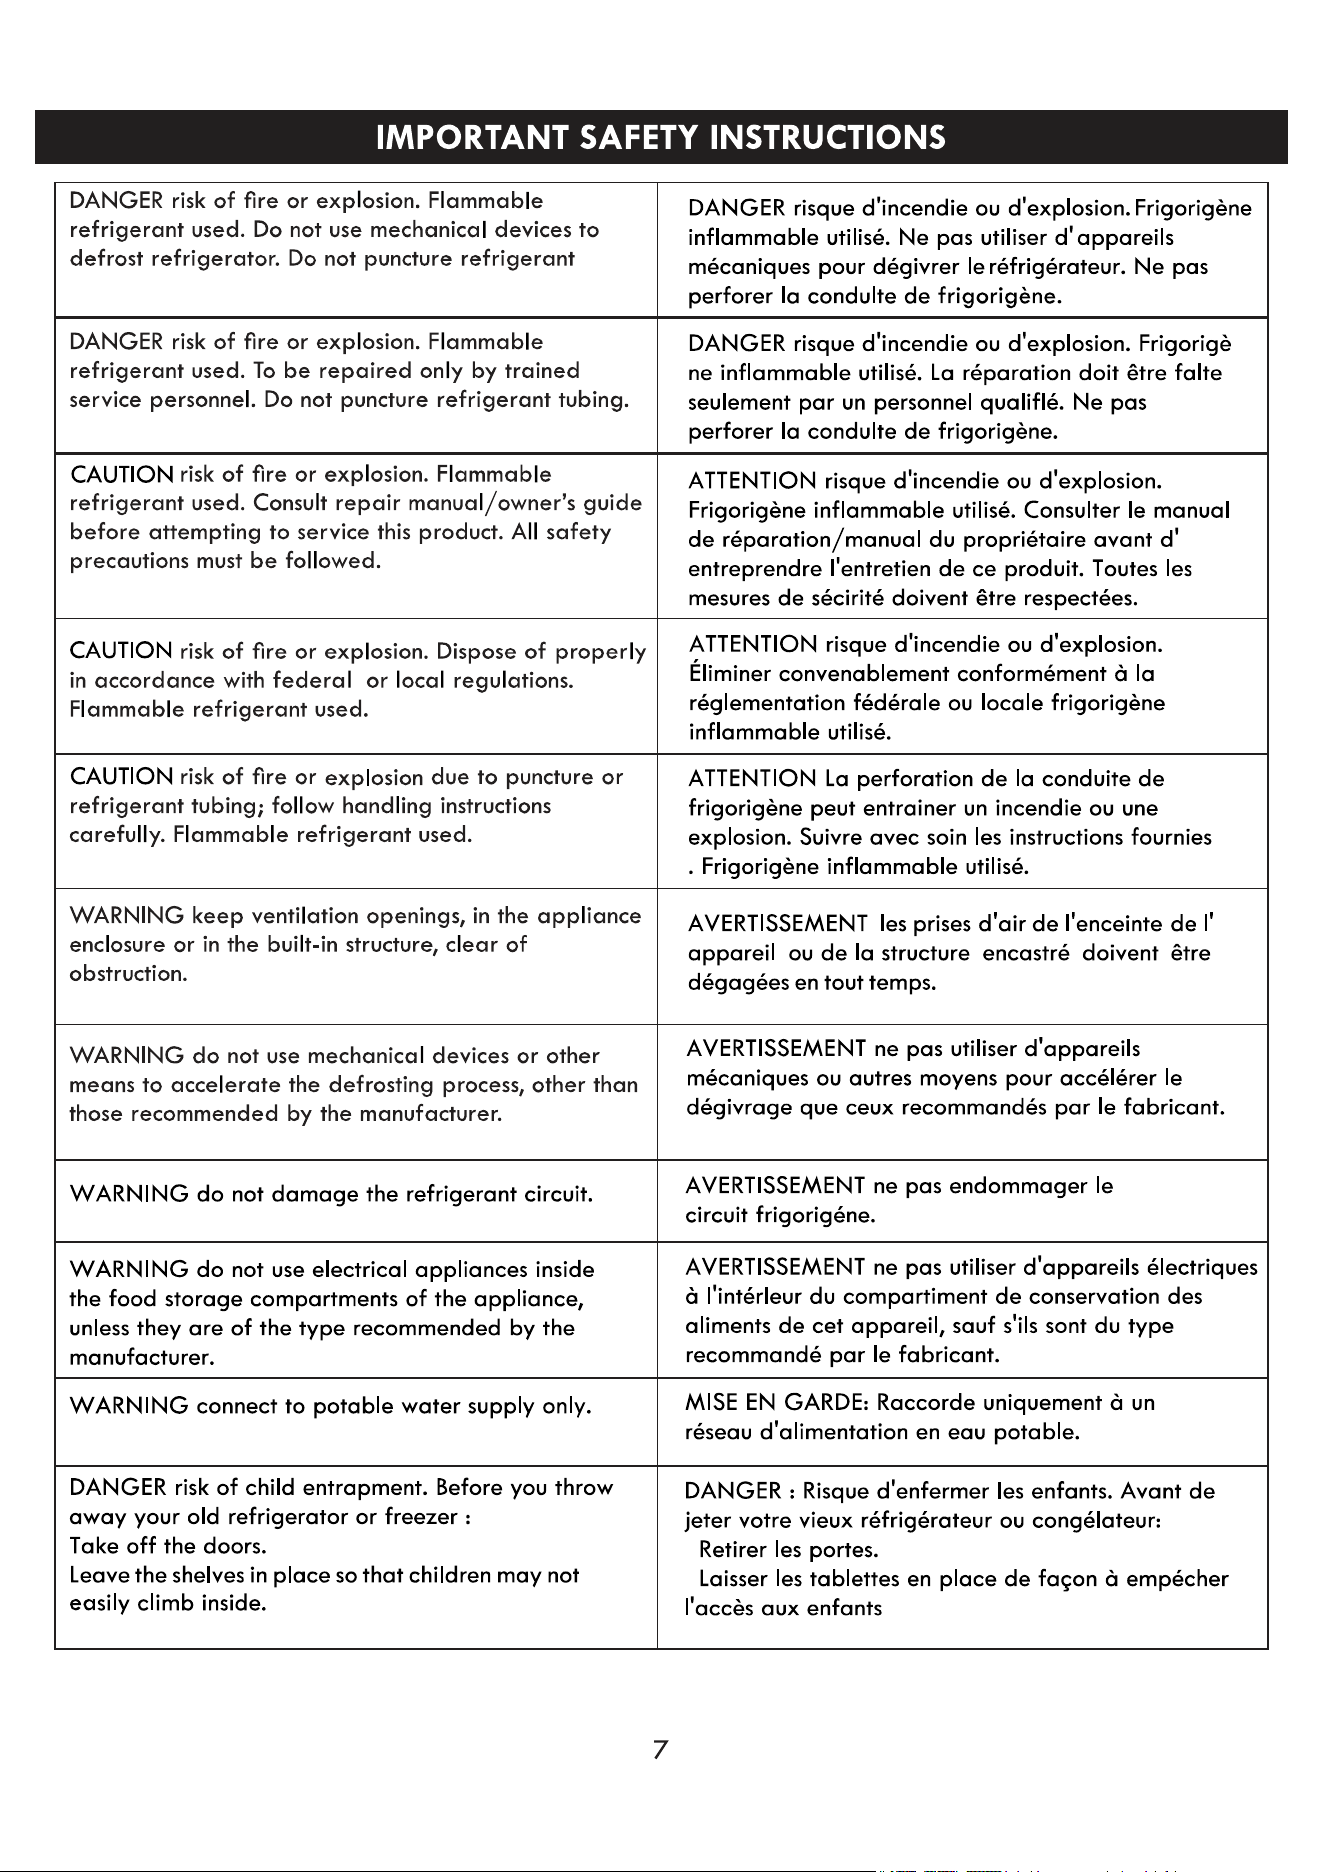
WARNING
Unplug the refrigerator. To eliminate the danger of
electric shock during installation, you must unplug
the refrigerator from its electrical outlet.
Models :
899.6231# 899.6133#
If you need to install an ice maker, please contact
after-sales service.
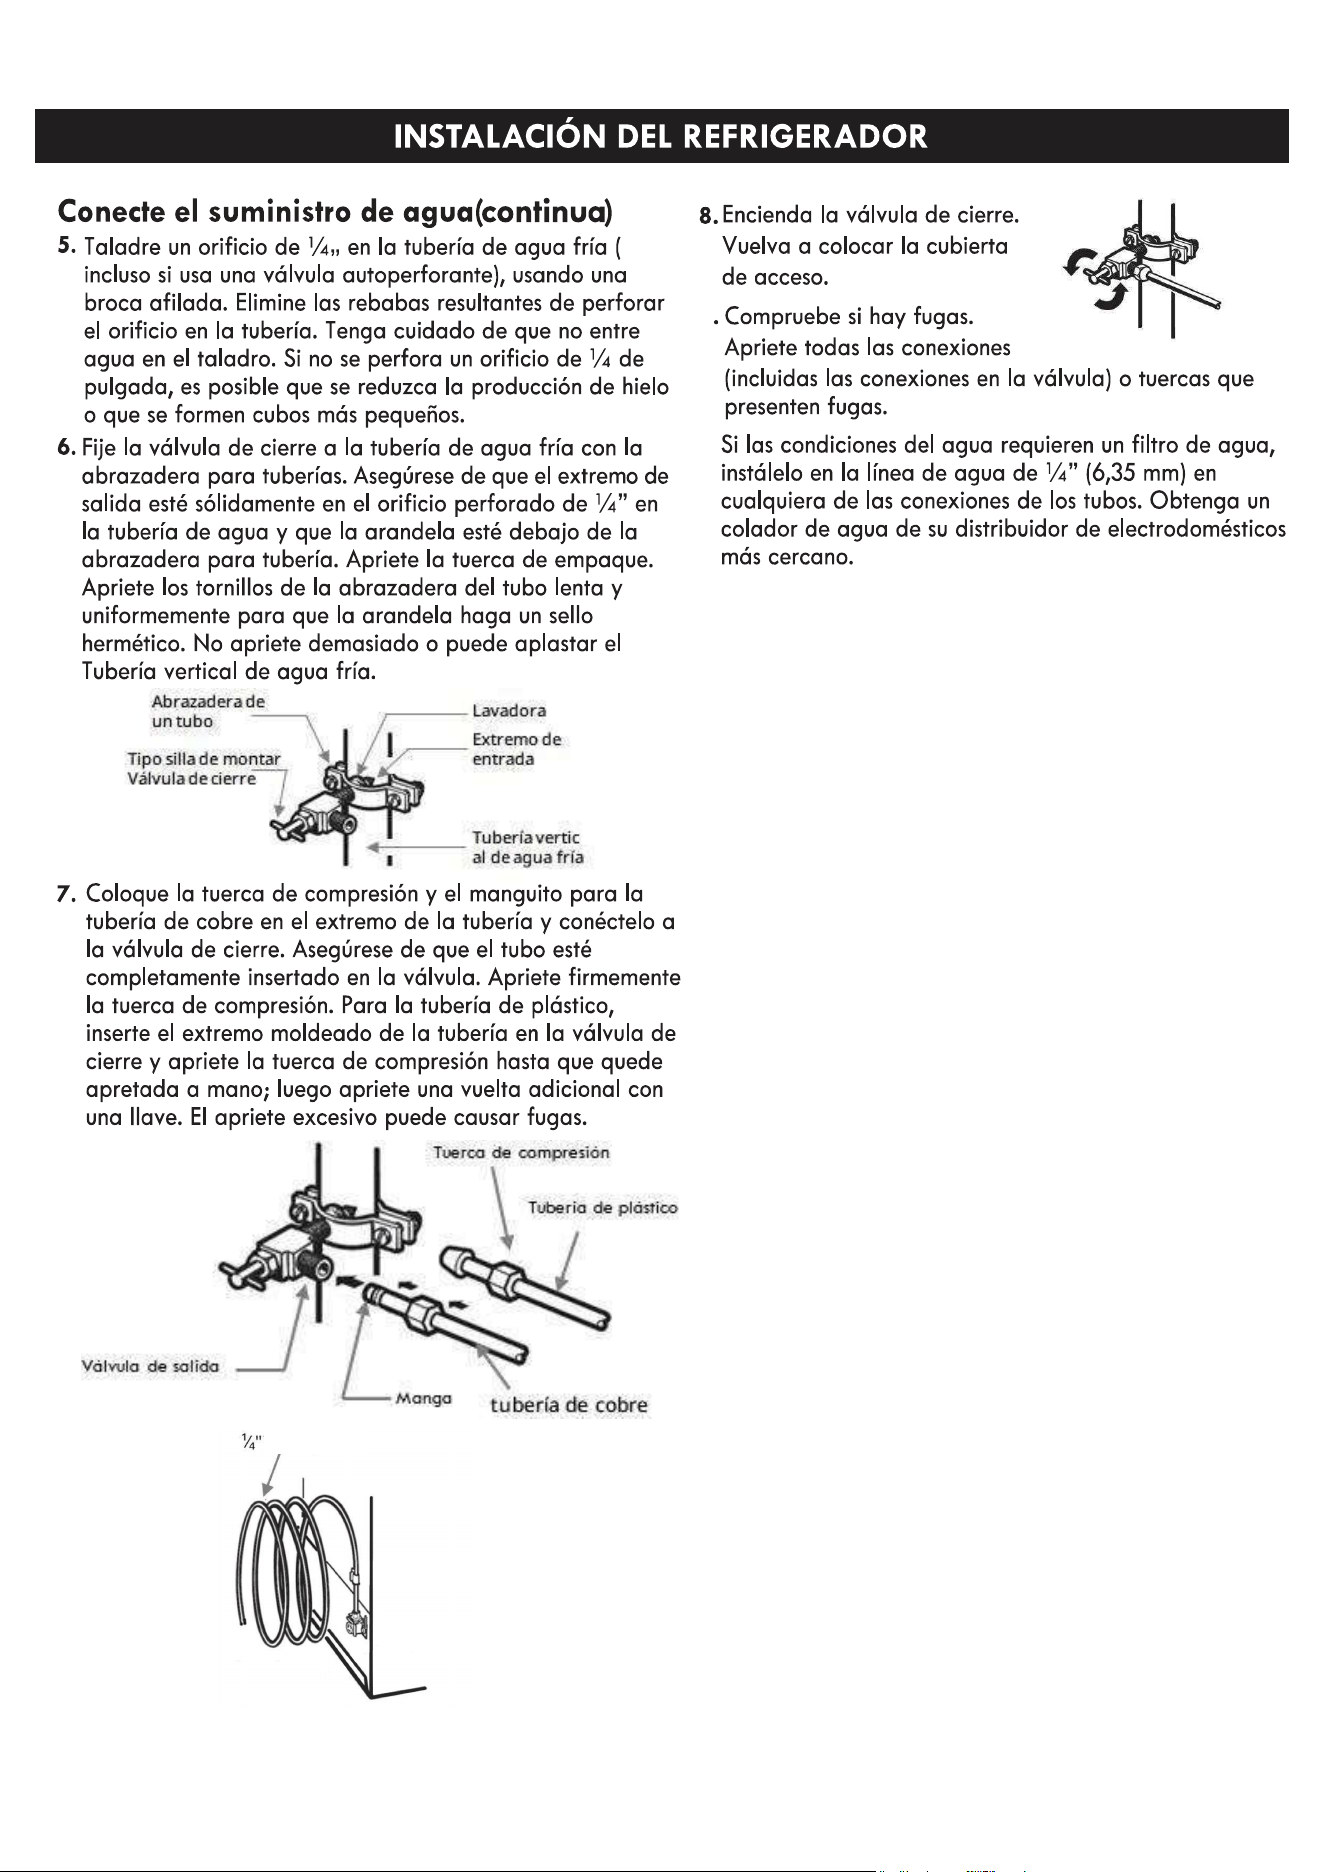
1/2"open ended wrenches or adjustable wrench
1/4" outer diameter refrigerator copper tubing kit
Two 1/4" outer diameter compression nuts and 2
sleeves
Power drill and bit
Models :
899.7231# 899.7133#
The refrigerator is equipped with an ice maker
model FDI101S.
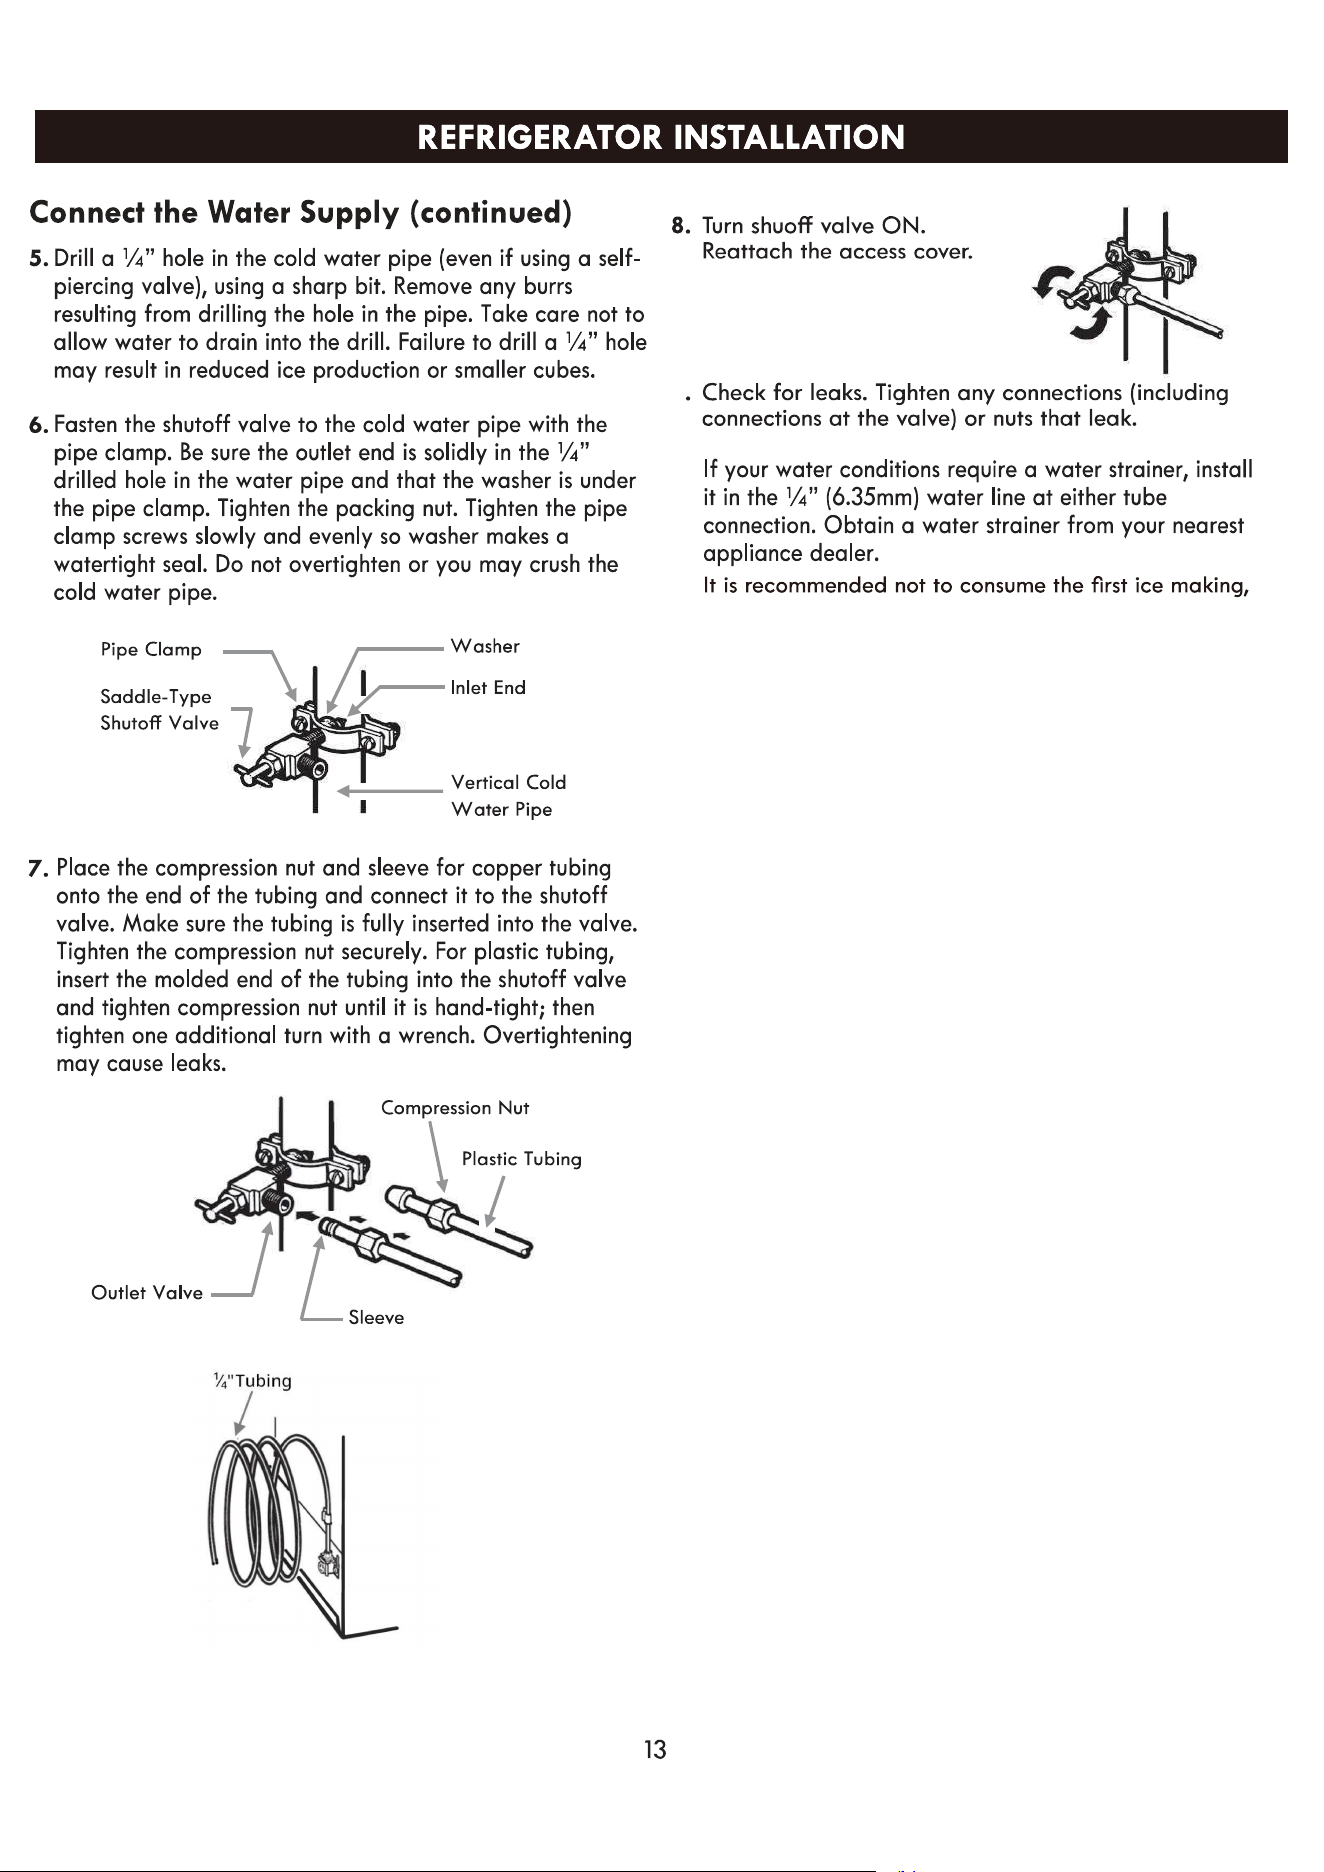
and to consume the second ice making again.
9
10.
11.
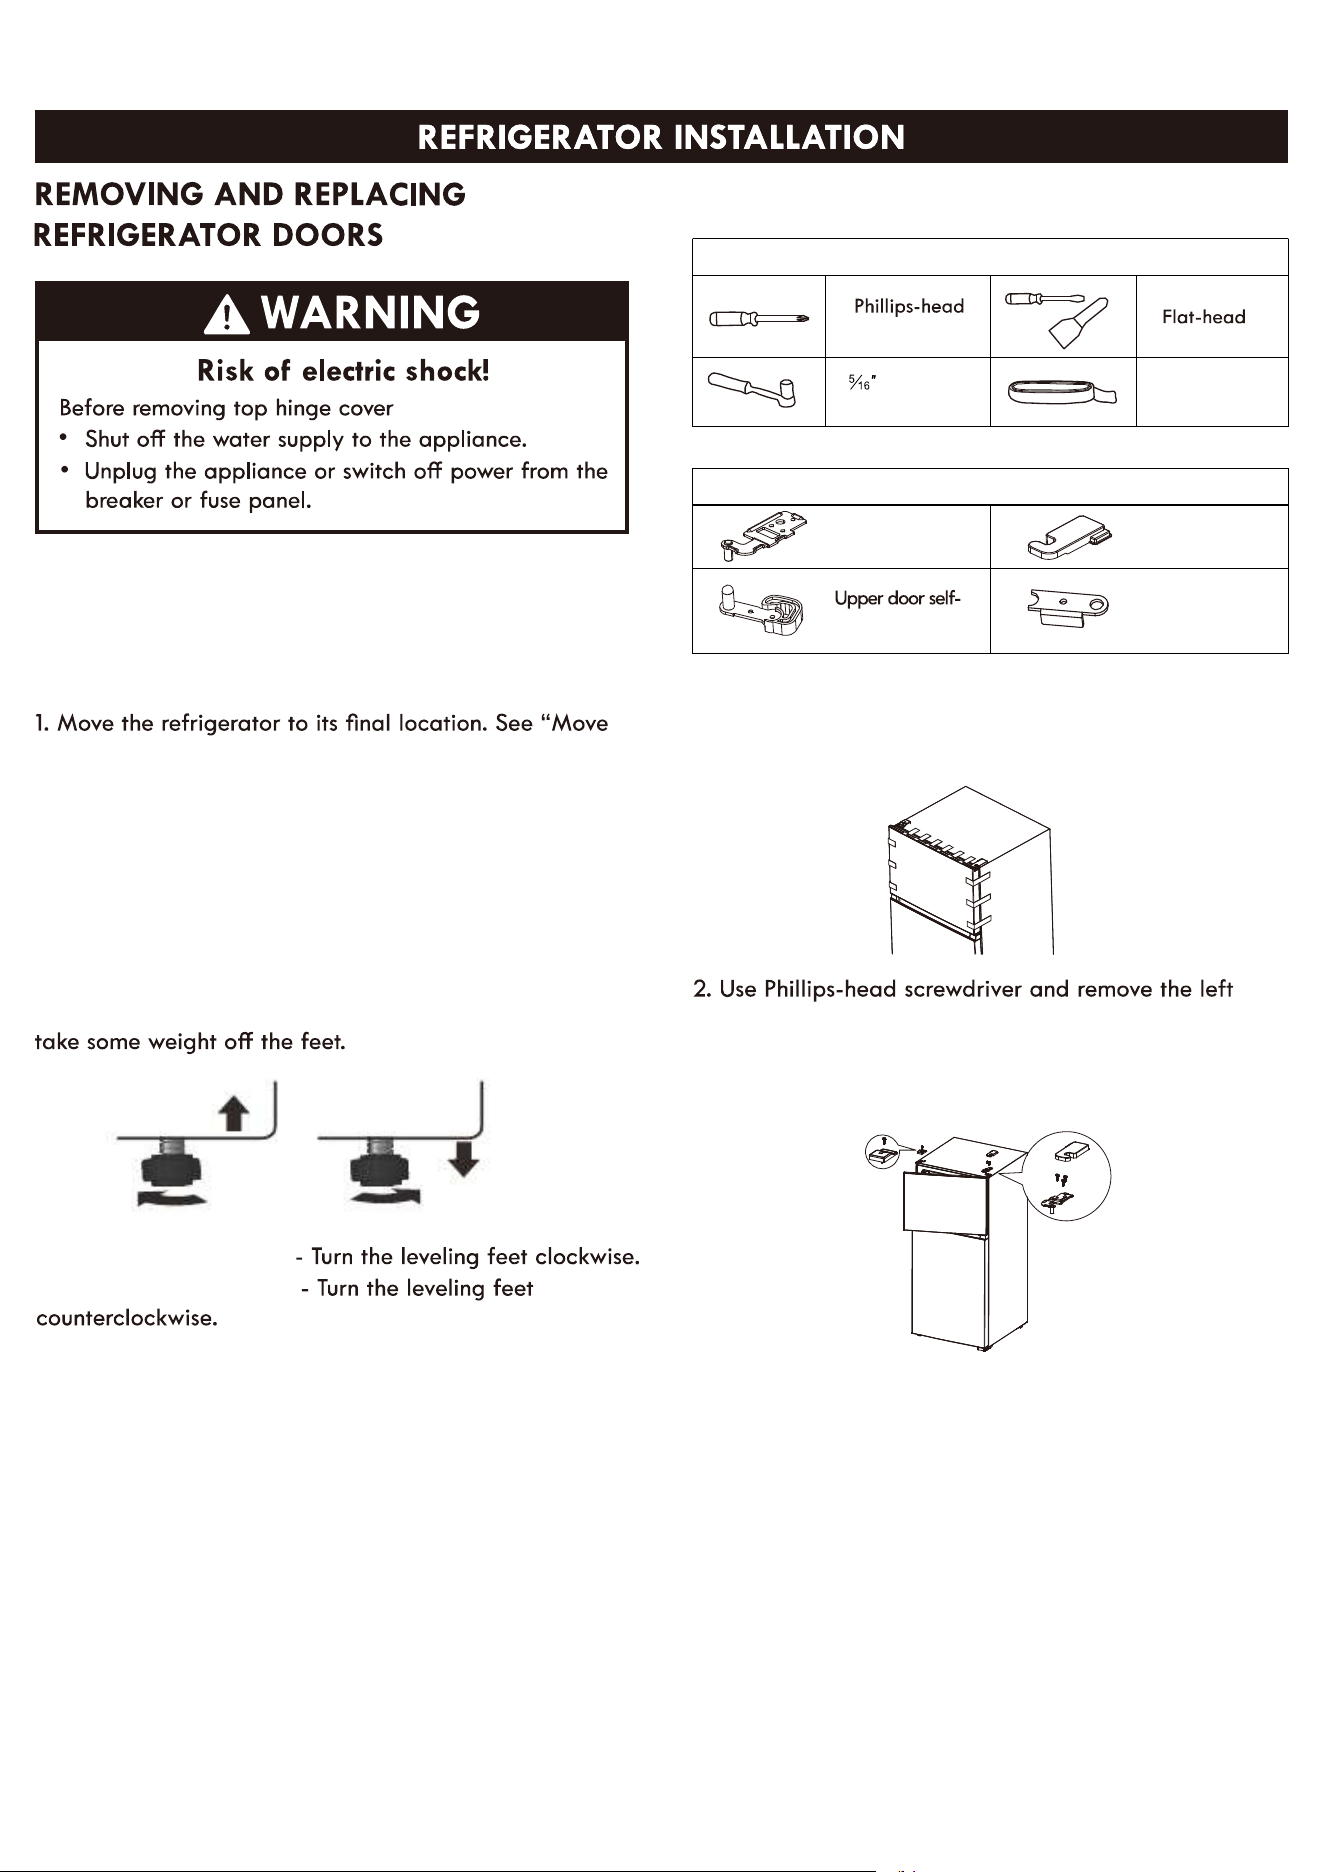
REVERSE THE DOOR SWING
LEVEL REFRIGERATOR
IMPORTANT: Level the refrigerator for proper operation
and to avoid cooling, frost and moisture problems that
can occur when the door does not close properly.
to Final Location.”
2. Place a carpenter's level on the top of the refrigerator
cabinet.
3. Adjust the two leveling feet, (one foot located at each
of the two front
corners of the refrigerator cabinet) until the refrigerator
is level.
NOTE: The leveling feet are easier to adjust if you have
someone push against the top front of the refrigerator to
socket and
ratchet
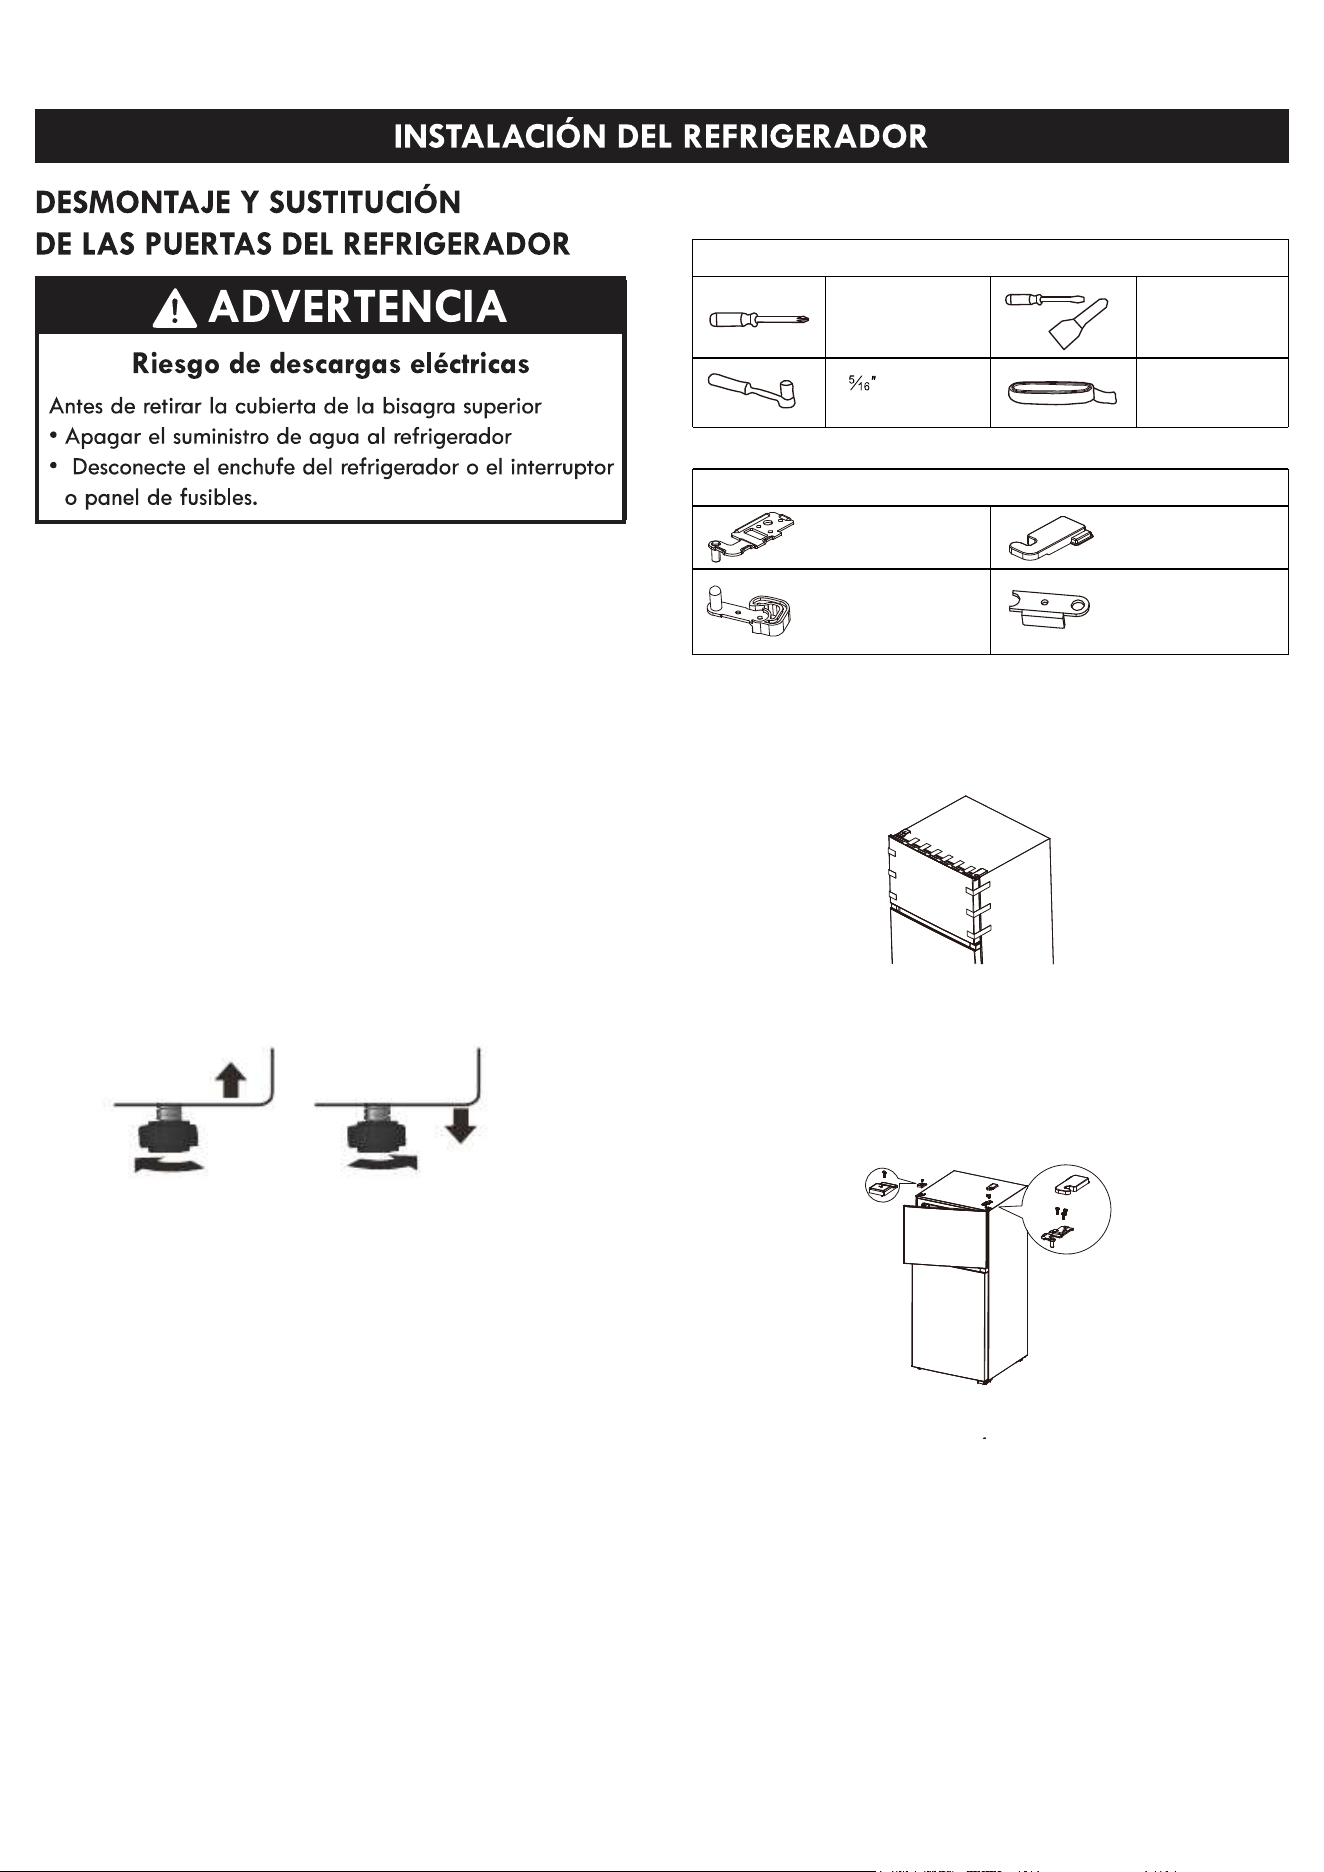
List of tools to be provided by the user
Screwdriver
Putty knife
Screwdriver
Masking tape
Parts included with the hinge kit
Top left hinge
Left top
hinge cover
locking block
Left door
open
stopper
1.Unplug your refrigerator and remove all food from the
door shelves.
Remove all food from the inner door liner. Tape the
freezer door in place with masking tape.
cover plate and the right top hinge cover, then unscrew
screws and remove the right top hinge. Keep the screws
to reuse.
Left cover plate Right top hinge cover
3. Lift the freezer door up and away from your
refrigerator.Place the doors on a protective surface.
4. Use Phillips-head screwdriver and unscrew screws
of middle hinge, remove the hinge, then lift the
refrigerator door up and away from your refrigerator.
Save the screws to reuse.
14
To raise the refrigerator
To lower the refrigerator
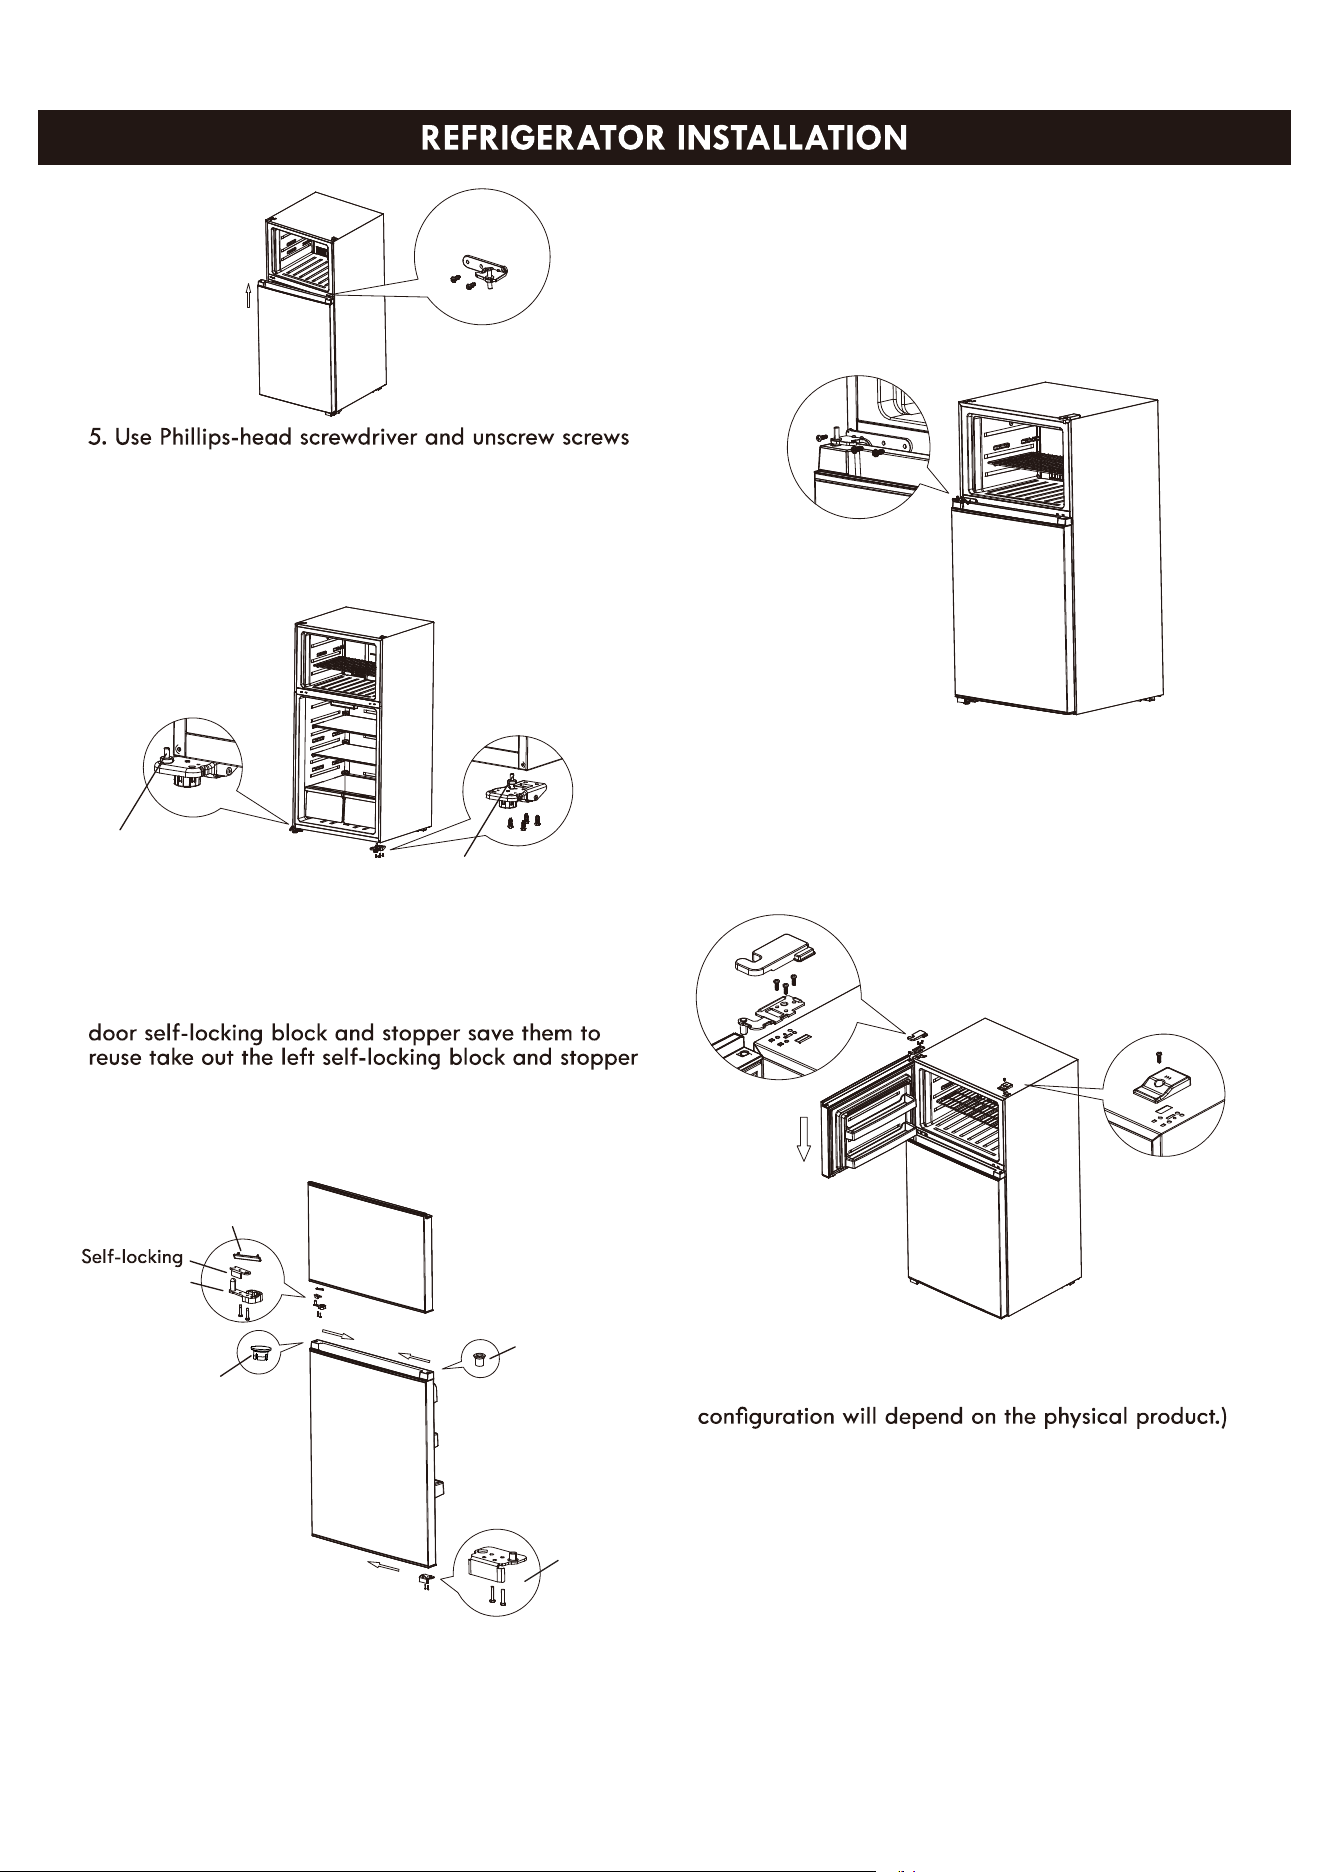
Center hinge
of the bottom hinge, then remove the bottom hinge
from the bottom right side of the refrigerator.
6. Unscrew the hinge shaft from the right side of the
bottom hinge and move it to the left side, then secure
the bottom hinge to the bottom left side of the
refrigerator, using the screws you removed previously.
7. Remove the sleeves from the top right of doors
and hole cap from top left of doors, and assemble
them on the opposite sides.
8. Remove the refrigerator door stopper and install
it on the other side of the door. Remove the freezer
from the accessory bag in the refrigerator and
installed on the left of door.
Remove the Hinge hole cover from the lateral beam,
and assemble them on the opposite sides.
9. Put down the refrigerator door bottom hinge
vertically, take out the middle hinge of the other side
from the accessory bag then assemble the middle
hinge on.
Attach the left center hinge
Reattach the
bottom hinge
Remove the
bottom hinge
Hinge shaft
Hinge shaft
10.Put down the freezer door on the middle hinge
vertically, then take out the top hinge and cover of
other side from accessory bag, assemble top hinge,
hinge cover and hole cover.
Top hinge
Hole cover
(The picture above is only for reference. The actual
15
Stopper
Hole cap
Hinge hole cover
Sleeves
Stopper
BEFORE USE
WAITING PERIOD
·
electrical outlet, allow it to stand upright for approximately
2 hours.
NOTE: This reduces the possibility of a malfunction in the
cooling system from improper handling during
transportation.
CLEANING
1. Wash the refrigerator interior using a soft cloth
dampened with a baking soda solution (2 tablespoons
baking soda mixed with 1 quart of warm water).
2. Using a soft cloth, thoroughly dry all surfaces.
REFRIGERATOR USE
GENERAL
ENERGY SAVING TIPS
· The storage life of frozen foods varies and the
recommended storage time should not be exceeded.
Electrical Shock Hazard
· Plug into a grounded 3 prong outlet.
· Do not remove the ground prong from the power cord
plug.
· Do not use an adapter.
· Do not use an extension cord.
shock.
WARNING
1. Plug in your refrigerator. Wait for 30 minutes, and
then open the refrigerator door to determine if the
refrigerator has started working.
· Allow hot foods to cool to room temperature before
placing them in the refrigerator. Foods that freeze too
slowly may lose quality or spoil.
· Overloading the refrigerator forces the compressor to
run longer.
· Wrap foods properly and wipe containers dry before
placing them inthe refrigerator. This cuts down on frost
· Do not line refrigerator storage shelves with aluminum
foil, wax paper or paper toweling. Liners interfere with
· Organize and label food to reduce door openings and
extended searches. Remove as many items as needed at
one time, and then close the door as soon as possible.
· Do NOT add a large amount of unfrozen food to the
refrigerator at one time. This will lower the cooling
16
2. Allow 4 hours for the refrigerator to cool completely
before adding food.If there are instructions on the
package, carefully follow these instructions regarding
storage times.
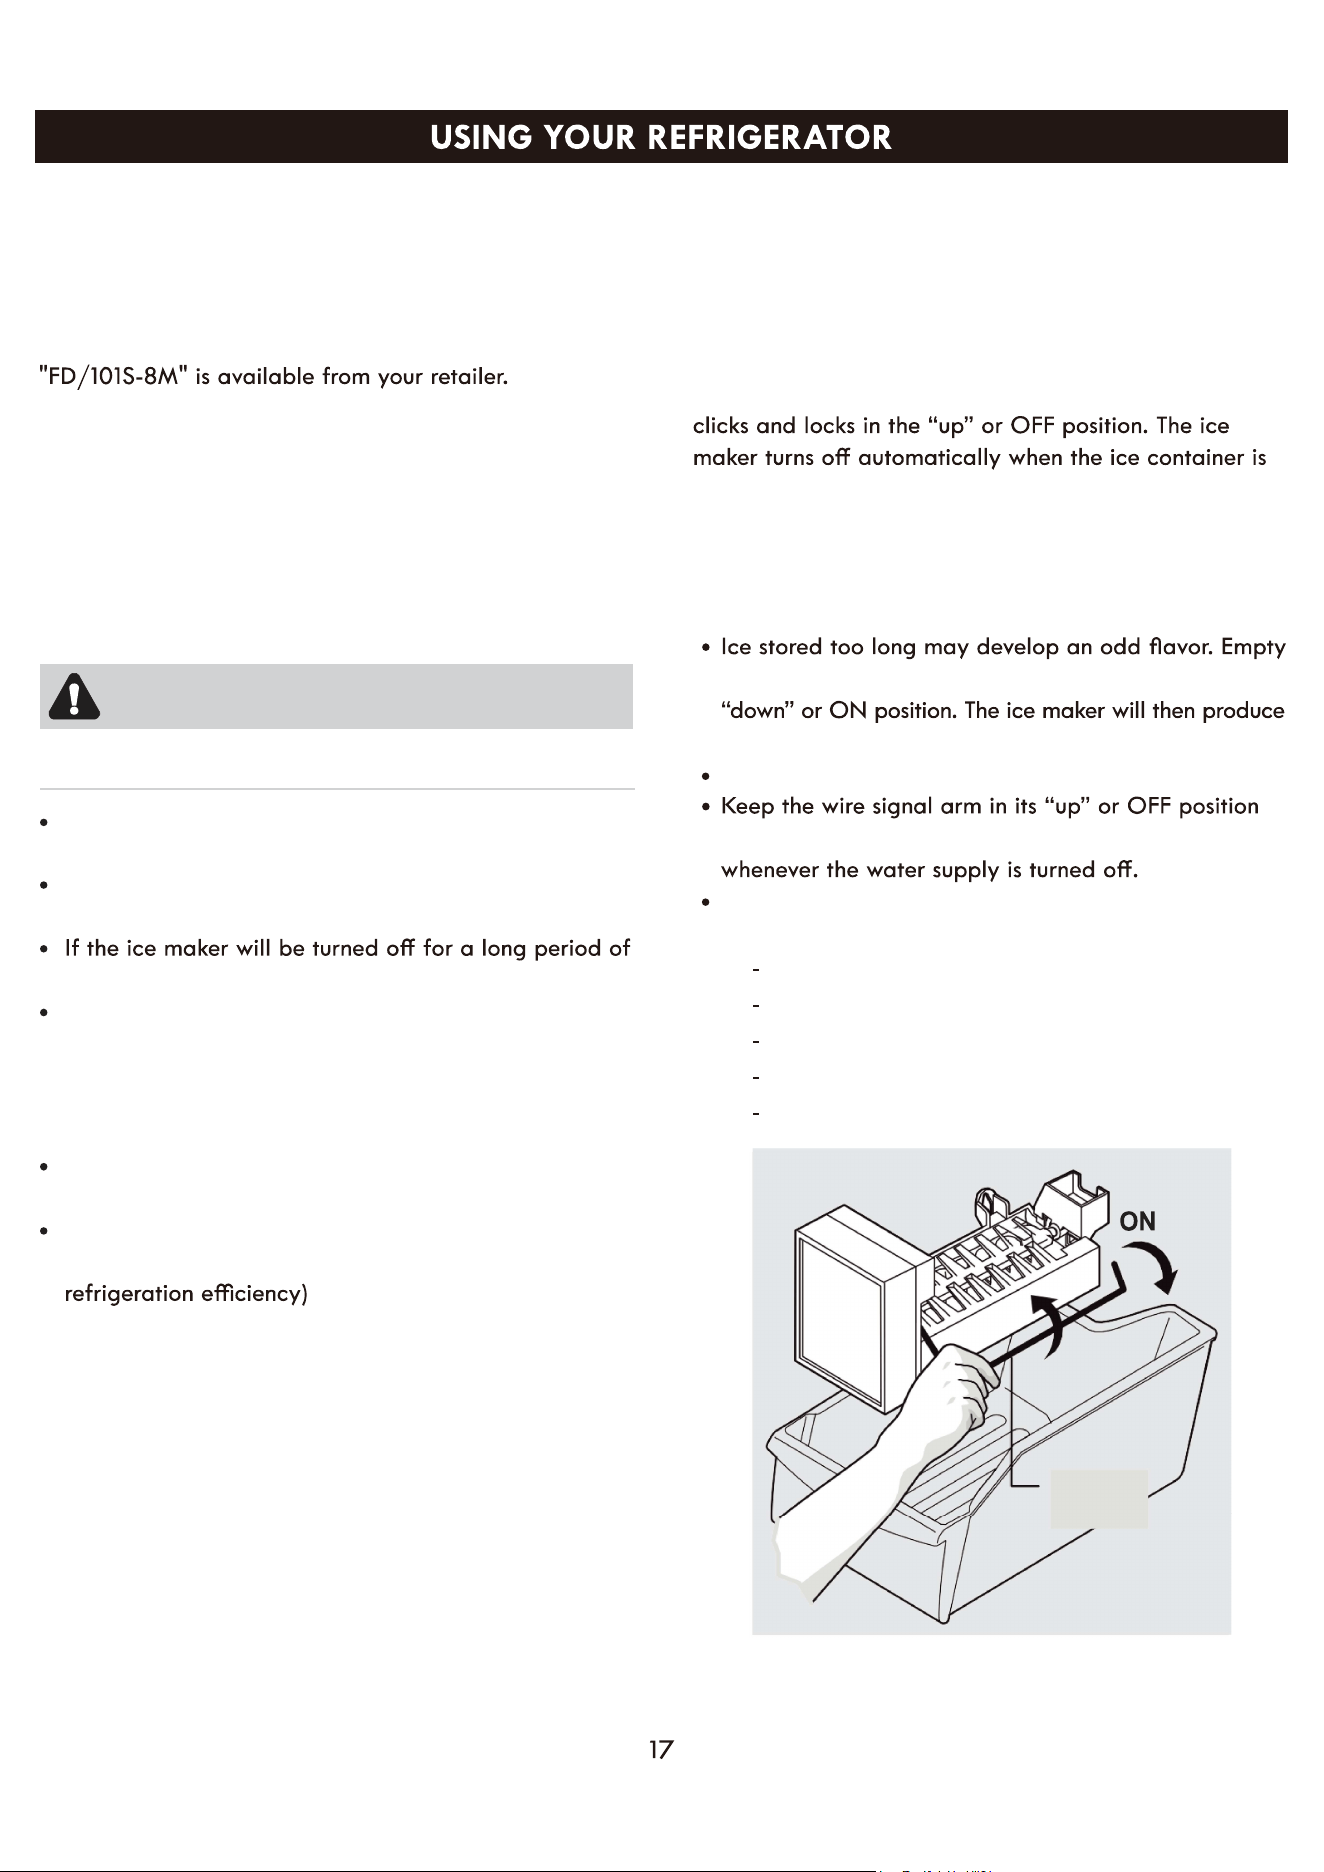
OFF
Wire
Signal Arm
Automatic Ice Maker Tips
Remember that water quality determines your ice quality.
If the water source uses a water softener, ensure that the
softener is maintained and working properly. Chemicals
from a malfunctioning softener can damage the ice
maker.
To stop the ice maker, lift the wire signal arm until it
full. If your model has an adjustable freezer shelf, place
the shelf so the wire signal arm will hit the ice when the
ice container is full.
Ice Maker Tips
Ice loosening from tray
Ice dropping into ice container
Running water
Water valve opening or closing
Motor running
the container and be sure the wire signal arm is in its
more ice.
Occasionally shake the container to keep ice separated.
until therefrigerator is connected to the water supply or
The following sounds are normal when the ice maker is
operating.
ICE MAKER INSTALLATION INSTRUCTIONS
(OPTIONAL)
Based on the model you purchased, your refrigerator
comes with an ice maker or is ice maker ready. If you
need an ice maker, optional icemaker kit model
Follow the icemaker installation guide supplied with
the icemaker kit.
CAUTION
Do Not place the ice container in your dishwasher.
Wash ice container in warm water with mild detergent.
Rinse well and dry.
Stop the ice maker when cleaning the freezer or for
short vacations.
time, turn the water supply valve to the closed position.
Do not allow your children to touch the ice maker. This
could cause injury.
Ice P roduction Rate
8 pieces of ice are made each time, with a total weight
of 0.209 ~ 0.287lb. The shape of ice is "half-moon".
Ice production volume is about 0.276lb/1.2 hours, 5.5lb/
day (ice production volume is related to refrigerator
18
LED1 LED2 LED3 LED4 LED5
CONTROLS
DISPLAY
STANDBY MODE
SETTING THE FREEZER TEMPERATURE
TEMPERATURE SETTING
To enter standby mode, press the setting for 3
seconds when the refrigerator is running. In standby
mode, the compressor will not operate and the standby
indicator light will be illuminated. To resume normal
operation, just press the setting momentarily.
Caution: The refrigerator will not cool or freeze while
in standby mode.
Turn the controls to adjust the freezer temperature.
Place frozen food into the freezer as quickly as possible
after purchase.Pay attention to the storage
time on the food packaging instructions. The storage life
of frozen foods varies and the recommended storage time
should not be exceeded.
Each time the temperature setting is pressed once.
the temperature setting changes one time.
After the temperature setting has been completed, the
refrigerator will run according to the set value after 25s.
From left to right, the temperature is lower.
The order of coldness settings is as follows:
B
C
D
E
F
G
Setting button
LED1 Cold indicator
LED2 indicator
LED3 indicator
LED4 indicator
LED5 Coldest indicator
LED6 Standby mode
A
The refrigerator default setting is medium, and the
LED 3 indicator will be illuminated.
Normal operation display.
In case of a failure, the appropriate LED light show in
combination the failure code (in recycling display).
In case of no failures, the actual operation position of
refrigerator will be on display.
A B C D E F G
19
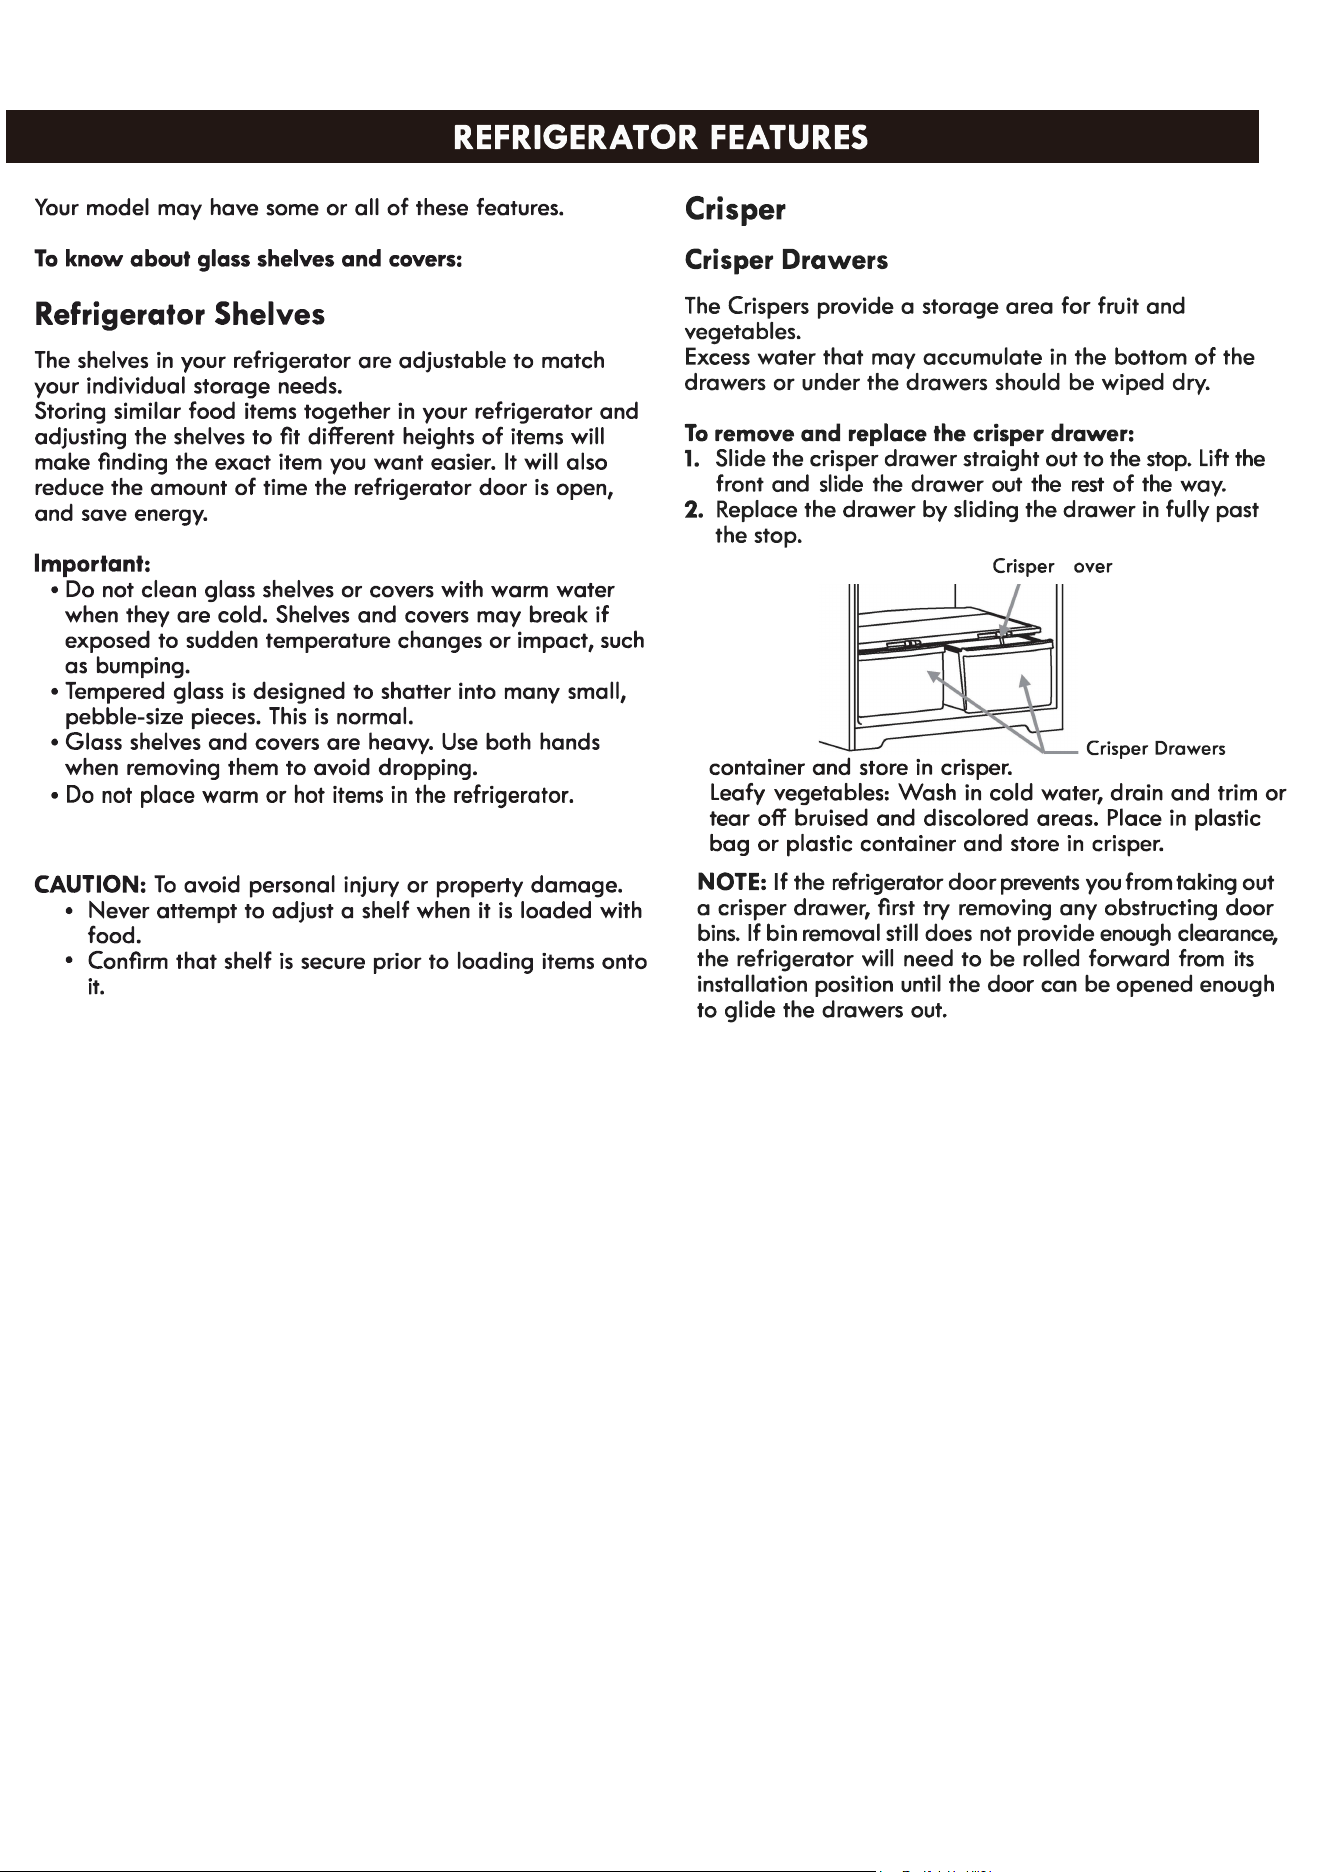
The crispers provide fresher tasting fruit and vegetables
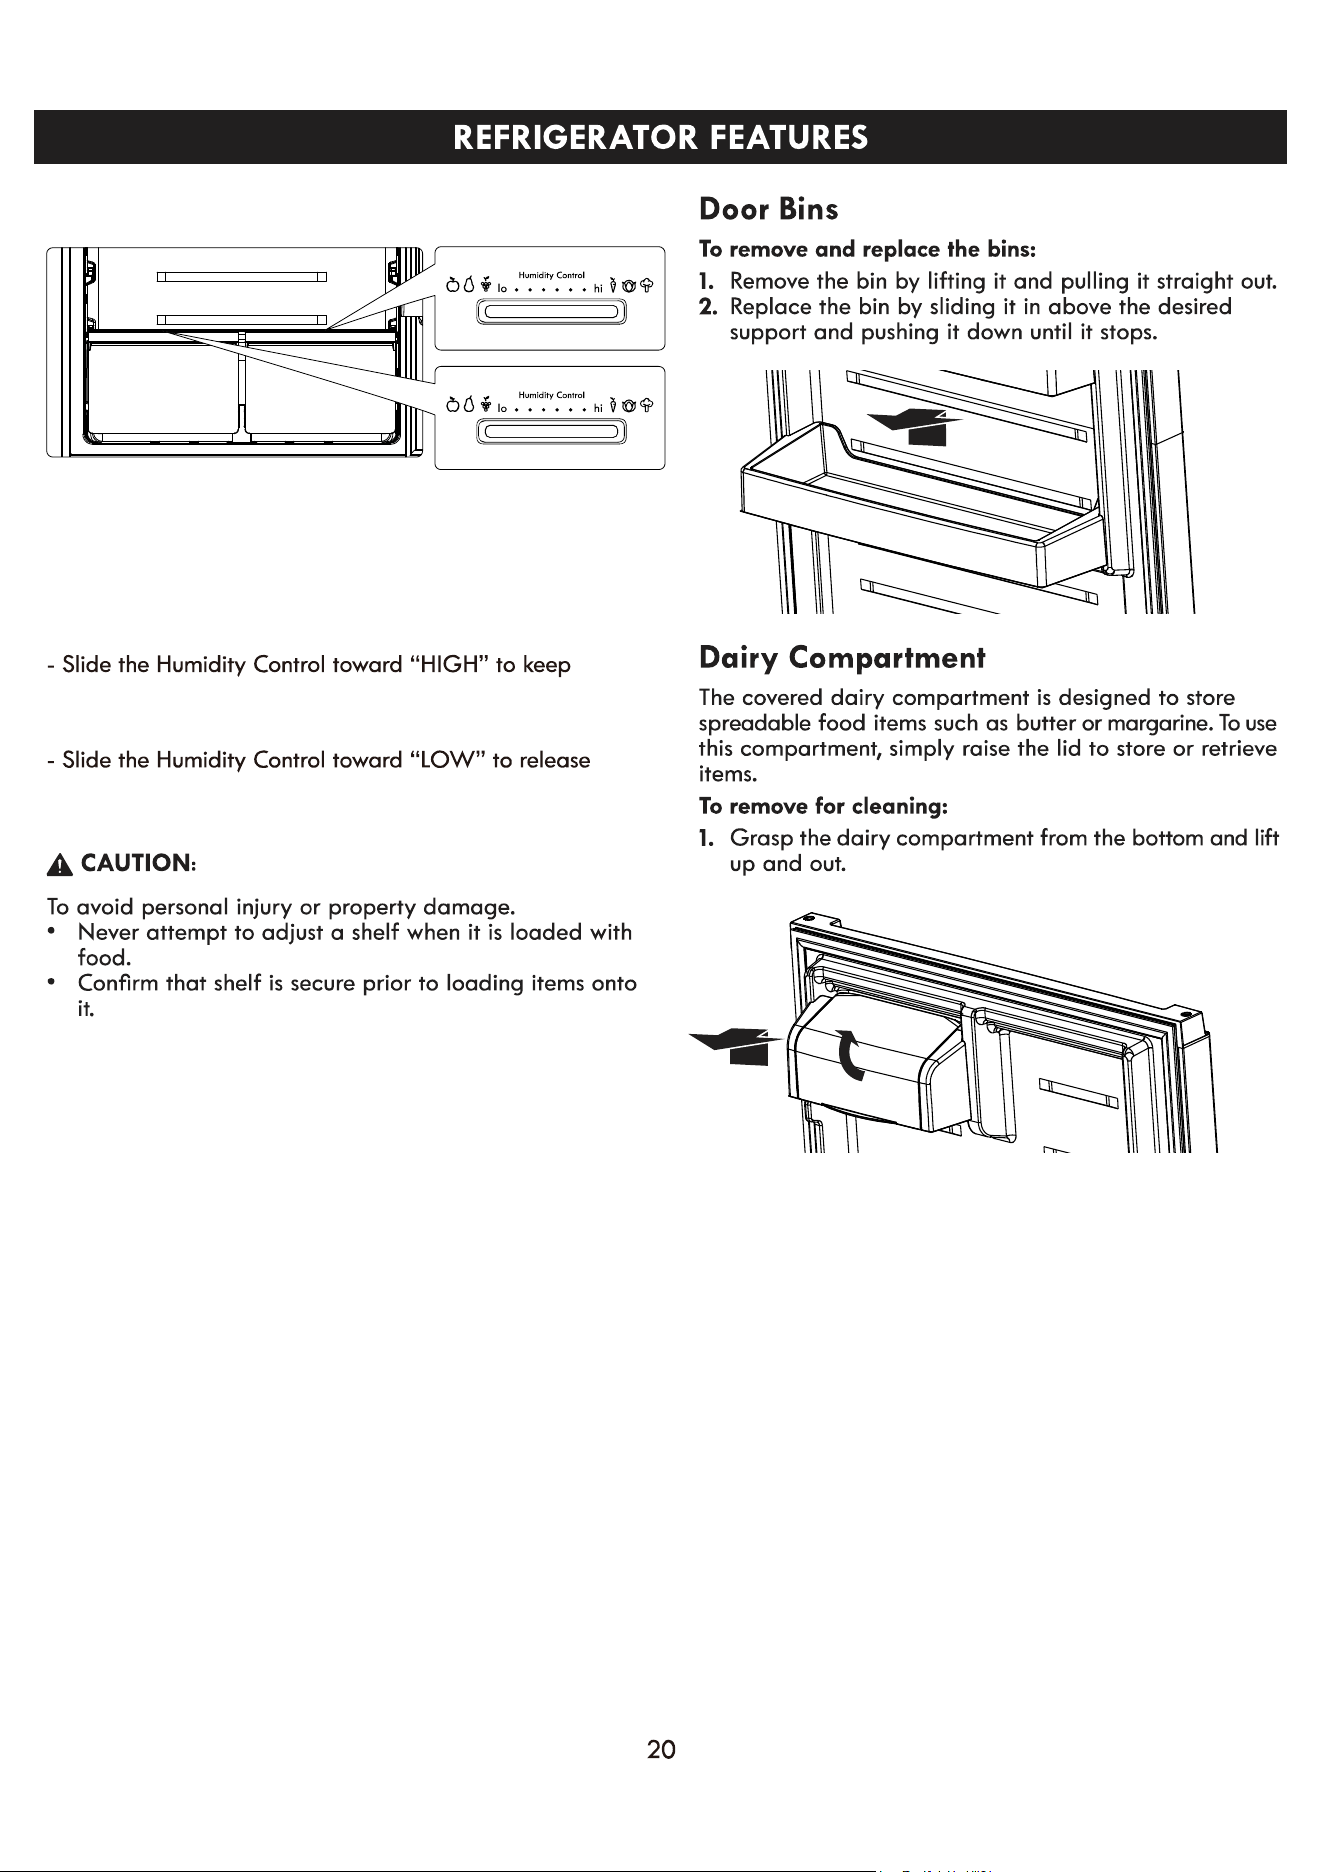
by letting you easily control humidity inside the drawer.
You can control the amount of humidity in the moisture
sealed crispers crispers by adjusting the control to any
setting between VEGETABLES and FRUIT.
moist air in crisper for best storage of fresh, leafy
vegetables.
moist air from crisper for best storage of fruit.
HUMIDITY CONTROLLED CRISPER

21

22
frequent
Wash stainless
steel surfaces with a clean, soft cloth or sponge and
a mild detergent in warm water. Rinse surfaces with
clean, warm water anddry immediately to avoid water
spots.
Fingerprint resistant stainless steel
23
TROUBLESHOOTING
IMPORTANT: DO NOT try to repair your refrigerator yourself. Doing so invalidates the warranty
GENERAL
PROBLEM PROBLEM CAUSE SOLUTION
The refrigerator
does not operate
·The refrigerator is unplugged.
·The fuse on the circuit is blown or
the circuit breaker is tripped.
·Power failure.
·Make sure that the refrigerator power cord is fully plugged
into the electrical outlet.
·Check the house fuse /circuit breaker box and replace the
fuse or reset the circuit breaker.
the power is restored.
The refrigerator
door does not
close completely
·Food packages are interfering
with the door.
·The door gaskets are dirty.
·The refrigerator may not be level.
·Move or remove some food items.
·Clean the door gaskets.
·Level the refrigerator.
Food in the
refrigerator
is not cold
·The door has been opened too
often or was not closed properly.
·A large amount of food was
recently added.
·The door is not closed completely.
·The refrigerator has been
disconnected for a period of time.
·The temperature control is set too
warm.
·Make sure that the door is closed properly.
·Allow time for the recently added food to cool, and then
check again.
·Check the door gasket and food distribution, and make
sure that the door closes completely.
·Allow 4 hours for the refrigerator to cool completely
before adding food.
·Set the temperature control to a colder setting.
·The refrigerator may not be level.
·The refrigerator cabinet is
touching a wall.
·Metal parts undergo expansion
and contraction.
·Refrigerant is circulating
throughout the system.
·Adjust the leveling feet located on the front corners of
the refrigerator until the refrigerator is level.
·Move the refrigerator away from the wall.
·This is normal.
·This is normal.
·The door has been opened too
often or was not closed properly.
·The refrigerator is located in a
humid area.
·The weather is hot and humid.
·Make sure that the door is closed properly.
·Move the refrigerator to a drier location.
·This is normal.
·The room temperature is hotter
than normal.
·A large amount of food was
recently added.
·The door is not closed completely
or was opened too often.
·The refrigerator has been
disconnected for a period of time.
·The temperature control was not
set correctly.
·This is normal.
·Allow time for the recently added food to cool, and then
check again.
·Check the door gasket and food distribution to make sure
the door will close completely.
·Allow 4 hours for the refrigerator to cool completely
before adding food.
·Set the temperature control to the correct setting.
·Refrigerator needs cleaning.
·Improperly wrapped food is
giving o fan odor.
·Wrap food tightly or seal before storing it in the
refrigerator.
Refrigerator has
an odor
The compressor
turns on and
The refrigerator
makes unusual
noises or
vibrations
Moisture is
building up in
the interior of
the refrigerator
ERROR CODES
Fault Code Fault Description
LED1 indicator and LED2 indicator
LED1 indicator and LED3 indicator
LED1 indicator and LED4 indicator
Refrigerator temperature sensor circuit
Freezer defrost sensor
Ambient temperature sensor
24

18 cf 6231#, 7231#
21 cf 6133#, 7133#
32
48
49
45
43-44
Características del refrigerador
46-47
Cuidado del refrigerador
Especificaciones
Desmontar/reemplazar, Enfriamiento del nivel
de líquido, Intercambio de puerta izquierda
y derecha
38-39
40-42
40
Máquina de hielo 41
Conexión al suministro de agua
(opcional)
Uso del refrigerador 40
Controles 42
26
27
28
3129
35
33
3936
3736
34
Guía de almacenamiento de Alimentos
27
28
o, para entregas en el estado de California, un año a partir de la fecha de
entrega original,
Kenmore
Kenmore
29
30
31
R600a
160W
827 kPa(120psi)
138 kPa(20psi)
899.6231#
29.5 in
30.75 in
66.38 in
163 lbs
4.3 cu ft
13.9 cu ft
18.2 cu ft
29.5 in
30.75 in
66.38 in
166 lbs
4.2 cu ft
13.9 cu ft
18.1 cu ft
32.7 in
30.75 in
66.38 in
176 lbs
4.9 cu ft
15.6 cu ft
20.5 cu ft
32.7 in
30.75 in
66.38 in
179 lbs
4.8 cu ft
15.6 cu ft
20.4 cu ft
899.7231# 899.6133# 899.7133#
32
33
7.6
3
7.6
3
7.6
3
34
100
38
50
10
1. Estantes
2. Control del congelador
3. Control del refrigerador
4. Estantes
5. Cajones para verduras
6. Patas niveladoras
Ruedas
7. Compartimentos en la puerta
8. Contenedor de lácteos
9. Compartimentos en la puerta
1. Estantes
2. Control del congelador
3. Control del refrigerador
4. Estantes
5. Cajones para verduras
6. Patas niveladoras
Ruedas
7. Compartimentos en la puerta
8. Contenedor de lácteos
9. Compartimentos en la puerta
10. Cubo de hielo
11. Fabricador de hielo
12. Válvula de agua
13. Conjunto de tubos
14. Tubos
35
1 / 2 "abierta a las escrituras o a las escrituras
judiciables
1/4"outerdiametrrefigeratorCoppertubingkit
Dos 1 / 4 "outer diametr Comprehension Nuts and
2 sleeves
Power drill and bit
Conexión al suministro de agua (opcional)
Lea todas las instrucciones antes de comenzar.
Aviso
Desconecte el enchufe del refrigerador. Para eliminar
el riesgo de descarga eléctrica durante la instalación,
debe desconectar la toma de corriente del refrigerador.
Herramientas necesarias:
Modelo:
899.6231# 899.6133#
Si necesita instalar una máquina de hielo, Póngase
en contacto con el servicio post - venta.
Modelo:
899.7231# 899.7133#
El refrigerador está equipado con una máquina de
hielo FDI101S.
36
Se recomienda no consumir la primera fabricación de
hielo, sino consumir la segunda fabricación de hielo
nuevamente.
11.
9
10.
Oleoductos
37
INVERTIR EL GIRO DE LA PUERTA
NIVELACION DEL REFRIGERADOR
IMPORTANTE: Nivele el refrigerador para que funcione
correctamente y para evitar problemas de enfriamiento,
escarcha y humedad que pueden ocurrir cuando la puerta
no cierra correctamente.
1.Muevaelrefrigeradorasuubicaciónfinal.Consulte
“Moveralaubicaciónfinal”.
2. Coloque un nivel de carpintero en la parte superior del
gabinete del refrigerador.
3. Ajuste las dos patas niveladoras (una pata ubicada en
cada una de las dos esquinas delanteras del gabinete del
refrigerador) hasta que el refrigerador esté nivelado.
NOTA: Las patas niveladoras son más fáciles de ajustar si
alguien empuja contra la parte superior delantera del
refrigerador para quitar algo de peso de las patas.
zócalo y
trinquete
Lista de herramientas a proporcionar por el usuario
Destornillador
Phillips
Espátula
destornillador de
cabeza plana
Cinta adhesiva
Piezas incluidas con el kit de bisagras
Bisagra superior
izquierda
Cubierta de la
bisagra izquierda
Bloque autoblocante
puerta superior
Tope de apertura de
puerta izquierda
1.Unplug your refrigerator and remove all food from the
door shelves.Remove all food from the inner door liner.
Tape the freezer door in place with masking tape.
2. Usar un destornillador cruzado y retire la placa de
cubierta izquierda y la cubierta de la bisagra superior
derecha, luego desatornille los tornillos y retire la
bisagra superior derecha. Guarde los tornillos para
reutilizarlos.
3. Levante la puerta del congelador y sepárela de su
refrigerador.
4. Usar un destornillador cruzado y desatornille los
tornillos de la bisagra central, retire la bisagra y luego
levante la puerta del refrigerador y sepárela de su
refrigerador. Guarde los tornillos para reutilizarlos.
Para subir: gire las patas niveladoras en el sentido de las
agujas del reloj.
Para bajar: gire las patas niveladoras en sentido contrario
a las agujas del reloj.
Placa de cubierta izquierda
Cubierta de la bisagra
superior derecha
38

Bisagras
centrales
5. Usar un destornillador cruzado y quite los tornillos
de la bisagra inferior, luego quite la bisagra inferior
del lado inferior derecho del refrigerador.
6. Desatornille el eje de la bisagra del lado derecho
de la bisagra inferior y muévalo hacia el lado
izquierdo,luegofijelabisagrainferiorallado
inferior izquierdo del refrigerador usando los tornillos
que quitó anteriormente.
7. Retire los manguitos de la parte superior derecha
delaspuertasylatapadelorificiodelaparte
superior izquierda de las puertas y móntelos en los
lados opuestos.
8. Retire el tope de la puerta del refrigerador e
instálelo en el otro lado de la puerta. Quite el bloque
autobloqueante y el tope de la puerta del congelador,
guárdelos para reutilizarlos. Saque el bloque
autobloqueante izquierdo y el tope de la bolsa de
accesorios en el refrigerador e instale a la izquierda
de la puerta.
9. Coloque la bisagra inferior de la puerta del
refrigerador verticalmente, saque la bisagra central del
otro lado de la bolsa de accesorios y luego monte la
bisagra central.
Fije la bisagra central izquierda
10. Coloque la puerta del congelador sobre la
bisagra central verticalmente, luego saque la bisagra
superior y la cubierta del otro lado de la bolsa de
accesorios, monte la bisagra superior, la cubierta de
labisagraylacubiertadelorificio.
Bisagra superior
tapa del agujero
Tapa del agujero
de la bisagra
Vuelva a colocar la
bisagra inferior
Eje de bisagra
Eje de bisagra
Retire la
bisagra inferior
tapa del agujero
mangas
Tapón
Tapón
autobloqueante
(La imagen de arriba es solo para referencia. La
configuraciónrealdependerádelproductofísico).
39

ANTES DE USAR
PERIODO DE ESPERA
· Antes de enchufar el refrigerador en un tomacorriente
de 3 clavijas con conexión a tierra, déjelo en posición
vertical durante aproximadamente 2 horas.
NOTA: Esto reduce la posibilidad de un mal
funcionamiento en el sistema de enfriamiento debido
a un manejo inadecuado durante el transporte.
LIMPIEZA
1. Limpie el interior del refrigerador con un paño suave
humedecido con una solución de bicarbonato de sodio
(2 cucharadas de bicarbonato de sodio mezclado con
1 litro de agua tibia).
2. Usando un paño suave, seque completamente todas
lassuperficies
USO DEL REFRIGERADOR
GENERAL
· La vida de almacenamiento de los alimentos
congeladosvaríaynosedebeexcedereltiempode
almacenamiento recomendado.
ADVERTENCIA
1. Enchufe su refrigerador. Espere 30 minutos y luego
abra la puerta del refrigerador para determinar si el
refrigerador funciona correctamente.
2. Coloque los alimentos congelados en el refrigerador
lo más rápido posible después de comprarlos. Si hay
instrucciones en el paquete, siga cuidadosamente estas
instrucciones con respecto a los tiempos de
almacenamiento.
CONSEJOS PARA AHORRAR ENERGÍA
·Permitaquelosalimentoscalientesseenfríena
temperatura ambiente antes de colocarlos en el
refrigerador. Los alimentos que se congelan muy
lentamente pueden perder calidad o echarse a perder.
· Sobrecargar el refrigerador obliga al compresor a
funcionar por más tiempo.
· Envuelva los alimentos correctamente y seque los
recipientes antes de colocarlos en el refrigerador. Esto
reduce la acumulación de escarcha dentro del
refrigerador.
· No cubra los estantes de almacenamiento del
refrigerador con papel de aluminio, papel encerado o
toallasdepapel.Losrevestimientosinterfierenconla
circulacióndelairefrío,loquehacequeelrefrigerador
seamenoseficiente.
· Organice y etiquete los alimentos para reducir las
aperturas de puertas y las búsquedas prolongadas.
Saque tantos elementos como sea necesario a la vez y
luego cierre la puerta lo antes posible.
· NO agregue una gran cantidad de alimentos
descongelados al refrigerador al mismo tiempo.
Estoreducirálaeficienciadeenfriamientodel
refrigerador.
Peligro de descarga eléctrica
· Conéctelo a un tomacorriente de 3 clavijas con
conexión a tierra.
· No quite la clavija de conexión a tierra del enchufe
del cable de alimentación.
· No use un adaptador.
· No utilice un cable de extensión.
· Si no lo hace, puede provocar la muerte, un incendio
o una descarga eléctrica.
40
OFF
Brazo de
señal de cable
Instrucciones de instalación de la máquina
de hielo (opcional)
Según el modelo que compra, su refrigerador equipado
con una máquina de hielo o con una máquina de hielo
lista. Si tú se necesita una máquina de hielo, modelo
opcional de kit de máquina de hielo"Fd / 101s - 8m" está
disponible en su minorista.
SigalaGuíadeinstalacióndelamáquinadehieloque
viene con el kit de la máquina de Hielo.
Cuidado
No pongas el congelador en el lavavajillas.
· Lave el recipiente de hielo en agua tibia con un
detergente suave.
Enjuague bien y seque.
· Detenga la máquina de hielo al limpiar el congelador o
durante las vacaciones cortas.
· Si la máquina de hielo se apagará durante mucho
tiempo, mueva la válvula de suministro de agua a la
posición de cierre.
· No dejes que tus hijos toquen la máquina de Hielo. Esto
puede causar daño.
Tasa de producción de hielo
· Cada vez se hacen 8 hielo, con un peso total de 95 a 130
gramos. La forma del hielo es "medio mes".
· La cantidad de hielo es de aproximadamente 0125 kg / 1,2
horas, 2,5 kg / D (la cantidad de hielo está relacionada con
laeficienciaderefrigeracióndelrefrigerador)
Consejos de la máquina automática de
hielo
Recuerde que la calidad del agua determina la
calidad del Hielo.
Si la fuente de agua utiliza un Suavizador de agua,
asegúrese de que el Suavizador de agua se mantenga
yfuncionecorrectamente.Losproductosquímicos
producidos por la falla del suavizador pueden dañar
la máquina de Hielo.
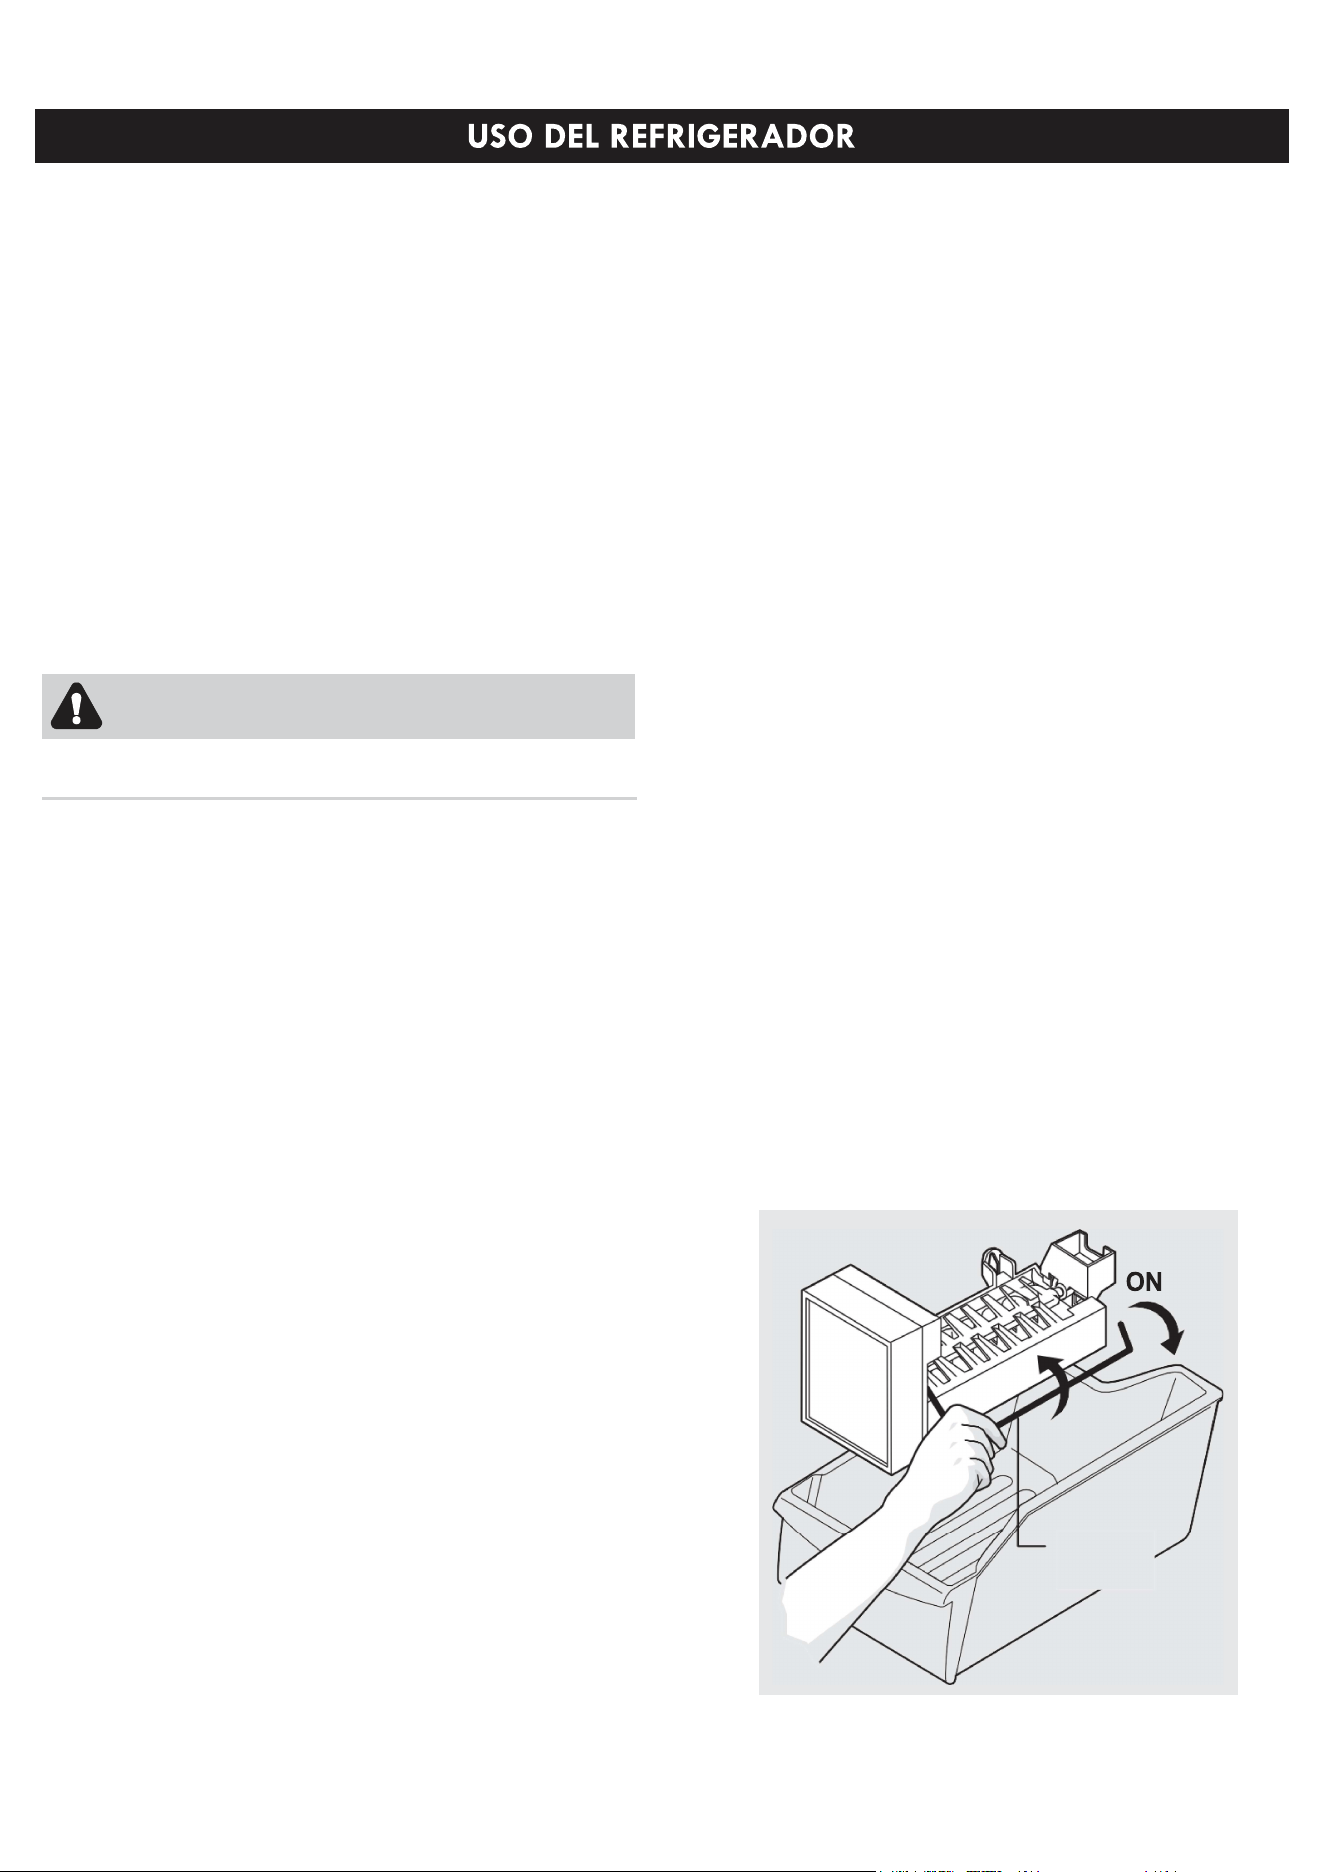
Para detener la máquina de hielo, levante el brazo de
señalización eléctrica hasta que haga clic y bloquee
en la posición "arriba" o "fuera". Cuando el congelador
está lleno, la oportunidad de hacer hielo se cierra
automáticamente. Si su modelo tiene un congelador
ajustable, coloque el congelador para que cuando el
congelador esté lleno, el brazo de señal del cable
toque el Hielo.
Consejos de la máquina de hielo
· El hielo se almacena durante demasiado tiempo y
puede producir sabores extraños. Vaciar el contenedor
y asegurarse de que el brazo de señal del cable esté
en la posición "hacia abajo" o "abierta". Luego, la
máquina de hielo producirá más Hielo.
· Agite el recipiente de vez en cuando para mantener
el hielo separado.
· Mantenga el brazo de señalización del cable en una
posición "ascendente" o "cerrada" hasta que el
refrigerador esté conectado al sistema de suministro de
agua o el sistema de suministro de agua esté cerrado.
· Cuando la máquina de hielo funciona, los siguientes
sonidos son normales.
-
-
-
-
-
Funcionamiento del motor
Elhieloseaflojaenlabandeja
El hielo cae en el congelador
Agua del grifo
Válvula de agua abierta o cerrada
41
LED1 LED2 LED3 LED4 LED5
CONTROLES
PANTALLA
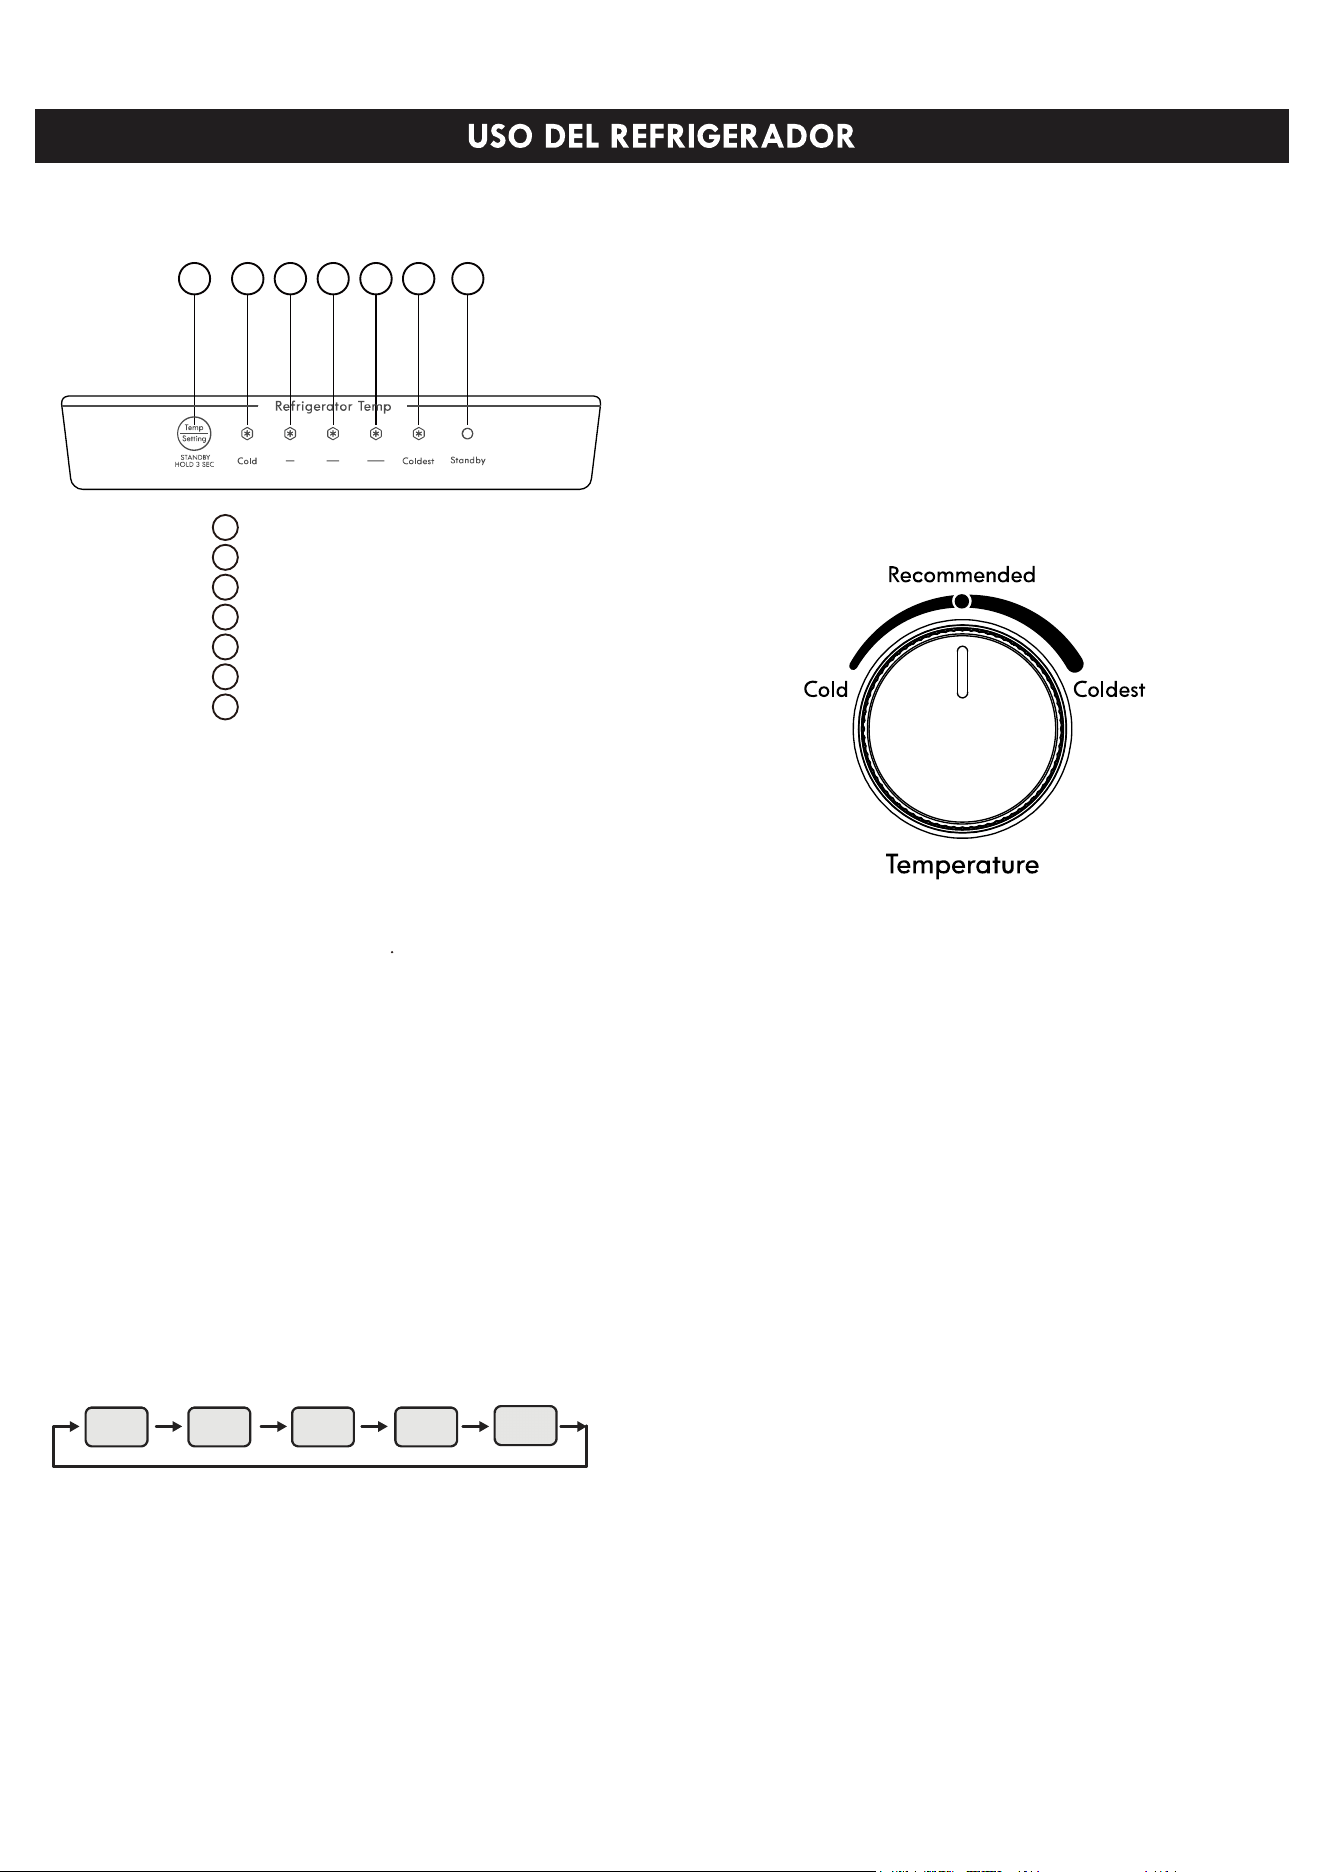
MODO DE ESPERA
AJUSTE DE LA TEMPERATURA DEL
CONGELADOR
AJUSTE DE TEMPERATURA
Para ingresar al modo de espera, presione la
configuracióndurante3segundoscuandoelrefrigerador
esté funcionando. En el modo de espera, el compresor no
funcionará y la luz indicadora de espera estará
iluminada. Para reanudar el funcionamiento normal,
simplementepresionelaconfiguración
momentáneamente.
Gire los controles para ajustar la temperatura del
congelador.
Coloque los alimentos congelados en el congelador lo
más rápido posible después de comprarlos. Preste
atención al tiempo de almacenamiento en las
instrucciones del empaque de alimentos. La vida de
almacenamientodelosalimentoscongeladosvaríay
no se debe exceder el tiempo de almacenamiento
recomendado.
B
C
D
E
F
G
botóndeconfiguración
Indicador LED 1 FRÍO
Indicador LED 2
Indicador LED 3
Indicador LED 4
LED 5 Indicador MÁS FRÍO
LED 6 Modo de espera
A
Una vez que se enciende inicialmente, la pantalla (incluida
la luz de la tecla) se muestra en pantalla completa durante
3segundosyluegolaconfiguraciónpredeterminadadel
refrigerador es media y el indicador LED 3 se iluminará.
Pantalla de funcionamiento normal
En caso de falla, la luz LED correspondiente muestra en
combinación el código de falla (en la pantalla de ciclo).
En caso de que no haya fallas, se mostrará la posición de
funcionamiento real del refrigerador.
A B C D E F G
Cada vez que se presiona una vez el ajuste de temperatura,
el ajuste de temperatura cambia una vez.
Después de que se haya completado el ajuste de la
temperatura, el refrigerador funcionará de acuerdo con el
valor establecido después de 25 s.
De izquierda a derecha, la temperatura es más baja.
El orden de los ajustes de frialdad es el siguiente:
42
43
Control de humedad del cajon de verduras
El Cajon de verduras te permite controlar facilmente la
humedad del cajon, proporcionando asi frutas y verduras con
un sabor mas fresco.
Puede controlar la humedad en el cajon de verduras,
ajustandoelcontrolacualquierconfiguracionentreverduras
y frutas.
- deslizar el control de la humedad en una dirección "HIGH"
paramantenerelairehúmedoelcajonyasíalmacenarde
manera óptima las verduras frescas de hoja múltiple.
- deslizar el control de la humedad en dirección "LOW"
paraliberarelairehúmedoelcajon,lograndoasíun
almacenamiento óptimo de la fruta.
44
45
46
47
El explorador que levanta la máquina de hielo la cierra
SOLUCIÓN DE PROBLEMAS
IMPORTANTE:NOintenterepararsurefrigeradorustedmismo.Hacerloinvalidalagarantía.
GENERAL
PROBLEMA CAUSA SOLUCION
El refrigerador
no funciona
·El refrigerador está desenchufado.
·El fusible del circuito está quemado o
el disyuntor está disparado,
·Fallo de alimentación
·Asegúrese de que el cable de alimentación del refrigerador esté
completamente insertado en el tomacorriente.
·Verifiquelacajadefusibles/disyuntoresdelacasayreemplace
el fusible o reinicie el disyuntor
·Siocurreunafalladeenergía,elrefrigeradorseapaga.Espere
hastaqueserestablezcalaenergía.
La puerta del
refrigerador no
cierra
completamente
·Los paquetes de alimentos
interfierenconlapuerta.
·Las juntas de la puerta están sucias.
·El refrigerador puede no estar nivelado.
·Mueva o retire algunos alimentos.
·Limpie las juntas de la puerta.
·nivelar el refrigerador
La comida en el
refrigerador no
estáfría.
·La puerta se ha abierto con demasiada
frecuencia o no se ha cerrado
correctamente.
·Recientemente se agregó una gran
cantidad de alimentos.
·La puerta no está completamente cerrada.
·El refrigerador ha estado desconectado
porunperíododetiempo.
·El control de temperatura está demasiado
caliente.
·Asegúrese de que la puerta esté bien cerrada.
·Dejequeseenfríelacomidareciénañadidayluegovuelvaa
comprobar.
·Verifiquelajuntadelapuertayladistribucióndealimentos,y
asegúrese de que la puerta cierre completamente.
·Espere4horasparaqueelrefrigeradorseenfríeporcompleto
antes de agregar alimentos.
·Ajusteelcontroldetemperaturaaunajustemásfrío.
El refrigerador
hace ruidos o
vibraciones
inusuales
·Es posible que el refrigerador no esté
nivelado.
·El gabinete del refrigerador está
tocando una pared.
·Las partes metálicas sufren expansión
y contracción.
·El refrigerante circula por todo el sistema.
·Ajuste las patas niveladoras ubicadas en las esquinas delanteras
del refrigerador hasta que el refrigerador esté nivelado.
·Aleje el refrigerador de la pared.
·Esto es normal
·Esto es normal.
Se está
acumulando
humedad en el
interior del
refrigerador.
·La puerta se abrió con demasiada
frecuencia o no se cerró correctamente.
·El refrigerador está ubicado en un
área húmeda.
·El clima es cálido y húmedo.
·Asegúrese de que la puerta cierre correctamente.
·Mueva el refrigerador a un lugar más seco.
·Esto es normal
El compresor se
enciende y se
apaga con
frecuencia
·La temperatura ambiente es más alta
de lo normal.
·Recientemente se agregó una gran
cantidad de alimentos.
·La puerta no está completamente cerrada
o se abrió con demasiada frecuencia.
·El refrigerador ha estado desconectado
porunperíododetiempo.
·El control de temperatura no se
configurócorrectamente.
·Esto es normal.
·Dejetiempoparaqueseenfríenlosalimentosalmacenados
recientementeyluegoverifiquenuevamente.
·Revise la junta de la puerta y la distribución de alimentos para
asegurarse de que la puerta cierre completamente.
·Espere4horasparaqueelrefrigeradorseenfríeporcompleto
antes de agregar alimentos.
·Ajusteelcontroldetemperaturaalaconfiguracióncorrecta.
El refrigerador
tiene un olor.
·El refrigerador necesita limpieza.
·La comida mal envuelta está dando
un olor.
·Limpia el refrigerador. Consulte la sección "Limpieza".
·Envuelva bien los alimentos antes de guardarlos en el refrigerador.
ERROR CODES
Código de Error Descripción
Indicadores LED1 y LED2
Indicadores LED1 y LED3
Indicadores LED1 y LED4
Sensor de temperatura del circuito del refrigerador
Sensor de descongelación del congelador
Sensor de temperatura ambiental
48

49