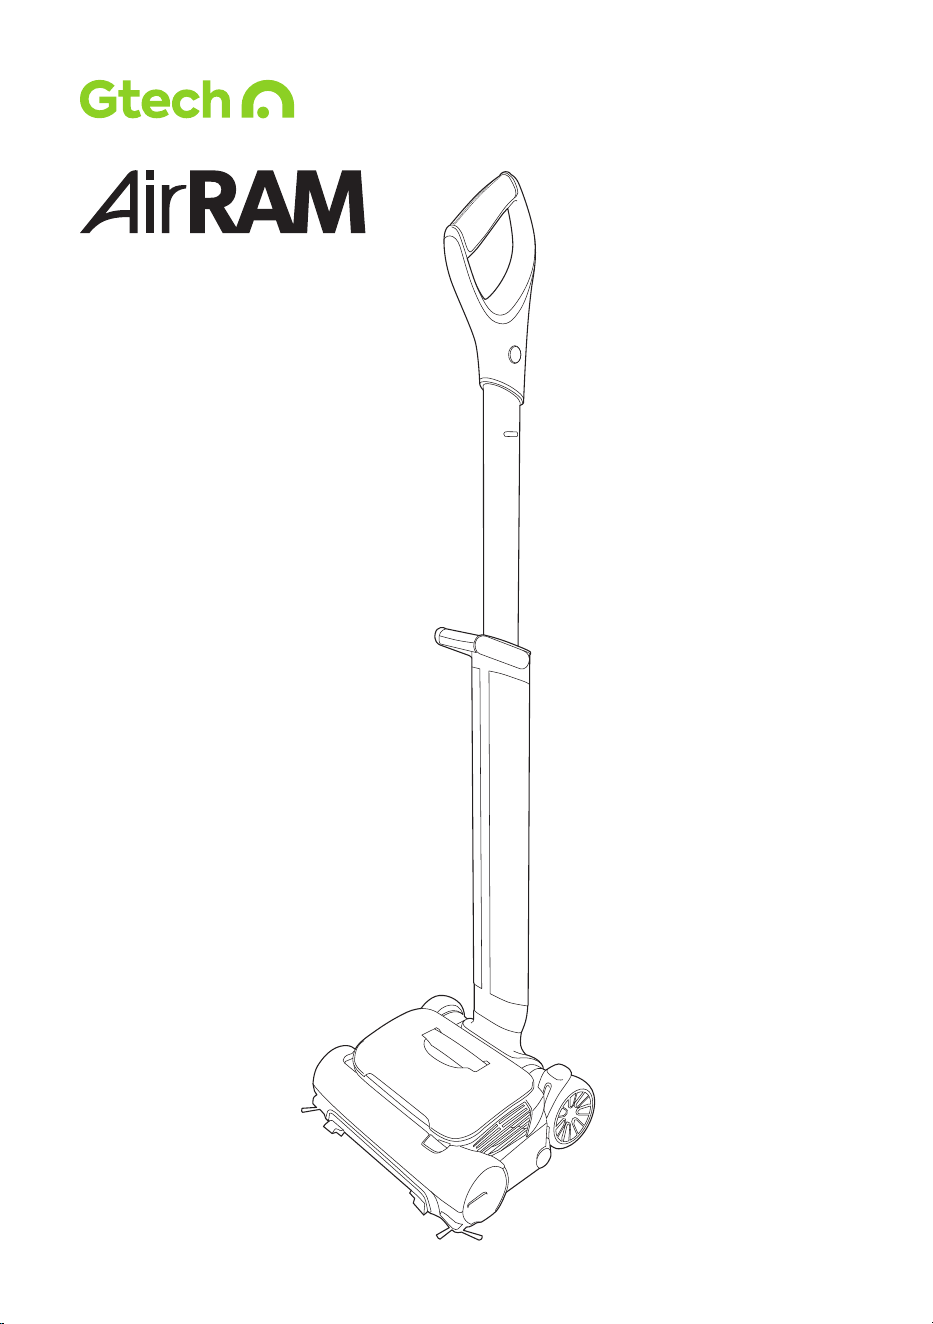
Model number:
AR52
OPERATING MANUAL

2
IMPORTANT SAFEGUARDS:
IMPORTANT: READ ALL INSTRUCTIONS BEFORE USE.
RETAIN INSTRUCTIONS FOR FUTURE REFERENCE.
Do not use in rain or leave outdoors whilst raining.
WARNING: Basic safety precautions should always be observed when us-
ing an electrical appliance, including the following to reduce the risk of fire,
electrical shock, or injury:
Personal Safety:
• Store indoors in a dry place out of the
reach of children.
• Always use responsibly. This appliance
can be used by children aged from 8 years
and above and persons with reduced
physical, sensory or mental capabilities or
lack of experience and knowledge if they
have been given supervision or instruction
concerning use of the appliance in a safe
way and understand the hazards involved.
• Don’t let children play with the appliance;
supervise children using or maintaining
the appliance.
• Use only manufacturer’s recommended
attachments as described in this
manual; misuse or use of any accessory
or attachment other than those
recommended, may present a risk of
personal injury.
• Take extra care when cleaning stairs.
• Keep the appliance and accessories away
from hot surfaces.
• Do not block the appliances openings
or hinder air flow; keep openings free of
any objects including dust, lint, clothing,
fingers (and all parts of the body).
• Particularly keep hair away from openings
and moving parts.
Electrical safety:
• Only use batteries and chargers supplied
by Gtech.
• Never modify the charger in any way.
• The charger has been designed for a
specific voltage. Always check that the
mains voltage is the same as that stated on
the rating plate.
A charger that is suitable for one type of
battery pack may create a risk of fire when
used with another battery pack; never
use the charger with another appliance
or attempt to charge this product with
another charger.
• Before use, check the charger cord for
signs of damage or ageing. A damaged or
entangled charger cord increases the risk
of fire and electric shock.
• Do not abuse the charger cord.
• Never carry the charger by the cord.
• Do not pull the cord to disconnect from
a socket; grasp the plug and pull to
disconnect.
• Don’t wrap the cord around the charger
when storing.
• Keep the charger cord away from hot
surfaces and sharp edges.
• The supply cord cannot be replaced. If the
cord is damaged the charger should be
discarded and replaced.
• Do not handle the charger or the
appliance with wet hands.
• Do not store or charge the appliance
outdoors.
• The charger must be removed from the
socket before removing the battery,
cleaning or maintaining the appliance.
Battery safety:
• This appliance includes Li-Ion batteries; do
not incinerate batteries or expose to
high temperatures, as they may explode.
• Liquid ejected from the battery may cause
irritation or burns.
• In an emergency situation contact
professional help immediately!

3
• Leaks from the battery cells can occur
under extreme conditions. Do not touch
any liquid that leaks from the battery. If the
liquid gets on the skin wash immediately
with soap and water. If the liquid gets into
the eyes, flush them immediately with
clean water for a minimum of 10 minutes
and seek medical attention. Wear gloves
to handle the battery and dispose of
immediately in accordance with local
regulations.
• Shorting the battery terminals may cause
burns or fire.
• When the battery pack is not in use, keep
it away from paper clips, coins, keys,
nails, screws or other small metal objects
that could make a connection from one
terminal to another.
• Store the battery away from any liquids
and chemicals that may damage the
battery and cause a risk of fire.
• Store the battery in clean, dry conditions,
within a recommended temperature range
of 0 - 25°C
• Do not store the battery in areas of high
temperature above 25°C. Do not store
near a source of heat or where exposed to
direct sunlight.
• When you dispose of the appliance remove
the battery and dispose of the battery safely
in accordance with local regulations.
Service:
• Before using the appliance and aer any
impact, check for signs of wear or damage
and repair as necessary.
• Do not use the appliance if any part
is damaged or defective.
• Repairs should be carried out by a
service agent or a suitably qualified
person in accordance with relevant
safety regulations. Repairs by unqualified
persons could be dangerous.
• Never modify the appliance in any way as
this may increase the risk of personal injury.
• Only use replacement parts or accessories
provided or recommended by Gtech.
Intended use:
• This appliance has been designed for
domestic dry vacuum cleaning only.
• Do not pick up liquids or use on wet surfaces.
• Do not pick up anything that is flammable,
burning or smoking.
• Use only as described in this manual.
• Don’t use on concrete, tarmacadam
or other rough surfaces.
• The brush bar may damage certain floor
surfaces. Before vacuuming flooring,
rugs or carpets, check the flooring
manufacturer’s recommended
cleaning instructions.
• The product may damage delicate fabrics
or upholstery. Care should be taken on
loose-weave carpets and coverings or
where there are loose threads. It is advised
to test on an inconspicuous area first
before use.
• The product has been designed to clean
a wide variety of floor surfaces without the
need to change settings. However some
surfaces such as delicate loose-pile rugs or
carpets, tasselled rug edges or damaged
carpets with exposed threads are not
suitable for cleaning with a rotary brush.
• The product has a constantly rotating
brush bar. Never leave the cleaning head
in one spot for an extended period of time
as this may damage the floor surface.
• Particularly for hard flooring, before
vacuuming check the area being cleaned is
free of any hard debris or objects that could
damage the flooring if caught underneath
the product, and that the underside of the
product is free from foreign objects that
could mark the surface.
WARNING:
• Do not use water, solvents, or polishes to
clean the outside of the appliance; wipe
clean with a dry cloth.
• Never immerse the unit in water and do
not clean in a dish washer.
• Never use the appliance without the
filter fitted.
FOR HOUSEHOLD USE ONLY
Thank you for choosing Gtech
“Welcome to the Gtech family. I started Gtech to create sensible, easy
to use products that do a great job, and hope you get many years of
trouble-free performance from your new product.”
Nick Grey – Inventor, owner of Gtech
4
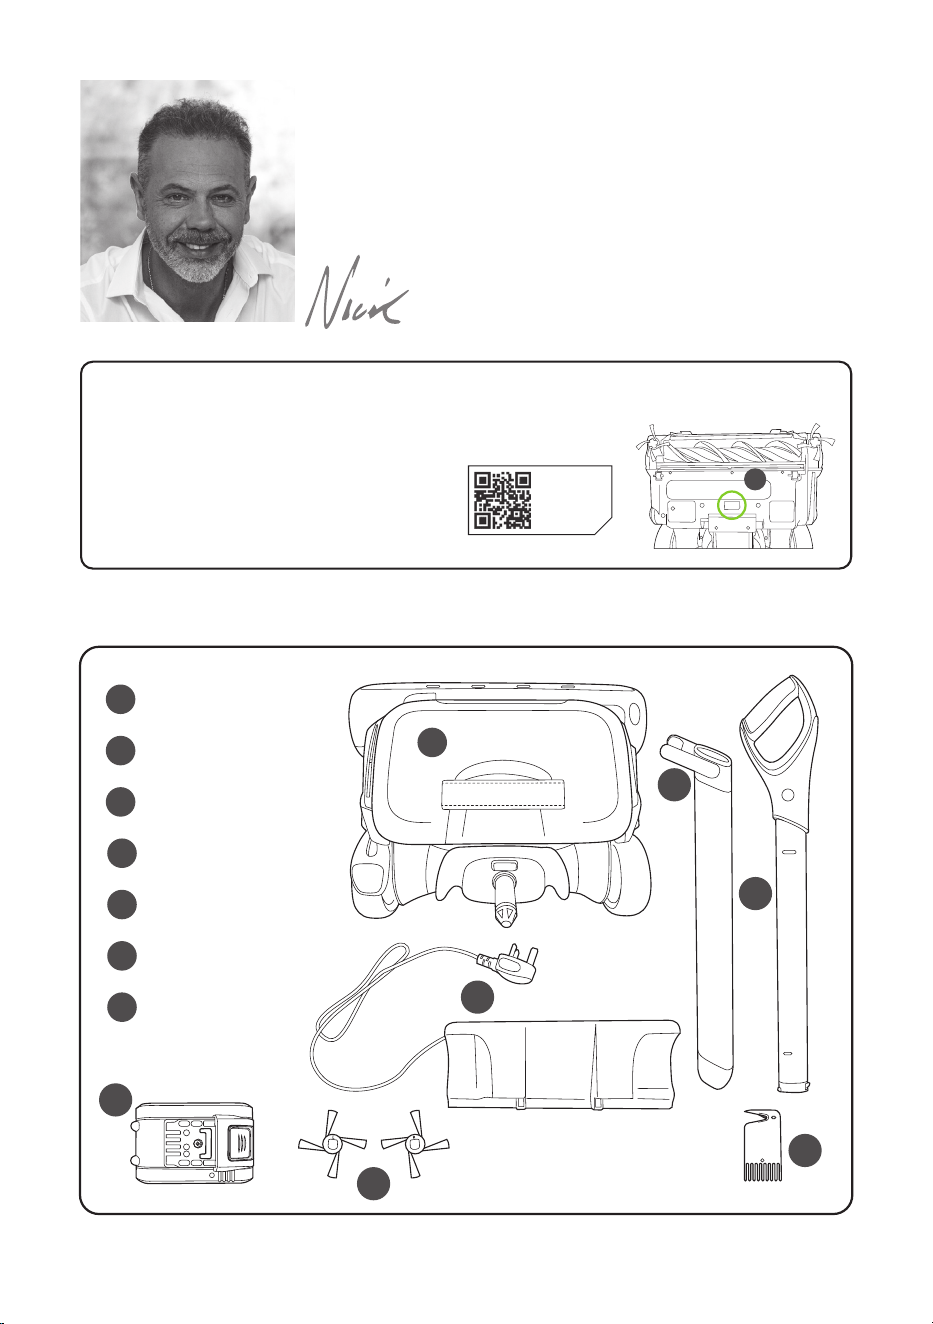
What’s in the box
2
1
1
3
4
5
7
6
Head full assembly
Lower handle
Upper handle
Battery
Charging stand
Hair removal tool
Spare edge brushes
2
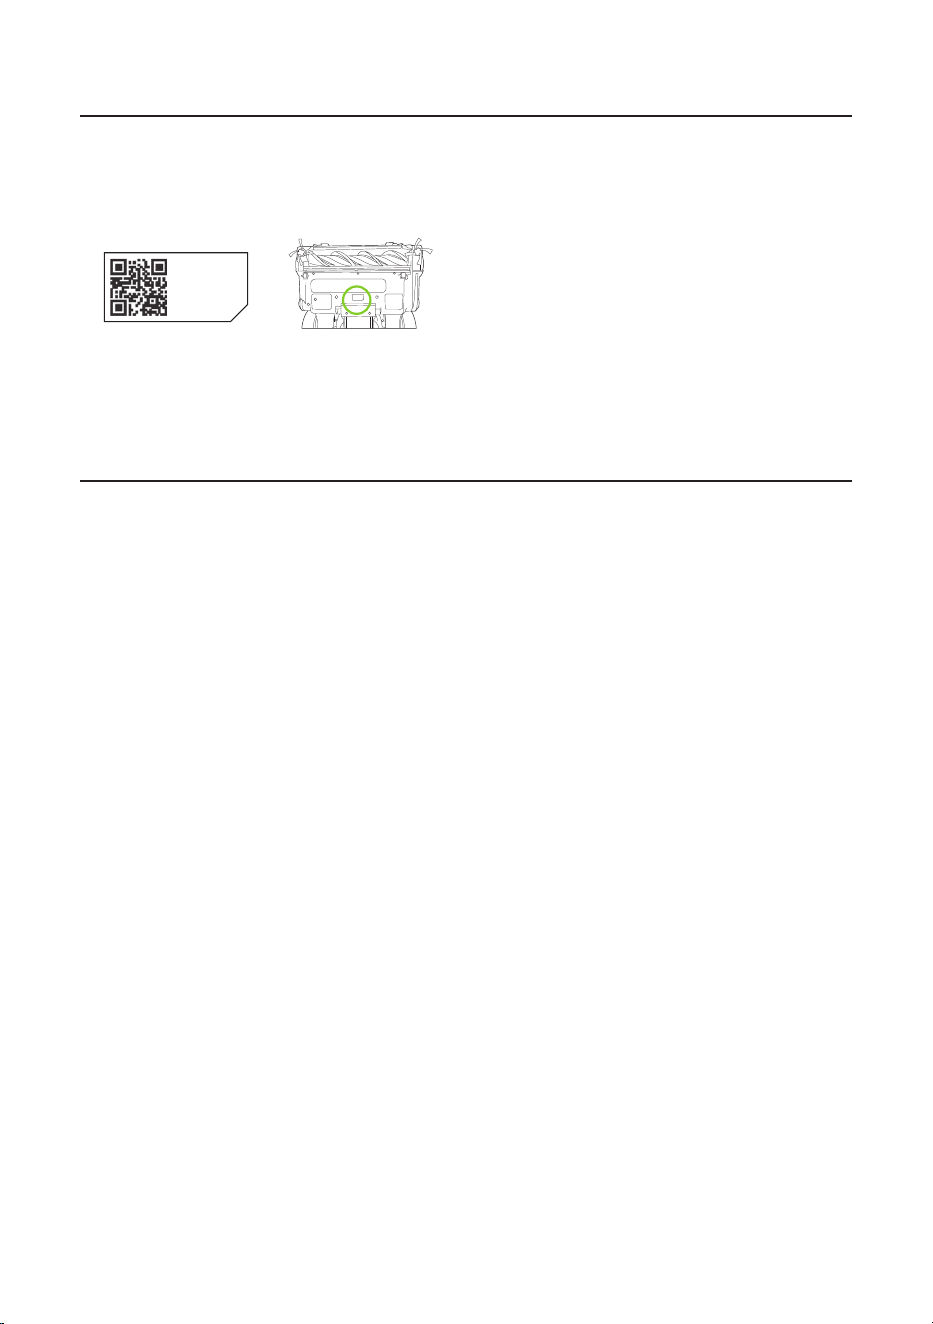
Make a note of your product serial number code for future reference. You can find this on
the underside of item
_ - _ _ - _ _ _ ~
_ _ _ _ _ ~
_ _ _ _ ~
_ _ ~ _ _ _ _ _ _ _
X-XX-XXX~
XXXXX~
WWYY~
00~0000000
1
3
4
5
6
7
5
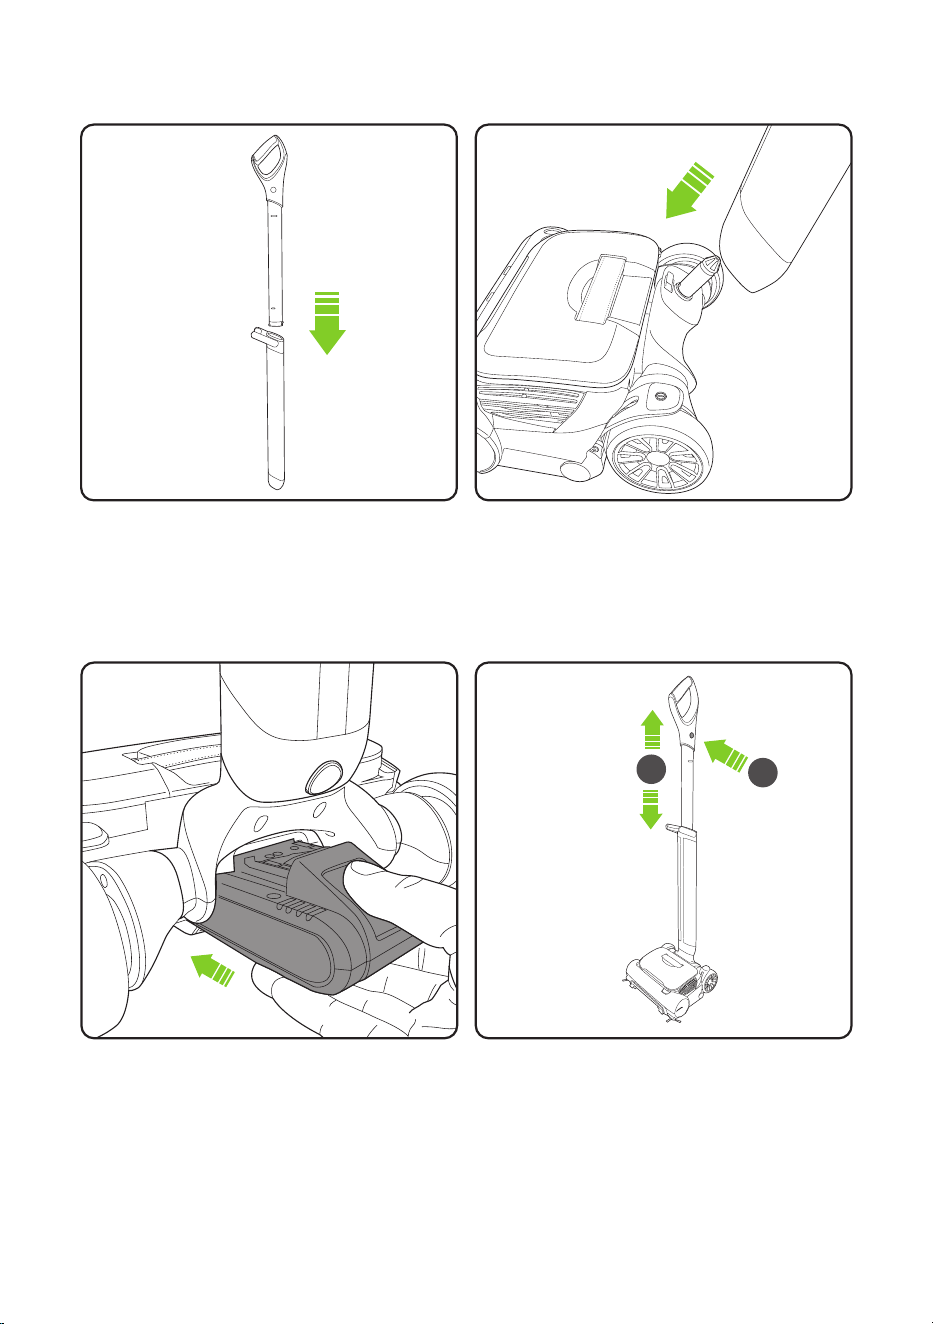
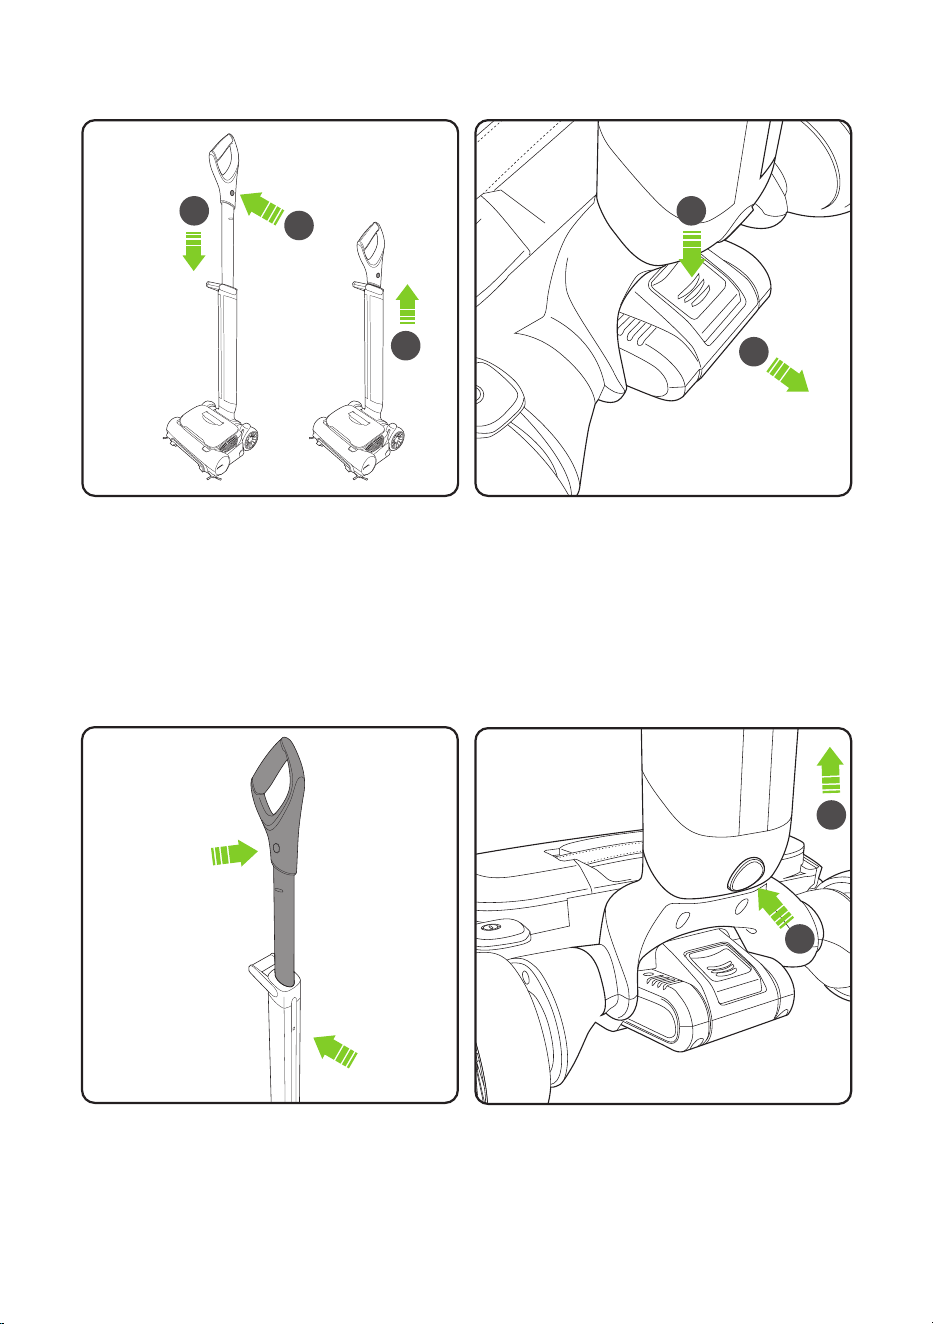
Assembly
Locate the handle onto the steering pivot on
the head.
Push the handle down until it clicks securely
into place.
Push the battery into the head until it clicks into
place.
Insert the upper handle into the lower handle.
It will slide down and click into place.
The upper handle can be set to a range of
height positions.
Press the button and slide the handle up or
down until it locks into place at the required
height.
1
2
6
Dis-assembly
Should the upper handle need to be removed,
press the button and use a suitable tool to press
in the latch. Pull the handle upwards to remove.
Should the handle need to be removed, press
the button and pull the handle away from the
head.
1
2
Removing the batteryStorage
Press the release button and pull to remove
the battery.
1
2
The handle can be lowered for storage and
raised for use.
Press the button and raise or lower the handle
until it locks into position
1
2
2
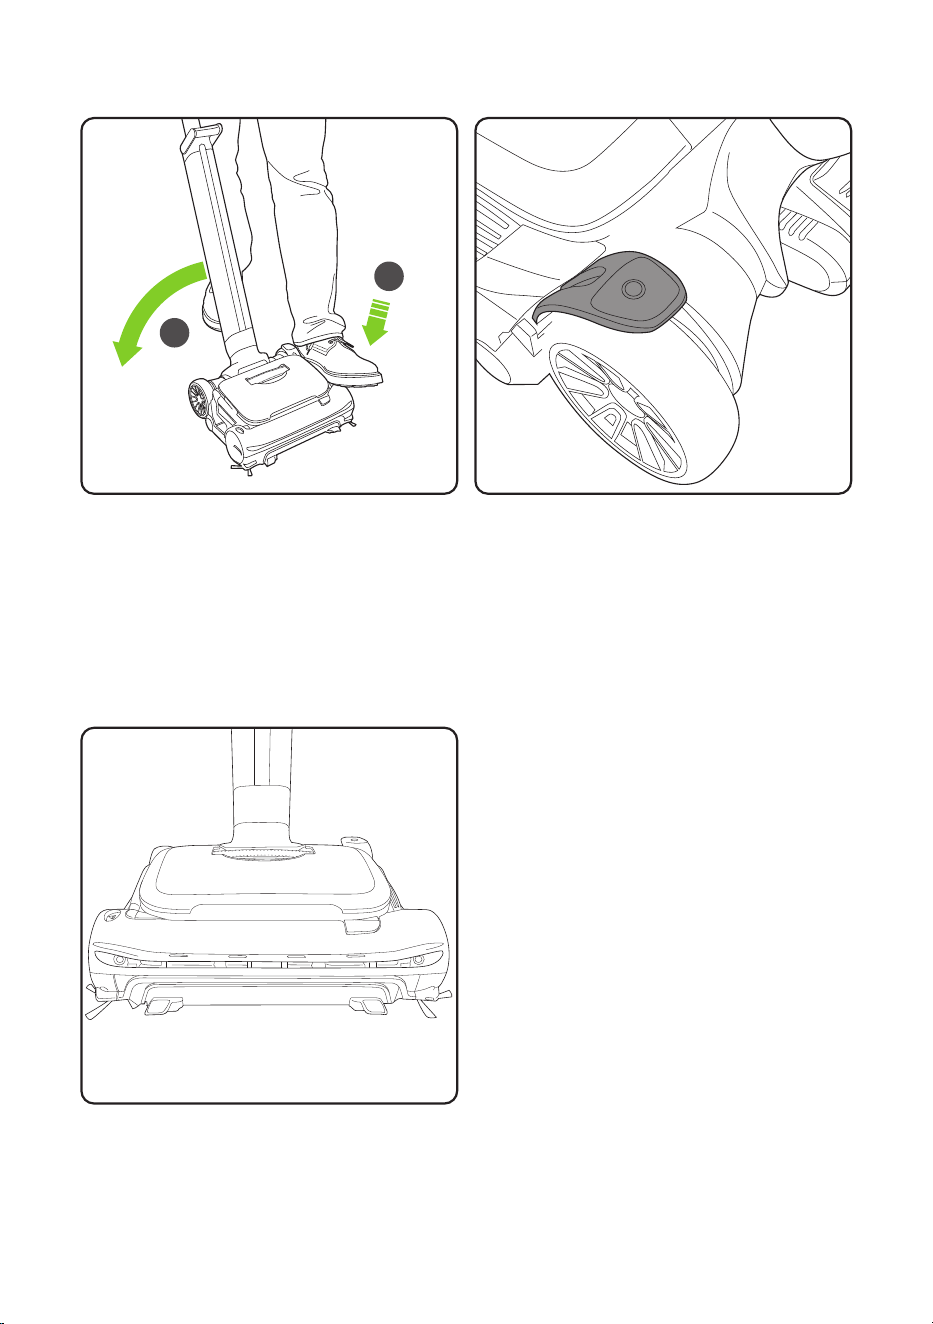
Place your foot on the side of the head (1) and
pull the handle back (2).
7
Operation
The power button is located on the le hand
side of the head. Press the power button
with your foot to turn the product on. Press
the power button with your foot to turn the
product off.
1
2
Headlights
The headlights will illuminate when the
product is switched on.
Close the bin door.Pull the lever fully back.
8
Emptying the bin
Pull the bin handle to li the bin out of the
product.
Hold the bin over a rubbish bin and slide the
lever to open the bin door and empty the dirt.
Emptying the bin (contd.)
The product has a filter regeneration function
to maintain performance. The regeneration will
operate when the product is switched off aer
more than 2 minutes of continuous use. The
headlights will appear pink when regeneration
is in process.
To activate filter regeneration during use press
and hold the power button for 3 seconds.
When the filter regeneration operates you
will hear a vibrating noise for 3 seconds.
9
Fit the bin into the product.
Never use the product without the bin and
filter fitted.
Filter regeneration
3
seconds
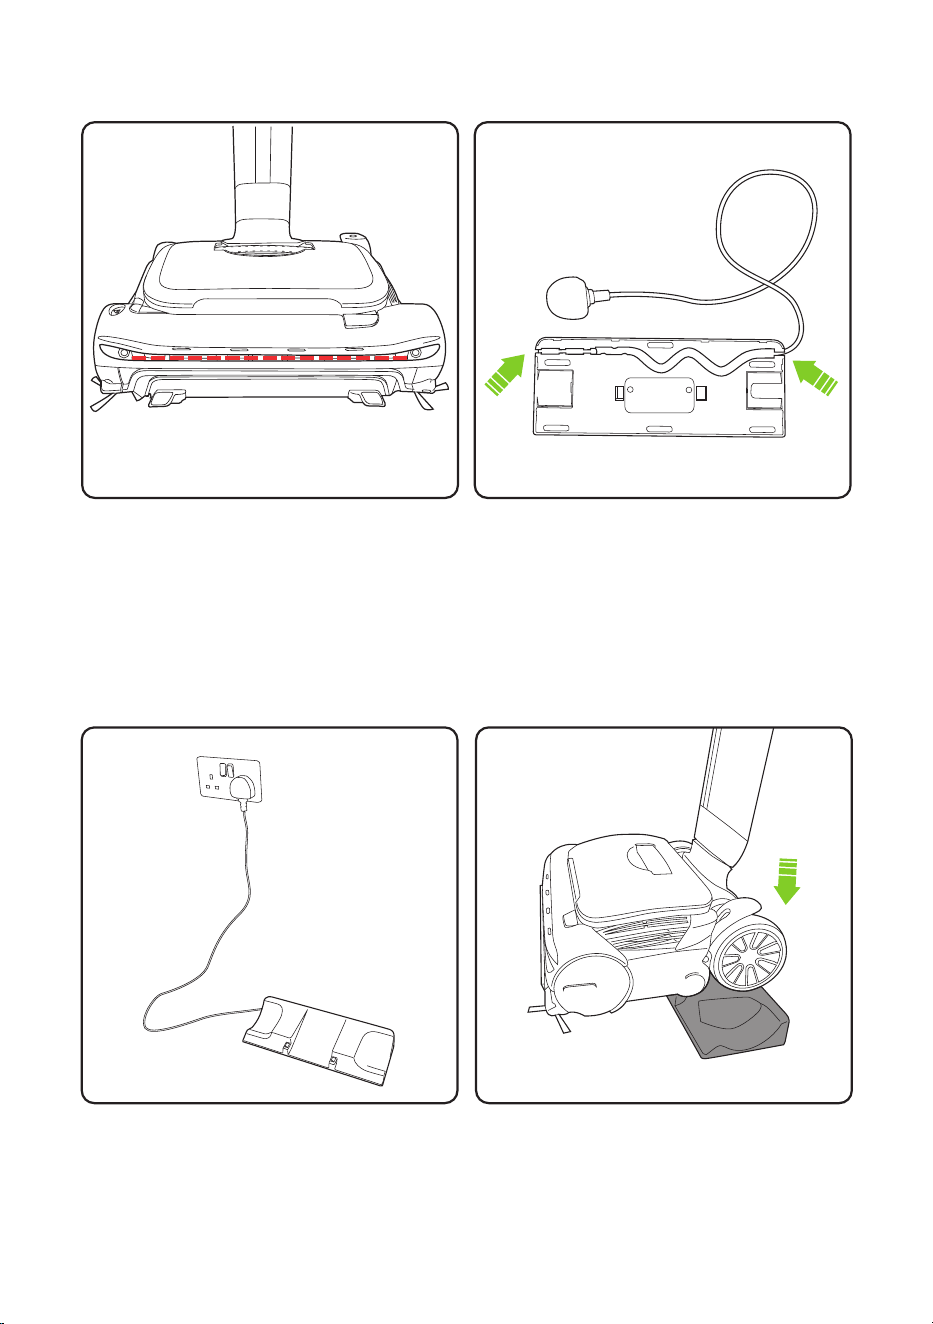
When in use the headlights will be on. When
there is no power le the headlights will flash
red. The battery needs recharging.
Plug the charging stand into a wall socket. Place the product on the charging stand.
Battery charge status
10
Charging the battery
The charging stand cord is stored in the base.
Pull the cord out to the required length, from
either side of the unit.
Charging stand
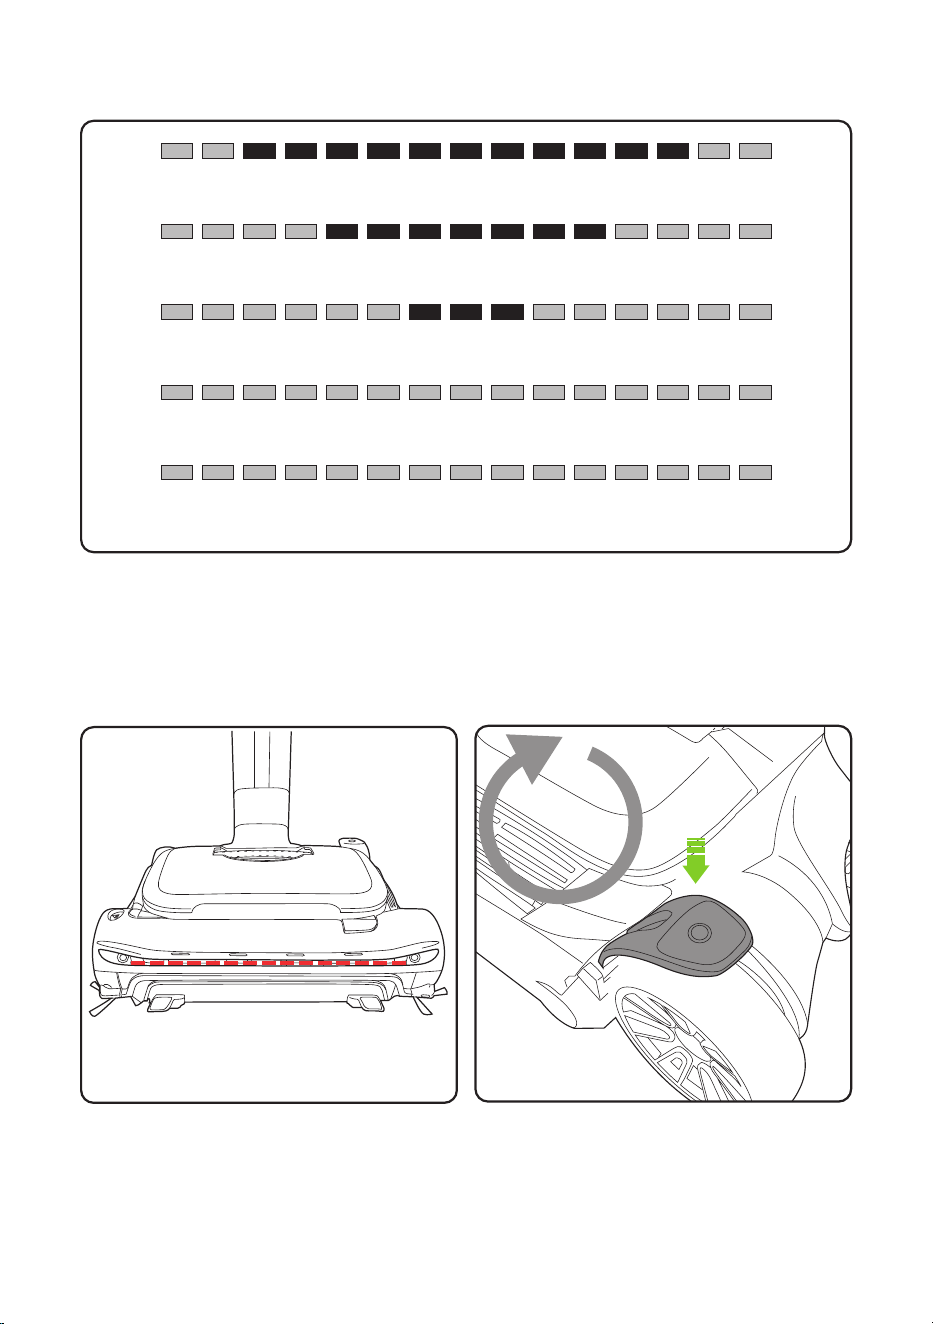
Battery level 40% - 70%
Battery level 10% - 40%
Battery level 0% - 10%
Battery level 70% - 98%
Battery level 98% - 100%
11
Front LED battery charge indicator
The battery can be charged from flat in 3 hours. While charging, the headlights will
progressively pulse until all 4 are white. When the battery is fully charged the headlights will flash
3 times and then turn off. When the battery is fully charged switch off the charging stand at the
wall socket to optimise battery life.
The product will not re-start until the red
lights go out. This will take 5 seconds. Press
the power button with your foot to turn the
product on. If the problem persists, follow the
troubleshooting instructions on page 17.
If the brush bar jams during use, the product
will stop and the headlights will appear red.
You will need to clean the brush bar and
remove any blockage.
Brush bar jam
5
seconds
12
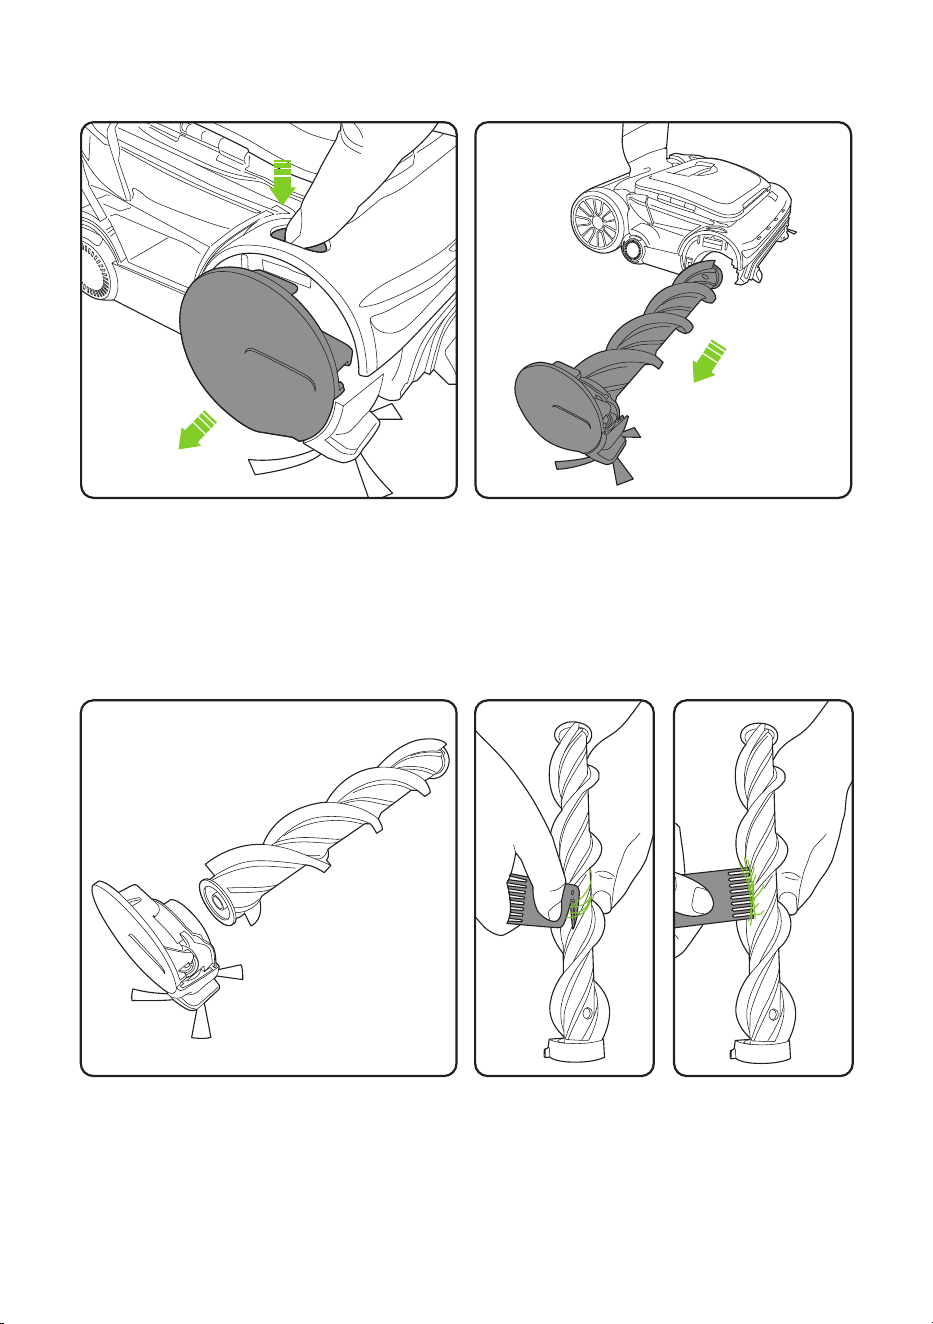
The brush bar can be removed from the end
cap for more thorough cleaning
To remove hair from the brush bar, run the hair
removal tool down the groove to cut the hair,
then use the comb remove it.
Before checking for a blockage, switch off and
remove the battery. Press the button to release
and eject the brush bar.
The brush bar can now be removed from the
head.
Removing and cleaning the brush bar
13
While the brush bar is removed you can take
the opportunity to remove any hair from the
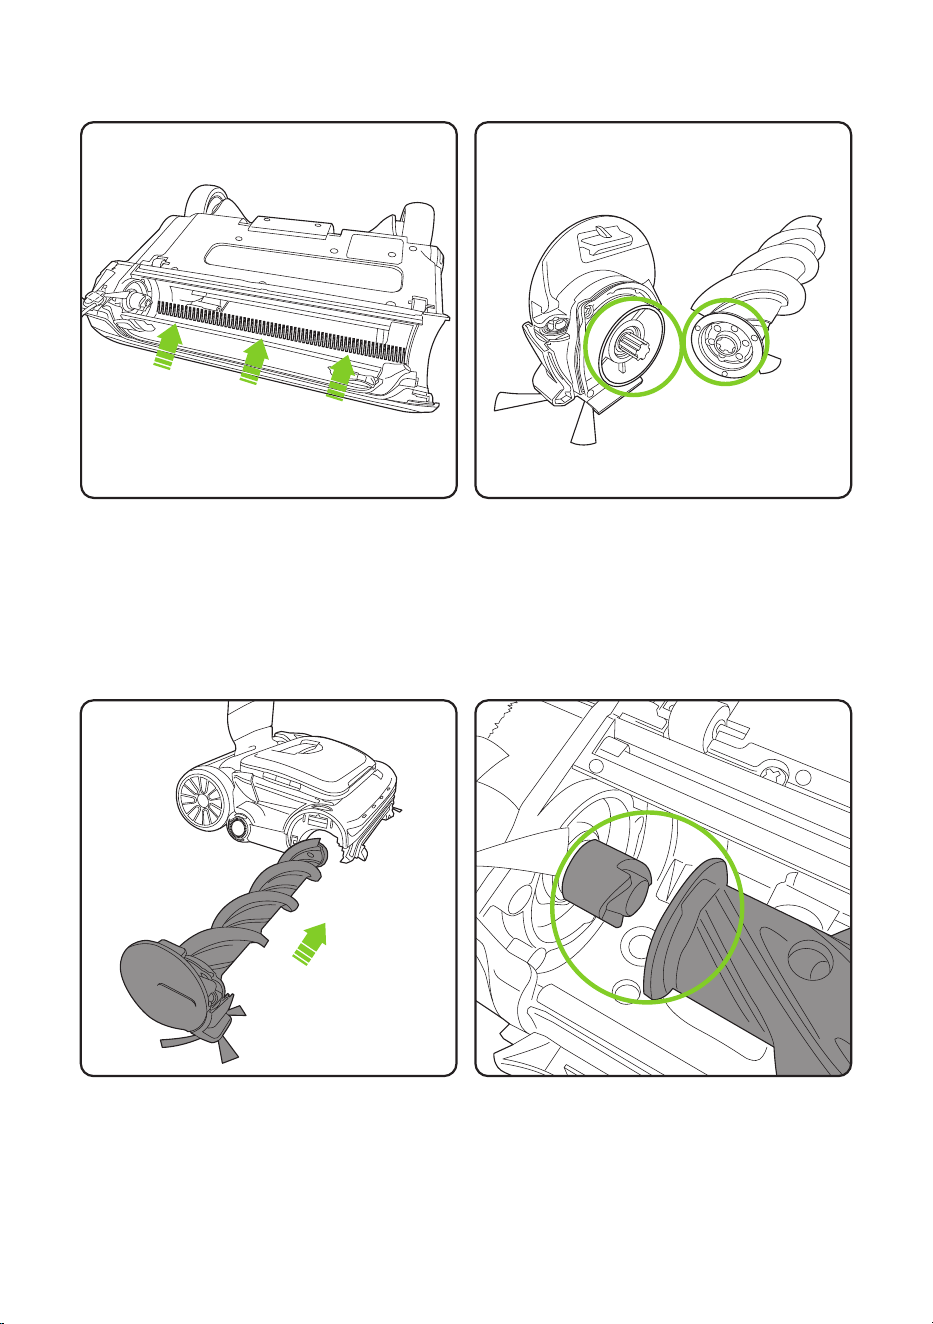
brush bar housing comb as indicated.
Note to assemble the matching end when
re-fitting the brush bar to the end cap.
Push the brush bar into the product until
it clicks into place. Check the brush bar is
engaged onto the drive spindle.
Replace the battery.
Never operate the product without the
brush bar in place.
14
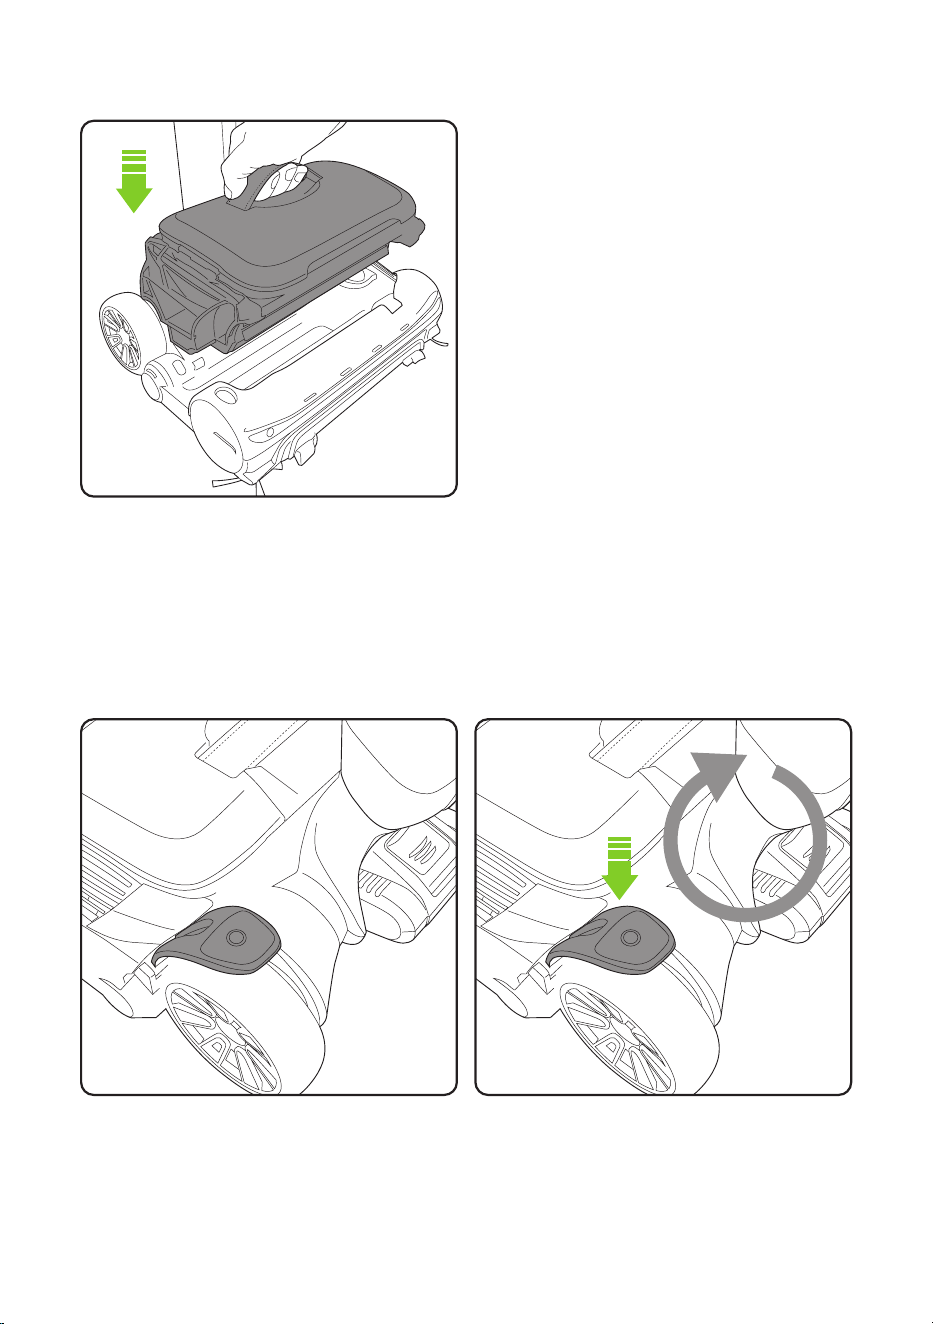
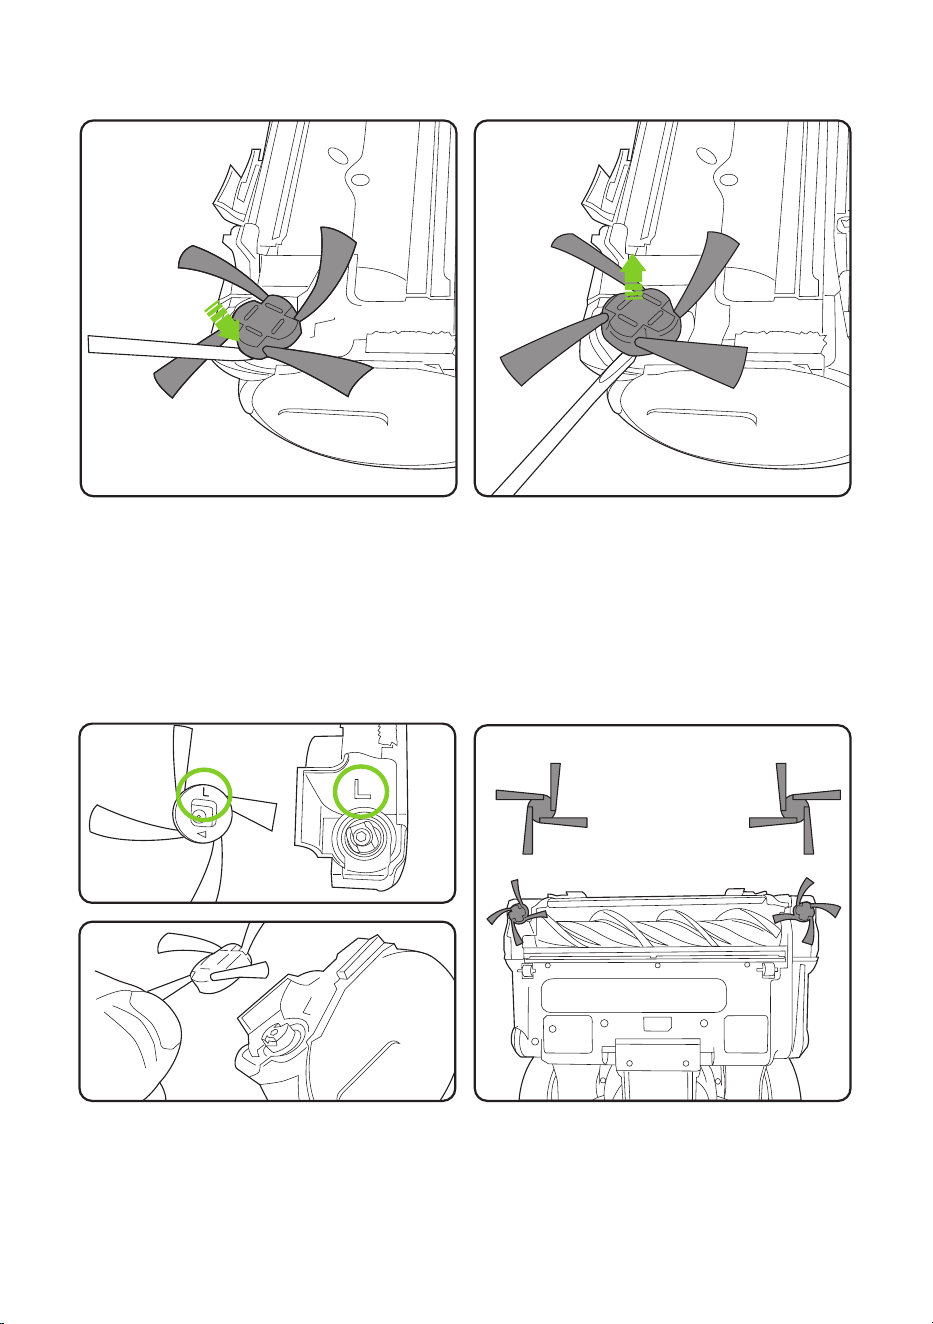
To re-fit align the brush onto the drive spindle and press the brush until it clicks into place.
The edge brushes are handed and note to match the “L “and “R” markings on the brush and
housing.
The edge brushes can be removed for cleaning
or replacement.
Before cleaning and removing the edge
brushes switch off and remove the battery.
Cleaning and removing the edge brushes
Carefully insert a small flat bladed screwdriver
or similar tool into the gap around the edge
brush.
Use the tool to push the edge brush up and
away from the housing.
15
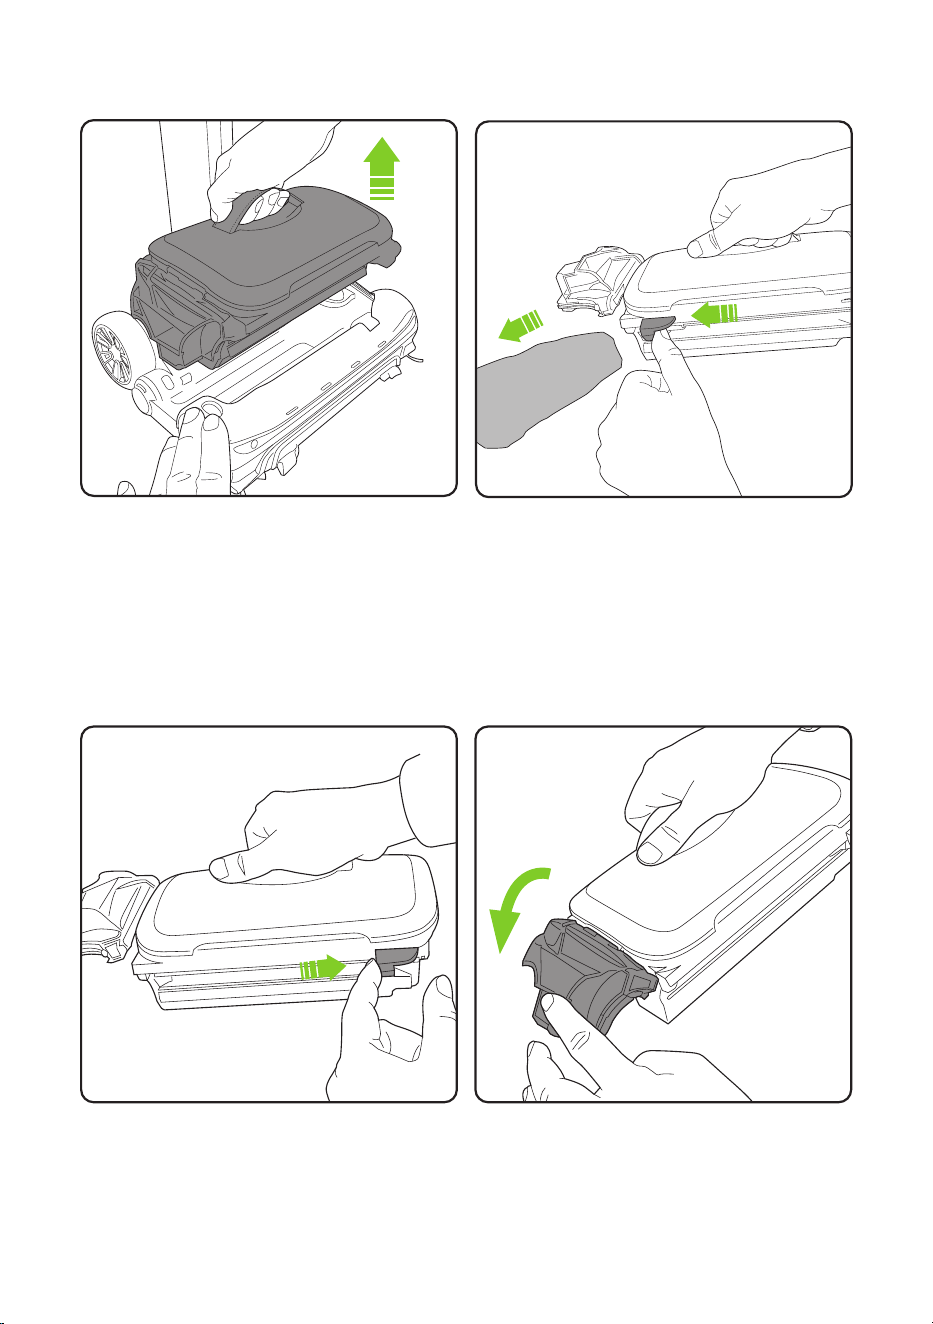
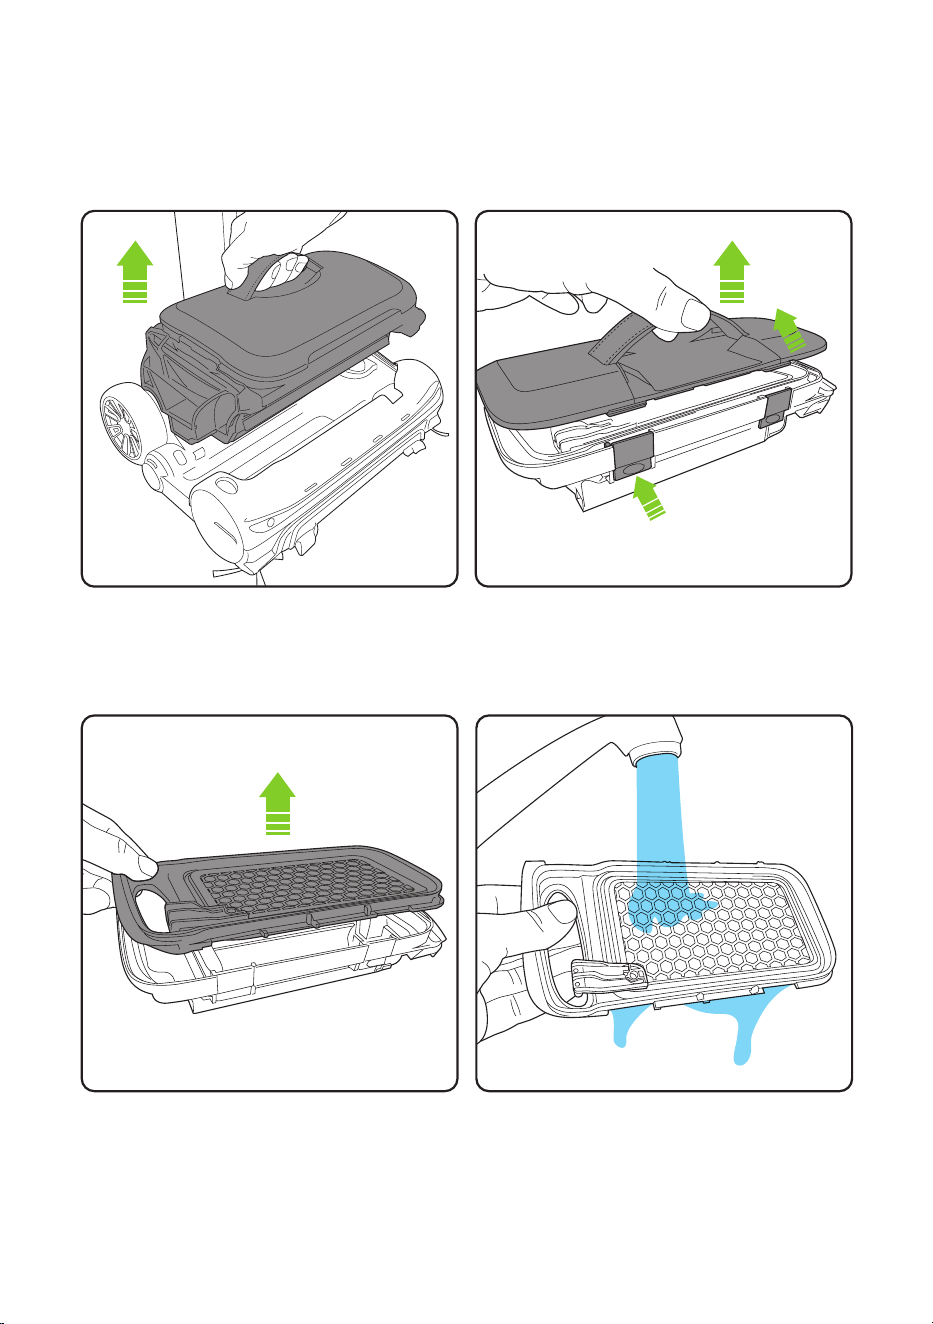
Removing and washing the filter
Remove the filter from the dust bin Wash the filter under a tap. Recommended
water temperature 40°C. Do not use
detergent or soaps. Let it dry completely
before reinserting into the product.
Never use the product without the filter.
You could damage the motor.
Holding onto the product with one hand,
pull the bin handle and li the bin out of the
product.
The filter regeneration function will maintain the life and performance of the filter but in some
circumstances it may be necessary to service the filter.
Press the 2 latches and li off the bin lid
16
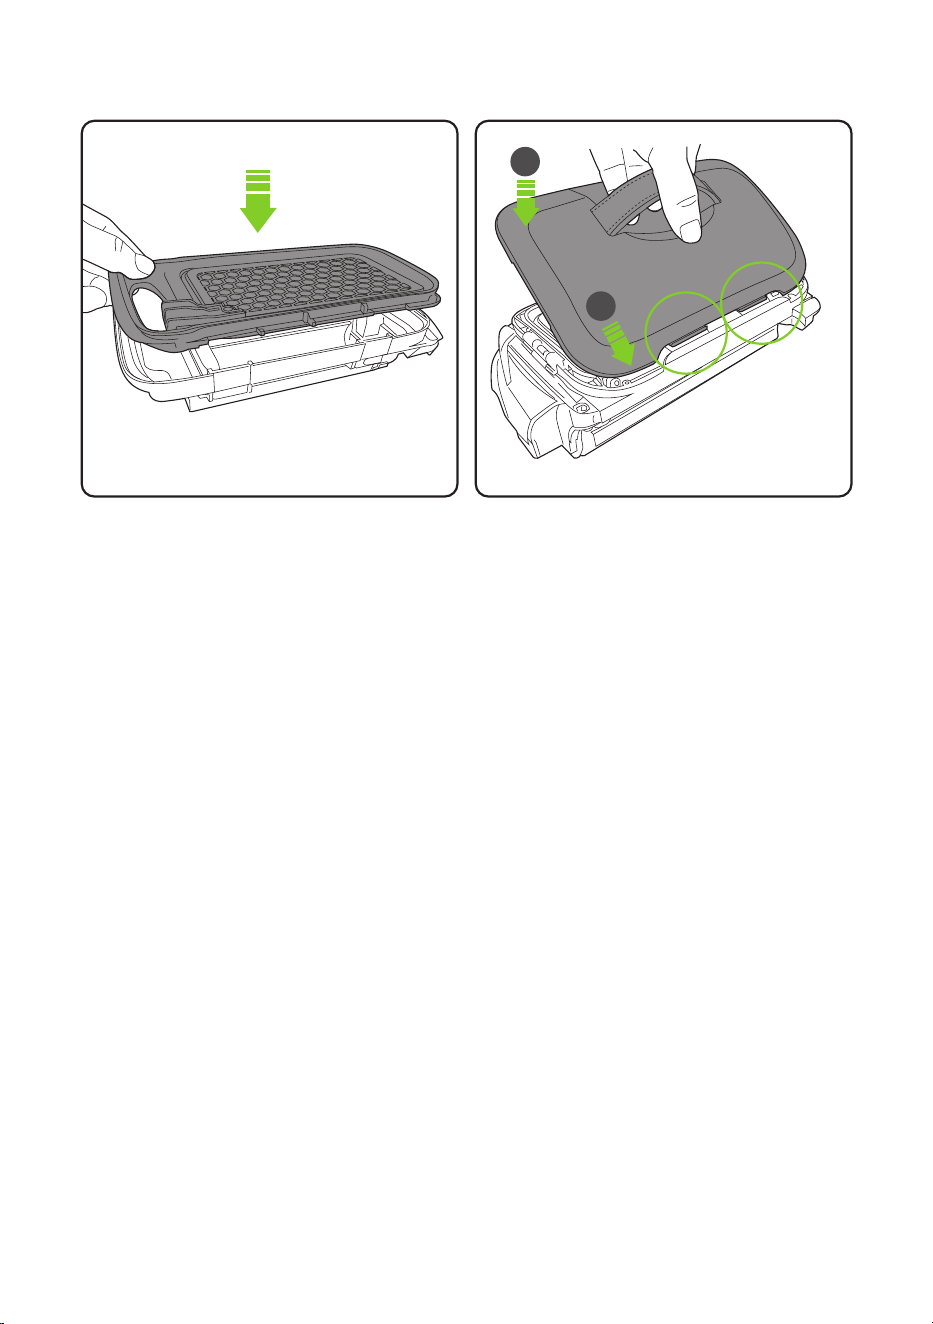
Replacing the filter
Fit the filter into the dust bin Locate the 2 tabs at the front of the lid into the
bin and then push down the lid until it clicks
into place.
Never use the without the bin and filter
fitted.
1
2
17
support@gtech.co.ukOnline How to Videos
Product support
If these initial tips do not solve your problem we please visit our support area where you can find
troubleshooting help including online manuals, FAQs and how-to-videos, as well as genuine
spares and replacement parts compatible with your product.
Visit: www.gtech.co.uk/support
Troubleshooting
Product is not cleaning well 1. Empty the bin
2. Check bin is correctly fitted
3. Check filter is correctly fitted
4. Clean and/or replace filter
5. Check brush bar fitment
6. Clean and/or replace brush bar
Product has stopped
or won’t work
– flashing red headlights
1. Battery is fully discharged
2. Recharge the battery
Product has stopped
or won’t work
– red headlights
1. The brush bar is blocked or jammed
2. Clear debris from the brush bar
(see p.12-14)
Battery will not charge 1. Check the product is correctly sitting on the
charging stand.
2. Check the charging stand is correctly
connected to the wall socket.
3. Check wall socket is switched on
4. Try another wall socket
Product care
Your product doesn’t need much maintenance: keep the filters clean, keep the brush bar tangle-
free and charge the battery. Wipe it with a dry cloth if it gets dirty, including under the bin.
To maintain optimum battery life store the battery in clean, dry conditions, within a recommended
temperature range of 0 - 25°C. Do not store the battery in areas of high temperature above 25°C.
Do not store near a source of heat or where exposed to direct sunlight.
The product can be stored on the charging stand. When the battery has fully charged, switch
the charging stand at the wall socket. This will optimise the battery life.
If the product will be stored for longer periods of time without use it is recommended to fully
charge the battery before storage to help maintain its condition and life.

TECHNICAL SPECIFICATION
Battery 20V Li-Ion
Charging period 3 hours
Battery charger output 21V DC 1.2A
Weight 3.8kg
Many of the electrical items that are thrown away
can be repaired or recycled, saving natural re-
sources and helping to protect the environment.
Gtech products are marked with the symbol
indicating they can be recycled, and are covered
by legislation for Waste Electrical and Electronic
Products (2012/19/EU)
When the product has reached the end of its life
both it and the Li-Ion battery it contains should not
be disposed of with general household waste. The
battery should be removed from the product and
both should be disposed of separately at a recog-
nised recycling centre.
Recycling electrical products and batteries is free
at your local recycling centre.
To find your nearest centre and discover how
easy it is to recycle electrical products visit
www.recycle-more.co.uk
Alternatively contact your local council or civic
amenity site.
Product Recycling
FOR HOUSEHOLD USE ONLY
18
19
Visit www.gtech.co.uk/warrantyregistration to register your product and ensure that we have all
the information required to provide you with quick and efficient support.
You will need your product’s serial number.
WARRANTY – REGISTRATION
X-XX-XXX~
XXXXX~
WWYY~
00~0000000
If your product is within its warranty and has a fault that cannot be resolved from the
troubleshooting section or online support, please do the following:
• Contact our Gtech Customer Care Helpline on UK: 08000 308 794, who will go through any
troubleshooting with you to identify the fault.
• If your fault can be resolved by a replacement part, this will be sent to you free of charge.
• Following troubleshooting, if your product needs to be replaced, we will arrange collection of
your faulty product for inspection, and delivery of a replacement product free of charge.
Your product is guaranteed against material or manufacturing faults for 2 years from the date of
purchase (or the delivery date if this is later) subject to the following terms and conditions:
WHAT ISN’T COVEREDSUMMARY
The guarantee becomes effective at
the date of purchase (or the date of
delivery if this is later). If a product
is repaired or replaced during the
warranty period, the warranty period
is not started again.
• You must provide proof of delivery/
purchase before any work can be
carried out on the product. Without
this proof, any work carried out will be
chargeable. Please keep your receipt or
delivery note.
• All work will be carried out by Gtech or
its authorised agents.
• Any parts which are replaced will
become the property of Gtech.
• The repair or replacement of your
product is under guarantee and will not
extend the period of guarantee.
• The guarantee provides benefits which
are additional to and do not affect your
statutory rights as a consumer.
Gtech does not guarantee the repair or
replacement of a product as a result of:
• Normal wear and tear (e.g. drive belt, brush bar, batteries) .
• Use of consumables (e.g dust bags and cartridges)
• Accidental damage, faults caused by negligent use or lack of care
and maintenance, misuse, neglect, careless operation or handling of
the product which is not in accordance with operating manual.
• Blockages. Please refer to the operating manual for details of how to
unblock your product.
• Use of the product for anything other than the normal domestic
household purposes.
• Use of parts and accessories which are not Gtech genuine
components.
• Faulty installation (except where installed by Gtech)
• If it is modified in any way.
• Repairs or alterations carried out by parties other than Gtech or its
authorised agents.
• Purchasing your product from an unofficial third party (i.e not from
Gtech or an official Gtech retailer.
• If you are in doubt as to what is covered by your guarantee, please
call the Gtech Customer Care Helpline on UK: 08000 308 794
International orders are subject to a delivery charge for both faulty and
non faulty products.
WARRANTY – TERMS AND CONDITIONS
If you purchased directly from Gtech, your
details are already registered and your 2-year
warranty will start automatically.
If you purchased from an authorised Gtech retailer,
please register your warranty within 3 months.
You will need to provide proof of purchase to
support any claim(s) against your warranty.

5906 100425
Grey Technology Limited
Brindley Road, Warndon, Worcester WR4 9FB, UK
email: support@gtech.co.uk
telephone: 08000 308 794
www.gtech.co.uk