3
2
1
1
2
3
7 8
4
5
6
5
7
4
8
6
Electro Sight
©2019 BARSKA® | Pomona, CA 91767 | www.barska.com
8/19
BC617
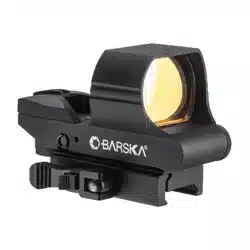
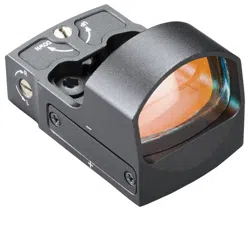
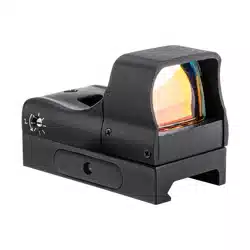
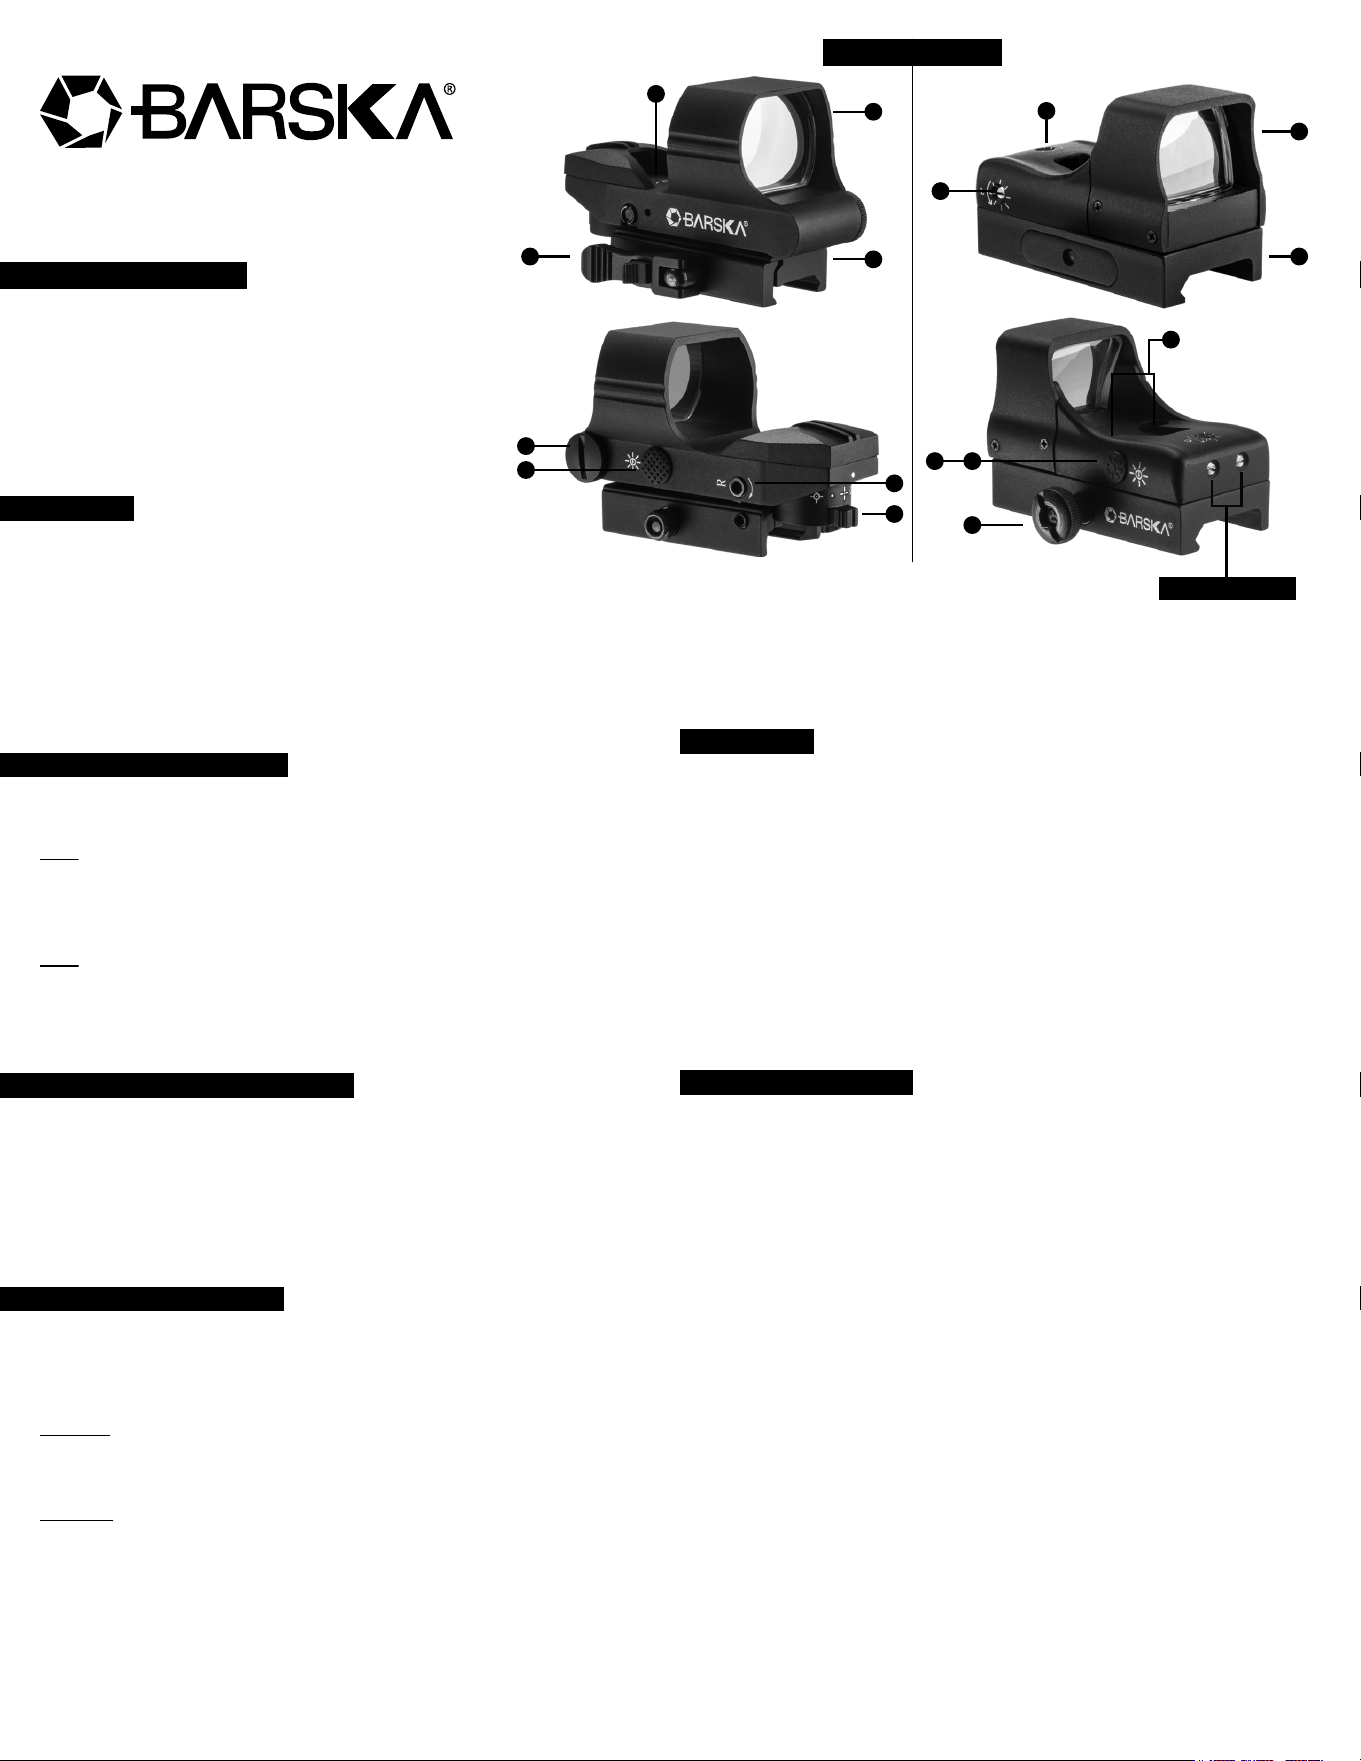
PARTS OF THE SIGHT
1. Objective Lens
2. Weaver Picatinny Mounting Base
3. Clamping Plate
4. Windage Adjustment
5. Elevation Adjustment
6. Battery Compartment
7. Reticle Selector
8. Rheostat Button
CAUTION
1. BE SURE THAT THE FIREARM IS NOT LOADED. PRACTICE
SAFE FIREARM HANDLING PROCEDURES AT ALL TIMES.
2. ALL DISCHARGING OF FIREARMS SHOULD BE DONE AT AN
APPROVED RANGE OR EQUALLY SAFE AREA. USE OF EYE
AND EAR PROTECTION IS RECOMMENDED.
3. DIRECT VIEWING OF THE SUN CAN CAUSE PERMANENT EYE
DAMAGE. DO NOT ATTEMPT TO VIEW THE SUN DIRECTLY WITH
EITHER THIS PRODUCT OR THE NAKED EYE.
INSTALLING THE BATTERY
To install batteries, locate Battery Compartment
1x30
Remove the two screws then top separates and insert one CR2032 3V
Lithium Battery and insert battery positive ("+") side up. Replace the battery
cover.
1x40
Unscrew battery cover and insert 3 x LR44 battery positive ("+") side up.
Replace the battery cover.
If the reticle dims or does not illuminate at all, replace the battery.
MOUNTING YOUR ELECTRO SIGHT
Position the electro sight so that the Objective Lens is facing in the
same direction as the muzzle of the firearm. Provide at least three inches
of clearance between your eye and the objective lens. Loosen the
Clamping Knob. Align the Mounting Base of the electro sight onto the rail of
your firearm, and slide electro sight into place. Tighten the Clamping Plate
to lock the sight in place. For Quick Release Mount push button on the
latch upwards then lift latch.
WINDAGE AND ELEVATION
The Windage Adjustment is located on the side of the sight. This
adjusts the horizontal axis of the sight. The Elevation Adjustment is
located on the top of the sight. This adjusts the vertical axis of the sight.
Windage
Turn the turret counter clockwise to make the reticle move to the right.
Turn the turret clockwise to make the reticle move to the left.
Elevation
With an allen wrench turn the screw counter clockwise to raise the reticle.
Turn the turret clockwise to lower the reticle.
ZEROING
With the scope mounted, rest the gun on a solid support. Sight along the
barrel and aim at a target 50 to 100 yards away. Sight through the electro
sight and set the intensity at the best position for you. All test shots should
be done in the same conditions to achieve maximum accuracy for
adjustment, also remember to a use a firm rest for firing as well as the
same type of cartridge is recommendable. Each click adjustment moves
the point of impact by 1 MOA (approx. 1” @ 100yds. Or 1/2” @ 50yds.)
NOTE: For 1x30 model, please slightly loosen the locking screws while you
perform aiming alignment.
Once the alignment is completed, please tighten the locking screws to lock
the setting.
ILLUMINATED RETICLE
With the battery properly in place, push the Rheostat button to activate the
illuminated reticle. Press Rheostat button again to acheive the desired
brightness.
To turn off the illuminated reticle, press and hold the Rheostat button for
3-5 seconds. Otherwise it will automatically turn off after 1 hour.
See reverse side for additional information.
1x40 1x30
Locking Screws

1 YEAR LIMITED WARRANTY
ELECTRO SIGHT / RED DOT
BARSKA® Optics, as manufacturer, warrants this new precision optical product to be free
of original defects in materials and/or workmanship for the length of time specified by this
warranty. This warranty does not include damage caused by abuse, improper handling,
installation, maintenance, normal wear-and-tear, unauthorized repairs or modifications and
tampering in anyway.
This warranty is limited to the original purchaser and is not transferable. This warranty
applies only to products purchased in the United States of America.
In the event of a defect within 30 days, the consumer must return the defective unit to the
BARSKA dealer (the place of purchase) at his/her own expense.
Beyond 30 days, BARSKA products should be sent to the following address for warranty
repairs. Products must be packed carefully and sturdily to prevent damage in transit, and
returned freight prepaid to:
BARSKA® OPTICS
Repair Department
855 Towne Center Drive
Pomona, CA 91767
For additional and updated information
please visit our website at www.barska.com
Please email [email protected] or call 1-888-666-6769 for Return Merchandise Number
(RMA#) before any returns.
NOTE: All merchandise received without a valid RMA # will be returned to shipper at
his/her own expense.
Please include all of the following when returning BARSKA products for service and/or
replacement:
1. Please write your complete details (Name, Address, Telephone #, E-mail address,
RMA#, etc.)
2. Purchase receipt or Proof of Purchase. (Original/Copy)
3. A brief explanation of the defect.
4. A Check/Money Order of $20.00 to cover inspection, shipping and handling.
*Please allow 6-8 weeks for delivery.
This product will either be replaced or repaired at the discretion of the warrantor. If it's a
discontinued item, we will replace the product with an equivalent product. Should the repair
not be covered by this warranty, an estimate will be sent for your approval. Non-warranty
repairs or refurbishing of your optical products are always provided at a reasonable cost.
BARSKA® Optics shall not be liable for any consequential, incidental and/or contingent
damages whatsoever. We will not pay shipping, insurance or transportation charges from
you to us, or any import fees, duties and or taxes. This warranty supersedes all previous
BARSKA® Optics warranties.
BC291