
Technical Support and E-Warranty Certificate
www.vevor.com/support
HANDHELD METAL DETECTOR
INSTRUCTIONS
MODEL: TS-102
We continue to be committed to provide you tools with competitive price.
"Save Half", "Half Price" or any other similar expressions used by us only represents an
estimate of savings you might benefit from buying certain tools with us compared to the major
top brands and does not necessarily mean to cover all categories of tools offered by us. You
are kindly reminded to verify carefully when you are placing an order with us if you are
actually saving half in comparison with the top major brands.

- 1 -
MODEL: TS-102
Have product questions? Need technical support? Please feel free to
contact us:
Technical Support and E-Warranty Certificate
www.vevor.com/support
NEED HELP? CONTACT US!
This is the original instruction, please read all manual instructions
carefully before operating. VEVOR reserves a clear interpretation of our
user manual. The appearance of the product shall be subject to the
product you received. Please forgive us that we won't inform you again if
there are any technology or software updates on our product.
Handheld metal detector
Instructions

- 2 -
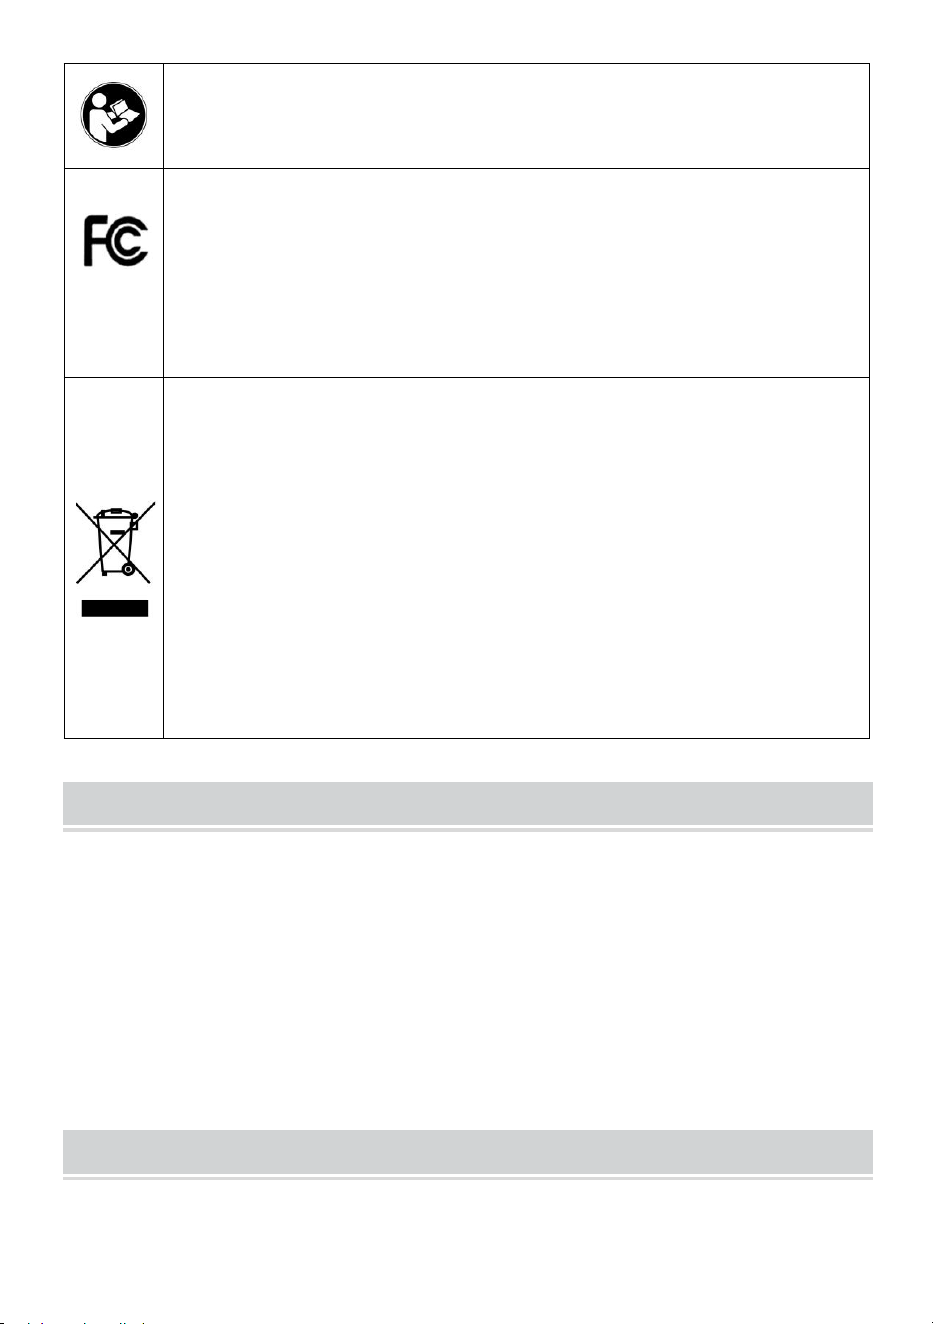
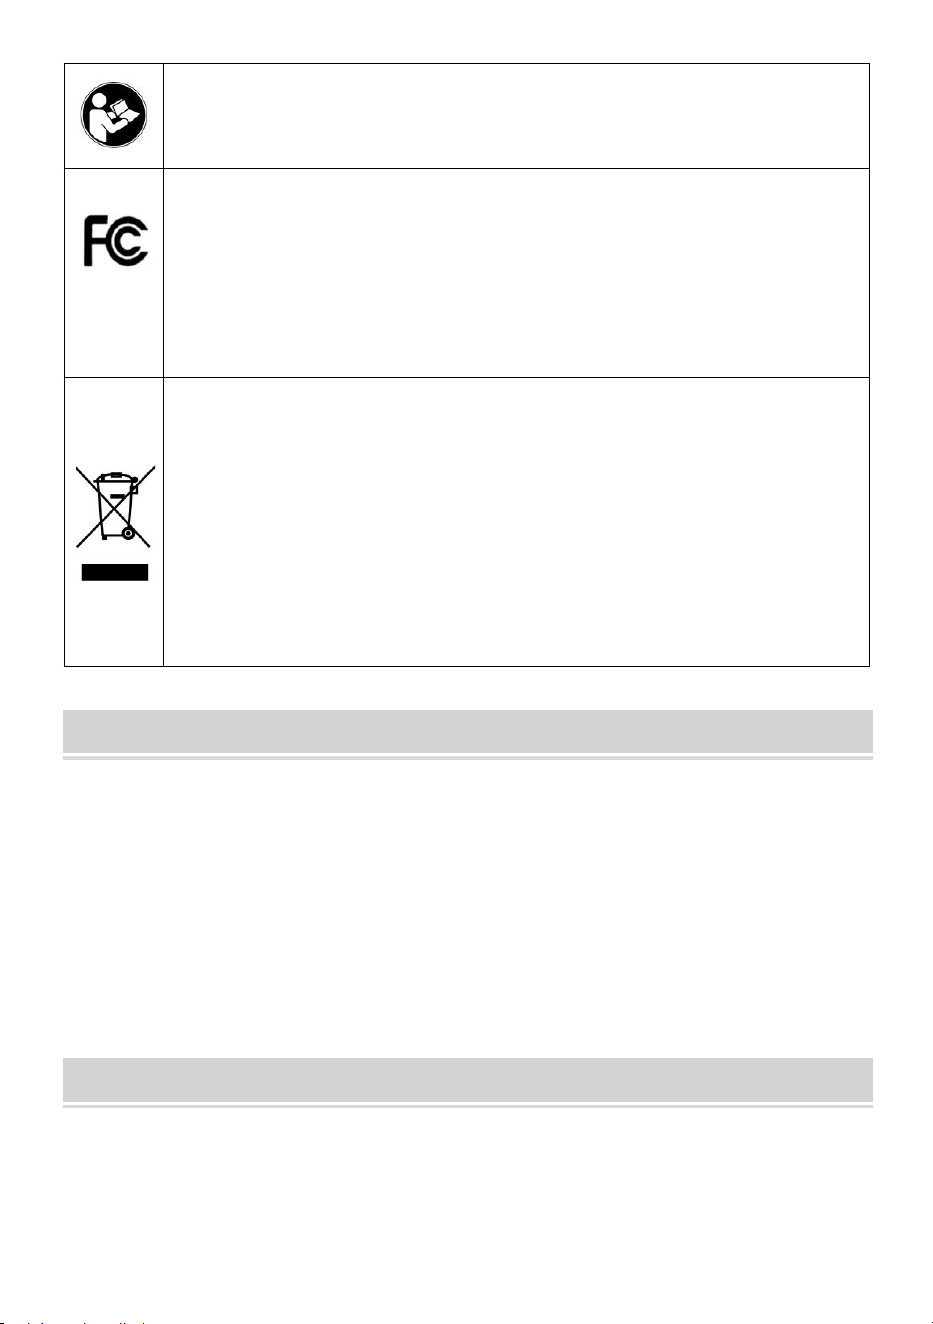
Warning-To reduce the risk of injury, user must read
instructions manual carefully.
This device complies with Part 15 of the FCC Rules. Operation
is subject to the following two conditions:(1)This device may not
cause harmful interference, and (2)this device must accept any
interference received, including interference that may cause
undesired operation.
This product is subject to the provision of European Directive
2012/19/EC. The symbol showing a wheelie bin crossed
through indicates that the product requires separate refuse
collection in the European Union. This applies to the product
and all accessories marked with this symbol. Products marked
as such may not be discarded with normal domestic waste, but
must be taken to a collection point for recycling electrical and
electronic devices
FEATURES
Detect metal objects in all directions.
High precision identifying system.
Auto power off.
Low power consumption.
Shock resistance.
Small size, light weight.
Waterproof design, IP degree of IP68.
SPECIFICATIONS
Sensitivity: 40mm ( for one dollar coin )
Alarm Mode:
Mode 1: Vibration and buzzer sound alarm mode
Mode 2: Buzzer sound alarm mode
Mode 3: Vibration alarm mode
- 3 -
Operating Evnironment:
Temperature: -20C to 60C
Relative Humidity: <90%
Battery: 9V battery, 6F22 or equivalent, 1 piece
Dimensions: 250mm x 45mm x 42mm
Weight: About 180g ( including battery )
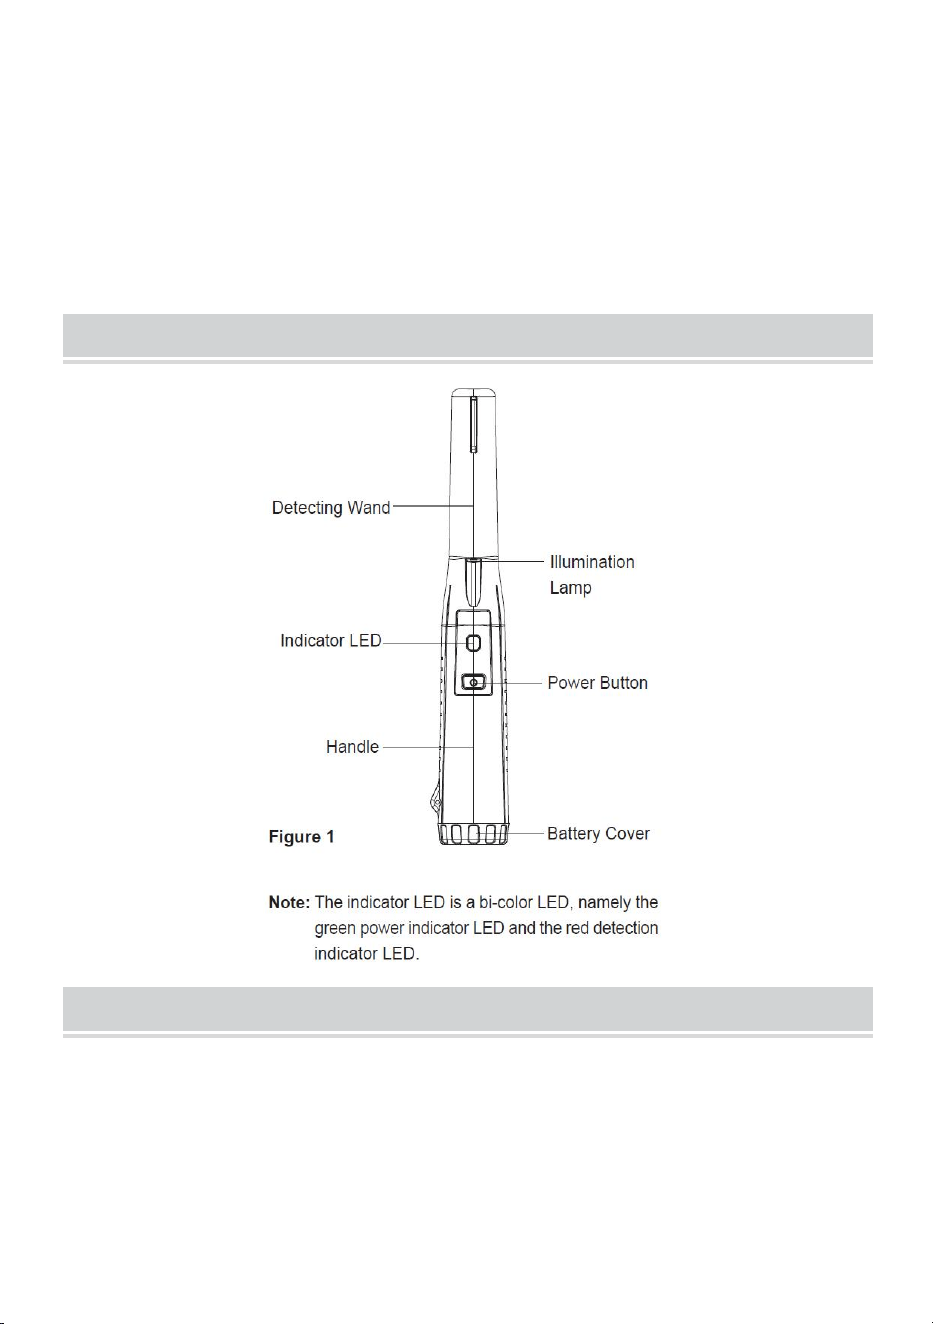
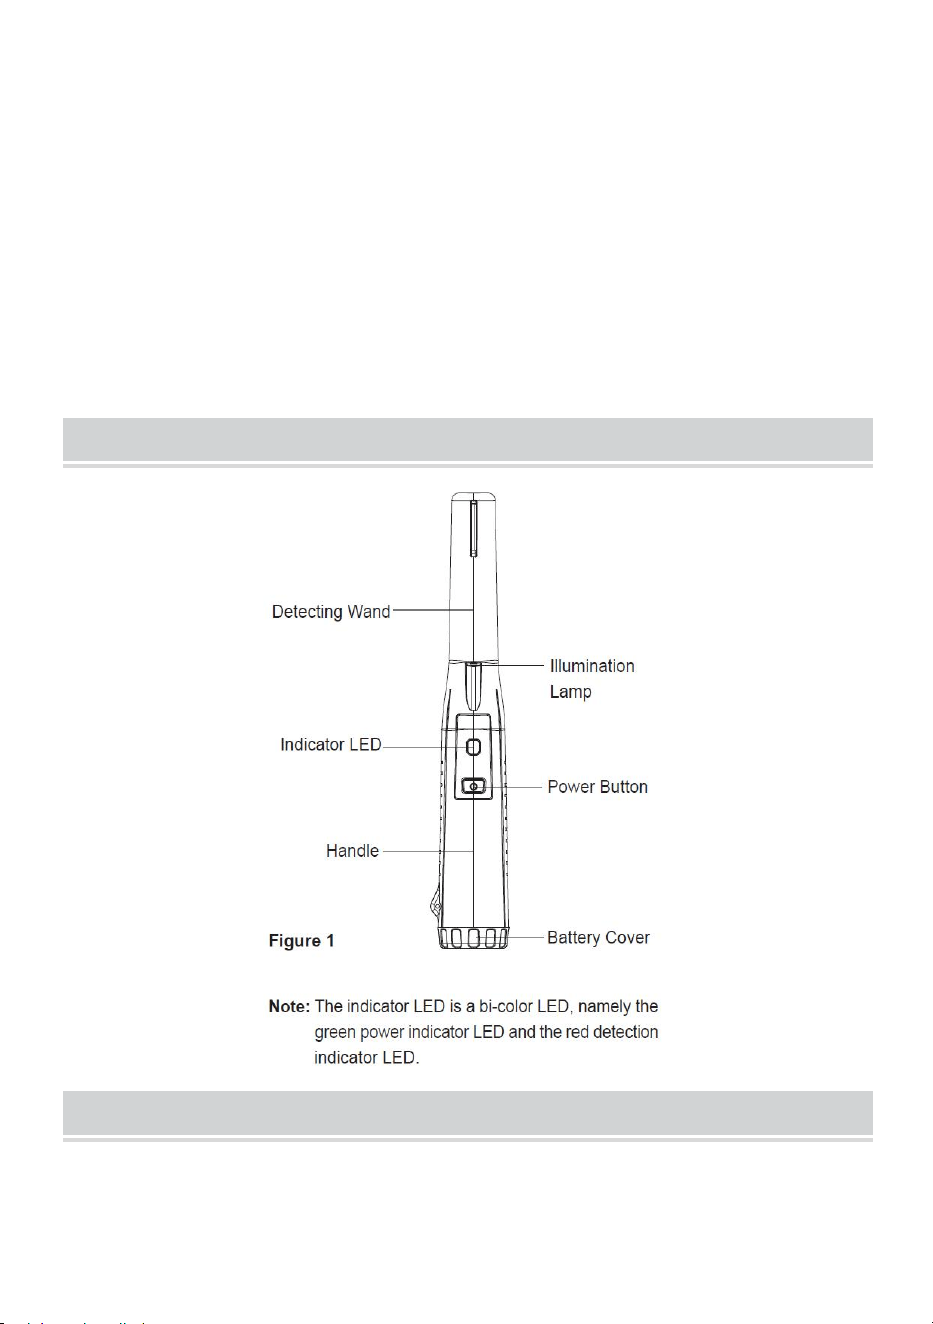
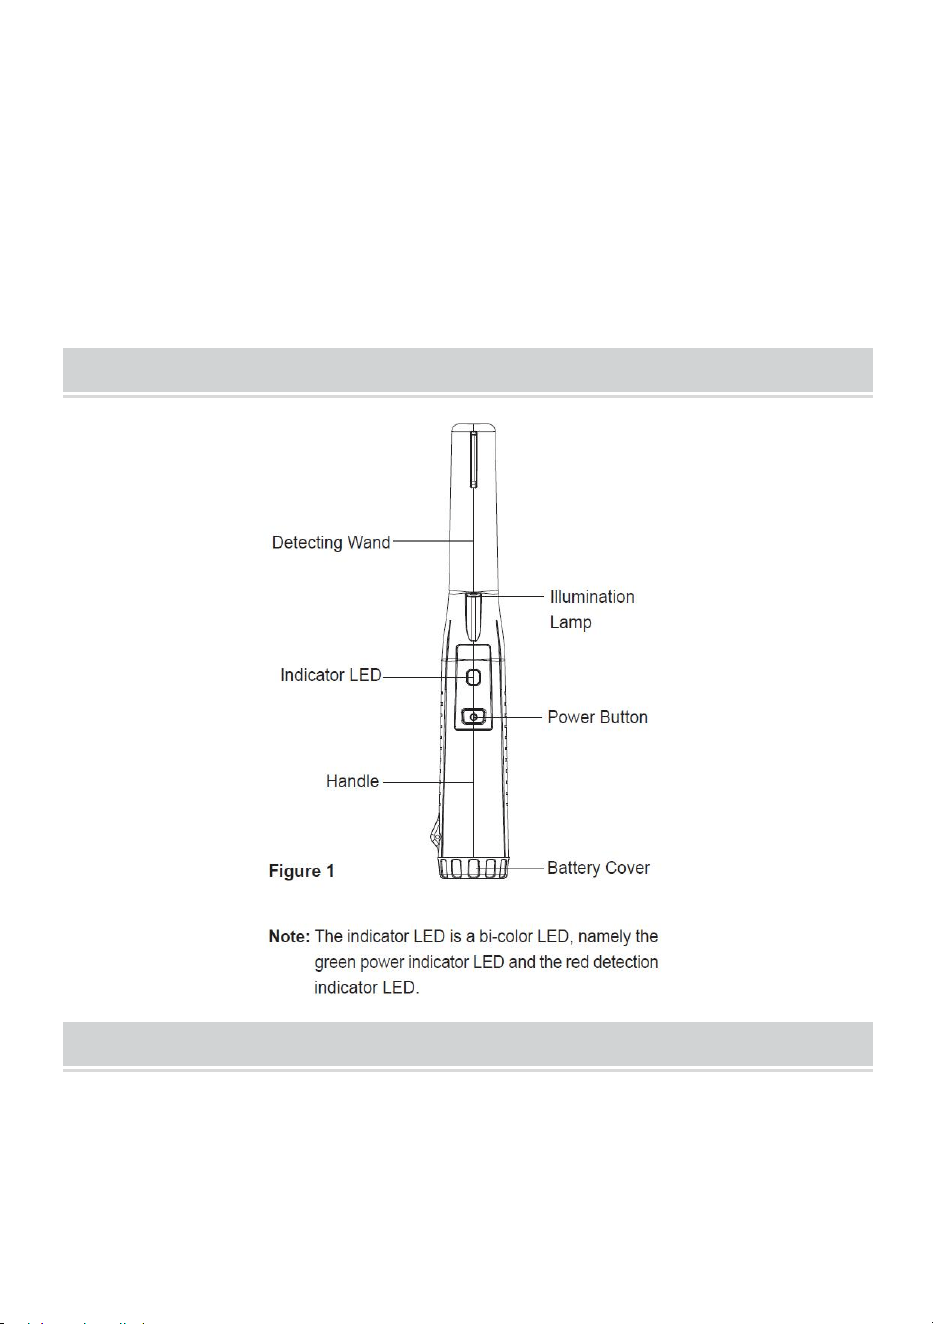
STRUCTURE
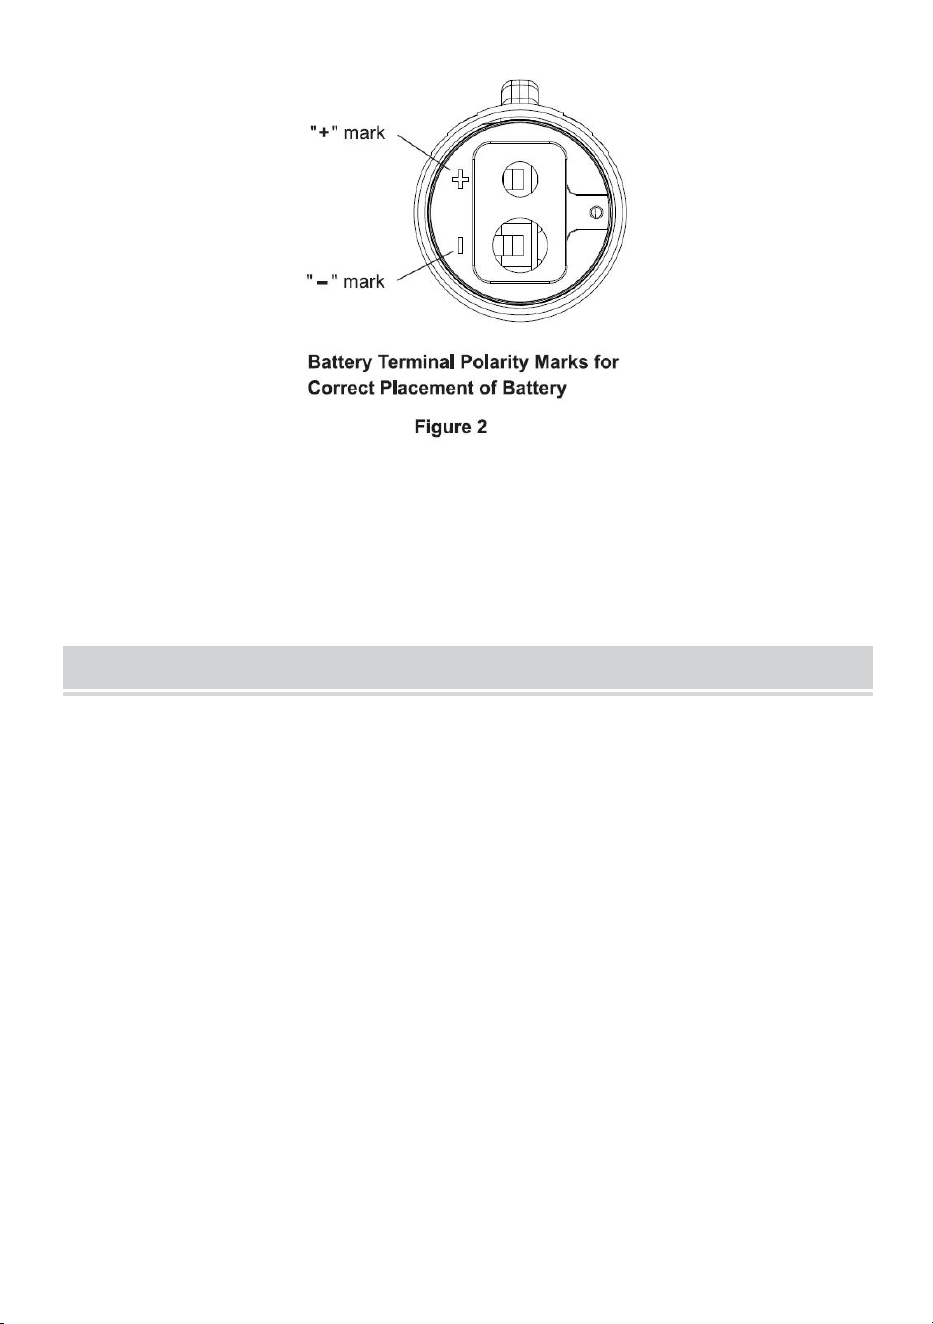
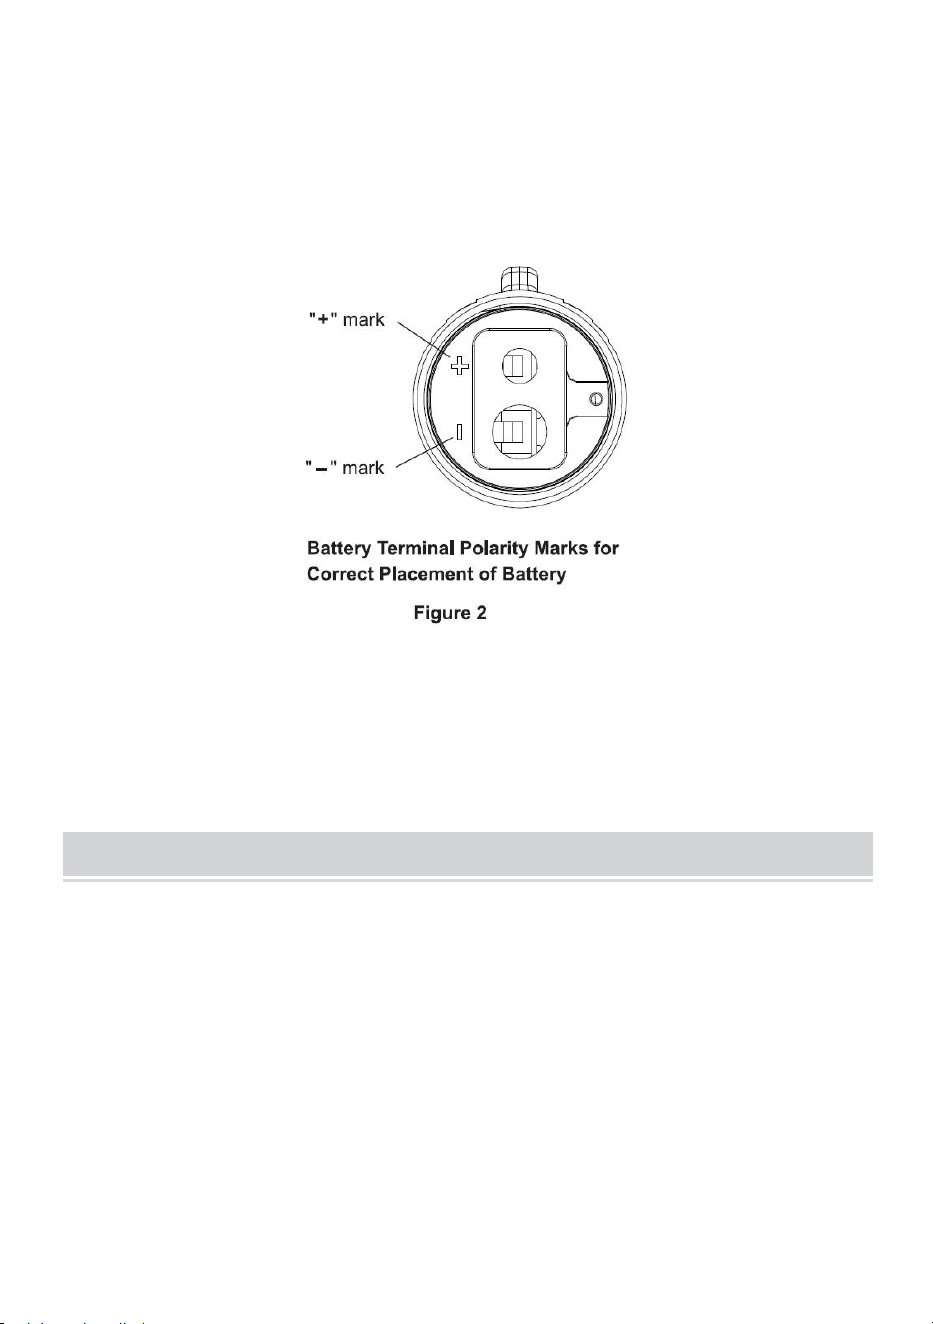
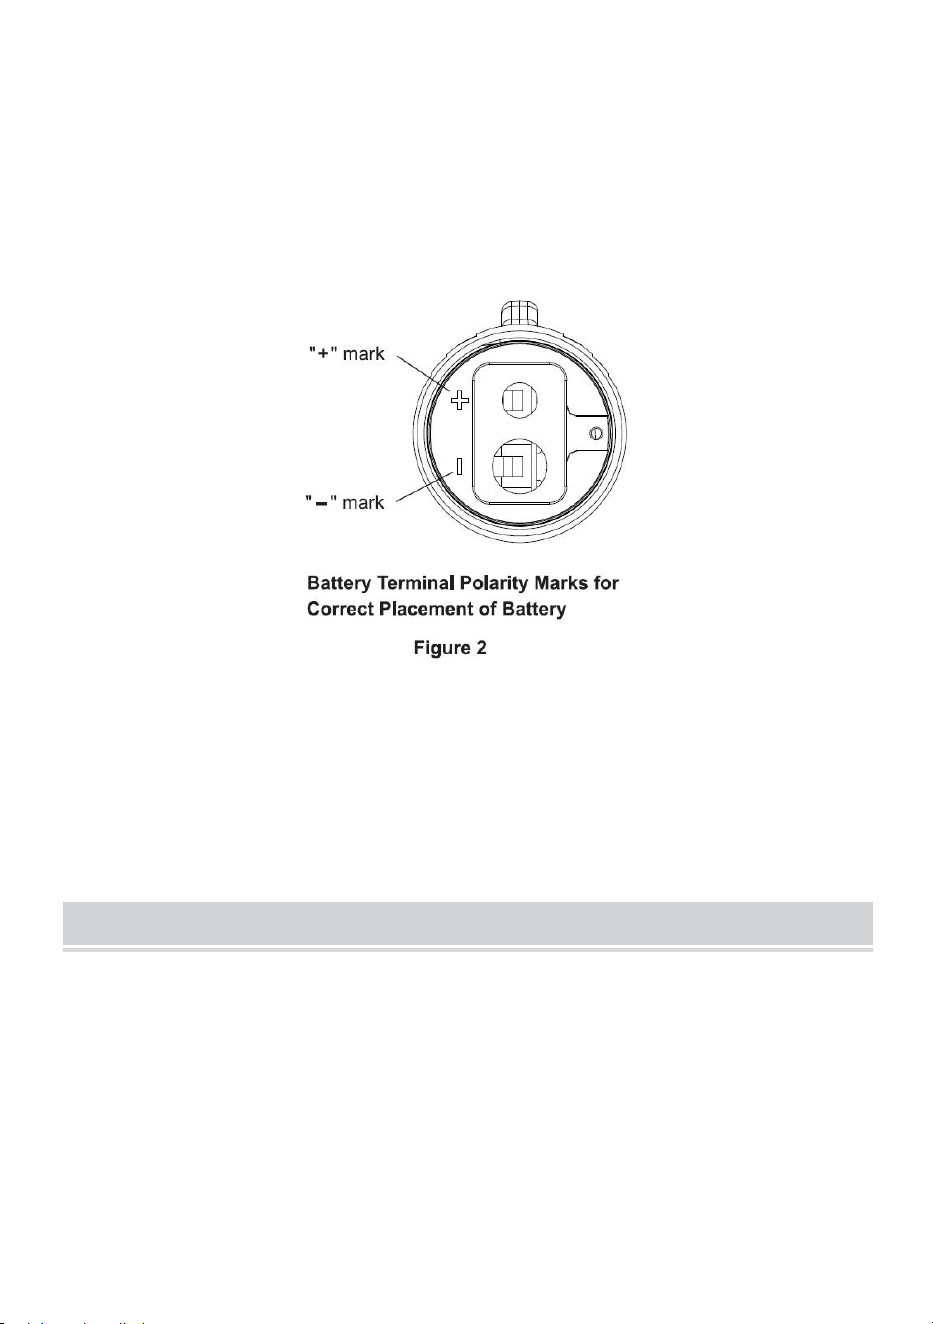
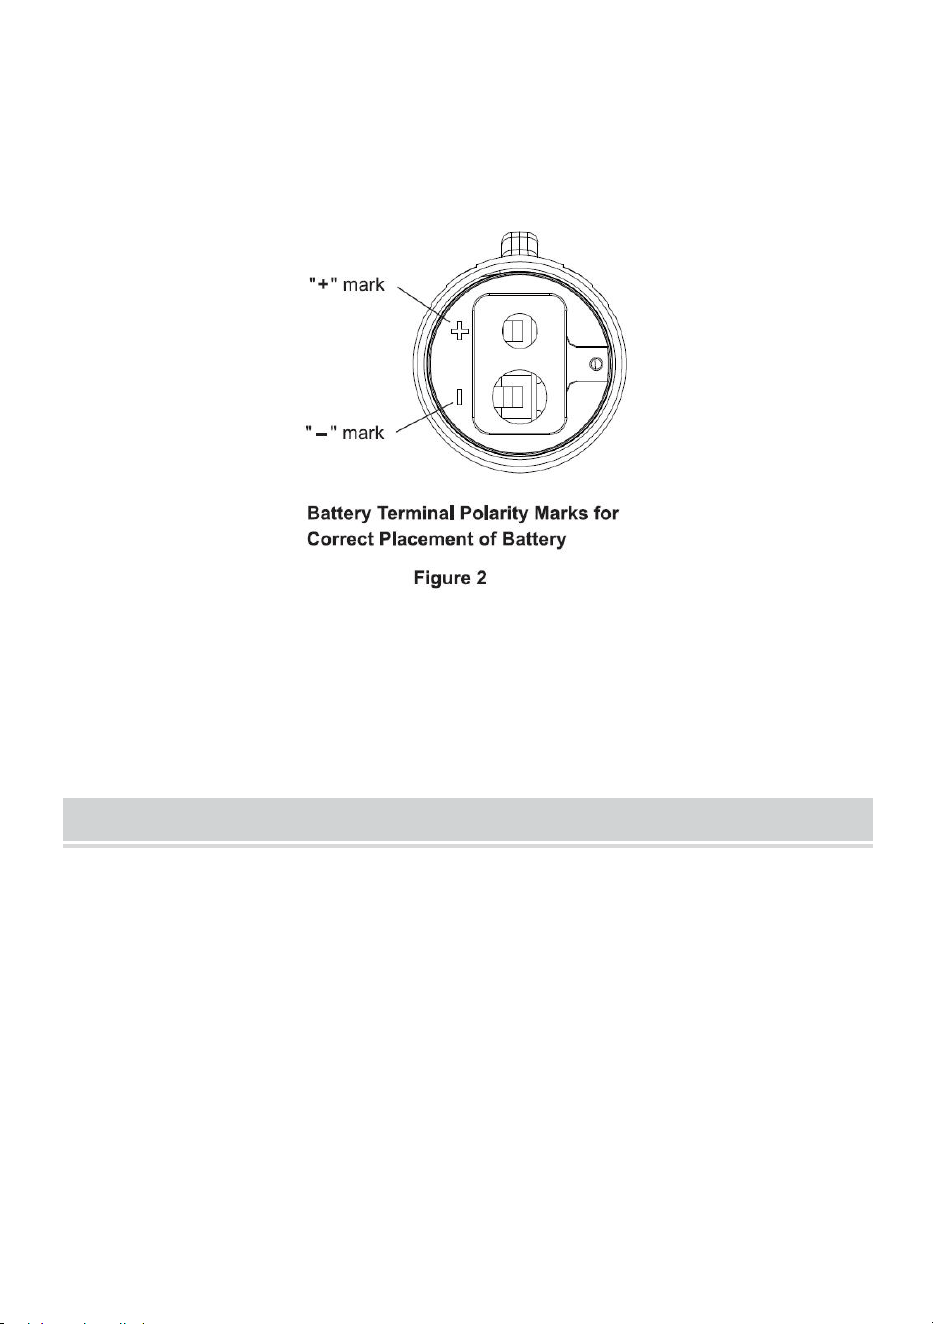
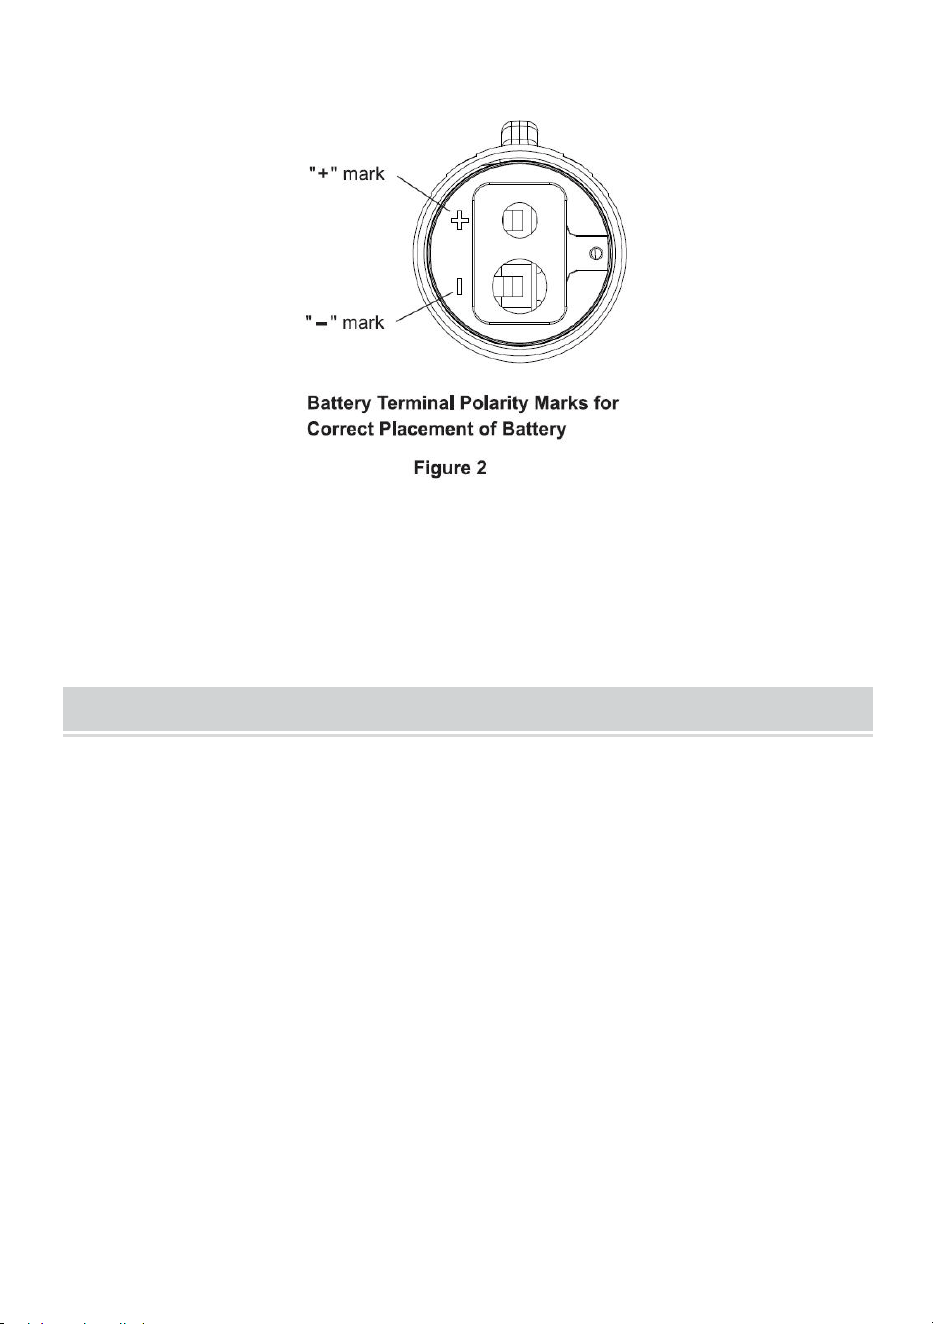
INSTALLING BATTERY
1.Remove the battery cover by turning it counterclockwise.
2. Install a new 9V battery ( 6F22 or equivalent ) intothe battery
compartment, make sure the polarityconnections are correct( see
Figure 2 ); otherwisethe metal detector may be damaged.
3. Reinstall the battery cover, turn it clockwise tosecure it in place.
- 4 -
Note:
1. Never leave an exhausted battery in the detector
2. If you do not use the detector in a long period oftime, remove the
battery from the detector to avoidcorrosion.
OPERATIONINSTRUCTION
1. Hold the detector by the handle. Make sure that the detector is far away
from any metal object, and then press the power button briefly to turn on
the detector. The green power indicator LED and the illumination lamp
light up, and the detector vibrates once and/or the buzzer sounds a beep,
indicating that the detector has been turned on.
2 .The detector starts calibration automatically. Thecalibration takes about
2 to 4 secs.When thecalibration is completed, the detector vibrates
brieflytwo times and/or the buzzer sounds two beeps.
Note: lf you want to use this detector to detectmetal objects buried in
mineralized soil,salt water or wet salt sand, you must holdthe tip of the
detector to mineralized soil!salt water or wet salt sand and turn on
thedetector to let it perform auto calibrationthere.
3. Move the detecting wand smoothly along thesurface of the object to be
checked. As the detectorgets close to a metal object, it will start to
vibrateand/or the built-in buzzer will sound. The vibrationand/or the
beep sound will intensify as the detectorgets closer to the metal.

- 5 -
4. After the detector is turned on and calibrated, youcan press and hold the
power button for about 2seconds to enter the alarm-mode-switching
stateThe illumination light will flash as an indicationThe detector defaults
to enter the alarm mode withvibration and buzzer sound. Press the
power buttononce to switch to the buzzer sound alarm mode.and press it
again to switch to the vibration alarmmode. After selecting the desired
mode, press andhold the power button for about 2 seconds toconfirm
it,or wait for about 5 seconds for thedetector to automatically confirm.
Note: After the next power-up, the detector willdefault to the alarm mode
confirmed in the previoususe.
5. After finishing using the detector, press the powerbutton once to turn off
the detector; the detectorwill vibrate three times and/or the buzzer will
soundthree beeps
Note:
Before each use, verify the detector's operationby detecting a known
metal object.Do not use the detector if it operates abnormally.
If the illumination light flashes after the detectoris turned on(in
non-alarm mode-switching state)the battery is not high enough and
you mustreplace the battery immediately; otherwise thedetector may
not operate or detect metal normally.
When the battery is too low, the detector will turnoff automatically.
To save battery charge, turn off the detector whennot in use.
AUTOMATIC POWER OFF
lf you have not pressed the power button and thedetector has not detected
any metal object for about5 minutes, the detector will start to prompt
withvibration and/or buzzer sound every 12 secs.Andafter six prompts, the
detector will turn offautomatically.
Note: If any metal object is detected or the powerbutton is pressed, the
prompt will be cancelled andthe timer will reset.

- 6 -
DECLARATION
1. This Instruction Sheet is subject to change without notice.
2. Our company will not take the other responsibilitiesfor any loss.
3. The contents of this Instruction Sheet can not beused as the reason to
use the detector for anyspecial application.
LIST OF ACCESSORIES
9V carbon tandem battery (6F22)*1
Waist hanging cover*1
Telescopic lanyard*1
Instructions*1
DISPOSAL OF THIS ARTICLE
Dear Customer,
lf you at some point intend to dispose of this article, then please
keep in mind that many of its components consist of valuable
materials,which can be recycled.
Please do not discharge it in the garbage bin, but check with
your local council for recycling facilities in your area.
Address: Baoshanqu Shuangchenglu 803long 11hao 1602A-1609shi Shanghai
Imported to AUS: SIHAO PTY LTD.1 ROKEVA STREETEASTWOOD NSW 2122
Australia
Imported to USA: Sanven Technology Ltd. Suite 250, 9166 Anaheim Place,
Rancho Cucamonga, CA 91730
REP
EC
SHUNSHUN GmbH
Römeräcker 9 Z2021, 76351
Linkenheim-Hochstetten, Germany
REP
UK
Pooledas Group Ltd
Unit 5 Albert Edward House, The
Pavilions Preston, United Kingdom
Made In China

- 7 -


- 2 -
Technique Assistance et certificat de garantie électronique
www.vevor.com/support
DÉTECTEUR DE MÉTAUX PORTATIF
INSTRUCTIONS
MODÈLE: TS-102
We continue to be committed to provide you tools with competitive price.
"Save Half", "Half Price" or any other similar expressions used by us only represents an
estimate of savings you might benefit from buying certain tools with us compared to the major
top brands and does not necessarily mean to cover all categories of tools offered by us. You
are kindly reminded to verify carefully when you are placing an order with us if you are
actually saving half in comparison with the top major brands.

- 1 -
MODÈLE: TS-102
Have product questions? Need technical support? Please feel free to
contact us:
Technical Support and E-Warranty Certificate
www.vevor.com/support
NEED HELP? CONTACT US!
This is the original instruction, please read all manual instructions
carefully before operating. VEVOR reserves a clear interpretation of our
user manual. The appearance of the product shall be subject to the
product you received. Please forgive us that we won't inform you again if
there are any technology or software updates on our product.
Handheld metal detector
Instructions

- 2 -
Avertissement : Pour réduire le risque de blessure, l'utilisateur
doit lire attentivement le manuel d'instructions.
Cet appareil est conforme à la partie 15 des règles FCC. Son
fonctionnement est soumis aux deux conditions suivantes : (1)
Cet appareil ne doit pas provoquer d'interférences nuisibles et
(2) cet appareil doit accepter toute interférence reçue, y
compris les interférences susceptibles de provoquer un
fonctionnement indésirable.
Ce produit est soumis aux dispositions de la directive
européenne 2012/19/CE. Le symbole représentant une
poubelle barrée indique que le produit nécessite une collecte
sélective des déchets dans l'Union européenne. Ceci
s'applique au produit et à tous les accessoires marqués de ce
symbole. Les produits marqués comme tels ne peuvent pas
être jetés avec les ordures ménagères normales, mais doivent
être déposés dans un point de collecte pour le recyclage des
appareils électriques et électroniques.
FEATURES
Détectez les objets métalliques dans toutes les directions .
Système d'identification de haute précision .
Mise hors tension automatique .
Faible consommation d'énergie .
Résistance aux chocs .
Petite taille, poids léger .
Conception étanche, degré IP de IP 68.
SPECIFICATIONS
Sensibilité : 4,0 mm (pour une pièce d'un dollar)
Mode d'alarme :
Mode 1 : mode d'alarme sonore par vibration et sonnerie

- 3 -
Mode 2 : mode d'alarme sonore
Mode 3 : mode d'alarme vibrante
opérationnel :
Température : -20 C à 60 C
Humidité relative : <90 %
Pile : pile 9 V, 6F22 ou équivalent, 1 pièce
Dimensions : 2,50 mm x 4,5 mm x 4,2 mm
Poids : environ 1,80 g (batterie incluse)
STRUCTURE
INSTALLING BATTERY
1. Retirez le couvercle de la batterie en le tournant dans le sens
inverse des aiguilles d'une montre.
2. Installez une nouvelle pile 9 V (6F22 ou équivalent) dans le
- 4 -
compartiment à piles, assurez-vous que les connexions de
polarité sont correctes (voir Figure 2) ; sinon le détecteur de
métaux pourrait être endommagé.
3. Réinstallez le couvercle de la batterie, tournez-le dans le sens des
aiguilles d'une montre pour le fixer en place.
Note:
3. Ne laissez jamais une pile épuisée dans le détecteur
4. Si vous n'utilisez pas le détecteur pendant une longue période, retirez la
pile du détecteur pour éviter la corrosion.
OPERATIONINSTRUCTION
1. Tenez le détecteur par la poignée. Assurez-vous que le détecteur est
éloigné de tout objet métallique, puis appuyez brièvement sur le bouton
d'alimentation pour allumer le détecteur. Le voyant d'alimentation vert et
la lampe d'éclairage s'allument, et le détecteur vibre une fois et/ou le
buzzer émet un bip, indiquant que le détecteur a été allumé.
2. Le détecteur démarre automatiquement l'étalonnage. L'étalonnage
prend environ 2 à 4 secondes. Une fois l'étalonnage terminé, le
détecteur vibre brièvement deux fois et/ou le buzzer émet deux bips.
Remarque : si vous souhaitez utiliser ce détecteur pour détecter des objets
métalliques enfouis dans un sol minéralisé, de l'eau salée ou du sable

- 5 -
salé humide, vous devez maintenir la pointe du détecteur sur un sol
minéralisé ! De l'eau salée ou du sable salé humide et allumer le
détecteur pour le laisser fonctionner automatiquement. étalonnage
là-bas.
3. Déplacez doucement la baguette de détection le long de la surface de
l'objet à vérifier. Lorsque le détecteur s'approche d'un objet métallique,
il commence à vibrer et/ou le buzzer intégré retentit. La vibration et/ou
le bip s'intensifieront à mesure que le détecteur se rapproche du métal.
4. Une fois le détecteur allumé et calibré, vous pouvez appuyer et
maintenir le bouton d'alimentation pendant environ 2 secondes pour
entrer dans l'état de commutation du mode d'alarme. Le voyant
d'éclairage clignote à titre d'indication. Le détecteur passe par défaut en
mode d'alarme avec vibration et buzzer. Appuyez une fois sur le bouton
d'alimentation pour passer en mode d'alarme sonore et appuyez à
nouveau pour passer en mode d'alarme par vibration. Après avoir
sélectionné le mode souhaité, maintenez enfoncé le bouton
d'alimentation pendant environ 2 secondes pour le confirmer, ou
attendez environ 5 secondes pour que le détecteur confirme
automatiquement.
Remarque : Après la prochaine mise sous tension, le détecteur passera
par défaut au mode d'alarme confirmé lors de l'utilisation précédente.
5. Après avoir fini d'utiliser le détecteur, appuyez une fois sur le bouton
d'alimentation pour éteindre le détecteur ; le détecteur vibrera trois fois
et/ou le buzzer émettra trois bips
Note:
Avant chaque utilisation, vérifiez le fonctionnement du détecteur en
détectant un objet métallique connu. N'utilisez pas le détecteur s'il
fonctionne anormalement.
Si le voyant d'éclairage clignote après l'allumage du détecteur (en
mode de commutation sans alarme), la batterie n'est pas assez
chargée et vous devez la remplacer immédiatement ; sinon, le
détecteur pourrait ne pas fonctionner ou détecter le métal
normalement.
Lorsque la batterie est trop faible, le détecteur s'éteint

- 6 -
automatiquement.
Pour économiser la batterie, éteignez le détecteur lorsqu'il n'est pas
utilisé.
AUTOMATIC POWER OFF
Si vous n'avez pas appuyé sur le bouton d'alimentation et que le détecteur
n'a détecté aucun objet métallique pendant environ 5 minutes, le détecteur
commencera à émettre une vibration et/ou un signal sonore toutes les 12
secondes. Et après six invites, le détecteur s'éteindra automatiquement.
Remarque : si un objet métallique est détecté ou si le bouton
d'alimentation est enfoncé, l'invite sera annulée et la minuterie sera
réinitialisée.
DECLARATION
1. Cette fiche d'instructions est sujette à modification sans préavis.
2. Notre société n'assumera aucune autre responsabilité en cas de perte.
3. Le contenu de cette fiche d'instructions ne peut pas être utilisé comme
raison d'utiliser le détecteur pour une application spéciale.
LIST OF ACCESSORIES
Pile tandem carbone 9 V (6F22)*1
Housse suspendue à la taille * 1
Longe télescopique * 1
Instructions*1
ÉLIMINATION DE CET ARTICLE
Cher client,
Si, à un moment donné, vous avez l'intention de vous
débarrasser cet article, alors gardez à l'esprit que bon nombre
de ses composants sont constitués de matériaux précieux, qui
peuvent être recyclé.
AUTOMATIC POWER OFF

- 7 -
Merci de ne pas le jeter à la poubelle poubelle, mais vérifiez auprès de
votre mairie pour installations de recyclage dans votre région.
Adresse : Baoshanqu Shuangchenglu 803long 11hao 1602A-1609shi Shanghai
Importé en Australie : SIHAO PTY LTD . 1 ROKEVA STREETASTWOOD NSW
2122 Australie
Importé aux États-Unis : Sanven Technology Ltd. Bureau 250, 9166 Anaheim
Place, Rancho Cucamonga, CA 91730
REP
EC
SHUNSHUN GmbH
Römeräcker 9 Z2021, 76351
Linkenheim-Hochstetten, Germany
REP
UK
Pooledas Group Ltd
Unit 5 Albert Edward House, The
Pavilions Preston, United Kingdom
Fabriqué en Chine


- 2 -
Technisch Support- und E-Garantiezertifikat
www.vevor.com/support
HANDMETALLDETEKTOR
ANWEISUNGEN
MODELL: TS-102
We continue to be committed to provide you tools with competitive price.
"Save Half", "Half Price" or any other similar expressions used by us only represents an
estimate of savings you might benefit from buying certain tools with us compared to the major
top brands and does not necessarily mean to cover all categories of tools offered by us. You
are kindly reminded to verify carefully when you are placing an order with us if you are
actually saving half in comparison with the top major brands.

- 1 -
MODELL: TS-102
Have product questions? Need technical support? Please feel free to
contact us:
Technical Support and E-Warranty Certificate
www.vevor.com/support
NEED HELP? CONTACT US!
This is the original instruction, please read all manual instructions
carefully before operating. VEVOR reserves a clear interpretation of our
user manual. The appearance of the product shall be subject to the
product you received. Please forgive us that we won't inform you again if
there are any technology or software updates on our product.
Handheld metal detector
Instructions
- 2 -
Warnung: Um das Verletzungsrisiko zu verringern, muss der
Benutzer die Bedienungsanleitung sorgfältig lesen.
Dieses Gerät entspricht Teil 15 der FCC-Bestimmungen. Der
Betrieb unterliegt den folgenden beiden Bedingungen: (1)
Dieses Gerät darf keine schädlichen Störungen verursachen
und (2) dieses Gerät muss alle empfangenen Störungen
akzeptieren, einschließlich Störungen, die einen
unerwünschten Betrieb verursachen können.
Dieses Produkt unterliegt den Bestimmungen der europäischen
Richtlinie 2012/19/EG. Das Symbol einer durchgestrichenen
Mülltonne weist darauf hin, dass das Produkt in der
Europäischen Union einer getrennten Müllsammlung bedarf.
Dies gilt für das Produkt und alle Zubehörteile, die mit diesem
Symbol gekennzeichnet sind. Als solche gekennzeichnete
Produkte dürfen nicht über den normalen Hausmüll entsorgt
werden, sondern müssen an einer Sammelstelle für das
Recycling von Elektro- und Elektronikgeräten abgegeben
werden
FEATURES
Erkennen Sie Metallobjekte in alle Richtungen .
Hochpräzises Identifikationssystem .
Automatische Abschaltung .
Geringer Stromverbrauch .
Stoßfestigkeit .
Kleine Größe, geringes Gewicht .
Wasserdichtes Design, IP-Schutzart IP 68.
SPECIFICATIONS
Empfindlichkeit: 4,0 mm (für eine Dollarmünze)
Alarmmodus:
- 3 -
Modus 1: Alarmmodus mit Vibration und Summerton
Modus 2: Alarmmodus mit Summerton
Modus 3: Vibrationsalarmmodus
Betriebsumgebung :
Temperatur: -20 °C bis 60 °C
Relative Luftfeuchtigkeit: <90 %
Batterie: 9V-Batterie, 6F22 oder gleichwertig, 1 Stück
Abmessungen: 2 50 mm x 4 5 mm x 4 2 mm
Gewicht: ca. 1 80 g (inkl. Batterie)
STRUCTURE
INSTALLING BATTERY
1. Entfernen Sie die Batterieabdeckung, indem Sie sie gegen den
Uhrzeigersinn drehen.
- 4 -
2. Legen Sie eine neue 9-V-Batterie (6F22 oder gleichwertig) in das
Batteriefach ein und achten Sie auf die richtige Polarität der
Anschlüsse (siehe Abbildung 2). Andernfalls kann der
Metalldetektor beschädigt werden.
3. Bringen Sie die Batterieabdeckung wieder an und drehen Sie sie
im Uhrzeigersinn, um sie zu befestigen.
Notiz:
5. Lassen Sie niemals eine leere Batterie im Detektor
6. Wenn Sie den Detektor über einen längeren Zeitraum nicht verwenden,
entfernen Sie die Batterie aus dem Detektor, um Korrosion zu
vermeiden.
OPERATIONINSTRUCTION
1. Halten Sie den Detektor am Griff. Stellen Sie sicher, dass der Detektor
weit von Metallgegenständen entfernt ist, und drücken Sie dann kurz die
Ein-/Aus-Taste, um den Detektor einzuschalten. Die grüne
Betriebsanzeige-LED und die Beleuchtungslampe leuchten auf, und der
Detektor vibriert einmal und/oder der Summer gibt einen Piepton aus,
um anzuzeigen, dass der Detektor eingeschaltet wurde.
2. Der Detektor beginnt automatisch mit der Kalibrierung. Die Kalibrierung
dauert etwa 2 bis 4 Sekunden. Wenn die Kalibrierung abgeschlossen ist,

- 5 -
vibriert der Detektor zweimal kurz und/oder der Summer ertönt zwei
Pieptöne.
Hinweis: Wenn Sie diesen Detektor zur Erkennung von Metallobjekten
verwenden möchten, die in mineralisiertem Boden, Salzwasser oder
nassem Salzsand vergraben sind, müssen Sie die Spitze des
Detektors an mineralisierten Boden, Salzwasser oder nassen
Salzsand halten und den Detektor einschalten, damit er automatisch
funktioniert Kalibrierungdort.
3. Bewegen Sie den Prüfstab sanft über die Oberfläche des zu prüfenden
Objekts. Wenn sich der Detektor einem Metallgegenstand nähert,
beginnt er zu vibrieren und/oder der eingebaute Summer ertönt. Die
Vibration und/oder der Piepton verstärken sich, je näher der Detektor
dem Metall kommt.
4. Nachdem der Detektor eingeschaltet und kalibriert wurde, können Sie
die Ein-/Aus-Taste etwa 2 Sekunden lang gedrückt halten, um in den
Alarmmodus-Umschaltzustand zu gelangen. Das Beleuchtungslicht
blinkt als Anzeige. Der Detektor wechselt standardmäßig mit Vibration
und Summerton in den Alarmmodus. Drücken Sie die Ein-/Aus-Taste
einmal, um in den Summer-Alarmmodus zu wechseln. Drücken Sie sie
erneut, um in den Vibrationsalarmmodus zu wechseln. Nachdem Sie
den gewünschten Modus ausgewählt haben, halten Sie die
Ein-/Aus-Taste etwa 2 Sekunden lang gedrückt, um ihn zu bestätigen,
oder warten Sie etwa 5 Sekunden, bis der Detektor die automatische
Bestätigung durchführt.
Hinweis: Nach dem nächsten Einschalten wechselt der Melder
standardmäßig in den Alarmmodus, der bei der vorherigen
Verwendung bestätigt wurde.
5. Nachdem Sie den Detektor nicht mehr verwendet haben, drücken Sie
einmal die Ein-/Aus-Taste, um den Detektor auszuschalten. Der Melder
vibriert dreimal und/oder der Summer ertönt drei Pieptöne
Notiz:
Überprüfen Sie vor jedem Gebrauch die Funktion des Detektors,
indem Sie ein bekanntes Metallobjekt erkennen. Verwenden Sie den
Detektor nicht, wenn er nicht ordnungsgemäß funktioniert.

- 6 -
Wenn die Beleuchtung nach dem Einschalten des Melders blinkt (im
Nicht-Alarmmodus-Umschaltzustand), ist die Batterie nicht mehr voll
genug und Sie müssen die Batterie sofort ersetzen; Andernfalls
funktioniert der Detektor möglicherweise nicht ordnungsgemäß und
erkennt Metall nicht ordnungsgemäß.
Wenn die Batterie zu schwach ist, schaltet sich der Detektor
automatisch aus.
Um den Akku zu schonen, schalten Sie den Detektor aus, wenn er
nicht verwendet wird.
AUTOMATIC POWER OFF
Wenn Sie den Netzschalter nicht gedrückt haben und der Detektor etwa
fünf Minuten lang kein Metallobjekt erkannt hat, gibt der Detektor alle 12
Sekunden eine Vibration und/oder einen Summerton aus. Nach sechs
Aufforderungen schaltet sich der Detektor automatisch aus.
Hinweis: Wenn ein Metallgegenstand erkannt wird oder der Netzschalter
gedrückt wird, wird die Eingabeaufforderung abgebrochen und der Timer
zurückgesetzt.
DECLARATION
1. Dieses Merkblatt kann ohne vorherige Ankündigung geändert werden.
2. Unser Unternehmen übernimmt keine Haftung für etwaige Verluste.
3. Der Inhalt dieser Gebrauchsanweisung kann nicht als Grund für die
Verwendung des Detektors für eine spezielle Anwendung herangezogen
werden.
LIST OF ACCESSORIES
9V Carbon-Tandembatterie (6F22)*1
Taillen-Hängeabdeckung * 1
Teleskop-Lanyard*1
Anleitung*1
AUTOMATIC POWER OFF

- 7 -
ENTSORGUNG DIESES ARTIKELS
Lieber Kunde,
Wenn Sie irgendwann entsorgen möchten Wenn Sie diesen
Artikel gelesen haben, denken Sie bitte daran aus dem viele
seiner Bestandteile bestehen wertvolle Materialien, die sein
können recycelt.
Bitte entsorgen Sie es nicht im Müll Mülleimer, aber erkundigen
Sie sich bei Ihrer Gemeindeverwaltung Recyclinganlagen in Ihrer Nähe.
Adresse: Baoshanqu Shuangchenglu 803long 11hao 1602A-1609shi Shanghai
Importiert nach AUS: SIHAO PTY LTD . 1 ROKEVA STREETEASTWOOD NSW
2122 Australien
Importiert in die USA: Sanven Technology Ltd. Suite 250, 9166 Anaheim Place,
Rancho Cucamonga, CA 91730
REP
EC
SHUNSHUN GmbH
Römeräcker 9 Z2021, 76351
Linkenheim-Hochstetten, Germany
REP
UK
Pooledas Group Ltd
Unit 5 Albert Edward House, The
Pavilions Preston, United Kingdom
In China hergestellt


- 2 -
Tecnico Supporto e certificato di garanzia elettronica
www.vevor.com/support
RILEVATORE DI METALLI PORTATILE
ISTRUZIONI
MODELLO: TS-102
We continue to be committed to provide you tools with competitive price.
"Save Half", "Half Price" or any other similar expressions used by us only represents an
estimate of savings you might benefit from buying certain tools with us compared to the major
top brands and does not necessarily mean to cover all categories of tools offered by us. You
are kindly reminded to verify carefully when you are placing an order with us if you are
actually saving half in comparison with the top major brands.
- 1 -
MODELLO: TS-102
Have product questions? Need technical support? Please feel free to
contact us:
Technical Support and E-Warranty Certificate
www.vevor.com/support
NEED HELP? CONTACT US!
This is the original instruction, please read all manual instructions
carefully before operating. VEVOR reserves a clear interpretation of our
user manual. The appearance of the product shall be subject to the
product you received. Please forgive us that we won't inform you again if
there are any technology or software updates on our product.
Handheld metal detector
Instructions
- 2 -
Avvertenza: per ridurre il rischio di lesioni, l'utente deve leggere
attentamente il manuale di istruzioni.
Questo dispositivo è conforme alla Parte 15 delle norme FCC.
Il funzionamento è soggetto alle seguenti due condizioni: (1)
Questo dispositivo non può causare interferenze dannose e (2)
questo dispositivo deve accettare qualsiasi interferenza
ricevuta, comprese le interferenze che potrebbero causare un
funzionamento indesiderato.
Questo prodotto è soggetto alle disposizioni della Direttiva
Europea 2012/19/CE. Il simbolo del bidone della spazzatura
barrato indica che nell'Unione Europea il prodotto richiede la
raccolta differenziata dei rifiuti. Ciò vale per il prodotto e tutti gli
accessori contrassegnati da questo simbolo. I prodotti
contrassegnati come tali non possono essere smaltiti con i
normali rifiuti domestici, ma devono essere portati in un punto
di raccolta per il riciclaggio di dispositivi elettrici ed elettronici
FEATURES
Rileva oggetti metallici in tutte le direzioni .
Sistema di identificazione ad alta precisione .
Spegnimento automatico .
Basso consumo energetico .
Resistenza agli urti .
Piccole dimensioni, leggero .
Design impermeabile, grado IP IP 68.
SPECIFICATIONS
Sensibilità: 4,0 mm (per moneta da un dollaro)
Modalità sveglia:
Modalità 1: modalità di allarme con vibrazione e cicalino
Modalità 2: modalità di allarme sonoro del cicalino

- 3 -
Modalità 3: modalità allarme con vibrazione
operativo :
Temperatura: da -20°C a 60°C
Umidità relativa: <90%
Batteria: batteria da 9 V, 6F22 o equivalente, 1 pezzo
Dimensioni: 2,50 mm x 4,5 mm x 4,2 mm
Peso: circa 1,80 g (batteria inclusa)
STRUCTURE
INSTALLING BATTERY
1.Rimuovere il coperchio della batteria ruotandolo in senso
antiorario.
2. Installare una nuova batteria da 9 V (6F22 o equivalente) nel vano
batteria, assicurarsi che la polarità dei collegamenti sia corretta

- 4 -
(vedere Figura 2); in caso contrario il metal detector potrebbe
danneggiarsi.
3. Reinstallare il coperchio della batteria, ruotarlo in senso orario per
fissarlo in posizione.
Nota:
7. Non lasciare mai una batteria scarica nel rilevatore
8. Se non si utilizza il rilevatore per un lungo periodo di tempo, rimuovere
la batteria dal rilevatore per evitare la corrosione.
OPERATIONINSTRUCTION
1. Tenere il rilevatore per la maniglia. Assicurarsi che il rilevatore sia
lontano da qualsiasi oggetto metallico, quindi premere brevemente il
pulsante di accensione per accendere il rilevatore. Il LED verde
indicatore di alimentazione e la lampada di illuminazione si accendono, il
rilevatore vibra una volta e/o il cicalino emette un segnale acustico,
indicando che il rilevatore è stato acceso.
2. Il rilevatore avvia automaticamente la calibrazione. La calibrazione dura
circa 2-4 secondi. Una volta completata la calibrazione, il rilevatore vibra
brevemente due volte e/o il cicalino emette due segnali acustici.
Nota: se si desidera utilizzare questo rilevatore per rilevare oggetti metallici
sepolti in terreno mineralizzato, acqua salata o sabbia salata bagnata,

- 5 -
è necessario tenere la punta del rilevatore su terreno mineralizzato!
Acqua salata o sabbia salata bagnata e accendere il rilevatore per
consentirne l'esecuzione automatica calibrazione lì.
3. Muovere dolcemente la bacchetta di rilevamento lungo la superficie
dell'oggetto da controllare. Quando il rilevatore si avvicina a un oggetto
metallico, inizierà a vibrare e/o suonerà il cicalino incorporato. La
vibrazione e/o il segnale acustico si intensificheranno man mano che il
rilevatore si avvicina al metallo.
4. Dopo che il rilevatore è acceso e calibrato, è possibile tenere premuto il
pulsante di accensione per circa 2 secondi per accedere allo stato di
commutazione della modalità di allarme. La luce di illuminazione
lampeggerà come indicazione. Per impostazione predefinita il rilevatore
entra in modalità di allarme con vibrazione e suono del cicalino. Premere
una volta il pulsante di accensione per passare alla modalità di allarme
sonoro con cicalino e premerlo di nuovo per passare alla modalità di
allarme con vibrazione. Dopo aver selezionato la modalità desiderata,
tenere premuto il pulsante di accensione per circa 2 secondi per
confermarla, oppure attendere circa 5 secondi affinché il rilevatore
confermi automaticamente.
Nota: dopo la successiva accensione, il rilevatore passerà
automaticamente alla modalità di allarme confermata nell'uso
precedente.
5. Dopo aver finito di utilizzare il rilevatore, premere una volta il pulsante di
accensione per spegnere il rilevatore; il rilevatore vibrerà tre volte e/o il
cicalino emetterà tre segnali acustici
Nota:
Prima di ogni utilizzo, verificare il funzionamento del rilevatore
rilevando un oggetto metallico noto. Non utilizzare il rilevatore se
funziona in modo anomalo.
Se la luce di illuminazione lampeggia dopo l'accensione del rilevatore
(nello stato di non commutazione della modalità di allarme), la batteria
non è sufficientemente carica ed è necessario sostituire
immediatamente la batteria; altrimenti il rilevatore potrebbe non
funzionare o rilevare il metallo normalmente.

- 6 -
Quando la batteria è troppo scarica, il rilevatore si spegnerà
automaticamente.
Per risparmiare la carica della batteria, spegnere il rilevatore quando
non è in uso.
AUTOMATIC POWER OFF
Se non è stato premuto il pulsante di accensione e il rilevatore non ha
rilevato alcun oggetto metallico per circa 5 minuti, il rilevatore inizierà a
avvisare con vibrazione e/o suono acustico ogni 12 secondi. E dopo sei
avvisi, il rilevatore si spegnerà automaticamente.
Nota: se viene rilevato un oggetto metallico o viene premuto il pulsante di
accensione, il messaggio verrà annullato e il timer verrà ripristinato.
DECLARATION
1. Questo foglio di istruzioni è soggetto a modifiche senza preavviso.
2. La nostra azienda non si assumerà altre responsabilità per eventuali
perdite.
3. Il contenuto di questo foglio di istruzioni non può essere utilizzato come
motivo per utilizzare il rilevatore per qualsiasi applicazione speciale.
LIST OF ACCESSORIES
Batteria tandem al carbonio da 9 V (6F22)*1
Copertura per appendere la vita * 1
Cordino telescopico*1
Istruzioni*1
SMALTIMENTO DEL PRESENTE ARTICOLO
Gentile Cliente,
Se ad un certo punto intendi smaltire questo articolo, quindi
tienilo a mente di cui sono costituiti molti dei suoi componenti
materiali preziosi, che possono essere riciclato.
AUTOMATIC POWER OFF

- 7 -
Si prega di non gettarlo nella spazzatura bidone, ma verifica con il tuo
comune impianti di riciclaggio nella tua zona.
Indirizzo: Baoshanqu Shuangchenglu 803long 11hao 1602A-1609shi Shanghai
Importato in AUS: SIHAO PTY LTD . 1 ROKEVA STREETEASTWOOD NSW
2122 Australia
Importato negli Stati Uniti: Sanven Technology Ltd. Suite 250, 9166 Anaheim
Place, Rancho Cucamonga, CA 91730
REP
EC
SHUNSHUN GmbH
Römeräcker 9 Z2021, 76351
Linkenheim-Hochstetten, Germany
REP
UK
Pooledas Group Ltd
Unit 5 Albert Edward House, The
Pavilions Preston, United Kingdom
Made in China


- 2 -
Técnico Certificado de soporte y garantía electrónica
www.vevor.com/support
DETECTOR DE METALES DE MANO
INSTRUCCIONES
MODELO: TS-102
We continue to be committed to provide you tools with competitive price.
"Save Half", "Half Price" or any other similar expressions used by us only represents an
estimate of savings you might benefit from buying certain tools with us compared to the major
top brands and does not necessarily mean to cover all categories of tools offered by us. You
are kindly reminded to verify carefully when you are placing an order with us if you are
actually saving half in comparison with the top major brands.

- 1 -
MODELO: TS-102
Have product questions? Need technical support? Please feel free to
contact us:
Technical Support and E-Warranty Certificate
www.vevor.com/support
NEED HELP? CONTACT US!
This is the original instruction, please read all manual instructions
carefully before operating. VEVOR reserves a clear interpretation of our
user manual. The appearance of the product shall be subject to the
product you received. Please forgive us that we won't inform you again if
there are any technology or software updates on our product.
Handheld metal detector
Instructions

- 2 -
Advertencia: para reducir el riesgo de lesiones, el usuario debe
leer atentamente el manual de instrucciones.
Este dispositivo cumple con la Parte 15 de las normas de la
FCC. El funcionamiento está sujeto a las dos condiciones
siguientes: (1) Este dispositivo no puede causar interferencias
dañinas y (2) este dispositivo debe aceptar cualquier
interferencia recibida, incluidas las interferencias que puedan
causar un funcionamiento no deseado.
Este producto está sujeto a las disposiciones de la Directiva
Europea 2012/19/CE. El símbolo que muestra un contenedor
con ruedas tachado indica que el producto requiere recogida
selectiva de basura en la Unión Europea. Esto se aplica al
producto y a todos los accesorios marcados con este símbolo.
Los productos marcados como tales no podrán desecharse
con la basura doméstica normal, sino que deberán llevarse a
un punto de recogida para el reciclaje de aparatos eléctricos y
electrónicos.
FEATURES
Detecta objetos metálicos en todas las direcciones .
Sistema de identificación de alta precisión .
Apagado automático .
Bajo consumo de energía .
Resistencia a los golpes .
Tamaño pequeño, peso ligero .
Diseño resistente al agua, grado IP de IP 68.
SPECIFICATIONS
Sensibilidad: 4 0 mm (para moneda de un dólar)
Modo de alarma:
Modo 1: modo de alarma con vibración y zumbador

- 3 -
Modo 2: modo de alarma con sonido de zumbador
Modo 3: modo de alarma por vibración
operativo :
Temperatura: -20C a 60C
Humedad relativa: <90%
Batería: batería de 9 V, 6F22 o equivalente, 1 pieza
Dimensiones: 2 50 mm x 4 5 mm x 4 2 mm
Peso: alrededor de 180 g (incluida la batería)
STRUCTURE
INSTALLING BATTERY
1.Retire la tapa de la batería girándola en sentido antihorario.
2. Instale una batería nueva de 9 V (6F22 o equivalente) en el
compartimiento de la batería, asegúrese de que las conexiones

- 4 -
de polaridad sean correctas (consulte la Figura 2); De lo contrario,
el detector de metales podría dañarse.
3. Vuelva a instalar la tapa de la batería, gírela en el sentido de las
agujas del reloj para asegurarla en su lugar.
Nota:
9. Nunca deje una batería agotada en el detector
10. Si no utiliza el detector durante un largo período de tiempo, retire la
batería del detector para evitar la corrosión.
OPERATIONINSTRUCTION
1. Sostenga el detector por el mango. Asegúrese de que el detector esté
lejos de cualquier objeto metálico y luego presione brevemente el botón
de encendido para encender el detector. El LED indicador de
alimentación verde y la lámpara de iluminación se encienden, el detector
vibra una vez y/o el zumbador emite un pitido, lo que indica que el
detector se ha encendido.
2. El detector inicia la calibración automáticamente. La calibración tarda
entre 2 y 4 segundos. Cuando se completa la calibración, el detector
vibra brevemente dos veces y/o el zumbador emite dos pitidos.
Nota: Si desea utilizar este detector para detectar objetos metálicos
enterrados en suelo mineralizado, agua salada o arena salada

- 5 -
húmeda, debe sostener la punta del detector en suelo mineralizado.
Agua salada o arena salada húmeda y encender el detector para que
funcione automáticamente. calibración allí.
3. Mueva la varilla detectora suavemente a lo largo de la superficie del
objeto a comprobar. A medida que el detector se acerca a un objeto
metálico, comenzará a vibrar y/o sonará el timbre incorporado. La
vibración y/o el pitido se intensificarán a medida que el detector se
acerque al metal.
4. Después de encender y calibrar el detector, puede presionar y mantener
presionado el botón de encendido durante aproximadamente 2
segundos para ingresar al estado de cambio de modo de alarma. La luz
de iluminación parpadeará como indicación. El detector ingresa de
manera predeterminada al modo de alarma con vibración y sonido de
zumbador. Presione el botón de encendido una vez para cambiar al
modo de alarma con sonido de timbre y presiónelo nuevamente para
cambiar al modo de alarma por vibración. Después de seleccionar el
modo deseado, presione y mantenga presionado el botón de encendido
durante aproximadamente 2 segundos para confirmarlo, o espere
aproximadamente 5 segundos para que el detector lo confirme
automáticamente.
Nota: Después del siguiente encendido, el detector pasará de forma
predeterminada al modo de alarma confirmado en el uso anterior.
5. Después de terminar de usar el detector, presione el botón de
encendido una vez para apagar el detector; el detector vibrará tres
veces y/o el timbre sonará tres pitidos
Nota:
Antes de cada uso, verifique el funcionamiento del detector
detectando un objeto metálico conocido. No utilice el detector si
funciona de manera anormal.
Si la luz de iluminación parpadea después de encender el detector (en
estado de cambio de modo sin alarma), la batería no tiene suficiente
carga y debe reemplazarla inmediatamente; De lo contrario, es
posible que el detector no funcione o no detecte metales
normalmente.

- 6 -
Cuando la batería esté demasiado baja, el detector se apagará
automáticamente.
Para ahorrar carga de la batería, apague el detector cuando no esté
en uso.
AUTOMATIC POWER OFF
Si no ha presionado el botón de encendido y el detector no ha detectado
ningún objeto metálico durante aproximadamente 5 minutos, el detector
comenzará a avisar con una vibración y/o un timbre cada 12 segundos. Y
después de seis indicaciones, el detector se apagará automáticamente.
Nota: Si se detecta algún objeto metálico o se presiona el botón de
encendido, el mensaje se cancelará y el temporizador se reiniciará.
DECLARATION
1. Esta Hoja de Instrucciones está sujeta a cambios sin previo aviso.
2. Nuestra empresa no asumirá otras responsabilidades por ninguna
pérdida.
3. El contenido de esta hoja de instrucciones no puede utilizarse como
motivo para utilizar el detector en ninguna aplicación especial.
LIST OF ACCESSORIES
Batería tándem de carbono de 9 V (6F22)*1
1 funda para colgar en la cintura.
Cordón telescópico*1
Instrucciones*1
ELIMINACIÓN DE ESTE ARTÍCULO
Estimado cliente,
Si en algún momento tiene la intención de deshacerse de este
artículo, entonces por favor tenga en cuenta que muchos de
sus componentes constan de materiales valiosos, que pueden
AUTOMATIC POWER OFF

- 7 -
ser reciclado.
Por favor no lo arrojes a la basura. contenedor, pero consulte con su
ayuntamiento para instalaciones de reciclaje en su área.
Dirección: Baoshanqu Shuangchenglu 803long 11hao 1602A-1609shi Shanghai
Importado a AUS: SIHAO PTY LTD . 1 ROKEVA STREETASTWOOD NSW 2122
Australia
Importado a EE. UU.: Sanven Technology Ltd. Suite 250, 9166 Anaheim Place,
Rancho Cucamonga, CA 91730
REP
EC
SHUNSHUN GmbH
Römeräcker 9 Z2021, 76351
Linkenheim-Hochstetten, Germany
REP
UK
Pooledas Group Ltd
Unit 5 Albert Edward House, The
Pavilions Preston, United Kingdom
Hecho en china


- 2 -
Techniczny Certyfikat wsparcia i e-gwarancji
www.vevor.com/support
RĘCZNY WYKRYWACZ METALI
INSTRUKCJE
MODEL: TS-102
We continue to be committed to provide you tools with competitive price.
"Save Half", "Half Price" or any other similar expressions used by us only represents an
estimate of savings you might benefit from buying certain tools with us compared to the major
top brands and does not necessarily mean to cover all categories of tools offered by us. You
are kindly reminded to verify carefully when you are placing an order with us if you are
actually saving half in comparison with the top major brands.

- 1 -
MODEL: TS-102
Have product questions? Need technical support? Please feel free to
contact us:
Technical Support and E-Warranty Certificate
www.vevor.com/support
NEED HELP? CONTACT US!
This is the original instruction, please read all manual instructions
carefully before operating. VEVOR reserves a clear interpretation of our
user manual. The appearance of the product shall be subject to the
product you received. Please forgive us that we won't inform you again if
there are any technology or software updates on our product.
Handheld metal detector
Instructions

- 2 -
Ostrzeżenie — aby zmniejszyć ryzyko obrażeń, użytkownik
musi uważnie przeczytać instrukcję obsługi.
To urządzenie jest zgodne z częścią 15 przepisów FCC.
Działanie podlega następującym dwóm warunkom: (1) to
urządzenie nie może powodować szkodliwych zakłóceń oraz
(2) to urządzenie musi akceptować wszelkie odbierane
zakłócenia, w tym zakłócenia, które mogą powodować
niepożądane działanie.
Ten produkt podlega przepisom Dyrektywy Europejskiej
2012/19/EC. Symbol przekreślonego kosza na śmieci oznacza,
że produkt wymaga selektywnej zbiórki śmieci na terenie Unii
Europejskiej. Dotyczy to produktu i wszystkich akcesoriów
oznaczonych tym symbolem. Produktów oznaczonych jako
takie nie można wyrzucać razem ze zwykłymi odpadami
domowymi, lecz należy je oddać do punktu zbiórki w celu
recyklingu urządzeń elektrycznych i elektronicznych
FEATURES
Wykrywaj metalowe obiekty we wszystkich kierunkach .
System identyfikacji o wysokiej precyzji .
Automatyczne wyłączanie .
Niskie zużycie energii .
Odporność na wstrząsy .
Mały rozmiar, niewielka waga .
Wodoodporna konstrukcja, stopień IP IP 68.
SPECIFICATIONS
Czułość: 4 0 mm (dla monety jednodolarowej)
Tryb alarmowy:
Tryb 1: tryb alarmu wibracyjnego i dźwiękowego
Tryb 2: Tryb alarmu dźwiękowego
- 3 -
Tryb 3: Tryb alarmu wibracyjnego
operacyjne :
Temperatura: -20°C do 60°C
Wilgotność względna: <90%
Bateria: bateria 9V, 6F22 lub odpowiednik, 1 sztuka
Wymiary: 2 50 mm x 4 5 mm x 4 2 mm
Waga: około 180 g (z baterią)
STRUCTURE
INSTALLING BATTERY
1. Zdejmij pokrywę baterii, obracając ją w kierunku przeciwnym do
ruchu wskazówek zegara.
2. Zainstaluj nową baterię 9V (6F22 lub odpowiednik) w komorze
baterii, upewnij się, że polaryzacja jest prawidłowa (patrz Rysunek
- 4 -
2); w przeciwnym razie wykrywacz metali może zostać
uszkodzony.
3. Załóż ponownie pokrywę baterii i obróć ją w kierunku zgodnym z
ruchem wskazówek zegara, aby ją zamocować.
Notatka:
11. Nigdy nie zostawiaj wyczerpanej baterii w czujce
12. Jeśli nie będziesz używać wykrywacza przez dłuższy czas, wyjmij
baterię z czujnika, aby uniknąć korozji.
OPERATIONINSTRUCTION
1. Trzymaj czujnik za uchwyt. Upewnij się, że wykrywacz znajduje się z
dala od metalowych przedmiotów, a następnie naciśnij krótko przycisk
zasilania, aby włączyć wykrywacz. Zaświeci się zielona dioda LED
wskaźnika zasilania i lampka podświetlająca, a czujka wibruje raz i/lub
brzęczyk emituje sygnał dźwiękowy, wskazując, że czujka została
włączona.
2.Czujnik automatycznie rozpoczyna kalibrację. Kalibracja trwa około 2 do
4 sekund. Po zakończeniu kalibracji czujnik dwukrotnie wibruje krótko
i/lub słychać dwa sygnały dźwiękowe.
Uwaga: jeśli chcesz używać tego detektora do wykrywania metalowych
obiektów zakopanych w zmineralizowanej glebie, słonej wodzie lub

- 5 -
mokrym solnym piasku, musisz przyłożyć końcówkę detektora do
zmineralizowanej gleby! słonej wody lub mokrego słonego piasku i
włączyć detektor, aby umożliwić mu automatyczne działanie kalibracja
tam.
3. Płynnie przesuwaj różdżkę wykrywającą po powierzchni sprawdzanego
obiektu. Gdy detektor zbliży się do metalowego przedmiotu, zacznie
wibrować i/lub zabrzmi wbudowany brzęczyk. Wibracje i/lub sygnał
dźwiękowy będą się nasilać w miarę zbliżania się wykrywacza do
metalu.
4. Po włączeniu i skalibrowaniu czujki możesz nacisnąć i przytrzymać
przycisk zasilania przez około 2 sekundy, aby wejść w stan przełączania
trybu alarmu. Podświetlenie będzie migać jako wskazówka. Czujka
domyślnie wchodzi w tryb alarmu z wibracją i dźwiękiem brzęczyka.
Naciśnij raz przycisk zasilania, aby włączyć tryb alarmu dźwiękowego.
Naciśnij go ponownie, aby przejść do trybu alarmu wibracyjnego. Po
wybraniu żądanego trybu należy wcisnąć i przytrzymać przycisk
zasilania przez około 2 sekundy w celu potwierdzenia lub odczekać
około 5 sekund aż detektor automatycznie to potwierdzi.
Uwaga: Po kolejnym włączeniu czujka przejdzie domyślnie w tryb
alarmowy potwierdzony w poprzednim użyciu.
5. Po zakończeniu korzystania z czujki należy jednokrotnie nacisnąć
przycisk zasilania, aby wyłączyć czujkę; czujnik wibruje trzykrotnie i/lub
brzęczyk wyda trzy sygnały dźwiękowe
Notatka:
Przed każdym użyciem sprawdź działanie wykrywacza wykrywając
znany metalowy przedmiot. Nie używaj wykrywacza jeśli działa
nieprawidłowo.
Jeśli lampka podświetlająca miga po włączeniu czujki (w stanie
przełączania trybu bez alarmu), bateria nie jest wystarczająco
naładowana i należy ją natychmiast wymienić; w przeciwnym razie
detektor może nie działać lub normalnie wykrywać metal.
Gdy poziom naładowania baterii będzie zbyt niski, detektor wyłączy
się automatycznie.
Aby oszczędzać baterię, wyłączaj detektor, gdy nie jest używany.

- 6 -
AUTOMATIC POWER OFF
Jeśli nie naciśniesz przycisku zasilania, a detektor nie wykryje żadnego
metalowego przedmiotu przez około 5 minut, detektor zacznie
sygnalizować wibracją i/lub dźwiękiem brzęczyka co 12 sekund. Po
sześciu monitach detektor wyłączy się automatycznie.
Uwaga: W przypadku wykrycia metalowego przedmiotu lub naciśnięcia
przycisku zasilania monit zostanie anulowany, a licznik czasu zostanie
zresetowany.
DECLARATION
1. Niniejsza Karta instrukcji może ulec zmianie bez powiadomienia.
2. Nasza firma nie będzie ponosiła żadnej innej odpowiedzialności za
jakiekolwiek straty.
3. Treść niniejszej Instrukcji nie może być podstawą do wykorzystania
detektora do jakichkolwiek zastosowań specjalnych.
LIST OF ACCESSORIES
Bateria tandemowa 9 V z włókna węglowego (6F22)*1
Pokrowiec na talię*1
Smycz teleskopowa*1
Instrukcje*1
USUWANIE TEGO ARTYKUŁU
Szanowny Kliencie,
Jeśli w pewnym momencie zamierzasz się pozbyć ten artykuł,
to pamiętaj o tym z których składa się wiele jego elementów
cenne materiały, które mogą być poddane recyklingowi.
Proszę nie wyrzucać go do śmieci bin, ale skontaktuj się z
władzami lokalnymi w sprawie zakładów recyklingu w Twojej
okolicy.
AUTOMATIC POWER OFF

- 7 -
Adres: Baoshanqu Shuangchenglu 803long 11hao 1602A-1609shi Szanghaj
Import do AUS: SIHAO PTY LTD . 1 ROKEVA STREETEASTWOOD NSW 2122
Australia
Import do USA: Sanven Technology Ltd. Apartament 250, 9166 Anaheim Place,
Rancho Cucamonga, Kalifornia 91730
REP
EC
SHUNSHUN GmbH
Römeräcker 9 Z2021, 76351
Linkenheim-Hochstetten, Germany
REP
UK
Pooledas Group Ltd
Unit 5 Albert Edward House, The
Pavilions Preston, United Kingdom
Wyprodukowano w Chinach


- 2 -
Technisch Ondersteuning en e-garantiecertificaat
www.vevor.com/support
HANDMETAALDETECTOR
INSTRUCTIES
MODEL: TS-102
We continue to be committed to provide you tools with competitive price.
"Save Half", "Half Price" or any other similar expressions used by us only represents an
estimate of savings you might benefit from buying certain tools with us compared to the major
top brands and does not necessarily mean to cover all categories of tools offered by us. You
are kindly reminded to verify carefully when you are placing an order with us if you are
actually saving half in comparison with the top major brands.

- 1 -
MODEL: TS-102
Have product questions? Need technical support? Please feel free to
contact us:
Technical Support and E-Warranty Certificate
www.vevor.com/support
NEED HELP? CONTACT US!
This is the original instruction, please read all manual instructions
carefully before operating. VEVOR reserves a clear interpretation of our
user manual. The appearance of the product shall be subject to the
product you received. Please forgive us that we won't inform you again if
there are any technology or software updates on our product.
Handheld metal detector
Instructions
- 2 -
Waarschuwing-Om het risico op letsel te verminderen, moet de
gebruiker de handleiding zorgvuldig lezen.
Dit apparaat voldoet aan Deel 15 van de FCC-regels. Het
gebruik is onderworpen aan de volgende twee voorwaarden:
(1) Dit apparaat mag geen schadelijke interferentie
veroorzaken, en (2) dit apparaat moet alle ontvangen
interferentie accepteren, inclusief interferentie die een
ongewenste werking kan veroorzaken.
Dit product valt onder de bepalingen van de Europese richtlijn
2012/19/EG. Het symbool met een doorgestreepte
afvalcontainer geeft aan dat het product in de Europese Unie
een aparte afvalinzameling vereist. Dit geldt voor het product
en alle accessoires die met dit symbool zijn gemarkeerd.
Producten die als zodanig gemarkeerd zijn, mogen niet met het
normale huisvuil worden weggegooid, maar moeten naar een
inzamelpunt voor recycling van elektrische en elektronische
apparaten worden gebracht
FEATURES
Detecteer metalen voorwerpen in alle richtingen .
Zeer nauwkeurig identificatiesysteem .
Automatische uitschakeling .
Laag stroomverbruik .
Schokbestendigheid .
Klein formaat, licht van gewicht .
Waterdicht ontwerp, IP-graad van IP 68.
SPECIFICATIONS
Gevoeligheid: 4,0 mm (voor muntstuk van één dollar)
Alarmmodus:
Modus 1: Trillings- en zoemergeluidsalarmmodus

- 3 -
Modus 2: Zoemer klinkt alarmmodus
Modus 3: Trilalarmmodus
Bedrijfsomgeving :
Temperatuur: -20C tot 60C
Relatieve vochtigheid: <90%
Batterij: 9V batterij, 6F22 of gelijkwaardig, 1 stuk
Afmetingen: 2 50 mm x 4 5 mm x 4 2 mm
Gewicht: ongeveer 1 80 g (inclusief batterij)
STRUCTURE
INSTALLING BATTERY
1.Verwijder het batterijdeksel door het tegen de klok in te draaien.
2. Installeer een nieuwe 9V-batterij (6F22 of gelijkwaardig) in het
batterijcompartiment, zorg ervoor dat de polariteitsaansluitingen

- 4 -
correct zijn (zie Figuur 2); anders kan de metaaldetector
beschadigd raken.
3. Plaats het batterijdeksel terug en draai het met de klok mee om
het op zijn plaats te bevestigen.
Opmerking:
13. Laat nooit een lege batterij in de detector zitten
14. Als u de detector langere tijd niet gebruikt, verwijder dan de batterij uit
de detector om corrosie te voorkomen.
OPERATIONINSTRUCTION
1. Houd de detector vast bij het handvat. Zorg ervoor dat de detector ver
verwijderd is van metalen voorwerpen en druk vervolgens kort op de
aan/uit-knop om de detector in te schakelen. De groene
voedingsindicator-LED en het verlichtingslampje lichten op, de detector
trilt één keer en/of de zoemer laat een piep horen, wat aangeeft dat de
detector is ingeschakeld.
2. De detector start automatisch met kalibreren. De kalibratie duurt
ongeveer 2 tot 4 seconden. Wanneer de kalibratie is voltooid, trilt de
detector twee keer kort en/of laat de zoemer twee pieptonen horen.
Opmerking: als u deze detector wilt gebruiken om metalen voorwerpen te
detecteren die zijn begraven in gemineraliseerde grond, zout water of

- 5 -
nat zout zand, moet u de punt van de detector tegen gemineraliseerde
grond houden! Zout water of nat zout zand en de detector inschakelen
om deze automatisch te laten werken kalibratie daar.
3. Beweeg de detectiestaaf soepel langs het oppervlak van het te
controleren object. Wanneer de detector in de buurt van een metalen
voorwerp komt, begint deze te trillen en/of klinkt de ingebouwde
zoemer. De trilling en/of het piepgeluid worden sterker naarmate de
detector dichter bij het metaal komt.
4. Nadat de detector is ingeschakeld en gekalibreerd, kunt u de
aan/uit-knop ongeveer 2 seconden ingedrukt houden om naar de
alarmmodus-schakelstatus te gaan. Het verlichtingslampje knippert ter
indicatie. De detector gaat standaard naar de alarmmodus met trilling en
zoemer. Druk één keer op de aan/uit-knop om over te schakelen naar de
zoemeralarmmodus. Druk er nogmaals op om over te schakelen naar de
trilalarmmodus. Nadat u de gewenste modus hebt geselecteerd, houdt u
de aan/uit-knop ongeveer 2 seconden ingedrukt om deze te bevestigen,
of wacht u ongeveer 5 seconden totdat de detector automatisch
bevestigt.
Opmerking: Na de volgende keer opstarten zal de detector standaard naar
de alarmmodus gaan die bij het vorige gebruik is bevestigd.
5. Nadat u klaar bent met het gebruik van de detector, drukt u eenmaal op
de aan/uit-knop om de detector uit te schakelen; de detector trilt drie
keer en/of de zoemer laat drie pieptonen horen
Opmerking:
Controleer vóór elk gebruik de werking van de detector door een
bekend metalen voorwerp te detecteren. Gebruik de detector niet als
deze abnormaal werkt.
Als het verlichtingslampje knippert nadat de detector is ingeschakeld
(in de niet-alarmmodus-schakelstatus), is de batterij niet voldoende
opgeladen en moet u de batterij onmiddellijk vervangen; Anders werkt
de detector mogelijk niet normaal of detecteert hij metaal niet normaal.
Wanneer de batterij te laag is, schakelt de detector automatisch uit.
Om de batterij te sparen, schakelt u de detector uit wanneer deze niet
in gebruik is.

- 6 -
AUTOMATIC POWER OFF
Als u de aan/uit-knop niet hebt ingedrukt en de detector gedurende
ongeveer 5 minuten geen metalen voorwerp heeft gedetecteerd, zal de
detector elke 12 seconden een trillings- en/of zoemergeluid geven. En na
zes meldingen wordt de detector automatisch uitgeschakeld.
Opmerking: Als er een metalen voorwerp wordt gedetecteerd of als de
aan/uit-knop wordt ingedrukt, wordt de melding geannuleerd en wordt de
timer gereset.
DECLARATION
1. Dit instructieblad kan zonder voorafgaande kennisgeving worden
gewijzigd.
2. Ons bedrijf zal de andere verantwoordelijkheden voor enig verlies niet
op zich nemen.
3. De inhoud van dit instructieblad kan niet worden gebruikt als reden om
de detector voor een speciale toepassing te gebruiken.
LIST OF ACCESSORIES
9V koolstoftandembatterij (6F22)*1
Tailleophanghoes*1
Telescopisch koord*1
Instructies*1
VERWIJDERING VAN DIT ARTIKEL
Beste klant,
Als u op een gegeven moment van plan bent om er afstand van
te doen dit artikel, houd er dan rekening mee waaruit veel van
de componenten bestaan waardevolle materialen, wat kan zijn
gerecycled.
Gooi het alstublieft niet bij het huisvuil prullenbak, maar vraag
AUTOMATIC POWER OFF

- 7 -
dit na bij uw gemeente recyclingfaciliteiten bij u in de buurt.
Adres: Baoshanqu Shuangchenglu 803long 11hao 1602A-1609shi Shanghai
Geïmporteerd naar AUS: SIHAO PTY LTD . 1 ROKEVA STREETEASTWOOD
NSW 2122 Australië
Geïmporteerd naar de VS: Sanven Technology Ltd. Suite 250, 9166 Anaheim
Place, Rancho Cucamonga, CA 91730
REP
EC
SHUNSHUN GmbH
Römeräcker 9 Z2021, 76351
Linkenheim-Hochstetten, Germany
REP
UK
Pooledas Group Ltd
Unit 5 Albert Edward House, The
Pavilions Preston, United Kingdom
Gemaakt in China


- 2 -
Teknisk Support och e-garanticertifikat
www.vevor.com/support
HANDHÅLLEN METALLDETEKTOR
INSTRUKTIONER
MODELL: TS-102
We continue to be committed to provide you tools with competitive price.
"Save Half", "Half Price" or any other similar expressions used by us only represents an
estimate of savings you might benefit from buying certain tools with us compared to the major
top brands and does not necessarily mean to cover all categories of tools offered by us. You
are kindly reminded to verify carefully when you are placing an order with us if you are
actually saving half in comparison with the top major brands.

- 1 -
MODELL: TS-102
Have product questions? Need technical support? Please feel free to
contact us:
Technical Support and E-Warranty Certificate
www.vevor.com/support
NEED HELP? CONTACT US!
This is the original instruction, please read all manual instructions
carefully before operating. VEVOR reserves a clear interpretation of our
user manual. The appearance of the product shall be subject to the
product you received. Please forgive us that we won't inform you again if
there are any technology or software updates on our product.
Handheld metal detector
Instructions

- 2 -
Varning - För att minska risken för skada måste användaren
läsa instruktionerna noggrant.
Denna enhet uppfyller del 15 av FCC-reglerna. Användningen
är föremål för följande två villkor: (1) Den här enheten får inte
orsaka skadliga störningar och (2) den här enheten måste
acceptera alla mottagna störningar, inklusive störningar som
kan orsaka oönskad funktion.
Denna produkt omfattas av bestämmelserna i det europeiska
direktivet 2012/19/EC. Symbolen som visar en soptunna
korsad anger att produkten kräver separat sophämtning i EU.
Detta gäller för produkten och alla tillbehör märkta med denna
symbol. Produkter märkta som sådana får inte slängas
tillsammans med vanligt hushållsavfall, utan måste lämnas till
en insamlingsplats för återvinning av elektriska och
elektroniska apparater
FEATURES
Upptäck metallföremål i alla riktningar .
Identifieringssystem med hög precision .
Automatisk avstängning .
Låg strömförbrukning .
Stötmotstånd .
Liten storlek, lätt vikt .
Vattentät design, IP-grad IP 68.
SPECIFICATIONS
Känslighet: 4 0 mm (för ett dollarmynt)
Larmläge:
Läge 1: Vibrations- och summerljud larmläge
Läge 2: Larmläge för summerljud
Läge 3: Vibrationslarmläge

- 3 -
Driftmiljö :
Temperatur: -20C till 60C
Relativ luftfuktighet: <90 %
Batteri: 9V batteri, 6F22 eller motsvarande, 1 st
Mått: 2 50 mm x 4 5 mm x 4 2 mm
Vikt: Cirka 1 80 g (inklusive batteri)
STRUCTURE
INSTALLING BATTERY
1. Ta bort batteriluckan genom att vrida den moturs.
2. Installera ett nytt 9V-batteri (6F22 eller motsvarande) i
batterifacket, se till att polaritetsanslutningarna är korrekta (se
figur 2); annars kan metalldetektorn skadas.
3. Sätt tillbaka batteriluckan, vrid den medurs för att säkra den på
- 4 -
plats.
Notera:
15. Lämna aldrig ett urladdat batteri i detektorn
16. Om du inte använder detektorn under en längre tid, ta bort batteriet
från detektorn för att undvika korrosion.
OPERATIONINSTRUCTION
1. Håll detektorn i handtaget. Se till att detektorn är långt borta från
metallföremål och tryck sedan kort på strömbrytaren för att slå på
detektorn. Den gröna strömindikatorn LED och belysningslampan tänds,
och detektorn vibrerar en gång och/eller summern avger ett pip, vilket
indikerar att detektorn har slagits på.
2 .Detektorn startar kalibreringen automatiskt. Kalibreringen tar cirka 2 till 4
sekunder. När kalibreringen är klar vibrerar detektorn kort två gånger
och/eller summern avger två pip.
Obs: Om du vill använda den här detektorn för att upptäcka metallföremål
begravda i mineraliserad jord, saltvatten eller våt saltsand, måste du
hålla spetsen på detektorn mot mineraliserad jord! saltvatten eller våt
saltsand och slå på detektorn för att låta den fungera automatiskt
kalibrering där.
3. Flytta detekteringsstaven mjukt längs ytan på föremålet som ska

- 5 -
kontrolleras. När detektorn kommer nära ett metallföremål kommer den
att börja vibrera och/eller den inbyggda summern ljuder. Vibrationerna
och/eller pipljudet kommer att intensifieras när detektorn kommer
närmare metallen.
4. Efter att detektorn har slagits på och kalibrerats kan du trycka på och
hålla ned strömknappen i cirka 2 sekunder för att gå in i
larmlägesväxlingsläget. Belysningslampan blinkar som en indikation.
Detektorn går in i larmläge som standard med vibration och summer.
Tryck på strömknappen en gång för att växla till larmläget för
summerljudet och tryck på den igen för att växla till vibrationslarmläget.
När du har valt önskat läge, tryck och håll in strömknappen i cirka 2
sekunder för att bekräfta det, eller vänta i cirka 5 sekunder för att
detektorn ska bekräfta automatiskt.
Obs: Efter nästa uppstart kommer detektorn att gå över till det larmläge
som bekräftades vid föregående användning.
5. Efter avslutad användning av detektorn, tryck på strömknappen en gång
för att stänga av detektorn; detektorn kommer att vibrera tre gånger
och/eller summern kommer att ljuda tre pip
Notera:
Före varje användning, verifiera detektorns funktion genom att
detektera ett känt metallföremål. Använd inte detektorn om den
fungerar onormalt.
Om belysningslampan blinkar efter att detektorn har slagits på (i
tillstånd som inte byter larmläge) är batteriet inte tillräckligt högt och du
måste byta ut batteriet omedelbart; annars kanske detektorn inte
fungerar eller detekterar metall normalt.
När batteriet är för lågt stängs detektorn av automatiskt.
För att spara batteriladdning, stäng av detektorn när den inte används.
AUTOMATIC POWER OFF
Om du inte har tryckt på strömbrytaren och detektorn inte har upptäckt
något metallföremål på cirka 5 minuter, kommer detektorn att börja avge
vibrationer och/eller summer var 12:e sekund. Och efter sex uppmaningar

- 6 -
stängs detektorn av automatiskt.
Obs: Om något metallföremål upptäcks eller strömknappen trycks in,
avbryts uppmaningen och timern återställs.
DECLARATION
1. Detta instruktionsblad kan ändras utan föregående meddelande.
2. Vårt företag tar inte det övriga ansvaret för någon förlust.
3. Innehållet i detta instruktionsblad kan inte användas som anledning att
använda detektorn för någon speciell applikation.
LIST OF ACCESSORIES
9V kol tandem batteri (6F22)*1
Midjeupphängning*1
Teleskoplina*1
Instruktioner*1
AVFALLSHANTERING AV DENNA ARTIKEL
Kära kund,
Om du någon gång tänker göra dig av med den här artikeln,
tänk då på som många av dess komponenter består av
värdefulla material, vilket kan vara återvunnet.
Vänligen töm inte ut det i soporna soptunna, men kolla med ditt
lokala råd för återvinningsanläggningar i ditt område.
Adress: Baoshanqu Shuangchenglu 803long 11hao 1602A-1609shi Shanghai
Importerad till AUS: SIHAO PTY LTD . 1 ROKEVA STREETEASTWOOD NSW
2122 Australien
till USA: Sanven Technology Ltd. Suite 250, 9166 Anaheim Place, Rancho
Cucamonga, CA 91730

- 7 -
REP
EC
SHUNSHUN GmbH
Römeräcker 9 Z2021, 76351
Linkenheim-Hochstetten, Germany
REP
UK
Pooledas Group Ltd
Unit 5 Albert Edward House, The
Pavilions Preston, United Kingdom
Tillverkad i Kina