

POWER SLICER
PROFESSIONAL
COUNTERMAN 100
5.5 QUART9” BLADE
MODEL#GFS-900

MODEL NUMBER: DY-SV200
POWER: 12
0V
; 50
HZ
USER
MANUAL
POWER SLICER
PROFESSIONAL
COUNTERMAN 100
Safety Precautions 4
Product Specs 6
Using Your Device 6
Manufacturer’s Tips 8
Cleaning and Care 9
Assembling and Removing the
Sliding Feed Table
10
Storage and Disposal 11
Warranty Details 11
MODEL#GFS-900

•
•
•
•
•
•
•
•
•
•
•
•
•
•
•
•
•
•
•
•
•
•
•
•
SAFETY PRECAUTIONS:
Disclaimer: Manual instructions should always be read and implemented prior to
product use. Manufacturer/ importer advisory board are not reliable for inadequate
use due to instruction manual negligence or failure to follow direction.
This product is intended for indoor household use only!
Children: Keep this device out of the reach of children or other disqualified
persons, since the misuse of contents and packaging materials may result in hazard
or death.
Care is needed while handling/ removing/ cleaning the blade.
This appliance must be used with the sliding feed table and the food holder in
position unless this is not possible due to the size or shape of the food.
Electric shock prevention: Never attempt to repair the device on your own. In the
event of product malfunction, contact customer service for assistance.
Never immerse the electrical parts of this device in liquid, nor place under running
water.
Before connecting the appliance to the power supply, check that the power
supply voltage and current rating corresponds with the power supply details
shown on the appliance rating label.
To avoid damaging the cord, do not squeeze, bend or chafe it on sharp edges.
Keep it away from hot surfaces and open flames as well. Do not let the rotating
blade touch the power cord.
Avoid trip and fall accidents by placing the cord in a safe position.
If an extension cord is used, its capacity needs to be suitable for the power
consumed by the appliance.
Do not operate the appliance with wet hands or while standing on a wet floor. Do
not touch the power plug with wet hands.
Do not open the appliance housing under any circumstances. Do not insert any
foreign objects into the interior of the housing.
Never use accessories which are not recommended by the manufacturer. They
could pose a safety risk to the user and might damage the appliance. Only use
original parts and accessories.
Keep the appliance away from any hot surfaces and open flames. Always operate
4 5
the appliance on a level, stable, clean and dry surface. Protect the appliance
against heat, dust, direct sunlight, moisture, dripping and splashing water.
Do not place heavy objects on top of the appliance. Do not place objects with
open flames, e.g. candles, on top of or beside the appliance. Do not place objects
filled with water, e.g. vases, on or near the appliance.
Regularly check the power plug and power cord for damage. If the supply cord is
damaged, it must be replaced by the manufacturer, its service agent or similarly
qualified persons in order to avoid a hazard.
Do not pull the power plug out of the electrical outlet by the power cord and do
not wrap the power cord around the appliance.
Disconnect the power plug from the electrical outlet when not in use and before
cleaning.
Switch o the appliance before changing accessories or approaching parts which
move during use.
If the appliance should overheat, stop using the appliance and disconnect from its
electrical outlet.
Never leave the appliance unattended during use.
Dry the appliance and all accessories before connecting to the power supply and
prior to attaching the accessories.
Always turn the appliance o before disconnecting the power plug.
Clean the appliance thoroughly prior to using it.
During operation keep hands, hair, clothing and utensils away from the cutting
blade to avoid injuries and damage to the appliance.
The appliance is only intended for short term operation. After an operation time of
5 minutes let it cool for at least 30 minutes. Do not overload the appliance.
.
•
•
•
PRODUCT SPECS USING YOUR DEVICE
USING YOUR DEVICE
This appliance is only suitable for slicing food contents, e.g. meats, cheeses,
fruits, vegetables, breads, etc. The food to be sliced must be thawed, unpacked
and deboned before it can be sliced with the appliance. Do not use it for slicing
frozen food, bones or for any other purpose.
This appliance is only suitable for private household use and it is not designed for
commercial purposes.
This appliance is intended for dry indoor use only. Do not use the appliance
outdoors.
• Use the appliance only as described in this manual.
• Any other use might lead to damage of the appliance, property or personal
injury.
BEFORE FIRST USE
1) Unpack the appliance carefully, remove all packaging materials and retain for
future use.
Warning!
Packaging materials are not toys. Children should not play with the
packaging materials, as they pose a risk of swallowing and suocation!
2) Check for the presence of all parts and for transport damage. In case of
damages or incomplete delivery, please contact your dealer.
3) Clean the appliance ( Cleaning and care).
4) Place the appliance on a dry, flat, and steady surface.
5) Apply downward pressure onto the appliance so that the suction feet (7) get a
good grip.
APPLIANCE OPERATION
Before plugging in the appliance, make sure:
1) The electrical circuit is not overloaded with other appliances.
2) The blade (1) is properly engaged and tightened.
3) The on/o switch (8) is set to 0 (o position).
4) The thickness knob (9) is set to 0.
Do not slice:
• Hardly frozen foods
• Meat with bones
• Food containing large stones or seeds
• Food in wrappers such as aluminium foil or plastic film
FOOD OPERATION
1)
Pull the food guide (11) backward, as far as it can slide. (Fig. 1).
2)
Place the food to be sliced on the platform (6). Afterwards, put the food holder
(5) onto the food guide handle (10) and adjust it until it holds the food firmly in
place.(Fig. 2).
3)
Place a collection tray (not provided) behind the blade (1) to catch the slices.
4) Turn the thickness knob (9) to desired slice thickness (0 - 22 mm) (Fig. 3).
5)
Connect the power plug (3) to a suitable electrical outlet.
6) Set the on/o switch (8) to I (on position) to switch on the appliance. The blade
(1) will start running.
7) Grasp the food holder (5) with your right hand while keeping your thumb
6 7
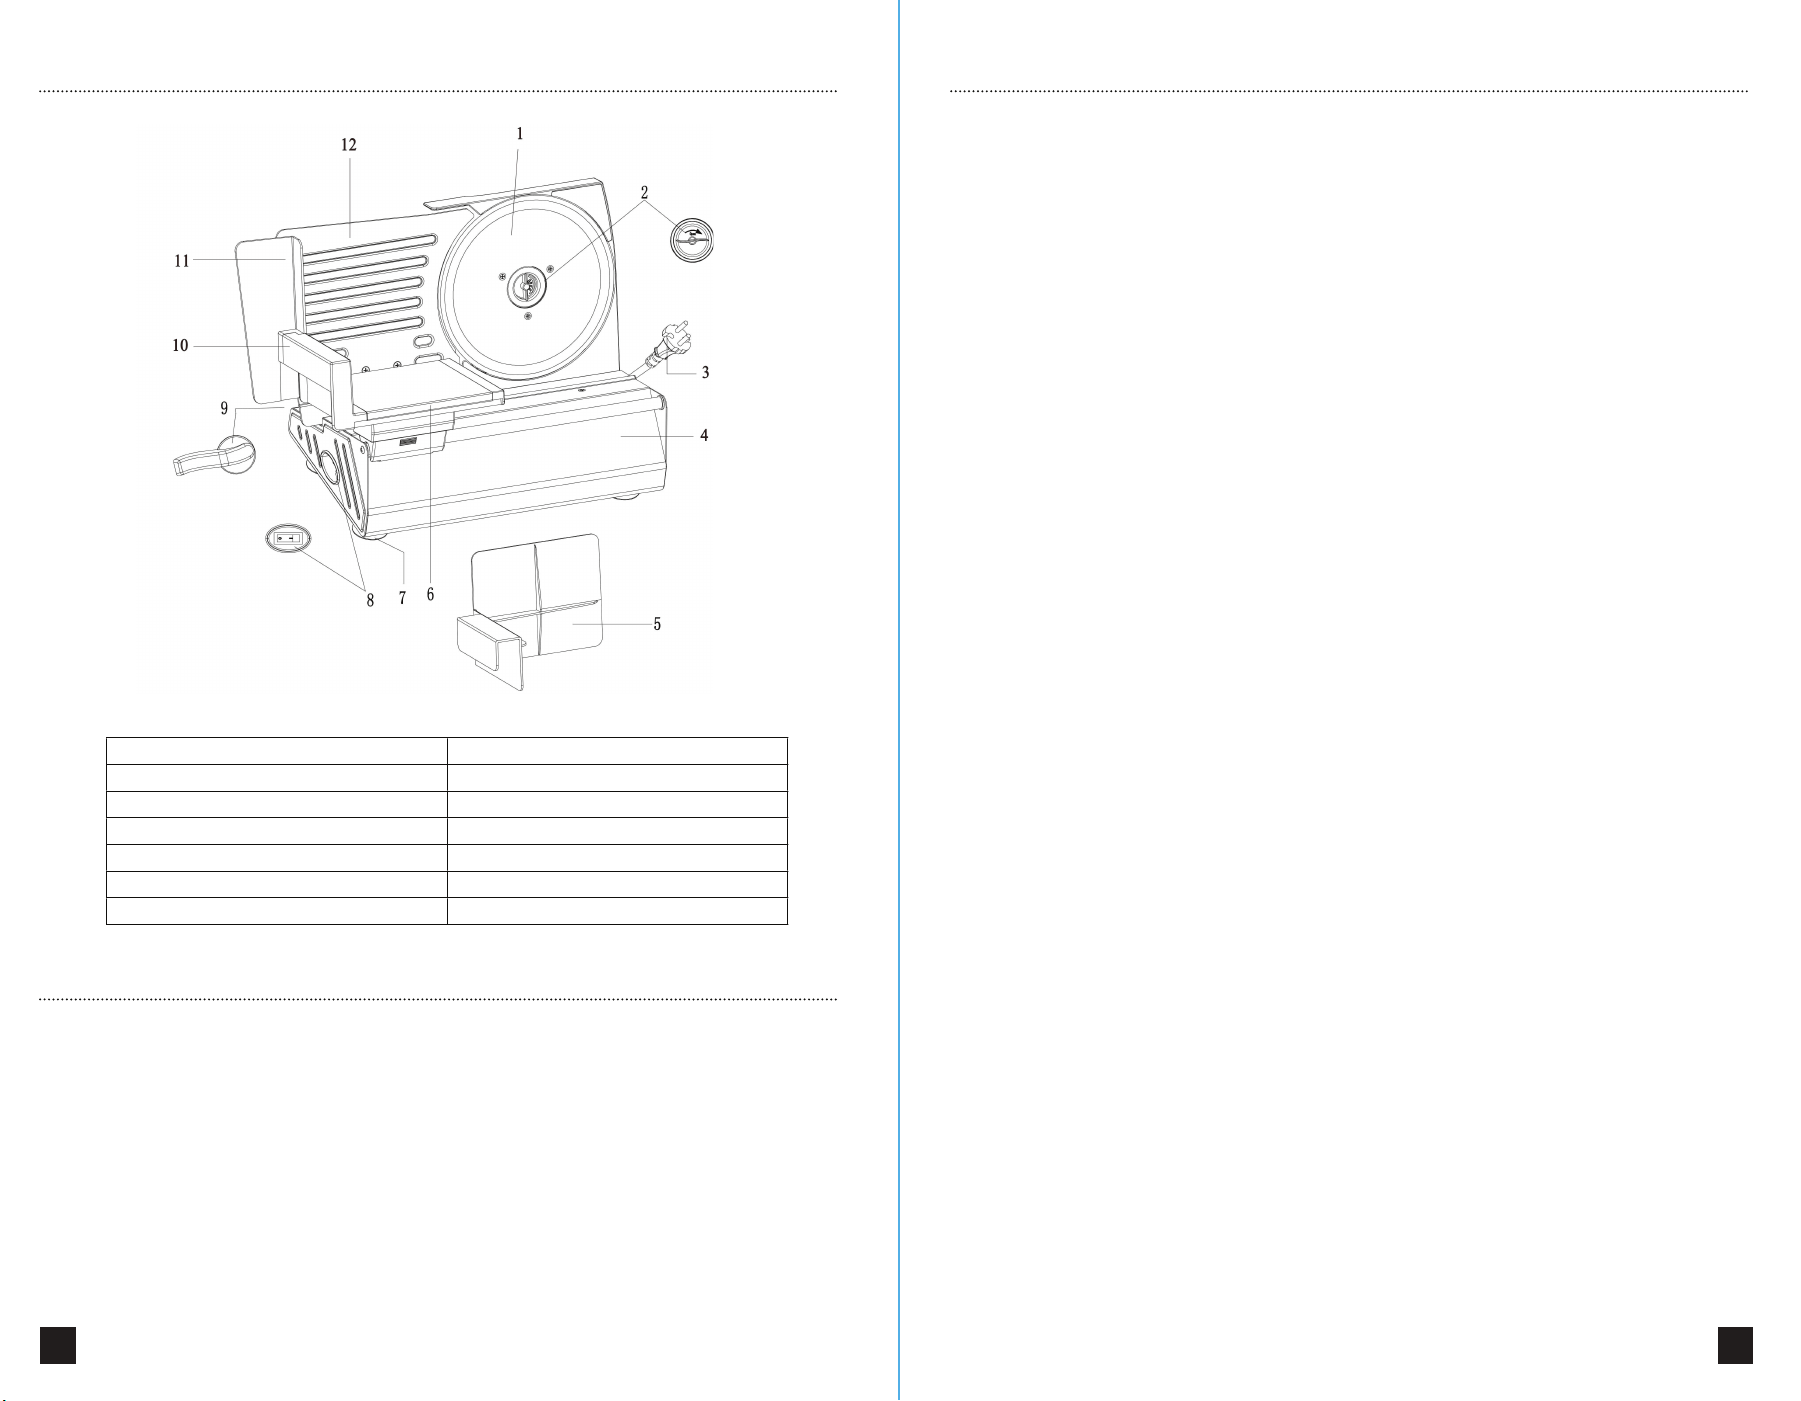
No. Description No. Description
1. Stainless steel serrated blade 7. Suction feet
2. Blade holder 8. On/o switch (0, 1)
3. Power cord with power plug 9. Slice thickness knob (0-22 mm)
4. Cast aluminium housing 10. Food guide handle
5. Food holder with finger guard 11. Sliding food guide
6. Sliding platform 12. Food shield
protected behind the food guide (11). Apply even pressure for best slicing results.
8) Slide the food guide (11) toward the blade (1). Move back and forth steadily with
even pressure. Repeat for additional slices.
9) After use, set the on/o switch (8) to 0 (o position) and the thickness knob (9)
to 0.
10) Allow the blade (1) to stop running completely. Unplug the appliance.
Warning:
• Do not operate this appliance without the food guide (11) and food holder (5) in
place.
• Do not operate the appliance continuously for more than 10 minutes. Allow the
appliance to cool down for 30 minutes before operating it again.
Hot Roasts—Beef, Pork, Lamb, Turkey, Ham
• When slicing boneless roasts, remove from oven and allow to cool for 15-20
minutes before slicing. The meat will retain its natural juices and slice without
crumbling.
• Cut the roast, if necessary, to fit onto the platform.
• Place foil underneath the platform table to catch juices and crumbs for easy
cleanup.
• For rolled or tied roast, remove strings one at a time as the strings become
closer to the blade (make sure the appliance is o).
Cheese
• Slice while well chilled.
• Before serving, allow cheese to reach room temperature. This will enhance the
natural flavour.
• Some processed cheese may stick to the blade. When necessary, turn the
appliance off and remove the plug. Wipe the blade with a damp cloth since
moisture will help prevent the blade from sticking.
Bulk Bacon
• Chill thoroughly before slicing. Some types of smoked bacon should have the
crust removed.
Cold Cuts and Sandwiches
• Cold cuts of meat will last longer and will retain flavour longer if sliced when
needed.
• For best results, chill first.
• Remove any plastic or hard casing before slicing.
• Use a constant, gentle pressure for uniform slices.
Fruits and Vegetables
• Slice potatoes for thick or thin chips.
• Slice carrots lengthwise in very thin strips. Soak in ice water to curl.
• Slice zucchini, eggplant and squash.
Breads and Cakes
• Effective with coarse textured breads and cakes.

MANUFACTURER’S TIPS
CLEANING AND CARE
This appliance is only suitable for slicing food contents, e.g. meats, cheeses,
fruits, vegetables, breads, etc. The food to be sliced must be thawed, unpacked
and deboned before it can be sliced with the appliance. Do not use it for slicing
frozen food, bones or for any other purpose.
This appliance is only suitable for private household use and it is not designed for
commercial purposes.
This appliance is intended for dry indoor use only. Do not use the appliance
outdoors.
• Use the appliance only as described in this manual.
• Any other use might lead to damage of the appliance, property or personal
injury.
BEFORE FIRST USE
1) Unpack the appliance carefully, remove all packaging materials and retain for
future use.
Warning! Packaging materials are not toys. Children should not play with the
packaging materials, as they pose a risk of swallowing and suocation!
2) Check for the presence of all parts and for transport damage. In case of
damages or incomplete delivery, please contact your dealer.
3) Clean the appliance ( Cleaning and care).
4) Place the appliance on a dry, flat, and steady surface.
5) Apply downward pressure onto the appliance so that the suction feet (7) get a
good grip.
APPLIANCE OPERATION
Before plugging in the appliance, make sure:
1) The electrical circuit is not overloaded with other appliances.
2) The blade (1) is properly engaged and tightened.
3) The on/o switch (8) is set to 0 (o position).
4) The thickness knob (9) is set to 0.
Do not slice:
• Hardly frozen foods
• Meat with bones
• Food containing large stones or seeds
• Food in wrappers such as aluminium foil or plastic film
FOOD OPERATION
1) Pull the food guide (11) backward, as far as it can slide. (Fig. 1).
2) Place the food to be sliced on the platform (6). Afterwards, put the food holder
(5) onto the food guide handle (10) and adjust it until it holds the food firmly in
place.(Fig. 2).
3) Place a collection tray (not provided) behind the blade (1) to catch the slices.
4) Turn the thickness knob (9) to desired slice thickness (0 - 22 mm) (Fig. 3).
5) Connect the power plug (3) to a suitable electrical outlet.
6) Set the on/o switch (8) to I (on position) to switch on the appliance. The blade
(1) will start running.
7) Grasp the food holder (5) with your right hand while keeping your thumb
8 9
protected behind the food guide (11). Apply even pressure for best slicing results.
8)
Slide the food guide (11) toward the blade (1). Move back and forth steadily with
even pressure. Repeat for additional slices.
9)
After use, set the on/o switch (8) to 0 (o position) and the thickness knob (9)
to 0.
10) Allow the blade (1) to stop running completely. Unplug the appliance.
Warning:
• Do not operate this appliance without the food guide (11) and food holder (5) in
place.
• Do not operate the appliance continuously for more than 10 minutes. Allow the
appliance to cool down for 30 minutes before operating it again.
Hot Roasts—Beef, Pork, Lamb, Turkey, Ham
• When slicing boneless roasts, remove from oven and allow to cool for 15-20
minutes before slicing. The meat will retain its natural juices and slice without
crumbling.
• Cut the roast, if necessary, to fit onto the platform.
• Place foil underneath the platform table to catch juices and crumbs for easy
cleanup.
• For rolled or tied roast, remove strings one at a time as the strings become
closer to the blade (make sure the appliance is o).
Cheese
• Slice while well chilled.
• Before serving, allow cheese to reach room temperature. This will enhance the
natural flavour.
• Some processed cheese may stick to the blade. When necessary, turn the
appliance off and remove the plug. Wipe the blade with a damp cloth since
moisture will help prevent the blade from sticking.
Bulk Bacon
• Chill thoroughly before slicing. Some types of smoked bacon should have the
crust removed.
Cold Cuts and Sandwiches
• Cold cuts of meat will last longer and will retain flavour longer if sliced when
needed.
• For best results, chill first.
• Remove any plastic or hard casing before slicing.
• Use a constant, gentle pressure for uniform slices.
Fruits and Vegetables
• Slice potatoes for thick or thin chips.
• Slice carrots lengthwise in very thin strips. Soak in ice wat
er to curl.
• Slice zucchini, eggplant and squash.
Breads and Cakes
• Effective with coarse textured breads and cakes.
• Before cleaning, always switch off the appliance. Allow the appliance come to a
complete stop and set the thickness knob (9) to 0.
• Disconnect the appliance from its electrical outlet.
• Clean the appliance after every use. This appliance contains no user serviceable
parts and requires little maintenance. Leave any servicing or repairs to qualified
personnel only.
• Do not put any appliance parts in the dishwasher.
• Never use corrosive detergents, wire brushes, abrasive scourers, or metal
utensils to clean the device.
• Wipe the appliance housing (4) with a soft, damp cloth.
Parts How to clean...
Food holder (5) • Remove and clean with soapy water.
• Rinse under tap water and dry thoroughly.
Sliding platform (6)
Sliding food guide (11)
Food shield (12)
• Wipe with a soft cloth damped with some
dishwashing liquid.
• Wipe with a clean cloth and dry thoroughly.
• Do not immerse in water or other liquids!
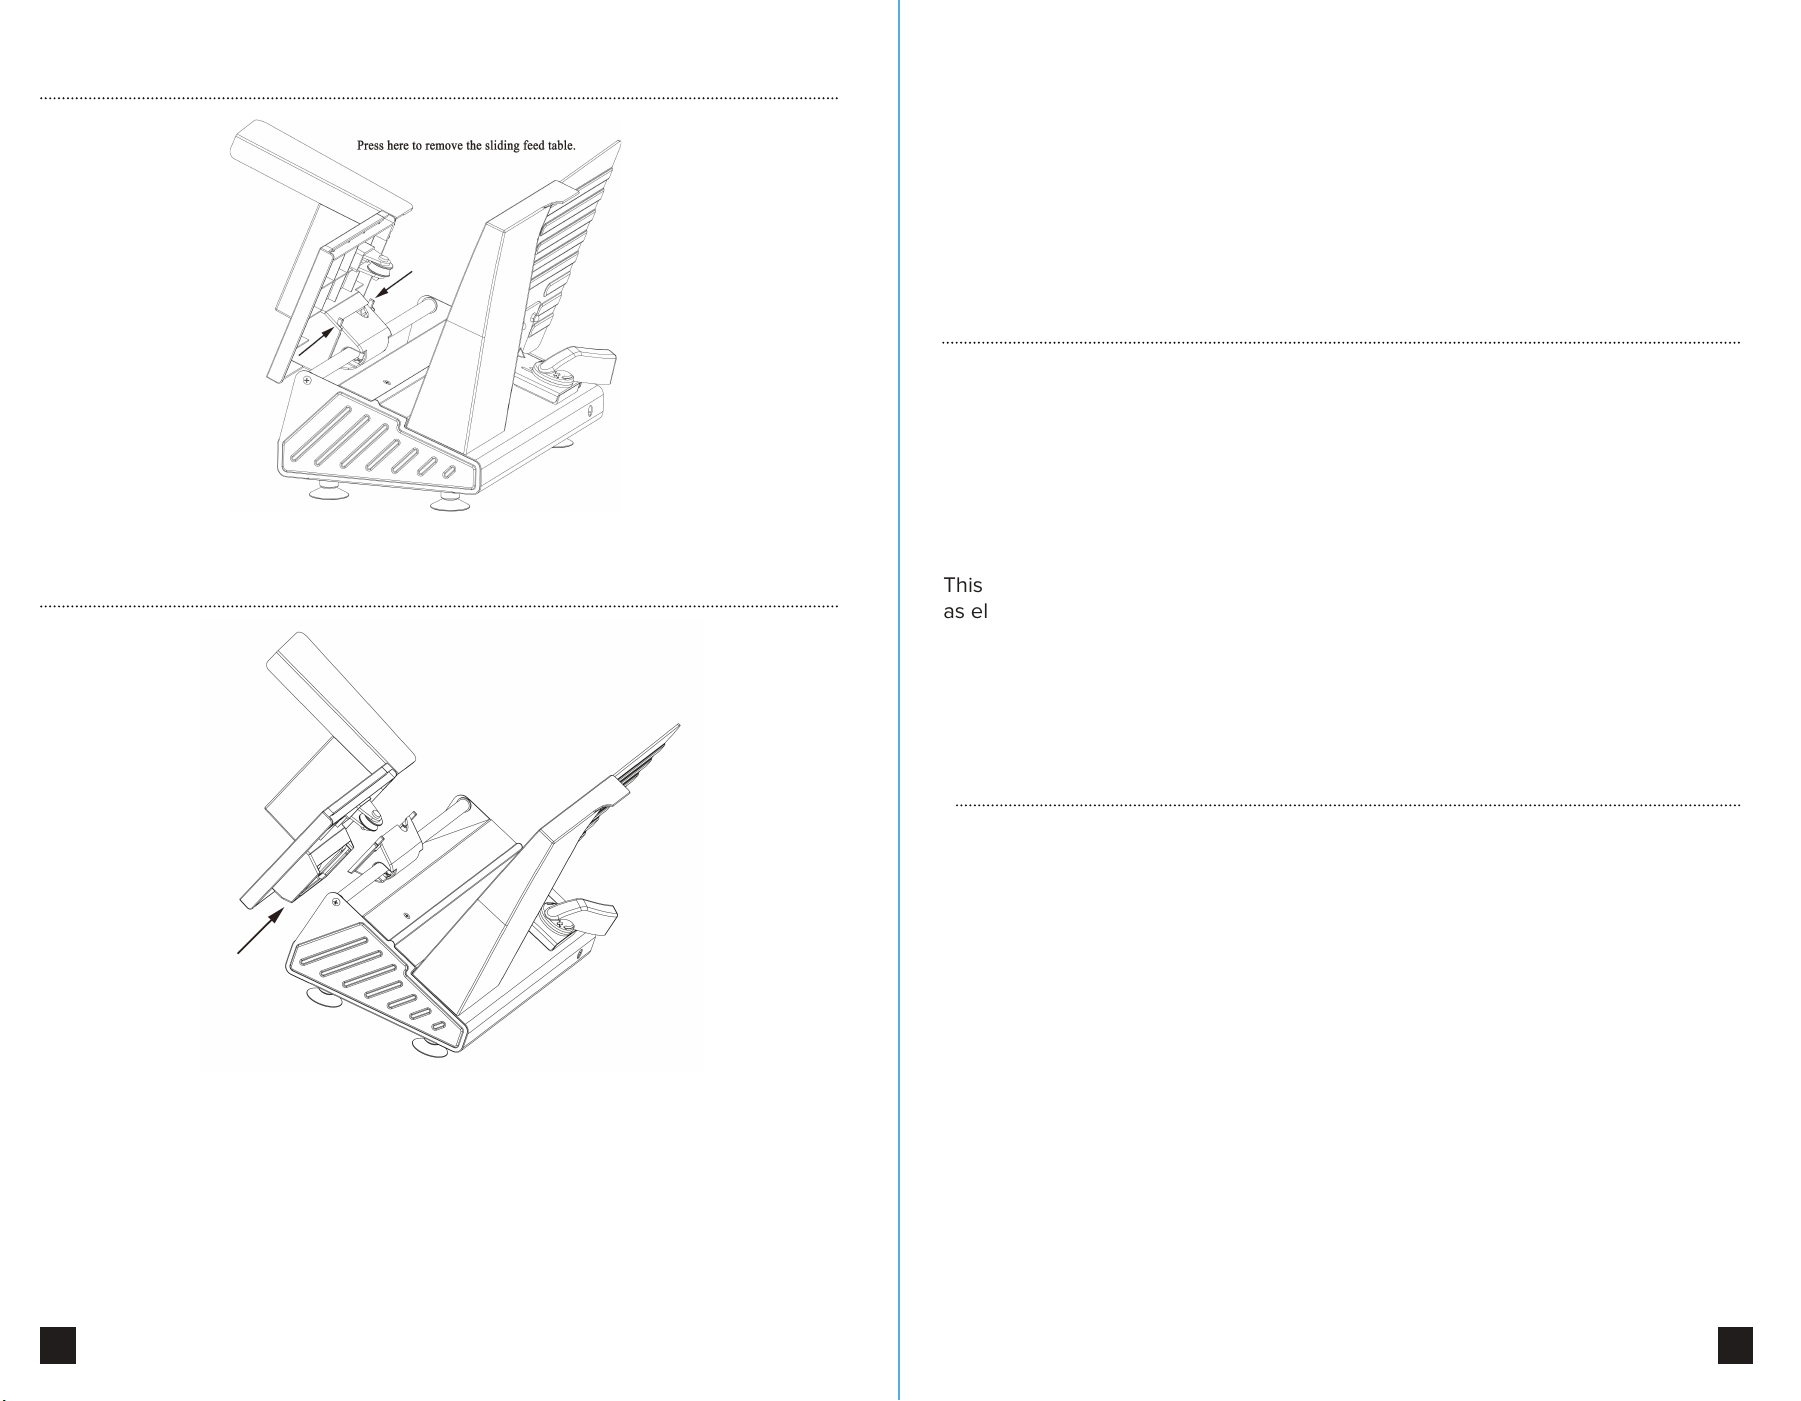
REMOVING THE SLIDING FEED TABLE
STORAGE AND DISPOSAL
ASSEMBLING THE SLIDING FEED TABLE
10 11
Removing the Blade
Warning! The blade (1) is very sharp! Handle with care!
• Pull the food guide (11) backward, as far as it can slide .
• Turn the blade holder (2) clockwise to unlock the blade (1). Then remove the
blade (1).
• Immerse in warm, soapy water for several minutes. Rinse and dry thoroughly.
Inserting the Blade
Warning! The blade (1) is very sharp! Handle with care!
• Hold the blade holder (2). Align the blade (1) with drive gears and adjust it so that
it engages fully.
• Turn the blade holder (2) counter-clockwise to lock the blade (1) in place.
Storage:
• Store the appliance in a cool, dry and clean place, out of the reach of children
and pets.
• Please keep the packaging for transporting the appliance or for storing your
appliance when not in use for a prolonged time period.
Product Disposal:
This product may not be disposed of along with with ordinary household waste,
as electrical and electronic waste must be disposed of separately.
Contact your retailer, distributor or the municipal authorities for further information
on product disposal.
WARRANTY DETAILS
This product is guaranteed under a one-year limited warranty period, applicable to
the original purchaser and not transferable to a third party user.
Repair or replacement of defective parts are at the seller's discretion. In the event
that repair isn't possible, the seller will replace the product/ part. If product repair/
replacement won’t suce, the seller has the option of refunding the cash value of
the product or component returned.
Product defects not covered under the warranty provisions include normal wear
and damage incurred from use or accidental negligence, misuse of instruction
specifications, or repair by unauthorized parties. The manufacturing company is not
liable for any incidental or consequential damages incurred by such circumstances.