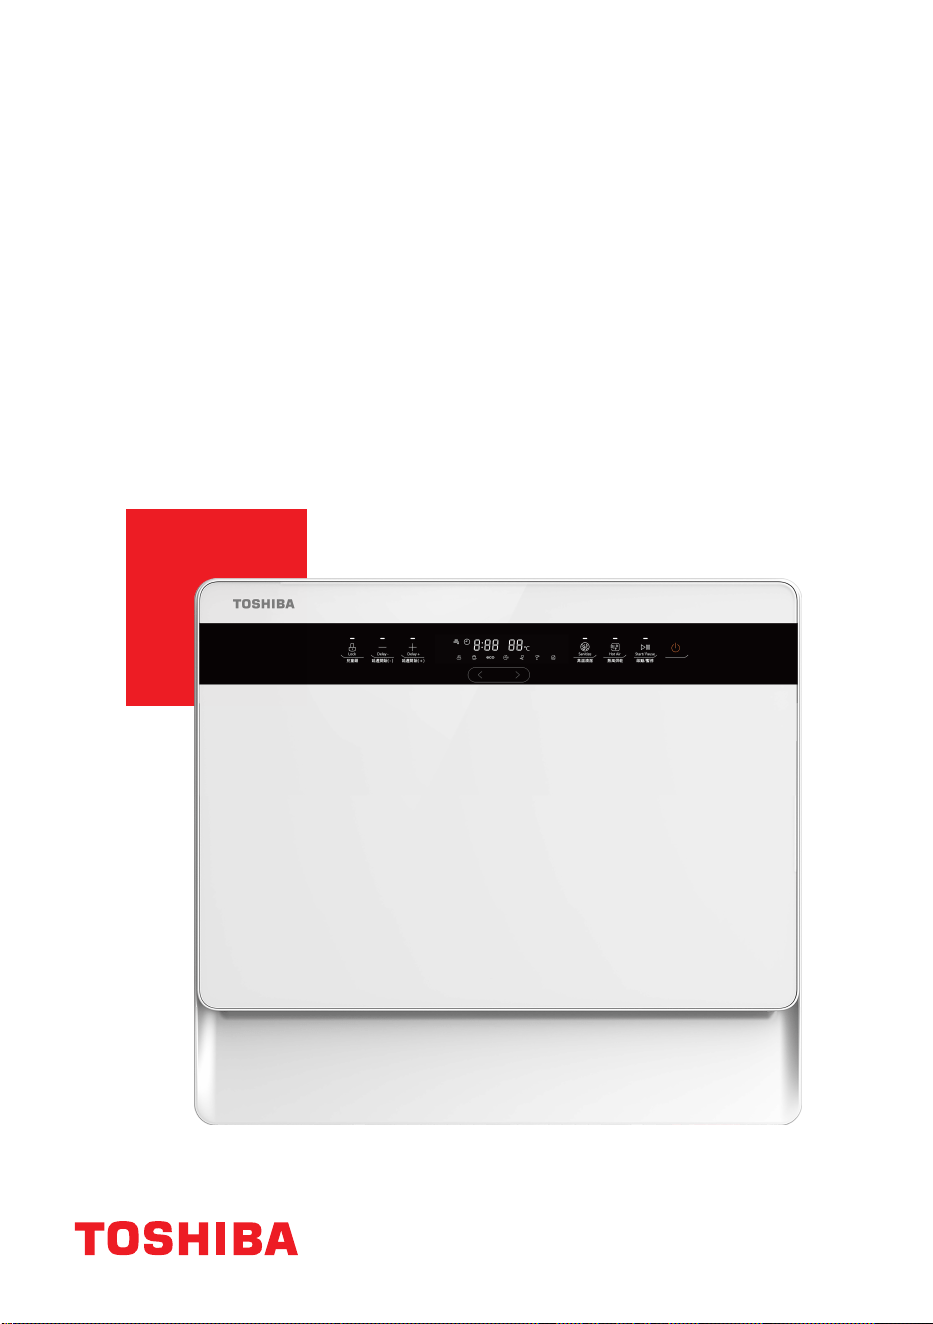
洗碗機
使用說明書
型號:
DW-05T2-HK
在使用之前,請仔細閱讀,並妥善保管。
02
安全須知
請認真閱讀並遵循所有說明。
z
這些說明是預防措施,用於防止用戶重傷或死亡及任何財產損失風險。
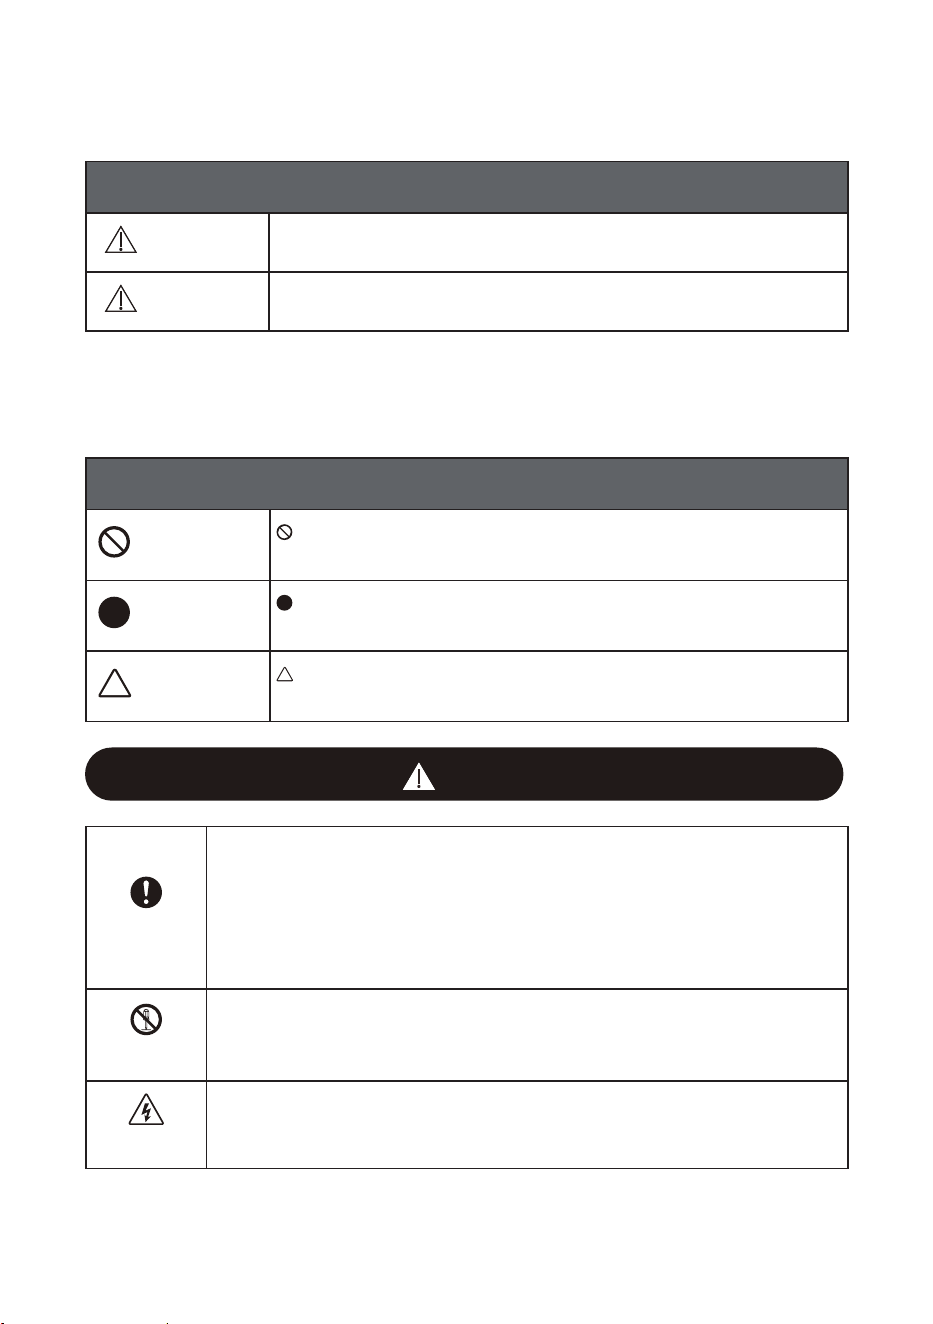
標識
警告
「警告」表示極有可能造成使用者受重傷(*1)或死亡。
注意
「注意」表示極有可能造成受傷(*2)或財產損失(*3)。
(*1) 重傷——需要住院、長期治療或失明、皮膚冷熱灼傷、觸電、骨折或中毒的傷害。
(*2) 損傷——不需要住院或長期治療的損傷、皮膚灼傷或觸
電。
(*3) 財產損失——房屋、傢俱、家畜或寵物的擴展損失。
符號
禁止!
禁止! 表示禁止作出的行為。
詳細說明將以數字或書面形式在圓圈內或符號周圍標明。
重要提示
「重要提示」表示強制性行動。
詳細說明將以數字或書面形式在圓圈內或符號周圍標明。
注意
「注意」表示建議採取的預防措施。
詳細說明將以數字或書面形式在三角形內或符號周圍標明。
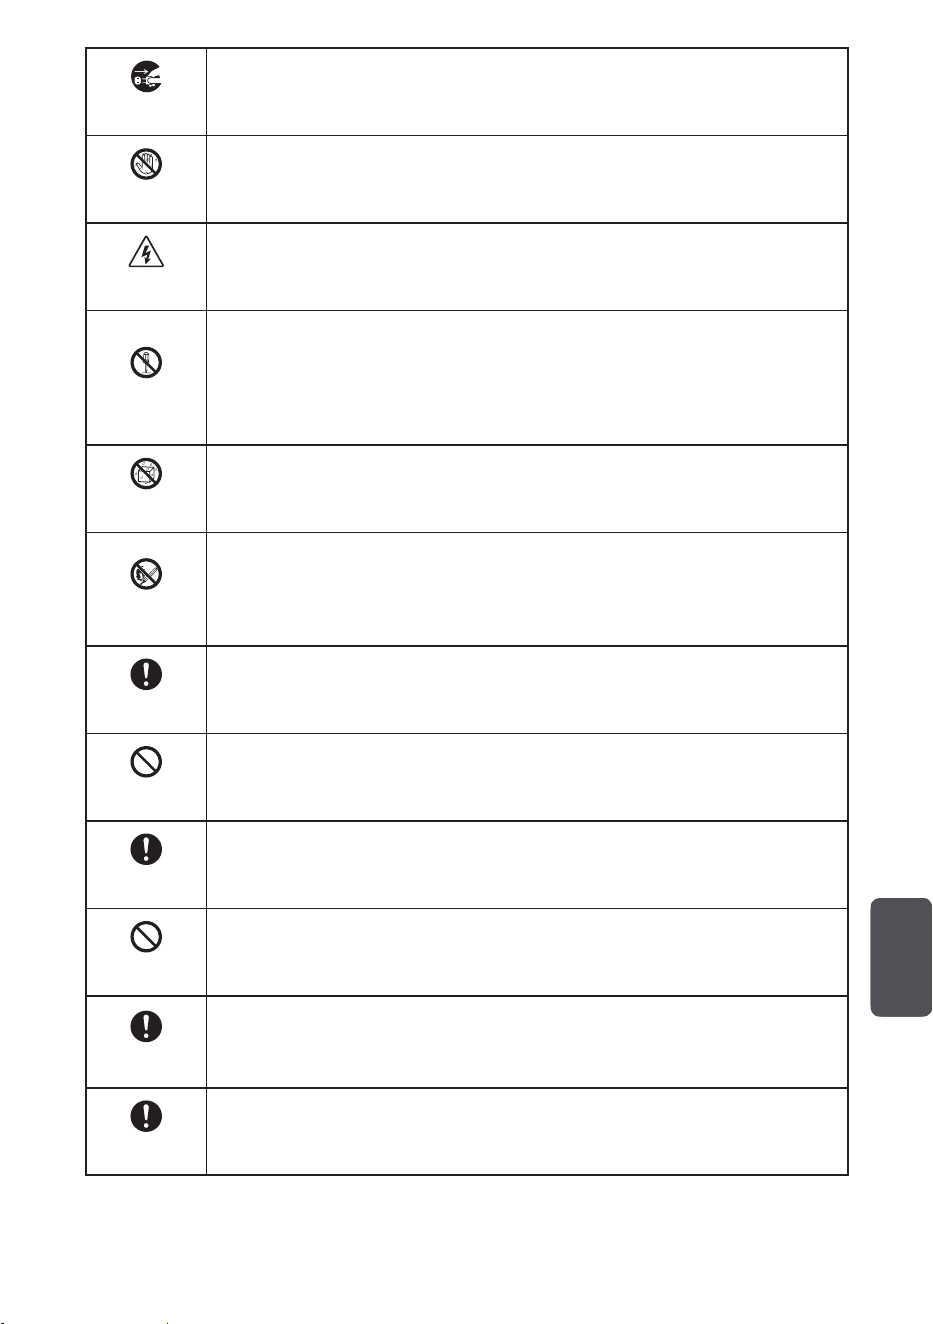
警告
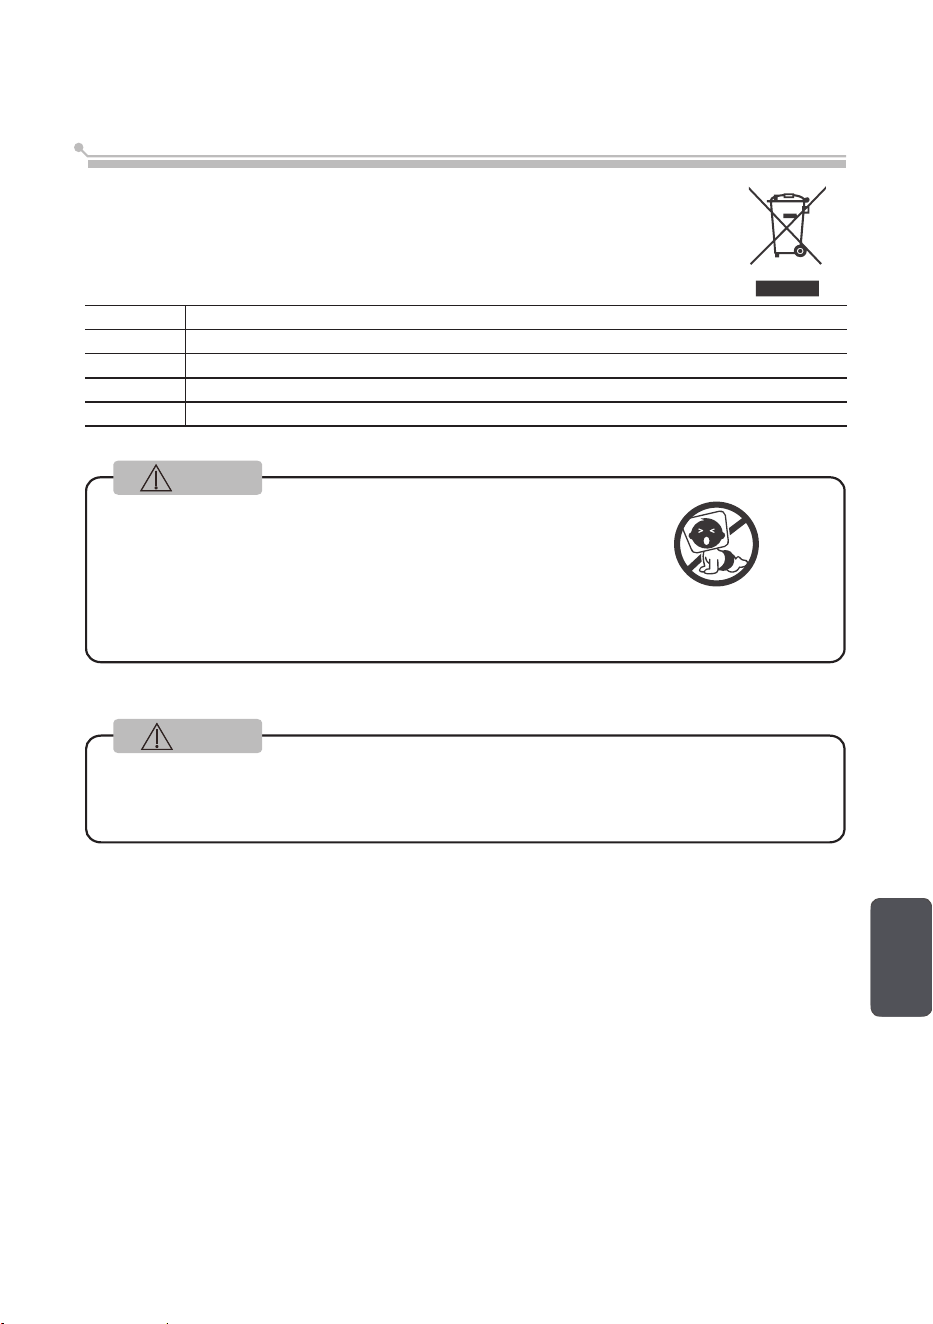
勿讓兒童接觸
¤
請勿讓以下人員操作洗碗機。
本洗碗機不適合體力、感官或智力有缺陷的人士以及缺乏相關經驗和知識的
人員(包括兒童)使用,必須在負責其安全的人員監督或指導下方可使用本
洗碗機。
¤
請照顧好孩子,防止兒童把 = 玩耍本洗碗機。
¤
包裝材料可能會對兒童造成危險。
無改裝
¤
請勿拆卸或改裝洗碗機。
否則可能導致火災、觸電或故障,並造成傷害。 如需維修,請與洗碗機供
應商聯繫。
觸電
¤
請根據洗碗機銘牌上的功率指示使用合適的電源。
否則會引起火災或觸電。 使用不當的電源可能會導致插座過熱,引起火災。
03
斷開電源插頭
¤
在清洗或維護洗碗機之前,請先斷開電源插頭。
禁止濕手觸摸
¤
請勿用濕手插拔電源插頭。
否則可能會導致觸電或故障,並造成傷害。
觸電
¤
請勿使用損壞的電源線、電源插頭或鬆動的電源插座。
否則可能會導致觸電或故障,並造成傷害或火災。
嚴禁私自拆修
¤
請勿損壞電源線。
請勿損壞、切割、處理電源線或彎曲、拉扯、扭曲、綁紮電源線。 另外,不
要猛拉電源線的金屬部分,也不要在電源線上放重物或夾住電源線。
否則電源線可能會損壞,引起火災或觸電。 如果電源線損壞,必須由製造
商或其服務代理商或合資質人員更換損壞的電線,以防發生危險。
請勿噴水
¤
請勿將水直接噴灑在洗碗機的主體零件上。 否則可能導致觸電或短路事故。
遠離易燃物品
¤
請勿將易燃物品放入洗碗機。
請勿將煤油、汽油、揮發油、稀釋劑、酒精等易燃物品以及含有此類物質的
餐具放入洗碗機。
否則可能會引起爆炸或火災。
擦去灰塵
¤
請將電源線插頭上積聚的灰塵或污垢擦拭乾淨。
積聚的灰塵或污垢可能會引起火災。
禁止
¤
操作期間或操作後 30
分鐘內,請勿觸摸機櫃內部、蒸汽噴嘴。
以免被燙傷。
說明
¤
清洗過濾器,結果後等待 30 分鐘以上方可取出餐具。
以免燙傷。
禁止
¤
請勿使用延長線。
受熱後可能引起火災。
說明
¤
如出現噴淋臂停止運作、冒煙或異味等異常情況,請立即拔掉電源插頭並停
止使用洗碗機。
請聯繫代理商進行檢查 /
維修。 存在觸電、漏電或短路引起火災的危險。
插入插頭
¤
將電源插頭牢固地插入底座,保持電源線朝下。
如果電源線朝上或插頭未完全插入,可能會漏電或發熱而引起火災。
中文
04
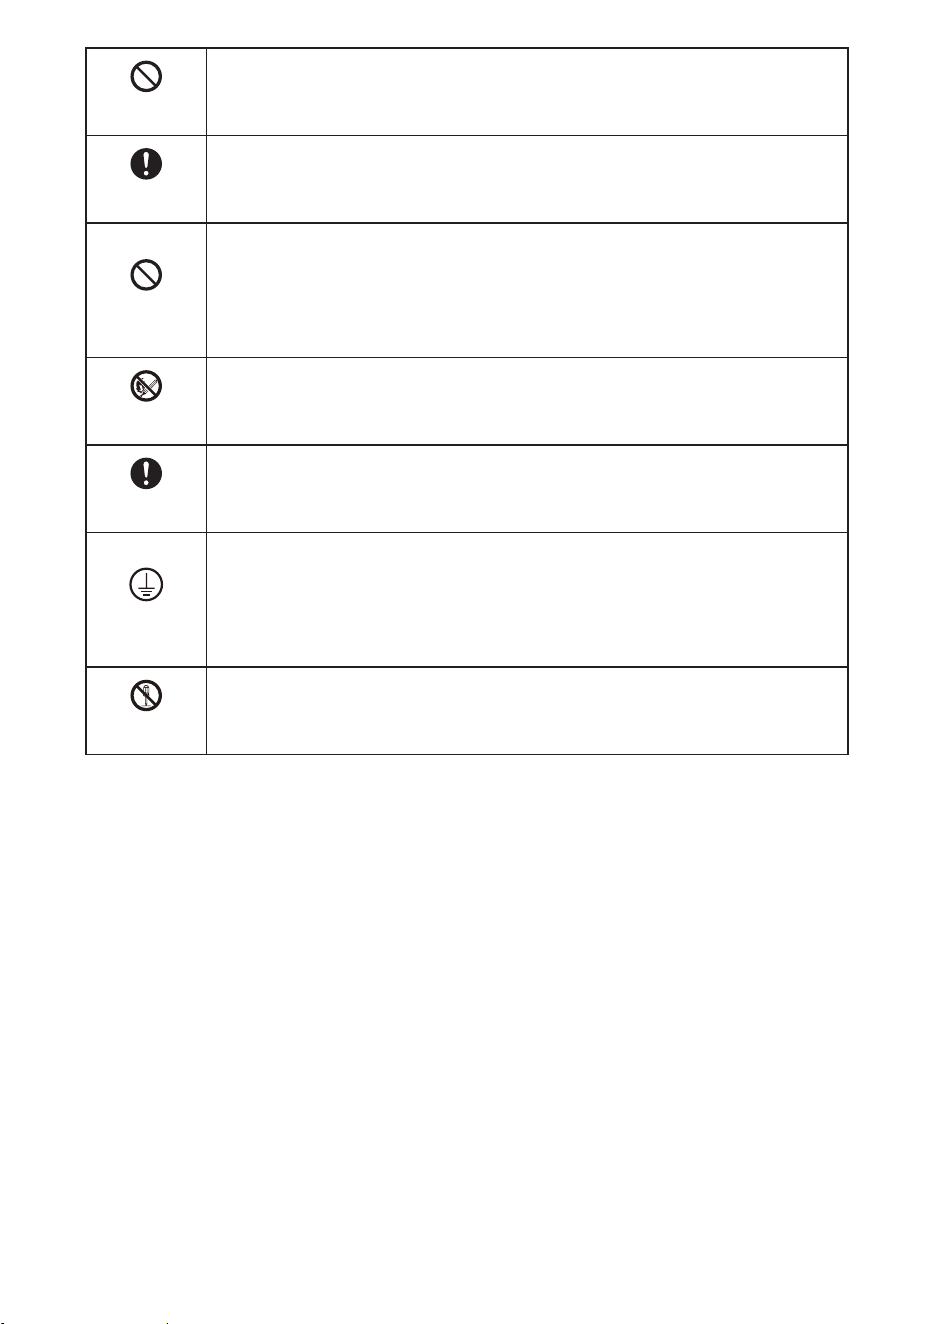
禁止
¤
請勿將毛巾、抹布等易燃物品放入洗碗機櫃內進行操作。
以免發生火災。
說明
¤
遠離燃氣灶等熱源 15cm 以上。
以免發生火災和變形。
禁止
¤
請勿在主機上放置任何物品。
請勿在主機頂部放置重物或溫度較高的物體,如盛有冷水或熱水的容器、加
熱電器、玻璃杯、電子產品、餐具等。
否則開關門時可能會發生墜落,造成傷害。 此外,溢出的水可能會損壞絕緣
並導致漏電和火災。
遠離易燃物品
¤
請勿將洗碗機靠近火源。
¤
請勿將燃燒的蠟燭或香煙放在洗碗機上。 否則可能會引起火災。
精心安裝
¤
確保洗碗機安裝在排水通暢的位置。
使用排水不良的洗碗機可能會導致水回流到洗碗機中,引起觸
電或火災。
正確接地
¤
洗碗機必須接地。
接地後電流電阻最小,可減少洗碗機處於故障狀態時觸電的可能性。 這台洗碗
機的電線有接地線和接地插頭。
接地線連接錯誤會導致觸電。 如果出現 E3 故障,請將電源插頭從插座上拔下,
並需由專業電工或維修人員進行維修。
嚴禁私自拆修
¤
請勿私自更換插頭。
當插頭與插座不匹配時,應由專業電工安裝合適的電源插座。
05
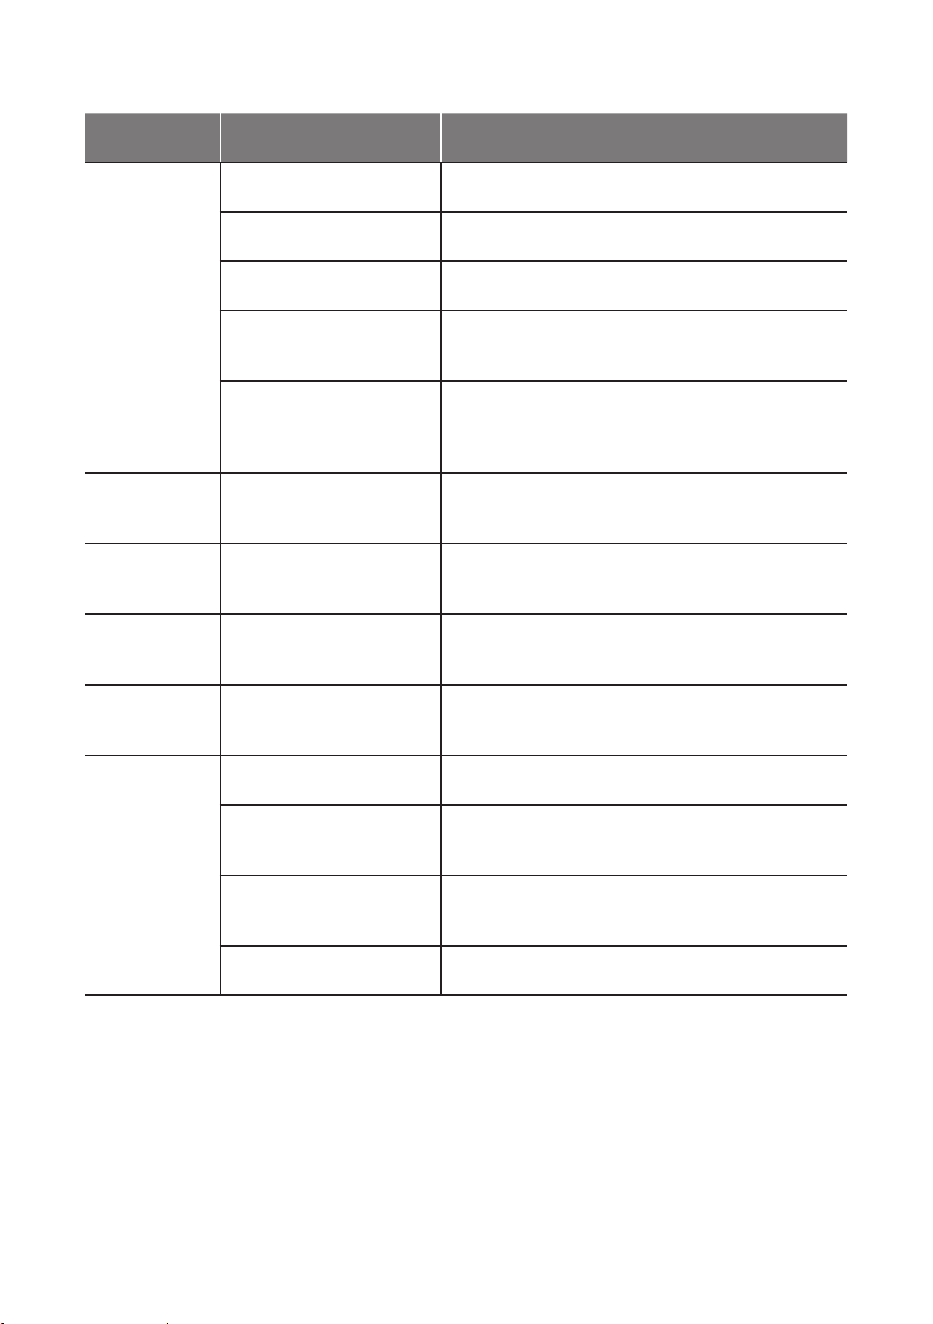
注意
禁止強拉
¤
從插座上拔下插頭時,請勿用力強拉電源線。
抓住電源插頭拔出。 否則可能導致觸電或故障,造成傷害。
請勿使用
¤
請勿使用肥皂、洗衣粉或其他洗手液。 僅適用自動洗碗機專用洗滌劑。 否則可
能導致機器故障。
禁止清洗
¤
請勿清洗塑膠餐具。
只有標注可由洗碗機安全清洗或其他類似情況的塑膠餐具,才能用洗碗機清洗。
對於沒有標記的塑膠餐具,請與餐具製造商核對詳細資訊。
應用環境
¤
僅供室內使用。
此類家用電器供家庭使用,例如:
- 適用於商店、辦公樓和其他工作環境的員工廚房;
- 農舍;
- 適用於酒店、汽車旅館和其他居住環境中的客戶;
- 客房的環境
禁止攀爬
¤
請勿坐在或站在洗碗機的餐具架或洗碗機門上。
否則可能會因變形或損壞而造成受傷的危險。
拔下電源插
頭
¤
長時間不使用洗碗機時,請從電源插座上拔下電源插頭,關閉洗碗機門。
絕緣材料降解可能會導致觸電或短路。
留意洗碗機
門
¤
洗碗機門應保持關閉,防止絆倒。
¤
清洗期間打開洗碗機門是非常危險的動作,熱水可能會造成燙傷。
注意安全
¤
將物品(碗碟、餐具等)放入洗碗機時:
1. 小心放置尖銳器具,防止擦傷洗碗機門密封條。
2. 警告:刀具等鋒利的工具必須放在碗籃內,尖端朝下或水準放置。
清潔護理
¤
用溫和的清潔液潤濕軟布,然後擦拭機器,再用乾布擦乾。
中文
06
請注意
¤
清洗後,檢查洗滌劑是否排空。
¤
在使用洗碗機之前,首先請確認面板上沒有錯誤或異常提示。
¤
安裝洗碗機時,請使用全新水管。 請勿使用當前的軟水管。
¤
最大進水壓力為 1MPa。
最小進水壓力為 0.04MPa。
載重量
¤
禁止
¤
不要用力推開洗碗機門和主機,也不要對洗碗機門施加向下的壓力。 墜落可能
造成傷害。
注意夾傷手
指
¤
開關洗碗機門時注意不要夾傷手指。
手指被夾時有受傷的危險。
禁止
¤
不要靠近排氣口。
蒸汽或熱空氣可能導致燙傷。
注意燙傷
¤
使用洗碗機時或使用後,注意排出熱水。
高溫熱水可能會溢出,有燙傷的風險。
禁止
¤
禁止撞擊或敲擊洗碗機。
觸電、漏電短路可能會引起火災。
說明
¤
正確設置過濾器。
殘留物堵塞,導致故障。
禁止
¤
請勿放置塑膠容器等輕便餐具。
如果在噴水器水壓的作用下下落,可能會堵塞洗碗機進而導致故障。
禁止
¤
請勿用於洗碗機和烘乾機以外的用途。
否則可能會導致故障。
說明
¤
主機在堅固的水平面上。
否則可能無法正常運行。 可能導致漏水。
說明
¤
務必固定好排水管的連接。
可能導致漏水。
清洗容量: 46 件(筷子 *5+ 茶匙 *5+ 飯匙 *1+ 碗 *5+ 湯匙 *5+ 長柄湯勺 *1
+ 淺盤 *5+ 深盤 *1+玻璃杯 *2+ 小料碟 *3+ 馬克杯 *2+ 面碗 *2+ 肉湯勺 *1
+ 叉子 *4 + 刀 *4)
07
處理方法
¤
小心搬運洗碗機的包裝。
¤
所有包裝均可回收。
¤
塑膠件上標有國際標準縮寫;
PE 聚乙烯,例如片狀包裝材料
PS 聚苯乙烯,如包裝材料
POM 聚縮醛或聚氧乙烯,如塑膠夾
ABS 丙烯腈 - 丁二烯 - 苯乙烯,如控制台
PP 聚丙烯,如內壁
¤
包裝材料可能會對兒童造成危險!
¤
包裝和機器應提交回收中心處置。
¤
機器不使用時,請關閉電源並關上機門。
¤
紙板包裝由再生紙製成,應回收利用。
¤
如果產生的垃圾不能妥善處理,會對環境和人體健康造成危害,因此應妥善處置,防止潛
在威脅。
警告
¤
有關產品回收的詳細資訊,請諮詢當地政府相關部門或生活垃圾管理服務中心。
¤
處理: 請勿將本產品視為未分類的市政垃圾。
不同類別的垃圾必須分別進行特殊處理。
警告
此警告標誌用於防止對您和他人造成危險。
請嚴格遵守。
閱讀後請妥善保管,以備不時之需。
中文

08
使用洗碗機前請仔細閱讀使用說明書,這有助於產品的使用和維護。
01
快速使用指南
09
02
認識洗碗機
11
12
洗碗機功能
配件
控制台
13
03
使用洗碗機
安裝洗碗機碗籃 15
將洗滌劑放入添加處
19
04
程式設置
洗滌程式 20
節能 21
啟動 21
更改程式 21
添加餐具 22
洗滌程式結束 22
05
清潔和保養
外部保養 23
內部保養 23
保養與維護 26
06
安裝
產品尺寸 26
安裝前準備 27
放置位置 27
安裝吸盤 28
排氣口 28
進水管接水龍頭
29
排水管連接 30
07
故障排除
聯繫客服中心前 31
錯誤代碼 33
規格 34
目錄
09
快速使用指南
詳細操作方法請仔細閱讀說明書。
連接電源
電源為 220V AC 50Hz
插座規格為 10A 220V AC
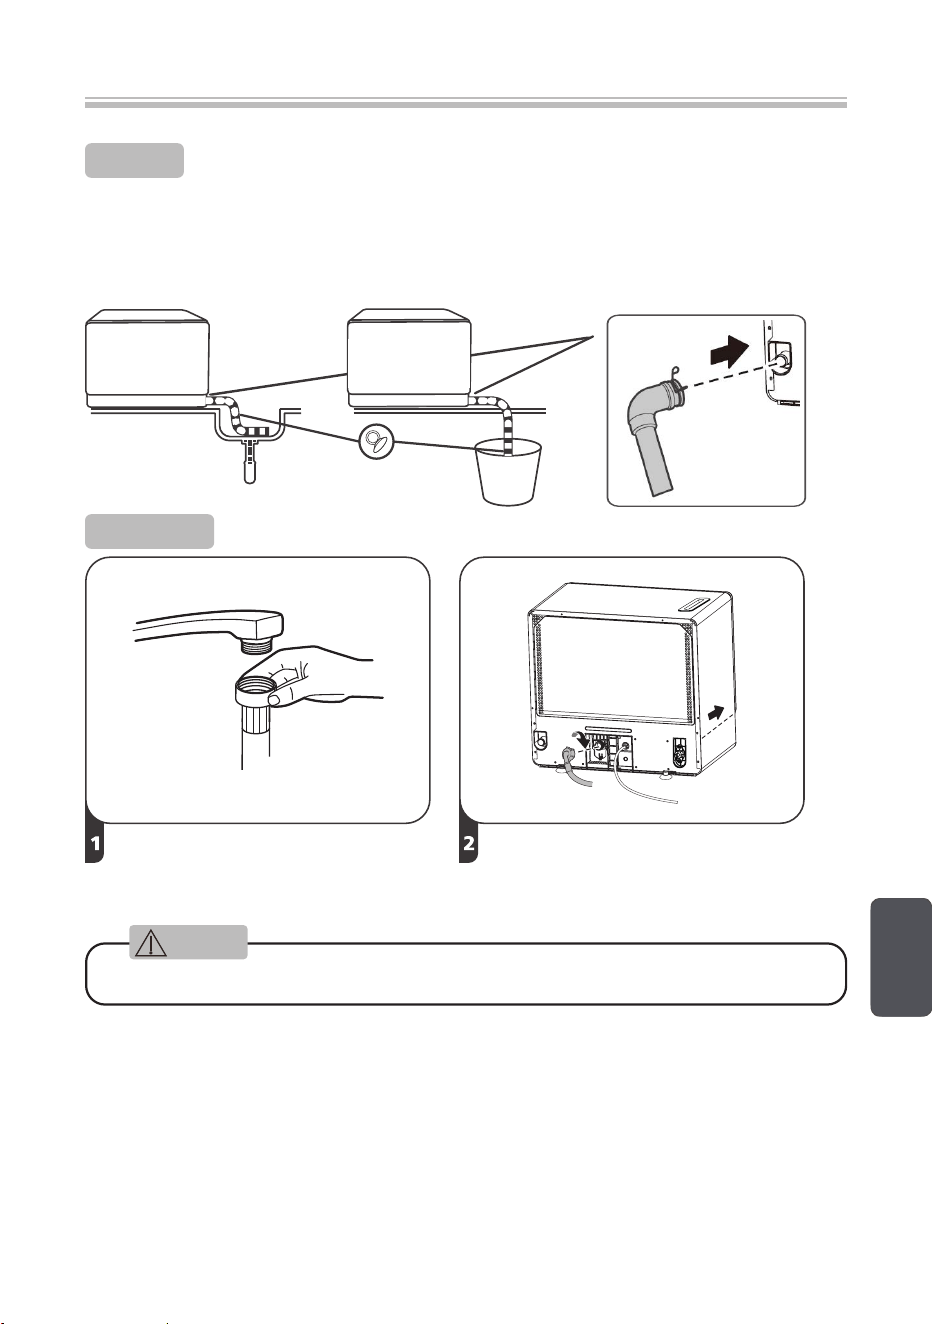
排水管的連接: 將排水管末端放入水槽或水桶中。
將排水管與機器後水管固定。
接頭用手捏式夾箍裝好。
用吸盤固定排水管
或者
進水管連接
進水管接水龍頭 將進水管連接到洗碗機上
更多資訊請參閱安裝部分的內容
中文
注意
10
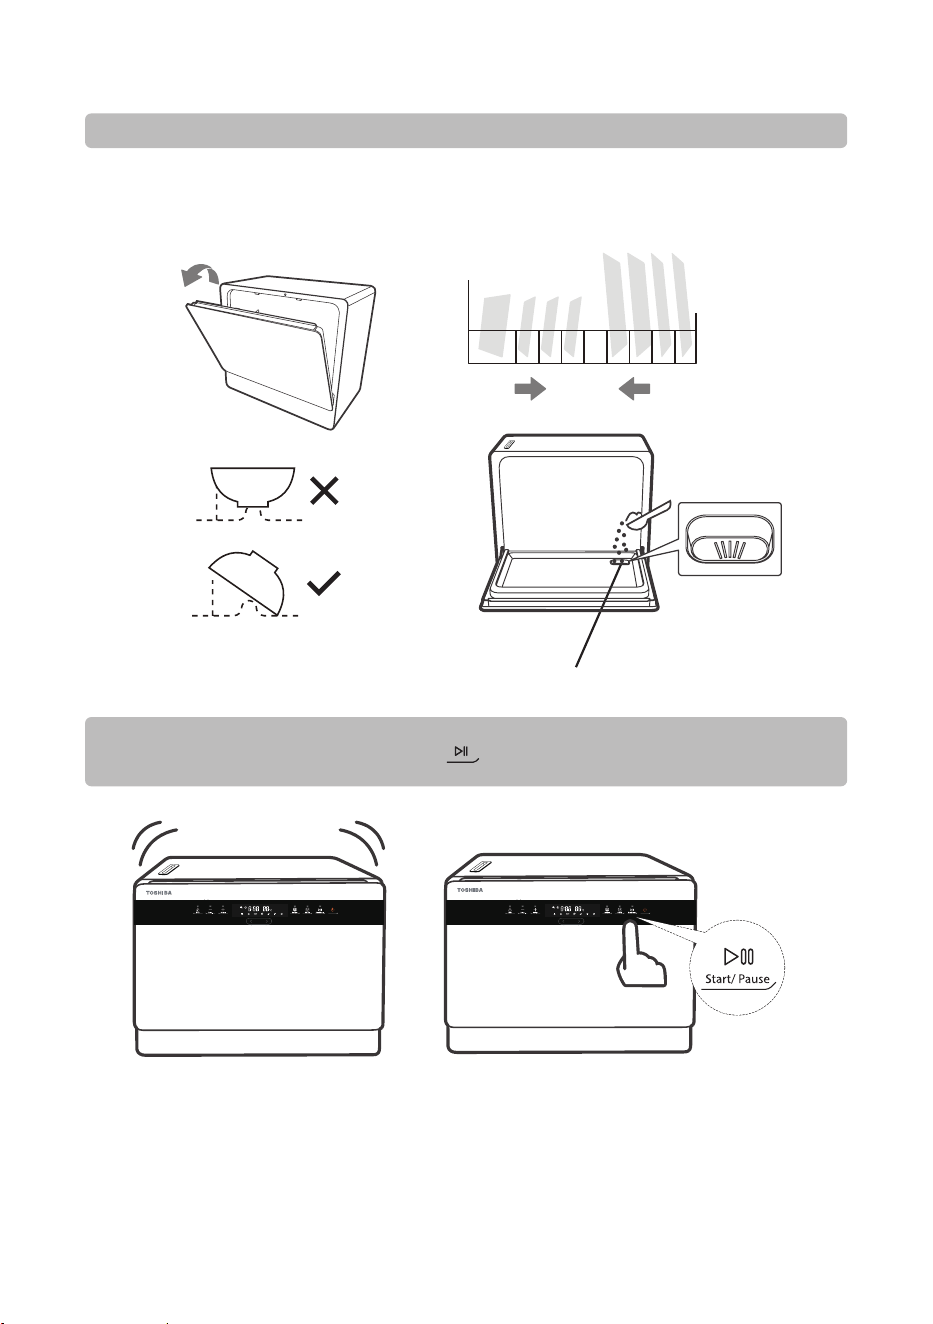
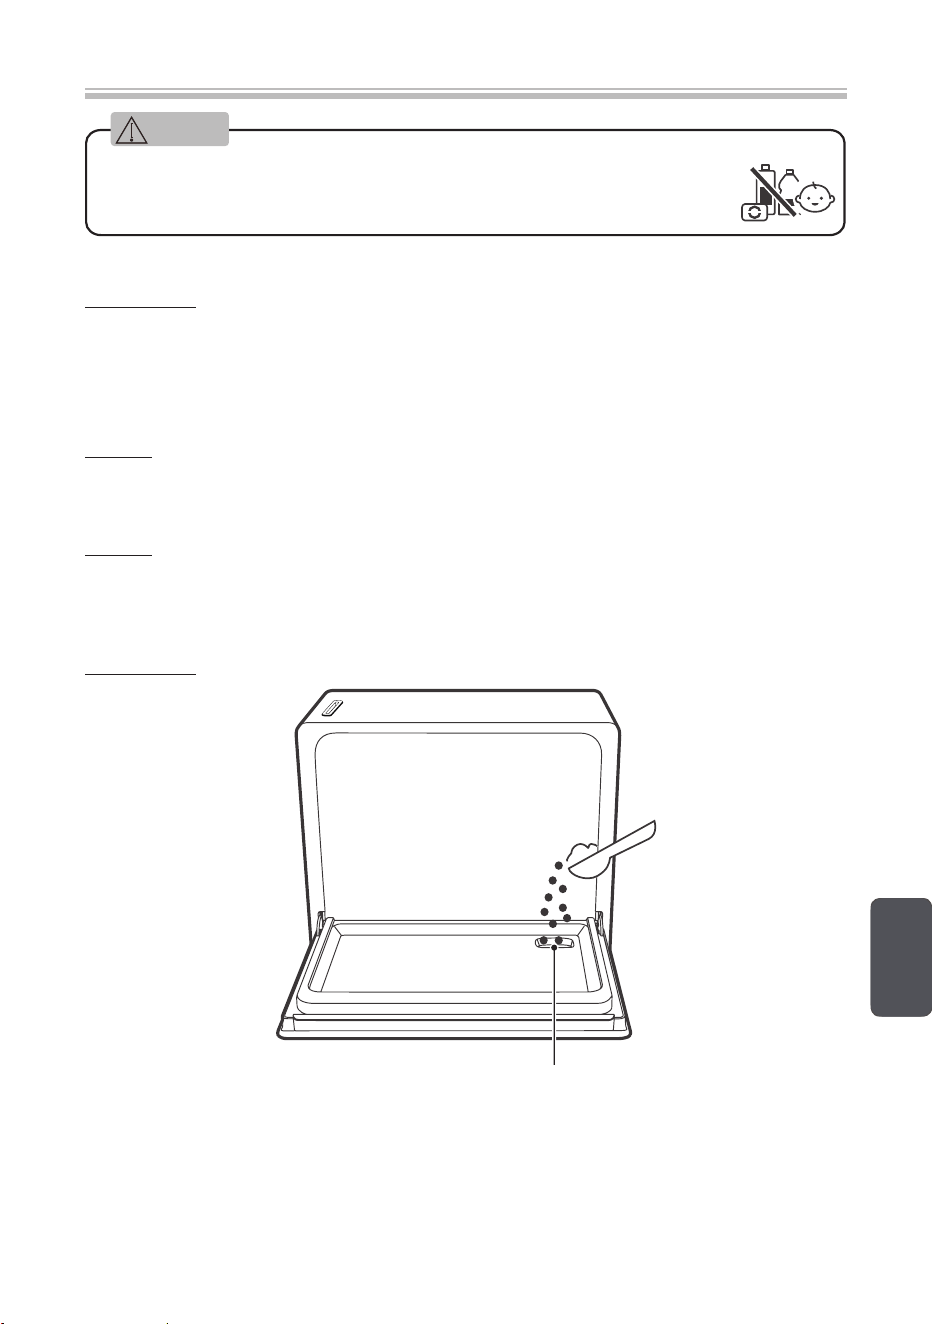
打開機門,放入碗碟和洗滌劑
根據尺寸從兩邊向中間擺放。 最好將碗碟傾斜放置,以達到更好的清洗效果。 放置不當會
造成清洗過程中斷或清洗效果不理想。
拉開
左側 右側
將洗滌劑放入添加處
餐具擺放方位不當也會影響清潔。
儘量將有污垢的一面朝向噴淋臂。
關門,打開洗碗機,選擇程式,按下 按鈕
兒童鎖
延遲開始( - )
延遲開始( + )
高溫清潔
熱風烘乾
啟動/暫停
兒童鎖
延遲開始( - )
延遲開始( + )
高溫清潔
熱風烘乾
啟動/暫停
啟動/暫停
11
重要提示:
首次使用洗碗機前,請閱讀以下說明,以確保最佳效果。
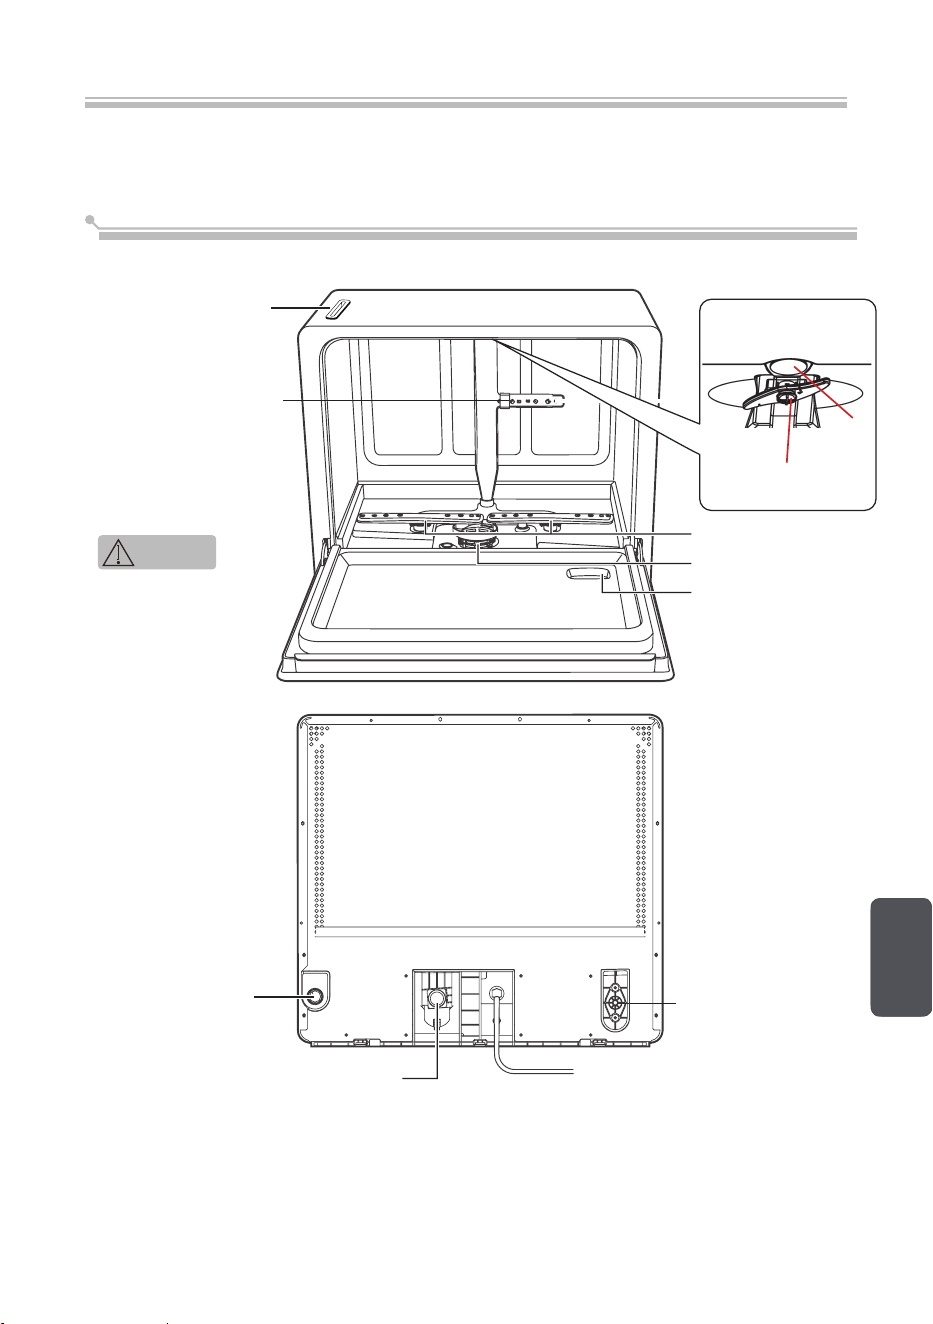
洗碗機功能
■ 正面
排氣口
內腔頂部
照明燈
上噴臂
中噴臂
■ 背面
排氣口用於排出蒸
氣,以促進洗滌循
環的乾燥性能。
排水管接口
進水管接口
電源線
下噴淋臂
過濾器(Ag+)
洗滌劑添加位置
自吸水管接口
認識洗碗機
中文
注意
12
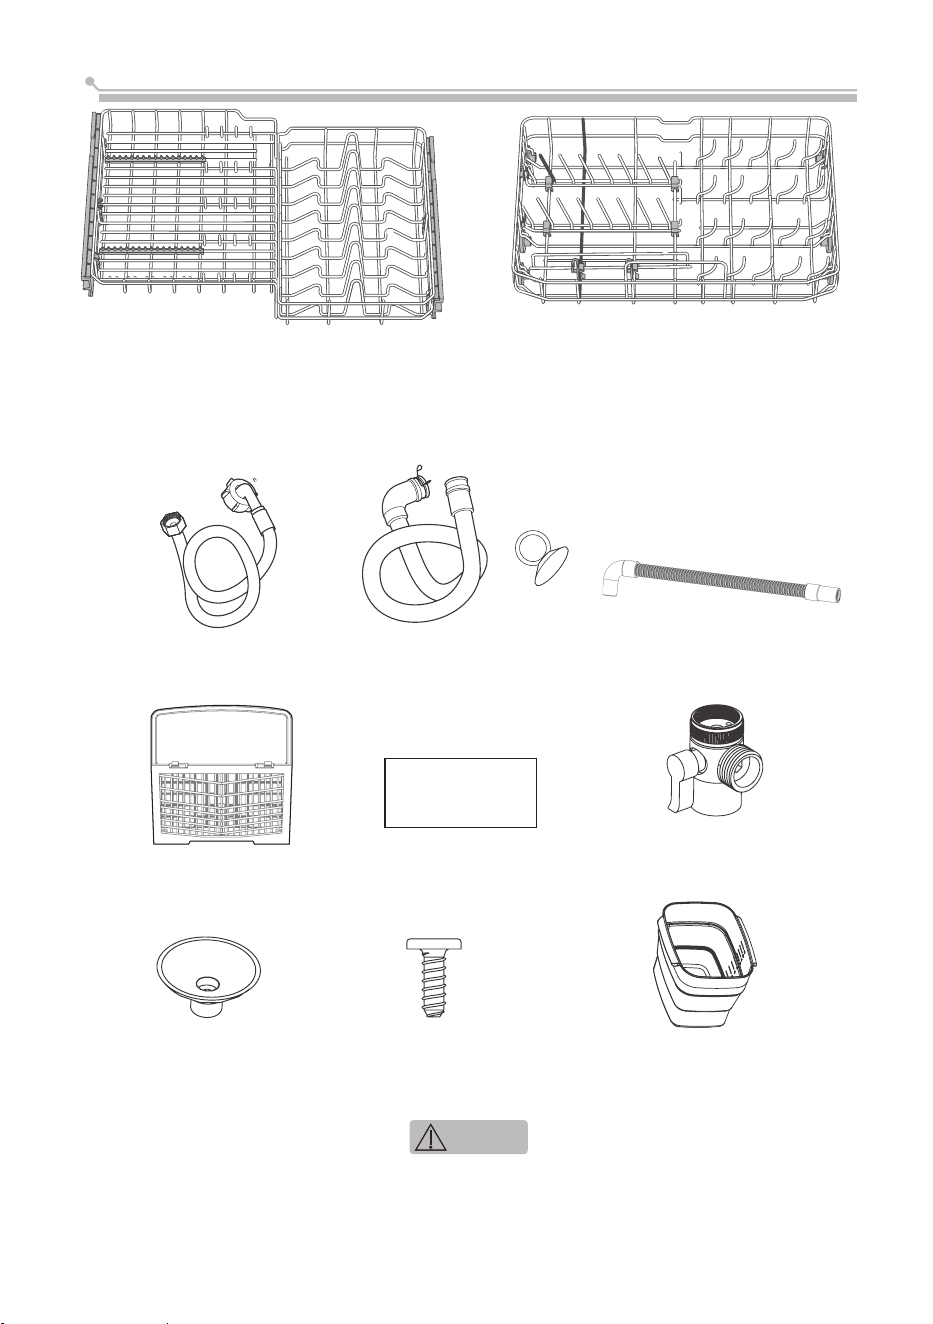
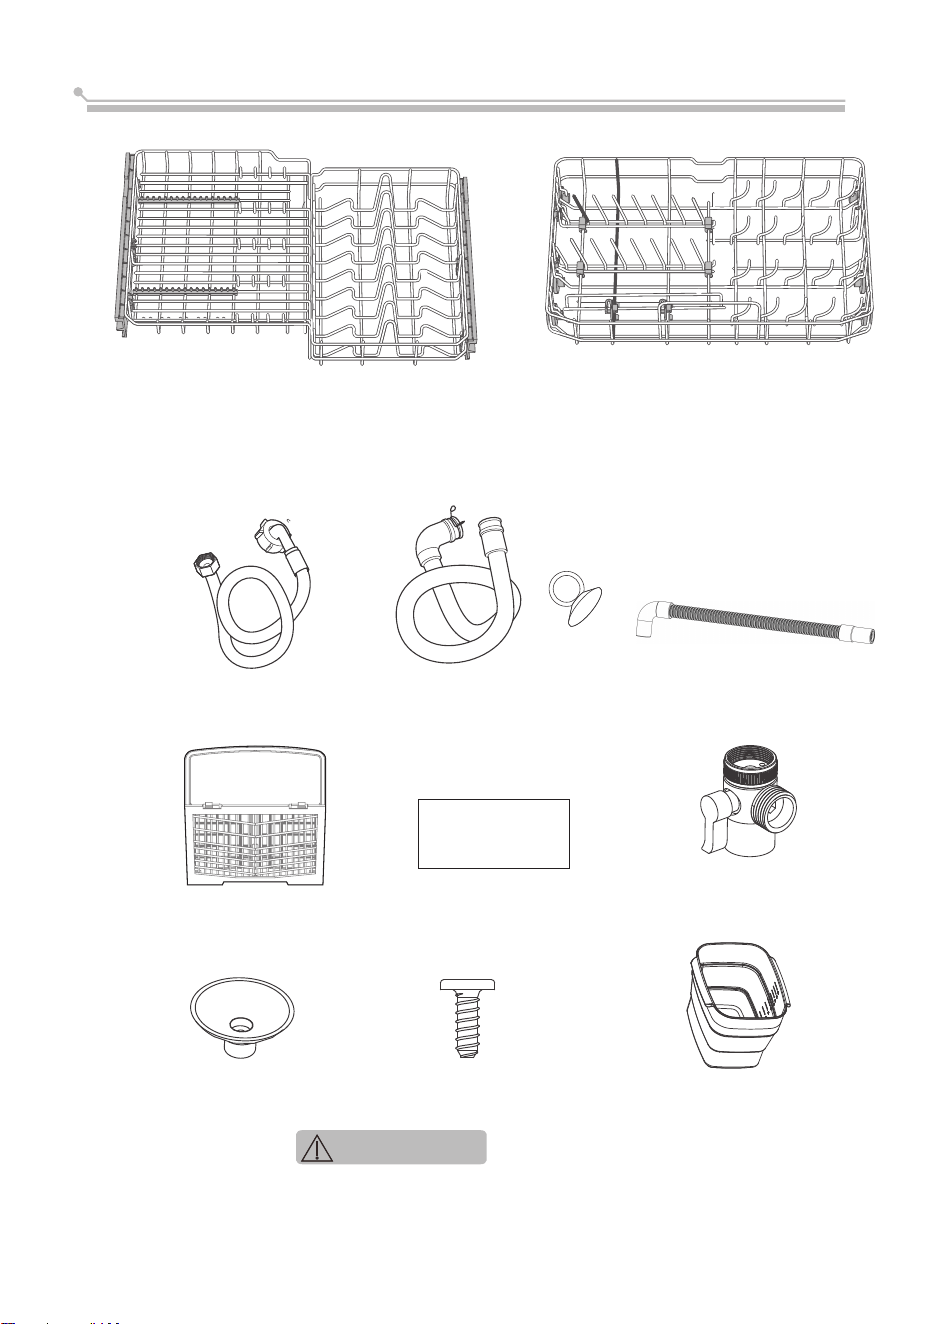
配件
上碗籃
進水管(X1)
吸盤(X2)
筷子籃
排水管(X1)
螺釘(X2)
防腐貼紙(X1)
自吸水管(X1)
摺疊水桶(X1)
三通接頭(X1)
配件清單
下碗籃
使用前請務必安裝好吸盤,避免潛在危險!
注意
13
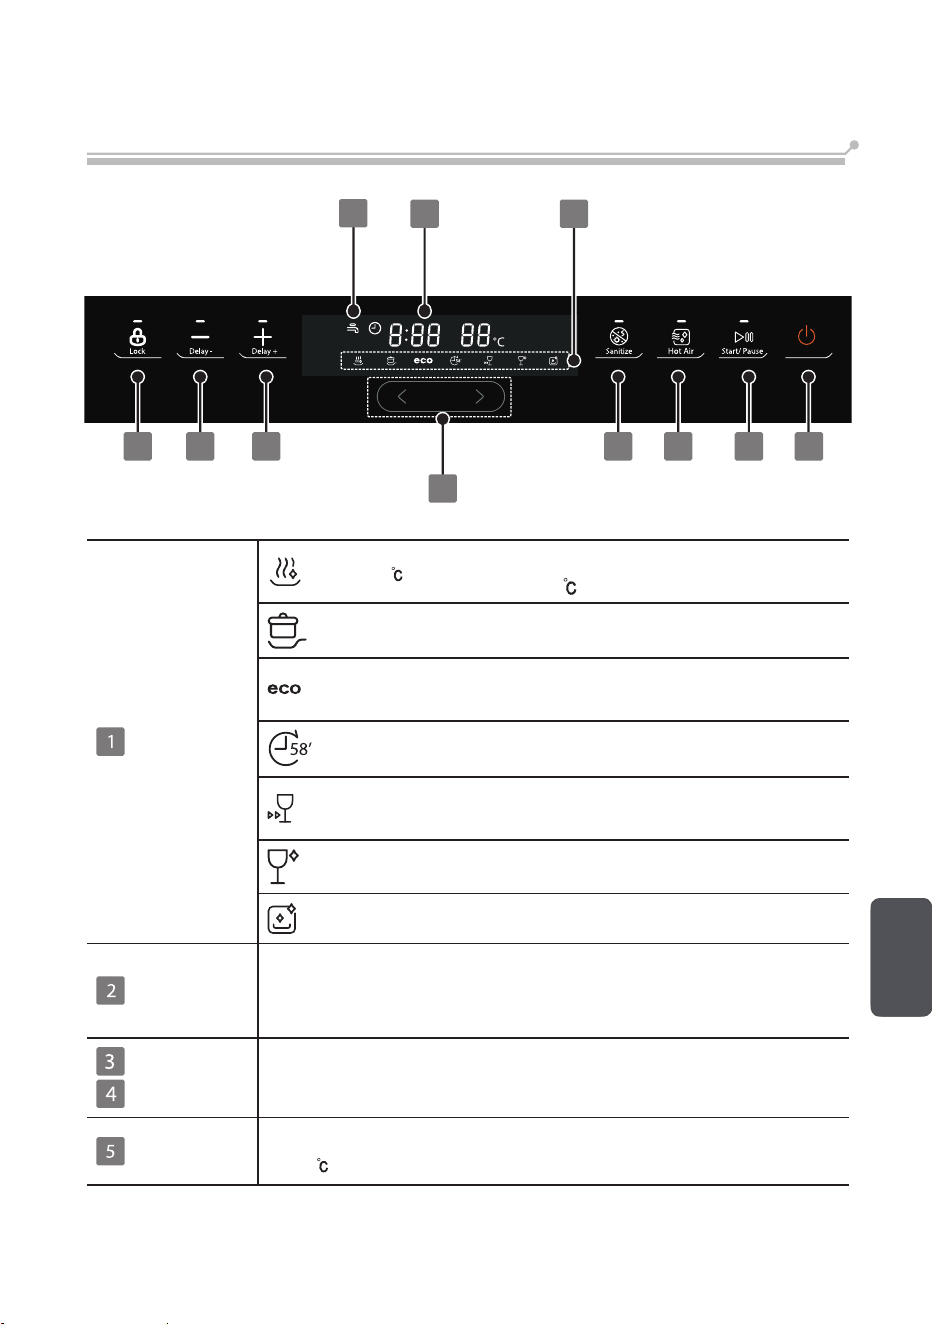
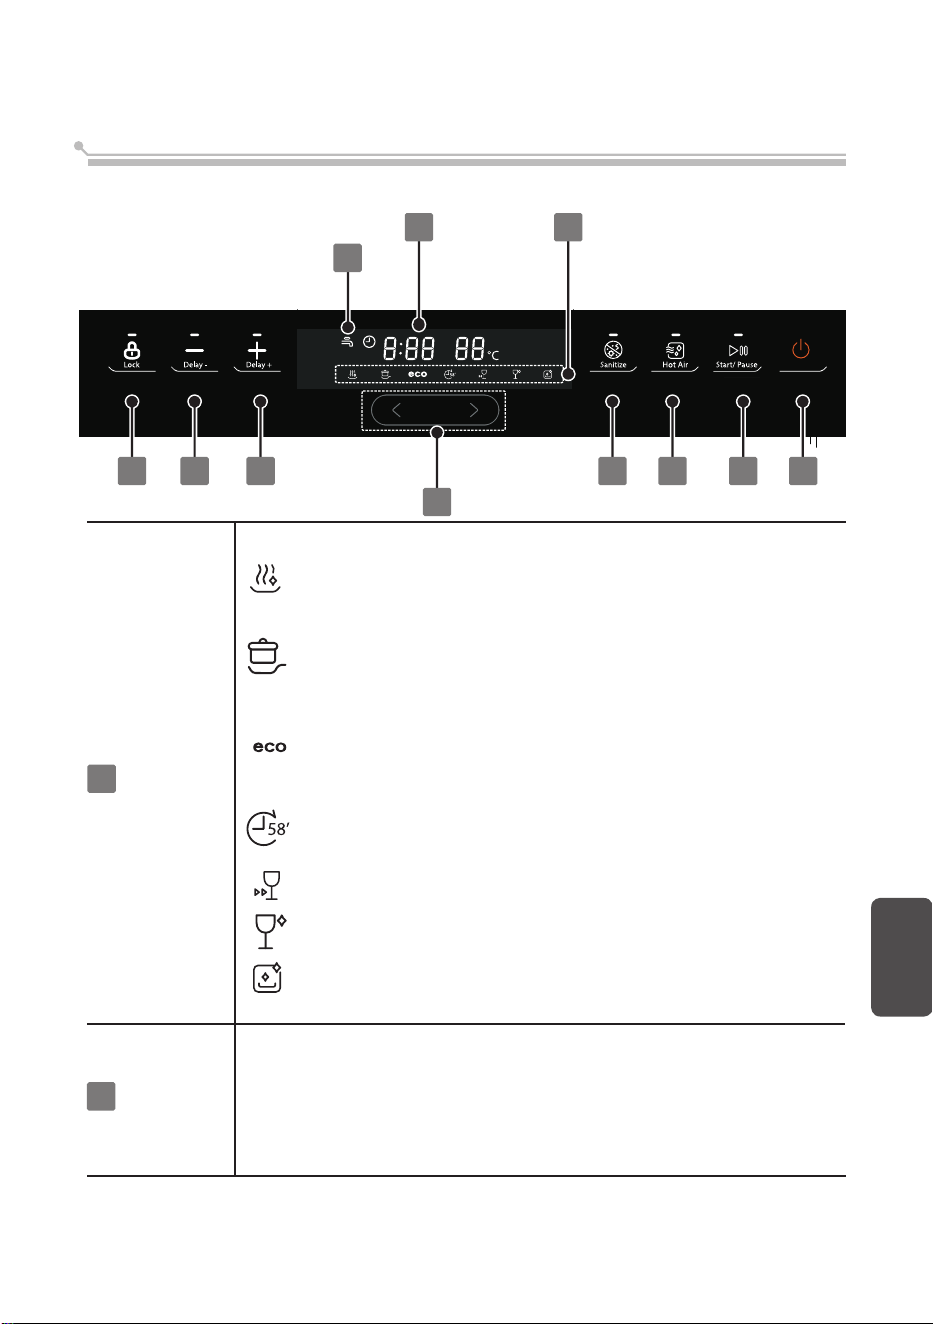
控制台
23
4
56
78
1
10
9
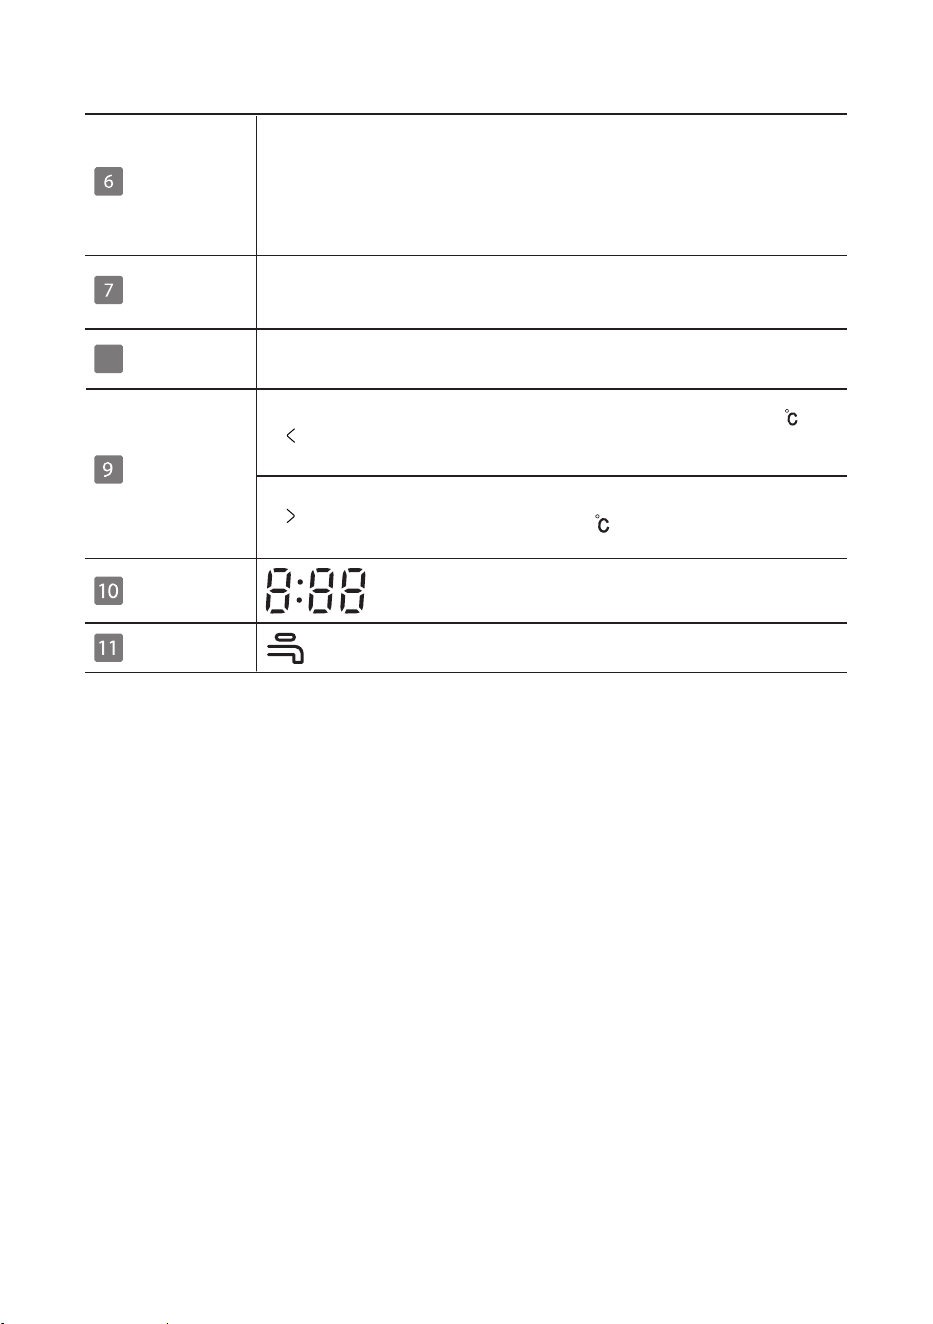
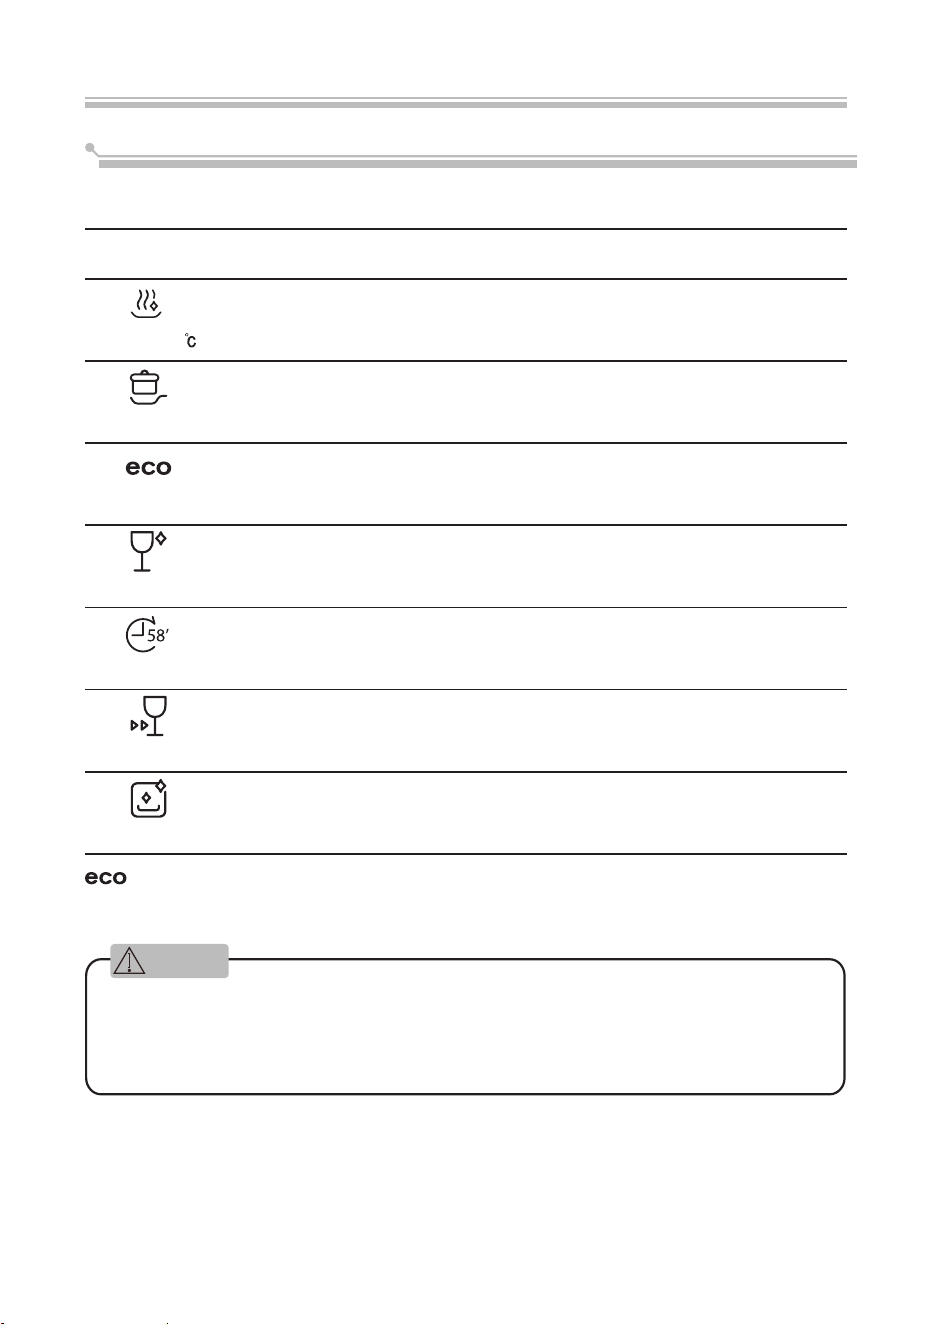
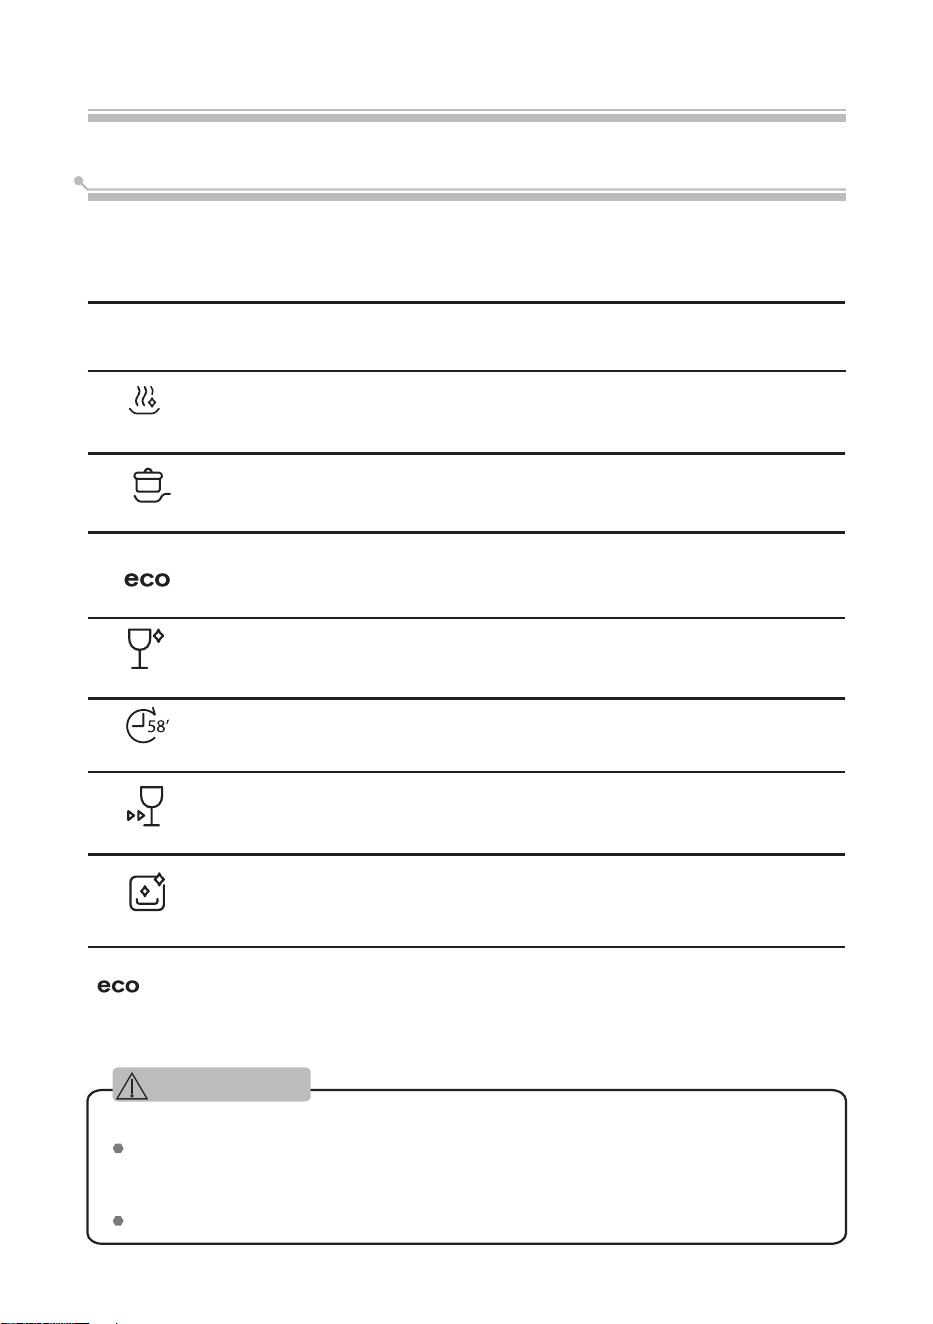
程式
衛生
強洗
用於帶有油污及特別髒污的烹飪用具和餐具。
節能
用於一般髒污程度的餐具及用具(例如
鍋、碟子、玻璃杯)。
58 分鐘
用於需要快速清洗的餐具。
快洗
用於輕微髒污的餐具,清洗時間相對較短。
玻璃
用於輕微髒污的餐具及玻璃器皿。
機身清潔
此程式可以有效地自行清洗洗碗碟機。
兒童鎖
長按 3 秒,選擇童鎖功能。 此功能可鎖定控制面板上的按
鍵,防止兒童按下控制面板上的按鍵而意外啟動洗碗機。 只
有「開/關」鍵仍可操作。
延遲開始
按此鍵可增加或減少延遲開始時間。
以一小時為單位,最多延遲 24 小時。
高溫清潔
啟動/暫停
11
熱風烘乾高溫清潔延遲開始( + )延遲開始( - )兒童鎖
70
在漂洗階段用高溫清洗餐具。(不能與「玻璃」、「衛
生
70
」、「快洗」和「機身清潔」功能一起使用)
中文
用於清除碟子和玻璃器皿上的細菌。
水溫維持在
70
。
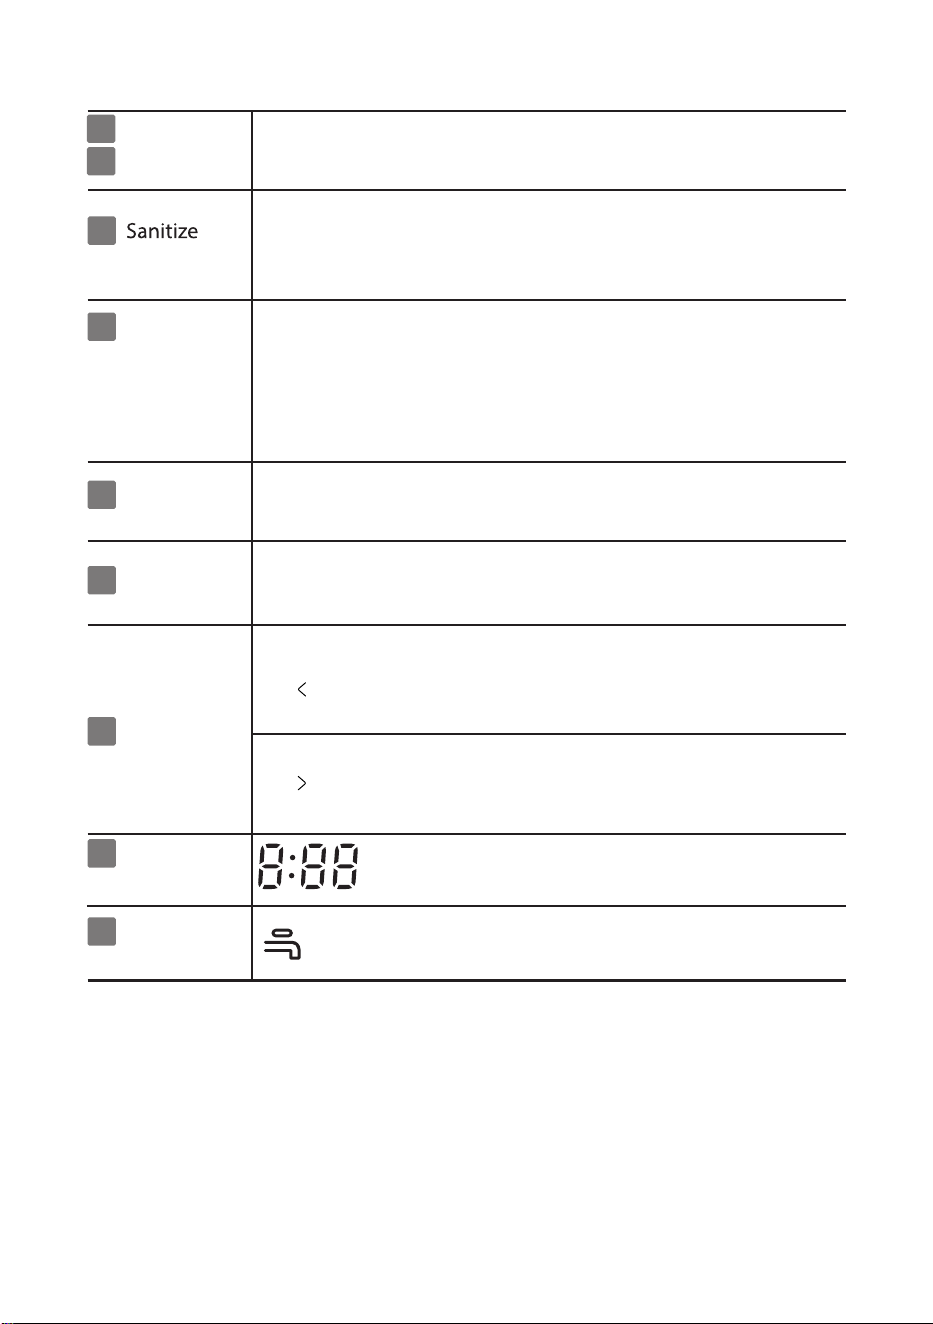
14
熱風烘乾
噴出熱風烘乾餐具, 待洗滌過程完結後即可使用。
合共3個選擇, 可滿足不同需要。
· 除異味 – 60分鐘
· 溫碗碟 – 120分鐘
· 漂洗 + 熱風 – 100分鐘
啟動/暫停
啟動或暫停洗碗機的洗滌過程。
開/關
按下此按鍵,開/關洗碗機,螢幕將亮起。
顯示
顯示剩餘時間和預約時間、故障代碼等。
警告指示燈
水量不足指示燈
8
程式選擇
按鍵
按此按鍵往左選擇程式: 節能>強洗>衛生70
>機身清潔>玻璃>快洗>58分鐘>節能。
按此按鍵往右選擇程式:節能>58分鐘>快洗
>玻璃>機身清潔>衛生70 >強洗>節能
15
安裝洗碗機碗籃
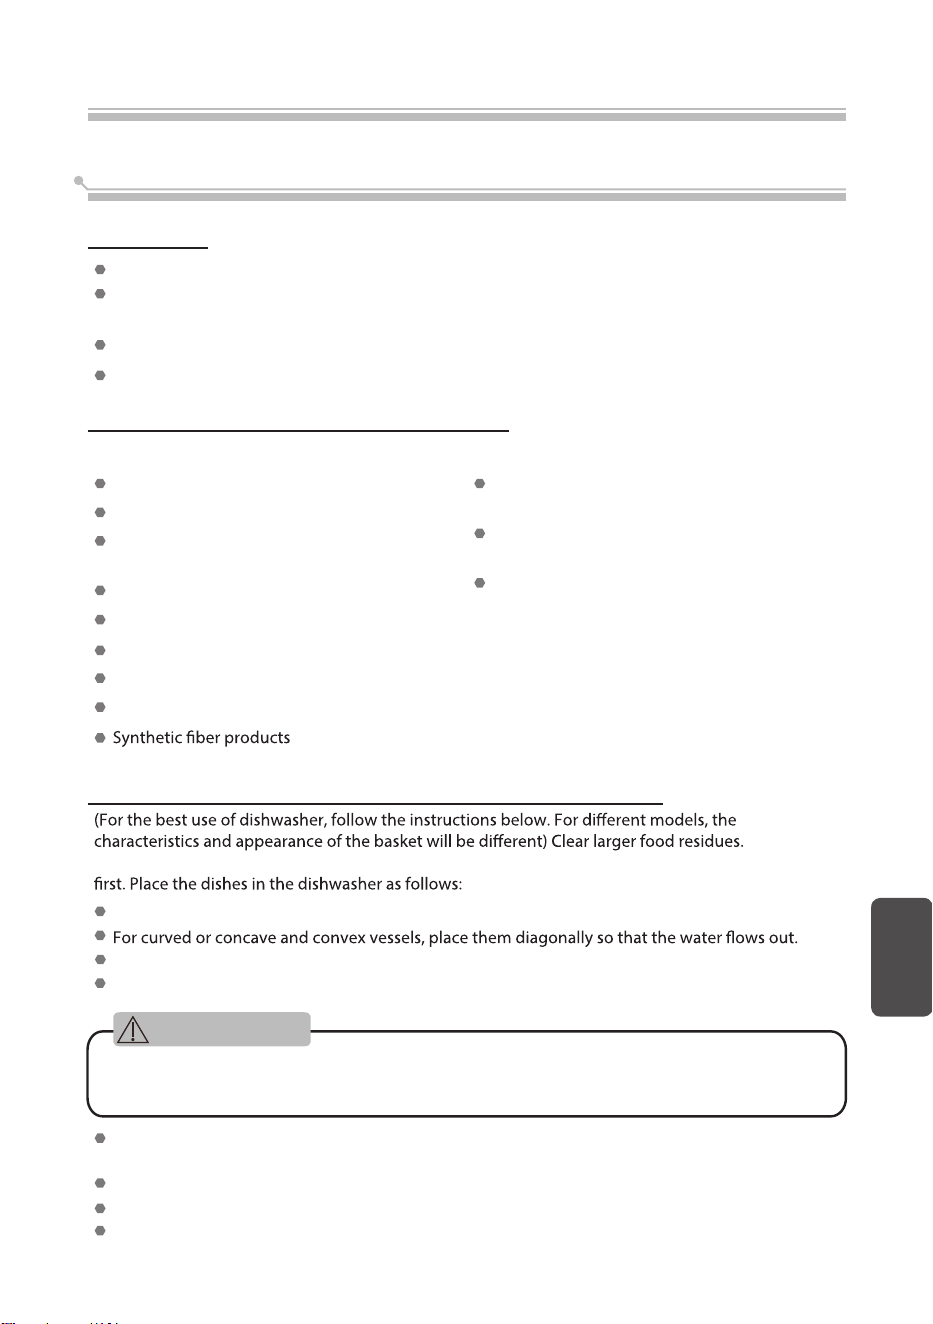
建議
¤
購買適用於洗碗機的餐具。
¤
使用合適的溫和洗滌劑。 如需瞭解更多資訊,請諮詢製造商。
¤
清洗特殊器具時,儘量選擇低溫洗程式。
¤
程式結束後,請勿立即取出玻璃器皿,防止其損壞。
合理使用洗碗機
不適用於:
¤
木制、象牙、瓷或珍珠柄工具
¤
非耐熱塑膠製品
¤
帶膠粘零件的
¤
陳舊非耐熱刀具
¤
粘合刀具或餐具
¤
錫或銅容器
¤
水晶玻璃杯
¤
生銹鋼製品
¤
木制廚具
¤
合成纖維製品
在以下情況有限使用:
¤
有些玻璃器皿經過幾次清洗後會變暗
¤
銀或鋁製品在清洗過程中容易變色
¤
光滑的餐具若經常清洗可能會掉色
碗籃放置前後注意事項
(為了更好地使用洗碗機,請按照下述說明操作。 機型不同,則碗籃的特性和外觀會有所不同)
清除較大塊食物殘渣。 軟化鍋上燒焦的食物殘渣。 不需要先用水漂洗餐具。 按照以下步驟將餐具
放入洗碗機中:
¤
茶杯、玻璃杯、鍋等餐具面朝下放置。
¤
彎曲或凹凸容器對角放置,讓水流出。
¤
所有器皿應安全放置,不得倒置。
¤
所有器皿的擺放位置應確保洗碗過程中噴淋臂可以自由旋轉。
小餐具容易從碗籃裡掉出來,因此不宜放在洗碗機內。
¤
中空餐具(如茶杯、玻璃杯、鍋等)的開口應朝下,這樣水就不容易留在容器或洗滌槽內。
¤
餐具和刀具不能放在其他器皿中,也不能相互重疊。
¤
玻璃杯之間的位置不要太近,以防損壞。
¤
長刀具垂直放置會比較危險。
¤
長或鋒利的刀具(如切肉刀)應水平地置於碗籃中。
¤
洗碗機不能超負荷使用,否則無法獲得良好的洗滌效果。
使用洗碗機
中文
注意
16
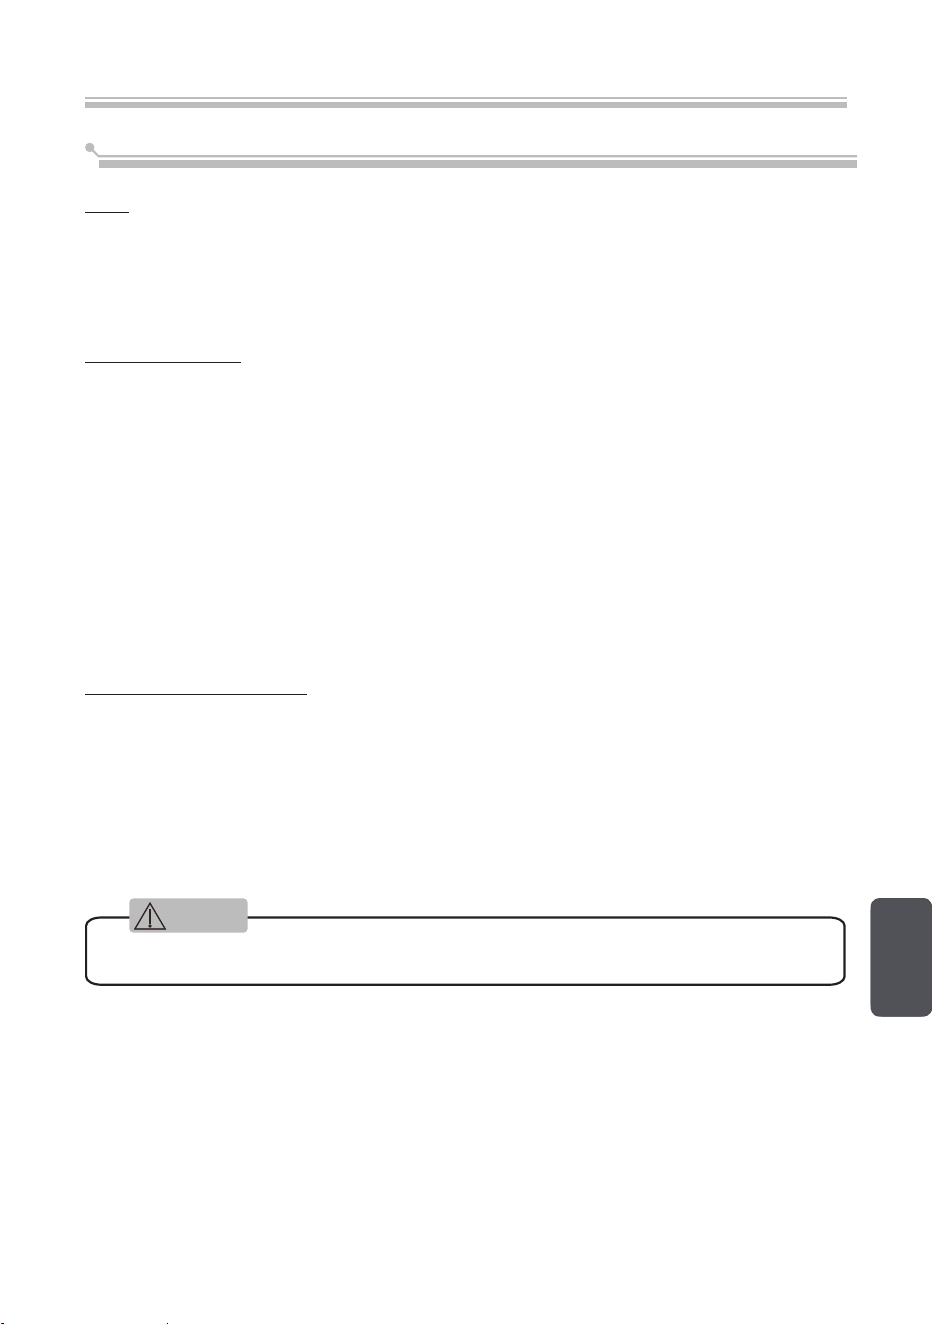
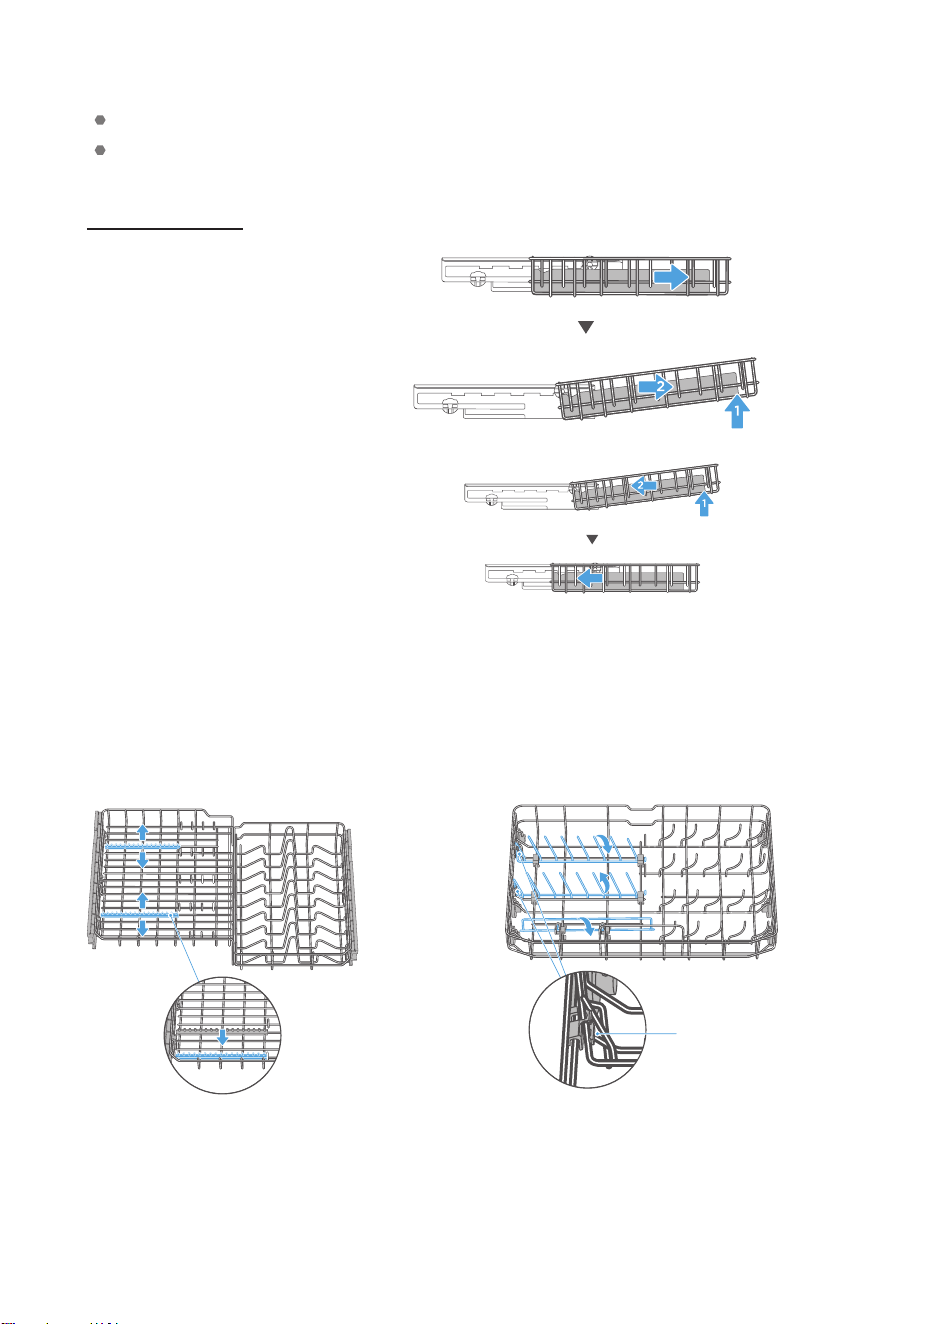
碗籃的使用
如何移出上碗籃: 拉出上碗籃,然後將碗籃提
升至一定角度,繼續拉出。
上碗籃碗筷架的使用方法:
碗筷架可以移動,以適應不同長度的筷子。
下碗籃可折疊翻轉叉齒的使用方法:
可折疊的翻轉叉齒可組合成扁平形狀,可容納
大鍋。
當豎起折疊翻蓋
時,請務必將其
卡入帶扣中。
17
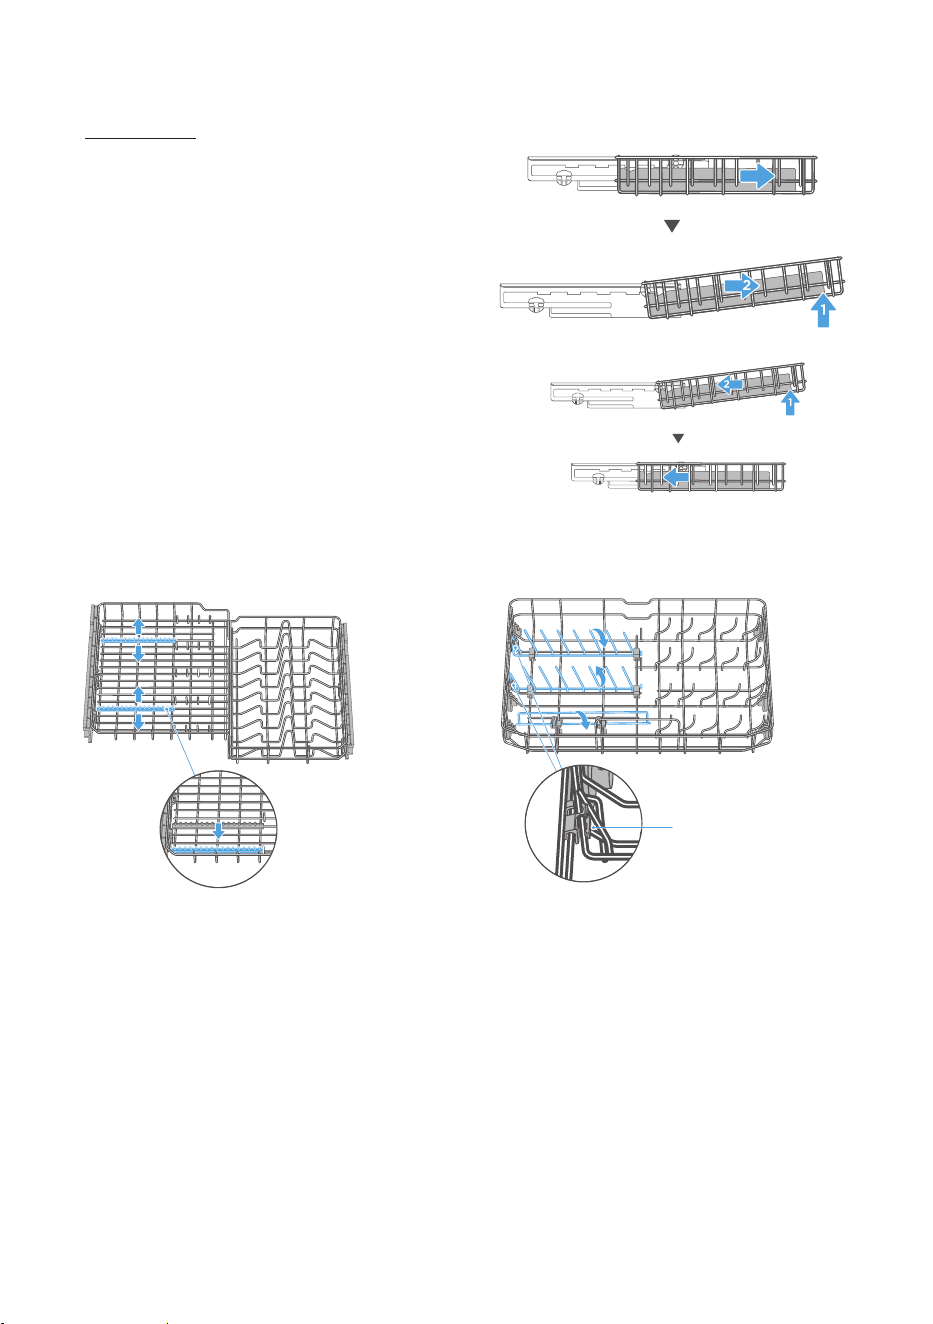
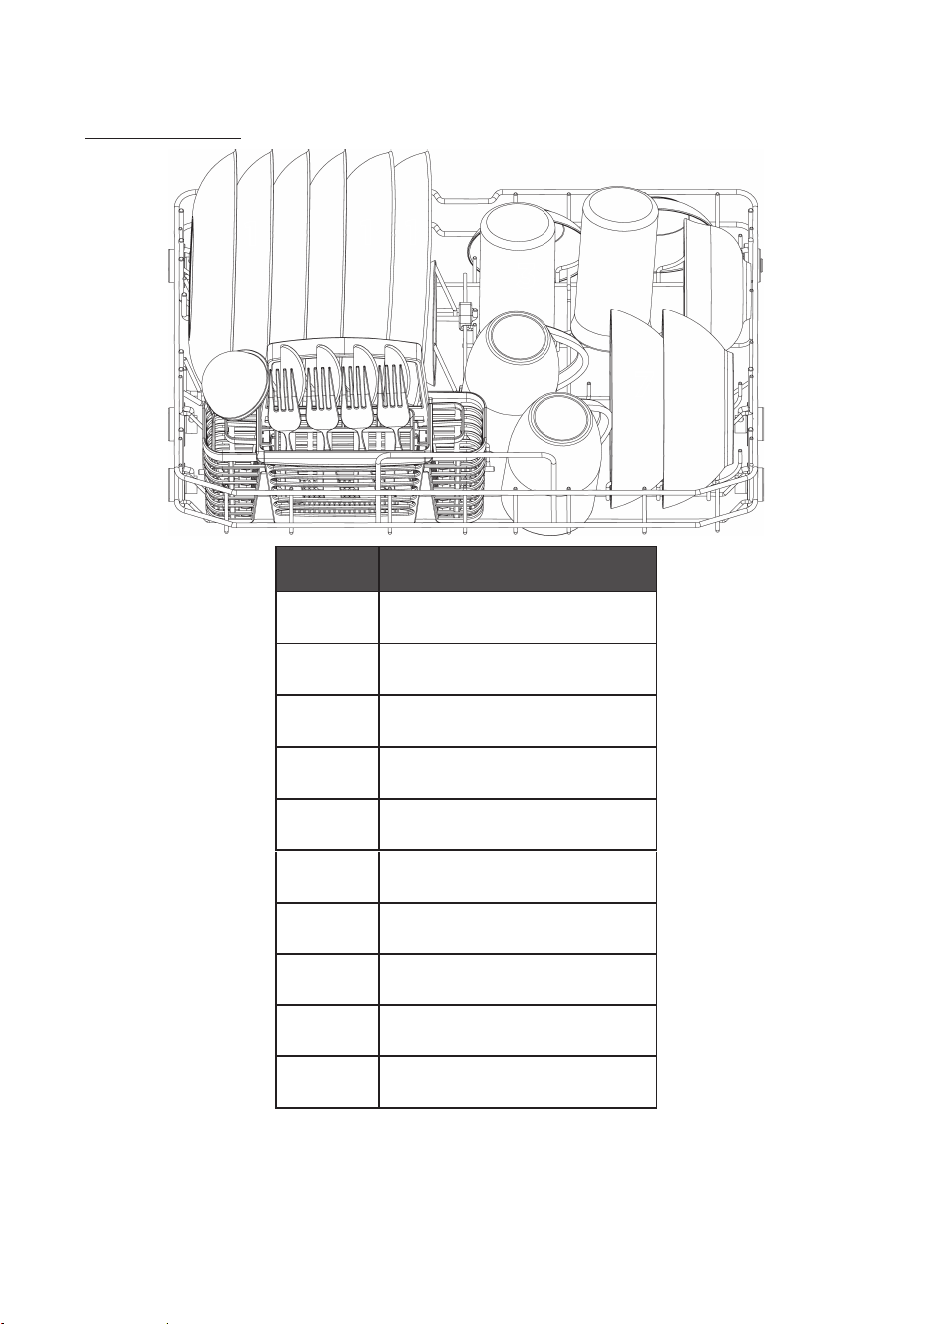
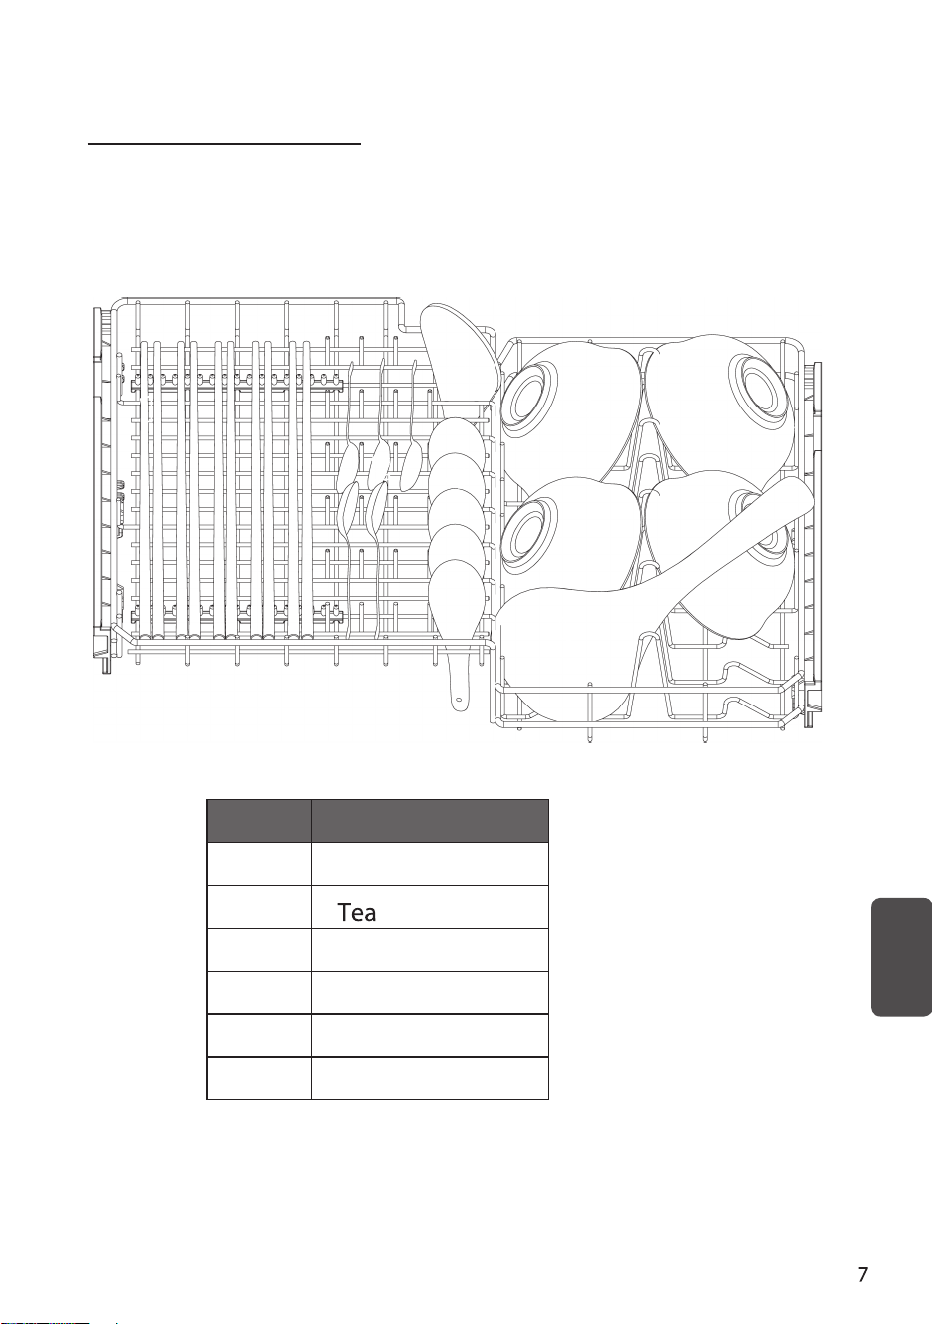
上碗籃餐具放置
餐具應妥善擺放,避免被水流移動。 為方便噴淋水柱清洗表面,留有污垢的表面必須
朝內。
序號 物品
1
筷子
2
飯勺
3
碗
4
湯勺
5
碗
6
3
6
1 1 1 1
2 2
2 2
2
4
4
4
5
55
5
1
中文
長柄湯勺
4
4
18
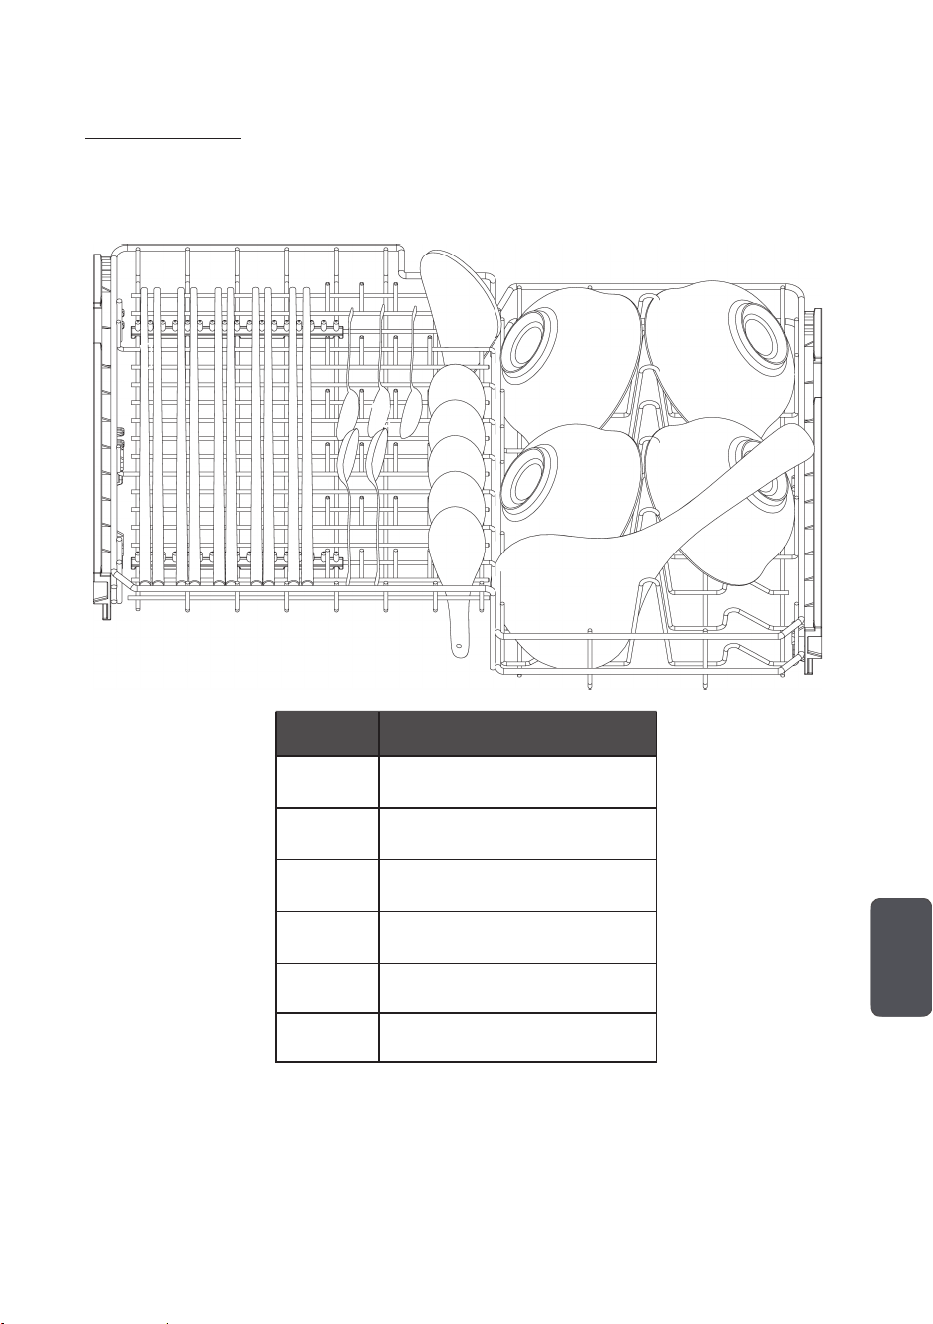
下碗籃餐具放置
序號 物品
1
淺盤
2
深盤
3
玻璃杯
4
小料碟
5
碗
6
馬克杯
7
面碗
為了人身安全, 請按照以下步驟將銀制餐具放入碗籃:
¤
他們不能堆在一起。
¤
放置銀制餐具時把手朝下。
¤
但是, 放置刀和其他潛在危險的餐具時把手應朝上。
5
4
4
6
6
8
1 1 1 1
2
1
4
33
77
10101010
9
9
9
9
9
10
8
肉湯勺
叉子
刀
19
¤
只能使用洗碗機專用洗滌劑。 請勿使用其他洗滌劑,以免損壞機器。
¤
洗滌劑有腐蝕性! 將洗滌劑放在兒童接觸不到的地方。
濃縮洗滌劑
根據化學成分的不同,有兩種基本類型:
¤
含腐蝕性成分的傳統鹼性洗滌劑。
¤
含天然酶的濃縮弱鹼性洗滌劑。
正常的洗滌程式,使用濃縮弱鹼性洗滌劑可減少污染和餐具損壞。
清潔片
不同品牌的清潔片溶出度不同。 當使用較短時間的洗滌程式時,有些清潔片不能完全溶解和充分
發揮作用。 因此,使用清潔片需要選擇時間較長的洗滌程式,確保清潔片完全去除。
洗滌劑
在每次洗滌程式之前,根據第 20 頁的洗滌程式表中提供的說明重新添加洗滌劑。 洗碗機使用的
洗滌劑比傳統洗碗使用的洗滌劑少。 一般來說,正常洗滌和一般污垢的餐具只需要一勺洗滌劑。
重污餐具需要添加更多洗滌劑。 請在啟動洗碗機前加入洗滌劑,否則會受潮難以溶解。
加入洗滌劑
添加位置
將洗滌劑放入添加處
中文
注意
20
洗滌程式
下表提供了清洗各類食物殘留的最佳程式,以及洗滌劑用量。 表中還提供了各清洗程
式的相關資訊。 除 ECO 程式外,消耗值和程式持續時間僅供參考。
程式 最高水溫 洗滌劑(g) 時間(分鐘)功率(kWh)用水量(L)
70℃ 15 170 0.970 8.5
強洗
65℃ 15 165 0.920 8.5
55℃ 15 165 0.710 8.5
玻璃
50℃ 15 130 0.510 8.5
58 分鐘
60℃ 15 58 0.590 6.8
快洗
55℃ 12 29 0.450 6.8
機身清潔
65℃ 15 125 0.760 8.5
: ECO程式適用於清潔一般髒污程度的餐具, 從該用途的綜合能量消耗和耗水量
來看, 能效最高。
以上程式資料僅供參考。 試驗條件如下:
¤
程式設置
衛生
70
節能
清洗容量: 46 件(筷子 *5+ 茶匙 *5+ 飯匙 *1+ 碗 *5+ 湯匙 *5+ 長柄湯勺 *1+ 淺盤 *5
+ 深盤 *1+玻璃杯 *2+ 小料碟 *3+ 馬克杯 *2+ 面碗 *2+ 肉湯勺 *1+ 叉子 *4 + 刀 *4)
¤
關機狀態和待機狀態下的用電量同樣為
0.49 W。
注意

21
節能
啟動程式:
應先將插頭插入插座。 電源應為 220V AC 50 Hz,插座為 10 A 220V AC。 在選擇
程式之前,按下「開 / 關」按鈕打開洗碗機。 按下所需程式的按鍵,相應的指示燈將亮起。
然後,按「Start/Pause」鍵開始洗滌。
如果在洗滌過程中按下「
Start/Pause
」按鈕,洗碗機每隔 60 秒發出一次蜂鳴聲,直到再
次按下「
Start/Pause
」按鈕。
更改程式
前提: 如果洗碗機工作時長較短,可更改洗滌程式。 否則,洗滌劑可能已被沖走,設
備可能已經排出洗滌水,在此種情況下,必須重新開始循環。
關門後,按下 Start/Pause 按鈕使機器暫停。
按下程式按鈕「>」或「<」3 秒以上,機器將處於待機狀態,然後可將程式更改為所需
的循環設置(參見標題為「啟動」的章節)。
顯示視窗顯示洗碗機的狀態:
a) 顯示視窗顯示「-:--」--------------------------------> 待機;
b) 顯示視窗顯示「H:MM」且不閃爍 -------------> 暫停;
c) 顯示視窗顯示「H:MM」且僅「: 」閃爍 ------------------------> 運行;
d) 顯示視窗顯示 "END"------------------------> 結束。
如果在洗滌過程中打開門,機器將暫停工作。 按下「Start/Pause」按鈕時,機器將在 10 秒
內繼續工作。
如果所購機型具有中斷記憶功能,機器將在斷電後繼續完成所選程式。
中文
注意
注意
1. 在使用過程中,按照說明使用家用洗碗機清洗餐具通常比手動洗碗消耗更少的能量
和水。
啟動
22
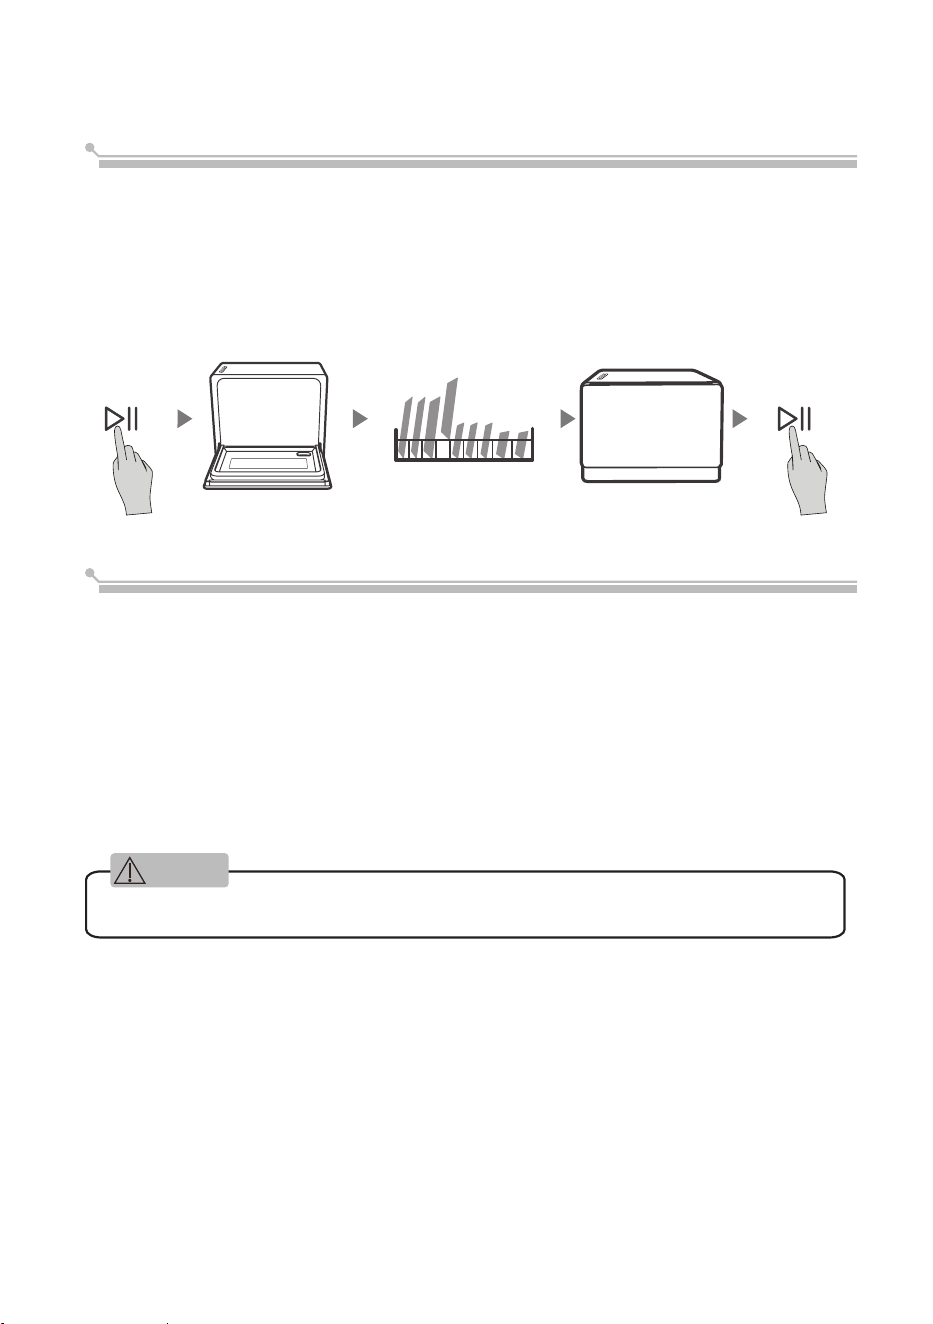
添加餐具
在洗碗機程式啟動之前,可以隨時添加餐具。 如需在洗碗過程中添加餐具,請按照以
下說明操作:
1. 按下「Start/Pause」鍵,洗滌程式暫停;
2. 等待 5 秒,然後開門;
3. 放入需添加的餐具;
4. 關門;
5. 按下「Start/Pause」鍵,10 秒後,洗碗機將重啟。
5 秒後
洗滌程式結束
程式結束後,蜂鳴器長鳴 8 秒後洗碗機顯示「結束」。 如欲立即停止機器,
請按下「開 / 關」按鈕。 然後等待幾分鐘,以免燙傷,之後打開洗碗機門並清
理乾淨。 當心餐具燙手。
¤
關閉洗碗機
按下開 / 關鍵關閉洗碗機。
¤
小心開門
餐具高溫時更容易損壞。 應將餐具冷卻約 15 分鐘後再從洗碗機中取出。
¤
清理洗碗機
洗碗機內部潮濕屬於正常現象。
在清洗過程中打開洗碗機門是非常危險的,熱水可能會導致嚴重燙傷。
警告
23
外部保養
門和門密封條
定期用柔軟濕布清潔門密封條,清除食物殘渣。 將餐具放入洗碗機時,食物和飲料殘
渣可能會滴到洗碗機門的側面。 這些表面在洗碗櫃外部,且無法通過噴淋臂將水噴到
表面。 關門前,應將所有殘渣清理乾淨。
控制面板
如需進行清潔,應僅使用濕的軟抹布對控制面板進行擦拭。
¤
為防止水滲入門鎖和電氣部件內,請勿使用任何類型的清潔噴劑。
¤
絕對不要在外表面使用擦洗劑或百潔布,否則會刮傷面漆。 一些紙巾也可能會刮
壞表面或留下刮痕。
內部保養
過濾系統
洗碗櫃基座內的過濾系統會將較粗的殘渣阻隔在洗碗循環之外。 當粗渣聚積,可能會
導致過濾器阻塞。 定期檢查過濾器的狀況,如有需要,請置於自來水下清洗。 按照以
下步驟清洗洗碗櫃內的過濾器。
清潔和保養
中文
注意
24
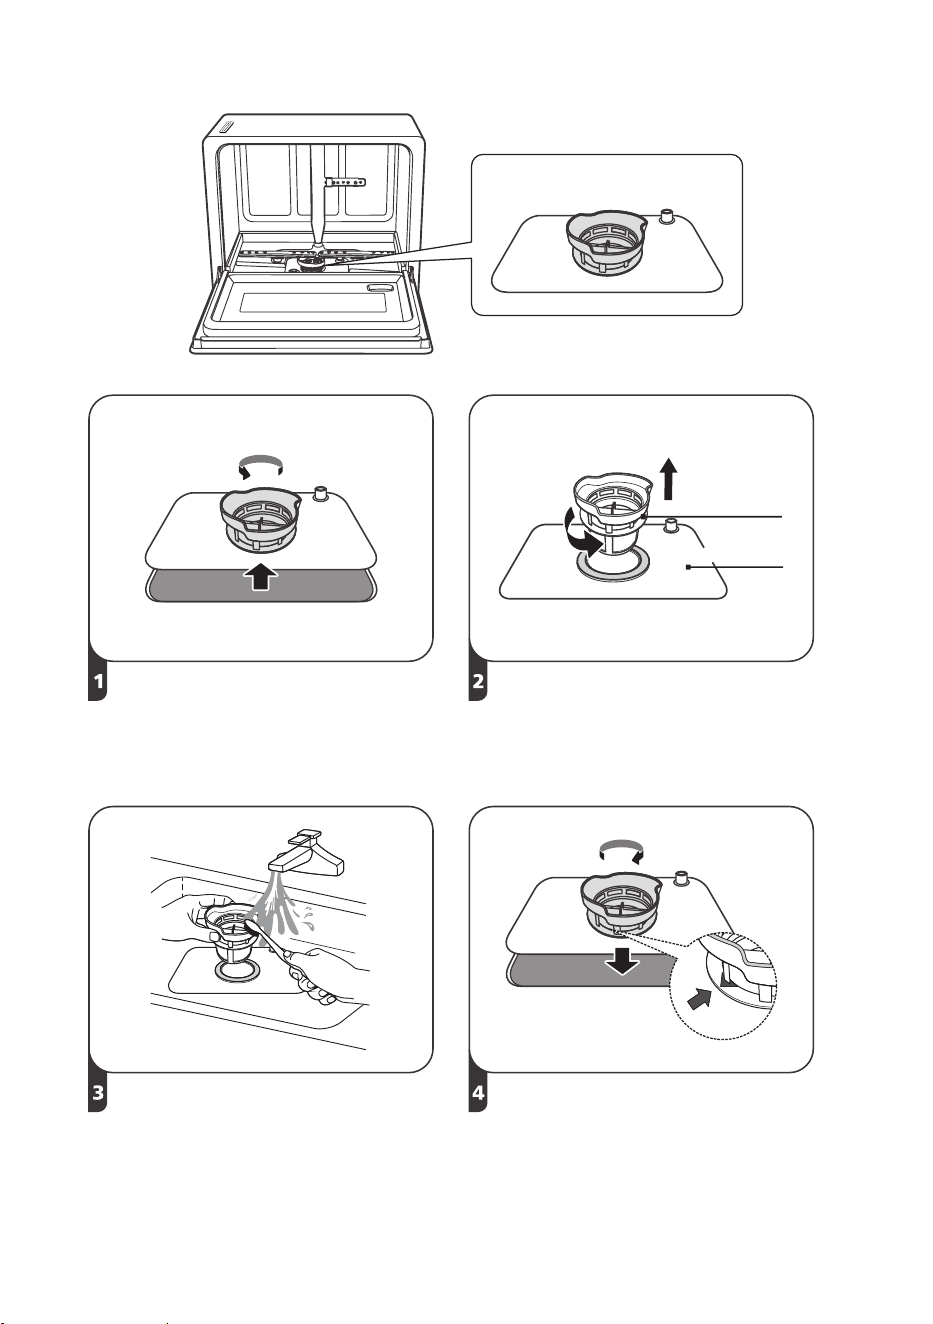
過濾系統
握住粗濾器並逆時針旋轉,解鎖粗濾
器。 向上提起粗濾器並將其從洗碗
機中取出。
將細過濾器從主過濾器上提起。
細濾器
主濾器
對於較大的食物殘渣,可以用自來水
沖洗過濾器將其去除。
如需更徹底的清潔,請使用軟清潔刷。
以與拆卸相反的步驟對過濾器進行重
新組裝,更換濾芯,並順時針轉動到
關閉箭頭。
25
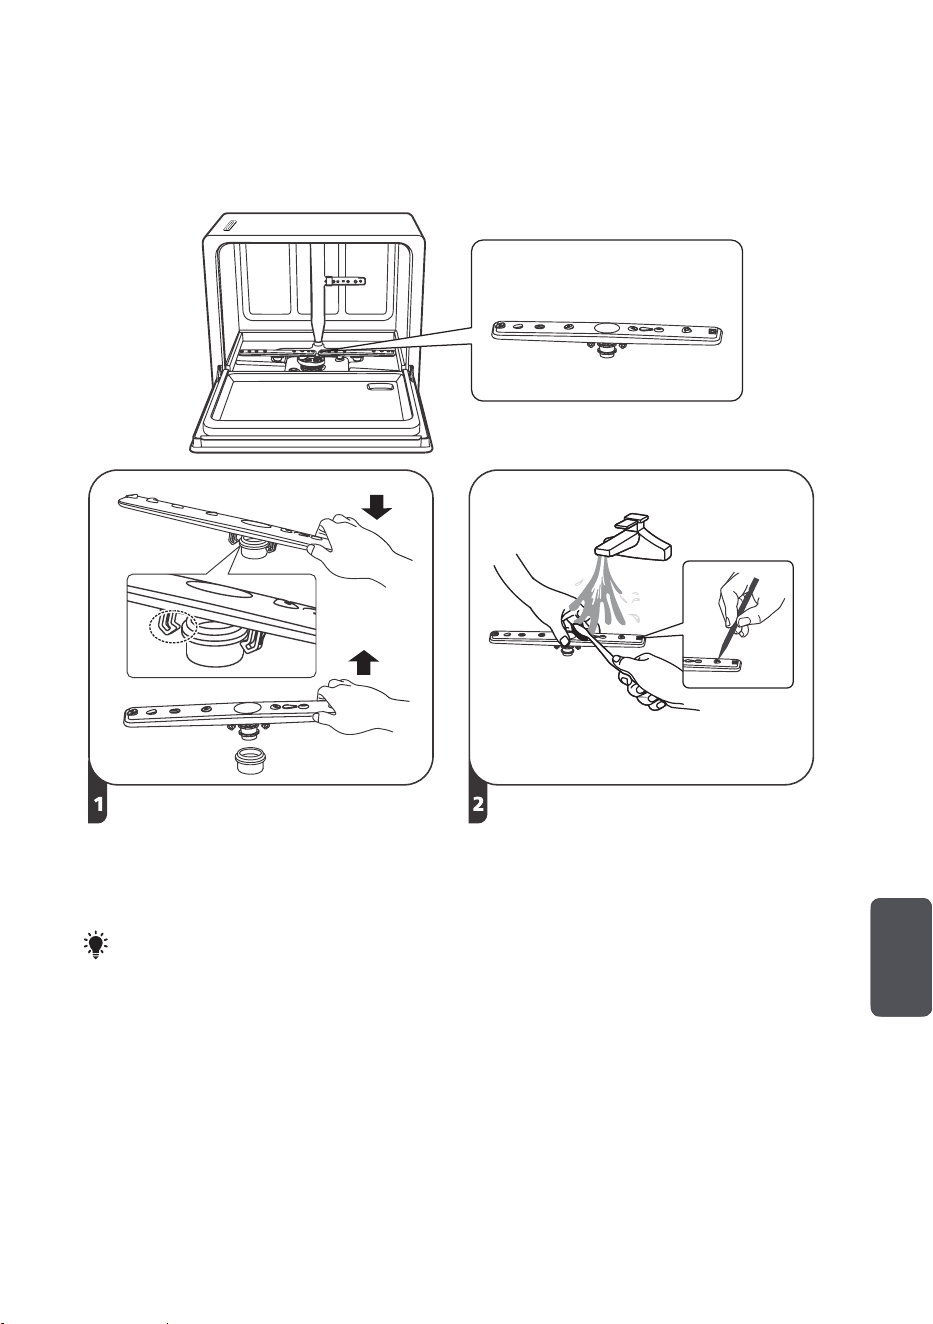
噴臂
由於硬水中化學物質會阻塞噴臂的噴嘴和軸承,必須定期對噴臂進行清潔。
清潔噴臂時,請按照下述說明操作:
噴臂
拆卸噴臂時,請先握住噴臂的一端,
然後用力按下,鬆開按鈕,向上拉
出。
把噴臂放在溫熱的肥皂水中清洗,並
使用軟毛刷清潔噴嘴。 徹底沖洗
後,進行更換。
注意
握住噴臂兩端一側,避免拉出時碰到上碗籃。
中文
26
保養與維護
控制台可用稍濕的抹布擦拭。 清潔後,確保控制台完全乾燥。
請勿在洗碗機的任何部位使用鋒利的工具、刮擦海綿或粗糙的洗滌劑。
¤
請勿使用噴霧型洗滌劑清洗洗碗機門,否則會損壞門鎖和其他電氣部件。
¤
請勿使用研磨劑或粗糙的紙巾,否則可能會在不銹鋼表面留下劃痕或劃斑。
安裝
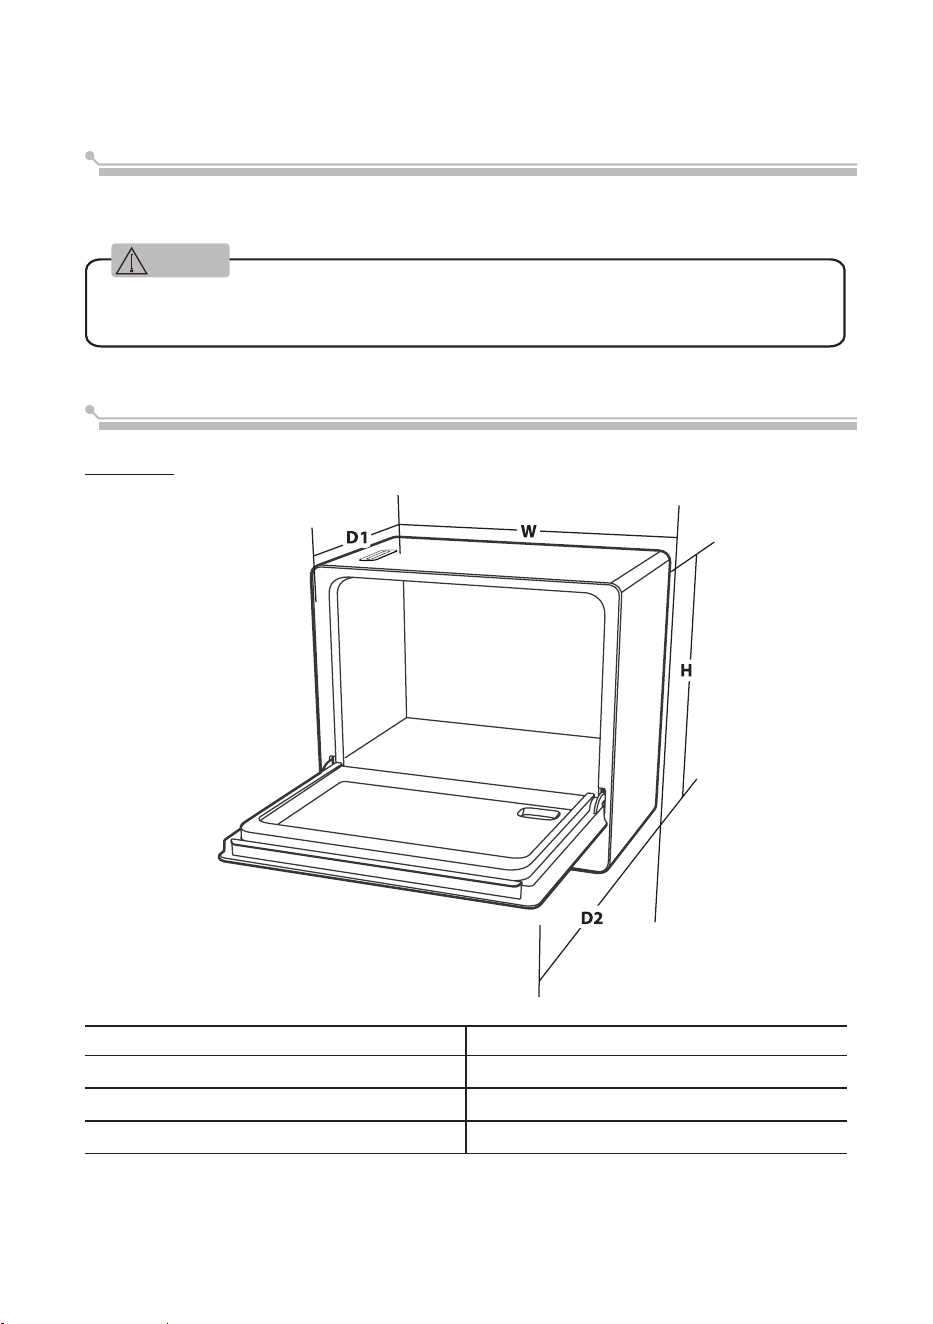
產品尺寸
高度(H)
500 mm
闊度(W)
550 mm
深度(D1)
345 mm(門關閉)
深度(D2)
713 mm(門打開 90°)
警告
27
觸電
應先斷電再安裝洗碗機。 否則,可能導致觸電或死亡。
使用前請確保洗碗機正確接地。
電源連接
觸電
¤
請勿給洗碗機配置延長電源線或電源適配器。
¤
請勿切斷或拆除接地連接的電源線。
電源要求
請查閱電源系統上的額定值標籤,了解額定電壓,並接通洗碗機的相應電源。 要求使
用 10 A 熔斷器,建議使用延時熔斷器或斷路器。 本洗碗機僅適用單獨電路。
洗碗機連接
確保電源電壓和頻率與銘牌上的所示值相對應。 插頭只能接至正常接地的插座。 如果
洗碗機須連接的插座與插頭不相容,則更換插座,不要使用電源適配器,否則可能引起
過熱和燒毀。
接地說明
本設備必須接地。 如果發生故障或失靈,接地將通過提供電阻最小的電流路徑來降低
觸電風險。
本設備配有一根電線,該電線具有一個設備接地導體和一個接地插頭。 插頭必須插入
適當的插座,插座的安裝和接地應符合所有當地標準和要求。
安裝前準備
機器應安裝在靠近現有水龍頭、出水口和插座的位置。 機器應靠近排水口,便
於連接排水管。
放置位置
將機器放置在適當的位置上。背部應流出合適的距離用於水管的安裝,側面
沿著相鄰的櫥櫃或牆壁。
機器配有排水管,可放置在左側或右側,便於安裝。 此外,還可使用進水
管或自吸水管向摺疊水桶中加水。 詳情請聯繫代理商。
中文
警告
警告

28
安裝吸盤
用螺絲刀將吸盤擰緊到機器背面底部左右兩側的孔中。
排氣口
排氣口
放置在檯面上
防腐貼紙
5cm 以上
洗碗機
頂板
有出風口,以提高洗滌循環的乾燥性能。 為防止水霧腐蝕木制機櫃,
應儘量避免出風口正對木制機櫃,或在木制機櫃上粘貼防腐貼紙。
將貼紙粘貼在面向出風口的木制機櫃上。
上方空间30cm 以上
注意
29
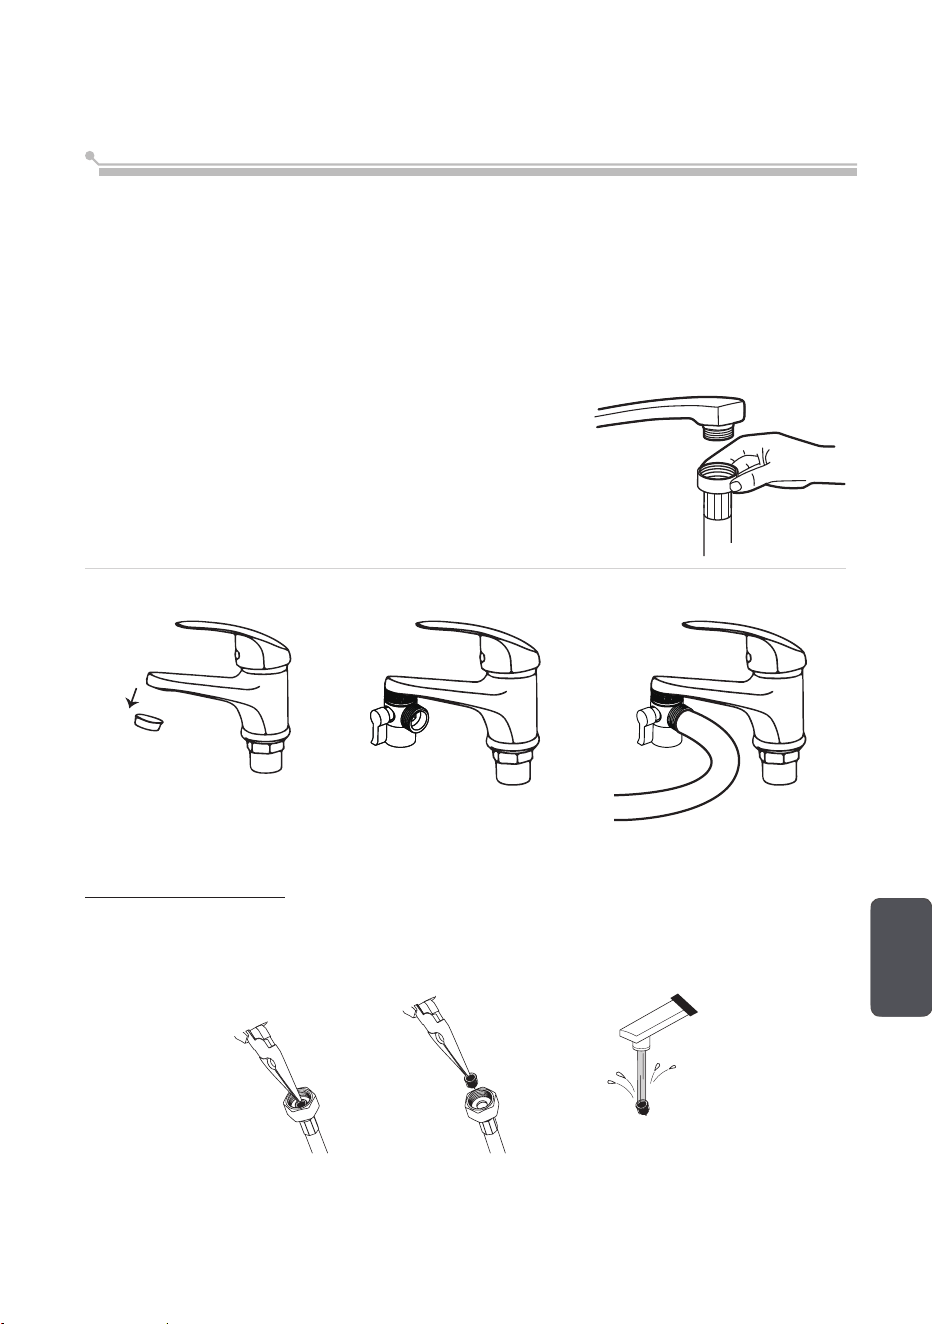
進水管接水龍頭
將冷水供應軟管連接到 3/4(英寸)的螺紋接頭上,並確保擰緊。如果水管全新或長時
間未使用,讓水流動以確保水清澈無雜質。如果不採取此預防措施,進水口可能會堵塞
並損壞設備。
請注意:如果配備的軟管接頭不適合水龍頭,請聯繫當地的管道供應中心,有適配器可
供購買。
進水管與水龍頭有兩種連接方式。
1. 直接連接水龍頭。
2. 使用三通連接。
(1) (2) (3)
清洗進水管過濾裝置
進水管端部與水龍頭之間設有一個過濾系統,可用于過濾掉水中的雜質。 隨著時間的
推移,累積的雜質越來越多,可能會堵塞水管。 因此,建議每月檢查一次進水管的狀態,
必要時用鉗子將過濾器從進水管上拆下,用自來水清洗雜質。
中文
30
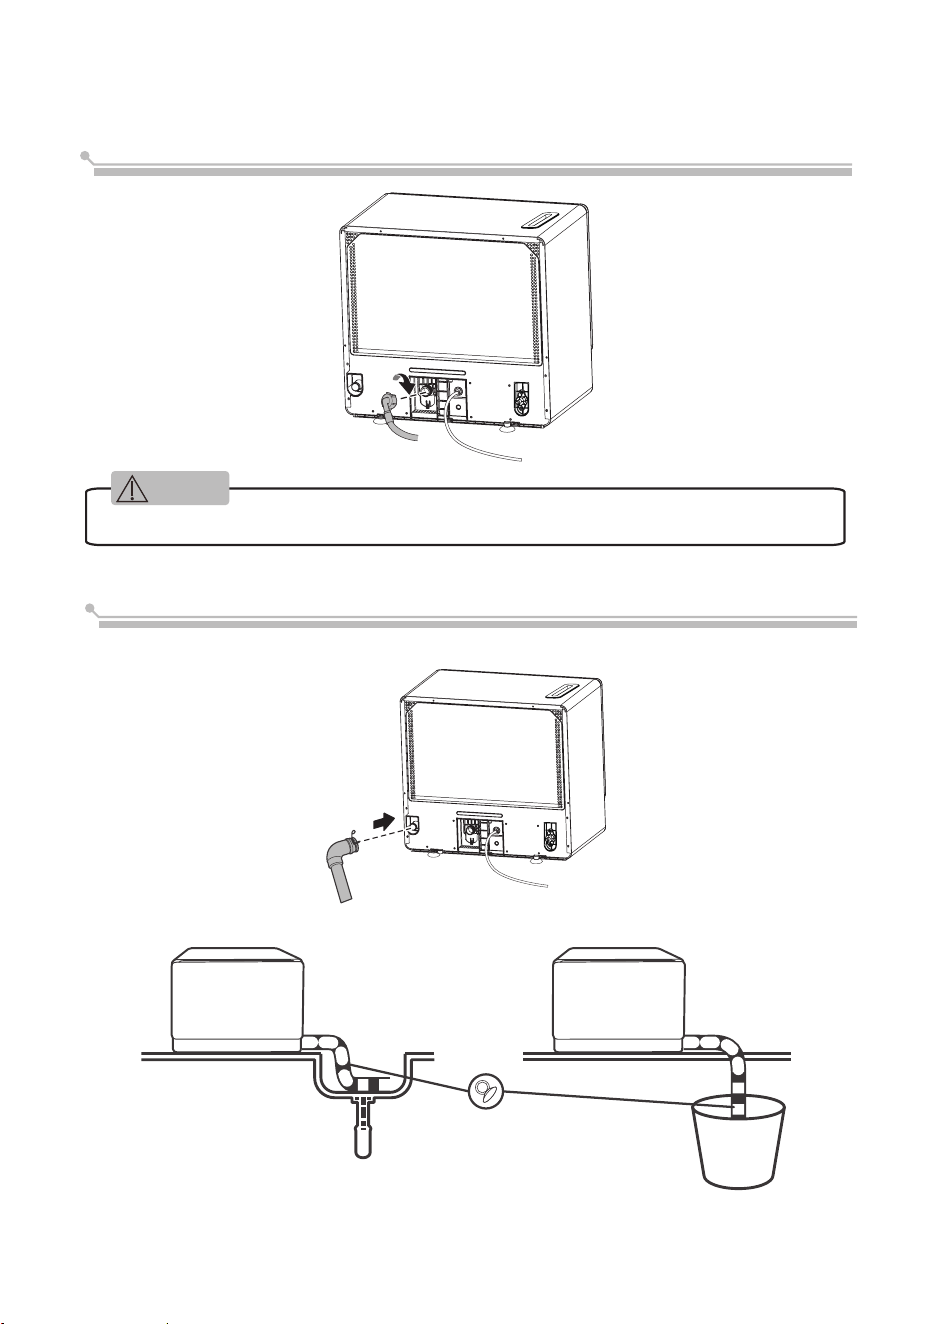
將進水管連接到洗碗機上
應由專業人士對管道和電氣設備進行安裝。
排水管連接
將排水管與機器後水管固定。 界面自帶卡扣。
將排水管與機器後水管固定。界面配有卡扣。
或者
用吸盤固定排水管
排水管的連接: 將排水管末端放入水槽或水桶中。
警告
31
故障排除
聯繫客服中心前
在聯繫客戶服務中心之前,請查看下表
問題 可能原因 解決方案
機器不工作
保險絲熔斷或電路跳閘。
更換保險絲或重置斷路器。移除與洗碗機共用同
一電路的任何其他電器。
電源未接通。
確保洗碗機開啟,機門已關好。 確保電源線已妥
善插入插座。
機門打開。 關門。
排水不暢
排水管打結或堵塞。 檢查排水管。
過濾器堵塞。 檢查粗濾器。
水槽排水管堵塞。
檢查水槽排水口,確保排水良好。 如果廚房水槽
排水管不能正常工作,應向管道技術人員而非合
格的洗碗機維修人員尋求幫助。
內膽中有泡沫
殘留
使用的洗滌劑不合適。
為避免起泡,只能使用洗碗機專用洗滌劑。 在此
種情況下,打開機門讓泡沫蒸發。 如果泡沫過多,
啟動任何洗滌程式進行清潔。
洗滌劑溢出。 立即擦去溢出的清潔劑。
內膽著色
使用的洗滌劑帶有著色
劑。
確保使用的洗滌劑不含著色劑。
內膽有白膜 水質較硬。
使用沾有洗滌劑的濕海綿,戴上橡膠手套進行內
部清潔。 請勿使用除洗滌劑以外的任何洗滌劑,
否則可能會產生泡沫或氣泡。
餐具生銹 生銹的餐具容易被腐蝕。 避免在洗碗機中清洗易腐蝕的餐具。
在洗碗機中壓
碎
架子上餐具妨礙噴淋臂
旋轉。
暫停程式,重新擺放妨礙噴淋臂旋轉的餐具。
洗碗機噪音 餐具鬆動。 暫停程式並重新擺放餐具。
水管跳動
可能是由於現場安裝不
當或管道橫截面不當導
致。
對洗碗機運行無影響。 如有疑問,請聯繫有資質
的管道技術人員。
中文
32
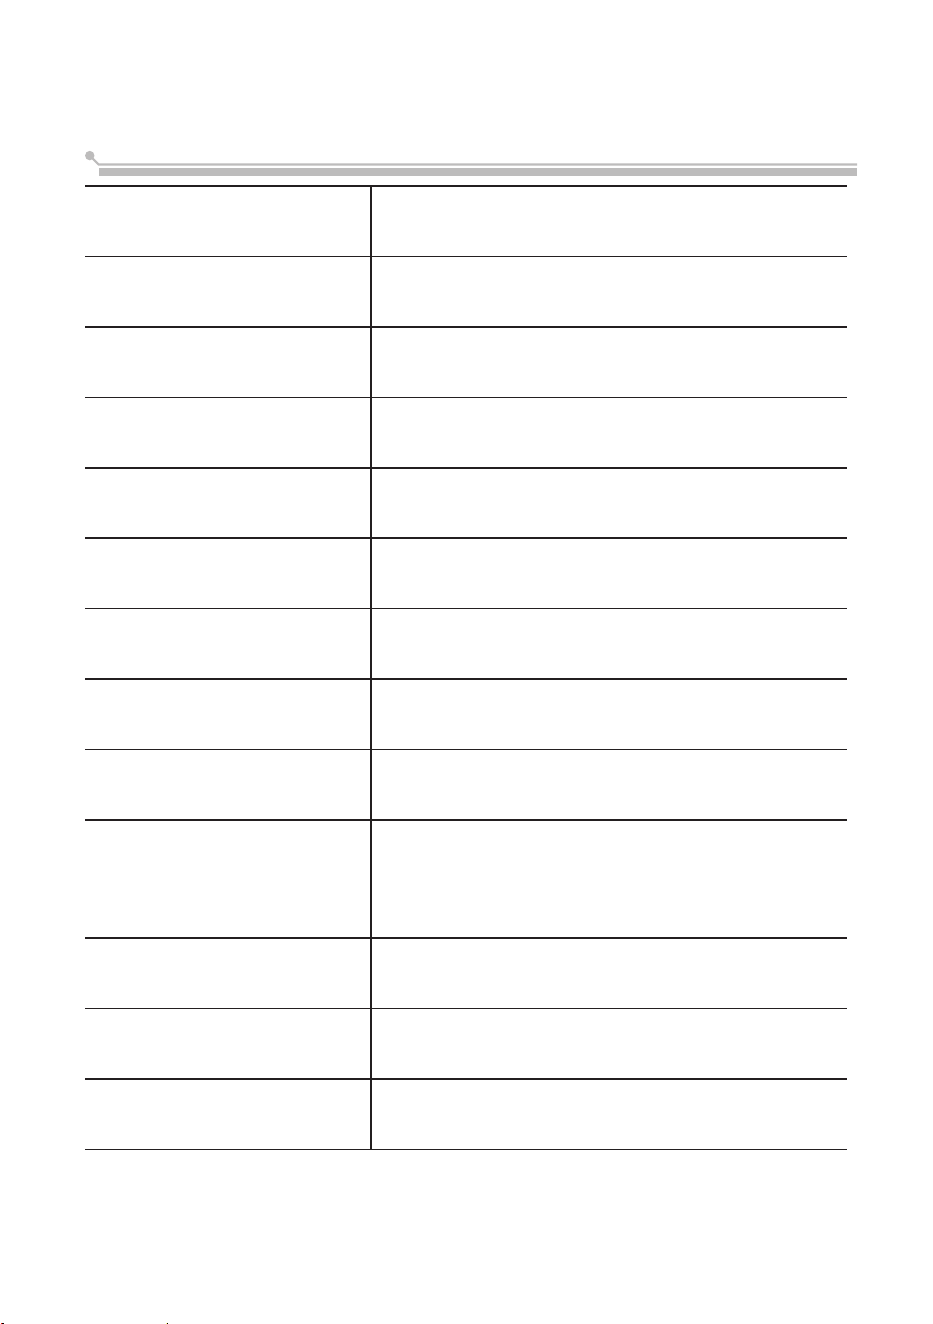
問題 可能原因 解決方案
餐具清洗後仍
有污漬
餐具放置欠妥。 詳情請參見「碗籃餐具放置」章節(第 18 頁)。
所選程式清潔效力不夠。 選擇更強力的洗滌程式。
洗滌劑量不足。 添加更多洗滌劑或更換新的洗滌劑。
餐具的擺放影響噴淋臂
旋轉。
重新放置餐具,使噴淋臂能夠自由旋轉。
過濾器長期被污垢阻擋
或未正確安裝在底座上,
可能妨礙噴淋臂轉動。
清洗或正確安裝過濾器和噴淋臂。
玻璃器皿無光
澤
軟水條件下,添加的洗滌
劑過多。
如果使用軟水,請使用較少的洗滌劑,並選擇時
長較短的洗滌程式清潔玻璃器皿。
餐具或玻璃器
皿上有白點
硬水會產生更多的水垢。 添加洗滌劑。
餐具上有黑色
或灰色印記
鋁制器具和餐具之間有
摩擦。
使用溫和的清潔劑可去除這些痕跡。
洗滌劑槽內殘
留洗滌劑
餐具的擺放妨礙洗滌劑
加入。
正確擺放餐具。
餐具未完全乾
燥
放置不當。 詳情請參見「碗籃餐具放置」章節(第 18 頁)。
餐具過早取出。
程式結束後,請勿立即取出餐具。 稍微打開門,
讓蒸汽排出,等待餐具冷卻。
程式錯誤。
當使用時長較短的洗滌程式時,洗滌溫度較低且
清潔效率降低。 應選擇時長較長的程式。
洗碗機排水能力差。 餐具排水能力差,不適合在洗碗機中清洗。
33
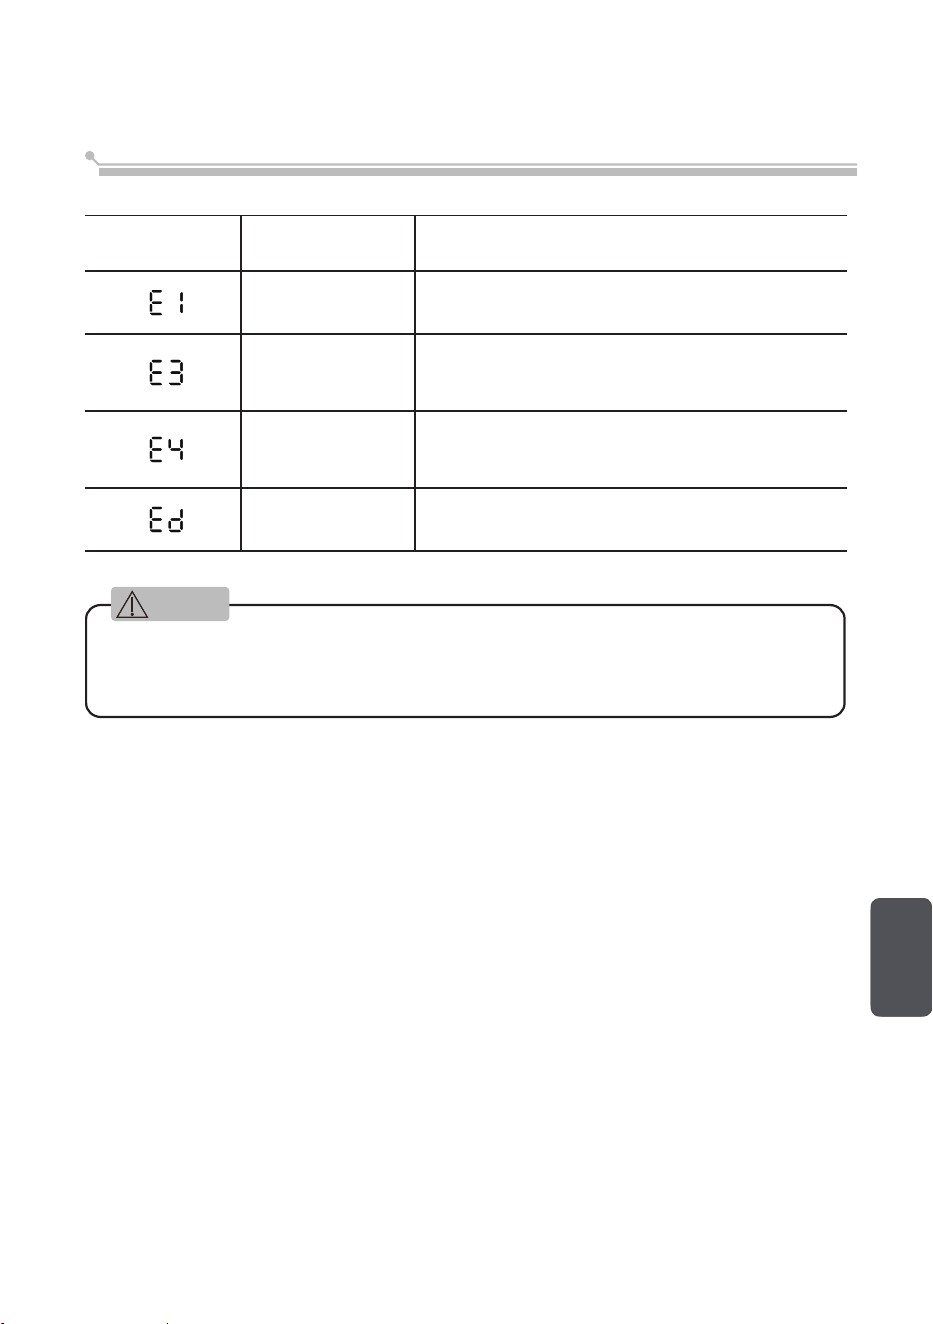
錯誤代碼
發生故障時,會提示以下錯誤代碼:
錯誤代碼
錯誤代碼名稱 可能原因
進水時間長 流量計、排水閥或泵故障應由合格的維修人員修理。
加熱異常
加熱管或熱敏電阻呈異常狀態,需從插座上拔下相應
的電源插頭,由合格的維修人員修理。
溢流或水箱問題
若洗碗機出現溢流情況或其水箱中的浮子存在問題,
則需由合格的維修人員修理。
通訊異常 需要由合格的維修人員進行修理。
¤
如果加水過量,應先關閉主供水系統,再尋求説明。
¤
如果因加水過量或輕微漏水導致底座中積水,則再次啟動洗碗機前應清除積水。
¤
如有無法解決的錯誤代碼,請尋求專業人員幫助。
中文
警告
34
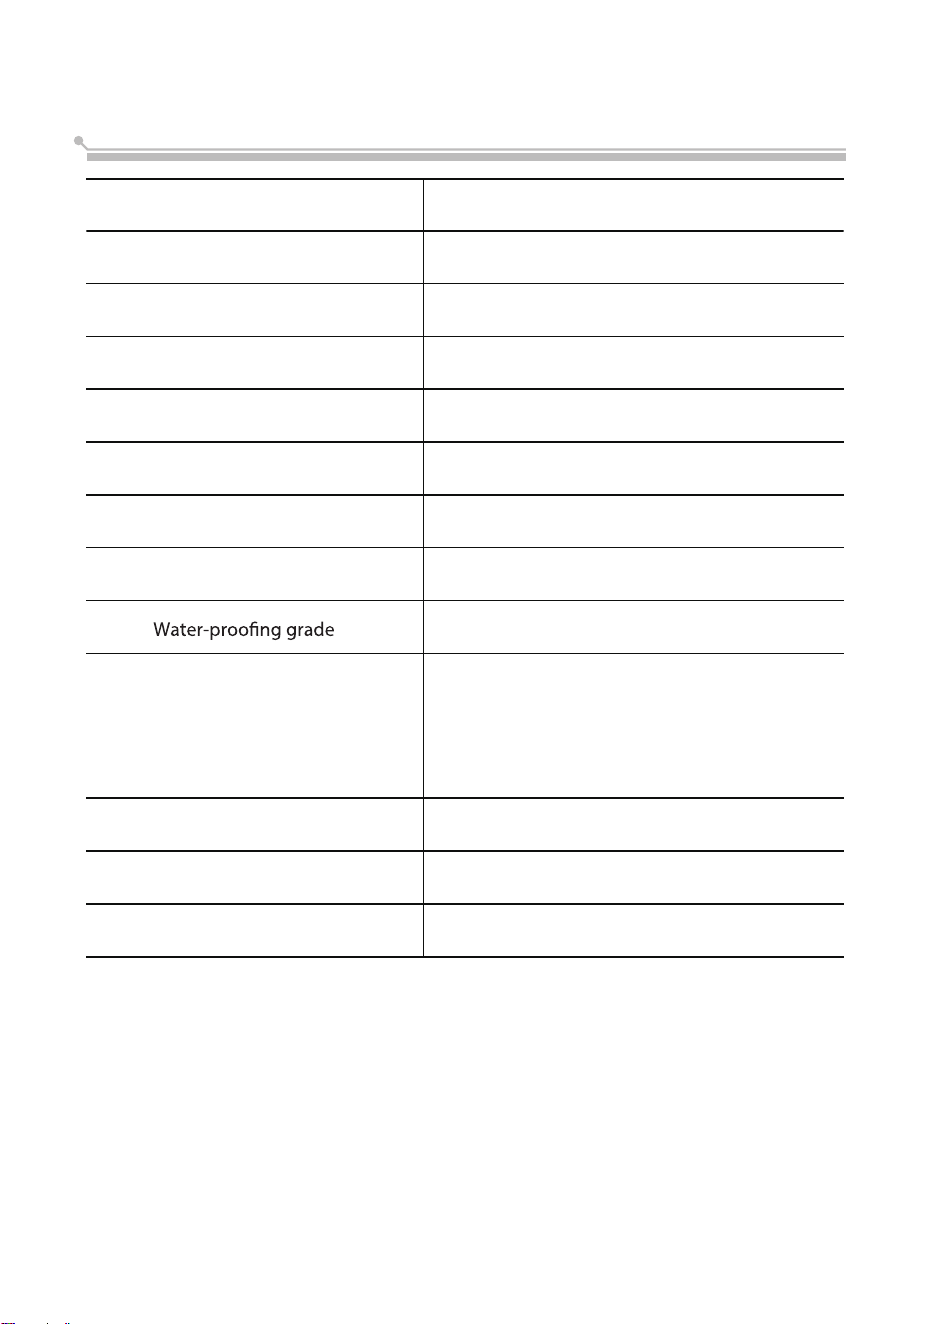
規格
型號 DW-05T2-HK
尺寸(mm) 550(闊)*500(高)*345(深)
額定電壓 / 頻率
220V/50Hz
額定功率
1350W
耗水量 8.5L
功耗 / 循環 0.710kWh
噪音等級 55dB
控制模式 電控
防水等級 IPX1
清洗容量
46 件(筷子 *5+ 茶匙 *5+ 飯匙 *1+ 碗 *5+ 湯匙 *5+
長柄湯勺 *1+ 淺盤 *5+ 深盤 *1+玻璃杯 *2+ 小料碟 *3
+ 馬克杯 *2+ 面碗 *2+ 肉湯勺 *1+ 叉子 *4 + 刀 *4)
總重 24 kg
淨重 21.5 kg
水壓 0.04-1.00MPa
DISHWASHER
DW-05T2-HK
WARNING
Instruction
Prohibit
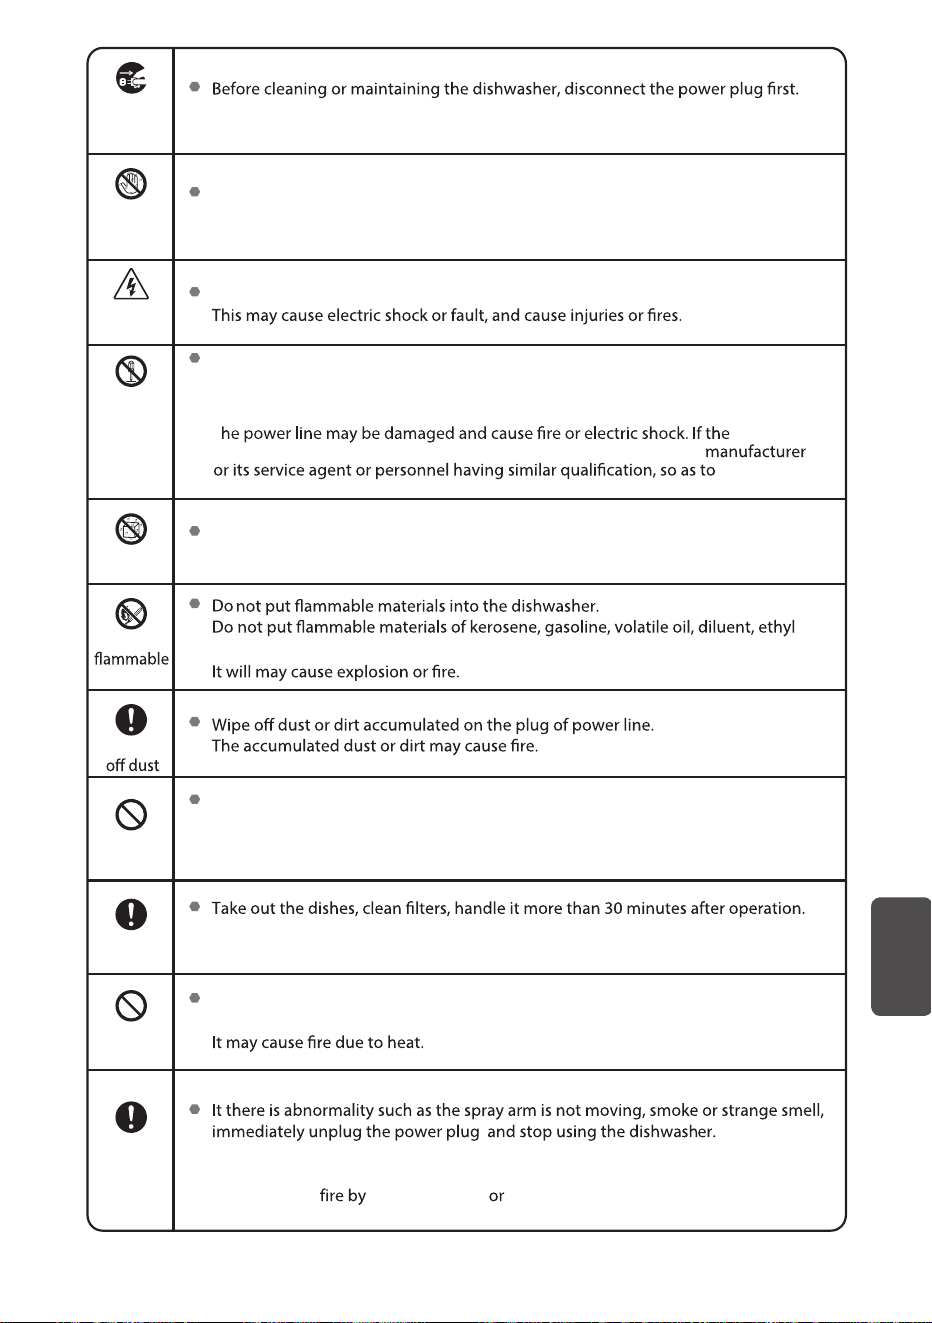
Do not touch the inside of the cabinet, steam jetsfor during operation or 30
minutes after operation.
There is a fear of burning.
There is a fear of burning.
Instruction
Please ask the agent you purchased for inspection / repair. There is a danger of
electric shock,
electric leakage short-circuiting.
Do not use extension cord.
Prohibit
No touch
by wet
hand
Electric
shock
No water
spraying
Away from
materials
Disconnect
power plug
Wipe
Do not connect or disconnect the power plug by wet hand.
This may cause electric shock or fault and cause injuries.
Do not use damaged power lines, power plug or loose power socket.
alcohol etc. as well as dishes having such matters into the dishwasher.
Do not spray water directly onto the parts of the main body of the dishwasher.
This may cause accidents of electric shock or short circuit.
Do not damage power line.
Do not damage, cut, process power line or bend, pull, twist or bind power line.
Besides, do not yank the metal part of the power line, or put weights on the line
or clamp the power line.
power line is damaged, the damaged line must be replaced by the
prevent
No
dis-assembly
and repair
without
permission
dangers.
T
03
English
Fault connection of the grounding wire will cause electric shock. If E3 failure occurs,
please unplugging the power plug from the outlet, and needs to be repaired by
professional electricians or service men.
When it is difficult to confirm the correctness of grounding, please call for
professional electricians or service men for inspection.

CAUTION
06
Prohibit
Prohibit
Attention
to burn
Prohibit
Prohibit
Prohibit
Instruction
Instruction
Instruction
Loading
capacity
Attention
to pinching
of fingers
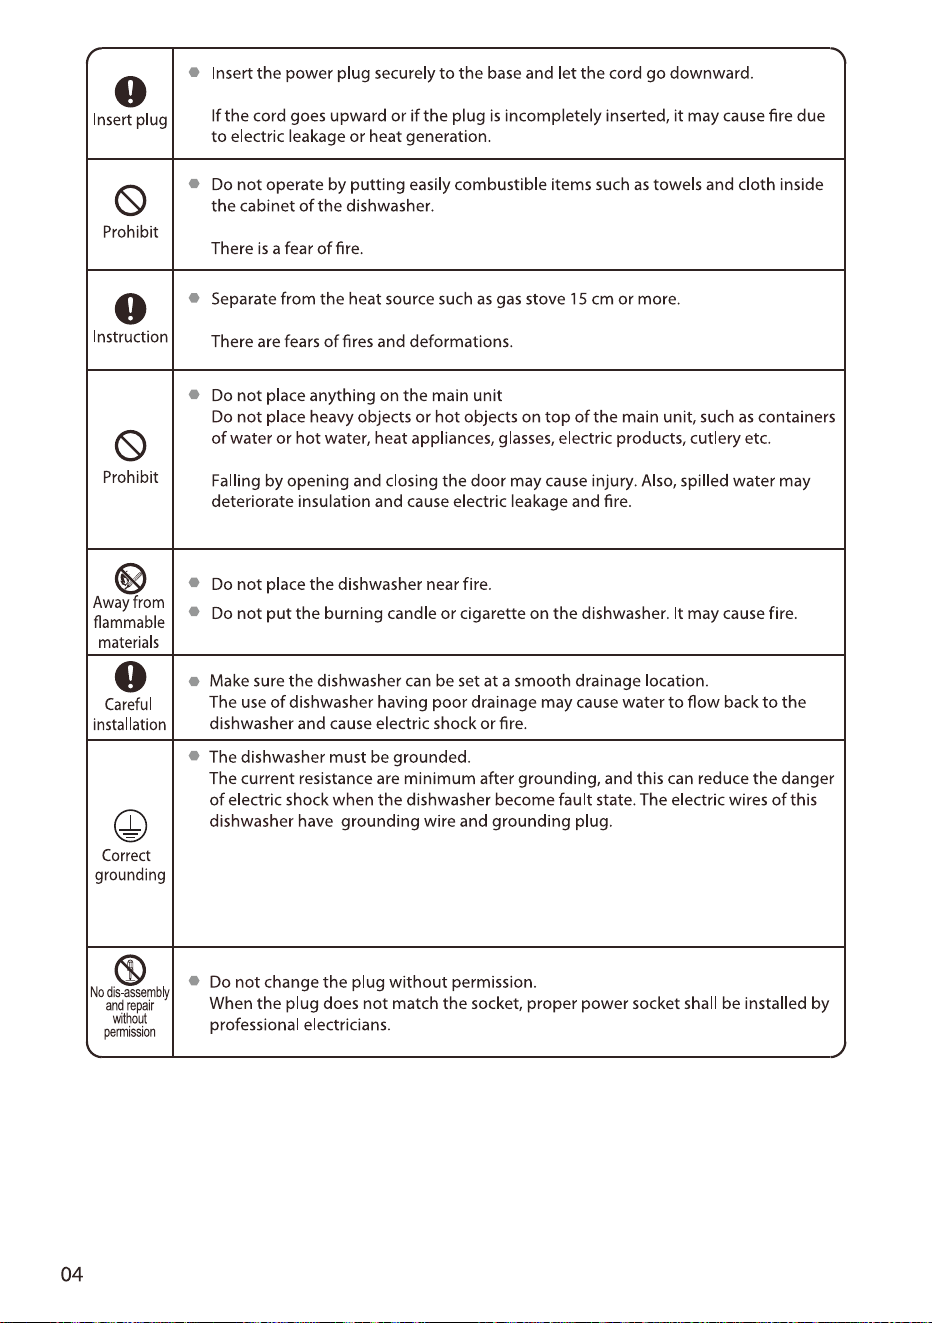
Do not strongly push open door and main body, nor put the downward
pressure to the door. Falling may cause injuries.
Be careful not to pinch fingers when opening and closing the door.
There is a risk of getting hurt while pinching fingers.
Do not get close to the exhaust port.
Steam or hot air may cause the burns.
While using or after using the dishwasher, pay attention to hot water
drained out.
High temperature hot water may come out, there is a risk of burns.
Prohibit to hit or tap the dishwasher.
Electric shock, electric leakage short circuit may cause fire.
Set the filters correctly.
Residues clogs, causing breakdown.
Do not put light and small dishes such as plastic containers.
If it is dropped by water pressure of the water spray, it may cause malfunction
due to clogging the dishwasher.
Do not use for purposes other than dishwasher dryer.
It may cause a malfunction.
Make the main unit a solid level surface.
Normal operation may not be possible. It may cause water leakage.
Fix the connection of drainage pipe certainly.
It may cause water leakage.
Washing capacity: 46 pcs (chopsticks*5 + tea spoon*5 + rice spoon*1 +bowl*5
+ soup spoon*5 + soup ladle*1 +shallow plate*5 + deep ladle*1 + glass*2
+ sauce plate*3 + mug*2+ noodle bowl*2 +gravy ladle*1 + fork*4 + knife*4)
The packing material may be dangerous to children!
The disposal of package and machine shall be submitted to the
recycle center.
close the machine door.
The cardboard package is made by recycled paper and shall be collected for recycling.
If the generated rubbish cannot be treated properly, they will be harmful to the environment
and human health, and they shall be properly disposed to prevent potential threat.
For more details of product recycle, please contact relevant departments of local government or
the service center for domestic refuse management.
Such warning sign is used to prevent dangers to you and others.
Please follow it strictly.
After reading, please store it properly for use just in case.
Handle the package of the dishwasher with extreme care.
All packages are recyclables.
Plastic parts are marked with abbreviation of international standard;
Treatments
07
English
PP
Polyacetal or polyox, e.g., plastic clip
Acrylonitrile Butadiene Styrene , e.g., control panel
Polyethylene, e.g., tableted package material
Polystyrene, e.g., packing material
Polypropylene, e.g., inner wall
ABS
POM
PS
PE
WARNING
WARNING

Please carefully read the instruction manual before using the dishwasher,
Dishwasher features
11
Accessories
12
Control panel
13
Quick instruction manual
01
Recognize the dishwasher
02
Program Setting
04
Cleaning and care
05
Installation
06
Troubleshooting
07
Saving Energy
21
Startup
21
Put additional dishes in
22
External Care
23
Internal Care
23
Care and maintenance
26
Preparation before installation
27
Where to place
27
Install the suction cups
28
Drain pipe connected
30
31
33
End of washing program
22
Put the dishwashing powder into the addition place
19
and this is helpful for the use and maintenance of the product.
03
Use the dishwasher
34
Before
connecting customer service center
Error code
Specification
Install dishwasher bowl basket
15
Washing program
20
Change the program
21
Contents
Connect the inlet pipe to the faucet
29
26
Product Dimensions
Air outlet
28
08
09
Quick instruction manual
English
09
For detailed operation methods, read the manual carefully.
Connected to power supplies
or
Fix the drain pipe with the back pipe of the machine.
Tighten the interface with clamp.
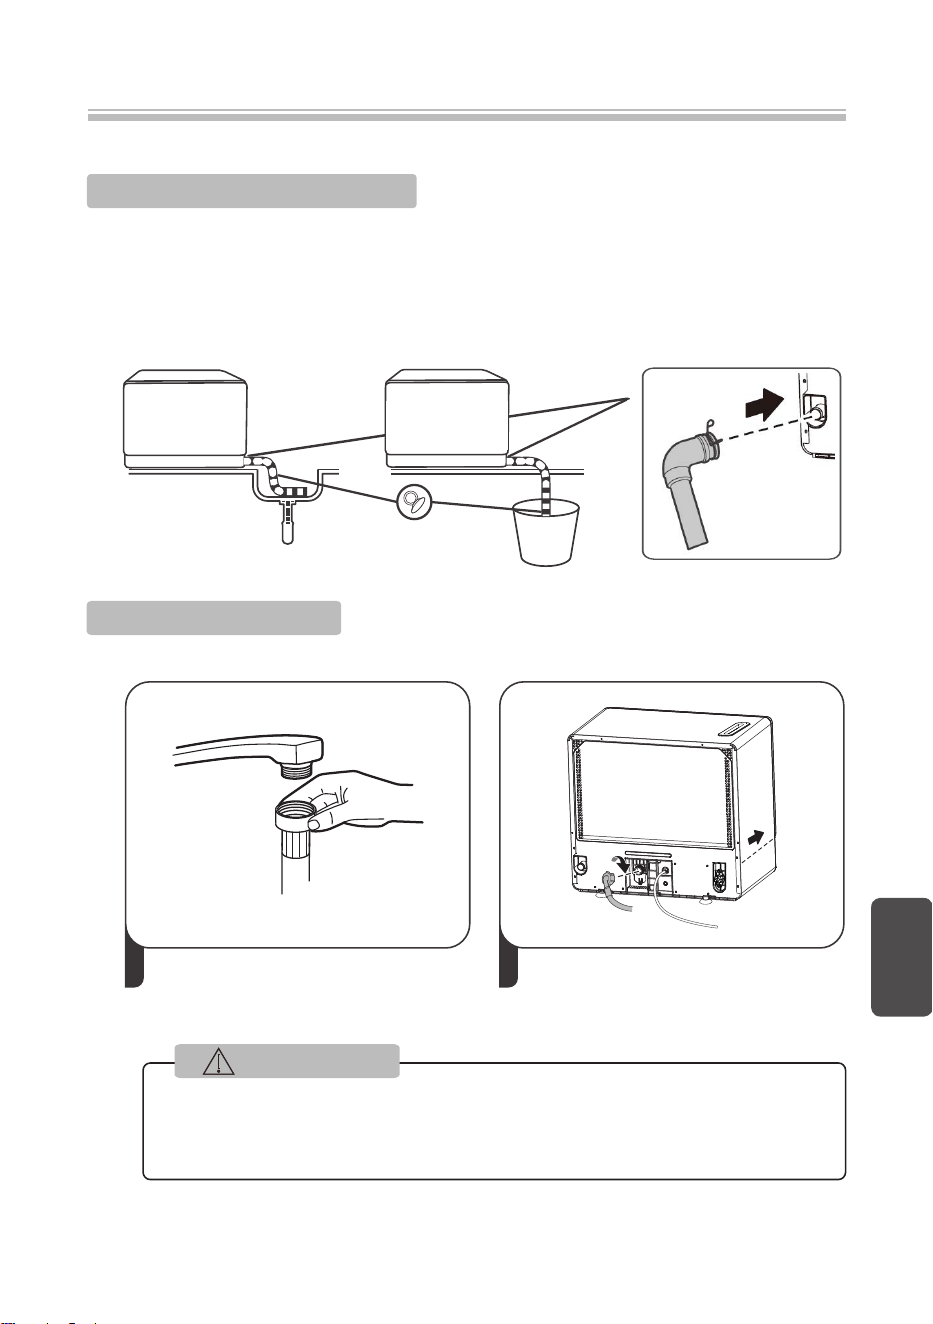
Fix the drain pipe with
suction cups
The connection of the drain pipe: Put end of the drain into a sink or bucket.
The power supply is V AC 50Hz
the speci cation f he ocket s
220
10A 220V AC
fi o t s i
Inlet Pipe Connected
1 2
Connect the inlet pipe to the faucet Connect the inlet pipe to the
dishwasher
Please read the content of INSTALLATION for more reference
NOTE
Open the door, put in the dishes and dishwashing powder
Close the door, turn on the dishwasher, select the program, and
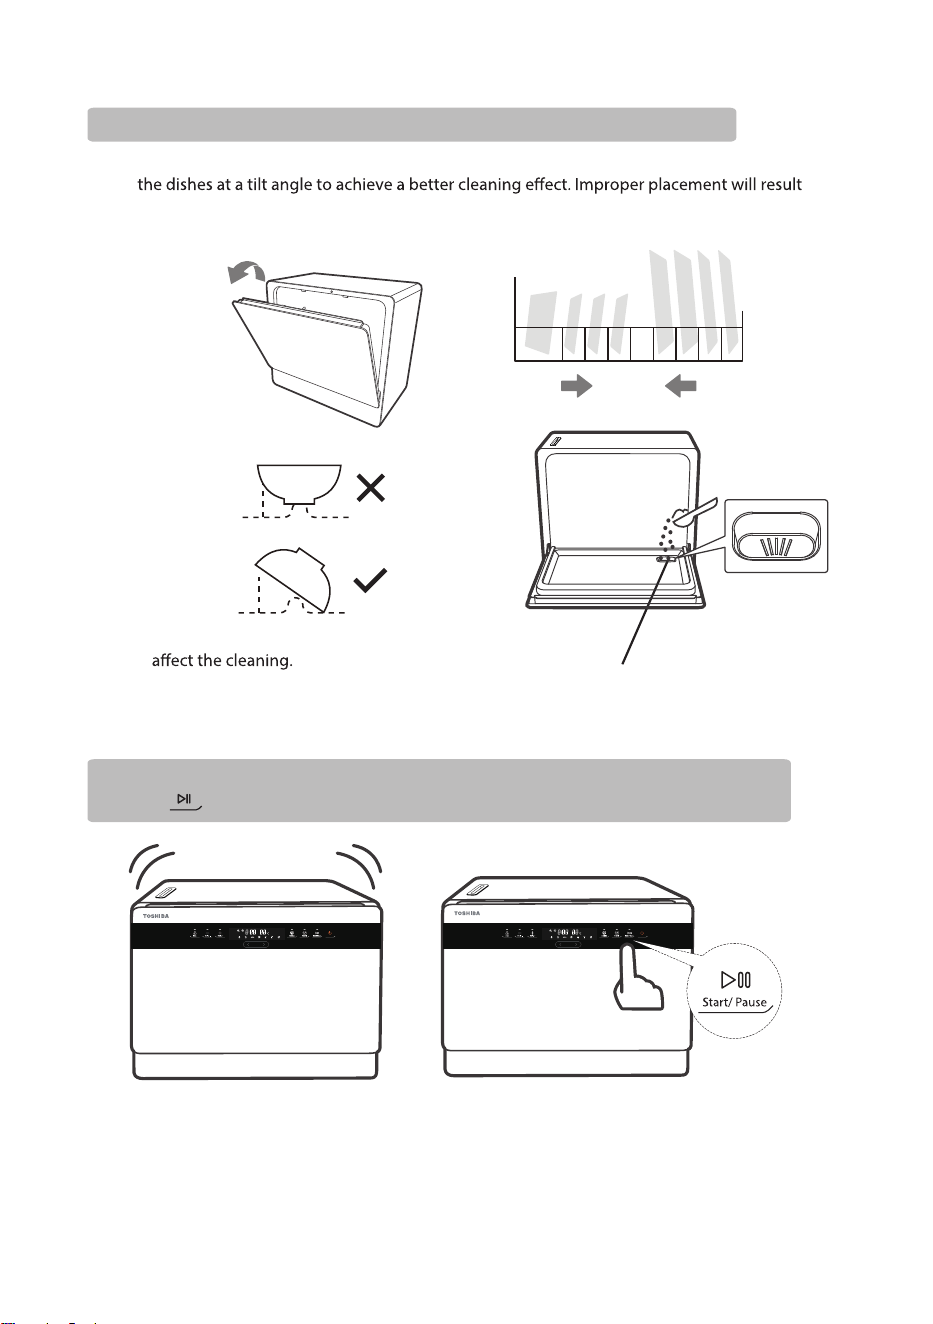
in interruption of cleaning process and unsatisfactory cleaning results.
Improper orientation of dishes can also
Try to direct the dirty side toward the spray arm. Put the dishwashing powder
at the adding place
Left side Right side
press button
Pull
open
10
Place them from the two sides to the center according to the size. It is the best to place
兒童鎖
延遲開始( - )
延遲開始( + )
高溫清潔
熱風烘乾
啟動/暫停
兒童鎖
延遲開始( - )
延遲開始( + )
高溫清潔
熱風烘乾
啟動/暫停
啟動/暫停
suction pipe interface
he air outlet is to
Important:
ensure the best results.
Dishwasher features
11
English
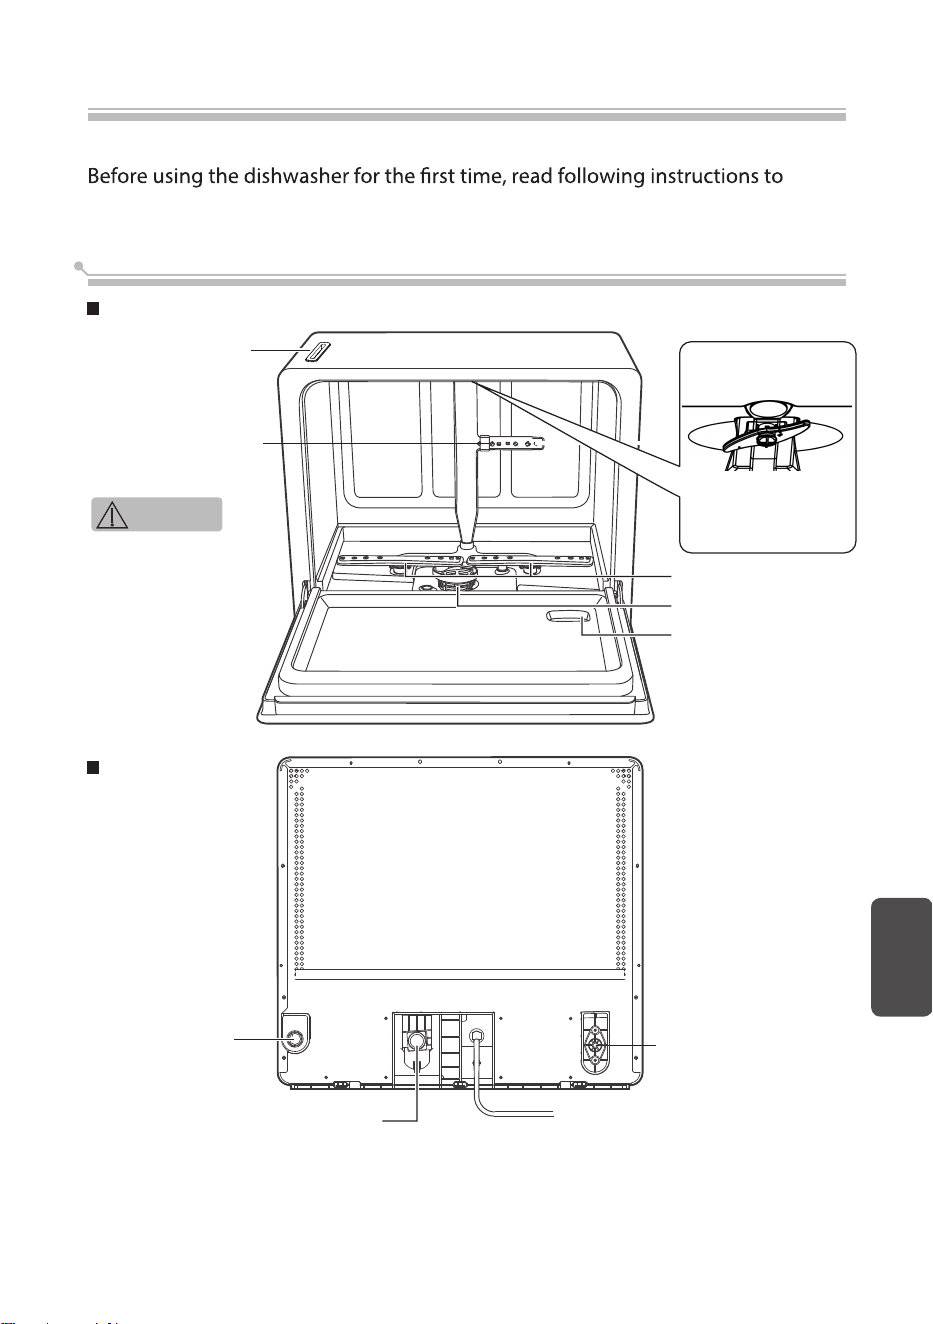
Recognize the dishwasher
Front
Back
Drain pipe
interface
Inlet pipe interface
Power cable
Upper
spray
arm
Lower spray arms
Filter (Ag+ )
hygiene basket)
Detergent
adding receptacle
Middle spray arm
Air outlet
T
exhaust the steam to
promote the dry
performance of
washing cycle.
Light
Top of inner tank
NOTE
Sution pipe ( X1 )
List of accessories
Screws ( X2 )
Inlet pipe ( X1 )
Suction Cups ( X2 )
Upper basket
Lower basket
Be sure to install the befor
e
use to avoid potential dangerous!
Suction Cups
12
Accessories
Drain-pipe ( X1 )
Anti-corrosion sticker(X1)
Cutlery rack
Folding bucket ( X1 )
Tee connection ( X1 )
CAUTION
1
2
3
Program
GLASS
HYGIENE
INTENSIVE
58 MIN
RAPID
Use to remove bacteria from your dishes and
glassware.
Maintains the water temperature at 70°C.
For dishes with oil stains and heavy dirty
cooking utensils and dishes.
This is standard program. For general dirty
dishes and utensils (such as pots, plates,
glasses, pans).
For normally soiled loads that need quick wash.
For slight dirty dishes, the required cleaning
time is relatively short.
For slight dirty dishes and glasses.
This program provides an effective cleaning of
the dishwasher itself.
2 3
4
5 6 7 8
11
1
10
9
Lock
Press the button for 3 seconds to select the Child lock function.
This function allows you to lock the buttons on the control
panel, so children cannot accidently start the dishwasher by
pressing the buttons on the panel. Only the Power button
remains active.
Control panel
13
English
Self
Clean
ECO
兒童鎖
延遲開始( - )
延遲開始( + )
高溫清潔
熱風烘乾
啟動/暫停
Delay start
3
Press the button to increase or munus the delay start time.
Delay a cycle for up to 24 hours in one-hour increments.
To start or pause the washing process of the dishwasher.
8
Display
To show the remaining time and delay time,
error codes etc.
Water insufficient indicator
10
Warning
Indicator
11
14
Power
Press this button to turn on your dishwasher, the screen will
light up.
5
6
7
Start/Pause
Hot Air
To sanitize your dishes with higher temperature in the rinse
phase.(It can’t be used with Glass, Hygiene, Rapid and
Self Clean)
To blow your dishes dry with 3 options. Satisfying different
needs, they can be used when your dishes have been cleaned.
• Odor Elimination – 60mins
• Warm Dishes – 120mins
• Rinse & Heat Drying – 100mins
4
9
Program button
Press the button to select program backward:
ECO→INTENSIVE→HYGIENE→Self
Clean→GLASS→RAPID→58 MIN→ECO
Press the button to select program forward:
ECO→58 MIN→RAPID→GLASS→Self
Clean→HYGIENE→INTENSIVE→ECO
Purchase dishes suitable for dishwasher.
Use a suitable mild dishwashing powder. If necessary, consult the manufacturer for more
information.
For special appliances, try to select a washing program that with a lower temperature.
Do not take out the glass dishes immediately after the program ends to prevent damage.
Not for: Limited use:
Wooden, ivory, porcelain or pearl shank tool
Non heat-resistant plastic products
Stale non heat-resistant cutters with glue
adhesive part
Cohesive knives or dishes
Tin or copper vessels
Crystal glass
Rusty steel products
Wooden utensils
Cups, glasses, pots and so on are placed face down.
All utensils should be placed safely and must not be overturned.
All utensils should be placed that the arms can rotate freely during washing.
After several cleanings, some glassware
will become dull
Silver or aluminum products tend to change
color during cleaning
Color of smooth dishes may fade out if often
washed
Use the dishwashing machine rationally
For small objects, it is easy to fall out from the basket, which should not be
placed in the dishwasher.
The open of hollow tablewares (such as cups, glasses, pots, etc.) should face downward so
that water does not easily remain in the container or grooves.
Dishes and knives should not be placed in other utensils, and they can’t overlaid each other.
Do not place glass close to each other to avoid damage.
For long knives, placing upright is very dangerous.
Precautions before and after the baskets is placed
Soften the residue of burnt food left on the pan. It is not necessary to rinse dishes with water
Suggestion
15
Use the dishwasher
Install dishwasher basket
English
ATTENTION
Long or sharp knives (eg. meat cleavers) should be placed horizontally in the basket.
Do not use the dishwasher overloaded so that you can get better cleaning performance.
Use of baskets
16
How to move out the upper basket:
Pull out the upper basket, then raise the
basket to a certain angle and continue to
pull out.
How to use the chopstick rack of the
upper basket:
The chopstick rack can be moved to suit
chopsticks of different lengths.
How to use the foldable flip tines of the
lower basket:
The foldable flip tines can be combined
as flat which holds your big pots.
When you want to
erect the foldable flip,
be sure to snap it into
the buckle.
Loading the upper basket
Place the dishes and utensils properly to avoid being moved by the water stream.
In order to allow the spray water column to clean the surface, the dirty surface must
face inside.
1
2
3
4
5
Item
Number
Chopsticks
Spoon
Bowl
Soup
Spoon
Soup
Ladle
1
English
6
Rice Spoon
6
1 1 1 1
2 2
22
2
4
4
4
4
4
5
55
5
1
3

Item
Number
18
Loading the lower basket
For personal safety and a top quality clean, make sure place the silverware in
the basket as follows:
They do not nest together.
Place silverware with handles-down.
But place knives and other potentially dangerous utensils handles-up.
1
2
3
4
5
6
7
Shallow Plate
Deep Plate
Glass
Sauce Plate
Bowl
Mug
Noodle Bowl
8
9
10
Gravy ladle
Fork
Knife
5
4
4
6
6
8
1 1 1 1 2 1
4
33
77
10 101010
9999

Put the dishwashing r into the addition placepowde
Only dishwashing powder is specially designed for dishwashers can be used.
Do not use other dishwashing powders to avoid machine damage.
The dishwashing powder
is corrosive! Keep the dishwashing powder in
a place where children cannot reach.
Concentrated dishwashing powder
Traditional alkaline dishwashing powder with corrosive ingredients.
Concentrated weak alkaline dishwashing powder with natural enzymes.
Normal washing programs with concentrated dishwashing powder can reduce contamination
and dishes damage.
Cleaning tablets
washing program, there are certain cleansing tablets that cannot completely dissolve and fully
f unction. Therefore, the use of cleaning tablets requires long-term washing programs to ensure
Dishwashing powder
provided in the washing program . Dishwashers use less dishwashing powder than table at page 20
traditional ones. In general, only one spoon of dishwashing powder is required for normal washing
19
The palce to add the detergent
complete removal of cleaning tablets.
Prior to each washing program, re-add the dishwashing powder according to the instructions
and general dirty dishes. Heavy dirty dishes need to add more powder. Please add dishwashing
Add the dishwashing powder
English
CAUTION
Washing program
Dishwashing
powder (g)
15
15
15
15
15
Highest Water
Temperature
70℃
50℃
65℃
5 ℃5
60℃
Time
(min)
170
165
165
130
58
Power
(kWh)
0.970
0.920
0.710
0.510
0.590
(L)
Program
12
55℃
29 0.450
15
65℃
125 0.760
The table below shows which programs are best for the levels of food residue on them and
how much detergent is needed. It also show various information about the programs.
Consumption values and program duration are only indicative except for ECO program.
: The ECO program is suitable to clean normally soiled tableware, that for
it is the most e˙cient pr ogram in terms of its combined energy and water
consumption.
this use,
The above program data is for reference only. Test conditions are as follows:
Program Setting
20
Washing capacity: 46 pcs (chopsticks*5 + tea spoon*5 + rice spoon*1 +bowl*5 + soup
spoon*5 + soup ladle*1 +shallow plate*5 + deep ladle*1 + glass*2 + sauce plate*3 +
mug*2+ noodle bowl*2 +gravy ladle*1 + fork*4 + knife*4)
Power consumption at shutdown state and standby state similarly are 0.49W.
W ater
8.5
8.5
8.5
8.5
6.8
6.8
8.5
INTENSIVE
HYGIENE
RAPID
GLASS
SELF
CLEAN
58 MIN
ATTENTION
If you press “Start/ Pause” button in the process of washing, the beeps at dishwasher
every 60 seconds until started up again by pressing the “Start/ Pause” button.
Start up
To start the program:
The plug shall be firstly plugged into the socket. Power supply shall be of 220V AC 50Hz
type, with socket of 10 A 220V AC. Before selecting a program, press "ON/OFF" button
turn on the dishwasher. Press the button of desired program, the corresponding
indicator will light up.
Then, press "Start/Pause" button to start.
Premise: You can modify the washing program, if the dishwasher just worked for a short
time. Otherwise, the detergent may have already been released, and the appliance may
have already drained the wash water in this case, the cycle must be restarted.
If your model has broken remember function, the machine will go on to finish the selected
program after the power cut.
Press Start/Pause Button to pause the machine when the door is closed.
Press Program Button">"or "<" for more than 3 seconds the machine will be in stand-by
state, then you can change the program to the desired cycle setting(see the section
entitled "Start up" ).
The Display window shows the state of the dishwasher:
a) Display window shows "-:--" ----------------------------------> stand by;
b) Display window shows "H:MM" and not blinking -------------> pause;
c) Display window shows "H:MM" and only " : " blinking ------------------------> run;
d) Display window shows "END" ------------------------> end.
Change the program
If you open the door during washing, the machine will pause. When you and press the Start/Pause
Button, the machine will keep on working after 10 seconds.
21
1. Washing tableware in a household dishwasher usually consumes less energy and
water in the use phase than hand dishwashing when the household dishwasher is
used according to the instructions.
Saving Energy
English
ATTENTION
ATTENTION
It is extremely dangerous to open the door in
burn by hot water.
Open the door carefully
Hot dishes are more likely to be damaged. The dishes shall be cool for about 15 minutes and then
taken out from the dishwasher.
Clear the dishwasher
It is normal that the dishwasher still remains wet inside.
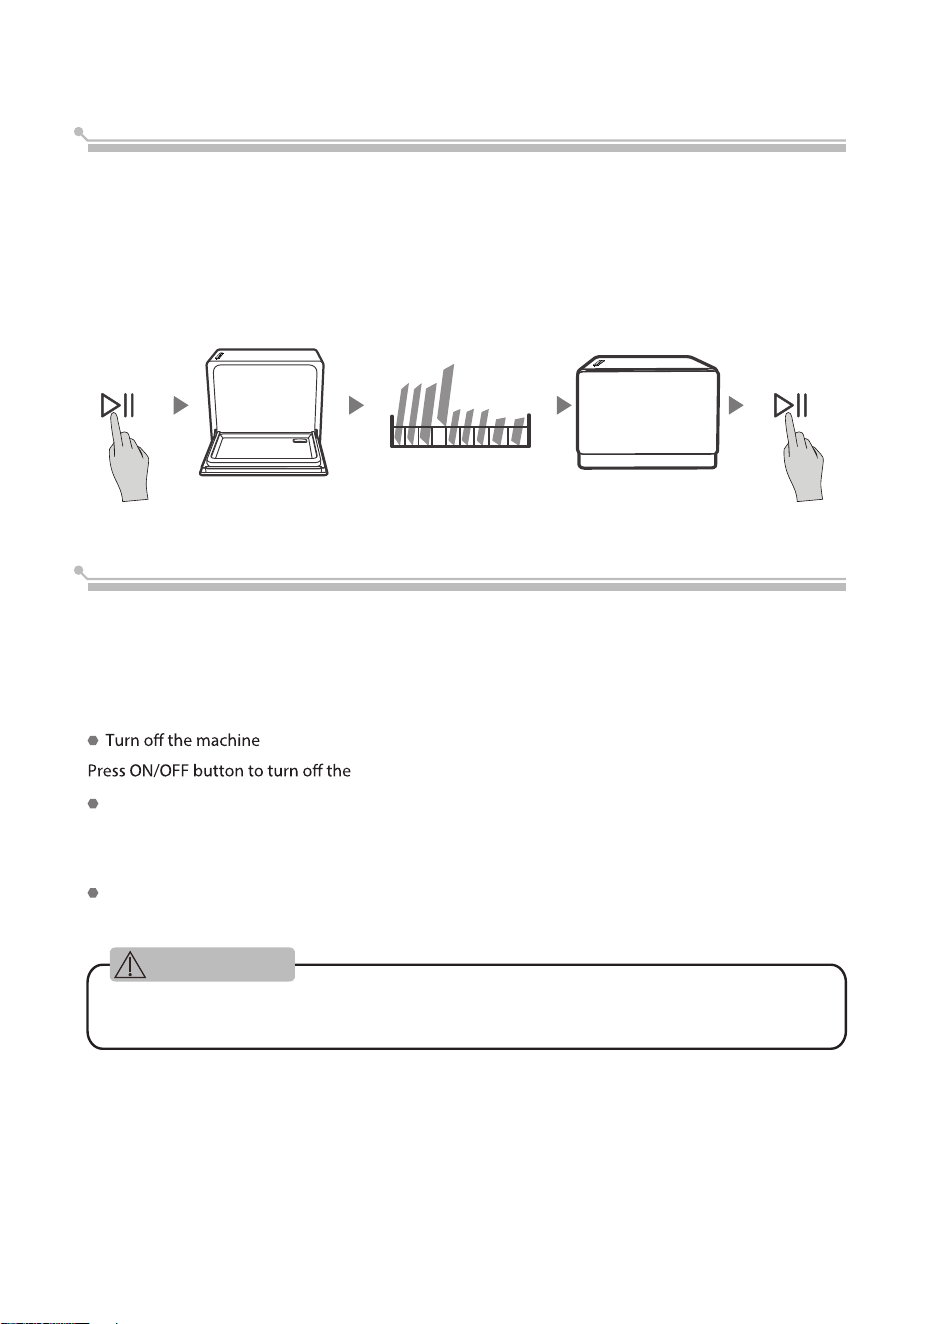
After the program f inishes, the machine show”End”and the buzzer beeps for
8 seconds. If you want to stop the machine immediately, press ON/OFF button.
Then, wait a few minutes to avoid burns before open the door and clear the
dishwasher. Be careful of hot dishes.
dishwasher.
End of washing program
Additional dishes can be placed in at any time before dishwasher program start.
If you
want to reload dishes in the process of washing, please follow instructions below:
1. Press “Start/Pause” button to pause washing program;
2. Wait for 5 seconds to open the door;
3. Put the additional dishes in;
4. Close the door;
5. Press “Start/Pause” button and after 10 seconds, the dishwasher will start again.
Put dishes in additional
After 5 seconds
22
the process of washing as this may cause severe
WARNING
23
English
Cleaning and care
External Care
The door and the door seal
Clean the door seals regularly with a soft damp cloth to remove food deposits. When the
dishwasher is being loaded, food and drink residues may drip onto the sides of the
dishwasher door. These surfaces are outside the wash cabinet and are not accessed by
water from the spray arm. Any deposits should be wiped off before the door is closed.
The control panel
If cleaning is required, the control panel should be wiped with a soft damp cloth only.
To avoid penetration of water into the door lock and electrical components,
do not use a spray cleaner of any kind.
Never use abrasive cleaners or scouring pads on the outer surfaces because
they may scratch the finish. Some paper towels may also scratch or leave
marks on the surface.
Internal Care
Filtering system
The filtering system in the base of the wash cabinet retains coarse debris from the
washing cycle. The collected coarse debris may cause the filters to clog. Check the
condition of the filters regularly and clean them if necessary under running water.
Follow the steps below to clean the filters in the wash cabinet.
NOTE
24
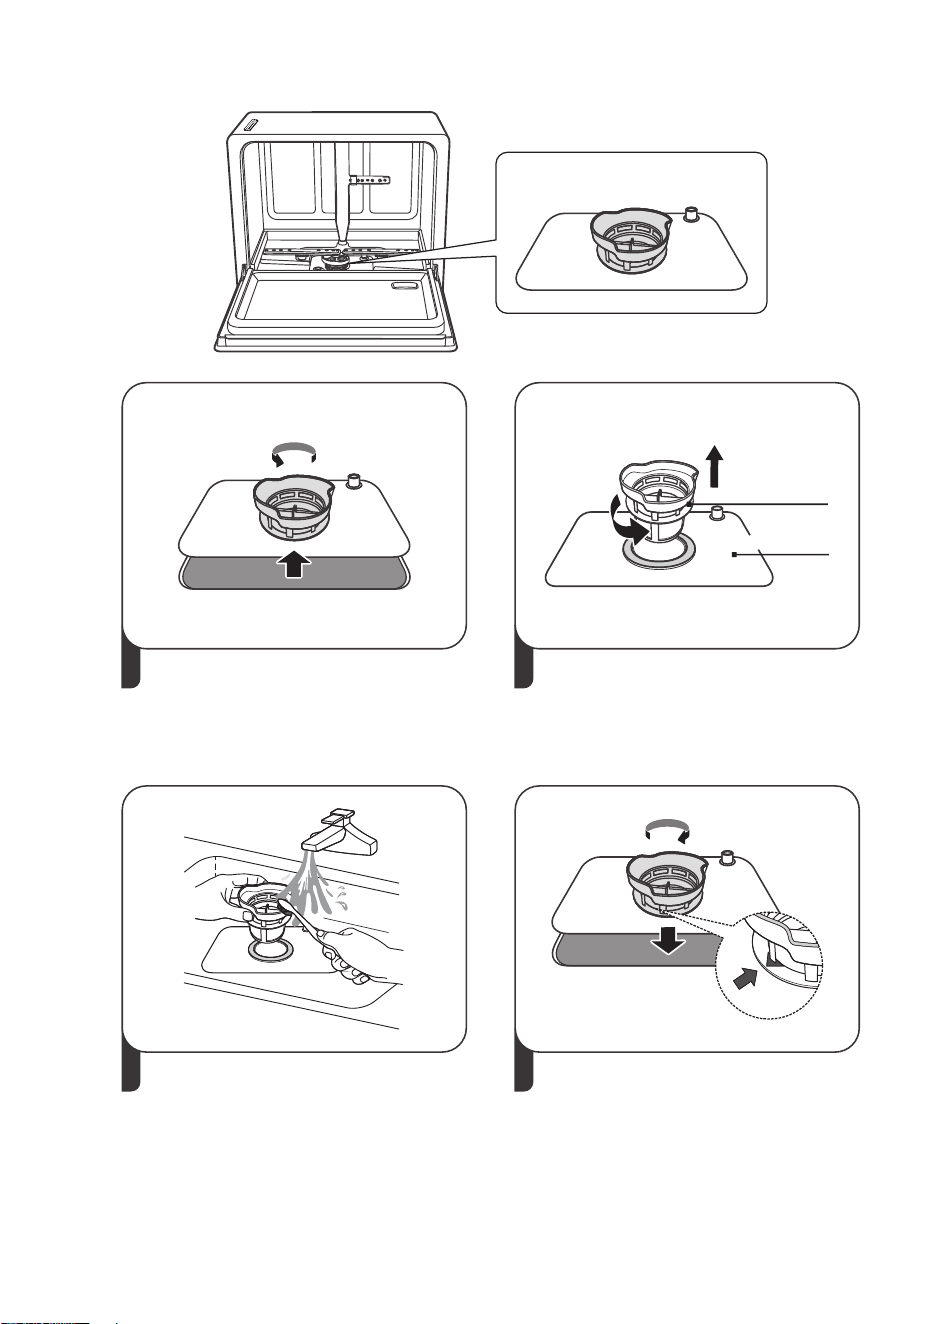
1 2
Hold the coarse filter and rotate it
anticlockwise to unlock the filter.
Lift the filter upwards and out of
the dishwasher.
Lift fine filter up from main filter.
3 4
Larger food remnants can be
cleaned by rinsing the filter
under running water.
For a more thorough clean, use a
soft cleaning brush.
Reassemble the filters in the reverse
order of the disassembly, replace
the filter insert, and rotate clockwise
to the close arrow.
Fine filter
Main filter
Filtering system
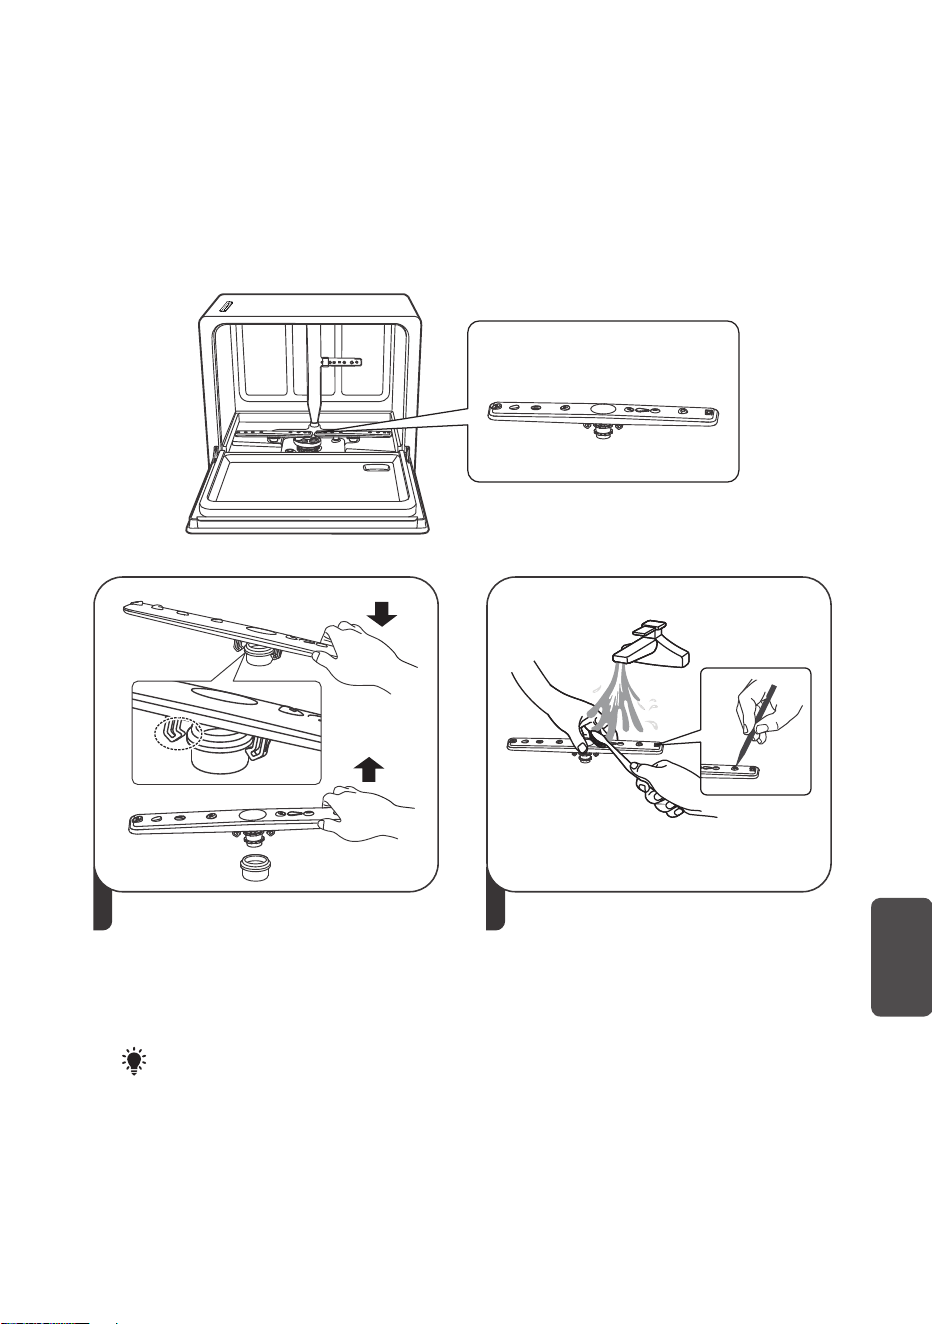
Spray arms
It is necessary to clean the spray arm regularly for hard water chemicals will clog the spray
arm jets and bearings.
To clean the spray arm, follow the instructions below:
Spray arms
2
Wash the spray arm in soapy and
warm water and use a soft brush
to clean the jets. Replace them
after rinsing them thoroughly.
1
To remove the spray arm, hold one
end of the spray arm first, then
press down firmly to release the
button and pull it up and out.
NOTE
Hold one side of both ends of
the spray arm to avoid hitting
the upper bowl basket when
pulling out.
English
25
Do not use spray detergent to clean the door, as it may damage the door lock and other
electrical components.
Do not use abrasives or rough paper towels, as it may leave scratches or spots on stainless
steel surface.
Control panel can be wiped with a slightly wet cloth. After cleaning, make sure
it is completely dry.
Do not use Sharp tools, Scratch sponge, or Rough detergent anywhere in the
machine
26
Care and maintenance
Installation
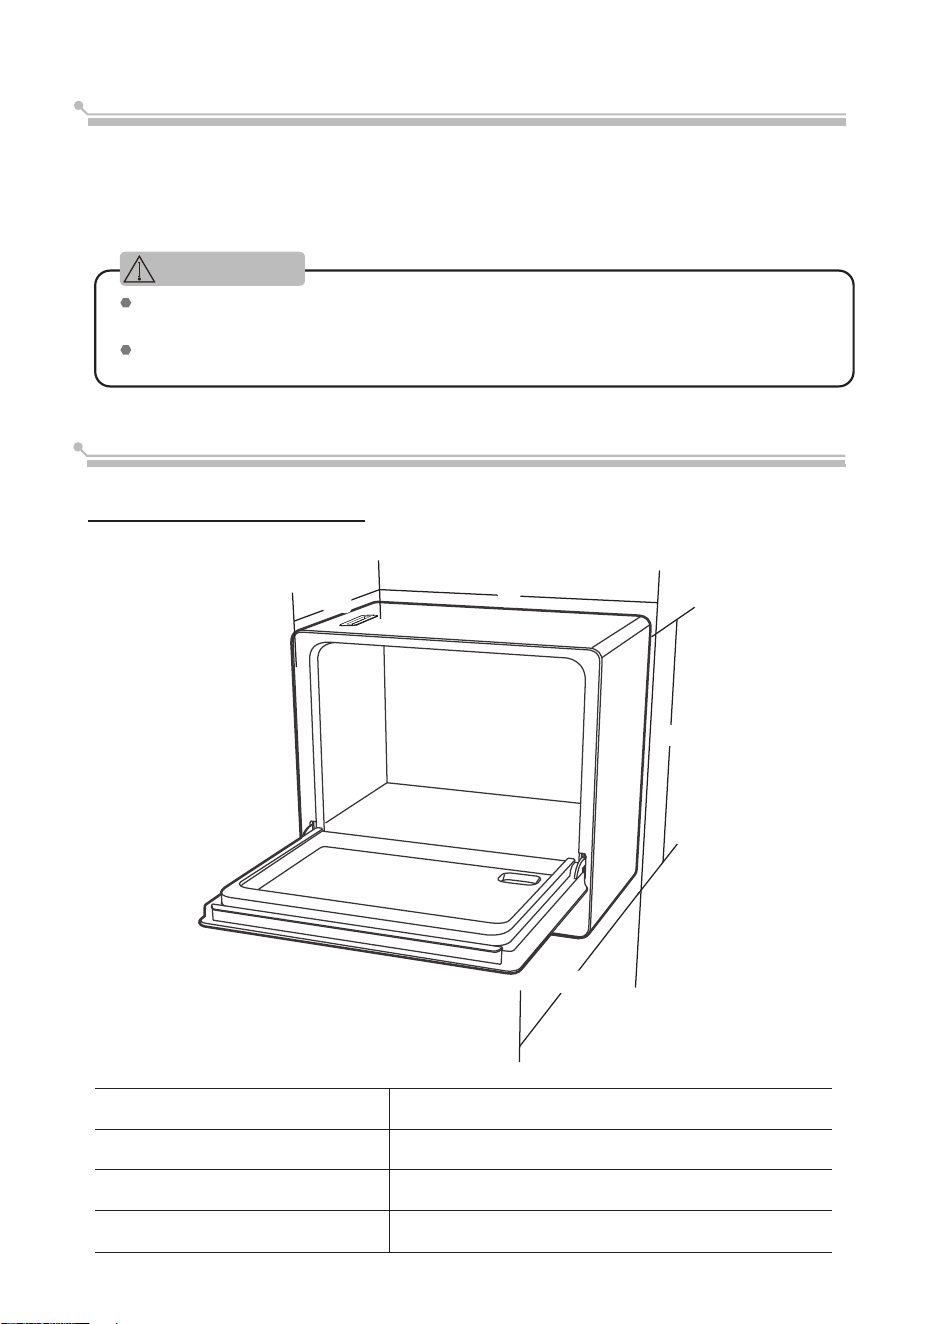
Product Dimensions
W
H
D2
D1
Height (H)
Width (W)
Depth (D1)
Depth (D2)
500 mm
550 mm
345 mm(with the door closed)
713 mm (with the door opened 90°)
WARNING
27
English
Preparation before installation
The machine shall be installed close to existing water tap, outlets and socket.
It should be close to drain to facilitate connection of drainage pipe.
The back of the machine shall be against the wall and to have proper distance for
water pipe. It shall be arranged along adjacent cabinet or wall.
The machine is equipped with a drainage pipe, which allows to be positioned on
the left or right side for easy installation. In addition, you may use a water supply
pipe or use a suction pipe with adding water to the folding bucket. For details,
please contact your agent.
Where to place
Grounding Instructions
This appliance must be earthed. In the event of a malfunction or breakdown, earthing
will reduce the risk of electric shock by providing a path of least resistance for the
electric current.
This appliance is equipped with a cord having an equipment-earthing conductor and
an earthing plug. The plug must be plugged into an appropriate outlet that is
installed and earthed in accordance with all local standards and requirements.
Power connection
Electric Shock
Do not use an extension cord or power adapter on this machine.
In case, do not cut off or remove the grounding connection of power cord.
Power requirements
Please check the label of rated value of power supply system for knowing rated voltage and
connect the machine to appropriate power supply. 10A fuse is required and time-delay
fuse or circuit breaker is recommended. Only separate circuit is suitable for this machine.
Machine connection
Make sure that supplied voltage and frequency correspond to those on rating plate. Plug
can only be connected to a properly grounded socket. If the socket that the machine must
be connected to is not suitable for the plug, replace the socket, and do not use a power
adapter that may cause overheating and burning.
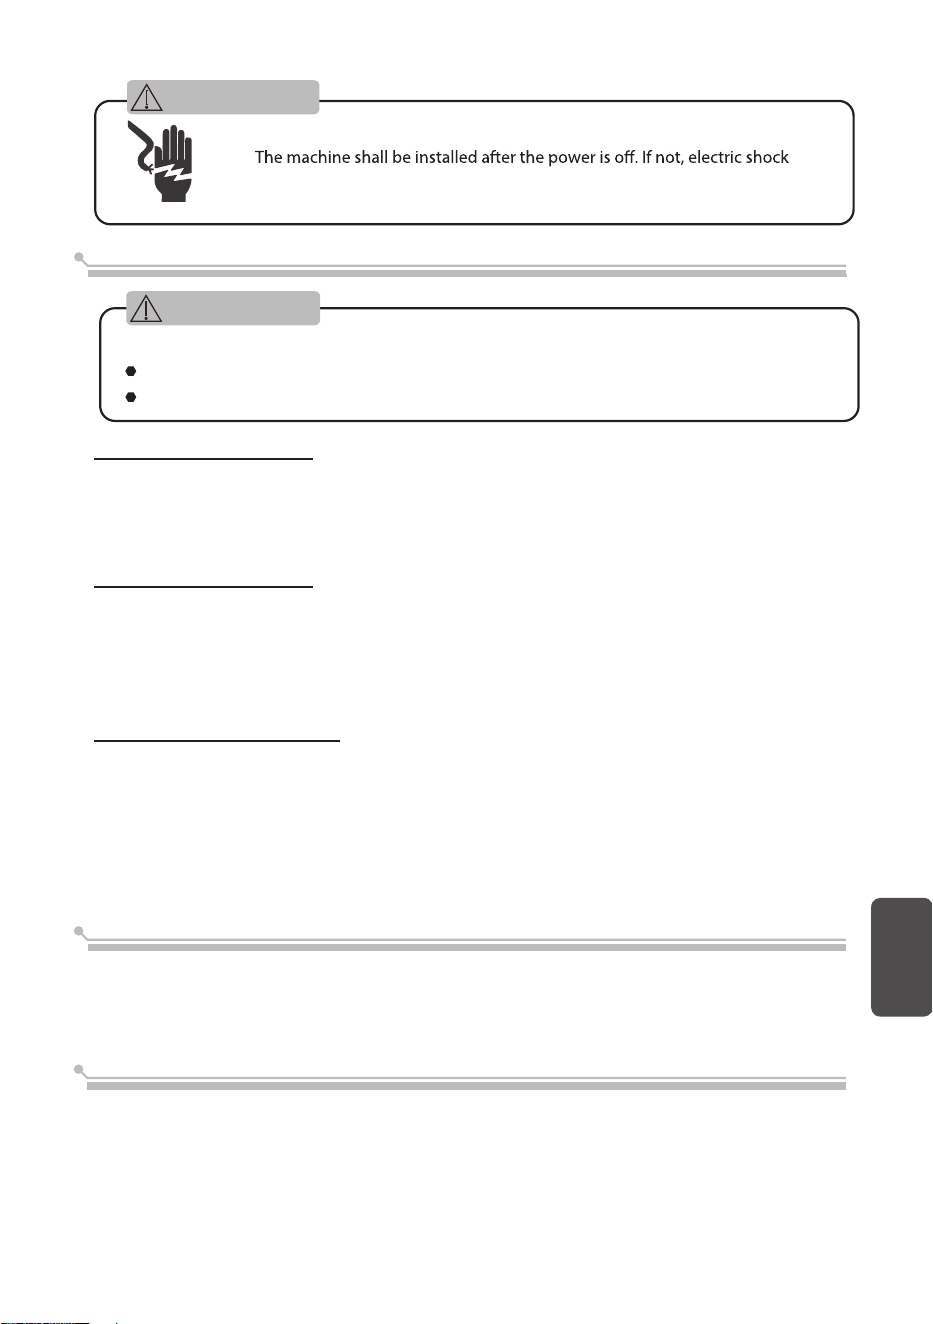
Electric Shock
or death can be caused.
Please make sure the machine is properly grounded before use.
WARNING
WARNING
28
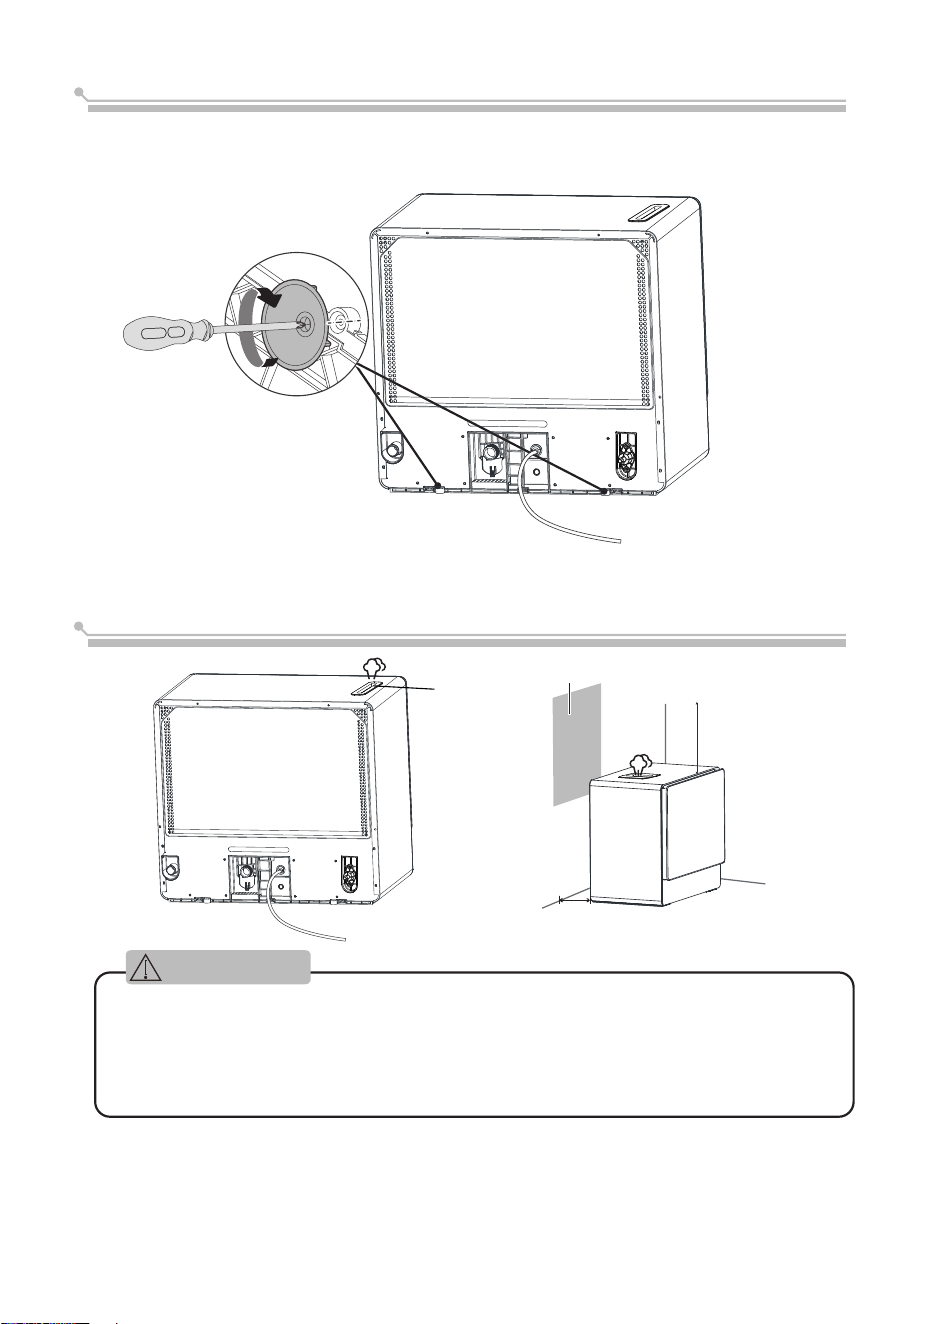
Install the suction cups
Use a screwdriver to tighten the suction cups into the holes on the left and right sides
at the bottom of the back of the machine.
Air Outlet
There is an air outlet on the top of the dishwasher, which is to promote the dry
performance of washing cycle. In order to prevent water mist from corroding the
wooden cabinets, try to avoid the air outlet directly facing the wooden cabinets, or
stick anti-corrosion stickers on the cabinets.
Paste the sticker on the wooden cabinet facing the air outlet.
anti-corrosion
sticker
Placed on the countertop
more than 5cm
air outlet
Above 30cm of space
NOTE
plumbing supply center where adapters are available for purchase.
Please Note: lf the supplied hose cloes not fit your tap, please contact your local
get blocked and damage the appliance.
free of impurities. lf this precaution is not taken, there is a risk that the water inlet can
an extended period of time, let the water run to make sure that the water is clear and
that it is fastened tightly in place.lf the water pipes are new or have not been used for
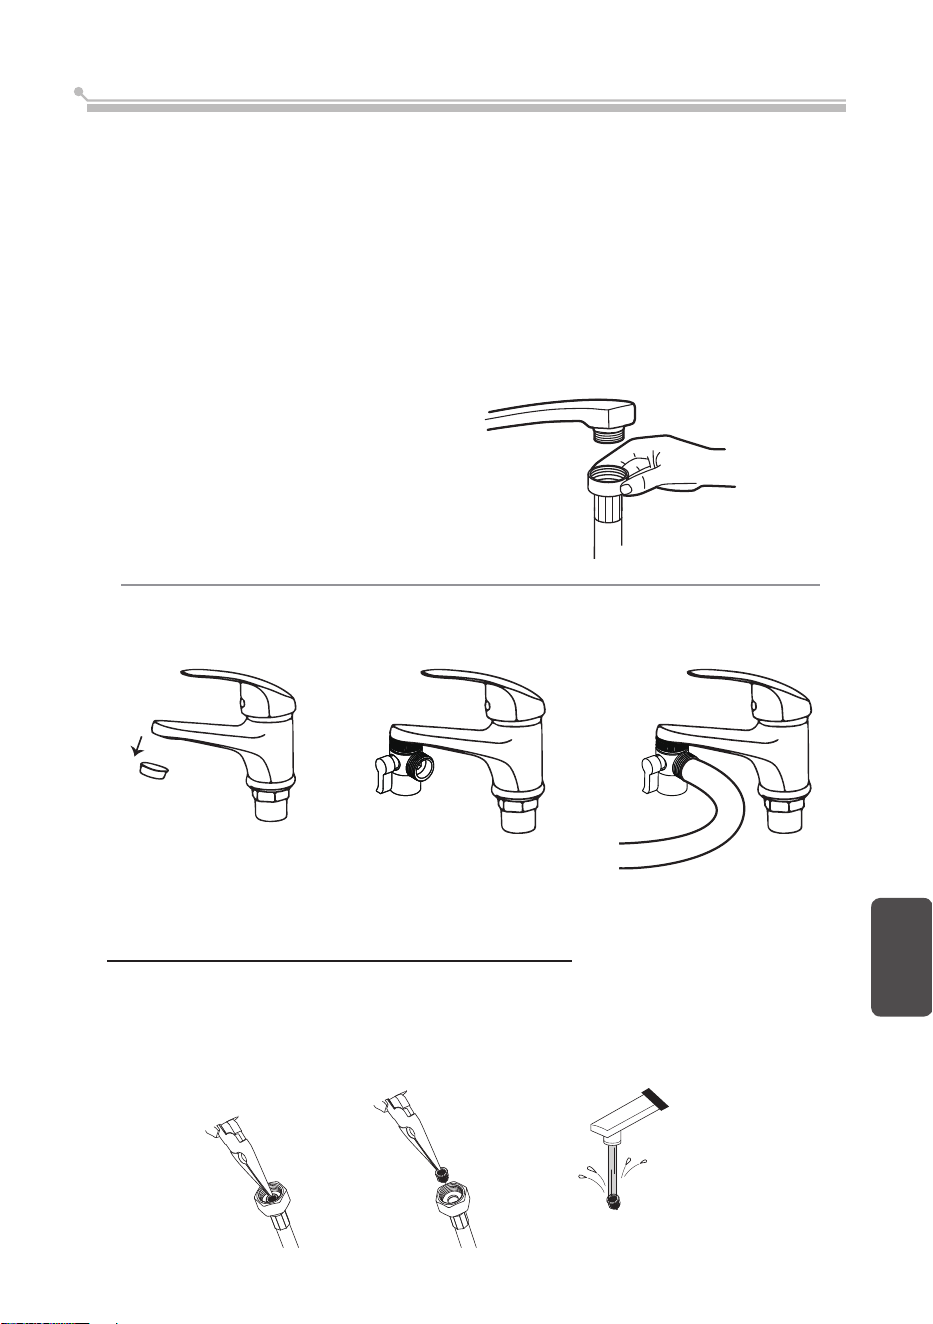
`Connect the cold water supply hose to a threaded 3/4(inch) connector and make sure
Connect the inlet pipe to the faucet
Clean the filter device of the water inlet pipe
There is a filtering system, which is located at one side of the water inlet pipe to the
bucket. It is recommended to check and clean the filter regularly. Accumulation of dirt may
cause blocking of water inflow and even alarm E1 error code.
It is recommended to remove the filter from the water inlet pipe by using a plier and clean
impurities with running water when necessary.
29
English
(1) (2) (3)
There are two ways to connect the inlet pipe to the faucet.
1.Connect to the faucet directly.
2.Use a tee connection.
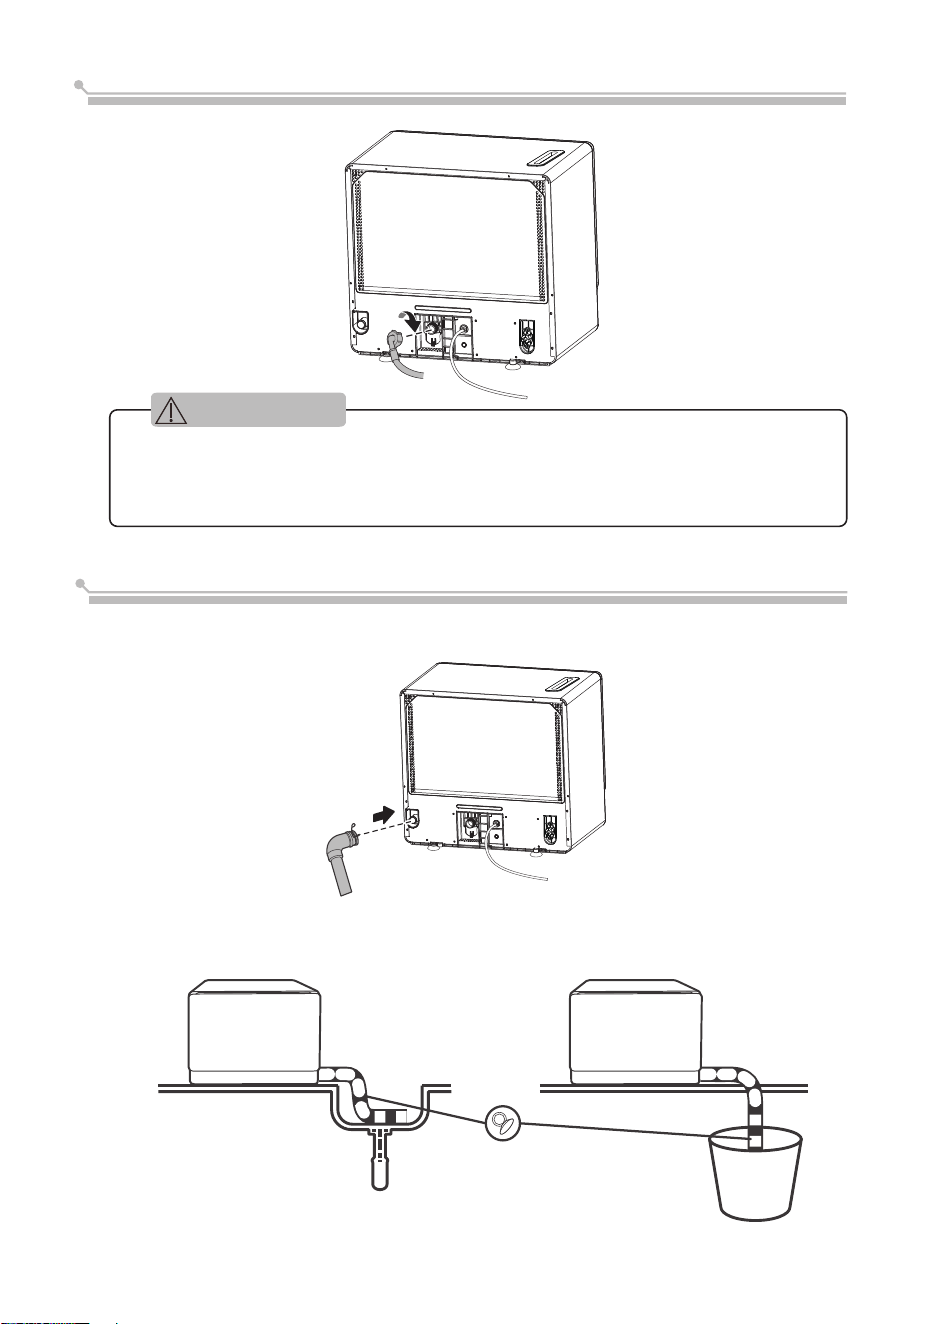
Connect the inlet pipe to the dishwasher
The installation of the pipes and electrical equipments should be
done by professionals.
Fix the drain pipe with the back pipe of the machine.The interface is fitted with
clamp.
or
The connection of the drain pipe: Put end of the drain into a sink or bucket.
Drain Pipe Connected
Fix the drain pipe with the back pipe of the machine. The interface is fitted with clips.
Fix the drain pipe with
suction cups
30
WARNING
Troubleshooting
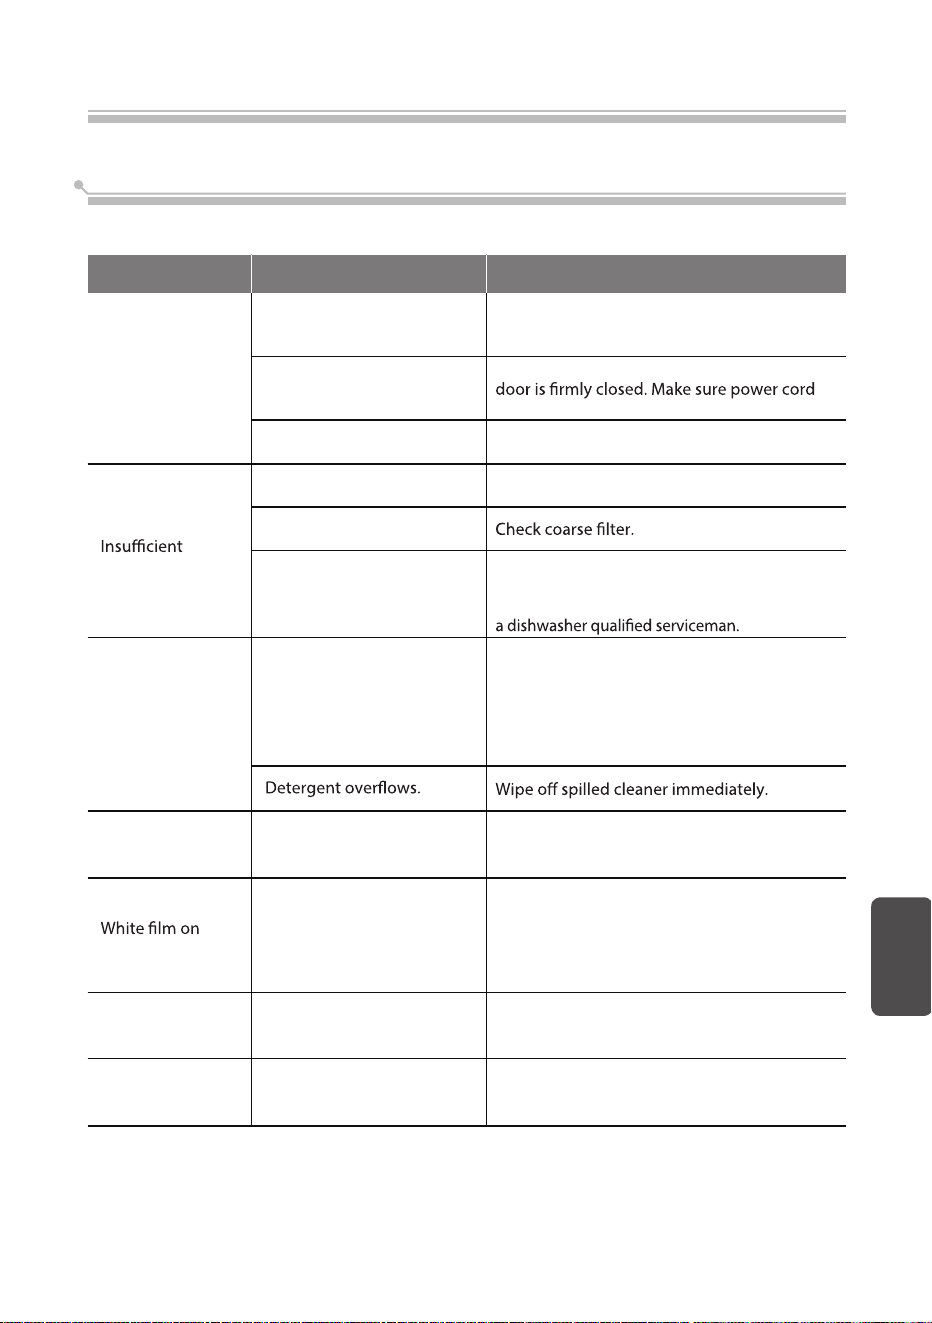
Please check the chart below before connecting customer service center
Problem
Possible cause Solutions
Before connecting customer service center.
The machine is
not working
Fuse burn-out or circuit trip.
Replace fuse or reset circuit breaker
Remove any other appliances that share
same circuit with the dishwasher.
Power is not connected.
Make sure that dishwasher is on and the
is properly plugged into the socket.
drainage
Drainage pipe has a knot
or is blocked.
Check the drainage pipe.
Foam remains
in liner
Improper dishwashing
powder is used.
In order to avoid foaming, only dishwashing
powder specially designed for dishwasher
can be used. In such case, open the door
and allow the foam to evaporate.
In case of too much foam, start any
washing program for cleaning.
Colors on liner
Use dishwashing powder
with coloring agent.
Make sure that dishwashing powder used is
free of coloring agent.
Rust on dishes
Dishes with rust are easily
to be corroded.
Avoid washing dishes that are easily to be
corroded in dishwasher.
Crush in
dishwasher
Dishes in the rack prevents
spray arm from rotating.
Suspend the program and reposition the
dishes that prevent spray arm from rotating.
liner
Hard water minerals.
Use wet sponge with dishwashing powder and
wear rubber gloves for interior cleaning.
Do not use any detergent other than
dishwashing powder as it may generate foam
or bubble.
Filter is blocked.
Sink drian is blocked.
Check the sink drain to ensure good drainage.
If the kitchen sink drain is not working properly,
you shall ask a pipe technician for help rather than
Door is open.
Close the door.
English
31
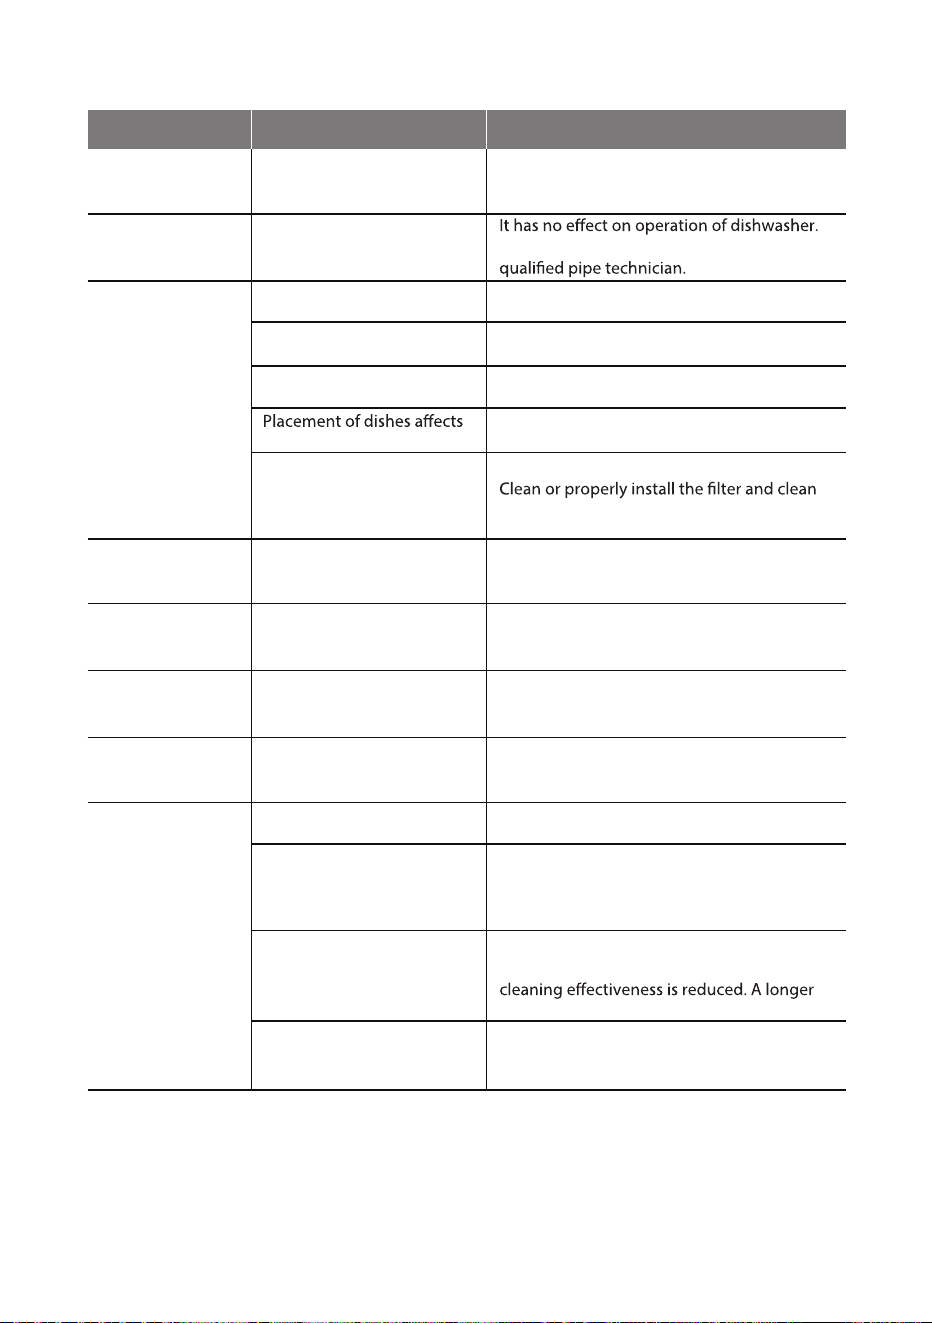
Problem Possible cause Solutions
Noise from
dishwasher
Suspend the program and reposition the
dishes.
Dishes are loose.
Glassware is not
glossy
If soft water is used, use less powder and
select a shorter washing program to clean
the glassware.
Add too much dishwashing
powder under soft water
conditions.
Black or grey
imprints on dishes
Use mild detergent to eliminate these
imprints.
Friction between aluminum
utensil and dishes.
Dishes are not
completely dry
Please see “Loading the basket” information for
details (Page 1
Placement is improper.
Do not take dishes out immediately after
the program ends. Slightly open the door
let the vapor out and wait until dishes are
cool.
Dishes are taken out too
early.
When shorter washing procedures are
used, washing temperature is lower and
program shall be selected.
Program is wrong.
These dishes have poor drainage ability,
which are not suitable to be washed in
dishwasher.
Dishwashing
powder remains in
adding position
Place the dishes correctly.
Placement of dishes
hinders the addition of
dishwashing powder.
White point on
dishes or
glassware
Add dishwashing powder.
Hard water produces more
scale.
Dishes remain
dirty after
washing
Please see “Loading the basket” information for
details (Page 18).
Dishes are not placed
correctly.
Select a more powerful program.
The program is not
powerful enough.
Use more dishwashing powder or replace
new detergent.
Dishwashing powder is
not enough.
Reposition the dishes so that spray arm
can rotate freely.
spray arm.
the rotation of spray arm.
Filter assembly is dirty or
not properly installed on the
base, which may impede
the rotation of spray arm.
Beats in water
pipe
In case of any doubts, please contact
This may be caused by site
installation or cross section
of pipelines.
The dishes have poor
drainage ability.
9).
32
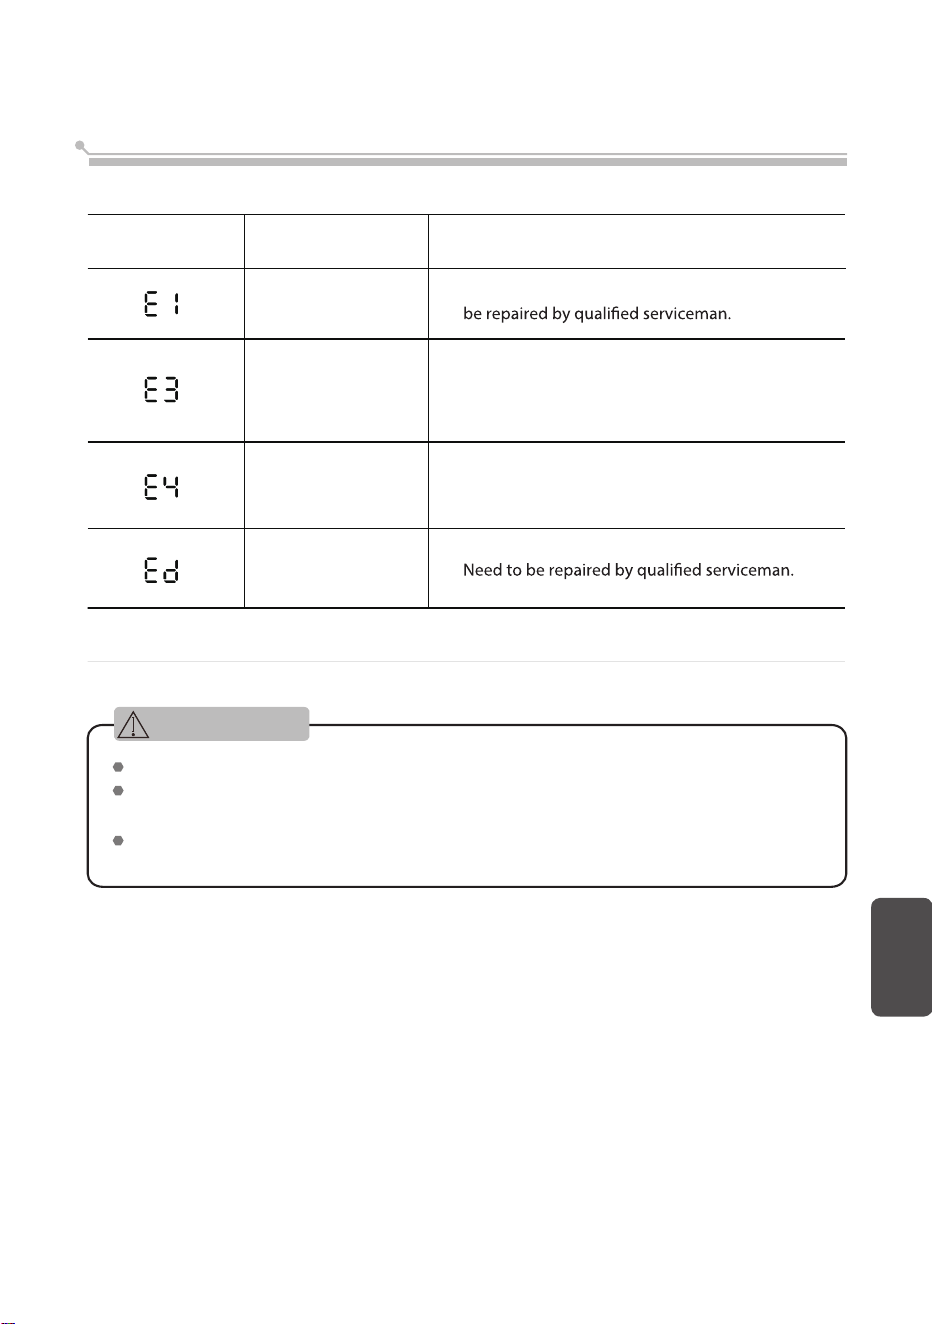
When failure occurs, error code will appear to remind you:
Code name
Long water
intake time
Flow-meters, drain valves, or pump failures shall
Abnormal heating
Abnormal
communication
Heating pipe or thermistor is at abnormal state,
which needs to be unplugged the power plug
from the outlet , and needs to be repaired by
qualified serviceman.
Overflow or water
tank problem
The machine occur overflow or something
wrong with the floater in the water tank, needs
to be repaired by qualified serviceman.
If overflow occurs, turn off the main water supply before calling a service.
If there is water in the base pan because of an overfill or small leak, the water
should be removed before restarting the dishwasher.
If there is an error code that cannot be solved, please request professional
assistance.
Possible cause
Error
code
Error code
33
English
WARNING
24 kg
46 pcs (chopsticks*5 + tea spoon*5 + rice spoon*1
+bowl*5 + soup spoon*5 + soup ladle*1 +shallow
plate*5 + deep ladle*1 + glass*2 + sauce plate*3 +
mug*2+ noodle bowl*2 +gravy ladle*1 + fork*4 +
knife*4)
Specification
Model
Dimension (mm)
Rated coltage/Frequency
Rated Power
Power consumption/Cycle
Noise Level
Control mode
Washing capacity
DW-05T2-HK
550(W)*500(H)*345(D)
220V/50Hz
1350W
55dB
Electronic type
IPX1
Water consumption
8.5L
0.710kWh
Total weight
Net weight
21.5 kg
34
Water pressure
0.04-1.00MPa

https://www.toshiba-lifestyle.com/hk

