I www.russellhobbs.com
26450
2
u
v
nor
s
t
e
f
g
j
k
m
l
i
3
A B C
D E
G H
J
K
L
F
30 ml x 1
60 ml
x 2
M
U
L

4
Read the instructions, keep them safe, pass them on if you pass the appliance on. Remove all
packaging before use.
IMPORTANT SAFEGUARDS
Follow basic safety precautions, including:
This appliance can be used by children aged from 8 years and
above and persons with reduced physical, sensory or mental
capabilities or lack of experience and knowledge if they have been
supervised/instructed and understand the hazards involved.
Children shall not play with the appliance.
Cleaning and user maintenance shall not be done by children unless
they are older than 8 and supervised.
Keep the appliance and cable out of reach of children under 8 years.
Misuse of the appliance may cause injury.
The coffee-maker shall not be placed in a cabinet during use.
h The surfaces of the appliance will get hot. Residual heat will keep
the surfaces hot after use.
If the cable is damaged, it must be replaced by the manufacturer, its
service agent, or someone similarly qualified, to avoid hazard.
The surface of the heating element is subject to residual heat after use.
Use the appliance according to these instructions. Any misuse may
cause potential injury, electric shock or other hazards.
This appliance can be used by persons with reduced physical,
sensory or mental capabilities or lack of experience and knowledge
if they have been given supervision or instruction concerning use of
the appliance in a safe way and understand the hazards involved.
Clean the product and all other accessories after each use.
i Do not immerse in any liquid.
This appliance is intended to be used in household and similar
applications such as:
• staff kitchen areas in shops, offices and other working
environments;
• by clients in hotels, motels and other residential type
environments;
• bed and breakfast type environments;
• farm houses.

5
• Sit the appliance on a stable, level, heat-resistant surface.
• Don’t use the appliance for any purpose other than those described in these instructions.
• Don’t use the appliance if it’s damaged or malfunctions.
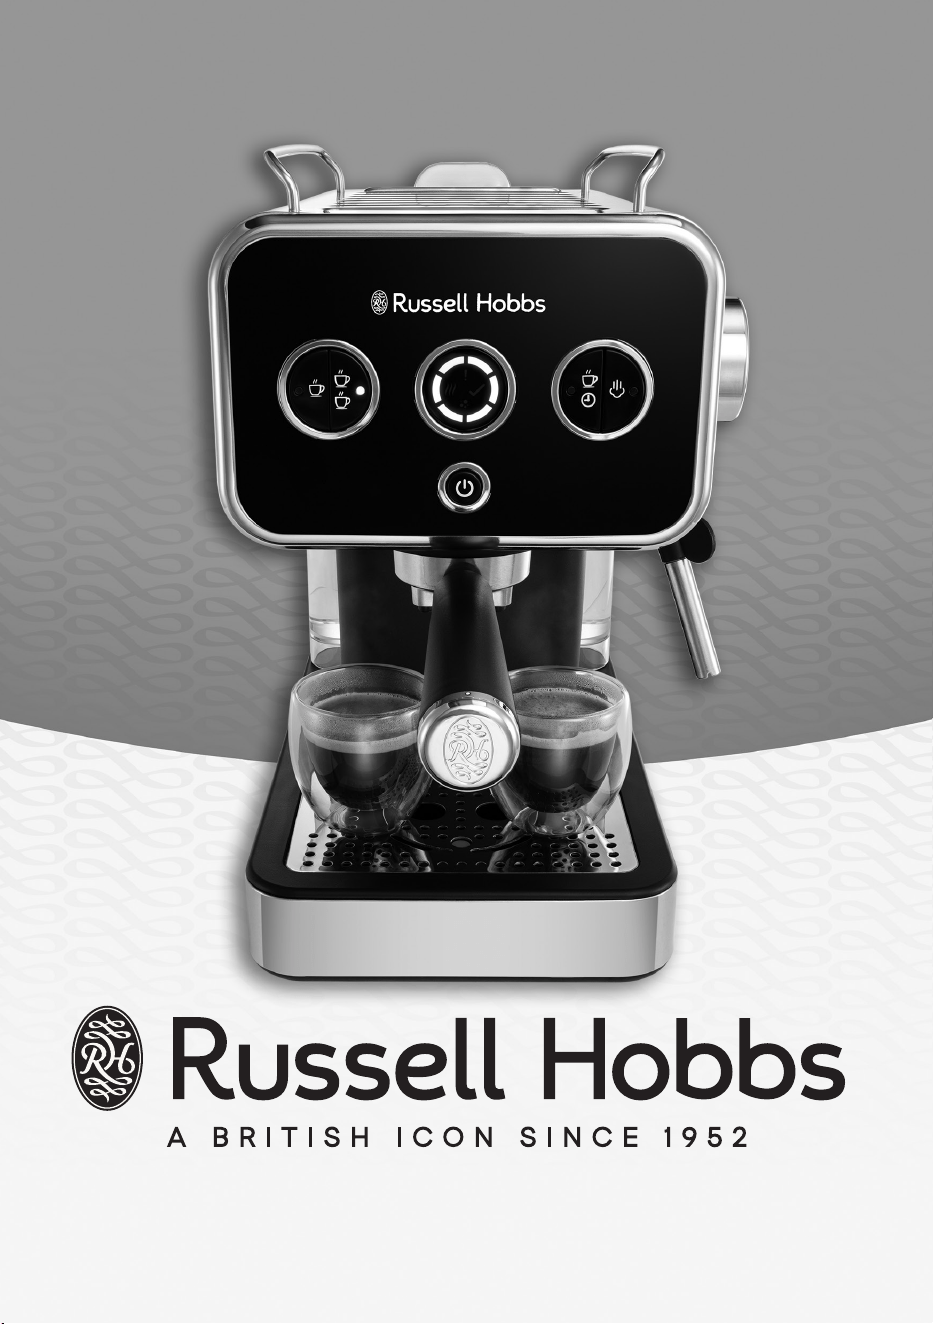
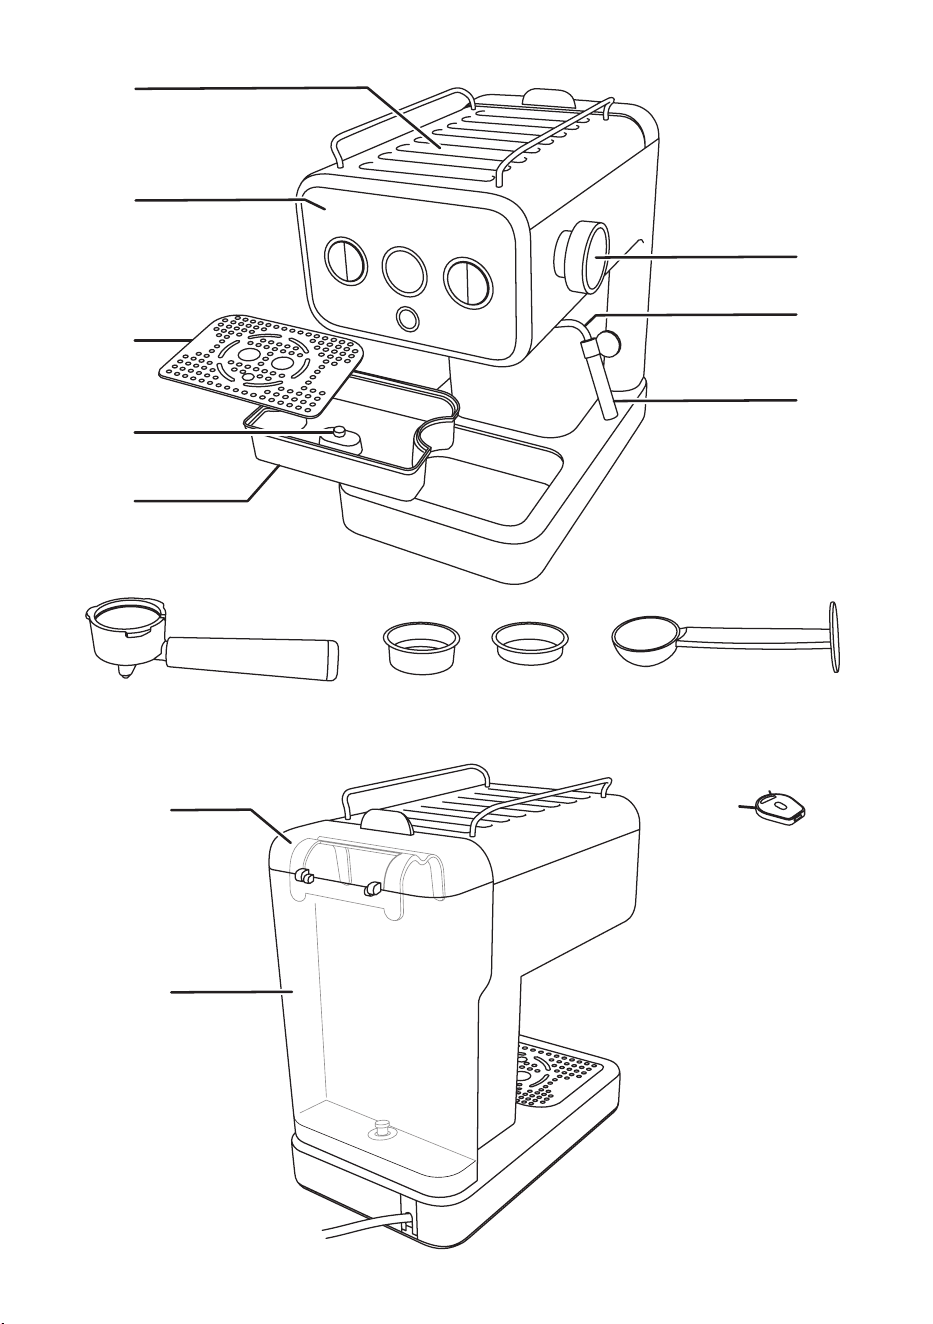
PARTS
1. Cup warming plate
2. Control panel
3. Drip tray cover
4. Removable drip tray
5. Drip tray full indicator
6. Steam/hot water control
7. Swivel arm
8. Removable steam nozzle
9. Portafilter
10. 2 shot sieve
11. 1 shot sieve
12. Measure/tamper
13. Cleaning tool
14. Water tank lid
15. Water tank
BEFORE USING FOR THE FIRST TIME
• Wash the portafilter, sieves and the measure/tamper in warm soapy water. Rinse and dry.
• Before using for the first time, or if the appliance has not been used for a long time, clean it
by filling and running the appliance without coffee. Follow the instructions under FILLING
and MAKING ESPRESSO but without adding any coffee.
• Clean the steam system by following the instructions under CARE AND MAINTENANCE.
AUTO SHUTOFF
After 25 minutes of inactivity, your espresso maker will shut off. To turn it back on, press C.
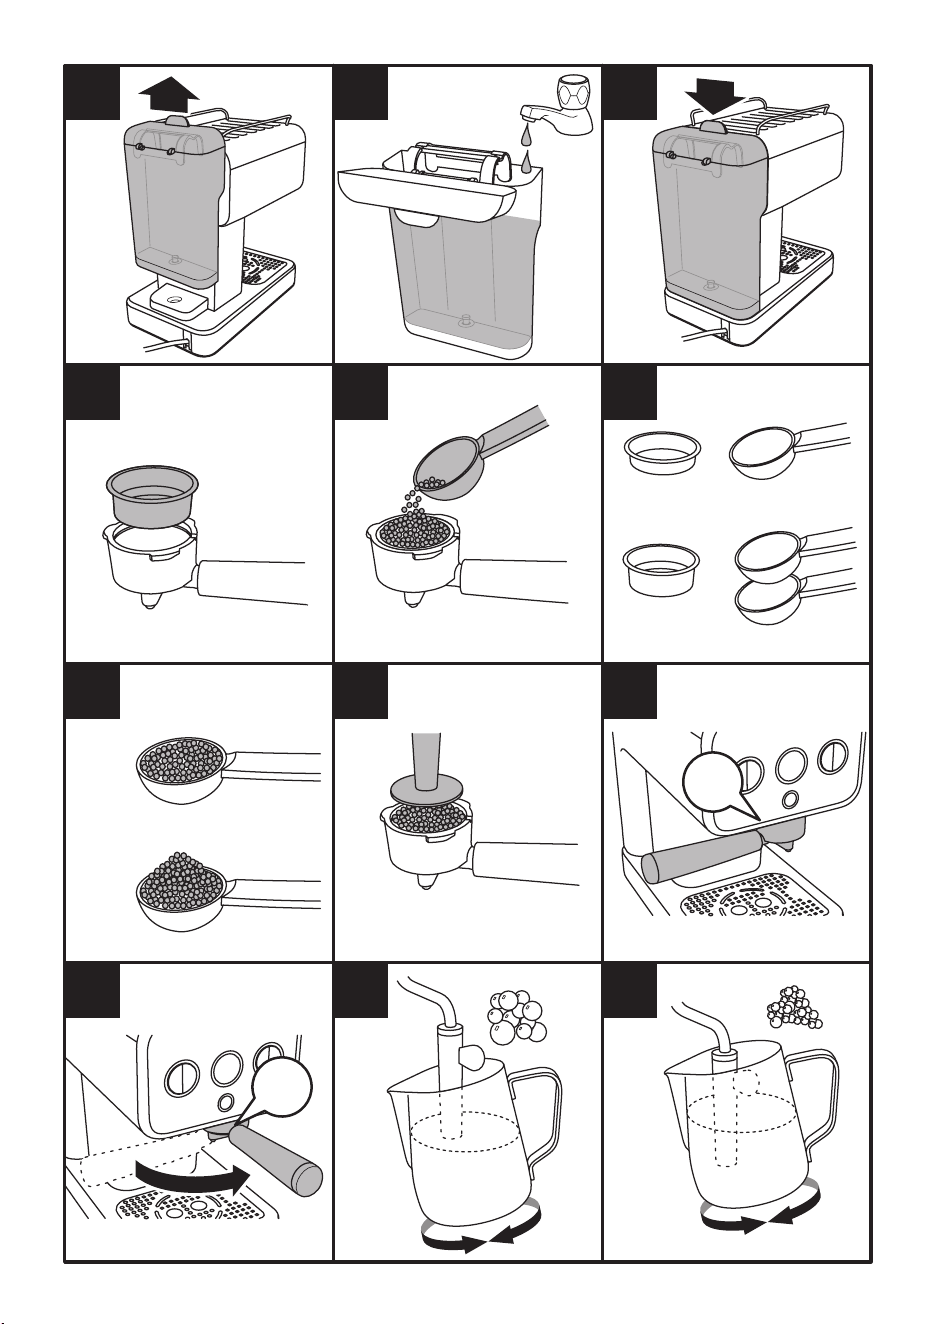
FILLING
1. Remove the water tank by lifting it upwards (Fig A).
2. Fill the water tank with cold, fresh water to the max marking (Fig. B).
3. Refit the water tank (Fig. C). Ensure it is correctly fitted and fully seated.
MAKING ESPRESSO
Espresso can be enjoyed on it’s own or used for many popular espresso based variations such as
Latte, Cappuccino, Americano, etc. Your espresso maker can make a single shot (approx. 30ml),
or a double shot (60ml) of espresso.
Your Espresso maker can make drinks automatically or under manual control.
Filling the portafilter
1. Decide whether you are making a single shot or double shot.
2. For a single shot fit the 1 shot (smaller) sieve into the portafilter; for a double fit the 2 shot
(larger) sieve (Fig. D). For ESE (easy serving espresso) pods use the 1 shot sieve.
3. Use the measure to fill the sieve (Fig. E). For a single shot use 1 measure and for a double
use 2 measures (Fig. F). The coffee in the measure should be level and not heaped (Fig. G).
4. Lightly tamp (compress) the coffee into the portafilter using the flat end of the measure
(Fig. H) until it is level. You need to compact the coffee just enough to create resistance to
the water as it passes through the coffee. Too loose and the water passes easily through the
coffee and the full flavour won’t be extracted. Too tight and it will be difficult for the water
to pass through the coffee and the flavour will be harsh and bitter.

6
Fitting the portafilter
1. Make sure the rim of the portafilter is free from any coffee debris. Fit it into the machine
with the handle facing out to the left so that is aligned with the Umark (Fig. J).
2. Push the portafilter upwards then turn it to the right until it stops (Fig. K).
• To remove the portafilter, turn it to the left until the handle lines up with the Umark.
Automatic One and Two Cup Mode
Your Espresso maker can make one or two cups with just a single button press.
1. Fill the water tank, then add the required amount of coffee to the portafilter and fit it.
2. Press the C button to switch your Espresso maker on.
3. Your Espresso maker will start its pre-heat cycle. The six segments in the display and the (P)
icon will light up. The first segment will flash. The flashing segment will go off and the next
anticlockwise segment will flash. When all of the segments have gone off, and the G icon
comes on, your Espresso maker is heated and ready.
4. Place one or two cups onto the drip tray.
5. For one cup, press the R button; for two cups press the R/R button.
6. The six segments in the display will cycle until they all go off in a similar way to the pre-heat
cycle but without showing the P icon.
7. When the coffee is ready, all six segments will have gone off and the G icon will come on.
• Note that if your Espresso maker needs to pre-heat once the coffee is brewed, the pre-heat
icon P will show instead of the ready icon G.
Manual Mode
This mode allows you to control the amount of coffee your Espresso maker dispenses.
1. Fill the water tank, then add the required amount of coffee to the portafilter and fit it.
2. Place one or two cups onto the drip tray.
3. Press and hold the R/T button. The button light will come on.
4. Hold the button until the required amount of coffee has been dispensed.
Notes
• The maximum run time in manual mode is 60 seconds.
• The display will show a single segment at a time in a moving anticlockwise patern while the
button is held down.
STEAM/HOT WATER FUNCTIONS
The steam/hot water functions can be used to heat milk, froth milk and heat drinks that have
cooled.
Important: The appliance requires a short cooling period after the steaming or frothing
function is completed and will not be able to brew immediately.
Steaming milk
1. Press the steam button D.
2. The six segments in the display and the P icon will light up. The first segment will flash. The
flashing segment will go off and the next anticlockwise segment will flash. When all of the
segments have gone off, and the G icon comes on, your Espresso maker is ready to make
steam.
3. Fill a small jug with milk.
4. Hold the jug under the steam nozzle with the nozzle beneath the surface of the milk.
5. Turn the steam/hot water control counterclockwise. The further counterclockwise you turn
the control, the more steam is produced.
6. When the milk is heated to your satisfaction, turn the steam/hot water control clockwise to
the off (A) position.

7
7. Clean the steam nozzle.
Frothing milk
1. Follow steps 1 and 2 under ‘Steaming milk’. Use cold milk from the refrigerator for best
results.
2. Hold the jug under the nozzle as above and open the steam/hot water control as desired.
3. To make frothy milk with large bubbles, hold the nozzle just under the surface of the milk
and make circular motions with the jug as steam is released (Fig. L).
4. To make frothy milk with small bubbles (micro foam), hold the nozzle fully under the surface
of the milk and make circular motions with the jug as steam is released (Fig. M).
5. Turn the steam/hot water control clockwise to the off (A) position when you are finished.
6. Clean the steam nozzle.
Hot water
1. Follow steps 1 and 2 under ‘Steaming milk’.
2. Hold a suitable container under the steam nozzle.
3. Turn the steam/hot water control fully counterclockwise to the D/E position.
4. Hot water will come out of the steam nozzle for up to 90 seconds.
5. Turn the steam/hot water control clockwise to the off (A) position when you are finished.
Heating drinks
• Follow the directions under ‘Steaming milk’ but holding the cooled drink under the steam
nozzle instead of the milk.
Cleaning the steam nozzle after each use
1. Clean the steam nozzle and the swivel arm immediately after every use.
2. Immerse the steam nozzle in a cup of clean water.
3. Turn the steam/hot water control counterclockwise. Let steam escape into the clear water
for several seconds.
4. Repeat the process several times if necessary.
5. Finally, carefully remove the steam nozzle and wipe it and the swivel arm with a clean damp
cloth before replacing it.
TIPS
• Place your espresso cups on top of the unit where they will be gently warmed.
• To get a hotter espresso, warm the portafilter before use. Fit the sieve into the portafilter, fit
the portafilter and run the brewing process for 5-10 seconds to heat the filter up. Then,
remove the portafilter and use it as normal to make espresso. Be aware when handling the
portafilter and sieve that they will be hot after doing this.
• After several uses of the steam function, the temperature of the unit can become high and
this will prevent further brewing until the machine has cooled a little. You can use the hot
water function to cool the machine more quickly.
CARE AND MAINTENANCE
Cleaning
1. Unplug the appliance and let it completely cool down.
2. Clean the exterior surfaces and the steam nozzle with a slightly damp cloth and then dry
them thoroughly. Make sure that no water enters the product interior (for example, through
the control opening). The steam nozzle tip can be removed by pulling it downwards and it
can then be washed separately.
3. Remove the portafilter and sieve and empty out the coffee grounds. Wash under running
water and dry thoroughly.

8
4. Wipe the area on the machine where the portafilter fits.
5. Empty the drip tray when you have finished using the machine, or when the drip tray full
indicator pops up.
• Use the cleaning tool to unblock the openings in the portafilter.
• The steam nozzle, sieves, drip tray and drip tray cover can be cleaned in a dishwasher.
Descaling
After approximately 500 cycles, the clean icon c will appear in the display indicating that the
unit should be descaled. This is a warning and will not affect coffee making but the icon will
remain lit until it is reset after descaling the appliance.
Never use a descaling product based on mineral acids such as sulphuric acid, hydrochloric acid,
sulphamic acid and acetic acid (e.g. vinegar). These descalers may damage the machine. Use a
descaling product recommended for appliances with plastic parts.
Products returned under guarantee with faults due to scale will be subject to a repair charge.
• Descale your product regularly depending on your water’s lime content and frequency of
use.
• Use a proprietary descaling product and follow the manufacturer’s instructions.
1. Pour fresh water and the specified amount of decalcifier into the water tank.
2. Repeatedly start the brewing process and also use the ‘hot water’ process to clean the
steam nozzle and internal components.
3. Do this until the water tank is empty. If necessary, repeat this process.
4. After descaling, rinse the product several times by brewing water with no coffee to remove
any decalcifier residue.
5. To reset the light, hold the R/R button and the manual R/D button at the same time for 5
seconds. The clean icon c will go off.
TROUBLESHOOTING
The caution (!) icon will appear in the display under the following circumstances:
Cause Solution
The steam/hot water control is in the open
position during brewing.
Close the control.
Manual brewing longer than 60 seconds.
Don’t hold the R/D button for longer than
60 seconds in manual mode.
Steaming longer than 180 seconds.
Don’t use the steam/hot water control for
longer than 180 seconds.
Hot water dispensed for longer than 90
seconds.
Don’t try to dispense hot water for longer
than 90 seconds.
The steam/hot water control is in the open
position when the unit is switched on.
The unit will not brew. Close the control.

9
The pre-heat (P) icon and the countdown display segments along with the flashing caution (!)
icon will appear in the display under the following circumstances:
Cause Solution
Attempting to brew coffee before the unit has
reached the correct temperature.
Allow the unit to pre-heat fully indicated by
the P icon.
Attempting to create steam before the unit
has reached the correct temperature.
Allow the unit to reach the correct
temperature indicated by the P icon.
Attempting to dispense hot water before the
unit has reached the correct temperature.
Allow the unit to reach the correct
temperature indicated by the P icon.
General
Problem Possible Cause Solution
No espresso is made Water tank empty Fill the water tank
Portafilter or sieve is blocked Remove and clean
Machine needs descaling Descale the machine
Grind is too fine or coarse Grind the coffee to the correct
consistency
Espresso leaks from
around the portafilter
The portafilter is not fitted
correctly
Remove and refit the portafilter.
Make sure it is turned fully to the
right until it won’t turn any
further.
Portafilter can’t be
fitted
Too much coffee in the sieve Use the supplied measure/
tamper as directed.
Debris around the portafilter
fitting
Clean the area where the
portafilter fits
Coffee tastes weak Not enough coffee in the sieve Use the supplied measure/
tamper as directed.
Grind is too fine or coarse Grind the coffee to the correct
consistency
Coffee too loose in sieve Tamp the coffee down with more
pressure

10

11
RECYCLING
W
To avoid environmental and health problems due to hazardous substances,
appliances and rechargeable and non-rechargeable batteries marked with
one of these symbols must not be disposed of with unsorted municipal
waste. Always dispose of electrical and electronic products and, where
applicable, rechargeable and non-rechargeable batteries, at an appropriate
official recycling/collection point.
SERVICE
If you ring Customer Service, please have the Model Number to hand, as we won’t be able to
help you without it. It’s on the rating plate (usually underneath the product).
The product isn’t user-serviceable. If it’s not working, read the instructions, check the plug fuse
and main fuse/circuit breaker. If it’s still not working, consult your retailer.
If that doesn’t solve the problem – ring Customer Service – they may be able to offer technical
advice.
If they advise you to return the product to us, pack it carefully, include a note with your name,
address, day phone number, and what’s wrong. If under guarantee, say where and when
purchased, and include proof of purchase (till receipt). Send it to:
Customer Service
Spectrum Brands (UK) Ltd
Fir Street, Failsworth, Manchester M35 0HS
email: support@russellhobbs.com
telephone: 0345 658 9700 (local rate number)
Please note: If you have purchased the product within the last 6 months, please contact the
retailer in the first instance to deal with any matters relating to warranty.
GUARANTEE
Defects affecting product functionality appearing within the guarantee period will be corrected
by replacement or repair at our option provided the product is used and maintained in
accordance with the instructions. Your statutory rights are not affected.
This warranty shall not be valid where it is contrary to U.S. and other applicable laws, or where
the warranty would be prohibited under any economic sanctions, export control laws,
embargos, or other restrictive trade measures enforced by the United States or other applicable
jurisdictions. This includes, without limitation, any warranty claims implicating parties from, or
otherwise located in, Cuba, Iran, North Korea, Syria and the Crimea region.
Guarantee period = 2 years from first retail purchase.
To claim an extra 1 year guarantee, register your product online within 28 days of purchase.
Register at: uk.russellhobbs.com/product-registration
Consumables are guaranteed only for their recommended lifecycle. Replacement/Spare parts*
are excluded and are only covered by a 1 year warranty.
* Examples include filters, removable grill plates, drip trays/crumb trays etc.
J ONLINE
www.russellhobbs.com for more products

T22-9003584