Coolster
Luftkühler
Air Cooler
Enfriador de aire
Refroidisseur d‘air
Raffreddamento dell‘aria
10032346 10032347

3
DE
Sehr geehrter Kunde,
wir gratulieren Ihnen zum Erwerb Ihres Gerätes. Lesen Sie
die folgenden Hinweise sorgfältig durch und befolgen Sie
diese, um möglichen Schäden vorzubeugen. Für Schäden,
die durch Missachtung der Hinweise und unsachgemäßen
Gebrauch entstehen, übernehmen wir keine Haftung. Scannen
Sie den folgenden QR-Code, um Zugriff auf die aktuellste
Bedienungsanleitung und weitere Informationen rund um das
Produkt zu erhalten.
INHALTSVERZEICHNIS
Sicherheitshinweise4
Geräteübersicht5
Funktionen5
Inbetriebnahme und Bedienung6
Reinigung und Pege8
Hinweise zur Entsorgung8
Spezielle Entsorgungshinweise für Verbraucher in Deutschland9
TECHNISCHE DATEN
Artikelnummer 10032346, 10032347
Stromversorgung 220-240 V ~ 50-60 Hz
Leistung 60 W
HERSTELLER & IMPORTEUR (UK)
Hersteller:
Chal-Tec GmbH, Wallstraße 16, 10179 Berlin, Deutschland.
Importeur für Großbritannien:
Berlin Brands Group UK Limited
PO Box 42
272 Kensington High Street
London, W8 6ND
United Kingdom
English 11
Español 17
Français 23
Italiano 29

4
DE
SICHERHEITSHINWEISE
• Benutzen Sie ausschließlich die angegebene Spannung.
• Reparieren oder remontieren Sie das Gerät nicht selbstständig; es sollte von einem
qualizierten Fachmann repariert werden.
• Benutzen Sie das Gerät nicht mit nassen Händen, um Verletzungsgefahr
vorzubeugen.
• Sollte das Stromkabel defekt sein, muss es mit einem kompatiblen Kabel ersetzt
werden oder vom Hersteller bzw. seinem Kundendienst repariert werden.
• Wenn das Gerät nicht benutzt wird, schalten Sie es aus und trennen Sie es vom
Strom.
• Blockieren Sie den Luftauslass nicht (mit inserierten Gegenständen), um Schaden
vorzubeugen.
• Benutzen Sie das Gerät nicht in der Nähe von explosivem Gas.
• Benutzen Sie das Gerät ausschließlich auf einer ebenerdigen Fläche.
• Benutzen Sie das Gerät nicht im Freien.
• Der Wasserstand im Wasserspeicher sollte “MAX” niemals überschreiten. Bei
Luftbefeuchtung sollte der Wasserstand “MIN” niemals unterschreiten.
• Kippen oder werfen Sie beim Auf- oder Umstellen das Gerät nicht um, nachdem
Sie Wasser in den Speicher gegeben haben. Verrutschen Sie das Gerät im
senkrechten Zustand, wenn Sie es bewegen wollen, um das Verschütten von
Wasser zu vermeiden.
• Legen Sie das Gerät nicht um. Sollte es umfallen und Wasser in sein Gehäuse
geraten, entfernen Sie es vom Strom. Schicken Sie es dann bei der Reparatur oder
dem Kundendienst ein und lassen es überprüfen.
• Legen Sie keine Gegenstände auf dem Gerät ab und blockieren Sie nicht die
Entlüftungsöffnung. (WARNUNG: Bedecken Sie nicht die Heizung, um Überhitzung
vorzubeugen.)
• Säubern Sie das Gerät mit einem leicht feuchten Lappen. Verwenden Sie keine
Reinigungsmittel oder -lösungen. Waschen Sie es nicht mit Wasser ab.
• Positionieren Sie den Luftaus- und -einlass nicht zu nah an einer Wand oder einem
Vorhang.
• Stoßen Sie während der Benutzung nicht gegen das Gerät und schütteln Sie es
nicht, da es sonst stoppen könnte.
• Das Wasser im Speicher kann im Sommer schnell abgestanden sein und einen
schlechten Geruch entwickeln. Wechseln Sie das Wasser daher häug.
• Das Gerät darf nicht direkt unterhalb einer Steckdose stehen. Die Stromspannung
der Steckdose sollte höher als 10 A sein.
• Benutzen Sie das Gerät nicht in direkter Nähe von Badezimmer, Dusche oder
Schwimmbecken.
• Dieses Gerät ist nicht zur Verwendung durch Personen (einschließlich Kinder) mit
eingeschränkten körperlichen, geistigen oder sensoriellen Fähigkeiten oder
• Ohne ausreichende Erfahrung und Kenntnis geeignet, es sei denn, sie wurden durch
eine für ihre Sicherheit verantwortliche Person beaufsichtigt oder eingewiesen.
• Kinder sollten beaufsichtigt werden, um das Spielen am Gerät vorzubeugen.

5
DE
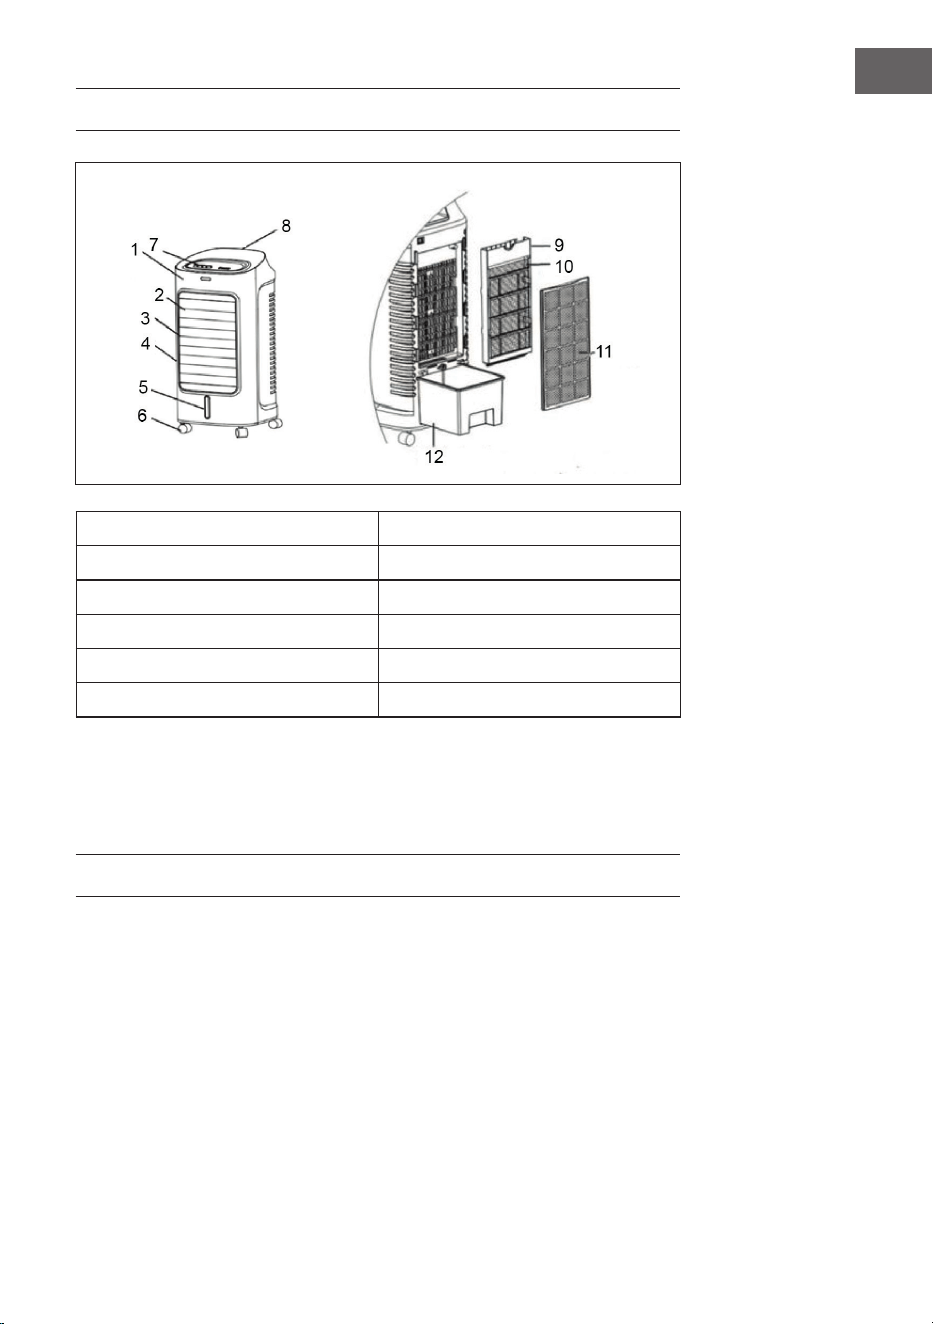
GERÄTEÜBERSICHT
1 Frontplatte 7 Bedienfeld
2 Frontplatten-Zierleiste 8 Griff
3 Luftauslass 9 Halterung
4 Gehäuse-Vorderteil 10 Wasservorhang
5 Wassertank 11 Staublter
6 Lenkrollen 12 Wassertank
Kühlprinzip: Wasser wird über die Pumpe vom Wassertank nach oben gepumpt, wo
es in den Verdunster aus Papier fällt. Durch die Verdunstung wird die Luft gekühlt. Man
spürt einen kühlen Luftzug, wenn die gekühlte Luft über den Ventilator verteilt wird.
FUNKTIONEN
• Einstellbare Geschwindigkeit und Gebläsetyp: drei Geschwindigkeiten und
Gebläsetypen, Flügel oszillierend.
• Kühlend: Temperatur fällt und relative Luftfeuchtigkeit steigt durch die Verdunstung.
• Verteilt Luft in weitem Winkel: Innere Lamellen schwingen automatisch, verteilen
Luft in weitem Winkel. Äußerer Lamellenverbund manuell nach oben und unten
ausrichtbar, Windrichtung nach oben oder unten einstellbar.
• Fernbedienung: 6 Meter Radius, empfängt im bis zu 60° Winkel.

6
DE
INBETRIEBNAHME UND BEDIENUNG
Montage und Tankbefüllung
1 Montage der Rollen: stellen Sie das Gerät auf eine gerade Fläche, nehmen Sie den
Schraubenschlüssel aus dem Styroporkarton und montieren Sie die Rollen.
2 Wässern: ziehen Sie den Wasserspeicher 1/3 weit heraus und geben Sie sauberes
Wasser hinein.
Wichtige Hinweise zum Tank:
• Achten Sie auf den Wasserstand im Tank, wenn Sie Wasser hineingeben.
• Der Wasserstand sollte die Markierung “MAX” nie überschreiten; bei
Luftbefeuchtung sollte er niemals “MIN” unterschreiten.
• Geben Sie Eis oder einen gefüllten Eiswürfelbehälter in den Wasserspeicher,
wenn sie die Kühlefzienz steigern wollen. Der Wasserstand sollte auch mit Eis die
“MAX”-Markierung niemals überschreiten.
Bedienung und Funktionen
1 ON/OFF (AN/AUS)auf dem Bedienfeld: Drücken Sie die Taste und schalten Sie
das Gerät an. Drücken Sie die Taste erneut, schaltet sich das Gerät aus.
2 Speed (Geschwindigkeit): Drücken Sie diese Taste und schalten Sie das Gerät ein.
Die zugehörige Funktion ändert sich folgendermaßen, wenn die Taste fortlaufend
gedrückt wird: LOW - MEDIUM - HIGH - LOW.
HINWEIS: Achten Sie auf die Anzeigen auf dem Display.
3 Wind Type (Wind-Typ): Mit dem Drücken dieser Taste können Sie zwischen
normalem Wind, natürlichem Wind und Schlafmodus wählen.
4 Swing (Schwingbewegung der Lamellen): Drücken Sie diesen Knopf, um den
Wind hin und her wehen zu lassen. Die Swing-Kontrolllampe geht an. Bei erneutem
Drücken des gleichen Knopfes schaltet sich diese Funktion wieder aus.
HINWEIS: Sie können den äußeren Lamellenverbund manuell nach oben und unten
verstellen, so dass der Wind in die bevorzugte Richtung weht.

7
DE
6 Timer einstellen:
Wenn das Gerät in Betrieb ist: Drücken Sie diese Taste. Der Timer kann zwischen
1 und 9 Stunden in stündlichen Schritten eingestellt werden. Das Gerät schaltet sich
nach Ablauf der eingestellten Zeit dann automatisch aus.
Bei ausgeschaltetem Gerät: Drücken Sie die Timer-Taste und stellen Sie die
Zeit ein, zu der sich das Gerät automatisch (nach Ihrer Wahl zwischen 1 und 9
Stunden, einstellbar in stündlichen Intervallen) einschalten soll. Sie können die
Windgeschwindigkeit, Windart, Ionen-Funktion und Schwing-Funktion einstellen.
Die ausgewählten Funktionen starten nach Ablauf des Timers automatisch.
7 Cooling (Kühlung): Drücken Sie die Taste, um das Kühlsystem zu starten. Bei
erneutem Drücken der Taste hebt sich die Funktion wieder auf.
WICHTIG: Vergewissern Sie sich, dass sich genug Wasser im Wasserspeicher
bendet, bevor Sie diese Taste drücken. Drücken Sie niemals die “Cool”-Taste wenn
sich kein Wasser im Tank bendet.
8 Anion-Funktion: Liefert gereinigte und sterilisierte Luft durch Erzeugung von
negativen Ionen.
So benutzen Sie den Gefrierbehälter
Das Eis im Gefrierbehälter kann Hitze aus dem Wasser absorbieren und ist somit in der
Lage, die Wassertemperatur im Wassertank niedriger als die Umgebungstemperatur zu
senken, so dass der erzeugte Luftstrom angenehm kühl wird.
a. Befüllen Sie den Gefrierbehälter (nicht komplett) mit Wasser und legen Sie ihn ins
Gefrierfach, bis der Inhalt komplett gefroren ist.
b. Öffnen Sie die Klappe und legen Sie den Behälter in den Wassertank.
c. Es existieren zwei Behälter, die abwechselnd benutzt werden können.
8
DE
REINIGUNG UND PFLEGE
Hinweis: Vergewissern Sie sich, dass der Ventilator vom Strom getrennt ist, bevor Sie
das Luftlter-Gitter entfernen.
Säubern des Luftlter-Gitters
Trennen Sie das Gerät vom Strom, ziehen Sie am Griff des Luftlter-Gitters und
nehmen Sie es aus dem Gerät. Säubern Sie das Gitter mit einem Neutralreiniger
und Geländerbürste und spülen Sie es dann mit klarem Wasser ab. Setzen Sie es
anschließend wieder in das Gerät ein.
Reinigung des Absorbierkissens
Entfernen Sie das Gerät vom Strom, nehmen Sie das Luftlter-Gitter ab und ziehen
Sie das Absorbierkissen aus seiner Halterung. Reinigen Sie es mit Neutralreiniger
und Geländerbürste und spülen Sie es dann mit klarem Wasser ab. Setzen Sie es
anschließend wieder in die Halterung und danach ins Gerät ein.
Achtung: Das Absorbierkissen muss horizontal eingesetzt werden, um eventuelles
Auslaufen vorzubeugen.
Reinigung des Speichers
Trennen Sie das Gerät vom Strom, öffnen Sie die Klappe und nehmen Sie den Speicher
heraus. Reinigen Sie ihn mit Neutralreiniger und spülen Sie ihn dann mit klarem Wasser
ab. Setzen Sie ihn nun wieder in das Gerät ein.
Reinigung des Gehäuses
Reinigen Sie das Gehäuse mit Neutralreiniger und einem weichen Lappen.
Achtung: Trennen Sie das Gerät vom S Strom, wenn Sie es reinigen, da es unter hohem
Spannungsdruck steht. Das Bedienfeld dar nicht mit Wasser in Berührung kommen.
HINWEISE ZUR ENTSORGUNG
Wenn es in Ihrem Land eine gesetzliche Regelung zur
Entsorgung von elektrischen und elektronischen Geräten
gibt, weist dieses Symbol auf dem Produkt oder auf der
Verpackung darauf hin, dass dieses Produkt nicht im
Hausmüll entsorgt werden darf. Stattdessen muss es zu
einer Sammelstelle für das Recycling von elektrischen
und elektronischen Geräten gebracht werden. Durch
regelkonforme Entsorgung schützen Sie die Umwelt und die
Gesundheit Ihrer Mitmenschen vor negativen Konsequenzen.
Informationen zum Recycling und zur Entsorgung dieses
Produkts, erhalten Sie von Ihrer örtlichen Verwaltung oder
Ihrem Hausmüllentsorgungsdienst.
9
DE
SPEZIELLE ENTSORGUNGSHINWEISE FÜR
VERBRAUCHER IN DEUTSCHLAND
Entsorgen Sie Ihre Altgeräte fachgerecht. Dadurch wird gewährleistet, dass die
Altgeräte umweltgerecht verwertet und negative Auswirkungen auf die Umwelt und
menschliche Gesundheit vermieden werden. Bei der Entsorgung sind folgende Regeln
zu beachten:
• Jeder Verbraucher ist gesetzlich verpichtet, Elektro- und Elektro-
nikaltgeräte (Altgeräte) sowie Batterien und Akkus getrennt vom
Hausmüll zu entsorgen. Sie erkennen die entsprechenden Altgeräte
durch folgendes Symbol der durchgestrichene Mülltonne (WEEE
Symbol).
• Sie haben Altbatterien und Altakkumulatoren, die nicht vom Altgerät umschlossen
sind, sowie Lampen, die zerstörungsfrei aus dem Altgerät entnommen werden
können, vor der Abgabe an einer Entsorgungsstelle vom Altgerät zerstörungsfrei zu
trennen.
• Bestimmte Lampen und Leuchtmittel fallen ebenso unter das Elektro- und
Elektronikgesetz und sind dementsprechend wie Altgeräte zu behandeln.
Ausgenommen sind Glühbirnen und Halogenlampen. Entsorgen Sie Glühbirnen
und Halogenlampen bitte über den Hausmüll, sofern Sie nicht das WEEE Symbol
tragen.
• Jeder Verbraucher ist für das Löschen von personenbezogenen Daten auf dem
Elektro- bzw. Elektronikgerät selbst verantwortlich.
Rücknahmepicht der Vertreiber
Vertreiber mit einer Verkaufsäche für Elektro- und Elektronikgeräte von mindestens 400
Quadratmetern sowie Vertreiber von Lebensmitteln mit einer Gesamtverkaufäche von
mindestens 800 Quadratmetern, die mehrmals im Kalenderjahr oder dauerhaft Elektro-
und Elektronikgeräte anbieten und auf dem Markt bereitstellen, sind verpichtet,
1 bei der Abgabe eines neuen Elektro- oder Elektronikgerätes an einen Endnutzer ein
Altgerät des Endnutzers der gleichen Geräteart, das im Wesentlichen die gleichen
Funktionen wie das neue Gerät erfüllt, am Ort der Abgabe oder in unmittelbarer
Nähe hierzu unentgeltlich zurückzunehmen und
2 auf Verlangen des Endnutzers Altgeräte, die in keiner äußeren Abmessung größer
als 25 Zentimeter sind, im Einzelhandelsgeschäft oder in unmittelbarer Nähe hierzu
unentgeltlich zurückzunehmen; die Rücknahme darf nicht an den Kauf eines Elektro-
oder Elektronikgerätes geknüpft werden und ist auf drei Altgeräte pro Geräteart
beschränkt.

10
DE
• Bei einem Vertrieb unter Verwendung von Fernkommunikationsmitteln ist die
unentgeltliche Abholung am Ort der Abgabe auf Elektro- und Elektronikgeräte der
Kategorien 1, 2 und 4 gemäß § 2 Abs. 1 ElektroG, nämlich „Wärmeüberträger“,
„Bildschirmgeräte“ (Oberäche von mehr als 100 cm²) oder „Großgeräte“
(letztere mit mindestens einer äußeren Abmessung über 50Zentimeter)
beschränkt. Für andere Elektro- und Elektronikgeräte (Kategorien 3, 5, 6) ist eine
Rückgabemöglichkeit in zumutbarer Entfernung zum jeweiligen Endnutzer zu
gewährleisten.
• Altgeräte dürfen kostenlos auf dem lokalen Wertstoffhof oder in folgenden
Sammelstellen in Ihrer Nähe abgegeben werden: www.take-e-back.de
• Für Elektro- und Elektronikgeräte der Kategorien 1, 2 und 4 an bieten wir auch die
Möglichkeit einer unentgeltlichen Abholung am Ort der Abgabe. Beim Kauf eines
Neugeräts haben sie die Möglichkeit eine Altgerätabholung über die Webseite
auszuwählen.
• Batterien können überall dort kostenfrei zurückgegeben werden, wo sie verkauft
werden (z. B. Super-, Bau-, Drogeriemarkt). Auch Wertstoff- und Recyclinghöfe
nehmen Batterien zurück. Sie können Batterien auch per Post an uns zurücksenden.
Altbatterien in haushaltsüblichen Mengen können Sie direkt bei uns von Montag bis
Freitag zwischen 08:00 und 16:00 Uhr unter der folgenden Adresse unentgeltlich
zurückgeben:
Chal-Tec Fulllment GmbH
Norddeutschlandstr. 3
47475 Kamp-Lintfort
• Wichtig zu beachten ist, dass Lithiumbatterien aus Sicherheitsgründen vor der
Rückgabe gegen Kurzschluss gesichert werden müssen (z. B. durch Abkleben der
Pole).
• Finden sich unter der durchgestrichenen Mülltonne auf der Batterie zusätzlich die
Zeichen Cd, Hg oder Pb ist das ein Hinweis darauf, dass die Batterie gefährliche
Schadstoffe enthält. (»Cd« steht für Cadmium, »Pb« für Blei und »Hg« für
Quecksilber).
Hinweis zur Abfallvermeidung
Indem Sie die Lebensdauer Ihrer Altgeräte verlängern, tragen Sie dazu bei, Ressourcen
efzient zu nutzen und zusätzlichen Müll zu vermeiden. Die Lebensdauer Ihrer Altgeräte
können Sie verlängern indem Sie defekte Altgeräte reparieren lassen. Wenn sich
Ihr Altgerät in gutem Zustand bendet, könnten Sie es spenden, verschenken oder
verkaufen.
11
EN
Dear Customer,
Congratulations on purchasing this device. Please read the
following instructions carefully and follow them to prevent
possible damages. We assume no liability for damage caused
by disregard of the instructions and improper use. Scan the QR
code to get access to the latest user manual and more product
information.
CONTENTS
Safety instructions12
Product description13
Features13
Use and operation14
Care and cleaning16
Hints on disposal16
TECHNICAL DATA
Item number 10032346, 10032347
Power supply 220-240 V ~ 50-60 Hz
Power consumption 60 W
MANUFACTURER & IMPORTER (UK)
Manufacturer:
Chal-Tec GmbH, Wallstrasse 16, 10179 Berlin, Germany.
Importer for Great Britain:
Berlin Brands Group UK Limited
PO Box 42
272 Kensington High Street
London, W8 6ND
United Kingdom

12
EN
SAFETY INSTRUCTIONS
• Use as per the rating voltage.
• Do not repair or remake the appliance by yourself, it should be repaired by the
repairmen.
• Do not operate the appliance with wet hands, in order to avoid damage.
• If the supply cord is damaged, it must be replaced by a special cord or assembly
available from the manufacturer or its service agents.
• When the appliance is not in use, switch it off and unplug it.
• Do not insert things to air outlets and inlets, in order to avoid damage.
• Do not use the appliance near explosive and combustible gas.
• Use the appliance only on a at surface.
• Do not use outdoors.
• The level of water tank should not over “MAX” scale at any time, when humidifying,
the total level of water tank should not below “MIN” scale.
• After adding water to the water tank, do not tilt or knock over the appliance when
you put or move it. If you want to move , please drive it at side, in order to avoid
spilling the water.
• Do not turnover the appliance. If it is toppled over, and there have some water in
the body, should unplug the power supply. Then send it to repair department or
after-sales service and overhaul.
• Do not put things on the appliance, do not cover air vent. (WARNING: Do not
cover heater, in order to avoid over heat.)
• Clean the appearance with a lightly damp cloth. Do not use any type of detergents
or solutions. Do not rinse with water.
• Do not make air outlets and inlets near the wall or curtain.
• Do not knock or shake the body when use, otherwise it may cause stop.
• The water in water tank can easily metamorphose and have odour at summer,
renew the water frequently.
• The appliance must not be located immediately below a socket outlet. The rating
current of socket should exceed 10A.
• Do not use the appliance in the immediate surroundings of a bath, a shower or a
swimming pool.
• This appliance is not intended for use by persons (including children) with reduced
physical, sensory or mental capabilities, or lack of experience and knowledge,
unless they have been given supervision or instruction concerning use of the
appliance by a person responsible for their safety.
• Children should be supervised to ensure that they do not play with the appliance.
13
EN
PRODUCT DESCRIPTION
1 Panel 7 Control panel
2 Panel decoration strip 8 Handle
3 Air outlet 9 Curtain bracket
4 Front housing 10 Water curtain
5 Water tank 11 Dust gaze
6 Casters 12 Water tank
Principle of Cooling: Water is taken from the water tank by pump to the top, then the
water drops into paper evaporator . When the water in paper evaporator evaporates to
water vapour, the air is cooled. People will feel cool wind when the cool air is delivered by
fan.
FEATURES
• Adjustable speed and fan type: have three speeds and fan types, and it can send
wind from side to side neatly.
• Cooling: Through air evaporating, cut down the air temperature and raise relative
humidity.
• Deliver wind at wide angle: swing the blades automatically, deliver wind at wide
angle. Also swing the blades transversely by your hands, choose the wind direction
up and down..
• Remote control: 6 meters far away, receive at 60 degree wide angle.

14
EN
USE AND OPERATION
Assembling and Watering
1 Assembling castors: put the appliance on a at surface, take out the wrench from
foam box, then assemble the castors.
2 Watering: pull 1/3 water tank, then add clean water.
Important notes on the tank:
• Pay attention to the level of water tank when add water.
• The level of water tank should not over “MAX” scale at any time, when humidifying,
the total level of water tank should not below “MIN” scale.
• Put ice or frozen ice box to the water tank if you want to strengthen the efciency of
cooling. But the total level of water tank should not over “MAX” scale.
Operation and Functions
1 ON/OFF on control panel : Press the key, turn on the appliance, second press, shut
it down .
2 Speed: press this key, start the appliance, the corresponding function changes as
follows when you press the key serially: LOW- MEDIUM- HIGH -LOW.
NOTE: Pay attention to the indications on the display.
3 Wind type: press this key, you can choose the normal wind, natural wind and
sleeping wind .
4 Swing : press this key, the wind direction can swing atly, and the swing indicator
light is on. It cancels this function when you press again.
NOTE: You also can swing the transverse blades by your hands, choose the wind
direction up and down.

15
EN
6 Timer settings:
When the product is working: press this key, the timer from 1 to 9 hours options
with step 1 hours. It will shutdown when the timer nished.
When the product is under stand-by state: press this key,you could reserve the
time to start the the product,the timer from 1 to 9 hours options with step 1 hours
and you also could choose the wind speed, wind type, negative ion,swing function
in the meanwhile. It will start follow your demand when the timer nished.
7 Cooling: press the key to start cooling system. It cancels this function when you
press again.
IMPORTANT: Please be sure there is enough water in the water tank before press this
key. Do not press the key “cool” without water!
8 Anion: puried and sterilized air by generating negative ion.
The Use of Ice Box
The ice crystal has a particular feature of keeping cool, it can absorb heat from water
and let the water temperature in the water tank below environmental temperature, so the
air will be much cooler.
a. add water to the ice box(not full) and put it into the refrigerating chamber of
refrigerator to make sure that it icing absolutely.
b. Open the door, put the frozen ice box into the water tank.
c. There have two air boxes ,can use circularly.
16
EN
CARE AND CLEANING
Note: Ensure that the fan is switched off from the supply mains before removing the air
lter screen.
Clean the air lter screen
Cut off the power supply, pull the handle of air lter screen, remove it from appliance.
Clean the air lter screen with neutral detergent and banister brush, then clean it with
clear water. Finally, reinstall to the appliance.
Clean the wetted pad
Cut off the power supply, take down the air lter screen, then draw the wetted pad from
support. Clean the wetted pad with neutral detergent and banister brush, then clean it
with clear water. Finally, reinstall to the appliance.
Attention: the wetted pad must be installed horizontally, in order to avoid leaking.
Clean the water tank
Cut off the power supply, open the door, take out the water tank, clean it with neutral
detergent, and wash it with clear water, then reinstall to the appliance.
Clean the shell
Clean with neutral detergent and soft cloth.
Attention: cut off the power supply when clean the appliance as there have a high
pressure in the body. Do not leave any water on the surface of control panel.
HINTS ON DISPOSAL
If there is a legal regulation for the disposal of electrical
and electronic devices in your country, this symbol on the
product or on the packaging indicates that this product must
not be disposed of with household waste. Instead, it must be
taken to a collection point for the recycling of electrical and
electronic equipment. By disposing of it in accordance with
the rules, you are protecting the environment and the health of
your fellow human beings from negative consequences. For
information about the recycling and disposal of this product,
please contact your local authority or your household waste
disposal service.

17
ES
Estimado cliente,
Le felicitamos por la adquisición de este producto. Lea
atentamente las siguientes instrucciones y sígalas para evitar
posibles daños. No asumimos ninguna responsabilidad por los
daños causados por el incumplimiento de las instrucciones y el
uso inadecuado. Escanee el siguiente código QR para obtener
acceso a la última guía del usuario y más información sobre el
producto.
ÍNDICE DE CONTENIDOS
Indicaciones de seguridad 18
Vista general del aparato19
Funciones19
Puesta en funcionamiento20
Limpieza y cuidado22
Retirada del aparato22
DATOS TÉCNICOS
Número de artículo 10032346, 10032347
Fuente de alimentación 220-240 V ~ 50-60 Hz
Potencia 60 W
FABRICANTE E IMPORTADOR (REINO UNIDO)
Fabricante:
Chal-Tec GmbH, Wallstraße 16, 10179 Berlín, Alemania.
Importador para Gran Bretaña:
Berlin Brands Group UK Limited
PO Box 42
272 Kensington High Street
London, W8 6ND
United Kingdom

18
ES
INDICACIONES DE SEGURIDAD
• Conecte el aparato únicamente a tomas de corriente que se adecuen a la tensión
del mismo.
• No intente reparar o reensamblar el aparato usted mismo. Solamente un técnico
cualicado debe llevar a cabo las reparaciones.
• No utilice el aparato con las manos mojadas para evitar cualquier riesgo de sufrir
lesiones.
• Si el cable de alimentación está dañado, el fabricante o el servicio de atención al
cliente deberá repararlo o sustituirlo por un cable compatible.
• Si no utiliza el aparato, apáguelo y desconéctelo de la toma de corriente.
• No bloquee ni inserte objetos en la salida de aire para evitar dañar el aparato.
• No utilice el aparato cerca de gas explosivo.
• Utilice el aparato únicamente en una supercie nivelada.
• Utilice el aparato únicamente en el interior.
• El agua en el depósito de agua no debe sobrepasar la marca «MAX». Durante la
humidicación de aire, el nivel de agua no debe ser inferior a la marca «MIN».
• Después de añadir agua al depósito de agua, no vuelque o deje caer el aparato
al colocarlo o moverlo. Mueva el aparato en posición vertical para evitar
derramar el agua.
• No gire el aparato. Si el aparato se cae y entra agua en su carcasa, desconéctelo
de la toma de corriente. Póngase en contacto con el servicio de atención al cliente
para su supervisión y reparación.
• No coloque objetos encima del aparato y no obstruya sus ranuras de ventilación.
(ATENCIÓN: No cubra el calefactor para evitar que el aparato se sobrecaliente.)
• Limpie el aparato con un paño ligeramente húmedo. No utilice productos de
limpieza o disolventes. No limpie el aparato en agua.
• No posicione las ranuras de salida y entrada de aire demasiado cerca de una
pared o cortina.
• No golpee o sacuda el aparato mientras está en marcha, ya que podría detenerse.
• El agua en el depósito de agua puede reposarse rápidamente en verano y
producir malos olores. Cambie el agua con frecuencia.
• No coloque el aparato debajo de una toma de corriente. El voltaje de la toma de
corriente debe ser superior a 10 A.
• No utilice el aparato cerca de cuartos de baños, duchas o piscinas.
• Los niños y las personas con discapacidad física, psíquica o sensorial, o carentes
de la experiencia y conocimiento necesarios podrán utilizar el aparato si han sido
previamente instruidos por su tutor o supervisor sobre el funcionamiento del mismo
y conocen las funciones, así como las indicaciones de seguridad.
• Los niños deberán estar vigilados para evitar que jueguen con el aparato

19
ES
VISTA GENERAL DEL APARATO
1 Placa frontal 7 Panel de control
2 Elementos decorativos de la placa
frontal
8 Asa
3 Salida de aire 9 Soporte
4 Parte delantera de la carcasa 10 Cortina de agua
5 Depósito de agua 11 Filtro de polvo
6 Ruedas 12 Depósito de agua
Principio de enfriamiento: La bomba del depósito de agua bombea el agua hacia
arriba, donde esta desciende hasta el evaporador de papel. El aire se enfría mediante
la evaporación. Cuando el ventilador distribuye el aire, se puede notar una corriente
de aire frío.
FUNCIONES
• Velocidad ajustable y tipo de ventilación: 3 velocidades y tipos de ventilación,
aspas oscilantes.
• Enfriamiento: la temperatura desciende y la humedad del aire relativa aumenta a
través del aire emitido.
• Distribuye aire en un ángulo ancho: las aspas se mueven automáticamente
distribuyendo el aire en un ángulo ancho. También se pude mover manualmente las
aspas de forma transversal y cambiar la dirección del aire hacia arriba o abajo.
• Mando a distancia: radio de 6 metros, capaz de recibir a un ángulo de 60°.

20
ES
PUESTA EN FUNCIONAMIENTO
Montaje y llenado del depósito de agua
1 Montaje de las ruedas: coloque el aparato en una supercie plana, utilice la llave
de tuercas de la caja de poliestireno y monte las ruedas.
2 Llenado del depósito de agua: extraiga hacia fuera 1/3 del depósito y llénelo con
agua limpia.
Indicaciones importantes sobre el depósito:
• Preste atención al nivel de agua cuando llene el depósito.
• El agua en el depósito de agua no debe sobrepasar la marca «MAX»; durante la
humidicación de aire, el nivel de agua no debe ser inferior a la marca «MIN».
• Añada hielo o una hielera llena en el depósito de agua si desea aumentar la
eciencia de enfriamiento. El nivel de agua con hielo tampoco debe sobrepasar la
marca «MAX».
Puesta en marcha y funciones
1 ON/OFF (Encendido/Apagado) en el panel de control: Pulse el botón para
encender el aparato. Vuelva a pulsar el botón para apagar el aparato.
2 Speed (Velocidad): Pulse este botón para encender el aparato. La función cambia
de la siguiente si mantiene el botón pulsado: BAJA - MEDIA - ALTA - BAJA.
ATENCIÓN: Preste atención a las indicaciones en la pantalla.
3 Wind Type (Tipo de brisa): Pulse este botón para cambiar entre brisa normal, brisa
natural o modo nocturno.
4 Swing (Movimiento oscilatorio de la brisa): Pulse este botón para que la brisa
sople de un lado a otro. Se encenderá la luz indicadora Swing. Vuelva a pulsar el
mismo botón para apagar esta función.
ATENCIÓN: También puede ajustar de forma manual la dirección de la brisa,
moviendo las aspas en la dirección que desee que sople el viento.

21
ES
6 Congurar el temporizador:
Cuando el aparato está en marcha: Pulse este botón. Puede ajustar el
temporizador entre 1 y 9 horas en pasos de 1 hora. Tras transcurrir el tiempo
elegido, el aparato se apaga automáticamente.
Cuando el aparato está apagado: Pulse el botón Timer y elija la hora en la
que el aparato debe encenderse (el temporizador se ajuste entra 1 y 9 horas, en
pasos de 1 hora). Puede congurar la velocidad y el tipo de la brisa, la función
ionizadora y la oscilación. La función elegida se iniciará automáticamente al
transcurrir el tiempo del temporizador.
7 Cooling (Enfriamiento): pulse el botón para activar el sistema de enfriamiento.
Vuelva a pulsar el botón para desactivar dicha función.
IMPORTANTE: Asegúrese de que hay agua suciente en el depósito de agua antes
de pulsar este botón. Nunca presione el botón Cool cuando el depósito de agua
está vacío.
8 Función Anion: Purica y esteriliza el aire al emitir Iones negativos.
Uso de la hielera
El hielo en la hielera absorbe el calor especíco del agua y por ello, hace que la
temperatura del agua en el depósito sea más baja que la temperatura ambiente, por lo
que el aire emitido es agradablemente fresco.
a. Llene la hielera (no completamente) con agua y colóquela en el congelador hasta
que el contenido se congele por completo.
b. Abra la tapa e introduzca el artículo en el depósito de agua.
c. Existen dos hieleras que pueden usarse por separado.
22
ES
LIMPIEZA Y CUIDADO
Atención: Antes de retirar la rejilla del ltro de aire, asegúrese de que el
humidicador no está conectado a la toma de corriente
Limpieza de la rejilla del ltro de aire
Desconecte el aparato de la toma de corriente, tire del asa de la rejilla del ltro de aire
y retírela del aparato. Limpie la rejilla con un detergente neutro y cepillo de mano, y a
continuación, enjuáguela. Vuelva a introducir la rejilla en el aparato.
Limpieza de la almohadilla de absorción
Desconecte el aparato de la toma de corriente, retire la rejilla del ltro de agua y
extraiga la almohadilla de absorción de su soporte. Limpie la almohadilla con un
detergente neutro y cepillo de mano, y a continuación, enjuáguela. Vuelva a colocarla
en el soporte y luego, en el aparato.
Advertencia: La almohadilla de absorción debe colocarse horizontalmente para
evitar que rezuma eventualmente.
Limpieza del depósito de agua
Desconecte el aparato de la toma de corriente, abra la tapa y retire el depósito.
Limpie el depósito con un detergente neutro y a continuación, enjuáguelo. Vuelva a
introducirlo en el aparato.
Limpieza de la carcasa
Limpie la carcasa con un detergente neutro y un paño suave.
Advertencia: Antes de limpiar el aparato, desconéctelo de la toma de corriente, ya que
se haya bajo alta presión. Asegúrese de que el panel de control no entra en contacto
con el agua.
RETIRADA DEL APARATO
Si en su país existe una disposición legal relativa a la
eliminación de aparatos eléctricos y electrónicos, este
símbolo estampado en el producto o en el embalaje
advierte que no debe eliminarse como residuo doméstico.
En lugar de ello, debe depositarse en un punto de recogida
de reciclaje de aparatos eléctricos y electrónicos. Una
gestión adecuada de estos residuos previene consecuencias
potencialmente negativas para el medio ambiente y la salud
de las personas. Puede consultar más información sobre el
reciclaje y la eliminación de este producto contactando con
su administración local o con su servicio de recogida de
residuos.

23
FR
Chère cliente, cher client,
Toutes nos félicitations pour l’acquisition de ce nouvel appareil.
Veuillez lire attentivement et respecter les instructions de ce mode
d’emploi an d’éviter d’éventuels dommages. Nous ne saurions
être tenus pour responsables des dommages dus au non-respect
des consignes et à la mauvaise utilisation de l’appareil. Scannez
le QR-Code pour obtenir la dernière version du mode d‘emploi
et des informations supplémentaires concernant le produit.
SOMMAIRE
Consignes de sécurité24
Aperçu de l‘appareil25
Fonctions25
Mise en service et utilisation26
Nettoyage et entretien28
FICHE TECHNIQUE
Numéro d’article 10032346, 10032347
Alimentation 220-240 V ~ 50-60 Hz
Puissance 60 W
FABRICANT ET IMPORTATEUR (UK)
Fabricant :
Chal-Tec GmbH, Wallstraße 16, 10179 Berlin, Allemagne.
Importateur pour la Grande Bretagne :
Berlin Brands Group UK Limited
PO Box 42
272 Kensington High Street
London, W8 6ND
United Kingdom

24
FR
CONSIGNES DE SÉCURITÉ
• Utilisez uniquement la tension indiquée.
• Ne réparez pas l‘appareil vous-même et ne le remontez pas non plus ; l‘appareil
doit être réparé par un spécialiste agréé.
• N‘utilisez pas l‘appareil avec les mains mouillées pour éviter les risques de
blessures.
• Si le câble secteur est endommagé, faites-le remplacer par un câble compatible ou
conez-le au fabricant ou au service client pour réparation.
• Pendant que l‘appareil n‘est pas utilisé, éteignez-le et débranchez-le du secteur.
• N‘obstruez pas la sortie d‘air (en y insérant des objets) pour éviter les dégâts.
• N‘utilisez pas l‘appareil à proximité de gaz explosifs.
• Utilisez l‘appareil uniquement sur une surface plane.
• N‘utilisez pas l‘appareil à l‘extérieur.
• Le niveau d‘eau du réservoir ne doit jamais dépasser la marque “MAX”. pendant
l‘humidication de l‘air, le niveau d‘eau ne doit jamais descendre en dessous de la
marque “MIN”.
• Ne basculez pas l‘appareil lorsque vous l‘installez ou le déplacez après avoir mis
de l‘eau dans le réservoir. Faites glisser l‘appareil à la verticale si vous devez le
déplacer pour éviter de renverser de l‘eau.
• Ne retournez pas l‘appareil. s‘il tombe alors qu‘il contient de l‘eau, débranchez-
le de l‘alimentation. Envoyez-le ensuite en réparation ou faites-le contrôler par le
service client.
• Ne posez aucun objet sur l‘appareil et n‘obstruez pas les ouvertures d‘aération.
(AVERTISSEMENT : ne recouvrez pas le chauffage pour éviter les surchauffes.)
• Nettoyez l‘appareil avec un chiffon légèrement humide. N‘utilisez aucun produit ou
solution de nettoyage. Ne le nettoyez pas à l‘eau.
• Ne placez pas les entrée et sortie d‘air trop près d‘un mur ou d‘un voilage.
• Ne cognez pas l‘appareil pendant qu‘il est en marche car cela peut l‘arrêter.
• L‘eau du réservoir peut tourner très vite en été et produire une odeur désagréable.
Pour cette raison, changez l‘eau fréquemment.
• L‘appareil ne doit pas être installé sous une prise de courant. La prise doit fournir
plus de 10 A.
• N‘utilisez pas l‘appareil à proximité directe d‘une salle de bains, d‘une douche ou
d‘un bassin de natation.
• Cet appareil n’est pas destiné à être utilisé par des personnes (enfants inclus) aux
capacités physiques sensorielles ou mentales réduites, ou manquant d’expérience
ou/et de connaissances, sauf si elles sont surveillées ou qu‘elles ont été formées
par une personne responsable de leur sécurité.
• Surveillez les enfants an qu‘ils ne jouent pas avec l‘appareil.

25
FR
APERÇU DE L‘APPAREIL
1 Panneau avant 7 Panneau de commande
2 Moulure du panneau avant 8 Poignée
3 Sortie d'air 9 Support
4 Partie avant du châssis 10 Rideau d'eau
5 Réservoir d'eau 11 Filtre à poussières
6 Roulettes pivotantes 12 Réservoir d'eau
Principe de refroidissement : l‘eau est pompée vers le haut à partir du réservoir
d‘eau, où elle tombe sur un évaporateur en papier. L‘air est rafraîchi par évaporation.
Vous pouvez ressentir un léger courant d‘air lorsque l‘air rafraîchi est distribué au-dessus
du ventilateur.
FONCTIONS
• Vitesse réglable et type de ventilation : trois vitesses et types de ventilation, pales
oscillantes.
• Rafraîchisseur : la température diminue et l‘humidité relative augmente par
vaporisation de l‘air.
• Distribue l‘air dans un large rayon: les pales oscillent automatiquement,
et répartissent l‘air sur un grand angle. Les pales peuvent aussi osciller
transversalement, avec un vent dirigé vers le haut ou vers le bas.
• Télécommande : 6 mètres de rayon, reçoit à un angle de 60° maximum.

26
FR
MISE EN SERVICE ET UTILISATION
Montage et remplissage du réservoir
1 Montage des roulettes : posez l‘appareil sur une surface droite, sortez la clé outil
de la boîte en polystyrène et installez les roulettes.
2 Arroser : faites sortir le réservoir d‘eau de 1/3 de sa longueur et versez de l‘eau
propre à l‘intérieur.
Consignes importante pour le réservoir :
• Faites attention au niveau d‘eau à l‘intérieur lorsque vous remplissez le réservoir.
• Le niveau d‘eau ne doit jamais dépasser le marquage “MAX” ; quand l‘air est
humidié, l‘eau ne doit jamais descendre au-dessous du marquage “MIN”.
• Mettez de la glace ou un bac à glaçons rempli dans le réservoir d‘eau, si vous
voulez augmenter l‘efcacité du rafraîchissement. Le niveau d‘eau ne doit jamais
non plus dépasser le marquage “MAX”, même avec de la glace.
Utilisation et fonctions
1 ON/OFF (marche/arrêt) sur le panneau de commande : appuyez sur la touche et
allumez l‘appareil. appuyez de nouveau sur la touche pour éteindre l‘appareil.
2 Speed (vitesse) : appuyez sur cette touche et allumez l‘appareil. La fonction
associée change dans l‘ordre suivant si vous maintenez la touche appuyée : LOW -
MEDIUM - HIGH - LOW.
REMARQUE : surveillez les témoins sur l‘écran.
3 Wind Type (type de vent) : en appuyant sur cette touche vous pouvez choisir entre
un vent normal, un vent naturel ou le mode nuit.
4 Swing (oscillation des lamelles) : appuyez sur ce bouton pour faire soufer le vent
vers l‘avant et l‘arrière. Le témoin lumineux du Swing s‘allume. Si vous appuyez de
nouveau sur le même bouton, cette fonction s‘éteint.
REMARQUE : vous pouvez aussi régler manuellement la direction du vent en réglant
les lamelles de sorte que le vent soufe dans la direction voulue.

27
FR
6 Réglage de la minuterie :
Quand l‘appareil est en marche : appuyez sur cette touche. La minuterie peut
être réglée entre 1 et 9 heures par cran d‘une heure. L‘appareil s‘arrête alors
automatiquement après écoulement de cette durée.
Quand l‘appareil est éteint : appuyez sur la touche Timer et réglez la durée au
bout de laquelle l‘appareil doit d‘allumer automatiquement (entre 1 et 9 heures,
réglable par intervalles d‘une heure). Vous pouvez régler la vitesse du vent, le type
de vent, la fonction ioniseur et la fonction oscillation. Les fonctions sélectionnées
démarrent automatiquement au bout de la durée de la minuterie.
7 Cooling (rafraîchissement): appuyez sur cette touche pour démarrer le système de
rafraîchissement. Si vous appuyez de nouveau sur cette touche la fonction s‘arrête.
IMPORTANT : assurez-vous qu‘il se trouve sufsamment d‘eau dans le réservoir,
avant d‘appuyer sur la touche. N‘appuyez jamais sur la touche “Cool” lorsque le
réservoir d‘eau est vide.
8 Fonction anions : délivre un air purié et stérilisé par production d‘ions négatifs.
Comment utiliser le congélateur
La glace du congélateur peut absorber la chaleur de l‘eau, et peut ainsi faire baisser la
température de l‘eau du réservoir en dessous de la température ambiante pour créer un
ux d‘air agréablement rafraîchissant.
a. Remplissez le bac à glaçons (mais pas en entier) avec de l‘eau et placez-le au
congélateur jusqu‘à ce que le contenu soit complètement gelé.
b. Ouvrez le clapet et posez le bac à glaçons dans le réservoir d‘eau.
c. Il y a deux bacs à glaçons, que vous pouvez utiliser alternativement.
28
FR
NETTOYAGE ET ENTRETIEN
Remarque : assurez-vous que le ventilateur est bien débranché du secteur avant de
retirer la grille du ltre à air.
Nettoyage de la grille du ltre à air
Débranchez l‘appareil du secteur tirez sur la poignée de la grille du ltre à air et sortez-
le de l‘appareil. Nettoyez la grille avec un produit neutre et une balayette et rincez-el
ensuite à l‘eau claire. Puis remettez-le en place dans l‘appareil.
Nettoyage du tampon absorbant
Débranchez l‘appareil du secteur, retirez la grille du ltre à air et retirez le tampon
absorbant du support. Nettoyez-le avec u produit neutre et une balayette puis rincez-le
à l‘eau claire. Puis remettez-le en place sur le support puis dans l‘appareil.
Attention : le tampon absorbant doit être installé horizontalement pour éviter
d‘éventuelles fuites.
Nettoyage du récupérateur
Débranchez l‘appareil du secteur, ouvrez le clapet et retirez le récupérateur. Nettoyez-
le avec un produit neutre puis rincez-le à l‘eau claire. Puis remettez-le en place dans
l‘appareil.
Nettoyage du boîtier
Nettoyez le boîtier avec un nettoyant neutre et un chiffon doux.
Attention : débranchez l‘appareil du secteur lorsque vous le nettoyez car il est sous
haute tension. Le panneau de commande ne doit pas entrer en contact avec de l‘eau.
CONSEILS POUR LE RECYCLAGE
S‘il existe une réglementation pour l‘élimination ou le
recyclage des appareils électriques et électroniques dans
votre pays, ce symbole sur le produit ou sur l‘emballage
indique que cet appareil ne doit pas être jeté avec les
ordures ménagères. Vous devez le déposer dans un point
de collecte pour le recyclage des équipements électriques
et électroniques. La mise au rebut conforme aux règles
protège l‘environnement et la santé de vos semblables des
conséquences négatives. Pour plus d‘informations sur le
recyclage et l‘élimination de ce produit, veuillez contacter
votre autorité locale ou votre service de recyclage des
déchets ménagers.
29
IT
Gentile cliente,
La ringraziamo per aver acquistato il dispositivo. La preghiamo
di leggere attentamente le seguenti istruzioni per l’uso e di
seguirle per evitare possibili danni. Non ci assumiamo alcuna
responsabilità per danni scaturiti da una mancata osservazione
delle avvertenze di sicurezza e da un uso improprio del
dispositivo. Scansionare il codice QR seguente, per accedere
al manuale d’uso più attuale e per ricevere informazioni sul
prodotto.
INDICE
Avvertenze di sicurezza30
Descrizione del prodotto31
Funzioni31
Messa in funzione e utilizzo32
Pulizia e manutenzione34
Smaltimento34
DATI TECNICI
Numero articolo 10032346, 10032347
Alimentazione 220-240 V ~ 50-60 Hz
Potenza 60 W
PRODUTTORE E IMPORTATORE (UK)
Produttore:
Chal-Tec GmbH, Wallstraße 16, 10179 Berlino, Germania.
Importatore per la Gran Bretagna:
Berlin Brands Group UK Limited
PO Box 42
272 Kensington High Street
London, W8 6ND
United Kingdom

30
IT
AVVERTENZE DI SICUREZZA
• Utilizzare esclusivamente la tensione indicata.
• Non riparare o rimontare il dispositivo autonomamente; deve essere riparato da un
tecnico specializzato.
• Non utilizzare il dispositivo con le mani bagnate, in modo da evitare lesioni.
• Se il cavo di alimentazione dovesse essere guasto, deve essere sostituito con un
cavo compatibile o riparato dal produttore o dal suo servizio di assistenza clienti.
• Se il dispositivo non viene utilizzato, spegnerlo e scollegarlo dalla rete elettrica.
• Non bloccare i punti di accesso dell’aria (inserendovi oggetti) per evitare danni.
• Non utilizzare il dispositivo nelle vicinanze di gas esplosivi.
• Utilizzare il dispositivo esclusivamente su una supercie a livello del suolo.
• Non utilizzare il dispositivo all’aperto.
• Il livello nella riserva d’acqua non deve mai superare il livello “MAX”. In caso di
umidicazione dell’aria, il livello non deve essere mai sotto a “MIN”.
• Dopo aver inserito acqua nella riserva , non ribaltare il dispositivo quando lo si
posiziona o lo si sposta. Spostare il dispositivo in verticale per evitare di rovesciare
acqua.
• Non mettere il dispositivo in orizzontale. Se dovesse cadere e dell’acqua dovesse
penetrare nell’alloggiamento, staccarlo dalla corrente. Procedere a inviare il
dispositivo al servizio di riparazione o di assistenza clienti per farlo controllare.
• Non poggiare oggetti sul dispositivo e non bloccare le aperture di rilascio dell’aria
(AVVERTIMENTO: non coprire il riscaldatore, per evitare il surriscaldamento).
• Pulire il dispositivo con un panno leggermente umido. Non utilizzare detergenti o
solventi. Non lavarlo con acqua.
• Non posizionare i punti di ingresso e rilascio dell’aria troppo vicino a pareti o tende.
• Non sbattere contro il dispositivo durante il funzionamento e non scuoterlo, per
evitare che smetta di funzionare.
• Durante l’estate, l’acqua nella riserva può stagnare rapidamente ed emanare cattivi
odori. Cambiare l’acqua di frequente.
• Il dispositivo non può trovarsi direttamente sotto ad una presa di corrente. La
tensione della presa deve essere superiore a 10 A.
• Non utilizzare il dispositivo nelle vicinanze di bagni, docce e piscine.
• Questo dispositivo non può essere utilizzato da persone (inclusi bambini) con limitate
capacità siche, sensoriali o mentali o senza sufciente esperienza e conoscenza,
a meno che non siano informate o controllate da una persona responsabile per la
loro sicurezza.
• Tenere sotto controllo i bambini, per evitare che giochino con il dispositivo.

31
IT
DESCRIZIONE DEL PRODOTTO
1 Pannello frontale 7 Pannello di controllo
2 Bordo decorativo dei pannelli frontali 8 Impugnatura
3 Rilascio dell’aria 9 Supporto
4 Fronte dell’alloggiamento 10 Cortina d’acqua
5 Serbatoio dell’acqua 11 Filtro antipolvere
6 Rotelle orientabili 12 Serbatoio dell’acqua
Principio di raffreddamento: l’acqua viene spinta verso l’alto dal serbatoio attraverso
la pompa, nendo nel vaporizzatore di carta. L’acqua viene raffreddata attraverso la
vaporizzazione. Quando l’aria raffreddata viene distribuita dal ventilatore, si sente una
fresca corrente d’aria.
FUNZIONI
• Tipi di ventilazione e velocità impostabili: tre velocità e tre tipi di ventilazione, alette
oscillanti.
• Rinfrescante: la temperatura diminuisce e l’umidità relativa dell’aria aumenta
attraverso l’aria vaporizzata.
• Aria distribuita su ampio raggio: le alette si muovono automaticamente,
distribuendo l’aria su un ampio raggio. Le alette possono essere fatte oscillare
trasversalmente in modo manuale, direzionando l’aria verso l’alto e verso il basso.
• Telecomando: 6 metri di raggio, ricezione no ad un angolo di 60°.

32
IT
MESSA IN FUNZIONE E UTILIZZO
Montaggio e riempimento del serbatoio
1 Montaggio delle rotelle: posizionare il dispositivo su una supercie piana, togliere
la chiave inglese dalla scatola di polistirolo e montare le rotelle.
2 Aggiungere l’acqua: estrarre la riserva d’acqua per 1/3 e aggiungere acqua
pulita.
Importanti avvertenze sul serbatoio:
• Fare attenzione al livello dell’acqua quando si riempie il serbatoio.
• Il livello nella riserva d’acqua non deve mai superare il livello “MAX”; in caso di
umidicazione dell’aria, il livello non deve essere mai sotto a “MIN”.
• Posizionare ghiaccio o un contenitore per ghiaccio pieno nella riserva d’acqua, in
modo da incrementare le prestazioni di raffreddamento. Anche con il ghiaccio, il
livello nella riserva d’acqua non deve mai superare il livello “MAX”.
Utilizzo e funzioni
1 ON/OFF sul pannello di controllo: premere il tasto e il dispositivo si accende.
Premere di nuovo il tasto e il dispositivo si spegne.
2 Speed (velocità): premere il tasto e il dispositivo si accende. La relativa funzione
cambia come segue quando si preme il tasto: LOW - MEDIUM - HIGH - LOW.
AVVERTENZA: fare attenzione alle indicazioni sul display.
3 Wind Type (tipo di ventilazione): con questo tasto è possibile selezionare tra vento
normale, naturale e modalità sonno.
4 Swing (oscillazione delle alette): premere questo tasto per far oscillare il vento. La
spia Swing si accende. Premere lo stesso tasto per arrestare questa funzione.
AVVERTENZA: è possibile anche impostare manualmente la direzione del vento,
regolando le alette nella direzione desiderata.

33
IT
6 Impostare il timer:
Quando il dispositivo è in funzione: premere questo tasto. Il timer può
essere impostato tra 1 e 9 ore, in intervalli di un’ora. Una volta scaduto il tempo
impostato, il dispositivo si spegne automaticamente.
Quando il dispositivo è spento: premere il tasto Timer e impostare il tempo
(a scelta tra 1 e 9 ore, in intervalli di un’ora) per attivare automaticamente il
dispositivo. È possibile impostare velocità, tipo di ventilazione, funzione a ioni
e oscillazione. Una volta scaduto il tempo, le funzioni selezionate si attivano
automaticamente.
7 Cooling (raffreddamento): premere il tasto per attivare il sistema di raffreddamento.
Premendo il tasto di nuovo, la funzione si arresta.
IMPORTANTE: assicurarsi che vi sia acqua sufciente nella riserva, prima di premere
questo tasto. Non premere mai il tasto “Cool”, se nel serbatoio non c’è acqua.
8 Funzione ad anioni: fornisce aria depurata e sterilizzata, grazie alla produzione di
ioni negativi.
Come utilizzare il contenitore di congelamento
Il ghiaccio nel contenitore di congelamento può assorbire calore dall’acqua ed è
quindi in grado di abbassare la temperatura dell’acqua nel serbatoio al di sotto della
temperatura ambiente, rendendo l’aria emessa piacevolmente fresca.
a. Riempire il contenitore di congelamento (non totalmente) con acqua e metterlo in
congelatore, no a quando il contenuto è completamente ghiacciato.
b. Aprire il tappo e posizionare il contenitore nel serbatoio dell’acqua.
c. Ci sono due contenitori, che possono essere utilizzati in modo alternato.
34
IT
PULIZIA E MANUTENZIONE
Avvertenza: assicurarsi che il ventilatore sia staccato dalla rete elettrica, prima di
rimuovere la griglia di ltraggio dell’aria.
Pulire la griglia di ltraggio dell’aria
Scollegare il dispositivo dalla rete elettrica, tirare l’impugnatura della griglia di ltraggio
dell’aria e rimuoverla dal dispositivo. Pulire la griglia con un detergente neutro, una
spazzola e risciacquare con acqua pulita. Procedere a riposizionarla nel dispositivo.
Pulizia del cuscino assorbente
Scollegare il dispositivo dalla rete elettrica, togliere la griglia di ltraggio dell’aria ed
estrarre il cuscino assorbente dal suo supporto. Pulire con un detergente neutro, una
spazzola e risciacquare con acqua pulita. Procedere a riposizionarlo nel supporto e poi
nel dispositivo. Attenzione: il cuscino assorbente deve essere inserito in orizzontale, per
evitare eventuali fuoriuscite.
Pulire la riserva
Scollegare il dispositivo dalla rete elettrica, aprire il tappo e togliere la riserva. Pulire
con un detergente neutro e risciacquare con acqua pulita. Procedere a riposizionarlo
nel dispositivo.
Pulire l’alloggiamento
Pulire l’alloggiamento con un detergente neutro e un panno morbido. Attenzione:
scollegare il dispositivo dalla rete elettrica quando lo si pulisce, dato che si trova sotto
ad alta tensione. Non far entrare in contatto il pannello di controllo con acqua.
SMALTIMENTO
Se nel proprio paese si applicano le regolamentazioni
inerenti lo smaltimento di dispositivi elettrici ed elettronici,
questo simbolo sul prodotto o sulla confezione segnala che
questi prodotti non possono essere smaltiti con i riuti normali
e devono essere portati a un punto di raccolta di dispositivi
elettrici ed elettronici. Grazie al corretto smaltimento dei
vecchi dispositivi si tutela il pianeta e la salute delle persone
da possibili conseguenze negative. Informazioni riguardanti il
riciclo e lo smaltimento di questi prodotti si ottengono presso
l’amministrazione locale oppure il servizio di gestione dei
riuti domestici.