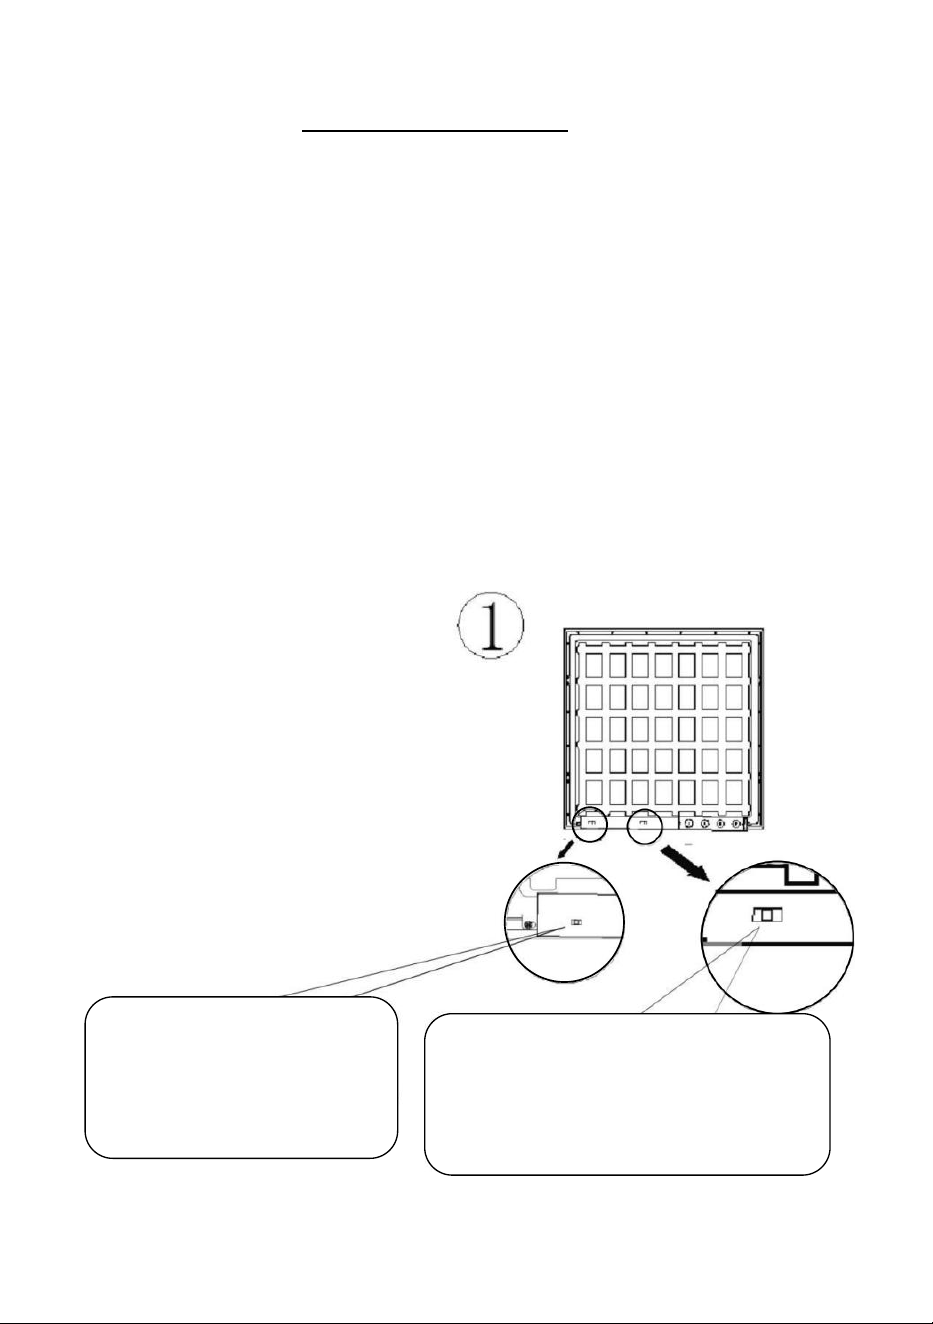
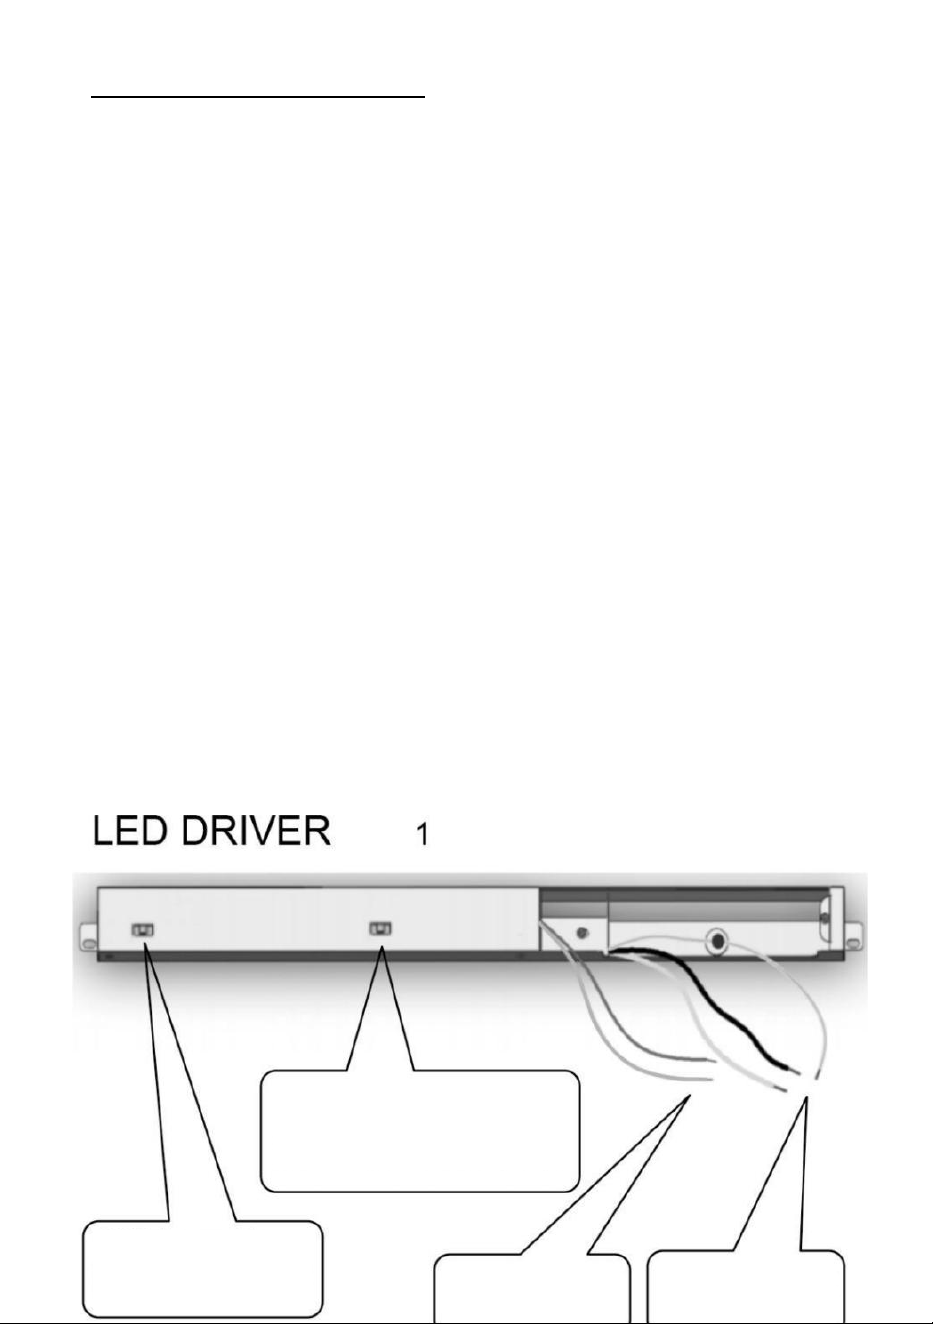
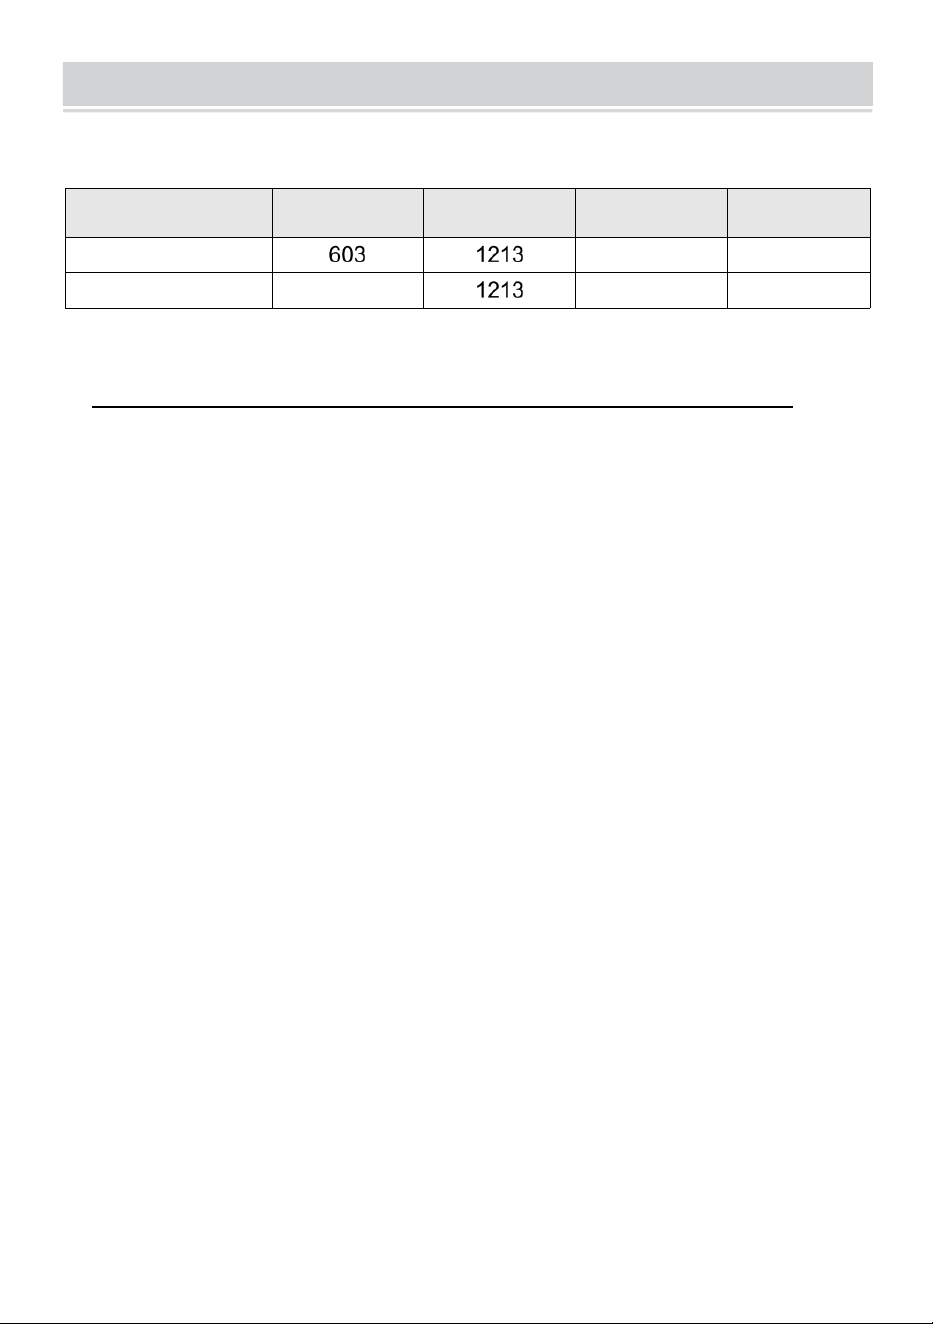
Wattage selectable
1x4: Left:36W;Middle:40W; Right:55W
2x4: Left:36W;Middle:40W; Right:50W
CCT changeable
Left-3500K; Middle-4000K;
Right-5000K
0-10V dimmable
Pink &Purple wire
Black: L White: N
Green: G
Black: L White:N
Green: G
0-10V dimmable
Pink &Purple wire
CCT changeable
Left-3500K: Middle-4000K;
Right-5000K
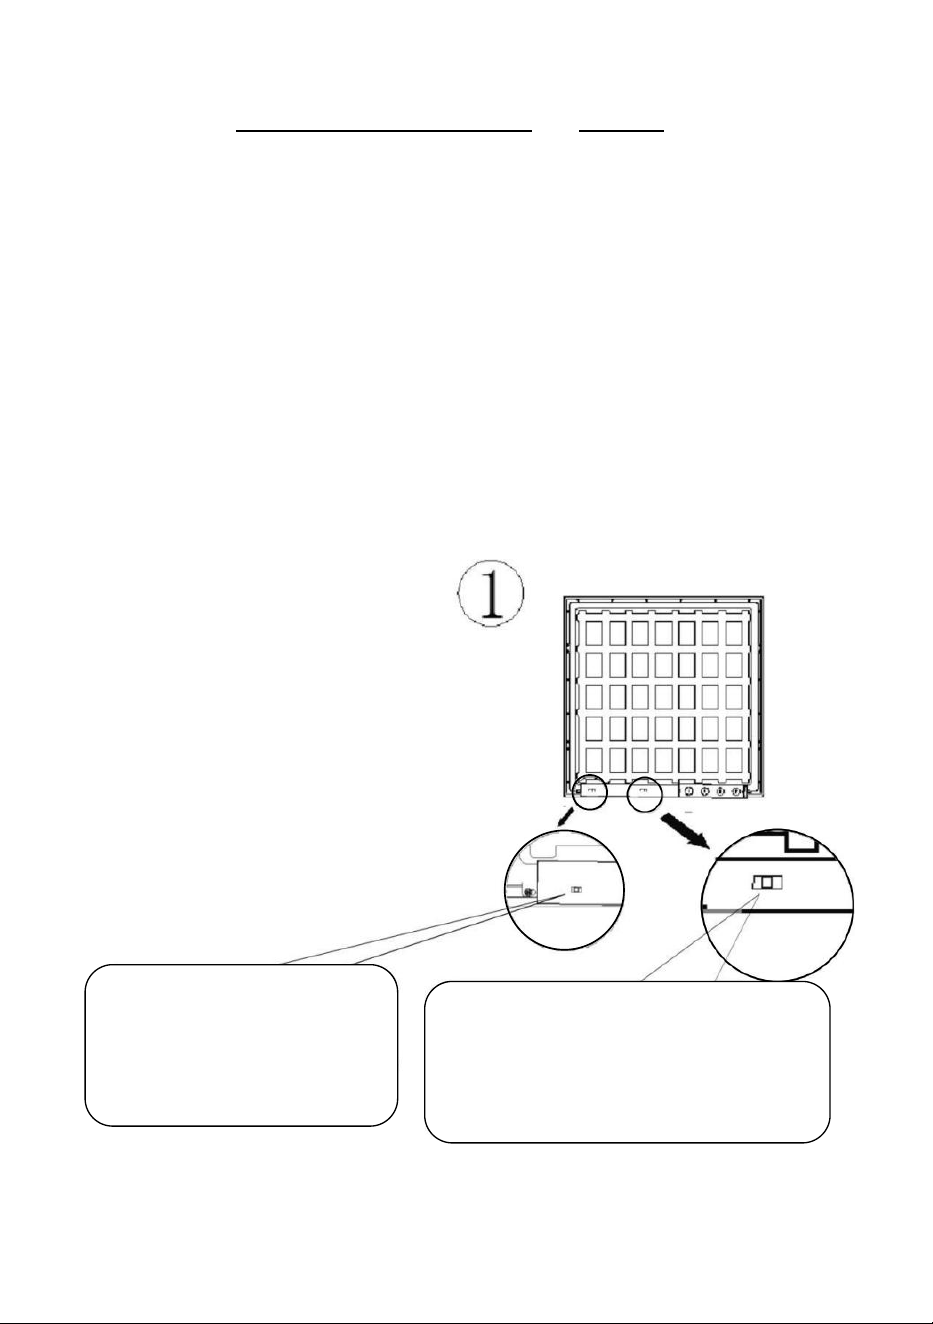
PS:The defaults switch setting
is set to 4000K on the fixture.
Wattage Selectable
1X4: Left:36W; Middle:40W; Right:55W
2X4: Left:36W; Middle:40W; Right:50W
PS: The defaults switch setting is set to
40W (1X4/2X4)on the fixture.
Please press
List of accessories
1.Panel light *1
2.Hanging wire*4
3.Stainless steel nut*4
4.Hanging wire sleeve*4
5.Hanging wire holder*4
6.Spring head*4
7.Screw*4
8.
KDSLEDMBD1J2LG8JRV6
Instruction manual*1
1.Panel light *2
2.Hanging wire*8
3.Stainless steel nut*8
4.Hanging wire sleeve*8
5.Hanging wire holder*8
6.Spring head*8
7.Screw*8
KDSLEDMBD2J2WYJAUV6
8.Instruction manual*1
Support technique et Certificat de garantie électronique
Www . vevor . com / support
PANNEAU LED LUMIÈRE
nous continuons à nous engager à vous fournir des outils avec compétitif prix.
"sauvegarder Moitié", " "Moitié prix" ou toute autre expression similaire utilisé par nous
seulement représente un estimation des économies que vous pourrait bénéficier de
acheter certains outils avec nous par rapport à la grandes marques et fait ne signifie
pas nécessairement couvrir tout catégories d'outils offert
par nous . tu es nous vous rappelons avec plaisir de vérifier attentivement lorsque toi
sont placement un commander avec nous si toi sont en train d'économiser
moitié dans comparaison avec les plus grandes marques.
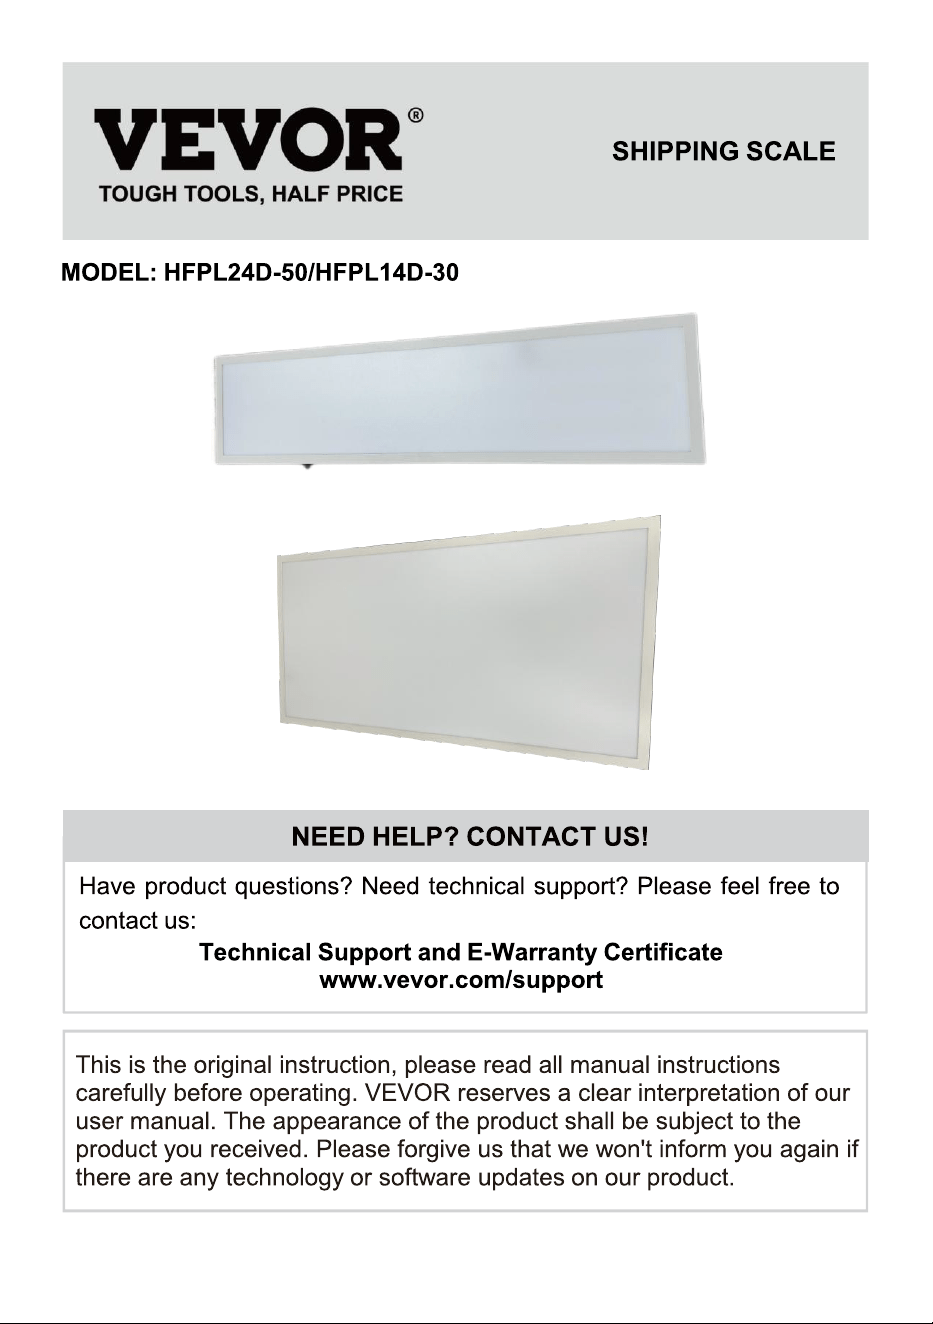
SHIPPING SCALE
MODÈLE : HF PL 24D-50/ HF PL 14D-30
BESOIN Besoin d'aide ? Contactez-nous !
Avoir Des questions sur les produits ? Besoin technique soutien ?
s'il vous plaît N'hésite pas à Contactez-nous
Technique soutien et garantie électronique
certificat www.vevo r. com/support
C'est l'original instruction, s'il vous plaît lisez tout l manuel linstructions
soigneusement avant en fonctionnement. VEVO R se réserve une
interprétation claire de notre manuel d'utilisation.Le apparition de le
produit doit lb-e sujet à le
produit vous reçu. s'il te plaît pardonne nous que nous ne sera pas dans
forme toi encore si il y a des technologies ou des mises à jour logicielles
sur notre produit.
LED PANEL LIGHT
TOUJOURS TOURNER DÉSACTIVÉ PUISSANCE PRINCIPALE
AVANT INSTALLATION
Dimension
Un (mm)
B( mm )
C( mm )
Note
2*4
35
1*4
303
35
S'IL TE PLAÎT LIRE: Informations importantes Avant l'installation
Cet équipement est destiné à être installé uniquement par personnel
qualifié . Le installation doit être fait dans un accord avec l'édition
actuelle à le National Électrique code et tout État et local applicables
bâtiment
codes .
Le installation finale doit être approuvé par le personnel qualifié
approprié électricité/bâtiment inspecteur(s). Installation incorrecte
peut entraîner une
feu ou électrique danger. Assurez-vous que l'électricité
alimentation du circuit a été débranché avant d'installer ce
dispositif électrique système.
1. Examinez attentivement les diagrammes et débrancher tous
les appareils électriques pouvoir avant l'installation pour éviter
les erreurs choc électrique.
2. FAIRE pas monter près inflammable matériels ou électrique radiateurs
.3. FAIRE pas
laisser les cordons
d'alimentation se toucher
surface chaude .
4. Le luminaire est destiné à l'intérieur et endroit sec, FAIRE ne pas
utiliser pour emplacement extérieur.
5. Le luminaire doit être installé ou
entretien par un électricien qualifié ou personne OMS est familier avec
le Lumina jerés .
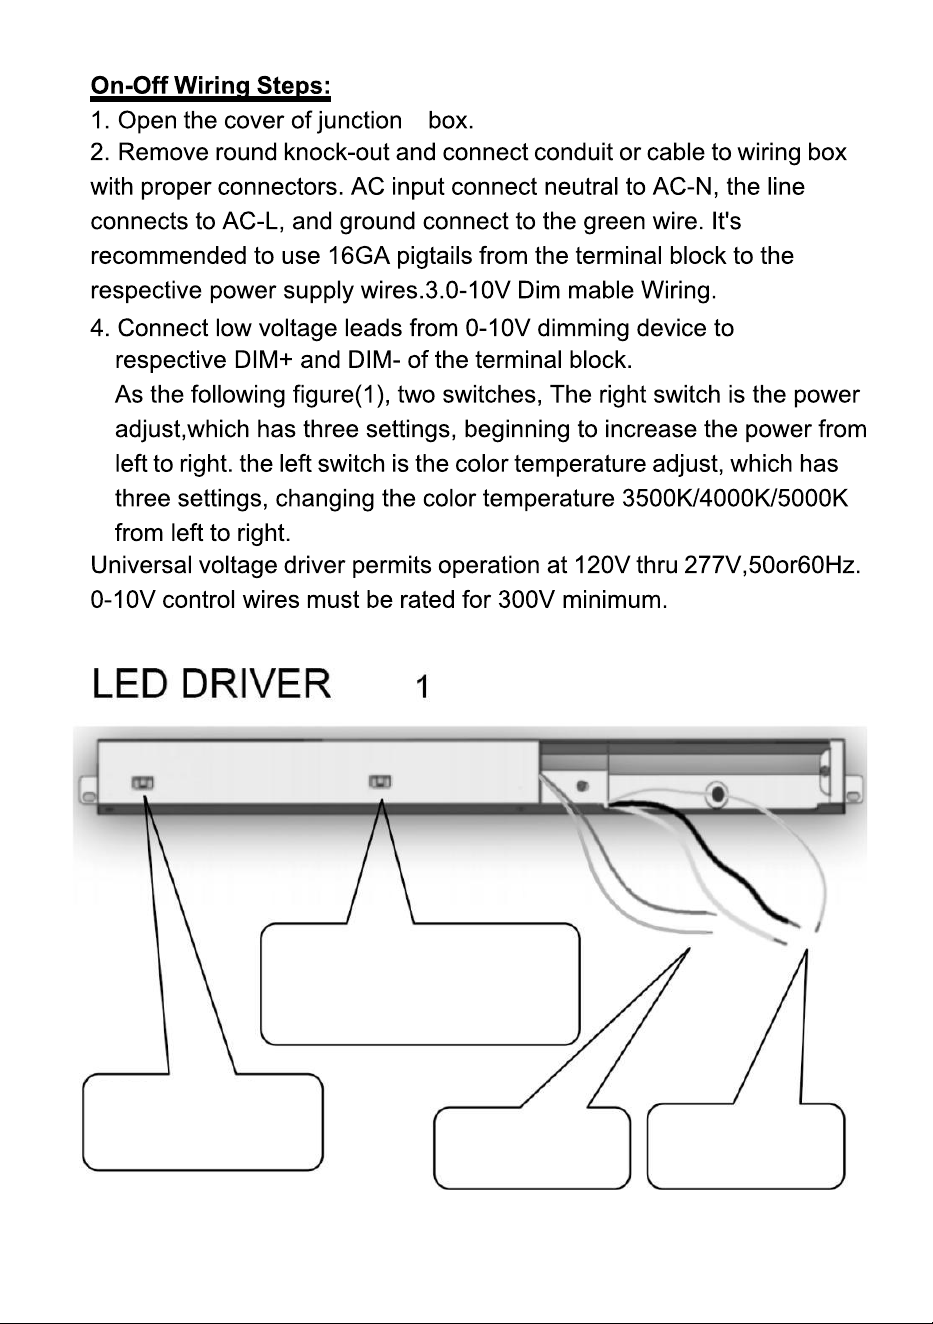
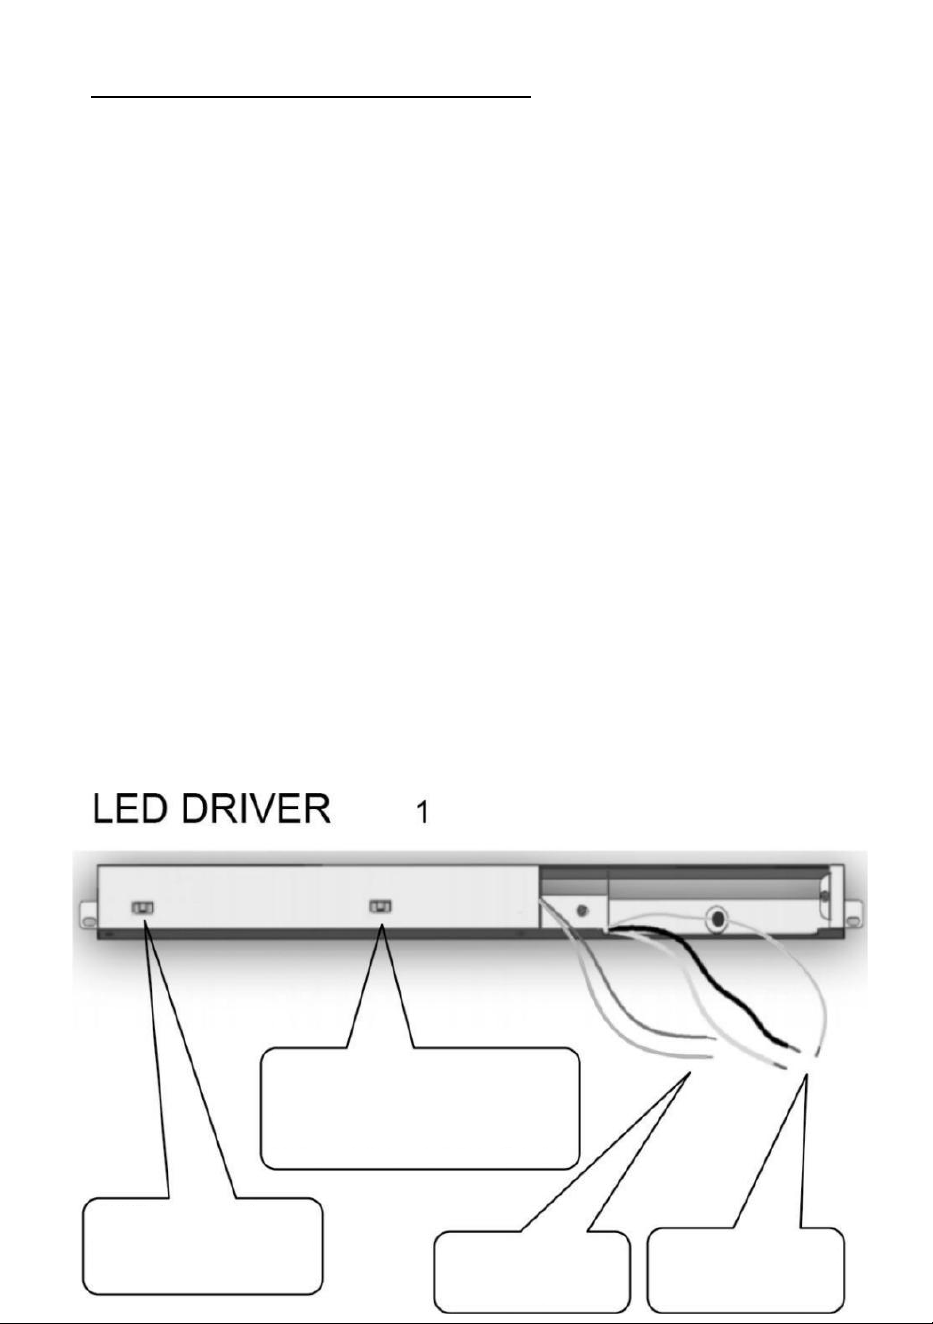
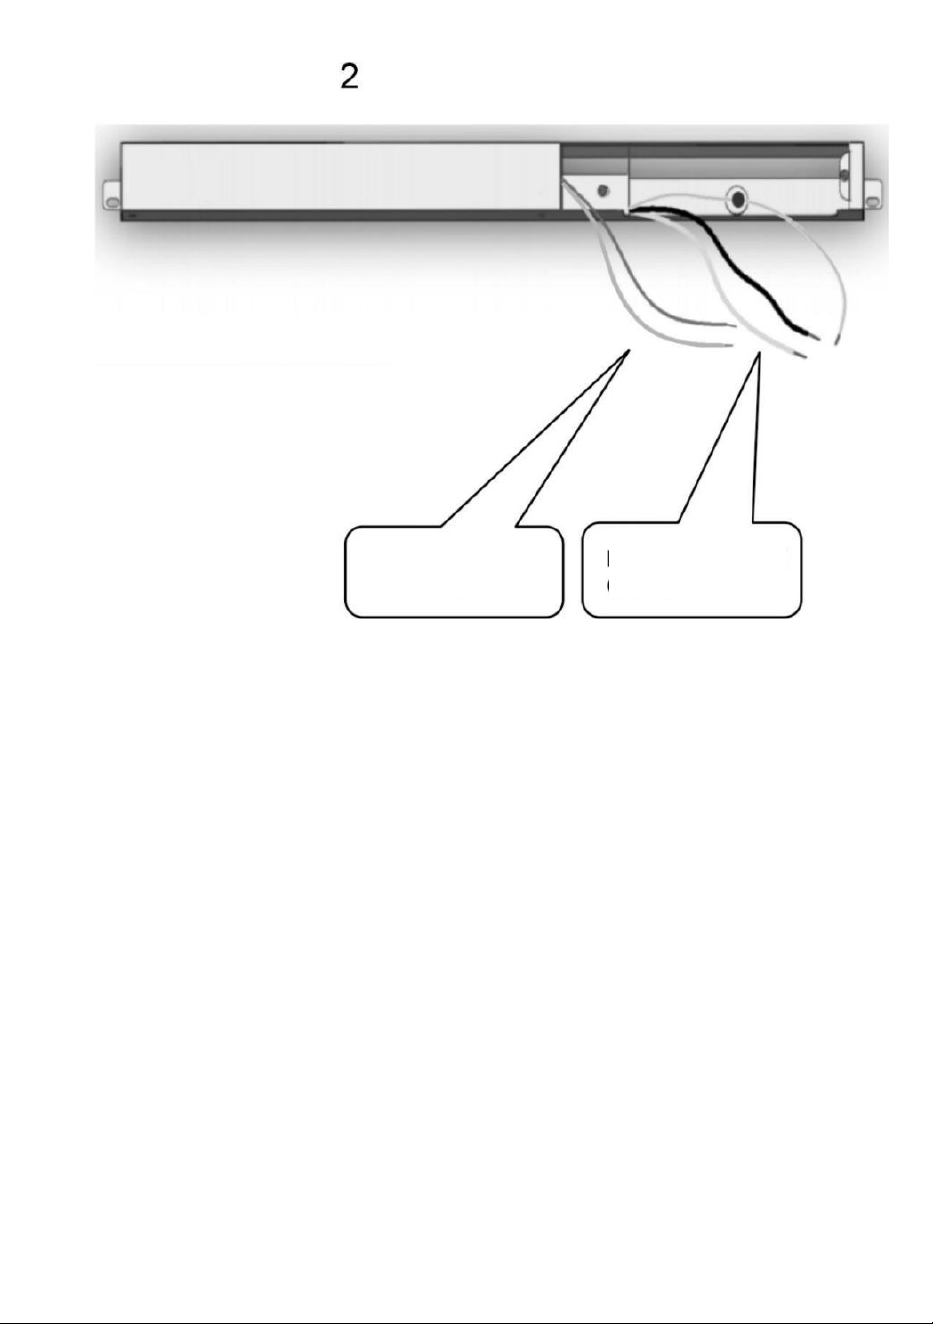
marche-arrêt câblage mesures:
1. ouvrir le COUVERCLE de la jonction boîte.
2. Retirer rond Assommer et connecter conduit ou câble à
câblage boîte avec connecteurs appropriés. CA entrée connecter le
neutre à AC-N, le doubler
se connecte à AC -L, et sol connecter à le vert fil . C'est
recommandé à UTILISER 16 GA des nattes depuis le Terminer
bloc à les fils d'alimentation respectifs.3.0-10v Dim câblage
mable.
4. connecter basse tension câbles de 0 à 10 V atténuation appareil
à
respectif DIM+ et DIM- de le terminal bloc.
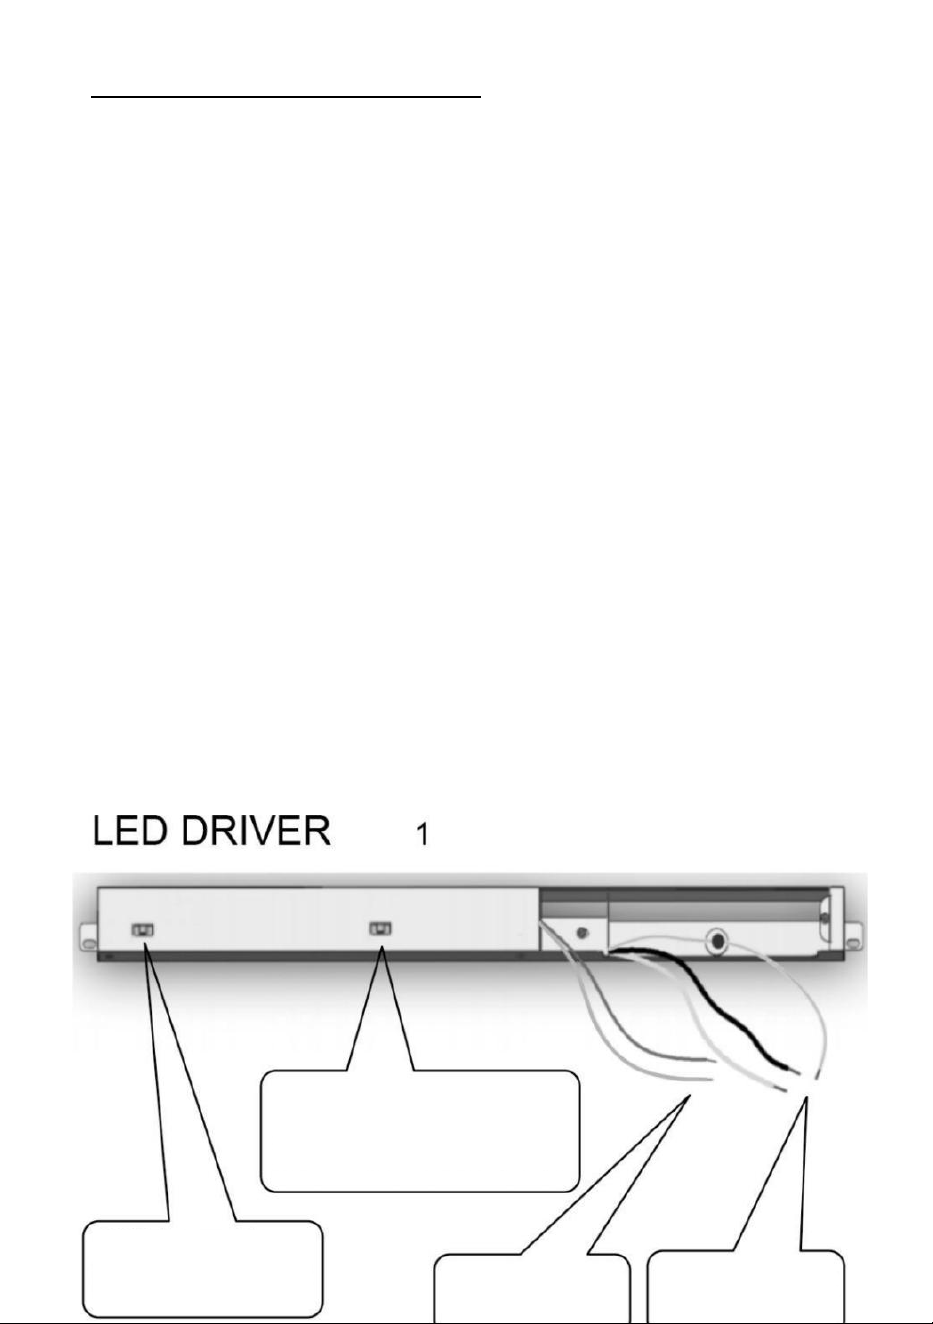
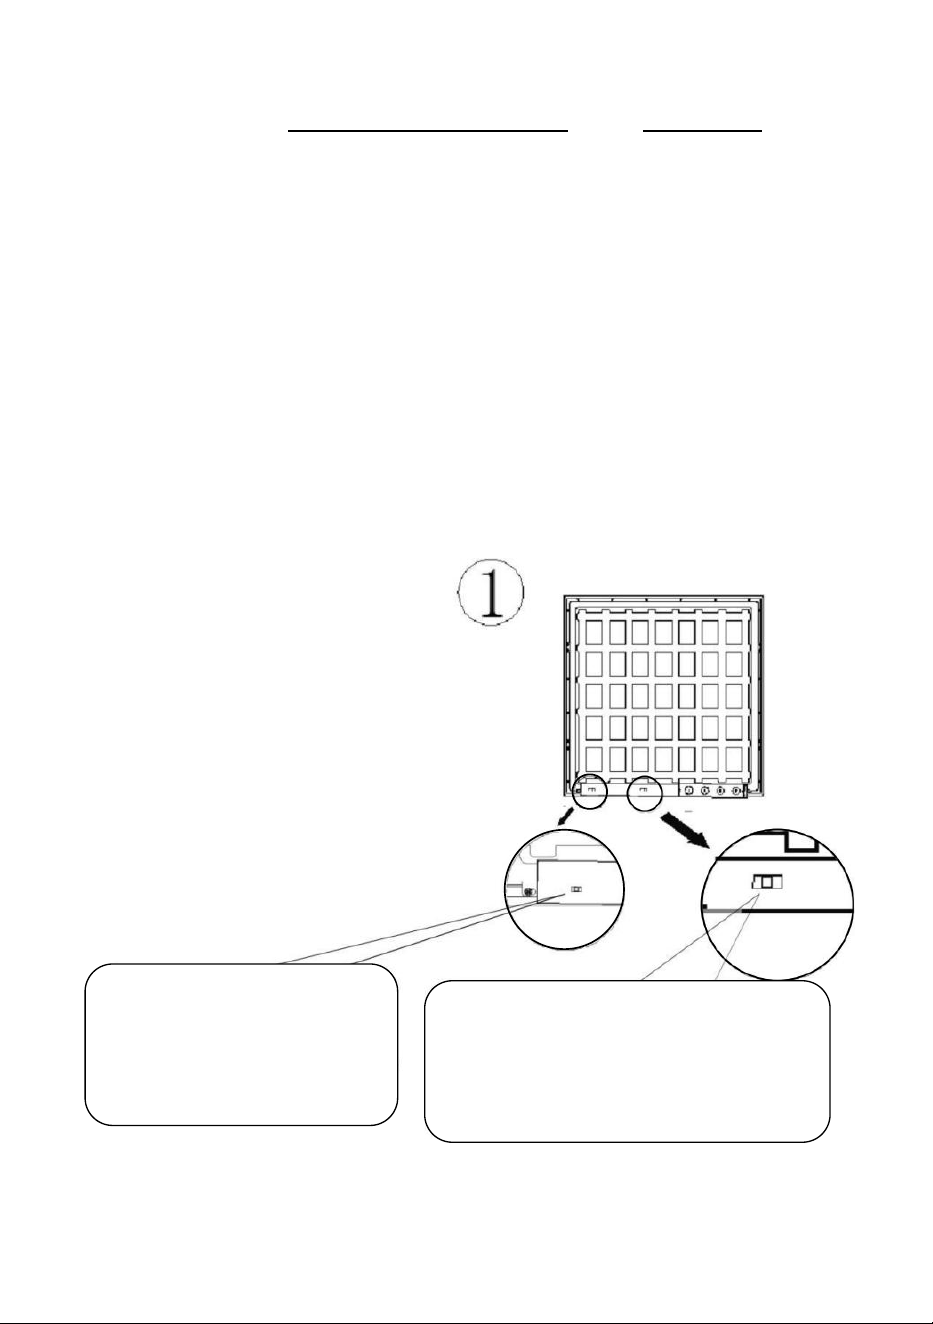
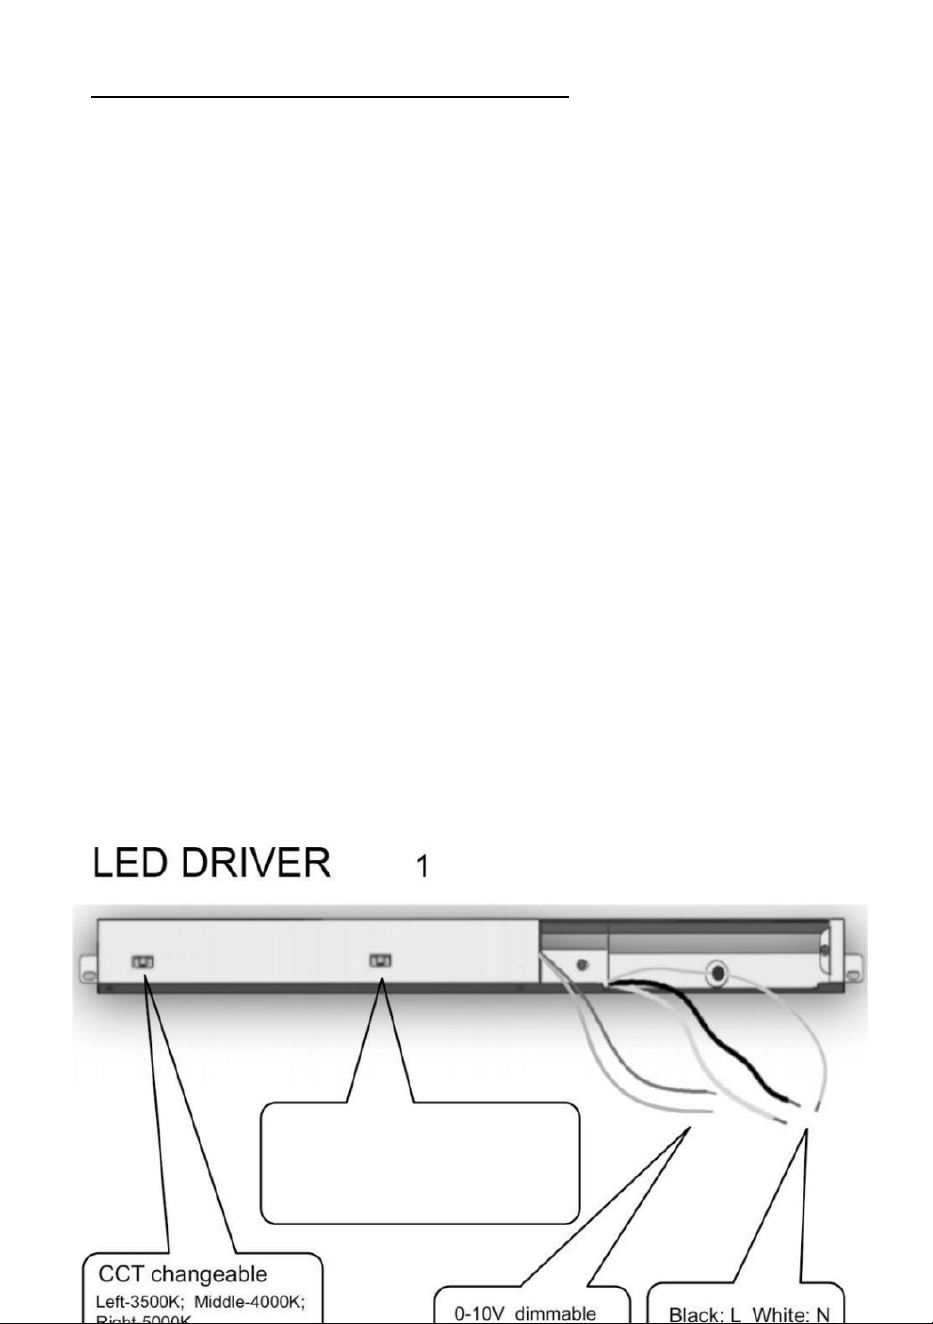
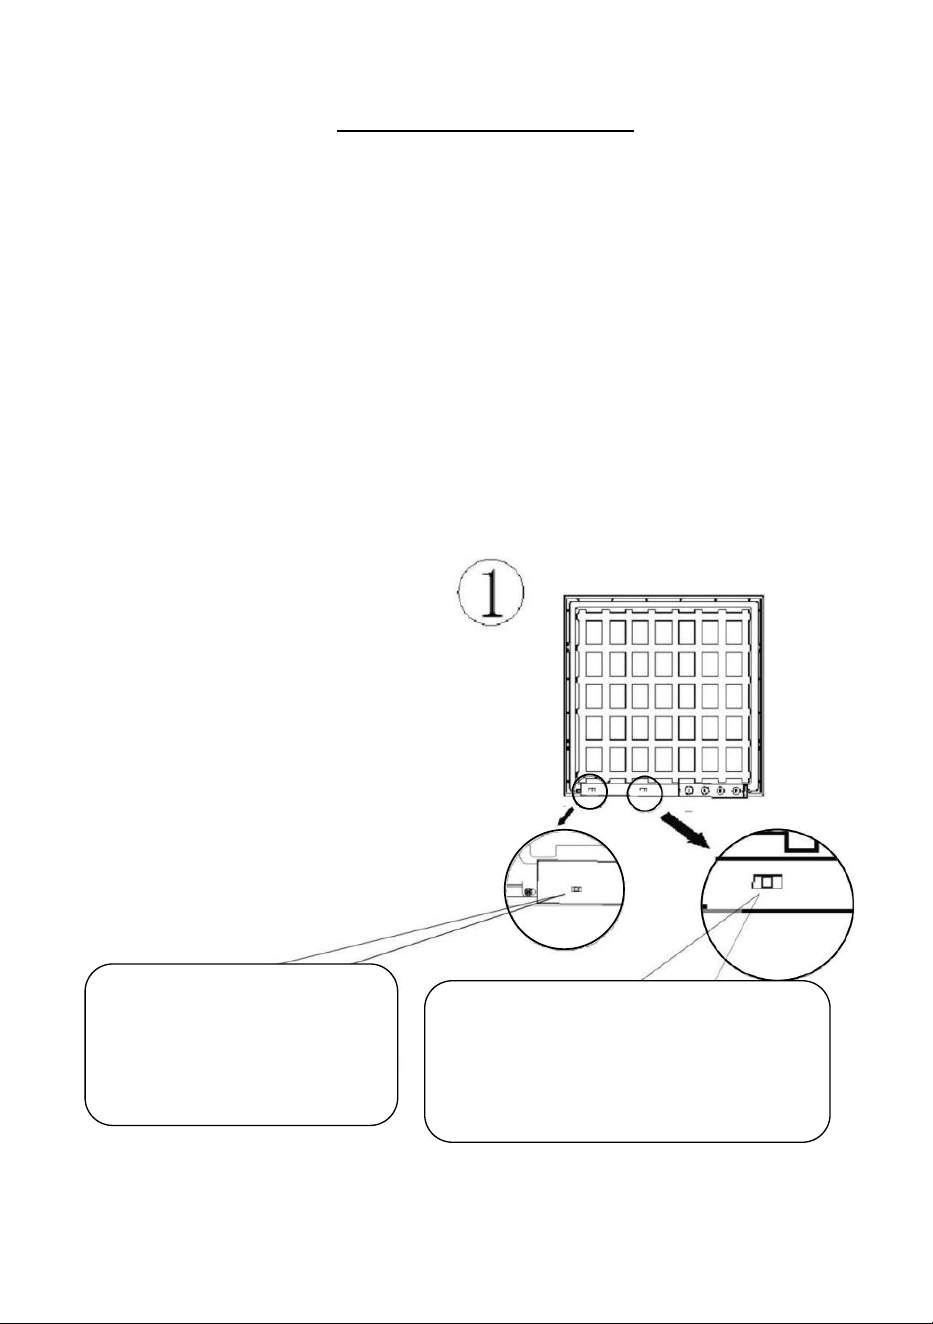
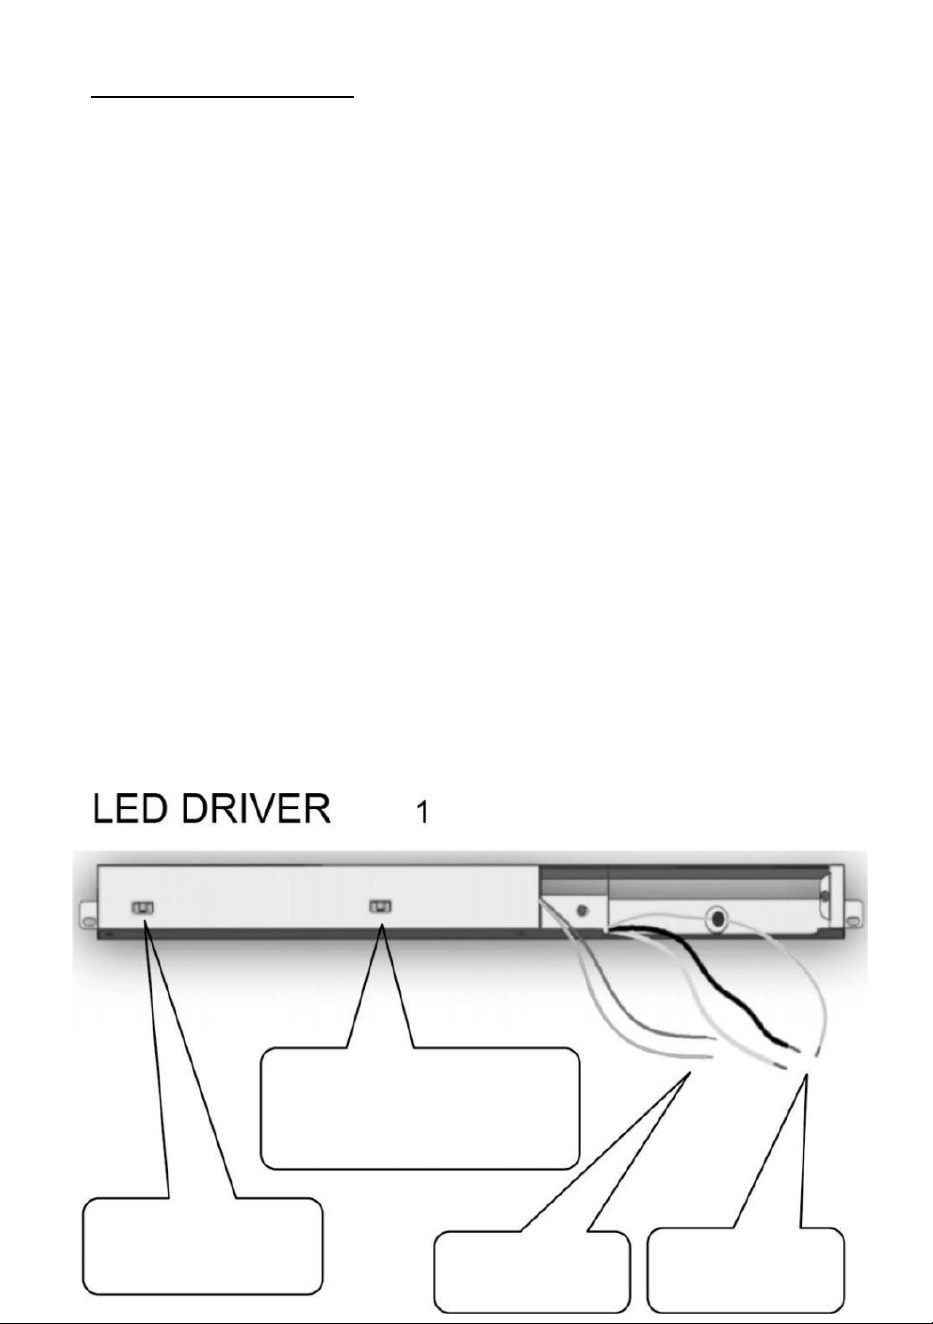
Comme le montre la figure suivante (1), deux commutateurs, Le
interrupteur droit est le pouvoir ajuster, lequel a trois réglages,
commence à augmenter le puissance de de gauche à droite.
l'interrupteur gauche est la couleur réglage de la température , qui a
trois réglages, changer la couleur température 3500k/40
00k/5000k depuis de gauche à droite.
univers un pilote de tension permet le fonctionnement à 120v jusqu'à
277v , 50 ou 60Hz. 0-10 v contrôle fils doit être noté pour 300 v
minimum .
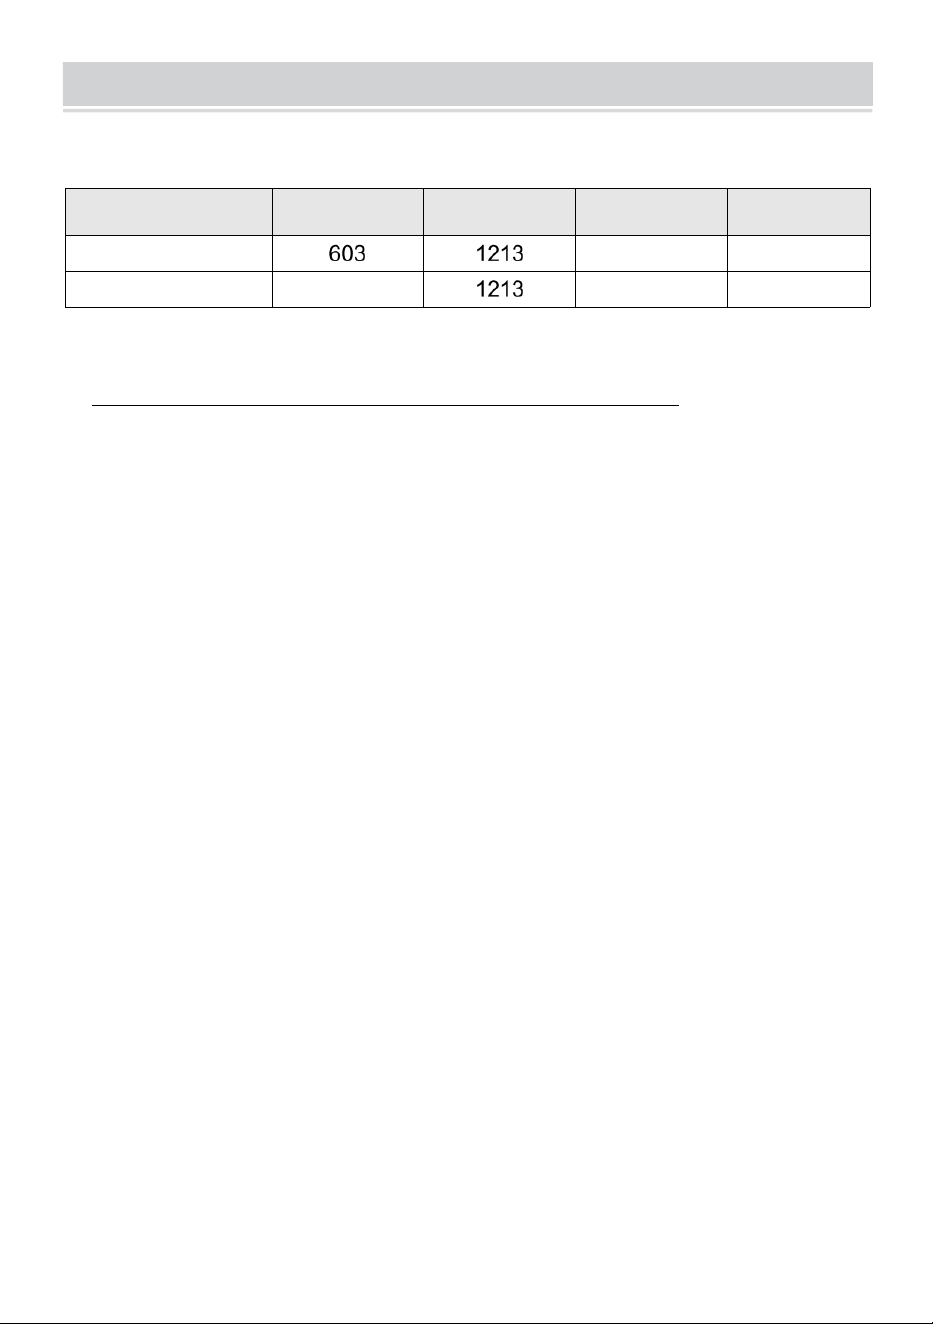
Wattage selectable
1x4: Left:36W;Middle:40W; Right:55W
2x4: Left:36W;Middle:40W; Right:50W
CCT changeable
Left-3500K; Middle-4000K;
Right-5000K
0-10V dimmable
Pink &Purple wire
Black: L White: N
Green: G

Black: L White:N
Green: G
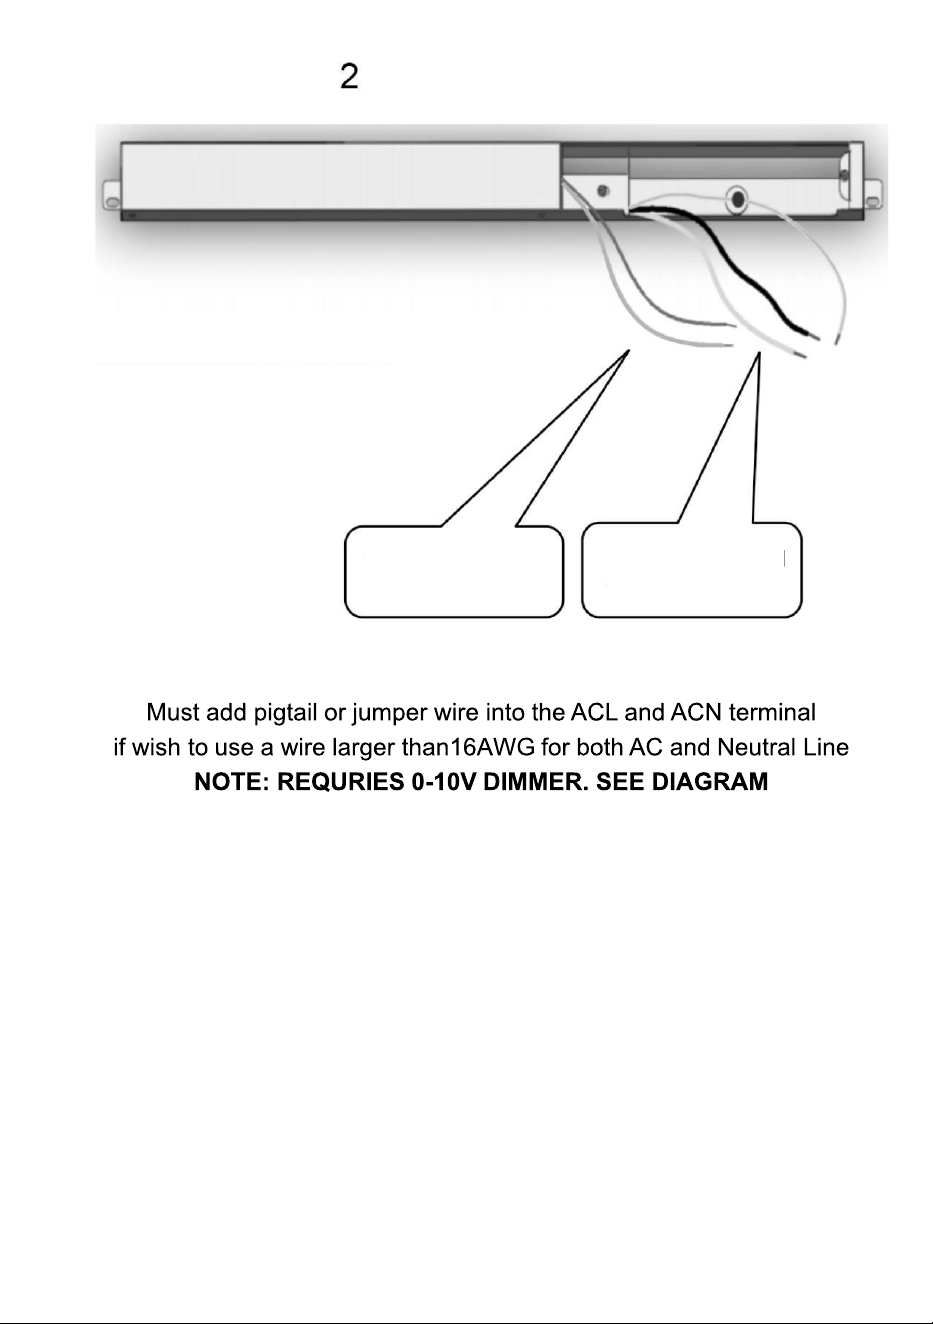
Doit ajouter cochon taï ou cavalier fil dans le terminal ACL et ACN
si je le souhaite à UTILISER un fil plus grand que 16 AWG pour les deux
Ac et Neutre Doubler
NOTE : DEMANDE RIES 0-10 V VARIATEUR . VOIR
DIAGRAMME
0-10V dimmable
Pink &Purple wire
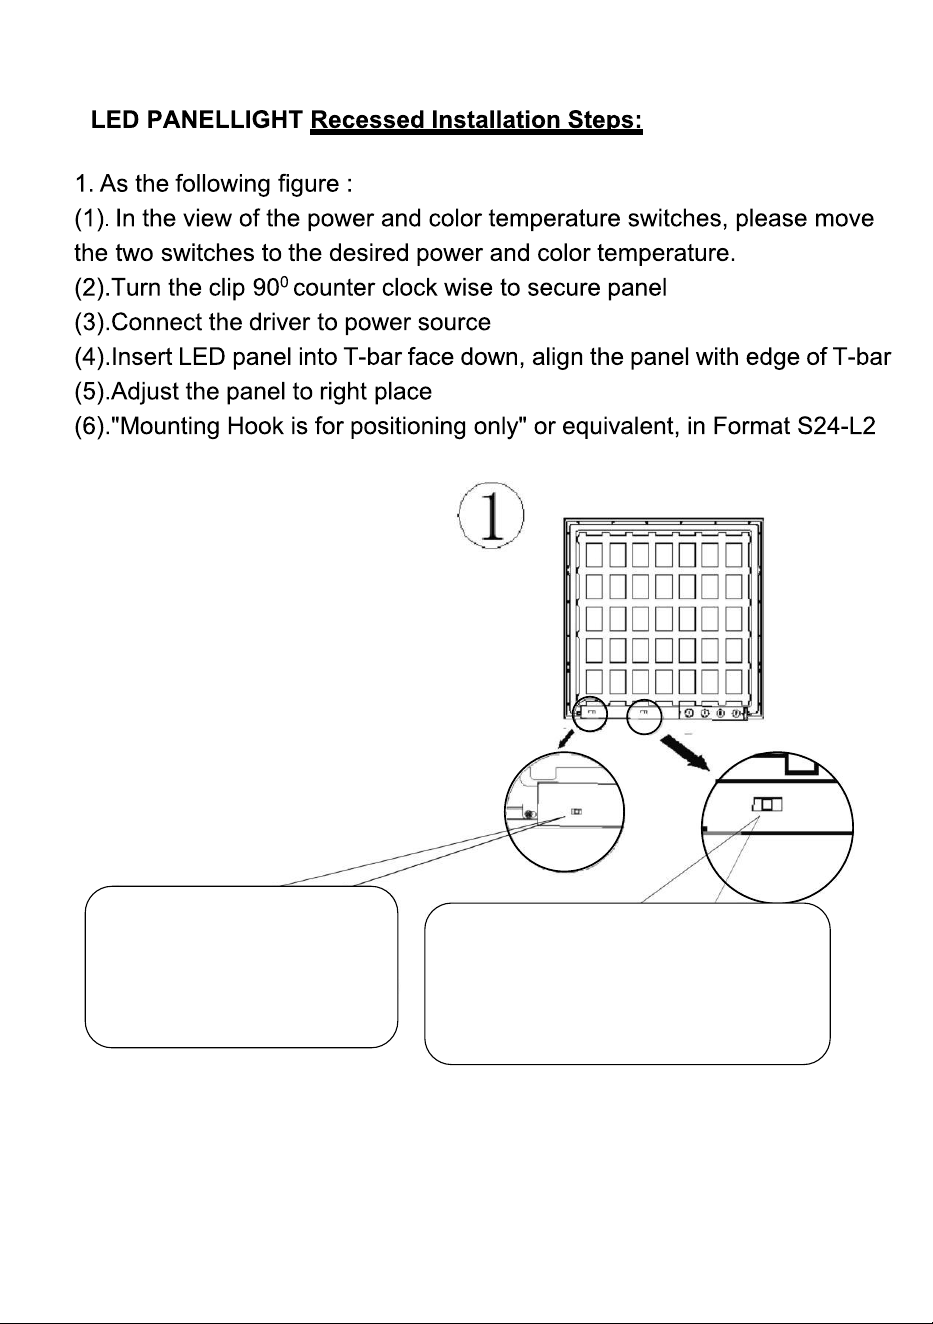
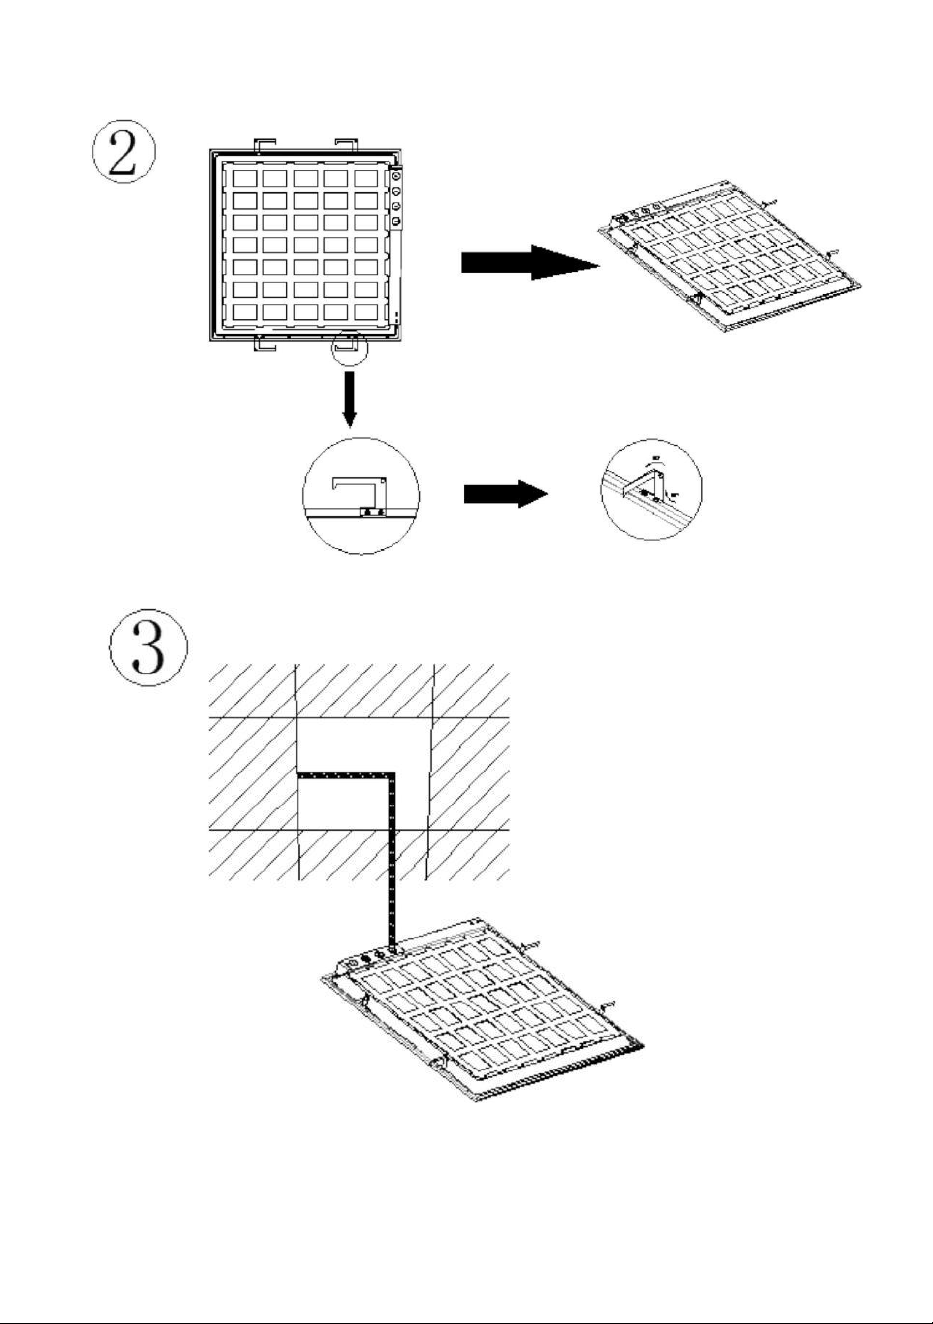
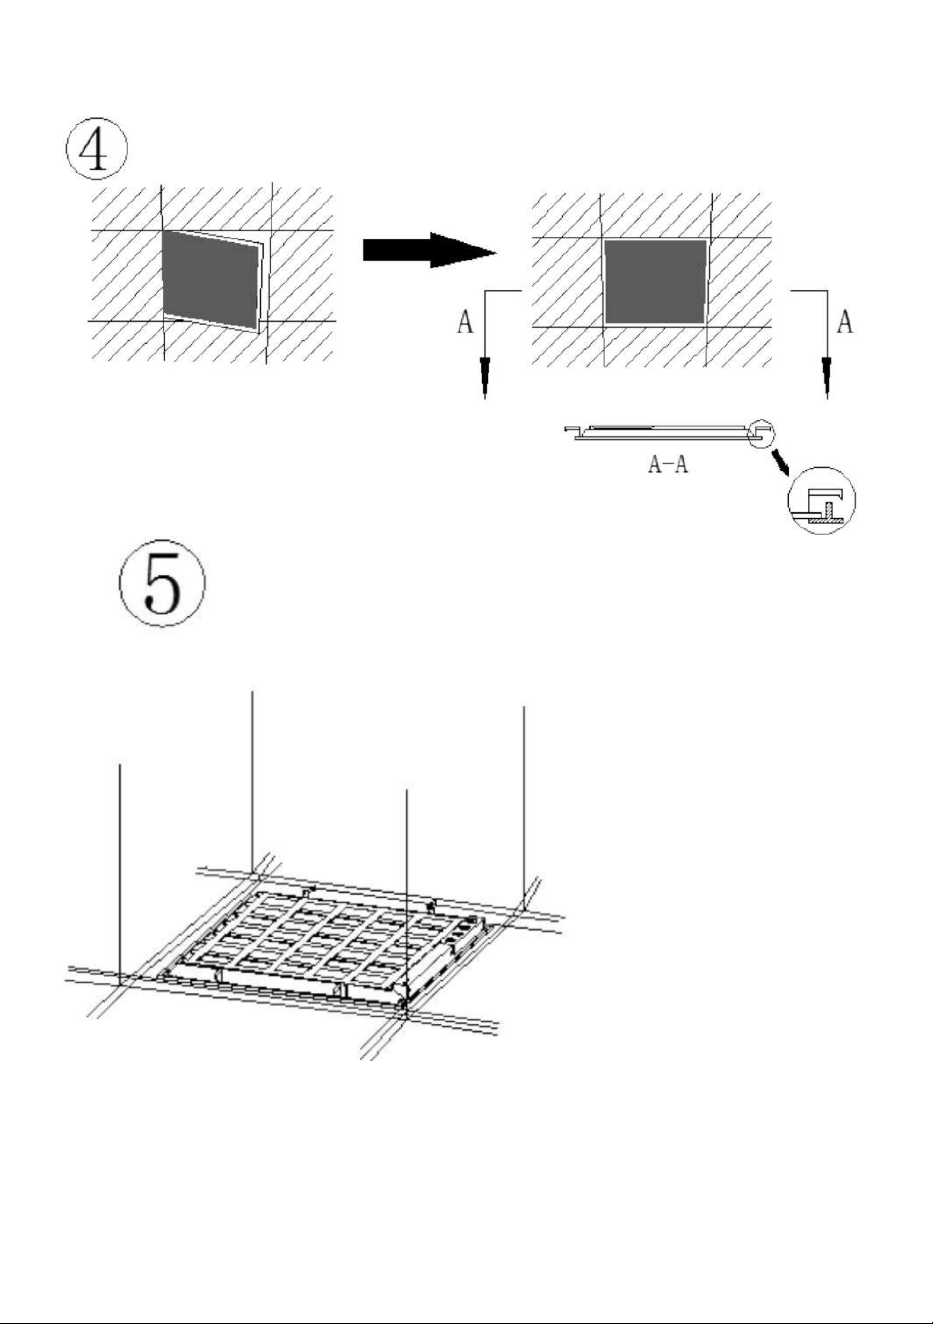
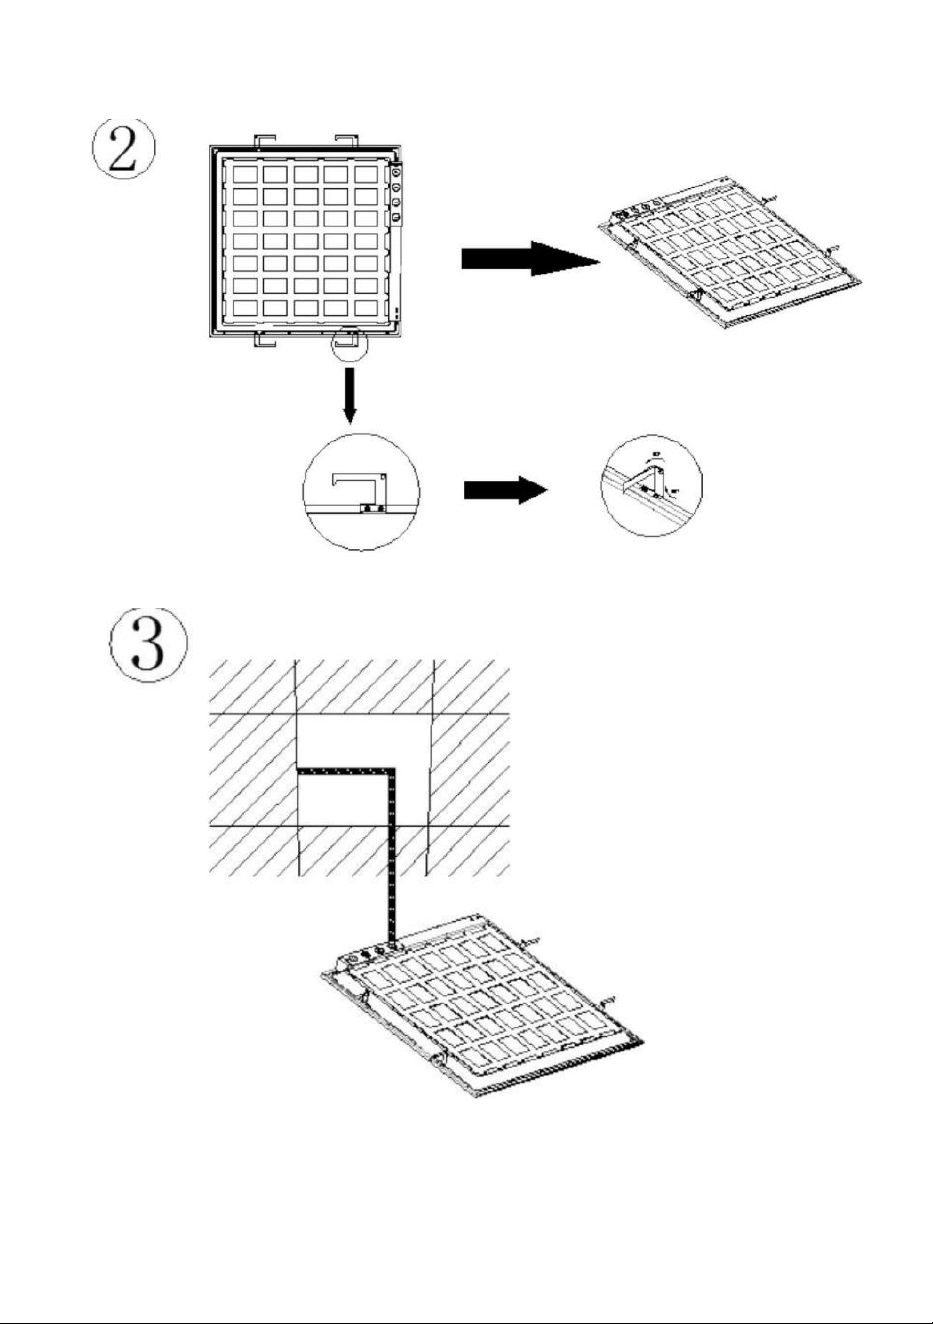
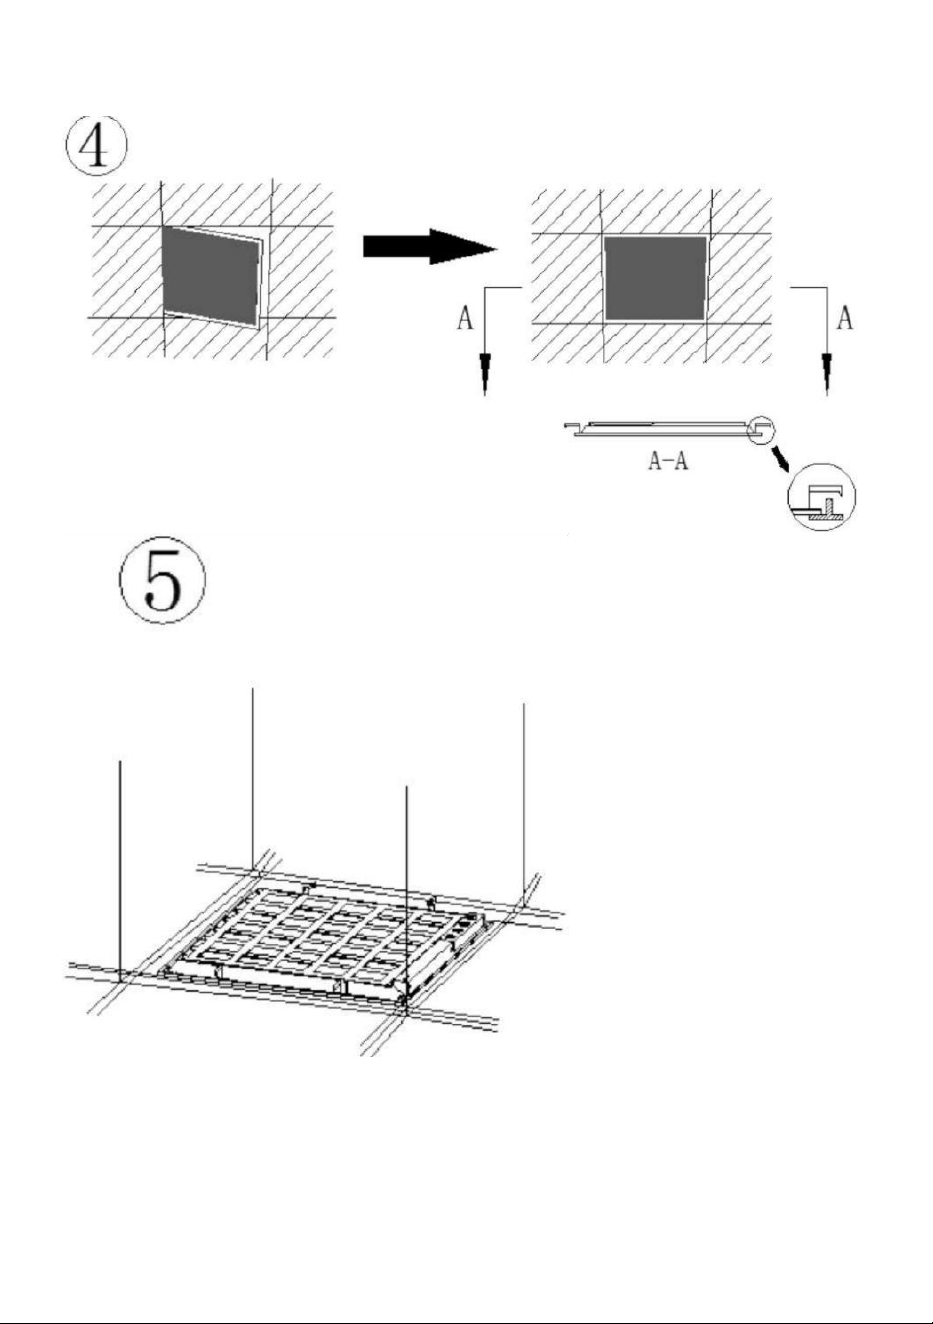
PANNEAU LED Installation encastrée LIGHT mesures:
le montre la figure suivante :
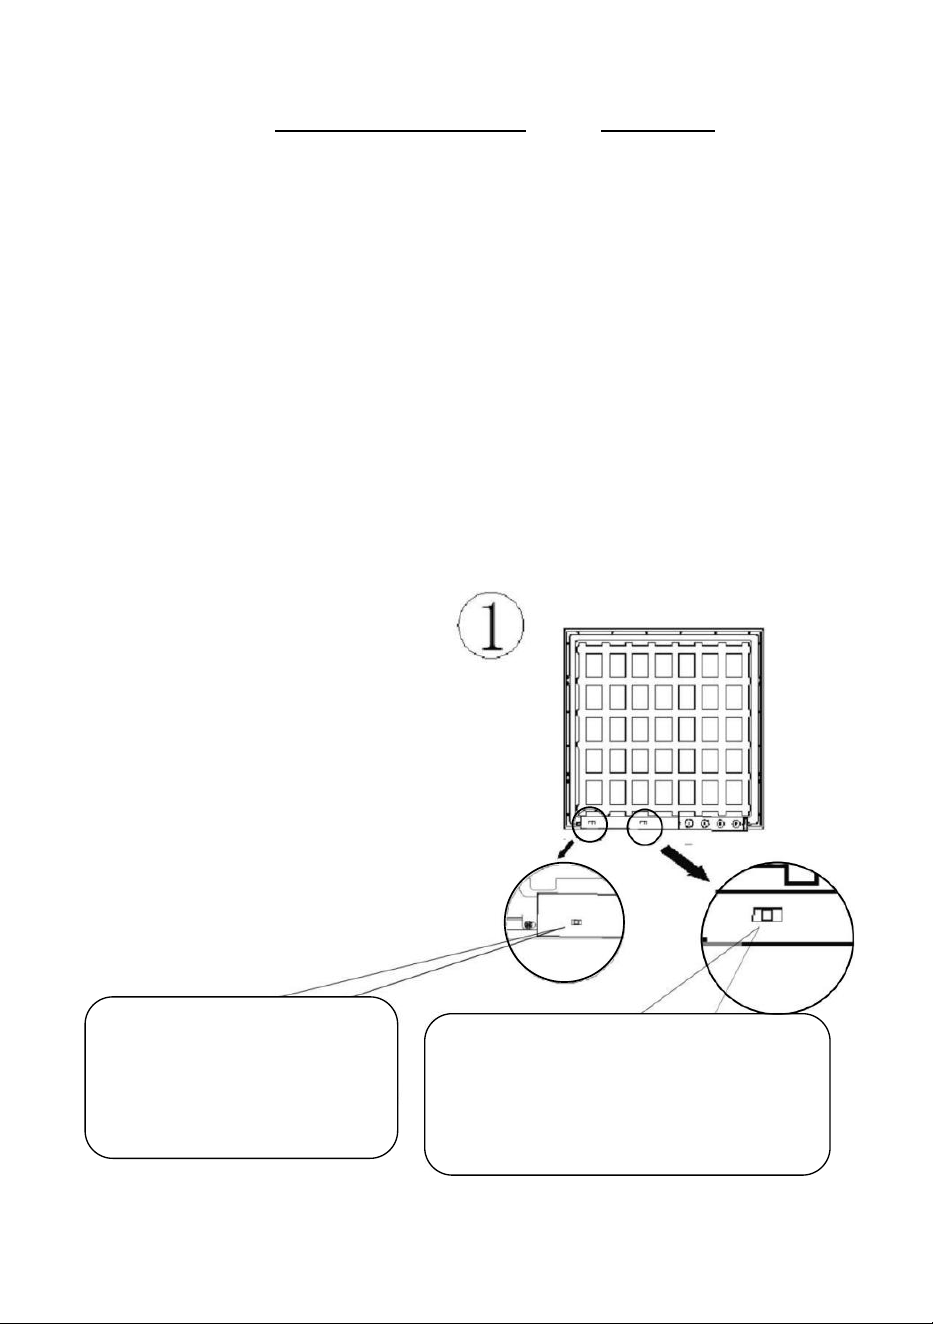
(1). De l'avis de le puissance et commutateurs de température de couleur,
s'il te plaît se déplacer les deux interrupteurs sur la position souhaitée
puissance et couleur température .
(2). Tournez le clipgoo dans le sens inverse des
aiguilles d'une montre pour fixer le panneau (3).
connecter le conducteur à pouvoir source
(4). Insérer LED Panneau dans la barre en T face contre terre, aligner le
panneau avec le bord de la barre en T
(5).Ajustez le panneau au bon endroit
(6)."Montage "HOOK est uniquement destiné au positionnement" ou
équivalent, dans Format s24-L2
Wattage Selectable
1X4: Left:36W; Middle:40W; Right:55W
2X4: Left:36W; Middle:40W; Right:50W
PS: The defaults switch setting is set to
40W (1X4/2X4)on the fixture.
CCT changeable
Left-3500K: Middle-4000K;
Right-5000K
PS:The defaults switch setting
is set to 4000K on the fixture.


DIRIGÉ PANNEAU LUMIÈRE
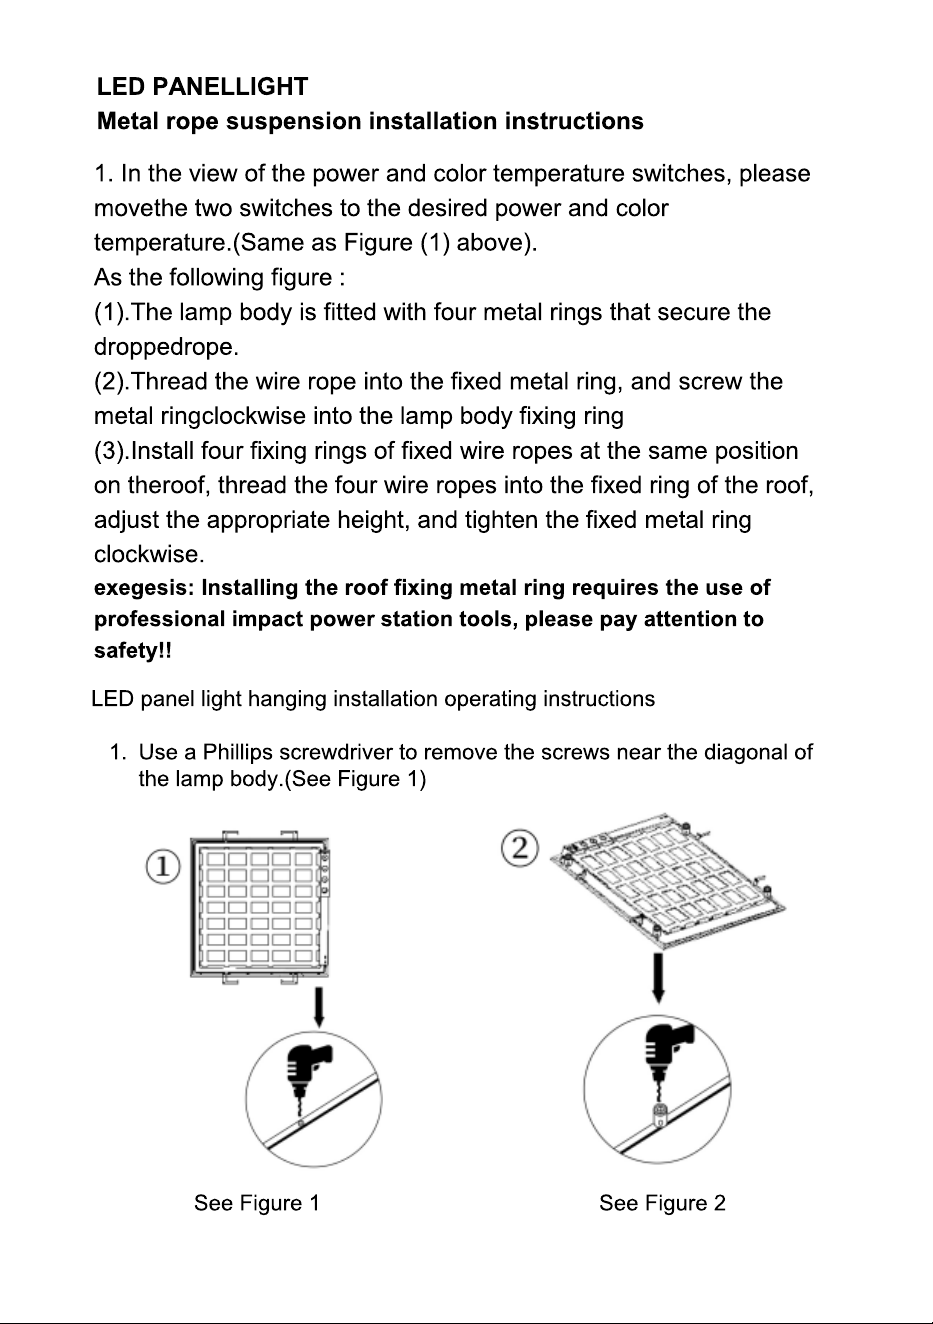
Installation de suspension par câble métallique instructions
1. Dans la vue de le pouvoir et les commutateurs de température
de couleur, s'il te plaît se déplacer les deux interrupteurs sur la
position souhaitée puissance et couleur
température (identique à la figure (1) ci-
dessus). Comme le montre la figure
suivante :
(1). La lampe le corps est équipé de quatre anneaux
métalliques qui sécuriser le abandonné corde.
(2). Enfiler le câble métallique dans le fixe métal anneau, et au
diable le métal anneau dans le sens des aiguilles d'une montre
dans le corps de la lampe fixation anneau
(3). Installer quatre fixation anneaux de fil fixe cordes à la même
position sur le toit, enfilez les quatre câbles métalliques dans le
fixé anneau du toit, ajuster le approprié hauteur, et serrer le
anneau métallique fixe
dans le sens des aiguilles d'une montre.
exégèse: Installation le toit anneau de fixation en métal
nécessite l' utilisation de puissance d'impact professionnelle
outils de la station, veuillez payer attention à sécurité!!
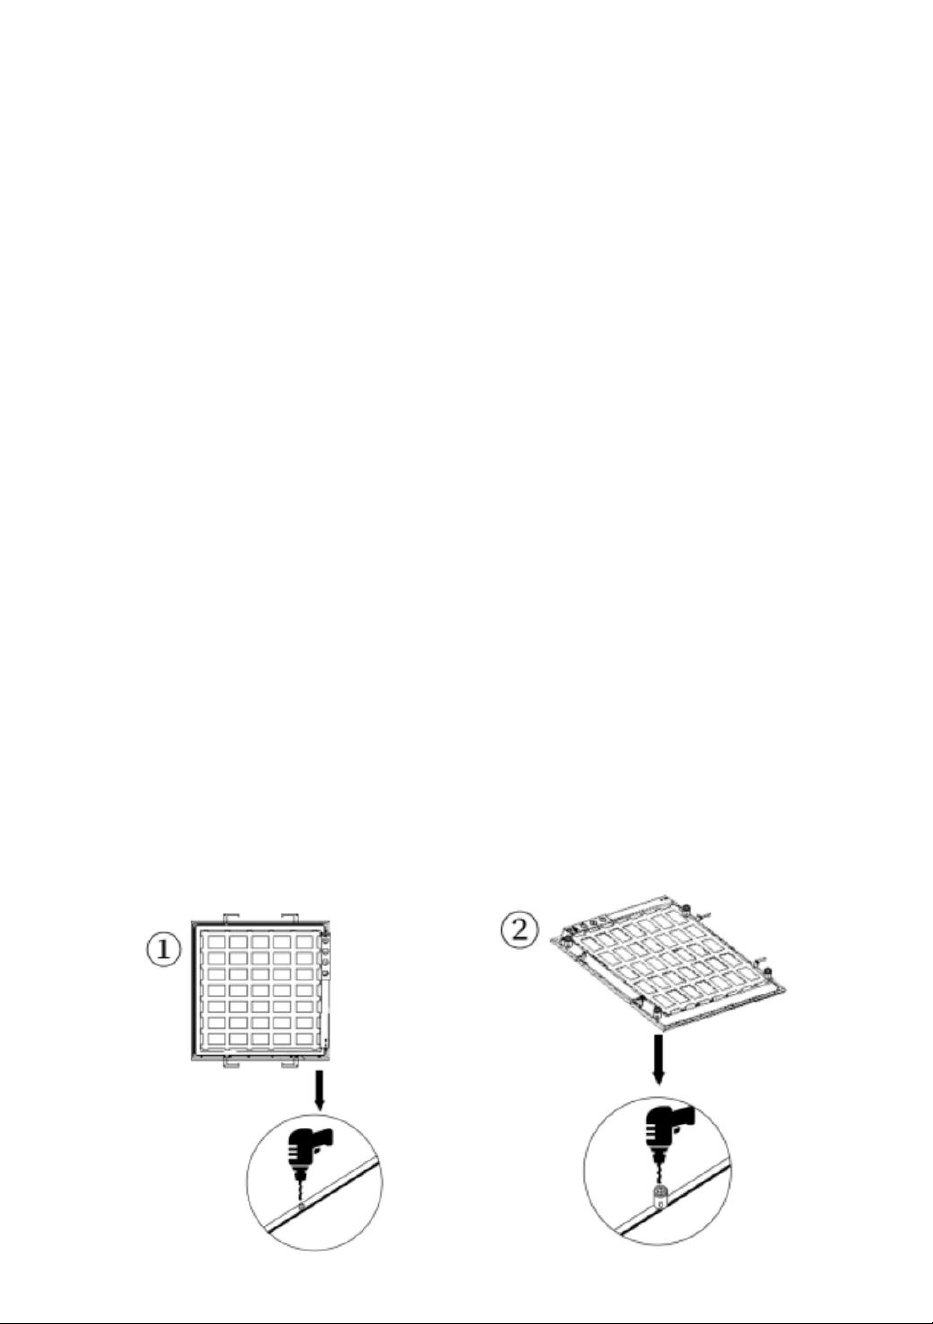
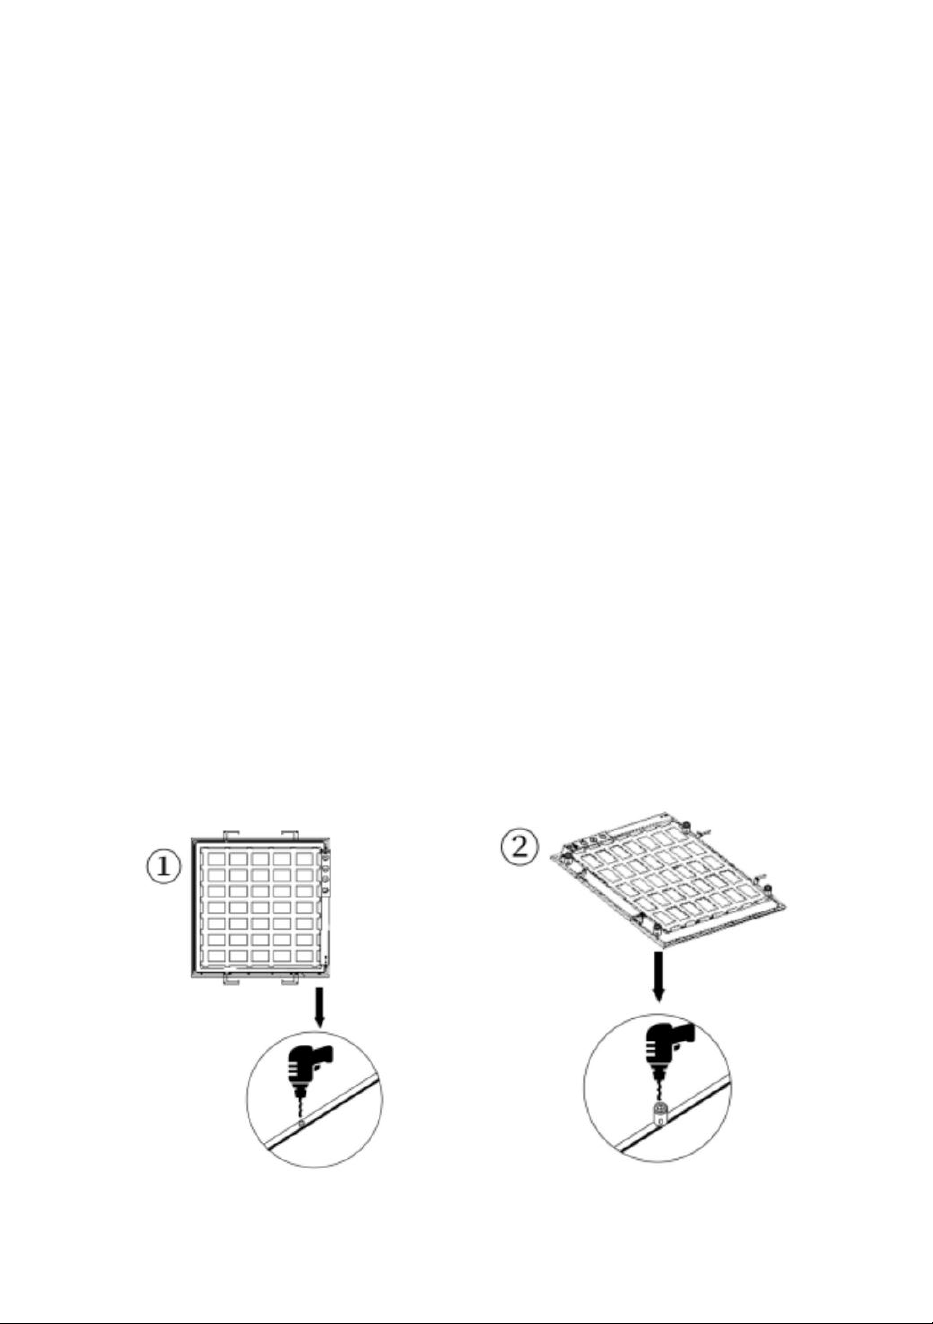
DIRIGÉ panneau suspension légère installation fonctionnement
instructions
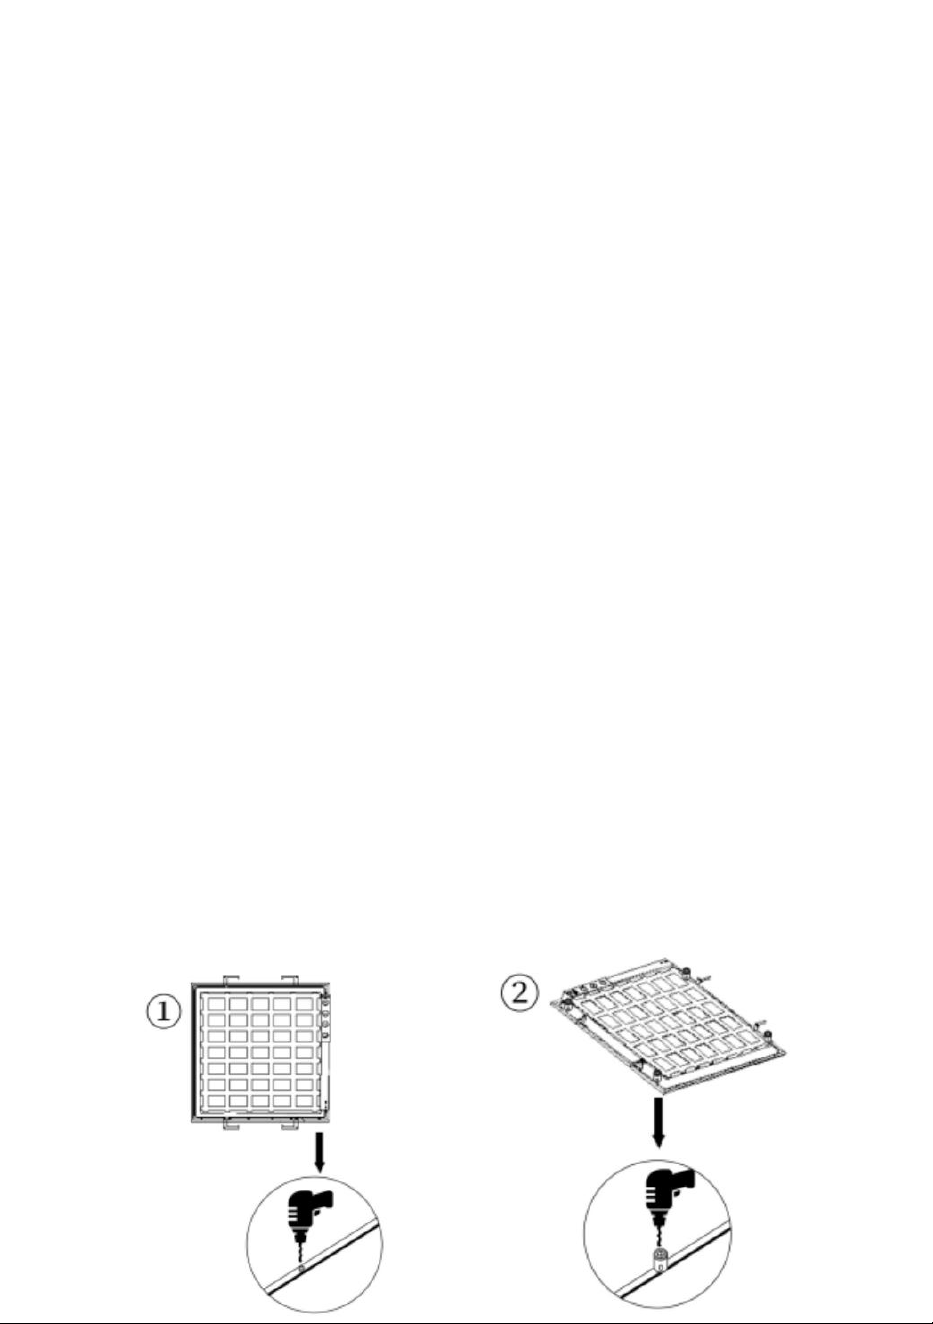
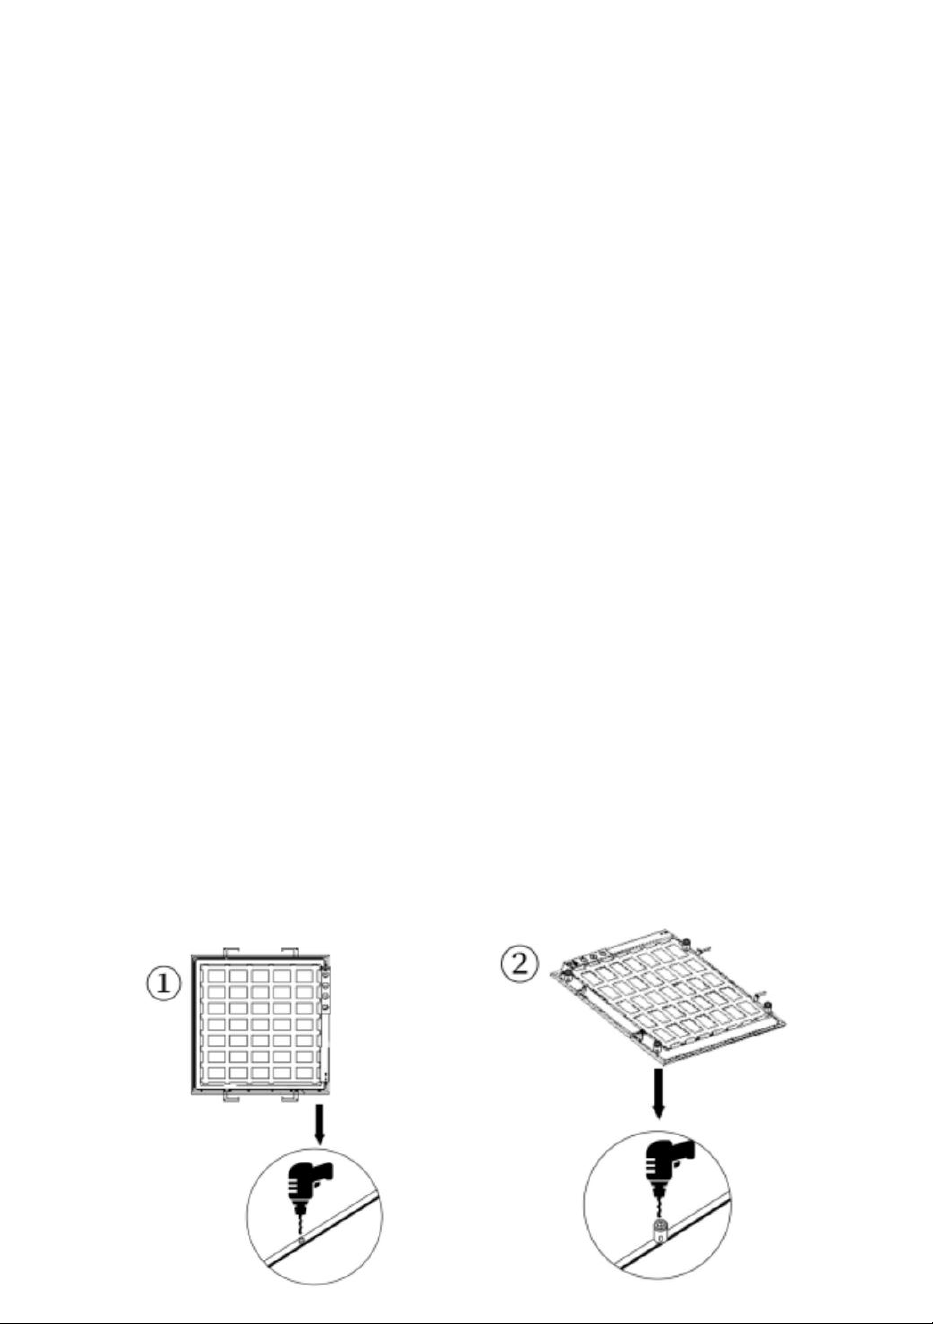
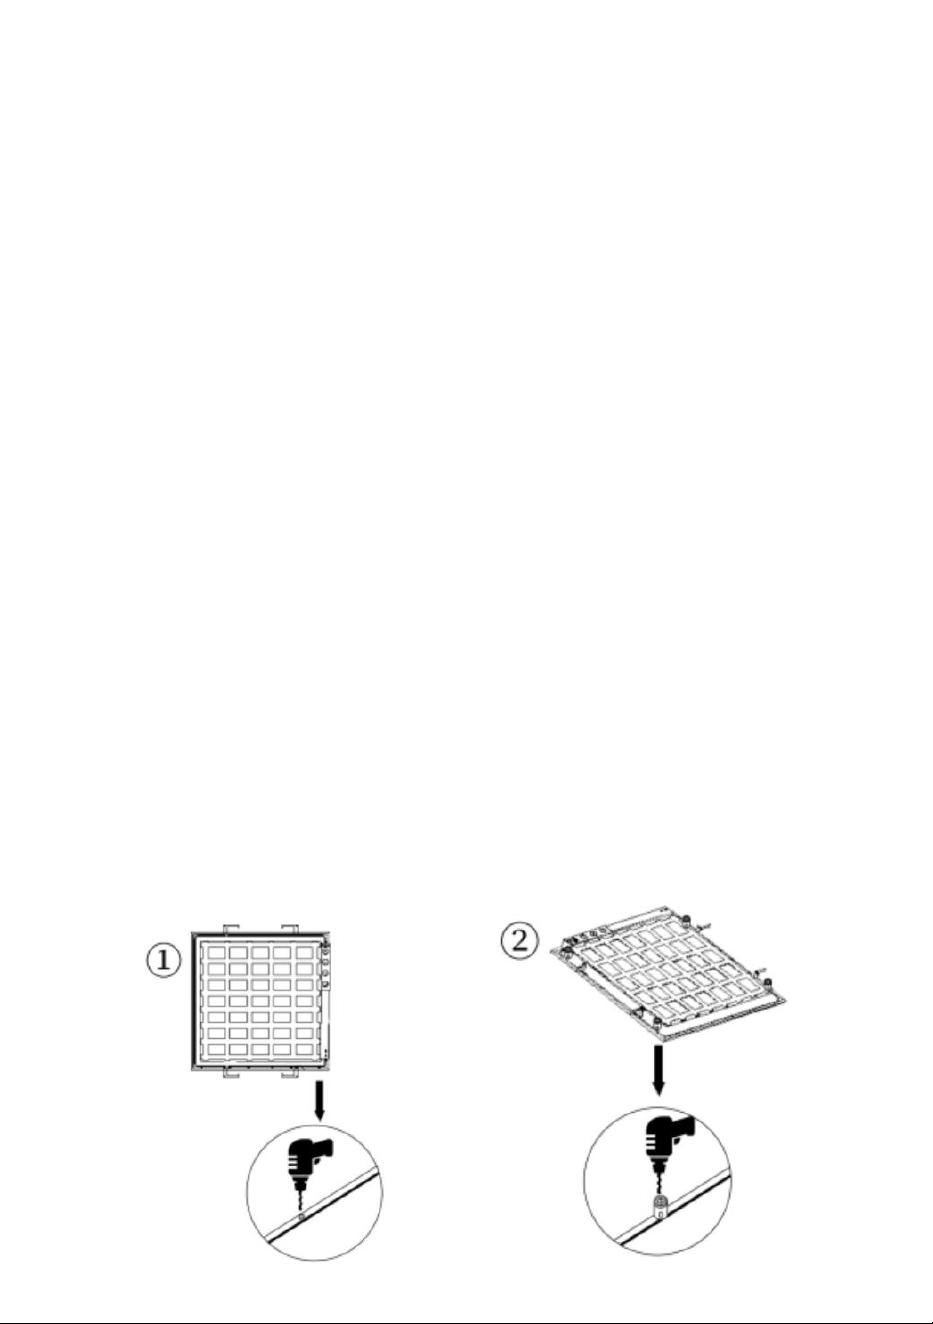
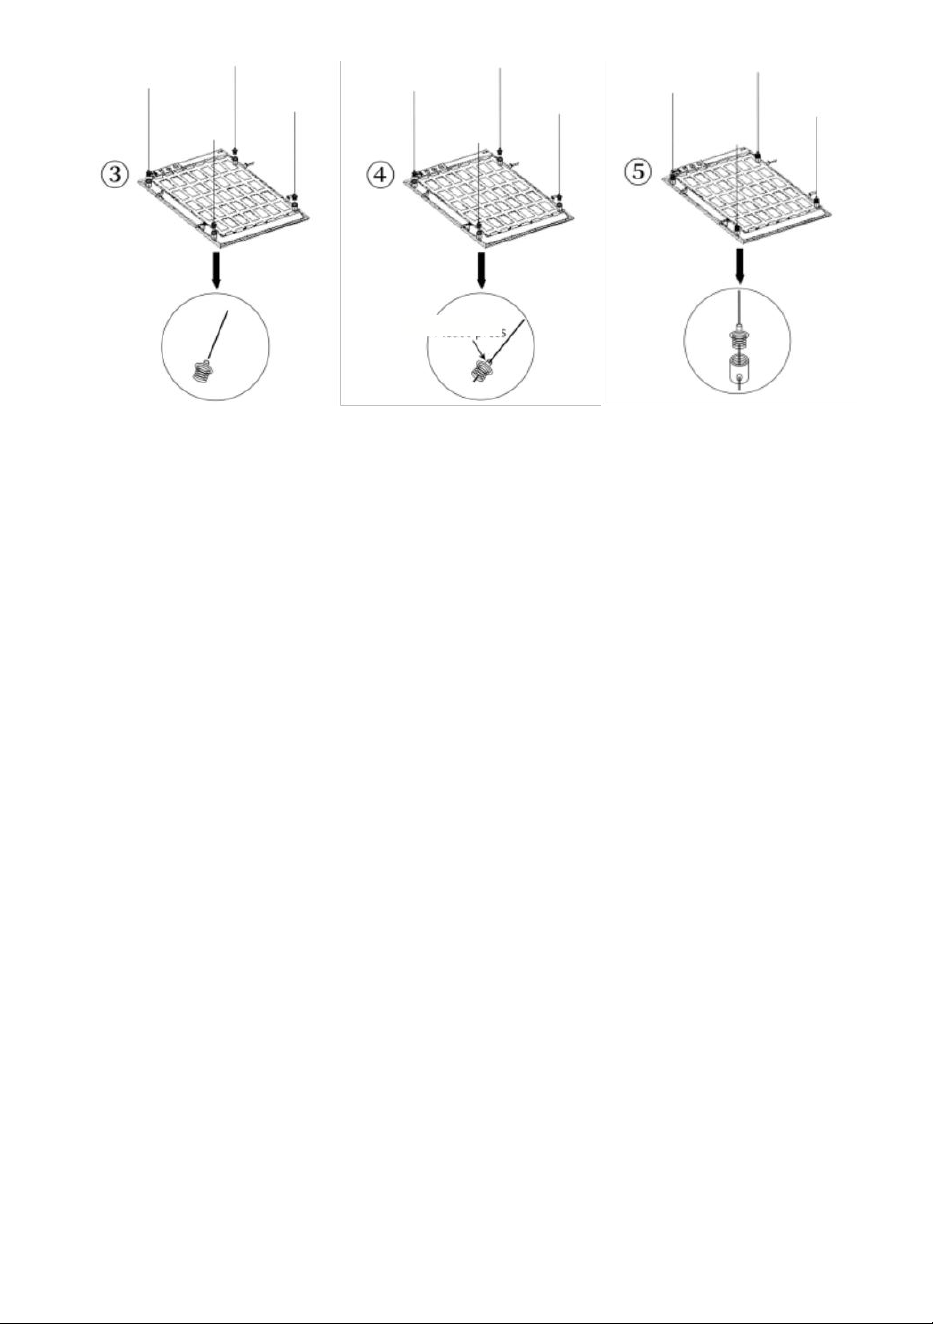
1. utiliser un Phillips tournevis pour retirer les vis près de la diagonale
de le lampe corps. (voir figure 1)

voir Chiffre voir Figure 2

Please press
voir Chiffre 3 voir Figure 4 voir Figure 5
2. veuillez retirer les vis et acier inoxydable cylindrique noix du sac d'accessoires et
mettre les vis dans l' acier inoxydable cylindrique noix;Ensuite utilisez un tournevis
cruciforme pour
vissez l' écrou en acier inoxydable sur le corps de la lampe. (où se trouve la vis supprimé
dans le d'abord étape). (voir (Figure 2).
3. s'il vous plaît, retirez l'acier inoxydable cylindrique vis et le fil corde, et enfile le fil corde
dans le trou intérieur de l'acier inoxydable cylindrique vis (voir figure 3).
4. veuillez appuyer sur le trou central de la vis en acier inoxydable par main pour ajuster
le câble métallique à votre désir hauteur.(voir (Figure 4).
5. s'il vous plaît installer lth eto pofth e maison par toi-même ,je moi morve expliquer d ici.

Liste des accessoires
KDSLEDMBD1J2LG8JRV6
1. Panneau lumière *1
2. Fil de suspension * 4
3.Acier inoxydable écrou*4
4.Manchon de fil de
suspension*4 5.
Support de fil suspendu
* 4 6. Printemps tête*4
7. Vis * 4
8.Manuel d'instructions*1
KDSLEDMBD2J2WYJAUV6
1. Panneau lumière *2
2. Fil de suspension*8
3.Acier inoxydable écrou *8
4.Manchon de fil de
suspension*8 5.
Support de fil suspendu
* 8 6. Printemps tête*8
7. Vis*8
8.Manuel d'instructions*1
KDSL EDM BD 2J15 TAL
6V6 1.panneau lumière*2
2. Suspension fil *8
3. inoxydable acier écrou *8
4. Fil de suspension
manche8 5. Suspendu fil
titulaire *8 6.printemps
tête*8
7. vis *8
8. Instruction manuel *1

Support technique et Garantie
électronique
certificat
www.vevor.com/support
Fait Dans Chine

Technischer Support und E-Garantie-Zertifikat
Www.vevor . com / Unterstützung
LED-Panel LICHT
Wir sind weiterhin bestrebt, bieten Ihnen Werkzeuge mit wettbewerbsfähig
Preis.
"speichern Hälfte" , " Halber Preis" oder andere ähnliche Ausdrücke gebraucht von
uns stellt nur dar ein Schätzung der Einsparungen, die Sie könnte profitieren von
Kauf bestimmter Werkzeuge mit uns im Vergleich zu den Die wichtigsten Top-
Marken Und tut bedeutet nicht unbedingt, dass alle Kategorien von Werkzeugen
angeboten
von uns . du bist Bitte überprüfen Sie sorgfältig, wann Du Sind Platzierung ein
Bestellen Sie mit uns Wenn Du sparen tatsächlich halb in Vergleich mit
den Top-Großmarken.
SHIPPING SCALE
MODELL : HF PL 24D-50/ HF PL 14D-30
BRAUCHEN HILFE? KONTAKTIEREN SIE
UNS!
Haben Fragen zum Produkt? Brauchen technisch Unterstützung?
Bitte Fühlen Sie sich frei Zu kontaktiere uns
Technisch Unterstützung und E-Garantie
Zertifikat www.vevo R.
com/support
Dies ist das Original Anweisung, bitte lesen Sie alles m Handbuch m
Anweisungen
sorgfältig vor in Betrieb. VEVO R behält sich eine klare Auslegung
unserer Benutzerhandbuch.Die Aussehen von Das Produkt soll Pfund
e Thema Zu Die
Produkt Sie erhalten. bitte verzeihen uns das Wir nicht in bilden Sie
wieder Wenn Es gibt jede Technologie oder Software-Updates zu
unserem Produkt.

LED PANEL LIGHT
STETS DREHEN AUS HAUPTSTROM VORHER INSTALLATION
Dimension
A (mm)
B( mm )
C ( mm )
Notiz
2*4
35
1*4
303
35
BITTE LESEN: Wichtige Informationen Vor der Installation
Dieses Gerät ist darf nur von qualifiziertes Personal. Der Installation
muss sein gemacht In eine Übereinstimmung mit der aktuellen
Ausgabe Zu der Nationale Elektrisch Code und alle geltenden
staatlichen und lokalen Gebäude
Codes .
Der Endmontage muss genehmigt werden durch die
entsprechende qualifizierte Elektro/Gebäude Inspektor(en).
Unsachgemäße Installation kann zu einer
Feuer oder elektrisch Gefahr. Stellen Sie sicher, dass die
elektrische Stromzufuhr zum Schaltkreis ist vor der Installation
dieses elektrischen System.
1. Überprüfen Sie die Diagramme gründlich und Trennen Sie
alle elektrischen Leistung vor der Installation, um zu vermeiden
Stromschlag.
2. TUN nicht montieren nahe entflammbar Materialien oder elektrisch
Heizungen .3. TUN nicht
Lassen Sie die Netzkabel nicht
berühren heiße Oberfläche .
4. Die Leuchte ist für den Innen- und trockener Standort, TUN nicht
VERWENDEN für den Außenbereich.
5. Die Vorrichtung soll Sei
installiert oder Wartung durch einen qualifizierten Elektriker oder
Person WHO Ist vertraut mit Die Leuchte ichres .

Ein-Aus Verdrahtung Schritte:
1. Öffnen Sie die Abdeckung der Verbindung Kasten.
2. Entfernen runden ausschlagen Und verbinden Leitung oder
Kabel Zu Verdrahtung Box mit richtige Anschlüsse. AC Eingang
Neutralleiter mit AC-N verbinden, Die Linie
verbindet Zu AC -L, Und Boden verbinden Zu Die Grün Draht . Es ist
empfohlen Zu VERWENDEN 16 GA Zöpfe aus Die Termin Block
Zu die jeweiligen Stromversorgungskabel.3.0-10v Dim
kompatible Verdrahtung.
4. Niederspannung anschließen Leitungen von 0-10V Dimmen Gerät
zu
jeweiligen DIM+ Und DIM- von das Terminal Block.
Wie die folgende Abbildung (1) zeigt, sind zwei Schalter, Der rechter
Schalter ist das Leistung anpassen, welche hat drei einstellungen,
beginnend erhöhen die Strom von von links nach rechts. der linke
Schalter ist die Farbe Temperatureinstellung , die hat
drei Einstellungen, Ändern der Farbe Temperatur 3500k/40
00k/5000k aus von links nach rechts.
Universum Ein Spannungstreiber ermöglicht den Betrieb bei 120 V bis
277 V , 50 oder 60 Hz. 0-10 V Kontrolle Drähte muss Sei bewertet für
300 V Minimum .
Wattage selectable
1x4: Left:36W;Middle:40W; Right:55W
2x4: Left:36W;Middle:40W; Right:50W
CCT changeable
Left-3500K; Middle-4000K;
Right-5000K
0-10V dimmable
Pink &Purple wire
Black: L White: N
Green: G

Black: L White:N
Green: G
Muss hinzufügen Schwein tai oder Jumper Draht ins ACL-ACN-
Terminal
wennwünschen Zu VERWENDEN A Draht größer als 16 AWG für beide
Wechselstrom Und Neutral Linie
NOTIZ : ANFRAGE RIES 0-10 V DIMMER . SEHEN
DIAGRAMM
0-10V dimmable
Pink &Purple wire
LED-Panel LIGHT Einbauleuchte Schritte:
1.Wie die folgende Abbildung zeigt :
(1) Nach Auffassung von Die Macht und Farbtemperaturschalter, Bitte
bewegen die beiden Schalter auf die gewünschte Macht und Farbe
Temperatur e.
(2). Drehen Sie den Clip gegen den Uhrzeigersinn, um
das Panel zu sichern. (3). verbinden Die Treiber Zu
Leistung Quelle
(4). LED einsetzen Platte in T-Profil mit dem Gesicht nach unten, Richten Sie
das Panel mit der Kante der T-Stange aus
(5).Stellen Sie die an die richtige Stelle
(6)."Montage HOOK dient nur zur Positionierung" oder gleichwertig, In
Format s24-L2
Wattage Selectable
1X4: Left:36W; Middle:40W; Right:55W
2X4: Left:36W; Middle:40W; Right:50W
PS: The defaults switch setting is set to
40W (1X4/2X4)on the fixture.
CCT changeable
Left-3500K: Middle-4000K;
Right-5000K
PS:The defaults switch setting
is set to 4000K on the fixture.


LED PANEL LICHT
Installation einer Metallseilaufhängung Anweisungen
1. In der Ansicht von Die Leistung und Farbtemperaturschalter ,
Bitte bewegen die beiden Schalter auf die gewünschte Macht und
Farbe
Temperatur (wie in Abbildung (1) oben).
Wie die folgende Abbildung zeigt :
(1). Die Lampe Körper ist mit vier Metallringen ausgestattet,
die sichern Sie die fallengelassen Seil.
(2). Fädeln Sie das Drahtseil in die feste Metall Ring, und
schrauben Sie die Metall Ring im Uhrzeigersinn in den
Lampenkörper Festsetzung Ring
(3). Installiere vier Festsetzung Ringe von Fester Draht Seile an der
gleichen Stelle auf der Dach, fädeln Sie die vier Drahtseile in die
behoben Ring des Daches, anpassen die entsprechende Höhe,
und ziehen Sie die fester Metallring
im Uhrzeigersinn.
Exegese: Installieren das Dach Befestigungsmetallring
erfordert die Verwendung von professionelle Schlagkraft
Stationswerkzeuge, bitte zahlen Aufmerksamkeit auf Sicherheit!!
LED Bedienfeld licht hängen Installation Betrieb Anweisungen
1. verwenden Sie eine Phillips Schraubendreher , um die Schrauben
in der Nähe der Diagonale des Die Lampe Körper. (siehe Abbildung
1)

sehen Figur sehen Abbildung 2

Please press
sehen Figur 3 siehe Abbildung 4 sehen Abbildung 5
2. Bitte entfernen Sie die Schrauben und Edelstahl zylindrisch Muttern der
Zubehörtasche Und Setzen Sie die Schrauben in den Edelstahl zylindrisch Nüsse;Dann
Mit einem Kreuzschlitzschraubendreher
Schrauben Sie die Edelstahlmutter auf den Lampenkörper. (wo die Schraube ist ENTFERNT
im Erste Schritt). (sehen Abbildung 2).
3. Bitte nehmen Sie den Edelstahl zylindrisch schrauben und die Draht Seil, und fädeln Sie
den Draht Seil in die inneres Loch von der Edelstahl zylindrisch Schraube (siehe Abbildung
3).
4. drücken Sie bitte das mittlere Loch von die Edelstahlschraube durch Hand zum
Einstellen des Drahtseils zu Ihrem Wunsch Höhe.(siehe Abbildung 4).
5. Bitte installieren Sie es auf Ihrem Computer . Haus eby selbst ,ich ti Rotz erklären D Hier.

Liste des Zubehörs
KDSLEDMBD1J2LG8JRV6
1.Panel Licht *1
2. Hängedraht * 4
3. Edelstahl Nuss*4
4. Hängedrahthülse * 4
5. hängen draht halter *
4 6.Frühling Kopf*4
7.Schraube * 4
8. Bedienungsanleitung * 1
KDSLEDMBD2J2WYJAUV6
1.Panel Licht *2
2. Hängedraht * 8
3. Edelstahl Nuss *8
4. Hängedrahthülse * 8
5. Hängedrahthalter * 8
6.Frühling Kopf*8
7.Schraube * 8
8. Bedienungsanleitung * 1
KDSL Funkenerosion BD
2J15 TAL 6V6 1.Panel
Licht*2
2. Hängen Draht *8
3. Edelstahl Stahl Nuss *8
4. Aufhängedraht
Ärmel8 5. Hängend
Draht Halter *8
6.Frühling Kopf*8
7. Schraube *8
8. Unterrichtung Handbuch *1

Technischer Support und E-
Garantie
Zertifikat
www.vevor.com/support
Gemacht In China

Supporto tecnico e Certificato di garanzia elettronica
Www . benvenuto . com / supporto
PANNELLO LED
LEGGERO
continuiamo ad impegnarci per fornirti gli strumenti con competitivo prezzo.
"salva Metà", ""Metà prezzo" o altre espressioni simili usato da noi rappresenta
solo UN stima dei risparmi che puoi potrebbe trarre beneficio da acquistare
determinati strumenti con noi rispetto al marchi più importanti E fa non significa
necessariamente coprire tutto categorie di strumenti offerto
da noi . sei si ricorda gentilmente di verificare attentamente quando Voi Sono
collocamento UN ordina con noi Se Voi stanno effettivamente
risparmiando mezzo dentro confronto con i principali marchi.

SHIPPING SCALE
MODELLO : Alta frequenza PL 24D-50/ HF PL14D -30
BISOGNO AIUTO? CONTATTACI!
Avere domande sul prodotto? Bisogno tecnico supporto? per favore
sentiti libero A contattaci
Tecnico supporto e garanzia elettronica
certificato www.vevo R.
com/support
Questo è l'originale istruzione, per favore leggi tutto l manuale l nelle
istruzioni
attentamente prima operativo. VEVO R si riserva una chiara
interpretazione della nostra manuale utente.Il aspetto di il prodotto
deve libbra e soggetto A IL
prodotto tu ricevuto. per favore perdonami noi che Noi non entrerà
formarti Ancora Se ci sono delle tecnologie o aggiornamenti software sul
nostro prodotto.
LED PANEL LIGHT
SEMPRE GIRO SPENTO ALIMENTAZIONE PRINCIPALE PRIMA
INSTALLAZIONE
Dimensione
Un(mm)
La rgh e zz
a ( mm )
C( mm )
Nota
2*4
35
1*4
303
35
PER FAVORE LEGGERE: Informazioni importanti Prima
dell'installazione
Questa attrezzatura è destinato ad essere installato solo da qualificato
personalmente .
IL installazione deve essere fatto In una
concordanza con l'edizione corrente A
la Nazionale Elettrico codice e
tutto applicabile statale e locale edificio
codici .
IL installazione finale deve essere approvato d a personale
qualificato appropriato elettrico/edile ispettore/i. Installazione non
corretta può comportare un
fuoco o elettrico pericolo. Assicurati che l'impianto elettrico
alimentazione al circuito è stato scollegato prima di installare
questo impianto elettrico sistema.
1. Rivedere attentamente i diagrammi e scollegare tutti i
componenti elettrici energia prima dell'installazione per evitare
id scossa elettrica.
2. FARE non montare vicino infiammabile materiali O elettrico riscaldatori
.3. FARE non
lasciare che i cavi di
alimentazione si tocchino
superficie calda .
4. L'apparecchio è per interni e luogo asciutto, FARE non usare per
postazioni esterne. 5. L'apparecchio deve Essere installato o
manutenzione da parte di elettricista qualificato o persona Chi È
familiare con IL luce ioris .
acceso-spento cablaggio passaggi:
1. aprire il COVER dell'incrocio scatola.
2. Rimuovere girare tramortire E collegare condotto O cavo A
cablaggio scatola con connettori appropriati. AC ingresso collega il
neutro a AC-N, IL linea
collega A Corrente alternata -L, E terra collegare A IL verde filo . Suo
raccomandato A UTILIZZO 16 anni fa trecce da IL termina
bloccare A i rispettivi cavi di alimentazione.3.0-10v Dim
cablaggio in metallo.
4. collegare bassa tensione cavi da 0-10v oscuramento dispositivo a
rispettivo DIM+ E DIM- di il terminale bloccare.
Come nella figura seguente (1), due interruttori, IL interruttore a
destra è il energia regolare, Quale ha tre impostazioni, cominciando
a aumentare il potere da da sinistra a destra. l'interruttore di sinistra
è il colore regolazione della temperatura , che ha
tre impostazioni, cambiare il colore temperatura 3500k/40
00k/5000k da da sinistra a destra.
universo un driver di tensione consente il funzionamento A 120V
tramite 277 V , 50 o 60 Hz. 0-10 V controllare fili dovere Essere
valutato per 300 volt minimo .
Wattage selectable
1x4: Left:36W;Middle:40W; Right:55W
2x4: Left:36W;Middle:40W; Right:50W
CCT changeable
Left-3500K; Middle-4000K;
Right-5000K
0-10V dimmable
Pink &Purple wire
Black: L White: N
Green: G

Black: L White:N
Green: G
Bisogna aggiungere maiale tai o maglione filo nel terminale ACL e
ACN
se vuoi A UTILIZZO UN filo più grande di 16 AWG per Entrambi A.C. E
Neutro Linea
NOTA : RICHIESTA RIES 0-10 V REGOLATORE DI LUCE .
VEDERE DIAGRAMMA
0-10V dimmable
Pink &Purple wire
PANNELLO LED Installazione ad incasso LIGHT passaggi:
figura seguente :
(1). Secondo il punto di vista di IL potere e interruttori della temperatura
del colore, Per favore mossa i due interruttori nella posizione desiderata
potere e colore temperatura
(2). Girare il clipgoo in senso antiorario per proteggere
il pannello (3) collegare IL autista A energia fonte
(4). Inserire LED Pannello nella barra a T a faccia in giù, allineare il pannello
con il bordo della barra a T
(5).Regolare il pannello al posto giusto
(6)."Montaggio HOOK è solo per il posizionamento" o equivalente, In
Formato s24-L2
Wattage Selectable
1X4: Left:36W; Middle:40W; Right:55W
2X4: Left:36W; Middle:40W; Right:50W
PS: The defaults switch setting is set to
40W (1X4/2X4)on the fixture.
CCT changeable
Left-3500K: Middle-4000K;
Right-5000K
PS:The defaults switch setting
is set to 4000K on the fixture.


GUIDATO PANNELLO LEGGERO
Installazione di sospensione con fune metallica istruzioni
1. Nella vista Di IL energia e interruttori della temperatura del
colore, Per favore mossa i due interruttori nella posizione
desiderata potere e colore
temperatura.(come nella Figura (1)
sopra). Come la figura seguente :
(1). La lampada il corpo è dotato di quattro anelli metallici che
proteggere il caduto corda.
(2). Infilare il cavo metallico nel fisso metallo squillo, e avvitare
il metallo squillo in senso orario nel corpo della lampada
fissaggio squillo
(3). Installare l quattro fissaggio anelli Di fissare il filo corde nella
stessa posizione sul tetto, infilare i quattro cavi metallici dentro il
fisso squillo del tetto, regolare l'appropriato altezza, e stringere il
anello di metallo fisso
in senso orario.
esegesi: Installazione il tetto fissaggio anello metallico richiede
l'uso di potenza d'impatto professionale strumenti della
stazione, si prega di pagare attenzione a sicurezza!!
GUIDATO pannello luce sospesa installazione operativo istruzioni
1. usare un croce cacciavite per rimuovere le viti vicino alla diagonale
di IL lampada corpo. (vedi Figura 1)
Vedere Figura Vedere Figura 2

Please press
Vedere Figura 3 vedere Figura 4 Vedere Figura 5
2. per favore togli le viti e acciaio inossidabile cilindrico dadi della borsa degli accessori
E mettere le viti nell'acciaio inossidabile cilindrico noci;Poi utilizzare un cacciavite a
croce per
avvitare il dado in acciaio inox al corpo della lampada. (dove si trova la vite RIMOSSO nel
Primo fare un passo). (Vedere Figura 2).
3. per favore togli l'acciaio inossidabile cilindrico vite e il filo corda, e infilare il filo corda
dentro il foro interno di l'acciaio inossidabile cilindrico vite. (vedere Figura 3).
4. si prega di premere il foro centrale di la vite in acciaio inossidabile di mano per
regolare il cavo metallico al tuo desiderato altezza.(vedi Figura 4).
5. per favore installa lth eto pofth e casa eby te stesso ,io ti moccio spiegare D Qui.

Elenco degli accessori
KDSLEDMBD1J2LG8JRV6
1.Pannello luce *1
2.Filo sospeso*4
3. Acciaio inossidabile noce*4
4.Manicotto per filo
sospeso*4 5. Supporto
per filo sospeso*4
6.Primavera testa*4
7.Vite*4
8.Manuale di istruzioni*1
KDSLEDMBD2J2WYJAUV6
1.Pannello luce *2
2.Filo sospeso*8
3. Acciaio inossidabile noce *8
4. Manicotto per filo
sospeso*8 5. Supporto
per filo sospeso*8
6.Primavera testa*8
7.Vite*8
8.Manuale di istruzioni*1
KDSL Elettroerosione a
elettroni BD 2J15 TAL 6V6
1.pannello luce*2
2. Appeso filo *8
3. inossidabile acciaio noce *8
4. Filo sospeso
manica8 5. Sospeso filo
titolare *8 6.primavera
testa*8
7. vite *8
8. Istruzione manuale *1

Supporto tecnico e Garanzia
elettronica
certificato
www.vevor.com/support
Fatto In Cina

Soporte técnico y Certificado de garantía electrónica
Www . vevor . com / soporte
PANEL LED LUZ
Seguimos comprometidos con proporcionarle herramientas con competitivo
precio.
"ahorrar Medio" , ""mitad de precio" o cualquier otra expresión similar usado por
nosotros solo representa un Estimación de los ahorros que usted puede obtener
Podría beneficiarse de comprar ciertas herramientas con nosotros comparados con
el Las mejores marcas y hace No necesariamente significa cubrir todo Categorías
de herramientas Ofrecido
Por nosotros . eres Se recuerda que se debe verificar cuidadosamente cuando tú
son colocación un Ordene con a nosotros si tú En realidad están
ahorrando la mitad en Comparación con las principales marcas líderes.

SHIPPING SCALE
MODELO : alta frecuencia PL 24D-50/ HF PL 14D-30
NECESIDAD ¿AYUDA? ¡CONTÁCTENOS!
Tener ¿Preguntas sobre el producto? Necesidad técnico ¿Apoyo?
por favor sentir la libertad a Contáctenos
Técnico apoyo y garantía electrónica
certificado www.vevo a.
com/soporte
Este es el original instrucción, Por favor lea todo yo manual yo
instrucciones
con cuidado antes operante. VEVO R se reserva una interpretación
clara de nuestra Manual de usuario.El Apariencia de El producto
deberá libra y sujeto a el
producto tu recibió. Por favor perdona nosotros que nosotros No entrará
formate tu de nuevo si ¿Existe alguna tecnología? o actualizaciones de
software en nuestro producto.
LED PANEL LIGHT
SIEMPRE DOBLAR APAGADO ENERGÍA PRINCIPAL ANTES
INSTALACIÓN
Dimensión
A(mm)
B( mm )
C( mm )
Nota
2*4
35
1*4
303
35
POR FAVOR LEER: Información importante Antes de la instalación
Este equipo es destinado a ser instalado únicamente por Personal
calificado . El instalación debe ser hecho en una concordancia con la
edición actual a El Nacional Eléctrico código y todo aplicables
estatales y locales edificio
códigos .
El Instalación final Debe ser aprobado por el profesional
cualificado apropiado Electricidad/construcción inspector(es).
Instalación incorrecta Puede resultar en una
fuego o eléctrico peligro. Asegúrese de que el sistema eléctrico
energía al circuito ha sido Desconectar antes de instalar este
aparato eléctrico. sistema.
1. Revise los diagramas a fondo y Desconecte todos los
aparatos eléctricos. fuerza Antes de la instalación para evitar
descarga eléctrica.
2. HACER no montar cerca inflamable materiales o eléctrico calentadores
.3. HACER no
Deje que los cables de
alimentación entren en contacto
superficie caliente
4. El accesorio es para uso en interiores y lugar seco, HACER no utilizar
Para ubicación al aire libre.
5. El accesorio deberá ser instalado o
mantenimiento por parte de un electricista calificado o persona OMS
es familiar con el luminaires .
encendido-apagado alambrado pasos:
1. abrir la tapa de la unión caja.
2. Eliminar redondo knockear y conectar conducto o cable a
alambrado caja con Conectores adecuados. AC Entrada conectar
neutro a AC-N, el línea
conecta a CA -L, y suelo conectar a el verde cable . Es
recomendado a USAR 16 GA coletas de el termina bloquear a
los respectivos cables de alimentación.3.0-10v Dim cableado
maleable.
4. conectar bajo voltaje cables de 0-10v oscurecimiento dispositivo
para
respectivo Atenuación+ y DIM- de La terminal bloquear.
Como se muestra en la siguiente figura (1), dos interruptores, El
interruptor derecho es el fuerza ajustar, cual tiene tres
configuraciones, Empezando a aumentar el poder de De izquierda a
derecha el interruptor izquierdo es el color ajuste de temperatura , que
tiene
tres configuraciones, cambiando el color Temperatura 3500k/40
00k/5000k de De izquierda a derecha.
universo Un controlador de voltaje permite el funcionamiento en 120v
hasta 277v , 50 o 60HZ. 0-10 voltios control cables debe ser calificado
para 300 voltios mínimo .
Wattage selectable
1x4: Left:36W;Middle:40W; Right:55W
2x4: Left:36W;Middle:40W; Right:50W

CCT changeable
Left-3500K; Middle-4000K;
Right-5000K
0-10V dimmable
Pink &Purple wire
Black: L White: N
Green: G
Black: L White:N
Green: G
Debe agregar cerdo tai o saltador cable en la terminal ACLand ACN
si lo deseo a USAR a cable Más grande de 16 AWG para ambos C.A y
Neutral Línea
NOTA : REQUISITOS RIES 0-10 V ATENUADOR DE LUZ . VER
DIAGRAMA
0-10V dimmable
Pink &Purple wire
PANEL LED Instalación empotrada de LUZ pasos:
1.Como se muestra en la siguiente figura :
(1) En opinión de el poder y interruptores de temperatura de color, por
favor mover los dos interruptores a la deseada poder y color temperatura .
(2). Gire el clipgoo en sentido antihorario para
asegurar el panel. (3) conectar el conductor a fuerza
fuente
(4). Insertar LED Panel en barra T boca abajo, Alinee el panel con el borde
de la barra en T
(5).Ajuste el panel al lugar correcto
(6)."Montaje "HOOK es solo para posicionamiento" o equivalente, en
Formato s24-L2
Wattage Selectable
1X4: Left:36W; Middle:40W; Right:55W
2X4: Left:36W; Middle:40W; Right:50W
PS: The defaults switch setting is set to
40W (1X4/2X4)on the fixture.
CCT changeable
Left-3500K: Middle-4000K;
Right-5000K
PS:The defaults switch setting
is set to 4000K on the fixture.


CONDUJO PANEL LUZ
Instalación de suspensión con cuerda metálica instrucciones
1. En la vista de el fuerza y interruptores de temperatura de color,
por favor mover los dos interruptores a la deseada poder y color
temperatura.(igual que la Figura (1)
arriba). Como se muestra en la siguiente
figura :
(1). La lámpara El cuerpo es equipado con cuatro anillos de
metal que asegurar el abandonó soga.
(2). Pase el cable de acero En lo fijo metal anillo, y al diablo
metal anillo dextrorso En el cuerpo de la lámpara fijación anillo
(3). Instalar cuatro fijación anillos de alambre fijo cuerdas en la
misma posición en el techo, pase los cuatro cables de acero
dentro del fijado anillo del techo, ajustar El apropiado altura, y
apretar el anillo de metal fijo
dextrorso.
exégesis: Instalación El techo anillo de metal de fijación
requiere El uso de potencia de impacto profesional
Herramientas de la estación, por favor pagar Atención a
¡¡seguridad!!
CONDUJO panel luz colgante instalación operando instrucciones
1. utilizar un phillips Destornillador para quitar los tornillos cerca de la
diagonal de el lámpara cuerpo.(ver Figura 1)
ver Cifra ver Figura 2

Please press
ver Cifra 3 ver Figura 4 ver Figura 5
2. Por favor, saque los tornillos y acero inoxidable cilíndrico Tuercas de la bolsa de
accesorios y Poner los tornillos En el acero inoxidable cilíndrico nueces;Entonces Utilice
un destornillador Phillips para
Atornille la tuerca de acero inoxidable al cuerpo de la lámpara. (donde esta el tornillo
remoto en el primero paso). (ver Figura2).
3. Por favor, saque el acero inoxidable. cilíndrico tornillo y el cable soga, y enhebrar el
alambre soga dentro del agujero interior de El acero inoxidable cilíndrico tornillo.(ver Figura
3).
4. Por favor presione el orificio central de El tornillo de acero inoxidable por mano para
ajustar el cable de acero a tu gusto altura.(ver Figura 4).
5. Por favor, instale el programa lth eto pofth e casa por tú mismo ,i sí moco Explicar d aquí.

Lista de accesorios
KDSLEDMBD1J2LG8JRV6
1. Panel luz *1
2. Alambre para colgar*4
3.Acero inoxidable nuez*4
4. Funda de alambre
para colgar*4 5.
Soporte de alambre
para colgar * 4
6.Primavera cabeza*4
7.Tornillo*4
8. Manual de instrucciones*1
KDSLEDMBD2J2WYJAUV6
1. Panel luz *2
2. Alambre para colgar*8
3.Acero inoxidable nuez *8
4. Funda de alambre
para colgar*8 5.
Soporte de alambre
para colgar * 8
6.Primavera cabeza*8
7.Tornillo*8
8. Manual de instrucciones*1
KDSL Electroerosión
BD2J15TAL6V6
1.panel luz*2
2. Colgando alambre *8
3. inoxidable acero nuez *8
4. Alambre para colgar
manga8 5. Colgante
cable titular *8
6.primavera cabeza*8
7. tornillo *8
8. Instrucción Manual de instrucciones *1

Soporte técnico y Garantía
electrónica
certificado
www.vevor.com/support
Hecho En porcelana

Wsparcie techniczne i Certyfikat e-gwarancji
Www . vevor . com / wsparcie
PANEL LEDOWY ŚWIATŁO
nadal jesteśmy zaangażowani w zapewniamy Ci narzędzia konkurencyjny
cena.
"ratować Połowa" , ""Połowa ceny" lub jakiekolwiek inne podobne wyrażenia
używany p r z e z na s reprezentuje tylko jakiś szacunkowe oszczędności może
skorzystać z kupując określone narzędzia nas w porównaniu do główne marki I
robi niekoniecznie oznacza to objęcie wszystkiego kategorie narzędzi oferowany
przez nas . jesteś uprzejmie przypominamy o dokładnym sprawdzeniu, kiedy Ty Czy
umieszczanie jakiś zamów er z nas Jeśli Ty faktycznie oszczędzają
połowa w porównanie z wiodącymi markami.

SHIPPING SCALE
MODEL : HF PL 24D-50/ HF PL 14D-30
POTRZEBOWAĆ POMOCY? SKONTAKTUJ
SIĘ Z NAMI!
Mieć masz pytania dotyczące produktu? Potrzebować techniczny
wsparcie? proszę czuj się swobodnie Do Skontaktuj się z nami
Techniczny wsparcie i e-gwarancja
certyfikat www.vevo R.
com/wsparcie
To jest oryginał instrukcja, proszę przeczytać całość ja instrukcja ja w
instrukcjach
ostrożnie przed operacyjny. VEVO R zastrzega sobie jasną interpretację
naszych Instrukcja obsługi. wygląd Produkt musi funt e temat Do ten
produkt ty otrzymane. proszę wybaczyć my to My nie będzie w
uformować cię Ponownie Jeśli czy istnieje jakaś technologia lub
aktualizacje oprogramowania na temat naszego produktu.
LED PANEL LIGHT
ZAWSZE ZAKRĘT WYŁĄCZONY GŁÓWNE ZASILANIE ZANIM
INSTALACJA
Wymiar
mm (mm)
B( mm )
C( mm )
Notatka
2*4
35
1*4
303
35
PROSZĘ CZYTAĆ: Ważne informacje Przed instalacją
Ten sprzęt jest przeznaczony do instalacji wyłącznie przez
wykwalifikowany personel. Ten instalacja musi być zrobiony W
zgodnie z aktualną edycją Do Narodowy Elektryczny kod i wszystko
obowiązujące przepisy stanowe i lokalne budynek
kody .
Ten instalacja końcowa musi zostać zatwierdzone przez
odpowiednio wykwalifikowanych elektryczny/budowlany
inspektor(zy). Nieprawidłowa instalacja może spowodować
ogień lub elektryczny zaryzykować. Upewnij się, że elektryczne
zasilanie obwodu było odłączone przed zainstalowaniem tego
urządzenia elektrycznego system.
1. Dokładnie przejrzyj schematy i odłączyć wszystkie
urządzenia elektryczne moc przed instalacją, aby uniknąć
identyfikatora porażenie prądem.
2. ZROBIĆ nie uchwyt w pobliżu zapalny przybory Lub elektryczny
grzejniki .3. ZROBIĆ nie
pozwól przewodom zasilającym
się zetknąć gorąca powierzchnia
.
4. Oprawa przeznaczona do stosowania wewnątrz i na zewnątrz
pomieszczeń. suche miejsce, DO nie UŻYWAJ do lokalizacji na zewnątrz.
5. Oprawa musi Być zainstalowany lub konserwacja przez
wykwalifikowanego elektryka lub osoba Kto Jest znajomy z ten
światłość Irozdzielczość .
wł.-wył. okablowanie kroki:
1. otwórz pokrywę złącza skrzynka.
2. Usunąć okrągły wybić I łączyć przewód Lub kabel Do
okablowanie pudełko z odpowiednie złącza. AC wejście podłączyć
neutralne do AC-N, ten linia
łączy Do AC -L, I grunt łączyć Do ten zielony drut . Jego
zalecony Do UŻYWAĆ 16 GA warkoczyki z ten koniec blok Do
odpowiednie przewody zasilające.3,0-10 V Dim okablowanie
przenośne.
4. podłączyć niskie napięcie przewody od 0-10 V ściemnianie
urządzenie do
poszczególny PRZYCIEMNIJ+ I DIM- z terminal blok.
Jak na poniższym rysunku (1), dwa przełączniki, Ten przełącznik
prawy jest moc regulować, Który ma trzy ustawienia, zaczynać
zwiększyć moc z z lewej do prawej. przełącznik lewy to jest kolor
regulacja temperatury , która ma
trzy ustawienia, zmiana koloru temperatura 3500k/40 00k/5000k z
od lewej do prawej.
uniwersytety sterownik napięcia umożliwia działanie Na 120 V do 277
V , 50 lub 60 Hz. 0-10 V kontrola przewody musieć Być oceniony Do
300 V minimalny .
Wattage selectable
1x4: Left:36W;Middle:40W; Right:55W
2x4: Left:36W;Middle:40W; Right:50W
CCT changeable
Left-3500K; Middle-4000K;
Right-5000K
0-10V dimmable
Pink &Purple wire
Black: L White: N
Green: G

Black: L White:N
Green: G
Trzeba dodać świnia tai lub sweter drut do terminala ACL i ACN
jeśliżyczę Do UŻYWAĆ A drut większy niż 16 AWG Do Zarówno Ac I
Neutralny Linia
NOTATKA : WYMAGANIE RIES 0-10 V ŚCIEMNIACZ .
WIDZIEĆ DIAGRAM
0-10V dimmable
Pink &Purple wire

PANEL LEDOWY Montaż wpuszczany LIGHT kroki:
1.Jak na poniższym rysunku :
(1). Z punktu widzenia ten moc i przełączniki temperatury barwowej,
Proszę przenosić dwa przełączniki na pożądane moc i kolor temperatura
e.
(2). Obróć clipgoo w kierunku przeciwnym do ruchu
wskazówek zegara, aby zabezpieczyć panel (3)
połączyć ten kierowca Do moc źródło
(4). Włóż diodę LED Panel do belki T ignorować, wyrównaj panel z krawędzią
belki T
(5).Dostosuj panel na właściwe miejsce
(6)."Montaż HOOK służy wyłącznie do pozycjonowania lub jest równoważny,
W Formatuj s24-L2
Wattage Selectable
1X4: Left:36W; Middle:40W; Right:55W
2X4: Left:36W; Middle:40W; Right:50W
PS: The defaults switch setting is set to
40W (1X4/2X4)on the fixture.
CCT changeable
Left-3500K: Middle-4000K;
Right-5000K
PS:The defaults switch setting
is set to 4000K on the fixture.

PROWADZONY PŁYTA ŚWIATŁO
Montaż zawieszenia na linie metalowej instrukcje
1. W widoku z ten moc i przełączniki temperatury barwowej,
Proszę przenosić dwa przełączniki na pożądane moc i kolor
temperatura (tak samo jak na rysunku
(1) powyżej). Jak na poniższym rysunku :
(1). Lampa ciało jest wyposażony w cztery metalowe
pierścienie, które zabezpieczyć upuszczony lina.
(2). Przewlecz linę stalową do stałego metal pierścień, i
pieprzyć metal pierścień zgodnie ze wskazówkami zegara do
korpusu lampy ustalenie pierścień
(3). Zainstaluj l cztery ustalenie Pierścienie z przymocować
przewód liny w tej samej pozycji na dach, przewlecz cztery liny
stalowe do naprawił pierścień dachu , regulować odpowiedni
wysokość, i dokręć stały pierścień metalowy
zgodnie ze wskazówkami zegara.
egzegeza: Instalowanie Dach mocowanie pierścienia
metalowego wymaga użycie profesjonalna moc udarowa
narzędzia stacji, proszę zapłacić uwaga na bezpieczeństwo!!
PROWADZONY płyta lekkie zawieszenie instalacja operowanie
instrukcje
1. użyj krzyżak śrubokręt do wykręcania śrub znajdujących się w
pobliżu przekątnej ten lampa ciało. (patrz rys . 1)
Widzieć Postać Widzieć Rysunek
2

Please press
Widzieć Postać 3 zobacz Rysunek 4 Widzieć Rysunek 5
2. proszę wyjmij śruby i stal nierdzewna cylindryczny nakrętki torby na akcesoria I wkręć
śruby d o stali nierdzewnej cylindryczny orzechy;Następnie użyj śrubokręta
krzyżakowego, aby
przykręć nakrętkę ze stali nierdzewnej do korpusu lampy. (gdzie jest śruba REMOVED w
Pierwszy krok). (Widzieć Rysunek 2).
3. proszę wyjąć stal nierdzewną cylindryczny śruba i drut lina, i przewlecz drut lina do
wewnętrzny otwór stal nierdzewna cylindryczny śruba. (patrz rysunek 3).
4. proszę nacisnąć środkowy otwór śruba ze stali nierdzewnej przez ręka wyregulować
linę stalową do twojego życzenia wysokość.(zobacz Rysunek 4).
5. proszę zainstalować lth eto pofth e dom eby się ,I czas smark wyjaśnić D Tutaj.

Lista akcesoriów
KDSLEDMBD1J2LG8JRV6
1.Panel światło *1
2.Drut wiszący*4
3.Stal nierdzewna orzech*4
4. Wisząca tuleja
druciana*4 5. Uchwyt
na drut wiszący*4
6.Wiosna głowa*4
7. Śruba*4
8. Instrukcja obsługi*1
KDSLEDMBD2J2WYJAUV6
1.Panel światło *2
2.Drut wiszący*8
3.Stal nierdzewna orzech *8
4. Wisząca tuleja
druciana*8 5. Uchwyt
na drut wiszący*8
6.Wiosna głowa*8
7. Śruba*8
8. Instrukcja obsługi*1
KDSL Muzyka
elektroniczna BD 2J15 TAL
6V6 1.panel światło*2
2. Wiszące drut *8
3. nierdzewny stal orzech *8
4. Drut wiszący rękaw8
5. Brelok drut posiadacz
*8 6.wiosna głowa*8
7. śruba *8
8. Instrukcja instrukcja *1

Wsparcie techniczne i E-
gwarancja
certyfikat
www.vevor.com/support
Zrobiony W Chiny
Technische ondersteuning en E-garantie certificaat
Www .vevor . com / ondersteuning
LED-PANEEL LICHT
wij blijven ons inzetten voor u hulpmiddelen bieden competitief prijs.
"redden Half" , " Halve prijs" of andere soortgelijke uitdrukkingen gebruikt door ons
alleen vertegenwoordigt een schatting van de besparingen die u zou kunnen
profiteren van bepaalde gereedschappen kopen met ons vergeleken met de
belangrijkste topmerken En doet betekent niet noodzakelijkerwijs dat alles wordt
gedekt categorieën van gereedschappen aangeboden
door ons . jij bent vriendelijk herinnerd om zorgvuldig te controleren wanneer Jij Zijn
plaatsen een bestel er met ons als Jij zijn eigenlijk aan het sparen half in
vergelijking met de grootste topmerken.

SHIPPING SCALE
MODEL : HF PL 24D-50/ HF PL- 14D-30
BEHOEFTE HULP? NEEM CONTACT MET
ONS OP!
Hebben productvragen? Behoefte technisch ondersteuning?
alstublieft voel je vrij naar Neem contact met ons op
Technisch steun en E-garantie certificaat
www.vevo R. com/ondersteuning
Dit is het origineel instructie, lees alstublieft al ik handleiding ik in
instructies
zorgvuldig voor in werking. VEVO R behoudt zich een duidelijke
interpretatie van onze gebruiksaanwijzing.De verschijning van het
product zal pond e onderwerp naar de
product jij ontvangen. vergeef me alsjeblieft ons dat Wij zal niet in vorm
je opnieuw als er is enige technologie of software-updates op ons
product.
LED PANEL LIGHT
ALTIJD DRAAI UIT HOOFDVERMOGEN VOOR INSTALLATIE
Dimensie
Een (mm)
B( mm )
C( mm )
Opmerki
ng
2*4
35
1*4
303
35
ALSJEBLIEFT LEZEN: Belangrijke informatie Voor installatie
Deze apparatuur is uitsluitend bestemd om te worden geïnstalleerd
door gekwalificeerd per soneel. De installatie moet zijn gemaakt in
een overeenstemming met de huidige editie naar de Nationale
Elektrisch code en alles toepasselijke staats- en lokale gebouw
coderen .
De definitieve installatie moet worden goedgekeurd door de juiste
gekwalificeerde elektrisch/gebouw inspecteur(s). Onjuiste installatie
kan resulteren in een
vuur of elektrisch gevaar. Zorg ervoor dat de elektrische stroom
naar het circuit is geweest losgekoppeld voordat u deze
elektrische installatie installeert systeem.
1. Bekijk de diagrammen grondig en Koppel alle elektriciteit los
stroom voor de installatie om id te voorkomen elektrische
schok.
2. DO niet berg in de buurt van ontvlambaar materialen of elektrisch
verwarmingselementen .3. DOEN niet
laat de voedingskabels elkaar
raken heet oppervlak .
4. Armatuur is voor binnen en droge locatie, DOEN niet GEBRUIKEN
voor buitenlocatie.
5. De armatuur zal zijn geïnstalleerd of onderhoud
door een gekwalificeerde elektricien of persoon WHO is bekend met de
lichtirest .

aan-uit bedrading stappen:
1. open de COVER van de verbinding doos.
2. Verwijderen ronde knock - out En verbinden leiding of kabel naar
bedrading doos met juiste connectoren. AC ingang sluit neutraal aan
op AC-N, de lijn
verbindt naar AC -L, En grond verbinden naar de groente draad . Zijn
aanbevolen naar GEBRUIK 16 GA vlechtjes van de einde blok
naar de respectievelijke voedingsdraden.3.0-10v Dim
Kabelbedrading.
4. lage spanning aansluiten leidt van 0-10v dimmen apparaat om
respectievelijk DIM+ En DIM- van de terminal blok.
Zoals in de volgende afbeelding (1) zijn twee schakelaars
weergegeven, De rechtse schakelaar is de stroom aanpassen, welke
heeft drie instellingen, begin tot verhoog de kracht van van links naar
rechts. de linker schakelaar is de kleur temperatuur aanpassen, welke
heeft
drie instellingen, de kleur veranderen temperatuur 3500k/40
00k/5000k van van links naar rechts.
universum een spanningsdriver maakt bediening mogelijk bij 120v via
277v , 50of60HZ. 0-10 volt controle draden moeten zijn beoordeeld
voor 300 volt minimaal .
Wattage selectable
1x4: Left:36W;Middle:40W; Right:55W
2x4: Left:36W;Middle:40W; Right:50W
CCT changeable
Left-3500K; Middle-4000K;
Right-5000K
0-10V dimmable
Pink &Purple wire
Black: L White: N
Green: G

Black: L White:N
Green: G
Moet toevoegen varken tai of trui draad in de ACLand ACN-terminal
als ik wens naar GEBRUIK A draad groter dan 16 AWG voor beide AC
En Neutrale Lijn
OPMERKING : VEREIST RIES 0-10 V DIMMER . ZIEN
DIAGRAM
0-10V dimmable
Pink &Purple wire
LED-PANEEL LIGHT Inbouwinstallatie stappen:
1. Zoals de volgende figuur laat zien :
(1). Naar het oordeel van de kracht en kleurtemperatuur schakelaars,
Alsjeblieft beweging de twee schakelaars naar de gewenste kracht en
kleur temperatuur e.
(2). Draai de clip tegen de klok in naar het SECURE-
paneel (3). verbinden de bestuurder naar stroom bron
(4). LED invoegen Paneel in T-balk met het gezicht naar beneden, Lijn het
paneel uit met de rand van de T-balk
(5). Pas de paneel op de juiste plaats
(6). "Montage HOOK is alleen voor positionering" of equivalent, in Formaat
s24-L2
Wattage Selectable
1X4: Left:36W; Middle:40W; Right:55W
2X4: Left:36W; Middle:40W; Right:50W
PS: The defaults switch setting is set to
40W (1X4/2X4)on the fixture.
CCT changeable
Left-3500K: Middle-4000K;
Right-5000K
PS:The defaults switch setting
is set to 4000K on the fixture.


LED PANEEL LICHT
Installatie van metalen touwophanging instructies
1. In het zicht van de stroom en kleurtemperatuurschakelaars ,
Alsjeblieft beweging de twee schakelaars naar de gewenste kracht
en kleur
temperatuur (hetzelfde als figuur (1)
hierboven). Zoals de volgende
afbeelding laat zien :
(1). De lamp lichaam is voorzien van vier metalen ringen die
beveilig de gevallen touw.
(2). Rijg het staaldraad in de vaste metaal ring, en schroef de
metaal ring rechtsom in het lamplichaam vastmaken ring
(3). Installeer l vier vastmaken ringen van vaste draad touwen op
dezelfde positie op de dak, rijg de vier staalkabels in de vast ring
van het dak, aanpassen de juiste hoogte, en draai de vaste
metalen ring
rechtsom.
exegese: Installeren het dak metalen ring bevestigen vereist
het gebruik van professionele slagkracht station gereedschap,
graag betalen aandacht voor veiligheid!!
LED paneel licht hangend installatie operationeel instructies
1. gebruik een phillips schroevendraaier om de schroeven in de buurt
van de diagonaal van de de lamp lichaam. (zie figuur 1)
zien Figuur zien Figuur 2
Please press
zien Figuur 3 zien Figuur 4 zien Figuur 5
2. verwijder de schroeven en roestvrij staal cilindrisch moeren van de accessoiretas En
de schroeven plaatsen in het roestvrij staal cilindrisch noten;Toen Gebruik een
kruiskopschroevendraaier om
Schroef de roestvrijstalen moer vast aan de lampbehuizing. (waar de schroef zit
VERWIJDERD in de Eerst stap). (zien Figuur 2).
3. haal alsjeblieft het roestvrij staal eruit cilindrisch schroef en de draad touw, en rijg de
draad touw in de binnenste gat van het roestvrij staal cilindrisch schroef.(zie Figuur 3).
4. druk op het middelste gat van de roestvrijstalen schroef door hand om de staalkabel
aan te passen naar uw wens hoogte.(zie Figuur 4).
5. installeer alstublieft lth eto pofth e huis ebij jezelf ,i ik snot uitleggen D hier.

Lijst met accessoires
KDSLEDMBD1J2LG8JRV6
1. Paneel licht *1
2. Hangdraad*4
3.Roestvrij staal moer*4
4. Hangdraadhuls*4
5.Hangdraadhouder*4
6.Lente hoofd*4
7.Schroef*4
8. Gebruiksaanwijzing*1
KDSLEDMBD2J2WYJAUV6
1. Paneel licht *2
2. Hangdraad*8
3.Roestvrij staal moer *8
4. Hangdraadhuls*8
5.Hangdraadhouder*8
6.Lente hoofd*8
7.Schroef*8
8. Gebruiksaanwijzing*1
KDSL EDM BD 2J15 TAL
6V6 1.paneel licht*2
2. Hangend draad *8
3. roestvrij staal moer *8
4. Hangdraad mouw8 5.
Hangend draad houder
*8 6.lente hoofd*8
7. schroef *8
8. Instructie handleiding *1

Technische ondersteuning en E-
garantie
certificaat
www.vevor.com/support
Gemaakt In China

Teknisk support och d E-garantibevis
Www . vevor . se / support
LED PANEL LJUS
vi fortsätter att vara engagerade i förse dig med verktyg konkurrenskraftig
pris.
"spara Halv" , " Halva priset" eller andra liknande uttryck begagnad av oss
företräder endast nts en uppskattning av dina besparingar kan ha nytta av köpa
vissa verktyg med oss jämfört med stora varumärken och gör inte nödvändigtvis
att täcka alla kategorier av verktyg erbjuds
av oss . du är vänligen påmind om att noggrant kontrollera när du är placering en
beställ med oss om du faktiskt sparar hälften in jämförelse med de främsta
varumärkena.

SHIPPING SCALE
MODELL : HF PL 24D-50/ HF PL 14D-30
BEHOV HJÄLP? KONTAKTA OSS!
Ha produktfrågor? Behov teknisk stöd? behaga känna dig fri till
kontakta oss
Teknisk stöd och E-garanti certifikat
www.vevo r. se/support
Detta är originalet instruktion, vänligen läs al l manua li instruktionerna
noga innan fungerar. VEVO R reserverar sig för en tydlig tolkning av vår
användarmanual.The utseende av produkten skall lb e ämne till de
produkt dig mottagen. snälla förlåt oss det vi kommer inte in bilda dig
igen om det finns någon teknik eller programuppdateringar på vår
produkt.
LED PANEL LIGHT
ALLTID SVÄNG AV HUVUDKRAFT VAR FÖRE INSTALLATION
Dimensionera
A(mm)
B( mm )
C( mm )
Notera
2*4
35
1*4
303
35
BEHAGA LÄSA: Viktig information Före installation
Denna utrustning är avsedd att installeras endast av kvalificerad
personal.
De installation måste vara gjord i en överenskommelse
med nuvarande upplaga till
den nationella Elektrisk kod och allt
tillämplig stat och lokal byggnad
koder .
De slutlig installation måste godkännas av lämplig kvalificerad
el/byggnad inspektör(er). Felaktig installation kan resultera i a
eld eller elektrisk fara. Se till att det elektriska ström till kretsen
har varit kopplas bort innan du installerar denna elektriska
system.
1. Gå igenom diagrammen noggrant och di koppla bort all el
driva före installation för att undvika id elektrisk stöt.
2. GÖR inte montera nära brännbar material eller elektrisk värmare .3.
DO inte
låt nätsladdarna röra sig varm
yta .
4. Fixtur är för inomhus och torr plats, DO inte ANVÄND för plats
utomhus.
5. Armaturen ska vara installerat eller underhåll av behörig
elektriker eller person WHO är bekant med de luminaires .
på-av ledningar steg:
1. öppna omslaget till förbindelsen låda.
2. Ta bort runda slå ut och ansluta rörledning eller kabel till
ledningar låda med rätt kontakter. AC ingång anslut noll till AC-N, de
linje
ansluter till AC -L, och jord ansluta till de grön tråd . Det är
rekommenderad till ANVÄNDA 16 GA flätor från de terminal
blockera till respektive strömförsörjningsledningar.3,0-10v Dim
mabla ledningar.
4. koppla lågspänning leder från 0-10v dimma ng enhet till
respektive DIM+ och DIM- av te rminalen blockera.
Som följande figur(1), två omkopplare, De höger omkopplare är den
driva justera, som har tre inställningar, börjar öka kraft från vänster
till höger. vänster strömbrytare är färgen temp erature justera, som
har
tre inställningar, byter färg temperatur 3500k/40 00k/5000k från
vänster till höger.
univers en spänningsdrivenhet tillåter drift på 120v till 277V , 50 eller
60 HZ. 0-10 v kontrollera ledningar måste vara betygsatt för 300 v
minimum .
Wattage selectable
1x4: Left:36W;Middle:40W; Right:55W
2x4: Left:36W;Middle:40W; Right:50W
CCT changeable
Left-3500K; Middle-4000K;
Right-5000K
0-10V dimmable
Pink &Purple wire
Black: L White: N
Green: G

Black: L White:N
Green: G
Måste lägga till gris tai eller jumper tråd in i ACLand ACN-terminalen
önskar till ANVÄNDA a tråd större än 16 AWG för både Ac och Neutral
Linje
OBS : REQU RIES 0-10 V DIMMER . SE DIAGRAM
0-10V dimmable
Pink &Purple wire
LED PANEL LIGHT Infälld installation steg:
1.Som följande figur e :
(1). I synen på de kraft och färgtemperaturomkopplare, behaga flytta de
två växlarna till önskad kraft och färg temperatur e.
(2). Vrid clipgoo moturs till SEcurE Panel (3). ansluta
de förare till driva källa
(4). Sätt i LED Panel i T-bar ansiktet nedåt, rikta in panelen mot T-stångens
kant
(5). Justera panelen till rätt plats
(6)."Montering HOOK är endast för positionering" eller motsvarande, i
Format s24-L2
Wattage Selectable
1X4: Left:36W; Middle:40W; Right:55W
2X4: Left:36W; Middle:40W; Right:50W
PS: The defaults switch setting is set to
40W (1X4/2X4)on the fixture.
CCT changeable
Left-3500K: Middle-4000K;
Right-5000K
PS:The defaults switch setting
is set to 4000K on the fixture.

LED PANEL LJUS
Installation av metallrepupphängning instruktioner
1. I vyn av de driva och färgtemperaturomkopplare , behaga flytta
de två växlarna till önskad kraft och färg
temperatur.(samma som figur (1) ovan).
Som följande figur :
(1). Lampan kroppen är försedd med fyra metallringar som
säkra tappade rep.
(2). Trä stållinan in i det fasta metall ringa, och skruva fast
metall ringa medurs in i lampkroppen fixering ringa
(3). Installera l fyra fixering ringar av fixerad tråd rep i samma
position på tak, trä de fyra stållinorna in i fast ringa av taket,
justera lämpligt höjd, och dra åt fast metallring
medurs.
exeges: Installerar taket fixering av metallring kräver u se av
professionell genomslagskraft stationsverktyg, vänligen betala
uppmärksamhet på säkerhet!!
LED panel ljus hängande installation drift instruktioner
1. använd a phillips skruvmejsel för att ta bort skruvarna nära
diagonalen på de lampa kropp.(se figur e 1)
se Figur se Figur 2

Please press
se Figur 3 se Figur 4 se Bild 5
2. snälla ta bort skruvarna och rostfritt stål cylindrisk muttrar i tillbehörsväskan och sätt i
skruvarna i det rostfria stålet cylindrisk nötter; då använd en stjärnskruvmejsel för att
skruva fast den rostfria muttern på lampkroppen. (där skruven sitter tas bort i första steg).
(se Figur 2).
3. vänligen ta bort det rostfria stålet cylindrisk skruva och den tråd rep, och trä tråden rep in
i inre hål av det rostfria stålet cylindrisk skruv. (se figur 3).
4. tryck på mitthålet på skruven i rostfritt stål hand för att justera stållinan efter dina
önskemål höjd.(se Figur 4).
5. vänligen installera eto pofth e hus eby själv , jag ti snor förklara d här.

Lista över tillbehör
KDSLEDMBD1J2LG8JRV6
1. Panel ljus *1
2.Hängtråd*4
3. Rostfritt stål mutter*4
4.Hängande trådhylsa*4
5.Hängtrådshållare*4 6.
Vår huvud*4
7.Skruv*4
8.Instruktionsmanual*1
KDSLEDMBD2J2WYJAUV6
1. Panel ljus *2
2.Hängtråd*8
3. Rostfritt stål mutter *8
4.Hängande trådhylsa*8
5.Hängtrådshållare*8 6.
Vår huvud*8
7.Skruv*8
8.Instruktionsmanual*1
KDSL EDM BD 2J15 TAL
6V6 1.panel ljus*2
2. Hängning tråd *8
3. rostfri stål mutter *8
4. Hängande tråd ärm8
5. Hängande tråd hållare
*8 6.vår huvud*8
7. skruv *8
8. Instruktion manual *1

Teknisk support och E-garanti
certifikat www.vevor.com/support
Gjord I Kina