High Denition Bluetooth
®
Audio Receiver
BT HD STREAMER
User Manual
Bedienungsanleitung
de
en

2
Inhaltsverzeichnis
1. Allgemeine Hinweise .........................................................................................................4
2. Anschluss und Bedienelemente .......................................................................................5
3. Hardware-Konguration ....................................................................................................6
3.1 Anschluss einer digitalen Signalquelle im SPDIF Format ....................................................................6
3.2 Anschluss des optischen Digitalausgangs im SPDIF Format ..............................................................6
3.3 Konguration des Standby-Modus (STBY) ............................................................................................ 6
3.4 Optional: Freisprechmikrofon anschließen ...........................................................................................6
3.5 Optional: Konguration des Freisprechprotokolls ...............................................................................6
3.6 Anschluss des Multifunktion-Power Connectors .................................................................................. 7
3.7 Koppeln (Pairing) eines Bluetooth
®
-Geräts ...........................................................................................8
4. Weitere Funktionen ...........................................................................................................9
4.1 Pair-Taster ...............................................................................................................................................9
4.2 Status LED...............................................................................................................................................9
4.3 Passthrough-Funktion ............................................................................................................................9
5. Anschlussbeispiele .........................................................................................................10
5.1 BT HD STREAMER als externer Bluetooth
®
Receiver ........................................................................10
5.2 BT HD STREAMER als externer Bluetooth
®
Receiver mit zusätzlicher digitaler Signalquelle .......... 11
5.3 Stand-Alone Applikation .......................................................................................................................12
5.4 Stand-Alone Applikation in Verbindung mit einer Head Unit ..............................................................13
6. Anschluss des optionalen HELIX BT HD Hands-Free Microphone Kit .........................14
7. Problembehandlung ........................................................................................................17
8. Technische Daten ............................................................................................................18
9. Rechtliche Hinweise ........................................................................................................19

3
Herzlichen Glückwunsch
Sehr geehrter Kunde,
Wir gratulieren Ihnen zum Kauf dieses hochwertigen High Denition Bluetooth
®
Audio Receivers.
Der BT HD STREAMER wurde von uns nach neuesten technischen Erkenntnissen entwickelt und zeichnet sich durch
eine hervorragende Verarbeitung und eine überzeugende Anwendung ausgereifter Technologien aus.
Viel Freude an diesem Produkt wünscht Ihnen das
Team von
AUDIOTEC FISCHER
de
4
1. Allgemeine Hinweise
Um alle Möglichkeiten des Produktes optimal ausschöpfen zu können, lesen Sie bitte sorgfältig die nachfolgenden In-
stallationshinweise. Wir garantieren, dass jedes Gerät vor Versand auf seinen einwandfreien Zustand überprüft wurde.
Wir empfehlen, die Installation von einem Einbauspezialisten vornehmen zu lassen, da der Nachweis eines fachge-
rechten Einbaus und Anschlusses des Gerätes Voraussetzung für die Garantieleistungen sind.
Vor Beginn der Installation unterbrechen Sie den Minusanschluss der Autobatterie.
Der Audio Receiver darf nur in Kraftfahrzeuge eingebaut werden, die den 12 V / 24 V-Minuspol an Masse haben. Bei
anderen Systemen können der BT HD STREAMER und die elektrische Anlage des Kfz beschädigt werden.
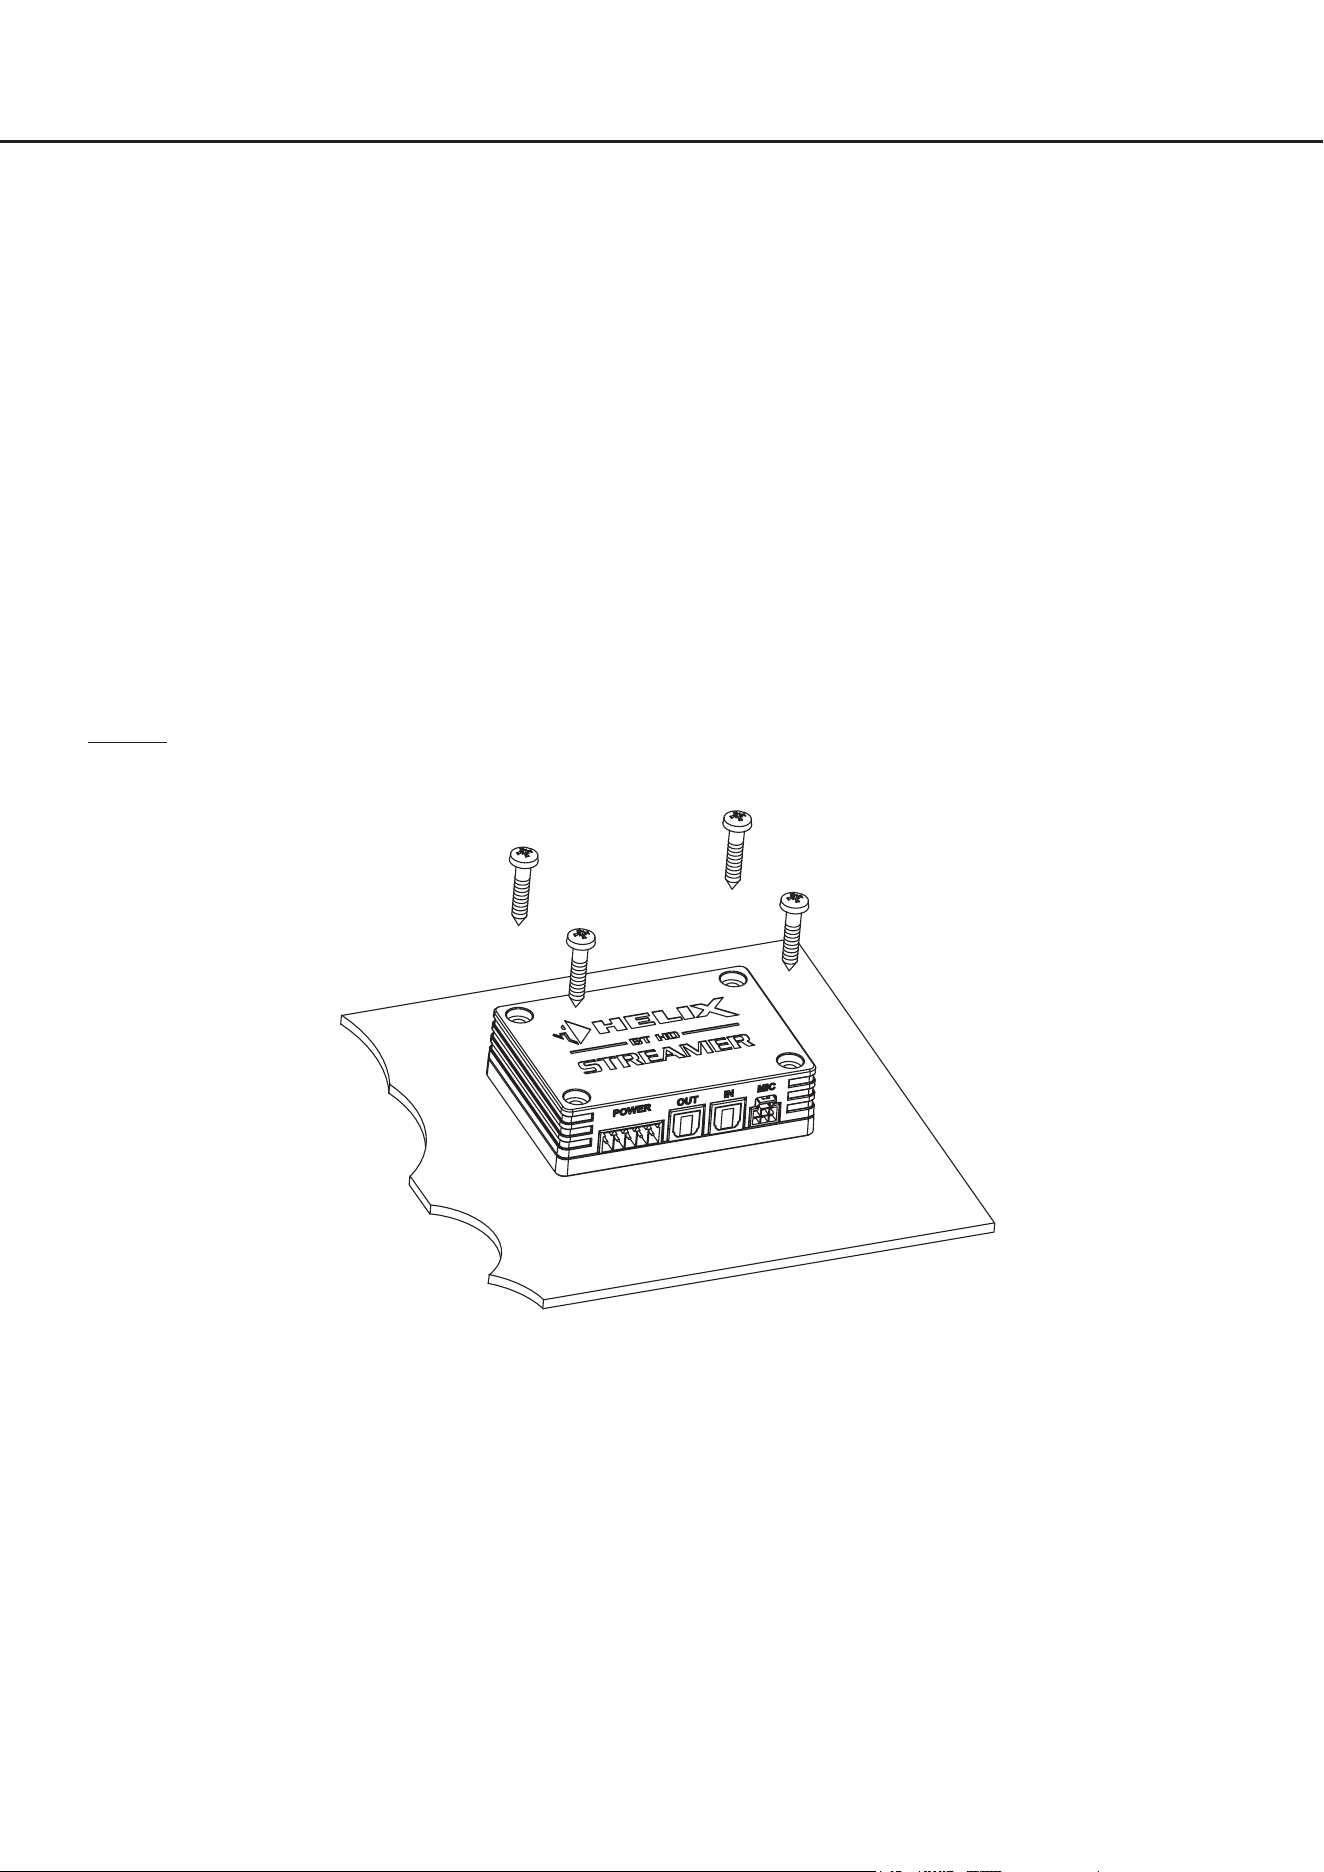
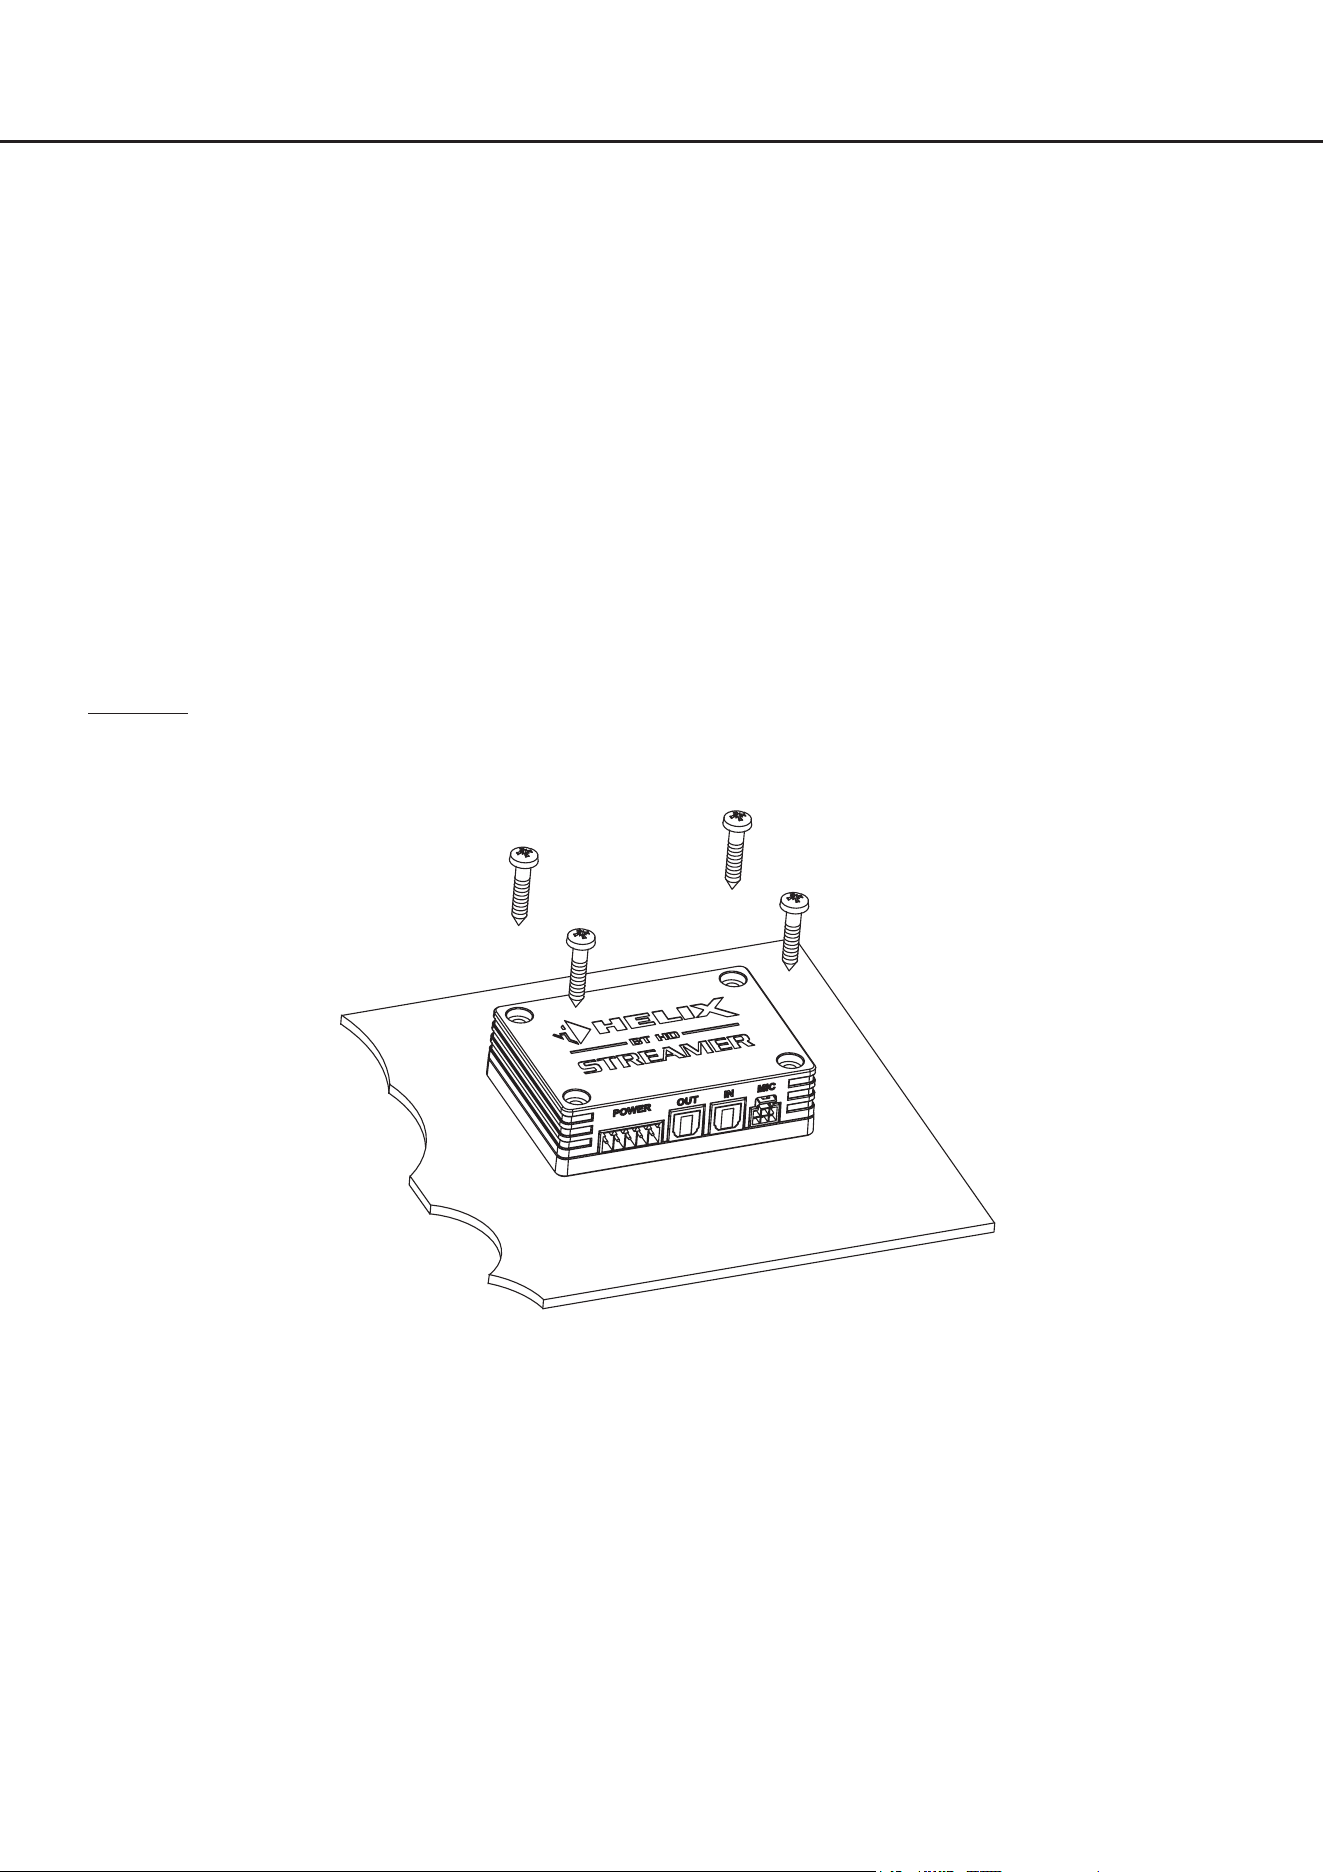
Installieren Sie Ihren BT HD STREAMER an einer trockenen Stelle im Auto. Montieren Sie das Gerät nicht in der Nähe
von wärmeabstrahlenden Teilen oder elektronischen Steuerungen des Fahrzeuges.
Im Sinne der Unfallsicherheit muss der BT HD STREAMER professionell befestigt werden, damit der Audio
Receiver keine Gefahr für die Insassen und / oder das Fahrzeug während einer kritischen Fahrsituation, wie
beispielsweise einer Gefahrenbremsung, darstellt.
Dieses geschieht über Schrauben, die in eine Montageäche eingeschraubt werden, die wiederum genügend Halt
bieten muss.
Wichtig: Achten Sie bei der Montage darauf, dass keine Sicherheitssysteme Ihres Fahrzeugs (bspw. Airbag) in ihrer
Wirkung beeinträchtigt werden können.
Bevor Sie die Schrauben im Montagefeld befestigen, vergewissern Sie sich, dass keine elektrischen Kabel und Kom-
ponenten, hydraulische Bremsleitungen, der Benzintank etc. dahinter verborgen sind. Diese könnten sonst beschädigt
werden. Achten Sie bitte darauf, dass sich solche Teile auch in der doppelten Wandverkleidung verbergen können.
Die Kabelverbindungen müssen so verlegt sein, dass keine Klemm-, Quetsch- oder Bruchgefahr besteht. Bei scharfen
Kanten (Blechdurchführungen) müssen alle Kabel gegen Durchscheuern gepolstert sein. Ferner darf das Anschluss-
kabel niemals mit Zuleitungen zu Vorrichtungen des Kfz (Lüftermotoren, Brandkontrollmodulen, Benzinleitungen etc.)
verlegt werden.
5
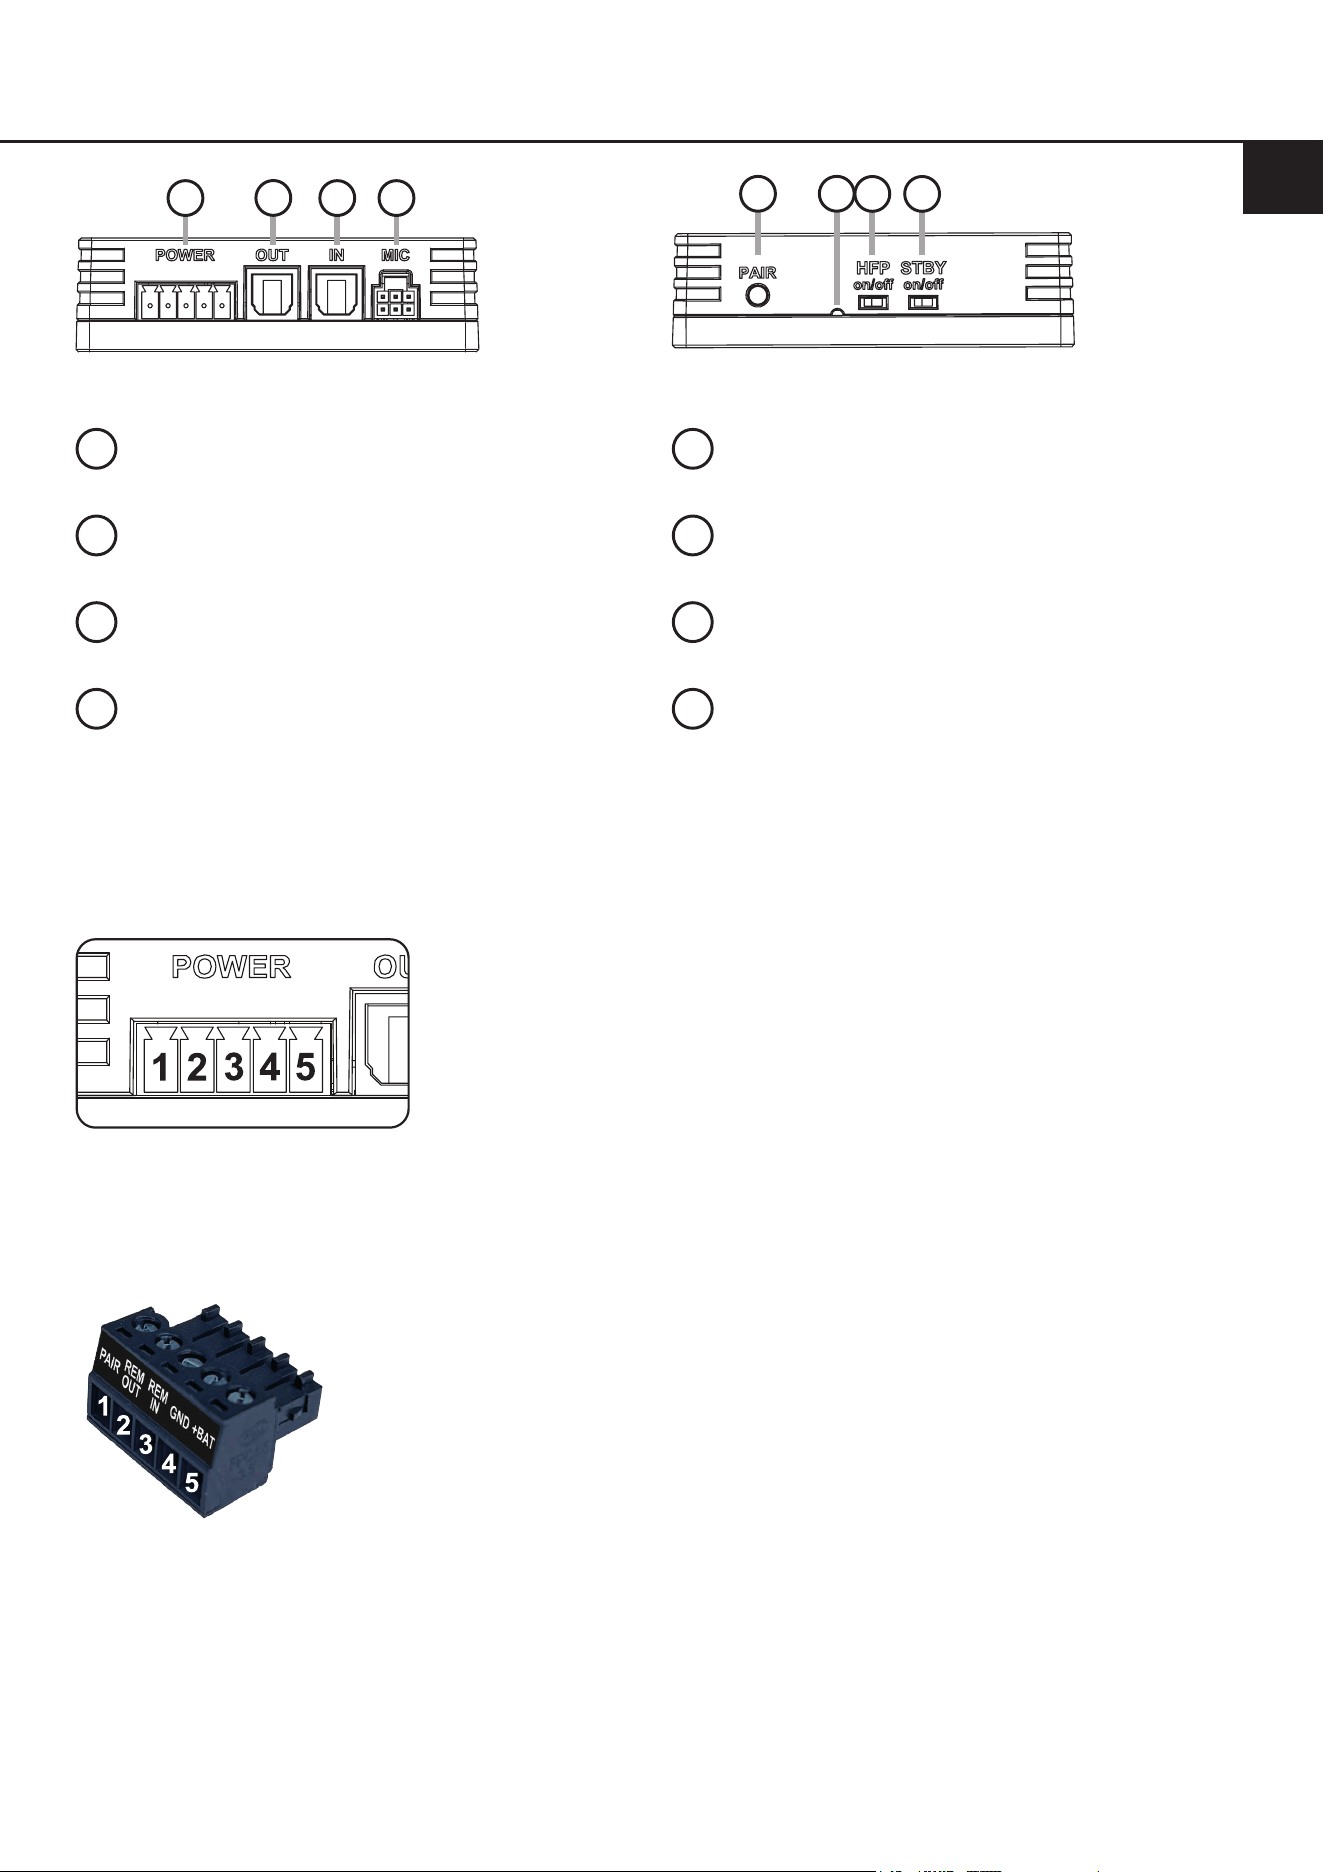
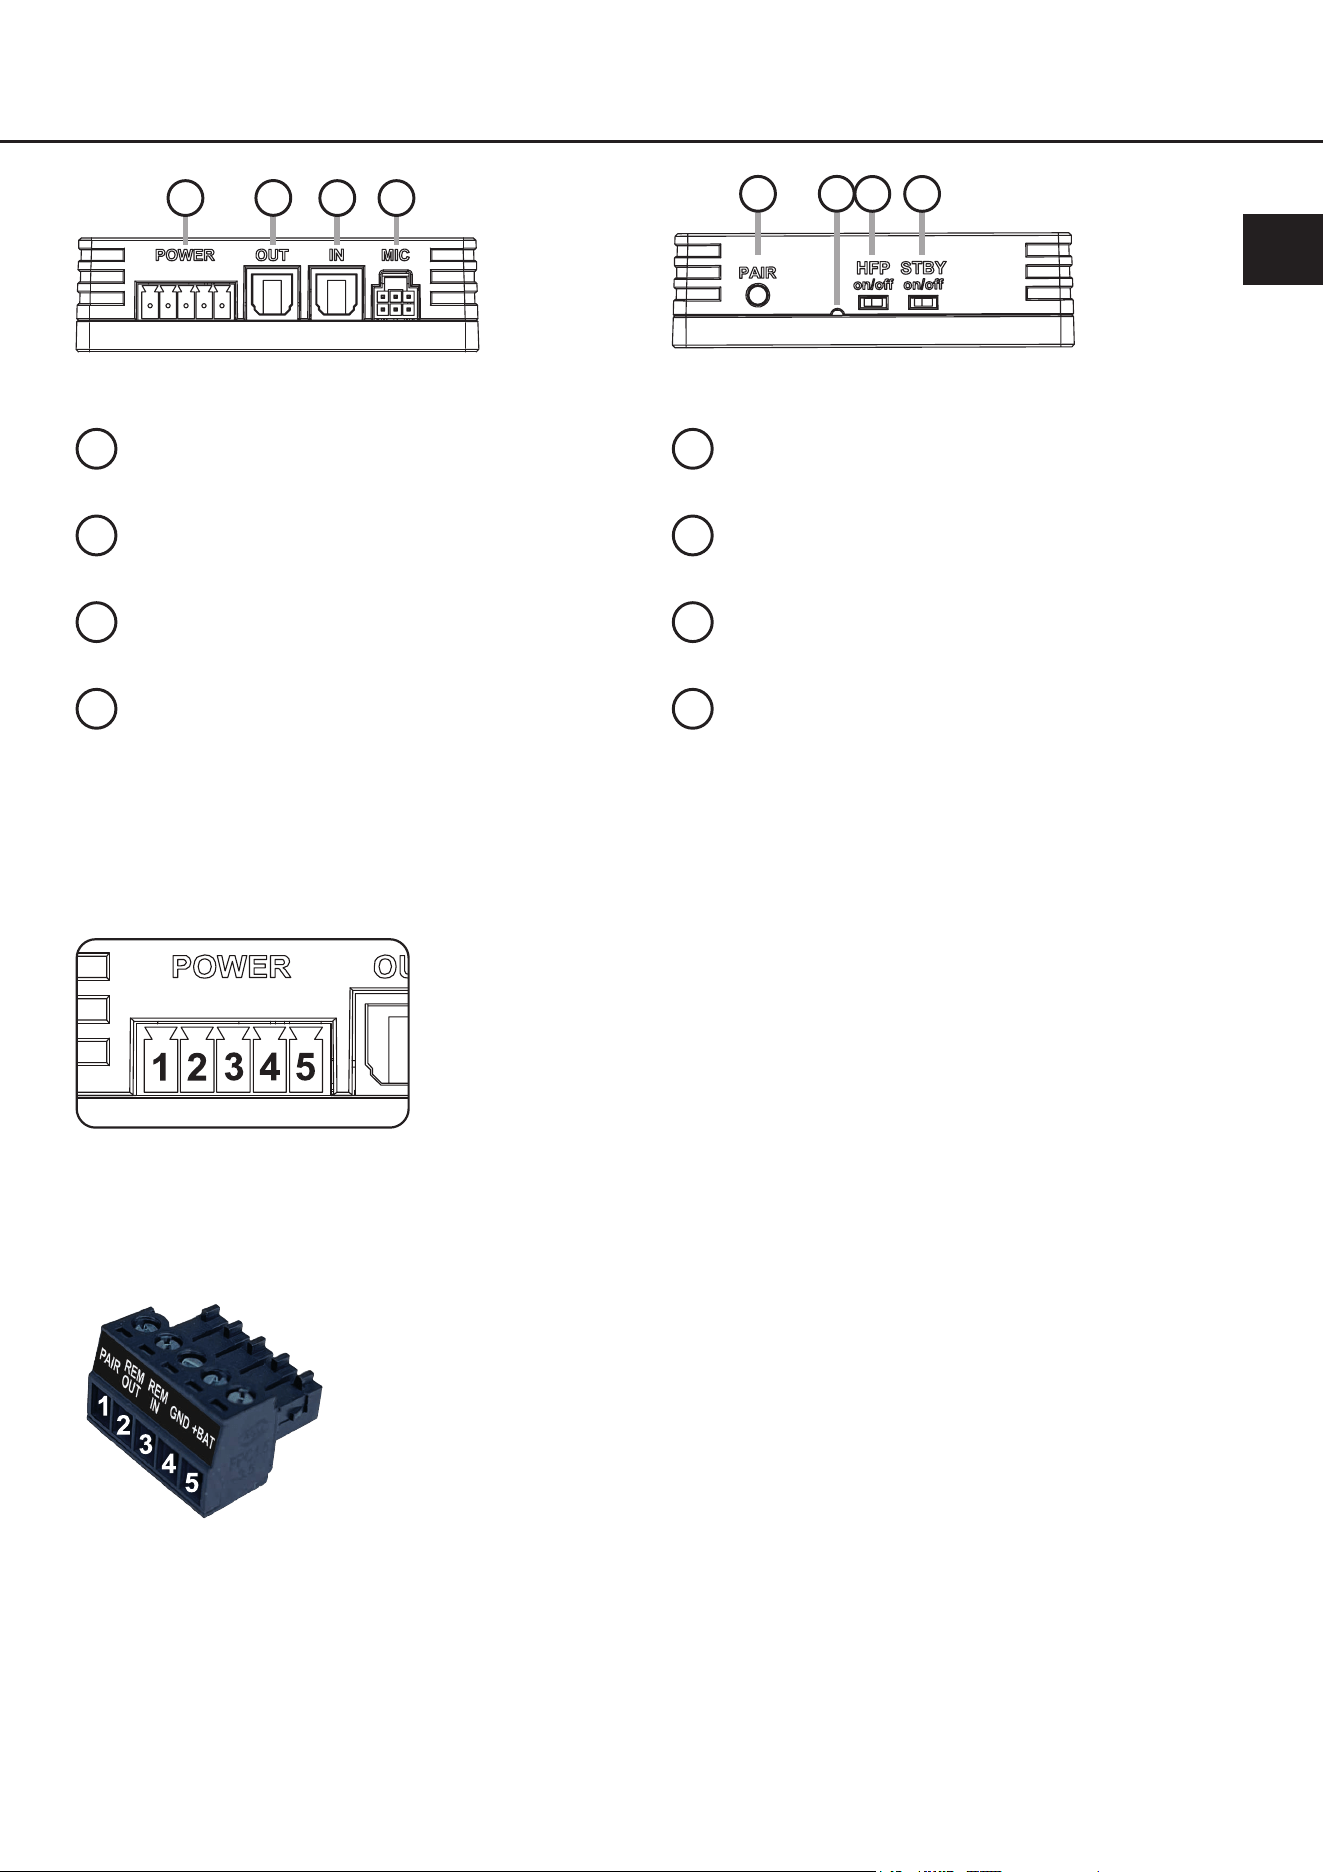
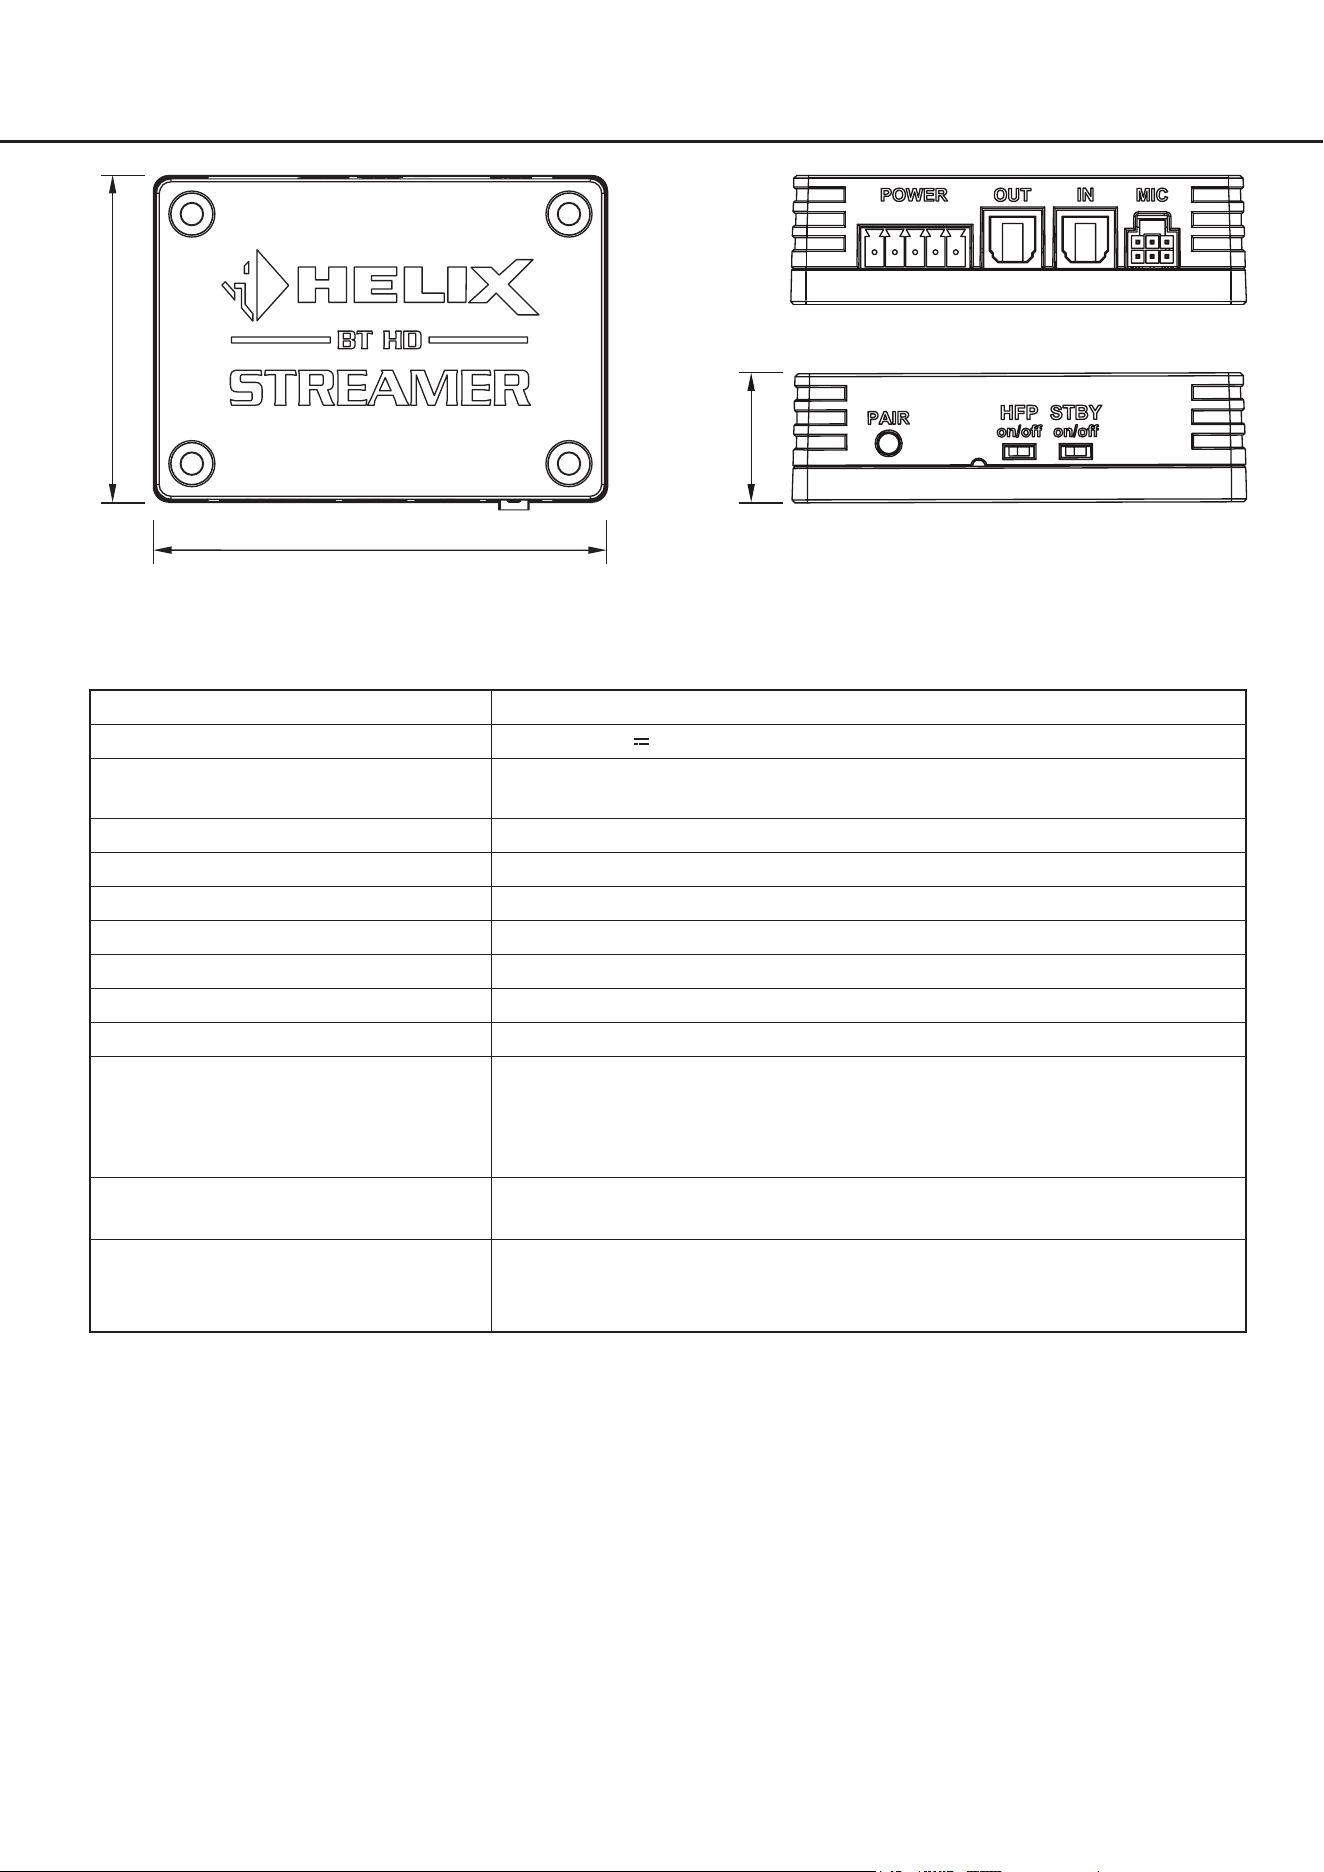
2. Anschluss und Bedienelemente
de
1
Multifunktion-Power Connector
Seite 7, Punkt 3.6
2
Optischer Digitalausgang
Seite 6, Punkt 3.2
.
3
Optischer Digitaleingang
Seite 6, Punkt 3.1
4
Mikrofoneingang
Seite 6, Punkt 3.4
5
Pair-Taster
Seite 9, Punkt 4.1
6
Status LED
Seite 9, Punkt 4.2
7
Freisprechprotokoll-Schalter
Seite 6, Punkt 3.5
8
Standby-Schalter
Seite 6, Punkt 3.3
Pin-Belegung des Multifunktion-Power Connector
1. Bluetooth
®
Pairing
2. Remote-Ausgang
3. Remote-Eingang
4. Masse (GND)
5. +12 V / +24 V
1
2
3 4
5
7 8
6
Anschlussstecker des Multifunktion-Power Connector (Power Input Stecker)

6
Kongurieren Sie den BT HD STREAMER in der nachfolgenden Reihenfolge.
Um Anschlussfehler und Beschädigungen zu vermeiden, fragen Sie im Zweifelsfall Ihren Einbauspezialisten und be-
achten Sie zwingend die allgemeinen Anschluss- und Einbauhinweise (siehe Seite 4).
3.1 Anschluss einer digitalen Signalquelle im SPDIF Format
Sofern Sie über eine Signalquelle mit optischem Digitalausgang verfügen, kann diese an den optischen Digi-
taleingang (3) des BT HD STREAMERs angeschlossen werden. Die Abtastrate (Sampling Rate) muss zwischen
12 - 96 kHz liegen.
Hinweis: Das Bluetooth
®
-Audiosignal hat immer Vorrang bei der Signalweiterleitung.
WICHTIG: Um die Passthrough-Funktion des optischen Eingangs nutzen zu können, muss der Remote-Eingang
des Multifunktion-Power Connectors belegt werden.
3.2 Anschluss des optischen Digitalausgangs im SPDIF Format
Optischer, digitaler Stereo-Signalausgang im SPDIF-Format für den Anschluss eines Signalprozessors (DSP)
oder DSP-Verstärkers. Der Ausgang hat, in Abhängigkeit der angeschlossenen Signalquelle, eine „Sampling
Rate“ von bis zu 96 kHz / 24 Bit und liefert ein lautstärkegeregeltes Signal.
Hinweis: Dieser Ausgang liefert ausschließlich ein Stereosignal. Fader Informationen und Mehrkanal-Surround-
sound-Formate wie Dolby oder DTS werden nicht unterstützt!
3.3 Konguration des Standby-Modus (STBY)
Der BT HD STREAMER bietet einen Standby-Modus, der den Stromverbrauch bei einer dauerhaften Einschaltung
auf ein Minimum (ca. 3 mA) reduziert und er ermöglicht, sich zu jeder Zeit von der Signalquelle (Mobiltelefon,
Audio Player, etc.) aus mit dem Streamer zu verbinden, auch wenn das restliche Soundsystem ausgeschaltet ist.
Bei Erkennung eines Bluetooth
®
-Audiosignals aktiviert sich der BT HD STREAMER automatisch und generiert ein
Remote-Signal, mit welchem das nachgeschaltete Soundsystem eingeschaltet werden kann. Wenn für mehr als
drei Minuten kein Bluetooth
®
-Audiosignal aktiv ist, schaltet sich das angeschlossene Soundsystem aus, und der
BT HD STREAMER kehrt in seinen Energiesparmodus zurück.
Der Standby-Modus ist immer dann zu aktivieren, sobald der Streamer durch eine Bluetooth
®
-Signalquelle, wie
z.B. ein Smartphone, eingeschaltet werden soll.
On: Der BT HD STREAMER ist dauerhaft eingeschaltet und im Standby-Modus, so dass man sich jederzeit mit
dem Gerät verbinden kann. Bei Erkennung eines Bluetooth
®
-Audiosignals wird ein Remote-Signal generiert
und das nachgeschaltete Soundsystem eingeschaltet. Ist für länger als drei Minuten kein Stream mehr aktiv,
wird das Soundsystem abgeschaltet und der Streamer wechselt zurück in den Energiesparmodus.
WICHTIG: Im aktivierten Standby-Modus ist die Passthrough-Funktion des optischen Eingangssignals nicht
möglich. Um diese nutzen zu können muss der Remote-Eingang belegt werden.
O: Die Einschaltung des Streamers erfolgt ausschließlich über ein Remote-Signal. Dazu muss der Remote-Ein-
gang am Multifunktion-Power Connector belegt werden.
3.4 Optional: Freisprechmikrofon anschließen
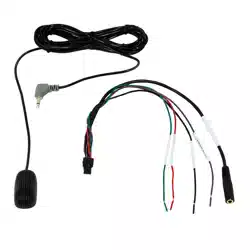
Anschluss für das optionale HELIX BT HD Hands-Free Microphone Kit zur Nachrüstung einer Freisprechfunktion.
Weitere Informationen zum Anschluss nden Sie auf Seite 14 . in dieser Bedienungsanleitung.
3.5 Optional: Konguration des Freisprechprotokolls
Wenn Sie das optionale HELIX BT HD Hands-Free Microphone Kit anschließen, ist es notwendig, den Frei-
sprechprotokoll-Schalter (HFP – Hands-Free Protocol) auf „On“ zu setzen. Sofern eine werkseitig verbaute Frei-
sprecheinrichtung verwendet werden soll, muss das Freisprechprotokoll deaktiviert werden (HFP = O), um Kon-
ikte zwischen den Freisprecheinrichtungen zu vermeiden.
Hinweis: Die Einschaltung muss zwingend im ausgeschalteten Zustand vorgenommen werden. Zusätzlich ist ein
erneutes Pairing mit der Signalquelle erforderlich, wenn diese zuvor mit dem BT HD STREAMER ohne aktives
Freisprechprotokoll verwendet wurde.
3. Hardware-Konguration
7
de
3.6 Anschluss des Multifunktion-Power Connectors
Eine Übersicht der Pin-Belegung des Multifunktion-Power Connectors nden Sie auf Seite 5. Verwenden Sie zum
Anschluss ausschließlich die mitgelieferten Power Input Stecker mit integrierten Schraubklemmen.
+12 V / +24 V: Anschluss für die Plusleitung. Das Versorgungskabel ist entweder direkt an den Pluspol
der Batterie oder an einen Stromverteiler anzuschließen, der mit dem Pluspol der Batterie
verbunden ist. Die Stromaufnahme des HELIX BT HD STREAMERs ist mit ca. 100 mA (plus
zusätzlich bis zu 200 mA aufgrund des maximalen Ausgangsstroms des Remote-Ausgangs)
zwar sehr gering, trotzdem sollten Kabel mit min. 1 mm² Querschnitt für die Spannungsver-
sorgung verwendet werden.
Masse (GND): Anschluss für die Masseleitung. Das Massekabel muss an einer nicht isolierten Stelle mit
dem Kfz-Chassis verbunden werden. Der Kabelquerschnitt sollte den gleichen Durchmesser
wie die Plusleitung haben. Ein nicht ausreichender Massekontakt führt zu Fehlfunktionen.
Remote-Eingang: Der Remote-Eingang ermöglicht das Einschalten des BT HD STREAMERs, wenn dies nicht
über ein Bluetooth
®
-Audiosignal erfolgen soll.
Hinweis: Dieser Eingang muss nicht belegt werden, wenn das Einschalten über
ein Bluetooth
®
-Signal erfolgt. In dem Fall ist es notwendig den Standby-Modus des
BT HD STREAMERs zu aktivieren (Seite 6, Punkt 3.3).
Remote-Ausgang: Der Remote-Ausgang dient zum Einschalten des am optischen Digitalausgang angeschlos-
senen DSP oder DSP-Verstärker. Schließen Sie den Remote-Ausgang an den Remote-Ein-
gang Ihres DSP-Produkts an.
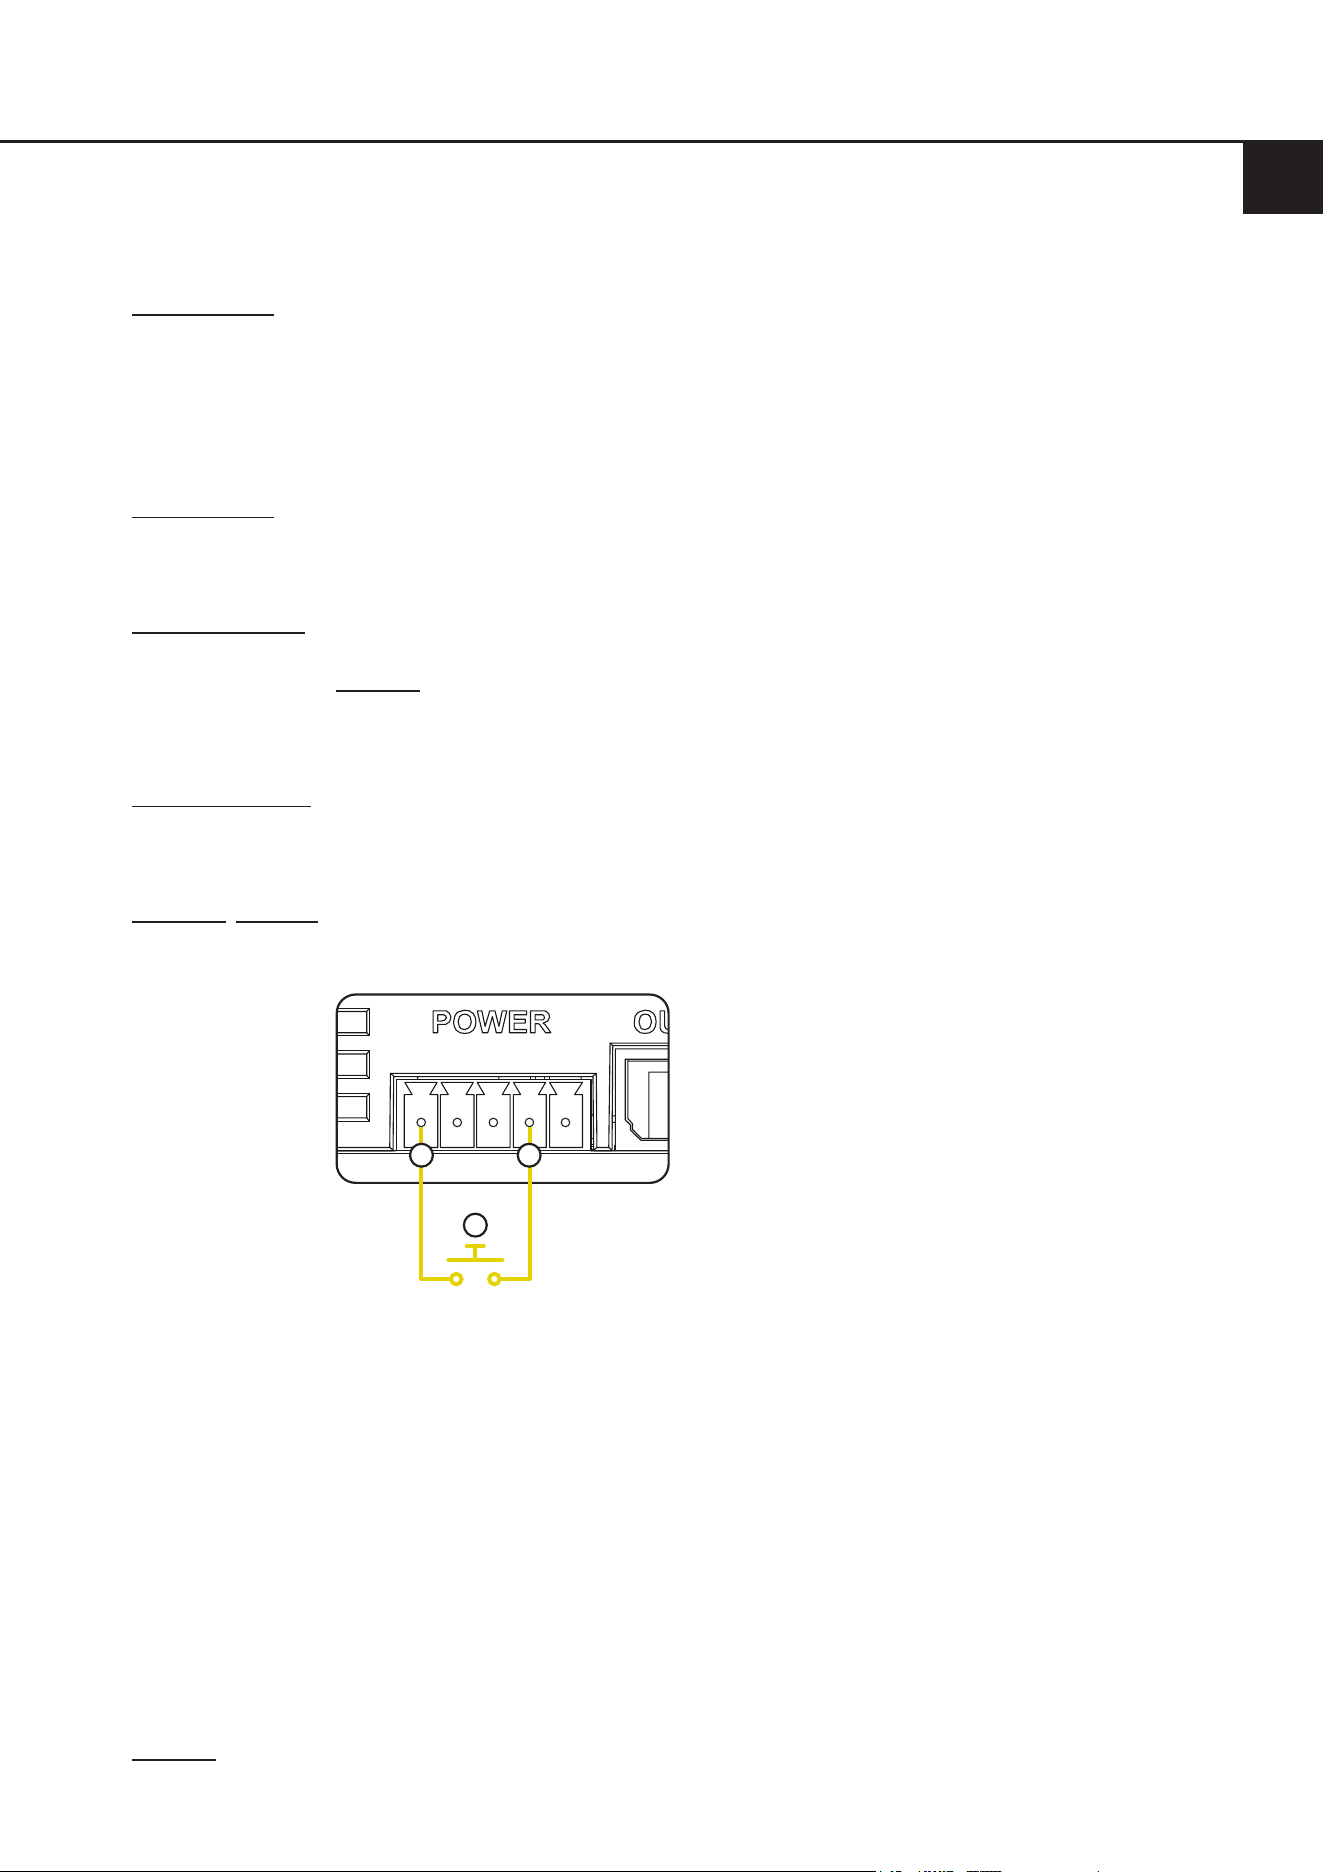
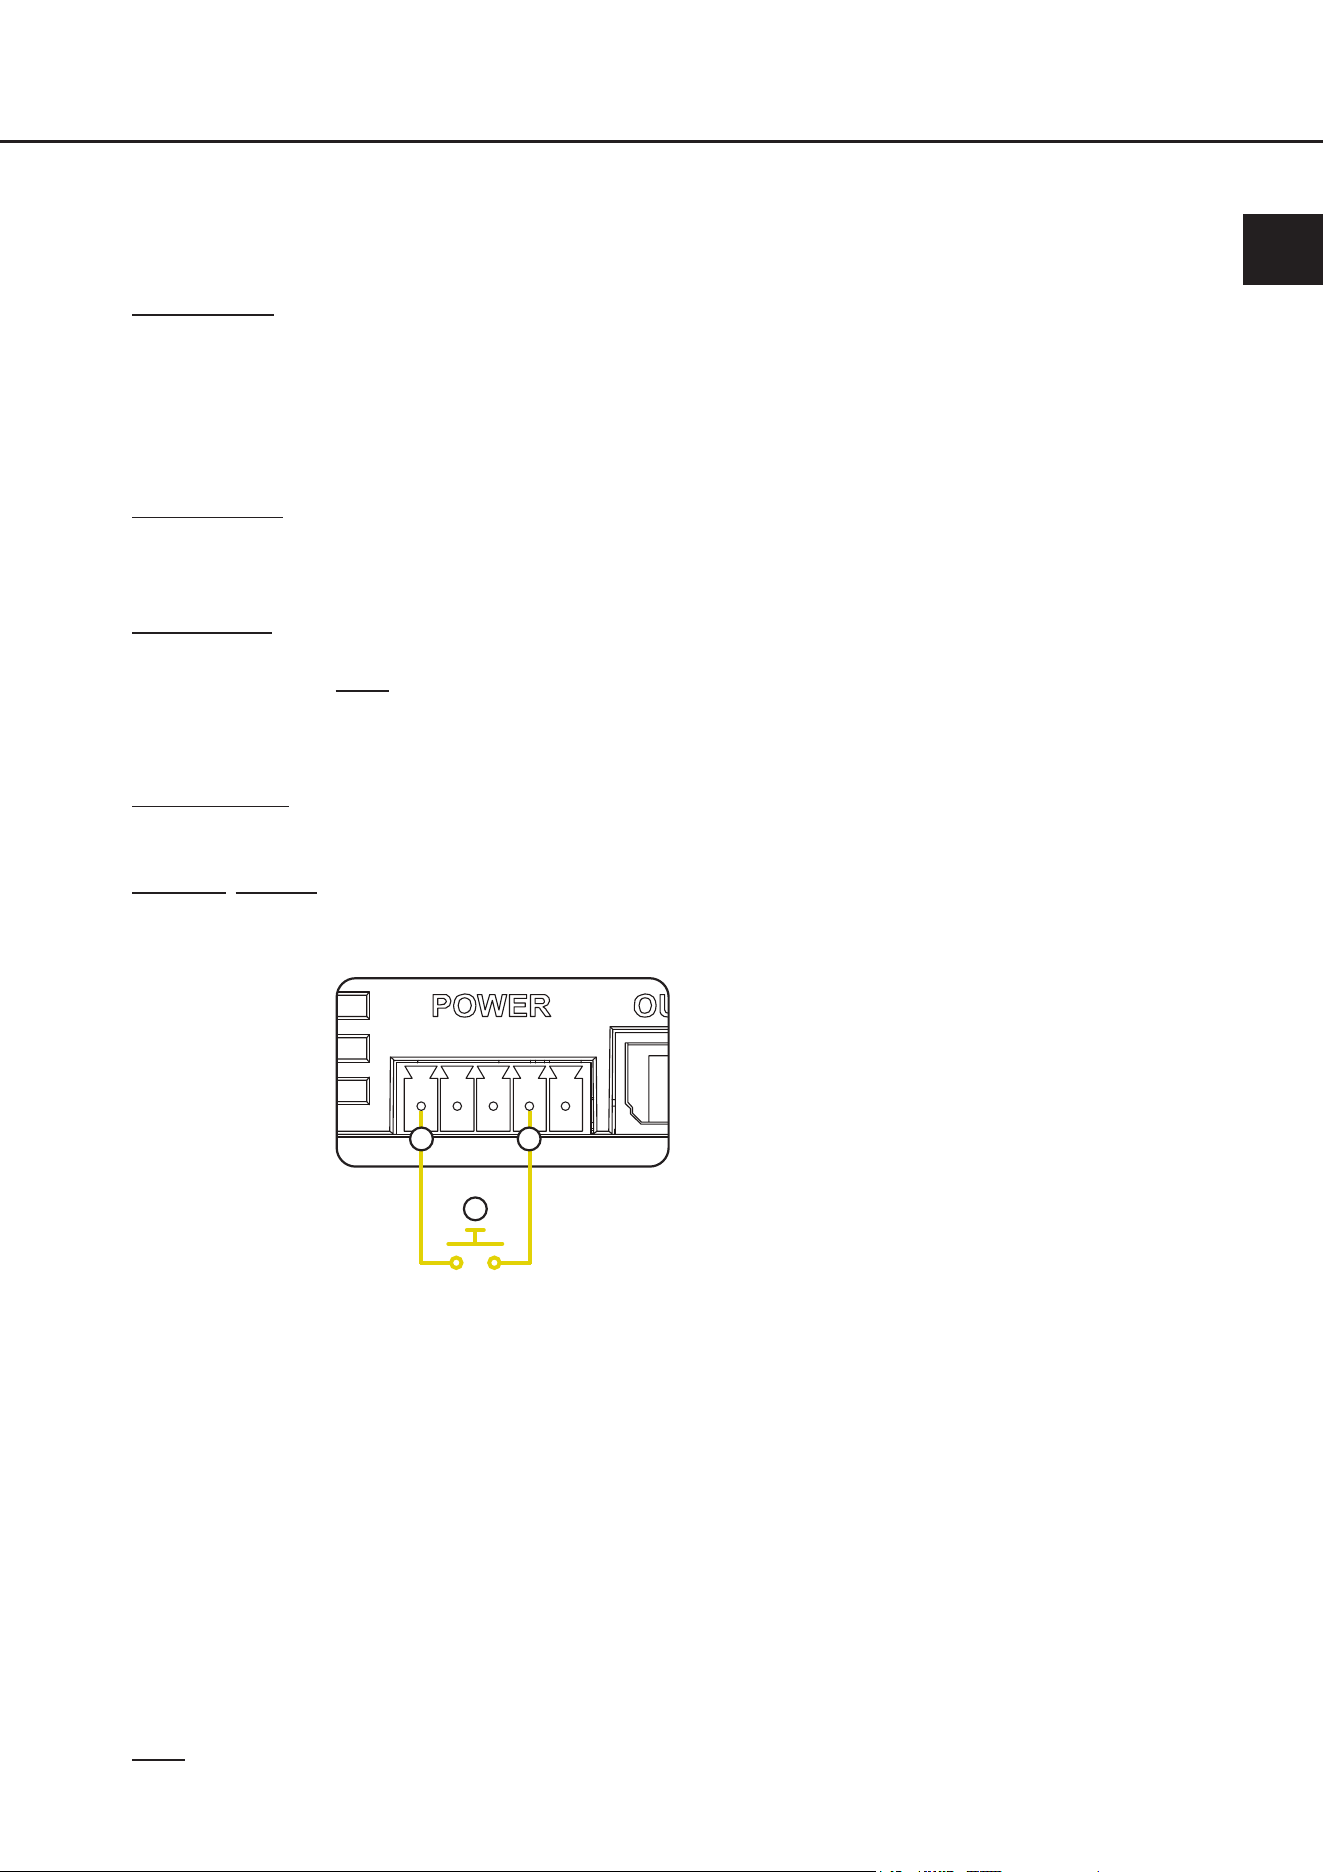
Bluetooth
®
-Pairing: Dieser Eingang ermöglicht den Anschluss eines optionalen, externen Tasters, um verschie-
dene Pairing-Funktionen des BT HD STREAMERs auszuführen.
Der Taster ist wie in der nachfolgenden Grak anzuschließen:
a. Bluetooth
®
Pairing Anschluss
b. Masse-Anschluss (GND)
c. Externer Taster
a
b
c
Alternativ kann der Bluetooth
®
Pairing Schalteingang auch über den Taster an den meisten
Stellen im Fahrzeug direkt gegen Fahrzeugmasse geschaltet werden.
Folgende Funktionen können über den Bluetooth
®
Pairing Schalteingang in Verbindung mit
einem optionalen Taster gesteuert werden:
- Kurzer Tastendruck (<3s): Reconnect → Verbindet sich automatisch zum zuletzt
gekoppelten Gerät, sofern beim Tastendruck kein Gerät
verbunden ist
oder
Disconnect → Trennt beim Tastendruck das aktuell ver-
bundene Gerät
- Langer Tastendruck (>3s & <10s): Pairing Modus starten
- Sehr langer Tastendruck (>10s): Alle gekoppelten Geräte löschen
Hinweis: Verwenden Sie zum Anschluss ausschließlich den mitgelieferten Stecker mit integrierten Schraubklem-
men.

8
3.7 Koppeln (Pairing) eines Bluetooth
®
-Geräts
Nachdem Sie den BT HD STREAMER wie zuvor beschrieben angeschlossen und konguriert haben, können Sie
eine Signalquelle, wie beispielsweise ein Smartphone, wie folgt per Bluetooth
®
verbinden:
1. Pairing-Modus aktivieren
Aktivieren Sie den Pairing-Modus des BT HD STREAMERs mit Hilfe des Pair-Tasters (Seite 5, Punkt 5), über den
Schalteingang des optionalen HELIX BT HD Hands-Free Microphone Kit oder über einen optionalen, externen
Taster, welcher am Bluetooth
®
-Pairing Anschluss (Seite 7, Punkt 3.6) des Multifunktion-Power Connecors ange-
schlossen ist.
2. Neues Bluetooth
®
-Gerät koppeln
Gehen Sie in die Bluetooth
®
-Einstellungen ihrer Signalquelle und starten Sie die Suche nach neuen
Bluetooth
®
-Geräten.
3. Verbindung herstellen
Tippen Sie in der Liste auf BT HD STREAMER, um eine Verbindung herzustellen.
4. Verbindung bestätigen
Sobald die Verbindung hergestellt ist, zeigt ihre Signalquelle eine Bestätigung an und die Status LED des BT HD
STREAMERs blinkt alle 2 Sekunden blau auf.
5. Testen der Verbindung
Spielen Sie einen Songtitel auf der Signalquelle ab, um sicherzustellen, dass der Ton über das Soundsystem
wiedergegeben wird.
Hinweis: Dieser Vorgang muss nur ein Mal pro Bluetooth
®
-Signalquelle durchgeführt werden. Anschließend n-
den Sie das gekoppelte Bluetooth
®
-Gerät in der Liste ihrer bekannten Bluetooth
®
-Geräte.
Nach diesem Vorgang wird der BT HD STREAMER jedes Mal nach dem Einschalten versuchen, sich zum zuletzt
gekoppelten Gerät automatisch zu verbinden.
Es werden bis zu 8 gekoppelte Geräte intern im BT HD STREAMER gespeichert. Wenn die maximale Anzahl
erreicht ist, wird immer das älteste Gerät aus der Liste bekannter Geräte gelöscht.
Mit allen 8 Geräten ist es möglich, sich vom Gerät aus über das Bluetooth
®
-Menü mit dem BT HD STREAMER zu
verbinden, indem man das Gerät aus der Bluetooth
®
-Geräte-Liste anwählt.
3. Hardware-Konguration

9
de
4. Weitere Funktionen
4.1 Pair-Taster
Dieser Taster dient zum Ausführen verschiedener Pairing-Funktionen des BT HD STREAMERs.
Die Status LED (Punkt 4.2) gibt Informationen zum aktuellen Verbindungs-Status.
- Kurzer Tastendruck (<3s): Reconnect → Verbindet sich automatisch zum zuletzt gekoppelten Gerät,
sofern beim Tastendruck kein Gerät verbunden ist
oder
Disconnect → Trennt beim Tastendruck das aktuell verbundene Gerät
- Langer Tastendruck (>3s & <10s): Pairing Modus starten
- Sehr langer Tastendruck (>10s): Alle gekoppelten Geräte löschen
4.2 Status LED
Die Status LED zeigt über zwei LEDs den Betriebszustand des BT HD STREAMERs und dessen Bluetooth
®
-Ver-
bindungs-Status an.
Betriebszustand:
Grün schnell blinkend: Gerätestart / Geräteabschaltung
Grün dauerhaft an: Streaming aktiv
Grün langsam blinkend: BT HD STREAMER bendet sich im Update-Modus
Grün sehr langsam blinkend: Passthrough-Funktion aktiv
Grün alle 10 Sek. kurz blinkend: BT HD STREAMER bendet sich im Standby-Modus
Bluetooth
®
-Verbindungs-Status:
Blau 1s an, 2s aus: Kein Gerät Verbunden
Blau blinkend alle 2s: Gerät verbunden
Blau doppel blinkend alle 2s: Signalwiedergabe
Blau / Rot schnell abwechselnd blinkend: Pairing-Modus aktiv
4.3 Passthrough-Funktion
Der BT HD STREAMER bietet eine Passthrough-Funktion, welche das Audiosignal unverändert und verlustfrei
vom optischen Digitaleingang zum Digitalausgang weiterleitet. Dies ist besonders praktisch, wenn der optische
Signaleingang des nachgeschalteten DSPs oder DSP-Verstärkers schon belegt ist, beispielsweise von einer
Head Unit oder einem High-Res Player. In diesem Fall kann die digitale Signalquelle an den BT HD STREAMER
angeschlossen werden und dieser wiederum an das nachgeschaltete Soundsystem ohne Verlust der voll digitalen
Signalkette. Anschlussbeispiele für verschiedene Anwendungsfälle nden Sie auf Seite 10 .
Hinweis: Die Passthrough-Funktion ist immer aktiv, wenn kein Bluetooth
®
-Audosignal abgespielt wird.
WICHTIG: Um die Passthrough-Funktion des optischen Eingangs nutzen zu können, muss der Remote-Eingang
des Multifunktion-Power Connectors belegt werden.

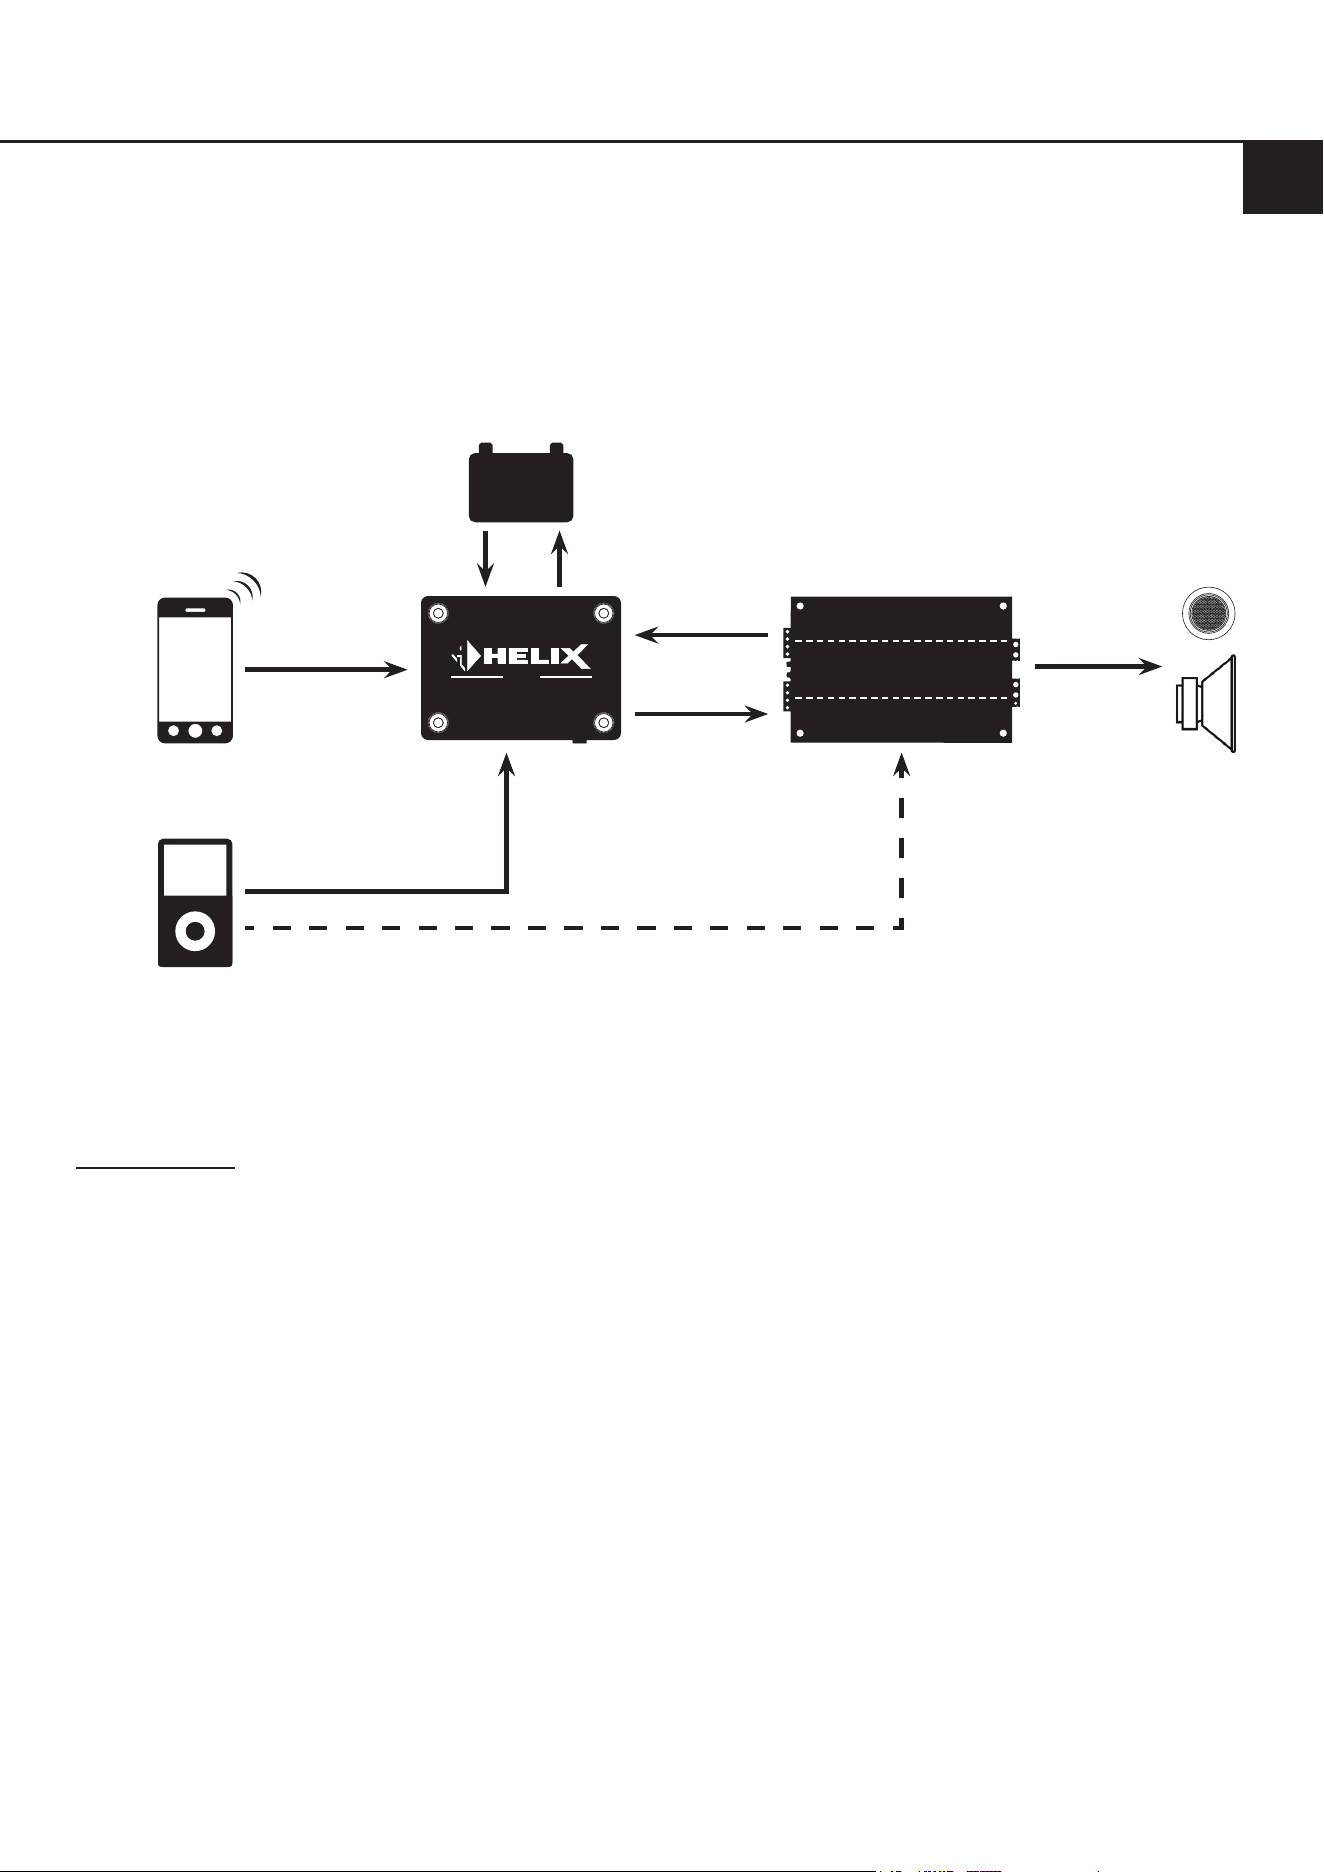
10
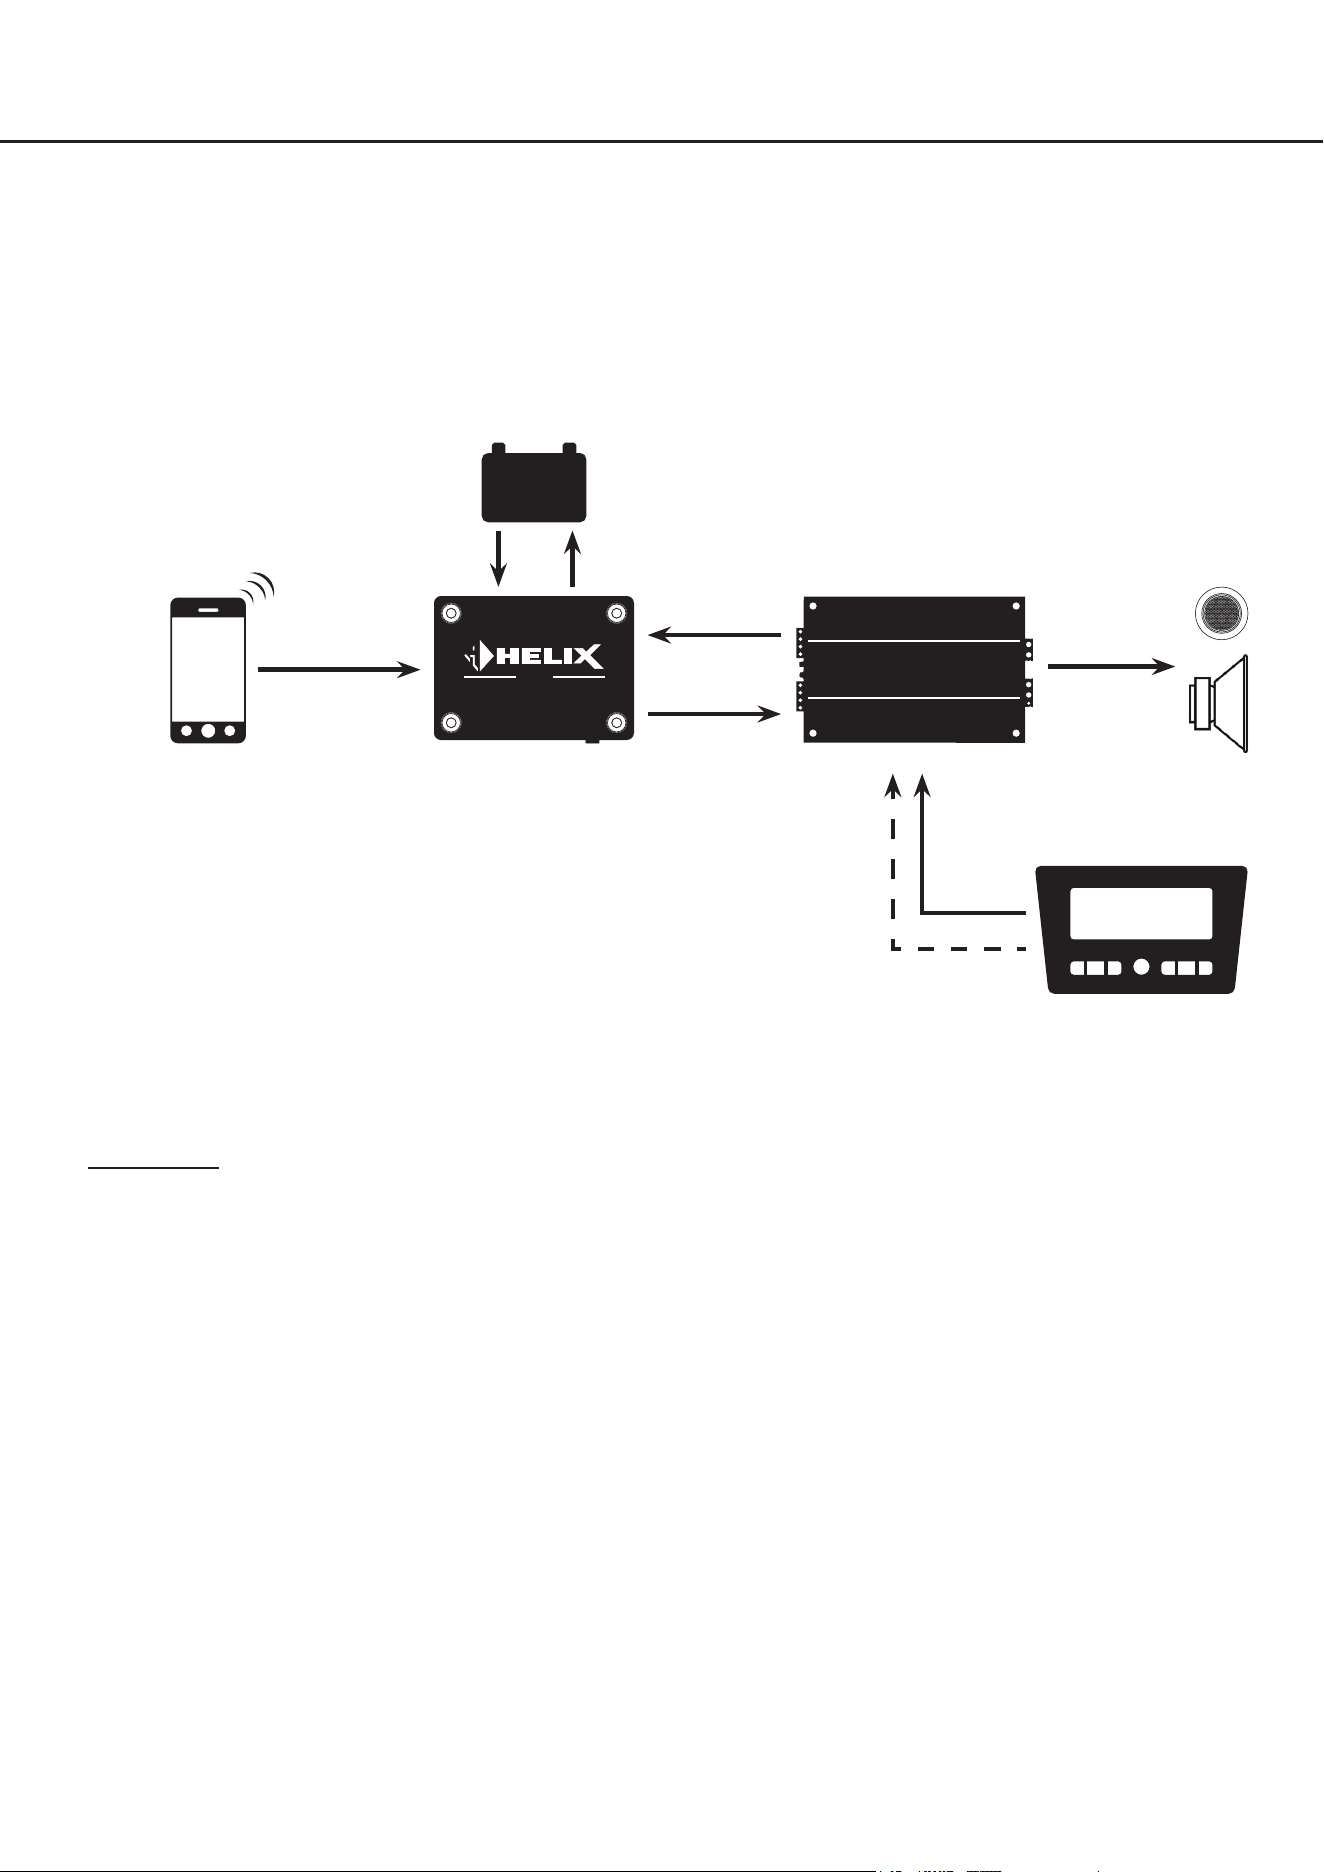
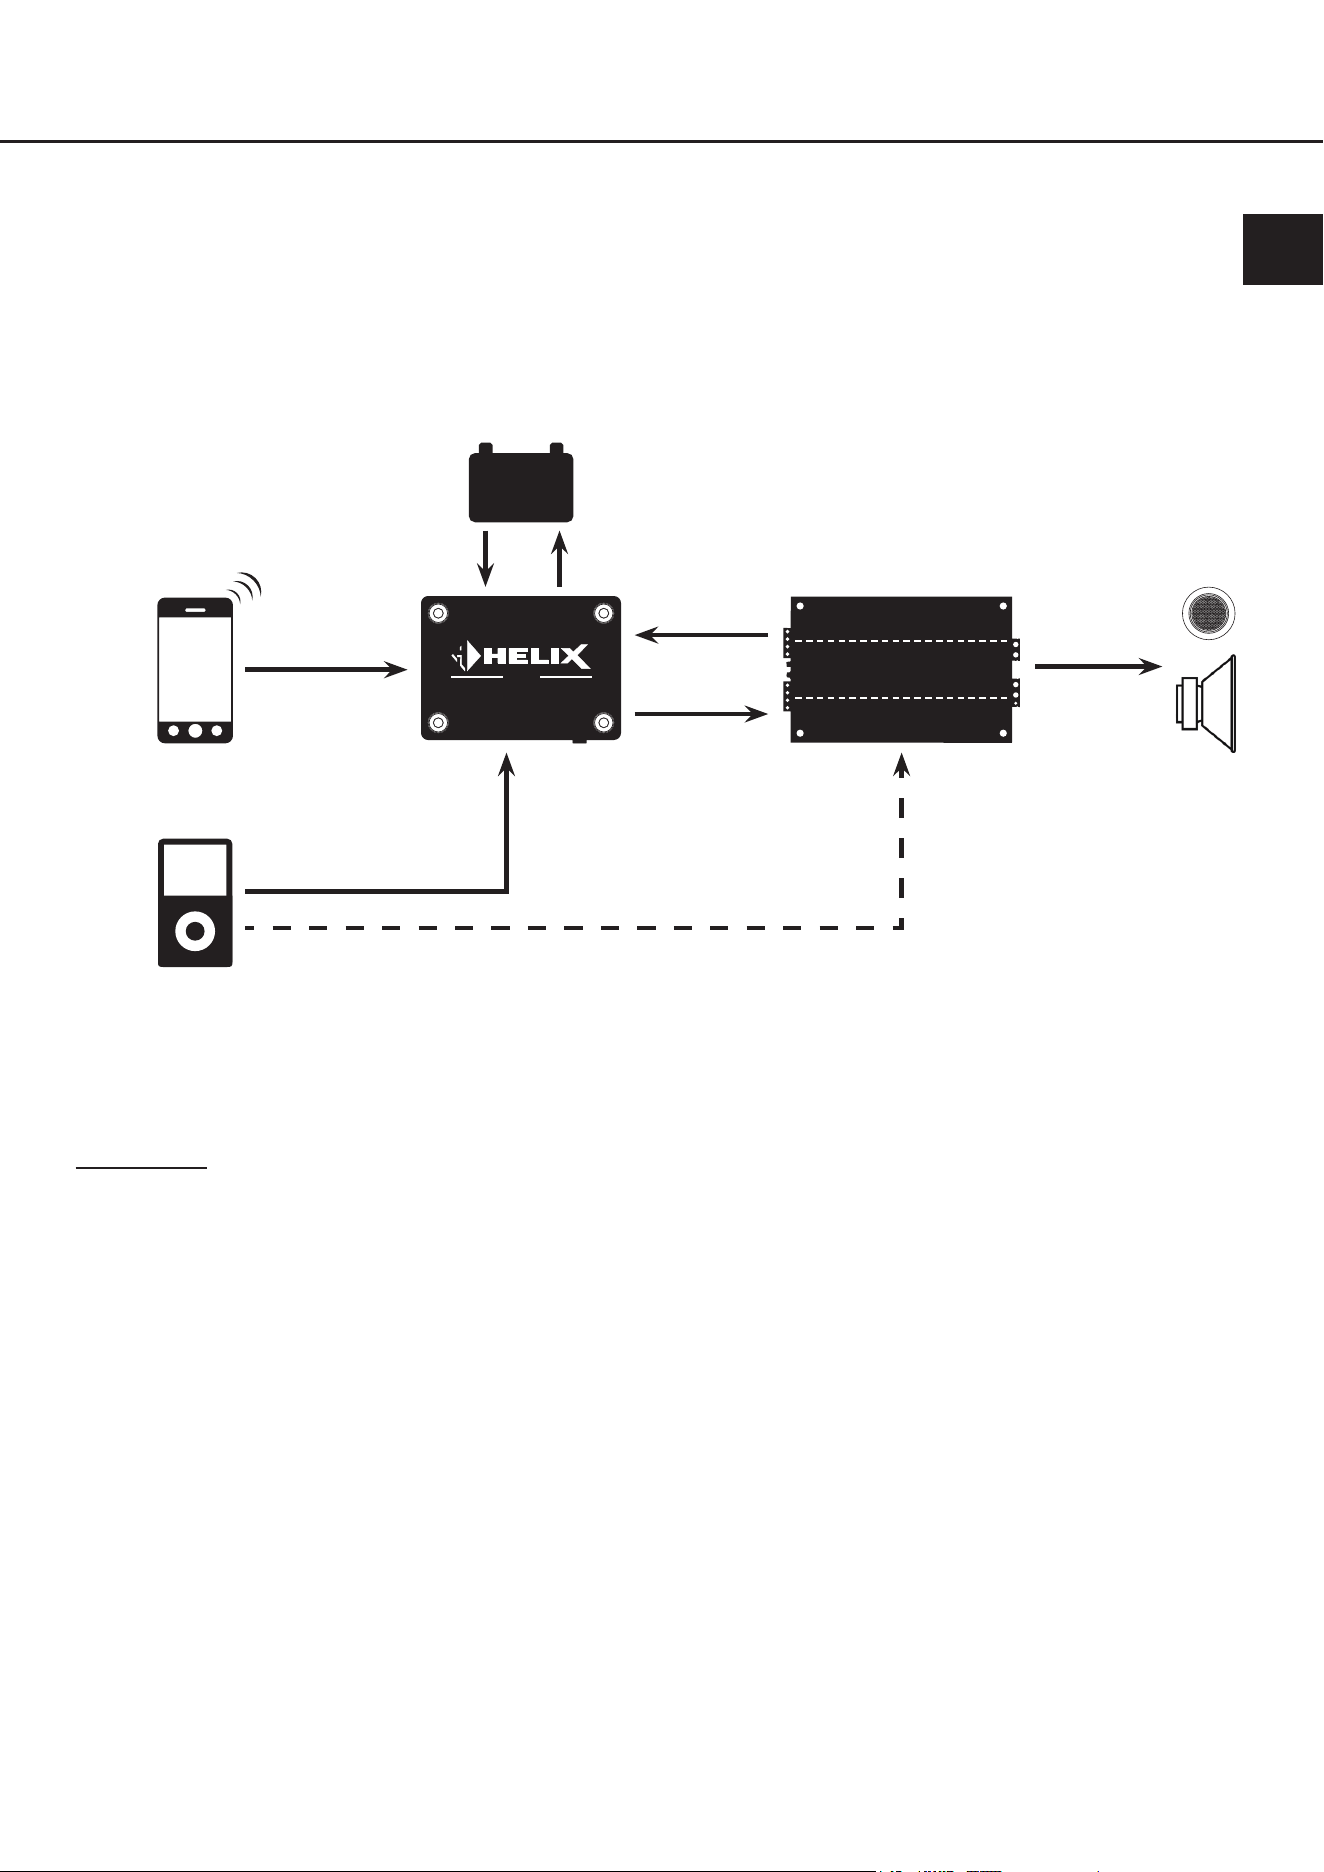
5.1 BT HD STREAMER als externer Bluetooth
®
Receiver
Der BT HD STREAMER wird als externer Bluetooth
®
Receiver als zusätzliche Signalquelle in das Soundsystem in-
tegriert. Dabei erfolgt die Einschaltung des BT HD STREAMERs über das Remote-Ausgangssignal des angeschlos-
senen DSPs / DSP-Verstärkers. Der Standby-Modus ist ausgeschaltet (STBY-Schalter = O).
5. Anschlussbeispiele
DSP /
DSP-Verstärker
- +
Remote-
Signal
zu den
Lautsprechern
optisches
Digitalsignal
STREAMER
BT HD
Bluetooth
®
-
Audiosignal
Bluetooth
®
-Signalquelle
z.B. Smartphone
externe Stromquelle
Standby-Modus = Off
Funktionsweise: Der BT HD STREAMER wird über den DSP / DSP-Verstärker ein- und ausgeschaltet. Nach dem
Einschalten versucht der BT HD STREAMER sich automatisch mit dem zuletzt gekoppelten Gerät zu verbinden.
Sollte das Gerät nicht in Reichweite sein, kann man sich manuell über das Bluetooth
®
-Menü der Signalquelle mit dem
BT HD STREAMER verbinden. Das Gerät wird bei Abschalten des Soundsystems automatisch mit ausgeschaltet.
Remote-Signal
analoges
Signal
Original- oder
Aftermarket-Head Unit
11
de
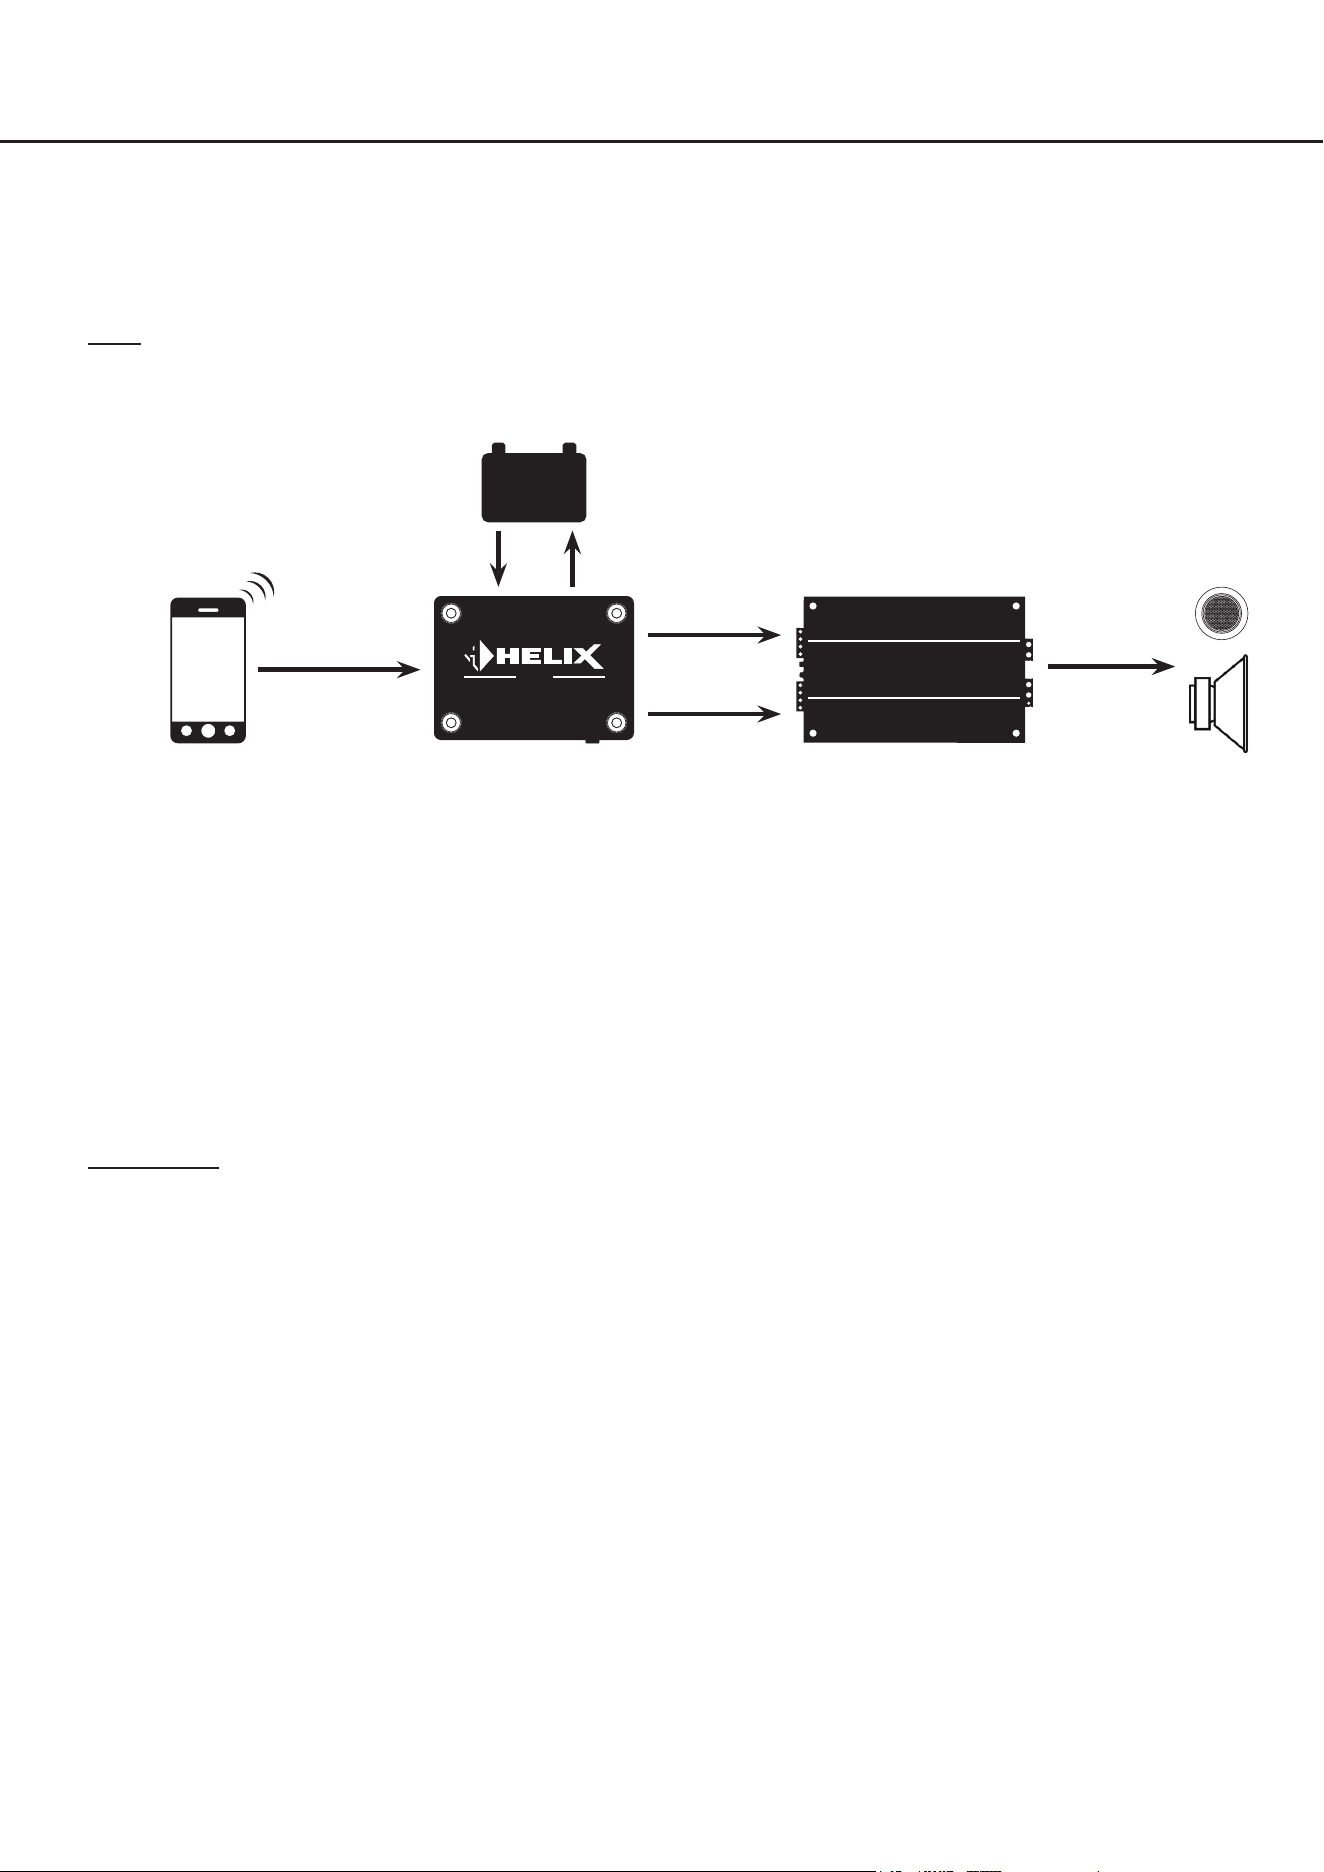
5.2 BT HD STREAMER als externer Bluetooth
®
Receiver mit zusätzlicher digitaler Signalquelle
Der BT HD STREAMER wird wie im Beispiel 5.1 als zusätzliche Signalquelle in das Soundsystem integriert. Zudem
wird eine weitere Signalquelle über den optischen Digitaleingang des BT HD STREAMERs in das Soundsystem einge-
bunden. Das Soundsystem wird in diesem Fall über ein externes Remote-Signal oder die automatische Einschaltfunkti-
on des DSPs / DSP-Verstärkers eingeschaltet. Der Standby-Modus des BT HD STREAMERs muss ausgeschaltet sein
(STBY-Schalter = O).
DSP /
DSP-Verstärker
- +
Remote-
Signal
zu den
Lautsprechern
optisches
Digitalsignal
STREAMER
BT HD
Bluetooth
®
-
Audiosignal
optionales Remote-Signal (falls vorhanden)
optisches
Digitalsignal
Signalquelle
z.B. Head Unit, Audio-Inter-
face, High-Res Player, etc.
Bluetooth
®
-Signalquelle
z.B. Smartphone
externe Stromquelle
Standby-Modus = Off
Funktionsweise: Der BT HD STREAMER wird über den DSP / DSP-Verstärker ein- und ausgeschaltet. Nach dem
Einschalten versucht der BT HD STREAMER sich automatisch mit dem zuletzt gekoppelten Gerät zu verbinden.
Sollte das Gerät nicht in Reichweite sein, kann man sich manuell über das Bluetooth
®
-Menü der Signalquelle mit dem
BT HD STREAMER verbinden.
Die zweite Signalquelle, welche über den optischen Digitaleingang des BT HD STREAMERs eingebunden ist, kann
nun auch zur Musikwiedergabe benutzt werden.
In dieser Konstellation hat die Bluetooth
®
-Musikwiedergabe immer höhere Priorität als die zweite Signalquelle, dass
heißt, dass die Musikwiedergabe der zweiten Signalquelle umgehend unterbrochen wird, sobald Musik über Bluetooth
®
zugespielt wird. Nach dem Pausieren der Bluetooth
®
-Wiedergabe schaltet der BT HD STREAMER automatisch wieder
auf die zweite Signalquelle zurück.
Dieser Anwendungsfall bietet eine Vielzahl an Kongurationsmöglichkeiten, beispielsweise wenn ein Audio-Interface
auch per optischen Digitalsignal eingebunden werden soll oder wenn als zusätzliche Signalquelle noch ein High-Res
Player integriert werden soll.

12
5.3 Stand-Alone Applikation
Der BT HD STREAMER wird als Hauptsignalquelle integriert und schaltet das komplette Soundsystem ein- und aus.
Dafür wird das Gerät im Standby-Modus betrieben (STBY-Schalter = On), so dass sich die Bluetooth
®
-Signalquelle
jederzeit mit dem Bluetooth
®
-Receiver verbinden kann. Wird nach dem Verbinden ein Audiosignal abgespielt, generiert
der BT HD STREAMER ein Remote-Ausgangssignal, welches das nachgeschaltete Soundsystem einschaltet.
Hinweis: Der BT HD STREAMER wird in diesem Fall nur über die Bluetooth
®
-Signalquelle eingeschaltet, kann aber
zusätzlich auch noch über den Remote-Eingang eingeschaltet werden.
DSP /
DSP-Verstärker
- +
Remote-
Signal
zu den
Lautsprechern
optisches
Digitalsignal
STREAMER
BT HD
Bluetooth
®
-
Audiosignal
Bluetooth
®
-Signalquelle
z.B. Smartphone
externe Stromquelle
Standby-Modus = On
5. Anschlussbeispiele
Funktionsweise: Der BT HD STREAMER wird über die Bluetooth
®
-Signalquelle ein- und ausgeschaltet. Dazu ist es
notwendig sich von einer gekoppelten Bluetooth
®
-Signalquelle aus, manuell über das Bluetooth
®
-Menü des Gerätes,
mit dem BT HD STREAMER zu verbinden. Anschließend wird nach Abspielen von Musik die Soundanlage automatisch
eingeschaltet. Sobald die Musikwiedergabe für länger als drei Minuten pausiert wird, wird die Anlage automatisch wie-
der ausgeschaltet. Die Bluetooth
®
-Signalquelle bleibt jedoch weiterhin mit der Anlage verbunden, so dass eine Musik-
wiedergabe jederzeit wieder gestartet werden kann.
Dieser Anwendungsfall eignet sich besonders für die Nachrüstung von Oldtimern und Wohnmobilen.
13
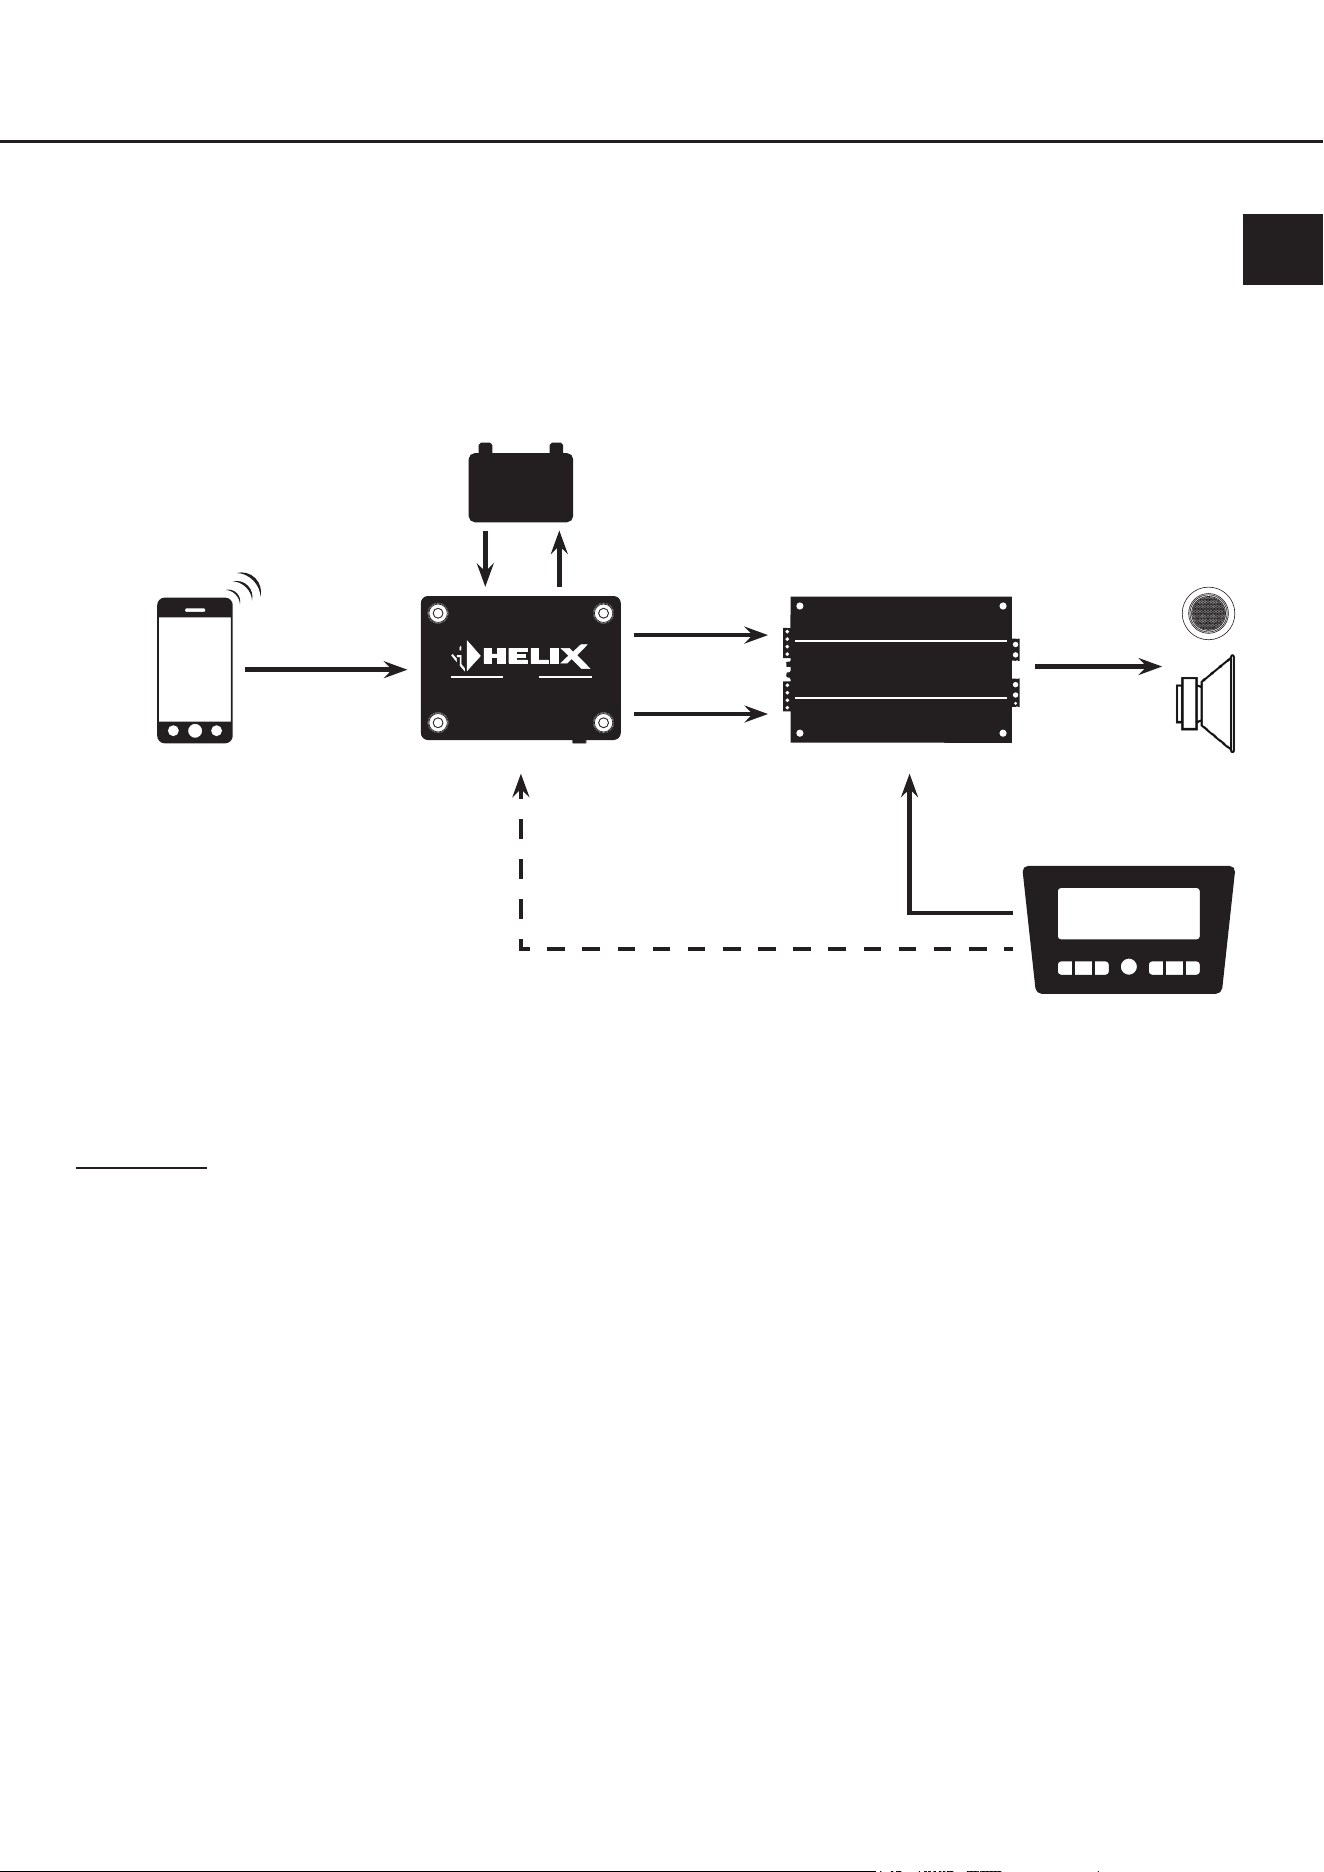
5.4 Stand-Alone Applikation in Verbindung mit einer Head Unit
Der BT HD STREAMER wird parallel zur Head Unit als Signalquelle integriert. Beide Signalquellen können nun das
komplette Soundsystem ein- und ausschalten. Die Head Unit schaltet dabei das Soundsystem automatisch über
die Lautsprecherausgänge ein. Sollte die Head Unit ausgeschaltet sein oder nicht genutzt werden, kann auch der
BT HD STREAMER das komplette Soundsystem über eine Bluetooth
®
-Signalquelle, wie im Beispiels 5.2, einschalten.
Dazu muss der Standby-Modus des BT HD STREAMERs eingeschaltet sein (STBY-Schalter = On).
DSP /
DSP-Verstärker
- +
Remote-
Signal
zu den
Lautsprechern
optisches
Digitalsignal
STREAMER
BT HD
Bluetooth
®
-
Audiosignal
Bluetooth
®
-Signalquelle
z.B. Smartphone
externe Stromquelle
Standby-Modus = On
Funktionsweise: Der BT HD STREAMER wird über die Head Unit oder die Bluetooth
®
-Signalquelle ein- und ausge-
schaltet. Wenn die Head Unit aus ist, ist es notwendig sich von einer gekoppelten Bluetooth
®
-Signalquelle aus ggfs.
manuell über das Bluetooth
®
-Menü des Gerätes, mit dem BT HD STREAMER zu verbinden. Anschließend wird nach
Abspielen von Musik die Soundanlage automatisch wieder eingeschaltet.
Sobald die Musikwiedergabe für länger als drei Minuten pausiert wird, wird die Anlage automatisch ausgeschaltet. Die
Bluetooth
®
-Signalquelle bleibt jedoch weiterhin mit der Anlage verbunden, so dass eine Musikwiedergabe jederzeit
wieder gestartet werden kann.
Dieser Anwendungsfall eignet sich besonders, wenn Sie auch ohne eingeschaltete Head Unit / Zündung im Fahrzeug
Musik über ihr Soundsystem hören wollen, bspw. in Wohnmobilen.
analoges
Signal
Original- oder
Aftermarket-Head Unit
optionales Remote-Signal (falls vorhanden)
de
14
Im nachfolgenden Abschnitt werden nun die wichtigsten Schritte zum Anschluss des HELIX BT HD Hands-Free
Microphone Kit beschrieben.
Im Sinne der Unfallsicherheit muss das Mikrofon und dessen Kabel sicher befestigt werden, damit es keine
Gefahr für die Insassen und/oder das Fahrzeug während der Fahrt oder einer kritischen Fahrsituation, wie bei-
spielsweise einer Gefahrenbremsung, darstellt.
Wichtig: Achten Sie bei der Montage darauf, dass keine Sicherheitssysteme Ihres Fahrzeugs (bspw. Airbag) in ihrer
Wirkung beeinträchtigt werden können oder das Kabel bei der Fahrt behindern kann.
• Befestigen Sie das Mikrofon nicht auf einer Abdeckung eines Airbags (bspw. Lenkrad oder Armaturenbrett Beifah-
rerseite)
• Befestigen Sie das Mikrofon nicht im Sichtfeld des Fahrers
• Legen Sie das Mikrofon nicht unbefestigt auf dem Armaturenbrett ab
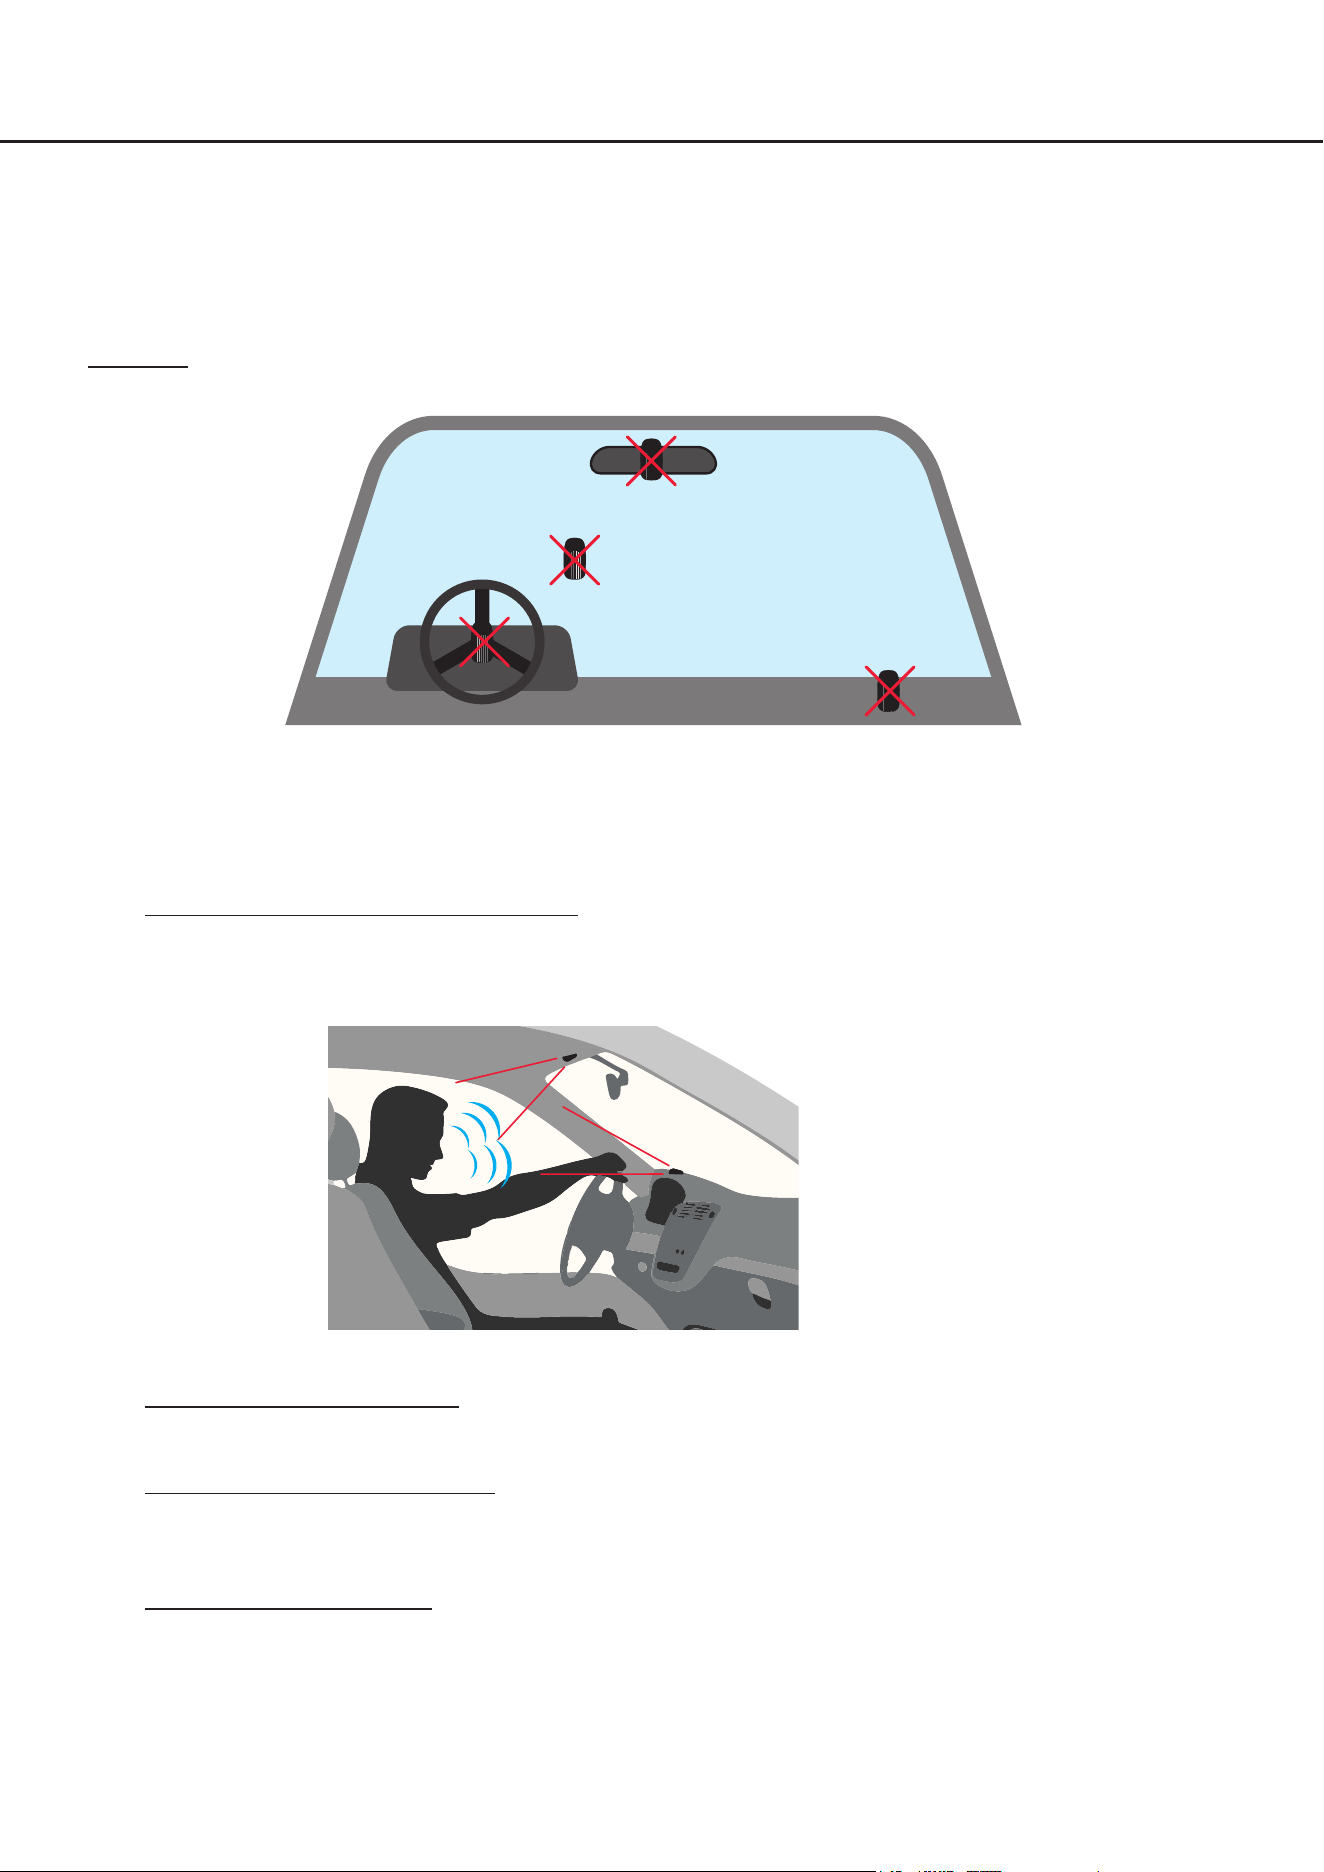
1. Installationsort für Mikrofon auswählen
Um eine gute Spracherfassung zu gewährleisten ist es ratsam das Mikrofon möglichst frontal zur sprechenden
Person und nicht hinter Verkleidungen, Stoen oder Abdeckungen zu montieren, bspw. auf dem Armaturenbrett
oder am Dachhimmel vor der sprechenden Person.
2. Vorbereiten des Kabelsatzes
Prüfen Sie, dass der Kabelsatz lang genug ist, um vom Mikrofon zum BT HD STREAMER zu reichen.
3. Vorbereiten des Montageorts
Reinigen Sie die Oberäche, an der Sie das Mikrofon befestigen möchten, gründlich, um sicherzustellen, dass sie
frei von Schmutz, Staub und Fett ist. Dies gewährleistet eine bessere Haftung für die Montage.
4. Montage des Mikrofons
Reinigen Sie die Unterseite des Mikrofons und kleben Sie anschließend das beiliegende Klebepad auf. Anschlie-
ßend kleben Sie das Mikrofon auf die von Ihnen zuvor ausgewählte, vorbereitete Montageäche. Um eine ma-
ximale Klebehaftung sicherzustellen, ist es wichtig, dass das Mikrofon vollständig mit der Klebeäche auf der
Montageäche auiegt.
6. Anschluss des optionalen HELIX BT HD Hands-Free Microphone Kit
Mikrofon
15
de
5. Verlegen des Kabels
Verlegen Sie das Kabel des Mikrofons so, dass es nicht zu Behinderungen während der Fahrt führt, und dass kei-
ne Klemm-, Quetsch- oder Bruchgefahr besteht. Bei scharfen Kanten (Blechdurchführungen) müssen alle Kabel
gegen Durchscheuern gesichert sein.
6. Anschluss des Kabels an den BT HD STREAMER
Zuerst verbinden Sie die 3,0 m lange Zuleitung des Mikrofons mit dem 30 cm Anschlusskabel. Anschließend ste-
cken Sie den NanoFit Stecker in den Mikrofoneingang des BT HD STREAMERs.
7. Optional: Anschluss der Funktionseinänge
Die oenen Kabelenden des 30 cm Anschlusskabels ermöglichen den Anschluss optionaler externer Taster zur
Ausführung verschiedener Funktionen. Es ist für die Funktionalität der Freisprecheinrichtung nicht erforder-
lich, diese Anschlüsse zu verwenden.
Wichtig: Unbenutzte Anschlüsse müssen isoliert werden, um Kurzschlüsse zu vermeiden.
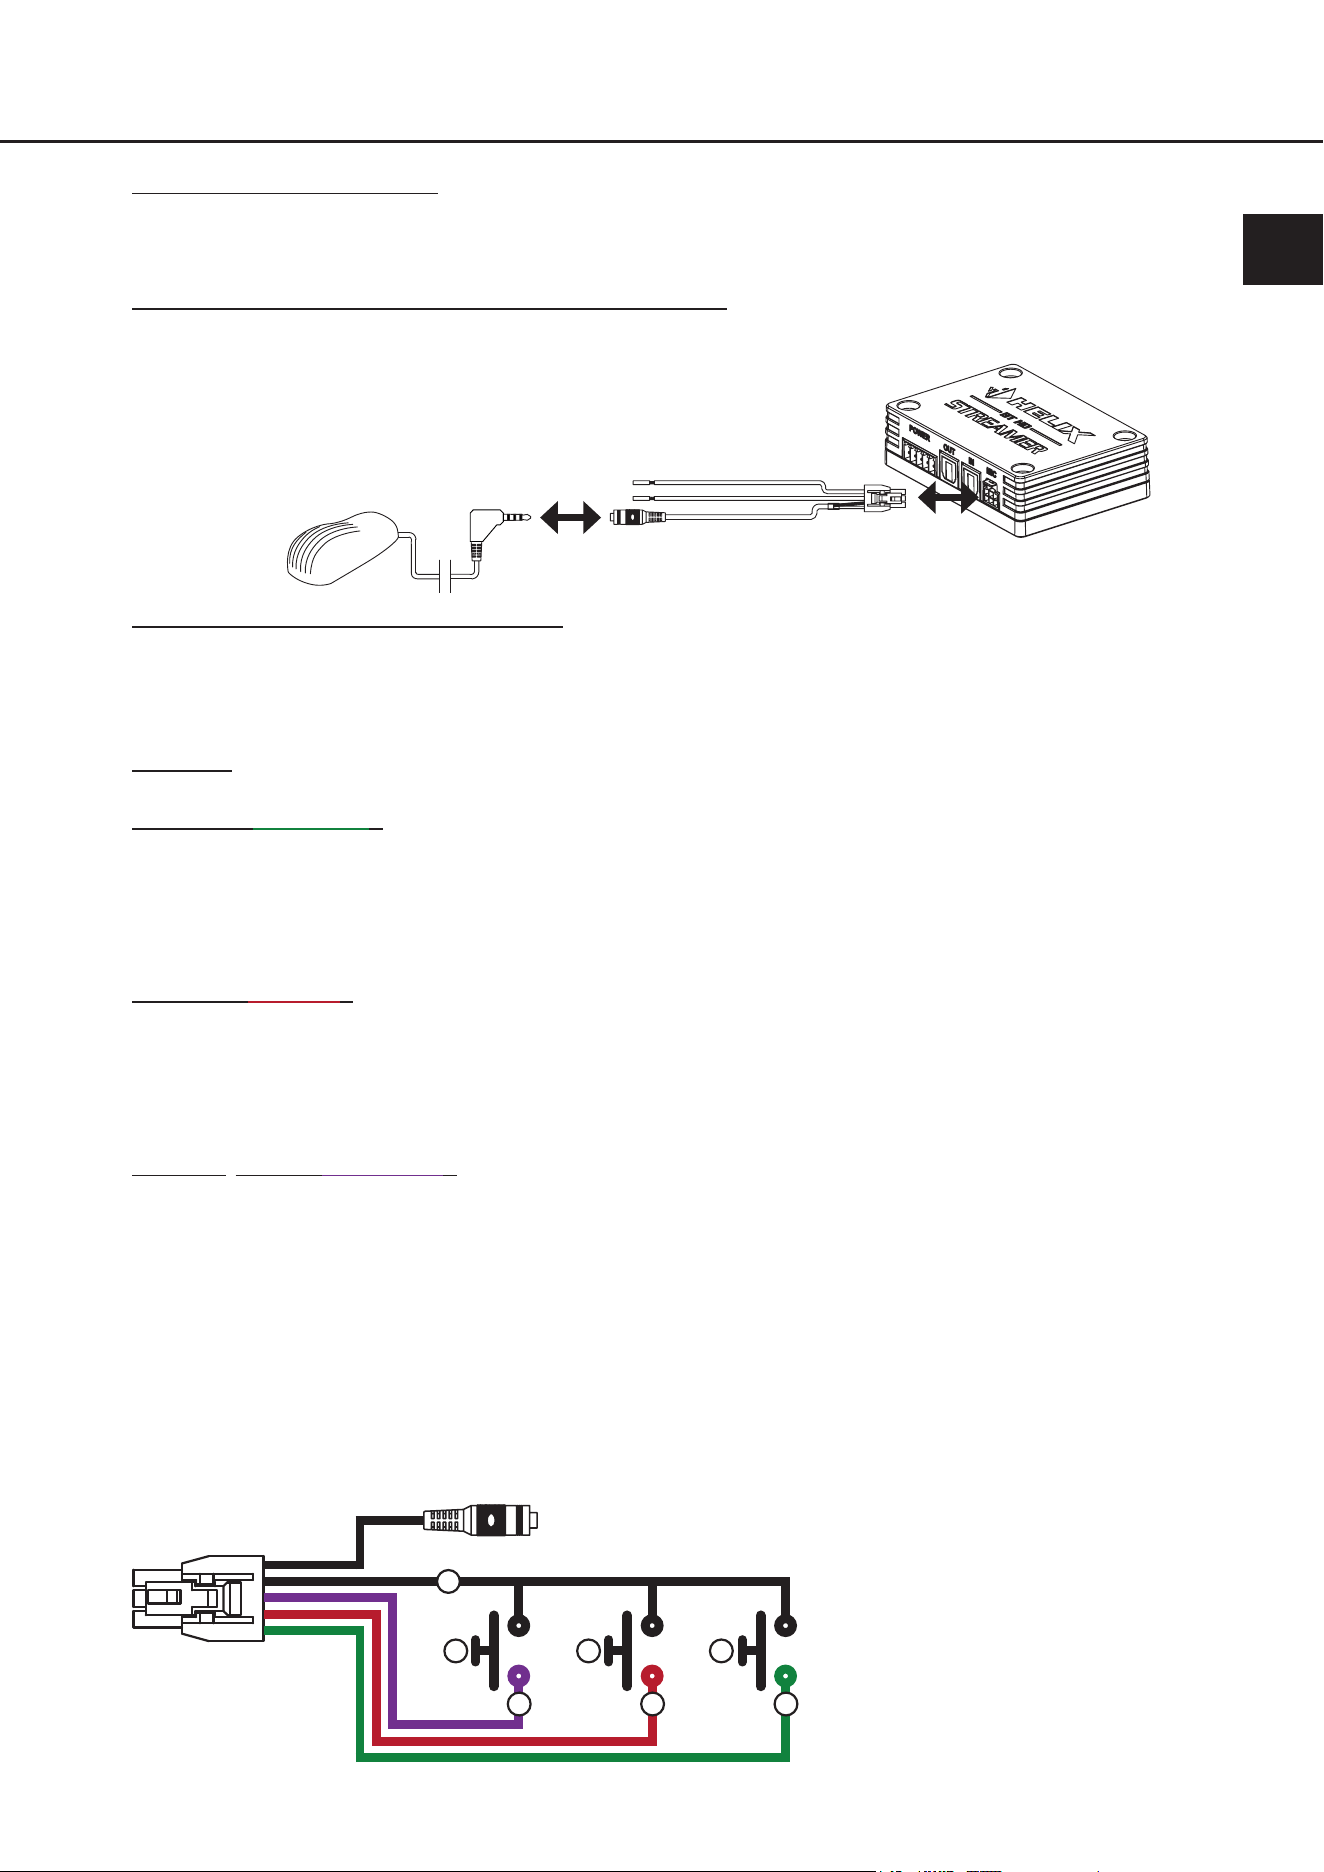
Accept call (grünes Kabel): Durch den Anschluss eines optionalen externen Tasters können eingehende Tele-
fonanrufe angenommen sowie die „Nächster Titel“-Funktion bzw. die „Vorheriger
Titel“-Funktion aktiviert werden.
- Kurzer Tastendruck (<3s): eingehenden Anruf annehmen
- Doppelter, kurzer Tastendruck: Nächster Titel
- Dreifacher, kurzer Tastendruck: Vorheriger Titel
Reject call (rotes Kabel): Durch den Anschluss eines optionalen externen Tasters können eingehende Tele-
fonanrufe abgelehnt oder aktive Anrufe beendet werden.
- Kurzer Tastendruck (<3s): eingehenden Anruf ablehnen
oder
aktiven Anruf beenden
Bluetooth
®
-Pairing (lila Kabel): Durch den Anschluss eines optionalen externen Tasters können verschiedene
Pairing-Funktionen ausgeführt werden. Die Status LED des BT HD STREAMERs
(Seite 9, Punkt 4.2) zeigt dabei Informationen zum aktuellen Verbindungs-Status.
- Kurzer Tastendruck (<3s): Reconnect → Verbindet sich automatisch zum zu-
letzt gekoppelten Gerät, sofern beim Tastendruck
kein Gerät verbunden ist
oder
Disconnect → Trennt beim Tastendruck das aktuell
verbundene Gerät
- Langer Tastendruck (>3s): Pairing Modus starten
Die Taster sind wie in der nachfolgenden Grak anzuschließen:
a
d
e
c
b b b
a. GND (Masse) / Fahrzeugmasse
b. Externer Taster
c. Bluetooth-Pairing
d. Anruf ablehnen (Reject call)
e. Anruf annehmen (Accept call)
(und Titelwahl)

16
8. Freisprechprotokoll am BT HD STREAMER aktivieren
Stellen Sie den Freisprechprotokoll-Schalter (HFP) auf „On“.
Hinweis: Die Aktivierung muss zwingend im ausgeschalteten Zustand vorgenommen werden.
9. Mobilgerät neu verbinden
Starten Sie Ihr Soundsystem und aktivieren Sie den Pairing-Modus des BT HD STREAMERs entweder mit dem
Pair-Taster (Seite 5, Punkt 5) oder einem externen Taster. Verbinden Sie Ihr Mobilgerät gemäß den Anweisungen
in dieser Anleitung mit dem BT HD STREAMER.
Hinweis: Ein Pairing ist auch dann erforderlich, wenn Ihr Mobilgerät zuvor bereits ohne aktive Freisprechfunktion
mit dem BT HD STREAMER verbunden war.
10. Verbindung testen
Überprüfen Sie, ob das Mikrofon ordnungsgemäß funktioniert, indem Sie einen Testanruf durchführen. Stellen Sie
sicher, dass Sie gehört werden und dass die Audioqualität klar und deutlich ist. Sofern der Test nicht erfolgreich
war, prüfen Sie die Verkabelung sowie alle Steckverbindungen und führen die Installationsschritte noch einmal
durch. Sollte das Problem weiterhin bestehen, wenden Sie sich an Ihren Einbauspezialisten für weitere Unter-
stützung.
6. Anschluss des optionalen HELIX BT HD Hands-Free Microphone Kit

17
7. Problembehandlung
Problem: Keine Bluetooth
®
-Verbindung:
Mögliche Ursache: Der BT HD STREAMER kann keine Verbindung zur Bluetooth
®
-Signalquelle herstellen.
Möglicherweise liegt eine Inkompatibilität zwischen dem BT HD STREAMER und der
Bluetooth
®
-Signalquelle vor, oder es gibt Probleme mit der Bluetooth
®
-Verbindung.
Problemlösung: Stellen Sie sicher, dass die Bluetooth
®
-Signalquelle mit dem BT HD STREAMER kompatibel ist und
dass es sich im Pairing-Modus bendet. Versuchen Sie, das Bluetooth
®
-Gerät erneut zu koppeln,
indem Sie den Pairing-Modus am BT HD STREAMER aktivieren (Seite 8, Punkt 3.7). Überprüfen
Sie auch, ob andere Bluetooth
®
-Geräte das Problem verursachen könnten, indem Sie diese vorü-
bergehend deaktivieren.
Problem: Kein Audiosignal vom BT HD STREAMER
Mögliche Ursache: Der BT HD STREAMER gibt kein Audiosignal aus. Es könnte ein Problem mit der Verkabelung
oder den Einstellungen des BT HD STREAMERs vorliegen, das dazu führt, dass kein Audiosignal
übertragen wird.
Problemlösung: Überprüfen Sie zunächst die Verkabelung, um sicherzustellen, dass alle Anschlüsse korrekt und
fest sitzen. Stellen Sie sicher, dass die Bluetooth
®
-Verbindung zum BT HD STREAMER herge-
stellt ist. Überprüfen Sie die Kongurationseinstellungen des BT HD STREAMERs, insbesondere
den Standby-Modus (Seite 6, Punkt 3.3). Wenn das Problem weiterhin besteht, wenden Sie sich
an Ihren Einbauspezialisten für weitere Unterstützung.
Problem: Probleme mit dem Standby-Modus
Mögliche Ursache: Der Standby-Modus des BT HD STREAMERs funktioniert nicht wie erwartet.
Problemlösung: Überprüfen Sie die Kongurationseinstellungen des Standby-Modus gemäß den Anweisungen in
der Bedienungsanleitung (Seite 6, Punkt 3.3). Stellen Sie sicher, dass die Verkabelung des Re-
mote-Ausgangs des Streamers korrekt ist und dass keine Unterbrechungen oder Beschädigungen
vorliegen.
Prüfen Sie, ob die Bluetooth
®
-Verbindung zum BT HD STREAMER besteht. Sollte dies nicht der
Fall sein, verbinden Sie das Gerät erneut, wie auf Seite 8 unter Punkt 3.7 beschrieben. Wenn das
Problem weiterhin besteht, überprüfen Sie die Stromversorgung des BT HD STREAMERs und kon-
taktieren Sie gegebenenfalls Ihren Einbauspezialisten für weitere Unterstützung.
Problem: Passthrough-Funktion des optischen Eingangs funktioniert nicht
Mögliche Ursache: Die Passthrough-Funktion des optischen Eingangs funktioniert nicht.
Es könnte ein Problem mit der Konguration oder der Verkabelung des BT HD STREAMERs vorlie-
gen, das dazu führt, dass die Passthrough-Funktion nicht wie erwartet funktioniert.
Problemlösung: Überprüfen Sie, ob der Remote-Eingang des Multifunktion-Power Connectors ordnungsgemäß
belegt ist, um die Passthrough-Funktion zu aktivieren. Stellen Sie sicher, dass die Verkabelung
des optischen Eingangs und Ausgangs korrekt ist und dass keine Beschädigungen vorliegen.
Überprüfen Sie die Kongurationseinstellungen des BT HD STREAMERs gemäß den Anwei-
sungen in der Bedienungsanleitung. Wenn das Problem weiterhin besteht, wenden Sie sich an
Ihren Einbauspezialisten für weitere Unterstützung.
de

18
8. Technische Daten
56.3 mm
78.3 mm
3.08“
2.22“
22.2 mm
0.87“
Betriebsspannung 10,5 - 32 Volt (max. 5 Sek. bis zu 6 Volt)
Leistungsaufnahme DC 12 / 24 V
100 mA max. (+ bis zu 200 mA Remote-Ausgangsstrom)
Standby-Leistungsaufnahme
(Sandby-Schalter On)
~3 mA
Max. Remote-Ausgangsstrom 200 mA
Bluetooth
®
Standard 5.0 + EDR
Bluetooth
®
Codec Qualcomm
®
aptX™ HD, Qualcomm
®
aptX™, AAC, SBC
Bluetooth
®
Prol A2DP, AVRCP, SPP
Drahtlose Frequenz-Bandbreite 2402 ~ 2480 MHz
Reichweite Bis zu 10 m
Anzahl gekoppelter Geräte 8
Eingänge 1 x Optisch SPDIF (12 - 96 kHz)
1 x Remote-Eingang
1 x Pairing-Eingang
1 x Eingang für das optionale “HELIX BT HD Hands-Free Microphone Kit”
Ausgänge 1 x Optisch SPDIF (In Abhängigkeit der Signalquelle bis zu 96 kHz / 24 Bit)
1 x Remote-Ausgang
Lieferumfang 1 x BT HD STREAMER
1 x Power Input Stecker
1 x Montagematerial
19
Garantiehinweise
Die Garantieleistung entspricht der gesetzlichen Regelung. Von der Garantieleistung ausgeschlossen sind Defekte
und Schäden, die durch Überlastung oder unsachgemäße Behandlung entstanden sind. Eine Rücksendung kann
nur nach vorheriger Absprache in der Originalverpackung, einer detaillierten Fehlerbeschreibung und einem gültigen
Kaufbeleg erfolgen. Technische Änderungen, Druckfehler und Irrtümer vorbehalten! Für Schäden am Fahrzeug oder
Gerätedefekte, hervorgerufen durch Bedienungsfehler des Gerätes, können wir keine Haftung übernehmen.
Markenzeichen
Die Bluetooth
®
Wortmarke und die Logos sind eingetragene Warenzeichen der Bluetooth SIG,
Inc. und jegliche Nutzung dieser Marken durch die Audiotec Fischer GmbH geschieht unter
Lizenz. Andere Handelsmarken und Handelsnamen gehören den jeweiligen Inhabern.
Hinweise zur Entsorgung
Dieses Symbol bedeutet, dass das Produkt nicht über den Hausmüll entsorgt werden darf, sondern bei
einer entsprechenden Sammelstelle zum Recycling abgegeben werden muss. Befolgen Sie die ört-
lichen Vorschriften und entsorgen Sie das Produkt niemals mit dem normalen Hausmüll. Die ordnungs-
gemäße Entsorgung von Altgeräten trägt zur Vermeidung von Umwelt- und Gesundheitschäden bei.
Regulatorische Hinweise
Dieses Produkt ist mit einer CE-Kennzeichnung versehen. Damit ist das Gerät für den Betrieb in Fahr-
zeugen innerhalb der Europäischen Union (EU) zertiziert.
Dieses Produkt ist mit einer UKCA-Kennzeichnung versehen. Damit ist das Gerät für den Betrieb in Fahr-
zeugen innerhalb des Vereinigten Königreichs zertiziert.
Dieses Produkt ist mit einer EAC-Kennzeichnung versehen. Damit ist das Gerät für den Betrieb in Fahr-
zeugen innerhalb der Eurasian Customs Union zertiziert.
9. Rechtliche Hinweise
de

20
Table of contents
1. General information ........................................................................................................22
2. Connectors and control units .........................................................................................23
3. Hardware conguration ..................................................................................................24
3.1 Connection of a digital signal source in SPDIF format ........................................................................24
3.2 Connection of the optical digital output in SPDIF format ....................................................................24
3.3 Conguration of the standby mode (STBY) ..........................................................................................24
3.4 Optional: Connection of a hands-free microphone ..............................................................................24
3.5 Optional: Conguration of the hands-free protocol .............................................................................24
3.6 Connection of the Multi-purpose Power Connector ............................................................................. 25
3.7 Pairing of a Bluetooth
®
device ............................................................................................................... 26
4. Additional functions ........................................................................................................27
4.1 Pair pushbutton ......................................................................................................................................27
4.2 Status LED ..............................................................................................................................................27
4.3 Pass-through function ...........................................................................................................................27
5. Connection examples ......................................................................................................28
5.1 BT HD STREAMER as external Bluetooth
®
receiver ............................................................................28
5.2 BT HD STREAMER as external Bluetooth
®
receiver with additional digital signal source .................29
5.3 Stand-alone application .........................................................................................................................30
5.4 Stand-Alone application in combination with a head unit ...................................................................31
6. Connection of the optional HELIX BT HD Hands-Free Microphone Kit ........................32
7. Trouble shooting .............................................................................................................35
8. Technical data ..................................................................................................................36
9. Legal information ............................................................................................................37

21
en
Congratulations
Dear Customer,
Congratulations on purchasing this High Denition Bluetooth
®
Audio receiver.
We developed the BT HD STREAMER based on state-of-the-art engineering which is reected in its exceptional quality
and the impressive use of sophisticated technologies.
We hope you enjoy using this product
The
AUDIOTEC FISCHER Team
22
1. General information
To make optimal use of all the possibilities this product provides, please carefully read through the following installation
instructions. We guarantee that the awless condition of every device has been checked before delivery.
We recommend appointing a specialist to install the product, as the verication of professional installation and connec-
tion of the device is a prerequisite for the warranty services.
Before starting the installation, disconnect the negative connection of the car battery.
The audio receiver may only be installed in vehicles which have a 12 / 24 Volts negative terminal connected to the chas-
sis ground. Any other system could cause damage to the BT HD STREAMER and the electrical system of the vehicle.
Install your BT HD STREAMER in a dry place in the car. Do not t the device near parts that radiate heat or near the
vehicle’s electronic control units.
For safety reasons the BT HD STREAMER must be installed professionally to prevent hazard to the vehicle
and / or risk of injury to the passengers during a critical driving situation such as an emergency braking.
The audio receiver should be secured to a solid mounting surface using proper mounting hardware.
Important: During assembly, make sure that none of your vehicle’s safety systems (e.g. airbag) are negatively aected
in their function.
Before mounting, carefully examine the area around and behind the proposed installation location to ensure that there
are no electrical cables or components, hydraulic brake lines or any part of the fuel tank located behind the mounting
surface. Failure to do so may result in unpredictable damage to these components and possible costly repairs to the
vehicle.
Prior to installation, plan the wire routing to avoid any possible damage to the wire harness. All cabling should be pro-
tected against possible crushing or pinching hazards. Also avoid routing cables close to potential noise sources such
as electric motors, high power accessories and other vehicle harnesses or supply lines to vehicle devices (fan motors,
re control modules, fuel lines, etc.).
23
en
2. Connectors and control units
1
Multi-purpose Power Connector
Page 25, point 3.6
2
Optical output
Page 24, point 3.2
.
3
Optical input
Page 24, point 3.1
4
Microphone input
Page 24, point 3.4
5
Pair pushbutton
Page 27, point 4.1
6
Status LED
Page 27, point 4.2
7
Hands-free Protocol switch
Page 24, point 3.5
8
Standby switch
Page 24, point 3.3
Pin assignment of the multi-purpose Power Connector
1. Bluetooth
®
Pairing
2. Remote out
3. Remote in
4. Ground (GND)
5. +12 V / +24 V
1
2
3 4
5
7 8
6
Plug of the Multi-purpose Power Connector (Power Input Plug)

24
Congure the BT HD STREAMER in the following order.
To avoid connection errors and damage, ask your installation specialist in case of doubt and be sure to observe the
general connection and installation instructions (see page 22).
3.1 Connection of a digital signal source in SPDIF format
If you have a signal source with an optical digital output, this can be connected to the BT HD STREAMERs optical
digital input. The sampling rate must be between 12 - 96 kHz.
Note: The Bluetooth
®
audio signal always has priority when forwarding the signal.
MPORTANT: The remote input of the Multi-purpose Power Connector has to be connected in order to use the
pass-through function of the optical input.
3.2 Connection of the optical digital output in SPDIF format
Optical, digital stereo signal output in SPDIF format for connecting a signal processor (DSP) or DSP amplier.
Depending on the connected signal source, the output has a sampling rate of up to 96 kHz / 24 Bit and provides
a volume-controlled signal.
Note: This output only provides a stereo signal. Fader information and multi-channel surround sound formats such
as Dolby or DTS are not supported!
3.3 Conguration of the standby mode (STBY)
The BT HD STREAMER oers a standby mode that reduces power consumption to a minimum (approx. 3 mA)
when switched on continuously and allows you to connect to the streamer from the signal source (smartphone,
audio player, etc.) at any time, even when the rest of the sound system is switched o.
When a Bluetooth
®
audio signal is detected, the BT HD STREAMER is automatically activated and generates a
remote signal that can be used to switch on the connected sound system. If no Bluetooth
®
audio signal is active
for more than three minutes, the connected sound system switches o and the BT HD STREAMER returns to
its energy-saving mode. The standby mode must always be activated if the streamer should be activated by a
Bluetooth
®
signal source, e.g. a smartphone.
On: The BT HD STREAMER is permanently switched on and in standby mode so that you can connect to the
device at any time. When a Bluetooth
®
audio signal is detected, a remote signal is generated and the con-
nected sound system is switched on. If no stream is active for longer than three minutes, the sound system is
switched o and the streamer switches back to energy-saving mode.
IMPORTANT: When standby mode is activated, the optical input signal pass-through function is not possible.
To be able to use this, the remote input must be connected.
O: The streamer is only switched on via a remote signal. To do this, the remote input on the Multi-purpose Power
Connector must be connected.
3.4 Optional: Connection of a hands-free microphone
Connection for the optional HELIX BT HD Hands-Free Microphone Kit for retrotting a hands-free function.
Further information on the connection can be found on page 32 et seq. of these operating instructions.
3.5 Optional: Conguration of the hands-free protocol
If you connect the optional HELIX BT HD Hands-Free Microphone Kit, it is necessary to set the hands-free pro-
tocol switch (HFP – Hands-free protocol) to “on”. If a factory installed hands-free kit is to be used, the hands-free
protocol must be deactivated (HFP = o) to avoid conicts between the hands-free kits.
Note: This exact conguration is essential when the streamer is switched o. In addition, a new pairing with the
signal source is required if it was previously used with the BT HD STREAMER without an active hands-free pro-
tocol.
3. Hardware conguration
25
en
3.6 Connection of the Multi-purpose Power Connector
An overview of the pin assignment of the Multi-purpose Power Connector can be found on page 23. Only connect
the supplied Power Input Plug with integrated screw terminals.
+12 V / +24 V: Connection for the positive cable. The supply cable must be connected either directly to
the positive terminal of the battery or to a power distributor that is connected to the positive
terminal of the battery. Although the current consumption of the HELIX BT HD STREAMER
is very low at approx. 100 mA (additionally, plus up to 200 mA due to the maximum output
current of the remote output), cables with a cross-section of at least 1 mm² / AWG 18 should
be used for the power supply.
Ground (GND): Connection for the ground cable. The ground cable must be connected to the vehicle chas-
sis at a non-insulated point. The cable cross-section should have the same diameter as the
positive cable. Insucient ground contact will lead to malfunctions.
Remote Input: The remote input is used to switch on the BT HD STREAMER if the optical input is used as
signal input.
Note: This input must not be connected, if the streamer is switched on via a Bluetooth
®
au-
dio signal. In this case, it is necessary to activate the standby mode of the device (page 24,
point 3.3).
Remote Output: The remote output is used to switch on the DSP or DSP amplier connected to the optical
digital output. Connect the remote output to the remote input of your DSP product.
Bluetooth
®
Pairing: This input allows to connect an optional external pushbutton to perform various pairing func-
tions of the BT HD STREAMER.
The pushbutton must be connected as shown in the following diagram:
a. Bluetooth
®
Pairing connector
b. Ground connector (GND)
c. External pushbutton
a
b
c
Alternatively, the Bluetooth
®
pairing connector can also be connected directly to chassis
ground in most of the locations within the vehicle via the optional pushbutton.
The following functions can be controlled via an optional pushbutton which is connected to
the Bluetooth
®
pairing gate connector:
- Short button press (<3s): Reconnect → Automatically connects to the last paired
device if no device is connected when the button is
pressed
or
Disconnect → Disconnects the currently connected
device
- Long button press (>3s & <10s): Start pairing mode
- Very long button press (>10s): Delete all paired devices
Note: Only use the supplied plug with the integrated screw terminals for the connection.

26
3.7 Pairing of a Bluetooth
®
device
Once you have connected and congured the BT HD STREAMER as described before, you can connect a signal
source, such as a smartphone, via Bluetooth
®
via the following steps:
1. Activate pairing mode
Activate the pairing mode of the BT HD STREAMER using the pair pushbutton (page 21, point 5), via the gate
input of the optional HELIX BT HD Hands-Free Microphone Kit or via an optional external pushbutton connected
to the Bluetooth
®
pairing connector (page 25, point 3.6) of the Multi-purpose Power Connector.
2. Pair a new Bluetooth
®
device
Go to the Bluetooth
®
settings of your signal source and start the search for new available devices.
3. Establish connection
To establish a connection tap on BT HD STREAMER in the list.
4. Conrm connection
As soon as the connection is established, your signal source displays a conrmation and the Status LED of the
BT HD STREAMER ashes blue every 2 seconds.
5. Testing the connection
Play a song title on the signal source to ensure that the sound is played back via the sound system.
Note: This process only has to be done once for each Bluetooth
®
signal source. You will then nd the paired
Bluetooth
®
device in the list of your known Bluetooth
®
devices.
After this procedure, the BT HD STREAMER will automatically attempt to connect to the last paired device each
time it is switched on.
The BT HD STREAMER stores internally up to 8 paired devices. When the maximum number is reached, the
oldest device is always deleted from the list of known devices.
With all 8 devices, it is possible to directly connect to the BT HD STREAMER by selecting the streamer from its
Bluetooth
®
device list of your known Bluetooth
®
devices.
3. Hardware conguration

27
en
4. Additional functions
4.1 Pair pushbutton
This button is used to execute various pairing functions of the BT HD STREAMER. The Status LED (point 4.2)
provides information on the current connection status.
- Short button press (<3s): Reconnect → Automatically connects to the last paired device if no device is
connected when the button is pressed
or
Disconnect → Disconnects the currently connected device
- Long button press (>3s & <10s): Start pairing mode
- Very long button press (>10s): Delete all paired devices
4.2 Status LED
The status LED uses two LEDs to indicate the operating status of the BT HD STREAMER and its Bluetooth
®
connection status.
Operating status:
Green fast ashing: Device start / device switch-o
Green permanently on: Streaming active
Green slow ashing: BT HD STREAMER is in update mode
Green very slow ashing: Pass-through function active
Green ashing every 10 sec. slowly: BT HD STREAMER is in standby mode
Bluetooth
®
connection status:
Blue 1s on, 2s o: No device connected
Blue ashing every 2s: Device connected
Blue double ashing every 2s: Signal playback
Blue / red fast ashing: Pairing mode active
4.3 Pass-through function
The BT HD STREAMER oers a pass-through function that bypasses the audio signal directly and lossless from
the optical digital input to the digital output. This is particularly convenient if the optical signal input of the connect-
ed DSP or DSP amplier is already used, for example by a head unit or high-res player. In this case, the digital
signal source can be connected to the BT HD STREAMER, which in turn can be connected to the sound system
without losing the fully digital signal chain. Connection examples for various applications can be found on page
28 et seq.
Note: The pass-through function is always active when no Bluetooth
®
audio signal is being played.
IMPORTANT: The remote input of the Multi-purpose Power Connector has to be connected in order to use the
pass-through function of the optical input.
28
5. Connection examples
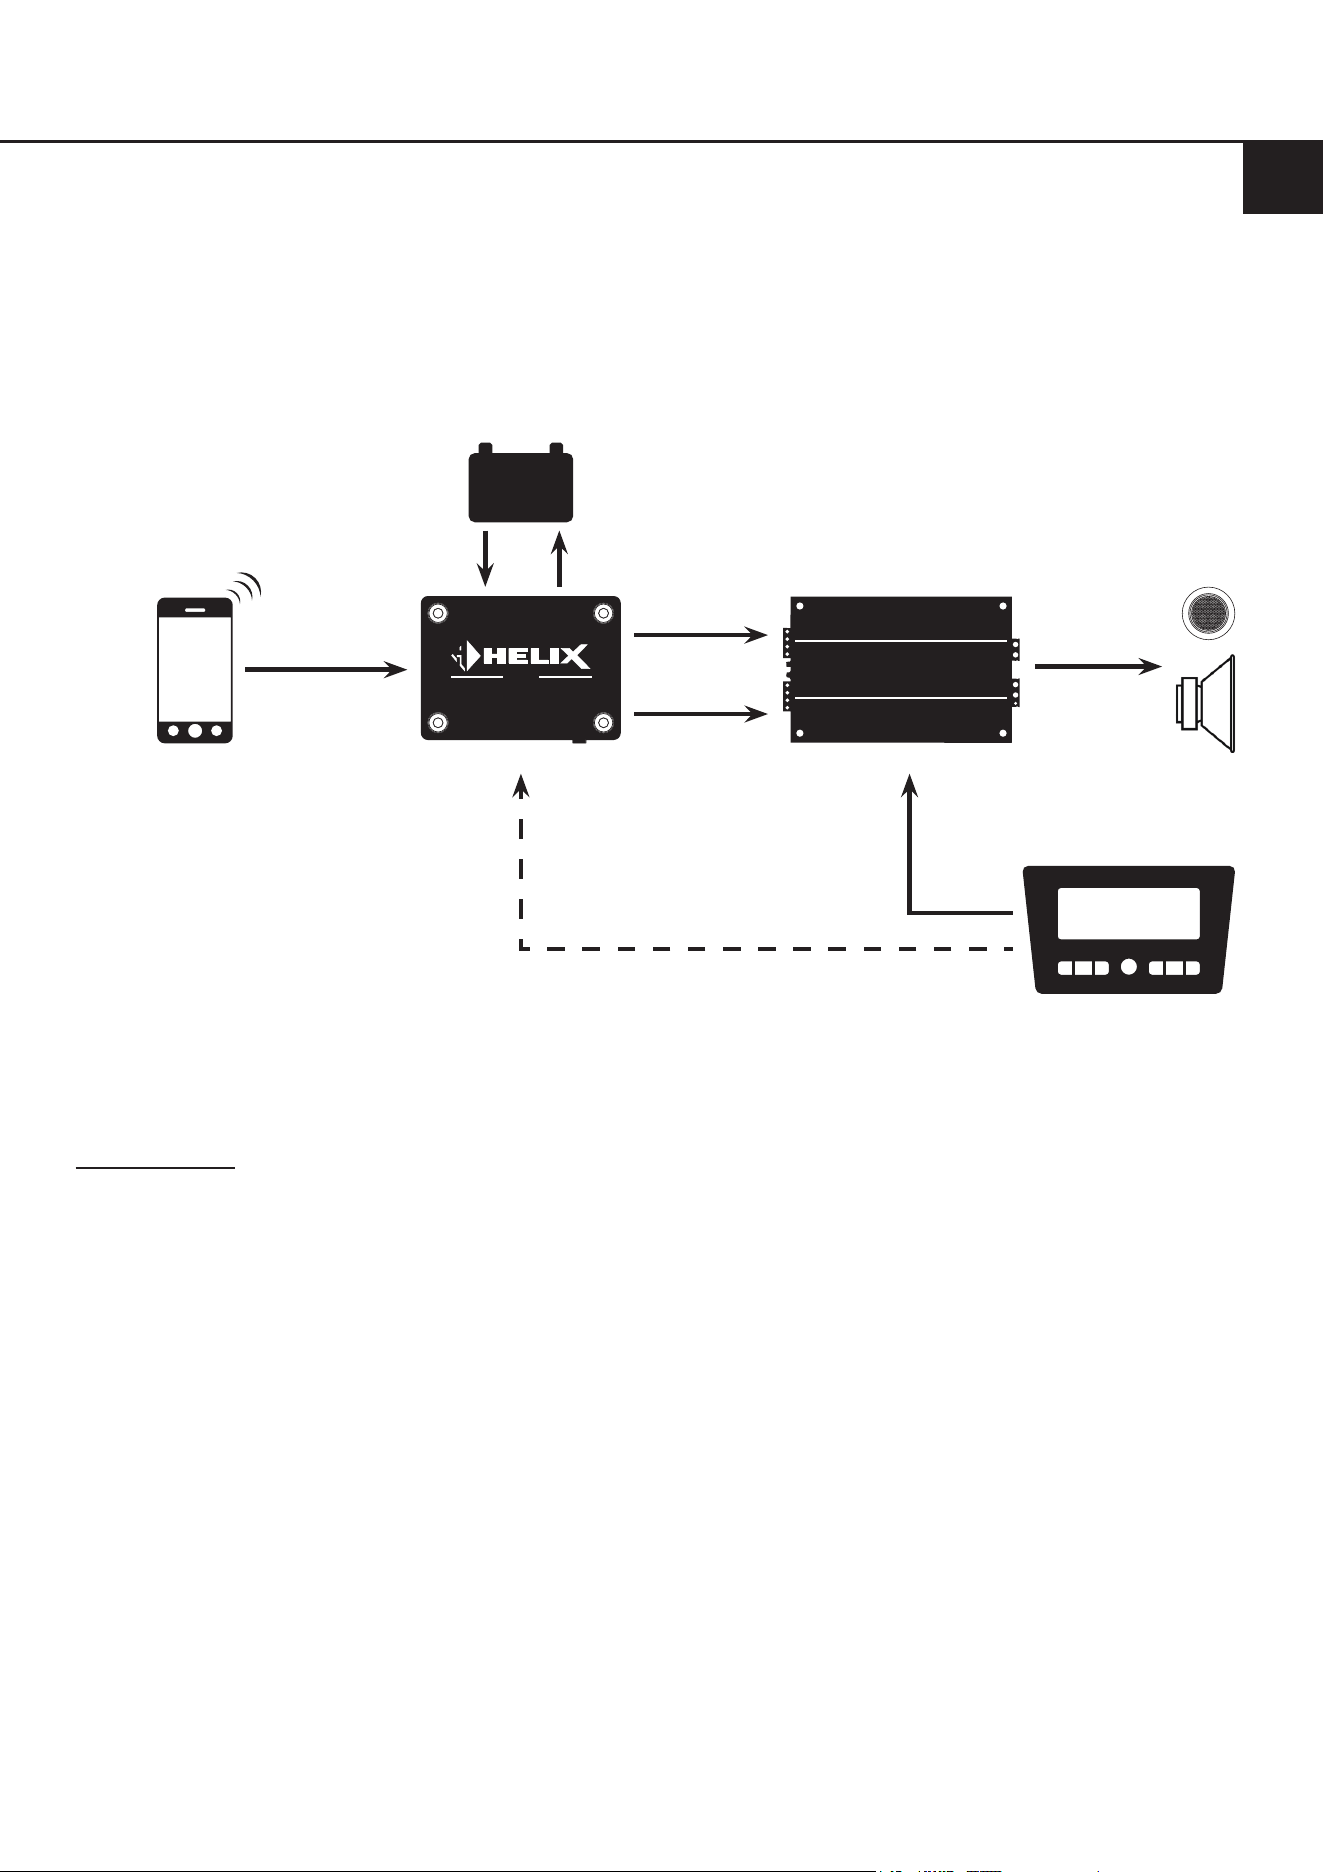
5.1 BT HD STREAMER as external Bluetooth
®
receiver
The BT HD STREAMER is integrated into the sound system as an external Bluetooth
®
receiver and additional signal
source. The BT HD STREAMER is switched on via the remote output signal of the connected DSP / DSP amplier.
Standby mode is switched o (STBY switch = o).
DSP /
DSP amplier
- +
remote
signal
to
loudspeakers
optical
digital signal
STREAMER
BT HD
Bluetooth
®
audio signal
Bluetooth
®
signal source
e.g. smartphone
external power supply
Standby mode = off
Functionality: The BT HD STREAMER is switched on and o via the DSP / DSP amplier. After switching on, the
BT HD STREAMER automatically attempts to connect to the last paired device. If the device is not within range, you can
connect to the BT HD STREAMER manually via the Bluetooth
®
menu of the signal source. The device is automatically
switched o when the sound system is switched o.
remote signal
analog
signal
factory or
aftermarket head unit
29
en
5.2 BT HD STREAMER as external Bluetooth
®
receiver with additional digital signal source
The BT HD STREAMER is integrated into the sound system as an additional signal source, as in the example 5.1. In
addition, another signal source is integrated into the sound system via the optical digital input of the BTHD STREAMER.
In this case, the sound system is switched on via an external remote signal or the automatic switch-on function of the
DSP / DSP amplier. The BT HD STREAMERs standby mode must be switched o (STBY switch = o).
DSP /
DSP amplier
- +
remote
signal
to
loudspeakers
optical
digital signal
STREAMER
BT HD
Bluetooth
®
audio signal
optional remote signal (if available)
optical
digital signal
signal source
e.g. head unit, audio inter-
face, high-res player, etc.
Bluetooth
®
signal source
e.g. smartphone
external power supply
Standby mode = off
Functionality: The BT HD STREAMER is switched on and o via the DSP / DSP amplier. After switching on, the
BT HD STREAMER automatically attempts to connect to the last paired device. If the device is not within range, you can
connect to the BT HD STREAMER manually via the Bluetooth
®
menu of the signal source. The second signal source,
which is connected to the optical digital input of the BT HD STREAMER, can now also be used for music playback.
In this combination, the Bluetooth
®
music playback always has higher priority than the second signal source, i.e. the
music playback of the second signal source is interrupted immediately as soon as music is played via Bluetooth
®
.
After pausing Bluetooth
®
playback, the BT HD STREAMER automatically switches back to the second signal source.
This application oers a wide range of conguration options, for example if an audio interface is also to be integrated via
an optical digital signal or if a high-res player is to be integrated as an additional signal source.
30
5. Connection examples
5.3 Stand-alone application
The BT HD STREAMER is integrated as main signal source and switches the entire sound system on and o. To do
this, the device is operated in standby mode (STBY switch = on) so that the Bluetooth
®
signal source can connect to
the Bluetooth
®
receiver at any time. If an audio signal is played after connection, the BT HD STREAMER generates a
remote output signal which switches on the connected sound system.
Note: In this case, the BT HD STREAMER is only switched on via the Bluetooth
®
signal source, but can also be switched
on via the remote input.
DSP /
DSP amplier
- +
remote
signal
to
loudspeakers
optical
digital signal
STREAMER
BT HD
Bluetooth
®
audio signal
Bluetooth
®
signal source
e.g. smartphone
external power supply
Standby mode = on
Functionality: The BT HD STREAMER is switched on and o via the Bluetooth
®
signal source. To do this, it is necessary
to connect a paired Bluetooth
®
signal source to the BT HD STREAMER manually, using the Bluetooth
®
menu of the
device. The sound system is then switched on automatically after playing music.
As soon as the music playback is paused for longer than three minutes, the system is automatically switched o again.
However, the Bluetooth
®
signal source remains connected to the system so that music playback can be restarted at
any time.
This application is particularly suitable for retrotting classic cars and motorhomes.
31
5.4 Stand-Alone application in combination with a head unit
The BT HD STREAMER is integrated as one signal source parallel to the head unit. Both signal sources can now switch
the entire sound system on and o. The head unit automatically switches the sound system on via the loudspeaker
outputs. If the head unit is switched o or not in use, the BT HD STREAMER can also switch on the complete sound
system via a Bluetooth
®
signal source, as in example 5.2. Therefore, the BT HD STREAMERs standby mode must be
switched on (STBY switch = on).
DSP /
DSP amplier
- +
to
loudspeakers
STREAMER
BT HD
Bluetooth
®
audio signal
Bluetooth
®
signal source
e.g. smartphone
External power supply
Standby mode = on
Functionality: The BT HD STREAMER is switched on and o via the head unit or the Bluetooth
®
signal source. If the
head unit is o, it is necessary to connect a paired Bluetooth
®
signal source to the BT HD STREAMER manually, using
the Bluetooth
®
menu of the device. The sound system is then automatically switched on again after playing music. As
soon as the music playback is paused for longer than three minutes, the system is automatically switched o. However,
the Bluetooth
®
signal source remains connected to the system so that music playback can be restarted at any time.
This application is particularly suitable if you want to listen to music via your sound system even when the head unit /
ignition is not switched on in the vehicle, e.g. in motorhomes.
en
remote
signal
optical
digital signal
analog
signal
factory or
aftermarket head unit
optional remote signal (if available)
32
The following section describes the most important steps for connecting the HELIX BT HD Hands-Free Microphone Kit.
For safety reasons the microphone and its cable harnesses must be installed professionally to prevent hazard
to the vehicle and / or risk of injury to the passengers during a critical driving situation such as an emergency
braking.
Important: During assembly make sure that the safety systems of your vehicle (e.g. airbag) are not impaired or that the
cables cannot interfere with driving.
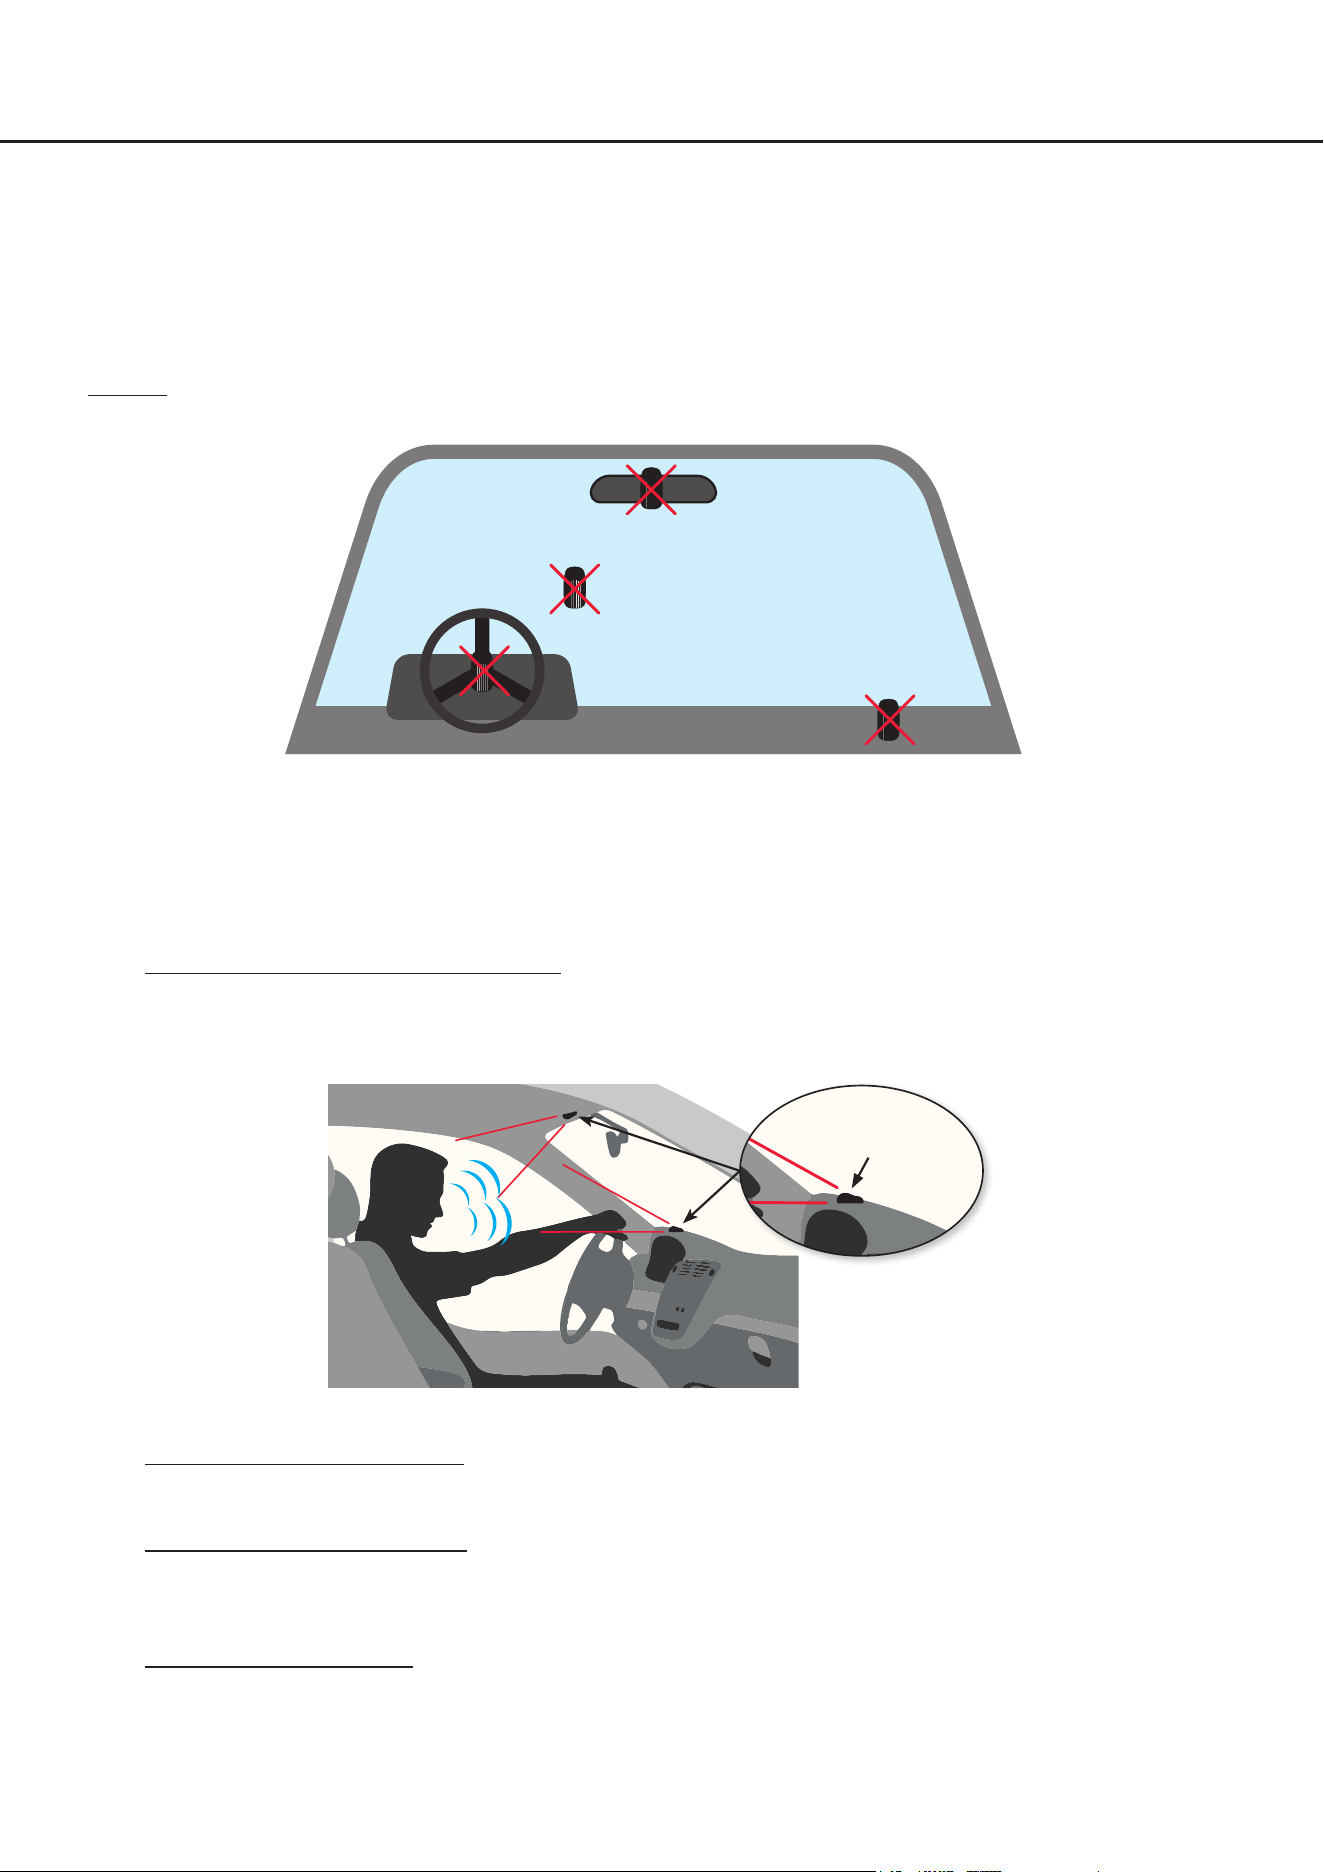
• Do not attach the microphone to an airbag cover (e.g. steering wheel or dashboard passenger side)
• Do not mount the microphone in the driver's eld of vision
• Do not place the microphone unsecured on top of the dashboard
1. Select mounting location for microphone
To ensure good voice pick-up, it is advisable to mount the microphone as close as possible to the front of the
person speaking and not behind panels, fabrics or covers, e.g. on the dashboard or on the roof lining in front of
the person speaking.
2. Preparing the cable harness
Check that the cable harness is long enough to reach from the microphone to the BT HD STREAMER.
3. Preparing the mounting location
Thoroughly clean the surface where you want to place the microphone to ensure it is free of dirt, dust and grease.
This will ensure better adhesion for mounting.
4. Mounting the microphone
Clean the bottom of the microphone and then stick on the enclosed adhesive pad. Then stick the microphone onto
the prepared mounting surface you have previously selected. To ensure maximum adhesion, it is important that
the microphones bottom with the adhesive surface is fully applied on the mounting surface.
6. Connection of the optional HELIX BT HD Hands-Free Microphone Kit
33
en
5. Installing the cable harness
Install the microphone cable in such a way that it does not cause any disturbance while driving and prevent risks
of pinching hazards or crushing. Make sure that the wiring is fully protected from cutting or wear at sharp edges.
6. Connecting the cable harness to the BT HD STREAMER
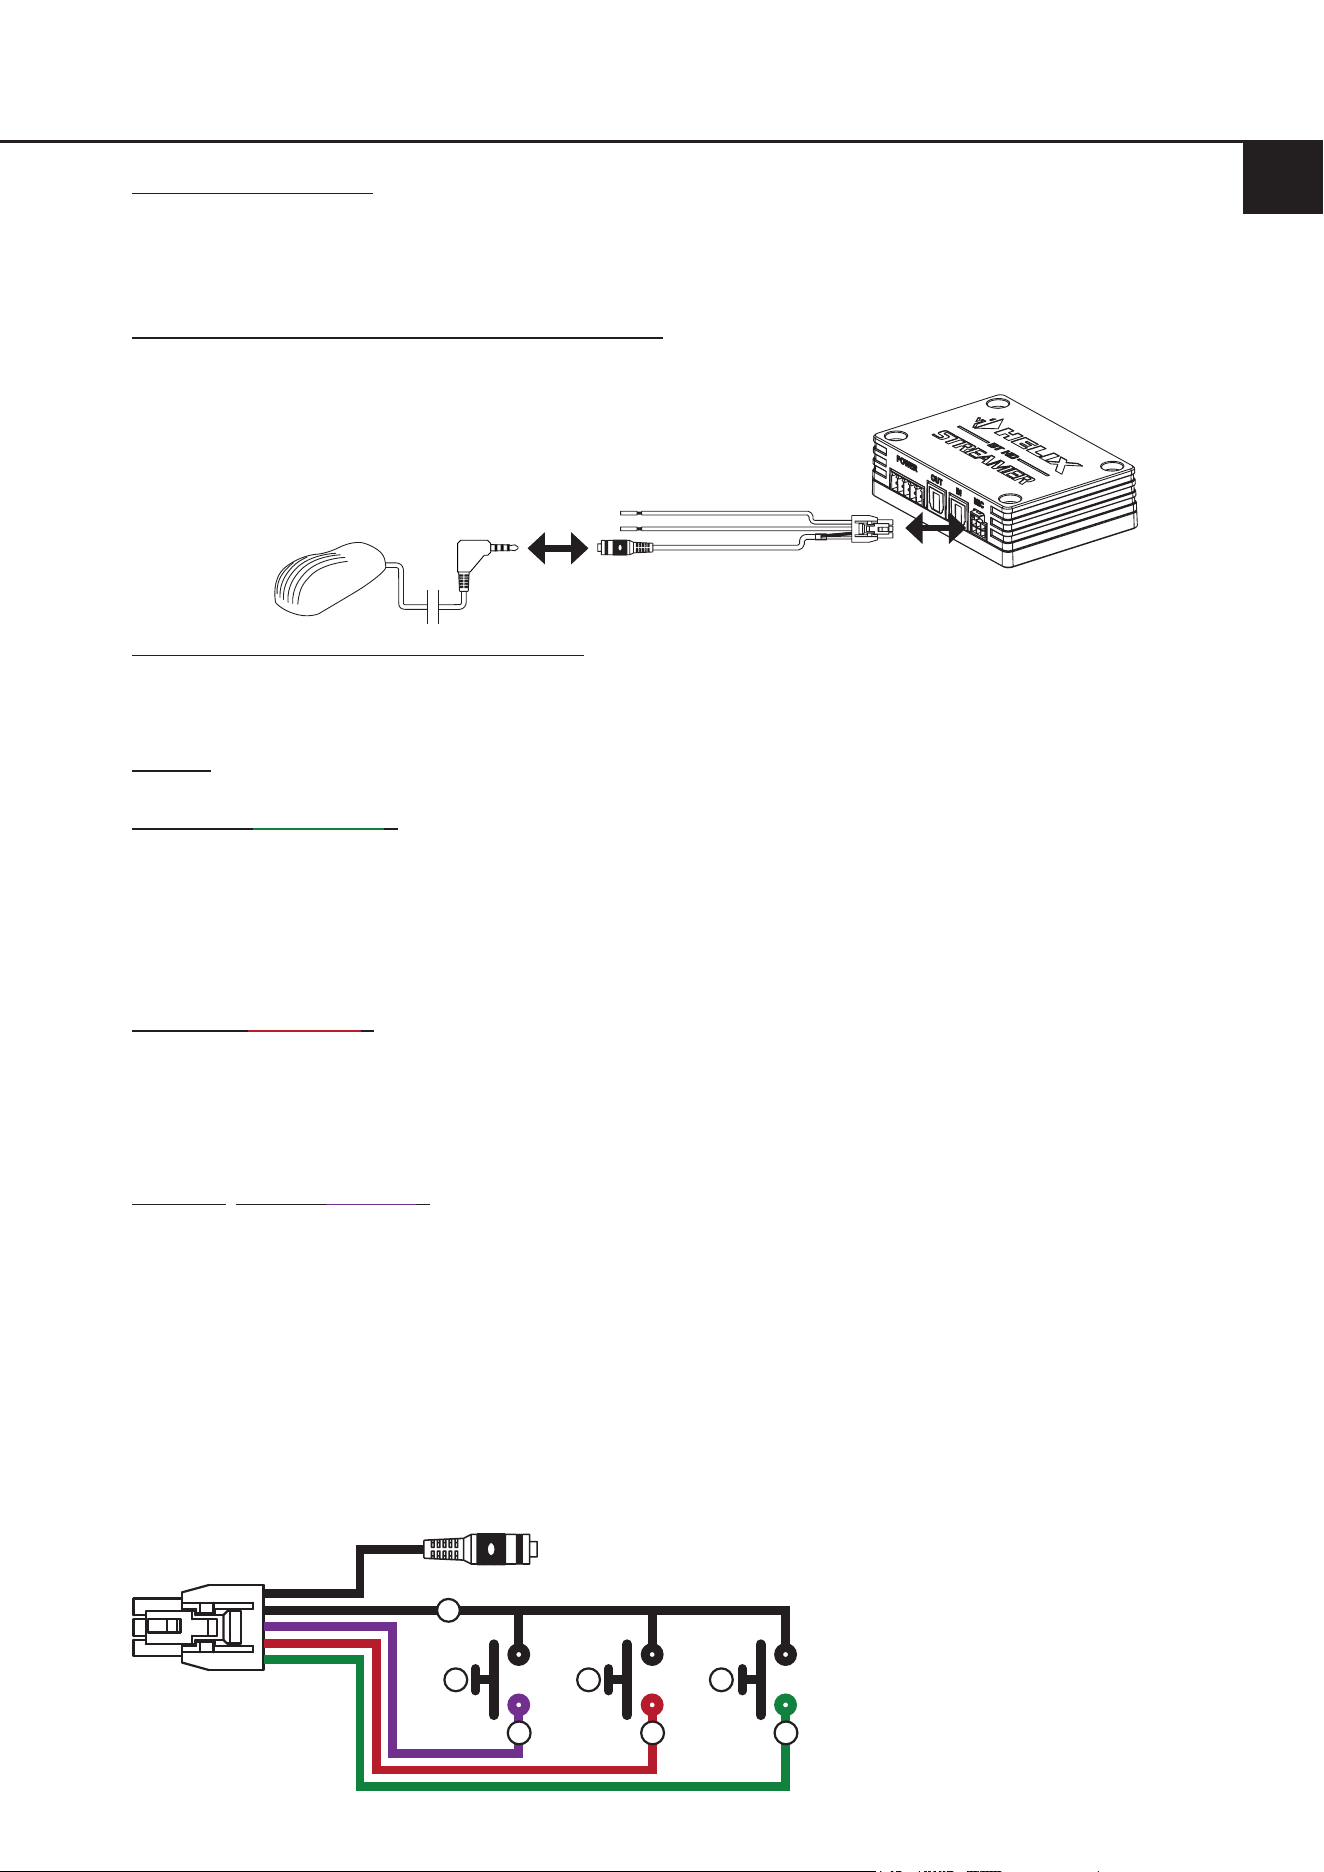
First connect the 3.0 m / 9.8 feet supply cable of the microphone to the 30 cm / 1 feet connection cable. Afterwards
insert the NanoFit plug into the microphone input of the BT HD STREAMER.
7. Optional: Connecting the function inputs
The ying leads of the 30 cm / 1 feet connection cable allow to connect optional external pushbuttons to perform
various functions. It is not necessary to use all connections. It is not necessary to use these connections for a
proper function of the hands-free system.
Important: Unused ying leads must be insulated to prevent short circuits.
Accept call (green cable): By connecting an optional external pushbutton, incoming telephone calls can
be answered and the "Next track" or "Previous track" function can be activated.
- Short button press (<3s): Accept incoming call
- Double, short button press: Next track
- Triple, short button press: Previous track
Reject call (red cable): By connecting an external pushbutton, incoming telephone calls can be reject-
ed or active calls can be ended.
- Short button press (<3s): Reject incoming call
or
end active call
Bluetooth
®
pairing (purple cable): By connecting an external pushbutton, various pairing functions can be acti-
vated. The Status LED of the BT HD STREAMER (page 27, point 4.2) shows
information on the current connection status.
- Short button press (<3s): Reconnect → Automatically connects to the last
paired device if no device is connected when the
button is pressed
or
Disconnect → Disconnects the currently connected
device
- Long button press (>3s): Start pairing mode
The pushbuttons must be connected as shown in the following diagram:
a
d
e
c
b b b
a. GND (Ground) / chassis ground
b. External pushbutton
c. Bluetooth pairing
d. Reject call
e. Accept call
(and track selection)

34
8. Activate hands-free protocol on the BT HD STREAMER
Set the hands-free protocol switch (HFP) to "on".
Note: Activation must be done when the device is switched o.
9. Reconnect mobile device
Start your sound system and activate the pairing mode of the BT HD STREAMER either with the pair pushbutton
(see page 23, point 5) or an external pushbutton. Connect your mobile device to the BT HD STREAMER accord-
ing to the instructions in this manual.
Note: Pairing is also required if your mobile device was previously connected to the BT HD STREAMER without
an active hands-free function.
10. Test connection
Check if the microphone is working properly by making a test call. Make sure that you can be heard and that the
audio quality is clear and distinct. If the test was not successful, check the cabling and all plug connections and
carry out the installation steps again. If the problem persists, contact your installation specialist for further assis-
tance.
6. Connection of the optional HELIX BT HD Hands-Free Microphone Kit

35
en
7. Trouble shooting
Problem: No Bluetooth
®
connection:
Possible reason: The BT HD STREAMER cannot establish a connection to the Bluetooth
®
signal source.
There may be an incompatibility between the BT HD STREAMER and the Bluetooth
®
signal source,
or there may be problems with the Bluetooth
®
connection.
Problem solution: Make sure that the Bluetooth
®
signal source is compatible with the BT HD STREAMER and that its
pairing mode is activated. Try to pair the Bluetooth
®
device again by activating pairing mode on the
BT HD STREAMER (page 26, point 3.7). Also check whether other Bluetooth
®
devices could be
causing the problem by temporarily deactivating them.
Problem: No audio signal from BT HD STREAMER
Possible reason: The BT HD STREAMER is not putting an audio signal out. There could be a problem with the ca-
bling or the settings of the BT HD STREAMER, which means that no audio signal is being transmit-
ted.
Problem solution: First check the cabling to ensure all connections are correct and secure. Make sure the Bluetooth
®
connection to the BT HD STREAMER is established. Check the conguration settings of the BT HD
STREAMER, especially the standby mode (page 24, point 3.3). If the problem persists, contact your
installation specialist for further support.
Problem: Problems with standby mode
Possible reason: The BT HD STREAMER's standby mode is not working as expected.
Problem solution: Check the conguration settings of the standby mode according to the instructions in the manual
(page 24, point 3.3). Make sure the wiring of the streamers remote output is correct and that there
are no interruptions or damage.
Check whether the Bluetooth
®
connection to the BT HD STREAMER is established. If this is not
the case, reconnect the device as described on page 26 under point 3.7. If the problem persists,
check the power supply to the BT HD STREAMER and contact your installation specialist for further
support if necessary.
Problem: Pass-through function of the optical input does not work
Possible reason: The pass-through function of the optical input is not working.
There may be a problem with the conguration or cabling of the BT HD STREAMER that is prevent-
ing the pass-through function.
Problem solution: Check whether the remote input of the Multi-purpose Power Connector is properly connected. Make
sure that the cabling of the optical input and output is correct and that there is no damage. Check
the conguration settings of the BT HD STREAMER according to the instructions in the user man-
ual. If the problem persists, contact your installation specialist for further assistance.
36
8. Technical data
56.3 mm
78.3 mm
3.08“
2.22“
22.2 mm
0.87“
Operating voltage 10.5 - 32 Volts (max. 5 sec. down to 6 Volts)
Power rating DC 12 / 24 V
100 mA max. (+ up to 200 mA remote output current)
Standby power consumption
(Sandby switch on)
~3 mA
Max. remote output current 200 mA
Bluetooth
®
standard 5.0 + EDR
Bluetooth
®
codec Qualcomm
®
aptX™ HD, Qualcomm
®
aptX™, AAC, SBC
Bluetooth
®
prole A2DP, AVRCP, SPP
Wireless frequency range 2402 ~ 2480 MHz
Range Up to 10 m
Number of paired devices 8
Inputs 1 x Optical SPDIF (12 - 96 kHz)
1 x Remote Input
1 x Pairing Inplut
1 x Input for optional “HELIX BT HD Hands-Free Microphone Kit”
Outputs 1 x Optical SPDIF (depending on the signal source up to 96 kHz / 24 Bit)
1 x Remote Output
Scope of delivery 1 x BT HD STREAMER
1 x Power Input plug
1 x Mounting material
37
en
9. Legal information
Warranty disclaimer
The warranty service is based on the statutory regulations. Defects and damage caused by overload or improper han-
dling are excluded from the warranty service. Any return can only take place following prior consultation, in the original
packaging together with a detailed description of the error and a valid proof of purchase.
Technical modications, misprints and errors excepted! For damages on the vehicle and the device, caused by han-
dling errors of the device, we can’t assume liability.
Trademarks
The Bluetooth
®
word mark and logos are registered trademarks owned by Bluetooth SIG, Inc.
and any use of such marks by Audiotec Fischer GmbH is under license. Other trademarks
and trade names are those of their respective owners
Correct disposal of this product
This symbol means the product must not be discarded as household waste, and should be delivered to
an appropriate collection facility for recycling. Follow local rules and never dispose of the product with
normal household waste. Correct disposal of old products helps prevent negative consequences for the
environment and human health.
Regular notes
This product has been issued a CE marking. This means that the device is certied for use in vehicles
within the European Union (EU).
This product has been issued an UKCA marking. This means that the device is certied for use in vehi-
cles within the United Kingdom.
This product has been issued an EAC marking. This means that the device is certied for use in vehicles
within the Eurasian Customs Union.

Audiotec Fischer GmbH
Hünegräben 26 - 28 · 57392 Schmallenberg ·Germany
Tel.: +49 2972 9788 0 · Fax: +49 2972 9788 88
E-mail: helix@audiotec-scher.com · Internet: www.audiotec-scher.com
Made in China