DRUM SET
MODEL:SH-002-BL-A,SH-002-RD,
SH-002-SY,SH-002-BK,SH-002-BL

- 1 -
A
MODEL:SH-002-BL-A,SH-002-RD, SH-002-SY,SH-002-BK,SH-002-BL
This is the original instruction, please read all manual instructions
carefully before operating. VEVOR reserves a clear interpretation of our
user manual. The appearance of the product shall be subject to the
product you received. Please forgive us that we won't inform you again if
there are any technology or software updates on our product.
DRUM SET

- 2 -
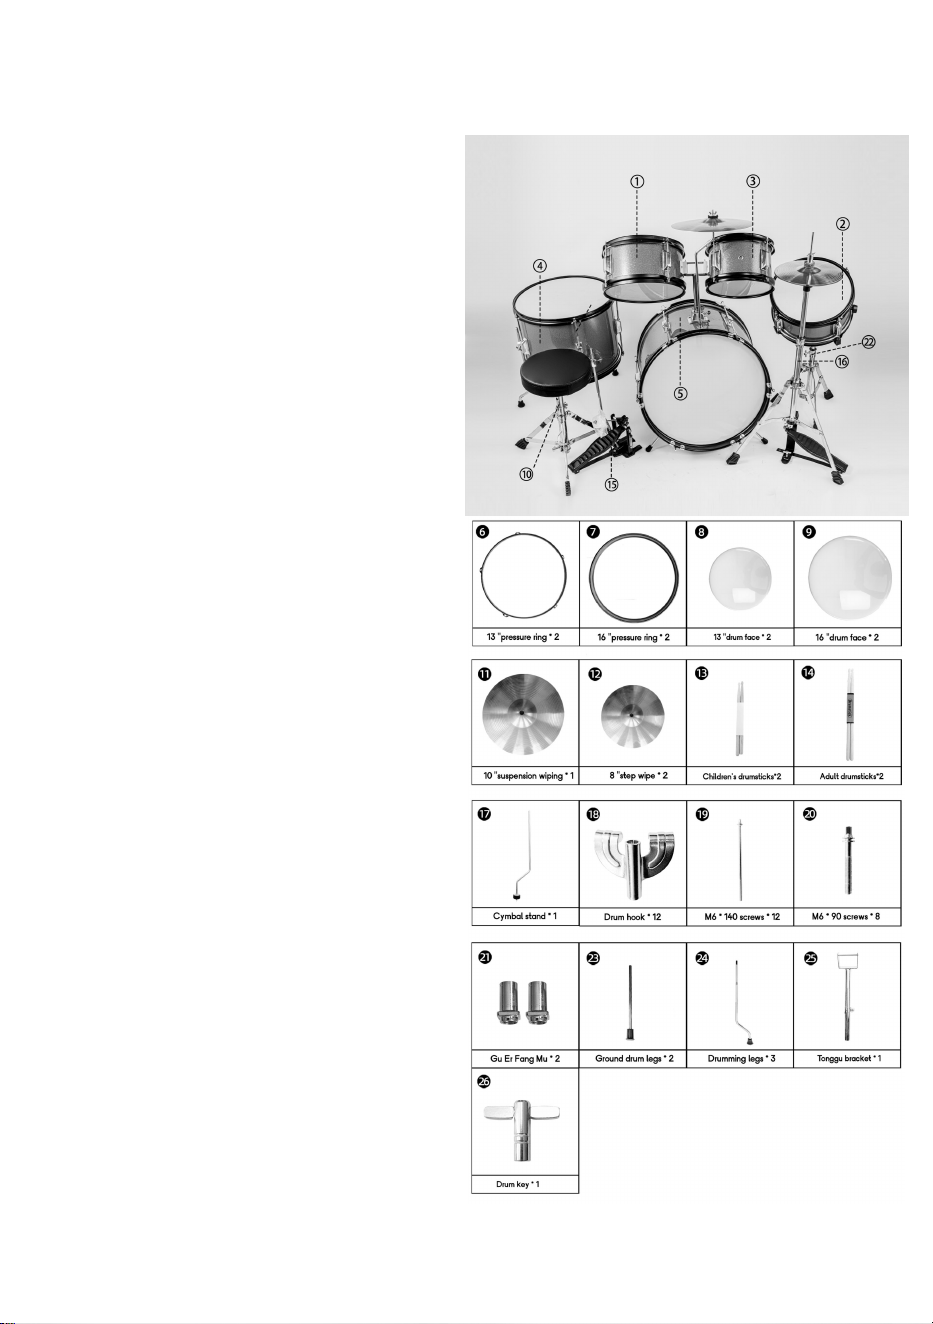
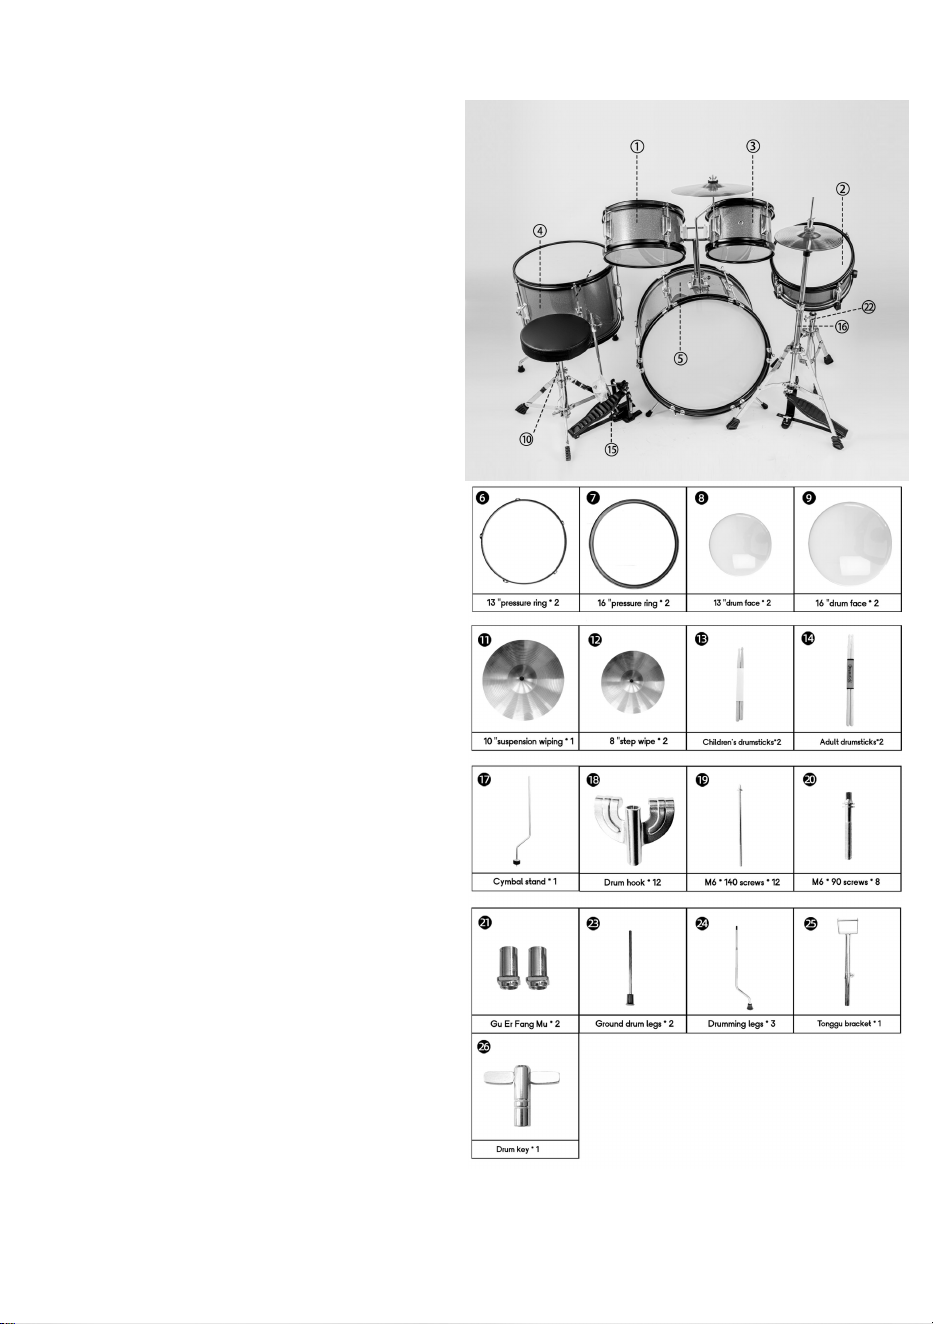
Parts list
(1)10 "* 6" drum * 1,
(2)10"* 5" Snare Drum * 1
(3)8 "* 5.5" drum * 1
(4)13 "* 10" Landing Tom drum * 1
(5)16 "* 11" Bass Drum * 1
(6)13 "pressure ring * 2
(7)16 "pressure ring * 2
(8)13 "drum face * 2
(9)16 "drum face * 2
(10)Drum stool * 1 set
(11)10 "Crash Cymbal * 1
(12)8 "Hi-hat * 2
(13)Children's drumsticks * 2
(14)Adult drumsticks * 2
(15)Step hammer * 1 set
(16)Hi-hat bracket * 1
(17)Cymbal pole * 1
(18)Drum hook * 12
(19)M6 * 150 screws * 12
(20)M6 * 100 screws * 8
(21)Drum ear square nut * 2
(22)1 set of Snare Drum stand
(23)Bass Drum legs * 2
(24)Drumming legs * 3
(25)Drum stand * 1
(26)Drum key*1
There is installation video guidance on the homepage of the purchasing
website. You can refer to the installation video if necessary.
- 3 -
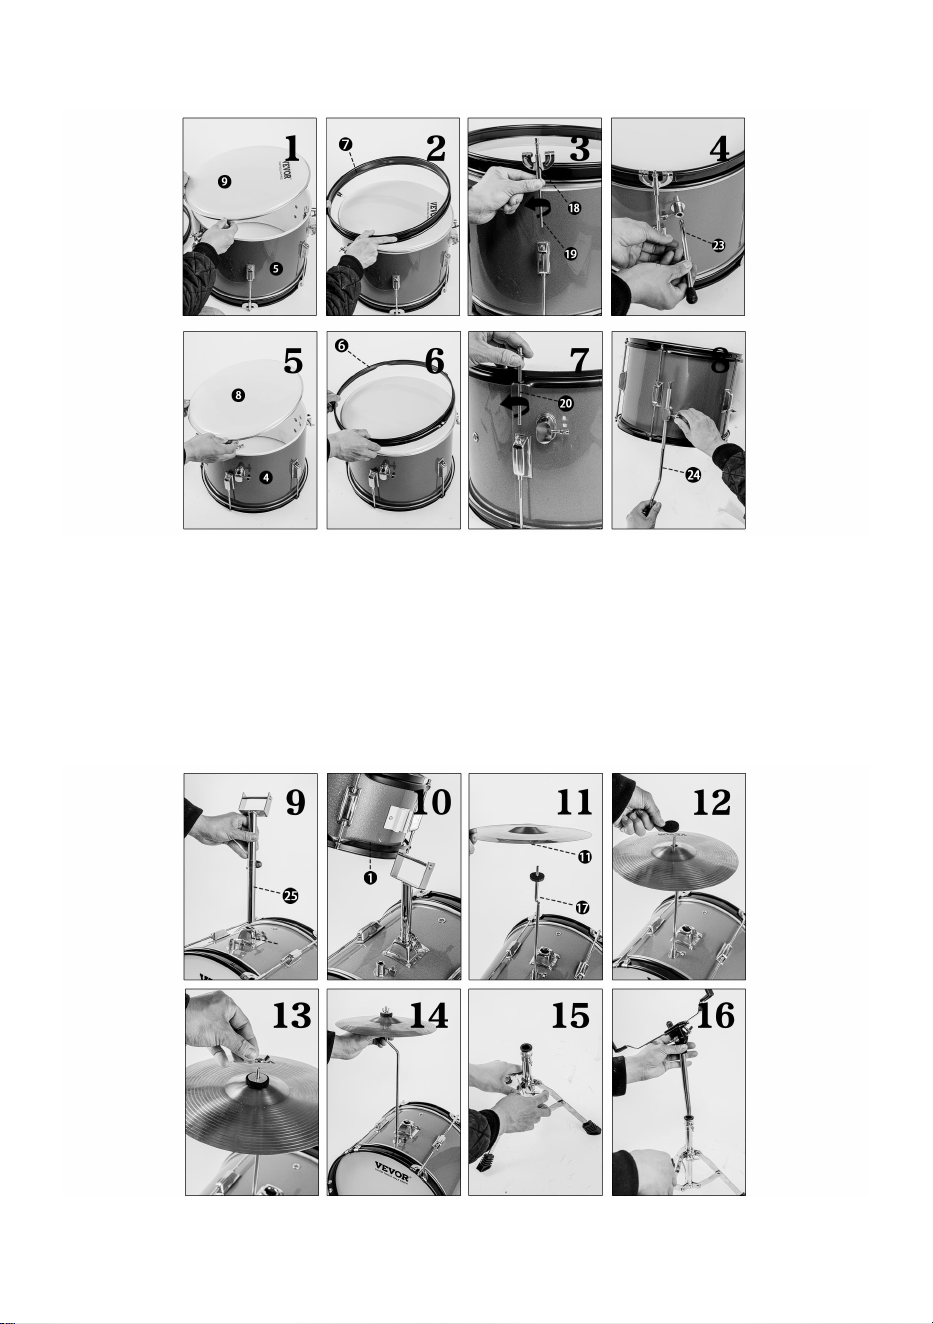
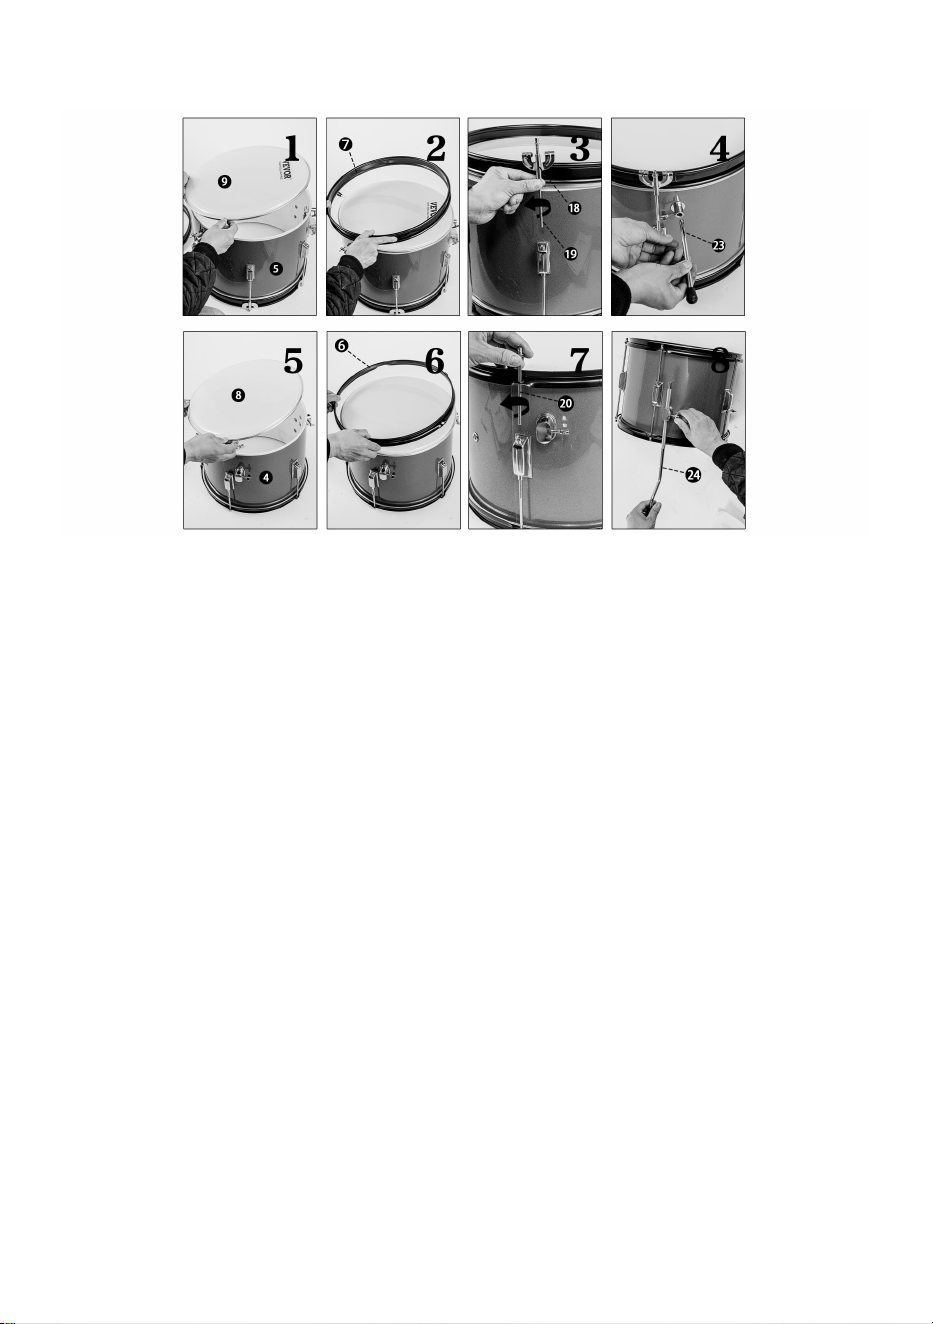
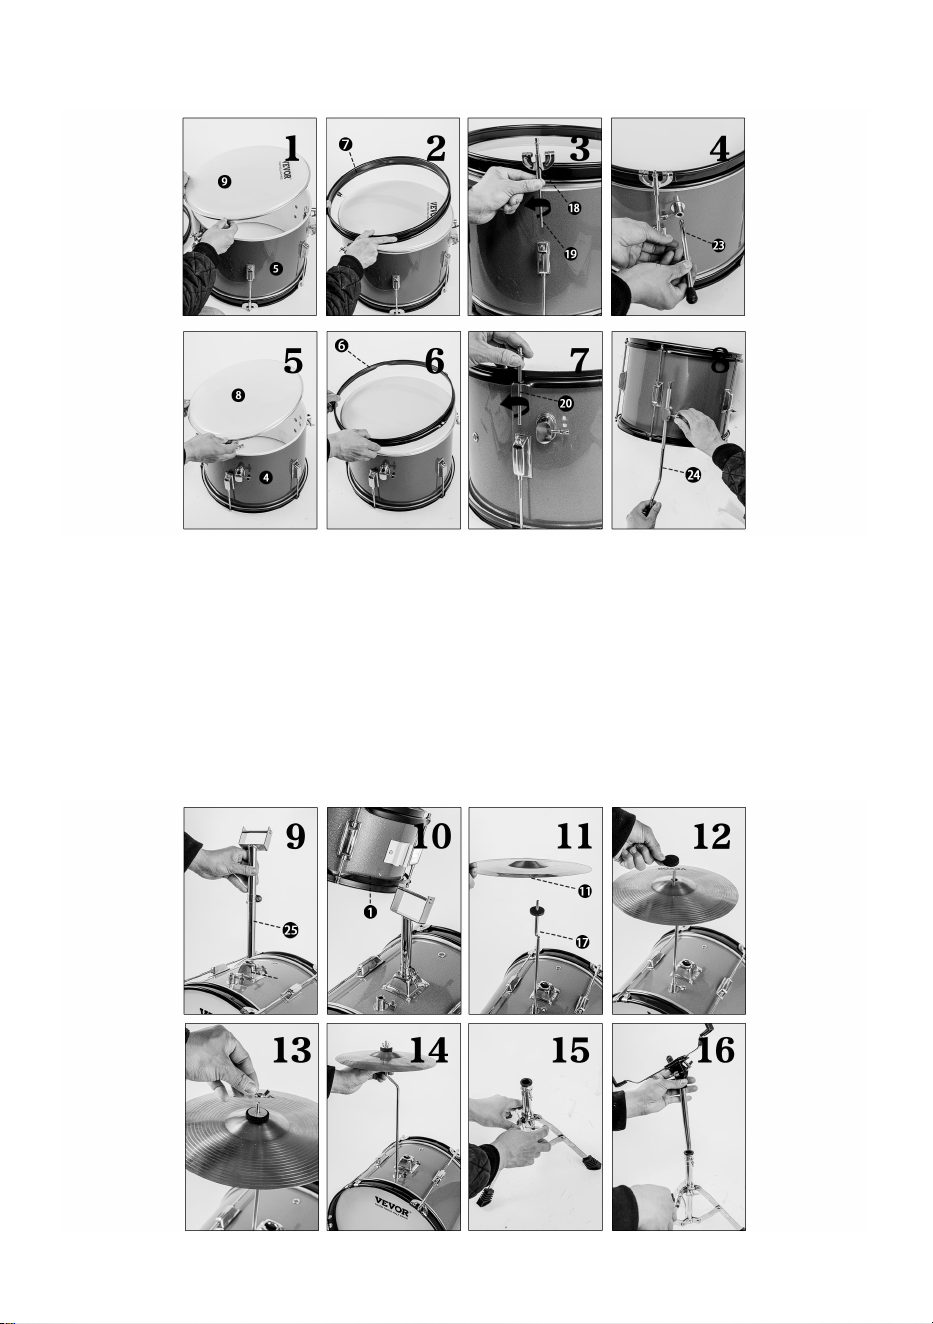
1-8: Lift the drumhead and place it on the drum shell, getting ready for installation.
Install the tension adjustment components of the drum (such as square head
screws), and use a tool (drum key) to initially tighten them evenly (tighten evenly)
to fix the drumhead. Repeat the above operation to install and adjust the other side
of the drumhead, ensuring that the tension of both drumheads is uniform and
appropriat

- 4 -
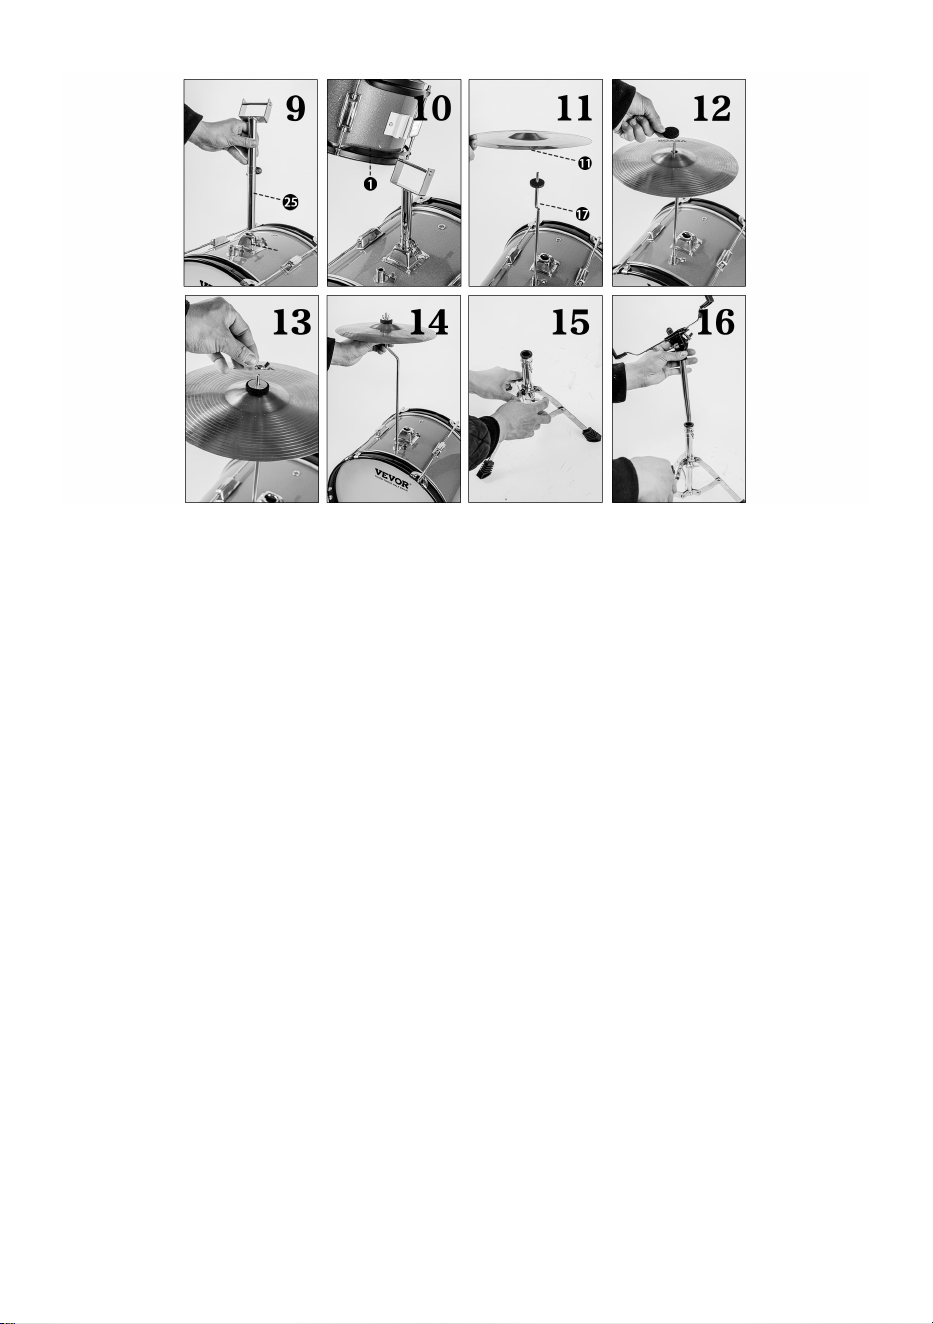
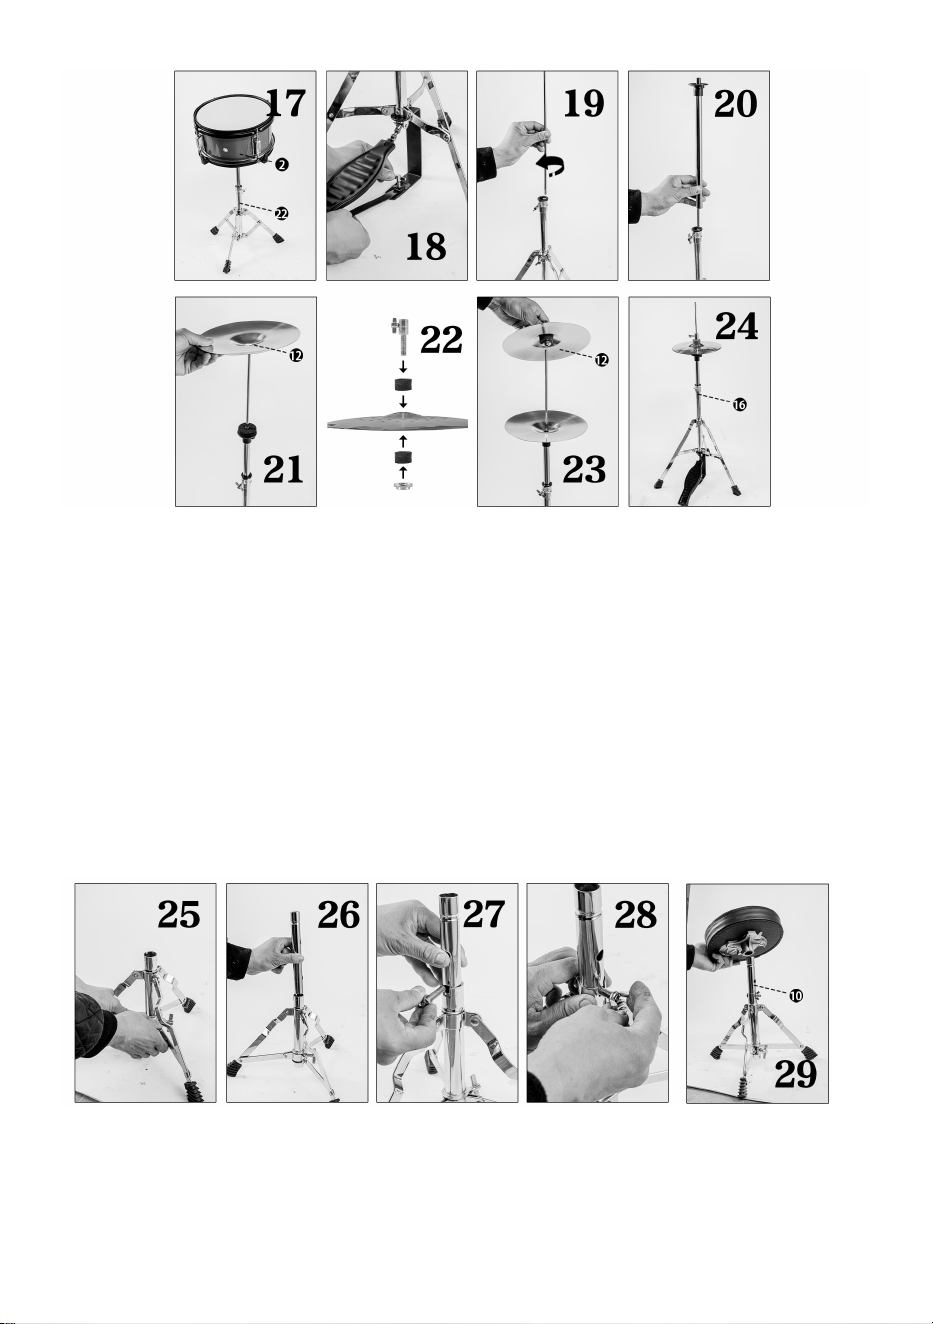
9: Install the stand components for the tom-toms and fix them at the appropriate
position on the bass drum or drum set to support the tom-toms.
10: Install the tom-toms onto the stand, adjust its position and Angle to facilitate
playing.
11-14: Pick up the cymbal mounting component and install the cymbal onto the
corresponding bracket, paying attention to the installation direction.
Adjust the cymbal stand to ensure that the cymbal is in the right and stable position.
Fine-tuning can be done through adjusting screws and other components.
15-16: Expand the support feet of the drum frame, erect the columns, install the
adjusting components and fix them to stabilize the drum frame.Further adjust the
drum frame components to ensure their stability and get ready for the placement of
drums or other accessories.
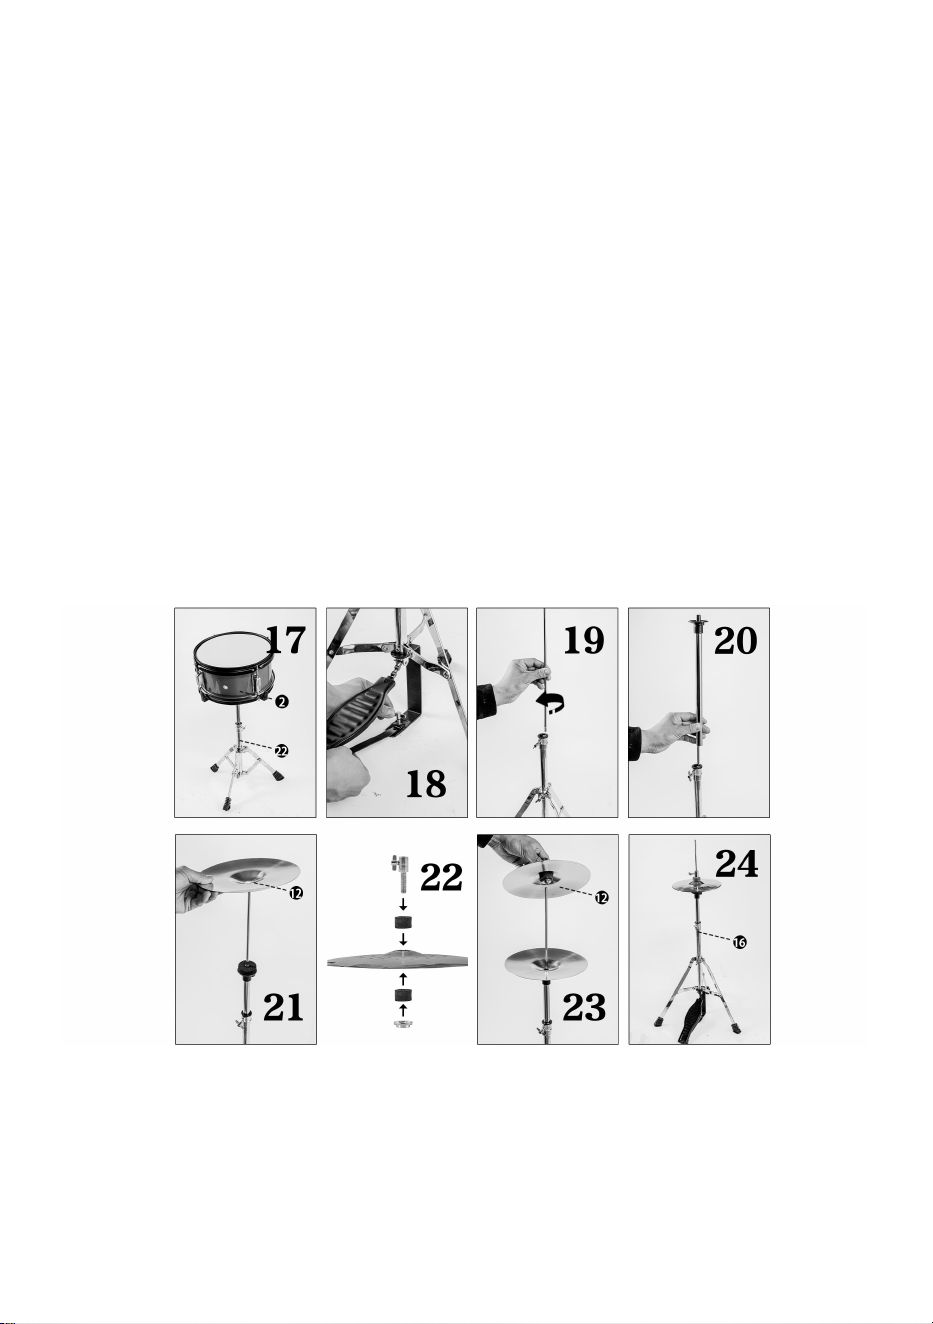
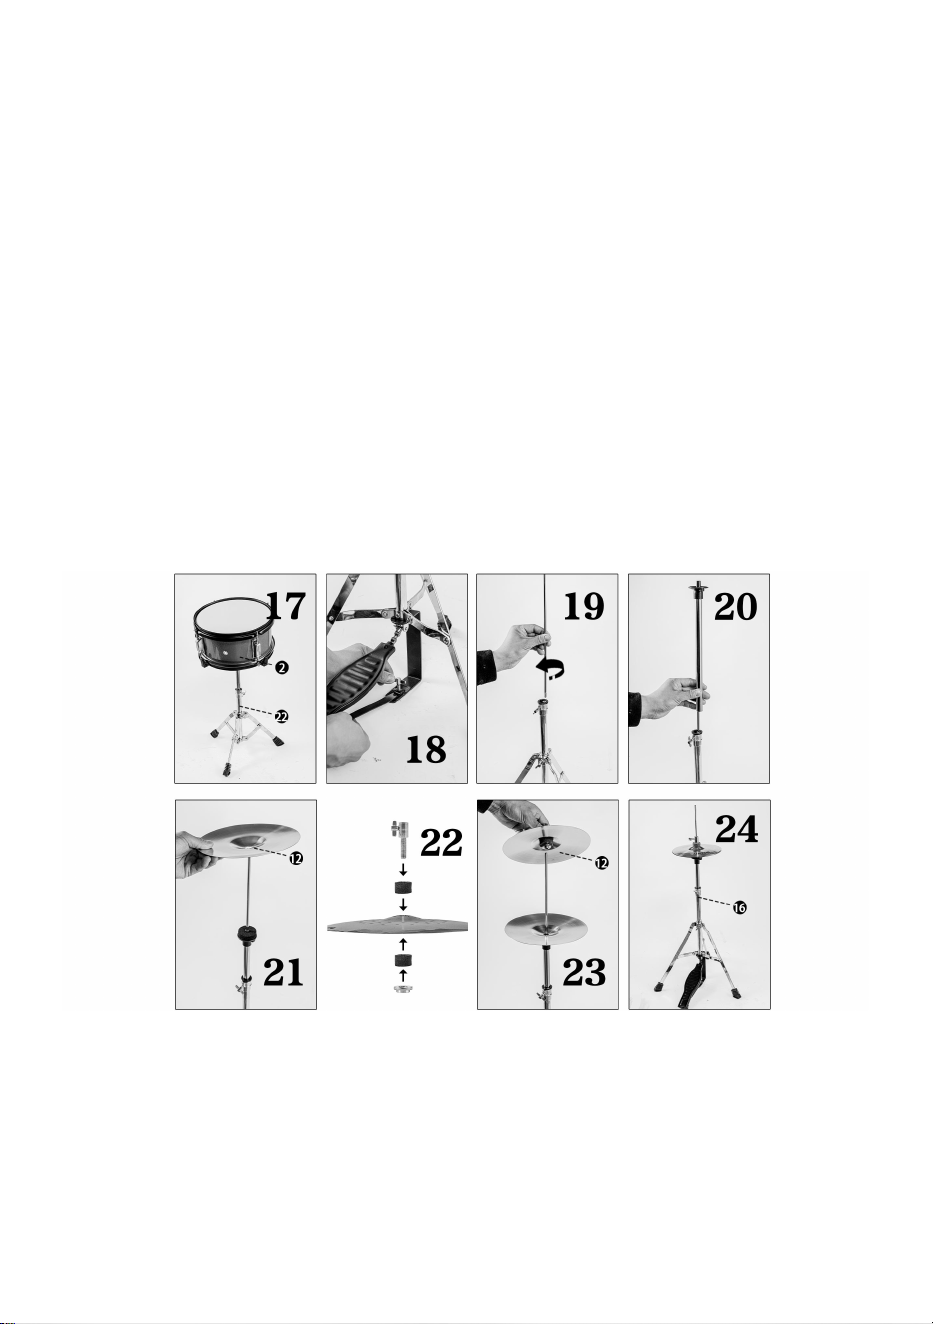
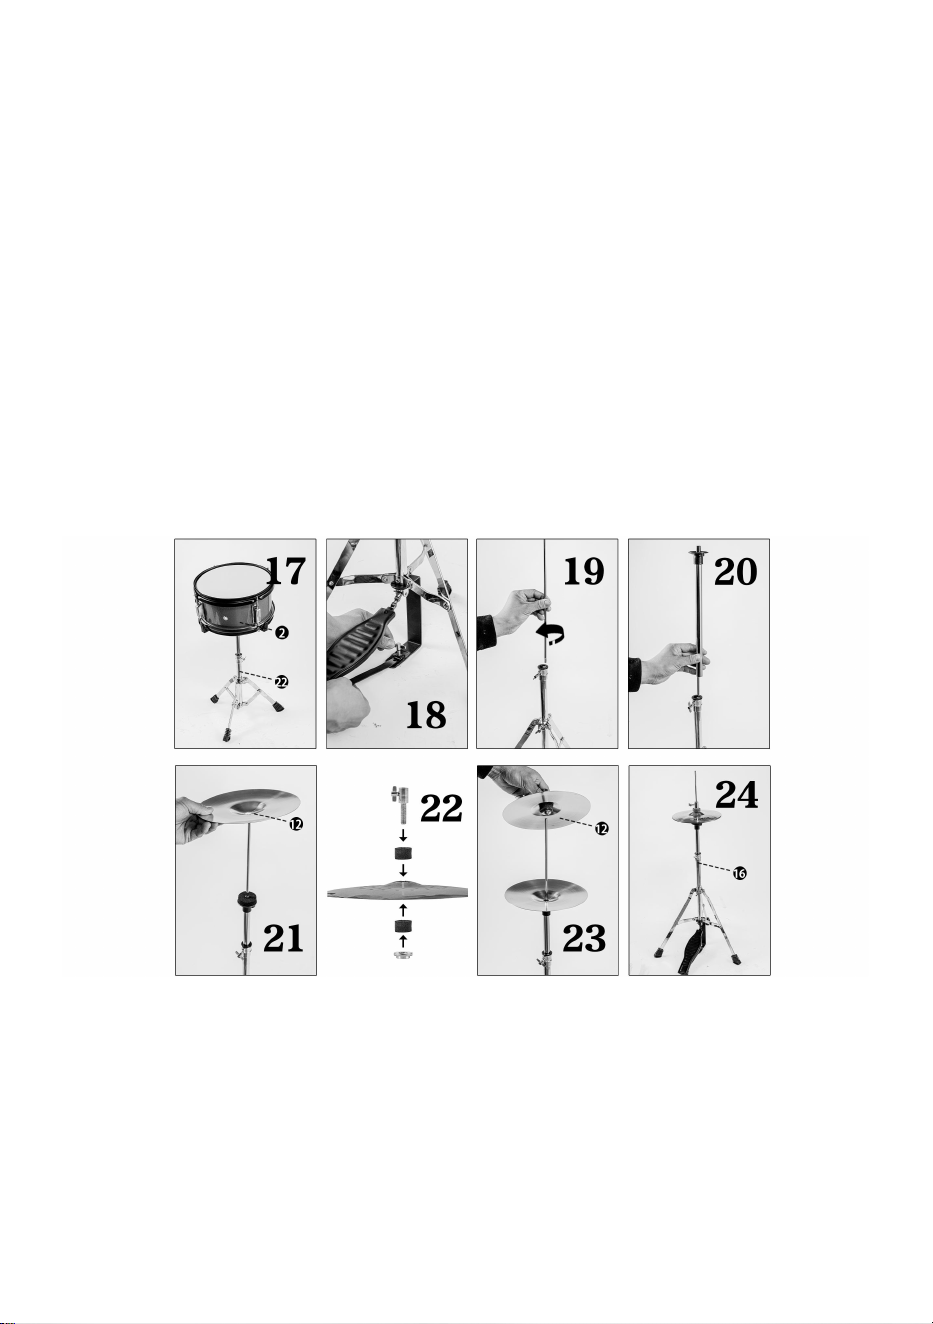
18-24: Unfold the hi-hat stand and fix it by tightening the screws. Insert the main
pole of the hi-hat stand into the corresponding interface of the base. Install the
hi-hat tray and other components at the appropriate position on the main pole.
Prepare the washers, screws and other components needed for installing the
hi-hat in sequence. Place the hi-hat on the tray and then fix it with the prepared
components. Check again to ensure the hi-hat is installed firmly. Adjust the hi-hat
stand to the appropriate height and angle.

- 5 -
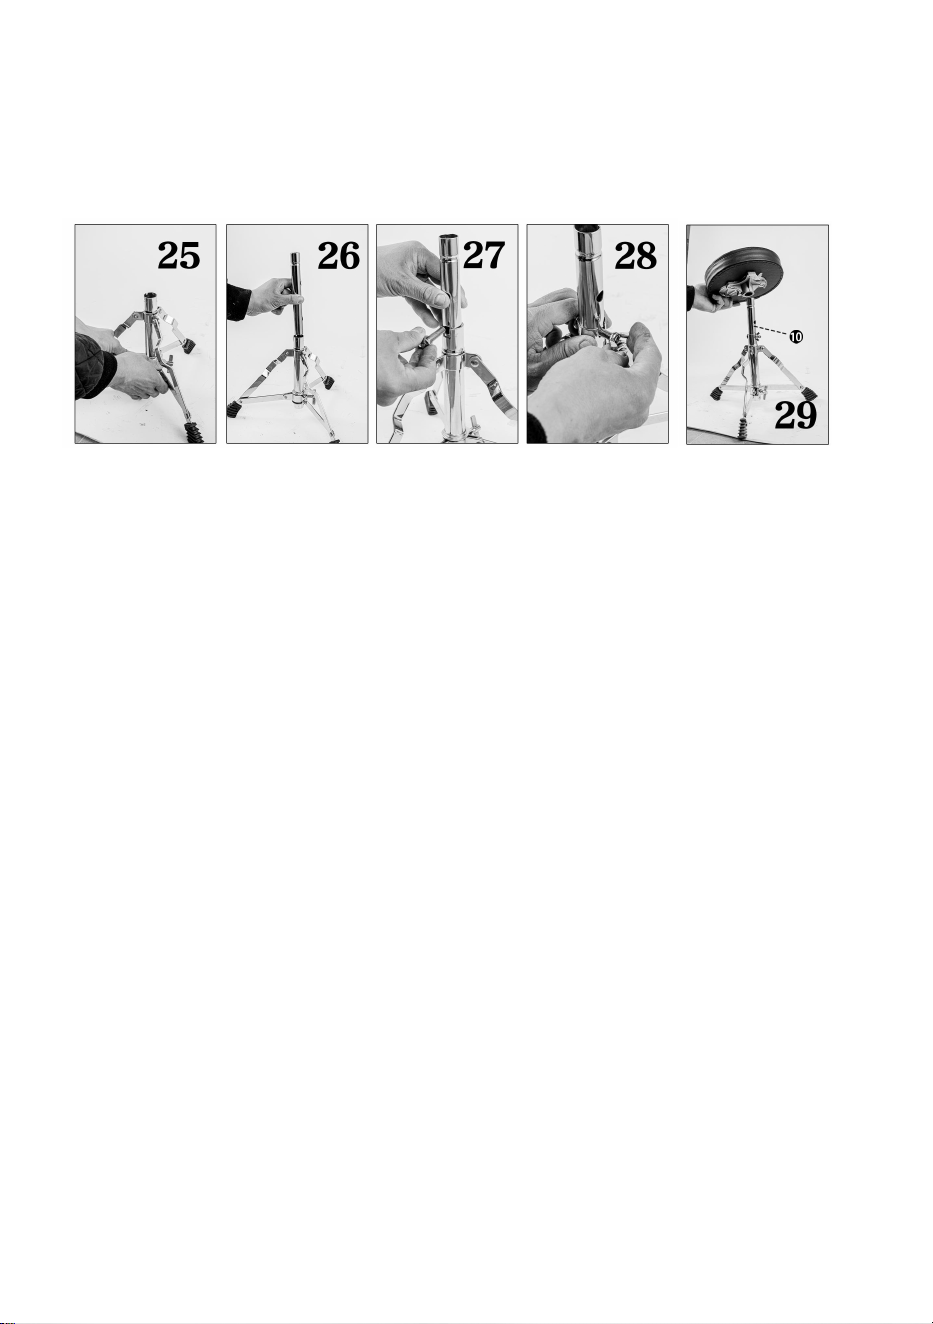
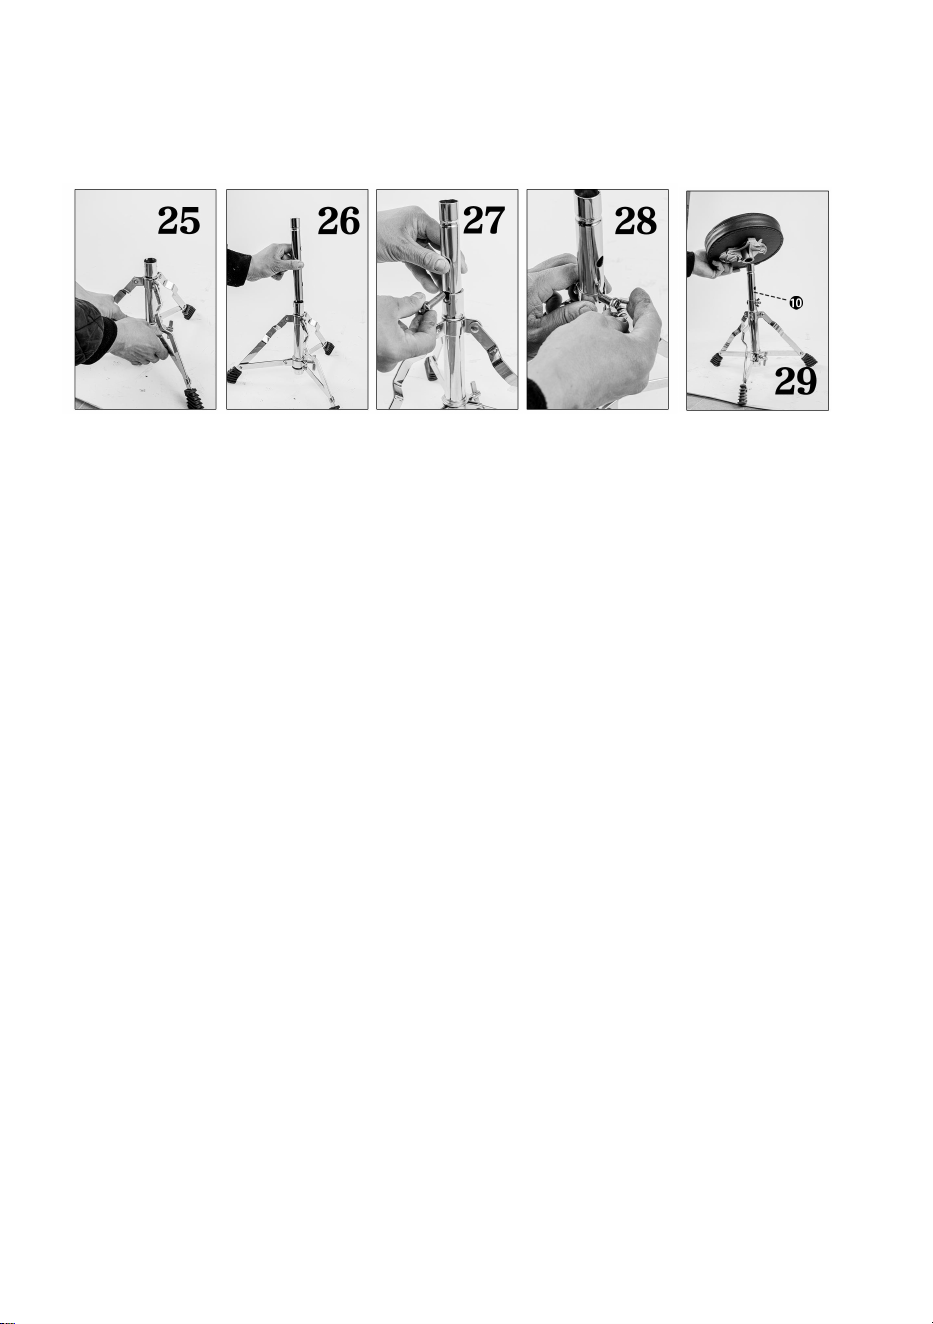
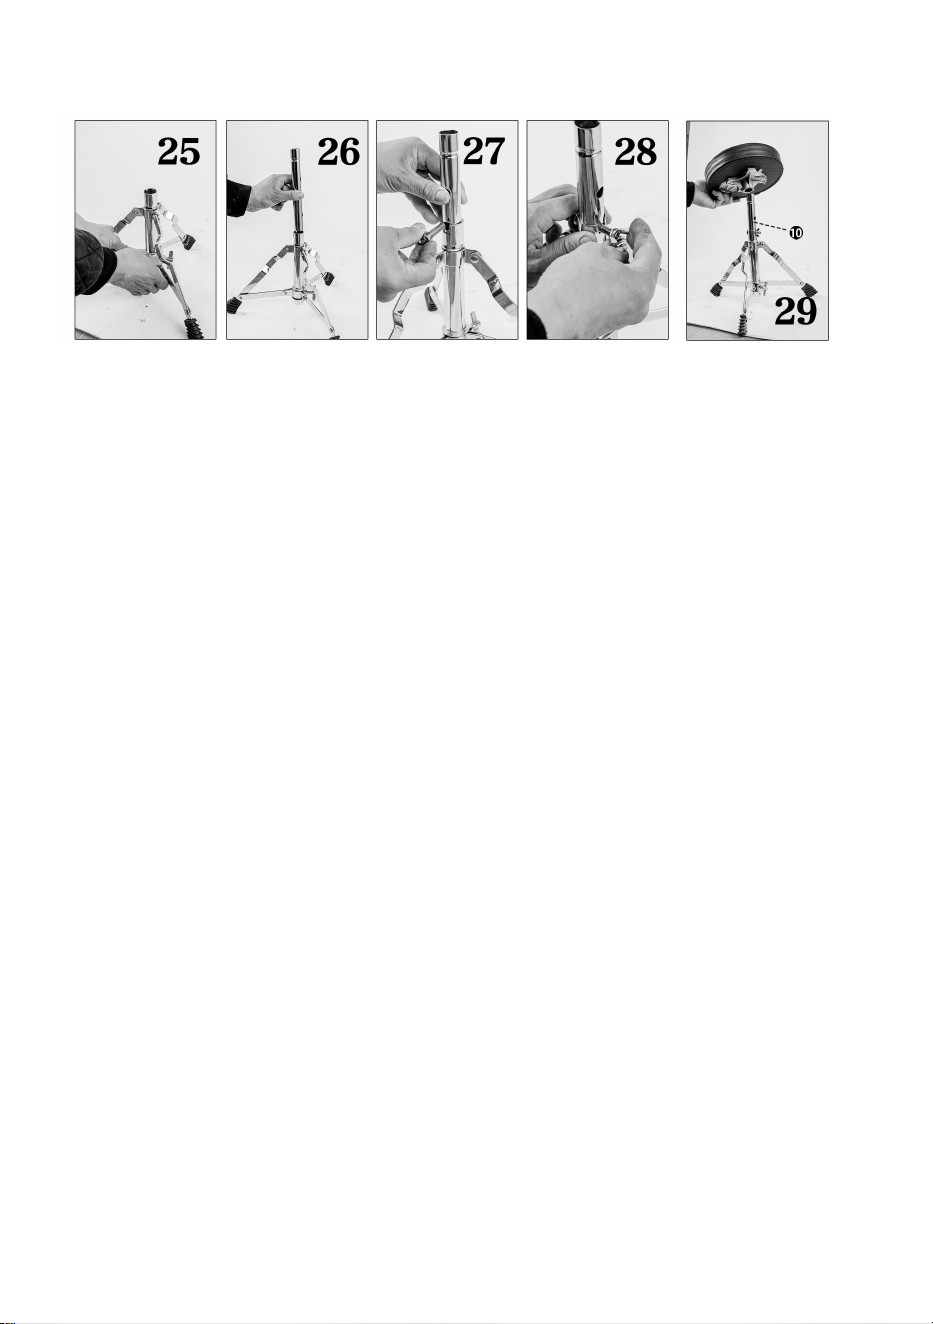
25-29: Unfold the drum stool stand and make sure the legs are firmly extended.
Pick up the extension rods and other components of the drum stand to prepare for
further assembly.
Connect and fix the extension rods and other components to the main pole of the
drum stand.
Tighten the screws and other fastening parts at the connection points to ensure a
tight connection.
Install the drum stool at the appropriate position on the drum stand to complete the
installation of the drum set.
- 6 -
Manufacturer: Tianjin Korpus Musical Instrument Co., Ltd
Address: 50 meters east of Cierzhuang Primary School, Tangguantun Town,
Jinghai District, Tianjin City, China
Imported to AUS: SIHAO PTY LTD. 1 ROKEVA STREETEASTWOOD
NSW 2122 Australia
Imported to USA: Sanven Technology Ltd. Suite 250, 9166 Anaheim
Place, Rancho Cucamonga, CA 91730
REP
UK
YH CONSULTING LIMITED. C/O YH Consulting
Limited Office 147, Centurion House, London
Road, Staines-upon-Thames, Surrey, TW18 4AX
REP
EC
E-CrossStu GmbH
Mainzer Landstr.69,
60329 Frankfurt am Main.

- 1 -

- 2 -
BATTERIE
MODÈLE : SH-002-BL-A,SH-002-RD,
SH-002-SY,SH-002-BK,SH-002-BL

- 1 -
UN
MODÈLE : SH-002-BL-A,SH-002-RD, SH-002-SY,SH-002-BK,SH-002-BL
Ceci est le mode d'emploi d'origine. Veuillez lire attentivement l'intégralité
du manuel avant utilisation. VEVOR se réserve le droit d'interpréter
clairement ce manuel d'utilisation. L'apparence du produit dépend du
produit que vous avez reçu. Veuillez nous excuser pour les éventuelles
mises à jour technologiques ou logicielles.
DRUM SET

- 2 -
Liste des pièces
(1) Tambour 10 "* 6 "*1,
(2) Caisse claire 10 "* 5 " *1
(3) Tambour 8 "* 5,5 "*1
(4) Tom d'atterrissage 13 "* 10 " tambour * 1
(5) Grosse caisse 16 "* 11 " *1
(6) 13 "anneau de pression * 2
(7) Anneau de pression 16 " * 2
(8) 13 "face de tambour * 2
(9) Face de tambour 16 " * 2
(10) Tabouret de tambour * 1 ensemble
(11) 10 "Crash Cymbale * 1
(12) 8 "Hi-hat * 2
(13) Baguettes pour enfants * 2
(14) Pilons pour adultes * 2
(15) Marteau étagé * 1 jeu
(16) Support de charleston * 1
(17) Poteau de cymbale * 1
(18) Crochet de tambour * 12
(19) M6 * 1 50 vis * 12
(20) M6 * 100 vis * 8
(21) Écrou carré d'oreille de tambour * 2
(22) 1 jeu de supports de caisse claire
(23) Pieds de grosse caisse * 2
(24) Jambes tambourinantes * 3
(25) Support de batterie * 1
(26) Clé de batterie*1
Une vidéo d'installation est disponible sur la page d'accueil du site web
d'achat. Vous pouvez vous y référer si nécessaire.

- 3 -
1-8 : Soulevez la peau et placez-la sur le fût, en préparation de l'installation.
Réglez la tension. composants de réglage du tambour (tels que des vis à tête
carrée) et utiliser un outil (clé de tambour) pour initialement Serrez-les
uniformément pour fixer la peau. Répétez l'opération ci-dessus pour l'installer et
l'ajuster. l'autre côté de la peau du tambour, en veillant à ce que la tension des
deux peaux soit uniforme et
appropriée
- 4 -
9 : Installez les composants du support pour les toms et fixez-les à la position
appropriée sur la basse tambour ou ensemble de percussions pour soutenir les
toms.
10 : Installez les toms sur le support, ajustez sa position et son angle pour faciliter
le jeu.
11-14 : Prenez le composant de montage de la cymbale et installez la cymbale sur
le support correspondant, en faisant attention au sens d'installation.
Ajustez le pied de cymbale pour vous assurer que la cymbale est dans une
position correcte et stable. Un réglage précis peut être effectué. réalisé en ajustant
les vis et autres composants.
15-16 : Déployer les pieds de support du cadre du tambour, ériger les colonnes,
installer les composants de réglage et fixez-les pour stabiliser le cadre du tambour.
Ajustez davantage les composants du cadre du tambour pour assurer leur stabilité
et préparez-vous au placement des tambours ou autres accessoires.
18-24 : Dépliez le pied de charleston et fixez-le en serrant les vis. Insérez le
poteau principal du pied. dans l'interface correspondante de la base. Installez le
plateau de charleston et les autres composants aux emplacements appropriés.
Positionnez-le sur le poteau principal. Préparez les rondelles, les vis et les autres
composants nécessaires à l'installation du charleston. dans l'ordre. Placez le
- 5 -
charleston sur le plateau, puis fixez-le avec les composants préparés. Vérifiez à
nouveau pour vous assurer Le charleston est bien installé. Réglez le charleston.
se tenir à la hauteur et à l'angle appropriés.
25-29 : Dépliez le support du tabouret de batterie et assurez-vous que les pieds
sont fermement étendus. Prenez les tiges d'extension et les autres composants du
support de batterie pour préparer pour un assemblage ultérieur.
Connectez et fixez les tiges d'extension et les autres composants au poteau
principal de le support de batterie.
Serrez les vis et autres pièces de fixation aux points de connexion pour garantir
une connexion étroite.
Installez le tabouret de batterie à la position appropriée sur le support de batterie
pour terminer l'installation de la batterie.

- 6 -
Fabricant : Tianjin Korpus Musical Instrument Co., Ltd
Adresse : 50 mètres à l'est de l'école primaire de Cierzhuang, ville de
Tangguantun, district de Jinghai, ville de Tianjin, Chine
Importé en Australie : SIHAO PTY LTD. 1 ROKEVA STREET, ASTWOOD
NSW 2122 Australie
Importé aux États-Unis : Sanven Technology Ltd. Suite 250, 9166 Anaheim
Lieu, Rancho Cucamonga, CA 91730
REP
UK
YH CONSULTING LIMITED. C/O YH Consulting
Limited Office 147, Centurion House, London
Road, Staines-upon-Thames, Surrey, TW18 4AX
REP
EC
E-CrossStu GmbH
Mainzer Landstr.69,
60329 Frankfurt am Main.

- 1 -

- 2 -
SCHLAGZEUG
MODELL: SH-002-BL-A,SH-002-RD,
SH-002-SY,SH-002-BK,SH-002-BL

- 1 -
A
MODELL: SH-002-BL-A, SH-002-RD, SH-002-SY, SH-002-BK, SH-002-BL
Dies ist die Originalanleitung. Bitte lesen Sie alle Anweisungen sorgfältig
durch, bevor Sie das Gerät in Betrieb nehmen. VEVOR behält sich das
Recht vor , die Bedienungsanleitung klar und deutlich zu interpretieren.
Das Aussehen des Produkts hängt vom gelieferten Produkt ab. Bitte
haben Sie Verständnis dafür, dass wir Sie nicht erneut über Technologie-
oder Software-Updates informieren.
DRUM SET

- 2 -
Teileliste
(1) 10 "* 6 " Trommel * 1,
(2) 10 " * 5 " Snare Drum * 1
(3) 8 "* 5,5 " Trommel * 1
(4) 13 " * 10 " Landing Tom Trommel * 1
(5) 16 " * 11 " Bass Drum * 1
(6) 13 "Druckring * 2
(7) 16 "Druckring * 2
(8) 13 " Schlagfläche * 2
(9) 16 " Schlagfläche * 2
(10) Schlagzeughocker * 1 Satz
(11) 10" Crash-Becken * 1
(12) 8 "Hi-Hat * 2
(13) Kindertrommelstöcke * 2
(14) Erwachsene Drumsticks * 2
(15) Stufenhammer * 1 Satz
(16) Hi-Hat-Halterung * 1
(17) Beckenstange * 1
(18) Trommelhaken * 12
(19) M6 * 1 50 Schrauben * 12
(20) M6 * 100 Schrauben * 8
(21) Trommelohr-Vierkantmutter * 2
(22) 1 Satz Snare Drum- Ständer
(23) Bass Drum Beine * 2
(24) Trommelbeine * 3
(25) Trommelständer * 1
(26) Stimmschlüssel*1
Auf der Homepage der Kaufwebsite finden Sie eine Videoanleitung zur

- 3 -
Installation. Sie können bei Bedarf auf das Installationsvideo zurückgreifen.
- 4 -
1-8: Heben Sie das Trommelfell an und legen Sie es auf den Trommelkessel.
Bereiten Sie es für die Installation vor. Installieren Sie die Spannung
Einstellelemente der Trommel (z. B. Vierkantschrauben) und verwenden Sie ein
Werkzeug (Trommelschlüssel), um zunächst Ziehen Sie sie gleichmäßig fest
(gleichmäßig festziehen), um das Trommelfell zu fixieren. Wiederholen Sie den
obigen Vorgang, um zu installieren und einzustellen die andere Seite des
Trommelfells, um sicherzustellen, dass die Spannung beider Trommelfelle
gleichmäßig und angemessen
ist
- 5 -
9: Montieren Sie die Ständerkomponenten für die Tom-Toms und befestigen Sie
diese an der entsprechenden Position am Bass Trommel oder Schlagzeug zur
Unterstützung der Tomtoms.
10: Montieren Sie die Tomtoms auf dem Ständer und passen Sie ihre Position und
ihren Winkel an, um das Spielen zu erleichtern.
11-14: Nehmen Sie die Beckenhalterung und montieren Sie das Becken an der
entsprechenden Halterung. Achten Sie dabei auf die Einbaurichtung.
Stellen Sie den Beckenständer so ein, dass das Becken in der richtigen und
stabilen Position steht. Die Feineinstellung kann erfolgt über Stellschrauben und
andere Bauteile.
15-16: Die Stützfüße des Trommelrahmens ausklappen, die Säulen aufstellen, die
Justierelemente montieren und Fixieren Sie sie, um den Trommelrahmen zu
stabilisieren. Passen Sie die Trommelrahmenkomponenten weiter an, um ihre
Stabilität zu gewährleisten und Machen Sie sich bereit für die Platzierung von
Trommeln oder anderem Zubehör.

- 6 -
18-24: Klappen Sie den Hi-Hat-Ständer auf und befestigen Sie ihn mit den
Schrauben. Stecken Sie die Hauptstange des Hi-Hat-Ständers in die
entsprechende Schnittstelle der Basis. Installieren Sie das Hi-Hat-Tablett und
andere Komponenten an der entsprechenden Position auf der Hauptstange.
Bereiten Sie die Unterlegscheiben, Schrauben und andere Komponenten vor, die
für die Montage der Hi-Hat benötigt werden der Reihe nach. Legen Sie die Hi-Hat
auf das Tablett und befestigen Sie sie anschließend mit den vorbereiteten
Komponenten. Überprüfen Sie erneut, ob die Hi-Hat fest installiert ist. Stellen Sie
die Hi-Hat Ständer auf die entsprechende Höhe und den entsprechenden Winkel.
25-29: Klappen Sie den Schlagzeughockerständer auseinander und achten Sie
darauf, dass die Beine fest ausgefahren sind. Nehmen Sie die
Verlängerungsstangen und andere Komponenten des Trommelständers zur

- 7 -
Vorbereitung zur weiteren Montage.
Verbinden und befestigen Sie die Verlängerungsstangen und andere
Komponenten mit der Hauptstange des der Trommelständer.
Ziehen Sie die Schrauben und anderen Befestigungsteile an den
Verbindungsstellen fest, um sicherzustellen eine dichte Verbindung.
Installieren Sie den Trommelhocker an der entsprechenden Stelle auf dem
Trommelständer, um die die Installation des Schlagzeugs.

- 8 -
Hersteller: Tianjin Korpus Musical Instrument Co., Ltd
Adresse: 50 Meter östlich der Cierzhuang-Grundschule, Stadt Tangguantun,
Bezirk Jinghai, Stadt Tianjin, China
Importiert nach AUS: SIHAO PTY LTD. 1 ROKEVA STREETEASTWOOD
NSW 2122 Australien
Importiert in die USA: Sanven Technology Ltd. Suite 250, 9166 Anaheim
Place, Rancho Cucamonga, CA 91730
REP
UK
YH CONSULTING LIMITED. C/O YH Consulting
Limited Office 147, Centurion House, London
Road, Staines-upon-Thames, Surrey, TW18 4AX
REP
EC
E-CrossStu GmbH
Mainzer Landstr.69,
60329 Frankfurt am Main.

- 1 -

- 2 -
BATTERIA
MODELLO: SH-002-BL-A,SH-002-RD,
SH-002-SY,SH-002-BK,SH-002-BL

- 1 -
UN
MODELLO: SH-002-BL-A,SH-002-RD, SH-002-SY,SH-002-BK,SH-002-BL
Queste sono le istruzioni originali, si prega di leggere attentamente tutte
le istruzioni del manuale prima di utilizzare il prodotto. VEVOR si riserva la
piena interpretazione del manuale utente. L'aspetto del prodotto
dipenderà dal prodotto ricevuto. Vi preghiamo di non informarvi
ulteriormente in caso di aggiornamenti tecnologici o software relativi al
nostro prodotto.
DRUM SET

- 2 -
Elenco delle parti
(1) 10 "* 6 " tamburo * 1,
(2) Rullante da 10 "* 5 " * 1
(3) 8 "* 5.5 " tamburo * 1
(4) 13 "* 10 " Atterraggio Tom tamburo * 1
(5) Grancassa da 16 "* 11 " * 1
(6) 13 "anello di pressione * 2
(7) Anello di pressione da 16 "* 2
(8) 13 "faccia del tamburo * 2
(9) 16 "faccia del tamburo * 2
(10) Sgabello per batteria * 1 set
(11) 10 "Piatto crash * 1
(12) 8 "Hi-hat * 2
(13) Bacchette per bambini * 2
(14) Cosce di pollo per adulti * 2
(15) Martello a gradini * 1 set
(16) Supporto per charleston * 1
(17) Asta per piatti * 1
(18) Gancio per tamburo * 12
(19) M6 * 1 50 viti * 12
(20) M6 * 100 viti * 8
(21) Dado quadrato per orecchio del tamburo * 2
(22) 1 set di supporto per rullante
(23) Gambe della grancassa * 2
(24) Gambe che tamburellano * 3
(25) Supporto per batteria * 1
(26) Tasto tamburo*1
Sulla homepage del sito web dedicato agli acquisti è disponibile un video

- 3 -
con le istruzioni per l'installazione. Se necessario, è possibile consultare il
video.

- 4 -
1-8: Sollevare la pelle del tamburo e posizionarla sul fusto, preparandosi per
l'installazione. Installare il tensionatore componenti di regolazione del tamburo
(come viti a testa quadrata) e utilizzare uno strumento (chiave del tamburo) per
inizialmente Stringerli uniformemente per fissare la pelle del tamburo. Ripetere
l'operazione sopra descritta per installare e regolare l'altro lato della pelle del
tamburo, assicurandosi che la tensione di entrambe le pelli sia uniforme e
appropriata
- 5 -
9: Installare i componenti del supporto per i tom-tom e fissarli nella posizione
appropriata sul basso tamburo o batteria per supportare i tom-tom.
10: Installare i tom-tom sul supporto, regolarne la posizione e l'angolazione per
facilitarne l'esecuzione.
11-14: Prendi il componente di montaggio del piatto e installa il piatto sulla staffa
corrispondente, prestando attenzione al senso di installazione.
Regolare il supporto del piatto per assicurarsi che il piatto sia nella posizione
corretta e stabile. È possibile effettuare una messa a punto precisa effettuato
tramite viti di regolazione e altri componenti.
15-16: Espandere i piedi di supporto del telaio del tamburo, erigere le colonne,
installare i componenti di regolazione e fissarli per stabilizzare il telaio del tamburo.
Regolare ulteriormente i componenti del telaio del tamburo per garantirne la
stabilità e preparatevi per il posizionamento della batteria o di altri accessori.
18-24: Aprire il supporto per hi-hat e fissarlo stringendo le viti. Inserire il palo
principale del supporto per hi-hat. nell'interfaccia corrispondente della base.
Installare il vassoio del charleston e gli altri componenti nella posizione
appropriata Posizione sul palo principale. Preparare le rondelle, le viti e gli altri
componenti necessari per l'installazione del charleston. in sequenza. Posizionare
il charleston sul vassoio e fissarlo con i componenti preparati. Controllare

- 6 -
nuovamente per assicurarsi il charleston è installato saldamente. Regolare il
charleston posizionarsi all'altezza e all'angolazione appropriate.
25-29: Aprire il supporto dello sgabello per batteria e accertarsi che le gambe
siano ben estese. Raccogli le aste di prolunga e gli altri componenti del supporto
per batteria per preparare per ulteriore assemblaggio.
Collegare e fissare le aste di prolunga e gli altri componenti al palo principale di il
supporto del tamburo.
Serrare le viti e gli altri elementi di fissaggio nei punti di collegamento per garantire
una connessione stretta.
Installare lo sgabello per batteria nella posizione appropriata sul supporto per
batteria per completare l'installazione della batteria.

- 7 -
Produttore: Tianjin Korpus Musical Instrument Co., Ltd
Indirizzo: 50 metri a est della scuola elementare di Cierzhuang, città di
Tangguantun, distretto di Jinghai, città di Tianjin, Cina
Importato in AUS: SIHAO PTY LTD. 1 ROKEVA STREETEASTWOOD
Nuovo Galles del Sud 2122 Australia
Importato negli USA: Sanven Technology Ltd. Suite 250, 9166 Anaheim
Luogo, Rancho Cucamonga, CA 91730
REP
UK
YH CONSULTING LIMITED. C/O YH Consulting
Limited Office 147, Centurion House, London
Road, Staines-upon-Thames, Surrey, TW18 4AX
REP
EC
E-CrossStu GmbH
Mainzer Landstr.69,
60329 Frankfurt am Main.

- 1 -

- 2 -
BATERÍA
MODELO: SH-002-BL-A,SH-002-RD,
SH-002-SY,SH-002-BK,SH-002-BL

- 1 -
A
MODELO: SH-002-BL-A,SH-002-RD, SH-002-SY,SH-002-BK,SH-002-BL
Estas son las instrucciones originales; lea atentamente todas las
instrucciones del manual antes de utilizarlo. VEVOR se reserva el
derecho de interpretar su manual de usuario. La apariencia del producto
dependerá del producto que haya recibido. Le rogamos que nos disculpe
si no le informamos de nuevo si hay actualizaciones tecnológicas o de
software en nuestro producto.
DRUM SET

- 2 -
Lista de piezas
(1) Tambor de 10 "* 6 " * 1,
(2) Caja de 10 "* 5 " * 1
(3) Tambor de 8 " x 5,5 " x 1
(4) Tom de aterrizaje de 13 "* 10 " tambor * 1
(5) Bombo de 16 "* 11 " * 1
(6) Anillo de presión de 13 "* 2
(7) Anillo de presión de 16 "* 2
(8) Cara de tambor de 13 " * 2
(9) Cara de tambor de 16 "* 2
(10) Taburete de tambor * 1 juego
(11) Platillo Crash de 10" * 1
(12) 8 "Hi-hat * 2
(13) Baquetas para niños * 2
(14) Muslos de adulto * 2
(15) Martillo escalonado * 1 juego
(16) Soporte de charles * 1
(17) Poste de platillo * 1
(18) Gancho de tambor * 12
(19) M6 * 1 50 tornillos * 12
(20) M6 * 100 tornillos * 8
(21) Tuerca cuadrada de oreja de tambor * 2
(22) 1 juego de soporte para caja
(23) Patas de bombo * 2
(24) Piernas tamborileando * 3
(25) Soporte de tambor * 1
(26) Tecla de tambor*1
Hay un video de instalación en la página principal del sitio web de compras.

- 3 -
Puede consultarlo si lo necesita.
- 4 -
1-8: Levante el parche y colóquelo en el casco, preparándose para la instalación.
Instale el tensor. componentes de ajuste del tambor (como tornillos de cabeza
cuadrada) y utilice una herramienta (llave de tambor) para ajustar inicialmente
Apriételos uniformemente para fijar el parche. Repita la operación anterior para
instalarlo y ajustarlo. el otro lado del parche, asegurándose de que la tensión de
ambos parches sea uniforme y
apropiada

- 5 -
9: Instale los componentes del soporte para los tom-toms y fíjelos en la posición
adecuada en el bajo. Tambor o batería para apoyar los tom-toms.
10: Instale los tom-toms en el soporte, ajuste su posición y ángulo para facilitar la
ejecución.
11-14: Levante el componente de montaje del platillo e instale el platillo en el
soporte correspondiente, prestando atención a la dirección de instalación.
Ajuste el soporte del platillo para asegurarse de que esté en la posición correcta y
estable. El ajuste fino se puede realizar Se realiza mediante el ajuste de tornillos y
otros componentes.
15-16: Expanda los pies de soporte del marco del tambor, erija las columnas,
instale los componentes de ajuste y Fíjelos para estabilizar el marco del tambor.
Ajuste aún más los componentes del marco del tambor para garantizar su
estabilidad y Prepárese para la colocación de tambores u otros accesorios.
18-24: Despliegue el soporte de hi-hat y fíjelo apretando los tornillos. Inserte el
poste principal del soporte. en la interfaz correspondiente de la base. Instale la
bandeja del hi-hat y otros componentes en el lugar apropiado. Posición en el
poste principal. Prepare las arandelas, tornillos y demás componentes necesarios
para instalar el hi-hat. En secuencia. Coloque el hi-hat en la bandeja y fíjelo con
los componentes preparados. Verifique nuevamente para asegurarse. El hi-hat
- 6 -
está firmemente instalado. Ajuste el hi-hat. Colóquese a la altura y ángulo
adecuados.
25-29: Despliegue el soporte del taburete de batería y asegúrese de que las patas
estén firmemente extendidas. Recoge las varillas de extensión y otros
componentes del soporte de batería para preparar para su posterior montaje.
Conecte y fije las varillas de extensión y otros componentes al poste principal de
El soporte del tambor.
Apriete los tornillos y otras piezas de fijación en los puntos de conexión para
asegurar una conexión estrecha
Instale el taburete del tambor en la posición adecuada en el soporte del tambor
para completar La instalación de la batería.
- 7 -
Fabricante: Tianjin Korpus Musical Instrument Co., Ltd.
Dirección: 50 metros al este de la escuela primaria Cierzhuang, ciudad de
Tangguantun, distrito de Jinghai, ciudad de Tianjin, China
Importado a AUS: SIHAO PTY LTD. 1 ROKEVA STREET, EASTWOOD
NSW 2122 Australia
Importado a EE. UU.: Sanven Technology Ltd. Suite 250, 9166 Anaheim
Lugar, Rancho Cucamonga, CA 91730
REP
UK
YH CONSULTING LIMITED. C/O YH Consulting
Limited Office 147, Centurion House, London
Road, Staines-upon-Thames, Surrey, TW18 4AX
REP
EC
E-CrossStu GmbH
Mainzer Landstr.69,
60329 Frankfurt am Main.

- 1 -

- 2 -
ZESTAW PERKUSYJNY
MODELE: SH-002-BL-A,SH-002-RD,
SH-002-SY,SH-002-CZARNY,SH-002-NIEBIESKI

- 1 -
A
MODELU: SH-002-BL-A,SH-002-RD, SH-002-SY,SH-002-BK,SH-002-BL
To jest oryginalna instrukcja, przed użyciem należy uważnie przeczytać
wszystkie instrukcje. VEVOR zastrzega sobie jasną interpretację naszej
instrukcji obsługi. Wygląd produktu będzie zależał od produktu, który
otrzymałeś. Prosimy o wybaczenie, że nie poinformujemy Cię ponownie,
jeśli w naszym produkcie pojawią się jakiekolwiek aktualizacje
technologiczne lub oprogramowania.
DRUM SET

- 2 -
Lista części
(1) bęben 10 "* 6 " * 1,
(2) 10 "* 5 " werbel * 1
(3) bęben 8 "* 5,5 " * 1
(4) 13 "* 10 " Lądujący Tom bęben * 1
(5) 16 "* 11 " Bęben basowy * 1
(6) 13 -calowy pierścień dociskowy * 2
(7) Pierścień dociskowy 16 " * 2
(8) 13 " powierzchnia bębna * 2
(9) 16 -calowa powierzchnia bębna * 2
(10) Stołek perkusyjny * 1 zestaw
(11) 10-calowy talerz Crash * 1
(12) 8-calowy hi-hat * 2
(13) Pałki dla dzieci * 2 szt.
(14) Pałki dla dorosłych * 2 szt.
(15) Młotek krokowy * 1 zestaw
(16) Uchwyt hi-hatu * 1
(17) Trzonek talerzowy * 1
(18) Hak perkusyjny * 12
(19) Śruby M6 * 1 50 * 12
(20) śrub M6 * 100 * 8
(21) Nakrętka kwadratowa ucha bębna * 2
(22) 1 zestaw statywów pod werbel
(23) Nogi bębna basowego * 2
(24) Nogi bębniące * 3
(25) Statyw perkusyjny * 1
(26) Klawisz perkusyjny*1
Na stronie głównej witryny zakupowej znajduje się instrukcja wideo

- 3 -
dotycząca instalacji. W razie potrzeby możesz zapoznać się z instrukcją
wideo dotyczącą instalacji.

- 4 -
1-8: Podnieś membranę bębna i umieść ją na korpusie bębna, przygotowując się
do instalacji. Zainstaluj naciąg elementy regulacyjne bębna (takie jak śruby z łbem
kwadratowym) i użyj narzędzia (klucza do bębna), aby na początek dokręć je
równomiernie (dokręć równomiernie), aby zamocować naciąg bębna. Powtórz
powyższą operację, aby zainstalować i wyregulować drugą stronę membrany
bębna, zapewniając równomierne i odpowiednie naprężenie obu
membran
- 5 -
9: Zamontuj elementy stojaka pod tom-tomy i zamocuj je w odpowiedniej pozycji
na basie. bęben lub zestaw perkusyjny wspomagający tom-tomy.
10: Zamontuj tom-tomy na stojaku, dostosuj ich położenie i kąt, aby ułatwić grę.
11-14: Podnieś element mocujący talerz i zamontuj talerz na odpowiednim
uchwycie, zwracając uwagę na kierunek instalacji.
Wyreguluj statyw talerza, aby upewnić się, że talerz jest w odpowiedniej i stabilnej
pozycji. Dokładne dostrojenie można odbywa się poprzez śruby regulacyjne i inne
elementy.
15-16: Rozłóż stopy podporowe ramy bębna, ustaw kolumny, zamontuj elementy
regulacyjne i przymocuj je, aby ustabilizować ramę bębna. Następnie wyreguluj
elementy ramy bębna, aby zapewnić ich stabilność i Przygotuj się na
rozmieszczenie bębnów i innych akcesoriów.
18-24: Rozłóż statyw hi-hat i zamocuj go, dokręcając śruby. Włóż główny drążek
statywu hi-hat do odpowiedniego interfejsu podstawy. Zainstaluj tackę hi-hat i inne
komponenty w odpowiednim miejscu pozycja na głównym słupie. Przygotuj
podkładki, śruby i inne elementy potrzebne do zainstalowania hi-hatu po kolei.
Umieść hi-hat na tacy, a następnie przymocuj go przygotowanymi komponentami.
Sprawdź ponownie, aby upewnić się, że hi-hat jest mocno zainstalowany.
Wyreguluj hi-hat stań na odpowiedniej wysokości i pod odpowiednim kątem.

- 6 -
25-29: Rozłóż stojak na stołek perkusyjny i sprawdź, czy nogi są mocno
wyciągnięte. Podnieś pręty przedłużające i inne elementy stojaka na perkusję, aby
je przygotować do dalszego montażu.
Podłącz i zamocuj pręty przedłużające i inne elementy do głównego słupa. statyw
perkusyjny.
Dokręć śruby i inne elementy mocujące w punktach połączeń, aby zapewnić
ścisłe połączenie.
Aby zakończyć, zamontuj stołek pod bęben w odpowiednim miejscu na statywie
pod bęben. montaż zestawu perkusyjnego.

- 7 -
Producent: Tianjin Korpus Musical Instrument Co., Ltd
Adres: 50 metrów na wschód od szkoły podstawowej Cierzhuang, miasto
Tangguantun, dystrykt Jinghai, miasto Tianjin, Chiny
Importowane do AUS: SIHAO PTY LTD. 1 ROKEVA STREETEASTWOOD
NSW 2122 Australia
Importowane do USA: Sanven Technology Ltd. Suite 250, 9166 Anaheim
Miejsce, Rancho Cucamonga, CA 91730
REP
UK
YH CONSULTING LIMITED. C/O YH Consulting
Limited Office 147, Centurion House, London
Road, Staines-upon-Thames, Surrey, TW18 4AX
REP
EC
E-CrossStu GmbH
Mainzer Landstr.69,
60329 Frankfurt am Main.

- 1 -

- 2 -
DRUMSTEL
MODEL: SH-002-BL-A,SH-002-RD,
SH-002-SY,SH-002-BK,SH-002-BL
- 1 -
A
MODELLEN: SH-002-BL-A,SH-002-RD,
SH-002-SY,SH-002-BK,SH-002-BL
Dit is de originele handleiding. Lees alle instructies zorgvuldig door
voordat u het product gebruikt. VEVOR behoudt zich het recht voor om de
gebruiksaanwijzing duidelijk te interpreteren. Het uiterlijk van het product
is afhankelijk van het product dat u hebt ontvangen. Neemt u het ons niet
kwalijk dat we u niet meer op de hoogte stellen van eventuele
technologische of software-updates voor ons product.
DRUM SET
- 2 -
Onderdelenlijst
(1) 10 "* 6 " trommel * 1,
(2) 10 "* 5 " snaredrum * 1
(3) 8 "* 5,5 " trommel * 1
(4) 13 "* 10 " Landing Tom trommel * 1
(5) 16 "* 11 " bastrommel * 1
(6) 13 "drukring * 2
(7) 16 "drukring * 2
(8) 13 "trommelvlak * 2
(9) 16 "trommelvlak * 2
(10) Drumkruk * 1 set
(11) 10 "Crash-bekken * 1
(12) 8 "Hi-hat * 2
(13) Kinderdrumsticks * 2
(14) Volwassen drumsticks * 2
(15) Staphamer * 1 set
(16) Hi-hatbeugel * 1
(17) Cimbaalstok * 1
(18) Trommelhaak * 12
(19) M6 * 1 50 schroeven * 12
(20) M6 * 100 schroeven * 8
(21) Trommeloor vierkante moer * 2
(22) 1 set snaredrumstandaards
(23) Basdrumpoten * 2
(24) Trommelbenen * 3
(25) Drumstandaard * 1
(26) Trommelsleutel*1

- 3 -
Er is een installatievideo beschikbaar op de homepage van de
aankoopwebsite. U kunt de installatievideo indien nodig raadplegen.

- 4 -
1-8: Til het trommelvel op en plaats het op de trommel, ter voorbereiding op de
installatie. Installeer de spanning. afstelcomponenten van de trommel (zoals
schroeven met vierkante kop) en gebruik een gereedschap (trommelsleutel) om
de eerste keer Draai ze gelijkmatig vast (gelijkmatig vastdraaien) om het
trommelvel te bevestigen. Herhaal bovenstaande handeling om te installeren en af
te stellen. de andere kant van het trommelvel, waarbij ervoor wordt gezorgd dat de
spanning van beide trommelvellen gelijkmatig en juist
is

- 5 -
9: Installeer de standaardcomponenten voor de tom-toms en bevestig ze op de
juiste positie op de bas trommel of drumstel ter ondersteuning van de toms.
10: Plaats de toms op de standaard, pas de positie en hoek aan om het spelen te
vergemakkelijken.
11-14: Pak het bekkenmontagecomponent en installeer het bekken op de
bijbehorende beugel, Let hierbij op de installatierichting.
Stel de bekkenstandaard zo af dat de bekkens in de juiste en stabiele positie staan.
Fijnafstemming is mogelijk. gedaan door middel van stelschroeven en andere
componenten.
15-16: De steunvoeten van het trommelframe uitklappen, de kolommen oprichten,
de afstelcomponenten installeren en Bevestig ze om het trommelframe te
stabiliseren. Pas de trommelframecomponenten verder aan om hun stabiliteit te
garanderen en Maak je klaar voor het plaatsen van drums of andere accessoires.
- 6 -
18-24: Klap de hihatstandaard uit en zet hem vast door de schroeven vast te
draaien. Plaats de hoofdpaal van de hihatstandaard. in de overeenkomstige
interface van de basis. Installeer de hihat-lade en andere componenten op de
juiste plaats. Plaats de hihat op de hoofdpaal. Bereid de ringen, schroeven en
andere onderdelen voor die nodig zijn voor de installatie van de hihat. in volgorde.
Plaats de hihat op de tray en bevestig deze vervolgens met de voorbereide
componenten. Controleer nogmaals om er zeker van te zijn De hihat is stevig
gemonteerd. Stel de hihat af. Ga op de juiste hoogte en onder de juiste hoek
staan.
25-29: Vouw de drumkrukstandaard open en zorg ervoor dat de poten stevig zijn
uitgeklapt. Pak de verlengstangen en andere onderdelen van de drumstandaard
op om voor te bereiden voor verdere montage.

- 7 -
Sluit de verlengstangen en andere componenten aan op de hoofdpaal en bevestig
ze. de drumstandaard.
Draai de schroeven en andere bevestigingsdelen op de verbindingspunten goed
vast om ervoor te zorgen een hechte verbinding.
Installeer de drumkruk op de juiste positie op de drumstandaard om het geheel af
te maken de installatie van het drumstel.
- 8 -
Fabrikant: Tianjin Korpus Musical Instrument Co., Ltd
Adres: 50 meter ten oosten van de Cierzhuang Primary School, Tangguantun
Town, Jinghai District, Tianjin City, China
Geïmporteerd naar AUS: SIHAO PTY LTD. 1 ROKEVA STREETEASTWOOD
NSW 2122 Australië
Geïmporteerd naar de VS: Sanven Technology Ltd. Suite 250, 9166 Anaheim
Plaats, Rancho Cucamonga, CA 91730
REP
UK
YH CONSULTING LIMITED. C/O YH Consulting
Limited Office 147, Centurion House, London
Road, Staines-upon-Thames, Surrey, TW18 4AX
REP
EC
E-CrossStu GmbH
Mainzer Landstr.69,
60329 Frankfurt am Main.

- 1 -

- 2 -
TRUMSET
MODELL: SH-002-BL-A, SH-002-RD,
SH-002-SY, SH-002-BK, SH-002-BL
- 1 -
EN
MODELL: SH-002-BL-A,SH-002-RD, SH-002-SY,SH-002-BK,SH-002-BL
Detta är originalinstruktionerna, vänligen läs alla instruktioner noggrant
innan du använder produkten. VEVOR förbehåller sig en tydlig tolkning av
vår användarmanual. Produktens utseende ska vara beroende av den
produkt du mottagit. Vi ber om ursäkt för att vi inte kommer att informera
dig igen om det finns några teknik- eller programuppdateringar för vår
produkt.
DRUM SET
- 2 -
Delar lista
(1) 10 " * 6 " trumma * 1,
(2) 10 " * 5 " virveltrumma * 1
(3) 8 " * 5,5 " trumma * 1
(4) 13 "* 10 " landningspuka trumma * 1
(5) 16 " * 11 " bastrumma * 1
(6) 13 " tryckring * 2
(7) 16 " tryckring * 2
(8) 13 " trummans yta * 2
(9) 16 " trummans yta * 2
(10) Trumpall * 1 set
(11) 10" Crashcymbal * 1
(12) 8" hi-hat * 2
(13) Barnklubbor * 2
(14) Vuxna trumstockar * 2
(15) Steghammare * 1 set
(16) Hi-hat-fäste * 1
(17) Cymbalstång * 1
(18) Trumkrok * 12
(19) M6 * 150 skruvar * 12
(20) M6 * 100 skruvar * 8
(21) Fyrkantig mutter för trumöra * 2
( 22) 1 uppsättning virveltrumstativ
(23) Bastrumben * 2
(24) Trumben * 3
(25) Trumställ * 1
(26) Trumtangent*1
Det finns installationsvideoinstruktioner på hemsidan för köpet. Du kan titta

- 3 -
på installationsvideon vid behov.

- 4 -
1-8: Lyft trumskinnet och placera det på trumman, förbered dig för installation.
Montera spänningen justeringskomponenterna på trumman (t.ex. fyrkantsskruvar)
och använd ett verktyg (trumnyckel) för att initialt Dra åt dem jämnt (dra åt jämnt)
för att fixera trumskinnet. Upprepa ovanstående steg för att montera och justera
andra sidan av trumskinnet, och se till att spänningen på båda trumskinnen är
jämn och
lämplig

- 5 -
9: Montera stativkomponenterna för pukorna och fäst dem på rätt plats på basen
trumma eller trumset för att stödja pukorna.
10: Montera pukorna på stativet, justera dess position och vinkel för att underlätta
spelandet.
11-14: Plocka upp cymbalmonteringsdelen och montera cymbalen på
motsvarande fäste, var uppmärksam på installationsriktningen.
Justera cymbalstativet för att säkerställa att cymbalen är i rätt och stabil position.
Finjustering kan göras görs genom justerskruvar och andra komponenter.
15-16: Expandera trumramens stödfötter, res upp pelarna, montera
justeringskomponenterna och Fäst dem för att stabilisera trumramen. Justera
trumramens komponenter ytterligare för att säkerställa deras stabilitet och Gör dig
redo för placering av trummor eller andra tillbehör.
18-24: Fäll ut hi-hat-stativet och fäst det genom att dra åt skruvarna. Sätt i
hi-hat-stativets huvudstång i motsvarande gränssnitt på basen. Installera
hi-hat-facket och andra komponenter på lämplig plats position på huvudstången.
Förbered brickor, skruvar och andra komponenter som behövs för att installera
hi-haten i ordning. Placera hi-haten på brickan och fäst den sedan med de
förberedda komponenterna. Kontrollera igen för att säkerställa hi-haten är
ordentligt monterad. Justera hi-haten stå i lämplig höjd och vinkel.
- 6 -
25-29: Fäll ut trumstolsstativet och se till att benen är ordentligt utsträckta. Plocka
upp förlängningsstängerna och andra komponenter till trumstället för att förbereda
för vidare montering.
Anslut och fäst förlängningsstängerna och andra komponenter till huvudstolpen på
trumstället.
Dra åt skruvarna och andra fästelement vid anslutningspunkterna för att
säkerställa en tät förbindelse.
Montera trumstolen på lämplig plats på trumstället för att slutföra installationen av
trumsetet.

- 7 -
Tillverkare: Tianjin Korpus Musical Instrument Co., Ltd.
Adress: 50 meter öster om Cierzhuang Primary School, Tangguantun Town,
Jinghai District, Tianjin City, Kina
Importerad till Australien: SIHAO PTY LTD. 1 ROKEVA STREETEASTWOOD
NSW 2122 Australien
Importerad till USA: Sanven Technology Ltd. Suite 250, 9166 Anaheim
Plats, Rancho Cucamonga, Kalifornien 91730
REP
UK
YH CONSULTING LIMITED. C/O YH Consulting
Limited Office 147, Centurion House, London
Road, Staines-upon-Thames, Surrey, TW18 4AX
REP
EC
E-CrossStu GmbH
Mainzer Landstr.69,
60329 Frankfurt am Main.