
GT-GCD-U2-S
GT-GCD-E2-S
GT-GCD-SS-1/
GT-GCD-SS-2
/
GT-GCD-U1/ GT-GCD-E1/
GT-GCD-U2/ GT-GCD-E2/
E
R
Affordable. Reliable. Home Improvement.
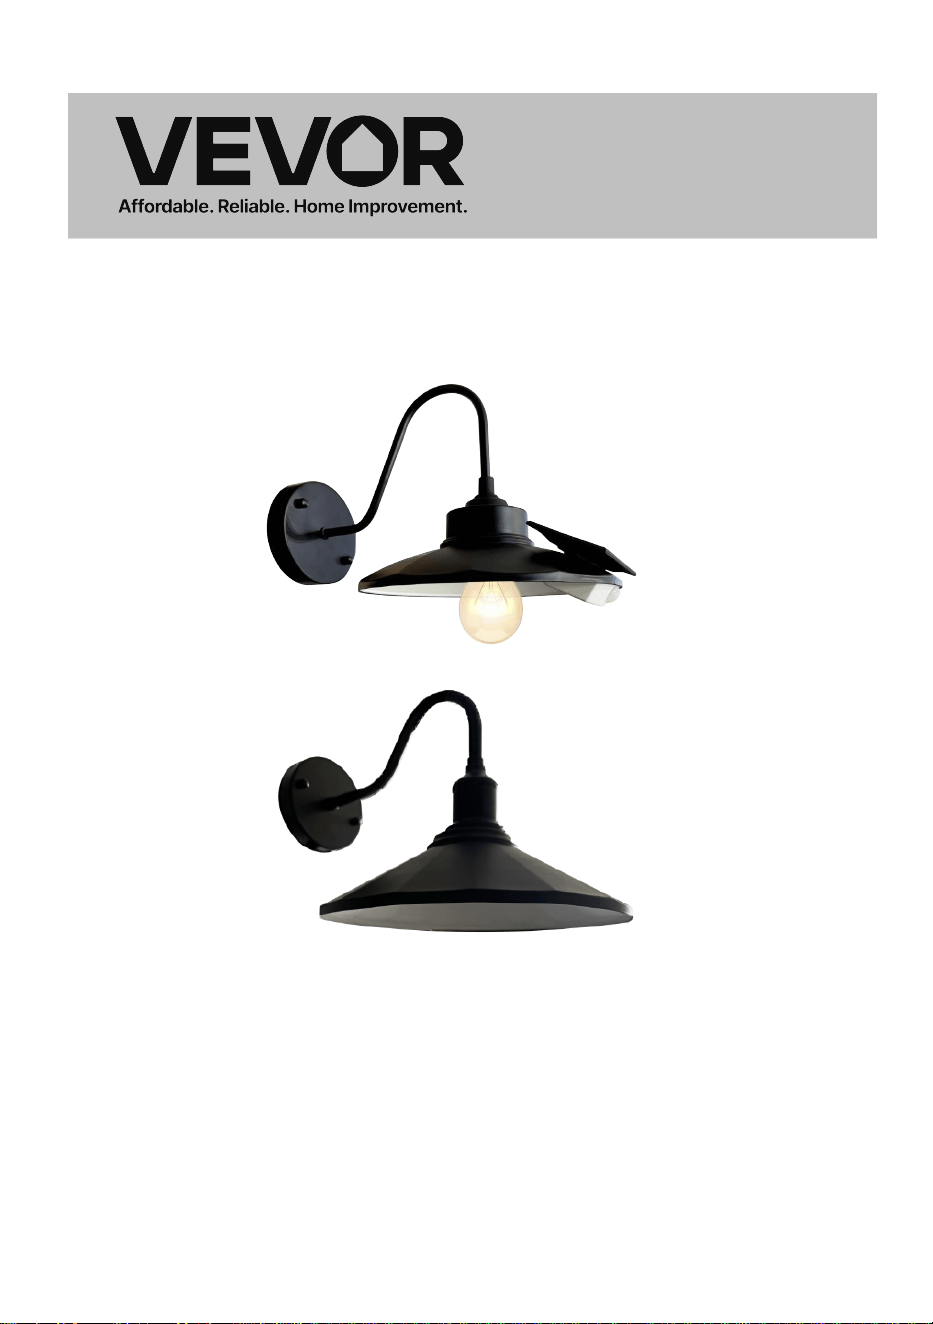
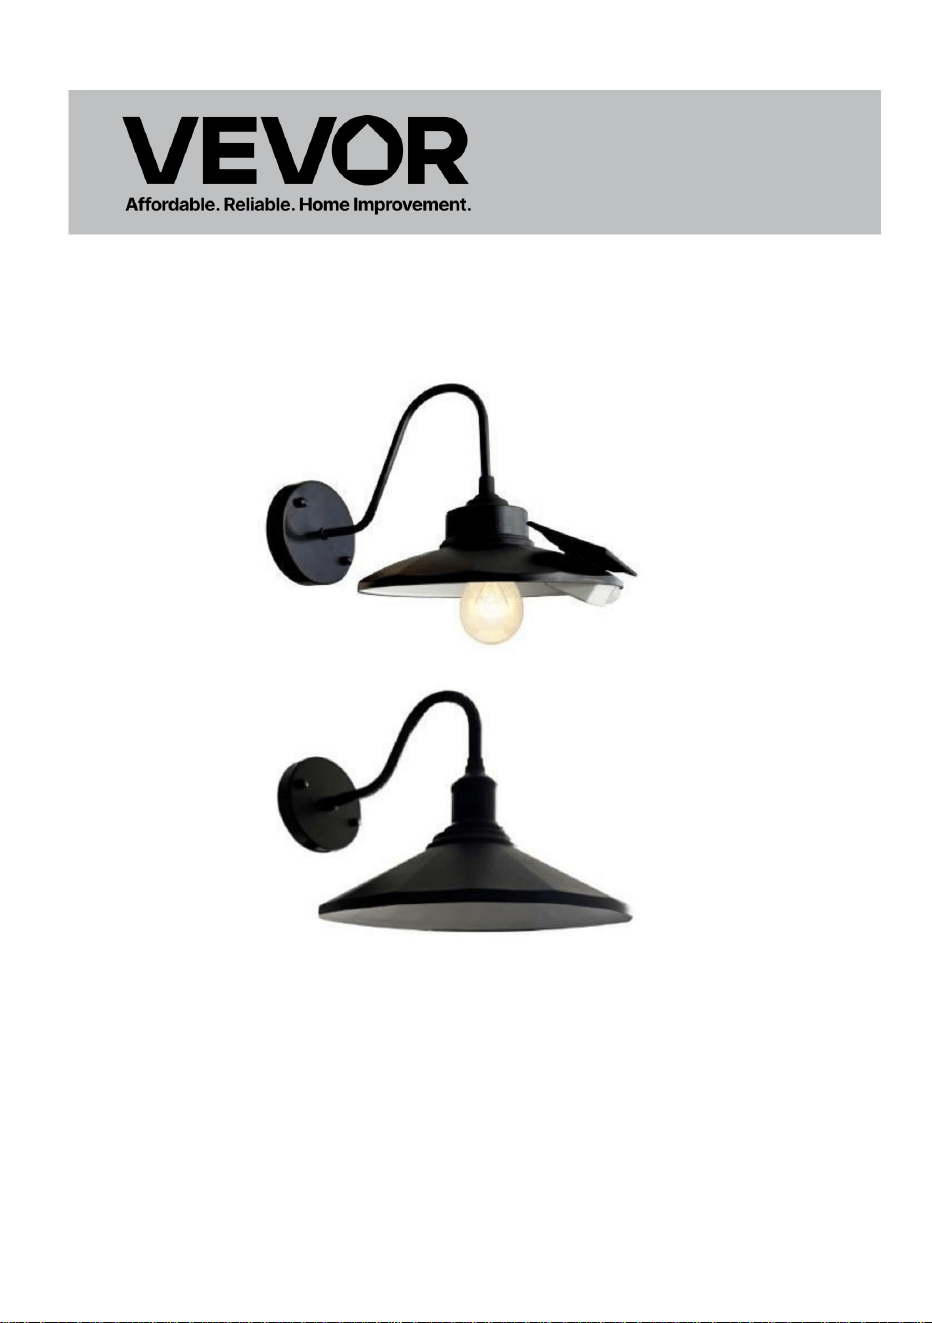
BARN LIGHTS
GT-GCD-U2-S
GT-GCD-E2-S
MODEL: GT-GCD-SS-1/
GT-GCD-SS-2/
GT-GCD-U1 / GT-GCD-E1/
GT-GCD-U2 / GT-GCD-E2/
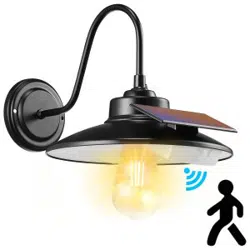
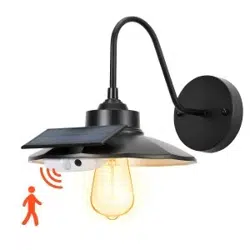
BARN LIGHTS
The picture is for
reference only, please refer to the actual object
This is the original instruction, please read all manual instructions
carefully before operating. VEVOR reserves a clear interpretation of
our
user manual. The appearance of the product shall be subject to the
product you received. Please forgive us that we won't inform you again if
there are any technology or software updates on our product.
-1-

Warning-To reduce the risk of injury, user must read
instructions manual carefully.
This device complies with Part 15 of the FCC Rules. Operation
is subject to the following two conditions:(1)This device may
not cause harmful interference, and (2)this device must accept
any interference received, including interference that may
cause undesired operation.
This product is subject to the provision of European Directive
2012/19/EC. The symbol showing a wheelie bin crossed
through indicates that the product requires separate refuse
collection in the European Union. This applies to the product
and all accessories marked with this symbol. Products marked
as such may not be discarded with normal domestic waste, but
must be taken to a collection point for recycling electrical and
electronic devices
-2-
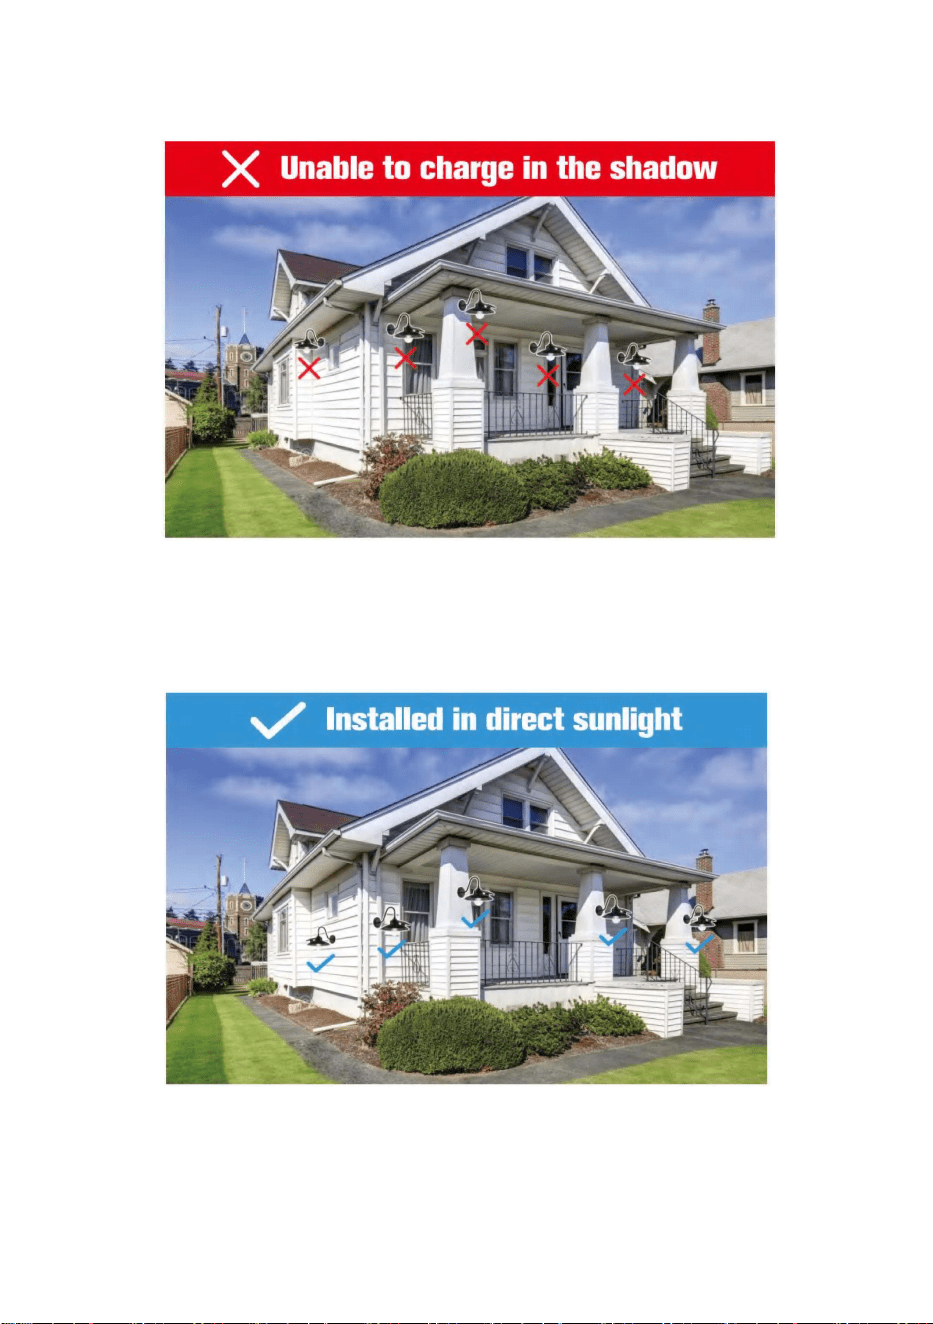
Do not install in a location without direct sunlight, if the photovoltaic panel
cannot receive sunlight,the solar lamp will not work properly at night.
-3-
GT-GCD-U2-S
GT
-GCD-E2-S
GT-GCD-U1 / GT-GCD-E1 /
GT-GCD-U2 / GT-GCD-E2 /
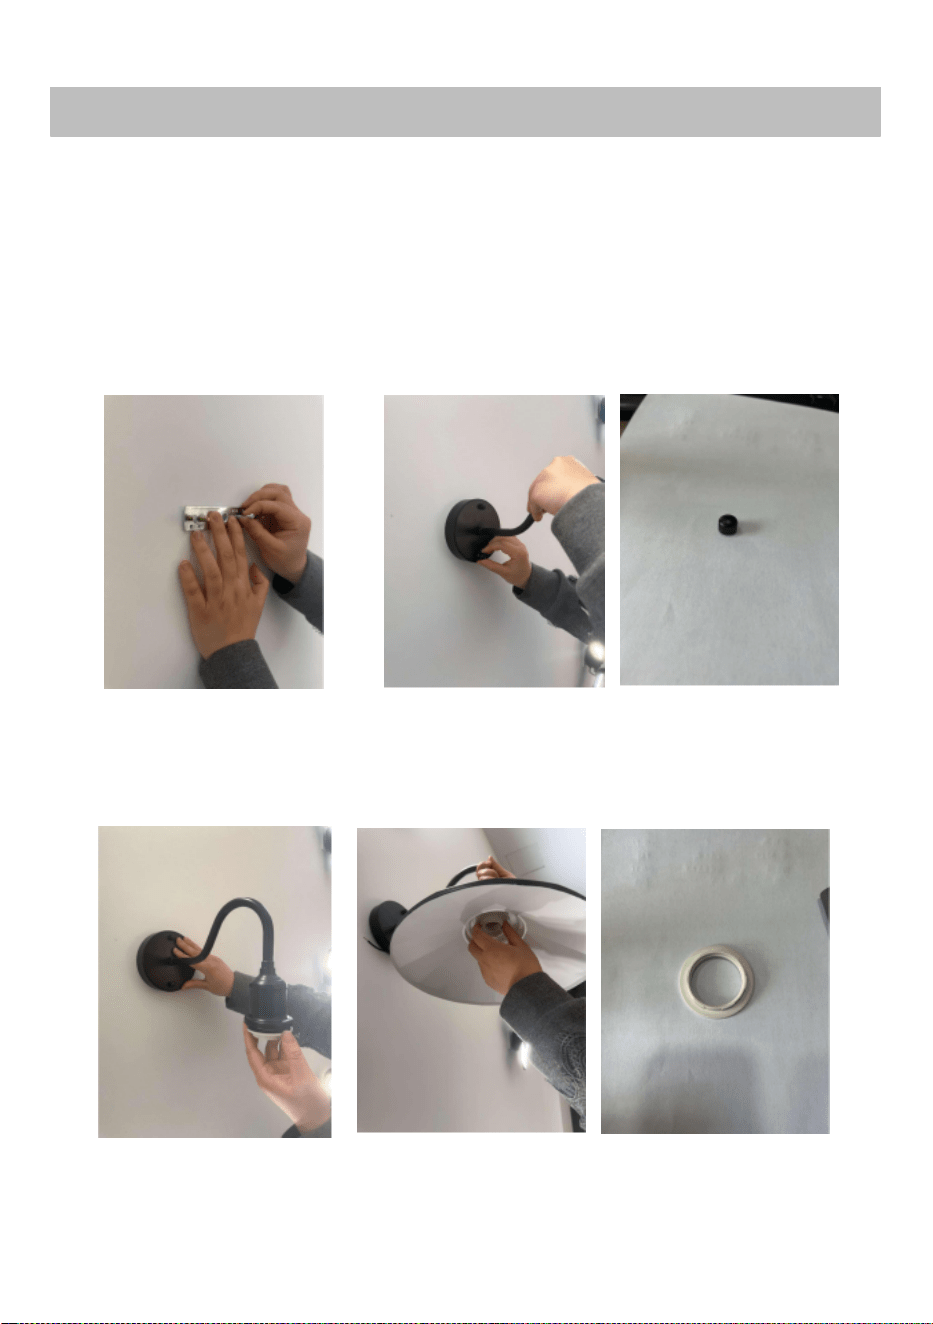
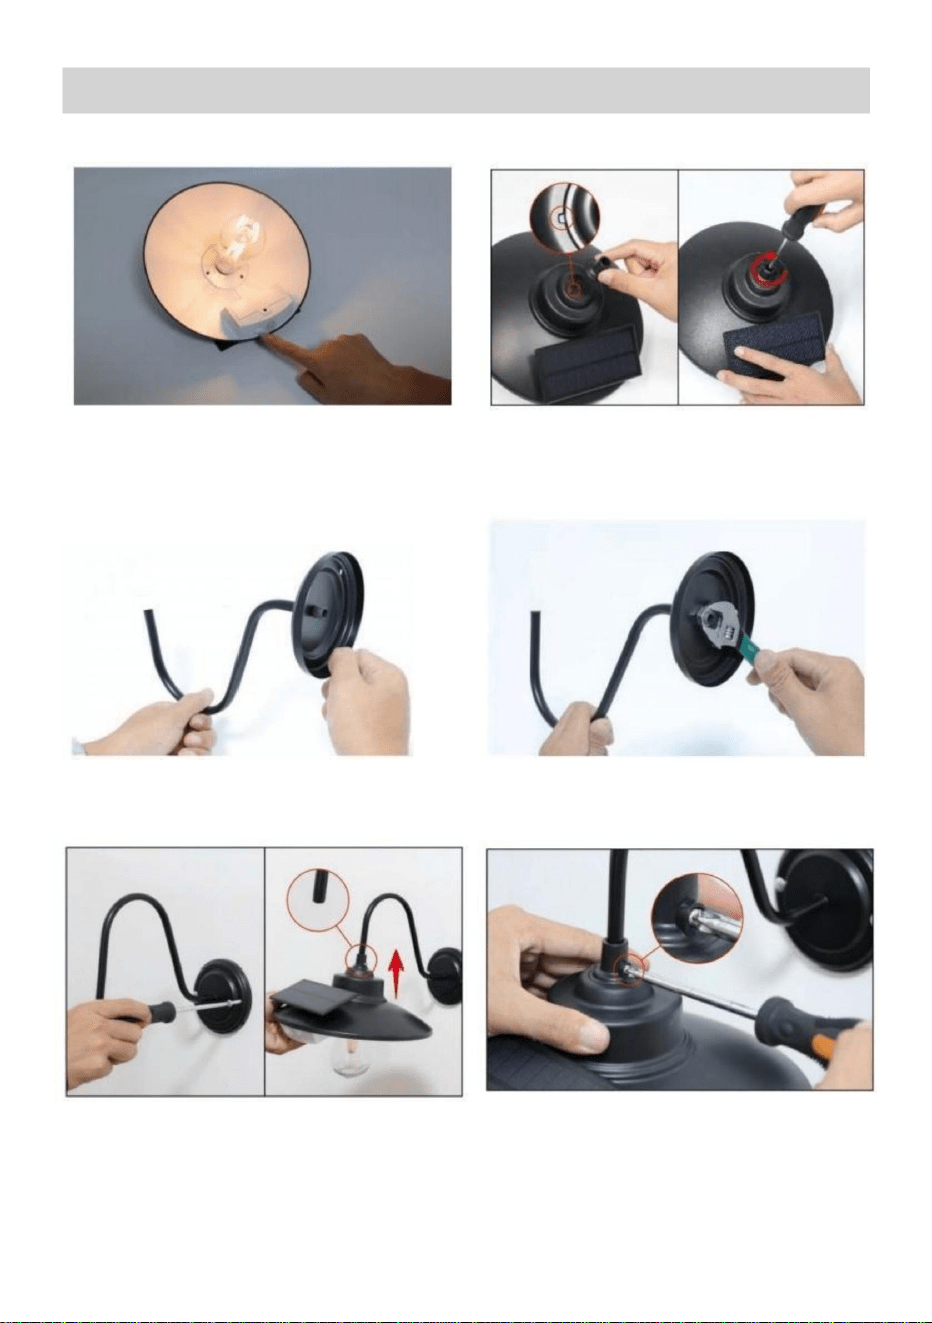
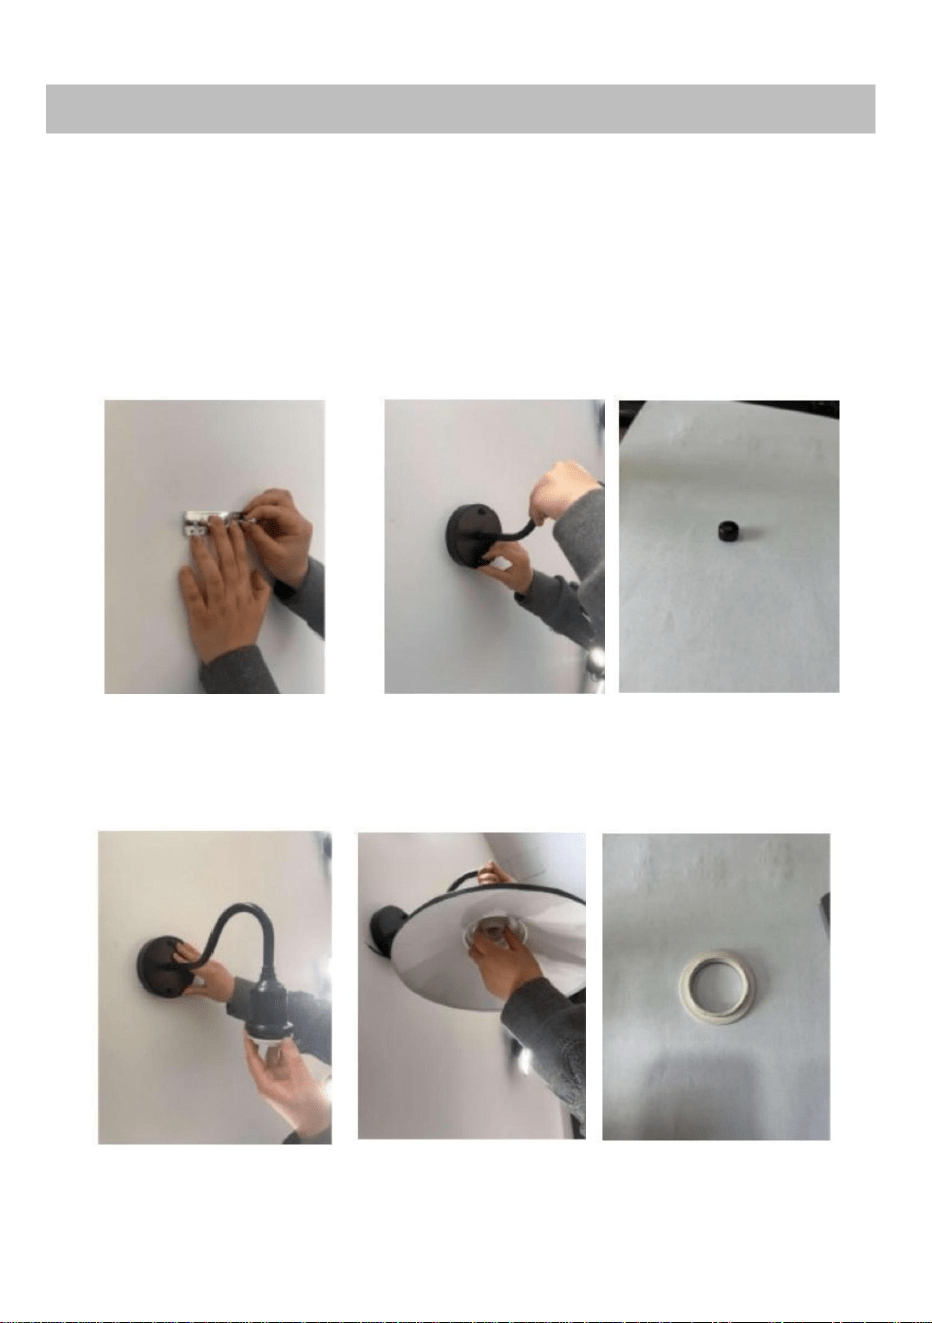
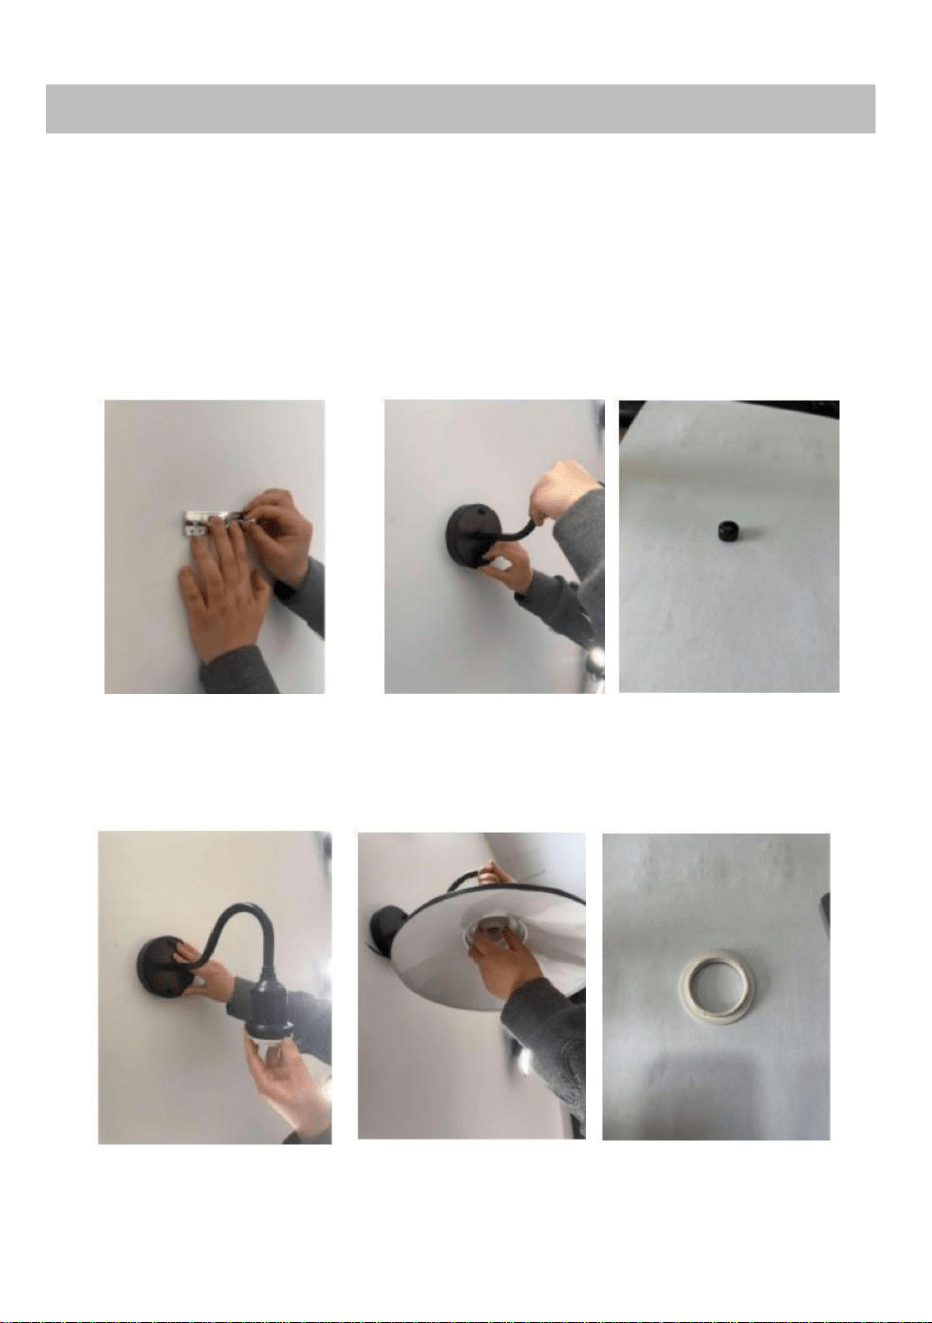
1.As show in the figure,fix
the bottom to the wall with
expansion screws.
2.Tighten with a black nut.
3.Remove the white plastic ring, place the lampshade, and
then tighten thewhite plastic ring.
MODEL
:
HOW TO INSTALL?
-4-
HOW TO INSLL?
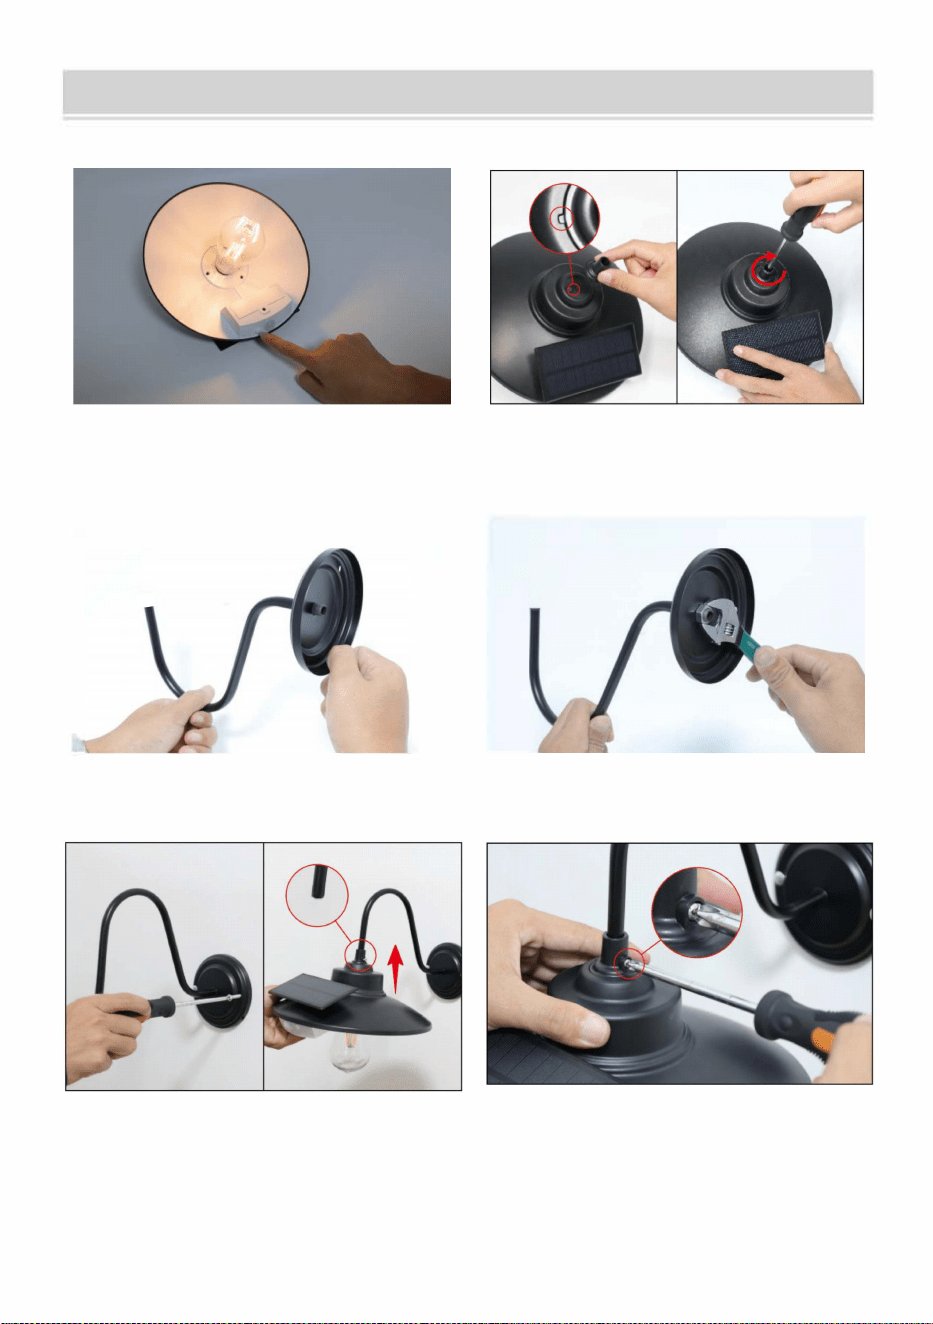
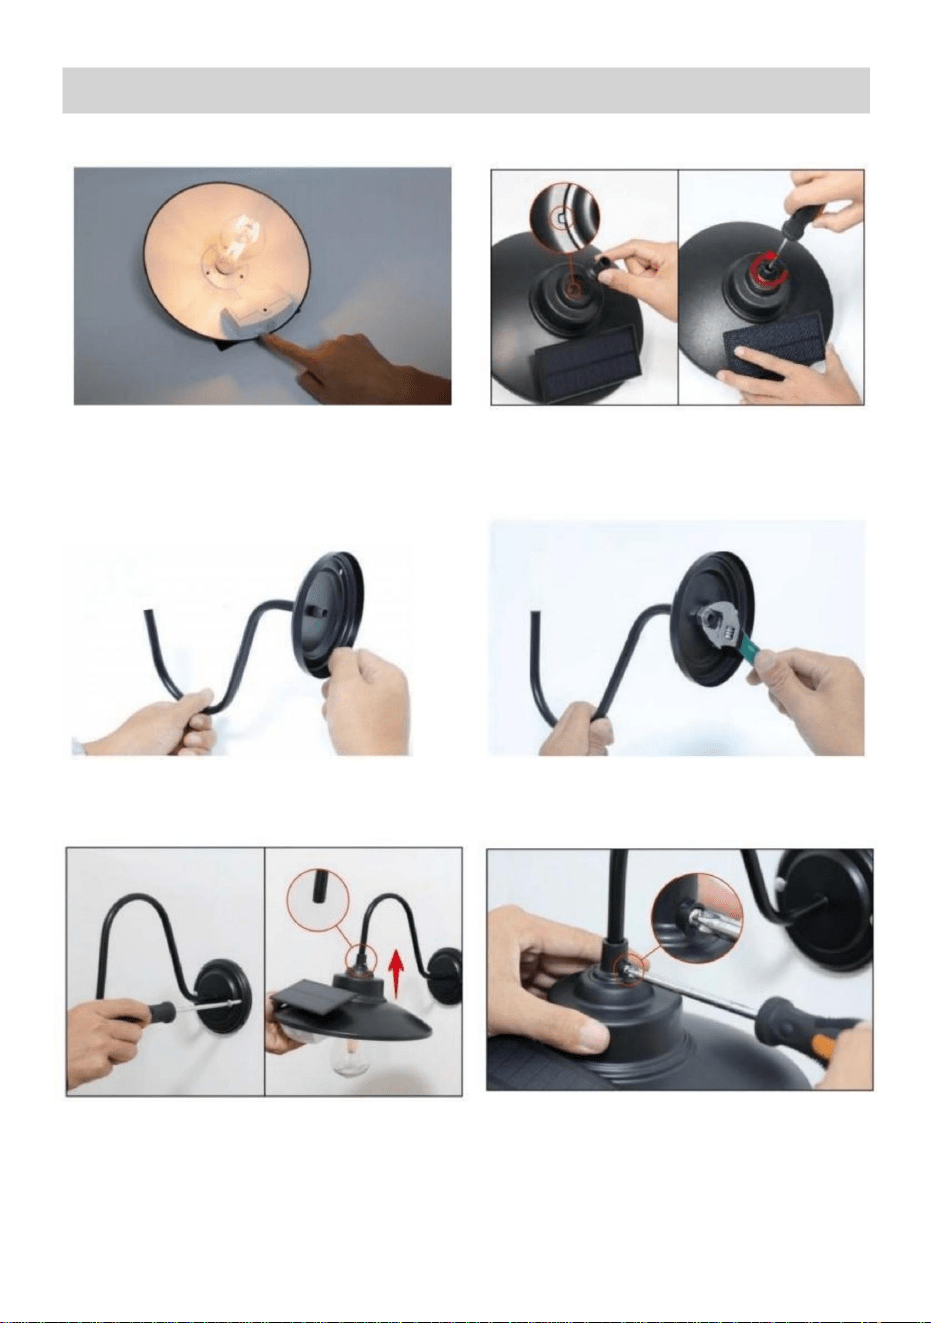
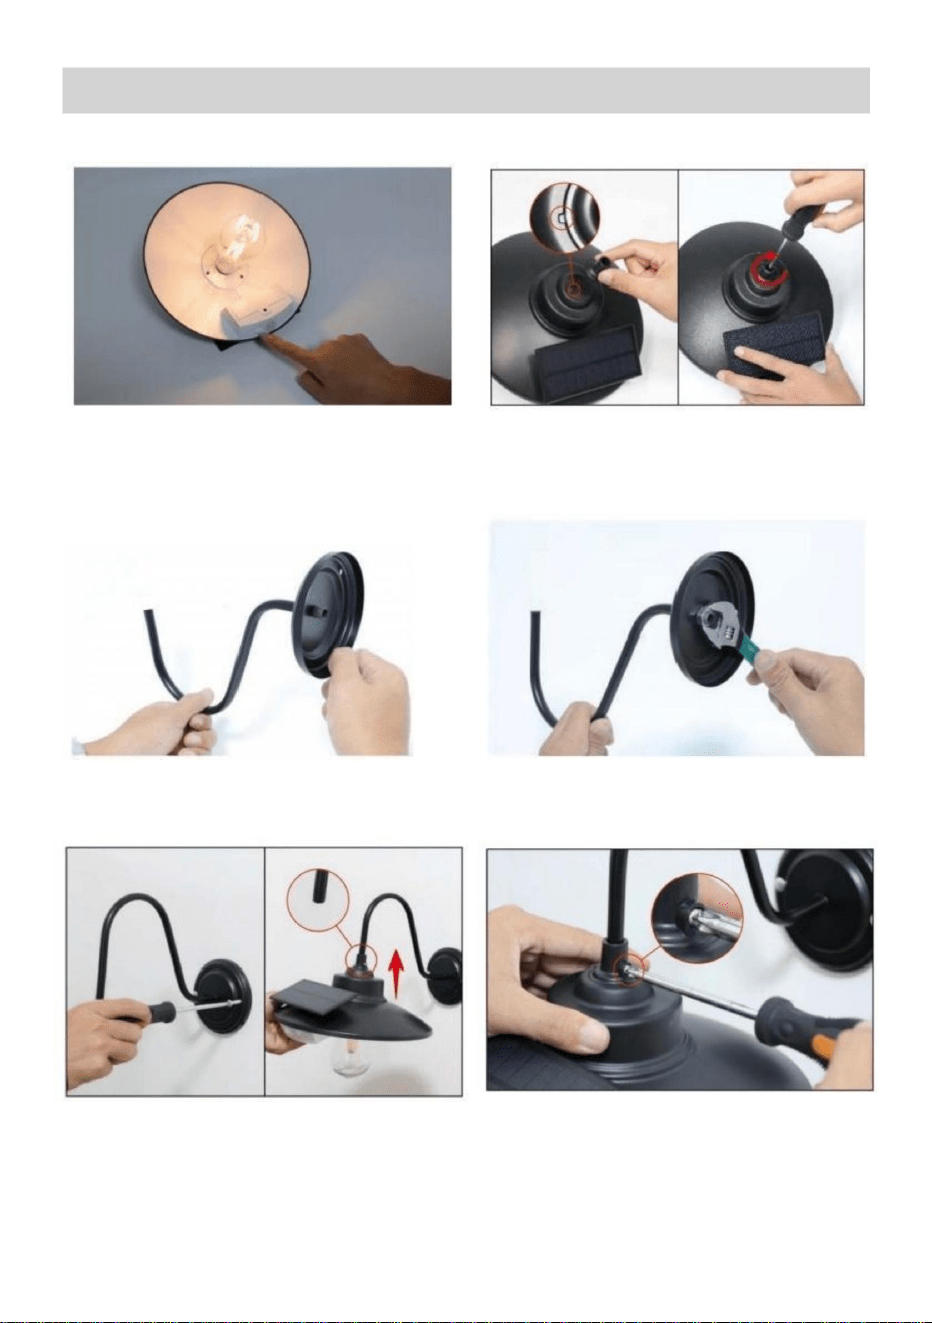
1.Cover the solar panel or place the light
2.As show in the figure,justify groove
in a dark environment,turn on the switch
part to fix the connector.
to check if the light work normally.
3.Thread the bracket through the
4.Fix the bracket and base together
mounting base.
with nuts.
5.Use long screws to fix the base at the
6. Fix the light head and the bracket
position you need to install, unplug the firmly with screws.
blue cover, and connect the light head
with the bracket.
MODEL:GT-GCD-SS-1/ GT-GCD-SS-2
-5-
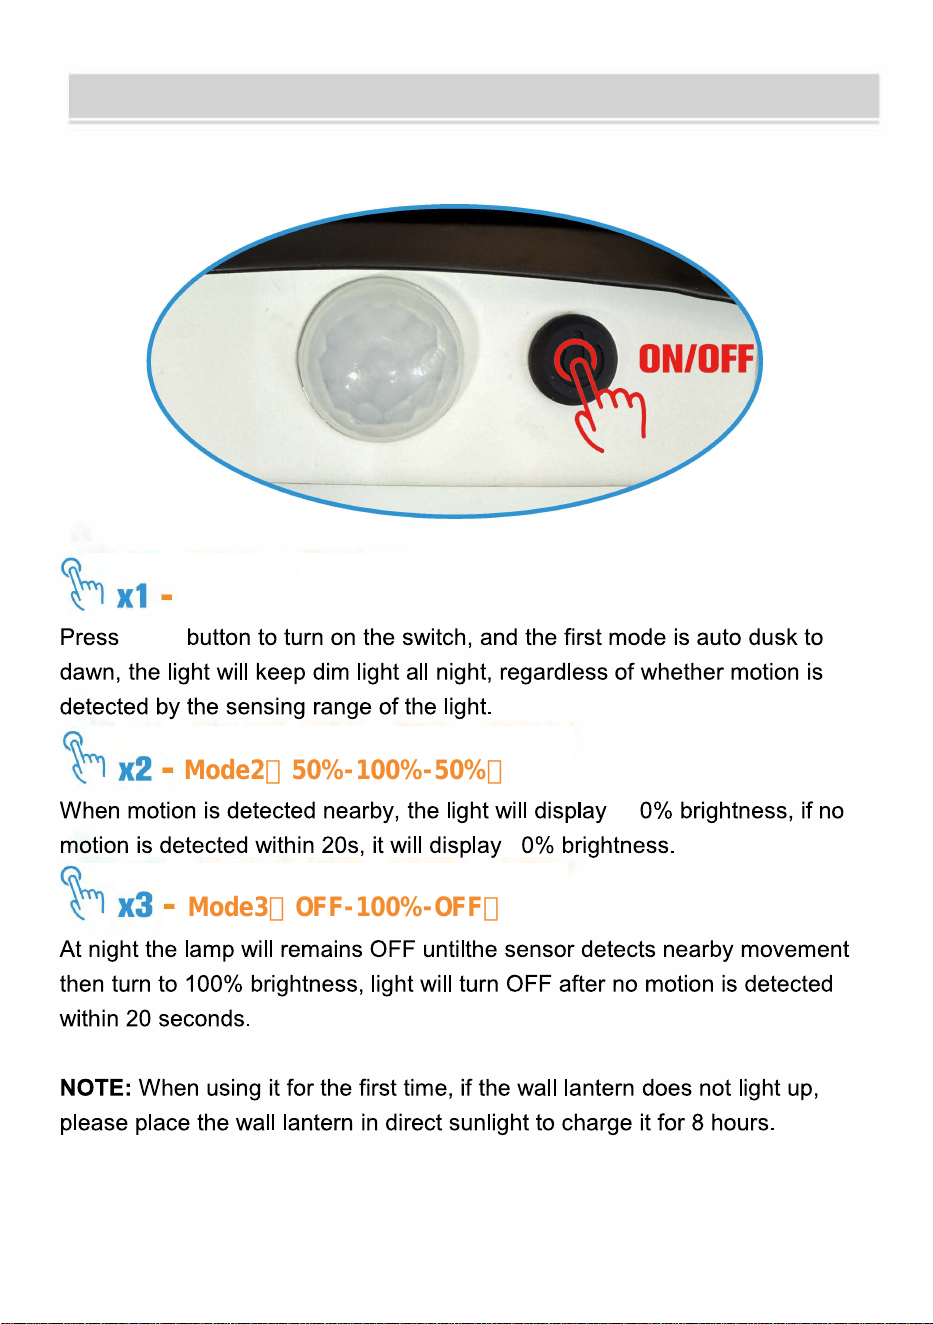
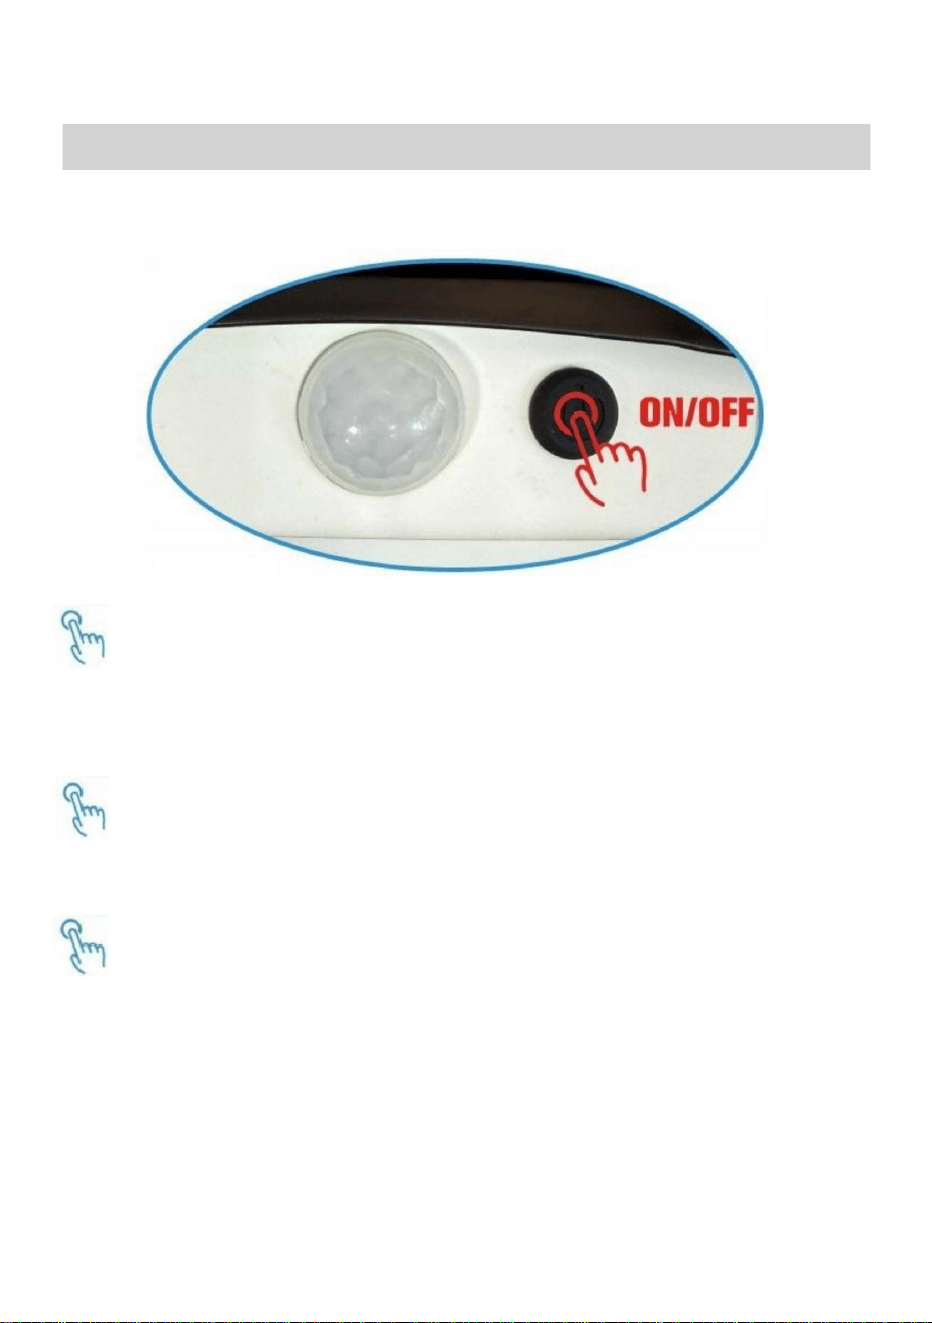
3 LIGHTING MODES
Select mode by pressing the white button.
Mode1(5
0%)
black
Mode2(50
%-100%-50%)
10
5
Mode3(OFF-100%-O
FF)
-6-

FREQUENTLY ASKED QUESTIONS
Why does my light not come on at night?
(1) Make sure the switch is ON (White button). Light can only be charged
when the switch is turned on.
(2) Make sure that the location you install does not have shade or eaves to
block the sun.
(3) Make sure that there are no other light sources above the solar panel at
night,such as street lights.
Does the solar panel require the direct sun to charge?
The solar panel must be installed in a location where it can receive full
direct sunshine (when available) and usually set the solar panel facing
South at an appropriate angle. The solar panel must not be installed in a
shaded or part-shaded location.
What type of batte does my solar hanging light require to operate?
The solar barn light requires one Lithium-Ion 3. 7V 2000 mAh battery,
battery model: 18650.
Can I use any regular bulb r the solar barn light?
Only bulbs purchased through Aulanto can be used for this product.
NOTE: If it still does not work aer the above operations, please contact:
[email protected], we will replace it for you free of charge.
-7-
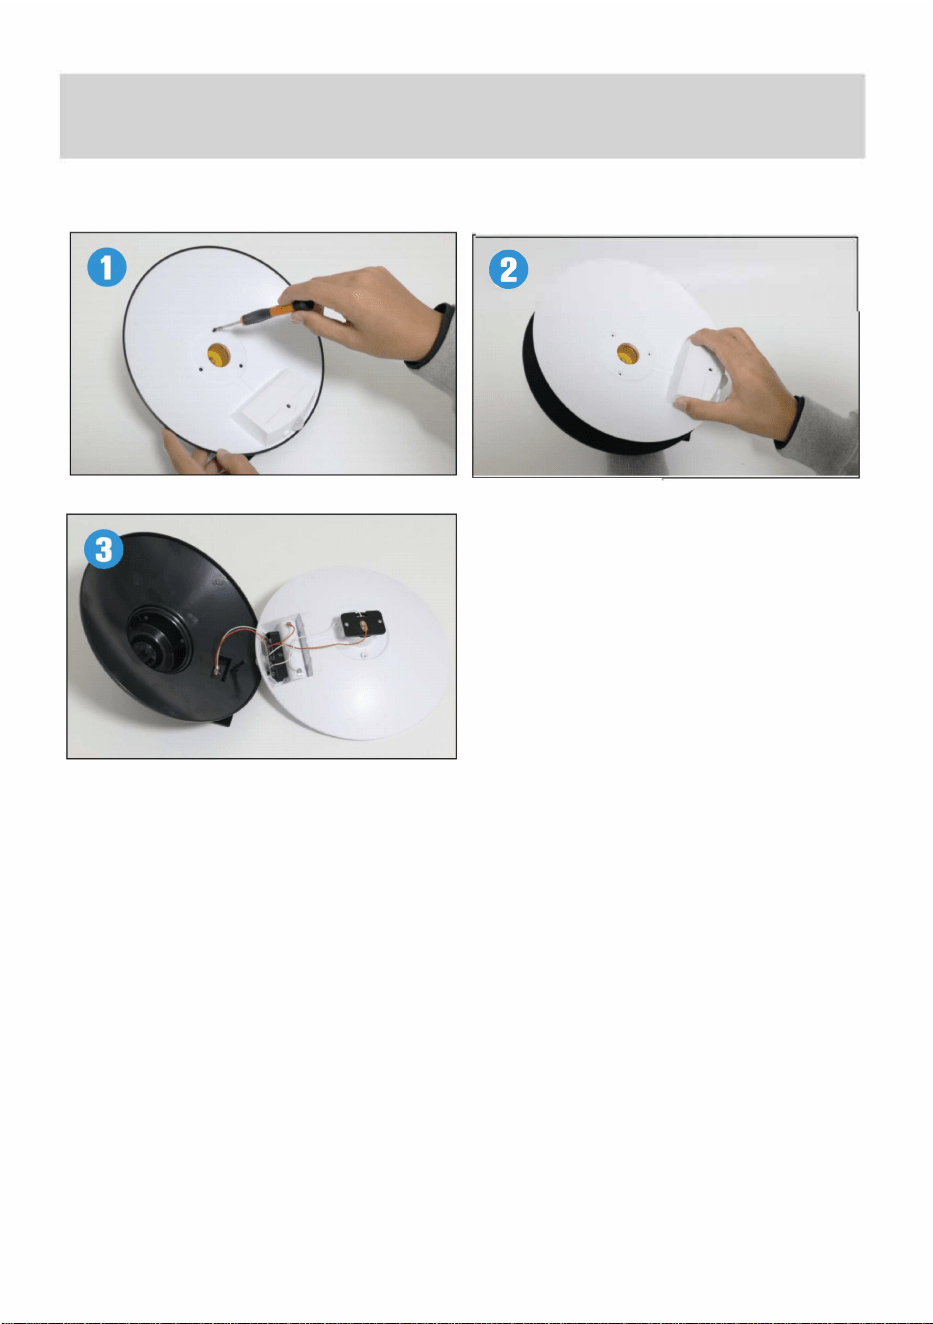
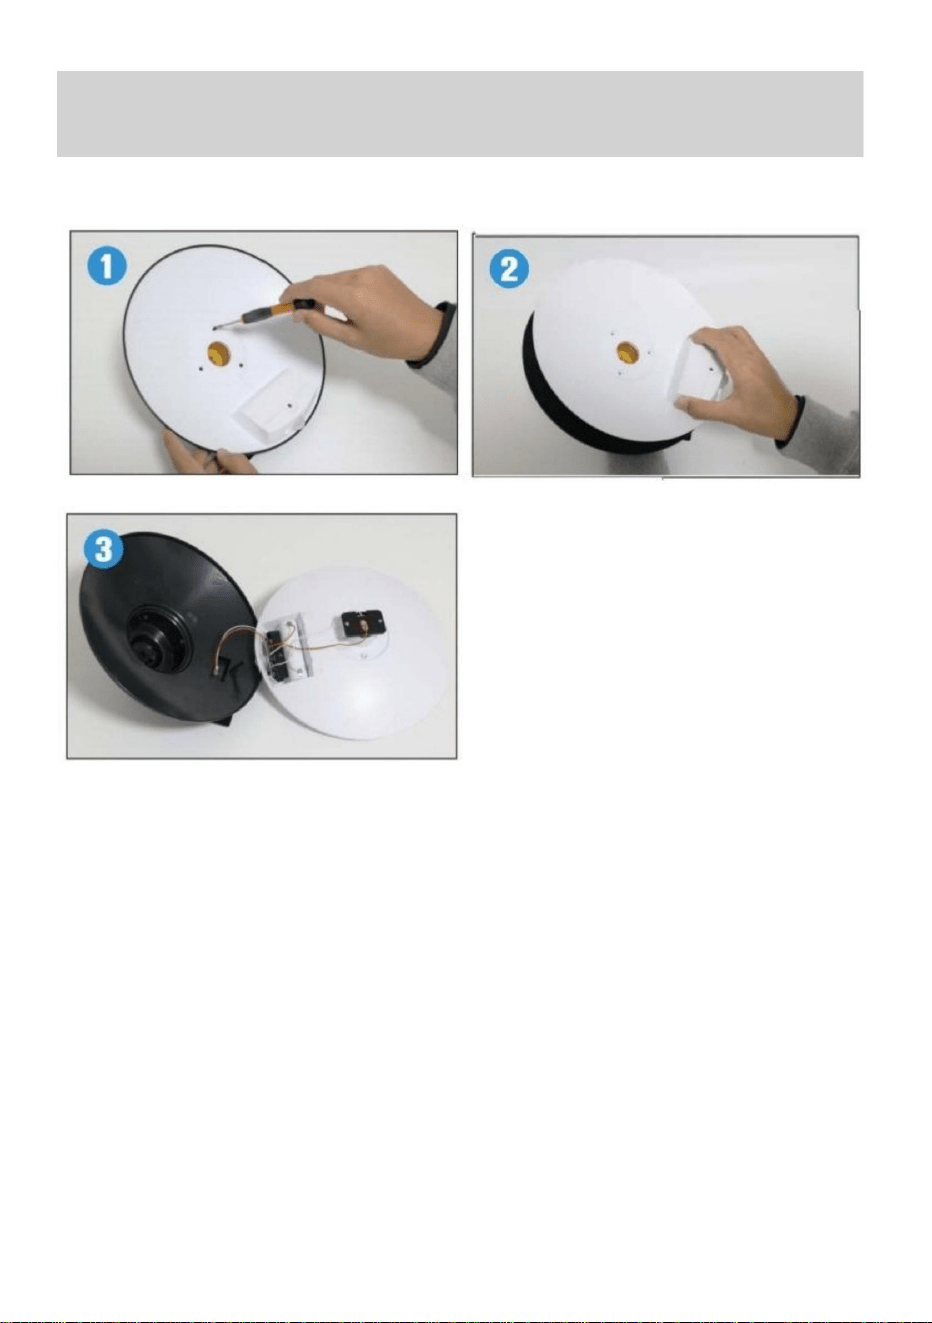
IF THE LIGHT DOES NOT TURN ON DUSK AFTER 6-8 HOURS OF
CHARGING:
。
1: Unscrew the three fixing screws as shown in the picture.
2: Uncover the lampshade gently upward.
3: Check whether the internal circuit is o, loose, etc.
-8-
Model
Input
Lampshade size Waterproof class
GT-GCD-U1 AC120V 60Hz
φ
11.5
"
IP54
GT-GCD-E1 AC230V 50Hz
GT-GCD-U2 AC120V 60Hz
GT-GCD-E2 AC230V 50Hz
GT-GCD-U2-S
AC120V 60Hz
GT-GCD-E2-S
AC230V 50Hz
DC3.6V 1.1A
GT-GCD-SS-1
Max 4W
φ
9.5
"
GT-GCD-SS-2
Manufacturer: Shanghaimuxinmuyeyouxiangongsi
Address: Shuangchenglu 803nong11hao1602A-1609shi, baoshanqu,
shanghai 200000 CN.
Imported to AUS: SIHAO PTY LTD. 1 ROKEVA STREETEASTWOOD
NSW 2122 Australia
Imported to USA: Sanven Technology Ltd. Suite 250, 9166 Anaheim
SPECIFICATION
Place, Rancho Cucamonga, CA 91730
UK REP
YH CONSULTING LIMITED. C/O YH Consulting
Limited Office 147, Centurion House, London
Road, Staines-upon-Thames, Surrey, TW18 4AX
EC REP
E-CrossStu GmbH
Mainzer Landstr.69,
60329 Frankfurt am Main.
-9-


。

LUMIÈRESDE
MODÈLE:
GTGCDSS1/GTGCDU1/GTGCDE1/GTGCDU2S
GTGCDSS2/GTGCDU2/GTGCDE2/GTGCDE2S
GRANGE

LUMIÈRESDE
MODÈLE:GTGCDSS1/GTGCDU1/GTGCDE1/GTGCDU2
GTGCDSS2/GTGCDU2/GTGCDE2/GTGCDE2
L'imageestàtitreindicatifuniquement,veuillezvousréféreràl'objetréel
Ils'agitdesinstructionsd'origine,veuillezlireattentivementtoutesles
instructionsdumanuelavantdel'utiliser.VEVORseréserveuneinterprétationclaire
denotremanueld'utilisation.L'apparenceduproduitserasoumiseauproduit
quevousavezreçu.Veuilleznouspardonnerdenepasvousinformerànouveaus'il
existedesmisesàjourtechnologiquesoulogiciellessurnotreproduit.
S
S
GRANGE
—1—

AvertissementPourréduirelerisquedeblessure,l'utilisateurdoitlire
Lisezattentivementlemanuel
Cetappareilestconformeàlapartie15desrèglesdelaFCC.
L'exploitationestsoumiseauxdeuxconditionssuivantes:(1)Cette
l'appareilnedoitpasprovoquerd'interférencesnuisibles,et(2)cetappareil
doitacceptertouteinterférencereçue,ycomprislesinterférences
cequipeutprovoquerunfonctionnementindésirable.
d'instructions.
Ceproduitestsoumisauxdispositionsdeladirectiveeuropéenne
2012/19/CE.Lesymbolereprésentantunepoubellebarrée
àtraversindiquequeleproduitnécessiteuntrisélectif
collectedansl'Unioneuropéenne.Cecis'appliqueauproduit
ettouslesaccessoiresmarquésdecesymbole.Produitsmarqués
entantquetel,ilnepeutpasêtrejetéaveclesdéchetsménagersnormaux,mais
doitêtreapportéàunpointdecollectepourlerecyclagedesappareilsélectriques.
etappareilsélectroniques
—2—

Nepasinstallerdansunendroitsanslumièredirectedusoleil,silepanneauphotovoltaïquene
peutpasrecevoirlalumièredusoleil,lalampesolairenefonctionnerapascorrectementla
—3—
nuit.

GTGCDU2/GTGCDE21
1.Commeindiquésurlafigure,
fixezlebasaumuravecdesvis
d'expansion.
COMMENT
MODÈLE:GTGCDU1/GTGCD
3.Retirezl'anneauenplastiqueblanc,placezl'abatjour,puisserrez
l'anneauenplastiqueblanc.
E1/
INSTALLER?
GTGCDU2S
GTGCDE2S
2.Serreravecunécrounoir.
—4—
2.Commeindiquésurlafigure,justifiezlapartie
rainuréepourfixerle
3.Enfilezlesupportàtraverslabasede
—5—
montage.
connecteur.
1.Couvrezlepanneausolaireouplacezla
lumièredansunenvironnementsombre,allumez
l'interrupteurpourvérifiersilalumière
fonctionne
4.Fixezlesupportetlabaseensembleavec
desécrous.
normalement.
COMMENT
MODÈLE:GTGCDSS1/GTGCD
5.Utilisezdelonguesvispourfixerlabaseà
l'endroitoùvoussouhaitezl'installer,débranchezle
couverclebleuetconnectezlatêted'éclairageau
support
SS2
INSTALLER?
6.Fixezfermementlatêted'éclairageetle
supportavecdesvis.

X2
x1Mode1(50%)
Appuyezsurleboutonnoirpourallumerl'interrupteur,etlepremiermodeestlecrépusculeautomatique.
l'aube,lalumièreresterafaibletoutelanuit,peuimportesilemouvementest
détectéparlaportéededétectiondela
Lorsqu'unmouvementestdétectéàproximité,lalumièreafficherauneluminositéde100%,sinon
unmouvementestdétectédansles20secondes,ilaffichera50%deluminosité.
Mode2(50%100%50%)
lumière.
3MODESD'ÉCLAIRAGE
Sélectionnezlemodeenappuyantsurlebouton
x3Mode3(OFF100%OFF)
Lanuit,lalamperesteéteintejusqu'àcequelecapteurdétecteunmouvementàproximité
puispassezà100%deluminosité,lalumières'éteindralorsqu'aucunmouvementn'estdétecté
dansles20secondes.
REMARQUE:lorsdelapremièreutilisation,silalanternemuralenes'allumepas,veuillezplacer
lalanternemuraleàlalumièredirectedusoleilpourlachargerpendant8heures.
blanc.
—6—

QUESTIONSFRÉQUEMMENT
—7—
POSÉES
Pourquoimalumièrenes'allumepaslanuit?
(1)Assurezvousquel'interrupteurestsurON(boutonblanc).Lalumièrenepeutêtrechargéeque
lorsquel'interrupteurestallumé.
(2)Assurezvousquel'emplacementoùvousinstallezn'apasd'ombreoud'avanttoit
bloquerlesoleil.
(3)Assurezvousqu'iln'yapasd'autressourcesdelumièreaudessusdupanneausolaireà
lanuit,commeleslampadaires.
Lepanneausolaireatilbesoindusoleildirectpoursecharger?
Lepanneausolairedoitêtreinstallédansunendroitoùilpeutrecevoirlapleine
soleildirect(lorsqu'ilestdisponible)etplacezgénéralementlepanneausolaireface
Sudàunangleapproprié.Lepanneausolairenedoitpasêtreinstallédansun
emplacementombragéoumiombragé.
Dequeltypedebatteriemalampesolairesuspendueatellebesoinpourfonctionner?
LalampesolairedegrangenécessiteunebatterieLithiumion3,7V2000mAh,
modèledebatterie:18650.
Puisjeutilisern'importequelleampouleordinairepourl'éclairagesolairedelagrange?
SeuleslesampoulesachetéesviaAulantopeuventêtreutiliséespource
REMARQUE:Sicelanefonctionnetoujourspasaprèslesopérationscidessus,veuillezcontacter:
[email protected],nousleremplaceronsgratuitementpourvous.
produit.

SILALUMIÈRENES'ALLUMEPASAUCRÉPUSCULEAPRÈS6À8HEURESDE
CHARGEMENT:
1:Dévissezlestroisvisdefixationcommeindiquésurl'image.
2:Découvrezdoucementl'abatjourverslehaut.
3:Vérifiezsilecircuitinterneestéteint,desserré,etc.
—8—
φ11,5"
IP54
φ9,5"
Modèle
GTGCDU1
GTGCDE1
GTGCDU2
GTGCDE2
GTGCDU2S
GTGCDE2S
GTGCDSS1
GTGCD
Saisir
CA120V60Hz
CA230V50Hz
CA120V60
Classe
CA230V50Hz
CA120V60Hz
CA230V50Hz
DC3,6V
Max4W
1,1A
d'étanchéité
Hz
SS2
Tailledel'abatjour
Fabricant:Shanghaimuxinmuyeyouxiangongsi
Adresse:Shuangchenglu803nong11hao1602A1609shi,Baoshanqu,Shanghai
200000CN.
ImportéenAustralie:SIHAOPTYLTD.1ROKEVASTREET,ASTWOOD
NSW2122Australie
ImportéauxÉtatsUnis:SanvenTechnologyLtd.Suite250,9166Anaheim
Lieu,RanchoCucamonga,CA
YHCONSULTINGLIMITED.A/SYH
REPRÉSENTANTDUROYAUME
REPRÉSENTANTDELACE
UNI
Consulting
91730
Bureaulimité147,CenturionHouse,Londres
Route,StainesuponThames,Surrey,TW18
ECrossStuGmbH
MainzerLandstr.69,
60329FrancfortsurleMain.
4AX
SPÉCIFICATION
—9—


MODELL:
GT-GCD-SS-1/GT-GCD-U1/GT-GCD-E1/GT-GCD-U2-S
GT-GCD-SS-2/GT-GCD-U2/GT-GCD-E2/GT-GCD-E2-S
Scheunenbeleuchtung
MODELL: GT-GCD-SS-1/GT-GCD-U1/GT-GCD-E1/GT-GCD-U2-
GT-GCD-SS-2/GT-GCD-U2/GT-GCD-E2/GT-GCD-E2-S
S
Das Bild dient nur als Referenz, bitte beziehen Sie sich auf das tatsächliche Objekt
Dies ist die Originalanleitung. Bitte lesen Sie alle Anweisungen im Handbuch
sorgfältig durch, bevor Sie das Gerät in Betrieb nehmen. VEVOR behält sich eine klare
Auslegung unseres Benutzerhandbuchs vor. Das Aussehen des Produkts hängt von
dem Produkt ab, das Sie erhalten haben. Bitte verzeihen Sie uns, dass wir Sie nicht erneut
informieren, wenn es Technologie- oder Software-Updates für unser Produkt gibt.
Scheunenbeleuchtung
—1—
Warnung - Um das Verletzungsrisiko zu verringern, muss der
Lesen Sie die Bedienungsanleitung sorgfältig
Dieses Gerät entspricht Teil 15 der FCC-Regeln.
Der Betrieb unterliegt den folgenden zwei Bedingungen:(1)Diese
Das Gerät darf keine schädlichen Störungen verursachen und (2) dieses Gerät
muss alle empfangenen Störungen akzeptieren, einschließlich Störungen
Dies kann zu unerwünschtem Betrieb führen.
durch.
Benutzer
Dieses Produkt unterliegt den Bestimmungen der Europäischen Richtlinie
2012/19/EG. Das Symbol einer durchgestrichenen Mülltonne
durch bedeutet, dass das Produkt einer getrennten Entsorgung bedarf
Sammlung in der Europäischen Union. Dies gilt für das Produkt
und alle mit diesem Symbol gekennzeichneten Zubehörteile. Produkte
Daher dürfen sie nicht mit dem normalen Hausmüll entsorgt werden, sondern
müssen zu einer Sammelstelle für das Recycling von Elektro-
und elektronische Geräte
—2—

Installieren Sie die Solarlampe nicht an einem Ort ohne direkte Sonneneinstrahlung. Wenn das
Photovoltaikmodul kein Sonnenlicht empfängt, funktioniert die Solarlampe nachts nicht richtig.
—3—

WIE INSTALLIERT MAN
MODELL:GT-GCD-U1/GT-GCD-
—4—
E1/
ES?
GT-GCD-U2-S
GT-GCD-E2-S
GT-GCD-U2/GT-GCD-E21
1. Befestigen Sie die Unterseite wie
in der Abbildung gezeigt mit
Dehnschrauben an der
3. Entfernen Sie den weißen Kunststoffring, setzen Sie den Lampenschirm auf und
ziehen Sie dann den weißen Kunststoffring fest.
Wand.
2. Mit einer schwarzen Mutter festziehen.
3.Fädeln Sie die Halterung durch die
—5—
Montagebasis.
4. Befestigen Sie Halterung und Basis mit Muttern.
5. Befestigen Sie die Basis mit langen Schrauben an
der gewünschten Position, ziehen Sie die blaue
Abdeckung ab und verbinden Sie den Lichtkopf mit der
Halterung
1. Decken Sie das Solarpanel ab oder platzieren Sie
das Licht in einer dunklen Umgebung. Schalten Sie den
Schalter ein, um zu prüfen, ob das Licht normal
6. Befestigen Sie den Lichtkopf und die Halterung
fest mit Schrauben.
funktioniert.
WIE INSTALLIERT MAN
MODELL: GT-GCD-SS-1/GT-GCD-
2. Richten Sie, wie in der Abbildung gezeigt, den Nutteil
aus, um den Stecker zu befestigen.
SS-2
ES?
X2
-Modus 2 (50 % - 100 % - 50 %)
x1 Modus1 (50 %)
Drücken Sie die schwarze Taste, um den Schalter einzuschalten, und der erste Modus ist automatische Dämmerung
Morgendämmerung, das Licht bleibt die ganze Nacht schwach, unabhängig davon, ob Bewegung ist
vom Erfassungsbereich des Lichts
Wenn eine Bewegung in der Nähe erkannt wird, leuchtet das Licht mit 100 % Helligkeit, wenn keine
Wenn innerhalb von 20 Sekunden eine Bewegung erkannt wird, wird die Helligkeit auf 50 % erhöht.
erfasst.
x3 Modus3 (AUS-100 %-AUS)
Nachts bleibt die Lampe ausgeschaltet, bis der Sensor eine Bewegung in der Nähe erkennt.
dann drehen Sie auf 100 % Helligkeit, das Licht wird ausgeschaltet, wenn keine Bewegung erkannt wird
innerhalb von 20 Sekunden.
HINWEIS: Wenn die Wandlaterne beim ersten Gebrauch nicht leuchtet, legen Sie sie bitte 8 Stunden lang in
direktes Sonnenlicht, um sie aufzuladen.
3 BELEUCHTUNGSMODI
Wählen Sie den Modus durch Drücken der weißen
—6—
Taste.

HÄUFIG GESTELLTE
Warum geht mein Licht nachts nicht an?
(1)Stellen Sie sicher, dass der Schalter eingeschaltet ist (weißer Knopf). Das Licht kann nur aufgeladen werden
wenn der Schalter eingeschaltet ist.
(2)Stellen Sie sicher, dass der Installationsort keinen Schatten oder Dachvorsprünge hat,
die Sonne blockieren.
(3) Stellen Sie sicher, dass sich oberhalb des Solarpanels keine weiteren Lichtquellen befinden.
Nacht, wie zum Beispiel Straßenlaternen.
Benötigt das Solarpanel zum Laden direkte Sonneneinstrahlung?
Das Solarmodul muss an einem Ort installiert werden, wo es die volle
direkte Sonneneinstrahlung (sofern verfügbar) und richten Sie das Solarpanel in der Regel nach
Süd in einem geeigneten Winkel. Das Solarpanel darf nicht in einem
schattiger oder halbschattiger Standort.
Welchen Batterietyp benötigt meine Solar-Hängeleuchte zum Betrieb?
Die Solar-Scheunenleuchte benötigt eine Lithium-Ionen-Batterie mit 3,7 V und 2000 mAh.
Batteriemodell: 18650.
Kann ich für die Solar-Scheunenbeleuchtung jede normale Glühbirne verwenden?
Für dieses Produkt können nur über Aulanto erworbene Glühbirnen verwendet
HINWEIS: Wenn es nach den oben genannten Vorgängen immer noch nicht funktioniert, wenden Sie sich bitte an:
[email protected], wir ersetzen es kostenlos für Sie.
werden.
FRAGEN
—7—
WENN DAS LICHT NACH 6-8 STUNDEN NICHT EINSCHALTET
—8—
AUFLADEN:
1: Lösen Sie die drei Befestigungsschrauben wie im Bild gezeigt.
2: Den Lampenschirm vorsichtig nach oben öffnen.
3: Überprüfen Sie, ob der interne Schaltkreis ausgeschaltet, locker usw. ist.
Hersteller: Shanghaimuxinmuyeyouxiangongsi
Adresse: Shuangchenglu 803nong11hao1602A-1609shi, Baoshanqu, Shanghai
200000 CN.
Importiert nach AUS: SIHAO PTY LTD. 1 ROKEVA STREETEASTWOOD
NSW 2122 Australien
Importiert in die USA: Sanven Technology Ltd. Suite 250, 9166 Anaheim
Place, Rancho Cucamonga, CA
YH CONSULTING LIMITED. C/O YH Consulting
91730
Straße, Staines-upon-Thames, Surrey, TW18 4AX
E-CrossStu GmbH
Mainzer Landstr.69,
60329 Frankfurt am Main.
Eingang Lampenschirmgröße Wasserdichtigkeitsklasse
ÿ11,5"
IP54
Modell
GT-GCD-U1
GT-GCD-E1
GT-GCD-U2
GT-GCD-E2
GT-GCD-U2-S
GT-GCD-E2-S
GT-GCD-SS-1
GT-GCD-
DC 3,6 V 1,1 A
SS-2
AC120V 60Hz
AC230V 50Hz
AC120V 60Hz
AC230V50Hz
AC120V 60Hz
AC230V
Max. 4 W
ÿ9,5"
50Hz
SPEZIFIKATION
Britische Republik
Limited Office 147, Centurion House,
EG-
—9—
Vertreter
London


LUCI DEL
MODELLO:
GT-GCD-SS-1/GT-GCD-U1/GT-GCD-E1/GT-GCD-U2-S
GT-GCD-SS-2/GT-GCD-U2/GT-GCD-E2/GT-GCD-E2-S
FIENILE

LUCI DEL
MODELLO: GT-GCD-SS-1/GT-GCD-U1/GT-GCD-E1/GT-GCD-U2-
GT-GCD-SS-2/GT-GCD-U2/GT-GCD-E2/GT-GCD-E2-
L'immagine è solo di riferimento, fare riferimento all'oggetto reale
Queste sono le istruzioni originali, leggere attentamente tutte le
istruzioni del manuale prima dell'uso. VEVOR si riserva una chiara
interpretazione del nostro manuale utente. L'aspetto del prodotto
dipenderà dal prodotto ricevuto. Vi preghiamo di scusarci se non vi
informeremo nuovamente se ci saranno aggiornamenti tecnologici o
software sul nostro prodotto.
S
S
FIENILE
—1—

Avvertenza - Per ridurre il rischio di lesioni, l'utente deve leggere
attentamente il manuale di
Questo dispositivo è conforme alla Parte 15 delle Norme FCC.
Il funzionamento è soggetto alle due condizioni seguenti: (1) Questo
il dispositivo non può causare interferenze dannose e (2) questo dispositivo
deve accettare qualsiasi interferenza ricevuta, comprese le interferenze
che potrebbero causare un funzionamento
—2—
indesiderato.
istruzioni.
Questo prodotto è soggetto alle disposizioni della Direttiva Europea
2012/19/CE. Il simbolo raffigurante un bidone della spazzatura barrato
attraverso indica che il prodotto richiede un rifiuto separato
raccolta nell'Unione Europea. Ciò vale per il prodotto
e tutti gli accessori contrassegnati con questo simbolo. I prodotti contrassegnati
come tali non possono essere smaltiti con i normali rifiuti domestici, ma devono essere
portati in un punto di raccolta per il riciclaggio di apparecchiature elettriche ed elettroniche.
e dispositivi elettronici

Non installare in un luogo senza luce solare diretta, se il pannello fotovoltaico non
può ricevere la luce solare, la lampada solare non funzionerà correttamente di
—3—
notte.
COME INSTALLARE?
MODELLO: GT-GCD-U1/GT-GCD-
GT-GCD-U2/GT-GCD-
1. Come mostrato nella figura,
fissare la parte inferiore alla
parete con viti ad espansione.
E21
E1/
GT-GCD-U2-S
GT-MCD-E2-S
2.Serrare con un dado nero.
3. Rimuovere l'anello di plastica bianca, posizionare il paralume e
quindi stringere l'anello di plastica bianca.
—4—
2. Come mostrato nella figura, giustificare la parte
scanalata per fissare il
—5—
connettore.
3. Infilare la staffa attraverso la base di
montaggio.
5. Utilizzare viti lunghe per fissare la base nella
posizione in cui è necessario installarla, scollegare il
coperchio blu e collegare la testa della luce alla
staffa
MODELLO: GT-GCD-SS-1/GT-GCD-
6.Fissare saldamente la testa della lampada e la
staffa con le viti.
SS-2
COME
1. Coprire il pannello solare o posizionare la luce
in un ambiente buio, accendere l'interruttore per
verificare se la luce funziona
4.Fissare la staffa e la base insieme con i dadi.
normalmente.
INSTALLARE?

X2
-Modalità 2 (50%-100%-50%)
x1 Modalità 1 (50%)
Premere il pulsante nero per accendere l'interruttore e la prima modalità è il crepuscolo automatico
all'alba, la luce manterrà una luce fioca per tutta la notte, indipendentemente dal fatto che ci sia movimento
rilevati dal campo di rilevamento della
Quando viene rilevato un movimento nelle vicinanze, la luce mostrerà il 100% di luminosità, se non c'è
se viene rilevato un movimento entro 20 secondi, la luminosità sarà del 50%.
luce.
3 MODALITÀ DI
Selezionare la modalità premendo il pulsante
x3 Modalità 3 (SPENTO-100%-SPENTO)
Di notte la lampada rimarrà SPENTA finché il sensore non rileva un movimento nelle vicinanze
quindi imposta la luminosità al 100%, la luce si spegnerà dopo che non viene rilevato alcun movimento
entro 20 secondi.
NOTA: se al primo utilizzo la lanterna da parete non si accende, posizionarla alla luce diretta del
sole e caricarla per 8 ore.
bianco.
ILLUMINAZIONE
—6—

DOMANDE
—7—
FREQUENTI
Perché la mia luce non si accende di notte?
(1) Assicurarsi che l'interruttore sia su ON (pulsante bianco). La luce può essere caricata solo
quando l'interruttore è acceso.
(2)Assicurarsi che la posizione in cui si installa non abbia ombra o grondaie
bloccare il sole.
(3)Assicurarsi che non ci siano altre fonti di luce sopra il pannello solare a
di notte, come i lampioni.
Il pannello solare necessita della luce diretta del sole per caricarsi?
Il pannello solare deve essere installato in un luogo in cui possa ricevere la piena
luce solare diretta (quando disponibile) e di solito posizionare il pannello solare rivolto verso
A sud con un'angolazione appropriata. Il pannello solare non deve essere installato in un
posizione ombreggiata o parzialmente ombreggiata.
Che tipo di batteria richiede la mia lampada solare sospesa per funzionare?
La luce solare del fienile richiede una batteria agli ioni di litio da 3,7 V 2000 mAh,
modello batteria: 18650.
Posso usare qualsiasi lampadina normale per la luce solare del fienile?
Per questo prodotto è possibile utilizzare solo le lampadine acquistate tramite
NOTA: Se dopo le operazioni sopra descritte il problema persiste, contattare:
[email protected], te lo sostituiremo gratuitamente.
Aulanto.

SE LA LUCE NON SI ACCENDE AL CREPUSCOLO DOPO 6-8 ORE DI
RICARICA:
1: Svitare le tre viti di fissaggio come mostrato in figura.
2: Scoprire delicatamente il paralume verso l'alto.
3: Controllare se il circuito interno è spento, allentato, ecc.
—8—

Dimensioni del paralume
CC 3,6 V 1,1 A
IP54
ÿ9,5"
Classe
AC120V 60Hz
AC230V 50Hz
AC120V 60Hz
AC230V50Hz
AC120V 60Hz
AC230V
Massimo 4W
50Hz
impermeabileIngresso
Modello
GT-GCD-U1
GT-MCD-E1
GT-MCD-U2
GT-MCD-E2
GT-GCD-U2-S
GT-MCD-E2-S
GT-MCD-SS-1
GT-MCD-
ÿ11,5"
SS-2
Nuovo Galles del Sud 2122
YH CONSULTING LIMITED. Per conto di YH
RAPPRESENTANTE DEL REGNO
Rappresentante della CE
UNITO
Consulting
Australia
Produttore: Shanghaimuxinmuyeyouxiangongsi
Indirizzo: Shuangchenglu 803nong11hao1602A-1609shi, Baoshanqu, Shanghai
200000 CN.
Importato in AUS: SIHAO PTY LTD. 1 ROKEVA
Importato negli USA: Sanven Technology Ltd. Suite 250, 9166 Anaheim
Luogo, Rancho Cucamonga, CA 91730
STREETEASTWOOD
Ufficio limitato 147, Centurion House, Londra
Strada, Staines-upon-Thames, Surrey, TW18
E-CrossStu GmbH
Mainzer Landstr.69,
60329 Francoforte sul Meno.
4AX
SPECIFICHE
—9—


LUCESDE
MODELO:
GTGCDSS1/GTGCDU1/GTGCDE1/GTGCDU2S
GTGCDSS2/GTGCDU2/GTGCDE2/GTGCDE2S
GRANERO

GTGCDSS2/GTGCDU2/GTGCDE2/GTGCDE2S
LUCESDE
MODELO:GTGCDSS1/GTGCDU1/GTGCDE1/GTGCDU2
Laimagenessolodereferencia,consulteelobjetoreal.
Estaeslainstrucciónoriginal,leaatentamentetodaslasinstrucciones
delmanualantesdeoperar.VEVORsereservaunainterpretaciónclarade
nuestromanualdeusuario.Laaparienciadelproductoestarásujetaal
productoquerecibió.Perdónenosquenoleinformaremosnuevamentesi
hayactualizacionesdetecnologíaosoftwareennuestroproducto.
S
GRANERO
—1—

Advertencia:Parareducirelriesgodelesiones,elusuariodebeleer
Leaatentamenteelmanualde
EstedispositivocumpleconlaParte15delasNormasdelaFCC.
Laoperaciónestásujetaalasdoscondicionessiguientes:(1)Esta
Eldispositivonopuedecausarinterferenciasdañinasy(2)estedispositivo
debeaceptarcualquierinterferenciarecibida,incluidalainterferencia
quepuedenprovocarunfuncionamientono
—2—
deseado.
instrucciones.
EsteproductoestásujetoalasdisposicionesdelaDirectivaEuropea
2012/19/CE.Elsímboloquemuestrauncontenedordebasuraconruedascruzado
atravésdeindicaqueelproductorequiereuncontenedordebasuraseparado
RecogidaenlaUniónEuropea.Estoaplicaalproducto
ytodoslosaccesoriosmarcadosconestesímbolo.Productosmarcados
Porlotanto,nosepuedendesecharconlabasuradomésticanormal,sinoquedeben
llevarseaunpuntoderecolecciónparareciclaraparatoseléctricos.
ydispositivoselectrónicos

Noloinstaleenunlugarsinluzsolardirecta,sielpanelfotovoltaiconopuede
recibirluzsolar,lalámparasolarnofuncionarácorrectamentedurantela
—3—
noche.

¿CÓMOINSTALAR?
MODELO:GTGCDU1/GTGCD
GTGCDU2/GTGCDE21
1.Comosemuestraenlafigura,
fijelaparteinferioralaparedcon
tornillosdeexpansión.
E1/
GTGCDU2S
GTGCDE2S
2.Aprieteconunatuercanegra.
3.Retireelanillodeplásticoblanco,coloquelapantalladelalámpara
yluegoaprieteelanillodeplásticoblanco.
—4—

2.Comosemuestraenlafigura,justifiquela
parteranuradaparafijarel
—5—
conector.
3.Paseelsoporteatravésdelabase
demontaje.
MODELO:GTGCDSS1/GTGCD
5.Usetornilloslargosparafijarlabaseenla
posiciónquenecesitainstalar,desconectela
cubiertaazulyconecteelcabezaldelaluzcon
elsoporte.
SS2
¿CÓMO
1.Cubraelpanelsolarocoloquelaluzenun
ambienteoscuro,enciendaelinterruptorpara
verificarsilaluzfunciona
4.Fijeelsoporteylabasejuntoscontuercas.
normalmente.
INSTALAR?
6.Fijeelcabezaldelaluzyelsoporte
firmementecontornillos.

X2
x1Modo1(50%)
Presioneelbotónnegroparaencenderelinterruptoryelprimermodoeselanochecerautomático.
Amanecer,laluzsemantendrátenuetodalanoche,independientementedesihaymovimiento.
detectadoporelrangodedeteccióndela
Modo2(50%100%50%)
luz.
Cuandosedetectamovimientocercano,laluzmostraráunbrillodel100%,sino
Sisedetectamovimientodentrodelos20segundos,semostraráunbrillodel50%.
3MODOSDE
Seleccioneelmodopresionandoelbotón
x3Modo3(APAGADO100%APAGADO)
Porlanoche,lalámparapermaneceráapagadahastaqueelsensordetectemovimientocercano.
Luego,gireal100%debrillo,laluzseapagarácuandonosedetectemovimiento.
en20segundos.
NOTA:Cuandoloutiliceporprimeravez,silalinternadeparednoseenciende,colóquelabajola
luzsolardirectaparacargarladurante8horas.
blanco.
ILUMINACIÓN
—6—

PREGUNTAS
¿Porquémiluznoseenciendeporlanoche?
(1)Asegúresedequeelinterruptorestéencendido(botónblanco).Laluzsolosepuedecargar
Cuandoseenciendeelinterruptor.
(2)Asegúresedequeellugardondeloinstalenotengasombranialeros.
bloquearelsol.
(3)Asegúresedequenohayaotrasfuentesdeluzsobreelpanelsolar.
noche,comolaslucesdelacalle.
¿Elpanelsolarrequiereelsoldirectoparacargarse?
Elpanelsolardebeinstalarseenunlugardondepuedarecibirenergíacompleta.
luzsolardirecta(cuandoestédisponible)ygeneralmentecolocamoselpanelsolarorientado
Surenunánguloapropiado.Elpanelsolarnodebeinstalarseenun
ubicaciónsombreadaosemisombreada.
¿Quétipodebateríanecesitamilámparasolarcolganteparafuncionar?
Laluzsolarparagranerorequiereunabateríadelitiode3,7Vy2000mAh.
Modelodebatería:18650.
¿Puedoutilizarcualquierbombillanormalparalaluzsolardelgranero?
Sólosepuedenutilizarparaesteproductobombillasadquiridasatravésde
NOTA:Siaúnnofuncionadespuésdelasoperacionesanteriores,comuníquesecon:
[email protected],loreemplazaremossincargoalguno.
Aulanto.
FRECUENTES
—7—

SILALUZNOSEENCIENDEALATARDECERDESPUÉSDE6A8HORASDE
—8—
CARGANDO:
1:Desatornillelostrestornillosdefijacióncomosemuestraenlaimagen.
2:Descubralapantalladelalámparaconcuidadohaciaarriba.
3:Verifiquesielcircuitointernoestáapagado,suelto,etc.

Fabricante:Shanghaimuxinmuyeyouxiangongsi
Dirección:Shuangchenglu803nong11hao1602A1609shi,Baoshanqu,Shanghai
200000CN.
ImportadoaAUS:SIHAOPTYLTD.1ROKEVASTREET,EASTWOOD
NSW2122Australia
ImportadoaEE.UU.:SanvenTechnologyLtd.Suite250,9166Anaheim
Lugar,RanchoCucamonga,CA
YHCONSULTINGLIMITADA.A/CYHConsulting
91730
Oficinalimitada147,CenturionHouse,Londres
Carretera,StainesuponThames,Surrey,TW18
ECrossStuGmbH
MainzerLandstr.69,
60329FráncfortdelMeno.
4AX
Tamañodelapantalladela
REPRESENTANTEDELREINO
RepresentantedelaCE
UNIDO
lámpara
CC3,6V1,1A
IP54
φ9.5"
Aporte
CA120V60Hz
CA230V50Hz
CA120V60
Clase
CA230V50Hz
CA120V60Hz
CA230V50
Máximo4W
Hz
impermeable
Hz
φ11,5"
Modelo
GTGCDU1
GTGCDE1
GTGCDU2
GTGCDE2
GTGCDU2S
GTGCDE2S
GTGCDSS1
GTGCDSS2
ESPECIFICACIÓN
—9—


LAMPY DO
MODEL:
GT-NWD-SS-1/GT-NWD-U1/GT-NWD-E1/GT-NWD-U2-S
GT-NWD-SS-2/GT-NWD-U2/GT-NWD-E2/GT-NWD-E2-S
STODOŁY

LAMPY DO
MODEL: GT-GCD-SS-1/GT-GCD-U1/GT-GCD-E1/GT-GCD-U2-
GT-NWD-SS-2/GT-NWD-U2/GT-NWD-E2/GT-NWD-E2-
Zdjęcie ma charakter poglądowy, proszę odnieść się do rzeczywistego obiektu
To jest oryginalna instrukcja, przed użyciem należy uważnie przeczytać wszystkie
instrukcje. VEVOR zastrzega sobie prawo do jednoznacznej interpretacji instrukcji
obsługi. Wygląd produktu zależy od otrzymanego produktu. Prosimy o wybaczenie,
że nie będziemy Państwa ponownie informować o wszelkich aktualizacjach
technologicznych lub oprogramowania naszego produktu.
S
S
STODOŁY
—1—

Ostrzeżenie – aby zmniejszyć ryzyko obrażeń, użytkownik musi przeczytać
Przeczytaj uważnie instrukcję
To urządzenie jest zgodne z częścią 15 przepisów FCC.
Eksploatacja podlega następującym dwóm warunkom: (1) Niniejsze
urządzenie nie może powodować szkodliwych zakłóceń i (2) to urządzenie
musi zaakceptować wszelkie otrzymane zakłócenia, w tym zakłócenia
co może spowodować niepożądane
—2—
działanie.
obsługi.
Niniejszy produkt podlega postanowieniom dyrektywy UE
2012/19/WE. Symbol przedstawiający przekreślony kosz na śmieci
przez wskazuje, że produkt wymaga oddzielnego składowania
zbiórka w Unii Europejskiej. Dotyczy produktu
i wszystkie akcesoria oznaczone tym symbolem. Produkty oznaczone
w związku z tym nie wolno wyrzucać go razem z normalnymi odpadami
domowymi, lecz należy oddać go do punktu zbiórki w celu recyklingu urządzeń elektrycznych
i urządzeń elektronicznych

Nie należy instalować panelu w miejscu, w którym nie ma bezpośredniego światła słonecznego. Jeśli panel
fotowoltaiczny nie będzie otrzymywał światła słonecznego, lampa solarna nie będzie działała prawidłowo w
—3—
nocy.

JAK
MODEL:GT-GCD-U1/GT-GCD-
GT-NWD-U2/GT-NWD-
2. Dokręć czarną
1. Jak pokazano na rysunku,
przymocuj spód do ściany za
pomocą wkrętów rozporowych.
nakrętką.
E21
E1/
ZAINSTALOWAĆ?
GT-NWD-U2-S
GT-GCD-E2-S
3. Zdejmij biały plastikowy pierścień, załóż klosz i dokręć
biały plastikowy pierścień.
—4—

3. Przeciągnij wspornik przez podstawę
—5—
montażową.
4. Przymocuj wspornik do podstawy za
pomocą nakrętek.
5. Za pomocą długich śrub zamocuj podstawę w
miejscu, w którym chcesz ją zamontować, odłącz
niebieską osłonę i podłącz głowicę lampy do
uchwytu.
MODEL:GT-GCD-SS-1/GT-GCD-
6. Przymocuj głowicę lampy i uchwyt mocno
śrubami.
SS-2
JAK
1. Przykryj panel słoneczny lub umieść lampę w
ciemnym miejscu, włącz przełącznik, aby sprawdzić,
czy lampa działa
2. Jak pokazano na rysunku, wyreguluj część
rowka, aby zamocować złącze.
prawidłowo.
ZAINSTALOWAĆ?

X2
-Tryb 2 (50%-100%-50%)
x1 Tryb 1 (50%)
Naciśnij czarny przycisk, aby włączyć przełącznik. Pierwszym trybem jest automatyczny zmierzch.
o świcie światło będzie przyćmione przez całą noc, niezależnie od tego, czy będzie się poruszać
wykryte przez zasięg wykrywania
W przypadku wykrycia ruchu w pobliżu światło będzie świecić z jasnością 100%, jeśli nie
Jeśli w ciągu 20 sekund zostanie wykryty ruch, jasność wyświetlacza wyniesie 50%.
światła.
x3 Tryb 3 (WYŁ.-100%-WYŁ.)
W nocy lampa pozostanie WYŁĄCZONA, dopóki czujnik nie wykryje ruchu w pobliżu
następnie ustaw jasność na 100%, światło wyłączy się po wykryciu braku ruchu
w ciągu 20
UWAGA: Jeśli przy pierwszym użyciu lampa ścienna nie zaświeci się, należy umieścić ją w
bezpośrednim świetle słonecznym, aby ją naładować. Ładowanie powinno trwać 8 godzin.
sekund.
3 TRYBY
Wybierz tryb naciskając biały
—6—
przycisk.
OŚWIETLENIA

Do oświetlenia stodoły zasilanego energią słoneczną potrzebny jest jeden akumulator litowo-jonowy 3,7 V o pojemności 2000 mAh,
model baterii: 18650.
Czy mogę użyć zwykłej żarówki do oświetlenia solarnego w stodole?
Do tego produktu można używać wyłącznie żarówek zakupionych w Aulanto.
NAJCZĘŚCIEJ ZADAWANE
Dlaczego moje światło nie zapala się w nocy?
(1) Upewnij się, że przełącznik jest w pozycji WŁ. (biały przycisk). Lampę można ładować tylko
po włączeniu przełącznika.
(2) Upewnij się, że miejsce, w którym instalujesz, nie jest zacienione ani nie ma okapów.
zasłaniać słońce.
(3) Upewnij się, że nad panelem słonecznym nie ma innych źródeł światła.
w nocy, np. oświetlenie uliczne.
Czy panel słoneczny potrzebuje bezpośredniego światła słonecznego do ładowania?
Panel słoneczny musi być zainstalowany w miejscu, w którym będzie mógł odbierać pełne promieniowanie
bezpośrednie światło słoneczne (jeśli jest dostępne) i zwykle ustawiaj panel słoneczny w kierunku
Południe pod odpowiednim kątem. Panel słoneczny nie może być instalowany w
miejsce zacienione lub częściowo zacienione.
Jakiego typu baterii potrzebuję do działania mojej wiszącej lampy
UWAGA: Jeżeli po wykonaniu powyższych czynności urządzenie nadal nie działa, prosimy o kontakt:
[email protected], wymienimy Ci go bezpłatnie.
solarnej?
PYTANIA
—7—

JEŚLI ŚWIATŁO NIE WŁĄCZY SIĘ O ZMIERZCHU PO 6-8 GODZINACH
—8—
ŁADOWANIE:
1: Odkręć trzy śruby mocujące, jak pokazano na rysunku.
2: Delikatnie odkryj klosz lampy, kierując go ku górze.
3: Sprawdź, czy obwód wewnętrzny nie jest wyłączony, poluzowany itp.

Producent: Shanghaimuxinmuyeyouxiangongsi
Adres: Shuangchenglu 803nong11hao1602A-1609shi, Baoshanqu, Szanghaj
200000 CN.
Importowane do AUS: SIHAO PTY LTD. 1 ROKEVA STREETEASTWOOD
NSW 2122 Australia
Importowane do USA: Sanven Technology Ltd. Suite 250, 9166 Anaheim
Miejsce, Rancho Cucamonga, CA 91730
YH CONSULTING LIMITED. C/O YH Consulting
Biuro Limited 147, Centurion House, Londyn
Droga, Staines-upon-Thames, Surrey, TW18 4AX
E-CrossStu GmbH
Mainzer Landstr.69,
60329 Frankfurt nad Menem.
REP WIELKIEJ
Przedstawiciel UE
BRYTANII
φ11,5"
IP54
Prąd stały 3,6 V 1,1 A
Prąd zmienny 120 V 60 Hz
AC230V 50Hz
Prąd zmienny 120 V 60 Hz
AC230V50Hz
Prąd zmienny 120 V 60 Hz
AC230V
Maksymalnie 4W
φ9,5"
50Hz
Model
Rozmiar
GT-GCD-U1
GT-GCD-E1
GT-NWD-U2
GT-GCD-E2
GT-NWD-U2-S
GT-GCD-E2-S
GT-NWCD-SS-1
GT-NWCD-SS-2
abażuru Klasa wodoodpornościWejście
SPECYFIKACJA
—9—


MODEL:
GT-GCD-SS-1/GT-GCD-U1/GT-GCD-E1/GT-GCD-U2-S
GT-GCD-SS-2/GT-GCD-U2/GT-GCD-E2/GT-GCD-E2-S
SCHUURVERLICHTING

MODEL: GT-GCD-SS-1/GT-GCD-U1/GT-GCD-E1/GT-GCD-U2-
GT-GCD-SS-2/GT-GCD-U2/GT-GCD-E2/GT-GCD-E2-
De afbeelding is alleen ter referentie, raadpleeg het daadwerkelijke object
Dit zijn de originele instructies. Lees alle instructies in de handleiding zorgvuldig
door voordat u het product gebruikt. VEVOR behoudt zich het recht voor om de
correcte interpretatie van onze gebruikershandleiding te respecteren. Het uiterlijk
van het product is afhankelijk van het product dat u hebt ontvangen. Wij informeren u
niet meer over eventuele technologische of software-updates voor ons product.
S
S
SCHUURVERLICHTING
—1—

Waarschuwing - Om het risico op letsel te verminderen, moet de gebruiker de gebruiksaanwijzing
Lees de gebruiksaanwijzing zorgvuldig
Dit apparaat voldoet aan Deel 15 van de FCC-regels.
De exploitatie is onderworpen aan de volgende twee voorwaarden: (1) Deze
het apparaat mag geen schadelijke interferentie veroorzaken, en (2) dit apparaat
moet elke ontvangen interferentie accepteren, inclusief interferentie
die een ongewenste werking kunnen
—2—
veroorzaken.
door.
lezen
Dit product is onderworpen aan de bepalingen van de Europese richtlijn
2012/19/EG. Het symbool met een doorgestreepte kliko
door geeft aan dat het product gescheiden afvalverwerking vereist
inzameling in de Europese Unie. Dit geldt voor het product
en alle accessoires gemarkeerd met dit symbool. Producten gemarkeerd
mag als zodanig niet bij het normale huisvuil worden weggegooid, maar moet
naar een inzamelpunt voor recycling van elektrische apparaten worden gebracht
en elektronische apparaten
Installeer het paneel niet op een plek zonder direct zonlicht. Als het
fotovoltaïsche paneel geen zonlicht kan krijgen, werkt de lamp 's nachts niet
—3—
goed.
HOE TE
MODEL: GT-GCD-U1/GT-GCD-
GT-GCD-U2/GT-GCD-E21
1. Bevestig de onderkant met
expansieschroeven aan de muur,
zoals afgebeeld in de afbeelding.
E1/
INSTALLEREN?
GT-GCD-U2-S
GT-GCD-E2-S
2.Vastdraaien met een zwarte moer.
3. Verwijder de witte plastic ring, plaats de lampenkap en draai vervolgens
de witte plastic ring vast.
—4—
3. Schuif de beugel door de
—5—
montagebasis. 4. Bevestig de beugel en de basis met moeren
aan elkaar.
5. Gebruik lange schroeven om de basis vast te
zetten op de positie waar u hem wilt installeren, haal
de blauwe afdekking los en sluit de lampkop aan
op de beugel
1. Bedek het zonnepaneel of plaats de lamp in
een donkere omgeving. Zet de schakelaar aan om te
controleren of de lamp normaal
6. Bevestig de lampenkop en de beugel stevig
met schroeven.
werkt.
HOE TE
MODEL: GT-GCD-SS-1/GT-GCD-
2. Zoals weergegeven in de afbeelding, bevestig
het groefgedeelte aan de connector.
SS-2
INSTALLEREN?

—6—
X2
x1 Modus1(50%)
Druk op de zwarte knop om de schakelaar in te schakelen, en de eerste modus is automatische schemering
dageraad, het licht zal de hele nacht zwak blijven, ongeacht of er beweging is
gedetecteerd door het detectiebereik van het
-Modus 2 (50%-100%-50%)
licht.
Wanneer er beweging in de buurt wordt gedetecteerd, geeft het licht 100% helderheid weer. Als er geen beweging wordt gedetecteerd,
Als er binnen 20 seconden beweging wordt gedetecteerd, wordt 50% helderheid weergegeven.
3 VERLICHTINGSMODI
Selecteer de modus door op de witte knop te
x3 Mode3 (UIT-100%-UIT)
's Nachts blijft de lamp UIT totdat de sensor beweging in de buurt detecteert
schakel dan over naar 100% helderheid, het licht gaat UIT als er geen beweging meer wordt gedetecteerd
binnen 20 seconden.
LET OP: Als de wandlantaarn bij het eerste gebruik niet gaat branden, plaats de wandlantaarn dan 8
uur lang in direct zonlicht en laat hem opladen.
drukken.

VEELGESTELDE
—7—
VRAGEN
Waarom gaat mijn licht 's nachts niet aan?
(1) Zorg ervoor dat de schakelaar AAN staat (witte knop). De lamp kan alleen worden opgeladen
wanneer de schakelaar wordt omgezet.
(2) Zorg ervoor dat de locatie waar u de installatie uitvoert geen schaduw of overstekken heeft.
de zon blokkeren.
(3)Zorg ervoor dat er zich boven het zonnepaneel geen andere lichtbronnen bevinden.
's nachts, zoals straatverlichting.
Heeft het zonnepaneel direct zonlicht nodig om op te laden?
Het zonnepaneel moet op een locatie worden geïnstalleerd waar het de volledige energie kan ontvangen
direct zonlicht (indien beschikbaar) en plaats het zonnepaneel meestal op de juiste plek
Zuidwaarts in een geschikte hoek. Het zonnepaneel mag niet in een
schaduwrijke of halfschaduwrijke locatie.
Welk type batterij heeft mijn solar hanglamp nodig om te werken?
De zonne-schuurlamp heeft één Lithium-ion 3,7V 2000 mAh batterij nodig,
batterijmodel: 18650.
Kan ik elke normale gloeilamp gebruiken voor de zonne-schuurverlichting?
Voor dit product kunnen uitsluitend via Aulanto gekochte lampen worden
LET OP: Als het na bovenstaande handelingen nog steeds niet werkt, neem dan contact op met:
Stuur een e-mail naar [email protected], dan vervangen wij het kosteloos voor u.
gebruikt.

ALS HET LICHT NIET AANGAAT IN DE SCHEMERING NA 6-8 UUR
OPLADEN:
1: Draai de drie bevestigingsschroeven los zoals aangegeven op de afbeelding.
2: Open de lampenkap voorzichtig naar boven.
3: Controleer of het interne circuit uit is, los zit, enz.
—8—

ÿ11,5"
IP54
DC3,6V 1,1A
Model
GT-GCD-U1
GT-GCD-E1
GT-GCD-U2
GT-GCD-E2
GT-GCD-U2-S
GT-GCD-E2-S
GT-GCD-SS-1
GT-GCD-
AC230V50Hz
AC120V 60Hz
AC230V
Maximaal 4W
ÿ9,5"
50Hz
SS-2
LampenkapmaatInvoer
AC120V 60Hz
AC230V 50Hz
AC120V
Waterdichte klasse
60Hz
Fabrikant: Shanghaimuxinmuyeyouxiangongsi
Adres: Shuangchenglu 803nong11hao1602A-1609shi, Baoshanqu, Shanghai
200000 CN.
Geïmporteerd naar AUS: SIHAO PTY LTD. 1 ROKEVA STREETEASTWOOD
NSW 2122 Australië
Geïmporteerd naar de VS: Sanven Technology Ltd. Suite 250, 9166 Anaheim
Plaats, Rancho Cucamonga, CA
YH CONSULTING LIMITED. C/O YH
—9—
Consulting
91730
Beperkt kantoor 147, Centurion House, Londen
Weg, Staines-upon-Thames, Surrey, TW18
E-CrossStu GmbH
Mainzer Landstr.69,
60329 Frankfurt am Main.
4AX
SPECIFICATIE
VK
EC REP
REP


LJUS I
MODELL:
GT-GCD-SS-1/GT-GCD-U1/GT-GCD-E1/GT-GCD-U2-S
GT-GCD-SS-2/GT-GCD-U2/GT-GCD-E2/GT-GCD-E2-S
LADUGÅRDEN
LJUS I
MODELL: GT-GCD-SS-1/GT-GCD-U1/GT-GCD-E1/GT-GCD-U2-S
GT-GCD-SS-2/GT-GCD-U2/GT-GCD-E2/GT-GCD-E2-
Bilden är endast för referens, vänligen hänvisa till det faktiska objektet
Detta är originalinstruktionerna, läs alla instruktioner noggrant innan du
använder produkten. VEVOR förbehåller sig en tydlig tolkning av vår
användarmanual. Produktens utseende ska vara beroende av den
produkt du mottagit. Vi ber om ursäkt för att vi inte informerar dig igen om det
finns några teknik- eller programuppdateringar för vår produkt.
S
LADUGÅRDEN
—1—

Varning – För att minska risken för skador måste användaren läsa
bruksanvisningen
Denna enhet uppfyller del 15 av FCC-reglerna.
Driften är föremål för följande två villkor:(1) Detta
enheten får inte orsaka skadliga störningar, och (2) denna enhet
måste acceptera alla mottagna störningar, inklusive störningar
vilket kan orsaka oönskad
—2—
drift.
noggrant.
Denna produkt omfattas av bestämmelserna i EU-direktivet
2012/19/EG. Symbolen som visar en överkorsad soptunna
genom indikerar att produkten behöver sopsorteras separat
insamling i Europeiska unionen. Detta gäller produkten
och alla tillbehör märkta med denna symbol. Produkter märkta
får därför inte slängas med vanligt hushållsavfall utan måste lämnas till
en återvinningsstation för elektriska
och elektroniska apparater

Installera inte på en plats utan direkt solljus, om solcellspanelen inte kan
ta emot solljus kommer solcellslampan inte att fungera korrekt på
—3—
natten.

HUR INSTALLERAR MAN?
MODELL: GT-GCD-U1/GT-GCD-
GT-GCD-U2/GT-GCD-
1. Som visas på bilden, fäst botten
på väggen med expansionsskruvar.
E21
E1/
GT-GCD-U2-S
GT-GCD-E2-S
2. Dra åt med en svart mutter.
3. Ta bort den vita plastringen, sätt tillbaka lampskärmen och
dra sedan åt den vita plastringen.
—4—
2. Som visas på bilden, justera spårdelen för
att fixera
—5—
kontakten.
3. Trä fästet genom monteringsbasen.
5. Använd långa skruvar för att fästa basen på
den plats du behöver installera, koppla ur det blå
locket och anslut lamphuvudet till fästet.
1. Täck över solpanelen eller placera lampan
i en mörk miljö, slå på strömbrytaren för att
kontrollera om lampan fungerar
6. Fäst lamphuvudet och fästet ordentligt
med skruvar.
normalt.
HUR INSTALLERAR
MODELL: GT-GCD-SS-1/GT-GCD-
4. Fäst fästet och basen tillsammans med
muttrar.
SS-2
MAN?

X2
-Läge2 (50%-100%-50%)
x1 Läge1 (50%)
Tryck på den svarta knappen för att slå på strömbrytaren, och det första läget är automatisk skymning till
gryningen, ljuset kommer att hålla ett svagt ljus hela natten, oavsett om det finns rörelse
detekteras av ljusets
När rörelse detekteras i närheten visar lampan 100 % ljusstyrka, om ingen
Om rörelse detekteras inom 20 sekunder visar den 50 % ljusstyrka.
avkänningsområde.
3
Välj läge genom att trycka på den vita
x3 Läge3 (AV-100%-AV)
På natten förblir lampan släckt tills sensorn detekterar rörelse i närheten
Vrid sedan till 100 % ljusstyrka, ljuset släcks efter att ingen rörelse detekteras
inom 20
OBS: Om vägglyktan inte tänds när du använder den för första gången, placera den i
direkt solljus för att ladda den i 8 timmar.
sekunder.
knappen.
LJUSLÄGEN
—6—

VANLIGA
Varför tänds inte min lampa på natten?
(1) Se till att strömbrytaren är PÅ (vit knapp). Lampan kan endast laddas
när strömbrytaren slås på.
(2) Se till att platsen där du installerar inte har skugga eller takfot.
blockera solen.
(3) Se till att det inte finns några andra ljuskällor ovanför solpanelen vid
natten, såsom gatubelysning.
Kräver solpanelen direkt solljus för att laddas?
Solpanelen måste installeras på en plats där den kan ta emot full ström.
direkt solljus (när det finns) och ställ vanligtvis solpanelen mot
Söderut i lämplig vinkel. Solpanelen får inte installeras i en
skuggig eller delvis skuggig plats.
Vilken typ av batteri behöver min solcellslampa för att fungera?
Solcellslampan i ladan kräver ett litiumjonbatteri på 3,7 V och 2000 mAh.
Batterimodell: 18650.
Kan jag använda vilken vanlig glödlampa som helst till solcellsbelysningen i ladan?
Endast glödlampor som köpts via Aulanto kan användas till denna
OBS: Om det fortfarande inte fungerar efter ovanstående åtgärder, vänligen kontakta:
[email protected], vi byter ut den åt dig kostnadsfritt.
produkt.
FRÅGOR
—7—

OM LJUSET INTE TÄNDS I SKYMNINGEN EFTER 6–8 TIMMAR
—8—
LADDNING:
1: Skruva loss de tre fästskruvarna som visas på bilden.
2: Lyft försiktigt uppåt på lampskärmen.
3: Kontrollera om den interna kretsen är avstängd, lös etc.
Tillverkare: Shanghaimuxinmuyeyouxiangongsi
Adress: Shuangchenglu 803nong11hao1602A-1609shi, Baoshanqu, Shanghai
200000 CN.
Importerad till Australien: SIHAO PTY LTD. 1 ROKEVA STREETEASTWOOD
NSW 2122 Australien
Importerad till USA: Sanven Technology Ltd. Suite 250, 9166 Anaheim
Plats, Rancho Cucamonga, Kalifornien
YH CONSULTING LIMITED. C/O YH Consulting
91730
Begränsat kontor 147, Centurion House, London
Väg, Staines-upon-Thames, Surrey, TW18 4AX
E-CrossStu GmbH
Mainzer Landstr.69,
60329 Frankfurt am Main.
Lampskärmens
Storbritanniens
EG-representant
republikaner
storlek
DC3.6V 1.1A
IP54
ÿ9,5"
Input
AC120V 60Hz
AC230V 50Hz
AC120V
Vattentät
AC230V50Hz
AC120V 60Hz
AC230V
Max 4W
50Hz
klass
60Hz
Modell
GT-GCD-U1
GT-GCD-E1
GT-GCD-U2
GT-GCD-E2
GT-GCD-U2-S
GT-GCD-E2-S
GT-GCD-SS-1
GT-GCD-
ÿ11,5"
SS-2
SPECIFIKATION
—9—