
Technical Support and E-Warranty Certificate www.vevor.com/support
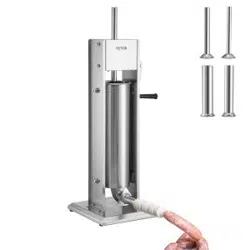
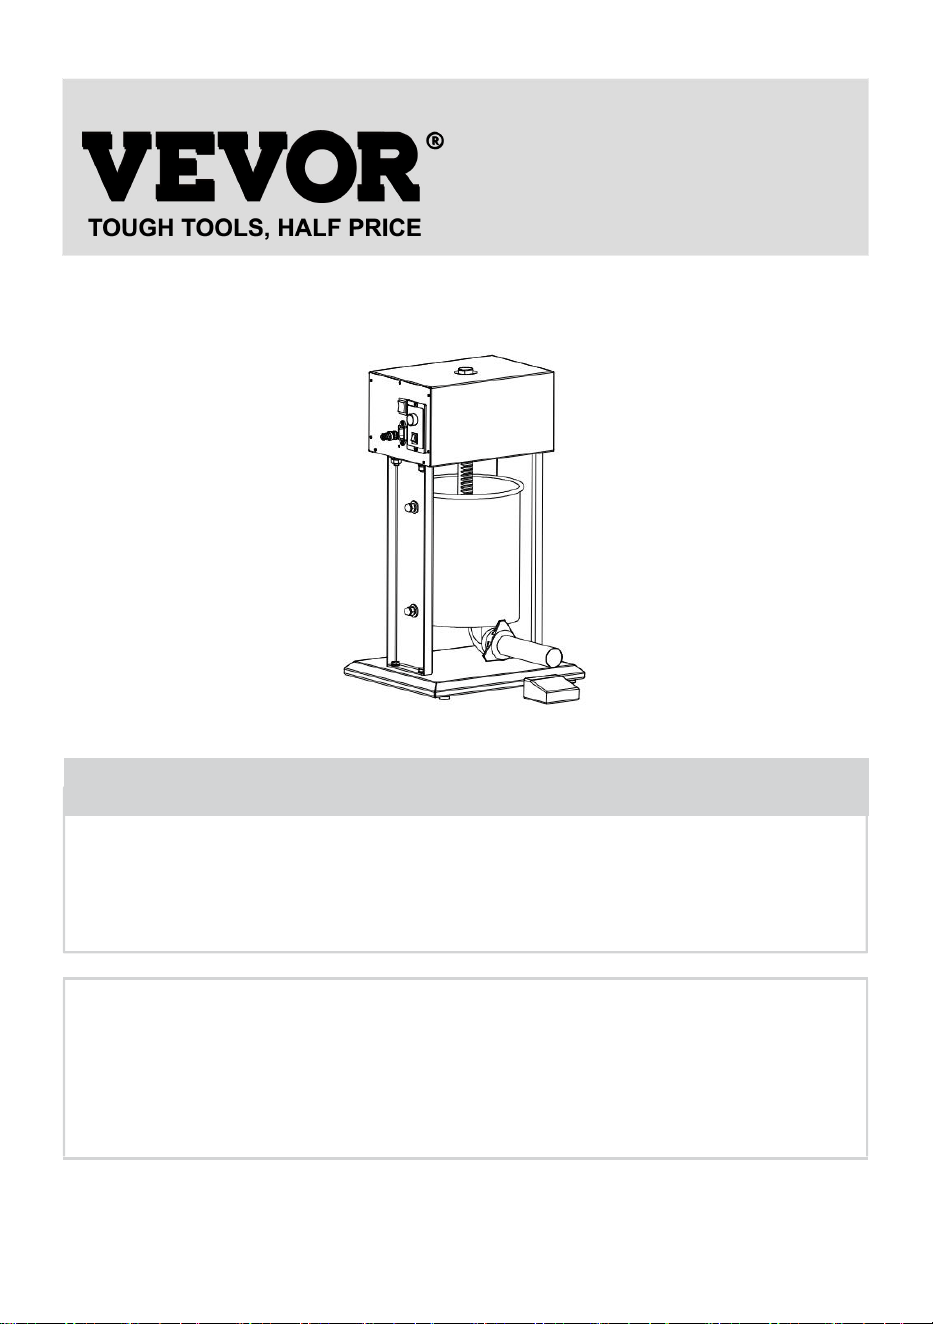
SAUSAGE STUFFER
MODEL: XZO-12D,XZO-25D
We continue to be committed to provide you tools with competitive price.
"Save Half", "Half Price" or any other similar expressions used by us only represents an
estimate of savings you might benefit from buying certain tools with us compared to the major
top brands and doses not necessarily mean to cover all categories of tools offered by us. You
are kindly reminded to verify carefully when you are placing an order with us if you are
actually saving half in comparison with the top major brands.

- 1 -
MODEL: XZO-12D,XZO-25D
Have product questions? Need technical support? Please feel free to
contact us:
Technical Support and E-Warranty Certificate
www.vevor.com/support
NEED HELP? CONTACT US!
This is the original instruction, please read all manual instructions
carefully before operating. VEVOR reserves a clear interpretation of our
user manual. The appearance of the product shall be subject to the
product you received. Please forgive us that we won't inform you again if
there are any technology or software updates on our product.
SAUSAGE STUFFER

- 2 -
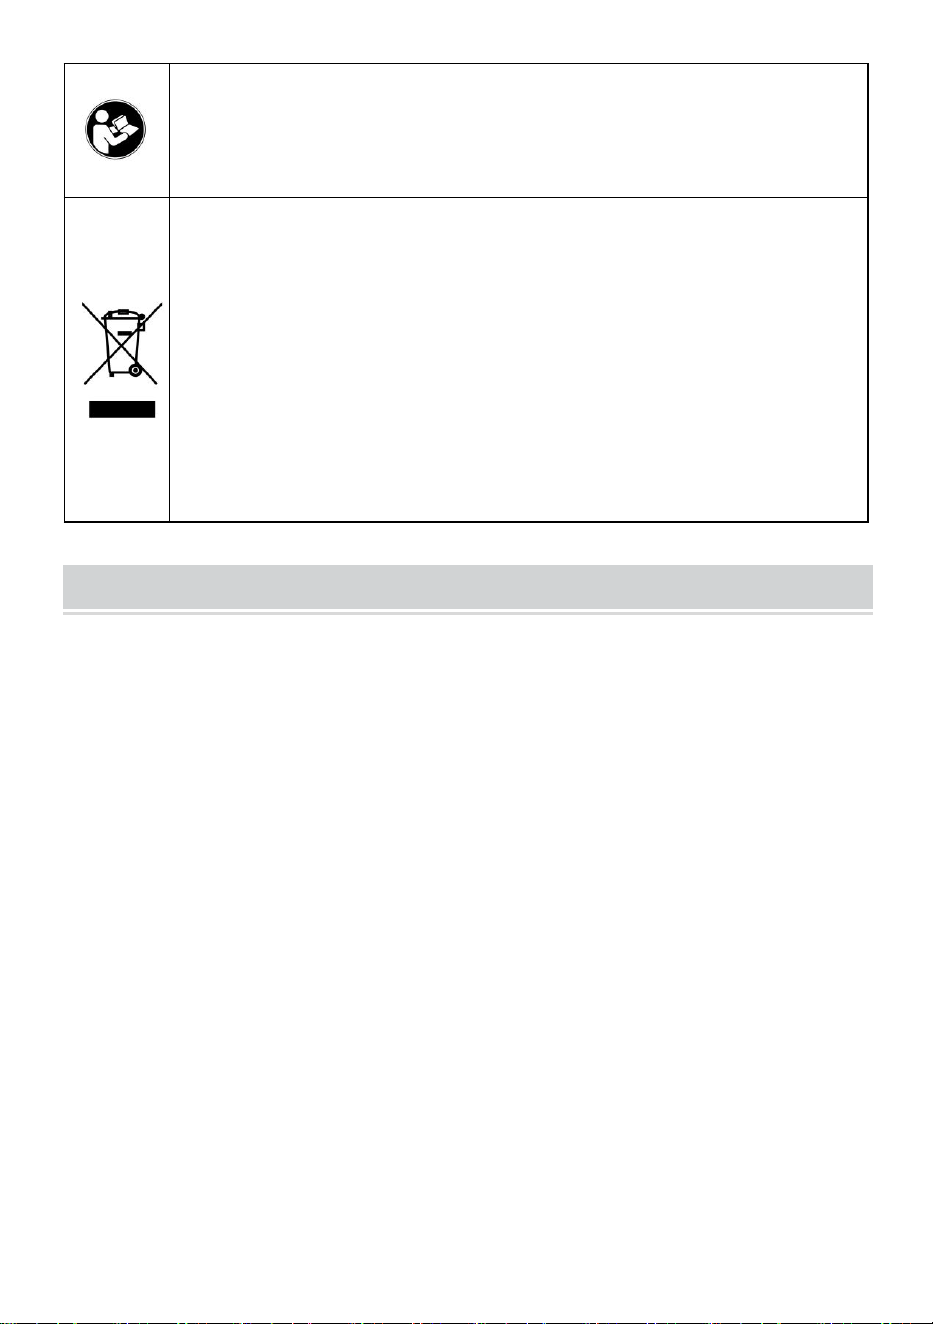
Warning-To reduce the risk of injury, user must read
instructions manual carefully.
CORRECT DISPOSAL
This product is subject to the provision of European Directive
2012/19/EC. The symbol showing a wheelie bin crossed through
indicates that the product requires separate refuse collection in the
European Union. This applies to the product and all accessories
marked with this symbol. Products marked as such may not be
discarded with normal domestic waste, but must be taken to a
collection point for recycling electrical and electronic devices
Important SAFETY INSTRUCTIONS
When using electrical appliances,basic safety precautions should
always be followed as below:
1. Read all instruction before using this appliance.
2. Do not operate this appliance with a damaged cord,plug or
malfunctions.
3. To protect against electrical shock, do not immerse foot switch,
cord, plug or stuffer in water or other liquids.
4. This appliance is not intended for using by children.
5. Keep fingers and hands clear of all moving parts.
6. Unplug this appliance when not in use or before cleaning.
7.This appliance is for household use only.
8. Never dip machine into any liquid and sharp edges. Do not use the
appliance with wet hands. If the appliance is humid or wet, unplug it
immediately.
9. This appliance can be used by children aged from 8 years and above
and persons with reduced physical, sensory or mental capabilities or lack
of experience and knowledge if they have been given supervision or
instruction concerning use of the appliance in a safe way and understand

- 3 -
the hazards involved. Children shall not play with the appliance. Cleaning
and user maintenance shall not be made by children without supervision.
10. Always disconnect the machine from the supply if it is left unattended
and before assembling, disassembling or cleaning.
11. If the supply cord is damaged, it must be replaced by the manufacture
of its service agent or a similar qualified person in order to avoid a hazard.
12. Keep your finger away from moving parts and fitted tools .Never put
your fingers etc in hinge mechanism.
13. Use only original spare parts.
14. In order to ensure your children’s safety, please keep all packaging
(plastic bags, boxes, polystyrene etc.) out of their reach.
15. Do not interfere with any safety switches.
16. Place the machine on a smooth, flat and stable working surface.
17. Wait until moving parts stop running before you remove the lid of
machine.
18. Do not exceed the maximum content indicated on the accessories.
BEFORE CONNECTING TO POWER
Before connecting to the power, recheck the type of supply and the
mains voltage match with the details given on the rating label on the
appliance.
Using for the first time, rip off all wrapping paper and plastic bags.
Clean the fittings.
SAVE THESE INSTRUCTIONS,HOUSEHOLD USE ONLY
FCC Information
CAUTION: Changes or modifications not expressly approved by the party
responsible for compliance could void the user's authority to operate the
equipment!
This device complies with Part 15 of the FCC Rules. Operation is subject to
the following two conditions:
1) This product may cause harmful interference.

- 4 -
2)This product must accept any interference received, including
interference that may cause undesired operation.
WARNING: Changes or modifications to this product not expressly
approved by the party.responsible for compliance could void the user's
authority to operate the product.
Note: This product has been tested and found to comply with the limits for
a Class B digital device pursuant to Part 15 of the FCC Rules, These limits
are designed to provide reasonable protection against harmful interference
in a residential installation.
This product generates, uses and can radiate radio frequency energy, and
if not installed and used in accordance with the instructions, may cause
harmful interference to radio communications. However, there is no
guarantee that interference will not occur in a particular installation. If this
product does cause harmful interference to radio or television
reception,which can be determined by turning the product off and on, the
user is encouraged to try to correct the interference by one or more of the
following measures.
· Reorient or relocate the receiving antenna.
· Increase the distance between the product and receiver.
· Connect the product to an outlet on a circuit different from that to which
the receiver is connected.
· Consult the dealer or an experienced radio/TV technician for assistance.
- 5 -
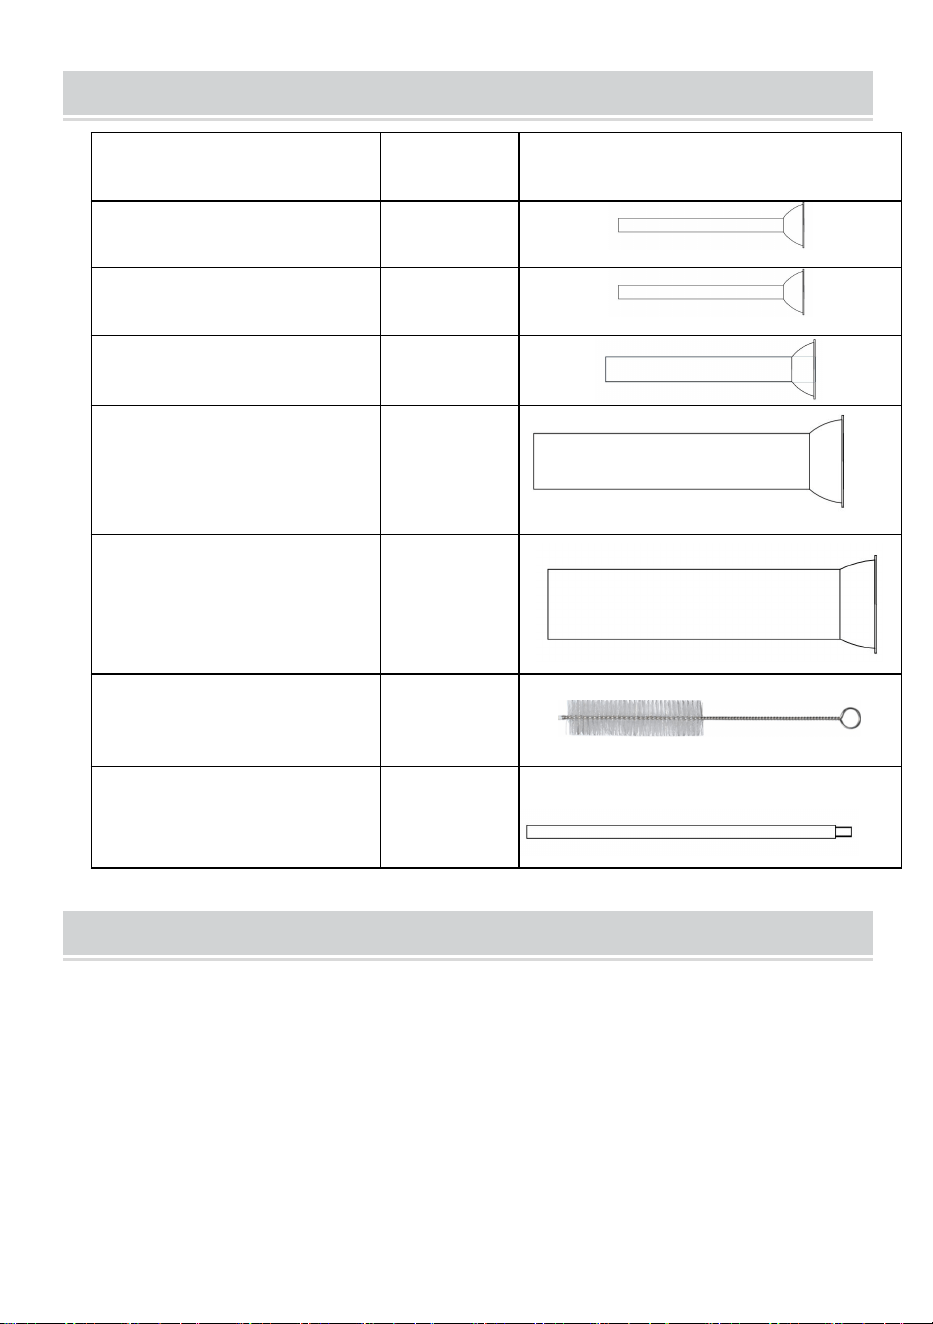
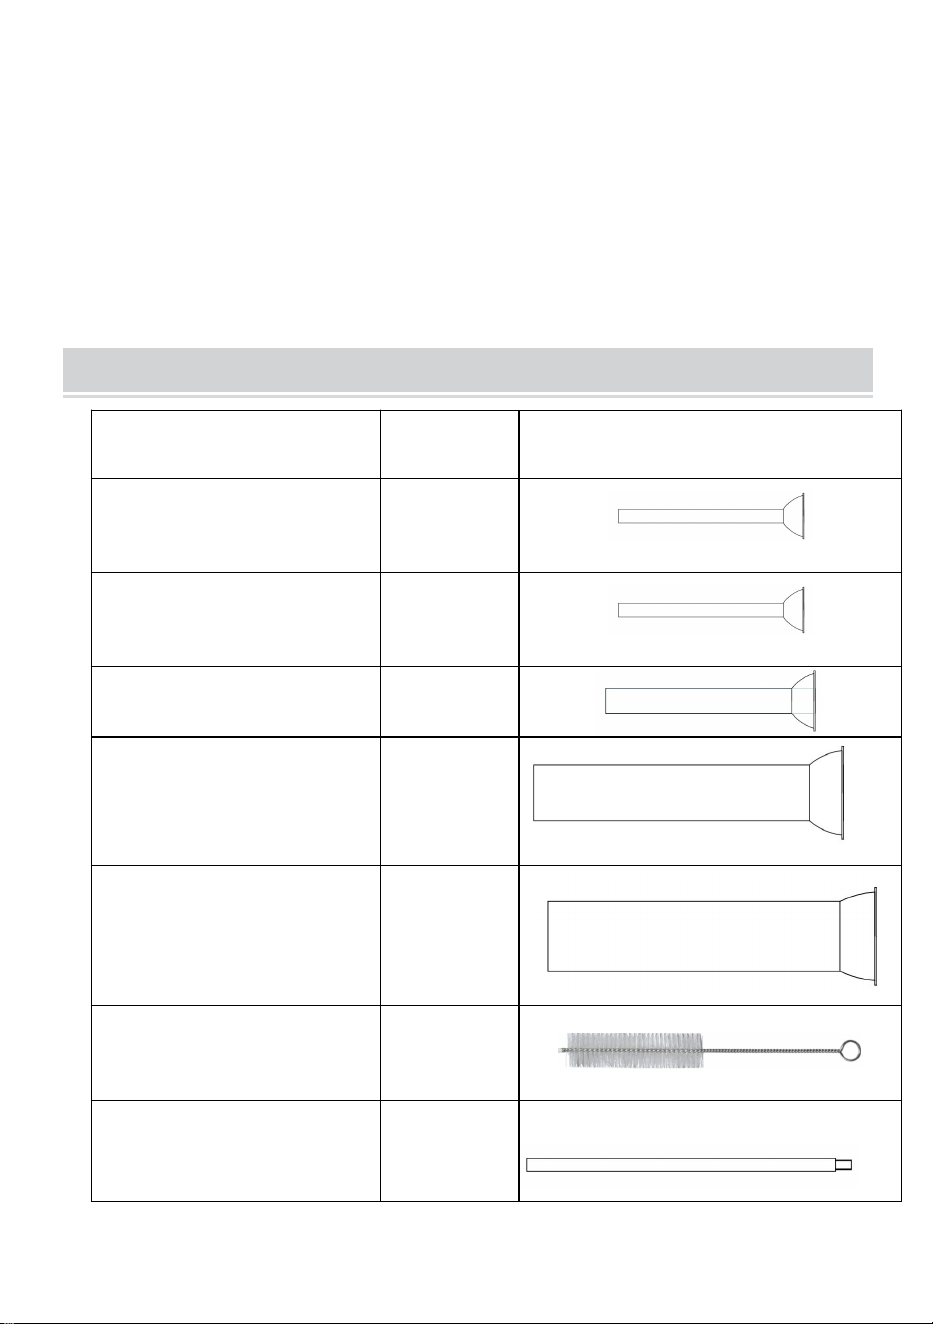
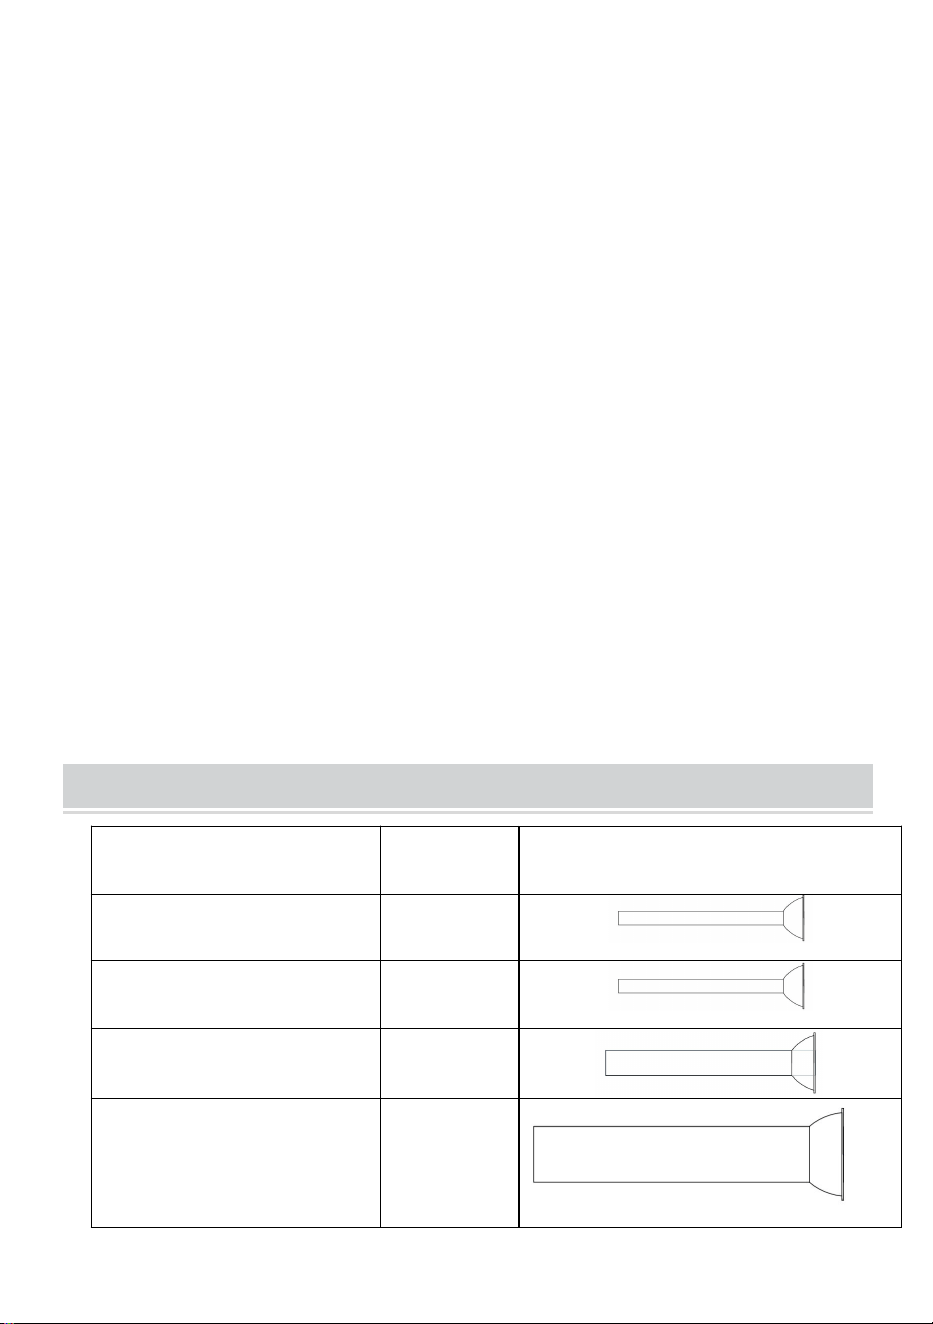
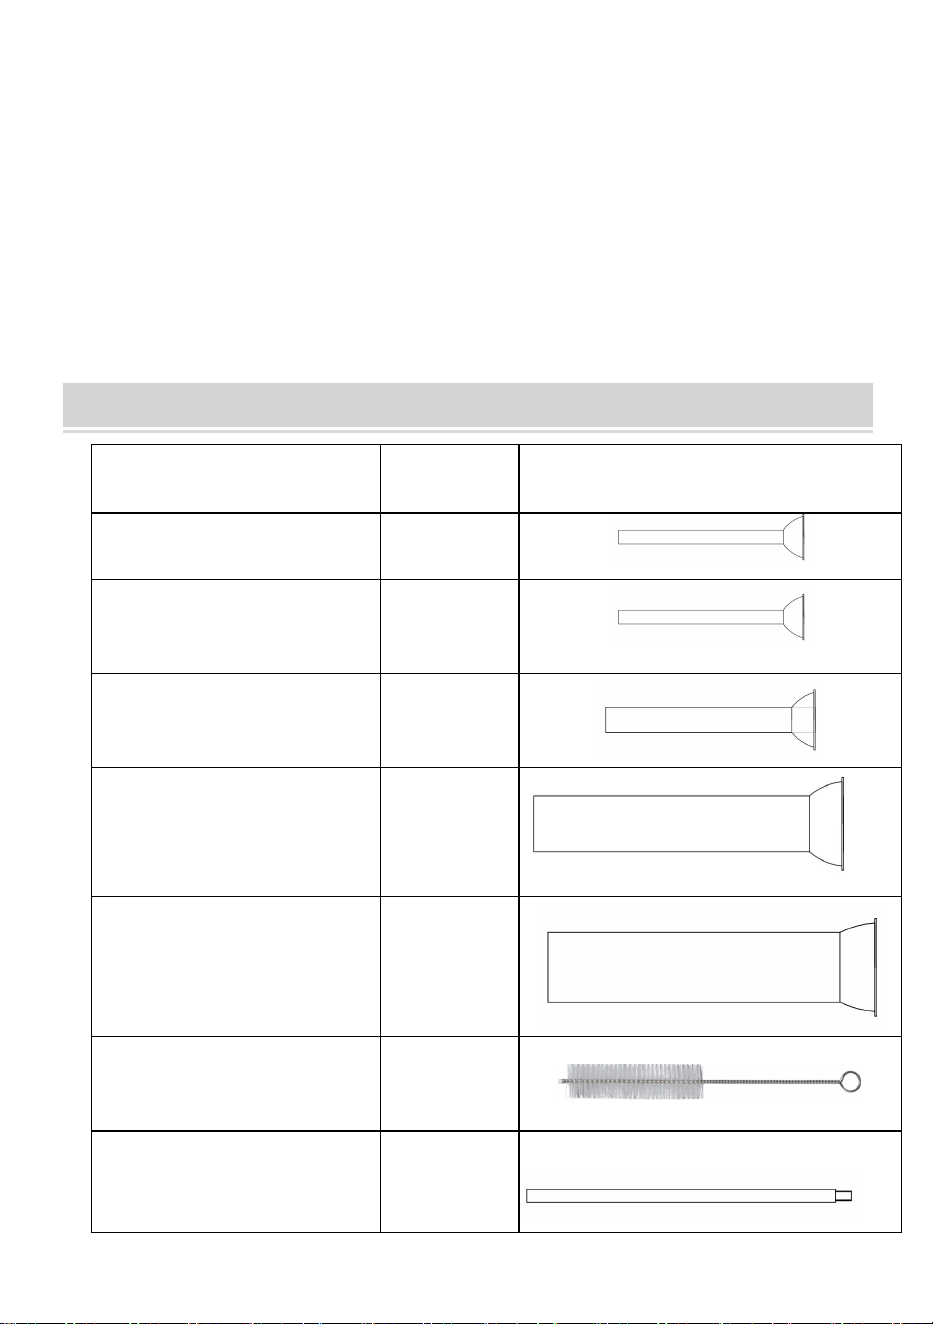
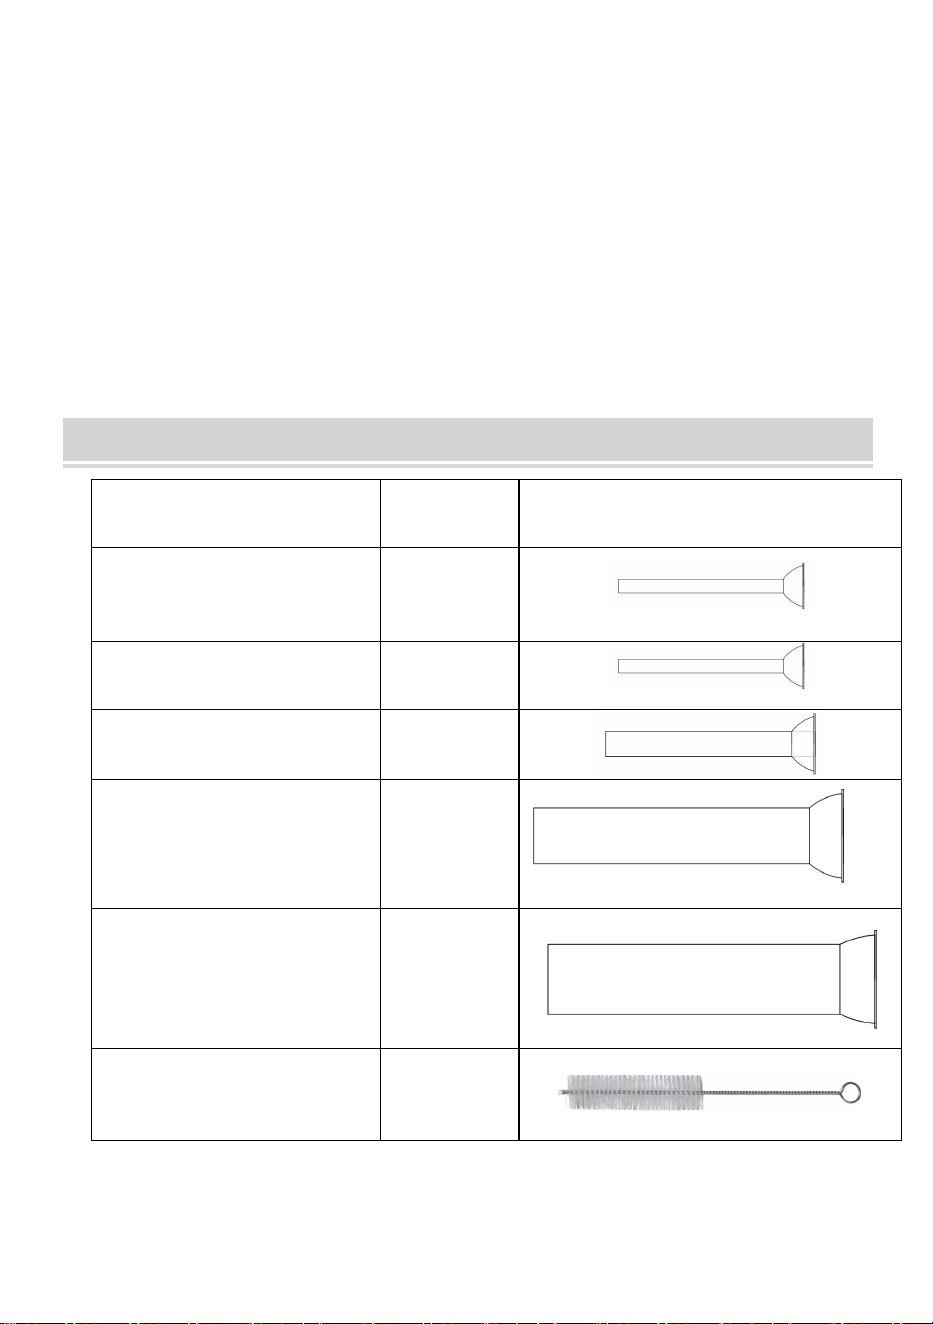
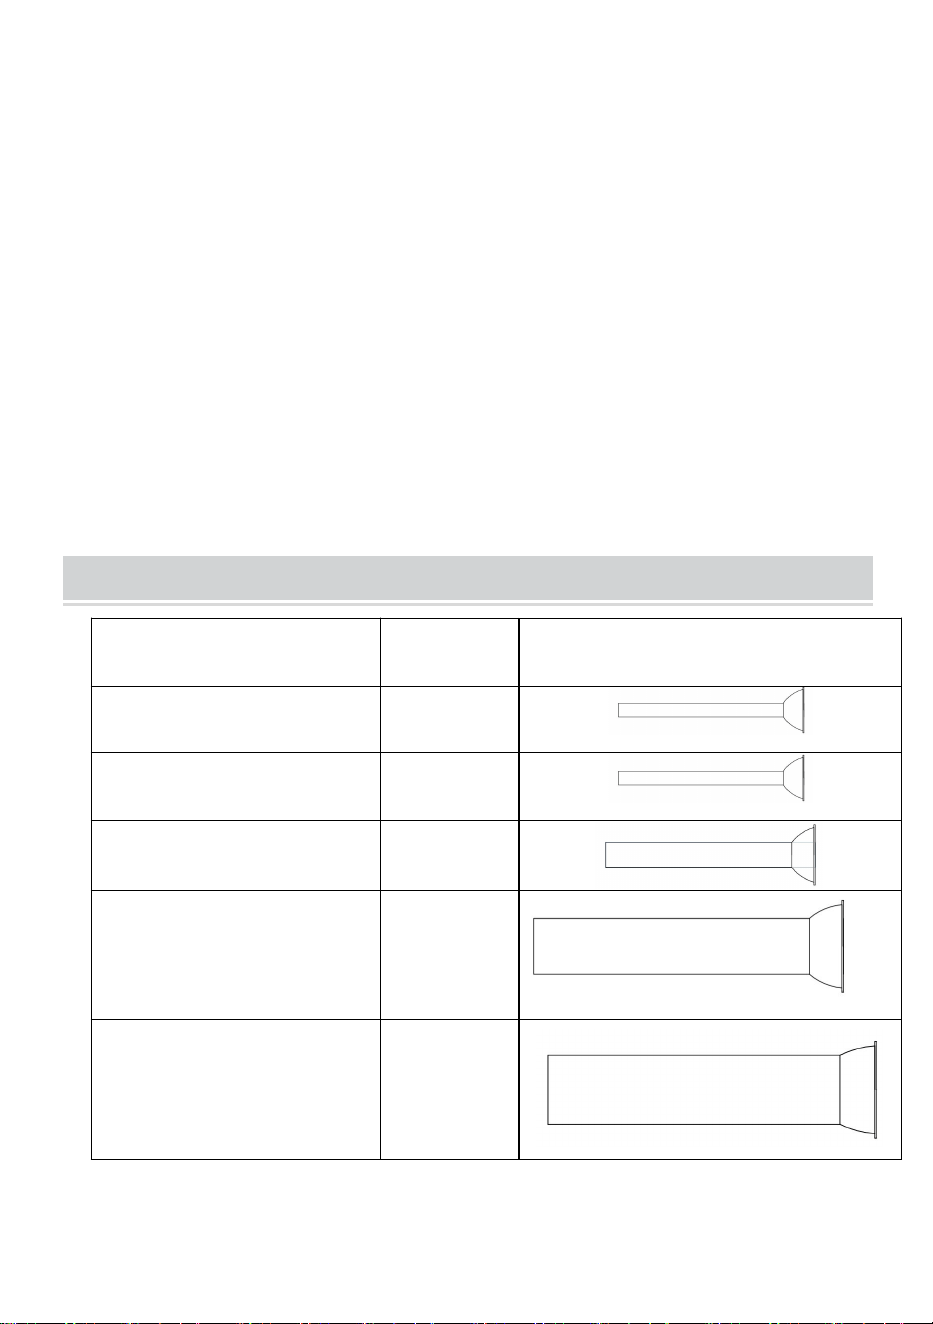
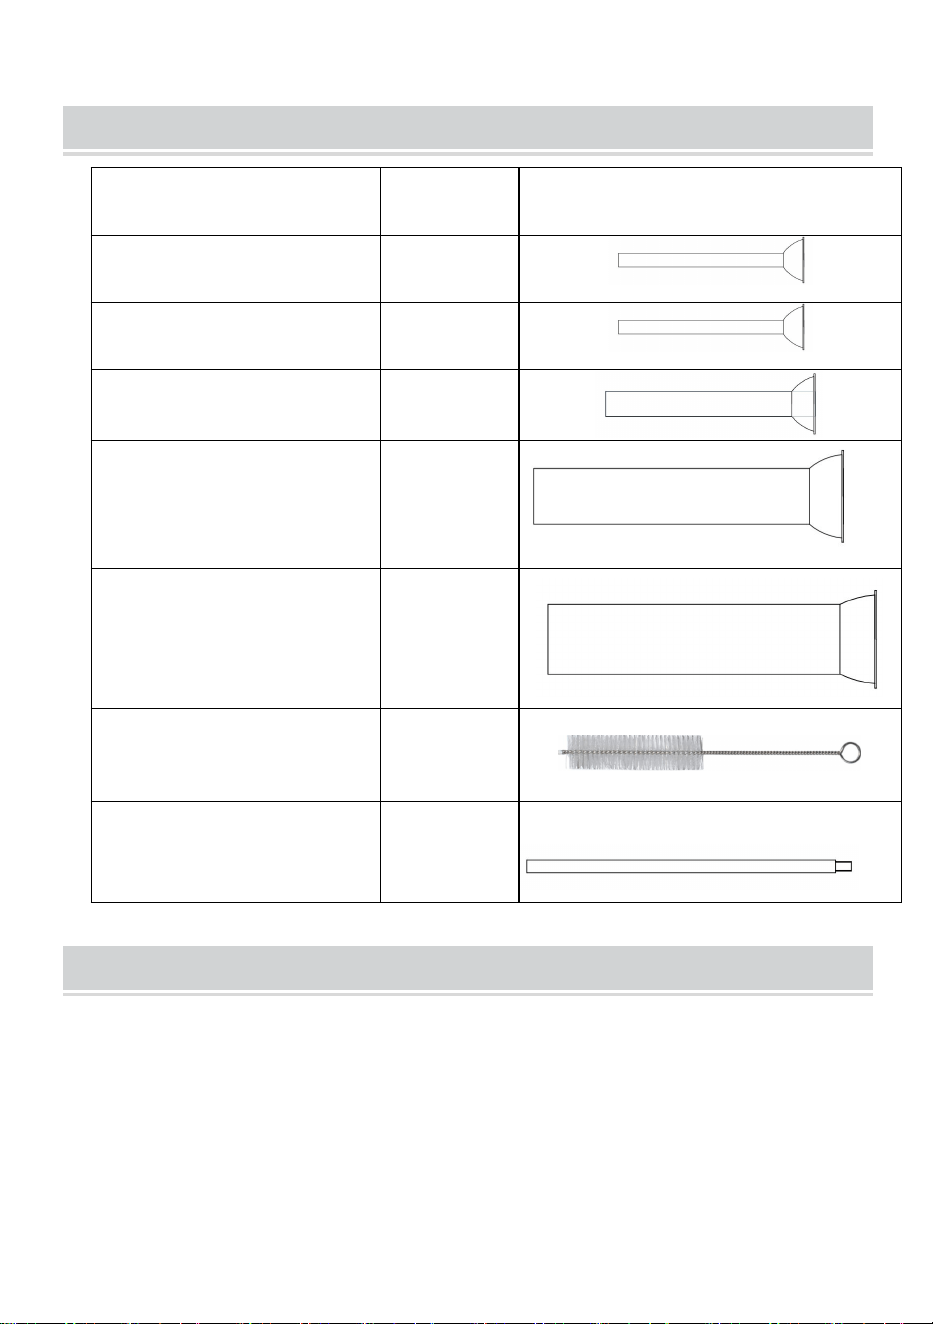
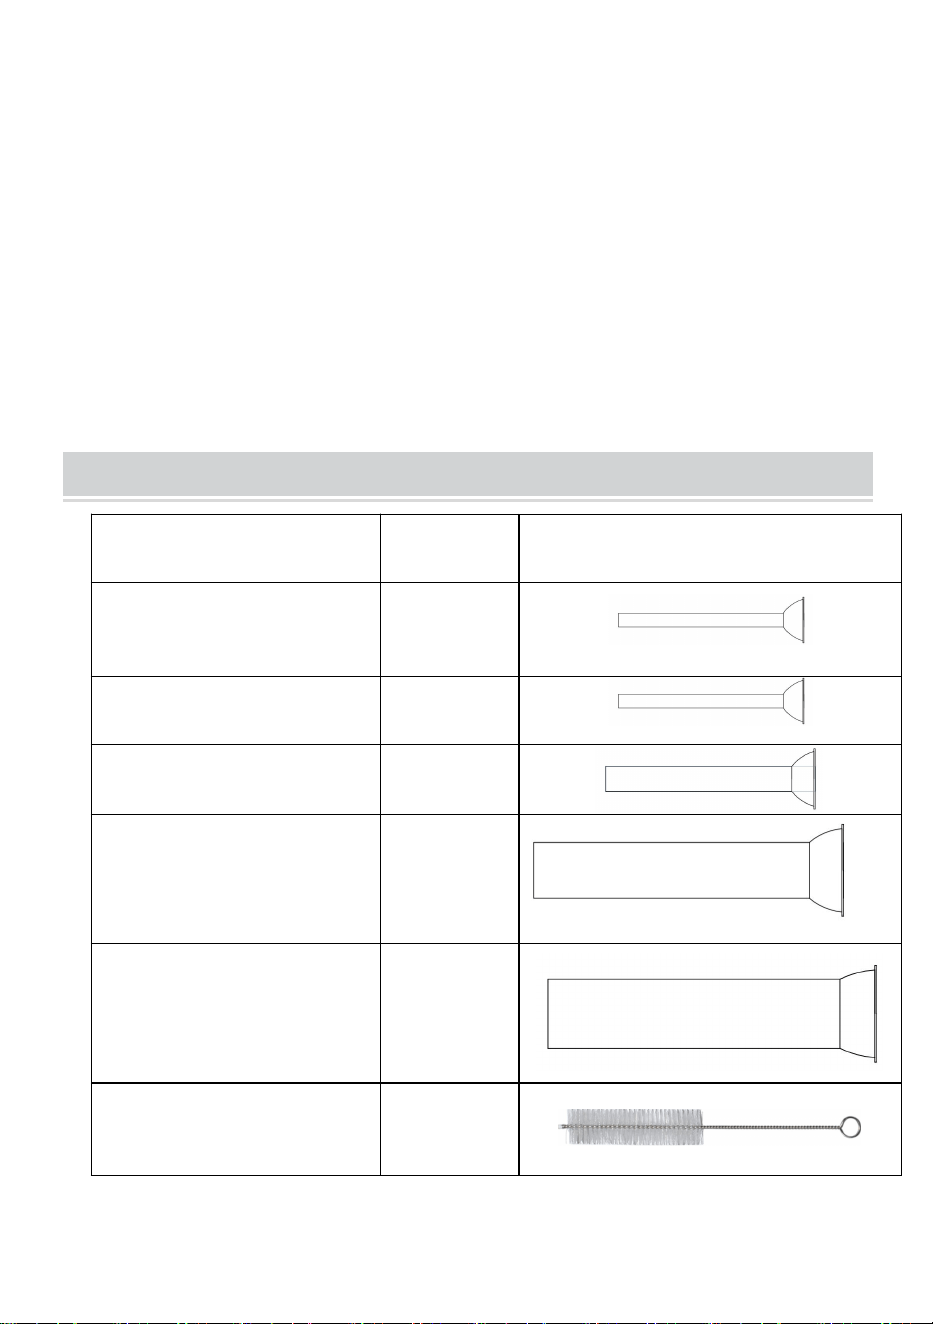
PARTS LIST
Name
QTY
Diagram
Stuffing tube 12mm
1
Stuffing tube 15mm
1
Stuffing tube 21mm
1
Stuffing tube 30mm
1
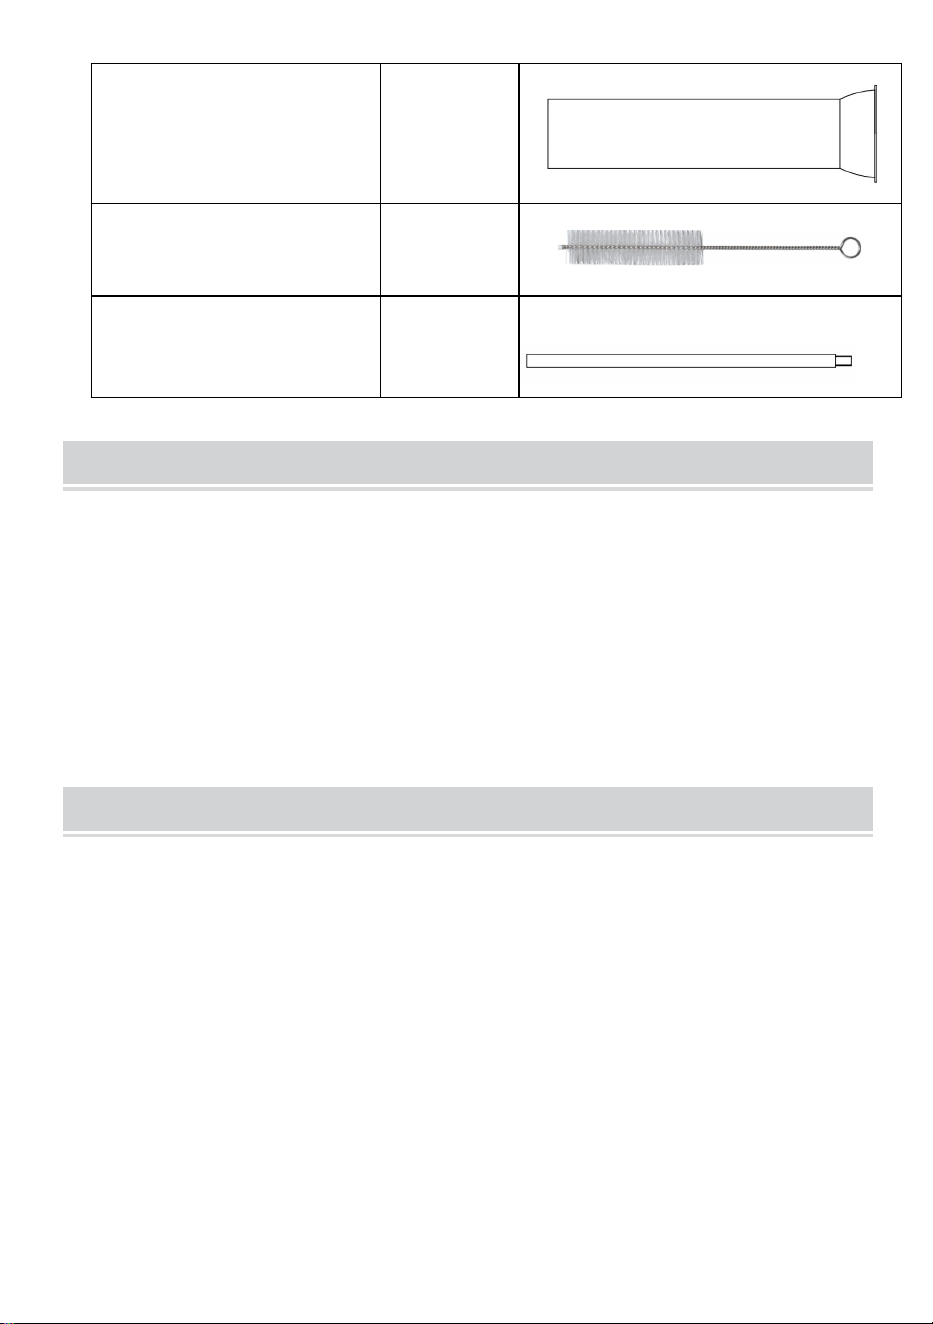
Stuffing tube 37mm
1
Cleaning brush
1
Piston rod
1
ASSEMBLY ANDINSTALLATION
1. Choose a workbench with a suitable height and make sure you have
enough room for operation.
2. Assemble the stufing tube. Four sizes of stuffing tubes have been
provided with the unit (Diametersare 15mm, 21mm, 30mm and 37mm).
Choose an appropriate tube and carefully insert it into the fixedcollar,
slowly tighten it onto the barrel, press down on the packing tube, and make
sure it has beenstuck and locked.

- 6 -
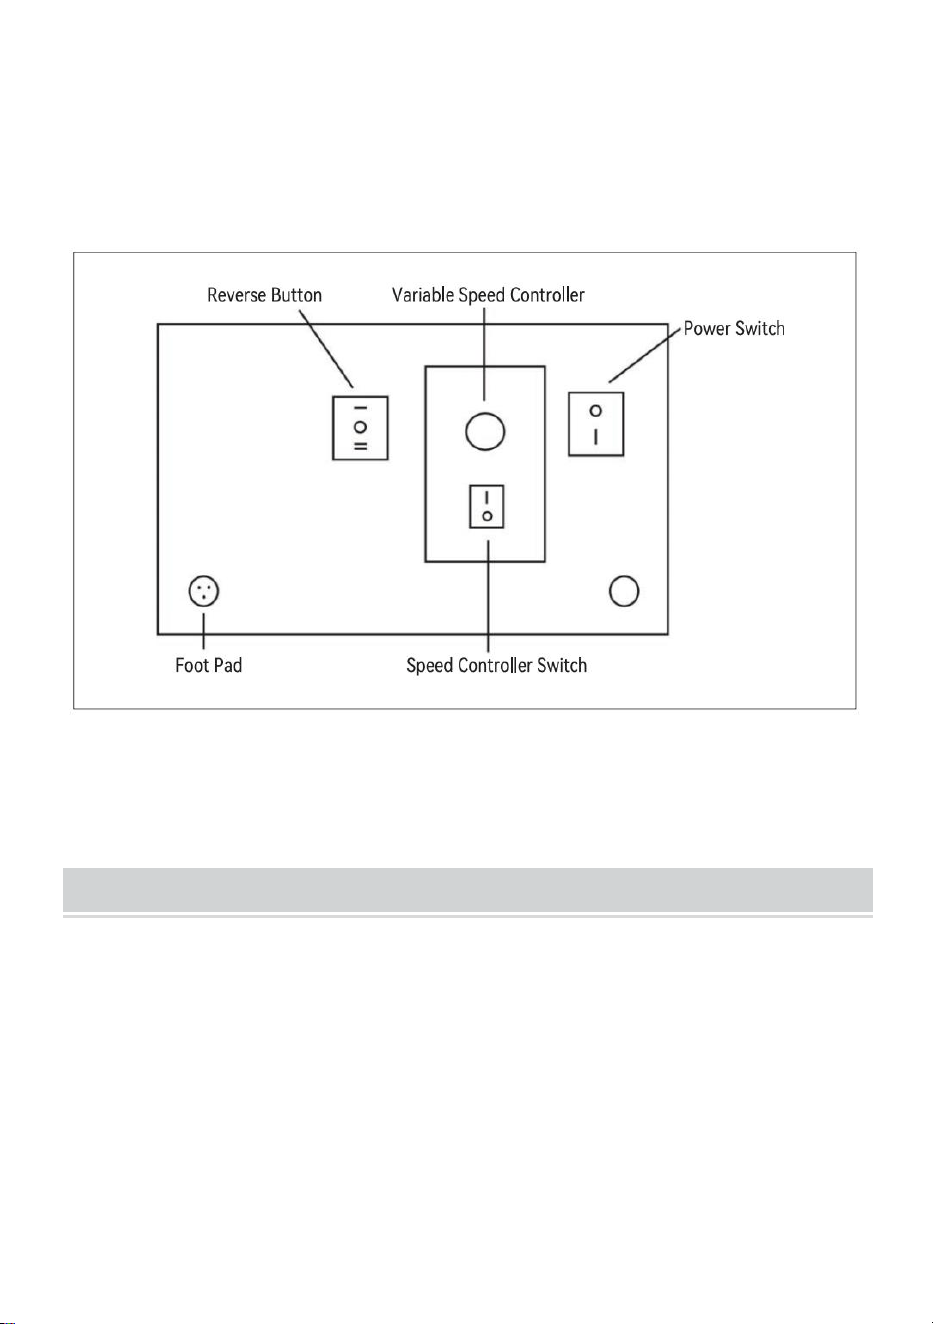
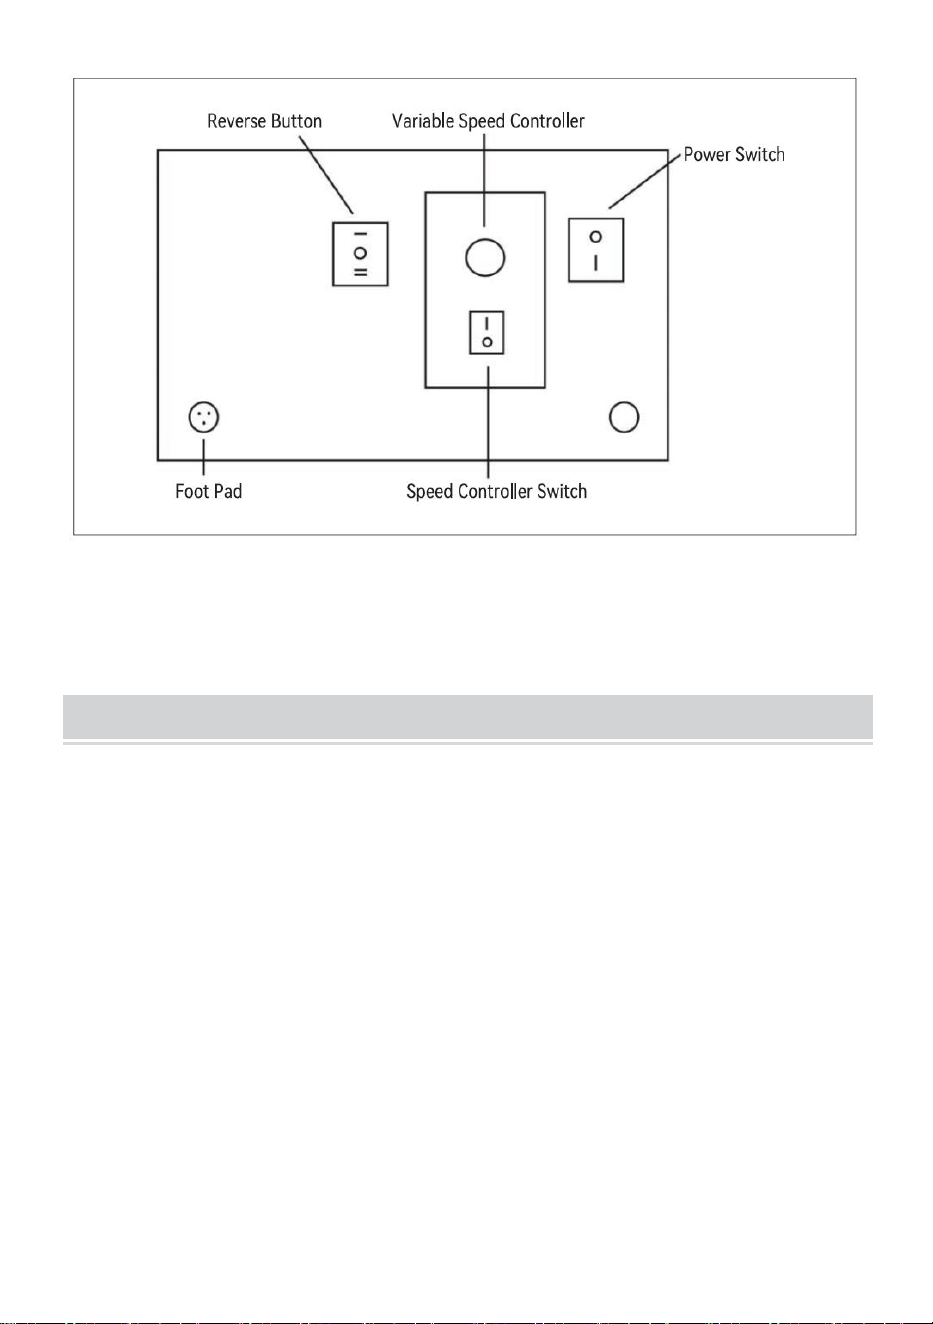
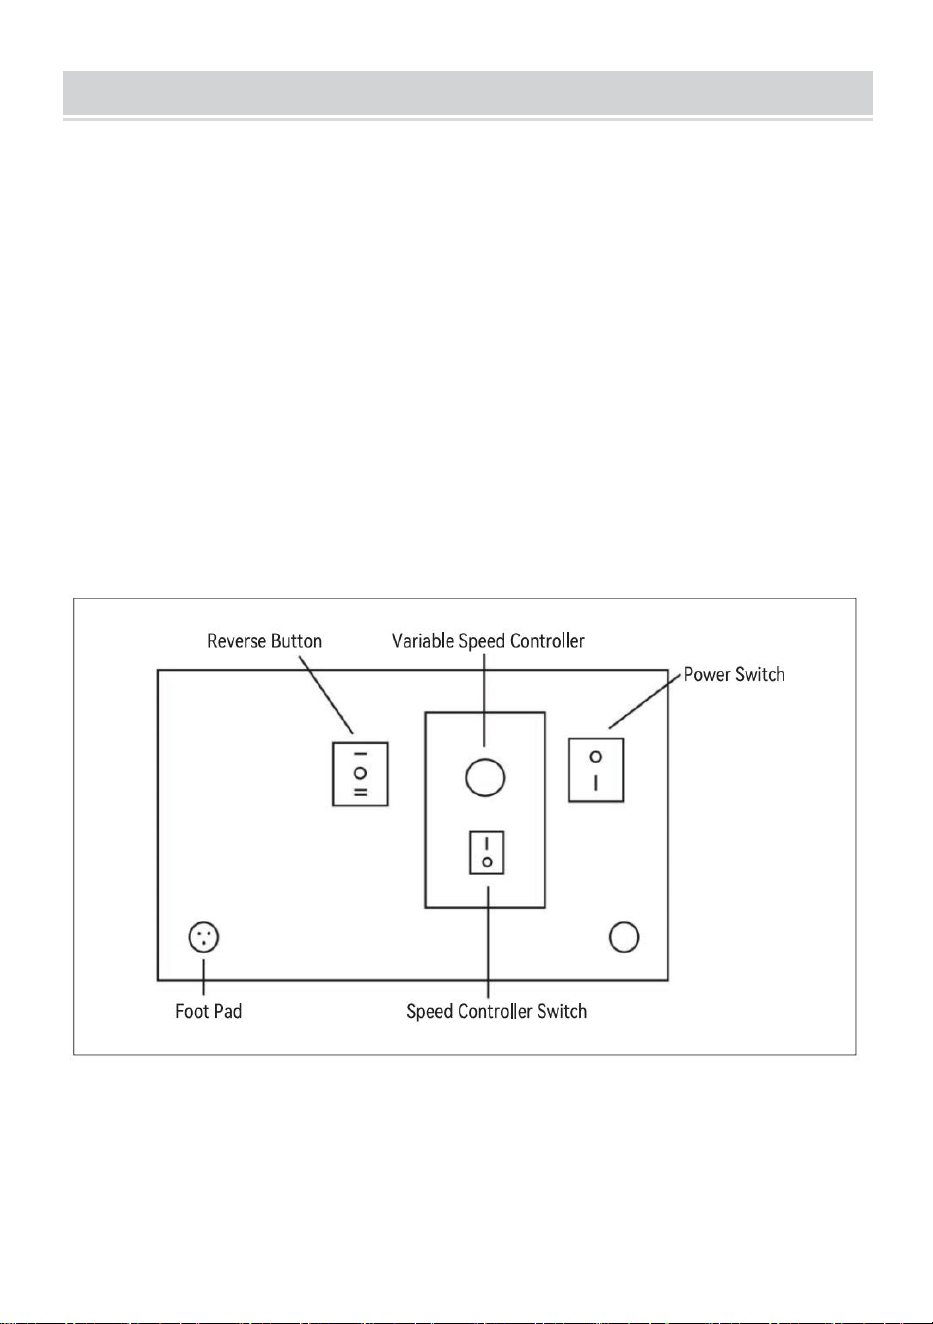
OPERATION
1. Place the pedal in a dry position.2.Switch ON the power supply, and then
set the on-off switch (red) to ON.3. Turn the REVERSE switch (black) to
UP and let the piston move to the top4. Tilt the cylinder and place the meat
into the cylinder.
5.Place the cylinder back on the frame.
6. Turn the REVERSE switch(black)to DOWN and push the lower side of
the footpad. Thepiston will start to drop.7. lf the piston drops too fast or too
slow, use the speed controller (knob) on the sideof the electric box to
adjust to the appropriate speed.
8. When filling the housing, remove the foot from the pad and the piston will
stop9. When the piston moves down to the bottom of the cylinder, the
device will stopautomatically. Then turn the REVERSE switch (black) to UP
to lift the piston to the top.10. Repeat the process from 4 if necessary.
- 7 -
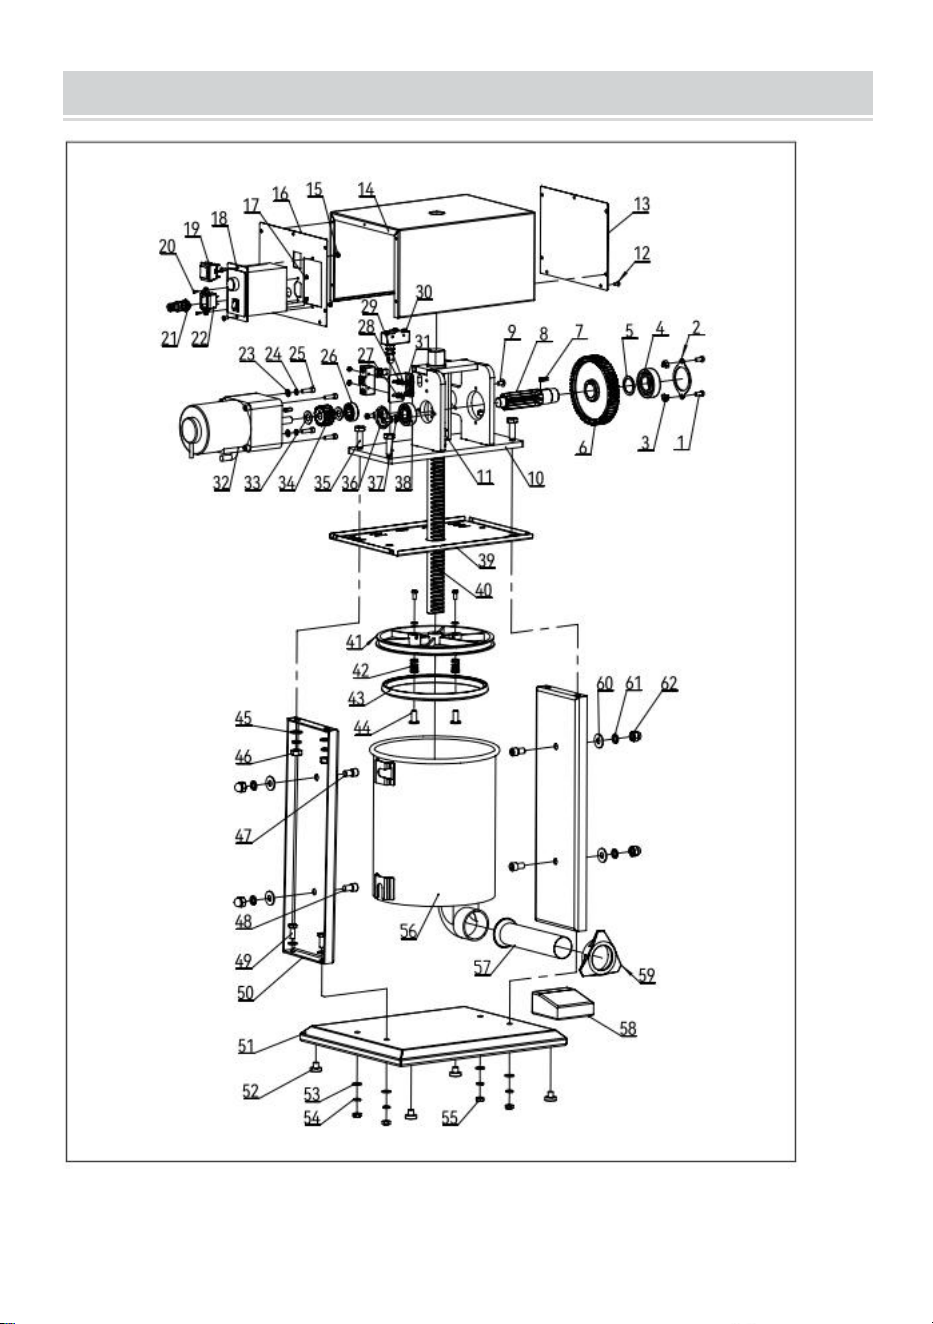
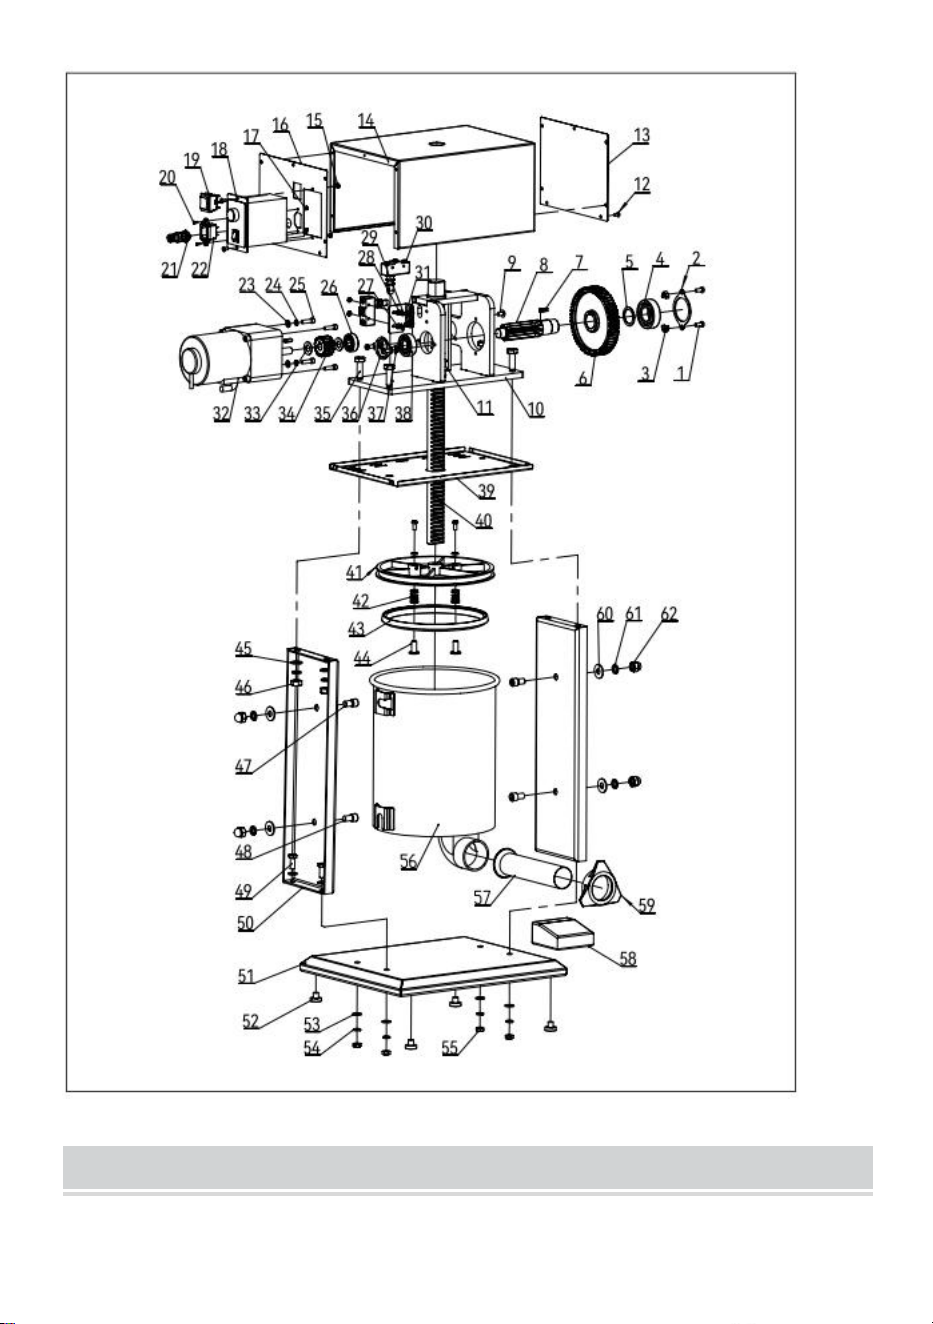
EXPLOSIVE VIEW

- 8 -
PARTS LIST

- 9 -
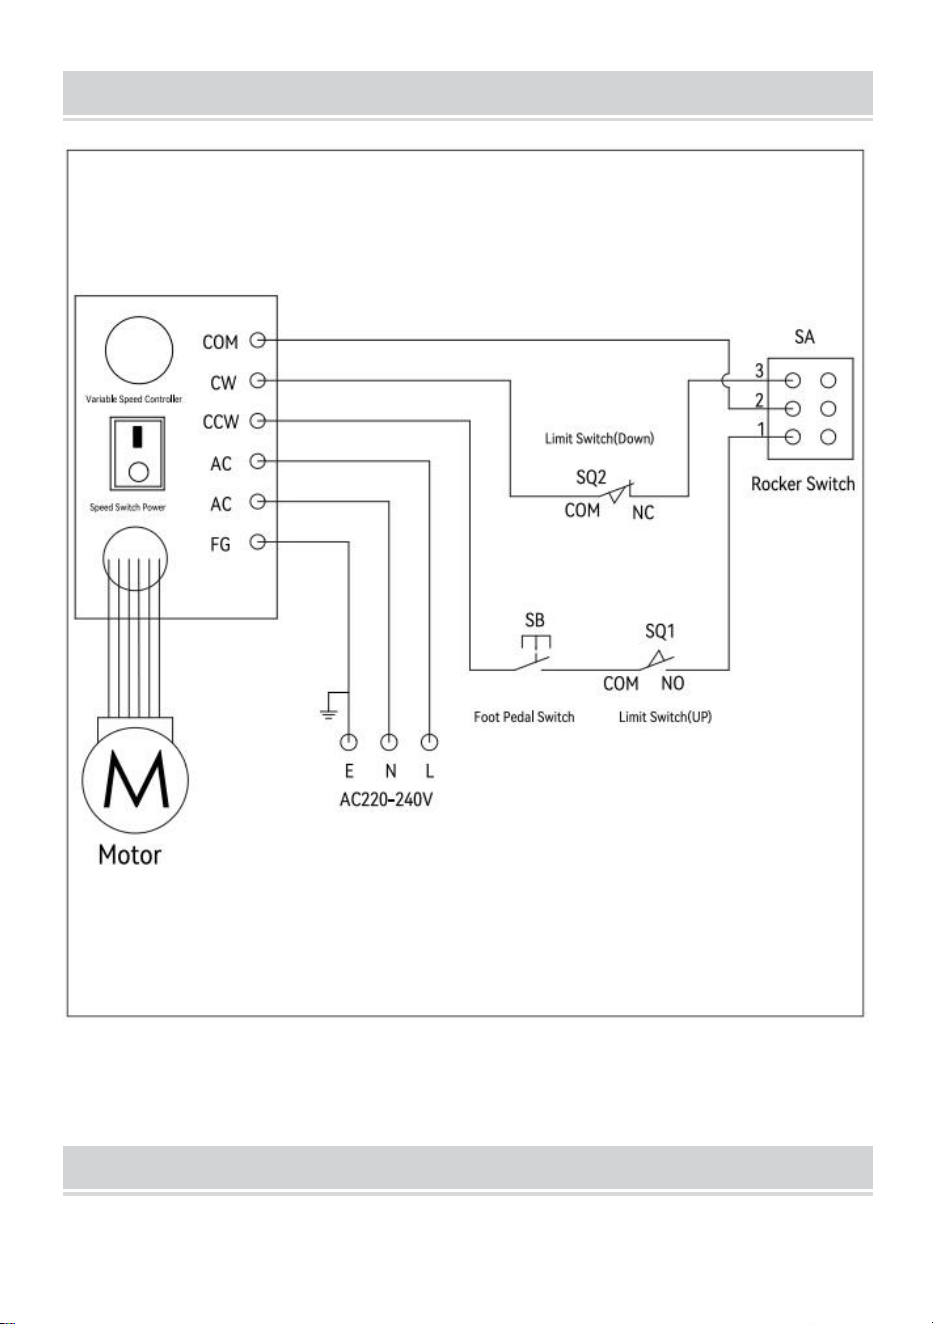
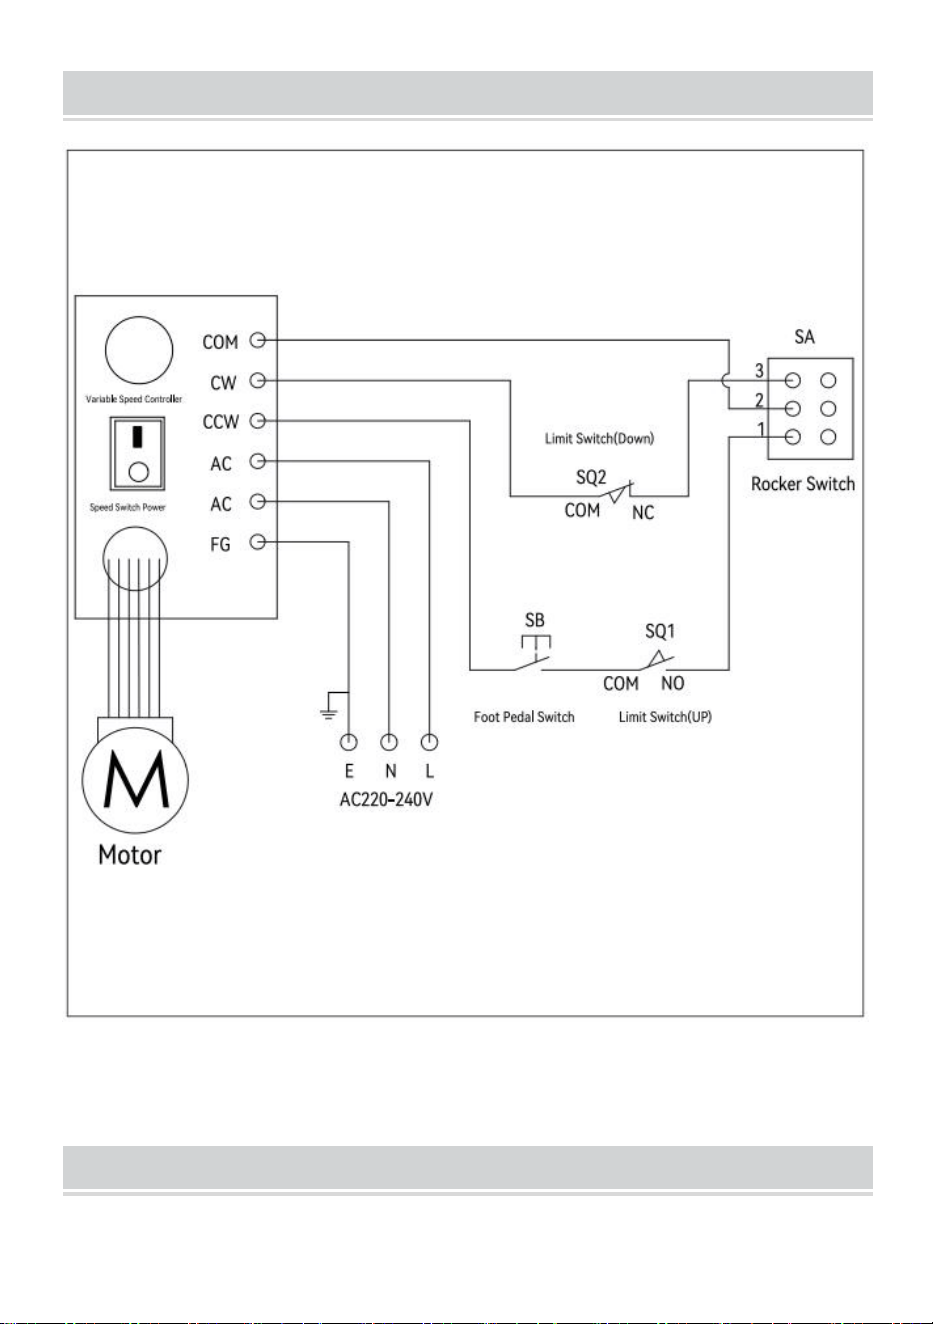
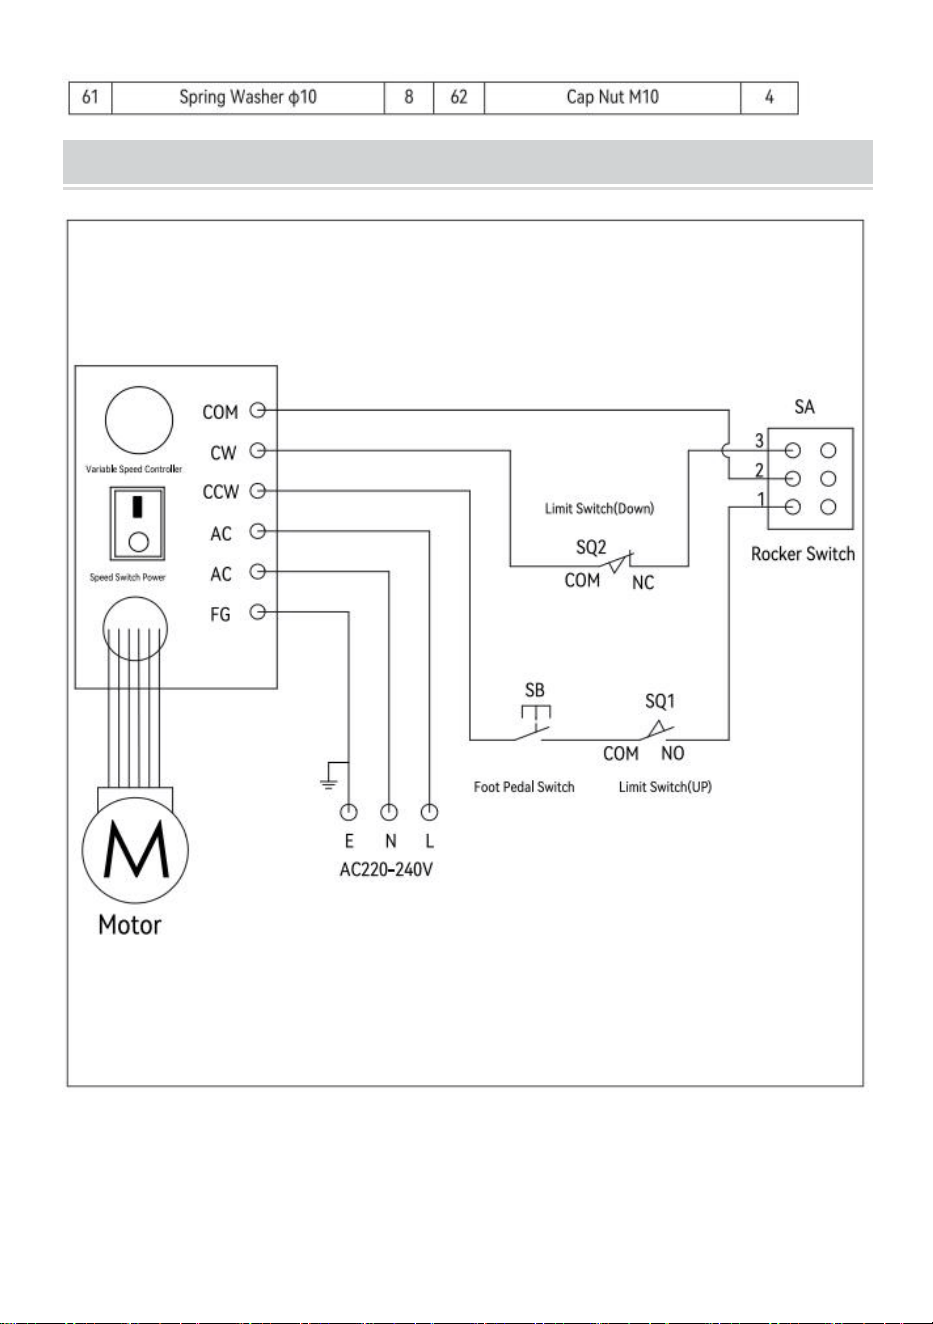
SCHEMATIC CIRCUIT DIAGRAM

- 10 -
REPAIR AND MAINTENANCE
1. Please unplug the power supply before cleaning.
2.Remove and clean all parts that come in contact with the sausage.
3.Wipe non-removable parts with a cloth to remove bacteria.
4. Lubricate moving parts and gears to extend product life.
5. Do not use corrosive or abrasive detergents for cleaning.
6. Store the machine in a dry, clean and secure place.
Manufacturer: Shanghaimuxinmuyeyouxiangongsi
Address: Shuangchenglu 803nong11hao1602A-1609shi, baoshanqu,
shanghai 200000 CN.
Imported to AUS: SIHAO PTY LTD. 1 ROKEVA STREETEASTWOOD
NSW 2122 Australia
Imported to USA: Sanven Technology Ltd. Suite 250, 9166 Anaheim
Place, Rancho Cucamonga, CA 91730


Techniczny Certyfikat wsparcia i e-gwarancji www.vevor.com/support
NADZIEWANIE KIEŁBAS
MODELE: XZO-12D, XZO-25D
We continue to be committed to provide you tools with competitive price.
"Save Half", "Half Price" or any other similar expressions used by us only represents an
estimate of savings you might benefit from buying certain tools with us compared to the major
top brands and doses not necessarily mean to cover all categories of tools offered by us. You
are kindly reminded to verify carefully when you are placing an order with us if you are
actually saving half in comparison with the top major brands.

- 1 -
MODELE: XZO-12D, XZO-25D
Have product questions? Need technical support? Please feel free to
contact us:
Technical Support and E-Warranty Certificate
www.vevor.com/support
NEED HELP? CONTACT US!
This is the original instruction, please read all manual instructions
carefully before operating. VEVOR reserves a clear interpretation of our
user manual. The appearance of the product shall be subject to the
product you received. Please forgive us that we won't inform you again if
there are any technology or software updates on our product.
SAUSAGE STUFFER

- 2 -
Ostrzeżenie — aby zmniejszyć ryzyko obrażeń, użytkownik
musi uważnie przeczytać instrukcję obsługi.
PRAWIDŁOWA UTYLIZACJA
Ten produkt podlega przepisom Dyrektywy Europejskiej 2012/19/EC.
Symbol przekreślonego kosza na śmieci oznacza, że produkt
wymaga selektywnej zbiórki śmieci na terenie Unii Europejskiej.
Dotyczy to produktu i wszystkich akcesoriów oznaczonych tym
symbolem. Produktów oznaczonych jako takie nie można wyrzucać
razem ze zwykłymi odpadami domowymi, lecz należy je oddać do
punktu zbiórki w celu recyklingu urządzeń elektrycznych i
elektronicznych
Important SAFETY INSTRUCTIONS
Podczas korzystania z urządzeń elektrycznych należy zachować
podstawowe środki ostrożności
zawsze postępuj zgodnie z poniższymi wskazówkami:
1. Przeczytaj całą instrukcję przed użyciem tego urządzenia.
2. Nie używaj tego urządzenia z uszkodzonym przewodem, wtyczką lub
awarie.
3. Aby zabezpieczyć się przed porażeniem prądem, nie zanurzaj włącznika
nożnego,
przewodu, wtyczki lub wypełniacza w wodzie lub innych płynach.
4. To urządzenie nie jest przeznaczone do użytku przez dzieci.
5. Trzymaj palce i dłonie z dala od wszelkich ruchomych części.
6. Odłącz urządzenie od prądu, gdy nie jest używane lub przed
czyszczeniem.
7. To urządzenie jest przeznaczone wyłącznie do użytku domowego.
8. Nigdy nie zanurzaj urządzenia w płynach i ostrych krawędziach. Nie
używaj urządzenia mokrymi rękami. Jeśli urządzenie jest wilgotne lub
mokre, natychmiast odłącz je od prądu.

- 3 -
9. Z tego urządzenia mogą korzystać dzieci w wieku od 8 lat i starsze oraz
osoby o ograniczonych zdolnościach fizycznych, sensorycznych lub
umysłowych lub nieposiadające doświadczenia i wiedzy, jeżeli znajdują się
pod nadzorem lub zostały pouczone dotyczące bezpiecznego użytkowania
urządzenia i rozumieją związane z tym zagrożenia. Dzieciom nie wolno
bawić się urządzeniem. Czyszczenie i konserwacja nie mogą być
wykonywane przez dzieci bez nadzoru.
10. Zawsze odłączaj maszynę od zasilania, jeśli pozostawiana jest bez
nadzoru oraz przed montażem, demontażem lub czyszczeniem.
11. Jeśli przewód zasilający jest uszkodzony, musi zostać wymieniony
przez producenta, przedstawiciela serwisowego lub osobę o podobnych
kwalifikacjach, aby uniknąć zagrożenia.
12. Trzymaj palec z dala od ruchomych części i zamontowanych narzędzi.
Nigdy nie wkładaj palców itp. do mechanizmu zawiasu.
13. Używaj wyłącznie oryginalnych części zamiennych.
14. W trosce o bezpieczeństwo swoich dzieci prosimy o przechowywanie
wszelkich opakowań (plastikowych torebek, pudełek, styropianu itp.) poza
ich zasięgiem.
15. Nie ingeruj w żadne wyłączniki bezpieczeństwa.
16. Umieść maszynę na gładkiej, płaskiej i stabilnej powierzchni roboczej.
17. Poczekaj, aż ruchome części przestaną się poruszać, zanim zdejmiesz
pokrywę maszyny.
18. Nie przekraczaj maksymalnej zawartości wskazanej na akcesoriach.
BEFORE CONNECTING TO POWER
Przed podłączeniem do prądu sprawdź ponownie rodzaj zasilania i
napięcie sieciowe zgodne z danymi podanymi na tabliczce
znamionowej urządzenia.
Przy pierwszym użyciu należy oderwać cały papier do pakowania i
plastikowe torby. Oczyścić armaturę.
ZACHOWAJ TE INSTRUKCJE, WYŁĄCZNIE DO UŻYTKU
DOMOWEGO
FCC Information

- 4 -
UWAGA : Zmiany lub modyfikacje, które nie zostały wyraźnie
zatwierdzone przez stronę odpowiedzialną za zgodność, mogą unieważnić
uprawnienia użytkownika do obsługi urządzenia!
To urządzenie jest zgodne z częścią 15 przepisów FCC. Działanie podlega
następującym dwóm warunkom:
1) Ten produkt może powodować szkodliwe zakłócenia.
2) Ten produkt musi akceptować wszelkie odbierane zakłócenia, w tym
zakłócenia, które mogą powodować niepożądane działanie.
OSTRZEŻENIE: Zmiany lub modyfikacje tego produktu, które nie zostały
wyraźnie zatwierdzone przez stronę odpowiedzialną za zgodność, mogą
unieważnić uprawnienia użytkownika do obsługi produktu.
Uwaga: ten produkt został przetestowany i stwierdzono, że spełnia
ograniczenia dla urządzeń cyfrowych klasy B zgodnie z częścią 15
przepisów FCC. Ograniczenia te mają na celu zapewnienie rozsądnej
ochrony przed szkodliwymi zakłóceniami w instalacjach domowych.
Ten produkt generuje, wykorzystuje i może emitować energię o
częstotliwości radiowej, a jeśli nie zostanie zainstalowany i nie będzie
używany zgodnie z instrukcją, może powodować szkodliwe zakłócenia w
komunikacji radiowej. Nie ma jednak gwarancji, że w konkretnej instalacji
nie wystąpią zakłócenia. Jeśli produkt powoduje szkodliwe zakłócenia w
odbiorze radia lub telewizji, co można stwierdzić poprzez wyłączenie i
włączenie produktu, zachęca się użytkownika do podjęcia próby
skorygowania zakłóceń za pomocą jednego lub kilku z poniższych
środków.
· Zmień orientację lub położenie anteny odbiorczej.
· Zwiększ odległość pomiędzy produktem a odbiornikiem.
· Podłącz produkt do gniazdka w innym obwodzie niż ten, do którego
podłączony jest odbiornik.
· Skonsultuj się ze sprzedawcą lub doświadczonym technikiem
radiowo-telewizyjnym w celu uzyskania pomocy.
- 5 -
PARTS LIST
Nazwa
ILOŚĆ
Diagram
nadziewanie rura 1 2
mm
1
Rurka do farszu 15
mm
1
Rurka do farszu 21mm
1
Rurka do farszu 30mm
1
Rurka do farszu 37mm
1
Szczotka do
czyszczenia
1
Tłoczysko
1

- 6 -
ASSEMBLY ANDINSTALLATION
1. Wybierz stół warsztatowy o odpowiedniej wysokości i upewnij się, że
masz wystarczająco dużo miejsca do pracy.
2. Zamontuj rurkę zapychającą. Do urządzenia dołączone są rurki
wypełniające w czterech rozmiarach (średnice 15 mm, 21 mm, 30 mm i 37
mm). Wybierz odpowiednią tubę i ostrożnie włóż ją do stałego kołnierza,
powoli dokręć ją do lufy, dociśnij tubę i upewnij się, że została utknięta i
zablokowana.
OPERATION
1. Ustaw pedał w suchej pozycji.2.Włącz zasilanie, a następnie ustaw
wyłącznik (czerwony) w pozycji ON.3. Ustaw przełącznik REVERSE
(czarny) w pozycji UP i pozwól, aby tłok przesunął się do góry4. Przechyl
cylinder i umieść w nim mięso.
5.Umieść cylinder z powrotem na ramie.
6. Ustaw przełącznik REVERSE (czarny) w pozycji DÓŁ i naciśnij dolną
część podnóżka. Tłok zacznie opadać.7. Jeśli tłok opada zbyt szybko lub
zbyt wolno, użyj regulatora prędkości (pokrętła) z boku skrzynki
elektrycznej, aby ustawić odpowiednią prędkość.
8. Podczas napełniania obudowy zdejmij stopkę z podkładki, a tłok się
zatrzyma9. Gdy tłok opadnie na dno cylindra, urządzenie zatrzyma się
automatycznie. Następnie obróć przełącznik REVERSE (czarny) w
położenie UP, aby unieść tłok do góry.10. Jeśli to konieczne, powtórz
proces od punktu 4.

- 7 -
EXPLOSIVE VIEW

- 8 -
PARTS LIST

- 9 -

- 10 -
SCHEMATIC CIRCUIT DIAGRAM
REPAIR AND MAINTENANCE
- 11 -
1. Przed czyszczeniem należy odłączyć zasilanie.
2. Wyjmij i oczyść wszystkie części mające kontakt z kiełbasą.
3. Wytrzyj nieusuwalne części szmatką, aby usunąć bakterie.
4. Nasmaruj ruchome części i przekładnie, aby przedłużyć żywotność
produktu.
5. Do czyszczenia nie używaj żrących lub ściernych detergentów.
6. Przechowuj maszynę w suchym, czystym i bezpiecznym miejscu.
Producent: Shanghaimuxinmuyeyouxiangongsi
Adres: Shuangchenglu 803nong11hao1602A-1609shi, baoshanqu,
szanghaj 200000 CN.
Import do AUS: SIHAO PTY LTD. 1 ROKEVA STREETEASTWOOD NSW
2122 Australia
Import do USA: Sanven Technology Ltd. Suite 250, 9166 Anaheim Place,
Rancho Cucamonga, CA 91730


Technisch Support- und E-Garantie-Zertifikat www.vevor.com/support
WURSTSTUFFER
MODELL: XZO-12D,XZO-25D
We continue to be committed to provide you tools with competitive price.
"Save Half", "Half Price" or any other similar expressions used by us only represents an
estimate of savings you might benefit from buying certain tools with us compared to the major
top brands and doses not necessarily mean to cover all categories of tools offered by us. You
are kindly reminded to verify carefully when you are placing an order with us if you are
actually saving half in comparison with the top major brands.

- 1 -
MODELL: XZO-12D,XZO-25D
Have product questions? Need technical support? Please feel free to
contact us:
Technical Support and E-Warranty Certificate
www.vevor.com/support
NEED HELP? CONTACT US!
This is the original instruction, please read all manual instructions
carefully before operating. VEVOR reserves a clear interpretation of our
user manual. The appearance of the product shall be subject to the
product you received. Please forgive us that we won't inform you again if
there are any technology or software updates on our product.
SAUSAGE STUFFER
- 2 -
Warnung: Um das Verletzungsrisiko zu verringern, muss der
Benutzer die Bedienungsanleitung sorgfältig lesen.
RICHTIGE ENTSORGUNG
Dieses Produkt unterliegt den Bestimmungen der europäischen
Richtlinie 2012/19/EG. Das Symbol einer durchgestrichenen
Mülltonne weist darauf hin, dass das Produkt in der Europäischen
Union einer getrennten Müllsammlung bedarf. Dies gilt für das
Produkt und alle Zubehörteile, die mit diesem Symbol
gekennzeichnet sind. Als solche gekennzeichnete Produkte dürfen
nicht über den normalen Hausmüll entsorgt werden, sondern
müssen an einer Sammelstelle für das Recycling von Elektro- und
Elektronikgeräten abgegeben werden
Important SAFETY INSTRUCTIONS
Bei der Verwendung von Elektrogeräten sollten grundlegende
Sicherheitsvorkehrungen getroffen werden
immer wie folgt befolgt werden:
1. Lesen Sie alle Anweisungen, bevor Sie dieses Gerät verwenden.
2. Betreiben Sie dieses Gerät nicht mit einem beschädigten Kabel, Stecker
oder
Fehlfunktionen.
3. Zum Schutz vor Stromschlägen den Fußschalter nicht in Wasser
tauchen.
Kabel, Stecker oder Füller in Wasser oder andere Flüssigkeiten tauchen.
4. Dieses Gerät ist nicht für die Benutzung durch Kinder bestimmt.
5. Halten Sie Finger und Hände von allen beweglichen Teilen fern.
6. Trennen Sie das Gerät vom Netz, wenn es nicht verwendet wird oder
bevor Sie es reinigen.
7.Dieses Gerät ist nur für den Hausgebrauch bestimmt.

- 3 -
8. Tauchen Sie die Maschine niemals in Flüssigkeiten und scharfe Kanten.
Benutzen Sie das Gerät nicht mit nassen Händen. Wenn das Gerät feucht
oder nass ist, ziehen Sie sofort den Netzstecker.
9. Dieses Gerät kann von Kindern ab 8 Jahren und Personen mit
eingeschränkten körperlichen, sensorischen oder geistigen Fähigkeiten
oder mangelnder Erfahrung und Wissen verwendet werden, wenn sie
beaufsichtigt werden oder Anweisungen erhalten haben, wie das Gerät auf
sichere Weise verwendet werden kann und sie verstehen welche Gefahren
damit verbunden sind. Kinder dürfen nicht mit dem Gerät spielen.
Reinigung und Benutzerwartung dürfen nicht von Kindern ohne Aufsicht
durchgeführt werden.
10. Trennen Sie die Maschine immer vom Stromnetz, wenn sie
unbeaufsichtigt bleibt und bevor Sie sie zusammenbauen, demontieren
oder reinigen.
11. Wenn das Netzkabel beschädigt ist, muss es durch den Hersteller oder
eine ähnlich qualifizierte Person ersetzt werden, um Gefahren zu
vermeiden.
12. Halten Sie Ihre Finger von beweglichen Teilen und eingebauten
Werkzeugen fern. Stecken Sie Ihre Finger usw. niemals in den
Scharniermechanismus.
13. Verwenden Sie nur Original-Ersatzteile.
14. Um die Sicherheit Ihrer Kinder zu gewährleisten, bewahren Sie bitte
alle Verpackungen (Plastiktüten, Kartons, Styropor usw.) außerhalb ihrer
Reichweite auf.
15. Beeinflussen Sie keine Sicherheitsschalter.
16. Stellen Sie die Maschine auf eine glatte, ebene und stabile
Arbeitsfläche.
17. Warten Sie, bis die beweglichen Teile nicht mehr laufen, bevor Sie den
Deckel der Maschine abnehmen.
18. Überschreiten Sie nicht den auf dem Zubehör angegebenen
Maximalinhalt.
BEFORE CONNECTING TO POWER

- 4 -
Bevor Sie das Gerät an die Stromversorgung anschließen, prüfen
Sie noch einmal, ob die Art der Stromversorgung und die
Netzspannung mit den Angaben auf dem Typenschild am Gerät
übereinstimmen.
Ziehen Sie bei der ersten Verwendung sämtliches Geschenkpapier
und alle Plastiktüten ab. Reinigen Sie die Armaturen.
BEWAHREN SIE DIESE ANWEISUNGEN AUF. NUR FÜR DEN
HAUSHALTSGEBRAUCH
FCC Information
VORSICHT : Änderungen oder Modifikationen, die nicht ausdrücklich von
der für die Einhaltung verantwortlichen Partei genehmigt wurden, können
zum Erlöschen der Berechtigung des Benutzers zum Betrieb des Geräts
führen!
Dieses Gerät entspricht Teil 15 der FCC-Bestimmungen. Der Betrieb
unterliegt den folgenden zwei Bedingungen:
1) Dieses Produkt kann schädliche Störungen verursachen.
2) Dieses Produkt muss alle empfangenen Störungen akzeptieren,
einschließlich Störungen, die zu unerwünschtem Betrieb führen können.
WARNUNG: Änderungen oder Modifikationen an diesem Produkt, die
nicht ausdrücklich von der für die Einhaltung verantwortlichen Partei
genehmigt wurden, können zum Erlöschen der Berechtigung des
Benutzers zum Betrieb des Produkts führen.
Hinweis: Dieses Produkt wurde getestet und entspricht den Grenzwerten
für ein digitales Gerät der Klasse B gemäß Teil 15 der FCC-Bestimmungen.
Diese Grenzwerte sollen einen angemessenen Schutz vor schädlichen
Störungen in einer Wohnanlage bieten.
Dieses Produkt erzeugt und verwendet Hochfrequenzenergie und kann
diese ausstrahlen. Wenn es nicht gemäß den Anweisungen installiert und
verwendet wird, kann es schädliche Störungen der Funkkommunikation
verursachen. Es gibt jedoch keine Garantie dafür, dass bei einer
bestimmten Installation keine Störungen auftreten. Wenn dieses Produkt
schädliche Störungen beim Radio- oder Fernsehempfang verursacht, was
- 5 -
durch Aus- und Einschalten des Produkts festgestellt werden kann, wird
dem Benutzer empfohlen, zu versuchen, die Störung durch eine oder
mehrere der folgenden Maßnahmen zu beheben.
· Richten Sie die Empfangsantenne neu aus oder versetzen Sie sie.
· Erhöhen Sie den Abstand zwischen Produkt und Empfänger.
· Schließen Sie das Produkt an eine Steckdose an, die zu einem anderen
Stromkreis gehört als dem, an den der Empfänger angeschlossen ist.
· Wenden Sie sich für Hilfe an den Händler oder einen erfahrenen
Radio-/TV-Techniker.
PARTS LIST
Name
MENGE
Diagramm
Füllung Rohr 1 2 mm
1
Stopfrohr 15mm
1
Stopfrohr 21mm
1
Stopfrohr 30mm
1
- 6 -
Stopfrohr 37mm
1
Reinigungsbürste
1
Kolbenstange
1
ASSEMBLY ANDINSTALLATION
1. Wählen Sie eine Werkbank mit geeigneter Höhe und sorgen Sie für
ausreichend Platz zum Arbeiten.
2. Montieren Sie das Stopfrohr. Im Lieferumfang des Geräts sind Füllrohre
in vier Größen enthalten (Durchmesser: 15 mm, 21 mm, 30 mm und 37
mm). Wählen Sie ein geeignetes Rohr und führen Sie es vorsichtig in den
festen Kragen ein, ziehen Sie es langsam am Lauf fest, drücken Sie das
Verpackungsrohr nach unten und stellen Sie sicher, dass es festsitzt und
verriegelt ist.
OPERATION
1. Stellen Sie das Pedal in eine trockene Position. 2. Schalten Sie die
Stromversorgung ein und stellen Sie dann den Ein-Aus-Schalter (rot) auf
EIN.3. Drehen Sie den RÜCKWÄRTS-Schalter (schwarz) auf UP und
lassen Sie den Kolben nach oben bewegen4. Kippen Sie den Zylinder und
legen Sie das Fleisch in den Zylinder.
5. Platzieren Sie den Zylinder wieder am Rahmen.
6. Drehen Sie den RÜCKWÄRTS-Schalter (schwarz) auf AB und drücken
Sie auf die Unterseite des Fußpolsters. Der Kolben beginnt zu sinken.7.
Wenn der Kolben zu schnell oder zu langsam absinkt, verwenden Sie den
Geschwindigkeitsregler (Knopf) an der Seite des Elektrokastens, um die
entsprechende Geschwindigkeit einzustellen.
- 7 -
8. Entfernen Sie zum Befüllen des Gehäuses den Fuß vom Pad und der
Kolben stoppt9. Wenn sich der Kolben bis zum Boden des Zylinders
bewegt, stoppt das Gerät automatisch. Drehen Sie dann den
RÜCKWÄRTS-Schalter (schwarz) auf UP, um den Kolben nach oben zu
heben.10. Wiederholen Sie ggf. den Vorgang ab 4.
EXPLOSIVE VIEW
- 8 -
PARTS LIST

- 9 -
- 10 -
SCHEMATIC CIRCUIT DIAGRAM
REPAIR AND MAINTENANCE
- 11 -
1. Bitte ziehen Sie vor der Reinigung den Netzstecker.
2.Entfernen und reinigen Sie alle Teile, die mit der Wurst in Berührung
kommen.
3.Wischen Sie nicht abnehmbare Teile mit einem Tuch ab, um Bakterien zu
entfernen.
4. Schmieren Sie bewegliche Teile und Zahnräder, um die
Produktlebensdauer zu verlängern.
5. Verwenden Sie zur Reinigung keine ätzenden oder scheuernden
Reinigungsmittel.
6. Bewahren Sie die Maschine an einem trockenen, sauberen und
sicheren Ort auf.
Hersteller: Shanghaimuxinmuyeyouxiangongsi
Adresse: Shuangchenglu 803nong11hao1602A-1609shi, baoshanqu,
Shanghai 200000 CN.
Importiert nach AUS: SIHAO PTY LTD. 1 ROKEVA STREETEASTWOOD
NSW 2122 Australien
In die USA importiert: Sanven Technology Ltd. Suite 250, 9166 Anaheim
Place, Rancho Cucamonga, CA 91730

- 12 -


Tecnico Supporto e certificato di garanzia elettronica www.vevor.com/support
INSIEME DI SALSICCIA
MODELLO: XZO-12D,XZO-25D
We continue to be committed to provide you tools with competitive price.
"Save Half", "Half Price" or any other similar expressions used by us only represents an
estimate of savings you might benefit from buying certain tools with us compared to the major
top brands and doses not necessarily mean to cover all categories of tools offered by us. You
are kindly reminded to verify carefully when you are placing an order with us if you are
actually saving half in comparison with the top major brands.

- 1 -
MODELLO: XZO-12D,XZO-25D
Have product questions? Need technical support? Please feel free to
contact us:
Technical Support and E-Warranty Certificate
www.vevor.com/support
NEED HELP? CONTACT US!
This is the original instruction, please read all manual instructions
carefully before operating. VEVOR reserves a clear interpretation of our
user manual. The appearance of the product shall be subject to the
product you received. Please forgive us that we won't inform you again if
there are any technology or software updates on our product.
SAUSAGE STUFFER

- 2 -
Avvertenza: per ridurre il rischio di lesioni, l'utente deve
leggere attentamente il manuale di istruzioni.
CORRETTO SMALTIMENTO
Questo prodotto è soggetto alle disposizioni della Direttiva Europea
2012/19/CE. Il simbolo del bidone della spazzatura barrato indica
che nell'Unione Europea il prodotto richiede la raccolta differenziata
dei rifiuti. Ciò vale per il prodotto e tutti gli accessori contrassegnati
da questo simbolo. I prodotti contrassegnati come tali non possono
essere smaltiti con i normali rifiuti domestici, ma devono essere
portati in un punto di raccolta per il riciclaggio di dispositivi elettrici ed
elettronici
Important SAFETY INSTRUCTIONS
Quando si utilizzano apparecchi elettrici, è necessario adottare precauzioni
di sicurezza di base
essere sempre seguito come segue:
1. Leggere tutte le istruzioni prima di utilizzare questo apparecchio.
2. Non utilizzare questo apparecchio con un cavo, una spina o una spina
danneggiati
malfunzionamenti.
3. Per proteggersi dalle scosse elettriche, non immergere l'interruttore a
pedale,
cavo, spina o imbottitura in acqua o altri liquidi.
4. Questo apparecchio non è destinato all'uso da parte dei bambini.
5. Tenere le dita e le mani lontane da tutte le parti in movimento.
6. Scollegare l'apparecchio quando non è in uso o prima della pulizia.
7.Questo apparecchio è destinato esclusivamente all'uso domestico.
8. Non immergere mai la macchina in liquidi e bordi taglienti. Non utilizzare
l'apparecchio con le mani bagnate. Se l'apparecchio è umido o bagnato,
scollegarlo immediatamente.

- 3 -
9. Questo apparecchio può essere utilizzato da bambini di età pari o
superiore a 8 anni e da persone con ridotte capacità fisiche, sensoriali o
mentali o con mancanza di esperienza e conoscenza se hanno ricevuto
supervisione o istruzioni relative all'uso dell'apparecchio in modo sicuro e
hanno compreso i rischi connessi. I bambini non devono giocare con
l'apparecchio. La pulizia e la manutenzione da parte dell'utente non
devono essere effettuate da bambini senza supervisione.
10. Scollegare sempre la macchina dall'alimentazione se lasciata
incustodita e prima di montarla, smontarla o pulirla.
11. Se il cavo di alimentazione è danneggiato, deve essere sostituito dal
produttore del suo agente di servizio o da una persona qualificata al fine di
evitare pericoli.
12. Tenere le dita lontane dalle parti in movimento e dagli strumenti
montati. Non inserire mai le dita ecc. nel meccanismo della cerniera.
13. Utilizzare solo pezzi di ricambio originali.
14. Per garantire la sicurezza dei vostri bambini, vi preghiamo di tenere
tutti gli imballaggi (sacchetti di plastica, scatole, polistirolo, ecc.) fuori dalla
loro portata.
15. Non interferire con gli interruttori di sicurezza.
16. Posizionare la macchina su una superficie di lavoro liscia, piana e
stabile.
17. Attendere finché le parti mobili smettono di funzionare prima di
rimuovere il coperchio della macchina.
18. Non superare il contenuto massimo indicato sugli accessori.
BEFORE CONNECTING TO POWER
Prima di collegare l'alimentazione, verificare che il tipo di
alimentazione e la tensione di rete corrispondano ai dati riportati
sulla targhetta identificativa dell'apparecchio.
Utilizzando per la prima volta, strappare tutta la carta da imballaggio
e i sacchetti di plastica. Pulire i raccordi.
CONSERVARE QUESTE ISTRUZIONI, SOLO PER USO
DOMESTICO

- 4 -
FCC Information
ATTENZIONE : Cambiamenti o modifiche non espressamente approvati
dalla parte responsabile della conformità potrebbero invalidare il diritto
dell'utente a utilizzare l'apparecchiatura!
Questo dispositivo è conforme alla Parte 15 delle norme FCC. Il
funzionamento è soggetto alle seguenti due condizioni:
1) Questo prodotto può causare interferenze dannose.
2)Questo prodotto deve accettare qualsiasi interferenza ricevuta,
comprese le interferenze che potrebbero causare un funzionamento
indesiderato.
AVVERTENZA: cambiamenti o modifiche a questo prodotto non
espressamente approvati dalla parte responsabile della conformità
potrebbero annullare l'autorità dell'utente a utilizzare il prodotto.
Nota: questo prodotto è stato testato ed è risultato conforme ai limiti per un
dispositivo digitale di Classe B ai sensi della Parte 15 delle norme FCC.
Questi limiti sono progettati per fornire una protezione ragionevole contro
interferenze dannose in un'installazione residenziale.
Questo prodotto genera, utilizza e può irradiare energia in radiofrequenza
e, se non installato e utilizzato in conformità con le istruzioni, può causare
interferenze dannose alle comunicazioni radio. Tuttavia, non vi è alcuna
garanzia che non si verifichino interferenze in una particolare installazione.
Se questo prodotto causa interferenze dannose alla ricezione radiofonica o
televisiva, cosa che può essere determinata spegnendo e accendendo il
prodotto, si consiglia all'utente di provare a correggere l'interferenza
adottando una o più delle seguenti misure.
· Riorientare o riposizionare l'antenna ricevente.
· Aumentare la distanza tra il prodotto e il ricevitore.
· Collegare il prodotto ad una presa su un circuito diverso da quello a cui è
collegato il ricevitore.
· Consultare il rivenditore o un tecnico radio/TV esperto per assistenza.
- 5 -
PARTS LIST
Nome
QUANTITÀ
Diagramma
Ripieno tubo 12 mm
1
Tubo di riempimento
15 mm
1
Tubo di riempimento
21 mm
1
Tubo di riempimento
30 mm
1
Tubo di riempimento
37mm
1
Spazzola per la
pulizia
1
Asta del pistone
1

- 6 -
ASSEMBLY ANDINSTALLATION
1. Scegli un banco da lavoro con un'altezza adeguata e assicurati di avere
spazio sufficiente per il funzionamento.
2. Assemblare il tubo di riempimento. Con l'unità sono state fornite quattro
dimensioni di tubi di riempimento (i diametri sono 15 mm, 21 mm, 30 mm e
37 mm). Scegliere un tubo appropriato e inserirlo con attenzione nel
collare fisso, serrarlo lentamente sulla canna, premere sul tubo di tenuta e
assicurarsi che sia bloccato e bloccato.
OPERATION
1. Posizionare il pedale in una posizione asciutta.2.Accendere
l'alimentazione, quindi impostare l'interruttore on-off (rosso) su ON.3.
Ruotare l'interruttore REVERSE (nero) su UP e lasciare che il pistone si
sposti verso l'alto4. Inclinare il cilindro e posizionare la carne nel cilindro.
5.Riposizionare il cilindro sul telaio.
6. Ruotare l'interruttore REVERSE (nero) su GIÙ e spingere il lato inferiore
del poggiapiedi. Il pistone inizierà a scendere.7. Se il pistone scende
troppo velocemente o troppo lentamente, utilizzare il regolatore di velocità
(manopola) sul lato della scatola elettrica per regolare la velocità
appropriata.
8. Durante il riempimento dell'alloggiamento, rimuovere il piede dal
tampone e il pistone si fermerà9. Quando il pistone si sposta verso il fondo
del cilindro, il dispositivo si fermerà automaticamente. Quindi ruotare
l'interruttore REVERSE (nero) su UP per sollevare il pistone verso l'alto.10.
Se necessario, ripetere il procedimento dal punto 4.

- 7 -
EXPLOSIVE VIEW

- 8 -
PARTS LIST

- 9 -

- 10 -
SCHEMATIC CIRCUIT DIAGRAM
REPAIR AND MAINTENANCE

- 11 -
1. Scollegare l'alimentazione prima della pulizia.
2.Rimuovere e pulire tutte le parti che entrano in contatto con la salsiccia.
3.Pulire le parti non rimovibili con un panno per rimuovere i batteri.
4. Lubrificare le parti mobili e gli ingranaggi per prolungare la durata del
prodotto.
5. Non utilizzare detergenti corrosivi o abrasivi per la pulizia.
6. Conservare la macchina in un luogo asciutto, pulito e sicuro.
Produttore: Shanghaimuxinmuyeyouxiangongsi
Indirizzo: Shuangchenglu 803nong11hao1602A-1609shi, baoshanqu,
shanghai 200000 CN.
Importato in AUS: SIHAO PTY LTD. 1 ROKEVA STREETEASTWOOD
NSW 2122 Australia
Importato negli Stati Uniti: Sanven Technology Ltd. Suite 250, 9166
Anaheim Place, Rancho Cucamonga, CA 91730


Technique Assistance et certificat de garantie électronique
www.vevor.com/support
REMPLISSEUR DE SAUCISSES
MODÈLE : XZO-12D,XZO-25D
We continue to be committed to provide you tools with competitive price.
"Save Half", "Half Price" or any other similar expressions used by us only represents an
estimate of savings you might benefit from buying certain tools with us compared to the major
top brands and doses not necessarily mean to cover all categories of tools offered by us. You
are kindly reminded to verify carefully when you are placing an order with us if you are
actually saving half in comparison with the top major brands.

- 1 -
MODÈLE : XZO-12D,XZO-25D
Have product questions? Need technical support? Please feel free to
contact us:
Technical Support and E-Warranty Certificate
www.vevor.com/support
NEED HELP? CONTACT US!
This is the original instruction, please read all manual instructions
carefully before operating. VEVOR reserves a clear interpretation of our
user manual. The appearance of the product shall be subject to the
product you received. Please forgive us that we won't inform you again if
there are any technology or software updates on our product.
SAUSAGE STUFFER

- 2 -
Avertissement : Pour réduire le risque de blessure, l'utilisateur
doit lire attentivement le manuel d'instructions.
ÉLIMINATION CORRECTE
Ce produit est soumis aux dispositions de la directive européenne
2012/19/CE. Le symbole représentant une poubelle barrée indique
que le produit nécessite une collecte sélective des déchets dans
l'Union européenne. Ceci s'applique au produit et à tous les
accessoires marqués de ce symbole. Les produits marqués comme
tels ne peuvent pas être jetés avec les ordures ménagères normales,
mais doivent être déposés dans un point de collecte pour le
recyclage des appareils électriques et électroniques.
Important SAFETY INSTRUCTIONS
Lors de l'utilisation d'appareils électriques, des précautions de sécurité de
base doivent
toujours être suivi comme ci-dessous :
1. Lisez toutes les instructions avant d'utiliser cet appareil.
2. N'utilisez pas cet appareil avec un cordon, une fiche ou un
dysfonctionnements.
3. Pour vous protéger contre les chocs électriques, n'immergez pas la
pédale,
cordon, fiche ou bourrage dans l'eau ou d'autres liquides.
4. Cet appareil n'est pas destiné à être utilisé par des enfants.
5. Gardez les doigts et les mains éloignés de toutes les pièces mobiles.
6. Débranchez cet appareil lorsqu'il n'est pas utilisé ou avant de le
nettoyer.
7.Cet appareil est destiné à un usage domestique uniquement.
8. Ne plongez jamais la machine dans un liquide ou dans des bords
tranchants. N'utilisez pas l'appareil avec les mains mouillées. Si l'appareil
est humide ou mouillé, débranchez-le immédiatement.

- 3 -
9. Cet appareil peut être utilisé par des enfants âgés de 8 ans et plus et
des personnes ayant des capacités physiques, sensorielles ou mentales
réduites ou un manque d'expérience et de connaissances s'ils ont reçu
une supervision ou des instructions concernant l'utilisation de l'appareil en
toute sécurité et comprennent les dangers encourus. Les enfants ne
doivent pas jouer avec l'appareil. Le nettoyage et l'entretien par l'utilisateur
ne doivent pas être effectués par des enfants sans surveillance.
10. Débranchez toujours la machine de l'alimentation si elle est laissée
sans surveillance et avant de l'assembler, de la démonter ou de la
nettoyer.
11. Si le cordon d'alimentation est endommagé, il doit être remplacé par le
fabricant de son agent de service ou une personne de qualification
similaire afin d'éviter tout danger.
12. Gardez vos doigts éloignés des pièces mobiles et des outils installés.
Ne mettez jamais vos doigts, etc., dans le mécanisme de charnière.
13. Utilisez uniquement des pièces de rechange d'origine.
14. Afin d'assurer la sécurité de vos enfants, veuillez conserver tous les
emballages (sacs plastiques, cartons, polystyrène etc.) hors de leur
portée.
15. N'interférez avec aucun interrupteur de sécurité.
16. Placez la machine sur une surface de travail lisse, plate et stable.
17. Attendez que les pièces mobiles s'arrêtent de fonctionner avant de
retirer le couvercle de la machine.
18. Ne dépassez pas le contenu maximum indiqué sur les accessoires.
BEFORE CONNECTING TO POWER
Avant de brancher l'appareil au secteur, vérifiez à nouveau le type
d'alimentation et la tension du secteur avec les informations
indiquées sur l'étiquette signalétique de l'appareil.
Lors de la première utilisation, retirez tous les papiers d'emballage et
les sacs en plastique. Nettoyez les raccords.
CONSERVEZ CES INSTRUCTIONS, USAGE DOMESTIQUE
UNIQUEMENT

- 4 -
FCC Information
ATTENTION : Les changements ou modifications non expressément
approuvés par la partie responsable de la conformité pourraient annuler le
droit de l'utilisateur à utiliser l'équipement !
Cet appareil est conforme à la partie 15 des règles FCC. L’exploitation est
soumise aux deux conditions suivantes :
1) Ce produit peut provoquer des interférences nuisibles.
2) Ce produit doit accepter toute interférence reçue, y compris les
interférences susceptibles de provoquer un fonctionnement indésirable.
AVERTISSEMENT : les changements ou modifications apportés à ce
produit non expressément approuvés par la partie responsable de la
conformité pourraient annuler l'autorité de l'utilisateur à utiliser le produit.
Remarque : Ce produit a été testé et déclaré conforme aux limites d'un
appareil numérique de classe B conformément à la partie 15 des règles de
la FCC. Ces limites sont conçues pour fournir une protection raisonnable
contre les interférences nuisibles dans une installation résidentielle.
Ce produit génère, utilise et peut émettre de l'énergie radiofréquence et,
s'il n'est pas installé et utilisé conformément aux instructions, il peut
provoquer des interférences nuisibles aux communications radio.
Cependant, rien ne garantit que des interférences ne se produiront pas
dans une installation particulière. Si ce produit provoque des interférences
nuisibles à la réception radio ou télé, ce qui peut être déterminé en
éteignant et rallumant le produit, l'utilisateur est encouragé à essayer de
corriger les interférences en prenant une ou plusieurs des mesures
suivantes.
· Réorientez ou déplacez l'antenne de réception.
· Augmentez la distance entre le produit et le récepteur.
· Connectez le produit à une prise sur un circuit différent de celui auquel le
récepteur est connecté.
· Consultez le revendeur ou un technicien radio/TV expérimenté pour
obtenir de l'aide.
- 5 -
PARTS LIST
Nom
QTÉ
Diagramme
Rembourrage tube 1 2
millimètres
1
Tube de farce 15mm
1
Tube de farce 21mm
1
Tube de farce 30mm
1
Tube de farce 37mm
1
Brosse de nettoyage
1

- 6 -
Tige de piston
1
ASSEMBLY ANDINSTALLATION
1. Choisissez un établi d'une hauteur appropriée et assurez-vous de
disposer de suffisamment d'espace pour fonctionner.
2. Assemblez le tube de farce. Quatre tailles de tubes de remplissage ont
été fournies avec l'unité (les diamètres sont de 15 mm, 21 mm, 30 mm et
37 mm). Choisissez un tube approprié et insérez-le soigneusement dans le
collier fixe, serrez-le lentement sur le canon, appuyez sur le tube
d'emballage et assurez-vous qu'il est collé et verrouillé.
OPERATION
1. Placez la pédale dans une position sèche.2.Allumez l'alimentation, puis
réglez l'interrupteur marche-arrêt (rouge) sur ON.3. Tournez l'interrupteur
REVERSE (noir) sur UP et laissez le piston se déplacer vers le haut4.
Inclinez le cylindre et placez la viande dans le cylindre.
5.Remettez le cylindre sur le cadre.
6. Tournez l'interrupteur REVERSE (noir) sur DOWN et poussez le côté
inférieur du repose-pieds. Le piston commencera à descendre.7. Si le
piston descend trop vite ou trop lentement, utilisez le contrôleur de vitesse
(bouton) sur le côté du boîtier électrique pour régler la vitesse appropriée.
8. Lors du remplissage du boîtier, retirez le pied du coussinet et le piston
s'arrêtera9. Lorsque le piston descend vers le bas du cylindre, l'appareil
s'arrête automatiquement. Tournez ensuite l'interrupteur REVERSE (noir)
sur UP pour soulever le piston vers le haut.10. Répétez le processus à
partir de 4 si nécessaire.

- 7 -
EXPLOSIVE VIEW

- 8 -
PARTS LIST

- 9 -
- 10 -
SCHEMATIC CIRCUIT DIAGRAM
REPAIR AND MAINTENANCE

- 11 -
1. Veuillez débrancher l'alimentation avant le nettoyage.
2. Retirez et nettoyez toutes les pièces qui entrent en contact avec la
saucisse.
3. Essuyez les pièces non amovibles avec un chiffon pour éliminer les
bactéries.
4. Lubrifiez les pièces mobiles et les engrenages pour prolonger la durée
de vie du produit.
5. N'utilisez pas de détergents corrosifs ou abrasifs pour le nettoyage.
6. Rangez la machine dans un endroit sec, propre et sécurisé.
Fabricant : Shanghaimuxinmuyeyouxiangongsi
Adresse : Shuangchenglu 803nong11hao1602A-1609shi, baoshanqu,
Shanghai 200000 CN.
Importé en Australie : SIHAO PTY LTD. 1 ROKEVA STREETASTWOOD
NSW 2122 Australie
Importé aux États-Unis : Sanven Technology Ltd. Suite 250, 9166
Anaheim Place, Rancho Cucamonga, CA 91730

- 12 -


Technisch Ondersteuning en e-garantiecertificaat www.vevor.com/support
WORSTVUL
MODEL: XZO-12D,XZO-25D
We continue to be committed to provide you tools with competitive price.
"Save Half", "Half Price" or any other similar expressions used by us only represents an
estimate of savings you might benefit from buying certain tools with us compared to the major
top brands and doses not necessarily mean to cover all categories of tools offered by us. You
are kindly reminded to verify carefully when you are placing an order with us if you are
actually saving half in comparison with the top major brands.
- 1 -
MODEL: XZO-12D,XZO-25D
Have product questions? Need technical support? Please feel free to
contact us:
Technical Support and E-Warranty Certificate
www.vevor.com/support
NEED HELP? CONTACT US!
This is the original instruction, please read all manual instructions
carefully before operating. VEVOR reserves a clear interpretation of our
user manual. The appearance of the product shall be subject to the
product you received. Please forgive us that we won't inform you again if
there are any technology or software updates on our product.
SAUSAGE STUFFER

- 2 -
Waarschuwing-Om het risico op letsel te verminderen, moet
de gebruiker de handleiding zorgvuldig lezen.
CORRECTE VERWIJDERING
Dit product valt onder de bepalingen van de Europese richtlijn
2012/19/EG. Het symbool met een doorgestreepte afvalcontainer
geeft aan dat het product in de Europese Unie een aparte
afvalinzameling vereist. Dit geldt voor het product en alle
accessoires die met dit symbool zijn gemarkeerd. Producten die als
zodanig gemarkeerd zijn, mogen niet bij het normale huisvuil worden
weggegooid, maar moeten naar een inzamelpunt voor recycling van
elektrische en elektronische apparaten worden gebracht
Important SAFETY INSTRUCTIONS
Bij het gebruik van elektrische apparaten moeten elementaire
veiligheidsmaatregelen in acht worden genomen
altijd als volgt volgen:
1. Lees alle instructies voordat u dit apparaat gebruikt.
2. Gebruik dit apparaat niet met een beschadigd snoer, stekker of
beschadigde stekker
storingen.
3. Ter bescherming tegen elektrische schokken mag u de voetschakelaar
niet onderdompelen.
snoer, stekker of stop in water of andere vloeistoffen.
4. Dit apparaat is niet bedoeld voor gebruik door kinderen.
5. Houd vingers en handen uit de buurt van alle bewegende delen.
6. Haal de stekker van dit apparaat uit het stopcontact als u het niet
gebruikt of voordat u het schoonmaakt.
7. Dit apparaat is uitsluitend bedoeld voor huishoudelijk gebruik.

- 3 -
8. Dompel de machine nooit in vloeistoffen en scherpe randen. Gebruik het
apparaat niet met natte handen. Als het apparaat vochtig of nat is, haal
dan onmiddellijk de stekker uit het stopcontact.
9. Dit apparaat kan worden gebruikt door kinderen van 8 jaar en ouder en
door personen met verminderde lichamelijke, zintuiglijke of geestelijke
vermogens of een gebrek aan ervaring en kennis, als zij onder toezicht
staan of instructies hebben gekregen over het veilige gebruik van het
apparaat en de de gevaren die daarmee gepaard gaan. Kinderen mogen
niet met het apparaat spelen. Reiniging en gebruikersonderhoud mogen
niet door kinderen zonder toezicht worden uitgevoerd.
10. Koppel de machine altijd los van de voeding als deze onbeheerd wordt
achtergelaten en vóór montage, demontage of reiniging.
11. Als het netsnoer beschadigd is, moet het worden vervangen door de
fabrikant van zijn serviceagent of een vergelijkbaar gekwalificeerd persoon
om gevaar te voorkomen.
12. Houd uw vingers uit de buurt van bewegende delen en gemonteerd
gereedschap. Steek uw vingers enz. nooit in het scharniermechanisme.
13. Gebruik uitsluitend originele reserveonderdelen.
14. Om de veiligheid van uw kinderen te garanderen, dient u alle
verpakkingen (plastic zakken, dozen, polystyreen enz.) buiten hun bereik
te houden.
15. Bemoei je niet met veiligheidsschakelaars.
16. Plaats de machine op een glad, vlak en stabiel werkoppervlak.
17. Wacht tot de bewegende delen niet meer draaien voordat u het deksel
van de machine verwijdert.
18. Overschrijd niet de maximale inhoud aangegeven op de accessoires.
BEFORE CONNECTING TO POWER
Voordat u het apparaat op het elektriciteitsnet aansluit, controleert u
nogmaals of het type voeding en de netspanning overeenkomen met
de gegevens op het typeplaatje op het apparaat.
Als u het apparaat voor de eerste keer gebruikt, verwijder dan al het
inpakpapier en de plastic zakken. Maak de fittingen schoon.

- 4 -
BEWAAR DEZE INSTRUCTIES, ALLEEN VOOR
HUISHOUDELIJK GEBRUIK
FCC Information
LET OP: Wijzigingen of aanpassingen die niet uitdrukkelijk zijn
goedgekeurd door de partij die verantwoordelijk is voor naleving kunnen de
bevoegdheid van de gebruiker om de apparatuur te bedienen ongeldig
maken!
Dit apparaat voldoet aan Deel 15 van de FCC-regels. De werking is
onderworpen aan de volgende twee voorwaarden:
1) Dit product kan schadelijke interferentie veroorzaken.
2)Dit product moet alle ontvangen interferentie accepteren, inclusief
interferentie die een ongewenste werking kan veroorzaken.
WAARSCHUWING: Wijzigingen of aanpassingen aan dit product die niet
uitdrukkelijk zijn goedgekeurd door de partij die verantwoordelijk is voor
naleving kunnen de bevoegdheid van de gebruiker om het product te
bedienen ongeldig maken.
Opmerking: Dit product is getest en voldoet aan de limieten voor een
digitaal apparaat van Klasse B overeenkomstig Deel 15 van de FCC-regels.
Deze limieten zijn bedoeld om redelijke bescherming te bieden tegen
schadelijke interferentie in een residentiële installatie.
Dit product genereert, gebruikt en kan radiofrequentie-energie uitstralen,
en als het niet wordt geïnstalleerd en gebruikt in overeenstemming met de
instructies, kan het schadelijke interferentie aan radiocommunicatie
veroorzaken. Er is echter geen garantie dat er geen interferentie zal
optreden in een bepaalde installatie. Als dit product schadelijke
interferentie veroorzaakt aan radio- of televisieontvangst, wat kan worden
vastgesteld door het product uit en weer in te schakelen, wordt de
gebruiker aangeraden te proberen de interferentie te corrigeren door een
of meer van de volgende maatregelen.
· Heroriënteer of verplaats de ontvangstantenne.
· Vergroot de afstand tussen het product en de ontvanger.
- 5 -
· Sluit het product aan op een stopcontact op een ander circuit dan dat
waarop de ontvanger is aangesloten.
· Raadpleeg de dealer of een ervaren radio-/tv-technicus voor hulp.
PARTS LIST
Naam
AANTAL
Diagram
Vulling buis 1 2 mm
1
Vulling buis 15 mm
1
Vulling buis 21 mm
1
Vulling buis 30 mm
1
Vulling buis 37 mm
1

- 6 -
Borstel
1
Zuigerstang
1
ASSEMBLY ANDINSTALLATION
1. Kies een werkbank met een geschikte hoogte en zorg ervoor dat u
voldoende werkruimte heeft.
2. Monteer de opvulbuis. Er zijn vier maten vulbuizen bij de unit geleverd
(diameters zijn 15 mm, 21 mm, 30 mm en 37 mm). Kies een geschikte buis
en steek deze voorzichtig in de vaste kraag, draai hem langzaam vast op
de loop, druk de pakkingbuis naar beneden en zorg ervoor dat deze vastzit
en vergrendeld is.
OPERATION
1. Plaats het pedaal in een droge positie.2. Schakel de voeding in en zet
vervolgens de aan-uitschakelaar (rood) op AAN.3. Draai de
REVERSE-schakelaar (zwart) naar UP en laat de zuiger naar boven
bewegen4. Kantel de cilinder en plaats het vlees in de cilinder.
5.Plaats de cilinder terug op het frame.
6. Draai de REVERSE-schakelaar (zwart) naar OMLAAG en druk op de
onderkant van de voetzool. De zuiger begint te dalen.7. Als de zuiger te
snel of te langzaam zakt, gebruik dan de snelheidsregelaar (knop) aan de
zijkant van de elektriciteitskast om de juiste snelheid in te stellen.
8. Haal bij het vullen van de behuizing de voet van het kussen en de zuiger
stopt9. Wanneer de zuiger naar de bodem van de cilinder beweegt, stopt
het apparaat automatisch. Draai vervolgens de REVERSE-schakelaar
(zwart) naar UP om de zuiger naar boven te tillen.10. Herhaal indien nodig
het proces vanaf 4.
- 7 -
EXPLOSIVE VIEW

- 8 -
PARTS LIST

- 9 -

- 10 -
SCHEMATIC CIRCUIT DIAGRAM
REPAIR AND MAINTENANCE

- 11 -
1. Haal vóór het reinigen de stekker uit het stopcontact.
2.Verwijder en reinig alle onderdelen die in contact komen met de worst.
3. Veeg niet-verwijderbare onderdelen af met een doek om bacteriën te
verwijderen.
4. Smeer bewegende delen en tandwielen om de levensduur van het
product te verlengen.
5. Gebruik bij het reinigen geen bijtende of schurende
schoonmaakmiddelen.
6. Bewaar de machine op een droge, schone en veilige plaats.
Fabrikant: Shanghaimuxinmuyeyouxiangongsi
Adres: Shuangchenglu 803nong11hao1602A-1609shi, baoshanqu,
shanghai 200000 CN.
Geïmporteerd naar AUS: SIHAO PTY LTD. 1 ROKEVA
STREETEASTWOOD NSW 2122 Australië
Geïmporteerd naar de VS: Sanven Technology Ltd. Suite 250, 9166
Anaheim Place, Rancho Cucamonga, CA 91730

- 12 -


Teknisk Support och e-garanticertifikat www.vevor.com/support
KORVSTÄLLARE
MODELL: XZO-12D, XZO-25D
We continue to be committed to provide you tools with competitive price.
"Save Half", "Half Price" or any other similar expressions used by us only represents an
estimate of savings you might benefit from buying certain tools with us compared to the major
top brands and doses not necessarily mean to cover all categories of tools offered by us. You
are kindly reminded to verify carefully when you are placing an order with us if you are
actually saving half in comparison with the top major brands.

- 1 -
MODELL: XZO-12D, XZO-25D
Have product questions? Need technical support? Please feel free to
contact us:
Technical Support and E-Warranty Certificate
www.vevor.com/support
NEED HELP? CONTACT US!
This is the original instruction, please read all manual instructions
carefully before operating. VEVOR reserves a clear interpretation of our
user manual. The appearance of the product shall be subject to the
product you received. Please forgive us that we won't inform you again if
there are any technology or software updates on our product.
SAUSAGE STUFFER
- 2 -
Varning - För att minska risken för skada måste användaren
läsa instruktionerna noggrant.
KORREKT AVFALLSHANTERING
Denna produkt omfattas av bestämmelserna i det europeiska
direktivet 2012/19/EC. Symbolen som visar en soptunna korsad
anger att produkten kräver separat sophämtning i EU. Detta gäller för
produkten och alla tillbehör märkta med denna symbol. Produkter
märkta som sådana får inte slängas tillsammans med vanligt
hushållsavfall, utan måste lämnas till en insamlingsplats för
återvinning av elektriska och elektroniska apparater
Important SAFETY INSTRUCTIONS
Vid användning av elektriska apparater bör grundläggande
säkerhetsåtgärder
alltid följas enligt nedan:
1. Läs alla instruktioner innan du använder denna apparat.
2. Använd inte denna apparat med en skadad sladd, kontakt eller
felfunktioner.
3. För att skydda mot elektriska stötar, doppa inte ned fotkontakten,
sladd, stickpropp eller fyllning i vatten eller andra vätskor.
4. Denna apparat är inte avsedd att användas av barn.
5. Håll fingrar och händer borta från alla rörliga delar.
6. Koppla ur apparaten när den inte används eller före rengöring.
7. Denna apparat är endast avsedd för hushållsbruk.
8. Doppa aldrig maskinen i vätska och vassa kanter. Använd inte
apparaten med våta händer. Om apparaten är fuktig eller våt, dra
omedelbart ur kontakten.
9. Denna apparat kan användas av barn från 8 år och uppåt och personer
med nedsatta fysiska, sensoriska eller mentala förmågor eller bristande
erfarenhet och kunskap om de har fått övervakning eller instruktioner

- 3 -
angående användning av apparaten på ett säkert sätt och förstår de
inblandade farorna. Barn får inte leka med apparaten. Rengöring och
användarunderhåll får inte utföras av barn utan tillsyn.
10. Koppla alltid bort maskinen från strömförsörjningen om den lämnas
utan uppsikt och innan montering, demontering eller rengöring.
11. Om nätsladden är skadad måste den bytas ut av tillverkaren av dess
servicerepresentant eller en liknande kvalificerad person för att undvika
fara.
12. Håll fingret borta från rörliga delar och monterade verktyg. Sätt aldrig in
fingrarna etc i gångjärnsmekanismen.
13. Använd endast originalreservdelar.
14. För att säkerställa dina barns säkerhet, vänligen förvara all förpackning
(plastpåsar, lådor, polystyren etc.) utom räckhåll.
15. Stör inte några säkerhetsbrytare.
16. Placera maskinen på en slät, plan och stabil arbetsyta.
17. Vänta tills rörliga delar slutar fungera innan du tar bort maskinens lock.
18. Överskrid inte det maximala innehållet som anges på tillbehören.
BEFORE CONNECTING TO POWER
Innan du ansluter till strömmen, kontrollera igen att typen av
strömförsörjning och nätspänningen stämmer överens med
uppgifterna på märketiketten på apparaten.
Använd för första gången, riv av allt omslagspapper och plastpåsar.
Rengör beslagen.
SPARA DESSA INSTRUKTIONER, ENDAST ANVÄNDNING I
HUSHÅLL
FCC Information
FÖRSIKTIGT : Ändringar eller modifieringar som inte uttryckligen
godkänts av den part som ansvarar för efterlevnaden kan upphäva
användarens rätt att använda utrustningen!
Denna enhet uppfyller del 15 av FCC-reglerna. Driften är föremål för
följande två villkor:

- 4 -
1) Denna produkt kan orsaka skadliga störningar.
2) Denna produkt måste acceptera alla mottagna störningar, inklusive
störningar som kan orsaka oönskad funktion.
VARNING: Ändringar eller modifieringar av denna produkt som inte
uttryckligen godkänts av den part som är ansvarig för efterlevnaden kan
upphäva användarens behörighet att använda produkten.
Obs: Denna produkt har testats och befunnits överensstämma med
gränserna för en digital enhet av klass B i enlighet med del 15 av
FCC-reglerna. Dessa gränser är utformade för att ge rimligt skydd mot
skadliga störningar i en bostadsinstallation.
Denna produkt genererar, använder och kan utstråla radiofrekvensenergi,
och om den inte installeras och används i enlighet med instruktionerna kan
den orsaka skadliga störningar på radiokommunikation. Det finns dock
ingen garanti för att störningar inte kommer att inträffa i en viss installation.
Om denna produkt orsakar skadliga störningar på radio- eller
tv-mottagning, vilket kan fastställas genom att stänga av och på produkten,
uppmanas användaren att försöka korrigera störningen med en eller flera
av följande åtgärder.
· Rikta om eller flytta mottagningsantennen.
· Öka avståndet mellan produkten och mottagaren.
· Anslut produkten till ett uttag på en annan krets än den som mottagaren
är ansluten till.
· Kontakta återförsäljaren eller en erfaren radio/TV-tekniker för hjälp.
- 5 -
PARTS LIST
namn
ANTAL
Diagram
Fyllning rör 1 2 mm
1
Fyllningsrör 15 mm
1
Fyllningsrör 21 mm
1
Fyllningsrör 30 mm
1
Fyllningsrör 37 mm
1
Rengöringsborste
1
Kolvstång
1
ASSEMBLY ANDINSTALLATION
1. Välj en arbetsbänk med lämplig höjd och se till att du har tillräckligt med
utrymme för drift.
2. Sätt ihop fyllningsröret. Fyra storlekar av fyllningsrör har levererats med
enheten (diametrar är 15 mm, 21 mm, 30 mm och 37 mm). Välj ett lämpligt
rör och sätt försiktigt in det i den fasta kragen, dra långsamt åt det på
cylindern, tryck ner packningsröret och se till att det har fastnat och låst.
- 6 -
OPERATION
1. Placera pedalen i ett torrt läge. 2. Slå PÅ strömförsörjningen och ställ
sedan på/av-knappen (röd) till ON.3. Vrid REVERSE-omkopplaren (svart)
till UPP och låt kolven röra sig till toppen4. Luta cylindern och placera köttet
i cylindern.
5.Sätt tillbaka cylindern på ramen.
6. Vrid REVERSE-omkopplaren (svart) till DOWN och tryck på fotplattans
nedre sida. Kolven kommer att börja falla.7. Om kolven faller för snabbt
eller för långsamt, använd hastighetsreglaget (ratten) på sidan av elboxen
för att justera till lämplig hastighet.
8. När du fyller på huset, ta bort foten från dynan och kolven stannar9. När
kolven rör sig ner till botten av cylindern kommer enheten att stanna
automatiskt. Vrid sedan REVERSE-omkopplaren (svart) till UPP för att lyfta
kolven till toppen.10. Upprepa processen från 4 om det behövs.

- 7 -
EXPLOSIVE VIEW

- 8 -
PARTS LIST
- 9 -
SCHEMATIC CIRCUIT DIAGRAM
- 10 -
REPAIR AND MAINTENANCE
1. Koppla ur strömförsörjningen före rengöring.
2.Ta bort och rengör alla delar som kommer i kontakt med korven.
3. Torka av icke-borttagbara delar med en trasa för att ta bort bakterier.
4. Smörj rörliga delar och kugghjul för att förlänga produktens livslängd.
5. Använd inte frätande eller slipande rengöringsmedel för rengöring.
6. Förvara maskinen på en torr, ren och säker plats.
Tillverkare: Shanghaimuxinmuyeyouxiangongsi
Adress: Shuangchenglu 803nong11hao1602A-1609shi, baoshanqu,
shanghai 200000 CN.
Importerad till AUS: SIHAO PTY LTD. 1 ROKEVA STREETEASTWOOD
NSW 2122 Australien
Importerad till USA: Sanven Technology Ltd. Suite 250, 9166 Anaheim
Place, Rancho Cucamonga, CA 91730


Técnico Soporte y certificado de garantía electrónica www.vevor.com/support
EMBUTIDOR DE SALCHICHAS
MODELO: XZO-12D,XZO-25D
We continue to be committed to provide you tools with competitive price.
"Save Half", "Half Price" or any other similar expressions used by us only represents an
estimate of savings you might benefit from buying certain tools with us compared to the major
top brands and doses not necessarily mean to cover all categories of tools offered by us. You
are kindly reminded to verify carefully when you are placing an order with us if you are
actually saving half in comparison with the top major brands.

- 1 -
MODELO: XZO-12D,XZO-25D
Have product questions? Need technical support? Please feel free to
contact us:
Technical Support and E-Warranty Certificate
www.vevor.com/support
NEED HELP? CONTACT US!
This is the original instruction, please read all manual instructions
carefully before operating. VEVOR reserves a clear interpretation of our
user manual. The appearance of the product shall be subject to the
product you received. Please forgive us that we won't inform you again if
there are any technology or software updates on our product.
SAUSAGE STUFFER
- 2 -
Advertencia: para reducir el riesgo de lesiones, el usuario
debe leer atentamente el manual de instrucciones.
ELIMINACIÓN CORRECTA
Este producto está sujeto a las disposiciones de la Directiva Europea
2012/19/CE. El símbolo que muestra un contenedor con ruedas
tachado indica que el producto requiere recogida selectiva de basura
en la Unión Europea. Esto se aplica al producto y a todos los
accesorios marcados con este símbolo. Los productos marcados
como tales no podrán desecharse con la basura doméstica normal,
sino que deberán llevarse a un punto de recogida para el reciclaje de
aparatos eléctricos y electrónicos.
Important SAFETY INSTRUCTIONS
Al utilizar aparatos eléctricos, se deben tomar precauciones básicas de
seguridad.
Siempre se seguirá lo siguiente:
1. Lea todas las instrucciones antes de usar este aparato.
2. No opere este aparato con un cable, enchufe o cable dañado.
mal funcionamiento.
3. Para protegerse contra descargas eléctricas, no sumerja el interruptor
de pie,
cable, enchufe o embutidor en agua u otros líquidos.
4. Este aparato no está diseñado para que lo utilicen niños.
5. Mantenga los dedos y las manos alejados de todas las piezas móviles.
6. Desenchufe este aparato cuando no esté en uso o antes de limpiarlo.
7.Este aparato es sólo para uso doméstico.
8. Nunca sumerja la máquina en líquidos ni bordes afilados. No utilice el
aparato con las manos mojadas. Si el aparato está húmedo o mojado,
desconéctelo inmediatamente.

- 3 -
9. Este aparato puede ser utilizado por niños a partir de 8 años y personas
con capacidades físicas, sensoriales o mentales reducidas o con falta de
experiencia y conocimiento si han recibido supervisión o instrucciones
sobre el uso del aparato de forma segura y comprenden los peligros
involucrados. Los niños no deben jugar con el aparato. La limpieza y el
mantenimiento del usuario no deben ser realizados por niños sin
supervisión.
10. Desconecte siempre la máquina del suministro si se deja desatendida
y antes de montarla, desmontarla o limpiarla.
11. Si el cable de alimentación está dañado, debe ser reemplazado por el
fabricante de su agente de servicio o una persona calificada similar para
evitar riesgos.
12. Mantenga los dedos alejados de las piezas móviles y de las
herramientas instaladas. Nunca coloque los dedos, etc., en el mecanismo
de bisagra.
13. Utilice únicamente repuestos originales.
14. Para garantizar la seguridad de sus hijos, mantenga todos los
embalajes (bolsas de plástico, cajas, poliestireno, etc.) fuera de su
alcance.
15. No interfiera con ningún interruptor de seguridad.
16. Coloque la máquina sobre una superficie de trabajo lisa, plana y
estable.
17. Espere hasta que las piezas móviles dejen de funcionar antes de quitar
la tapa de la máquina.
18. No exceda el contenido máximo indicado en los accesorios.
BEFORE CONNECTING TO POWER
Antes de conectarlo a la corriente, vuelva a verificar que el tipo de
suministro y el voltaje de la red coincidan con los detalles que
figuran en la etiqueta de clasificación del aparato.
Al usarlo por primera vez, retire todo el papel de regalo y las bolsas
de plástico. Limpiar los accesorios.

- 4 -
GUARDE ESTAS INSTRUCCIONES, SÓLO PARA USO
DOMÉSTICO
FCC Information
PRECAUCIÓN : ¡ Los cambios o modificaciones no aprobados
expresamente por la parte responsable del cumplimiento podrían anular la
autoridad del usuario para operar el equipo!
Este dispositivo cumple con la Parte 15 de las normas de la FCC. La
operación está sujeta a las dos condiciones siguientes:
1) Este producto puede causar interferencias perjudiciales.
2) Este producto debe aceptar cualquier interferencia recibida, incluidas
las interferencias que puedan causar un funcionamiento no deseado.
ADVERTENCIA: Los cambios o modificaciones a este producto que no
estén aprobados expresamente por la parte responsable del cumplimiento
podrían anular la autoridad del usuario para operar el producto.
Nota: Este producto ha sido probado y cumple con los límites para un
dispositivo digital Clase B de conformidad con la Parte 15 de las reglas de
la FCC. Estos límites están diseñados para brindar una protección
razonable contra interferencias dañinas en una instalación residencial.
Este producto genera, usa y puede irradiar energía de radiofrecuencia y, si
no se instala y usa de acuerdo con las instrucciones, puede causar
interferencias dañinas en las comunicaciones por radio. Sin embargo, no
hay garantía de que no se produzcan interferencias en una instalación en
particular. Si este producto causa interferencias dañinas en la recepción
de radio o televisión, lo cual se puede determinar apagando y
encendiendo el producto, se recomienda al usuario que intente corregir la
interferencia mediante una o más de las siguientes medidas.
· Reorientar o reubicar la antena receptora.
· Aumentar la distancia entre el producto y el receptor.
· Conecte el producto a una toma de corriente de un circuito diferente al
que está conectado el receptor.
· Consulte al distribuidor o a un técnico experimentado en radio/TV para
obtener ayuda.
- 5 -
PARTS LIST
Nombre
CANTIDAD
Diagrama
Relleno tubo 1 2
milímetros
1
tubo de relleno 15mm
1
tubo de relleno 21mm
1
tubo de relleno 30mm
1
tubo de relleno 37mm
1
Cepillo de limpieza
1

- 6 -
Vástago de émbolo
1
ASSEMBLY ANDINSTALLATION
1. Elija un banco de trabajo con una altura adecuada y asegúrese de tener
suficiente espacio para operar.
2. Ensamble el tubo de relleno. Con la unidad se proporcionan cuatro
tamaños de tubos de relleno (los diámetros son 15 mm, 21 mm, 30 mm y
37 mm). Elija un tubo apropiado e insértelo con cuidado en el collar fijo,
apriételo lentamente sobre el cilindro, presione hacia abajo el tubo de
empaque y asegúrese de que esté pegado y bloqueado.
OPERATION
1. Coloque el pedal en una posición seca.2.Encienda la fuente de
alimentación y luego coloque el interruptor de encendido y apagado (rojo)
en ON.3. Gire el interruptor de REVERSA (negro) hacia ARRIBA y deje
que el pistón se mueva hacia arriba4. Incline el cilindro y coloque la carne
dentro del cilindro.
5.Coloque el cilindro nuevamente en el marco.
6. Gire el interruptor de REVERSA (negro) hacia ABAJO y empuje el lado
inferior de la almohadilla para los pies. El pistón comenzará a bajar.7. Si el
pistón cae demasiado rápido o demasiado lento, use el controlador de
velocidad (perilla) en el costado de la caja eléctrica para ajustarlo a la
velocidad adecuada.
8. Al llenar la carcasa, retire el pie de la almohadilla y el pistón se
detendrá9. Cuando el pistón desciende hasta el fondo del cilindro, el
dispositivo se detendrá automáticamente. Luego gire el interruptor de
REVERSA (negro) hacia ARRIBA para levantar el pistón hasta la parte
superior.10. Repita el proceso desde 4 si es necesario.

- 7 -
EXPLOSIVE VIEW

- 8 -
PARTS LIST

- 9 -

- 10 -
SCHEMATIC CIRCUIT DIAGRAM
REPAIR AND MAINTENANCE
- 11 -
1. Desenchufe la fuente de alimentación antes de limpiar.
2.Retirar y limpiar todas las piezas que entren en contacto con la
salchicha.
3.Limpie las piezas no extraíbles con un paño para eliminar las bacterias.
4. Lubrique las piezas móviles y los engranajes para prolongar la vida útil
del producto.
5. No utilice detergentes corrosivos o abrasivos para la limpieza.
6. Guarde la máquina en un lugar seco, limpio y seguro.
Fabricante: Shanghaimuxinmuyeyouxiangongsi
Dirección: Shuangchenglu 803nong11hao1602A-1609shi, baoshanqu,
shanghai 200000 CN.
Importado a AUS: SIHAO PTY LTD. 1 ROKEVA STREET ASTWOOD
NSW 2122 Australia
Importado a EE. UU.: Sanven Technology Ltd. Suite 250, 9166 Anaheim
Place, Rancho Cucamonga, CA 91730