
Warning & Safety
PLEASE READ AND FOLLOW INSTRUCTIONS BELOW TO PREVENT
INJURY OR DAMAGE TO THE PRODUCT
BakeMax® (a registered trademark of Titan Ventures International Inc or TVI) is
not responsible for any harm or injury caused due to any person’s improper or
negligent use of this equipment. The product shall only be operated by someone
over the age of 18, of sound mind, and not under the influence of any drugs or
alcohol, who has been trained in the correct operation of this machine, and is
wearing authorized, proper safety clothing. This machine is intended for
commercial use only. Any modification or miss use to the machine voids any
warranty and may cause harm to individuals using the machine or around the
machine while in operation.
• When using the machine, please ensure that you have read all the instructions within
this manual.
• Be aware of your surroundings when using this machine, ensure there are no children
or any other persons who are near the machine before operating.
• Do not put hand near moving parts.
• Remove all obstacles, which may interfere with machine functions.
• Keep work area clean and clear of clutter.
• Do not sit or stand on machine.
• Do not wear loose clothing or jewellery when operating machine as it may get caught
in moving parts and cause injury.
• Stop using the machine and have it checked by an authorized service personal if it is
not working properly.
• Disconnect from power source before performing and maintenance or cleaning on the
machine.
• When the machine is not in use, please clean and store properly,
• Do not place any electrical parts or plug / cord in water or liquid.
• If the supply cord is damaged it must be replaced by an authorized service agent to
avoid any electrical hazards.
• Keep power cord away from heat.
• Always ensure to follow local laws when operating your machine.

Cleaning
• This unit has been coated for shipping purposes, please clean before use.
• Do not use any liquid pressurised cleaning equipment on this machine.
• Disconnect power supply before cleaning.
• Only use food grade non-abrasive cleaning agents.
• Follow any additional cleaning / maintenance listed below.
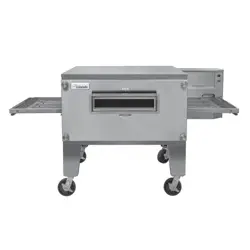
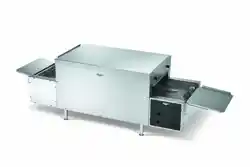
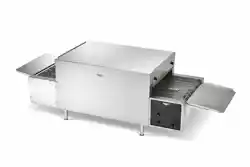
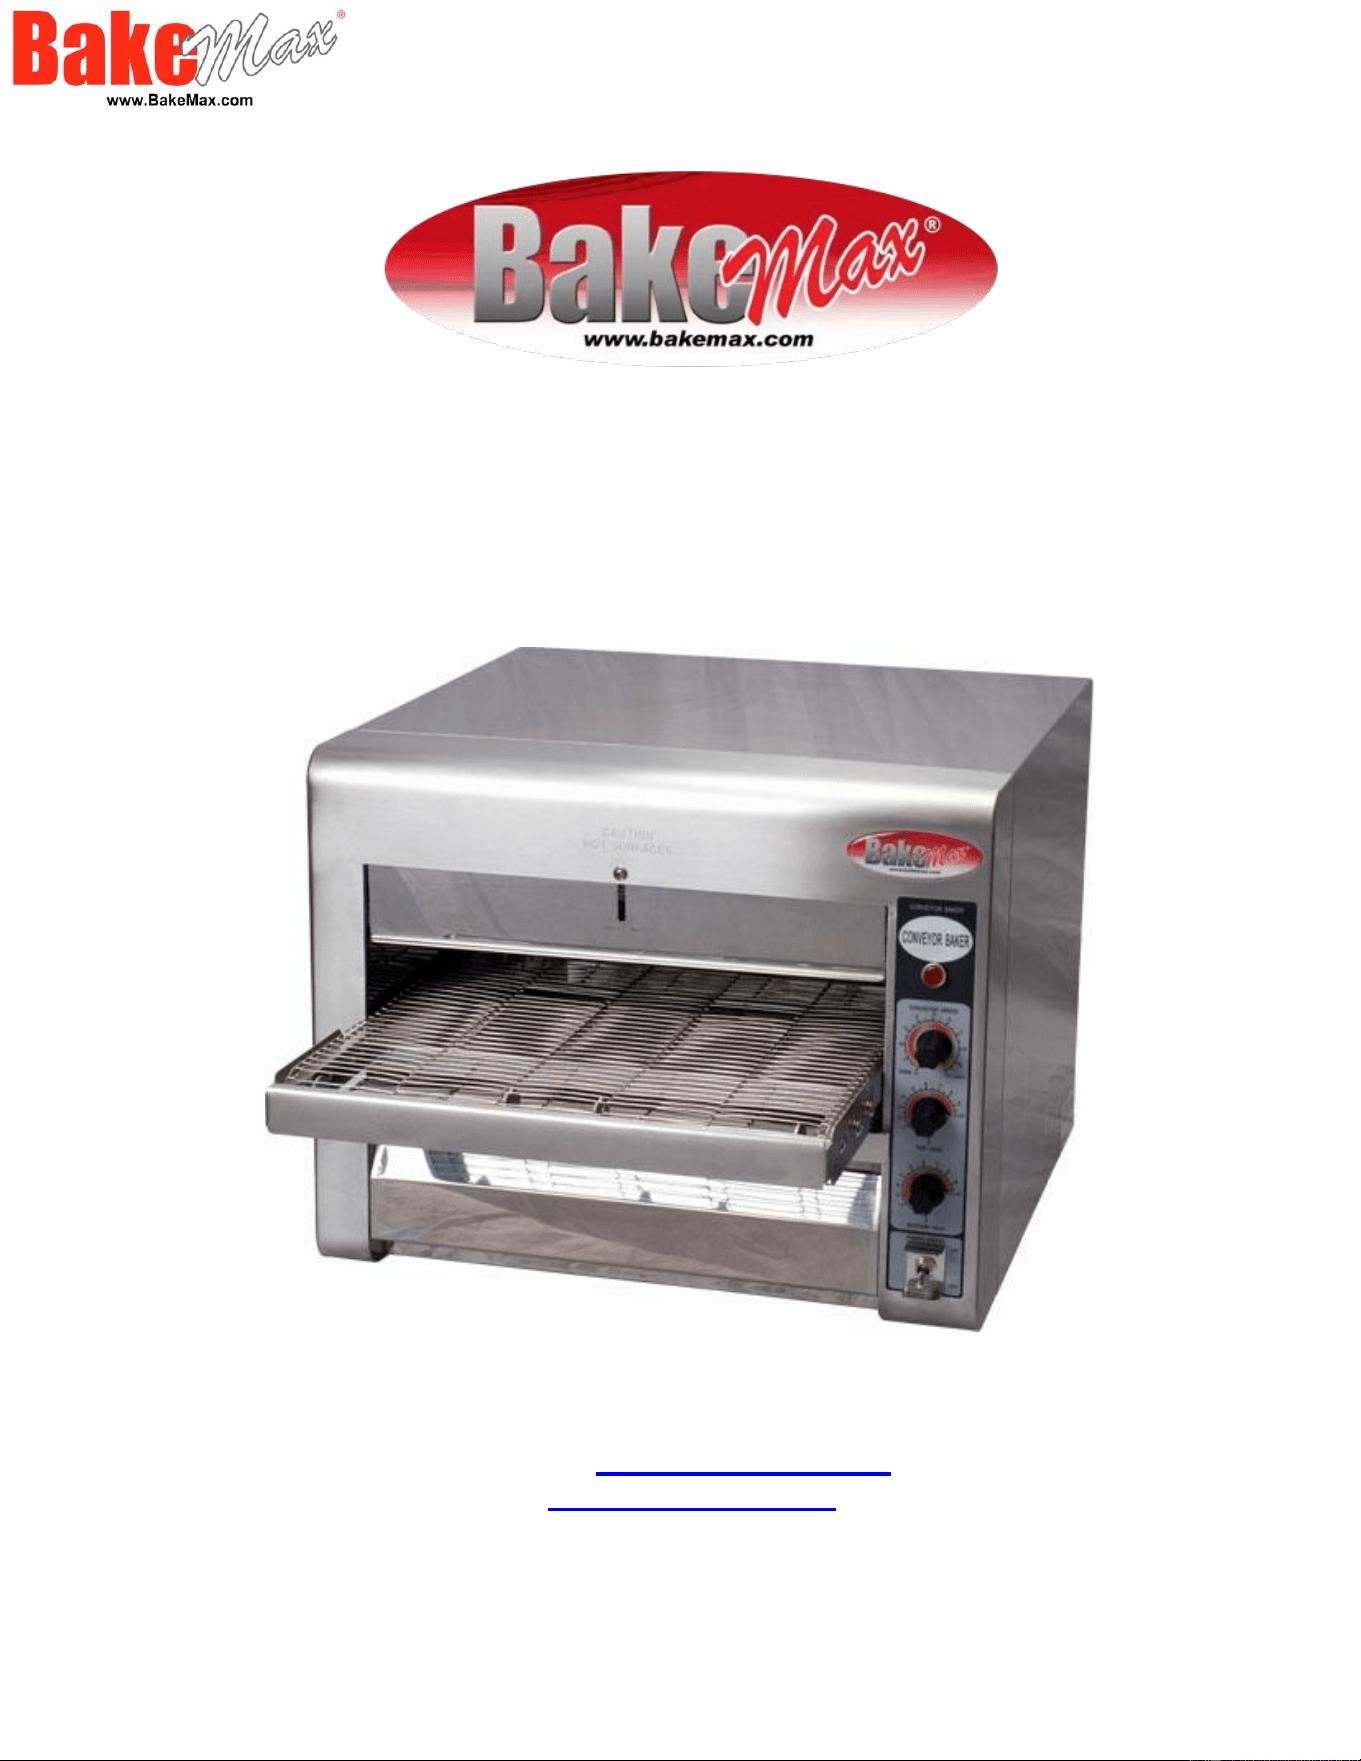
Features
The BakeMax Conveyor Baker is great for baking all types of bread, pizza, bagels, cookies
and more. Designed to provide consistent heat with top and bottom infrared heaters and
variable speed controls. Ideal for restaurants, convenience stores, cafes, and grocery stores.
• Body Constructed in Stainless Steel
• Fast Start-Up due to the powerful 3,600-Watt heating source
• Quartz sheathed heaters (2 above, 2 below conveyor) regulated by separate
controls.
• Adjustable heat 158˚F – 500˚F (70˚C – 260˚C)
• Touch Safe™: with its burn proof design prevents accidental burns during
operation.
• Variable speed stainless steel conveyor belt
• Bakes up to Sixteen 12” or Twelve 14” parbaked pizzas per hour.
• Menu items can be cooked in the same oven to offer superior flexibility.
• Opening clearance: 3.25”
• 1-Year Limited Warranty
Technical Specifications:
• Electrical: 220V / 15 Amps / 3600W / 60Hz / Nema 6-20P*.
• Dimensions (No catch tray: WDH): 18.75” x 30” x 15.5”.
• Dimensions (One catch tray: WDH): 18.75” x 40.5” x 15.5”.
• Dimensions (Both catch tray’s: WDH): 18.75” x 47” x 15.5”.
• Net weight: 60 lbs.
Shipping Specifications:
• Packaging Dimensions (WDH): 38” x 28” x 20”
• Weight: 66 lbs.
* Cutting the cord or changing the plug, voids all warranty.
** Due to continuous product improvement, specifications are subject to change without notice.
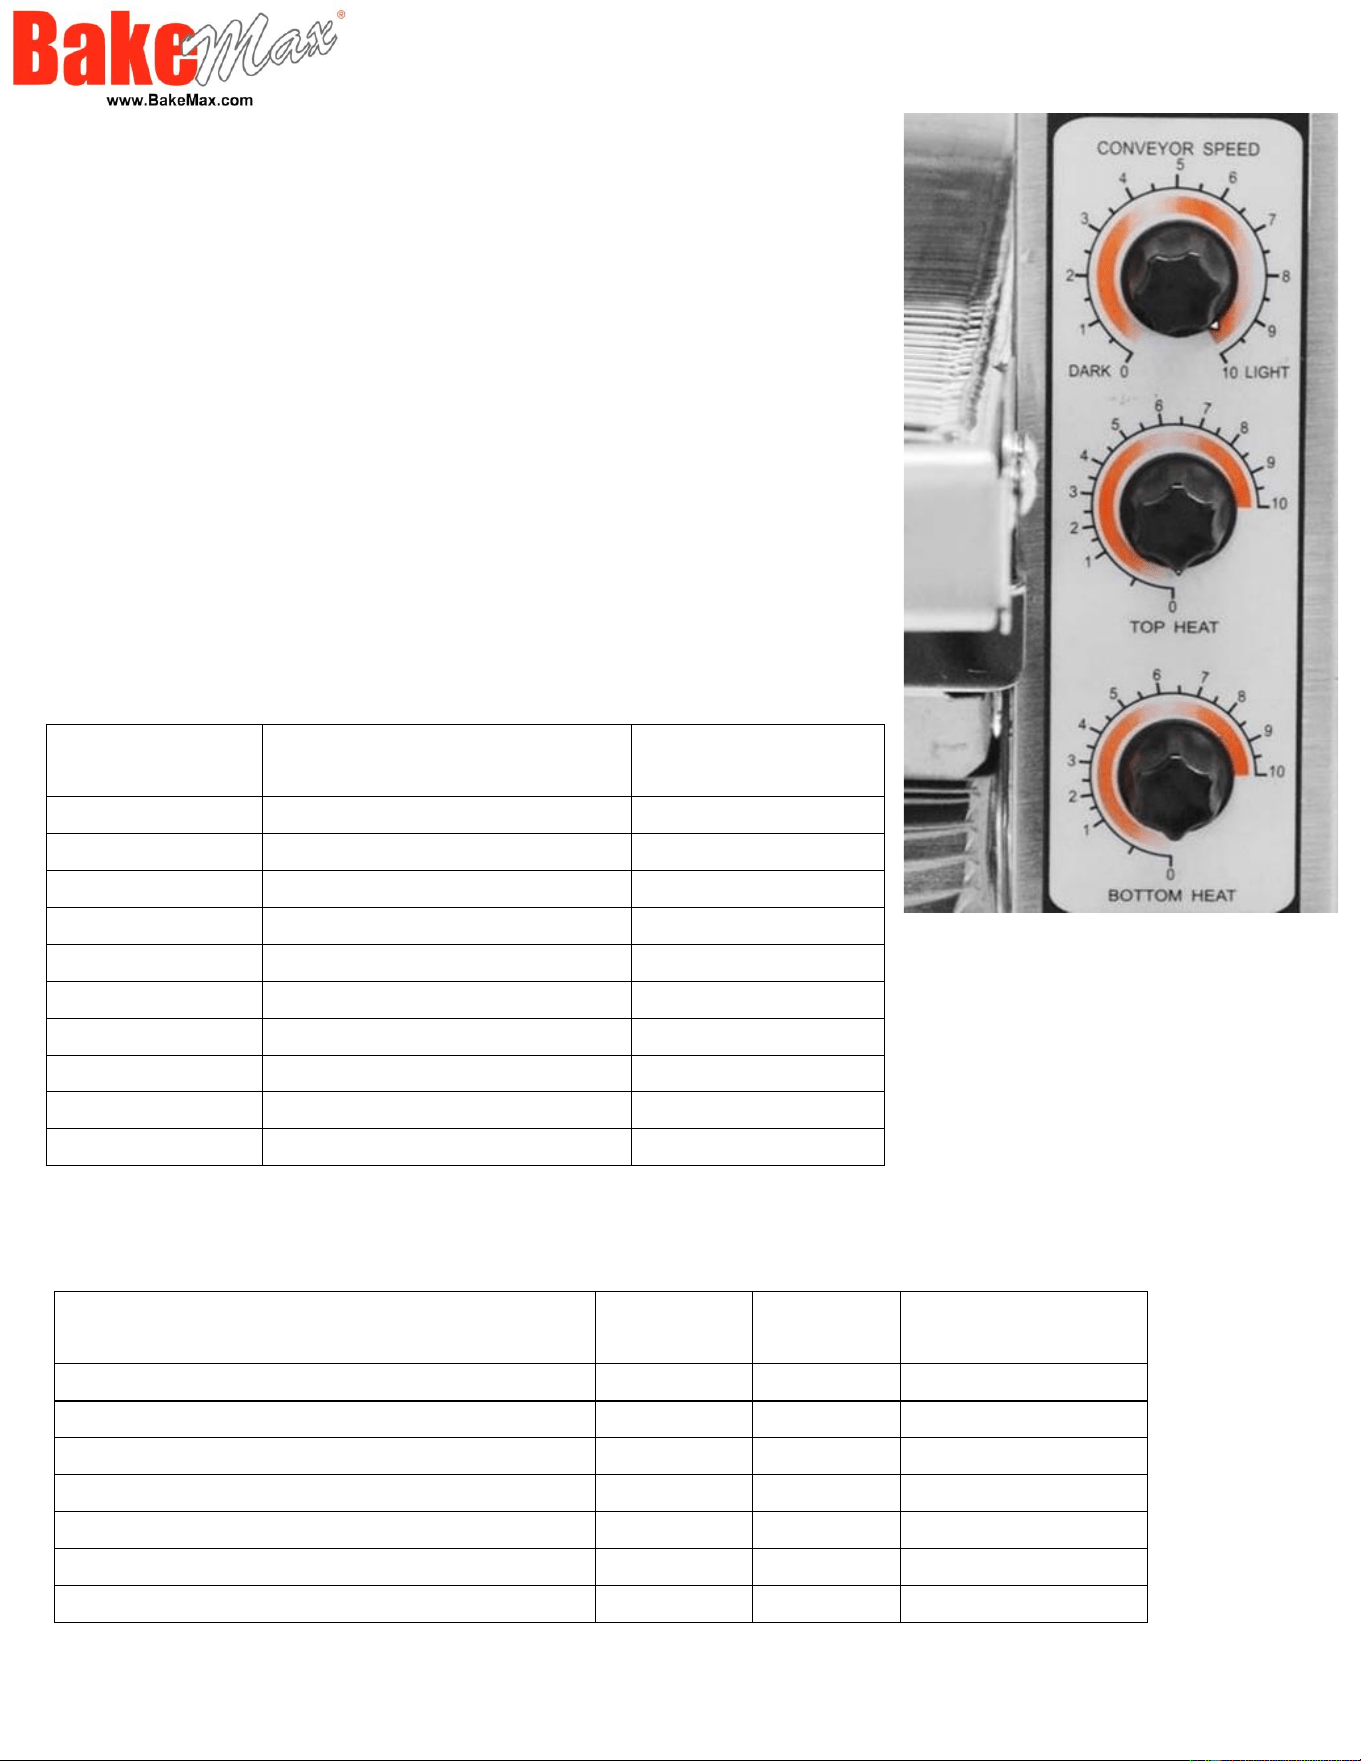
Operating Instructions:
• Turn the power to FULL POWER and turn conveyor
speed control to maximum setting.
• Allow preheat time 8-10 min. for unit to heat up.
• Place a sample product on the conveyor belt to test
the settings.
• If toasting is too light, turn conveyor speed control
counterclockwise to a
slower speed.
• If toasting is too dark, turn conveyor control
clockwise to a faster speed.
Control Panel
Temperature & Time Settings
Dial Setting
Temperature
Time (Minutes'
Seconds")
1
158-194˚F (70-90˚C)
10' 5"
2
194-230˚F (90-110˚C)
8' 50"
3
266-284˚F (130-140˚C)
7' 45"
4
284-311˚F (140-155˚C)
6' 35"
5
311-356˚F (155-180˚C)
5' 45"
6
365-401˚F (185-205˚C)
5' 05"
7
401-428˚F (205-220˚C)
4' 20"
8
464-500˚F (240-260˚C)
3' 30"
9
482-500˚F (250-260˚C)
1' 45"
10
482-500˚F (250-260˚C)
1' 20"
Baking Settings
Product
Top
Heat
Bottom
Heat
Belt Speed
Pizza 12” Parbaked
300F
400F
6 Minutes
Meat & Cheese Sandwich
450F
300F
4 minutes
Meatball
500F
350F
2 Minutes
Bagel (open)
500F
400F
2 Minutes
1 oz Cookies
200F
250F
10 Minutes
Garlic Bread (Lightly Seasoned)
500F
500F
2 Minutes
Fish Sizzle Platter
400F
500F
6 Minutes
**Above settings are guidelines only; product portions and temperatures can cause variations
in product results.

General Maintenance & Cleaning
1. Daily maintenance should be carried out with all power to the unit in the off position, and the
electrical cord unplugged. Cleaning should be carried out by means of food grade cleaning
solutions via a soft or damp cloth. Do not utilize any type of pressurized water equipment.
2. Do not use any acidic agents and make sure that no water enters the device.
3. Clean the water pan regularly. Calcification in the water pan may be removed with common
cleaning agents or liquids. (Ensure pan is removed from unit before cleaning)
4. After the cleaning procedure, you should use a soft and dry cloth to dry and polish the surface.
5. Make sure the device has been cleaned properly before storing it in a dry place.
6. Regular inspection on the outside and internal cabinet along with the power cord should be
observed and carried out on a regular basis to isolate and or observe any unforeseen failure or
safety concern.
Daily Cleaning
1. Turn main power switch to the OFF position, disconnect unit from power source and allow unit
to cool.
2. Using a mild detergent and warm water, wipe exterior surfaces, clean with a damp cloth.
• For lightly soiled build-up, clean with a damp cloth.
• For heavily soiled build-up, use a soft damp cloth and mild detergent. DO NOT USE
CORROSIVE CLEANERS.
• Rinse thoroughly and allow to dry.
• 3. Remove the load and unload tray by lifting it out of position. Clean using mild detergent
and warm water. Rinse thoroughly and allow to dry.
4. Remove each crumb tray by sliding each of them out from under the conveyor belt. Clean
crumb tray by wiping with a damp cloth and mild detergent, then rinse thoroughly and dry. DO
NOT use corrosive cleaners. Place trays in place prior to putting unit back into operating.
5. Reconnect power.
Warning: When placing the tray back into position; be sure that the message “CAUTION HOT
SURFACE” is the right side up.
Weekly Cleaning of the Conveyor Belt
1. Turn power switch to the OFF position. Disconnection unit from power source and allow
the unit to fully cool down before continuing.
2. Perform daily cleaning procedures.
3. Use a damp cloth to wipe the fan guard located on the box cover under the unit. Ensure
the unit is fully dry before you reconnect power or turn power back on.
4. Switch the ON/OFF switch to the ON position and turn conveyor to its fastest setting
(Make sure the heater is off).
5. With the conveyor turned on and the crumb tray in place, take a wire grill brush or dry
abrasive pad, clean the exposed surface of conveyor belt by passing the brush or pad,
back and forth across the surface of the conveyor belt as the belt moves past (See Figure
A below). Continue until the entire belt is clean. Make sure the crumb tray is installed; this
will minimize the number of particles that fall into the oven.
6. When the conveyor belt is clean, take a damp cloth and wipe the conveyor, removing
any loose particles on the belt surface.
7. Remove the crumb tray by sliding it out from beneath the conveyor belt. Clean the
crumb tray by wiping with a damp cloth and mild detergent. • Do not use corrosive
cleaners. • Do not run conveyor oven without crumb trays installed. • Overheating
to electrical components and premature failure can occur. • Do not immerse or let
the unit stand in water. • Do not hose down the unit or the table/counter if the unit is
on the table/counter. • Keep away from running water.
Figure “A”
1.
2.
3.
Figure “B” Master Links
Removal & Installation
Monthly Cleaning & Removal of Belt
1. Turn main power switch to the OFF position. Disconnect unit from its power source and
allow unit to fully cool.
2. Perform daily and weekly cleaning procedures. Follow the step 1 in Figure “B”, to
remove all the master links. To remove, unhook each end of one link and bring the two
ends together, and un-thread. Once detached, re-hook onto itself so not to get damaged.
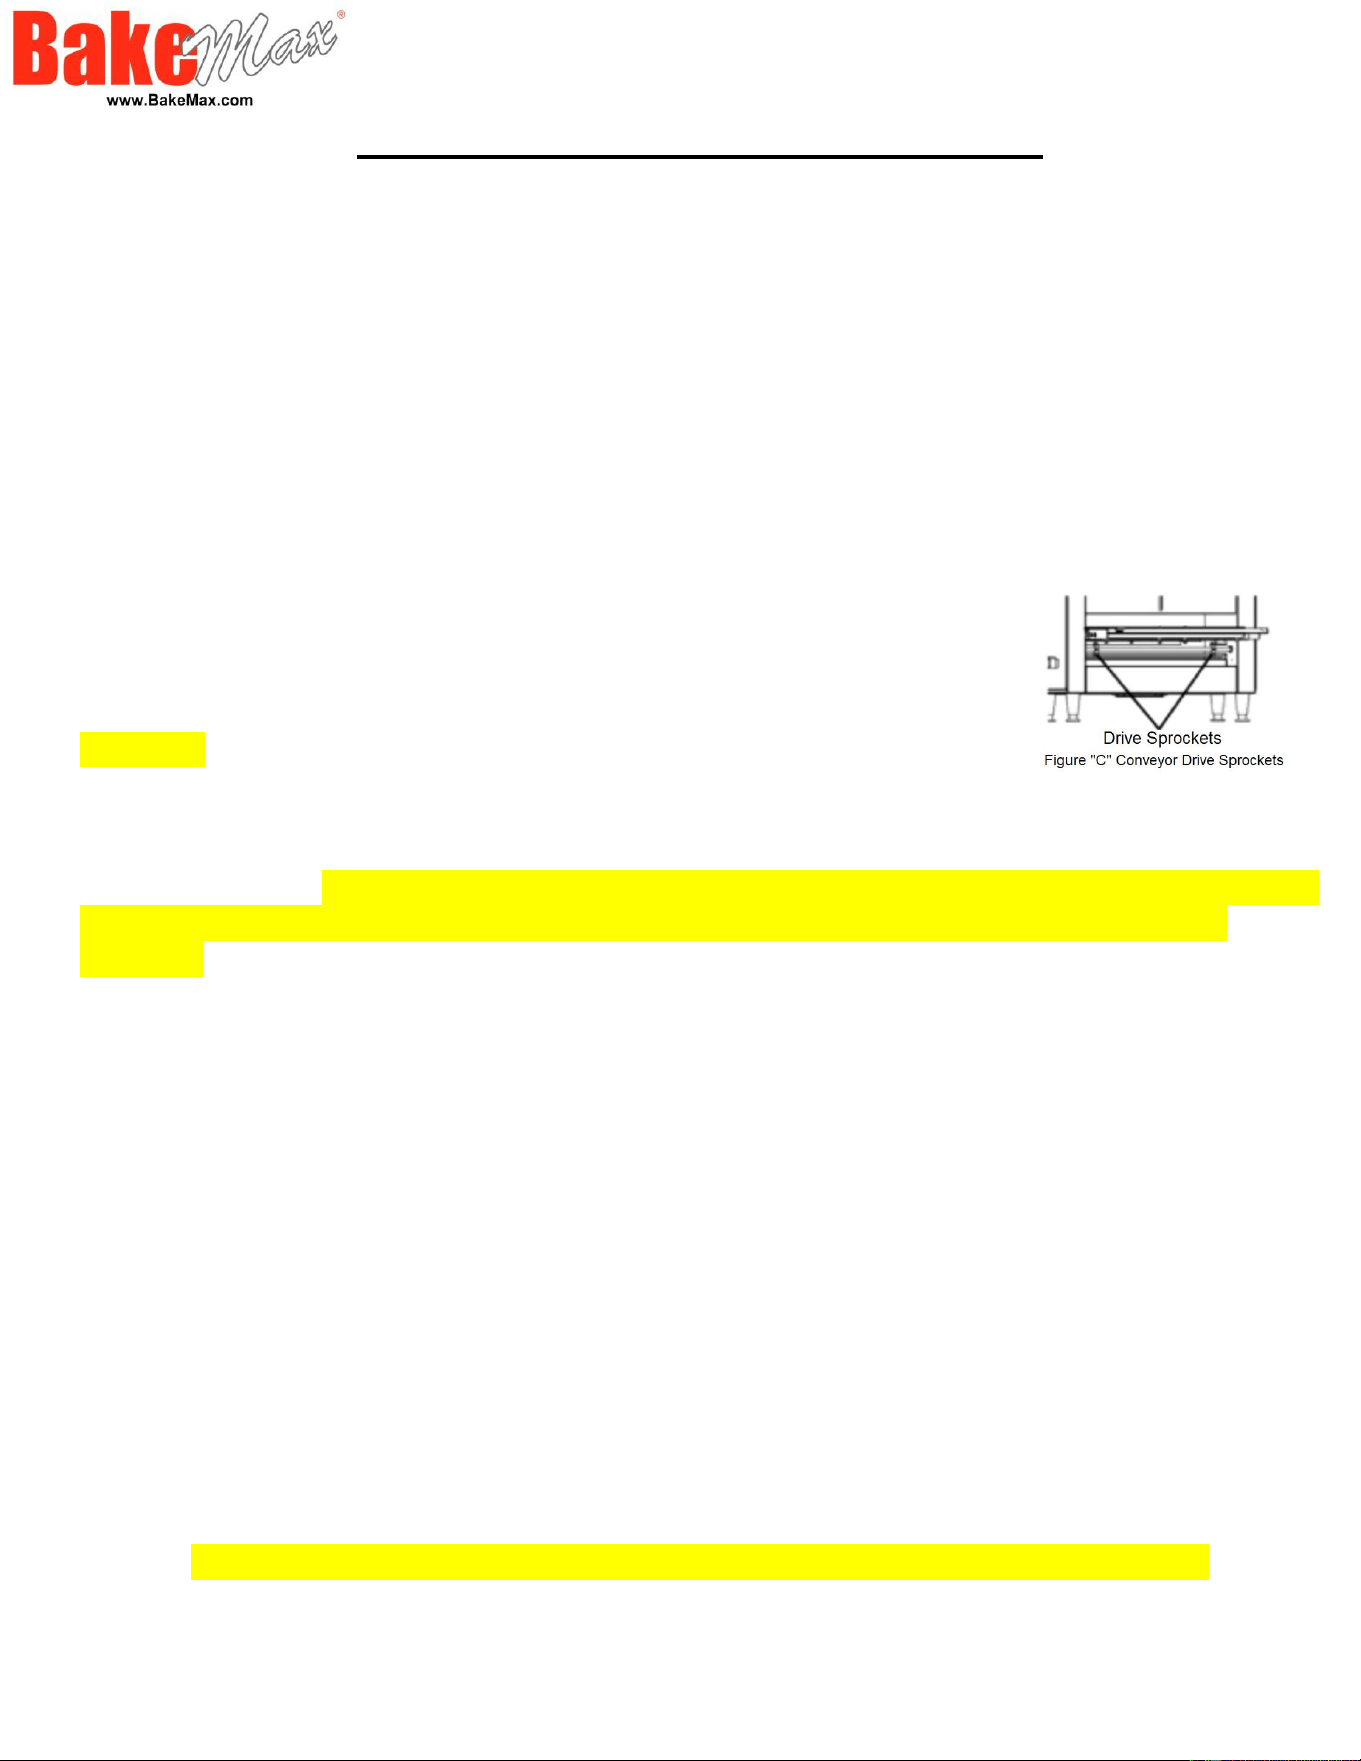
3. Now that the links have been unhooked, the conveyor can now be carefully removed
from the oven. Standing at one end of the oven, starting with the end on the bottom, roll
the conveyor belt until it has been totally removed. Take careful notice being sure not to
damage the heater tubes, and working it over the drive sprockets, (see Figure “C” Below).
4. Clean conveyor belt in deep sink, caustic cleaners may be used.
For a heavy soiled conveyor belt, soak overnight in hot soapy water.
Warning: Do NOT attempt to clean the heater tubes.
5. Take this opportunity to clean and remove any loose materials inside the unit. Using a
mild cleaner and damp cloth, carefully wipe the inside surfaces being sure NOT to clean
the heater tubes. WARNING: DAMAGE CAN OCCUR TO THE HEATER TUBES FROM
IMPROPER CLEANING. DO NOT SPRAY CLEANING SOLUTIONS INTO OVEN
CAVITY.
6. Reinstall conveyor belt by first laying the belt along the bottom of the oven cavity
making sure the hooks on the sides are facing the inside and ends of the hooks will be
pointing away from the direction of the belt so not to catch on any internal components
once put back into operating. Also, being sure to properly align the belt over the conveyor
drive sprockets shown in Figure “C” Above. PLEASE NOTE: The direction of the belt.
7. Next, pull one end of the conveyor belt over the top of the sprockets, (being sure to line
the links up properly with the sprockets) bring the two ends together.
8. Reinstall the previously removed master links as shown in step 2 & 3 in Figure “B”
(Above) Unhook the last link of the conveyor, farthest away from you, and re-thread
through the other end, and reconnect back onto itself.
9. Examine the oven to assure proper installation, once satisfied, install crumb trays if you
have not done so.
***DO NOT OPERATE UNIT WITHOUT CRUMB TRAYS INSTALLED.***
10. Reconnect oven to power supply and check for proper operation.

Replacing the Glass Tube Elements
Step 1. DISCONNECT POWER SOURCE.
Step 2. Remove the top cover panel. By removing the truss head screws. Pull the top
cover panel out slightly.
Step 3. Remove each heater tube wires which are requiring replacement from its terminal
block connection. One
tube at a time.
Step 4. Remove heater tube retainer by removing retainer screws with washer.
Step 5. Gently, pull defective heater tube out of unit.
Step 6. Gently, put new heater tube into unit.
Step 7. Replace heater tube retainers.
Step 8. Reconnect the heater tube wires to the terminal block.
Step 9. Install top cover panel.
Step 10. Connect unit to power source and test unit for proper operation.
Replacing the Fan Motor
Step 1. DISCONNECT POWER SOURCE.
Step 2. After unit has cooled, remove the crumb tray, and turn unit over so this bottom is
facing upward. Never place unit on its side.
Step 3. Unplug power supply cord from fan motor.
Step 4. Remove screws which hold fan motor and grill to the control box cover and
remove fan.
Step 5. Once removed, clean fan grill and control box cover using warm soapy water.
Step 6. Put replacement motor and grill in place and secure to control box cover with
screws previously removed.
Step 7. Reconnect power supply cord to fan motor.
Step 8. Replace back panel and enclosure.
Step 9. Connect unit to power source, reinstall the crumb tray and test unit for proper
operation.
Replacing Belt Drive Motor
Step 1. DISCONNECT POWER SOURCE.
Step 2. After unit has cooled, remove the crumb tray, and turn unit over so the bottom is
facing upward. Never place unit on its side.
Step 3. Remove the control box cover which contains the fan motor.
Step 4. Remove the cover that will expose the drive chain and sprockets.
Step 5. Remove the sprockets from motor shaft, using an Allen wrench and
loosening the setscrew.
Step 6. Remove the wire from terminal block connecting the drive motor
to the internal wiring.
Step 7. Remove screws holding motor in place and remove motor from unit.
Step 8. Put new motor in place and attach loosely with mounting screws.
Step 9. Replace sprocket on motor shaft. PEASE NOTE: The two sprockets must line up
flush with each other, so the chain does not twist any during operating. Also, the hub gets
installed closest to the motor.
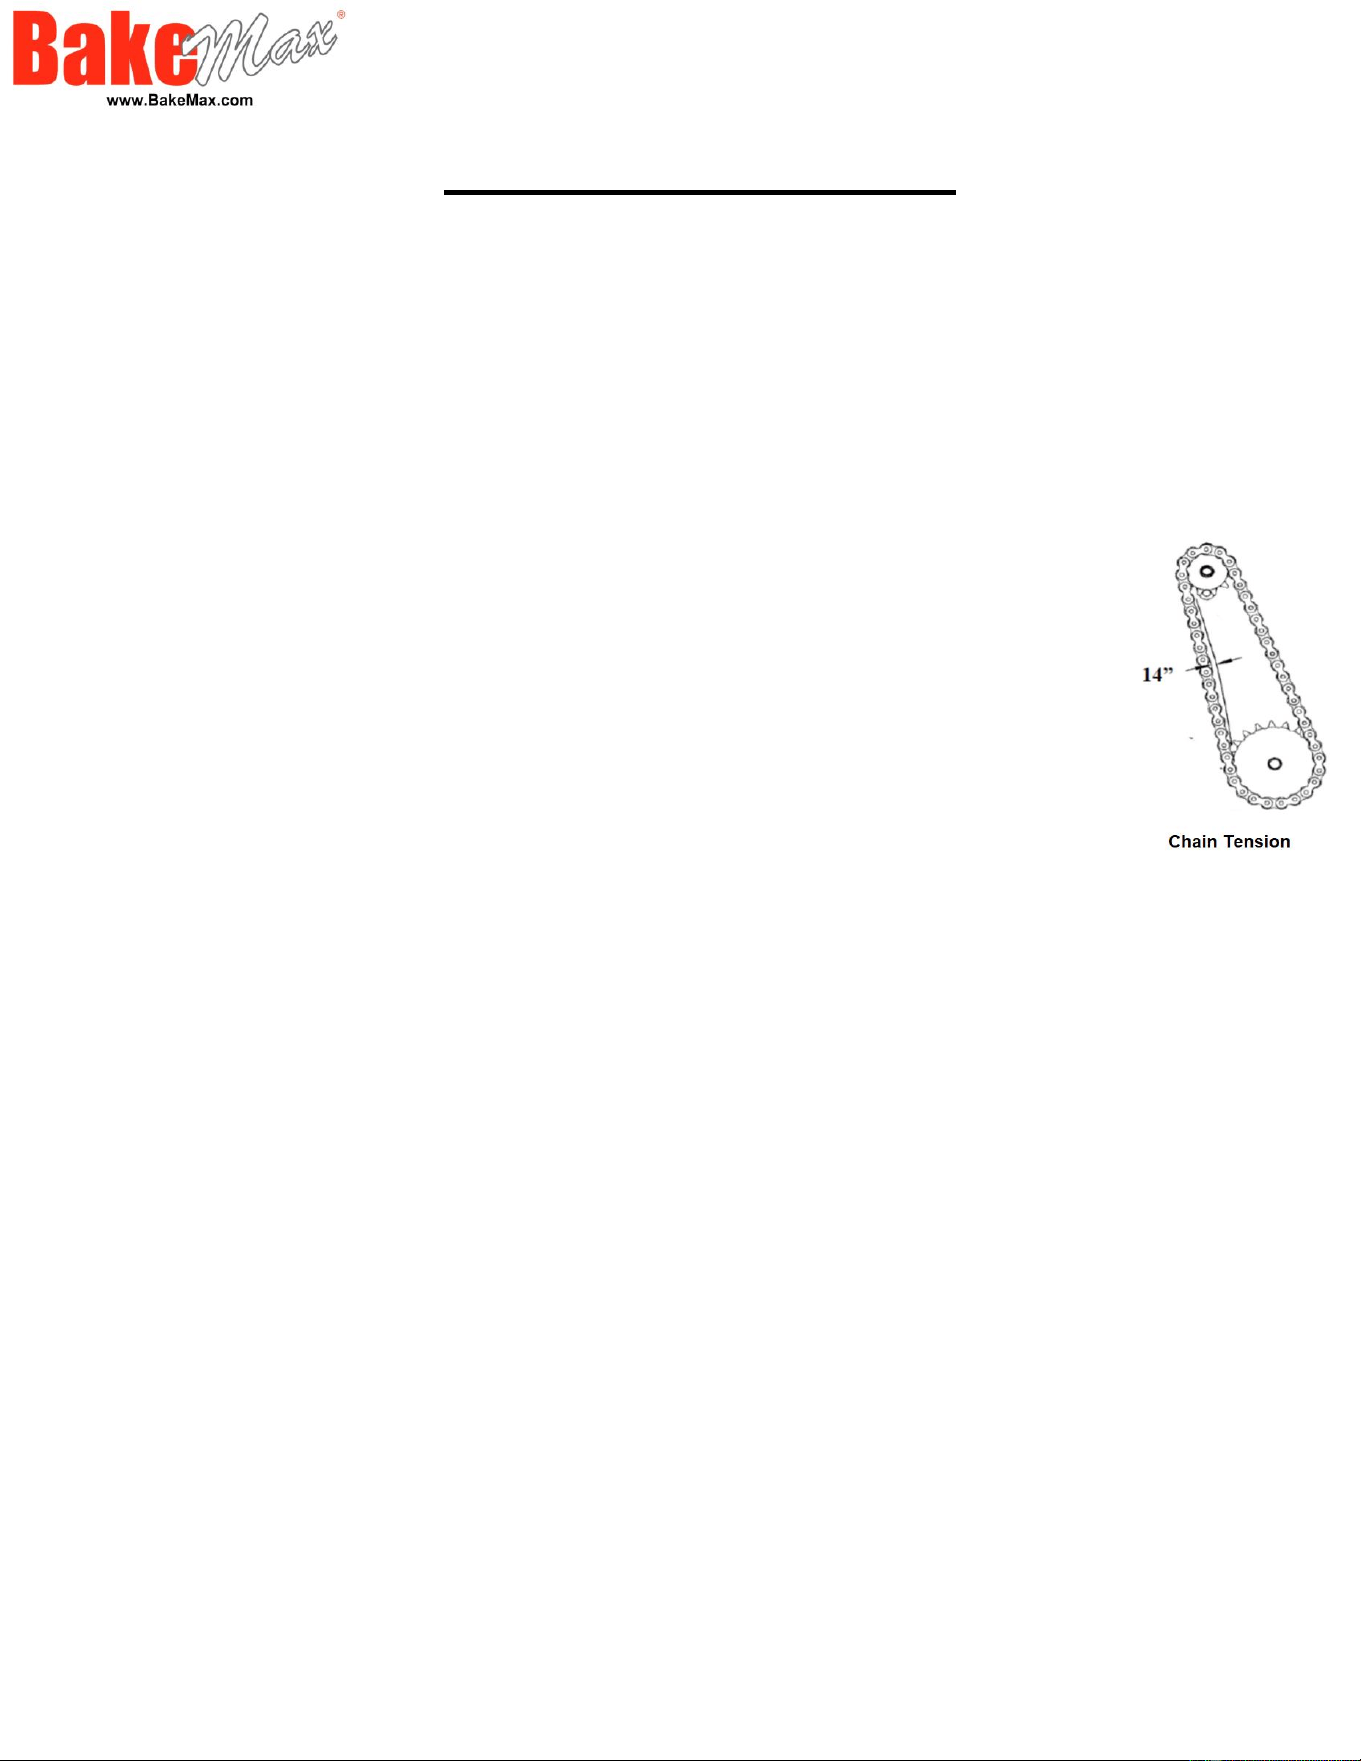
Step 10. Slide motor unit the drive chain has about 1/4” slack when lightly pushed at the
center of its top open run. (See chain tensioning illustration below.)
Step 11. Tighten screw to secure motor.
Step 12. Rewire leads.
Step 13. At this time, you may plug unit in and test for proper operation prior to reinstalling
panel and turning unit back over onto its feet.
Step 14. If unit is working correctly, turn unit off and unplug unit completed.
Step 15. Reinstall side panels and control box cover. Place unit back into its upright
position. Reinstall the crumb tray.
Step 16. Connect unit to power source and test unit for proper operation.

Cleaning Air Intake – Weekly
Step 1. DISCONNECT POWER SOURCE.
Step 2. Place unit upside down. NOTE: you may damage the heater tubes by
placing unit on its side.
Step 3. Use a vacuum cleaner and or a damp cloth to clean the air intake. The
procedure should be done at least once a week.
Lubricate the Sprockets & Chains – Monthly
Step 1. DISCONNECT POWER SOURCE.
Step 2. Remove the panel which exposes chain drive.
Step 3. Using an extreme pressure, synthetic chain lubricant with a temperature
range up to 400°F. Apply liberally onto chain and sprockets.
Step 4. Replace panel, reconnect power source and test unit.
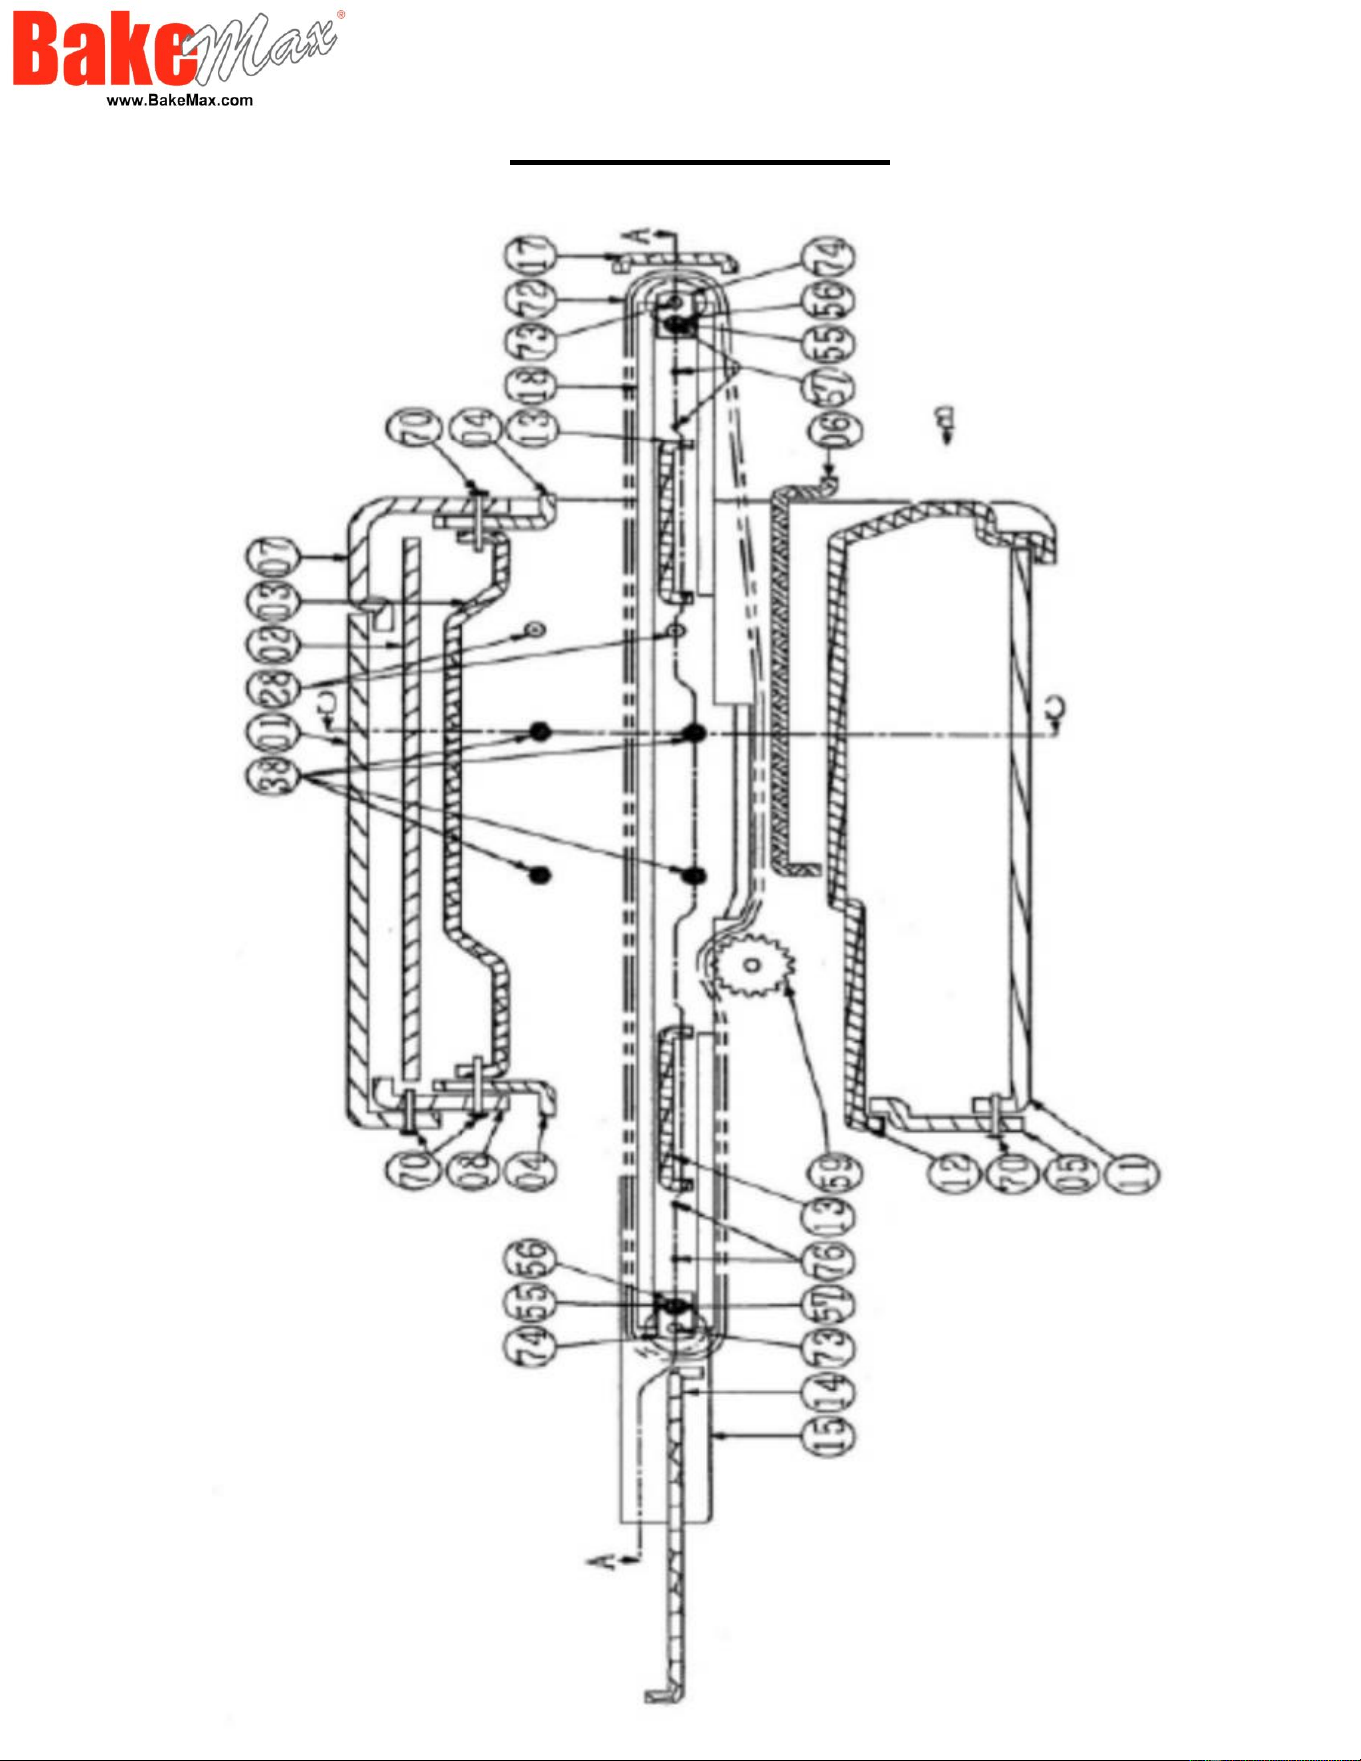
Parts Break Down
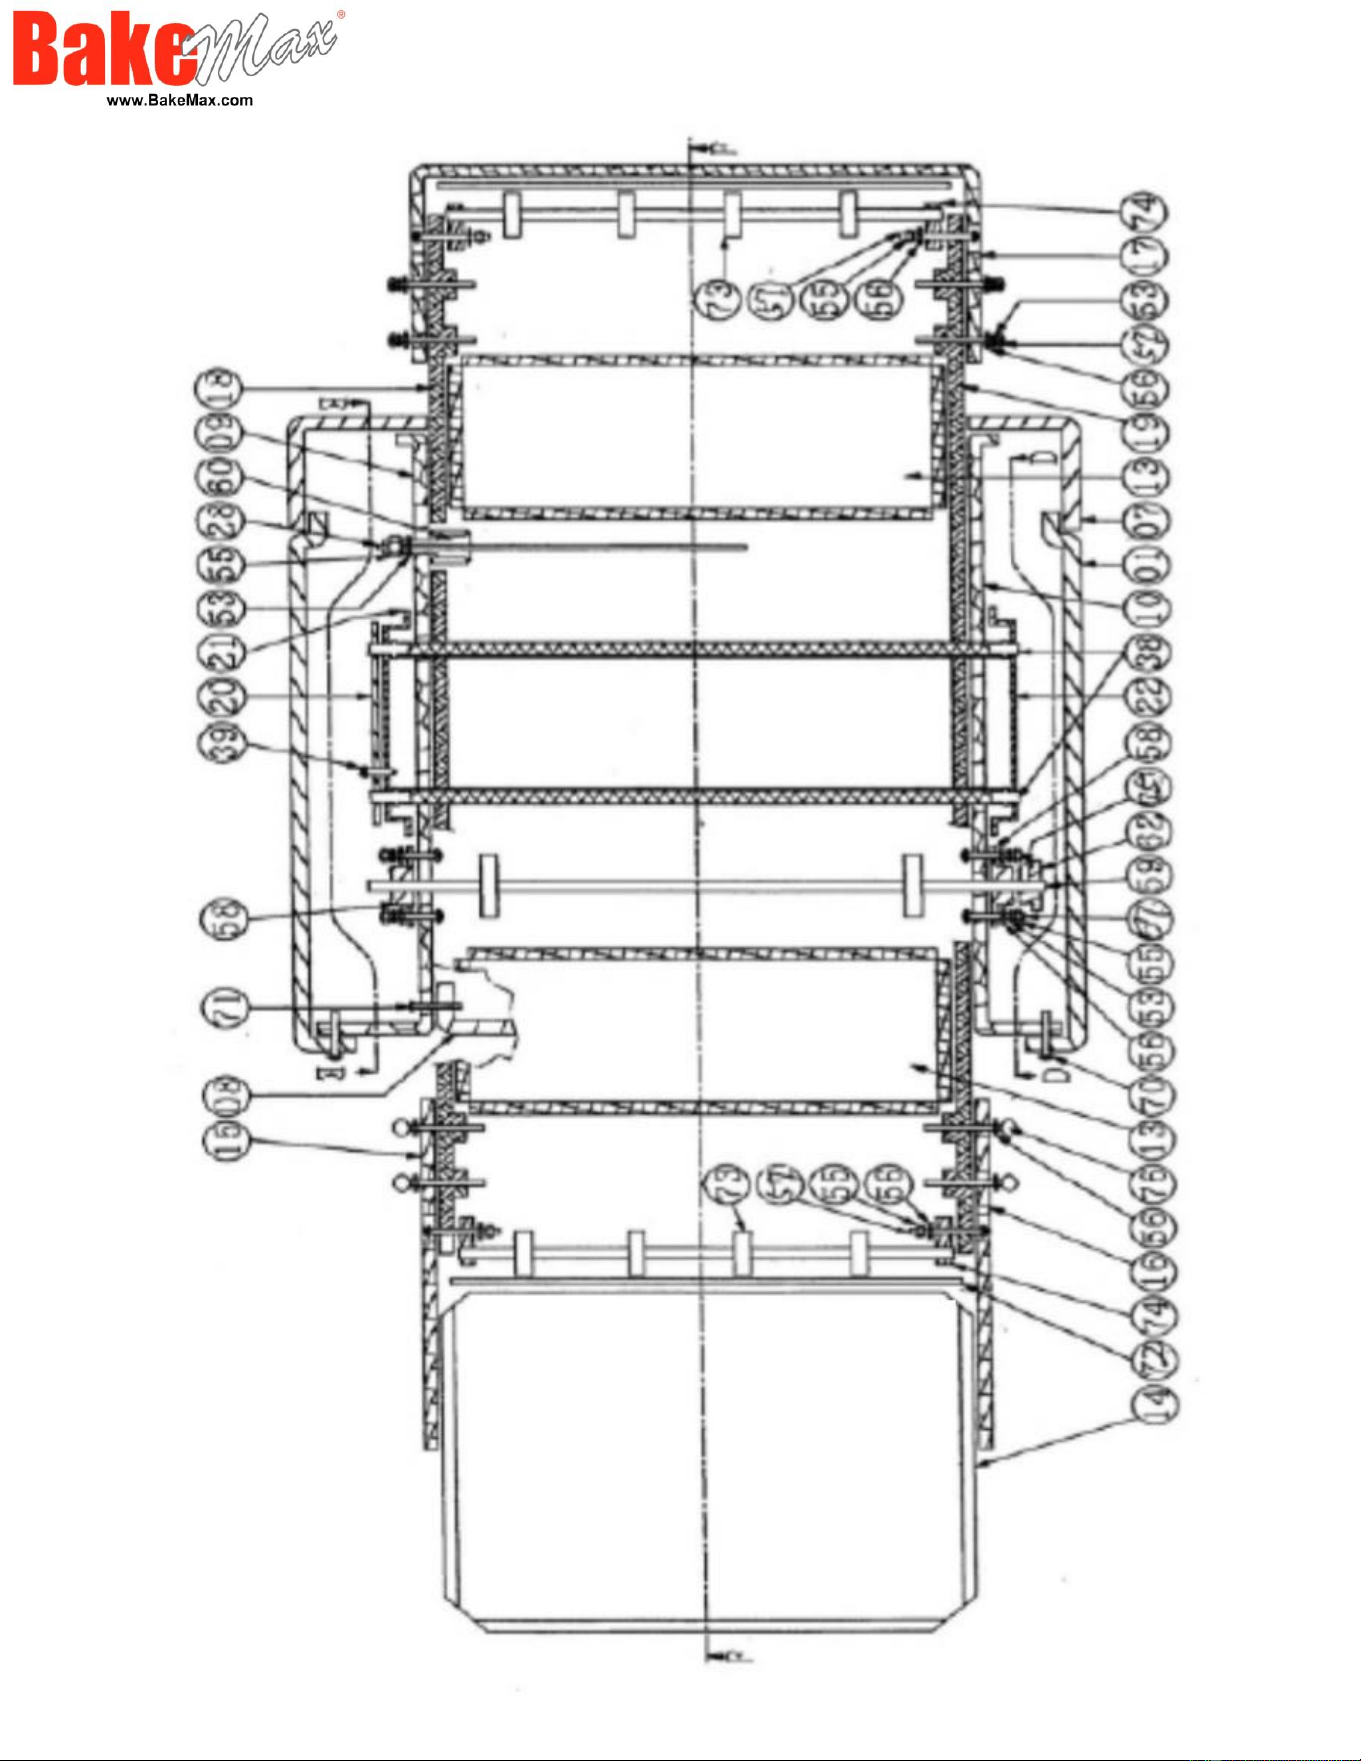
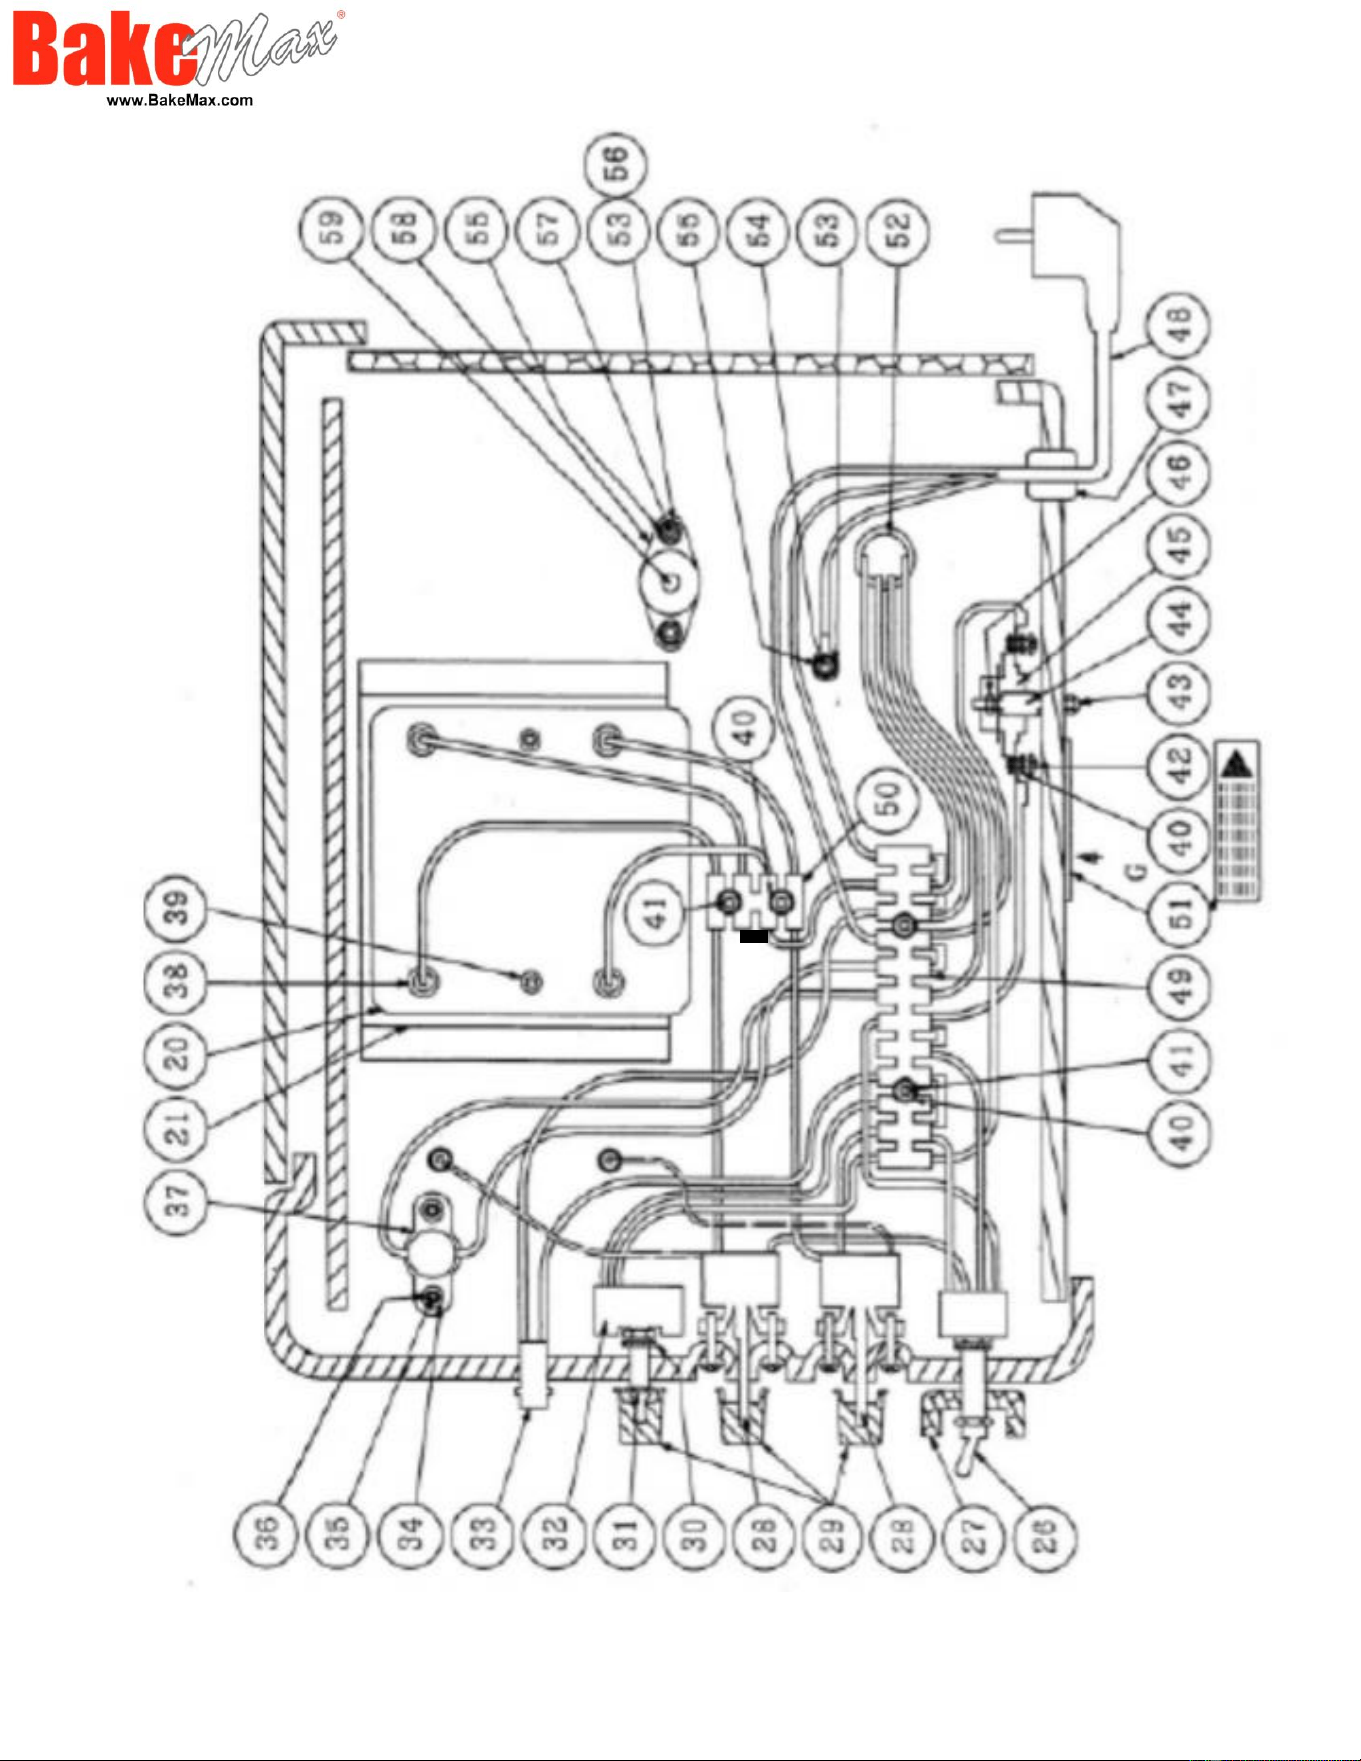
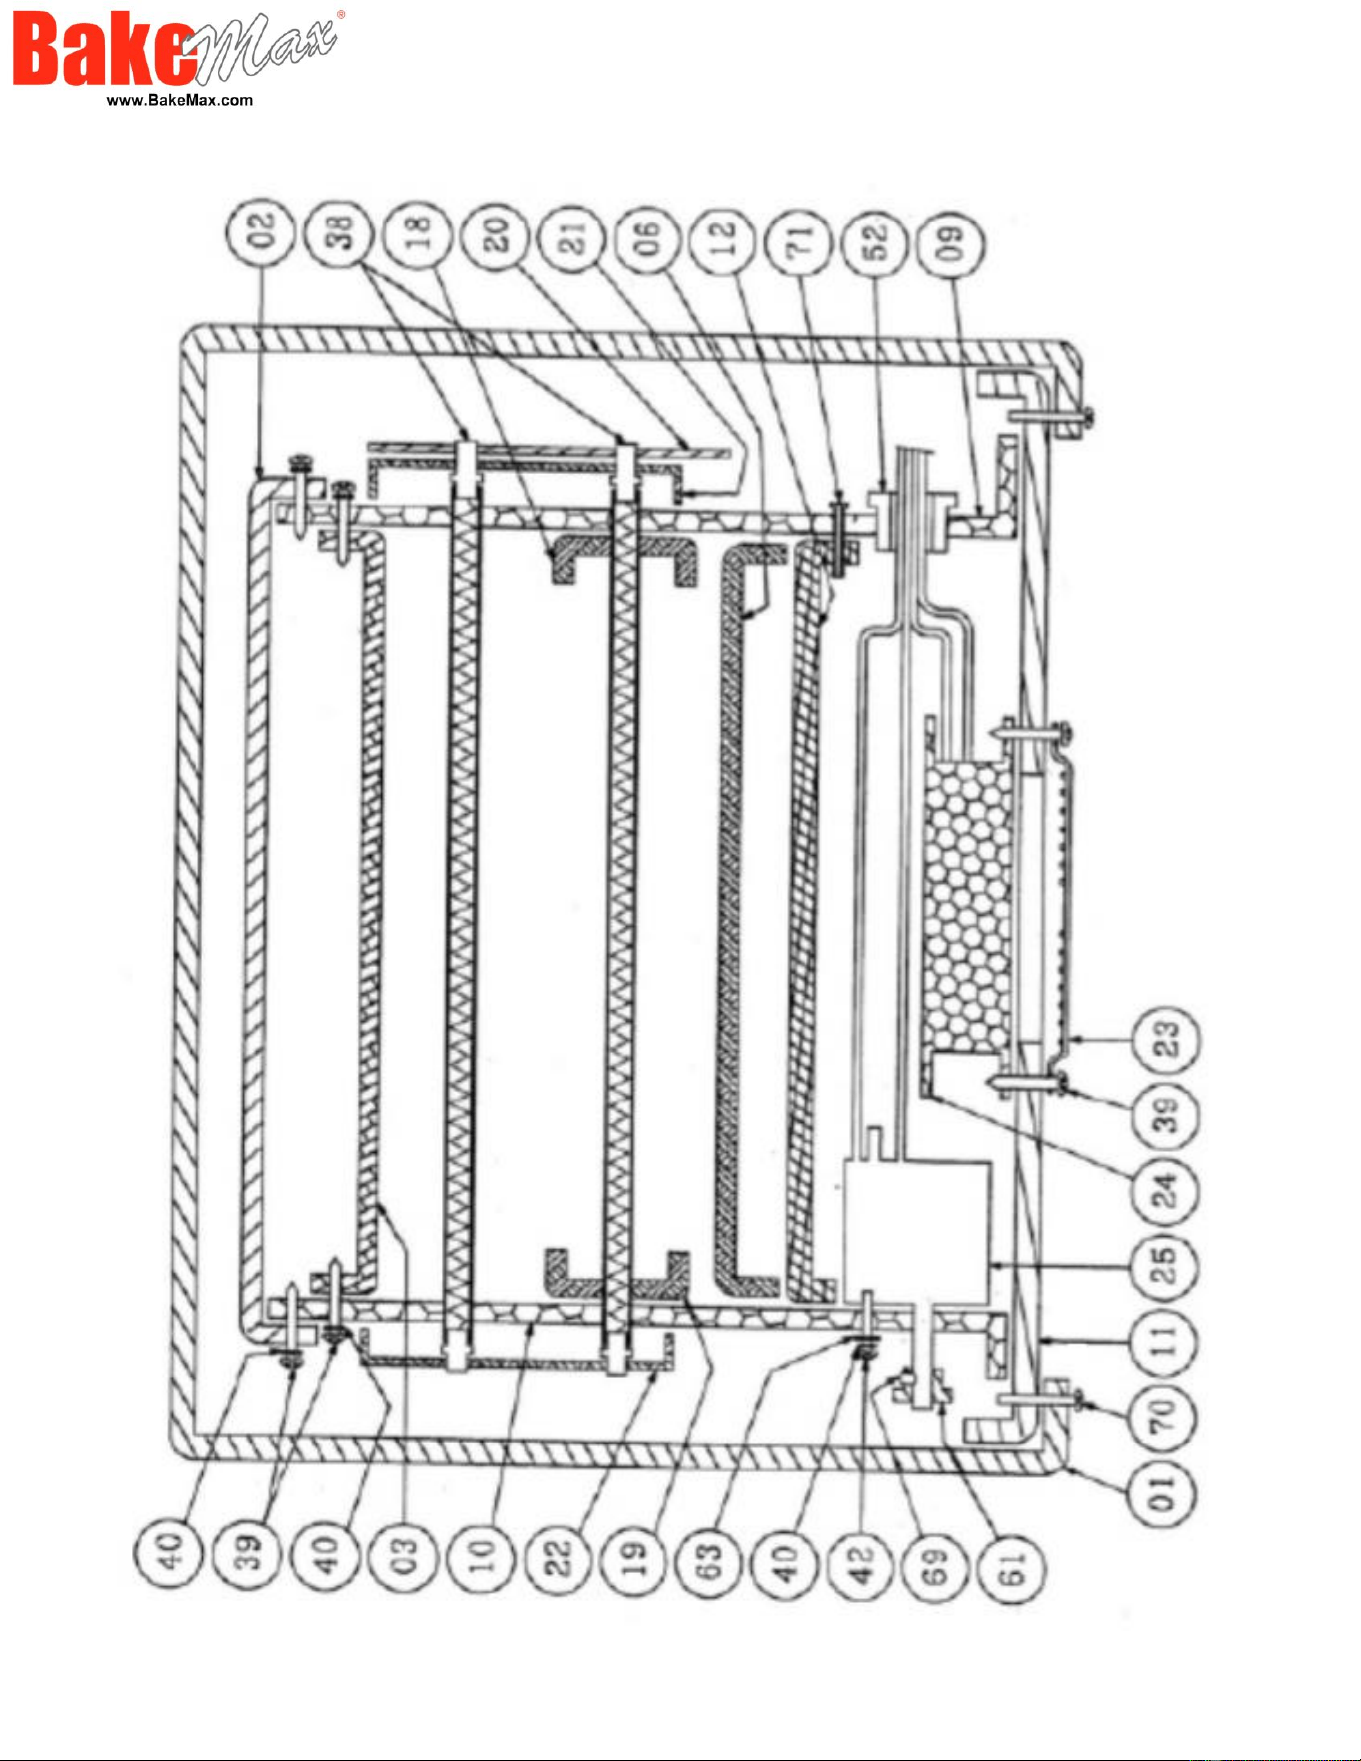

Parts List
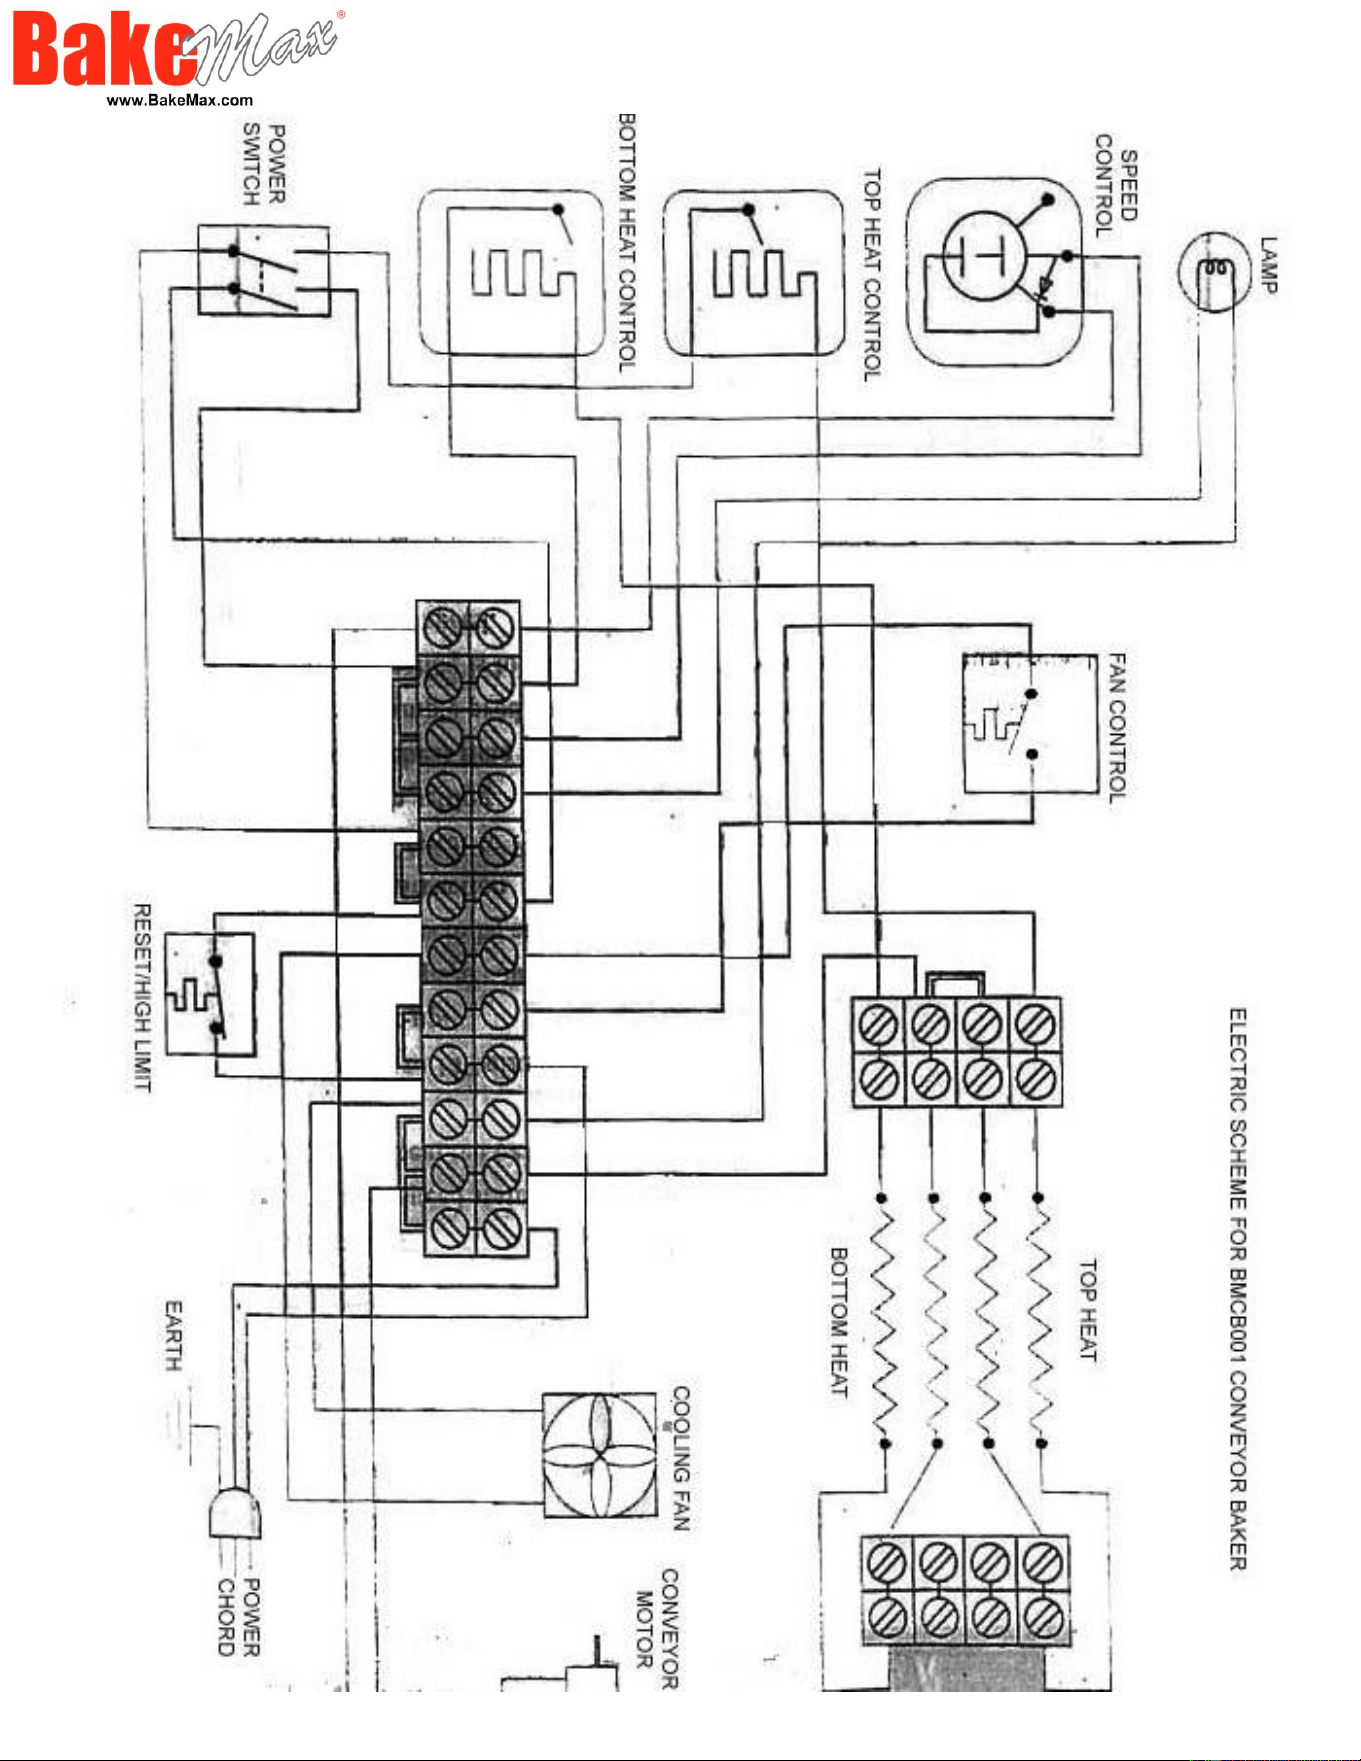
Position 01 - Stainless Steel Cover
Position 02 - Fan Terminal
Position 03 - Insulation Plate
Position 04 - Plate Front
Position 05 - Cover Rear
Position 06 - Drawer
Position 07 - Front Plate
Position 08 - Rear Plate
Position 09 - Left Plate
Position 10 - Right Plate
Position 11 - Base Plate
Position 12 - Insulation Plate Middle
Position 13 - Conveyor Frame
Position 14-16 - Stainless Steel Complete Tray
Position 17-19 - Protection for Conveyor
Position 20-22 - Protection for Tube Element
Position 23-24 - Fan with Protection
Position 25 - Drive Motor Complete
Position 26 - 4P On/Off Switch
Position 27 - Switch Protection
Position 28-1 - Ego Switch 250C (for Controlled Upper Heater)
Position 28-2 - Ego Switch 320C (for Controlled Bottom Heater)
Position 29 - Knob
Position 32 - Speed Regular Controller 230V 1000 Omega
Position 33 - Indicate Light
Position 37 - T.O.D.36 F65
Position 38 - Element
Position 45 - CR-1 Thermostat (Top - Speed Control)
Position 49 - Terminal PA-12 (12P)
Position 50 - Terminal
Position 59 - Drive Shaft
Position 61 - Gear 11T
Position 62 - Gear 17T
Position 64 - Chain (#25x56 Mesh)
Position 72 - Stainless Steel Conveyor Belt (Width 35.5cm)

Warranty & Service
BakeMax provides a 1-Year Limited Parts and Labor warranty on most items, there are select items which carry a Limited 2-Year Warranty. Extended
Warranty is available on some products. Please contact us for details. The Warranty is not transferable and is limited to original installation of equipment sold
by BakeMax for the original user.
For all Warranty Claims, Proof of Purchase and/or Serial Number is required. Once the machine is approved, BakeMax will provide our customers with on-site
Warranty Coverage on all equipment more than 100lbs. BakeMax assumes no responsibility for down time or loss of product. Repairs must be Pre-Authorized
by BakeMax and have a Service Authorization Number issued prior to commencing Warranty Service.
Warranty begins 10-Days after shipping from warehouse; delays in installation which would extend the Warranty must be Approved. All equipment must be
installed and connected by Qualified Professionals in accordance with the Manual Specification. Products shipped are to be inspected at time of delivery, the
receiver is responsible for inspection.
Any abuse or improper use of the equipment will void the warranty. This includes failure to follow all cleaning instructions, improper installation, improper
maintenance, failure to follow capacity charts, improperly wired electrical connections. The Warranty does not apply to abuse, willful or accidental damage,
or to products used for other than their intended purpose. Normal wear parts such as Accessories, Attachments, or Electrical Components such as Fuses,
Bulbs, Elements, and Switches carry a 90-Day Warranty only.
Bench Warranty (Machines Weighing 100 lb. or less)
Once the machine is Approved for Warranty Service, if the machine requires Warranty work in less than 30 days of purchase date, BakeMax will pay all
shipping charges. Once the machine is received and repaired it will be returned to the user at BakeMax expense. Freight Damages during return shipping is
the responsibility of the owner of the machine.
The following is not covered under the BakeMax Warranty:
1. Overtime Labor Rates are not covered by BakeMax.
2. All parts will be shipped via Ground Courier only; If Express Shipping is required, it will be the responsibility of the Customer or Dealer.
3. Travel for Warranty Service is covered up to 100 Miles /160 Km Roundtrip, any further milage will be the responsibility of the Customer or Dealer.
4. There is no on-site Warranty Service for Residential Addresses or addresses outside of the contiguous United States (Lower 48) or Canada.
**BakeMax machines sold outside of the contiguous United States (Lower 48), or Canada will carry 1-Year Parts Warranty only.
Terms & Conditions
Terms
Net 15 days subject to Credit Approval. All past due Accounts are subject to 2% per month Service Charge as per Credit Application. We accept Visa,
MasterCard, and Discover Credit Cards. We also accept E-Transfer & Wire Transfer, additional fees may apply.
Pricing
All prices are subject to change without notice. All prices are Sales Tax Extra, should you be claiming Tax Exemption, Tax Exempt Forms must accompany
your Purchase Order. BakeMax products are sold in Canadian and US Dollars. BakeMax is not responsible for specifications errors or printing errors.
Shipping
Free shipping to Canada and the U.S. Minimum order $6,000 for BakeMax and $10,000 for BakeMax America Cooking Line. Tailgate Delivery is $90.00
minimum. All checks made Payable to Titan Ventures International Inc. BakeMax is not responsible for goods damaged during shipping. BakeMax is not
responsible for any delays in delivery once product has left our Warehouse and is in the carrier’s possession. Products shipped are to be inspected at time of
delivery, the receiver is responsible for inspection. Damaged Freight Claims are to be claimed with the carrier. BakeMax assumes no responsibility for
Damaged Freight. Shipping Insurance available by request. By signing your name on the delivery receipt without noting any damages, you are stating that
you have received your shipment in Acceptable Condition.
Return Policy
Returns will not be Approved unless in Writing. Returns must be made within 30-Days of Purchase and must have a Return Authorization Number issued
before returning. The purchase order number, reason for return, and the serial number(s) of the unit are required for the Return Authorization Number.
Minimum return amount of $100.00.
Returns are subject to a minimum restocking fee of 30%. The cost of any repairs or re-crating required will be charged back to the dealer. If there is a
manufacturer’s defect BakeMax® will pay standard freight returned and prepaid shipping back to the customer.
Special Order Items, Clearance / Discontinued Equipment, Parts, Refurbished/Demo Equipment, or Non-Standard items are not Returnable.
Ordering Information
Send purchase orders to BakeMax via e-mail [email protected] or Fax (506-859-6929). Use Model or Part number when ordering including Voltage
Requirements, and Product Description. Please include the Dealer, Name, Address, terms, special delivery, or instructions required or attention names to be
applied to packaging. Please notify BakeMax should you need order confirmation or tracking numbers, by calling 1-800-565-2253 or email
Special Terms and Conditions
BakeMax reserves the right to make improvements or equipment changes without prior permission. Setup and Installation are the end user’s Responsibility.
Failure to properly Install or Maintain Equipment may Void Warranty.
Catalog, Spec Sheets and Website
BakeMax is not liable for incorrect information found in our Catalog, Spec Sheets or Website. Please contact us to confirm specifications. Pictures and
specifications are for general purposes only. Product may not be exactly as shown. Prices and availability may change at any time without notice.
Dimensions shown may change at any time without notice.