
Technical Support and E-Warranty Certificate
www.vevor.com/support
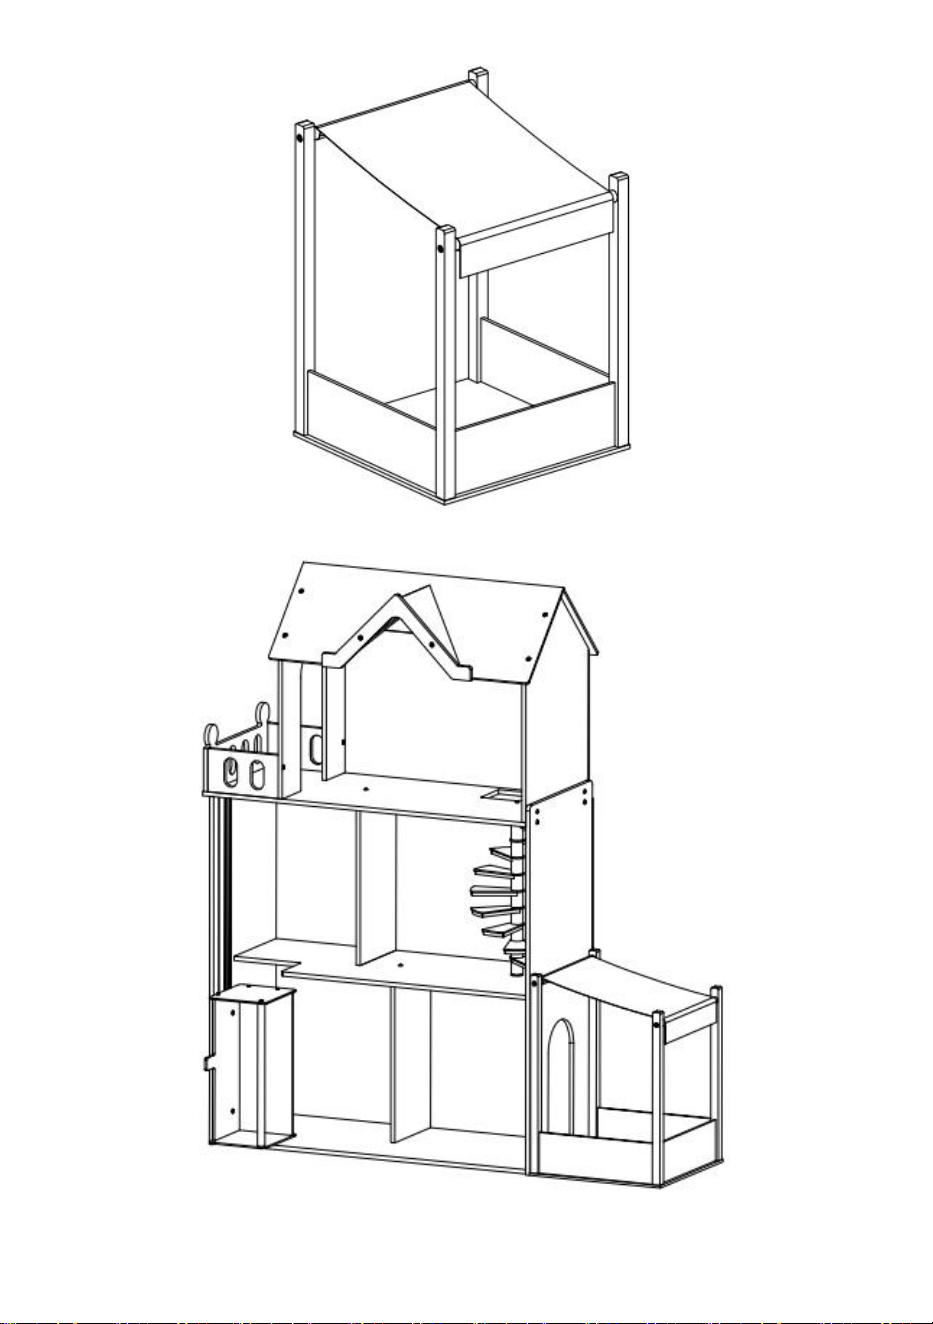
WOODEN DOLLHOUSE
MODEL:TX1195
We continue to be committed to provide you tools with competitive price.
"Save Half", "Half Price" or any other similar expressions used by us only represents an
estimate of savings you might benefit from buying certain tools with us compared to the major
top brands and does not necessarily mean to cover all categories of tools offered by us. You
are kindly reminded to verify carefully when you are placing an order with us if you are
actually saving half in comparison with the top major brands.

- 1 -
MODEL: TX1195
Have product questions? Need technical support? Please feel free to
contact us:
Technical Support and E-Warranty Certificate
www.vevor.com/support
NEED HELP? CONTACT US!
This is the original instruction, please read all manual instructions
carefully before operating. VEVOR reserves a clear interpretation of our
user manual. The appearance of the product shall be subject to the
product you received. Please forgive us that we won't inform you again if
there are any technology or software updates on our product.
WOODEN DOLLHOUSE

- 2 -
SAFETY INSTRUCTIONS
WARNING:
1. Please read the instructions carefully and install it correctly.
2. CHOKING HAZARD-Small parts. Not for children under 3 years.
3. Adult assembly required.
4. Do not install it in a dark, damp place.
5. Put it in a place with good ventilation.
6. Please be sure to remove the packaging, all rubber bands, wire ties,
and tags or fastenings from the toy. They are not part of this toy and must
be removed and discarded before being given to your child.
7. Tighten all the screws before giving this toy to a child.
MODEL AND PARAMETERS
Model
TX1195
Age of application
3+ age
Size
1040*350*1200mm
Material
Wood
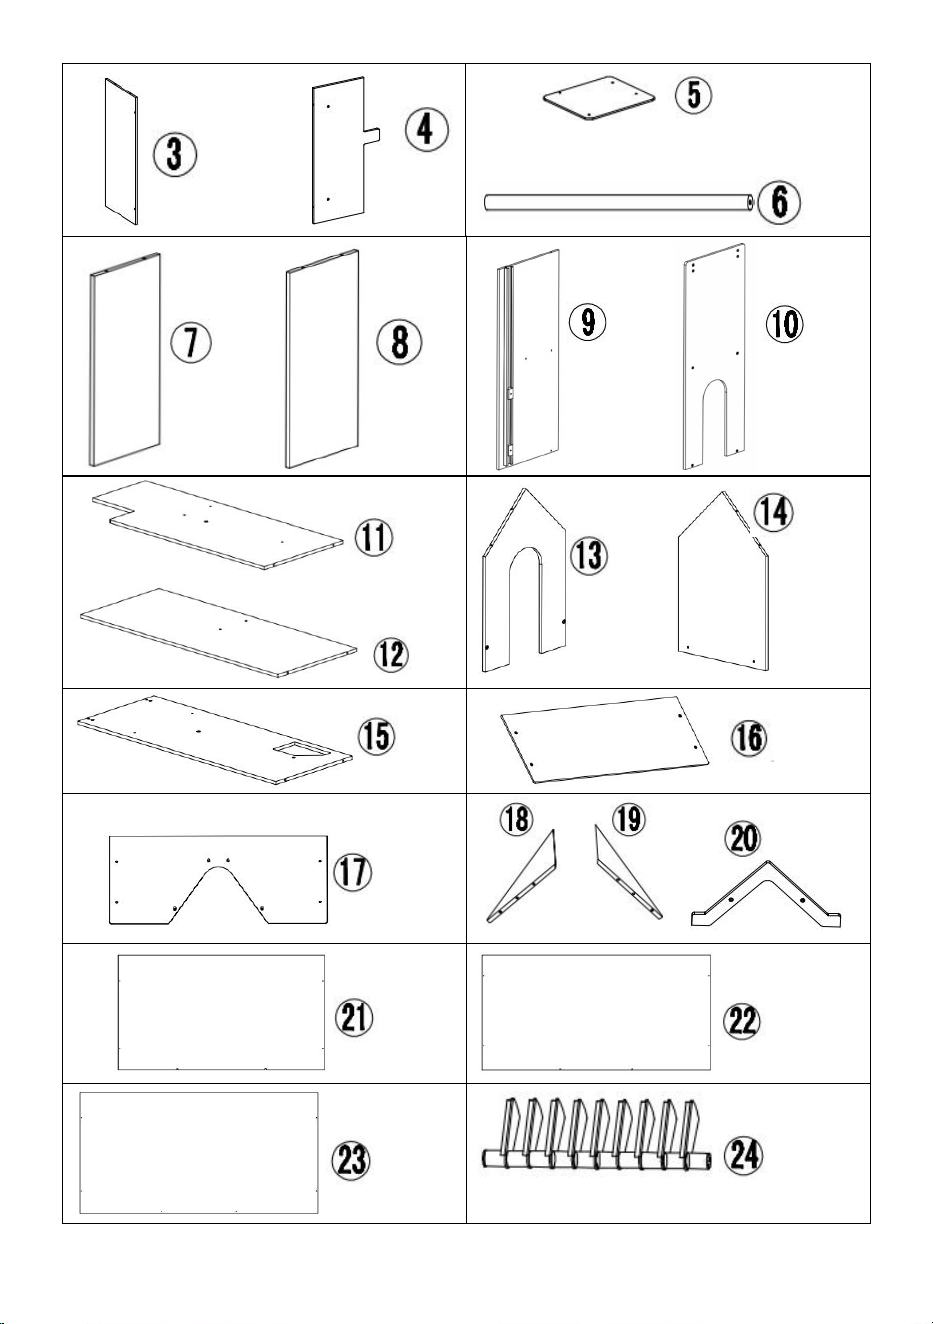
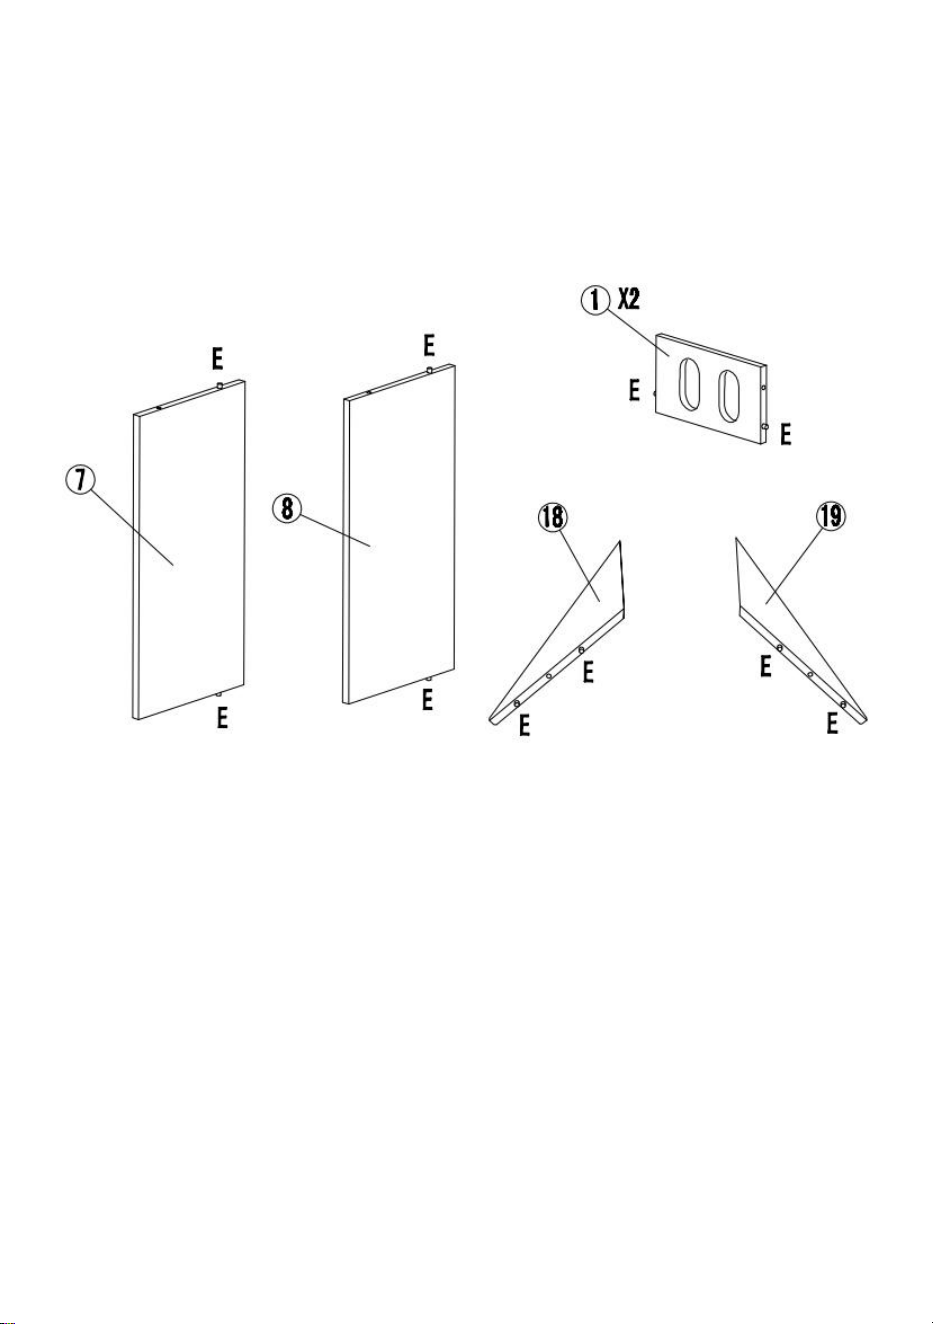
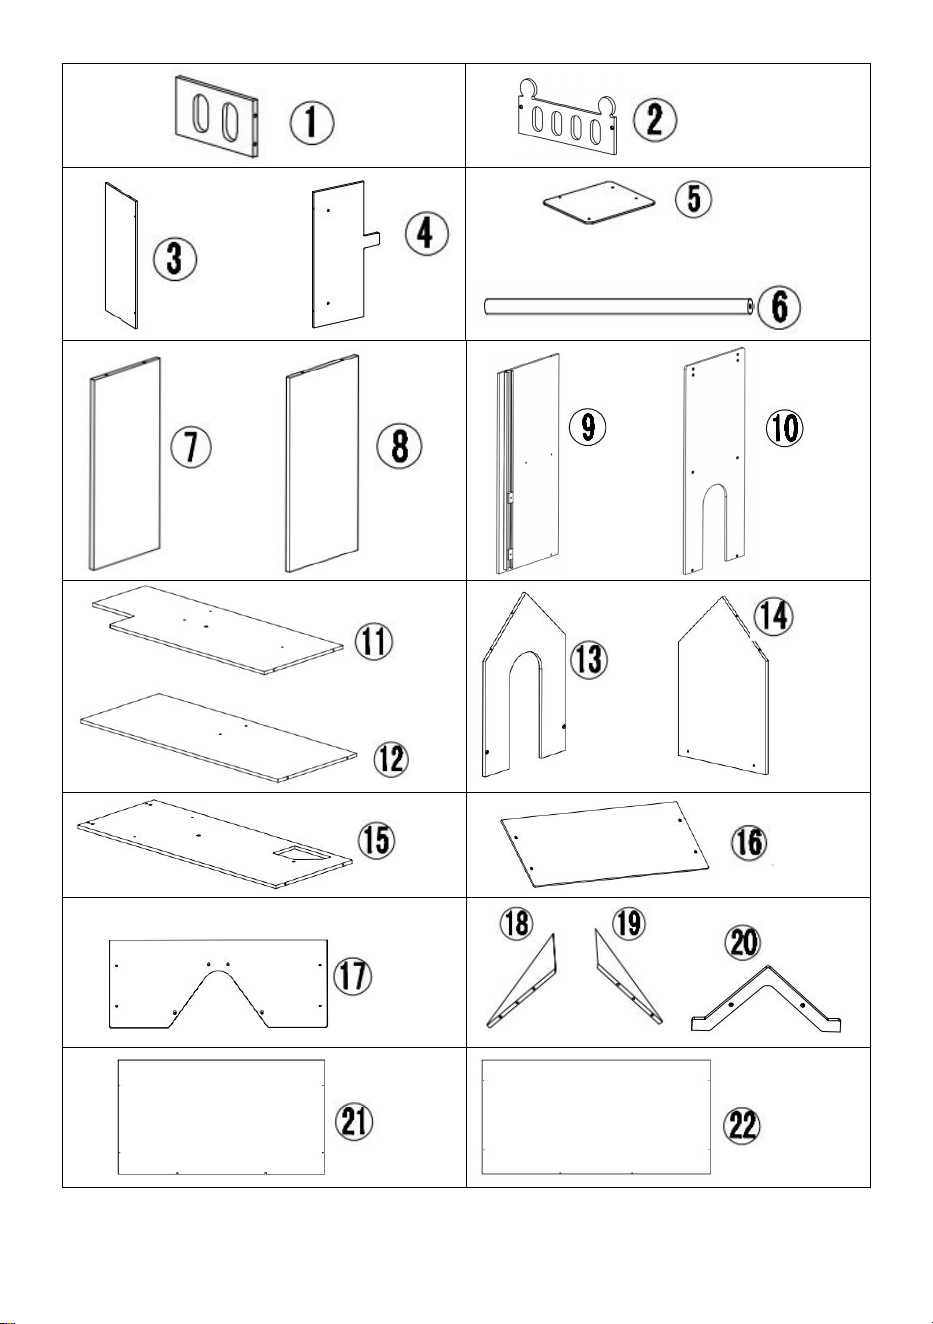
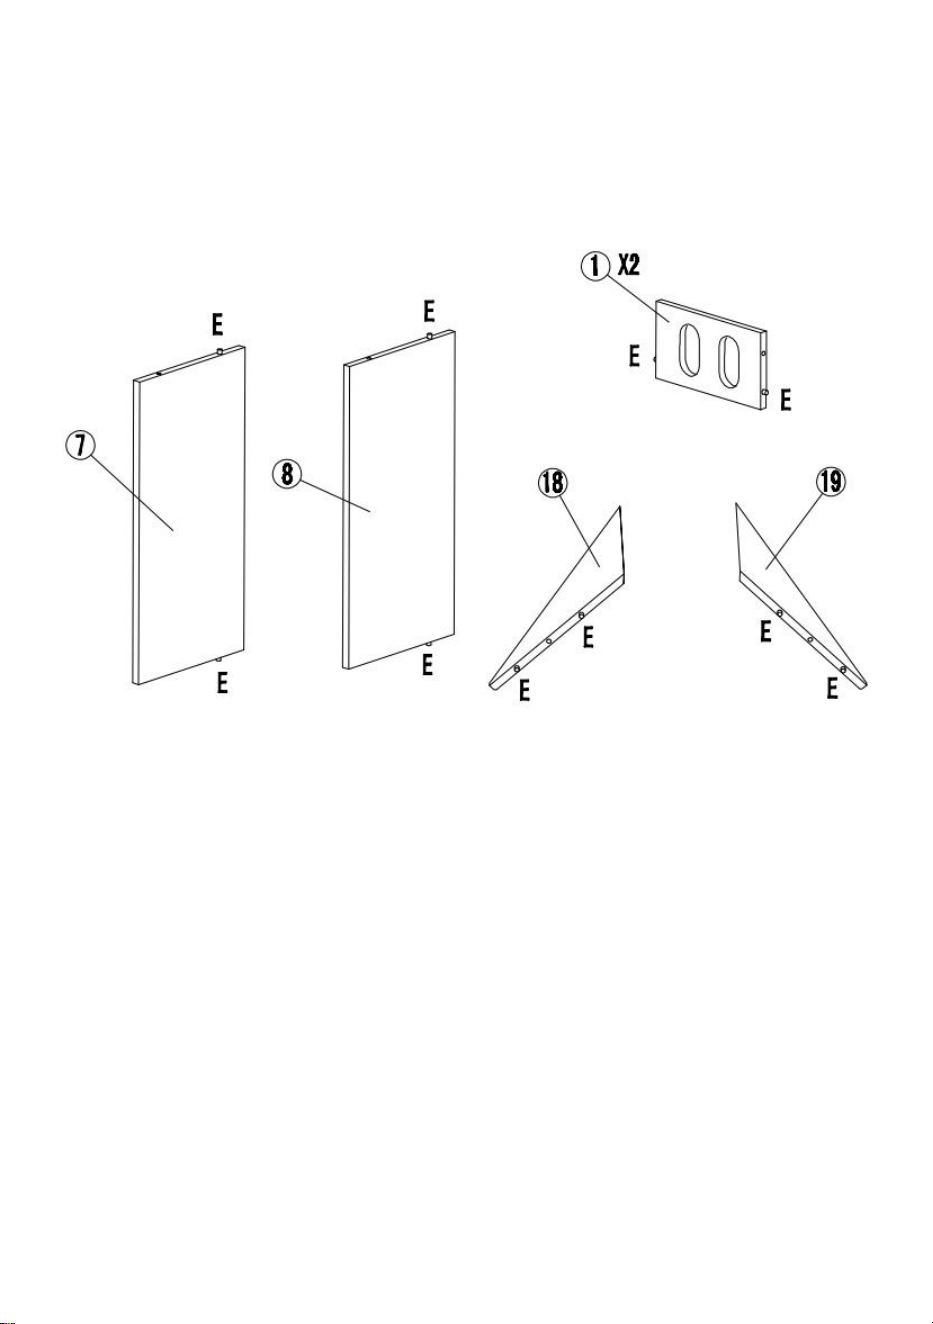
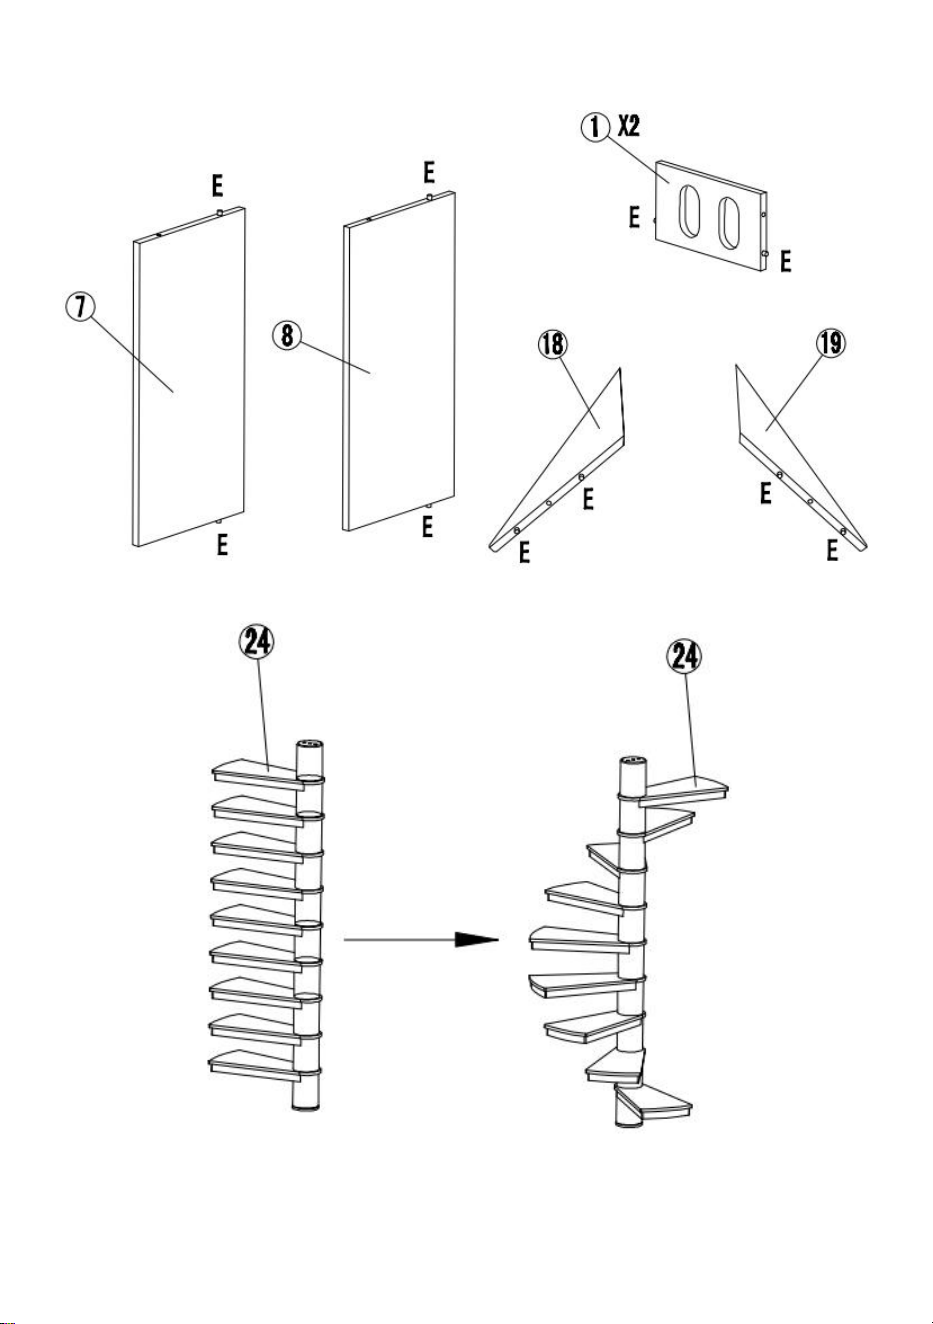
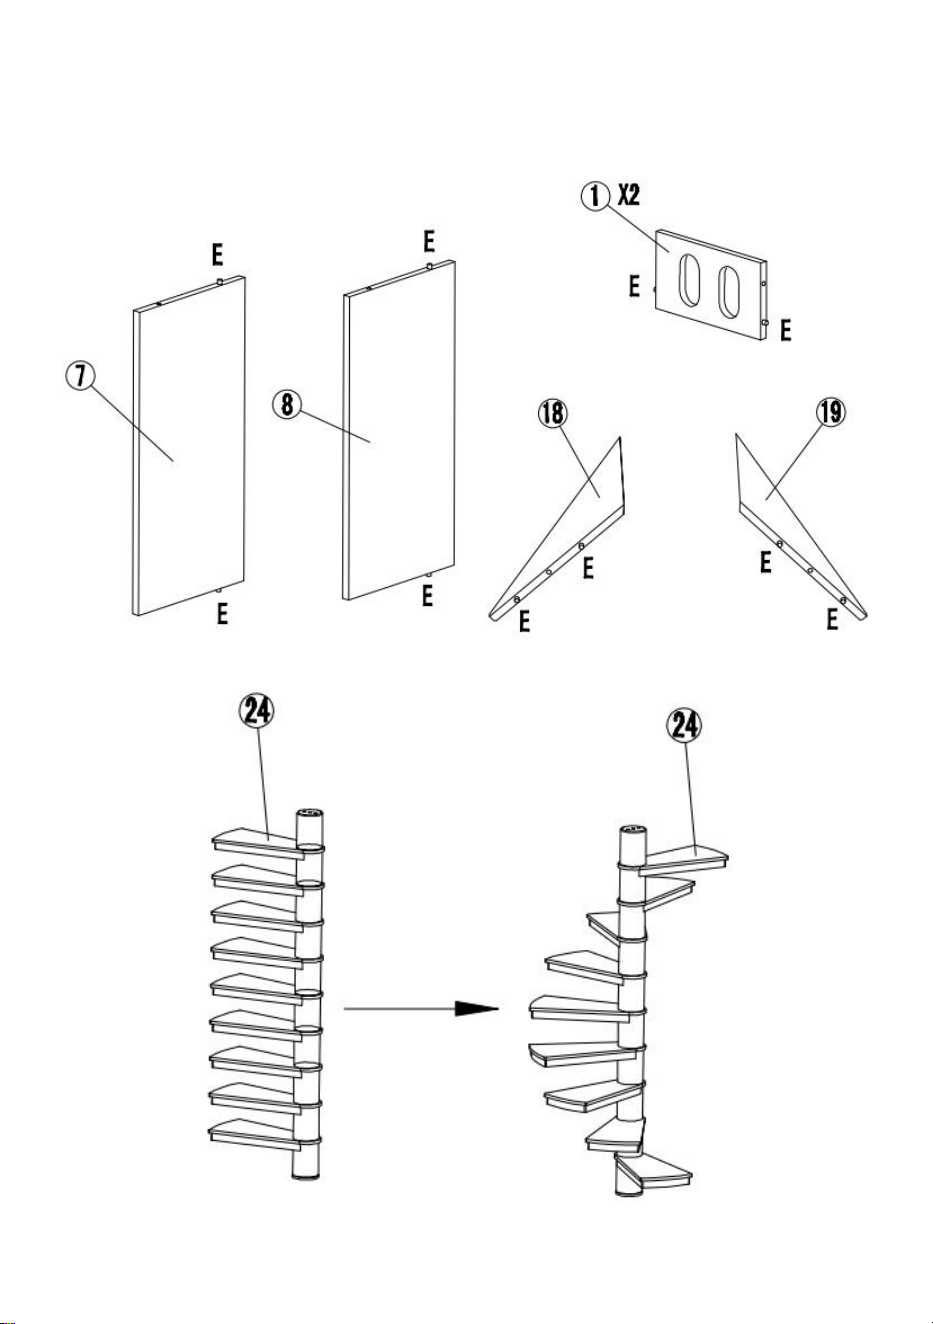
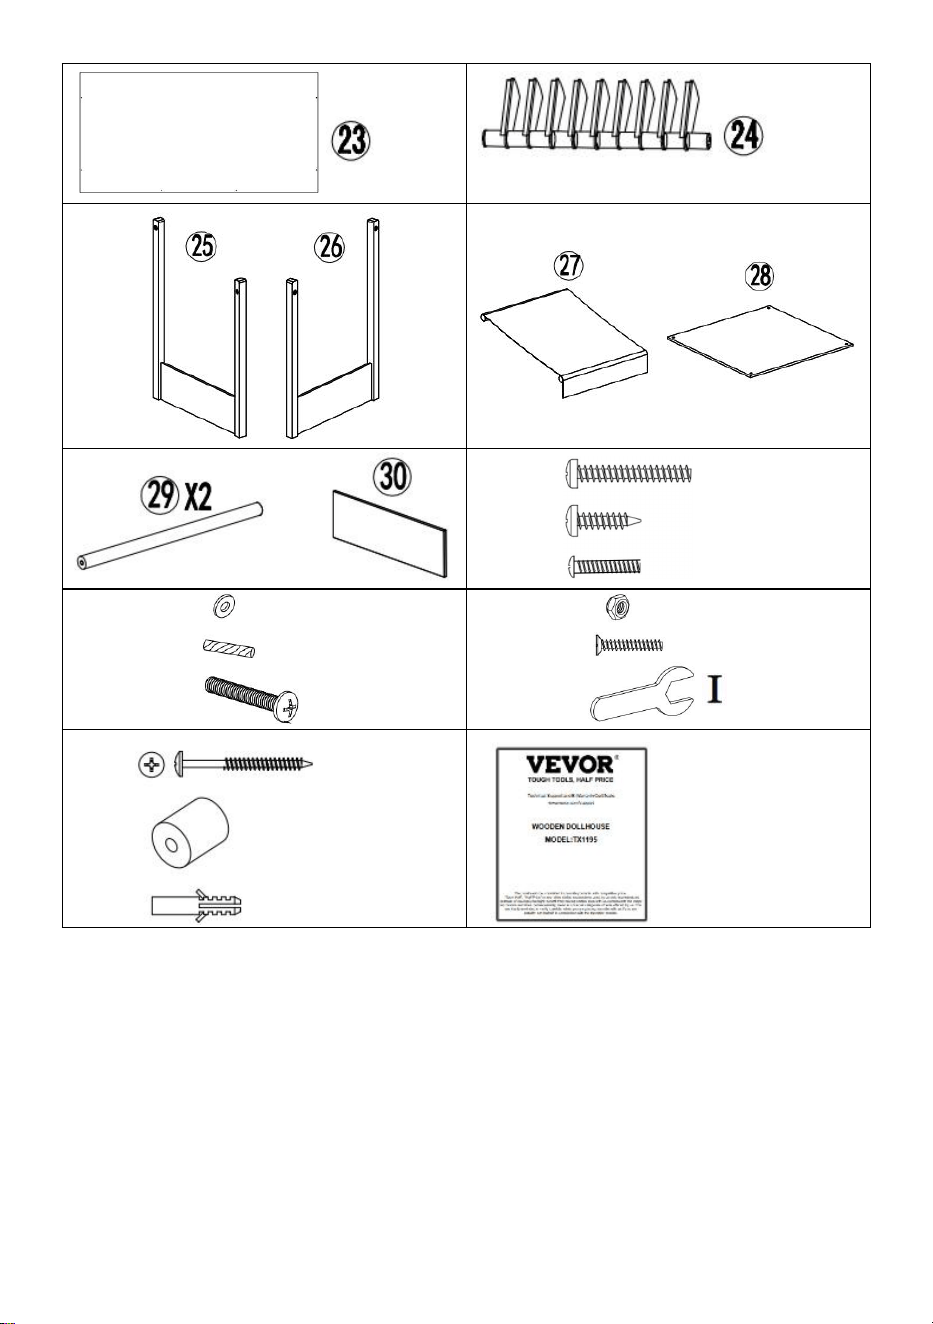
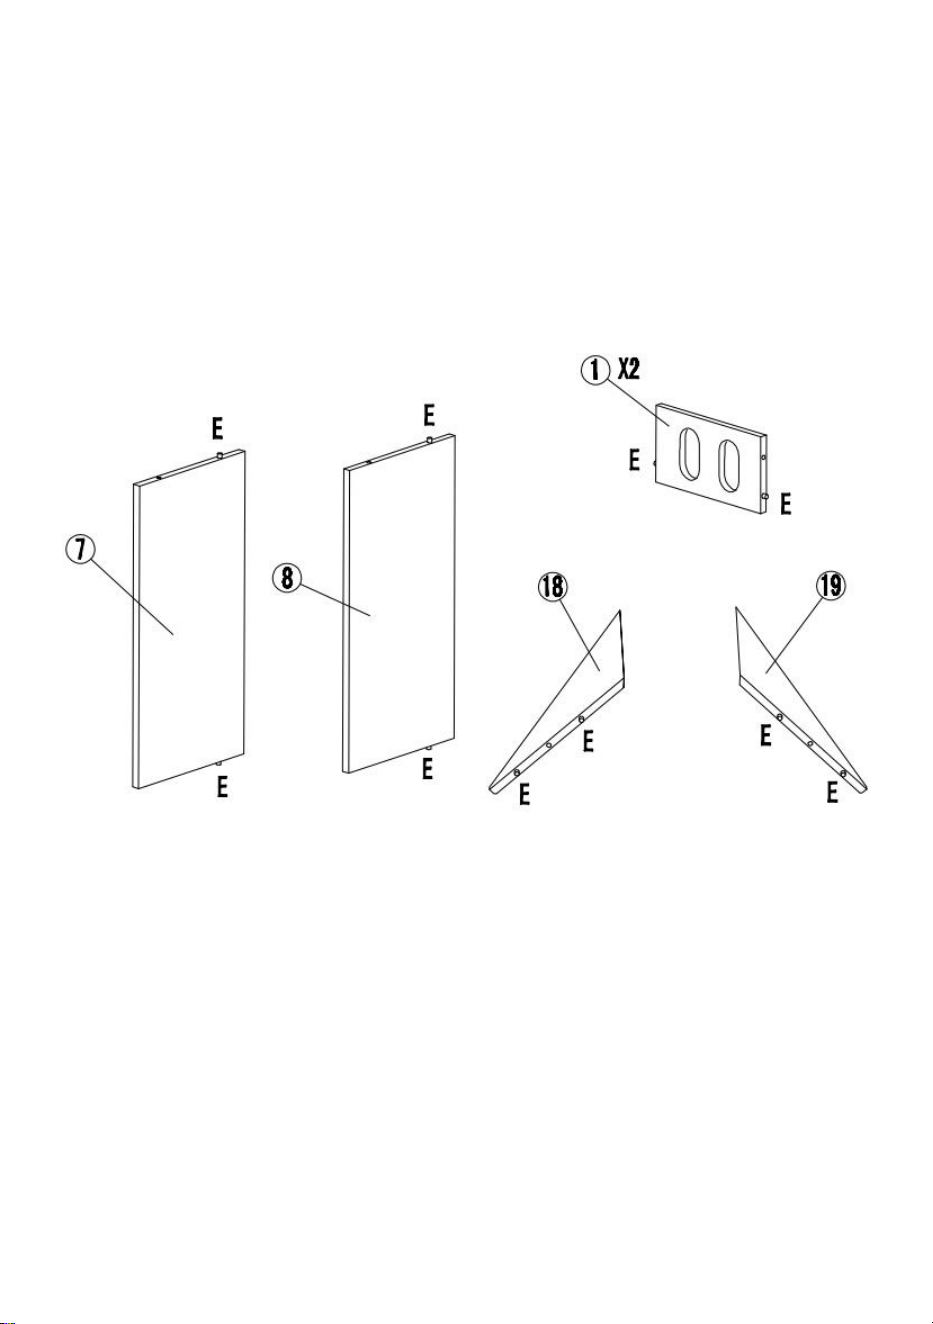
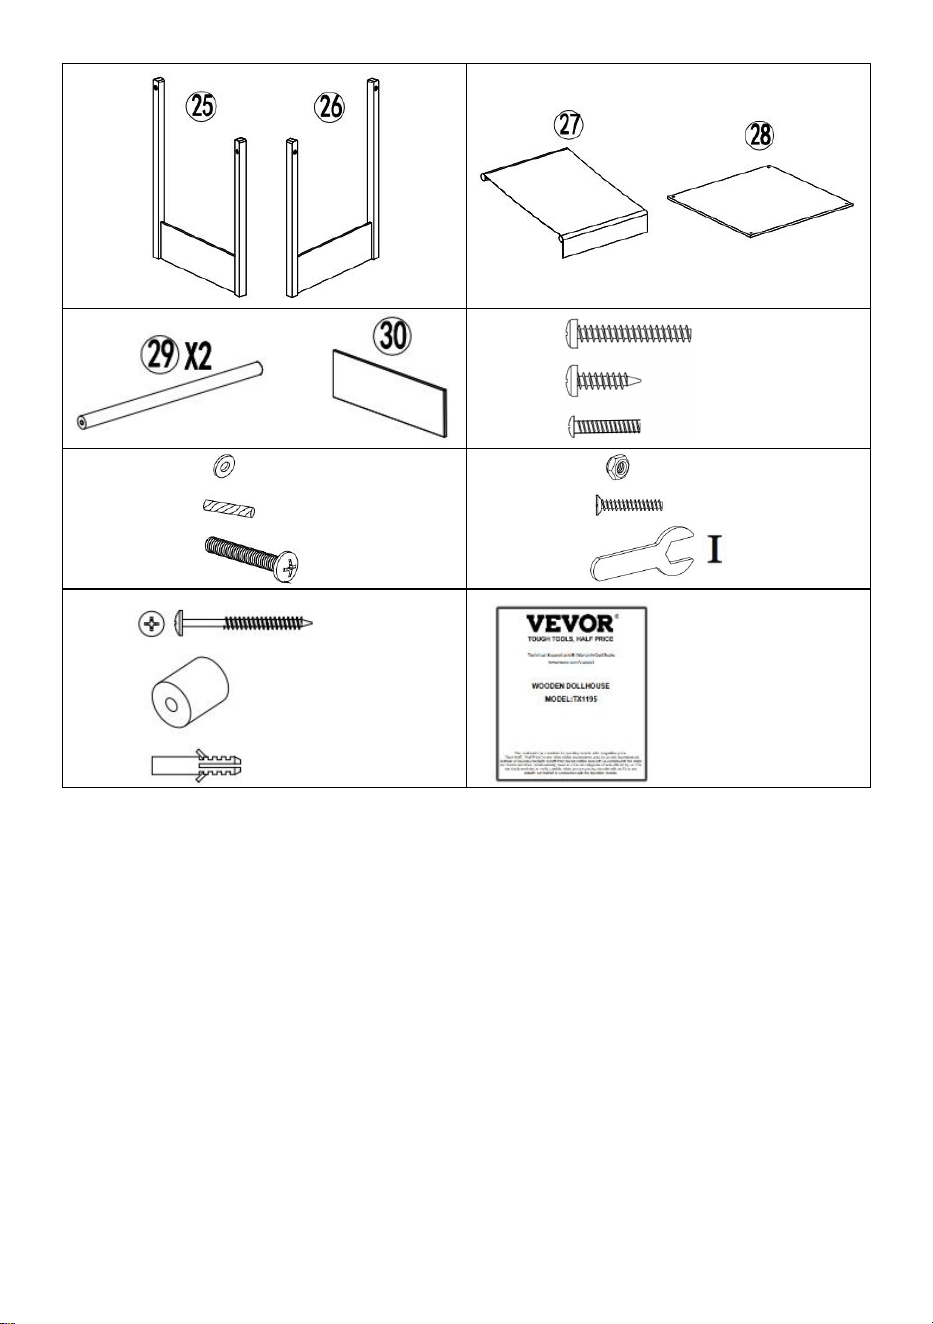
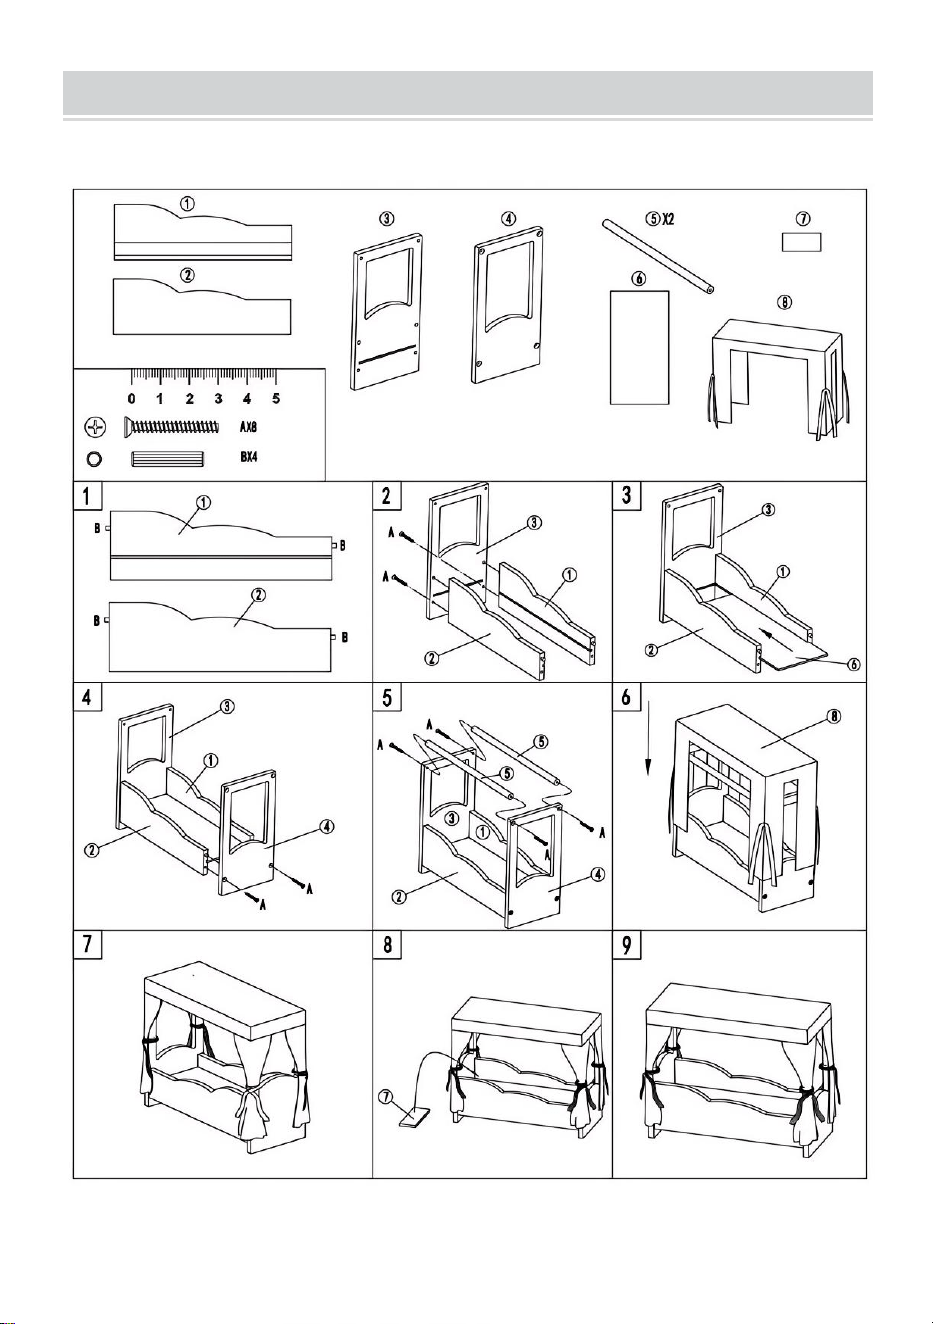
PARTS LIST AND INSTALLATION
NOTE: Please check you have all the parts as shown in the part list.
X2
X1

- 3 -
X1
X1
X2
X1
X1
X1
X1
X1
X1
X1
X1
X1
X1
X1
X1
X1
X1
X1
X1
X1
X1
X1

- 4 -
NOTE:
1. The sharp tip of screws may scratch hands.
2. Tighten all the screws before giving this toy to a child.
3. Do not OVER tighten screws.
4. Electric screwdrivers should NOT be used for assembly.
X1
X1
X1
X1
X1
HX4
GX2
FX2
EX12
DX4
CX32
BX2
AX40
X1
LX1
KX1
JX1
User Manual x1

- 5 -
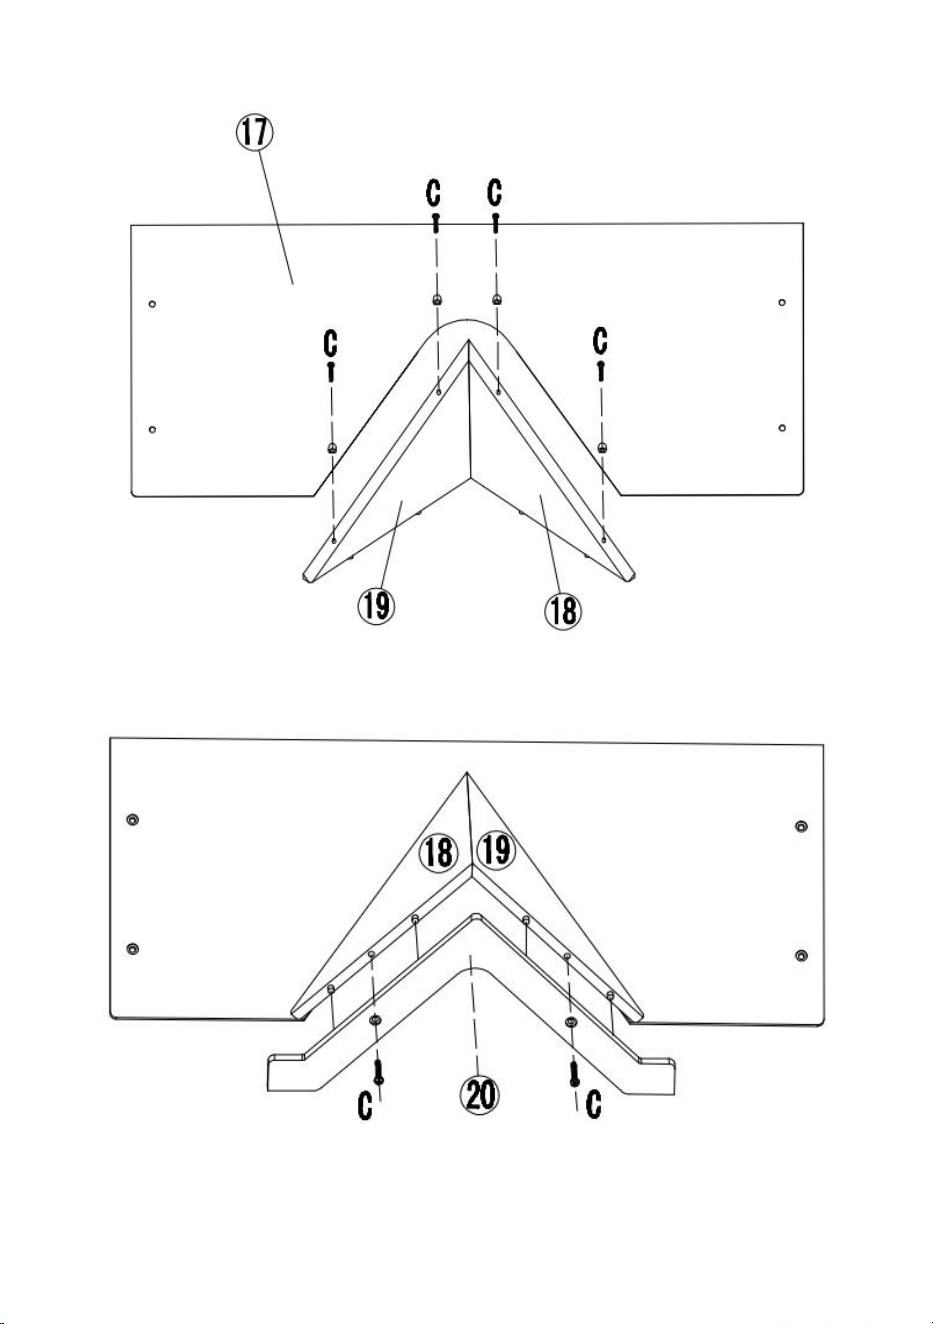
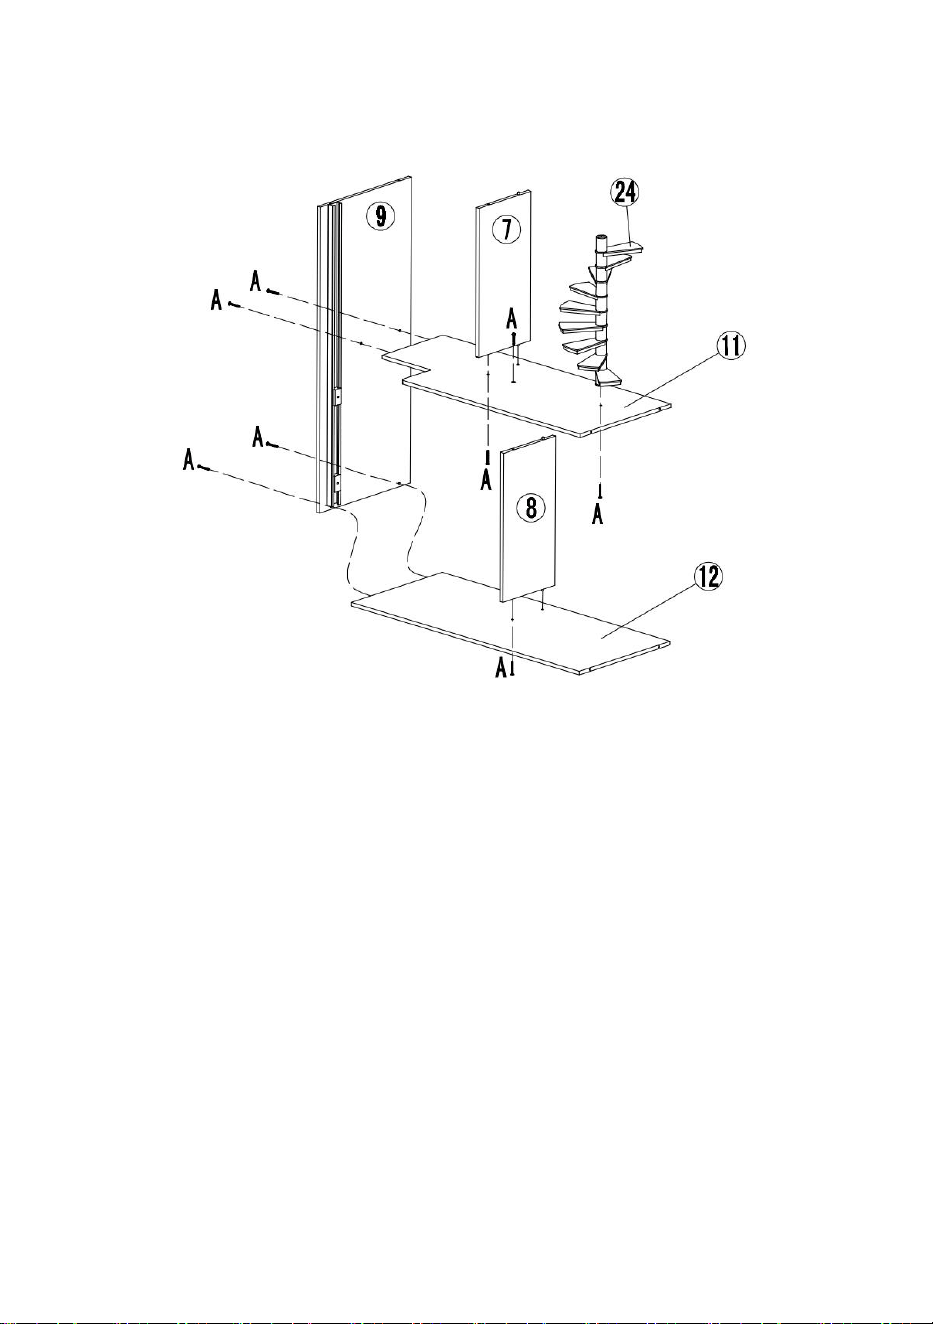
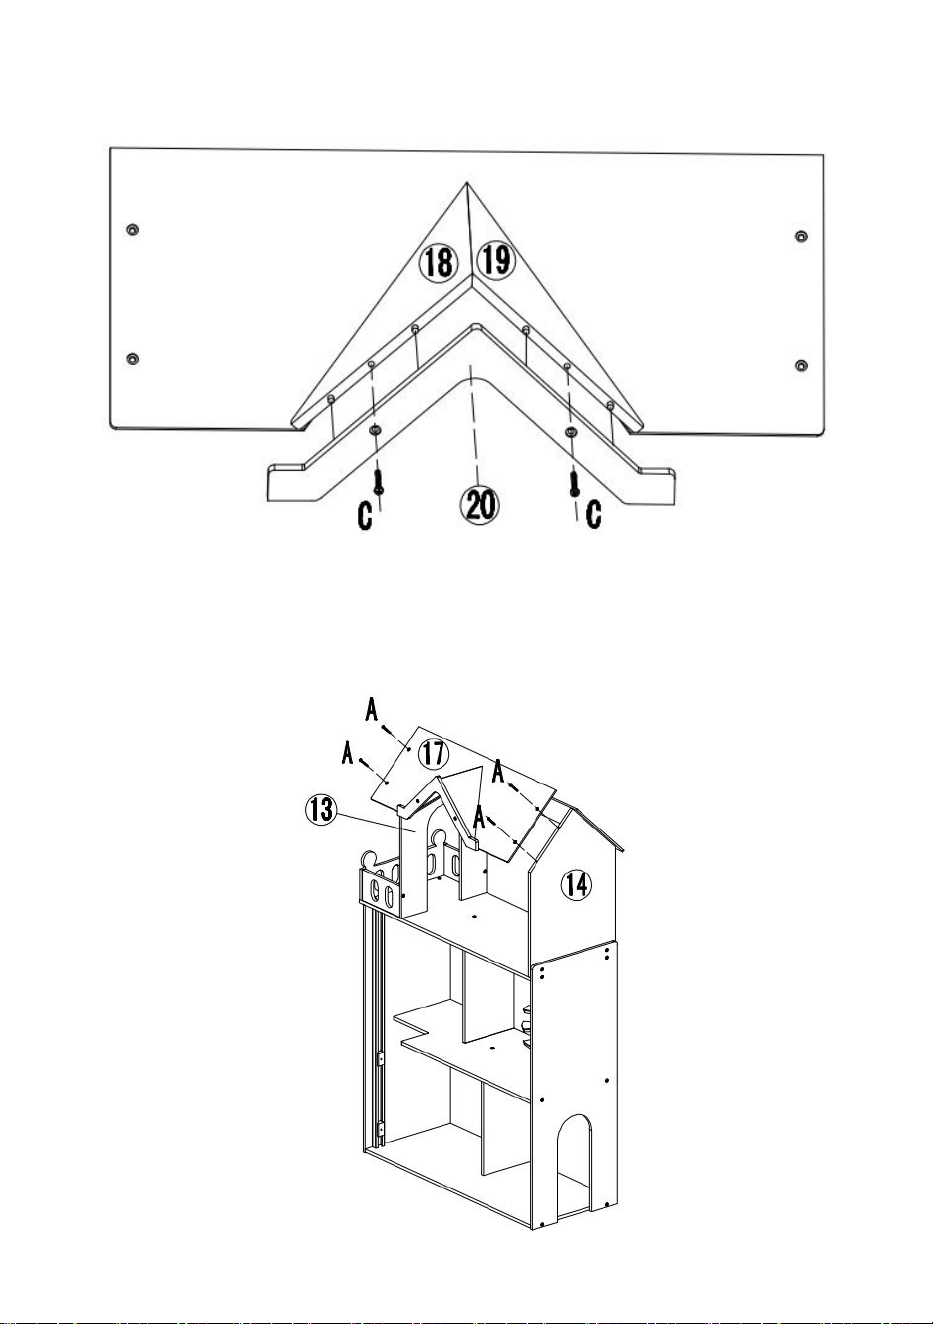
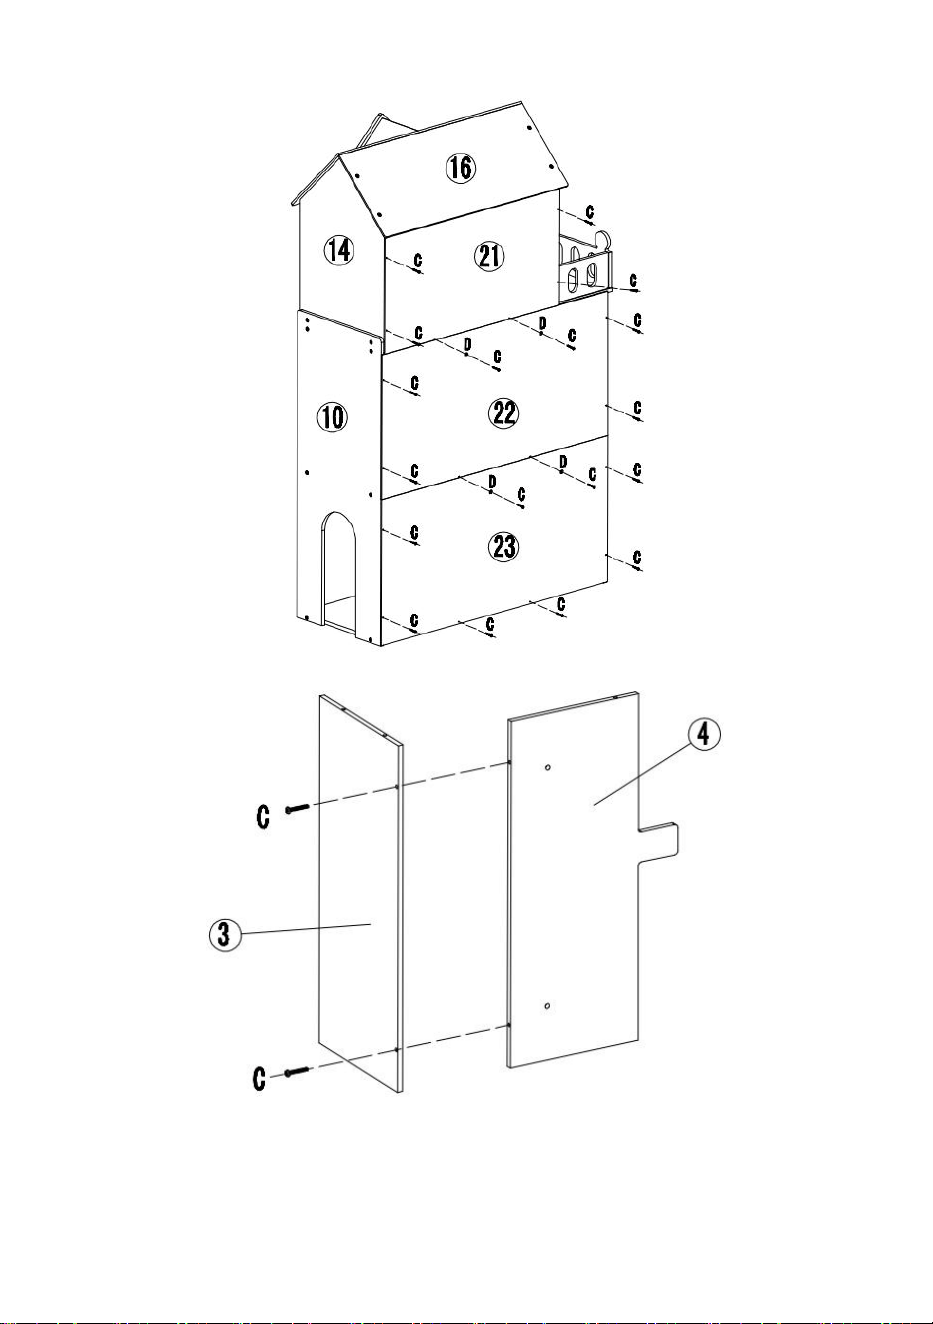
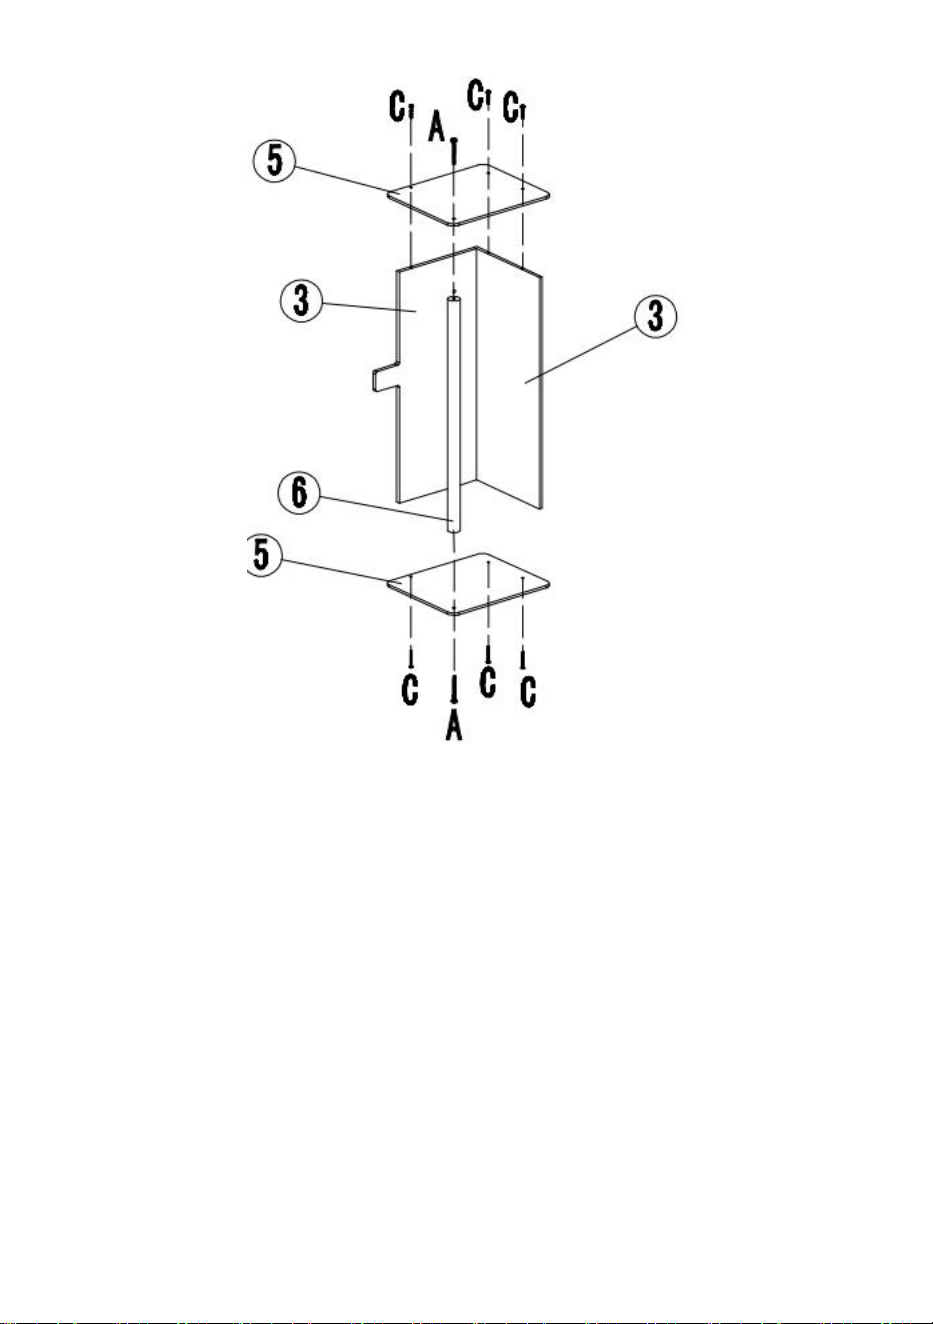
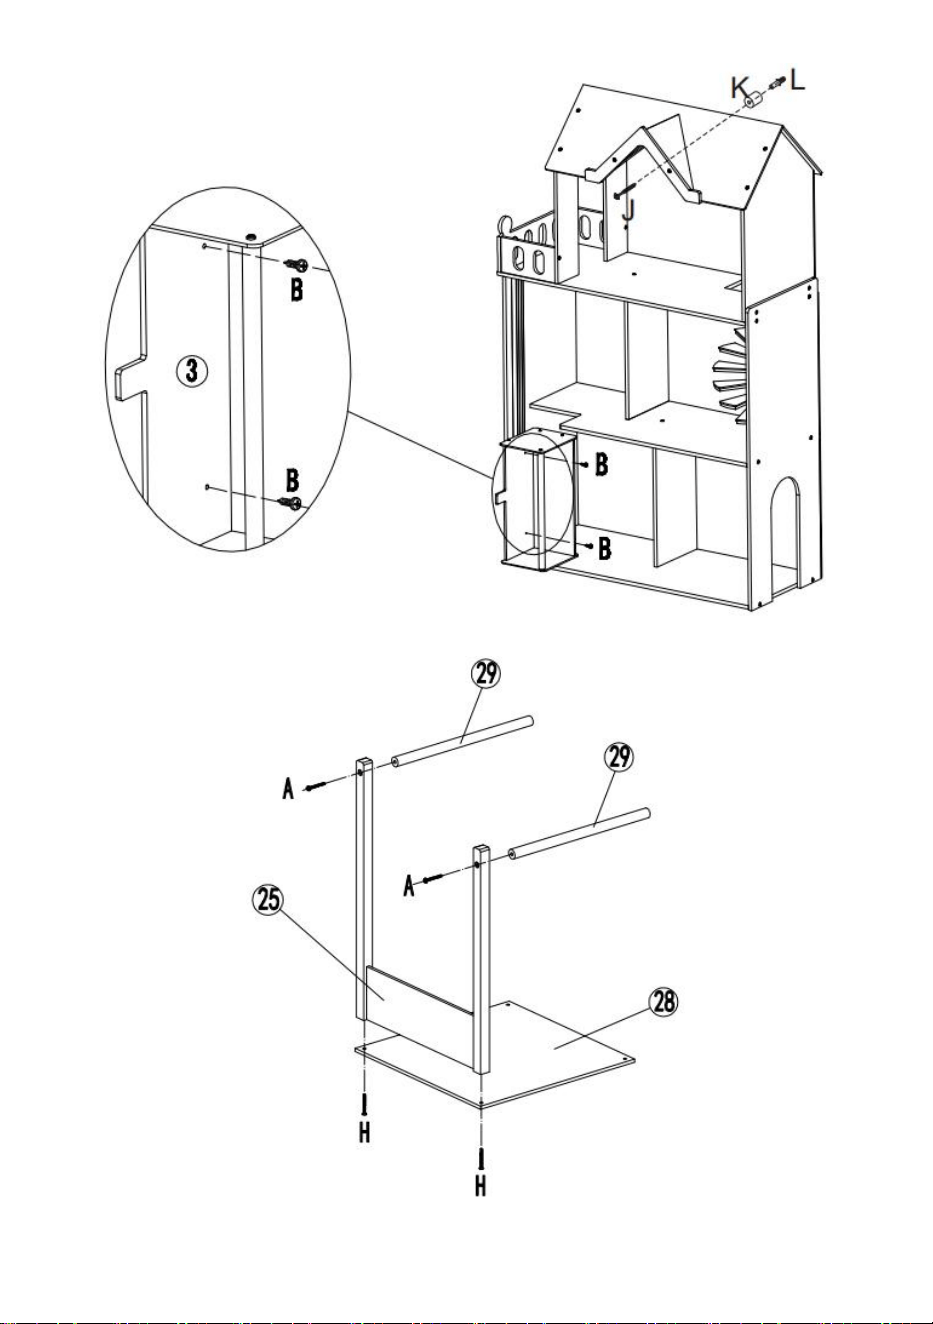
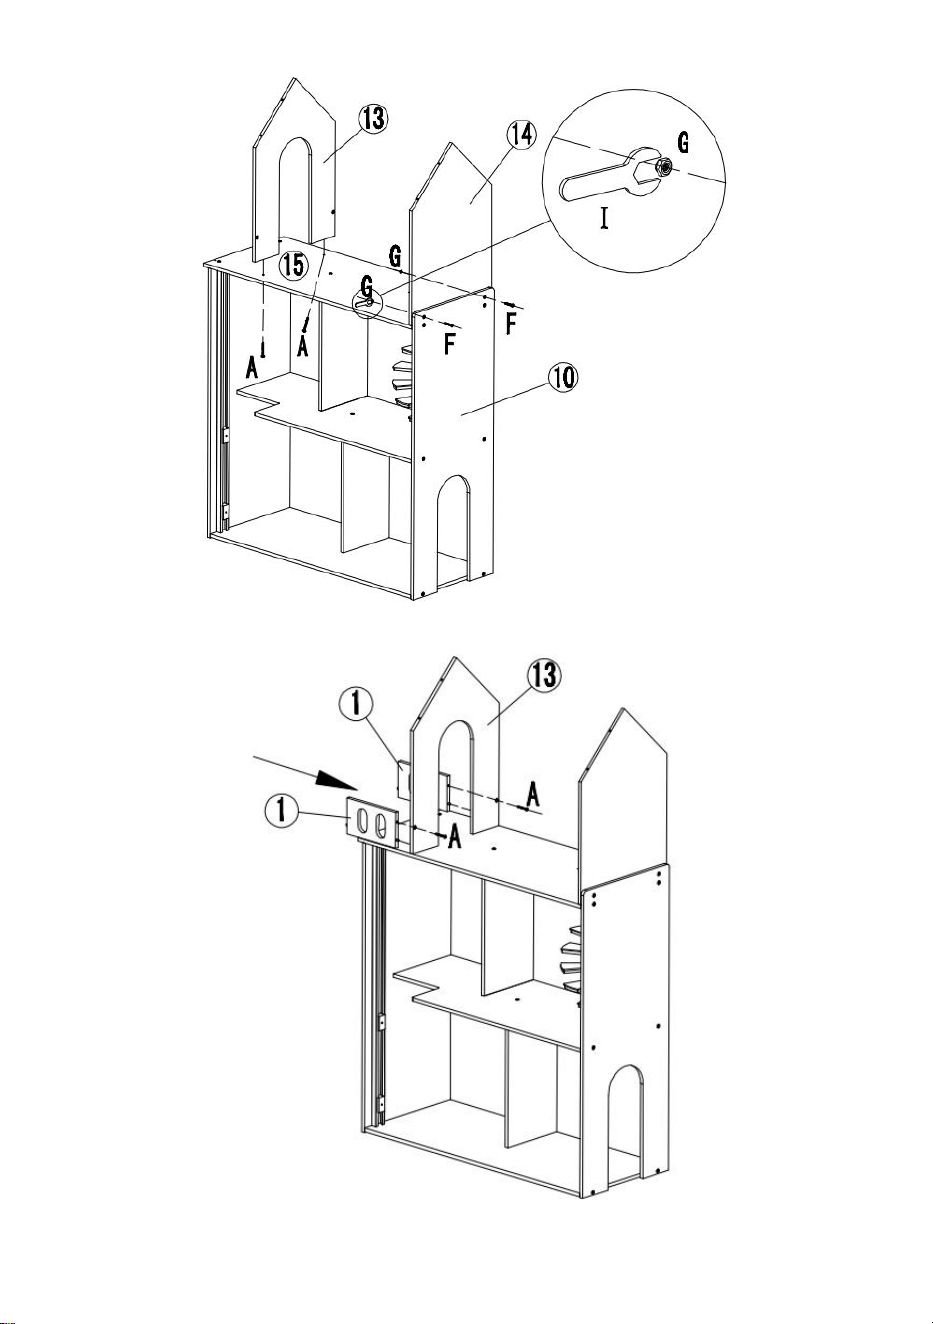
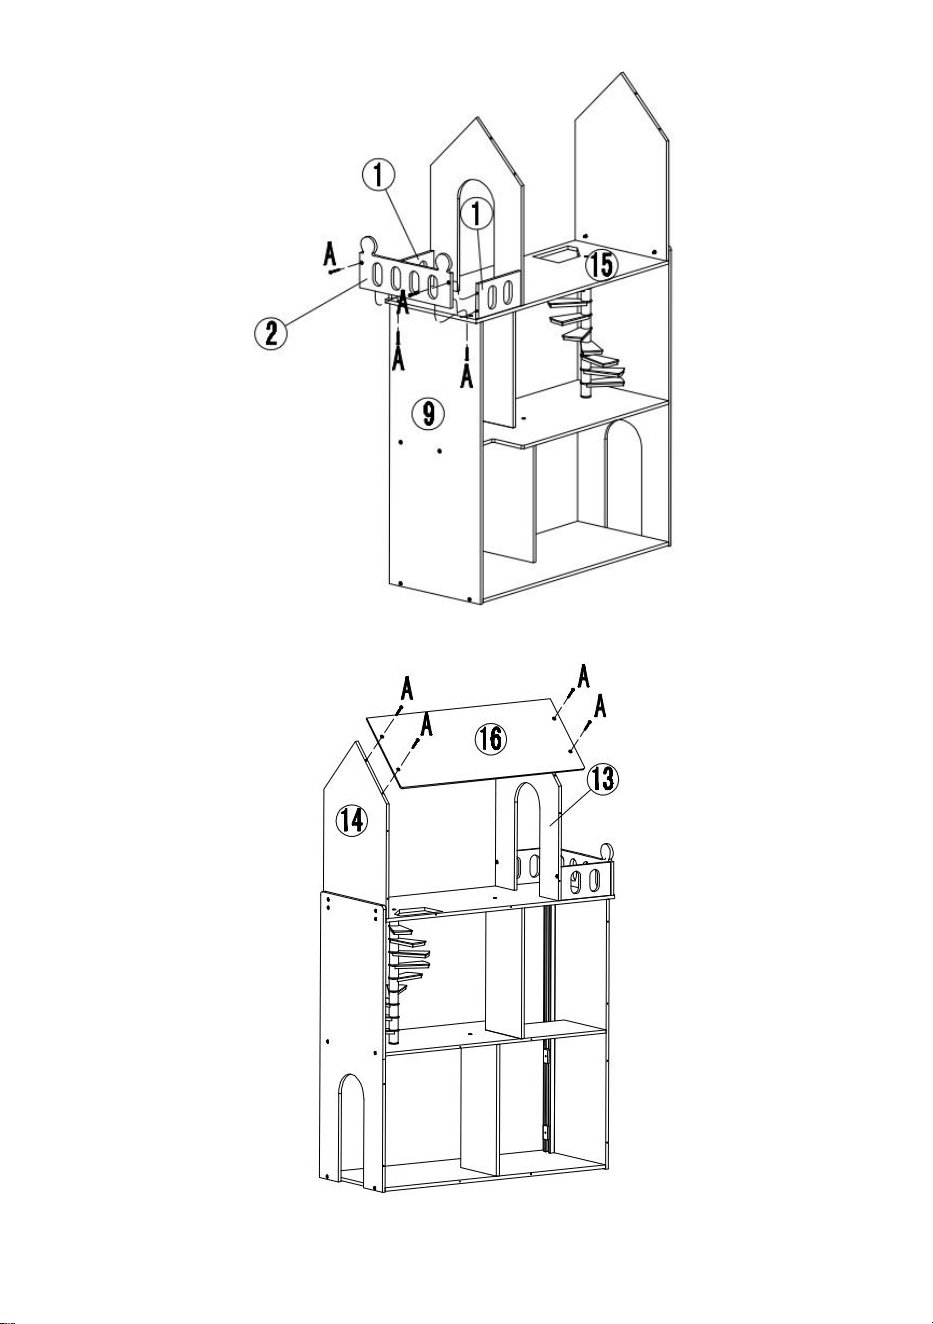
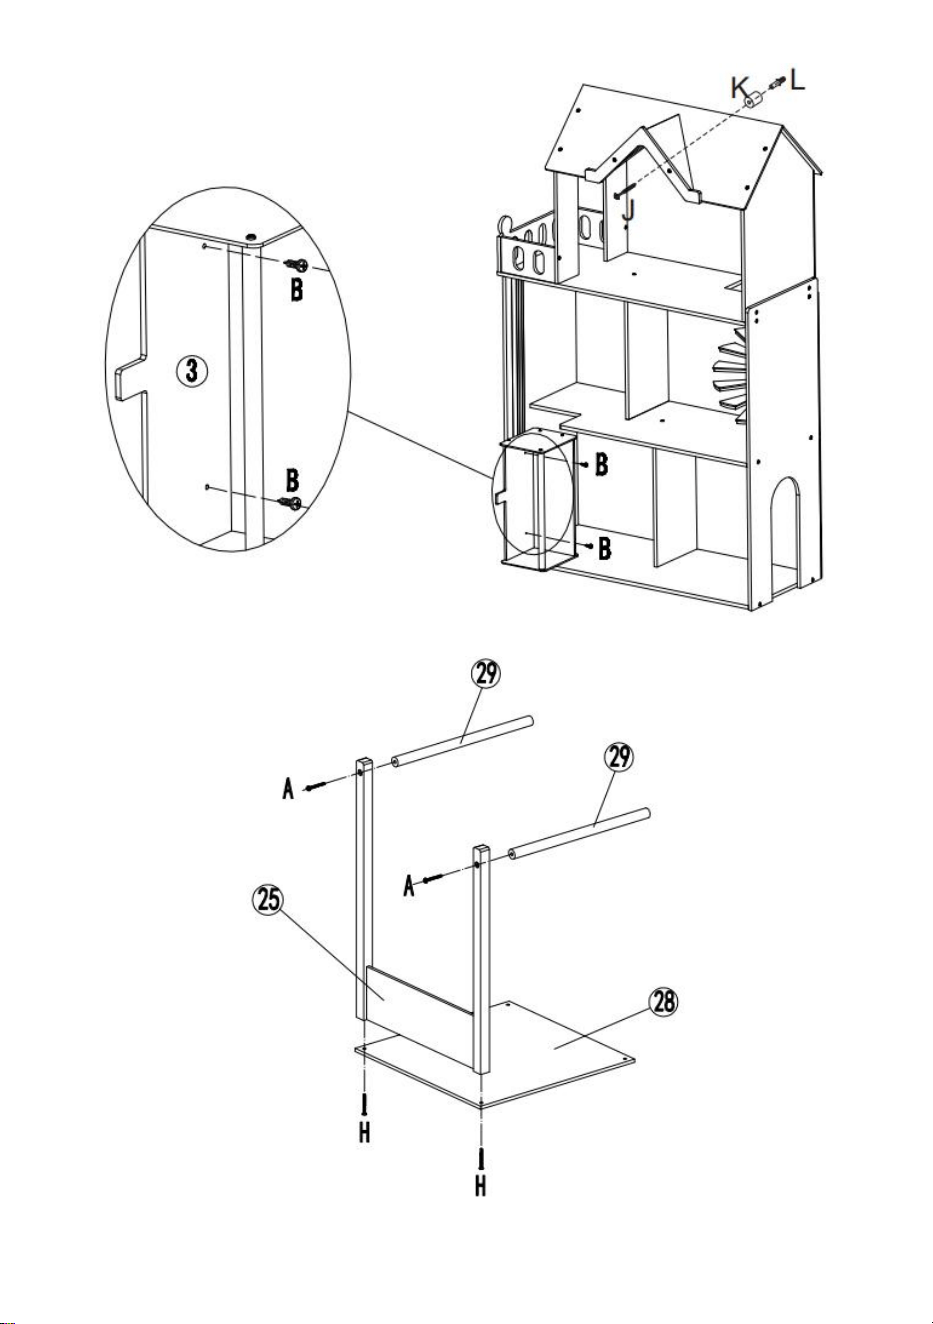
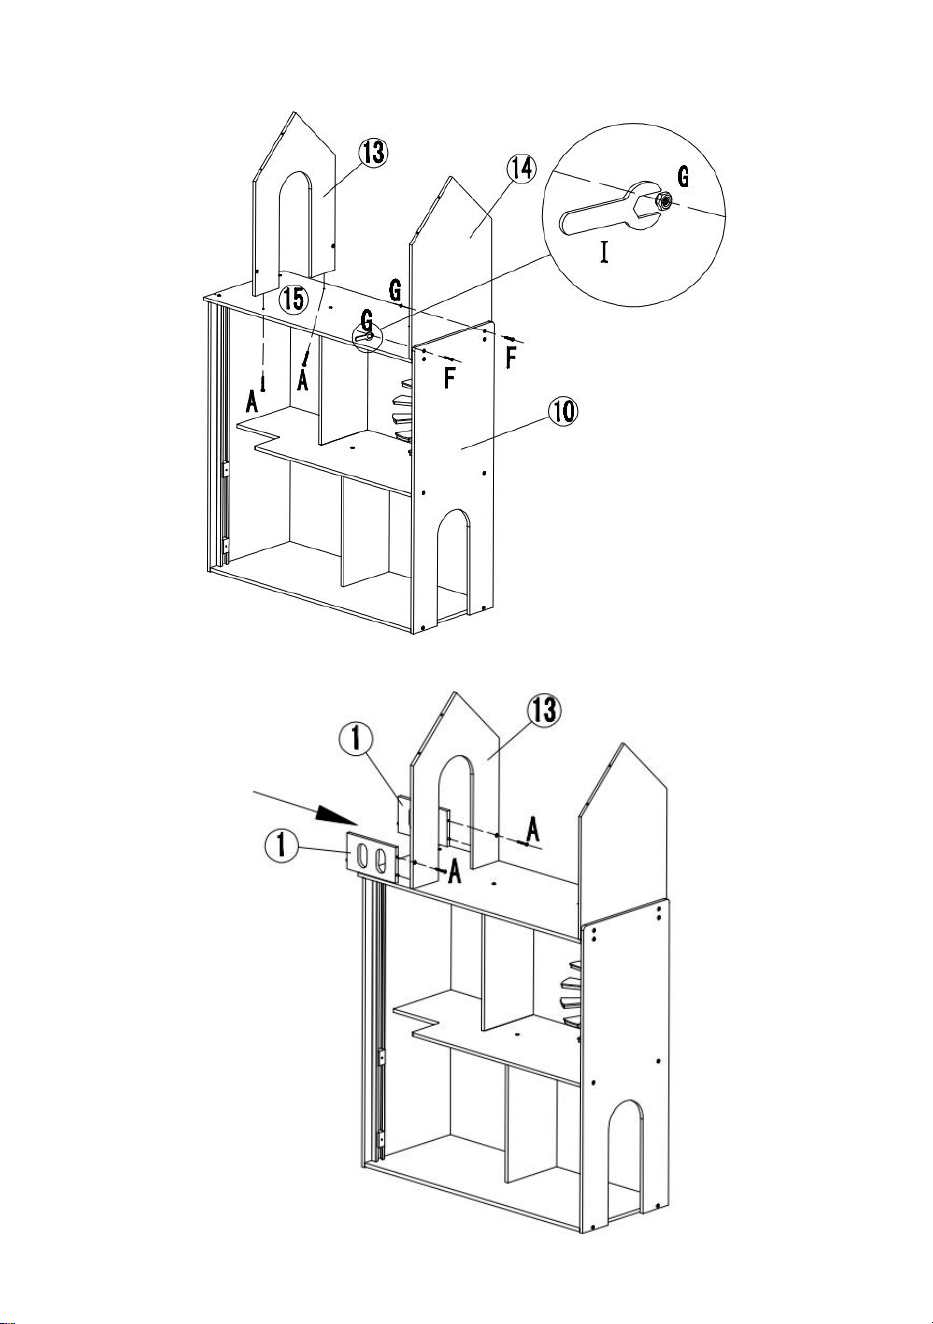
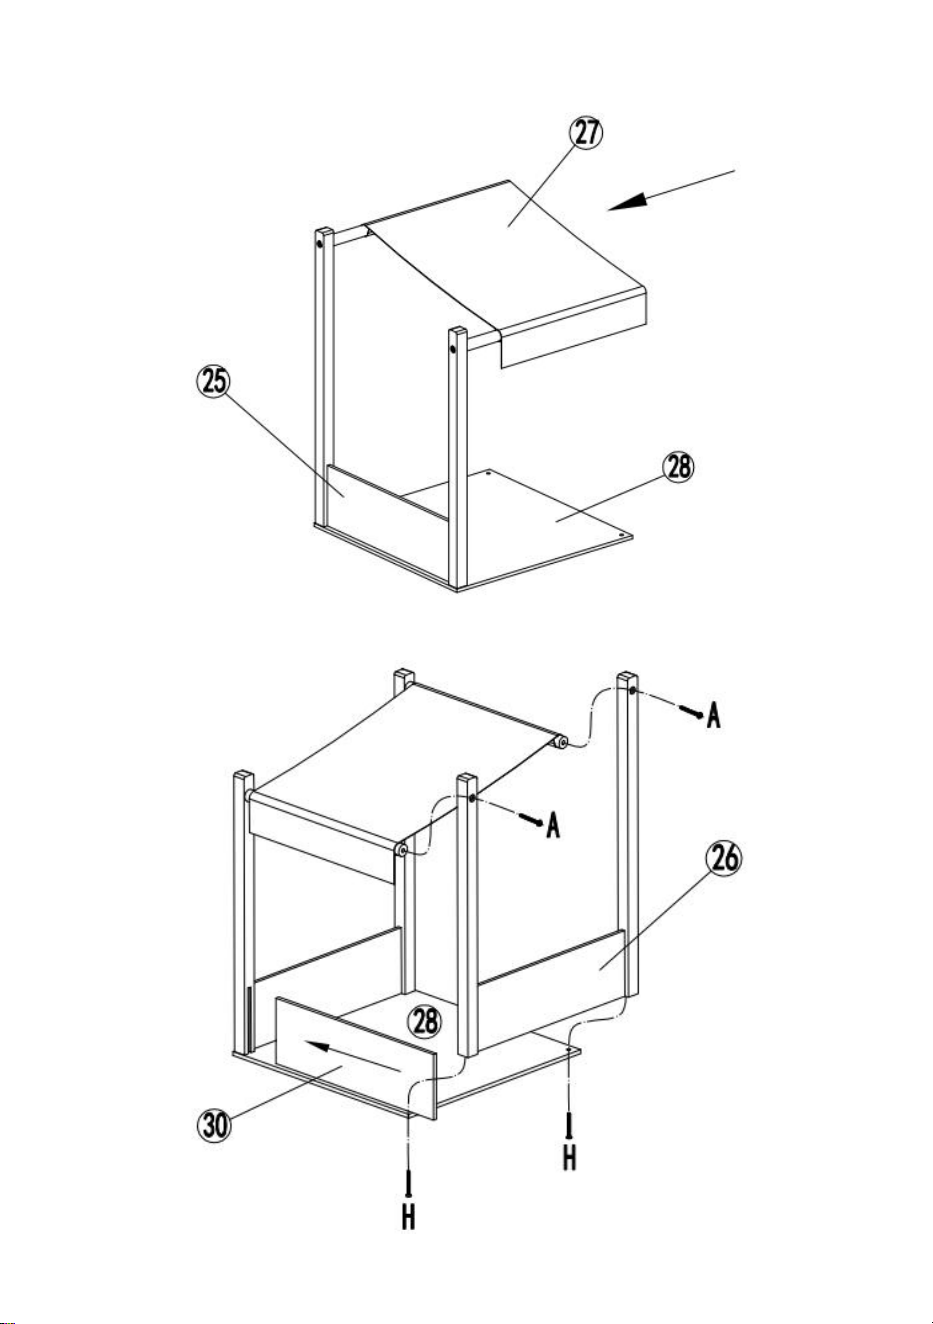
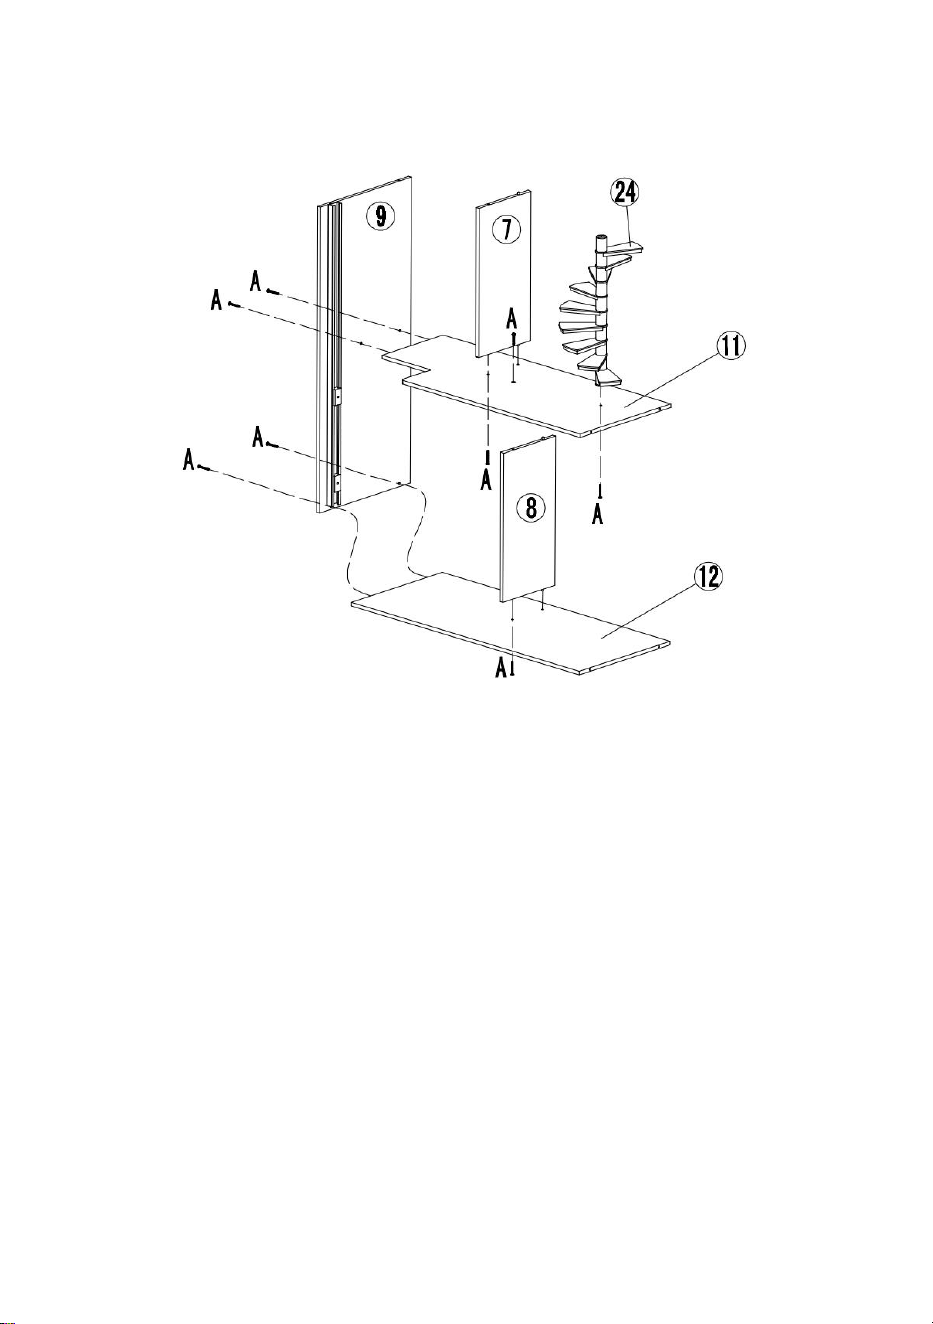
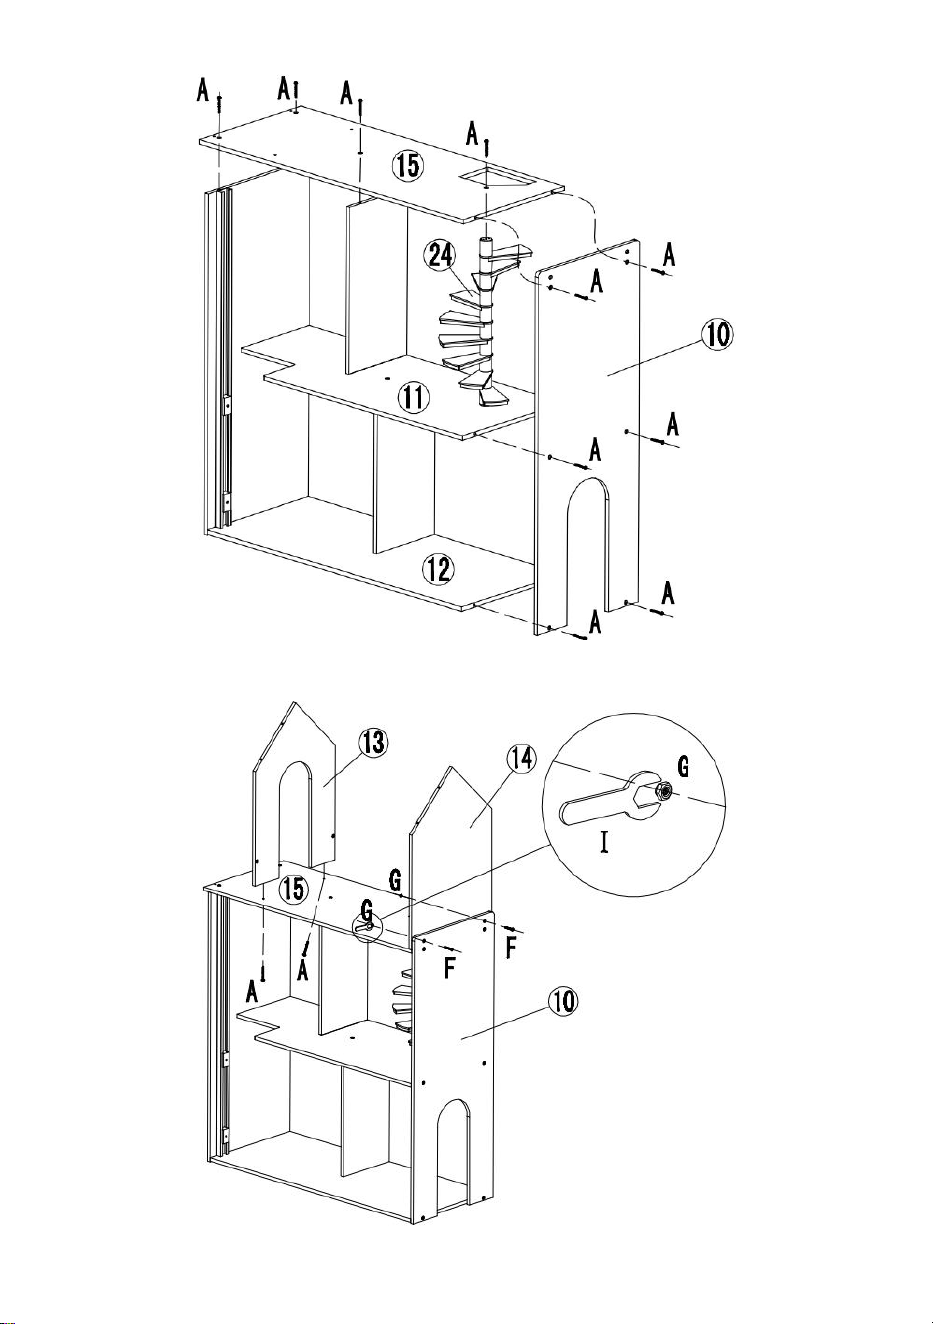
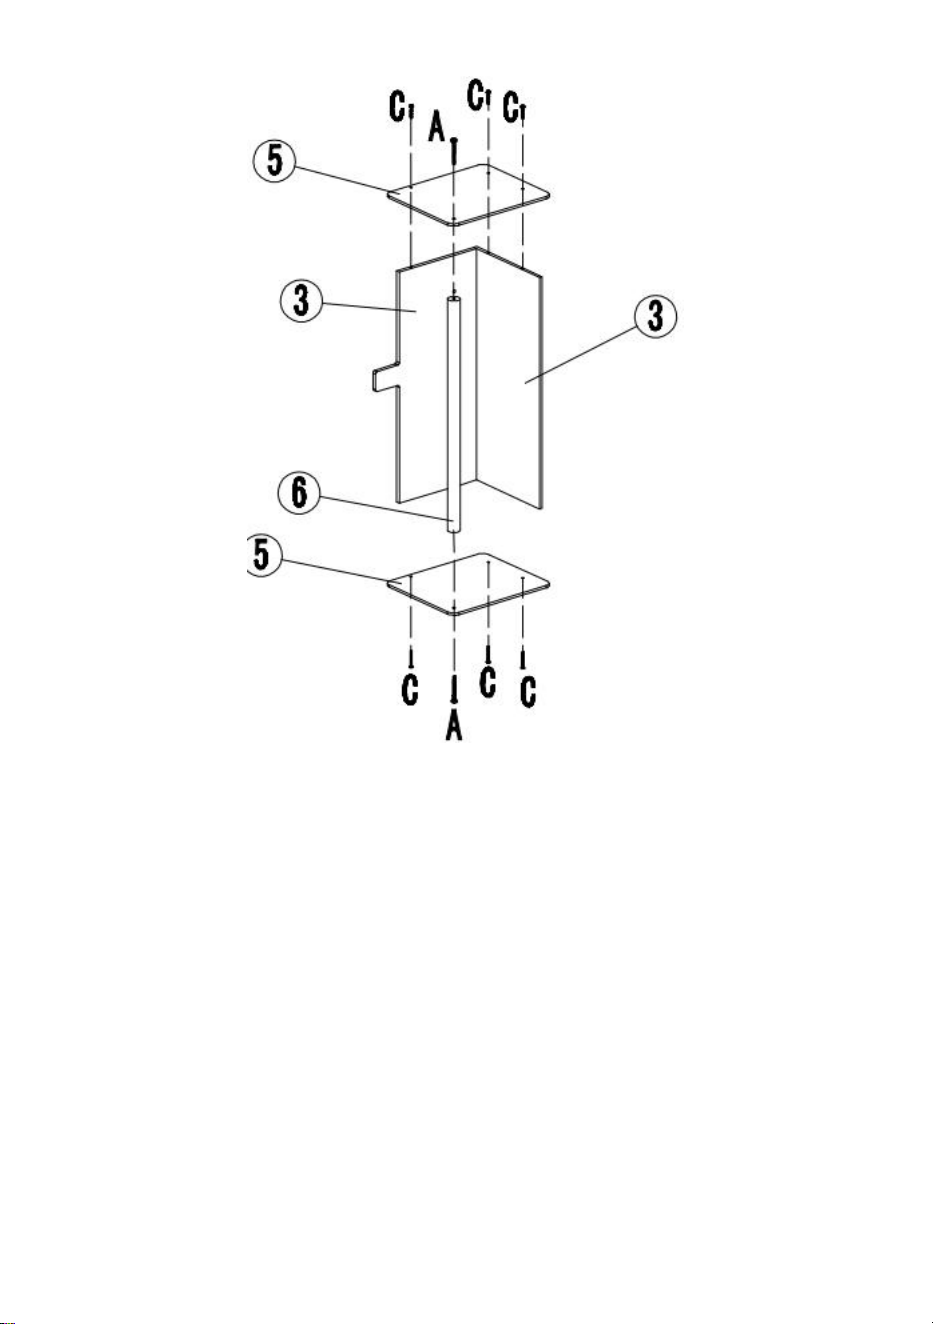
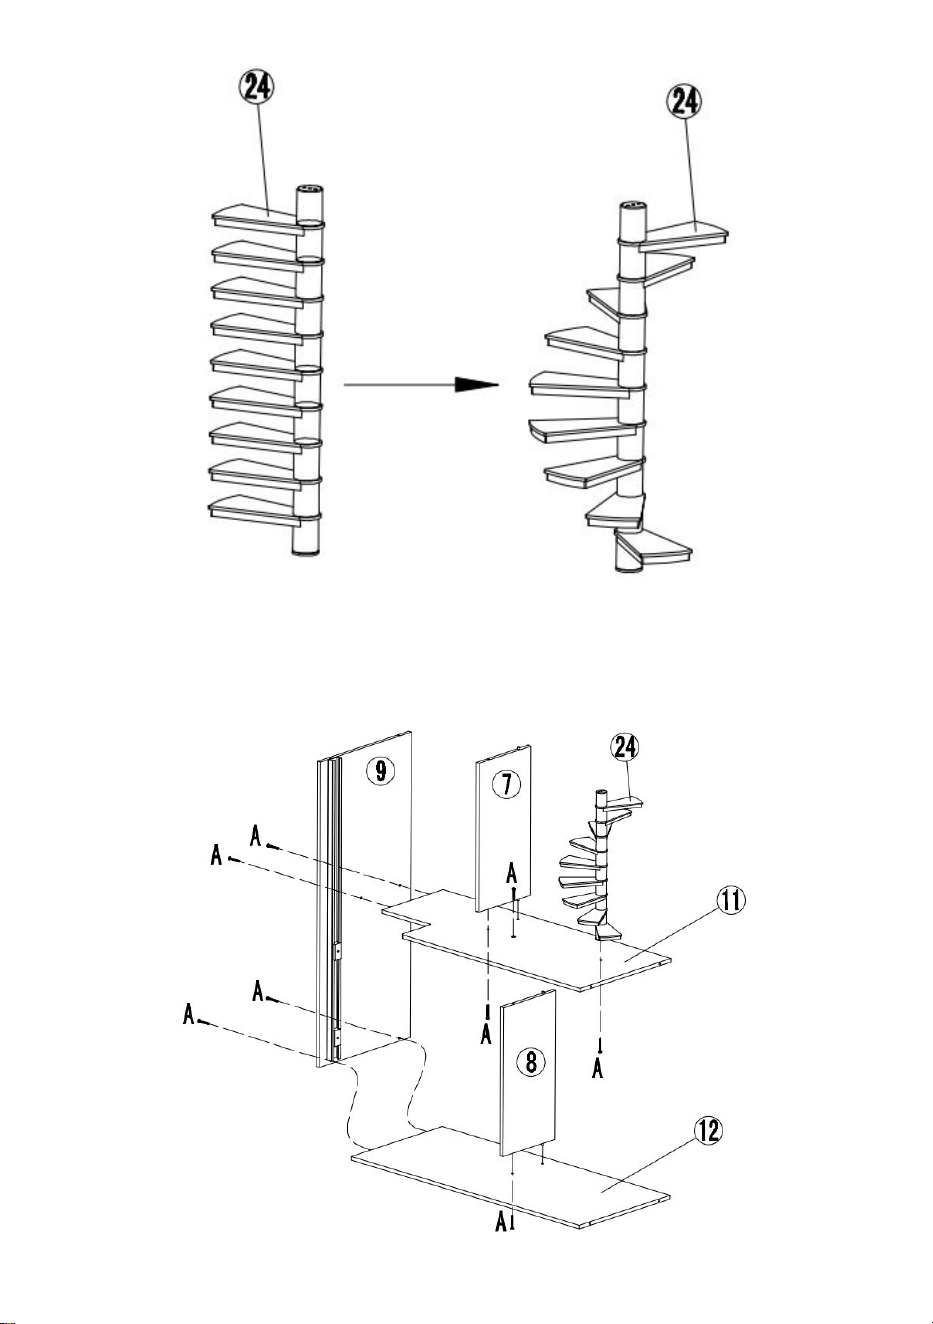
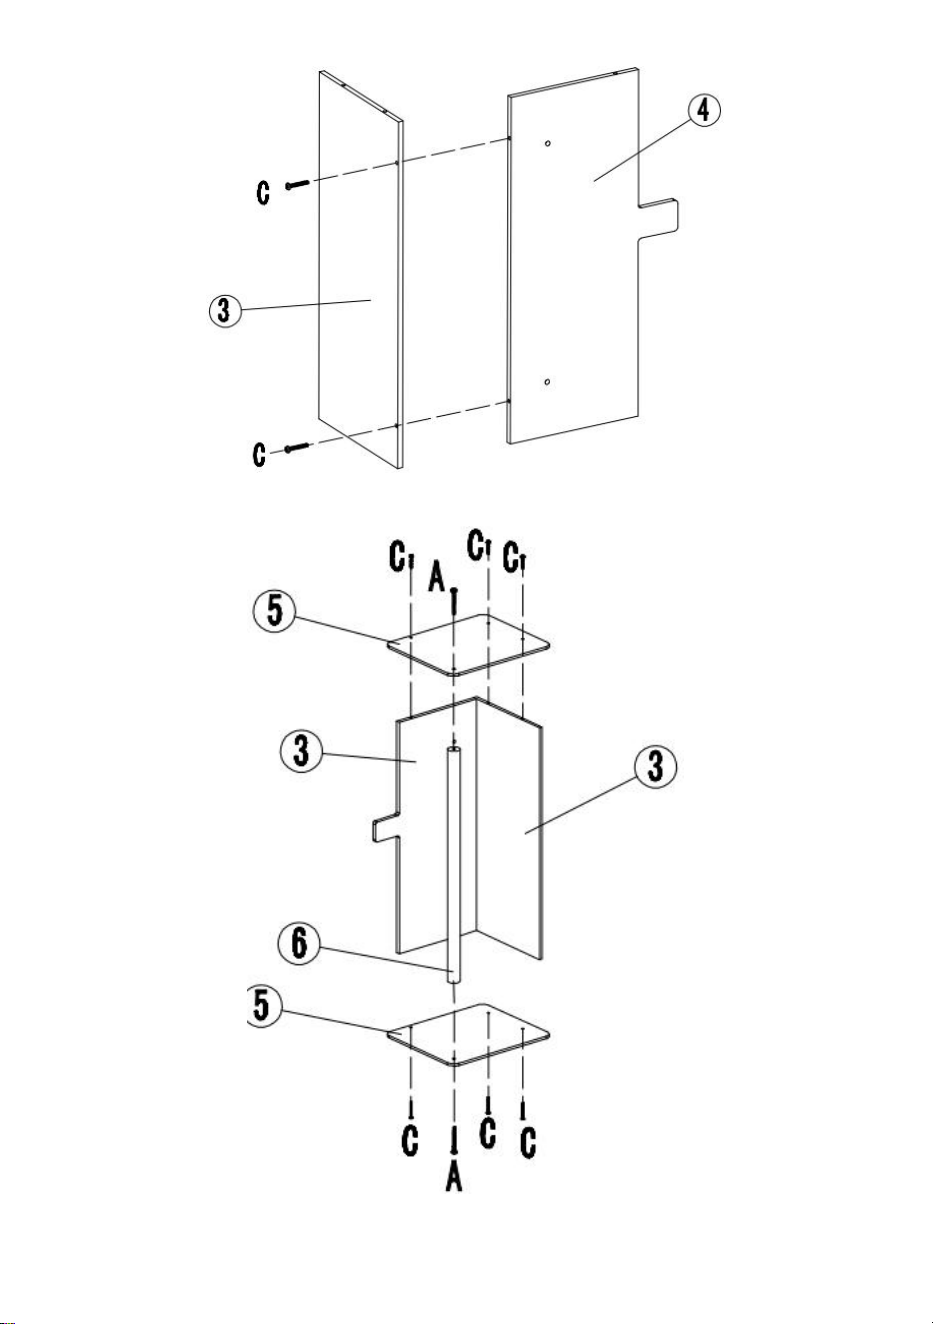
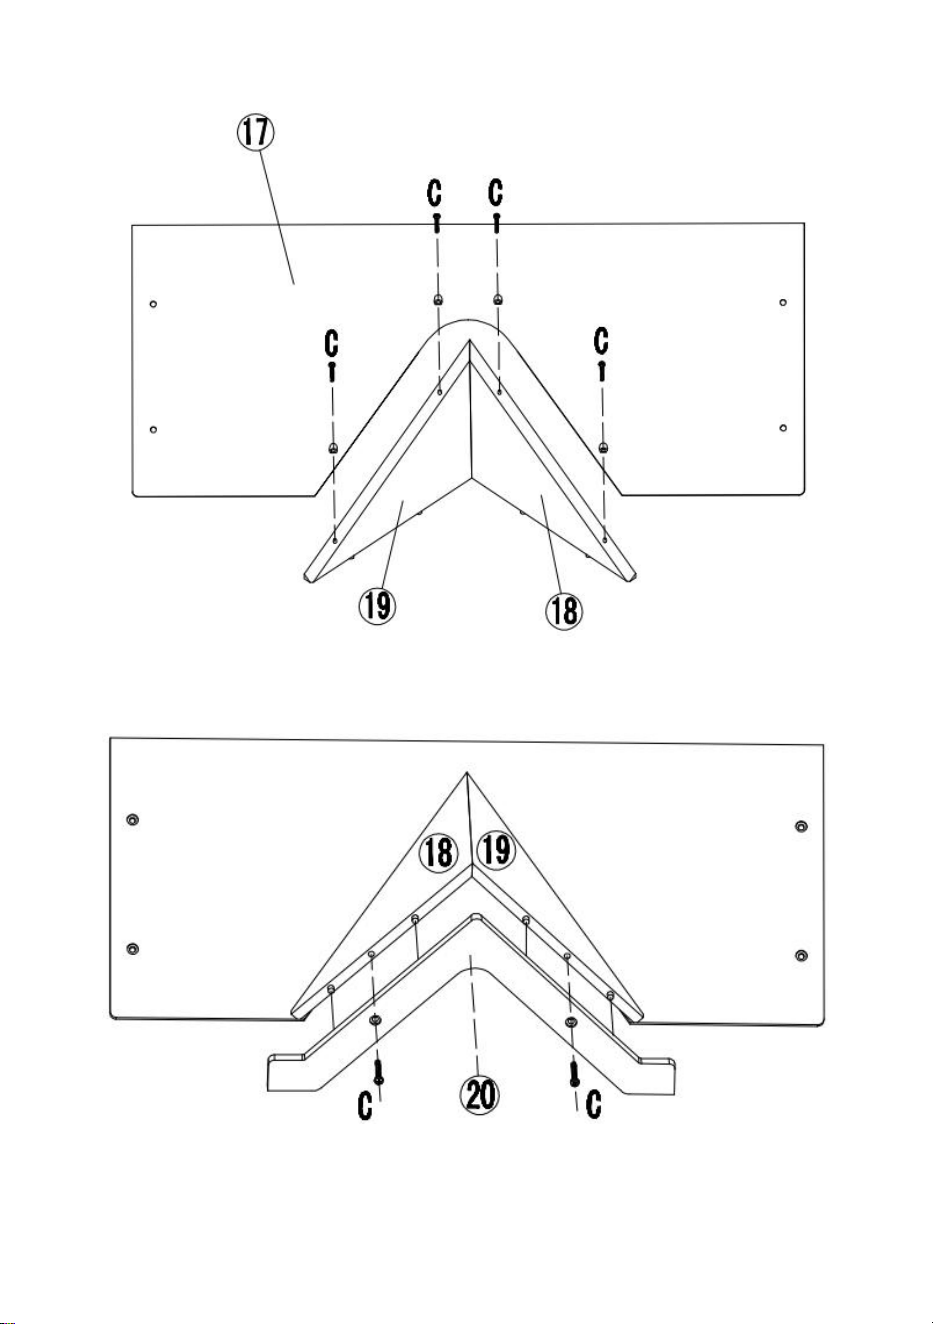
STEP 1:
STEP 2:
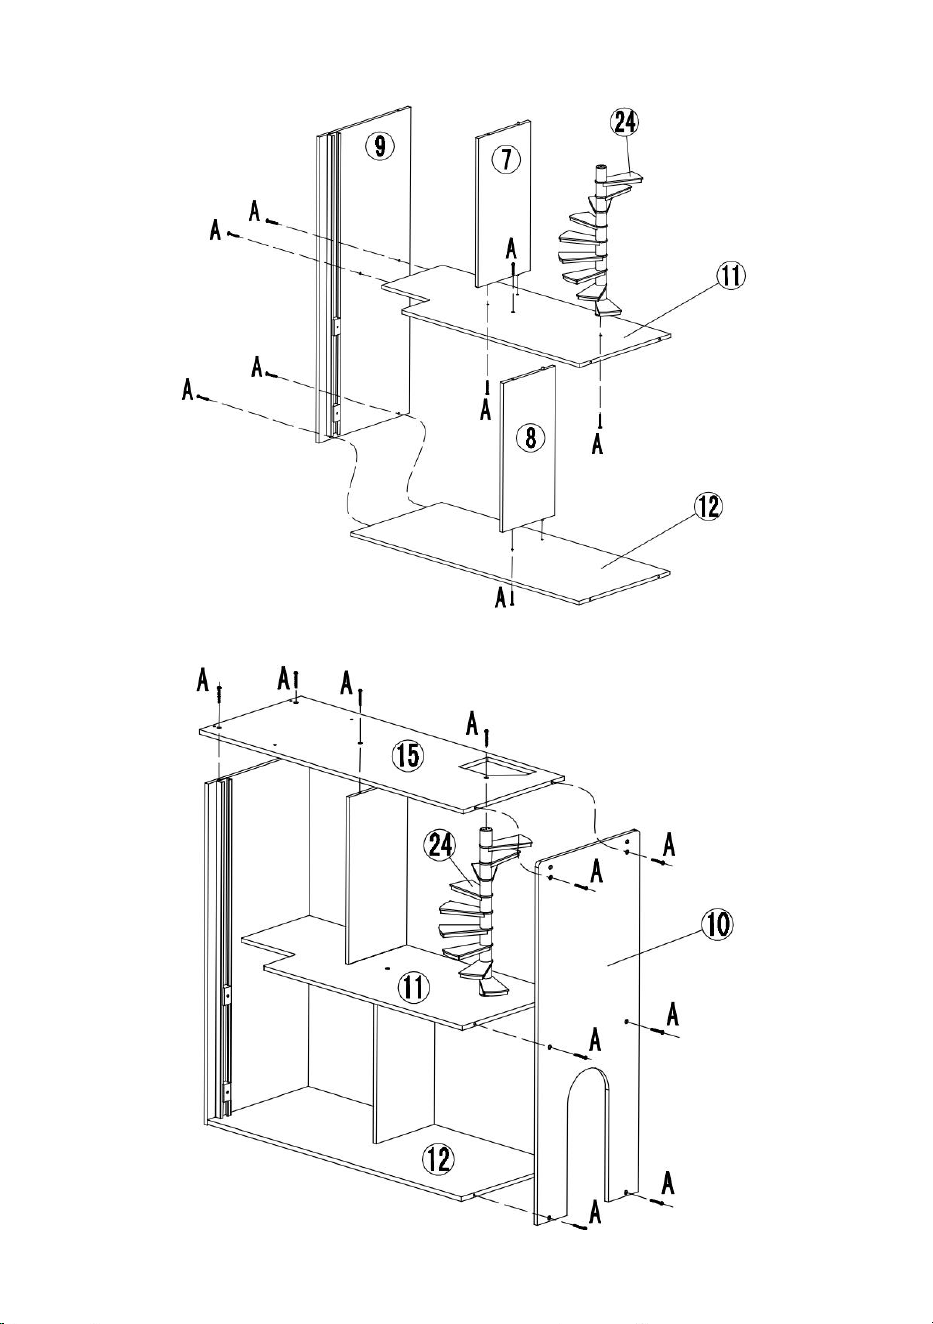
- 6 -
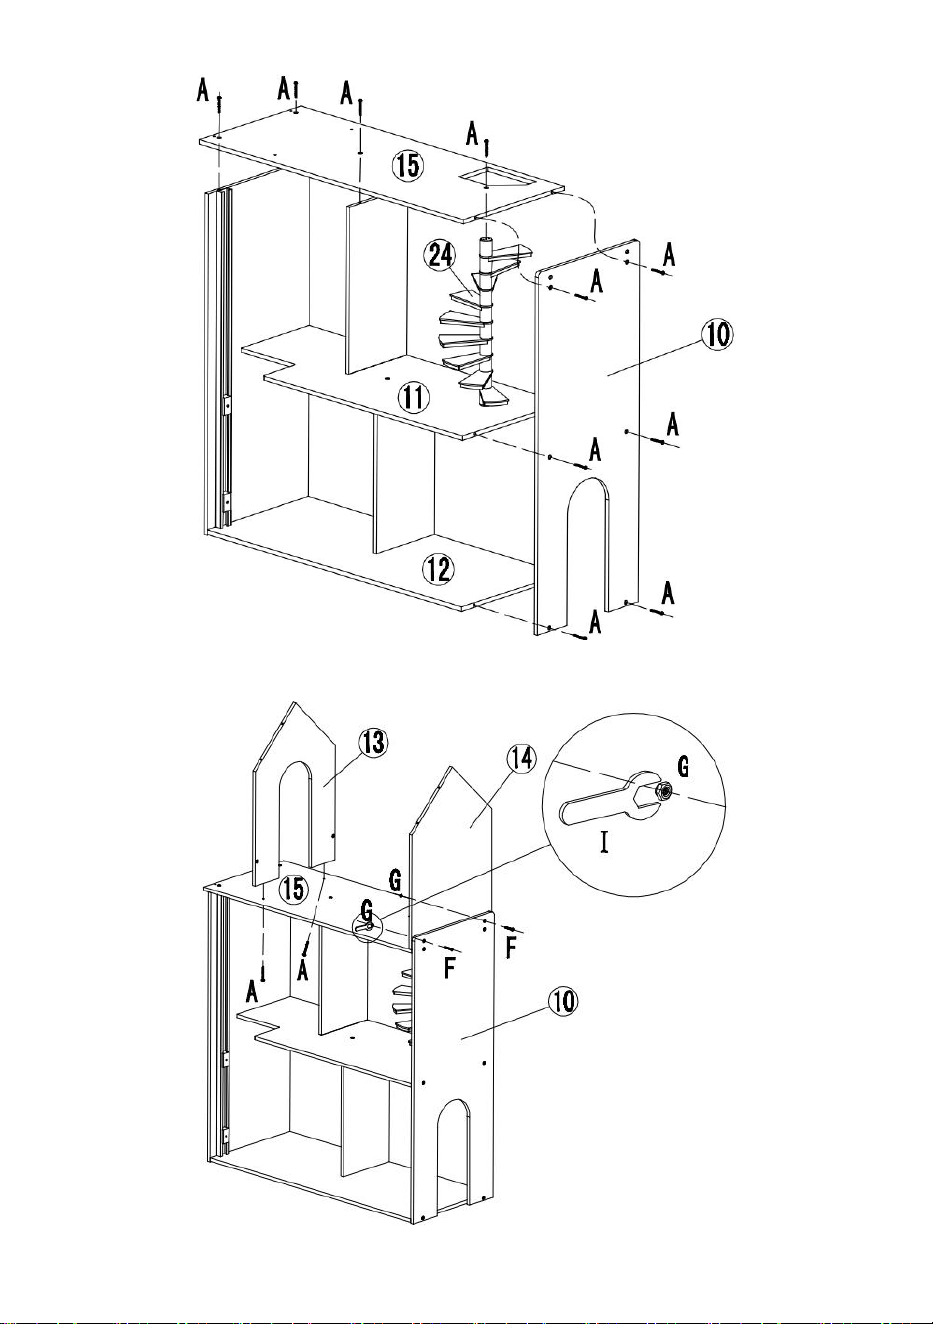
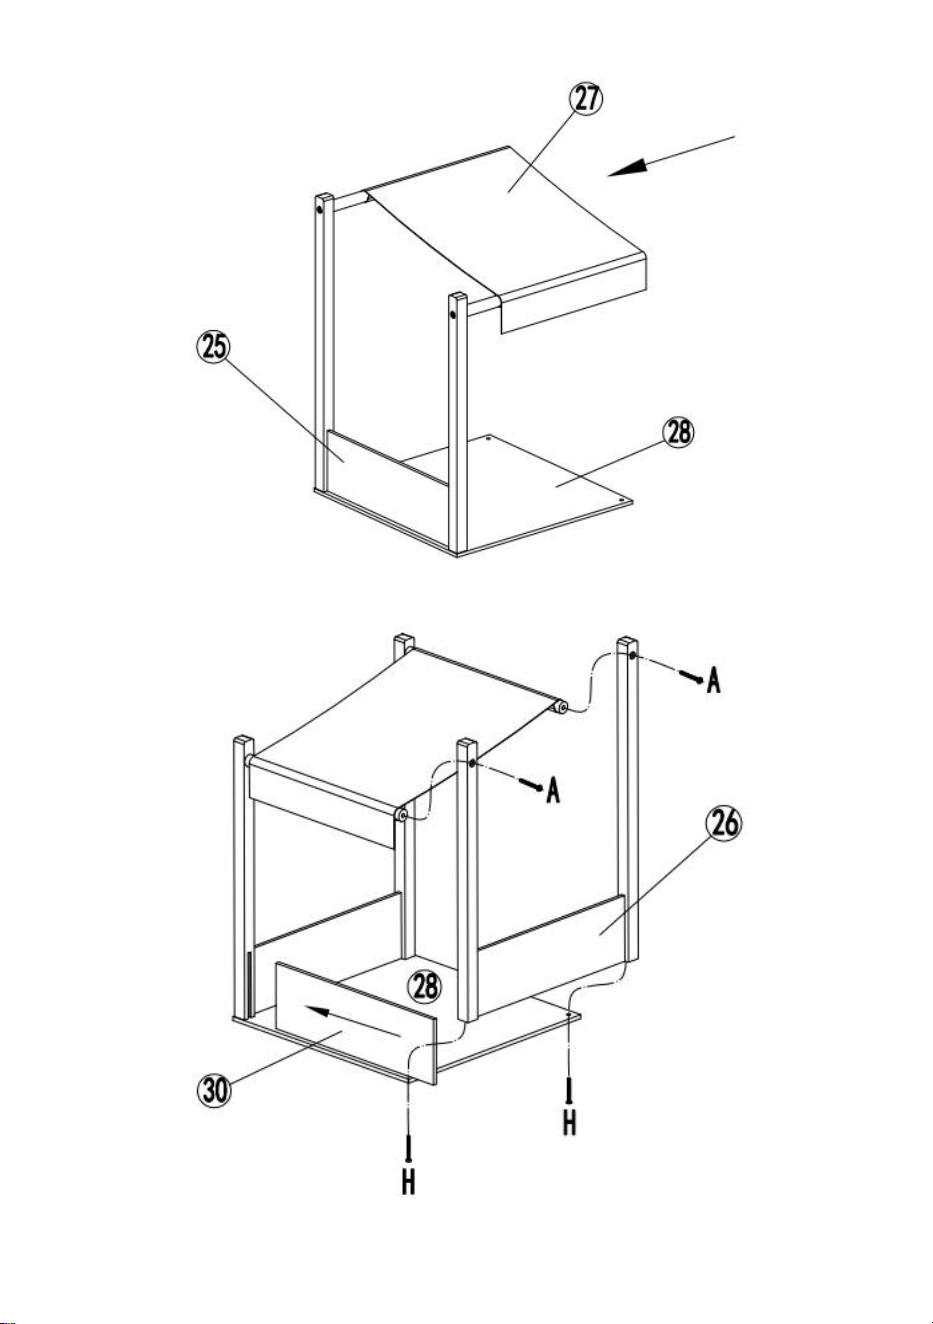
STEP 3:
STEP 4:
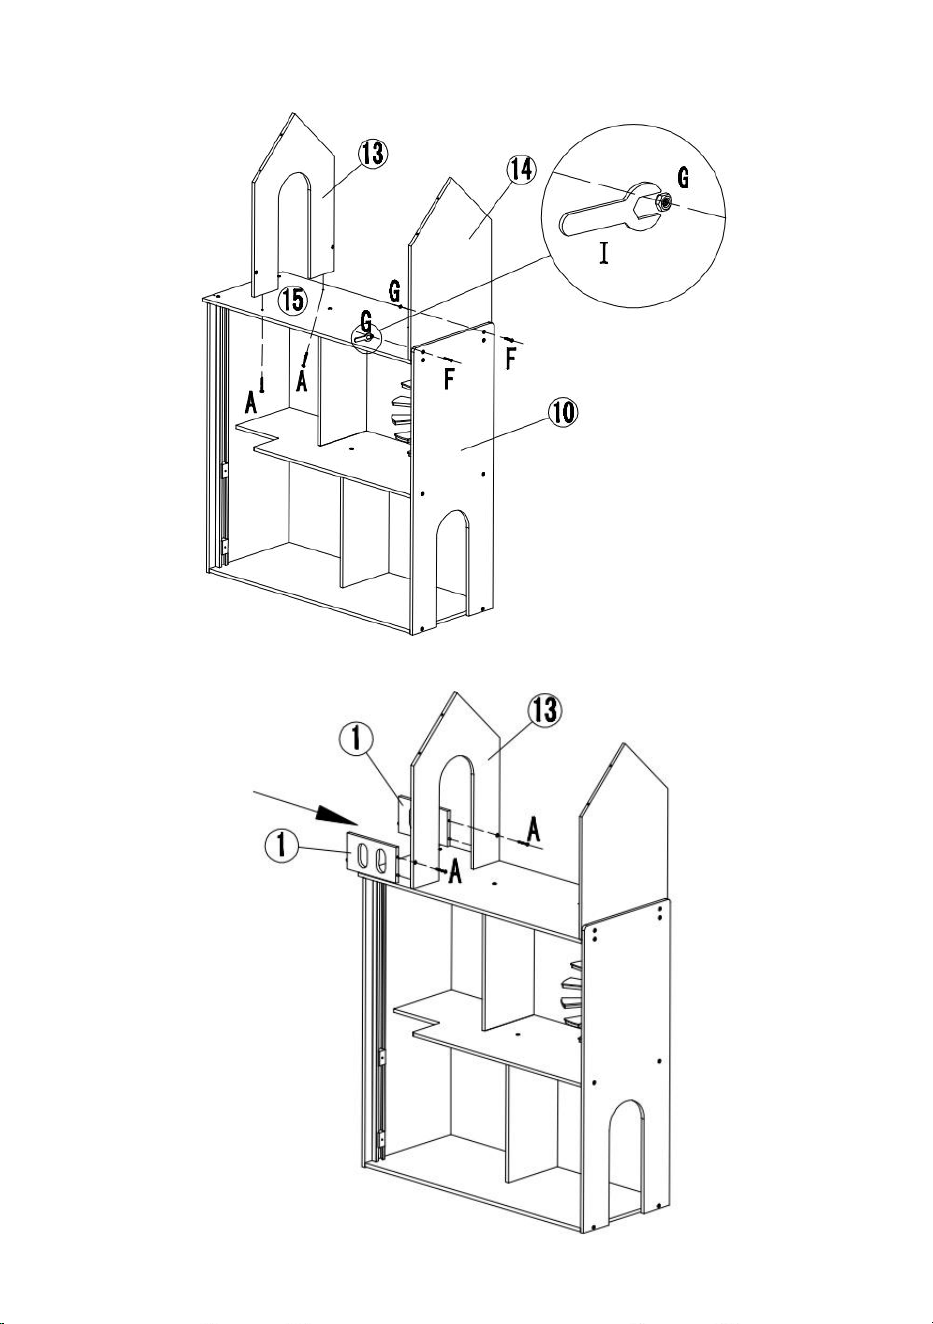
- 7 -
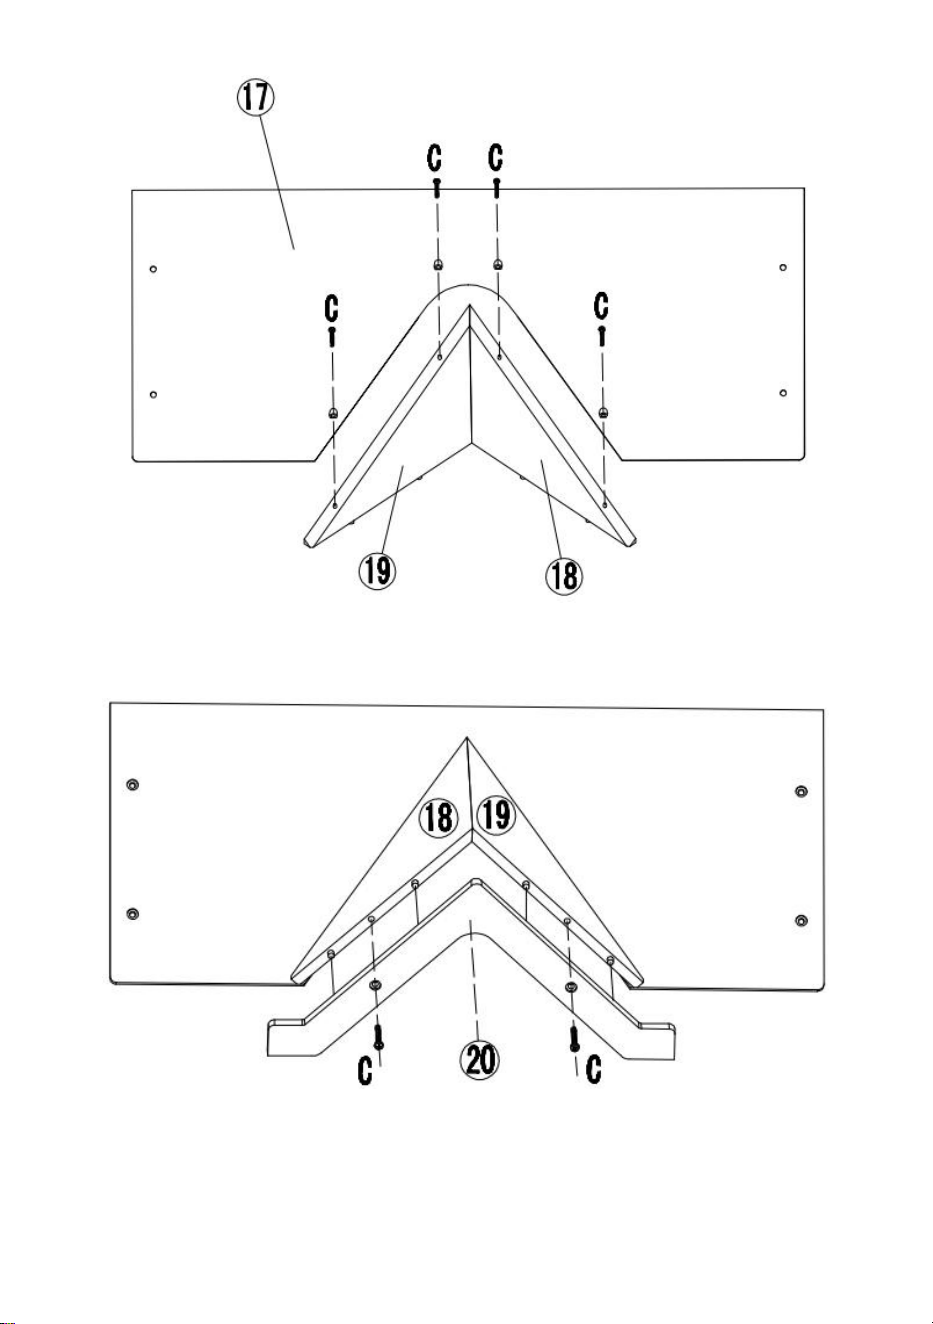
STEP 5:
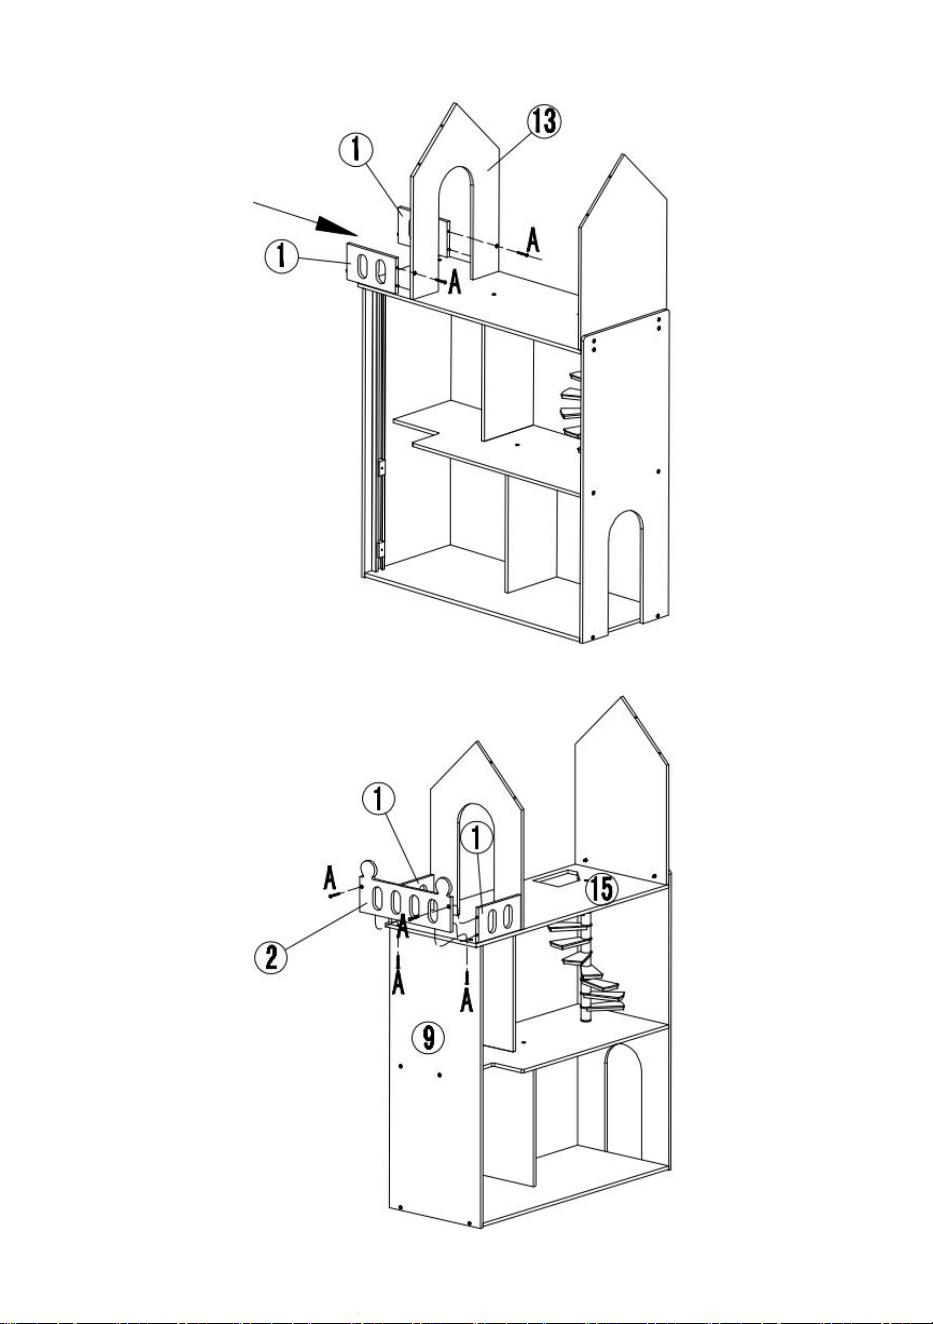
STEP 6:
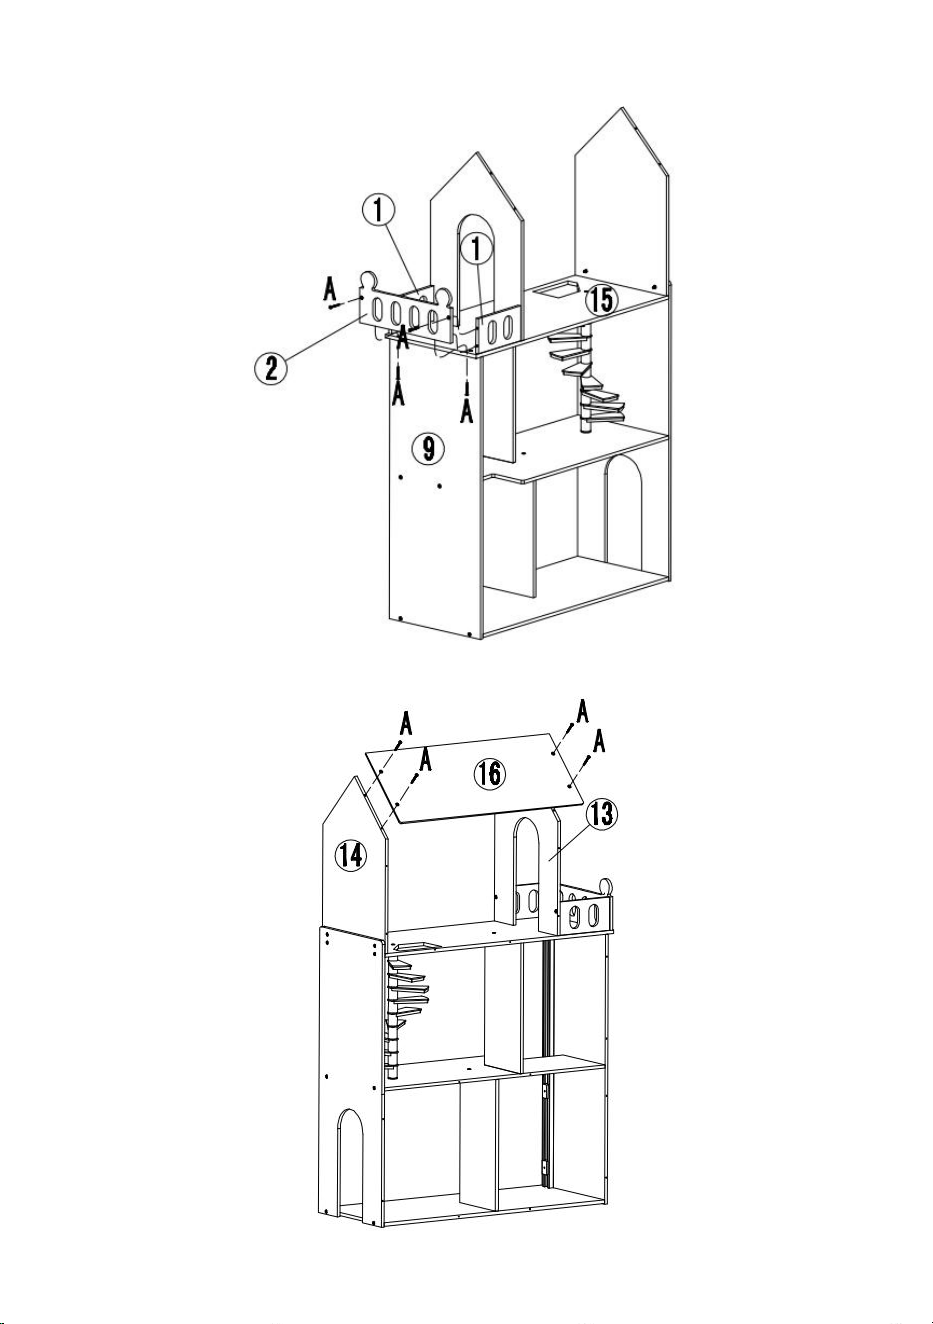
- 8 -
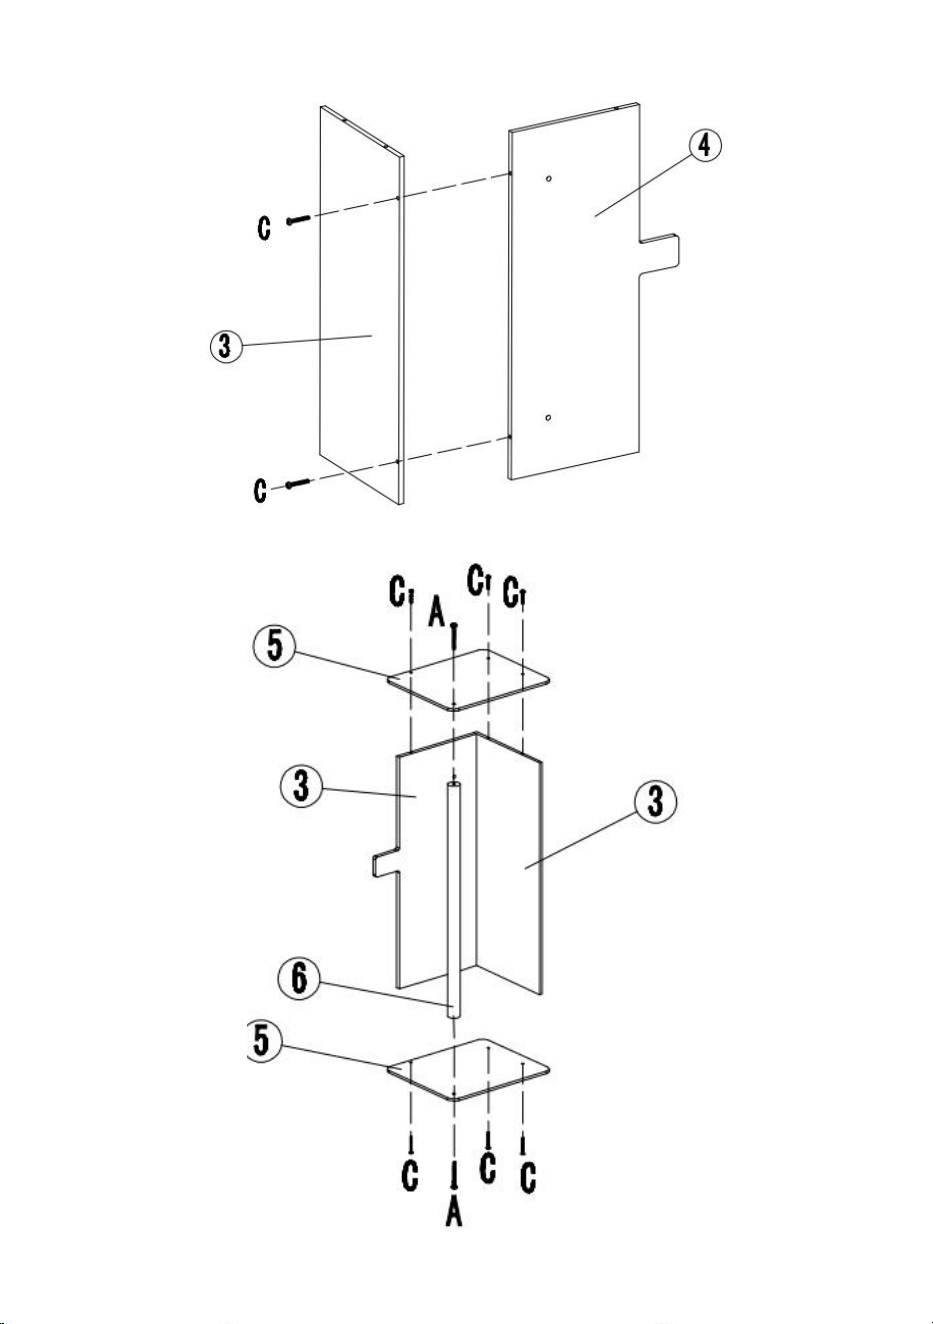
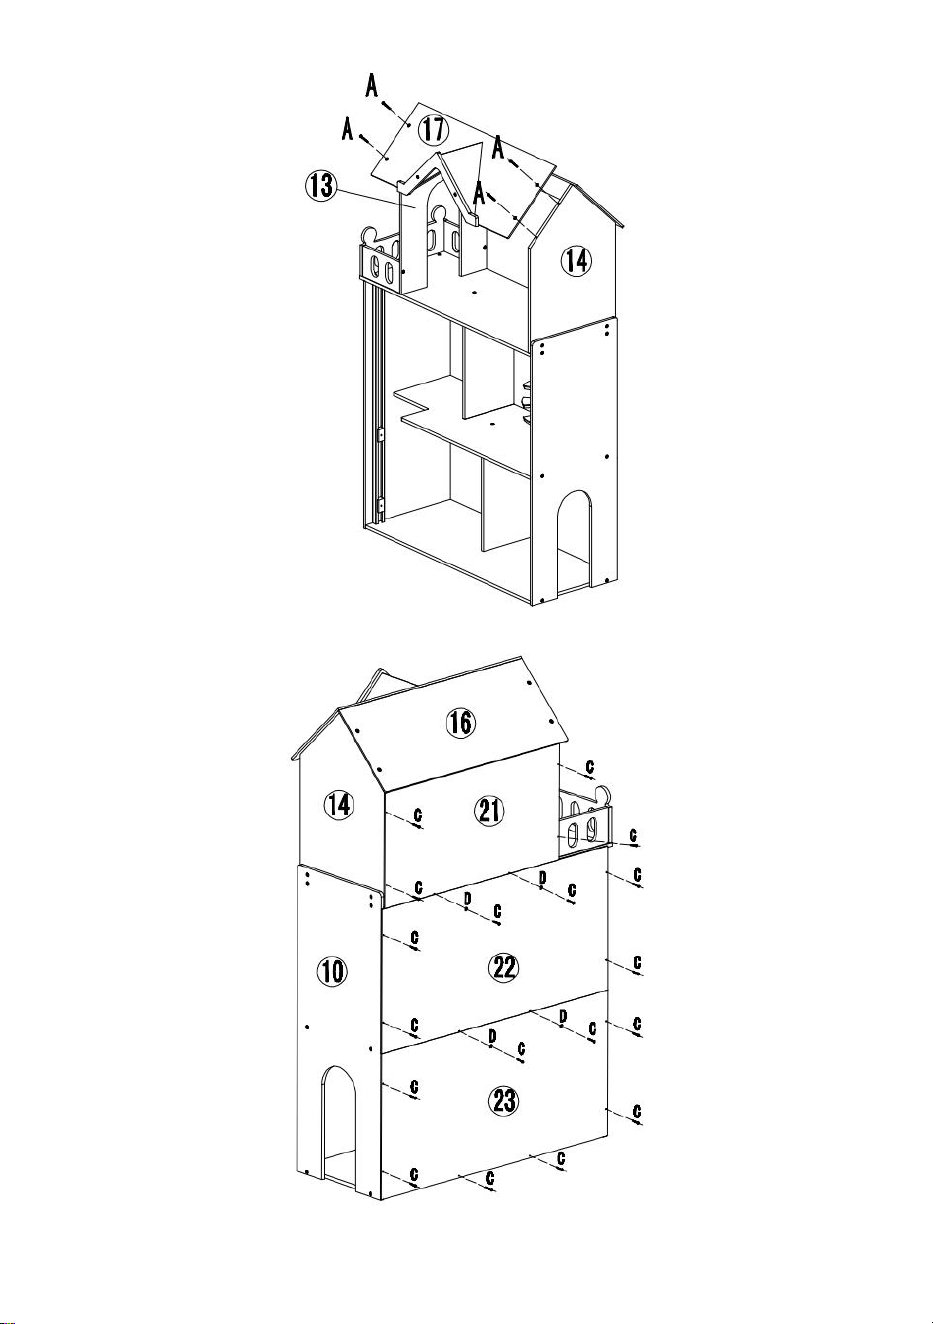
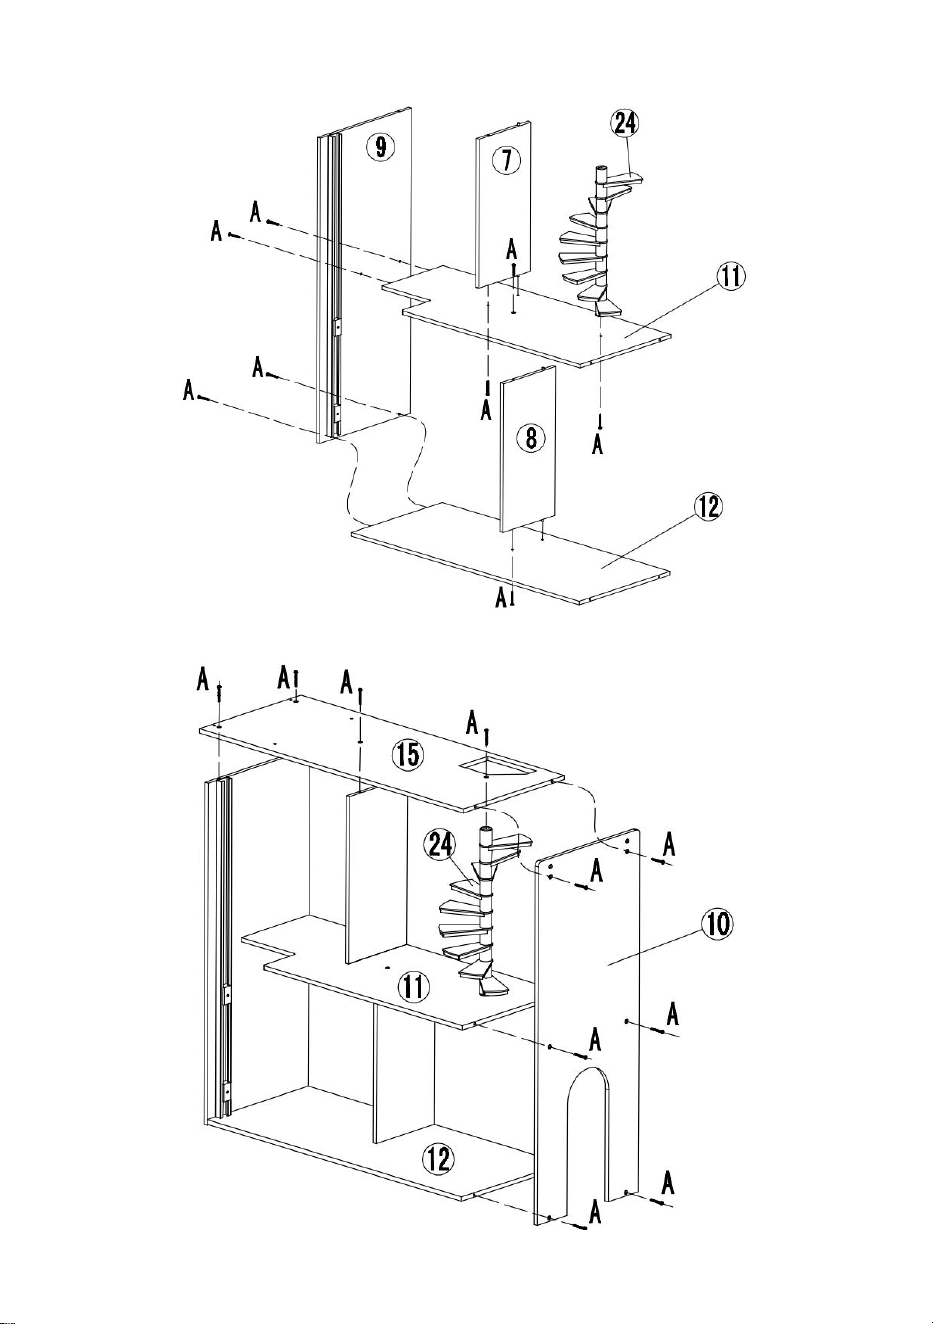
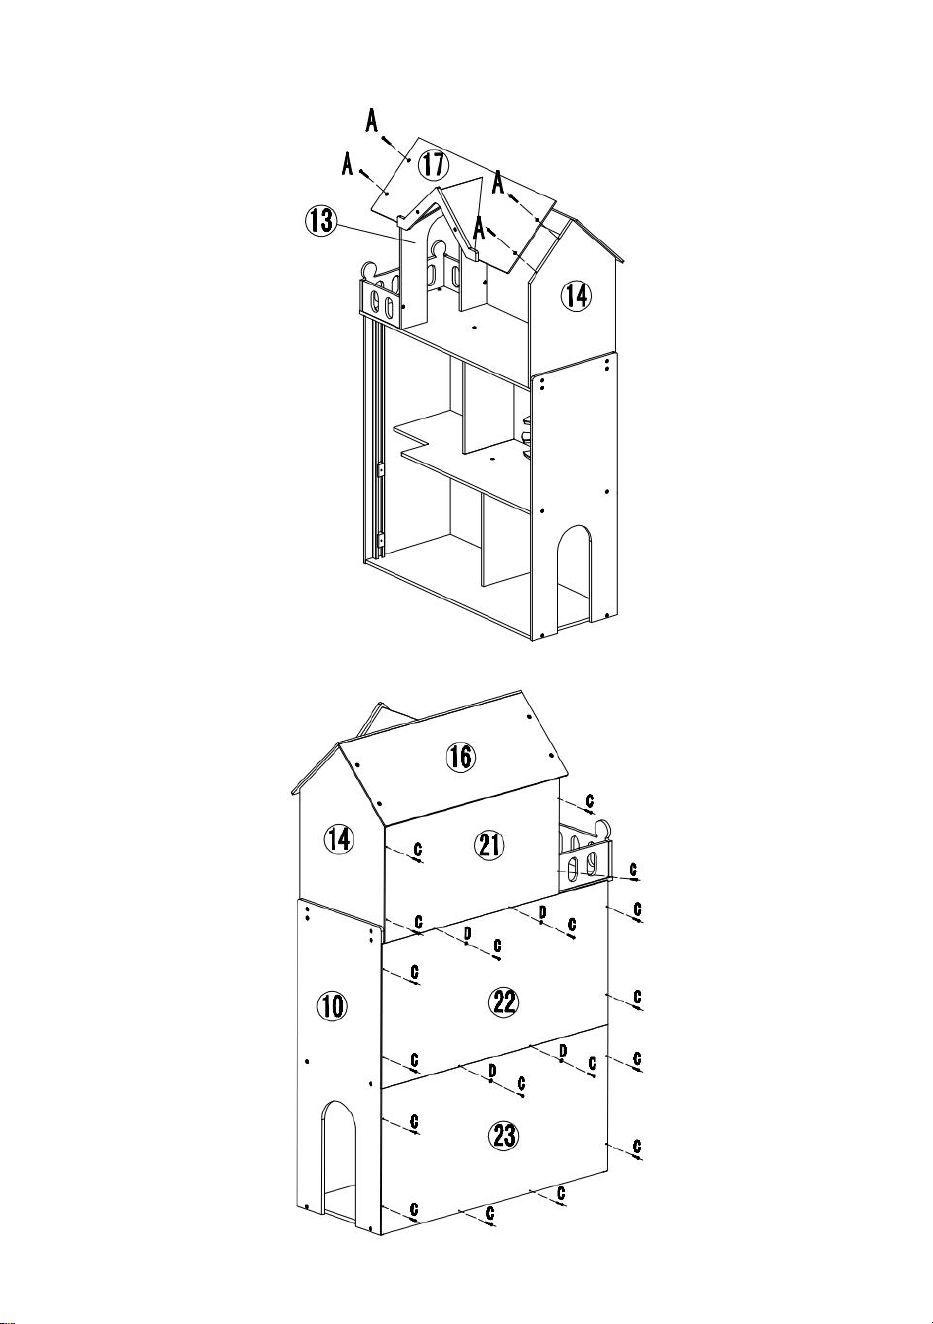
STEP 7:
STEP 8:
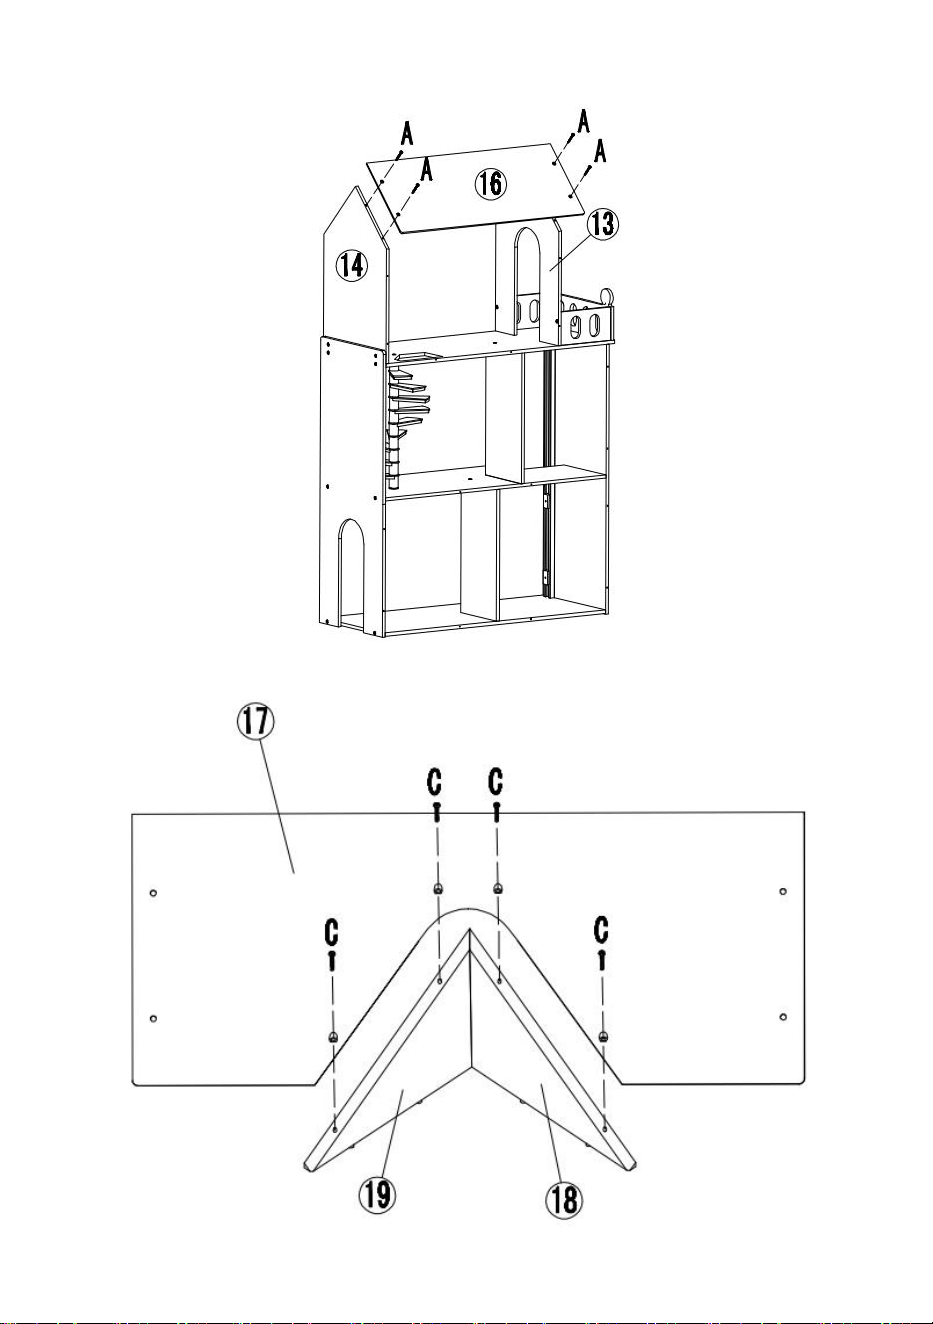
- 9 -
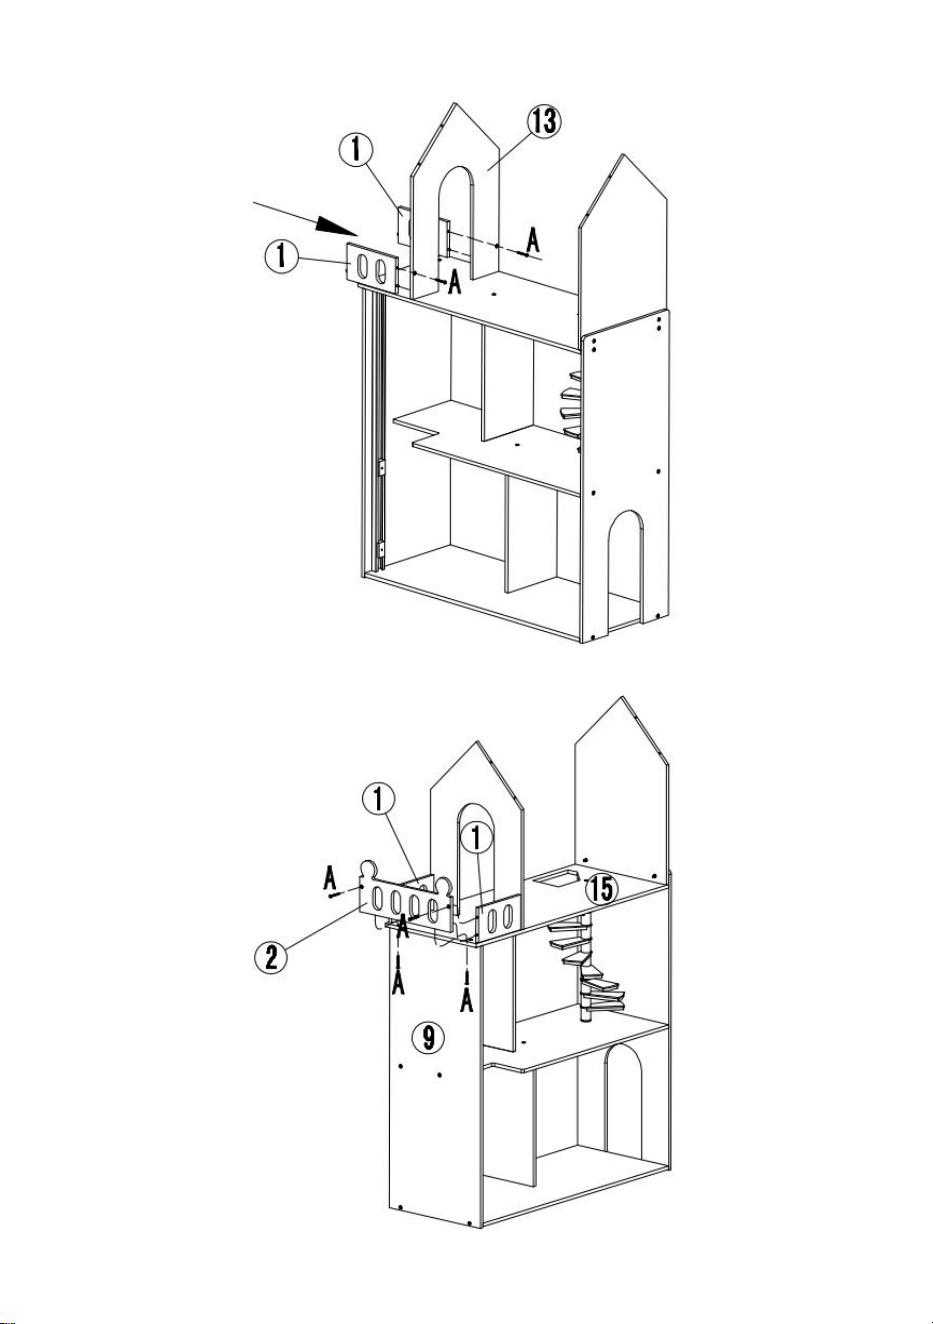
STEP 9:
STEP 10:

- 10 -
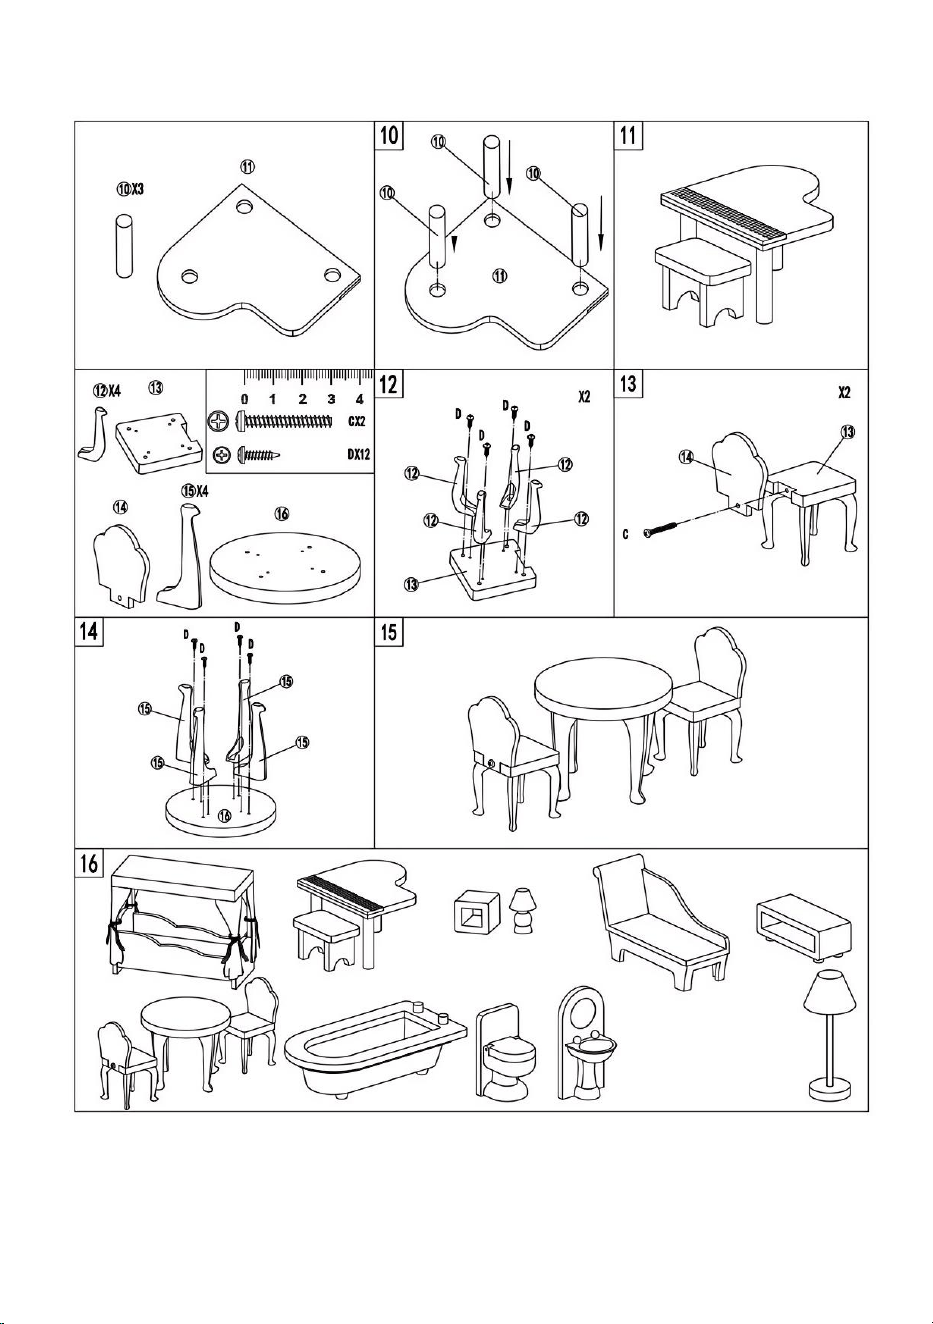
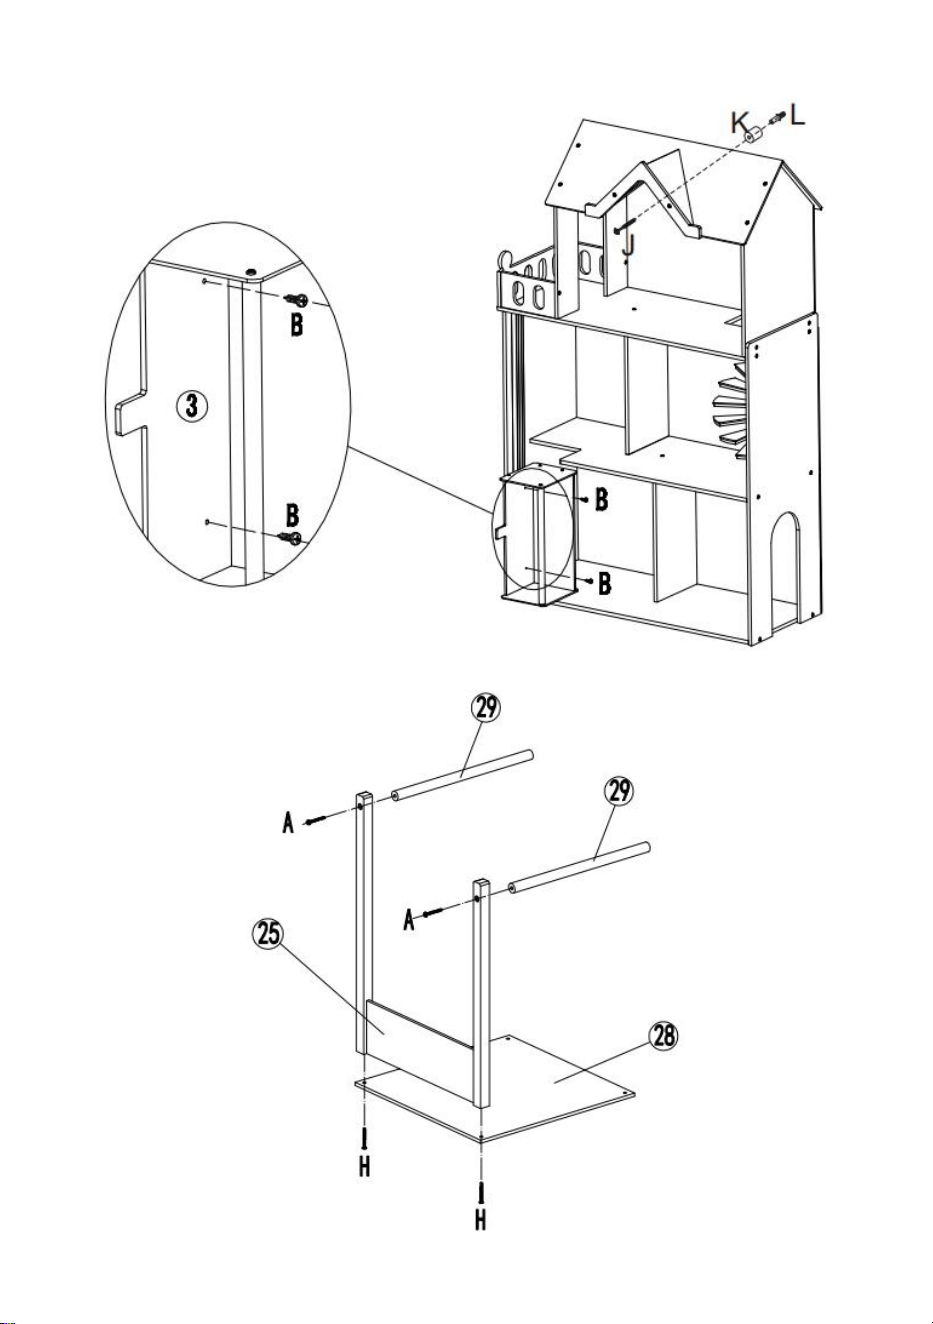
STEP 11:
STEP 12:
- 11 -
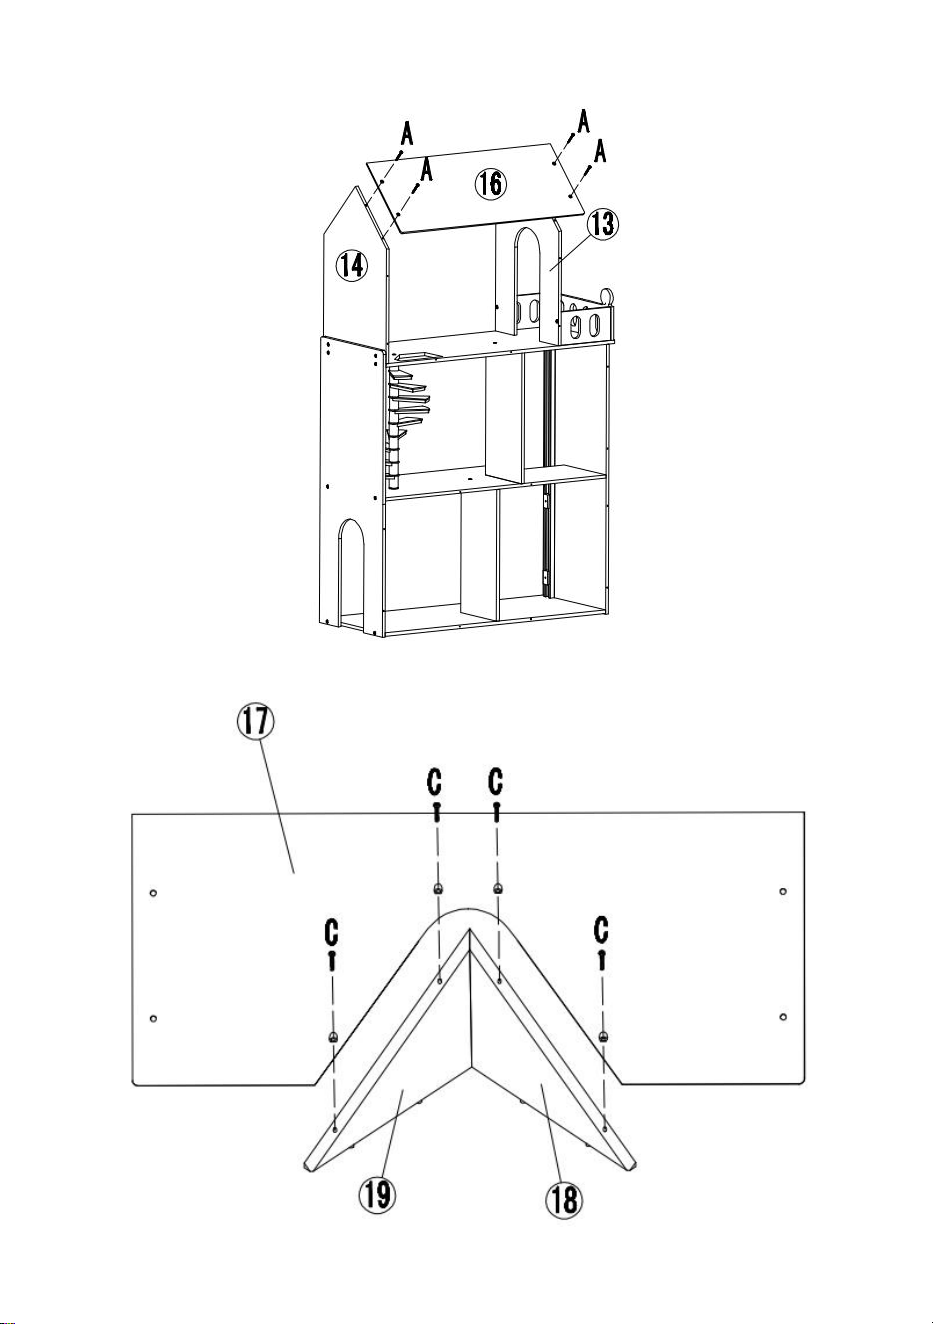
STEP 13:
STEP 14:

- 12 -
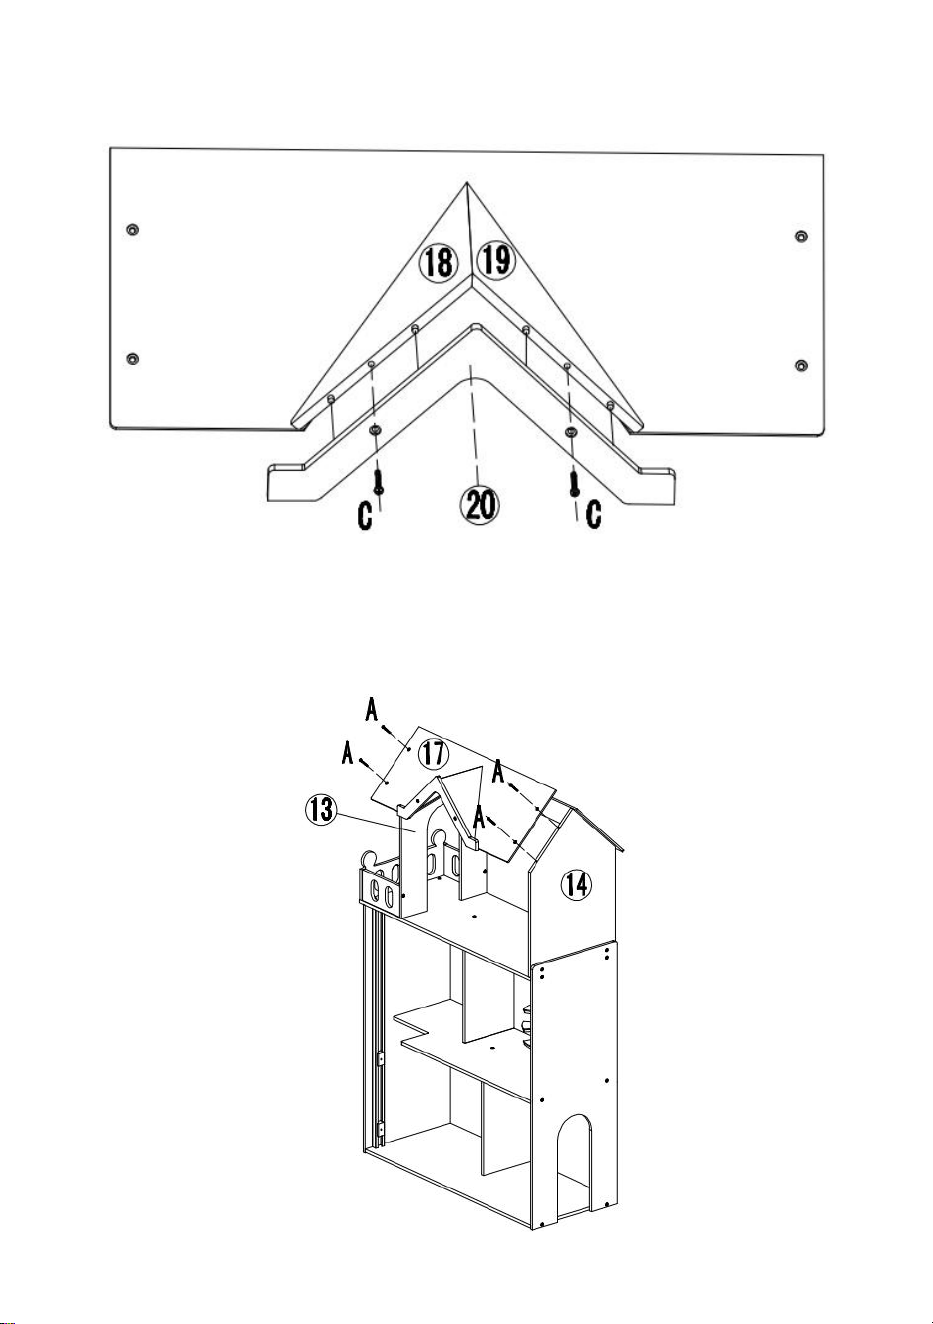
STEP 15:
STEP 16:

- 13 -
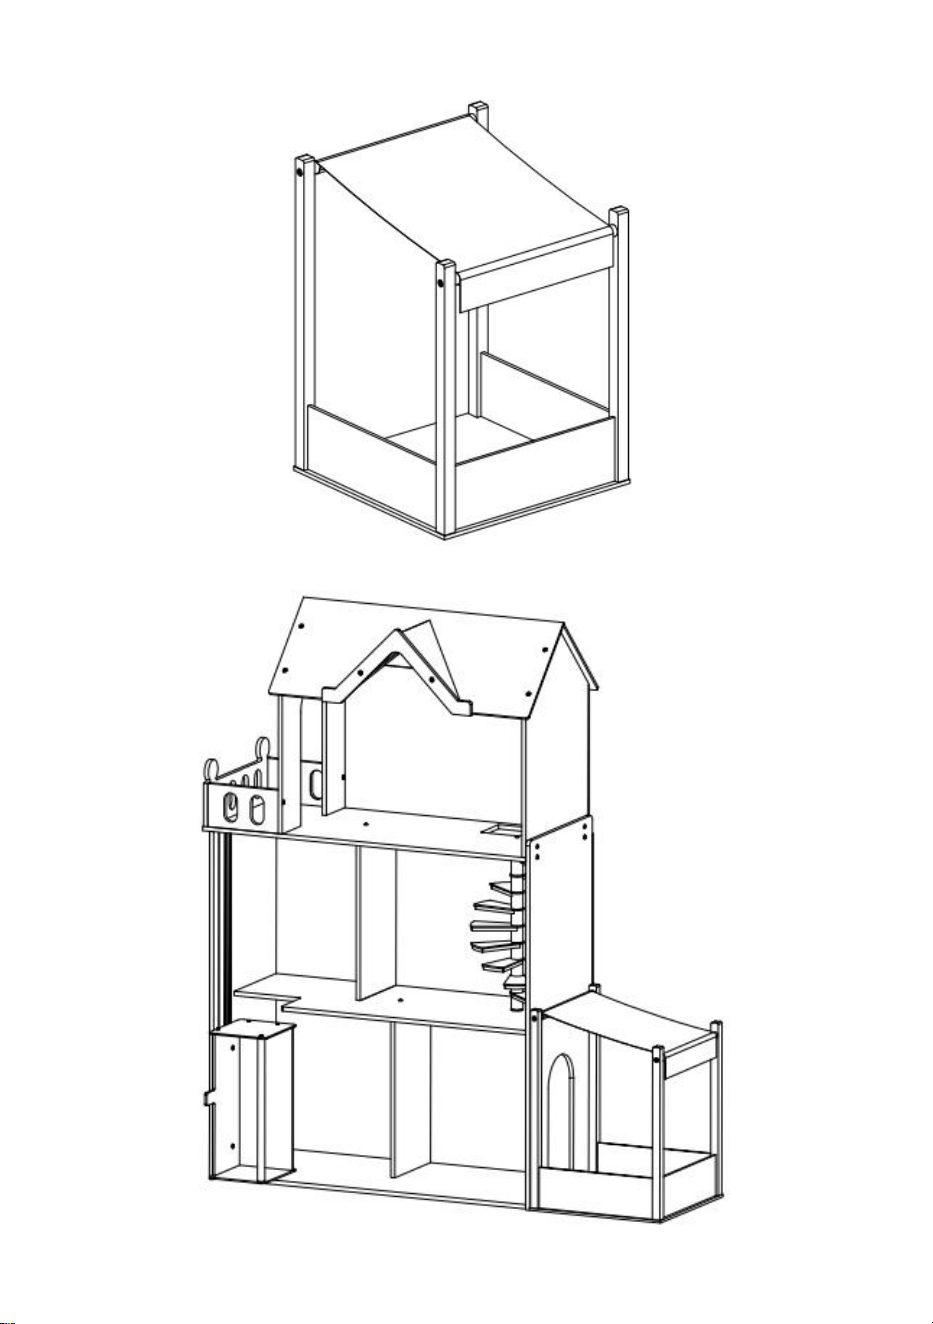
STEP 17:
STEP 18:

- 14 -
STEP 19:
STEP 20:

- 15 -
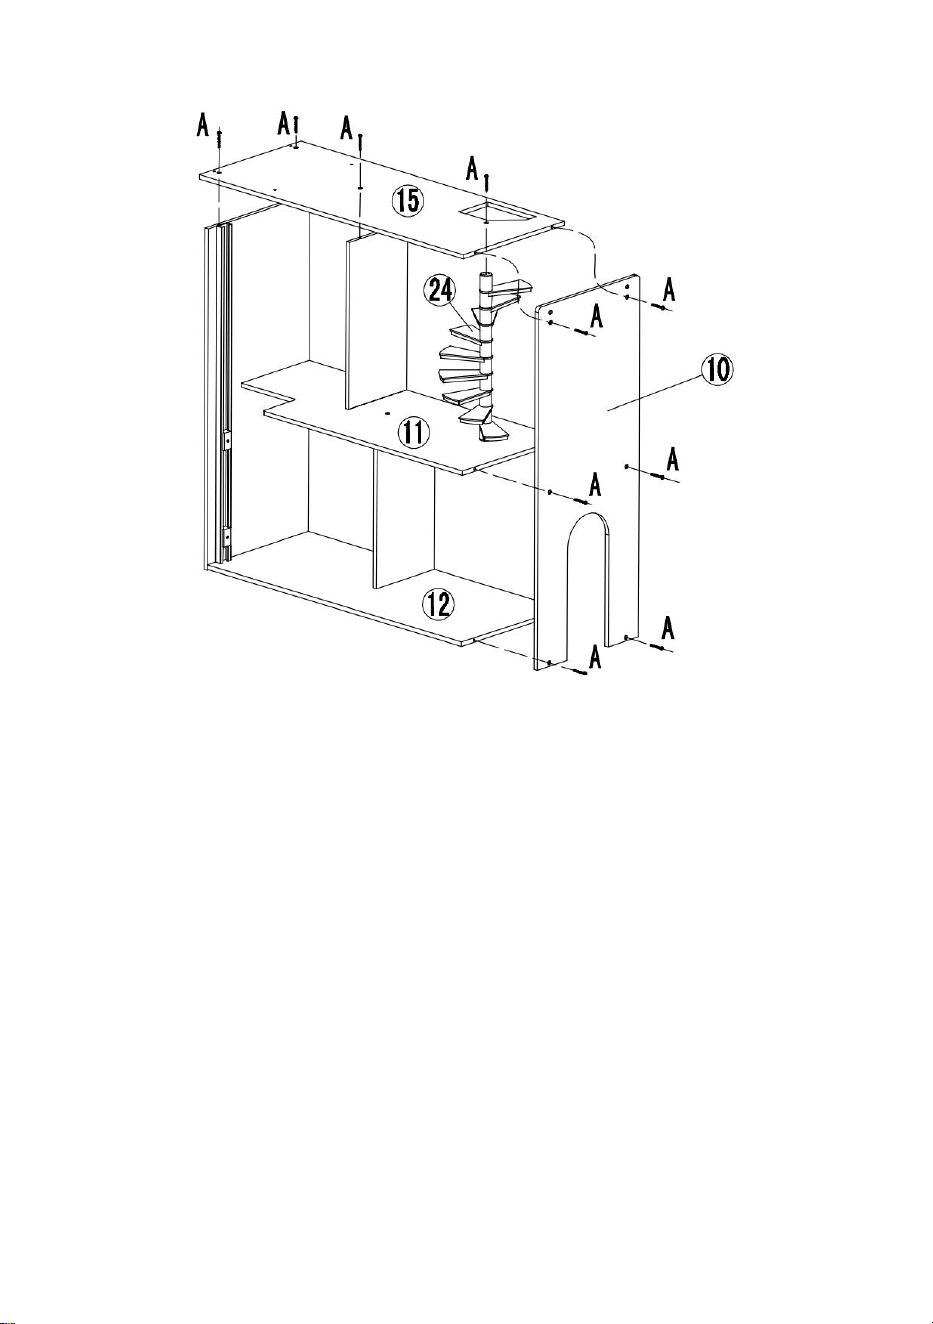
Assembly Instructions
- 16 -

- 17 -
MAINTENANCE
1. Clean and disinfect your product frequently to keep it clean and hygienic.
2.Store away from direct sunlight.
3.Check the reliability of the parts before use.


Assistance technique et certificat de garantie électronique
www.vevor.com/support
MAISON DE POUPÉE EN BOIS
MODÈLE:TX1195
We continue to be committed to provide you tools with competitive price.
"Save Half", "Half Price" or any other similar expressions used by us only represents an
estimate of savings you might benefit from buying certain tools with us compared to the major
top brands and does not necessarily mean to cover all categories of tools offered by us. You
are kindly reminded to verify carefully when you are placing an order with us if you are
actually saving half in comparison with the top major brands.

- 1 -
MODÈLE : TX1195
Have product questions? Need technical support? Please feel free to
contact us:
Technical Support and E-Warranty Certificate
www.vevor.com/support
NEED HELP? CONTACT US!
This is the original instruction, please read all manual instructions
carefully before operating. VEVOR reserves a clear interpretation of our
user manual. The appearance of the product shall be subject to the
product you received. Please forgive us that we won't inform you again if
there are any technology or software updates on our product.
WOODEN DOLLHOUSE

- 2 -
SAFETY INSTRUCTIONS
AVERTISSEMENT:
8. Veuillez lire attentivement les instructions et l' installer correctement.
9. RISQUE D'ÉTOUFFEMENT - Petites pièces. Ne convient pas aux
enfants de moins de 3 ans.
10. Assemblage par un adulte requis.
11. Ne l' installez pas dans un endroit sombre et humide.
12. Placez-le dans un endroit bien ventilé .
13. Assurez-vous de retirer l'emballage, tous les élastiques, les attaches
métalliques et les étiquettes ou attaches du jouet. Ils ne font pas partie de
ce jouet et doivent être retirés et jetés avant d'être donnés à votre enfant.
14. Serrez toutes les vis avant de donner ce jouet à un enfant.
MODEL AND PARAMETERS
Modèle
TX1195
Âge d'application
3 ans et plus
Taille
104 0*3 50 *12 00 mm
Matériel
Bois
PARTS LIST AND INSTALLATION
REMARQUE : Veuillez vérifier que vous disposez de toutes les pièces
comme indiqué dans la liste des pièces.
X2
X1
- 3 -
X1
X1
X2
X1
X1
X1
X1
X1
X1
X1
X1
X1
X1
X1
X1
X1
X1
X1
X1
X1
X1
X1

- 4 -
NOTE:
4. La pointe acérée des vis peut rayer les mains.
5. Serrez toutes les vis avant de donner ce jouet à un enfant.
6. Ne serrez pas TROP les vis.
4. Les tournevis électriques ne doivent PAS être utilisés pour l’
assemblage.
X1
X1
X1
X1
X1
HX4
GX2
FX2
EX12
DX4
CX32
BX2
AX40
X1
LX1
KX1
JX1
User Manual x1

- 5 -
ÉTAPE 1 :
ÉTAPE 2 :
- 6 -
ÉTAPE 3 :
ÉTAPE 4 :
- 7 -
ÉTAPE 5 :
- 8 -
ÉTAPE 6 :
ÉTAPE 7 :
- 9 -
ÉTAPE 8 :
ÉTAPE 9 :
- 10 -
ÉTAPE 10 :
ÉTAPE 11 :
- 11 -
ÉTAPE 12 :
ÉTAPE 13 :
ÉTAPE 14 :
- 12 -
ÉTAPE 15 :
- 13 -
ÉTAPE 16 :
ÉTAPE 17 :

- 14 -
ÉTAPE 18 :
ÉTAPE 19 :
- 15 -
ÉTAPE 20 :

- 16 -
Assembly Instructions

- 17 -

- 18 -
MAINTENANCE
1. Nettoyez et désinfectez fréquemment votre produit pour le garder propre
et hygiénique.
2. Conserver à l'abri de la lumière directe du soleil .
3. Vérifiez la fiabilité des pièces avant utilisation.


Technischer Support und E-Garantie-Zertifikat
www.vevor.com/support
PUPPENHAUS AUS HOLZ
MODELL:TX1195
We continue to be committed to provide you tools with competitive price.
"Save Half", "Half Price" or any other similar expressions used by us only represents an
estimate of savings you might benefit from buying certain tools with us compared to the major
top brands and does not necessarily mean to cover all categories of tools offered by us. You
are kindly reminded to verify carefully when you are placing an order with us if you are
actually saving half in comparison with the top major brands.

- 1 -
MODELL: TX1195
Have product questions? Need technical support? Please feel free to
contact us:
Technical Support and E-Warranty Certificate
www.vevor.com/support
NEED HELP? CONTACT US!
This is the original instruction, please read all manual instructions
carefully before operating. VEVOR reserves a clear interpretation of our
user manual. The appearance of the product shall be subject to the
product you received. Please forgive us that we won't inform you again if
there are any technology or software updates on our product.
WOODEN DOLLHOUSE
- 2 -
SAFETY INSTRUCTIONS
WARNUNG:
15. Bitte lesen Sie die Anleitung sorgfältig durch und führen Sie die
Installation korrekt durch.
16. ERSTICKUNGSGEFAHR – Kleinteile. Nicht für Kinder unter 3 Jahren.
17. Zusammenbau durch Erwachsene erforderlich.
18. es nicht an einem dunklen, feuchten Ort.
19. Stellen Sie es an einen Ort mit guter Belüftung .
20. Bitte entfernen Sie unbedingt die Verpackung, alle Gummibänder,
Kabelbinder und Etiketten oder Verschlüsse vom Spielzeug. Diese sind
nicht Teil dieses Spielzeugs und müssen entfernt und entsorgt werden,
bevor Sie es Ihrem Kind geben.
21. Ziehen Sie alle Schrauben fest, bevor Sie dieses Spielzeug einem
Kind geben.
MODEL AND PARAMETERS
Modell
TX1195
Alter der Bewerbung
3+ Jahre
Größe
104 0*3 50 *12 00 mm
Material
Holz
PARTS LIST AND INSTALLATION
HINWEIS: Bitte überprüfen Sie, ob Sie alle in der Teileliste aufgeführten
Teile haben.

- 3 -
X2
X1
X1
X1
X2
X1
X1
X1
X1
X1
X1
X1
X1
X1
X1
X1
X1
X1
X1
X1
X1
X1

- 4 -
NOTIZ:
7. Die scharfen Spitzen der Schrauben können Ihre Hände zerkratzen.
8. Ziehen Sie alle Schrauben fest, bevor Sie dieses Spielzeug einem Kind
geben.
9. Ziehen Sie die Schrauben nicht zu fest an.
4. Für die Montage dürfen KEINE Akkuschrauber verwendet werden.
X1
X1
X1
X1
X1
X1
X1
HX4
GX2
FX2
EX12
DX4
CX32
BX2
AX40
X1
LX1
KX1
JX1
User Manual x1
- 5 -
SCHRITT 1:
SCHRITT 2:

- 6 -
SCHRITT 3:
- 7 -
SCHRITT 4:
SCHRITT 5:
- 8 -
SCHRITT 6:
SCHRITT 7:

- 9 -
SCHRITT 8:
SCHRITT 9:

- 10 -
SCHRITT 10:
SCHRITT 11:

- 11 -
SCHRITT 12:
SCHRITT 13:

- 12 -
SCHRITT 14:
SCHRITT 15:

- 13 -
SCHRITT 16:
SCHRITT 17:

- 14 -
SCHRITT 18:
SCHRITT 19:

- 15 -
SCHRITT 20:

- 16 -
Assembly Instructions

- 17 -

- 18 -
MAINTENANCE
1. Reinigen und desinfizieren Sie Ihr Produkt regelmäßig, um es sauber zu
halten und hygienisch.
2. Vor direkter Sonneneinstrahlung geschützt aufbewahren .
3. Überprüfen Sie vor der Verwendung die Zuverlässigkeit der Teile .


Supporto tecnico e certificato di garanzia elettronica
www.vevor.com/support
CASA DELLE BAMBOLE IN LEGNO
MODELLO:TX1195
We continue to be committed to provide you tools with competitive price.
"Save Half", "Half Price" or any other similar expressions used by us only represents an
estimate of savings you might benefit from buying certain tools with us compared to the major
top brands and does not necessarily mean to cover all categories of tools offered by us. You
are kindly reminded to verify carefully when you are placing an order with us if you are
actually saving half in comparison with the top major brands.

- 1 -
MODELLO: TX1195
Have product questions? Need technical support? Please feel free to
contact us:
Technical Support and E-Warranty Certificate
www.vevor.com/support
NEED HELP? CONTACT US!
This is the original instruction, please read all manual instructions
carefully before operating. VEVOR reserves a clear interpretation of our
user manual. The appearance of the product shall be subject to the
product you received. Please forgive us that we won't inform you again if
there are any technology or software updates on our product.
WOODEN DOLLHOUSE

- 2 -
SAFETY INSTRUCTIONS
AVVERTIMENTO:
22. Si prega di leggere attentamente le istruzioni e di installarlo
correttamente .
23. PERICOLO DI SOFFOCAMENTO - Parti piccole. Non adatto ai
bambini di età inferiore ai 3 anni.
24. È richiesto il montaggio da parte di un adulto.
25. Non installarlo in un luogo buio e umido.
26. Metterlo in un luogo ben ventilato .
27. Si prega di assicurarsi di rimuovere l'imballaggio, tutti gli elastici, le
fascette metalliche e le etichette o chiusure dal giocattolo. Non fanno parte
di questo giocattolo e devono essere rimossi e scartati prima di essere dati
al bambino.
28. Stringere tutte le viti prima di dare il giocattolo al bambino.
MODEL AND PARAMETERS
Modello
Numero di modello: TX1195
Età di applicazione
3+ anni
Misurare
104 0*3 50 *12 00 millimetri
Materiale
Legna
PARTS LIST AND INSTALLATION
NOTA: verificare di avere a disposizione tutti i pezzi indicati nell'elenco.
- 3 -
X2
X1
X1
X1
X2
X1
X1
X1
X1
X1
X1
X1
X1
X1
X1
X1
X1
X1
X1
X1
X1
X1

- 4 -
NOTA:
10. La punta affilata delle viti potrebbe graffiare le mani.
11. Stringere tutte le viti prima di dare il giocattolo al bambino.
12. Non serrare ECCESSIVAMENTE le viti.
4. Per l'assemblaggio NON devono essere utilizzati cacciaviti elettrici.
X1
X1
X1
X1
X1
X1
X1
HX4
GX2
FX2
EX12
DX4
CX32
BX2
AX40
X1
LX1
KX1
JX1
User Manual x1
- 5 -
PASSO 1:
PASSO 2:

- 6 -
PASSO 3:

- 7 -
PASSO 4:
PASSO 5:

- 8 -
PASSO 6:
PASSO 7:
- 9 -
PASSO 8:
PASSO 9:

- 10 -
PASSO 10:
PASSO 11:

- 11 -
PASSO 12:
PASSO 13:

- 12 -
PASSO 14:
PASSO 15:
- 13 -
PASSO 16:
PASSO 17:

- 14 -
PASSO 18:
PASSO 19:

- 15 -
PASSO 20:

- 16 -
Assembly Instructions

- 17 -

- 18 -
MAINTENANCE
1. Pulisci e disinfetta frequentemente il tuo prodotto per mantenerlo pulito e
igienico.
2. Conservare al riparo dalla luce solare diretta .
3. Verificare l'affidabilità delle parti prima dell'uso.


Soporte técnico y certificado de garantía electrónica
www.vevor.com/support
CASA DE MUÑECAS DE MADERA
MODELO: TX1195
We continue to be committed to provide you tools with competitive price.
"Save Half", "Half Price" or any other similar expressions used by us only represents an
estimate of savings you might benefit from buying certain tools with us compared to the major
top brands and does not necessarily mean to cover all categories of tools offered by us. You
are kindly reminded to verify carefully when you are placing an order with us if you are
actually saving half in comparison with the top major brands.

- 1 -
MODELO: TX1195
Have product questions? Need technical support? Please feel free to
contact us:
Technical Support and E-Warranty Certificate
www.vevor.com/support
NEED HELP? CONTACT US!
This is the original instruction, please read all manual instructions
carefully before operating. VEVOR reserves a clear interpretation of our
user manual. The appearance of the product shall be subject to the
product you received. Please forgive us that we won't inform you again if
there are any technology or software updates on our product.
WOODEN DOLLHOUSE
- 2 -
SAFETY INSTRUCTIONS
ADVERTENCIA:
29. Lea atentamente las instrucciones e instálelo correctamente .
30. PELIGRO DE ASFIXIA: contiene piezas pequeñas. No apto para
niños menores de 3 años.
31. Requiere ensamblaje por parte de un adulto.
32. No lo instale en un lugar oscuro y húmedo.
33. Colóquelo en un lugar con buena ventilación .
34. Asegúrese de quitar el embalaje, las bandas elásticas, las ataduras de
alambre y las etiquetas o cierres del juguete. No forman parte de este
juguete y deben quitarse y desecharse antes de entregárselo a su hijo.
35. Apriete todos los tornillos antes de darle este juguete a un niño.
MODEL AND PARAMETERS
Modelo
TX1195
Edad de aplicación
3+ años
Tamaño
104 0*3 50 *12 00 mm
Material
Madera
PARTS LIST AND INSTALLATION
NOTA: Verifique que tenga todas las piezas como se muestra en la lista de
piezas.
X2
X1

- 3 -
X1
X1
X2
X1
X1
X1
X1
X1
X1
X1
X1
X1
X1
X1
X1
X1
X1
X1
X1
X1
X1
X1

- 4 -
NOTA:
13. La punta afilada de los tornillos puede rayar las manos.
14. Apriete todos los tornillos antes de darle este juguete a un niño.
15. No apriete demasiado los tornillos.
4. NO se deben utilizar destornilladores eléctricos para el montaje.
X1
X1
X1
X1
X1
HX4
GX2
FX2
EX12
DX4
CX32
BX2
AX40
X1
LX1
KX1
JX1
User Manual x1
- 5 -
PASO 1:
PASO 2:

- 6 -
PASO 3:
PASO 4:
- 7 -
PASO 5:
PASO 6:

- 8 -
PASO 7:
PASO 8:

- 9 -
PASO 9:
PASO 10:

- 10 -
PASO 11:
PASO 12:

- 11 -
PASO 13:
PASO 14:

- 12 -
PASO 15:
PASO 16:
- 13 -
PASO 17:
PASO 18:

- 14 -
PASO 19:
PASO 20:

- 15 -
Assembly Instructions

- 16 -

- 17 -
MAINTENANCE
1. Limpie y desinfecte su producto con frecuencia para mantenerlo limpio y
higiénico.
2. Conservar lejos de la luz solar directa .
3. Compruebe la fiabilidad de las piezas antes de su uso.


Wsparcie techniczne i certyfikat e-gwarancji
www.vevor.com/support
DREWNIANY DOMEK DLA LALEK
MODEL:TX1195
We continue to be committed to provide you tools with competitive price.
"Save Half", "Half Price" or any other similar expressions used by us only represents an
estimate of savings you might benefit from buying certain tools with us compared to the major
top brands and does not necessarily mean to cover all categories of tools offered by us. You
are kindly reminded to verify carefully when you are placing an order with us if you are
actually saving half in comparison with the top major brands.

- 1 -
MODEL: TX1195
Have product questions? Need technical support? Please feel free to
contact us:
Technical Support and E-Warranty Certificate
www.vevor.com/support
NEED HELP? CONTACT US!
This is the original instruction, please read all manual instructions
carefully before operating. VEVOR reserves a clear interpretation of our
user manual. The appearance of the product shall be subject to the
product you received. Please forgive us that we won't inform you again if
there are any technology or software updates on our product.
WOODEN DOLLHOUSE
- 2 -
SAFETY INSTRUCTIONS
OSTRZEŻENIE:
36. Przeczytaj uważnie instrukcję i zainstaluj ją prawidłowo.
37. RYZYKO ZADŁAWIENIA – małe części. Nie dla dzieci poniżej 3 lat.
38. Wymagany montaż przez osobę dorosłą.
39. Nie należy instalować urządzenia w ciemnym i wilgotnym miejscu.
40. Umieść go w miejscu o dobrej wentylacji .
41. Upewnij się, że usunięto opakowanie, wszystkie gumki, opaski
zaciskowe i metki lub zapięcia z zabawki. Nie są one częścią tej zabawki i
muszą zostać usunięte i wyrzucone przed przekazaniem jej dziecku.
42. Przed podaniem zabawki dziecku należy dokładnie dokręcić wszystkie
śruby.
MODEL AND PARAMETERS
Model
TX1195
Wiek aplikacji
wiek 3+
Rozmiar
104 0*3 50 *12 00 mm
Tworzywo
Drewno
PARTS LIST AND INSTALLATION
UWAGA: Sprawdź, czy masz wszystkie części pokazane na liście części.
X2
X1

- 3 -
X1
X1
X2
X1
X1
X1
X1
X1
X1
X1
X1
X1
X1
X1
X1
X1
X1
X1
X1
X1
X1
X1

- 4 -
NOTATKA:
16. Ostre końcówki śrub mogą porysować dłonie.
17. Przed podaniem zabawki dziecku należy dokładnie dokręcić wszystkie
śruby.
18. Nie dokręcaj śrub ZBYT mocno.
4. Do montażu NIE NALEŻY używać wkrętarek elektrycznych.
X1
X1
X1
X1
X1
HX4
GX2
FX2
EX12
DX4
CX32
BX2
AX40
X1
LX1
KX1
JX1
User Manual x1
- 5 -
KROK 1:
KROK 2:
- 6 -
KROK 3:
KROK 4:
- 7 -
KROK 5:
- 8 -
KROK 6:
KROK 7:
- 9 -
KROK 8:
KROK 9:
- 10 -
KROK 10:
KROK 11:

- 11 -
KROK 12:
KROK 13:
KROK 14:
- 12 -
KROK 15:

- 13 -
KROK 16:
KROK 17:
- 14 -
KROK 18:
KROK 19:

- 15 -
KROK 20:

- 16 -
Assembly Instructions

- 17 -

- 18 -
MAINTENANCE
1. Często czyść i dezynfekuj swój produkt , aby zachować jego czystość i
higieniczny.
2. Przechowywać z dala od bezpośredniego światła słonecznego .
3. Przed użyciem sprawdź niezawodność części .


Technische ondersteuning en e-garantiecertificaat
www.vevor.com/support
HOUTEN POPPENHUIS
MODEL:TX1195
We continue to be committed to provide you tools with competitive price.
"Save Half", "Half Price" or any other similar expressions used by us only represents an
estimate of savings you might benefit from buying certain tools with us compared to the major
top brands and does not necessarily mean to cover all categories of tools offered by us. You
are kindly reminded to verify carefully when you are placing an order with us if you are
actually saving half in comparison with the top major brands.
- 1 -
MODEL: TX1195
Have product questions? Need technical support? Please feel free to
contact us:
Technical Support and E-Warranty Certificate
www.vevor.com/support
NEED HELP? CONTACT US!
This is the original instruction, please read all manual instructions
carefully before operating. VEVOR reserves a clear interpretation of our
user manual. The appearance of the product shall be subject to the
product you received. Please forgive us that we won't inform you again if
there are any technology or software updates on our product.
WOODEN DOLLHOUSE

- 2 -
SAFETY INSTRUCTIONS
WAARSCHUWING:
43. Lees de instructies zorgvuldig door en installeer het correct.
44. VERSTIKKINGSGEVAAR - Kleine onderdelen. Niet voor kinderen
jonger dan 3 jaar.
45. Montage door volwassenen vereist.
46. het niet op een donkere, vochtige plaats.
47. Zet het op een plek met goede ventilatie .
48. Zorg ervoor dat u de verpakking, alle elastiekjes, kabelbinders en
labels of bevestigingen van het speelgoed verwijdert. Deze maken geen
deel uit van dit speelgoed en moeten worden verwijderd en weggegooid
voordat u het aan uw kind geeft.
49. Draai alle schroeven goed vast voordat u het speeltje aan een kind
geeft.
MODEL AND PARAMETERS
Model
TX1195
Leeftijd van toepassing
3+ leeftijd
Maat
104 0*3 50 * 12 00mm
Materiaal
Hout
PARTS LIST AND INSTALLATION
LET OP: Controleer of u alle onderdelen hebt die in de onderdelenlijst
staan.

- 3 -
X2
X1
X1
X1
X2
X1
X1
X1
X1
X1
X1
X1
X1
X1
X1
X1
X1
X1
X1
X1
X1
X1
- 4 -
OPMERKING:
19. De scherpe punt van schroeven kan krassen op uw handen
veroorzaken.
20. Draai alle schroeven goed vast voordat u het speeltje aan een kind
geeft.
21. Draai de schroeven niet TE vast.
4. Elektrische schroevendraaiers mogen NIET worden gebruikt voor de
montage.
X1
X1
X1
X1
X1
X1
X1
HX4
GX2
FX2
EX12
DX4
CX32
BX2
AX40
X1
LX1
KX1
JX1
User Manual x1
- 5 -
STAP 1:
STAP 2:
- 6 -
STAP 3:

- 7 -
STAP 4:
STAP 5:

- 8 -
STAP 6:
STAP 7:

- 9 -
STAP 8:
STAP 9:
- 10 -
STAP 10:
STAP 11:
- 11 -
STAP 12:
STAP 13:
- 12 -
STAP 14:
STAP 15:

- 13 -
STAP 16:
STAP 17:

- 14 -
STAP 18:
STAP 19:

- 15 -
STAP 20:

- 16 -
Assembly Instructions

- 17 -

- 18 -
MAINTENANCE
1. Reinig en desinfecteer uw product regelmatig om het schoon en
hygiënisch.
2. Bewaar op een plek waar geen direct zonlicht is .
3. Controleer de betrouwbaarheid van de onderdelen vóór gebruik.


Teknisk support och e-garanticertifikat
www.vevor.com/support
DOLLHOUS AV TRÄ
MODELL: TX1195
We continue to be committed to provide you tools with competitive price.
"Save Half", "Half Price" or any other similar expressions used by us only represents an
estimate of savings you might benefit from buying certain tools with us compared to the major
top brands and does not necessarily mean to cover all categories of tools offered by us. You
are kindly reminded to verify carefully when you are placing an order with us if you are
actually saving half in comparison with the top major brands.

- 1 -
MODELL: TX1195
Have product questions? Need technical support? Please feel free to
contact us:
Technical Support and E-Warranty Certificate
www.vevor.com/support
NEED HELP? CONTACT US!
This is the original instruction, please read all manual instructions
carefully before operating. VEVOR reserves a clear interpretation of our
user manual. The appearance of the product shall be subject to the
product you received. Please forgive us that we won't inform you again if
there are any technology or software updates on our product.
WOODEN DOLLHOUSE
- 2 -
SAFETY INSTRUCTIONS
VARNING:
50. Läs instruktionerna noggrant och installera den korrekt.
51. KVÄVNINGSRISK - Små delar. Ej för barn under 3 år.
52. Vuxenmontering krävs.
53. den inte på en mörk, fuktig plats.
54. Placera den på en plats med god ventilation .
55. Var noga med att ta bort förpackningen, alla gummiband, band och
etiketter eller fästen från leksaken. De är inte en del av denna leksak och
måste tas bort och kasseras innan de ges till ditt barn.
56. Dra åt alla skruvar innan du ger denna leksak till ett barn.
MODEL AND PARAMETERS
Modell
TX1195
Ansökningsålder
3+ ålder
Storlek
104 0*3 50 *12 00 mm
Material
Trä
PARTS LIST AND INSTALLATION
OBS: Kontrollera att du har alla delar som visas i dellistan.
X2
X1

- 3 -
X1
X1
X2
X1
X1
X1
X1
X1
X1
X1
X1
X1
X1
X1
X1
X1
X1
X1
X1
X1
X1
X1
- 4 -
NOTERA:
22. Den vassa spetsen på skruvarna kan repa händerna.
23. Dra åt alla skruvar innan du ger denna leksak till ett barn.
24. Dra inte åt skruvarna för hårt.
4. Elektriska skruvmejslar ska INTE användas för montering.
X1
X1
X1
X1
X1
HX4
GX2
FX2
EX12
DX4
CX32
BX2
AX40
X1
LX1
KX1
JX1
User Manual x1

- 5 -
STEG 1:
STEG 2:
- 6 -
STEG 3:
STEG 4:

- 7 -
STEG 5:
STEG 6:

- 8 -
STEG 7:
STEG 8:
- 9 -
STEG 9:
STEG 10:
- 10 -
STEG 11:
STEG 12:

- 11 -
STEG 13:
STEG 14:
- 12 -
STEG 15:
STEG 16:

- 13 -
STEG 17:
STEG 18:
- 14 -
STEG 19:
STEG 20:
- 15 -
Assembly Instructions

- 16 -

- 17 -
MAINTENANCE
1. Rengör och desinficera din produkt ofta för att hålla den ren och
hygienisk.
2. Förvaras åtskilt från direkt solljus .
3. Kontrollera delarnas tillförlitlighet före användning.


