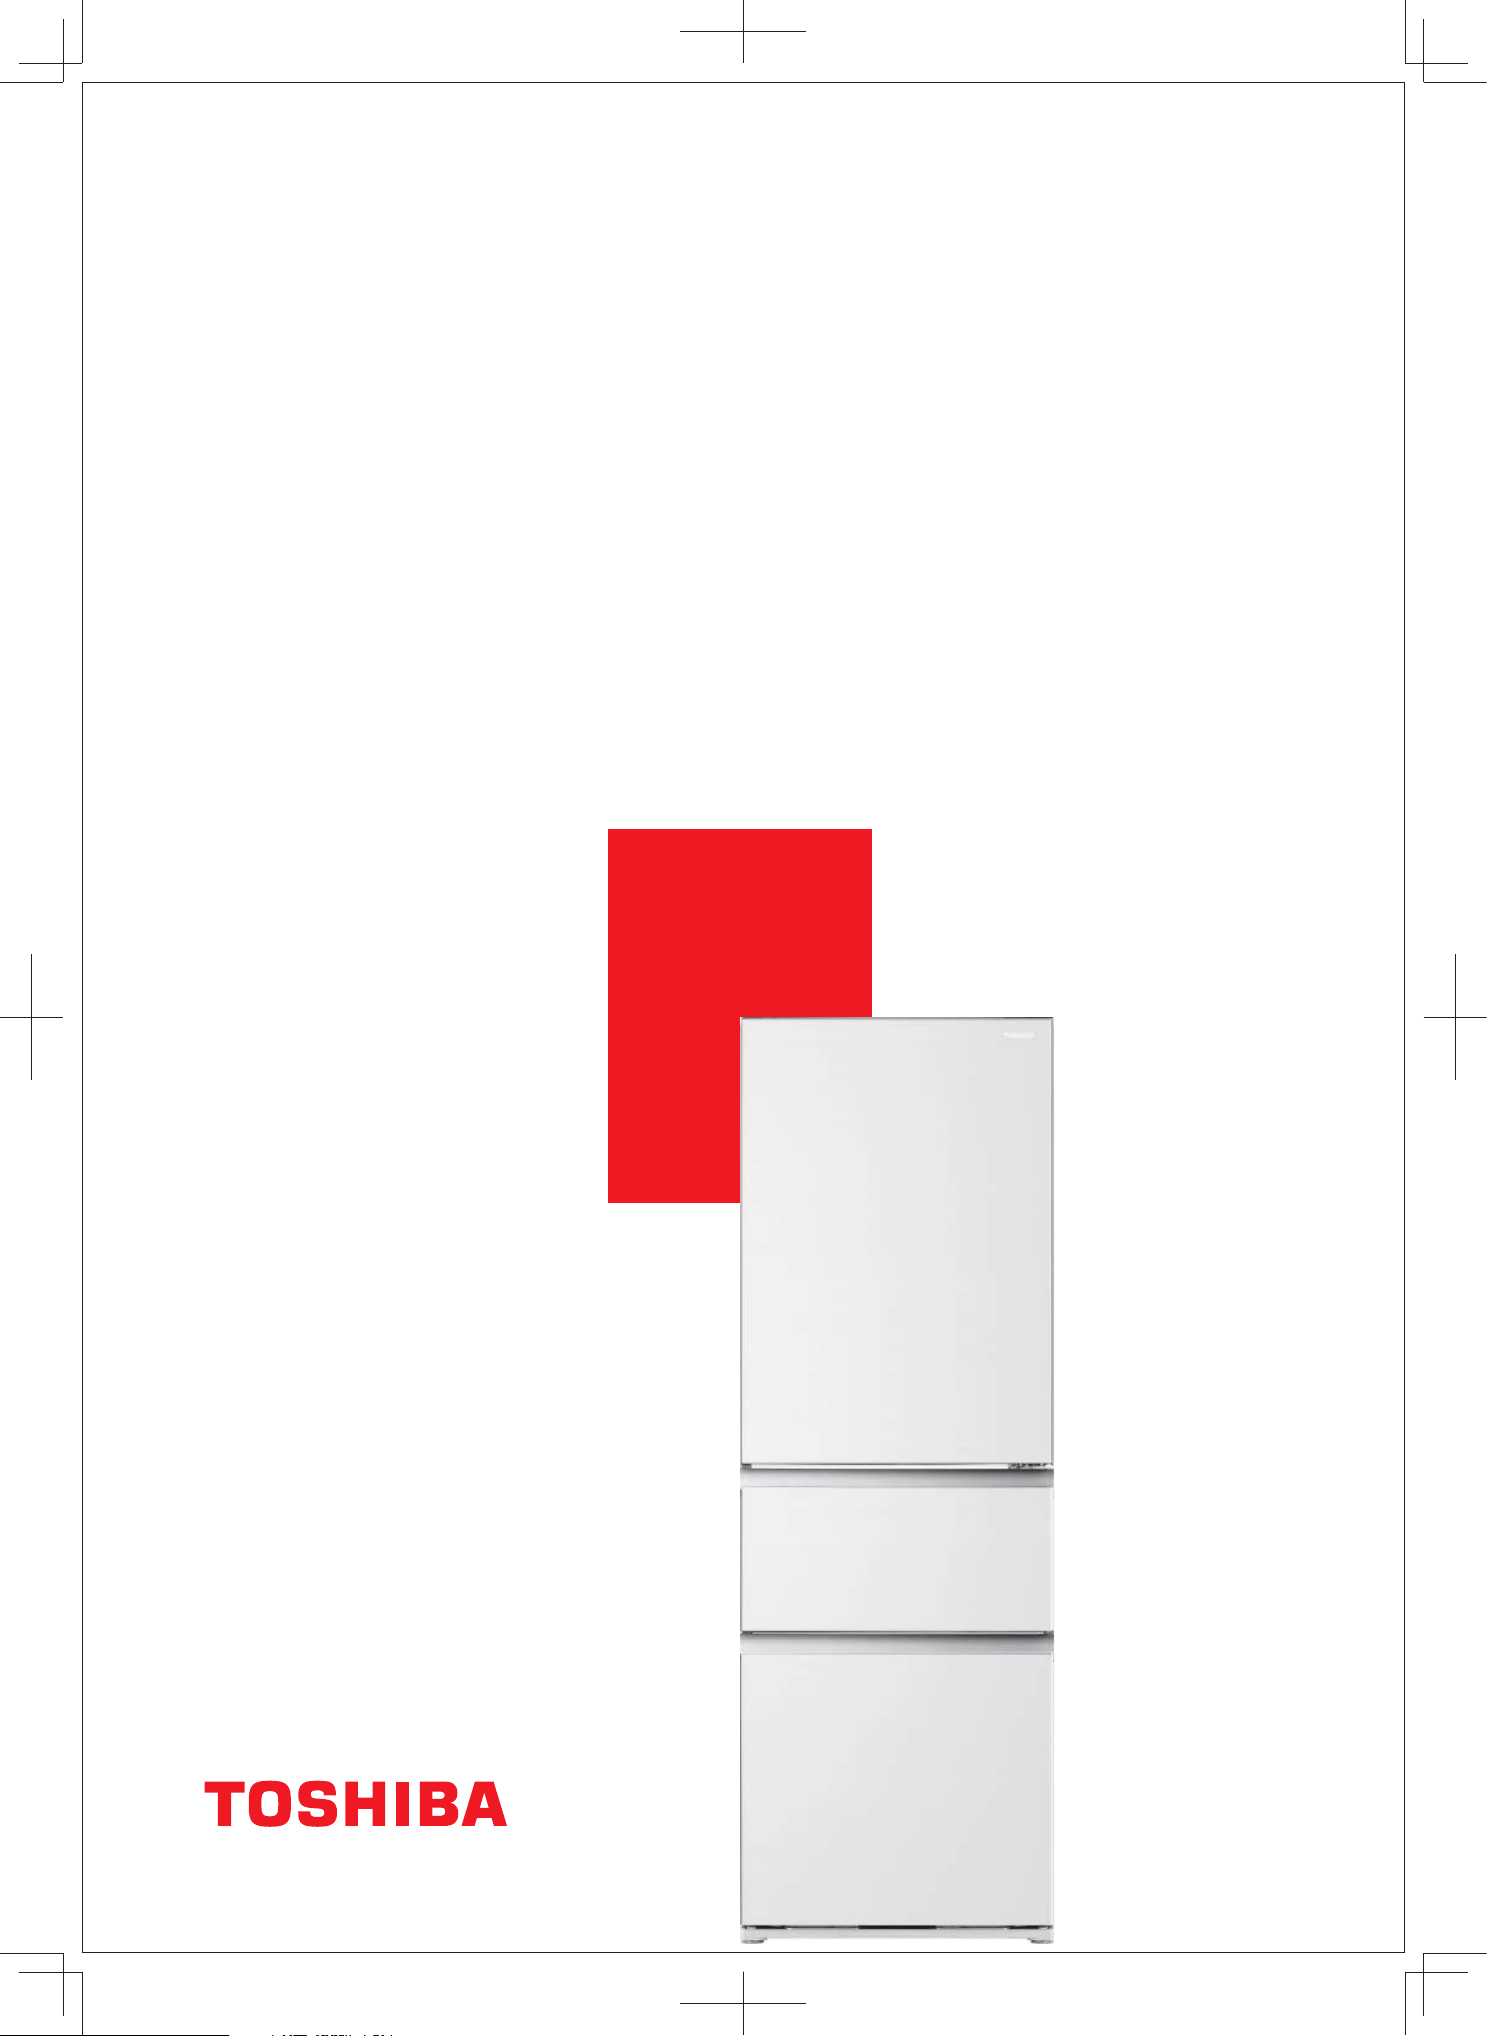
用戶手冊
東芝家庭雪櫃
GR-RM469WE-PGA(B3)-1
中文
安全信息
在安裝和使用電器前,仔細閱讀用戶手冊。
製造商不承擔錯誤安裝或使用可能造成人身傷害
或損壞的責任。
請妥善保管用戶手冊以供後續使用。
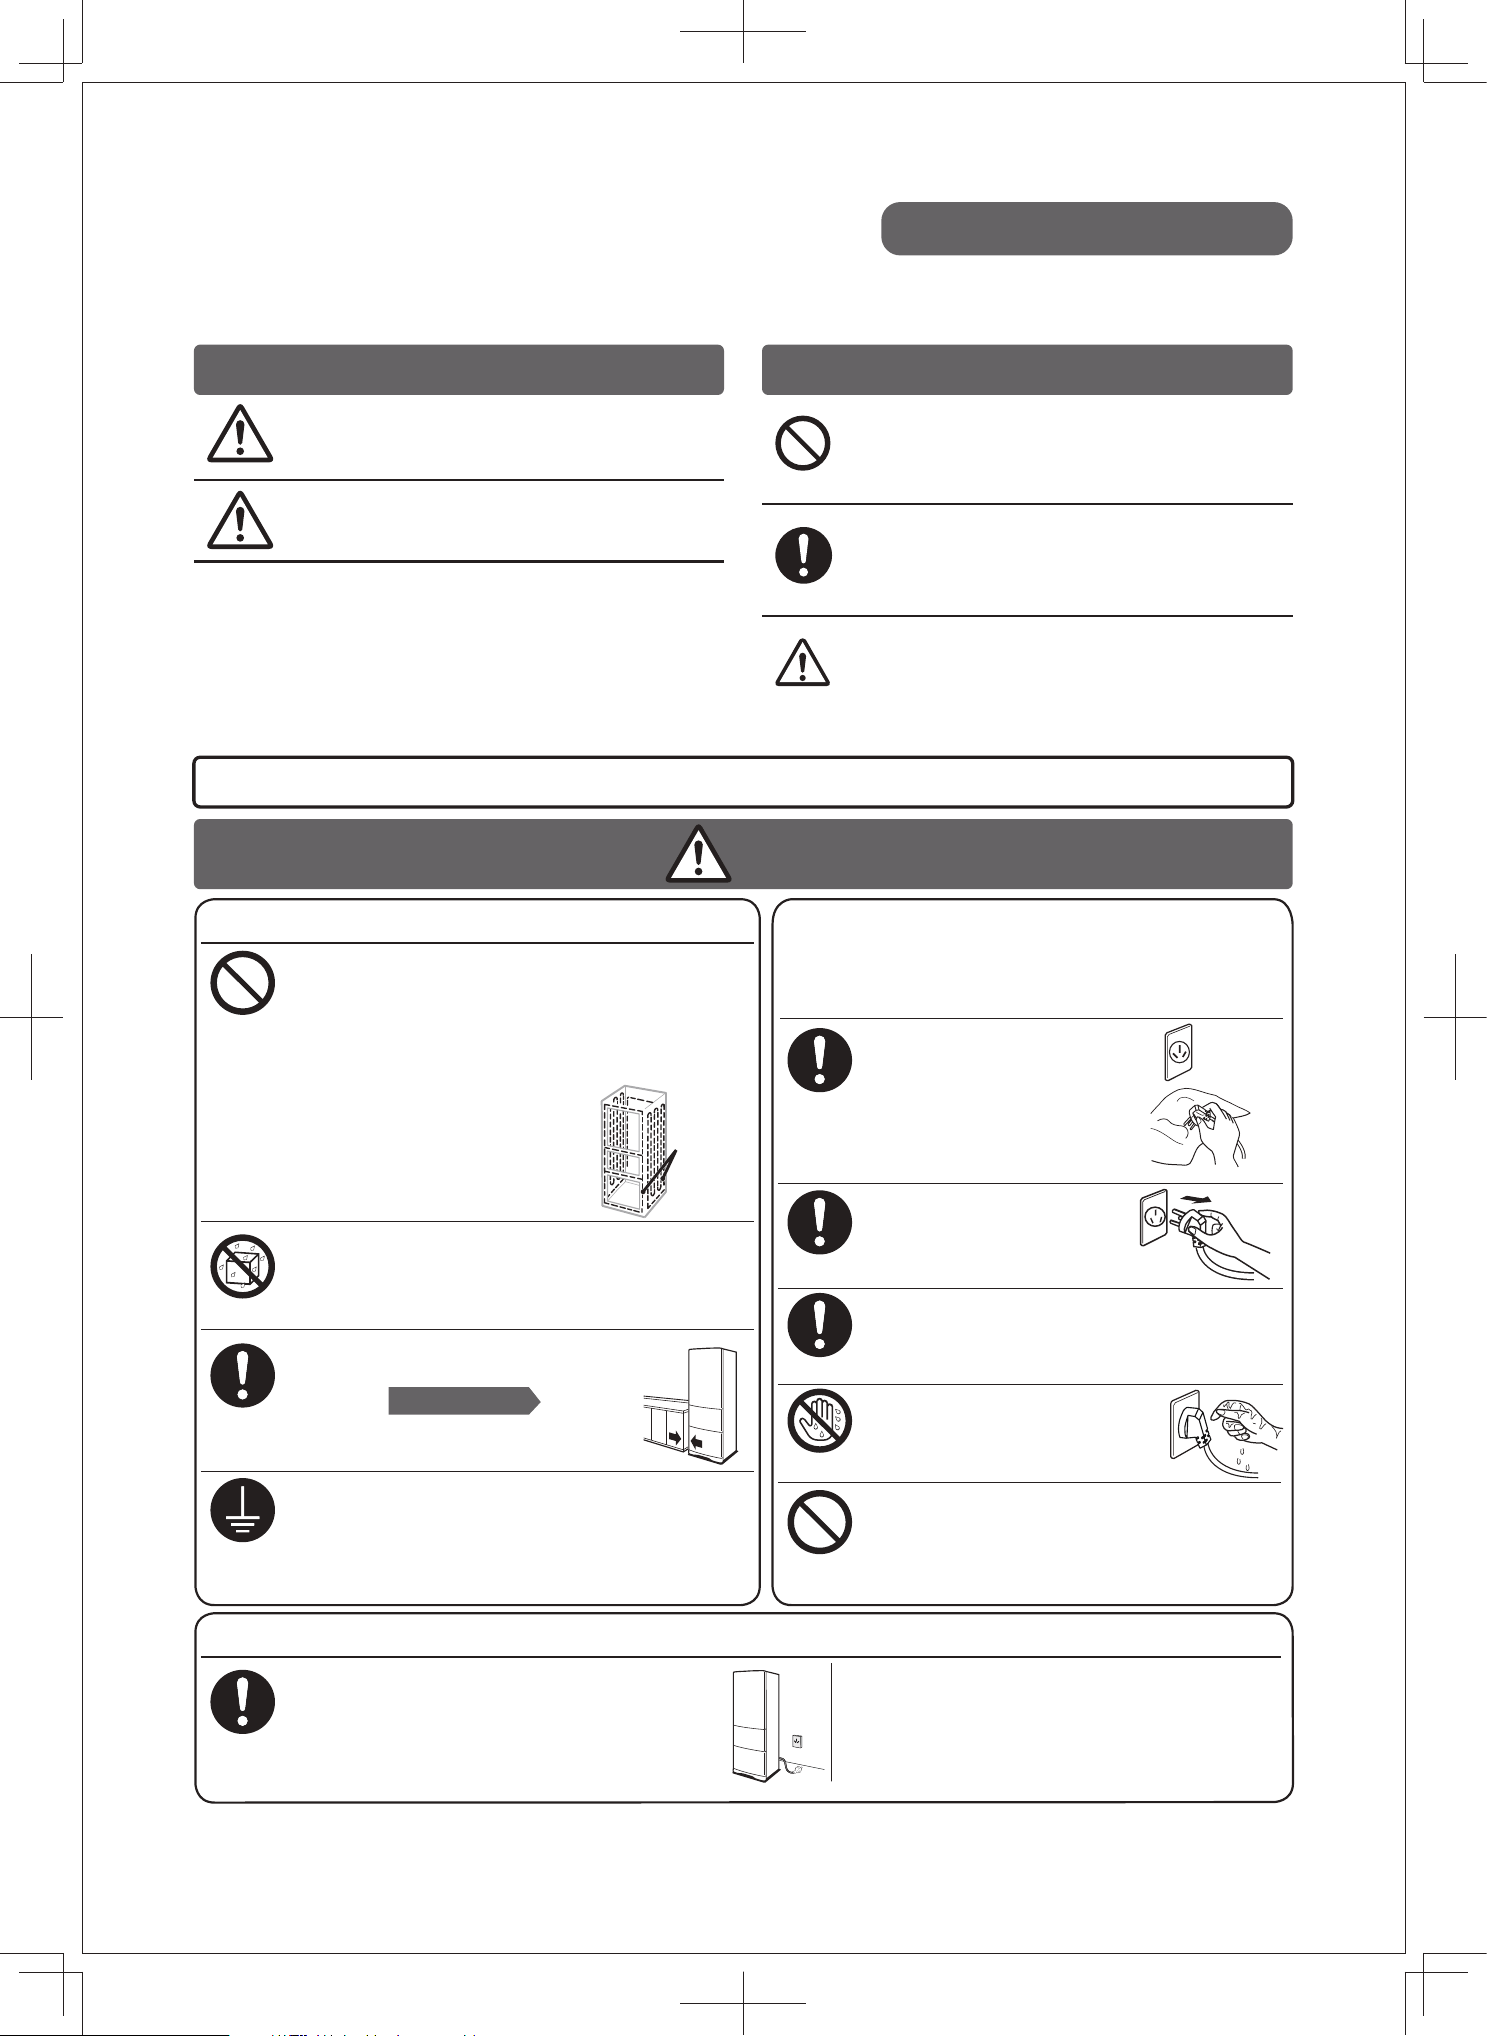
警告: 火/易燃材料的危險
•
•
•
本雪櫃含功能性接地結構。
如果電源線破損,必須由製造商、其服務代理
商或類似的合格人員進行更換,以避免危險。
•
•
警告:保持雪櫃外殼或內置結構通風孔暢通無
•
•
警告:請勿在雪櫃的食物儲藏室內使用非製造商所
建議類型的電器。
請勿在本雪櫃中存放易燃性推進劑等易燃物,例如
氣霧罐。
•
警告:為電器設備定位時,確保電源線沒有被夾住
或損壞。
•
•
警告:請勿在雪櫃背面放置多個便攜式插座或便攜
式電源供應器。
本雪櫃不適合肢體、感官或心智能力較弱的人
•
•
本雪櫃的製冷劑為可燃製冷劑,在安裝和運輸
(包括兒童)或缺乏經驗和知識的人使用,除
非負責其安全的人員已監督或指示他們使用該
設備。
應監督兒童確保他們不玩此雪櫃。
警告:只能裝飲用水。
警告:為了避免由於雪櫃固定不穩導致的危險,必
•
警告:請勿使用製造商建議的方法以外的機械
請勿讓兒童攀爬雪櫃,以免
裝置或其他任何方法加速除霜程序。
•
•
本雪櫃旨在家用或類似應用,例如:
——商店、辦公室和其他工作環境中的員工廚房區
——農舍以及客戶在酒店、汽車旅館和其他住宅類
型環境中的住房;
——床和早餐類型的環境;
——餐飲和類似的非零售應用。
等級
亞溫帶
符號
SN
N
ST
T
周邊環境溫度範圍(℃)
IEC 62552
(ISO 15502)
+10 to +32
+16 to +32
+16 to +38
+16 to +43
ISO 8561
+10 to +32
+16 to +32
+18 to +38
+18 to +43
須按照說明的要求來安裝固定。
雪櫃的設計能在其額定等級指定的溫度範圍內正常
運轉。
溫帶
亞熱帶
熱帶
02
在對雪櫃進行保養、維護、安裝和維修工作之前,
請將電源插頭從電源插座上拔出。
LED燈的更換或維護應由製造商,其服務代理或類
似的合格人員進行。
如果雪櫃在其額定的氣候等級(環境溫度範圍)之
外運行,則它可能無法保持令人滿意的內部溫度。
過程中,請注意不要損壞冷卻管。如果發生氣
體洩露,請與經銷商或當地服務代理聯繫,並
採取以下預防措施:
打開窗戶,確保通風良好。
確保四周無火源,並勿使用其他電器。
雪櫃被廢棄時,應遠離火源,由具有相應資質
的專門回收公司進行回收,不得進行燃燒處理,
以免破壞環境或造成其他危害。
阻。
域;
造成雪櫃倒下、部件鬆脫或
兒童被關入雪櫃,傷及兒童。
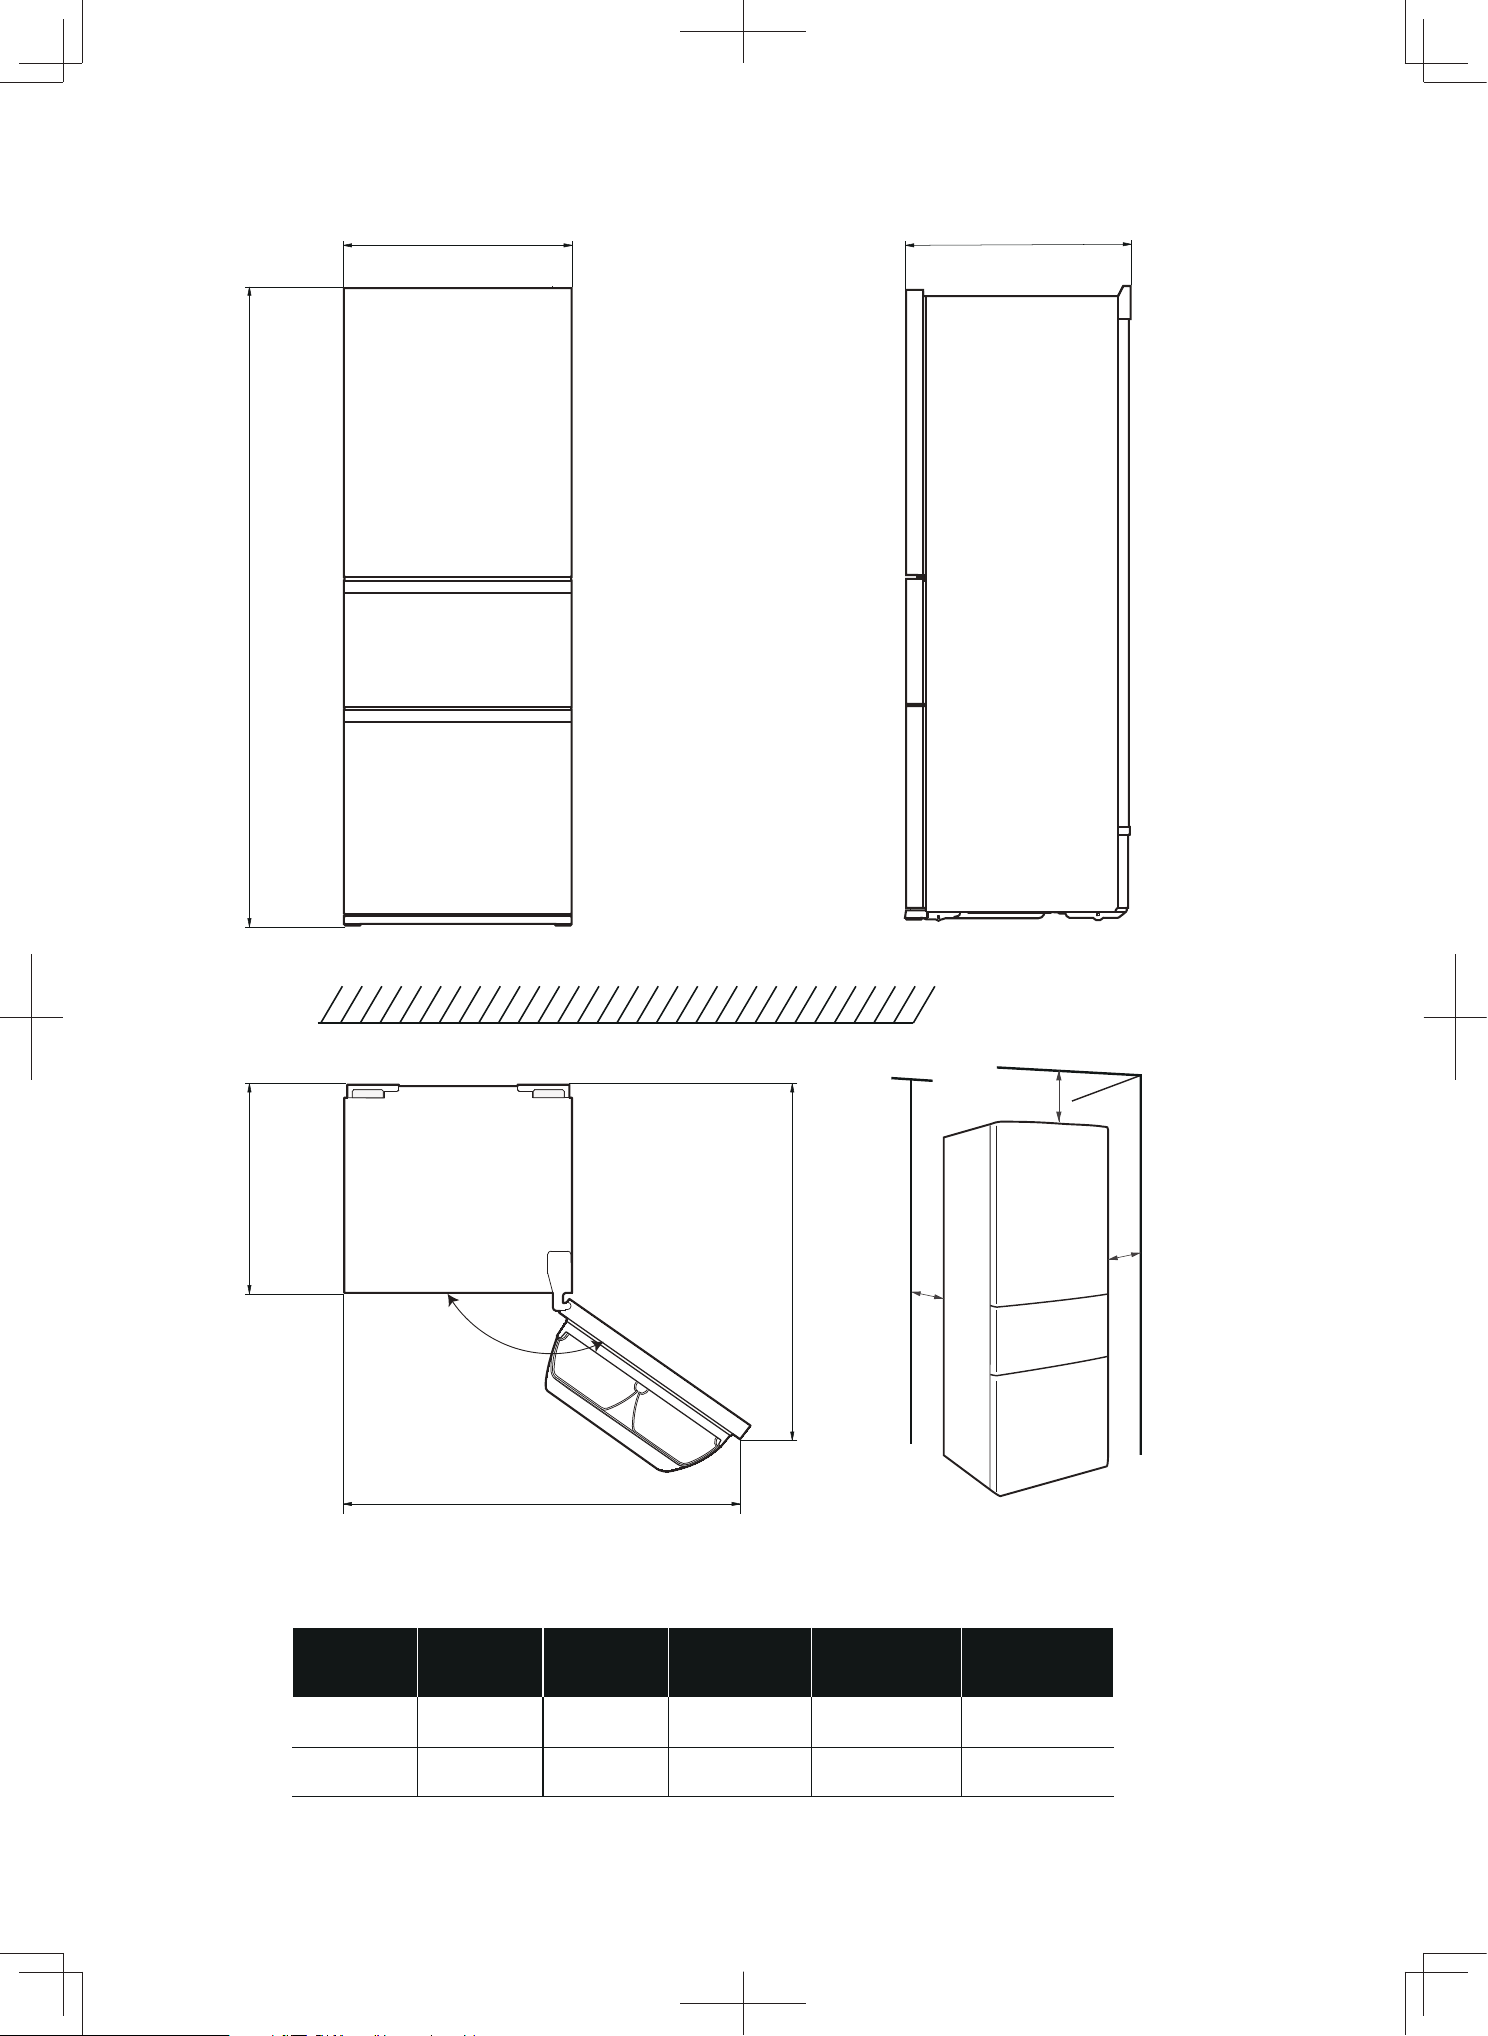
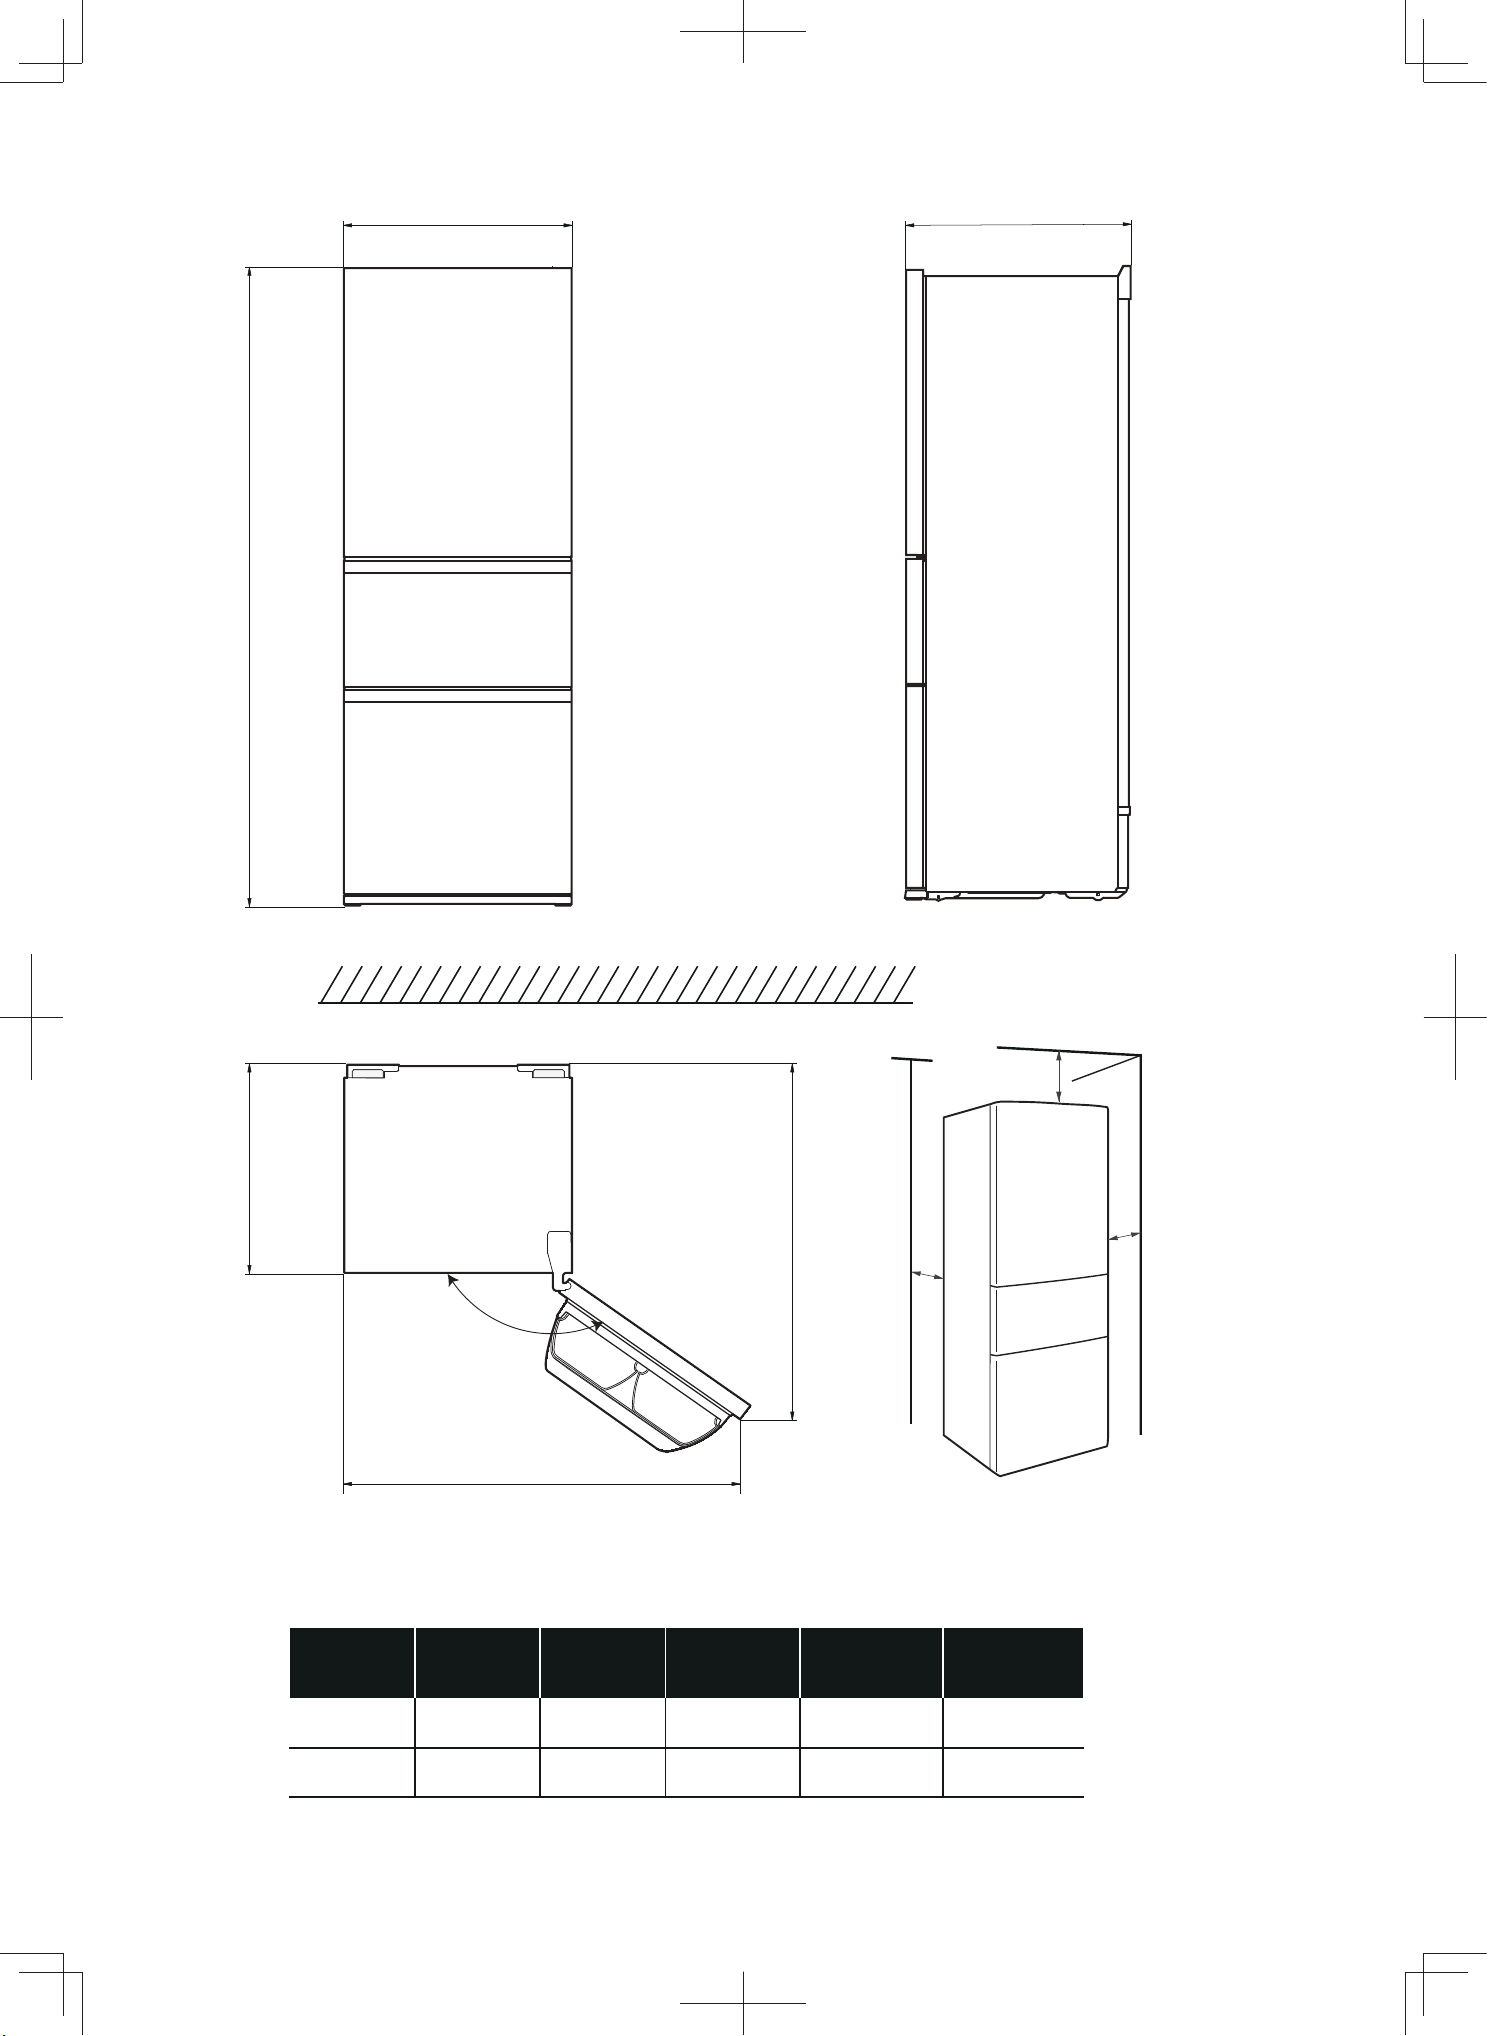
A B C C1 D E
145°
03
所需空間示意圖(門開啟及關閉時)
寬度 總高度 深度 僅櫃體深度
門打開145°
時深度
門打開145°
時寬度
600 6731757 607.5 1005 1072
註: 尺寸均以 mm 為單位
A
E
C
B
C1
D
雪櫃頂部空間應大於100mm,雪櫃側面空間應大於50mm,雪櫃背面空間應大於50mm,以便雪櫃散熱。
100mm
50mm
50mm
?
?
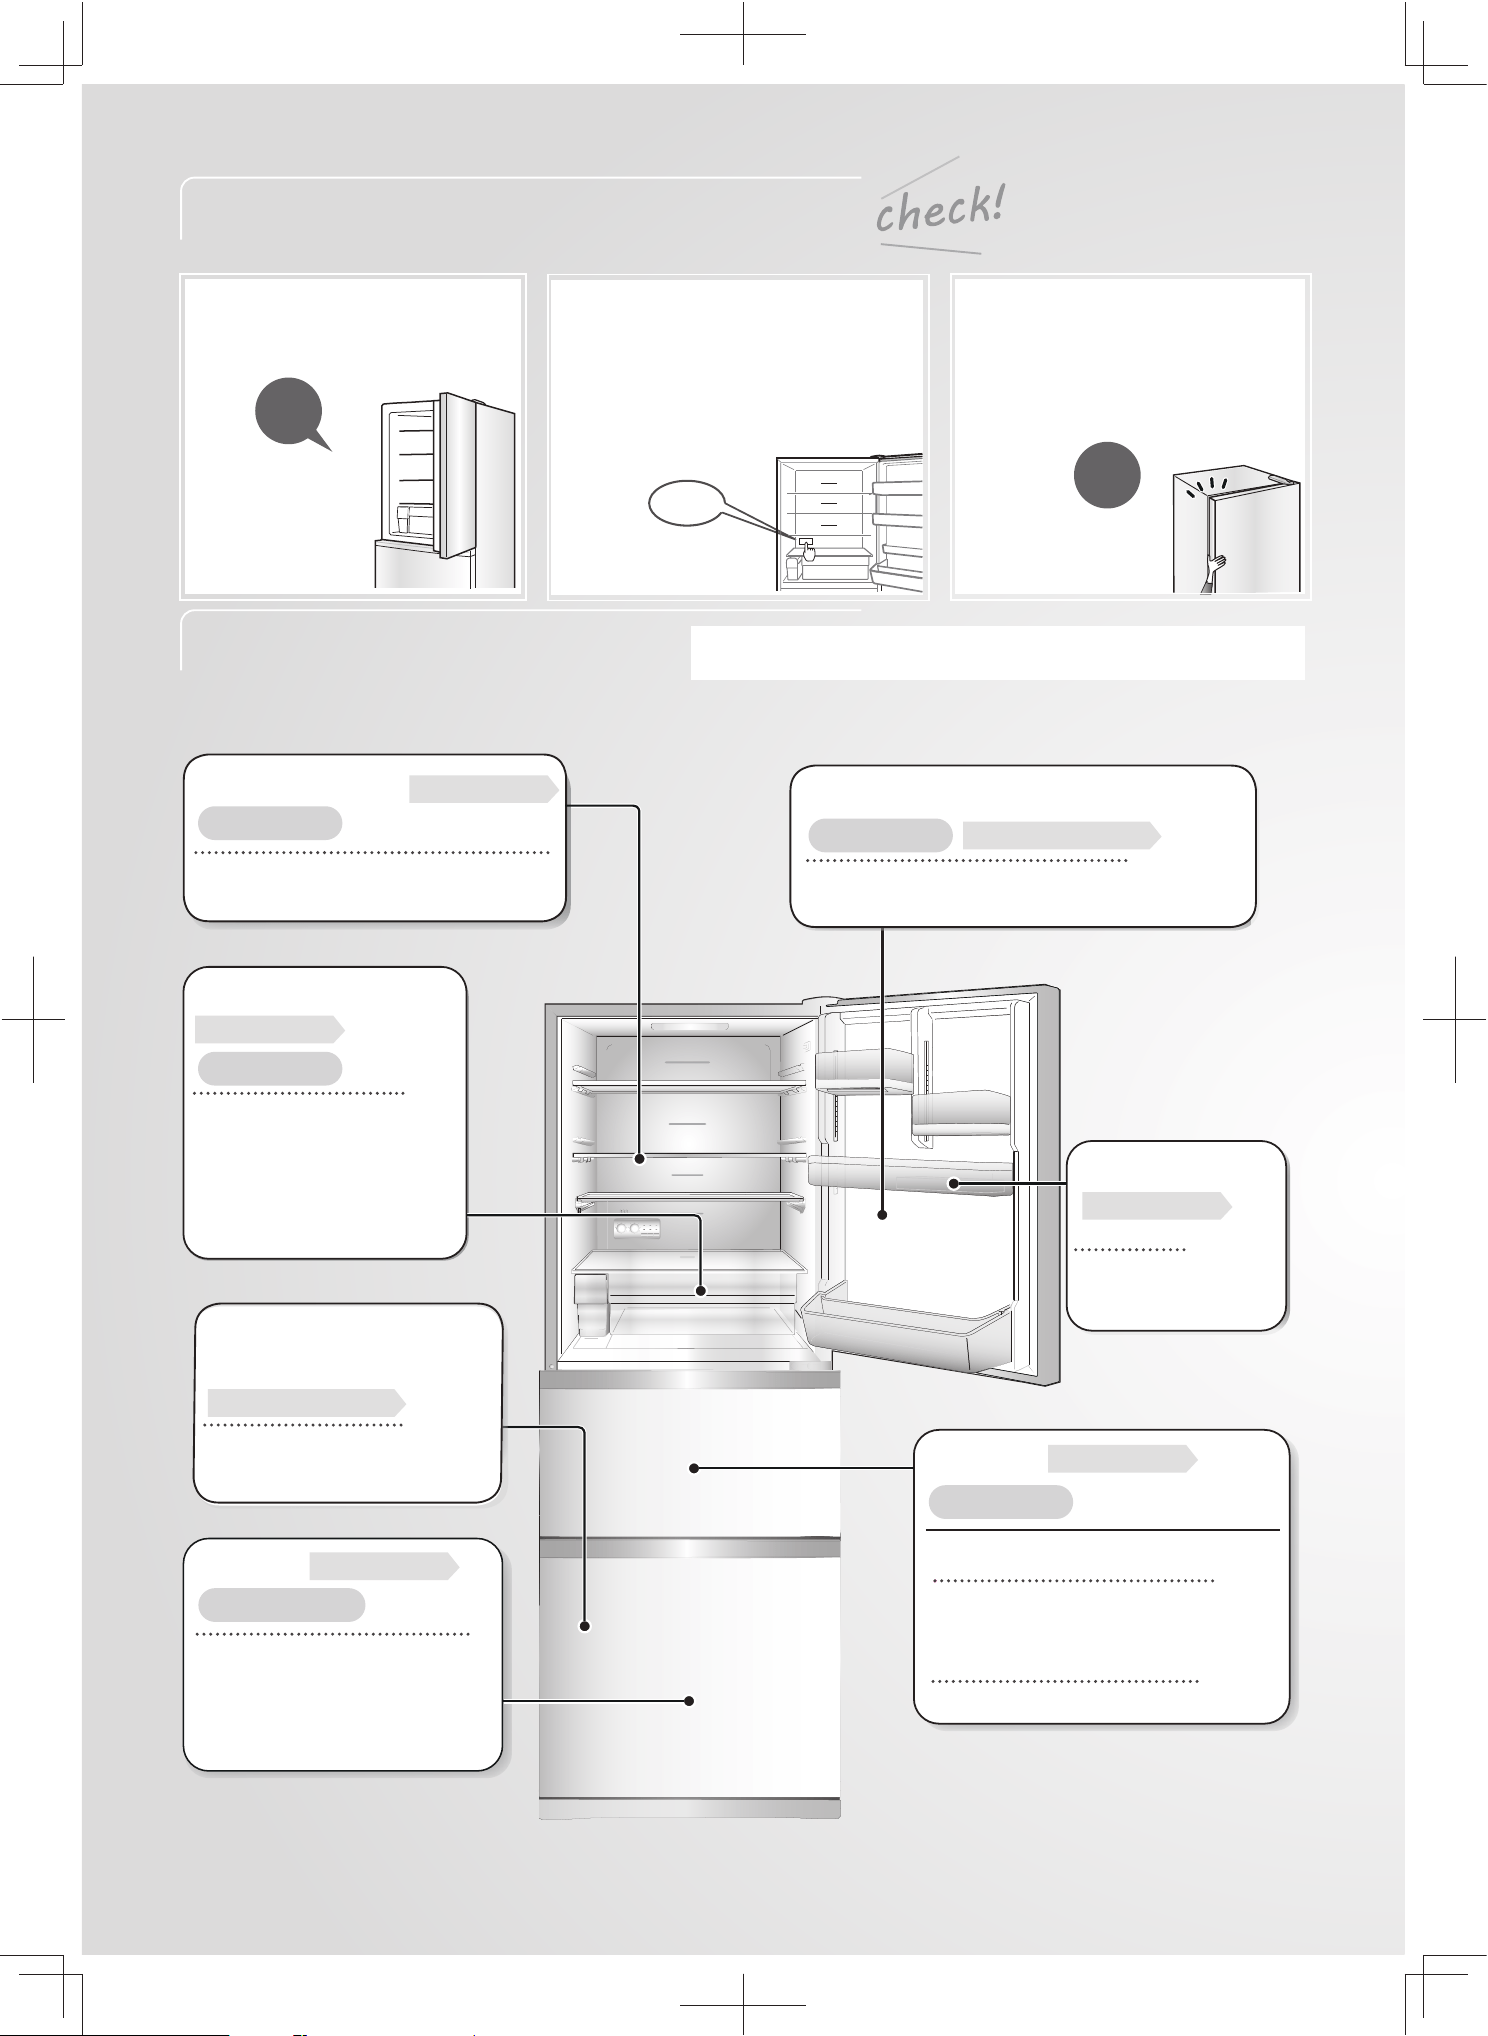
常見問題
操作面板
的使用方法
為什麼門不能
關閉、有錯位?
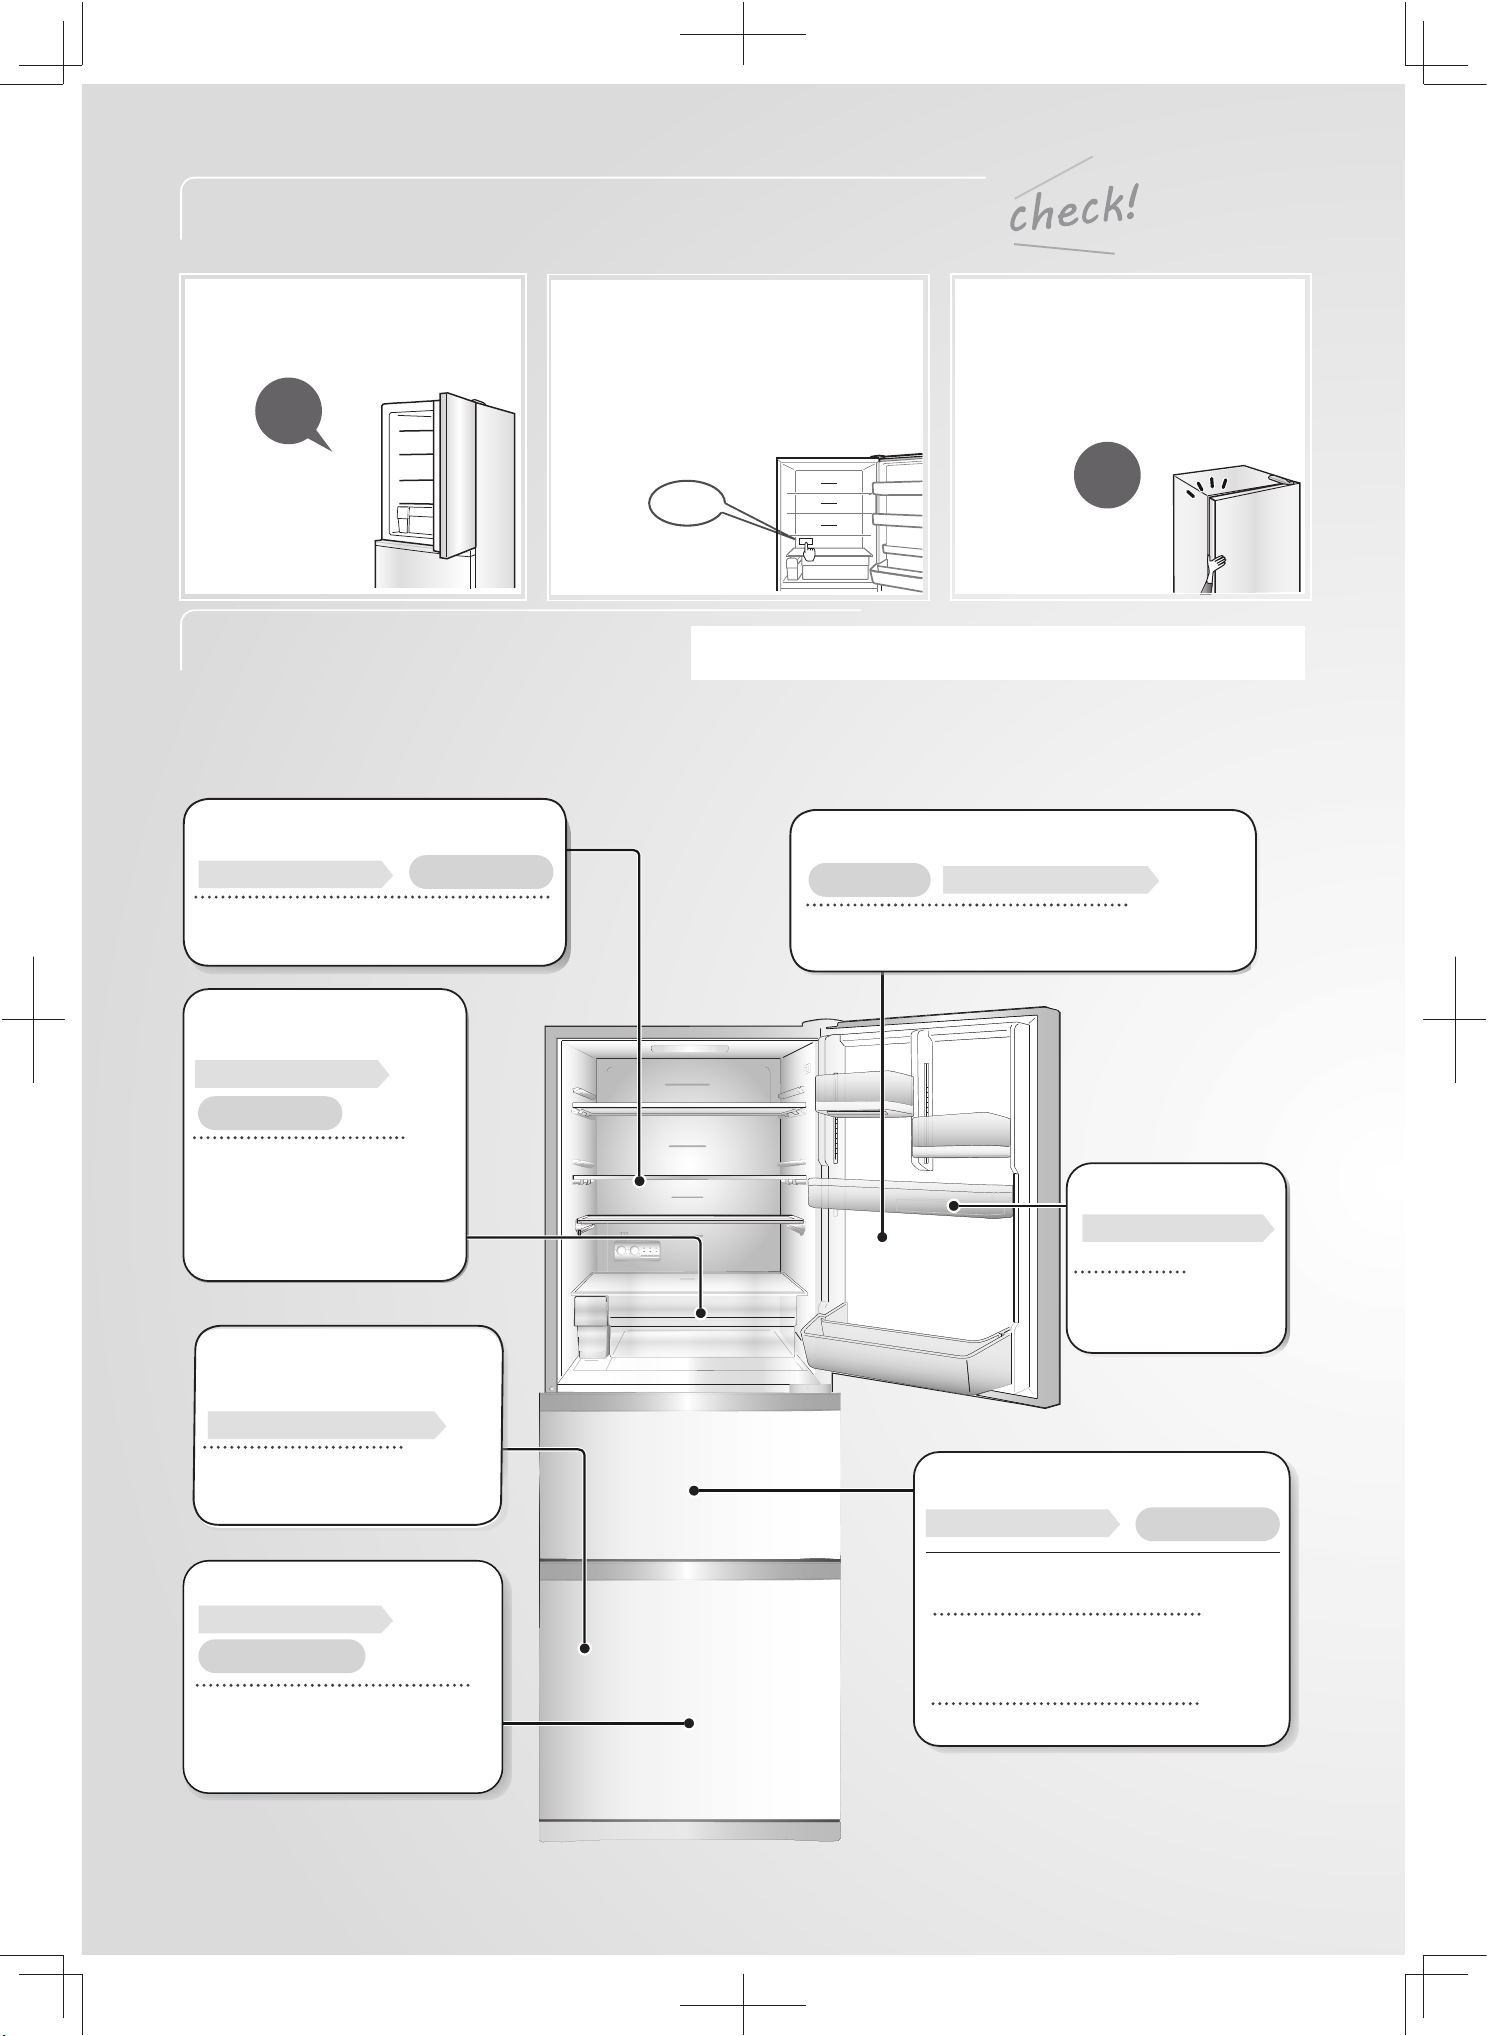
食物的貯存位置及溫度
為什麼不製冷?
第10~11頁
嗶
第09、30頁
圖中的溫度值,是在環境溫度為32℃、溫度調節檔位為「中」,
未放入食物,關上雪櫃門,溫度穩定時測得的溫度值。
接通電源後,等待3~4小時,雪櫃製冷後,再放入食物。
約2~6℃
請參閱第12頁
冷藏室(雪櫃內)
速凍冰鮮盒
製冰盒
(自動製冰機)
冷凍室
冷藏室(門上置物架)
蛋架
已烹調的食物、冷藏小件
物品、調味品等。
肉類、魚類、乳製品、
加工食物、容易發酵或
腐爛的食物等。
● 快速微凍、解凍都是在
速凍冰鮮盒進行。
● 快速冷凍在冷凍室進行。
調味品、罐裝食物、軟包裝調味品、
牛奶、啤酒、果汁等。
雞蛋和
冷藏小件物品等。
可自動製冰。
蔬菜、水果等。
蔬菜、水果、瓶類等。
冷凍食物、雪糕等。
約3~8℃
請參閱第14~15頁
約0~2℃
請參閱第12頁
請參閱第17~18頁
請參閱第16頁
約-19~-21℃
蔬果室
蔬果室滑動盒
蔬果容器
請參閱第16頁
請參閱第15頁
約2~10℃
第 28 頁
04
目錄
尊敬的用戶:
• 感謝惠購東芝產品,謹在此致以誠摯謝意。
• 為了您正確使用本產品,請在產品安裝和使用前仔細閱讀本用戶手冊,並妥
善保管以供日後參考。
• 您所使用的東芝產品,需要定期進行清洗與保養。如未能正確的清洗與保養,
其故障率將增加且適用壽命大為縮減。
• 請您每年定期與東芝當地服務網點或直接與本公司聯絡,我們將指派專業人
員給您提供有償的檢查和保養服務。
1.安全注意事項 ....................................................................................06
2.安裝方法............................................................................................08
3.操作面板的功能 ................................................................................10
4.冷藏室................................................................................................12
5.蔬果室、冷凍室 ................................................................................16
6.自動製冰機 ........................................................................................17
7.快速冷凍............................................................................................19
8.清潔保養............................................................................................20
9.自動製冰機的保養.............................................................................24
10.各種處理..........................................................................................26
11.層架及容器的負重 ..........................................................................26
12.遇到故障時......................................................................................27
13.搬運、遷居時 ..................................................................................32
14.線路圖..............................................................................................33
15.規格..................................................................................................34
16.附件..................................................................................................35
17.化霜間隔宣稱 ..................................................................................35
05
06
220V ~
安全注意事項
為保安全,請必須遵守
警告
為保安全並且正確地使用本產品,請務必仔細閱讀。
有關設定
異常時
有關電源插頭/電線
標示符號的說明 圖示符號的說明
為防止對用戶或他人造成傷害或財產損失,並且讓用戶能夠更安全正確地使用本產品,此用戶手冊提供了有關
安全使用方面的重要內容。請充分理解下列內容(標示、圖示符號)後閱讀正文,並遵守說明事項。
表示錯誤操作時,有可能造成死
亡或重傷。
禁止
禁止
禁止濕氣
請務必接
上地線
禁止濕手操作
強制
強制
強制
強制
強制
冷凝管
(製冷劑
循環)
表示錯誤操作時,有可能造成輕
傷或物品損壞。
具體的禁止內容標示在圖示符號中或在其附
近用圖畫或文字說明。
具體的強制內容標示在圖示符號中或在其附
近用圖畫或文字說明。
具體的注意內容標示在圖示符號中或在其附
近用圖畫或文字說明。
如需維修電源插頭和電線,請致電服務熱線。
「如果電源軟線損壞,為免危險,必須由製造商、
其維修部或類似部門的專業人員更換。」
注意
警告
* 重傷是指因失明、燒傷、燙傷、凍傷(高溫、低
溫)、觸電、骨折、中毒等留下後遺症以及需要
住院或長期去醫院接受治療的人身傷害。
* 輕傷是指無需為了治療而住院或長期去醫院看病
的負傷、燙傷或觸電等。
* 物品損壞是指對家庭財產、飼養的動物或寵物造
成的長期傷害。
● 警告:不得損壞製冷循環。
受損時,製冷劑可能出現洩漏,導致起火、
爆炸。
受損時,請不要觸摸雪櫃,按照
以下有關事項處理,並和選購的
經銷商聯絡或致電服務熱線。
1. 打開窗戶,疏通室內空氣。
(請不要使用排氣扇)
2. 請不要使用明火或電器。
● 不要放置在潮濕的地方或易濺水的地方,否
則可能引致火警或觸電。
● 從電源插座拔出插頭時,
請拿住插頭拔出。
● 請單獨使用220V的交流電
源插座。
● 插入電源插頭時應使電線朝
下,且完全插入插座中。
● 請定期清除電源插頭上的
灰塵。
● 保養時或長期不使用時,請
將電源插頭從插座中拔出。
● 請勿用濕手拔出、插入電源
插頭。
● 請勿使用損壞的電源線和電源插頭,
插入插座時感到鬆弛時請勿使用。
● 請勿損毀、捆綁、彎折、用重物壓或
用雪櫃背面擠壓電源插頭及電線。
● 可燃氣體(液化石油氣、天然氣等)洩漏
時,請勿觸摸雪櫃或電源插頭,應首先進
行通風換氣。
否則,電器連接點的火花可能導致起火爆
炸,引致火警、受傷、燒傷。
● 警告:器具周圍或在嵌入式
結構裡無阻礙物,保持通風
通暢。
製冷劑洩漏時,可能在空氣中
滯留導致起火、爆炸。
● 在濕氣較重、或有水氣的地方使用時,請裝
上地線以及防漏電裝置。
否則,一旦漏電,可導致火警或觸電意外。
● 發生異常或故障時,請拔出電源插頭,
停止使用。
否則可能引致火警、觸電、受傷、燙傷。
需修理時,請與選購的經銷商聯絡或致電
服務熱線。
請參閱第08頁
07
警告 注意
有關使用
有關使用
門開關注意事項
搬運、移動時注意事項
報廢時
● 不得在器具中貯存爆炸物,如助燃噴霧劑。
● 請勿在附近使用可燃性噴霧劑。
否則可能起火,引致火警。
● 請勿讓食物超出置物架。
● 請勿將放不到底的瓶類物品放在雙瓶置物
架的前排。
否則瓶類物品可能會掉下,造成損壞。
● 請勿將瓶類物品放入冷凍室。
否則瓶類物品可能凍結裂開,造成損壞。
● 請勿濕手觸摸冷凍室的食物
和容器(金屬物件)。
因為低溫可能造成凍傷。
● 請勿將手腳伸入雪櫃的底部否
則可能會因鐵板等造成受傷。
● 玻璃層架和冰鮮盒頂板必須用雙手取放,
否則掉落可能會碎裂,引起受傷。
● 請勿強行關門。
否則食物跌落可能導致受傷。
● 請勿在冷藏室門把手抓住的
同時開關蔬果室門。
● 請勿將手指伸入冷藏室門的
側面。
● 請勿將腳靠近冷凍室的門,
否則腳可能被門的縫隙夾到
而導致受傷。
● 關閉雪櫃門時,應抓握好把手
若抓住把手的上邊,手指可能
會被夾住。
● 在開關門或有他人和雪櫃接觸
時,請確認手指是否可能被門
夾住。
可能造成受傷。
● 在容易損壞的地板上,請勿使
用雪櫃下的腳輪。
否則可能損壞地板。
移動時請鋪墊上保護板等。
● 搬運時請使用前面下側和背面上側的
搬運用把手。
否則可能會因手打滑而造成受傷。
● 安裝在平穩堅固的地板上。
不穩定的地方易翻倒,從而造成受傷。
● 請勿將醫藥品或學術試樣放入雪櫃。
家用雪櫃不能保存對溫度控制有嚴格要求
的物品。
● 請勿食用有異味或變色的食物,可能會發
生食物中毒或生病。
● 請勿在雪櫃頂部放置物品。
物品掉落會造成受傷,如放置裝有
液體的容器,濺出的液體將可能影
響到電氣絕緣效果,可能會引致火
警、觸電。
● 警告:除了製造商推薦使用的類型外,不
得在器具的食物儲藏室使用電器。
製冷劑洩漏時,可能引致火警、爆炸事故。
● 請勿碰撞玻璃門和玻璃層架等。
造成裂痕和缺口時,可能引起受傷。當出
現裂痕和缺口時,請不要碰觸並請立即聯
絡經銷商或致電服務熱線。
● 請勿用手觸摸自動製冰機的
製冰部分(製冰室上側)否
則製冰盤轉動時,可能會造
成受傷。
● 請勿沖洗雪櫃的內部和外部。
否則可能降低電氣絕緣性,引致火警
或觸電。
● 棄置雪櫃時,請交給經銷商或專門的棄
置機構。
若隨意棄置,製冷劑、發泡層材料誤接
觸火源,可能引致火警或爆炸。
● 棄置時請拆下門封。
否則可能有幼兒被關在裡面,
引起事故。
● 請勿自行拆卸、改裝、修理。
● 禁止打開雪櫃背面的後蓋,
否則可能引致火警、觸電、
受傷、燙傷。並且,如果損
壞製冷循環,可能引致火警、
爆炸事故。需修理時,請與
選購的經銷商聯絡或致電服
務熱線。
● 請勿攀吊於門上或坐在門上。
可能造成雪櫃翻倒、門掉下、手被夾住而
受傷。
禁止
禁止
禁止
禁止
強制
強制
強制
強制
禁止濕手操作
禁止接觸
禁止接觸
禁止沖洗
禁止拆卸
使
用
前

08
1
2
90°
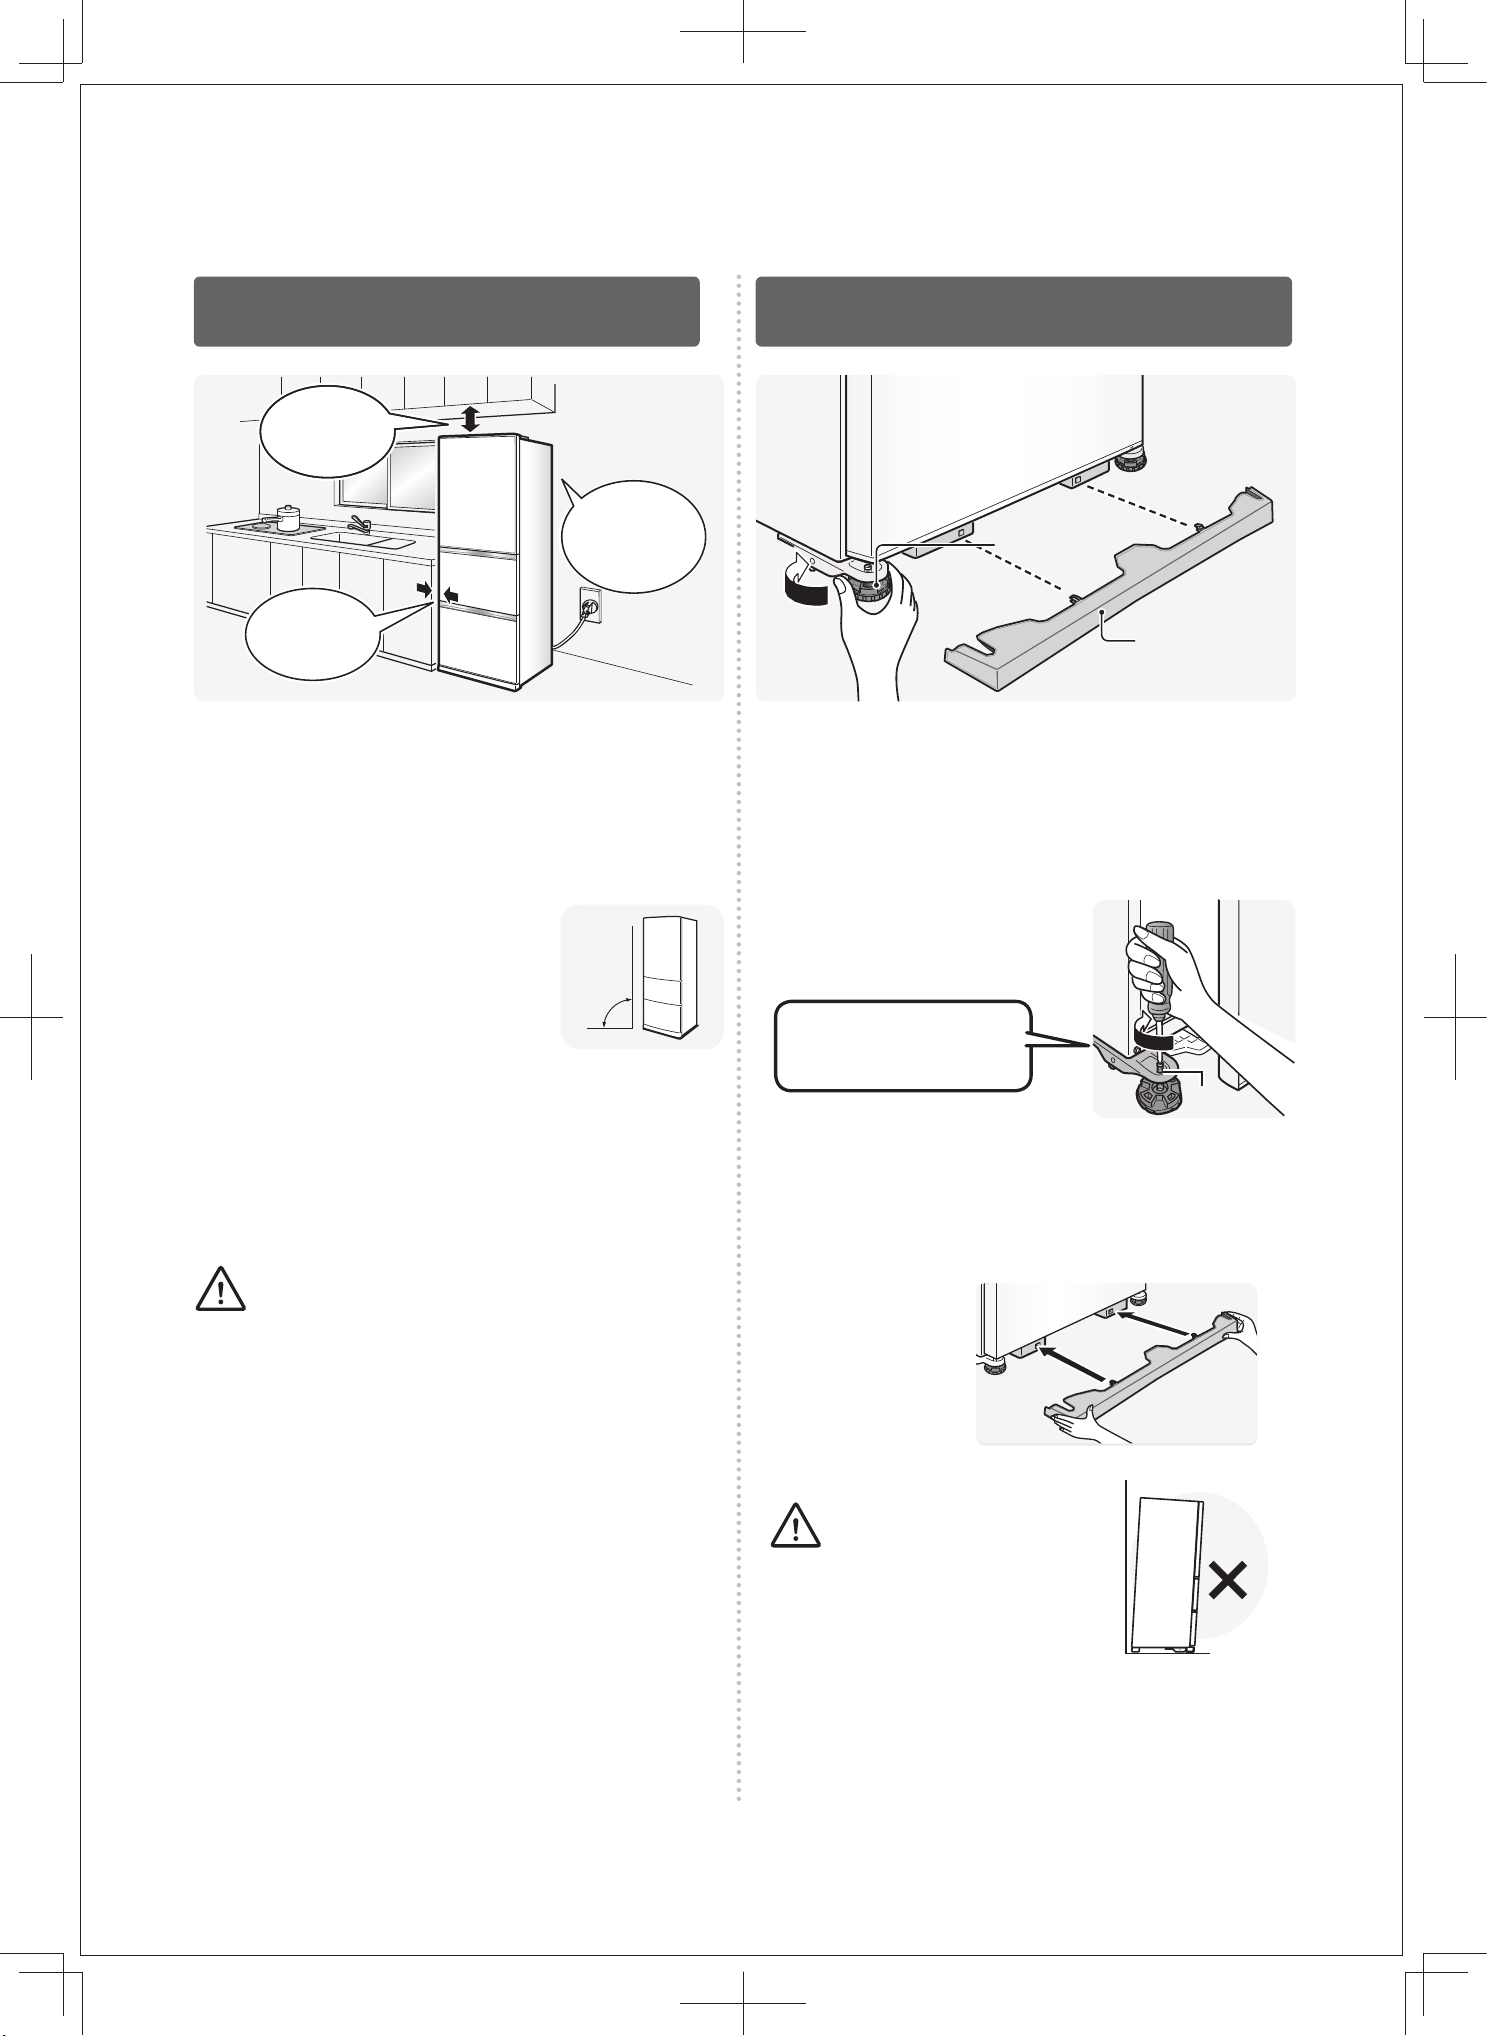
安裝方法
安裝 固定
距離天花板
100mm以上
左右距離
50mm以上
背面距離
50mm以上
安裝場所的選擇方法
遠離熱源和陽光直射的地方
●可避免冷卻能力的降低,節省電費。
請放在平整、乾燥、通風較好的地方
● 否則,可能引起振動(噪音)
和門下降。
地上為地毯、地板、聚氯乙烯
(避免雪櫃重量引起地面變形
以及雪櫃底面的熱量引起的變
色。)
調節調整腳
按指定位置安裝前面裝飾板
當調整腳無法用手轉動時
保養
請用柔軟的濕布擦拭雪櫃內部。
● 為了便於使用,雪櫃內的食物存放容器及導軌等部
位塗有符合日本食物衛生法的潤滑劑。
如潤滑劑不慎沾到存放容器或導軌以外的部位時,請
用柔軟的濕布擦拭乾淨。
剛開始使用時,可能會有塑膠味。
請給房間通風,以驅散異味。
雪櫃四周要留有空隙。
● 可避免冷卻能力降低,節省電費。
且可避免產生振動聲以及牆壁變色等情況。
● 根據雪櫃的安裝狀態不同,有時會發生電話、
對講機、收音機和電視機等有雜音或影像紊亂
的現象。這種情況下,請將這些設備盡可能遠
離雪櫃。
● 請按箭頭方向旋轉左右兩邊的調整腳,使
調整腳觸及到地面,不要讓雪櫃晃動。
● 請打開冷凍室門,用螺絲批
等工具轉動調整腳螺絲。
注意
注意
前面裝飾板
螺絲孔
如過度轉動調整腳螺
絲,螺絲可能會掉出
螺絲孔外。
如轉動調整腳仍不能調平雪櫃的話,請在雪櫃
下面墊上墊板。
雪櫃要水平固定,以免向前
傾斜導致門不能完全關閉。
調整腳
靜置
將雪櫃放置平穩;搬運或移動雪櫃後需靜置4~6小時
以上方可插入電源。
使用前,請去除所有的包裝物,包括內部的墊塊、膠
帶、泡沫等。
09
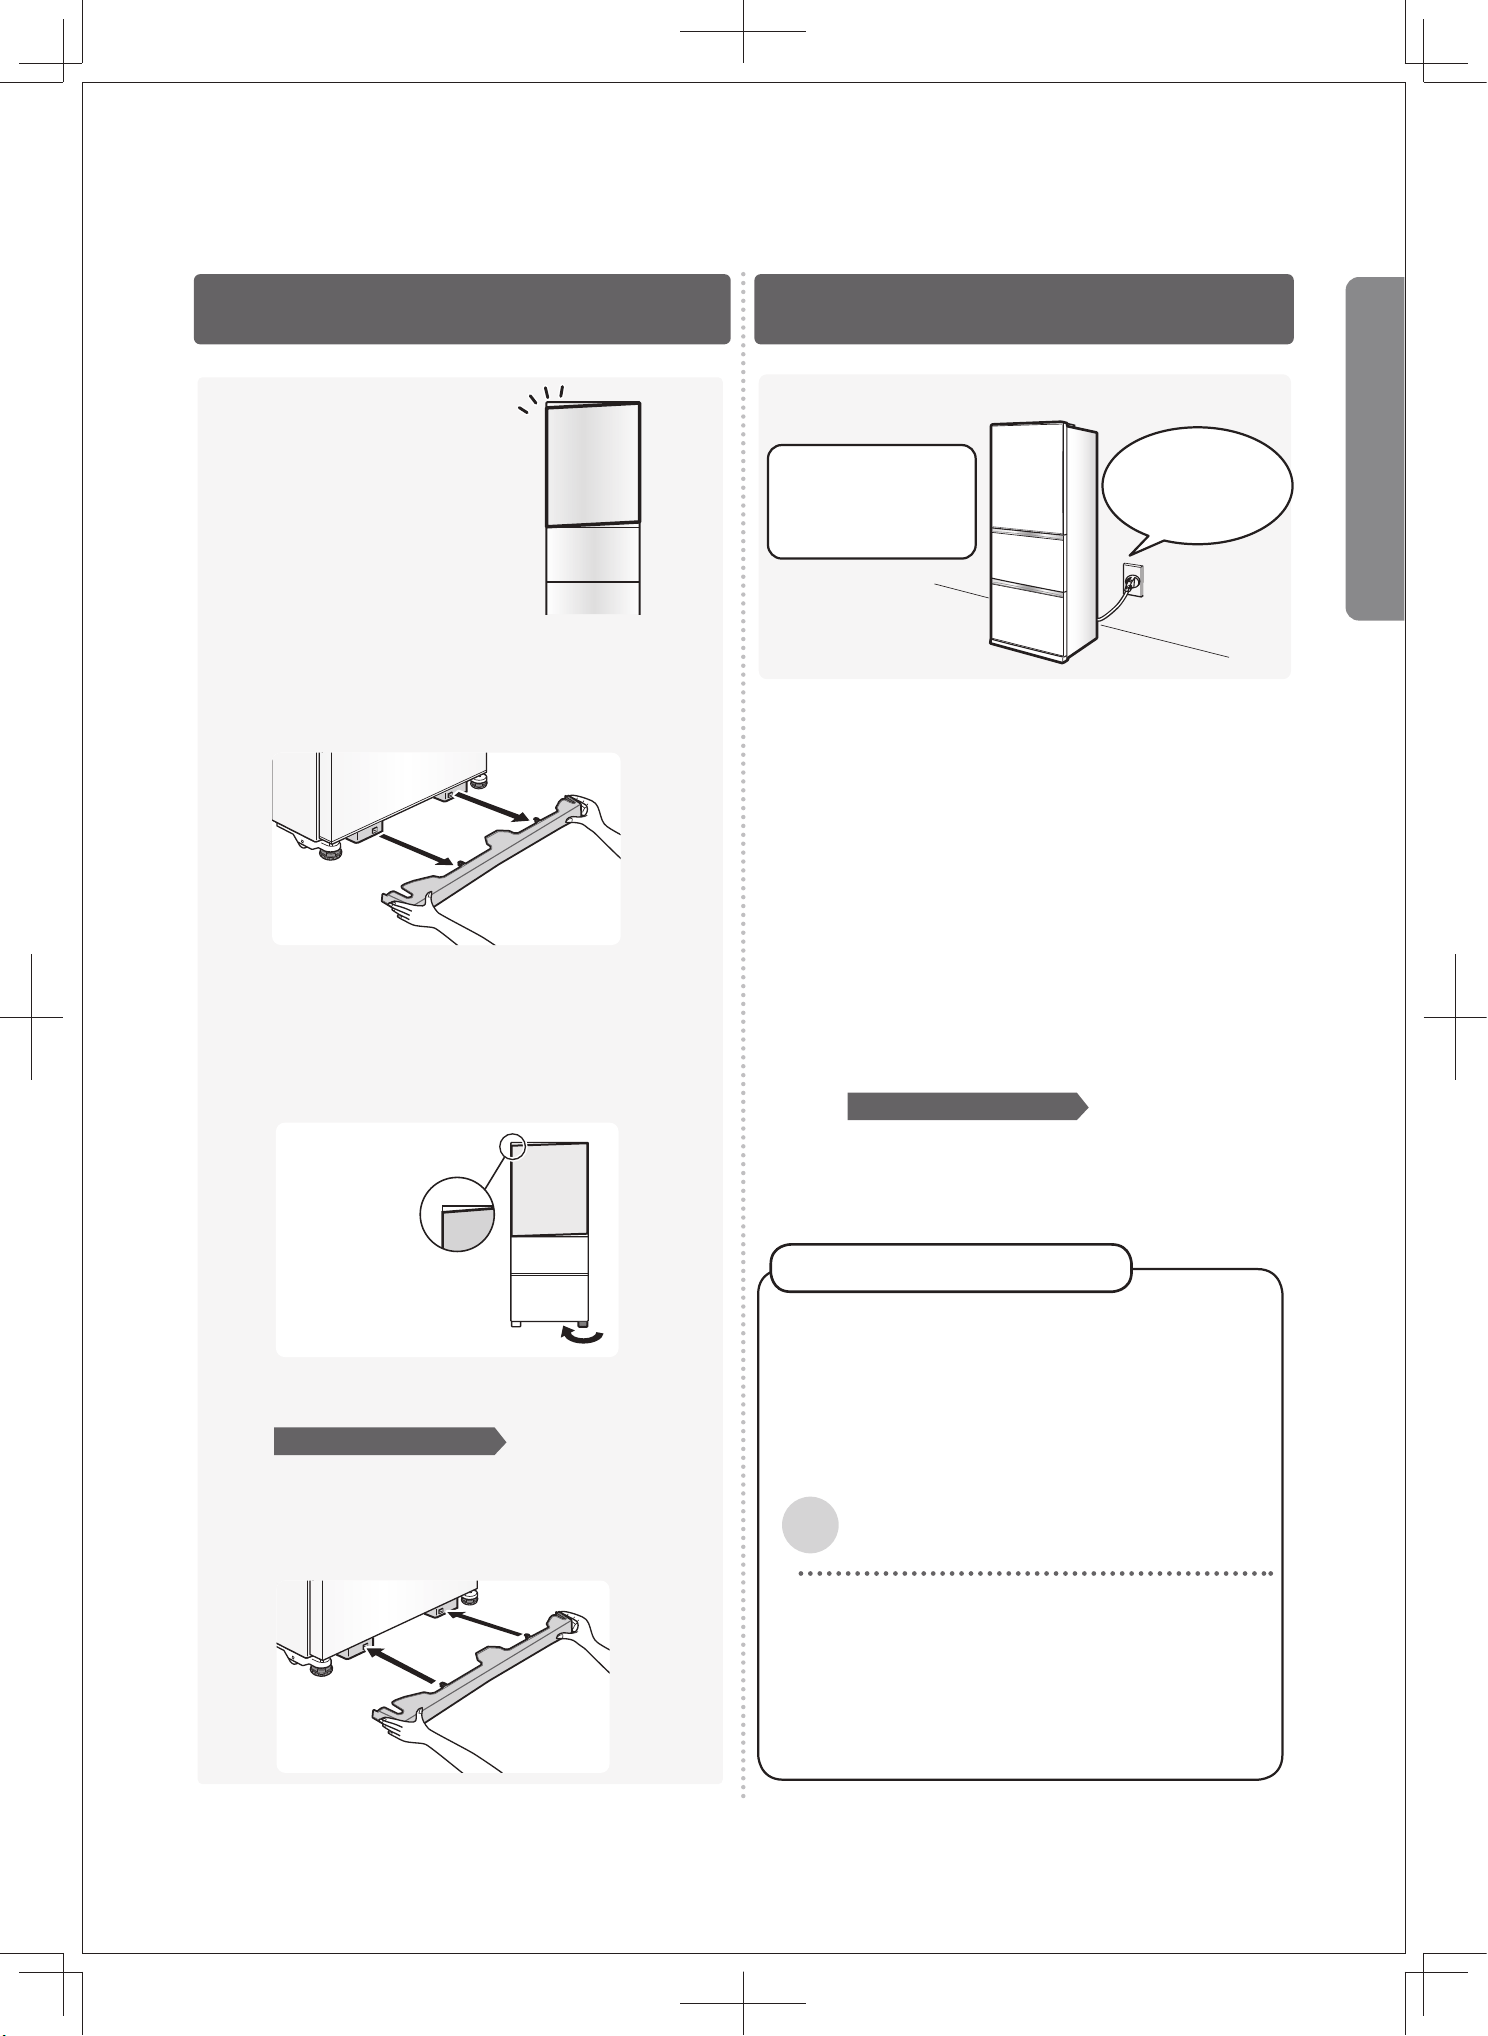
1
2
3
1
2
調整 插入電源
取下前面裝飾板
請確認是否處於演示模式
調整門的平行度
接地方法
安裝在水氣或濕氣多的位置時
按指定位置安裝前面裝飾板
將右側的調整腳
按箭頭方向旋轉
食物請在放涼後才
放入雪櫃。
製冰會在雪櫃冷卻
下來以後才開始。
安裝好並確認接
地正常後,即可
插入電源插頭。
當調整腳無法用手轉動時
為了防止觸電事故,必須採取接地的安全措施。
請務必連接好地線。
特別是雪櫃安裝在水氣或濕氣較多的位置時,
除了需要連接地線外,還需安裝防漏電裝置。
● 雪櫃門會因為地板的狀態以
及食物的重量,在數日後出
現門下降的情況。此時請再
次調整門的平行度。
● 處於演示模式時,製冷系統會停止運作。
請解除演示模式。
請參閱第08頁
請將電源插頭插入電源插座
(請使用220V 交流的獨立電源插座)
請參閱第10頁
使
用
前
10
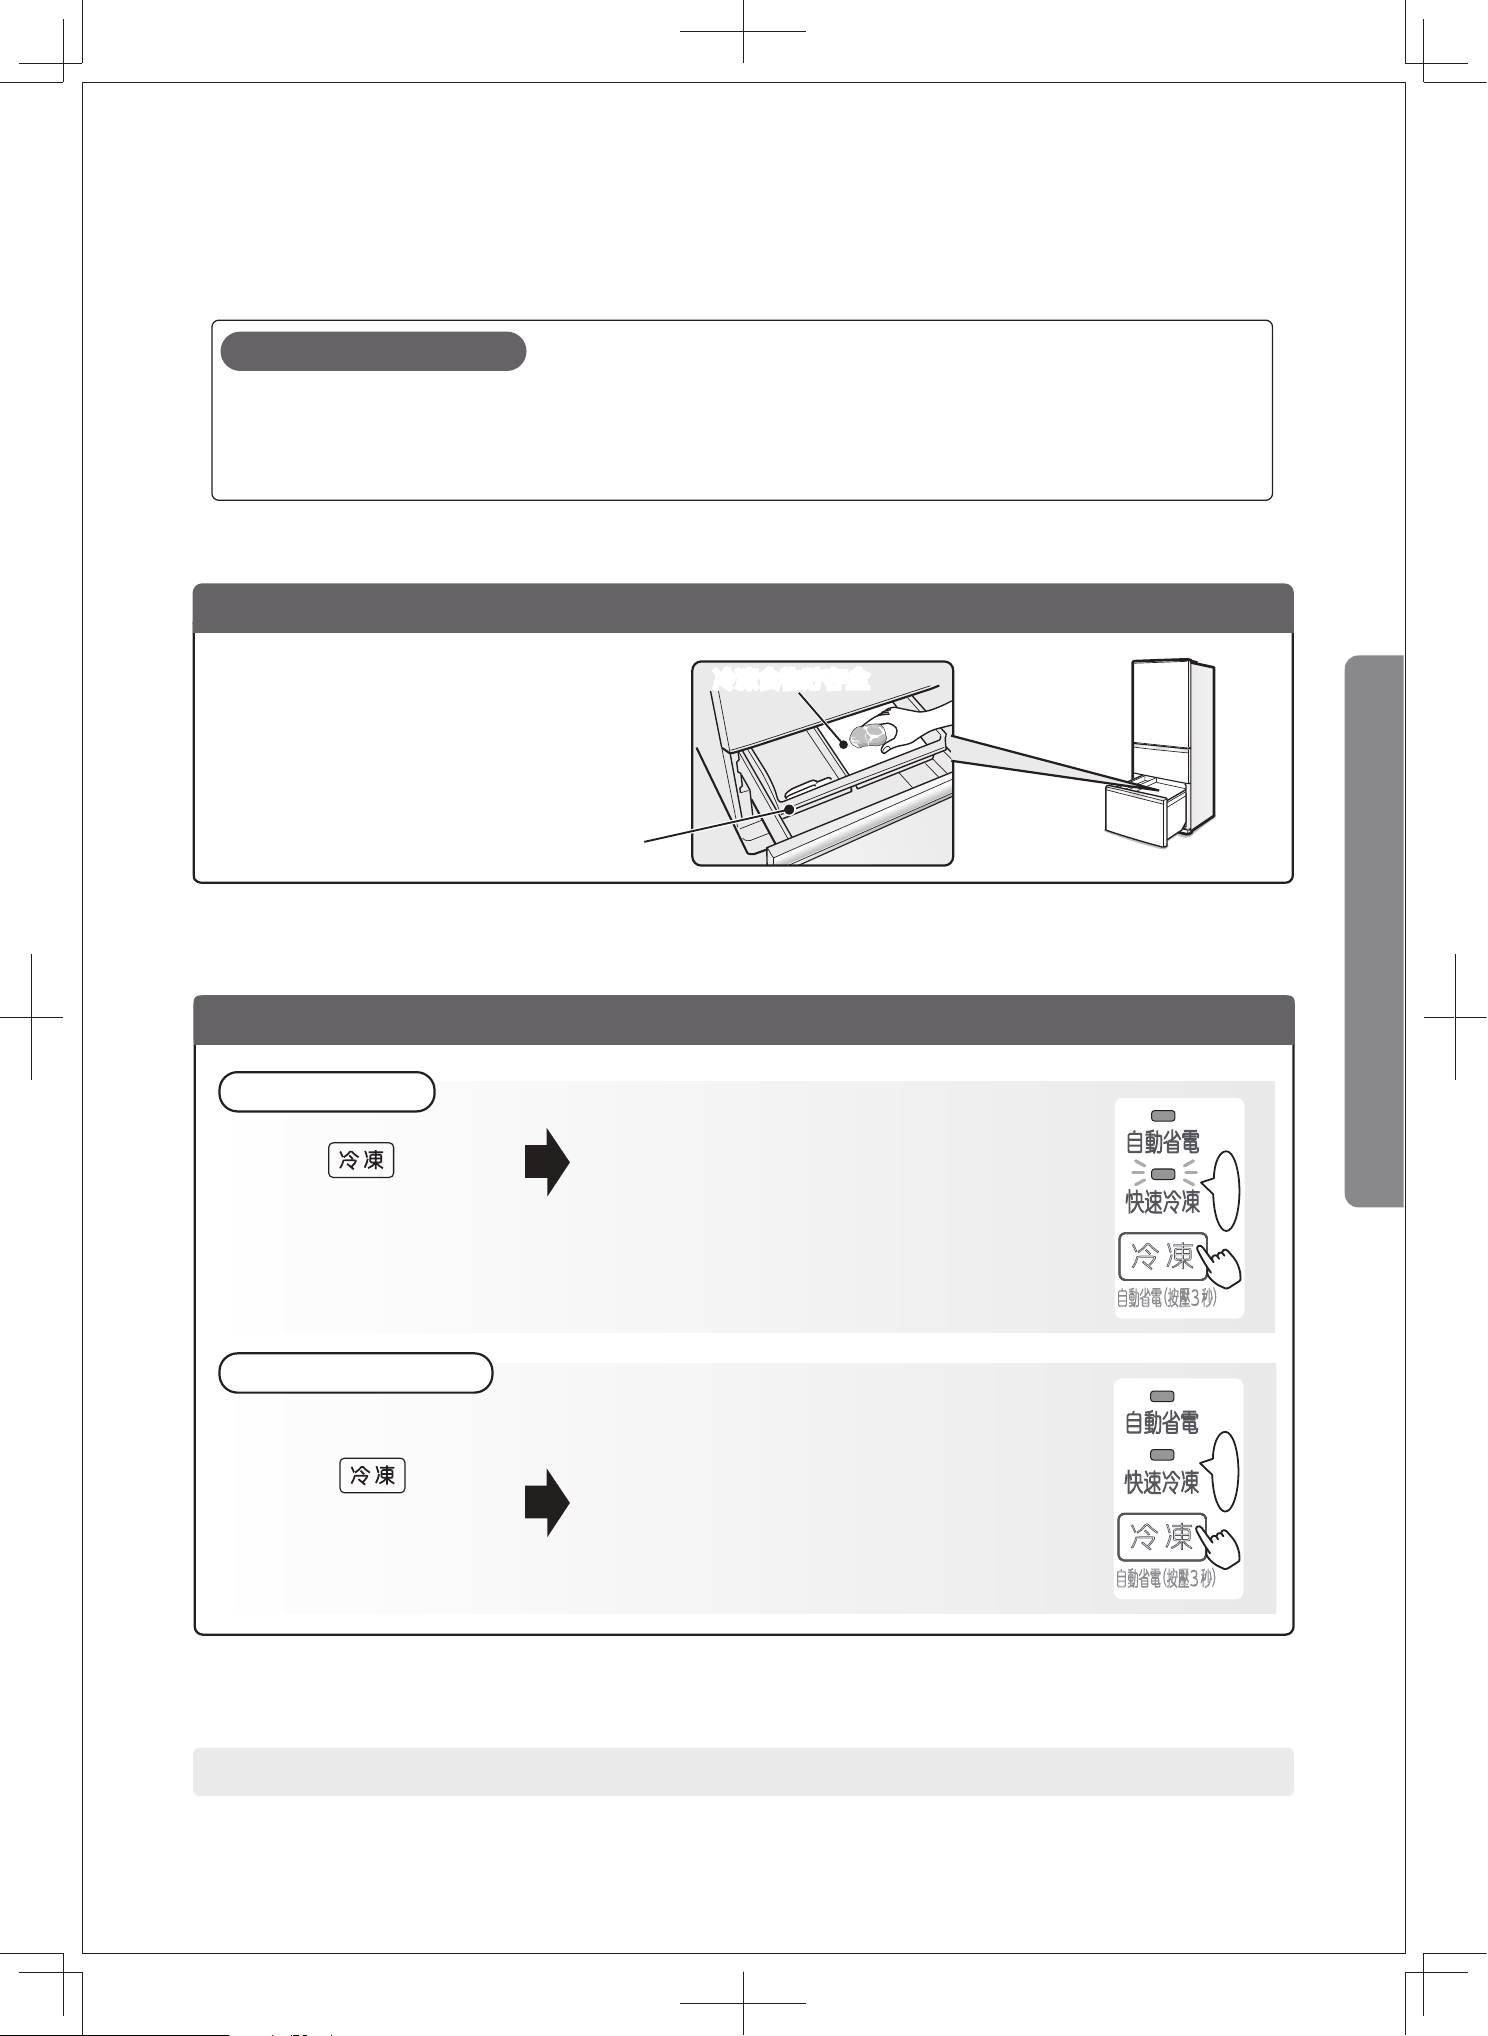
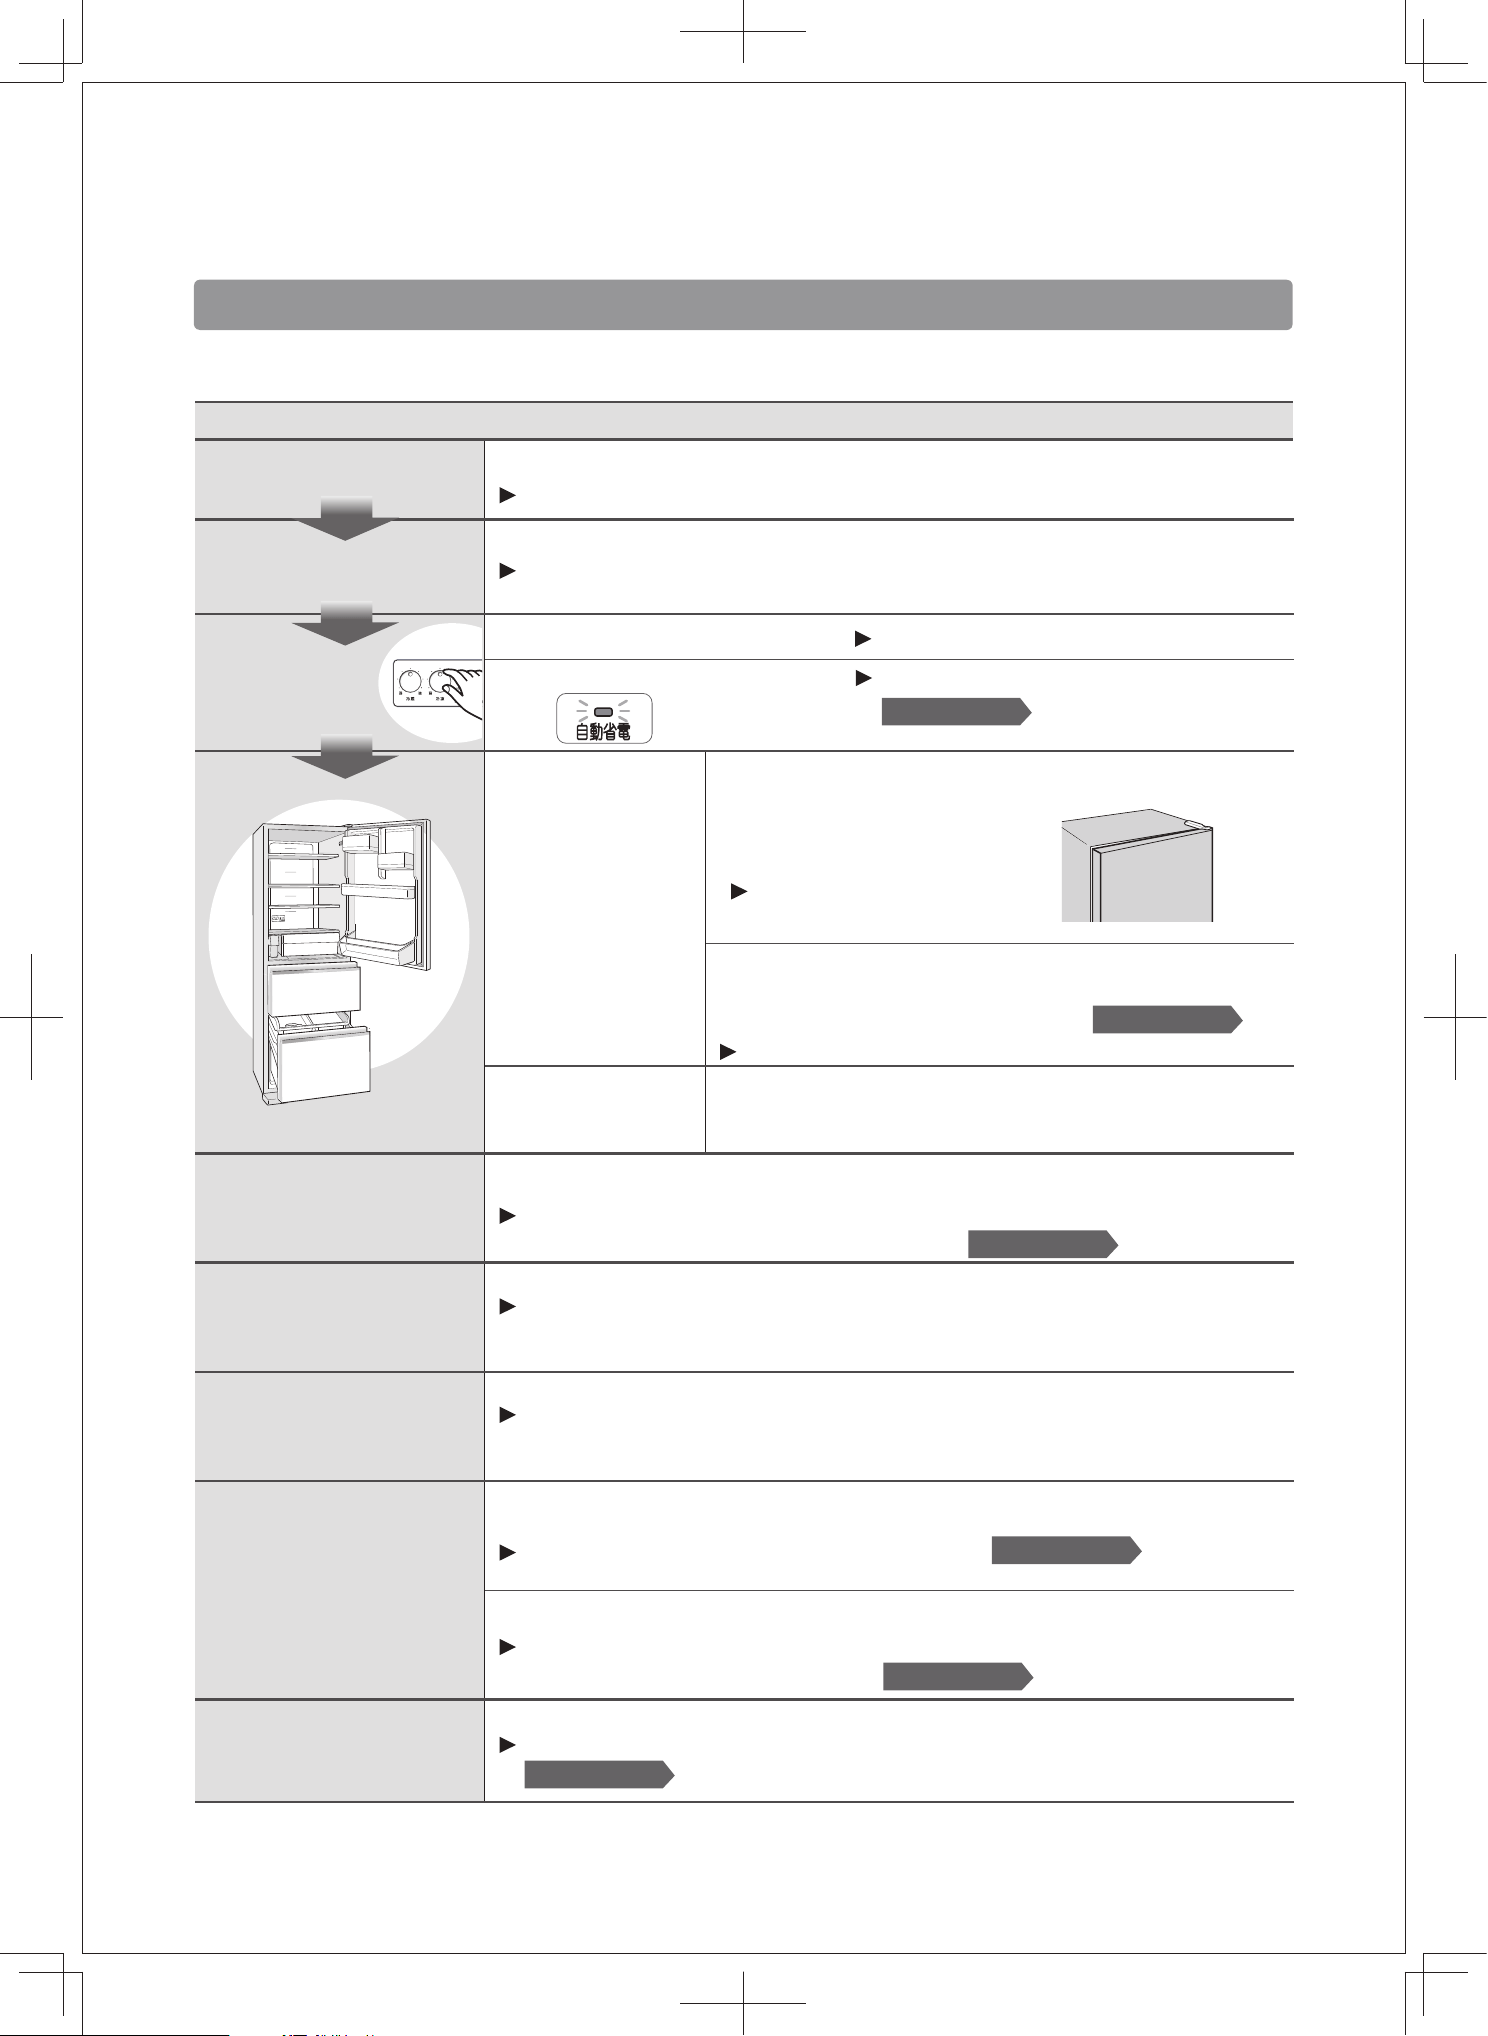
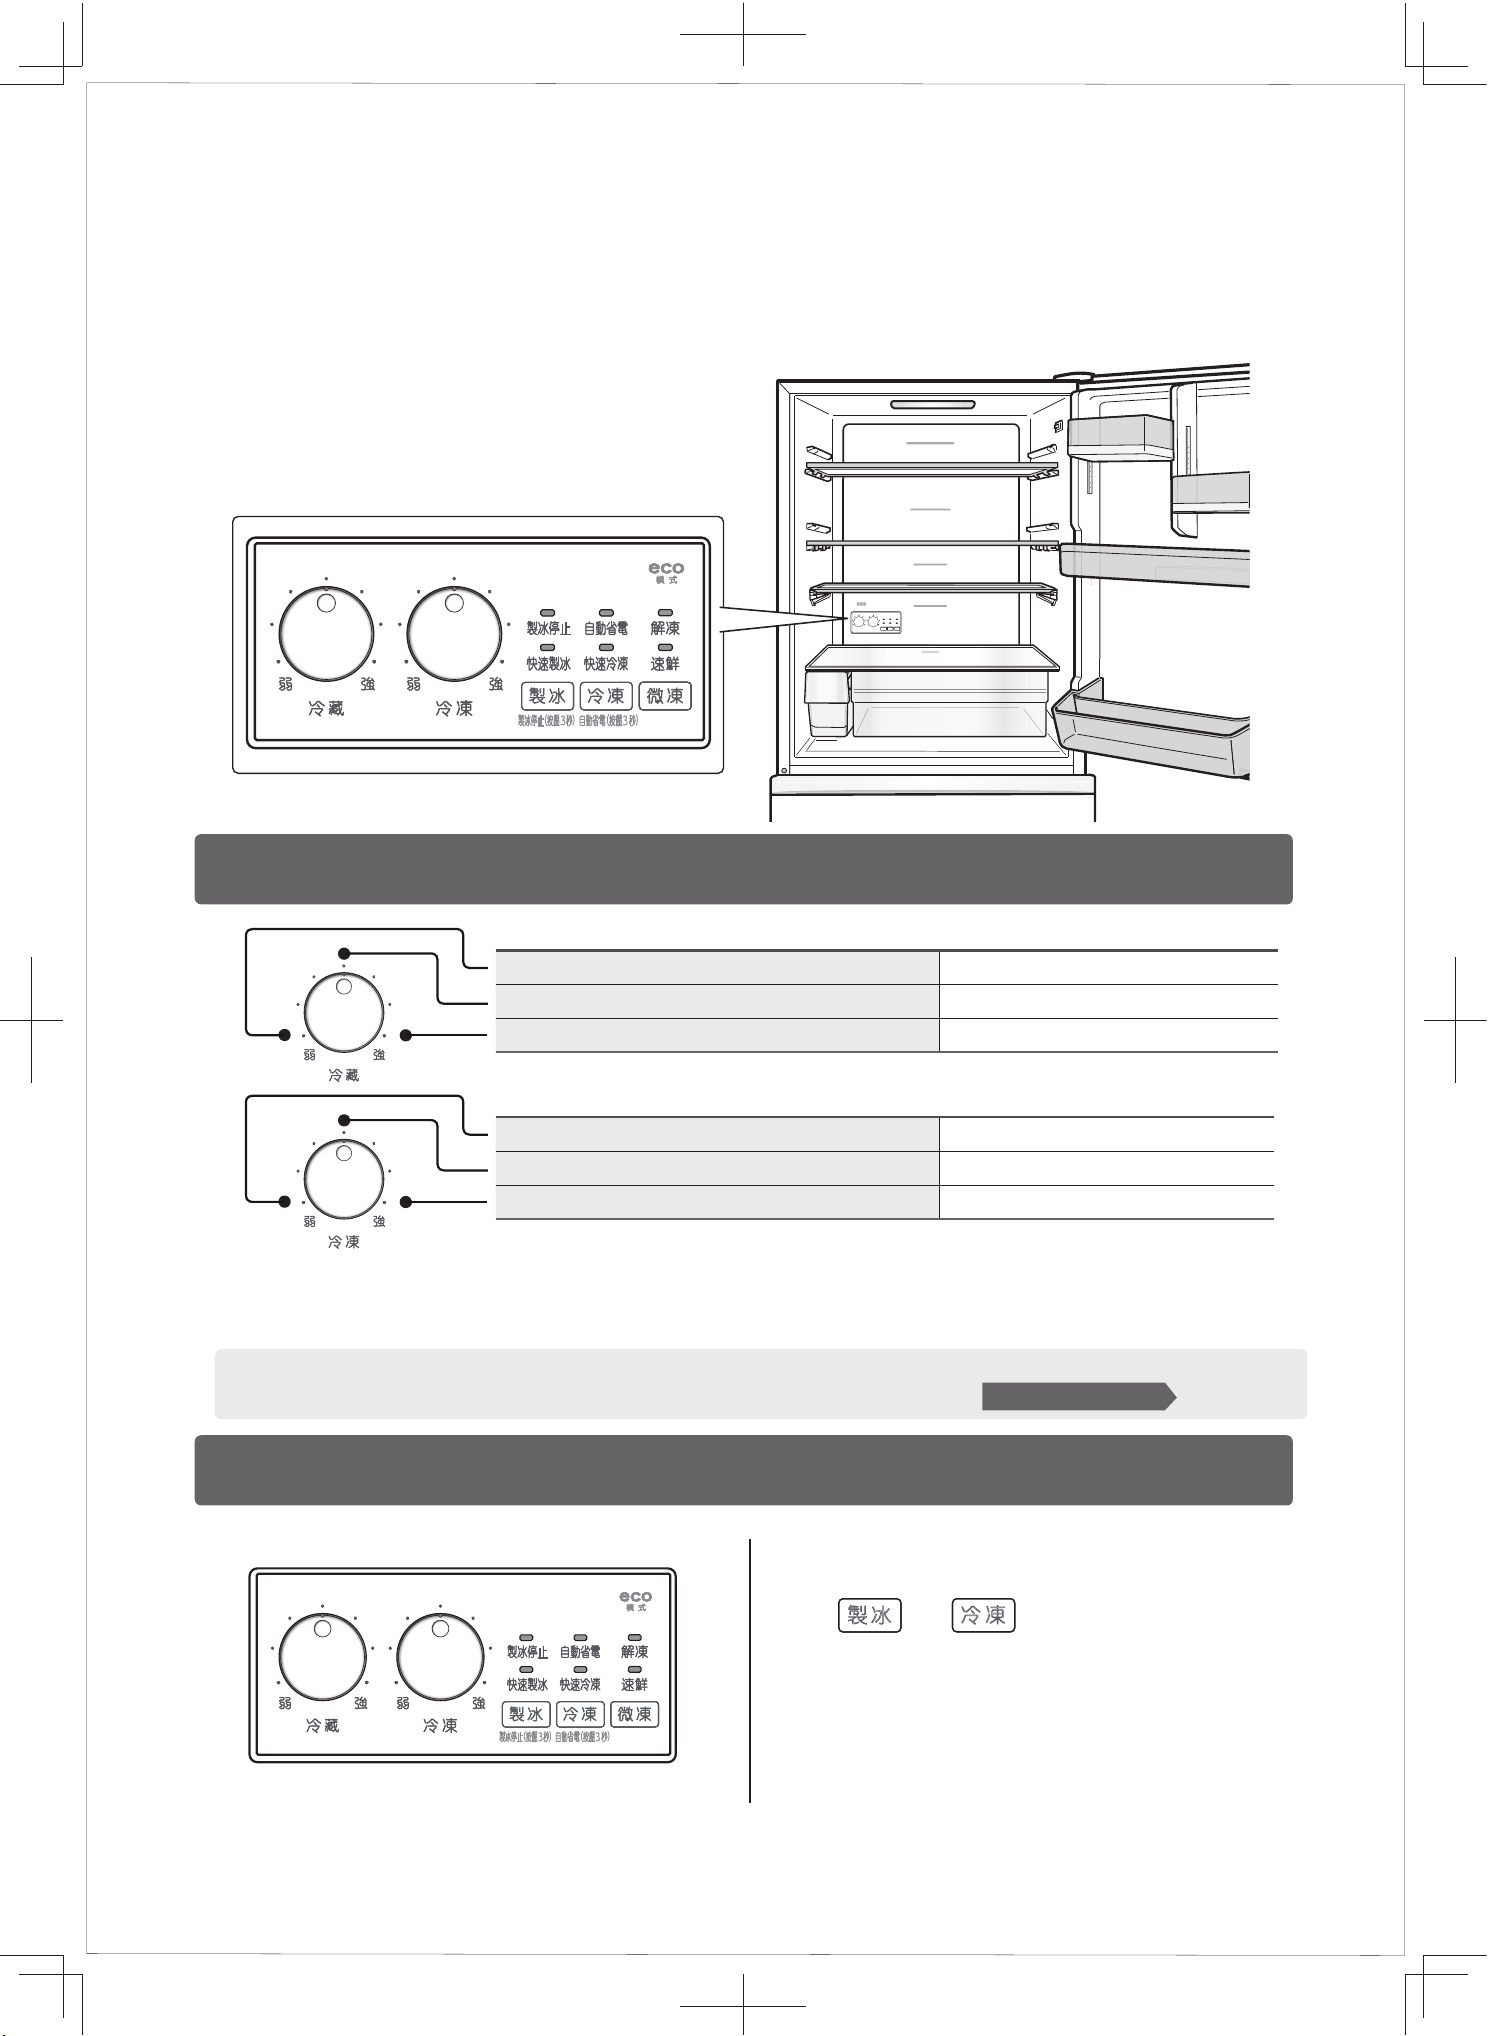
操作面板的功能
溫度調節
當操作面板全部亮燈時(演示模式)
一般情況下,請調節至「中」檔使用(強和弱之間)。
處於演示模式時,雪櫃不製冷。
打開雪櫃門,
(直到發出「嗶」~提示音)
同時按壓 和 3秒,
▲
當操作面板燈全部熄滅時,表示演示模式已
解除。
處於演示模式時操作面板全部亮燈
提示
操作面板在冷藏室內。
● 圖中的溫度值,是在環境溫度為32℃,溫度調節檔位為「中」,未放入食物,關上雪櫃門,
溫度穩定時測得的值。
● 調節冷藏室的溫度時,速凍冰鮮盒和蔬果室的溫度也會隨之變化。
請參閱第11頁
● 當處於自動省電時,即使調節為「中」或「強」,溫度設定依然比「中」高1~2℃。
當製冷不足時,請解除自動省電模式。
冰製
冷 凍
模 式
模 式
冷藏室溫度調節檔位
冷凍室溫度調節檔位
強
弱
中(強和弱之間)
強
弱
中(強和弱之間)
比「中」低2~3℃。
比「中」高2~3℃。
約2~6℃。
比「中」低4~5℃。
比「中」高4~5℃。
約-19~-21℃。
11
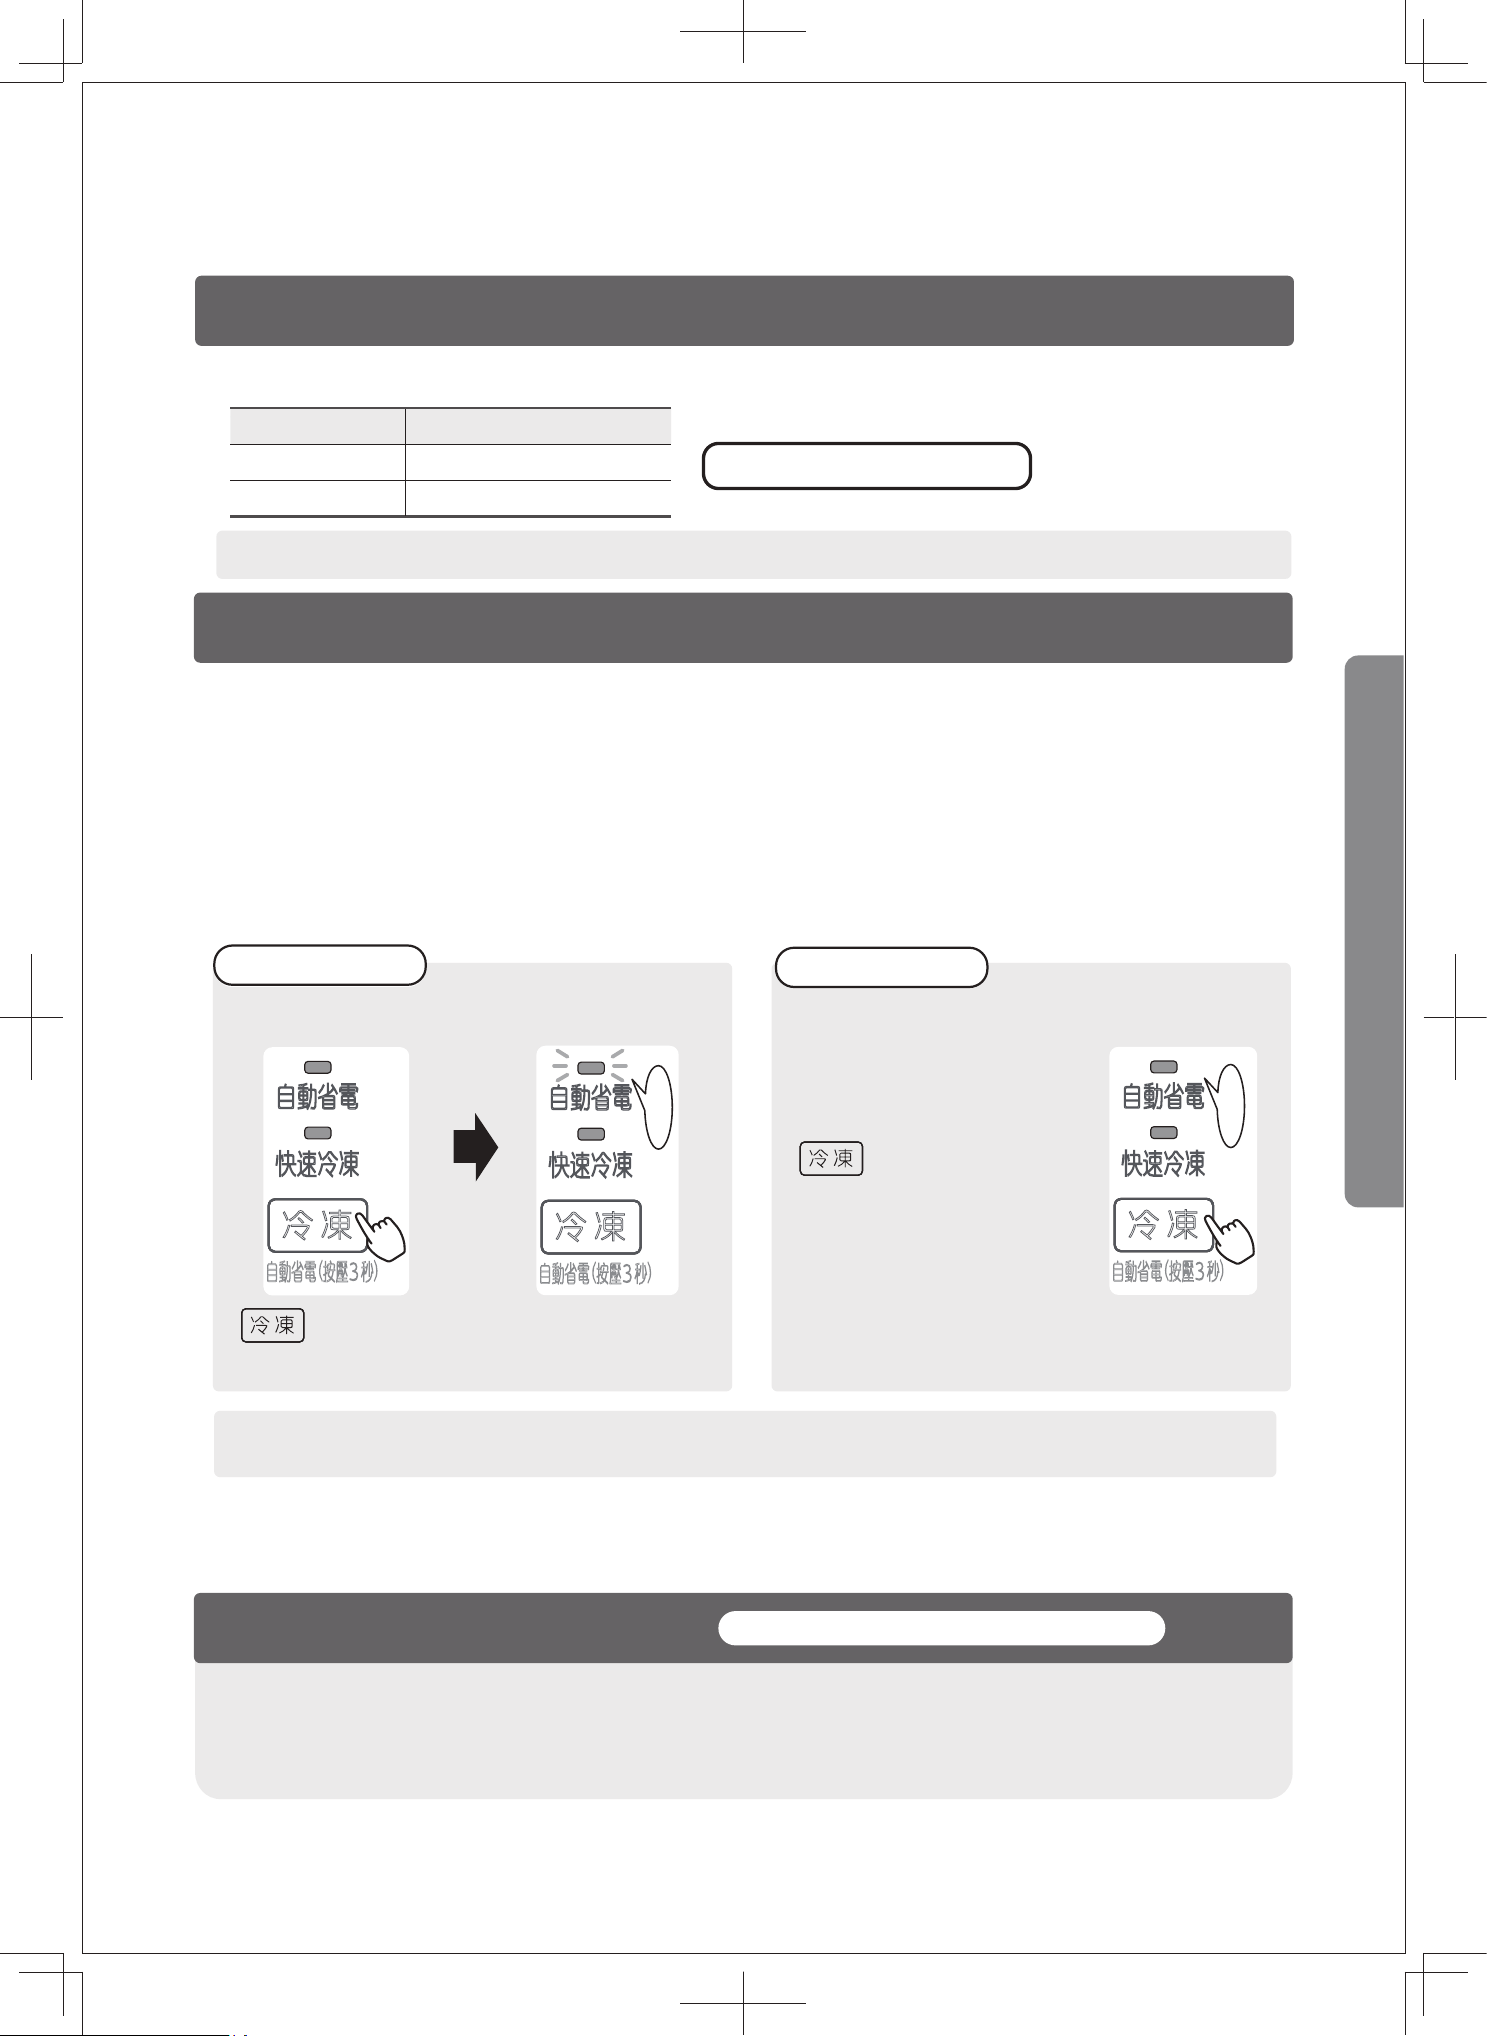
自動省電
請關門
省電妙招
關上冷凍室門,
「自動省電」燈滅,解除使用自動省電功能。
靈活使用自動省電功能
「自動省電」燈亮,開始使用自動省電功能。
關上冷凍室門,
設定方法
解除方法
冷藏室門和冷凍室門在24小時以上都沒有開閉時,將自動切換成省電20%的模式。
● 以對食物沒有影響的溫度運行。(冷藏室和冷凍室的溫度約高1~2℃)
(溫度值是在環境溫度為32℃,溫度調節檔位為「中」,未放入食物,關上雪櫃門,溫度穩定時測得的值。)
● 處於自動省電約20%的模式時,只要打開冷藏室、冷凍室的任何一個門,就會自動切換成省電10%的模式。
● 以下情況時,省電效果可能會有所變化。
· 設定為快速制冰、快速冷凍功能時
· 周圍溫度、門開關頻度、溫度調節檔位、食物存放量不同時
● 設定為自動省電時,制冰時間可能會延長,制冰次數也會變少。
門打開的時間
1分鐘、2分鐘後
3分鐘後
提示音
連續發出提示音
提示
● 門打開一點時,不會發出提示音。(如食物塞得過滿,或食物袋子被夾住時等情況。)
提示
*一般運行和自動省電模式的比較。在本公司環境實驗室的實驗條件下測量的值。條件:環境溫度為32℃時,
設定為冷藏室「中」、冷凍室「中」,無門的開關動作,製冰有運行。根據使用環境不同,測量值也會不同。
● 不要過於擁擠
食物存放過於擁
擠,會使冷空氣
循環不良。
● 儘量減少開關門次數
過於頻繁開關門,會
使冷空氣洩漏,雪櫃
內溫度升高。
● 冷卻後再存放
熱飯熱菜待冷卻後再
存放,以防雪櫃內溫
度升高。
發出7次提示音
關好門,提示音就會停止。
設定為自動省電時,約可以省電10%
*
。
按壓3秒(直到發出嗶嗶嗶的提示音)。
(直到發出嗶~的提示音)。
冷藏室、冷凍室的任何一個門打開時間超過1分鐘以上時,響起提示音(如下表)。
按壓3秒
●當處於自動省電時,即使調節為「中」或「強」,溫度設定依然比「中」高1~2℃。
當製冷不足時,請解除自動省電模式。
自動省電
快速冷凍
冷 凍
自動省電(按壓 秒)
自動省電
快速冷凍
冷 凍
自動省電(按壓 秒)
嗶
嗶
嗶
自動省電
快速冷凍
冷 凍
自動省電(按壓 秒)
嗶
~
冷 凍
冷 凍
使
用
方
法
12
1
2
1
2
1 2
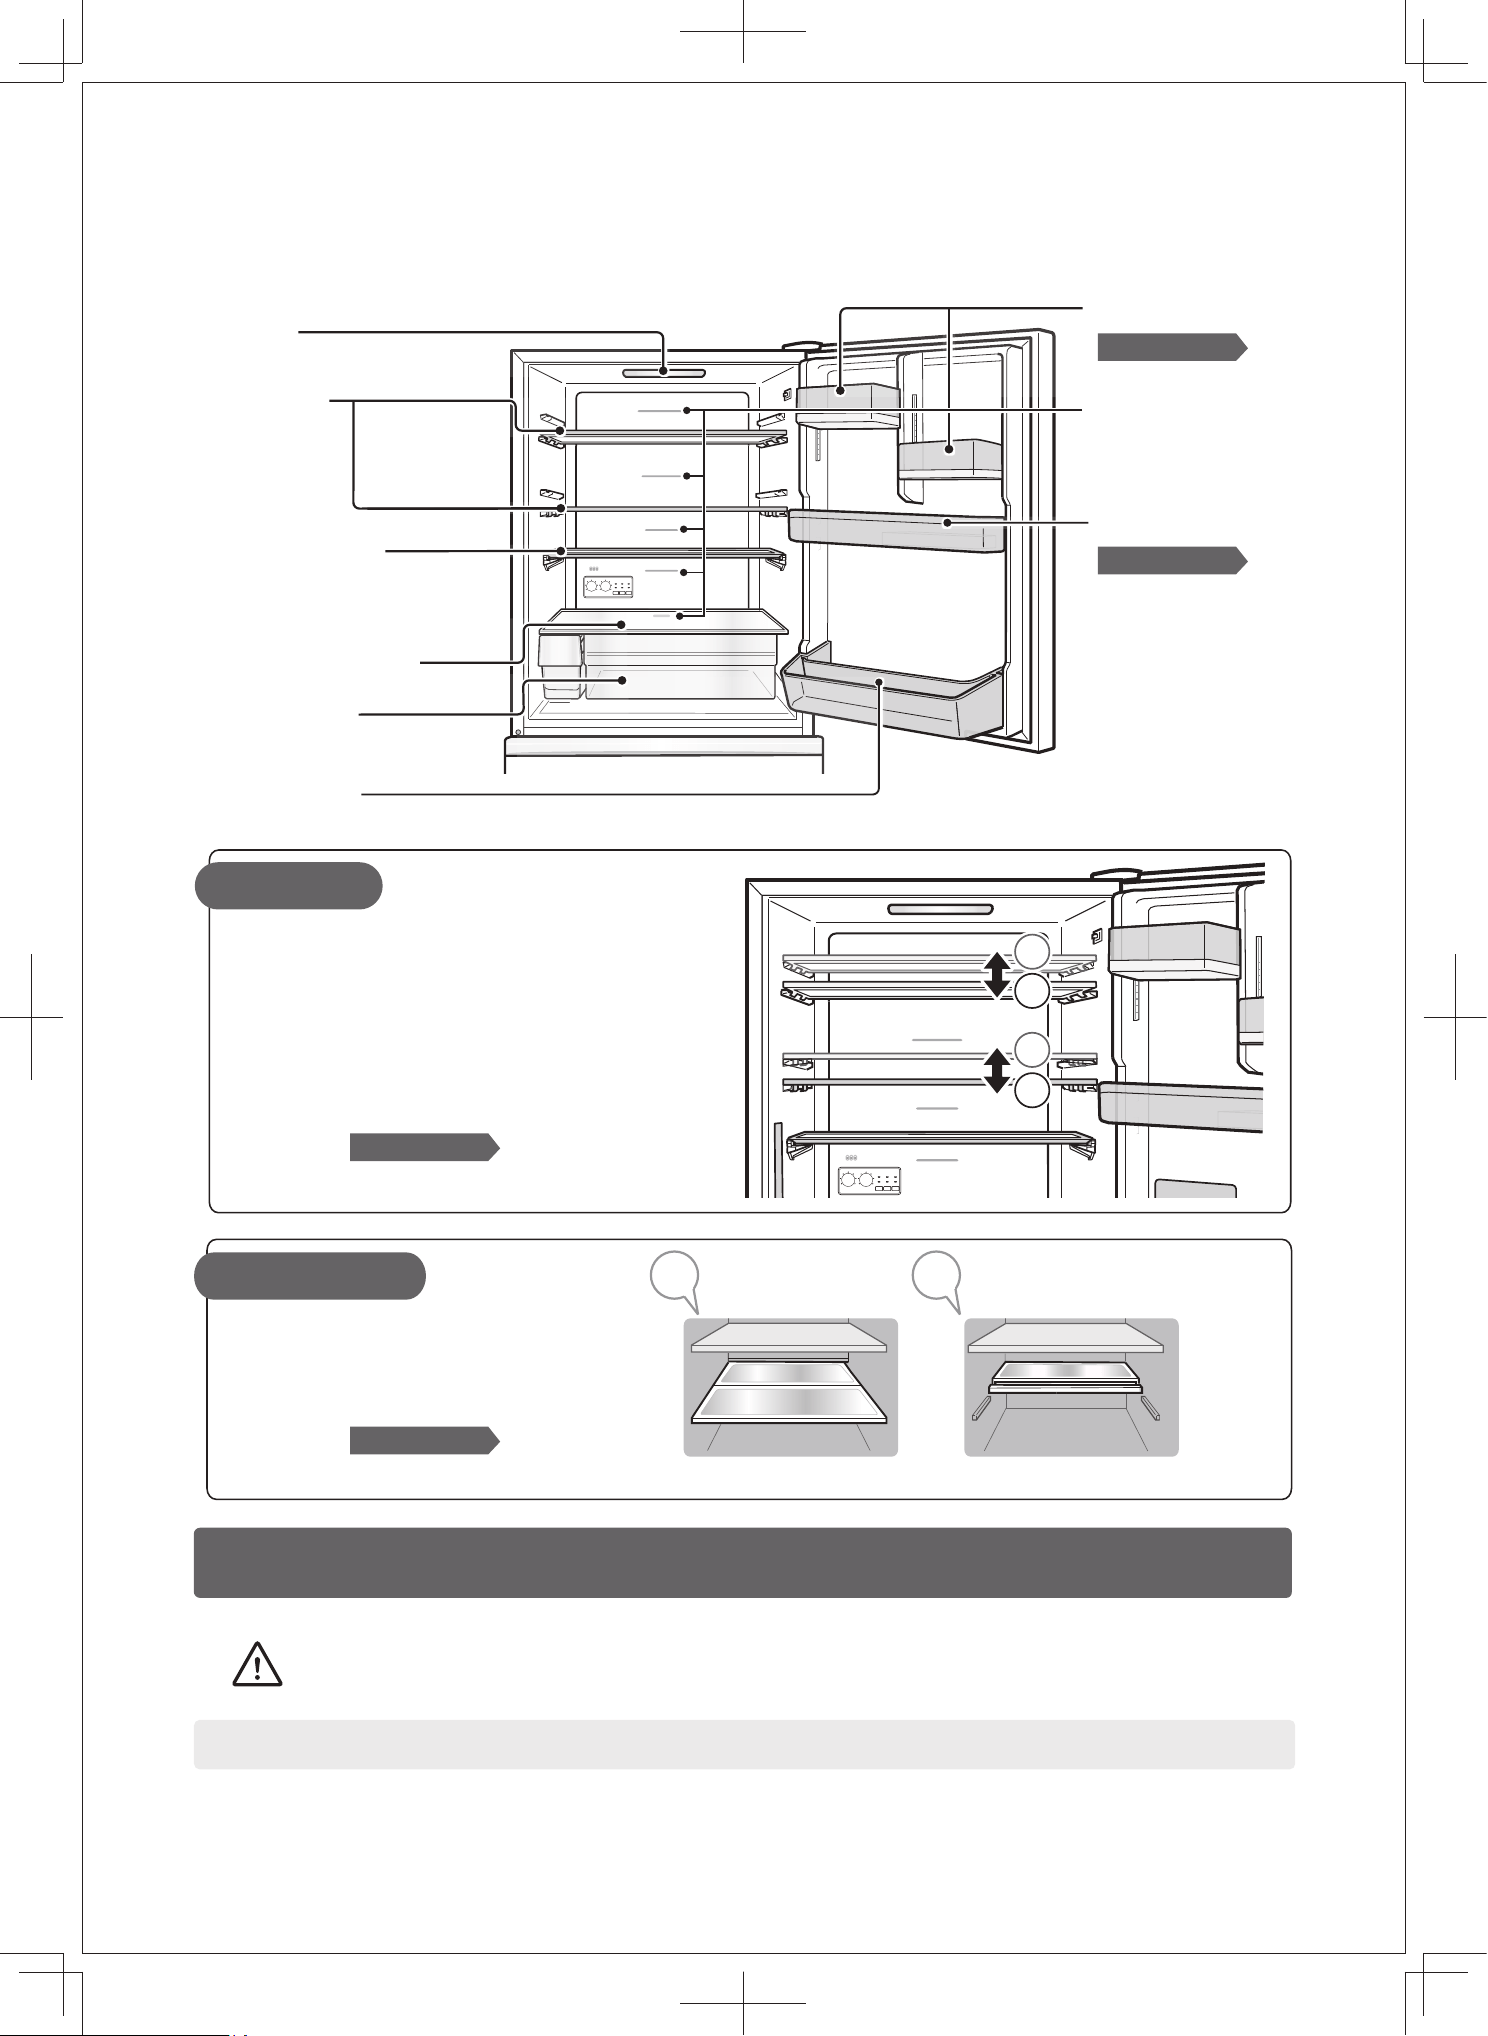
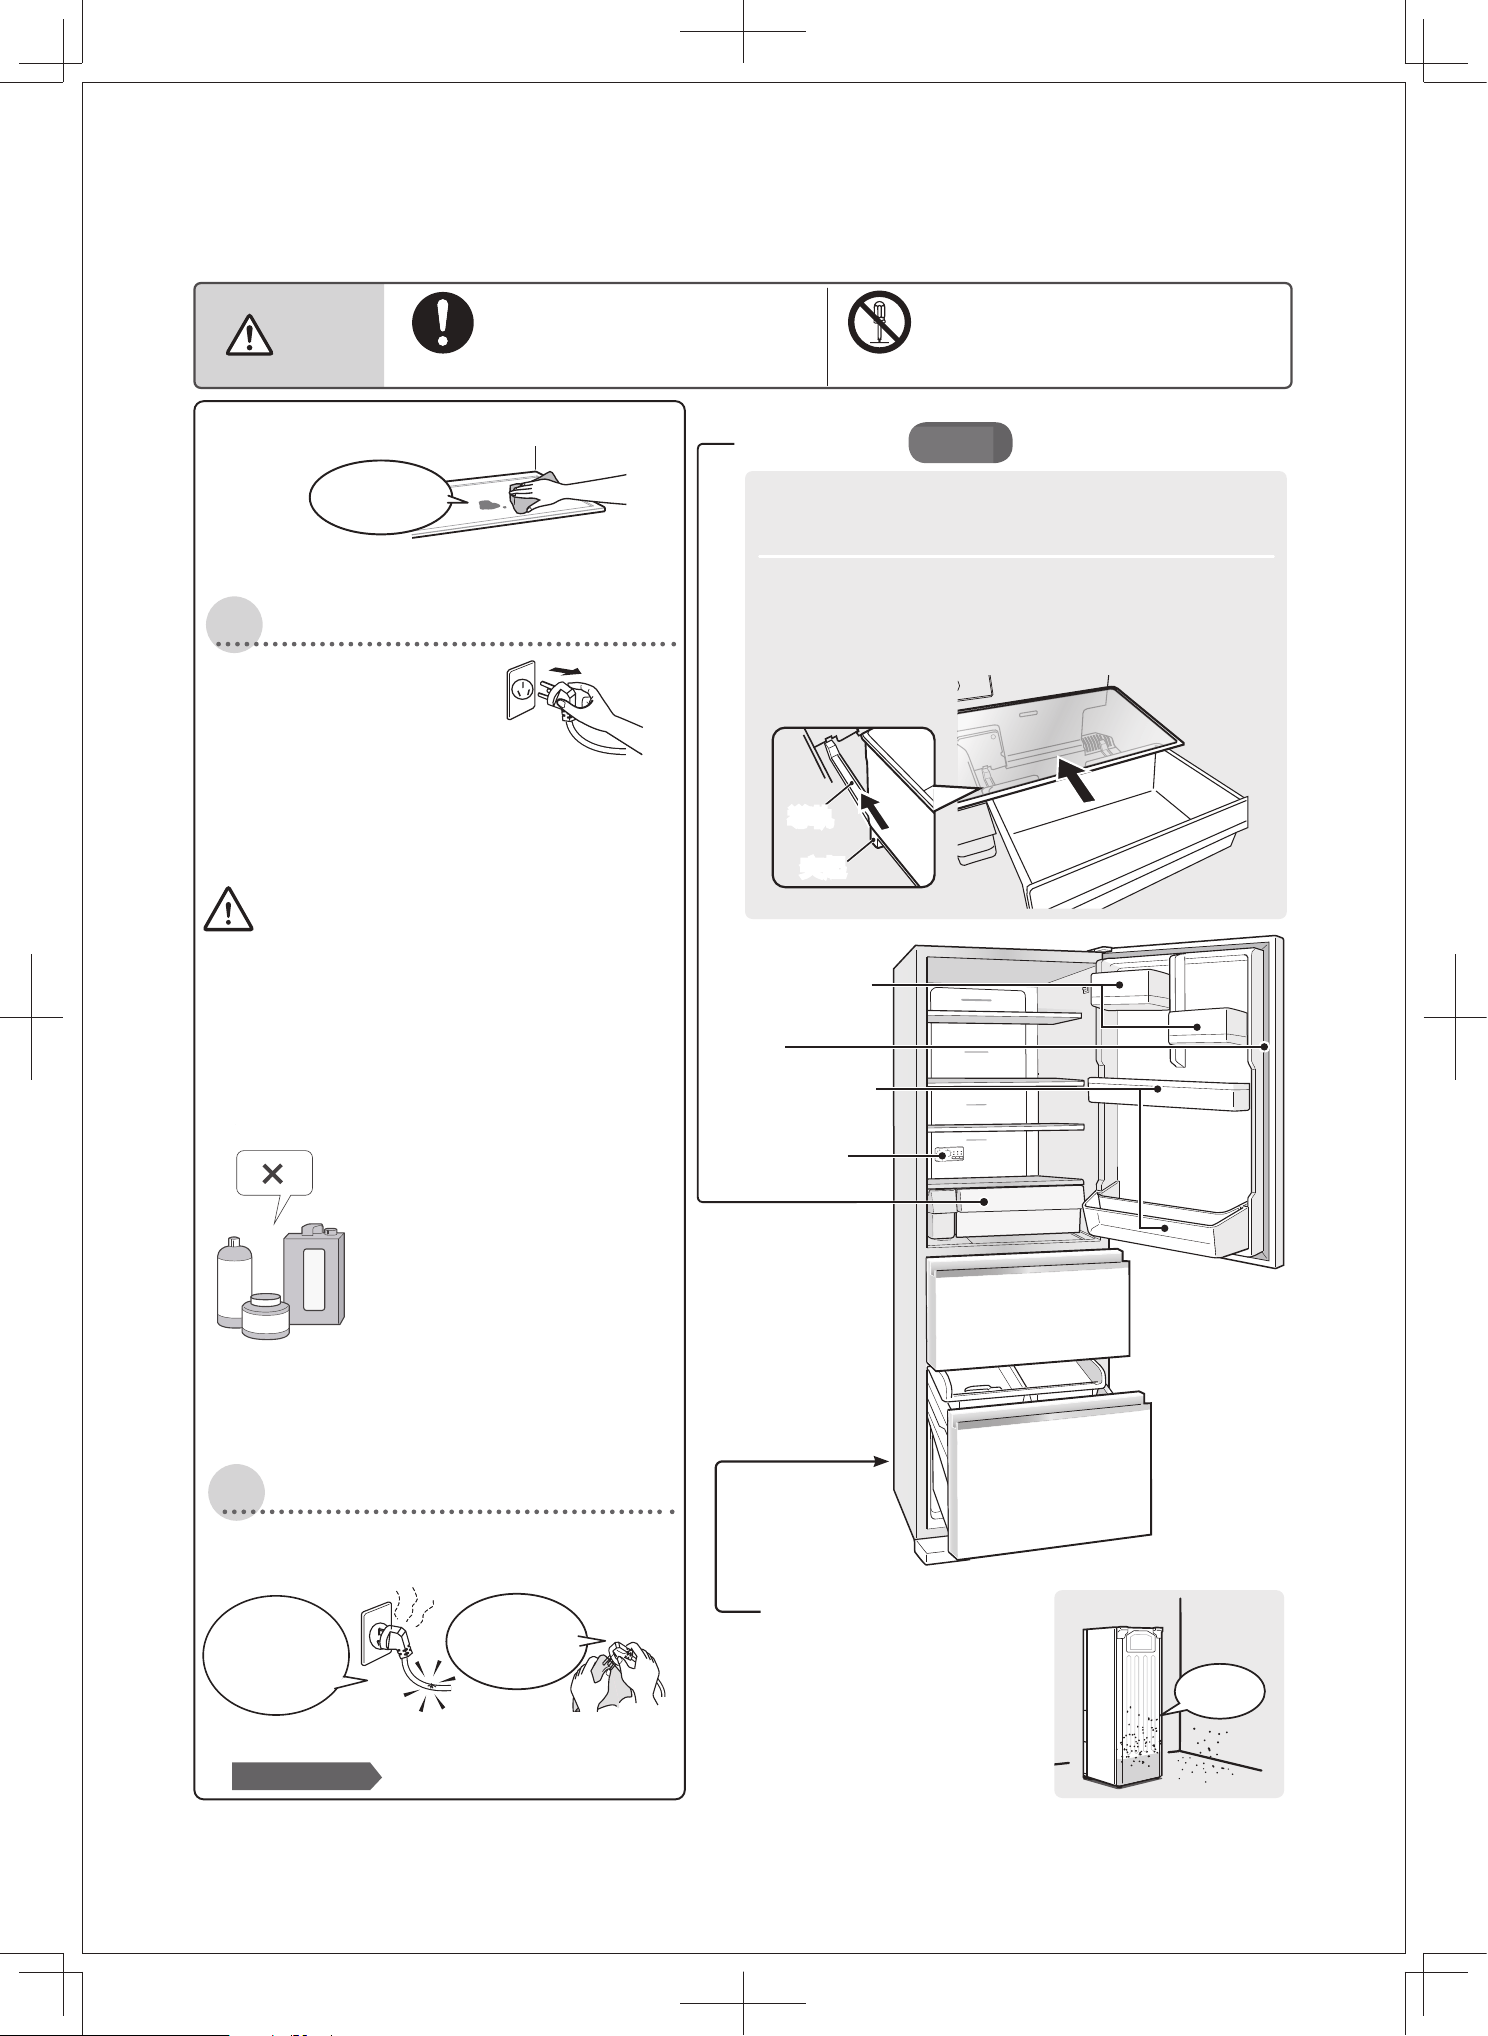
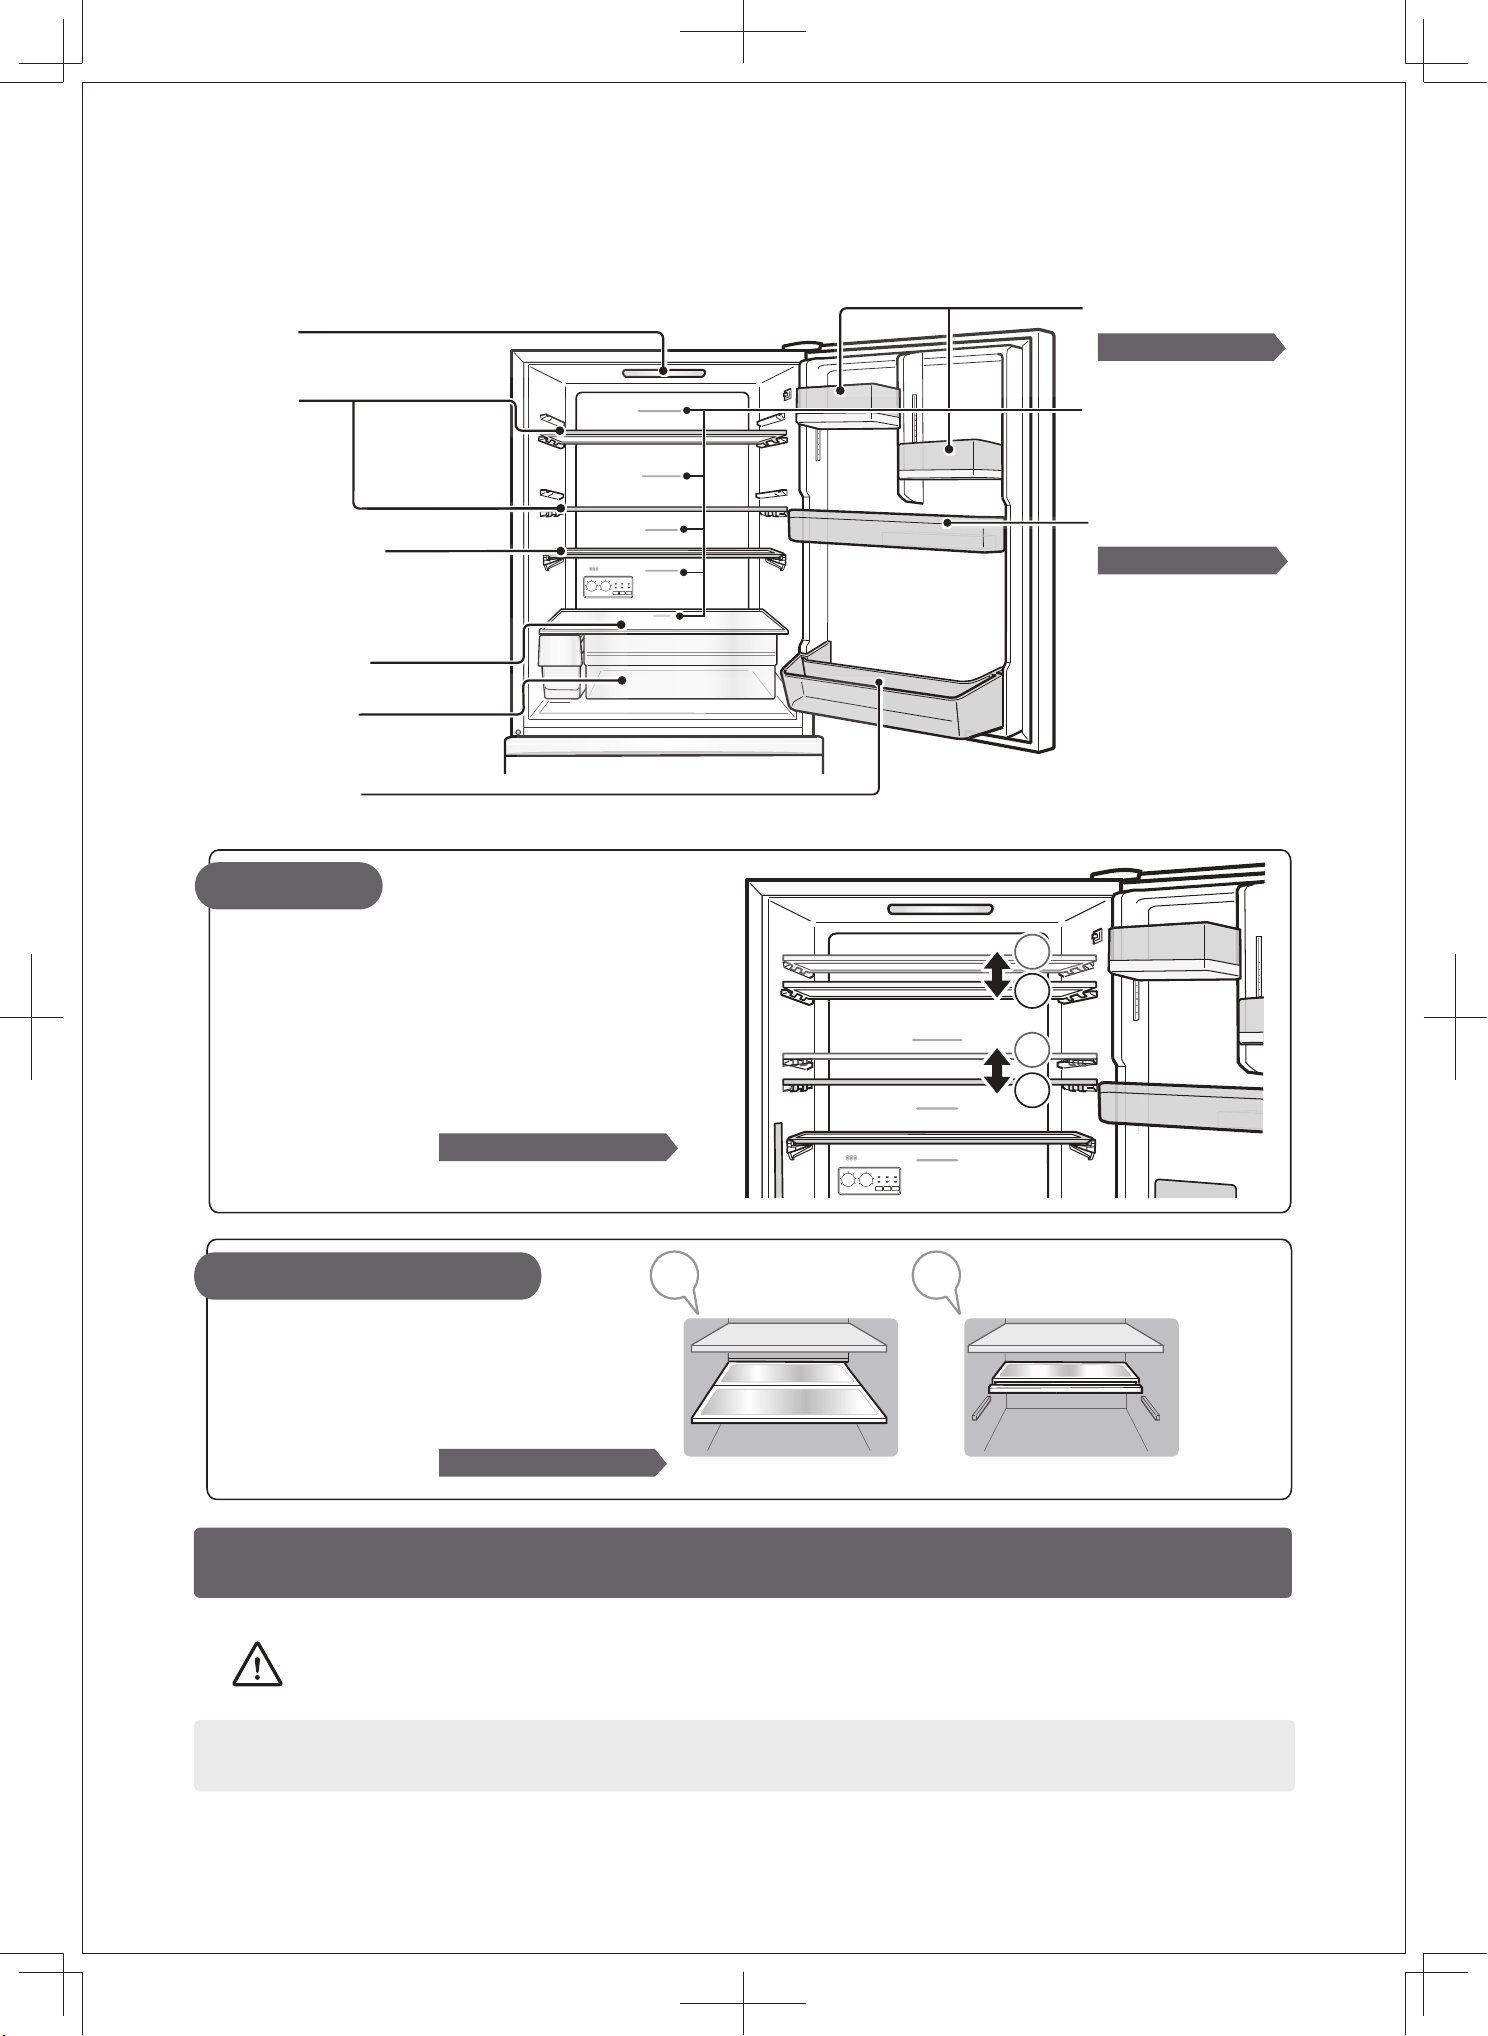
冷藏室
速凍冰鮮盒
室內燈
活動層架
二段活動層架
速凍冰鮮盒頂板
速凍冰鮮盒
雙瓶置物架
玻璃層架較重,必須雙手取放!
玻璃層架較重,必須雙手取放!
作為普通層架。 提起前段層架的前側往裡推,
可收起前段層架。
● 活動層架和門上置物架可根據食物高度進行兩層
調節。
● 根據食物大小可將前段層架收起。
● 水分多的食物及雞蛋、飲品等放置在冷風吹出口前面時,容易結冰。請放在層架靠前的位置。
(特別是碳酸飲料,結冰後可能會破裂)
門上置物架
冷風吹出口
活動置物架
活動層架
二段活動層架
請參閱第15頁
請參閱第21頁
請參閱第14頁
(拆裝方式 )
請參閱第22頁
(拆裝方式 )
注意
提示
● 冷藏室門開啟10分鐘以上,室內燈會自動熄滅。
1
2
1
13
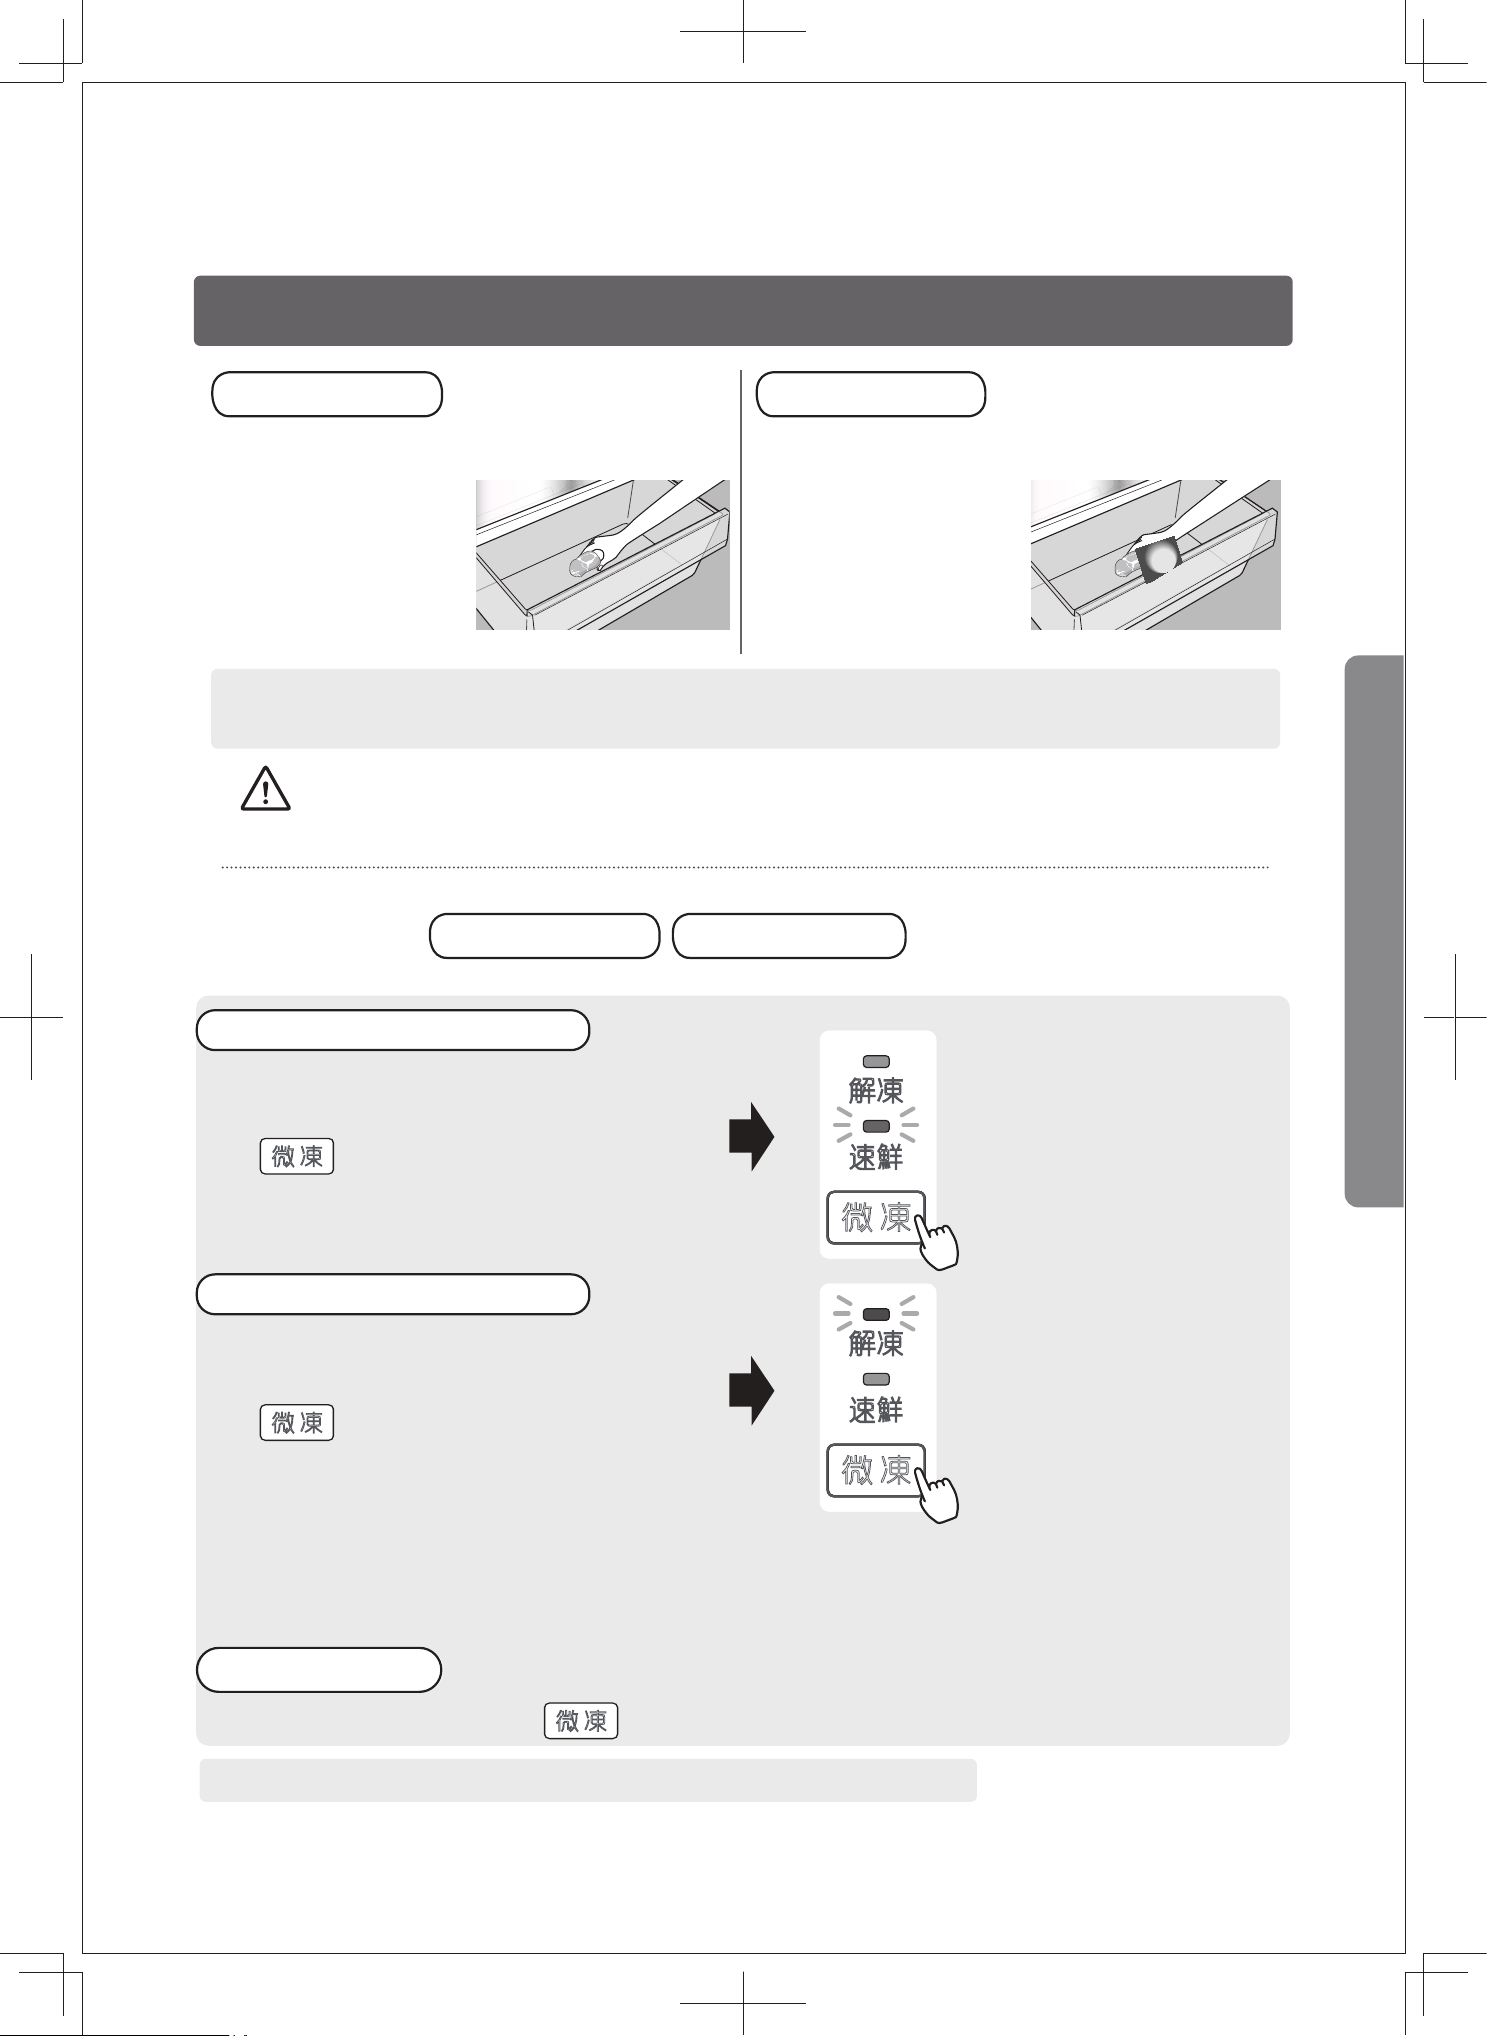
關上冷藏室的速凍冰鮮盒,
按壓 ,使速鮮燈亮燈。
「速鮮」顯示燈亮起,開
始使用快速微凍功能。
「解凍」顯示燈亮起,
開始使用解凍功能。
亮燈90分鐘後自動結束。
(「速鮮」顯示燈熄滅)
關上冷藏室的速凍冰鮮盒,
按壓 ,使解凍燈亮燈。
和設定方法的操作相同。重複按壓 ,以熄滅對應的功能顯示燈。
提示
● 快速微凍或解凍結束後的食物可一直放在速凍冰鮮盒內。
● 快速微凍、解凍、快速冷凍不可以同時進行設定。
快速微凍·解凍功能的使用
快速微凍
快速微凍的設定方法
解凍功能的設定方法
中途停止時
準備
準備
解凍
對肉類、魚類等生鮮食物快速製冷且不結冰。
● 將食物放在速凍冰鮮盒。
● 將冷凍食物放在速凍
冰鮮盒。
將肉類、魚類等冷凍食物解凍到可烹調的硬度,
可加速解凍。
提示
● 其他食物可一起放在速凍冰鮮盒內。
● 食物較厚或者重疊堆放時,無法在設定的時間內完成解凍。
● 水分多的食物放在冷風吹出口前面時,容易結冰。請隔開一點距離放置。
● 當速凍冰鮮盒上有食物汁液時,請立即擦拭乾淨。
注意
設定
快速微凍
解凍
亮燈90分鐘後自動結束。
(「解凍」顯示燈熄滅)
解凍
速鮮
微 凍
解凍
速鮮
微 凍
微 凍
微 凍
微 凍
使
用
方
法
冷藏室
…續
活動置物架底座
活動置物架
把手
活動置物架的使用方法
1 2
手托起活動置物架底座,往上推 移動到所需位置
位於最上層的活動置物架可配合食物高度進
行6層調節。
(拆裝方法 )
警告
禁止拆卸
請勿自行拆卸、改裝、修理
請勿攀吊於活動置物架或活動置物架底
座上
拆卸活動置物架後,請勿在
置物架底座放置調味料或飲
料瓶等。
調味料掉落,可能造成
受傷。
請勿用水清洗活動置物架底座
請沾水擦拭或用乾布擦拭。
禁止
禁止
安裝活動置物架及其底座時,
請務必確認置物架和底座內沒
有放置物品。
注意
禁止濕氣
活動置物架上升時
強制 強制
當移動或拆裝時,請用
手扶著輕輕操作,小心
夾手。
可能引起零件損壞或造
成受傷。
14
請參閱第21頁
● 請勿放置過高的食物或調味料等,避免關不上門。
(否則食物可能掉落,造成受傷)
● 當調節活動置物架高度時,安裝到位時會發出「咔」的聲音。
(否則食物可能掉落,造成受傷)
● 當放置有食物等時,請注意輕輕移動。
(否則食物等可能掉落,造成受傷)
● 拆下容器後,請勿將調味料或飲料等放置在底座上。
(否則食物等可能掉落,造成受傷)
● 將蛋架翻過來,可作小件物品容器使用。
1
2
門上置物架
門上置物架·蛋架的使用方法
1
往前拉起底座把手,使活動置物架下降
位於中層位置的門上置物架可根據食物高度進行兩層調節。
(拆裝
方法 )
活動置物架下降時
2
移動到所需位置後放開把手
15
注意
請參閱第21頁
蛋架
)
使
用
方
法
當蓋子無法取出時,可
以打開蔬果室,將手伸
進蔬果容器下方,用手
將蓋子頂出。
※清理完垃圾後,請務必將蓋子
復位鎖好,否則會造成蔬果室
內的水分流失。
鎖蓋狀態 開蓋狀態
解除 解除
清潔口蓋
位於蔬果容器底部。
便於清潔容器內的碎葉
等垃圾。
蔬果室
蔬果容器
可存放大型及中型
水果、蔬菜
蔬果室滑動盒
可存放小型水果、蔬菜
●蔬果室的門即使沒有完全關閉,也不會發出請關門提示音。提示
提示
冷凍室
表示貯存上限
產生間隙的狀態
蔬果室
產生間隙的狀態
冷凍室
※為了便於說明,圖中未顯示冷藏室門。
●
請勿讓容器或貯存盒中存放的食物
量超出右圖所示的貯存上限位置。
否則,由於門無法完全關閉,而導
致門封產生間隙,不僅會降低製冷
性能,引起凝露或結霜,還可能會
造成零件的損壞。
食物超出貯存上限會導致
門無法完全關閉。(產生
間隙)
冷凍室上層滑動盒
冷凍室下層滑動盒
冷凍貯存容器
(清潔口) (清潔口)
快速冷凍的使用方法
蔬果室、冷凍室
16
請參閱第11頁
請參閱第19頁
注意
●所冷凍的食物不能直接與室內已儲藏的食物接觸,並且,如需每天凍結食物,應減少冷凍食物
的數量。

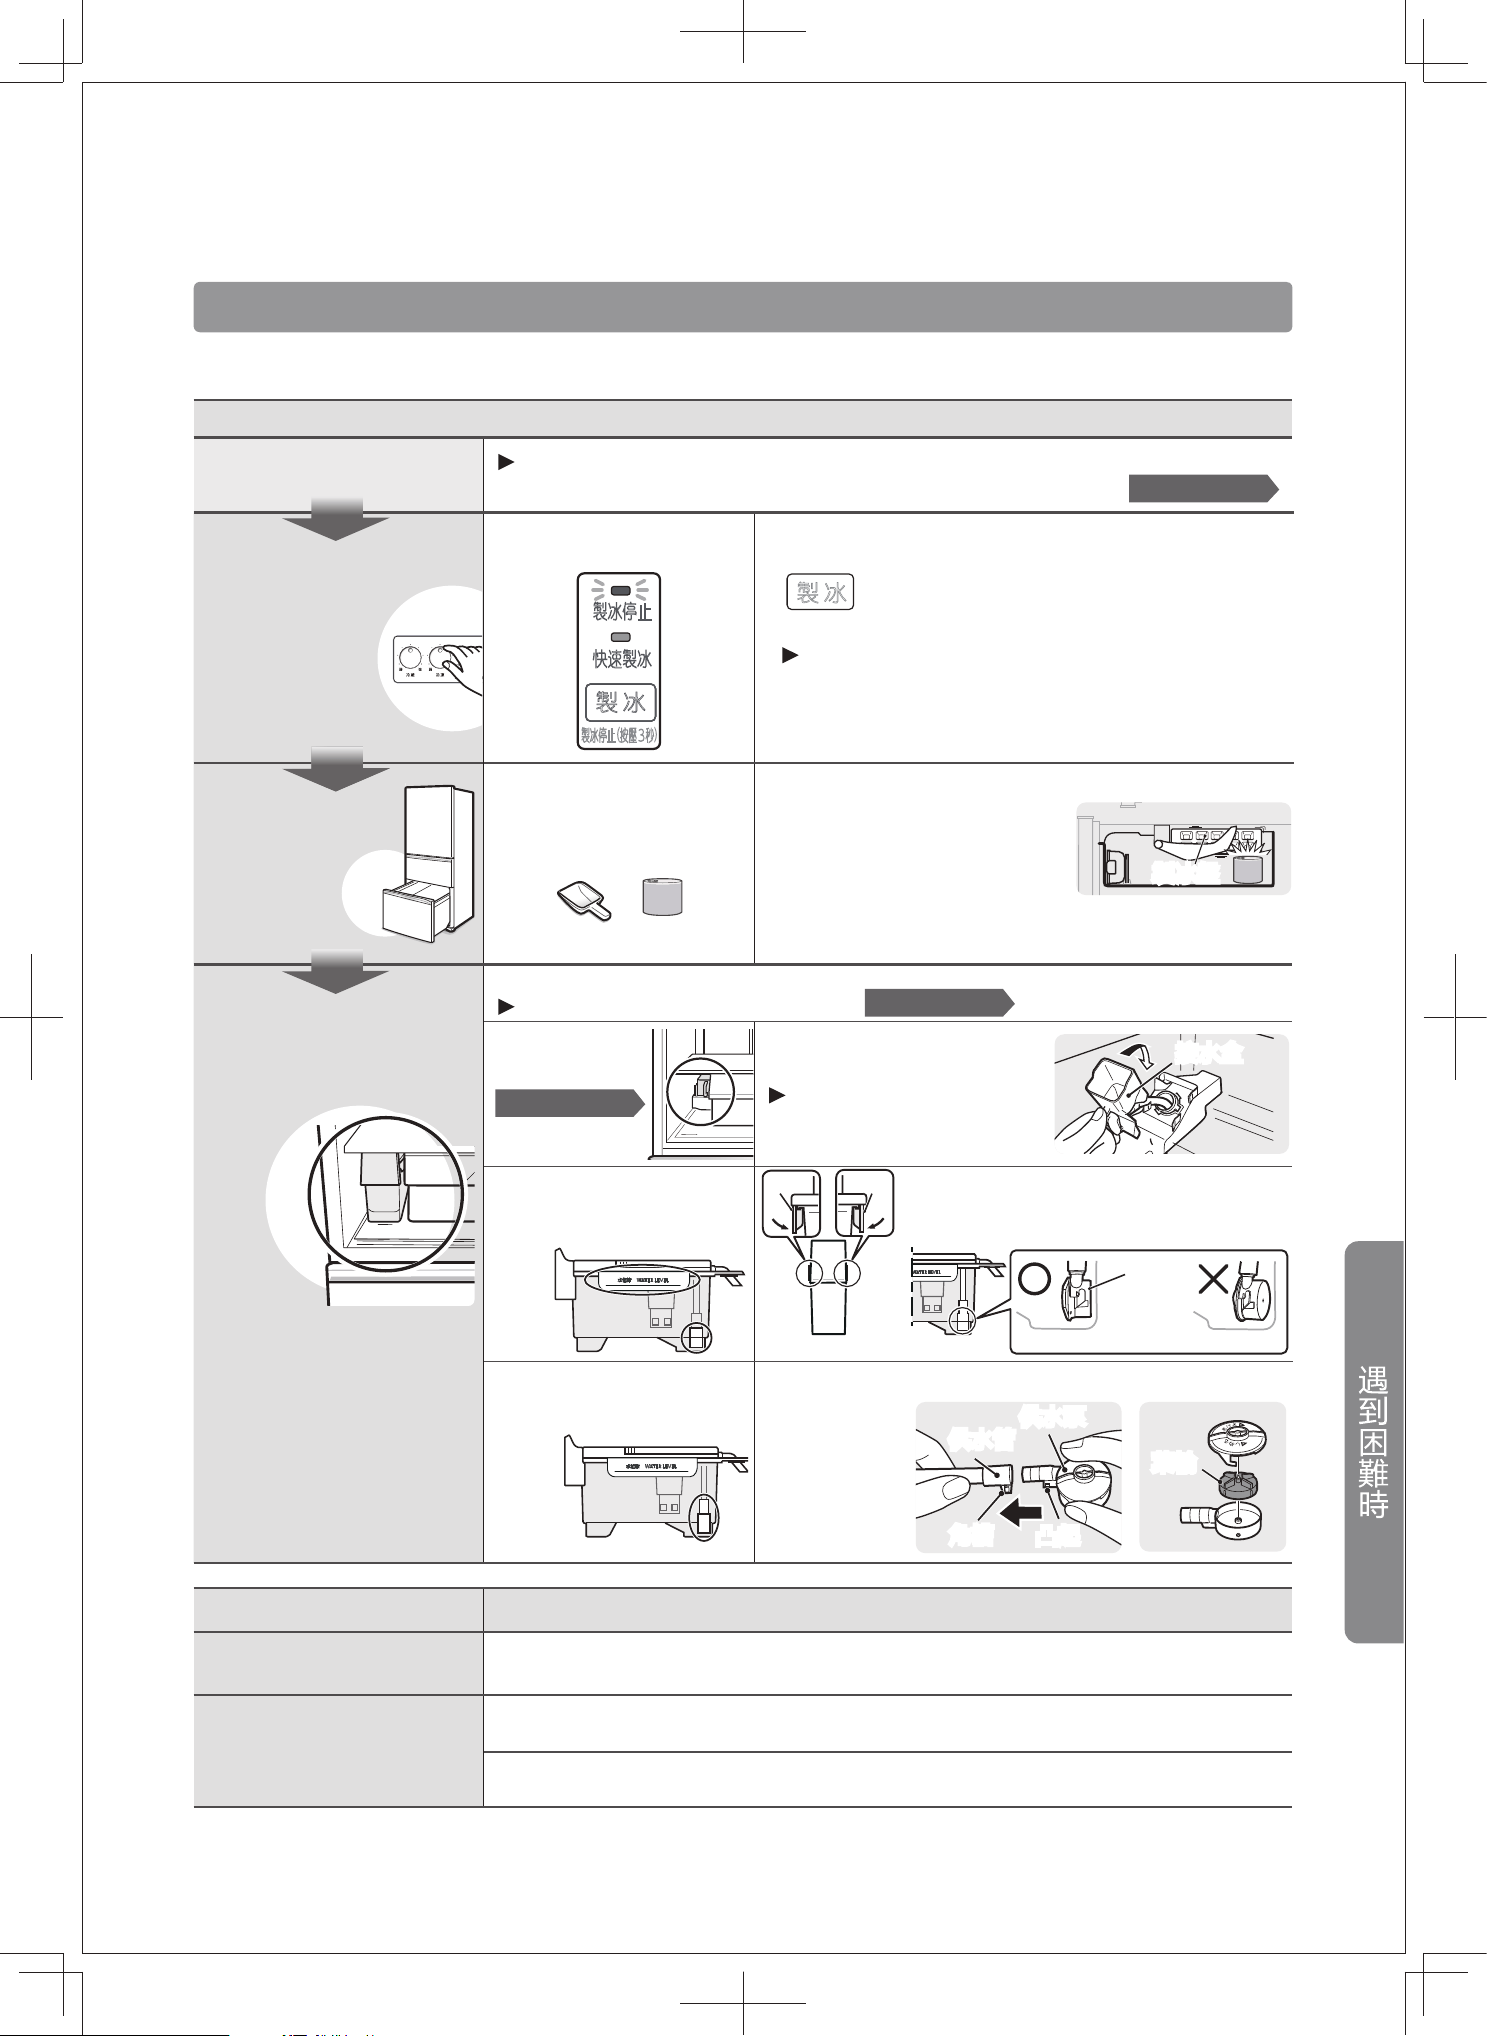
製冰停止
快速製冰
冰製
製冰停止(按壓 秒)
嗶
提示 ● 當供水箱沒有水或貯冰盒的冰塊已滿時,
不能進行快速製冰。
快速製冰 不使用製冰功能時
(製冰停止)
中途停止時
解除方法
約8小時後,自動結束。(「快速製冰」燈熄滅)
「快速製冰」燈亮,
開始快速製冰。
按壓1次
響起「嗶」提示音,「快速製冰」燈熄滅。
反復按壓 ,直至「快速製冰」燈熄滅。
▲
▲▲
▲
「製冰停止」燈熄滅,開始製冰。
「製冰停止」燈亮,
製冰停止。
關上冷凍室門,
按壓3秒 ,(直到
響起嗶嗶嗶的提示音)
關上冷凍室門,按壓3秒 。
(直到響起嗶~的提示音)
設定方法 設定方法
●
當設定為製冰停止時,殘留在製冰盤中的冰或水完
成製冰後,會落入貯冰盒中,並停止製冰。
供水箱
把手
卡扣
(用於固定水箱蓋)
供水口蓋
水箱蓋
供水口
水箱
製冰前
將供水箱推到「供水箱位置」。
不推到規定位置,將無法製冰或無法關門。
2
供水口蓋
水位線
供水箱安裝方向
打開供水口蓋,加水至「水位線」位置。
如果加水量超過「水位線」位置,在安裝
供水箱時,水容易潑灑出來。
1
慢慢移動,以
防水灑出。
把手朝外
供水箱位置
製冰盤有進行抗菌處理。
*
冰盒
冰勺
自動製冰機
17
(容量:約0.9L)
音)
製冰停止
快速製冰
製 冰
製冰停止(按壓 秒)
嗶
嗶
嗶
冰製
冰製
冰製
冰製
使
用
方
法
18
自動製冰機
…續
檢測桿
用完冰勺後,
請放回原位
攤平冰塊
請勿放入冰塊以外
的其他物品
檢測桿
(環境為20℃,不開關門的情況下)
●製冰時間
· 在一般製冰模式下,1次可以製出約10個冰塊。根據雪櫃的運行狀態不同,製冰時間有可能會延長。
一般製冰 約2小時/次
快速製冰 約1小時/次
●
製冰前/製冰用水
製冰時的注意事項
製冰時間及貯冰量
在以下情況時,製冰時間可能會延長。
· 剛開始使用時,冷凍室尚未充分冷卻的情況下。
特別是自動省電設定時或夏季等環境溫度較高時,甚至可能需要1天以上。
· 雪櫃門開關次數較多時,或是一次放入大量食物時。
· 冬天等室溫較低時,或是夏季等非常炎熱時。
· 雪櫃周圍的空隙過窄時。
檢測桿碰到冰塊前會持續製冰。
注意事項
●貯冰量
將冰塊攤平持續製冰時 約150個
冰塊堆積在局部區域時,
製冰室門沒有開閉時
約50~100個
部分冰塊堆積在局部區域時,可
能會使冰塊過早碰到檢測桿,導
致製冰不足就停止製冰的情況
發生。
存放有冰塊以外的物品,
碰到了檢測桿
存放有冰塊以外的物品,導致
製冰盤翻轉時碰撞或製冰停止
供水箱內有水的情況下無法製冰,可能是發生了以下情況
製冰量少,可能是因為發生了以下情況
環境溫度較高時,製冰時間可能需要1天以上。
●建議使用純淨水。
使用前,請務必先用水清洗供水箱,以防水垢或黴菌。
使用礦泉水製冰時,請使用硬
度為100mg/L以下的礦泉水。
●請倒掉第一次製出的冰塊(約30個),因為可能有異味或污垢。
警告:僅可注入飲用水。
●請勿放入60℃以上的熱水或果汁等清水以外的液體,否則將會造成故障。
礦泉水、淨水器的水等去除了氯的水,比較容易滋
生雜菌、水垢,並導致供水箱內壁黏膩,因此需要
小心清潔。
· 不製冰時,也請勿將冰塊以外的物品放置在貯冰盒內。
否則再次啟用製冰功能時,物品等可能碰到檢測桿,導致故障或不能製冰等。
製冰盤的抗菌作用
● 試驗委託單位:廣東省微生物分析檢測中心 ● 試驗方法:貼膜法(GB21551.2-2010)
● 抗菌方法:抗菌材料 ● 抗菌對象:製冰盤 ● 抗菌效果:確認有90%以上的抗菌效果
*
請參閱第08頁
檢測桿
冰勺冰勺
製冰盤
冷 凍
準備
提示 ● 不能同時設定快速微凍、解凍、快速冷凍。
●請選用保鮮度較好的食物。
●為防止食物乾燥,請使用保鮮膜或密封容器、密封袋子等存放食物。
●已解凍的食物,請全部食用完,否則會變味或口感變差。
冷凍食物時的注意事項
在冷凍室進行。
冷凍室
冷凍室上層滑動盒
●
請將密封的食物放在冷凍室上層滑動盒的
冷凍食物貯存盒中。
設定
1
2
按壓1次 。
反復按壓 ,直到
「快速冷凍」燈熄滅。
「快速冷凍」燈亮,開始快速冷凍。
響起「嗶~」的提示音,
「快速冷凍」燈熄滅。
中途停止時
設定方法
約150分鐘後,自動結束。(「快速冷凍」燈熄滅)
當打開冷凍室時看不到冷凍室上層滑動盒
時,請將冷凍室上層滑動盒抽拉出來。
快速冷凍
19
冷凍食物貯存盒
冷 凍
自動省電
快速冷凍
冷 凍
自動省電(按壓 秒)
嗶
自動省電
快速冷凍
冷 凍
自動省電(按壓 秒)
嗶
~
~
使
用
方
法
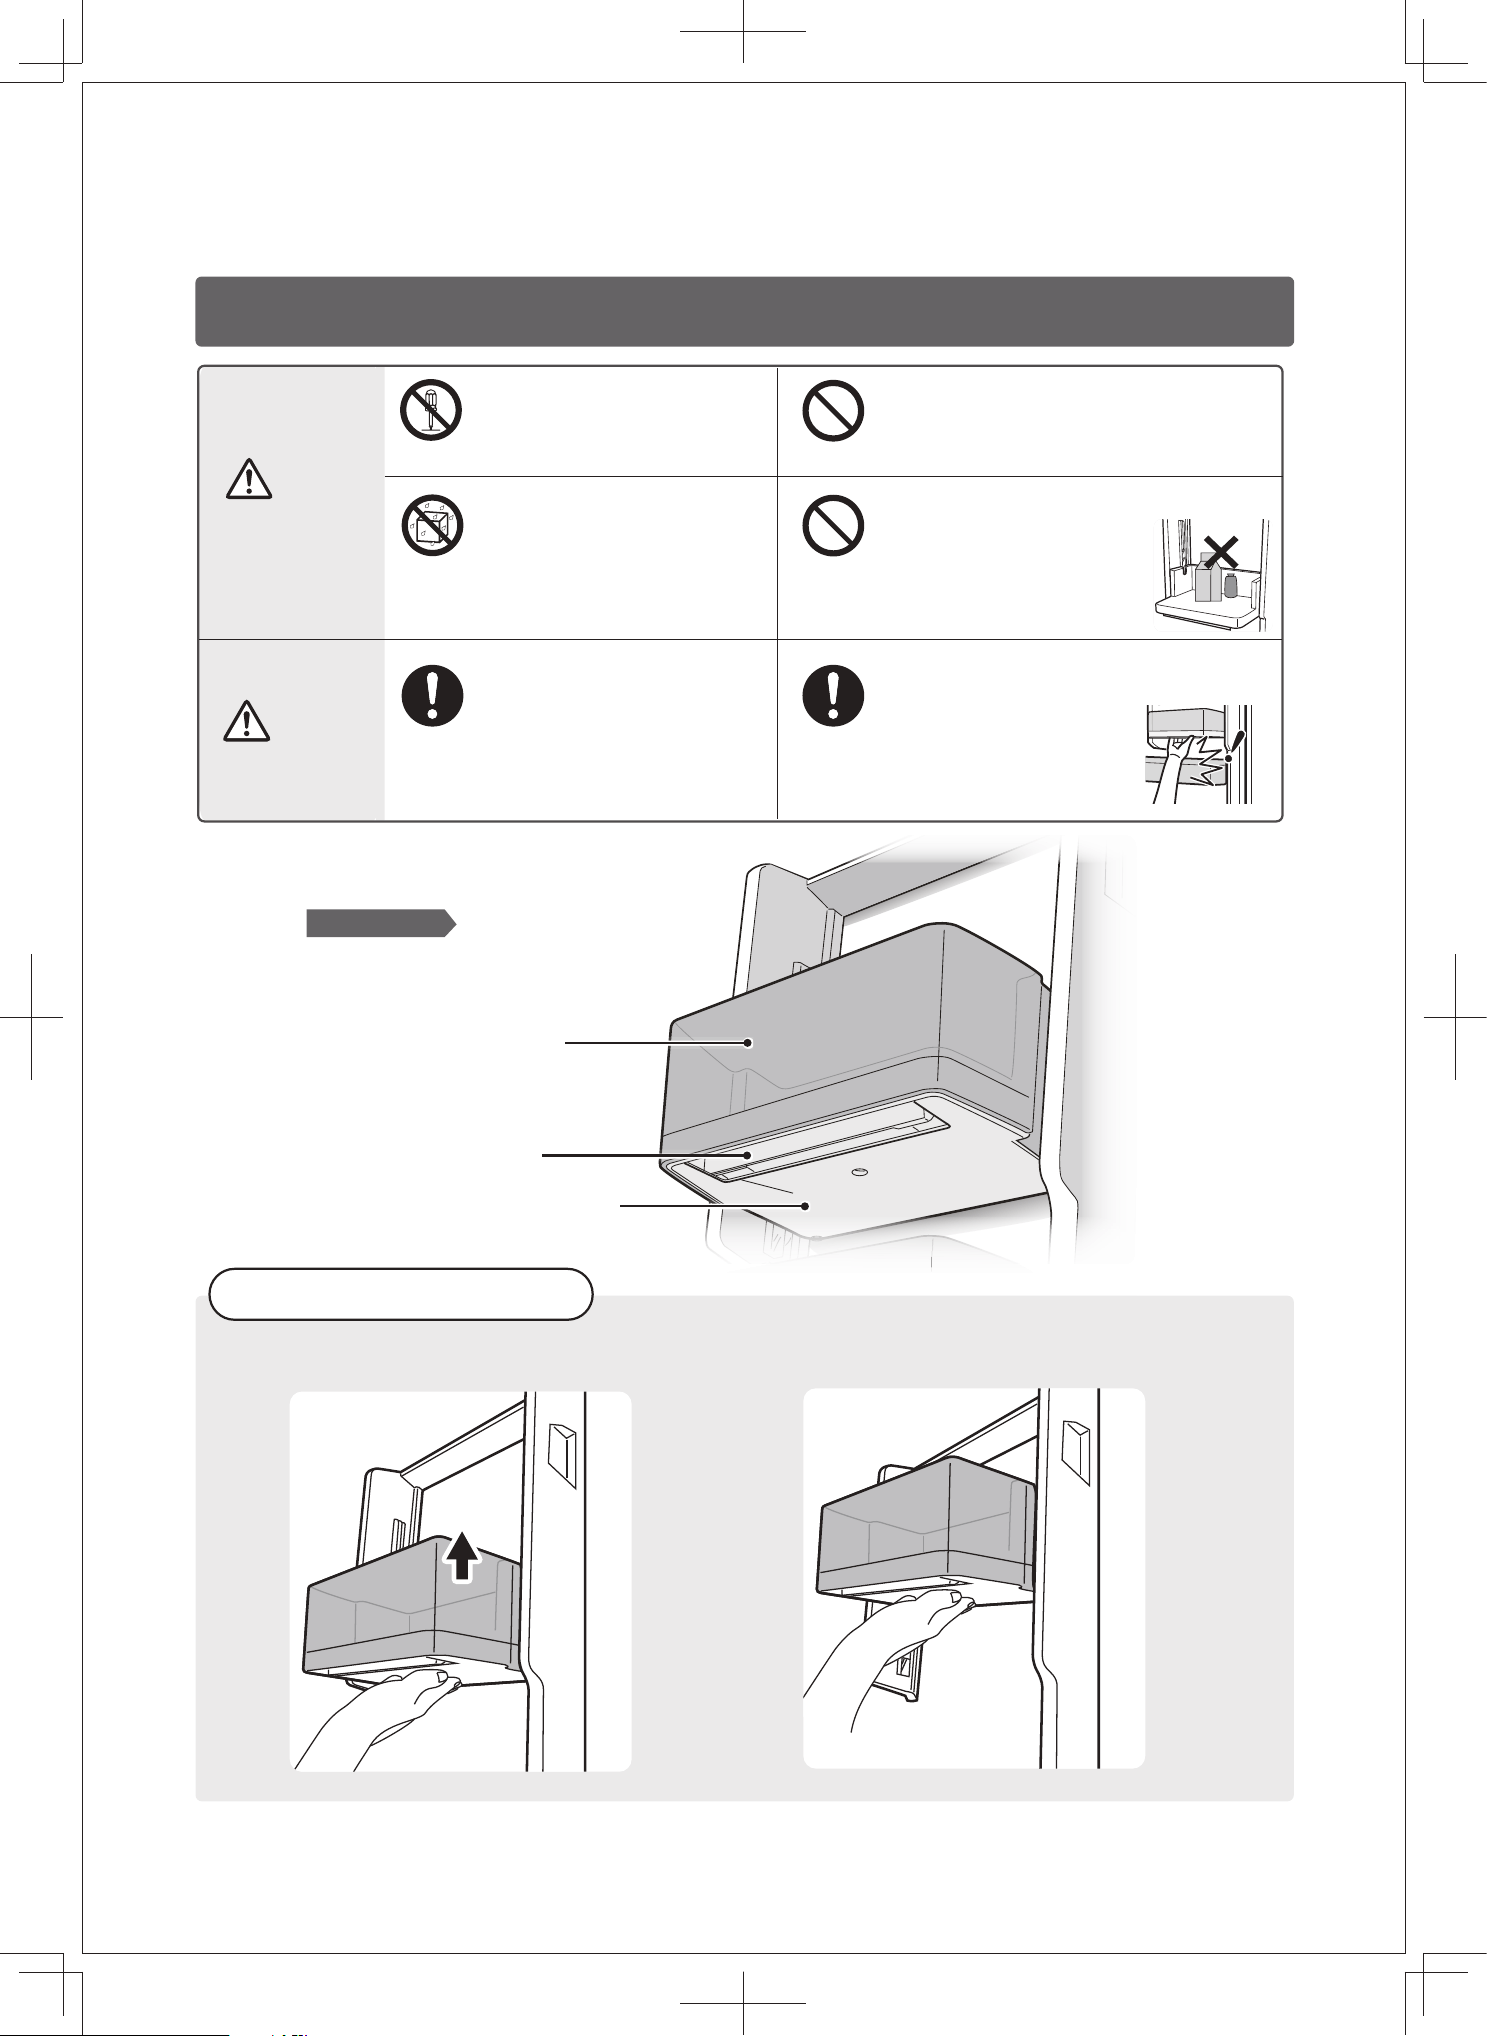
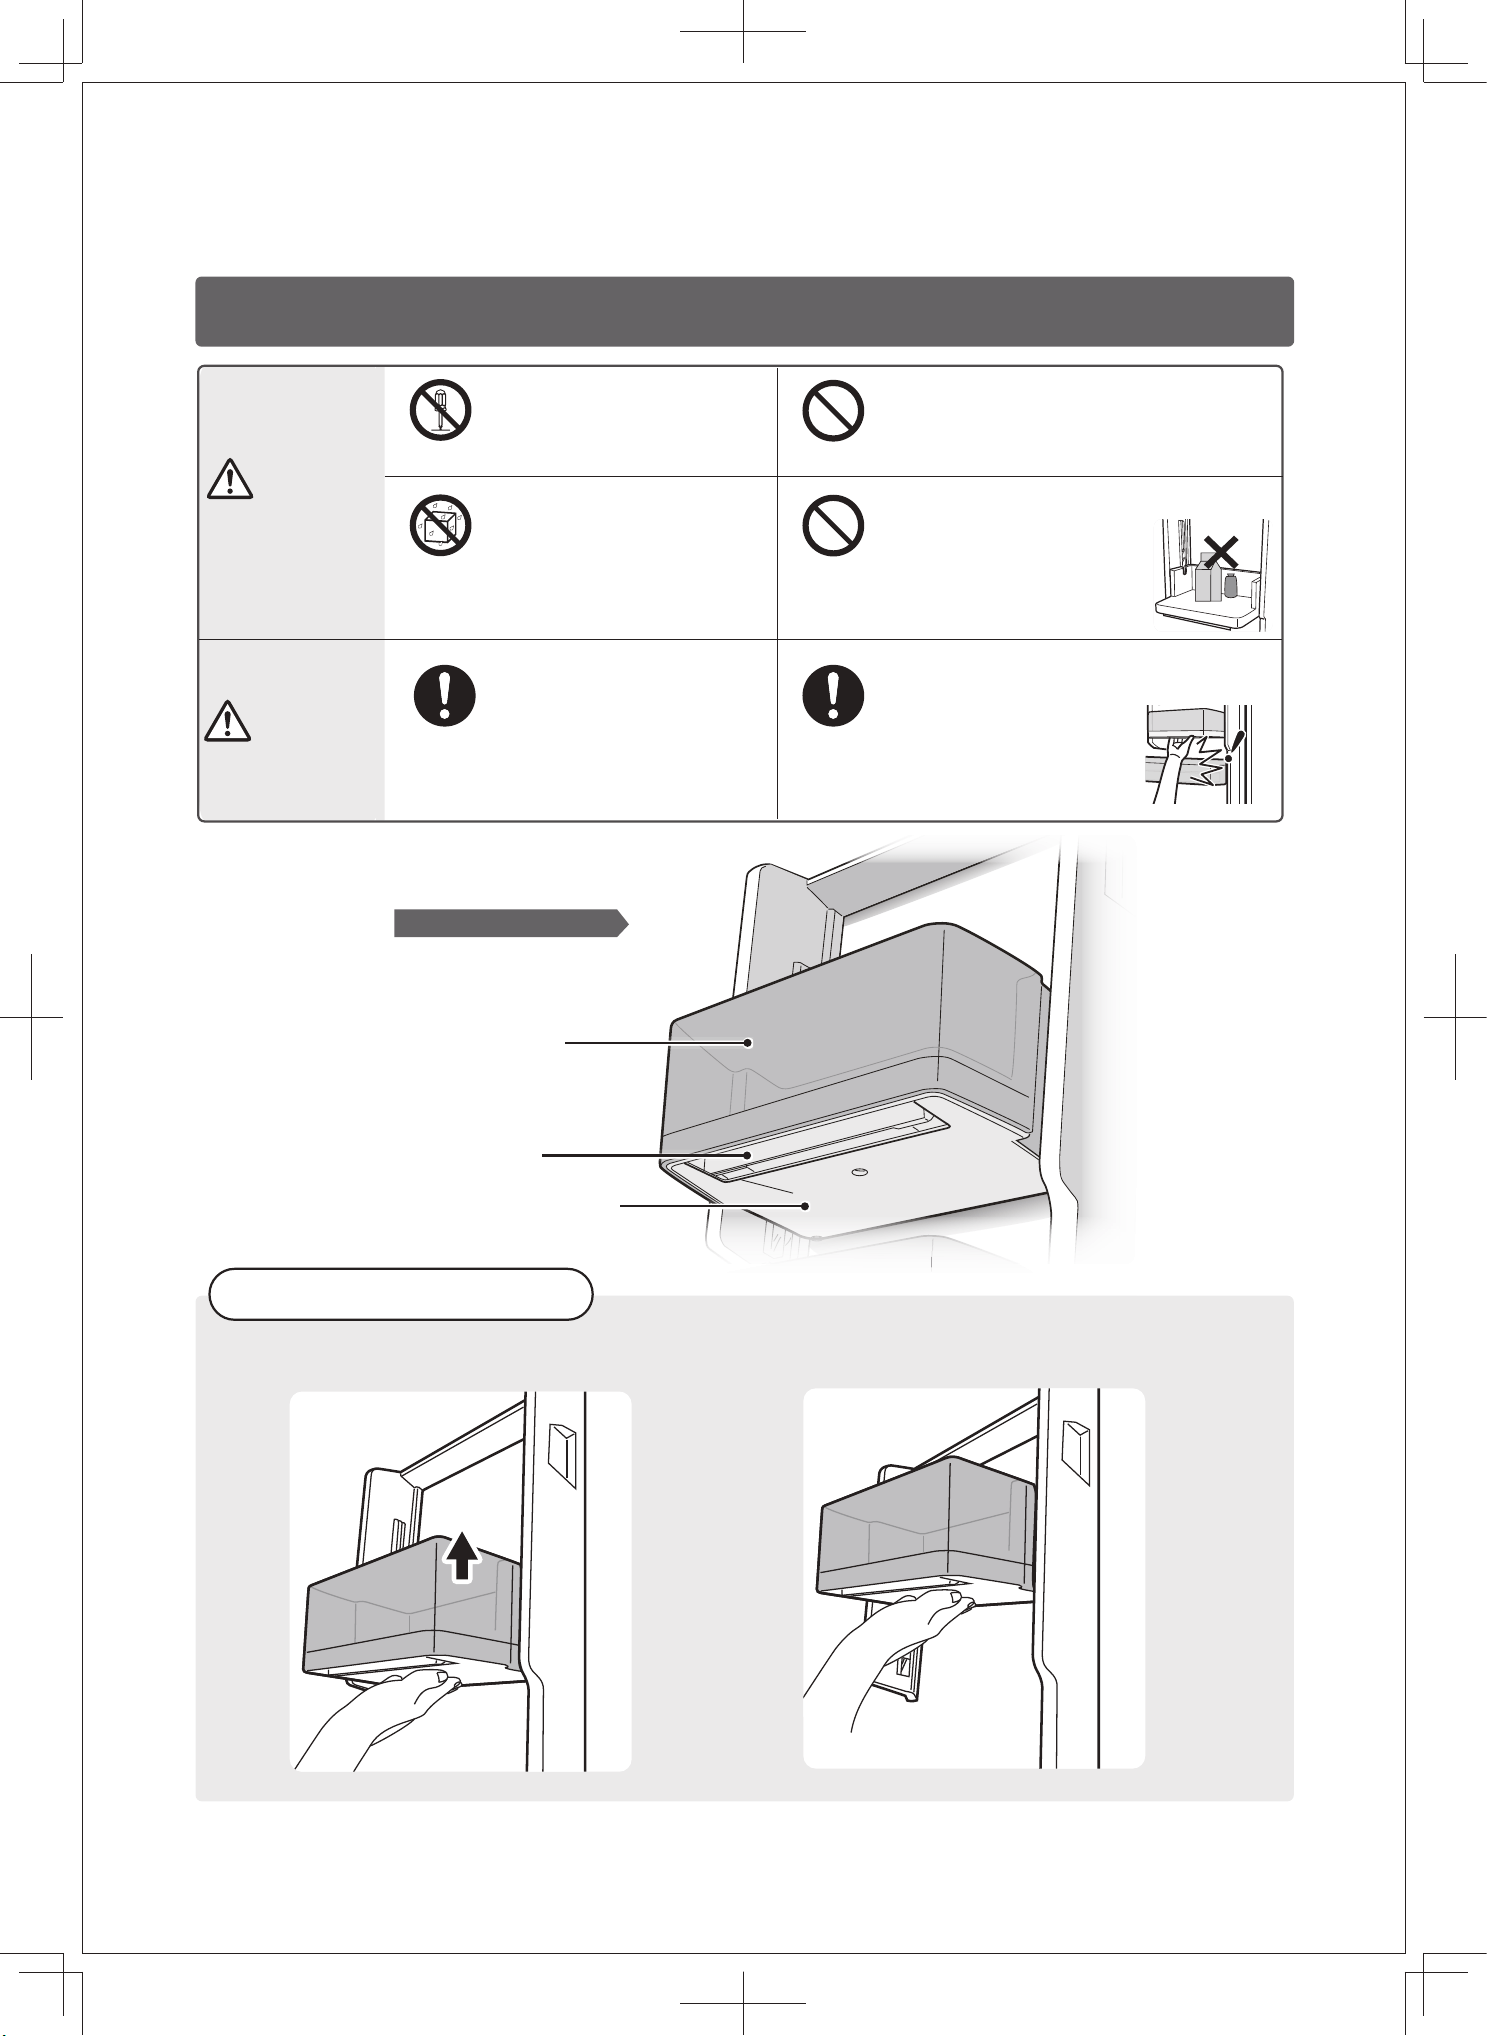
導軌
突起
速凍冰鮮盒
1
拔出電源插頭
2
清潔後請對電源線及電源插頭進行以下檢查,
以防發生觸電或火警等。
●
如有疑問,請立刻致電服務熱線。
●
塑膠零件、玻璃層架、玻璃門等位置上如
沾到油或果汁時,請立即擦拭乾淨。
否則,可能會導致這些部件破裂或變色。
●
請勿對玻璃表面以及邊緣部位以衝擊等
方式的施力。
否則,可能會導致玻璃碎裂或有缺口。
●
請勿使用以下物品:
有污跡,請
立刻擦除。
清潔步驟
清潔後的檢查
●
平時如有污跡,用乾布擦淨即可。
請用柔軟的布沾溫水擦拭
· 使用廚房用中性洗滌劑時,請務必稀
釋後使用。
· 使用洗滌劑後,請務必沾水擦掉洗滌劑,
再用乾布擦拭。
電源線損傷、
插頭發熱、
插入很鬆。
有灰塵時,
請用乾布
擦拭乾淨。
看不見的地方也請進行1~2次/年的清潔
警告
禁止拆卸
請勿自行拆卸、改裝、修理
清潔時,請拔出電源插頭
拔出插頭
灰塵等
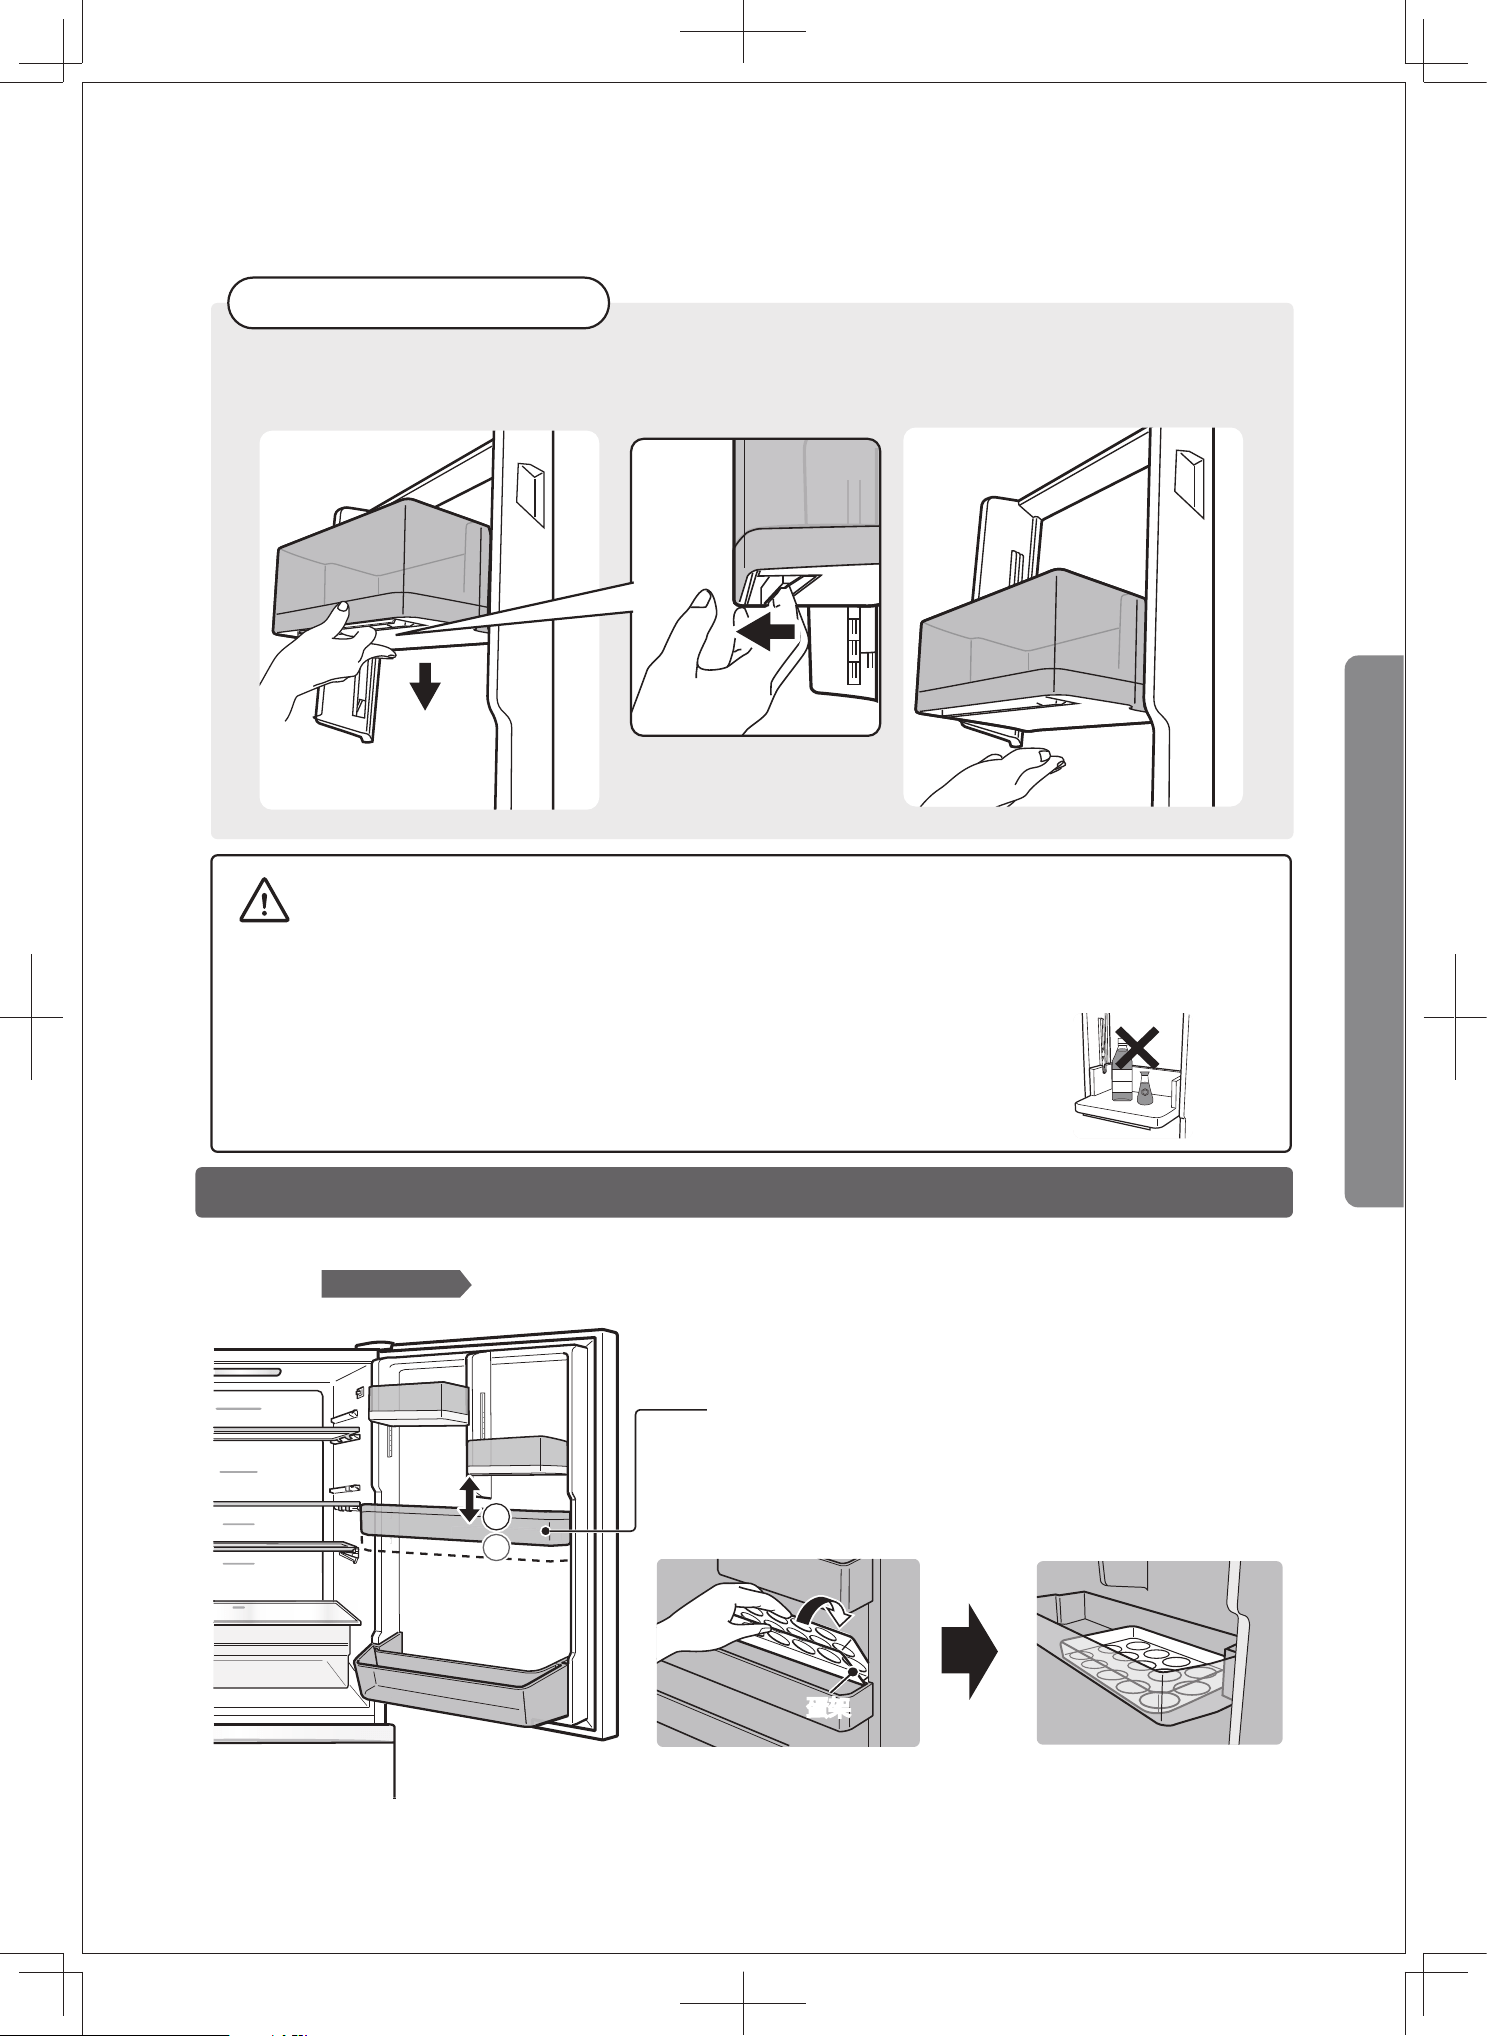
將速凍冰鮮盒拉出到最大限度,稍往上提起後取出。
拆卸方法
安裝方法
沿導軌裝入速冷冰鮮盒並
推到最裡面。
雪櫃背面和地板
拉出雪櫃,打掃灰塵。
擦拭背面、牆壁和地板上
的污垢。
·
·
水洗
清潔保養
20
注意
研磨粉
洗
滌
劑
汽
油
廚房用鹼性洗滌劑或標有弱鹼性
的洗滌劑。
(否則,可能會導致塑膠零件、
層架、門等破損)
研磨粉、洗衣粉、酒精(乙醇、
甲醇等)、汽油、稀釋劑、酸、
堿、蠟、石油、熱水、刷子等
(否則,可能會導致塑膠零件、
玻璃層架、玻璃門等破損,或塗
漆面被損壞)
請參閱第35頁
活動置物架
門封
操作面板
門上置物架、
雙瓶置物架
●維護或清潔時,所凍結食物的溫升可能
會縮短儲存期。
· 安裝方法和拆卸方法相反。
1
4
5
2 3
雙手握住活動置物架。
一邊拉起把手,一邊將活動
置物架底座推至最高位。
取出活動置物架底座。
雙手一邊抓住活動置物
架一邊往上提起。
拉起活動置物架底座的把手。
門上置物架、雙瓶置物架
水洗
活動置物架
濕布擦拭
用乾布擦拭
門封
弄髒後容易損壞,會
引起冷氣洩漏。
門表面
用濕布或乾布擦拭
如果有污跡擦不掉時,請用少量稀釋的中性洗滌
劑進行擦拭。再用抹布沾清水擦乾淨洗滌劑,最
後用乾布擦拭。
操作面板
用乾布擦拭門把手。
清潔後,請確認設定位置等
是否改變。
用濕布或乾布擦拭
拆卸方法
拆卸方法
活動置物架
活動置物架底座
從下面交替地向上頂置物
架,取出置物架。
置物架安裝得較牢固。
安裝方法
將置物架水平放入,再
按下去即可。
水洗
活動置物架底座水洗可能造成故障
·
·
活動置物架活動置物架
活動置物
架底座
21
清潔保養
…續
使
用
方
法
導軌
安裝方法
1
1
2
2
雙手拿住活動層架。
雙手拿住活動層架,層架導軌
對準冷藏室的導軌裝入。
雙手將其稍往上抬起,將其拉出。
雙手稍微將其抬起,將層架的
凸起扣入到導軌的槽中。
二段活動層架
冷凍室下層滑動盒、
冷凍貯存容器
蔬果室滑動
盒、蔬果
容器
導軌凹處
先拆下速冷冰鮮盒和供水箱。
拆卸方法
雙手拿住並稍往上抬起速冷冰鮮盒頂板以後將其往前拉出。
安裝方法
雙手拿住速冷冰鮮盒頂板,將速冷冰鮮盒頂板卡扣對準冷
藏室導軌裝入,頂板上的突起需安裝到冷藏室導軌凹處。
突起
導軌凹處
導軌
卡扣
拆卸方法
手抓住層架,斜向上拉起取出
活動層架
速凍冰鮮盒頂板
拆卸方法
· 安裝方法和拆卸方法相反。
水洗
水洗
水洗
玻璃製品較重,必須用雙手取放。
玻璃製品較重,必須用雙手取放。
玻璃製品較重,必須用雙手
取放。
突起背面標有左右標識,
請確認後再安裝層架。
22
清潔保養
…續
卡扣
導軌
冷凍室上層滑動盒、

蔬果室滑動盒、蔬果容器
水洗
冷凍室上層滑動盒、冷凍室下層滑動盒、冷凍貯存容器
水洗
將門拉出到最大限度後往
上提再拉出,將蔬果容器
上的突起插到導軌的孔內
並安裝到位。
21
將門稍往上提再拉出,
取出蔬果容器。
將門提起過高的話會
導致門脫落。
21
拆卸方法
安裝方法
將門拉出到最大限度,
取出蔬果室滑動盒。
將門拉出到最大限度,
安裝蔬果室滑動盒並往
裡推。
32
2
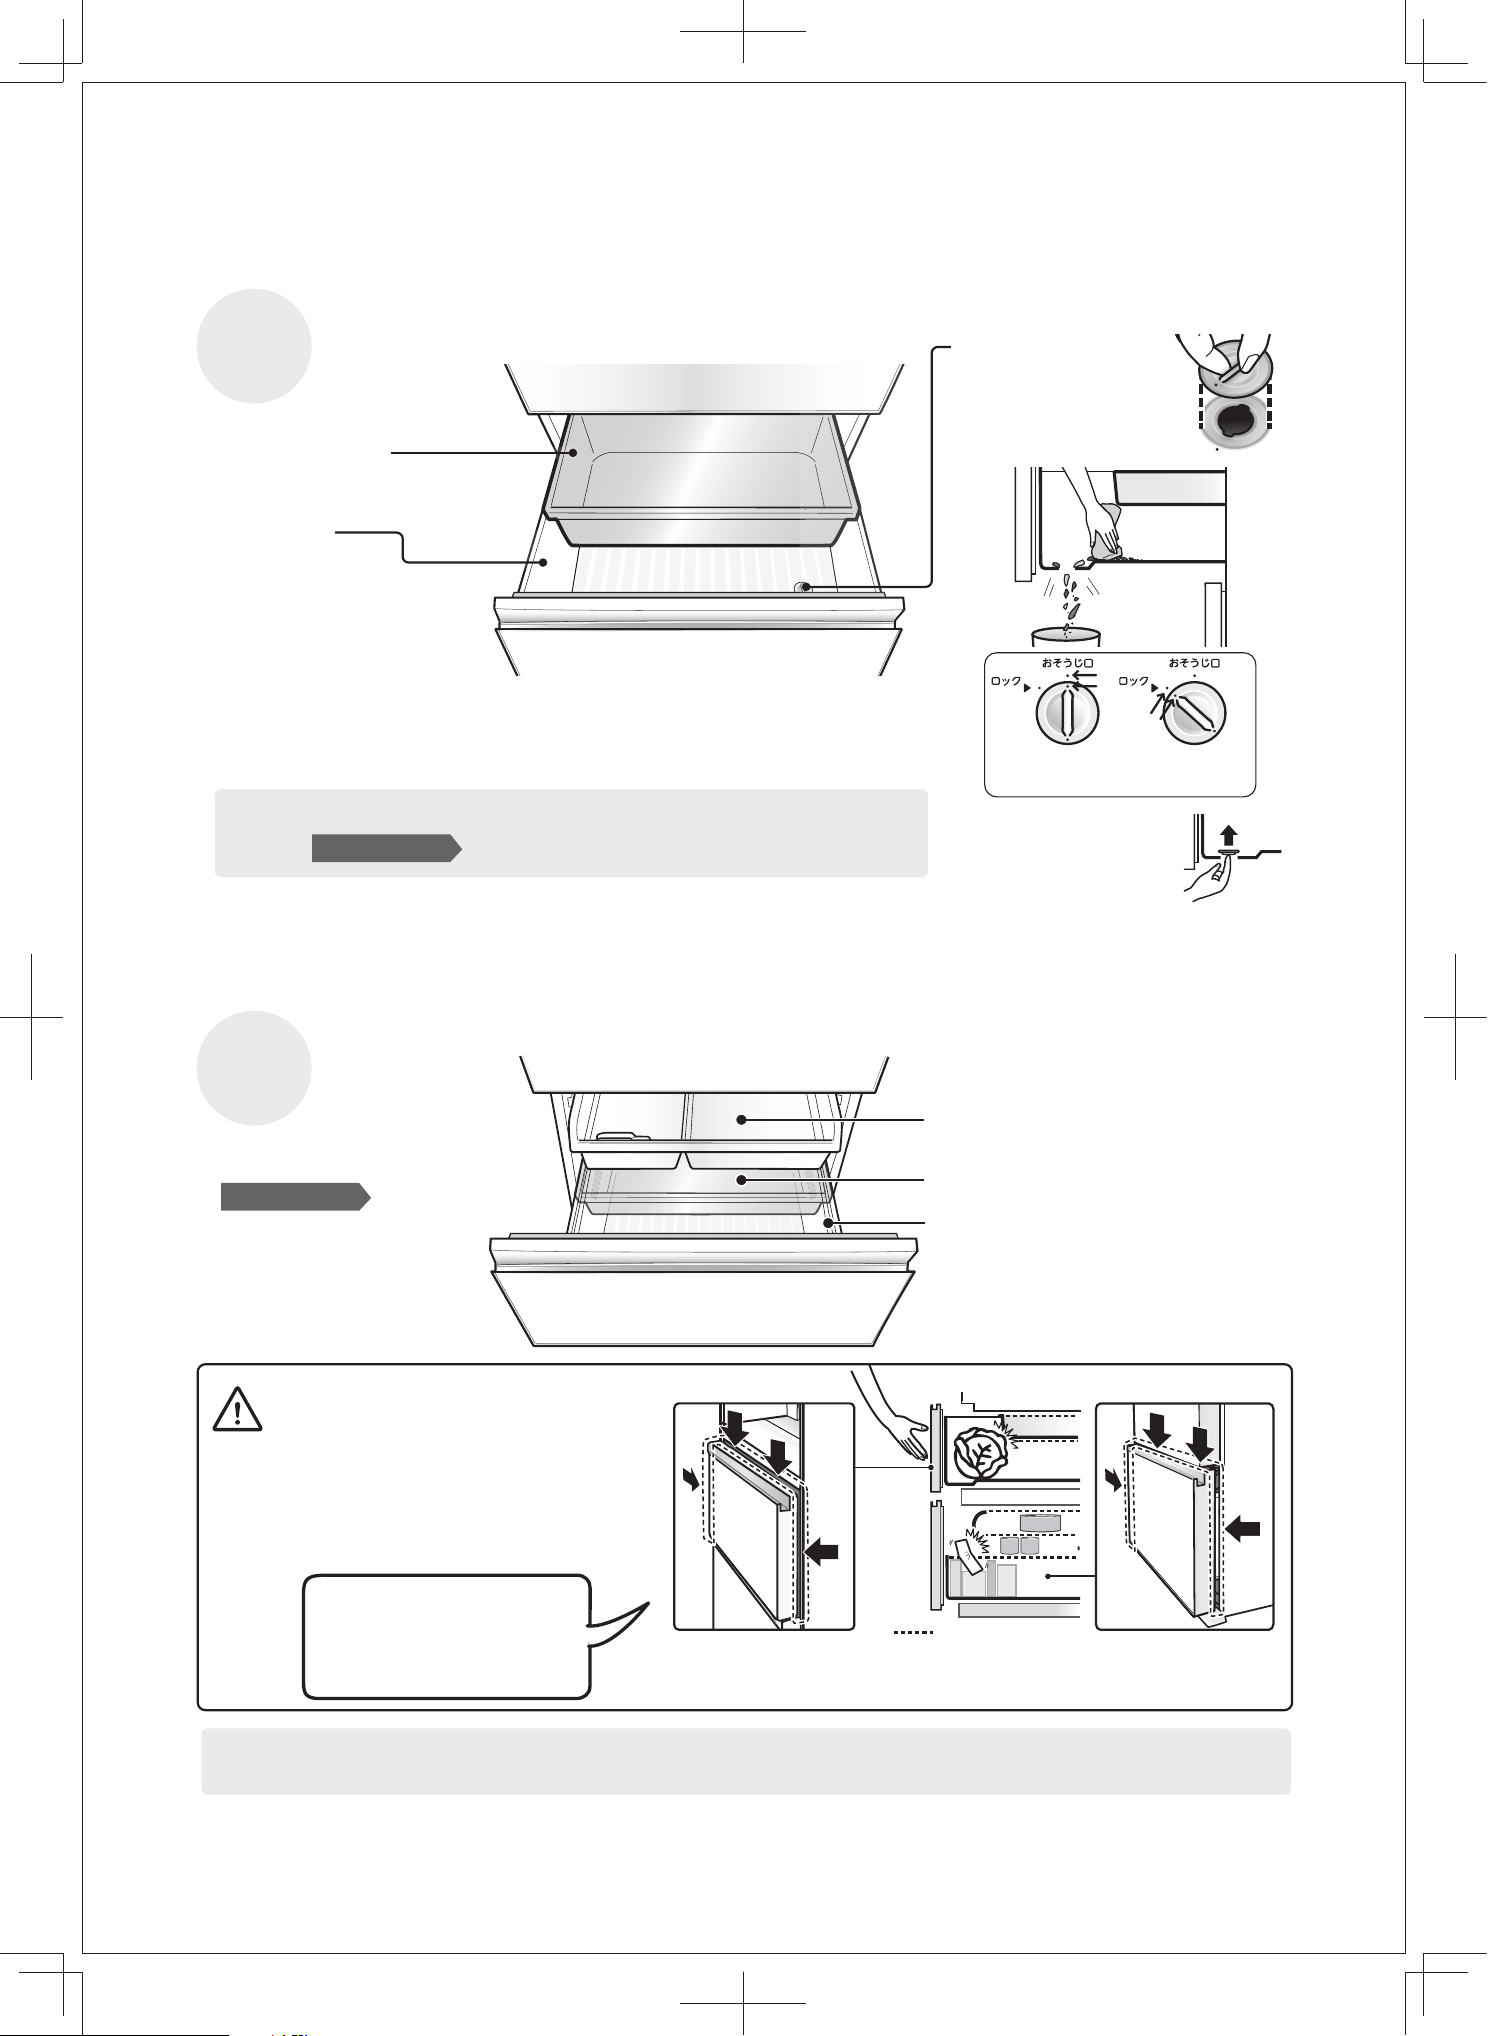
取出冷凍貯存容器。取出冷凍室下層滑動盒。
(第1步和第2步的操作
可以反過來)
安裝冷凍室下層滑動盒。
(第2步和第3步的操作可
以反過來)
安裝方法
1
將門拉出到最大限度,將門
向上抬起的同時繼續拉出,
直到門碰到地為止,將冷凍
貯存容器的突起插到導軌的
孔內並安裝到位。
3
安裝冷凍室上層滑動盒。
拆卸方法
1
將門拉出到最大限度,將門
向上抬起的同時繼續拉出,
直到門碰到地為止,取出冷
凍室上層滑動盒。
23
使
用
方
法
請勿用水或其他清洗劑噴灑沖洗槽處,否則
會導致製冰機故障。
請勿將供水軟管從接水盒上拆下,否則容易
造成漏水。
拆卸方法
用柔軟的濕布擦拭接水盒
的安裝槽處(雪櫃上)
安裝方法
將供水軟管牢固地插到供
水箱的槽中。
接水盒
請務必使用柔軟的濕布或海
綿清潔,需清洗的零件必須
用清水清洗。
(防止滋生黴菌、水鏽等)
請勿使用以下物品:
● 洗滌劑、漂白劑、研磨粉、
刷子、稀釋劑、汽油等
(否則,可能導致異味或故障)
●熱水
先取出供水箱,再握住接水
盒的把手將接水盒取出。
供水管路
請勿用手觸摸自動製冰機的製冰
部分(貯冰盒上側)
請勿自行拆卸、改裝、修理
警告
禁止拆卸 禁止接觸
●
●
●
洗
滌
劑
汽
油
自動製冰機的保養
24
(各零件的耐熱溫度為60℃)
供水箱
1~2次/年
注意
把手
把手
供水軟管
供水軟管
供水軟管
槽
研磨粉
將卡扣向上掰開,拆下水箱蓋。
拆卸方法
葉輪
請確認是否有異物黏附。
拆卸方法
· 安裝方法和拆卸方法相反。
按箭頭方向旋轉
拆下供水管
1
水箱、水箱蓋
供水管、供水泵
1次/週
1次/月
請確保全部零件安裝到位,否
則無法供水。
安裝方法和拆卸方法相反。
拆卸方法
清潔方法
水洗。
淨水過濾器易破損,因此請
勿用銳器刺戳。
淨水過濾器
兩側朝箭頭
方向推,拆
下過濾器盒
將供水泵
從供水管
拆下
將泵盒蓋按
箭頭方向旋
轉拆下
2
3
將水箱蓋的卡扣固定好,固定時會發出「叭」的
聲音。確保卡扣安裝到位。
請確認供水泵是否與
水箱後側呈平行狀態
供水泵
水箱後側
正面 側面
水箱蓋的安裝方法
如安裝不到位,將導致無法供水、製冰,或者導
致供水泵發出噪音。
卡扣
供水箱
過濾器盒
●
·
25
1次/週
卡扣
供水管
供水管
供水泵
使
用
方
法
GR-RM469WE-PGA(B3)-1
1
2
26
● 請聯絡專業人員更換室內燈。
各種處理
層架及容器的負重
更換室內燈時
● 請勿觸碰碎裂的玻璃,並請致電服務熱線。
玻璃部件碎裂時
● 減少門的開關次數,避免貯存新的食物。
(否則雪櫃內部溫度會升高)
停電時
● 如果立刻再插入插頭或合上斷路器,會使壓縮機負荷過重,引起故障。
請等待5分鐘後再插入插頭或合上斷路器。視乎雪櫃內的溫度和壓縮機的啟動狀態,有時
壓縮機保護計時器會啟動,使插入電源插頭6分鐘左右不運轉。
拔出電源插頭時、保險絲或斷路器斷開時
長期不使用雪櫃時
請倒掉自動製冰機內的冰和水。
(詳見「移動、搬運之前」的步驟2 )
拔出電源插頭,將雪櫃內部清理乾淨,打開雪櫃門2~3天,使其乾燥。
所在位置
冷藏室
蔬果室
活動層架
二段活動層架
速凍冰鮮盒頂板
蔬果室滑動盒
蔬果容器
冷凍室上層滑動盒
冷凍室下層滑動盒
冷凍貯存容器
冷凍室
層架及容器
請參閱第32頁
請參閱第12頁
請參閱第16頁
請參閱第16頁
7.5kg
7.0kg
7.5kg
4.0kg
13.0kg
8.5kg
5.5kg
15.5kg
27
遇到故障時
關於聲音
發生異響 …以下為正常現象。
雪櫃內部
「嗶」「嘁」
是零件因溫度變化相互摩擦的聲音。
打開冷藏室門約5秒後,開始容易發
此聲音。
背面附近
「流水聲」「嗤」
是製冷劑流動的聲音。在除霜過程中容易響。
夏天…1天約1次 冬天…2天約1次
蔬果室打開時
「噗噗」是冷卻風扇旋轉的聲音。
打開蔬果室門時,雪櫃內的風扇也不會停止
旋轉,因此容易聽到風扇旋轉的聲音。
雪櫃下方
「噗嘶」是壓縮機運轉的聲音。
夏天或是剛開始運行時,如進行快速冷凍、
快速製冰,壓縮機運轉的聲音會變大。
供水箱附近
「呼嚕嚕」是供水泵的聲音。
約2小時響1次,1次響約3秒左右。
(快速製冰時約1小時1次)
製冰機附近
「嗡」是製冰盤翻轉的聲音。
「咚咚」是冰塊掉落的聲音。
約2小時響1次,1次響約3秒左右。
(快速製冰時約1小時1次)
可以設定為「製冰停止」以停止此
類聲音。
請留意以下情形
「嘎達嘎達」「咚咚」 「警示音」
● 地板是否牢固?
● 是否碰觸到周圍牆壁?
● 雪櫃是否放置平穩?
● 供水箱的供水泵、供水管是否安裝正確?
請參閱第17頁
請參閱第25頁
● 門是否未關好?
如所有門關閉後仍不停止,請致電服務熱線。
(發生警示音時,可拔出電源插頭,等待5分
鐘後再重新插入,3分鐘後則停止。)
28
遇到故障時
…續
完全不製冷·冷卻能力差 …請按照順序確認以下事項。
關於製冷
斷開電源
是否正常供電?
請確認電源插頭是否鬆脫,總開關或保險絲是否斷開。
雪櫃內部製冷需要一定時間,夏季等炎熱時製冷可能需1天以上。
溫度調節檔位是不是設定為「弱」?
是否設定了「自動省電」?
門的密封條周圍是
否有間隙?
是否頻繁開啟
雪櫃門?
頻繁開啟雪櫃門會導致外界空氣(暖氣)進入雪櫃,使雪
櫃內溫度暫時上升。大約一晚上的時間溫度會恢復正常,
請留意觀察。
是否將水分過多的食物放入冷藏室的最裡面或速凍冰鮮盒內?
由於冷藏室深處離冷風吹出口近,且速凍冰鮮盒內溫度較低,製冷過快。
請勿將水分過多的食物放在冷風吹出口前面。
速凍冰鮮盒溫度約0~2℃,通常不會結凍。
(但是,放在冷風吹出口附近的食物可能會出現結凍的現象。)
快速微凍通常不會使食物微結凍(軟冷凍)。
(但是,放在冷風吹出口附近的食物可能會出現結凍的現象。)
是否存放了水分過多的食物?
請勿將水分過多的食物放在冷風吹出口的前面。
是否將食物存放在速凍冰鮮盒的內側?
內側位置離冷風吹出口較近,因此容易結凍。
請勿將食物放在冷風吹出口的前面。
當食物較厚或者堆放密集時,有可能無法在設定的時間內完成解凍。
冷藏室門的情況
層架上的食物是否超出層架而
頂到雪櫃門,使之產生間隙?
請勿讓食物超出層架。
蔬果室門或冷凍室門的情況
是否有食物袋子卡住了門,導致門產生了間隙?
另外,容器中的食物有無頂到滑動盒?
如有,則會導致門關閉不良,漏冷而使製冷效果變差。
請解除設定。
請將溫度調節檔位設定為「中」或「強」。
電源接通多久
操作面板
門
冷藏室的食物結凍
速凍冰鮮盒中的食物不
會微結凍(軟冷凍)
設定為快速微凍時,
食物也不會微結凍
設定為快速微凍時,
食物結凍
即使設定為解凍,
食物也未能解凍
確認事項·原因/對策
請參閱第11頁
請參閱第16頁
請參閱第12頁
請參閱第13頁
請參閱第13頁
請參閱第13頁
自動省電
29
無法製冰·製冰少 …請按照順序確認以下事項。
電源接通多久
請參閱第18頁
關於製冰
操作面板
貯冰盒
供水箱·接水盒
冰塊互相黏結,或呈
圓球狀,或變小
是否長時間貯冰?
可能昇華作用令冰塊變成圓球狀,以及變圓和變小。
是否設定為快速製冰或 快速冷凍模式?
因加快結冰速度,造成水分中的空氣被封在冰塊中形成氣泡,使冰塊看起來發白。
是否使用了礦物質含量較高的水(礦泉水等)?
因礦物質結凍,出現白色沉澱物,使冰塊看起來發白,但這對健康無害。
冰塊呈白色,或有沉澱物
雪櫃剛開始運行等未充分製冷的情況下,製冰時間會變長。
夏季等炎熱天氣時可能需1天以上,請根據實際情況留意觀察。
「製冰停止」有無亮燈?
是否將冰塊以外的物品放
入貯冰盒內?
是否忘記安裝
接水盒?
供水箱的卡扣和供水泵是
否確實已安裝好?
供水管和葉輪是否確實
安裝好?
供水管和供水泵
供水泵
供水管
請將供水泵的
凸起部分安裝
到供水管的角
槽內。
請將卡扣固定好。
卡扣
卡扣
前面
側面
供水泵
與後面平行
請安裝好接水盒。
供水箱內是否有充足的水?
請將水加入供水箱至水位線位置。
請勿將冰塊以外的物品放入貯冰盒內。
物品可能會碰到檢測杆導致製冰
停止,或使製冰盤翻轉時受到撞
擊而破損,造成無法製冰。
使用完冰勺後,請將其放回原位。
關上冷凍室門,
按壓3秒(直到響起嗶~的提示音)
「製冰停止」燈熄滅。
製冰盤
接水盒
確認事項·原因/對策
請參閱第17頁
請參閱第24頁
凸起
葉輪
葉輪
現象
確認事項·原因/對策
角槽
供水管
供水泵
葉輪
凸起
角槽
接水盒
製冰盤
製冰停止
快速製冰
製 冰
製冰停止(按壓 秒)
製 冰
30
遇到故障時
…續
關於門
現象
確認事項·原因/對策
冷藏室的門有錯位
請旋轉調整腳,以調整門的平行度。
是否有食物袋等被門夾住,
或者食物放置超出層架,
導致間隙產生?
冷凍室或蔬果室容器中的食物是否碰到了上面的滑動盒,食物等是否掉落到
冷凍室裡側?
雪櫃是否向前傾斜?
請旋轉調整腳,以使雪櫃水平放置。
如不能調整,請與選購的經銷商聯絡或致電服務熱線。
活動置物架上是否放置了過高的食物或調味料?
請勿在活動置物架上放置過高的食物或調味料。
請向地面側調整左右兩側的調整腳,直至雪櫃穩定不晃動。
即使調整調整腳也無法使雪櫃穩定不晃動時,請墊上一塊板。
請取出被夾住的食物。
請勿讓食物超出層架。
門不能關閉
開關門時,雪櫃不穩
剛關門直接再打開時很吃力
關門時其他門會有瞬間開啟現象
燈閃爍
「快速冷凍」和「快速製冰」的燈持續閃爍?
雪櫃出現了異常,請與選購的經銷商聯絡或致電服務熱線。
進入雪櫃的空氣被迅速凍卻,箱內壓力暫時比箱外低,導致開門吃力。
因關門產生的風壓將其他門頂開。
請參閱第08頁
請參閱第08頁
請參閱第08頁
請參閱第14頁
請參閱第16頁
請勿讓食物碰到滑動盒。
請取走掉落到冷凍室裡側的食物。
現象
以下情況為正常現象
確認事項·原因/對策
現象
確認事項·原因/對策
關於操作面板
現象 確認事項·原因/對策
關於結露、結霜、漏水
冷凍室結霜
是否因食物放入過多,導
致門封產生間隙?
※為便於說明,插圖省略
了蔬果室門。
食物放入過多時,門不能
完全關閉,門封間隙導致
結霜。即使是很小的間
隙,也會導致結霜。
是否濕度過高?門是否未完全關好?
門是否頻繁開啟或長時間敞開?門是否未完全關好?
由於高度保濕,所以瓶罐類食物上有時會有結露產生。結露時,請用乾布擦乾。
加水時,水量是否超過了供水箱的水位線?
供水箱的水量請不要超過水位線。
蔬果容器底部的清潔口是否有安裝好?
請正確安裝好清潔口蓋。
接水盒是否安裝到位? 請正確安裝好接水盒。
結露時,請用乾布擦乾。
請勿超出食物貯存
上限。請確認門封
周邊有無間隙。
門封
貯存上限
雪櫃外結露
蔬果室或冷藏室的
內側結露
水漏到雪櫃內或
地板上
請參閱第17頁
請參閱第24頁
請參閱第16頁
31
關於活動置物架
現象
確認事項·原因/對策
無法調節活動置物架的高度
是否有拉動把手?
當要升高活動置物架時,無需拉動把手。
當要降低活動置物架時,請邊拉著位於置物架底座處的把手邊
將置物架降低。
活動置物架是可拆卸的。
當活動置物架脫落時,請雙手拿住活動置物架,將其安裝到置
物架底座上。
有無拉起活動置物架底座把手?
當安裝活動置物架底座時,請將底座底部的把手向前拉起後
安裝到雪櫃門的導軌上。
是否放入了未用保鮮膜或密封容器包裝的、散發強烈味道的食物
(蔥、薑、蒜等)?
無法消除食物本身的味道。如擔心味道擴散,請將食物密封包裝。
活動置物架脫落
無法安裝活動置物架底座
雪櫃內有異味
雪櫃的外側和門封發熱
雪櫃周圍內藏散熱管,用以防止雪櫃結露。剛運行時或周圍溫度過高時,
會感到雪櫃外側溫度較高,但不會影響雪櫃內部的食物。
為了便於操作,在盒子和導軌上塗抹了一層符合日本食物衛生法規定的潤滑劑。
如潤滑劑不小心黏著在其他位置時,請擦拭乾淨。
雪櫃內的燈是否被食物遮住了? 請將遮住燈的食物移開。
雪櫃內部有黏膩感
雪櫃內部較暗
請參閱第14頁
請參閱第21頁
請參閱第21頁
其他
現象
確認事項·原因/對策
現象
以下為正常現象
確認事項·原因/對策
1
2
4
5
3
32
搬運、遷居時
取出雪櫃內的食物
需由2人以上搬運。
● 前後移動雪櫃時,請將雪櫃稍往後傾。其
底部裝有腳輪。
● 搬運雪櫃時,請先在通道上鋪設保護墊。
否則可能會因蒸發盤的水未完全排出,而
導致水灑落在地板上。
● 搬運雪櫃時,請務必握住把手,不可握住
門把手或閘。否則可能使雪櫃摔落、損毀
或人受傷。
關上冷凍室門以後,
「快速製冰」從亮燈
變成閃爍。
拔出電源插頭
卸下前面裝飾板
如有安裝防翻倒措施,必須將其拆除。
將雪櫃向前拉出
此時,製冰盤開始旋轉,水、冰會自動倒入
貯冰盒中,因此,請務必關上冷凍室門。
倒掉製冰盤中的水
(1) 取出供水箱,倒掉
殘餘的水。
(2) 打開冷凍室的門,
按壓約10秒,
直到響起嗶嗶嗶的提示
音,關上冷凍室門。
(3) 「快速製冰」停止閃爍後,打開冷凍室門,倒
掉貯冰盒中的水和冰。
(4) 用水清洗冷凍室上層滑動盒、冰勺和供水箱,
擦拭乾淨後放回原位。
移動、搬運之前
移動、搬運
遷居時
切勿使背面或側面等部分的製冷循環受損
警告
禁止
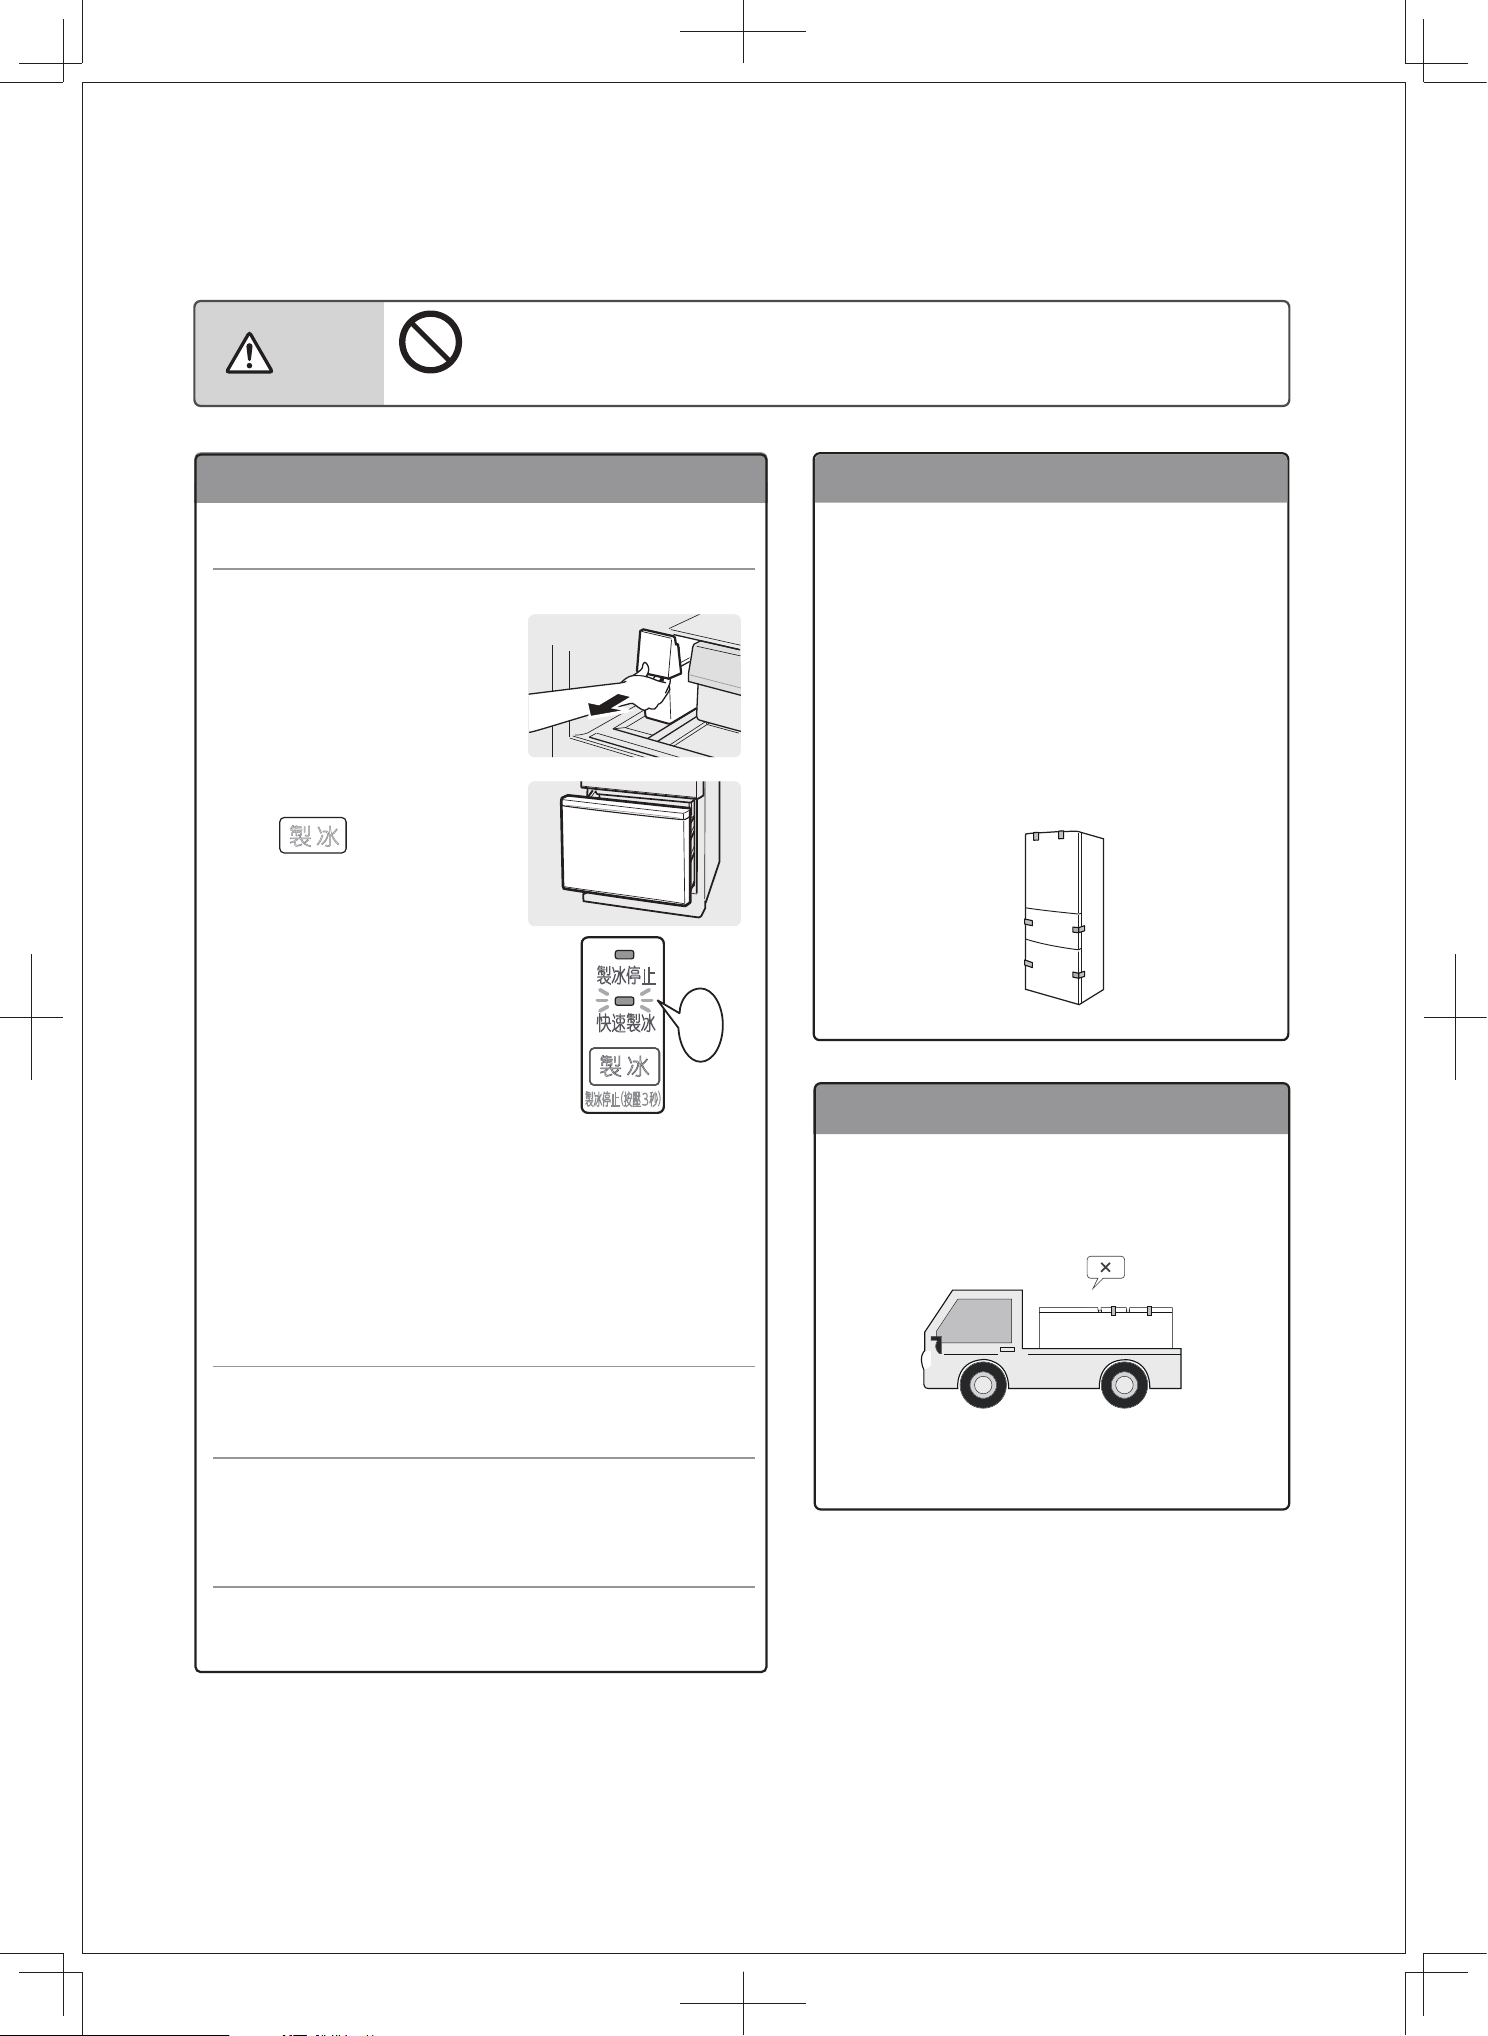
● 請勿將雪櫃平放,否則會造成壓縮機故障。
製冰停止
快速製冰
製 冰
製冰停止(按壓 秒)
嗶
嗶
嗶
製 冰
GR-RM469WE-PGA(B3)-1
1 2 3
LEN
R78
R78
R74
R74
33
(F)
(F)(R)
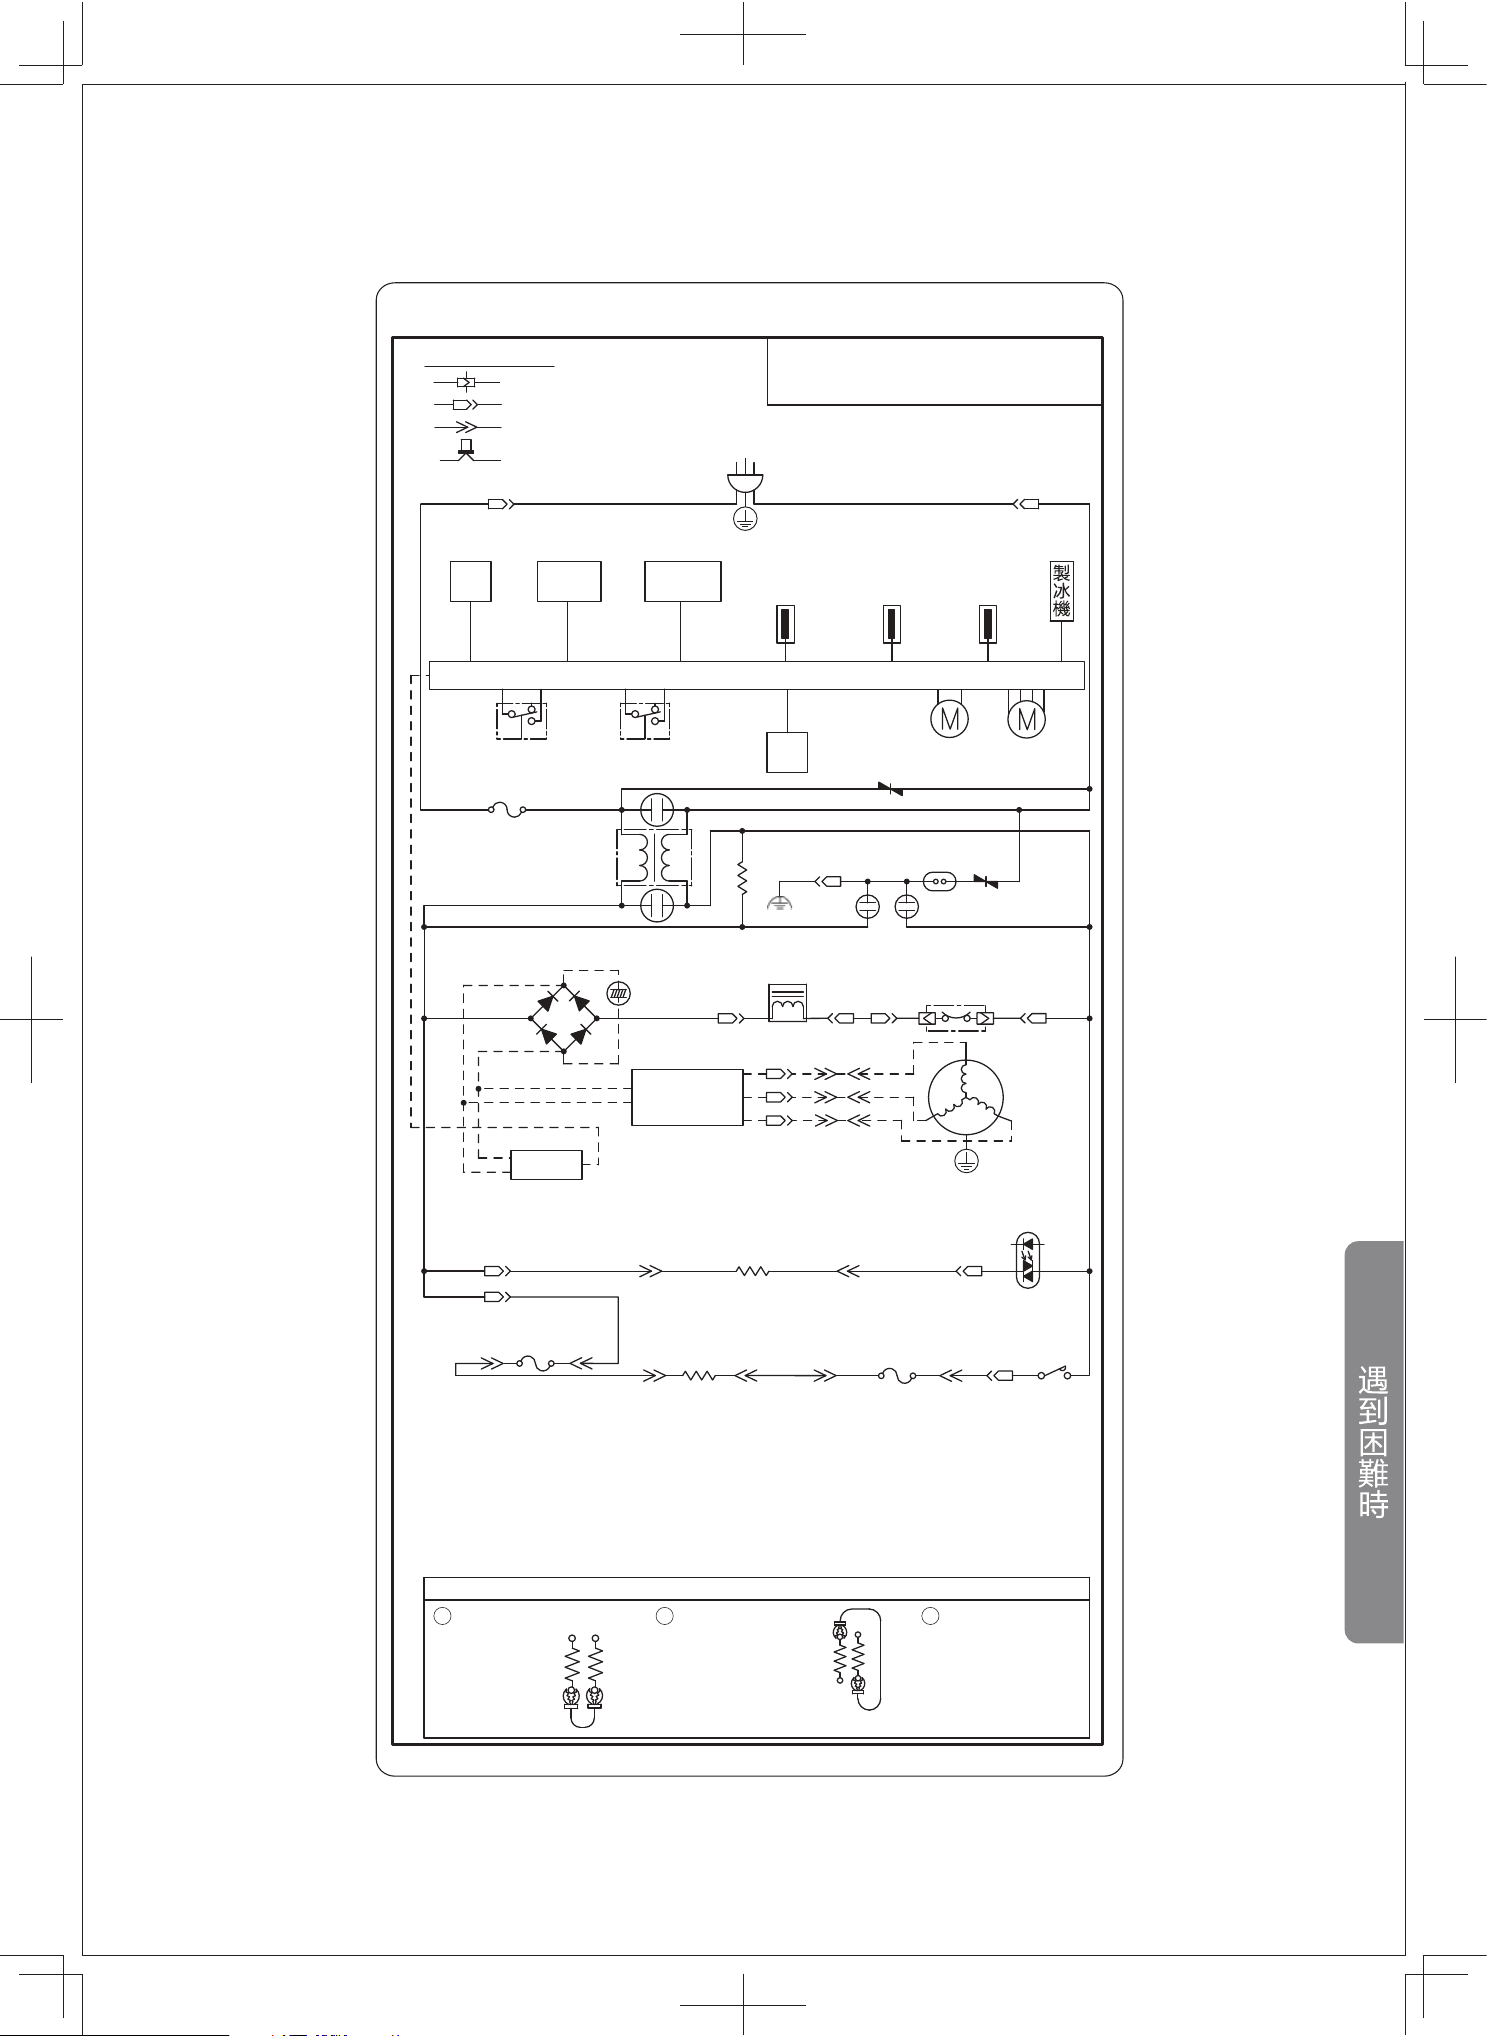
線路圖
等價回路圖
連接端子
基板插接端子
中繼連接端子
末端封閉式
接線端子
電源插頭
接地
操作
基板
門開關
電流保險絲
(250V~ 6.3A)
門開關
風門
馬達
給水
馬達
F風扇
馬達
壓敏電阻
壓敏電阻
綠
黑
黑
黑
桃
紫
白
白
藍
紅
棕
白
紅
棕
黃
電感器
壓縮機過
熱保護器
變頻壓縮機
接地
變頻回路
DC電源
給水口加熱器
(12kΩ)
除霜加熱器
(372Ω)
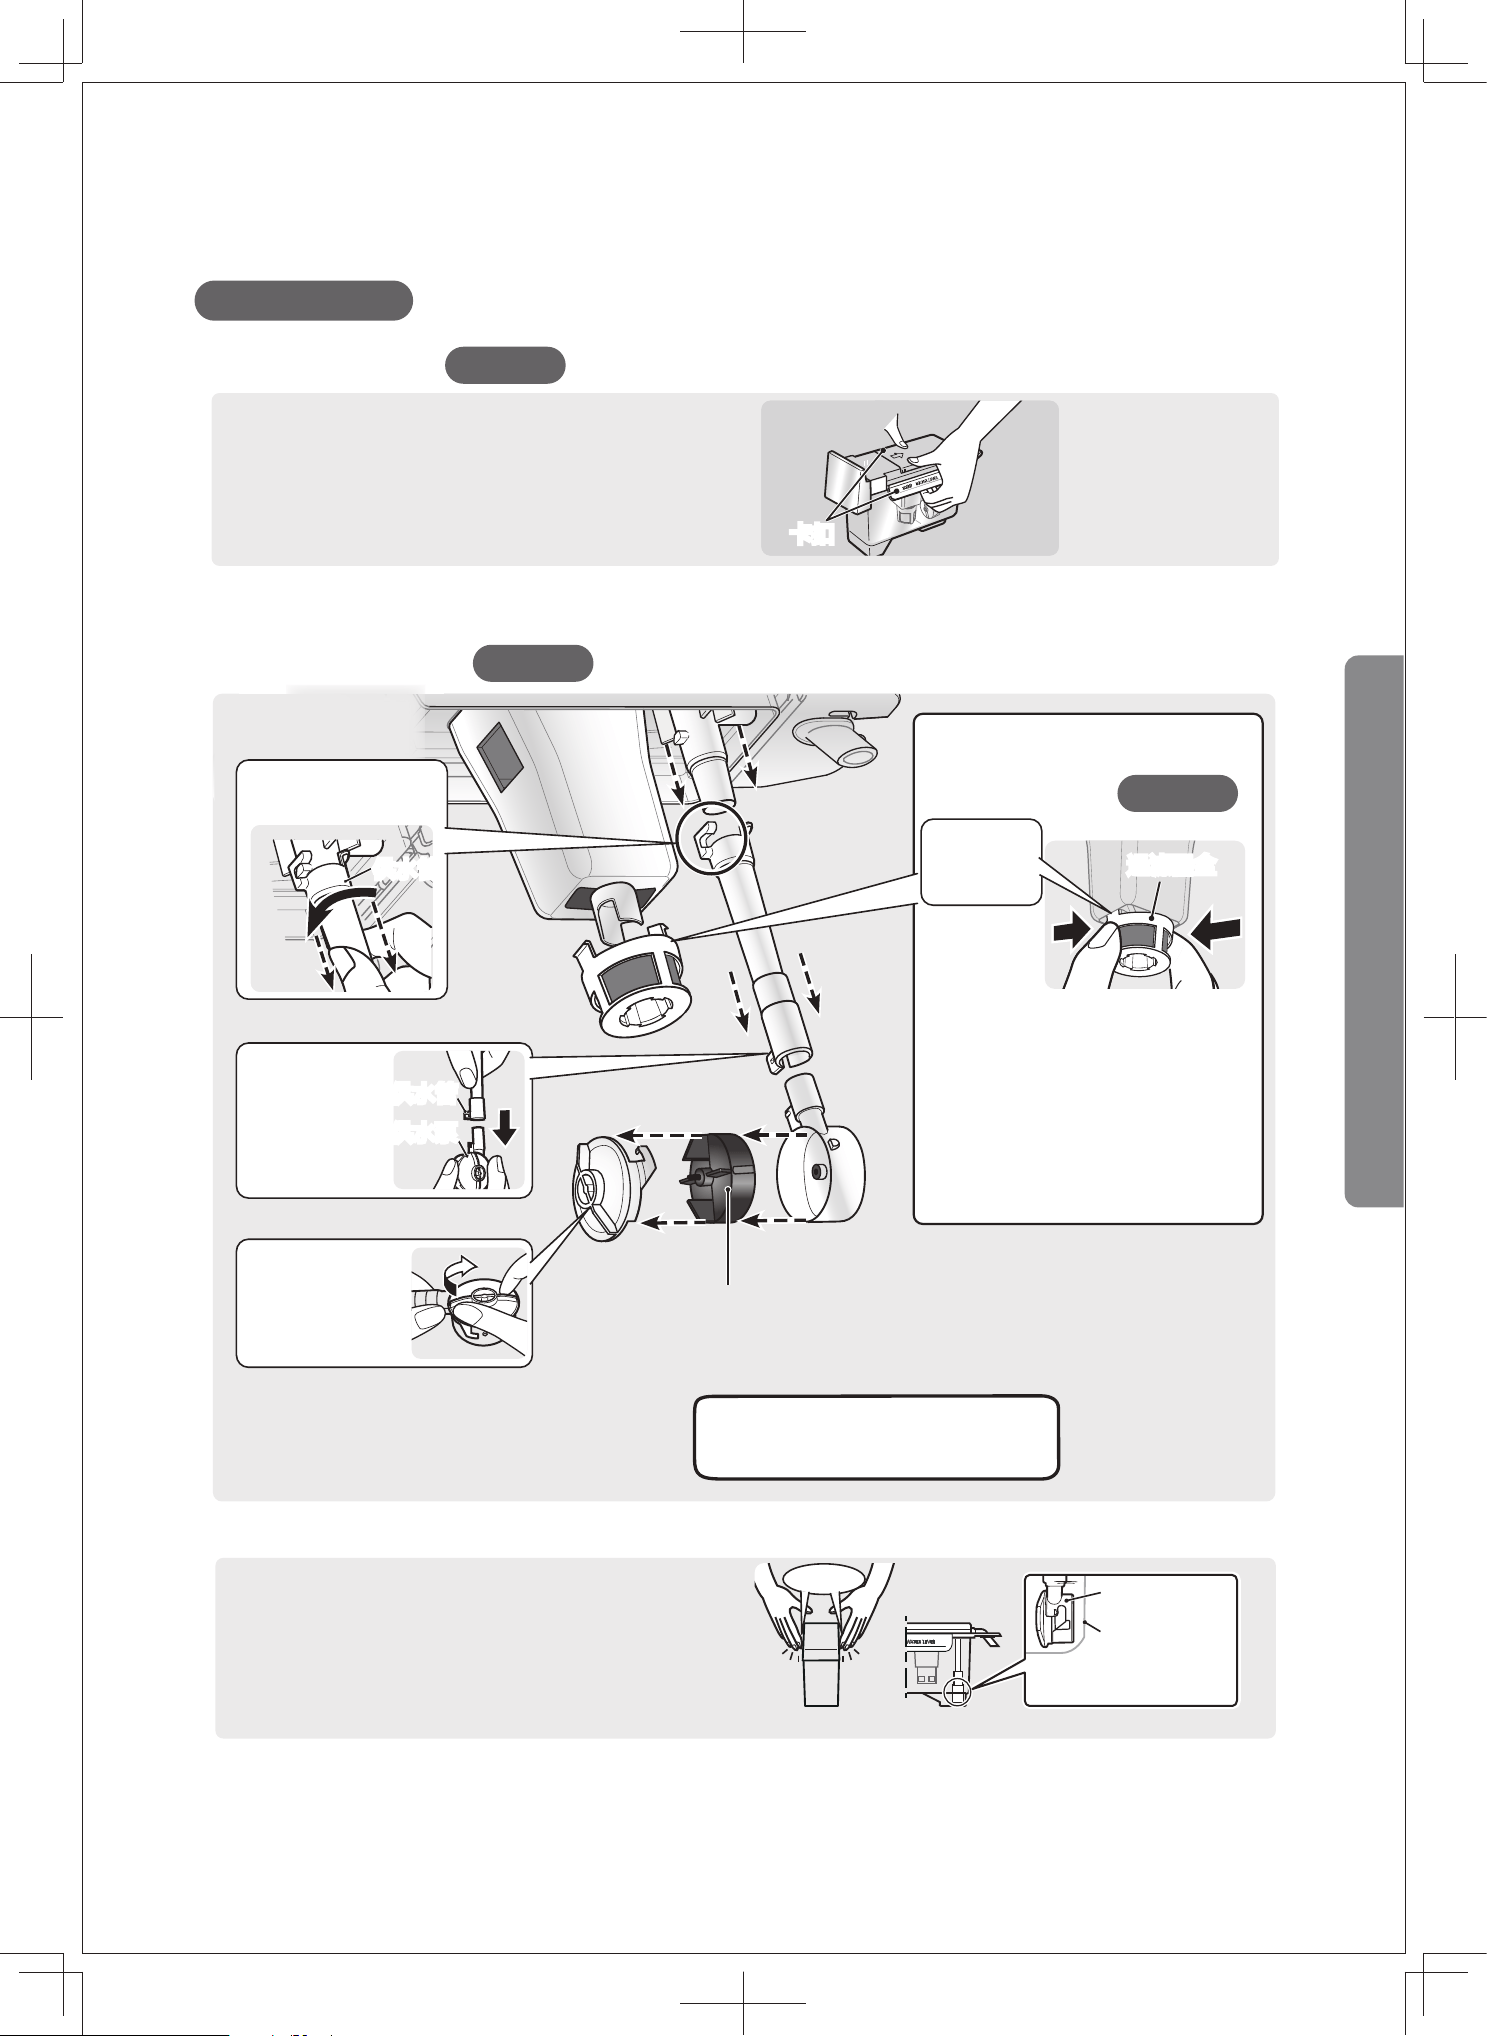
強制除霜的方法
將控制基板
的R78下側
和R74下側
短路,進入
除霜模式。
接 著 將 R 7 8 上 側
R74和下側短路,
短縮計時,約20秒
內對除霜加熱器進
行通電。
()裡的加熱器電阻值是電路檢查時使用的近似值。
(但是,當除霜感測器的溫度高於恢復溫度時,將不進行對除霜加熱器通電。)
確認除霜後,卸載
短路配線,拔掉電
源插頭後再次插入
電源插頭。
溫度保險絲
(76℃或77℃)
溫度保險絲
(76℃或77℃)
電源基板
蜂鳴器
基板
天井照
明LED
冷凍室
傳感器
冷藏室
傳感器
除霜傳感器
220-240V~/50Hz
無霜冷藏冷凍箱線路圖
GR-RM469WE-PGA(B3)-1
34
220-240V~
規格
項目 技術數據
型號
冷凍室星級
總容量
冷藏室容量
冷凍室容量
蔬果室容量(冷卻室)
額定電壓
額定頻率
冷凍能力
製冰能力
額定電流
照明燈輸入功率
能源效率等級
噪音值
製冷劑
外形尺寸(闊X深X高)
● 不包括把手、調整腳,最大推入深度:665mm
此雪櫃的冷凍室星級為 。
關於冷凍室
此雪櫃為自動除霜,不需要進行手動除霜。
警告:除了製造商推薦的方式外,不得使
用機械設備或其他方式加速除霜過程。
關於自動除霜
344L
201L
68L
75L
50Hz
6.0kg/24h
1.2kg/24h
0.85A
2.0W
1 級
39dB(A)
R600a
600mmX673mmX1757mm
(
(
)
)
35
t d-min
t d-max
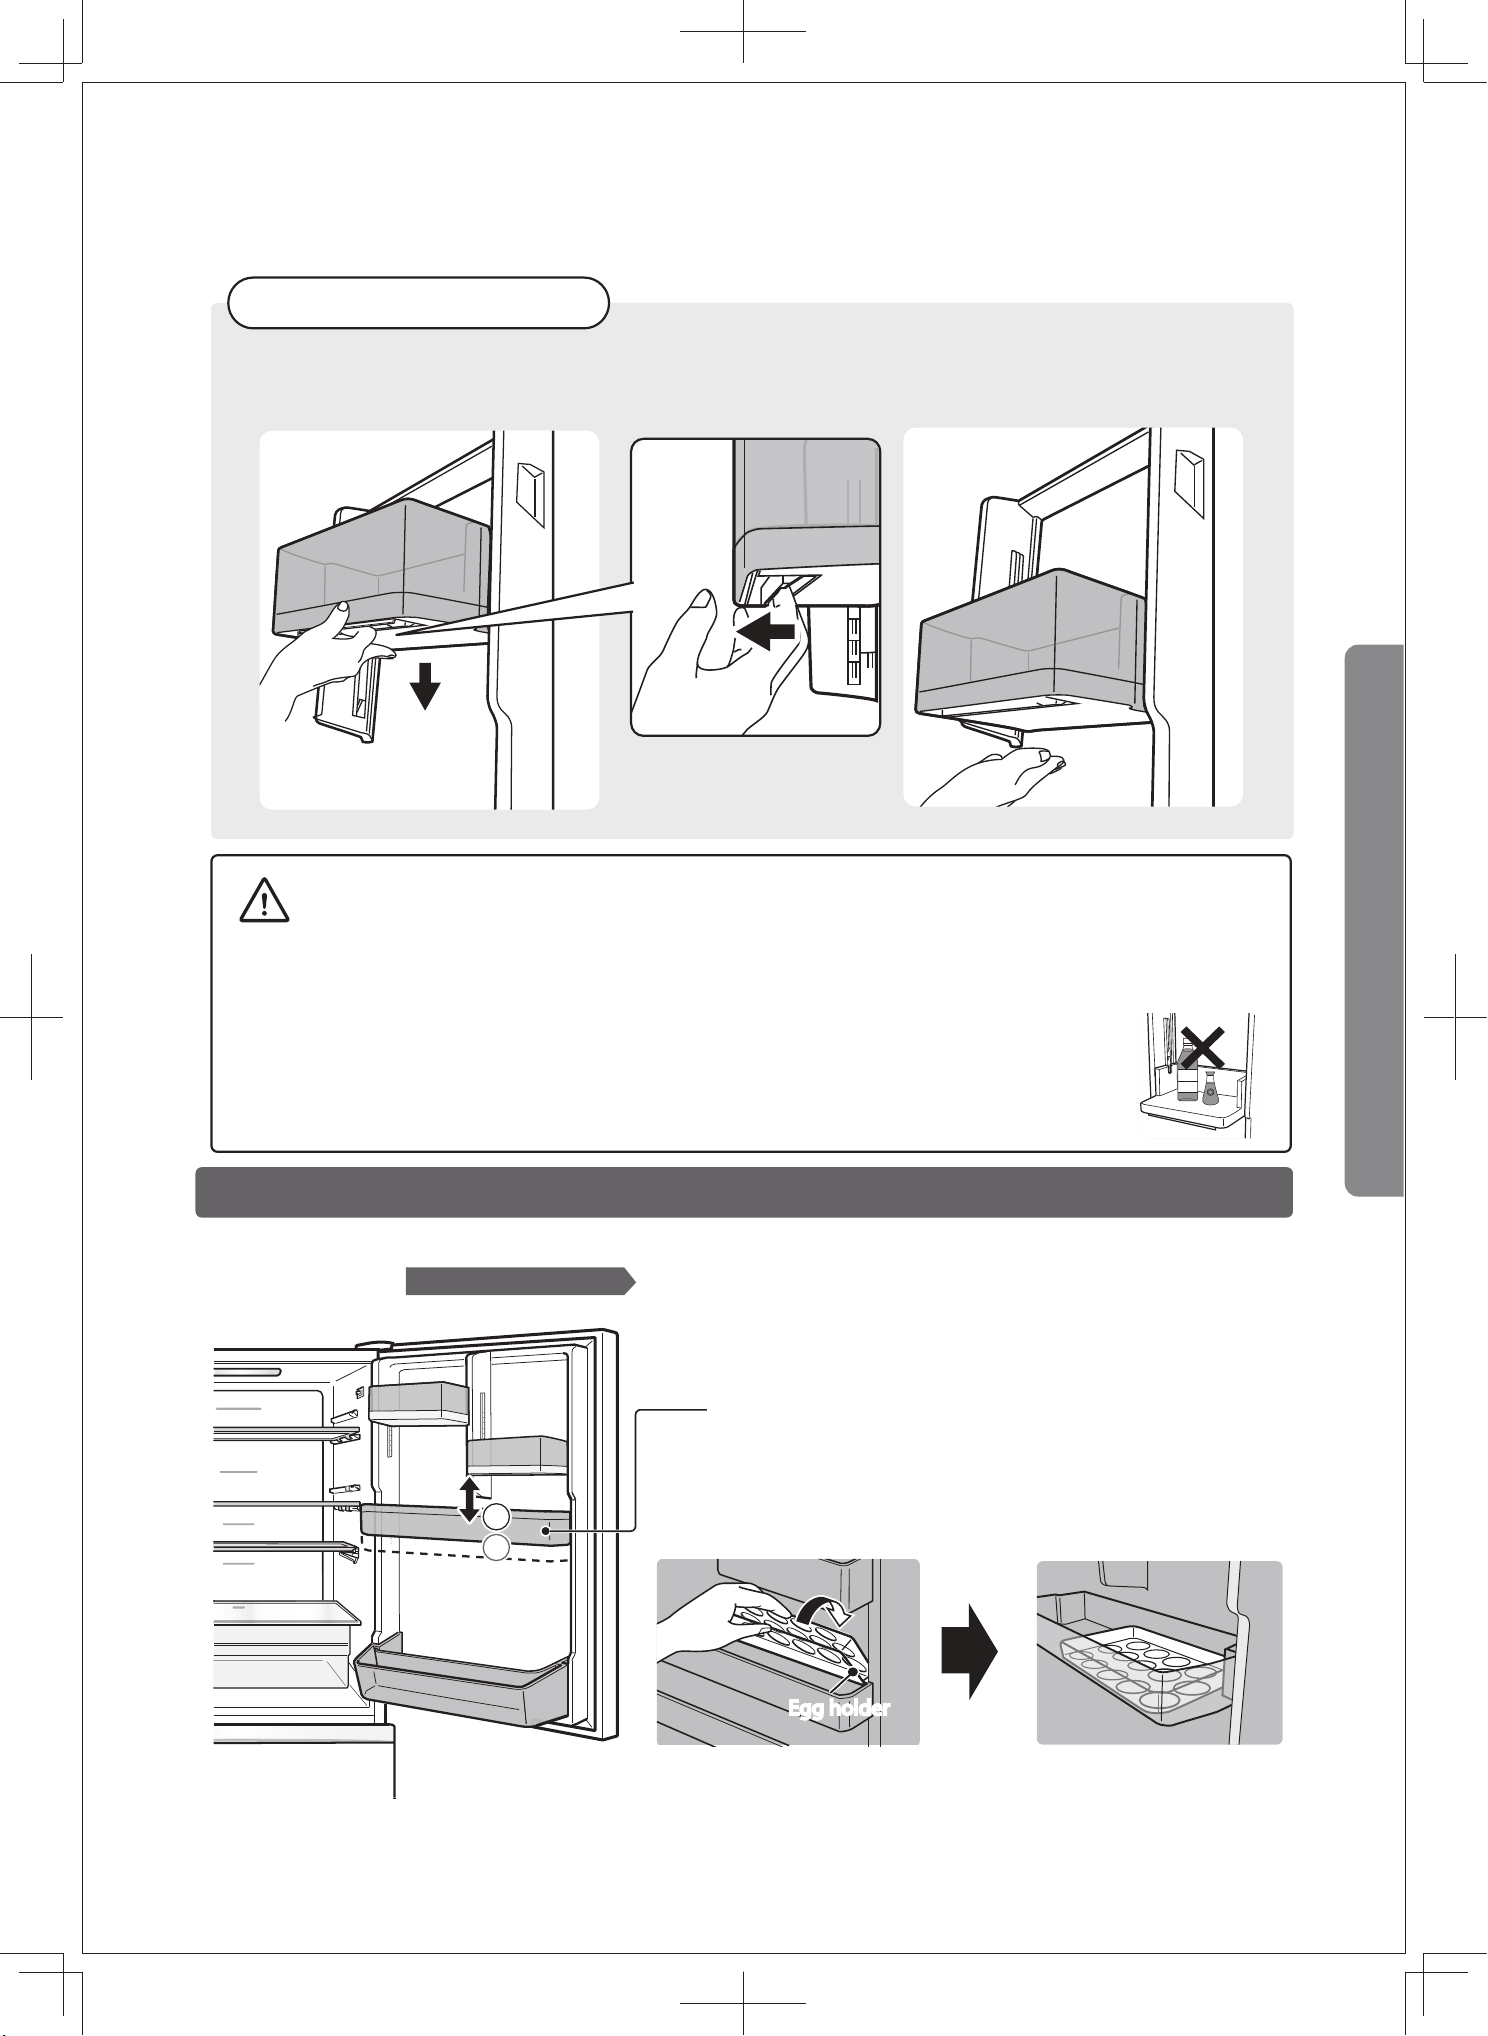
附件
化霜間隔宣稱
活動層架 .............................. 2
二段活動層架 ....................... 1
速凍冰鮮盒 ........................... 1
速凍冰鮮盒頂板 .................... 1
供水箱 ................................. 1
活動置物架 ........................... 2
門上置物架 ........................... 1
雙瓶置物架 ........................... 1
蛋架 .................................... 1
蔬果室滑動盒 ....................... 1
蔬果容器 .............................. 1
冷凍室上層滑動盒 ................. 1
冷凍室下層滑動盒 ................. 1
冰勺 .................................... 1
接水盒 ................................. 1
冷凍貯存容器 ....................... 1
前面裝飾板 ........................... 1
環溫 時間 特定條件
化霜間隔
售後服務聯絡方式
服務熱線:2635 9222
規格如有變更,恕不另行通知。
本用戶手冊上的圖案均為示意圖,實際配件及結構以產品為準。
10h
32˚C
96h
最小化霜間隔
最大化霜間隔
過度使用,冷凍室無法達到設定溫度
無開關門動作,未設定特殊模式


GR-RM469WE-PGA(B3)-1
USER
MANUAL
REFRIGERATOR FREEZER
For Home Use Only
ENGLISH
Safety information
Before the installation and use of the appliance,
carefully read the supplied instructions. The
manufacturer is not responsible if an incorrect
installation or use causes injuries or damages.
Always keep the instructions with the appliance
for future reference.
WARNING:
Risk of fire / Flammable materials
•
•
•
This appliance incorporates an earth connection
for functional purposes.
If the supply cord is damaged, it must be replaced
by the manufacturer, its service agent or similarly
qualified persons in order to avoid a hazard.
•
•
WARNING:
the appliance enclosure or in the built-in
structure, clear of obstruction.
•
•
WARNING:
Do not use electrical appliances
inside the food storage compartments of the
appliance, unless they are of the type recommended
by the manufacturer.
Do not store explosive substances such as aerosol
cans with a flammable propellant in this appliance.
•
WARNING:
When positioning the appliance,
ensure the supply cord is not trapped or damaged.
•
•
WARNING:
Do not locate multiple portable
socket-outlets or portable power supplies at the
rear of the appliance.
This appliance is not intended for use by persons
•
•
The refrigerant of the appliance is flammable,
(including children) with reduced physical,
sensory or mental capabilities, or lack of
experience and knowledge, unless they have
beengiven supervision or instruction concerning
useof the appliance by a person responsible for
their safety.
Children should be supervised to ensure that
they do not play with the appliance.
WARNING:
:
Fill with potable water only.
WARNING
To avoid a hazard due to instability
•
WARNING:
Do not use mechanical
devices or other means to accelerate the
defrosting process, other than those
recommended by the manufacturer.
Keep ventilation openings, in
•
•
This appliance is intended to be used in household
and similar applications such as:
——staff kitchen areas in shops, offices and other
working environments;
——farm houses and by clients in hotels, motels
and other residential type environments;
——bed and breakfast type environments;
——catering and similar non-retail applications.
Class
Extended Temperate
Symbol
SN
N
ST
T
Ambient Temperature
IEC 62552
(ISO 15502)
+10 to +32
+16 to +32
+16 to +38
+16 to +43
ISO 8561
+10 to +32
+16 to +32
+18 to +38
+18 to +43
range
(℃)
of the appliance, it must be fixed in accordance with
The refrigerator is designed to operate normally
in the temperature range specified by its class
rating.
Temperate
Subtropical
Tropical
02
the instructions.
Disconnect the mains plug from the mains socket
before carrying out care, maintenance, installation
and repair work on the product.
Any replacement or maintenance of the LED lamps
is intended to be made by the manufacturer, its
service agent or similar qualified person.
If the refrigerator operates outside the climate
class (ambient temperaturerange) for which it
is rated then it may not be able to maintain
satisfactory internal temperatures.
please be care not to damage the cooling
pipes during installation and transportation.
If gas leakage happens, please contact the
distributor or local service agent, and the
following precautions should be always taken:
Open the windows for ensuring good ventilation.
No fire around and please do not use other
electric appliance.
When the refrigerator is scraped, it shall be kept
away from any fire source and be recovered by a
special recovering company with corresponding
qualification other than be disposed by
combustion, so as to prevent damage to the
environment or any other harm.
Please do not allow children to climb
the refrigerator to prevent tipping,
component detachment, or accidental
entrapment, which could cause injury.
A B C C1 D E
Width
600 6731757 607.5 1005 1072
Overall
Height
Depth
Depth Only
Cabinet
Depth doors
open 145°
Width doors
open 145°
145°
03
Space requirement diagram (when the door is open and when the door is closed)
Notice: All dimensions in mm
A
E
C
B
C1
D
The top space of the refrigerator shall be greater than 100mm, the side space of the refrigerator shall be
greater than 50mm, and the refrigerator should be placed against a wall with a free distance more than
50mm to facilitate heat dissipation.
100mm
50mm
50mm
?
?
Questions Often Asked By Customers
Use method of the
operation panel
Why can't the door
close tightly?
Storage Location And
Temperature For Foods
Why does it not cool?
Pages 10 ~ 11
Beep
Pages 09, 30
The temperature values in the figure are measured when the ambient temperature is 32°C, the temperature
adjustment grade is
「
Power on the refrigerator and wait for 3 ~ 4 hours. After it starts
to cool, put in the food.
About 2 ~ 6°C
Please refer to page 12.
Refrigerating chamber (in the
refrigerator)
Quick-cooling
fresh-keeping box
Ice-making box
(Automatic ice maker)
Freezing chamber
Refrigerating chamber (door shelf)
Egg holder
Cooked foods, refrigerated small
items, condiments, etc.
Meat, fish, dairy products,
processed foods, foods that
are easy to ferment or rot, etc.
● Quick micro-freezing and
unfreezing are carried out in
quick-cold fresh boxes.
● Quick freezing is carried out in the
freezing chamber.
Condiments, canned foods, hose condiments, milk, beer,
fruit juices, etc.
Eggs,
refrigerated small items,
etc.
Makes ice
automatically.
Vegetables, fruits, etc.
Vegetables, fruits, bottles, etc.
Frozen foods, ice cream, etc.
About 3 ~ 8°C
Please refer to pages 14 ~ 15.
About 0 ~ 2°C
Please refer to page 12.
Please refer to pages 17 ~ 18.
Please refer to page 16.
About -19 ~ -21°C
Fruit and vegetable chamber
Sliding box of the fruit and vegetable
chamber
Fruit and vegetable container
Please refer to page 16.
Please refer to page 15.
About 2 ~ 10°C
Page 28
Medium」
, no food is put in, the refrigerator door is closed, and the temperature is stable.
04

Contents
Dear User:
• Thank you for purchasing Toshiba products.
• In order for you to use this product correctly, please read this manual carefully
before installation and use, and keep it properly for future reference.
• The Toshiba products you use need to be cleaned and maintained regularly. If
it is not properly cleaned and maintained, its failure rate will increase and the
applicable life will be greatly reduced.
• Please contact Toshiba's local service outlets regularly or directly with our
company every year. Our company will assign professionals to provide you
with paid inspection and maintenance services.
1. Precautions and Safety Measures ...................................................... 06
2. Installation Method ........................................................................... 08
3. Functions of the Operation Panel...................................................... 10
4. Refrigerating Chamber....................................................................... 12
5. Doors of the Fruit and Vegetable Chamber and the Freezing Chamber.. 16
6. Automatic Ice Maker.......................................................................... 17
7. Quick Freezing................................................................................... 19
8. Cleaning and Maintenance ............................................................... 20
9. Maintenance of Automatic Ice Maker................................................ 24
10. Various Solutions............................................................................. 26
11. Loads of Shelves and Containers..................................................... 26
12. Malfunctions.................................................................................... 27
13. Carrying or Moving House............................................................... 32
14. Circuit Diagram ............................................................................... 33
15. Specifications .................................................................................. 34
16. Accessories ...................................................................................... 35
17. Defrosting Interval........................................................................... 35
05

06
220V ~
Precautions and
Safety Measures
For safety, please make sure to comply
with these items.
Warning
For safe and correct use, please read this manual carefully.
About settings
Abnormal conditions
About power plug/power cord
Description of indicative symbols
Description of graphic symbols
To avoid injuries or property losses to users or others, and to let users use this product more safely and correctly, this manual contains important
contents about safe use. Please fully understand the following contents (indicative symbols and graphic symbols), then read the text, and comply
with the recorded items.
Indicates that death or serious injuries
may be caused in case of misoperation.
Prohibition
Prohibition
No moisture
Be sure to
connect the
ground wire
No wet hands
Compulsory
Compulsory
Compulsory
Compulsory
Compulsory
Condenser
pipes
(refrigerant
circuit)
Indicates that minor injuries or item
damage may be caused in case of
misoperation.
Indicate the specific prohibited content in the graphic
symbol, or explain that with pictures or words near the
graphic symbol.
Indicate the specific compulsory content in the graphic
symbol, or explain that with pictures or words near the
graphic symbol.
Indicate the specific precautions in the graphic symbol,
or explain that with pictures or words near the graphic
symbol.
Please call the service hotline for the repair of power plug and
power cord.
"To avoid danger, if the supply cord is damaged, it must be replaced by the
manufacturer, its maintenance department, and relevant professionals."
Note
Warning
* Serious injuries refer to personal injuries such as blindness,
burn, scald, frostbite (high temperature, low temperature),
electric shock, fracture, and poisoning, which leave sequelae
and require people to be hospitalized or go to the hospital for
long-term treatment.
* Minor injuries refer to burn, electric shock, and other injuries
that do not require people to be hospitalized or go to the
hospital for long-term treatment.
* Item damage refers to the long-term injury to family property,
raised animals or pets.
● Warning: The refrigeration circuit must not be damaged.
If the refrigeration circuit is damaged, the refrigerant may
leak, causing fire and explosion.
If the refrigeration circuit is damaged,
please do not touch the refrigerator. Deal
with it according to the following relevant
matters and contact the dealer or call
service hotline.
1. Open the windows to replace the
indoor air. (please do not use the
exhaust fan)
2. Please do not use open fire or
electrical appliances.
● Do not place the refrigerator in humid or splashy
areas, as this may cause a fire or electric shock.
● When pulling out the power plug
from the socket, please hold the
plug and pull it out.
● Please use an independent 220V
AC socket.
● Make sure that the power plug is
fully plugged into the socket while
keeping the cord under the plug.
● Remove dust from the power
plug regularly.
● When the refrigerator is maintained or not
used for a long time, please pull out the
power plug from the socket.
● Do not pull out or insert the power
plug with wet hands.
● Do not use the damaged power cord and power
plug, and do not use the power plug that cannot be
tightly plugged into a socket.
● Do not allow power plugs and power cords to be
damaged, bound, bent, pressed with heavy objects
or squeezed with the back of the refrigerator.
● When flammable gases (liquefied petroleum gas,
natural gas, etc.) leak, do not touch the refrigerator or
the power plug. You should ventilate the room first.
Otherwise, sparks at the connection points of electrical
appliances may cause fire and explosion, resulting in
injuries and burns.
● Warning: There should be no obstruction
around the appliance or inside the built-in
structure, and the ventilation should be
smooth.
The refrigerant may linger in the air after
leakage, resulting in fire and explosion.
● When using the refrigerator in places with heavy humidity
or moisture, please install ground wires and anti-leakage
devices.
Otherwise, fire or electric shock may be caused in case of
electric leakage.
● When the refrigerator operates abnormally or
malfunctions, please pull out the power plug and
stop using the refrigerator.
Otherwise, fire, electric shock, injury, and burns may
be caused. If the refrigerator needs to be repaired,
please contact the dealer or call the service hotline.
Please refer to page 08.

07
Warning Note
About the use
About the use
Notes for opening and closing the refrigerator door
Notes for carrying and moving the refrigerator
When the refrigerator is scrapped
● Do not store explosives in appliances, such as
combustion-supporting sprays.
● Do not use flammable sprays nearby.
Otherwise, fire may be caused.
● Please do not let foods go beyond the shelf.
● Do not place bottles that cannot reach the bottom in
the front row of the double bottle shelf.
Otherwise, bottles may fall off and get damaged.
● Do not put bottles in the freezing chamber.
Otherwise, bottles may freeze to crack and get
damaged.
● Do not touch foods and containers
(metal parts) in the freezing chamber
with wet hands.
Otherwise, frostbite may be caused
due to the low temperature.
● Do not put your hands or feet into the
bottom of the refrigerator. Otherwise,
injuries may be caused due to iron
plates.
● Both hands should be used to take out and place the
glass shelf and the top plate of the fresh-keeping
box. Otherwise, they may shatter after falling,
resulting in injuries.
● Please do not slam the refrigerator door.
Otherwise, falling food may cause injuries.
● Do not open and close the door of the
fruit and vegetable chamber while
grasping the door handle of the
refrigerating chamber.
● Do not put your fingers into the side of
the door of the refrigerating chamber.
● Do not place your feet near the door
of the freezing chamber. Otherwise,
your feet may be clamped by the gap
of the door, resulting in injuries.
● When closing the refrigerator door, hold
the handle firmly. Fingers may be
clamped if you grasp the top of the
handle.
● Please make sure that your fingers will not
be clamped by the refrigerator door,
when you open or close the door or other
people are in contact with the refrigerator.
Injuries may be caused.
● Do not use the casters under the
refrigerator on an easily damaged floor.
Otherwise, the floor may be damaged.
Please put a protective board on the
floor before moving the refrigerator.
● Please use the carrying handles on the underside of
the front and on the back to carry the refrigerator.
Otherwise, injuries may be caused due to hand
slipping.
● Install the refrigerator on a steady and firm floor.
The refrigerator installed in an unstable floor is
easy to overturn, resulting in injuries.
● Do not put pharmaceuticals or academic samples in
the refrigerator.
Household refrigerators cannot store items that have
strict requirements for temperature management.
● Do not eat the foods that become smelly or change
colors. Otherwise, you may get food poisoning or get
sick.
● Do not place items on the top of the
refrigerator.
Falling items can cause injuries. If a container
containing liquid is placed, the spilled liquid
may affect the effect of electrical insulation,
resulting in fire and electric shock.
● Warning: Do not use electrical appliances in the food
storage room of the appliance except for the type
recommended by the manufacturer.
When the refrigerant leaks, fire and explosion may be
caused.
● Do not collide with the glass door and glass shelf.
Cracks and nicks may occur and cause injuries. When
cracks or nicks occur, please do not touch them and
contact the dealer or call the service hotline immediately.
● Do not touch the ice making part of
the automatic ice maker with your
hands (upper side of the ice-making
box). Otherwise, the rotating ice
tray may cause injuries.
● Do not flush the inside and outside of the
refrigerator.
Otherwise, electrical insulation may be reduced,
resulting in a fire or electric shock.
● When the refrigerator is scrapped, please deliver it to
the dealer or professional scrapping organization.
If the refrigerator is scrapped randomly, the refrigerant
and foamed layer materials may accidentally contact
the fire source and cause fire or explosion.
● When the refrigerator is scrapped, please
remove the door seal.
Otherwise, accidents may occur if
children are locked inside.
● Do not disassemble, modify, or
repair the refrigerator by yourself.
● Do not open the back cover of the
refrigerator. Otherwise, fire, electric
shock, injury, and burns may be
caused. In addition, if the
refrigeration circuit is damaged, fire
and explosion may be caused. If the
refrigerator needs to be repaired,
please contact the dealer or call the
service hotline.
● Do not hang or sit on the door.
Otherwise, the refrigerator may overturn, the door
may fall off, or your hands may be clamped.
Prohibition
Prohibition
Prohibition
Prohibition
Compulsory
Compulsory
Compulsory
Compulsory
No wet hands
No touching
No touching
No flushing
No
disassembling
Before Use
08
1
2
90°
Installation Method
Installation Fixing
More than
100mm away
from the ceiling
More than 50mm
away from the
left and right
objects
More than 50mm
away from the
wall
Methods to select an installation site
Select the place that is far away from the heat source and direct
sunlight
● Avoid the reduction of cooling capacity, saving electricity. Select
the place that is
flat, dry, and well-ventilated
● Otherwise, vibration (noise) and
door descending may be caused.
The floor is carpet, floor,
polyvinyl chloride.
(Avoid the floor deformation caused by
the weight of the refrigerator, and the
discoloration caused by the heat on the
bottom side of the refrigerator).
Adjust the adjustment foot
Install the front decorative panel to
the designated position
When the adjustment foot cannot
be rotated by hand
Maintenance
Please wipe the inside of the refrigerator with a soft wet cloth.
● To facilitate the use, the food storage containers and guide rails in the
refrigerator are coated with lubricants, which comply with the
Japanese food hygiene law.
If the lubricant accidentally touches the parts other than storage
containers or guide rails, please wipe it clean with a soft wet cloth.
There may be a plastic smell in the refrigerator when it is first used.
Please ventilate the room so the odor will dissipate.
There are spaces left.
● Avoid the reduction of cooling capacity, saving electricity.
And vibration sound and wall discoloration can also be avoided.
● Depending on the installation state of the refrigerator, there
may be instances of noise or image distortion in your phone,
walkie-talkie, radio, and television. In this case, keep these
devices as far away from the refrigerator as possible.
● Please rotate the adjustment feet on the left and right sides in
the direction of the arrow until the adjustment foot touches the
ground and the refrigerator no longer shakes.
● Open the door of the freezing
chamber and turn the screw of the
adjustment foot with a screwdriver
or other tools.
Note
Note
Front decorative
panel
Screw hole
If you turn the screw of the
adjustment foot too much, the
screw may fall out of the screw
hole.
If the refrigerator cannot be leveled after you rotate the
adjustment foot, please put a pad under the refrigerator.
The refrigerator should be fixed
horizontally to avoid leaning forward.
Otherwise, the refrigerator door
cannot be completely closed.
Adjustment foot
Quiesce
Place the refrigerator smoothly; after handling or moving the
refrigerator, it needs to be rested for more than 4 ~ 6 hours before it
can be plugged into the power supply.
Before use, remove all packaging, including internal padding, tape,
foam, etc.
09
1
2
3
1
2
Adjustment Plugging in
Remove the front decorative
panel
Please confirm whether the
demo mode is on
Adjust the parallelism of the
door
Grounding method
When the refrigerator is installed in a
place with heavy humidity or moisture
Install the front decorative panel
to the designated position
Rotate the
adjustment
foot on the
right in the
direction of
the arrow.
Please let the food cool
before putting it in the
refrigerator.
Ice making will start after the
refrigerator cools down.
After installing the ground
wire and confirming that the
grounding is normal, plug in
the power plug.
When the adjustment foot cannot be rotated
by hand
To prevent electric shock, grounding measures must
be taken.
Be sure to connect the ground wire
In particular, when the refrigerator is installed in
a place with heavy humidity or moisture, the
anti-leakage device needs to be installed, in
addition to connecting the ground wire.
● Due to the state of the floor
and the weight of the foods,
the refrigerator door will
descend after a few days. At
that time, please adjust the
parallelism of the door again.
● If the refrigerator is in the demo mode, the
refrigeration system will not operate. Please
deactivate the demo mode.
Please refer to page 08.
Please plug the power plug into
the socket
(Please use an independent 220V
AC socket)
Please refer to page 10.
Before Use
10
Functions of the Operation Panel
Temperature adjustment
When the lights on the operation panel are all on (demo mode)
Under general conditions, please adjust to the 「Medium」 grade
(between the high and low level)tw
The temperature adjustment grade for the refrigerating chamber
When in demo mode, the refrigerator does not cool.
Open the door,
(until you hear a beeping sound)
Press and simultaneously for 3 seconds,
▲
When the lights on the operation panel are all off,
the demo mode is deactivated.
When the refrigerator is in the demo mode,
the lights on the operation panel are all on.
High level
Tips
Low level
The operation panel is in the
refrigerating chamber.
● The temperature values in the above table are measured when the ambient temperature is 32°C, the temperature adjustment grade is「Medium」,
no food is put in, the refrigerator door is closed, and the temperature is stable.
● When the temperature of the refrigerating chamber is adjusted, the temperature of the quick-cooling fresh-keeping box and the fruit and
vegetable chamber will also change accordingly.
Please refer to page 11.
2 ~ 3°C lower than 「Medium」.
2 ~ 3°C higher than「Medium」.
About 2 ~ 6°C.
● When the automatic power saving mode is on, the temperature of
「
Medium
」
or
「
When the refrigeration is insufficient, please deactivate the automatic power saving mode.
冰製
冷 凍
模 式
模 式
「Medium」(between the high and low level)
The temperature adjustment grade for the freezing chamber
High level
Low level
4 ~ 5°C lower than 「Medium」.
4 ~ 5°C higher than「Medium」.
About -19 ~ -21°C.
「Medium」(between the high and low level)
High」 is set to be 1 to 2°C higher than that of 「Medium
」
.

11
Automatic power saving
Closing the door
Power saving tips
Close the door of the freezing chamber,
The 「自動省電」 light is off, and the automatic power saving
function is turned off.
Flexible use of automatic power saving function
The light of「自動省電」 is on to start using the auto power saving
function
.
Close the door of the freezing chamber,
Setting method
Deactivating method
When the doors of the refrigerating chamber and the freezing chamber have not been opened or closed for more than 24 hours, the energy saving
mode will automatically switch to 20%.
● Run at a temperature that has no effect on food. (The temperatures in the refrigerating chamber and the freezing chamber are about 1-2°C higher.)
(The temperature values are measured when the ambient temperature is 32°C, the temperature adjustment grade is 「Medium」
, no food is put in,
refrigerator door is closed, and the temperature is stable.)
● When the automatic power saving mode is set to about 20%, it will automatically switch to 10% as long as you open any door of the refrigerating
chamber and the freezing chamber.
● The following situations may change the effect of power saving.
· When quick ice making and quick freezing functions are set
· When the ambient temperature, the frequency of door opening and closing, the temperature adjustment grade, and the amount of food
storage are different
● When the automatic power saving is set, the ice making time may be extended and the ice making times may be reduced.
Door opening time
1 minute, 2 minutes later
3 minutes later
Warning sound
Continuous warning sounds
Tips
● When the door is opened a little bit, you will hear no warning sound. (For example, too much food is stuffed or the food bag is
clamped.)
Tips
* Comparison of general operation and automatic power saving modes. The value measured under the experimental conditions of the
environmental laboratory of our company. Conditions: The ambient temperature is 32°C. The temperatures of the refrigerating chamber and the
freezing chamber are both set to 「Medium」. and there is no door opening and closing action, while the ice making function is working. The
measured values are different in different use environments.
● Do not let the food be
too crowded.
Overcrowded food
storage can cause poor
circulation of cold air.
● Try to reduce the frequency of opening and
closing doors.
Opening and closing the door too frequently
will cause the leakage of cold air, resulting in
the temperature in the refrigerator to rise.
● Cool food before storage.
Cool the hot food before
storage to prevent the
temperature in the
refrigerator from rising.
Seven warning sounds
The warning sound will stop after you close the door.
When the automatic power saving mode is on, power can be saved by about 10%*.
Press for three seconds (until you hear a beeping sound).
(until you hear a beeping sound).
When any door of the refrigerating chamber and the freezing chamber is opened for more than one minute, you will hear a warning sound (as
shown in the table below).
Press for three seconds
● When the energy saving mode is on, the temperature of「Medium」 or「High」 is set to be 1 to 2°C higher than that of「Medium」.
When the refrigeration is insufficient, please deactivate the automatic power saving mode.
自動省電
快速冷凍
冷 凍
自動省電(按壓 秒)
自動省電
快速冷凍
冷 凍
自動省電(按壓 秒)
Beep
自動省電
快速冷凍
冷 凍
自動省電(按壓 秒)
~
冷 凍
冷 凍
Beep
Beep
Beep
the
Method of Use
12
1
2
1
2
1 2
Refrigerating Chamber
Quick-cooling fresh-keeping box
Indoor
lights
Movable
shelf
Two-stage movable
shelf
Top plate of the
quick-cooling
fresh-keeping box
Quick-cooling
fresh-keeping box
Double bottle
rack
Both hands should be used to take out or place the
heavy glass shelf!
Both hands should be used to take out or
place the heavy glass shelf!
Normal state. Fold the front-part shelf by lifting
its front part and push it inward.
● The movable shelf and door rack can be adjusted in
two layers to suit the height of the food.
● Fold the front-part shelf according to the
size of foods.
● Water-rich foods, eggs, and beverages are easy to freeze in front of the outlet of the cold air. Please
place them in the front part of the shelf. (Carbonated beverages, in particular, may crack after
freezing)
Door rack
Outlet of the
cold air
Movable rack
Movable shelf
Two-stage movable shelf
Please refer to page 15.
Please refer to page 21.
Please refer to page 14.
(disassembly method )
Please refer to page 22.
(disassembly method )
Note
Tips
● The light in the refrigerating chamber will be turned off automatically after the door of the
refrigerating chamber is opened for 10 minutes.
1
1
2
13
Close the refrigerating chamber quick-cooling
fresh-keeping box and press to turn on
the
light.
The light of 「速鮮」 is on
and the quick
micro-freezing starts.
The light of 「解凍」 is on
and the unfreezing starts.
It will end automatically in
about 90 minutes. (「速鮮」
light off)
Close the refrigerating chamber quick-cooling
fresh-keeping box and press to turn on
the unfreezing light.
It is the same as the setting method. Press repeatedly to turn off the corresponding function light.
Tips
● Food that has been quickly frozen or unfrozen can always be placed in a quick-cooling fresh-keeping box.
● Quick micro-freezing, unfreezing, and quick freezing cannot be set at the same time.
Use methods of quick micro-freezing · unfreezing functions
Quick partial freezing
Setting methods of quick micro-freezing function
Setting method of unfreezing function
When stopping halfway
Preparation
Preparation
Unfreeze
Fresh foods such as meat and fish are quickly
refrigerated and not frozen.
● Place the food in a
quick-cooling
fresh-keeping box.
● Place frozen food in a
quick-cooling
fresh-keeping box.
Unfreeze the frozen food such as meat, fish, etc. to a cookable
hardness, and use it when you want to unfreeze quickly.
Tips
● Other foods can be placed together in a quick-cooling fresh-keeping box.
● When food is thick or stacked overlapping, unfreezing cannot be completed within the set time.
● Water-rich food i
s easy to freeze in front of the outlet of the cold air. Please place a little distance apart.
● When there is food juice on the quick-cooling fresh-keeping box, wipe it off immediately.
Note
Settings
Quick partial freezing
Unfreezing function
It will end automatically in
about 90 minutes. (「解凍」
light off)
解凍
速鮮
微 凍
解凍
速鮮
微 凍
「速鮮」
微 凍
微 凍
微 凍
Method of Use
Refrigerating Chamber
…Continued
Base of the movable rack
Movable rack
Handle
Use methods of the movable rack
1 2
Hold the base of the movable rack by
hand and push it up.
Move it to the desired location.
The movable rack on the top layer can be adjusted in
six layers to suit the height of the food.
(disassembly method )
Warning
No disassembling
Do not disassemble,
modify, or repair the
refrigerator by yourself.
Do not hang on the movable rack or the
base of the movable rack.
After the movable rack is
removed, do not place
seasoning or beverage
bottles on the base of the
rack.
Falling seasoning bottles
may cause injuries.
Do not wash the base of
the movable rack with
water.
Please wipe it with a
cloth dipped in water or
a dry cloth.
Prohibition
Prohibition
When installing the
movable rack and its
base, please make sure
that there are no items in
the rack and its base.
Note
No moisture
When the movable rack rises
Compulsory Compulsory
When moving or
disassembling the rack,
please hold it with hands
and operate it gently to
avoid hand clamping.
Otherwise, parts may be
damaged or people may be
injured.
14
Please refer to page 21.
● Do not put in foods or seasonings that are too tall, otherwise the door cannot be closed.
(Otherwise, falling parts may cause injuries)
● When adjusting the height of the movable rack, you will hear a click sound once the
movable rack is installed in place. (Otherwise, falling parts may cause injuries)
● When food and other items are placed on it, please move them gently.
(Otherwise, the falling food may cause injuries)
● After removing the container, do not place seasonings or beverages on the base.
(Otherwise, the falling food may cause injuries)
●
The inverted egg holder can be used as a
container for small items.
1
2
Door rack
Use methods of the door rack · egg holder
1
Pull the handle of the base forward to lower the
movable rack.
The door rack located in the middle can be adjusted in two layers to suit the height of the food.
(disassembly
method )
When the movable rack falls
2
Move it to the desired location and
release the handle.
15
Note
Please refer to page 21.
Egg holder
Method of Use

When the cap cannot be taken
out, you can open the fruit and
vegetable chamber, put your
hand under the fruit and
vegetable container, and push
the cap up with your hand.
※
After cleaning up the garbage, be sure to
reset and lock the cap. Otherwise, the
moisture in the fruit and vegetable
chamber will be lost.
Locking
state
Unlocking
state
Deactivating
Deactivating
Cap of the cleaning opening
It is located at the bottom of the
fruit and vegetable container.
It is convenient to clean the
garbage such as broken leaves in
the container.
Fruit and Vegetable
Chamber
Fruit and
vegetable
container
Stores large and
medium fruits and
vegetables
Sliding box of the fruit
and vegetable chamber
Stores small fruits and vegetables
●
You will not hear the warning sound for closing the door even if
the door of the fruit and vegetable chamber is not completely
closed.
Tips
Tips
Freezing
Chamber
Upper storage limit
State of the gap
Fruit and vegetable chamber
State of the gap
Freezing Chamber
※ For ease of explanation, the representation of the refrigerating chamber door is
●
Do not allow the amount of food stored in the
container or storage box to exceed the upper
storage limit shown in the right picture.
Otherwise, the door will not be completely
closed, resulting in a gap in the door seal. This
may not only reduce refrigeration performance
and cause condensation or frosting, but also
damage parts.
Food that exceeds the upper
storage limit will prevent the door
from being completely closed.
(Gaps are created)
Sliding box on the upper layer
of the freezing chamber
Sliding box on the lower layer
of the freezing chamber
Freezing storage container
(Cleaning opening)
(Cleaning
opening)
Use methods of quick freezing
Doors of the Fruit and Vegetable
Chamber and the Freezing Chamber
16
Please refer to page 11.
Please refer to page 19.
Note
●
The frozen food should not come into direct contact with stored food in the room, and the number
of frozen food should be reduced if it is necessary to freeze food every day.
製冰停止
快速製冰
冰製
製冰停止(按壓 秒)
Beep
音
製冰停止
快速製冰
製 冰
製冰停止(按壓 秒)
Beep
Tips
●
When there is no water in the water tank or the ice
storage box is full, quick ice making cannot be started.
Quick ice making
(Quick ice making)
When not using ice making
(Ice making stop)
When stopping halfway
Deactivating method
It will end automatically in about
eight hours.
(The light of 「快速製冰」 is off.)
The light of 「快速製冰」 is on
and the quick ice making starts.
Press once.
The light of 「快速製冰」 is off with a beeping sound.
Press repeatedly until the light of
「快速製冰」 is off.
▲
▲▲
Start ice making when the light of 「製冰停止」 is
off.
The 「製冰停止」light comes
on and ice making stops.
Close the door of the freezing chamber,
Press for three seconds
(until you hear three short beeps.)
Close the door of the freezing chamber
and press for three seconds.
(until you hear a beeping sound.)
Setting method Setting method
●
When stopping ice making is set, the ice or water remaining in the
ice tray will fall into the ice storage box after ice making is
completed, and then ice making will stop.
Water tank
Handle
Buckle
(for fixing the water tank
cover)
Water supply
outlet cover
Water tank
cover
Water supply
outlet
Water tank
Before ice making
Push the water tank to the water tank position.
If the water tank is not pushed to the specified
position, ice making cannot be started, or the door
cannot be closed.
2
Water supply outlet cover
Water level
Installation direction of
water tank
Open the water supply outlet cover and add water
to the water level position.
If the amount of water added exceeds the water level
position, the water will easily spill out during the
installation of water tank.
1
Move slowly to
avoid water
splashing.
Handle
facing out
Water tank
position
The ice tray has went through the antibacterial treatment.
*
Ice storage box
Ice scoop
Automatic Ice Maker
17
(volume: about 0.9 L)
冰製
冰製
冰製
冰製
Beep
Beep
Method of Use
18
Automatic Ice Maker
…Continued
Detection rod
Please put the
ice scoop back in
place after use.
Flatten ice
cubes
Do not put anything
other than ice cubes
Detection rod
(The ambient temperature is 20°C and the door is
not opened or closed)
●
Ice making
time
·
running states of the refrigerator.
Ordinary ice making
About 2 hours each time
Quick ice making About 1 hour each time
●
Before ice making/the water for ice making
Notes for ice making
Ice making time and ice storage capacity
The ice making time may be extended
in the following situations.
·
Freezing chamber is not fully cooled at the beginning of use
Especially when the automatic power saving is set, or when the ambient temperature is higher in the summer, the
ice making time may even exceed one day.
·
The refrigerator door is opened and closed frequently, or a large amount of food is put in at one time.
·
In winter when the room temperature is too low, or in summer when it's too high.
·
The space around the refrigerator is too narrow.
The ice making continues until the detection rod touches the ice cube.
Notes
●
Ice storage
capacity
continues
About 150
When ice cubes pile up in some areas or the
door of the ice making chamber is not
opened or closed
About 50~100
Some ice cubes piling up in some areas
may hit the detection rod too early,
leading to ice making being stopped
Items other than ice cubes hit the
detection rod.
Items other than ice cubes cause the rolling
ice tray to be hit or stop ice making.
The following situation may prevent the ice from being made even
though there is water in the water tank
The following situation may reduce the
amount of ice made
When the ambient temperature is high, the ice making
time may exceed one day.
●
When using mineral water for ice
making, please use the mineral water
with a hardness value below 100 mg/L.
●
Warning: Only drinking water can be infused.
●
Do not put in hot water above 60°C, or liquids other than clean water such as fruit juice, otherwise, malfunction will be caused.
have germs and scale deposit, which cause the inner wall of the
bucket to be sticky. So, the bucket needs to be cleaned carefully.
·
Do not put anything other than ice cubes in the ice storage box when not making ice.
Otherwise, when the ice making function is enabled again, items may hit the detection rod, resulting in a malfunction or failure to start the
ice-making.
●
Test entrusting organization: Guangdong Detection Center of Microbiology
●
●
Antibacterial method: antibacterial material
●
Antibacterial object: ice tray
●
*
Please refer to page 08.
Detection rod
Ice scoop
Ice scoop
Ice tray

自動省電
快速冷凍
冷 凍
自動省電(按壓 秒)
Preparation
Tips
●
Quick micro-freezing, unfreezing, and quick freezing cannot be set at the same time.
●Please choose the food with good freshness.
●To prevent food from drying, please store food with plastic wrap, airtight container, airtight bag, etc.
●Please use up the food that has been thawed, otherwise, the food will go sour or have a bad taste.
Notes for freezing food
In the freezing chamber.
Freezing Chamber
Sliding box on the upper layer of the freezing chamber
●
Please put the sealed food in the frozen food storage
box of the sliding box on the upper layer in the
freezing chamber.
Settings
1
2
Press once.
Press repeatedly
until the light of 「快速
冷凍」 is off.
The light of 「快速冷凍」 is on and the
quick freezing starts.
The light of 「快速冷凍」
is off with a beeping sound.
When stopping halfway
Setting method
It will end automatically in about 150 minutes. (The light of 「快速冷凍」 is off)
When you open the freezing chamber, the sliding box
on the upper layer is not visible. Please pull out the
sliding box on the upper layer.
Quick Freezing
19
Storage container for frozen
food
Beep
自動省電
快速冷凍
冷 凍
自動省電(按壓 秒)
Beep
~
冷 凍
冷 凍
Method of Use

Guide rail
Protrusion
Quick-cooling fresh-keeping box
1
Pull out the power plug.
2
After cleaning, please check the power cord and power plug
●
If you have any questions, please call the service hotline.
●
detergent with water and wipe it clean with a dry cloth.
Otherwise, it may cause these parts to crack or discolor.
●
Do not apply impact or force to the glass surface or
edges.
Otherwise, the glass may be broken or chipped.
●
Do not use the following items:
If there are stains,
immediately.
Cleaning steps
Inspection after cleaning
●
If there is a stain, wipe it with a dry cloth.
Please wipe it with a soft cloth dipped in
warm water
·
When using kitchen neutral detergent, please
make sure to dilute it before use.
·
the detergent with water and wipe it clean with a dry
cloth.
If the power cord is
damaged, the plug
loosely,
When there is dust,
please wipe it clean
with a dry cloth.
Please clean the invisible areas once or twice a year as
well.
Warning
No disassembling
Do not disassemble, modify, or
repair the refrigerator by yourself.
Please pull out the power plug
when cleaning the refrigerator.
Pull out the plug
Dust
Pull the quick-cooling fresh-keeping box out to the
maximum, lift it up slightly, and take it out.
Disassembly method
Installation Method
Insert the quick-cooling and fresh-keeping box along
the guide rail and push it to the back.
The back of the refrigerator
Pull out the refrigerator to
Clean dirt on the back,
·
·
Water washing
Cleaning and Maintenance
20
Note
Abrasive
powder
detergent
gasoline
Use alkaline detergent or detergent
labeled as mildly alkaline in kitchen
(Otherwise, it may cause damage to
plastic parts, shelves, doors, etc.)
Do not use abrasive powder, laundry
detergent, alcohol (ethanol, methanol,
etc.), gasoline, thinner, acid, alkali, wax,
petroleum, hot water, or brushes
(otherwise, it may cause damage to plastic
parts, glass shelves, glass doors, or paint
surfaces).
Please refer to page 35.
Movable rack
Door seal
Operation
panel
Door rack, double
bottle rack
●
When maintaining or cleaning, the temperature rise
of the frozen food may shorten the shelf life.
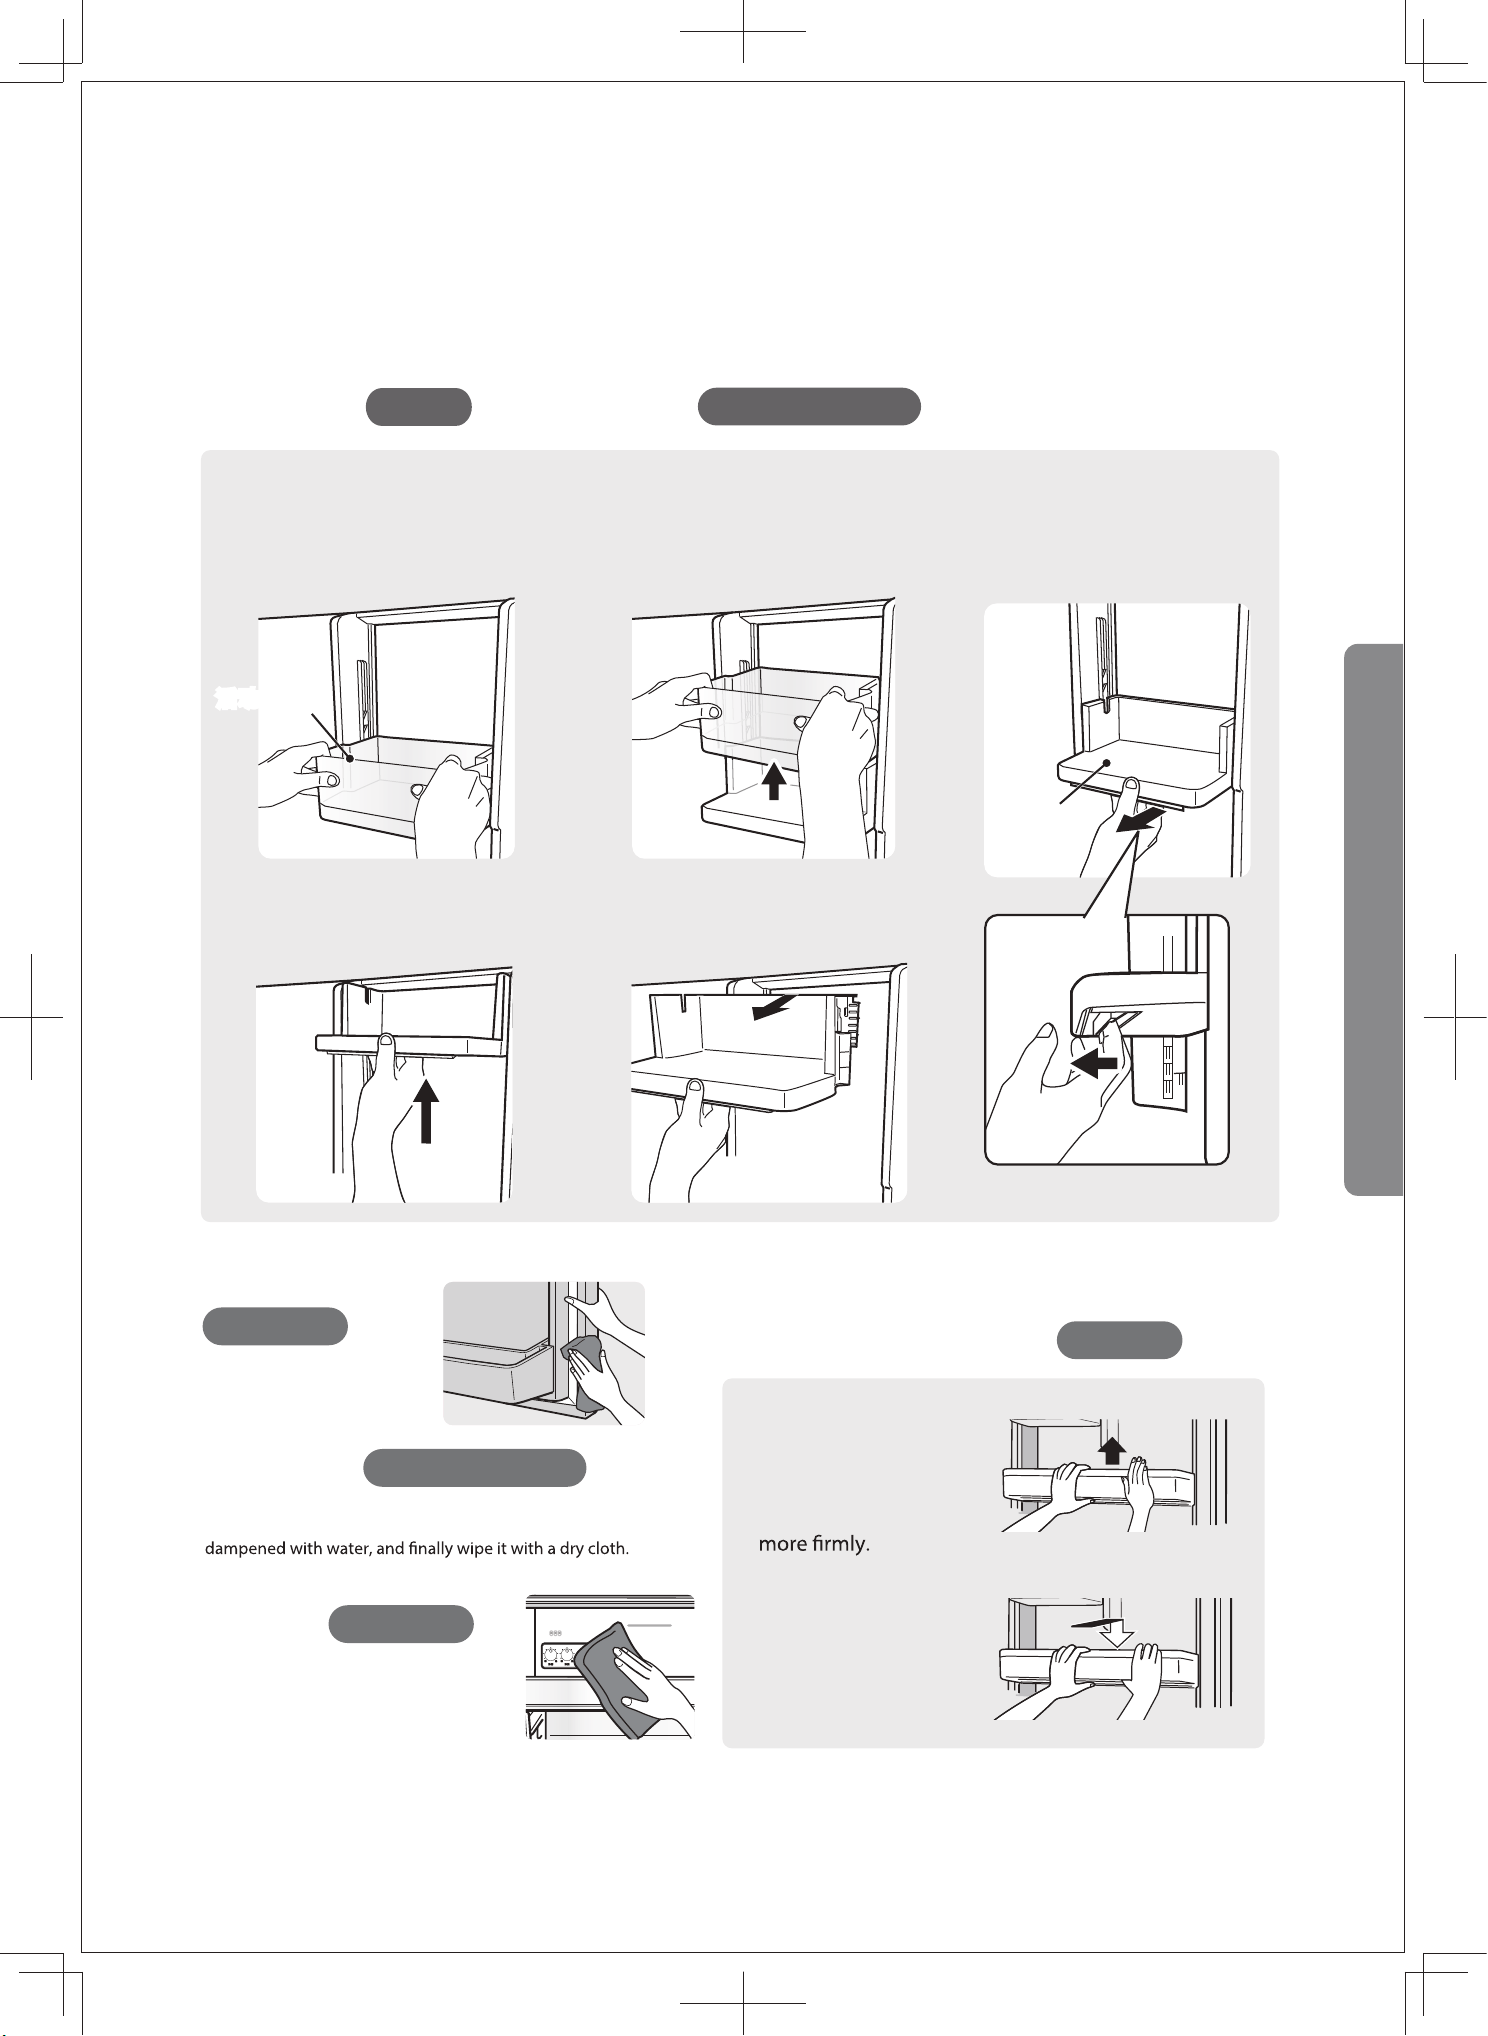
· The installation method is opposite to the disassembly method.
1
4
5
2 3
Grasp the movable rack
with both hands.
Lift the handle and meanwhile
push the base of the movable
rack to the highest position.
Take out the base of the
movable rack.
Grasp the movable rack with
both hands and lift it up.
Lift the handle of the base of
the movable rack.
Door rack, double bottle rack
Water washing
Movable rack
Wiping it with
a wet cloth
Wiping it with a
dry cloth
Door seal
The soiled door seal is easy
to be damaged, resulting in
cold air leakage.
Door surface
Wet cloth or dry cloth
for wiping
If stains persist, wipe with a small amount of diluted neutral
detergent. Then wipe the detergent clean with a cloth
Operation
panel
Please wipe it with a soft dry
cloth.
After wiping, please make
sure whether the set position
has changed.
Wet cloth or dry cloth
for wiping
Disassembly method
Disassembly method
Movable rack
Base of the
movable rack
Push the rack repeatedly
from below to take it out.
The rack is installed
Installation method
Put the rack horizontally
and press it down.
Water
washing
Washing the base of the movable
rack may cause malfunction.
·
·
Movable rackMovable rack
Base of the
movable
rack
21
Cleaning and Maintenance
…Continued
·
Method of Use
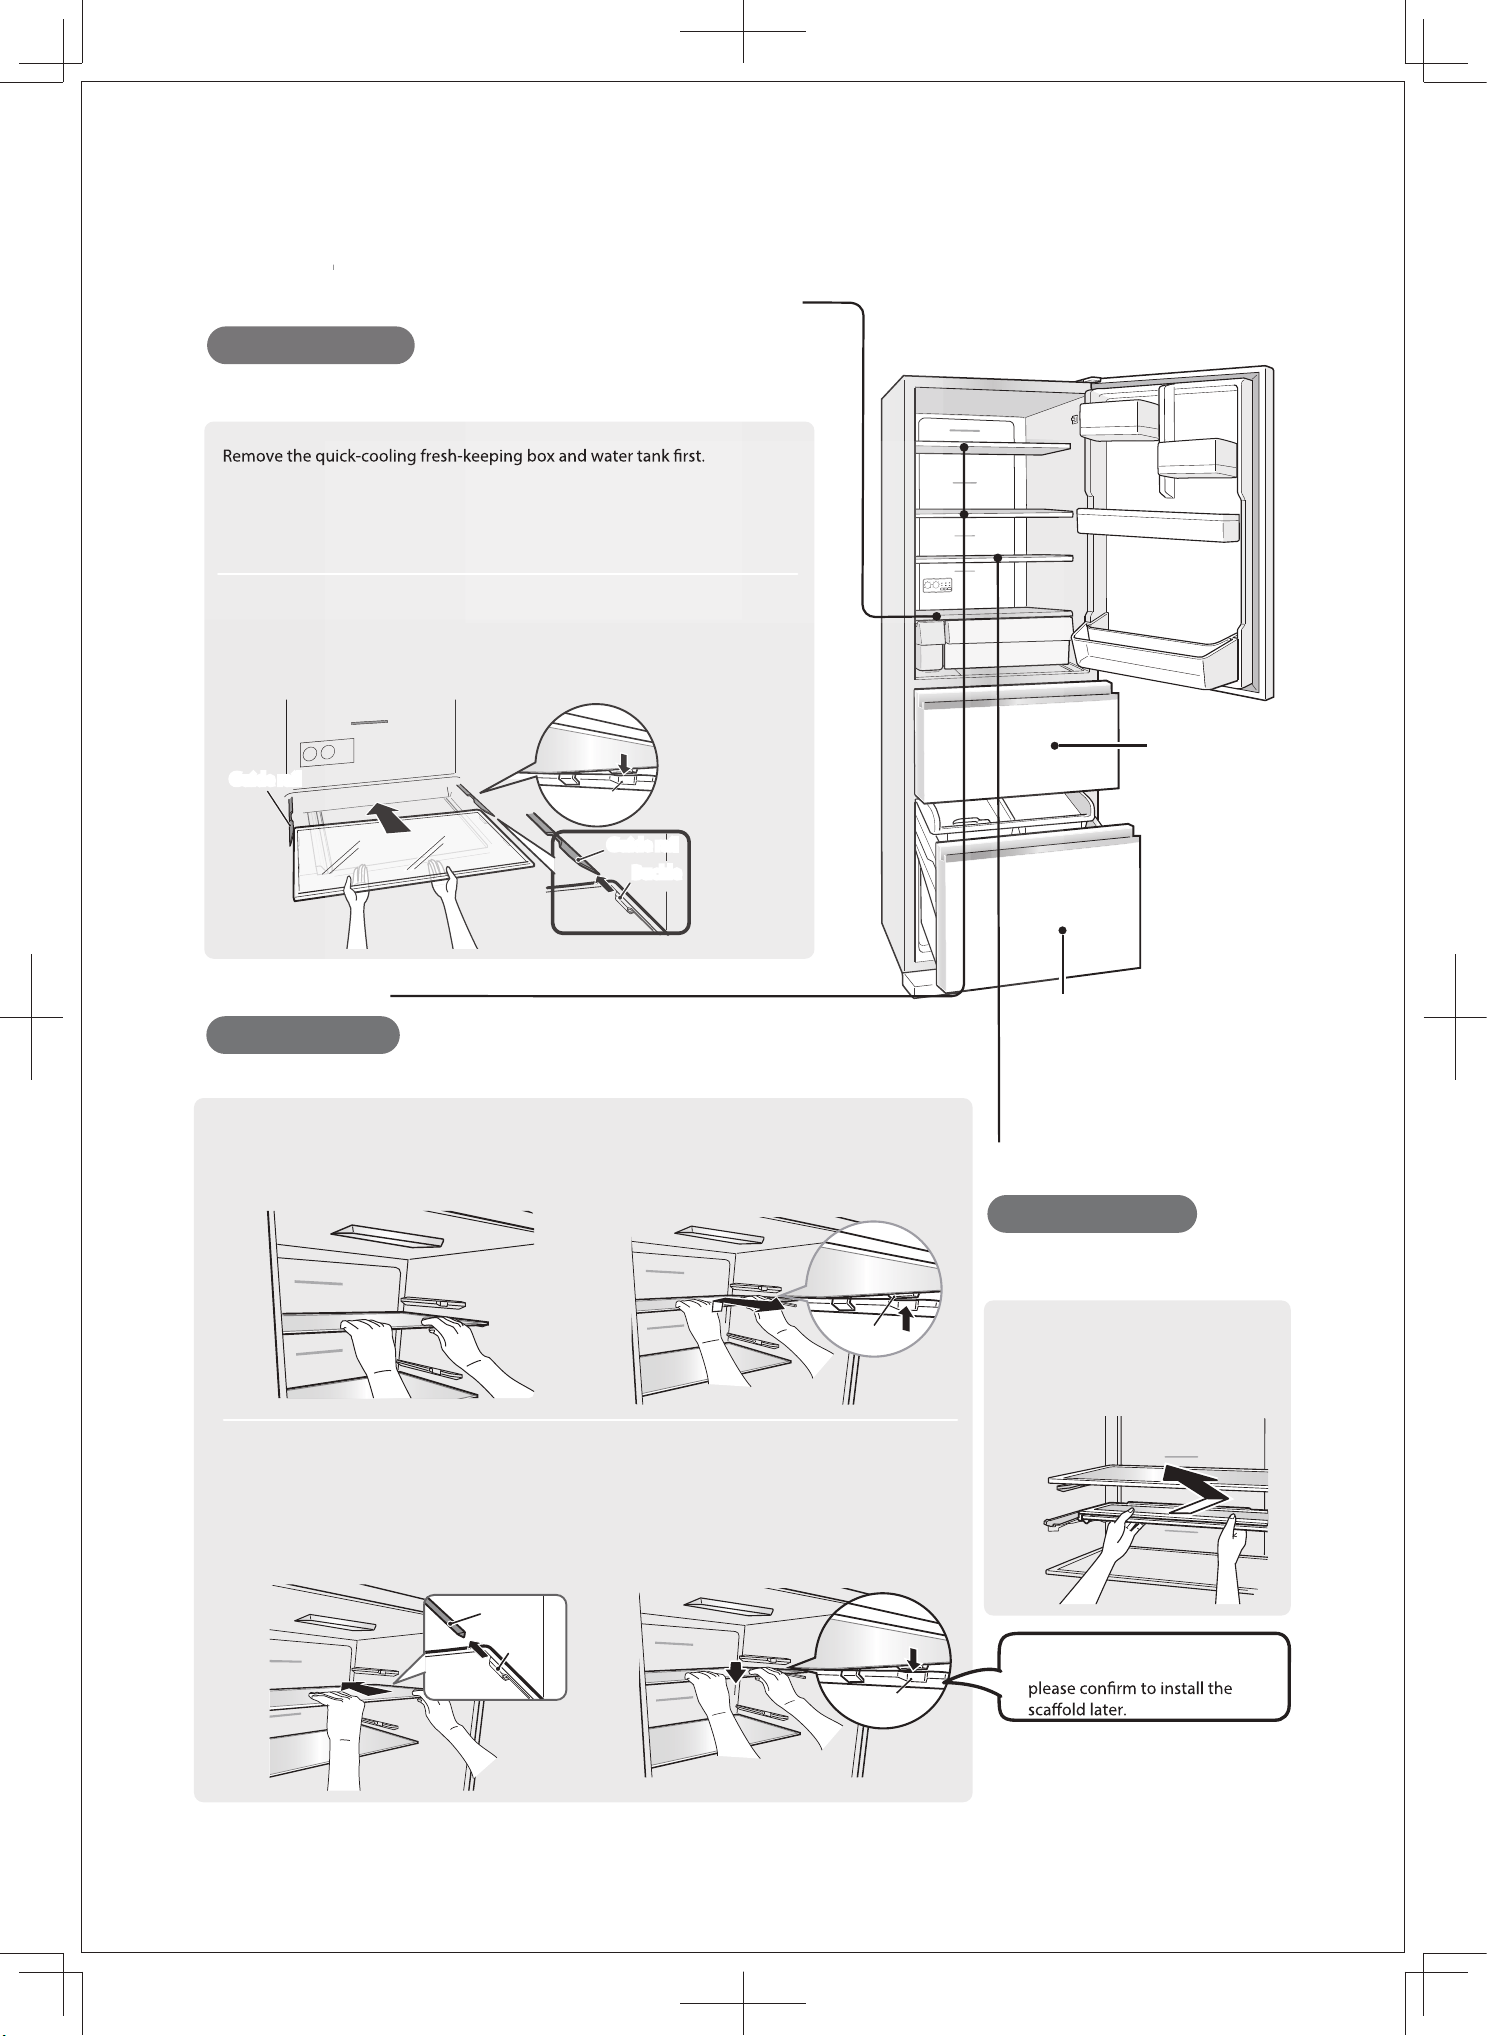
Guide rail
Installation method
1
1
2
2
Hold the movable shelf.
Hold the movable shelf with both
hands, align the guide rail of the shelf
with the guide rail of the refrigerating
chamber, and put it inward.
Lift it up slightly with both hands
and then pull it out.
Lift the shelf slightly with both hands,
and buckle the protrusion of the shelf
into the groove of the guide rail.
Two-stage movable shelf
sliding box on the lower
layer of the freezing
chamber, freezing storage
container
Sliding box of
the fruit and
vegetable
chamber, fruit
and vegetable
container
Dent of the
guide rail
Disassembly method
Hold the top plate of the quick-cooling fresh-keeping box with both hands, lift
it up slightly, and then pull it out.
Installation method
Hold the top plate of the quick-cooling fresh-keeping box with both hands,
align the buckle on the top plate with the guide rail in the refrigerating
chamber, and put the top plate in. The protrusions on the top plate need to
be installed in the dents of the guide rails in the refrigerating chamber.
Protrusion
Dent of the guide
rail
Guide rail
Buckle
Disassembly method
Grasp the shelf, pull it up obliquely to
take it out.
Movable shelf
Top plate of the quick-cooling fresh-keeping box
Disassembly method
·
The installation method is opposite
to the disassembly method.
Water washing
Water washing
Water washing
Both hands should be used to take out or place the heavy glass products.
Both hands should be used to take out or place the heavy glass products.
Both hands should be used to take out
or place the heavy glass products.
The back of the protrusion is
marked with a left and right logo,
22
Cleaning and Maintenance
…Continued
Buckle
Guide rail
Sliding box on the upper
layer of the freezing chamber,
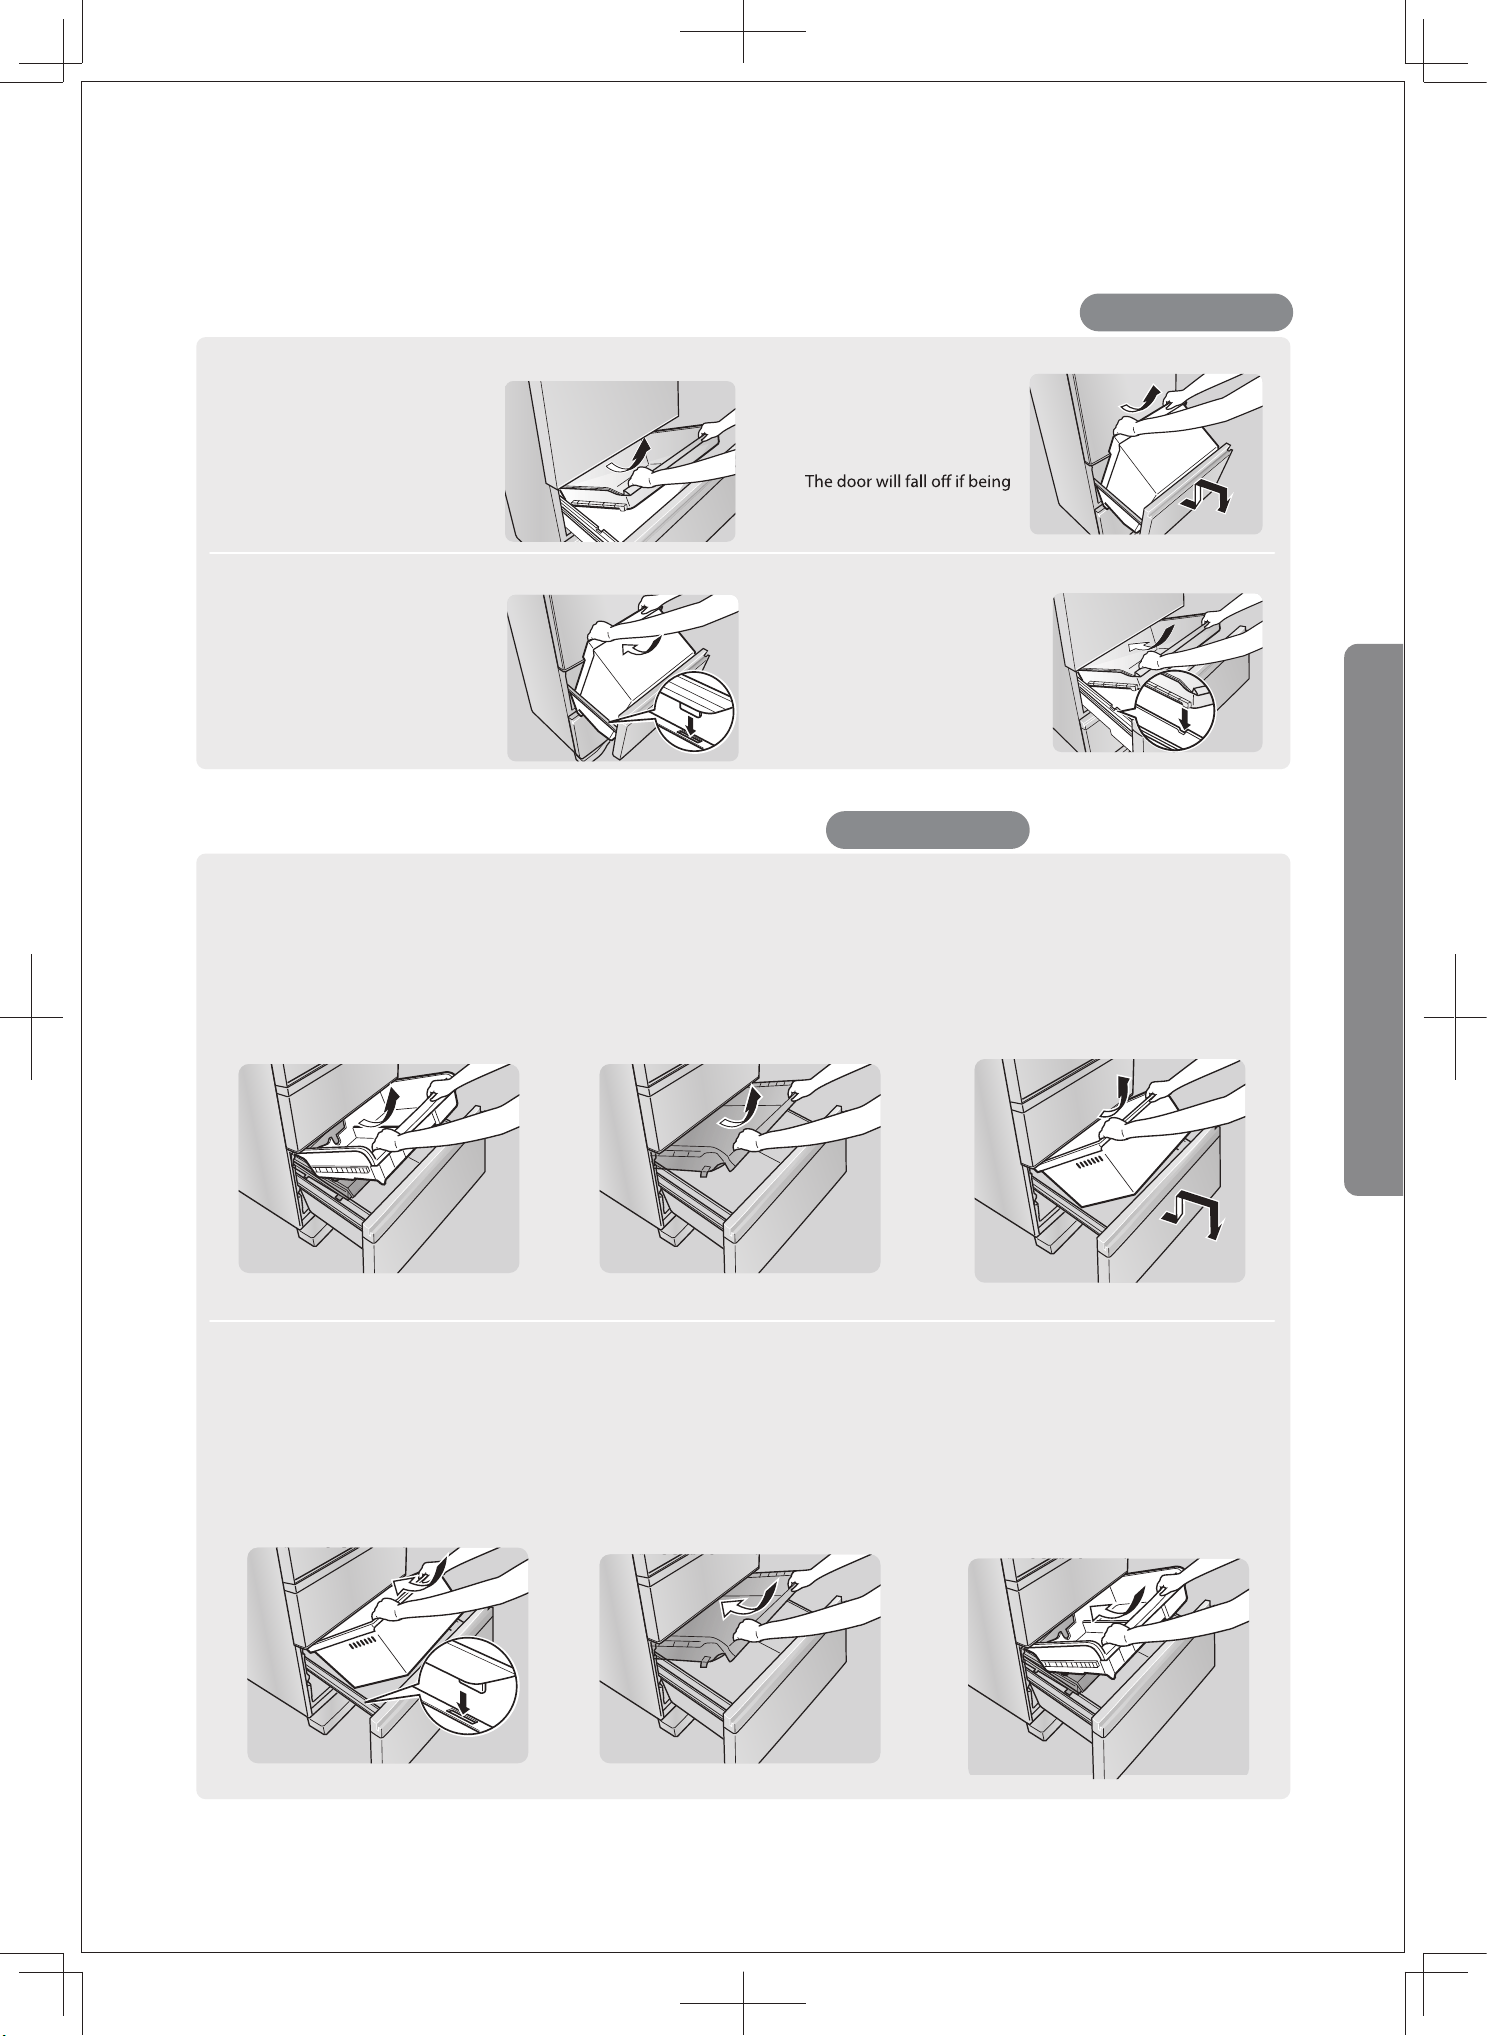
Sliding box of the fruit and vegetable chamber, fruit and vegetable container
Water washing
Sliding box on the upper layer of the freezing chamber, sliding box on the lower layer
of the freezing chamber, freezing storage container
Water washing
Pull the door out to the maximum.
Lift the door and keep pulling it
out. Then insert the protrusion of
the fruit and vegetable container
into the hole on the guide rail and
installed it in place.
21
Lift the door slightly, pull it
out, and take out the fruit
and vegetable container.
lifted too high.
21
Disassembly method
Installation method
Pull out the door to the
maximum and take out the
sliding box in the fruit and
vegetable chamber.
Pull out the door to the
maximum, install the sliding
box in the fruit and vegetable
chamber, and push it inward.
32
2
Remove the freezing storage
container.
Remove the sliding box on the
lower layer of the freezing
chamber.
(Steps 1 and 2 can be reversed)
Install the sliding box on the
lower layer of the freezing
chamber.
(Steps 2 and 3 can be reversed)
Installation method
1
Pull the door out to the maximum.
Lift the door and keep pulling it out
until it touches the ground. Then
insert the protrusion of the freezing
storage container into the hole on
the guide rail and installed it in place.
3
Install the sliding box on the
upper layer of the freezing
chamber.
Disassembly method
1
Lift the door and keep pulling it out
until it touches the ground. Then take
out the freezing storage container.
23
Method of Use
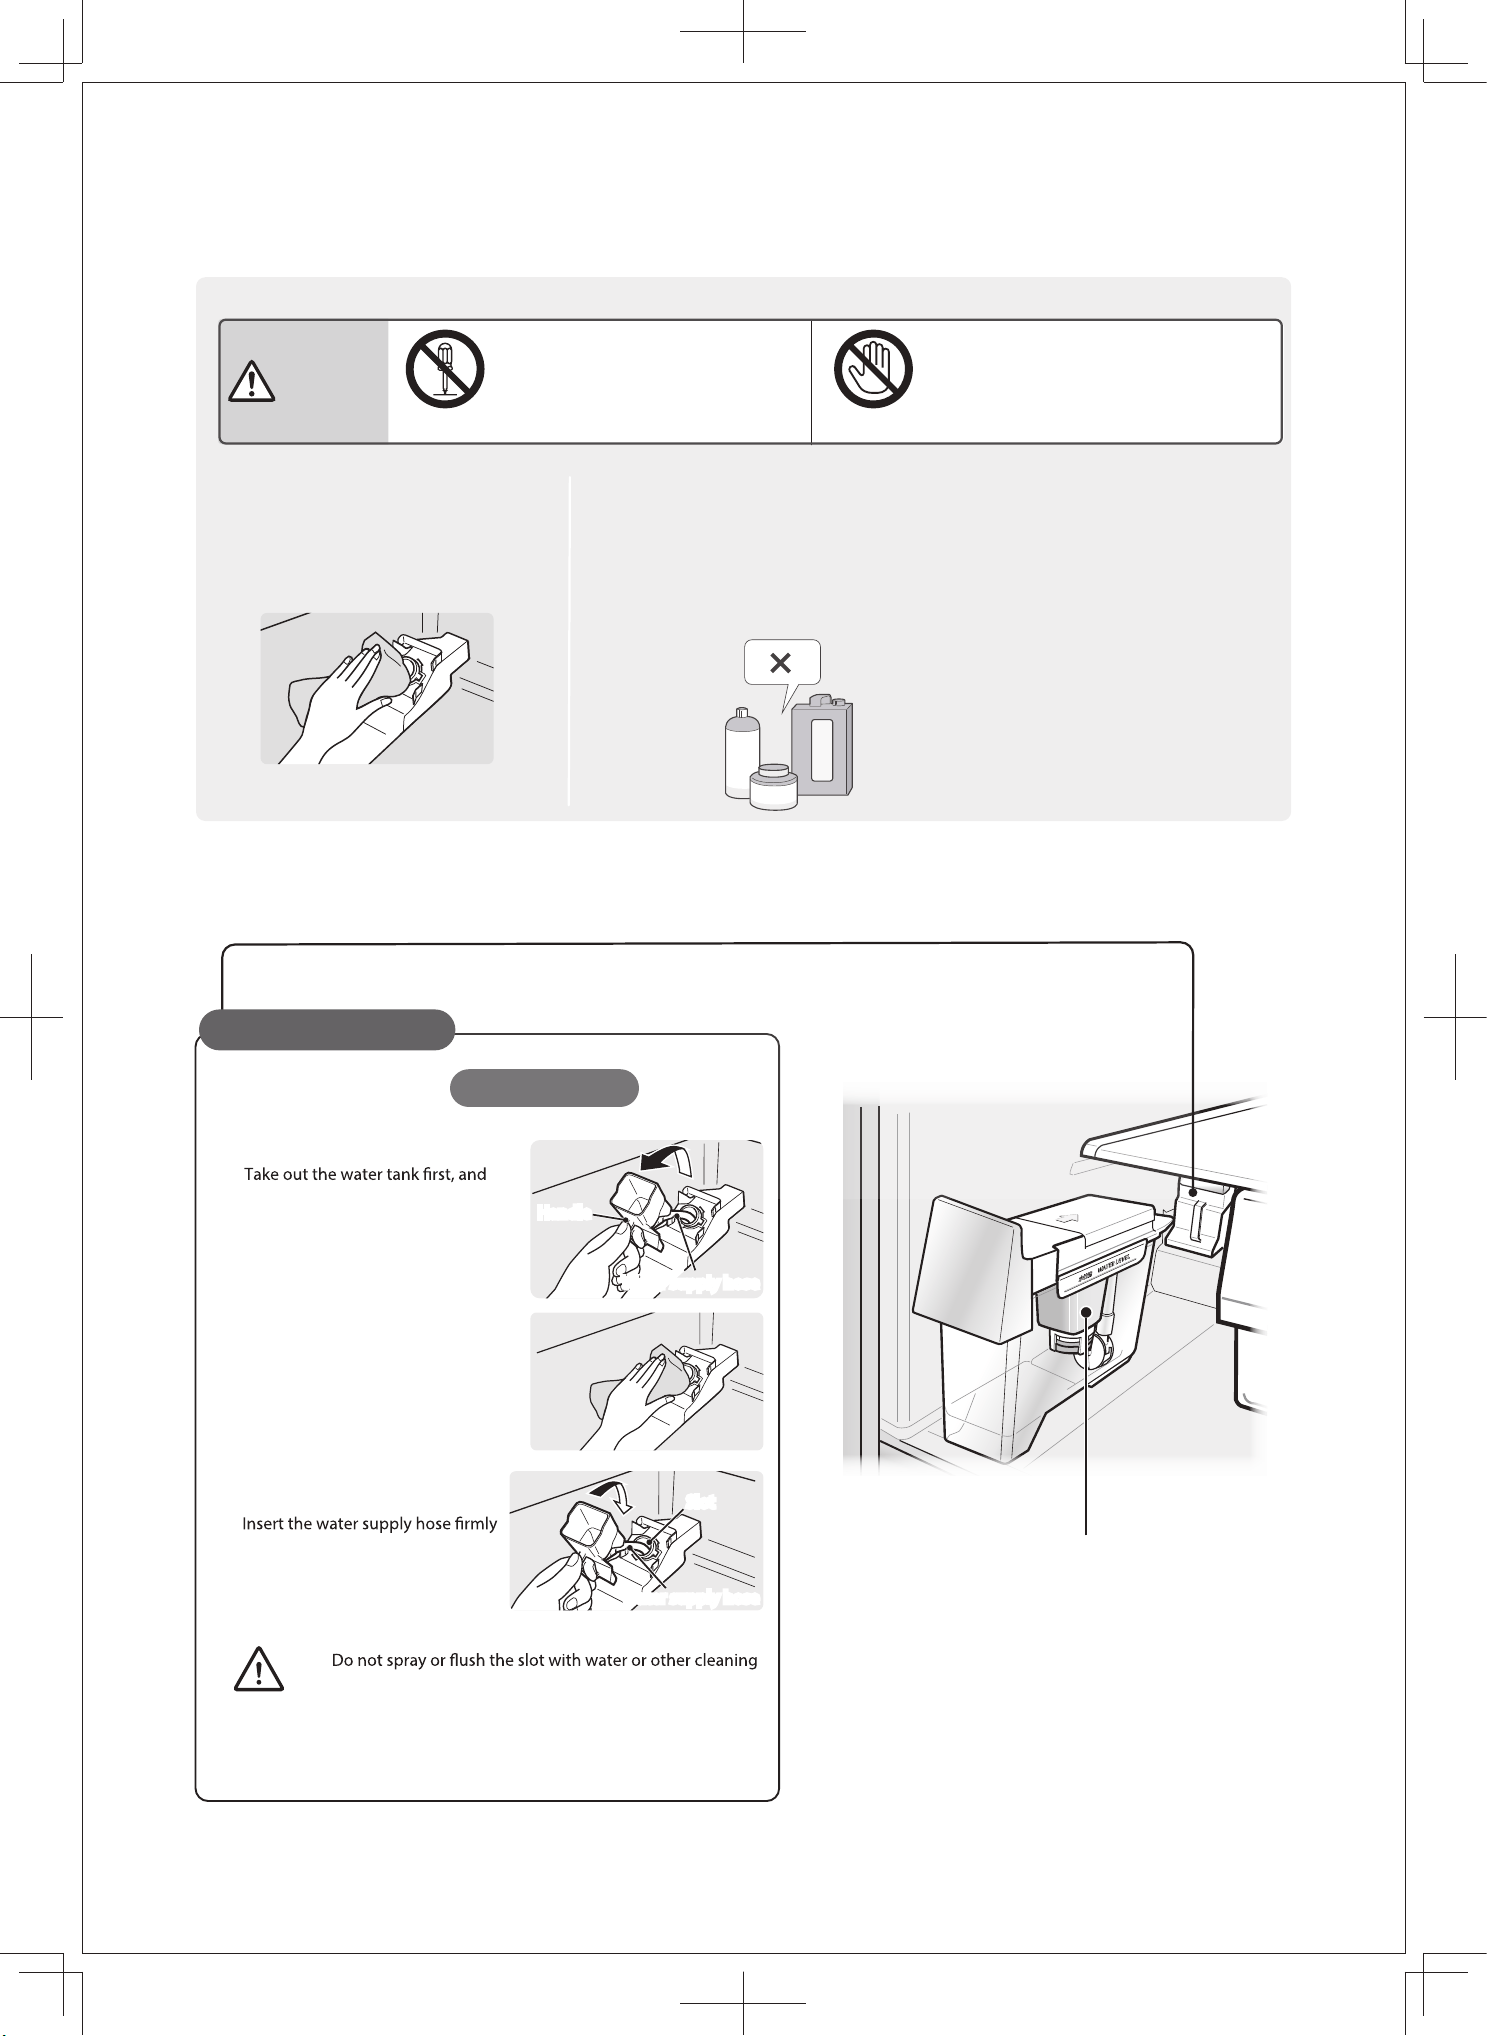
agents, otherwise the ice maker will malfunction.
Do not remove the water supply hose from the water
receiver, otherwise water leakage may be caused.
Disassembly method
Wipe the installation slot of the
water receiver with a soft wet
cloth (on the refrigerator)
Installation method
into the slot of the water supply
tank.
Water receiver
Be sure to use a soft wet cloth or sponge
for cleaning, and rinse the parts to be
rinsed with clean water.
(To avoid mold, water rust, etc.)
Do not use the following items:
●
Detergent, bleach, abrasive powder, brush,
diluent, gasoline, etc.
(Otherwise, peculiar smell or malfunction may
be caused.)
●hot water
then grasp the handle of the water
receiver to take out the water
receiver.
Water supply pipe
Do not touch the ice making part
of the automatic ice maker (upper
side of the ice storage box) with
your hands.
Do not disassemble, modify,
or repair the refrigerator by
yourself.
Warning
No disassembling No touching
●
●
●
detergent
gasoline
Maintenance of Automatic
Ice Maker
24
(The heat-resistant temperature of
each part is 60°C)
Water tank
1~2 times/year
Note
Water supply hose
Slot
Water supply hose
Handle
griding powder
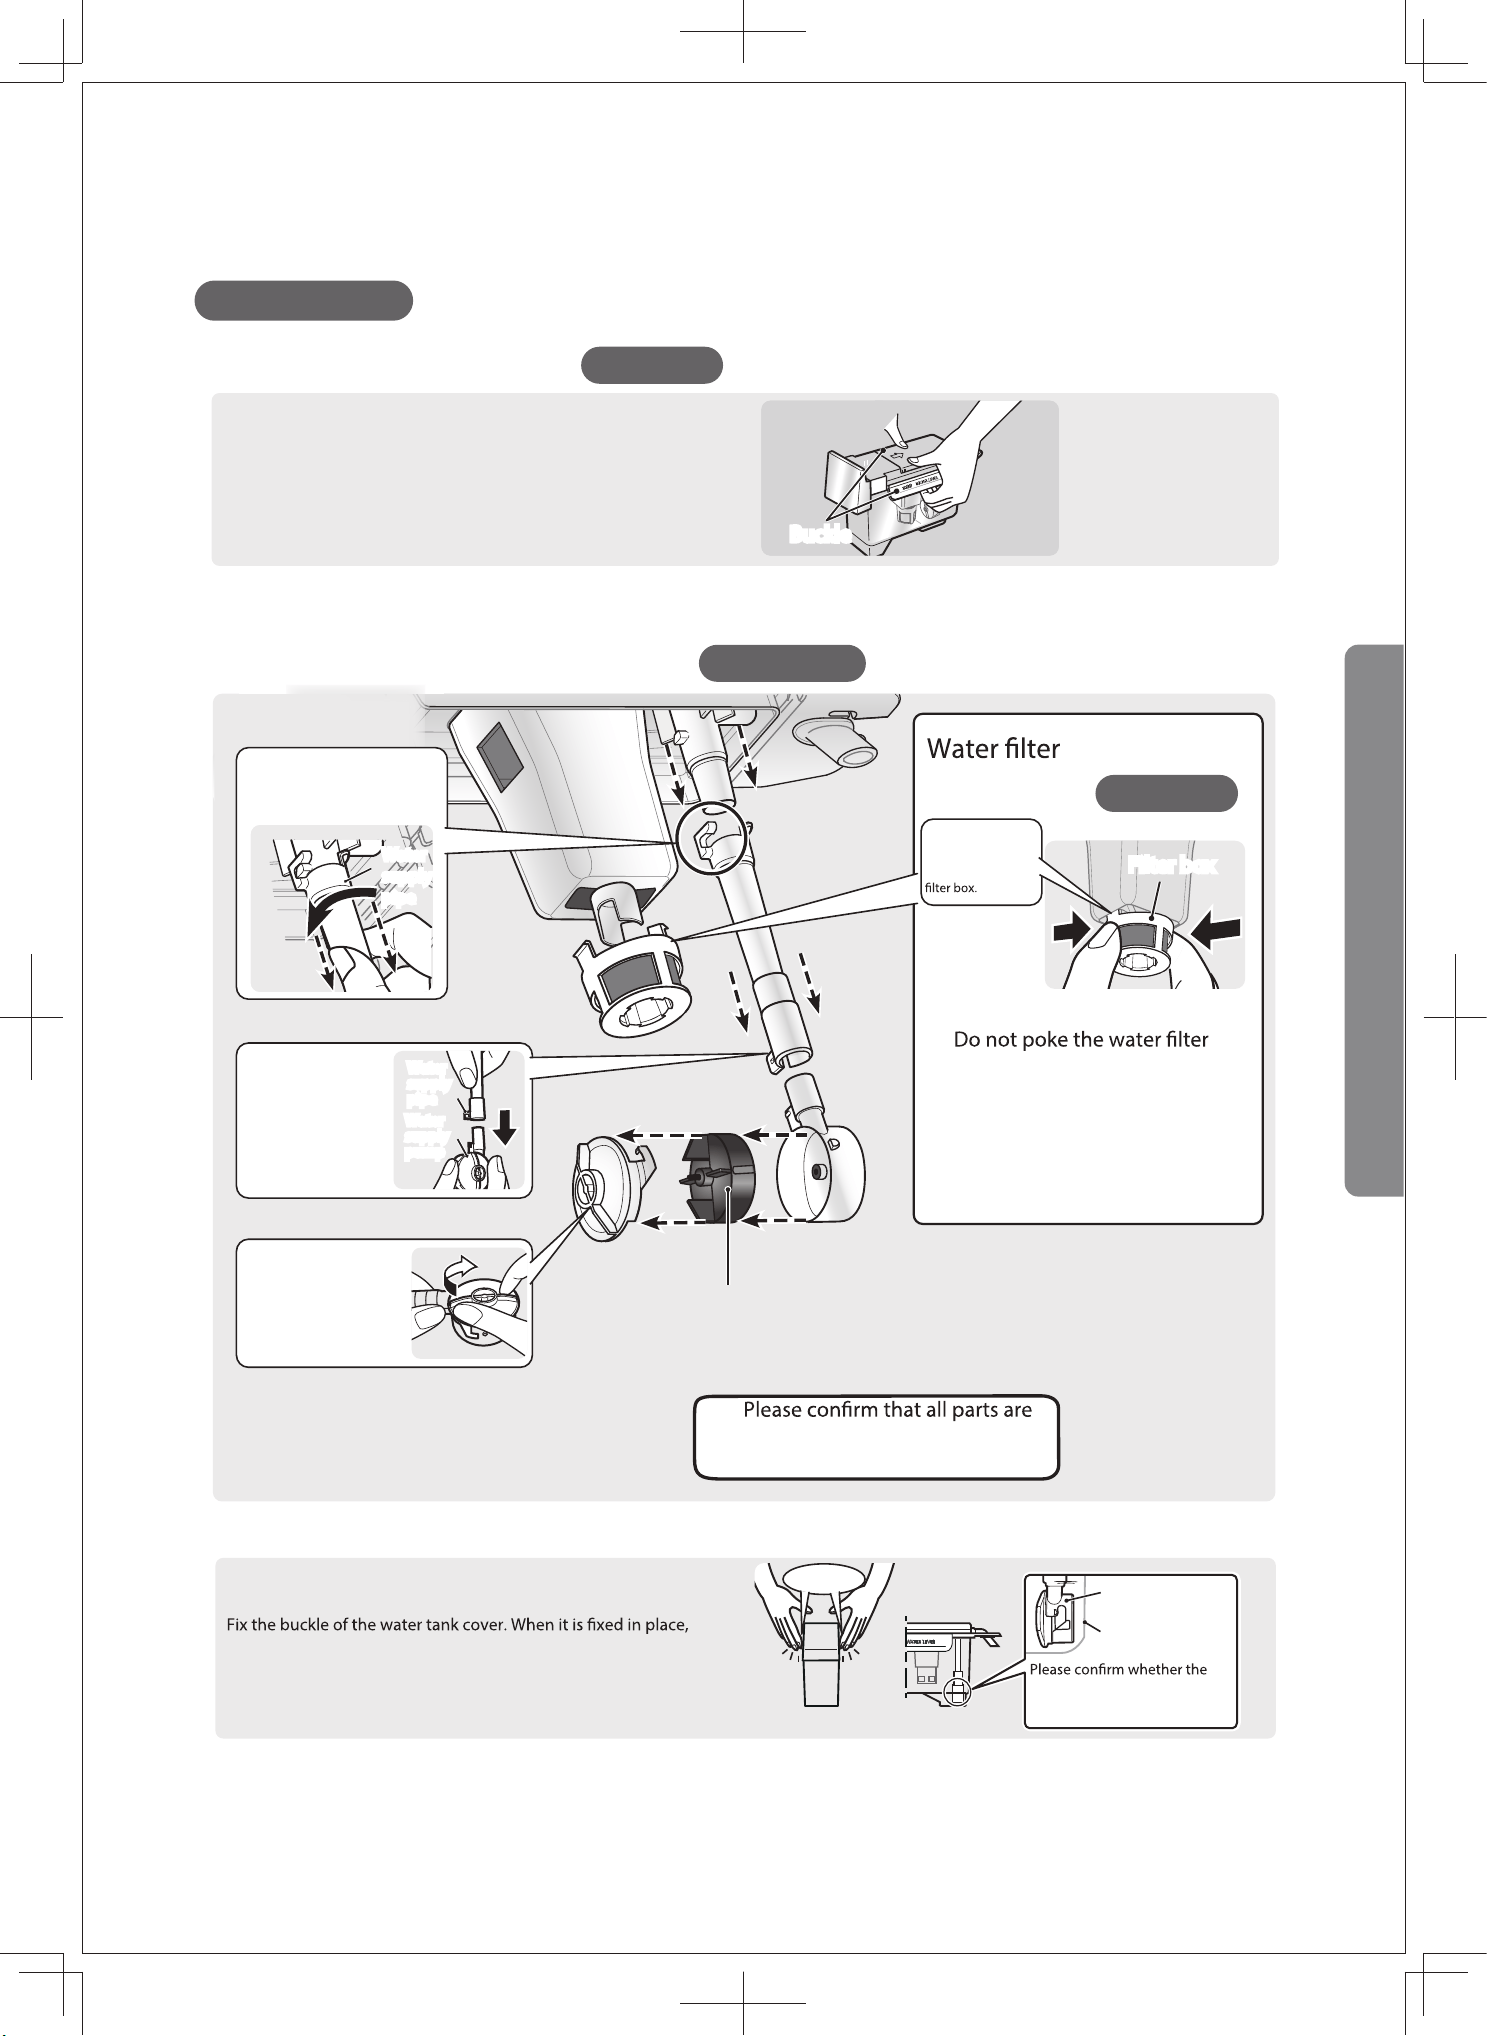
Break the buckle upward to remove the
water tank cover.
Disassembly method
Impeller
Make sure that no foreign matter adheres
to it.
Disassembly method
·
The installation method is opposite to
the disassembly method.
Remove the water
supply pipe by rotating
it in the direction of the
arrow.
1
Water tank, water tank cover
Water supply pipe, water supply pump
1 time/week
1 time/month
installed in place, otherwise
the water cannot be supplied.
The installation method is
opposite to the disassembly
method.
Disassembly
method
Cleaning
method
Water washing.
with a sharp object, because
it is easy to be damaged.
Push two sides in
the direction of the
arrow to remove the
Remove the
water
supply
pump from
the water
supply pipe.
Remove the
pump box
cover by
rotating it in
the direction of
the arrow.
2
3
you will hear a crack. Make sure the buckle is installed in place.
water supply pump is parallel
to the back of the water tank.
Water supply pump
Back of the water
tank
Front Side
Installation method of the water tank cover
If it is not installed in place, water supply and ice making will
not start, or the water supply pump will make noise.
Buckle
Water tank
Filter box
●
·
25
1 time/week
Buckle
Water
supply
pipe
Water
supply
pipe
Water
supply
pump
Method of Use
GR-RM469WE-PGA(B3)-1
1
2
26
● Please contact a professional for indoor lamp replacement.
Various Solutions
Loads of Shelves and Containers
Replacing indoor lights
● Do not touch the broken glass and call the service hotline.
Broken glass parts
● Reduce the frequency of opening and closing doors and avoid storing new food.
(Otherwise, the temperature in the inside of the refrigerator will rise.)
Power failure
● If the power plug is inserted again or the circuit breaker is closed immediately, the compressor will be
overloaded and malfunction.
the refrigerator and starting state of the compressor sometimes can enable the compressor protection timer.
As a result, the compressor will not run within about six minutes after power on.
Pulling out the power plug, or disconnecting the fuse or circuit breaker
Not using the refrigerator for a long time
Please dump the ice and water from the automatic ice maker.
(For details, please refer to the step 2 in the Before Moving or Carrying section)
Pull out the power plug and clean the inside of the refrigerator. Open the refrigerator door for two - three
days to dry it.
Location
Refrigerating chamber
Fruit and vegetable
chamber
Movable shelf
Two-stage movable shelf
Top plate of the quick-cooling fresh-keeping box
Sliding box of the fruit and vegetable chamber
Fruit and vegetable container
Sliding box on the upper layer of the freezing chamber
Sliding box on the lower layer of the freezing chamber
Freezing storage container
Freezing Chamber
Shelves and containers
Please refer to page 32.
Please refer to page 12.
Please refer to page 16.
Please refer to page 16.
7.5 kg
7.0 kg
7.5 kg
4.0 kg
13.0 kg
8.5 kg
5.5 kg
15.5 kg
27
Malfunctions
About the sound
... the following conditions are normal for abnormal sounds.
The inside of the refrigerator
"Beep", "Hiss"
are the sounds of parts rubbing against
each other due to temperature changes.
This sound is easy to start after the door
of the refrigerating chamber is opened
for about five seconds.
Near the back
"Squawking" "Sneezing"
is the sound of the refrigerant flowing. It rings
easily during defrosting.
In the summer... about once a day
In the winter... about once every two days
When the fruit and
vegetable chamber is open
"Puff" is the sound of the cooling fan spinning.
When the door of the fruit and vegetable
chamber is opened, the fan in the refrigerator
will not stop spinning, so it is easy to hear the
sound of the spinning fan.
Lower part of the refrigerator
"Fizz" is the sound of the running compressor.
In the summer or when the refrigerator starts
to run for quick freezing and quick ice making,
the sound of the compressor will become
louder.
Near the water tank
"Whoosh" is the sound of the water
supply pump.
They sound once every two hours and
last about three seconds each time.
(about once an hour during quick ice
making)
Near the ice maker
"Hum" is the sound of the ice tray rolling.
"Dong Dong" is the sound of ices falling.
They sound once every two hours and
last about three seconds each time.
(about once an hour during quick ice
making)
such sounds can be set to stop ice
making.
Please pay attention to the following occasions
Thudding and Dong Dong Alarm sound
● Is the floor firm?
● Does the refrigerator touch the surrounding walls?
● Is the refrigerator placed steadily?
● Are water supply pumps and pipes of the water tank
installed correctly?
Please refer to page 17.
Please refer to page 25.
● Is the door not properly closed?
If the alarm sound does not stop after all doors
are closed, please call the service hotline. (When
the alarm sound cannot be stopped, you can
pull out the power plug and wait five minutes
before plugging it back in. The alarm sound will
stop after three minutes.)
When encountering difficulties
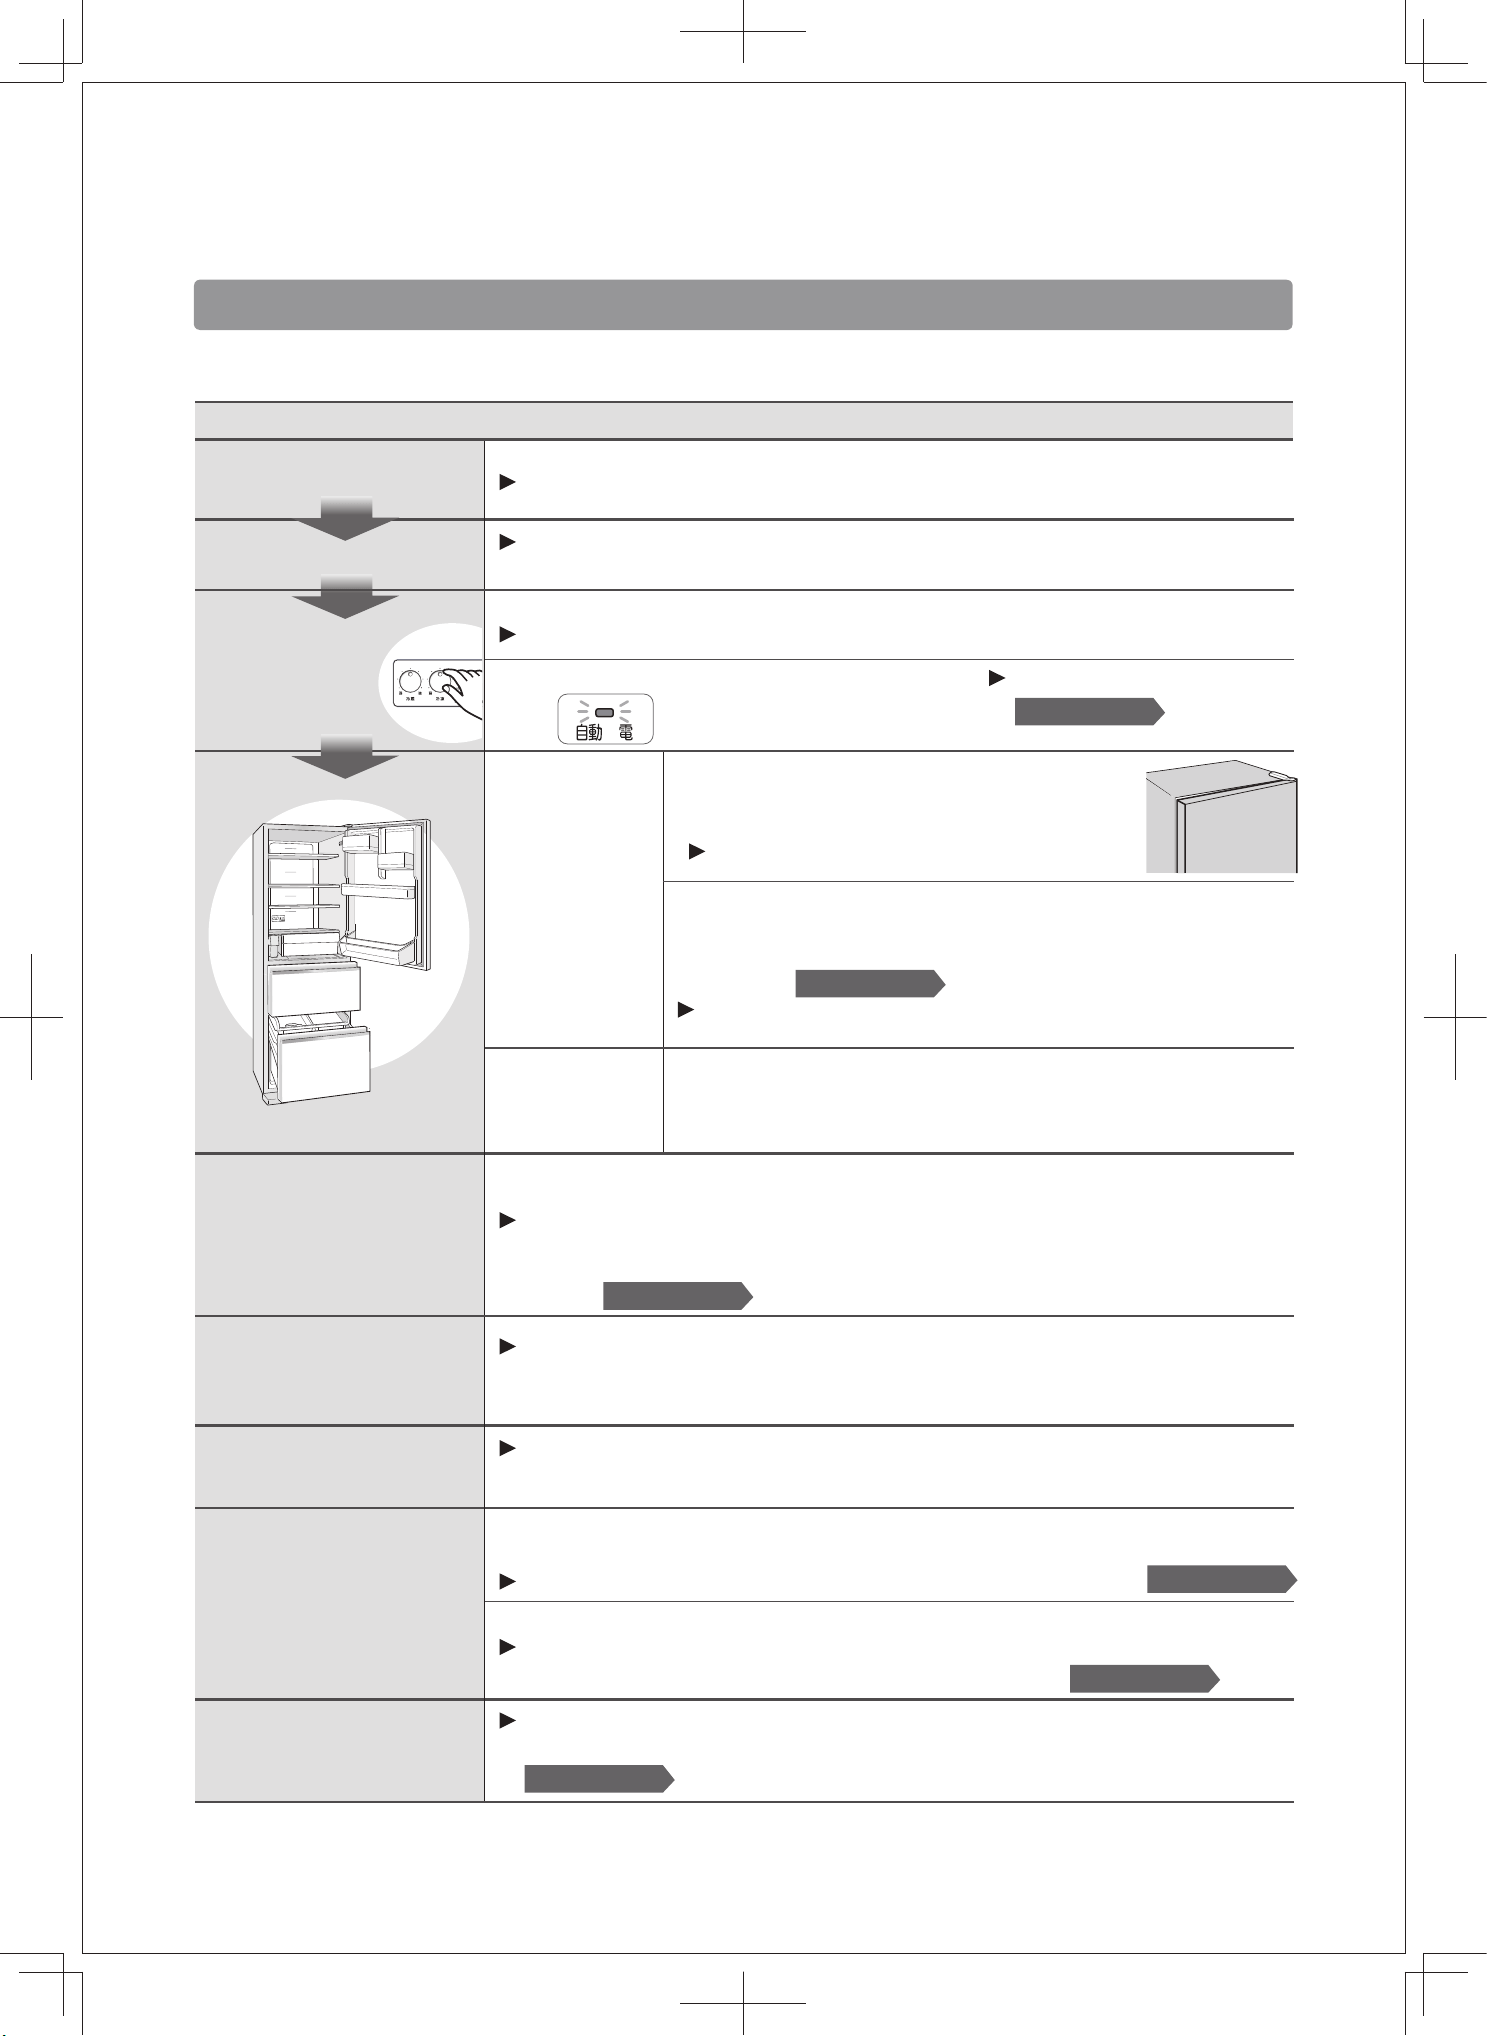
28
Malfunctions
…Continued
Completely not cooling/Poor cooling capacity... Please confirm the following items in order.
About cooling
Power supply
Does the power supply work well?
Please confirm whether the power plug is loose or falls off, and whether the main
switch or fuse is disconnected.
The refrigeration inside the refrigerator takes a certain time, and it may take more
than a day to cool down in hot weather like summer.
Is the temperature adjustment grade set to 「Low」 ?
Is the「自動省電」mode enabled?
Is there a gap
around the door
seal?
Is the refrigerator
door opened
frequently?
Opening the refrigerator door frequently will cause the external air
(warm air) to enter the refrigerator, resulting in the temperature in
the refrigerator rising temporarily. The temperature will return to
normal in about one night, please pay attention to it.
Is the water-rich food put in the innermost part of the refrigerating chamber or in the
quick-cooling fresh-keeping box?
The innermost part of the refrigerating chamber is close to the outlet of the cold air
and the temperature in the quick-cooling fresh-keeping box is lower, resulting in
too fast refrigeration. Do not place the water-rich food in front of the outlet of the
cold air.
The temperature in the quick-cooling fresh-keeping box is about 0~2°C,
which usually does not freeze the food.
(However, food placed near the outlet of the cold air may be frozen.)
Quick micro-freezing usually does not micro freeze food (soft freezing).
(However, food placed near the outlet of the cold air may be frozen.)
Are there foods that are too hydrated?
Do not place the water-rich food in front of the outlet of the cold air.
Is the food stored inside the quick-cooling fresh-keeping?
The inner position is close to the cold air outlet, so it is easy to freeze.
Do not place the food in front of the outlet of the cold air.
When food is thicker or stacked densely, it may not be possible to complete
unfreezing within the set time.
Condition of the refrigerating chamber door
Does the food on the shelf go beyond the shelf
and touch the refrigerator door, resulting in a gap?
Please do not let food go beyond the shelf.
The conditions of the fruit and vegetable chamber door
or the freezing chamber door
Is there a food bag stuck in the door, resulting in a gap?
Also, does the food in the container touch the
sliding box?
If it does, the door will not be completely closed, resulting
in the air leaking and the worse cooling effect.
Please cancel the setting.
Please set the temperature adjustment grade to 「Medium」 or「High」..
How long has the power
been on?
Operation panel
Door
The food in the refrigerating
chamber is frozen.
The food in the
quick-cooling fresh-keeping
box cannot be slightly
frozen (soft freezing).
When set to quick
micro-freeze, food will
not microfreeze
When set to quick
micro-freeze, food freezes
Food failed to unfreeze
even if it was set to freeze
Confirmation items · causes/countermeasures
Please refer to page 11.
Please refer to page 16.
Please refer to page 12.
Please refer to page 13.
Please refer to page 13.
Please refer to page 13.
省
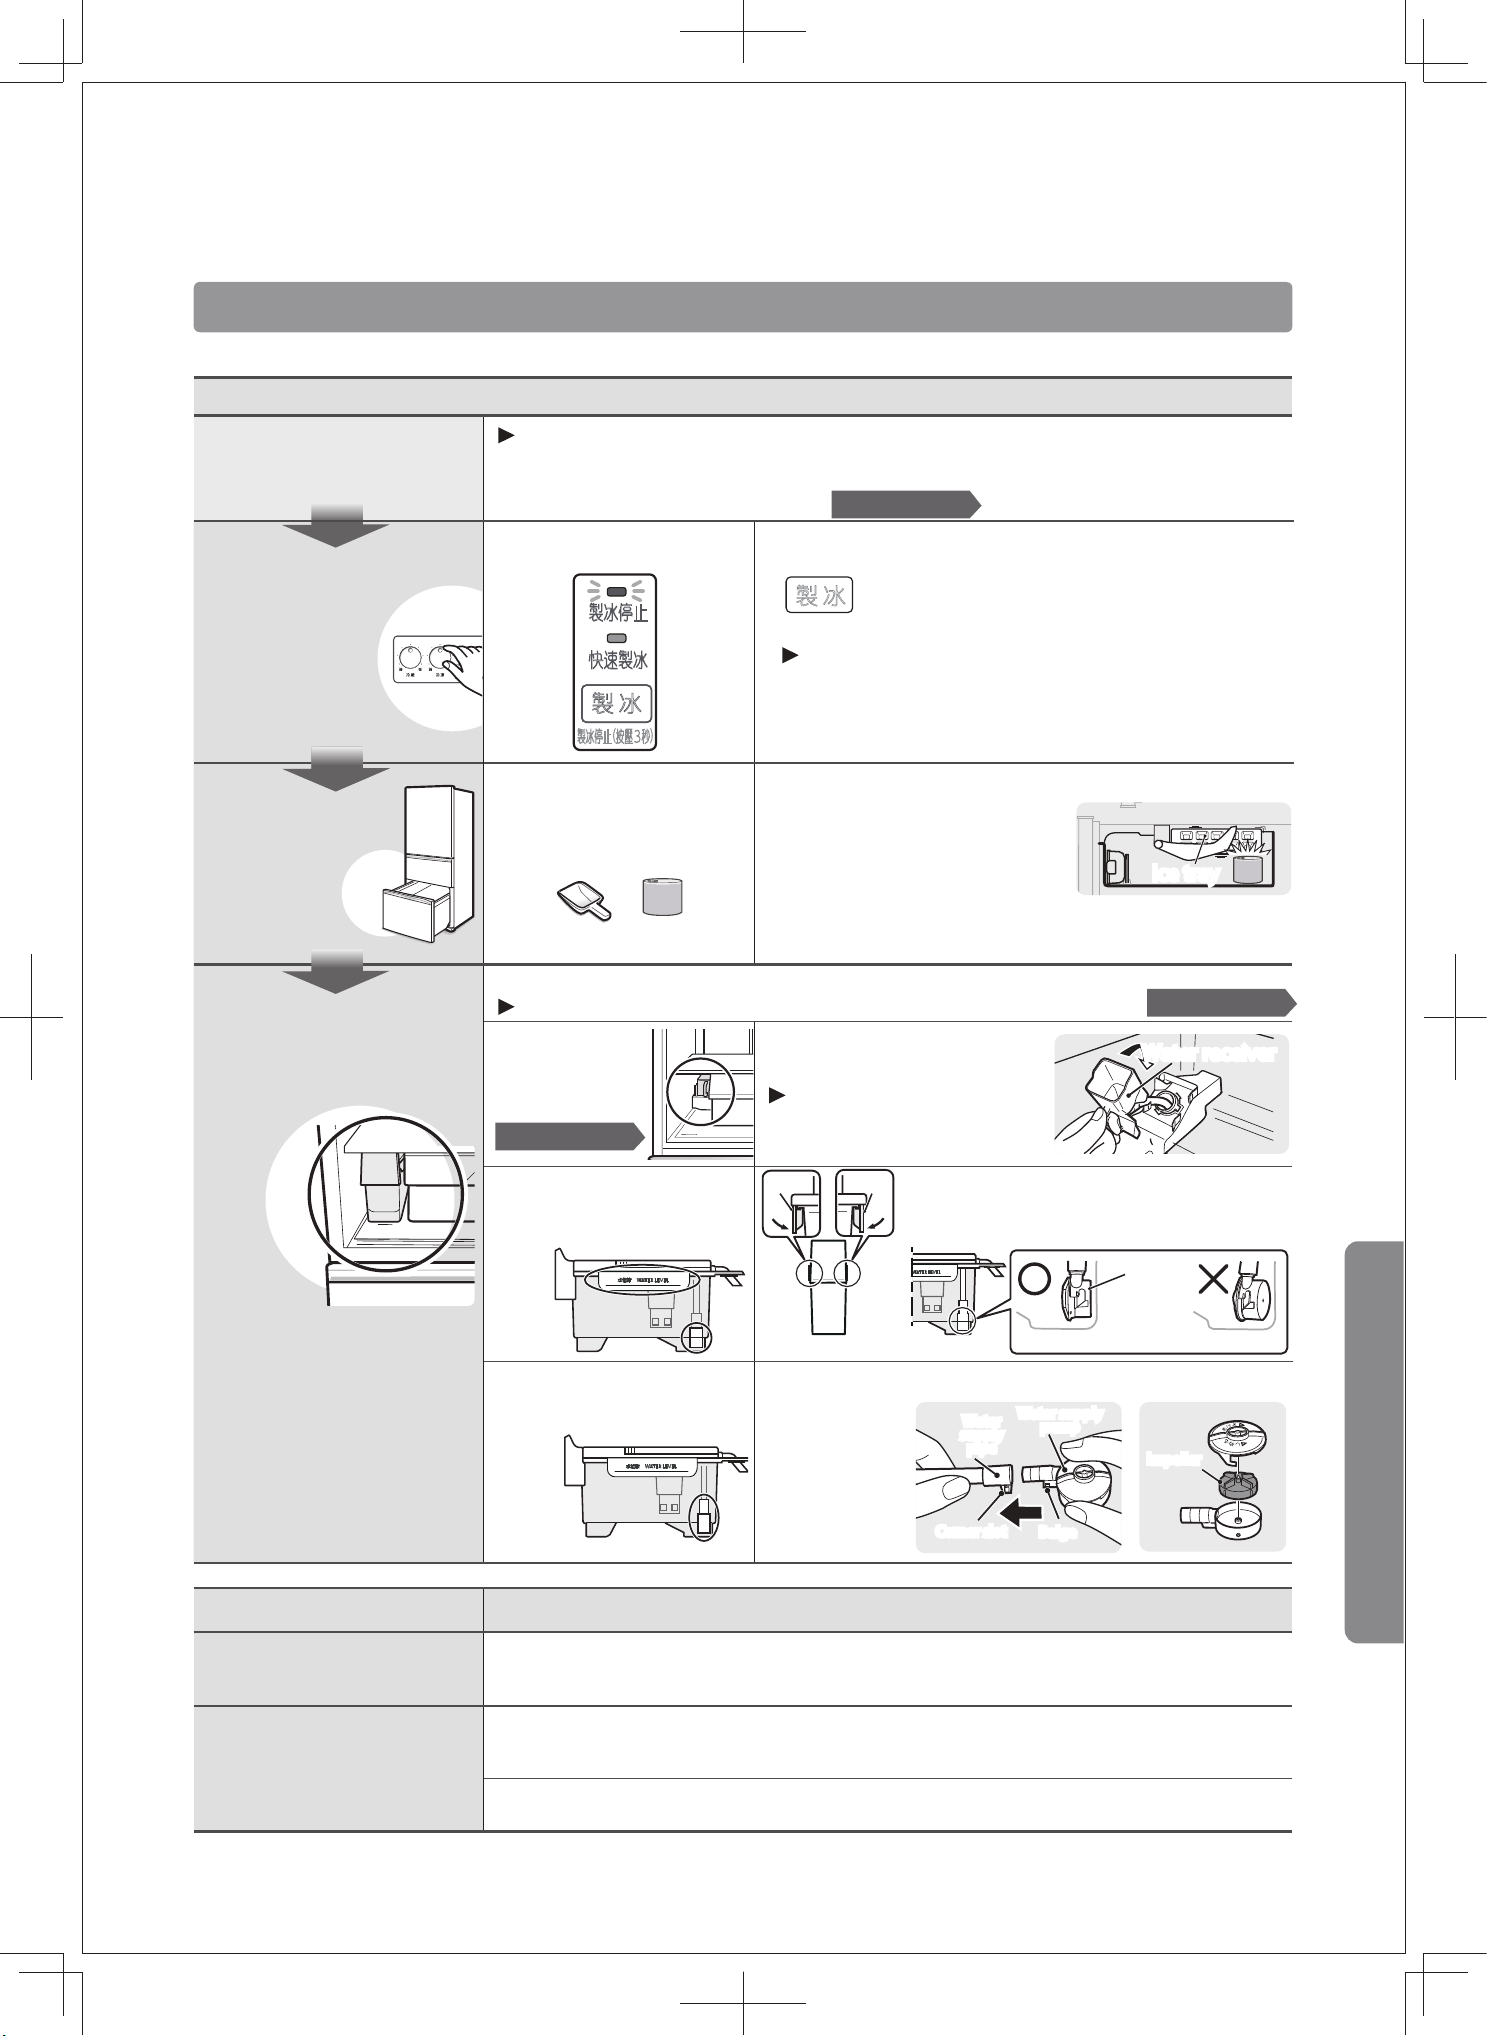
29
Do not put anything other than ice cubes in the ice
storage box.
The item may touch the
detection rod, causing the ice
making to stop. The ice tray may
also be damaged after being hit
when it rolls, making it impossible to make ice.
Please put the ice scoop back in place after use.
Unable to make ice/Low ice production… Please confirm the following items in order.
How long has the power
been on?
Please refer to page 18.
About ice making
Operation panel
Ice storage box
Water tank · water receiver
The ice cubes stick to each
other, becoming round balls
or smaller cubes.
Have the ice cubes been stored for a long time?
It may be the sublimation that causes the ice cubes to become round balls or smaller
cubes.
Are quick ice making or quick freezing modes on?
Due to the faster freezing speed, the air in the water is trapped in the ice and forms
bubbles, making the ice look white.
Is the water with higher mineral content (mineral water, etc.) used?
Frozen minerals can form white sediment, making the ice look white, but they are harmless.
The ice cubes are white
or contain sediment.
When the refrigerator is not fully refrigerated, such as the refrigerator just starts to
run, the ice making time will become longer.
It may take more than one day in hot days such as the summer, please pay
attention to the actual situation.
Is the light of 「製冰停止」
on?
Is anything other than ice
cubes put in the ice
storage box?
Is the water
receiver
forgotten to be
installed?
Are the buckles of water
tank and the water supply
pump installed properly?
Are the water supply pipe
and impeller properly
installed?
Water supply pipe and water supply pump
Please install the
bulge of the
water supply
pump into the
corner slot of the
water supply
pipe.
Please fix the buckle.
Buckle
Buckle
Front
Side
Water
supply
pump
Parallel to the back part
Please install the water
receiver correctly.
Is there enough water in the water tank?
Please add water to the water tank until the water reaches the water level.
Close the door of the freezing chamber,
Press it for three seconds
(until you hear a beeping sound.)
The light of 「製冰停止」is off.
Ice tray
Water receiver
Confirmation items · causes/countermeasures
Please refer to page 17.
Please refer to page 24.
Impeller
Phenomena
Confirmation items · causes/countermeasures
Water
supply
pipe
Water supply
pump
Impeller
Bulge
Corner slot
Water
supply
pipe
Water supply
pump
Impeller
Bulge
Corner slot
Ice tray
Water receiver
製冰停止
快速製冰
製 冰
製冰停止(按壓 秒)
製 冰
When encountering difficulties
30
Malfunctions
…Continued
About the door
Phenomena
Confirmation items · causes/countermeasures
The door of the refrigerating
chamber is slightly displaced.
Please rotate the adjustment foot to adjust the parallelism of the door.
Is the food bag clamped by the
door, or is the food placed beyond
the shelf, causing a gap?
Does the food in the containers of the freezing chamber or the fruit and vegetable chamber touch
the sliding box above? Does the food fall to the inner side of the freezing chamber?
Does the refrigerator lean forward?
Please rotate the adjustment foot to keep the refrigerator level.
If it cannot be adjusted, please contact the dealer or call the service hotline.
Are excessively tall food or seasonings placed on the movable rack?
Do not place excessively tall food or seasonings on the movable rack.
Please adjust the adjustment feet on the left and right sides of the bottom of
the refrigerator until the refrigerator is stable and does not shake.
If the adjustment of the adjustment feet cannot stabilize the refrigerator,
please place a board under the adjustment feet.
Please take out the clamped
foods. Please do not let food go
beyond the shelf.
The door cannot be closed.
The refrigerator shakes when the
door is opened and closed.
It’s very laborious to open the door just after
closing it.
The moment the door is closed, other doors may
be opened.
Light flashes.
Do the lights of 「快速冷凍」 and 「快速製冰」 keep flashing?
If the refrigerator malfunctions, please contact the dealer or call the service hotline.
The air entering the refrigerator is quickly cooled, resulting in the pressure inside the refrigerator
to be temporarily lower than the outside. Therefore, opening the door will be laborious.
Other doors are pushed open by the wind pressure generated by closing the door.
Please refer to page 08..
Please refer to page 08.
Please refer to page 08.
Please refer to page 14.
Please refer to page 16.
Do not let the food touch the
sliding box.
Please take away the food that has fallen to
the inner side of the freezing chamber.
Phenomena
The following conditions are normal
Confirmation items · causes/countermeasures
Phenomena
Confirmation items · causes/countermeasures
About the operation panel
Phenomena Confirmation items · causes/countermeasures
About condensation, frosting, and leakage
Frosting occurs in the
freezing chamber.
Is too much food put in, resulting
in a gap in the door seal?
※ For better explanation, the
door of the fruit and vegetable
chamber is omitted in the
illustration.
When too much food is put in,
the door cannot be completely
closed, resulting in a gap in the
door seal and frosting. Even a
small gap can lead to frosting.
Is the humidity too high? Is the door not properly closed?
Is the door opened frequently or left open for a long time? Is the door not properly closed?
Due to a high degree of moisturizing, condensation sometimes occurs on bottle and can foods.
Please wipe off the condensed water with a dry cloth.
When adding water, does the water exceed the water level of the water tank?
The water in the water tank cannot exceed the water level.
Is the cleaning opening at the bottom of the fruit and vegetable container properly installed?
Please install the cap of the cleaning opening correctly.
Is the water receiver installed in place? Please install the water receiver correctly.
Please wipe off the condensed water with a dry cloth.
Do not allow
food stored to
exceed the
storage limit.
Please confirm
whether there is
a gap around the
door seal.
Door seal
Upper storage limit
Condensation occurs on the
outside of the refrigerator.
The inside condensation of fruit
and vegetable chamber or the
refrigerating chamber.
Water leaks into the
refrigerator or on the floor.
Please refer to page 17.
Please refer to page 24.
Please refer to page 16.
31
About the movable rack
Phenomena
Confirmation items · causes/countermeasures
The height of the movable
rack cannot be adjusted
Is there a pull handle?
The pull handle is not needed when you raise the movable rack.
Lower the movable rack while pulling the handle at the base of
the rack when you lower the rack.
The movable rack is detachable.
When the movable rack falls off, please hold the movable rack
with both hands and install it on the rack base.
Is there a handle to lift the base of the movable rack?
When installing the base of the movable rack, please pull the handle at the
bottom of the base forward, and then install the base on the guide rail of the
refrigerator door.
Are foods that have strong smells (scallion, ginger, garlic, etc.) put in the refrigerator
without being packaged in plastic wrap or airtight containers?
The smell of the foods itself cannot be eliminated. If you are worried about the
spread of the smell, please package the foods in an airtight manner.
The movable rack falls off
The base of the movable rack
cannot be installed
There are bad smells in the
refrigerator
The outside of the
refrigerator and the door
seal are hot
The built-in heat dissipation tube is hidden around the refrigerator to prevent water
from condensing on the refrigerator. When the refrigerator is just running or the
ambient temperature is too high, the temperature on the outside of the refrigerator is
slightly high, but this will not affect the food inside the refrigerator.
To facilitate the operation, the boxes and guide rails are coated with lubricants, which
comply with the Japanese food hygiene law. If the lubricants accidentally adhere to
other parts, please wipe them off.
Is the light in the refrigerator blocked by the food?
Please remove the food blocking the light.
Stickiness inside the
refrigerator
Dimness inside the
refrigerator
Please refer to page 14.
Please refer to page 21.
Please refer to page 21.
Others
Phenomena
Confirmation items · causes/countermeasures
Phenomena
The following conditions are normal
Confirmation items · causes/countermeasures
When encountering difficulties
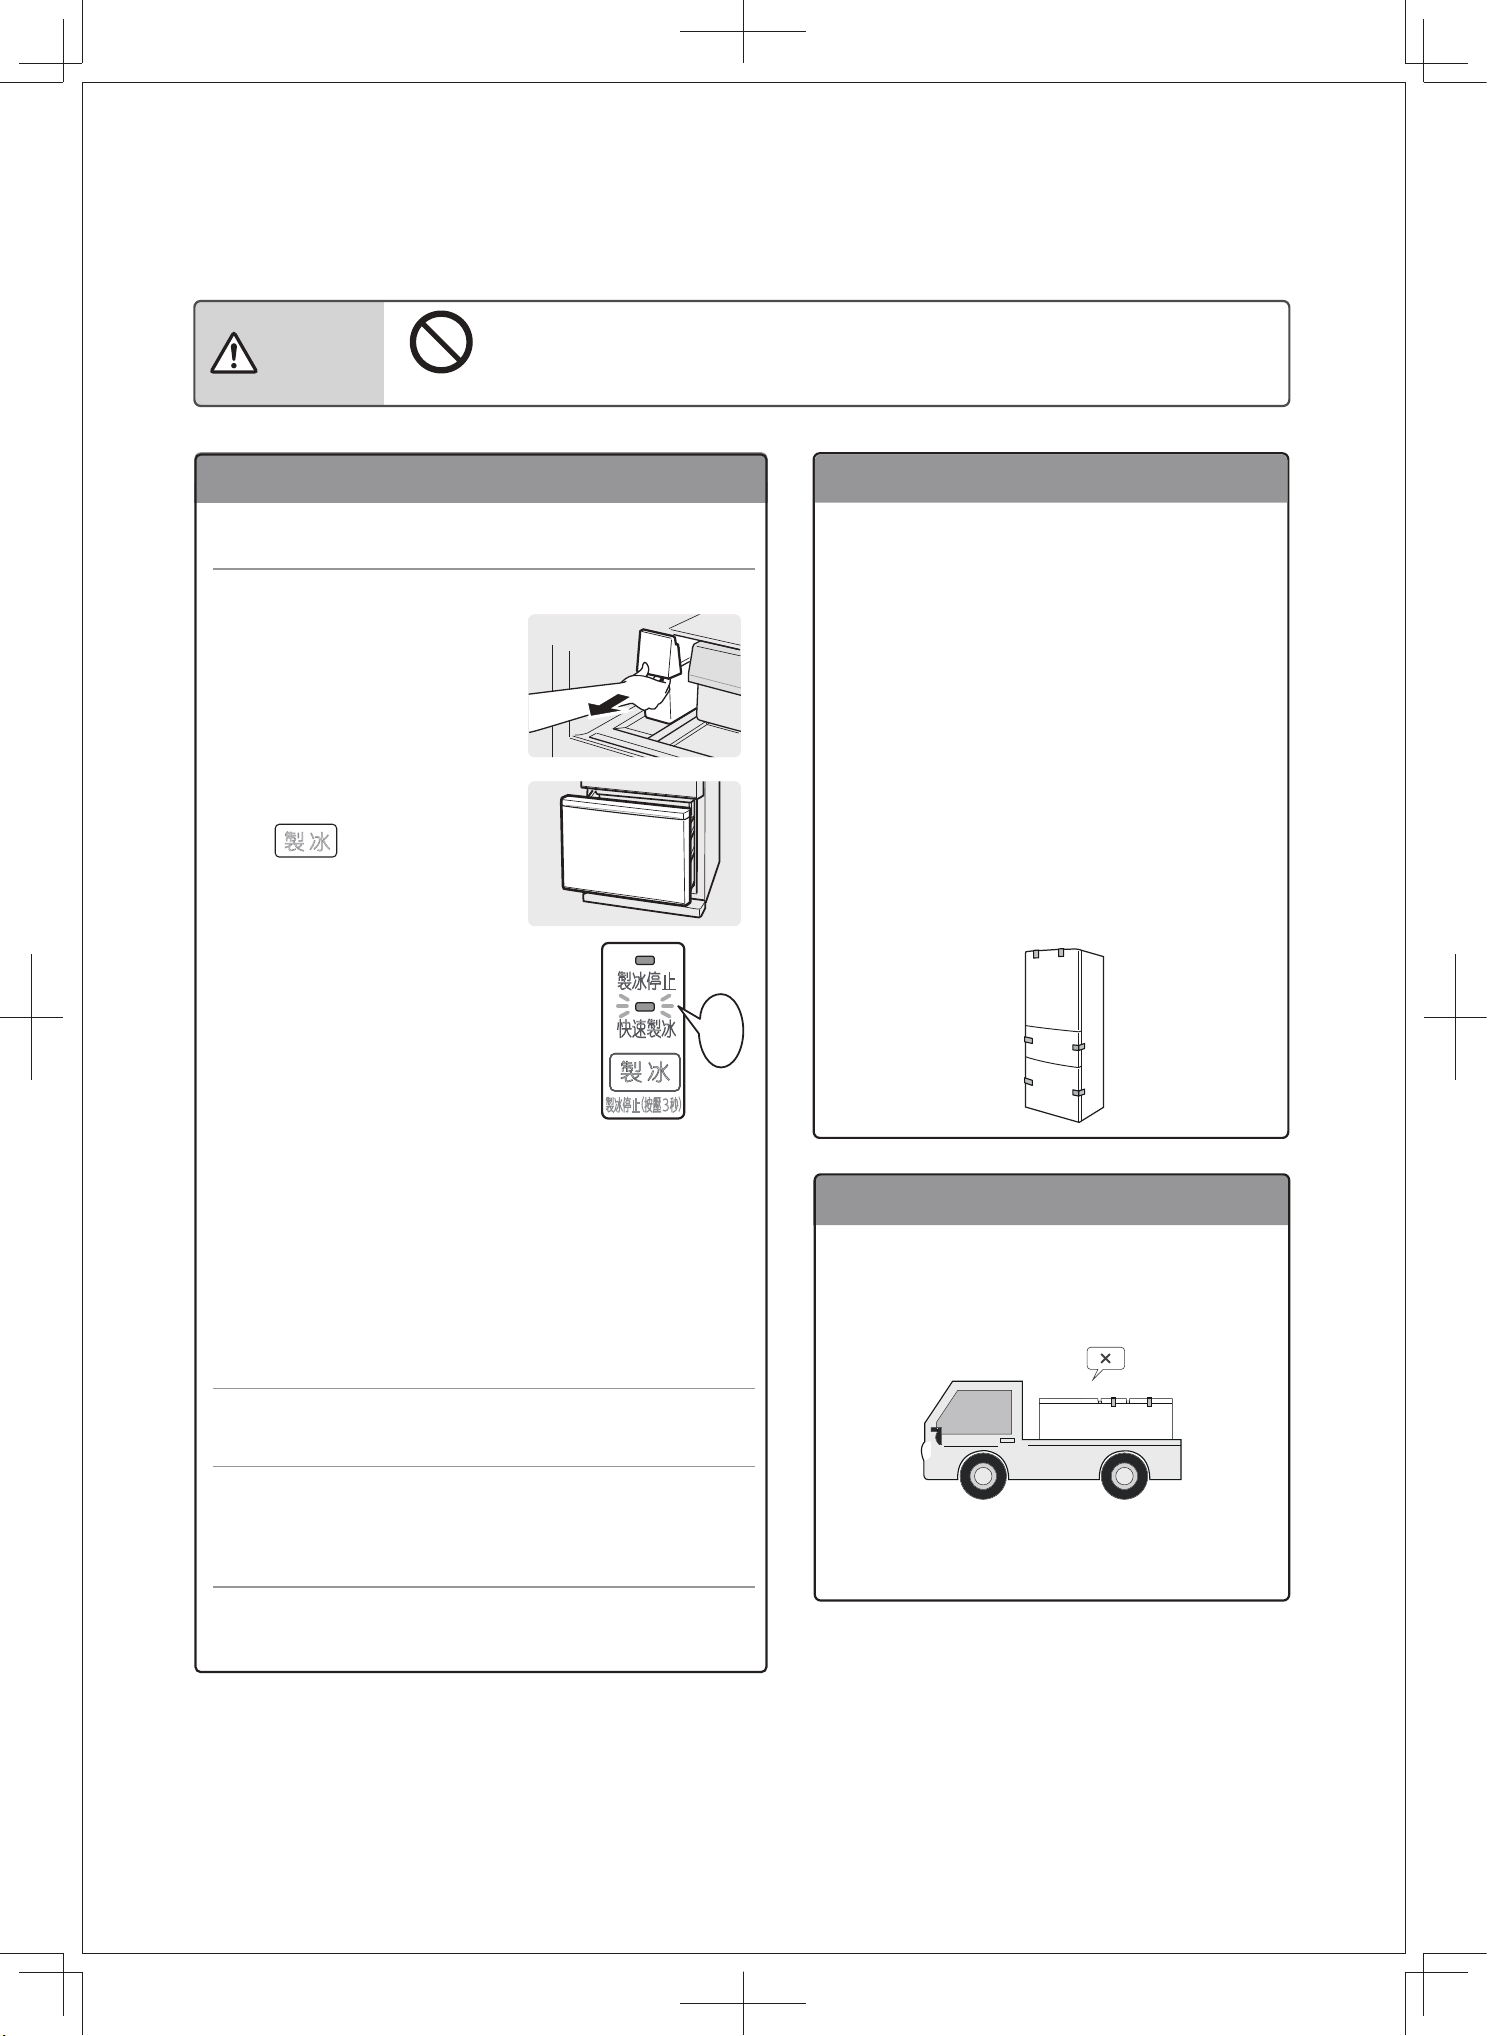
1
2
4
5
3
32
Carrying or Moving House
Take out the foods in the refrigerator
More than two people are needed to carry the
refrigerator.
● When moving the refrigerator back and
forth, lean the refrigerator slightly backward.
There are casters at the bottom of the
refrigerator.
● When carrying the refrigerator, please lay a
protective mat on the passageway first.
Otherwise, the water that is not completely
discharged from the evaporating pan may
spill on the floor.
● When carrying the refrigerator, be sure to
hold the handle instead of the door handle
or door. Otherwise, the refrigerator may fall
and be damaged, or people may be injured.
After the door of the freezing
chamber is closed, the light of
「快速製冰」 starts to flash.
Pull out the power plug.
Remove the front decorative panel.
If anti-overturning devices are installed, they
must be removed.
Pull the refrigerator forward to pull it out.
At this point, the ice tray begins
to rotate, and water and ice are
automatically dumped into the ice storage
box. Therefore, be sure to close the door of the
freezing chamber.
Dump the water from the ice tray.
(1) Take out the water
tank and dump the
remaining water.
(2) Open the door of the
freezing chamber, press
for about 10
seconds until you hear a
beeping sound, and then
close the door of the
freezing chamber.
(3) After the light of 「快速製冰」 stops flashing,
open the door of the freezing chamber and dump
the water and ice from the ice storage box.
(4) Wash the sliding box on the upper layer of the
freezing chamber, ice scoop, and water tank with
water. Then wipe up the remaining water and put
them back in place.
Before moving or carrying
Moving and carrying
Moving house
Avoid damage to the refrigeration circuit on the back or sides of the refrigerator.
Warning
Prohibition
● Please do not put the refrigerator flat,
otherwise the compressor will malfunction.
製冰停止
快速製冰
製 冰
製冰停止(按壓 秒)
Beep,
beep,
beep
製 冰
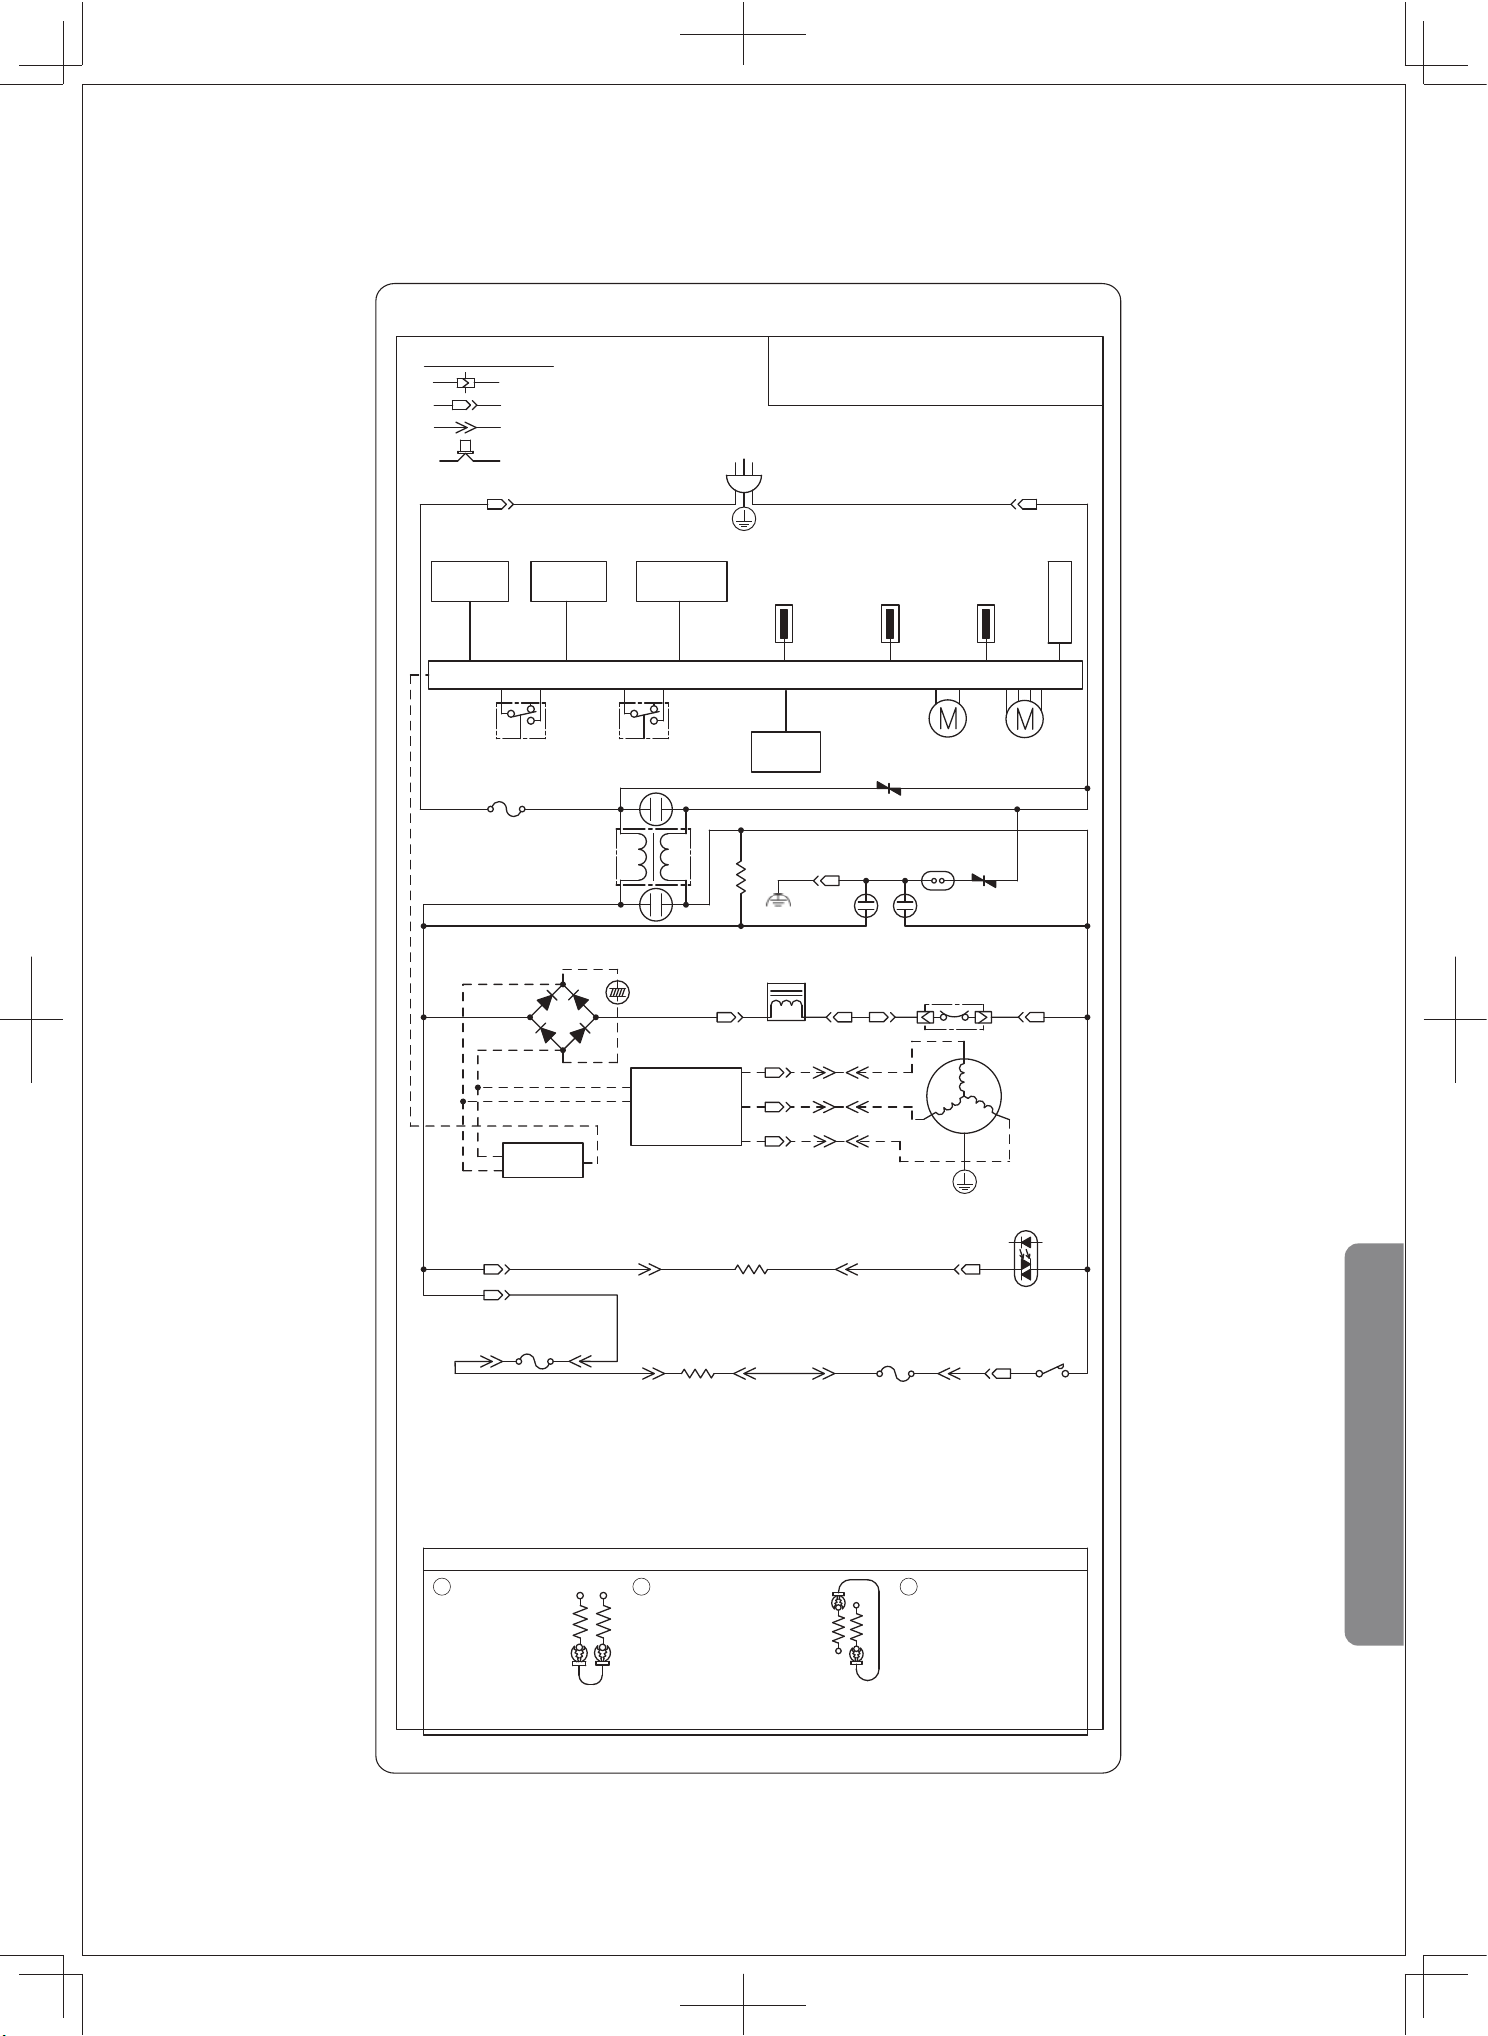
GR-RM469WE-PGA(B3)-1
1 2 3
LEN
R78
R74
R78
R74
33
(F)
(F)(R)
Circuit Diagram
Equivalent circuit diagram
Operation
PCB
Door switch
Current fuse
(250V ~ 6.3A)
Door switch
Throttle
Power PCB
motor
Water supply
motor
F fan
motor
Varistor
Varistor
Green
Black
Black
Black
Peach
Purple
White
White
Blue
Red
Brown
White
Red
Brown
Yellow
Inductor
Over-Temperature
Protection
Inverter
Compressor
Protective earth
Inverter PCB
DC power
supply
Water supply pipe heater
(12kΩ)
Defrost heater
(372Ω)
Method of forced defrosting
The heater resistance value in () is the approximate value used in circuit inspection.
(However, when the temperature of the defrost sensor is higher than the recovery temperature, thedefrost heater will not
Thermal fuse
(76°C or 77°C)
Thermal fuse
(76°C or 77°C)
Buzzer
PCB
Sensor of
R room
Defrost sensor
Circuit diagram of frost-free refrigerator-freezer
Ice maker
When encountering difficulties
Connection terminal
PCB Connectors
Chain Terminals
Closed-end splice
Power plug
Protective earth
220-240V~/50Hz
R room
lighting LED
Sensor of
freezing
room
After defrosting is
short circuit wiring, unplug
the power plug and plug
the power plug in again.
Short-circuit
the lower side
of R78 and R74
of the PCB to
enter the
Then the upper side of R78
and the lower side of R74
are short-circuited, the
timing is shortened, and the
defrost heater is powered
on in about 20 seconds.
confirmed, dismount the
be powered on.)
defrosting mode.
GR-RM469WE-PGA(B3)-1
34
Specifications
Items Technical data
Model number
Freezer compartment stars
Total volume
Fresh Food Storage Volume
Freezer Storage Volume
Cellar Storage Volume (Fruit and Vegetable compartment)
Rated voltage
Rated frequency
Freezing capacity
Ice making capacity
Rated current
Input power for lighting
Energy eciency level
Noise value
Refrigerant
Dimensions (width × depth × height)
● Maximum pushing depth excluding handles and adjustment feet: 665 mm
The freezing chamber of this refrigerator is
rated as .
About the freezing chamber
The defrosting of this refrigerator can be carried out
automatically, so manual defrosting is not needed.
Warning: Do not use mechanical devices or other
means of acceleration other than those
recommended by the manufacturer.
About automatic defrosting
220-240V~
344L
201L
68L
75L
50Hz
6.0kg/24h
1.2kg/24h
0.85A
2.0W
Grade 1
39dB(A)
R600a
600mmX673mmX1757mm
35
( )
t
d-min
(
)
t
d-max
Accessories
Defrosting interval
Movable shelf ......................................................................2
Two-stage movable shelf ................................................1
Quick-cooling fresh-keeping box................................. 1
Top plate of the quick-cooling fresh-keeping box 1
Water tank.............................................................................1
Movable rack........................................................................2
Door rack...............................................................................1
Double bottle rack .............................................................1
Egg holder ............................................................................1
Sliding box of the fruit and vegetable chamber.....1
Fruit and vegetable container.......................................1
Sliding box on the upper layer of the freezing
chamber.................................................................................1
Sliding box on the lower layer of the freezing
chamber.................................................................................1
Ice scoop................................................................................ 1
Water receiver .....................................................................1
Freezing storage container.............................................1
Front decorative panel .....................................................1
Ambient temperature Time Specific conditions
Defrosting interval
Contact information of after-sales service
Hotline: 2635 9222
Specifications are subject to change without prior notice.
The patterns on this manual are all diagrams, and the parts and structures take the actual product as the standard.
10h
32°C
96h
Minimum defrosting interval
Maximum defrosting interval
The freezing chamber cannot reach
the set temperature due to heavy use.
No door opening and closing action,
and no special mode set
When encountering difficulties

version:(K3WL-A)