Instruction
& Recipe
Booklet
For your safety and continued enjoyment of this product, always
read the instruction book carefully before using.
5-Cup Chop & Shred
Food Processor
FP-5 SERIES
GARANTíA DE
TRES AÑOS
ESPAÑOL INCLUIDO

2
Important
Unpacking
Instructions
This package contains a Cuisinart 5-Cup Chop &
Shred Food Processor and the accessories for it:
5-cup work bowl, work bowl cover with pusher,
universal blade, reversible shredding disc (ne/
medium), removable stem adapter, storage hub,
base, and instruction/recipe book.
Caution: The cutting tools have very sharp edges.
To avoid injury when unpacking the parts, please
follow these instructions.
1. Place the box on a low table or on the oor next
to the kitchen counter where you intend to
keep the food processor. Be sure the box is right
side up.
2. Open top aps. There will be a rectangular
block of packing material that holds the
processor parts, each tted into a cavity.
3. Remove the instruction/recipe book.
4. Lift out the packing material.
5. Remove the base and bowl and place them on
the counter or table. Read the instructions
thoroughly before using the machine.
6. Save the shipping carton and packing material.
You will nd these very useful if you need to
repack the processor for moving or other
shipment.
We recommend that you visit our website,
www.cuisinart.com, for a fast, ecient way to
complete your product registration.
Important
Safeguards
Always follow these safety precautions when using
this appliance.
Getting Ready
1. Read all instructions.
2. Blade and disc are sharp. Handle them carefully.
3. Alwaysturnoandunplugappliancefrom
outletwhennotinuse,beforeputtingonor
takingoparts,beforeremovingfood,and
beforecleaning.Tounplug,graspplugandpull
fromelectricaloutlet.Neverpullcord.
4. Do not use outdoors.
5. Do not let cord hang over edge of table or
counter, or touch hot surfaces.
6. Do not operate any appliance that has a
damaged cord or plug, or after it has been
dropped or damaged in any way. Contact
Cuisinart Consumer Service Center for
information on examination, repair, or
adjustment.
Operation
1. Keep hands as well as spatulas and other
utensils away from moving blade or disc while
processing food to prevent the possibility of
severe personal injury or damage to food
processor. A plastic scraper may be used, but
only when the food processor motor is stopped.
2. Avoid coming into contact with moving parts.
Never push food down by hand when shredding.
Always use pusher.
3. Make sure motor has completely stopped
before removing cover. (If machine does not
stop within 4 seconds after you remove the
bowl cover assembly, contact Cuisinart
Consumer Service Center for assistance. Do not
use the machine.)
4. Never store any blade or disc on stem adapter.
To reduce the risk of injury, no blade or disc
should be placed on the shaft except when the
bowl is properly locked in place and the
processor is in use. Store blade and disc as you
would sharp knives, out of reach of children.
5. Be sure cover and feed tube are securely locked
in place before operating food processor.
6. Never feed food by hand. Always use
the pusher.
7. Never try to override or tamper with cover
interlock mechanism.
Cleaning
To protect against risk of electrical shock, do not
put base in water or other liquids.
General
1. This appliance should not be used by or near
children or individuals with certain disabilities.
2. Do not operate this or any other motor-driven
appliance while under the inuence of alcohol
or other substances that aect your reaction
time or perception.
3. This food processor is for household use. Use it
only for food preparation as described in the
accompanying instruction and recipe book.
Do not use this appliance for anything but its
intended use.
4. When using an approved Cuisinart food
processor accessory, read all instructions
included with that accessory.
5. The use of attachments not recommended or
sold by Cuisinart may cause re, electrical
shock, or personal injury, or damage to your
food processor.
3
6. To avoid possible malfunction of work bowl
switch, never store processor with cover
assembly in locked position.
7. Do not operate your appliance in an appliance
garage or under a wall cabinet. When storing in
anappliancegarage,alwaysunplugtheunitfrom
the electrical outlet. Not doing so could create a
risk of re, especially if the appliance touches
the walls of the garage or the door touches the
unit as it closes.
Note:Thisappliancehasapolarizedplug
(onebladeiswiderthantheother).Asasafety
feature,thisplugwilltinapolarizedoutlet
onlyoneway.Iftheplugdoesnottfullyinthe
outlet,reversetheplug.Ifitstilldoesnott,
contactaqualiedelectrician.Donotattemptto
defeatthissafetyfeature.
Note:Thisapplianceisnotintendedforuseby
children or by persons with reduced physical,
sensory,ormentalcapabilities,orlackof
experience and knowledge. Close supervision is
necessary when any appliance is used near
children. Children should be supervised to
ensure that they do not play with the appliance.
Donotllthebowlabovethemarkedmaximum
llline(orratedcapacity)toavoidriskofinjury
due to damage to the cover or bowl.
Save These
Instructions.
For Household
Use Only.
Warning: Risk of fire or
electric shock
The lightning ash with arrowhead
symbol within an equilateral triangle is
intended to alert the user to the presence
of dangerous uninsulated voltage within
the product’s enclosure that may be of
sucient magnitude to constitute a risk
of re or electric shock to persons.
The exclamation point within an
equilateral triangle is intended to alert
the user to the presence of important
operating and maintenance (servicing)
instructions in the literature
accompanying the appliance.
Contents
Important Unpacking Instructions. . . . . . . . . 2
Important Safeguards . . . . . . . . . . . . . . . . 2
Parts. . . . . . . . . . . . . . . . . . . . . . . . . . . 4
Assembly Instructions . . . . . . . . . . . . . . . . 4
Machine Controls . . . . . . . . . . . . . . . . . . . 5
Machine Functions . . . . . . . . . . . . . . . . . . 5
User Guide . . . . . . . . . . . . . . . . . . . . . . . 6
Cleaning, Storage, and Maintenance. . . . . . . . 7
For Your Safety . . . . . . . . . . . . . . . . . . . . 7
Technical Data . . . . . . . . . . . . . . . . . . . . . 7
Troubleshooting . . . . . . . . . . . . . . . . . . . . 8
Recipes . . . . . . . . . . . . . . . . . . . . . . . . . 9
Warranty Information . . . . . . . . . . . . . . . . 14
WARNING
RISK OF FIRE OR ELECTRIC SHOCK
DONOTOPEN
Warning:Toreducetheriskoffireorelectricshock,
Donotremovecover(orback)
Nouser-serviceablepartsinside
Repairshouldbedonebyauthorizedservicepersonnelonly
2.
1.
7.
8.
3.
4.
6.
5.
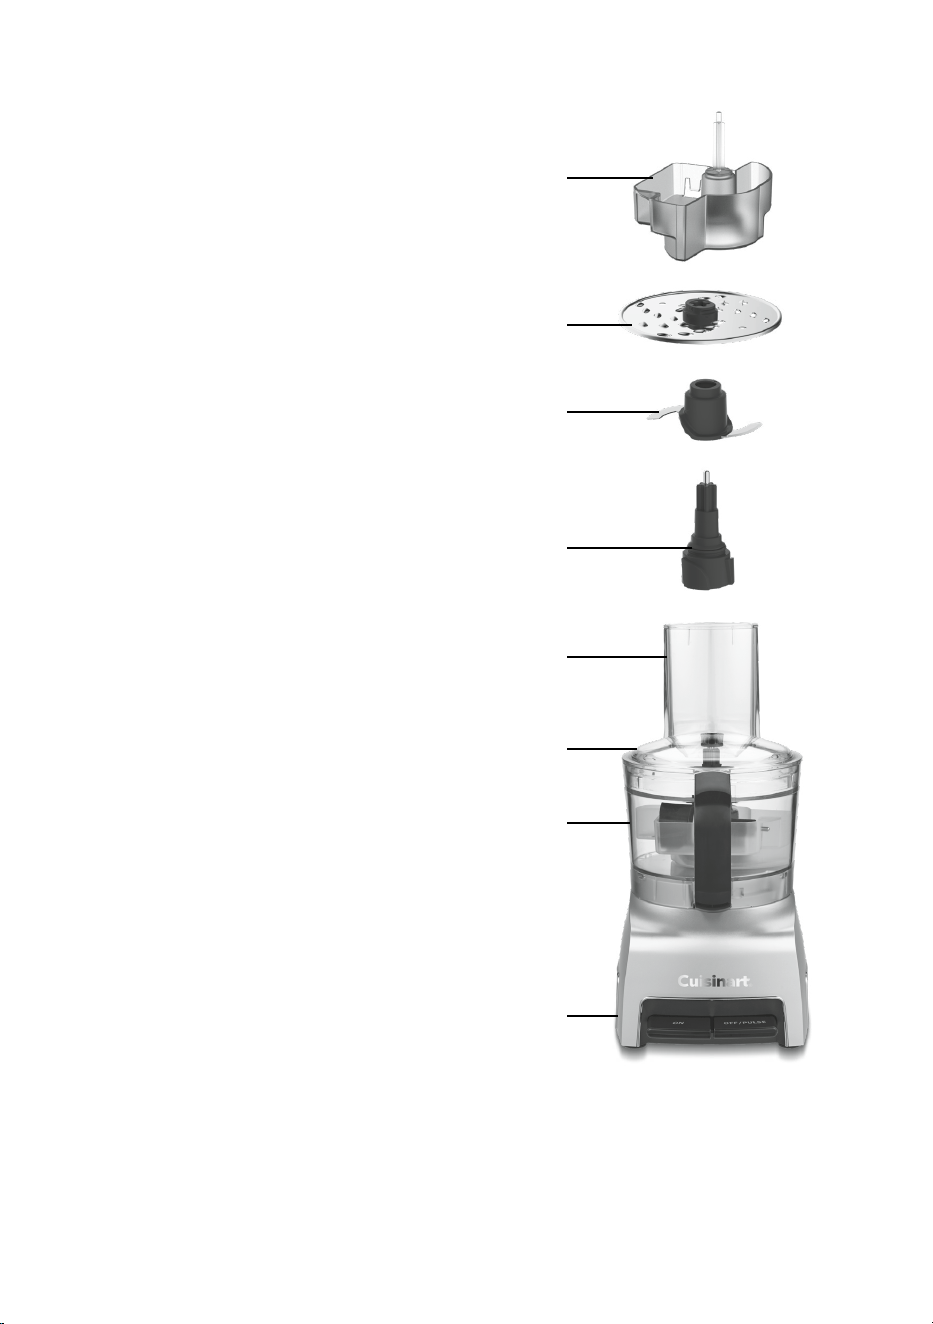
4
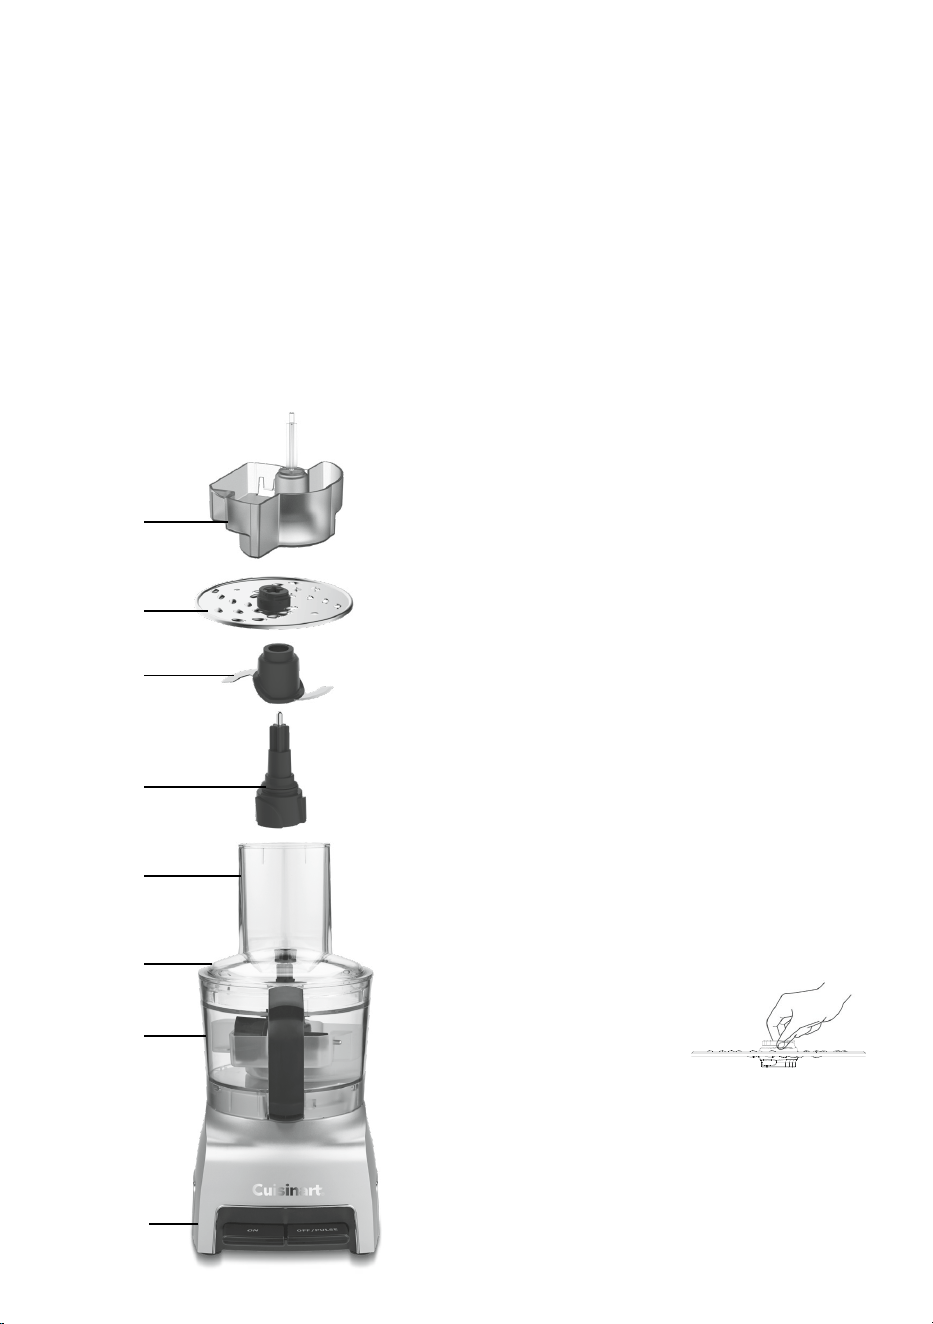
Parts
The machine includes:
1. Housing base – with control paddles for On
and O/Pulse
2. 5-cupremovableworkbowl
3. Workbowlcoverwithfeedtube
4. Pusher
5. Stem adapter
6. Universal blade
7.Reversibleshreddingdisc–ne/medium
8. Storage hub – stores stem adapter, blade, and
disc inside the work bowl (for storage use only)
9. Cord storage
(not shown)
Assembly Instructions
BeforeFirstUse
Before using your Cuisinart
®
5-Cup Chop & Shred
Food Processor for the rst time, wash the work
bowl, work bowl cover, pusher, universal blade,
reversible shredding disc, and stem adapter (see
cleaning instructions on page 7).
1. Place the food processor base on a dry,
level countertop with the control paddles
facing you. Do not plug the unit in until it is
fully assembled.
2. Position the work bowl on the base, with handle
facing to the right of center. Turn the work bowl
clockwise using the handle to securely lock it
onto the housing base.
Universal Blade
1. Place the work bowl on top of base, with the
work bowl handle just to the right of center.
Turn the work bowl clockwise to lock it onto
the housing base until the handle is centered.
2. Carefully place the blade onto the stem
adapter. Holding top of stem adapter, lift and
place over the work bowl accessory adapter.
Blade should click in place and rest on the
bottom of the work bowl.
3. Add desired ingredients to work bowl.
4. Place the work bowl cover with feed tube at the
back of the work bowl just to the left of center.
Turn clockwise to lock the work bowl cover
in place.
5. Align pusher with the feed tube opening on the
work bowl cover and slide down to the bottom.
6. Plug in the housing base.
7. You are now ready to operate the machine.
Reversible Shredding Disc
1. Place the work bowl on top of the base, with
the work bowl handle just to the right of center.
Turn the work bowl clockwise to lock it onto
the housing base until the handle is centered.
2. Insert stem adapter without universal blade
over the work bowl accessory adapter.
3. Carefully place
reversible shredding
disc over stem
adapter, with the side
being used facing up.
4. Place the work bowl cover with feed tube at the
back of the work bowl just to the left of center.
Turn clockwise to lock the work bowl cover
in place.
5. Align pusher with the feed tube opening on the
work bowl cover and slide down to the bottom.
6. Plug in the housing base.
7. The machine is now ready for use.

5
Machine Controls
OnandPulse/OControlPaddles
The On control paddle allows the machine to run
until O/Pulse is selected.
1. Properly assemble and engage the machine.
2. Add ingredients to the work bowl, either
through the feed tube or directly into the bowl.
3. Plug in the unit, and press the On paddle. The
motor will start.
4. Press and release the O/Pulse paddle to stop.
PulseControl
The O/Pulse paddle allows the machine to run
only while it is being pressed. This capability
provides more accurate control of the duration and
frequency of processing. Unless otherwise specied,
a pulse should be about 1 second.
With the machine properly assembled and engaged,
and ingredients in the work bowl, press the O/
Pulse paddle repeatedly as needed.
Machine Functions
Using the Universal Blade
Chopping
• For raw ingredients: Peel, core, and/or remove
seeds and pits. Food should be cut into even
½-inch pieces. Foods cut into same-size pieces
produce the most even results.
• Pulse food in 1-second increments to chop. For
the nest chop, either hold the O/Pulse
paddle down or press On to run the machine
continuously. Watch ingredients closely to
achieve desired consistency and scrape the
work bowl as necessary.
Puréeing
• To purée fresh fruits or cooked fruits/
vegetables: Ingredients should be cut into
½-inch pieces; a smooth purée is best achieved
when all the pieces are equal in size. Pulse to
initially chop and then process by pressing On
until the food is puréed; scrape the work bowl
as necessary.
Note:Donotusethismethodtopuréecooked
white potatoes.
MakingDough
• First, process the dry ingredients (our, salt,
etc). Press On to start processing. With the
machine running, add the liquid ingredients
through the feed tube as quickly as the dry
ingredients will absorb them. Should liquid be
added too quickly, wait until ingredients in work
bowl have been incorporated before adding
more liquid. Add remaining liquid slowly with
machine still running. If dough appears too
sticky, add additional our, about 1 tablespoon
at a time, until a cohesive dough ball is formed.
Conversely, do the same should the dough be
too dry, adding additional liquid 1 tablespoon at
a time until a cohesive dough ball forms.
Never use more than 1½ cups of our when
preparing a yeasted dough in this food
processor.
UsingtheReversibleShreddingDisc
• The shredding disc shreds most rm and hard
cheeses. It also shreds vegetables like potatoes,
carrots, and zucchini.
• Always pack food in the feed tube evenly for
shredding. The food will dictate the amount of
pressure: Use light pressure for soft foods,
medium pressure for medium foods, and rm
pressure for harder foods. Always process with
even pressure.
• For round fruits or vegetables: Remove a thick
slice on the bottom of the produce so that it
sits upright in the feed tube. If food does not t
in the feed tube, cut in half or quarters to t.
Process with even pressure.
• When shredding cheese, be sure that the
cheese is chilled.
Note:Donotuseuniversalbladewhenshredding.
Note:Alwaysusethepusherwhenshredding.Never
putyourhandsinthefeedtubewhileunitisrunning.
FOOD CAPACITY
Shredded fruit, vegetables, or cheese 4 cups
Chopped fruit or vegetable 2 cups
Chopped cheese 1½ cups
Puréed fruit or vegetables 3 cups cooked; 1½ cups puréed
Chopped or puréed meat, sh, or seafood ¾ pound
Thin liquid (e.g., dressings, soups, etc.) 1 cup
White bread/pizza dough 1½ cups (all-purpose or bread our)
Nuts for nut butter 1½ cups
Recommended maximum work bowl capacity

6
FOOD TOOL DIRECTIONS
Soft Cheeses
(Ricotta,
Cream Cheese,
Cottage
Cheese, etc.)
Universal
Blade
Bring cheese to room temperature. When applicable, cut into 1-inch pieces.
Process until smooth, stopping to scrape down the sides of the bowl as
needed. Perfect for making cheesecakes, dips, pasta llings, and more.
Firm Cheeses
(Cheddar,
Swiss, Edam,
Gouda, etc.)
Reversible
Shredding
Disc
Cheese should be well chilled before shredding. Cut to t feed tube. Use
light to medium pressure when shredding.
Hard Cheeses
(Parmesan,
Romano, etc.)
Universal
Blade or
Reversible
Shredding
Disc
If using the universal blade, cut cheese into ½-inch pieces. Pulse to break up
and then process until nely grated. If shredding, cut to t feed tube. Use
light to medium pressure when shredding.
Baby Food Universal
Blade
As for all fruit and vegetable purées, cut ingredients into ½- to 1-inch pieces.
Steam ingredients until completely soft. Pulse to chop, then process until
completely smooth (add steaming liquid through the feed tube when
processing if necessary). To ensure there are no lumps, press mixture
through a ne-mesh strainer. Freeze in ice cube trays for individual
1-ounce portions.
Butter Universal
Blade or
Reversible
Shredding
Disc
For creaming: Bring butter to room temperature. Cut into 1-inch pieces.
Process, scraping bowl as necessary. For compound (avored) butters,
process avoring ingredients, such as herbs, zest, vegetables, etc., before
adding butter. For shredding: Freeze briey. Use light to medium pressure to
shred. Shredded butter is great for preparing certain pastry doughs.
Crumbs
(Bread, Cookie,
Cracker, Chip)
Universal
Blade
Break into pieces. Pulse to break up, and then process until desired
consistency. This will make perfect bread/cracker/chip crumbs for coating
meats and sh. Processed cookies make delicious pie and cake crusts.
Fresh Herbs Universal
Blade
Wash and dry herbs VERY well. Pulse to roughly chop. Continue pulsing until
desired consistency is achieved.
Ground Meat Universal
Blade
Cut meat into ½-inch pieces. Pulse to chop — about 14 long pulses or until
desired consistency is achieved. If a purée is desired, continue to process.
Never chop/purée more than 1½ pounds at one time.
Ice Cream Universal
Blade
Put frozen fruit cut into 1-inch pieces into the work bowl, with liquid (juice
or milk), any desired sweeteners, such as sugar, honey, or simple syrup, and
other avors. Process until smooth, and then freeze as directed.
Milkshakes/
Smoothies
Universal
Blade
For milkshakes, rst add ice cream. While unit is running, add milk through
the feed tube until desired consistency is achieved. For smoothies, add fruit
rst, then add the liquid through the feed tube while unit is running.
Nuts Universal
Blade
Pulse to chop to desired consistency. To make a nut butter, pulse to break
up, and then process until smooth, stopping to scrape down as needed.
Superne
Sugar
Universal
Blade
Process granulated sugar for about 1 minute until nely ground. Excellent for
using in meringues and other baked goods.
Whipped
Cream
Universal
Blade
Process well-chilled cream until cream begins to thicken. Add sugar as
desired; process continuously until cream reaches desired consistency. This
cream is dense and perfect as a topping for cake or ice cream.
User Guide
You can shred and chop a multitude of vegetables and fruits in the Cuisinart
®
food processor. What you
may not know is that the food processor is the perfect tool for a number of other tasks, such as softening
butter, making breadcrumbs, making baby food, etc. Here is a guide that will help you in preparing just
about anything!

7
Cleaning, Storage,
and Maintenance
• Keep your Cuisinart
®
5-Cup Chop & Shred Food
Processor ready to use on the kitchen counter.
When not in use, leave it unplugged. Store
accessories in the provided storage hub, inside
the work bowl.
• Keepthebladeanddiscoutofthereachof
children.
• All parts except the housing base are
dishwasher safe but on the top rack only. Due
to intense water heat, washing the work bowl,
cover, and accessories on the bottom rack may
cause damage over time. Insert the cover with
the feed tube facing up to ensure proper
cleaning. Insert the work bowl and pusher
upside down for drainage. Remember to unload
the dishwasher carefully when removing sharp
blade and disc.
• To simplify cleaning, rinse the work bowl, cover,
pusher, stem adapter, blade, or disc
immediately after use so food won’t dry on
them. Be sure to position the pushers and work
bowl upside down for drainage. If food lodges in
the pusher, remove it by running water through
it, or use a bottle brush.
• If you wash the blade and disc by hand, do it
carefully. When handling, use the plastic hubs.
Avoid leaving them in soapy water where
they may disappear from sight. If necessary,
use a brush.
• Work bowl should not be placed in a
microwave oven.
• The housing base may be wiped clean with a
soapy, nonabrasive cloth or sponge. Be sure to
dry it thoroughly.
• If the feet leave spots on the counter, spray
stains with a spot remover and wipe with a
damp sponge.
• If any trace of the spot remains, repeat the
procedure and wipe the area with a damp
sponge and nonabrasive cleaning powder.
Important: Always use the provided storage hub.
Never store any blade or disc on the stem
adapter. No blade or disc should be placed on
the shaft except when the processor is about to
be used.
Important: Any other servicing should be
performed by an authorized service
representative.
For Your Safety
• Like all powerful electrical appliances, a food
processor should be handled with care. Follow
these guidelines to protect yourself and your
family from misuse that could cause injury.
• Handle and store universal blade and disc
carefully using the provided storage hub. Their
cutting edges are very sharp.
• Never attach the stem adapter with disc
or blade on it until the work bowl is locked
in place.
• Always be sure that the blade or disc is down
on the stem adapter as far as it will go.
• Always insert the stem adapter with metal
blade in the work bowl before putting
ingredients in bowl.
• When shredding food, always use the pusher.
Never put your ngers or spatula into feed tube.
• Always wait for the blade or disc to stop
spinning before you remove the pusher or cover
from the work bowl.
• Always unplug the unit before removing food,
cleaning, or putting on or taking o parts.
• Always remove work bowl from base of machine
before you remove the universal blade or
shredding disc.
• Be careful to prevent the universal blade or
shredding disc from falling out of the work bowl
when emptying the bowl. Remove the stem
adapter with blade before tilting the work bowl.
Technical Data
The motor in your food processor operates on a
standard line operating current. The appropriate voltage
and frequency for your machine are shown on a label
on the bottom of the base.
An automatic temperature-controlled circuit breaker in
the motor ensures complete protection against motor
burnout. If the processor runs for an exceptionally long
time when chopping, mixing, or kneading a thick or
heavy mixture in successive batches, the motor may
overheat. If this happens, the processor will stop. Turn
it off, unplug the unit, and wait for the motor to cool
before proceeding. It will usually cool within 10
minutes. In extreme cases, it could take an hour.
Safety switches prevent the machine from operating
when the work bowl or the cover is not locked into
position. The motor stops within seconds when the
motor is turned off. Cuisinart offers a limited three-year
warranty on the entire machine.

8
Troubleshooting
FoodProcessing
1. Problem: The food is unevenly processed.
Solution:
• The ingredients should be cut evenly into
½- to 1-inch pieces before processing.
• Process in batches to avoid overloading.
2. Problem: Food falls over in feed tube.
Solution:
• Feed tube should be loosely packed.
• Food should not be tightly packed inside the
feed tube for best results.
3. Problem: Some food remains on top of the disc.
Solution:
• It is normal for small pieces to remain; cut
remaining bits by hand and add to processed
ingredients.
4. Problem: Universal blade cannot be removed
from the stem adapter.
Solution:
• Place the blade/stem adapter assembly in a
bowl lled with warm tap water. This should
help loosen trapped food particles between
the blade and stem adapter. To see if food has
loosened, remove assembly from water by
lifting from the stem. Holding the stem, place
the blade assembly on countertop and press
down on stem. This should free the blade
from the stem. If blade still cannot removed,
return to warm water and repeat above steps.
DoughKneading
1. Problem:Motor slows down.
Solution:
• Amount of dough may exceed maximum
capacity of your food processor. Remove half
and process in two batches.
• Dough may be too wet (see number 8). If
motor speeds up, continue processing. If not,
add more our, 1 tablespoon at a time, until
the motor speeds up. Process until dough
cleans the sides of the work bowl.
2. Problem:Blade doesn’t incorporate ingredients.
Solution:
• Always start the food processor before adding
liquid. Add liquid in a slow, steady stream
though the feed tube, allowing the dry
ingredients to absorb the liquid as fast as they
can. If too much liquid is added, wait until
ingredients in the work bowl are incorporated,
then add remaining liquid slowly (do not turn
o the machine). Pour liquid onto dough as it
passes under feed tube opening; do not pour
liquid directly onto bottom of the work bowl.
3. Problem: Blade rises in work bowl.
Solution:
• Excessively sticky dough can cause blade to
rise. Carefully reinsert blade and immediately
add 2 tablespoons of our through the feed
tube while the machine is running.
Technical
1. Problem: The motor does not start.
Solution:
• There is a safety interlock to prevent the
motor from starting if it is not properly
assembled. Make sure the work bowl and work
bowl cover are securely locked into position.
• If the motor still will not start, check the
power cord and outlet.
2. Problem: The food processor shuts o during
operation.
Solution:
• The cover may have become unlocked; check
to make sure it is securely in position.
• A safety protector in the motor prevents the
motor from overheating, which is caused by
excessive strain. Press the O/Pulse paddle,
unplug the unit, and wait 20 to 30 minutes to
allow the food processor to cool o before
resuming.
3. Problem:The motor slows down during
operation.
Solution:
• This is normal as some heavier loads (e.g.,
shredding cheese) may require the motor to
work harder. Simply reposition the food in the
feed tube and try again.
• The maximum load capacity may have been
exceeded. Remove some of the ingredients
and continue processing.
4. Problem: The food processor vibrates or moves
around the countertop during processing.
Solution:
• Make sure the rubber feet at the bottom of
the unit are clean and dry. Also make sure
that the maximum load capacity is not being
exceeded.
• This is normal as some heavier loads (e.g.,
shredding cheese) may require the motor to
work harder.

9
Recipes
Mediterranean Egg Bites .................................... 9
Honey Nut Butter .................................................. 9
Individual Flatbreads with Pesto ..................... 9
Southwestern Queso Dip ..................................10
Cheesy Quesadillas with Guacamole
and Salsa Fresca .................................................10
Guacamole .............................................................11
Salsa Fresca ...........................................................11
Zucchini Potato Cakes ........................................11
Carrot Cake Muffins ...........................................12
Easy Buttermilk Biscuits ....................................12
Pistachio Shortbread .......................................... 12
Mediterranean Egg Bites
Prep breakfast for the week with these tasty
egg bites.
Makes 12 egg bites
Nonstickcookingspray
4 ouncesfontinacheese
1 garlic clove
1/3 cupsun-driedtomatoes(about6halves),
packed in oil
10 large eggs
2 tablespoonswhole-milkplain
Greek yogurt
1 teaspoon plus a pinch kosher salt
¼ teaspoonfreshlygroundblackpepper
1 teaspoon olive oil
1 cup baby kale
1. Preheat the oven to 250°F. Spray a 12-cup mun
pan well with nonstick cooking spray.
2. Insert the medium shredding disc in the food
processor. Shred the fontina. Remove and
reserve.
3. Replace the shredding disc with the universal
blade. Add the eggs, yogurt, 1 teaspoon of the
salt, and the pepper. Process until combined.
Remove and reserve.
4. Add the garlic and process until nely chopped.
Scrape the bowl. Add the sun-dried tomatoes
and pulse until roughly and evenly chopped.
5. Put the oil into a 10-inch skillet and place over
medium-low heat. Once the oil is hot, add the
garlic and sun-dried tomatoes and the pinch of
salt. Sauté, stirring, until the garlic is fragrant.
Add the kale. Cook, tossing, until bright
and wilted.
6. Evenly distribute the cheese and then the
sun-dried tomato-kale mixture among the
prepared cups. Divide the egg mixture evenly
among the cups. Stir each cup with a toothpick
to make sure the ingredients are evenly
distributed.
7. Bake until a toothpick inserted in the center
comes out clean, 25 to 30 minutes.
Honey Nut Butter
Add to your smoothie, toast, or oatmeal.
Makes about 1 cup
1 cup raw almonds
½ teaspoon kosher salt; more as needed
2 tablespoons vegetable oil
4 teaspoons clover honey; more as needed
1. Preheat the oven to 350°F. Spread the almonds
on a baking sheet. Toast until golden brown and
fragrant, 8 to 10 minutes. Cool completely.
2. Once cooled, add the almonds to the work bowl
tted with the universal blade. Pulse 5 to 6
times to break up, and then press On to process.
Scrape the sides of the bowl as needed.
3. With the unit running, slowly stream in the oil
and then the honey. Process until the mixture is
smooth.
4. Taste and add salt or honey as desired. Store in
an airtight container in the refrigerator for up to
two weeks.
Individual Flatbreads
with Pesto
Just one of many topping possibilities for these
easy atbreads.
Makes 4 small atbreads
For the dough
2 teaspoons active dry yeast
1 teaspoon granulated sugar
½ cup plus 2 tablespoons warm water
(105°F to 110°F)
1½ cupsunbleachedall-purposeour
¾ teaspoon kosher salt
1 teaspoonextra-virginoliveoilplusmore
forthebowl

10
For the topping
4 ounceslow-moisturewhole-milk
mozzarella,wellchilled
2 ouncesParmesan,cutinto½-inchpieces
1 small garlic clove
¼ cup pine nuts, lightly toasted
3 cupstightlypackedfreshbasilleaves,
about 3 ounces
½ teaspoon kosher salt
Pinchfreshlygroundblackpepper
½ cupextra-virginoliveoil;morefor
brushing
1. In a liquid measuring cup, dissolve the yeast and
sugar in the warm water. Let stand until foamy,
3 to 5 minutes.
2. Insert the universal blade, and then add the
our and salt to the work bowl. Add the olive oil
to the liquid mixture. With the machine running,
pour the liquid mixture through the feed tube as
fast as the our absorbs it. Process until the
dough cleans the sides of the work bowl and
forms a ball. Continue processing for about 30
seconds to knead.
3. Place the dough in a large, lightly oiled stainless
mixing bowl and cover with plastic wrap. Let rise
in a warm place for about 45 minutes.
4. While the dough is resting, prep the toppings.
Replace the universal blade with the medium
shredding disc. Shred the mozzarella; remove
and reserve.
5. Replace the shredding disc with the universal
blade. Add the Parmesan and garlic to the work
bowl. Pulse 8 to 10 times, and then press On
and process until evenly chopped.
6. Add the pine nuts, basil, salt, and pepper.
Pulse 3 to 5 times, scraping the sides of the
bowl if necessary.
7. Press On, and then pour the olive oil slowly
through the feed tube. Continue processing until
homogenous. Remove and reserve.
8. Place the dough on a lightly oured surface and
punch down. Divide the dough into four equal
portions. Working one piece at a time, gently
press down with your ngertips to atten
slightly, and then stretch each piece into a
3-inch round. Place on a baking sheet and cover
loosely with plastic. Let rest for 30 minutes.
Preheat the oven to 450°F.
9. Once rested, brush the edges of the dough with
olive oil. Spoon 1 tablespoon of pesto on each
round, leaving a ¼-inch edge. Divide the
shredded mozzarella evenly among the four
dough rounds.
10. Transfer the baking sheet to the oven. Bake until
the top is bubbly and the edges of the dough are
golden, pued, and crispy, about 10 minutes.
Remove from the oven. Let rest for 2 to 3
minutes before serving.
Southwestern Queso Dip
This tasty sauce is a perfect dipping companion for
pretzels, chips, and crusty bread.
Makes about 4 cups
1 medium shallot
1 jalapeño,seeded
1 pound sharp Cheddar cheese, cut in
piecestotthefeedtube
6 tablespoons unsalted butter
¼ cupunbleachedall-purposeour
2 cupslow-sodiumchickenbroth
1 can (7 ounces) chopped green chiles
1 teaspoon kosher salt
½ teaspoon onion powder
½ teaspoon garlic powder
1. Insert the universal blade into the work bowl of
the food processor. With the unit running, drop
the shallot and jalapeño through the feed tube
to nely chop. Remove and reserve.
2. Replace the universal blade with the medium
shredding disc. Shred the cheese and reserve.
3. Put the butter in a medium saucepan, and
place over medium-low heat to melt. Add the
shallot and jalapeño. Cook, stirring, until fragrant
and softened.
4. Stir in the our. Cook, stirring, for 1 to 2 minutes.
Slowly add the broth, whisking continuously,
until smooth.
5. Whisk in the cheese a handful at a time,
incorporating each handful before adding the
next. Once all the cheese has been added, stir in
the green chiles, salt, onion powder, and garlic
powder. Serve warm.
Cheesy Quesadillas with
Guacamole and Salsa Fresca
Great for a quick meal or snack. Add homemade
Guacamole and Salsa Fresca for family cheers!
Makes 4 to 8 servings
3 ounces Cheddar cheese
3 ounces Monterey Jack
1 greenonion,cutinto1-inchpieces

11
1 tablespoonpickledjalapeño
1 teaspoon olive oil, plus more as needed
4 8-inchourtortillas
Guacamole, Salsa Fresca, and crema
1. Insert the medium shredding disc into the work
bowl. Shred both cheeses; remove and reserve.
2. Replace the shredding disc with the universal
blade. Add the green onion and then pulse about
5 times to chop. Remove and reserve. Add the
jalapeño to the work bowl and pulse to chop.
Remove and reserve.
3. Put the olive oil in a 10-inch skillet and place
over medium heat. Once the oil is hot, add one
of the tortillas and ip to coat both sides with
oil. Place one-fourth of the cheese over half of
the tortilla and then a sprinkle of the green
onion and jalapeño on top of the cheese.
4. Fold the tortilla to cover the llings. Carefully
ip the quesadilla with a spatula. Let the
quesadilla cook until each side is golden and
crispy, about 2 minutes each. Repeat with the
remaining tortillas, cheese, onion, and jalapeño.
Lower the heat if the tortillas start to get too
dark. Serve immediately with Guacamole,
Salsa Fresca, and crema.
Guacamole
Makes about 2 cups
1 small garlic clove
½ jalapeño,seededandcutinto
1-inchpieces
1 greenonion,cutinto1-inchpieces
2 tablespoons cilantro leaves
2 medium to large ripe avocados
¾ teaspoon kosher salt
1½ tablespoonsfreshlimejuice
1. Insert the universal blade into the work bowl of
the food processor. Add the garlic, jalapeño,
green onion, and cilantro. Pulse to chop, 8 to 10
quick pulses, and then press On to process until
nely chopped.
2. Add the avocado, salt, and lime juice. Use quick
pulses to break down and chop the avocado.
Continue pulsing and/or press On, scraping the
sides of the bowl as needed, until desired
consistency is reached.
3. Taste and adjust seasoning according to
preference.
Salsa Fresca
Makes about 1½ cups
1 small garlic clove
1 smalljalapeño,seededandcutinto
1-inchpieces
1 greenonion,cutinto1-inchpieces
1 pint grape tomatoes
¼ cupfreshcilantro
1 teaspoonfreshlimejuice
½ to ¾ teaspoon kosher salt
1. Insert the universal blade into the food
processor. Add the garlic and jalapeño. Press On
to nely chop.
2. Scrape the sides of the bowl. Add the remaining
ingredients and pulse to roughly chop, 7 to
8 pulses.
3. Strain any excess liquid before serving. Taste
and adjust seasoning according to preference.
Zucchini-Potato Cakes
A way to sneak some veggies into the meal even
with the most nicky eaters!
Makes 10 to 12 cakes
1 tablespoonfreshparsley
1 tablespoonfreshdill
2 smallzucchini,trimmedandcuttotthe
feedtube
1 small to medium russet potato, peeled
andcuttotthefeedtube
1 small shallot
2 tablespoons unbleached
all-purposeour
¾ teaspoon kosher salt
¼ teaspoonfreshlygroundpepper
1 large egg, lightly beaten
2 tablespoons vegetable oil, plus
more as needed
1. Insert the universal blade into the work bowl of
the food processor. Add the parsley and dill.
Pulse to chop, 5 to 6 long pulses. Leave the
herbs in the work bowl.
2. Replace the universal blade with the medium
shredding disc. Shred the zucchini and then the
potato. Wrap the vegetables in a clean kitchen
towel and wring over the sink to squeeze out
any excess liquid.
3. Transfer to a mixing bowl. Toss gently with
the our, salt, and pepper to fully combine.

12
Add the egg and stir so that the mixture just
holds together.
4. Put the oil into a large nonstick skillet over
medium to medium-high heat. Once the oil is
hot, drop a heaping tablespoon of the batter into
the pan. Repeat to form three or four more
cakes, being careful not to crowd the pan. Use
the back of a spoon to atten the cakes into
2½-inch rounds. Cook until crisp and browned,
1½ to 2 minutes, and then ip to cook the other
side for another 1½ to 2 minutes. Cook in
batches, 4 to 5 at a time, being careful not to
crowd the pan. Add additional oil to the pan
if needed.
5. Hold the cakes in a 200°F oven on a rack set in a
baking pan. Serve warm.
Carrot Cake Muffins
With the shredding disc, these muns are
a breeze to make!
Makes 6 muns
Nonstickcookingspray
½ cup toasted walnuts
1 large or 2 medium carrots, peeled
½ cup packed light brown sugar
1 large egg, lightly beaten
¾ cupunbleachedall-purposeour
¼ teaspoon baking soda
¼ teaspoon baking powder
1 teaspoon ground cinnamon
¼ teaspoon ground cloves
¼ teaspoon ground nutmeg
¼ teaspoon ground ginger
½ teaspoon table salt
1/3 cupvegetableoil
¾ teaspoon pure vanilla extract
1. Preheat oven to 375°F. Lightly coat a 6-cup
regular mun pan with nonstick cooking spray;
reserve.
2. Insert the universal blade into the work bowl.
Add the nuts and pulse until evenly chopped.
Remove and reserve.
3. Replace the universal blade with the ne
shredding disc. Shred the carrots and reserve in
a large mixing bowl.
4. Add the brown sugar and egg to the carrot, and
then stir to fully combine. Add the our, baking
soda, baking powder, spices, salt, oil, vanilla, and
walnuts, and stir gently until just combined.
Divide the batter evenly among the prepared
mun cups.
5. Bake until a cake tester inserted in the center of
a mun comes out clean, 22 to 25 minutes.
Transfer the mun pan to a wire rack to cool.
When the muns are cool enough to handle,
transfer to a wire rack to cool completely
before serving.
Easy Buttermilk Biscuits
A simpler method for preparing biscuits. Just scoop,
bake, and serve.
Makes 10 biscuits
1½ cupsunbleachedall-purposeour;more
as needed
½ cupcakeour
1¾ teaspoons baking powder
¼ teaspoon baking soda
1 teaspoon granulated sugar
½ teaspoon kosher salt
Pinchfreshlygroundblackpepper
8 tablespoonsgood-qualityunsalted
butter, cold and cubed
1 cup buttermilk, chilled
1. Preheat the oven to 450°F with a rack in the
middle position. Line two baking sheets with
parchment paper; reserve.
2. Insert the universal blade into the work bowl of
the food processor. Add the dry ingredients and
process to sift. Add the butter and pulse until
well coated with our and about the size of
peas. While pulsing, slowly add the buttermilk
through the feed tube.
3. Turn the dough onto a lightly oured surface and
fold over a few times to incorporate all dry
ingredients. Using a large scoop, about 1/3 cup
in size, drop the dough onto the prepared
baking sheets, leaving about 2 inches of space
between each.
4. Bake until golden brown, 12 to 15 minutes.
Transfer to a wire rack to cool slightly before
serving.
Pistachio Shortbread
Don’t skip toasting the pistachios – it brings out the
oils of the nuts and is crucial to the true pistachio
avor in these cookies.
Makes 30 cookies
½ cup unsalted pistachios, toasted and
cooled
2 tablespoons granulated sugar

13
8 tablespoonsEuropean-quality
unsalted butter, room temperature and
cut into 4 pieces
¼ cupconfectioners’sugar,sifted
½ teaspoon pure vanilla extract
1 cupunbleachedall-purposeour
½ teaspoon kosher salt
1 large egg white, whisked well
1 to 2 tablespoons coarse sugar,
such as turbinado
1. Put the pistachios and 2 tablespoons sugar into
the work bowl of the food processor tted with
the universal blade. Pulse to break up the nuts
and then turn on to process to nely chop,
about 20 seconds.
2. Add the butter, confectioners’ sugar, and vanilla.
Pulse to combine, and then process until the
mixture comes together fully.
3. Add the our and salt, and pulse until combined.
Scrape down the work bowl and pulse a few
times until the dough comes together.
4. Transfer the dough to a piece of parchment.
Form into a 2-inch cylinder and wrap in the
parchment. Refrigerate overnight.
5. Preheat the oven to 350°F with oven racks in the
lower and upper third positions. Line two baking
sheets with parchment paper.
6. While the oven is preheating, remove the dough
from the refrigerator, and then brush with egg
white. Put the coarse sugar in a long rimmed
pan. Roll the egg-washed dough in the sugar.
Cut into ¼-inch-thick slices. Transfer the dough
to the prepared baking pans.
7. Bake until the cookies are just browned at the
edges, about 10 minutes. Transfer the pans to a
wire rack until the cookies are rm enough to
move to a second wire rack to cool completely
before serving.

14
Limited Warranty
LimitedThree-YearWarranty
Subject to the exclusions and limitations contained
herein, Conair LLC dba Cuisinart (“Cuisinart”)
warrants that the Cuisinart
®
5-Cup Chop & Shred
Food Processor (“Product”) will be free from
material defects in materials and workmanship
under normal home use conditions for a period of
THREE (3) years beginning on the date the Product
was purchased in its original, sealed packaging,
unless otherwise specied in this Limited Warranty.
This Limited Warranty is only for U.S. consumers
(dened herein as purchasers at retail for personal,
family, or household use) who originally purchase
the Product from Cuisinart or an authorized
Cuisinart
®
reseller (if you are unsure whether a
retailer or other point of sale is an authorized or
unauthorized Cuisinart reseller, contact Cuisinart).
This Limited Warranty does NOT cover:
• Normal wear and tear;
• Any Product purchased by commercial
purchasers or for commercial or non-household
uses;
• Accessories, parts, or software added to the
Product after the system is shipped from
Cuisinart;
• Any costs associated with the replacement or
repair of the Product, including labor,
installation, or other costs incurred by you
without prior Cuisinart approval;
• Damage to the Product, defective conditions, or
nonconformities due to: (1) external causes,
including shipping, accidents, problems with
electrical power (Product designed only for use
with 120-volt outlets), abnormal conditions
(such as mechanical or environmental); (2)
usage not in accordance with Product
instructions; (3) misuse, neglect, unauthorized
alteration, unauthorized repair; and (4) acts of
God or other events beyond Cuisinart’s control;
• Damage caused by you or any nonauthorized
third party, even though necessary repairs and
maintenance might be performed by any
company;
• Damage caused by accessories or replacement
parts not specically authorized by Cuisinart;
and
• Any Product where the original Product
identication markings (trademark or serial
number) have been removed, altered, or
obliterated.
It is recommended that you visit the website https://
www.cuisinart.com/register-your-product.html for a
fast, ecient way to complete your product
registration. However, product registration does not
eliminate the need for the consumer to maintain
the original proof of purchase in order to obtain the
warranty benets. In the event that you do not have
proof of purchase date, the purchase date for
purposes of this Limited Warranty will be the date
of manufacture.
Hassle-FreeWarranty
If the Product that is the subject of this Limited
Warranty fails during the warranty period for
reasons covered by this Limited Warranty, Cuisinart
will, at its option, repair the Product, replace the
Product with another identical or reasonably
equivalent product, or if Cuisinart is unable to repair
or replace the Product, refund the purchase price,
less the amount directly attributable to the
consumer’s prior usage of the Product. To obtain a
return shipping label, email us at https://www.
cuisinart.com/customer-care/product-assistance/
product-inquiry/, or call our Consumer Service
Center toll-free at 1-800-726-0190 to speak with a
representative.
Upon receipt of the Product, Cuisinart will inspect
the Product and, if required under this Limited
Warranty, attempt to repair, replace, or refund the
Product within thirty (30) days. However, there may
be delays beyond Cuisinart’s control, in which case
that time period may be extended as reasonably
necessary.
Important: If the nonconforming Product is to be
serviced by someone other than Cuisinart’s
Authorized Service Center, please remind the
servicer to call our Consumer Service Center at
1-800-726-0190 to ensure that the problem is
properly diagnosed, the Product is serviced with the
correct parts, and the Product is still under
warranty.
CaliforniaResidentsOnly
The THREE (3) year Limited Warranty period begins
on the date the Product was delivered, which may
be dierent than the date the Product was
purchased. California residents also have the option
of obtaining the benets of this Limited Warranty by
bringing the Product to (A) the store where it was
purchased or (B) another retail store that sells
Cuisinart products of the same type. The retail store
shall then, according to its preference, either repair
the Product, refer the consumer to an independent
repair facility, replace the Product with another
identical or reasonably equivalent product, or refund
the purchase price less the amount directly
attributable to the consumer’s prior usage of the
Product. California residents may also, according to
their preference, return nonconforming products
directly to Cuisinart for repair or, if necessary,
replacement with another identical or reasonably
equivalent product by calling our Consumer Service
Center toll-free at 1-800-726-0190. Cuisinart will be
responsible for the cost of such repair, replacement,
and/or shipping and handling for such
nonconforming products under warranty.

15
THISLIMITEDWARRANTYGIVESYOUSPECIFIC
LEGALRIGHTS,ANDYOUMAYALSOHAVEOTHER
RIGHTSTHATVARYFROMSTATETOSTATEORBY
JURISDICTION.INTHEEVENTTHISLIMITED
WARRANTYISBREACHED,YOUMAYHAVECLAIMS
FORREPLACEMENT,DAMAGES,OROTHER
PENALTIES.
LIMITATIONSOFLIABILITY/ADDITIONALLIMITATIONS
ANDEXCLUSIONS
ALLEXPRESSANDIMPLIEDWARRANTIESARE
LIMITEDINDURATIONTOTHELIMITEDWARRANTY
PERIOD.NOWARRANTIESAPPLYAFTERTHAT
PERIOD.SOMESTATES(ORJURISDICTIONS)DONOT
ALLOWLIMITATIONSONHOWLONGANIMPLIED
WARRANTYLASTS,SOTHISLIMITATIONMAYNOT
APPLYTOYOU.CUISINART’SRESPONSIBILITYUNDER
THISORANYOTHERWARRANTY,IMPLIEDOR
EXPRESS,ISLIMITEDTOREPAIR,REPLACEMENT,OR
REFUND,ASSETFORTHABOVE.
THESEREMEDIESARETHESOLEANDEXCLUSIVE
REMEDIESFORANYBREACHOFWARRANTY.TOTHE
MAXIMUMEXTENTPERMITTEDBYLAW,CUISINART
ISNOTRESPONSIBLEFORANYDIRECT,INDIRECT,
SPECIAL,INCIDENTAL,ORCONSEQUENTIAL
DAMAGESRESULTINGFROMANYBREACHOF
WARRANTYORUNDERANYOTHERLEGALTHEORY
(INCLUDING,BUTNOTLIMITEDTO,LOSTPROFITS,
DOWNTIME,LOSSOFGOODWILL,DAMAGETOOR
REPLACEMENTOFEQUIPMENTANDPROPERTY,AND
ANYCOSTSOFRECOVERING,REPROGRAMMING,OR
REPRODUCINGANYPROGRAMORDATASTOREDIN
ORUSEDWITHASYSTEMCONTAININGTHE
PRODUCT),EVENIFCUISINARTHASBEENADVISED
OFTHEPOSSIBILITYOFSUCHDAMAGES.SOME
STATES(ORJURISDICTIONS)DONOTALLOWTHE
EXCLUSIONORLIMITATIONOFINCIDENTALOR
CONSEQUENTIALDAMAGES,SOTHEABOVE
LIMITATIONSOREXCLUSIONSMAYNOTAPPLYTO
YOU.ALLEXPRESSANDIMPLIEDWARRANTIESARE
LIMITEDINDURATIONTOTHELIMITEDWARRANTY
PERIOD.NOWARRANTIESAPPLYAFTERTHAT
PERIOD.SOMESTATES(ORJURISDICTIONS)DONOT
ALLOWLIMITATIONSONHOWLONGANIMPLIED
WARRANTYLASTS,SOTHISLIMITATIONMAYNOT
APPLYTOYOU.
This Limited Warranty is issued by:
Conair LLC
1CummingsPointRoad
Stamford,CT06902
1-800-726-0190

16

17
Importantes
Instrucciones
de Desembalaje
Esta caja incluye la procesadora de alimentos de 5
tazas (1L) Cuisinart
®
y sus accesorios:
Un bol de 5 tazas (1L), una tapa con empujador, una
cuchilla universal, un disco triturador reversible
no/medio, un adaptador removible, un eje de
almacenamiento, un bloque-motor (base) y un
manual de instrucciones/libro de recetas.
PRECAUCIÓN:
ELDISCOYLACUCHILLASONMUYAFILADAS.
Para evitar el riesgo de lesiones, desembale con
cuidado el aparato, siguiendo las instrucciones a
continuación:
1. Coloque la caja en una supercie plana y
amplia, tal como una mesa o une encimera.
Compruebe que la caja no esté de cabeza.
2. Abra la caja. En la caja, encontrará un bloque de
espuma de poliestireno con cavidades que
contienen las piezas de la procesadora.
3. Retire el manual de instrucciones/libro
de recetas.
4. Quite el material de embalaje.
5. Retire la base y el bol de la caja colócalos en la
encimera/mesa. Lea atentamente todas las
instrucciones antes de usar el aparato.
6. Se recomienda conservar el material de
embalaje; puede ser útil para volver a
empaquetar el aparato cuando se mude o
necesite enviarlo por correo.
Se recomienda llenar el formulario de registro
disponible en www.cuisinart.com a n de facilitar la
vericación de la fecha de compra original de este
producto.
Medidas de
Seguridad
Importantes
Al usar aparatos eléctricos, siempre se deben tomar
precauciones básicas de seguridad, entre ellas las
siguientes:
Preparación
1. Lea todas las instrucciones.
2. Lacuchillaylosdiscossonmuyalados;
manipúlelos con sumo cuidado.
3. Siempreapagueydesenchufeelaparatocuando
noestéenuso,antesdeinstalar/quitarpiezas,
antesdevaciarelbolyantesdelimpiarlo.Para
desenchufar,agarreelenchufeyjálalopara
sacarlodelatomadecorriente;nuncajaleel
cable.
4. No lo use en exteriores.
5. No deje que el cable cuelgue de la encimera o
de la mesa, ni que tenga contacto con
supercies calientes.
6. No use este aparato si el cable o el enchufe
están dañados, si no funciona correctamente, si
está dañado o después de una caída; contacte
a nuestro centro de atención al cliente para
devolverlo para su revisión, reparación o ajuste.
Operación
1. Para reducir el riesgo de lesiones personales
graves o de daño al aparato, mantenga las
manos y los utensilios alejados de las cuchillas
o de los discos durante el funcionamiento. Se
puede usar una espátula de goma/plástico,
siempre que el aparato esté apagado.
2. Evite el contacto con las piezas móviles.
Nunca introduzca la mano en el tubo de
alimentación; siempre use el empujador.
3. Espere hasta que el motor se haya detenido por
completo antes de quitar la tapa. Si el motor no
se detiene dentro de 4 segundos después de
abrir la tapa, desenchufe el aparato y llame a
nuestro centro de atención al cliente para
asistencia. No use el aparato.
4. No guarde las cuchillas ni los discos en el
adaptador removible. Para reducir el riesgo de
lesiones personales, nunca instale la cuchilla o
el disco antes de haber comprobado que el bol
esté correctamente instalado. Guarde los
accesorios fuera del alcance de los niños.
5. Compruebe que la tapa esté correctamente
puesta y que el empujador esté completamente
engranado antes de encender el aparato.
6. Nunca empuje los alimentos con la mano.
siempre use el empujador.
7. No intente forzar/modicar el mecanismo de
enclavamiento/bloqueo de seguridad de la tapa.
Limpieza
Para reducir el riesgo de descarga eléctrica, no
coloque el bloque-motor en agua u otros líquidos.
Generalidades
1. Este aparato no debe ser usado por o cerca de
niños o personas con ciertas discapacidades.
2. No use este aparato bajo el efecto de alcohol u
otra sustancia que afecte su tiempo de
reacción o su percepción.
18
3. Este aparato es para uso doméstico. Úselo
solamente para la preparación de alimentos y
como se describe en este manual de
instrucciones y libro de recetas. Use este
aparato solo para el uso previsto.
4. Antes de usar un accesorio aprobado para uso
con este procesadora de alimentos, lea todas
las instrucciones incluidas con el accesorio.
5. El uso de accesorios no recomendados o
vendidos por Cuisinart puede provocar un
incendio, una descarga eléctrica o lesiones, o
dañar el aparato.
6. Nunca guarde el aparato en la base con la tapa
cerrada.
7. No haga funcionar el aparato debajo o dentro de
un armario/gabinete. Siempredesenchufeel
aparatoantesdealmacenarloenunarmario/
gabinete. Dejar el aparato enchufado representa
un riesgo de incendio, especialmente si este
toca las paredes o la puerta del armario/
gabinete cuando se cierra.
N o t a : El cable de este aparato cuenta con un
enchufe polarizado (una pata es más ancha que
otra). Como medida de seguridad, se podrá
enchufar de una sola manera en las tomas de
corriente polarizadas. Si no entra en la toma de
corriente, inviértalo. Si aún así no entra
completamente, comuníquese con un
electricista. No intente modicar esta función
de seguridad.
N o t a : Los niños o las personas que carezcan de
la experiencia o de los conocimientos
necesarios para manipular el aparato, o aquellas
cuyas capacidades físicas, sensoriales o
mentales estén limitadas, no deben usar este
aparato. Supervise el uso del aparato con
cuidado cuando sea usado cerca de niños. No
deje que los niños jueguen con este aparato.
Para evitar el riesgo de lesiones o daños al bol o
a la tapa, no llene el bol por encima de la línea
de llenado máximo, o más allá de su capacidad.
Guarde estas
Instrucciones.
Para Uso
Doméstico
Solamente.
Advertencia: Riesgo de
Incendio o Descarga
Eléctrica
El símbolo de relámpago con punta de
echa dentro de un triángulo equilátero
tiene como n alertar al usuario de la
presencia de voltajes peligrosos no
aislados en el interior del aparato, los
cuales pueden ser de suciente magnitud
para constituir un riesgo de incendio o
descarga eléctrica.
El signo de exclamación dentro de un
triángulo equilátero tiene como n alertar
al usuario de la presencia de
instrucciones importantes de uso y
mantenimiento (servicio) en la
documentación que acompaña al equipo.
ÍNDICE
Instrucciones de desembalaje . . . . . . . . . . . .17
Medidas de seguridad importantes . . . . . . . . 17
Piezas . . . . . . . . . . . . . . . . . . . . . . . . . . 19
Instrucciones de Ensamblaje . . . . . . . . . . . .20
Controles . . . . . . . . . . . . . . . . . . . . . . . .20
Funciones. . . . . . . . . . . . . . . . . . . . . . . .20
Guía de referencia. . . . . . . . . . . . . . . . . . .22
Limpieza, almacenamiento y mantenimiento. . .23
Para su seguridad . . . . . . . . . . . . . . . . . . .23
Especificaciones técnicas . . . . . . . . . . . . . . 23
Resolución de problemas . . . . . . . . . . . . . .24
Recetas . . . . . . . . . . . . . . . . . . . . . . . . .25
Garantía . . . . . . . . . . . . . . . . . . . . . . . .30
ADVERTENCIA
RIESGODEINCENDIOODESCARGA
ELÉCTRICA;NOLOABRA
ADVERTENCIA:PARAREDUCIRELRIESGODEDESCARGA
ELÉCTRICA,NODESARMELACARCASADELAPARATO.
ESTEAPARATONOCONTIENENINGUNAPIEZAQUEPUEDASER
REPARADA/REEMPLAZADAPORELUSUARIO.
LASREPARACIONESDEBENSERREALIZADASPORTÉCNICOS
AUTORIZADOSSOLAMENTE.
19
Piezas
1. Bloque-motor(base) – con dos controles:
ON (encendido continuo) y OFF/PULSE
(apagado/pulso)
2. Bolremoviblede5tazas(1L)
3. Tapacontubodealimentación
4. Empujador
5. Adaptador removible
6. Cuchilla universal
7.Discotrituradorreversible(no/medio)
8. Ejedealmacenamiento – Para guardar el
adaptador removible, la cuchilla y el disco
en el bol.
9. Espacio para guardar el cable (no ilustrado)
2.
1.
7.
8.
3.
4.
6.
5.

20
Instrucciones
de Ensamblaje
Antes del primer uso
Antes de usar el aparato por primera vez, lave todas
las piezas removibles como se describe en las
instrucciones de limpieza.
1. Coloque el aparato sobre una supercie
nivelada y seca.
No enchufe el aparato hasta que esté
completamente ensamblado.
2. Coloque el bol sobre la base, con el asa
ligeramente a la derecha del centro. Gire el bol
en sentido horario para bloquearlo.
Cuchilla Universal
1. Coloque el bol sobre la base, con el asa
ligeramente a la derecha del centro. Gire el bol
en sentido horario hasta que el asa esté en el
centro para sujetarlo.
2. Con cuidado, deslice la cuchilla por encima del
adaptador. Sosteniendo el adaptador por la
parte superior, colócalo en el eje del bol. La
cuchilla debe encajar y descansar en el fondo
del bol.
3. Coloque los ingredientes deseados en el bol.
4. Coloque la tapa sobre el bol, con el tubo de
alimentación en la parte de atrás, ligeramente a
la izquierda del centro. Gire la tapa en sentido
horario para bloquearla.
5. Inserte el empujador en el tubo de
alimentación.
6. Enchufe el cable en una toma de corriente.
7. El aparato está listo para su uso.
Disco Triturador
Reversible
1. Coloque el bol sobre la base, con el asa
ligeramente a la derecha del centro. Gire el bol
en sentido horario hasta que el asa esté en el
centro para sujetarlo.
2. Coloque el adaptador sobre el eje del motor.
3. Con cuidado, coloque el disco triturador
reversible sobre el adaptador, con el lado que
desea usar apuntado hacia arriba.
4. Coloque la tapa sobre el bol, con el tubo de
alimentación en la parte de atrás, ligeramente a
la izquierda del centro. Gire la tapa en sentido
horario para bloquearla.
5. Inserte el empujador en el tubo de
alimentación.
6. Enchufe el cable en una toma de corriente.
7. El aparato está listo para su uso.
Controles
BotónON
(encendido continuo)
1. Ensamble el aparato como se describió en las
instrucciones de ensamblaje.
2. Coloque los ingredientes en el bol o
introdúcelos en el tubo de alimentación.
3. Enchufe el aparato y presione el botón ON; el
motor se encenderá.
4. Para apagar, presione el botón OFF/PULSE.
BotónOFF/PULSE
(funcióndepulso)
La función de pulso proporciona más control para
evitar procesar excesivamente los ingredientes.
Salvo indicación contraria en la receta, use
pulsaciones de aprox. 1 segundo.
Ensamble el aparato como se describe en las
instrucciones de ensamblaje. Ponga los ingredientes
en el bol. Presione repetidamente el botón OFF/
PULSE hasta obtener la consistencia deseada.
Funciones
Instrucciones de uso de la cuchilla universal
Cómopicar
• Alimentos crudos: Pele las frutas y los
vegetales, y quite las partes duras (corazón,
pepas, semillas, huesos, etc.). Corte los
alimentos en pedazos uniformes de
½in(1.5cm); obtendrá resultados más
homogéneos con pedazos del mismo tamaño.
• Procese los alimentos con la función de pulso,
usando pulsaciones de 1 segundo, hasta obtener
la consistencia deseada. Para obtener una
textura más na, mantenga presionado el botón
OFF/PULSE o presione el botón ON. Compruebe
la consistencia a menudo y raspe el bol con una
espátula si es necesario.
Cómohacerpuré
• Puré de frutas/vegetales crudos o cocinados:
Corte los ingredientes en pedazos de
½in(1.5cm); se obtendrán resultados más
homogéneos con pedazos del mismo tamaño.
Presione repetidamente el botón OFF/PULSE
para picar, y luego procese continuamente hasta
obtener puré, parando para raspar el bol si es
necesario.
Nota:Nouseestemétodoparahacerpuré
de papas.

21
Cómoamasar
• Primero, procese los alimentos secos (harina,
sal, etc.) para tamizarlos. Presione el botón ON
para encender el aparato. Sin apagarlo, agregar
lentamente el líquido por el tubo de
alimentación, cerciorándose de que los
ingredientes secos absorben el líquido antes de
verter más. Nota: Si agrega líquido demasiado
rápido, espere hasta que los ingredientes se
hayan incorporado antes de agregar más
líquido. Agregue el líquido restante lentamente,
mientras el aparato sigue encendido. Si la masa
está demasiado pegajosa, agregar harina, una
cucharada a la vez, hasta que se forme una bola
de masa. Si la masa está demasiado seca,
agregar agua, una cucharada a la vez, hasta que
se forme una bola de masa. Nunca use más de
1½ tazas (375 g) de harina cuando prepare masa
de levadura.
Uso del disco triturador reversible
• El disco triturador es capaz de triturar la mayoría
de los quesos rmes y duros. También puede
usarse para triturar alimentos tales como papas,
zanahorias y calabacines/calabacitas.
• Para obtener resultados homogéneos, apretuje los
alimentos en el tubo de alimentación. La presión
necesaria dependerá de la consistencia de los
alimentos. Use una presión ligera para rebanar
alimentos suaves, una presión moderada para
rebanar alimentos rmes, y una presión rme para
rebanar ingredientes duros. Siempre ejerza una
presión uniforme.
• Para cortar frutas/vegetales en rodajas: Corte la
extremidad inferior de la fruta o del vegetal, e
introdúcelo en el tubo de alimentación, el lado
cortado primero. Si no cabe, córtelo a la mitad o
en cuartos. Procese, ejerciendo una presión
uniforme.
• Refrigere o congele brevemente el queso antes de
triturarlo.
NOTA:Nouselacuchillauniversalparatriturar.
NOTA:Siempreempujelosalimentosconel
empujador;nuncaintroduzcalosdedoseneltubode
alimentaciónduranteelfuncionamiento.
ALIMENTO CAPACIDAD
Frutas/vegetales/queso triturados 5 tazas
Frutas/vegetales picados 2 tazas
Queso picado 1½ tazas
Puré de frutas/vegetales 3 tazas (volumen procesado: 1½ tazas)
Carne, pescado o mariscos picados o molidos ¾lb (340 g)
Líquidos uidos (p.ej., aderezo, sopa, etc.) 3 tazas (700 ml)
Masa de pan blanco/pizza 1½ tazas (300 g) de harina (común o de pan).
Mantequilla de fruto seco (p.ej., maní) 1½ tazas
Capacidades Máximas

22
ALIMENTO ACCESORIO INSTRUCCIONES
Quesos suaves
(ricota/requesón,
queso crema,
requesón, etc.)
Cuchilla universal Lleve el queso a temperatura ambiente. De ser necesario, corte el queso en
pedazos de 1in(2.5cm). Procese hasta que esté namente picado, parando para
raspar el bol de vez en cuando si es necesario. Perfecto para preparar pastel de
queso, salsas para mojar/cremas para untar, relleno de pasta, etc.
Quesos rmes
(Cheddar, suizo,
Edam, Gouda,
etc.)
Disco triturador
reversible
Refrigere o congele brevemente el queso antes de triturarlo. Corte los alimentos
en pedazos que quepan en el tubo de alimentación. Use una presión ligera a
moderada.
Quesos duros
(Parmesano,
Romano, etc.)
Cuchilla universal o
disco triturador
Para picarlo (usando la cuchilla universal), córtelo en pedazos de ½in(1.5cm).
Pulse varias veces para picar, y luego procese hasta que esté namente picado;
Para triturarlo (usando el disco triturador): Córtelo en pedazos que quepan en el
tubo de alimentación. Use una presión ligera a moderada.
Papillas Cuchilla universal Corte las frutas/los vegetales en pedazos de ½-1in(1.5-2.5cm). Cocine los
ingredientes al vapor hasta que estén muy suaves. Pulse para picar, y luego
procese hasta obtener la consistencia deseada (agregar líquido por el tubo de
alimentación si es necesario). Cuele el puré con un colador de malla na.
Congela el puré en bandejas de cubitos de hielo para conseguir porciones
individuales de 1 oz (30 g).
Mantequilla Cuchilla universal o
disco triturador
Para acremar: Lleve la mantequilla a temperatura ambiente. Córtela en pedazos
de 1in(2.5cm). Procese, raspando el bol si es necesario. Para preparar
mantequillas aromatizadas, procese los ingredientes aromatizantes (hierbas,
ralladura, vegetales. etc.) primero, antes de agregar la mantequilla. Para triturar:
Congélela brevemente. Use una presión ligera a moderada. Triturar la
mantequilla puede resultar útil para preparar ciertos tipos de hojaldres.
Pan rallado o
galletas molidas
Cuchilla universal Rómpalo en pedazos. Pulse para picar, y luego procese hasta obtener la textura
deseada. Esto producirá pan/galletas saladas/chips rallados perfectos para
empanar/rebozar carne o pescado. ¡Las galletas ralladas son perfectas para
preparar corteza de tarta y pastel!
Hierbas frescas Cuchilla universal Lave y seque MUY BIEN las hierbas. Pulse para picar grueso. Siga pulsando hasta
obtener la consistencia deseada.
Carne molida Cuchilla universal Corte la carne en pedazos de ½in(1.5cm). Pulse para picar (aprox. 14
pulsaciones largas), hasta conseguir la consistencia deseada. Para moler, siga
procesando continuamente. No procese más de 1½lb (680 g) a la vez.
Helado Cuchilla universal Coloque pedazos de 1in(2.5cm) de fruta congelada en el bol. Agregar el líquido
(jugo o leche), el edulcorante deseado (azúcar, miel, jarabe simple) y otros
sabores. Procese hasta conseguir una consistencia suave, y luego congele.
Batidos/Licuados
(“smoothies”)
Cuchilla universal Para preparar batidos, agregue el helado primero. Sin apagar, vierta la leche por
el tubo de alimentación y procese hasta obtener la consistencia deseada. Para
hacer licuados de frutas, procese las frutas primero, y luego agregue el líquido
por el tubo de alimentación, sin apagar el aparato.
Nueces Cuchilla universal Pulse hasta obtener la consistencia deseada. Para preparar mantequilla de nuez
(como p.ej., mantequilla de maní), pulse para picar y luego procese hasta que
esté suave, parando para raspar el bol de vez en cuando si es necesario.
Azúcar superno Cuchilla universal Procese el azúcar granulado por aprox. 1 minuto, hasta pulverizarlo. El azúcar
superno es ideal para preparar merengues y otros productos de panadería y
contería.
Crema batida Cuchilla universal Procese la crema fría hasta que se espese. Agregue la cantidad deseada de
azúcar y siga procesando hasta obtener la consistencia deseada. La crema
batida será densa, perfecta para acompañar pastel o helado.
Guía de Referencia
Su nueva procesadora de alimentos Cuisinart
®
permite rebanar, triturar y picar una gran variedad de frutas y
vegetales. También es la herramienta perfecta para muchos otros trabajos de preparación, tales como
suavizar mantequilla, rallar pan, preparar papillas y mucho más. ¡A continuación incluimos una guía que le
ayudará a preparar cualquier receta!

23
Limpieza, Almacenamiento
y Mantenimiento
• Mantenga su procesadora de alimentos de 5 tazas
(1L) Cuisinart
®
sobre la encimera, para siempre
tenerla lista. Desenchúfela cuando no esté en uso.
Guarde los accesorios en el eje de
almacenamiento provisto, en el bol.
• Mantenga la cuchilla y el disco fuera del alcance
de los niños.
• Todas las piezas removibles son aptas para
lavavajillas (bandejasuperiorsolamente). ya que
con el tiempo, el intenso calor del agua en la
bandeja inferior del lavavajillas puede dañarlos).
Ponga la tapa recta, con el tubo de alimentación
apuntando hacia arriba, para que se limpie bien.
Coloque el bol y el empujador al revés. Tenga
cuidado al sacar la cuchilla y el disco del
lavavajillas, ya que tienen los cortantes.
• Para facilitar la limpieza, se recomienda enjuagar
el bol, la tapa, el empujador, el adaptador
removible, la cuchilla y el disco inmediatamente
después del uso para evitar que residuos de
alimentos se sequen en ellos. Cerciórese de
colocar los empujadores y el bol revés, para que el
agua se escurra. Si alimentos quedan atrapados en
el empujador, enjuague este en agua o límpielo
con un cepillo para biberones.
• Si desea lavar la cuchilla y el disco a mano, haga
esto con mucho cuidado. Siempre sosténgalos por
el eje central. Procure no dejarlos en agua
jabonosa, donde los pueda perder de vista. De ser
necesario, use un cepillo.
• No meta el bol al microondas.
• Limpie la base después de cada uso con un paño
no abrasivo o una esponja humedecidos con agua
jabonosa. Séquela bien.
• Si los pies dejan marcas en la encimera, rocíe
producto quitamanchas y restriegue con una
esponja húmeda.
• Si esto no soluciona el problema, vuelva a limpiar
la encimera con un limpiador en polvo no abrasivo.
IMPORTANTE:Siempre use el eje de
almacenamiento provisto. Nunca guarde la
cuchilla/el disco en el adaptador removible. Instale
la cuchilla o el disco en el momento de usarlos
solamente.
MANTENIMIENTO:Cualquier otro servicio debe ser
realizado por un técnico de servicio autorizado.
Para su Seguridad
• Como todos los electrodomésticos, este
aparato debe usarse con cuidado. Para evitar
las lesiones resultantes de un mal uso, siga
estas reglas de seguridad:
• Manipule la cuchilla y el disco con sumo
cuidado, y guárdelos en el eje de
almacenamiento provisto ya que sus los son
muy alados.
• Compruebe que el bol esté bloqueado antes de
instalar el adaptador removible.
• Compruebe que la cuchilla o el disco estén
debidamente asentados en el adaptador
removible, lo más abajo posible.
• Siempre instale la cuchilla antes de colocar los
ingredientes en el bol.
• Siempre use los empujadores para empujar los
alimentos. nunca introduzca los dedos ni una
espátula en el tubo de alimentación.
• Siempre espere hasta que la cuchilla o el disco
estén totalmente inmóviles antes de abrir la
tapa o quitar el empujador.
• Siempre desenchufe el aparato antes vaciar el
bol, limpiar el aparato e instalar/quitar piezas.
• Siempre retire el bol de la base antes de retirar
la cuchilla o el disco.
• Tenga cuidado de no dejar caer la cuchilla o el
disco al vaciar el bol. Retire el adaptador
removible, junto con la cuchilla, antes de
inclinar el bol.
Especificaciones Técnicas
El motor de esta procesadora de alimento funciona
con corriente estándar. Las especicaciones
eléctricas del aparato están indicadas en la etiqueta
situada debajo de la base.
Un interruptor de seguridad apagará
automáticamente en motor en caso de
sobrecalentamiento. Esto puede ocurrir cuando
procesa mezclas espesas por un largo período,
o cuando usa el aparato sin interrupción por un
tiempo excesivo. En caso de que esto suceda,
apague y desenchufe el aparato, y deje que el
motor se enfríe antes de continuar. Por lo general,
esto toma 10 minutos (hasta una hora en
casos extremos).
Un mecanismo de seguridad impide que el aparato
se ponga en marcha a menos que el bol y la tapa
estén asegurados. El motor se apaga muy
rápidamente después de apagar el aparato y se
detiene automáticamente al sacar el empujador.
Cuisinart ofrece una garantía limitada de tres años
en este aparato.

24
Resolución de Problemas
ProblemasalProcesarAlimentos
1. Problema: Los alimentos no se procesan
uniformemente.
Solución:
• Corte los alimentos en pedazos uniformes de
½-1in(1.5-2.5cm) antes de procesarlos.
• Procese los alimentos en tandas para evitar
sobrecargar el motor.
2. Problema: Los alimentos no se mantienen
rectos en el tubo de alimentación.
Solución:
• Llene completamente el tubo de alimentación,
pero sin apretar demasiado los alimentos.
3. Problema: Quedan pedazos de alimento en la
parte superior del disco.
Solución:
• Esto es normal; cortar los pedazos a mano.
4. Problema: La cuchilla universal está bloqueada
y no puede quitarse.
Solución:
• Coloque el adaptador (junto con la cuchilla)
en un bol lleno de agua tibia; esto aojará las
partículas de alimentos atrapadas entre la
cuchilla y el adaptador. Retire el conjunto del
agua, agarrándolo por el eje del adaptador.
Sosteniendo el adaptador, coloque la cuchilla
en la encimera y presione el adaptador; esto
debería liberar la cuchilla del adaptador. Si
aún no se puede quitar la cuchilla, vuelva a
colocar el conjunto en agua tibia por unos
minutos y repita el proceso.
ProblemasalAmasar
1. Problema: El motor pierde velocidad.
Solución:
• Puede que la cantidad de masa exceda la
capacidad máxima. Divida la masa en dos
porciones y amase cada porción por separado.
• Puede que la masa esté demasiado húmeda
(véase la sección “La masa está demasiado
húmeda” a continuación). Si el motor acelera,
siga procesando. En el caso contrario, agregue
harina, una cucharada (5 g) a la vez, hasta que
el motor acelere. Siga procesando hasta que la
masa se despegue de las paredes del bol.
2. Problema: La cuchilla no incorpora los
ingredientes.
Solución:
• Siempre encienda el aparato antes de agregar
líquido. Agregue lentamente el líquido por el
tubo de alimentación, cerciorándose de que
los ingredientes secos absorban el líquido
antes de agregar más. Si el líquido se añade
demasiado rápido, espere hasta que los
ingredientes se mezclen antes de agregar el
líquido restante lentamente (sin apagar el
aparato). Vierta el líquido por el tubo de
alimentación en el momento preciso en que la
masa pasa bajo este, procurando no verter el
líquido directamente en el fondo del bol.
3. Problema: La cuchilla no permanece en el fondo
del bol.
Solución:
• Esto puede pasar si la masa está demasiado
pegajosa. Con cuidado, vuelva a instalar la
cuchilla y, después de encender el aparato,
agregue inmediatamente 2 cucharadas (15 g)
de harina por el tubo de alimentación.
ProblemasTécnicos
1. Problema: El motor no se enciende.
Solución:
• Un sistema de seguridad impide que el motor
se encienda a menos que el aparato esté
ensamblado de forma correcta. Compruebe
que el bol y la tapa estén rmemente
asegurados.
• Si esto no soluciona el problema, inspeccione
el cable y la toma de corriente.
2. Problema: El aparato se apaga durante el uso.
Solución:
• Compruebe que la tapa esté bien cerrada.
• Un interruptor de seguridad apaga
automáticamente en motor en caso de
sobrecalentamiento, lo que puede ocurrir
cuando procesa mezclas espesas/masas por
un largo período. En caso de que esto suceda,
presione el botón OFF/PULSE, desenchufe el
aparato y deje que se enfríe por 20-30
minutos antes de continuar.
3. Problema: El motor pierde velocidad.
Solución:
• Esto puede ocurrir cuando el motor hace
mucha fuerza (p.ej., al rebanar/triturar queso).
Simplemente reposicione los alimentos en el
tubo de alimentación y siga procesando.
• Puede que la cantidad de alimentos exceda la
capacidad máxima del bol. Quite parte de los
ingredientes y siga procesando.
4. Problema: El aparato vibra/se mueve durante
el uso.
Solución:
• Compruebe que los pies de caucho debajo de
la base estén limpios y secos. También
cerciórese de que la cantidad de alimentos no
exceda la capacidad máxima del bol.
• Esto puede ocurrir cuando el motor hace
mucha fuerza (p.ej., al rebanar/triturar queso).

25
Recetas
Bocaditos de huevo al
estilo mediterráneo ...........................................25
Mantequilla de miel-nueces ............................25
Panes de pizza con pesto ................................25
Crema para mojar de queso
al estilo suroeste ................................................26
Quesadillas con guacamole
y salsa fresca ....................................................... 27
Guacamole ........................................................... 27
Salsa fresca .......................................................... 27
Panqueques de papa-calabacín .....................28
Muffins “pastel de zanahoria” ........................28
Panecillos de suero de leche fáciles ............28
Galletas de mantequilla de pistacho ...........29
Bocaditos de huevo al estilo
mediterráneo
Prepare el desayuno para toda la semana con estos
deliciosos bocaditos de huevo.
Rinde 12 porciones
Aceiteenaerosol/rocíovegetal
4 onzas(115g)dequesoFontina
1 dientedeajo
1/3 tazas(35g)detomatessecadosalsolen
aceite, escurridos
10 huevos grandes
2 tazas(475ml)deyogurgriegonaturalde
leche entera
1 cucharadita+1pizcadesalkosher
¼ cucharaditadepimientanegrarecién
molida
1 cucharadita de aceite de oliva
1 taza(30g)decolrizadatierna
(“baby”)fresca
1. Precalentar el horno a 250°F (120°C). Engrasar
un molde para 12 muns con aceite en aerosol/
rocío vegetal; reservar.
2. Instalar el disco rallador medio. Triturar el queso
Fontina. Retirar y reservar.
3. Quitar el disco triturador e instalar la cuchilla
universal. Agregar los huevos, el yogur, 1
cucharadita de sal y la pimienta. Procesar para
combinar. Retirar y reservar.
4. Agregar el ajo y procesar hasta que esté
namente picado. Raspar el bol. Agregar los
tomates secados al sol y pulsar 5-6 veces
para picar.
5. Poner el aceite a calentar a fuego medio-lento,
en una sartén grande. Cuando el aceite esté
caliente, agregar el ajo, los tomates secados al
sol y una pizca de la sal. Saltear, revolviendo,
hasta que el ajo esté fragante. Agregar la col
rizada. Cocinar, revolviendo, hasta que adquiera
un color vivo y se marchite.
6. Distribuir el queso y la mezcla de tomates
secados al sol/col rizada en los moldecitos
preparados. Agregar la mezcla de huevo,
dividiéndola uniformemente entre los
moldecitos. Revolver la mezcla con un palillo
para distribuir uniformemente los ingredientes.
7. Hornear por 25-30 minutos, hasta que un
probador introducido en el centro salga limpio.
Mantequilla de miel-nueces
Añádala a batidos, tostadas o avena.
Rinde aprox. 1 taza
1 taza(100g)dealmendrascrudas
½ cucharaditadesalkosher,agusto
2 cucharadas de aceite vegetal
4 cucharaditasdemieldetrébol
(mássinecesita)
1. Precalentar el horno a 350°F (175°C). Esparcir
las almendras en una placa para horno. Tostar
por 8-10 minutos, hasta que estén bien dorados
y fragantes. Dejar enfriar completamente.
2. Cuando las almendras estén frías, colocarlas en
el bol de la procesadora, equipada con la
cuchilla universal. Pulsar 5-6 veces para romper,
y luego procesar continuamente para moler,
raspando el bol cuantas veces sea necesario.
3. Encender el aparato y agregar lentamente el
aceite. A continuación, agregue la miel; procesar
hasta conseguir una mezcla suave.
4. Probar y ajustar la sazón/dulzura al gusto.
Refrigerar por un máximo de dos semanas,
en un recipiente hermético.
Panes de pizza con pesto
Es solo una de las muchas posibilidades
de cobertura para estos panes de pizza
fáciles de preparar.
Rinde 4 porciones
Masa:
2 cucharaditas de levadura seca activa
1 cucharaditadeazúcargranulada

26
½ taza+2cucharadas(150ml)deagua
tibia(105°Fa110°F)
1½ tazas(185g)deharinacomún
¾ cucharadita de sal kosher
1 cucharaditas de aceite de oliva virgen
extra+unpocomásparaengrasarelbol
Cobertura:
4 onzas(120ml)deMozzarelladeleche
enteradebajahumedad,helada
2 onzas(55g)dequesoParmesano,en
cubosde½in(1cm)
1 dientedeajopequeño
1 taza(140g)depiñones,
ligeramente tostados
3 tazas(85g)dehojasdealbahacafresca
½ cucharadita de sal kosher
1 pizcadepimientanegrareciénmolida
½ taza(120ml)deaceitedeolivavirgen
extra+másparacepillar
1. Disolver la levadura y el azúcar en el agua tibia,
en una taza medidora para líquidos Dejar reposar
por aprox. 3-5 minutos, hasta que esté
espumoso.
2. Instalar la cuchilla de universal en el bol y
agregar la harina y la sal. Agregar el aceite de
oliva de a la mezcla de levadura. Encender el
aparato y agregar lentamente la mezcla líquida
por el tubo de alimentación, cerciorándose de
que la harina absorba el líquido antes de agregar
más. Procesar hasta que se forme una bola que
deje las paredes del bol limpia. Seguir
procesando por 30 segundos para amasar.
3. Colocar la masa en un tazón limpio grande y
cubrir con papel lm/plástico. Dejar subir, en un
lugar templado, por aprox. 45 minutos.
4. Mientras la masa está descansando, preparar la
cobertura. Quitar la cuchilla universal e instalar
el disco triturador medio. Triturar la Mozzarella;
reservar.
5. Quitar el disco triturador e instalar la cuchilla
universal. Colocar el queso Parmesano y el ajo
en el bol. Pulsar 8-10 veces, y luego procesar
continuamente para picar uniformemente.
6. Agregar los piñones, la albahaca, la sal y la
pimienta. Pulsar 3-5 veces, parando para raspar
el bol si es necesario.
7. Encender el aparato y verter lentamente el
aceite de oliva por el tubo de alimentación.
Seguir procesando hasta obtener una mezcla
homogénea. Retirar y reservar.
8. Colocar la masa sobre una supercie
ligeramente enharinada y aplastar para desinar.
Dividir la masa en cuatro porciones iguales.
Trabajando una porción a la vez, estirar la masa
sobre una supercie ligeramente enharinada,
presionando ligeramente con los dedos para
allanarla ligeramente, hasta formar un disco de
3in(35cm). Colocar los discos sobre una placa
para horno y cubrir sin apretar con papel/
plástico. Dejar reposar por 30 minutos.
Precalentar el horno a 450°F (230°C).
9. Cuando los discos de masa hayan descansado,
pincelar la orilla con aceite de oliva. Esparcir 1
cucharada de pesto en cada disco, dejando un
borde de ¼in (0.5cm). Cubrir uniformemente
con la Mozzarella triturada.
10. Meter al horno. Hornear por aprox. 10 minutos,
hasta que el queso esté burbujeante y que la
orilla de la masa esté hinchada, dorada y
crujiente. Retirar del horno. Dejar reposar por
2-3 minutos antes de servir.
Crema para mojar de queso
al estilo suroeste
Esta sabrosa salsa es el acompañamiento perfecto
para pretzels, papas fritas o pan crujiente.
Rinde aprox. 4 tazas
1 chalote mediano
1 jalapeño,sinsemillas
1 libra(455g)dequesoCheddarfuerte,en
pedazosquequepaneneltubode
alimentación
6 cucharadas (85 g) de mantequilla sin sal
¼ taza(30g)deharinacomún
2 tazas(475ml)decaldodepollo
bajoensodio
1 latade7oz(200g)dechiles
verdes picados
1 cucharadita de sal kosher
½ cucharadita de cebolla en polvo
½ cucharaditadeajoenpolvo
1. Instalar la cuchilla universal en el bol. Encender
el aparato y dejar caer el chalote y el jalapeño
en el tubo de alimentación; procesar hasta que
estén namente picados. Retirar y reservar.
2. Quitar la cuchilla universal e instalar el disco
triturador medio. Triturar el queso; reservar.
3. Derretir la mantequilla a fuego medio-lento, en
una cacerola mediana. Agregar el chalote y el
jalapeño. Cocinar, revolviendo, hasta que esté
suave y fragante.

27
4. Agregar la harina. Cocinar, revolviendo,
por 1-2 minutos. Agregar lentamente el caldo,
batiendo continuamente hasta conseguir una
mezcla suave.
5. Incorporar el queso un puñado a la vez, batiendo
entre cada adición y esperando que se derrita
antes de añadir más. Cuando todo el queso haya
sido añadido, agregar los chiles, la sal, la cebolla
en polvo y el ajo en polvo. Servir tibio.
Quesadillas con guacamole
y salsa fresca
Ideal para una comida rápida o un tentempié.
¡Añada guacamole y salsa fresca caseros para que
la familia se ponga contenta!
Rinde 4-8 porciones
3 onzas(85g)dequesoCheddar
3 onzas(85g)dequesoMontereyJack
1 cebolleta(“greenonions”),entrozosde
1in(2.5cm)
1 cucharadadejalapeñosencurtidos
1 cucharadadeaceitedeoliva+mássi
es necesario
4 tortillasdetrigode8in(25cm)
Guacamole,salsafrescay
crema mexicana
1. Instalar el disco triturador medio en el bol. Rallar
los quesos; reservar.
2. Quitar el disco triturador e instalar la cuchilla
universal. Agregar la cebolleta; pulsar aprox. 5
veces para picar. Retirar y reservar. Agregar el
jalapeño; pulsar para picar. Retirar y reservar.
3. Poner el aceite de oliva a calentar a fuego medio,
en una sartén grande. Cuando el aceite esté
caliente, colocar una tortilla en la sartén y darle
la vuelta para cubrir ambos lados con aceite.
Esparcir un cuarto del queso en la mitad inferior
de la tortilla y agregar un cuarto de la cebolleta y
del jalapeño.
4. Doblar la tortilla por encima del relleno. Con
cuidado, voltear la quesadilla con una espátula.
Dejar que la quesadilla se cocine por aprox. 2
minutos por lado, hasta que esté dorada y
crujiente. Repetir con el resto de los
ingredientes. Nota: Si las tortillas empiezan a
quemarse, bajar el fuego. Servir inmediatamente
con guacamole, salsa fresca y crema mexicana.
Guacamole
Rinde aprox. 2 tazas
1 dientedeajopequeño
½ jalapeño,sinsemillas,enpedazosde
1in(2.5cm)
1 cebolleta(“greenonions”),entrozosde
1in(2.5cm)
2 cucharadasdehojasdecilantrofresco
2 aguacates maduros medianos a grande
¾ cucharadita de sal kosher
1½ cucharadasdejugodelima/limón
verdefresco
1. Instalar la cuchilla universal en el bol. Agregar el
ajo, el jalapeño, las cebolletas y el cilantro.
Pulsar 8-10 veces, y luego procesar
continuamente para picar namente.
2. Agregar la aguacate, la sal y el jugo de lima.
Pulsar rápidamente para picar el aguacate. A
continuación, seguir pulsando o procesar hasta
conseguir la consistencia deseada, parando para
raspar el bol si es necesario.
3. Probar y ajustar la sazón al gusto.
Salsa fresca
Rinde aprox. 1½ tazas (355 ml)
1 dientedeajopequeño
1 jalapeñopequeño,sinsemillas,en
pedazosde1in(2.5cm)
1 cebolleta(“greenonions”),entrozosde
1in(2.5cm)
1 pinta (475 g) de tomates de pera
¼ taza(15g)decilantrofresco
1 cucharaditadejugodelima/limón
verdefresco
½–¾ cucharadita de sal kosher
1. Instalar la cuchilla universal en el bol. Agregar el
ajo y el jalapeño. Procesar continuamente para
picar namente.
2. Raspar el bol. Agregar los ingredientes restantes
y pulsar aprox. 7-8 veces para picar.
3. Colar para eliminar el exceso de líquido antes
de servir. Probar y ajustar la sazón al gusto.

28
Panqueques de papa-calabacín
¡Una excelente manera de incluir vegetales en la
comida, incluso para los paladares más exigentes!
Rinde 10-12 porciones
1 cucharadadeperejilfresco
1 cucharadadeeneldofresco
2 calabacín/calabacita(“zucchini”)
pequeño,cortadoparacabereneltubo
dealimentación
1 papa“Russet”pequeñaamediana,
pelada y cortada para caber en el tubo
dealimentación
1 chalotepequeño
2 cucharadas(15g)deharinacomún
¾ cucharadita de sal kosher
¼ cucharaditadepimientareciénmolida
1 huevo grande, ligeramente batido
2 cucharadasdeaceitevegetal+mássi
es necesario
1. Instalar la cuchilla universal en el bol. Agregar el
perejil y el eneldo Pulsar largamente aprox. 5-6
veces para picar. Dejar las hierbas en el bol.
2. Quitar la cuchilla universal e instalar el disco
triturador medio. Triturar el calabacín, y, a
continuación, la papa. Envolver los vegetales
triturados en una toalla de cocina limpia y
exprimir el exceso de líquido.
3. Pasar a un tazón. Agregar la harina, la sal y la
pimienta; revolver suavemente para combinar.
Agregar el huevo y revolver.
4. Poner el aceite a calentar a fuego medio-alto en
una sartén grande. Cuando el aceite esté
caliente, agregar una cucharada llena de la
mezcla. Repetir para crear 3-4 panqueques más,
teniendo cuidado de dejar espacio entre ellos.
Aplanar con el dorso de la cuchara para formar
discos de aprox. 2½in(6cm). Cocinar cada lado
por 1½-2 minutos, hasta que estén bien dorados
y crujientes. Repetir con el resto de la mezcla,
cocinando en tandas de 4-5 panqueques. Nota:
Agregar más aceite a la sartén si es necesario.
5. Mantenga los panqueques calientes en el horno,
en 200°F (100°C), hasta el momento de servir.
Servir tibio.
Muffins “pastel de zanahoria”
¡Preparar estos sabrosos muns es muy fácil
gracias al disco triturador!
Rinde 6 porciones
Aceiteenaerosol/rocíovegetal
½ taza(60g)denuecestostadas
1 zanahoriamedianaagrande,pelada
½ tazallena(100g)deazúcarrubia
(azúcardecañaintegral)
1 huevo grande, ligeramente batido
¾ taza(95g)deharinacomún
¼ cucharadita de bicarbonato de sodio
¼ cucharadita de polvo de hornear
1 cucharadita de canela en polvo
¼ cucharadita de clavo de olor en polvo
¼ cucharaditadenuezmoscadarallada
¼ cucharaditadejengibreenpolvo
½ cucharadita de sal
1/3 taza(80ml)deaceitevegetal
¾ cucharadita de extracto natural
de vainilla
1. Precalentar el horno a 375°F (190°C). Engrasar
ligeramente un molde de 6 muns con aceite
en aerosol/rocío vegetal; reservar.
2. Instalar la cuchilla universal en el bol. Agregar
las nueces y pulsar para picar uniformemente.
Retirar y reservar.
3. Quitar la cuchilla universal e instalar el disco
triturador medio. Triturar las zanahorias; reservar
en un tazón grande.
4. Agregar el azúcar y el huevo a las zanahorias
y revolver bien para combinar. Agregar los
ingredientes restantes y revolver suavemente
para combinar. Dividir la mezcla entre
los moldecitos.
5. Hornear por 22-25 minutos, hasta que un
probador introducido en el centro salga limpio.
Panecillos de suero
de leche fáciles
Un método rápido y sencillo para preparar
panecillos. Simplemente saque, hornee y sirva.
Rinde 10 porciones
1½ tazas(185g)deharinacomún+mássi
es necesario
½ taza(70g)deharinaderepostería
1¾ cucharaditas de polvo de hornear
¼ cucharadita de bicarbonato de sodio
1 cucharadita(5g)deazúcargranulada
½ cucharadita de sal kosher
1 pizcadepimientanegrareciénmolida
8 cucharadas (115 g) de mantequilla sin sal
debuenacalidadfría,enpedazos

29
1 taza(245g)desuerodeleche
(“buttermilk”) helado
1. Colocar la rejilla del horno en el centro de este y
precalentar a 450°F (230°C). Forrar dos placas
para horno con papel sulfurizado; reservar.
2. Instalar la cuchilla universal en el bol. Colocar
los ingredientes secos en el bol y procesar para
tamizar. Agregar la mantequilla y pulsar
repetidamente hasta que la mantequilla forme
bolitas del tamaño de arvejas. Agregar
lentamente el suero de leche por el tubo de
alimentación de la procesadora mientras pulsa.
3. Colocar la masa sobre una supercie
ligeramente enharinada, y amasarla a mano unas
cuantas veces para unirla. Dividir la masa en
porciones de aprox. 1/3 de taza, usando una
cuchara, y disponer las porciones en las placas
para horno preparadas, dejando aprox.
2in(5cm) entre ellas.
4. Hornear por aprox. 12-15 minutos, hasta que
estén bien dorados. Dejar enfriar ligeramente
sobre una rejilla antes de servir.
Galletas de mantequilla
de pistacho
Tostar los pistachos en un paso imprescindible para
resaltar el sabor a pistacho de estas sabrosas
galletas.
Rinde 30 galletas
½ taza(50g)depistachossinsal,
tostadosyenfriados
2 cucharadas(35g)deazúcargranulada
8 cucharadas (115 g) de mantequilla sin sal
de calidad europea, a temperatura
ambiente,en4pedazos
¼ taza(30g)deazúcarglasé,tamizado
½ cucharadita de extracto natural
de vainilla
1 taza(125g)deharinacomún
½ cucharadita de sal kosher
1 huevo grande, bien batido
1-2 cucharadas(10-25g)deazúcargrueso
(p.ej.,turbinado)
1. Instalar la cuchilla universal en el bol. Añadir los
pistachos y 2 cucharadas (25 g) del azúcar
granulado. Pulsar para romper y, a continuación,
procesar continuamente por aprox. 20 segundos
para moler.
2. Agregar la mantequilla, el azúcar glasé y la
vainilla. Pulsar para combinar, y luego procesar
hasta que la mezcla se una.
3. Agregar la harina y la sal; pulsar para incorporar.
Raspar el bol y pulsar unas cuantas veces más
hasta que la masa se una.
4. Colocar la masa en una hoja de papel
sulfurizado. Formar un cilindro de 2in(5cm)
y envolver en el papel sulfurizado. Refrigerar por
la noche.
5. Colocar las rejillas del horno en los tercios
inferior y superior de este y precalentar este a
350°F (175°C). Forrar dos placas para horno con
papel sulfurizado.
6. Mientras el horno se está calentando, sacar el
cilindro de masa del refrigerador y cepillarlo con
la clara de huevo. Esparcir el azúcar en el fondo
de una bandeja larga. Hacer rodar el cilindro en
el azúcar. Cortar en rodajas de ¼in(1.5cm).
Disponer las rodajas de masa en las placas para
horno preparadas.
7. Hornear por aprox. 10 minutos, hasta que las
orillas estén ligeramente doradas. Dejar enfriar
en una rejilla hasta que estén lo sucientemente
rmes como para pasarlos a una segunda rejilla,
y dejar enfriar completamente antes de servir.

30
Garantía Limitada
Garantíalimitadadetresaños
Sujeto a las exclusiones y limitaciones contenidas
en este documento, Conair LLC/Cuisinart
(“Cuisinart”) garantiza que la procesadora de
alimentos de 5 tazas (1L) Cuisinart
®
(“Producto”)
estará libre de defectos de materiales y fabricación
en condiciones normales de uso doméstico durante
un período de TRES (3) años a partir de la fecha de
compra del Producto en su embalaje original
sellado, a menos que se especique lo contrario en
esta Garantía Limitada. Esta Garantía Limitada es
solo para consumidores de Estados Unidos
(denidos aquí como compradores al por menor
para uso personal, familiar o doméstico) que
compren originalmente el Producto a Cuisinart o a
un revendedor autorizado de Cuisinart. Si no está
seguro de si un minorista u otro punto de venta es
un revendedor autorizado de Cuisinart, póngase en
contacto con Cuisinart.
Esta Garantía Limitada NO cubre:
• El desgaste normal;
• Cualquier Producto adquirido por compradores
comerciales o para usos comerciales o no
domésticos;
• Accesorios, piezas o programas añadidos al
Producto después de que Cuisinart lo haya
enviado;
• Cualquier costo asociado con el reemplazo o
reparación del Producto, incluyendo mano de
obra, instalación u otros costos incurridos por
usted sin previa aprobación de Cuisinart;
• Daños, defectos y fallas debidos a: (1) causas
externas, incluyendo el envío, accidentes,
problemas con el suministro eléctrico (el
Producto está diseñado para su uso exclusivo
con enchufes de 120 V), condiciones anormales
(como mecánicas o medioambientales); (2) uso
no conforme a las instrucciones del Producto; (3)
uso indebido, negligencia, alteración no
autorizada, reparación no autorizada; y (4) casos
fortuitos u otros acontecimientos fuera del
control de Cuisinart;
• Daños causados por usted o terceros no
autorizados, aunque cualquier empresa puede
realizar las reparaciones y el mantenimiento
necesarios;
• Daños causados por accesorios o repuestos no
autorizados especícamente por Cuisinart; y
• Cualquier Producto cuyas marcas de identicación
originales (marca comercial o número de serie)
hayan sido retiradas, alteradas o borradas.
Se recomienda llenar el formulario de registro
disponible en https://www.cuisinart.com/register-
your-product.html a n de facilitar la vericación de
la fecha de compra original de este producto. Sin
embargo, no es necesario registrar el producto para
recibir servicio bajo esta garantía. En ausencia de
prueba de la fecha de compra, el período de
garantía será calculado a partir de la fecha de
fabricación del producto.
GARANTÍASINDIFICULTADES
Si el Producto objeto de esta Garantía Limitada falla
durante el período de garantía por razones cubiertas
por esta Garantía Limitada, Cuisinart, a su elección,
reparará el Producto, sustituirá el Producto por otro
idéntico o razonablemente equivalente, o si Conair
no puede reparar o sustituir el Producto,
reembolsará al consumidor el precio de compra,
menos la cantidad directamente atribuible al uso
anterior del Producto por parte del consumidor. Para
obtener una etiqueta de devolución, contáctenos,
visitando https://www.cuisinart.com/customer-
care/product-assistance/product-inquiry/ o
llamando a nuestro servicio de atención al cliente,
al 1-800-726-0190, para hablar con un
representante.
Tras la recepción del Producto, Conair lo
inspeccionará y, si lo requiere esta Garantía
Limitada, intentará reparar, reemplazar o
reembolsarlo en un plazo de treinta (30) días. No
obstante, pueden producirse retrasos fuera del
control de Cuisinart, en cuyo caso dicho plazo podrá
ampliarse en la medida en que sea razonablemente
necesario.
Importante: Si debe llevar el producto defectuoso a
un centro de servicio no autorizado, por favor
informe al personal del centro de servicio que
deben llamar al servicio de atención al cliente de
Cuisinart, al1-800-726-0190, a n de diagnosticar el
problema correctamente, usar las piezas correctas
para repararlo y comprobar que el producto aún
esté bajo garantía.
ResidentesDeCalifornia
El período de Garantía Limitada de TRES (3) años
comienza en la fecha de entrega del Producto, que
puede ser diferente de la fecha de compra del
Producto. Los residentes en California también
tienen la opción de obtener los benecios de esta
Garantía Limitada devolviendo el producto
defectuoso (A) a la tienda donde lo compraron, o (B)
a otra tienda que venda productos Cuisinart
®
del
mismo tipo. La tienda podrá, a su elección, reparar
el producto, referir al consumidor a un centro de
servicio independiente, sustituir el producto por uno
idéntico o razonablemente equivalente, o
reembolsar al consumidor el precio de compra
menos la cantidad directamente atribuible al uso
anterior del producto por el consumidor. Los
residentes de California también pueden, si lo
desean, enviar el producto defectuoso directamente
a Cuisinart para que sea reparado o sustituido por
uno idéntico o razonablemente equivalente. Para
esto, deben llamar a nuestro servicio de atención al
cliente al 1-800-726-0190. Cuisinart será
responsable por los gastos de reparación,
reemplazo, manejo y envío de los productos

31
defectuosos durante el período de garantía.
ESTAGARANTÍALIMITADALEOTORGADERECHOS
LEGALESESPECÍFICOS,YTAMBIÉNPUEDETENER
OTROSDERECHOSQUEVARÍANDEUNESTADOA
OTROOENFUNCIÓNDELAJURISDICCIÓN.ENCASO
DEINCUMPLIMIENTODEESTAGARANTÍALIMITADA,
USTEDPUEDERECLAMARLASUSTITUCIÓN,UNA
INDEMNIZACIÓNPORDAÑOSYPERJUICIOSUOTRAS
SANCIONES.
LIMITACIONESDERESPONSABILIDAD/LIMITACIONES
YEXCLUSIONESADICIONALES:
TODASLASGARANTÍASEXPRESASEIMPLÍCITAS
TIENENUNADURACIÓNLIMITADAALPERÍODODE
GARANTÍALIMITADA.NOSEAPLICARÁNINGUNA
GARANTÍADESPUÉSDEESTEPERÍODO.ALGUNOS
ESTADOS(OJURISDICCIONES)NOPERMITEN
LIMITACIONESENLADURACIÓNDEUNAGARANTÍA
IMPLÍCITA,DEMODOQUELASLIMITACIONES
MENCIONADASPUEDENNOREGIRPARAUSTED.LA
RESPONSABILIDADDECUISINARTBAJOESTAO
CUALQUIEROTRAGARANTÍA,IMPLÍCITAOEXPRESA,
SELIMITAALAREPARACIÓN,SUSTITUCIÓNO
REEMBOLSO,SEGÚNLOESTABLECIDO
ANTERIORMENTE.ESTOSRECURSOSSONLOS
ÚNICOSYEXCLUSIVOSENCASODE
INCUMPLIMIENTODELAGARANTÍA.ENLAMEDIDA
MÁXIMAPERMITIDAPORLALEY,CUISINARTNOSE
HACERESPONSABLEDENINGÚNDAÑODIRECTO,
INDIRECTO,ESPECIAL,INCIDENTALOCONSECUENTE
RESULTANTEDECUALQUIERINCUMPLIMIENTODE
LAGARANTÍAOBAJOCUALQUIEROTRATEORÍA
LEGAL(INCLUYENDO,PERONOLIMITADOA,LUCRO
CESANTE,TIEMPODEINACTIVIDAD,PÉRDIDADEL
FONDODECOMERCIO,DAÑOSOSUSTITUCIÓNDE
EQUIPOSYBIENES,YCUALQUIERCOSTEDE
RECUPERACIÓN,REPROGRAMACIÓNO
REPRODUCCIÓNDECUALQUIERPROGRAMAO
DATOSALMACENADOSENOUTILIZADOSCONUN
SISTEMAQUECONTENGAELPRODUCTO),INCLUSO
SICUISINARTHASIDOADVERTIDODELA
POSIBILIDADDETALESDAÑOS.ALGUNOSESTADOS
(OJURISDICCIONES)NOPERMITENLAEXCLUSIÓNO
LIMITACIÓNDEDAÑOSESPECIALES,INCIDENTALES
OCONSECUENTES,DEMODOQUELAS
LIMITACIONESMENCIONADASPUEDENNOREGIR
PARAUSTED.TODASLASGARANTÍASEXPRESASE
IMPLÍCITASTIENENUNADURACIÓNLIMITADAAL
PERÍODODEGARANTÍALIMITADA.NOSEAPLICARÁ
NINGUNAGARANTÍADESPUÉSDEESTEPERÍODO.
ALGUNOSESTADOS(OJURISDICCIONES)NO
PERMITENLIMITACIONESENLADURACIÓNDEUNA
GARANTÍAIMPLÍCITA,DEMODOQUELAS
LIMITACIONESMENCIONADASPUEDENNOREGIR
PARAUSTED.
Esta Garantía Limitada es emitida por:
Conair LLC
1CummingsPointRoad
Stamford,CT06902
1-800-726-0190

IB-18935-ESP
©2025 Cuisinart
Glendale, AZ 85307
Printed in China