Scan to register
bellakitchenware.com
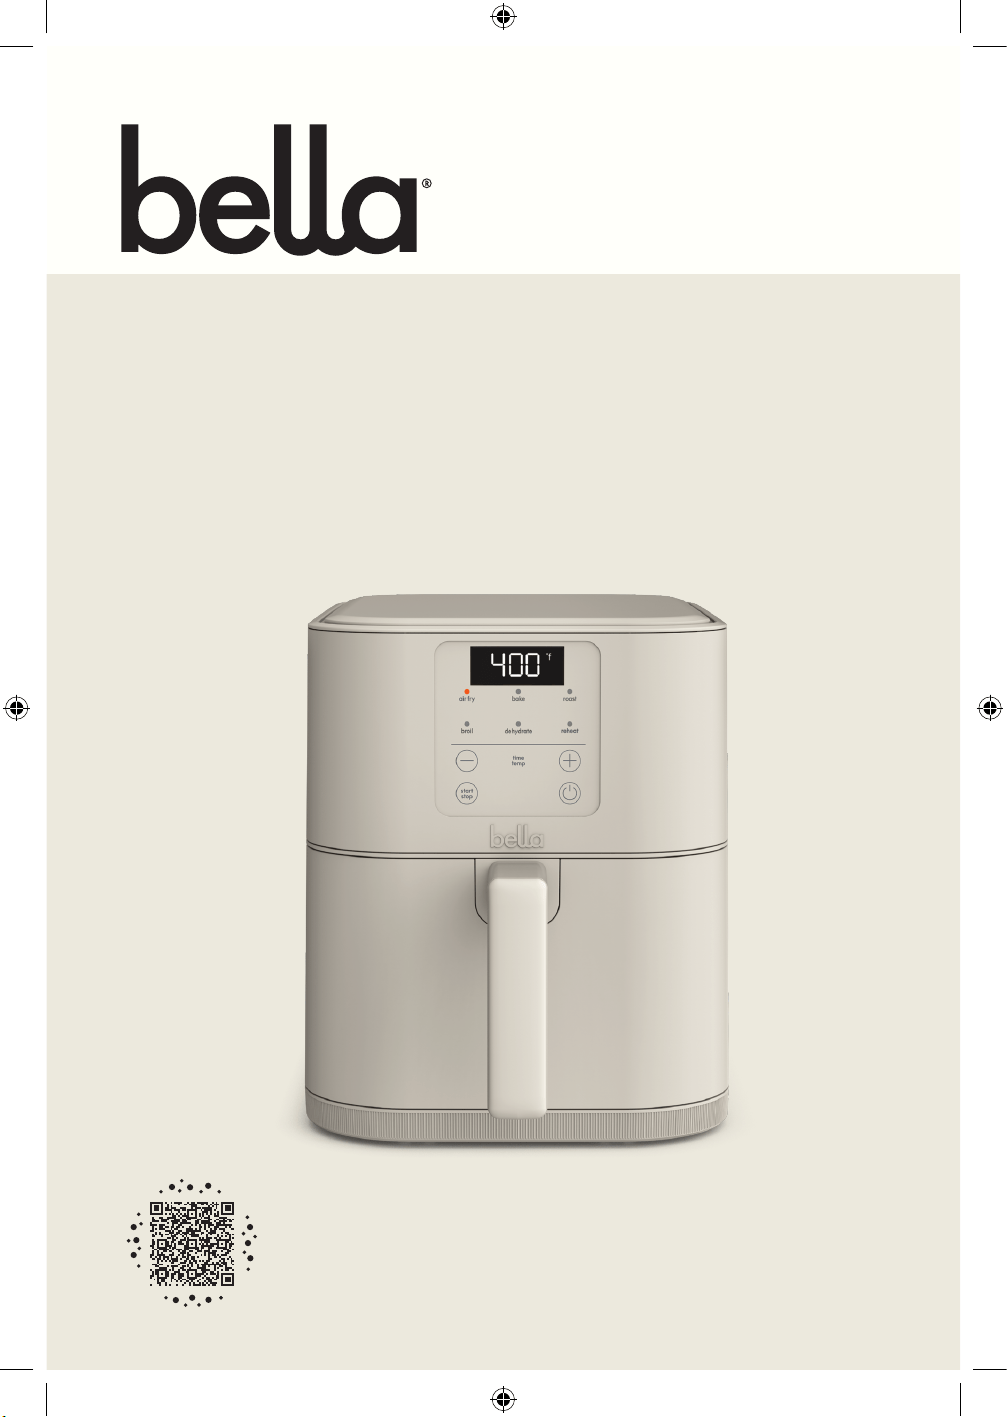
6qt Slim Air Fryer
Instruction Manual
Freidora de aire delgada de
6 cuartos de galón
Manual de instrucciones
35233_35234_35235_35236_35237_Bella_MultiUSA_6.0QT Slim_AirFryer_Oatmilk_IM_R2.indd 135233_35234_35235_35236_35237_Bella_MultiUSA_6.0QT Slim_AirFryer_Oatmilk_IM_R2.indd 1 2024-11-07 11:01 AM2024-11-07 11:01 AM

TABLE OF CONTENTS
IMPORTANT SAFEGUARDS ................................................................................................................................................2-3
ADDITIONAL IMPORTANT SAFEGUARDS ................................................................................................................... 3-4
NOTES ON THE PLUG ..............................................................................................................................................................4
NOTES ON THE CORD.............................................................................................................................................................4
PLASTICIZER WARNING .........................................................................................................................................................4
ELECTRIC POWER ......................................................................................................................................................................4
GETTING TO KNOW YOUR 6 QT AIR FRYER ...................................................................................................................5
TOUCH MEMBRANE CONTROL .......................................................................................................................................... 6
BEFORE USING FOR THE FIRST TIME ................................................................................................................................ 6
OPERATING INSTRUCTIONS ............................................................................................................................................... 7
MANUAL OPERATION............................................................................................................................................................ 7
AIR FRYING TECHNIQUE....................................................................................................................................................... 7
A NOTE ON AIR FRYING PRE-PACKAGED FROZEN FOODS .....................................................................................8
FOR BEST RESULTS ....................................................................................................................................................................8
USER MAINTENANCE INSTRUCTIONS ............................................................................................................................8
CARE & CLEANING INSTRUCTIONS ..................................................................................................................................8
STORING INSTRUCTIONS .....................................................................................................................................................8
WARRANTY ................................................................................................................................................................................ 9
ÍNDICE
MEDIDAS IMPORTANTES DE SEGURIDAD ................................................................................................................ 10-11
MEDIDAS IMPORTANTES DE SEGURIDAD ADICIONALES ...................................................................................11-12
NOTAS SOBRE EL ENCHUFE ............................................................................................................................................... 12
NOTAS SOBRE EL CABLE ...................................................................................................................................................... 12
ADVERTENCIA SOBRE EL ACABADO ............................................................................................................................... 12
ALIMENTACIÓN ELÉCTRICA ...............................................................................................................................................12
CONOZCA SU FREIDORA DE AIRE DE 6 CUARTOS DE GALÓN .............................................................................13
CONTROL DE MEMBRANA TÁCTIL ...................................................................................................................................14
ANTES DEL PRIMER USO .......................................................................................................................................................14
INSTRUCCIONES DE FUNCIONAMIENTO ....................................................................................................................15
FUNCIONAMIENTO MANUAL ..........................................................................................................................................15
TÉCNICA DE FREÍDO AL AIRE ....................................................................................................................................... 15-16
NOTA PARA FREÍR AL AIRE ALIMENTOS CONGELADOS PREENVASADOS ...................................................... 16
PARA OBTENER MEJORES RESULTADOS........................................................................................................................16
INSTRUCCIONES DE MANTENIMIENTO PARA EL USUARIO..................................................................................16
INSTRUCCIONES DE LIMPIEZA Y CUIDADO .................................................................................................................16
INSTRUCCIONES DE ALMACENAMIENTO ...................................................................................................................16
GARANTÍA ................................................................................................................................................................................. 17
35233_35234_35235_35236_35237_Bella_MultiUSA_6.0QT Slim_AirFryer_Oatmilk_IM_R2.indd 235233_35234_35235_35236_35237_Bella_MultiUSA_6.0QT Slim_AirFryer_Oatmilk_IM_R2.indd 2 2024-11-07 11:01 AM2024-11-07 11:01 AM

2
IMPORTANT SAFEGUARDS
When using electrical appliances, basic safety precautions should always be
followed, including the following:
1. READ ALL INSTRUCTIONS.
2. Do not touch hot surfaces. Use handles or knobs. Use oven mitts or potholders.
3. To protect against electric shock do not immerse cord, plugs, or appliance in
water or other liquid.
4. This appliance is not intended for use by persons (including children) with
reduced physical, sensory or mental capabilities, or lack of experience and
knowledge, unless they have been given supervision or instruction concerning
use of the appliance by a person responsible for their safety.
5. Close supervision is necessary when any appliance is used by or near children.
6. Unplug from outlet when not in use and before cleaning. Allow to cool before
putting on or taking off parts, and before cleaning the appliance.
7. Do not operate any appliance with a damaged cord or plug or after the
appliance malfunctions, or has been damaged in any manner. Return
appliance to the nearest authorized service facility for examination, repair,
or adjustment.
8. The use of accessory attachments not recommended by the appliance
manufacturer may cause injuries.
9. Do not use outdoors.
10. Do not let cord hang over edge of table or counter, or touch hot surfaces.
11. Do not place on or near a hot gas or electric burner, or in a heated oven.
12. Extreme caution must be used when moving an appliance containing hot oil or
other hot liquids.
13. Always attach plug to appliance first, then plug cord into the wall outlet. To
disconnect, turn any control to “off”, then remove plug from wall outlet.
14. Do not use appliance for other than intended use.
15. Make sure the crisping tray is in place before adding food to be air fried.
16. Make sure the frying basket is locked securely into the front of the Air Fryer,
while the Air Fryer is in operation.
WARNING: The Air Fryer will not operate unless frying basket is fully closed.
CAUTION: After hot air frying, extreme caution must be used when handling
the hot frying basket, crisping tray, and cooked foods.
17. Oversize foods or metal utensils must not be inserted in appliance as they may
create a fire or risk of electric shock.
18. A fire may occur if the appliance is covered or touching flammable material,
including curtains, draperies, walls, and the like, when in operation. Do not
store any item on top of the appliance when in operation.
19. Extreme caution should be exercised when using containers constructed of
other than metal or glass.
20. Do not store any materials, other than manufacturers recommended
accessories, in this appliance when not in use.
35233_35234_35235_35236_35237_Bella_MultiUSA_6.0QT Slim_AirFryer_Oatmilk_IM_R2.indd 235233_35234_35235_35236_35237_Bella_MultiUSA_6.0QT Slim_AirFryer_Oatmilk_IM_R2.indd 2 2024-11-07 11:01 AM2024-11-07 11:01 AM

3
21. Do not place any of the following materials in the appliance: paper,
cardboard, plastic, and the like.
22. Do not cover crumb tray or any part of the oven with metal foil. This will cause
overheating of the oven.
23. Preheating of the appliance is not necessary.
24. To turn off the appliance, press the POWER
button.
FOR HOUSEHOLD USE ONLY
ADDITIONAL IMPORTANT
SAFEGUARDS
CAUTION HOT SURFACES: This appliance generates heat and escaping steam
during use. Proper precautions must be taken to prevent the risk of burns, fires,
or other injury to persons or damage to property. CAUTION: This appliance is
hot during operation and retains heat for some time after turning OFF. Always
use oven mitts when handling hot materials and allow metal parts to cool before
cleaning. Do not place anything on top of the appliance while it is operating or
while it is hot.
1. All users of this appliance must read and understand this instruction manual
before operating or cleaning this appliance.
2. The cord to this appliance should be plugged into a 120V AC electrical
outlet only.
3. If this appliance begins to malfunction during use, pull the frying basket
drawer out of the body. Then remove plug from wall outlet. Do not use or
attempt to repair the malfunctioning appliance.
4. Do not leave this appliance unattended during use.
5. Do not immerse power cord in any liquid. If the power cord to this appliance is
damaged, it must be replaced by contacting Consumer Service.
6. Keep the cord out of reach from children and infants to avoid the risk of
electric shock and choking.
7. Place the Air Fryer on a flat, heat-resistant work area.
8. Do not obstruct the air outlet or air inlets on the back and sides of the Air Fryer,
with any objects. Avoid escaping steam from the air outlet during air frying.
9. Keep appliance at least 4 inches away from walls or other objects
during operation.
10. Always use the frying basket handle to open frying basket drawer.
WARNING: After air frying, make sure to place the frying basket drawer on a
flat, heat-resistant surface.
WARNING: Over-filling the frying basket may damage the Air Fryer and
could result in serious personal injury.
12. Never move a hot Air Fryer or an Air Fryer containing hot food. Allow to cool
before moving.
13. Do not clean with metal scouring pads. Pieces can break off the pad and touch
electrical parts, creating a risk of electric shock.
35233_35234_35235_35236_35237_Bella_MultiUSA_6.0QT Slim_AirFryer_Oatmilk_IM_R2.indd 335233_35234_35235_35236_35237_Bella_MultiUSA_6.0QT Slim_AirFryer_Oatmilk_IM_R2.indd 3 2024-11-07 11:01 AM2024-11-07 11:01 AM

4
WARNING! This air fryer should not be used to boil water.
WARNING! This air fryer should not be used to deep fry foods.
NOTES ON THE PLUG
This appliance has a polarized plug (one blade is wider than the other). To reduce
the risk of electric shock, this plug will fit in a polarized outlet only one way. If the
plug does not fit fully into the outlet, reverse the plug. If it still does not fit, contact
a qualified electrician. Do not modify the plug in any way.
NOTES ON THE CORD
A. A short power-supply cord (or detachable power-supply cord) is to be
provided to reduce the risk resulting from becoming entangled in or tripping
over a longer cord.
B. Longer detachable power-supply cords or extension cords are available and
may be used if care is exercised in their use.
C. If a long detachable power-supply cord or extension cord is used :
1. The marked electrical rating of the cord or extension cord should be at
least as great as the electrical rating of the appliance;
2. If the appliance is of the grounded type, the extension cord should be a
grounding-type3-wire cord.
3. The longer cord should be arranged so that it does not drape over the
countertop or table top where it can be pulled on by children or tripped
over unintentionally.
PLASTICIZER WARNING
CAUTION: To prevent Plasticizers from migrating to the finish of the
counter top or table top or other furniture, place NON-PLASTIC coasters
or place mats between the appliance and the finish of the counter top
or table top. Failure to do so may cause the finish to darken; permanent
blemishes may occur or stains can appear.
ELECTRIC POWER
If the electrical circuit is overloaded with other appliances, your appliance
may not operate properly. It should be operated on a separate electrical
circuit from other appliances.
SAVE THESE INSTRUCTIONS
35233_35234_35235_35236_35237_Bella_MultiUSA_6.0QT Slim_AirFryer_Oatmilk_IM_R2.indd 435233_35234_35235_35236_35237_Bella_MultiUSA_6.0QT Slim_AirFryer_Oatmilk_IM_R2.indd 4 2024-11-07 11:01 AM2024-11-07 11:01 AM

5
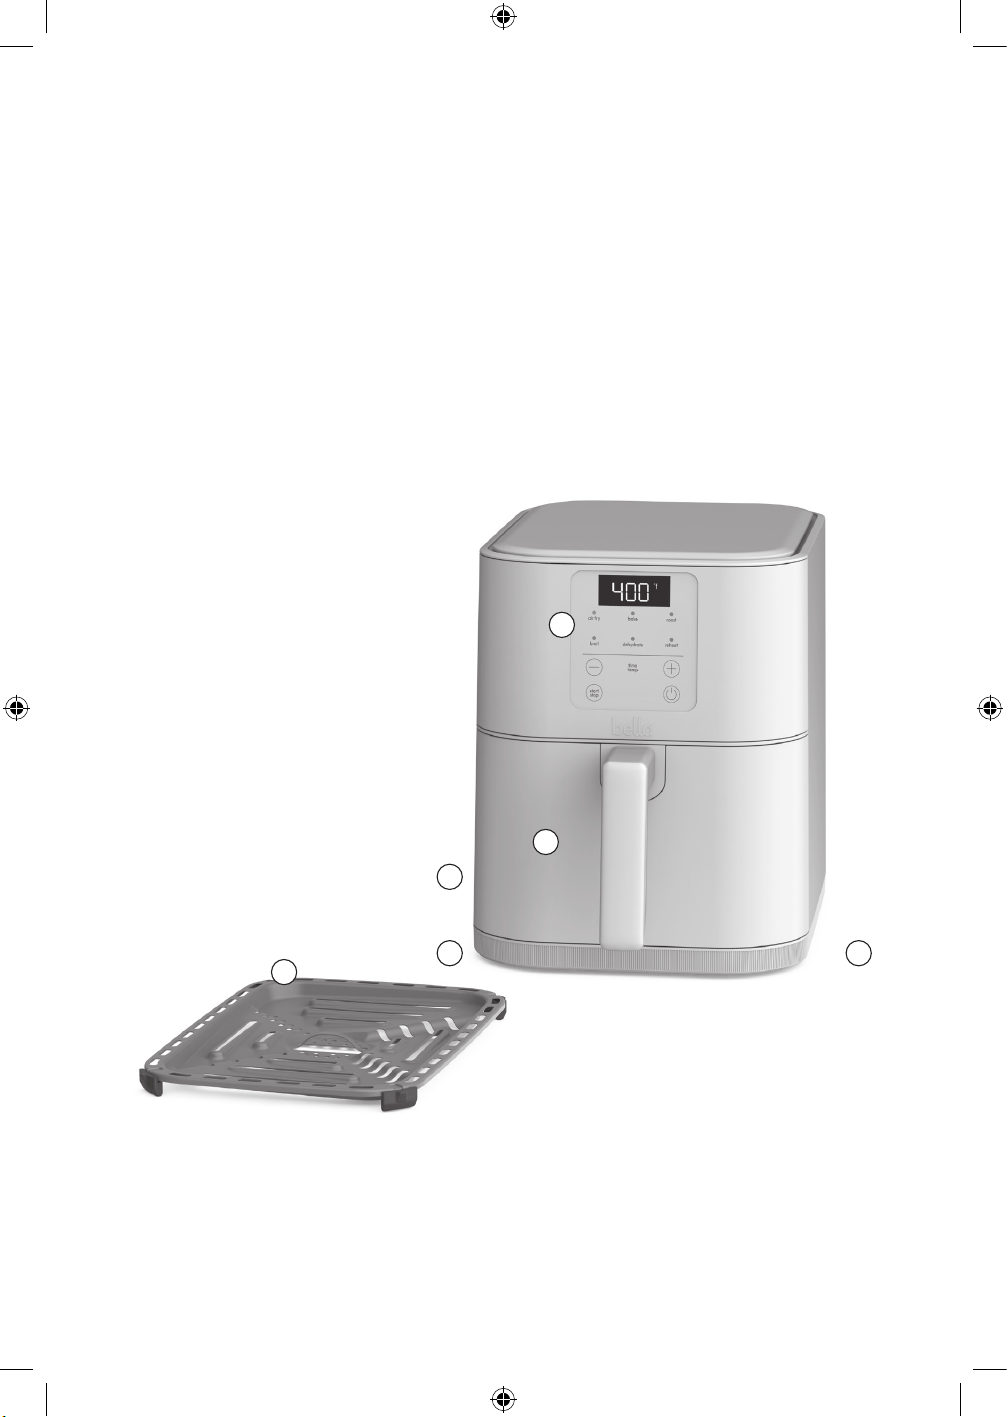
GETTING TO KNOW YOUR 6 QT AIR FRYER
Product may vary slightly from illustration
1) Touch Membrane Control
2) Frying Basket with Cool Touch Handle
3) Power Cord with Polarized Plug (not shown)
4) Non-skid Feet (not shown)
5) Crisping Tray
6) Cord Wrap (not shown)
3
1
2
4 6
5
35233_35234_35235_35236_35237_Bella_MultiUSA_6.0QT Slim_AirFryer_Oatmilk_IM_R2.indd 535233_35234_35235_35236_35237_Bella_MultiUSA_6.0QT Slim_AirFryer_Oatmilk_IM_R2.indd 5 2024-11-07 11:01 AM2024-11-07 11:01 AM
6
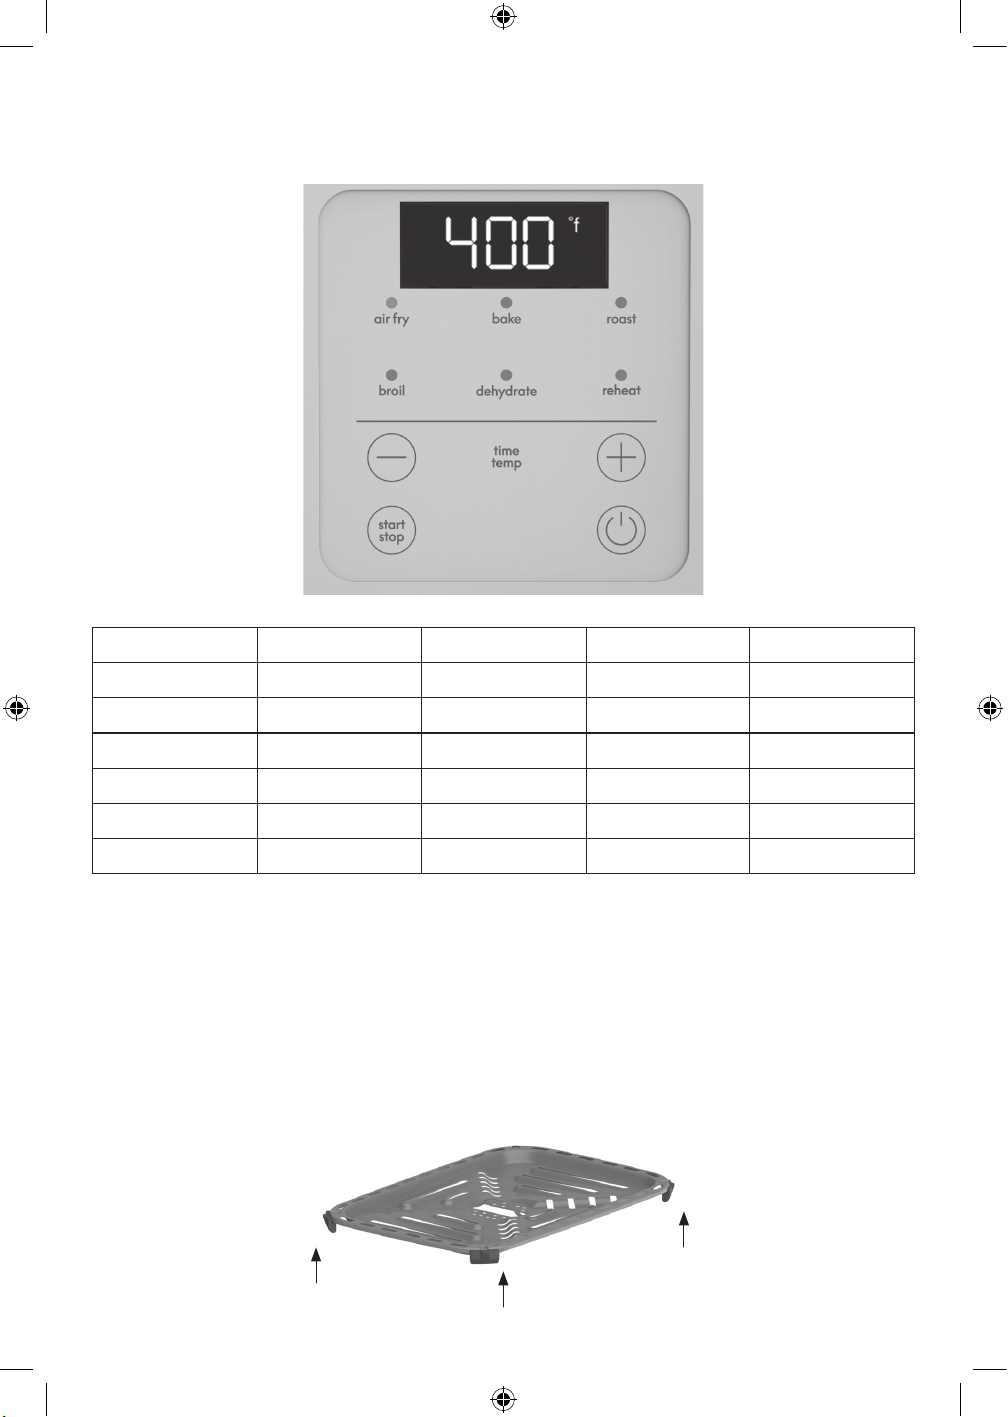
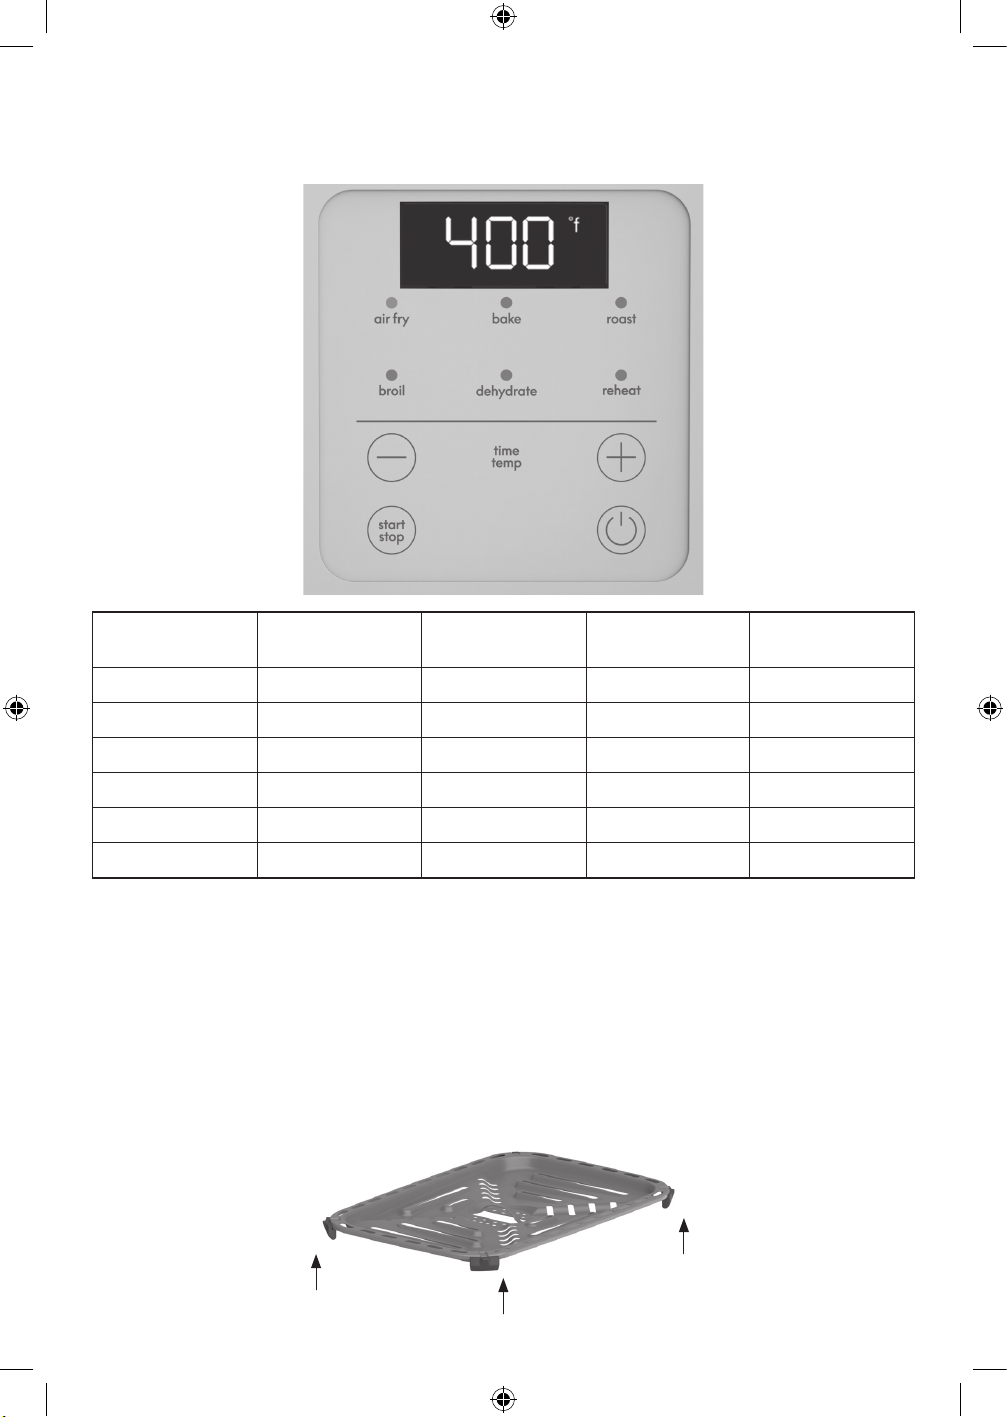
Figure 2
TOUCH MEMBRANE CONTROL
1. There are 6 menu options, each with a preset time and temperature.
2. Press on the desired function and the preset temp/time will be displayed.
BEFORE USING FOR THE FIRST TIME
1. Remove all packing material and labels from the inside and outside of the air fryer. Check that there is no
packaging underneath and around the frying basket.
2. Your air fryer is shipped with the frying basket locked inside the air fryer body. Firmly grasp the frying basket
handle to open frying basket and place on a flat, clean work area.
3. Wash frying basket and crisping tray in hot, soapy water.
4. DO NOT IMMERSE THE AIR FRYER BODY IN WATER. Wipe the air fryer body with a damp cloth. Dry all
parts thoroughly.
5. To ensure the crisping tray fits snugly into the frying basket drawer, there are 4 rubber tips attached to the
sides of the tray. Before using, check to make sure all 4 rubber tips are in place. If they become separated from
the tray, simply slide onto the tabs as shown. (See fig 2.)
Menu Default Time Time Range Default Temp Temp Range
Air Fry 20:00 01:00 – 60:00 400 ˚F 170 ˚F – 400 ˚F
Bake 25:00 01:00 – 60:00 350 ˚F 170 ˚F – 400 ˚F
Roast 35:00 01:00 – 60:00 400 ˚F 350 ˚F – 400 ˚F
Broil 10:00 01:00 – 30:00 400 ˚F -
Dehydrate 8hrs 1-24hrs 130 ˚F 90 ˚F - 170 ˚F
Reheat 6:00 01:00 – 60:00 250 ˚F 170 ˚F – 400 ˚F
35233_35234_35235_35236_35237_Bella_MultiUSA_6.0QT Slim_AirFryer_Oatmilk_IM_R2.indd 635233_35234_35235_35236_35237_Bella_MultiUSA_6.0QT Slim_AirFryer_Oatmilk_IM_R2.indd 6 2024-11-07 11:01 AM2024-11-07 11:01 AM

7
OPERATING INSTRUCTIONS
WARNING! This air fryer should not be used to boil water.
NOTE: During first use, the air fryer may emit a slight odor. This is normal.
1. Place the Air Fryer on a flat, heat-resistant work area, close to an electrical outlet.
2. Firmly grasp the frying basket handle to open frying basket; then remove from the machine and place on a flat,
clean surface.
3. Place the crisping tray into the base of the frying basket.
4. Arrange food on top of the crisping tray. Do not overfill frying basket with food. To ensure proper cooking and
air circulation, NEVER fill any frying basket more than 2/3 full. When air frying fresh vegetables, we do not
recommend adding more than 1-1/2 cups of food to the frying basket.
5. Fully insert the frying basket into the front of the Air Fryer.
6. Plug cord in the wall outlet
7. To begin, press the POWER
button.
MANUAL OPERATION
8. Press on the desired function. Once selected the light above the function will flash.
9. The default Temperature and Time for the selected preset will alternate on the screen every 5 seconds.
11. To adjust the air frying TEMPERATURE, press the TIME/TEMP button until you see the temperature displayed
then press (-) to reduce the temperature and (+) to increase the temperature in 5 degree increments.
NOTE: To toggle between Fahrenheit and Celsius, press and hold the TIME/TEMP button and the (+) button at
the same time for 5 seconds.
12. To adjust the air frying TIME, press the TIME/TEMP button until you see the time displayed then Press (-) to
decrease the time and (+) to increase the time in 1 minute increments.
13. When the desired TIME and TEMPERATURE appear on the display, press the START/STOP button to turn the air
fryer on to its working mode. The preset temperature and time will alternate on the display until the time
has expired.
IMPORTANT: The air fryer will not heat until the START/STOP button is pressed. If no buttons are pressed, the
air fryer will automatically turn OFF within 3minute.
NOTE: If the air fryer basket is removed while the air fryer is in working mode the unit will pause and the
display will flash. Once the basket is put back in place the working mode will resume. If the basket is not put
back in place after 10 minutes, the unit will automatically shut off.
14. Once the timer reaches 00:00 a tone will sound and END will be displayed.
AIR FRYING TECHNIQUE
1. Please consult the Air Frying Chart and/or follow package instructions for suggested TIME and TEMPERATURE.
2. To assure even cooking/browning, ALWAYS open the frying basket halfway through the cooking time and
check, turn or shake foods in the frying basket. Adjust TIME or TEMPERATURE if needed.
WARNING: Extreme caution must be used when handling the hot frying basket and crisping tray. Avoid
escaping steam from the frying basket and the food.
CAUTION: Always use oven mitts when handling the hot air fryer basket.
CAUTION: Hot oil can collect at the base of the drawer. To avoid risk of burns or personal injury, or to avoid oil
from contaminating air fried foods, always unlock and remove the frying basket from the drawer before emptying.
NEVER turn the drawer upside down with the frying basket attached.
3. If additional air frying is needed, adjust TEMPERATURE if desired, and set TIME for 2 to 5 minute intervals until
fully cooked.
4. Once the timer reaches 00:00 a tone will sound and END will be displayed.
5. To turn the air fryer OFF at any time, simply press the POWER
button.
WARNING! ALWAYS USE A MEAT THERMOMETER TO ENSURE THAT MEAT, POULTRY AND FISH ARE
COOKED THOROUGHLY BEFORE EATING.
6. If recipe instructions instruct, allow cooked foods to rest for 5 to 10 minutes. Remove the frying basket from the
machine and place on a flat, heat resistant surface.
7. Use tongs or a long fork to remove air fried foods onto a serving plate. Promptly replace the frying basket into
the front of the air Fryer. Continue with subsequent batches, if any.
8. Unplug the Air fryer when not in use.
35233_35234_35235_35236_35237_Bella_MultiUSA_6.0QT Slim_AirFryer_Oatmilk_IM_R2.indd 735233_35234_35235_35236_35237_Bella_MultiUSA_6.0QT Slim_AirFryer_Oatmilk_IM_R2.indd 7 2024-11-07 11:01 AM2024-11-07 11:01 AM

8
A NOTE ON AIR FRYING PRE-PACKAGED FROZEN FOODS
1. The air fryer is powered with 1750W high performance technology that circulates heat for fast air fry
and recovery.
2. As a general rule, reduce the package cooking time by 30% to 50% depending on the food and amount to
be cooked.
3. Always check food halfway though cooking time to determine final cook time and temperature.
4. Always check cooking progress after TIME has expired. If more time is needed, cook at short time intervals until
food tests done.
FOR BEST RESULTS
1. Use your air fryer to cook pre-packaged foods with a fraction of the oil, in a fraction of the time!
2. Always check food halfway though cooking time to determine final cook time and temperature.
3. Always pat food dry before cooking to encourage browning and avoid excess smoke.
4. To avoid excess smoke, when cooking naturally high fat foods, such as chicken wings or sausages, it may be
necessary to empty fat from the frying basket drawer between batches.
5. For crispier results, air fry small batches of freshly breaded foods. Create more surface area by cutting food
into smaller pieces. Press breading onto food to help it adhere. Refrigerate breaded foods for at least 30
minutes before frying.
6. Arrange breaded food in frying basket so that food is not touching to allow air flow on all surfaces.
7. Spray olive oil or vegetable oil work best as oil is distributed evenly and less oil is needed.
8. Do not overfill frying basket with food. NEVER fill any frying basket more than 2/3 full. When air frying fresh
vegetables, we do not recommend adding more than 3 cups of food to the frying basket.
9. Some foods need to be shaken vigorously or turned over during the air fry time. Consult the Air Frying Chart for
a general guide.
PLEASE NOTE: The USDA recommends that meats such as beef and lamb, etc. should be cooked to an internal
temperature of 145°F/63°C. Pork should be cooked to an internal temperature of 160 °F/71 °C and poultry
products should be cooked to an internal temperature of 170 °F/77 °C -180 °F/82 °C to be sure any harmful
bacteria has been killed. When reheating meat/poultry products, they should also be cooked to an internal
temperature of 165°F/74°C.
USER MAINTENANCE INSTRUCTIONS
This appliance requires little maintenance. It contains no user-serviceable parts. Any servicing requiring disassembly
other than cleaning must be performed by a qualified appliance repair technician.
CARE & CLEANING INSTRUCTIONS
WARNING! Allow the Air fryer to cool fully before cleaning.
1. Unplug the Air Fryer. Remove frying basket. Make sure the frying basket and crisping tray have cooled
completely before cleaning. Use the center hole of the crisping tray to lift crisping tray up and out of the
frying basket.
2. Wash the frying basket and crisping tray in hot soapy water. Do not use metal kitchen utensils or abrasive
cleansers or cleaning products as this may damage the coating.
3. Wipe the air fryer body with a soft, non-abrasive damp cloth to clean.
STORING INSTRUCTIONS
1. Make sure the air fryer is unplugged and all parts are clean and dry before storing.
2. Never store the air fryer while it is hot or wet.
3. Store the air fryer in its box or in a clean, dry place.
35233_35234_35235_35236_35237_Bella_MultiUSA_6.0QT Slim_AirFryer_Oatmilk_IM_R2.indd 835233_35234_35235_35236_35237_Bella_MultiUSA_6.0QT Slim_AirFryer_Oatmilk_IM_R2.indd 8 2024-11-07 11:01 AM2024-11-07 11:01 AM

9
SENSIO Inc. hereby warrants that for a period of TWO YEARS from the date of purchase,
this product will be free from mechanical defects in material and workmanship, and
for 90 days in respect to non-mechanical parts. At its sole discretion, SENSIO Inc. will
either repair or replace the product found to be defective, or issue a refund on the
product during the warranty period.
The warranty is only valid for the original retail purchaser from the date of initial retail
purchase and is not transferable. Keep the original sales receipt, as proof of purchase is
required to obtain warranty validation. Retail stores selling this product do not have the
right to alter, modify, or in any way revise the terms and conditions of the warranty.
EXCLUSIONS:
The warranty does not cover normal wear of parts or damage resulting from any of the
following: negligent use of the product, use of improper voltage or current, improper
routine maintenance, use contrary to the operating instructions, disassembly, repair, or
alteration by anyone other than qualied SENSIO Inc. personnel. Also, the warranty
does not cover Acts of God such as re, oods, hurricanes, or tornadoes.
SENSIO Inc. shall not be liable for any incidental or consequential damages caused
by the breach of any express or implied warranty. Apart from the extent prohibited
by applicable law, any implied warranty of merchantability or tness for a particular
purpose is limited in time to the duration of the warranty. Some states, provinces or
jurisdictions do not allow the exclusion or limitation of incidental or consequential
damages, or limitations on how long an implied warranty lasts, and therefore, the
above exclusions or limitations may not apply to you. The warranty covers specic legal
rights which may vary by state, province and/or jurisdiction.
HOW TO OBTAIN WARRANTY SERVICE:
You must contact Customer Service at our toll-free number: 1-866-832-4843.
A Customer Service Representative will attempt to resolve warranty issues over the
phone. If the Customer Service Representative is unable to resolve the problem, you will
be provided with a case number and asked to return the product to SENSIO Inc. Attach
a tag to the product that includes: your name, address, daytime contact telephone
number, case number, and description of the problem. Also, include a copy of the
original sales receipt. Carefully package the tagged product with the sales receipt,
and send it (with shipping and insurance prepaid) to SENSIO Inc.’s address. SENSIO
Inc. shall bear no responsibility or liability for the returned product while in transit to
SENSIOInc.’s Customer Service Center.
LIMITED TWO-YEAR WARRANTY
35233_35234_35235_35236_35237_Bella_MultiUSA_6.0QT Slim_AirFryer_Oatmilk_IM_R2.indd 935233_35234_35235_35236_35237_Bella_MultiUSA_6.0QT Slim_AirFryer_Oatmilk_IM_R2.indd 9 2024-11-07 11:01 AM2024-11-07 11:01 AM

10
MEDIDAS IMPORTANTES DE
SEGURIDAD
Al utilizar electrodomésticos, se deben tomar siempre precauciones de seguridad
básicas, incluidas las siguientes:
1. LEA TODAS LAS INSTRUCCIONES.
2. No toque las superficies calientes. Use las asas o las perillas. Use guantes de
cocina o agarraderas.
3. Para protegerse contra una descarga eléctrica, no sumerja el cable, los
enchufes ni el aparato en agua u otro líquido.
4. Este aparato no está diseñado para ser utilizado por personas (incluidos
niños) con capacidades físicas, sensoriales o mentales limitadas, ni con falta
de experiencia y conocimiento, a menos que hayan recibido supervisión o
instrucciones sobre el uso del aparato por parte de una persona responsable
de su seguridad.
5. Es necesaria una estrecha supervisión cuando los niños utilizan un aparato o si
este se utiliza cerca de ellos.
6. Desenchufe el aparato del tomacorriente cuando no lo utilice y antes de
limpiarlo. Deje que se enfríe antes de poner o quitar piezas y antes de limpiar
el aparato.
7. No utilice ningún aparato que tenga un cable o enchufe dañados, o después
de que el aparato funcione de manera incorrecta o se haya dañado de
alguna manera. Devuelva el aparato al centro de servicio técnico autorizado
más cercano para su revisión, reparación o ajuste.
8. El uso de accesorios que no cuenten con la recomendación del fabricante del
aparato puede ocasionar lesiones.
9. No lo utilice en exteriores.
10. No deje que el cable cuelgue sobre el borde de una mesa o mostrador, ni que
toque superficies calientes.
11. No lo coloque sobre un hornillo eléctrico o a gas caliente o cerca de uno, ni en
un horno caliente.
12. Se debe tener mucho cuidado al mover un aparato que contenga aceite
caliente u otros líquidos calientes.
13. Siempre enchufe primero el cable al aparato, luego enchufe el cable al
tomacorriente. Para desconectar, apague cualquier control y luego retire el
enchufe del tomacorriente.
14. No use el aparato con otros fines para los cuales no se haya diseñado.
15. Asegúrese de que la bandeja para textura crujiente esté en su lugar antes de
agregar alimentos para freír en aire.
16. Asegúrese de que la cesta freidora esté bien bloqueada en el frente de la
freidora de aire mientras esta esté en funcionamiento.
ADVERTENCIA: La freidora de aire no funcionará a menos que la cesta
freidora esté bien cerrada.
PRECAUCIÓN: Después de freír al aire caliente, se debe tener mucho cuidado
al manipular la cesta freidora caliente, la bandeja para textura crujiente y los
alimentos cocidos.
35233_35234_35235_35236_35237_Bella_MultiUSA_6.0QT Slim_AirFryer_Oatmilk_IM_R2.indd 1035233_35234_35235_35236_35237_Bella_MultiUSA_6.0QT Slim_AirFryer_Oatmilk_IM_R2.indd 10 2024-11-07 11:01 AM2024-11-07 11:01 AM

11
17. No se deben insertar alimentos o utensilios metálicos de gran tamaño en el
aparato ya que estos elementos pueden provocar un incendio o crear el riesgo
de descargas eléctricas.
18. Puede provocar un incendio si se cubre el aparato o si toca algún material
inflamable como cortinas, paredes, y similares, mientras está funcionando. No
guarde ningún artículo en la parte superior del aparato cuando esté
en funcionamiento.
19. Tenga mucho cuidado cuando use contenedores que no sean de metal o vidrio.
20. No guarde ningún material que no sean los accesorios recomendados por el
fabricante en este aparato cuando no esté en uso.
21. No coloque ninguno de los siguientes materiales en el aparato: papel, cartón,
plástico y similares.
22. No cubra la bandeja para migas ni ninguna parte del horno con papel de
aluminio. Esto hará que el horno se sobrecaliente.
23. No es necesario precalentar el aparato.
24. Para apagar el aparato, presione el botón POWER
.
SOLO PARA USO DOMÉSTICO
MEDIDAS DE SEGURIDAD
IMPORTANTES ADICIONALES
PRECAUCIÓN, SUPERFICIES CALIENTES: Este aparato genera calor y vapor
durante el uso. Se deben tomar las precauciones adecuadas para prevenir el
riesgo de quemaduras, incendios u otros daños personales o materiales.
PRECAUCIÓN: Este aparato se calienta durante el funcionamiento y retiene calor
por un tiempo después de apagarlo. Use siempre guantes de horno cuando manipule
materiales calientes y deje que las piezas de metal se enfríen antes de limpiarlas. No
coloque objetos encima del aparato mientras esté funcionando o se encuentre caliente.
1. Todos los usuarios de este aparato deben leer y entender este manual de
instrucciones antes de utilizarlo o limpiarlo.
2. El cable de este aparato debe conectarse solo a un tomacorriente de 120 V de CA.
3. Si este aparato comienza a funcionar de manera incorrecta durante el uso,
saque el contenedor de la cesta freidora del cuerpo. Luego, quite el enchufe
del tomacorriente. No use ni intente reparar el aparato si está averiado.
4. No deje este aparato sin supervisión mientras está en uso.
5. No sumerja el cable de alimentación en líquidos. Si el cable de alimentación de este
aparato está dañado, debe reemplazarlo comunicándose con Servicio al cliente.
6. Mantenga el cable fuera del alcance de los niños e infantes para evitar el
riesgo de descarga eléctrica y asfixia.
7. Coloque la freidora de aire sobre una zona de trabajo plana y resistente al calor.
8. No obstruya con ningún objeto la salida de aire o las entradas de aire en la
parte posterior y en los lados de la freidora de aire. Evite el vapor que sale de
la salida de aire mientras se fríe al aire.
9. Mantenga el aparato a al menos 4 pulgadas de las paredes u otros objetos
cuando esté en funcionamiento.
35233_35234_35235_35236_35237_Bella_MultiUSA_6.0QT Slim_AirFryer_Oatmilk_IM_R2.indd 1135233_35234_35235_35236_35237_Bella_MultiUSA_6.0QT Slim_AirFryer_Oatmilk_IM_R2.indd 11 2024-11-07 11:01 AM2024-11-07 11:01 AM

12
10. Use siempre el asa de la cesta freidora para abrir el contenedor de la
cesta freidora.
ADVERTENCIA: Después de freír al aire, asegúrese de colocar el contenedor
de la cesta freidora sobre una superficie plana y resistente al calor.
ADVERTENCIA: Llenar en exceso la cesta freidora puede dañar la freidora de
aire y podría provocar lesiones personales graves.
11. Nunca mueva una freidora de aire caliente o que contenga alimentos
calientes. Deje que se enfríe antes de moverla.
12. No lo limpie con estropajos de metal. Se pueden caer fragmentos del
estropajo de metal y tocar las piezas eléctricas, generando un peligro de
descarga eléctrica.
¡ADVERTENCIA! No debe usarse esta freidora de aire para hervir agua.
¡ADVERTENCIA! Esta freidora de aire no debe usarse con alimentos para freír
en abundante aceite.
NOTAS SOBRE EL ENCHUFE
Este aparato posee un enchufe polarizado (una clavija es más ancha que la
otra). Para reducir el riesgo de descarga eléctrica, este enchufe encajará en un
tomacorriente polarizado en un solo sentido. Si el enchufe no entra completamente
en el tomacorriente, gire el enchufe. Si aun así no encaja, contacte a un técnico
electricista calificado. No modifique el enchufe de ninguna manera.
NOTAS SOBRE EL CABLE
A. Se proporciona un cable de alimentación corto (o un cable de alimentación
desconectable) para reducir el riesgo de enredarse o tropezarse con un cable largo.
B. Hay disponibles cables de alimentación desconectables más largos o cables
de extensión, los cuales se pueden utilizar si se tiene cuidado durante su uso.
C. Si se utiliza un cable eléctrico desconectable largo o un cable de extensión:
1. La clasificación eléctrica marcada en el cable o extensión debe ser al
menos igual a la clasificación eléctrica del aparato.
2. Si el aparato es del tipo con conexión a tierra, el cable de extensión
deberá ser un cable de 3 hilos con conexión a tierra.
3. El cable más largo debe colocarse de manera que no cuelgue de una
encimera o mesa de donde los niños pudieran jalarlo o tropezar con él
por accidente.
ADVERTENCIA SOBRE EL ACABADO
PRECAUCIÓN: Para evitar que el acabado del mostrador o de la mesa u otros
muebles se dañe, coloque posavasos o manteles individuales que NO SEAN
DE PLÁSTICO entre el aparato y la superficie del mostrador o de la mesa. No
hacerlo puede provocar el oscurecimiento del acabado, provocar desperfectos
permanentes o causar la aparición de manchas.
ALIMENTACIÓN ELÉCTRICA
Si el circuito eléctrico está sobrecargado con otros aparatos, este aparato podría
no funcionar correctamente. Debe utilizarse en un circuito eléctrico diferente al de
otros electrodomésticos.
GUARDE ESTAS INSTRUCCIONES
35233_35234_35235_35236_35237_Bella_MultiUSA_6.0QT Slim_AirFryer_Oatmilk_IM_R2.indd 1235233_35234_35235_35236_35237_Bella_MultiUSA_6.0QT Slim_AirFryer_Oatmilk_IM_R2.indd 12 2024-11-07 11:01 AM2024-11-07 11:01 AM
13
CONOZCA SU FREIDORA DE AIRE DE 6 CUARTOS DE GALÓN
El producto puede diferir ligeramente del que aparece en las ilustraciones
1) Control de membrana táctil
2) Cesta freidora con asa fría al tacto
3) Cable de alimentación con enchufe polarizado (no se muestra)
4) Patas antideslizantes (no se muestran)
5) Bandeja para textura crujiente
6) Soporte del cable (no se muestra)
3
1
2
4 6
5
35233_35234_35235_35236_35237_Bella_MultiUSA_6.0QT Slim_AirFryer_Oatmilk_IM_R2.indd 1335233_35234_35235_35236_35237_Bella_MultiUSA_6.0QT Slim_AirFryer_Oatmilk_IM_R2.indd 13 2024-11-07 11:01 AM2024-11-07 11:01 AM
14
Figura 2
CONTROL DE MEMBRANA TÁCTIL
1. Hay 6 opciones de menú; cada una tiene su tiempo y temperatura preestablecidos.
2. Presione la función deseada y se mostrará la temperatura/tiempo preestablecidos.
ANTES DEL PRIMER USO
1. Retire todo el material de embalaje y las etiquetas del interior y el exterior de la freidora de aire. Verifique que
no haya paquetes debajo y alrededor de la cesta freidora.
2. La freidora de aire se envía con la cesta freidora fijada al frente del cuerpo de la freidora de aire. Sujete con
firmeza el mango para abrir la cesta freidora; luego quite la cesta de la máquina y colóquela sobre un área de
trabajo plana y limpia.
3. Lave la cesta freidora y la bandeja para textura crujiente con agua caliente y jabón.
4. NO SUMERJA EL CUERPO DE LA FREIDORA DE AIRE EN AGUA. Limpie el cuerpo de la freidora de aire con un
paño húmedo. Seque bien todas las piezas.
5. Para garantizar que la bandeja para textura crujiente encaje bien en el contenedor de la cesta freidora, hay 4
puntas de goma fijadas a los lados de la bandeja. Antes de usar, verifique para asegurarse de que las 4 puntas de
goma estén en su lugar. Si se separan de la bandeja, solo deslícelas por las pestañas como se muestra. (Ver Figura 2.)
Menú Tiempo
predeterminado
Rango de tiempo Temperatura
predeterminada
Rango de
temperaturas
Freír al aire 20:00 01:00 – 60:00 400 °F 170 °F - 400 °F
Hornear 25:00 01:00 – 60:00 350 °F 170 °F - 400 °F
Rostizar 35:00 01:00 – 60:00 400 °F 350 °F - 400 °F
Asar a la parrilla 10:00 01:00 – 30:00 400 °F -
Deshidratar 8 h 1 h - 24 h 130 °F 90 °F - 170 °F
Recalentar 6:00 01:00 – 60:00 250 °F 170 °F - 400 °F
35233_35234_35235_35236_35237_Bella_MultiUSA_6.0QT Slim_AirFryer_Oatmilk_IM_R2.indd 1435233_35234_35235_35236_35237_Bella_MultiUSA_6.0QT Slim_AirFryer_Oatmilk_IM_R2.indd 14 2024-11-07 11:01 AM2024-11-07 11:01 AM

15
INSTRUCCIONES DE FUNCIONAMIENTO
¡ADVERTENCIA! No debe usarse esta freidora de aire para hervir agua.
NOTA: Durante el primer uso, la freidora de aire puede emitir un ligero olor. Esto es normal.
1. Coloque la freidora de aire sobre una superficie de trabajo plana y resistente al calor cerca de
un tomacorriente.
2. Sujete con firmeza el mango para abrir la cesta freidora; luego quítela de la máquina y colóquela sobre una
superficie plana y limpia.
3. Coloque la bandeja para textura crujiente en la base de la cesta freidora.
4. Disponga los alimentos sobre la bandeja para textura crujiente. No llene demasiado la cesta freidora con
alimentos. Para garantizar una cocción adecuada y buena circulación de aire, NUNCA llene una cesta
freidora a más de 2/3 de la capacidad máxima. Cuando fría al aire verduras frescas, no recomendamos
agregar más de 1-1/2 tazas de alimentos a la cesta freidora.
5. Inserte por completo la cesta freidora en el frente de la freidora de aire.
6. Enchufe el cable en el tomacorriente.
7. Para encender el aparato, presione el botón POWER
.
FUNCIONAMIENTO MANUAL
8. Presione la función deseada. Una vez que seleccione la función, comenzará a parpadear la luz situada encima
de dicha función.
9. La temperatura y el tiempo predeterminados del ajuste preestablecido seleccionado se alternarán en la
pantalla cada 5 segundos.
11. Para ajustar la TEMPERATURA de freído al aire, presione el botón TIME/TEMP (TIEMPO/TEMPERATURA)
hasta que se muestre la temperatura, luego presione el botón (-) para disminuir la temperatura y el botón (+)
para aumentar la temperatura en incrementos de 5 grados.
NOTA: Para alternar entre Fahrenheit y Celsius, mantenga presionado al mismo tiempo el botón TIME/TEMP
(TIEMPO/TEMPERATURA) y el botón (+) durante 5 segundos.
12. Para ajustar el TIEMPO de freído al aire, presione el botón TIME/TEMP (TIEMPO/TEMPERATURA) hasta que
se muestre el tiempo, luego presione el botón (-) para disminuir la temperatura y el botón (+) para aumentar la
temperatura en incrementos de 1 minuto.
13. Cuando aparezca el TIEMPO y la TEMPERATURA deseados en la pantalla, presione el botón START/STOP
(INICIAR/PARAR) para encender la freidora de aire y colocarla en modo de funcionamiento. La temperatura y
el tiempo preestablecidos se alternarán en la pantalla hasta que se termine el tiempo.
IMPORTANTE: La freidora de aire no se calentará hasta que se presione el botón START/STOP (INICIAR/
PARAR). Si no presiona ningún botón, la freidora de aire se apagará automáticamente cuando transcurran 3
minutos.
NOTA: Si se retira la cesta de la freidora de aire mientras está en modo de funcionamiento, la unidad se
pausará y la pantalla comenzará a parpadear. Una vez que coloque nuevamente la cesta en su lugar, la
freidora de aire volverá al modo de funcionamiento. Si no vuelve a colocar la cesta en su lugar antes de que
transcurran 10 minutos, la unidad se apagará automáticamente.
14. Cuando el temporizador llegue a 00:00, el aparato emitirá un sonido y aparecerá la palabra END (FIN) en
la pantalla.
TÉCNICA DE FREÍDO AL AIRE
1. Consulte la tabla de freído al aire y/o siga las instrucciones del paquete para ver el TIEMPO y TEMPERATURA.
2. Para garantizar una cocción/dorado uniforme, SIEMPRE abra el contenedor de la cesta freidora a la mitad
del tiempo de cocción y verifique, gire o sacuda los alimentos en la cesta freidora. Ajuste el TIEMPO y la
TEMPERATURA de ser necesario.
ADVERTENCIA: Se debe tener mucho cuidado al manipular cestas freidoras o bandejas para textura crujiente
calientes. Evite el vapor que sale de la cesta freidora y los alimentos.
PRECAUCIÓN: Utilice siempre guantes para horno cuando manipule la cesta de la freidora de aire caliente.
PRECAUCIÓN: El aceite caliente puede juntarse en la base del contenedor. Para evitar riesgo de quemaduras
o lesiones personales, o para evitar que el aceite contamine los alimentos freídos al aire, siempre desbloquee y
quite la cesta freidora del contenedor antes de vaciarlo. NUNCA invierta el contenedor con la cesta
freidora colocada.
3. Si se necesita más tiempo de freído al aire, ajuste la TEMPERATURA si es necesario, y ajuste el TIEMPO en
intervalos de 2 a 5 minutos hasta que se cocine del todo.
4. Cuando el temporizador llegue a 00:00, el aparato emitirá un sonido y aparecerá la palabra END (fin) en
la pantalla.
5. Para apagar la freidora de aire en cualquier momento, simplemente presione el botón POWER
.
¡ADVERTENCIA! UTILICE SIEMPRE UN TERMÓMETRO DE CARNE PARA ASEGURARSE DE QUE LA CARNE,
35233_35234_35235_35236_35237_Bella_MultiUSA_6.0QT Slim_AirFryer_Oatmilk_IM_R2.indd 1535233_35234_35235_35236_35237_Bella_MultiUSA_6.0QT Slim_AirFryer_Oatmilk_IM_R2.indd 15 2024-11-07 11:01 AM2024-11-07 11:01 AM

16
LAS AVES DE CORRAL Y EL PESCADO SE COCINAN COMPLETAMENTE ANTES DE COMER.
6. Si la receta lo pide, deje reposar los alimentos cocinados durante 5 a 10 minutos. Quite la cesta freidora de la
máquina y colóquela sobre una superficie plana y resistente al calor.
7. Use pinzas o un tenedor largo para llevar los alimentos freídos al aire a una bandeja para servir. Vuelva a
colocar la cesta de freír en la parte frontal de la freidora de aire. Siga con los lotes siguientes, si los hay.
8. Desenchufe la freidora de aire cuando no esté en uso.
NOTA PARA FREÍR AL AIRE ALIMENTOS CONGELADOS PREENVASADOS
1. La freidora de aire utiliza tecnología de alto desempeño de 1750 W que hace circular calor para un freído al
aire rápido y recuperación.
2. Como regla general, reduzca el tiempo de cocción del paquete en un 30 % a 50 % según el alimento y la
cantidad que va a cocinar.
3. Siempre verifique los alimentos a mitad del tiempo de cocción para determinar el tiempo y la temperatura
finales de cocción.
4. Siempre verifique el progreso de la cocción una vez expirado el TIEMPO. Si se necesita más tiempo, cocine en
intervalos de tiempo cortos hasta que termine las pruebas de los alimentos.
PARA OBTENER MEJORES RESULTADOS
1. ¡Use la freidora al aire cocinar alimentos preenvasados con una fracción del aceite y en una fracción del tiempo!
2. Siempre verifique los alimentos a mitad del tiempo de cocción para determinar el tiempo y la temperatura
finales de cocción.
3. Siempre intente secar los alimentos antes de cocinarlos para facilitar el dorado y evitar exceso de humo.
4. Para evitar el exceso de humo, al cocinar alimentos con mucha grasa, como alas de pollo o salchichas, puede
que sea necesario vaciar la grasa del contenedor de la cesta freidora entre lotes.
5. Para que quede más crujiente, fría al aire lotes pequeños de alimentos empanados frescos. Cree más área de
superficie al cortar los alimentos en piezas más pequeñas. Presione el empanado contra los alimentos para
ayudar a que se adhiera. Refrigere los alimentos empanados por al menos 30 minutos antes de freírlos.
6. Disponga los alimentos empanados en la cesta freidora de modo que los alimentos no se toquen y permitan el
flujo de aire en todas las superficies.
7. Rocíe aceite de oliva o vegetal que funcionan mejor, ya que el aceite se distribuye de manera uniforme y se
requiere menos cantidad.
8. No llene demasiado la cesta freidora con alimentos. NUNCA llene la cesta freidora más de 2/3 de su
capacidad. Cuando fría al aire verduras frescas, no recomendamos agregar más de 3 tazas de alimentos a la
cesta freidora.
9. Algunos alimentos se deben sacudir con vigor o voltear durante el tiempo de freído al aire. Consulte la tabla
de freído al aire para ver una guía general.
TENGA EN CUENTA: El USDA recomienda que las carnes como res y cordero, etc. se cocinen a una
temperatura interna de 145 °F/63 °C. El cerdo se debe cocinar a una temperatura interna de 160 °F/71 °C y
las aves se deben cocinar a una temperatura interna de 170 °F/77 °C - 180 °F/82 °C para garantizar que se
mueran las bacterias perjudiciales. Cuando recaliente productos de carne/ave, también se deben cocinar a
temperaturas internas de 165 °F/74 °C.
INSTRUCCIONES DE MANTENIMIENTO PARA EL USUARIO
Este aparato requiere poco mantenimiento. No contiene piezas que el usuario pueda reparar. Cualquier
mantenimiento que requiera desarmarlo, aparte de la limpieza, debe ser realizado por un técnico calificado en
reparación de electrodomésticos.
INSTRUCCIONES DE LIMPIEZA Y CUIDADO
¡ADVERTENCIA! Espere a que la freidora de aire se enfríe por completo antes de limpiarla.
1. Desenchufe la freidora de aire. Quite la cesta freidora. Asegúrese de que la cesta freidora y la bandeja para
textura crujiente se hayan enfriado por completo antes de limpiarlas. Use el orificio central de la bandeja para
textura crujiente para levantarla y sacarla de la cesta freidora.
2. Lave la cesta freidora y la bandeja para textura crujiente con agua caliente y jabón. No use utensilios de
cocina metálicos, limpiadores abrasivos o productos de limpieza ya que estos pueden dañar el recubrimiento.
3. Limpie el cuerpo de la freidora de aire con un paño húmedo suave y no abrasivo.
INSTRUCCIONES DE ALMACENAMIENTO
1. Asegúrese de que la freidora de aire esté desenchufada y de que todas las piezas estén limpias antes
de guardarla.
2. Nunca guarde la freidora de aire si está caliente o húmeda.
3. Guarde la freidora de aire en su caja o en un lugar limpio y seco.
35233_35234_35235_35236_35237_Bella_MultiUSA_6.0QT Slim_AirFryer_Oatmilk_IM_R2.indd 1635233_35234_35235_35236_35237_Bella_MultiUSA_6.0QT Slim_AirFryer_Oatmilk_IM_R2.indd 16 2024-11-07 11:01 AM2024-11-07 11:01 AM

17
Mediante la presente, SENSIO Inc. garantiza que, durante el plazo de DOS AÑOS a partir
de la fecha de compra, este producto no presentará defectos mecánicos en el material ni
en la mano de obra, y durante 90 días, no los presentará en las piezas no mecánicas. A su
entera discreción, SENSIO Inc. reparará o reemplazará el producto que resulte defectuoso,
o emitirá un reembolso por el producto durante el plazo de garantía.
Esta garantía es válida únicamente para el comprador minorista original a partir de
la fecha de compra minorista inicial y no es transferible. Conserve el recibo de compra
original, ya que se exige una prueba de compra para obtener la validación de la garantía.
Las tiendas minoristas no tienen derecho a alterar, modicar ni corregir de ninguna manera
los términos y condiciones de la garantía.
EXCLUSIONES:
La garantía no cubre el desgaste normal de las piezas ni el daño ocasionado por
cualquiera de las siguientes causas: uso negligente del producto, uso de un voltaje
o corriente incorrectos, mantenimiento de rutina inadecuado, uso contrario al de las
instrucciones de funcionamiento, desarmado, reparación o alteración a cargo de personas
que no sean miembros del personal calicado de SENSIO Inc. Asimismo, la garantía no
cubre actos de la naturaleza, como incendios, inundaciones, huracanes o tornados.
SENSIO Inc. no asumirá responsabilidad por daños incidentales o resultantes
ocasionados por la violación de cualquier garantía expresa o implícita. Salvo en
la medida en que lo prohíban las leyes aplicables, cualquier garantía implícita de
comerciabilidad o aptitud para un propósito particular se limita temporalmente a la
duración de la garantía. Algunos estados, provincias o jurisdicciones no permiten la
exclusión ni la limitación de daños incidentales o resultantes, o limitaciones sobre la
duración de una garantía implícita y, por lo tanto, es posible que las exclusiones o
limitaciones mencionadas no le correspondan. La garantía cubre derechos legales
especícos que pueden variar de un estado, una provincia o una jurisdicción a otros.
CÓMO OBTENER EL SERVICIO DE GARANTÍA:
Debe comunicarse con el Servicio de atención al cliente a nuestro número telefónico gratuito:
1-866-832-4843. Un representante del Servicio de atención al cliente intentará resolver los
problemas referidos a la garantía por teléfono. Si este no puede resolver el problema, le
proporcionarán un número de caso y le solicitarán que devuelva el producto a SENSIO Inc.
Adhiera una etiqueta al producto que incluya: su nombre, dirección, número telefónico de
contacto durante el día, número de caso y descripción del problema. Además, incluya una
copia del recibo de compra original. Envuelva cuidadosamente el producto etiquetado con el
recibo de compra, y envíelo (con el envío y el seguro prepagados) a la dirección de SENSIO
Inc. SENSIO Inc. no asumirá obligación ni responsabilidad alguna por el producto devuelto
que esté en el trayecto hacia el Centro de servicio al cliente de SENSIO Inc.
GARANTÍA LIMITADA DE DOS AÑOS
35233_35234_35235_35236_35237_Bella_MultiUSA_6.0QT Slim_AirFryer_Oatmilk_IM_R2.indd 1735233_35234_35235_35236_35237_Bella_MultiUSA_6.0QT Slim_AirFryer_Oatmilk_IM_R2.indd 17 2024-11-07 11:01 AM2024-11-07 11:01 AM

35233_35234_35235_35236_35237_Bella_MultiUSA_6.0QT Slim_AirFryer_Oatmilk_IM_R2.indd 1835233_35234_35235_35236_35237_Bella_MultiUSA_6.0QT Slim_AirFryer_Oatmilk_IM_R2.indd 18 2024-11-07 11:01 AM2024-11-07 11:01 AM
Para preguntas o comentarios para el servicio de atención al cliente
1-866-832-4843 / help@bellahousewares.com
Hecho en China
For customer service questions or comments
1-866-832-4843 / help@bellahousewares.com
Made in China
Sensio Inc.
dba Made by Gather
TM
New York, NY 10016/USA
35233_35234_35235_35236_35237 R.2
35233_35234_35235_35236_35237_Bella_MultiUSA_6.0QT Slim_AirFryer_Oatmilk_IM_R2.indd 1935233_35234_35235_35236_35237_Bella_MultiUSA_6.0QT Slim_AirFryer_Oatmilk_IM_R2.indd 19 2024-11-07 11:01 AM2024-11-07 11:01 AM