
Visit our website at: http://www.harborfreight.com
Email our technical support at: [email protected]
Owner’s Manual & Safety Instructions
Save This Manual Keep this manual for the safety warnings and precautions, assembly,
operating, inspection, maintenance and cleaning procedures. Write the product’s serial number in the
back of the manual near the assembly diagram (or month and year of purchase if product has no number).
Keep this manual and the receipt in a safe and dry place for future reference. 20c
When unpacking, make sure that the product is intact
and undamaged. If any parts are missing or broken,
please call 1-888-866-5797 as soon as possible.
Copyright
©
2020 by Harbor Freight Tools
®
. All rights reserved.
No portion of this manual or any artwork contained herein may be reproduced in
any shape or form without the express written consent of Harbor Freight Tools.
Diagrams within this manual may not be drawn proportionally. Due to continuing
improvements, actual product may differ slightly from the product described herein.
Tools required for assembly an d se rv ic e may n ot b e in cl uded.
Read this material before using this product.
Failure to do so can result in serious injury.
SAVE THIS MANUAL.
Page 2 For technical questions, please call 1-888-866-5797. Item 57230
SaFEty OpEratiOn MaintEnancESEtup
table of contents
Safety ........................................................................2
Specifications ............................................................5
Setup .........................................................................5
Operation ...................................................................7
Maintenance ..............................................................8
Parts List and Diagram .............................................10
Warranty ...................................................................12
WarninG SyMBOLS anD DEFinitiOnS
This is the safety alert symbol. It is used to alert you to potential
personal injury hazards. Obey all safety messages that
follow this symbol to avoid possible injury or death.
Indicates a hazardous situation which, if not avoided,
will result in death or serious injury.
Indicates a hazardous situation which, if not avoided,
could result in death or serious injury.
Indicates a hazardous situation which, if not avoided,
could result in minor or moderate injury.
Addresses practices not related to personal injury.
iMpOrtant SaFEty inStructiOnS
When using electric gardening appliances, basic safety precautions should always be followed
to reduce the risk of fire, electric shock, and personal injury, including the following:
rEaD aLL inStructiOnS
Battery precautions
1. Do not charge appliance in rain, or in wet locations.
2. Do not use battery-operated appliance in rain.
3. Use only the specified battery pack
or an identical replacement.
4. Do not dispose of the battery in a fire.
The cell may explode. Check with local codes
for possible special disposal instructions.
5. Do not open or mutilate the battery. Released
electrolyte is corrosive and may cause damage to
the eyes or skin. It may be toxic if swallowed.
6. Exercise care in handling batteries in order not
to short the battery with conducting materials
such as rings, bracelets, and keys. The battery
or conductor may overheat and cause burns.

Page 3For technical questions, please call 1-888-866-5797.Item 57230
SaFEtyOpEratiOnMaintEnancE SEtup
Lithium Battery Safety Warnings
LitHiuM BattEriES StOrE a
LarGE aMOunt OF EnErGy
anD WiLL VEnt FirE Or
EXpLODE iF MiStrEatED:
1. Keep Battery pack dry.
2. DO nOt DO any OF tHE FOLLOWinG
tO tHE BattEry pacK:
a. Open,
b. Drop,
c. Short-circuit,
d. puncture,
e. incinerate, or
f. Expose to temperatures greater than 140°F.
3. Charge Battery Pack only according
to its Charger’s instructions.
4. Inspect Battery Pack before every use;
do not use or charge if damaged.
personal Safety
1. Follow all guidelines regarding
chemicals sprayed, including MSDS
instructions and Epa regulations.
2. Dress Properly - Do not wear loose clothing or
jewelry. They can be caught in moving parts.
Use of rubber gloves and substantial footwear
is recommended when working outdoors.
Wear protective hair covering to contain long hair.
3. Wear ANSI-approved safety goggles and
heavy-duty work gloves. Use face or
dust mask if operation is dusty.
4. Avoid Unintentional Starting - Be sure
switch is off when installing battery.
5. Do not Overreach -
Keep proper footing and balance at all times.
6. Stay Alert - Watch what you are doing.
Use common sense. Do not operate
appliance when you are tired.
Gardening appliance use and care
1. avoid Dangerous Environment -
Do not use appliances in damp or wet locations.
2. Do not use in rain.
3. Keep children away - all visitors should
be kept at a distance from work area.
4. When servicing use only identical replacement parts.
5. Use Right Appliance - Do not use appliance for
any job except that for which it is intended.
6. Do not Force Appliance - It will do the job
better and with less likelihood of injury at
the rate for which it was designed.
7. Store Idle Appliances Indoors - When not in use,
appliances should be stored indoors in dry, and
high or locked-up place - out of reach of children.
8. Maintain Appliance With Care. Follow instructions
for lubricating and changing accessories. Inspect
appliance cord periodically, and if damaged,
have it repaired by an authorized service
facility. Inspect extension cords periodically
and replace if damaged. Keep handles dry,
clean, and free from oil and grease.
9. Check Damaged Parts - Before further use of the
appliance, a guard or other part that is damaged
should be carefully checked to determine that it will
operate properly and perform its intended function.
Check for alignment of moving parts, binding of
moving parts, breakage of parts, mounting, and any
other condition that may affect its operation. A guard
or other part that is damaged should be properly
repaired or replaced by a qualified technician
unless indicated elsewhere in this manual.

Page 4 For technical questions, please call 1-888-866-5797. Item 57230
SaFEty OpEratiOn MaintEnancESEtup
Vibration Hazard
This appliance vibrates during use.
Repeated or long-term exposure to vibration may
cause temporary or permanent physical injury,
particularly to the hands, arms and shoulders.
To reduce the risk of vibration-related injury:
1. Anyone using vibrating appliances regularly or
for an extended period should first be examined
by a doctor and then have regular medical
check-ups to ensure medical problems are not
being caused or worsened from use. Pregnant
women or people who have impaired blood
circulation to the hand, past hand injuries,
nervous system disorders, diabetes, or Raynaud’s
Disease should not use this appliance. If you
feel any symptoms related to vibration (such as
tingling, numbness, and white or blue fingers),
seek medical advice as soon as possible.
2. Do not smoke during use. Nicotine reduces
the blood supply to the hands and fingers,
increasing the risk of vibration-related injury.
3. Wear suitable gloves to reduce the
vibration effects on the user.
4. Use appliances with the lowest vibration when
there is a choice between different processes.
5. Include vibration-free periods each day of work.
6. Grip appliance as lightly as possible
(while still keeping safe control of it).
Let the appliance do the work.
7. To reduce vibration, maintain the appliance
as explained in this manual. If any abnormal
vibration occurs, stop use immediately.
General Safety
1. use only for water or water-based fertilizers,
herbicides, pesticides and sealers. Do not use
to spray combustible or corrosive chemicals.
2. Follow all guidelines regarding
chemicals sprayed, including MSDS
instructions and Epa regulations.
3. Do not point the Sprayer at yourself,
other people or animals.
4. Industrial applications must follow
OSHA requirements.
5. Make sure the liquid used in the Sprayer
is not dirty, sandy or viscous.
6. This product is not a toy. Do not allow
children to play with or near this item.
7. Inspect before every use; do not use
if parts are loose or damaged.
8. Do not use appliance for other than intended use.
9. Maintain labels and nameplates on the appliance.
These carry important safety information.
If unreadable or missing, contact
Harbor Freight Tools for a replacement.
10. The warnings, precautions, and instructions
discussed in this instruction manual cannot
cover all possible conditions and situations
that may occur. It must be understood by the
operator that common sense and caution are
factors which cannot be built into this product,
but must be supplied by the operator.
SaVE tHESE inStructiOnS.
Page 5For technical questions, please call 1-888-866-5797.Item 57230
SaFEtyOpEratiOnMaintEnancE SEtup
Specifications
Charger Type Bauer 20 V Li-ion (sold separately)
Battery Type Bauer 20 V Li-ion (sold separately)
Tank Capacity 1 Gallon
Maximum Output 28 PSI
Hose Length 4'
Set up instructions
read the EntirE iMpOrtant SaFEty inStructiOnS section at the beginning of this manual
including all text under subheadings therein before set up or use of this product.
tO prEVEnt SEriOuS inJury FrOM acciDEntaL OpEratiOn:
Make sure that the power Switch/trigger is in the off-position and remove the
Battery pack before performing any procedure in this section.
note: For additional information regarding the parts listed in the following pages,
refer to the Assembly Diagram near the end of this manual.
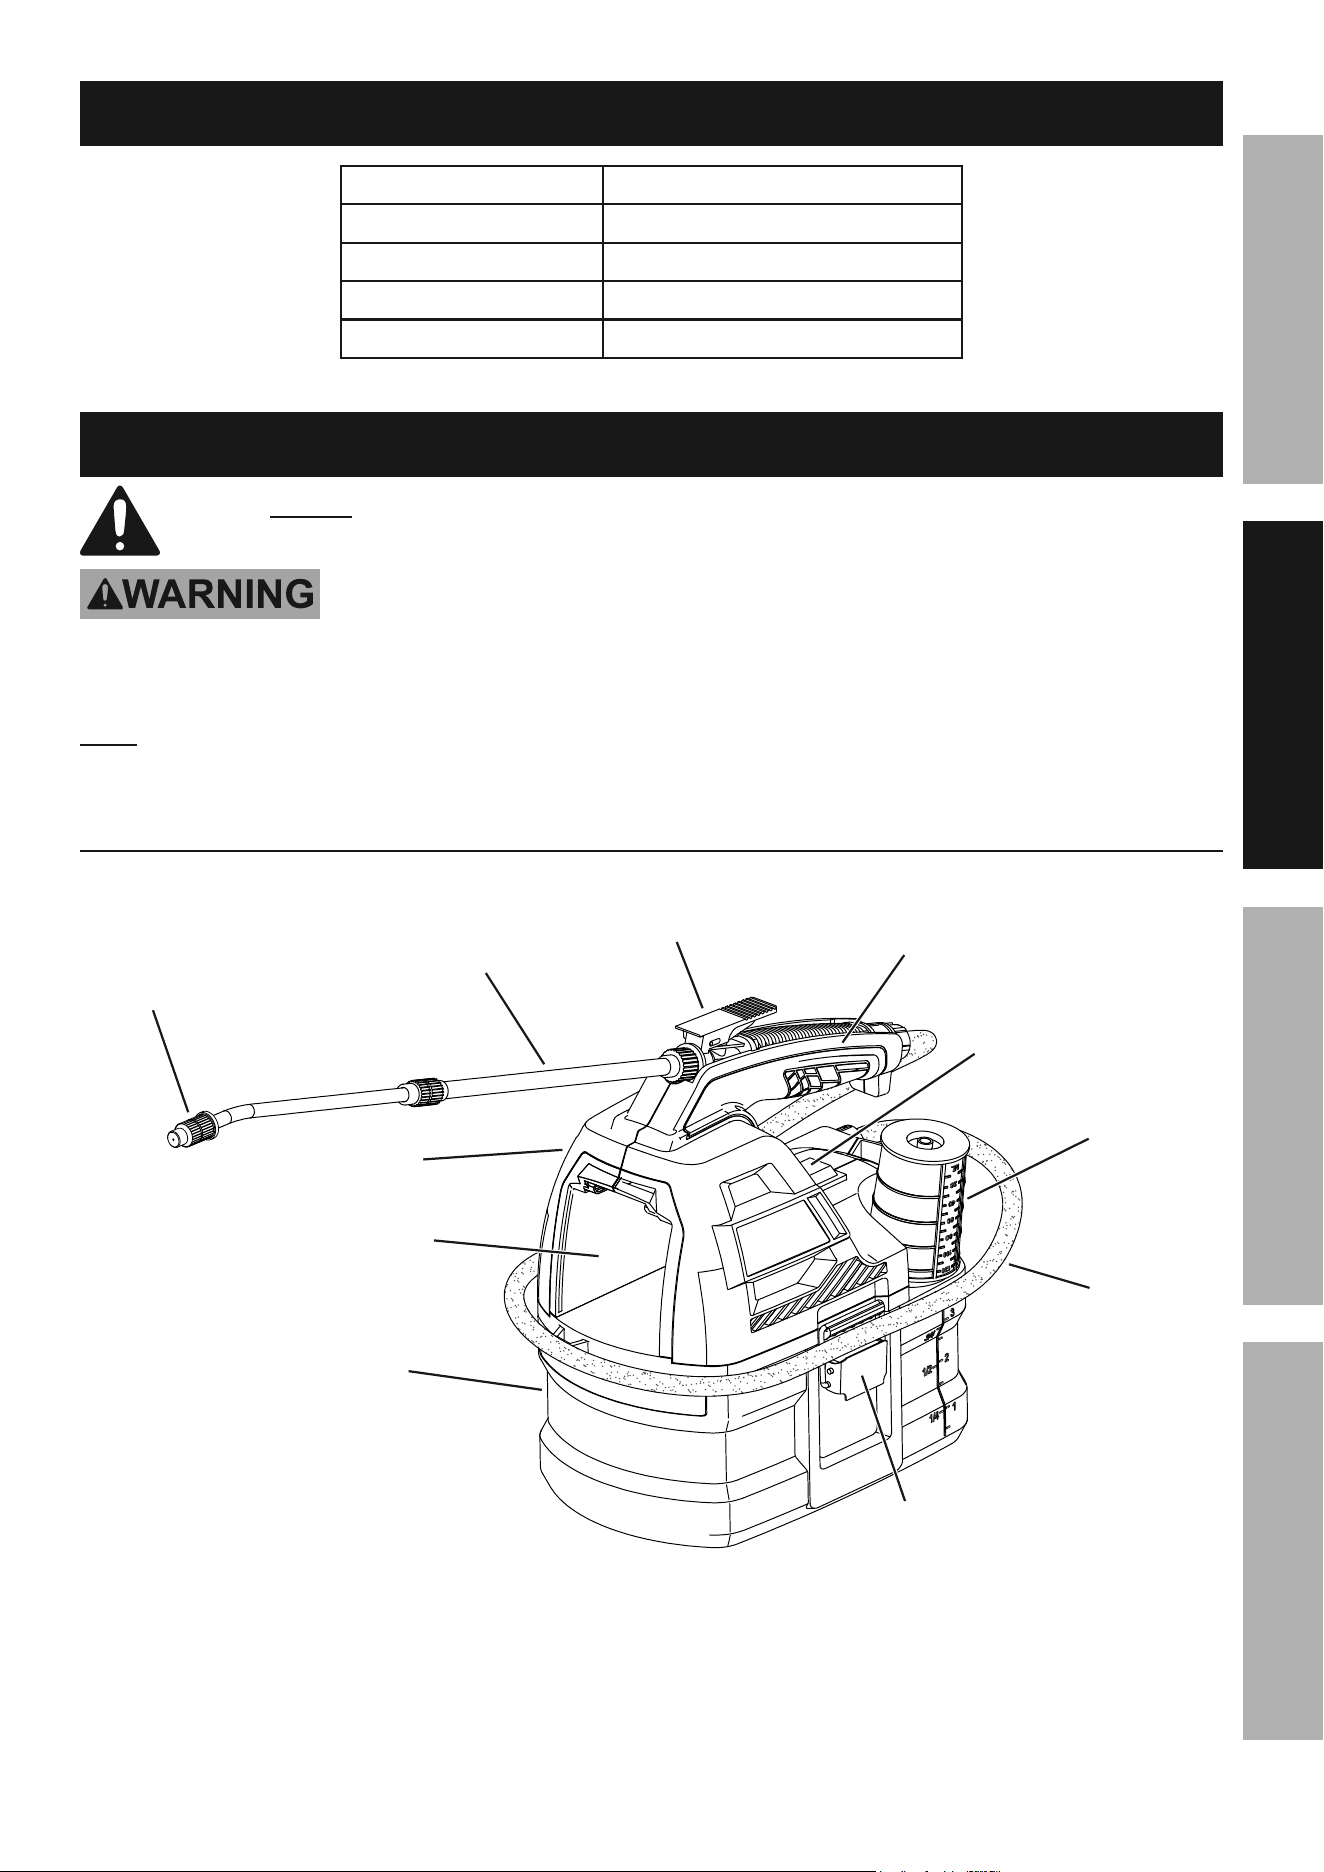
components and controls
Battery
receptacle
trigger
tank
Hose
Latch
nozzle
On/OFF
Switch
Measuring
cup
Motor
Housing
Spray Wand
Handle Storage area
Page 6 For technical questions, please call 1-888-866-5797. Item 57230
SaFEty OpEratiOn MaintEnancESEtup
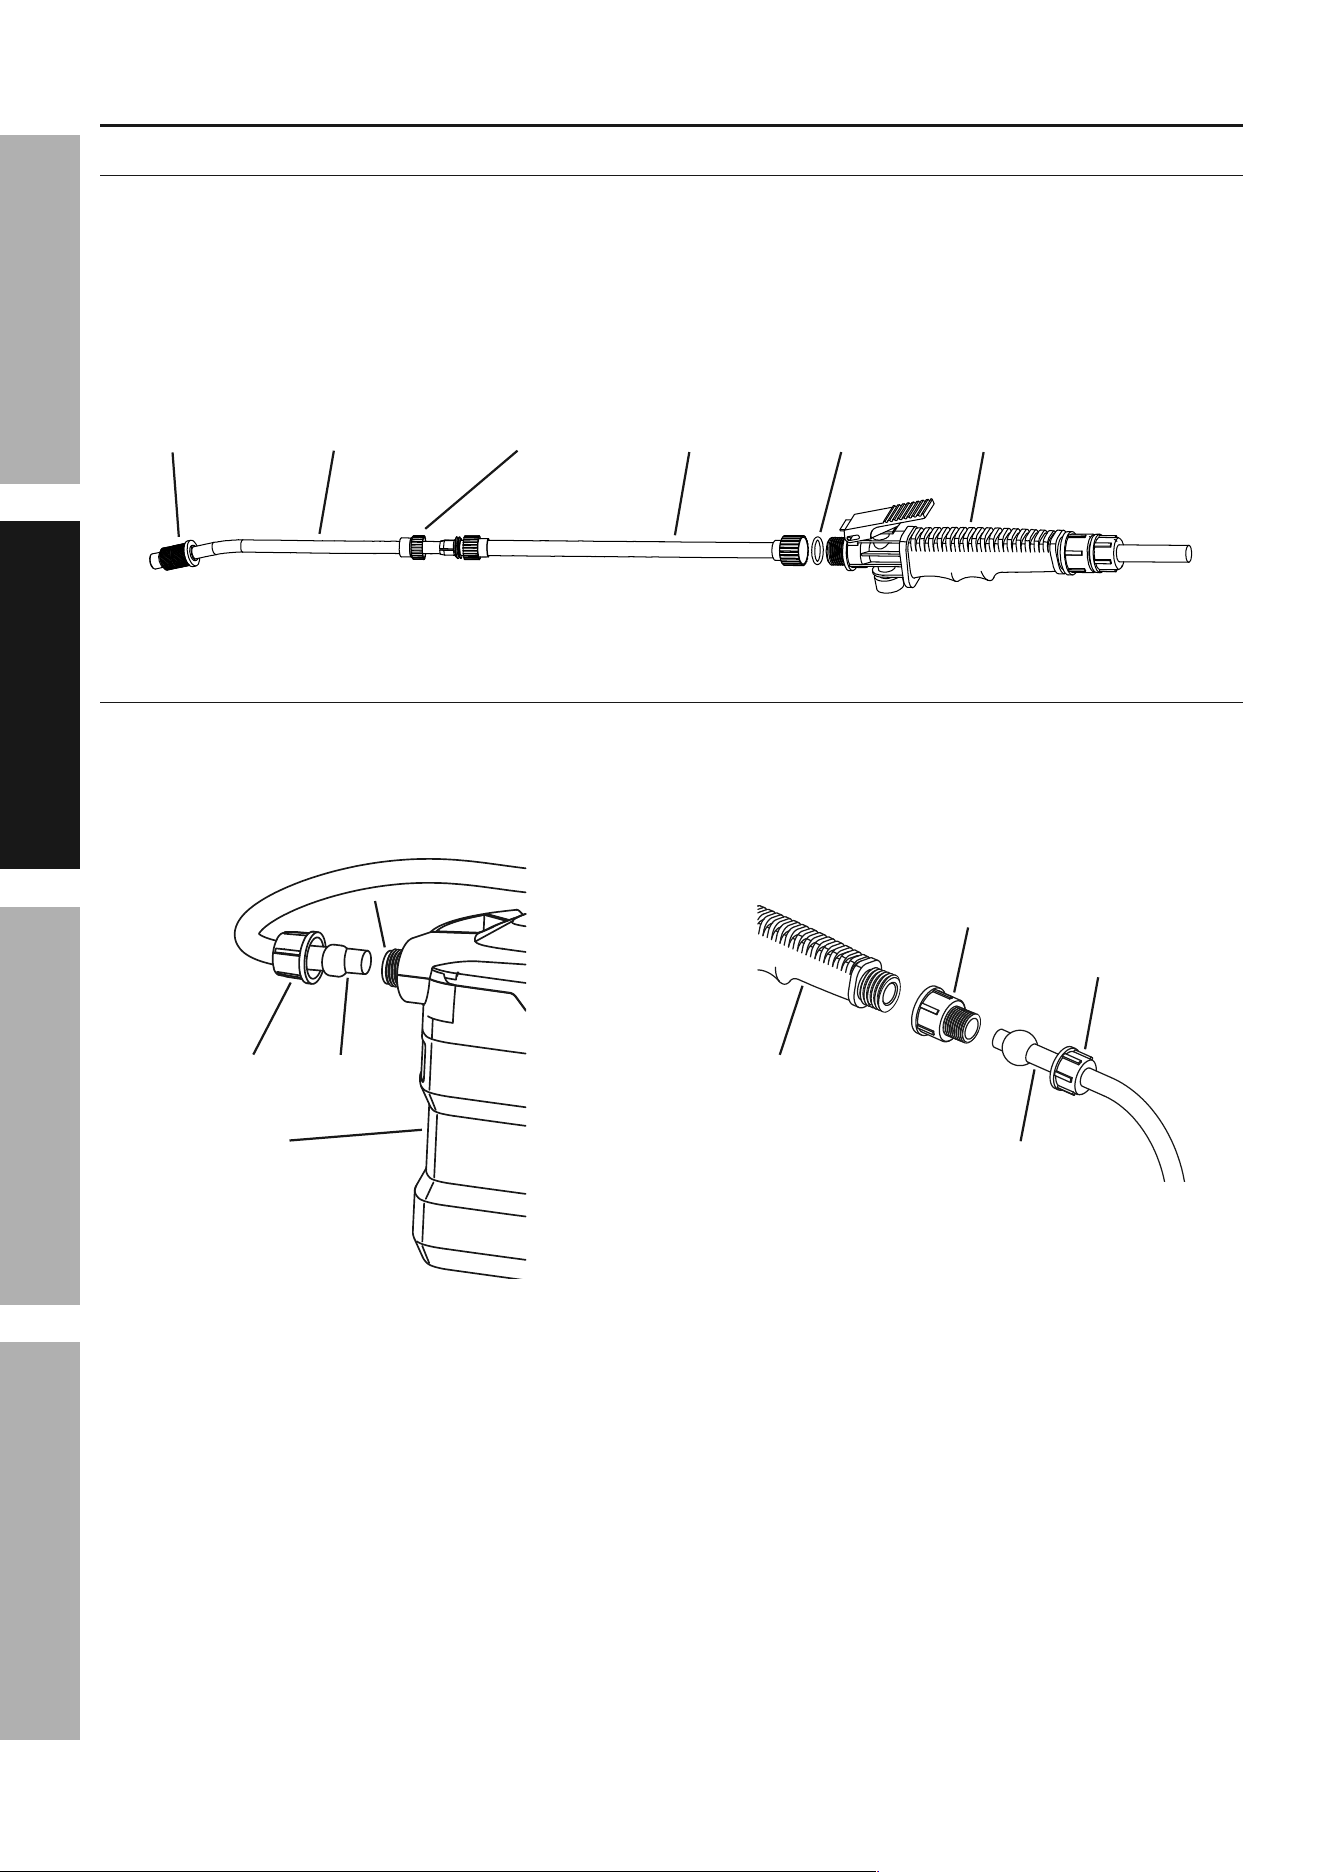
assembly
assembling the Spray Wand
1. Make sure the O-Ring is in place, then
thread the Spray Wand onto the Handle
and tighten securely. Refer to Figure A.
2. Loosen the Nozzle Nut and pull out the
Nozzle Extension to the desired length.
3. Align the Nozzle with the Handle so it is
pointing down and tighten the Nozzle Nut.
4. Pull on the Spray Wand to be
certain it is properly secured.
5. Place the Handle of the assembled Wand into
the handle storage area on the Sprayer.
O-ring Handle
nozzle nozzle nutnozzle Extension
Spray Wand
Figure a
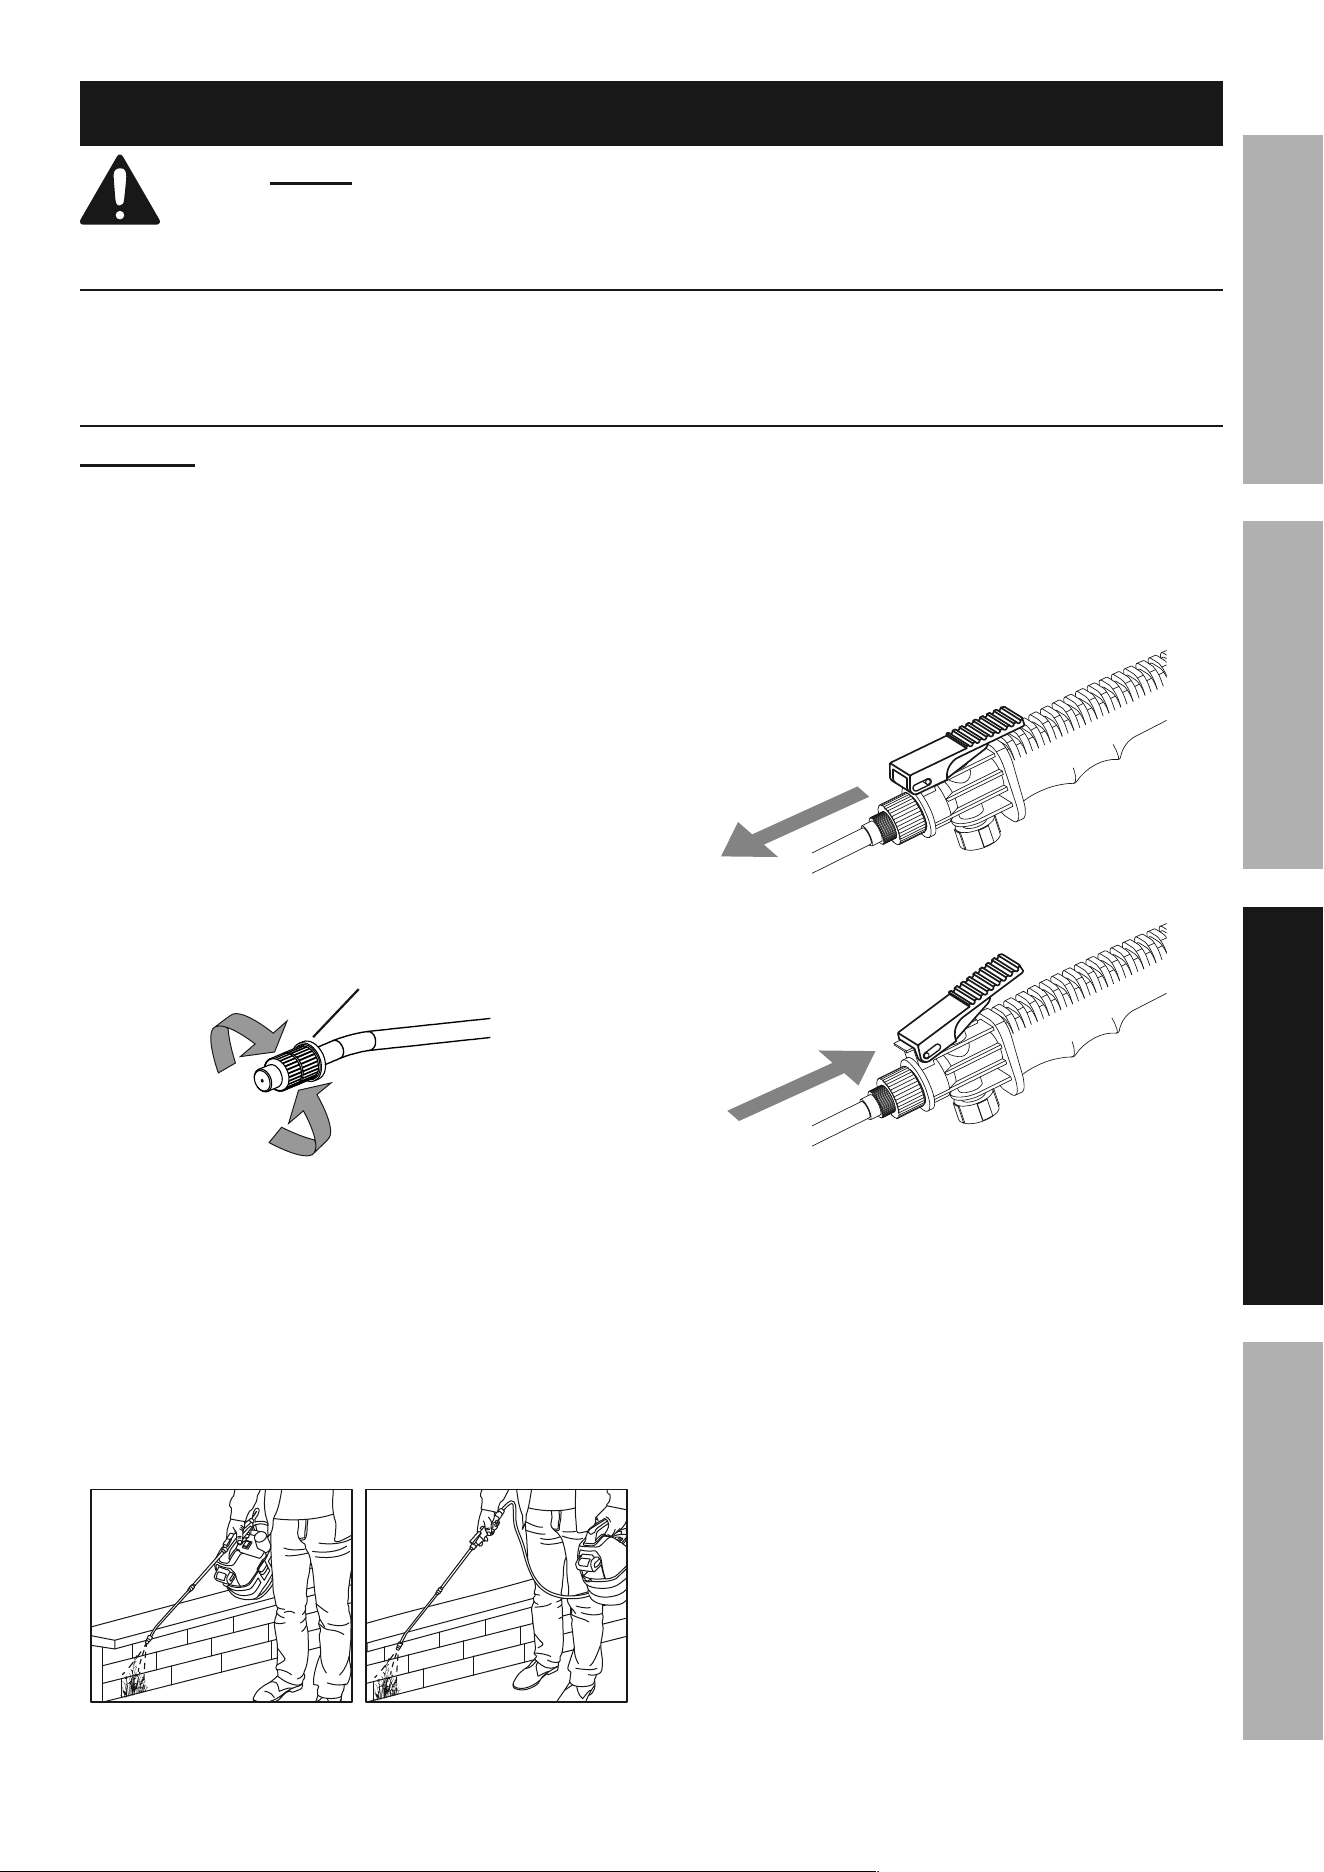
attaching the Hose
1. To attach the Hose to the Tank, insert the
end of the Hose into the threaded outlet on
the Tank. Make sure the Hose is pushed in
as far as it will go. Refer to Figure B.
threaded threaded
OutletOutlet
Hose
tank
nut
Figure B
2. Slide the Nut on the Hose over the threaded outlet
and Hose end and hand tighten. Make sure the
Hose is securely attached but do not overtighten.
3. To attach the Hose to the Handle, thread the
Cap onto the Handle and tighten securely.
4. Insert the end of the Hose into the threaded
opening on the Cap. Make sure the Hose is
pushed in as far as it will go. Refer to Figure C.
Handle
Hose
nut
cap
Figure c
5. Slide the Nut over the Hose end and Cap
and hand tighten. Make sure the Hose is
securely attached but do not overtighten.
Page 7For technical questions, please call 1-888-866-5797.Item 57230
SaFEtyOpEratiOnMaintEnancE SEtup
Operating instructions
read the EntirE iMpOrtant SaFEty inFOrMatiOn section at the beginning of this manual
including all text under subheadings therein before set up or use of this product.
charging Battery pack
Charge Battery Pack according to the instructions included with the 20 V Bauer
Battery Charger. Battery Pack and Charger sold separately.
General Operation
WarninG! tO prEVEnt SEriOuS inJury:
Follow all guidelines regarding chemicals sprayed,
including MSDS instructions and Epa regulations.
1. Before operating the gardening appliance,
put on ANSI-approved safety goggles and
other safety gear.
Safety goggles and other safety gear
are sold separately.
2. Assemble Sprayer according to Assembly
Instructions on page 6.
3. Unscrew and remove Measuring Cup and fill
Tank with up to one gallon of premixed spray
solution. Replace Cup and tighten securely.
4. Adjust the Nozzle for a fan spray or stream.
For a fan spray tighten the Nozzle or loosen
it for a steady stream. Refer to Figure D.
Stream
Fan Spray
nozzle
Figure D
5. Make sure the ON/OFF Switch is in the
off-position, then slide the Battery Pack
into the battery receptacle on the front of
the Sprayer until it clicks into place.
6. Press the ON/OFF Switch to start the Sprayer.
7. Operate either with the Spray Wand secured
in the handle storage area on the Sprayer or
with the Wand held in your hand as shown.
Wand mounted on Sprayer Wand held in hand
8. Point the Nozzle toward the area to be sprayed,
then depress the Trigger to begin spraying.
9. For continuous spray, press the Trigger down
and push it forward, then release the Trigger. To
stop continuous spray, press the Trigger down
and pull it back, then release the Trigger.
trigger in
Locked position
trigger in
unlocked position
Figure E
10. When finished spraying:
a. turn off Sprayer and remove its Battery pack.
b. point Wand is safe direction and depressurize
the tank by pressing down on the trigger.
c. Dispose of liquid according to
manufacturer guidelines.
d. clean the Sprayer according to
Maintenance instructions.
Page 8 For technical questions, please call 1-888-866-5797. Item 57230
SaFEty OpEratiOn MaintEnancESEtup
Maintenance and Servicing
procedures not specifically explained in this manual
must be performed only by a qualified technician.
tO prEVEnt SEriOuS inJury FrOM acciDEntaL OpEratiOn:
Make sure that the power Switch/trigger is in the off-position and remove
Battery pack before performing any procedure in this section.
tO prEVEnt SEriOuS inJury FrOM tOOL FaiLurE:
Do not use damaged equipment. if abnormal noise or vibration occurs,
have the problem corrected before further use.
cleaning, Maintenance, and Lubrication
1. BEFOrE EacH uSE, inspect the general
condition of the tool. Check for:
• leaking, swollen, or cracked battery pack
• loose hardware
• misalignment or binding of moving parts
• cracked or broken parts
• any other condition that may
affect its safe operation.
2. aFtEr EVEry uSE, clean the Sprayer:
a. Drain any remaining solution from the Tank
through the fill area and dispose of properly.
b. Fill Tank one-third full with clean water. Install
Battery Pack, point Wand in safe direction
and run Sprayer until Tank is empty.
c. Repeat previous step as necessary until
Sprayer is clean. Disconnect Battery Pack
and drain the Tank of residual water.
d. Lift the two Latches and remove the
Motor Housing from the Tank. Allow
tool to air-dry with the Tank open.
3. When dry, store Battery Pack, Charger,
and tool in dry, indoor area out of reach
of children and away from metal objects
(i.e., paperclips, coins) to prevent shorting.
4. Li-ion BattEry MuSt BE rEcycLED Or
DiSpOSED OF prOpErLy.
Do not short, incinerate or open battery.
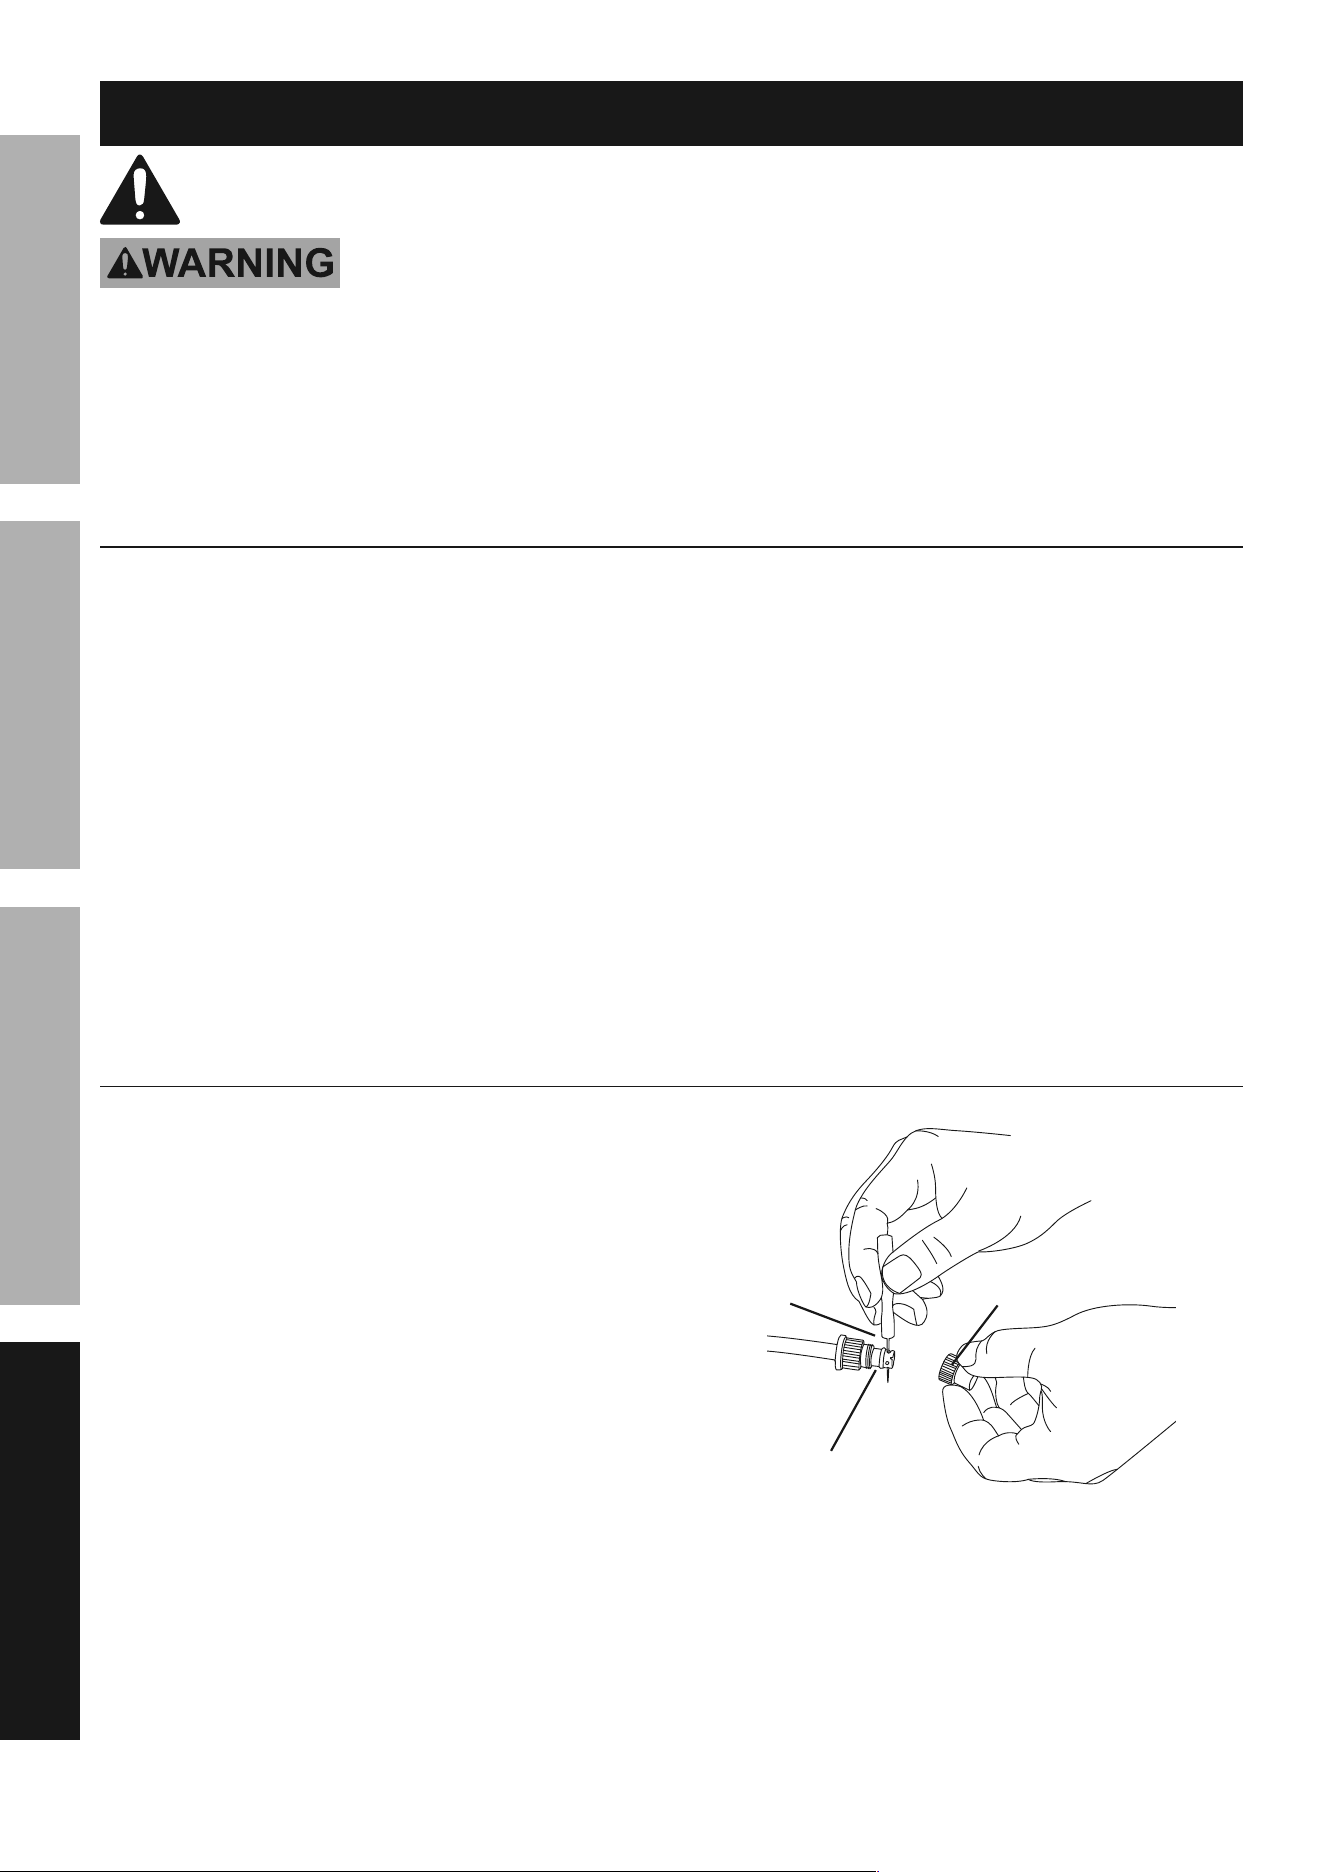
cleaning the nozzle
1. Remove the Nozzle Cap from the
Nozzle Head on the Spray Wand.
2. Push a small pin or wire through the exposed
holes in the Nozzle Head to remove accumulated
dirt and debris, then flush with clean water.
3. Wipe the Nozzle Head with a clean, dry cloth and
reattach the Nozzle Cap to the Nozzle Head.
nozzle
cap
pin
nozzle Head
Figure F
Page 9For technical questions, please call 1-888-866-5797.Item 57230
SaFEtyOpEratiOnMaintEnancE SEtup
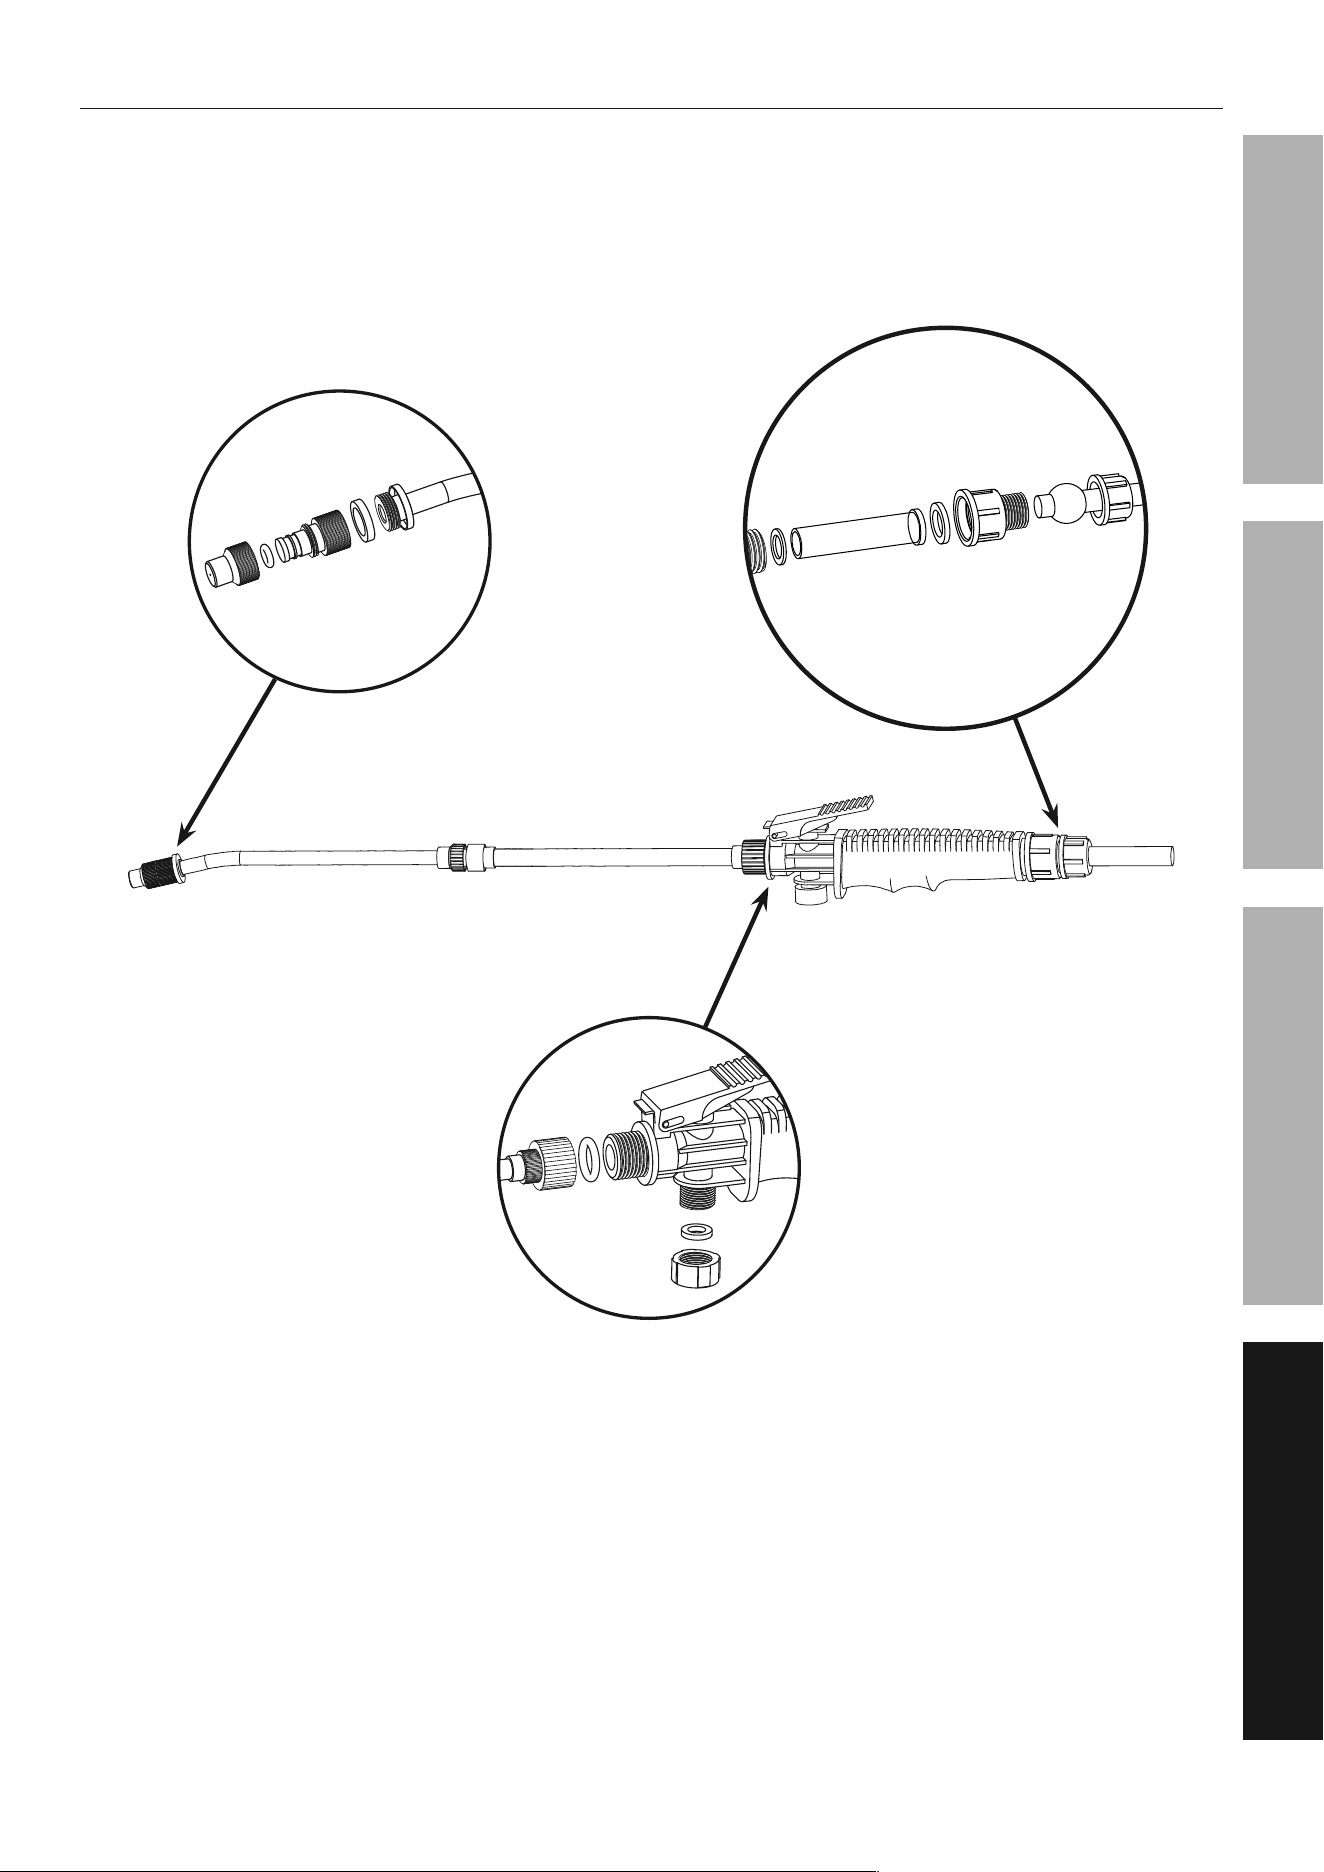
Seal replacement
1. Six replacement seals are included with
the Sprayer. It may become necessary
to replace the seals in the Spray Wand at
some point, as they can become hard and
damaged over time, causing leaks to occur.
2. Before replacing seals, thoroughly clean the Sprayer
as described on page 8. Refer to Figure G
for seal location and placement. Replace seals
when needed to correct any leaks that appear.
Figure G

Page 10 For technical questions, please call 1-888-866-5797. Item 57230
SaFEty OpEratiOn MaintEnancESEtup
record product’s Serial number Here:
note: If product has no serial number, record month and year of purchase instead.
note: Some parts are listed and shown for illustration purposes only,
and are not available individually as replacement parts.
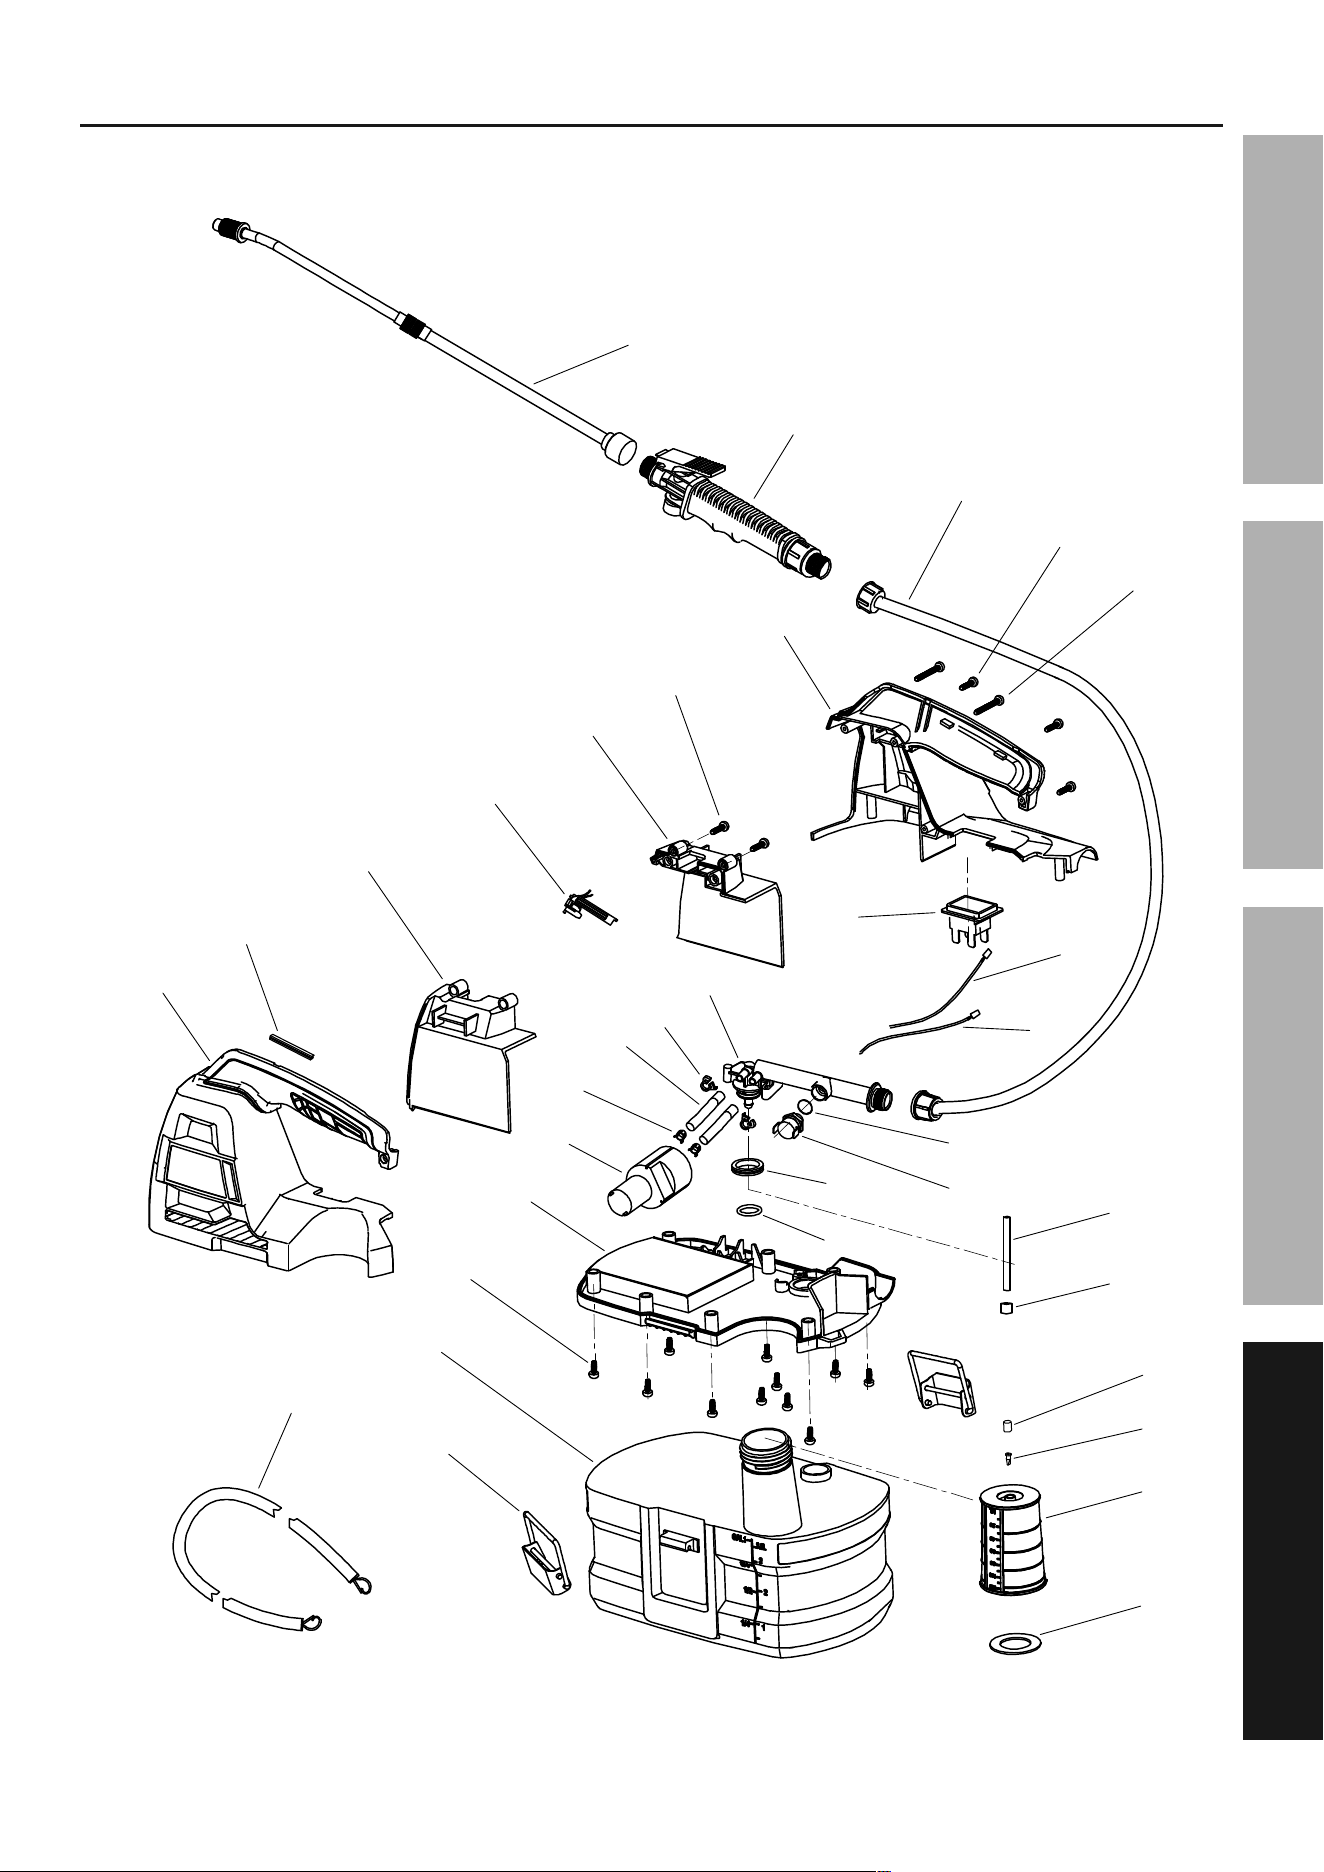
part Description Qty
1 Spray Wand Assembly 1
2 Handle Assembly 1
3 Spray Wand Hose 1
4 Screw 16
5 Screw 2
6 Two-Piece Housing 1
7 Battery Housing 1
8 PCBA 1
9 Seal Strip 1
10 Metal Latch 2
11 Tank 1
12 Bottom Plate 1
13 Pump Assembly 1
14 Hose Clip 2
15 Pump Hose 2
16 Pump Hose Clip 2
part Description Qty
17 Pump Assembly Connector 1
18 ON/OFF Switch 1
19 Internal Wire 1 1
20 Internal Wire 2 1
21 O-Ring 1
22 Pressure Sensor 1
23 Cup Seal Ring 1
24 O-Ring 1
25 Suction Tube 1
26 Filter 1
27 Block 1
28 Check Valve 1
29 Measuring Cup 1
30 Measuring Cup Seal Ring 1
31 Carry Strap 1
32 Replacement Seals (not shown) 6
parts List and Diagram
pLEaSE rEaD tHE FOLLOWinG carEFuLLy
THE MANUFACTURER AND/OR DISTRIBUTOR HAS PROVIDED THE PARTS LIST AND ASSEMBLY DIAGRAM
IN THIS MANUAL AS A REFERENCE TOOL ONLY. NEITHER THE MANUFACTURER OR DISTRIBUTOR
MAKES ANY REPRESENTATION OR WARRANTY OF ANY KIND TO THE BUYER THAT HE OR SHE IS
QUALIFIED TO MAKE ANY REPAIRS TO THE PRODUCT, OR THAT HE OR SHE IS QUALIFIED TO REPLACE
ANY PARTS OF THE PRODUCT. IN FACT, THE MANUFACTURER AND/OR DISTRIBUTOR EXPRESSLY
STATES THAT ALL REPAIRS AND PARTS REPLACEMENTS SHOULD BE UNDERTAKEN BY CERTIFIED AND
LICENSED TECHNICIANS, AND NOT BY THE BUYER. THE BUYER ASSUMES ALL RISK AND LIABILITY
ARISING OUT OF HIS OR HER REPAIRS TO THE ORIGINAL PRODUCT OR REPLACEMENT PARTS
THERETO, OR ARISING OUT OF HIS OR HER INSTALLATION OF REPLACEMENT PARTS THERETO.
parts List
Page 11For technical questions, please call 1-888-866-5797.Item 57230
SaFEtyOpEratiOnMaintEnancE SEtup
assembly Diagram
1
2
3
6
4
4
7
8
7
9
6
31
11
12
17
18
19
20
21
24
22
23
25
26
27
28
29
30
16
15
14
13
10
4
5

Limited 90 Day Warranty
Harbor Freight Tools Co. makes every effort to assure that its products meet high quality and durability standards,
and warrants to the original purchaser that this product is free from defects in materials and workmanship for the
period of 90 days from the date of purchase. This warranty does not apply to damage due directly or indirectly,
to misuse, abuse, negligence or accidents, repairs or alterations outside our facilities, criminal activity, improper
installation, normal wear and tear, or to lack of maintenance. We shall in no event be liable for death, injuries
to persons or property, or for incidental, contingent, special or consequential damages arising from the use of
our product. Some states do not allow the exclusion or limitation of incidental or consequential damages, so the
above limitation of exclusion may not apply to you. THIS WARRANTY IS EXPRESSLY IN LIEU OF ALL OTHER
WARRANTIES, EXPRESS OR IMPLIED, INCLUDING THE WARRANTIES OF MERCHANTABILITY AND FITNESS.
To take advantage of this warranty, the product or part must be returned to us with transportation charges
prepaid. Proof of purchase date and an explanation of the complaint must accompany the merchandise.
If our inspection verifies the defect, we will either repair or replace the product at our election or we may
elect to refund the purchase price if we cannot readily and quickly provide you with a replacement. We will
return repaired products at our expense, but if we determine there is no defect, or that the defect resulted
from causes not within the scope of our warranty, then you must bear the cost of returning the product.
This warranty gives you specific legal rights and you may also have other rights which vary from state to state.
26541 agoura road • calabasas, ca 91302 • 1-888-866-5797