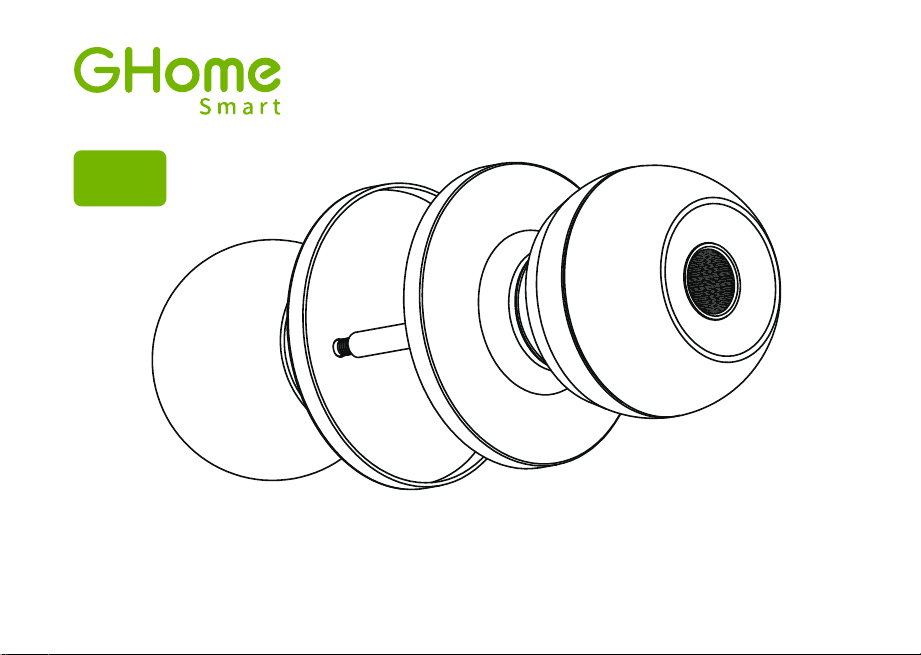
Smart Door Knob with Fingerprint
Rechargeable Smart Lock
NO
1
USB charging
Long beep Stay green for a while
Blinks green once
Blinks red once
Blinks green once
Blinks green then
blinks red
Beeps once
Beeps twice
Long beep
Beeps once
(after using fingerprint
or app to unlock)
Type-C/ 5V 2A
Max fingerprints 20pcs
Rechargeable battery
Low battery alarm voltage
Built-in 400mAh rechargeable
lithium battery
3.5V±0.2
Stand-by current
Working current
Working temperature
<90uA
23℉~131℉
<500mA
2
3
4
5
6
7
Name Parameter
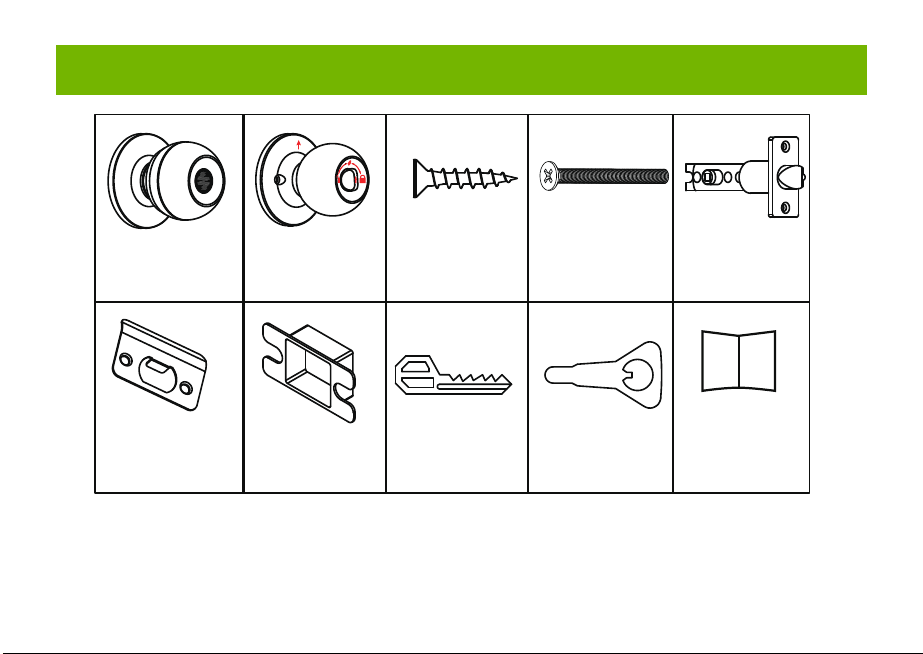
Please check the above components carefully to make sure all items have been received.
if any components are missing, please contact Customer Service.([email protected])
Please read this manual carefully before installation and operation.
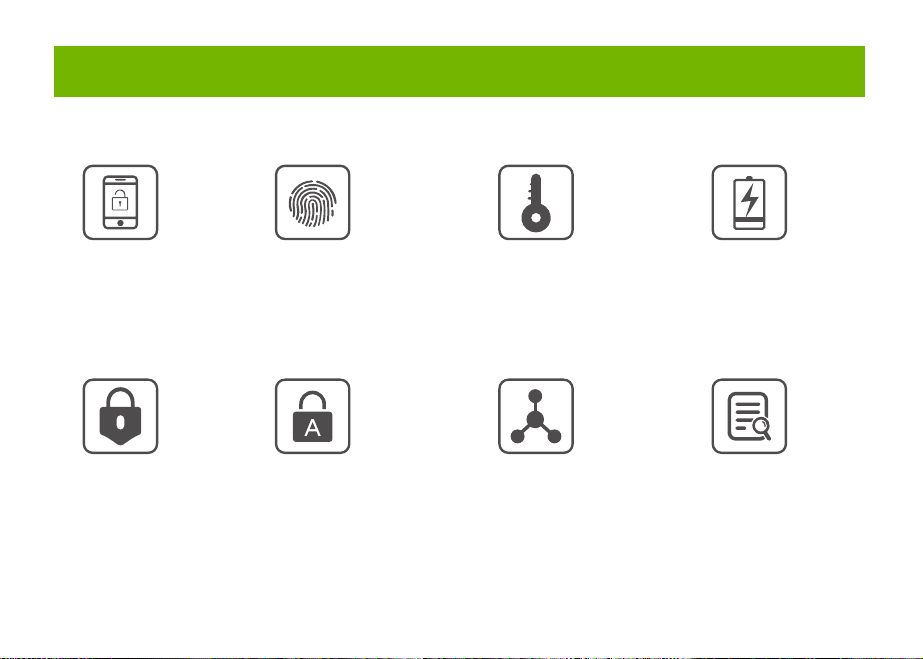
App Unlock Fingerprint Unlock Low Power IndicationKey Unlock
Unlock Records
Passage ModeNormal Mode
(Auto lock)
Privacy Mode
Main Features
Installation Guide
Installation Guide Installation Guide
Components Included
Installation Guide Installation Guide
Installation Guide
Product Parameter
Operation Guide
Product Parameter
K10
Action Buzzer Indicator
Fingerprint added
successfully
Unlocking successful
Unlocking failure
Low battery warning
Resetting successful
Operation Guide
Indicator Lights
backset
or
2 8”
(55mm)
1
1”
(25mm)
2 8”
(60mm)
3
2 4”
(70mm)
3
1 8” ~ 2 8”
(35~55mm)
3
1
Installation Guide
Scan the below QR code to download the Gosund App, or search “Gosund” in the APP Store(iOS) or
Google Play(Android) to install the APP.
Note: The door lock does not support a bluetooth connection by directly searching its signal from the
bluetooth list. Please connect to Gosund App first before the bluetooth connection. Once the door lock
is connected to the Gosund App and gets online normally, which means the bluetooth connection is
successful.
How to Connect to Gosund APP How to Pair with Gosund App How to Pair with Gosund App How to Pair with Gosund App Add Fingerprint (operate on the lock side)
Setting Kindly Reminder FAQ
Download Gosund App
1, Preparation before Door Installation
1.Remove your old lock and check your door.
2.Check if your door has holes as below. It is compatible with standard US doors.
Check The Door’s Dimension
• Make sure the thickness of the door is between 1-3/8” and 2-1/8” (35~55mm).
• Make sure the diameter of the hole in the door is 2-1/8” (55mm).
• Make sure the backset (as shown below) is either 2-3/8” (60mm) or 2-3/4”(70mm).
• Make sure the diameter of the hole in the door edge is 1” (25mm).
Any Changes or modifications not expressly approved by the party responsible for compliance could
void the user's authority to operate the equipment.
Note: This equipment has been tested and found to comply with the limits for a Class B digital
device, pursuant to part 15 of the FCC Rules. These limits are designed to provide reasonable
protection against harmful interference in a residential installation. This equipment generates uses
and can radiate radio frequency energy and, if not installed and used in accordance with the
instructions, may cause harmful interference to radio communications. However, there is no
guarantee that interference will not occur in a particular installation. If this equipment does cause
harmful interference to radio or television reception, which can be determined by turning the
equipment off and on, the user is encouraged to try to correct the interference by one or more of the
following measures:
-Reorient or relocate the receiving antenna.
-Increase the separation between the equipment and receiver.
-Connect the equipment into an outlet on a circuit different from that to which the receiver is
connected. -Consult the dealer or an experienced radio/TV technician for help.
This device complies with part 15 of the FCC Rules. (Operation is subject to the following two
conditions:(1) This device may not cause harmful interference, and (2) this device must accept any
interference received, including interference that may cause undesired operation.
Manufacturer: Shenzhen Cuco Smart Technology Co., Ltd.
Address: Room 201, 301, Building A, No.12 Difu Road, Guxing Community, Xixiang Street,
Bao'an District, Shenzhen, 518000, Guangdong, P. R. China
MADE IN CHINA
Contact Information:
E-mail: [email protected]
Tel: 1-844-394-5218 PST 9AM - 5PM (Monday-Friday)
Website: https://ghomesmart.com/
FCC WARNING
Exterior Knob
1PC
Interior Knob
1PC
Screw A
4PCS
Screw B
2PCS
Latch
1PC
User
Manual
1PC
Strike Plate
1PC
Strike Box
1PC
Key
2PCS
Pin
1PC
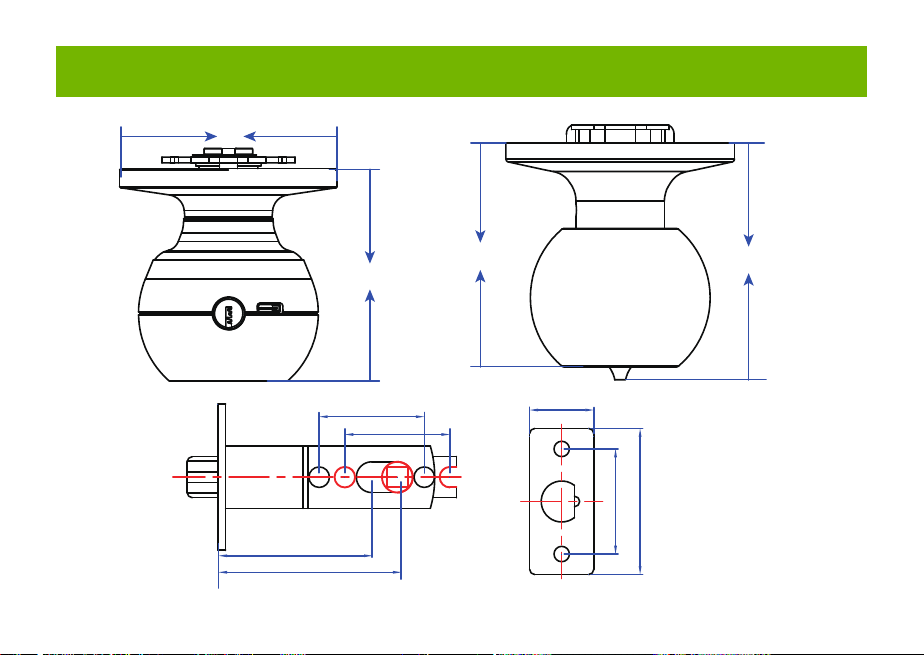
73mm/2.87'
77mm/3.03'
57mm/2.95'
25mm/0.98'
41mm/1.65'
41mm/1.61'
41mm/1.61'
60mm/2.36'
70mm/2.75'
Suitable for doors with a thickness of 1-3/8” - 2-1/8” (35~55mm)
75mm/2.95'
Keyhole
Type-C
Rod bolts
Spindle
Spindle bar
(3) Insert the exterior knob with spindle into the square-shaped (center) latch hole. Make sure that
rod bolts are positioned correctly through circular latch holes.
Rose
3, Install Exterior Knob and Interior Knob
(1) For the first installation, pull out the Interior knob without using a pin and remove the cardboard
hanger. Remove the screw B.
When you want to reinstall later, please use pin. Vigorously insert the pin into the hole as shown in
figure 1 and separate the rose from the Interior Knob as shown in figure.
(4) The “up” mark above the rose should face upward. Install the rose by placing on spindle and
aligning the circular holes with rod bolts. Then insert Screw B into the circular holes and tighten
them to secure the rose.
(5) Firstly, make sure the spindle bar is in the vertical position as shown above. Secondly, rotate the
thumb turn to the circular mark. Lastly, insert Interior Knob into the rose, making sure that the hole of
Interior knob is aligned with the spindle bar and the rectangular hole at the edge of the interior knob
is aligned with the circular hole at the edge of the rose.When you hear a ”click“ sound, it indicates
successful insertion.
Privacy Mode: As the figure shows, rotate the thumb turn to Lock position to active privacy
mode. In private mode, only the administrator can unlock it by fingerprint. Both members and
administrators can unlock it with the app.
Passage Mode: Rotate the thumb turn to Unlock position to activate passage mode. In passage
mode, both administrator and common members can open the door by turning the knob directly,
without a fingerprint.
Normal Mode (Auto lock): Rotate the thumb turn to the circular mark directly above to
switch to normal mode. In normal mode, after unlocking it with the fingerprint, the doorknob
automatically locks in 5 seconds.
Restore Factory Setting
Rotate the thumb turn from the circular mark to Lock position and then return to the circular mark.
After repeating this operation 5 times,perform the same operation to Unlock position 5 times. After
that, you will hear 1 long beep and the fingerprint identification area flashes green.
At this time,youcan unlockit withany fingerprint.
1, Create and login to your account.
2, Click upper right corner “+”,turn on Bluetooth and Click “Allow” to connect the lock.
Note: Touch the fingerprint screen of the lock to enable Bluetooth for easier connection.
3, Add the discovering devices.
4, Waiting for successful connection. You can click this icon “ ” to rename the lock.
Member management 一 click" +”- fill in name and other data -Role setting, choose“Administrator"or
“Common Member”一 go back to Members interface -click the accountyou just created 一> click "add"
- follow the prompt to add fingerprints.
Note: Try to touch the center of the fingerprint screen forcefully, add large area fingerprints, place your
fingers at multiple angles during fingerprint enrollment.
Only the administrator account has the privilege to manage the lock, including remote control and
adding or deleting a fingerprint.
Remote Unlock
To use the remote control function, a separate gateway needs to be purchased. Please note that the
door lock lets you control your door locally without a gateway.
Lock Volume
The volume of fingerprint reminder buzzer can be turned off in the APP. (The electric motor can not be
muted).
1, While the smart lock is going to pair with APP, please ensure the Bluetooth and network or Wi-Fi
are turned on.
2, Type-C power interface supports battery charging and a temporary emergency power supply for
unlocking.
3, Ensure your fingers are at multiple positions and angles during fingerprint enrollment.
4, When the fingers are wet, the hands are sticky, or not clean, it will be hard or even impossible to
unlock the door.
5, It is better to keep at least one key in a secure location as an extra precaution.
6, The remote unlock can only be done by connecting to the gateway. Customers need to purchase
the gateway separately.
7, Please replace the entire lock instead of parts.
8, The battery is not detachable and cannot be replaced. We recommend using a power bank with
an output voltage of 5V for charging.
9, After turning the mechanical key about 90 degrees, you need to turn the knob to open the door.
10, It is better to keep at least one key in a secure location as an extra precaution.
11, Please install the exterior and interior knob in correct position (read the installation), or the knob
can't work correctly.
Q1: Fingerprint cannot be recognized?
If fingerprint data is incomplete or entry failed. please re-enroll from multiple angles, add large area
fingerprints. The fingerprint is too dry wet, or not clean, also will hard to be recognized.
Q2: The APP cannot connect to the lock?
Make sure that the Bluetooth is turned on, and the mobile network or Wi-Fi is on.
Q3: Does the lock need internet to continue working after setup?
No, it does not require the internet. lt uses Bluetooth.
Q4: What if the battery dies? Can I charge it?
You can use the Type-c port for emergency unlocking and charging. Or unlock it with the mechanical
key, which comes with the lock.
Q5: How long does the battery last? How long does it take to fully charge?
This door lock has a built-in 400mAh rechargeable lithium battery. Battery life may vary from 8 to 12
months. It takes about 3 hours to fully charge.
Q6: Can I mute the lock volume?
The volume of fingerprint reminder buzzer can be turned off in the APP.
Q7: Can't separate the rosette from the Interior Knob?
Note that during the first installation, just remove the paper jam and directly pull out the handle without
using a pin. When you want to reinstall later, please vigorously insert the pins and separate them.
Q8: What is the difference between administrator and common members?
Only the administrator account has the privilege to manage users. In privacy mode, only administrator'
fingerprints can unlock the door.
Q9: How can I use Auto Lock function?
A: You can turn "thumb turn" in the interior knob to Normal mode, the door will be automatically lock in
5s,
73mm/2.87'
(2) Make sure that the keyhole of the Exterior Knob should be facing down.
UP
①
②
③
UP
UP
①
①
②
③
③
IMPORTANT: Please insert
the spindle bar vertically into the
hole, as shown in figure.
UP UPUP
①
②
③
Privacy Mode Passage Mode Nomal Mode
Components Included…………………………………………………………….... 1
Main Features……………………………………………………………………..... 2
Product Parameter…………………………………………………………………. 3
Installation Guide………………………………………………………………....... 5
Operation Guide…………………………………………………………………… 12
Indicator Lights ………………………………………………………………........ 14
APP Guide………………………………………………………………………..... 15
Setting………………………………………………………………………………. 20
Kindly Reminder & FAQ…………………………………………………………... 21
FCC Warning.…………………………………………………………………….... 23
Customer Services……………………………………………………….……...... 24
Contents
Customer Services
2)Set the latch backset to 60mm (2-3/8”) or 70mm (2-3/4”) to fit your door hole. For 70mm (2-3/4”)
backset, pull to extend the Latch in order to center square-shaped hole.
2, Install Latch and Strike
Facing Door Jamb
Screw A
3) Insert the Latch into the door hole, and tighten Screw A to fix the Latch. Install Strike Box and
Strike Plate with Screw A into the door frame.
In more cases, the existing plate is ready to be used. You can keep the strike plate in box for future
use. If not, please make sure the bolt is aligned correctly with the strike plate.
IMPORTANT: Please insert the
spindle bar vertically into the
hole, as shown in figure 2.
Ensure the direction is the same
as in figure 3.
UP
IMPORTANT: Keep
the spindle bar in
vertically direction and
prevent it from rotating.
Screw B
Screw B
Screw B
1) Hold the Latch in front of the door hole so that the Latch is flush with the door edge. Make sure the
square-shaped hole is centered.
IMPORTANT: The keyhole is
facing downwards.
IMPORTANT: The rectangular hole and the
circular hole should be kept horizontally aligned.
Installation Video
IMPORTANT: When you want
to reinstall it later, please use
a pin to remove the knob.
1
6 7 8 9 10 11 12
13 14 15 16 17 18 19
20 21 22 23 24 11 12
2 3 4 5

Smart Door Knob with Fingerprint
Rechargeable Smart Lock
NO
1
USB charging
Long beep Stay green for a while
Blinks green once
Blinks red once
Blinks green once
Blinks green then
blinks red
Beeps once
Beeps twice
Long beep
Beeps once
(after using fingerprint
or app to unlock)
Type-C/ 5V 2A
Max fingerprints 20pcs
Rechargeable battery
Low battery alarm voltage
Built-in 400mAh rechargeable
lithium battery
3.5V±0.2
Stand-by current
Working current
Working temperature
<90uA
23℉~131℉
<500mA
2
3
4
5
6
7
Name Parameter
Please check the above components carefully to make sure all items have been received.
if any components are missing, please contact Customer Service.([email protected])
Please read this manual carefully before installation and operation.
App Unlock Fingerprint Unlock Low Power IndicationKey Unlock
Unlock Records
Passage ModeNormal Mode
(Auto lock)
Privacy Mode
Main Features
Installation Guide
Installation Guide Installation Guide
Components Included
Installation Guide Installation Guide
Installation Guide
Product Parameter
Operation Guide
Product Parameter
K10
Action Buzzer Indicator
Fingerprint added
successfully
Unlocking successful
Unlocking failure
Low battery warning
Resetting successful
Operation Guide
Indicator Lights
backset
or
2 8”
(55mm)
1
1”
(25mm)
2 8”
(60mm)
3
2 4”
(70mm)
3
1 8” ~ 2 8”
(35~55mm)
3
1
Installation Guide
Scan the below QR code to download the Gosund App, or search “Gosund” in the APP Store(iOS) or
Google Play(Android) to install the APP.
Note: The door lock does not support a bluetooth connection by directly searching its signal from the
bluetooth list. Please connect to Gosund App first before the bluetooth connection. Once the door lock
is connected to the Gosund App and gets online normally, which means the bluetooth connection is
successful.
How to Connect to Gosund APP How to Pair with Gosund App How to Pair with Gosund App How to Pair with Gosund App Add Fingerprint (operate on the lock side)
Setting Kindly Reminder FAQ
Download Gosund App
1, Preparation before Door Installation
1.Remove your old lock and check your door.
2.Check if your door has holes as below. It is compatible with standard US doors.
Check The Door’s Dimension
• Make sure the thickness of the door is between 1-3/8” and 2-1/8” (35~55mm).
• Make sure the diameter of the hole in the door is 2-1/8” (55mm).
• Make sure the backset (as shown below) is either 2-3/8” (60mm) or 2-3/4”(70mm).
• Make sure the diameter of the hole in the door edge is 1” (25mm).
Any Changes or modifications not expressly approved by the party responsible for compliance could
void the user's authority to operate the equipment.
Note: This equipment has been tested and found to comply with the limits for a Class B digital
device, pursuant to part 15 of the FCC Rules. These limits are designed to provide reasonable
protection against harmful interference in a residential installation. This equipment generates uses
and can radiate radio frequency energy and, if not installed and used in accordance with the
instructions, may cause harmful interference to radio communications. However, there is no
guarantee that interference will not occur in a particular installation. If this equipment does cause
harmful interference to radio or television reception, which can be determined by turning the
equipment off and on, the user is encouraged to try to correct the interference by one or more of the
following measures:
-Reorient or relocate the receiving antenna.
-Increase the separation between the equipment and receiver.
-Connect the equipment into an outlet on a circuit different from that to which the receiver is
connected. -Consult the dealer or an experienced radio/TV technician for help.
This device complies with part 15 of the FCC Rules. (Operation is subject to the following two
conditions:(1) This device may not cause harmful interference, and (2) this device must accept any
interference received, including interference that may cause undesired operation.
Manufacturer: Shenzhen Cuco Smart Technology Co., Ltd.
Address: Room 201, 301, Building A, No.12 Difu Road, Guxing Community, Xixiang Street,
Bao'an District, Shenzhen, 518000, Guangdong, P. R. China
MADE IN CHINA
Contact Information:
E-mail: [email protected]
Tel: 1-844-394-5218 PST 9AM - 5PM (Monday-Friday)
Website: https://ghomesmart.com/
FCC WARNING
Exterior Knob
1PC
Interior Knob
1PC
Screw A
4PCS
Screw B
2PCS
Latch
1PC
User
Manual
1PC
Strike Plate
1PC
Strike Box
1PC
Key
2PCS
Pin
1PC
73mm/2.87'
77mm/3.03'
57mm/2.95'
25mm/0.98'
41mm/1.65'
41mm/1.61'
41mm/1.61'
60mm/2.36'
70mm/2.75'
Suitable for doors with a thickness of 1-3/8” - 2-1/8” (35~55mm)
75mm/2.95'
Keyhole
Type-C
Rod bolts
Spindle
Spindle bar
(3) Insert the exterior knob with spindle into the square-shaped (center) latch hole. Make sure that
rod bolts are positioned correctly through circular latch holes.
Rose
3, Install Exterior Knob and Interior Knob
(1) For the first installation, pull out the Interior knob without using a pin and remove the cardboard
hanger. Remove the screw B.
When you want to reinstall later, please use pin. Vigorously insert the pin into the hole as shown in
figure 1 and separate the rose from the Interior Knob as shown in figure.
(4) The “up” mark above the rose should face upward. Install the rose by placing on spindle and
aligning the circular holes with rod bolts. Then insert Screw B into the circular holes and tighten
them to secure the rose.
(5) Firstly, make sure the spindle bar is in the vertical position as shown above. Secondly, rotate the
thumb turn to the circular mark. Lastly, insert Interior Knob into the rose, making sure that the hole of
Interior knob is aligned with the spindle bar and the rectangular hole at the edge of the interior knob
is aligned with the circular hole at the edge of the rose.When you hear a ”click“ sound, it indicates
successful insertion.
Privacy Mode: As the figure shows, rotate the thumb turn to Lock position to active privacy
mode. In private mode, only the administrator can unlock it by fingerprint. Both members and
administrators can unlock it with the app.
Passage Mode: Rotate the thumb turn to Unlock position to activate passage mode. In passage
mode, both administrator and common members can open the door by turning the knob directly,
without a fingerprint.
Normal Mode (Auto lock): Rotate the thumb turn to the circular mark directly above to
switch to normal mode. In normal mode, after unlocking it with the fingerprint, the doorknob
automatically locks in 5 seconds.
Restore Factory Setting
Rotate the thumb turn from the circular mark to Lock position and then return to the circular mark.
After repeating this operation 5 times,perform the same operation to Unlock position 5 times. After
that, you will hear 1 long beep and the fingerprint identification area flashes green.
At this time,youcan unlockit withany fingerprint.
1, Create and login to your account.
2, Click upper right corner “+”,turn on Bluetooth and Click “Allow” to connect the lock.
Note: Touch the fingerprint screen of the lock to enable Bluetooth for easier connection.
3, Add the discovering devices.
4, Waiting for successful connection. You can click this icon “ ” to rename the lock.
Member management 一 click" +”- fill in name and other data -Role setting, choose“Administrator"or
“Common Member”一 go back to Members interface -click the accountyou just created 一> click "add"
- follow the prompt to add fingerprints.
Note: Try to touch the center of the fingerprint screen forcefully, add large area fingerprints, place your
fingers at multiple angles during fingerprint enrollment.
Only the administrator account has the privilege to manage the lock, including remote control and
adding or deleting a fingerprint.
Remote Unlock
To use the remote control function, a separate gateway needs to be purchased. Please note that the
door lock lets you control your door locally without a gateway.
Lock Volume
The volume of fingerprint reminder buzzer can be turned off in the APP. (The electric motor can not be
muted).
1, While the smart lock is going to pair with APP, please ensure the Bluetooth and network or Wi-Fi
are turned on.
2, Type-C power interface supports battery charging and a temporary emergency power supply for
unlocking.
3, Ensure your fingers are at multiple positions and angles during fingerprint enrollment.
4, When the fingers are wet, the hands are sticky, or not clean, it will be hard or even impossible to
unlock the door.
5, It is better to keep at least one key in a secure location as an extra precaution.
6, The remote unlock can only be done by connecting to the gateway. Customers need to purchase
the gateway separately.
7, Please replace the entire lock instead of parts.
8, The battery is not detachable and cannot be replaced. We recommend using a power bank with
an output voltage of 5V for charging.
9, After turning the mechanical key about 90 degrees, you need to turn the knob to open the door.
10, It is better to keep at least one key in a secure location as an extra precaution.
11, Please install the exterior and interior knob in correct position (read the installation), or the knob
can't work correctly.
Q1: Fingerprint cannot be recognized?
If fingerprint data is incomplete or entry failed. please re-enroll from multiple angles, add large area
fingerprints. The fingerprint is too dry wet, or not clean, also will hard to be recognized.
Q2: The APP cannot connect to the lock?
Make sure that the Bluetooth is turned on, and the mobile network or Wi-Fi is on.
Q3: Does the lock need internet to continue working after setup?
No, it does not require the internet. lt uses Bluetooth.
Q4: What if the battery dies? Can I charge it?
You can use the Type-c port for emergency unlocking and charging. Or unlock it with the mechanical
key, which comes with the lock.
Q5: How long does the battery last? How long does it take to fully charge?
This door lock has a built-in 400mAh rechargeable lithium battery. Battery life may vary from 8 to 12
months. It takes about 3 hours to fully charge.
Q6: Can I mute the lock volume?
The volume of fingerprint reminder buzzer can be turned off in the APP.
Q7: Can't separate the rosette from the Interior Knob?
Note that during the first installation, just remove the paper jam and directly pull out the handle without
using a pin. When you want to reinstall later, please vigorously insert the pins and separate them.
Q8: What is the difference between administrator and common members?
Only the administrator account has the privilege to manage users. In privacy mode, only administrator'
fingerprints can unlock the door.
Q9: How can I use Auto Lock function?
A: You can turn "thumb turn" in the interior knob to Normal mode, the door will be automatically lock in
5s,
73mm/2.87'
(2) Make sure that the keyhole of the Exterior Knob should be facing down.
UP
①
②
③
UP
UP
①
①
②
③
③
IMPORTANT: Please insert
the spindle bar vertically into the
hole, as shown in figure.
UP UPUP
①
②
③
Privacy Mode Passage Mode Nomal Mode
Components Included…………………………………………………………….... 1
Main Features……………………………………………………………………..... 2
Product Parameter…………………………………………………………………. 3
Installation Guide………………………………………………………………....... 5
Operation Guide…………………………………………………………………… 12
Indicator Lights ………………………………………………………………........ 14
APP Guide………………………………………………………………………..... 15
Setting………………………………………………………………………………. 20
Kindly Reminder & FAQ…………………………………………………………... 21
FCC Warning.…………………………………………………………………….... 23
Customer Services……………………………………………………….……...... 24
Contents
Customer Services
2)Set the latch backset to 60mm (2-3/8”) or 70mm (2-3/4”) to fit your door hole. For 70mm (2-3/4”)
backset, pull to extend the Latch in order to center square-shaped hole.
2, Install Latch and Strike
Facing Door Jamb
Screw A
3) Insert the Latch into the door hole, and tighten Screw A to fix the Latch. Install Strike Box and
Strike Plate with Screw A into the door frame.
In more cases, the existing plate is ready to be used. You can keep the strike plate in box for future
use. If not, please make sure the bolt is aligned correctly with the strike plate.
IMPORTANT: Please insert the
spindle bar vertically into the
hole, as shown in figure 2.
Ensure the direction is the same
as in figure 3.
UP
IMPORTANT: Keep
the spindle bar in
vertically direction and
prevent it from rotating.
Screw B
Screw B
Screw B
1) Hold the Latch in front of the door hole so that the Latch is flush with the door edge. Make sure the
square-shaped hole is centered.
IMPORTANT: The keyhole is
facing downwards.
IMPORTANT: The rectangular hole and the
circular hole should be kept horizontally aligned.
Installation Video
IMPORTANT: When you want
to reinstall it later, please use
a pin to remove the knob.
1
6 7 8 9 10 11 12
13 14 15 16 17 18 19
20 21 22 23 24 11 12
2 3 4 5
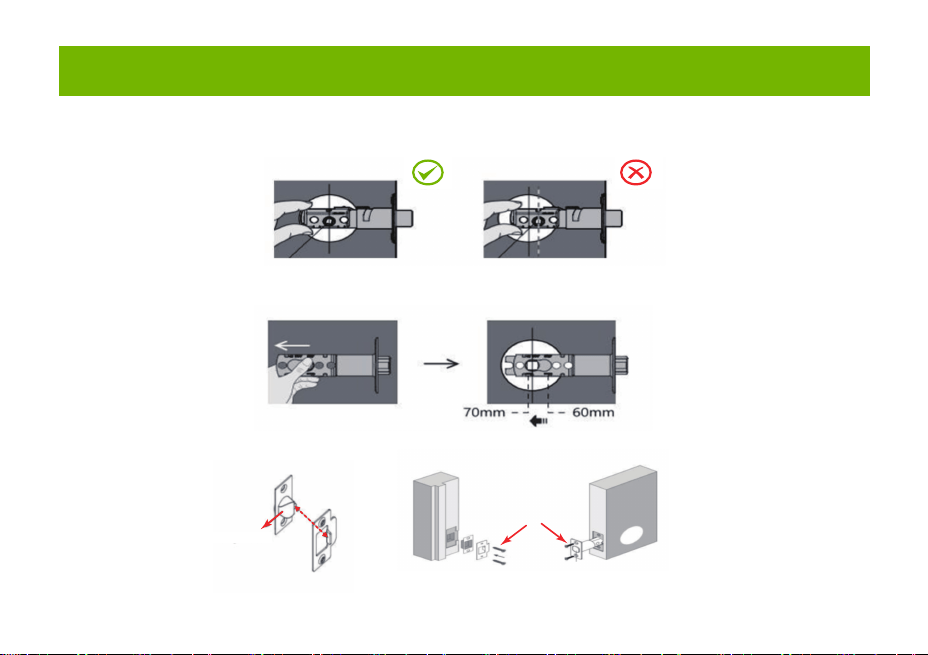
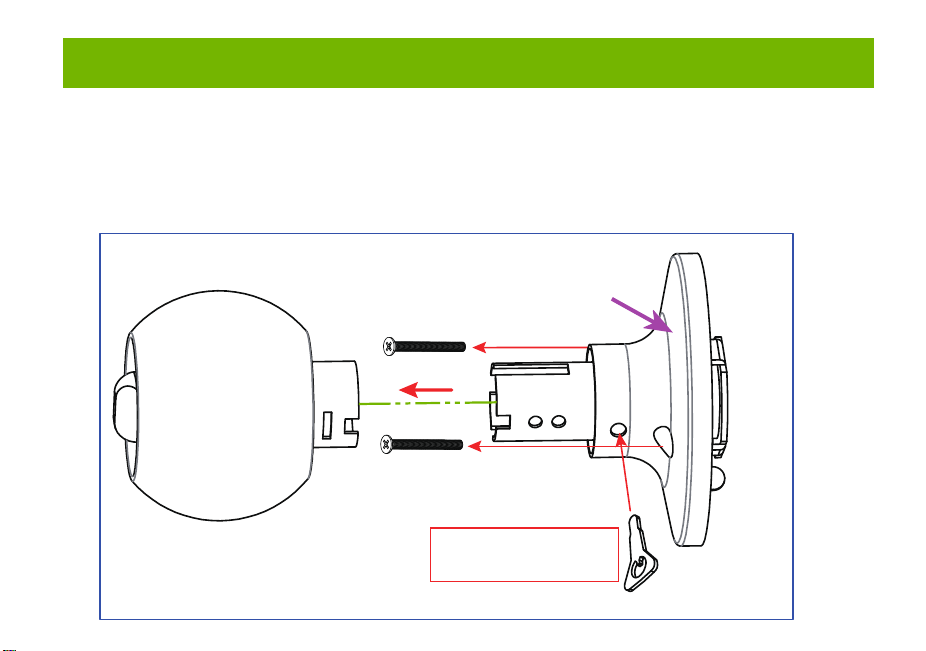
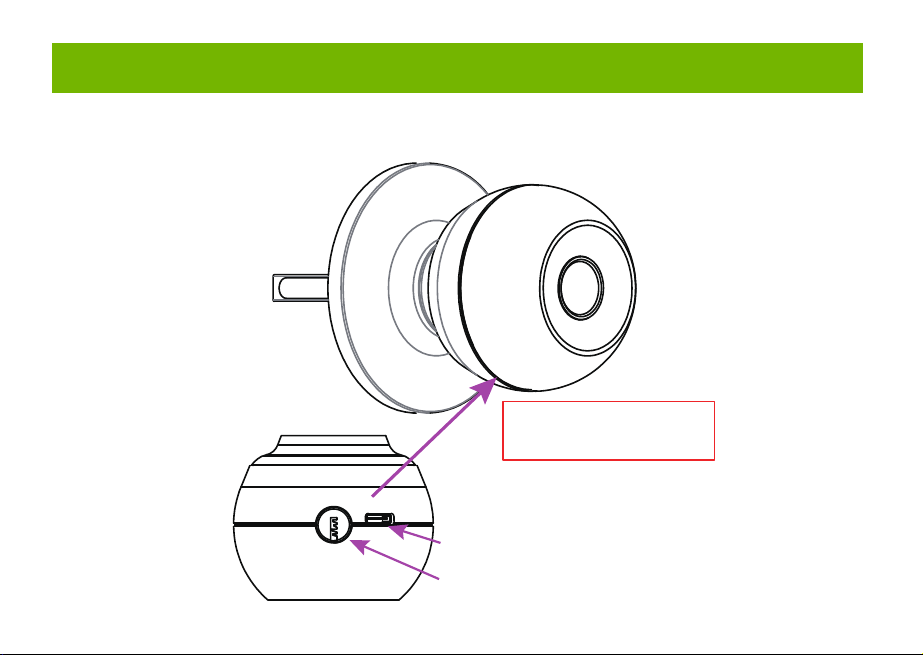
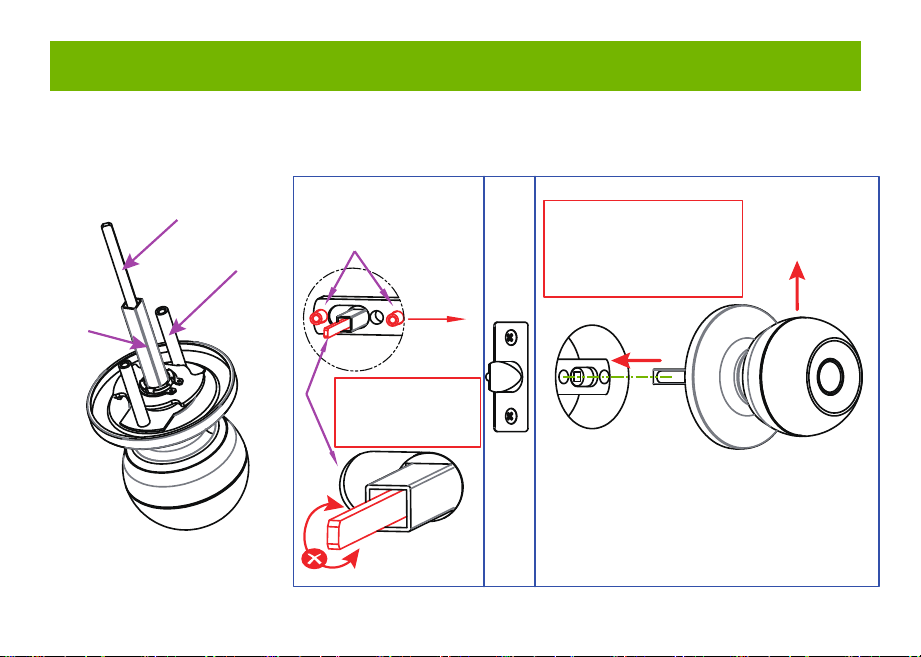
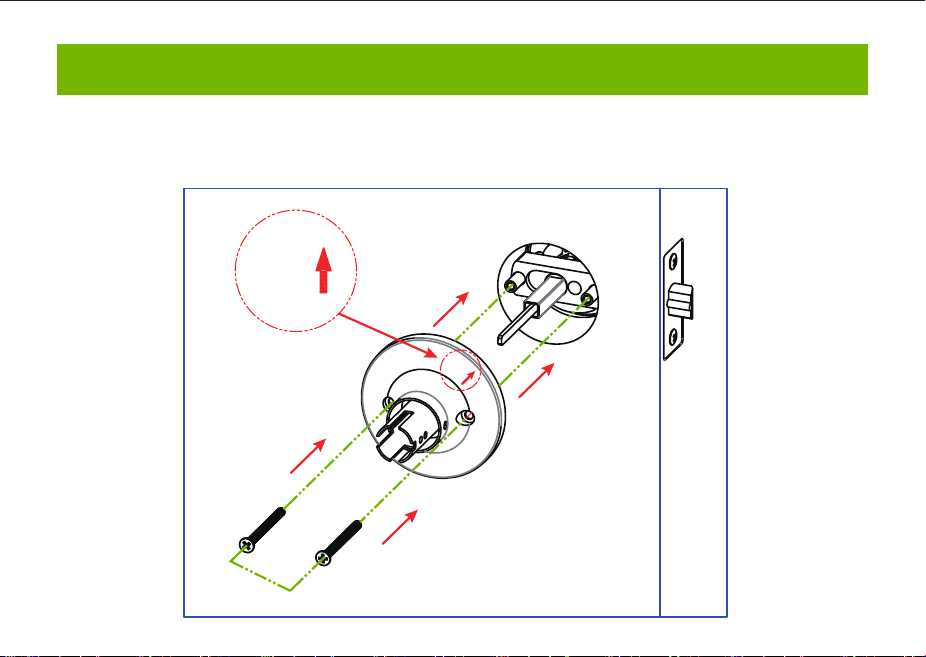
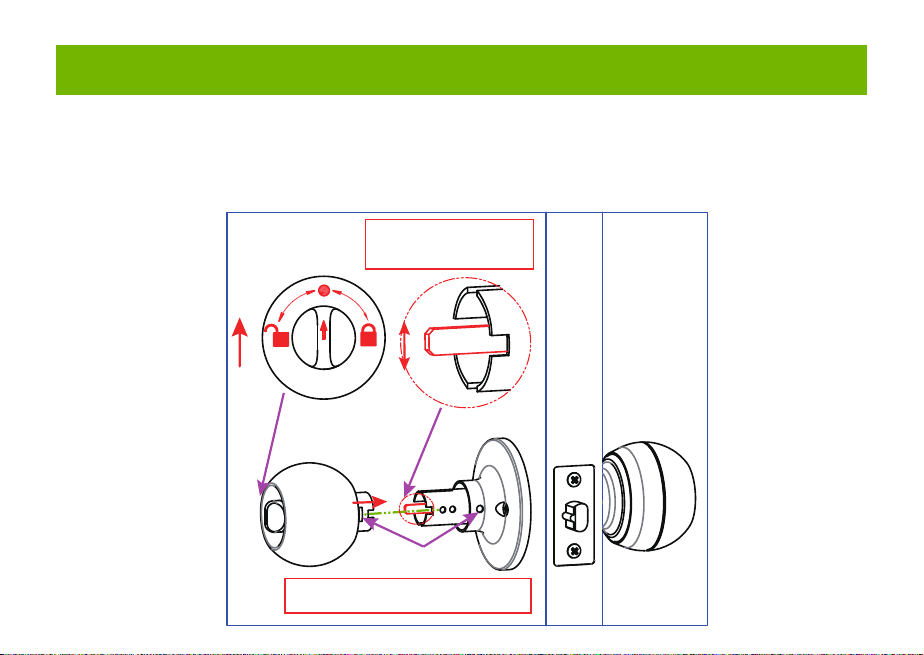
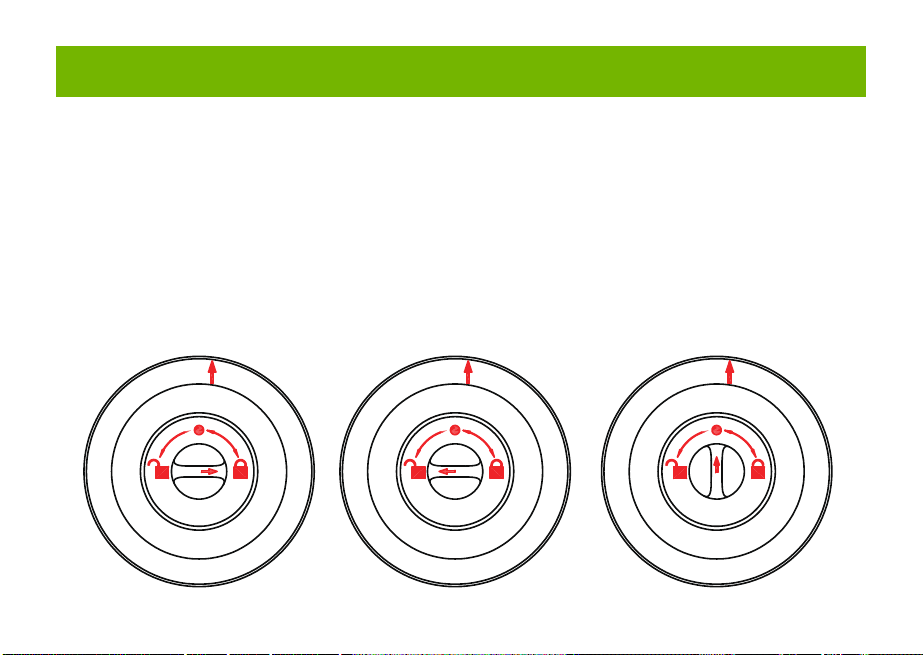
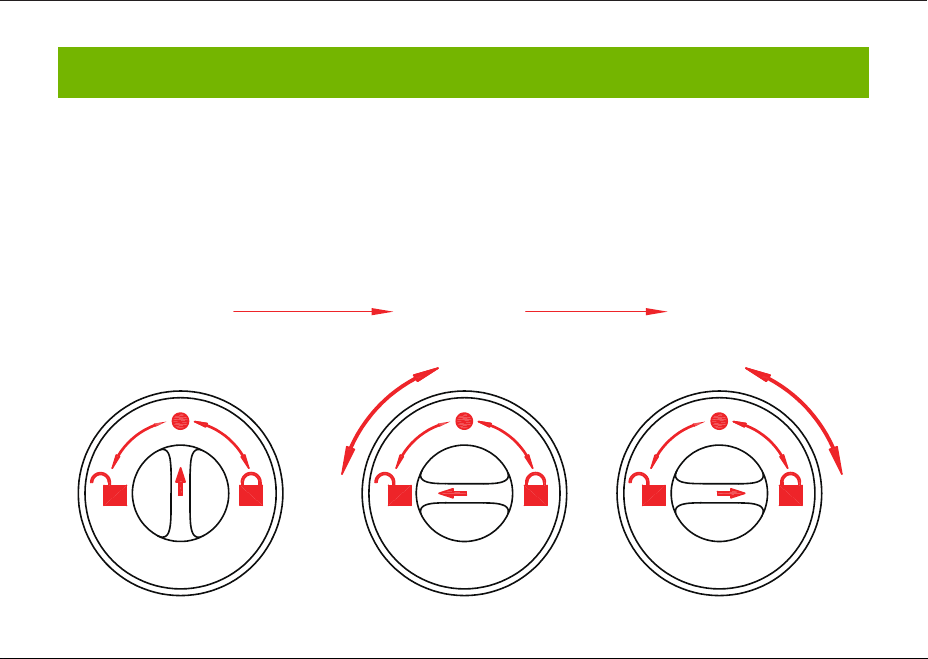
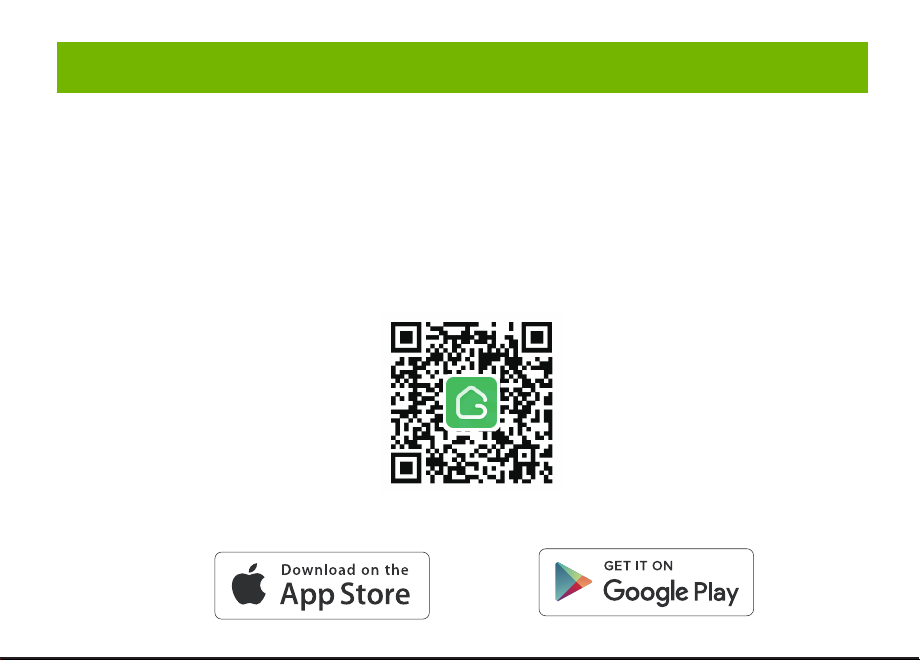
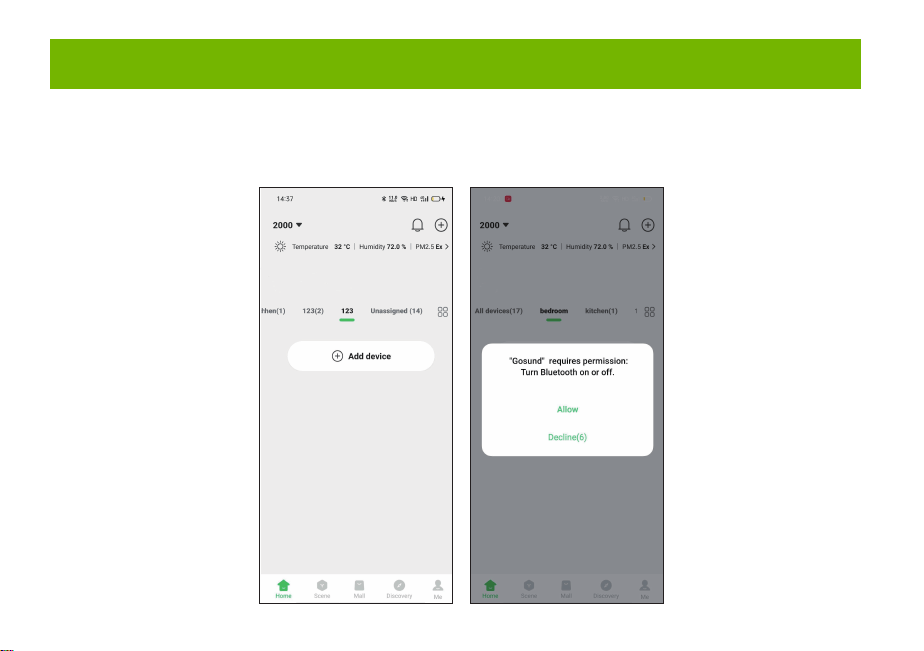
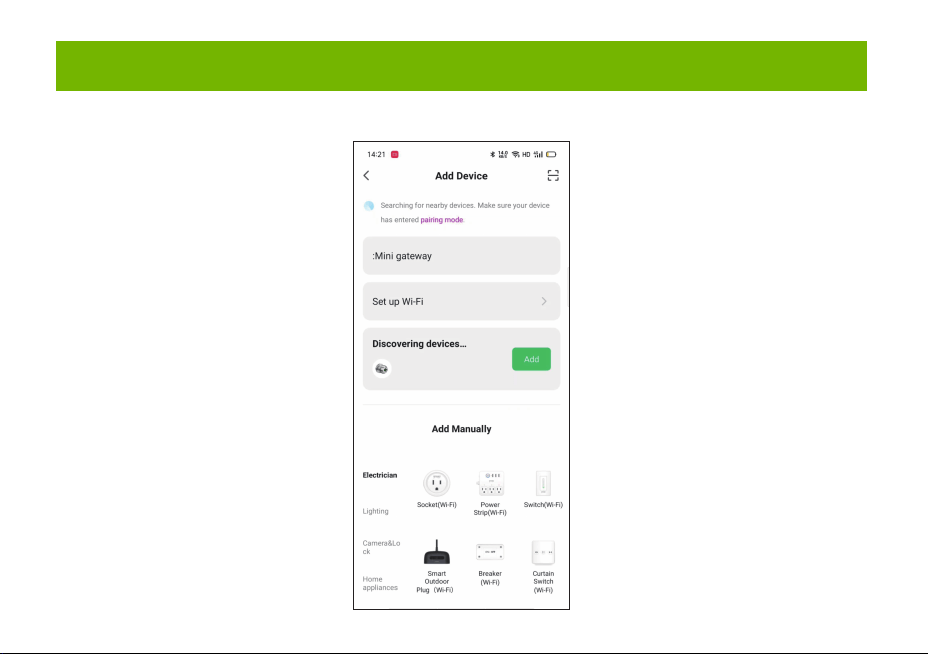
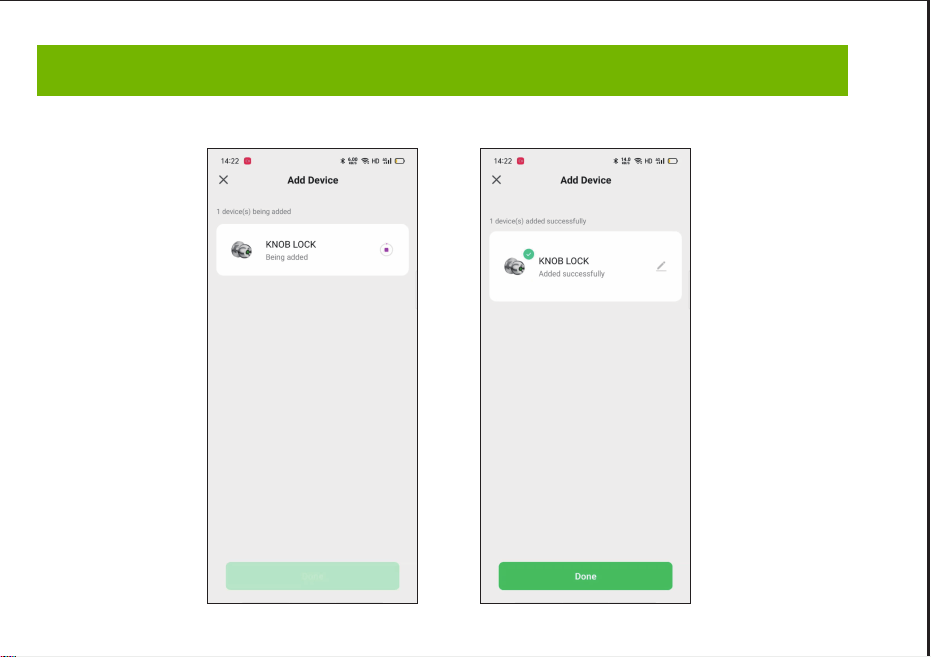
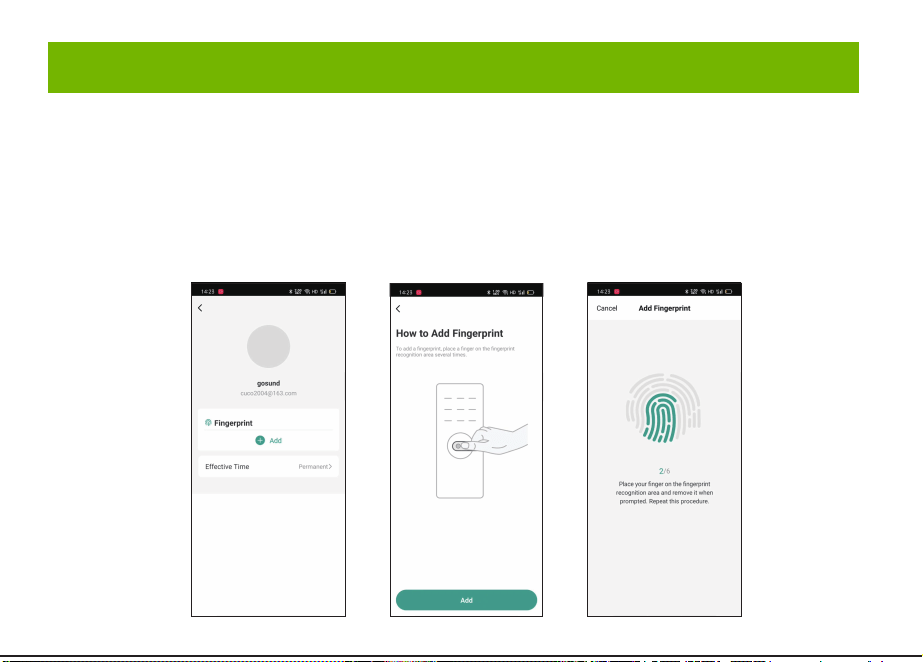
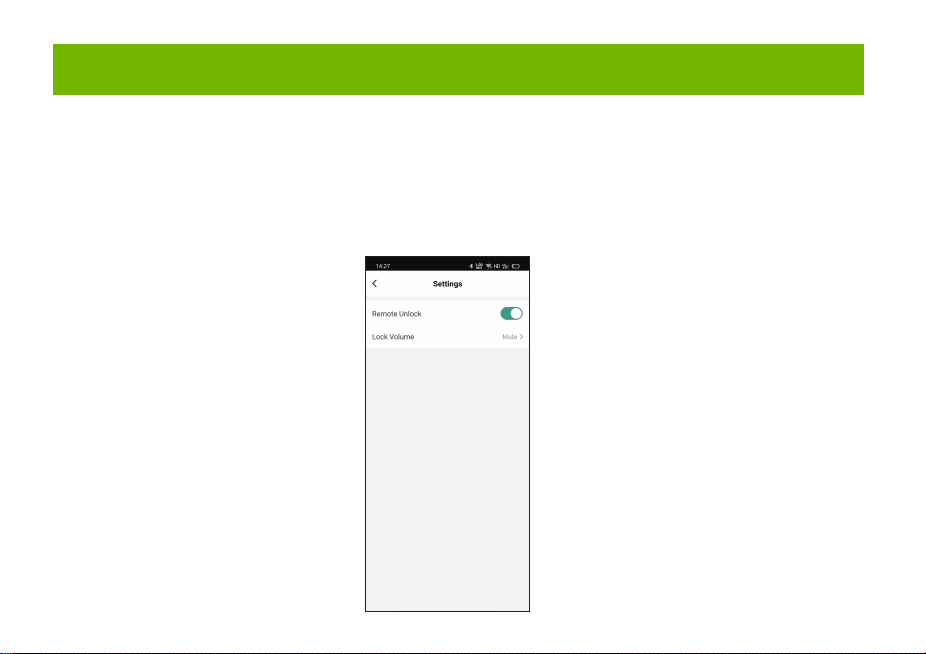