
Technical Support and E-Warranty Certificate www.vevor.com/support
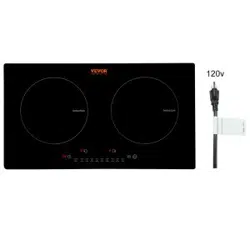
Induction Hob User Manual
MODEL:LI2V-30
We continue to be committed to provide you tools with competitive price.
"Save Half", "Half Price" or any other similar expressions used by us only represents an
estimate of savings you might benefit from buying certain tools with us compared to the major
top brands and doses not necessarily mean to cover all categories of tools offered by us. You
are kindly reminded to verify carefully when you are placing an order with us if you are
actually saving half in comparison with the top major brands.
2
MODEL:LI2V-30
Have product questions? Need technical support? Please feel free to
contact us:
CustomerService@vevor.com
NEED HELP? CONTACT US!
This is the original instruction, please read all manual instructions
carefully before operating. VEVOR reserves a clear interpretation of our
user manual. The appearance of the product shall be subject to the
product you received. Please forgive us that we won't inform you again if
there are any technology or software updates on our product.
Induction Hob
3
Warning-To reduce the risk of injury, user must read instructions
manual carefully.
This device complies with Part 15 of the FCC Rules. Operation is
subject to the following two conditions:(1)This device may not
cause harmful interference, and (2)this device must accept any
interference received, including interference that may cause
undesired operation.
This product is subject to the provision of European Directive
2012/19/EC. The symbol showing a wheelie bin crossed through
indicates that the product requires separate refuse collection in
the European Union. This applies to the product and all
accessories marked with this symbol. Products marked as such
may not be discarded with normal domestic waste, but must be
taken to a collection point for recycling electrical and electronic
devices

4
目录
SAFETY INSTRUCTIONS.................................................................................. 5
BEFORE USE
....................................................................................................... 7
INSTALLATION.................................................................................................... 8
ELECTRICAL CONNECTION .......................................................................... 10
INSTRUCTION FOR USE ..........................................................................................10
TECHNICAL INFORMATION
........................................................................... 13
CLEANING
.......................................................................................................... 13
NOISES MADE BY THE HOB..........................................................................14
AFTER-SALES SERVICE .................................................................................15

5
SAFETY INSTRUCTIONS
YOUR SAFETY AND THAT OF OTHERS ARE VERY
IMPORTANT
This manual and the appliance itself provide important safety messages,
to be read and always observed.
This is the warning / caution-safety symbol, regarding safety,
warning of potential risks to users and other
All messages relevant to safety specify the potential risk to which they refer
and indicate how to reduce the risk of injury, damage and electric shocks
due to incorrect use of the appliance. Make sure to comply with the
following:
The appliance must be disconnected from the power supply before
carrying out any installation operation.
Installation and maintenance must be carried out by a specialized
technician, in compliance with the manufacturer’s instructions and the
local safety regulations in force. Do not repair or replace any part of
the appliance unless specifically stated in the user manual.
The appliance must be earthed.
The power cable must be long enough to connect the appliance, fitted
in the cabinet, to the power supply.
For installation to comply with the current safety regulations, an
omnipolar switch with a minimum contact gap of 3mm is required.
Do not use multi-sockets or extension cords.
Do not pull the appliance’s power cable.
The electrical parts must not be accessible to the user after
installation.
The appliance is designed solely for domestic use for cooking food. No
other use is permitted (e.g. heating rooms). The Manufacturer declines
any liability for inappropriate use or incorrect setting of the controls.
WARNING: The appliance and its accessible parts become hot during
use. Care should be taken to avoid touching heating elements.
Children less than 8 years old shall be kept away unless continuously
supervised.
The accessible parts can become very hot during use. Children must
be kept away from the appliance and watched over to ensure they do

6
not play with it.
Do not touch the appliance heating elements during and after use. Do
not allow the appliance to come into contact with cloths or other
flammable materials until all the components have cooled sufficiently.
Do not place flammable materials on or near the appliance.
Overheated oils and fats catch fire easily. Pay attention when cooking
food products rich in fat and oil.
This appliance can be used by children aged from 8 years and above and
persons with reduced physical, sensory or mental capabilities or lack of
experience and knowledge if they have been given supervision or
instruction concerning use of the appliance in a safe way and understand
hazards involved. Children shall not play with the appliance.Children shall
not make cleaning and user maintenance without supervision.
An air switch or circuit breaker (not supplied) should be installed in the
compartment under the appliance.
If the surface is cracked, switch off the appliance to avoid the
possibility of electric shock.
The appliance is not intended to be operated by means of an external
timer or separate remote control system.
WARNING: Unattended cooking on a hob with fat or oil can be
dangerous and may result in fire. NEVER try to extinguish a fire with
water, but switch off the appliance and then cover flame e.g. with a lid
or a fire blanket.
WARNING: Danger of fire: do not store items on the cooking surfaces.
Do not use steam cleaners.
Metallic objects such as knives, forks, spoons and lids should not be
placed on the hob surface since they can get hot.
After use, switch off the hob element by its control and do not rely on
the pan detector.
7
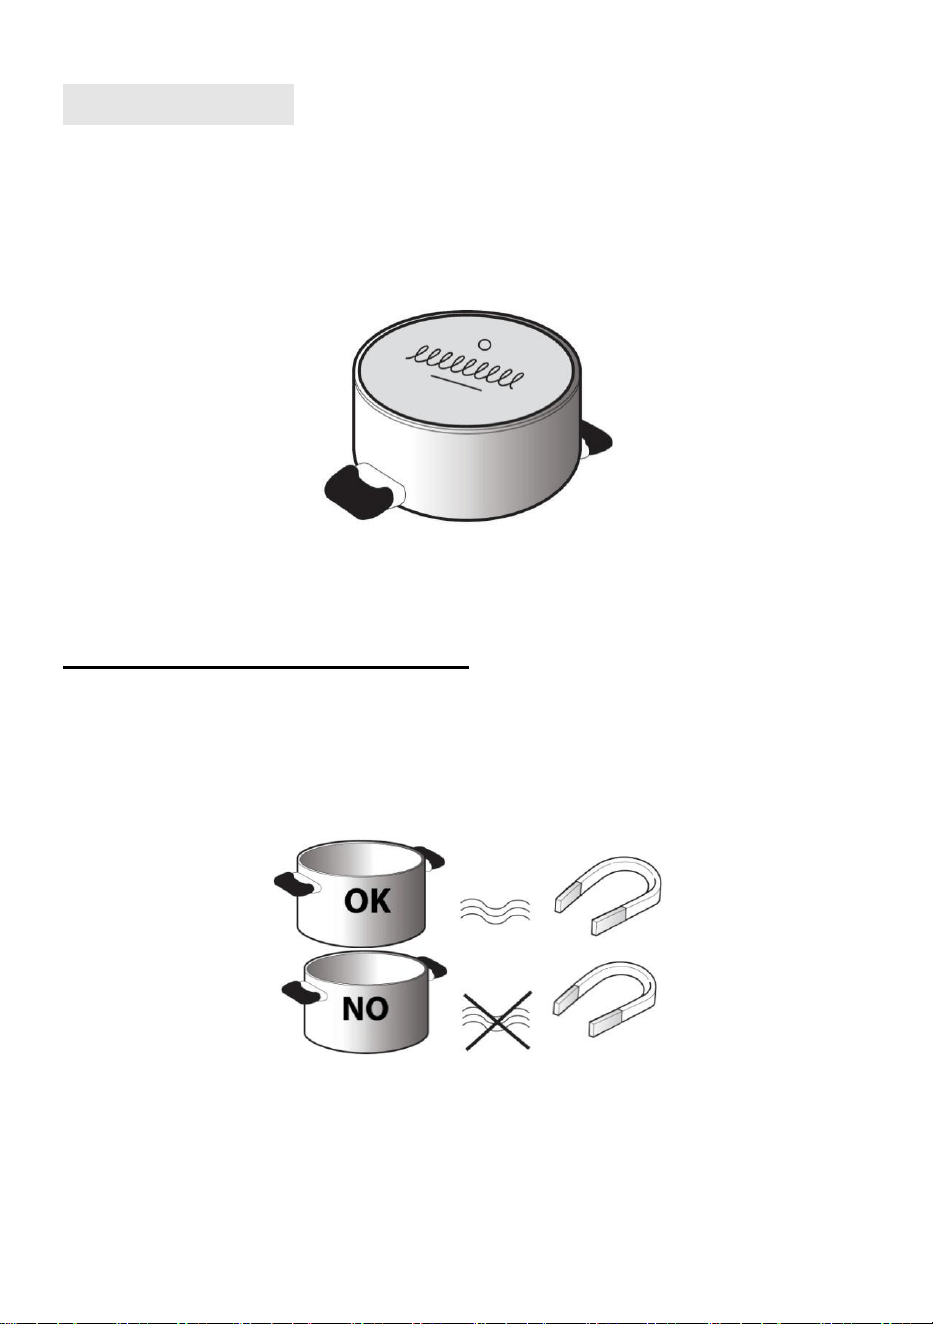
BEFORE USE
IMPORTANT: The cooking zones will not switch on if pots are not the right
size. Only use pots bearing the symbol “INDUCTION SYSTEM” (Figure
below). Place the pot on the required cooking zone before switching the
hob on.
EXISTING POTS AND PANS
Use a magnet to check if the pot is suitable for the induction hob: pots and
pans are unsuitable if not magnetically detectable.
Make sure pots have a smooth bottom, otherwise they could scratch
the hob. Check dishes.
Never place hot pots or pans on the surface of the hob’s control panel.
This could result in damage.
The bottom diameter of pots or pans should be at least 10cm.
8
INSTALLATION
After unpacking the product, check for any damage during transport. In
case of problems, contact the dealer or the After-Sales Service.
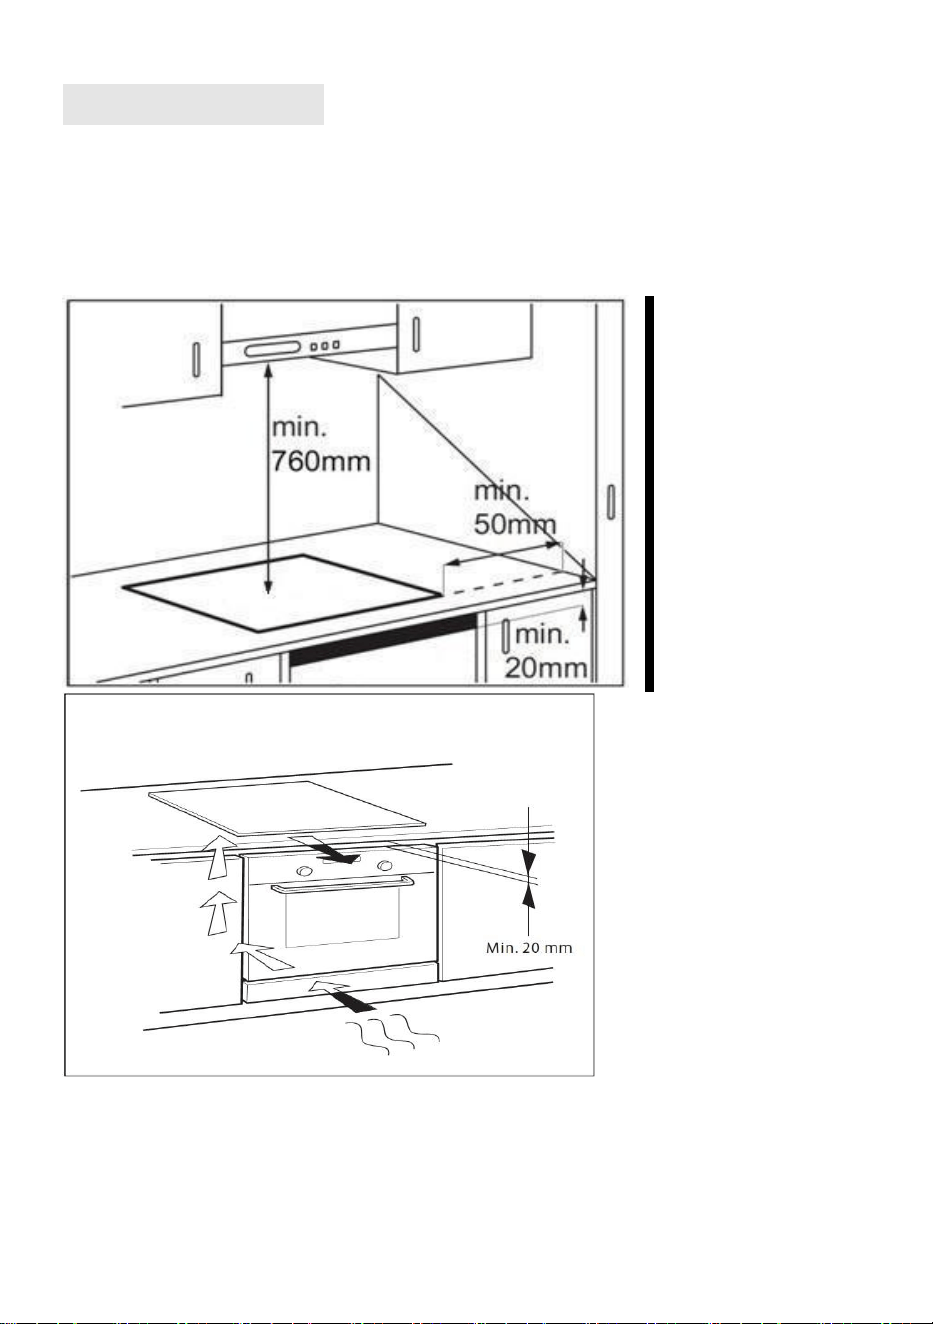
For built-in dimensions and installation instruction, see in below figures

9
The distance between the underside of the appliance and the
separator panel must respect the dimensions given in the
figure (min. 50mm).
In order to ensure the correct operation of the product, do not obstruct
the minimum required clearance (min. 20 mm) on the worktop for air
flow out.
If an undertop oven is installed, make sure the oven is equipped with a
cooling system.
Do not install the hob above a dishwasher or washing-machine, so that
10
the electronic circuits do not come into contact with steam or moisture
which could damage them.
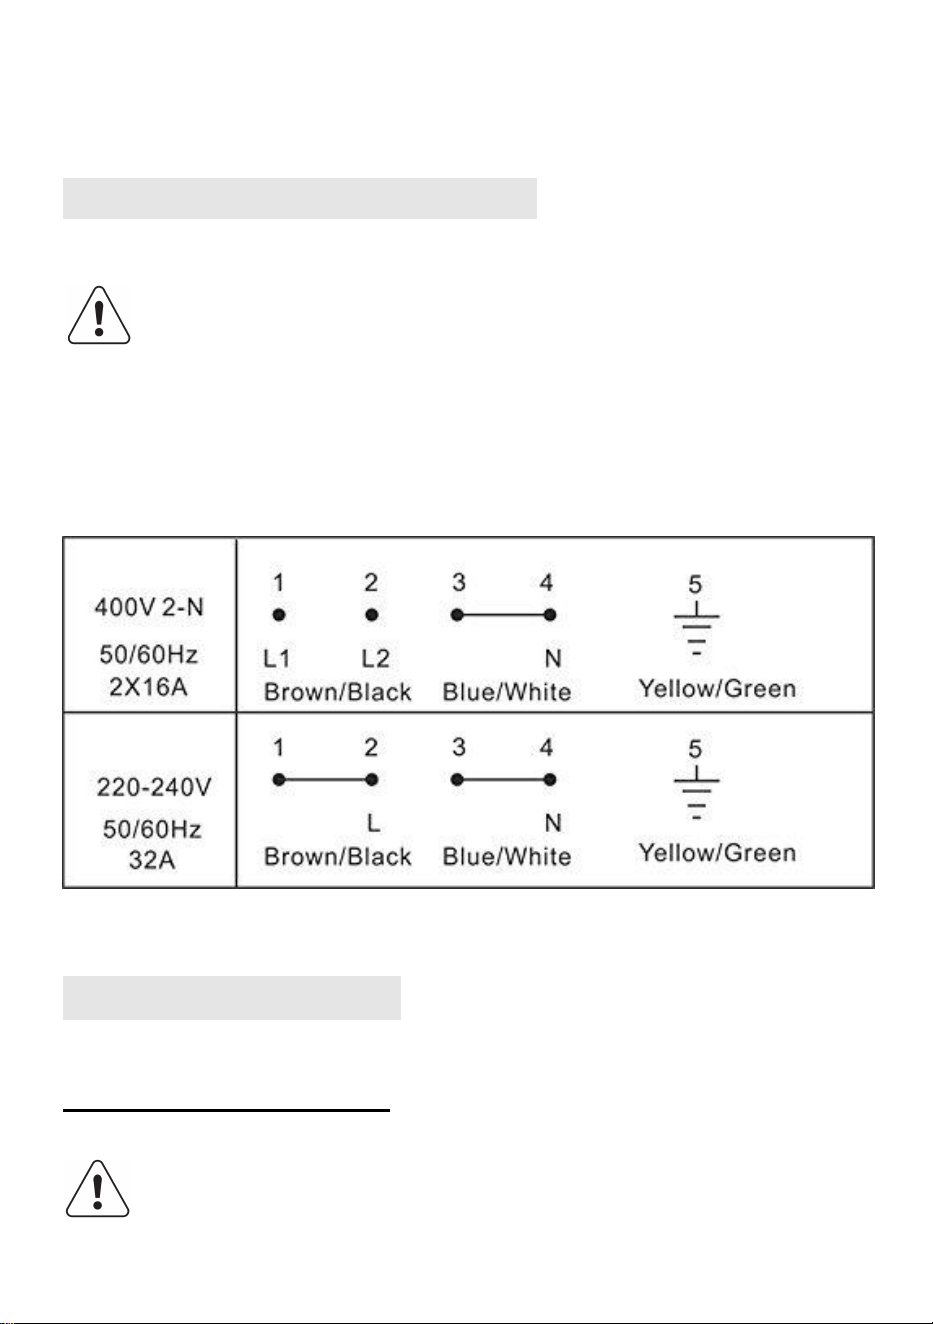
ELECTRICAL CONNECTION
Disconnect the appliance from the power supply.
Installation must be carried out by qualified personnel
who know the current safety and installation regulations.
The manufacturer declines all liability for injury to persons or animals
and for damage to property resulting from failure to observe the
regulations provided in this chapter.
The power cable must be long enough to remove the hob from the worktop.
Make sure the voltage specified on the rating label located on the
bottom of the appliance is the same as that of the home.
INSTRUCTION FOR USE
GENERAL OVERVIEW
To avoid permanently damaging the glass-ceramic top, do not
use:
11
Pots with bottoms that are not perfectly flat.
Metal pots with an enameled bottom.
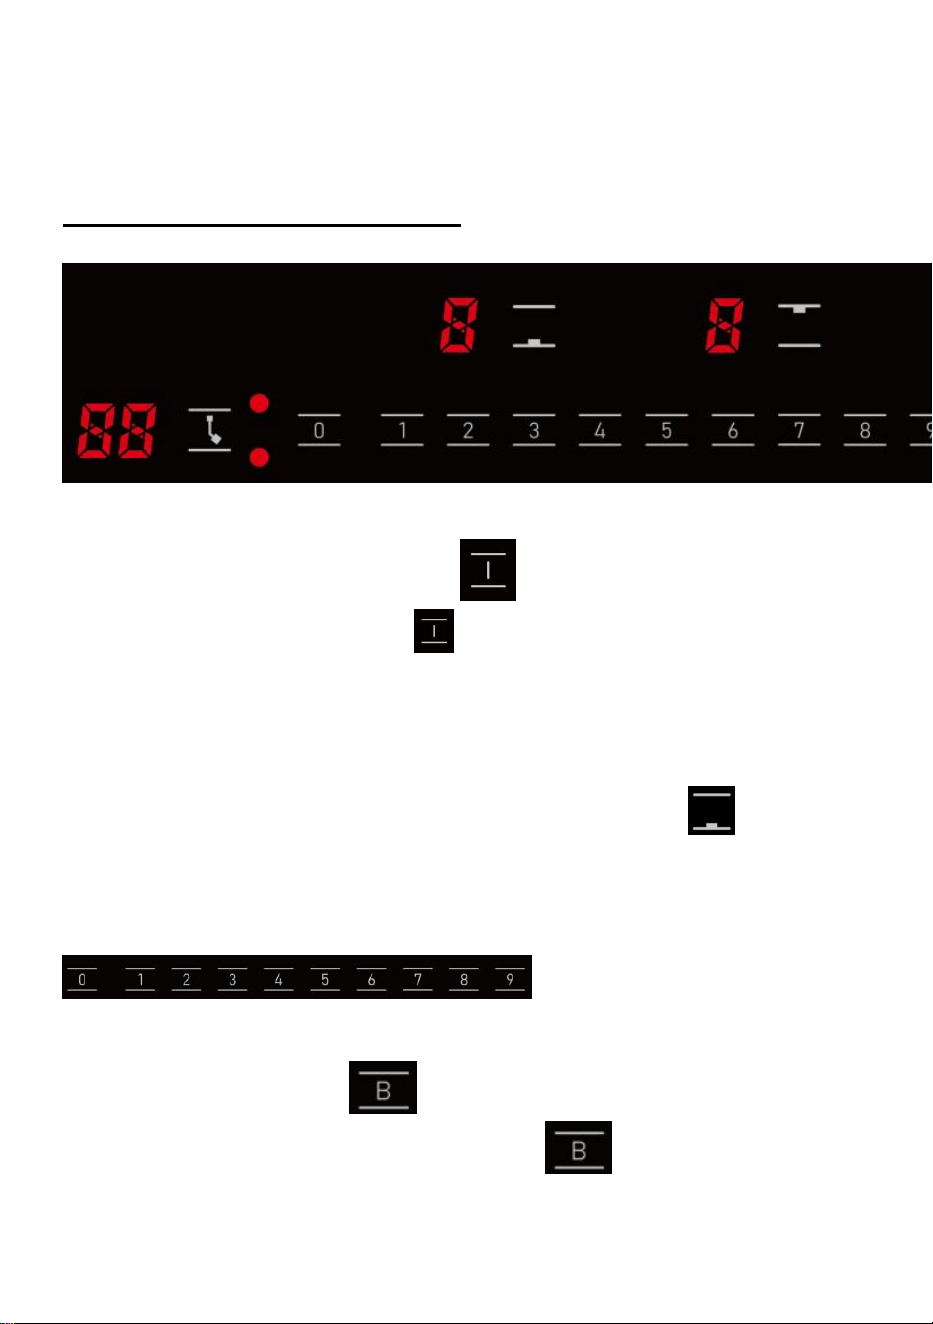
CONTROL PANEL LAYOUT
Switching the hob On/Off
To switch the hob on, press the button and the cooking zone displays
light up.
If no heating zone is selected within 120 seconds of switching on,
the hob switches off automatically.
Switching on and adjusting cooking level
Once the hob is switched on and the pan is positioned on the chosen
cooking zone, corresponding button: the display shows level 0. Each
cooking zone has various power levels, after selected the cooking zone,
adjust the power level by pressing the
.
User can adjust power from
0-9.
Booster function
Select the cooking zone you wish, and press ;
The cooking zone will work in 2200W continuously for 5 minutes.
12
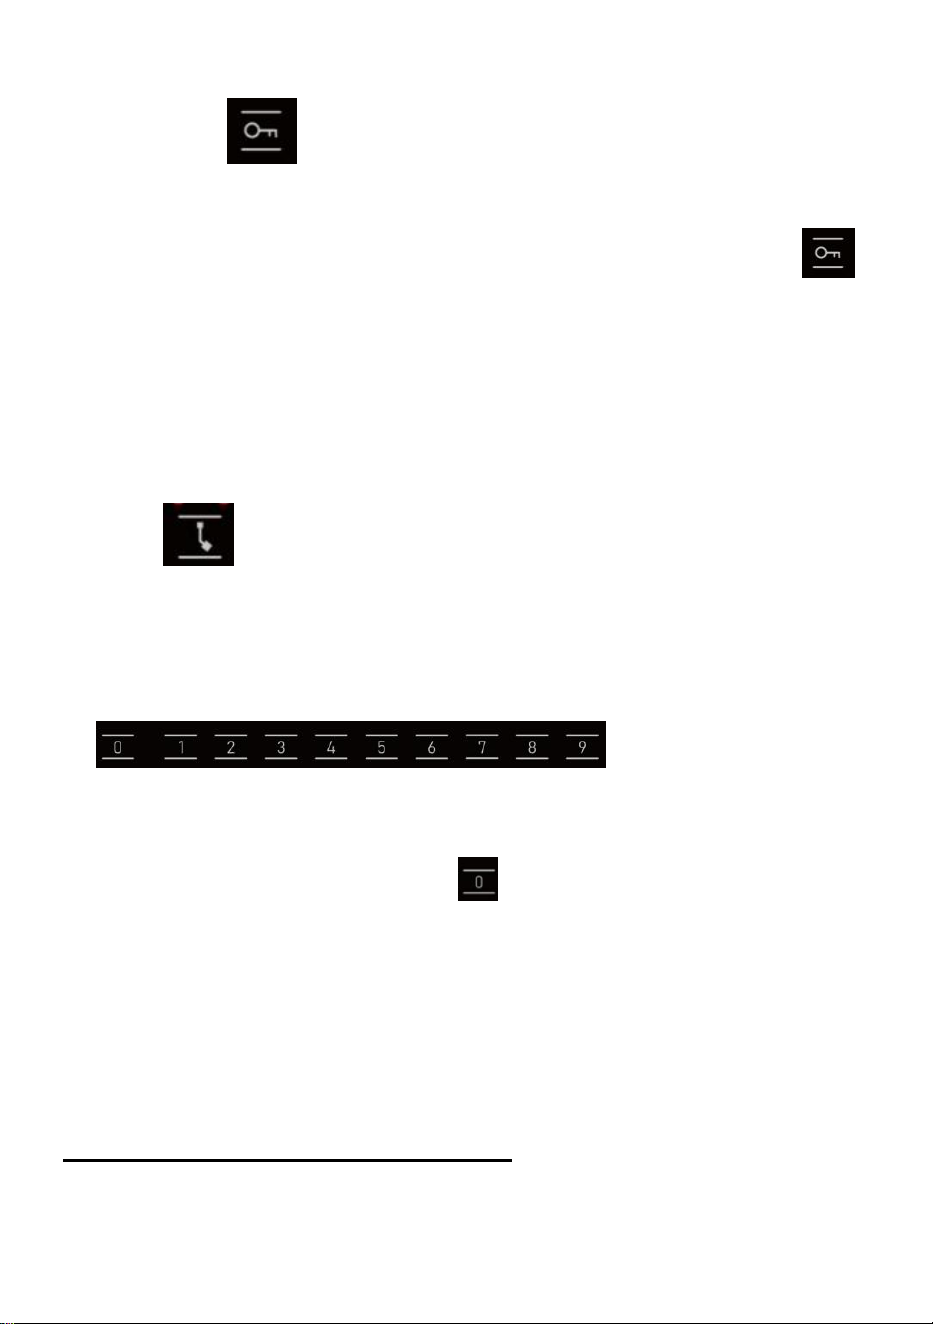
Child lock
This function locks the controls to prevent accidental switching on of the
hob.
To activate the child lock function, switch on the hob and hold button
for three seconds; the timer shows Lo. Then the control panel is locked.
To deactivate the control panel lock, repeat the activation procedure.
The Lo goes off and the hob is active again.
Timer
The timer can be used to set cooking time for a maximum of 99 minutes (1
hour and 39 minutes) for all cooking zones.
Select the cooking zone to be used with the timer, press the button with the
clock symbol
then set the desired cooking time using
the buttons of the timer
function. After a few seconds, the timer begins the countdown. Once the
set time has elapsed, an acoustic signal sounds and the hob switches off
automatically.
To deactivate the timer, press the
“ ”
button to set the display showing
“00” or hold the button with the clock symbol for at least 4 seconds.
Auto switch off
The hob will automatically switch off, when you did not set cooking time,
forgot to switch off the hob, and did not operate the hob at all for two hours.
CONTROL PANEL WARNINGS
Residual heat indicator
13
The hob is fitted with a residual heat indicator for each
cooking zone.
These indicators alert the user when cooking zones are still
hot.
If the display shows , the cooking zone is still hot.
If the residual heat indicator of a given cooking zone is lit, that zone
can be used, for example, to keep a dish warm or to melt butter.
When the cooking zone cools down, the display goes off.
Incorrect or missing pot indicator
• If you are using a pot that is not suitable, not correctly positioned or not
of the correct dimensions for your induction hob, the message “E0” will
appear in the display, If no pot is detected within 120 seconds, the hob
switches off.
TECHNICAL INFORMATION
Voltage: 220 - 240V, 50/60 Hz
Max. Power: 3000W ( Up zone is 1800W booster 2000W, down zone
is 1200W booster 1400W)
CLEANING
Do not use steam cleaners.
Before cleaning, make sure the cooking zones are switched
off and that the residual heat indicator (“H”) is not displayed.
IMPORTANT: Do not use abrasive sponges or scouring pads. Their use
could eventually ruin the glass.
After each use, clean the hob (when it is cool) to remove any deposits
and stains due to food residuals.
14
Sugar or foods with a high sugar content damage the hob and must be
immediately removed.
Salt, sugar and sand could scratch the glass surface.
•
Use a soft cloth, absorbent kitchen paper or a specific hob cleaner
(follow the Manufacturer’s instructions).
TROUBLESHOOTING GUIDE
Read and follow the instructions given in the section
“Instructions for use”.
Check that the electricity supply has not been shut off.
Dry the hob thoroughly after cleaning it.
If, when the hob is switched on, alphanumeric codes appear on the
display, consult the following table for instructions.
If the hob cannot be switched off after using it, disconnect it from the
power supply.
Error
code
Possible Cause
Remedy
E0
No Pan or did not detect
the pan
Put on the pan
E2
NTC short or open
Call the after-sales service and
specify the error code
E3
High voltage
Call the after-sales service and
specify the error code
E4
Low voltage
Call the after-sales service and
specify the error code
NOISES MADE BY THE HOB
• Induction hobs can make whistling or crackling sounds during normal
operation, these actually come from the pots and pans as a result of
the characteristics of the bottoms (for example, bottoms made of
several layers of material, or uneven bottoms).
• These noises vary depending on the pots and pans used and the
amount of food they contain, and are not indicative of a defect of any
kind.

15
• In addition, the induction hob is equipped with an internal cooling
system to control the temperature of electronic parts; as a result,
during operation and for several minutes after the hob has been
switched off, the noise of the cooling fan will be audible.
• This is perfectly normal and essential for proper appliance functioning.
AFTER-SALES SERVICE
Before contacting the After-sales Service:
1. See if you can solve the problem yourself with the help of the
“Troubleshooting guide”.
2. Switch the appliance off and then on again it to see if the problem has
been eliminated.
If the problem persists after the above checks, contact the nearest
After-Sales Service.
Always specify:
a brief description of the fault
the product type and exact model
your full address
your telephone number
If any repairs are required, contact an authorized After-Sales Service
Centre (to ensure the use of original spare parts and correct repairs).
Spare parts are available.
Energy saving
For optimum results, it is advisable to:
Use pots and pans with bottom width equal to that of the cooking zone.
Only use flat-bottomed pots and pans.
When possible, keep pot lids on during cooking.
Use a pressure cooker to save even more energy and time.
Place the pot in the middle of the cooking zone marked on the hob.

16

17