
COFFEE MAKER
Model# GCM-4850
USER MANUAL

Model: GCM-4850
© 2018 Gourmia
www.gourmia.com
The Steelstone Group
Brooklyn, NY
All rights reserved. No portion of this manual may be reproduced by any means
whatsoever without written permission from The Steelstone Group, except for the
inclusion of quotations in a media review.
Although every precaution has been taken in the preparation of this manual, The
Steelstone Group assumes no responsibility for errors or omissions. Nor is any
liability assumed for damages resulting from the use of the information contained
herein. Although every eort has been made to ensure that the information
contained in this manual is complete and accurate, The Steelstone Group is not
engaged in rendering professional advice or services to the individual consumer;
further, The Steelstone Group shall not be held responsible for any loss or damage
allegedly arising from any information or suggestion in this manual.
Read this manual thoroughly
before using and save it for
future reference
2
FOR CUSTOMER SERVICE
QUESTIONS OR COMMENTS
VISIT US @ GOURMIA.COM
OR CALL 888.552.0033
Welcome to the Convenient
and Aromatic World of the
Gourmia Coee Maker
Congratulations on your purchase of the Coee Maker from Gourmia.
Coee! Fresh. Aromatic. Intense. Flavorful. It’s what we all crave. That heavenly
aroma wafting from your local Starbucks each time you pass is now available in
your own kitchen. The rich and luscious avors will hit your palate in the most
welcome way. Instant relaxation and rejuvenation can now be at your ngertips.
This exclusive Gourmia coee maker will create magic in a few easy, quick and
simple steps. Just insert the grounds – PRESTO! Watch the deep brown liquid
drip into the carafe, ready for consumption. Indulge; drink a cup immediately,
and enjoy the experience.
Please read all safety instructions thoroughly to ensure safe usage at all times.
Thank you for your purchase. We sincerely hope you will enjoy this as well as all
the many innovative products brought to you by Gourmia.
3

IMPORTANT SAFEGUARDS
4
FOR CUSTOMER SERVICE VISIT US @ GOURMIA.COM OR CALL 888.552.0033
IMPORTANT SAFEGUARDS
Read all safety and usage instructions before using.
1. Do not use the appliance on wet or hot surfaces, or near a heat source.
2. To protect against re, electrical shock or injury, do not immerse the unit,
power cord or plug in water or any other liquid.
3. Unplug the appliance from the outlet when not in use or before cleaning.
4. To disconnect the appliance, unplug the power cord from the electrical outlet.
Do not disconnect by pulling on the cord.
5. Do not operate the appliance with a damaged power cord or plug. Do not operate
the appliance if it malfunctions or is damaged in any way. Return the appliance
to an authorized service center for examination and repair.
6. Do not use the appliance for anything other then its intended use.
7. Close supervision is necessary when the appliance is being used by or near children.
8. This appliance has a polarized plug (one blade is wider than the other). To reduce risk
of electrical shock, this plug is intended to t in a polarized outlet only one way.
If the plug does not t fully into the outlet, reverse the plug. If it still does not t,
contact a qualied electrician. Do not try to modify the plug in any way.
9. Do not let the cord hang over the edge of a counter or table.
10. Do not place the appliance on or near a hot burner or heated oven.
11. Extreme caution must be used when moving items containing hot liquids.
12. Only use fresh and cold water to ll the water tank.
13. Do not touch the surfaces of the appliance, including the warming plate,
as they become very hot.
14. Use the handle when holding the carafe.
15. Hot steam is emitted from the coee lter when the appliance is in use;
do not stand over or touch the steam.
16. Never leave the carafe empty on the warming plate- the carafe is liable to crack.
17. Do not use the appliance if the carafe appears to be cracked.
18. Only use accessories or attachments that were provided by the manufacturer
for this appliance.
19. Handle with care as the glass is very fragile.
20. Do not operate the coee maker without water in it.
FOR HOUSEHOLD USE ONLY
SAVE THESE INSTRUCTIONS
TABLE OF CONTENTS
Know Your Coee Maker ................6
Using Your Coee Maker .................8
Cleaning & Maintenance...............12
Warranty & Services......................13
FOR CUSTOMER SERVICE VISIT US @ GOURMIA.COM OR CALL 888.552.0033
5

6
FOR CUSTOMER SERVICE VISIT US @ GOURMIA.COM OR CALL 888.552.0033
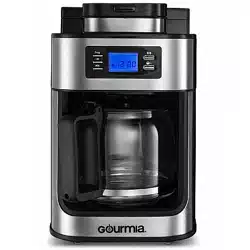
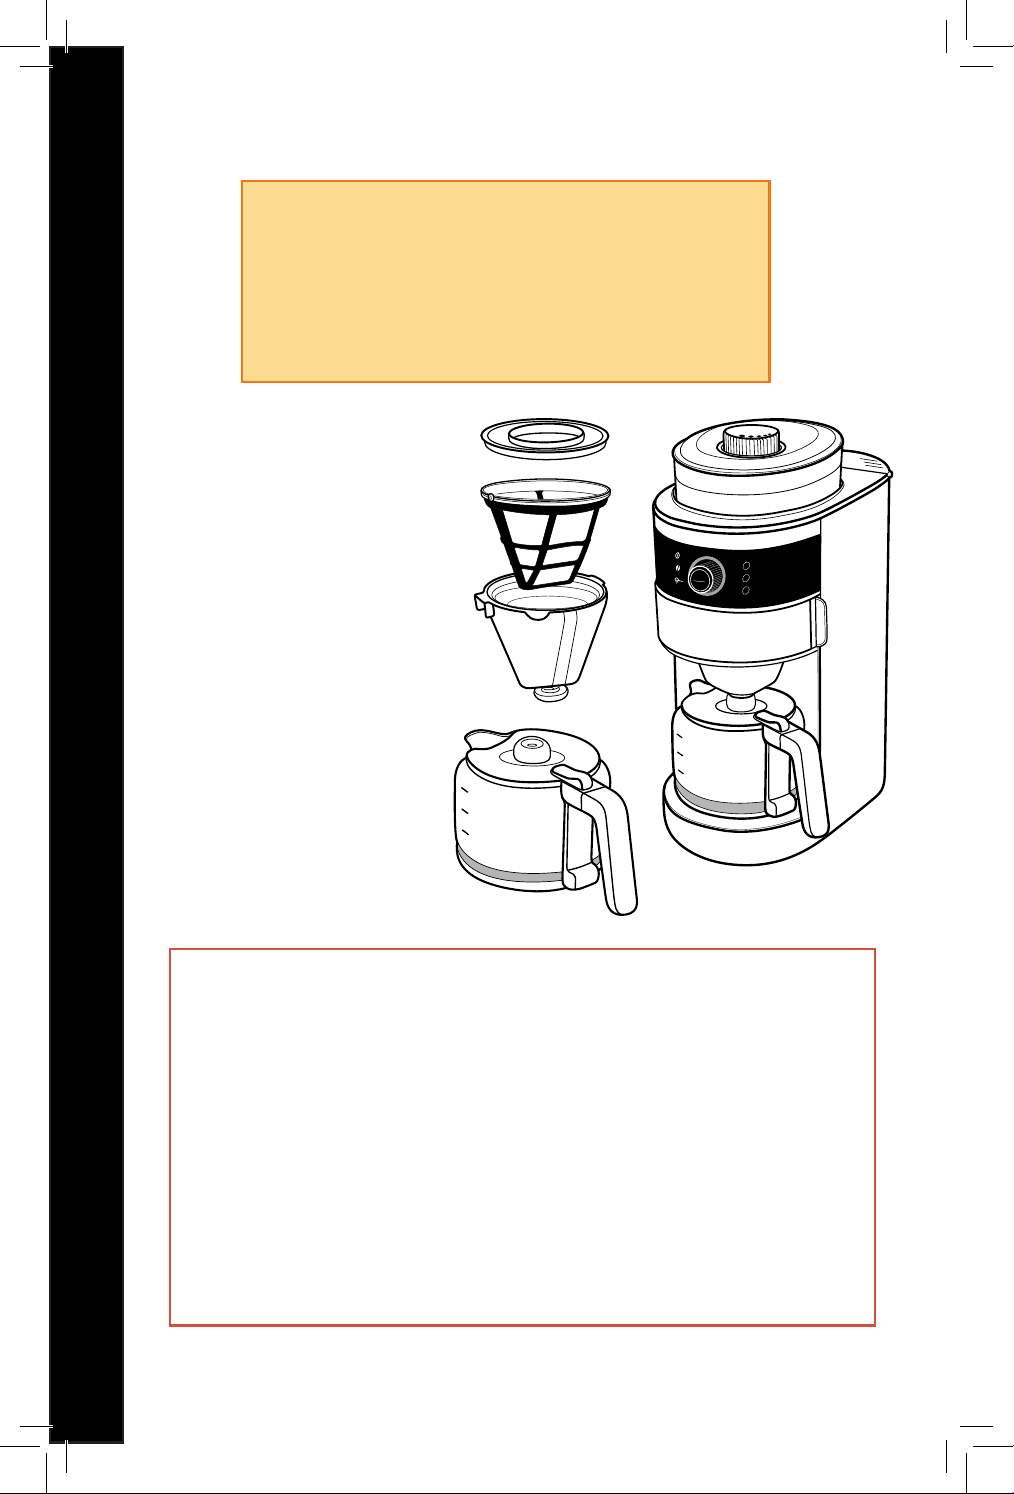
KNOW YOUR COFFEE MAKER
2
4
6
START
STOP
2
4
6
Funnel
Support
Opener
Grind
Amount
Selector
Water
Reservoir
Filter
Filter
Cover
Funnel
Coee
Grinder
Knob
Hopper
Lid
Hopper
Selection
Knob
Strong Coee
Regular Coee
Dispense Icon
Carafe
Funnel
Support
KNOW YOUR COFFEE MAKER
2
4
6
START
STOP
2
4
6
2
4
6
START
STOP
2
4
6
USING YOUR AIR FRYER
7
KNOW YOUR COFFEE MAKER
FOR CUSTOMER SERVICE VISIT US @ GOURMIA.COM OR CALL 888.552.0033
Water
Reservoir
BACK VIEW
Hopper
Open
Water
Reservoir
4
6
2
2
4
6
2
4
6
2
4
6
8
8
FOR CUSTOMER SERVICE VISIT US @ GOURMIA.COM OR CALL 888.552.0033
USING YOUR COFFEE MAKER
USING YOUR COFFEE MAKER
When using for the rst time:
1. Inspect the appliance and all accessories to ensure that they are
intact and there is no product damage. In the event of damage,
contact us immediately.
2. Rotate the funnel support to the left and remove all detachable
components.
3. Clean them using warm water and soap, and then place them back inside.
4. Fill the water reservoir to the maximum line using cold water.
5. Plug the machine in and press the start/stop button to boil the water.
6. Repeat the process 2-3 times to ensure that the machine is sterile
and ready for use.
2
4
6
START
STOP
2
4
6
USING COFFEE BEANS
1. Fill the water reservoir using cold water. Fill the water to the 2, 4, or 6 cup mark
depending on the amount of coee you want to brew. All of the water in the
water reservoir will despense during brewing. Do not ll past the 6 cup mark on
the water reservoir.
Note: since some of the water gets absorbed
into the coee grinds, the quantity in
the carafe will be slightly less than the
amount of water originally in the reservoir.
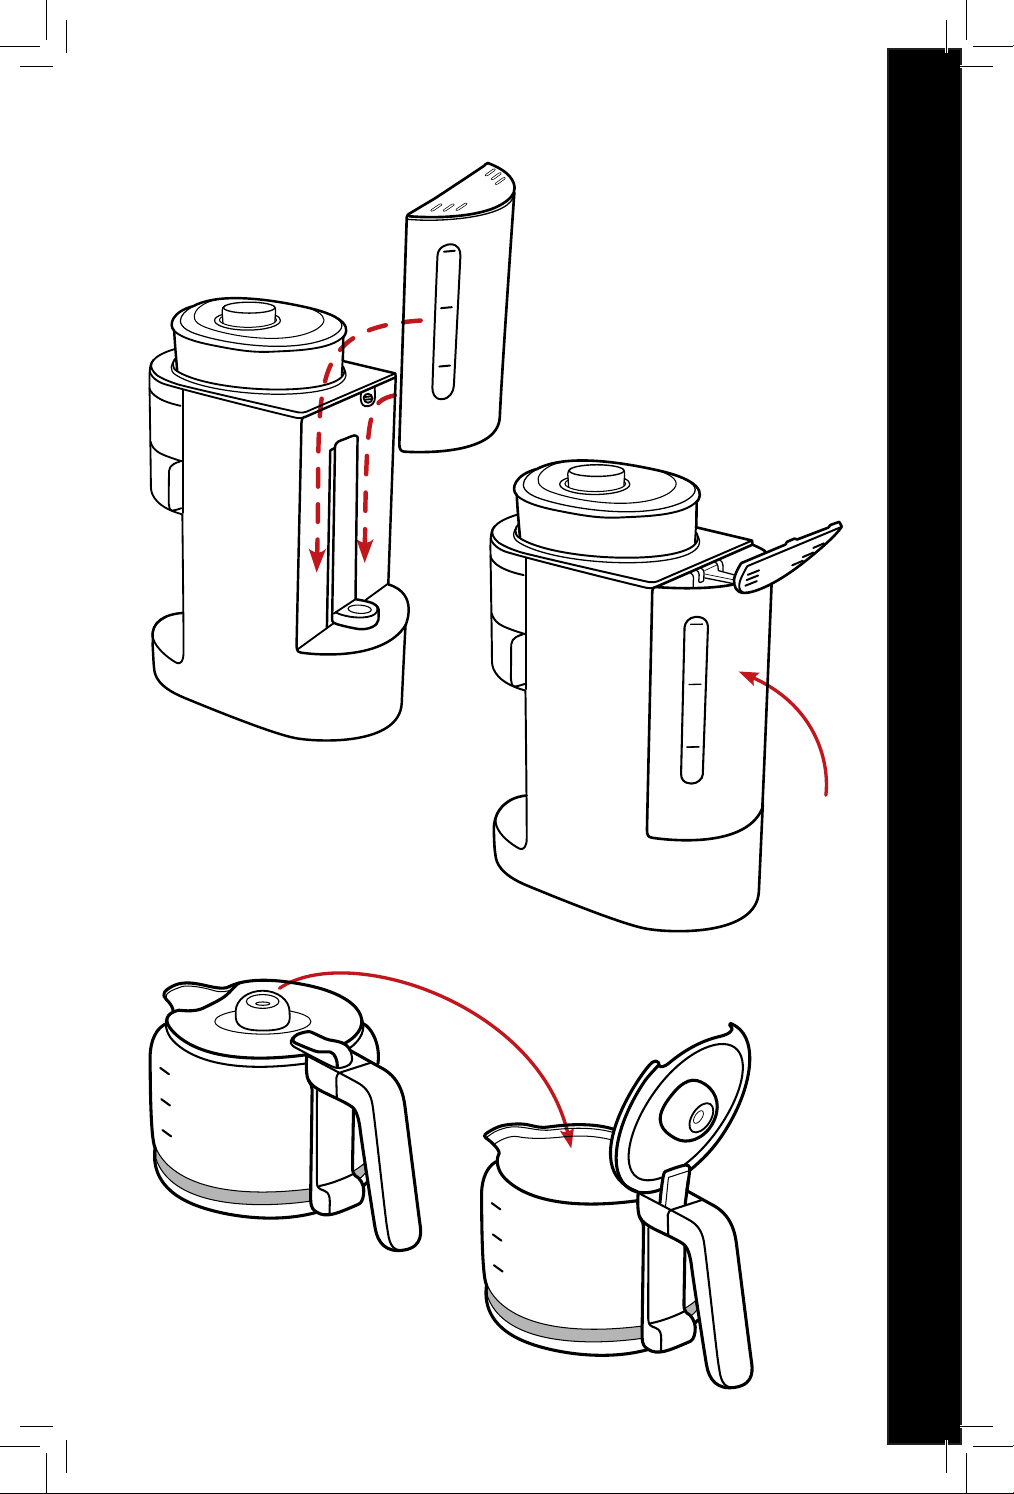
2. Rotate the funnel support to the left
and ensure that the lter, lter cover
and funnel are properly placed within it.
3. Rotate the funnel support back to
the right until it is locked in place.
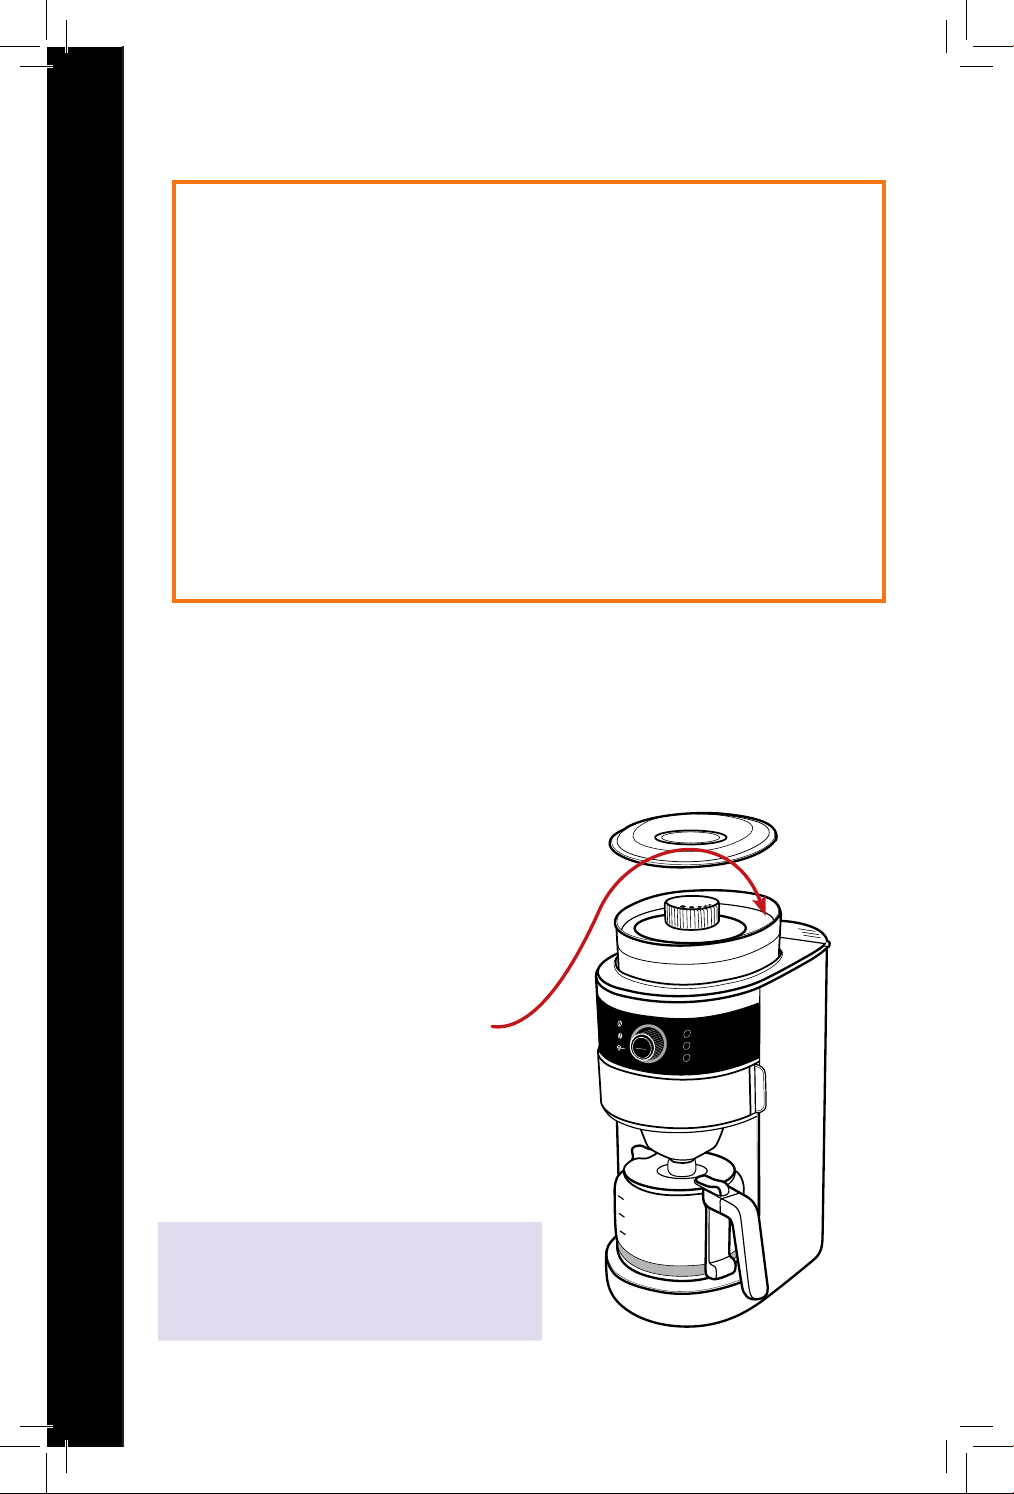
4. Place up to 100g of coee beans
into the hopper, and cover with
the lid. We recommend not placing
too many beans inside in order to
maintain freshness.
Note: to avoid blockage and damage
to the unit, do not use damp or
unroasted coee beans.
9
9
FOR CUSTOMER SERVICE VISIT US @ GOURMIA.COM OR CALL 888.552.0033
USING YOUR COFFEE MAKER
5. Plug the power cord into the outlet.
The lled in coee bean icon and the
6 icon will be lit.
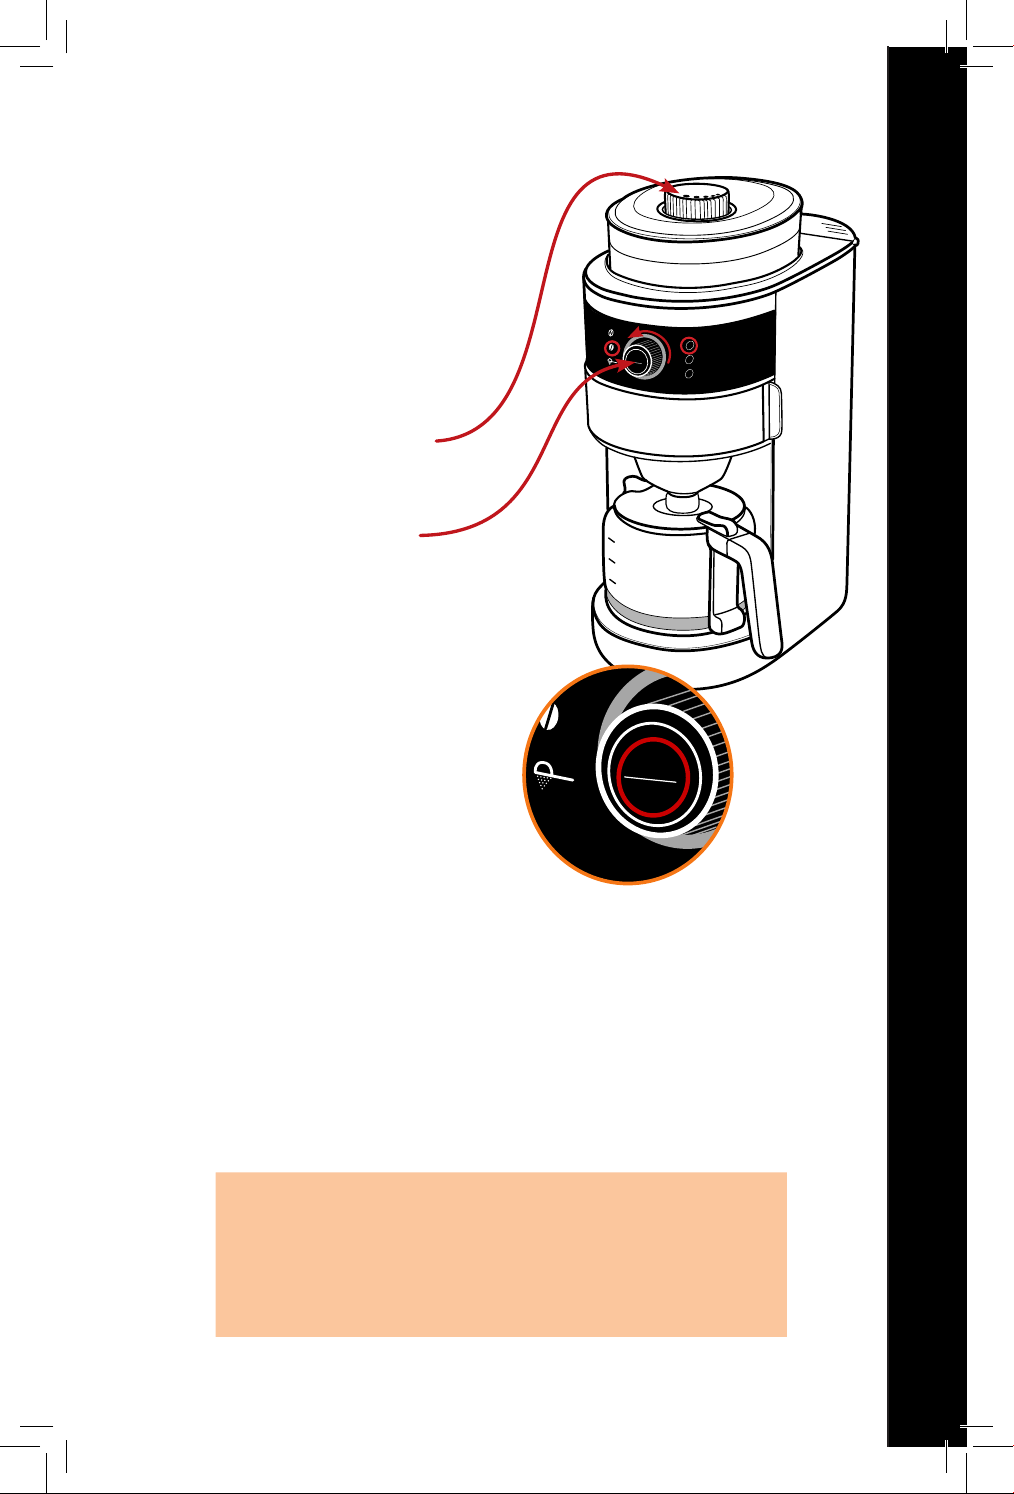
6. Turn the selection knob clockwise to
select the amount of beans to grind.
The options are grinds for 2, 4, or 6 cups
of coee. Grinds for 6 cups is the default
setting and will automatically grind if you
do not rotate the knob.
7. Rotate the coee grinder knob,
located at the top of the hopper,
to select the size of the grounds.
8. Turn the selection knob
counterclockwise to select the
desired coee strength.
The two options are regular (outlined
coee bean icon) and strong (lled in
coee bean icon).
9. Press the start/stop button once.
The indicator in the center will ash
and after approximately 3 seconds the
grinding will commence. The brewing
process begins immediately following
the grinding. The buzzer will sound
3 times to indicate the brewing is
complete.
10. The coee in the carafe will stay warm
for up to 35 minutes after brewing.
After this time, the power will shut o.
2
4
6
START
STOP
2
4
6
2
4
6
START
STOP
2
4
6
IMPORTANT NOTE FOR GROUND COFFEE:
• Avoid using nely ground coee as it may block the lter.
• Only use medium to coarse ground coee
• Do not overll the ground coee lter.
Note: The control panel goes into sleep mode if there
is no activity for 1 minute after it is plugged in. To reactivate
it, simply rotate the dial or press the start/stop button.
10
8
10
USING YOUR COFFEE MAKER
FOR CUSTOMER SERVICE VISIT US @ GOURMIA.COM OR CALL 888.552.0033
USING COFFEE GRINDS
1. Fill the water reservoir using cold water.
Fill the water reservoir to the 2, 4,
or 6 cup mark depending on the the
amount of coee you want to brew. All
of the water in the tank will dispense
during brewing.
Do not ll past the 6 cup mark on the
water reservoir.
Note: since some of the water gets
absorbed into the grinds, the quantity
in the carafe will be slightly less than
the amount of water originally in the
reservoir.
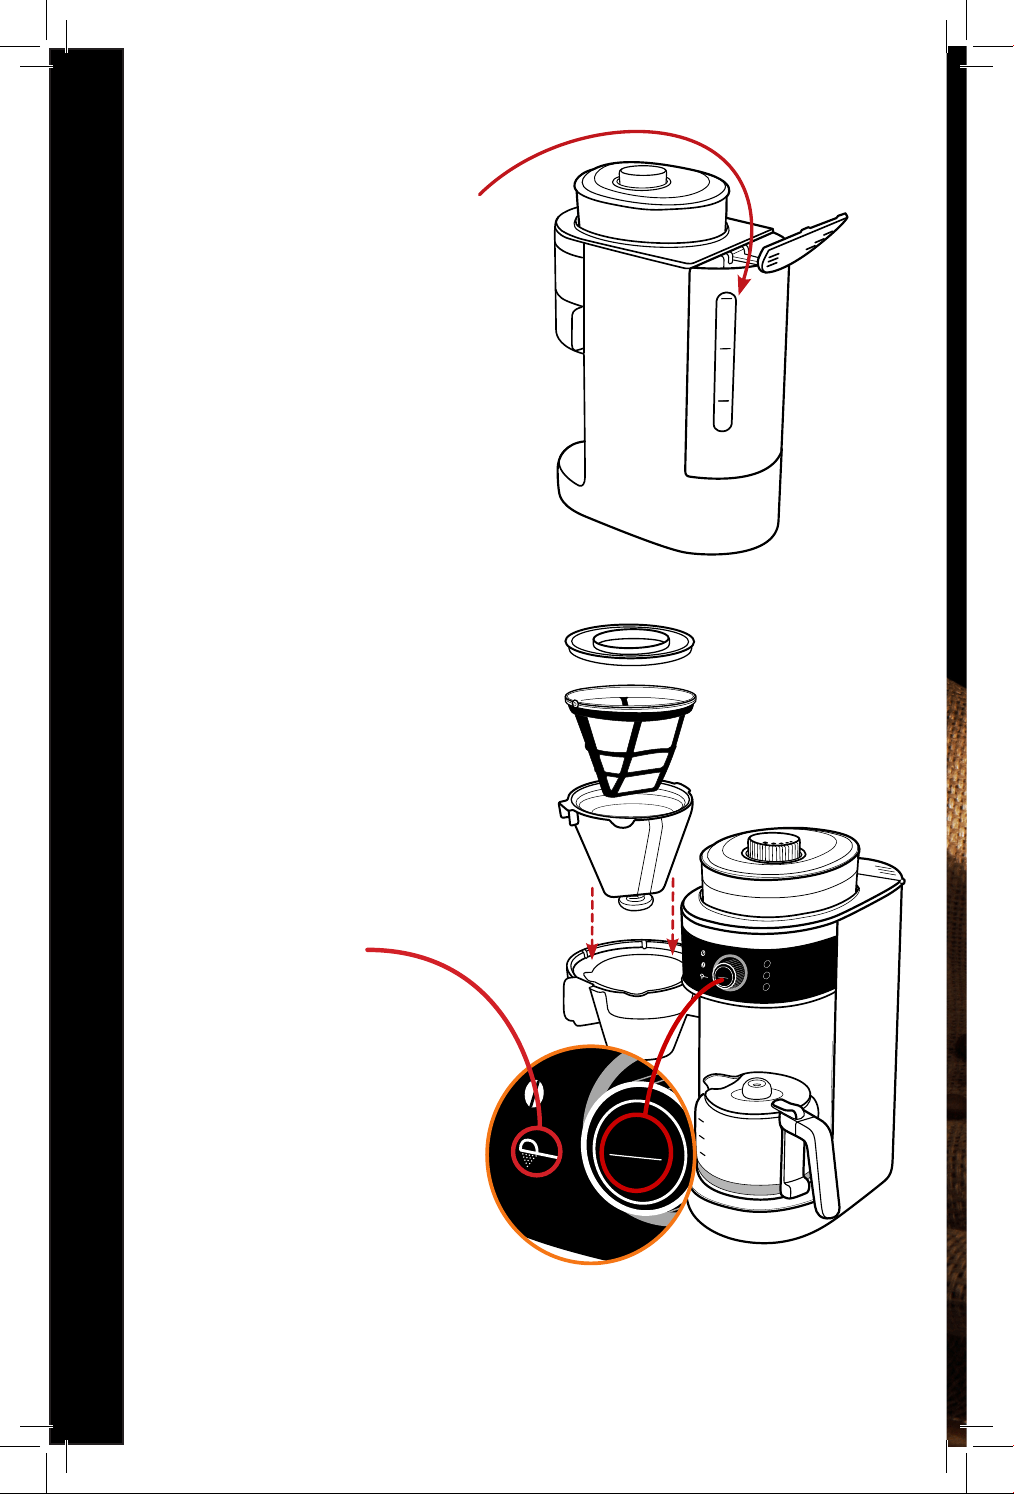
2. Rotate the funnel support to the left
and ensure that the funnel is properly
in place.
3. Fill the ground coee lter with coee
grinds. Place the ground coee lter in
the funnel and place the lid on top.
4. Rotate the funnel support back to the
right until it is locked in place
5. Plug the power cord into the outlet.
The outlined coee bean icon and the
6 icon on the control panel will be lit.
6. Rotate the selection knob
counterclockwise to
selectthe dispense icon.
7. Press the start/stop button.
The indicator in the center will
ash and the brewing will commence.
The buzzer will sound 3 times to
indicate the brewing is complete.
8. The carafe will warm the coee for
up to 35 minutes after completion
of the brewing. After this time,
the power will shut o.
2
4
6
2
4
6
START
STOP
2
4
6
2
4
6
START
STOP
2
4
6

11
AIR FRYING TIPS
9
FOR CUSTOMER SERVICE VISIT US @ GOURMIA.COM OR CALL 888.552.0033
10
8
12
CLEANING AND MAINTENANCE
FOR CUSTOMER SERVICE VISIT US @ GOURMIA.COM OR CALL 888.552.0033
CLEANING AND MAINTENANCE
Removing mineral deposits:
1. Fill the water tank to the “max” line with a household descale solution
and water using a 1:4 ratio. Citric acid can be used in place of the
descale solution with the water:acid ratio being 100:3.
2. Rotate the selection knob counterclockwise to the dispensing icon.
Press the start/stop button. The indicator in the center will ash and the
descaling will commence.
3. After the water tank is emptied, repeat the process 3 times using clean
water to ensure the machine is thoroughly rinsed out.
1. Clean the funnel, lter,
lter cover and carafe after
each use using warm water
and soap.
2. Wipe down the hopper,
warming plate and product’s
exterior using a soft, damp cloth
to remove any stains.
2
4
6
START
STOP
2
4
6
2
4
6
WARNING:
• Always remove the plug from the outlet and allow
the appliance to cool before cleaning.
• Do not immerse the coee maker or base into
water or any other liquid.
NOTE: Do not use
abrasive cleansers.

11
AIR FRYING TIPS
9
FOR CUSTOMER SERVICE VISIT US @ GOURMIA.COM OR CALL 888.552.0033
WARRANTY & SERVICE
This Limited Warranty is for one full year from the date
of purchase. It is applicable to the original purchaser
only and is not transferable to a third party user. Repair
or replacement of defective parts is solely at the seller’s
discretion. In the event that repair isn’t possible, the
seller will replace the product/part. If product repair/
replacement won’t suce, the seller has the option of
refunding the cash value of the product or component
returned.
Product defects not covered under the Warranty
provisions include normal wear and damage incurred
from use or accidental negligence, misuse of instruction
specications or repair by unauthorized parties.
The manufacturing company is not liable for any
incidental or consequential damages incurred by such
circumstances.
WARRANTY & SERVICES
13

FOR CUSTOMER SERVICE
QUESTIONS OR COMMENTS
VISIT US @ GOURMIA.COM
OR CALL 888.552.0033