Model: MRDSC6BK
INSTRUCTION MANUAL
Read these instructions carefully before
using this appliance for the rst time.
STORE THESE INSTRUCTIONS CAREFULLY
6.5L Digital Slow Cooker
For product hints and tips plus more join us at
facebook.com/MorphyRichardsAUS instagram.com/morphyrichardsau
www.morphyrichards.com.au

2
The use of any electrical appliance requires the following
common sense safety rules.
WARNING: Misuse of appliance could cause potential injury.
• Keep the appliance and its cord out of reach of children.
• This appliance is not intended for use by persons (including
children) with reduced physical, sensory or mental
capabilities or lack of experience and knowledge unless they
have been given supervision or instruction concerning use of
the appliance by a person responsible for their safety.
• Children should be supervised to ensure that they do not
play with this appliance and children should be watched
carefully to avoid scalding them.
• In the absence of supervision, the cleaning and maintenance
work should not be done by a child.
• This appliance must be used in accordance with the
instructions and must not be used for other purposes.
• This appliance is intended to be used in household and
similar applications such as: staff kitchen areas in shops,
offices and other working environments; farm houses;
by clients in hotels, motels and other residential type
environments; bed and breakfast type environments.
• CAUTION: In order to avoid a hazard due to inadvertent
resetting of the thermal cut-out, this appliance must not be
supplied through an external switching device, such as a
timer, or connected to a circuit that is regularly switched on
and off by the utility.
• The heating element surface is subject to residual heat after
use.
IMPORTANT SAFETY INSTRUCTIONS

3
IMPORTANT SAFETY INSTRUCTIONS
Location
• Always locate your appliance away from the edge of the
worktop.
• Ensure that the appliance is used on a firm, flat, heat resistant
surface and the surface is free from water or other liquids.
• Do not use the appliance outdoors or near water.
• Do not place on or near a hot gas or electric burner or in a
heated oven.
Power cord
• The power cord should reach from the socket to the appliance
without straining the connections.
• Do not let the power cord hang over the edge of the worktop
or open space where a child could reach it.
• Do not let the cord run across a cook top or hot area which
might damage the cord.
• If the supply cord is damaged, it must be replaced by the
manufacturer, its service agent or similarly qualified persons in
order to avoid a hazard.
• WARNING: This appliance is NOT recommended for use with
extension leads and/or power boards.
Electrical requirements
• Check that the voltage on the rating plate of your appliance
corresponds with your house electricity supply which must be
A.C. (Alternating Current).
• WARNING: This appliance must be earthed.

4
IMPORTANT SAFETY INSTRUCTIONS
Personal safety advice
• WARNING: Do not touch the top of the appliance or other hot
parts during or after use, use handles or knobs. Misuse of this
appliance could cause potential injury.
• The use of attachments or tools not recommended by Morphy
Richards may cause fire, electric shock or injury.
• Unplug from the socket when not in use, before putting on or
taking off attachments, and before cleaning.
• Do not plug in or switch on the slow cooker without having the
cooking pot inside the slow cooker housing.
• Do not switch on the appliance when it is upside down or laid
on its side.
• The glass lid and cooking pot are fragile. Handle them with
care.
• Never cook directly on the base unit. Use the removeable
cooking pot.
• Never operate the slow cooker without food or liquid in the
removable cooking pot.
• Switch off the base unit before removing the cooking pot.
• Do not use a damaged or dented cooking pot or cracked or
damaged glass lid.
• Position the glass lid so that the steam vent is directed away
from you. Lift and remove the lid carefully to avoid scalding
from escaping steam.
CAUTION: HOT SURFACE
PLEASE BE AWARE OF HOT SURFACES
HANDLE WITH CARE

5
• Allow the glass lid and cooking pot to cool before immersing in
water.
• When using the slow cooker functions, always keep the glass
lid on during cooking, unless stated in the recipe.
• Only use the supplied glass lid to cover the cooking pot.
• Do not allow water from the lid to drip directly into the base
unit, only into the cooking pot.
• To protect against the risk of electrical shock do not put base
in water or in any other liquid.
• Do not touch hot surfaces. Use oven gloves or a cloth when
removing lid or handling hot containers.
• Extreme caution must be used when moving an appliance
containing hot food, water, or other hot liquids.
• The tempered glass lid is stronger and more durable than
ordinary glass, but it is not unbreakable. If the glass is hit
extremely hard, it may weaken or break and later may shatter
into many small pieces.
• Do not use the cooking pot in a microwave or conventional
oven.
• Do not place the cooking pot on a gas cook top or electric hot
plate.
• The heating element surface is subjected to residual hat after
use.
• Avoid spillage on the connector.
• Appliance normally cleaned after use and not to be immersed
in water for cleaning.
IMPORTANT SAFETY INSTRUCTIONS
6
Model: MRDSC6BK
Colour: Matte Black
Rated Voltage: 220-240V~ 50-60Hz
Rated Power: 1135-1350W
Max Capacity: 6.5L
External Dimensions (L x W x H): 440 x 281 x 258mm
Net Weight: 5.64kg
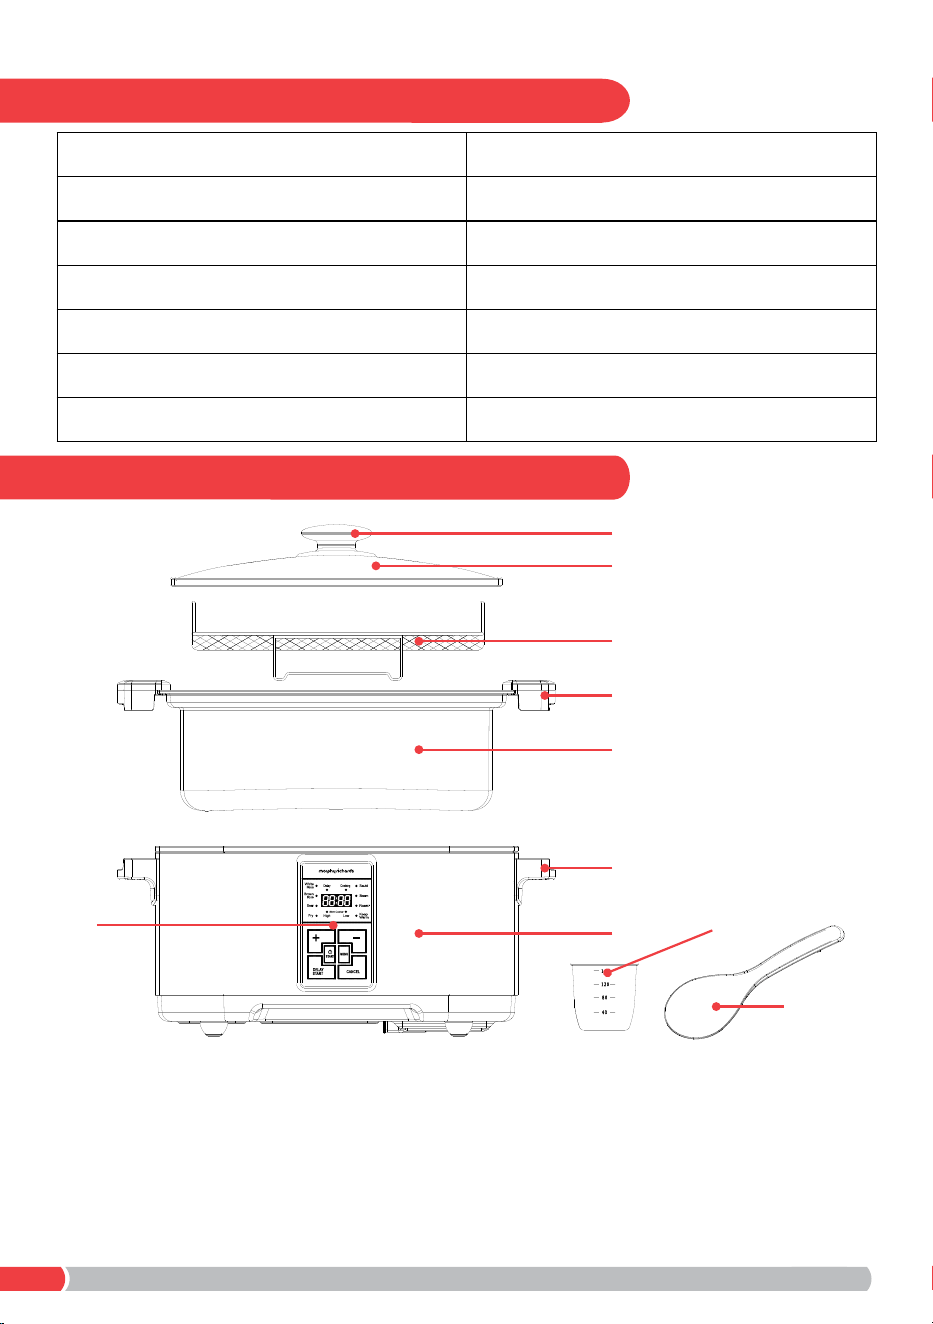
PRODUCT OVERVIEW
SPECIFICATIONS
1. Glass lid handle 6. Base unit handle
2. Tempered glass lid 7. Base unit
3. Steam rack 8. LED control panel
4. Removeable cooking pot handle 9. Measuring cup
5. Removeable cooking pot (6.5L capacity) 10. Rice spoon
1
2
3
4
5
6
7
8 9
10
7
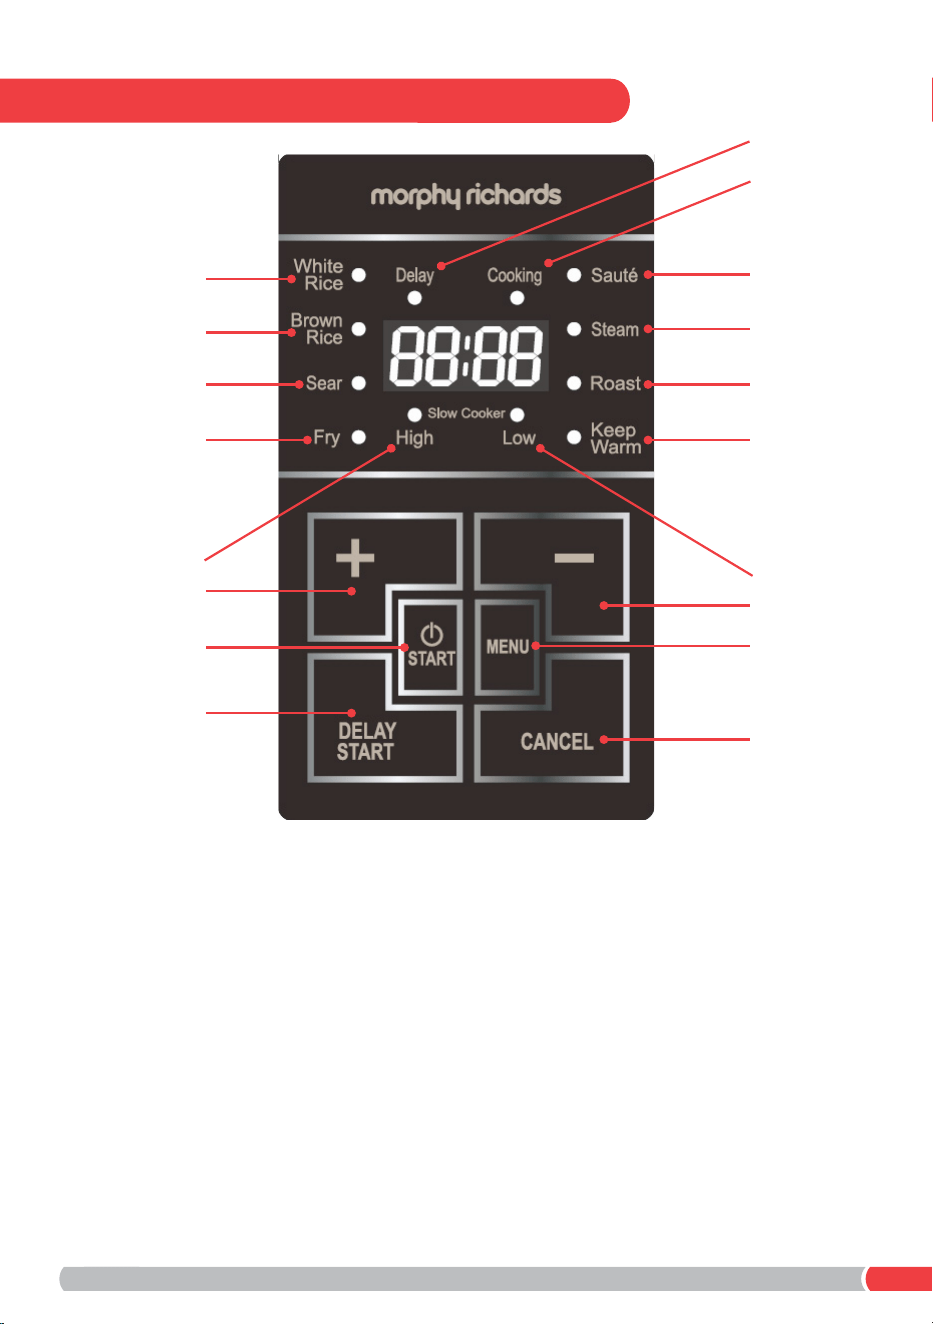
CONTROL PANEL
A. White Rice function indicator M. + button (increases cooking time)
B. Brown Rice function indicator N. - button (decreased cooking time)
C. Sear function indicator O. START button
D. Fry function indicator P. MENU button
E. High power slow cooker indicator Q. DELAY START button
F. Low power slow cooker indicator R. CANCEL button
G. Keep Warm function indicator
H. Roast function indicator
I. Steam function indicator
J. Saute function indicator
K. Cooking indicator
L. Delay start cooking indicator
A
B
C
D
E
F
G
H
I
J
K
L
M
N
O
P
Q
R

8
• Remove all packaging materials.
• Remove any stickers or labels from the appliance. Do not
remove the rating label on the bottom of the appliance.
• Wash the glass lid, steel tray and removeable cooking pot in
warm, soapy water. Rinse and dry.
USING YOUR SLOW COOKER
• WARNING: The Fry function is not designed for deep frying
and a maximum amount of 10mm (1cm) cooking oil should be
added to the cooking pot for shallow frying only.
• The removeable cooking pot is NOT suitable for a gas cook
top, electric hotplate or induction hob.
• All cooking must be done with the cooking pot placed securely
in the slow cooker base unit.
• Ensure the glass lid is level and sitting securely on the cooking
pot before cooking.
• Make sure the slow cooker is placed on a firm, flat, heat
resistant surface and the surface is free from water or other
liquids.
• Insert the power plug into a power outlet. The slow cooker
will beep and the control panel indicators will flash for
approximately 15 seconds and go off. The slow cooker is now
in standby mode.
• Press the MENU button to select the desired function. The
menu starts in the top left corner (White Rice) and moves in an
anti-clockwise direction with each press of the MENU button
until the required function is reached.
• When the desired function is reached, the LED display will
show the default time of the function.
BEFORE FIRST USE

9
USING YOUR SLOW COOKER
• Use the + and - buttons to increase or decrease the cooking
time for the selected function, within the set timer range. If no
selection is made within 15 seconds, the function indicator
buttons will stop flashing and the slow cooker goes into
standby mode. To reactive the appliance, simply press the
MENU button again.
• Pressing the START button confirms the selection and the unit
begins cooking and the Cooking indicator will illuminate.
• To stop the cooking function at any time, press the CANCEL
button. The slow cooker will return to standby mode.
• To turn the slow cooker off completely, unplug from the power
point.
• When removing the glass lid, tilt so that the opening faces
away from you to avoid being burnt by steam.
• The tempered glass lid is stronger and more durable than
ordinary glass, but it is not unbreakable. If the glass is hit
extremely hard, it may weaken or break and later may shatter
into many small pieces.
USING THE REMOVEABLE COOKING POT
USING THE GLASS LID
• WARNING: The cooking pot will become very hot when in use.
• WARNING: The glass lid, base unit and cooking pot all
become hot during cooking. Always use oven gloves when
handling ANY part of the Slow Cooker during cooking.
• Do not use metal utensils to stir food in the cooking pot as
this will scratch and remove the non-stick coating. Use either
wood or silicone plastic utensils.

10
Function White Rice Brown Rice Sear (185°C) Fry (150°C) Slow Cooker
High
Default
Cooking Time
N/A N/A
0:15 0:15 6:00
Variable Time
Range
N/A N/A
5-60 mins 5-60 mins 1-14 hours
Adjustable
Time
Increments
N/A N/A
1 min 5 mins
1-10hr
/ 30min
increments
10-14hr / 1hr
increments
Delay Start
Cooking
Default 4:00
5min-12hr
in 5min
increments
Default 4:00
5min-12hr
in 5min
increments
No No No
Function Slow Cooker
Low
Saute (175°C) Steam Roast (120°C) Keep Warm
Default
Cooking Time
8:00 0:15 0:15 0:15 0:00
Variable Time
Range
1-14 hours 5-60 mins 5-60 mins 5-60 mins N/A
Adjustable
Time
Increments
1-10hr
/ 30min
increments
10-14hr / 1hr
increments
1 min 1 min 1 min 1 min
Delay Start
Cooking
No No
Default 4:00
5min-12hr
in 5min
increments
No No
FUNCTIONS

11
• The Slow Cooker has 10 preset functions for cooking rice,
searing, frying, sauteeing, steaming and roasting. Refer to the
operation instructions on pg 8 & 9.
WHITE RICE
Select this function from the MENU button, press START and the
LED display will show a moving dotted line
until the rice is
cooked and the unit will automatically switch to the Keep Warm
function after cooking.
BROWN RICE
Select this function from the MENU button, press START and the
LED display will show a moving dotted line
until the rice is
cooked and the unit will automatically switch to the Keep Warm
function after cooking.
SEAR
Select this function from the MENU button, press START and
the LED display will show a moving dotted line
and the
Cooking indicator will illuminate until the unit reaches the set
temperature of 185°C. The unit will beep and begin cooking at
the set temperature until the programmed cooking time elapses.
FRY
Select this function from the MENU button, press START and
the LED display will show a moving dotted line
and the
Cooking indicator will illuminate until the unit reaches the set
temperature of 150°C. The unit will beep and begin cooking at
the set temperature until the programmed cooking time elapses.
NOTE: The height of the cooking oil should NOT exceed 10mm.
SLOW COOKER (HIGH)
Select this function from the MENU button and set the preferred
cooking time using the + or - buttons. The default cooking time is
6 hours. Press START to begin cooking and the LED display will
count down how long the function has to finish. When finished,
the unit will switch into the Keep Warm function.
FUNCTIONS

12
SLOW COOKER (LOW)
Select this function from the MENU button and set the preferred
cooking time using the + or - buttons. The default cooking time is
8 hours. Press START to begin cooking and the LED display will
count down how long the function has to finish. When finished,
the unit will switch into the Keep Warm function.
SAUTE
Select this function from the MENU button, press START and
the LED display will show a moving dotted line
and the
Cooking indicator will illuminate until the unit reaches the set
temperature of 175°C. The unit will beep and begin cooking at
the set temperature until the programmed cooking time elapses.
STEAM
Select this function from the MENU button, press START and
the LED display will show a moving dotted line and the
Cooking indicator will illuminate until the unit reaches the set
temperature of 100°C. The unit will beep and begin cooking at
the set temperature until the programmed cooking time elapses.
The steaming tray should be used for steaming fish or vegetables
inside the removable cooking pot with this function. Use the
supplied steam rack with this function.
ROAST
Select this function from the MENU button, press START and
the LED display will show a moving dotted line
and the
Cooking indicator will illuminate until the unit reaches the set
temperature of 120°C. The unit will beep and begin cooking at
the set temperature until the programmed cooking time elapses.
The steaming tray can also be used for roasting inside the
removable cooking pot with this function.
KEEP WARM
There are two ways to use the Keep Warm function.
1. Press the MENU button until the Keep Warm function indicator
light illuminates. Press START.
FUNCTIONS

13
2. After a selected cooking function finishes, the unit will beep
and will automatically switch to Keep Warm.
NOTE: This only occurs with the White Rice, Brown Rice, Steam,
Slow Cooker High & Slow Cooker Low functions.
3. When the Keep Warm function is operating, the indicator light
will illuminate while the other lights will go out. The timer will
increase in 1 minute intervals to a maximum time of 12 hours.
DELAY START
1. The DELAY START function allows you to pre-program the
starting time of the selected cooking function.
NOTE: This function is only available with White Rice, Brown Rice
and Steam functions.
2. Active the cooker and select the White Rice, Brown Rice or
Steam function. Press DELAY START to set the delayed time.
The indicator of the selected function will illuminate and the
time displayed will show the default time of 4:00 (4 hours).
3. Press the + or - buttons to adjust the delayed starting time.
The range is between 5 minutes to 12 hours and can be
adjusted in increments of 5 minutes.
4. After setting the delayed start time, press START to commence
the timer countdown. The indicator of the selected function
and time will illuminate. The delayed start time will count down
in one minute increments.
5. When the delayed time is over, a beep will sound and the unit
will begin to cook.
CANCELLING FUNCTIONS
The CANCEL button can be selected at any time during a
cooking function. Use the MENU button to restart a desired
cooking program.
POWER OFF MEMORY
After the appliance has been working and it encounters a power
failure, the cooking function will automatically restore, if power
returns within 30 minutes.
FUNCTIONS

14
• The removeable cooking pot has a maximum rice cooking
capacity line of 10 cups, this equates to 1.5kg of raw rice. Do
not fill above the RICE MAX line.
• The Slow Cooker has two preset rice cooking functions, White
Rice and Brown rice. Below is a guide only and timing will
depend on the amount of rice and water used.
TIPS FOR COOKING RICE
White Rice (RAW) Water Cooking Time
4 cups 850ml
38 mins
6 cups 1433ml
45 mins
8 cups 1726ml
46 mins
10 cups 2314ml
53 mins
Brown Rice (RAW) Water Cooking Time
4 cups 1026ml
68 mins
6 cups 1413ml
72 mins
8 cups 1693ml
76 mins
10 cups 2066ml
78 mins

15
• Select the Low or High Slow Cooker function from the MENU
button and set the preferred cooking time using the + or -
buttons. The default cooking time is 8 hours for Low and 6
hours for High. Press START to begin cooking and the LED
display will count down how long the function has to finish.
When finished, the unit will switch into the Keep Warm function.
Below are the approximate temperatures the unit reaches for
the time selected.
TIPS FOR YOUR SLOW COOKER
Cooking Time Slow Cooker (Low)
Temperature °C
Slow Cooker (High)
Temperature °C
1 hour 51.1
56.3
2 hours 70.8
76.2
3 hours 83.8
88.6
4 hours 91.1
96.6
5 hours 95.2
98.6
6 hours 97.1
98.6
7 hours 97.6
98.6
8-14 hours 97.4-97.8
98.5-98.7
Keep Warm Time Temperature °C
1 hour 24.4
2 hours 66.8
3 hours 69.3
4 hours 69.5
5-8 hours 69.7-70.0

16
• Most foods are suited to slow cooking methods, however,
there are a few guidelines that should be followed.
• Ensure all frozen ingredients are thoroughly defrosted prior to
cooking.
• Cut root vegetables into small, even pieces, as they take
longer to cook than meat. They can be gently sauteed for 2-3
minutes before slow cooking. Ensure that root vegetables
are always placed at the bottom of the cooking pot and all
ingredients are immersed in the cooking liquid.
• Trim all excess fat from meat before cooking, as the slow
cooking method does not allow fat to evaporate.
• If adapting an existing recipe from conventional cooking, you
may need to reduce the amount of liquid used. Liquid will
not evaporate from your Slow Cooker to the same extent as
conventional cooking.
• Never leave uncooked food at room temperature in your Slow
Cooker.
• Uncooked beans and pulses should be soaked overnight
and drained, rinsed and then boiled for at least 10 minutes to
remove toxins before use in a Slow Cooker.
• Insert a meat thermometer into joints of roasts, hams or
whole chickens to ensure they are cooked to the desired
temperature.
• Do not use your Slow Cooker to reheat food.
• The Slow Cooker must be at least half full for best results.
• If cooking soups, leave a 5cm gap from the rim of the cooking
pot and the food surface to allow for simmering.
TIPS FOR YOUR SLOW COOKER

17
• Removing the glass lid will allow heat to escape, reducing the
efficiency of your Slow Cooker and increasing the cooking time.
If you remove the lid to stir or add ingredients, you will need to
allow extra cooking time for each time you remove the glass lid.
• Pieces of food cut into small pieces will cook quicker. A degree
of ‘trial and error’ will be required to fully optimise the potential
of your Slow Cooker.
• Many things can affect how quickly a recipe will cook, including
water and fat content, initial temperature of the food and the
size of the food. Check food is properly cooked before serving.
• Many recipes will take several hours to cook. If you don’t have
time to prepare food in the morning, prepare it the night before,
storing the food in a covered container in the fridge. Transfer
the food to the cooking pot and add boiling liquid/stock.
• Some ingredients are not suitable for slow cooking. Pasta,
seafood, milk and cream should be added towards the end of
the cooking time.
• When cooking joints of meat, ham, poultry etc, the size and
shape of the joint is important. Try to keep the joint in the lower
2/3 of the pot. If necessary, cut into two pieces. Joint weight
should be kept within the maximum limit of 1kg.
• For ham and brisket fill with hot water to just cover the joint.
For beef, pork or poultry cover to 1/3 depth.
• Depending on the ingredients, slow cooking can take between
3 and 12 hours for best results.
• Searing or Browning prior to slow cooking is recommended but
not necessary. Searing and Browning helps seal in moisture,
and provides most tender results.
TIPS FOR YOUR SLOW COOKER

18
• The Slow Cooker has a preset Steam function and comes
equipped with a steam rack. Food can be steamed by placing
it on the tray over water or stock in the cooking pot. Ensure the
food sits above the water level in the cooking pot. Steamed
foods are known to retain most of their nutritional value,
making it a healthier way to cook.
• Before steaming, make sure the cooking pot is clean.
• It is recommended not to open the glass lid until the function
finishes and food is cooked. Opening the lid during steaming
will allow steam to escape and may delay the cooking time.
• Securely place the steam rack into the cooking pot.
• Add no more than 1.25L of liquid into the cooking pot,
ensuring that the liquid sits just below the level of the tray.
• Food can be steamed on the steam rack before the preset
Steam function is selected or once the liquid is boiling. It can
take approximately 10 minutes for 1.25L of liquid to begin
boiling.
• The steaming function cooking time can be adjusted by using
the + & - buttons. Please allow additional time for the liquid to
reach boiling temperature
• It is important to monitor the level of liquid in the cooking pot
while using the Steam function. If more hot liquid is required,
please use caution as steam will escape and use oven gloves
to avoid scalding.
• Remove cooked food using tongs from the steam rack or use
oven gloves to remove the steaming tray from the cooking pot
and place on a heat resistant surface.
TIPS FOR STEAMING

19
• WARNING: Do NOT immerse the base unit in water.
• Turn off and unplug the Slow Cooker from the mains. Allow to
cool completely before cleaning.
• To prevent damage to the appliance do not use alkaline
cleaning agents when cleaning, use a soft cloth and a mild
detergent.
• The unit should be cleaned with a damp cloth and immediately
wiped dry. Do not use detergents or chemical cleaning agents
to clean the unit.
• Remove the steam rack, glass lid and cooking pot and clean in
hot soapy water. Rinse and dry thoroughly.
• The cooking pot, glass lid, spoon and steam rack are
dishwasher safe. However, it is recommended to hand wash
all parts in hot soapy water. Do NOT immerse the base unit in
water.
• Please handle the glass lid and cooking pot carefully. Do not
use the glass lid if chipped, cracked or severely scratched.
• Avoid sudden and extreme temperature changes to the glass
lid. For example, do not place a hot lid into cold water or onto
a wet surface. Avoid hitting the glass lid against any hard
surfaces.
• Never heat the cooking pot when empty. When searing or
browning, add meat as soon as the oil is hot.
• Never place the glass lid, steaming tray or cooking pot under a
grill, in an oven, toaster oven or microwave.
• Do not use metal utensils when searing or to stir food in the
cooking pot as this will scratch and remove the non-stick
coating. Use either wooden or silicone plastic utensils.
CARE AND CLEANING

20
TROUBLESHOOTING
1. Water Burn Dry Protection (Er)
• During the Steam function, if the water boils dry and the
temperature at the bottom of the cooking pot reaches 135°C,
the base unit will automatically stop heating.
• The LED screen will blink and display the remaining time and
stops counting down. The unit will beep for 2 seconds and
then enters a protection state for 3 minutes to analyse the
error.
• During the 3 mins in the protection state, unless water is
added or the CANCEL button is pressed to return to standby
state, it will re-start cooking after you add water and the
temperature reaches 95°C. If water is not added to the pot, the
beeping will stop after 3 mins and Er shows on the display.
2. Over Temperature Protection (E5)
• During the White Rice, Brown Rice, Steam, Keep Warm and
Slow Cooker High & Low functions, if the temperature of
the pot bottom reaches 185°C, the unit will start the over
temperature protection.
• During the Sear, Fry & Roast functions, if the temperature
of the pot bottom reaches 225°C, the until will start the over
temperature protection.
3. Sensor Branch Fault Protection (E1 / E2)
• When the sensor branch fails, the unit stops heating, all
buttons are invalid, and the buzzer rings for a second and
stops for 2 seconds (repeats 10 times).
• Display error codes: Open circuit E1 and short circuit E2 on the
bottom temperature sensor.
• Contact our Customer Care Centre for these errors.

21
MAINTENANCE
• If the unit fails to operate efficiently, is broken or other
problems arise, unplug and do not operate.
• Ask for advice by calling your local after sales service agent
or the Customer Care Centre on 1300 556 816 (AU) / 0800 666
2824 (NZ).
WARRANTY
Please refer to the warranty card in the box for warranty information.
For any troubleshooting advice, please contact the relative Customer
Care Centre below.
Glen Dimplex Australia Pty Ltd Glen Dimplex New Zealand Ltd
8 Lakeview Drive, 38 Harris Road, East Tamaki,
Scoresby 3179, Victoria Auckland 2013
Australia New Zealand
Ph: 1300 556 816 Ph: 0800 666 2824

22
NOTES

23
NOTES

© Glen Dimplex Australia. All rights reserved. Material contained in this publication may not be
reproduced in whole or in part, without prior permission in writing of Glen Dimplex Australia.
MRDSC6BK_IM_v2
Recycling: Do not dispose of electrical appliances as unsorted municipal waste. Use separate collection
facilities. Contact your local government for information regarding the collection systems available. If
electrical appliances are disposed of in landfills or dumps, hazardous substances can leak into the ground
water, polluting the food chain and damaging health and wellbeing.
Expanded Polystyrene Disposal: The websites listed below can assist in the responsible disposal of EPS
(Expanded Polystyrene) packaging products.
Australia: https://recyclingnearyou.com.au/polystyrene and/or http://epsa.org.au
New Zealand: https://greenbusinesshq.com/epsrecycling and/or
https://www.plastics.org.nz/environment/recycling-disposal/eps-recycling
Glen Dimplex Australia Pty Ltd
8 Lakeview Drive
Scoresby VIC 3179
Phone: 1300 556 816
Email: [email protected]
Web: www.morphyrichards.com.au