Loading ...
Loading ...

3
SPECIFICATIONS
Cat. No. ..................................................... 3622-20
Volts.............................................................. 12 DC
Battery Type .................................................M12™
Charger Type................................................M12™
Laser............................................................Class 2
Lines Max Power ................................. P
AVG
≤ 7 mW
Points Max Power................................ P
AVG
≤ 1 mW
Pulse Frequency..........................................10 KHz
Pulse Duration Normal Mode ................. T
p
≤ 80 µs
Pulse Duration Power Save.................... T
p
≤ 50 µs
Wavelength.......................................... 510-530 nm
Lines Beam Divergence ................................. 1 rad
Points Beam Divergence .......................... 0.5 mrad
Storage Temp ....................................-4°F to 120°F
Working Range ................................................. 125'
Range with Detector .........................................165'
Accuracy ...............................................±1/8" @ 33'
Settle Time ......................................... < 3 Seconds
Tripod Mount ..................................1/4"-20, 5/8"-11
Ingress Protection............................................ IP54
Drop Rating .......................................................1 m
Leveling ............Auto ±°4 side to side, front to back
Recommended Ambient
Operating Temperature
.................. 14°F to 104°F
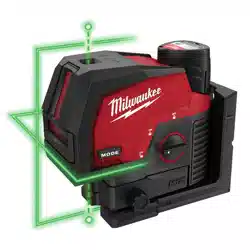
FUNCTIONAL DESCRIPTION
1. Laser apertures
2. Laser mode indicator
3. On/O dial
4. Pivot Bracket
3
4
7
5
1
6
Milwaukee Tool, Brookfield, WI 53005 USA
CROSS LINE & PLUMB POINTS
LASER
CAT. NO. 3622-20 12 V SER.
Made in China
WARNING AVERTISSEMENT ADVERTENCIA
™
To reduce the risk of injury, user must read operat or's manual. Use M12 batteries.
™
Pour minimis er les risques de blessures, l'u tilisateur doit lirel e manual. Utiliser des piles M12.
Para reduci r el riesgo de lesiones,
el usuari o debe leer el manual.
™
Util ice baterías de M12.
IEC 6082 5-1:20 14-05 t
P
≤ 80 μs MAX OUTP UT
P
AVG
≤ 7mW @ 510nm - 530 nm LINES
P
AVG
≤ 1mW @ 510nm - 530 nm POINTS
COMPL IES WITH 21 CFR 1 040.10 AND 1 040.11
EXCEP T FOR CONFOR MANCE WIT H IEC 60825- 1
ED. 3., AS DE SCRIBED I N LASER NOTI CE NO. 56,
DATED MAY 8, 2019. T HIS DEVICE C OMPLIES
WITH PART 15 OF TH E FCC RULES. OP ERATION IS
SUBJE CT TO THE FOLLO WING TWO CON DITION S:
(1) THIS D EVICE MAY NOT CAU SE HARMFUL
INTER FERENCE , AND (2) THIS DE VICE MUST
ACCEP T ANY INTERF ERENCE RE CEIVED,
INCLU DING INTE RFERENC E THAT MAY CAUSE
UNDES IRED OPER ATION.
2
1
1
1
5. Micro adjust
6. Fuel gauge
7. Mode button
8
10
9
8. Threaded inserts
9. Magnets
10. Nail/Screw hole
SYMBOLOGY
Volts
Direct Current
LASER RADIATION
DO NOT STARE INTO BEAM
CLASS 2 LASER PRODUCT
Magnets
Read operator’s manual
ASSEMBLY
WARNING
Recharge only with the charger
specied for the battery. For spe-
cic charging instructions, read the operator’s
manual supplied with your charger and battery.
Removing/Inserting the Battery
To remove the battery, push in the release buttons
and pull the battery pack away from the tool.
WARNING
Always remove battery pack before
changing or removing accessories.
To insert the battery, slide the pack into the body
of the tool. Make sure it latches securely into place.
WARNING
Only use accessories specically
recommended for this tool. Others
may be hazardous.
Power Save
Use power save mode to extend the battery run
time. Power save mode is indicated by dimmed laser
beams and the Mode indicator pulsing. Visual range
is decreased in power save mode. To turn power save
mode ON or OFF, press and hold Mode button for 3
seconds. The tool will automatically switch to power
save mode if less than 7% of battery charge remains.
Fuel Gauge
To determine the amount of charge left in the battery,
turn the tool ON. The Fuel Gauge will light up for 2-3
seconds. When less than 10% of charge is left, 1 light
on the fuel gauge will ash 4 times.
To signal the end of charge, 1 light on the fuel gauge
will ash 8 times and the tool will not run. Charge
the battery pack.
If the battery becomes too hot, the fuel gauge lights
will ash and the tool will not run. Allow the battery
to cool down.
*When automatically switched to power save mode
due to low battery, the tool cannot be switched back
to normal mode until the battery is charged/replaced.
WARNING
To reduce the risk of injury or dam-
age, securely mount/attach the
laser before starting an operation. Injury/damage
may occur if the laser falls.
Mounting/Adjusting the Laser Level
The pivot bracket can be used to mount the laser
level in multiple ways:
• Use the embedded magnets to secure the laser level
to steel studs, steel beams, etc.
• Use the keyhole slot to hang the laser level on the
wall with a nail or screw.
• Set the laser level on a at surface.
Loading ...
Loading ...
Loading ...