

AXISCameraStationS1216RackRecordingServer
TableofContents
Aboutyourdevice...........................................3
Getstarted................................................4
Installyourdevice..........................................5
Beforeinstallation...............................................5
Congureyourdevice........................................13
InitialAxisrecordersetup.........................................13
CongureAXISCameraStation....................................13
Licenseasystemonline..........................................16
Licenseasystemofine..........................................17
ManageWindows®useraccounts..............................19
Createauseraccount............................................19
Createanadministratoraccount...................................19
Createalocalusergroup.........................................19
Deleteauseraccount............................................19
Changeauseraccount'spassword..................................20
Createapasswordresetdiskforauseraccount.......................20
ManageAXISCameraStationuseraccounts.....................21
Congureuserpermissions........................................21
Addusersorgroups..............................................21
Userorgroupprivileges..........................................22
Manageyourdevice.........................................24
UpdateWindows®...............................................24
CongureWindowsupdatesettings................................24
Addaharddrive................................................
25
CreateRAIDvolume.............................................
26
CongureiDRAC................................................26
Productoverview...........................................28
Frontandrearsides..............................................
28
Specications..................................................28
Troubleshooting............................................30
CheckthecurrentBIOSversion....................................
30
UpgradeBIOS..................................................30
Rundiagnostics.................................................30
Performasystemrecovery........................................
30
ExportaSupportAssistcollection...................................31
Troubleshootthepowersupplyunit.................................31
Troubleshootmemoryerrors.......................................
32
TroubleshootAXISCameraStation..................................
32
Needmorehelp?............................................33
Usefullinks....................................................
33
Contactsupport.................................................33
2

AXISCameraStationS1216RackRecordingServer
Aboutyourdevice
Aboutyourdevice
AXISCameraStationS12Recorderseriesconsistofout-of-the-boxreadyrackserversandworkstationsvalidatedforreliable
high-denitionsurveillanceupto4K.Forquickandeasyinstallation,therecorderseriesispreconguredandpreloadedwithAXIS
CameraStationvideomanagementsoftwareincludinglicensesplusallnecessarysystemsoftware.Thesystemcongurationcan
easilybeimportedfromAXISSiteDesigner,andAXISCameraStationletsyoutakefulladvantageofAxiswiderangeofvideo
surveillancedevices.Withenterprise-gradeharddisks,operatingsystemstoredonsolid-statedrive,therecorderseriesprovides
high-performanceandreliabilityforyoursystem.
3

AXISCameraStationS1216RackRecordingServer
Getstarted
Getstarted
ThestandardworkowtocongureanAXISCameraStationrecordingserveris:
1.Installyourdevice
2.InitialWindows®setup:Afterinstallingyourdevice,youareguidedthroughafewstepstosetuptheregion,language,
keyboardlayout,anadministratoraccountanditspassword.
3.InitialAxisrecordersetup:AftertheinitialWindowssetup,AXISRecorderToolboxisopenedandyouareguidedthrougha
fewstepstosetupbasicandnecessarysettings,forexample,computername,dateandtime,andnetwork.SeeInitialAxis
recordersetuponpage13.
4.CongureWindows.Werecommendto:
-UpdateWindowstothelatestversion.SeeUpdateWindows®onpage24.
-Createastandarduseraccount.SeeCreateauseraccountonpage19.
5.UpdateAXISCameraStationtothelatestversion.
-Ifyoursystemisonline:opentheAXISRecorderToolboxappandclickUpdateAXISCameraStation.
-Ifyoursystemisofine:gotoaxis.comanddownloadthelatestversion.
6.CongureAXISCameraStation
7.RegisteryourAXISCameraStationlicenses.
-Licenseasystemonlineonpage16
-Licenseasystemofineonpage17
8.ConnectyoursystemtotheAXISCameraStationmobileviewingapp.SeeConnecttoAXISCameraStationserver.
Towatchthisvideo,gotothewebversionofthisdocument.
help.axis.com/?&piaId=92409§ion=about-your-device
4

AXISCameraStationS1216RackRecordingServer
Installyourdevice
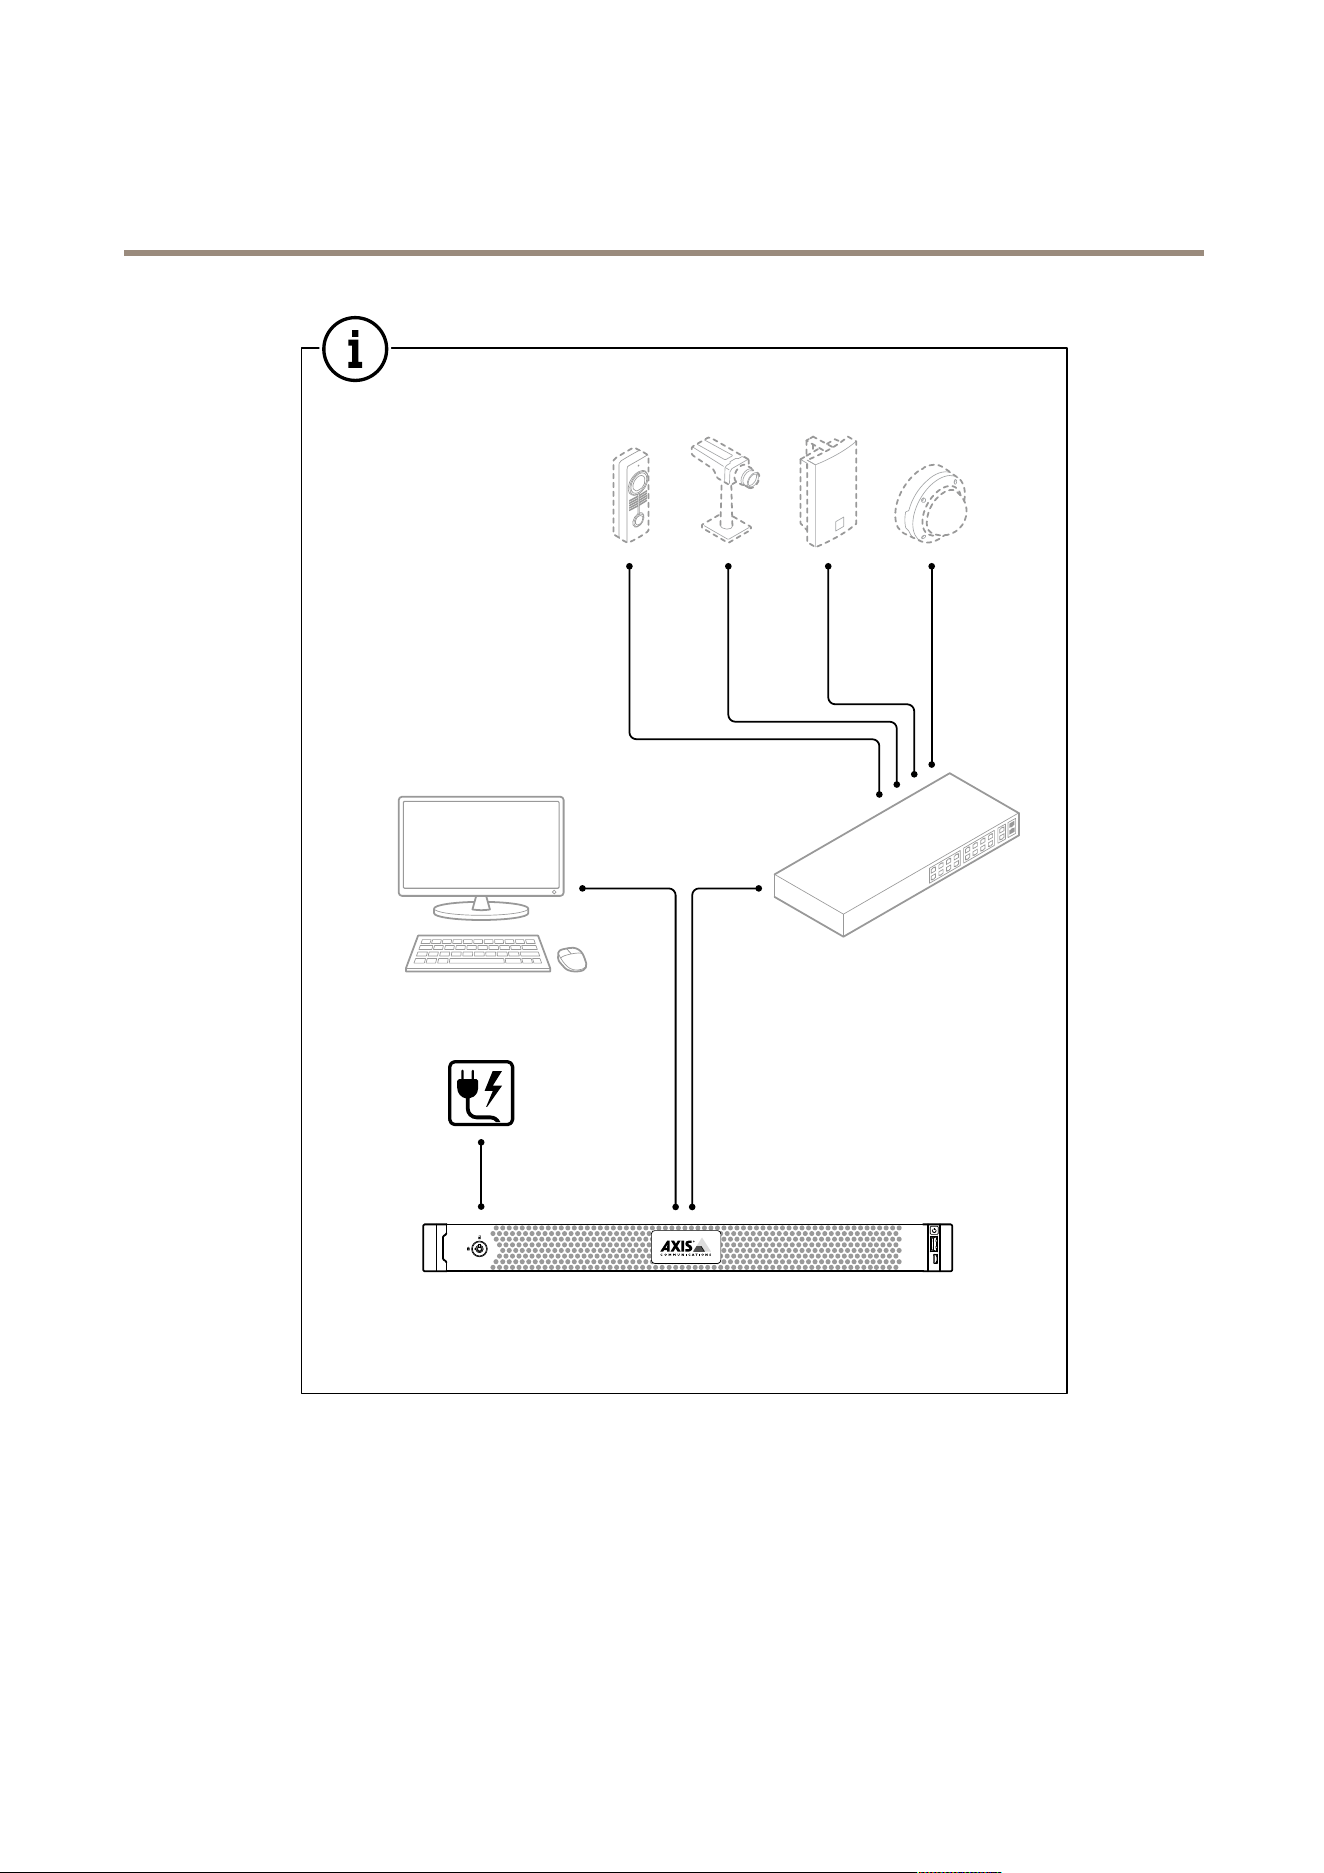
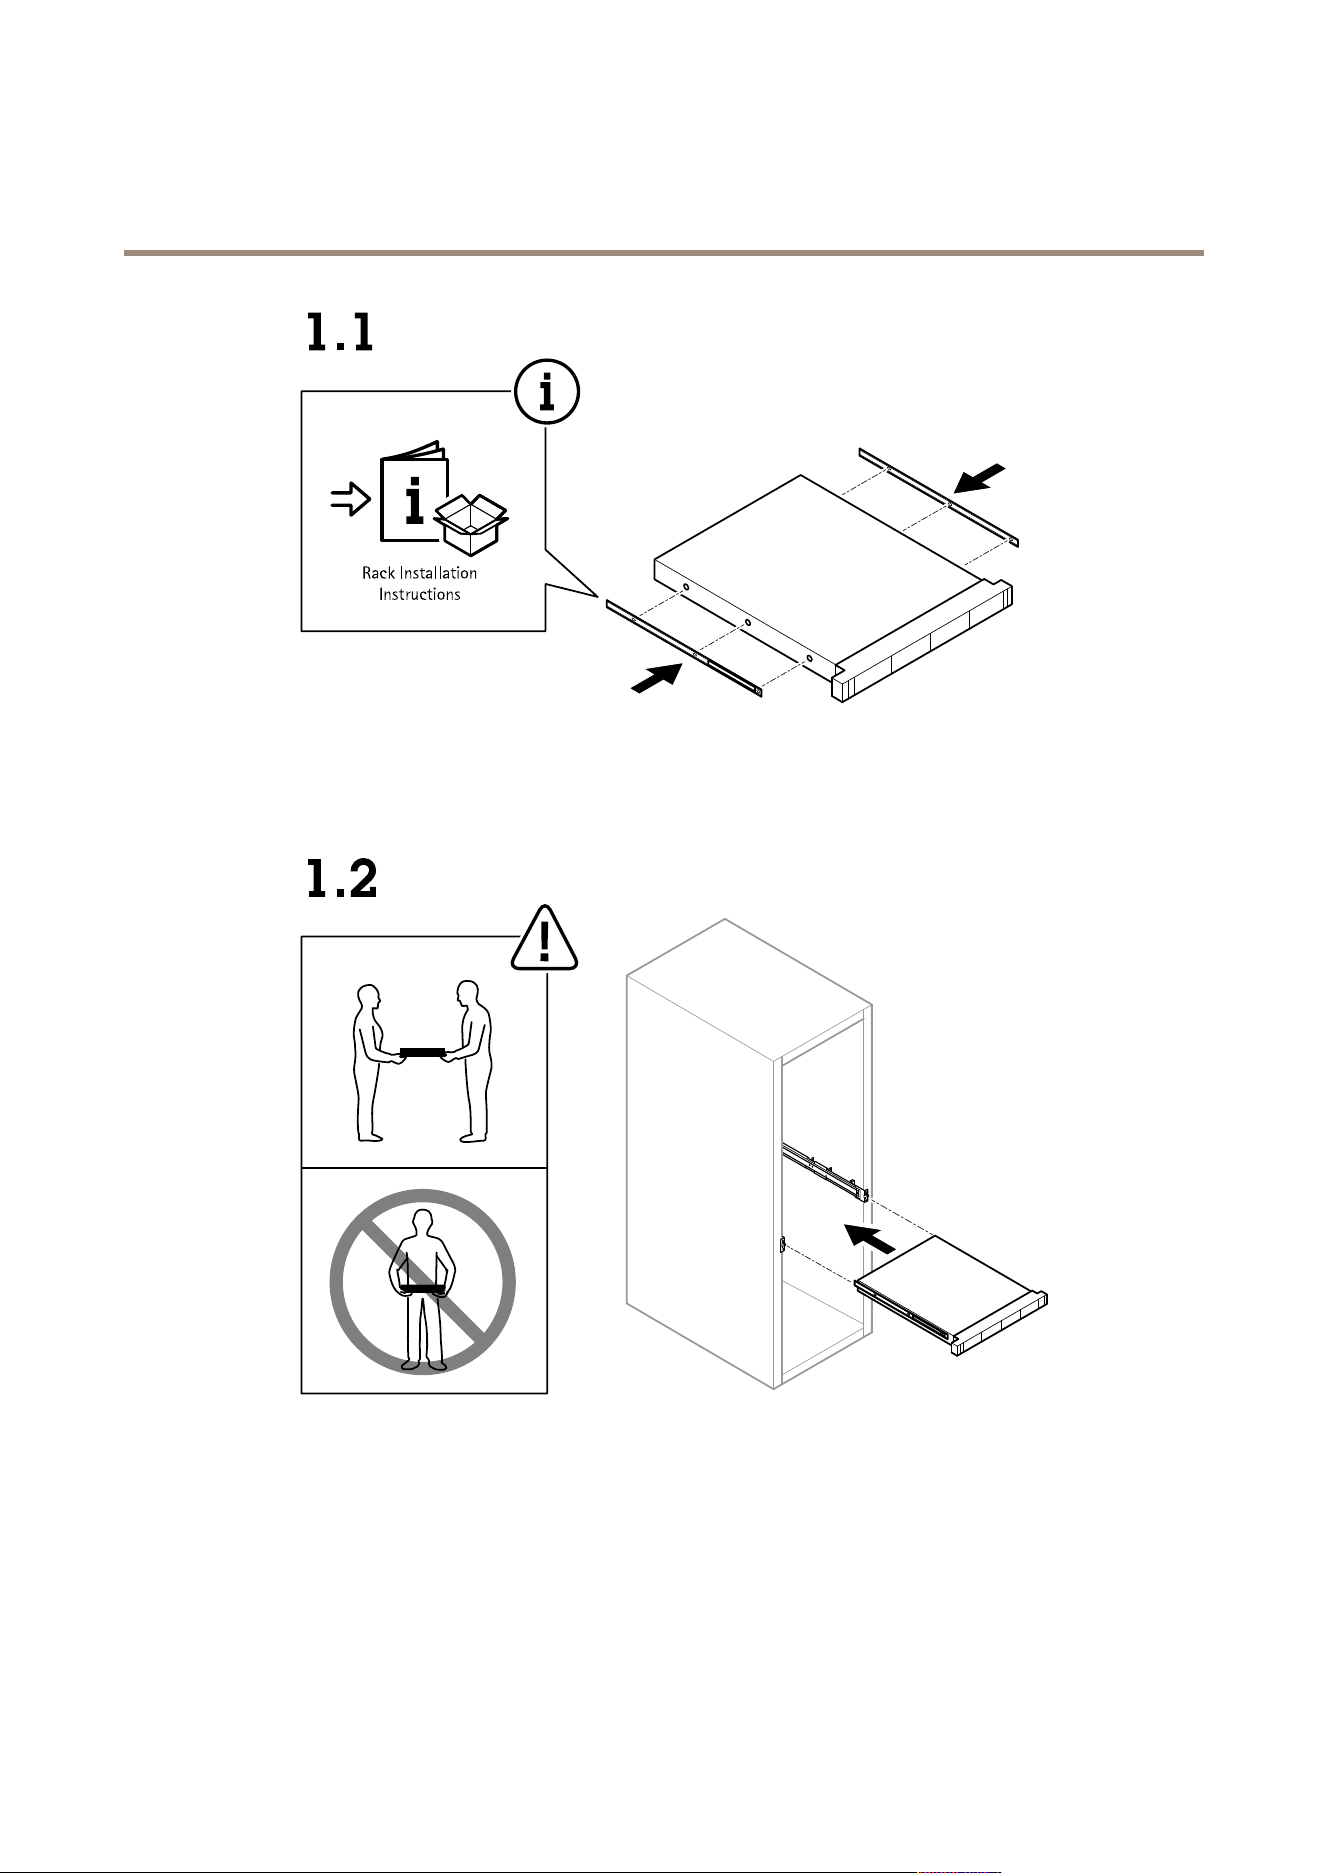
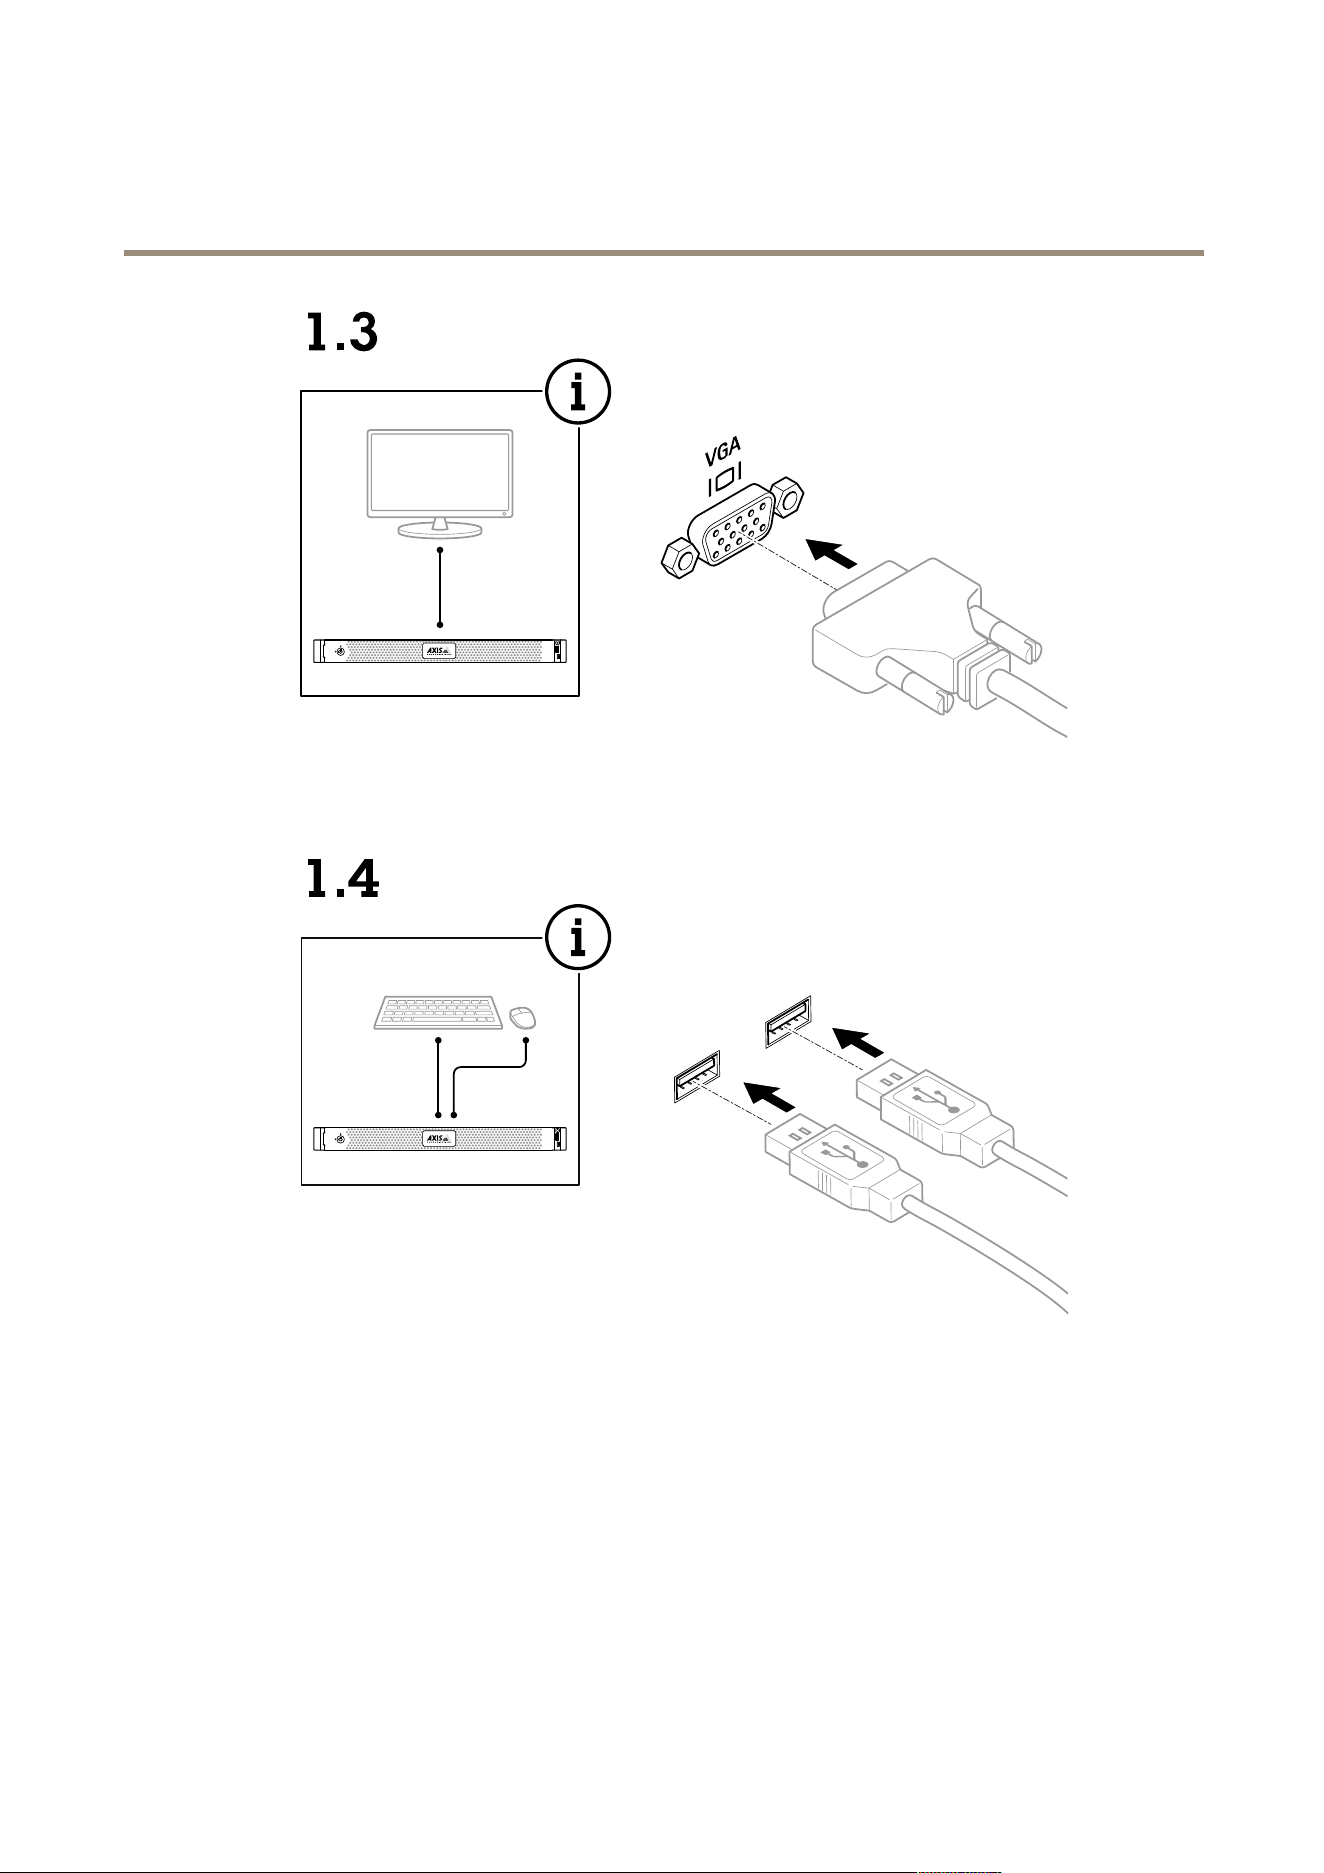
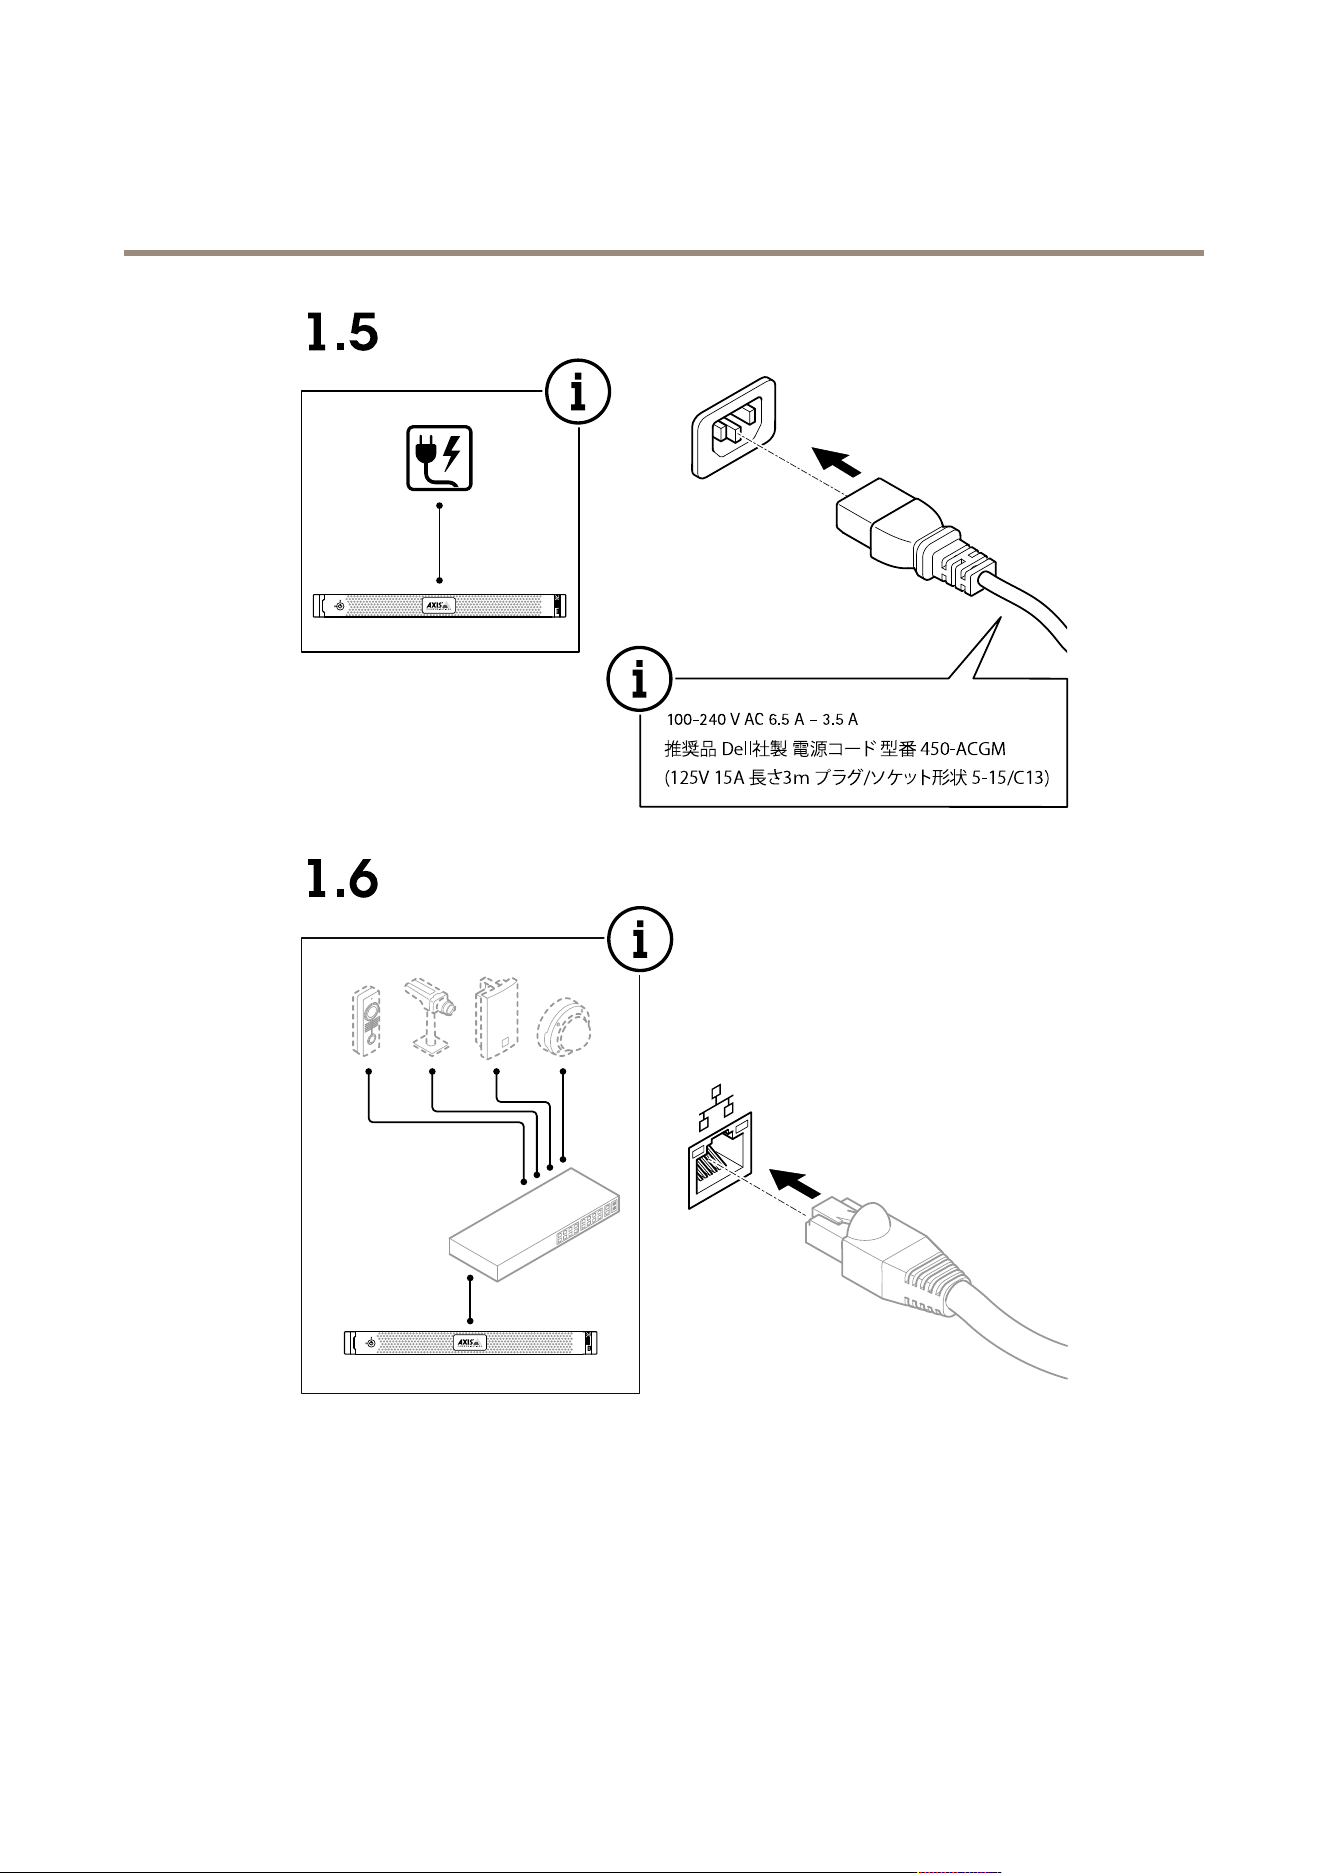
Installyourdevice
Beforeinstallation
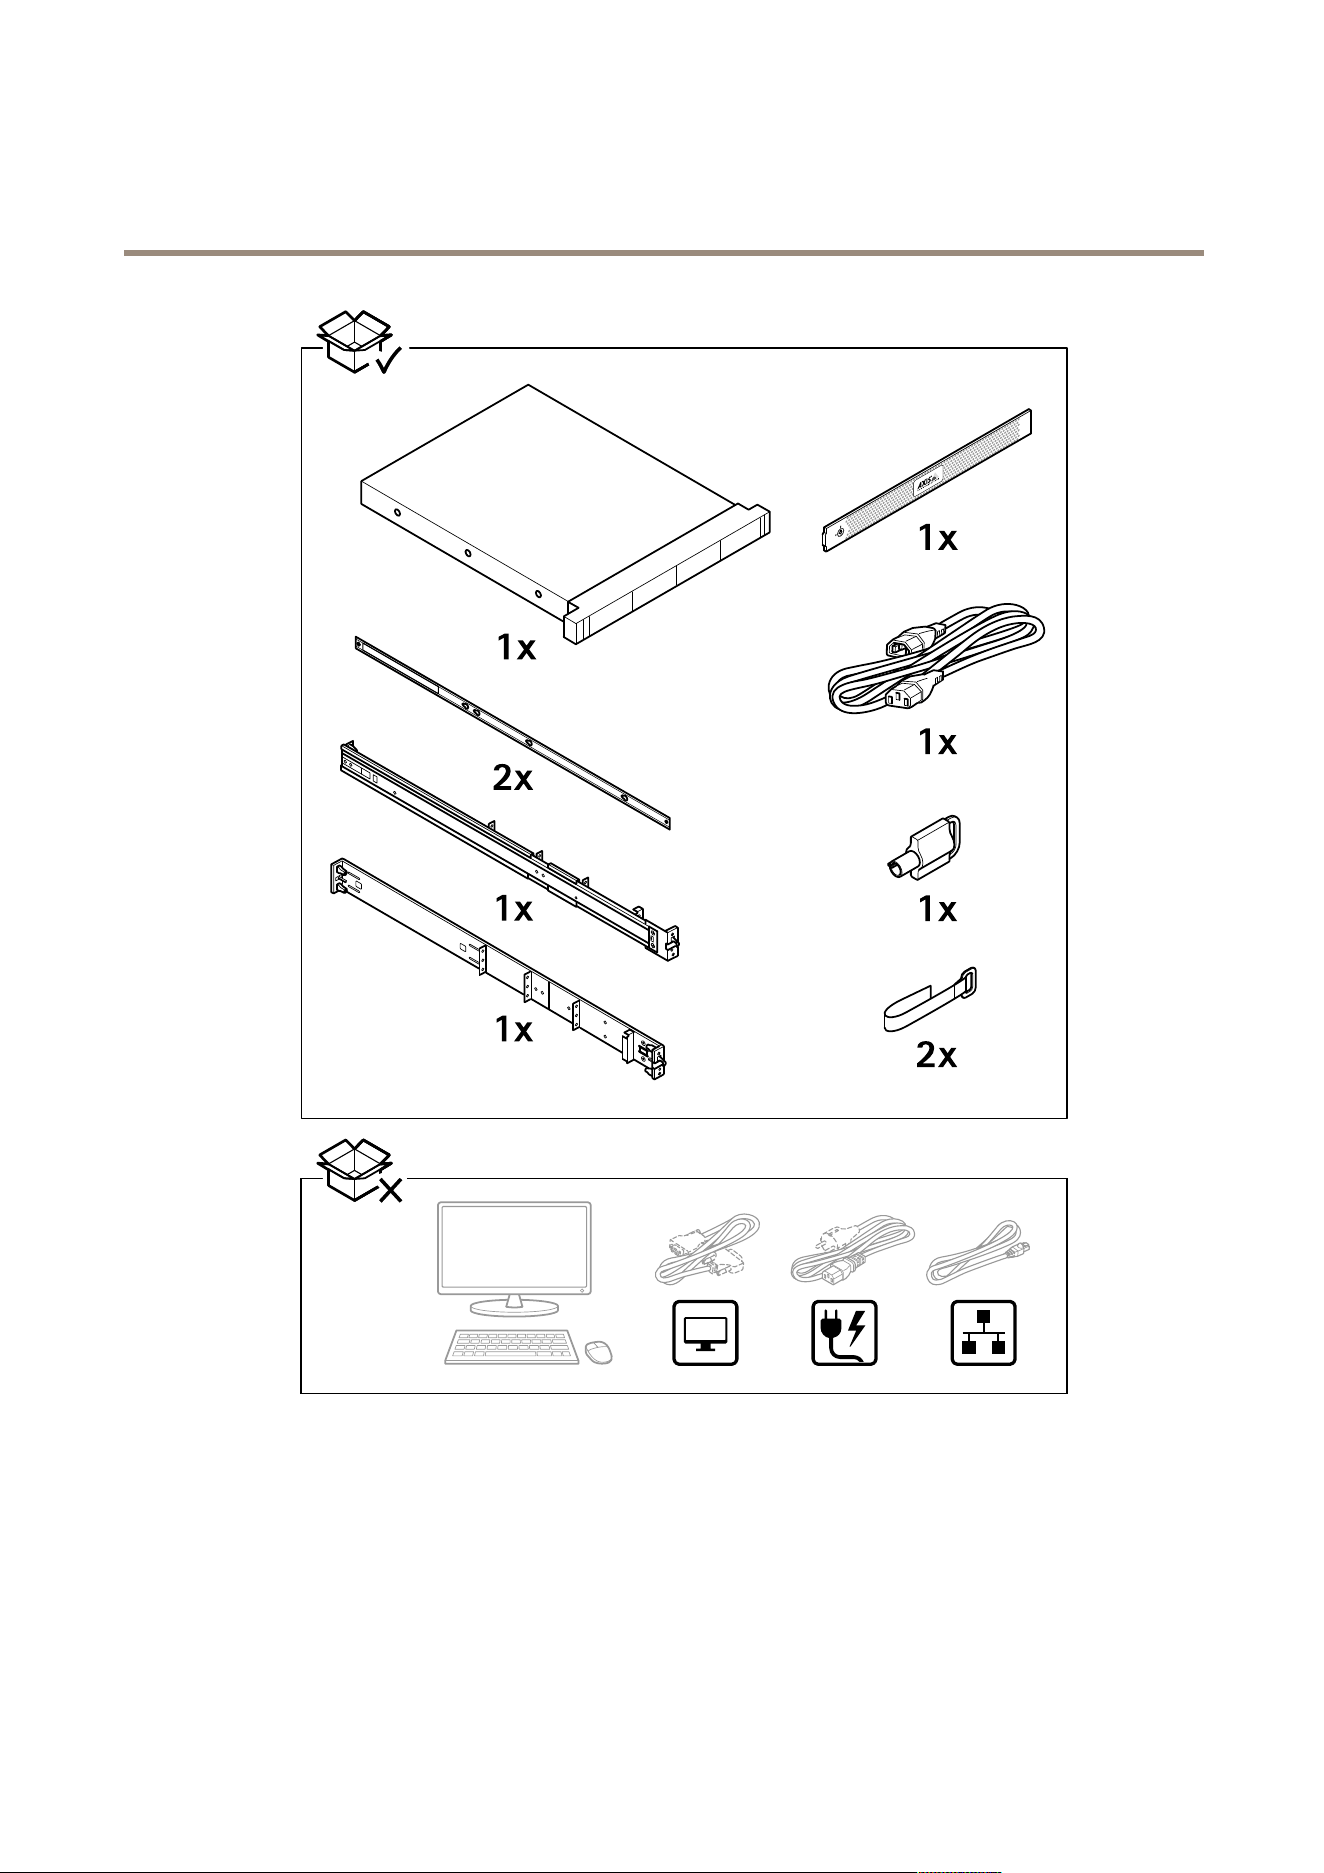
•Prepareadditionalaccessoriesusedforinstallation:monitor,mouse,keyboardandnetworkcable.
•Notethatthepowercabletothewallisnotincludedinthebox.
•Understandtheusageofdifferentuseraccounts.
Thefollowingtableliststheuseraccountsthatcanbeusedforinstallation,congurationandoperationofyourAxissystem.
UseraccountDescriptionNote
MyAxisUsedtodownloadthelatestsoftware,accessthe
licensesystem,AxisSecureRemoteAccess,and
SystemHealthMonitoring.
Registeredfrommy.axis.com.
Windows®
WindowsadministratorAdministratorprivilegesinWindows.We
recommendyoudonotuseitasAXISCamera
Stationadministrator.
CreatedduringinitialWindowssetup.
WindowsuserwithAXISCamera
Stationadministratorprivileges
AWindowsusergrantedwithadministrator
privilegesinAXISCameraStationtobeusedby
systemintegratororsystemadministratorfor
congurationortroubleshooting.
CreatedinWindowssettings.
WindowsuserwithAXISCamera
Stationoperatororviewer
privileges
AWindowsusergrantedwithoperatororviewer
privilegesinAXISCameraStation.
CreatedinWindowssettings.
Hardwaremanagement
iDRAC
UsedtoaccesstheiDRAC(IntegratedDellRemote
AccessController)tool.
Username:root
Password:Printedonthebackofthe
informationtag.
Device
DeviceadministratorUsedbytheadministratortoaccessthecamera
fromthevideomanagementsystemordevice
webpage.
Createdfromthedevicewebpageor
whenyouaddthedevicetoAXISCamera
Station.
5
AXISCameraStationS1216RackRecordingServer
Installyourdevice
6
AXISCameraStationS1216RackRecordingServer
Installyourdevice
7
AXISCameraStationS1216RackRecordingServer
Installyourdevice
8
AXISCameraStationS1216RackRecordingServer
Installyourdevice
9
AXISCameraStationS1216RackRecordingServer
Installyourdevice
10
AXISCameraStationS1216RackRecordingServer
Installyourdevice
11

AXISCameraStationS1216RackRecordingServer
Installyourdevice
12

AXISCameraStationS1216RackRecordingServer
Configureyourdevice
Configureyourdevice
InitialAxisrecordersetup
AfteryouhaveconguredWindows®,AXISRecorderToolboxisopenedautomaticallyandyouareguidedthroughtherst-time
congurationsetupassistant.Inthissetupassistant,youcancongureseveralbasicandnecessarysettingsbeforeyoumanage
yourdeviceinAXISRecorderToolbox.
1.SelectLightorDarkthemeandclickNext(ifit’savailableforyourproduct).
2.ChangethecomputernameifyouwantandclickNext.
3.UnderDateandtime,congurethefollowingsettingsandclickNext.
-Selectatimezone.
-TosetupanNTPserver,selectNTPserverandentertheNTPserveraddress.
-Tosetmanually,selectManualandselectadateandtime.
4.UnderNetworksettings,congurethefollowingsettingsandclickNext.
-UseautomaticIPsettings(DHCP)andUseautomaticDNSsettingsareturnedonbydefault.
-IfyourdeviceisconnectedtoanetworkwithaDHCPserver,theassignedIPaddress,subnetmask,gateway,and
preferredDNSareautomaticallydisplayed.
-IfyourdeviceisnotconnectedtoanetworkorthereisnoDHCPserveravailable,entertheIPaddress,subnet
mask,gateway,andpreferredDNSmanuallydependingonthenetworkrequirements.
5.ClickFinish.Ifyouhavechangedthecomputername,AXISRecorderToolboxwillpromptyoutorestartthedevice.
CongureAXISCameraStation
ThisGetstartedtutorialwillwalkyouthroughthebasicstepstomakeyoursystemupandrunning.
Beforeyoustart,youmayneedto:
•Congureyournetworkdependingonyourinstallation.SeeNetworkconguration.
•Congureyourserverportsifneeded.SeeServerportconguration.
•Considersecurityissues.SeeSecurityconsiderations.
Afternecessarycongurations,youcanstarttoworkwithAXISCameraStation:
1.StartAXISCameraStation
2.Adddevices
3.Congurerecordingmethodonpage14
4.Liveviewcamerasonpage14
5.Playbackrecordingsonpage14
6.Addbookmarksonpage15
7.Exportrecordingsonpage15
8.PlayandverifyrecordingsinAXISFilePlayeronpage15
13

AXISCameraStationS1216RackRecordingServer
Configureyourdevice
StartAXISCameraStation
AXISCameraStationServiceControlautomaticallystartsaftertheinstallationiscomplete.
Double-clicktheAXISCameraStationclienticontostarttheAXISCameraStationclient.Whenstartingtheclientforthersttime,
itautomaticallyattemptstologintotheAXISCameraStationserverinstalledonthesamecomputerastheclient.
YoucanconnecttomultipleAXISCameraStationserversindifferentways.
Adddevices
ThersttimeyoustartyourAXISCameraStation,youarenavigatedtotheAdddevicespage.AXISCameraStationautomatically
searchesthenetworkforconnecteddevicesanddisplaysalistofdevicesfound.
1.Selectthecamerastoaddfromthelist.
Ifyourcameraisnotlisted,clickManualsearch.
2.ClickAdd.
3.SelectQuickcongurationorSiteDesignerconguration.ClickNext.
4.UsethedefaultsettingsandensuretherecordingmethodissettoNone.ClickInstall.
Congurerecordingmethod
1.GotoConguration>Recordingandevents>Recordingmethod.
2.Ifyouwanttoenablemotiondetectionrecording:
2.1Selectacamera.
2.2TurnonMotiondetection.
2.3ClickApply.
3.Ifyouwanttoenablecontinuousrecording:
3.1Selectacamera.
3.2TurnonContinuous.
3.3ClickApply.
Liveviewcameras
1.ClicktheLiveviewtabtonavigatetothecameraliveview.
2.Clickacameratonavigatetotheliveviewofthatcamera.Areddotindicatesthatthecameraisrecording.
indicatesthatmotionisdetected,andthecameraisrecording.
3.Click
tonavigatefromLiveviewtoRecordings.Aredlineinthetimelineshowsthatmotiondetectionrecordinghas
beentakenforthatperiod.Abluelineinthetimelineshowsthattherecordingwastriggeredbyanactionrule.
Playbackrecordings
1.GototheRecordingtab.
2.Inthetimelineofthecamera,usethemousewheeltozoominandoutanddragthetimelinetomakethemarker
pointingatyourdesiredposition.
3.Tostartplayingtherecordingfromthedesiredposition,click
.
14

AXISCameraStationS1216RackRecordingServer
Configureyourdevice
Addbookmarks
1.GototheRecordingtab.
2.Inthetimelineofthecamera,usethemousewheeltozoominandoutanddragthetimelinetomakethemarker
pointingatyourdesiredposition.
3.Click
.
4.Enterthebookmarknameanddescription.Usekeywordsinthedescriptiontomakethebookmarkeasytondand
recognized.
5.SelectPreventrecordingdeletiontolocktherecording.Alockedrecordingcan'tbedeletedunlessactivelyunlocked.
6.ClickOK.Abookmarkiconisdisplayedatyourdesiredpositioninthetimeline.
Exportrecordings
1.GototheRecordingtab.
2.Inthetimelineofthecamera,usethemousewheeltozoominandout.
3.Click
todisplaytheselectionmarkers.
4.Dragthemarkerstoincludetherecordingsthatyouwanttoexport.
5.Click
toopentheExporttab.
6.ClickExport....
PlayandverifyrecordingsinAXISFilePlayer
1.Gotothefolderthatyouhavespeciedfortheexportedrecordings.Inthisexample,theexportedlesincludethe
recordingsinthe.asfformat,thenotesinthe.txtformat,andAXISFilePlayer.
2.Double-clickAXISFilePlayer.Theexportedrecordingswillbeautomaticallyplayed.
3.Clicktoshowthenotesaddedtotherecordings.
4.Toverifythedigitalsignature:
4.1GotoTools>Verifydigitalsignature.
4.2SelectValidatewithpasswordandenteryourpassword.
4.3ClickVerify.Thevericationresultpageisdisplayed.
Note
DigitalsignatureisdifferentfromSignedvideo.Signedvideoallowsvideotobetracedbacktothecameraitoriginatedfrom,
makingitpossibletoverifythattherecordinghasn’tbeentamperedwithafteritleftthecamera.SeeSignedvideoandthe
camera’susermanualformoreinformation.
Networkconguration
WhenAXISCameraStationclient,AXISCameraStationserver,andtheconnectednetworkdevicesareinstalledondifferentnetworks,
youmightneedtocongureproxyorrewallsettingsbeforeusingAXISCameraStation.
Clientproxysettings
Whentheclientandtheserverareseparatedbyaproxyserver,conguretheclientproxysettings.
15

AXISCameraStationS1216RackRecordingServer
Configureyourdevice
1.Double-clicktheAXISCameraStationclienticon.
2.ClickChangeclientproxysettings.
3.Changetheclientproxysettings.
4.ClickOK.
Serverproxysettings
Whennetworkdevicesandtheserverareseparatedbyaproxyserver,conguretheserverproxysettings.
1.Double-clicktheAXISServiceControliconinWindowsnoticationarea.
2.SelectModifysettings.
3.IntheProxysettingssection,usethedefaultSystemaccountinternetoptionorselectUsemanualproxysettings.
4.ClickSave.
NATandFirewall
WhentheclientandtheserverareseparatedbyaNAT,rewallorsimilar,conguretheNATorrewalltoensurethattheHTTPport,
TCPport,andstreamingportspeciedinAXISCameraStationServiceControlareallowedtopassthroughtherewalland/orNAT.
ForinstructionshowtoconguretheNATorrewall,contactthenetworkadministrator.
Serverportconguration
Theports55752(HTTP),55754(TCP),55756(mobilecommunication),and55757(mobilestreaming)areusedonAXISCamera
Stationserverforcommunicationbetweentheserverandtheclient.Ifrequired,theportscanbechangedfromAXISCamera
StationServiceControl.
Securityconsiderations
Topreventunauthorizedaccesstocamerasandrecordings,keepthefollowinginmind:
•Usestrongpasswordsforallnetworkdevices(cameras,videoencodersandauxiliarydevices).
•InstallAXISCameraStationserver,cameras,videoencoders,andauxiliarydevicesonasecurenetworkseparated
fromtheofcenetwork.AXISCameraStationclientcanbeinstalledonacomputeronanothernetwork,forexample
anetworkwithInternetaccess.
•Ensureallusershavestrongpasswords.UsingWindowsActiveDirectoryahighlevelofsecuritycanbeimplemented.
Licenseasystemonline
BoththeAXISCameraStationclientandtheservermustbeconnectedtotheinternet.
1.IntheAXISCameraStationclient,
1.1GotoConguration>Licenses>Management.
1.2Managelicensesonlineisturnedonbydefault.
1.3ClickGotoAXISLicensePortal.
2.IntheAXISLicensePortalwww.axis.com/licenses,
2.1SigninwithyourMyAxisaccount.
2.2ThelicensekeyisautomaticallygeneratedandshownunderLicensekeys.
2.3Ifyouhavepurchasedlicensekeysseparately,enteryourlicensekeyunderAddlicensekeyandclickAdd.
16

AXISCameraStationS1216RackRecordingServer
Configureyourdevice
3.IntheAXISCameraStationclient,checkthatyourlicensekeysareshownunderConguration>Licenses>Keys.
Towatchthisvideo,gotothewebversionofthisdocument.
help.axis.com/?&piaId=92409§ion=license-a-system-with-internet-connection
AXISCameraStationonlinelicenseregistration
Licenseasystemofine
1.IntheAXISCameraStationclient,exportthesystemle.
1.1GotoConguration>Licenses>Management.
1.2IfAXISCameraStationisonline,turnoffManagelicensesonlineandclickExportsystemle.
1.3IfAXISCameraStationisofine,clickExportsystemle.
1.4SaveyoursystemleonaUSBashdrive.
2.IntheAXISLicensePortalwww.axis.com/licenses,
2.1SigninwithyourMyAxisaccount.
2.2ClickUploadsystemletouploadthesystemlethatyouexportedtoyourUSBashdrive.
2.3ThelicensekeyisautomaticallygeneratedandshownunderLicensekeys.
2.4Ifyouhavepurchasedlicensekeysseparately,enteryourlicensekeyunderAddlicensekeyandclickAdd.
2.5UnderLicensekeys,clickDownloadlicenseleandsavetheletoaUSBashdrive.
3.IntheAXISCameraStationclient,importthelicensele.
3.1GotoConguration>Licenses>Management.
3.2ClickImportlicenseleandselectthelicenseleonyourUSBashdrive.
3.3CheckthatyourlicensekeysareshownunderConguration>Licenses>Keys.
17

AXISCameraStationS1216RackRecordingServer
Configureyourdevice
Towatchthisvideo,gotothewebversionofthisdocument.
help.axis.com/?&piaId=92409§ion=license-a-system-without-internet-connection
AXISCameraStationofinelicenseregistration
18

AXISCameraStationS1216RackRecordingServer
ManageWindows®useraccounts
ManageWindows®useraccounts
Createauseraccount
Tohelpkeepyourpersonaldataandinformationmoresecure,werecommendthatyouaddapasswordforeachlocalaccount.
Important
Onceyoucreateapasswordforalocalaccount,don'tforgetit.There’snowaytorecoveralostpasswordforlocalaccounts.
1.GotoSettings>Accounts>Otherpeople>AddsomeoneelsetothisPC.
2.ClickIdon’thavethisperson’ssign-ininformation.
3.ClickAddauserwithoutaMicrosoftaccount.
4.Enterausername,passwordandpasswordhint.
5.ClickNextandfollowtheinstructions.
Createanadministratoraccount
1.GotoSettings>Accounts>Otherpeople.
2.GototheaccountyouwanttochangeandclickChangeaccounttype.
3.GotoAccounttypeandselectAdministrator.
4.ClickOK.
5.Restartyourdeviceandsigninwiththenewadministratoraccount.
Createalocalusergroup
1.GotoComputerManagement.
2.GotoLocalUsersandGroups>Group.
3.Right-clickGroupandselectNewGroup.
4.Enteragroupnameandadescription.
5.Addgroupmembers:
5.1ClickAdd.
5.2ClickAdvanced.
5.3Findtheuseraccount(s)youwanttoaddtothegroupandclickOK.
5.4ClickOKagain.
6.ClickCreate.
Deleteauseraccount
Important
Whenyoudeleteanaccountyouremovetheuseraccountfromtheloginscreen.Youalsoremoveallles,settingsand
programdatastoredontheuseraccount.
19

AXISCameraStationS1216RackRecordingServer
ManageWindows®useraccounts
1.GotoSettings>Accounts>Otherpeople.
2.GototheaccountyouwanttoremoveandclickRemove.
Changeauseraccount'spassword
1.Loginwithanadministratoraccount.
2.GotoUserAccounts>UserAccounts>Manageanotheraccountinsequence.
You’llseealistwithalluseraccountsonthedevice.
3.Selecttheuseraccountwhosepasswordyouwouldliketochange.
4.ClickChangethepassword.
5.EnterthenewpasswordandclickChangepassword.
Createapasswordresetdiskforauseraccount
WerecommendtocreateapasswordresetdiskusingaUSBashdrive.Then,ifyouforgetyourpassword,youcanresetthe
password.WithoutaUSBresetdisk,youcan’tresetthepassword.
Ifyou’reusingWindows10,youcanaddsecurityquestionstoyourlocalaccountincaseyouforgetyourpassword,soyoudon'tneed
tocreateapasswordresetdisk.Todothis,gottoStartandclickSettings>Sign-inoptions>Updateyoursecurityquestions.
1.Signintoyourdevicewithalocaluseraccount.Youcan’tcreateapasswordresetdiskforaconnectedaccount.
2.PlugaUSBashdriveintoyourdevice.
3.Ifthere’sanydataontheUSBashdrive,backitup.
4.FromtheWindows®searcheld,gotoCreateapasswordresetdisk.
5.IntheForgottenPasswordwizard,clickNext.
6.SelectyourUSBashdriveandclickNext.
7.TypeyourcurrentpasswordandclickNext.
8.Followtheonscreeninstructions.
9.RemovetheUSBashdriveandkeepitinasafeplacewhereyou'llrememberit.Youdon'thavetocreateanewdiskwhen
youchangeyourpasswordevenifyouchangeitseveraltimes.
20

AXISCameraStationS1216RackRecordingServer
ManageAXISCameraStationuseraccounts
ManageAXISCameraStationuseraccounts
Congureuserpermissions
GotoConguration>Security>UserpermissionstoviewalistoftheusersandgroupsthathavebeenaddedtoAXISCamera
Station.
Note
AdministratorsofthecomputeronwhichtheAXISCameraStationserverisinstalledareautomaticallygivenadministrator
privilegestoAXISCameraStation.Youcan’tchangeorremovetheadministratorsgroup'sprivileges.
Beforeauserorgroupcanbeadded,theuserorgroupmustberegisteredonthelocalcomputerorhaveanWindowsActiveDirectory
useraccount.UsingWindowsActiveDirectory,ahighlevelofsecuritycanbeimplemented.
Whenauserispartofagroup,theusergetsthehighestrolepermissionthatisassignedtotheindividualandthegroup.
Whenauserispartofagroup,theusergetstheaccessgrantedasanindividualandalsoreceivestherightsaspartofagroup.For
example,auserisgivenaccesstocameraXasanindividual.Theuserisalsoamemberofagroup.Thegroupisgivenaccessto
camerasYandZ.TheuserthenhasaccesstocamerasX,YandZ.
IftherearesecurityconcernsregardingtheaccesstothecomputerbyadesignatedAXISCameraStationuser,createastandarduser
accountthatyouthenuseforaccesstoAxisCameraStation.YoucanthenelevatetheaccounttoadministratorinConguration>
Security>Userpermissions.
Thelistconsistsofthefollowinginformation:
ItemDescription
IconIndicatestheentryisagrouporasingleuser.
NameUsernameasitappearsinthelocalcomputerorActiveDirectory.
DomainDomainnamewheretheuserorgroupisregistered.
RoleTheaccessrolegiventotheuserorgroup.
Possiblevalues:Administrator,Operator,andViewer.
DetailsDetaileduserinformationasitappearsinthelocalcomputerorActiveDirectory.
ServerServernamewheretheuserorgroupisregistered.Onlyavailablewhenconnectingto
multipleAXISCameraStationservers.
Toaddusersorgroups,seeAddusersorgroups.
Tochangeuseraccessrightsforauserorgroup,clicktheuserorgroupandmakechanges.ClickApply.
Toremoveauserorgroup,selecttheuserorgroupandclickRemove.Inthepop-updialog,clickOKtoremovetheuserorgroup.
Addusersorgroups
UseraccountsinMicrosoftWindowsandActiveDirectoryusersandgroupscanaccessAXISCameraStation.ToaddausertoAXIS
CameraStation,youhavetoaddusersoragrouptoWindows.
ToaddauserorgroupinMicrosoftWindows:AddingauserinWindowsmayvarydependingonwhichversionofWindowsyou
arerunning.FollowtheinstructionsonMicrosoft'ssite.IfyouareconnectedtoanActiveDirectorydomainnetwork,consult
yournetworkadministrator.
Addusersorgroups
1.GotoConguration>Security>UserpermissionsandclickAdd.
21

AXISCameraStationS1216RackRecordingServer
ManageAXISCameraStationuseraccounts
2.WhenconnectingtomultipleAXISCameraStationservers,selectaserverfromtheSelectedserverdrop-downlist.
3.SelectServertosearchforusersorgroupsonthelocalcomputer,orselectDomaintosearchforActiveDirectoryusersor
groups.WhenconnectingtomultipleAXISCameraStationservers,youcanselectwhichservertosearchfor.
4.SelectUsersorGroupstosearchforonlyusersorgroups.
5.Thelistofusersorgroupsisdisplayed.UsersandgroupsthathavealreadybeenaddedtoAXISCameraStationarenotlisted.
-Iftherearetoomanyusersorgroups,thesearchresultisnotdisplayed.UsetheTypetosearcheldtorene
thesearchandndaspecicuserorgroup.
-Ifthedomainusersearchfails,theServicelogonaccountmustbechanged.
6.SelecttheusersorgroupsandclickAdd.Theusersorgroupsareaddedtothelistandshowninitalics.
Congureauserorgroup
1.Selectauserorgroupinthelist.
2.UnderRole,selectAdministrator,Operator,orViewer.
3.IfyouhaveselectedOperatororViewer,youcanconguretheuserorgroupprivileges.SeeUserorgroupprivileges.
4.ClickSave.Theuserorgroupinthelistisnotinitalicsandreadytobeused.
Userorgroupprivileges
Therearethreerolesthatcanbegiventoauserorgroup.Forhowtodeneaccessprivilegesforauserorgroup,seeAddusersor
groups.
•Administrator:Fullaccesstotheentiresystem,includingaccesstoliveandrecordedvideoofallcameras,accesstoallI/O
portsandviews.Therefore,youdonotneedtospecifyanycamera,I/Oorviewprivilegesforauserwiththisrole.Thisrole
isrequiredinordertocongureanythinginthesystem.
•Operator:AccesstoliveandrecordedvideoofselectedcamerasandaccesstoselectedI/Oportsandviews.Anoperator
hasfullaccesstoallfunctionalityofAXISCameraStationexceptsystemconguration.
•Viewer:AccesstolivevideoofselectedcamerasandaccesstoselectedI/Oportsandviews.Aviewerdoesnothaveaccess
torecordedvideoorsystemconguration.
Cameras
ThefollowingaccessprivilegesareavailableforusersorgroupswiththeOperatororViewerrole.
•Access:Allowaccesstothecameraandallcamerafeatures.
•Video:Allowaccesstolivevideofromthecamera.
•Audiolisten:Allowaccesstolistenfromthecamera.
•Audiospeak:Allowaccesstospeaktothecamera.
•ManualRecording:Allowtostartandstoprecordingsmanually.
•MechanicalPTZ:AllowaccesstomechanicalPTZcontrols.OnlyavailableforcameraswithmechanicalPTZ.
•PTZpriority:SetthePTZpriority.Alowernumbermeansahigherpriority.0meansthatnopriorityisassigned.An
administratorhasthehighestpriority.WhenarolewithhigherpriorityoperatesaPTZcamera,otherscan’toperatethe
samecamerafor10secondsbydefault.OnlyavailableforcameraswithmechanicalPTZandMechanicalPTZisselected.
Views
22

AXISCameraStationS1216RackRecordingServer
ManageAXISCameraStationuseraccounts
ThefollowingaccessprivilegesareavailableforusersorgroupswiththeOperatororViewerrole.Youcanselectmultipleviews
andsettheaccessprivileges.
•Access:AllowaccesstotheviewsinAXISCameraStation.
•Edit:AllowtoedittheviewsinAXISCameraStation.
I/O
ThefollowingaccessprivilegesareavailableforusersorgroupswiththeOperatororViewerrole.TheI/Oportsarelistedbydevice.
•Access:AllowfullaccesstotheI/Oport.
•Read:AllowtoviewthestateoftheI/Oport.Theuserisnotabletochangetheportstate.
•Write:AllowtochangethestateoftheI/Oport.
System
Theaccessprivilegesthatcan’tbeconguredaregreyedoutandlistedunderRoleprivileges.Theprivilegeswithcheckmarkmeans
theuserorgrouphavethisprivilegebydefault.
ThefollowingaccessprivilegesareavailableforusersorgroupswiththeOperatorrole.
•Takesnapshots:Allowtakingsnapshotsintheliveviewandrecordingsmodes.
•Exportrecordings:Allowexportingrecordings.
•Generateincidentreport:Allowgeneratingincidentreports.
•Preventaccesstorecordingsolderthan:Preventaccessingrecordingsolderthanthespeciednumberofminutes.When
usingsearch,theuserwillnotndrecordingsolderthanthespeciedtime.Recordingsandbookmarksolderthan
thespeciedtimecan'tbeplayed.
•AccessSystemHealthMonitoring:AllowaccessingSystemHealthMonitoring.
ThefollowingaccessprivilegesareavailableforusersorgroupswiththeViewerrole.
•Takesnapshots:Allowtakingsnapshotsintheliveviewandrecordingsmodes.
23

AXISCameraStationS1216RackRecordingServer
Manageyourdevice
Manageyourdevice
UpdateWindows®
Windows®10periodicallychecksforupdates.Whenanupdateisavailable,yourdeviceautomaticallydownloadstheupdatebut
you'vetoinstallitmanually.
Note
Recordingwillbeinterruptedduringascheduledsystemrestart.
Tomanuallycheckforupdates:
1.GotoSettings>Update&Security>WindowsUpdate.
2.ClickCheckforupdates.
CongureWindowsupdatesettings
SometimesyoumightwanttochangehowandwhenWindows
®
updates.
Note
Allongoingrecordingsstopduringascheduledsystemrestart.
1.OpentheRunapp.
-GotoWindowsSystem>Run,or
-pressWINandR.
2.Typegpedit.mscandclickOK.TheLocalGroupPolicyEditoropens.
3.GotoComputerConguration>AdministrativeTemplates>WindowsComponents>WindowsUpdate.
4.Congurethesettingsasrequired,seeexample.
Example
Toautomaticallydownloadandinstallupdateswithoutanyuserinteractionandhavethedevicerestartifnecessaryoutofofce
hoursusethefollowingconguration:
1.OpenAlwaysautomaticallyrestartatthescheduledtimeandselect:
1.1Enabled
1.2Therestarttimerwillgiveusersthismuchtimetosavetheirwork(minutes):15.
1.3ClickOK.
2.OpenCongureAutomaticUpdatesandselect:
2.1Enabled
2.2CongureAutomaticupdates:Autodownloadandscheduletheinstall
2.3ScheduleInstallday:EverySunday
2.4ScheduleInstalltime:00:00
2.5ClickOK.
3.OpenAllowAutomaticUpdatesimmediateinstallationandselect:
24

AXISCameraStationS1216RackRecordingServer
Manageyourdevice
3.1Enabled
3.2ClickOK.
Addaharddrive
Thedemandforstoragecandiffer.Retentiontimeofstoreddataorforstoringhigh-resolutionrecordingsoftenleadstothe
same:theneedtoinstallmorestorage.ThissectionexplainshowtoexpandyourAXISS12serieswithmoreharddrivesand
howtocongureRAID.
Note
UsethefollowinginstructionswhenyouaddadditionalstoragetocertainAXISS12series.Theseinstructionsareasis,and
AxisCommunicationsABtakesnoresponsibilityforlossofdataormiscongurationduringthesesteps.Thestandard
precautionsshouldbetakentobackupdatathatisbusinesscritical.Thefollowingprocedureofexpandingstoragewill
notbesupportedbyAxisTechnicalSupport.
Note
Toavoidelectrostaticdischarge,it’srecommendedthatyoualwaysuseastaticmatandstaticstrapwhileworkingon
componentsintheinteriorofthesystem.
Warranty
Detailedinformationaboutwarrantyisavailableat:www.axis.com/support/warranty.
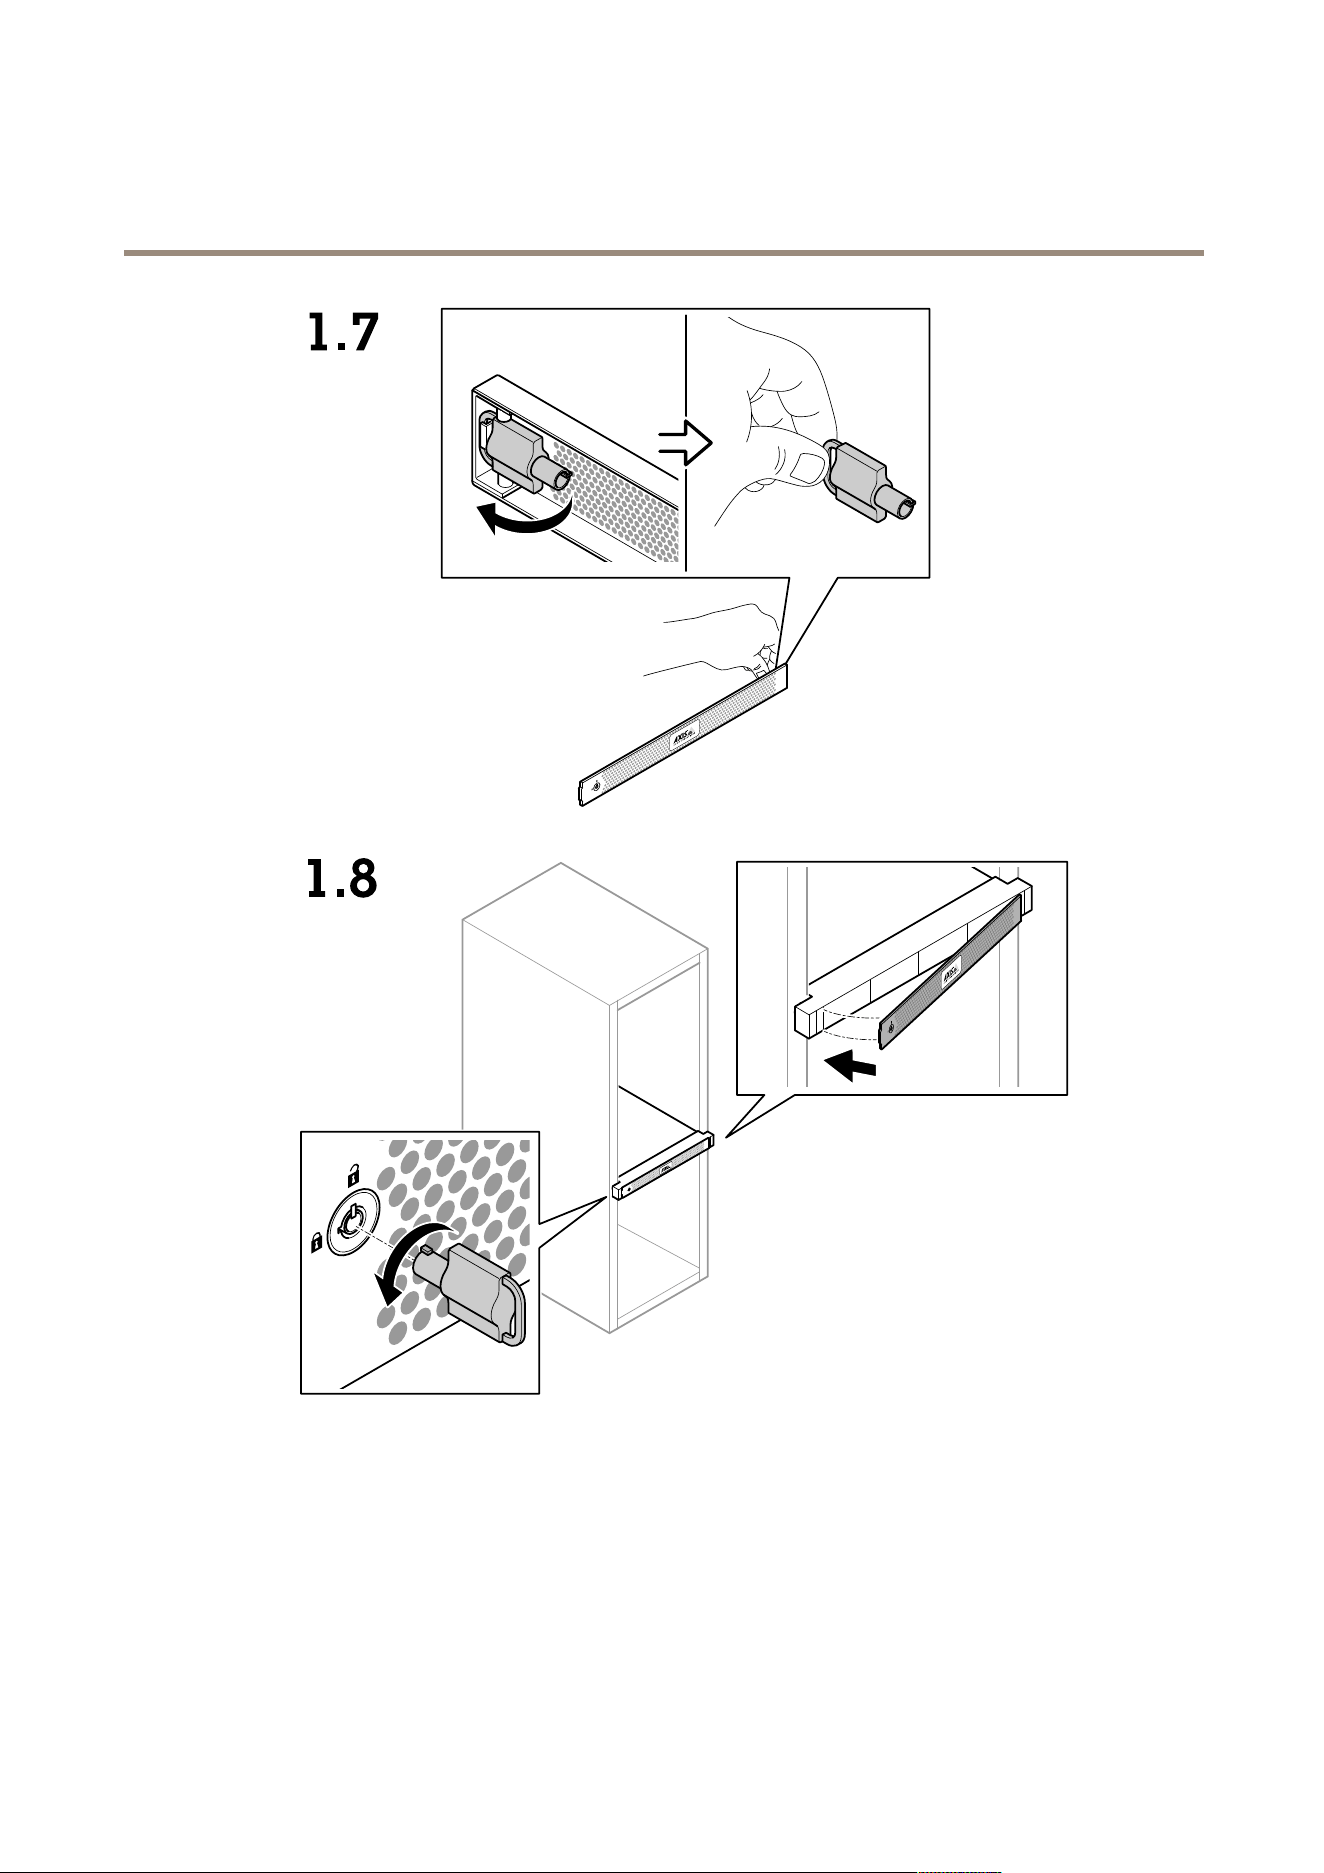
Installacold-swapharddrive
Removethebezel
1.Locatethebezelkey.
2.Unlockthebezelbyusingthekey.
3.Slidethereleaselatchupandpulltheleftendofthebezel.
4.Unhooktherightendandremovethebezel.
Installtheharddrive
CAUTION
•UseonlyharddrivesthathavebeentestedandapprovedforusewithAXISS12series.
•Whenyouinstallaharddrive,makesurethattheharddrivecarrierispushedallthewayin.Youwillhearaclickwhen
thedrivecarrierislocked.
•Beforeyouinstallaharddrive,makesurethepowercordisdisconnected.
1.Shutdownthesystemandmakesurethepowerisoff.
2.Disconnectthepowercord.
3.Useascrewdrivertorotatethelockcounterclockwisetotheunlockposition.
4.Liftthereleaselatchuntilthesystemcoverslidesback.
5.Lifttoremovethesystemcover.
6.Pressthereleasebuttononthebackoftheharddrivecarrierandpullouttheharddrivecarrier.
7.Installaharddriveintheharddrivecarrier.
25

AXISCameraStationS1216RackRecordingServer
Manageyourdevice
8.Pushtheharddrivecarrierintotheharddriveslotuntilthecarrierlocksinplaceandyouhearaclick.
9.Connectthepoweranddatacableconnectortothedrive.
10.Installthesystemcover.
11.Useascrewdrivertorotatethelockclockwisetothelockposition.
12.Startthesystem.
CreateRAIDvolume
Note
MakesureRAIDmodeissetintheBIOS.
CAUTION
Therearemoreparametersavailableformodication.However,AxisCommunicationsABdoesn’ttakeresponsibilityforany
miscongurationsthatmayhappenwhenyoumodifythoseparameters.Alwaysexercisecautionwhenyoumodifyparameters.
1.DuringPower-on-self-test(POST),pressF2toenterthesetupmenu.
2.ClickDeviceSettings>DellEMCPERCS150CongurationUtility>CongurationOptions.
3.InControllerManagement,chooseConvertRAIDCapableDisk.
4.SelectthedrivesyouwanttoRAIDintheinterfaceandclickApplyChanges.
-SetInterfaceTypetoSATAandRAIDTypetoWindowsRAID.
-ClickYeswhenthewarningstating“Alldatawillbedeletedontheconverteddisk(s)”isdisplayed.
5.GototherootmenuinCongurationOptions.
6.ClickVirtualDiskManagement>CreateVirtualDisk.
-SelectthedesiredRAIDlevelandwhichdrivestoinclude.
-SelectPhysicalDisks:Keepthedefaultsettings.
-SelectVirtualDisksize:Setthecapacityforthevirtualdrive.
-SelectCachePolicy:Keepthedefaultsettings.
InitiateRAIDvolumeinMicrosoftWindows®
Tocongureanewvolume:
1.Right-clicktheStartmenuandselectDiskManagement.
2.Inthepop-up“InitializeDisk”,selectGPTandclickOK.
3.Right-clicktheunallocateddiskandselectNewSimpleVolume.
-Followtheinstructionsinthesetupassistant.
Whenthesetupassistantisnished,DiskManagementshowsthenewvolume.CloseDiskManagementforthesystemtousethe
newvolume.
26

AXISCameraStationS1216RackRecordingServer
Manageyourdevice
CongureiDRAC
TheIntegratedDellRemoteAccessController9(iDRAC9)withLifecycleControllerisdesignedtomakesystemadministratorsmore
productiveandimprovetheoverallavailabilityofDellsystems.iDRACalertsadministratorstosystemissues,helpthemperform
remotesystemmanagementandreducestheneedforphysicalaccesstothesystem.Youmustconguretheinitialnetworksettings
basedonyournetworkinfrastructuretoenablethecommunicationtoandfromiDRAC.
1.PressF10duringPower-onSelf-test(POST).
Note
TheLifecycleControllerInitialSetupWizardwillbedisplayedonlyforthersttime.UsetheInitialSetupWizardtoselectthe
languageandkeyboard,congurenetworksettings,iDRACnetworksettings,credentialconguration,andviewthesummary
ofthesettings.Tomakecongurationchangeslater,selectSettingsfromtheLifecycleControllerhomepage.
2.Congurethelanguageandkeyboard,andclickNext.
3.ChecktheproductoverviewandclickNext.
4.CongureLifecycleControllernetworksettings:
4.1FromtheNICCarddrop-downlist,selecttheNICporttocongure.
4.2FromtheIPV4NetworkSettings>IPAddressSourcedrop-downlist,selectoneofthefollowingoptions:
-DHCP:indicatesthattheNICmustbeconguredbyusinganIPaddressfromaDHCPserver.DHCPisthedefault
optionandtheDHCPIPaddressisdisplayedontheNetworkSettingspage.
-StaticIP:indicatesthattheNICmustbeconguredbyusingastaticIP.TypetheIPaddresspropertiesincluding
IPAddress,SubnetMask,DefaultGateway,andDNSAddress.Ifyoudonothavethisinformation,contactyour
networkadministrator.
-NoConguration:indicatesthattheNICmustnotbecongured.
4.4IfVLANisused,clickEnabledandtypetheVLANIDandPriorityunderLifecycleControllerVLANSettingsto
conguretheVLANsettingsofaNIC.
4.5ClickNext.IfLifecycleControllersettingsarenotcorrectlycongured,anerrormessageisdisplayed.
5.CongureiDRACnetworkandcredentials:
5.1GotoIPV4Conguration>IPAddressSourceandselectoneofthefollowingoptions:
-Static:indicatesthatthenetworkmustbeconguredbyusingastaticIP.TypetheIPaddressproperties
includingIPAddress,SubnetMask,DefaultGateway,DNSAddressSourceandDNSAddress.Ifyoudonot
havethisinformation,contactyournetworkadministrator.
-DHCP:indicatesthattheNICmustbeconguredbyusinganIPaddressfromaDHCPserver.DHCPisthedefault
optionandtheDHCPIPaddressisdisplayedontheNetworkSettingspage.
5.3UnderCredentials,enterAccountUsernameandPasswordtoaccessiDRACnetwork.
5.4ClickNext.
6.VerifythesummaryoftheLifecycleControllerandiDRACnetworkcongurationandclickFinish.
27
AXISCameraStationS1216RackRecordingServer
Productoverview
Productoverview
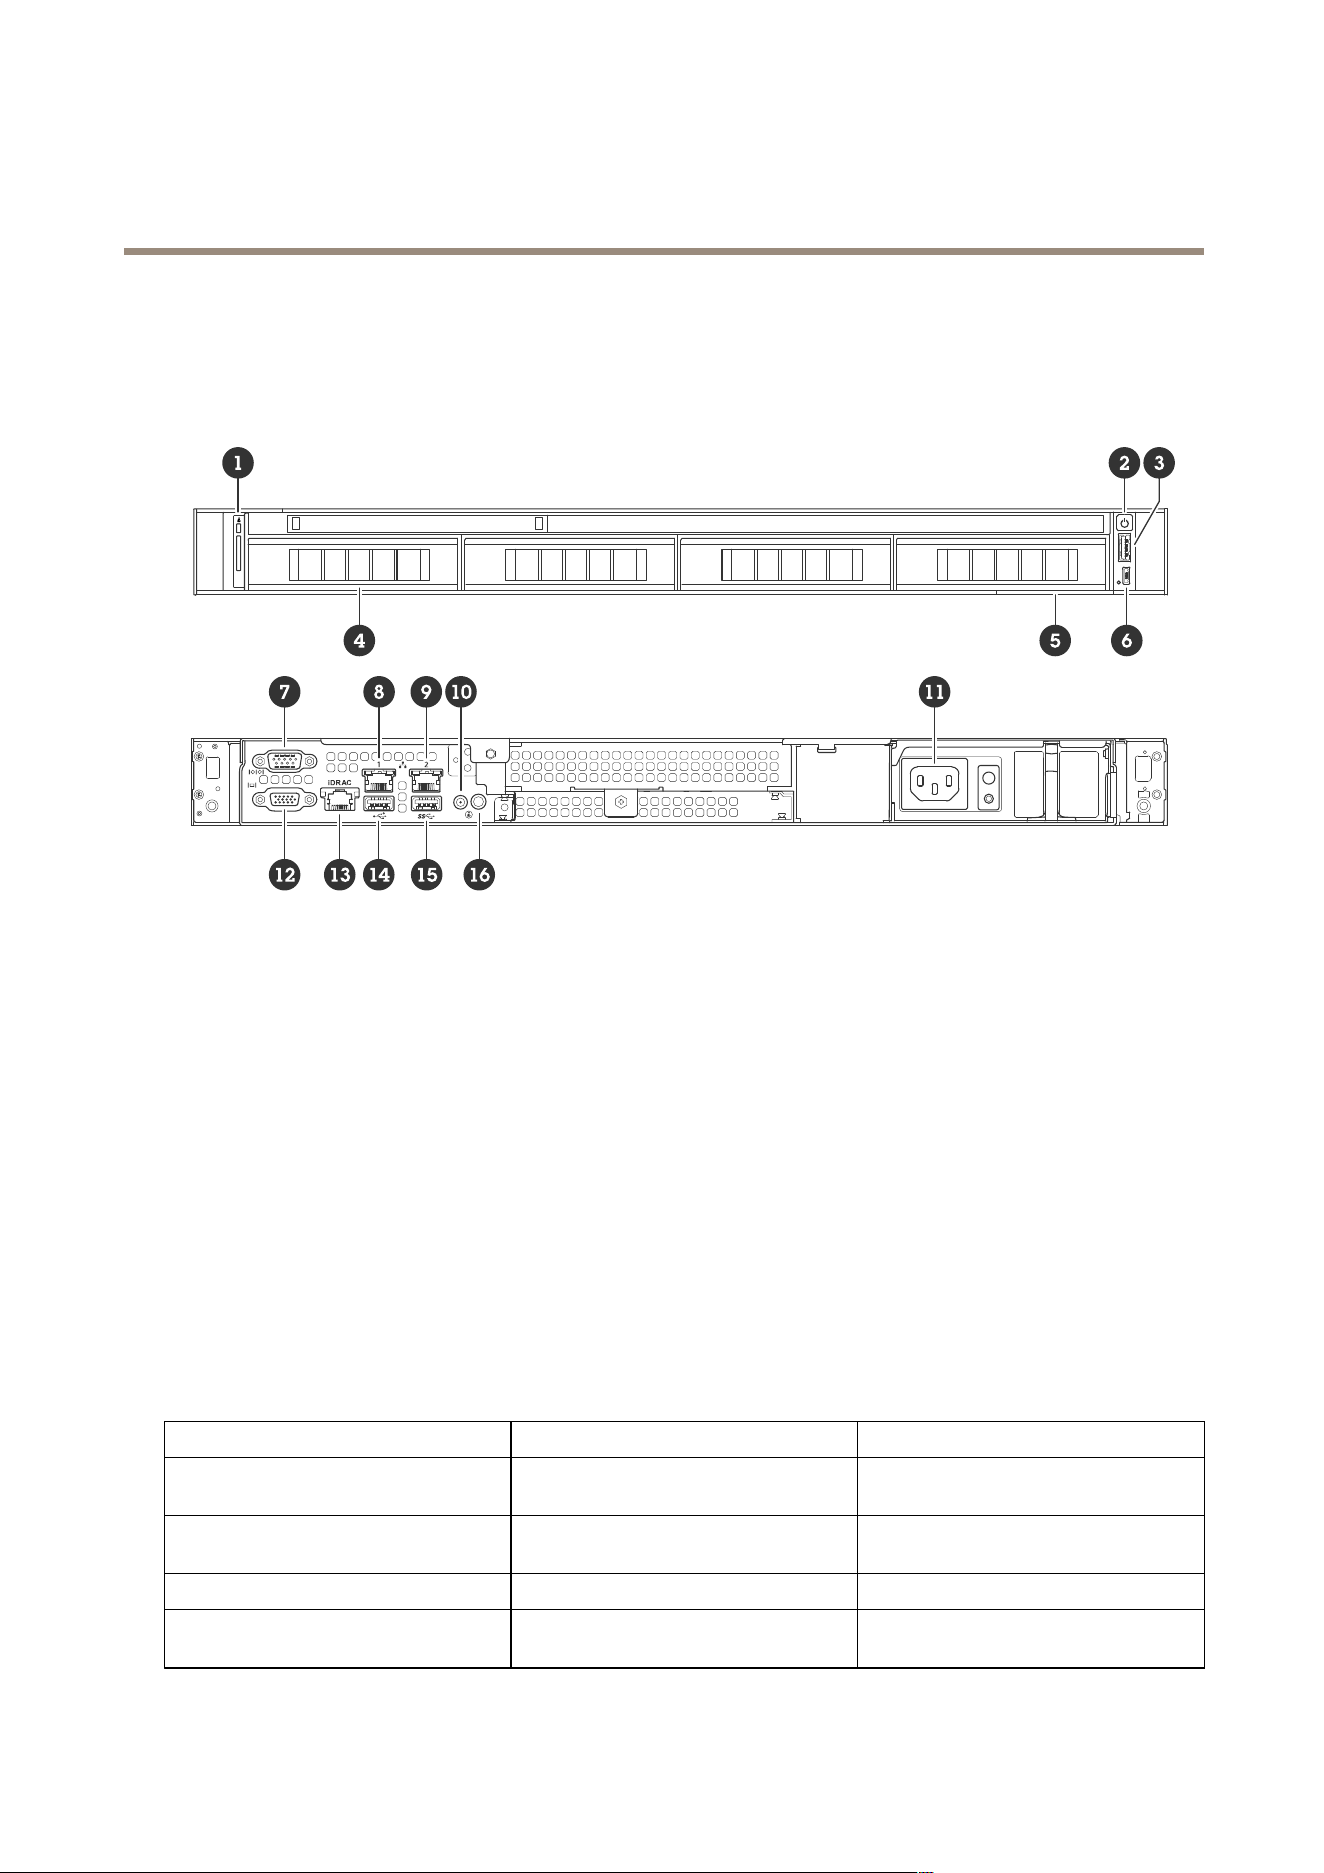
Frontandrearsides
1
Systemidenticationbuttonandindicator
2
Powerbutton/powerLED
3
USB2.0port
4
Harddrivetray
5
Informationtag
6
iDRACdirectport
7
Serialport
8
1GbEEthernetport1
9
1GbEEthernetport2
10
Systemstatusindicatorcableport
11
Powersupplyunit
12
VGAport
13
iDRACdedicatedEthernetport
14
USB2.0port
15
USB3.2Gen1port
16
Systemidenticationbuttonandindicator
Specications
SystemhealthandIDindicators
LEDDescriptionAction
Solidblue
Thesystemispoweredon,ishealthy,and
systemIDmodeisnotactive.
PressthesystemhealthandsystemID
buttontoswitchtosystemIDmode.
BlinkingblueThesystemIDmodeisactive.PressthesystemhealthandsystemID
buttontoswitchtosystemhealthmode.
Solidamber
Thesystemisinfail-safemode.
BlinkingamberThesystemisexperiencingafault.
Checkthesystemeventlogforthe
specicerrormessage.
28

AXISCameraStationS1216RackRecordingServer
Productoverview
iDRACdirectLEDindicators
LEDDescription
Solidgreenfortwoseconds
Thelaptoportabletisconnected.
Blinkinggreen(onfortwosecondsandofffortwoseconds)
Thelaptoportabletconnectedisrecognized.
Off
Thelaptoportabletisunplugged.
NICindicators
LEDDescription
Linkandactivityindicatorsareoff
TheNICisnotconnectedtothenetwork.
Linkindicatorisgreenandactivityindicatorisblinkinggreen
TheNICisconnectedtoavalidnetworkatitsmaximumport
speedanddataisbeingsentorreceived.
Linkindicatorisamberandactivityindicatorisblinkinggreen
TheNICisconnectedtoavalidnetworkatlessthanits
maximumportspeedanddataisbeingsentorreceived.
Linkindicatorisgreenandactivityindicatorisoff
TheNICisconnectedtoavalidnetworkatitsmaximumport
speedanddataisnotbeingsentorreceived.
Linkindicatorisamberandactivityindicatorisoff
TheNICisconnectedtoavalidnetworkatlessthatits
maximumportspeedanddataisnotbeingsentorreceived.
Powersupplyunit(PSU)indicators
LEDDescription
GreenAvalidpowersourceisconnectedtothePSUandthePSU
isoperational.
Notpoweredon
•PowerisnotconnectedtothePSU.
•ThereisaproblemwiththePSU.
29

AXISCameraStationS1216RackRecordingServer
Troubleshooting
Troubleshooting
CheckthecurrentBIOSversion
TocheckthecurrentBIOS:
1.Poweronthedevice.
2.WaituntilyouseetheAxissplashscreen.You’llseetheversionnumberabovethesplashscreen.
UpgradeBIOS
YoushouldupgradetheBIOSonlywhenyouareinstructedbyAxistechnicalsupport.
Ifyoudon’thaveaccesstoWindows®:updatepackageinstructionsforEFI
1.Gotothesupportpagesondell.comandenteryourservicetag.GotoDrivers&Downloadsanddownloadthe.ele.
2.CopytheletoaUSBdevice.
3.PlugintheUSBdeviceandpressF1 1duringPOSTtoenterBIOSBootManager.
4.GotoSystemUtilitiesmenu>BIOSUpdateFileExplorer.
5.SelecttheUSBdeviceandnavigatethroughthedirectorycontentstondtheexecutable(.e).
6.Launchtheexecutableandfollowtheinstructionsprovidedbytheashutility.
IfyouhaveaccesstoWindows®:updatepackageinstructionsforWindows®Dup
1.Browsetothelocationwhereyoudownloadedtheleanddouble-clickthenewle.
2.Readoverthereleaseinformationinthedialogwindow.
3.Downloadandinstallanyprerequisitesidentiedinthedialogwindowbeforeproceeding.
4.InstallanynecessaryEmbeddedSystemsManagementrmwarepriortothisBIOSupdate.
5.ClickInstall.
6.Followtheonscreeninstructions.
Rundiagnostics
Runningdiagnosticshelpyoutoidentifythecauseforasystemissue.Thediagnosticstestyoursystemhardwarewithoutrequiring
additionalequipmentorriskingdataloss.
1.Whilethesystemisbooting,pressF10toenterLifecycleController.
2.GotoHardwareDiagnosticsandclickRunHardwareDiagnostics.
3.NotetheerrorcodeandcontactAxistechnicalsupport.
Performasystemrecovery
Ifthedevicehashadacompletesystemfailure,youmustusearecoveryimagetorecreatetheWindows®system.Todownloadthe
AXISRecoveryKit,contactAxistechnicalsupportandsupplytheserialnumberofyourdevice.
1.DownloadtheAXISRecoveryKitandAXISISOtoUSBTool.
30

AXISCameraStationS1216RackRecordingServer
Troubleshooting
2.InsertaUSBdriveintoyourcomputer.
-UseaUSBdrivewithaminimumof16GBto32GB.
-TheUSBdrivewillbeformatted,andallexistingdatawillbeerased.
3.RuntheAXISISOtoUSBToolandfollowtheonscreeninstructions.
WritingdatatotheUSBdrivetakesapproximately10to15min.Don’tremovetheUSBdriveuntiltheprocessiscomplete.
4.AftertheISOtoUSBtooliscomplete,taketheUSBdriveandplugitintoyourdevice.
5.Startyourdevice.
6.WhenyouseetheAXISsplashscreen,pressF1 1.
7.ClickOne-shotUEFIBootMenu.
8.NavigatetoyourUSBdriveandpressENTER.ThesystembootsintotheAXISRecoveryKit.
9.ClickReinstallOperatingSystem.
Therecoverytakesroughly10to15mintocomplete.Younddetailedinstructionsinthedownloadfortherecoverykit.
ExportaSupportAssistcollection
YoucanexporttheSupportAssistcollectiontoaUSBdriveoranetworkshare(CIFS/NFS).Thecollectionincludesthefollowingdata:
•Hardware
•RAIDcontrollerlogs
ToexporttheSupportAssistcollection:
1.DuringPower-on-self-test(POST),pressF10tostartLifecycleController.
2.GotoHardwareDiagnostics>ExportSupportAssistcollection.
3.ReadthetermsandconditionsandclickNext.
YoumustacceptthetermsandconditionstoallowtechnicalsupporttousetheSupportAssistcollectiondata.
4.SelectthedataoptionswhichyouwanttoincludeintheSupportAssistcollectionandclickNext.
5.EntertherequiredexportsettingsinformationandclickNext.
-ToexporttoaUSBdrive:selecttheUSBdriveoptionandthenselectthenameoftheUSBDriveandenterthe
lepathdetailstowherethecollectionistoexport.
-ToexporttoNFS:selecttheNFSoptionandentertherequiredinformation.
-ToexporttoCIFS:selecttheCIFSoptionandentertherequiredinformation.
ClickTestNetworkConnectiontoverifyiftheLifecycleControllercanconnecttotheIPaddressthatisprovided.
Bydefault,itpingstheGatewayIP,DNSServerIP,hostIPandProxyIP.
6.VerifyyourselectionandclickFinish.
LifecycleControllerretrievestheselectedcollectiondataandexportstothespeciedlocation.Thiscantakeafewminutes.
Troubleshootthepowersupplyunit
1.Makesurethattherearenolooseconnections,forexampleloosepowercables.
31

AXISCameraStationS1216RackRecordingServer
Troubleshooting
2.Checkthestatusofthepowerindicatoronthepowersupplyunit.See.
3.Iftheproblempersists,contactAxistechnicalsupport.
Troubleshootmemoryerrors
1.UpgradetheBIOStothelatestversion.
2.Iftheerrorspersist,contactAxistechnicalsupport.
TroubleshootAXISCameraStation
ForinformationabouthowtotroubleshootAXISCameraStation,gototheAXISCameraStationusermanual.
32


UsermanualVer.M2.2
AXISCameraStationS1216RackRecordingServer
Date:June2023
©AxisCommunicationsAB,2023
Partno.T10194204