User's Guide

Copyright
No part of this publication may be reproduced, stored in a retrieval system, or transmitted in any form or by any
means, electronic, mechanical, photocopying, recording, or otherwise, without the prior written permission of
Seiko Epson Corporation. No patent liability is assumed with respect to the use of the information contained
herein. Neither is any liability assumed for damages resulting from the use of the information herein.
The
information contained herein is designed only for use with this Epson product. Epson is not responsible for any
use of this information as applied to other products.
Neither Seiko Epson Corporation nor its affiliates shall be liable to the purchaser of this product or third parties for
damages, losses, costs, or expenses incurred by the purchaser or third parties as a result of accident, misuse, or
abuse of this product or unauthorized modifications, repairs, or alterations to this product, or (excluding the U.S.)
failure to strictly comply with Seiko Epson Corporation's operating and maintenance instructions.
Seiko Epson Corporation and its affiliates shall not be liable for any damages or problems arising from the use of
any options or any consumable products other than those designated as Original Epson Products or Epson
Approved Products by Seiko Epson Corporation.
Seiko Epson Corporation shall not be held liable for any damage resulting from electromagnetic interference that
occurs from the use of any interface cables other than those designated as Epson Approved Products by Seiko
Epson Corporation.
© 2022 Seiko Epson Corporation
The contents of this manual and the specifications of this product are subject to change without notice.
CPD-63157R1
Copyright
2

Trademarks
❏
❏
EPSON is a registered trademark and the EPSON logo is a registered logomark of Seiko Epson Corporation.
Microsoft
®
, Windows
®
and Windows Server
®
are trademarks of the Microsoft group of companies.
❏ Apple, Mac, macOS, and OS X are trademarks of Apple Inc., registered in the U.S. and other countries.
❏ General Notice: Other product names used herein are for identification purposes only and may be trademarks
of their respective owners. Epson disclaims any and all rights in those marks.
Trademarks
3

Contents
Copyright
Trademarks
About This Manual
Introduction to the Manuals...................6
Marks and Symbols.........................6
Descriptions Used in this Manual...............6
Operating System References..................7
Important Instructions
Safety Instructions..........................8
Restrictions on Copying......................9
Scanner Basics
Part Names..............................10
Buttons and Lights.........................11
Information on Applications..................13
Epson Scan 2...........................13
Application for Updating Software and
Firmware (EPSON Software Updater). . . . . . . . . 13
Placing Originals on the Product
Placing Originals..........................14
Placing Large or
Thick
Originals...............15
Basic Scanning
Scanning Using Epson Scan 2.................18
Scanning Photos or Pictures (Photo Mode).....18
Scanning Documents (Document Mode). . . . . . 22
Setting a Resolution That Suits the Scanning
Purpose...............................25
Scanning Using a Scanner Button..............26
Advanced Scanning
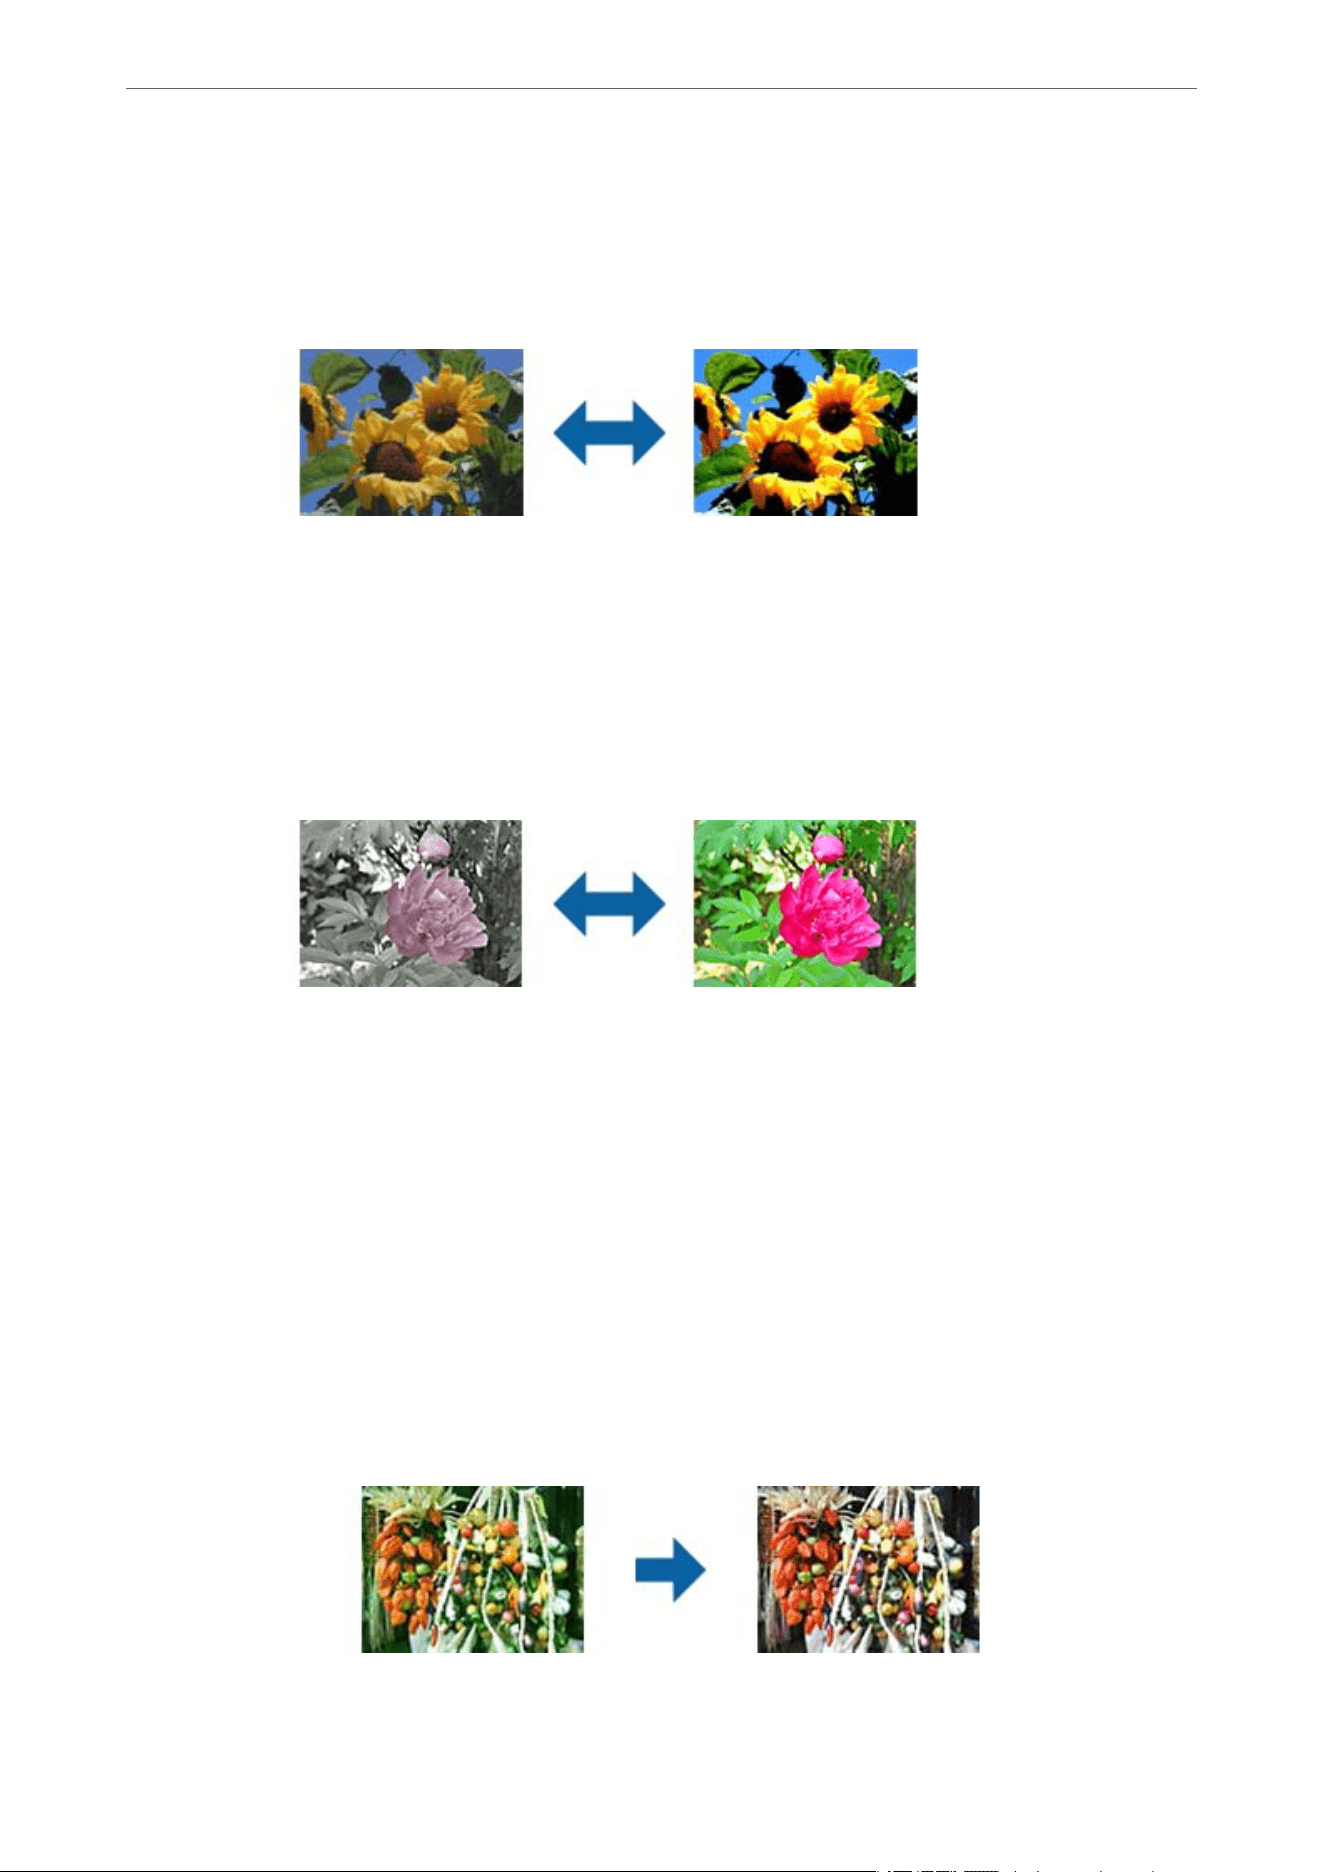
Image Adjustment Features for Photo Mode. . . . . . 27
Brightness.............................27
Contrast.............................. 28
Saturation.............................28
Detailed Adjustments Button...............28
Unsharp Mask..........................31
Color Restoration....................... 31
Backlight Correction.....................31
Descreening............................32
Dust Removal..........................32
Grain Reduction........................ 32
Image Adjustment Features for Document Mode. . . 33
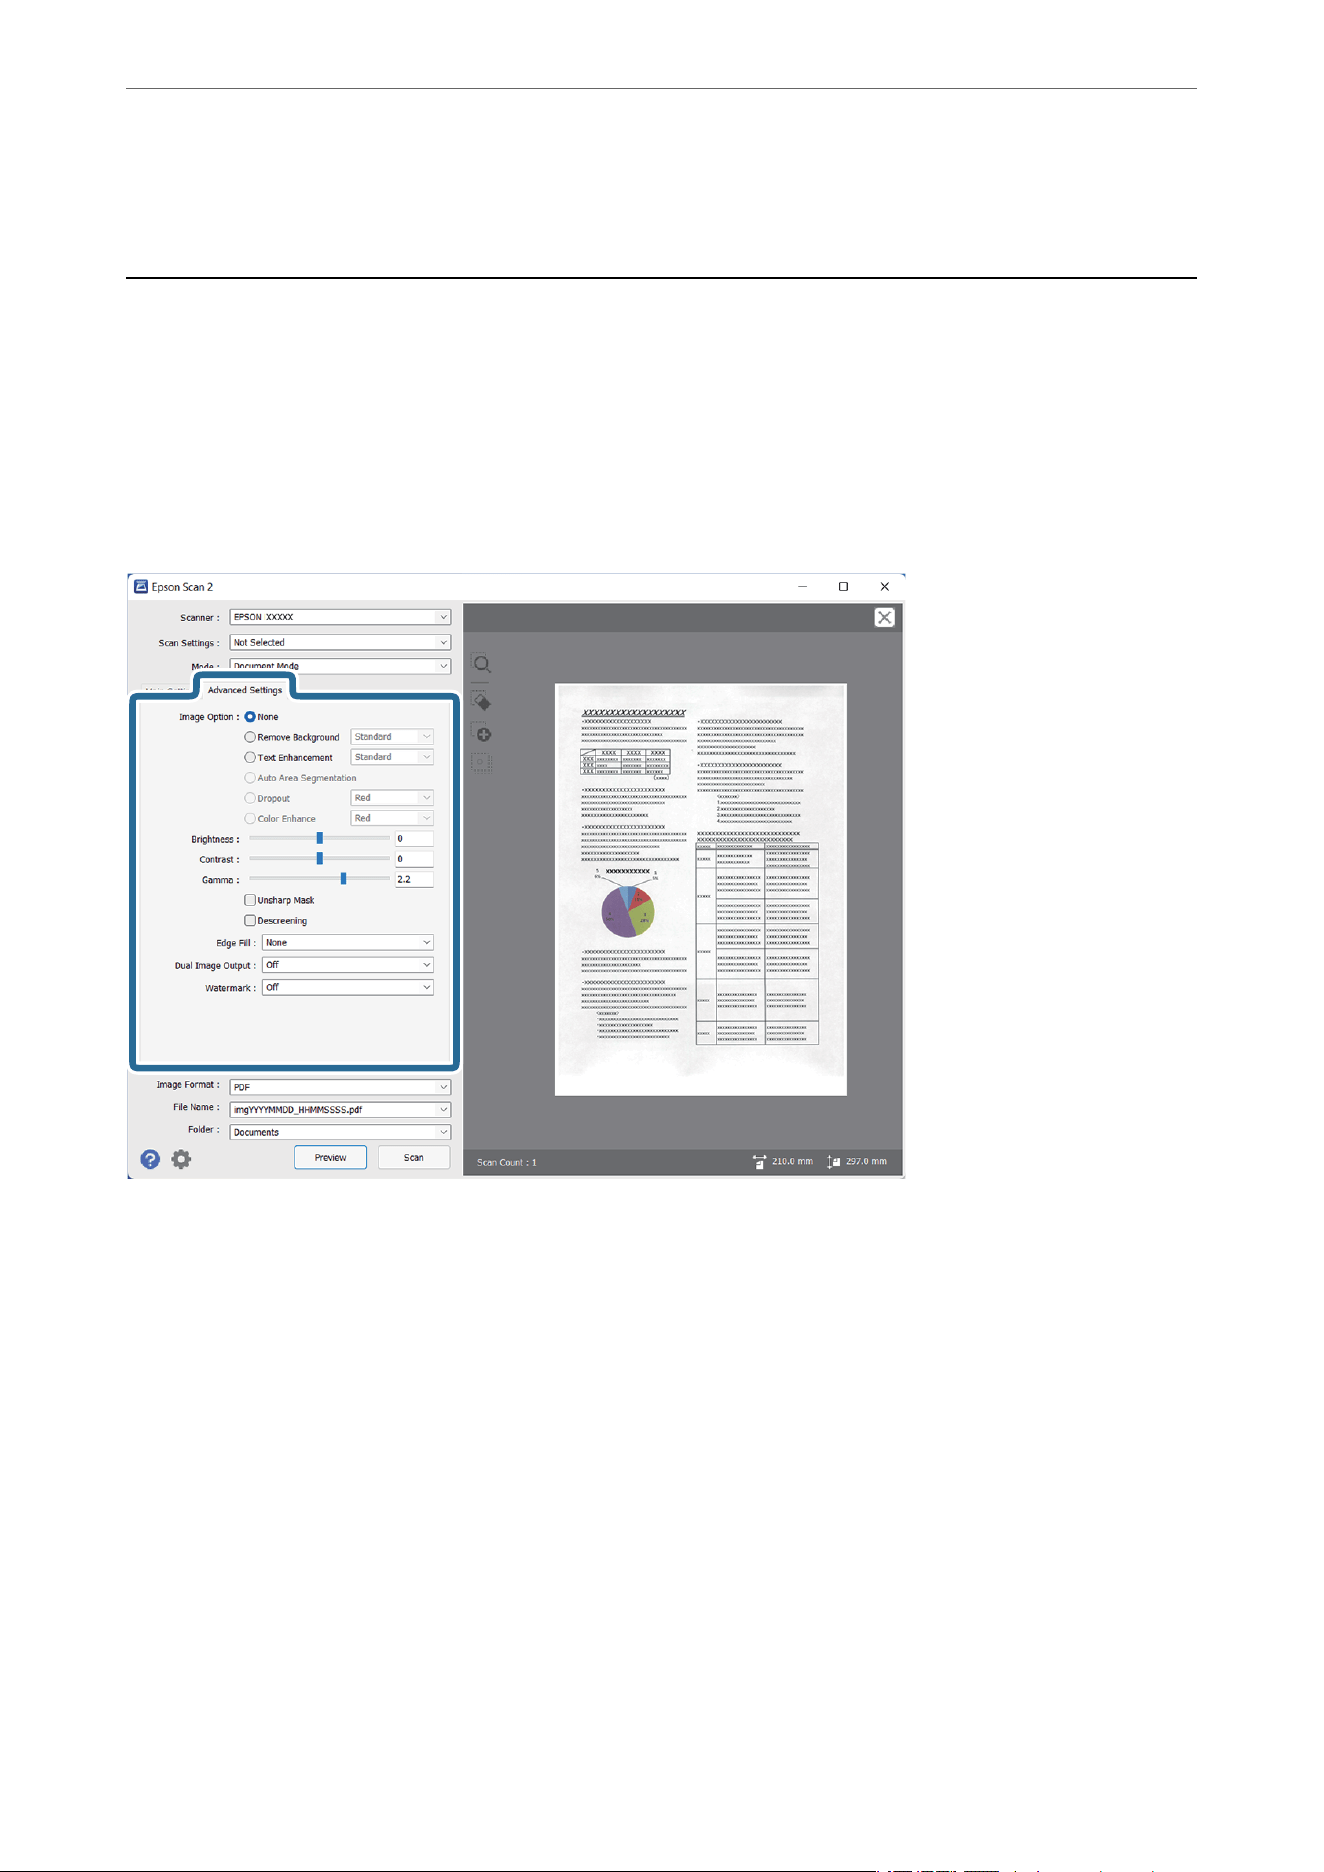
Image Option.......................... 33
Brightness.............................35
Contrast..............................35
Gamma...............................36
Threshold
............................. 36
Unsharp Mask..........................36
Descreening............................37
Edge Fill..............................37
Dual Image Output (for Windows Only).......37
Watermark (for Windows only)............. 37
Saving as a Searchable PDF...................38
Using the Transparency Unit
Unpacking the Transparency Unit..............39
Unlocking the transportation lock........... 39
Installing the Transparency Unit...............40
Setting and Placing Films....................42
35 mm film strips.. ... .. .. .. .. .. .. ..43
Mounted slides......................... 44
Medium format (120/220). . . . . . . . . . . . . . . . . 45
4×5 inch film ......... ................ 46
Non-standard film sizes.. . .. .. .. .. .. ..47
Using the Transparency Unit to Scan............48
Scanning with suitable sett
ings..............48
Maintenance
Cleaning the Scanner.......................50
Energy Saving............................50
Transporting the Scanner....................52
Updating Applications and Firmware...........52
Solving Problems
Scanner Problems......................... 54
Scanner Lights Indicate an Error.............54
Problems Starting Scanning..................54
Cannot Start Epson Scan 2.................55
Cannot Scan Using the Button..............55
Cannot Scan Using the Transparency Unit. . . . . .55
4
Scanning reflective (non-film) originals .. . . . . . 49

Cannot Scan Using Scanning Software Other
Than
Epson Scan 2.......................55
Scanned Image Problems....................56
Uneven Colors, Dirt, Spots, and so on Appear
when Scanning from the Scanner Glass........56
Offset
Appears in the Background of Images. . . . 56
Text is Blurred..........................57
Moiré Patterns (Web-Like Shadows) Appear. . . . 57
Cannot Scan the Correct Area on the
Scanner Glass.......................... 57
Cannot Preview in
Thumbnail
.............. 58
Cannot Achieve the Results Intended in Auto
Photo Orientation.......................58
Text is Not Recognized Correctly when
Saving as a Searchable PDF.................58
Binding Margins of a Booklet are Distorted
or Blurred.............................58
Cannot Solve Problems in the Scanned Image. . . 59
Striped Rings Appear in Scanned Images of
Film or Slides...........................59
Colors Differ From the Original Colors for
Film or Slide Images......................59
Negative Film Preview Images Look Strange. . . . 60
Problems With Scanning Time................60
Uninstalling and Installing Applications.........60
Uninstalling Your Applications..............60
Installing Your Applications................61
Technical Specications
Interface
Sp
ecifications
......................64
System Requirements.......................64
Standards and Approvals
Standards and Approvals for U.S. Model.........66
Standards and Approvals for European Model. . . . . 66
Standards and Approvals for Australian Model. . . . 66
ZICTA Type Approval for Users in Zambia.......66
OPEN SOURCE SOFTWARE LICENSE.........66
SHA1 license...........................67
Info-ZIP license.........................67
lua license.............................68
Where to Get Help
TechnicalS upport WebS ite...................69
Contacting Epson Support...................69
Before Contacting Epson..................69
5
Help for Users in the United States,
Canada, and the Caribbean . . . . . . . . . . . . . . . . . . 70
The Image Quality is Rough. . . . . . . . . . . . . . . 56
General Scanner Specifications . . . . . . . . . . . . . . . 63
Dimension Specifications. . . . . . . . . . . . . . . . . . . . 63
Electrical Specifications . . . . . . . . . . . . . . . . . . . . . 63
Environmental Specifications .. . . . . . . . . . . . . . . . 64

About This Manual
Introduction to the Manuals
The latest versions of the following manuals are available from the Epson support website.
http://www.epson.com/support/13000xl (U.S.)
http://www.epson.ca/support/13000xl (Canada)
http://latin.epson.com/support/13000xl (Latin America)
❏ Start Here (paper manual)
Provides you with information on setting up the product and installing the application.
❏ User's Guide (digital manual)
Provides instructions
on using the product, maintenance, and solving problems.
As well as the manuals above, see the help included in the various Epson applications.
Marks and Symbols
!
Caution:
Instructions that must be followed carefully to avoid bodily injury.
c
Important:
Instructions that must be observed to avoid damage to your equipment.
Note:
Provides complementary and reference information.
Related Information
& Links to related sections.
Descriptions Used in this Manual
❏ Screenshots for the applications are from Windows 11 or macOS Monterey. The content displayed on the
screens varies depending on the model and situation.
❏ Illustrations used in this manual are for reference only. Although they may differ slightly from the actual
product, the operating methods are the same.
About This Manual
>
Descriptions Used in this Manual
6

Operating System References
Windows
In this manual, terms such as "Windows 11","Windows 10", "Windows 8.1", "Windows 8", "Windows 7", "Windows
Server 2022", "Windows Server 2019", "Windows Server 2016", "Windows Server 2012 R2", "Windows Server
2012", "Windows Server 2008", and "Windows Server 2008 R2" refer to the following operating systems.
Additionally, "Windows" is used to refer to all versions and "Windows Server" is used to refer to "Windows Server
2022", "Windows Server 2019", "Windows Server 2016", "Windows Server 2012 R2", "Windows Server 2012",
"Windows Server 2008", and "Windows Server 2008 R2".
❏ Microsoft
®
Windows
®
11 operating system
❏ Microsoft
®
Windows
®
10 operating system
❏ Microsoft
®
Windows
®
8.1 operating system
❏ Microsoft
®
Windows
®
8 operating system
❏
Microsoft
®
Windows
®
7 operating system
❏ Microsoft
®
Windows Server
®
2022 operating system
❏ Microsoft
®
Windows Server
®
2019 operating system
❏
Microsoft
®
Windows Server
®
2016 operating system
❏ Microsoft
®
Windows Server
®
2012 R2 operating system
❏ Microsoft
®
Windows Server
®
2012 operating system
❏
Microsoft
®
Windows Server
®
2008 operating system
❏ Microsoft
®
Windows Server
®
2008 R2 operating system
Mac OS
In this manual, "Mac OS" is used to refer to macOS Monterey, macOS Big Sur, macOS Catalina, macOS Mojave,
macOS High Sierra, macOS Sierra, and OS X El Capitan.
About This Manual
>
Operating System References
7

Important Instructions
Safety Instructions
Read all these instructions, and follow all warnings and instructions marked on the product.
❏ Some of the symbols used on your product are to ensure safety and proper use of the product. Visit the
following Web site to learn the meaning of
the symbols.
http://support.epson.net/symbols
❏ Place the product on a flat, stable surface that extends beyond the base of the product in all directions. If you
place the product by the wall, leave more than 3.9 inches (10 cm) between the back of the product and the wall.
The product will not operate properly if it is tilted at an angle.
❏ Avoid places subject to dust, shocks, or vibrations.
❏ Place the product close enough to the computer for the interface cable to reach it easily. Do not place or store
the product or the power cord outdoors, near excessive dirt or dust, water, heat sources, or in locations subject
to shocks, vibrations, high temperature or humidity, direct sunlight, strong light sources, or rapid changes in
temperature or humidity.
❏ Do not use with wet hands.
❏ Place the product near an electrical outlet where the power cord plug can be easily unplugged.
❏ The power cord should be placed to avoid abrasions, cuts, fraying, crimping, and kinking. Do not place objects
on top of the cord and do not allow the power cord to be stepped on or run over. Be particularly careful to keep
the cord straight at the end.
❏ Use only the power cord supplied with the product and do not use the cord with any other equipment. Use of
other cords with this product or the use of the supplied power cord with other equipment may result in fire or
electric shock.
❏ Use only the type of power source indicated on the product’s label, and always supply power directly from a
standard domestic electrical outlet.
❏ When connecting this product to a computer or other device with a cable, ensure the correct orientation of the
connectors. Each connector has only one correct orientation. Inserting a connector in the wrong orientation
may damage both devices connected by the cable.
❏ Avoid using outlets on the same circuit as photocopiers or air control systems that regularly switch on and off.
❏ If you use an extension cord with the product, make sure the total ampere rating of the devices plugged into
the extension cord does not exceed the cord’s ampere rating. Also, make sure the total ampere rating of all
devices plugged into the wall outlet does not exceed the wall outlet’s ampere rating.
❏ Never disassemble, modify, or attempt to repair the product, or product option by yourself except as
specifically explained in the product’s guides.
❏ Do not insert objects into any opening as they may touch dangerous voltage points or short out parts. Beware
of electrical shock hazards.
❏ If damage occurs to the plug, replace the cord set or consult a qualified electrician. If there are fuses in the
plug,make sure you replace them with fuses of the correct size and rating.
❏ Unplug the product and the power cord, and refer servicing to qualified service personnel under the following
conditions: The power cord or plug is damaged; liquid has entered the product; the product or the power cord
has been dropped or the case has been damaged; the product or the power cord does not operate normally or
exhibits a distinct change in performance.
(Do not adjust controls that are not covered by the operating
instructions.)
Important Instructions
>
Safety Instructions
8

❏ Unplug the product and the power cord before cleaning. Clean with a damp cloth only. Do not use liquid or
aerosol cleaners.
❏ If you are not going to use the product or options for a long period, be sure to unplug the power cord from the
electrical outlet.
❏ After replacing consumable parts, dispose of them correctly following the rules of your local authority. Do not
disassemble them.
❏ Because the product is heavy, one person should never attempt to lift or carry it alone. Two people should lift
and carry the product.
❏ Do not place heavy objects on the scanner glass and do not press the glass with too much force.
Restrictions on Copying
Observe the following restrictions to ensure the responsible and legal use of your product.
Copying of the following items is prohibited by law:
❏ Bank bills, coins, government-issued marketable securities, government bond securities, and municipal
securities
❏ Unused postage stamps, pre-stamped postcards, and other
official
postal items bearing valid postage
❏ Government-issued revenue stamps, and securities issued according to legal procedure
Exercise caution when copying the following items:
❏ Private marketable securities (stock certificates, negotiable notes, checks, etc.), monthly passes, concession
tickets, etc.
❏ Passports, driver’s licenses, warrants of fitness, road passes, food stamps, tickets, etc.
Note:
Copying these items may also be prohibited by law.
Responsible use of copyrighted materials:
Products can be misused by improperly copying copyrighted materials. Unless acting on the advice of a
knowledgeable attorney, be responsible and respectful by obtaining the permission of the copyright holder before
copying published material.
Important Instructions
>
Restrictions on Copying
9
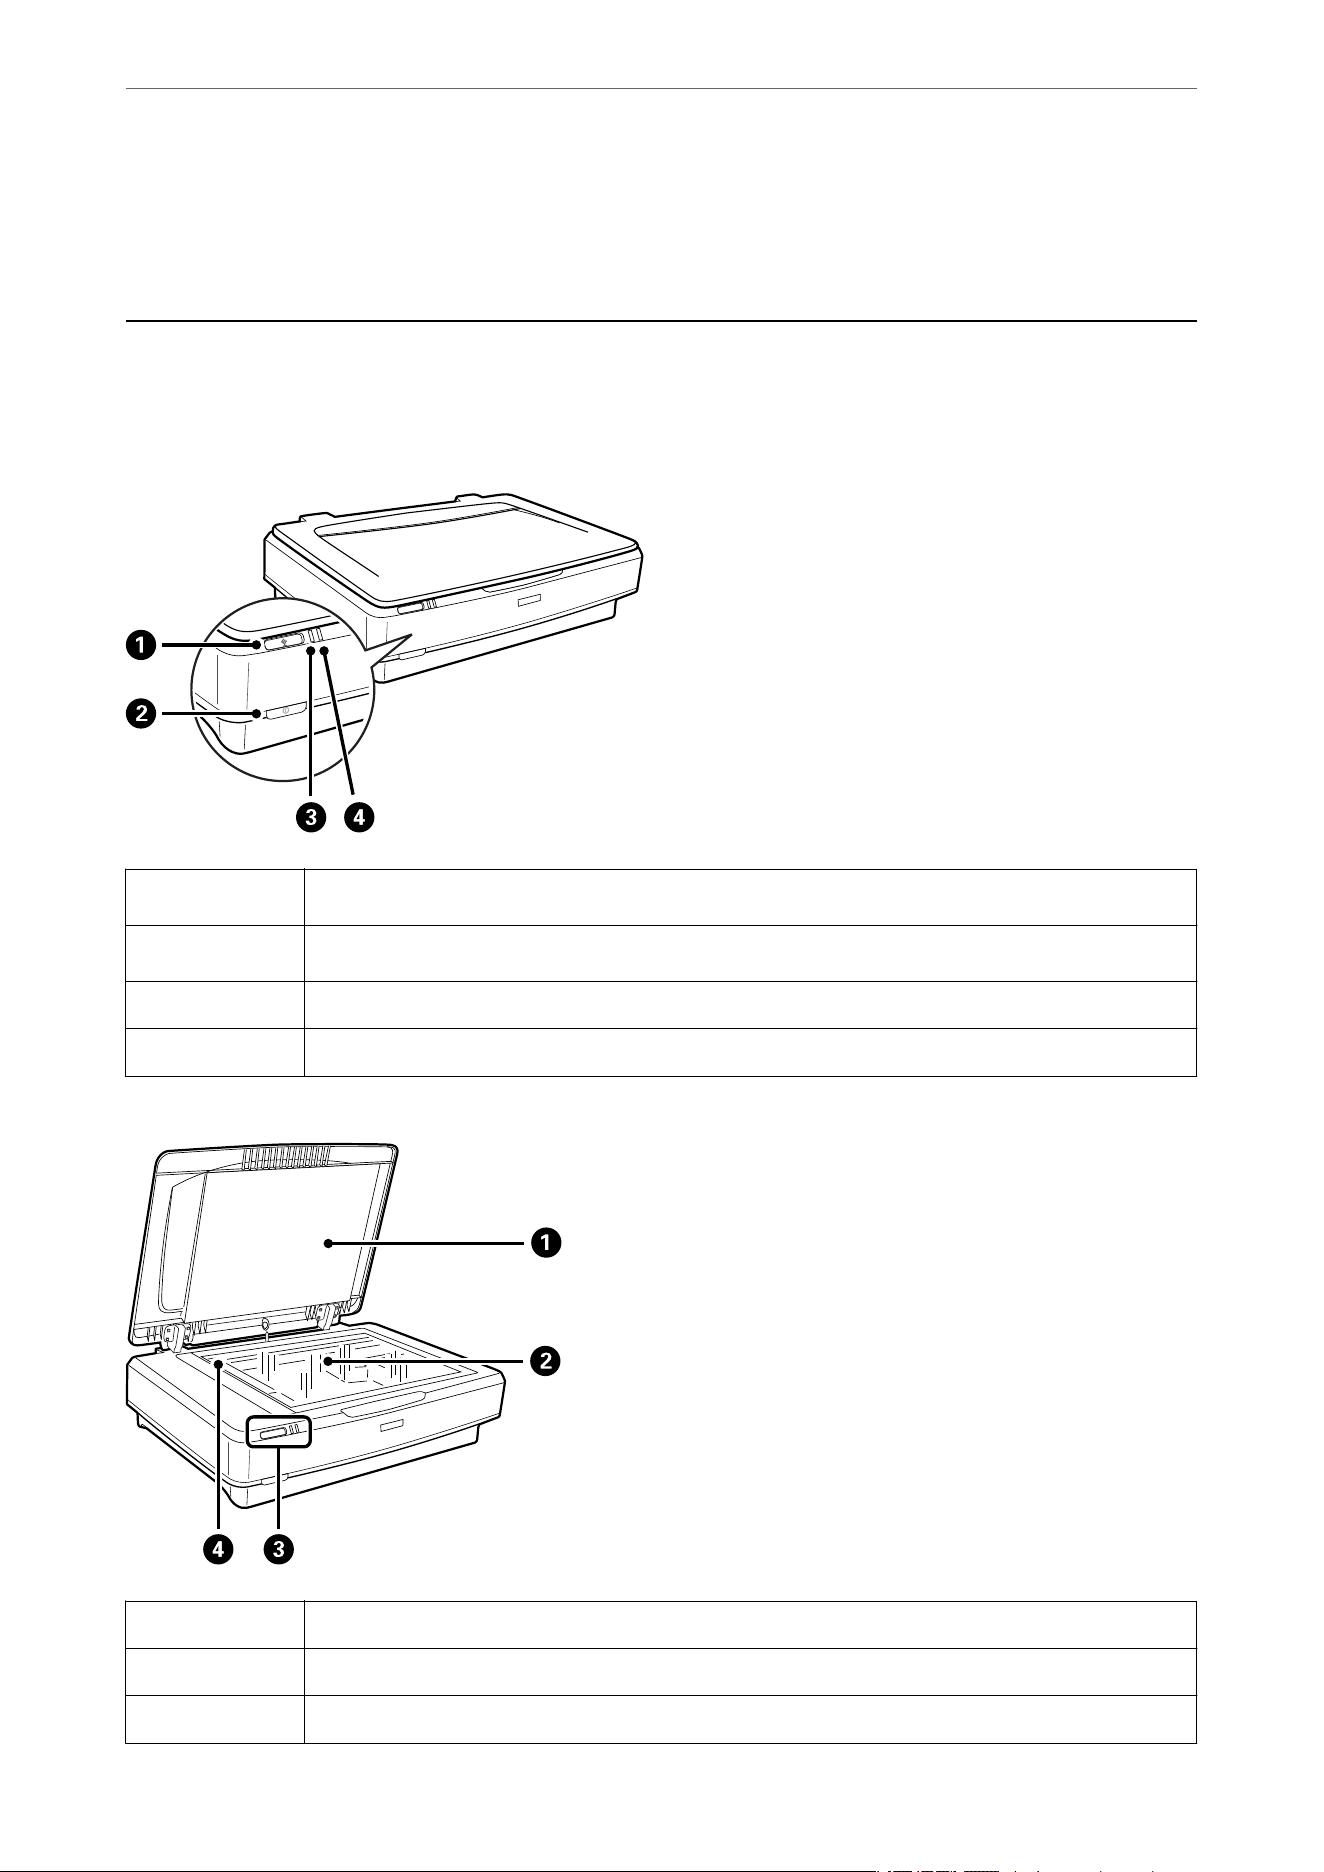
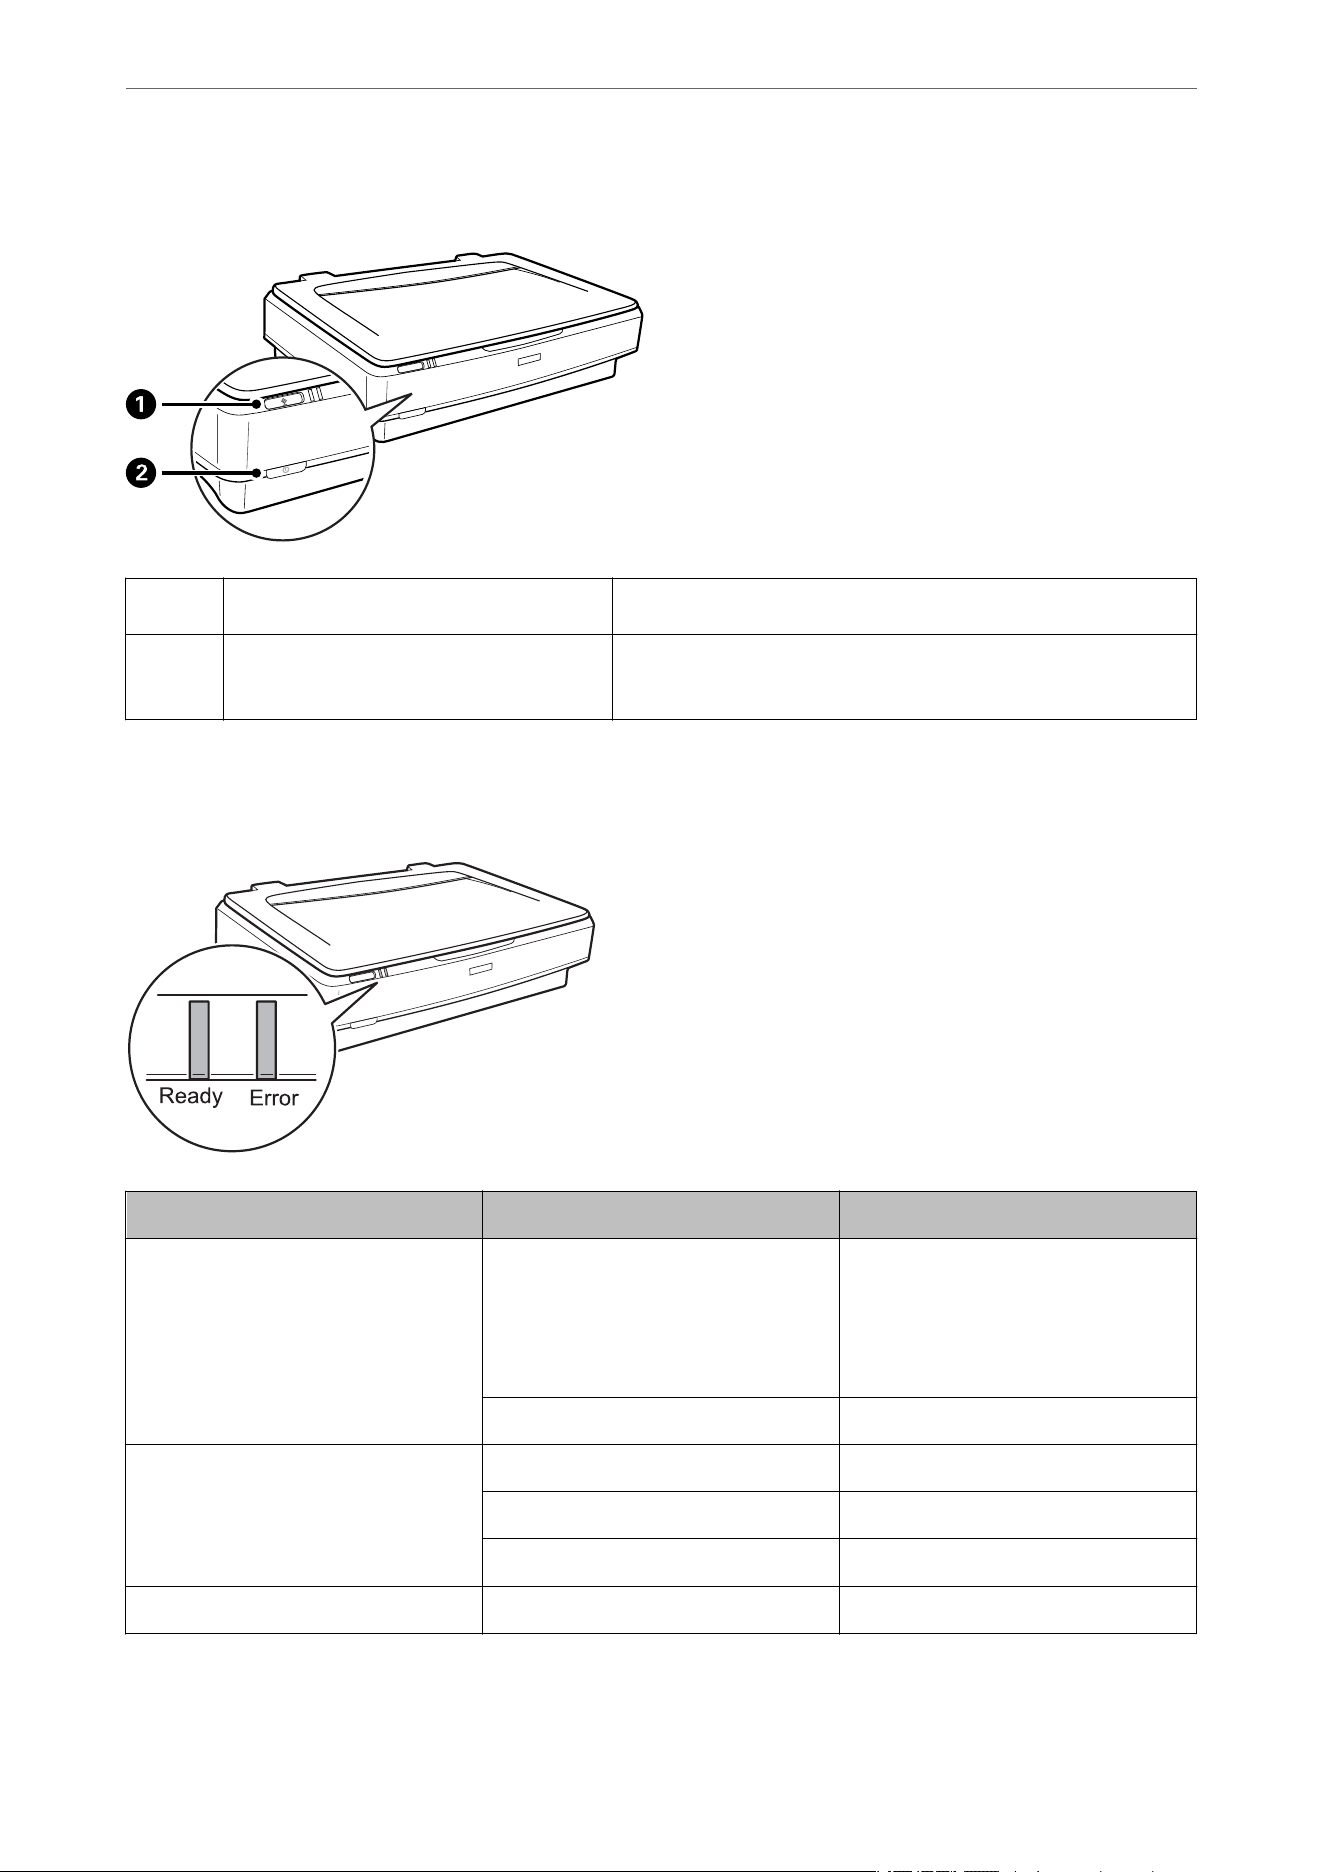
Before using the product buttons, make sure you have installed your scanning software.
A
a
button
Starts scanning.
B
.
button
Turns the product on if pressed once.
Press again to turn the product off.
Lights
The status light indicates whether the product is operating normally.
Light Indicator Status Meaning
Ready On Ready to scan images.
If you cannot scan images, an error
may have occurred. Make sure the op-
tional Transparency Unit is completely
closed.
Flashing Initializing, scanning, or sleeping.
Ready, Error On An error has occurred.
Flashing An error has occurred.
Off The product is off.
Error Flashing An error has occurred.
Scanner Basics
>
Buttons and Lights
12

Related Information
& “Scanning Using a Scanner Button” on page 26
& “Scanner Lights Indicate an Error” on page 54
Information on Applications
This
section introduces the application products available for your scanner.
The
latest application can be installed
at the Epson Web site.
Epson Scan 2
Epson Scan 2 is a driver for controlling your scanner, enabling a variety of scan settings. This also allows you to
start either as a standalone application or by using TWAIN-compliant application software.
See the Epson Scan 2 help for details on using the application.
Related Information
& “Scanning Using Epson Scan 2” on page 18
Application for Updating Software and Firmware (EPSON Software
Updater)
EPSON Software Updater is an application that installs new software, and updates firmware and manuals over the
Internet. If you want to check for update information regularly, you can set the interval for checking for updates in
EPSON Software Updater's auto update settings.
Note:
Windows Server operating systems are not supported.
Starting on Windows
❏ Windows 11
Click the start button, and then select All apps > Epson Soware > EPSON Soware Updater.
❏ Windows 10
Click the start button, and then select Epson
Soware
> EPSON
Soware
Updater.
❏ Windows 8.1/Windows 8
Enter the application name in the search charm, and then select the displayed icon.
❏ Windows 7
Click the start button, and then select All Programs > Epson Soware > EPSON Soware Updater.
Starting on Mac OS
Select Go > Applications > Epson Soware > EPSON Soware Updater.
Related Information
& “Updating Applications and Firmware” on page 52
Scanner Basics
>
Information on Applications
>
Application for Updating Software and Firmware (EPSON Software
…
13
Placing Originals on the Product
c
Important:
Do not place heavy objects on the scanner glass and do not press the glass with too much force.
Placing Originals
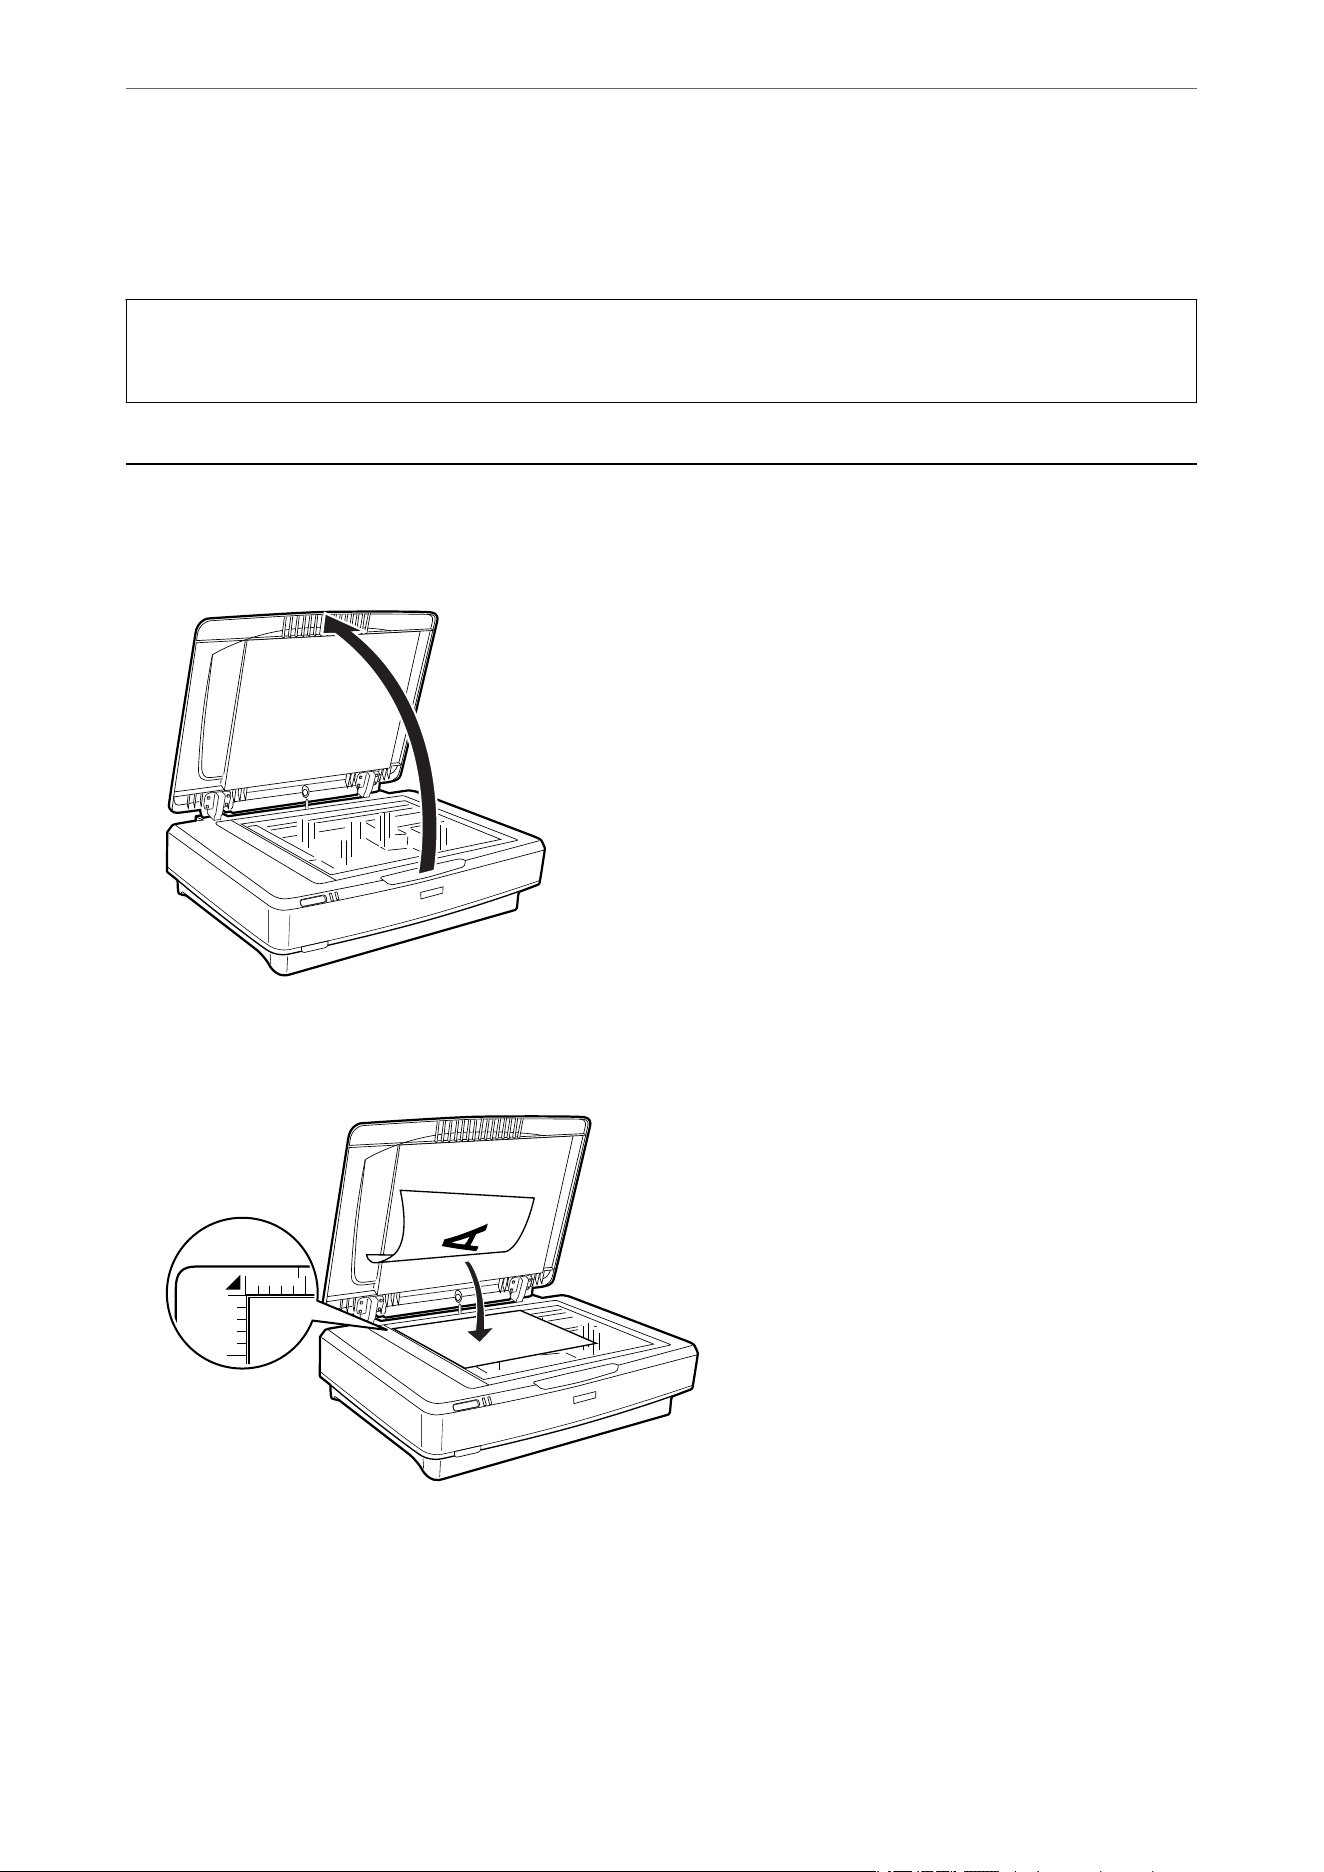
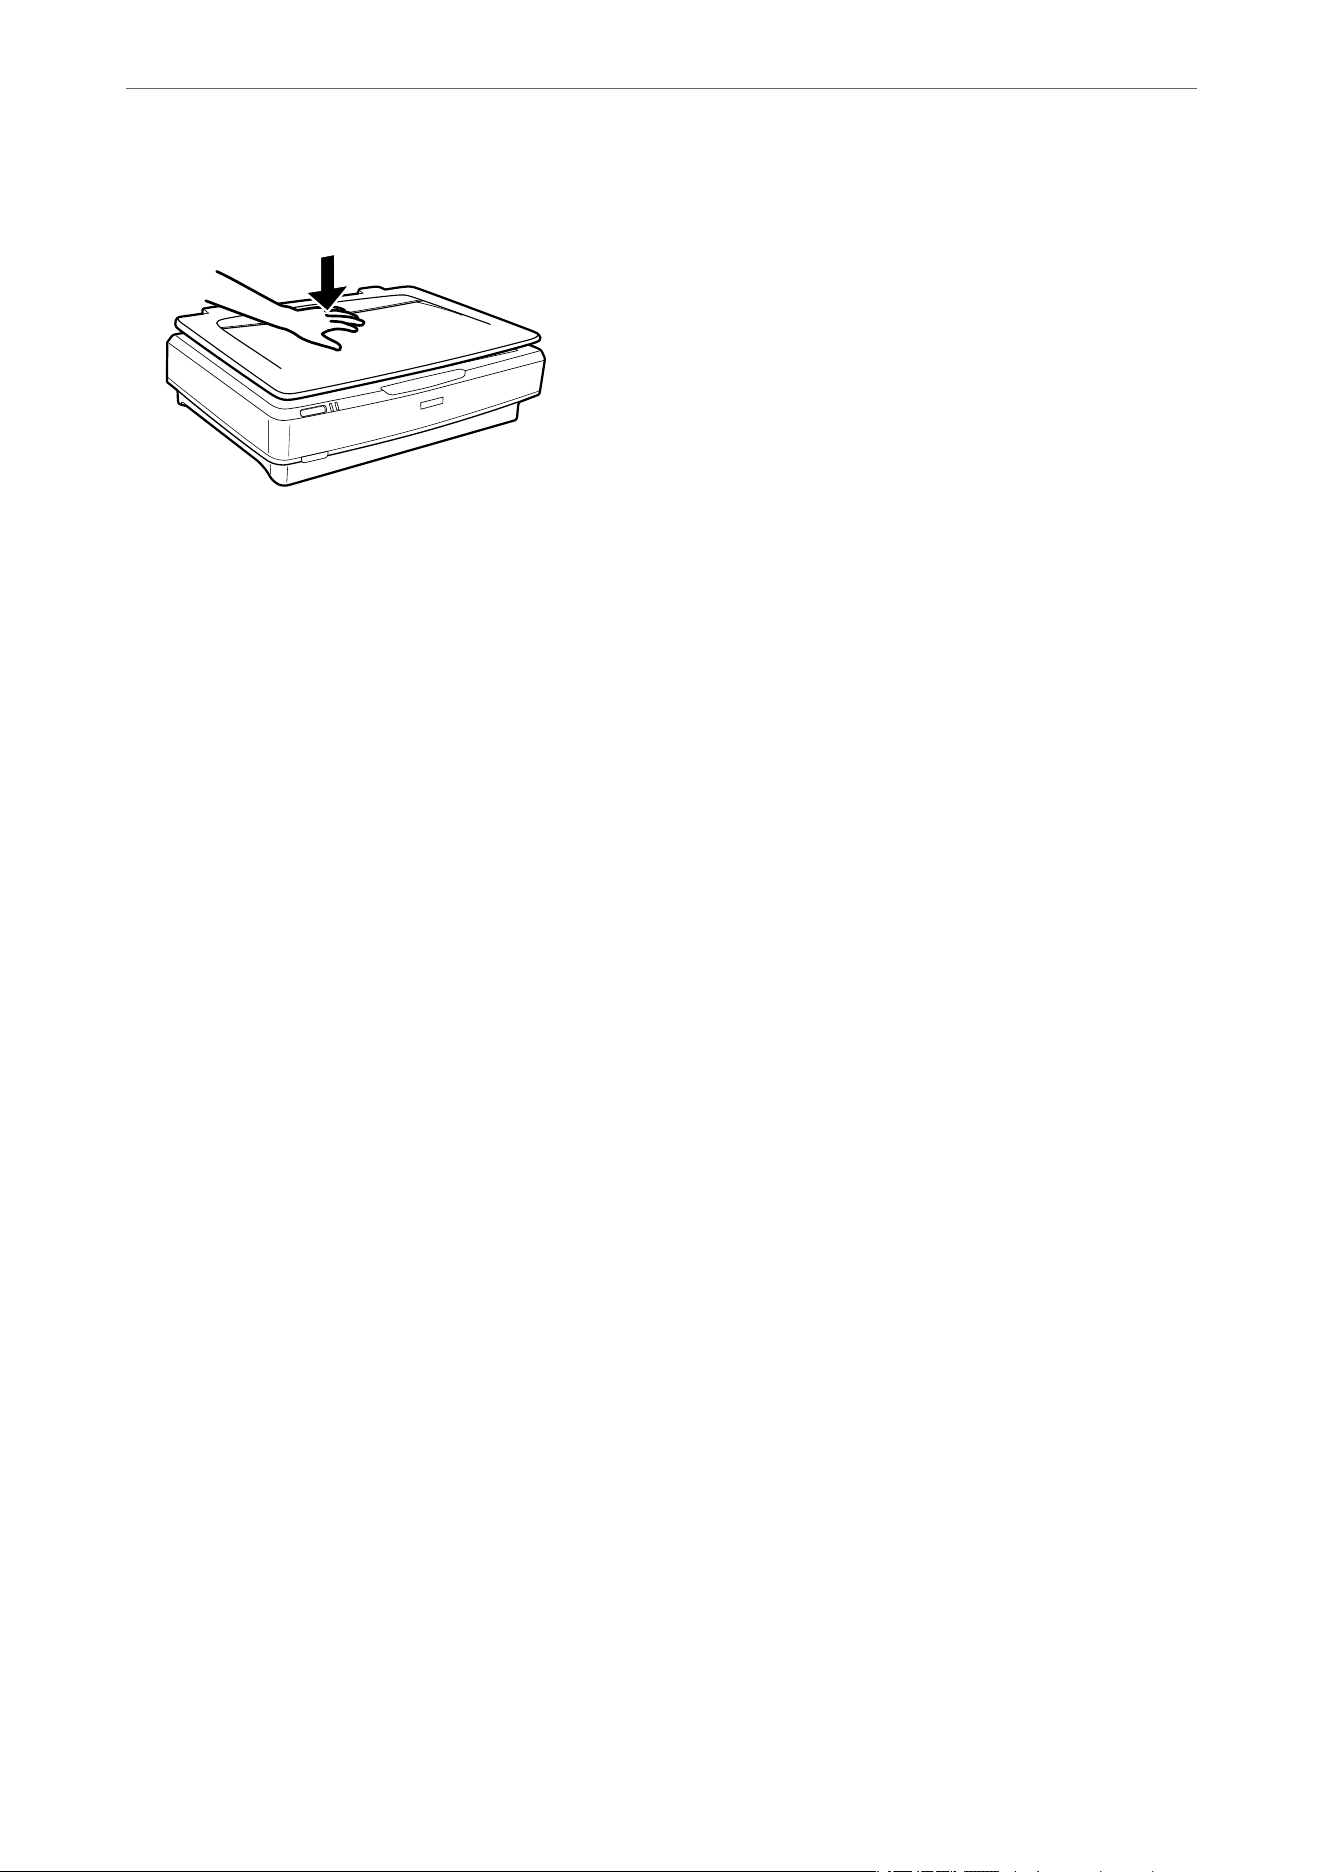
1. Open the document cover.
2. Place your original face down on the scanner glass making sure the top corner of the side you want to scan is
aligned with the
d
mark.
Note:
If you are scanning multiple originals at once, position each original at least 0.8 inch (20 mm) apart from the others.
Placing Originals on the Product
>
Placing Originals
14
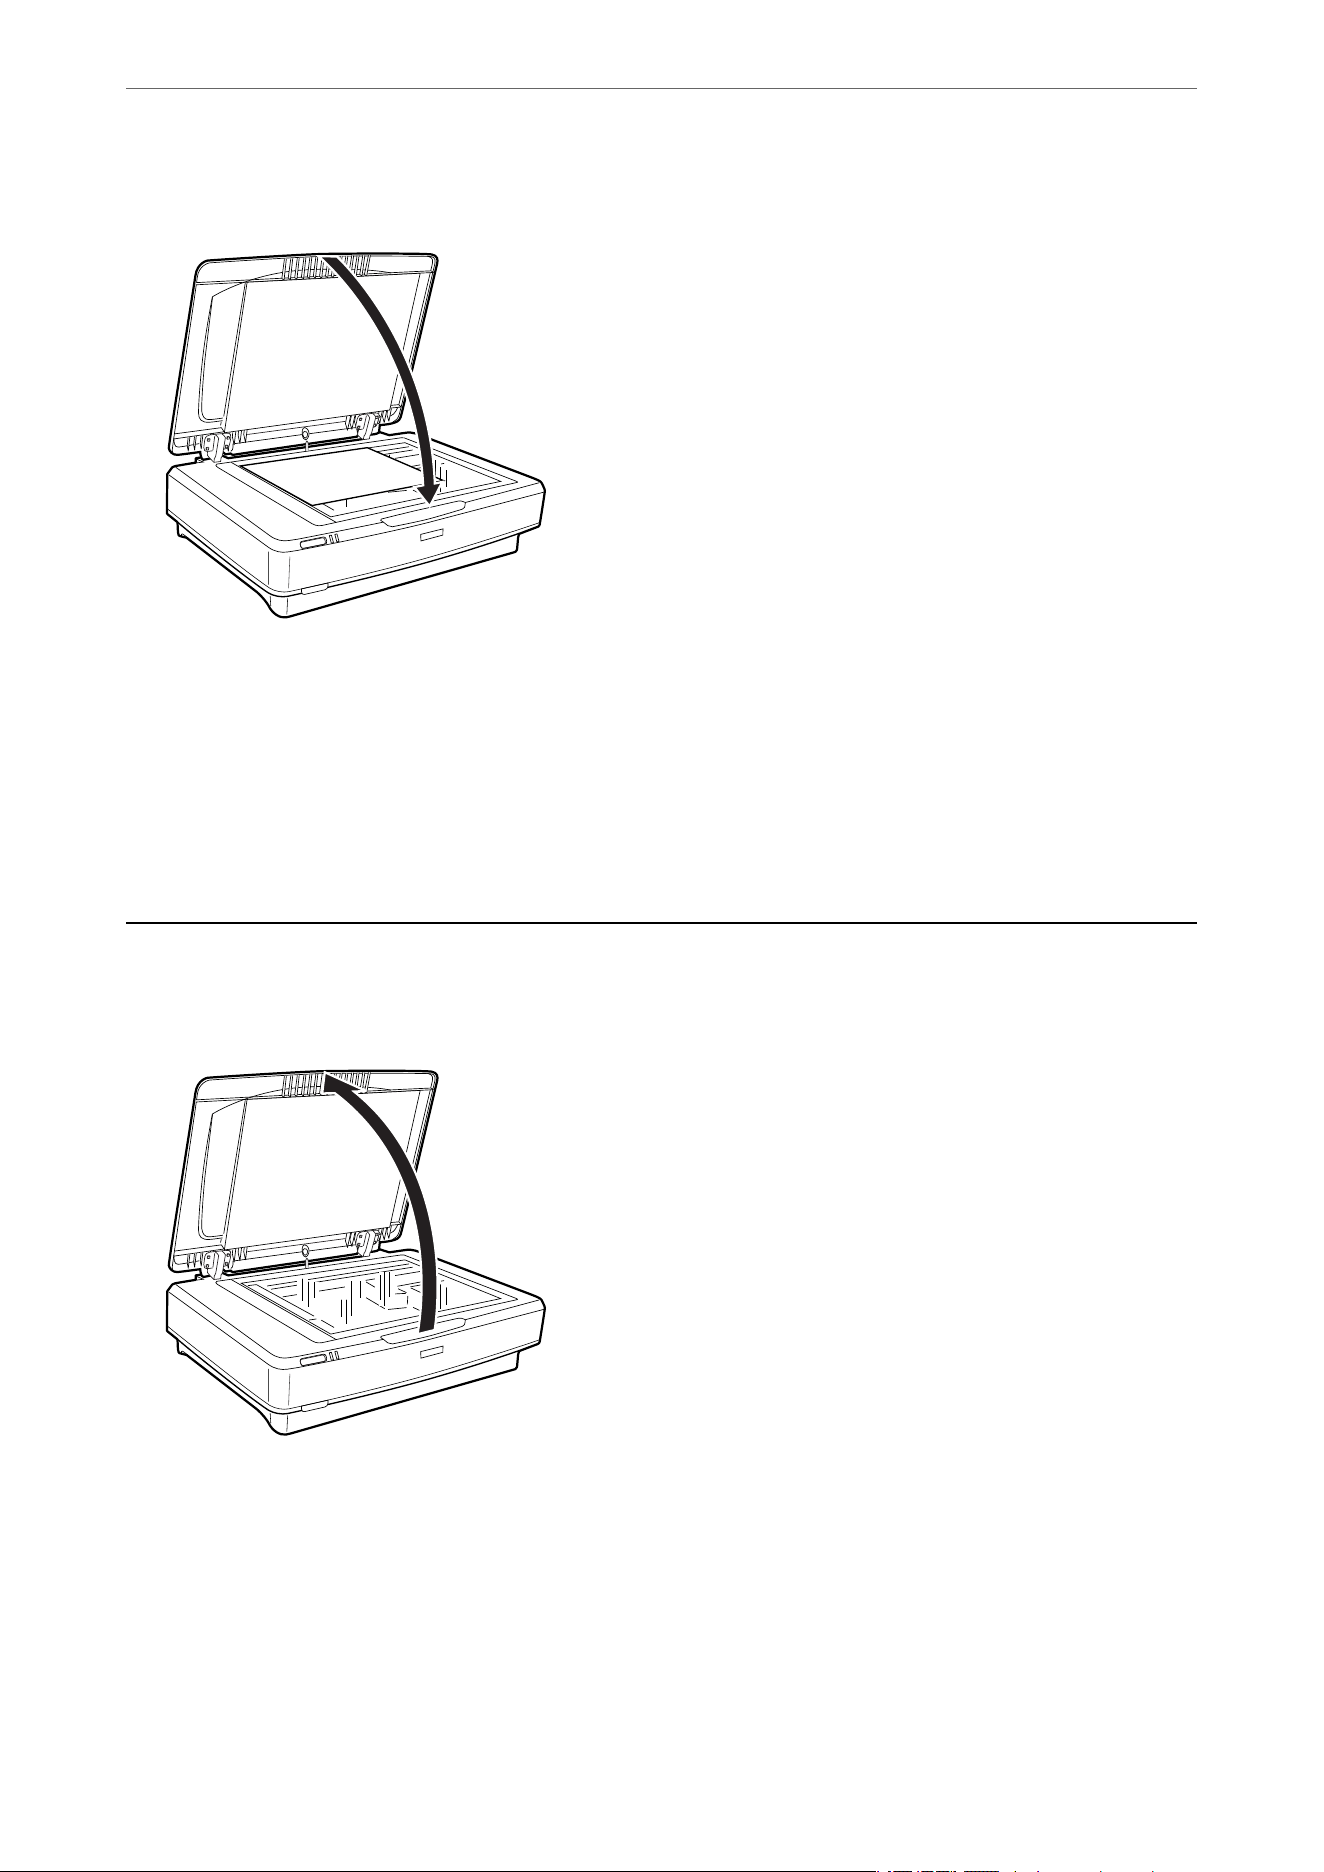
3. Close the document cover gently so that your original does not move.
Note:
❏ Always keep the scanner glass clean.
❏ Do not leave originals on the scanner glass for an extended period of time as they may stick to the glass.
Related Information
& “Basic Scanning” on page 18
Placing Large or Thick Originals
1. Open the document cover.
Placing Originals on the Product
>
Placing Large or Thick Originals
15
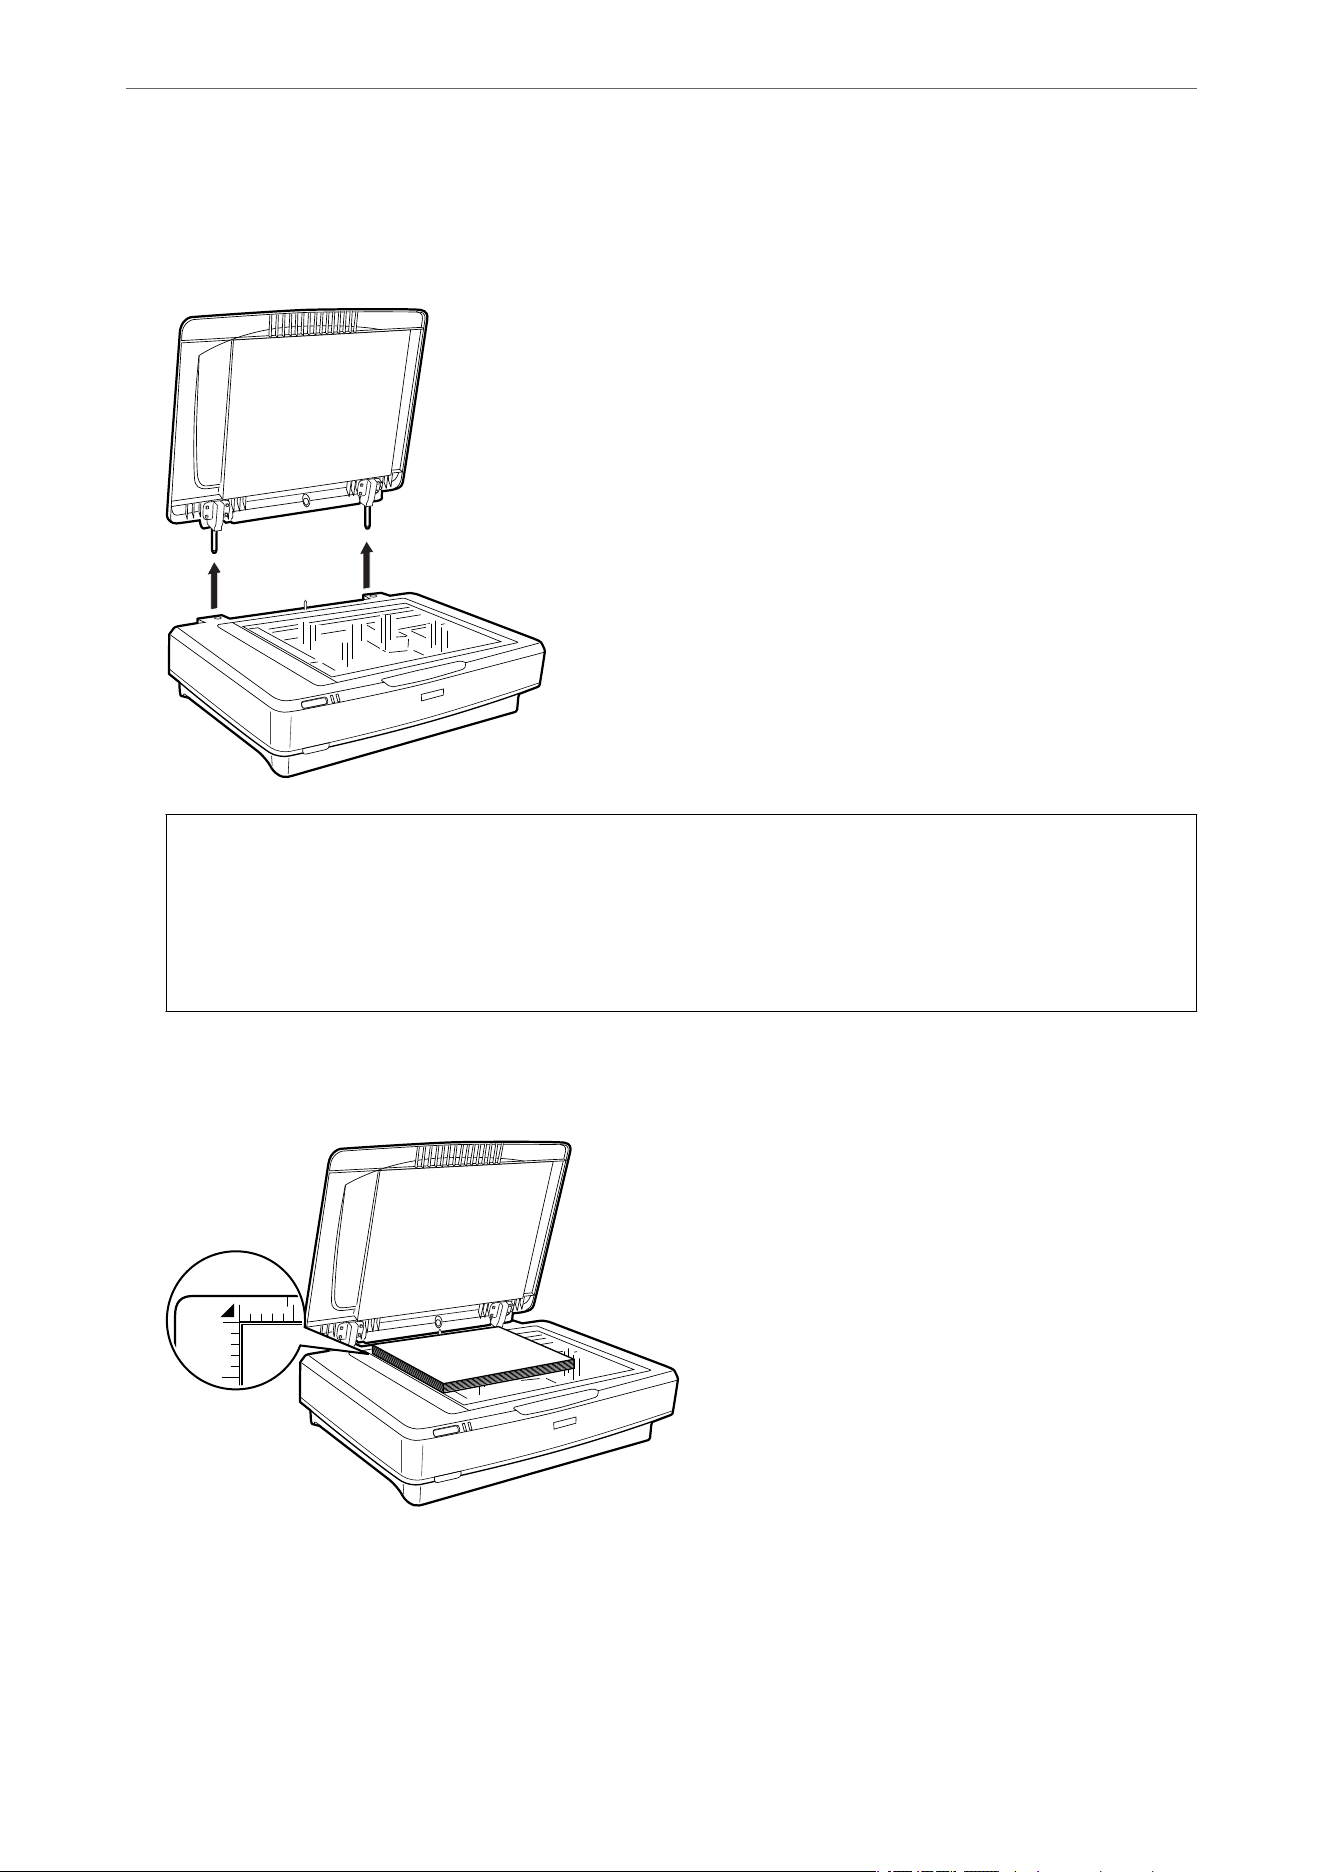
If the size of the original exceeds the size of the document cover, you can lift the document cover straight up
and remove it to make it easier to align the original. When you have
finished
scanning, replace the document
cover in the reverse order that you removed it.
c
Important:
❏ Before removing the document cover, make sure you raise it to the upright position to prevent the hinges
from snapping back on the springs.
❏ Do not force the cover o the scanner or li the cover from in front of the cover hinge; otherwise, the cover
may be damaged.
2. Place a large or thick original face-down on the scanner glass. Make sure the top corner of the original is
aligned with the
d
mark.
Placing Originals on the Product
>
Placing Large or Thick Originals
16
3. Close the document cover and hold it down firmly as you scan.
Note:
❏ When scanning without the document cover, gently press down on your original to atten it.
❏ If your original is very thick or curled at the edges, cover the edges with paper to block external light as you scan.
Related Information
& “Basic Scanning” on page 18
Placing Originals on the Product
>
Placing Large or Thick Originals
17

Basic Scanning
Scanning Using Epson Scan 2
Scanning Photos or Pictures (Photo Mode)
Using Photo Mode in Epson Scan 2, you can scan the originals using a wide variety of image adjustment features
that are suitable for photos or pictures.
1. Place the originals.
When placing multiple originals on the scanner glass, you can scan them all at the same time. Make sure there
is a gap
of at least 0.8 in. (20 mm) between the originals.
2. Start Epson Scan 2.
❏ Windows 11/Windows Server 2022
Click the start button, and then select All apps > EPSON > Epson Scan 2.
❏ Windows 10/Windows Server 2016/Windows Server 2019
Click the start button and select EPSON > Epson Scan 2.
❏ Windows 8.1/Windows 8/Windows Server 2012 R2/Windows Server 2012
Enter the application name in the search charm, and then select the displayed icon.
❏ Windows 7/Windows Server 2008/Windows Server 2008 R2
Click the start button, and select All Programs or Programs > EPSON > Epson Scan 2 > Epson Scan 2.
❏ Mac OS
Select Go > Applications > Epson Software > Epson Scan 2.
3. Select Photo Mode from the Mode list.
Basic Scanning
>
Scanning Using Epson Scan 2
>
Scanning Photos or Pictures (Photo Mode)
18

4. Make the following settings on the Main Settings tab.
❏ Image Type: Select the color for saving the scanned image.
❏ Resolution: Select the resolution.
❏ Scanning Quality: Select the quality.
Note:
❏ When scanning lms using the Transparency Unit, set the Document Source and Document Type as well.
❏ Scanning in monochrome (black and white binary) is unavailable in Photo Mode. To scan in monochrome, select
Document Mode.
Basic Scanning
>
Scanning Using Epson Scan 2
>
Scanning Photos or Pictures (Photo Mode)
19
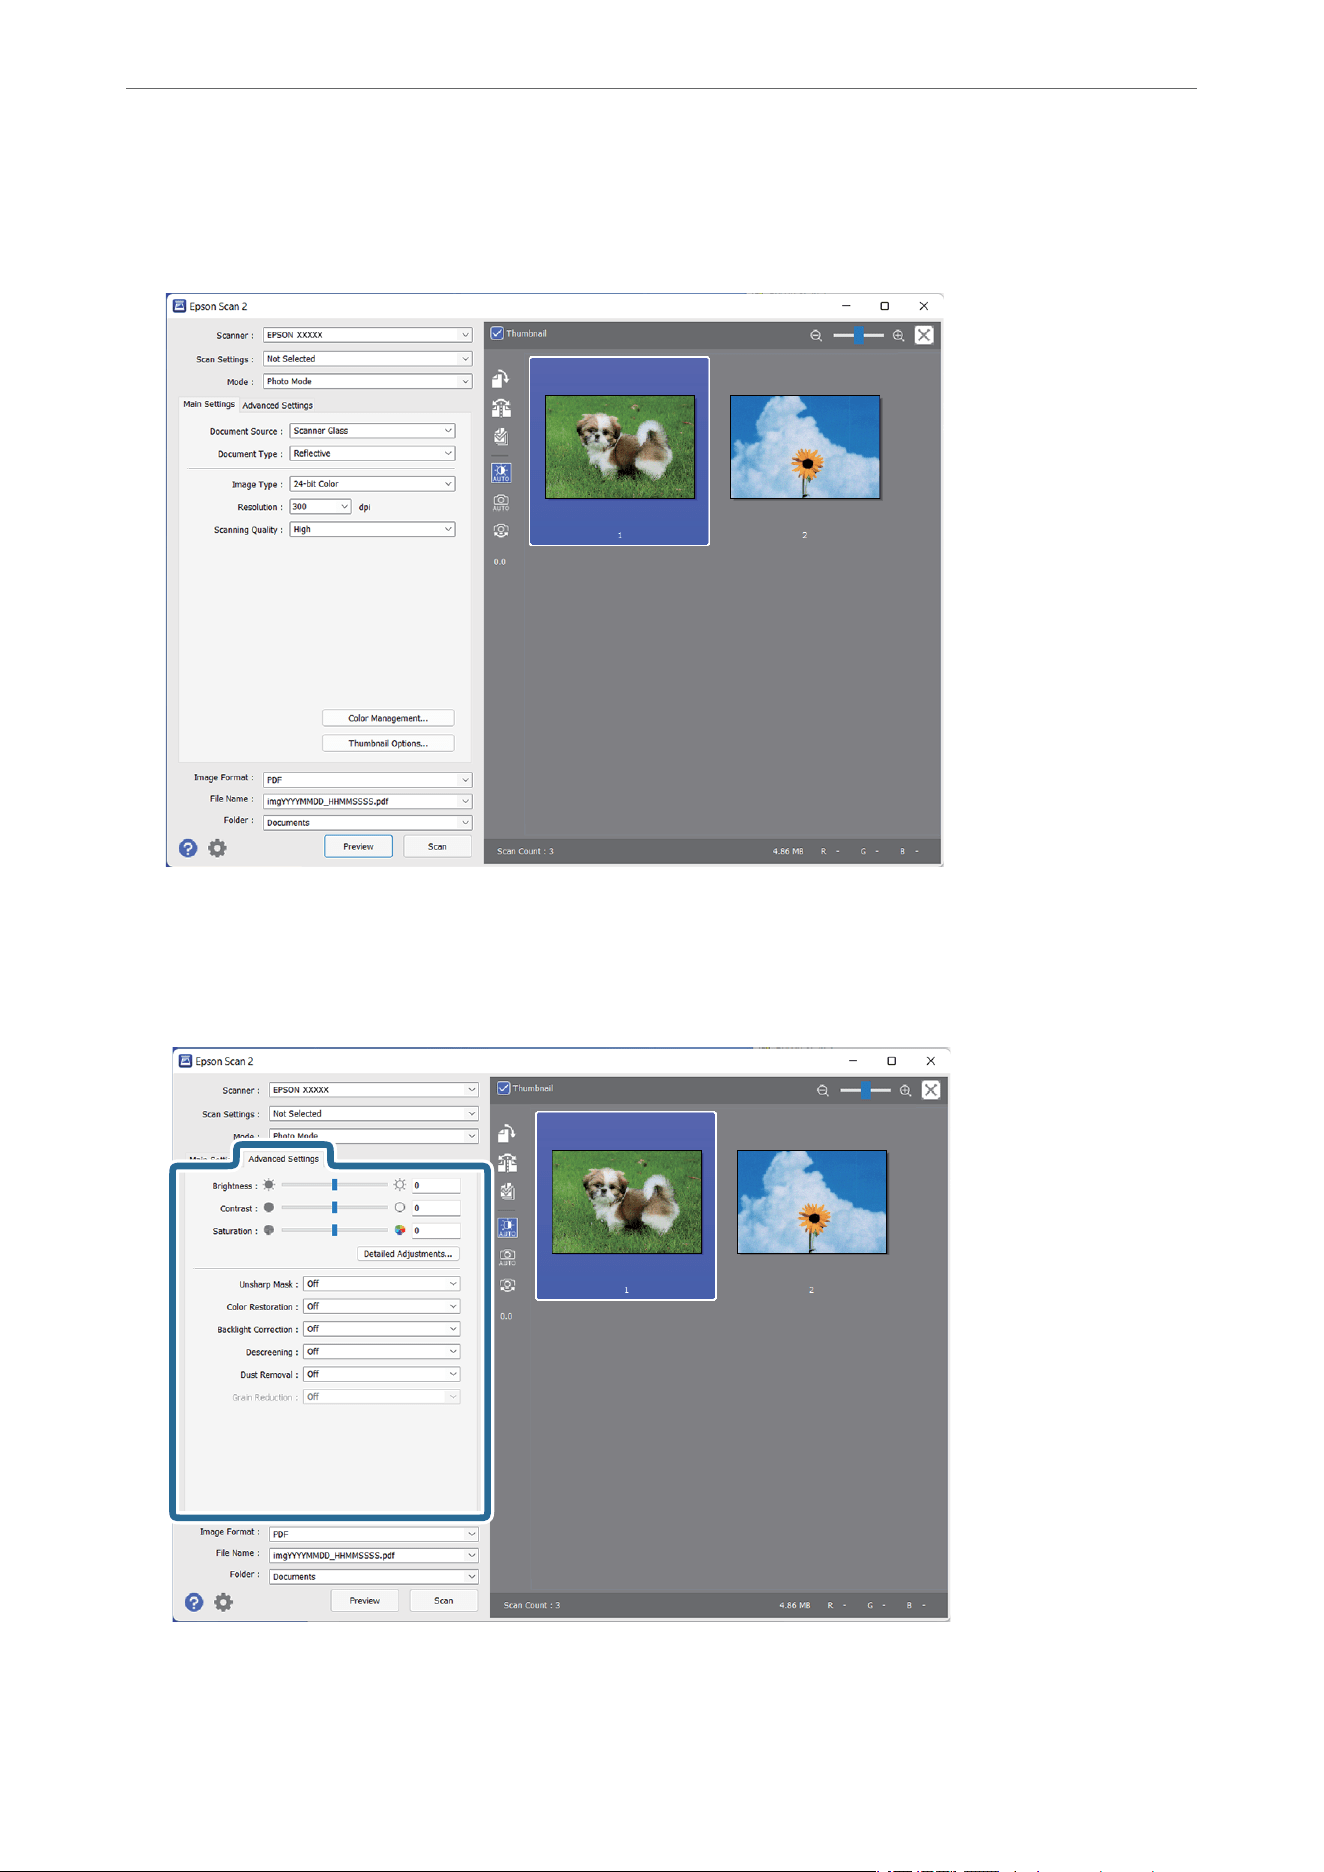
5. Click Preview.
The preview window opens, and the previewed image is displayed as thumbnails.
Note:
To preview the entire scanned area, clear the umbnail checkbox on the top of the preview window.
6. Check the preview, and make image adjustment settings on the Advanced Settings tab if necessary.
You can adjust the scanned image using detailed settings which are suitable for photos or pictures, such as the
following.
Basic Scanning
>
Scanning Using Epson Scan 2
>
Scanning Photos or Pictures (Photo Mode)
20
❏ Brightness: Select to adjust the brightness for the scanned image.
❏ Contrast: Select to adjust the contrast for the scanned image.
❏ Saturation: Select to adjust the saturation (color vividness) for the scanned image.
❏ Unsharp Mask: Select to enhance and sharpen the outlines for the scanned image.
❏ Color Restoration: Select to correct images that have faded to return them to their original colors.
❏ Backlight Correction: Select to lighten scanned images that are dark due to backlight.
❏ Descreening: Select to remove moiré patterns (web-like shadows) that appear when scanning printed
papers such as a magazine.
❏ Dust Removal: Select to remove dust on the scanned image.
Note:
❏ Some items may not be available depending on other settings you made.
❏ Depending on the original, the scanned image may not be adjusted correctly.
❏ When multiple thumbnails are created, you can adjust the image quality for each thumbnail. Depending on the
adjustment items, you can adjust the quality of scanned images at the same time by selecting multiple thumbnails.
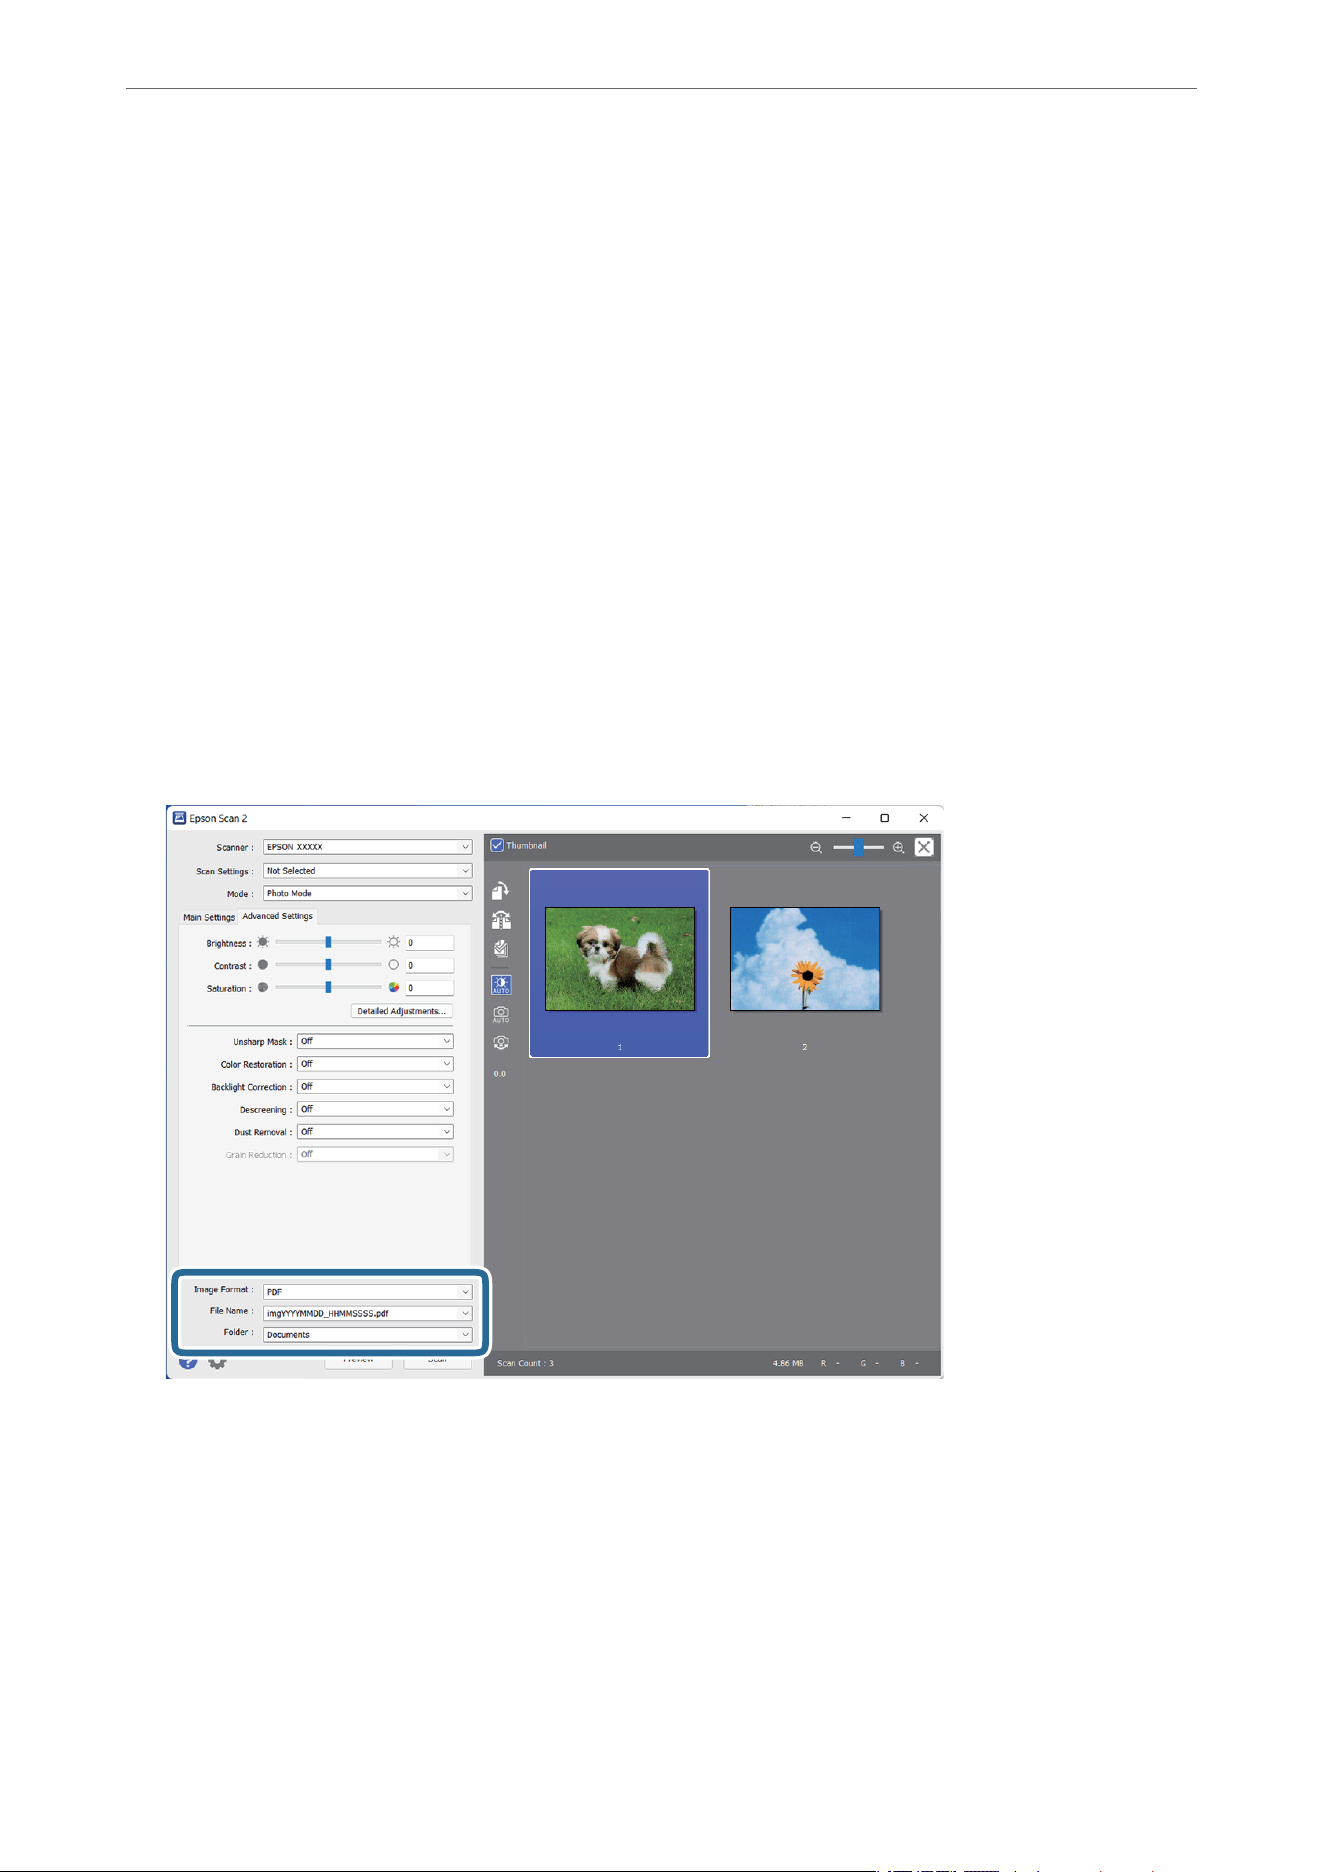
7. Set the file saving settings.
❏ Image Format: Select the save format from the list.
You can make detailed settings for each save format except BITMAP and PNG.
After
selecting the save
format, select Options from the list.
❏ File Name: Check the save file name displayed.
You can change settings for the file name by selecting Settings from the list.
❏ Folder: Select the save folder for the scanned image from the list.
You can select another folder or create a new folder by selecting Select from the list.
8. Click Scan.
Basic Scanning
>
Scanning Using Epson Scan 2
>
Scanning Photos or Pictures (Photo Mode)
21

Related Information
& “Placing Originals on the Product” on page 14
& “Epson Scan 2” on page 13
& “Setting a Resolution That Suits the Scanning Purpose” on page 25
& “Image Adjustment Features for Photo Mode” on page 27
Scanning Documents (Document Mode)
Using Document Mode in Epson Scan 2, you can scan the originals using detailed settings that are suitable for text
documents.
Note:
You cannot scan lms using Transparency Unit when scanning from Document Mode.
1. Place the originals.
2. Start Epson Scan 2.
❏ Windows 11/Windows Server 2022
Click the start button, and then select All apps > EPSON > Epson Scan 2.
❏ Windows 10/Windows Server 2016/Windows Server 2019
Click the start button and select EPSON > Epson Scan 2.
❏ Windows 8.1/Windows 8/Windows Server 2012 R2/Windows Server 2012
Enter the application name in the search charm, and then select the displayed icon.
❏ Windows 7/Windows Server 2008/Windows Server 2008 R2
Click the start button, and select All Programs or Programs > EPSON > Epson Scan 2 > Epson Scan 2.
❏ Mac OS
Select Go > Applications > Epson Soware > Epson Scan 2.
3. Select Document Mode from the Mode list.
Basic Scanning
>
Scanning Using Epson Scan 2
>
Scanning Documents (Document Mode)
22
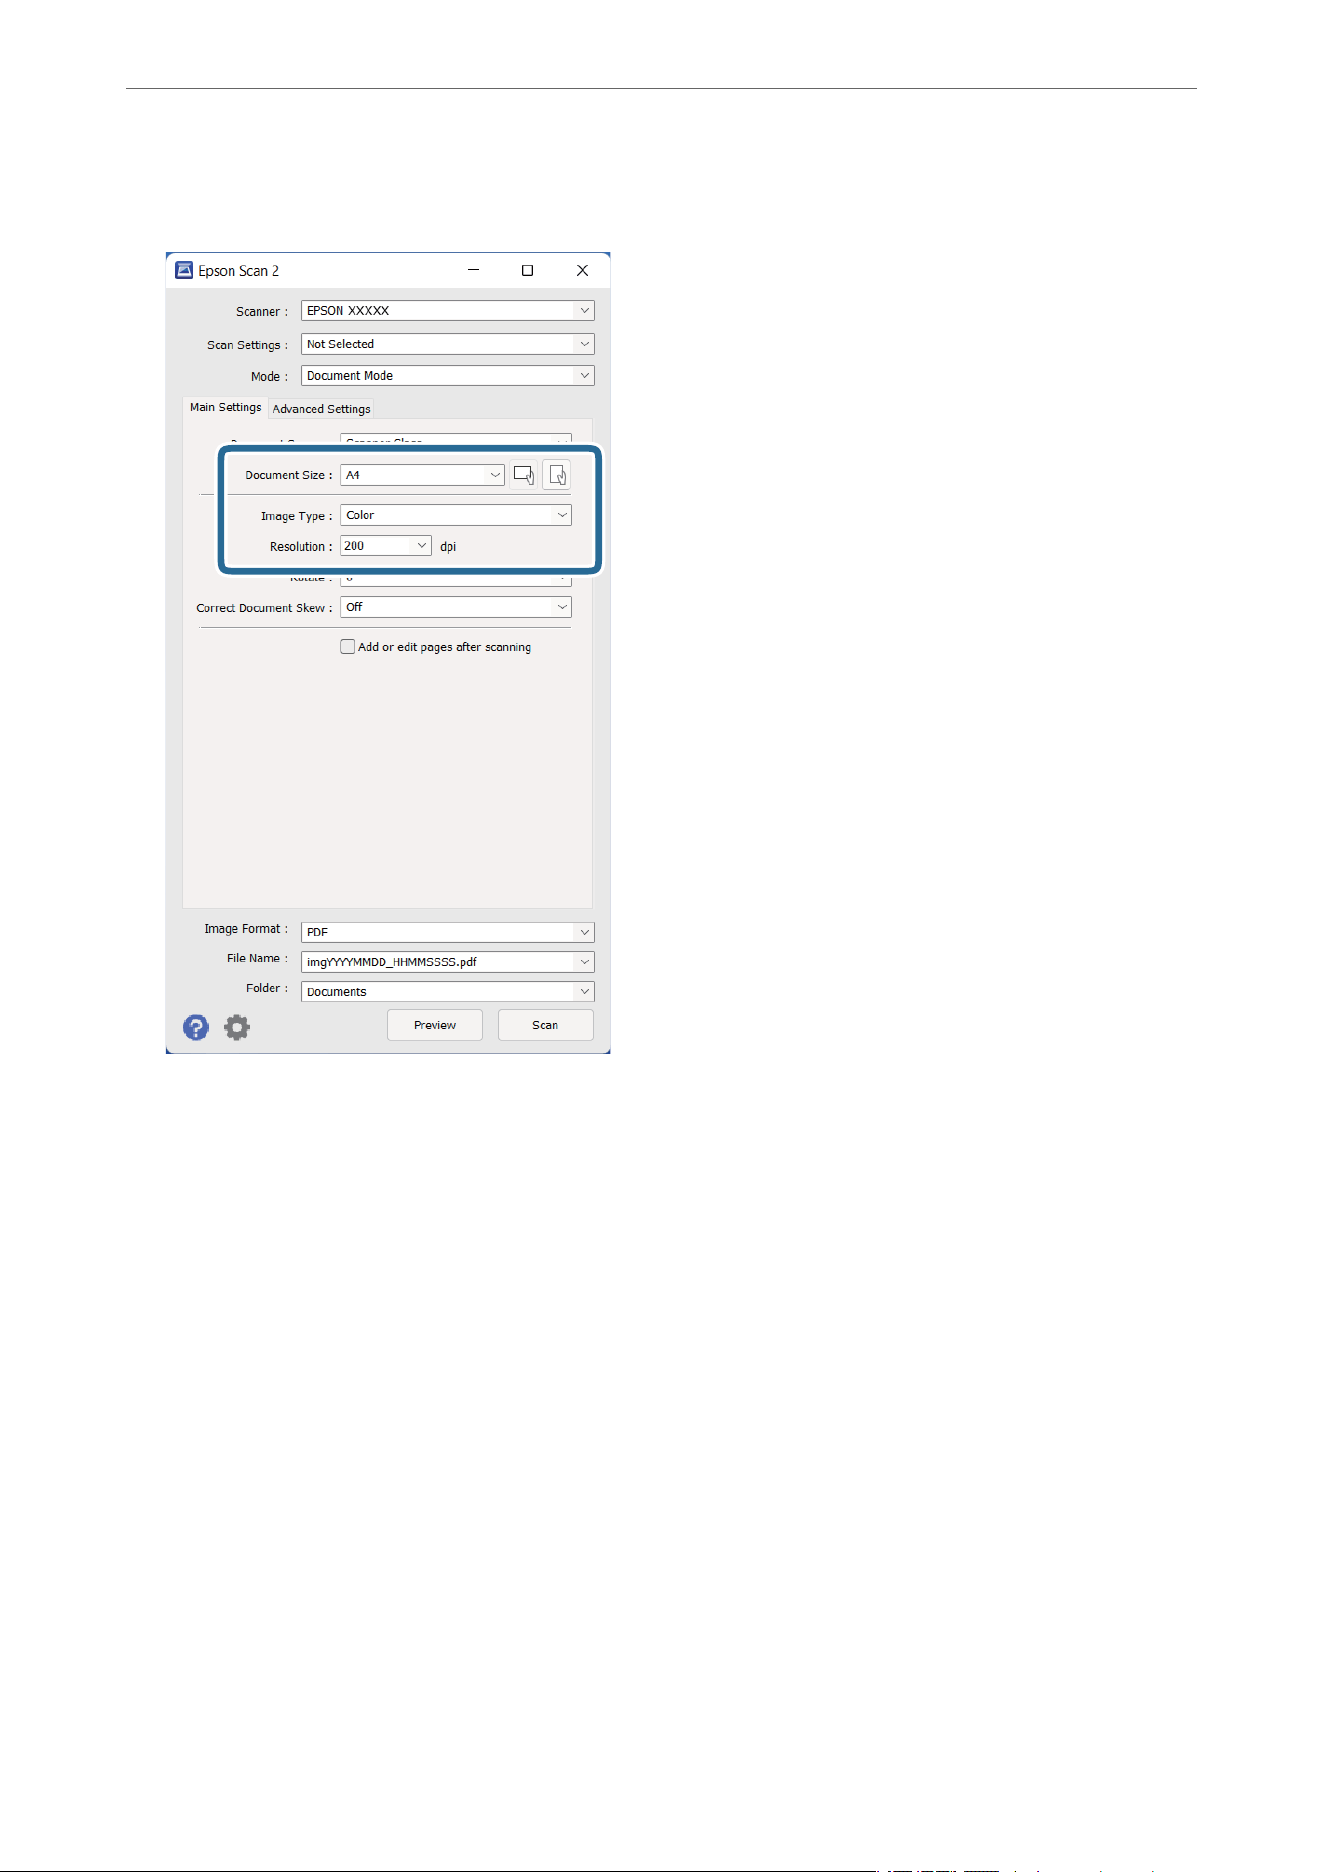
4. Make the following settings on the Main Settings tab.
❏ Document Size: Select the size of the original you placed.
❏ Image Type: Select the color for saving the scanned image.
❏ Resolution: Select the resolution.
Note:
e Document Source setting is xed as Scanner Glass. You cannot change this setting.
5. Make other scan settings if necessary.
❏ You can preview the scanned image by clicking the Preview button.
The
preview window opens, and the
previewed image is displayed.
❏ On the Advanced Settings tab, you can make image adjustments using detailed settings which are suitable
for text documents, such as the following.
❏ Text Enhancement: Select to make blurred letters in the original clear and sharp.
❏ Auto Area Segmentation: Select to make letters clear and images smooth when performing black and
white scanning for a document that contains images.
❏ Unsharp Mask: Select to enhance and sharpen the outlines of the image.
❏ Descreening: Select to remove moiré patterns (web-like shadows) that appear when scanning printed
papers such as a magazine.
Basic Scanning
>
Scanning Using Epson Scan 2
>
Scanning Documents (Document Mode)
23

Note:
Some items may not be available depending on other settings you made.
6. Set the file saving settings.
❏ Image Format: Select the save format from the list.
You can make detailed settings for each save format except BITMAP and PNG. After selecting the save
format, select Options from the list.
❏ File Name: Check the save file name displayed.
You can change settings for the file name by selecting Settings from the list.
❏ Folder: Select the save folder for the scanned image from the list.
You can select another folder or create a new folder by selecting Select from the list.
7. Click Scan.
Related Information
& “Placing Originals on the Product” on page 14
& “Epson Scan 2” on page 13
& “Setting a Resolution That Suits the Scanning Purpose” on page 25
& “Image Adjustment Features for Document Mode” on page 33
Basic Scanning
>
Scanning Using Epson Scan 2
>
Scanning Documents (Document Mode)
24

Setting a Resolution That Suits the Scanning Purpose
Advantages and Disadvantages of Increasing the Resolution
Resolution indicates the number of pixels (smallest area of an image) for each inch (25.4 mm), and is measured in
dpi (dots per inch). The advantage of increasing the resolution is that the details in the image become fine. The
disadvantage is that the file size becomes large.
❏ File size becomes large
(When you double the resolution, the
file
size becomes about four times larger.)
❏ Scanning, saving, and reading the image takes a long time
❏ Sending and receiving emails or faxes takes a long time
❏ The image becomes too large to fit the display or print on the paper
List of Recommended Resolutions to Suit Your Purpose
See the table and set the appropriate resolution for the purpose of your scanned image.
Purpose Resolution (Reference)
Displaying on a screen
Sending by email
Up to 200 dpi
Film Archiving 1,200 to 2,400 dpi
Using Optical Character Recognition (OCR)
Creating a text searchable PDF
200 to 300 dpi
Printing using a printer
Sending by fax
200 to 300 dpi
Recommended Resolutions for Scanning Film to Print
Film Size Printout Size Resolution (Reference)
35 mm film strips
Mounted slides
KG size 1,200 dpi
A4 2,400 dpi
A3 3,200 dpi
A2 4,800 dpi
A1 6,400 dpi
A0 6,400 dpi
Basic Scanning
>
Scanning Using Epson Scan 2
>
Setting a Resolution That Suits the Scanning Purpose
25

Film Size Printout Size Resolution (Reference)
6×7 cm film KG size 600 dpi
A4 1,200 dpi
A3 1,600 dpi
A2 2,400 dpi
A1 3,200 dpi
A0 4,800 dpi
4×5 inch film KG size 300 dpi
A4 600 dpi
A3 1,200 dpi
A2 1,600 dpi
A1 2,400 dpi
A0 3,200 dpi
Scanning Using a Scanner Button
You can scan using the button on your scanner.
Note:
Before using this feature, check the following.
❏ Epson Scan 2 is installed on your computer.
❏ e scanner is connected to your computer correctly.
1. Place the original.
2.
Press the
a
button.
Epson Scan 2 starts.
3.
Make scan settings if necessary, and then press the
a
button again.
Scanning starts.
Related Information
& “Part Names” on page 10
& “Placing Originals on the Product” on page 14
Basic Scanning
>
Scanning Using a Scanner Button
26

Advanced Scanning
Image Adjustment Features for Photo Mode
You can adjust scanned images using the features on the Advanced Settings tab in Epson Scan 2.
For Photo Mode, you can use image adjustment features that are suitable for photos or pictures.
For most features, you can check the adjustment results in the preview window.
Note:
Some items may not be available depending on other settings you made.
Brightness
You can adjust the brightness for the whole image.
Note:
is feature is not available depending on the settings on the Main Settings tab > Image Type or the settings
on the Advanced Settings tab.
Advanced Scanning
>
Image Adjustment Features for Photo Mode
27
Contrast
You can adjust the contrast for the whole image. If you increase the contrast, the bright areas become
brighter, and the dark areas become darker. On the other hand, if you lower the contrast, the
differences between the bright and dark areas of the image are less defined.
Note:
is feature is not available depending on the settings on the Main Settings tab > Image Type or the settings
on the Advanced Settings tab.
Saturation
You can adjust the saturation (color vividness) for the whole image. When you increase the
saturation, the colors become vivid. On the other hand, when you lower the saturation, the color
becomes neutral (gray).
Note:
is feature is not available depending on the settings in Image Type on the Main Settings tab.
Detailed Adjustments Button
Detailed Adjustments Screen
You can adjust the image quality for the scanned image by using a histogram or tone curve.
This
allows you to output high-quality images while keeping image degradation to a minimum.
Reset button
Returns adjustments made on the Detailed Adjustments screen to their defaults.
Image Adjustment Tab
You can adjust the color balance and gray balance of the image.
Advanced Scanning
>
Image Adjustment Features for Photo Mode
28

Color Balance
Adjusts the color balance of the image. You can adjust the tint when photos are tinted
with red and green due to the weather or the lighting where the photo was shot.
Gray Balance Intensity
Adjusts the gray balance of the image. You can remove colors if they have too much of
an impact on the image due to the illumination and so on of specific colors.
Operations are available once you select the parts you want to make black and white or
gray (neutral) with the
button.
button
Use the eyedropper displayed on the preview image, and select the parts you want to
make black and white or gray (neutral).
You can change the measurement range for the eyedropper by clicking the
(
Conguration
) button, and then selecting Preview > Eyedropper Sampling Area.
Tone Correction Tab
You can use the tone curve to adjust the brightness and contrast of the image.
Tone Correction
By adjusting the shape of the tone curve, you can adjust the brightness and contrast of
the image.
You can add up to 16 points along the line of the tone curve to control the shape.
You can remove unnecessary points by dragging the line outside the graph for the tone
curve.
Channel
Select the color (RGB) to be adjusted using the tone curve.
Preset
Standard tone curves have already been registered. We recommend fine-tuning the tone
curve after selecting an item that best suits your needs.
When selecting Linear, the tone curve becomes a straight line (density is not corrected).
Advanced Scanning
>
Image Adjustment Features for Photo Mode
29
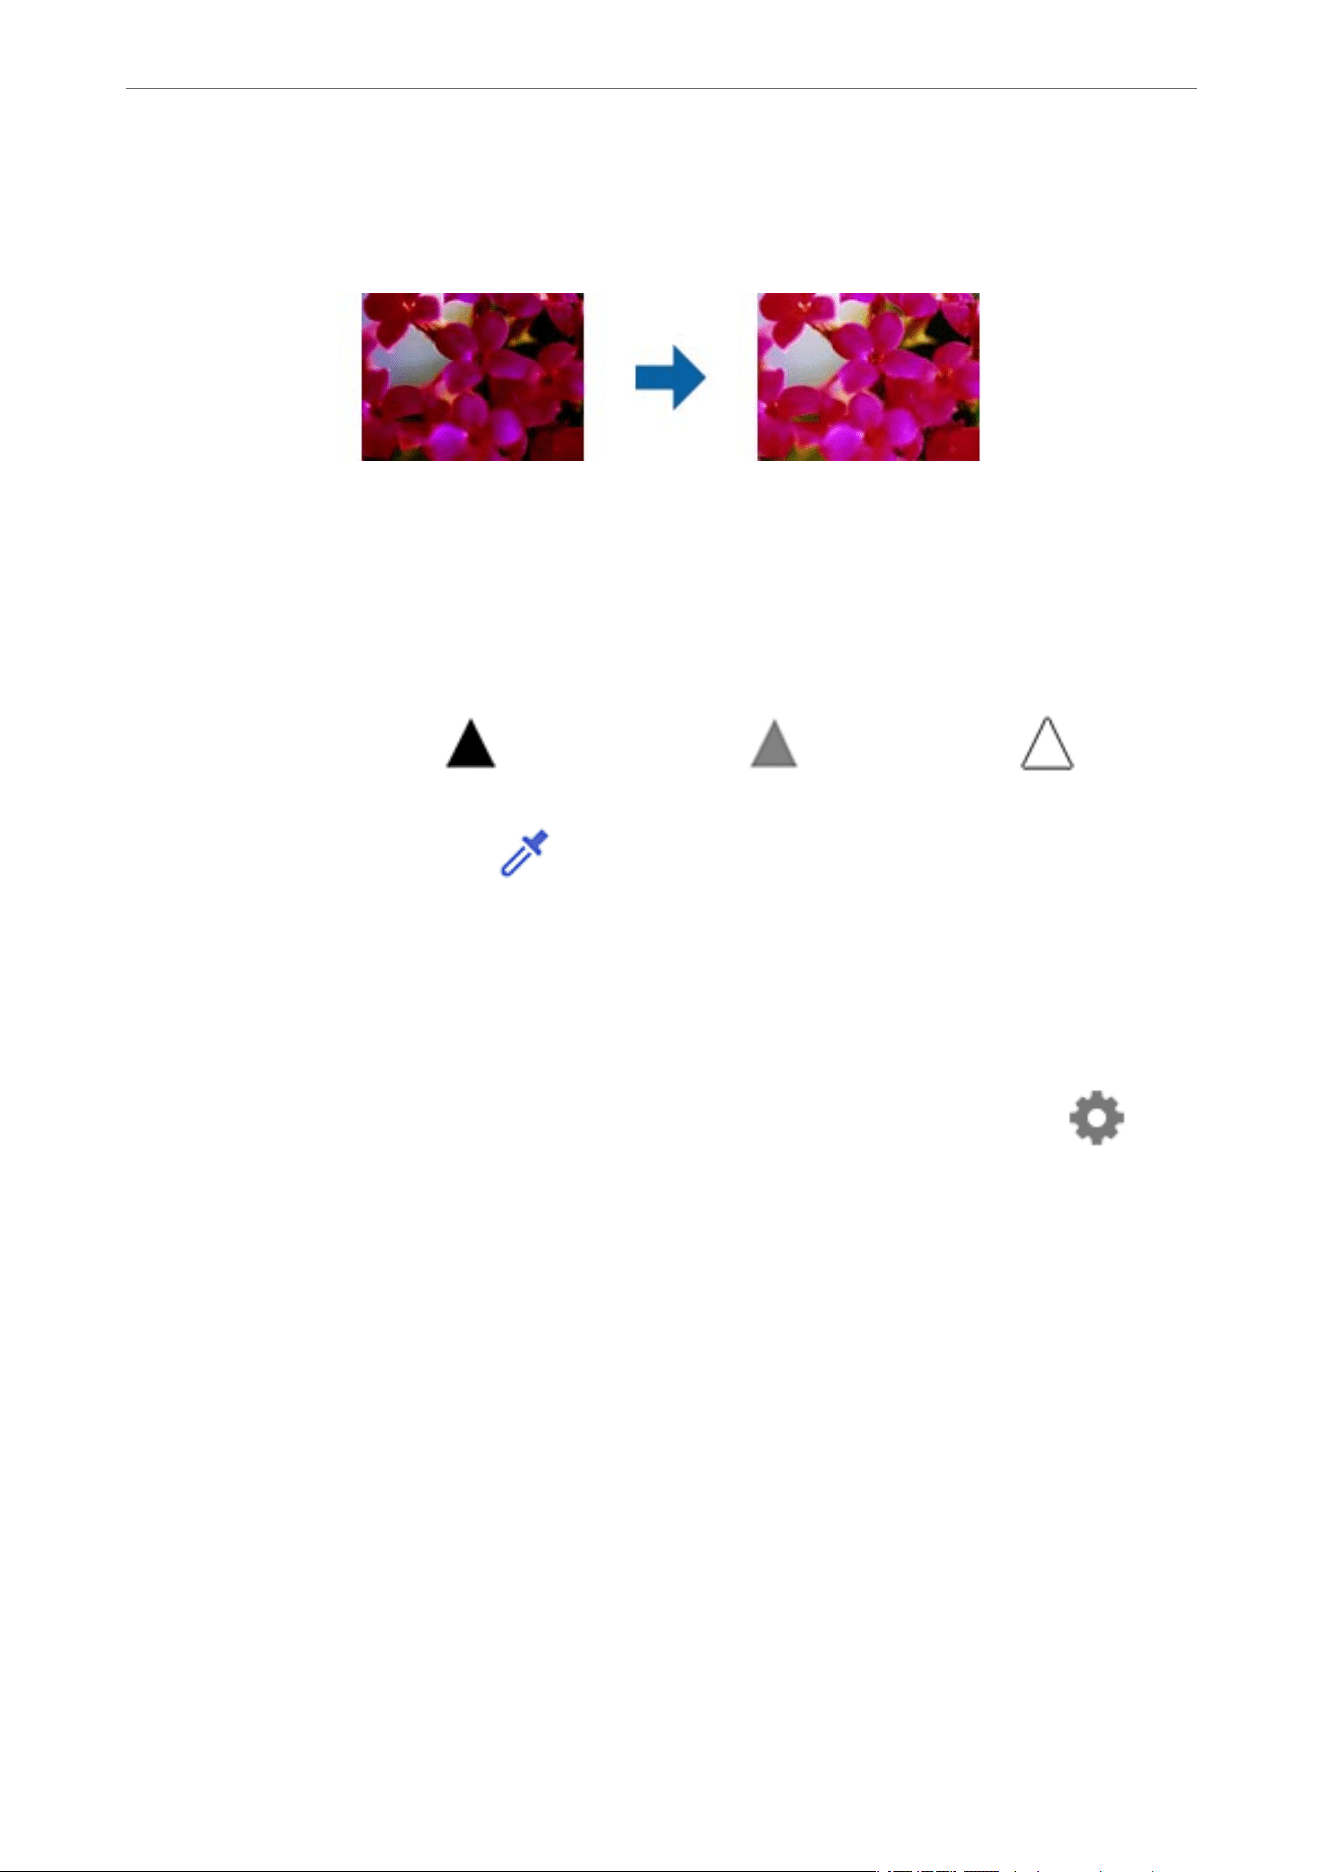
Histogram Adjustment Tab
You can use the histogram to adjust the brightness of the image.
Histogram
While checking the histogram (a graph that indicates light and shade) of the image, you
can adjust the brightness (shadow for the darkest parts, gamma for the medium light
and shade parts, and highlight for the lightest parts) of the image.
Adjust using one of the following methods.
❏ Move the triangle mark
The
symbol indicates shadow, indicates gamma, and indicates
highlights.
❏ Select the
button
Use the eyedropper displayed on the preview image, and select the color you want to
shadow, gamma, or highlight.
❏ Enter values directly
Adjust the values in Output for shadow and highlight. When the highlight is set to 255,
the light parts will be white. When the shadow is set to 0, the dark parts will be black.
You can change the measurement range for the eyedropper by clicking the
(
Conguration
) button, and then selecting Preview > Eyedropper Sampling Area.
Channel
Select the color (RGB) to be adjusted using the histogram.
Input
Displays the values for shadow, gamma, and highlight when scanning an original.
Output
Displays the values for the previous shadow and highlight adjustments.
Tone Cur ve
Displays the density for the output value for the image input value.
Adjusts the density outside of the shadow or highlight parts set in Histogram.
Advanced Scanning
>
Image Adjustment Features for Photo Mode
30
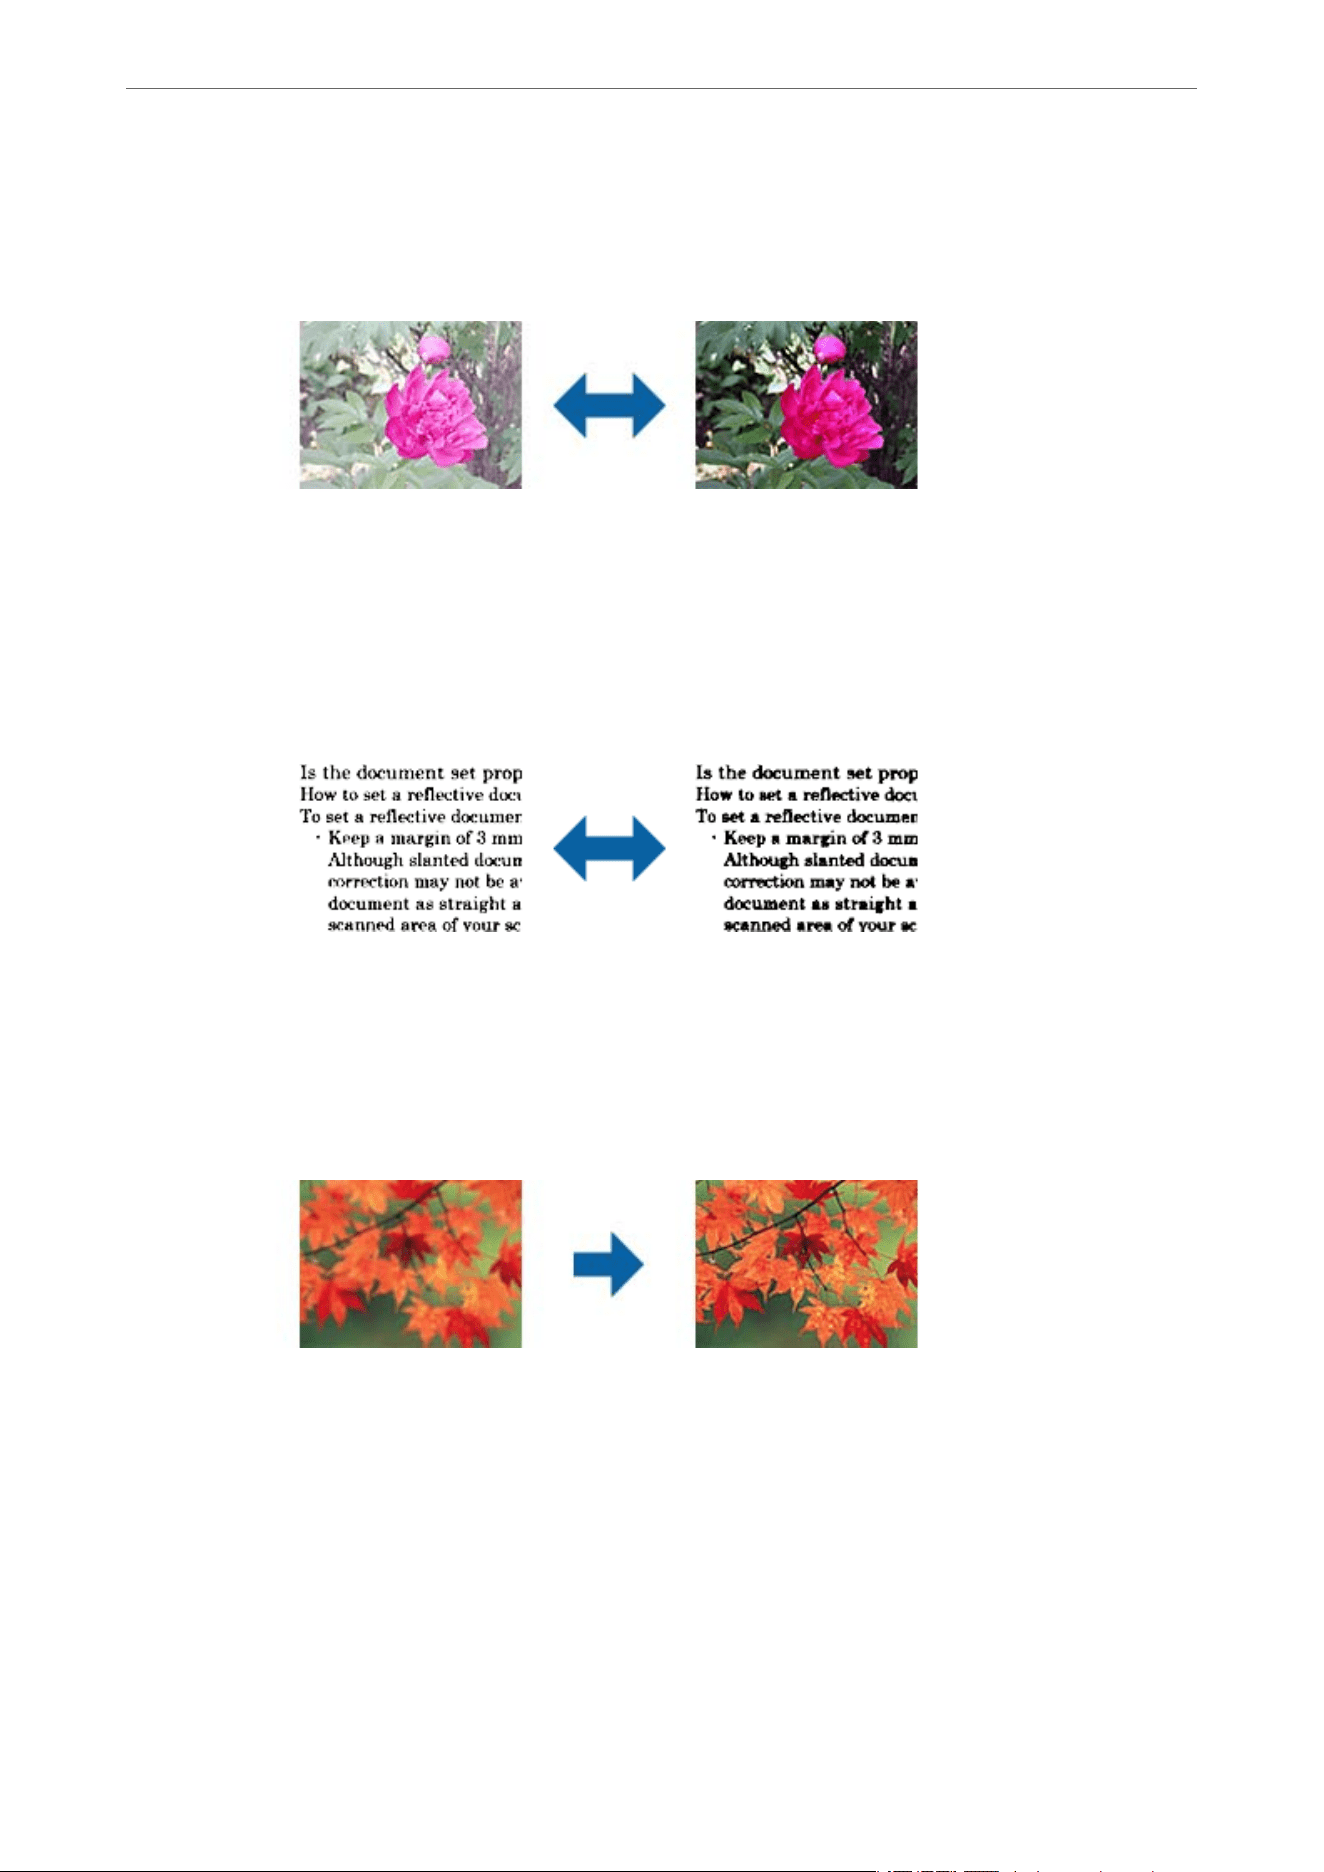
Unsharp Mask
You can enhance and sharpen the outlines of the image.
Note:
is feature is not available when selecting the Main Settings tab > Image Type > Black & White.
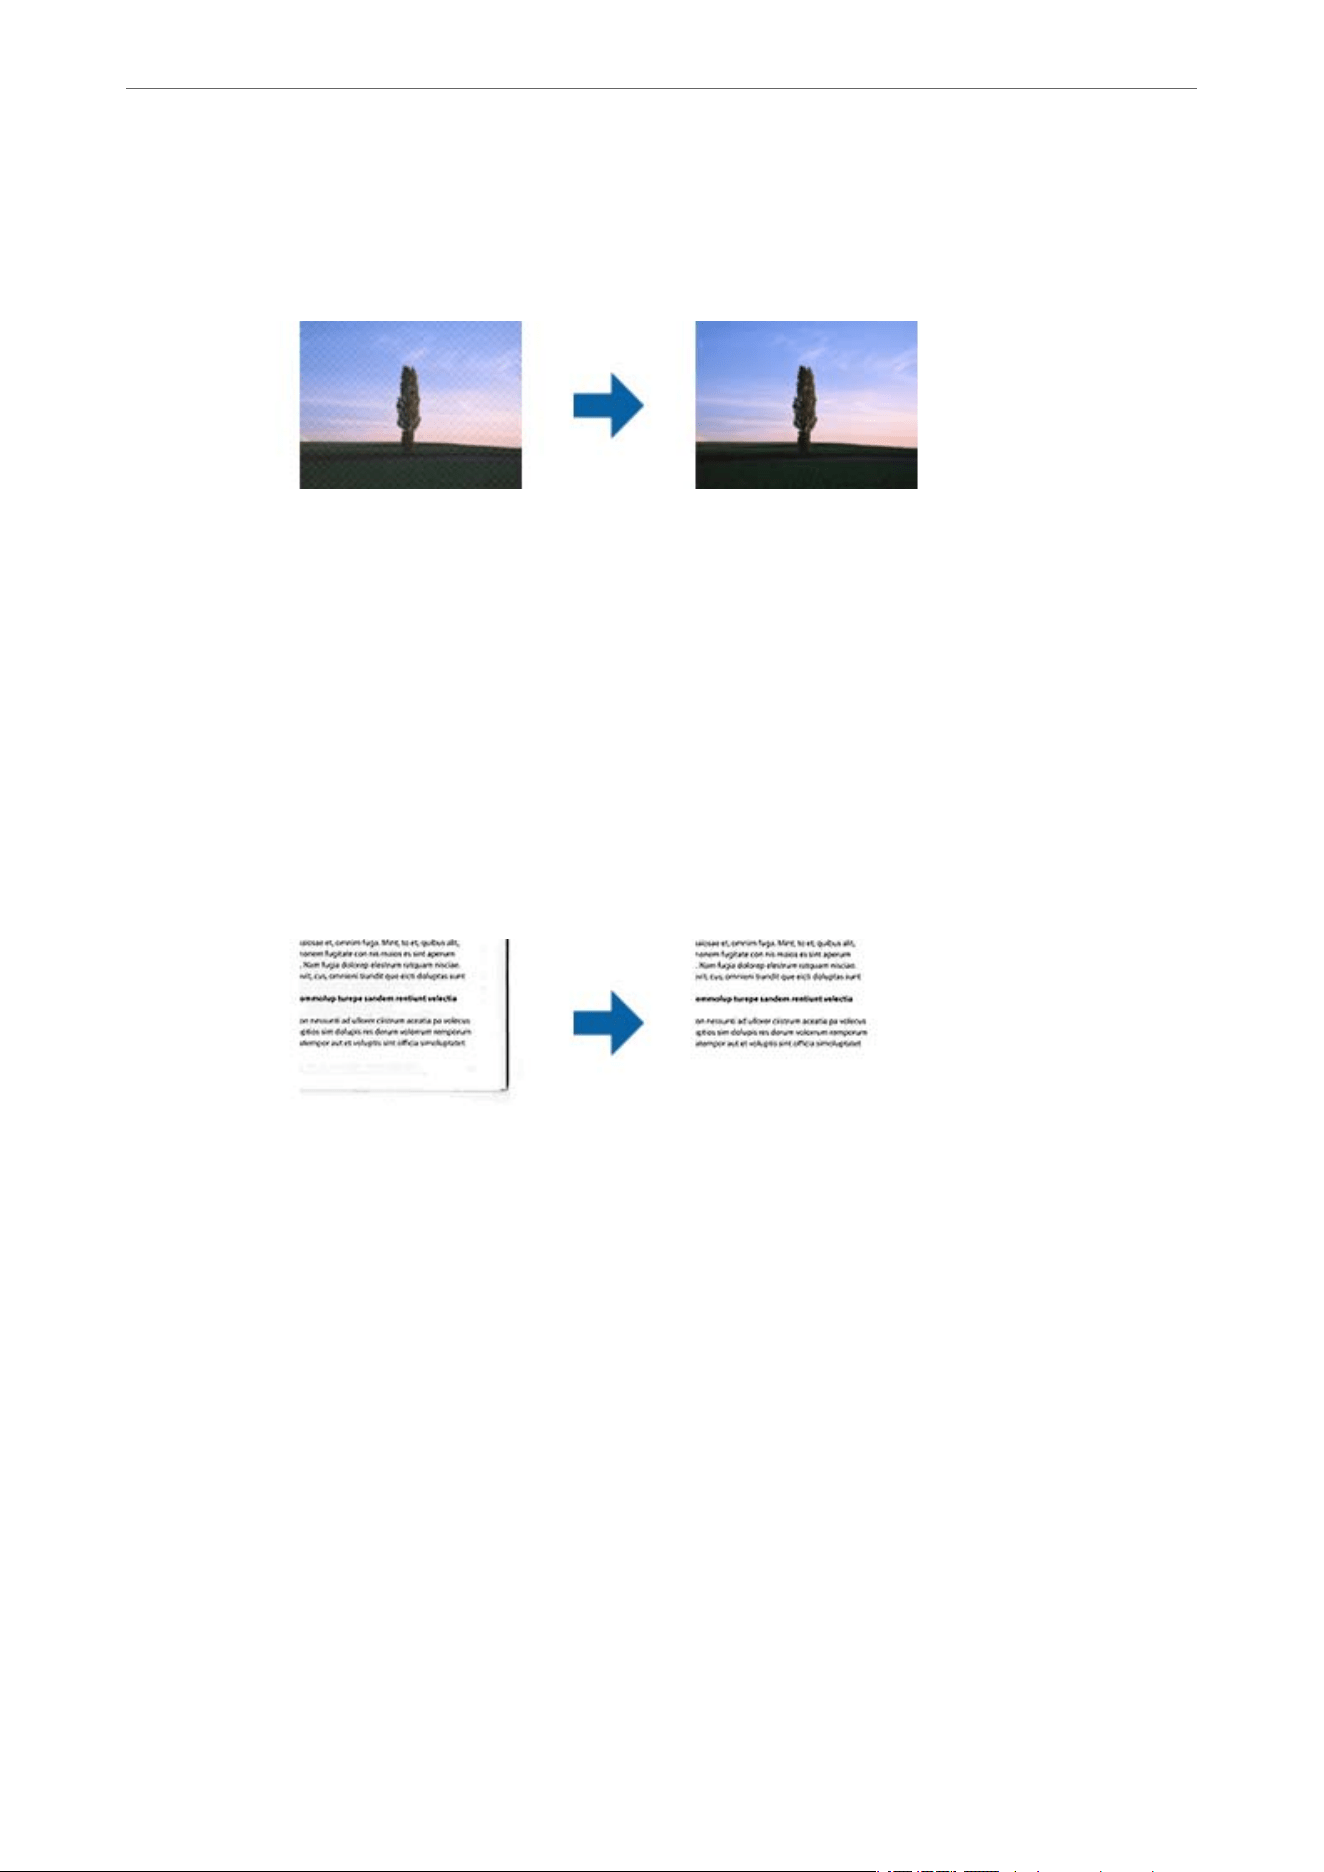
Color Restoration
You can correct images and film that have faded to return them to their original colors.
Note:
❏ Depending on the state of the original, it may not be corrected correctly. In this situation, adjust from the
Detailed Adjustments screen.
❏ When adjusting image quality on the Detailed Adjustments screen aer previewing an original, press the
(Auto Exposure) button on the preview screen.
Backlight Correction
You can lighten images and film that are dark due to backlight.
Note:
❏ Depending on the state of the original, it may not be corrected correctly. In this situation, adjust from the
Detailed Adjustments screen.
❏ When adjusting image quality on the Detailed Adjustments screen aer previewing an original, press the
(Auto Exposure) button again on the preview screen.
Advanced Scanning
>
Image Adjustment Features for Photo Mode
31
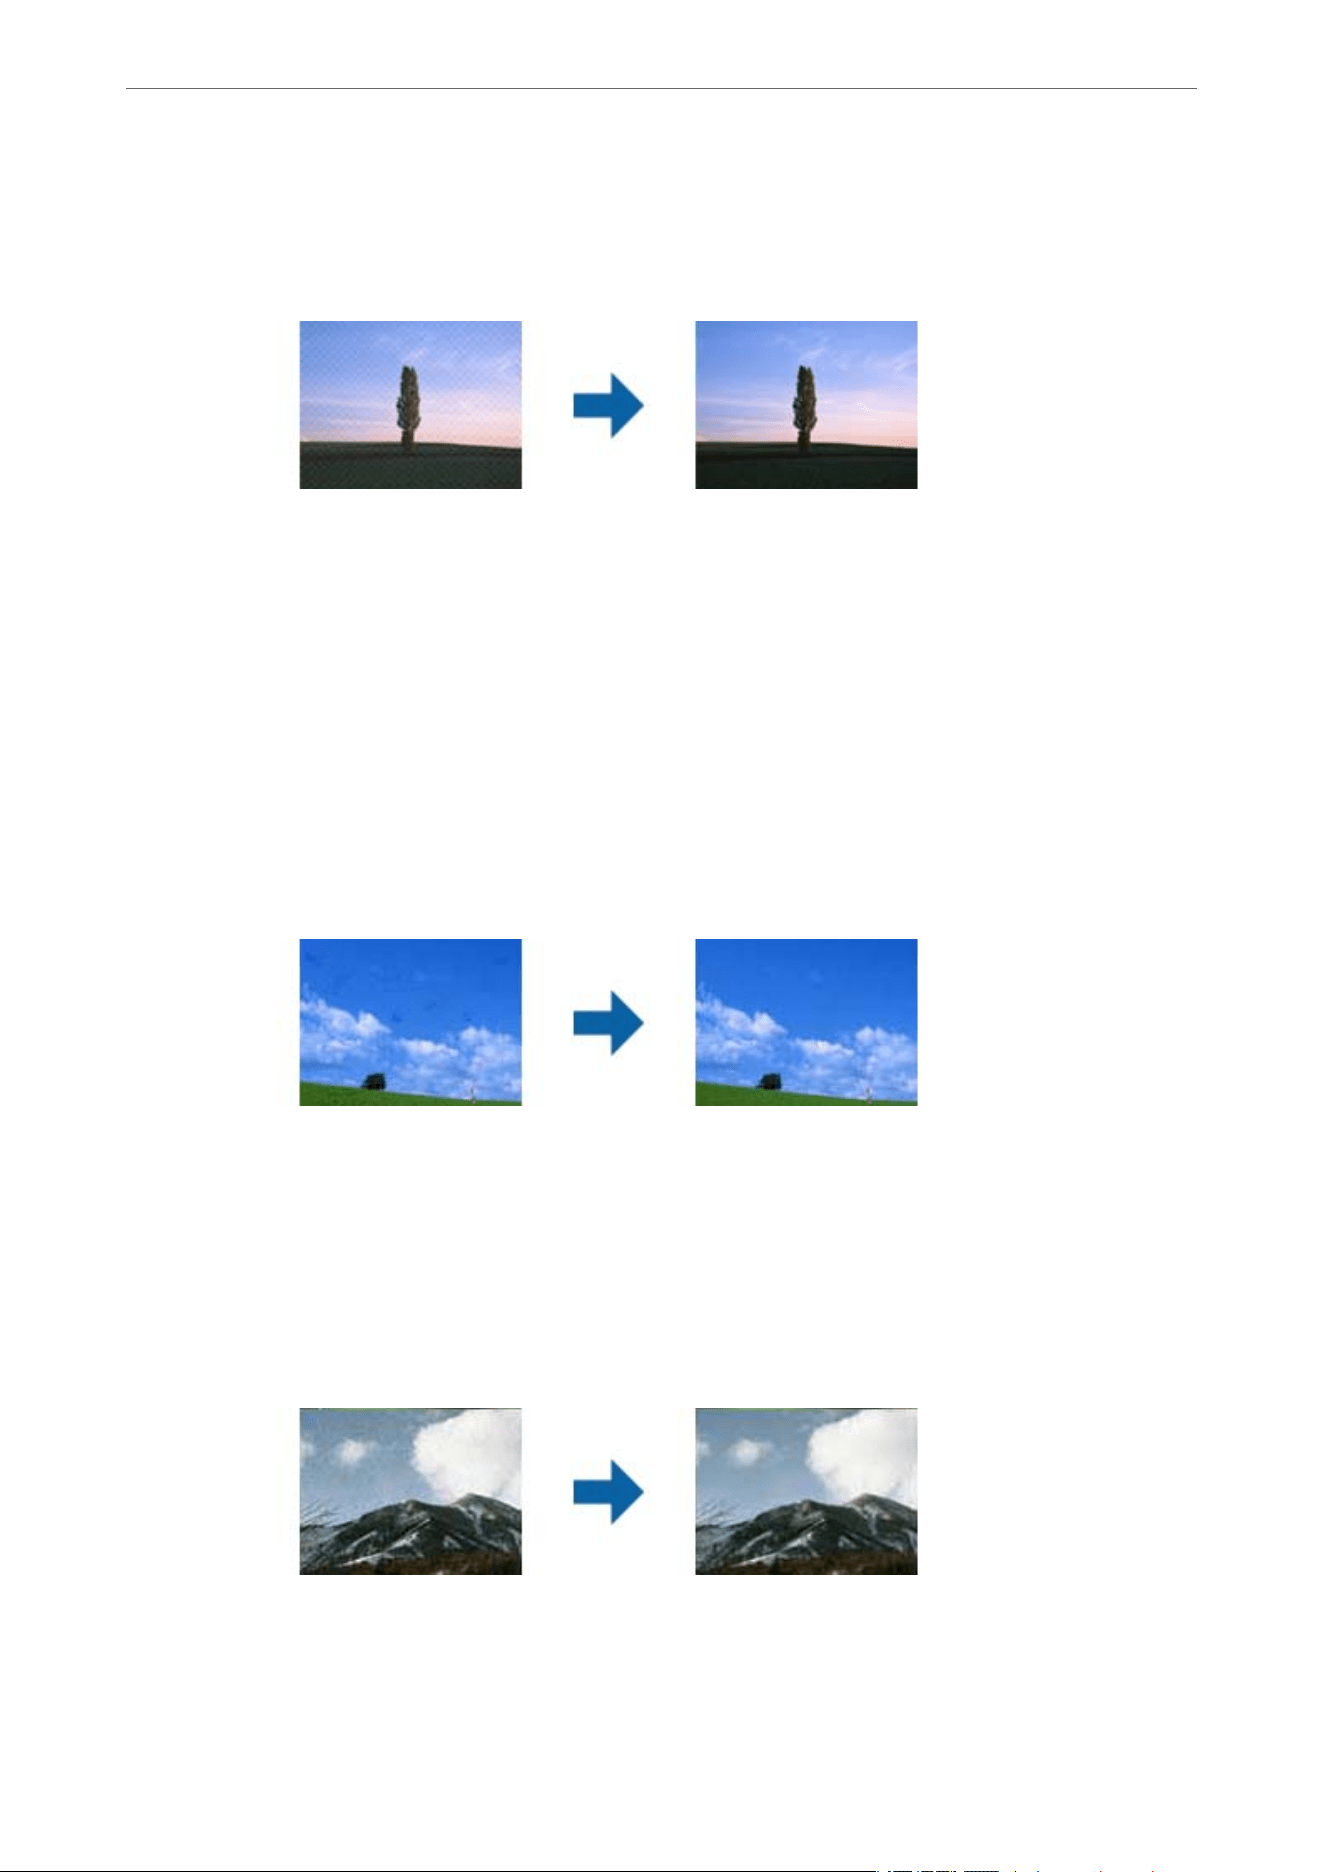
Descreening
You can remove moiré patterns (web-like shadows) that appear when scanning printed paper such as
a magazine.
To check for moiré patterns, display the image at 100 % (1:1). If the displayed image is zoomed out,
the image appears rough and may look like it has moiré patterns.
Note:
❏ To use this feature, set the Resolution on the Main Settings tab to 600 dpi or less.
❏ is feature is not available when selecting the Main Settings tab > Image Type > Black & White.
❏ is feature is not available when scanning lms.
❏ e eect of this feature cannot be checked in the preview window.
❏ is feature soens the sharpness of the scanned image.
Dust Removal
You can remove dust on photos and film.
Note:
❏ Depending on the state of the original, it may not be corrected correctly.
❏ e eect of this feature cannot be checked in the preview window.
❏ If the amount of free space in the memory is running low, you may not be able to scan.
Grain Reduction
You can reduce the grainy texture or roughness in images that occurs when scanning film.
❏ Depending on the state of the original, it may not be corrected correctly.
❏ This feature is not available when scanning photos.
❏ The effect of this feature cannot be checked in the preview window.
Advanced Scanning
>
Image Adjustment Features for Photo Mode
32
❏ This feature softens the sharpness of the scanned results.
Image Adjustment Features for Document Mode
You can adjust scanned images using the features on the Advanced Settings tab in Epson Scan 2.
For Document Mode, you can use image adjustment features that are suitable for text documents.
For most features, you can check the adjustment results in the preview window.
Note:
Some items may not be available depending on other settings you made.
Image Option
Remove Background
You can remove the background of the originals.
You can select the level of the effect by selecting the Main Settings tab > Image Type > Color.
If you select High, you can remove the background color of the originals, such as colored
papers, or papers discolored by sunlight or time.
To use this feature, the background color of the originals should be the lightest color in the
originals, and should be uniform. This feature is not applied correctly if there are patterns in
the background, or there are text or illustrations which are a lighter color than the background.
Note:
is feature is not available when you select the Main Settings tab > Image Type > Black & White.
Advanced Scanning
>
Image Adjustment Features for Document Mode
33
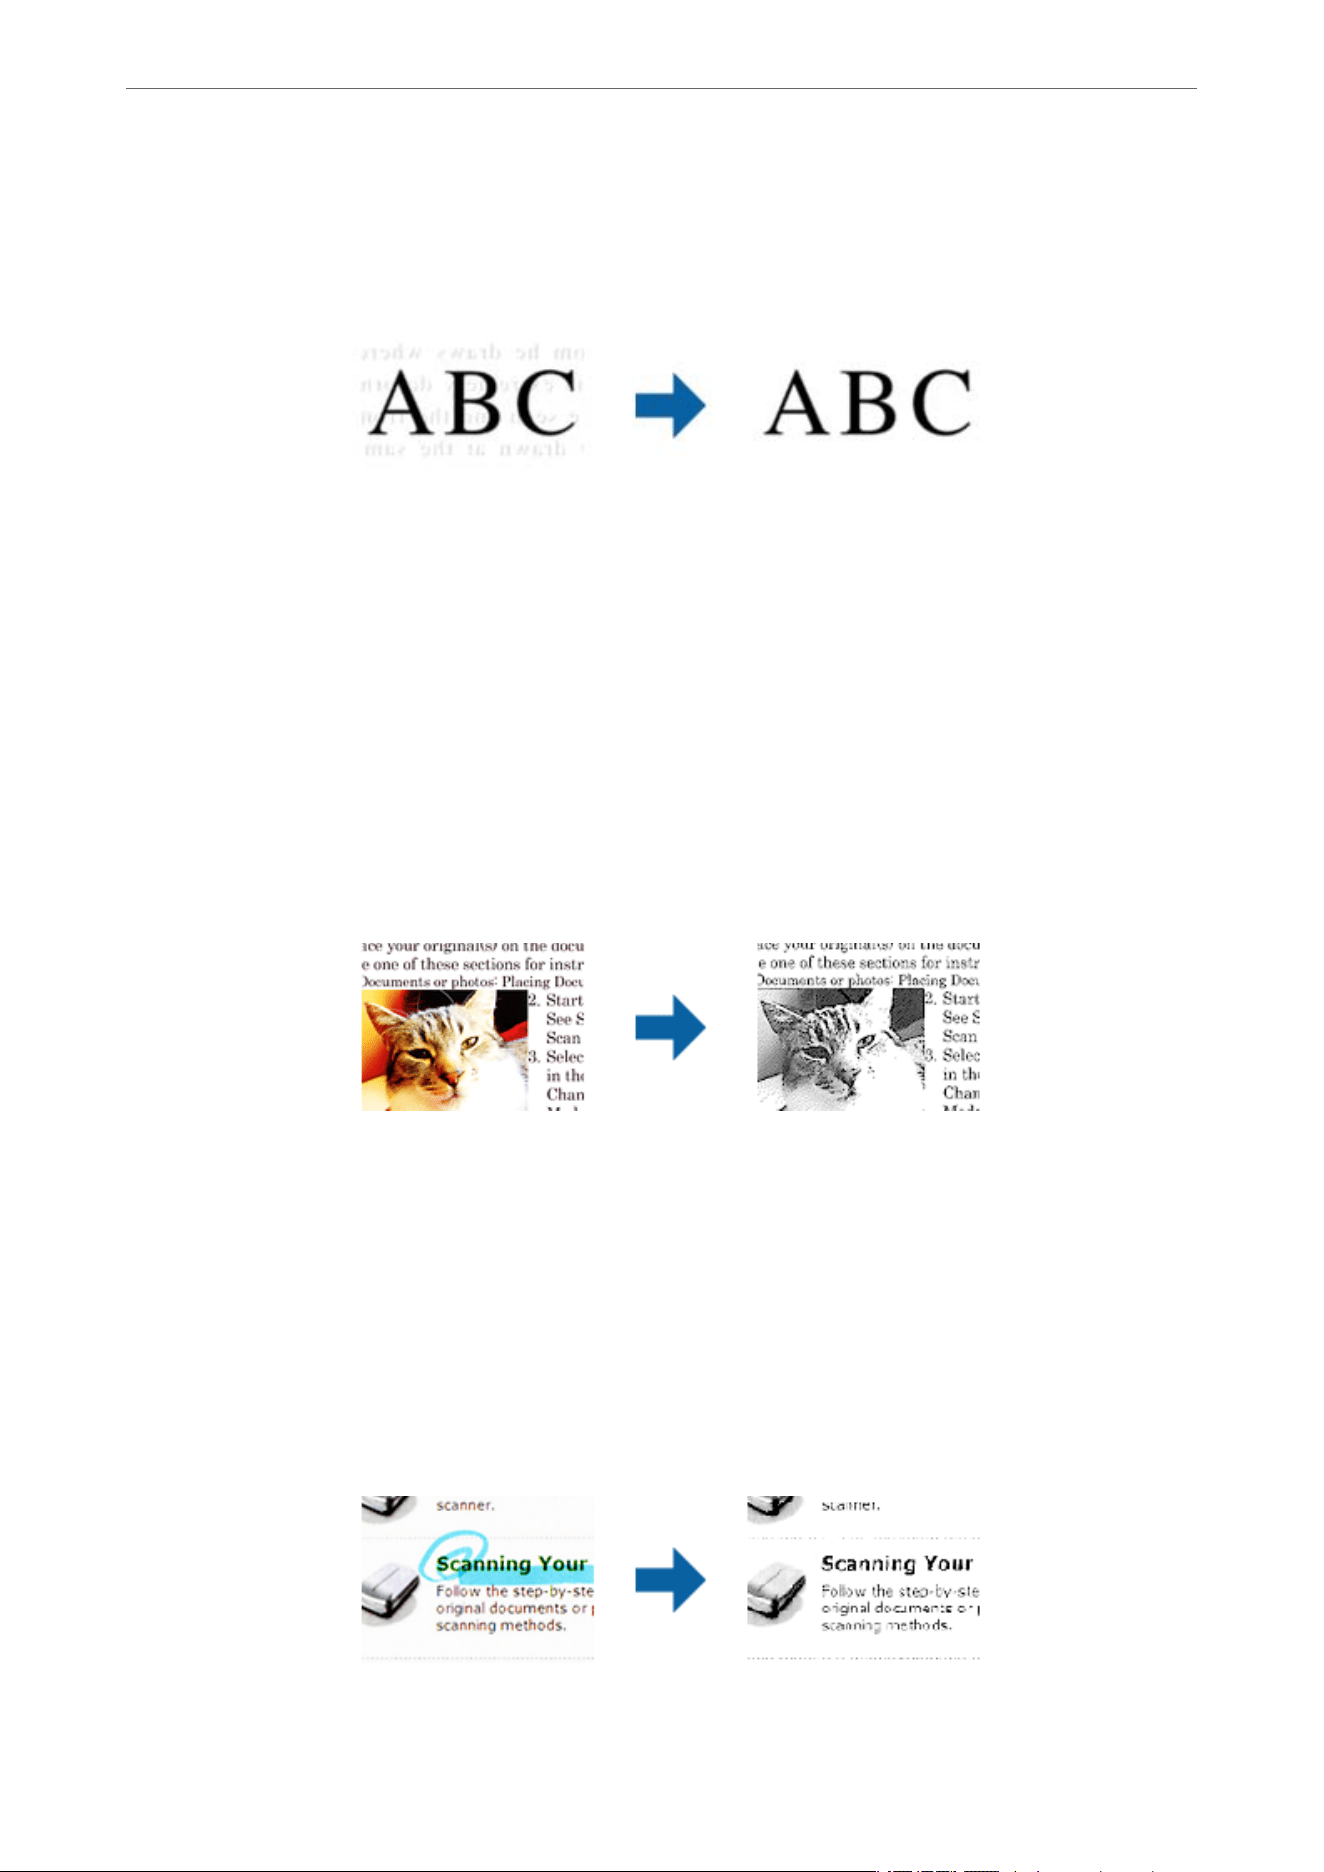
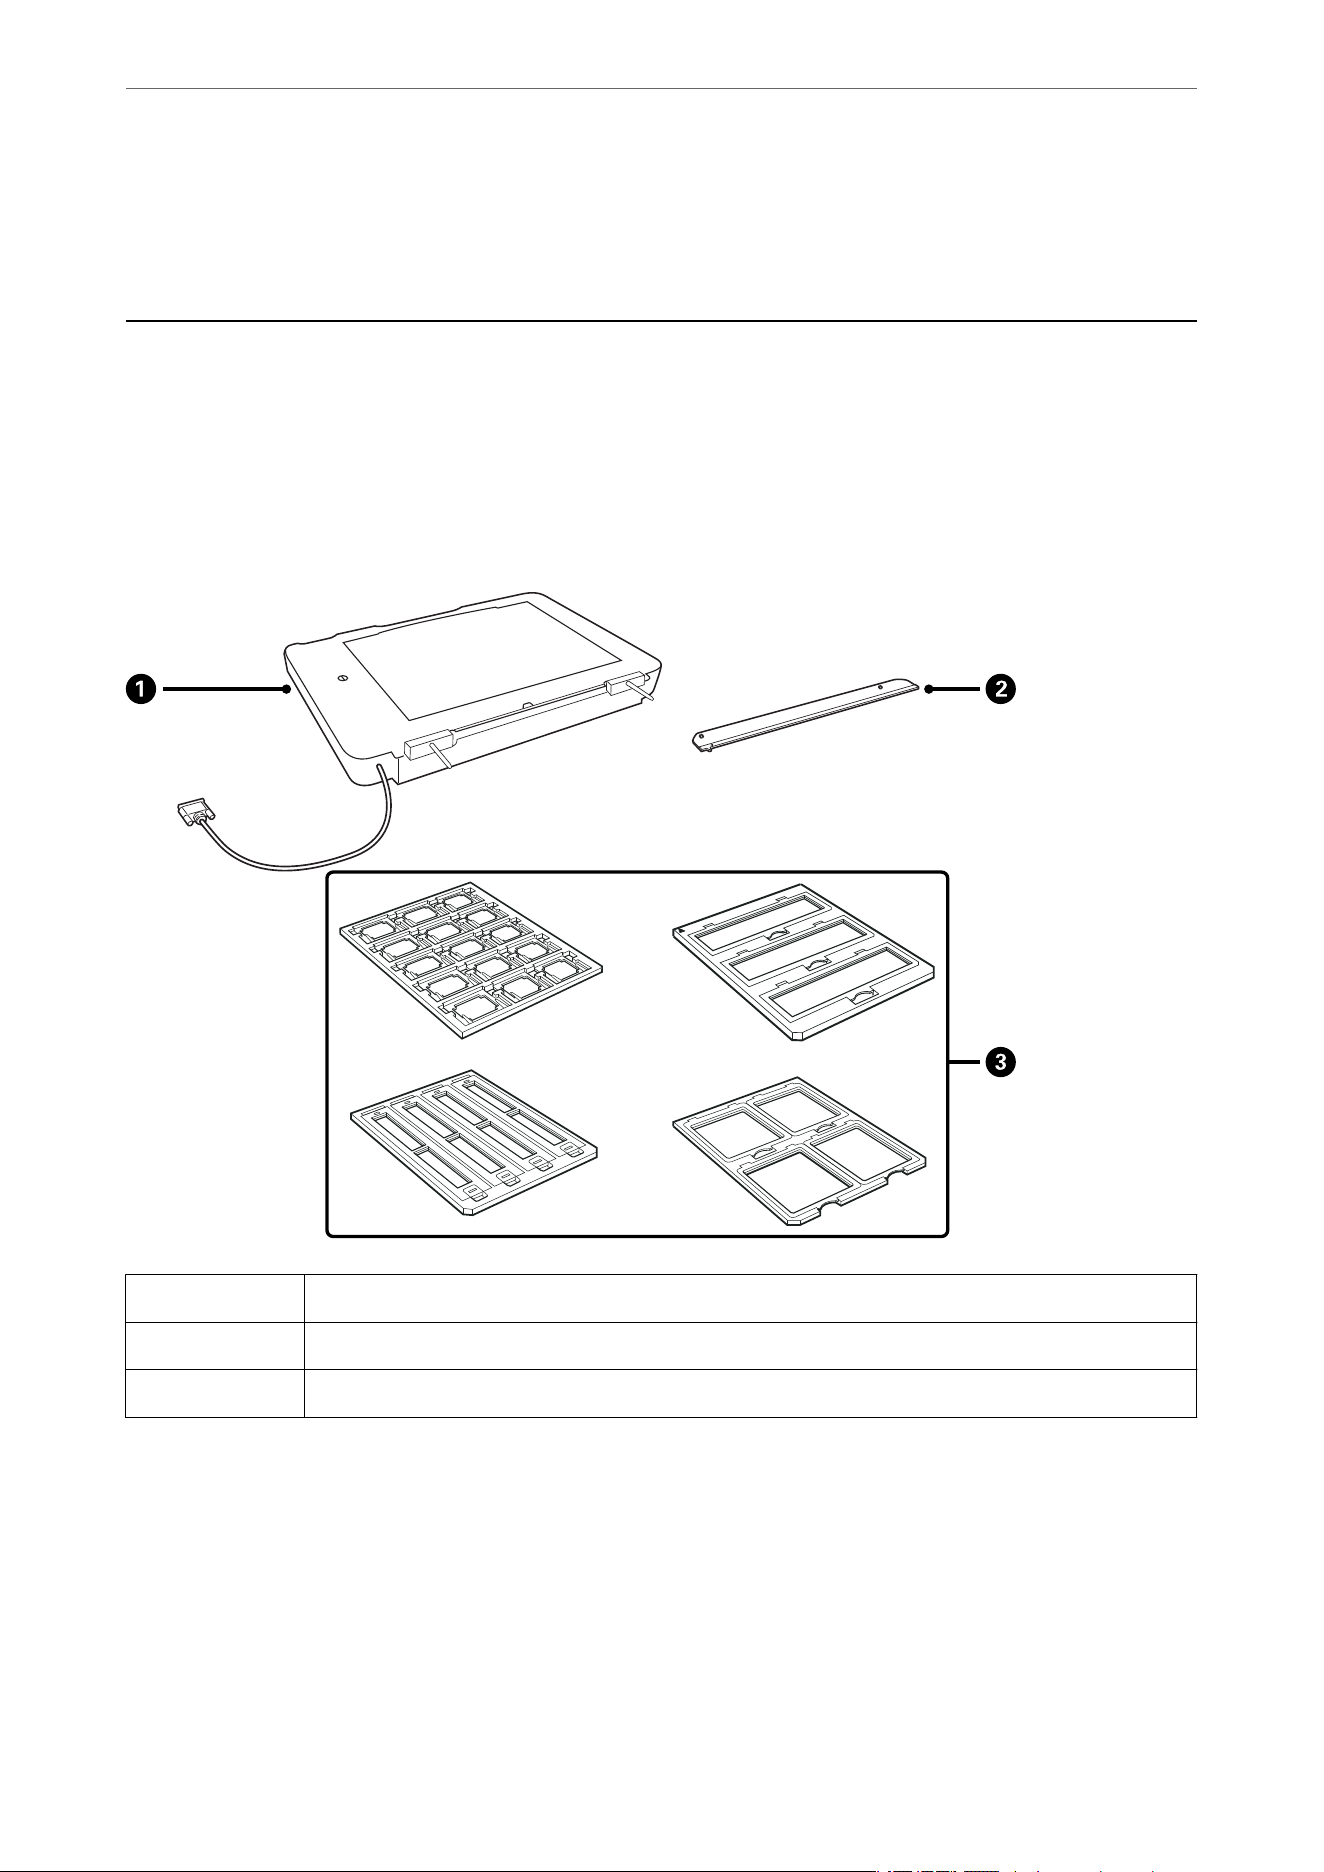
Text Enhancement
You can make blurred letters in the original clear and sharp. You can also reduce the offset or
unevenness of the background.
When you select the Main Settings tab > Image Type > Color or Grayscale, you can select the
level of the effect from Standard or High
When you select the Main Settings tab > Image Type > Black & White, the Settings button is
available which allows you to make detailed settings for the level of the
effect
in the Tex t
Enhancement Settings screen.
Note:
❏ To use this feature, set the Resolution on the Main Settings tab to 600 dpi or less.
❏ Depending on the original or resolution you set, Text Enhancement may not be applied.
Auto Area Segmentation
You can make letters clear and images smooth when performing black and white scanning for
a document that contains images.
You can adjust the quality of the image part of the original from Brightness and Contrast.
Note:
❏ You can only make settings for this feature when selecting the Main Settings tab > Image Type >
Black & White.
❏ To use this feature, set the Resolution on the Main Settings tab to 600 dpi or less.
Dropout
You can remove the color specified from the scanned image, and then save it in grayscale or
black and white. For example, you can erase marks or notes you wrote in the margins with
color pen when scanning.
Advanced Scanning
>
Image Adjustment Features for Document Mode
34
If you select Customize from the color list in Dropout, you can make settings for the color you
want to remove while checking the preview window (for Windows only).
Note:
is feature is not available when selecting the Main Settings tab > Image Type > Auto or Color.
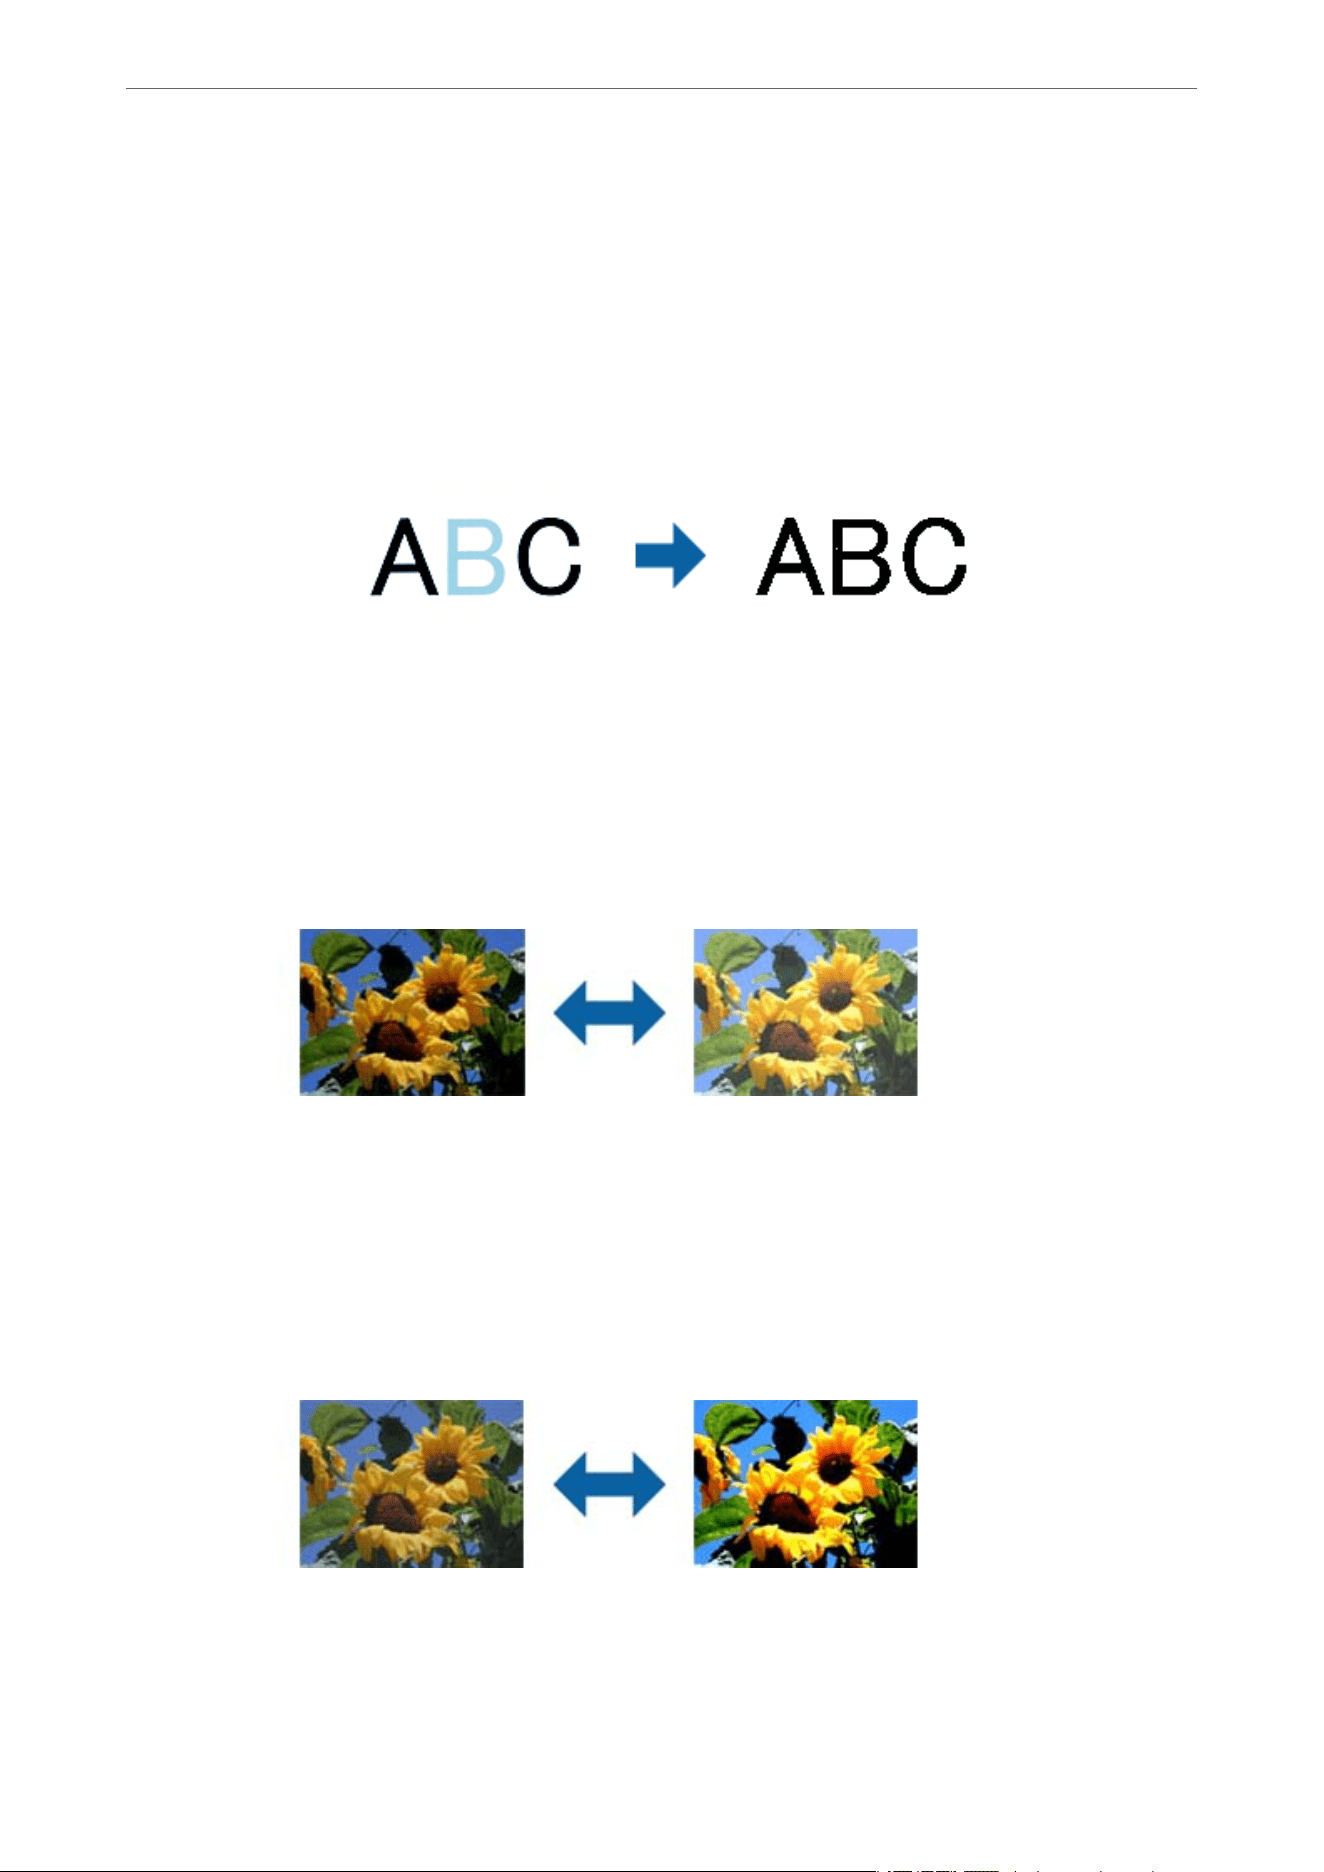
Color Enhance
You can enhance the color specified for the scanned image, and then save it in grayscale or
black and white. For example, you can enhance letters or lines that are in light colors.
If you select Customize from the color list in Color Enhance, you can make settings for the
color you want to enhance while checking the preview window (for Windows only).
Note:
is feature is not available when selecting the Main Settings tab > Image Type > Auto or Color.
Brightness
You can adjust the brightness for the whole image.
Note:
is feature is not available depending on the settings on the Main Settings tab > Image Type or the settings
on the Advanced Settings tab.
Contrast
You can adjust the contrast for the whole image. If you increase the contrast, the bright areas become
brighter, and the dark areas become darker. On the other hand, if you lower the contrast, the
differences between the bright and dark areas of the image are less defined.
Note:
is feature is not available depending on the settings on the Main Settings tab > Image Type or the settings
on the Advanced Settings tab.
Advanced Scanning
>
Image Adjustment Features for Document Mode
35
Gamma
You can adjust the gamma (brightness of the intermediate range) for the whole image. If the image is
too light or too dark, you can adjust the brightness.
Note:
is feature is not available depending on the settings on the Main Settings tab > Image Type or the settings
on the Advanced Settings tab.
Threshold
You can adjust the border for monochrome binary (black and white). Increase the threshold, the
black color area becomes larger. Decrease the threshold, the white color area becomes larger.
Note:
is feature may not be available depending on the settings on the Main Settings tab > Image Type or the
settings on the Advanced Settings tab.
Unsharp Mask
You can enhance and sharpen the outlines of the image.
Note:
is feature is not available when selecting the Main Settings tab > Image Type > Black & White.
Advanced Scanning
>
Image Adjustment Features for Document Mode
36
Descreening
You can remove moiré patterns (web-like shadows) that appear when scanning printed paper such as
a magazine.
To check for moiré patterns, display the image at 100 % (1:1). If the displayed image is zoomed out,
the image appears rough and may look like it has moiré patterns.
Note:
❏ To use this feature, set the Resolution on the Main Settings tab to 600 dpi or less.
❏ is feature is not available when selecting the Main Settings tab > Image Type > Black & White.
❏ is feature is not available when scanning lms.
❏ e eect of this feature cannot be checked in the preview window.
❏ is feature soens the sharpness of the scanned image.
Edge Fill
You can remove the shadow created around the scanned image.
For double-sided scanning, the settings for the edge
fill
range are mirror-reversed for the back of the
original.
If you select Settings, the Edge Fill Level screen is displayed, and you can adjust the edge fill ranges
for the top, bottom,
left,
and right.
Note:
e eect of this feature cannot be checked in the preview window.
Dual Image Output (for Windows Only)
You can scan once and save two images with different output settings at the same time.
The Settings for Output 2 screen is displayed when you select On or Settings. Change the settings
for the second scanned image (image 2).
Watermark (for Windows only)
You can add a watermark to the scanned image.
Select Settings to display the Watermark S ettings screen.
Advanced Scanning
>
Image Adjustment Features for Document Mode
37

Saving as a Searchable PDF
You can save the scanned image as a Searchable PDF. This is a PDF in which searchable text data is embedded.
Note:
❏ Text on the originals is recognized using Optical Character Recognition (OCR), and then embedded in the scanned
image.
❏ is feature is only available when the EPSON Scan OCR component (Windows) or Epson Scan 2 OCR component (Mac
OS) is installed.
1. Place the original.
2.
Start Epson Scan 2.
3. Make settings for each item on the Main Settings tab.
4. Click Preview.
5. Check the preview, and make other settings on the Advanced Settings tab if necessary.
6. Select Searchable PDF from the Image Format list.
7. Select Options from the Image Format list to open the Image Format Options window.
8. Select the Tex t tab on the Image Format Options window.
9. Check that the language of the original is selected in the Tex t L ang uage list.
10. Click OK to close the Image Format Options window.
11.
Check the save
file
name displayed in File Name.
12. Select the save folder for the scanned image from the Folder list.
13. Click Scan.
The scanned image is saved as a Searchable PDF.
Related Information
& “Scanning Using Epson Scan 2” on page 18
& “Placing Originals on the Product” on page 14
& “Text is Not Recognized Correctly when Saving as a Searchable PDF” on page 58
Advanced Scanning
>
Saving as a Searchable PDF
38
Using the Transparency Unit
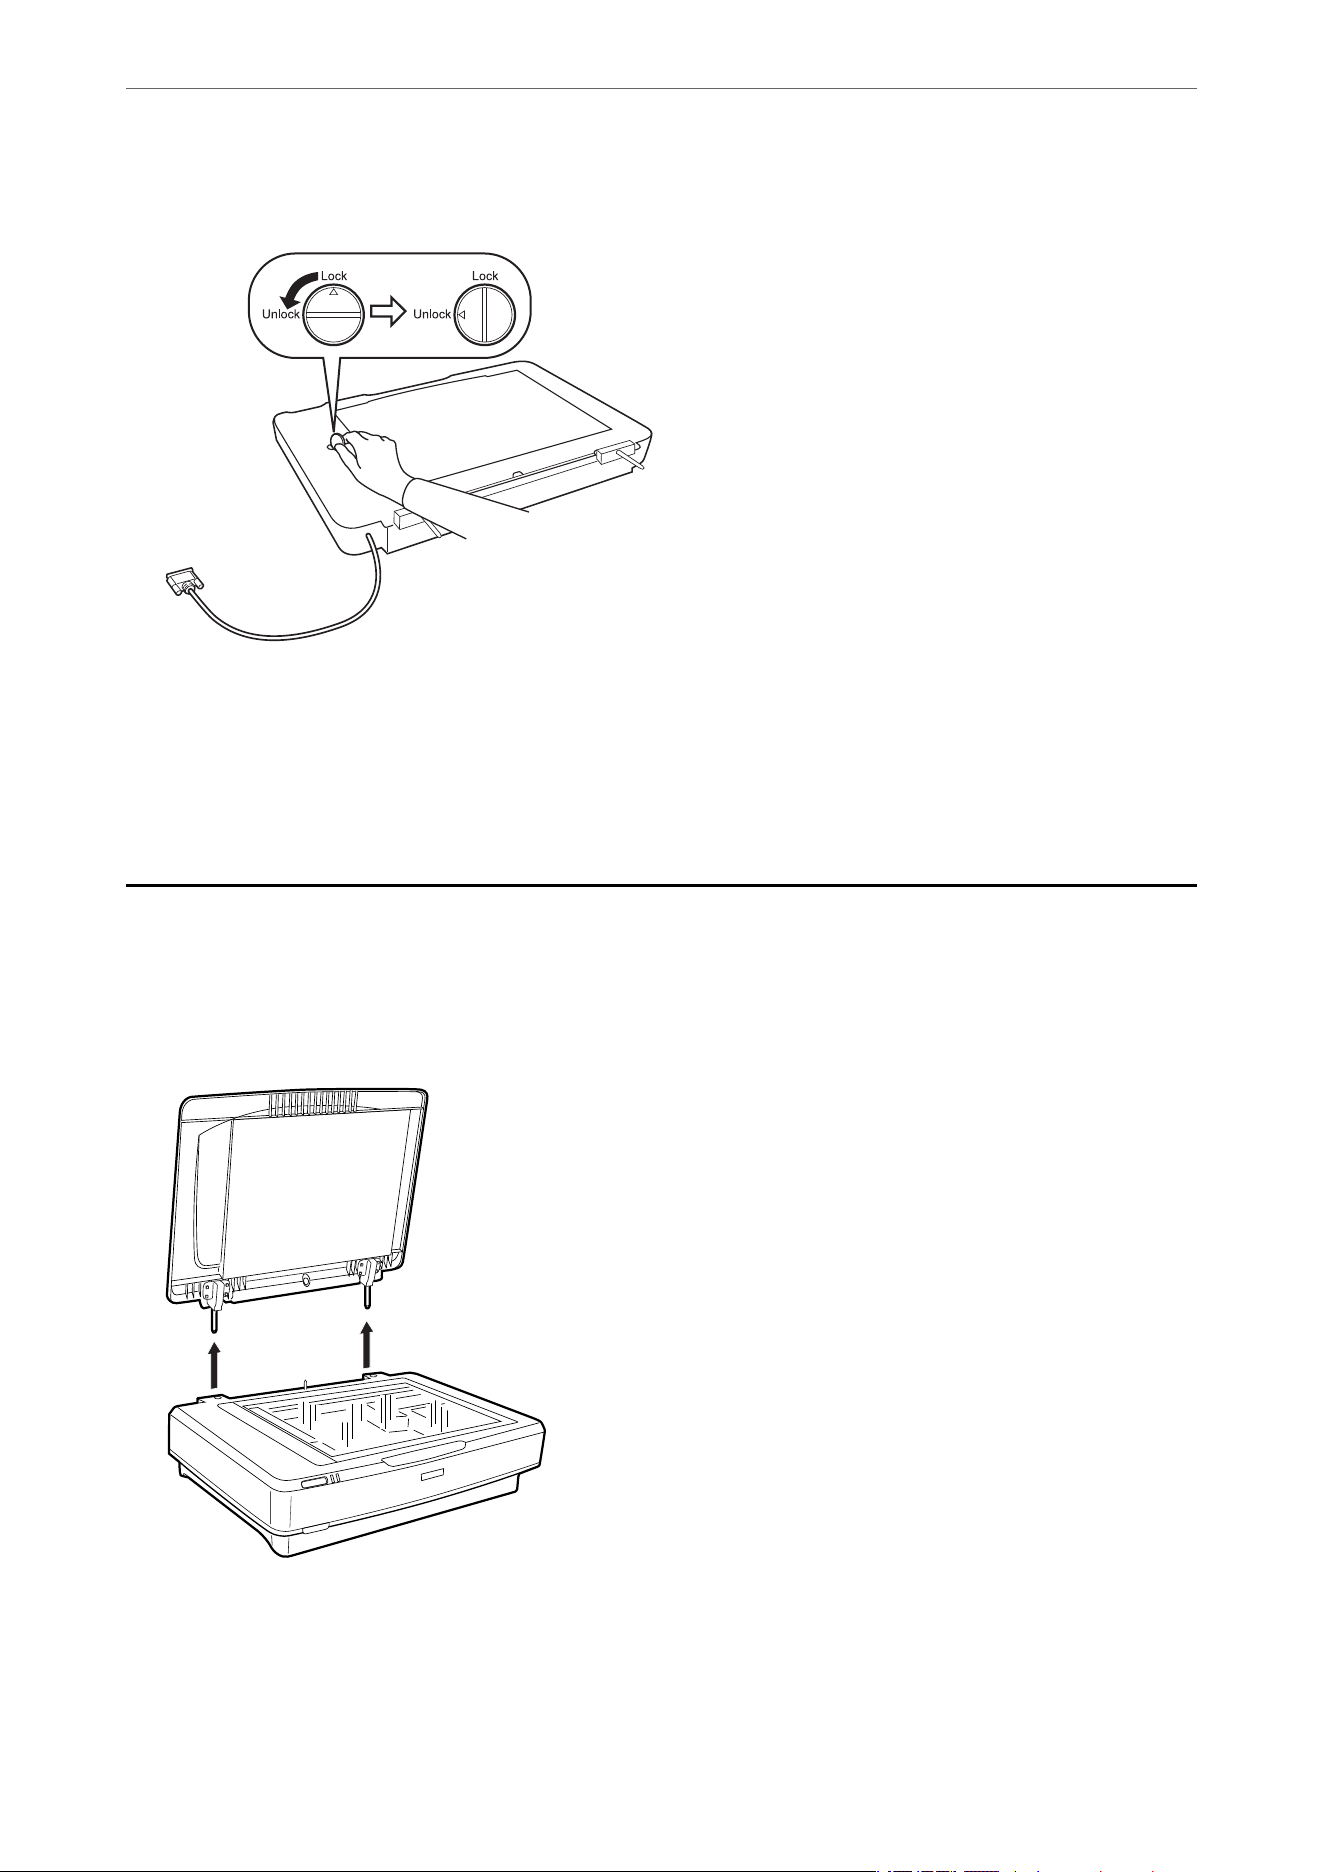
Unpacking the Transparency Unit
The optional A3 Transparency Unit (B12B819221) allows you to scan films and slides in full color. Once you install
the Transparency Unit, you can leave it in place even when you want to return to scanning normal (paper)
originals.
Make sure that all the items shown below are included and have not been damaged during shipping. Contact your
Epson dealer if any item is missing or damaged.
A
Transparency Unit
B
Transparency guide
C
Film holders
Unlocking the transportation lock
Before you install the Transparency Unit, you need to unlock the transportation lock.
1. Turn the unit so that the glass side faces up.
Using the Transparency Unit
>
Unpacking the Transparency Unit
>
Unlocking the transportation lock
39
2. Use a coin to unlock the transportation lock by turning it counter-clockwise one-quarter.
Note:
❏ Before transporting the scanner, lock the transportation lock to prevent damage.
❏ If the unit’s lamp assembly is not in its home position, you cannot lock the transportation lock. In this case, reattach
the unit to the scanner, close the unit, and then turn on the scanner; the unit’s lamp assembly then returns to its
home position. Turn o the scanner and remove the Transparency Unit.
Installing the Transparency Unit
1. Make sure the scanner is turned
off,
and then unplug the power cord from the scanner.
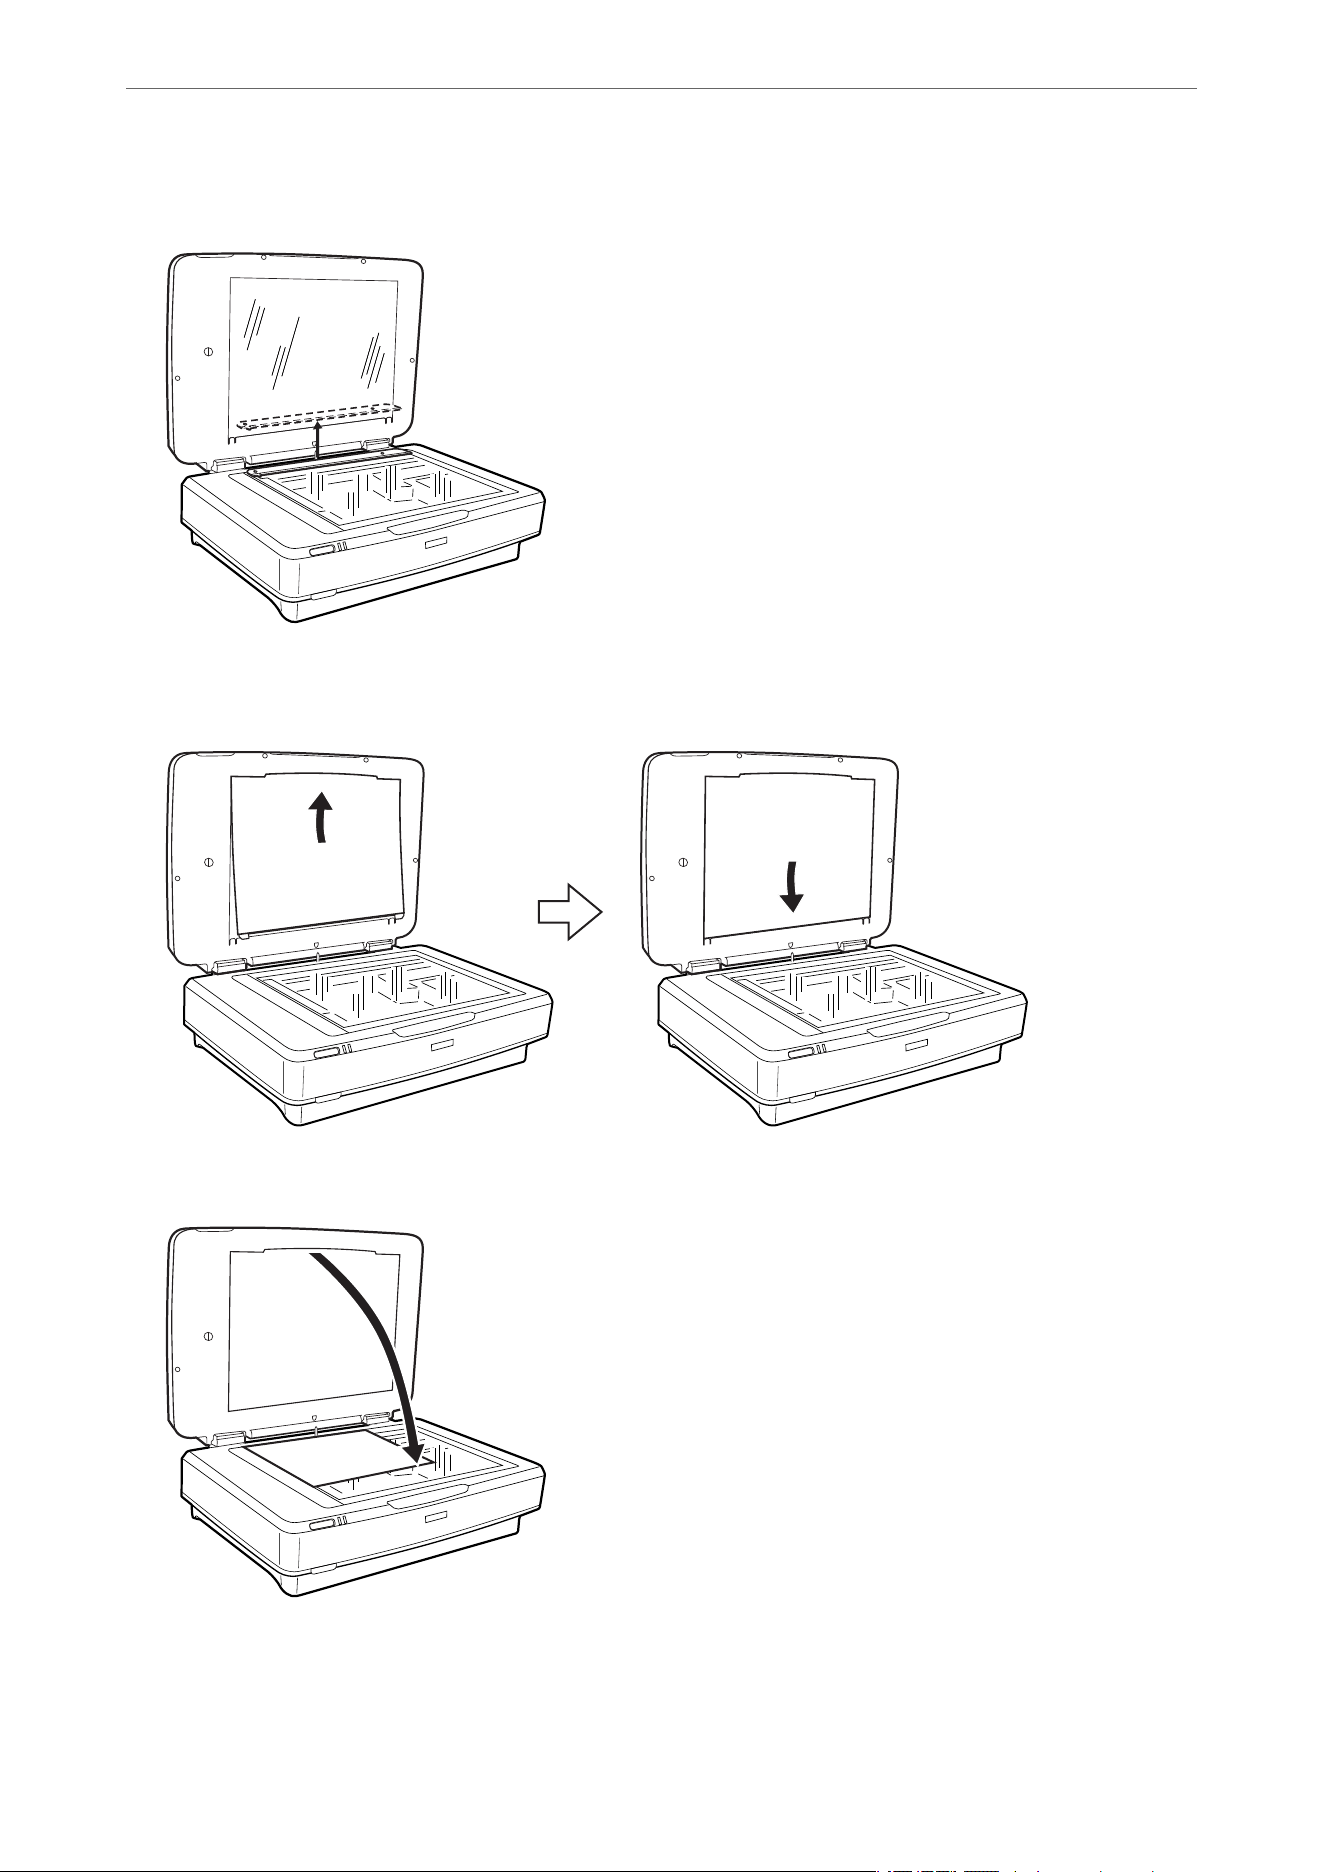
2. Open the scanner’s document cover, and then remove it by lifting the cover straight up.
Using the Transparency Unit
>
Installing the Transparency Unit
40

3. Align the pins of the unit with the holes of the scanner, and then lower the unit until it rests securely on the
scanner with the pins in the holes.
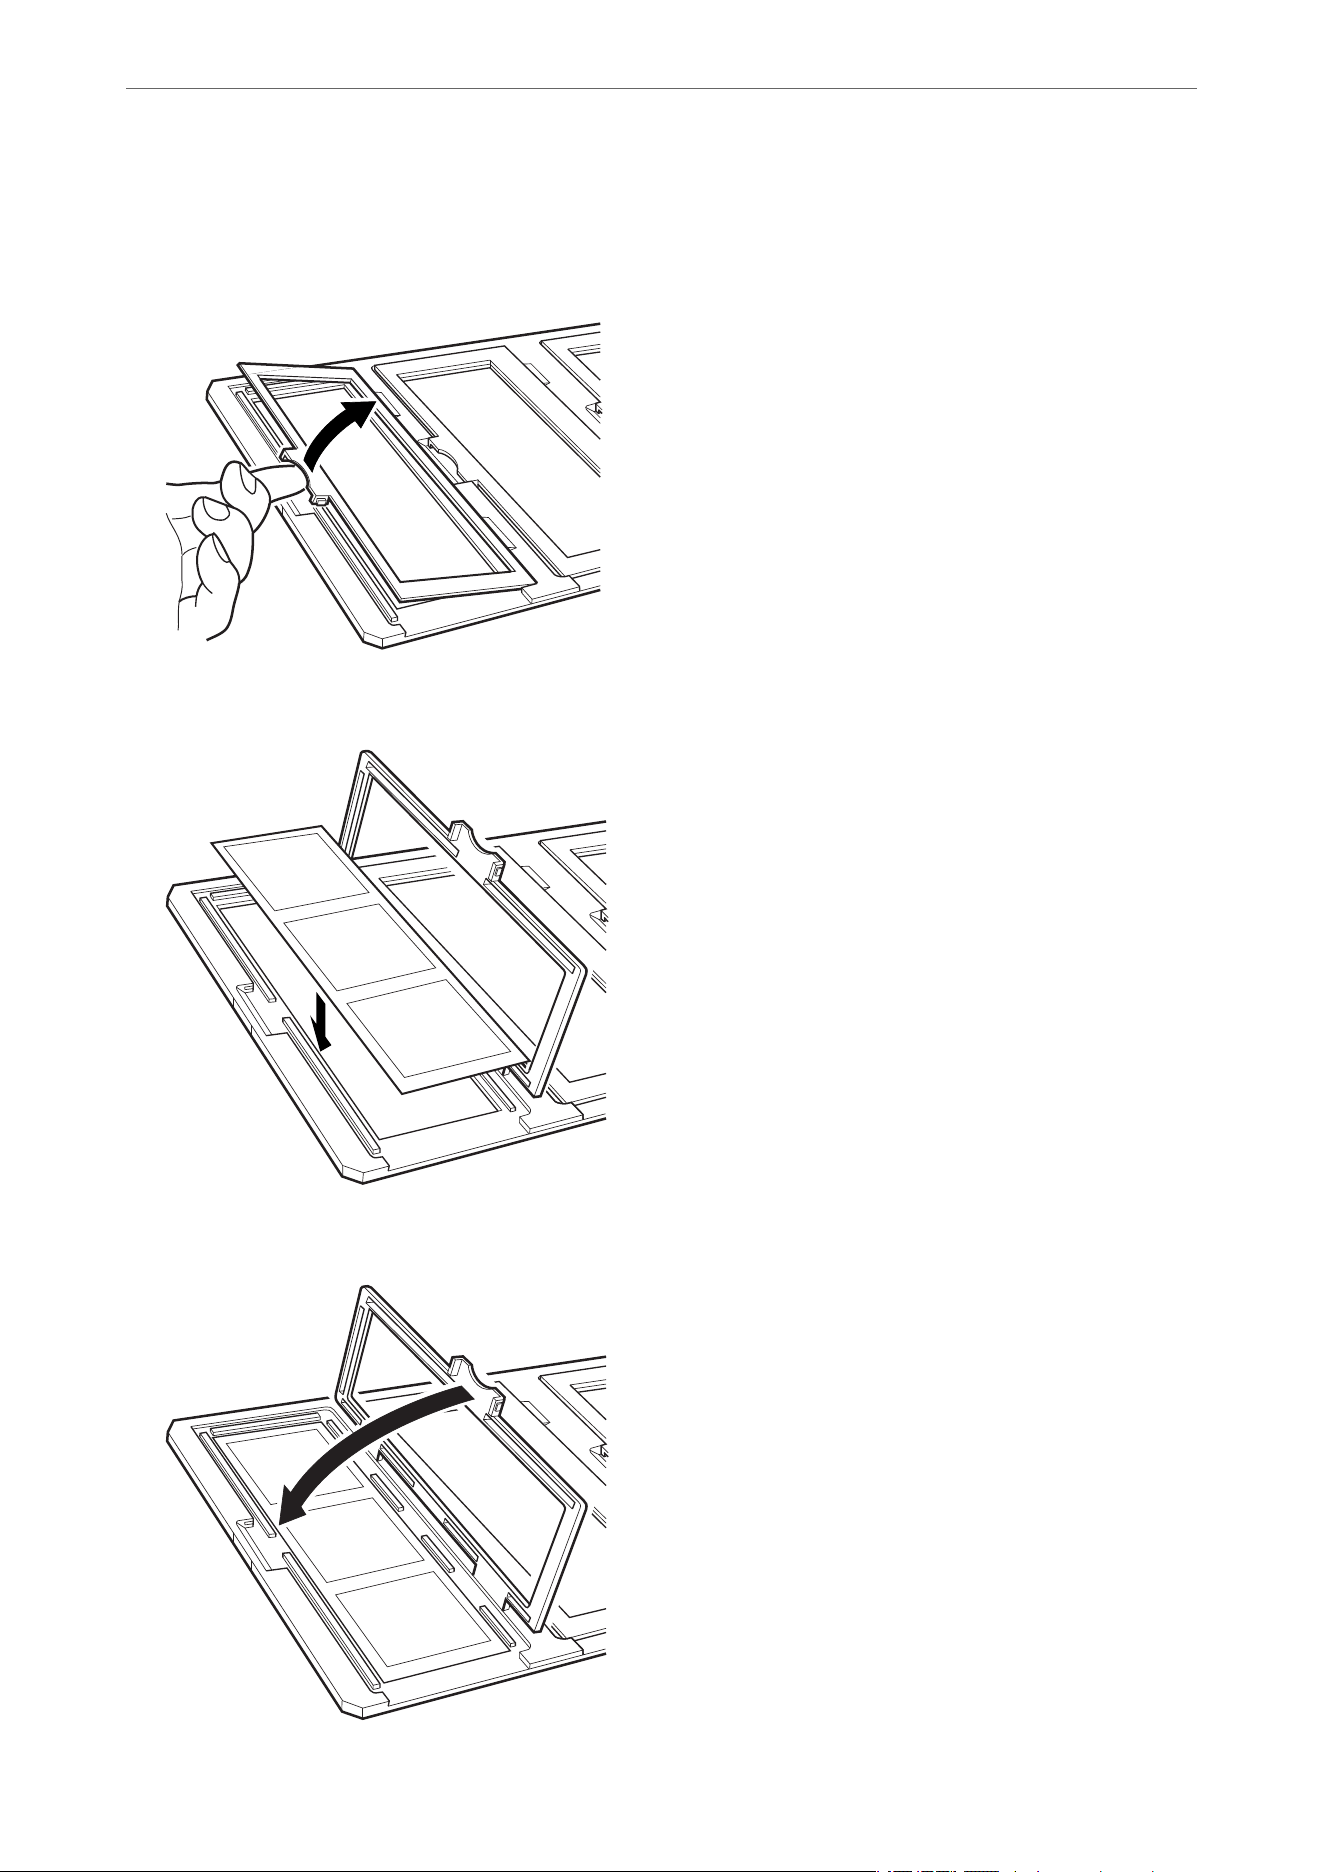
4. Remove the document mat from the Transparency Unit as shown below.
5. Place the transparency guide on the upper edge of the scanner glass as shown below.
6. Close the Transparency Unit.
Using the Transparency Unit
>
Installing the Transparency Unit
41
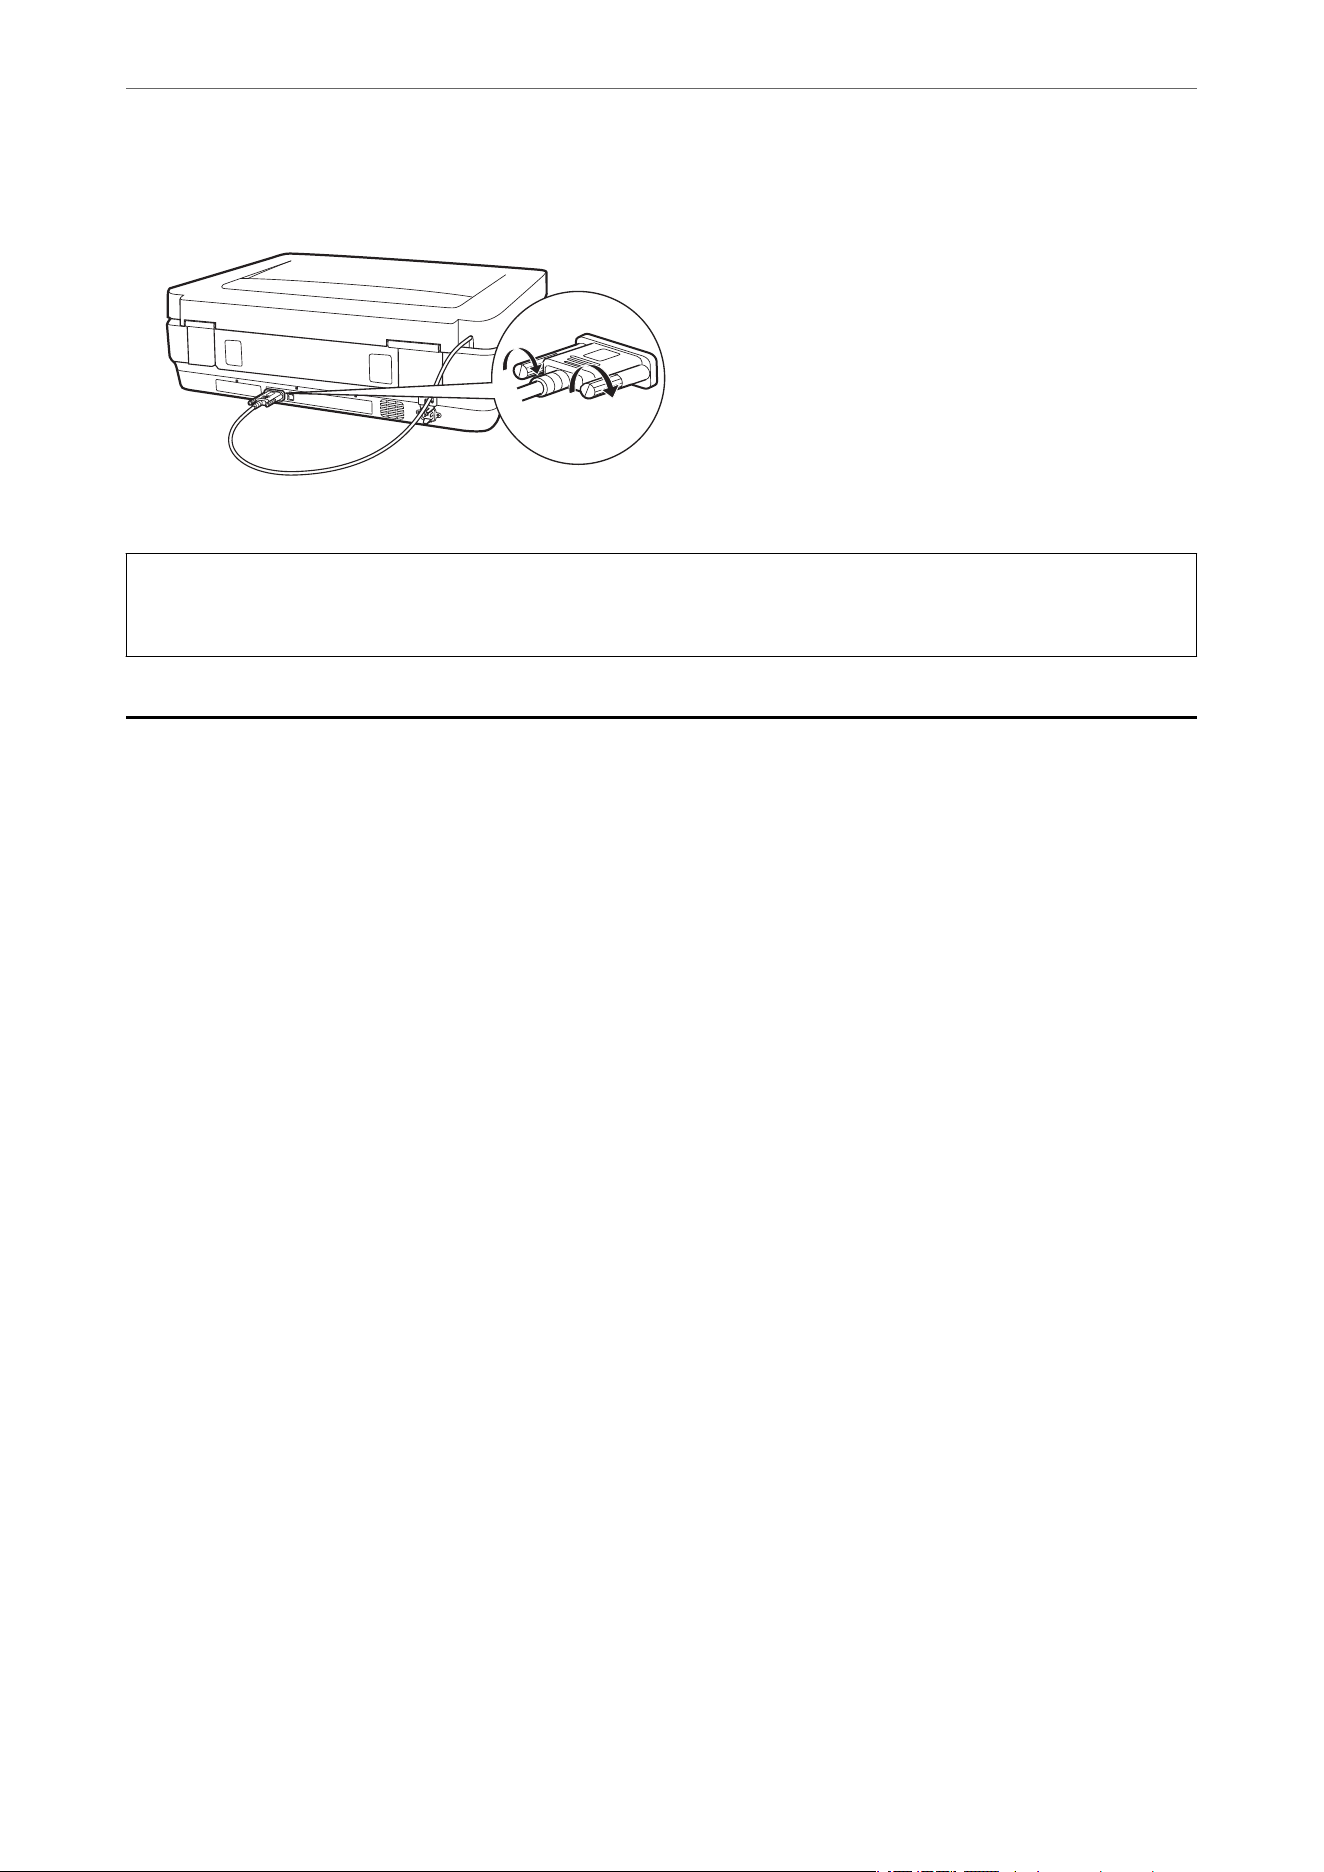
7. Connect the Transparency Unit’s connector to the option connector at the back of the scanner.
8. Connect the power cord to the scanner and then turn on the scanner.
c
Important:
Do not put heavy objects on the Transparency Unit; otherwise the unit may be damaged.
Setting and Placing Films
Note:
❏ Before scanning lms, make sure you use a so cloth to wipe the Transparency Unit glass and the scanner glass.
❏ When scanning lms, select the Photo Mode in Epson Scan 2, and make sure you set the Document Source and
Document Type correctly.
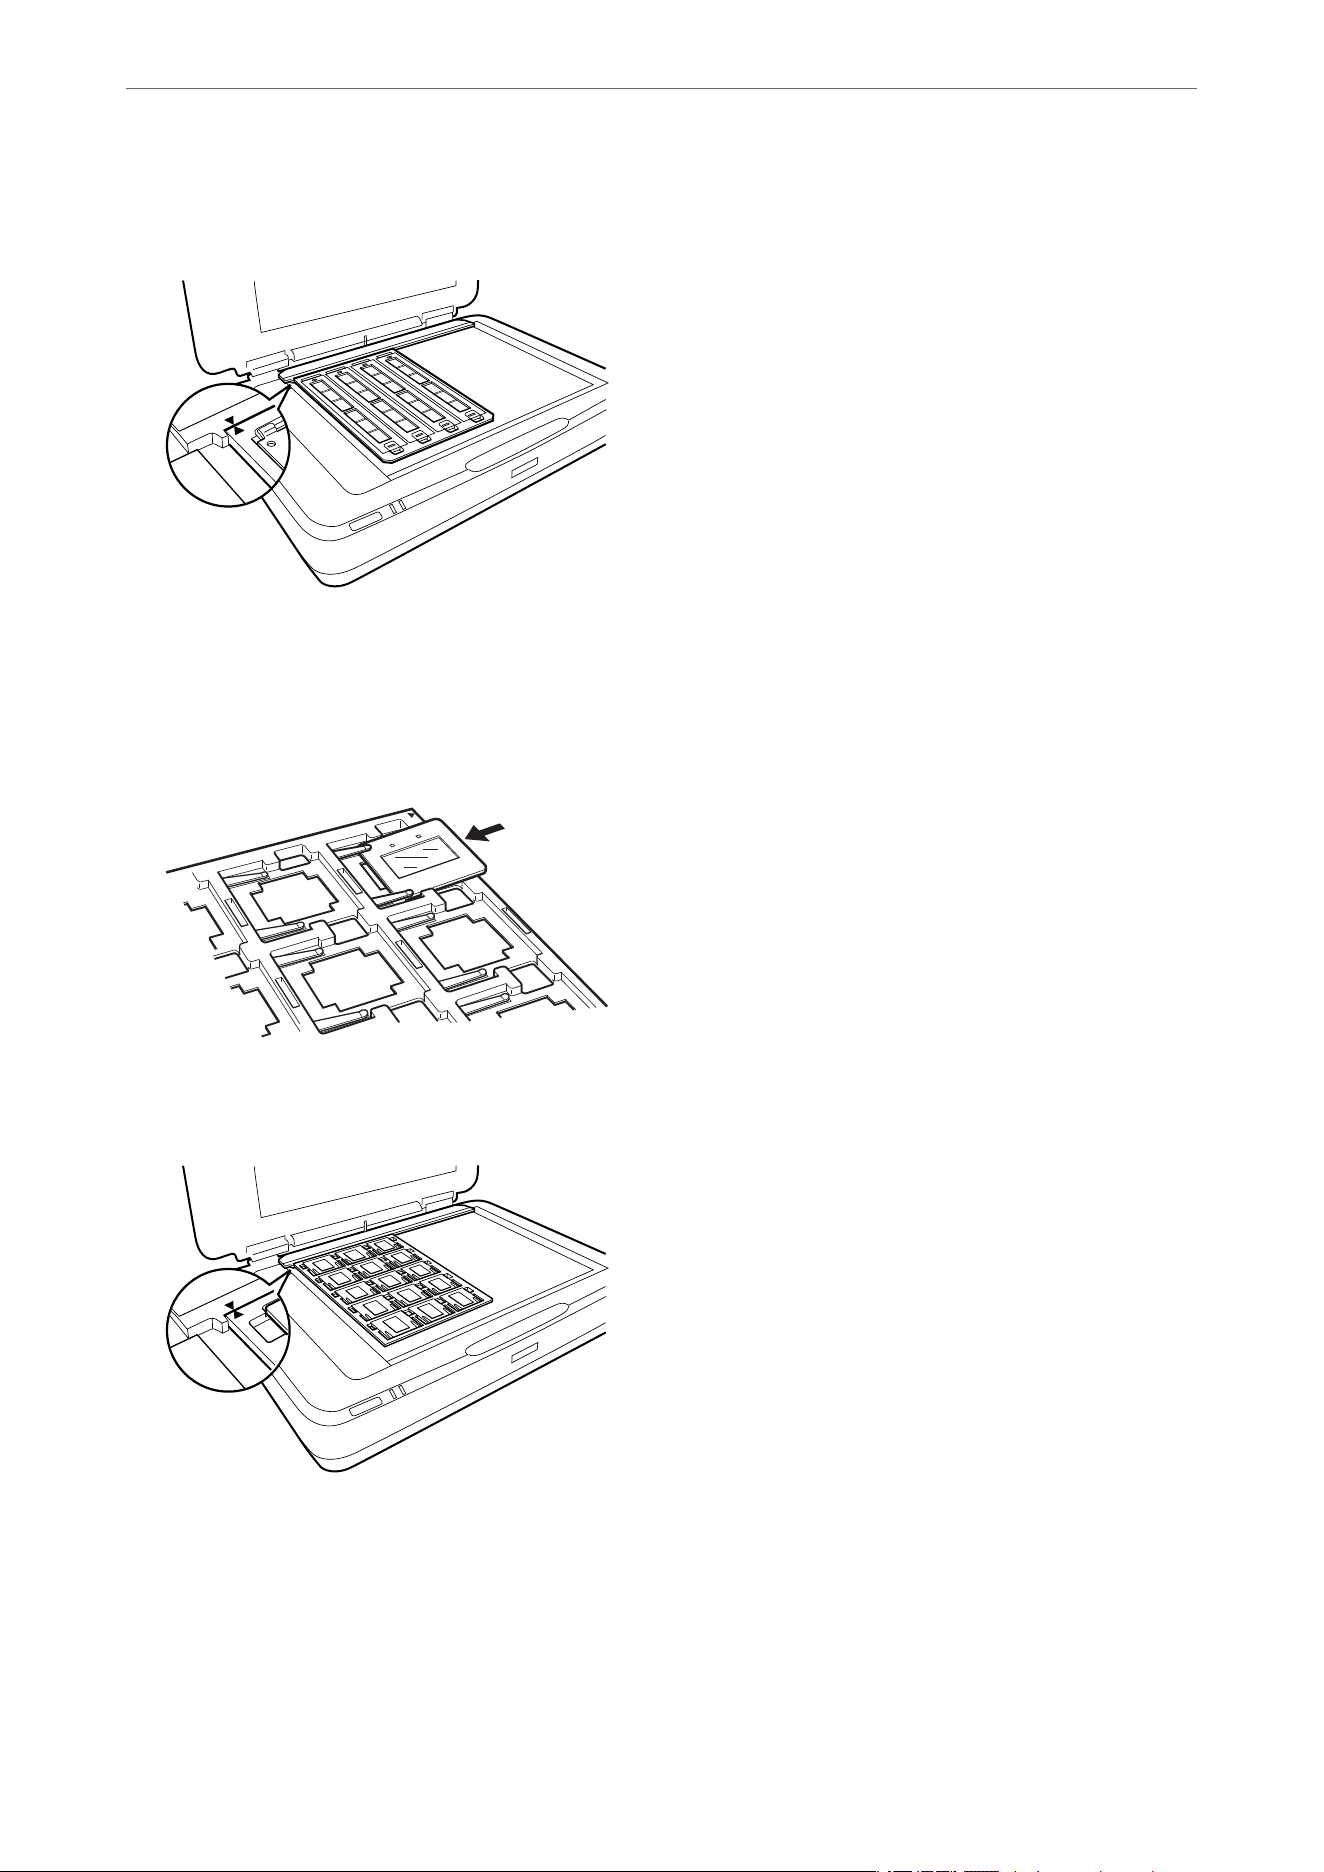
1. Open the Transparency Unit.
2. Place the film in the appropriate holder.
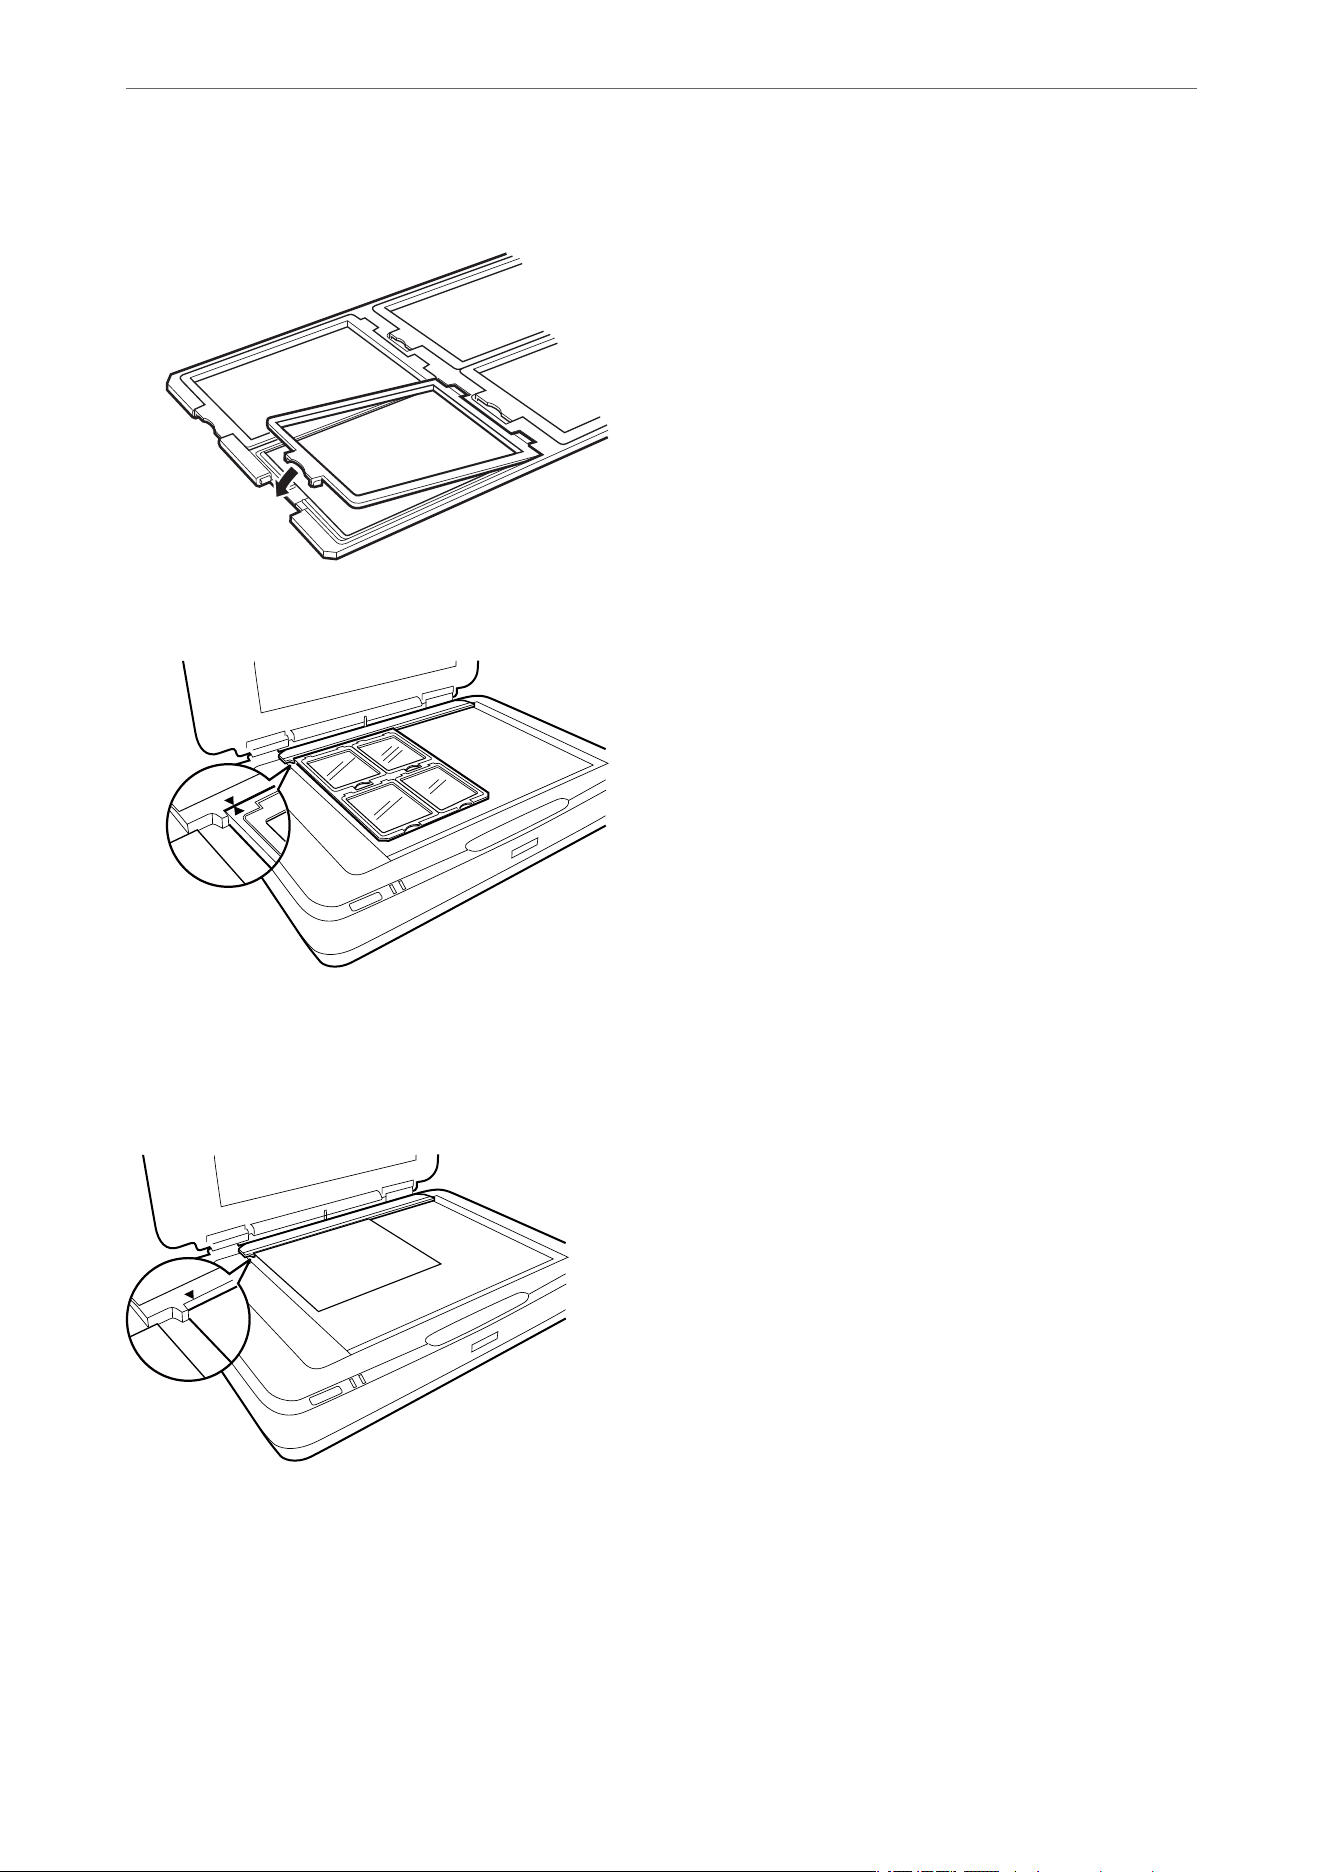
3. Place the film holder on the scanner glass, aligning it with the notch on the transparency guide. Make sure the
glossy side of the film is facing down.
4. Close the Transparency Unit.
If the document mat is installed in the Transparency Unit, remove it.
Use your scanner software to scan the film.
Note:
❏ Make sure the Transparency Unit is completely closed; otherwise, an option error occurs and you cannot scan.
❏ Store the document mat in the pocket on the top of the Transparency Unit when not in use.
Related Information
& “Installing the Transparency Unit” on page 40
Using the Transparency Unit
>
Setting and Placing Films
42
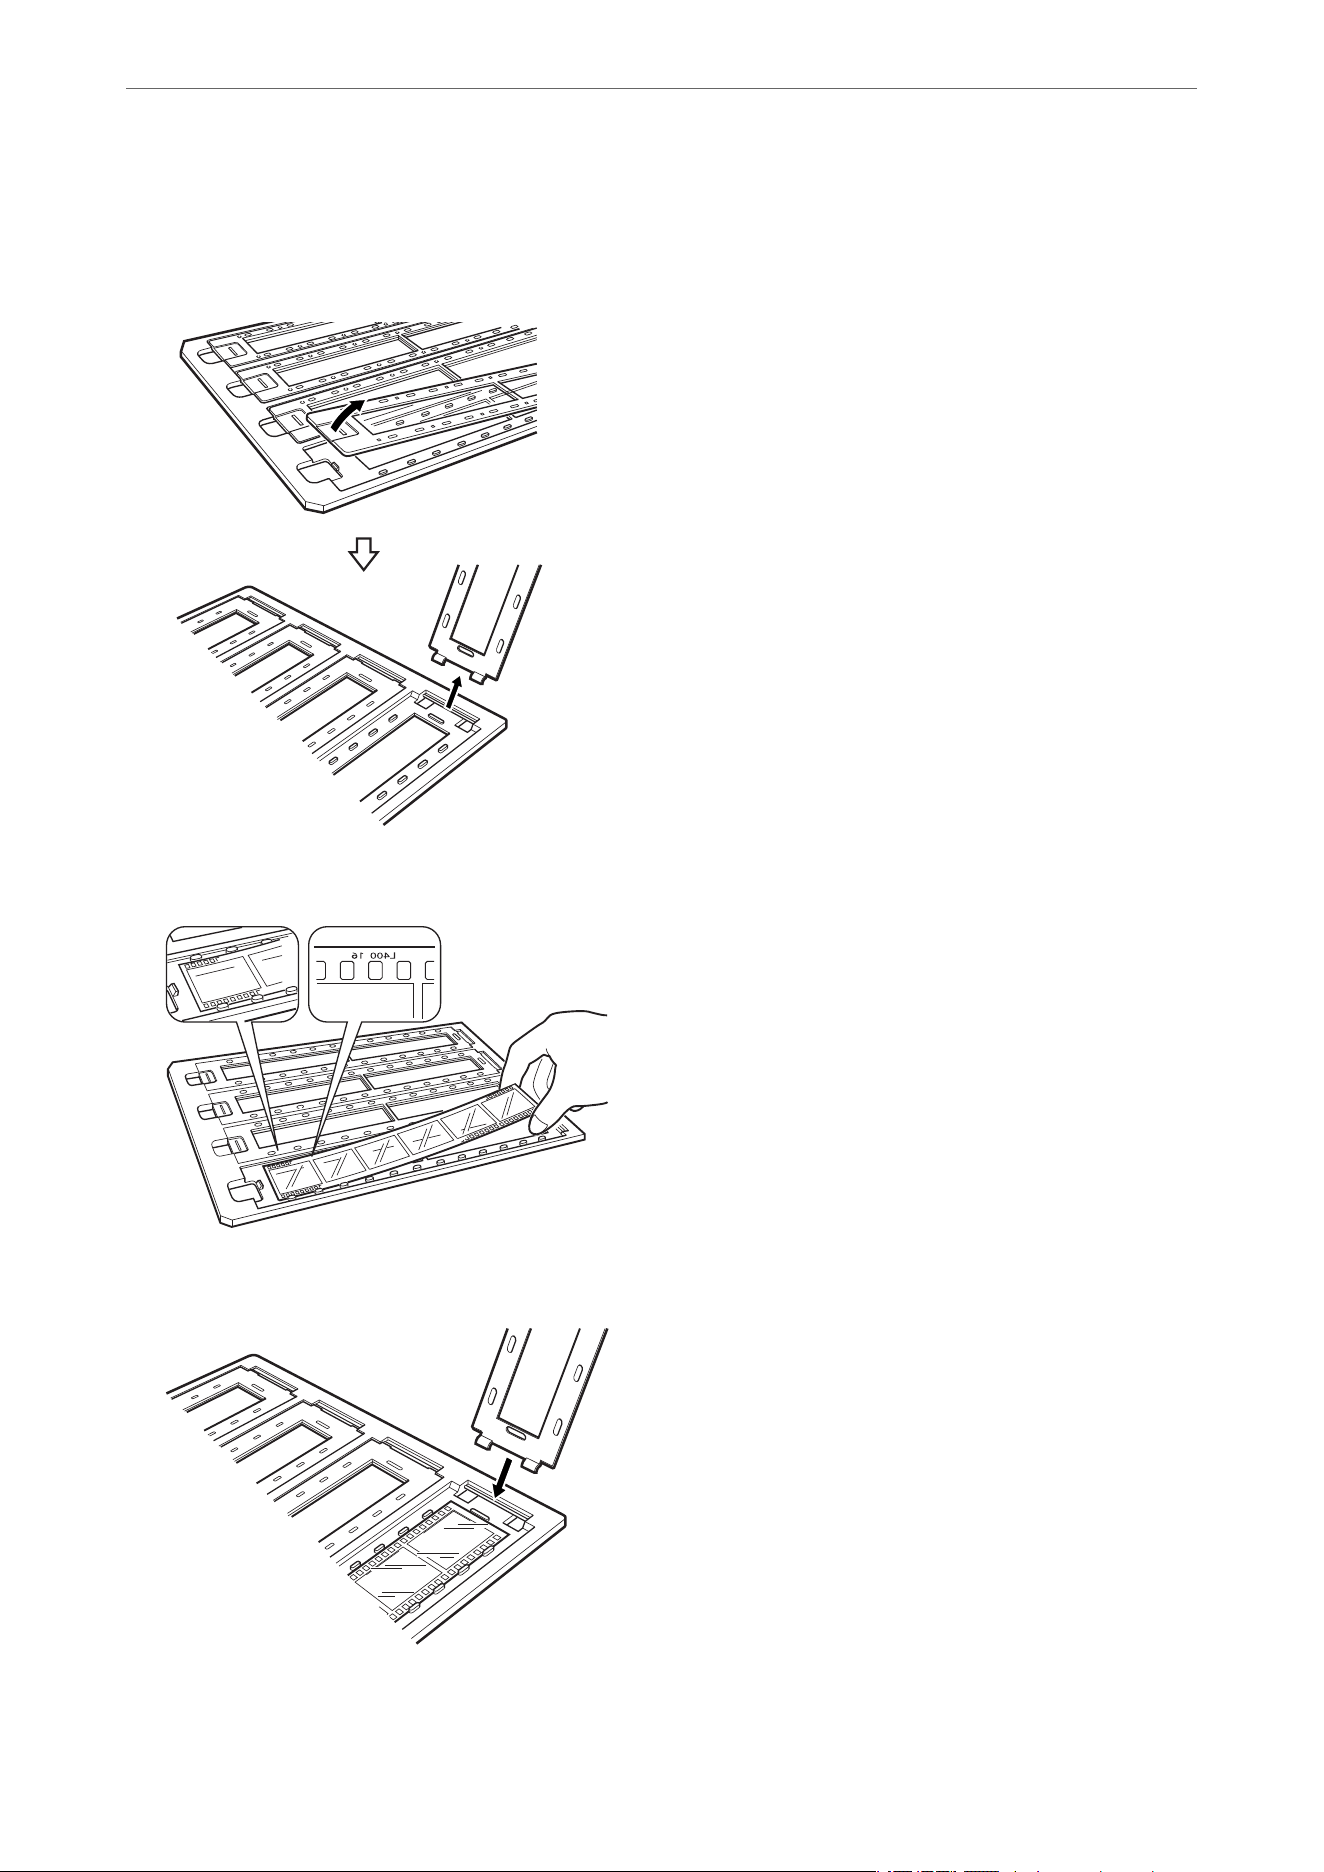
35 mm film strips
1. Place the 35 mm film holder on a flat surface, and then remove the strip cover.
2. Insert the film, face down, in the holder.
3. Replace the strip cover that you removed in step 1. Repeat steps 1 to 3 for all the film strips you want to scan.
Using the Transparency Unit
>
Setting and Placing Films
>
35 mm film strips
43
4. Place the film holder on the scanner glass and align it with the notch on the transparency guide as shown
below.
Mounted slides
1. Load slides, face down, in the Mounted slide holder, as shown below. Repeat this step for all the slides you
want to scan.
2. Place the slide holder on the scanner glass. Align the slide holder with the notch on the transparency guide, as
shown below.
Using the Transparency Unit
>
Setting and Placing Films
>
Mounted slides
44
Medium format (120/220)
1. Place the Medium format holder on a flat surface, and then open the strip cover.
2. Insert the film, face down, in the holder.
3. Close the cover. Repeat steps 1 to 3 for all the films you want to scan.
Using the Transparency Unit
>
Setting and Placing Films
>
Medium format (120/220)
45
4. Place the film holder on the scanner glass and align it with the notch on the transparency guide, as shown
below.
4×5 inch film
1. Place the 4×5 inch film holder on a flat surface, and then open the cover.
2. Insert the film, face down, in the holder.
Using the Transparency Unit
>
Setting and Placing Films
>
4×5 inch film
46
3. Close the cover. Repeat steps 1 to 3 for all the films you want to scan.
4. Place the holder on the scanner glass and align it with the notch on the transparency guide, as shown below.
Non-standard film sizes
Place the film directly on the scanner glass, making sure the glossy (smooth) side of the film is facing down.
If the document mat is installed in the Transparency Unit, remove it. Close the Transparency Unit.
Note:
❏ An area 0.67 ± .02 in. (17.0 ± 0.5 mm) from the horizontal and 0.8 ± .02 in (2.0 ±0.5 mm) from the vertical edges
of the scanner glass cannot be scanned.
❏ When you place the film directly on the scanner glass, make sure you set the focus position to 0.0 in Epson Scan 2.
Using the Transparency Unit
>
Setting and Placing Films
>
Non-standard film sizes
47

Using the Transparency Unit to Scan
Scanning
films
with suitable settings
This section explains how to make settings suitable for materials you want to scan.
1.
Make sure the scanner is connected to your computer.
2. Place your films on the scanner glass.
3. Start Epson Scan 2.
4. Select Photo Mode from the Mode list.
5. Make the following settings on the Main Settings tab.
❏ Document Source: Select Transparency Unit.
❏ Document Type: Select the film type to match your films.
❏ Image Type: Select the color for saving the scanned image.
❏ Resolution: Select the resolution.
❏ Scanning Quality: Select the quality.
Note:
When you specify a high resolution, the number of pixels in the data increases and the scanned image becomes ne in
texture. However, increasing the resolution causes the data size to increase. Specify a suitable resolution according to the
scanning purpose.
6. Click Preview.
7. Confirm the preview, and make other settings on the Advanced Settings tab if necessary.
8.
Set the Image Format setting.
9. Confirm the save file name displayed in File Name.
10. Select the save folder for the scanned image from the Folder list.
11.
Click Scan.
Related Information
& “Image Adjustment Features for Photo Mode” on page 27
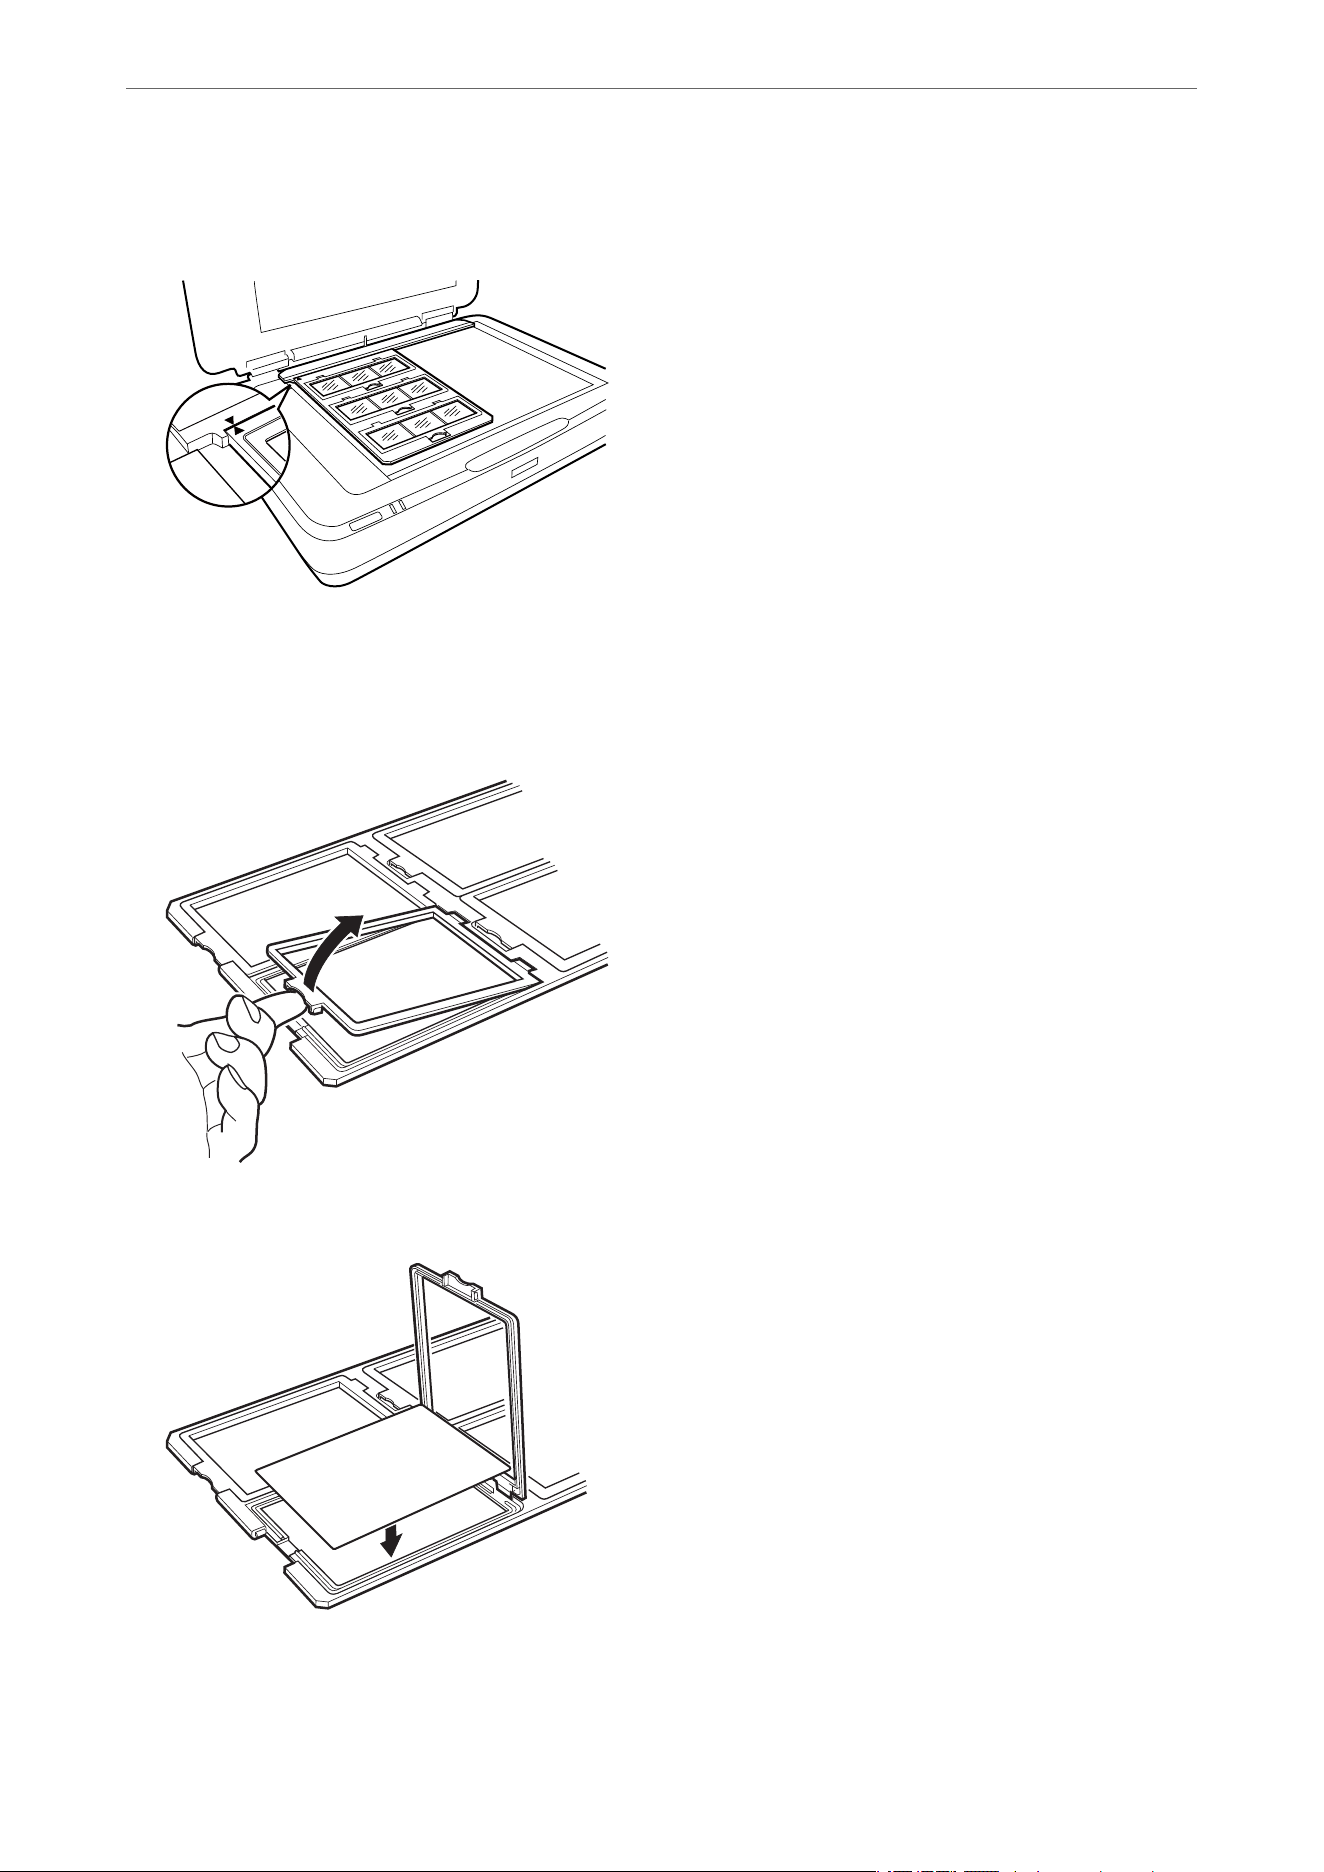
Scanning reflective (non-film) originals
To scan reflective originals using the Transparency Unit, always insert the document mat included with this unit.
Also, make sure you remove the transparency guide from the scanner glass.
Insert the document mat as described below.
Using the Transparency Unit
>
Using the Transparency Unit to Scan
>
Scanning reflective (non-film) originals
48
1. Open the Transparency Unit, and then remove the transparency guide from the scanner glass.
2. Slide the mat into the upper side, and then insert the tabs into the slots on the lower side slots on the
Transparency Unit.
3. Place your document on the scanner glass, and then close the Transparency Unit.
Using the Transparency Unit
>
Using the Transparency Unit to Scan
>
Scanning reflective (non-film) originals
49

Maintenance
Cleaning the Scanner
To keep your scanner operating at its best, clean it periodically using the following procedure.
c
Important:
❏ Do not press the glass surface of the scanner glass with any force.
❏ Be careful not to scratch or damage the glass surface of the scanner glass, and do not use a hard or abrasive
brush to clean it. A damaged glass surface can decrease the scan quality.
❏ Never use alcohol, thinner, or corrosive solvent to clean the scanner. ese chemicals can damage the product
components and the case.
❏ Be careful not to spill liquid into the scanner mechanism or electronic components. is could permanently
damage the mechanism and circuitry.
❏ Do not spray lubricants on the scanner.
❏ Never open the scanner case.
1. Turn off the scanner.
2.
Unplug the power cord from the scanner.
3. Clean the outer case with a cloth dampened with mild detergent and water.
4. If the glass surface gets dirty, clean it with a soft dry cloth. If the glass surface is stained with grease or some
other hard-to-remove material, use a small amount of glass cleaner and a soft cloth to remove it. Wipe off all
remaining liquid.
Make sure that dust does not build up on the glass surface. Dust can cause spots and straight lines in your
scanned images.
c
Important:
Do not spray glass cleaner directly on the glass surface.
5. Clean the document cover if it gets dirty.
Related Information
& “Part Names” on page 10
Energy Saving
You can adjust the time before power management is applied. Any increase will affect the product’s energy
efficiency. Please consider the environment before making any changes.
Maintenance
>
Energy Saving
50
1. Start Epson Scan 2 Utility.
❏ Windows 11/Windows Server 2022
Click the start button, and then select All apps > EPSON > Epson Scan 2 Utility.
❏ Windows 10/Windows Server 2019/Windows Server 2016
Click the start button, and then select EPSON > Epson Scan 2 Utility.
❏ Windows 8.1/Windows 8/Windows Server 2012 R2/Windows Server 2012
Start screen > Apps > Epson > Epson Scan 2 Utility.
❏ Windows 7/Windows Server 2008/Windows Server 2008 R2
Click the start button, and then select All Programs (or Programs) > EPSON > Epson Scan 2 > Epson
Scan 2 Utility.
❏ Mac OS
Select Go > Applications > Epson Soware > Epson Scan 2 Utility.
2. Click the Power Save tab.
3. Set the Power O Timer (minutes) or Power O If Disconnected, and then click Set.
Maintenance
>
Energy Saving
51

Transporting the Scanner
Before you transport the scanner for a long distance or store it for an extended period of time, you need to lock the
carriage to prevent damage.
!
Caution:
Because the product is heavy, one person should never attempt to
li
or carry it alone. Two people should
li
and
carry the product.
1.
Make sure the carriage is in the home position on the
left
side of the scanner. If the carriage is not in the home
position, turn on the scanner and wait until the carriage moves to the home position.
2.
Tur n
off
the scanner, and then unplug the power cord.
3. Disconnect the USB cable from the scanner.
4. Pull down the transportation lock.
5. Attach the packing materials that came with the scanner, then repack the scanner in its original box or a
similar box that
fits
the scanner snugly.
Related Information
& “Part Names” on page 10
Updating Applications and Firmware
You may be able to clear certain problems and improve or add functions by updating the applications and the
firmware. Make sure you use the latest version of the applications and firmware.
c
Important:
❏ Do not turn
o
the computer or the scanner while updating.
1.
Make sure that the scanner and the computer are connected, and the computer is connected to the internet.
2. Start EPSON
Software
Updater, and update the applications or the
firmware.
Note:
Windows Server operating systems are not supported.
Maintenance
>
Updating Applications and Firmware
52

❏ Windows 11
Click the start button, and then select All apps > Epson Soware > EPSON Soware Updater.
❏ Windows 10
Click the start button, and then select Epson Soware > EPSON Soware Updater.
❏ Windows 8.1/Windows 8
Enter the application name in the search charm, and then select the displayed icon.
❏ Windows 7
Click the start button, and then select All Programs or Programs > Epson Soware > EPSON Soware
Updater.
❏ Mac OS
Select Finder > Go > Applications > Epson
Soware
> EPSON
Soware
Updater.
Note:
If you cannot nd the application you want to update in the list, you cannot update using the EPSON Soware Updater.
Check for the latest versions of the applications on your local Epson website.
http://www.epson.com/support/13000xl (U.S.)
http://www.epson.ca/support/13000xl (Canada)
http://latin.epson.com/support/13000xl (Latin English)
Maintenance
>
Updating Applications and Firmware
53

Solving Problems
Scanner Problems
Scanner Lights Indicate an Error
Check the following if the scanner lights indicate an error.
❏ Try to rescan the original. The scanner returns to normal when it receives correct commands.
❏ Make sure the transportation lock has been released.
❏ Tur n
off
the scanner and turn it on again. If this does not solve the problem, the scanner may be
malfunctioning, or the light source in the scanner unit may need to be replaced. Contact your dealer.
Related Information
& “Buttons and Lights” on page 11
Problems Starting Scanning
❏ Make sure the scanning software is fully installed.
See the paper manual for instructions on installing the scanning software.
❏ Check the status light and make sure the product is ready to scan.
❏ Make sure your cables are securely connected to the product and a working electrical outlet.
❏ Check that the electrical outlet is working. Plug another device into the electrical outlet and check that you can
turn on the power.
❏ Turn off the scanner and computer, and then check the interface cable connection between them to make sure it
is secure.
❏ Make sure you select the correct scanner if a scanner list appears when starting to scan.
❏ Connect the product directly to the computer’s external USB port or through one USB hub only. The product
may not work properly when connected to the computer through more than one USB hub. If the problem
persists, try connecting the product directly to the computer.
❏ If more than one product is connected to your computer it may not work. Connect only the product you want
to use, and then try scanning again.
❏ If the scanning software does not work properly, uninstall the software first and then reinstall it as described in
the paper manual.
❏ If the light source has reached the end of its service life, it must be replaced by a professional. For details, contact
your dealer.
Related Information
& “Uninstalling Your Applications” on page 60
& “Contacting Epson Support” on page 69
Solving Problems
>
Problems Starting Scanning
54

Cannot Start Epson Scan 2
Make sure the scanner is connected to your computer properly.
❏ Check the USB cable connection.
❏ Make sure the USB cable is securely connected to the scanner and the computer.
❏ Use the USB cable that came with the scanner.
❏ Connect the scanner directly to the computer’s USB port. The scanner may not work properly when
connected to the computer through one or more USB hubs.
❏ If you are using the scanner with the Network Interface Unit, make sure the network cable is securely
connected.
❏ Make sure the scanner is turned on.
❏ Wait until the status light stops flashing indicating that the scanner is ready to scan.
❏ If you are using any TWAIN-compliant applications, make sure that the correct scanner is selected as the
scanner or source setting.
Cannot Scan Using the Button
❏ Make sure the scanner is connected to your computer properly.
❏ Make sure Epson Scan 2 is installed correctly.
Cannot Scan Using the Transparency Unit
❏ Make sure the document mat is removed from the scanner cover.
❏ Make sure the optional Transparency Unit is installed correctly.
❏ Make sure you are using Photo Mode and set the Document Type correctly.
❏ Make sure the film is set correctly in the film holder, and the film holder is properly positioned on the scanner
glass.
❏ Make sure the transportation lock on the Transparency Unit is released.
Related Information
& “Installing the Transparency Unit” on page 40
& “Using the Transparency Unit to Scan” on page 48
& “Setting and Placing Films” on page 42
Cannot Scan Using Scanning Software Other Than Epson Scan 2
❏ If you are using any TWAIN-compliant programs, make sure that the correct scanner is selected as the source
setting.
❏ If you cannot scan using a TWAIN-compliant scanning program, uninstall the TWAIN-compliant scanning
program and then reinstall it.
Solving Problems
>
Problems Starting Scanning
>
Cannot Scan Using Scanning Software Other Than Epson Scan 2
55

Scanned Image Problems
Uneven Colors, Dirt, Spots, and so on Appear when Scanning from
the Scanner Glass
❏ Clean the scanner glass.
❏ Remove any trash or dirt that adheres to the original.
❏ Do not press with too much force on the original or the document cover. If you press with too much force,
blurring, smudges, and spots may occur.
Related Information
& “Cleaning the Scanner” on page 50
The Image Quality is Rough
❏ Set the Mode in Epson Scan 2 according to the original you want to scan. Scan using the settings for documents
in Document Mode, and the settings for photos in Photo Mode.
❏ In Photo Mode in Epson Scan 2, set the Document Type on the Main Settings tab according to the original
you want to scan.
❏ If the resolution is low, try increasing the resolution and then scanning.
❏ In Epson Scan 2, adjust the image using items on the Advanced Settings tab, and then scan.
Related Information
& “Setting a Resolution That Suits the Scanning Purpose” on page 25
& “Image Adjustment Features for Photo Mode” on page 27
& “Image Adjustment Features for Document Mode” on page 33
Offset Appears in the Background of Images
Images on the back of the original may appear in the scanned image.
❏ In Epson Scan 2, select the Advanced Settings tab, and then adjust the Brightness.
This feature may not be available depending on the settings on the Main Settings tab > Image Type or other
settings on the Advanced Settings tab.
❏ In Document Mode in Epson Scan 2, select the Advanced Settings tab, and then Image Option > Te xt
Enhancement.
❏ When scanning from the scanner glass, place black paper or a desk pad over the original.
Related Information
& “Image Adjustment Features for Photo Mode” on page 27
& “Image Adjustment Features for Document Mode” on page 33
Solving Problems
>
Scanned Image Problems
>
Offset Appears in the Background of Images
56
Text is Blurred
❏ In Document Mode in Epson Scan 2, select the Advanced Settings tab, and then Image Option > Te xt
Enhancement.
❏ Select Document Mode as the Mode in Epson Scan 2. Scan using the settings for documents in Document
Mode.
❏ In Document Mode in Epson Scan 2, when Image Type on the Main Settings tab is set to Black & White,
adjust reshold on the Advanced Settings tab. When you increase the reshold, the black color area
becomes larger.
❏ If the resolution is low, try increasing the resolution and then scanning.
Related Information
& “Image Adjustment Features for Photo Mode” on page 27
& “Image Adjustment Features for Document Mode” on page 33
& “Setting a Resolution That Suits the Scanning Purpose” on page 25
Moiré Patterns (Web-Like Shadows) Appear
If the original is a printed document, moiré patterns (web-like shadows) may appear in the scanned image.
❏ On the Advanced Settings tab in Epson Scan 2, set Descreening.
❏ Change the resolution, and then scan again.
Related Information
& “Image Adjustment Features for Photo Mode” on page 27
& “Image Adjustment Features for Document Mode” on page 33
& “Setting a Resolution
That
Suits the Scanning Purpose” on page 25
Cannot Scan the Correct Area on the Scanner Glass
❏ Make sure the original is placed correctly against the alignment marks.
❏ If the edge of the scanned image is missing, move the original slightly away from the edge of the scanner glass.
❏ When placing multiple originals on the scanner glass, make sure there is a gap of at least 20 mm (0.79 in.)
between the originals.
Solving Problems
>
Scanned Image Problems
>
Cannot Scan the Correct Area on the Scanner Glass
57

Cannot Preview in Thumbnail
❏ When placing multiple originals on the scanner glass, make sure there is a gap of at least 20 mm (0.79 in.)
between the originals.
❏ Check that the original is placed straight.
❏ Depending on the original, such as when scanning Medium format (120/120) film or 4×5 inch film, previewing
may not be performed in
umbnail
. In this situation, clear the
umbnail
check box at the top of the preview
window to preview the entire scanned area, and then create marquees manually.
Cannot Achieve the Results Intended in Auto Photo Orientation
❏ Small photos are not rotated automatically.
❏ Film that is placed with the top and bottom inversed is not rotated automatically.
❏ Photos and
film
for which the top and bottom cannot be detected are not rotated automatically. Rotate
manually using the Rotate button.
Text is Not Recognized Correctly when Saving as a Searchable PDF
❏ On the Image Format Options window in Epson Scan 2, check that Text Language is set correctly on the Te xt
tab.
❏ Check that the original is placed straight.
❏ Use an original with clear text. Text recognition may decline for the following types of originals.
❏ Originals that have been copied a number of times
❏ Originals received by fax (at low resolutions)
❏ Originals on which the letter spacing or line spacing is too small
❏ Originals with ruled lines or underlining over the text
❏ Originals with hand-written text
❏ Originals with creases or wrinkles
❏ In Document Mode in Epson Scan 2, when Image Type on the Main Settings tab is set to Black & White,
adjust
reshold
on the Advanced Settings tab. When you increase the
reshold
, black becomes stronger.
❏ In Document Mode in Epson Scan 2, select the Advanced Settings tab, and then Image Option > Te xt
Enhancement.
Related Information
& “Saving as a Searchable PDF” on page 38
& “Image Adjustment Features for Photo Mode” on page 27
& “Image Adjustment Features for Document Mode” on page 33
Binding Margins of a Booklet are Distorted or Blurred
When scanning a booklet on the scanner glass, characters may appear distorted or blurred on the binding margin.
If this problem occurs, text is not recognized correctly when you save the scanned image as a Searchable PDF.
Solving Problems
>
Scanned Image Problems
>
Binding Margins of a Booklet are Distorted or Blurred
58

To decrease distortion or blurring on the binding margin, gently press down the document cover and hold it down
while scanning to
flatten
the booklet. Make sure you do not move the booklet while scanning.
c
Important:
Do not press the document cover with too much force. Otherwise, the booklet or the scanner may be damaged.
Cannot Solve Problems in the Scanned Image
If you have tried all of the solutions and have not solved the problem, initialize the Epson Scan 2 settings using
Epson Scan 2 Utility.
Note:
Epson Scan 2 Utility is an application that comes with Epson Scan 2.
1. Start Epson Scan 2 Utility.
❏ Windows 11/Windows Server 2022
Click the start button, and then select All apps > EPSON > Epson Scan 2 Utility.
❏ Windows 10/Windows Server 2019/Windows Server 2016
Click the start button, and then select EPSON > Epson Scan 2 Utility.
❏ Windows 8.1/Windows 8/Windows Server 2012 R2/Windows Server 2012
Enter the application name in the search charm, and then select the displayed icon.
❏ Windows 7/Windows Server 2008/Windows Server 2008 R2
Click the start button, and then select All Programs or Programs > EPSON > Epson Scan 2 > Epson Scan
2 Utility.
❏ Mac OS
Select Go > Applications > Epson Soware > Epson Scan 2 Utility.
2. Select the Other tab.
3. Click Reset.
Note:
If initialization does not solve the problem, uninstall and re-install Epson Scan 2.
Striped Rings Appear in Scanned Images of Film or Slides
A ring-shaped pattern of stripes (called a Newton ring) sometimes appears on scanned images of transparent
materials. This may occur if the film is curled.
Colors Differ From the Original Colors for Film or Slide Images
Clean the scanner.
Related Information
& “Cleaning the Scanner” on page 50
Solving Problems
>
Scanned Image Problems
>
Colors Differ From the Original Colors for Film or Slide Images
59

Negative Film Preview Images Look Strange
❏ Make sure the Document Type is set correctly for your film.
❏ If umbnail is disabled in Preview Mode, the dark area around the film and the frame of the film holder is
perceived as white. This alters the exposure and causes images to appear darker. Create marquees on the image
area you want to scan, and then click the
(Zoom) button to preview the area.
❏ For Preview Mode, select
umbnail
checkbox at the top of the preview window.
Problems With Scanning Time
❏ Computers with Hi-Speed external USB ports can scan faster than those with external USB ports. If you are
using a Hi-Speed external USB port with your product, make sure it meets the system requirements.
❏ Scanning at a high resolution takes a long time.
❏ When using security software, exclude the TWAIN.log file from monitoring, or set the TWAIN.log as a read-
only file. For more information on your security software’s functions, see the help and so on supplied with the
software.
The TWAIN.log file is saved in the following locations.
C:\Users\(user name)\AppData\Local\Temp
Uninstalling and Installing Applications
Uninstalling Your Applications
You may need to uninstall and then reinstall your applications to solve certain problems or if you upgrade your
operating system. Log on to your computer as an administrator. Enter the administrator password if the computer
prompts you.
Uninstalling Your Applications for Windows
1. Quit all running applications.
2. Disconnect the scanner from your computer.
3. Open the Control Panel:
❏ Windows 11/Windows Server 2022
Click on the start button, and then select All apps > Windows Tools > Control Panel.
❏ Windows 10/Windows Server 2019/Windows Server 2016
Click on the start button, and then select Windows System > Control Panel.
❏ Windows 8.1/Windows 8/Windows Server 2012 R2/Windows Server 2012
Select Desktop > Settings > Control Panel.
Solving Problems
>
Uninstalling and Installing Applications
>
Uninstalling Your Applications
60

❏ Windows 7/Windows Server 2008/Windows Server 2008 R2
Click the start button and select Control Panel.
4. Select Uninstall a program from Programs, and then open Uninstall a program (or Add or Remove
Programs).
5. Select the application you want to uninstall.
6. Uninstall the applications by clicking Uninstall/Change or Uninstall.
Note:
If the User Account Control window is displayed, click Continue.
7. Follow the on-screen instructions.
Note:
A message may be displayed prompting you to restart your computer. If it is displayed, make sure I want to restart my
computer now is selected, and then click Finish.
Uninstalling Your Applications for Mac OS
Note:
Make sure you installed EPSON Soware Updater.
1.
Download the Uninstaller using EPSON Software Updater.
Once you have downloaded the Uninstaller, you do not need to download it again each time you uninstall the
application.
2. Disconnect the scanner from your computer.
3.
To uninstall the scanner driver, select System Preferences from the Apple menu > Printers & Scanners (or
Print & Scan, Print & Fax), and then remove the scanner from the enabled scanner list.
4.
Quit all running applications.
5. Select Go > Applications > Epson Soware > Uninstaller.
6. Select the application you want to uninstall, and then click Uninstall.
c
Important:
e Uninstaller removes all drivers for Epson scanners on the computer. If you use multiple Epson scanners and
you only want to delete some of the drivers, delete all of them rst, and then install the necessary scanner
drivers again.
Note:
If you cannot nd the application you want to uninstall in the application list, you cannot uninstall using the
Uninstaller. In this situation, select Go > Applications > Epson Soware, select the application you want to uninstall,
and then drag it to the trash icon.
Installing Your Applications
Follow the steps below to install the necessary applications.
Solving Problems
>
Uninstalling and Installing Applications
>
Installing Your Applications
61

Note:
❏ Log on to your computer as an administrator. Enter the administrator password if the computer prompts you.
❏ When reinstalling applications, you need to uninstall them rst.
1. Quit all running applications.
2. When installing scanner driver
(Epson Scan 2), disconnect the scanner and the computer temporarily.
Note:
Do not connect the scanner and the computer until you are instructed to do so.
3. Install the application by following the instructions on your Start Here poster.
Solving Problems
>
Uninstalling and Installing Applications
>
Installing Your Applications
62
Technical Specifications
General Scanner
Specifications
Note:
Specications are subject to change without notice.
Scanner type Flatbed A3 Color Image Scanner
Photoelectric device Color CCD line sensor
Document Size
12.2×17.2 inches (310×437 mm)
Scanning resolution 2400 dpi (main scan)
4800 dpi with Micro Step (sub scan)
Output resolution 50 to 6400 dpi
Image data 16 bits per pixel per color internal
1 to 16 bits per pixel per color external
Interface One Hi-speed USB port
Light source LED Lamp
Note:
Optional optical resolution is the maximum scan resolution of the CCD elements, according to the ISO 14473 denitions.
ISO 14473 denes optical resolution as the fundamental sampling rate of the scan sensor.
Dimensional
Specifications
Dimensions *
Width: 25.8 inches (656.0 mm)
Depth: 18.4 inches (458.0 mm)
Height: 6.2 inches (158.0 mm)
Weight
Approx. 31.5 lb (14.3 kg
)
* Without protruding parts.
Electrical
Specifications
Rated input voltage AC 100 - 240 V
Rated input current 0.8 - 0.4 A
Rated input frequency 50 - 60 Hz
Technical Specifi cations
>
Electrical Specifications
63
Power consumption Operating:
❏ Approx. 20 W or below (without the optional Transparency Unit)
❏ Approx. 27 W or below (with the optional Transparency Unit)
Ready mode:
❏ Approx. 6 W or below (without the optional Transparency Unit)
❏ Approx. 12 W (with the optional Transparency Unit)
Sleep mode:
❏ 1.0 W or below (without the optional Transparency Unit)
❏ After approx 14 minutes from no operation
Power supply OFF:
❏ 0.2 W or below
Note:
For European users, see the following Website for details on power consumption.
http://www.epson.eu/energy-consumption
Environmental Specifications
Temperature Operating
41 to 95 °F (5 to 35 °C)
Storage
–13 to 140 °F (–25 to 60 °C)
Humidity Operating 10 to 80% (without condensation)
Storage 10 to 85% (without condensation)
Operating conditions Ordinary office or home conditions. Avoid operating the scanner in
direct sunlight, near a strong light source, or in extremely dusty
conditions.
Interface Specifications
USB Interface
Interface type Hi-Speed USB
Electrical standard Full Speed mode (12 Mbits per second) and Hi-Speed mode (480 Mbits per
second) of Universal Serial Bus Specification Revision 2.0.
Connector type One Type B port
System Requirements
Supported operating systems may vary depending on the application.
Technical Specifi cations
>
System Requirements
64

Windows Windows 11 or later
Windows 10
Windows 8/8.1
Windows 7
Windows Server 2008 or later
Mac OS
*1 *2
Mac OS X 10.9 or later, macOS 11 or later
*1 Fast User Switching on Mac OS or later is not supported.
*2 The UNIX File System (UFS) for Mac OS is not supported.
Technical Specifi cations
>
System Requirements
65
Standards and Approvals
Standards and Approvals for U.S. Model
Safety UL62368-1
CAN/CSA-C22.2 No. 62368-1
EMC FCC Part 15 Subpart B Class B
ICES-003 Class B
Standards and Approvals for European Model
The following model is CE marked and in compliance with all the applicable EU Directives. For further details,
visit the following website to access the full declaration of conformities containing reference to the Directives and
harmonized standards used to declare conformity.
http://www.epson.eu/conformity
J332A
Standards and Approvals for Australian Model
EMC AS/NZS CISPR32 Class B
ZICTA Type Approval for Users in Zambia
See the following website to check the information for ZICTA Type Approval.
https://support.epson.net/zicta/
OPEN SOURCE SOFTWARE LICENSE
1)
This
product includes open source
software
programs according to the license terms of each open source
software program.
2)
The
op
en source
software
programs are WITHOUT ANY WARRANTY; without even the implied warranty of
MERCHANTABILITY AND FITNESS FOR A PARTICULAR PURPOSE.
See the license agreements of each open source software program for more details, which are described below.
Standards and Approvals
>
OPEN SOURCE SOFTWARE LICENSE
66

SHA1 license
Copyright (C) The Internet Society (2001). All Rights Reserved.
This document and translations of it may be copied and furnished to others, and derivative works that comment
on or otherwise explain it or assist in its implementation may be prepared, copied, published and distributed, in
whole or in part, without restriction of any kind, provided that the above copyright notice and this paragraph are
included on all such copies and derivative works.
However, this document itself may not be modified in any way, such as by removing the copyright notice or
references to the Internet Society or other Internet organizations, except as needed for the purpose of developing
Internet standards in which case the procedures for copyrights
defined
in the Internet Standards process must be
followed, or as required to translate it into languages other than English.
The limited permissions granted above are perpetual and will not be revoked by the Internet Society or its
successors or assigns.
This document and the information contained herein is provided on an "AS IS" basis and THE INTERNET
SOCIETY AND THE INTERNET ENGINEERING TASK FORCE DISCLAIMS ALL WARRANTIES, EXPRESS
OR IMPLIED, INCLUDING BUT NOT LIMITED TO ANY WARRANTY THAT THE USE OF THE
INFORMATION HEREIN WILL NOT INFRINGE ANY RIGHTS OR ANY IMPLIED WARRANTIES OF
MERCHANTABILITY OR FITNESS FOR A PARTICULAR PURPOSE.
Info-ZIP license
This is version 2007-Mar-4 of the Info-ZIP license.
The definitive version of this document should be available at ftp://ftp.info-zip.org/pub/infozip/license.html
indefinitely and a copy at http://www.info-zip.org/pub/infozip/license.html.
Copyright © 1990-2007 Info-ZIP. All rights reserved.
For the purposes of this copyright and license, "Info-ZIP" is defined as the following set of individuals:
Mark Adler, John Bush, Karl Davis, Harald Denker, Jean-Michel Dubois, Jean-loup Gailly, Hunter Goatley, Ed
Gordon, Ian Gorman, Chris Herborth, Dirk Haase, Greg Hartwig, Robert Heath, Jonathan Hudson, Paul Kienitz,
David Kirschbaum, Johnny Lee, Onno van der Linden, Igor Mandrichenko, Steve P. Miller, Sergio Monesi, Keith
Owens, George Petrov, Greg Roelofs, Kai Uwe Rommel, Steve Salisbury, Dave Smith, Steven M. Schweda, Christian
Spieler, Cosmin Truta, Antoine Verheijen, Paul von Behren, Rich Wales, Mike White.
This software is provided "as is," without warranty of any kind, express or implied.
In no event shall Info-ZIP or its contributors be held liable for any direct, indirect, incidental, special or
consequential damages arising out of the use of or inability to use this software.
Permission is granted to anyone to use this
software
for any purpose, including commercial applications, and to
alter it and redistribute it freely, subject to the above disclaimer and the following restrictions:
1.
Redistributions of source code (in whole or in part) must retain the above copyright notice, definition,
disclaimer, and this list of conditions.
2. Redistributions in binary form (compiled executables and libraries) must reproduce the above copyright notice,
definition, disclaimer, and this list of conditions in documentation and/or other materials provided with the
distribution.
The
sole exception to this condition is redistribution of a standard UnZipSFX binary (including SFXWiz) as part of
a self-extracting archive; that is permitted without inclusion of this license, as long as the normal SFX banner has
not been removed from the binary or disabled.
3. Altered versions--including, but not limited to, ports to new operating systems, existing ports with new
graphical interfaces, versions with modified or added functionality, and dynamic, shared, or static library versions
Standards and Approvals
>
OPEN SOURCE SOFTWARE LICENSE
>
Info-ZIP license
67

not from Info-ZIP--must be plainly marked as such and must not be misrepresented as being the original source
or, if binaries, compiled from the original source.
Such altered versions also must not be misrepresented as being Info-ZIP releases--including, but not limited to,
labeling of the altered versions with the names "Info-ZIP" (or any variation thereof, including, but not limited to,
different capitalizations), "Pocket UnZip," "WiZ" or "MacZip" without the explicit permission of Info-ZIP.
Such altered versions are further prohibited from misrepresentative use of the Zip-Bugs or Info-ZIP e-mail
addresses or the Info-ZIP URL(s), such as to imply Info-ZIP will provide support for the altered versions.
4. Info-ZIP retains the right to use the names "Info-ZIP," "Zip," "UnZip," "UnZipSFX," "WiZ," "Pocket UnZip,"
"Pocket Zip," and "MacZip" for its own source and binary releases.
lua license
Copyright (C) 1994-2013 Lua.org, PUC-Rio.
Permission is hereby granted, free of charge, to any person obtaining a copy of this
software
and associated
documentation files (the "Software"), to deal in the Software without restriction, including without limitation the
rights to use, copy, modify, merge, publish, distribute, sublicense, and/or sell copies of the Software, and to permit
persons to whom the Software is furnished to do so, subject to the following conditions:
The above copyright notice and this permission notice shall be included in all copies or substantial portions of the
Software.
THE SOFTWARE IS PROVIDED "AS IS", WITHOUT WARRANTY OF ANY KIND, EXPRESS OR IMPLIED,
INCLUDING BUT NOT LIMITED TO THE WARRANTIES OF MERCHANTABILITY, FITNESS FOR A
PARTICULAR PURPOSE AND NONINFRINGEMENT.
IN NO EVENT SHALL THE AUTHORS OR COPYRIGHT HOLDERS BE LIABLE FOR ANY CLAIM,
DAMAGES OR OTHER LIABILITY, WHETHER IN AN ACTION OF CONTRACT, TORT OR OTHERWISE,
ARISING FROM, OUT OF OR IN CONNECTION WITH THE SOFTWARE OR THE USE OR OTHER
DEALINGS IN THE SOFTWARE.
Standards and Approvals
>
OPEN SOURCE SOFTWARE LICENSE
>
lua license
68

Where to Get Help
Technical Support Web Site
If you need further help, visit the Epson support website shown below. The latest drivers, FAQs, manuals, or
other downloads are also available from the site.
http://www.epson.com/support/13000xl (U.S.)
http://www.epson.ca/support/13000xl (Canada)
http://latin.epson.com/support/13000xl (Latin America)
If your Epson product is not operating properly and you cannot solve the problem, contact Epson support
services for assistance.
Contacting Epson Support
Before Contacting Epson
If your Epson product is not operating properly and you cannot solve the problem using the troubleshooting
information in your product manuals, contact Epson support services for assistance. If Epson support for your area
is not listed below, contact the dealer where you purchased your product.
Epson support will be able to help you much more quickly if you give them the following information:
❏ Product serial number
(The
serial number label is usually on the back of the product.)
❏ Product model
❏ Product software version
(Click About, Version Info, or a similar button in the product software.)
❏ Brand and model of your computer
❏ Your computer operating system name and version
❏ Names and versions of the software applications you normally use with your product
Note:
Depending on the product, the dial list data for fax and/or network settings may be stored in the product’s memory. Due to
breakdown or repair of a product, data and/or settings may be lost. Epson sh
all not be responsible for the loss of any data, for
backing up or recovering data and/or settings even during a warranty period. We recommend that you make your own
backup data or take notes.
Where to Get Help
>
Contacting Epson Support
>
Before Contacting Epson
69

Where to Get Help
>
Contacting Epson Support
>
Help for Users in the United States and Canada
70
Help for Users in the United States and Canada
If you need to contact Epson for technical support services, use the following support options.
Internet Support
Visit Epson's support website at http://epson.com/support/13000xl (U.S.), or http://epson.ca/support/13000xl
(Canada) for solutions to common problems with your product. You can download utilities and documentation,
get FAQs and troubleshooting advice, or e-mail Epson with your questions.
Note: For help using any other software on your system, see the documentation for that software for technical
support information.
Speak to a Support Representative
Before you call Epson for support, please have the information listed in "Before Contacting Epson" ready.
Call (562) 276-4382 (U.S.) or (905) 709-3839 (Canada), 7 a.m. to 4 p.m., Pacific Time, Monday through Friday.
Days and hours of support are subject to change without prior notice. Toll or long distance charges may apply.
Purchase Supplies and Accessories
You can purchase genuine Epson accessories at http://epson.com (U.S. sales), or http://epson.ca (Canadian sales).
You can also purchase accessories from an Epson authorized reseller. To find the nearest one, call
800-GO-EPSON (800-463-7766) in the U.S. or 800-807-7766 in Canada.
Help for Users in Latin America
If you need to contact Epson for technical support services, use the following support options.
Internet Support
Visit Epson's support website at http://latin.epson.com/support/13000xl and select your product for solutions to
common problems. You can download utilities and documentation, get troubleshooting advice, or e-mail Epson
with your questions.
Note: For help using any other software on your system, see the documentation for that software for technical support
information.
Speak to a Support Representative
Before you call Epson for support, please have the information listed in "Before Contacting Epson" ready.
Country
Argentina
Bolivia*
Brazil
Chile
Colombia
Costa Rica
(
54 11) 5167-0300
0
800-288-37766
800-100-116
3004-6627
0800-377-6627
(56 2) 2484-3400
Bo
gota: (57 1) 602-4751
Other cities: 018000-915235
800-377-6627
1-888-760-0068
Dominican Republic*
Ecuador*
El Salvador*
Guatemala*
Mexico
Nicaragua*
Panama*
Paraguay
Peru
Uruguay
Venezuela
1-800-000-044
800-6570
1-800-835-0358
Mexico City: (52 55)
1323-2052
Other cities: 01-800-087-1080
Country
* Contact your local phone company to call this
toll-free number from a mobile phone.
If your country does not appear in the list, contact the
sales office in the nearest country. Toll or long distance
charges may apply.
Telephone
Telephone
00-1-800-226-0368
00-800-052-1376
009-800-521-0019
Lima: (51 1) 418-0210
Other cities: 0800-10126
00040-5210067
(
58 212) 240-1111