
BEVERAGE COOLER
User Manual
KVC-70
Please Read and Save this Use & Care Book

English
GENERAL SAFETY RULES
Before you use your refrigerator, please read this owner’s manual carefully.
Use this appliance only for its intended purpose as described in this owner’s manual.
DANGER : Risk of child entrapment. Before you throw away your old refrigerator or freezer: Take off the doors.
Leave the shelves in place so that children may not easily climb inside.
The appliance must be correctly installed and connected to the power supply in accordance with the installation instructions before
it is used. (See: “Installing Your beverage cooler”).
The main power supply must be properly grounded.
This refrigerator must be positioned so that the plug is accessible. Never unplug you unit often by pulling on the power cord.
Always grasp the plug firmly and pull straight out from the outlet.
Do not use an extension cord as this can negatively affect the performance of the unit.
When transporting the refrigerator, keep the unit in the upright position. Do not tilt the appliance beyond 45° or place the unit in
upside down position. Do not tip over.
Do not touch the cooled surfaces while the appliance operates, especially not with wet hands, because the skin may stick to the
cold surfaces.
It is recommended that the refrigerator is positioned away from any combustible sources such as gas, petrol, alcohol, lacquer and
banana oil, etc. The aforementioned substances should not be stored in the refrigerator under any circumstances.
If the unit fails to cool properly, dispose of spoiled food as needed.
Unplug your unit before cleaning or before making any repairs. NOTE: If for any reason this product requires service, we strongly
recommend that a certified technician perform the service. Repairs made by non-qualified personnel will void the warranty.
Do not defrost the appliance with other electric devices (hair dryer etc.) and never scrape the ice or frost layer with sharp tools.
Warning: Do not damage the refrigerant circuit.
The rating plate is located inside or outside the rear wall or side wall of the unit.
This appliance is not intended for use by persons (including children) with reduced physical, sensory or mental capabilities, or lack of
experience and knowledge, unless they have been given supervision or instruction concerning use of the appliance by a person
responsible for their safety. Children should be supervised to ensure that they do not play with the appliance.
Do not run cord over carpeting or other heat insulators. Do not cover the cord. Keep cord away from traffic areas, and do not
submerge in water. If the supply cord is damaged, it must be replaced by the manufacturer or its service agent or a similarly
qualified person to avoid a hazard. Repair or replace immediately all electric service cords that have become frayed or otherwise
damaged. Do not use a cord that shows cracks or abrasion damage along its length, the plug, or the connector end.
Do not operate your refrigerator in the presence of explosive fumes. WARNING--Do not use the flame or catch fire near the unit.
DANGER-Risk of fire or Explosion. Flammable Refrigerant Used. To Be Repaired Only By Trained Service Personnel. Do Not Puncture
Refrigerant Tubing.
Caution--Risk of fire or Explosion. Dispose Of Property In Accordance With Federal Or Local Regulations.
Flammable Refrigerant Used.
CAUTION – Risk Of Fire Or Explosion. Flammable Refrigerant Used. Consult Repair Manual/Owner’s Guide Before Attempting
To Service This Product. All Safety Precautions Must be Followed.
CAUTION – Risk Of Fire Or Explosion Due To Puncture Of Refrigerant Tubing; Follow Handling Instructions Carefully. Flammable
Refrigerant Used.
Staple your receipt to your manual.
You will need it to obtain warranty service.

English
Parts and Features
1.
Interior Light
2.
Electronic Contr ol Pan el
3.
Fan co oling
4.
Wire Shelve s (2)
5.
Double Pane Glass Door
6.
Adjustable Leve ling Legs
PACKING LIST
NO. Description Quantity
1 Manual 1 pc
2 Nameplate 1 pc

English
Installing Your Beverage Cooler
Unpacking Your Beverage Cooler
1.
Remove all packaging material. This includes the foam base and all
adhesive tape holding the beverage cooler accessories inside and
outside.
2.
Inspect and remove any remaining packing, tape or printed materials
before powering on the beverage cooler.
Leveling Your Beverage Cooler
•
Your beverage cooler has two leveling legs which are located in the
front corners. After properly placing your beverage cooler in its final
position, you can level your beverage cooler.
•
Leveling legs can be adjusted by turning them clockwise to lower your
beverage cooler or by turning them counterclockwise to raise your beverage
cooler. The beverage cooler door will close more easily when the two front
leveling legs are extended slightly.
Proper Air Circulation
•
Toensure that your beverage cooler works at the maximum efficiency
it was designed for, you should install it in a
location where there is
proper air circulation and electrical connections.
•
The following are recommended clearances around the beverage center:
Sides……………2" (50mm)
Top....................2" (50mm)
Back..................2" (50mm)
•
Do not overfill your beverage cooler for proper cooling.
Note:
If your beverage cooler has been tilted for any reason, wait 24 hours
before plugging it in.
Drip Tray
•
Ensure the drip tray in the rear of the unit is in the proper position.

English
WARNING:
ELECTRICAL REQUIREMENT
-
SHOCK HAZARD
Electrical Requirement
•
Make sure there is a suitable power outlet (115 volts, 15 amps
outlet) with proper grounding to power the beverage cooler.
•
Avoid the use of three-prong adapters or cutting off the third grounding
prong in order to accommodate a two-prong outlet. This is a dangerous
practice since it provides no effective grounding for the beverage cooler and
may result in shock hazard.
Installation Limitations
•
Do not install your beverage cooler in any location that is heated or not
properly insulated (e.g., garage etc.). Your beverage cooler is not designed
to operate at an ambient temperature settings below 55˚ Fahrenheit.
•
Select a suitable location for the beverage cooler on a hard, even surface
away from direct sunlight or heat source (e.g., radiators, baseboard
heaters, cooking appliances, etc.). Any floor unevenness should be
corrected with the leveling legs located on the front and rear bottom
corners of the beverage cooler.
•
Your beverage cooler is designed for freestanding installation only. It is
not designed for built-in application.
Note: This unit is for indoor use only.
Use of Extension Cord
•
Avoid the use of an extension cord because of potential safety hazards
under certain conditions. If it is necessary to use an extension cord, use
only a 3-wire extension cord that has a 3-blade grounding plug and a 3-slot
outlet that will accept the plug. The marked rating of the extension cord
must be equal to or greater than the electrical rating of the appliance.
English
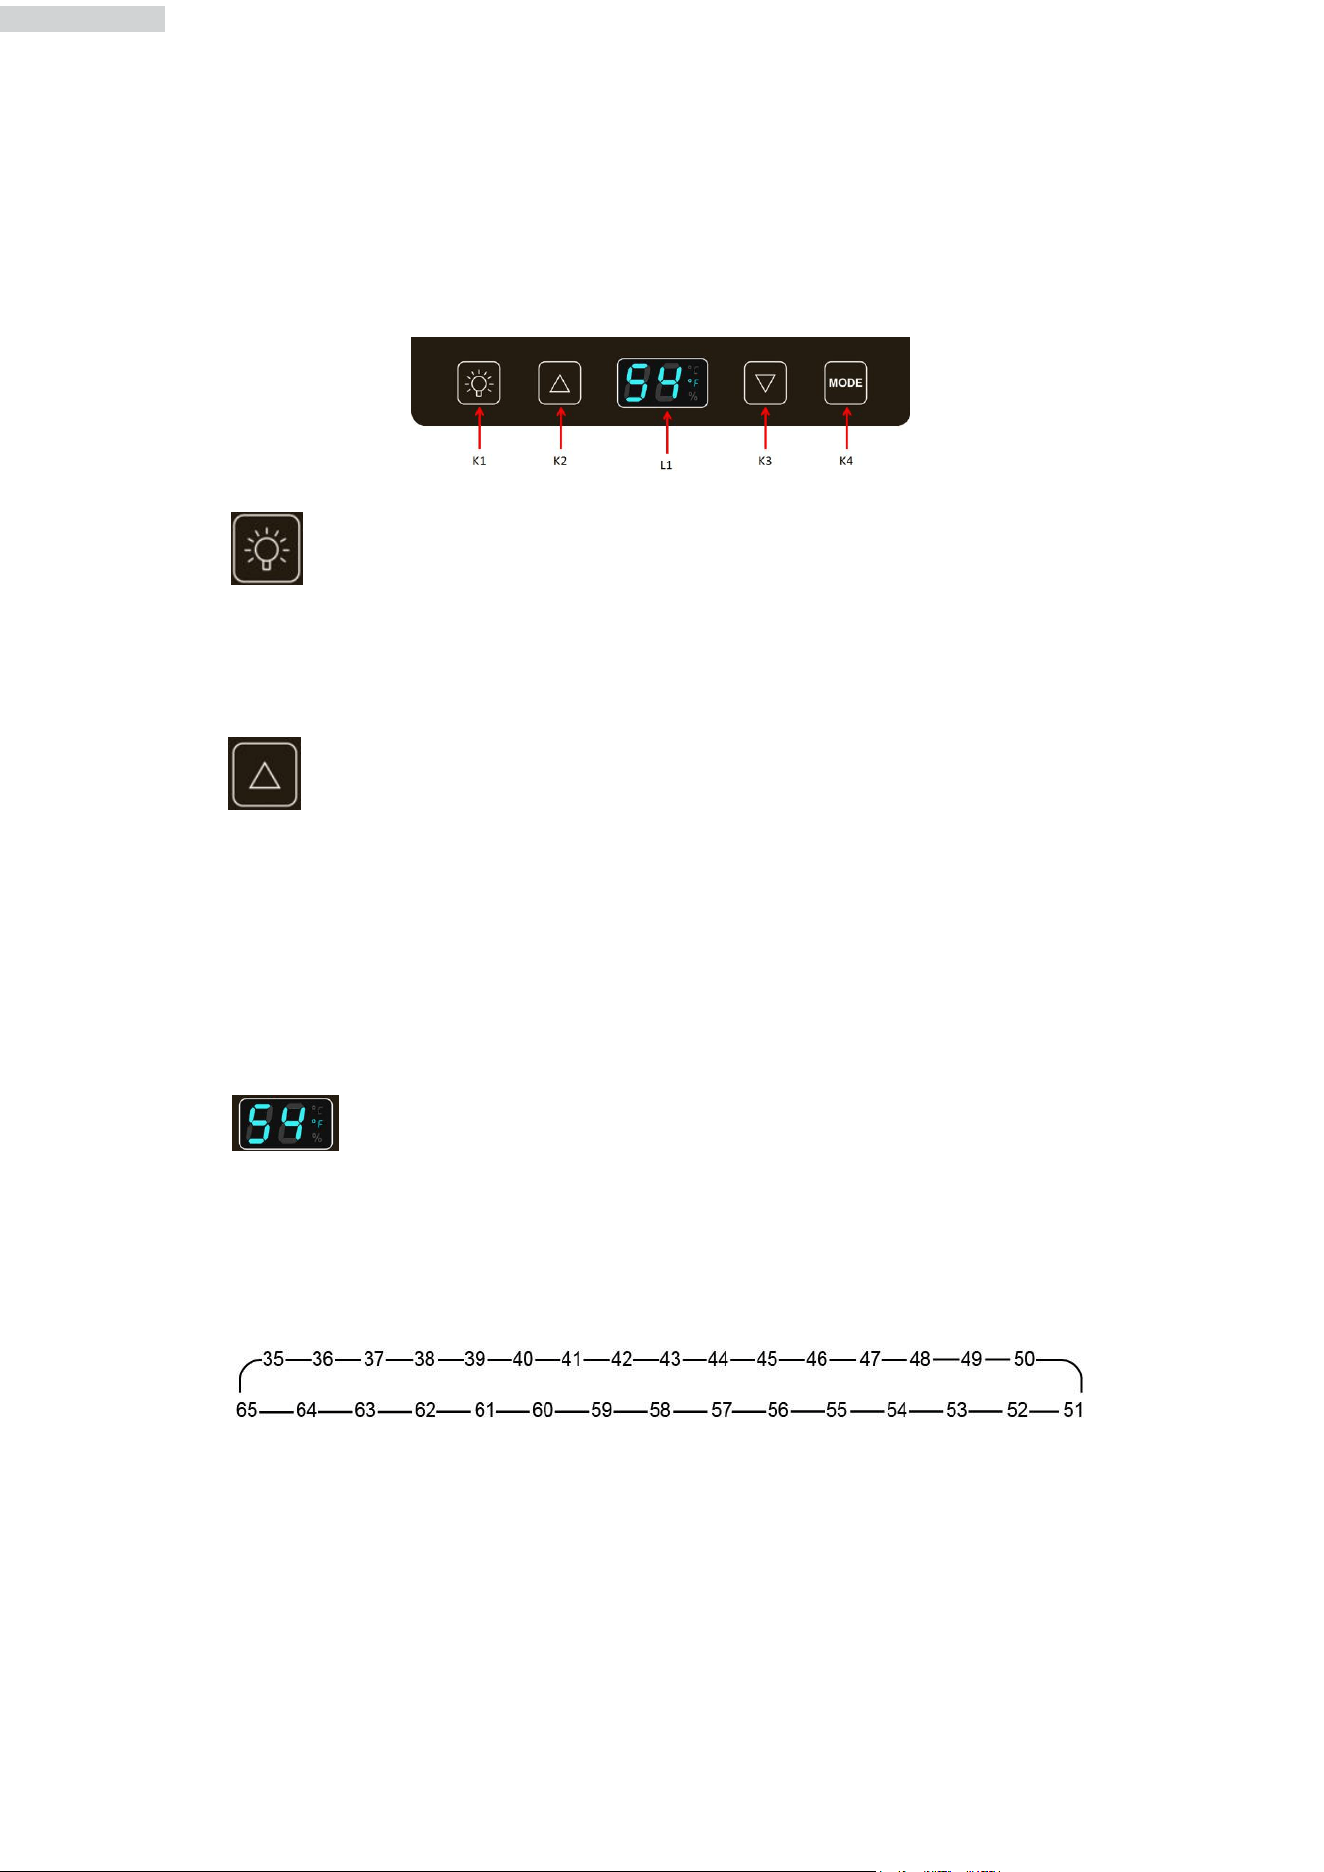
Beverage Cooler Features and Use
Light
K1: This button allows you to turn on / off the inside light
Increase temperature
K2: Press the button once, the LED display will flash indicating the current temperature.
Press again to set the temperature. Press once to increase the temperature by one
degree. The flash stops after 5 seconds without action on your part, and the new
temperature requested is recorded. The LED display then shows the actual temperature
inside.
Temperature display
L1: The temperature can be adjusted from 35 to 65 degrees depending on the cycle
below (1 touch = 1 additional degree)
English
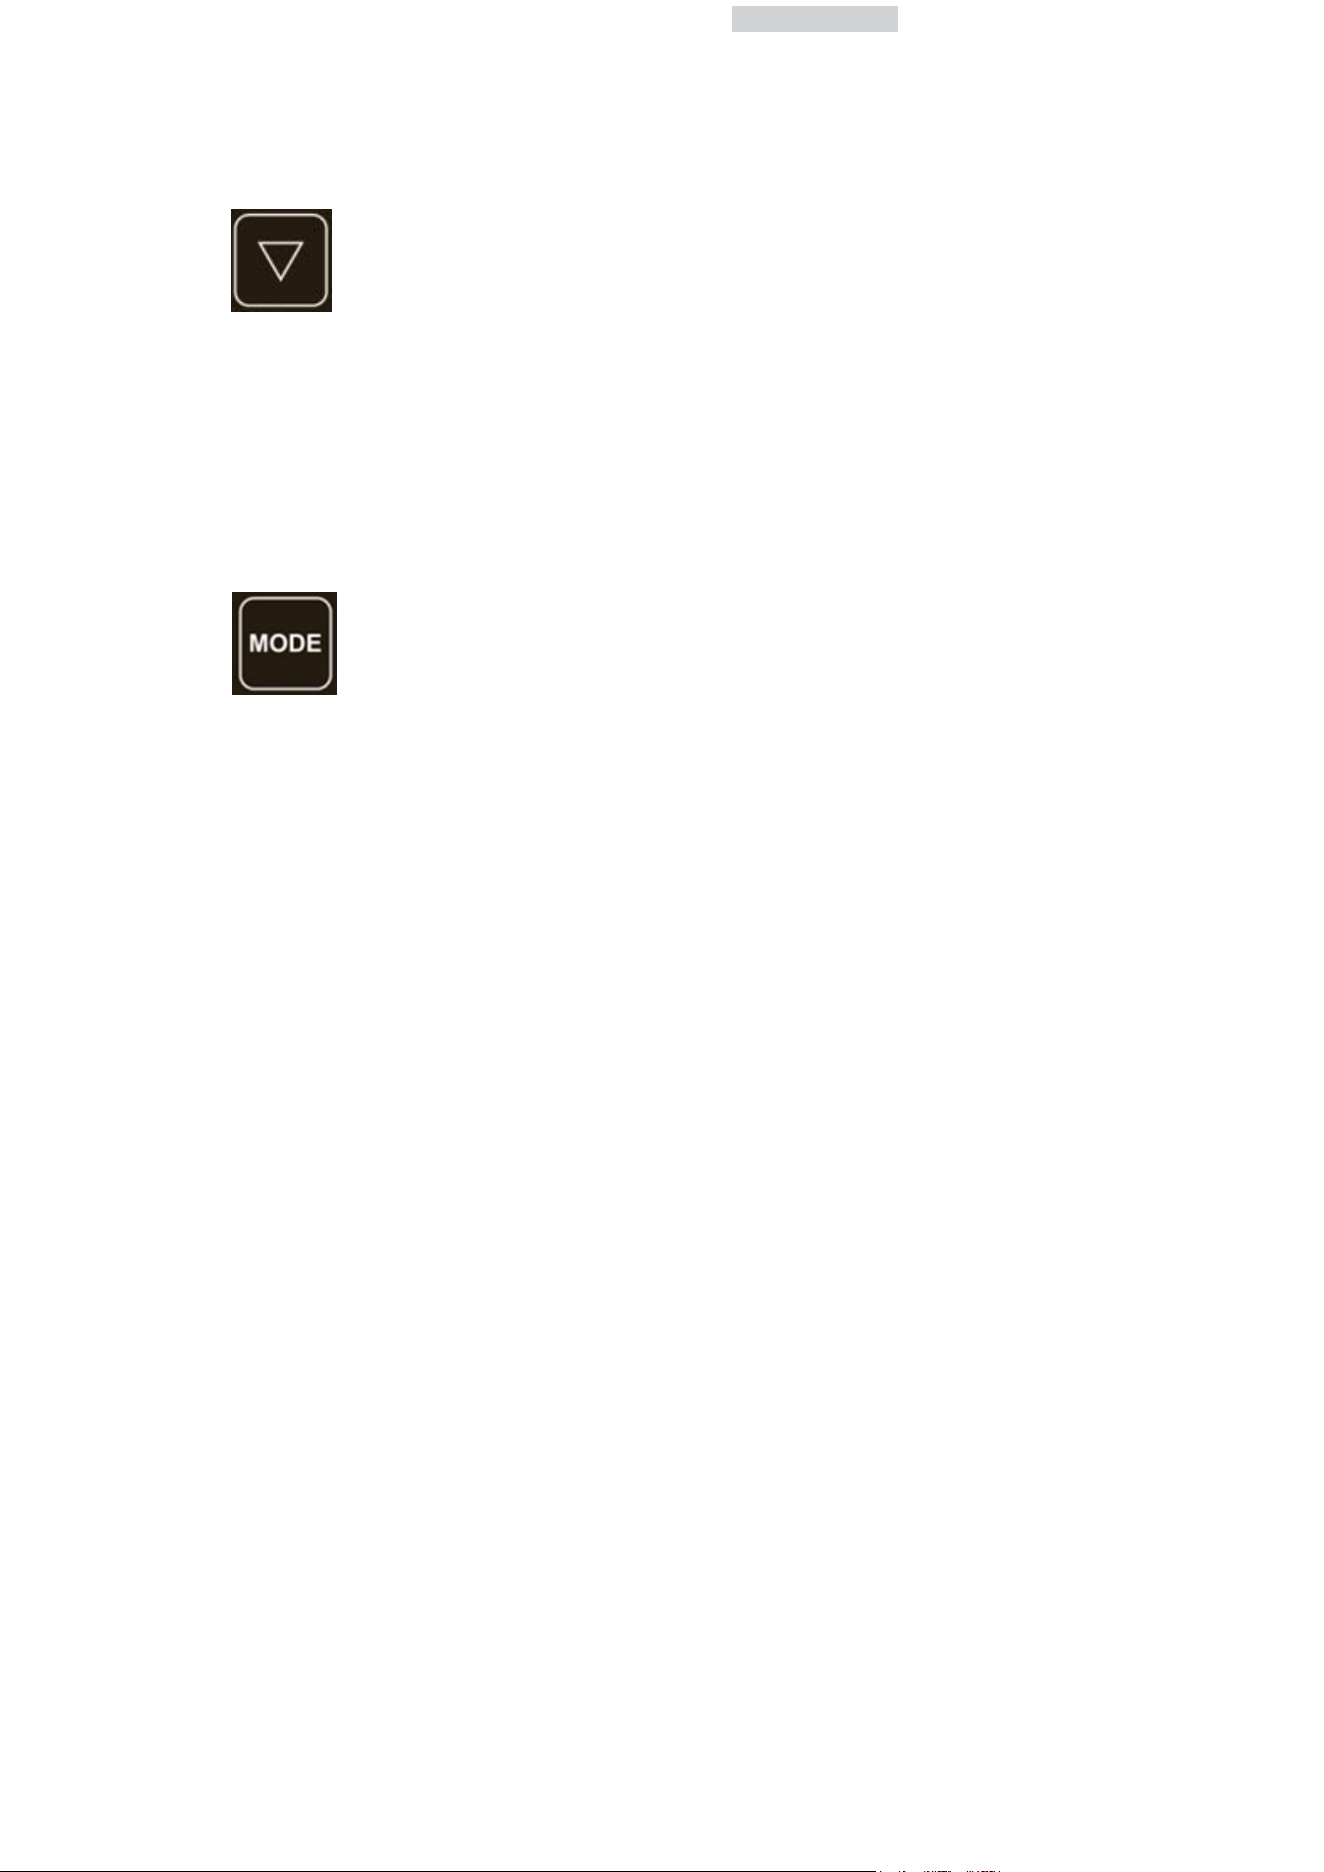
Decrease temperature
K3: Press the button once, the LED display will flash indicating the current temperature.
Press again to set the temperature. Press once to decrease the temperature by one
degree. The flash stops after 5 seconds without action on your part, and the newly set
temperature is recorded. The LED display then shows the actual inside temperature.
Mode Fahrenheit/Celsius
K4: Press the button to switch the temperature display between Fahrenheit and Celsius.

English
Proper Beverage Cooler Care & Cleaning
Cleaning and Maintenance
Warning:
To avoid electric shock, always unplug your beverage cooler
before cleaning. Ignoring this warning may result in death or
injury.
Caution: Before using or cleaning products, always read and follow manufacturer’s
instructions and warnings to avoid personal injury or product damage.
General: • Prepare a cleaning solution of 3-4 tablespoons of baking soda mixed with
warm water. Use sponge or soft cloth, dampened with the cleaning
solution, to wipe down your beverage center.
•
Rinse with clean warm water and dry with a soft cloth.
•
Do not use harsh chemicals, abrasives, ammonia, chlorine bleach,
concentrated detergents, solvents, or metal scouring pads. Some of these
chemicals may dissolve, damage, and/or discolor your beverage cooler.
Door Gaskets: • Clean door gaskets every three months according to general
instructions. Gaskets must be kept clean and pliable to ensure a proper
seal.
•
Apply petroleum jelly lightly on the hinge side of gaskets will keep the
gaskets pliable and ensure a good seal.
Defrosting Your Beverage Cooler
Your beverage cooler is designed with a manual defrost system. The beverage
cooler surfaces will defrost when the unit is unplugged. Water from the unit is
disposed of automatically by means of being channeled onto a drip tray located on
the compressor. Heat transfer from the compressor causes the water to evaporate.
Power Interruptions
Occasionally there may be power interruptions due to thunderstorms or
other causes. Remove the power cord from AC outlet when a power outage
occurs. When power has been restored, replug power cord to AC outlet.
The unit will revert to the factory setting of 46ºF after any power outage.
Reset your temperature selection.

English
Troubleshooting
Beverage Cooler Does Not Operate
•
Check if beverage cooler is plugged in.
•
Check if there is power at the AZ outlet by checking the circuit breaker.
•
Check if the power socket is turned on.
Temperature appears too warm
•
Frequent door openings.
•
Allow time for recently added beverages to reach proper temperature.
•
Check gaskets for proper seal.
•
Adjust the temperature control to the cool setting.
Temperature is too cold
•
If temperature control setting is too cold, adjust to a warmer setting and allow several
hours for temperature to adjust.
English
Thank you for purchasing this product! If you have any questions about the
product, such as missing parts, damaged products, product assembling, and
operation, please contact us via Amazon Message or customer service
number: 213-4467172 or 661-4358826
IMPORTANT
Please call our customer service department for any consulting:
213-4467172
661-4358826
(8:30am - 5:30pm P.S.T.)
DATED PROOF OF PURCHASE IS REQUIRED FOR WARRANTY SERVICE.
AVIS
Veuillez appeler le service à la clientèle pour toutes questions au:
213-4467172
661-4358826
(8:30am - 5:30pm P.S.T.)
PREUVE D’ACHAT ORIGINALE REQUISE POUR SERVICE DE GARANTIE.
IMPORTANTE
Sólo hay que llamar nuestro departamento de servicio
al cliente en caso de tener preguntas o inquietudes:
213-4467172
661-4358826
(8:30am - 5:30pm P.S.T.)
SE REQUIERE PRUEBA DE COMPRA CON FECHA PARA SERVICIO BAJO
GARANTÍA.
Address : 9733 Topanga Canyon Blvd. APT310, Chatsworth, CA 91311
Phone: 213-4467172 or 661-4358826