ELECTRIC SCOOTER USER MANUAL
V2022.0.1
HT-HVD-1/HT-HVD-3
MODEL NO:


PACKAGE CONTENTS··························································01
PRODUCT OVERVIEW····················································
·
02~09
CHARGE YOUR SCOOTER··················································
·
10
HOW TO RIDE································································11~12
FOLDING AND CARRYING····················································13
SPECIFICATIONS
& WARRANTY······································14~15
SAFETY INSTRUCTIONS·················································16~19
SAFETY REMINDER·······················································20~21
DAILY CARE AND MAINTENANCE·····································22~23
CONTENTS

Carefully check package contents, if anything is missing or damaged, please contact our
customer service for support
1
PACKAGE CONTENTS
Assembled electric scooter Accessories:
Electric Scooter
Charging adapter
Toolkit User Manual
Seat
S21
S19
S17
S
13
S10
S6
S5
s
4
S2.5
s3
S8
S5*16
S18 -S21 1P C
S17 -S19 1P C
S10 -S13 1P C
TOOLKIT

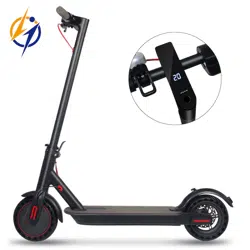
PRODUCT OVERVIEW
Handle Bar
Brake Handle
Headlight Switch
Mechanical Keys
Seat
Folding Mechanism
Turning Light
Taillight
Power Motor
Kickstand
Hydraulic Shock
Absorption
Side Lights
Disc Brake
Hydraulic Shock
Absorption
Solid Front Wheel
Headlight
2

POWER SWITCH
3
Brake Handle
Headlight Switch
Horn Switch
Function Key
Accelerator
Brake Handle
Battery Bar
Power Key
Speed
Gear
Press the accelerator lightly to speed
up the electric scooter.

4
Warm reminder: To make folding more convenient, the ferrule and shaft are not fully
tightened, it is normal if there is a gap. Please be assured that this will not affect
driving safety.
If necessary, you can adjust it by yourself: adjusting the screw clockwise will loosen the
handle, adjusting the screw counterclockwise will tighten the handle.

5
LCD-JX168 INTELLIGENT SPEED CONTROL-
HANDLE INSTRUCTIONS (SPECIAL FOR SCOOTER)
Version Number: 2016020
Model Number: JX-168
Working Voltage: 8-80V
Function:
1.Display function
Speed Display, Battery Indicator, Fault Indicator, Headlight Indicator, Cruise
Indicator, Gear Indicator, Total Mileage, Single Mileage, Real-time Voltage,
Operating Current, Operating Time, Start Mode
2.Communication Protocol: UART
3.All display will be displayed within 1S after power on

Icon Display Introduction
1. Battery Bar
2. Multifunction Icon
Total Mileage ODO; Single Mileage TRIP; Real-time Voltage V; Running Current A; Running
Time TIME; Fault Code E
3. When the symbol is flashing, short press the ON/OFF button to adjust the display
interface to Fault Code E interface.
The corresponding number represents different fault, the details are as follows:
ERRO 1. Motor HALL Malfunction
ERRO 2. Brake Malfunction
ERRO 6. Low Voltage
ERRO 7. Motor Malfunction
ERRO 8. Handlebar Malfunction
ERRO 9. Controller Malfunction
ERRO 10. Receive time out
ERRO 11. Sending Failure
6

4. Speed Icon
MPH, KM/H
5. Gear Icon
Short press the MODE button to switch the gears cyclically.
The higher the gear, the faster the speed. (The motor will not run at gear 0.)
6. Cruise Icon
After the motor is running, keep the speed for 5 seconds and then the cruise indicator lights up.
After releasing the speed control handle, the motor keeps running at the original speed.
When you brake or accelerate again, the cruise mode will end.
7. Start Method
Non-zero Start: NON indicator lights up
Zero Start: ZERO indicator lights up
7

8.USB Charging Icon
When USB is connected and generated exceed 100 mA current, the USB icon lights up.
The icon flashing indicates intermittent charging or the load current exceeds 500mA, at
this time it will automatically turn on the protection mode.
9. Parameter Setting and Definition
P02: Mileage Unit, 0: Km; 1: Mile;
P04: Sleep Time, 0: no sleep; Other Numbers: sleep time; Range, 1-60 minute;
P09: Zero Start, Non-zero Start, 0: zero start; 1: non-zero start;
P16: Real-time Cruise: 1: with this function; 0: without this function;
P99: One-key Reset, (long press the MODE button for 5-6 seconds, all parameters are
reset to the initial settings of the first start)
ODO: ODO Reset (short press the MODE button and then long press for 5-6 seconds until
the number is zero)
8

9
Brief Introduction of Key Functions
2.1 Long press the power button to power on, and then short press the power button, the
interface will switch between ODO, TRIP, V, A, E, TM.
2.2 Long press the power button to power off.
2.3 Long press the M button and the power button to enter the mode setting. In the setting
interface, short press the power button to switch parameters.
Short press the M button to change the speed, the gear shifts from 0 to the highest gear
cyclically. (The gears default to 3 gears, 0 gear motor will not run, 3 gears is highest speed.)
Parameter Modification:
Long press the power button and M button to enter the parameter setting, the same way to
exit the parameter setting. The parameter modification will be completed after power off and
restart.
2.4 Adjust the accelerator to speed up; Release it to return to the zero position.
2.5 The headlight switch button controls the headlights and rear taillights, long press the M
button for 3 seconds to control the side lights of the pedal.

CHARGE YOUR SCOOTER
Charging condition description:
The scooter is fully charged when the LED on the charger changes
from red to green
10
Lift up the rubber flap
Plug the charging adapter
into the charging port
When charging is completed,
put back the rubber flap

HOW TO RIDE
11
Warning: Wear a helmet,
elbow pads and knee
pads. Please read the
instruction carefully
before using. Do not
touch the brake system.
Refer to the instruction
for more information
1,Turn on the scooter, and check the
power indicator

12
2, Step on the deck with one foot, and slowly
kicks off the other on the ground. When the
scooter starts to coast, put both feet on the deck
and press the accelerator (the accelerator
initiates once the coasting speed exceeds 5km/h)
4,Release the accelerator and the kinetic energy
recovery system initiates automatically to brake
slowly; And squeeze the brake lever for a sudden
brake
3,When the scooter is at a full stop, the accelera-
tor automatically turns off. To restart the scooter, it
is necessary to repeat step 2
5,Tilt your body to the steering direction as you
turn, and slowly turn the handlebar

13
FOLDING AND CARRYING
The scooter needs to be turned off before folding. Hold the handlebar stem, controlled by the folder device.
Hold the handlebar stem with either one hand or both hands to carry.

14
SPECIFICATIONS & WARRANTY
Product Name:
Package Dimension:
Motor Power:
Battery Capacity:
Motor Type:
Tire Type:
N.W
G.W
Charging Time:
Brake Type:
Maximum Speed:
Maximum Mileage:
HT-HVD-1/HT-HVD-3
48V500W /800W/1000W
36V08A/10A/13A/15A /48V10A/13A/15A/18A
Strong Brushless Motor
10’’ Solid Tires
23.6KG
27.8KG
4-7H
Front & Rear Disc Brake
40-50KM, 1-3 gears switching
45-55KM
36V500W
1130*290*405MM

15
Note: data and specifications may vary due to different models, and are subject to change without notice.
SPECIFICATIONS & WARRANTY
Storage Temperature: 1 month: -20 - 60℃
3 months:-20 - 45℃
1 year: -20 - 20℃
Battery Lithium-ion battery
Working Temperature -10 ~ 40℃
Charging Temperature 10 ~ 40 ℃
Relative Humidity of Storage 5% ~ 95%

Safety Instructions Watch out for safety risks
Do not ride in the rain
Do not accelerate when you
go downhill
Look out for doors, elevators
and other overhead obstacles
Do not press the accelerator
when you’re walking alongside
the scooter
16

Always steer clear of obstacles
Do not hang bags or other heavy stuff
on the handlebar
Keep both feet on the deck all
time
Keep your speed between 5–10 km/h when
you ride through speed bumps, elevator door
stills, bumpy roads or other uneven surfaces.
Slightly bend your knee to better adjust
mentioned surfaces
17

Do not ride in traffic lanes or residential areas
where vehicles and Pedestrians are both
allowed
Do not turn the handlebar violently
during high-speed riding
Do not ride through puddles or any
other (water) obstacle. In such a
case please lower your speed and
bypass the obstacle.
Do not ride with anyone else, including
children
18

Do not keep your feet on the rear mudguard
Do not touch the disc brake
Do not keep your hands away from
handlebar
Do not try riding up or down stairs, and
jumping over obstacles
19

Safety Reminder!
1.The scooter is intended for riders older than 16 years. Do not ride the scooter if you
suffer from reduced physical, sensorial or mental capabilities. Riders with a lack of
experience or knowledge should drive carefully.
2.This electric scooter is a leisure device. But once they're in a public area, they'll be
seen as vehicles, subjecting to any risks faced by vehicles. For your safety, please
follow instructions in the manual and traffic laws and regulations set forth by govern-
ment and regulatory agencies.
3.At the same time, you should understand that risks cannot be entirely avoided as
others may violate traffic regulations and drive incautiously, The faster the scooter is,
the longer it takes to stop. On a smooth surface, the scooter may slip, lose balance,
and even result in a fall. Thus it is crucial that you use caution, keep proper speed and
distance, especially so when you're unfamiliar with the place.
4.Riding with high speed or a speed that is not appropriate or adequate for the
situation (bad weather conditions, bad surface conditions, or the like) may lead into a
potential loss of stability or loss of control. To reduce any risk, you must follow all
instructions in this user manual. Be careful when folding and unfolding the product, it
may fall and cause injury.
20

5.Check the scooter before every use. When you note loosen parts, low battery alerts,
flat tires, excessive wear, strange sounds, malfunctions and other abnormal conditions,
stop riding immediately and call for professional support.
6.When riding a scooter, you need to hold the handle with both hands to avoid shaking
and falling down.
7.Always place the scooter on its stand on a flat and stable surface. The scooter must
be placed with the stand against the slope to prevent it from tipping over. Never place
the scooter with the front facing down the slope, as the stand may close and tip the
machine.
21

Cleaning and storage
If you see stains on the scooter’s body, wipe them off with a damp cloth. If the stains
won’t scrub off, put on some toothpaste, and brush them with a toothbrush, then wipe
them off with a damp cloth. If you see scratches on plastic parts, use sandpaper or
other abrasive materials to polish them.
Notes:
Do not clean the scooter with alcohol, gasoline, kerosene or other corrosive and
volatile chemical solvents to prevent dire damage.
Do not wash the scooter with a high-pressure water spray.
During cleaning, make sure that the scooter’s turned off, the charging cable is
unplugged, and the rubber flap is closed as water leakage may result in electric shock
or other major problems.
When the scooter’s not in use, keep it indoors where it is dry and cool. Do not put it
outdoors for long time. Excessive sunlight, overheating and overcooling accelerate tire
aging and compromise the scooter and the battery pack’s lifespan.
Maintenance:
Always charge before exhausting the battery to prolong the battery’s lifespan. The
battery pack performs better at normal temperature, and poor when it is below 0°C. For
instance, when it is below -20°C, the riding range is only half or less at normal state.
When the temperature rises, the riding range restores.
22
DAILY CARE AND MAINTENANCE

Scooter shall be only be used with original batteries and charging of the Scooter shall
only be done by the original charging adapter supplied with the Scooter (or any battery
model or charging adapter model approved by the manufacturer as compatible).
Do not place the battery in an environment where the ambient temperature is higher
than 50°C or lower than -20°C (e.g., do not leave the scooter or the battery pack in a
car under direct sunlight for an extended time).
If the scooter is expected to be left idle for more than 30 days, please fully charge the
battery and place it in a dry and cool place. Keep in mind to recharge it every 60 days
to protect the battery from potential damage which is beyond limited warranty.
23