1
Table of Contents
1. Important Safety Instructions 2
2. Overview 3
3. Feature Identication 4
4. Setup 5
4.1 Powering the USB Charger/Hub Unit 5
4.2 Door Locks 5
5. 32-Port USB Charger/Hub 6
5.1 USB Charger/Hub Features 6
5.2 Connecting Smartphones 6
to the USB Charger/Hub
5.3 Connecting a Computer to the 6
USB Charger/Hub
6. Wall Mounting 7
7. Desktop Placement 8
8. Specications 9
9. Storage, Service and Cleaning 10
10. Warranty and Product Registration 10
Español 11
21
31
Français
Русский
Deutsch 41
32-Port USB Charging Station
for Smartphones
Models: CSD32USB, CSDXB32USB, CSDXS32USB
(Series number: AG-0737)
Owner’s Manual
TrippLite.Eaton.com/support
Copyright © 2023 Tripp Lite. All trademarks are the sole property of their respective owners.
WARRANTY REGISTRATION
Register your product today and be
automatically entered to win an ISOBAR
®
surge protector in our monthly drawing!
tripplite.com/warranty

2
1. Important Safety Instructions
SAVE THESE INSTRUCTIONS
This manual contains instructions and warnings that must be followed during the installation and operation of the product described
in this manual. Failure to comply may invalidate the warranty and cause property damage or personal injury.
USB Charger/Hub Unit:
• Connect the unit to an outlet that is in accordance with your local building codes and adequately protected against excess current,
short-circuits and earthly faults.
• The electrical outlet supplying power to the equipment should be installed near the unit and be easily accessible.
• The AC plug on the power supply cord serves as the disconnect device.
• Connect the unit directly to a properly grounded AC power outlet.
• Do not modify the plug, and do not use an adapter that would eliminate the ground connection.
• If any of the following situations arise, schedule an appointment with a service technician to have your equipment inspected:
• The equipment has been exposed to moisture
• The equipment has been dropped and damaged
• The equipment shows obvious signs of breakage
• The equipment is not functioning properly or is not functioning according to the instructions described in this Owner’s Manual
• Use of this equipment in life support applications where failure of this equipment can reasonably be expected to cause the failure of
the life support equipment or to significantly affect its safety or effectiveness is not recommended.
Charging Station Cabinet:
• Keep the charging station in a controlled indoor environment away from moisture, temperature extremes, flammable liquids and
gasses, conductive contaminants, dust and direct sunlight.
• Leave adequate space around the charging station for proper ventilation. Do not block, cover or insert objects into the charging
station’s external ventilation openings.
• For best performance, keep indoor temperature between 32°F and 86°F (0°C and 30°C).
• Do not remove any warnings, cautions or descriptive labels from the charging cart.
• The charging station is extremely heavy. Use caution when handling the charging station. Do not attempt to unpack or mount it
unassisted. Use a mechanical device such as a forklift or pallet jack to move the charging station in the shipping container.
• Do not place containers of liquid or stack items on the cabinet.
• Inspect the shipping container and the charging station for shipping damage. Do not use the charging station if it is damaged.
• Use caution when cutting packing materials. The charging station could be scratched, causing damage not covered by the warranty.
• Save all packing materials for later use. Repacking and shipping the charging station cabinet or equipment without the original
packing materials may cause product damage that will void the warranty.
For Wall-Mount and Desktop Installations:
• The charging station must be installed by a qualified technician.
• Before mounting, first make sure that the wall surface can safely support the combined load of the charging station, equipment
stored and all attached hardware and components.
• The charging station can support equipment up to its maximum load capacity of 180 lb. (81.6 kg).
• Always use suitable mounting means when installing to cinder blocks, concrete, drywall or wood studs. Install securely to the wall
using proper hardware (not provided).
WARNING: The supporting surface must be able to safely support the combined load of the charging station, equipment stored and all
attached hardware and components (see 8. Specifications for more information on your model’s weight and dimensions).

3
2. Overview
Your charging station is an all-in-one solution for storing, charging and syncing for up to 32 smartphones. Your charging station can be
conveniently mounted to walls as well as used for stationary desktop installations. To prevent theft and device tampering, your
charging station enclosure comes equipped with locking steel doors. A padlock hasp accessory (optional) attaches to the doors to
provide an extra measure of protection.
Explanation of Symbols:
CAUTION: RISK OF DANGER
PROTECTIVE BONDING TERMINAL
AC VOLTAGE
WALL-MOUNT WARNINGS: The wall surface, wall studs and all user-supplied mounting hardware must be able to support the
combined weight of the cabinet and all equipment that will be installed in the cabinet. The cabinet can support equipment up to its
maximum load capacity of 180 lb. (81.6 kg).
Wall-mounting holes are spaced 16 in. (406 mm) apart horizontally to accomodate standard placement of wall studs. It is advised to
safety distribute the weight of the cabinet and all installed equipment.

4
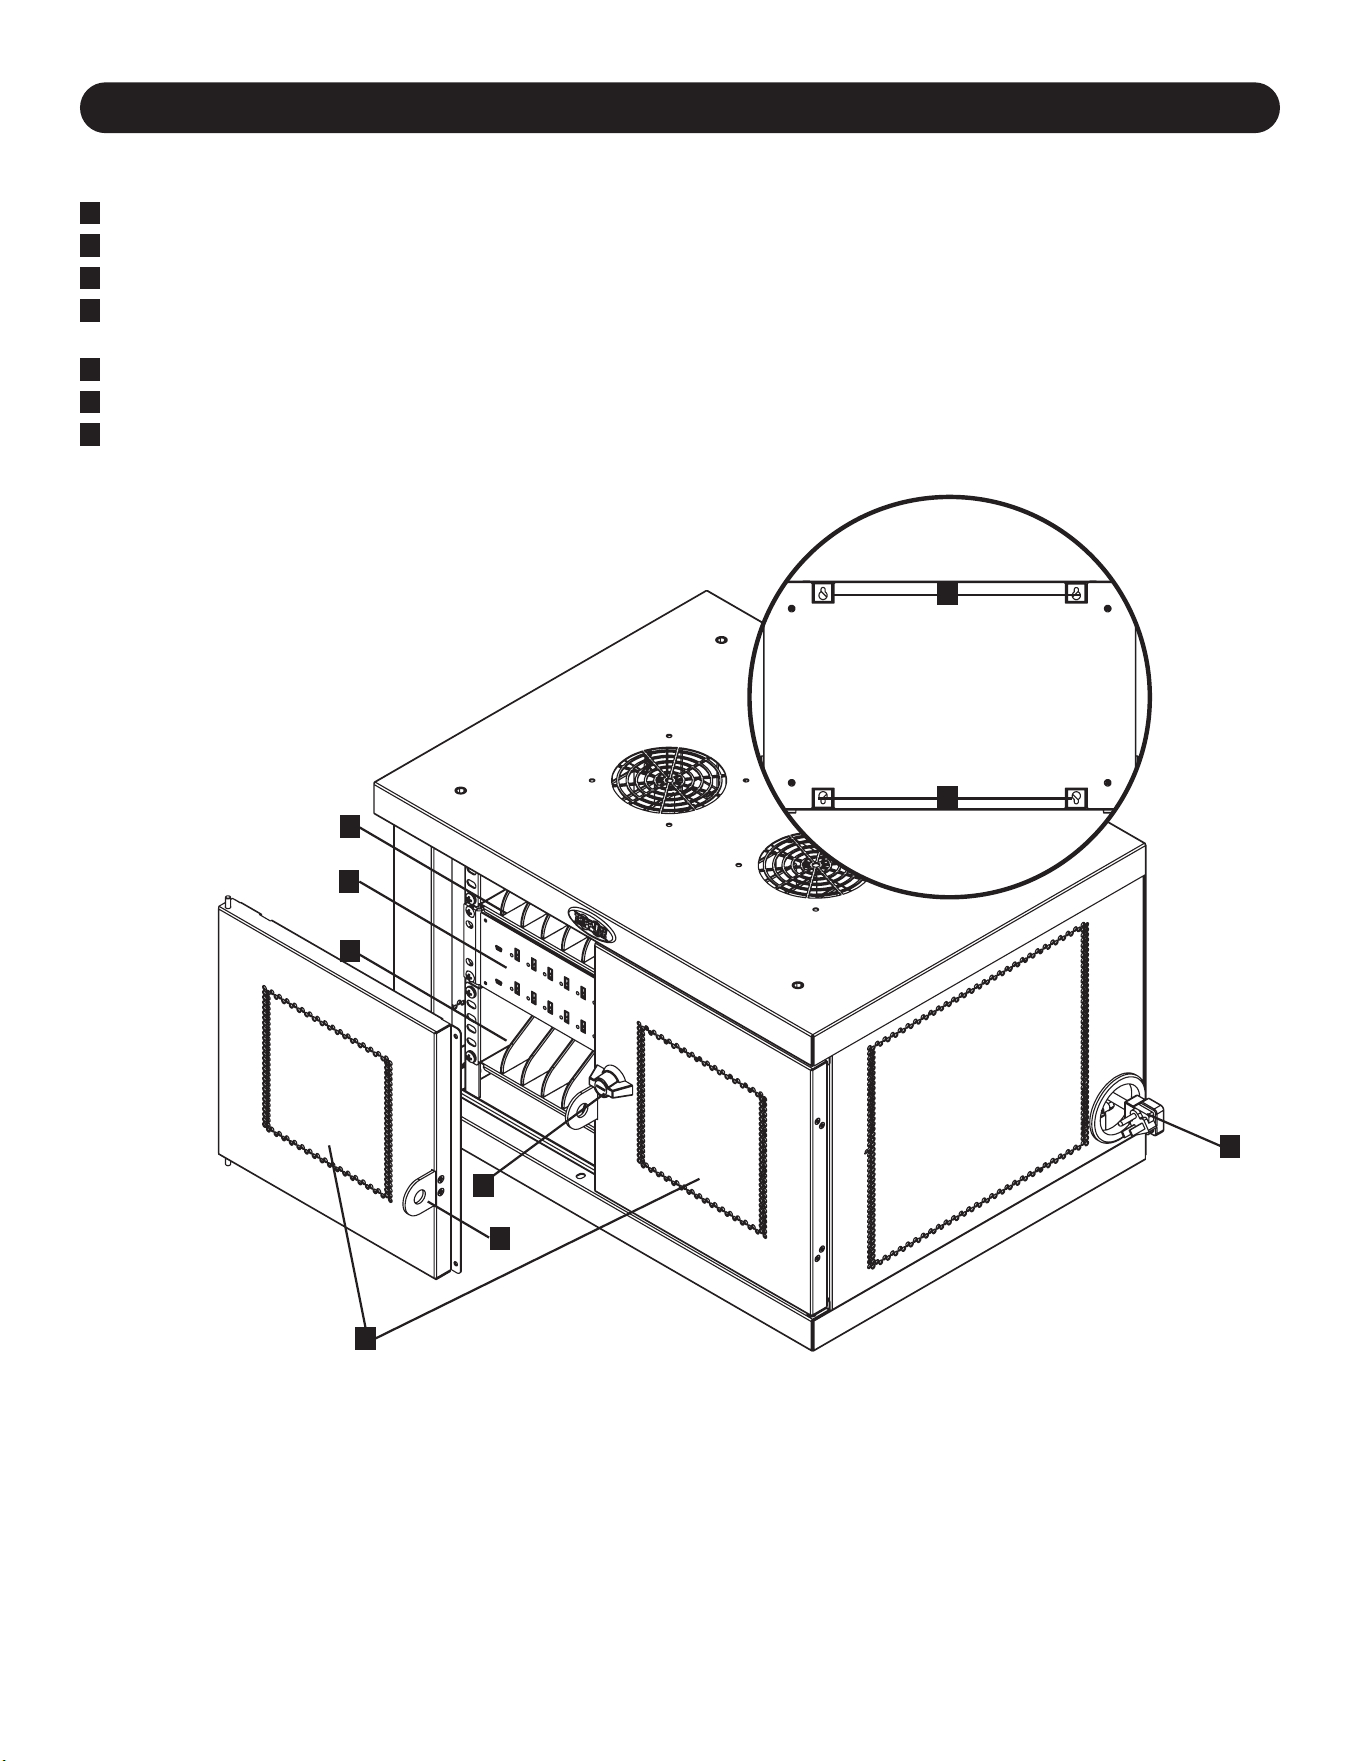
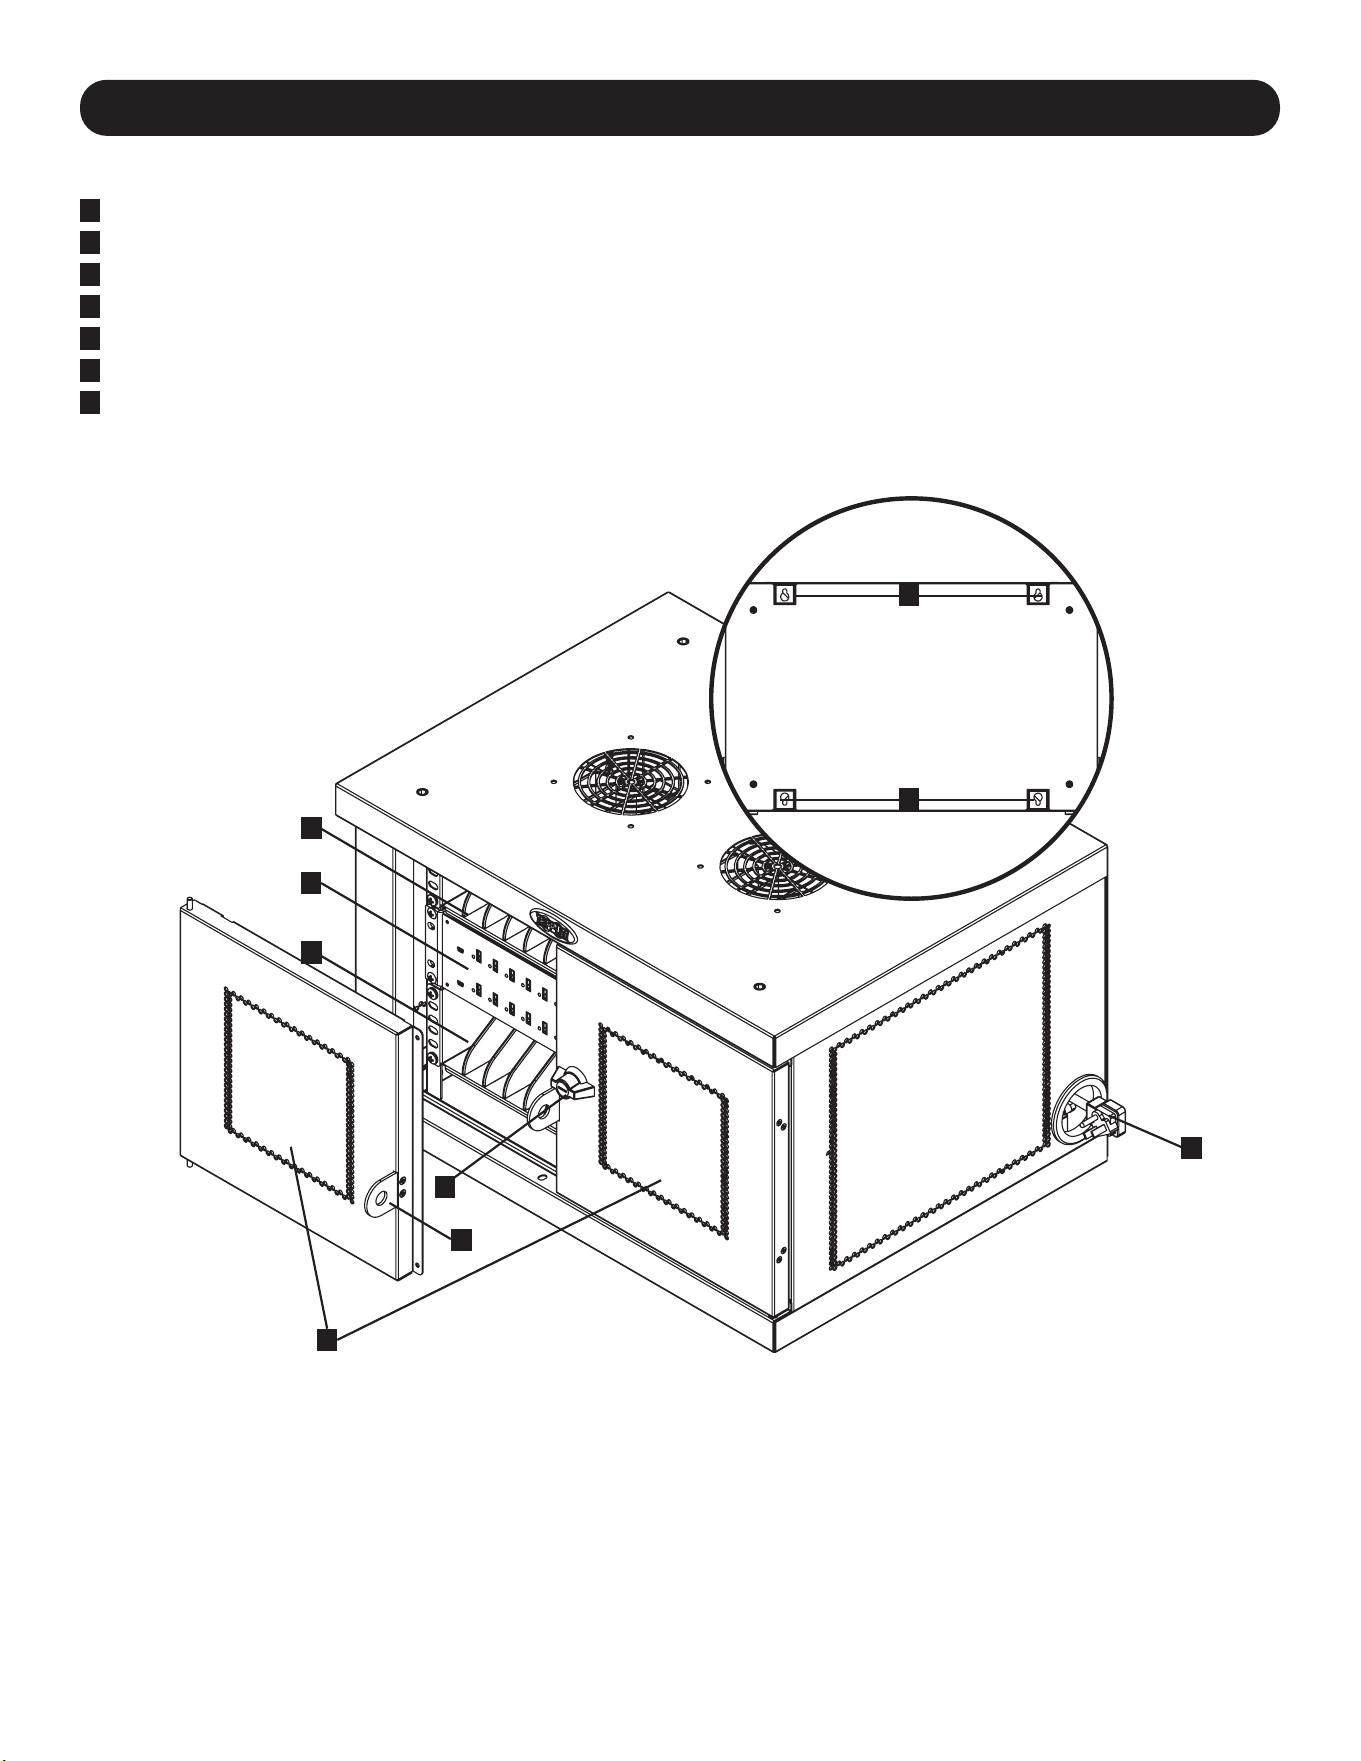
3. Feature Identification
CSD32USB
1
Locking Split Doors
2
Storage Shelves (Hold up to 16 Devices Each.)
3
32-Port USB Charger/Hub Unit
4
Power Cord Access Holes with 5-15P (CSD32USB) Right-Angle Plug (1 Opening Located on Each Side.)
5
3-Point Lock
6
Padlock Hasp (Optional. Assembly Required, See Section 3.4 for More Information. Lock Not Included.)
7
Rear Panel with Keyhole Wall Mount Slots (See Section 6 for More Information.)
Not Shown:
BS 1363 (CSDXB32USB) Plug or Schuko (CSDXS32USB) Power Cord Plugs
Keys
1
5
3
2
2
4
6
7
7

5
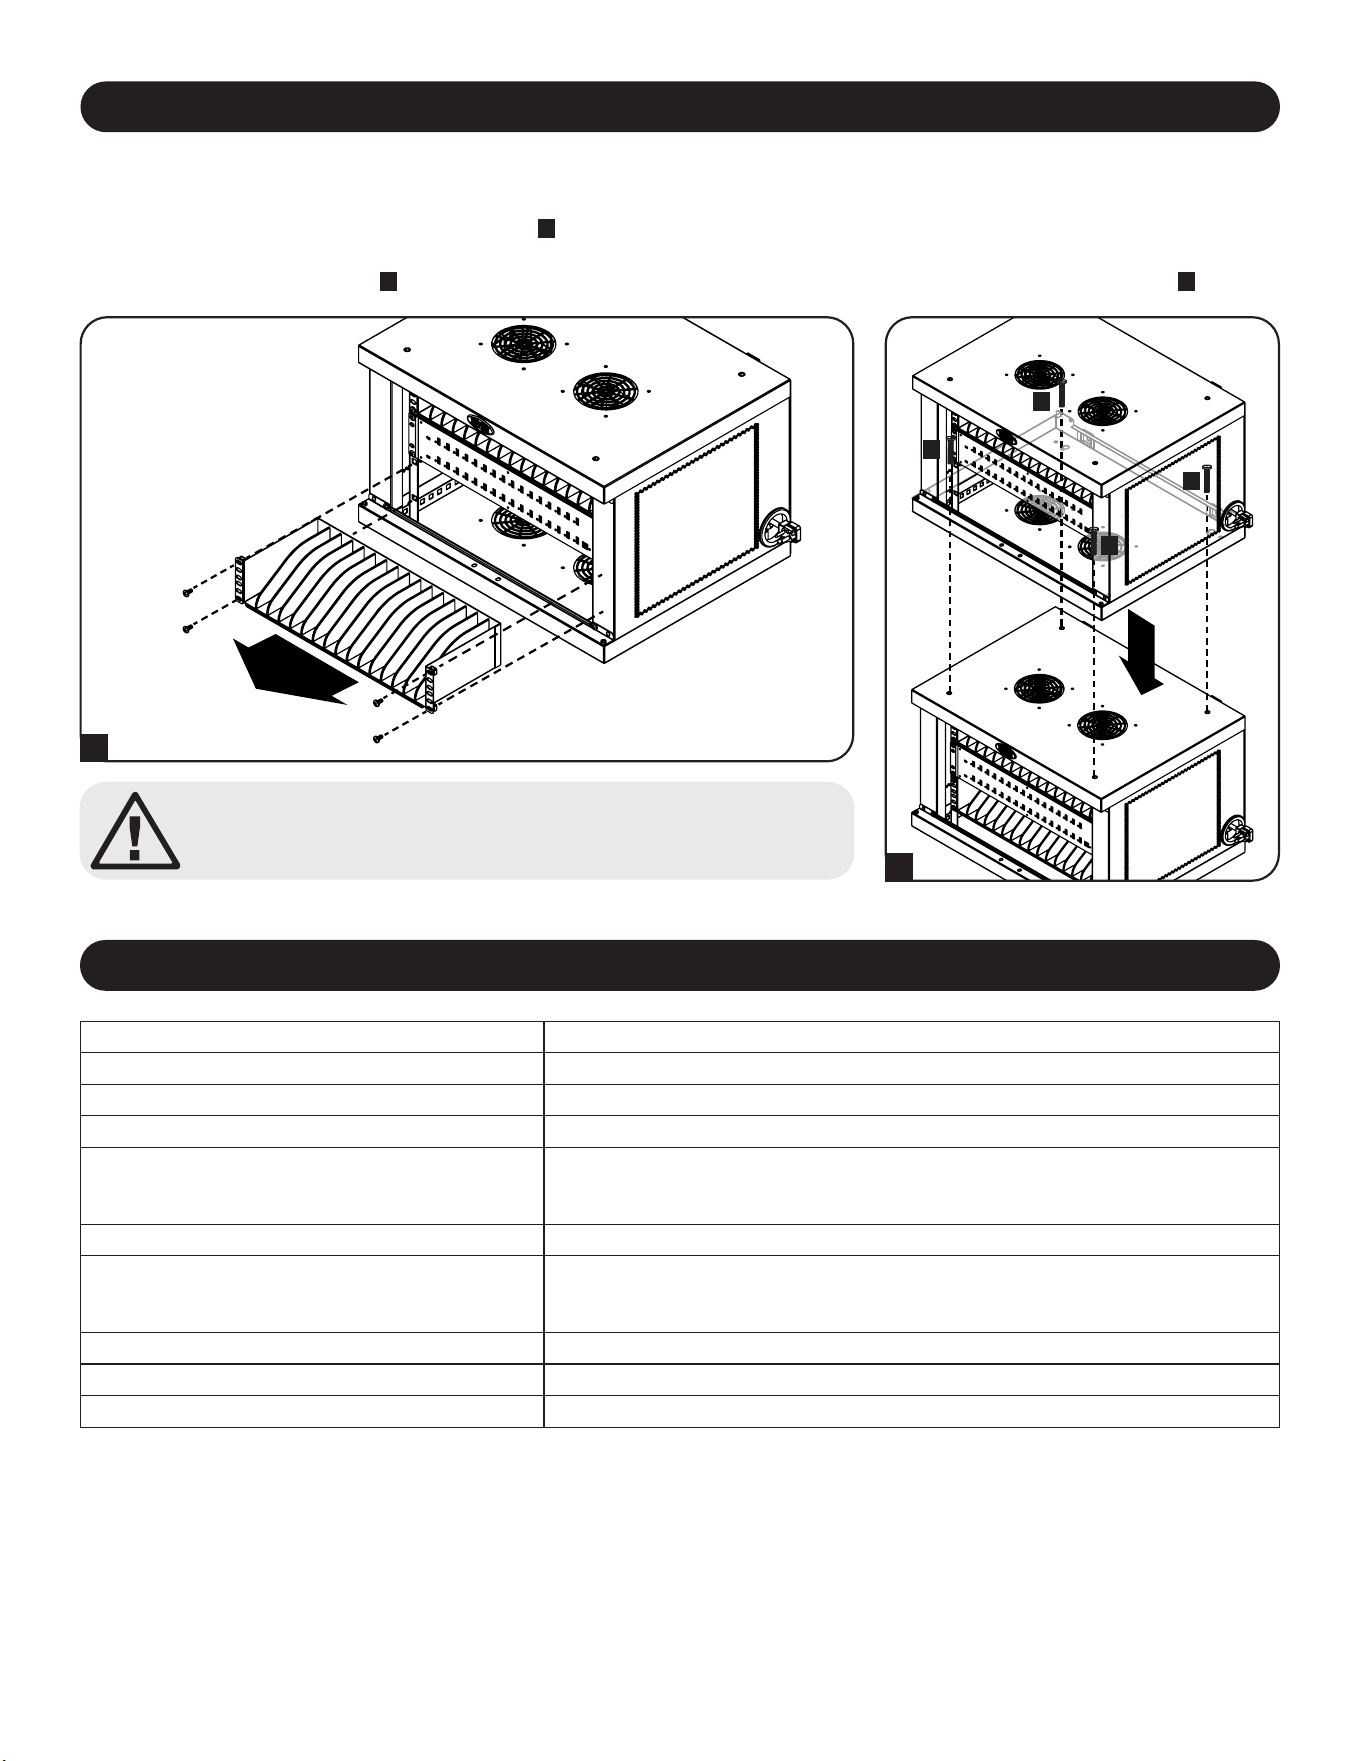
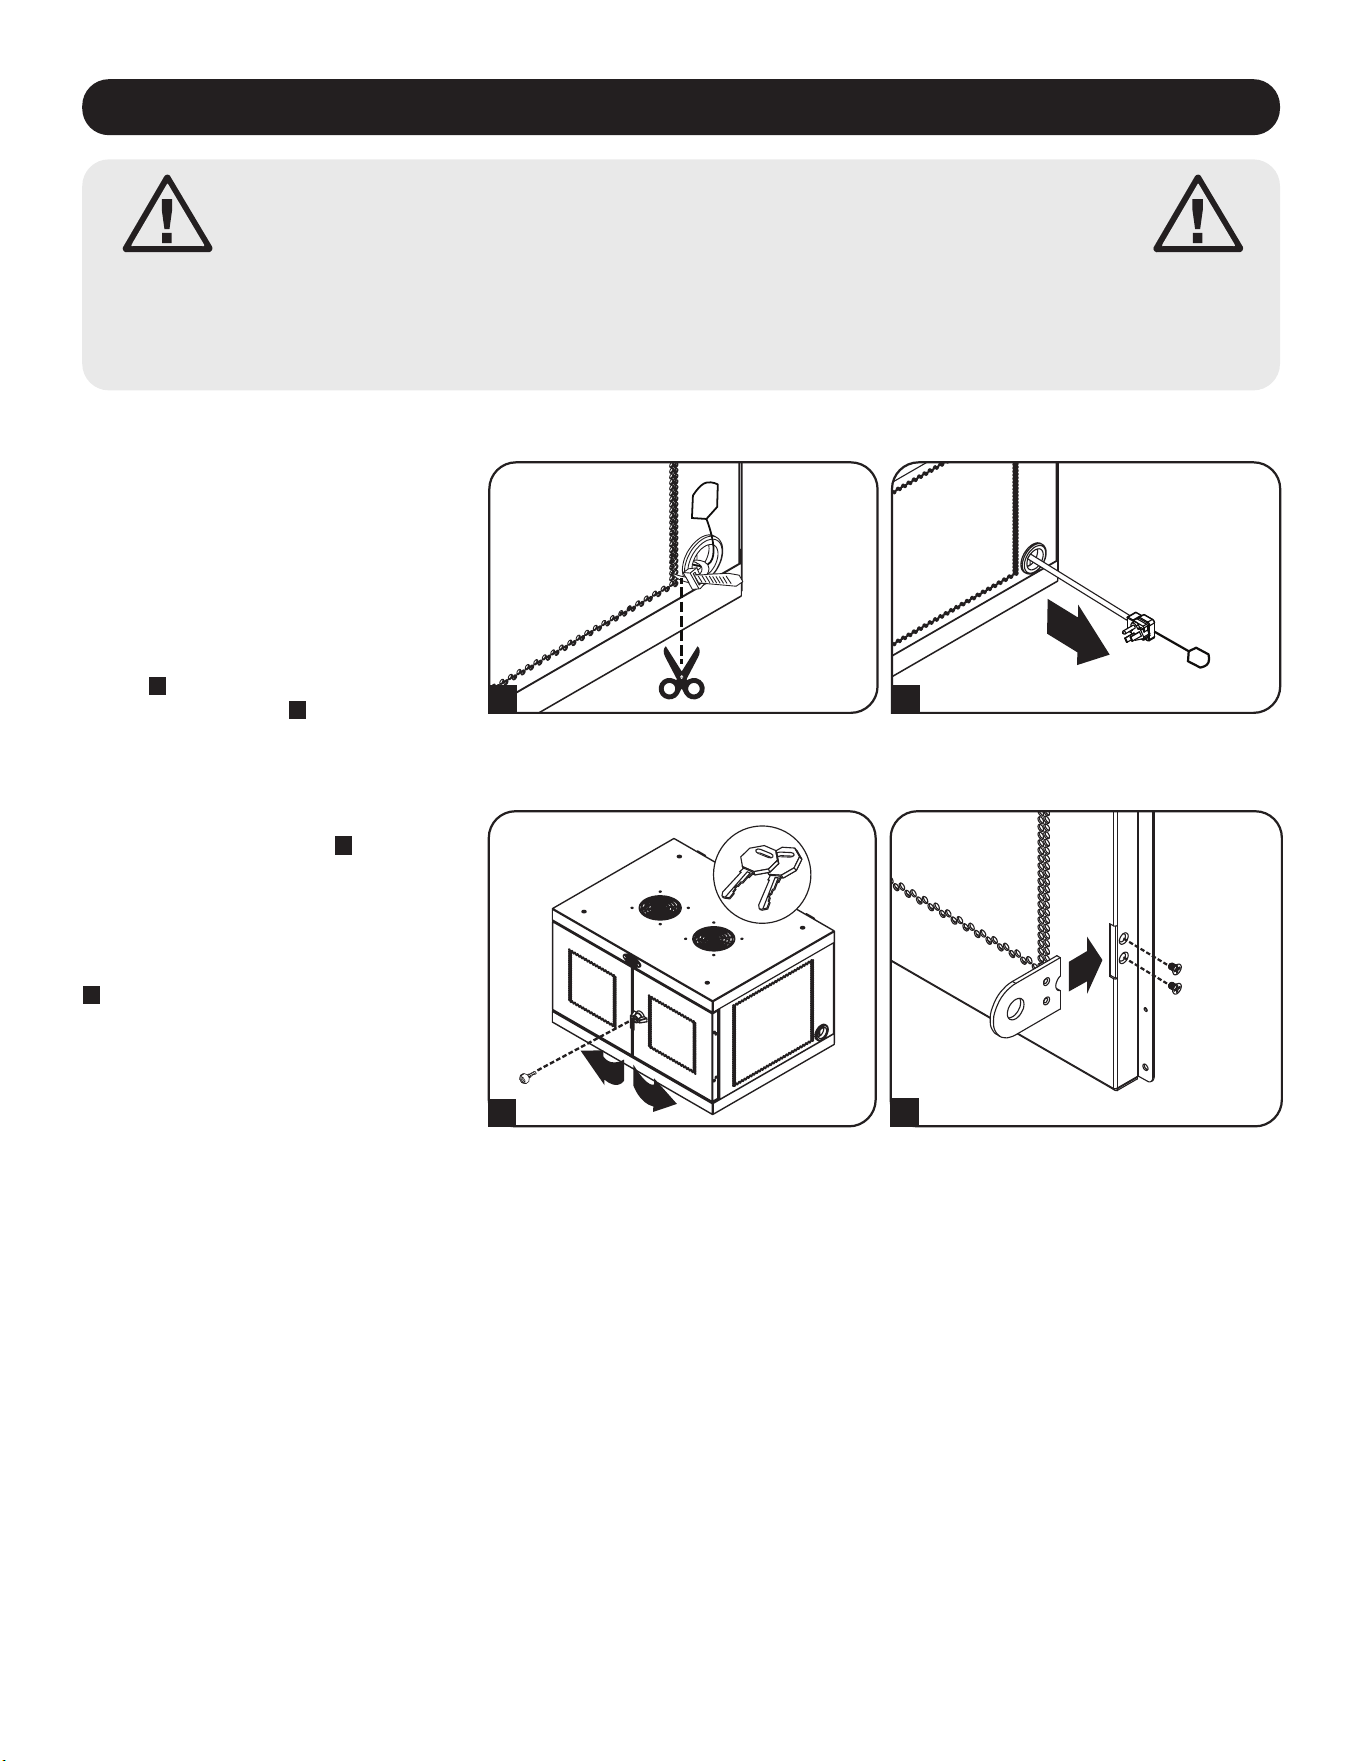
4. Setup
Caution! Read All Instructions and Warnings Before Installation!
Warning: Charging stations can be extremely heavy. Do not attempt to unpack or mount the charging station
without assistance. Use extreme caution when handling the charging station and be sure to follow all
handling and installation instructions. Do not attempt to install equipment without first stabilizing the
charging station.
4.1 Powering the USB Charger/Hub Unit
For convenient power connections, a tab
is located on each side of the power cord
access holes. To connect the USB
charger/hub, choose which side you would
like to use to plug in to a power outlet,
then cut the zip ties securing both tabs to
the power cord access holes
A
. Pull the
tab from the desired power cord access
hole
B
for the cord and plug to extend
outward.
BA
4.2 Door Locks
The split doors contain a lock that is
accessible with the included keys
A
.
The included padlock hasp accessory can
attach to the unit to provide an extra
measure of protection. To attach the
padlock hasp, use the included screws to
secure the hasp to the door
B
. Repeat for
the other door.
B
A
6
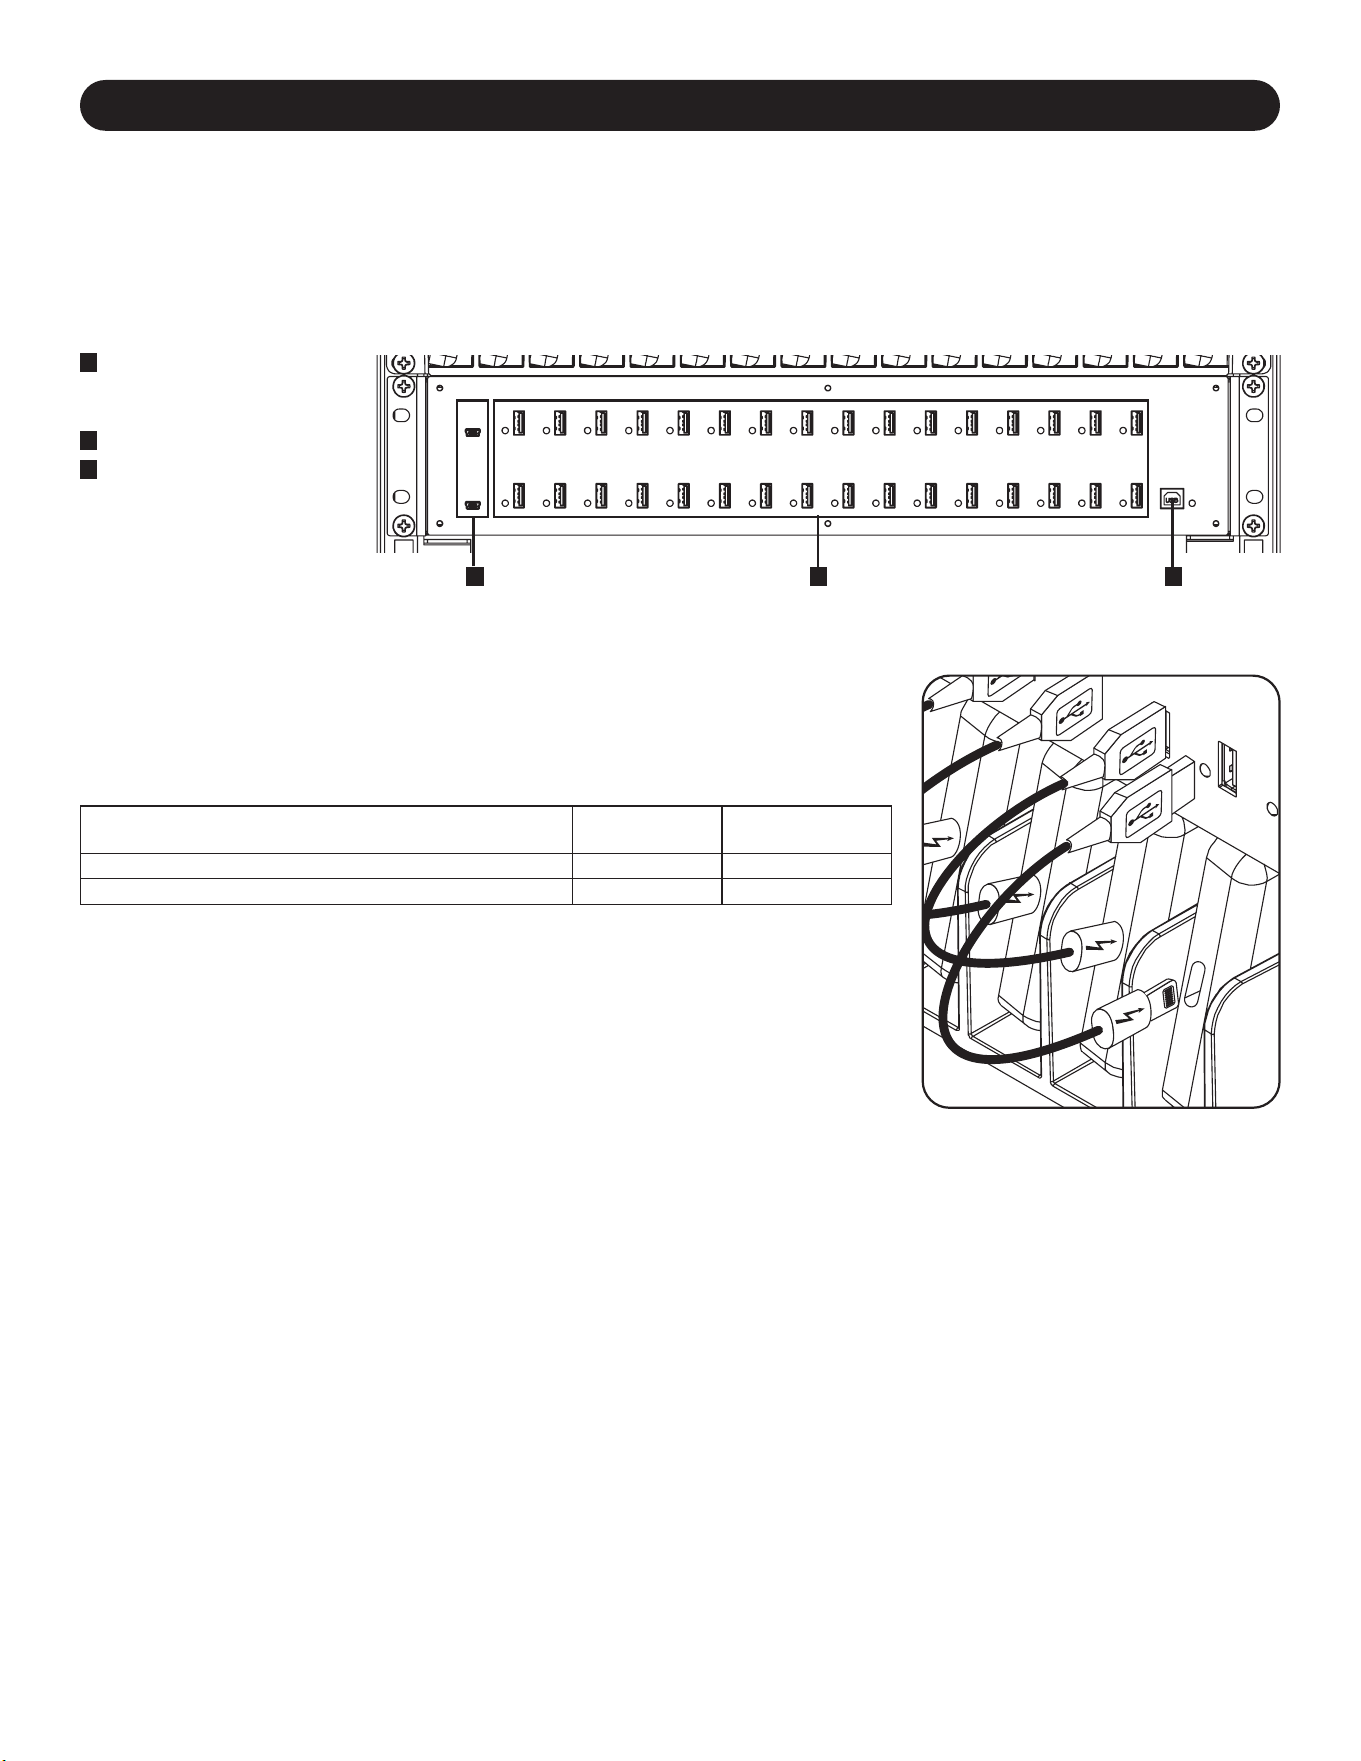
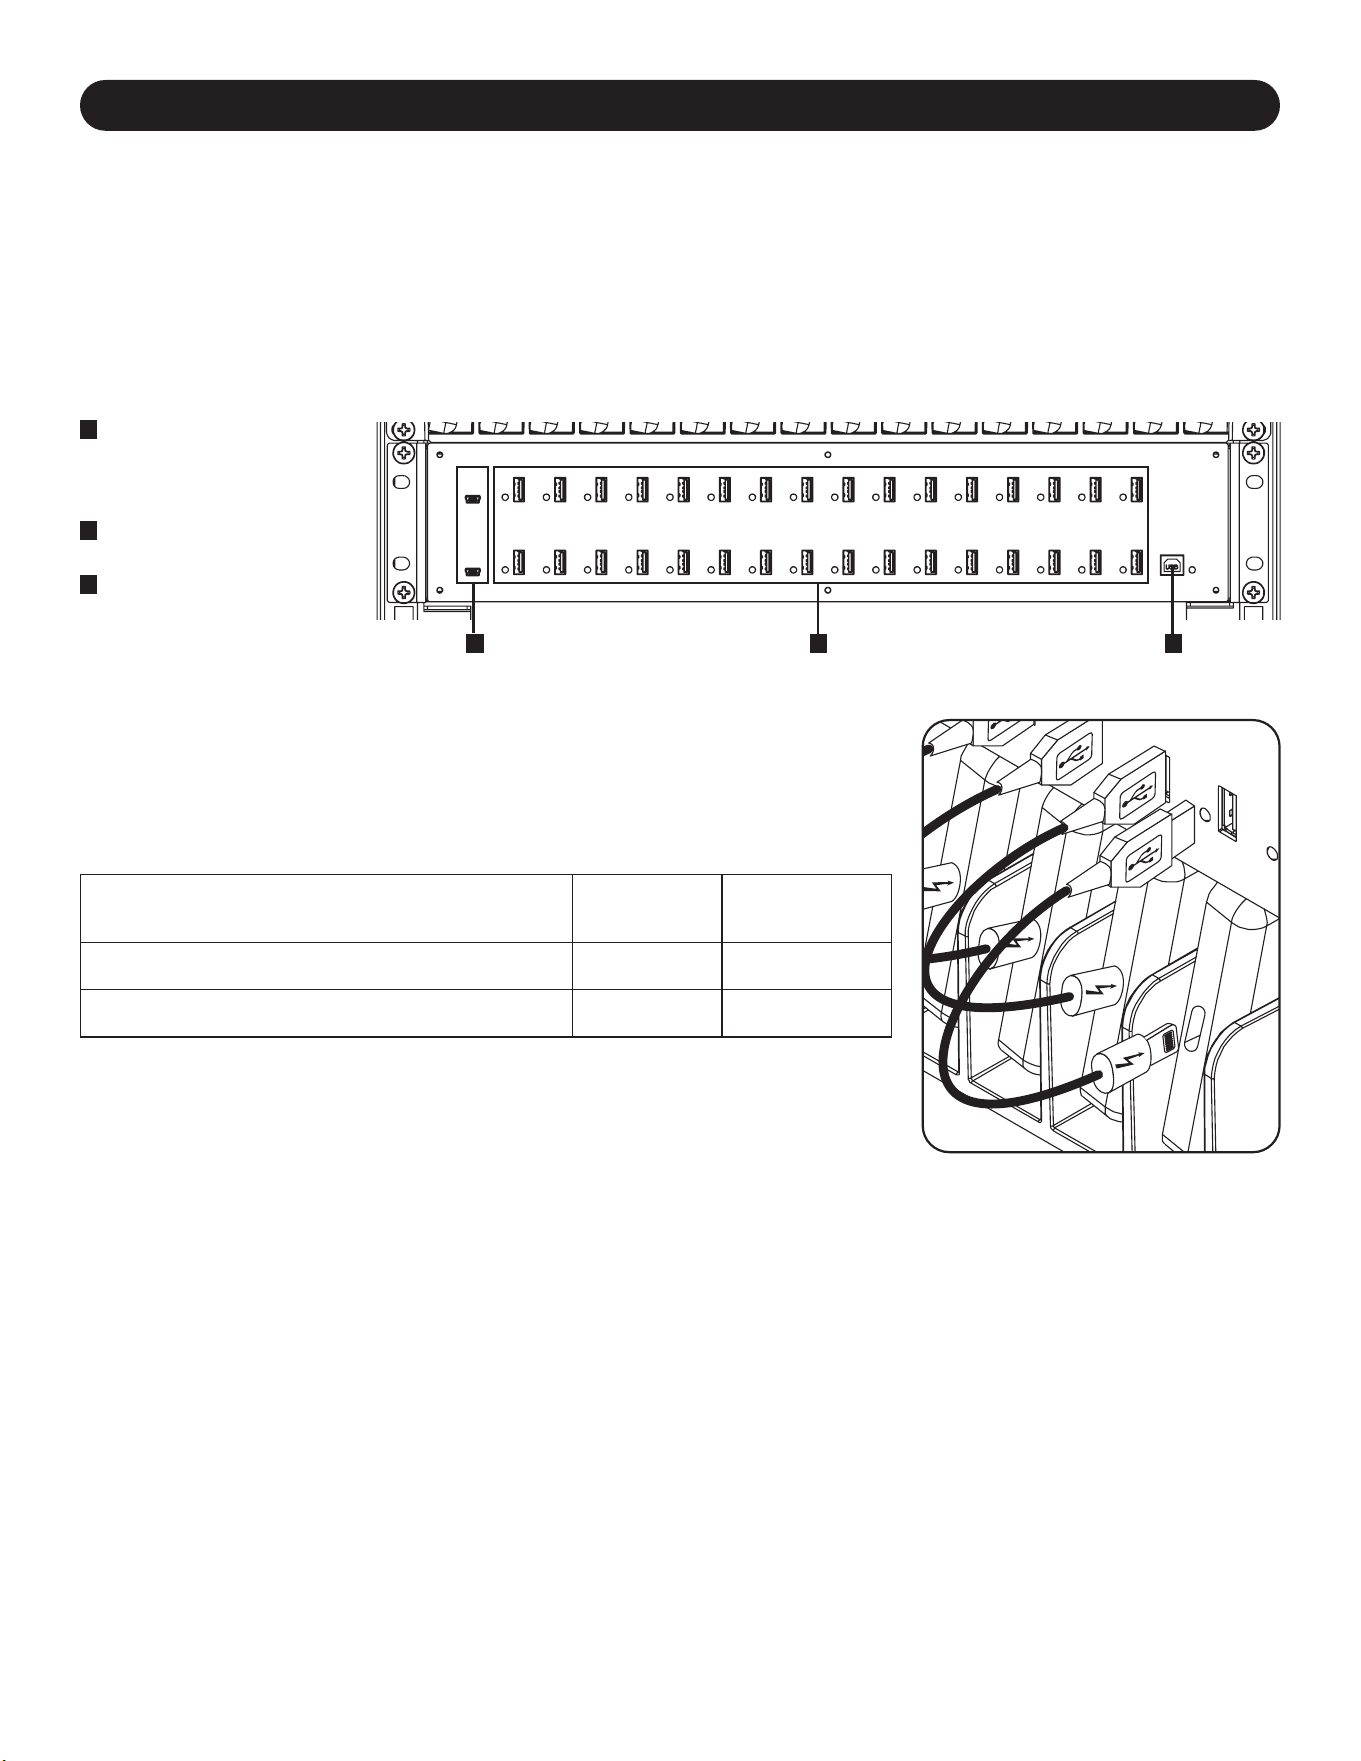
5. 32-Port USB Charger Hub
• Professional-grade USB charger/hub charges and syncs up to 32 smartphones.
• Provides each USB port with an optimum charge level for a particular device (up to 2.4 amps).
• Allows syncing to be performed with any device designed for USB data communications, per compatible file management software.
• Syncs Apple
®
devices via iTunes
®
software or Apple Configurator.
• Mini-USB Firmware Upgrade Port enables future software upgrades to support newer devices.
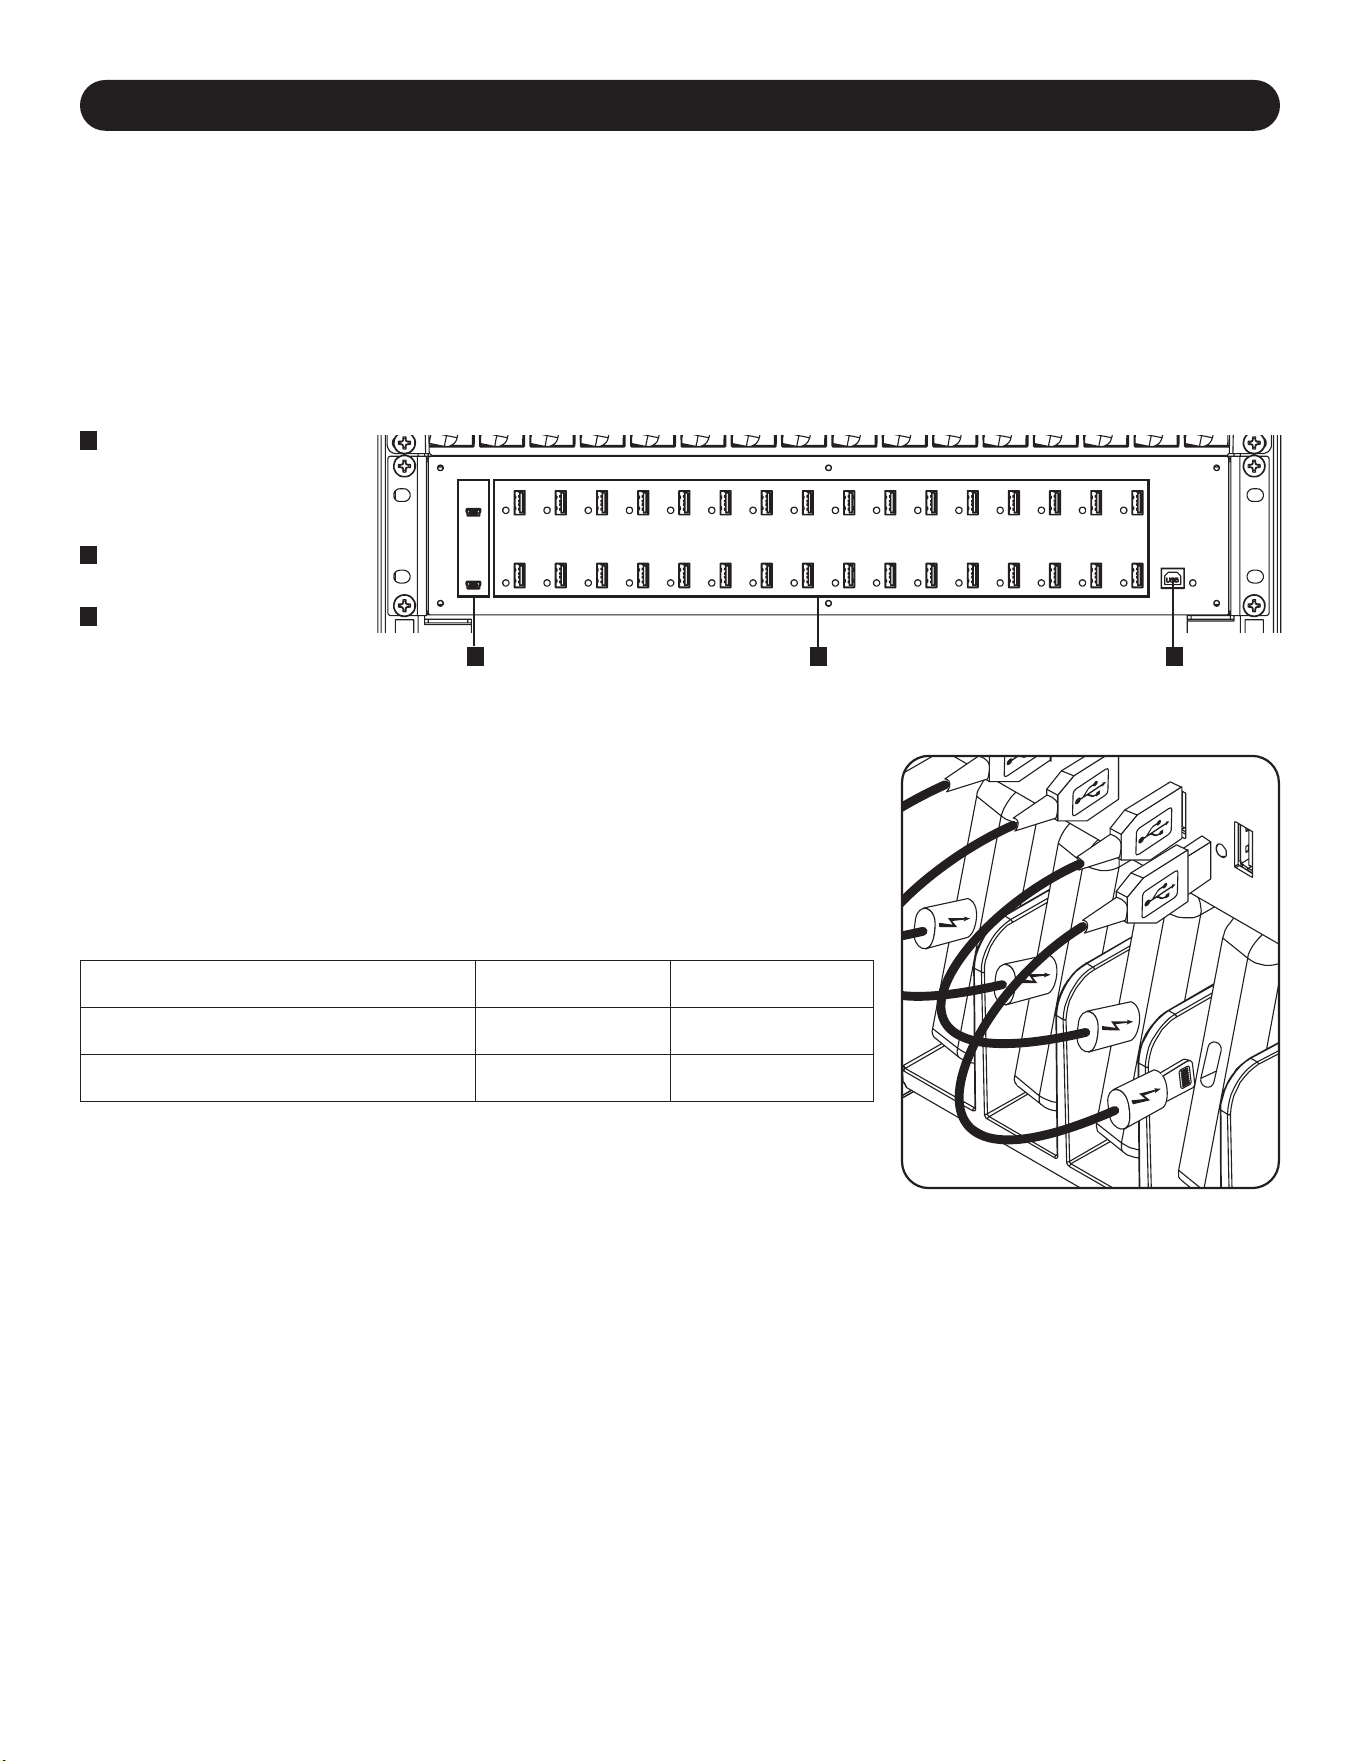
5.1 USB Charger/Hub Features
A
2.4A USB Device Ports
with LED Indicator
Lights (32 Total)
B
Computer Sync Port
C
Firmware Upgrade Ports
Using a user-supplied or device manufacturer’s shielded USB cable, connect the USB
cable to the smartphone to be charged. Repeat for all devices.
Tripp Lite offers individual and 10-pack cables for Apple devices using USB to 30-Pin or
USB to Lightning™ cables, as well as individual and 10-pack cables for USB 3.0 or 2.0
devices using USB-A (male) to 5-Pin Micro B (male) cables.
Cable Type
Individual Cable
Model Number
10-Pack Cable
Model Number
Apple USB to 8-Pin Lightning Connector, 10 in. M100-10N-BK M100-10N-BK-10
USB 3.0 SuperSpeed A (Male) to 5-Pin Micro-B (Male), 1 ft. U326-001-BK U326-001-BK-10
Visit tripplite.com for more information on our selection of premium USB cables.
5.2 Connecting Smartphones to the USB Charger/Hub
A BC
5.3 Connecting a Computer to the USB Charger/Hub
In addition to device charging, the USB Charger/Hub is equipped with a hub function that syncs devices and their respective software
applications via a connected computer. To enable the hub function, use the included USB cable to connect the USB-B connector into
the unit’s Computer Sync Port and the USB-A connector into a computer’s USB port.
Note: When a computer connection is established and multiple devices are connected to the USB Charger/Hub, the charge rate will reduce during
syncing and resume to the normal charge rate upon completion.
Note: The Firmware Upgrade Port requires a mini-USB connection (cable not included). To download the most recent firmware updates, go to
tripplite.com/support.
7
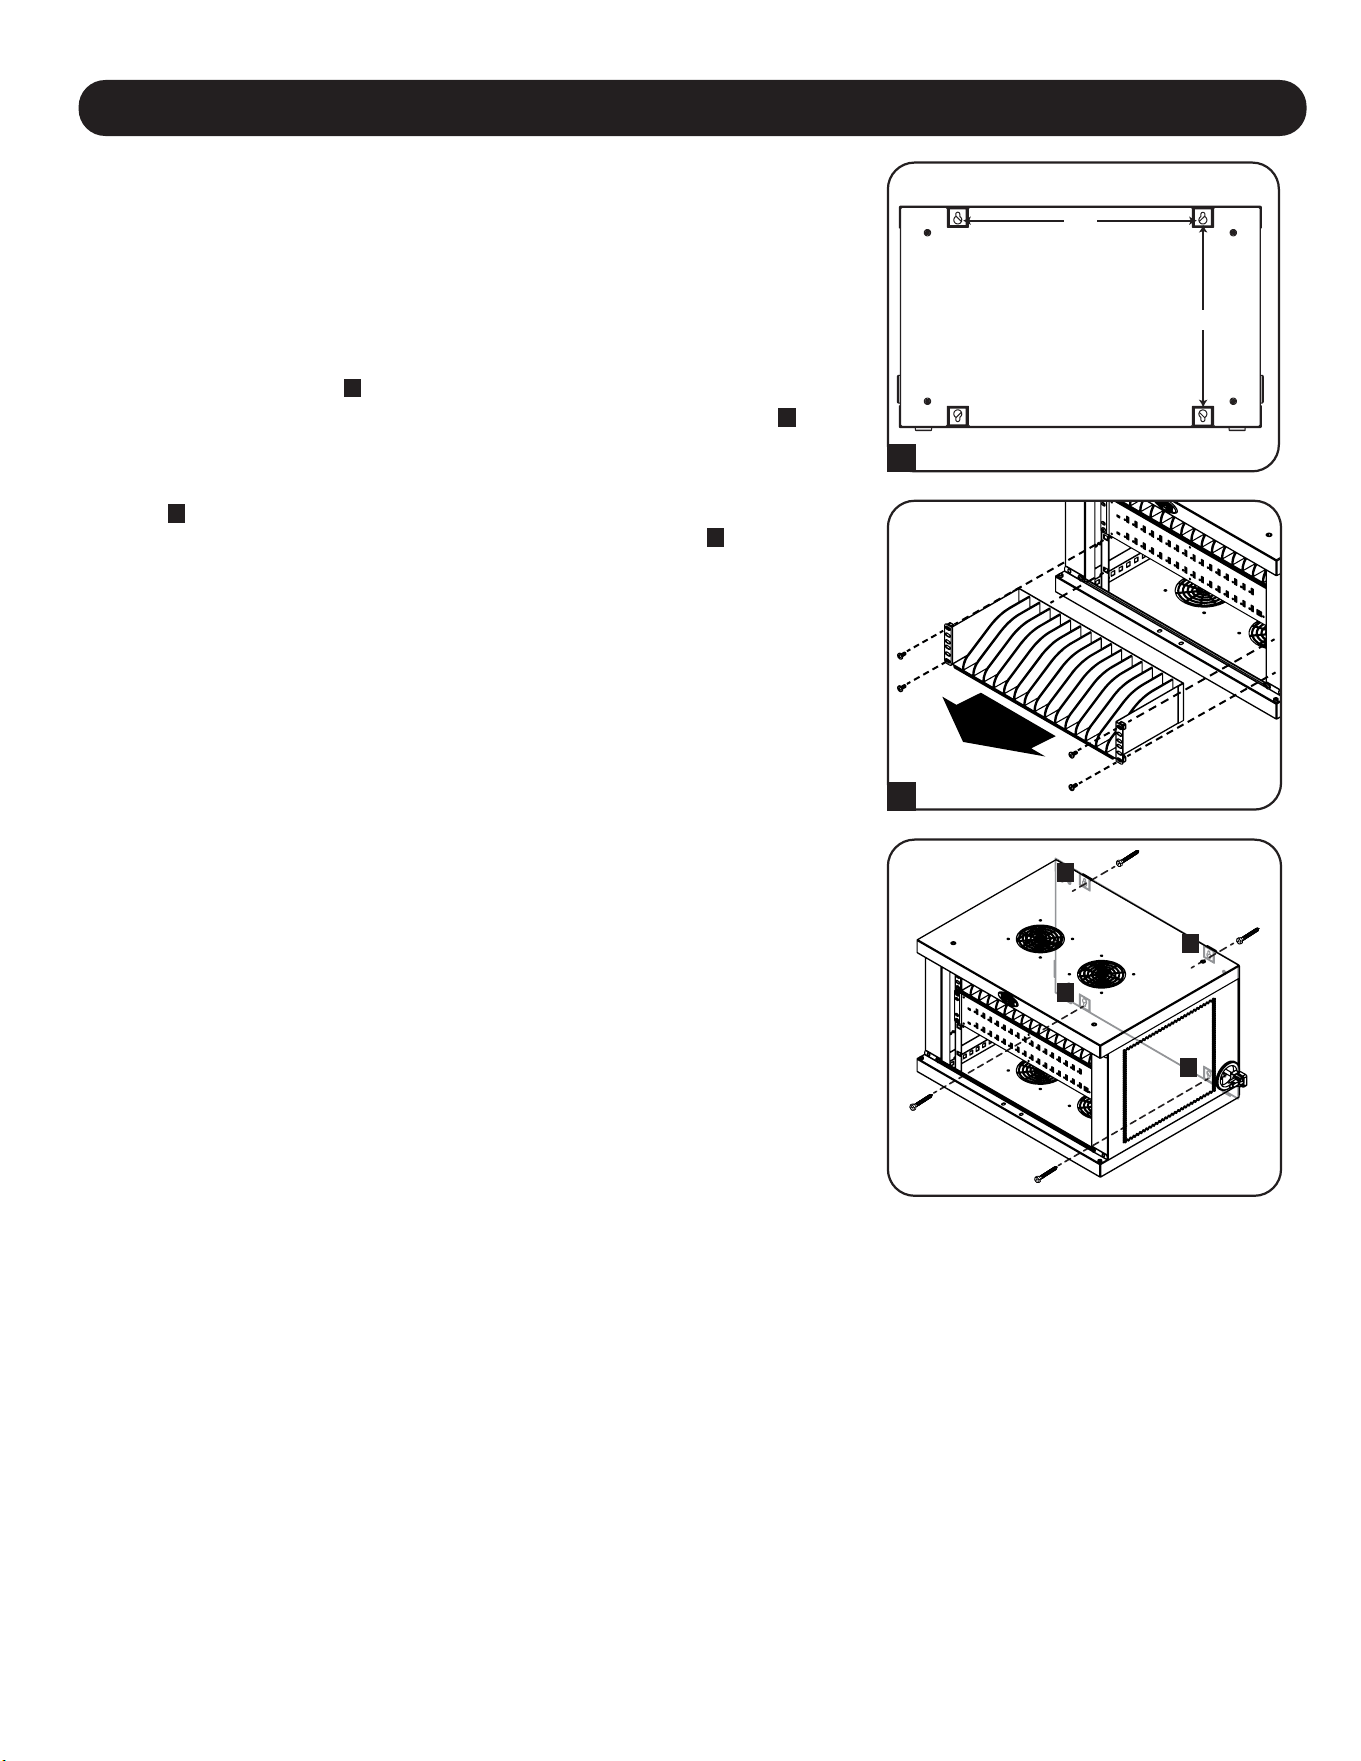
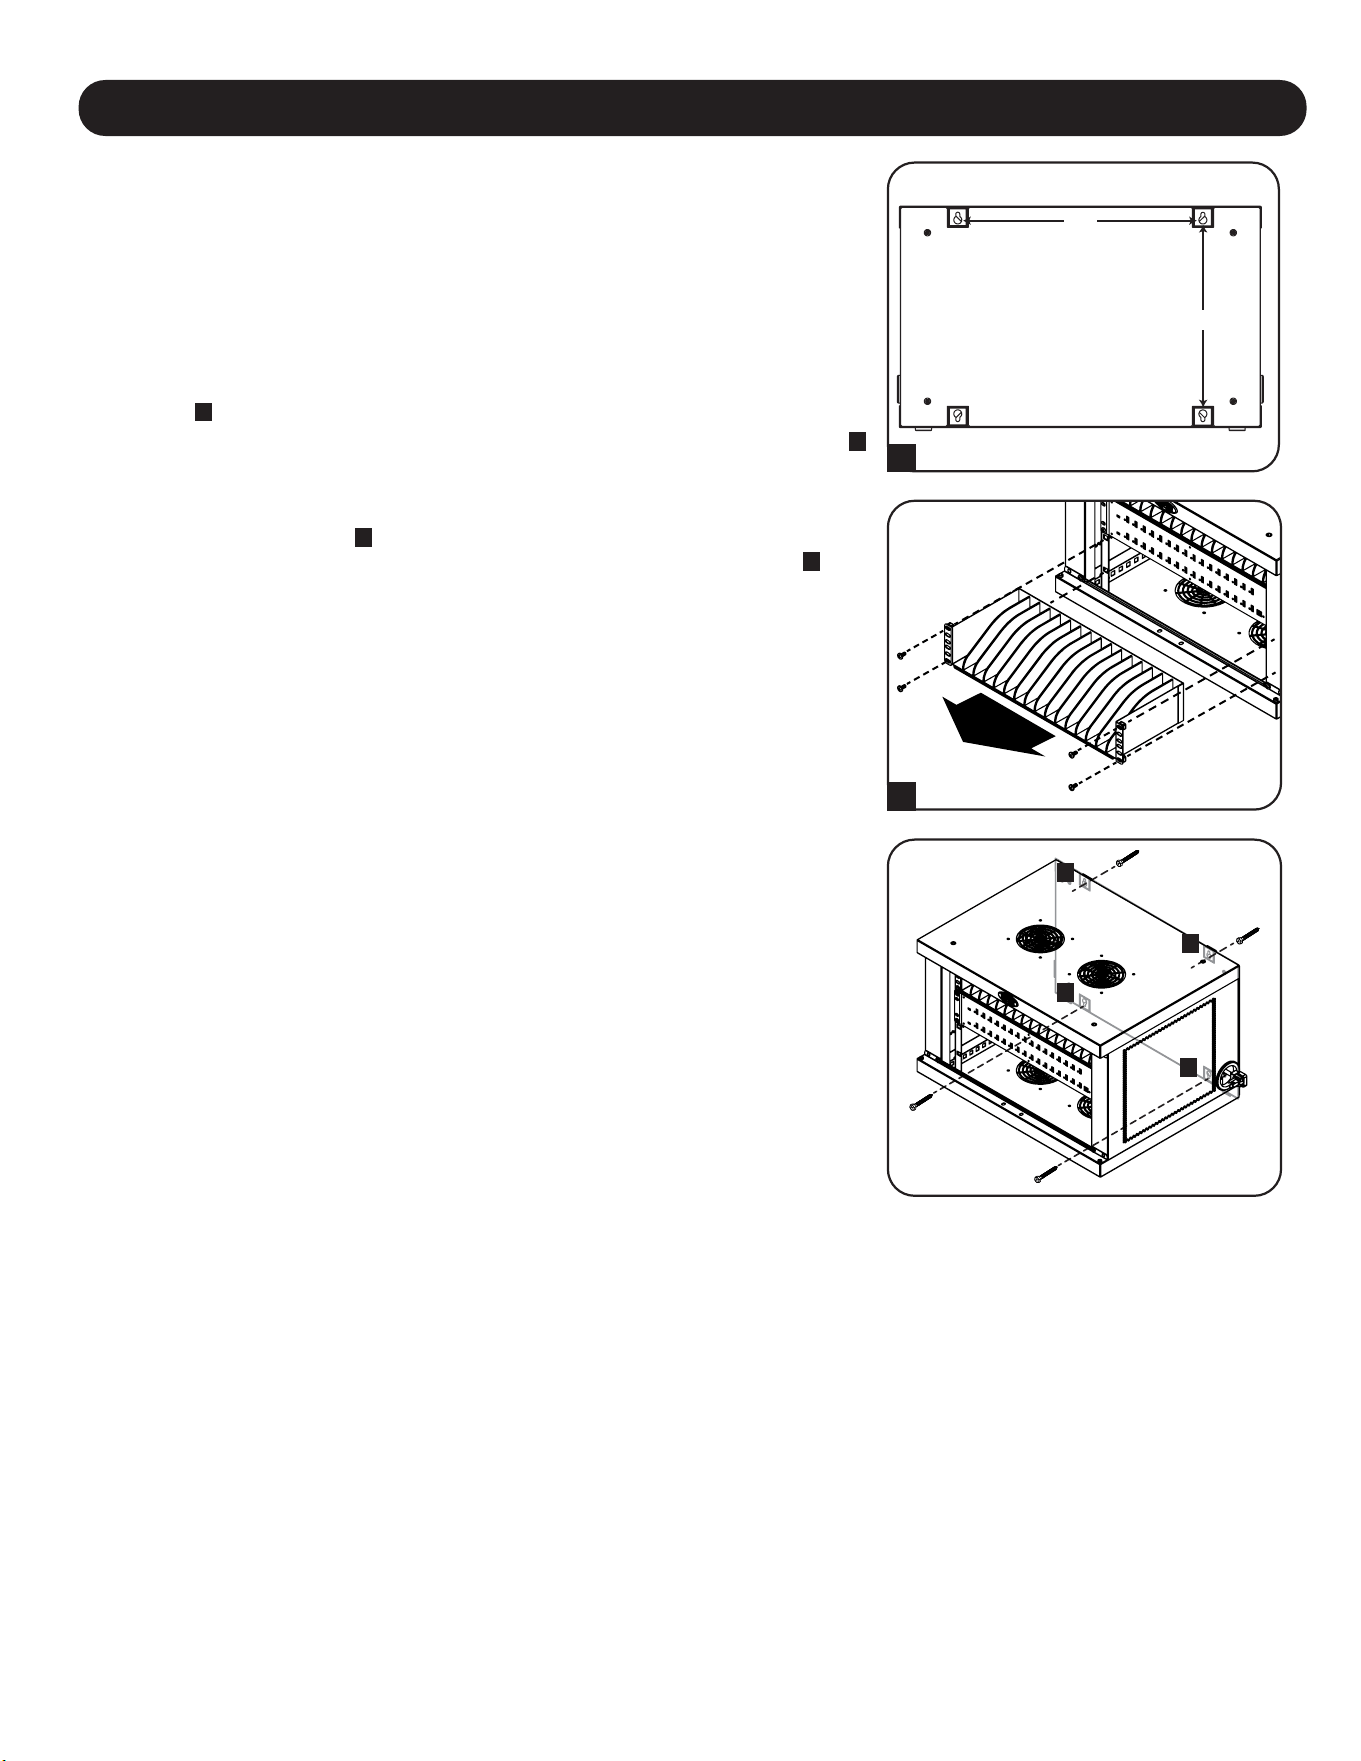
6. Wall Mounting
12”
16”
For wall mounting, you will need:
• Level
• Appropriate tools for wall mounting
• Appropriate hardware for wall mounting (not included)
Warning: Do not attempt to mount the charging station to the wall with any
personal electronic devices inside.
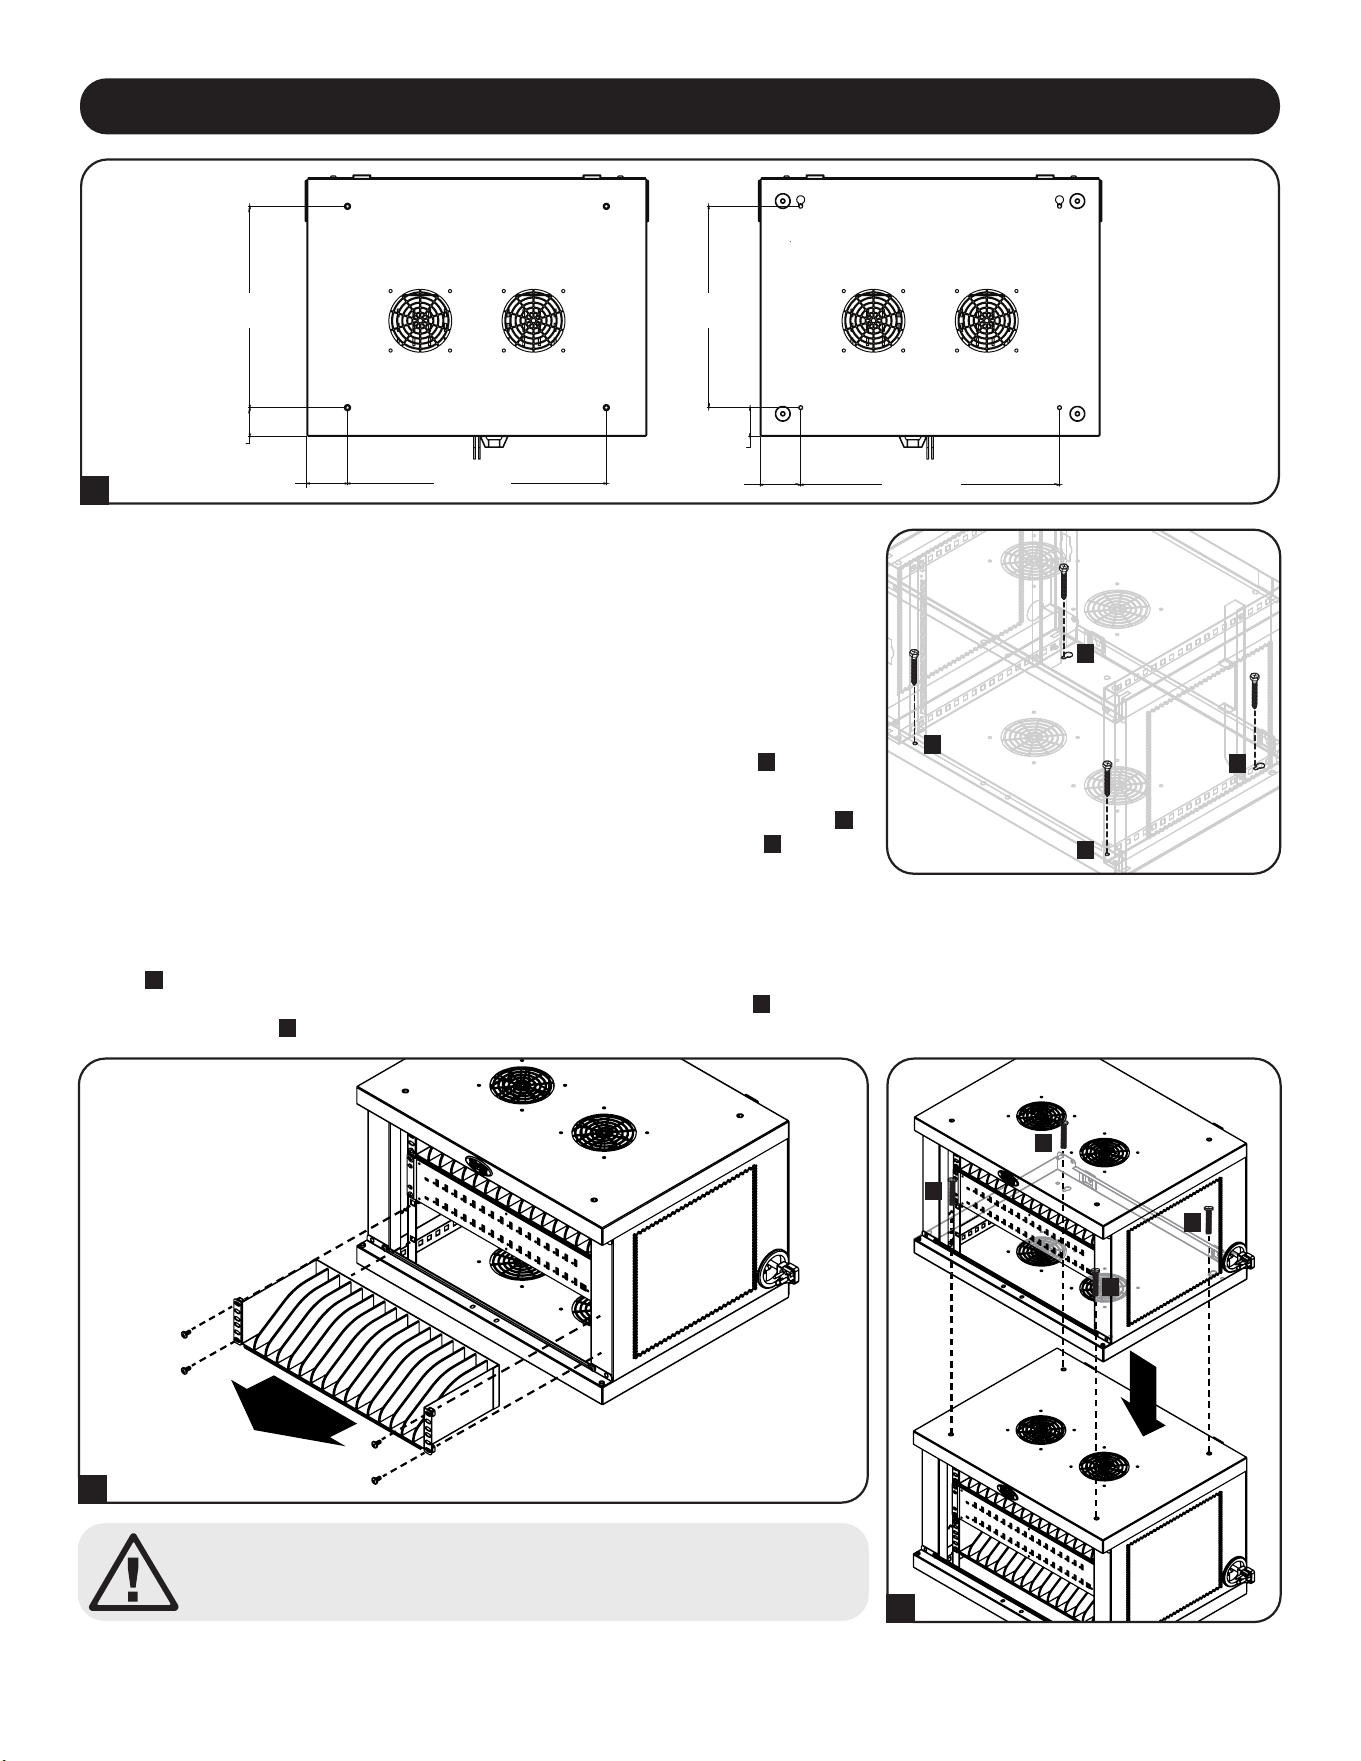
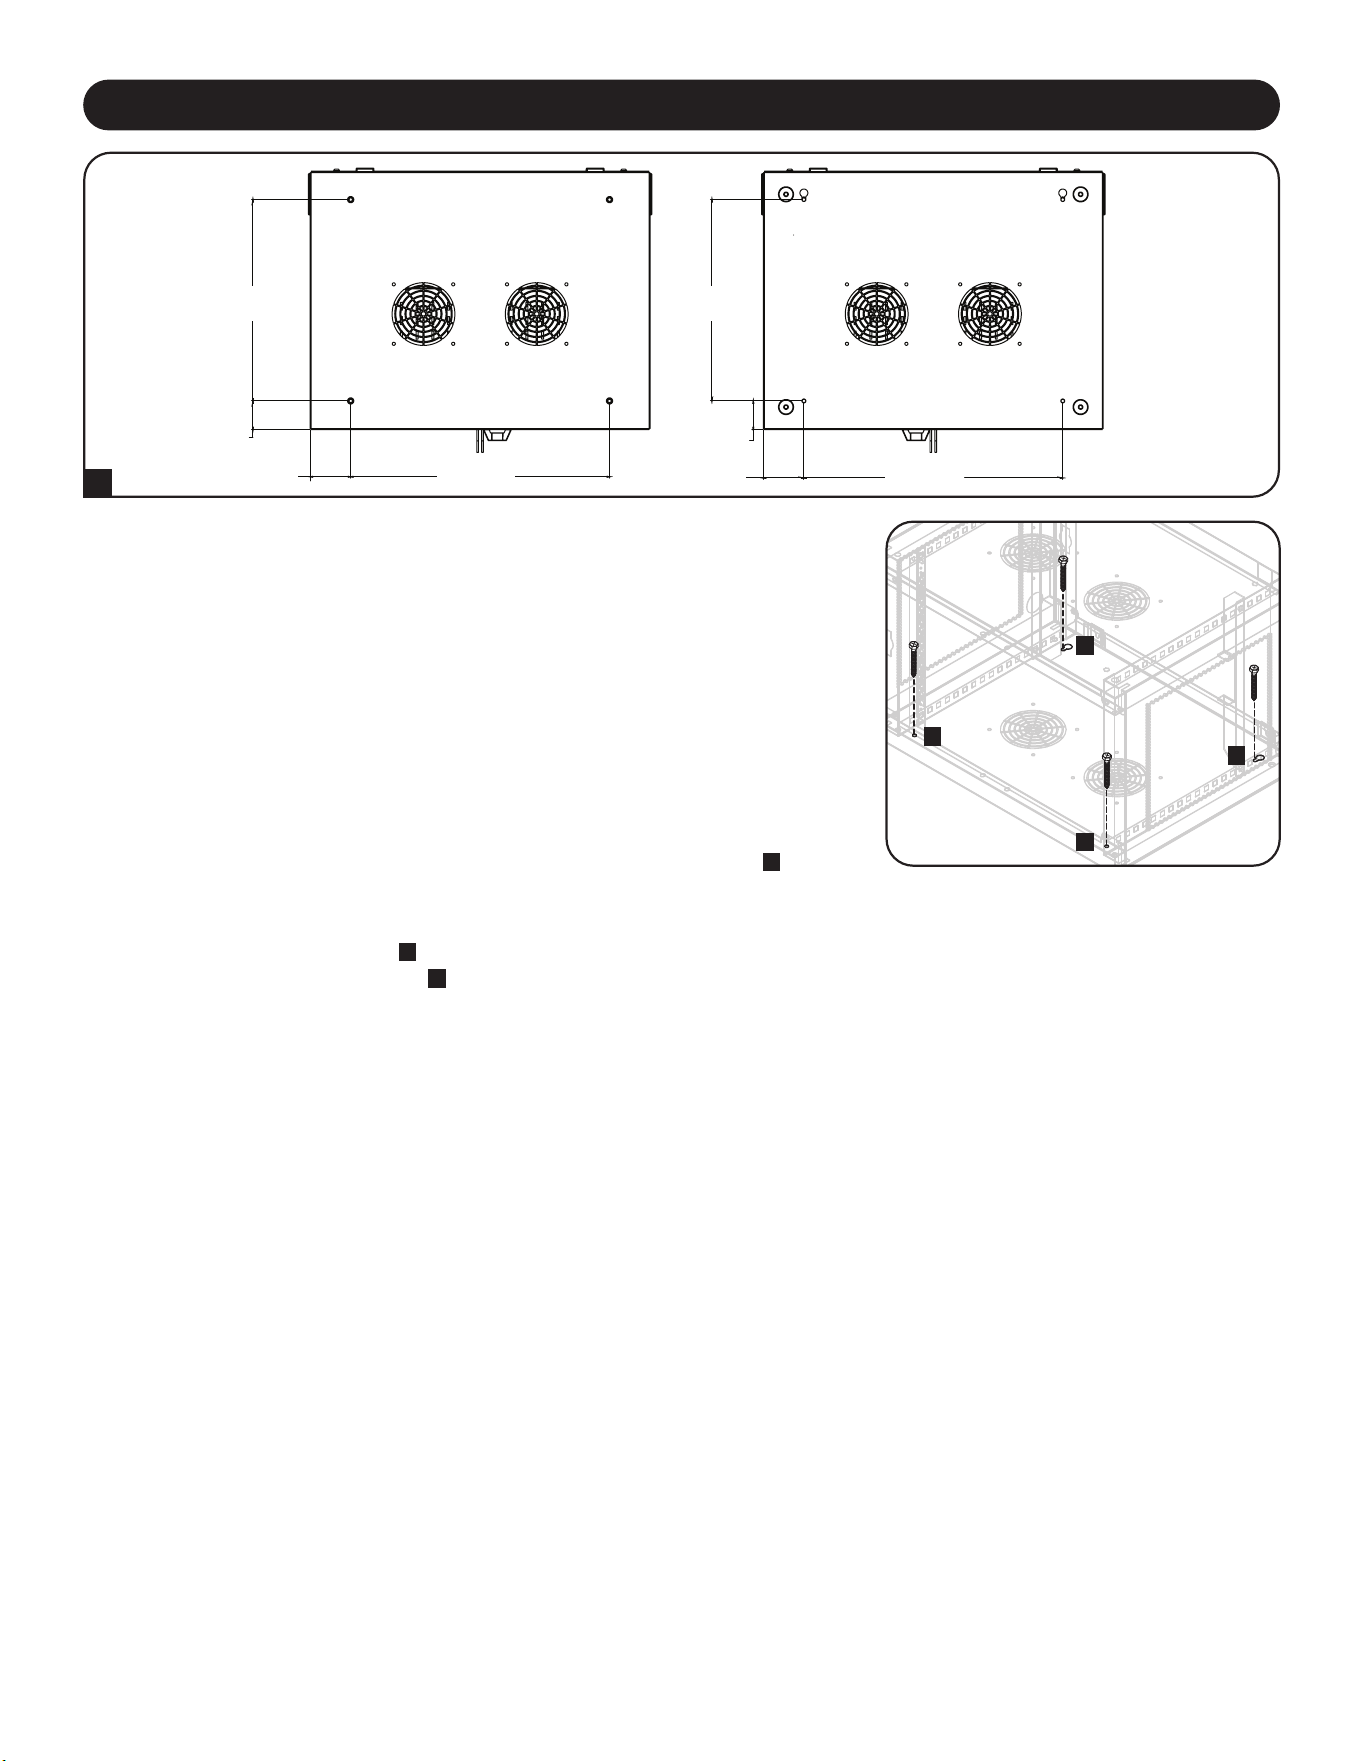
There are 4 keyhole cutouts on the charging station cabinet’s rear panel. Each keyhole
can accommodate an M5 or 3/16” bolt. The keyhole sets are centered 16” apart
horizontally and 12” vertically
A
.
To mount the charging station, first remove the bottom shelf inside the cabinet
B
. Using
a level and tape measure, measure to position your mounting area precisely. For the
position where the top keyholes will be located, secure appropriate fasteners (not
included) to the wall or supporting surface, then hang the charging station onto the
hardware
C
. For an added measure of security, use appropriate fasteners and the
bottom keyhole slots to secure the charging station cabinet to the wall
D
.
Note: The charging station must be installed by a qualified technician. Use suitable mounting
means when installing to cinder block, concrete, drywall or wood studs. Warning: The supporting
surface must be able to safely support the combined load of the charging station, equipment
stored and all attached hardware and components. See Section 8. Specifications for more
information on your model’s weight and dimensions.
TOP
BOTTOM
B
A
C
C
D
D
8
Caution! Do not stack more than one Charging Station Cabinet.
Personal or property damage may result.
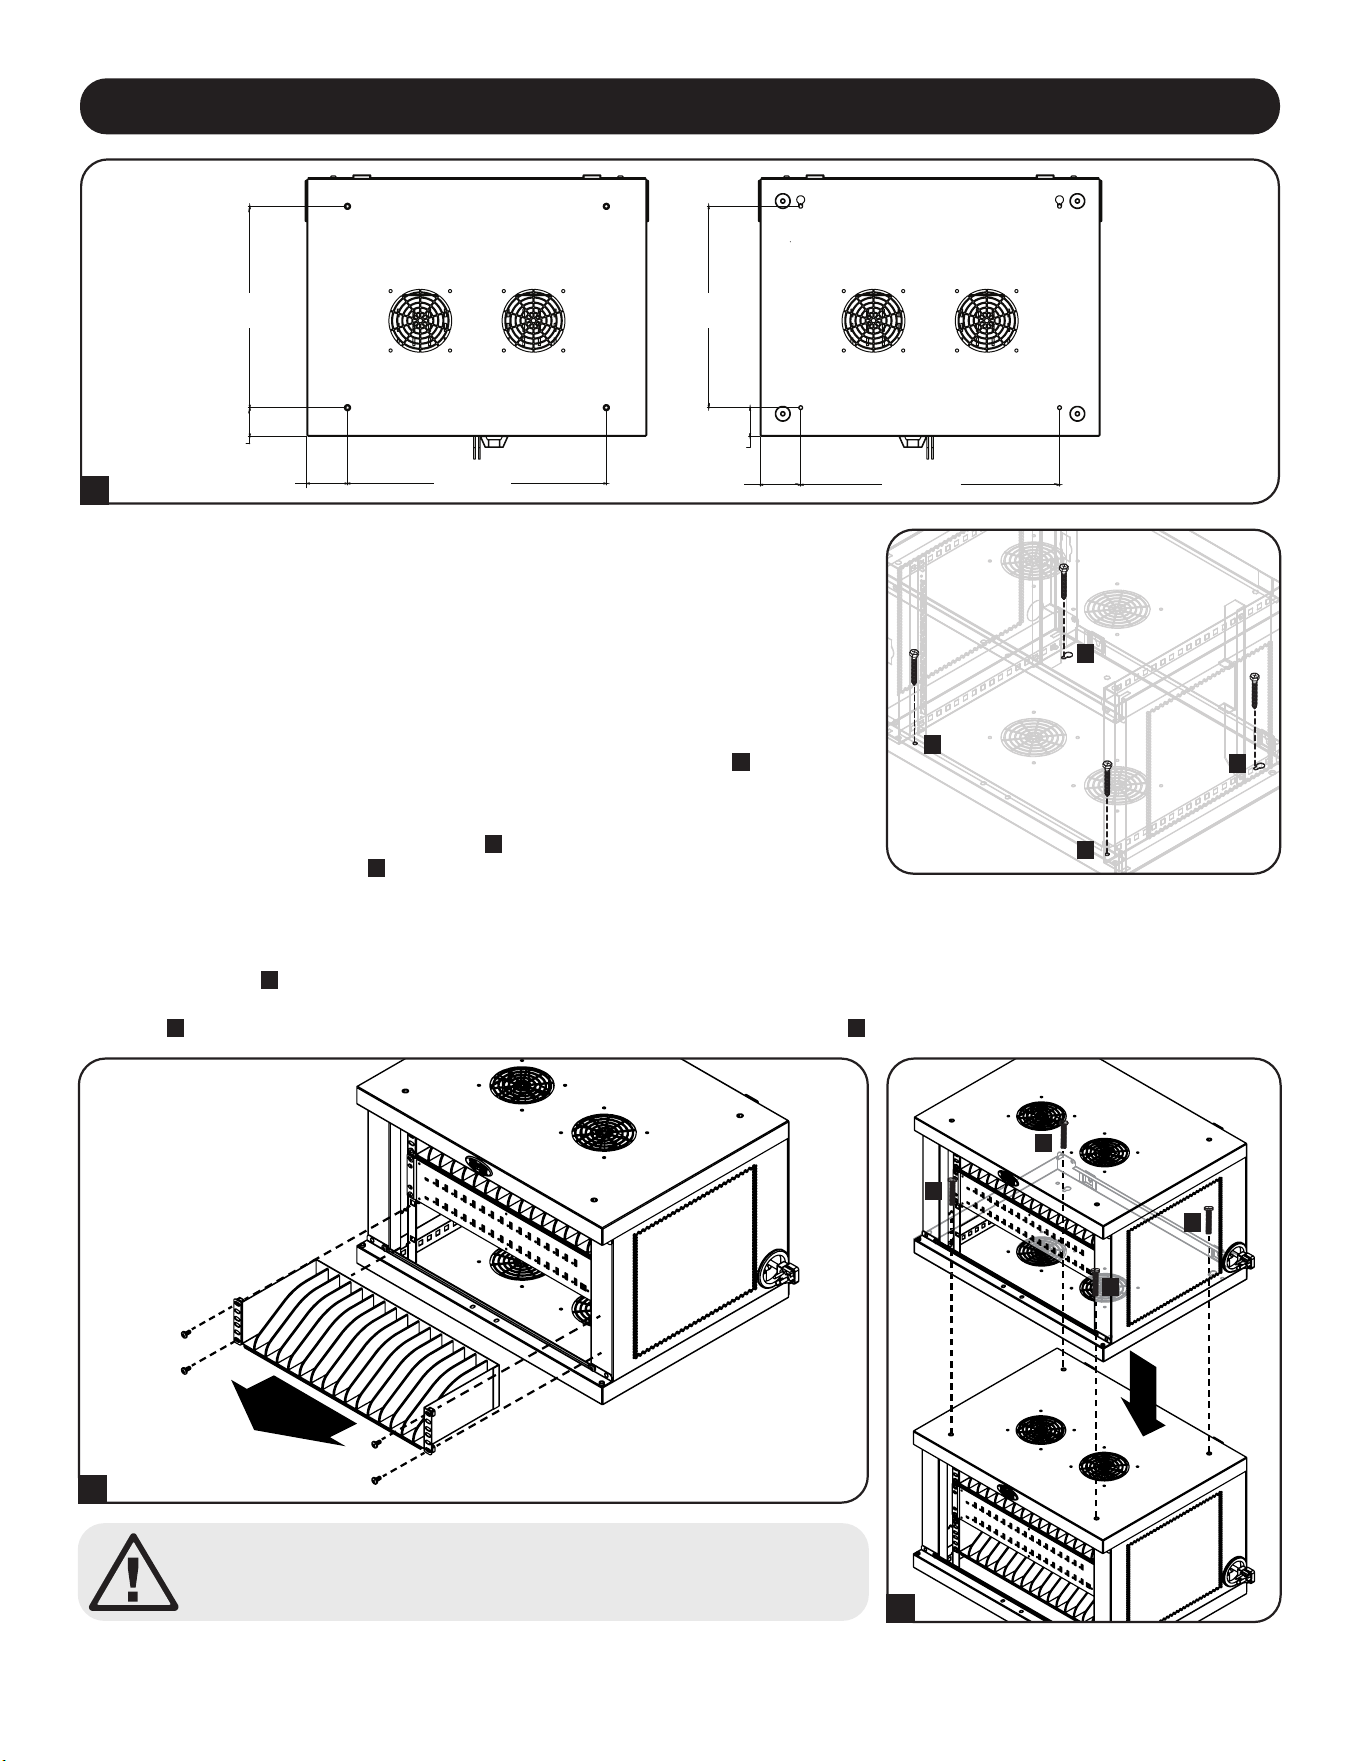
Stacking Charging Station Cabinets
One charging station can be securely stacked onto another. First remove the bottom shelf from inside the cabinet that will be placed
on top
A
. Carefully place the top cabinet on top of the bottom cabinet, aligning the top cabinet’s front mounting holes and rear keyhole
cutouts with the bottom cabinet’s threaded inserts located on the top panel
B
. To secure the two cabinets, use four (4) M6 x 20 mm
screws (not included)
C
.
A
B
C
C
C
C
7. Desktop Placement
WARNING: For desktop applications, always install the charging station in a structurally
sound area with a level surface that is able to bear the weight of the charging station, all
equipment that will be installed in the charging station and any other enclosures and/or
equipment that will be installed nearby. Never attempt to lift or install the charging station
without adequate help. See Section 8. Specifications for more information on the
charging station’s rated load capacity.
For an added measure of security, the cabinet can secure to a desktop. There are two
keyhole cutouts located at the rear end of the bottom panel. Each keyhole can
accommodate an M5 or 3/16” bolt. The bottom keyhole set is centered 18” (457 mm)
apart horizontally and 14” (356 mm) vertically from the front mounting holes
A
.
Using a tape measure, measure to position your mounting areas precisely. Use
appropriate fasteners (not included) to attach the cabinet to the rear keyhole cutouts
B
and secure the charging station to the desktop with the front mounting holes
C
.
A
C
C
B
B
14”
355.6 mm
TOP
FRONT FRONT
BOTTOM
2”
50.8 mm
2”
50.8 mm
18”
457.2 mm
18”
457.2 mm
2 13/16”
17.56 mm
2 13/16”
17.56 mm
14”
355.6 mm

9
8. Specifications
Models CSD32USB, CSDXB32USB, CSDXS32USB
Dimensions (H x W x D) 14.7 x 23.63 x 19 in. / 374 x 600 x 483 mm
Unit Weight 62.11 lb. / 28.2 kg
Load Capacity* 180 lb. / 81.65 kg
Charger/Hub Ports 32 x USB Type-A (Female)
1 x USB Type-B (Female)
2 x USB Mini (Female)
Transmission Speed USB 2.0: Up to 480 Mbps
Power Requirement Input: 110-120V, 8A, 50/60 Hz (CSD32USB) or 230V, 5A, 50 Hz (CSDXB32USB, CSDXS32USB)
Output: 5.0V, 2.4A Max (per USB port)
Operating Temperature 32° to 86° F / 0° to 30° C
Operating Humidity 5 to 95% RH, Non-Condensing
Enclosure Material Metal
*Full wall-mount load capacity requires a mounting surface capable of bearing the full load of the charging station and all connected components. Speci-
cations may be subject to change without further notice.

10
2-Year Limited Warranty
Seller warrants this product, if used in accordance with all applicable instructions, to be free from original defects in material and workmanship for a period of 2 years from
the date of initial purchase. If the product should prove defective in material or workmanship within that period, Seller will repair or replace the product, at its sole discretion.
THIS WARRANTY DOES NOT APPLY TO NORMAL WEAR OR TO DAMAGE RESULTING FROM ACCIDENT, MISUSE, ABUSE OR NEGLECT. SELLER MAKES NO
EXPRESS WARRANTIES OTHER THAN THE WARRANTY EXPRESSLY SET FORTH HEREIN. EXCEPT TO THE EXTENT PROHIBITED BY APPLICABLE LAW, ALL
IMPLIED WARRANTIES, INCLUDING ALL WARRANTIES OF MERCHANTABILITY OR FITNESS, ARE LIMITED IN DURATION TO THE WARRANTY PERIOD SET
FORTH ABOVE; AND THIS WARRANTY EXPRESSLY EXCLUDES ALL INCIDENTAL AND CONSEQUENTIAL DAMAGES. (Some states do not allow limitations on how
long an implied warranty lasts, and some states do not allow the exclusion or limitation of incidental or consequential damages, so the above limitations or exclusions may
not apply to you. This warranty gives you specific legal rights, and you may have other rights which vary from jurisdiction to jurisdiction.)
WARNING: The individual user should take care to determine prior to use whether this device is suitable, adequate or safe for the use intended. Since individual applications
are subject to great variation, the manufacturer makes no representation or warranty as to the suitability or fitness of these devices for any specific application.
Product Registration
Visit tripplite.com/warranty today to register your new Tripp Lite product. You’ll be automatically entered into a drawing for a chance to win a FREE Tripp Lite product!*
* No purchase necessary. Void where prohibited. Some restrictions apply. See website for details.
Regulatory Compliance Identification Numbers
For the purpose of regulatory compliance certifications and identification, your Tripp Lite product has been assigned a unique series number. The series number can be
found on the product nameplate label, along with all required approval markings and information. When requesting compliance information for this product, always refer to
the series number. The series number should not be confused with the marketing name or model number of the product.
FCC Notice, Class B
This device complies with part 15 of the FCC Rules. Operation is subject to the following two conditions: (1) This device may not cause harmful interference, and (2) this
device must accept any interference received, including interference that may cause undesired operation.
Note: This equipment has been tested and found to comply with the limits for a Class B digital device, pursuant to part 15 of the FCC Rules. These limits are designed to
provide reasonable protection against harmful interference in a residential installation. This equipment generates, uses and can radiate radio frequency energy and, if not
installed and used in accordance with the instructions, may cause harmful interference to radio communications. However, there is no guarantee that interference will not
occur in a particular installation. If this equipment does cause harmful interference to radio or television reception, which can be determined by turning the equipment off and
on, the user is encouraged to try to correct the interference by one or more of the following measures:
• Reorient or relocate the receiving antenna.
• Increase the separation between the equipment and receiver.
• Connect the equipment into an outlet on a circuit different from that to which the receiver is connected.
• Consult the dealer or an experienced radio/TV technician for help.
Any changes or modifications to this equipment not expressly approved by Tripp Lite could void the user’s authority to operate this equipment.
WEEE Compliance Information for Tripp Lite Customers and Recyclers (European Union)
Under the Waste Electrical and Electronic Equipment (WEEE) Directive and implementing regulations, when customers buy new electrical and electronic equipment
from Tripp Lite they are entitled to:
• Send old equipment for recycling on a one-for-one, like-for-like basis (this varies depending on the country)
• Send the new equipment back for recycling when this ultimately becomes waste
Tripp Lite has a policy of continuous improvement. Specifications are subject to change without notice. Photos and illustrations may differ slightly from actual products.
10. Warranty and Product Registration
TrippLite.Eaton.com/support
9. Storage, Service and Cleaning
Storage
The enclosure should be stored in a controlled indoor environment away from moisture, temperature extremes, flammable liquids and
gasses, conductive contaminants, dust and direct sunlight. Store the enclosure in its original shipping container if possible.
Service
The enclosure is covered by the limited warranty described in this manual. For more information, visit tripplite.com/support.
Cleaning
Before cleaning, always power off the charging station by unplugging it from its AC source. Dampen a clean, lint-free cloth with water
and wipe down the unit, as necessary. Allow the surface area to dry before plugging in the unit.
Note: Avoid using abrasive cloths, solvents or aerosol sprays to clean the charging station; doing so can damage the unit.
23-07-804 93-4753_RevB

11
Manual del Propietario
Índice
1. Instrucciones Importantes 12
de Seguridad
2. Descripción General 13
3.
Identicación de Partes
14
y Características
4. Instalación 15
4.1 Alimentación de la Unidad de 15
Cargador/Hub USB
4.2 Cerraduras de la Puerta 15
5. Cargador/Hub USB de 32 Puertos 16
5.1 Características del Cargador/Hub USB 16
5.2 Conexión de Smartphones al 16
Cargador / Hub USB
5.3 Conexión de una Computadora al 16
Cargador/Hub USB
17
18
19
20
20
1
21
31
6. Instalación en Pared
7. Para colocación en Escritorio
8. Especi icaciones
9. Almacenamiento, Servicio y
Limpieza
10. Garantía
English
Français
Русский
Deutsch
41
Estación de Carga USB de
32 Puertos para Smartphones
Modelos: CSD32USB, CSDXB32USB, CSDXS32USB
TrippLite.Eaton.com/support
Copyright © 2023 Tripp Lite. Todas las marcas registradas son propiedad de sus respectivos propietarios.

12
1. Instrucciones de Seguridad Importantes
CONSERVE ESTAS INSTRUCCIONES
Este manual contiene instrucciones y advertencias que deben observarse durante la instalación y la operación del
producto aquí descrito. El no hacerlo puede invalidar la garantía y causar daños materiales o lesiones personales.
Unidad de Cargador/Hub USB:
• Conecte la unidad a un tomacorriente que cumpla con los códigos de construcción locales y que esté adecuadamente
protegido contra el exceso de corriente, los cortocircuitos y los fallos a tierra.
• El tomacorriente eléctrico que suministra energía al equipo debe estar instalado cerca de la unidad y ser fácilmente
accesible.
• El conector CA en el cable de alimentación de energía sirve como dispositivo de desconexión.
• Conecte la unidad directamente a un tomacorriente de alimentación de CA conectado a tierra adecuadamente.
• No modifique el conector y no use un adaptador que pueda eliminar la conexión a tierra.
• Si surge cualquiera de las siguientes situaciones, programe una cita para que un técnico de servicio inspeccione su
equipo:
• El equipo ha estado expuesto a humedad
• El equipo se ha caído o dañado
• El equipo muestra signos evidentes de roturas
• El equipo no funciona correctamente o no funciona de acuerdo a las instrucciones descritas en el presente
Manual del Propietario
• No se recomienda utilizar este equipo en aplicaciones de soporte de vida donde una falla podría llegar a causar la
falla del equipo de soporte de vida o afectar significativamente su seguridad o efectividad.
Gabinete de la Estación de Carga:
• Mantenga la estación de carga en un ambiente interior controlado, alejada de humedad, temperaturas extremas, líquidos
y gases inflamables, contaminantes conductivos, polvo y luz solar directa.
• Deje un espacio adecuado alrededor de la estación de carga para que reciba una ventilación apropiada. No bloquee,
cubra ni coloque objetos en las aberturas externas de ventilación de la estación de carga.
• Para un mejor rendimiento, mantenga la temperatura interior entre 0°C y 30°C.
• No retire ninguna advertencia, precaución o etiqueta descriptiva de la estación de carga.
• La estación de carga es extremadamente pesada. Tenga cuidado al manipularla. No intente desempacarla ni instalarla
sin ayuda. Utilice un dispositivo mecánico, como un montacargas o un gato hidráulico para tarimas, para mover la
estación de carga en el contenedor de transporte.
• No coloque recipientes con líquidos ni apile artículos sobre el gabinete.
• Inspeccione el contenedor de transporte y la estación de carga para detectar daños producidos durante el envío. No
utilice la estación si está dañada.
• Tenga cuidado cuando corte el material de empaque. La estación de carga podría sufrir rayaduras, y estos daños no
están cubiertos por la garantía.
• Guarde todo el material de empaque para uso posterior. Volver a empacar y enviar el equipo o el gabinete de la estación
de carga sin el material de empaque original puede ocasionar daños al producto que anularían la garantía.
Para Instalaciones en Pared y Escritorio:
• La estación de carga debe ser instalada por un técnico cualificado.
• Antes de realizar la instalación, asegúrese de que la superficie de la pared pueda soportar con seguridad el peso
combinado de la estación de carga, el equipo almacenado y todos los accesorios y los componentes conectados.
• La estación de carga puede soportar equipos hasta su capacidad de carga máxima de 81.6 kg.
• Utilice siempre medios de montaje adecuados cuando realice la instalación en bloques de hormigón, paneles de yeso o
montantes de madera. Instálelo firmemente en la pared utilizando los herrajes adecuados (no vienen incluidos).
ADVERTENCIA: La superficie de apoyo debe poder soportar con seguridad la carga combinada de la estación de carga,
el equipo almacenado y todos los herrajes y componentes acoplados (consulte las especificaciones del punto número 8
para obtener más información acerca del peso y las dimensiones de su modelo).

13
2. Descripción General
Su estación de carga es una solución todo en uno para almacenamiento, carga y sincronización de hasta 32
smartphones. Su estación de carga puede instalarse en paredes de manera conveniente, así como configurarse para
instalaciones de escritorios fijos. Para evitar el robo y la manipulación indebida del dispositivo, el gabinete de la estación
de carga está equipado con puertas de acero con cerradura. Una aldaba para candado (opcional) se agrega a las
puertas para proporcionar una medida extra de protección.
Explicación de los Símbolos:
PRECAUCIÓN: RIESGO DE PELIGRO
TERMINAL DE CONEXIÓN DE PROTECCIÓN
VOLTAJE DE CA
ADVERTENCIAS DEL MONTAJE EN LA PARED: La superficie de la pared, los montantes de la pared y todos los accesorios de
Instalación suministrados por el usuario deben poder soportar el peso combinado del gabinete y de todos los equipos que se
instalarán en el gabinete. El gabinete puede soportar equipos hasta su capacidad de carga máxima de 81.6 kg.
Los orificios de montaje en pared tienen un espaciado de 16 pulgadas (406 mm) separadas horizontalmente para adaptarse a la
colocación estándar de los montantes de la pared. Se aconseja distribuir con seguridad el peso del gabinete y de todos los equipos
instalados.
14
3. Identificación de Partes y Características
CSD32USB
1
Puertas Divididas con Cerradura
2
Repisas de Almacenamiento (Soportan hasta 16 Dispositivos Cada Una.)
3
Unidad Cargadora / Hub USB de 32 Puertos
4
Orificios de Acceso para Cable de Alimentación con Clavija 5-15P en Ángulo Recto (1 Abertura Ubicada en
Cada Lado.)
5
Cerradura de 3 Puntos
6
Portacandados (Opcional. Requiere ensamblarse, Ver Sección 3.4 para Más Información. Candado No Incluido.)
7
Panel Posterior con Ranuras con Perforaciones para Instalación en Pared (Para Obtener Más Información,
Consulte la Sección 6.)
No se muestra:
Conector NEMA 5-15 (CSC16USB), BS 1363 (CSCXB16USB) o
Cables de energía/conector Schuko (CSCXS16USB)
Llaves
1
5
3
2
2
4
6
7
7

15
¡Precaución! ¡Lea todas las instrucciones y las advertencias
antes de realizar la instalación!
Advertencia: las estaciones de carga pueden ser muy pesadas. No intente desempacar ni
instalar la estación de carga sin ayuda. Antes de proceder con la instalación, siga las
instrucciones de desempaque incluidas en el documento que se envía junto con el producto.
Tenga mucho cuidado al manipular la estación de carga y asegúrese de seguir todas las
instrucciones de manejo e instalación. No intente instalar el equipo sin antes estabilizar la
estación de carga.
4. Instalación
4.2 Cerraduras de la Puerta
4.1 Alimentación de la Unidad de Cargador/Hub USB
Para conexiones de alimentación
convenientes, se encuentra una
pestaña a cada lado de los orificios
de acceso del cable de alimentación.
Para conectar el cargador / hub USB,
elija qué lado gustaría utilizar para
enchufar a un tomacorrientes, luego
corte los cintillos de nylon que
sujetan ambas pestañas a los
orificios para acceso del cable de
alimentación
A
. Jale la pestaña del
orificio de acceso del cable de
alimentación
B
deseado para que el
cable y la clavija se extiendan hacia
afuera.
BA
Las puertas divididas incluyen una
cerradura que puede abrirse con las
llaves incluidas
A
.
El portacandado incluido se puede
instalar en la unidad para
proporcionar una medida extra de
protección. Para instalar el
portacandado, utilice los tornillos
incluidos para asegurarlo a la puerta
B
. Repita para la otra puerta.
B
A
16
5. Cargador/Hub USB de 32 Puertos
• El cargador/hub USB de grado profesional carga y sincroniza hasta 32 smartphones.
• Proporciona a cada puerto USB un nivel de carga óptimo para un dispositivo en particular (hasta 2.4 Amperes).
• Permite realizar la sincronización para cualquier dispositivo diseñado para comunicaciones de datos por USB, mediante
software compatible para administración de archivos.
• Sincroniza dispositivos Syncs Apple
®
mediante el software iTunes
®
o Apple Configurator.
• El Puerto Mini-USB para Actualización de Firmware permite futuras actualizaciones de software a suporte dispositivos
nuevos.
5.1 Características del Cargador/Hub USB
A
Puertos para Disposi-
tivos con USB de 2.4A,
con Indicadores LED
(32 en total)
B
Puerto de Sincroni-
zación de Computadora
C
Puertos de Actual-
ización de Firmware
Usando un cable USB blindado suministrado por el usuario o el fabricante del
dispositivo, conecte el cable USB al smartphone por cargar. Repita para todos
los dispositivos.
Tripp Lite ofrece cables individuales y en paquetes de 10 para dispositivos
Apple
®
que usan cables USB a 30 Pines o USB a Lightning™, así como cables
individuales y en paquetes de 10 para dispositivos USB 3.0 o 2.0 usando
cables USB-A (macho) a Micro B (macho) de 5 Pines.
Tipo de Cable
Cable Individual
Número de Modelo
Paquete de 10 Cables
Número de Modelo
Conector Apple USB a Lightning de 8 Pines,
25.4 cm [10 pulg.]
M100-10N-BK M100-10N-BK-10
USB 3.0 SuperSpeed A (Macho) a Micro-B
(Macho) de 5 Pines, 30.5 cm [1 pie]
U326-001-BK U326-001-BK-10
Para más información sobre nuestra selección de cables USB premium, visite
tripplite.com.
5.2 Conexión de Dispositivos al Cargador/Hub USB
A BC
5.3 Conexión de una Computadora al Cargador/Hub USB
Además del dispositivo de carga, el Cargador/Hub USB está equipado con una función de hub que sincroniza
dispositivos y sus aplicaciones respectivas de software mediante una computadora conectada. Para permitir la función
de hub utilice el cable USB incluido para conectar el conector USB B en el puerto de sincronización del Cargador/Hub
USB y el conector USB A en el puerto USB de una computadora.
Nota: Cuando se ha establecido una conexión con una computadora y estén conectados múltiples dispositivos al Cargador/Hub USB,
la tasa de carga se reducirá durante la sincronización y se restablecerá la tasa de carga normal una vez terminada ésta.
Nota: El Puerto de Actualización de Firmware requiere una conexión mini-USB (cable no incluido). Para descargar las actualizaciones más
recientes de firmware, vaya a www.tripplite.com/support.

17
6. Instalación en Pared
Para realizar la instalación en pared, necesitará:
• Nivel
• Herramientas adecuadas para la instalación en pared
• Accesorios adecuados para la instalación en pared (no se incluyen)
Advertencia: no intente instalar la estación de carga a la pared con
ningún dispositivo electrónico personal adentro.
El panel lateral del gabinete de la estación de carga tiene 4 perforaciones.
Cada perforación admite un perno M5 o de 3/16 pulgadas. Cada juego de
perforaciones está centrado a 406 mm [16 pulgadas] de distancia en
dirección horizontal y a 305 mm [12 pulgadas] en dirección vertical
A
.
Para instalar la estación de carga, primero retire la repisa inferior dentro del
gabinete
B
. Usando un nivel y una cinta métrica, mida para determinar con
precisión la posición del área de instalación. Para la posición donde se
ubicarán los orificios superiores, asegure los sujetadores adecuados (no
incluidos) a la pared o superficie de apoyo y, a continuación, cuelgue la
estación de carga en los accesorios
C
. Para una medida adicional de
seguridad, utilice sujetadores apropiados y las ranuras con perforaciones de
la parte inferior para fijar el gabinete de la estación carga a la pared
D
.
Nota: la estación de carga debe ser instalada por un técnico calificado. Utilice los
medios de instalación adecuados para realizar la instalación en un bloque de
hormigón, concreto, tabla roca o travesaños de madera. Advertencia: la superficie
de apoyo debe ser capaz de soportar con seguridad el peso combinado de la
estación de carga, el equipo almacenado y de todos los accesorios y los
componentes conectados. Ver Sección 8. Especificaciones para obtener más
información sobre peso y dimensiones de su modelo.
12”
16”
PANEL SUPERIOR
PANEL INFERIOR
B
A
C
C
D
D
406 mm
[16 pulg.]
305 mm
[12 pulg.]
18
7. Colocación en Escritorio/Piso
ADVERTENCIA: Para aplicaciones en escritorio y piso, instale siempre una
estación de carga en un área estructuralmente firme con una superficie
nivelada que sea capaz de soportar el peso de la estación de carga, todo el
equipo que se instalará en la estación de carga y cualquier otro gabinete y/o
equipo que se instalará en la misma superficie. Nunca intente levantar o
instalar la estación de carga sin la ayuda adecuada. Ver Sección 8.
Especificaciones para obtener más información sobre la capacidad de carga
especificada de la estación de carga.
Para una medida adicional de seguridad, el gabinete puede fijarse a un
escritorio. Hay dos cortes con perforaciones situados en la parte trasera del
panel inferior. Cada perforación admite un tornillo M5 o de 3/16”. El conjunto
inferior de perforaciones está centrado separado 457 mm [18”] horizontalmente
y 356 mm [14”] verticalmente de los orificios frontales de instalación
A
.
Use una cinta de medir para determinar con precisión la posición de las áreas
de instalación. Utilice sujetadores adecuados (no incluidos) para fijar el
gabinete a los orificios traseros
B
y fije la estación de carga al escritorio con
los orificios de montaje delanteros
C
.
A
355.63 mm
[14 pulg.]
PANEL
SUPERIOR
PANEL
FRONTAL
PANEL
FRONTAL
PANEL
INFERIOR
50.8 mm
[2 pulg.]
50.8 mm
[2 pulg.]
457.2 mm
[18 pulg.]
457.2 mm
[18 pulg.]
17.56 mm
[2 13/16 pulg.]
17.56 mm
[2 13/16 pulg.]
355.63 mm
[14 pulg.]
C
C
B
B
19
Modelos CSD32USB, CSDXB32USB, CSDXS32USB
Dimensiones del gabinete (Al x An x Pr) 374 x 600 x 483 mm / 14.7 x 23.63 x 19 pulg.
Peso de la unidad 28.2 kg / 62.11 lb.
Capacidad de carga* 81.65 kg / 180 lb.
Puertos de Cargador/Hub 32 x USB-A (Hembra)
1 x USB-B (Hembra)
2 x USB Mini (Hembra)
Velocidad de Transmisión USB 2.0: Hasta 480 Mbps
Requerimiento de Energía Entrada: 110-120V, 8A, 50/60 Hz (CSD32USB) or 230V, 5A, 50 Hz (CSDXB32USB,
CSDXS32USB)
Salida: 5.0V, 2.4A Max (por puerto USB)
Temperatura de Operación 0° a 30° C / 32° a 86° F
Humedad de Funcionamiento 5 a 95% de HR, Sin Condensación
Material del Gabinete Metal
*Para la capacidad de carga total de instalación en pared, la supercie de instalación debe poder soportar el peso completo de la es-
tación de carga y de todos los componentes conectados. Las especicaciones pueden estar sujetas a cambio sin previo aviso.
8. Especificaciones
7. Colocación en Escritorio/Piso
¡Precaución! No apile más de un Gabinete de Estación de
Carga. Puede ocasionar daños personales o a la propiedad.
Gabinetes Apilables de Estación de Carga
Una estación de carga puede ser apilada una sobre otra con toda seguridad. Primero retire la repisa del interior del
gabinete que se colocará en la parte superior
A
. Con cuidado coloque el gabinete superior sobre el gabinete inferior,
alineando los orificios de instalación delanteros del gabinete superior y los orificios traseros con los insertos roscados
ubicados en el panel superior
B
. Para fijar los dos gabinetes, use cuatro 4 tornillos M6 x 20 mm (no incluidos)
C
.
A
B
C
C
C
C

20
GARANTÍA LIMITADA DE 2 AÑOS
El vendedor garantiza que este producto no tiene defectos originales de materiales ni de mano de obra por un período de dos años a partir de la fecha original de compra,
si se utiliza de acuerdo con todas las instrucciones correspondientes. En caso de demostrarse dentro de ese período que el producto tiene defectos de materiales o de
mano de obra, el vendedor lo reparará o reemplazará a su exclusiva discreción. El servicio técnico bajo esta garantía solo puede ser obtenido si usted entrega o envía el
producto (con todos los cargos de envío o entrega prepagos) a: Tripp Lite; 1111 W. 35th Street; Chicago IL 60609; EE. UU. El vendedor abonará los cargos de envío de
devolución. Visite www.tripplite.com/support antes de enviar cualquier equipo para reparación.
ESTA GARANTÍA NO CUBRE EL DESGASTE NORMAL NI LOS DAÑOS CAUSADOS POR ACCIDENTES, MAL USO, ABUSO O NEGLIGENCIA. EL VENDEDOR NO
OFRECE NINGUNA GARANTÍA EXPRESA QUE NO SEA LA ESTABLECIDA EXPRESAMENTE EN EL PRESENTE DOCUMENTO. EXCEPTO EN LA MEDIDA EN QUE LO
PROHIBAN LAS LEYES APLICABLES, LA DURACIÓN DE TODAS LAS GARANTÍAS IMPLÍCITAS, INCLUIDAS LAS DE COMERCIABILIDAD O APTITUD, SE LIMITA AL
PERÍODO DE GARANTÍA ANTES MENCIONADO Y ESTA GARANTÍA EXCLUYE EXPRESAMENTE TODOS LOS DAÑOS INCIDENTALES E INDIRECTOS. (Algunos
Estados no permiten las limitaciones a la duración de una garantía implícita y algunos Estados no permiten la exclusión o limitación de los daños incidentales o indirectos,
de modo que las limitaciones o exclusiones antes mencionadas pueden no corresponder en su caso. Esta garantía le otorga derechos legales específicos y usted puede
tener otros derechos que varían de una jurisdicción a otra.)
ADVERTENCIA: Antes de usar este dispositivo, cada usuario debe ocuparse de determinar si es apto, adecuado o seguro para el uso que pretende darle. Dado que las
aplicaciones individuales están sujetas a diversas variaciones, el fabricante no representa ni garantiza la idoneidad o condición de estos dispositivos para cualquier
aplicación específica.
Cumplimiento de las normas de los números de identificación
Para fines de identificación y certificación del cumplimiento de las normas, su producto Tripp Lite tiene asignado un número de serie único. Puede encontrar el número de
serie en la etiqueta de la placa de identificación del producto, junto con los símbolos de aprobación e información requeridos. Al solicitar información sobre el cumplimiento
de las normas para este producto, siempre mencione el número de serie. El número de serie no debe ser confundido con el nombre de identificación ni con el número de
modelo del producto.
Información de sobre Cumplimiento de la WEEE para Clientes de Tripp Lite y Recicladores (Unión Europea)
Según la Directiva de Residuos de Aparatos Eléctricos y Electrónicos (Waste Electrical and Electronic Equipment, WEEE) y sus reglamentos, cuando los clientes
compran nuevos equipos eléctricos y electrónicos a Tripp Lite, tienen derecho a:
• Enviar equipos antiguos para reciclaje según una base de uno por uno, entre productos similares (esto varía dependiendo del país)
• Enviar el equipo nuevo de vuelta para reciclaje cuando este se convierta finalmente en desecho
Tripp Lite tiene una política de mejora continua. Las especificaciones están sujetas a cambio sin previo aviso. Las fotografías e ilustraciones pueden diferir ligeramente de
los productos reales.
TrippLite.Eaton.com/support
10. Garantía
9. Almacenamiento, Servicio y Limpieza
Almacenamiento
El gabinete debe estar almacenado en un entorno interior controlado, alejado de humedad, temperaturas extremas,
líquidos y gases inflamables, contaminantes conductivos, polvo y luz solar directa. De ser posible, almacene el gabinete
en el contenedor de embarque original.
Servicio
El gabinete está cubierto por la garantía limitada descrita en el presente manual. Para obtener más información, visite
www.tripplite.com/support.
Limpieza
Antes de limpiar, siempre desconecte la estación de carga de la fuente CA. Humedezca un trapo limpio y sin pelusas
con agua, y limpie la unidad según sea necesario. Deje que la superficie se seque antes de conectarla.
Nota: evite el uso de trapos abrasivos, solventes o aerosoles para limpiar la estación de carga, ya que pueden dañarla.
23-07-804 93-4753_RevB

21
Sommaire
1. Importantes consignes de sécurité 22
2. Vue d'ensemble 23
3. Identication des fonctionnalités 24
4. Conguration 25
4.1 Alimentation du chargeur/ 25
concentrateur USB
4.2 Serrures de porte 25
5. Chargeur/concentrateur USB 32 ports 26
5.1 Caractéristiques du chargeur/ 26
concentrateur USB
5.2 Connexion de smartphones 26
au chargeur/concentrateur USB
5.3 Connexion d'un ordinateur au 26
chargeur/concentrateur USB
27
28
29
30
30
1
11
31
6. Montage mural
7. Placement sur un bureau
8. Caractéristiques techniques
9. Stockage, entretien et nettoyage
10. Garantie
English
Español
Русский
Deutsch
41
Station de charge USB 32 ports
pour smartphones
Modèles : CSD32USB, CSDXB32USB, CSDXS32USB
(Numéro de série : AG-0737)
Manuel d'utilisation
TrippLite.Eaton.com/support
Copyright © 2023 Tripp Lite. Toutes les marques commerciales appartiennent exclusivement à leurs propriétaires respectifs.

22
1. Importantes consignes de sécurité
CONSERVEZ CES INSTRUCTIONS
Ce manuel contient des instructions et des avertissements devant être suivis pour l'installation et l'utilisation du produit décrit dans ce manuel.
Le non-respect de ces instructions peut entraîner l'annulation de la garantie et occasionner des dommages matériels ou corporels.
Chargeur/concentrateur USB :
• Branchez l'unité à une prise de courant conforme à vos codes de construction locaux et correctement protégée contre les surintensités, les
courts-circuits et les défauts à la terre.
• La prise électrique alimentant l'équipement doit être installée à proximité de l'unité et facilement accessible.
• La fiche secteur du cordon d'alimentation sert de dispositif de déconnexion.
• Branchez directement l'unité à une prise de courant secteur correctement mise à la terre.
• Ne modifiez pas la fiche et n'utilisez pas un adaptateur qui empêcherait la connexion à la terre de l'onduleur.
• Si l'une des situations suivantes se présente, prenez rendez-vous avec un technicien de maintenance pour faire inspecter votre équipement :
• L'équipement a été exposé à l'humidité
• L'équipement est tombé et a été endommagé
• L'équipement présente des signes évidents de casse
• L'équipement ne fonctionne pas correctement ou ne fonctionne pas conformément aux instructions décrites dans le présent manuel
d'utilisation
• L'utilisation de ce produit avec des dispositifs de maintien en vie n'est pas recommandée dans les cas où une panne de ce produit serait
susceptible d'entraîner une panne du dispositif de maintien en vie ou de nuire considérablement à sa sécurité ou à son efficacité.
Boîtier de la station de charge
• Placez la station de charge dans un environnement intérieur contrôlé, à l'abri de l'humidité, des températures extrêmes, des liquides et gaz
inflammables, des contaminants conducteurs, de la poussière et de la lumière directe du soleil.
• Laissez un espace suffisant tout autour de la station de charge pour assurer une ventilation adéquate. Ne bloquez pas, ne couvrez pas ou
n'insérez pas d'objets dans les ouvertures de ventilation externes de la station de charge.
• Pour des performances optimales, veillez à ce que la température intérieure soit maintenue entre 0 ºC et 30 ºC (32 °F et 86 °F).
• Ne retirez pas les avertissements, les mises en garde ou les étiquettes descriptives du chariot de charge.
• La station de charge est très lourde. Manipulez-la avec précaution N'essayez pas de le déballer ou de le monter sans aide. Utilisez un
appareil mécanique tel qu'un chariot élévateur ou un transpalette pour déplacer la station de charge à l'intérieur du conteneur.
• Ne placez pas de récipients emplis de liquide ou d'objets empilés sur l'armoire.
• Inspectez le conteneur et la station de charge afin de détecter d'éventuels dégâts survenus pendant le transport. N'utilisez pas la station de
charge si elle est endommagée.
• Soyez prudent lors du découpage des éléments d'emballage. Vous pourriez rayer la station de charge et causer des dommages non
couverts par la garantie.
• Conservez tous les éléments d'emballage afin de pouvoir les réutiliser ultérieurement. Remballer et réexpédier la station de charge sans ses
éléments d'emballage d'origine peut endommager le produit et entraîner l'annulation de la garantie.
Pour les installations au mur et sur le bureau :
• La station de charge doit être installée par un technicien qualifié.
• Avant de procéder au montage, assurez-vous que la surface d'appui peut supporter en toute sécurité le poids combiné de la station de
charge, de l'équipement installé et de tous les accessoires et composants qui y sont fixés.
• La station de charge peut supporter des équipements jusqu'à sa capacité de charge maximale de 81,6 kg (180 lb).
• Utilisez toujours des moyens de fixation appropriés pour l'installation sur des parpaings, du béton, des cloisons sèches ou des montants en
bois. Installez-le solidement au mur à l'aide d'un matériel approprié (non fourni).
AVERTISSEMENT : la surface d'appui doit pouvoir supporter en toute sécurité le poids combiné de la station de charge, de l'équipement
installé et de tous les accessoires et composants qui y sont fixés (voir 8. Spécifications pour plus d'informations sur le poids et les dimensions
de votre modèle).

23
2. Vue d'ensemble
Votre station de charge est une solution tout-en-un pour stocker, charger et synchroniser jusqu'à 32 smartphones. Votre station de charge peut
être montée de manière pratique sur un mur ou être utilisée pour des installations fixes sur un bureau. Pour éviter le vol et l'altération de
l'appareil, le boîtier de votre station de charge est équipé de portes verrouillables en acier. Un moraillon à cadenas (en option) se fixe sur les
portes pour assurer une protection supplémentaire.
Explication des symboles :
ATTENTION : RISQUE DE DANGER
BORNE DE LIAISON PROTECTRICE
TENSION CA
AVERTISSEMENTS CONCERNANT LE MONTAGE MURAL : la surface et les montants muraux, ainsi que tout le matériel de montage fourni
par l'utilisateur, doivent pouvoir supporter le poids combiné de l'armoire et de tous les équipements qui y seront installés. L'armoire peut
supporter des équipements jusqu'à sa capacité de charge maximale de 81,6 kg (180 lb).
Les trous de fixation murale sont espacés de 406 mm (16 po) à l'horizontale pour s'adapter à l'emplacement standard des montants muraux. Il
est conseillé de bien répartir le poids de l'armoire et de tous les équipements installés.

24
3. Identification des fonctionnalités
CSD32USB
1
Portes rabattables verrouillables
2
Étagères de rangement (capacité de 16 appareils chacune)
3
Chargeur/concentrateur USB 32 ports
4
Trous d'accès au cordon d'alimentation avec fiche 5-15P (CSD32USB) à angle droit (1 ouverture de chaque côté).
5
Verrou à 3 points
6
Moraillon à cadenas (en option assemblage requis, voir Section 3.4 pour plus d'informations. Verrou non fourni.)
7
Panneau arrière avec fentes de montage mural en forme de trou de serrure (voir Section 6 pour plus d'informations).
Non montré :
Fiche BS 1363 (CSDXB32USB) ou fiches de cordon d'alimentation Schuko (CSDXS32USB)
Clés
1
5
3
2
2
4
6
7
7

25
4. Configuration
Attention ! Lisez toutes les instructions et tous
les avertissements avant de commencer l'installation !
Avertissement : les stations de charge peuvent être très lourdes. N'essayez pas de déballer ou de monter la
station de charge sans assistance. Soyez extrêmement prudent lors de la manutention de la station de charge
et veillez à bien respecter toutes les instructions de manutention et d'installation. N'essayez pas d'installer des
équipements sans avoir préalablement stabilisé la station de charge.
4.1 Alimentation du chargeur/concentrateur USB
Pour faciliter les connexions électriques, une
languette est située de chaque côté des trous
d'accès au cordon d'alimentation. Pour
connecter le chargeur/concentrateur USB,
choisissez le côté que vous souhaitez
brancher sur une prise de courant, puis
coupez les attaches qui fixent les deux
languettes aux trous d'accès du cordon
d'alimentation
A
. Tirez la languette de l'orifice
d'accès
B
du cordon d'alimentation souhaité
pour que celui-ci et sa fiche sortent vers
l'extérieur.
BA
4.2 Serrures de porte
Les portes rabattables sont équipées d'une
serrure pouvant être actionnée à l'aide des
clés fournies
A
.
Le moraillon à cadenas fourni peut être
accroché à l'unité pour assurer une
protection supplémentaire. Pour poser le
moraillon à cadenas, utilisez les vis incluses
pour le fixer à la porte
B
. Répétez cette
procédure pour l'autre porte.
B
A

26
5. Chargeur/concentrateur USB 32 ports
• Le chargeur/concentrateur USB de qualité professionnelle permet de charger et de synchroniser jusqu'à 32 smartphones.
• Il fournit à chaque port USB un niveau de charge optimal pour un appareil particulier (jusqu'à 2,4 ampères).
• Il permet d'effectuer la synchronisation avec n'importe quel appareil conçu pour les communications de données USB, par le biais d'un
logiciel de gestion de fichiers compatible.
• Il synchronise les appareils Apple
®
via le logiciel iTunes
®
ou Apple Configurator
• Le port mini-USB de mise à jour du micrologiciel permet d'effectuer de futures mises à jour logicielles pour prendre en charge des appareils
plus récents.
5.1 Caractéristiques du chargeur/concentrateur USB
A
Ports USB 2,4 A avec
voyants LED (32 au total)
B
Port de synchronisation
pour ordinateur
C
Ports de mise à niveau du
micrologiciel
En utilisant un câble USB blindé dont vous disposez ou fourni par le fabricant de l'appareil,
connectez le câble USB au smartphone qui doit être chargé. Faites la même chose pour les
autres appareils.
Tripp Lite propose des câbles individuels et des lots de 10 câbles pour les appareils Apple
®
nécessitant des câbles USB vers 30 broches ou USB vers Lightning™, ainsi que des câbles
individuels et des lots de 10 câbles pour les appareils USB 3.0 ou 2.0 nécessitant des
câbles USB-A (mâle) vers 5 broches Micro B (mâle).
Type de câble
Numéro de modèle
de câble individuel
Numéro de modèle
à 10 câbles
Connecteur USB Apple vers connecteur Lightning 8
broches, 25,4 cm (10 po).
M100-10N-BK M100-10N-BK-10
USB 3.0 SuperSpeed A (mâle) vers Micro-B 5 broches
(mâle), 30,5 cm (1 pi).
U326-001-BK U326-001-BK-10
Visitez tripplite.com pour plus d'informations sur notre sélection de câbles USB de haute qualité.
5.2 Connexion des smartphones au chargeur/concentrateur USB
A BC
5.3 Connexion d'un ordinateur au chargeur/concentrateur USB
Outre le chargement des appareils, le chargeur/concentrateur USB est équipé d'une fonction de hub qui synchronise les appareils et leurs
applications logicielles respectives par l'intermédiaire d'un ordinateur connecté. Pour activer la fonction de concentrateur, utilisez le câble USB
fourni pour connecter le connecteur USB-B au port de synchronisation de l'ordinateur de l'appareil et le connecteur USB-A au port USB d'un
ordinateur.
Remarque : lorsqu'une connexion informatique est établie et que plusieurs appareils sont connectés au chargeur/concentrateur USB, le taux de charge diminue
pendant la synchronisation et revient au taux de charge normal une fois celle-ci terminée.
Remarque : le port de mise à jour du micrologiciel nécessite une connexion mini-USB (câble non inclus). Pour télécharger les mises à jour les plus récentes du
micrologiciel, rendez-vous sur
tripplite.com/support.
27
6. Montage mural
12”
16”
Pour le montage mural, vous aurez besoin de ce qui suit :
• Niveau
• Outils appropriés pour le montage mural
• Quincaillerie adaptée pour le montage mural (non fournie)
Avertissement : ne pas tenter de fixer la station de charge au mur avec des appareils
électroniques personnels à l'intérieur.
Le panneau arrière de l'armoire de la station de charge comporte 4 ouvertures en forme de
trous de serrure. Chaque serrure s'adapte à des boulons M5 ou 3/16". Les jeux de trous de
serrure sont centrés à 40,6 cm (16") d'intervalle horizontalement et à 30,5 cm (12")
verticalement
A
.
Pour installer la station de charge, retirez d'abord l'étagère inférieure à l'intérieur de l'armoire
B
.
À l'aide d'un niveau et d'un mètre ruban, prenez des mesures pour positionner précisément
votre surface de montage. En ce qui concerne l'emplacement des trous de serrure supérieurs,
fixez les attaches appropriées (non incluses) au mur ou à la surface de support, puis
accrochez-y la station de charge
C
. Pour plus de sécurité, utilisez des fixations appropriées et
les fentes en trou de serrure du bas pour fixer le boîtier de la station de charge au mur
P
.
Remarque : la station de charge doit être installée par un technicien qualifié. Utilisez des moyens de
montage appropriés lors de l'installation sur bloc de béton, ciment, cloison sèche ou montants en bois.
Avertissement : la surface d'appui doit pouvoir supporter en toute sécurité le poids combiné de la
station de charge, de l'équipement installé et de tous les accessoires et composants qui y sont
fixés. Voir Section 8. Spécifications pour plus d'informations sur le poids et les dimensions de votre
modèle.
HAUT
BAS
B
A
C
C
P
P
28
Attention ! N'empilez pas plus d'une armoire de station de charge. Des
dommages personnels ou matériels peuvent en résulter.
Empilement des armoires de station de charge
Une station de charge peut être empilée en toute sécurité sur une autre. Retirez d'abord l'étagère inférieure de l'intérieur de l'armoire qui sera
placée sur le dessus
A
. Placez avec précaution l'armoire supérieure sur l'armoire inférieure, en alignant les trous de montage avant de
l'armoire supérieure et les découpes en forme de trous de serrure à l'arrière sur les inserts filetés de l'armoire inférieure situés sur le panneau
supérieur
B
. Pour fixer les deux armoires, utilisez quatre (4) vis M6 x 20 mm (non fournies)
C
.
A
B
C
C
C
C
7. Placement sur un bureau
AVERTISSEMENT : pour les applications de bureau, installez toujours la station de charge
dans un endroit structurellement sain avec une surface plane capable de supporter le poids de
la station de charge, de tous les équipements qui seront installés dans la station de charge et
de tous les autres racks et/ou équipements qui seront installés à proximité. N'essayez jamais
de soulever ou d'installer la station de charge sans assistance. Voir Section 8. Spécifications
pour plus d'informations sur la capacité de chargement nominale de la station de charge.
Pour plus de sécurité, l'armoire peut être fixée à un bureau. Deux ouvertures en forme de trou
de serrure sont situées à l'arrière du panneau inférieur. Chaque serrure s'adapte à des boulons
M5 ou 3/16". Le jeu de trous de serrure inférieur est centré à 457 mm (18") d'intervalle
horizontalement et à 356 mm (14") verticalement des trous de montage avant
A
.
À l'aide d'un mètre ruban, prenez les mesures nécessaires pour positionner avec précision les
zones de montage. Utilisez des fixations appropriées (non fournies) pour attacher l'armoire aux
découpes en forme de trou de serrure à l'arrière
B
et fixez la station de charge sur le bureau à
l'aide des trous de montage avant
C
.
A
C
C
B
B
355,6 mm
14"
HAUT
AVANT AVANT
BAS
50,8 mm
2"
50,8 mm
2"
457,2 mm
18"
457,2 mm
18"
17,56 mm
2 13/16"
17,56 mm
2 13/16"
355,6 mm
14"
29
8. Caractéristiques techniques
Modèles CSD32USB, CSDXB32USB, CSDXS32USB
Dimensions (H x l x P) 374 x 600 x 483 mm/14,7 x 23,63 x 19 po
Poids 28,2 kg/62,11 lb
Capacité de charge* 81,65 kg/180 lb
Ports pour chargeur/mandrin 32 x USB Type-A (femelle)
1 x USB Type-B (femelle)
2 x USB Mini (femelle)
Vitesse de transmission USB 2.0 : jusqu'à 480 Mbits/s
Alimentation requise Entrée : 110-120 V, 8 A, 50/60 Hz (CSD32USB) ou 230 V, 5 A, 50 Hz (CSDXB32USB, CSDXS32USB)
Sortie : 5,0 V, 2,4 A max. (par port USB)
Température de fonctionnement 0 à 30 °C / 32 à 86 °F
Taux d'humidité en fonctionnement 5 à 95 %, sans condensation
Matériau du rack Métal
* La capacité de charge totale d'un montage mural nécessite une surface de montage capable de supporter la charge totale de la station de charge et de tous les
composants connectés. Les caractéristiques techniques sont susceptibles d'être modiées sans préavis.

30
Garantie limitée de 2 ans
Le Vendeur garantit que ce produit, s'il est utilisé conformément à toutes les instructions applicables, est exempt de tout vice de matériaux et de fabrication pendant une période de 2 ans à compter de
la date d'achat initiale. Si le produit s'avère défectueux en raison d'un défaut de matériau ou de fabrication au cours de cette période, le Vendeur réparera ou remplacera le produit, à sa seule discrétion.
CETTE GARANTIE N'EST PAS APPLICABLE EN CAS D'USURE NORMALE OU DE DOMMAGES RÉSULTANT D'ACCIDENTS, DE MAUVAISE UTILISATION, DE MAUVAIS TRAITEMENT OU DE
NÉGLIGENCE. LE VENDEUR N'ACCORDE AUCUNE AUTRE GARANTIE EXPRESSE QUE LA GARANTIE EXPRESSÉMENT DÉCRITE DANS LE PRÉSENT DOCUMENT. SAUF DANS LA
MESURE OÙ CELA EST INTERDIT PAR LA LOI EN VIGUEUR, TOUTES LES GARANTIES IMPLICITES, Y COMPRIS TOUTES LES GARANTIES DE QUALITÉ MARCHANDE OU
D'ADÉQUATION, SONT LIMITÉES EN DURÉE À LA PÉRIODE DE GARANTIE ÉTABLIE CI-DESSUS ; D'AUTRE PART, CETTE GARANTIE EXCLUT EXPRESSÉMENT TOUS LES DOMMAGES
ACCIDENTELS OU CONSÉCUTIFS. (Certains états n'autorisent pas les limitations sur la durée d'une garantie implicite, et certains états n'autorisent pas l'exclusion ou la limitation des dommages
accessoires ou indirects, de sorte que les limitations ou exclusions ci-dessus peuvent ne pas vous concerner. Cette garantie vous octroie des droits légaux spécifiques et vous pouvez bénéficier d'autres
droits qui varient d'une juridiction à l'autre).
AVERTISSEMENT : les utilisateurs individuels doivent s'assurer de déterminer, avant toute utilisation, si cet appareil est adapté, adéquat ou sûr pour l'utilisation prévue. Dans la mesure où les
applications individuelles sont soumises à d'importantes variations, le fabricant ne formule aucune déclaration et ne donne aucune garantie quant à l'adaptation ou à l'adéquation de ces appareils pour
des applications spécifiques.
Numéro d'identification de conformité aux règlements
Pour des raisons d'identification et de conformité aux règles de certification, un numéro de série unique a été attribué à votre produit Tripp Lite. Le numéro de série est indiqué sur l'étiquette de la plaque
signalétique du produit, où vous pouvez aussi trouver toutes les marques de certification et les informations nécessaires. Pour toute demande d'informations relatives à la conformité de ce produit,
veuillez toujours mentionner le numéro de série. Le numéro de série ne doit pas être confondu avec le nom marketing ou le numéro de modèle du produit.
Informations de conformité DEEE pour les clients et les recycleurs Tripp Lite (Union européenne)
Dans le cadre de la directive sur les Déchets d'équipements électriques et électroniques (DEEE) et des réglementations d'application, lorsqu'un consommateur achète un équipement
électrique ou électronique neuf auprès de Tripp Lite, il est habilité à :
• Envoyer l'équipement usagé pour recyclage sur la base d'un équipement équivalent en nombre et en type (cela varie en fonction du pays)
• Renvoyer le nouvel équipement pour recyclage lorsqu'il devient un déchet en fin de vie
Tripp Lite mène une politique d'amélioration constante. Les caractéristiques peuvent être modifiées sans préavis. Les photos et illustrations peuvent légèrement différer des produits réels.
10. Garantie
9. Stockage, entretien et nettoyage
Stockage
La station de charge doit être stockée dans un environnement intérieur contrôlé à l'abri de l'humidité, des températures extrêmes, des liquides et
des gaz inflammables, des contaminants conducteurs, de la poussière et de la lumière directe du soleil. Conservez la baie dans son conteneur
d'expédition d'origine, si cela est possible.
Entretien
La station de charge est couverte par la garantie décrite dans le présent manuel. Pour plus de détails, veuillez visiter le site tripplite.com/support.
Nettoyage
Avant tout nettoyage, éteignez toujours la station de charge en la débranchant du secteur. Essuyez l'appareil à l'aide d'un chiffon humide, propre
et non pelucheux. Laissez sécher avant de rebrancher l'appareil.
Remarque : n'utilisez pas de chiffons abrasifs, solvants ou aérosols pour nettoyer la station de charge : cela pourrait endommager l'appareil.
TrippLite.Eaton.com/support
23-07-804 93-4753_RevB

31
Содержание
1.
Важные указания по технике безопасности
32
2. Краткое описание 33
3. Схема расположения функциональных 34
элементов
4. Начальная установка 35
4.1 Подключение зарядного устройства 35
USB / USB-концентратора к источнику питания
4.2 Дверные замки 35
5. 32-портовое зарядное устройство 36
USB / USB-концентратор
5.1 Возможности зарядного устройства 36
USB / USB-концентратора
5.2 Подключение смартфонов к зарядному 36
устройству USB / USB-концентратору
5.3 Подключение компьютера к зарядному 36
устройству USB / USB-концентратору
37
38
39
40
40
1
11
21
6. Настенный монтаж
7. Настольное размещение
8. Технические характеристики
9. Хранение, техническое обслуживание
и очистка
10. Гарантия
English
Español
Français
Deutsch
41
32-портовая зарядная
USB-станция для смартфонов
Модели: CSD32USB, CSDXB32USB, CSDXS32USB
(Номер серии: AG-0737)
Руководство пользователя
TrippLite.Eaton.com/support
Охраняется авторским правом © 2023 Tripp Lite. Все торговые знаки являются исключительной собственностью своих соответствующих владельцев.

32
1. Важные указания по технике безопасности
СОХРАНИТЕ НАСТОЯЩИЕ УКАЗАНИЯ
В настоящем руководстве содержатся указания и предупреждения, которые необходимо соблюдать в процессе установки и эксплуатации
описанного в нем изделия. Несоблюдение этих указаний и предупреждений может привести к аннулированию гарантии и причинить материальный
ущерб или вред здоровью людей.
Зарядное устройство USB / USB-концентратор:
• Подключите устройство к розетке, соответствующей принятым в вашей стране строительным нормам и надлежащим образом защищенной от
избыточных токов, коротких замыканий и замыканий на землю.
• Электрическая розетка, через которую осуществляется электропитание оборудования, должна быть установлена в легкодоступном месте вблизи
устройства.
• Штепсельный разъем переменного тока на шнуре электропитания служит в качестве устройства защитного отключения.
• Подключайте устройствo непосредственно к надлежащим образом заземленной розетке сети переменного тока.
• Не переделывайте электрическую вилку и не используйте переходник, не обеспечивающий заземления.
• В случае возникновения любой из описанных ниже ситуаций оформите вызов технического специалиста для проверки вашего оборудования:
• Попадание оборудования под воздействие влаги
• Падение оборудования с высоты или его механическое повреждение
• Появление явных признаков неисправности оборудования
• Ненадлежащая работа или отказ в работе оборудования согласно указаниям, изложенным в Руководстве пользователя
• Не рекомендуется использование данного оборудования в системах жизнеобеспечения, где его выход из строя предположительно может привести
к перебоям в работе оборудования жизнеобеспечения или в значительной мере снизить его безопасность или эффективность.
Корпус зарядной станции:
• Зарядная станция должна находиться в помещении с контролируемым микроклиматом вдали от источников влаги, экстремальных температур,
воспламеняющихся жидкостей и газов, электропроводных загрязнителей, пыли и прямого солнечного света.
• Со всех сторон зарядной станции необходимо обеспечить достаточно свободного пространства для его надлежащего проветривания. Не
загораживайте и не накрывайте внешние вентиляционные отверстия корпуса зарядной станции, а также не вставляйте в них какие-либо предметы.
• Для обеспечения максимальной производительности поддерживайте в помещении температуру воздуха в диапазоне от 0°C до 30°C.
• Не снимайте с зарядной станции какие-либо предупреждения, предостережения или описательные этикетки.
• Зарядная станция является крайне тяжеловесной. При перемещении зарядной станции соблюдайте осторожность. Не пытайтесь распаковывать
или монтировать ее в одиночку. Для перемещения зарядной станции в транспортировочном контейнере используйте механическое устройство
типа вилочного погрузчика или вилочной гидравлической тележки.
• Не кладите на корпус емкости с жидкостями или предметы, располагаемые один на другом.
• Осмотрите транспортировочный контейнер и зарядную станцию на предмет наличия повреждений, полученных при транспортировке. Не
пользуйтесь зарядной станцией в случае ее повреждения.
• При разрезании упаковочных материалов соблюдайте осторожность. Это может привести к нанесению царапин на поверхность зарядной станции,
что представляет собой ущерб, не покрываемый действующей гарантией.
• Все упаковочные материалы следует сохранить для последующего использования. Повторная упаковка и транспортировка зарядной станции без
использования оригинальных упаковочных материалов может привести к повреждению изделия, которое повлечет за собой аннулирование
действующей гарантии.
Для настенных и настольных систем:
• Установка зарядной станции должна производиться только квалифицированным техническим специалистом.
• Перед началом монтажа убедитесь в том, что поверхность стены может с запасом выдерживать суммарную нагрузку, создаваемую зарядной
станцией, хранящимся оборудованием и всеми входящими в комплект деталями оснастки и другими компонентами.
• Зарядная станция может выдерживать оборудование массой до 81,6 кг.
• При креплении к бетону, шлакобетону, гипсокартону или стойкам деревянного каркаса обязательно используйте соответствующие монтажные
приспособления. Надежно установите на стену с помощью надлежащей оснастки (в комплект поставки не входит).
ВНИМАНИЕ! Опорная поверхность должна с запасом выдерживать суммарную нагрузку, создаваемую зарядной станцией, находящимся в ней
оборудованием и всеми входящими в комплект деталями оснастки и другими компонентами (более подробную информацию о массе и габаритных
размерах вашей модели см. в Разделе 8).

33
2. Краткое описание
Приобретенная вами зарядная станция представляет собой универсальное устройство для хранения, зарядки и синхронизации устройств в
количестве до 32 шт. Зарядная станция может удобно монтироваться на стены, а также приспосабливаться для стационарного размещения на столе.
Во избежание хищения устройств или несанкционированного доступа к ним корпус вашей зарядной станции оснащен запирающимися стальными
дверцами. Для обеспечения дополнительной защиты к дверцам крепится петля для навесного замка (опционально).
Условные обозначения
ВНИМАНИЕ! ОПАСНОСТЬ
ЗАЩИТНАЯ КЛЕММА
НАПРЯЖЕНИЕ ПЕРЕМЕННОГО ТОКА
ВНИМАНИЕ! При монтаже на стену поверхность стены, элементы стенового каркаса и все монтажные приспособления, которые вы намереваетесь
использовать, должны выдерживать вес шкафа и всего установленного в нем оборудования. Этот шкаф может выдерживать нагрузку до 81,6 кг.
Отверстия для настенного монтажа имеют шаг 406 мм с горизонтальным расположением, что обеспечивает возможность крепления к элементам
стандартного стенового каркаса. В целях безопасности рекомендуется распределять вес шкафа и всего установленного в нем оборудования.
34
3. Схема расположения функциональных элементов
CSD32USB
1
Запираемые дверцы разрезной конструкции
2
Полки для хранения (вмещают до 16 устройств каждая).
3
32-портовое зарядное устройство USB / USB-концентратор
4
Отверстия для шнура питания с прямоугольным разъемом 5-15P (CSD32USB) (по 1 отверстию с каждой стороны).
5
3-точечный замок
6
Петля для навесного замка (опционально, требуется сборка. Подробнее см. в Разделе 3.4. Замок в комплект поставки не входит).
7
Задняя панель с прорезями для настенного монтажа (более подробная информация представлена в Разделе 6).
На рисунке не показаны:
Вилки шнура питания мод. BS 1363 (CSDXB32USB) или Schuko (CSDXS32USB)
Ключи
1
5
3
2-
2-
4
6
7
7
35
4. Начальная установка
Внимание! Перед установкой внимательно ознакомьтесь
со всеми указаниями и предупреждениями!
Внимание! Зарядные станции могут быть крайне тяжеловесными. Не пытайтесь распаковывать или монтировать
зарядную станцию в одиночку. Будьте предельно осторожны при перемещении зарядной станции и обязательно
следуйте всем указаниям по обращению и установке. Не производите установку оборудования в зарядную станцию
до обеспечения ее устойчивости.
4.1 Подключение зарядного устройства USB / USB-концентратора к источнику питания
Для удобства подключения к источнику питания
с каждой стороны от отверстий для
подсоединения шнура питания располагается
язычок. Для подключения зарядного устройства
USB / USB-концентратора выберите сторону,
которую вы хотите использовать для
подключения к розетке электропитания, а затем
разрежьте кабельные стяжки, обеспечивающие
крепление обоих язычков к отверстиям шнура
питания
A
. Потяните язычок из нужного
отверстия шнура питания
B
для выдвижения
наружу шнура и штепсельной вилки.
BA
4.2 Дверные замки
Дверцы разрезной конструкции снабжены
замком с ключами в комплекте
A
.
Для обеспечения дополнительной защиты к
оборудованию можно прикрепить входящую в
комплект петлю для навесного замка. Для
крепления петли для навесного замка к дверце
используйте поставляемые в комплекте винты
B
. Повторите данную процедуру для другой
дверцы.
B
A
36
5. 32-портовое зарядное устройство USB / USB-концентратор
• Зарядное устройство USB / USB-концентратор профессионального класса обеспечивает зарядку и синхронизацию до 32 смартфонов.
• Обеспечивает оптимальный уровень зарядного тока (до 2,4 А) для каждого порта USB в зависимости от подключенного к нему устройства.
• Позволяет осуществлять синхронизацию с любым устройством, предназначенным для обмена данными через порт USB, за счет совместимой
программы управления файлами.
• Синхронизирует устройства марки Apple
®
с использованием программного обеспечения iTunes
®
или Apple Configurator.
• Наличие порта mini-USB для обновления прошивки обеспечивает возможность обновления программного обеспечения под устройства, которые
могут быть выпущены когда-либо в будущем.
5.1 Возможности зарядного устройства USB / USB-концентратора
A
Порты USB 2.4 А для
подключения устройств с
светоидными индикаторами
(всего 32 шт.)
B
Порт для синхронизации с
компьютером
C
Порты для обновления
прошивки
Подключите кабель USB, приобретенный отдельно или поставляемый производителем устройства, к
заряжаемому смартфону. Повторите перечисленные действия для всех устройств.
Компания Tripp Lite предлагает отдельно и в упаковках по 10 шт. кабели для подключения устройств
марки Apple®, использующих кабели с USB- и 30-контактными разъемами или разъемами USB и
Lightning™, а также отдельно и в упаковках по 10 шт. кабели для устройств с разъемами USB 3.0 или
2.0, использующих кабели с разъемами USB-A (штекер) и 5-контактный Micro B (штекер).
Тип кабеля
Номер модели
отдельного
кабеля
Номер модели
кабеля в упаковке
по 10 шт.
Шнур с разъемом Apple USB и 8-контактным разъемом
Lightning, длина 0,25 м
M100-10N-BK M100-10N-BK-10
Шнур с разъемом USB 3.0 SuperSpeed A (штекер) и
5-контактным разъемом Micro-B (штекер), длина 0,3 м
U326-001-BK U326-001-BK-10
Более подробную информацию о предлагаемом нами ассортименте кабелей USB высшего качества
см. на сайте tripplite.com.
5.2 Подключение смартфонов к зарядному устройству USB / USB-концентратору
A BC
5.3 Подключение компьютера к зарядному устройству USB / USB-концентратору
Помимо зарядки устройств, зарядное устройство USB снабжено функцией концентратора, синхронизирующего устройства с их соответствующими
программными приложениями через подключенный компьютер. Для использования функции маршрутизатора вставьте разъем USB-B поставляемого
в комплекте USB-кабеля в порт синхронизации устройства с компьютером, а разъем USB-A ― в USB-порт компьютера.
Примечание. После соединения с компьютером при нескольких устройствах, подключенных к зарядному устройству/концентратору USB, скорость зарядки
снижается во время синхронизации и восстанавливается до нормального уровня после ее завершения.
Примечание. Для порта обновления прошивки требуется соединение через кабель с разъемом mini-USB (в комплект поставки не входит). Для загрузки последних
обновлений прошивки перейдите на страницу tripplite.com/support.
37
6. Настенный монтаж
12”
16”
Для настенного монтажа потребуются:
• Уровень
• Инструменты для настенного монтажа
• Оснастка для настенного монтажа (в комплект поставки не входит)
Внимание! Не пытайтесь крепить зарядную станцию с установленными в ней
персональными электронными устройствами.
На боковой панели корпуса зарядной станции имеются 4 прорези. Каждая из этих прорезей
рассчитана на болт размером M5. Расстояние между монтажными прорезями составляет 406 мм
по горизонтали и 305 мм по вертикали
A
.
Для монтажа зарядной станции сначала снимите нижнюю полку из шкафа
B
. С помощью уровня
и рулетки следует точно наметить место крепления. На месте верхних монтажных отверстий
прикрепите соответствующие крепежные детали (в комплект поставки не входят) к стене или
опорной поверхности, а затем навесьте зарядную станцию на крепеж
C
. Для обеспечения
дополнительной безопасности прикрепите корпус зарядной станции к стене при помощи
соответствующих крепежных деталей и нижних прорезей
D
.
Примечание. Установка зарядной станции должна производиться только квалифицированным
техническим специалистом. При креплении к бетону, шлакобетону, гипсокартону или стойкам
деревянного каркаса используйте соответствующие монтажные приспособления. Внимание! Опорная
поверхность должна с запасом выдерживать суммарную нагрузку, создаваемую зарядной
станцией, находящимся в ней оборудованием и всеми входящими в комплект деталями оснастки и
другими компонентами. См. Раздел 8. Технические характеристики для получения более подробной
информации о массе и габаритных размерах вашей модели.
ВЕРХ
НИЗ
B
A
C
C
D
D
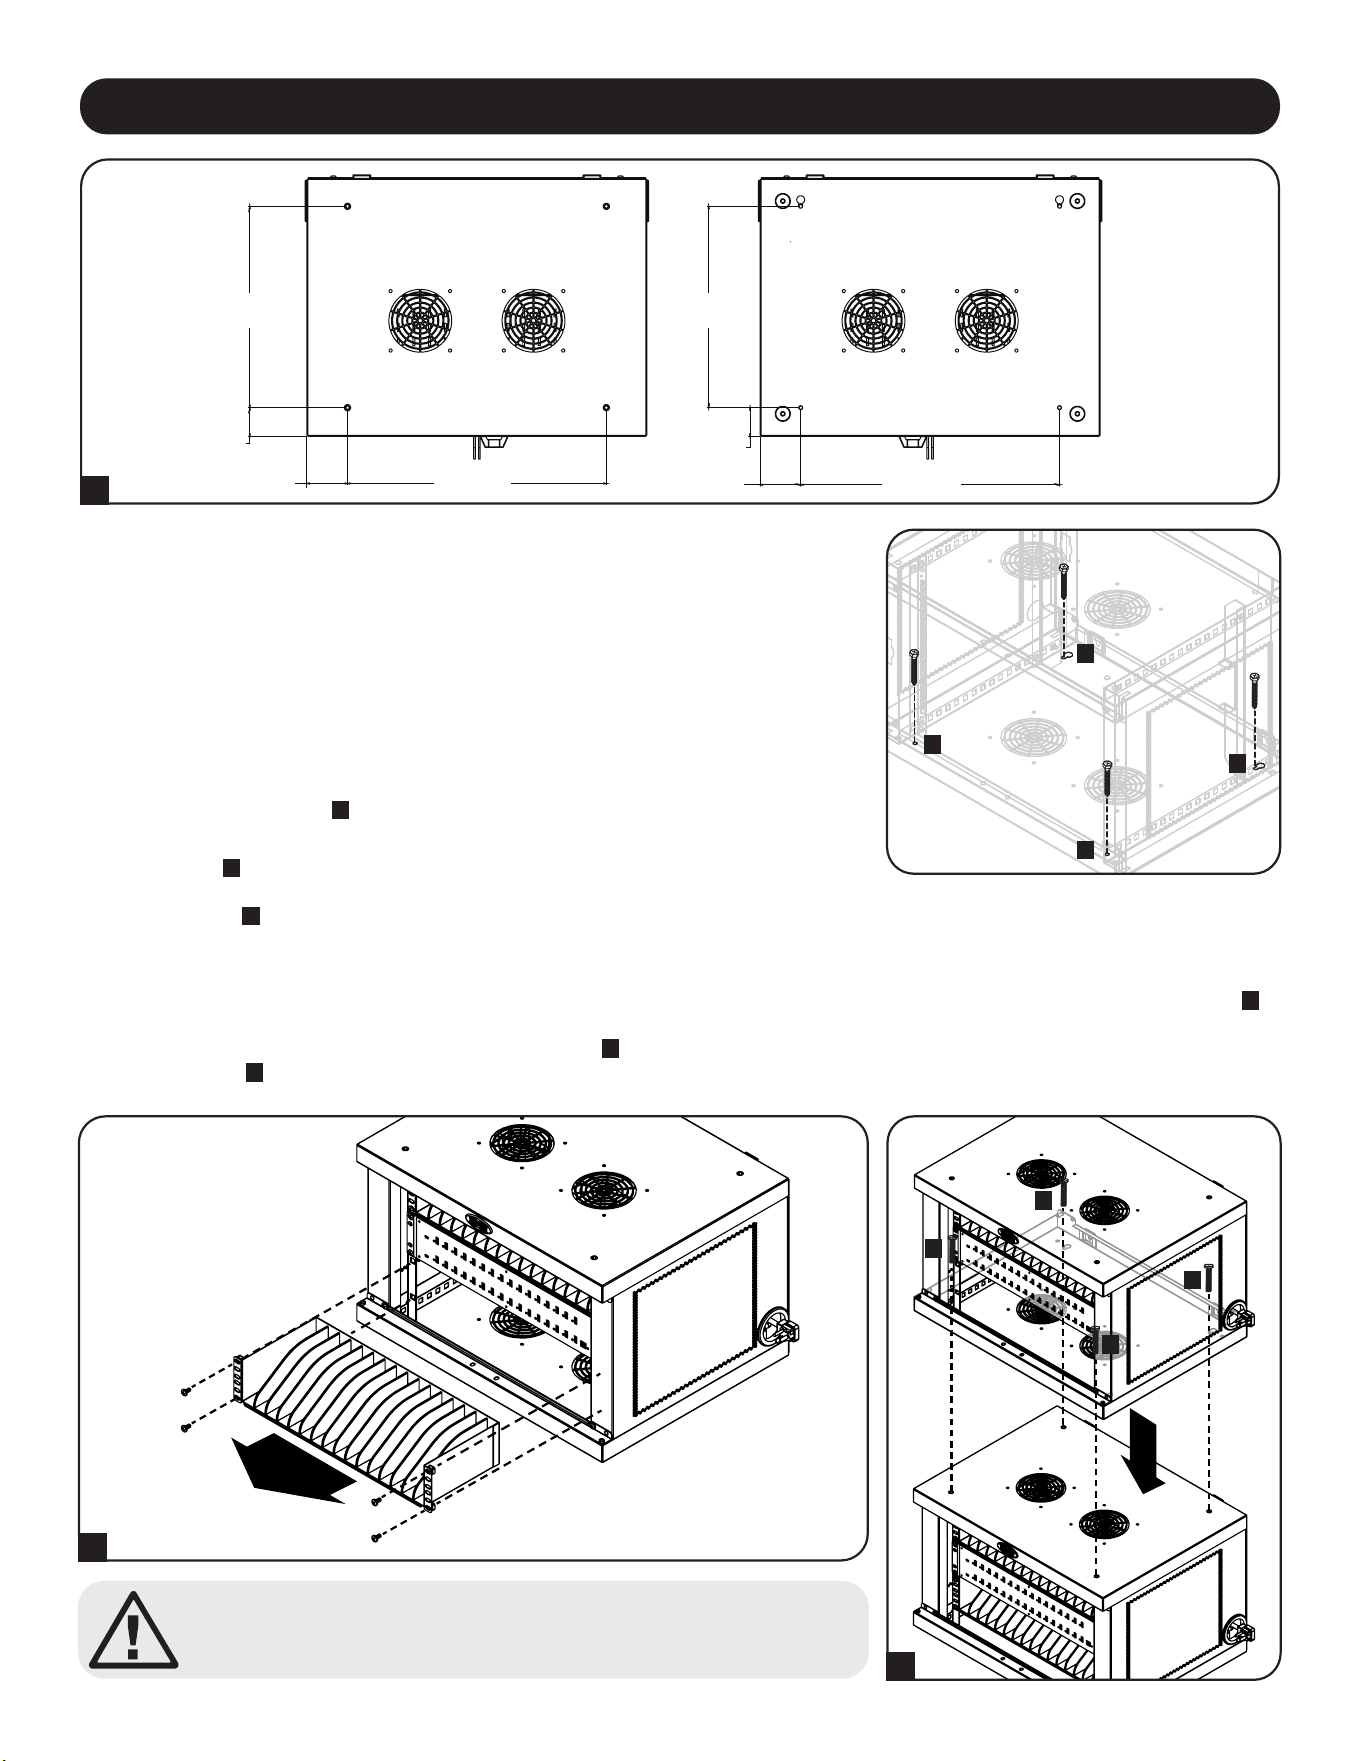
38
Внимание! Не ставьте несколько корпусов зарядных станций друг на друга.
Это может привести к травмам или имущественному ущербу.
Установка шкафов зарядных станций друг на друга
Одна зарядная станция может быть надежно прикреплена к другой. Сначала снимите нижнюю полку из шкафа, который будет размещен сверху
A
.
Аккуратно поместите верхний шкаф на верхнюю часть нижнего шкафа, совместив передние монтажные отверстия и задние прорези с резьбовыми
вставками нижнего шкафа, расположенными на верхней панели
B
. Для крепления двух шкафов используйте 4 винта M6 x 20 мм (в комплект
поставки не входят)
C
.
A
B
C
C
C
C
7. Настольное размещение
ВНИМАНИЕ! При настольном монтаже зарядная станция обязательно должна устанавливаться в
конструкционно прочном месте с ровным основанием, способным выдерживать вес самой
зарядной станции, всего оборудования, которое будет установлено внутри нее, и любых других
корпусов и/или оборудования, которые будут установлены вблизи нее. Ни в коем случае не
пытайтесь извлекать зарядную станцию из упаковки или устанавливать ее без полноценной
помощи. См. Раздел 8. Технические характеристики для получения более подробной
информации о весе и габаритных размерах зарядной станции.
Для обеспечения дополнительной безопасности шкаф может крепиться к настольной поверхности.
В задней части нижней панели имеются две монтажных прорези. Каждая из этих прорезей
рассчитана на болт размером M5. Нижние монтажные прорези располагаются по центру на
расстоянии 457 мм друг от друга по горизонтали и по вертикали на расстоянии 356 мм от
передних монтажных прорезей
A
.
С помощью уровня и рулетки следует точно наметить места крепления. Прикрепите шкаф к
задним прорезям
B
и прикрепите зарядную станцию к настольной поверхности через передние
монтажные отверстия при помощи подходящих для этой цели крепежных деталей (в комплект
поставки не входят)
C
.
A
C
C
B
B
355,6 мм
ВЕРХ
ЛИЦЕВАЯ
СТОРОНА
ЛИЦЕВАЯ
СТОРОНА
НИЗ
50,8 мм
50,8 мм
457,2 мм
457,2 мм
17,56 мм
17,56 мм
355,6 мм

39
8. Технические характеристики
Модели CSD32USB, CSDXB32USB, CSDXS32USB
Размеры (В x Ш x Г) 374 x 600 x 483 мм
Масса изделия 28,2 кг
Допустимая нагрузка* 81,65 кг
Порты зарядного устройства/концентратора USB-A (гнездо)― 32 шт.
USB-B (гнездо) ― 1 шт.
USB Mini (гнездо) ― 2 шт.
Скорость передачи данных USB 2.0: до 480 Мбит/с
Требования к электропитанию Вход: 110-120 В, 8 А, 50/60 Гц (CSD32USB) или 230 В, 5 А, 50 Гц (CSDXB32USB, CSDXS32USB)
Выход: не более 5,0 В, 2,4 А (на каждый порт USB)
Диапaзoн рабочих температур От 0 до 30°C
Рабочий диапазон влажности Отн. влажность от 5 до 95%, без образования конденсата
Материал корпуса Металл
*Полная несущая способность при настенном монтаже предусматривает, что монтажная поверхность способна выдерживать полную нагрузку, создаваемую зарядной
станцией и всеми подключенными к ней компонентами. Возможно изменение технических характеристик без последующего уведомления.

40
Ограниченная гарантия сроком 2 года
Продавец гарантирует отсутствие изначальных дефектов материала или изготовления в течение 2 лет с момента первой покупки данного изделия при условии его использования в соответствии со всеми применимыми к
нему указаниями. В случае проявления каких-либо дефектов материала или изготовления в течение указанного периода Продавец осуществляет ремонт или замену данного изделия исключительно по своему усмотрению.
ДЕЙСТВИЕ НАСТОЯЩЕЙ ГАРАНТИИ НЕ РАСПРОСТРАНЯЕТСЯ НА СЛУЧАИ ЕСТЕСТВЕННОГО ИЗНОСА ИЛИ ПОВРЕЖДЕНИЯ В РЕЗУЛЬТАТЕ АВАРИИ, НЕНАДЛЕЖАЩЕГО ИСПОЛЬЗОВАНИЯ, НАРУШЕНИЯ ПРАВИЛ
ЭКСПЛУАТАЦИИ ИЛИ ХАЛАТНОСТИ. ПРОДАВЕЦ НЕ ПРЕДОСТАВЛЯЕТ НИКАКИХ ЯВНО ВЫРАЖЕННЫХ ГАРАНТИЙ ЗА ИCКЛЮЧЕНИЕМ ПРЯМО ИЗЛОЖЕННОЙ В НАCTОЯЩЕМ ДОКУМЕНТЕ. ЗА ИСКЛЮЧЕНИЕМ
СЛУЧАЕВ, ЗАПРЕЩЕННЫХ ДЕЙСТВУЮЩИМ ЗАКОНОДАТЕЛЬСТВОМ, ВСЕ ПОДРАЗУМЕВАЕМЫЕ ГАРАНТИИ, ВКЛЮЧАЯ ВСЕ ГАРАНТИИ ПРИГОДНОСТИ ДЛЯ ПРОДАЖИ ИЛИ ИСПОЛЬЗОВАНИЯ ПО НАЗНАЧЕНИЮ,
ОГРАНИЧЕНЫ ПО ПРОДОЛЖИТЕЛЬНОСТИ ДЕЙСТВИЯ ВЫШEУКАЗАННЫМ ГАРАНТИЙНЫМ СРОКОМ; КРОМЕ ТОГО, ИЗ НАСТОЯЩЕЙ ГАРАНТИИ ЯВНЫМ ОБРАЗОМ ИСКЛЮЧАЮТСЯ ВСЕ ПОБОЧНЫЕ, СЛУЧАЙНЫЕ И
КОСВЕННЫЕ УБЫТКИ. (В некоторых штатах не допускается введение ограничений на продолжительность действия тех или иных подразумеваемых гарантий, а в некоторых — исключение или ограничение размера
побочных или косвенных убытков. В этих случаях вышеизложенные ограничения или исключения могут на вас не распространяться. Настоящая гарантия предоставляет конкретные юридические права, а набор других прав
может быть различным в зависимости от юрисдикции).
ВНИМАНИЕ! До начала использования данного устройства пользователь должен убедиться в том, что оно является пригодным, соответствующим или безопасным для предполагаемого применения. В связи с большим
разнообразием конкретных применений производитель не дает каких-либо заверений или гарантий относительно пригодности данных изделий для какого-либо конкретного применения или их соответствия каким-либо
конкретным требованиям.
Идентификационные номера соответствия нормативным требованиям
В целях сертификации на соответствие нормативным требованиям и опознавания приобретенному вами изделию марки Tripp Lite присвоен уникальный серийный номер. Серийный номер располагается на заводской
табличке вместе со всеми необходимыми отметками о приемке и прочей информацией. При запросе информации о соответствии данного изделия нормативным требованиям обязательно указывайте его серийный номер.
Номер серии не следует путать с торговым наименованием изделия или номером его модели.
Информация по выполнению требований Директивы WЕЕЕ для покупателей и переработчиков продукции компании Tripp Lite (являющихся резидентами
Eврoпейского союза)
Согласно положениям Директивы об утилизации отходов электрического и электронного оборудования (WЕЕЕ) и исполнительных распоряжений по ее применению, при покупке потребителями нового
электрического или электронного оборудования производства компании Тripp Lite они получают право на:
• Продажу старого оборудования по принципу "один за один" и/или на эквивалентной основе (в зависимости от конкретной страны)
• Отправку нового обoрудования на переработку после окончательной выработки его ресурса
Компания Tripp Lite постоянно совершенствует свою продукцию. B связи с этим возможно изменение технических характеристик без предварительного уведомления. Внешний вид реальных изделий может несколько
отличаться от представленного на фотографиях и иллюстрациях.
10. Гарантия
TrippLite.Eaton.com/support
9. Хранение, техническое обслуживание и очистка
Хранение
Корпус должен находиться в помещении с контролируемым микроклиматом вдали от источников влаги, экстремальных температур,
воспламеняющихся жидкостей и газов, электропроводных загрязнителей, пыли и прямого солнечного света. По возможности храните корпус в его
заводской транспортной упаковке.
Техническое обслуживание
На корпус распространяется действие ограниченной гарантии, условия которой изложены в настоящем руководстве. Более подробная информация
представлена на странице tripplite.com/support.
Очистка
Перед очисткой необходимо выключить зарядную станцию, отсоединив ее от источника переменного тока. При необходимости вытрите поверхности
устройства безворсовой тканью, смоченной в воде. Перед подключением устройства к источнику питания эти поверхности должны полностью
высохнуть.
Примечание. Для очистки зарядной станции не следует пользоваться шлифовальной шкуркой, растворителями или распыляемыми аэрозолями, поскольку это
может привести к повреждению устройства.
23-07-804 93-4753_RevB

41
Inhalt
1. Wichtige Sicherheitshinweise 42
2. Überblick 43
3. Eigenschaften 44
4. Einrichten 45
4.1 Stromversorgung des 45
USB-Ladegeräts/Hub-Einheit
4.2 Türverriegelungen 45
5. USB-Ladegerät-Hub mit 46
32 Anschlüssen
5.1 USB-Ladegerät-/Hub-Funktionen 46
5.2 Anschließen von Smartphones 46
an das USB-Ladegerät/Hub
5.3 Anschließen eines Computers an das 46
USB-Ladegerät/Hub
6. Wandmontage 47
7. Desktop-Platzierung 48
8. Technische Daten 49
9. Lagerung, Wartung und Reinigung 50
10. Garantie 50
English 1
Español 11
Français 21
Русский 31
USB-Ladestation mit
32 Anschlüssen für Smartphones
Modelle: CSD32USB, CSDXB32USB, CSDXS32USB
(Seriennummer: AG-0737)
Bedienungsanleitung
TrippLite.Eaton.com/support
Copyright © 2023 Tripp Lite. Alle Warenzeichen sind alleiniges Eigentum des jeweiligen Inhabers.

42
1. Wichtige Sicherheitshinweise
BITTE BEWAHREN SIE DIESE ANLEITUNG AUF
Diese Betriebsanleitung enthält Anweisungen und Warnhinweise, die bei Installation und Betrieb des hierin beschriebenen Produkts
befolgt werden müssen. Die Nichtbeachtung kann zum Erlöschen von Gewährleistungs-/Garantieansprüchen führen und
Sachschäden bzw. Verletzungen verursachen.
USB-Ladegerät/Netzknoten:
• Schließen Sie das Gerät an eine Steckdose an, die den örtlichen Bauvorschriften entspricht und ausreichend gegen Überstrom,
Kurzschluss und Erdschluss geschützt ist.
• Die Netzsteckdose, die Geräte mit Energie versorgt, sollte in der Nähe des Geräts installiert werden und leicht zugänglich sein.
• Der AC-Stecker am Netzkabel dient als Trennvorrichtung.
• Schließen Sie das Gerät direkt an eine ordnungsgemäß geerdete Wechselstrom-Steckdose an.
• Nehmen Sie keine Veränderungen am Stecker vor und verwenden Sie keinen Anschlussadapter, der den Erdungsanschluss
unterbricht.
• Wenn eine der folgenden Situationen eintritt, vereinbaren Sie einen Termin mit einem Servicetechniker, um Ihr Gerät überprüfen zu
lassen:
• Das Gerät war Feuchtigkeit/Nässe ausgesetzt
• Das Gerät wurde durch einen Sturz beschädigt
• Das Gerät weist sichtbare Bruchstellen auf
• Das Gerät funktioniert nicht ordnungsgemäß bzw. nicht so, wie in dieser Betriebsanleitung beschrieben
• Die Verwendung dieses Geräts für Lebenserhaltungssysteme, in denen der Ausfall des Geräts den Ausfall des
Lebenserhaltungssystems verursachen oder dessen Sicherheit beziehungsweise Wirksamkeit bedeutend beeinträchtigen kann, wird
nicht empfohlen.
Schrank mit Ladestationen
• Bewahren Sie die Ladestation in einem kontrollierten Raum auf, wo sie nicht Feuchtigkeit, extremen Temperaturen, entzündlichen
Flüssigkeiten oder Gasen, leitfähigen Schadstoffen, Staub oder direkter Sonneneinstrahlung ausgesetzt ist.
• Lassen Sie an allen Seiten der Ladestation genügend Platz für eine angemessene Belüftung. Die externen Lüftungsöffnungen des
Geräts dürfen nicht blockiert oder verdeckt bzw. Gegenstände darin eingeführt werden.
• Für eine optimale Leistungsfähigkeit sollte die Raumtemperatur zwischen 0 °C und 30 °C gehalten werden.
• Entfernen Sie keine Warnungen, Vorsichtshinweise oder Schilder von der Ladestation.
• Die Ladestation ist sehr schwer. Seien Sie im Umgang mit der Ladestation sehr vorsichtig, insbesondere beim Heben. Versuchen
Sie keinesfalls, sie alleine/ohne Hilfe auszupacken, zu bewegen oder zu installieren. Verwenden Sie ein mechanisches Hilfsmittel
wie z. B. einen Gabelstapler oder einen Hubwagen, um die Ladestation im Versandbehälter zu bewegen.
• Stellen Sie keine Behälter mit Flüssigkeiten auf das Kabinett und stapeln sie keine Gegenstände darauf.
• Untersuchen Sie Versandbehälter und Ladestation auf etwaige Transportschäden. Nehmen Sie die Ladestation nicht in Betrieb,
wenn diese beschädigt ist.
• Lassen Sie beim Aufschneiden der Verpackung Vorsicht walten! Die Ladestation könnte zerkratzt werden und die dabei
verursachten Schäden unterliegen nicht der Gewährleistung.
• Bewahren Sie sämtliche Verpackungsmaterialien für eine spätere Verwendung auf. Verpackung und Versand des Schranks mit
Ladestationen ohne die originalen Verpackungsmaterialien können Schäden am Produkt verursachen, die nicht durch die
Gewährleistung abgedeckt sind.
Für Wand- und Desktop-Installationen:
• Die Ladestation muss von einem qualifizierten Techniker installiert werden.
• Vergewissern Sie sich vor der Montage, dass die Wandfläche die kombinierte Belastung durch die Ladestation, die gelagerten
Geräte und alle angebrachten Teile und Komponenten sicher tragen kann.
• Die Ladestation kann Geräte bis zu ihrer maximalen Tragfähigkeit von 81,6 kg tragen.
• Verwenden Sie bei der Installation auf Betonsteinen, Beton, Trockenbauwänden oder Holzständern stets geeignete
Befestigungsmittel. Befestigen Sie das Gerät mit den entsprechenden Halterungen (nicht im Lieferumfang enthalten) sicher an der
Wand.
WARNUNG: Die Auflagefläche muss in der Lage sein, die kombinierte Last der Ladestation, der gelagerten Ausrüstung und aller
angebrachten Hardware und Komponenten sicher zu tragen (siehe 8. Spezifikationen für weitere Informationen zu Gewicht und
Abmessungen Ihres Modells).
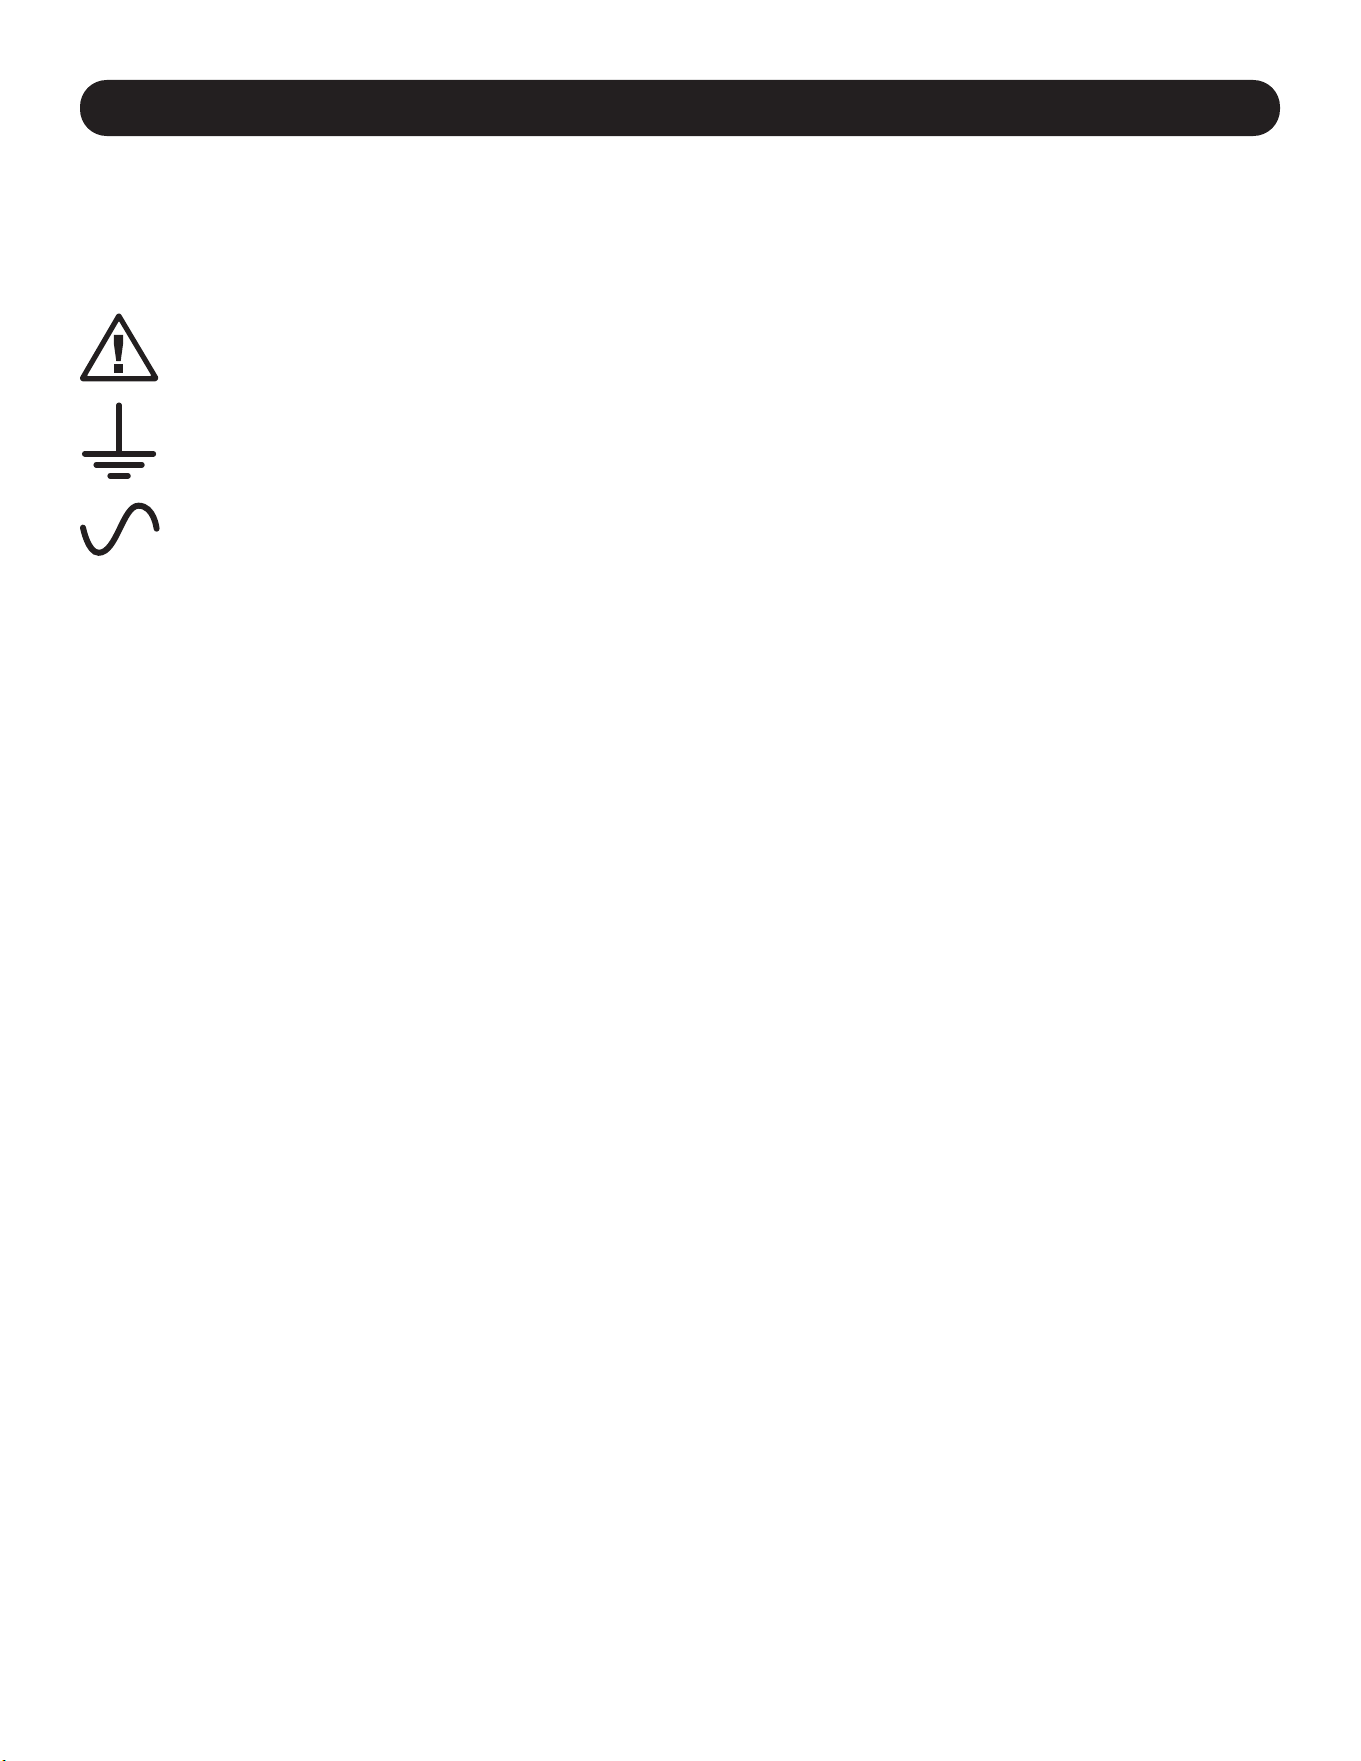
43
2. Überblick
Ihre Ladestation ist eine Rundum-Lösung zum Aufbewahren, Aufladen und Synchronisieren von bis zu 32 Smartphones. Ihre
Ladestation kann sowohl an der Wand als auch stationär auf dem Schreibtisch aufgestellt werden. Zum Schutz vor Diebstahl oder
unbefugtem Zugriff verfügt das Gehäuse Ihrer Ladestation über verschließbare Stahltüren. Ein Vorhängeschloss (optional), das an den
Türen angebracht wird, sorgt für zusätzlichen Schutz.
Erläuterung der Symbole:
ACHTUNG: GEFAHR
SCHUTZLEITERKLEMME
AC-SPANNUNG
WARNUNGEN FÜR DIE WANDMONTAGE: Die Wandoberfläche, die Wandstützen und alle vom Benutzer bereitgestellte Hardware
müssen das Gesamtgewicht des Kabinetts und aller im Kabinett installierten Geräte tragen können. Der Schrank kann Geräte bis zu
ihrer maximalen Tragfähigkeit von 81,6 kg tragen.
Die Löcher für die Wandmontage sind in einem horizontalen Abstand von 406 mm angeordnet, um die standardmäßige Platzierung
der Wandstiftschrauben zu ermöglichen. Es wird empfohlen, das Gewicht des Schranks und aller installierten Geräte sicher zu
verteilen.

44
3. Eigenschaften
CSD32USB
1
Verriegelbare geteilte Türen
2
Aufbewahrungsregale (Tragen jeweils bis zu 16 Geräten.)
3
32-Port USB-Ladegerät/Hub-Einheit
4
Öffnungen für Netzkabel mit rechtwinkligem 5-15P (CSD32USB) Stecker (1 Öffnung auf jeder Seite).
5
3-Punkt-Verriegelung
6
Vorhängeschloss-Haspe (Optional. Erforderliche Montage, siehe Abschnitt 3.4 für weitere Informationen. Schloss nicht im
Lieferumfang enthalten.)
7
Rückwand mit Schlüssellochschlitzen für die Wandmontage (Siehe Abschnitt 6 für weitere Informationen).
Nicht dargestellt:
BS 1363 (CSDXB32USB) Stecker oder
Schuko (CSDXS32USB) Netzkabelstecker
Schlüssel
1
5
3
2
2
4
6
7
7
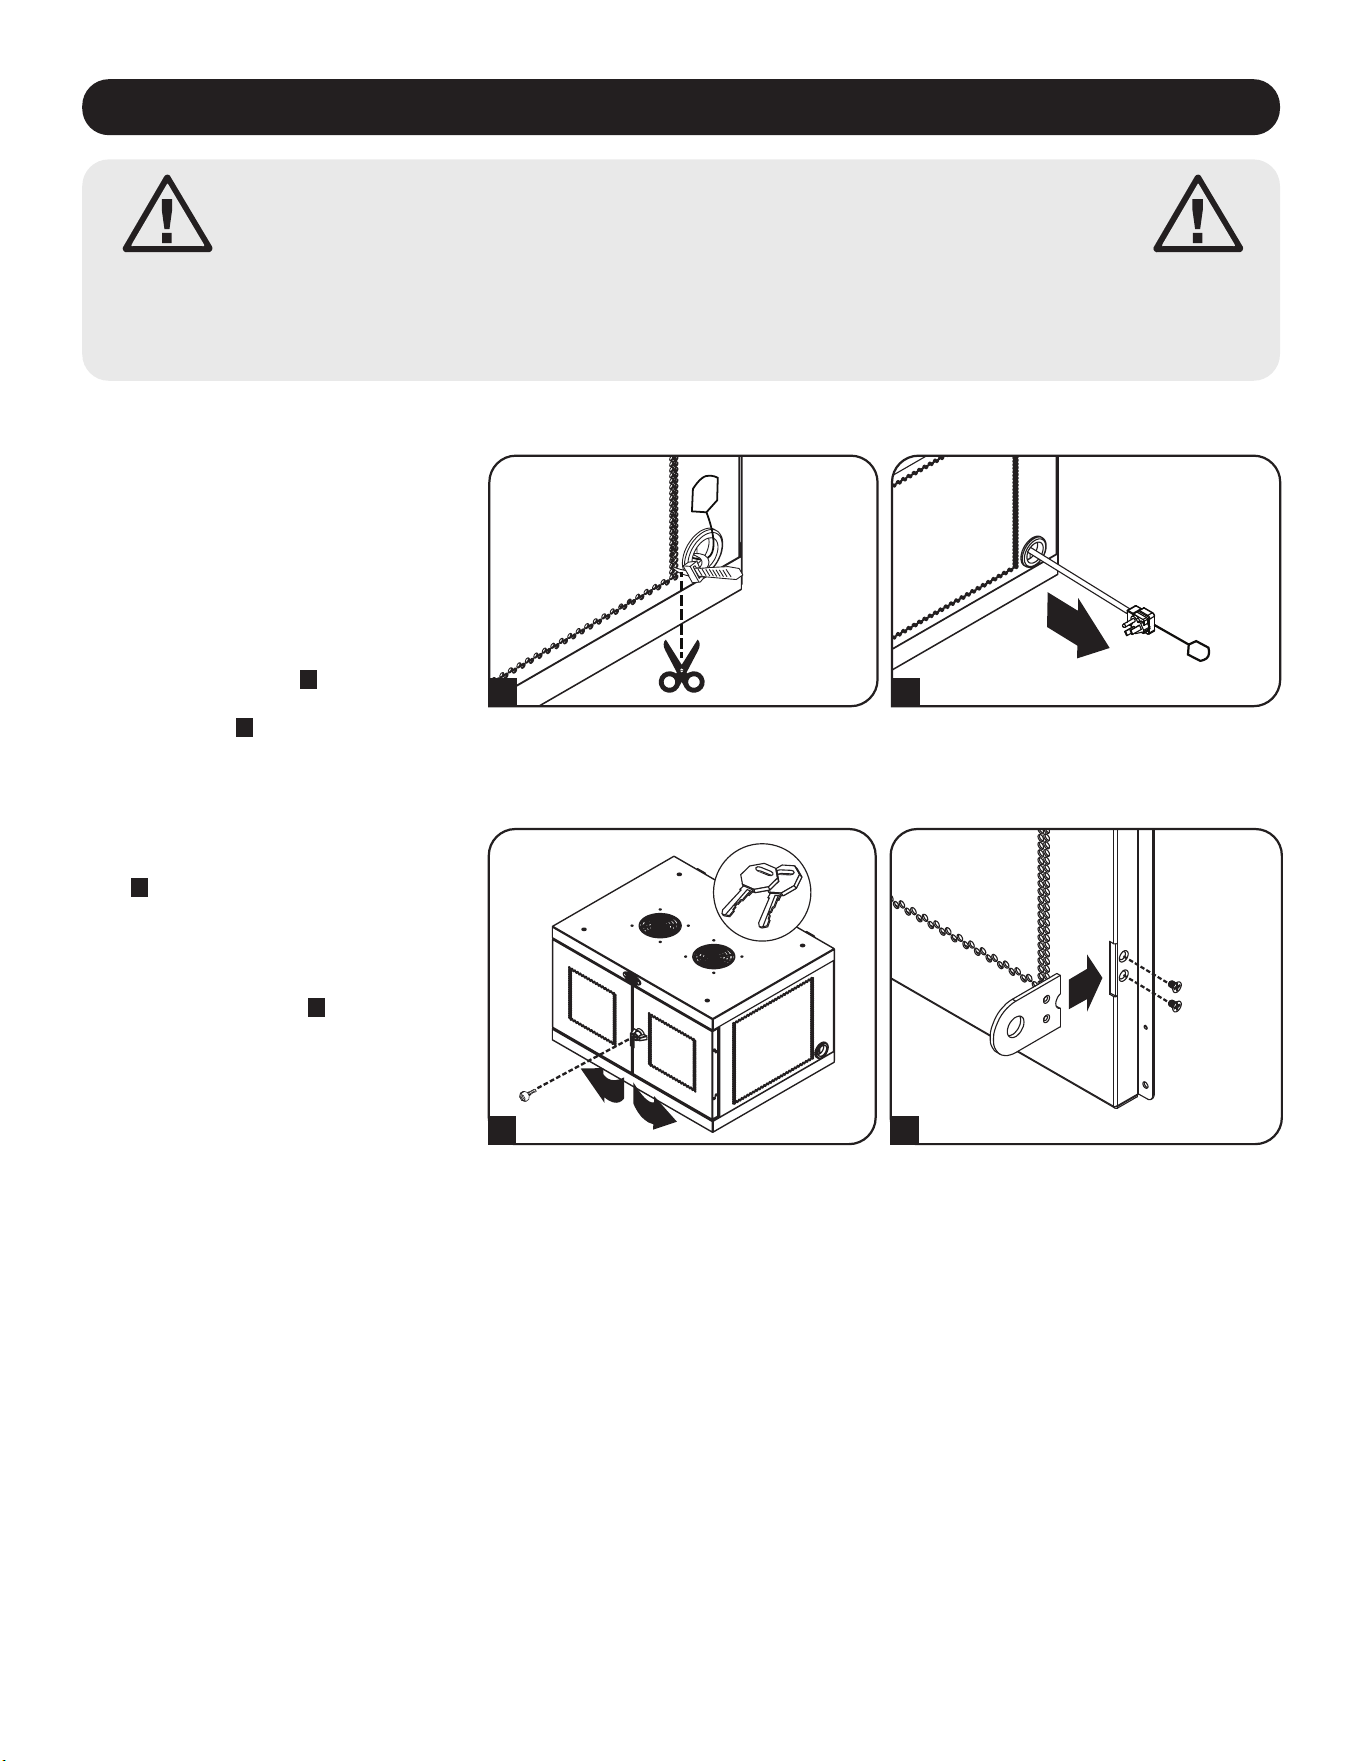
45
4. Einrichten
Achtung! Lesen Sie vor der Installation sämtliche
Anleitungen und Warnhinweise durch!
Achtung: Ladestationen können sehr schwer sein. Versuchen Sie nicht, die Ladestation ohne fremde Hilfe
auszupacken oder zu montieren. Lassen Sie beim Umgang mit der Ladestation äußerste Vorsicht walten
und befolgen Sie unbedingt sämtliche Anweisungen zu Umgang und Installation. Installieren Sie Geräte
erst, nachdem Sie die Ladestation stabilisiert haben.
4.1 Stromversorgung des USB-Ladegeräts/Hub-Einheit
Für bequeme Stromanschlüsse befindet
sich auf jeder Seite der
Netzkabelzugangslöcher eine Lasche. Um
das USB-Ladegerät/den USB-Hub
anzuschließen, wählen Sie die Seite aus,
die Sie an eine Steckdose anschließen
möchten, und schneiden Sie dann die
Kabelbinder durch, mit denen die beiden
Laschen an den Öffnungen für das
Netzkabel befestigt sind
A
. Ziehen Sie die
Lasche aus der gewünschten
Zugangsöffnung,
B
damit das Kabel und
der Stecker nach außen ragen.
BA
4.2 Türverriegelungen
Die Türen verfügen über ein Schloss, das
sich mit den beiliegenden Schlüsseln öffnen
lässt
A
. Die mitgelieferte Vorhängeschloss-
Haspe kann an der Einheit befestigt
werden, um zusätzlichen Schutz zu bieten.
Verwenden Sie die mitgelieferten
Schrauben, um die Vorhängeschloss-Haspe
an der Tür zu befestigen
B
. Wiederholen
Sie den Vorgang bei der anderen Tür.
B
A
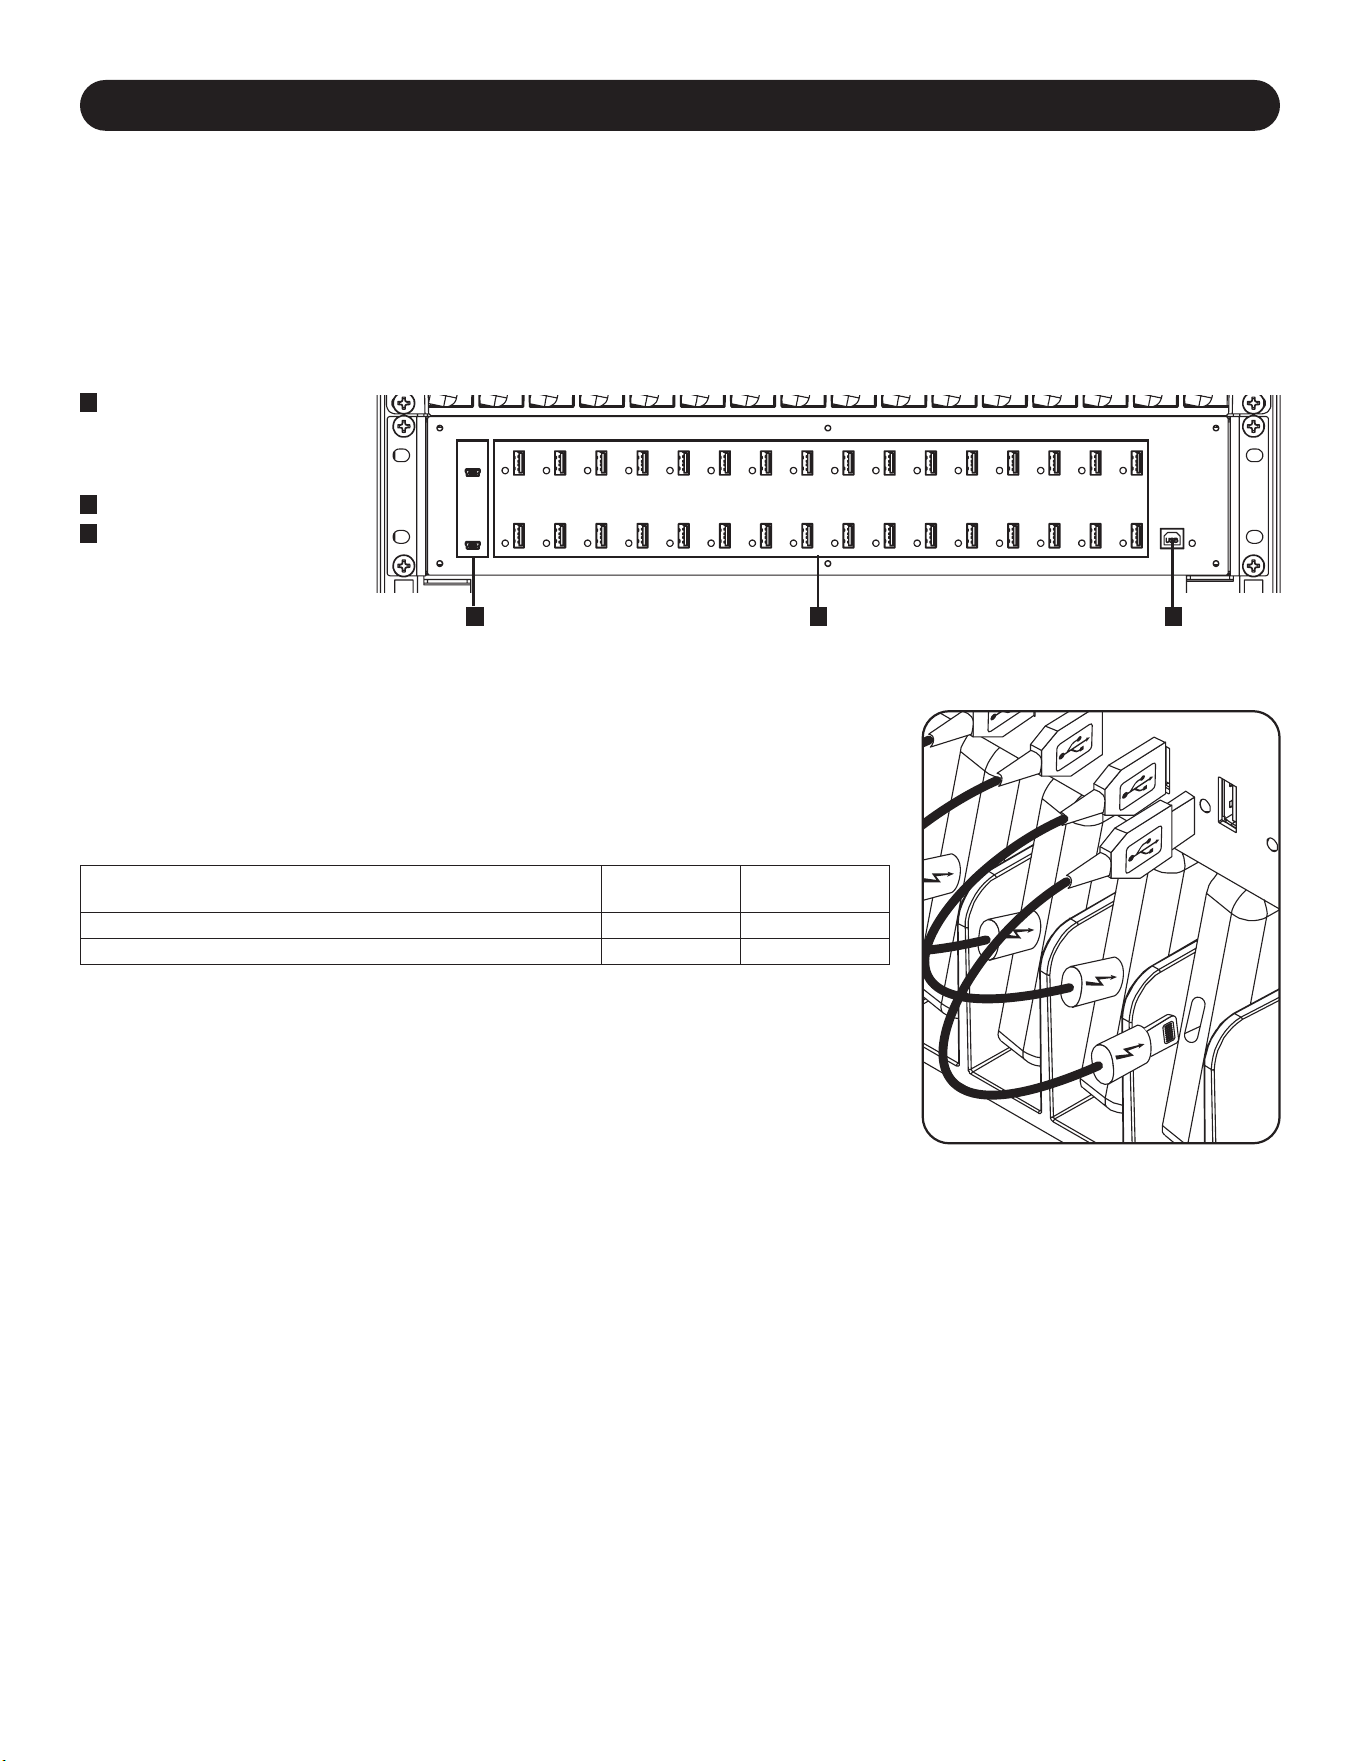
46
5. USB-Ladegerät-Hub mit 32 Anschlüssen
• Professionelles USB-Ladegerät/Hub lädt und synchronisiert bis zu 32 Smartphones.
• Jeder USB-Port bietet die optimale Ladekapazität für das bestimmte Gerät (bis zu 2,4 Ampere).
• Alle Geräte, die auf USB-Datenkommunikation ausgelegt sind, können mit Hilfe der passenden Datenverwaltungs-Software
synchronisiert werden.
• Synchronisiert Apple
®
-Geräte über iTunes
®
-Software oder Apple Configurator.
• Ein Firmware-Upgrade-Port mit Mini-USB-Anschluss ermöglicht spätere Softwareupgrades, um auch neuere Geräte unterstützen zu
können.
5.1 USB-Ladegerät-/Hub-Funktionen
A
2,4 A USB-Geräte
Anschlüsse mit
LED-Anzeigelampen
(32 insgesamt)
B
Computer Sync Port
C
Anschlüsse für
Firmwareaktualisierung
Schließen Sie das USB-Kabel mit einem vom Benutzer bereitgestellten oder vom
Gerätehersteller gelieferten abgeschirmten USB-Kabel an das zu ladende Smartphone an.
Wiederholen Sie den Vorgang für sämtliche Geräte.
Tripp Lite bietet einzelne Kabel und 10er-Packs für Apple-Geräte mit USB-auf-30-Pin- oder
USB-auf-Lightning™-Kabeln sowie einzelne Kabel und 10er-Packs für USB-3.0- oder
2.0-Geräte mit USB-A-auf-5-Pin-Micro-B-Kabeln (Stecker).
Kabeltyp
Einzelkabel
Modellnummer
10er-Pack Kabel
Modellnummer
Apple USB auf 8-Pin-Lightning-Stecker, 25,4 cm M100-10N-BK M100-10N-BK-10
USB 3.0 SuperSpeed A (Stecker) auf 5-Pin Micro-B (Stecker), 30 cm U326-001-BK U326-001-BK-10
Für weitere Informationen über unsere Auswahl an hochwertigen USB-Kabeln besuchen
Sie bitte tripplite.com.
5.2 Anschließen von Smartphones mit dem USB-Ladegerät/Hub
A BC
5.3 Anschließen eines Computers an das USB-Ladegerät/Hub
Zusätzlich zur Ladefunktion verfügt die USB-Dockingstation über eine Netzknotenfunktion, mit deren Hilfe sich Geräte und die darauf
enthaltene Software mit angeschlossenen Computern synchronisieren lassen. Um die Hub-Funktion zu aktivieren, verwenden Sie das
mitgelieferte USB-Kabel, um den USB-B-Stecker mit dem Computer Sync Port des Geräts und den USB-A-Stecker mit dem USB-
Anschluss eines Computers zu verbinden.
Hinweis: Wenn eine Computerverbindung hergestellt wird und mehrere Geräte an das USB-Ladegerät/Hub angeschlossen sind, wird die
Ladegeschwindigkeit während der Synchronisierung reduziert und nach Abschluss der Synchronisierung wieder auf die normale Ladegeschwindigkeit
erhöht.
Hinweis: Der Firmware Upgrade Port erfordert eine Mini-USB-Verbindung (Kabel nicht enthalten). Die neuesten Firmware-Updates können Sie unter
tripplite.com/support herunterladen.
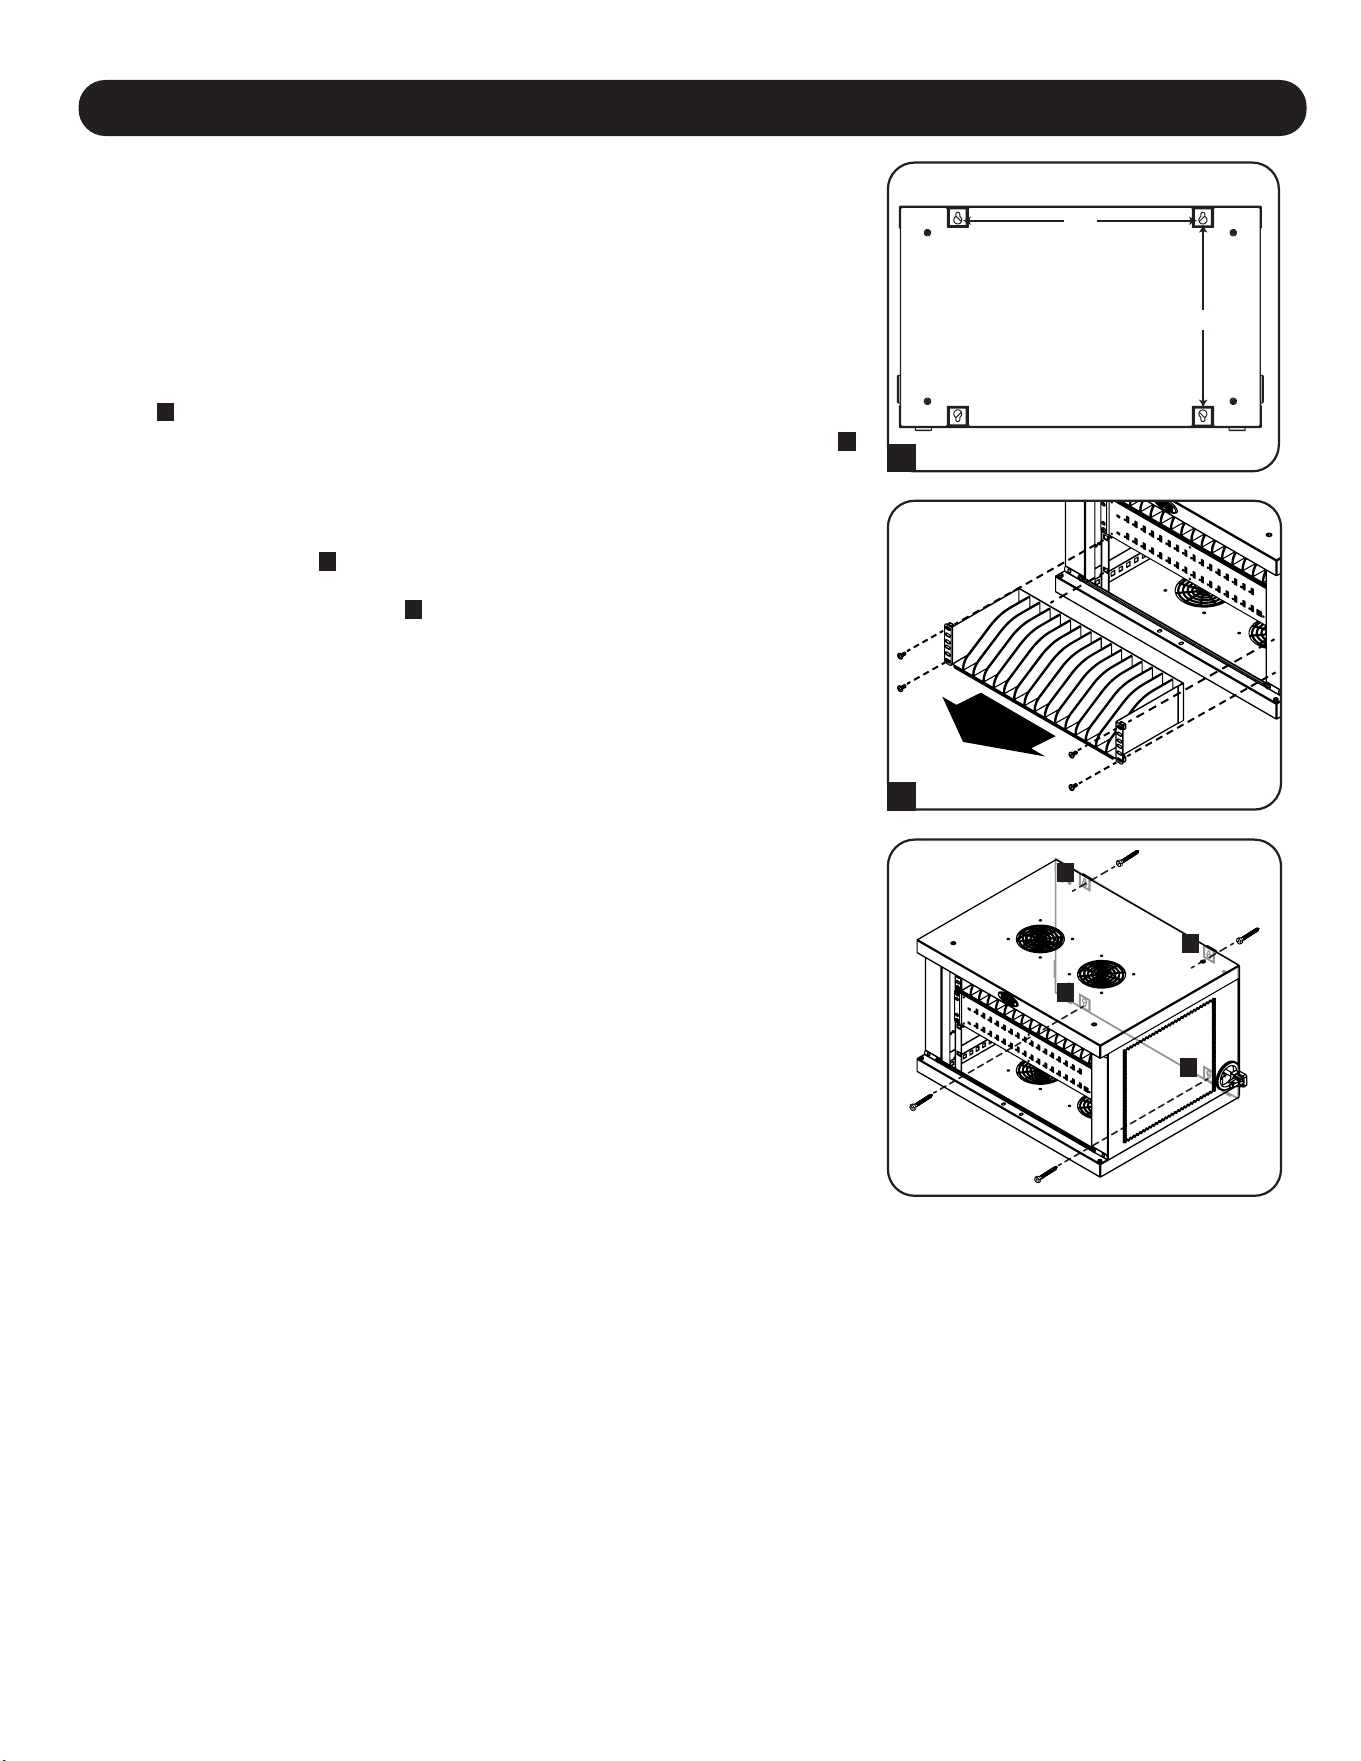
47
6. Wandmontage
12”
16”
Für die Wandmontage benötigen Sie:
• Wasserwaage
• Passende Werkzeuge für die Wandmontage
• Passende Eisenwaren für die Wandmontage (nicht im Lieferumfang enthalten)
Warnung: Versuchen Sie nicht, die Ladestation an der Wand zu befestigen, wenn
sich persönliche elektronische Geräte darin befinden.
An der Rückwand des Ladestationsschranks befinden sich 4 Schlüssellochausschnitte.
Jedes Schlüsselloch kann eine M5- oder 3/16-Zoll-Schraube aufnehmen. Die
Schlüssellochsets sind horizontal im Abstand von 16" und vertikal im Abstand von 12"
zentriert
A
.
Um die Ladestation zu montieren, entfernen Sie zuerst das untere Regal im Schrank
B
.
Messen Sie mit Hilfe einer Wasserwaage und eines Maßbandes die genaue Position
des Montagebereichs aus. Befestigen Sie an der Stelle, an der sich die oberen
Schlüssellöcher befinden sollen, geeignete Befestigungselemente (nicht im Lieferumfang
enthalten) an der Wand oder der tragenden Fläche und hängen Sie die Ladestation
dann an der Hardware auf
C
. Verwenden Sie für zusätzliche Sicherheit geeignete
Befestigungselemente und die unteren Schlüssellochschlitze, um den Ladestation-
Schrank an der Wand zu befestigen
D
.
Hinweis: Die Ladestation muss von einem qualifizierten Techniker installiert werden. Bei einer
Installation auf Betonblocks, Beton, Trockenmauer oder Holzpfosten verwenden Sie bitte die
entsprechenden angemessenen Montagemittel. Warnung: Die Auflagefläche muss in der Lage
sein, die kombinierte Last der Ladestation, der gelagerten Ausrüstung und aller
angebrachten Hardware und Komponenten sicher zu tragen. Siehe Abschnitt 8.
Spezifikationen für weitere Informationen zu Gewicht und Abmessungen Ihres Modells.
OBEN
UNTEN
B
A
C
C
D
D
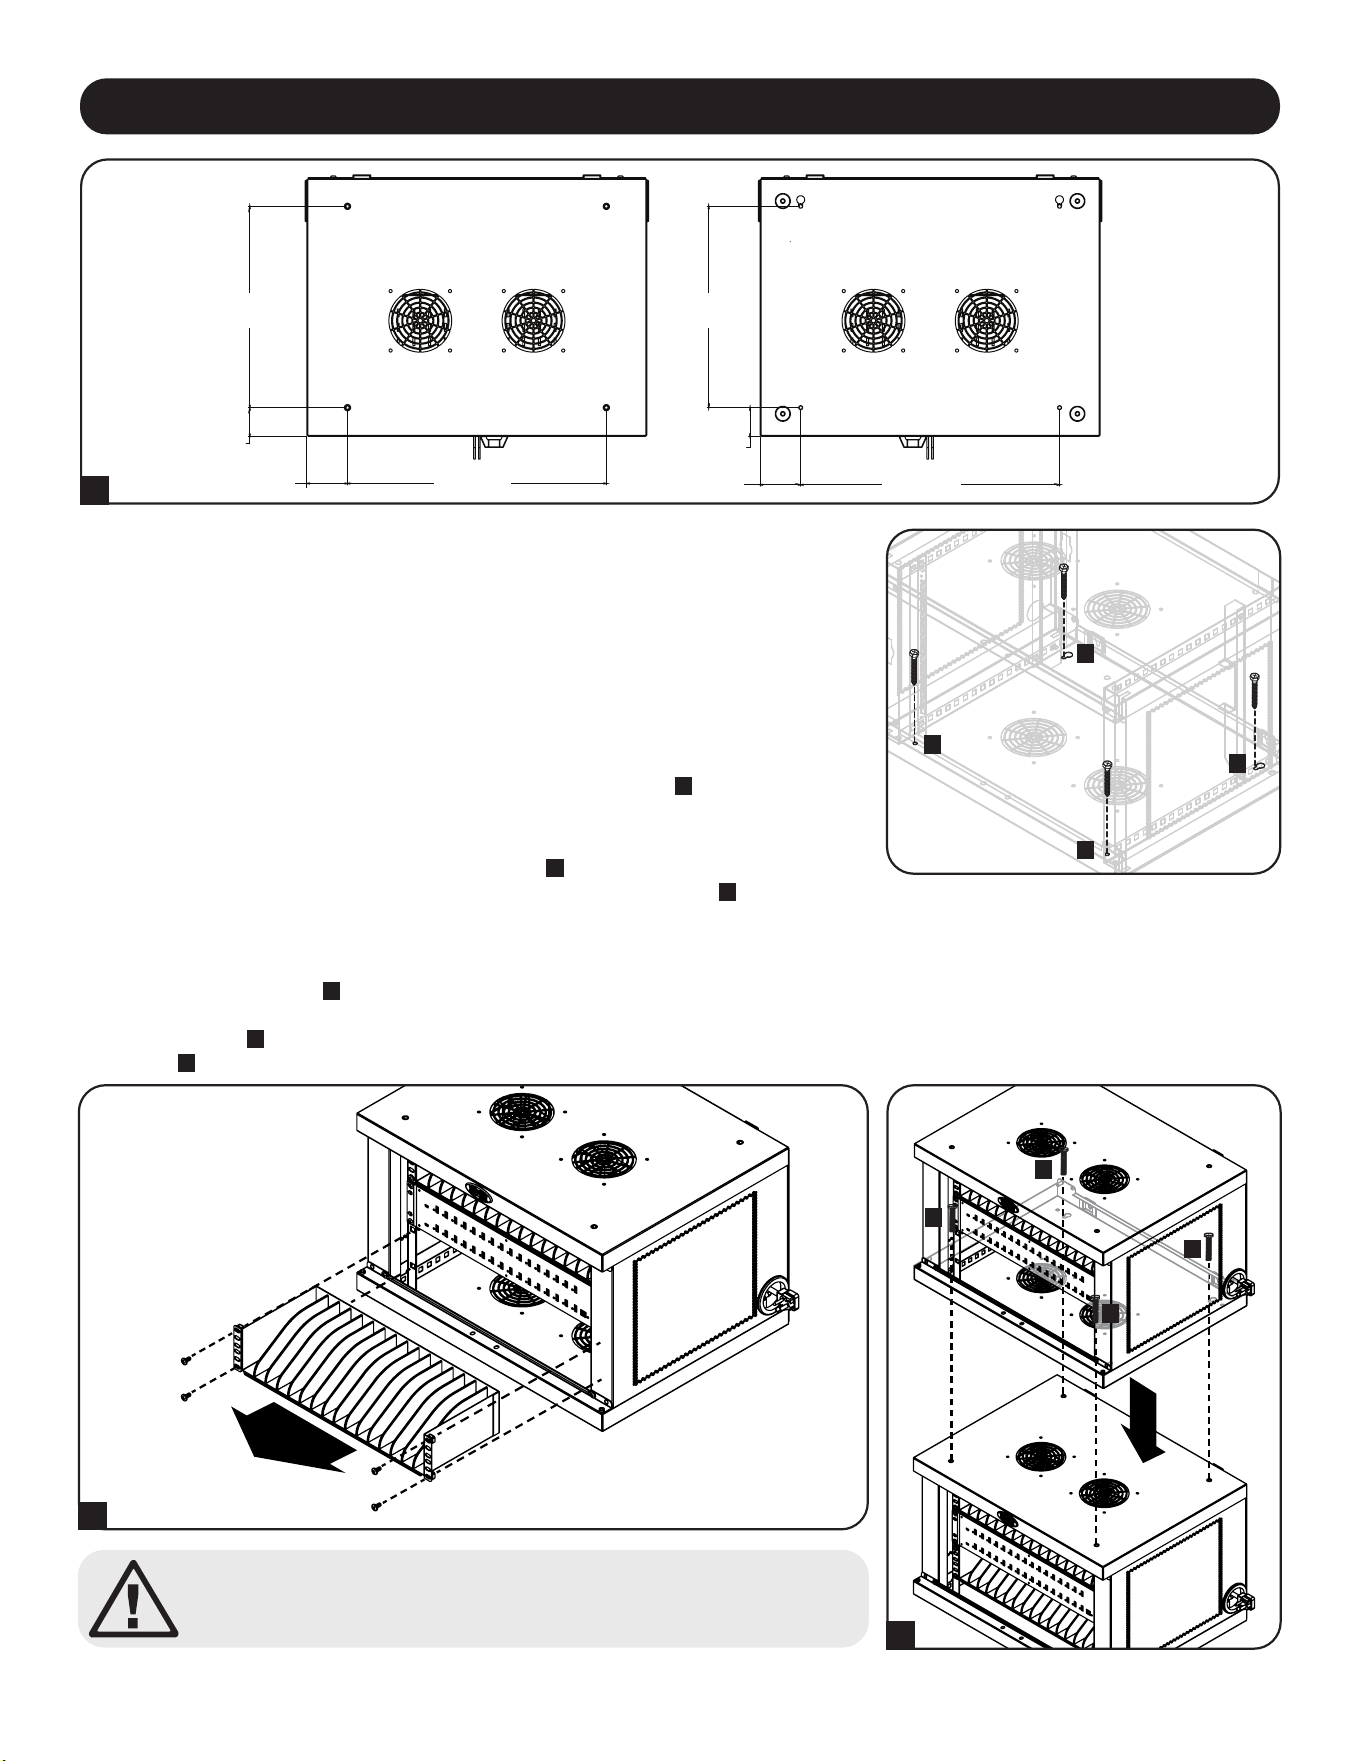
48
Achtung! Stapeln Sie nicht mehr als einen Ladestation-Schrank
Personen- oder Sachschäden können die Folge sein.
Stapelbare Ladestation-Schränke
Eine Ladestation kann sicher auf eine andere gestapelt werden. Entfernen Sie zunächst das untere Regalbrett aus dem Schrank, der
darauf gestellt werden soll
A
. Setzen Sie den Oberschrank vorsichtig auf das untere Schrankteil und richten Sie dabei die vorderen
Befestigungslöcher des oberen Teils und die hinteren Schlüssellochausschnitte mit den Gewindeeinsätzen des unteren Teils an der
oberen Platte aus
B
. Verwenden Sie zur Befestigung der beiden Kabinette vier (4) Schrauben M6 x 20 mm (nicht im Lieferumfang
enthalten)
C
.
A
B
C
C
C
C
7. Desktop-Platzierung
WARNUNG: Installieren Sie die Ladestation bei Desktop-Anwendungen immer in einem
statisch einwandfreien Bereich mit einer ebenen Fläche, die das Gewicht der
Ladestation, aller in der Ladestation installierten Geräte und aller anderen in der Nähe
installierten Gehäuse und/oder Geräte tragen kann. Versuchen Sie niemals, die
Ladestation ohne ausreichende Hilfe anzuheben oder zu installieren. Siehe Abschnitt 8.
Spezifikationen für weitere Informationen über Nennbelastbarkeit der Ladestation.
Als zusätzliche Sicherheitsmaßnahme kann der Schrank an einem Schreibtisch befestigt
werden. Am hinteren Ende der Bodenplatte befinden sich zwei Schlüssellochausschnitte.
Jedes Schlüsselloch kann eine M5- oder 3/16-Zoll-Schraube aufnehmen. Der untere
Schlüssellochsatz ist horizontal im Abstand von 457 mm (18") und vertikal im Abstand
von 356 mm (14") von den vorderen Befestigungslöchern zentriert
A
.
Messen Sie mit einem Maßband, um Ihre Montageflächen genau zu positionieren.
Verwenden Sie geeignete Befestigungsmittel (nicht im Lieferumfang enthalten), um das
Kabinett an den hinteren Schlüssellochausschnitten
B
zu befestigen, und befestigen Sie
die Ladestation mit den vorderen Montagelöchern auf der Arbeitsfläche
C
.
A
C
C
B
B
14”
355,6 mm
OBEN
VORDERSEITE VORDERSEITE
UNTEN
2”
50,8 mm
2”
50,8 mm
18”
457,2 mm
18”
457,2 mm
2 13/16”
17,56 mm
2 13/16”
17,56 mm
14”
355,6 mm
49
8. Technische Daten
Modelle CSD32USB, CSDXB32USB, CSDXS32USB
Maße (H x B x T) 374 x 600 x 483 mm
Gewicht der Einheit 28,2 kg / 62.11 lb.
Tragfähigkeit* 81,65 kg / 180 lb.
Lade-/Netzknoten-Anschlüsse 32 x USB Typ-A (Buchse)
1 x USB Typ-B (Buchse)
2 x USB-Mini (Buchse)
Übertragungsgeschwindigkeit USB 2.0: bis zu 480 Mbit/s
Strombedarf Eingang: 110-120 V, 8 A, 50/60 Hz (CSD32USB) oder 230 V, 5 A, 50 Hz (CSDXB32USB, CSDXS32USB)
Ausgang: 5,0 V, 2,4 A Max. (pro USB-Anschluss)
Betriebstemperatur 0 °C bis 30 °C
Luftfeuchtigkeit bei Betrieb 5 bis 95 % RH, nicht kondensierend
Gehäusematerial Metall
*Die volle Tragfähigkeit der Wandmontage erfordert eine Montageäche, die die volle Last der Ladestation und aller angeschlossenen Komponenten
tragen kann. Spezikationen können ohne Ankündigung geändert werden.

50
2 Jahre beschränkte Garantie
Der Verkäufer garantiert für einen Zeitraum von 2 Jahren ab Kaufdatum, dass das Produkt weder Material- noch Herstellungsfehler aufweist, wenn es gemäß aller
zutreffenden Anweisungen verwendet wird. Wenn das Produkt in diesem Zeitraum Material- oder Herstellungsfehler aufweist, kann der Verkäufer diese Fehler nach eigenem
Ermessen beheben oder das Produkt ersetzen.
DIE NORMALE ABNUTZUNG ODER BESCHÄDIGUNGEN AUFGRUND VON UNFÄLLEN, MISSBRAUCH ODER UNTERLASSUNG WERDEN VON DIESER GARANTIE
NICHT GEDECKT. AUSSER DEN NACHSTEHEND AUSDRÜCKLICH DARGELEGTEN GARANTIEBEDINGUNGEN ÜBERNIMMT DER VERKÄUFER KEINERLEI
GARANTIE. AUSSER WENN VON DEN GÜLTIGEN GESETZEN UNTERSAGT, SIND ALLE IMPLIZIERTEN GARANTIEN, EINSCHLIESSLICH ALLE GARANTIEN FÜR DIE
GEBRAUCHSTAUGLICHKEIT ODER EIGNUNG AUF DIE OBEN FESTGELEGTE GARANTIEDAUER BESCHRÄNKT. DIESE GARANTIE SCHLIESST AUSDRÜCKLICH
ALLE FOLGESCHÄDEN UND BEILÄUFIG ENTSTANDENEN SCHÄDEN AUS. (Da einige Länder den Ausschluss oder die Beschränkung von Folgeschäden oder beiläufig
entstandenen Schäden sowie den Ausschluss von implizierten Garantien oder die zeitliche Beschränkung einer implizierten Garantie untersagen, sind die oben genannten
Beschränkungen für Sie möglicherweise nicht zutreffend. Diese Garantie gibt Ihnen bestimmte Rechte. Sie haben jedoch möglicherweise andere Rechte, die abhängig von
der Gerichtsbarkeit variieren können.)
WARNUNG: Der Benutzer muss vor der Verwendung überprüfen, ob das Gerät für den beabsichtigten Zweck geeignet und angemessen ist und ob der Einsatz sicher ist. Da
die Anwendungen variieren können, übernimmt der Hersteller keine Garantie bezüglich der Eignung dieser Geräte für einen bestimmten Verwendungszweck.
Identifizierungsnummern für ordnungsrechtliche Compliance
Zum Zweck von Zertifizierungen und Identifizierung von gesetzlichen Bestimmungen wurde Ihrem Tripp-Lite-Produkt eine eindeutige Seriennummer zugewiesen. Die
Seriennummer ist auf dem Typenschild des Produkts zu sehen, zusammen mit allen erforderlichen Genehmigungskennzeichen und Informationen. Wenn Sie Compliance-
Informationen für dieses Produkt anfordern, geben Sie immer diese Seriennummer an. Die Seriennummer sollte nicht mit dem Marketingnamen oder der Modellnummer des
Produkts verwechselt werden.
FCC-Hinweis, Klasse B
Dieses Gerät erfüllt Teil 15 der FCC-Bestimmungen. Für den Betrieb gelten die folgenden zwei Bedingungen: (1) Das Gerät darf keine schädlichen Störungen verursachen
und (2) das Gerät muss Interferenzen vertragen können, darunter auch Störsignale, die unerwünschten Betrieb hervorrufen können.
Hinweis: Dieses Gerät wurde getestet und entspricht den Grenzwerten für ein digitales Gerät der Klasse A gemäß Teil 15 der FCC-Vorschriften. Diese Grenzwerte sollen einen
angemessenen Schutz vor schädlichen Störungen bei Installation in einem Wohngebiet bieten. Dieses Gerät erzeugt, nutzt und strahlt Hochfrequenzwellen aus, die bei
unsachgemäßer, nicht den Anweisungen entsprechender Installation und Verwendung Störungen im Rundfunkempfang verursachen können. Es gibt jedoch keine Garantie
dafür, dass bei einer bestimmten Installation keine Störungen auftreten. Wenn dieses Gerät schädliche Störungen des Radio- oder Fernsehempfangs verursacht, was durch Ein-
und Ausschalten des Geräts festgestellt werden kann, sollte der Benutzer versuchen,die Störung durch eine oder mehrere der folgenden Maßnahmen zu beheben:
• Richten Sie die Empfangsantenne neu aus oder verschieben Sie sie.
• Vergrößern Sie die Trennung zwischen dem Gerät und dem Empfänger.
• Schließen Sie das Gerät an eine Steckdose an, die zu einem anderen Stromkreis gehört als die mit dem Empfänger verbundene Steckdose.
• Wenden Sie sich an den Händler oder einen erfahrenen Radio-/Fernsehtechniker, um Hilfe zu erhalten.
Änderungen oder Modifikationen an diesem Gerät, die nicht ausdrücklich von Tripp Lite genehmigt wurden, können die Berechtigung des Benutzers zum Betreiben dieses
Geräts aufheben.
WEEE-Compliance-Informationen for Tripp-Lite-Kunden und Recycler (Europäische Union)
Die WEEE-Richtlinie und deren Ausführungsbestimmungen besagen, dass Kunden, die neue Elektro- oder Elektronikgeräte von Tripp Lite kaufen, ein Anrecht auf
Folgendes haben:
• Rücksendung von Altgeräten zum Recycling beim Kauf eines neuen, gleichwertigen Geräts (dies variiert je nach Land)
• Rücksendung der neuen Geräte zum Recyling, wenn ihr Lebenszyklus abgelaufen ist
Tripp Lite hat den Grundsatz, sich kontinuierlich zu verbessern. Spezifikationen können ohne Ankündigung geändert werden. Fotos und Illustrationen können von den
tatsächlichen Produkten leicht abweichen.
10. Garantie
9. Lagerung, Wartung und Reinigung
Lagerung
Das Gehäuse sollte in einem kontrollierten Raum aufbewahrt werden, wo es nicht Feuchtigkeit, extremen Temperaturen, entzündlichen
Flüssigkeiten oder Gasen, leitfähigen Schadstoffen, Staub oder direkter Sonneneinstrahlung ausgesetzt ist. Lagern Sie das Gehäuse
in der Original-Transportverpackung, falls möglich.
Wartung
Das Gehäuse unterliegt einer begrenzten Gewährleistung, wie in diesem Handbuch beschrieben. Weitere Informationen finden Sie auf
tripplite.com/support.
Reinigung
Schalten Sie vor jeder Reinigung die Ladestation aus und trennen Sie sie von der Stromquelle. Befeuchten Sie ein sauberes,
fusselfreies Tuch leicht mit Wasser und wischen Sie das Gerät je nach Bedarf damit ab. Lassen Sie die Oberfläche gut trocknen,
bevor Sie das Gerät wieder anstecken.
Hinweis: Verwenden Sie zum Reinigen der Ladestation keine scheuernden Stoffe, Lösungsmittel und Aerosolsprays, da diese das Gerät beschädigen
können.

51

52
TrippLite.Eaton.com/support
23-07-804 93-4753_RevB