1
Table of Contents
1. Important Safety Instructions 2
2. Overview 3
3. Feature Identication 4
4. Setup 5
4.1 Adjusting Storage Shelf Dividers 5
4.2 Powering the USB Charger/Hub Unit 5
4.3 Door Locks 5
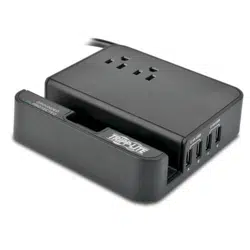
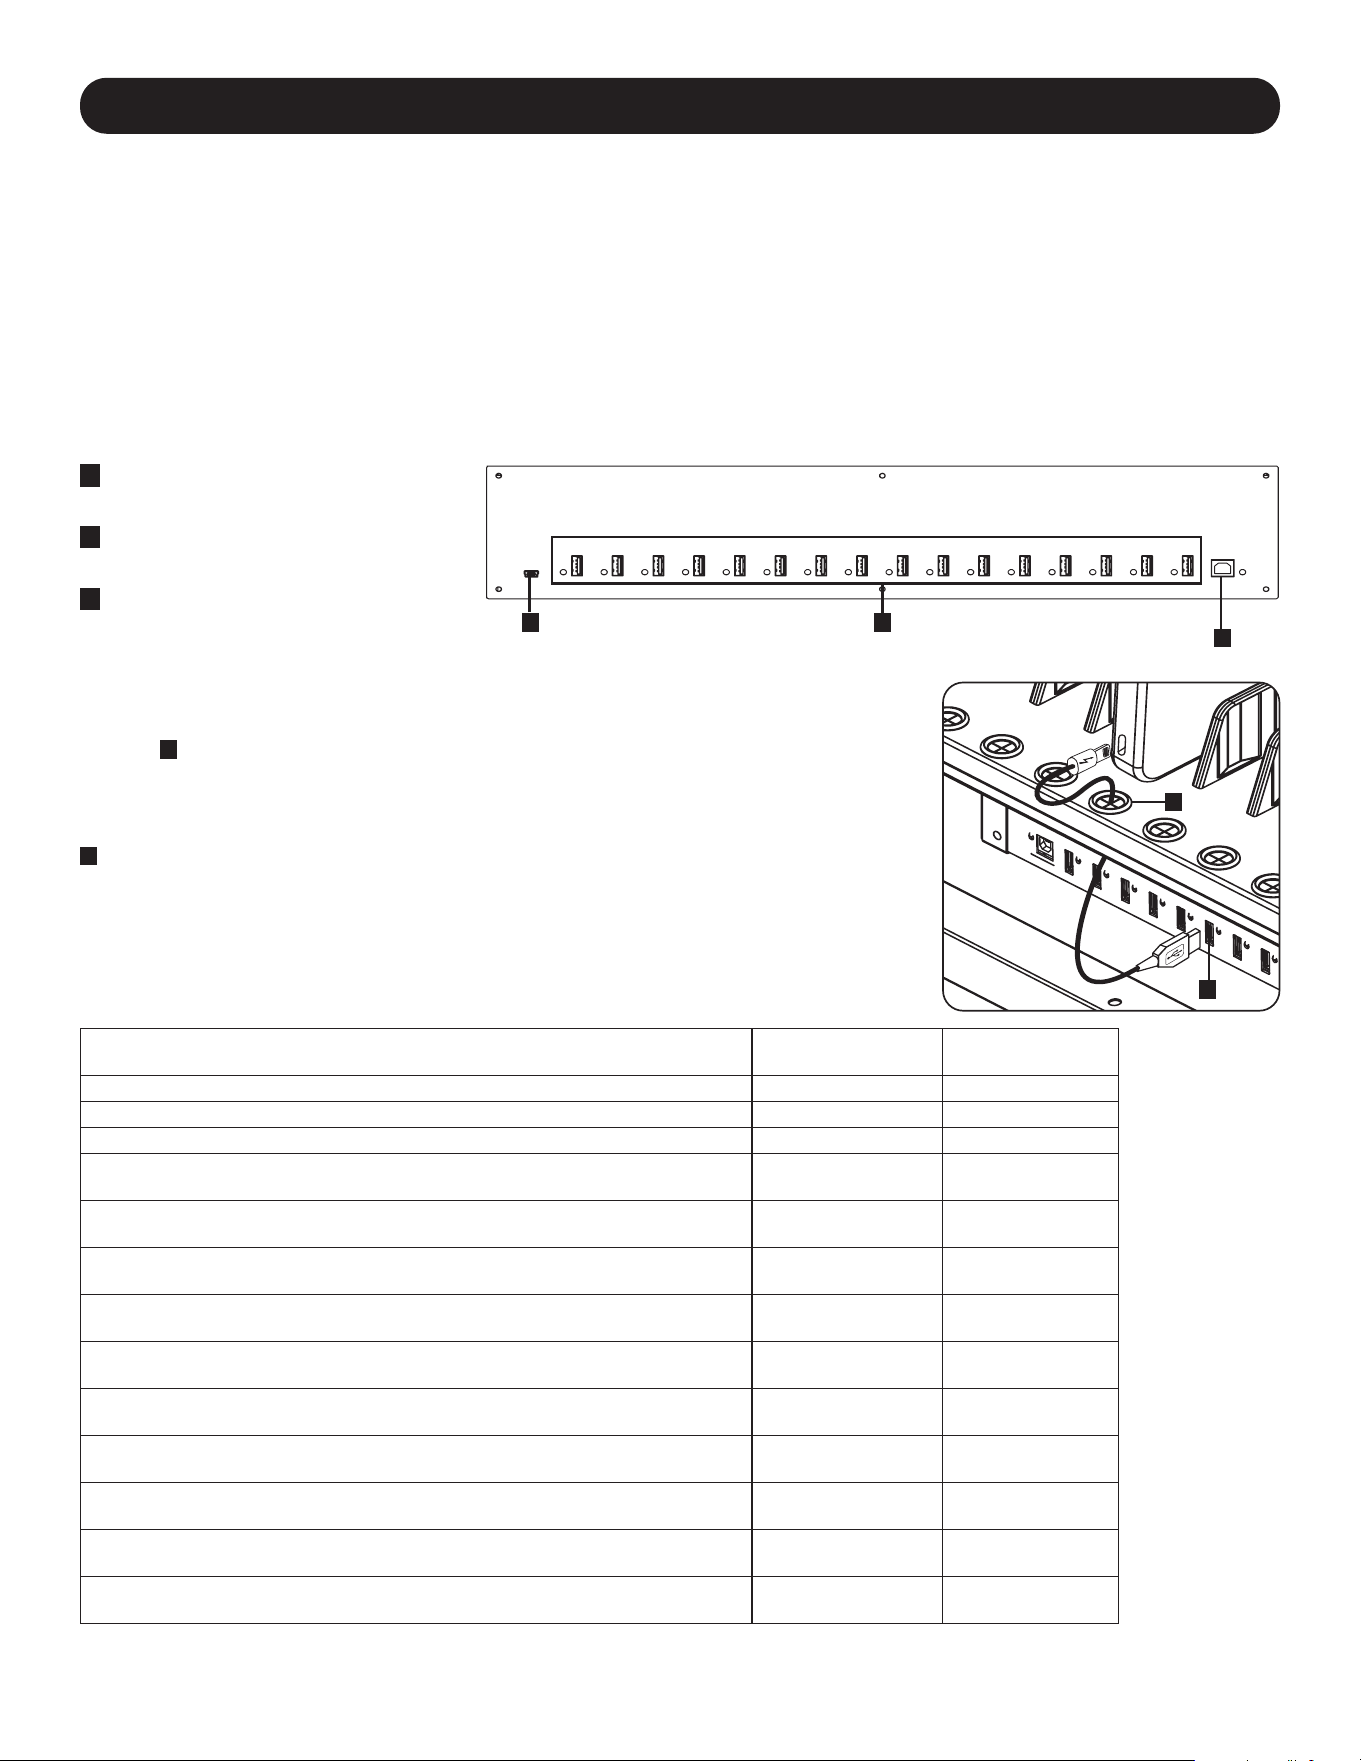
5. 16-Port USB Charger/Hub 6
5.1 USB Charger/Hub Features 6
5.2 Connecting Devices to the 6
USB Charger/Hub
5.3 Connecting a Computer to the 7
USB Charger/Hub
6. Wall Mounting 7
7. Desktop/Floor Placement 7
8. Specications 8
9. Storage, Service and Cleaning 8
10. Optional Casters and Handle 8
11. Warranty and Product Registration 9
Español 10
19
28
Français
Русский
Deutsch 37
USB Charging Station
16-Port Models: CSC16USB, CSCXB16USB, CSCXS16USB
(Seriesnumber:AG-0738)
Owner’s Manual
TrippLite.Eaton.com/support
Copyright © 2023 Tripp Lite. All trademarks are the sole property of their respective owners.
WARRANTY REGISTRATION
Register your product today and be
automatically entered to win an ISOBAR
®
surge protector in our monthly drawing!
tripplite.com/warranty

2
1. Important Safety Instructions
SAVE THESE INSTRUCTIONS
This manual contains instructions and warnings that must be followed during the installation and operation of the
product described in this manual. Failure to comply may invalidate the warranty and cause property damage or
personal injury.
USB Charger/Hub Unit:
• Connect the unit to an outlet that is in accordance with your local building codes and adequately protected against
excess current, short-circuits and earthly faults.
• The electrical outlet supplying power to the equipment should be installed near the unit and be easily accessible.
• The AC plug on the power supply cord serves as the disconnect device.
• Connect the unit directly to a properly grounded AC power outlet.
• Do not modify the plug, and do not use an adapter that would eliminate the ground connection.
• If any of the following situations arise, schedule an appointment with a service technician to have your equipment
inspected:
• The equipment has been exposed to moisture
• The equipment has been dropped and damaged
• The equipment shows obvious signs of breakage
• The equipment is not functioning properly or is not functioning according to the instructions described in this
Owner’s Manual
• Use of this equipment in life support applications where failure of this equipment can reasonably be expected to cause
the failure of the life support equipment or to significantly affect its safety or effectiveness is not recommended.
Charging Station Cabinet:
• Keep the charging station in a controlled indoor environment away from moisture, temperature extremes, flammable
liquids and gasses, conductive contaminants, dust and direct sunlight.
• Leave adequate space around the charging station for proper ventilation. Do not block, cover or insert objects into the
charging station’s external ventilation openings.
• For best performance, keep indoor temperature between 32°F and 86°F (0°C and 30°C).
• Do not remove any warnings, cautions or descriptive labels from the charging cart.
• The charging station is extremely heavy. Use caution when handling the charging station. Do not attempt to unpack or
mount it unassisted. Use a mechanical device such as a forklift or pallet jack to move the charging station in the
shipping container.
• Do not place containers of liquid or stack items on the cabinet.
• Inspect the shipping container and the charging station for shipping damage. Do not use the charging station if it is
damaged.
• Use caution when cutting packing materials. The charging station could be scratched, causing damage not covered by
the warranty.
• Save all packing materials for later use. Repacking and shipping the charging station cabinet or equipment without the
original packing materials may cause product damage that will void the warranty.
3
1. Important Safety Instructions
For Wall-Mount and Desktop Installations:
• The charging station must be installed by a qualified technician.
• Before mounting, first make sure that the wall surface can safely support the combined load of the charging station,
equipment stored and all attached hardware and components.
• The charging station can support equipment up to its maximum load capacity of 100 lb. (45 kg).
• Always use suitable mounting means when installing to cinder blocks, concrete, drywall or wood studs. Install securely
to the wall using proper hardware (not provided).
WARNING: The supporting surface must be able to safely support the combined load of the charging station, equipment
stored and all attached hardware and components (see 8.Specifications for more information on your model’s weight
and dimensions).
• For desktop installations, the mounting brackets that shipped with the unit can also be used to secure the charging
station to a desktop surface.
2. Overview
Your charging station is an all-in-one solution for storing, charging and syncing up to 16 devices. Your charging station
can be conveniently mounted to walls as well as used for stationary desktop or floor placement installations. To prevent
theft and device tampering, your charging station enclosure comes equipped with locking steel doors.
Explanation of Symbols:
CAUTION: RISK OF DANGER
PROTECTIVE BONDING TERMINAL
AC VOLTAGE
WALL-MOUNT WARNINGS: The wall surface, wall studs and all user-supplied mounting hardware must be able to
support the combined weight of the cabinet and all equipment that will be installed in the cabinet. The cabinet can
support equipment up to its maximum load capacity of 100 lb. (45 kg).
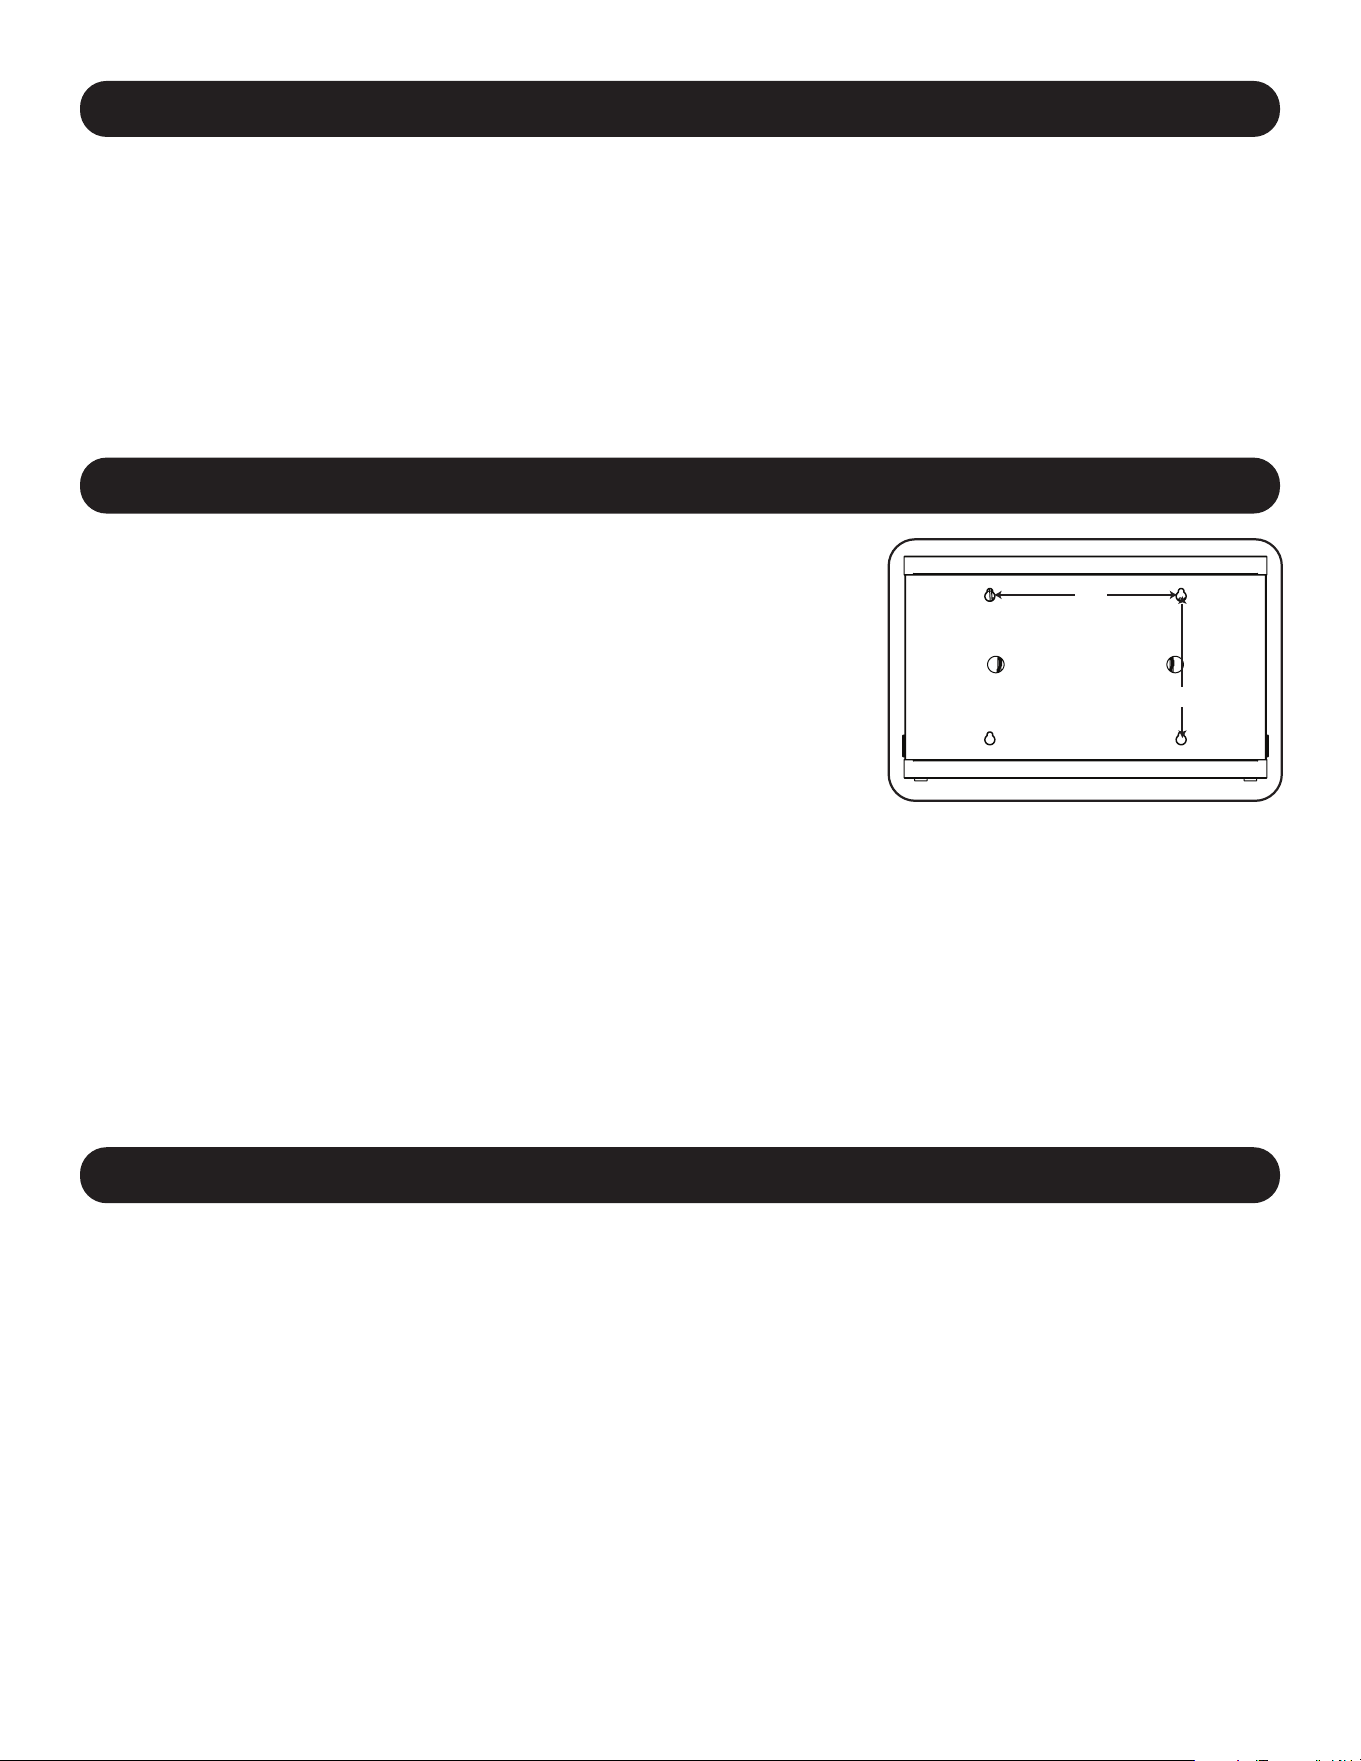
Wall-mounting holes are spaced 16 in. (406 mm) apart horizontally to accomodate standard placement of wall studs. It is
advised to safely distribute the weight of the cabinet and all installed equipment.

4
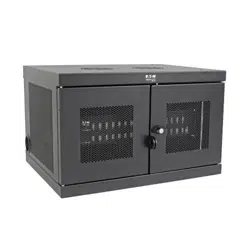
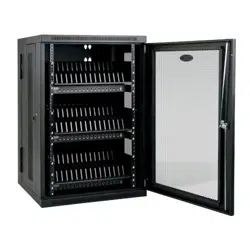
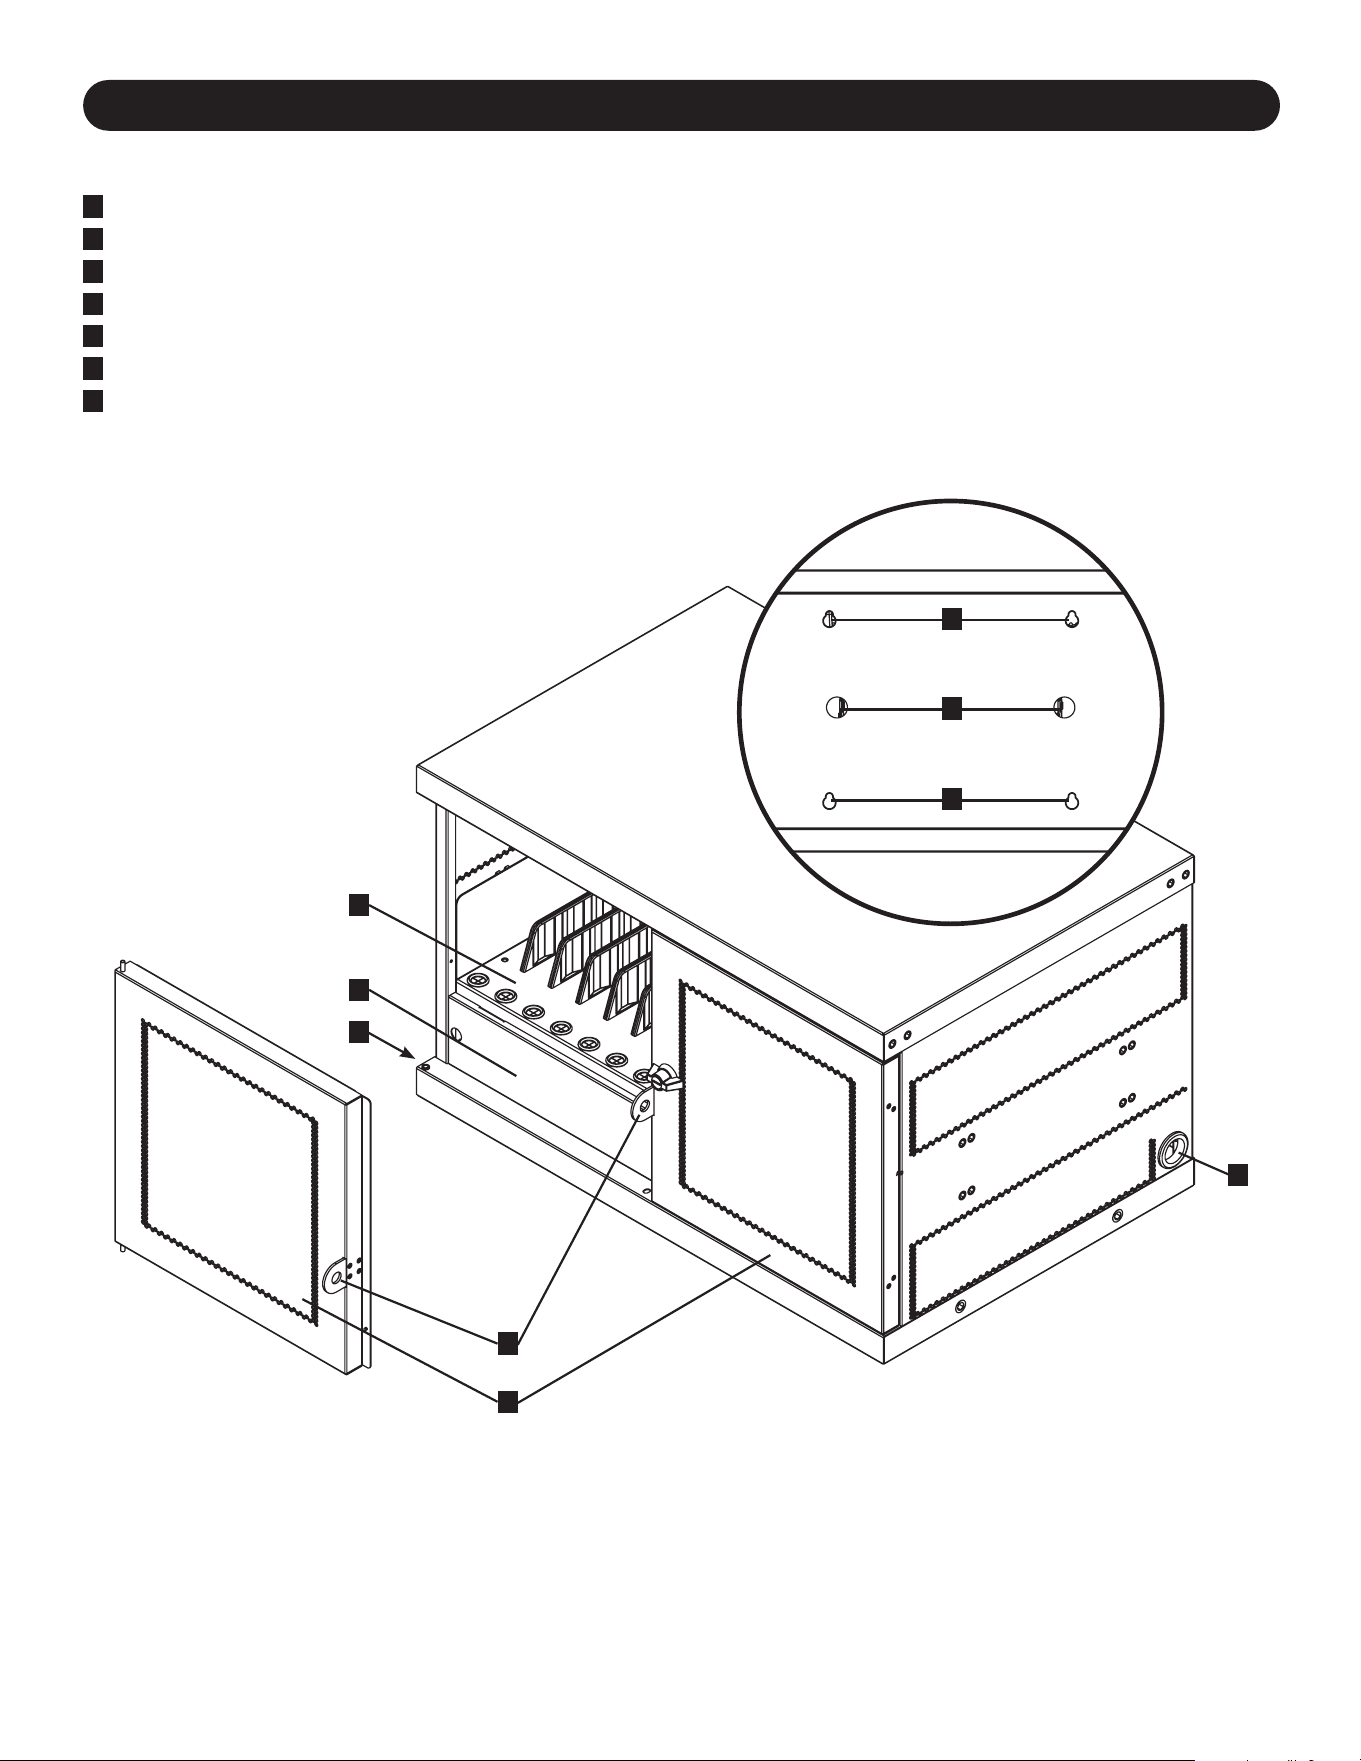
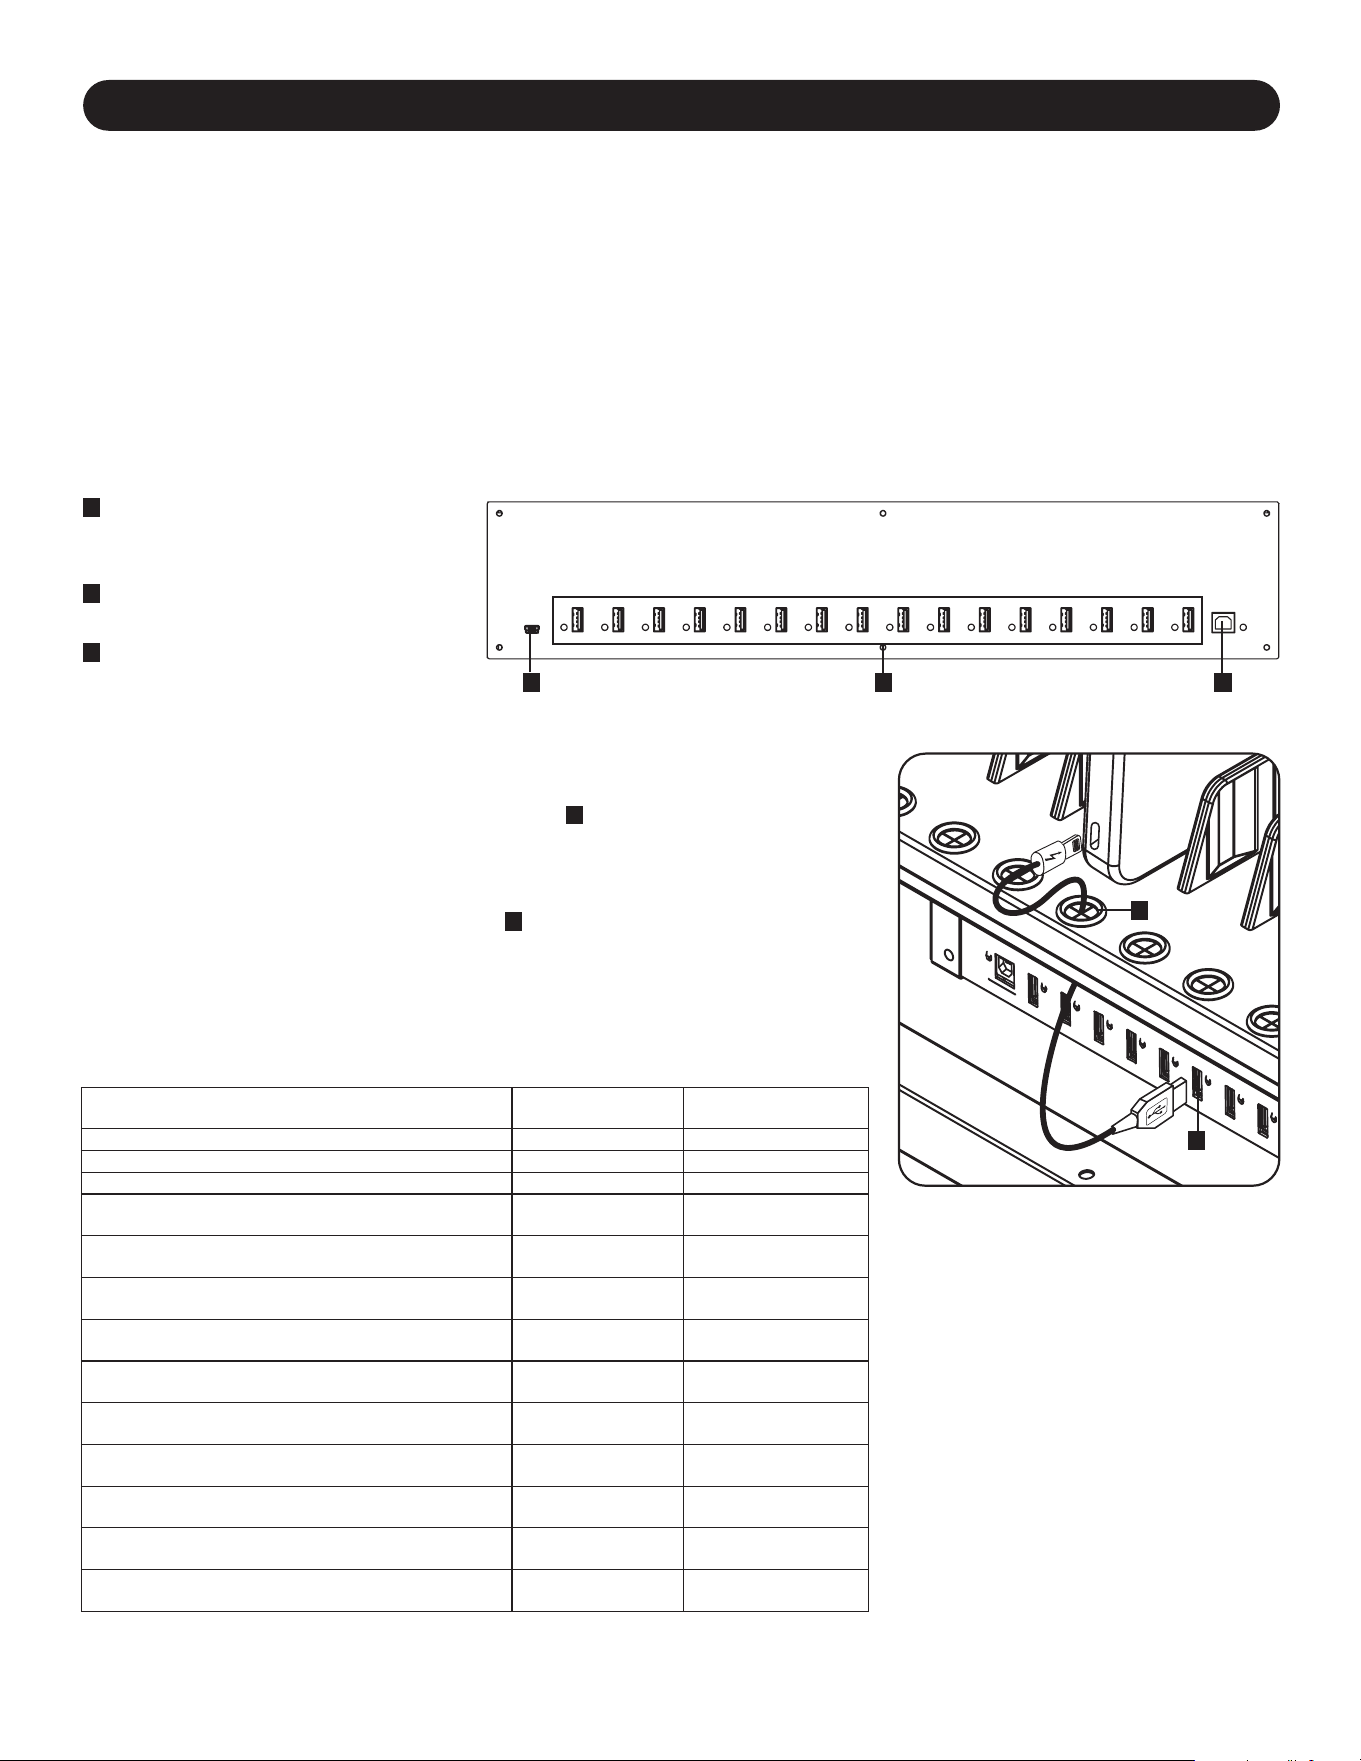
3. Feature Identification
CSC16USB
1
Locking Split Doors
2
Adjustable Storage Shelves (Holds up to 16 Devices)
3
Blanking Panel (Removable)
4
Power Cord Access Holes (1 Located on Each Side)
5
Padlock Hasp (User Supplies Lock)
6
Cable Lock Routing Holes (User Supplies Lock)
7
Rear Panel with Keyhole Wall Mount Slots (See Section 5 for More Information)
Not Shown:
USB Charger/Hub Unit
NEMA5-15(CSC16USB),
BS1363(CSCXB16USB)Plugor
Schuko(CSCXS16USB)PowerCords/Plugs
Keys
1
5
3
2
4
4
6
7
7
5
4. Setup
Caution! Read All Instructions and Warnings Before Installation!
Warning: Charging stations can be extremely heavy. Do not attempt to unpack or mount the
charging station without assistance. Use extreme caution when handling the charging station
and be sure to follow all handling and installation instructions. Do not attempt to install
equipment without first stabilizing the charging station.
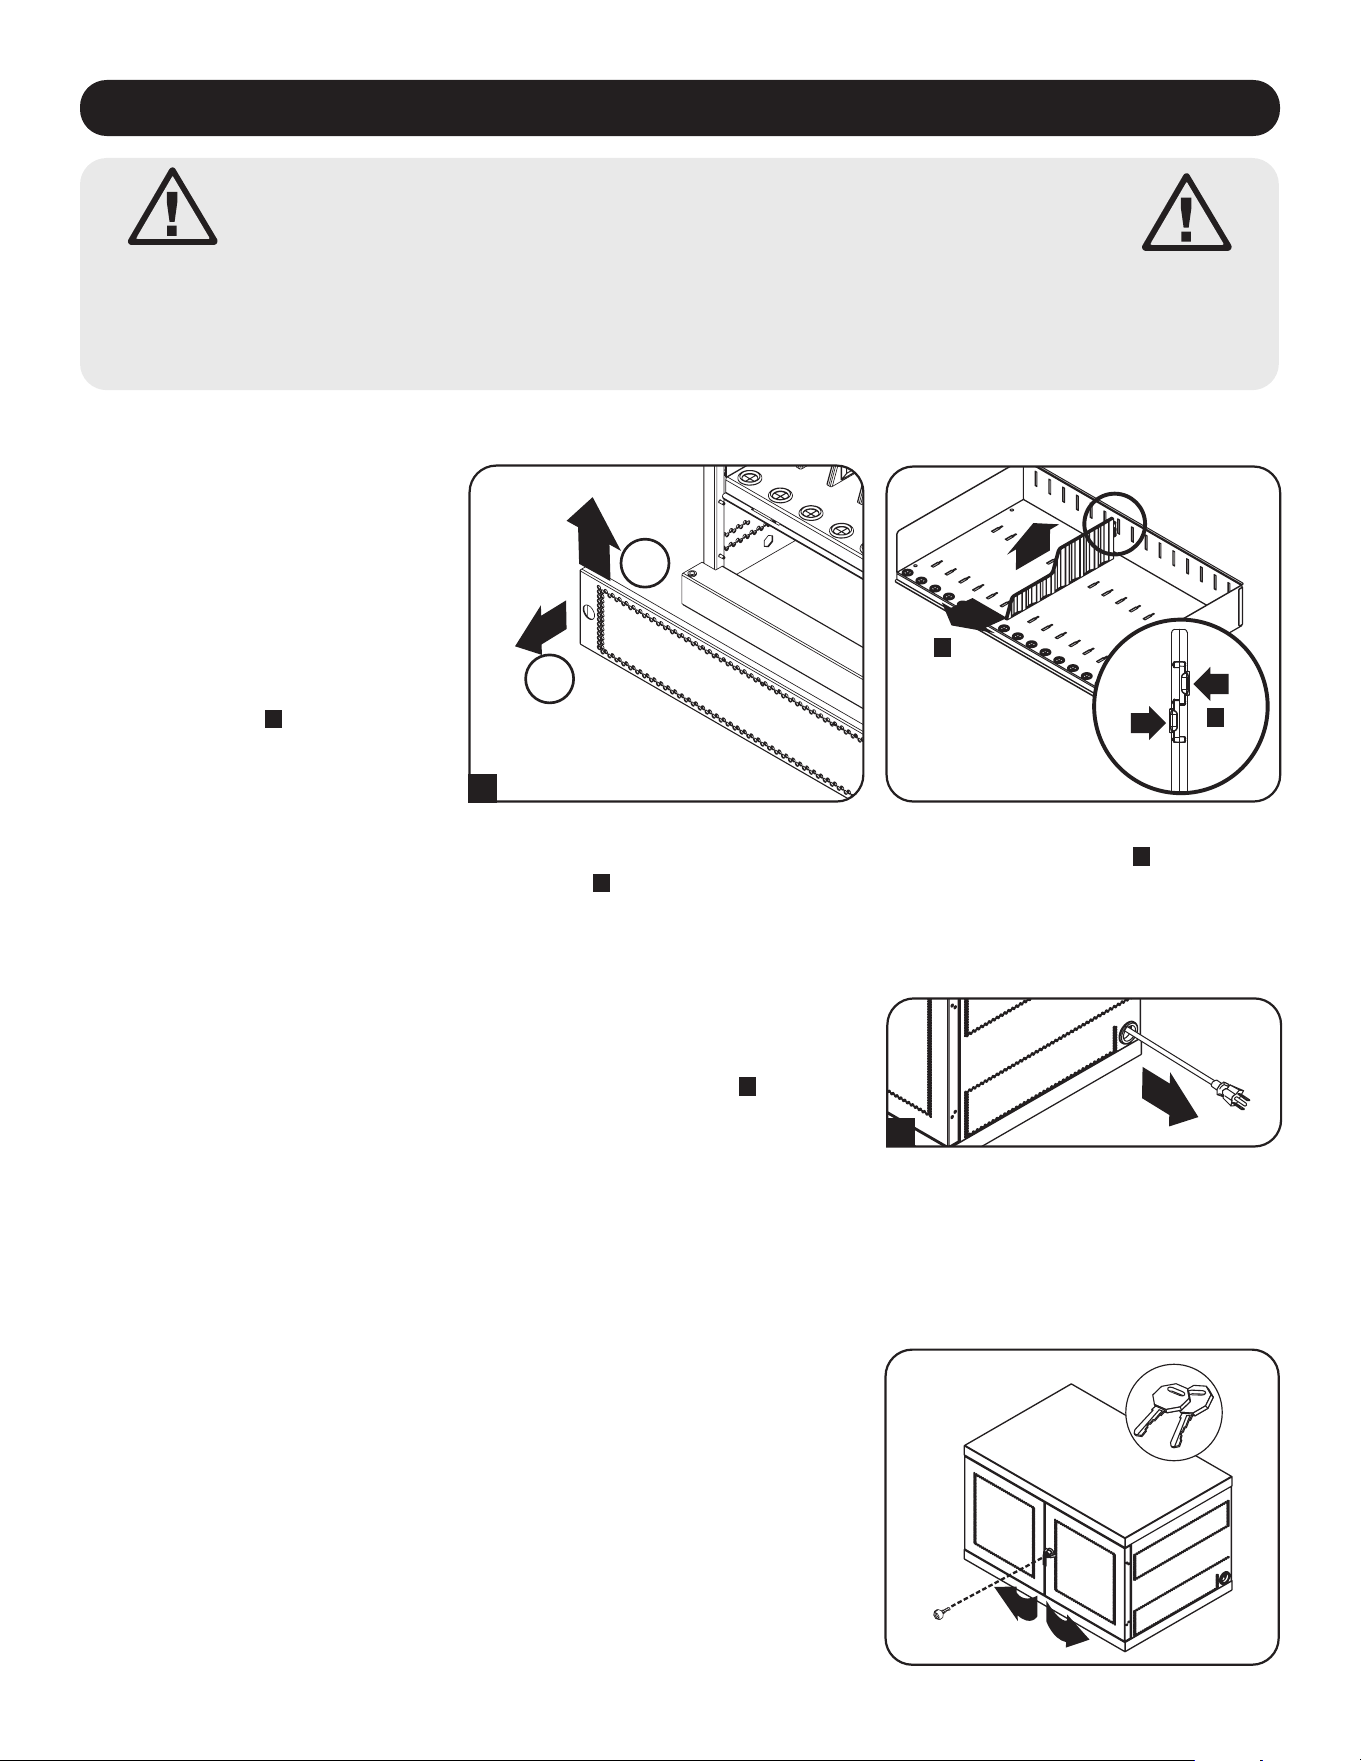
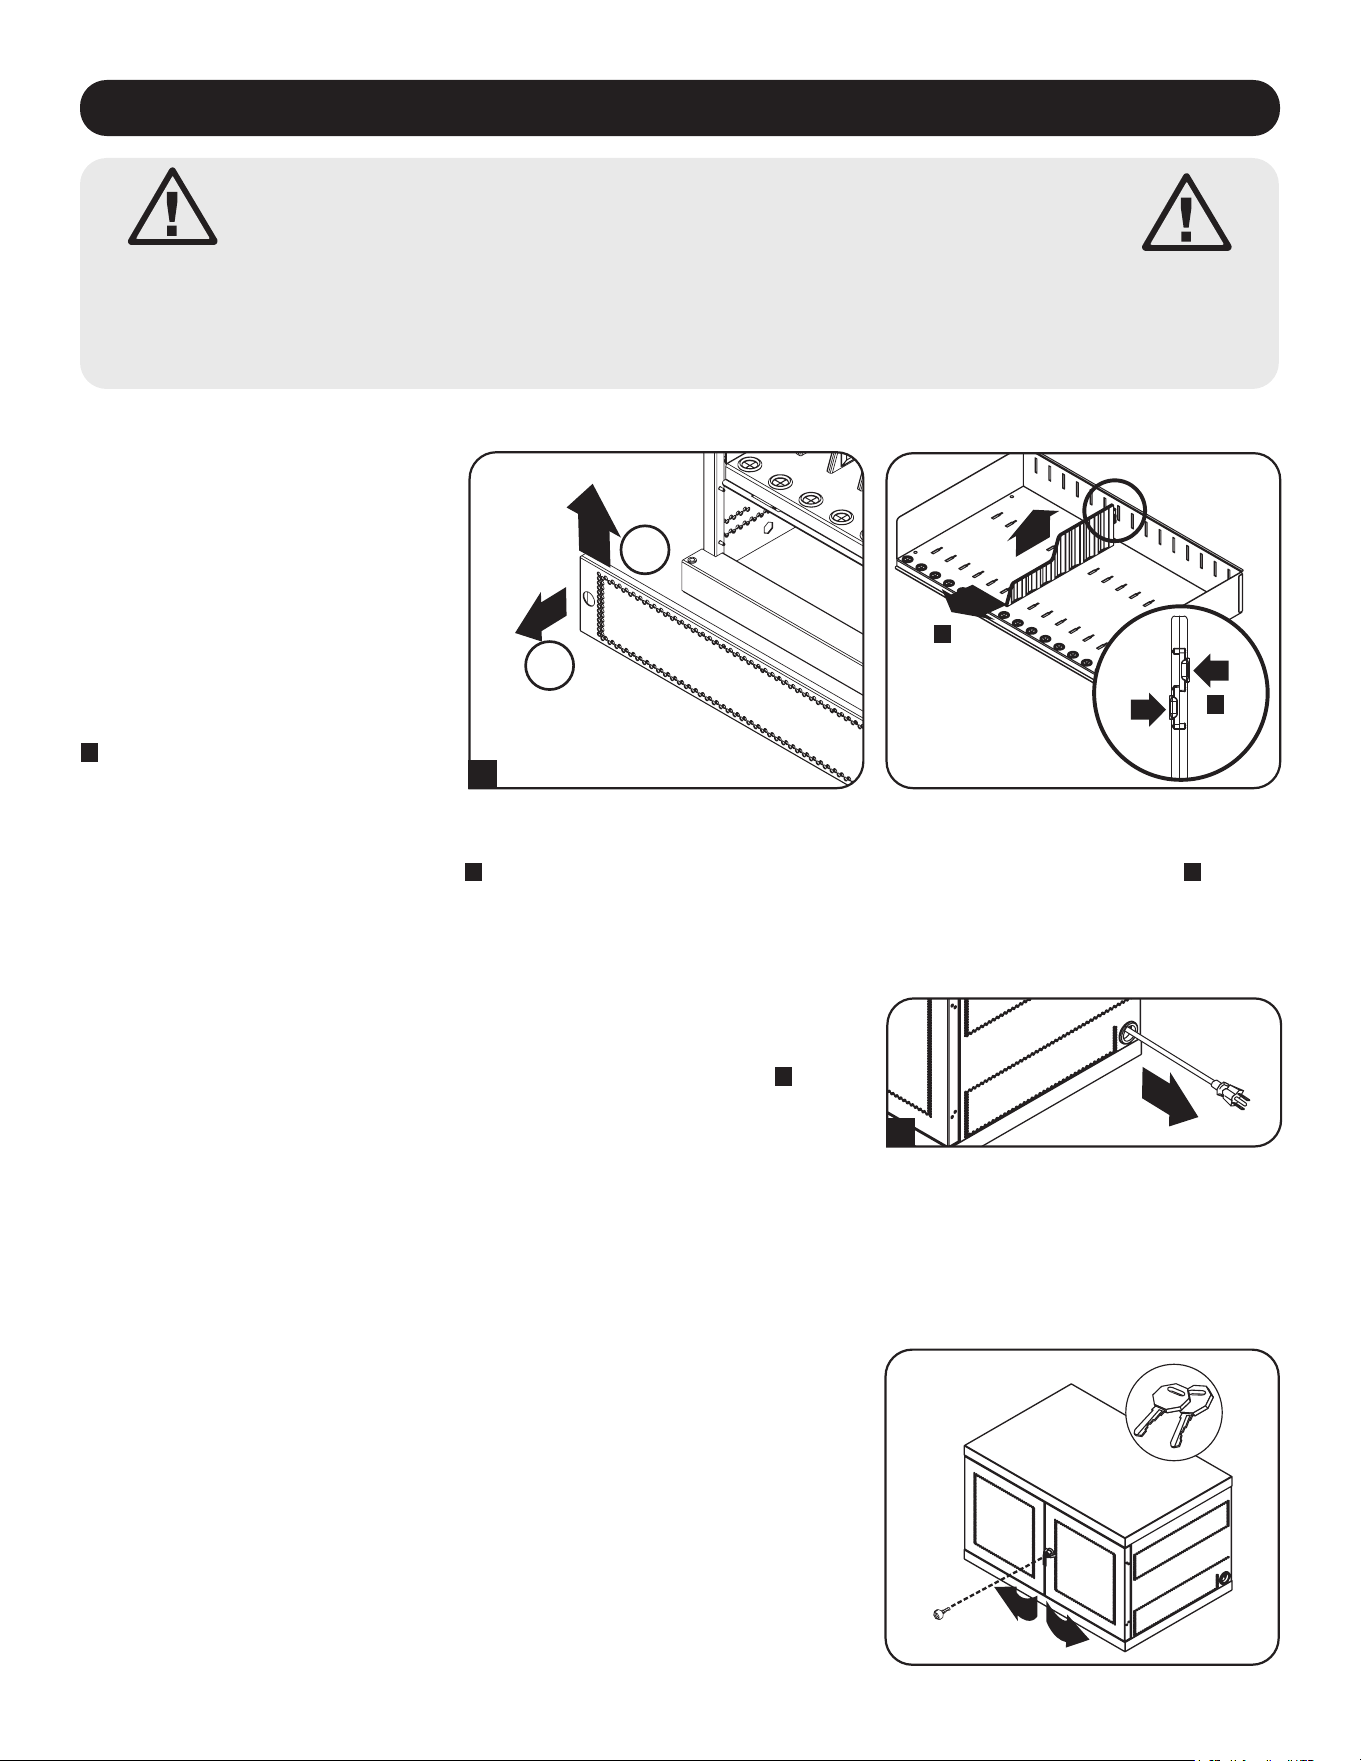
4.1 Adjusting Storage Shelf Dividers
4.2 Powering the USB Charger/Hub Unit
Your charging station comes with a
storage shelf containing adjustable
dividers that can accommodate up to
16 personal electronic devices.
Remove any personal electronic
devices stored on the shelf tray.
Then remove the blanking panel by
inserting your fingers into its left and
right holes, lifting the blanking panel
up and pulling out
A
. To remove the
shelf tray from the cabinet, push the
shelf tray forward to disengage from
the mounting hook, then pull the tray
up and out. Once the shelf is
Once the blanking panel has been removed as shown in Section 4.1, find the
USB Charger/Hub unit’s input plug and cable located in the charging station’s
bottom compartment. Then push the input plug through one of the power cord
access holes located on either side of the charging station cabinet
A
(using the
power cord access hole on the same side as the power cord manager is
recommended). Plug the power cord into the nearest 3-prong, grounded wall
outlet.
Note: The power cord can optionally be routed through the charging station’s rear panel.
To do so, first remove the rubber grommet from either power cord access hole and
attach it to the cable lock routing hole on the back of the unit (see 3. Feature
Identification for routing locations).
A
4.3 Door Locks
The split doors contain a lock that is accessible with the included keys.
B
C
1
2
A
removed, remove or rearrange the dividers by pushing in the two tabs securing the divider to the rear end
B
, then push
the divider forward to disengage from the shelf tray
C
. Repeat as necessary for additional shelf dividers.
6
5. 16-Port USB Charger Hub
• Professional-grade USB charger/hub charges and syncs up to 16 USB devices, including iPad
®
, iPod
®
, iPhone
®
, and
Android™ tablets and smartphones.
• Provides each USB port with an optimum charge level for a particular device (up to 2.4 amps).
• Allows syncing to be performed with any device designed for USB data communications, per compatible file
management software.
• Syncs Apple
®
devices via iTunes
®
software or Apple Configurator.
• Mini-USB Firmware Upgrade Port enables future software upgrades to support newer devices.
• 2U, rack-mountable housing can be configured for professional, educational or personal installations.
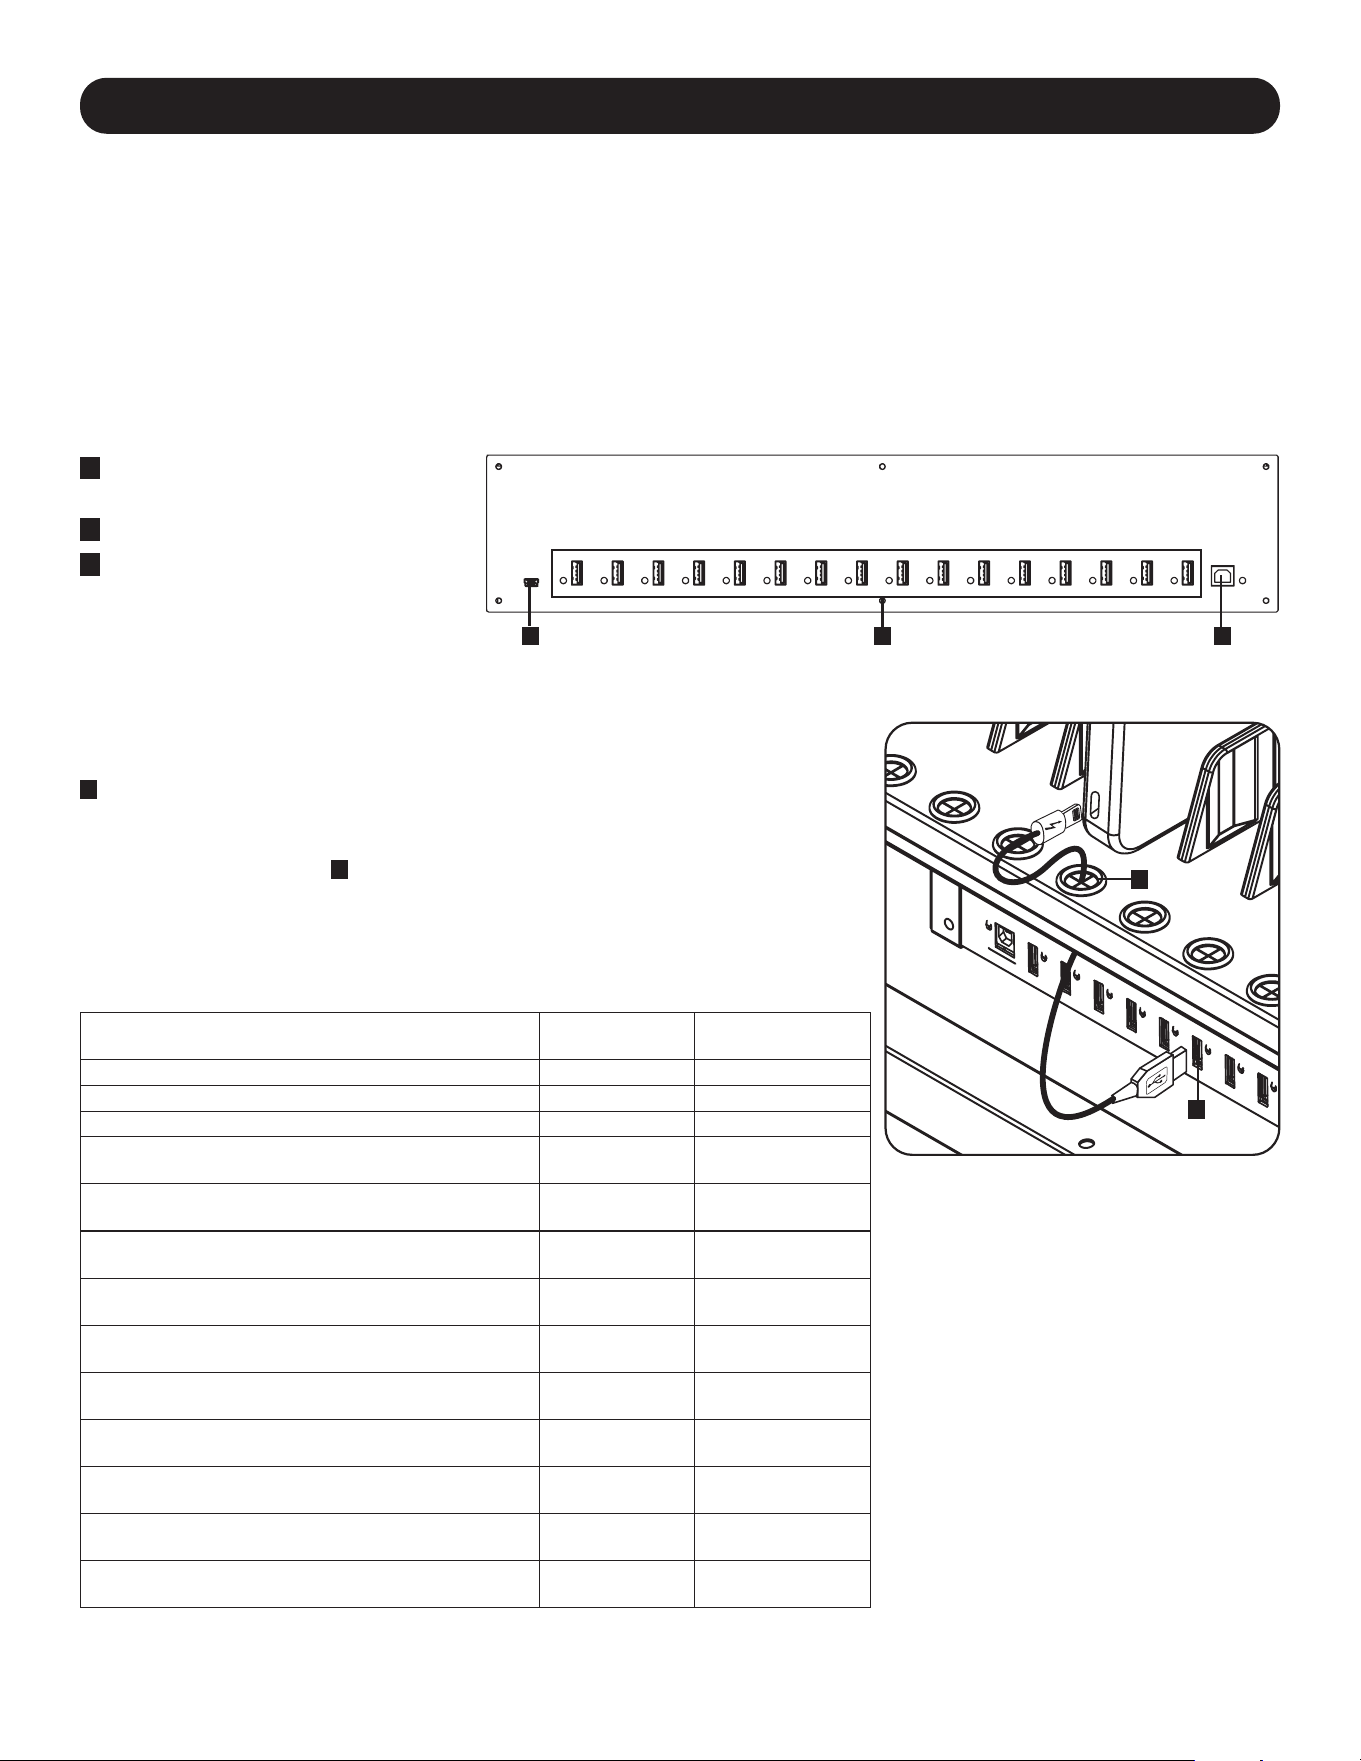
5.1 USB Charger/Hub Features
A
2.4A USB Device Ports with LED
IndicatorLights(16total)
B
Computer Sync Port
C
Firmware Upgrade Port
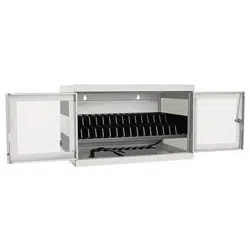
The charging station’s storage shelf features 16 strain relief bushings that
prevent the USB cable’s device connectors from slipping through the bushing
A
. Using a user-supplied or device manufacturer’s shielded USB cable, connect
the USB cable to the device to be charged. Then pass the cable end through
the strain relief bushing on the storage shelf and connect the USB connector
into a USB charging port
B
. Repeat for all devices and reattach the blanking
panel removed in Section 4.1 to the unit.
Tripp Lite offers individual and 10-pack cables for Apple devices using USB to
30-Pin or USB to Lightning™ cables, as well as individual and 10-pack cables
for USB 3.0 or 2.0 devices using USB-A (male) to 5-Pin Micro B (male) cables.
Cable Type
Individual Cable
Model Number
10-Pack Cable
Model Number
Apple USB to 30-Pin Connector, 10 in. M110-10N-BK M110-10N-BK-10
Apple USB to 30-Pin Connector, 3 ft. M110-003-WH —
Apple USB to 8-Pin Lightning Connector, 10 in. M100-10N-BK M100-10N-BK-10
Apple USB to 8-Pin Lightning Connector, 3 ft. M100-003-BK
M100-003-WH
—
Apple USB to 8-Pin Lightning Connector, 6 ft. M100-006-BK
M100-006-WH
—
Apple USB to 8-Pin Lightning Connector, 10 ft. M100-010-BK
M100-010-WH
—
USB 3.0 SuperSpeed A (Male) to
5-Pin Micro-B (Male), 1 ft.
U326-001-BK U326-001-BK-10
USB 3.0 SuperSpeed A (Male) to
5-Pin Micro-B (Male), 3 ft.
U326-003
U326-003-BK
—
USB 3.0 SuperSpeed A (Male) to
5-Pin Micro-B (Male), 10 ft.
U326-010 —
USB 2.0 Reversible A (Male) to
5-Pin Micro-B (Male), 1 ft.
UR050-001* UR050-001-10*
USB 2.0 Reversible A (Male) to
5-Pin Micro-B (Male), 3 ft.
UR050-003*
UR050-003-WH*
—
USB 2.0 Reversible A (Male) to
5-Pin Micro-B (Male), 6 ft.
UR050-006*
UR050-006-SLIM*
—
USB 2.0 Reversible A (Male) to
5-Pin Micro-B (Male), 10 ft.
UR050-010* —
* Features a reversible USB-A (male) connector for simplified installations.
Visit tripplite.com for more information on our selection of premium USB cables.
5.2 Connecting Devices to the USB Charger/Hub
A
B
A BC
7
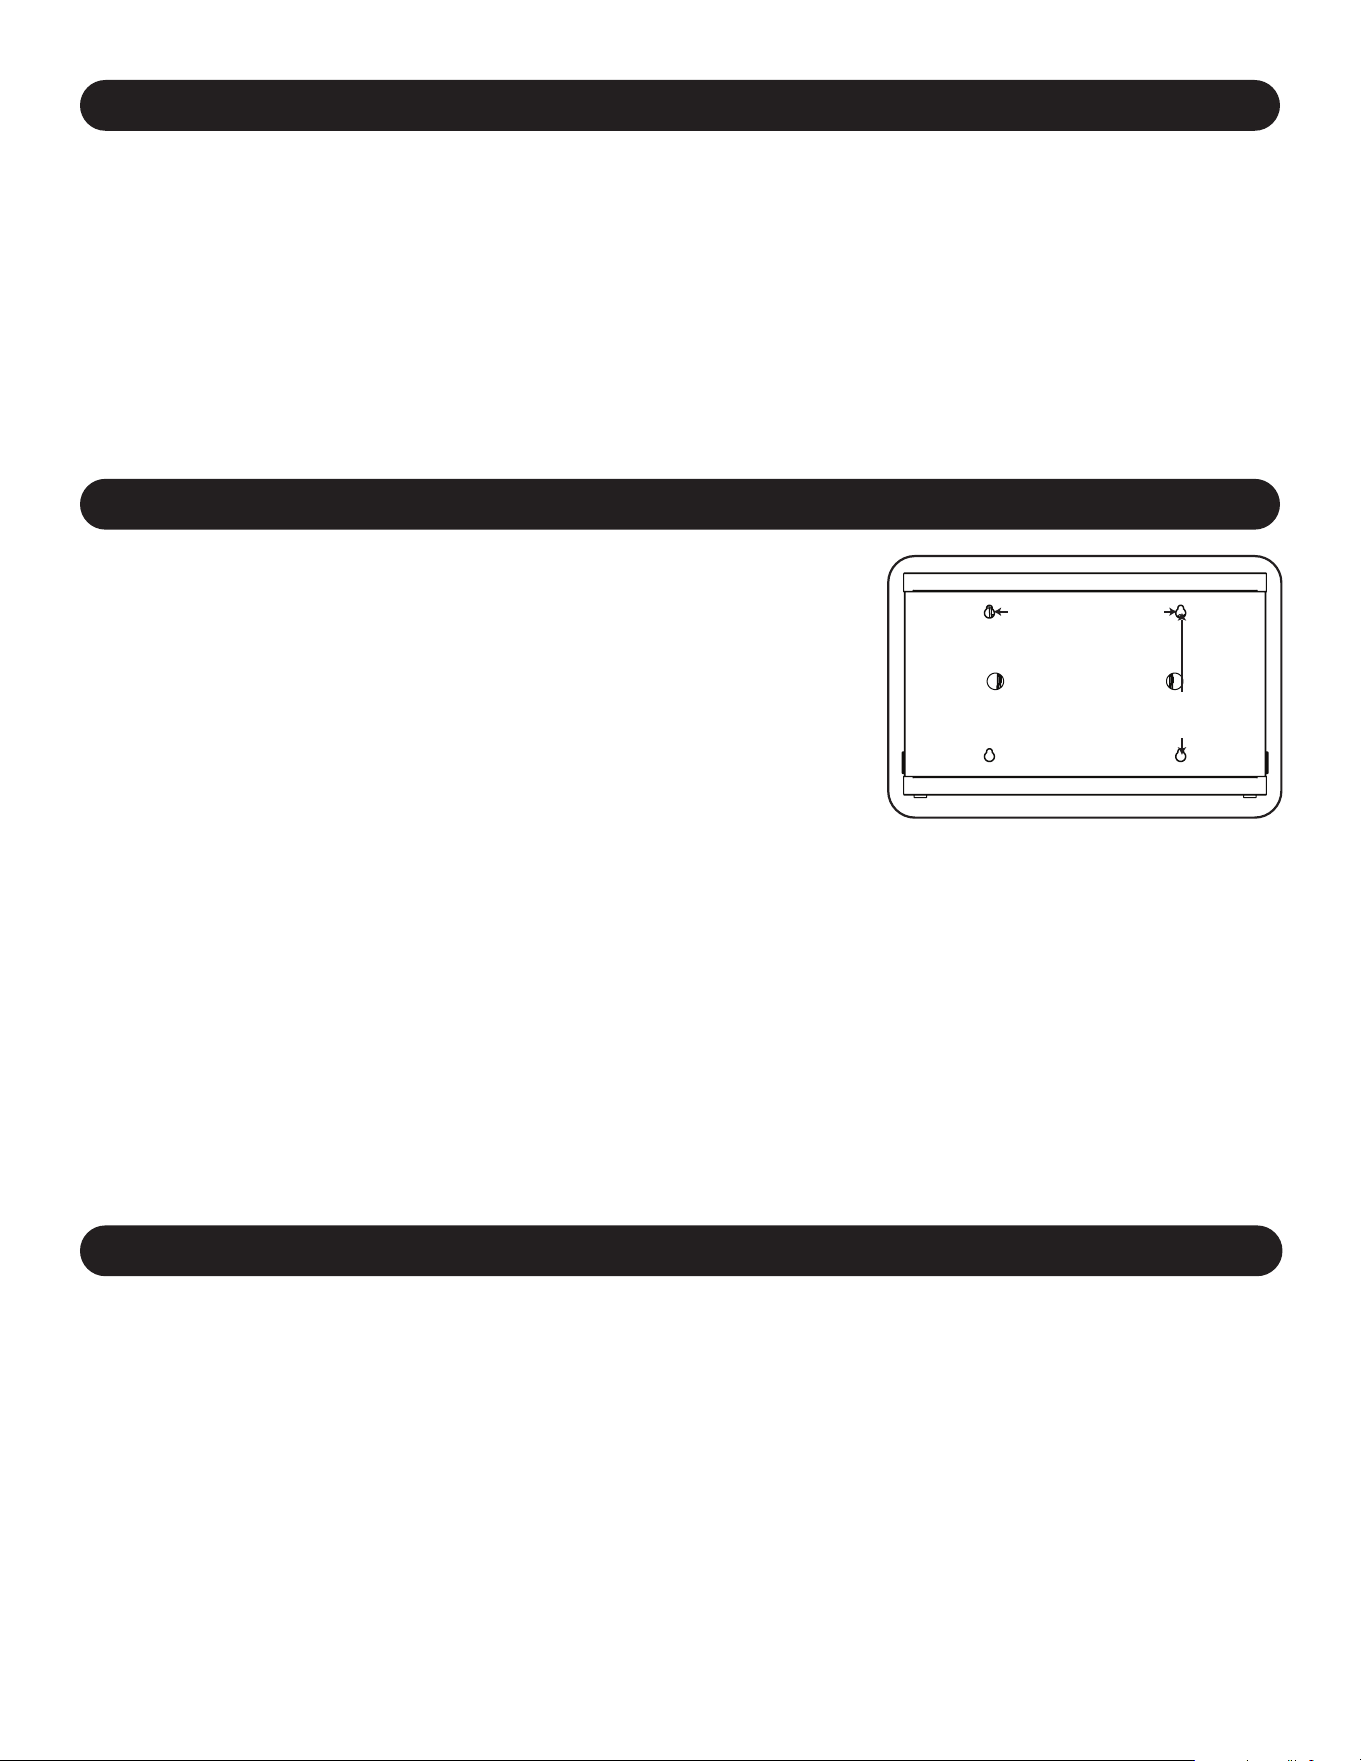
6. Wall Mounting
12”
16”
For wall mounting, you will need:
• Level
• Appropriate tools for wall mounting
• Appropriate hardware for wall mounting (not included)
Warning: Do not attempt to mount the charging station to the wall with
any personal electronic devices inside.
There are 4 keyhole cutouts on the charging station cabinet’s rear panel. Each
keyhole can accommodate an M5 or 3/16” bolt. Each of the keyhole sets are
centered 16” apart horizontally and 12” vertically (see the corresponding model
diagram for exact keyhole locations).
Using a level and tape measure, measure to position your mounting areas
precisely. Use appropriate fasteners (not included) to secure the charging
station to the wall.
Note: The charging station must be installed by a qualified technician. Use suitable
mounting means when installing to cinder block, concrete, drywall or wood studs.
Warning: The supporting surface must be able to safely support the combined
load of the charging station, equipment stored and all attached hardware and
components. See Section 8. Specifications for more information on your model’s
weight and dimensions.
7. Desktop/Floor Placement
WARNING: For desktop and floor applications, always install the charging station in a structurally sound area with a level
surface that is able to bear the weight of the charging station, all equipment that will be installed in the charging station
and any other enclosures and/or equipment that will be installed nearby. Never attempt to lift or install the charging
station without adequate help. See Section 8.Specifications for more information on the charging station’s rated load
capacity.
Note: The mounting brackets that shipped with the unit can also be used to secure the charging station to a desktop surface.
5. 16-Port USB Charger Hub
5.3 Connecting a Computer to the USB Charger/Hub
In addition to device charging, the USB Charger/Hub is equipped with a hub function that syncs devices and their
respective software applications via a connected computer. To enable the hub function, use the included USB cable to
connect the USB-B connector into unit’s Computer Sync Port and the USB-A connector into a computer’s USB port.
Note: When a computer connection is established and multiple devices are connected to the USB Charger/Hub, the charge rate will
reduce during syncing and resume to the normal charge rate upon completion.
Note: The Firmware Upgrade Port requires a mini-USB connection (cable not included). To download the most recent firmware
updates, go to tripplite.com/support.
8
8. Specifications
Models CSC16USB,CSCXB16USB,CSCXS16USB
Dimensions (H x W x D) 18.8 x 30.33 x 20.20 in. / 477.52 x 770.382 x 513.08 mm
Unit Weight 85.98 lb. / 39 kg
Load Capacity* 100 lb. / 45.4 kg
Charger/Hub Ports 16 x USB 2.0 A (Female)
1 x USB 2.0 B (Female)
1 x USB 2.0 Mini (Female)
Transmission Speed Up to 480 Mbps
Power Requirement Input: 110-120V, 2.5A, 50/60 Hz (CSC16USB) or 230V, 2.5A, 50Hz (CSCXB16USB, CSCXS16USB)
Output: 5.0V, 2.4A Max (per USB port)
Operating Temperature 32° to 86° F / 0° to 30° C
Operating Humidity 5 to 95% RH, Non-Condensing
Enclosure Material Metal
* Full wall-mount load capacity requires a mounting surface capable of bearing the full load of the charging station and all connected components.
Specicationsmaybesubjecttochangewithoutfurthernotice.
9. Storage, Service and Cleaning
Storage
The enclosure should be stored in a controlled indoor environment away from moisture, temperature extremes,
flammable liquids and gasses, conductive contaminants, dust and direct sunlight. Store the enclosure in its original
shipping container if possible.
Service
The enclosure is covered by the limited warranty described in this manual. For more information, visit
tripplite.com/support.
Cleaning
Before cleaning, always power off the charging station by unplugging it from its AC source. Dampen a clean, lint-free
cloth with water and wipe down the unit as necessary. Allow the surface area to dry before plugging in the unit.
Note: Avoid using abrasive cloths, solvents or aerosol sprays to clean the charging station; doing so can damage the unit.
10. Optional Casters and Handle
For applications requiring extra mobility, an optional caster and handle accessory kit (Model: CSHANDLEKIT2) contains
two swivel/locking casters, two swivel-only casters and a handle that attaches to the top of the charging station unit. Visit
tripplite.com for more information.

9
2-Year Limited Warranty
Seller warrants this product, if used in accordance with all applicable instructions, to be free from original defects in material and workmanship for a
period of 2 years from the date of initial purchase. If the product should prove defective in material or workmanship within that period, Seller will repair
or replace the product, at its sole discretion.
THIS WARRANTY DOES NOT APPLY TO NORMAL WEAR OR TO DAMAGE RESULTING FROM ACCIDENT, MISUSE, ABUSE OR NEGLECT.
SELLER MAKES NO EXPRESS WARRANTIES OTHER THAN THE WARRANTY EXPRESSLY SET FORTH HEREIN. EXCEPT TO THE EXTENT
PROHIBITED BY APPLICABLE LAW, ALL IMPLIED WARRANTIES, INCLUDING ALL WARRANTIES OF MERCHANTABILITY OR FITNESS, ARE
LIMITED IN DURATION TO THE WARRANTY PERIOD SET FORTH ABOVE; AND THIS WARRANTY EXPRESSLY EXCLUDES ALL INCIDENTAL
AND CONSEQUENTIAL DAMAGES. (Some states do not allow limitations on how long an implied warranty lasts, and some states do not allow the
exclusion or limitation of incidental or consequential damages, so the above limitations or exclusions may not apply to you. This warranty gives you
specific legal rights, and you may have other rights which vary from jurisdiction to jurisdiction.)
WARNING: The individual user should take care to determine prior to use whether this device is suitable, adequate or safe for the use intended. Since
individual applications are subject to great variation, the manufacturer makes no representation or warranty as to the suitability or fitness of these
devices for any specific application.
Product Registration
Visit tripplite.com/warranty today to register your new Tripp Lite product. You’ll be automatically entered into a drawing for a chance to win a FREE
Tripp Lite product!*
* No purchase necessary. Void where prohibited. Some restrictions apply. See website for details.
Regulatory Compliance Identification Numbers
For the purpose of regulatory compliance certifications and identification, your Tripp Lite product has been assigned a unique series number. The series
number can be found on the product nameplate label, along with all required approval markings and information. When requesting compliance
information for this product, always refer to the series number. The series number should not be confused with the marketing name or model number of
the product.
FCC Notice, Class B
This device complies with part 15 of the FCC Rules. Operation is subject to the following two conditions: (1) This device may not cause harmful
interference, and (2) this device must accept any interference received, including interference that may cause undesired operation.
Note: This equipment has been tested and found to comply with the limits for a Class B digital device, pursuant to part 15 of the FCC Rules. These
limits are designed to provide reasonable protection against harmful interference in a residential installation. This equipment generates, uses and can
radiate radio frequency energy and, if not installed and used in accordance with the instructions, may cause harmful interference to radio
communications. However, there is no guarantee that interference will not occur in a particular installation. If this equipment does cause harmful
interference to radio or television reception, which can be determined by turning the equipment off and on, the user is encouraged to try to correct the
interference by one or more of the following measures:
• Reorient or relocate the receiving antenna.
• Increase the separation between the equipment and receiver.
• Connect the equipment into an outlet on a circuit different from that to which the receiver is connected.
• Consult the dealer or an experienced radio/TV technician for help.
Any changes or modifications to this equipment not expressly approved by Tripp Lite could void the user’s authority to operate this equipment.
WEEE Compliance Information for Tripp Lite Customers and Recyclers (European Union)
Under the Waste Electrical and Electronic Equipment (WEEE) Directive and implementing regulations, when customers buy new electrical and
electronic equipment from Tripp Lite they are entitled to:
• Send old equipment for recycling on a one-for-one, like-for-like basis (this varies depending on the country)
• Send the new equipment back for recycling when this ultimately becomes waste
Tripp Lite has a policy of continuous improvement. Specifications are subject to change without notice. Photos and illustrations may differ slightly from
actual products.
11. Warranty and Product Registration
TrippLite.Eaton.com/support
23-07-803 934754_RevB

10
Manual del Propietario
Índice
1. Instrucciones Importantes 11
de Seguridad
2. Descripción General 12
3.
Identicación de Partes
13
y Características
4. Instalación 14
4.1 Ajuste de los Divisores de 14
Almacenamiento
4.2 Alimentación de la Unidad de 14
Cargador/Hub USB
4.3 Cerraduras de la Puerta 14
5. Cargador/Hub USB de 16 Puertos 15
5.1 Características del Cargador/Hub USB 15
5.2 Conexión de Dispositivos al 15
Cargador/Hub USB
5.3 Conexión de una Computadora al 16
Cargador/Hub USB
6. Instalación en Pared 16
7. Para colocación en Escritorio/Piso 16
17
17
17
18
1
19
28
8. Especi icaciones
9. Almacenamiento, Servicio y
Limpieza
10. Ruedas y Manija Opcionales
11. Garantía
English
Français
Русский
Deutsch
37
Estación de Carga de USB
Modelos con 16 Puertos: CSC16USB, CSCXB16USB,
CSCXS16USB
(Númerodeserie:AG-0738)
TrippLite.Eaton.com/support
Copyright © 2023 Tripp Lite. Todas las marcas registradas son propiedad de sus respectivos propietarios.

11
1. Instrucciones de Seguridad Importantes
CONSERVE ESTAS INSTRUCCIONES
Este manual contiene instrucciones y advertencias que deben observarse durante la instalación y la operación del
producto aquí descrito. El no hacerlo puede invalidar la garantía y causar daños materiales o lesiones personales.
Unidad de Cargador/Hub USB:
• Conecte la unidad a un tomacorriente que cumpla con los códigos de construcción locales y que esté adecuadamente
protegido contra el exceso de corriente, los cortocircuitos y los fallos a tierra.
• El tomacorriente eléctrico que suministra energía al equipo debe estar instalado cerca de la unidad y ser fácilmente
accesible.
• El conector CA en el cable de alimentación de energía sirve como dispositivo de desconexión.
• Conecte la unidad directamente a un tomacorriente de alimentación de CA conectado a tierra adecuadamente.
• No modifique el conector y no use un adaptador que pueda eliminar la conexión a tierra.
• Si surge cualquiera de las siguientes situaciones, programe una cita para que un técnico de servicio inspeccione su
equipo:
• El equipo ha estado expuesto a humedad
• El equipo se ha caído o dañado
• El equipo muestra signos evidentes de roturas
• El equipo no funciona correctamente o no funciona de acuerdo a las instrucciones descritas en el presente
Manual del Propietario
• No se recomienda utilizar este equipo en aplicaciones de soporte de vida donde una falla podría llegar a causar la
falla del equipo de soporte de vida o afectar significativamente su seguridad o efectividad.
Gabinete de la Estación de Carga:
• Mantenga la estación de carga en un ambiente interior controlado, alejada de humedad, temperaturas extremas,
líquidos y gases inflamables, contaminantes conductivos, polvo y luz solar directa.
• Deje un espacio adecuado alrededor de la estación de carga para que reciba una ventilación apropiada. No bloquee,
cubra ni coloque objetos en las aberturas externas de ventilación de la estación de carga.
• Para un mejor rendimiento, mantenga la temperatura interior entre 0°C y 40°C.
• No retire ninguna advertencia, precaución o etiqueta descriptiva de la estación de carga.
• Para un mejor rendimiento, mantenga la temperatura interior entre 0°C y 40°C.
• No retire ninguna advertencia, precaución o etiqueta descriptiva de la estación de carga.
• La estación de carga es extremadamente pesada. Tenga cuidado al manipularla. No intente desempacarla ni instalarla
sin ayuda. Utilice un dispositivo mecánico, como un montacargas o un gato hidráulico para tarimas, para mover la
estación de carga en el contenedor de transporte.
• No coloque recipientes con líquidos ni apile artículos sobre el gabinete.
• Inspeccione el contenedor de transporte y la estación de carga para detectar daños producidos durante el envío. No
utilice la estación si está dañada.
• Tenga cuidado cuando corte el material de empaque. La estación de carga podría sufrir rayaduras, y estos daños no
están cubiertos por la garantía.
• Guarde todo el material de empaque para uso posterior. Volver a empacar y enviar el equipo o el gabinete de la
estación de carga sin el material de empaque original puede ocasionar daños al producto que anularían la garantía.
12
2. Descripción General
La estación de carga es una solución integral para almacenamiento y carga de hasta 16 dispositivos. La estación de
carga también puede instalarse en paredes de manera conveniente, así como configurarse sobre el escritorio o sobre el
piso. Para evitar el robo y sabotaje del dispositivo, el gabinete de la estación de carga está equipado con puertas de
acero con cerradura.
Explicación de los Símbolos:
PRECAUCIÓN: RIESGO DE PELIGRO
TERMINAL DE CONEXIÓN DE PROTECCIÓN
VOLTAJE DE CA
ADVERTENCIAS DEL MONTAJE EN LA PARED: La superficie de la pared, los montantes de la pared y todos los
accesorios de Instalación suministrados por el usuario deben poder soportar el peso combinado del gabinete y de todos
los equipos que se instalarán en el gabinete. El gabinete puede soportar equipos hasta su capacidad de carga máxima
de 45 kg.
Los orificios de montaje en pared tienen un espaciado de 16 pulgadas (406 mm) separadas horizontalmente para
adaptarse a la colocación estándar de los montantes de la pared. Se aconseja distribuir con seguridad el peso del
gabinete y de todos los equipos instalados.
1. Instrucciones de Seguridad Importantes
Para Instalaciones en Pared y Escritorio:
• La estación de carga debe ser instalada por un técnico cualificado.
• Antes de realizar la instalación, asegúrese de que la superficie de la pared pueda soportar con seguridad el peso
combinado de la estación de carga, el equipo almacenado y todos los accesorios y los componentes conectados.
• La estación de carga puede soportar equipos hasta su capacidad de carga máxima de 45 kg.
• Utilice siempre medios de montaje adecuados cuando realice la instalación en bloques de hormigón, paneles de yeso
o montantes de madera. Instálelo firmemente en la pared utilizando los herrajes adecuados (no vienen incluidos).
ADVERTENCIA: La superficie de apoyo debe poder soportar con seguridad la carga combinada de la estación de
carga, el equipo almacenado y todos los herrajes y componentes acoplados (consulte las especificaciones del punto
número 8 para obtener más información acerca del peso y las dimensiones de su modelo).
• Para las instalaciones de escritorio, los soportes de montaje que se entregan con la unidad también se pueden utilizar
para fijar la estación de carga a una superficie de escritorio.
13
3. Identificación de Partes y Características
CSC16USB
1
Puertas divididas con cerradura
2
Estantedealmacenamientoajustables(concapacidadparaalmacenarhasta16dispositivos)
3
Panelobturador(removible)
4
Orificiosdeaccesodelcabledealimentación(unoencadalado)
5
Cerrojo para Candado (El Usuario Suministra el Candado)
6
Orificios para Pasar el Cable del Candado (El Usuario Suministra el Candado)
7
Panel lateral con ranuras con perforaciones para instalción en la pared
(para obtener más información, consulte la Sección 6)
No se muestra:
Unidades de Cargador/Hub USB (Pre-instalado)
ConectorNEMA5-15(CSC16USB),
BS1363(CSCXB16USB)o
Cablesdeenergía/conectorSchuko(CSCXS16USB)
Llaves
1
5
3
2
4
4
6
7
7

14
¡Precaución! ¡Lea todas las instrucciones y las advertencias
antes de realizar la instalación!
Advertencia: las estaciones de carga pueden ser muy pesadas. No intente desempacar ni
instalar la estación de carga sin ayuda. Antes de proceder con la instalación, siga las
instrucciones de desempaque incluidas en el documento que se envía junto con el producto.
Tenga mucho cuidado al manipular la estación de carga y asegúrese de seguir todas las
instrucciones de manejo e instalación. No intente instalar el equipo sin antes estabilizar la
estación de carga.
4. Instalación
4.1 Ajuste de los Divisores del Estante de Almacenamiento
La estación de carga viene con un
estante de almacenamiento con
divisores ajustables, donde se pueden
ubicar hasta 16 dispositivos
electrónicos personales.
Retire cualquier dispositivo electrónico
que esté almacenado sobre el
entrepaño. Entonces retire el panel
obturador insertando los dedos en los
orificios izquierdo y derecho y levante
el panel obturador y jale para extraerlo
A
. Para retirar el estante de la repisa
del gabinete, oprímalo hacia adelante
para desacoplarlo del gancho de
Una vez que se ha removido el panel obturador como se muestra en la
Sección 4.1, busque el cable y la clavija de entrada de la Unidad de Cargador/
Hub USB en el compartimiento inferior de la estación de carga. Empuje la
clavija a través de una de las perforaciones de acceso al cable ubicadas a
ambos lados del gabinete de la estación de carga
A
(se recomienda utilizar la
misma perforación lateral de acceso que el administrador del cable de
alimentación). Conecte el cable de alimentación en la toma en la pared de tres
clavijas, debidamente aterrizada, más cercana.
4.3 Cerraduras de la Puerta
Las puertas divididas incluyen una cerradura que puede abrirse con las llaves incluidas.
4.2 Alimentación de la Unidad de Cargador/Hub USB
A
B
C
1
2
A
instalación, después jale el estante hacia arriba y hacia afuera. Una vez que retire el estante, quite o vuelva a acomodar
los divisores presionando las dos pestañas que ajustan el divisor al extremo posterior
B
, y luego empuje el divisor hacia
adelante para desacoplarlo del entrepaño
C
. Repítalo si es necesario para los divisores adicionales.
Nota: Opcionalmente el cable de alimentación puede ser conducido a través del panel posterior de la estación de carga. Para hacerlo,
retire primero el ojal de hule de cualquiera de los orificios de acceso del cable de alimentación y colóquelo en el orificio para
conducción del cable de seguridad en la parte posterior de la unidad (ver 3. Identificación de la característica para ubicaciones
de conducción).
15
5. Cargador/Hub USB de 16 Puertos
• El cargador/hub USB de grado profesional carga y sincroniza hasta 16 dispositivos con USB, incluyendo iPad
®
, iPod
®
,
iPhone
®
, y tabletas y smartphones Android™.
• Proporciona a cada puerto USB un nivel de carga óptimo para un dispositivo en particular (hasta 2.4 Amperes).
• Permite realizar la sincronización para cualquier dispositivo diseñado para comunicaciones de datos por USB,
mediante software compatible para administración de archivos.
• Sincroniza dispositivos Syncs Apple
®
mediante el software iTunes
®
o Apple Configurator.
• El Puerto Mini-USB para Actualización de Firmware permite futuras actualizaciones de software a suporte dispositivos
nuevos.
• El alojamiento para instalación en rack 2U puede configurarse para instalaciones profesionales, educativas o
personales.
5.1 Características del Cargador/Hub USB
A
Puertos para Dispositivos con
USBde2.4A,conIndicadores
LED(16entotal)
B
Puerto de Sincronización de
Computadora
C
Puertos de Actualización de
Firmware
El entrepaño de almacenamiento de la estación de carga cuenta con 16 bujes
de protección liberadores de la tensión que evitan que los conectores de los
dispositivos del cable USB se salgan por el buje
A
. Usando un cable USB
blindado suministrado por el usuario o del fabricante del dispositivo, conecte el
cable USB al dispositivo por cargar. Pase entonces el extremo del cable por el
buje relevador de tensión en el entrepaño de almacenamiento y conecte el
conector USB en un puerto de carga USB
B
. Repita para todos los dispositivos
y reinstale el panel obturador removido en la Sección 4.1 a la unidad.
Tripp Lite ofrece cables individuales y en paquetes de 10 para dispositivos Apple
®
que usan cables USB a 30 Pines o USB a Lightning™, así como cables
individuales y en paquetes de 10 para dispositivos USB 3.0 o 2.0 usando cables
USB-A (macho) a Micro B (macho) de 5 Pines.
Tipo de Cable
Cable Individual
Número de Modelo
Paquete de 10 Cables
Número de Modelo
Conector Apple USB a 30 Pines, 25.4 cm [10 pulg.] M110-10N-BK M110-10N-BK-10
Conector Apple USB a 30 Pines, 0.9 m [3 pies] M110-003-WH —
Conector Apple USB a Lightning de 8 Pines, 25.4 cm [10 pulg.]
M100-10N-BK M100-10N-BK-10
Conector Apple USB a Lightning de 8 Pines, 0.9 m
[3 pies]
M100-003-BK
M100-003-WH
—
Conector Apple USB a Lightning de 8 Pines, 1.8 m
[6 pies]
M100-006-BK
M100-006-WH
—
Conector Apple USB a Lightning de 8 Pines, 3 m
[10 pies]
M100-010-BK
M100-010-WH
—
USB 3.0 SuperSpeed A (Macho) a Micro-B (Macho) de
5 Pines, 30.5 cm [1 pie]
U326-001-BK U326-001-BK-10
USB 3.0 SuperSpeed A (Macho) a Micro-B (Macho) de
5 Pines, 0.9 m [3 pies]
U326-003
U326-003-BK
—
USB 3.0 SuperSpeed A (Macho) a Micro-B (Macho) de
5 Pines, 3 m [10 pies]
U326-010 —
USB 2.0 Reversible A (Macho) a Micro-B (Macho) de
5 Pines, 30.5 cm [1 pie]
UR050-001* UR050-001-10*
USB 2.0 Reversible A (Macho) a Micro-B (Macho) de
5 Pines, 0.9 m [3 pies]
UR050-003*
UR050-003-WH*
—
USB 2.0 Reversible A (Macho) a Micro-B (Macho) de
5 Pines, 1.8 m [6 pies]
UR050-006*
UR050-006-SLIM*
—
USB 2.0 Reversible A (Macho) a Micro-B (Macho) de
5 Pines, 3 m [10 pies]
UR050-010* —
* Cuenta con un conector USB-A (macho) reversible para instalaciones simplificadas.
Para más información sobre nuestra selección de cables USB premium, visite tripplite.com.
5.2 Conexión de Dispositivos al Cargador/Hub USB
A BC
A
B
16
5. Cargador/Hub USB de 16 Puertos
5.3 Conexión de una Computadora al Cargador/Hub USB
Además del dispositivo de carga, el Cargador/Hub USB está equipado con una función de hub que sincroniza
dispositivos y sus aplicaciones respectivas de software mediante una computadora conectada. Para permitir la función
de hub utilice el cable USB incluido para conectar el conector USB-B en el puerto de sincronización del Cargador/Hub
USB y el conector USB-A en el puerto USB de una computadora.
Nota: Cuando se ha establecido una conexión con una computadora y estén conectados múltiples dispositivos al Cargador/Hub USB,
la tasa de carga se reducirá durante la sincronización y se restablecerá la tasa de carga normal una vez terminada ésta.
Nota: El Puerto de Actualización de Firmware requiere una conexión mini-USB (cable no incluido). Para descargar las actualizaciones más
recientes de firmware, vaya a tripplite.com/support.
6. Instalación en Pared
Para realizar la instalación en pared, necesitará:
• Nivel
• Herramientas adecuadas para la instalación en pared
• Accesorios adecuados para la instalación en pared (no se incluyen)
Advertencia: no intente instalar la estación de carga a la pared con
ningún dispositivo electrónico personal adentro.
El panel lateral del gabinete de la estación de carga tiene 4 perforaciones.
Cada perforación admite un perno M5 o de 3/16 pulgadas. Cada juego de
perforaciones está centrado a 406 mm [16 pulgadas] de distancia en dirección
horizontal y a 305 mm [12 pulgadas] en dirección vertical (consulte el diagrama
del modelo correspondiente para ver las ubicaciones exactas).
Usando un nivel y una cinta métrica, mida para determinar con precisión la
posición de las áreas de instalación. Use sujetadores adecuados (no incluidos)
para asegurar la estación de carga a la pared. Use sujetadores adecuados (no
incluidos) para asegurar la estación de carga a la pared.
Nota: la estación de carga debe ser instalada por un técnico calificado. Utilice los
medios de instalación adecuados para realizar la instalación en un bloque de hormigón,
concreto, tabla roca o travesaños de madera. Advertencia: la superficie de apoyo
debe ser capaz de soportar con seguridad el peso combinado de la estación de
carga, el equipo almacenado y de todos los accesorios y los componentes
conectados. Ver Sección 8. Especificaciones para obtener más información sobre
peso y dimensiones de su modelo.
305 mm
[12 pulg.]
406 mm [16 pulg.]
7. Colocación en Escritorio/Piso
ADVERTENCIA: Para aplicaciones en escritorio y piso, instale siempre una estación de carga en un área
estructuralmente firme con una superficie nivelada que sea capaz de soportar el peso de la estación de carga, todo el
equipo que se instalará en la estación de carga y cualquier otro gabinete y/o equipo que se instalará en la misma
superficie. Nunca intente levantar o instalar la estación de carga sin la ayuda adecuada. Ver Sección
8. Especificacionespara obtener más información sobre la capacidad de carga especificada de la estación de carga.
Nota: Los soportes de montaje que se entregan con la unidad también se puede utilizar para asegurar la estación de carga a una
superficie de escritorio.
17
Modelos CSC16USB,CSCXB16USB,CSCXS16USB
Dimensiones del gabinete (Al x An x Pr) 477.52 x 770.382 x 513.08 mm
Peso de la unidad 39 kg
Capacidad de carga* 45.4 kg
Puertos de Cargador/Hub 16 x USB 2.0 A (Hembra)
1 x USB 2.0 B (Hembra)
1 x USB 2.0 mini (Hembra)
Velocidad de Transmisión Hasta 480 Mbps
Requerimiento de Energía Entrada: 110-120V, 2.5A, 50/60 Hz
Salida: 5.0V, 2.4A Max (por puerto USB)
Temperatura de Operación 0° a 40° C / 32° a 104° F
Humedad de Funcionamiento 5 a 95% de HR, Sin Condensación
Material del Gabinete Metal
*Paralacapacidaddecargatotaldeinstalaciónenpared,lasuperciedeinstalacióndebepodersoportarelpesocompletodelaestacióndecargay
detodosloscomponentesconectados.Lasespecicacionespuedenestarsujetasacambiosinprevioaviso.
8. Especificaciones
9. Almacenamiento, Servicio y Limpieza
Almacenamiento
El gabinete debe estar almacenado en un entorno interior controlado, alejado de humedad, temperaturas extremas,
líquidos y gases inflamables, contaminantes conductivos, polvo y luz solar directa. De ser posible, almacene el gabinete
en el contenedor de embarque original.
Servicio
El gabinete está cubierto por la garantía limitada descrita en el presente manual. Para obtener más información, visite
tripplite.com/support.
Limpieza
Antes de limpiar, siempre desconecte la estación de carga de la fuente CA. Humedezca un trapo limpio y sin pelusas
con agua, y limpie la unidad según sea necesario. Deje que la superficie se seque antes de conectarla.
Nota: evite el uso de trapos abrasivos, solventes o aerosoles para limpiar la estación de carga, ya que pueden dañarla.
10. Ruedas y Manija Opcionales
Para aplicacioes que requieran movilidad extra, un juego opcional de accesorios de rueas y manija (Modelo:
CSHANDLEKIT2) contine dos ruedas giratiorias con seguro, dos ruedas solo giratorioas y una manija que se fija a la
parte superior de la unidad estación de carga. Visita tripplite.com para más información.

18
GARANTÍA LIMITADA DE 2 AÑOS
El vendedor garantiza que este producto no tiene defectos originales de materiales ni de mano de obra por un período de dos años a partir de la fecha original de compra,
si se utiliza de acuerdo con todas las instrucciones correspondientes. En caso de demostrarse dentro de ese período que el producto tiene defectos de materiales o de
mano de obra, el vendedor lo reparará o reemplazará a su exclusiva discreción. El servicio técnico bajo esta garantía solo puede ser obtenido si usted entrega o envía el
producto (con todos los cargos de envío o entrega prepagos) a: Tripp Lite; 1111 W. 35th Street; Chicago IL 60609; EE. UU. El vendedor abonará los cargos de envío de
devolución. Visite tripplite.com/support antes de enviar cualquier equipo para reparación.
ESTA GARANTÍA NO CUBRE EL DESGASTE NORMAL NI LOS DAÑOS CAUSADOS POR ACCIDENTES, MAL USO, ABUSO O NEGLIGENCIA. EL VENDEDOR NO
OFRECE NINGUNA GARANTÍA EXPRESA QUE NO SEA LA ESTABLECIDA EXPRESAMENTE EN EL PRESENTE DOCUMENTO. EXCEPTO EN LA MEDIDA EN QUE LO
PROHIBAN LAS LEYES APLICABLES, LA DURACIÓN DE TODAS LAS GARANTÍAS IMPLÍCITAS, INCLUIDAS LAS DE COMERCIABILIDAD O APTITUD, SE LIMITA AL
PERÍODO DE GARANTÍA ANTES MENCIONADO Y ESTA GARANTÍA EXCLUYE EXPRESAMENTE TODOS LOS DAÑOS INCIDENTALES E INDIRECTOS. (Algunos
Estados no permiten las limitaciones a la duración de una garantía implícita y algunos Estados no permiten la exclusión o limitación de los daños incidentales o indirectos,
de modo que las limitaciones o exclusiones antes mencionadas pueden no corresponder en su caso. Esta garantía le otorga derechos legales específicos y usted puede
tener otros derechos que varían de una jurisdicción a otra.)
ADVERTENCIA: Antes de usar este dispositivo, cada usuario debe ocuparse de determinar si es apto, adecuado o seguro para el uso que pretende darle. Dado que las
aplicaciones individuales están sujetas a diversas variaciones, el fabricante no representa ni garantiza la idoneidad o condición de estos dispositivos para cualquier
aplicación específica.
Cumplimiento de las normas de los números de identificación
Para fines de identificación y certificación del cumplimiento de las normas, su producto Tripp Lite tiene asignado un número de serie único. Puede encontrar el número de
serie en la etiqueta de la placa de identificación del producto, junto con los símbolos de aprobación e información requeridos. Al solicitar información sobre el cumplimiento
de las normas para este producto, siempre mencione el número de serie. El número de serie no debe ser confundido con el nombre de identificación ni con el número de
modelo del producto.
Información de sobre Cumplimiento de la WEEE para Clientes de Tripp Lite y Recicladores (Unión Europea)
Según la Directiva de Residuos de Aparatos Eléctricos y Electrónicos (Waste Electrical and Electronic Equipment, WEEE) y sus reglamentos, cuando los clientes
compran nuevos equipos eléctricos y electrónicos a Tripp Lite, tienen derecho a:
• Enviar equipos antiguos para reciclaje según una base de uno por uno, entre productos similares (esto varía dependiendo del país)
• Enviar el equipo nuevo de vuelta para reciclaje cuando este se convierta finalmente en desecho
Tripp Lite tiene una política de mejora continua. Las especificaciones están sujetas a cambio sin previo aviso. Las fotografías e ilustraciones pueden diferir ligeramente de
los productos reales.
TrippLite.Eaton.com/support
11. Garantía
23-07-803 934754_RevB

19
Sommaire
1. Importantes consignes de sécurité 20
2. Vue d'ensemble 21
3. Identication des fonctionnalités 22
4. Conguration 23
4.1 Réglage des séparateurs 23
des étagères de rangement
4.2 Alimentation du chargeur/ 23
concentrateur USB
4.3 Serrures des portes 23
5. Chargeur/concentrateur 24
USB 16 ports
5.1 Caractéristiques du chargeur/ 24
concentrateur USB
5.2 Connexion des appareils 24
au chargeur/concentrateur USB
5.3 Connexion d'un ordinateur 25
au chargeur/concentrateur USB
25
25
26
26
26
27
1
10
28
6. Montage mural
7. Placement sur un bureau/au sol
8. Caractéristiques techniques
9. Stockage, entretien et nettoyage
10. Roulettes et poignée en option
11. Garantie
English
Español
Русский
Deutsch
37
Station de charge USB
Modèles à 16 ports : CSC16USB, CSCXB16USB, CSCXS16USB
(Numérodesérie:AG-0738)
Manuel d'utilisation
TrippLite.Eaton.com/support
Copyright © 2023 Tripp Lite. Toutes les marques commerciales appartiennent exclusivement à leurs propriétaires respectifs.

20
1. Importantes consignes de sécurité
CONSERVEZ CES INSTRUCTIONS
Ce manuel contient des instructions et des avertissements devant être suivis pour l'installation et l'utilisation du produit
décrit dans ce manuel. Le non-respect de ces instructions peut entraîner l'annulation de la garantie et occasionner des
dommages matériels ou corporels.
Chargeur/concentrateur USB :
• Branchez l'unité à une prise de courant conforme à vos codes de construction locaux et correctement protégée contre
les surintensités, les courts-circuits et les défauts à la terre.
• La prise électrique alimentant l'équipement doit être installée à proximité de l'unité et facilement accessible.
• La fiche secteur du cordon d'alimentation sert de dispositif de déconnexion.
• Branchez directement l'unité à une prise de courant secteur correctement mise à la terre.
• Ne modifiez pas la fiche et n'utilisez pas un adaptateur qui empêcherait la connexion à la terre de l'onduleur.
• Si l'une des situations suivantes se présente, prenez rendez-vous avec un technicien de maintenance pour faire
inspecter votre équipement :
• L'équipement a été exposé à l'humidité
• L'équipement est tombé et a été endommagé
• L'équipement présente des signes évidents de casse
• L'équipement ne fonctionne pas correctement ou ne fonctionne pas conformément aux instructions décrites dans
le présent manuel d'utilisation
• L'utilisation de ce produit avec des dispositifs de maintien en vie n'est pas recommandée dans les cas où une panne
de ce produit serait susceptible d'entraîner une panne du dispositif de maintien en vie ou de nuire considérablement à
sa sécurité ou à son efficacité.
Boîtier de la station de charge
• Placez la station de charge dans un environnement intérieur contrôlé, à l'abri de l'humidité, des températures
extrêmes, des liquides et gaz inflammables, des contaminants conducteurs, de la poussière et de la lumière directe du
soleil.
• Laissez un espace suffisant tout autour de la station de charge pour assurer une ventilation adéquate. Ne bloquez pas,
ne couvrez pas ou n'insérez pas d'objets dans les ouvertures de ventilation externes de la station de charge.
• Pour des performances optimales, veillez à ce que la température intérieure soit maintenue entre 0 ºC et 30 ºC (32 °F
et 86 °F).
• Ne retirez pas les avertissements, les mises en garde ou les étiquettes descriptives du chariot de charge.
• La station de charge est très lourde. Manipulez-la avec précaution N'essayez pas de le déballer ou de le monter sans
aide. Utilisez un appareil mécanique tel qu'un chariot élévateur ou un transpalette pour déplacer la station de charge à
l'intérieur du conteneur.
• Ne placez pas de récipients emplis de liquide ou d'objets empilés sur l'armoire.
• Inspectez le conteneur et la station de charge afin de détecter d'éventuels dégâts survenus pendant le transport.
N'utilisez pas la station de charge si elle est endommagée.
• Soyez prudent lors du découpage des éléments d'emballage. Vous pourriez rayer la station de charge et causer des
dommages non couverts par la garantie.
• Conservez tous les éléments d'emballage afin de pouvoir les réutiliser ultérieurement. Remballer et réexpédier la
station de charge sans ses éléments d'emballage d'origine peut endommager le produit et entraîner l'annulation de la
garantie.

21
1. Importantes consignes de sécurité
Pour les installations au mur et sur le bureau :
• La station de charge doit être installée par un technicien qualifié.
• Avant de procéder au montage, assurez-vous que la surface d'appui peut supporter en toute sécurité le poids combiné
de la station de charge, de l'équipement installé et de tous les accessoires et composants qui y sont fixés.
• La station de charge peut supporter des équipements jusqu'à sa capacité de charge maximale de 45 kg (100 lb).
• Utilisez toujours des moyens de fixation appropriés pour l'installation sur des parpaings, du béton, des cloisons sèches
ou des montants en bois. Installez-le solidement au mur à l'aide d'un matériel approprié (non fourni).
AVERTISSEMENT : la surface d'appui doit pouvoir supporter en toute sécurité le poids combiné de la station de charge,
de l'équipement installé et de tous les accessoires et composants qui y sont fixés (voir 8.Spécifications pour plus
d'informations sur le poids et les dimensions de votre modèle).
• Pour les installations de bureau, les supports de montage livrés avec l'appareil peuvent également être utilisés pour
fixer la station de charge sur une surface de bureau.
2. Vue d'ensemble
Votre station de charge est une solution tout-en-un pour ranger, charger et synchroniser jusqu'à 16 appareils. Votre
station de charge peut être montée de manière pratique sur un mur ou être utilisée pour des installations fixes sur un
bureau ou au sol. Pour éviter le vol et l'altération de l'appareil, le boîtier de votre station de charge est équipé de portes
verrouillables en acier.
Explication des symboles :
ATTENTION : RISQUE DE DANGER
BORNE DE LIAISON PROTECTRICE
TENSION CA
AVERTISSEMENTS CONCERNANT LE MONTAGE MURAL : la surface et les montants muraux, ainsi que tout le
matériel de montage fourni par l'utilisateur, doivent pouvoir supporter le poids combiné de l'armoire et de tous les
équipements qui y seront installés. L'armoire peut supporter des équipements jusqu'à sa capacité de charge maximale
de 45 kg (100 lb).
Les trous de fixation murale sont espacés de 406 mm (16 po) à l'horizontale pour s'adapter à l'emplacement standard
des montants muraux. Il est conseillé de bien répartir le poids de l'armoire et de tous les équipements installés.
22
3. Identification des fonctionnalités
CSC16USB
1
Portes rabattables verrouillables
2
Étagères de rangement réglables (capacité de 16 appareils)
3
Panneau d'obturation (amovible)
4
Trous d'accès au cordon d'alimentation (1 de chaque côté)
5
Moraillon à cadenas (verrou fourni par l'utilisateur)
6
Trous d'acheminement du verrou de câble (verrou fourni par l'utilisateur)
7
Panneauarrièreavecfentesdemontagemuralenformedetroudeserrure(voir Section 5 pour plus d'informations).
Non montré :
chargeur/concentrateur USB
Cordons/fichesd'alimentationNEMA5-15(CSC16USB),
BS1363(CSCXB16USB)ou
Schuko(CSCXS16USB)
Clés
1
5
3
2
4
4
6
7
7

23
4. Configuration
Attention ! Lisez toutes les instructions et tous
les avertissements avant de commencer l'installation !
Avertissement : les stations de charge peuvent être très lourdes. N'essayez pas de déballer ou
de monter la station de charge sans assistance. Soyez extrêmement prudent lors de la
manutention de la station de charge et veillez à bien respecter toutes les instructions de
manutention et d'installation. N'essayez pas d'installer des équipements sans avoir
préalablement stabilisé la station de charge.
4.1 Réglage des séparateurs des étagères de rangement
4.2 Alimentation du chargeur/concentrateur USB
Votre station de charge est équipée
d'une étagère de rangement contenant
des séparateurs réglables pouvant
accueillir jusqu'à 16 appareils
électroniques personnels.
Retirez tous les appareils
électroniques personnels rangés sur
le plateau de l'étagère. Retirez
ensuite le panneau d'obturation en
insérant vos doigts dans les trous
gauche et droit, en le soulevant et en
le tirant vers l'extérieur
A
. Pour
retirer le plateau de l'armoire,
poussez le plateau vers l'avant pour
Une fois que le panneau d'obturation a été retiré comme indiqué à la section
4.1, trouvez la prise et le câble d'entrée de l'unité chargeur/concentrateur USB
situés dans le compartiment inférieur de la station de charge. Poussez ensuite
la fiche d'entrée dans l'un des trous d'accès au cordon d'alimentation situés de
chaque côté de l'armoire de la station de charge
A
(il est recommandé d'utiliser
le trou d'accès au cordon d'alimentation du même côté que le gestionnaire du
cordon d'alimentation). Branchez le cordon d'alimentation dans la prise murale
à 3 broches la plus proche, reliée à la terre.
Remarque : le cordon d'alimentation peut éventuellement passer par le panneau arrière
de la station de charge. Pour ce faire, retirez d'abord l'œillet en caoutchouc de l'un des
trous d'accès au cordon d'alimentation et fixez-le au trou d'acheminement du
verrou de câble à l'arrière de l'appareil (voir 3. Identification des caractéristiques
pour les emplacements d'acheminement).
A
4.3 Serrures des portes
Les portes rabattables sont équipées d'une serrure pouvant être actionnée à
l'aide des clés fournies.
B
C
1
2
A
le dégager du crochet de fixation, puis tirez le plateau vers le haut et vers l'extérieur. Une fois l'étagère enlevée, retirez
ou réorganisez les séparateurs en enfonçant les deux languettes qui les fixent à l'extrémité arrière
B
, puis repoussez-les
vers l'avant pour les désolidariser du plateau de l'étagère
C
. Répétez si nécessaire pour les autres séparations.
24
5. Chargeur/concentrateur USB 16 ports
• Le chargeur/concentrateur USB de qualité professionnelle charge et synchronise jusqu'à 16 appareils USB, notamment
les tablettes et smartphones iPad
®
, iPod
®
, iPhone
®
et Android™.
• Il fournit à chaque port USB un niveau de charge optimal pour un appareil particulier (jusqu'à 2,4 ampères).
• Il permet d'effectuer la synchronisation avec n'importe quel appareil conçu pour les communications de données USB,
par le biais d'un logiciel de gestion de fichiers compatible.
• Il synchronise les appareils Apple
®
via le logiciel iTunes
®
ou Apple Configurator.
• Le port mini-USB de mise à jour du micrologiciel permet d'effectuer de futures mises à jour logicielles pour prendre en
charge des appareils plus récents.
• Le boîtier 2U, montable en rack, peut être configuré pour des installations professionnelles, éducatives ou personnelles.
5.1 Caractéristiques du chargeur/concentrateur USB
A
PortsUSB2,4Aavecvoyants
lumineux(16autotal)
B
Portdesynchronisationpour
ordinateur
C
Portdemiseàniveaudurmware
L'étagère de rangement de la station de charge comporte 16 bagues anti-
traction qui empêchent les connecteurs des câbles USB de glisser par les
bagues
A
. En utilisant un câble USB blindé dont vous disposez ou fourni par le
fabricant de l'appareil, connectez le câble USB à l'appareil qui doit être chargé.
Faites ensuite passer l'extrémité du câble par la bague anti-traction de l'étagère
de rangement et connectez le connecteur USB à un port de chargement USB
B
. Répétez l'opération pour tous les appareils et fixez à nouveau sur l'appareil
le panneau d'obturation retiré à la section 4.1.
Tripp Lite propose des câbles individuels et des lots de 10 câbles pour les
appareils Apple® nécessitant des câbles USB vers 30 broches ou USB vers
Lightning™, ainsi que des câbles individuels et des lots de 10 câbles pour les appareils
USB 3.0 ou 2.0 nécessitant des câbles USB-A (mâle) vers 5 broches Micro B (mâle).
5.2 Connexion des appareils au concentrateur/chargeur USB
A
B
A
B
C
* Dispose d'un connecteur USB-A (mâle) réversible pour une installation plus simple.
Visitez tripplite.com pour plus d'informations sur notre sélection de câbles USB de haute qualité.
Typedecâble
Numéro de modèle
de câble individuel
Numéro de modèle
à 10 câbles
Connecteur Apple USB à 30 broches, 25,4 cm (10 po) M110-10N-BK M110-10N-BK-10
Connecteur Apple USB à 30 broches, 91,4 cm (3 pi) M110-003-WH —
Connecteur USB Apple vers connecteur Lightning 8 broches, 25,4 cm (10 po). M100-10N-BK M100-10N-BK-10
Connecteur USB Apple vers connecteur Lightning 8 broches, 91,4 cm (3 pi). M100-003-BK
M100-003-WH
—
Connecteur USB Apple vers connecteur Lightning 8 broches, 182,9 cm (6 pi). M100-006-BK
M100-006-WH
—
Connecteur USB Apple vers connecteur Lightning 8 broches, 304,8 cm (10 pi). M100-010-BK
M100-010-WH
—
USB 3.0 SuperSpeed A (mâle) vers Micro-B
5 broches (mâle), 30,5 cm (1 pi).
U326-001-BK U326-001-BK-10
USB 3.0 SuperSpeed A (mâle) vers Micro-B
5 broches (mâle), 91,4 cm (3 pi).
U326-003
U326-003-BK
—
USB 3.0 SuperSpeed A (mâle) vers Micro-B
5 broches (mâle), 304,8 cm (10 pi).
U326-010 —
USB 2.0 réversible A (mâle) vers Micro-B
5 broches (mâle), 30,5 cm (1 pi).
UR050-001* UR050-001-10*
USB 2.0 réversible A (mâle) vers Micro-B
5 broches (mâle), 91,4 cm (3 pi).
UR050-003*
UR050-003-WH*
—
USB 2.0 réversible A (mâle) vers Micro-B
5 broches (mâle), 182,8 cm (6 pi).
UR050-006*
UR050-006-SLIM*
—
USB 2.0 réversible A (mâle) vers Micro-B
5 broches (mâle), 304,8 cm (10 pi).
UR050-010* —

25
6. Montage mural
12”
16”
Pour le montage mural, vous aurez besoin de ce qui suit :
• Niveau
• Outils appropriés pour le montage mural
• Quincaillerie adaptée pour le montage mural (non fournie)
Avertissement:nepastenterdefixerlastationdechargeaumuravec
des appareils électroniques personnels à l'intérieur.
Le panneau arrière de l'armoire de la station de charge comporte 4 ouvertures
en forme de trous de serrure. Chaque serrure s'adapte à des boulons M5 ou
3/16". Chaque jeu de trous de serrure est centré à 40,6 cm (16") d'intervalle
horizontalement et à 30,5 cm (12") verticalement (voir le schéma du modèle
correspondant pour l'emplacement exact des trous de serrure).
À l'aide d'un niveau et d'un mètre ruban, prenez des mesures pour positionner
précisément vos surfaces de montage. Utilisez des fixations appropriées (non
fournies) pour bien fixer la station de charge au mur.
Remarque : la station de charge doit être installée par un technicien qualifié. Utilisez
des moyens de montage appropriés lors de l'installation sur bloc de béton, ciment,
cloison sèche ou montants en bois.
Avertissement : la surface d'appui doit pouvoir supporter en toute sécurité le
poids combiné de la station de charge, de l'équipement installé et de tous les
accessoires et composants qui y sont fixés. Voir Section 8. Spécifications pour plus
d'informations sur le poids et les dimensions de votre modèle.
7. Placement sur un bureau/au sol
AVERTISSEMENT : pour les applications de bureau et au sol, installez toujours la station de charge dans un endroit
structurellement sain avec une surface plane capable de supporter le poids de la station de charge, de tous les
équipements qui seront installés dans la station de charge et de tous les autres racks et/ou équipements qui seront
installés à proximité. N'essayez jamais de soulever ou d'installer la station de charge sans assistance. Voir Section8.
Spécifications pour plus d'informations sur la capacité de chargement nominale de la station de charge.
Remarque: les supports de montage livrés avec l'appareil peuvent également être utilisés pour fixer la station de charge sur une
surface de bureau.
5. Chargeur/concentrateur USB 16 ports
5.3 Connexion d'un ordinateur au chargeur/concentrateur USB
Outre le chargement des appareils, le chargeur/concentrateur USB est équipé d'une fonction de concentrateur qui
synchronise les appareils et leurs applications logicielles respectives par l'intermédiaire d'un ordinateur connecté. Pour
activer la fonction de concentrateur, utilisez le câble USB fourni pour connecter le connecteur USB-B au port de
synchronisation de l'ordinateur de l'appareil et le connecteur USB-A au port USB d'un ordinateur.
Remarque : lorsqu'une connexion informatique est établie et que plusieurs appareils sont connectés au chargeur/concentrateur USB,
le taux de charge diminue pendant la synchronisation et revient au taux de charge normal une fois celle-ci terminée.
Remarque : le port de mise à jour du micrologiciel nécessite une connexion mini-USB (câble non inclus). Pour télécharger les mises à
jour les plus récentes du micrologiciel, rendez-vous sur tripplite.com/support.
26
8. Caractéristiques techniques
Modèles CSC16USB,CSCXB16USB,CSCXS16USB
Dimensions (H x l x P) 477,52 x 770,382 x 513,08 mm/18,8 x 30,33 x 20,20 po
Poids 39 kg/85,98 lb
Capacité de charge* 45,4 kg/100 lb
Ports pour chargeur/mandrin 16 x USB 2.0 A (femelle)
1 x USB 2.0 B (femelle)
1 x USB 2.0 Mini (femelle)
Vitesse de transmission Jusqu'à 480 Mbit/s
Alimentation requise Entrée : 110-120 V, 2,5 A, 50/60 Hz (CSC16USB) ou 230 V, 2,5 A, 50 Hz (CSCXB16USB,
CSCXS16USB)
Sortie : 5,0 V, 2,4 A max. (par port USB)
Température de fonctionnement 0 à 30 °C / 32 à 86 °F
Taux d'humidité en fonctionnement 5 à 95 %, sans condensation
Matériau du rack Métal
* La capacité de charge totale d'un montage mural nécessite une surface de montage capable de supporter la charge totale de la station de charge et de
touslescomposantsconnectés.Lesspécicationspeuventêtremodiéessanspréavis.
9. Stockage, entretien et nettoyage
Stockage
La station de charge doit être stockée dans un environnement intérieur contrôlé à l'abri de l'humidité, des températures
extrêmes, des liquides et des gaz inflammables, des contaminants conducteurs, de la poussière et de la lumière directe
du soleil. Conservez la baie dans son conteneur d'expédition d'origine, si cela est possible.
Entretien
La station de charge est couverte par la garantie décrite dans le présent manuel. Pour plus de détails, veuillez visiter le
site
tripplite.com/support.
Nettoyage
Avant tout nettoyage, éteignez toujours la station de charge en la débranchant du secteur. Essuyez l'appareil à l'aide
d'un chiffon humide, propre et non pelucheux. Laissez sécher avant de rebrancher l'appareil.
Remarque : n'utilisez pas de chiffons abrasifs, solvants ou aérosols pour nettoyer la station de charge : cela pourrait endommager
l'appareil.
10. Roulettes et poignée en option
Pour les applications nécessitant une mobilité accrue, un kit d'accessoires avec roulettes et poignées en option
(modèle : CSHANDLEKIT2) contient deux roulettes pivotantes/bloquantes, deux roulettes uniquement pivotantes et une
poignée qui se fixe sur le dessus de la station de charge. Consultez tripplite.com pour plus d'informations.

27
Garantie limitée de 2 ans
Le Vendeur garantit que ce produit, s'il est utilisé conformément à toutes les instructions applicables, est exempt de défauts d'origine en matériaux et
en fabrication pendant une période de 2 ans à compter de la date d'achat initiale. Si le produit s'avère défectueux en raison d'un défaut de matériau ou
de fabrication au cours de cette période, le Vendeur réparera ou remplacera le produit, à sa seule discrétion.
CETTE GARANTIE N'EST PAS APPLICABLE EN CAS D'USURE NORMALE OU DE DOMMAGES RÉSULTANT D'ACCIDENTS, DE MAUVAISE
UTILISATION, DE MAUVAIS TRAITEMENT OU DE NÉGLIGENCE. LE VENDEUR N'ACCORDE AUCUNE AUTRE GARANTIE EXPRESSE QUE LA
GARANTIE EXPRESSÉMENT DÉCRITE DANS LE PRÉSENT DOCUMENT. SAUF DANS LA MESURE OÙ CELA EST INTERDIT PAR LA LOI EN
VIGUEUR, TOUTES LES GARANTIES IMPLICITES, Y COMPRIS TOUTES LES GARANTIES DE QUALITÉ MARCHANDE OU D'ADÉQUATION,
SONT LIMITÉES EN DURÉE À LA PÉRIODE DE GARANTIE ÉTABLIE CI-DESSUS ; D'AUTRE PART, CETTE GARANTIE EXCLUT EXPRESSÉMENT
TOUS LES DOMMAGES ACCIDENTELS OU CONSÉCUTIFS. (Certains états n'autorisent pas les limitations sur la durée d'une garantie implicite, et
certains états n'autorisent pas l'exclusion ou la limitation des dommages accessoires ou indirects, de sorte que les limitations ou exclusions ci-dessus
peuvent ne pas vous concerner. Cette garantie vous octroie des droits légaux spécifiques et vous pouvez bénéficier d'autres droits qui varient d'une
juridiction à l'autre).
AVERTISSEMENT : les utilisateurs individuels doivent s'assurer de déterminer, avant toute utilisation, si cet appareil est adapté, adéquat ou sûr pour
l'utilisation prévue. Dans la mesure où les applications individuelles sont soumises à d'importantes variations, le fabricant ne formule aucune
déclaration et ne donne aucune garantie quant à l'adaptation ou à l'adéquation de ces appareils pour des applications spécifiques.
Numéro d'identification de conformité aux règlements
Pour des raisons d'identification et de conformité aux règles de certification, un numéro de série unique a été attribué à votre produit Tripp Lite. Le
numéro de série est indiqué sur l'étiquette de la plaque signalétique du produit, où vous pouvez aussi trouver toutes les marques de certification et les
informations nécessaires. Pour toute demande d'informations relatives à la conformité de ce produit, veuillez toujours mentionner le numéro de série.
Le numéro de série ne doit pas être confondu avec le nom marketing ou le numéro de modèle du produit.
Informations de conformité DEEE pour les clients et les recycleurs Tripp Lite (Union européenne)
Dans le cadre de la directive sur les Déchets d'équipements électriques et électroniques (DEEE) et des réglementations d'application, lorsqu'un
consommateur achète un équipement électrique ou électronique neuf auprès de Tripp Lite, il est habilité à :
• Envoyer l'équipement usagé pour recyclage sur la base d'un équipement équivalent en nombre et en type (cela varie en fonction du pays)
• Renvoyer le nouvel équipement pour recyclage lorsqu'il devient un déchet en fin de vie
Tripp Lite mène une politique d'amélioration constante. Les caractéristiques peuvent être modifiées sans préavis. Les photos et illustrations peuvent
légèrement différer des produits réels.
11. Garantie
TrippLite.Eaton.com/support
23-07-803 934754_RevB

28
Содержание
1.
Важные указания по технике безопасности
29
2. Краткое описание 30
3. Схема расположения функциональных 31
элементов
4. Начальная установка 32
4.1Регулировкаположенияразделительных 32
перегородок
4.2ПодключениезарядногоустройстваUSB/ 32
USB-концентраторакисточникупитания
4.3Дверныезамки 32
5. 16-портовое зарядное устройство USB / 33
USB-концентратор
5.1ВозможностизарядногоустройстваUSB/ 33
USB-концентратора
5.2Подключениеустройствкзарядному 33
устройствуUSB/USB-концентратору
5.3Подключениекомпьютеракзарядному 34
устройствуUSB/USB-концентратору
6. Настенный монтаж 34
7. Настольное/напольное размещение 34
8. Технические характеристики 35
9. Хранение, техническое обслуживание и 35
очистка
35
36
1
10
19
10. Опциональные ролики и рукоятка
11. Гарантия
English
Español
Français
Deutsch
37
Зарядная станции для
устройств USB
16-портовые модели: CSC16USB, CSCXB16USB, CSCXS16USB
(Номерсерии:AG-0738)
Руководство пользователя
TrippLite.Eaton.com/support
Охраняетсяавторскимправом©2023TrippLite.Всеторговыезнакиявляютсяисключительнойсобственностьюсвоихсоответствующихвладельцев.

29
1. Важные указания по технике безопасности
СОХРАНИТЕ НАСТОЯЩИЕ УКАЗАНИЯ
Внастоящемруководствесодержатсяуказанияипредупреждения,которыенеобходимособлюдатьвпроцессе
установкииэксплуатацииописанноговнемизделия.Несоблюдениеэтихуказанийипредупрежденийможет
привестиканнулированиюгарантииипричинитьматериальныйущербиливредздоровьюлюдей.
Зарядное устройство USB / USB-концентратор:
• Подключитеустройствокрозетке,соответствующейпринятымввашейстранестроительнымнормами
надлежащимобразомзащищеннойотизбыточныхтоков,короткихзамыканийизамыканийназемлю.
• Электрическаярозетка,черезкоторуюосуществляетсяэлектропитаниеоборудования,должнабыть
установленавлегкодоступномместевблизиустройства.
• Штепсельныйразъемпеременноготоканашнуреэлектропитанияслужитвкачествеустройствазащитного
отключения.
• Подключайтеустройствoнепосредственнокнадлежащимобразомзаземленнойрозеткесетипеременноготока.
• Непеределывайтеэлектрическуювилкуинеиспользуйтепереходник,необеспечивающийзаземления.
• Вслучаевозникновениялюбойизописанныхнижеситуацийоформитевызовтехническогоспециалистадля
проверкивашегооборудования:
• Попаданиеоборудованияподвоздействиевлаги
• Падениеоборудованиясвысотыилиегомеханическоеповреждение
• Появлениеявныхпризнаковнеисправностиоборудования
• Ненадлежащаяработаилиотказвработеоборудованиясогласноуказаниям,изложеннымвРуководстве
пользователя
• Нерекомендуетсяиспользованиеданногооборудованиявсистемахжизнеобеспечения,гдееговыходизстроя
предположительноможетпривестикперебоямвработеоборудованияжизнеобеспеченияиливзначительной
мереснизитьегобезопасностьилиэффективность.
Корпус зарядной станции:
• Заряднаястанциядолжнанаходитьсявпомещениисконтролируемыммикроклиматомвдалиотисточников
влаги,экстремальныхтемператур,воспламеняющихсяжидкостейигазов,электропроводныхзагрязнителей,
пылиипрямогосолнечногосвета.
• Совсехсторонзаряднойстанциинеобходимообеспечитьдостаточносвободногопространствадляего
надлежащегопроветривания.Незагораживайтеиненакрывайтевнешниевентиляционныеотверстиякорпуса
заряднойстанции,атакженевставляйтевнихкакие-либопредметы.
• Дляобеспечениямаксимальнойпроизводительностиподдерживайтевпомещениитемпературувоздухав
диапазонеот0°Cдо30°C.
• Неснимайтесзаряднойстанциикакие-либопредупреждения,предостереженияилиописательныеэтикетки.
• Заряднаястанцияявляетсякрайнетяжеловесной.Приперемещениизаряднойстанциисоблюдайте
осторожность.Непытайтесьраспаковыватьилимонтироватьееводиночку.Дляперемещениязарядной
станциивтранспортировочномконтейнереиспользуйтемеханическоеустройствотипавилочногопогрузчика
иливилочнойгидравлическойтележки.
• Некладитенакорпусемкостисжидкостямиилипредметы,располагаемыеодиннадругом.
• Осмотритетранспортировочныйконтейнеризаряднуюстанциюнапредметналичияповреждений,полученных
притранспортировке.Непользуйтесьзаряднойстанциейвслучаеееповреждения.
• Приразрезанииупаковочныхматериаловсоблюдайтеосторожность.Этоможетпривестикнанесениюцарапин
наповерхностьзаряднойстанции,чтопредставляетсобойущерб,непокрываемыйдействующейгарантией.
• Всеупаковочныематериалыследуетсохранитьдляпоследующегоиспользования.Повторнаяупаковкаи
транспортировказаряднойстанциибезиспользованияоригинальныхупаковочныхматериаловможетпривести
кповреждениюизделия,котороеповлечетзасобойаннулированиедействующейгарантии.

30
1. Важные указания по технике безопасности
Для настенных и настольных систем:
• Установказаряднойстанциидолжнапроизводитьсятолькоквалифицированнымтехническимспециалистом.
• Передначаломмонтажаубедитесьвтом,чтоповерхностьстеныможетсзапасомвыдерживатьсуммарную
нагрузку,создаваемуюзаряднойстанцией,хранящимсяоборудованиемивсемивходящимивкомплект
деталямиоснасткиидругимикомпонентами.
• Заряднаястанцияможетвыдерживатьоборудованиемассойдо45кг.
• Прикреплениикбетону,шлакобетону,гипсокартонуилистойкамдеревянногокаркасаобязательноиспользуйте
соответствующиемонтажныеприспособления.Надежноустановитенастенуспомощьюнадлежащейоснастки
(вкомплектпоставкиневходит).
ВНИМАНИЕ!Опорнаяповерхностьдолжнасзапасомвыдерживатьсуммарнуюнагрузку,создаваемуюзарядной
станцией,находящимсявнейоборудованиемивсемивходящимивкомплектдеталямиоснасткиидругими
компонентами(вРазделе8.Техническиехарактеристикиприводитсяболееподробнаяинформацияомассеи
габаритныхразмерахвашеймодели).
• Вслучаенастольнойустановкидлякреплениязаряднойстанциикстолешницемогуттакжеиспользоваться
монтажныекронштейны,поставляемыевкомплектесустройством.
2. Краткое описание
Приобретеннаявамизаряднаястанцияпредставляетсобойуниверсальноеустройстводляхранения,зарядкии
синхронизацииустройстввколичестведо16шт.Заряднаястанцияможетудобномонтироватьсянастены,а
такжеприспосабливатьсядлястационарногоразмещениянастолеилинаполу.Воизбежаниехищенияустройств
илинесанкционированногодоступакнимкорпусвашейзаряднойстанцииоснащензапирающимисястальными
дверцами.
Условные обозначения
ВНИМАНИЕ!ОПАСНОСТЬ
ЗАЩИТНАЯКЛЕММА
НАПРЯЖЕНИЕПЕРЕМЕННОГОТОКА
ВНИМАНИЕ!Примонтаженастенуповерхностьстены,элементыстеновогокаркасаивсемонтажные
приспособления,которыевынамереваетесьиспользовать,должнывыдерживатьвесшкафаивсего
установленноговнемоборудования.Шкафможетвыдерживатьоборудованиемассойдо45кг.
Отверстиядлянастенногомонтажаимеютшаг406ммсгоризонтальнымрасположением,чтообеспечивает
возможностькреплениякэлементамстандартногостеновогокаркаса.Вцеляхбезопасностирекомендуется
распределятьвесшкафаивсегоустановленноговнемоборудования.

31
3. Схема расположения функциональных элементов
CSC16USB
1
Запираемыедверцыразрезнойконструкции
2
Регулируемыеполкидляхранения(вмещаютдо16устройств)
3
Панель-заглушка(съемная)
4
Отверстиядляшнурапитания(по1скаждойстороны)
5
Петлядлянавесногозамка(навеснойзамокприобретаетсяпользователем)
6
Отверстиядляблокировкикабелей(блокировкаприобретаетсяпользователем)
7
Задняяпанельспрорезямидлянастенногомонтажа(подробнеесм.вРазделе5)
На рисунке не показаны:
ЗарядноеустройствоUSB/USB-концентратор:
РазъемыNEMA5-15(мод.CSC16USB),
BS1363(мод.CSCXB16USB)или
Schuko(мод.CSCXS16USB)
Ключи
1
5
3
2
4
4
6
7
7
32
4. Начальная установка
Внимание! Перед установкой внимательно ознакомьтесь
со всеми указаниями и предупреждениями!
Внимание! Зарядные станции могут быть крайне тяжеловесными. Не пытайтесь распаковывать или
монтировать зарядную станцию в одиночку. Будьте предельно осторожны при перемещении
зарядной станции и обязательно следуйте всем указаниям по обращению и установке. Не
производите установку оборудования в зарядную станцию до обеспечения ее устойчивости.
4.1 Регулировка положения разделительных перегородок
4.2 Подключение зарядного устройства USB / USB-концентратора к источнику
питания
Приобретеннаявамизарядная
станциякомплектуетсяполкойдля
хранениярегулируемых
разделительныхперегородок,на
которойможетразмещатьсядо16
персональныхэлектронныхустройств.
Снимитевсеперсональные
электронныеустройства,хранящиеся
наполке.Затемснимитепанель-
заглушку,вставивпальцывотверстия
слеваисправа,поднявпанель-
заглушкувверхивытягиваяеенаружу
A
. Дляизвлеченияполкиизкорпуса
продвиньтееевпереддлявыводаиз
зацеплениясмонтажнойзащелкой,а
затемпотянитееевверхинаружу.
Послеснятияпанели-заглушки,какпоказановРазделе4.1,найдитевходнойразъеми
кабельзарядногоустройстваUSB/концентратора,находящиесявнижнемотсеке
заряднойстанции.Затемпроденьтевходнойразъемчерезодноизотверстийдля
шнурапитания,расположенныхслюбойстороныкорпусазаряднойстанции
A
(для
этойцелирекомендуетсяиспользоватьотверстиедляшнурапитания,расположенное
стойжестороны,чтоиприспособлениедляразмещенияшнурапитания).Вставьте
шнурпитаниявближайшую3-полюснуюнастеннуюрозеткусзаземлением.
Примечание. При желании шнур питания может быть проложен через заднюю
панель зарядной станции. Для этого сначала снимите резиновую втулку с любого
отверстия для шнура питания и прикрепите ее к отверстию для фиксации
кабеля с тыльной стороны устройства (в Разделе 3. Схема расположения
функциональных элементов приведены места маршрутизации).
A
4.3 Дверные замки
Дверцыразрезнойконструкцииснабженызамкомсключамивкомплекте.
B
C
1
2
A
Послеснятияполкиснимитеилипереставьтеразделительныеперегородки,надавивнаобаязычка,обеспечивающие
креплениеперегородкикзаднемуконцу
B
,азатемнадавитенаразделительвпереддляегоотсоединенияотполки
C
.При
необходимостиповторитевышеуказанныедействиядлядругихразделителейполок.

33
5. 16-портовый зарядный USB-концентратор
•ЗарядноеустройствоUSB/USB-концентраторпрофессиональногоклассаобеспечиваетзарядкуисинхронизациюдо16
USB-устройств,включаяiPad
®
,iPod
®
,iPhone
®
,атакжепланшетыисмартфоныAndroid™.
•Обеспечиваетоптимальныйуровеньзарядноготока(до2,4А)длякаждогопортаUSBвзависимостиотподключенногок
немуустройства.
•Позволяетосуществлятьсинхронизациюслюбымустройством,предназначеннымдляобменаданнымичерезпортUSB,за
счетсовместимойпрограммыуправленияфайлами.
•СинхронизируетустройстваApple
®
спомощьюпрограммногообеспеченияiTunes
®
илиAppleConfigurator.
•Наличиепортаmini-USBдляобновленияпрошивкиобеспечиваетвозможностьобновленияпрограммногообеспеченияпод
устройства,которыемогутбытьвыпущеныкогда-либовбудущем.
•Монтируемыйвстойкукорпусвысотой2Uимеетвозможностьподгонкиподоборудованиеспециализированного,
образовательногоилиперсональногоназначения.
5.1 Возможности зарядного устройства USB / USB-концентратора
A
USB-портыдляподключения
устройств(до16шт.)со
светодиоднымииндикаторами,
обеспечивающиезарядныйтокдо
2,4А
B
Портдлясинхронизациис
компьютером
C
Портдляобновленияпрошивки
Полкадляхранениязаряднойстанцииимеет16втулокскомпенсатораминатяжения,
предотвращающихпроскальзываниеразъемовUSB-кабелячерезвтулку
A
.
ПодключитекабельUSB,приобретенныйотдельноилипоставляемыйпроизводителем
устройства,кзаряжаемомуустройству.Затемпротянитеконецкабелячерезвтулкус
компенсаторомнатяжениянаполкеивставьтеUSB-разъемвзарядныйпортUSB
B
.
Повторитеэтидействиядлявсехустройствиприкрепитеобратнокустройствупанель-
заглушку,снятуюсогласноинструкциямвРазделе4.1.
КомпанияTrippLiteпредлагаетиндивидуальныекабелиикабеливупаковкепо10
шт.дляустройствAppleсиспользованиемкабелейсразъемамиUSBи
30-контактнымиилиUSBиLightning™,атакжеиндивидуальныекабелиикабелив
упаковкепо10шт.ДляустройствсразъемамиUSB3.0или2.0сиспользованием
кабелейсразъемамиUSB-A(штекер)и5-контактнымMicroB(штекер).
Типкабеля
Номермодели
отдельногокабеля
Номермоделикабеля
вупаковкепо10шт.
ШнурсразъемомAppleUSBи30-контактнымразъемом,
длина0,25м
M110-10N-BK M110-10N-BK-10
ШнурсразъемомAppleUSBи30-контактнымразъемом,
длина0,9м
M110-003-WH —
ШнурсразъемомAppleUSBи8-контактнымразъемом
Lightning,длина0,25м
M100-10N-BK M100-10N-BK-10
ШнурсразъемомAppleUSBи8-контактнымразъемом
Lightning,длина0,9м
M100-003-BK
M100-003-WH
—
ШнурсразъемомAppleUSBи8-контактнымразъемом
Lightning,длина1,8м
M100-006-BK
M100-006-WH
—
ШнурсразъемомAppleUSBи8-контактнымразъемом
Lightning,длина3м
M100-010-BK
M100-010-WH
—
ШнурсразъемамиUSB3.0SuperSpeedA(штекер)и
5-контактнымразъемомMicro-B(штекер),длина0,3м
U326-001-BK U326-001-BK-10
ШнурсразъемамиUSB3.0SuperSpeedA(штекер)и
5-контактнымразъемомMicro-B(штекер),длина0,9м
U326-003
U326-003-BK
—
ШнурсразъемамиUSB3.0SuperSpeedA(штекер)и
5-контактнымразъемомMicro-B(штекер),длина3м
U326-010 —
ШнурсразъемомUSB2.0ReversibleA(штекер)и
5-контактнымразъемомMicro-B(штекер),длина0,3м
UR050-001* UR050-001-10*
ШнурсразъемомUSB2.0ReversibleA(штекер)и
5-контактнымразъемомMicro-B(штекер),длина0,9м
UR050-003*
UR050-003-WH*
—
ШнурсразъемомUSB2.0ReversibleA(штекер)и
5-контактнымразъемомMicro-B(штекер),длина1,8м
UR050-006*
UR050-006-SLIM*
—
ШнурсразъемомUSB2.0ReversibleA(штекер)и
5-контактнымразъемомMicro-B(штекер),длина3м
UR050-010* —
* Оснащается двусторонним разъемом USB-A (штекер) для упрощения процесса установки.
Болееподробнаяинформацияопредлагаемомнамиассортиментекабелейвысшего
качестваUSBпредставленанасайтеtripplite.com.
5.2 Подключение устройств к зарядному устройству USB / USB-концентратору
A
B
A BC
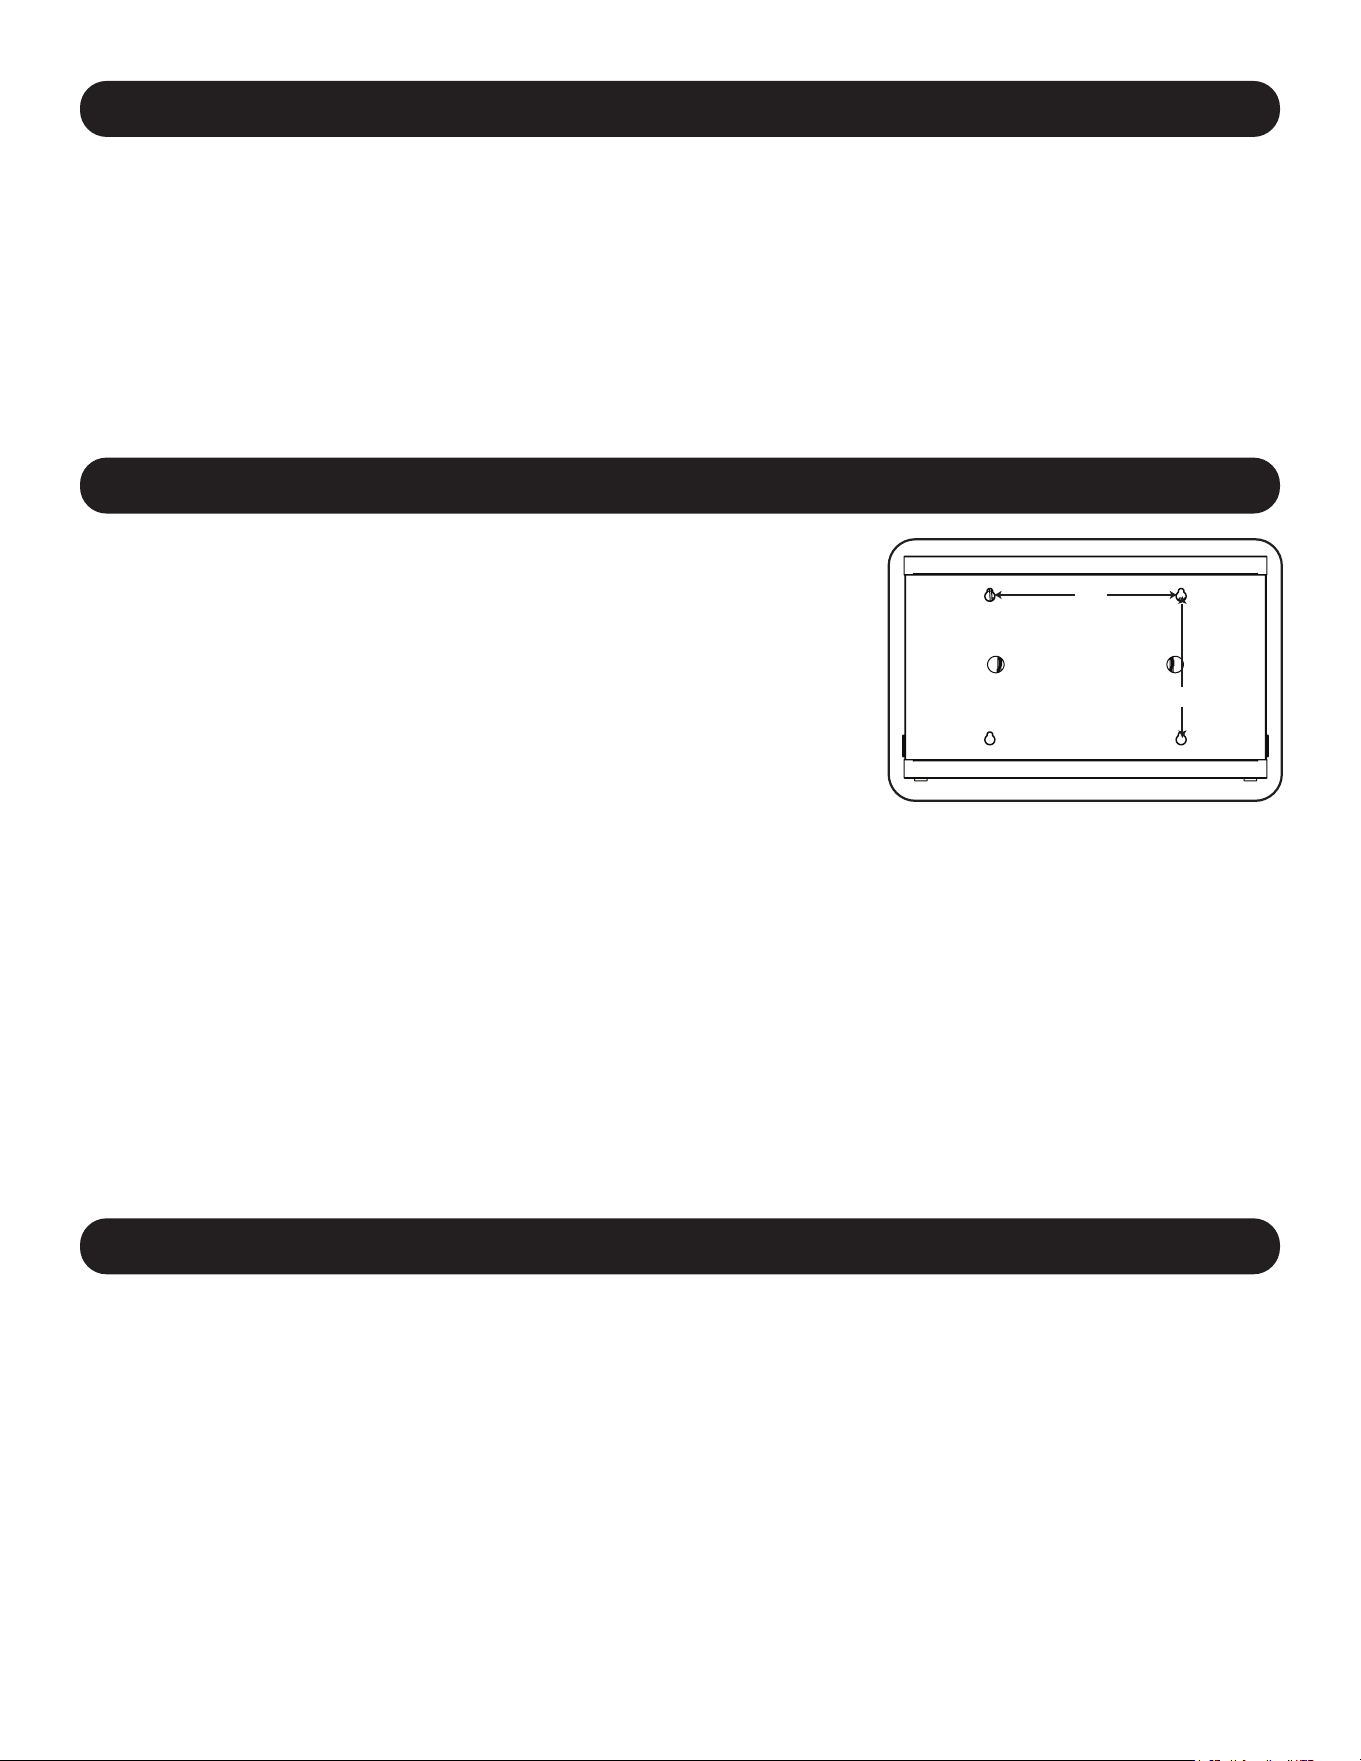
34
6. Настенный монтаж
12”
16”
Длянастенногомонтажапотребуются:
• Уровень
• Инструментыдлянастенногомонтажа
• Оснасткадлянастенногомонтажа(вкомплектпоставкиневходит)
Внимание!Непытайтеськрепитьзаряднуюстанциюс
установленнымивнейперсональнымиэлектроннымиустройствами.
Набоковойпанеликорпусазаряднойстанцииимеются4прорези.Каждое
монтажноеотверстиерассчитанонаболтM5.Межосевоерасстояние
междупрорезямисоставляет406,4ммпогоризонталии304,8ммпо
вертикали(точноерасположениепрорезейпоказанонасхеме
соответствующеймодели).
Спомощьюуровняирулеткиследуетточнонаметитьместакрепления.
Длякреплениязаряднойстанциикстенеиспользуйтеподходящиедля
этойцеликрепежныедетали(вкомплектпоставкиневходят).
Примечание. Установка зарядной станции должна производиться
квалифицированным техническим специалистом. При креплении к бетону,
шлакобетону, гипсокартону или стойкам деревянного каркаса используйте
соответствующие монтажные приспособления.
Внимание! Опорная поверхность должна с запасом выдерживать
суммарную нагрузку, создаваемую зарядной станцией, находящимся в ней
оборудованием и всеми входящими в комплект деталями оснастки и
другими компонентами. В Разделе 8. Технические характеристики
приводится более подробная информация о массе и габаритных размерах
вашей модели.
7. Настольное/напольное размещение
ВНИМАНИЕ!Принастольноминапольноммонтажезаряднаястанцияобязательнодолжнаустанавливатьсяв
конструкционнопрочномместесровнойповерхностью,способнойвыдерживатьвессамойзаряднойстанции,
всегооборудования,котороебудетустановленовнутринее,илюбыхдругихшкафови/илиоборудования,
которыебудутустановленывблизинее.Нивкоемслучаенепытайтесьизвлекатьзаряднуюстанциюизупаковки
илиустанавливатьеебезполноценнойпомощи.ВРазделе8.Техническиехарактеристикиприводитсяболее
подробнаяинформацияовесеигабаритныхразмерахзаряднойстанции.
Примечание. Для крепления зарядной станции к настольной поверхности могут также использоваться монтажные
кронштейны, поставляемые в комплекте с устройством.
5. 16-портовый зарядный USB-концентратор
5.3 Подключение компьютера к зарядному устройству USB / USB-концентратору
Помимозарядкиустройств,зарядноеустройствоUSBснабженофункциейконцентратора,синхронизирующегоустройствасих
соответствующимипрограммнымиприложениямичерезподключенныйкомпьютер.Длявключенияфункцииконцентратора
вставьтеразъемUSB-BпоставляемоговкомплектеUSB-кабелявпортсинхронизациикомпьютераустройства,аразъем
USB-A—вUSB-порткомпьютера.
Примечание. При установлении соединения с компьютером и подключении нескольких устройств к зарядному устройству
USB/USB - концентратору скорость зарядки снижается во время синхронизации и восстанавливается до нормального
уровня после ее завершения.
Примечание. Порт для обновления прошивки требует подключения через разъем mini-USB (кабель в комплект поставки
не входит). Для загрузки последних обновлений прошивки перейдите на страницу tripplite.com/support.
35
8. Технические характеристики
Модели CSC16USB,CSCXB16USB,CSCXS16USB
Размеры(ВxШxГ) 477,52x770,382x513,08мм
Массаизделия 39кг
Допустимаянагрузка* 45,4кг
Портызарядногоустройства/
концентратора
USB2.0A(гнездо)―16шт.
USB2.0B(гнездо)―1шт.
USB2.0Mini(гнездовой)―1шт.
Скоростьпередачиданных До480Мбит/с
Требованиякэлектропитанию Вход:110-120В,2,5А,50/60Гц(CSC16USB)или230В,2,5А,50Гц(CSCXB16USB,
CSCXS16USB)
Выход:неболее5,0В,2,4А(накаждыйпортUSB)
Диапaзoнрабочихтемператур От0°до30°C
Рабочийдиапазонвлажности Отн.влажностьот5до95%,безобразованияконденсата
Материалкорпуса Металл
* Полнаянесущаяспособностьпринастенноммонтажетребуетналичиямонтажнойповерхности,способнойвыдерживатьполнуюнагрузку,
создаваемуюзаряднойстанциейивсемиподключеннымикнейкомпонентами.Возможноизменениетехническиххарактеристикбез
последующегоуведомления.
9. Хранение, техническое обслуживание и очистка
Хранение
Корпусдолженнаходитьсявпомещениисконтролируемыммикроклиматомвдалиотисточниковвлаги,
экстремальныхтемператур,воспламеняющихсяжидкостейигазов,электропроводныхзагрязнителей,пылии
прямогосолнечногосвета.Повозможностихранитекорпусвегозаводскойтранспортнойупаковке.
Техническое обслуживание
Накорпусраспространяетсядействиеограниченнойгарантии,условиякоторойизложенывнастоящем
руководстве.Болееподробнаяинформацияпредставленанастранице
tripplite.com/support.
Очистка
Передочисткойнеобходимовыключитьзаряднуюстанцию,отсоединивееотисточникапеременноготока.При
необходимостипротритеустройствочистойбезворсовойтканьюводойипротритеее.Передподключением
устройствакисточникупитанияэтиповерхностидолжныполностьювысохнуть.
Примечание. Для очистки зарядной станции не используйте абразивные салфетки, растворители или аэрозольные
распылители; это может привести к повреждению устройства.
10. Опциональные ролики и рукоятка
Длясистем,требующихповышенноймобильности,опциональныйкомплектроликовсрукояткой(модель
CSHANDLEKIT2)включаетвсебядвашарнирныхроликасблокировочнымиприспособлениями,двашарнирных
роликабезблокировочныхприспособленийирукоятку,котораякрепитсякверхнейпанелизаряднойстанции.
Болееподробнаяинформацияпредставленанасайтеtripplite.com.

36
Ограниченная гарантия сроком 2 года
Продавецгарантируетотсутствиеизначальныхдефектовматериалаилиизготовлениявтечение2летсмоментапервойпокупкиданного
изделияприусловииегоиспользованиявсоответствиисовсемиприменимымикнемууказаниями.Вслучаепроявлениякаких-либодефектов
материалаилиизготовлениявтечениеуказанногопериодаПродавецосуществляетремонтилизаменуданногоизделияисключительнопо
своемуусмотрению.
ДЕЙСТВИЕНАСТОЯЩЕЙГАРАНТИИНЕРАСПРОСТРАНЯЕТСЯНАСЛУЧАИЕСТЕСТВЕННОГОИЗНОСАИЛИПОВРЕЖДЕНИЯВРЕЗУЛЬТАТЕ
АВАРИИ,НЕНАДЛЕЖАЩЕГОИСПОЛЬЗОВАНИЯ,НАРУШЕНИЯПРАВИЛЭКСПЛУАТАЦИИИЛИХАЛАТНОСТИ.ПРОДАВЕЦНЕПРЕДОСТАВЛЯЕТ
НИКАКИХЯВНОВЫРАЖЕННЫХГАРАНТИЙЗАИCКЛЮЧЕНИЕМПРЯМОИЗЛОЖЕННОЙВНАCTОЯЩЕМДОКУМЕНТЕ.ЗАИСКЛЮЧЕНИЕМ
СЛУЧАЕВ,ЗАПРЕЩЕННЫХДЕЙСТВУЮЩИМЗАКОНОДАТЕЛЬСТВОМ,ВСЕПОДРАЗУМЕВАЕМЫЕГАРАНТИИ,ВКЛЮЧАЯВСЕГАРАНТИИ
ПРИГОДНОСТИДЛЯПРОДАЖИИЛИИСПОЛЬЗОВАНИЯПОНАЗНАЧЕНИЮ,ОГРАНИЧЕНЫПОПРОДОЛЖИТЕЛЬНОСТИДЕЙСТВИЯ
ВЫШEУКАЗАННЫМГАРАНТИЙНЫМСРОКОМ;КРОМЕТОГО,ИЗНАСТОЯЩЕЙГАРАНТИИЯВНЫМОБРАЗОМИСКЛЮЧАЮТСЯВСЕПОБОЧНЫЕ,
СЛУЧАЙНЫЕИКОСВЕННЫЕУБЫТКИ.(Внекоторыхштатахнедопускаетсявведениеограниченийнапродолжительностьдействиятехилииных
подразумеваемыхгарантий,авнекоторых—исключениеилиограничениеразмерапобочныхиликосвенныхубытков.Вэтихслучаях
вышеизложенныеограниченияилиисключениямогутнаваснераспространяться.Настоящаягарантияпредоставляетконкретныеюридические
права,анабордругихправможетбытьразличнымвзависимостиотюрисдикции).
ВНИМАНИЕ!Доначалаиспользованияданногоустройствапользовательдолженубедитьсявтом,чтооноявляетсяпригодным,
соответствующимилибезопаснымдляпредполагаемогоприменения.Всвязисбольшимразнообразиемконкретныхприменений
производительнедаеткаких-либозаверенийилигарантийотносительнопригодностиданныхизделийдлякакого-либоконкретного
примененияилиихсоответствиякаким-либоконкретнымтребованиям.
Идентификационные номера соответствия нормативным требованиям
ВцеляхсертификациинасоответствиенормативнымтребованиямиопознаванияприобретенномувамиизделиюмаркиTrippLiteприсвоен
уникальныйсерийныйномер.Серийныйномеррасполагаетсяназаводскойтабличкевместесовсеминеобходимымиотметкамиоприемкеи
прочейинформацией.Призапросеинформацииосоответствииданногоизделиянормативнымтребованиямобязательноуказывайтеего
серийныйномер.Номерсериинеследуетпутатьсторговымнаименованиемизделияилиномеромегомодели.
Информация по выполнению требований Директивы WЕЕЕ для покупателей и переработчиков
продукции компании Tripp Lite (являющихся резидентами Eврoпейского союза)
СогласноположениямДирективыобутилизацииотходовэлектрическогоиэлектронногооборудования(WЕЕЕ)иисполнительных
распоряженийпоееприменению,припокупкепотребителяминовогоэлектрическогоилиэлектронногооборудованияпроизводства
компанииТrippLiteониполучаютправона:
• Продажустарогооборудованияпопринципу"одинзаодин"и/илинаэквивалентнойоснове(взависимостиотконкретнойстраны)
• Отправкуновогообoрудованиянапереработкупослеокончательнойвыработкиегоресурса
КомпанияTrippLiteпостоянносовершенствуетсвоюпродукцию.Bсвязисэтимвозможноизменениетехническиххарактеристикбез
предварительногоуведомления.Внешнийвидреальныхизделийможетнесколькоотличатьсяотпредставленногонафотографияхииллюстрациях.
11. Гарантия
TrippLite.Eaton.com/support
23-07-803934754_RevB

37
Inhalt
1. Wichtige Sicherheitshinweise 38
2. Überblick 39
3. Eigenschaften 40
4. Einrichten 41
4.1 Justieren der Regal-Trennwände 41
4.2 Stromversorgung des 41
USB-Ladegeräts/Hub-Einheit
4.3 Türverriegelungen 41
5. 16-Port USB-Ladegerät/Hub 42
5.1 USB-Ladegerät-/Hub-Funktionen 42
5.2 Anschließen von Geräten an das 42
USB-Ladegerät/Hub
5.3 Anschließen eines Computers an das 43
USB-Ladegerät/Hub
6. Wandmontage 43
7. Desktop-/Boden-Platzierung 43
8. Technische Daten 44
9. Lagerung, Wartung und Reinigung 44
10. Optionales Zubehör: Rollen und Griff 44
11. Garantie 45
English 1
Español 10
Français 19
Русский 28
USB-Ladestationen
16-Port-Modelle: CSC16USB, CSCXB16USB, CSCXS16USB
(Seriennummer:AG-0738)
Bedienungsanleitung
TrippLite.Eaton.com/support
Copyright © 2023 Tripp Lite. Alle Warenzeichen sind alleiniges Eigentum des jeweiligen Inhabers.

38
1. Wichtige Sicherheitshinweise
BITTE BEWAHREN SIE DIESE ANLEITUNG AUF
Diese Betriebsanleitung enthält Anweisungen und Warnhinweise, die bei Installation und Betrieb des hierin
beschriebenen Produkts befolgt werden müssen. Die Nichtbeachtung kann zum Erlöschen von Gewährleistungs-/
Garantieansprüchen führen und Sachschäden bzw. Verletzungen verursachen.
USB-Ladegerät/Netzknoten:
• Schließen Sie das Gerät an eine Steckdose an, die den örtlichen Bauvorschriften entspricht und ausreichend gegen
Überstrom, Kurzschluss und Erdschluss geschützt ist.
• Die Netzsteckdose, die Geräte mit Energie versorgt, sollte in der Nähe des Geräts installiert werden und leicht
zugänglich sein.
• Der AC-Stecker am Netzkabel dient als Trennvorrichtung.
• Schließen Sie das Gerät direkt an eine ordnungsgemäß geerdete Wechselstrom-Steckdose an.
• Nehmen Sie keine Veränderungen am Stecker vor und verwenden Sie keinen Anschlussadapter, der den
Erdungsanschluss unterbricht.
• Sollte eine der folgenden Situationen eintreten, vereinbaren Sie bitte einen Termin mit einem Servicetechniker zur
Inspektion Ihres Geräts:
• Das Gerät war Feuchtigkeit/Nässe ausgesetzt
• Das Gerät wurde durch einen Sturz beschädigt
• Das Gerät weist sichtbare Bruchstellen auf
• Das Gerät funktioniert nicht ordnungsgemäß bzw. nicht so, wie in dieser Betriebsanleitung beschrieben
• Die Verwendung dieses Geräts für Lebenserhaltungssysteme, in denen der Ausfall des Geräts den Ausfall des
Lebenserhaltungssystems verursachen oder dessen Sicherheit beziehungsweise Wirksamkeit bedeutend
beeinträchtigen kann, wird nicht empfohlen.
Schrank mit Ladestationen
• Bewahren Sie die Ladestation in einem kontrollierten Raum auf, wo sie nicht Feuchtigkeit, extremen Temperaturen,
entzündlichen Flüssigkeiten oder Gasen, leitfähigen Schadstoffen, Staub oder direkter Sonneneinstrahlung
ausgesetzt ist.
• Lassen Sie an allen Seiten der Ladestation genügend Platz für eine angemessene Belüftung. Die externen
Lüftungsöffnungen des Geräts dürfen nicht blockiert oder verdeckt bzw. Gegenstände darin eingeführt werden.
• Für eine optimale Leistungsfähigkeit sollte die Raumtemperatur zwischen 0 °C und 30 °C gehalten werden.
• Entfernen Sie keine Warnungen, Vorsichtshinweise oder Schilder von der Ladestation.
• Die Ladestation ist sehr schwer. Seien Sie im Umgang mit der Ladestation sehr vorsichtig, insbesondere beim Heben.
Versuchen Sie keinesfalls, sie alleine/ohne Hilfe auszupacken, zu bewegen oder zu installieren. Verwenden Sie ein
mechanisches Hilfsmittel wie z. B. einen Gabelstapler oder einen Hubwagen, um die Ladestation im Versandbehälter
zu bewegen.
• Stellen Sie keine Behälter mit Flüssigkeiten auf das Kabinett und stapeln sie keine Gegenstände darauf.
• Untersuchen Sie Versandbehälter und Ladestation auf etwaige Transportschäden. Nehmen Sie die Ladestation nicht in
Betrieb, wenn diese beschädigt ist.
• Lassen Sie beim Aufschneiden der Verpackung Vorsicht walten! Die Ladestation könnte zerkratzt werden und die dabei
verursachten Schäden unterliegen nicht der Gewährleistung.
• Bewahren Sie sämtliche Verpackungsmaterialien für eine spätere Verwendung auf. Verpackung und Versand des
Schranks mit Ladestationen ohne die originalen Verpackungsmaterialien können Schäden am Produkt verursachen,
die nicht durch die Gewährleistung abgedeckt sind.
39
1. Wichtige Sicherheitshinweise
Für Wand- und Desktop-Installationen:
• Die Ladestation muss von einem qualifizierten Techniker installiert werden.
• Vergewissern Sie sich vor der Montage, dass die Wandfläche die kombinierte Belastung durch die Ladestation, die
gelagerten Geräte und alle angebrachten Teile und Komponenten sicher tragen kann.
• Die Ladestation kann Geräte bis zu ihrer maximalen Tragfähigkeit von 45 kg (100 lb.) tragen.
• Bei einer Installation auf Betonblocks, Beton, Trockenmauer oder Holzpfosten verwenden Sie bitte immer die
entsprechenden angemessenen Montagemittel. Befestigen Sie das Gerät mit den entsprechenden Halterungen (nicht
im Lieferumfang enthalten) sicher an der Wand.
WARNUNG: Die Auflagefläche muss in der Lage sein, die kombinierte Last der Ladestation, der gelagerten Ausrüstung
und aller angebrachten Hardware und Komponenten sicher zu tragen (siehe 8.Spezifikationen für weitere
Informationen zu Gewicht und Abmessungen Ihres Modells.
• Bei Desktop-Installationen können die mit dem Gerät gelieferten Montagehalterungen auch zur Befestigung der
Ladestation an einer Tischoberfläche verwendet werden.
2. Überblick
Ihre Ladestation ist eine All-in-One-Lösung zum Aufbewahren, Aufladen und Synchronisieren von bis zu 16 Geräten. Ihre
Ladestation kann sowohl an der Wand als auch stationär auf dem Tisch oder auf dem Boden aufgestellt werden. Zum
Schutz vor Diebstahl oder unbefugtem Zugriff verfügt das Gehäuse Ihrer Ladestation über verschließbare Stahltüren.
Erläuterung der Symbole:
ACHTUNG: GEFAHR
SCHUTZLEITERKLEMME
AC-SPANNUNG
WARNHINWEISE FÜR DIE WANDMONTAGE: Die Wandoberfläche, die Wandstützen und alle vom Benutzer
bereitgestellten Befestigungselemente müssen das Gesamtgewicht des Schranks und aller im Schrank installierten
Geräte tragen können. Der Schrank kann Geräte bis zu seiner maximalen Tragfähigkeit von 45 kg tragen.
Die Löcher für die Wandmontage sind in einem horizontalen Abstand von 406 mm angeordnet, um die standardmäßige
Platzierung der Wandstiftschrauben zu ermöglichen. Es wird empfohlen, das Gewicht des Schranks und aller installierten
Geräte auf sichere Weise zu verteilen.

40
3. Eigenschaften
CSC16USB
1
Verriegelbare geteilte Türen
2
VerstellbareAufbewahrungsregale(für bis zu 16 Geräte)
3
Abdeckplatte (Abnehmbar)
4
ZugangsöffnungenfürdasNetzkabel(1 auf jeder Seite)
5
Vorhängeschloss-Haspe (Benutzer liefert Schloss)
6
Kabelverriegelungslöcher(Benutzer liefert Schloss)
7
RückwandmitSchlüssellochschlitzenfürdieWandmontage(Siehe Abschnitt 5 für weitere Informationen).
Nicht dargestellt:
USB-Ladegerät/Hub-Einheit
NEMA5-15(CSC16USB),
BS1363(CSCXB16USB)Steckeroder
Schuko(CSCXS16USB)Netzkabel/Stecker
Schlüssel
1
5
3
2
4
4
6
7
7
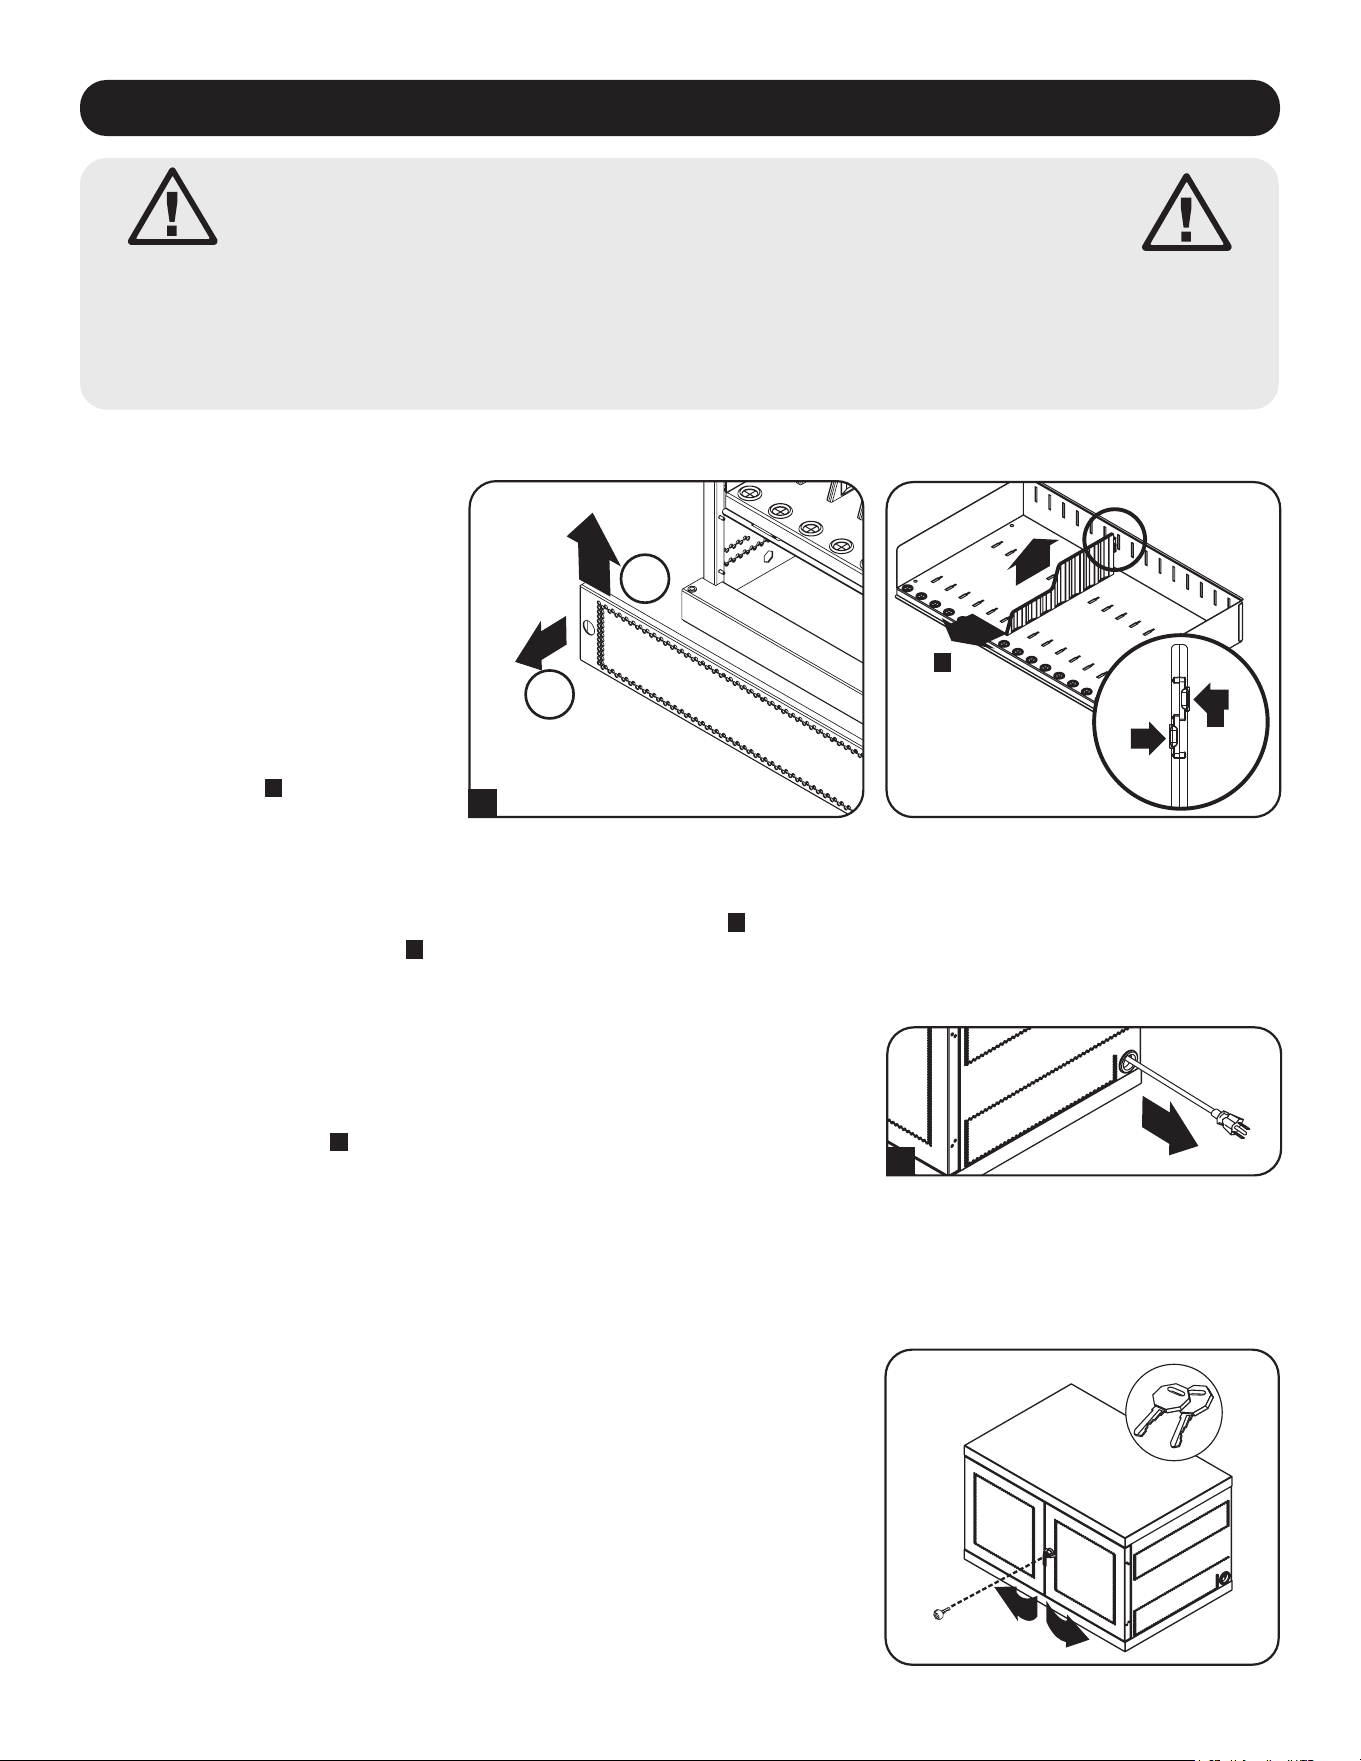
41
4. Einrichten
Achtung! Lesen Sie vor der Installation sämtliche
Anleitungen und Warnhinweise durch!
Achtung: Ladestationen können sehr schwer sein. Versuchen Sie nicht, die Ladestation ohne
fremde Hilfe auszupacken oder zu montieren. Lassen Sie beim Umgang mit der Ladestation
äußerste Vorsicht walten und befolgen Sie unbedingt sämtliche Anweisungen zu Umgang und
Installation. Installieren Sie Geräte erst, nachdem Sie die Ladestation stabilisiert haben.
4.1 Justieren der Regal-Trennwände
4.2 Stromversorgung des USB-Ladegeräts/Hub-Einheit
Ihre Ladestation verfügt über eine
Ablagefläche mit verstellbaren
Trennwänden, die Platz für bis zu
16 persönliche elektronische Geräte
bietet.
Entfernen Sie alle elektronischen
Geräte, die auf dem Regalbrett
gelagert sind. Entfernen Sie dann die
Abdeckplatte, indem Sie Ihre Finger
in die linken und rechten Löcher
stecken, die Abdeckplatte anheben
und herausziehen
A
. Um das
Regalfach aus dem Schrank zu
entfernen, schieben Sie das
Nachdem die Abdeckplatte wie in Abschnitt 4.1 gezeigt, entfernt wurde, finden
Sie den Eingangsstecker und das Kabel von USB-Ladegeräts/Hub-Einheit im
unteren Fach der Ladestation. Stecken Sie dann den Eingangsstecker durch
eine der Netzkabelzugangsöffnungen, die sich auf beiden Seiten des Gehäuses
der Ladestation befinden
A
(es wird empfohlen, die Netzkabelzugangsöffnung
auf derselben Seite wie der Netzkabelmanager zu verwenden). Stecken Sie das
Netzkabel in die nächstgelegene, geerdete 3-polige Steckdose.
Hinweis: Das Netzkabel kann optional durch die Rückwand der Ladestation verlegt werden.
Entfernen Sie dazu zunächst die Gummitülle aus einem der beiden Netzkabelzugangslöcher
des Stromkabels und befestigen Sie sie an der Kabelverriegelungsöffnung auf der Rückseite
des Geräts an (siehe 3. Identifizierung von Merkmalen für Routing-Standorte).
A
4.3 Türverriegelungen
Die Türen verfügen über ein Schloss, das sich mit den beiliegenden
Schlüsseln öffnen lässt.
B
C
1
2
A
Regalfach nach vorne, um es aus dem Befestigungshaken zu lösen, und ziehen Sie es dann nach oben heraus. Sobald
das Regal entfernt ist, können Sie die Trennwände entfernen oder neu anordnen, indem Sie die beiden Laschen, mit
denen die Trennwand am hinteren Ende befestigt ist, eindrücken
B
, schieben Sie dann die Trennwand nach vorne, um
sie aus dem Regalfach zu lösen
C
. Wiederholen Sie den Vorgang gegebenenfalls für zusätzliche Regaltrennwände.
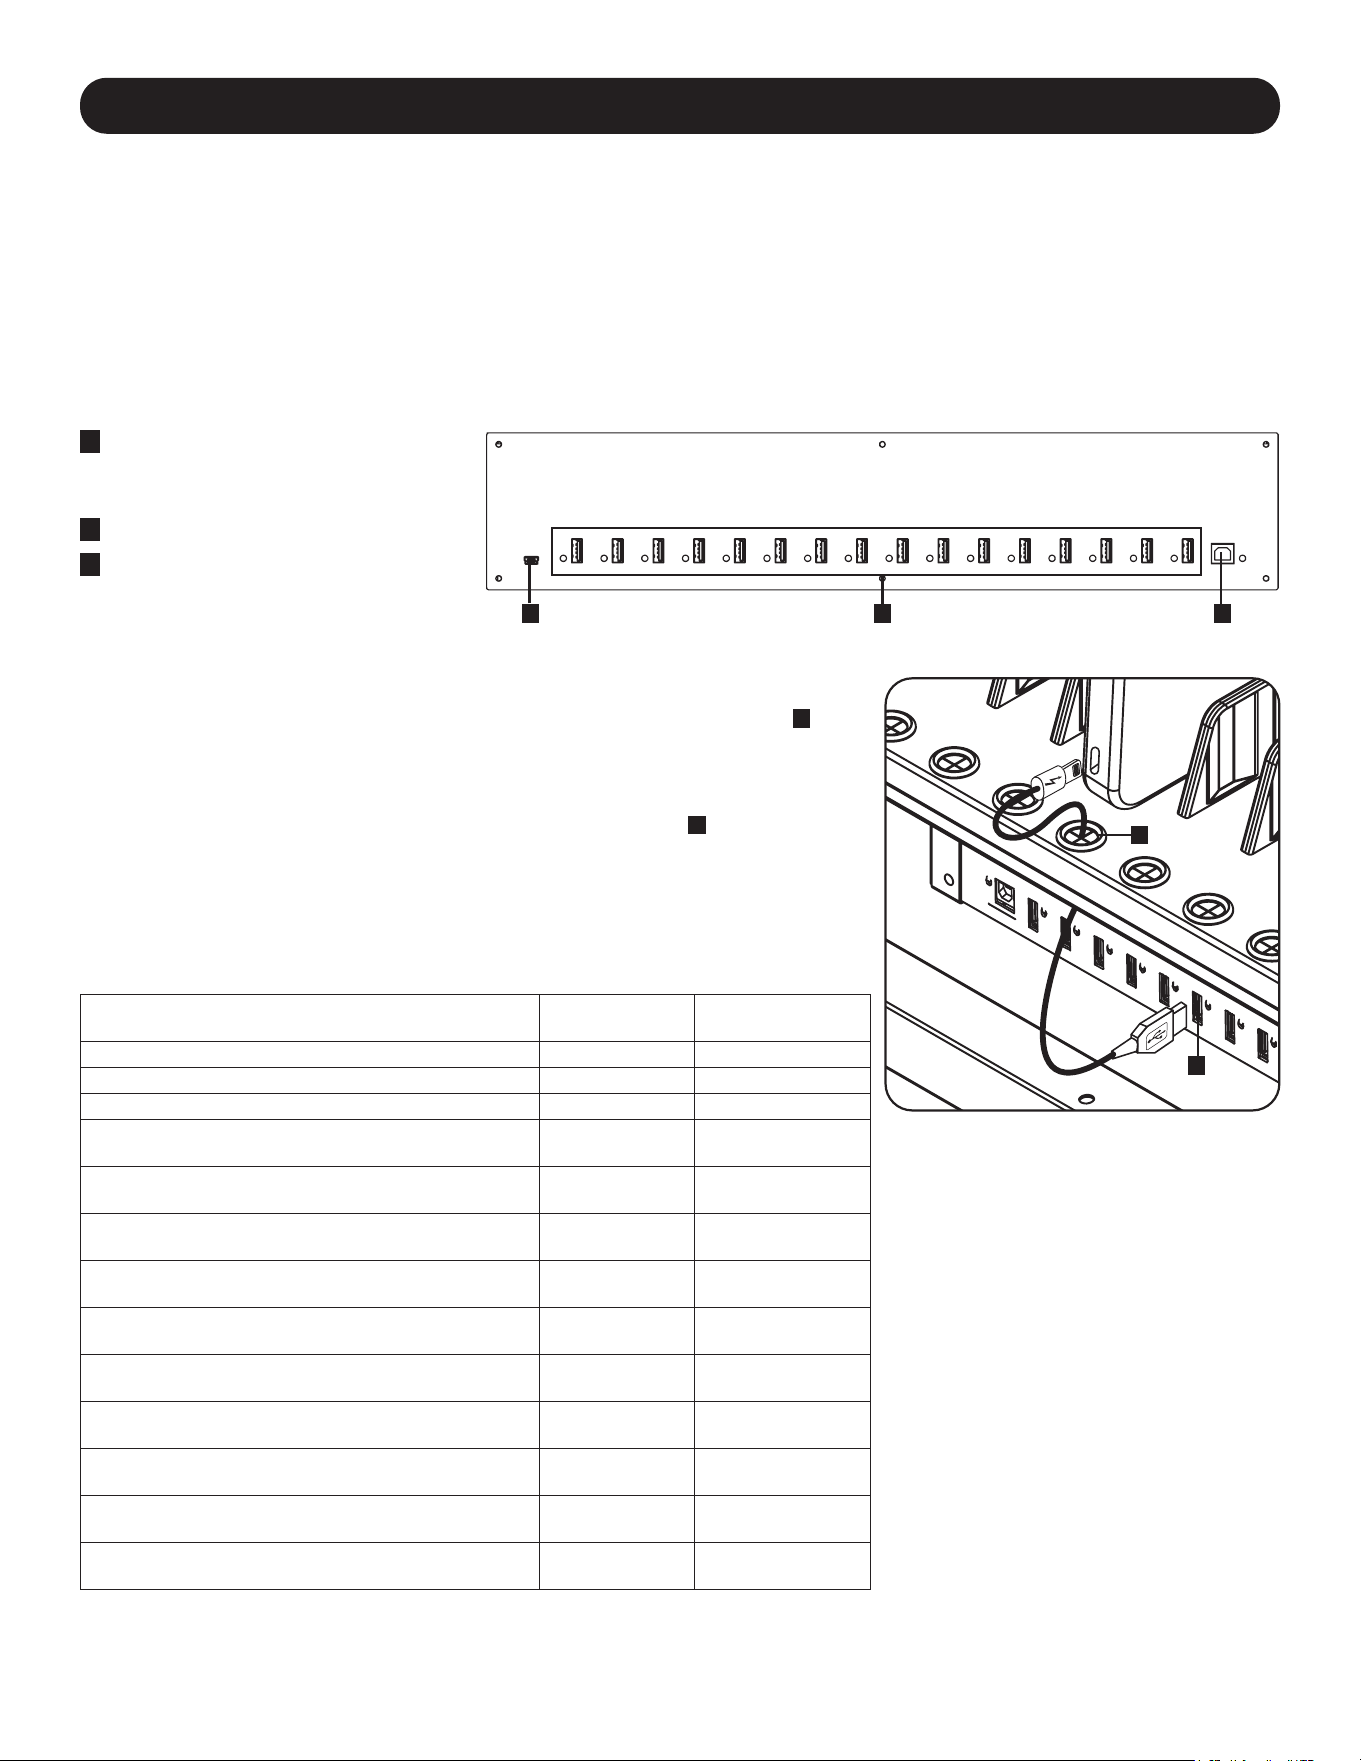
42
5. 16-Port USB-Ladegerät/Hub
• Professionelles USB-Ladegerät/Hub lädt und synchronisiert bis zu 16 USB-Geräte, einschließlich iPad
®
, iPod
®
, iPhone
®
und Android™-Tablets und -Smartphones.
• Jeder USB-Port bietet die optimale Ladekapazität für das bestimmte Gerät (bis zu 2,4 Ampere).
• Alle Geräte, die auf USB-Datenkommunikation ausgelegt sind, können mit Hilfe der passenden Datenverwaltungs-
Software synchronisiert werden.
• Synchronisiert Apple
®
-Geräte über iTunes
®
-Software oder Apple Configurator.
• Ein Firmware-Upgrade-Port mit Mini-USB-Anschluss ermöglicht spätere Softwareupgrades, um auch neuere Geräte
unterstützen zu können.
• Das rackmontierbare 2H-Gehäuse kann für professionelle, schulische oder private Installationen konfiguriert werden.
5.1 USB-Ladegerät-/Hub-Funktionen
A
2,4AUSB-Geräte-Anschlüsse
mit LED-Kontrollleuchten (16 in-
sgesamt)
B
Computer Sync Port
C
Anschlussfür
Firmwareaktualisierung
Das Regal der Ladestation verfügt über 16 Zugentlastungsmuffen, die verhindern,
dass der Geräteanschluss des USB-Kabels durch die Kabelbuchse rutscht
A
.
Schließen Sie das USB-Kabel (Ihr eigenes Kabel oder ein abgeschirmtes USB-
Kabel des Geräteherstellers) an das Gerät an, das Sie aufladen möchten. Führen
Sie dann das Kabelende durch die Zugentlastungsmuffe an der Ablage und
verbinden Sie den USB-Stecker mit einem USB-Ladeanschluss
B
. Wiederholen
Sie den Vorgang für alle Geräte und bringen Sie die Abdeckplatte, die in Abschnitt
4.1 entfernt wurde, wieder an der Einheit an.
Tripp Lite bietet einzelne Kabel und 10er-Packs für Apple-Geräte mit USB-auf-
30-Pin- oder USB-auf-Lightning™-Kabeln sowie einzelne Kabel und 10er-Packs
für USB-3.0- oder 2.0-Geräte mit USB-A-auf-5-Pin-Micro-B-Kabeln (Stecker).
Kabeltyp
Einzelkabel
Modellnummer
10er-Pack Kabel
Modellnummer
Apple USB auf 30-Pin-Lightning-Stecker, 25,4 cm M110-10N-BK M110-10N-BK-10
Apple USB auf 30-Pin-Lightning-Stecker, 91 cm M110-003-WH —
Apple USB auf 8-Pin-Lightning-Stecker, 25,4 cm M100-10N-BK M100-10N-BK-10
Apple USB auf 8-Pin-Lightning-Stecker, 91 cm M100-003-BK
M100-003-WH
—
Apple USB auf 8-Pin-Lightning-Stecker, 1,8 m M100-006-BK
M100-006-WH
—
Apple USB auf 8-Pin-Lightning-Stecker, 3,04 m M100-010-BK
M100-010-WH
—
USB 3.0 SuperSpeed A (Stecker) auf
5-Pin Micro-B (Stecker), 30 cm
U326-001-BK U326-001-BK-10
USB 3.0 SuperSpeed A (Stecker) auf
5-Pin Micro-B (Stecker), 91 cm
U326-003
U326-003-BK
—
USB 3.0 SuperSpeed A (Stecker) auf
5-Pin Micro-B (Stecker), 3,04 m
U326-010 —
USB 2.0 Reversible A (Stecker) auf
5-Pin Micro-B (Stecker), 0,3 m
UR050-001* UR050-001-10*
USB 2.0 Reversible A (Stecker) auf
5-Pin Micro-B (Stecker), 1 m
UR050-003*
UR050-003-WH*
—
USB 2.0 Reversible A (Stecker) auf
5-Pin Micro-B (Stecker), 1,8 m
UR050-006*
UR050-006-SLIM*
—
USB 2.0 Reversible A (Stecker) auf
5-Pin Micro-B (Stecker), 3,04 m
UR050-010* —
* Verfügt über einen reversiblen USB-A-Stecker für vereinfachte Installationen.
Für weitere Informationen über unsere Auswahl an hochwertigen USB-Kabeln
besuchen Sie bitte www.tripplite.com.
5.2 Anschließen von Geräten an das USB-Ladegerät/Hub
A
B
A BC
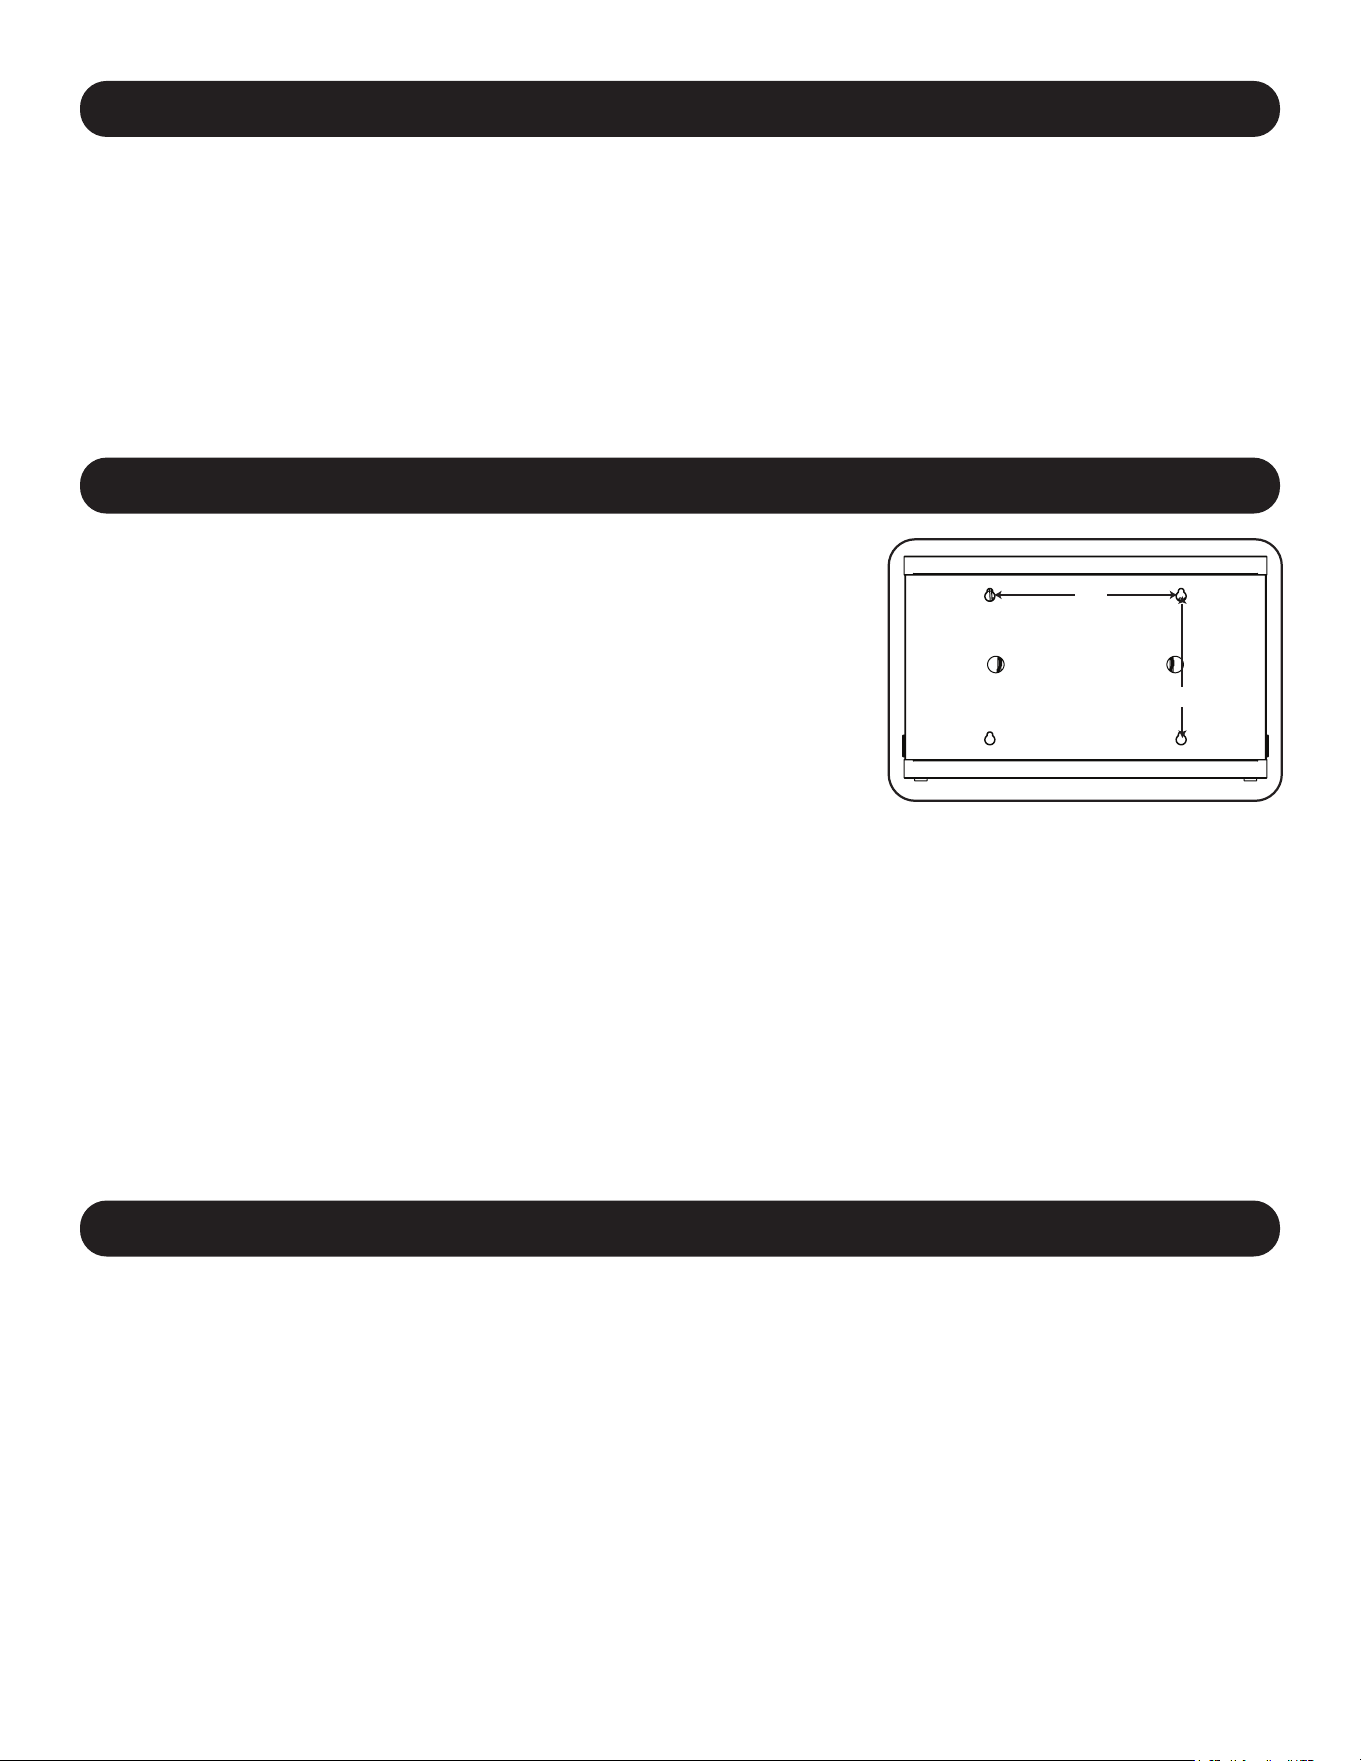
43
6. Wandmontage
12”
16”
Für die Wandmontage benötigen Sie:
• Wasserwaage
• Passende Werkzeuge für die Wandmontage
• Passende Eisenwaren für die Wandmontage (nicht im Lieferumfang enthalten)
Warnung:VersuchenSienicht,dieLadestationanderWandzu
befestigen,wennsichpersönlicheelektronischeGerätedarinbefinden.
An der Rückwand des Ladestationsschranks befinden sich
4 Schlüssellochausschnitte. Jedes Schlüsselloch kann eine M5- oder 3/16-Zoll-
Schraube aufnehmen. Die Schlüssellöcher sind in einem horizontalen Abstand
von 16 Zoll und einem vertikalen Abstand von 12 Zoll zentriert angeordnet (die
genaue Position der Schlüssellöcher entnehmen Sie bitte dem entsprechenden
Modellplan).
Messen Sie mit Hilfe einer Wasserwaage und eines Maßbandes die genaue
Position des Montagebereichs aus. Verwenden Sie geeignete
Befestigungsmittel (nicht im Lieferumfang enthalten), um die Ladestation an der
Wand zu befestigen.
Hinweis: Die Ladestation muss von einem qualifizierten Techniker installiert werden. Bei
einer Installation auf Betonblocks, Beton, Trockenmauer oder Holzpfosten verwenden
Sie bitte die entsprechenden angemessenen Montagemittel.
Warnung: Die Auflagefläche muss in der Lage sein, die kombinierte Last der
Ladestation, der gelagerten Ausrüstung und aller angebrachten Hardware und
Komponenten sicher zu tragen. Siehe Abschnitt 8. Spezifikationen für weitere
Informationen zu Gewicht und Abmessungen Ihres Modells.
7. Desktop-/Boden-Platzierung
WARNUNG: Installieren Sie die Ladestation bei Desktop- und Boden-Anwendungen immer in einem statisch
einwandfreien Bereich mit einer ebenen Fläche, die das Gewicht der Ladestation, aller in der Ladestation installierten
Geräte und aller anderen in der Nähe installierten Gehäuse und/oder Geräte tragen kann. Versuchen Sie niemals, die
Ladestation ohne ausreichende Hilfe anzuheben oder zu installieren. Siehe Abschnitt 8.Spezifikationen für weitere
Informationen über Nennbelastbarkeit der Ladestation.
Hinweis: Die mit dem Gerät gelieferten Halterungen können auch verwendet werden, um die Ladestation an einer Tischoberfläche zu
befestigen.
5. 16-Port USB-Ladegerät/Hub
5.3 Anschließen eines Computers an das USB-Ladegerät/Hub
Zusätzlich zur Ladefunktion verfügt die USB-Dockingstation über eine Netzknotenfunktion, mit deren Hilfe sich Geräte
und die darauf enthaltene Software mit angeschlossenen Computern synchronisieren lassen. Um die Hub-Funktion zu
aktivieren, verwenden Sie das mitgelieferte USB-Kabel, um den USB-B-Stecker mit dem Computer Sync Port des Geräts
und den USB-A-Stecker mit dem USB-Anschluss eines Computers zu verbinden.
Hinweis: Wenn eine Computerverbindung hergestellt wird und mehrere Geräte an das USB-Ladegerät/Hub angeschlossen sind, wird
die Ladegeschwindigkeit während der Synchronisierung reduziert und nach Abschluss der Synchronisierung wieder auf die normale
Ladegeschwindigkeit erhöht.
Hinweis: Der Firmware Upgrade Port erfordert eine Mini-USB-Verbindung (Kabel nicht enthalten). Die neuesten Firmware-Updates
können Sie unter tripplite.com/support herunterladen.
44
8. Technische Daten
Modelle CSC16USB,CSCXB16USB,CSCXS16USB
Maße (H x B x T) 477,52 x 770,382 x 513,08 mm (18,8 x 30,33 x 20,20 Zoll)
Gewicht der Einheit 39 kg / 85,98 lb.
Tragfähigkeit* 45,4 kg / 100 lb.
Lade-/Netzknoten-Anschlüsse 16 x USB 2.0 A (Buchse)
1 x USB 2.0 B (Buchse)
1 x USB 2.0 Mini (Buchse)
Übertragungsgeschwindigkeit Bis zu 480 MBit/s
Strombedarf Eingang: 110-120 V, 2,5 A, 50/60 Hz (CSC16USB) oder 230 V, 2,5 A, 50 Hz (CSCXB16USB,
CSCXS16USB)
Ausgang: 5,0 V, 2,4 A Max. (pro USB-Anschluss)
Betriebstemperatur 0 °C bis 30 °C
Luftfeuchtigkeit bei Betrieb 5 bis 95 % RH, nicht kondensierend
Gehäusematerial Metall
*DievolleTragfähigkeitderWandmontageerforderteineMontageäche,diedievolleLastderLadestationundallerangeschlossenenKomponenten
tragenkann.SpezikationenkönnenohneAnkündigunggeändertwerden.
9. Lagerung, Wartung und Reinigung
Lagerung
Das Gehäuse sollte in einem kontrollierten Raum aufbewahrt werden, wo es nicht Feuchtigkeit, extremen Temperaturen,
entzündlichen Flüssigkeiten oder Gasen, leitfähigen Schadstoffen, Staub oder direkter Sonneneinstrahlung ausgesetzt
ist. Lagern Sie das Gehäuse in der Original-Transportverpackung, falls möglich.
Wartung
Das Gehäuse unterliegt einer begrenzten Gewährleistung, wie in diesem Handbuch beschrieben. Weitere Informationen
finden Sie auf
tripplite.com/support.
Reinigung
Schalten Sie vor jeder Reinigung die Ladestation aus und trennen Sie sie von der Stromquelle. Befeuchten Sie ein
sauberes, fusselfreies Tuch leicht mit Wasser und wischen Sie das Gerät je nach Bedarf damit ab. Lassen Sie die
Oberfläche gut trocknen, bevor Sie das Gerät wieder anstecken.
Hinweis: Verwenden Sie zum Reinigen der Ladestation keine scheuernden Stoffe, Lösungsmittel und Aerosolsprays, da diese das
Gerät beschädigen können.
10. Optionales Zubehör: Rollen und Griff
Für Anwendungen, die zusätzliche Mobilität erfordern, ist ein optionaler Rollen- und Griff-Bausatz (Modell:
CSHANDLEKIT2) erhältlich. Er enthält zwei Lenkrollen mit Verriegelung, zwei Lenkrollen ohne Verriegelung und einen
Griff, der auf der Oberseite der Ladestation angebracht wird. Weitere Informationen finden Sie auf tripplite.com.

45
2 Jahre eingeschränkte Garantie
Der Verkäufer garantiert für einen Zeitraum von zwei Jahren ab Kaufdatum, dass das Produkt weder Material- noch Herstellungsfehler aufweist, wenn
es gemäß allen zutreffenden Anweisungen verwendet wird. Wenn das Produkt in diesem Zeitraum Material- oder Herstellungsfehler aufweist, kann der
Verkäufer diese Fehler nach eigenem Ermessen beheben oder das Produkt ersetzen.
DIE NORMALE ABNUTZUNG ODER BESCHÄDIGUNGEN AUFGRUND VON UNFÄLLEN, MISSBRAUCH ODER UNTERLASSUNG WERDEN VON
DIESER GARANTIE NICHT GEDECKT. AUSSER DEN NACHSTEHEND AUSDRÜCKLICH DARGELEGTEN GARANTIEBEDINGUNGEN
ÜBERNIMMT DER VERKÄUFER KEINERLEI GARANTIE. AUSSER WENN VON DEN GÜLTIGEN GESETZEN UNTERSAGT, SIND ALLE
IMPLIZIERTEN GARANTIEN, EINSCHLIESSLICH ALLE GARANTIEN FÜR DIE GEBRAUCHSTAUGLICHKEIT ODER EIGNUNG AUF DIE OBEN
FESTGELEGTE GARANTIEDAUER BESCHRÄNKT. DIESE GARANTIE SCHLIESST AUSDRÜCKLICH ALLE FOLGESCHÄDEN UND BEILÄUFIG
ENTSTANDENEN SCHÄDEN AUS. (Da einige Länder den Ausschluss oder die Beschränkung von Folgeschäden oder beiläufig entstandenen
Schäden sowie den Ausschluss von implizierten Garantien oder die zeitliche Beschränkung einer implizierten Garantie untersagen, sind die oben
genannten Beschränkungen für Sie möglicherweise nicht zutreffend. Diese Garantie gibt Ihnen bestimmte Rechte. Sie haben jedoch möglicherweise
andere Rechte, die abhängig von der Gerichtsbarkeit variieren können.)
WARNUNG: Der Benutzer muss vor der Verwendung überprüfen, ob das Gerät für den beabsichtigten Zweck geeignet und angemessen ist und ob der
Einsatz sicher ist. Da die Anwendungen variieren können, übernimmt der Hersteller keine Garantie bezüglich der Eignung dieser Geräte für einen
bestimmten Verwendungszweck.
Identifizierungsnummern für ordnungsrechtliche Compliance
Zum Zweck von Zertifizierungen und Identifizierung von gesetzlichen Bestimmungen wurde Ihrem Tripp-Lite-Produkt eine eindeutige Seriennummer
zugewiesen. Die Seriennummer ist auf dem Typenschild des Produkts zu sehen, zusammen mit allen erforderlichen Genehmigungskennzeichen und
Informationen. Wenn Sie Compliance-Informationen für dieses Produkt anfordern, geben Sie immer diese Seriennummer an. Die Seriennummer sollte
nicht mit dem Marketingnamen oder der Modellnummer des Produkts verwechselt werden.
FCC-Hinweis, Klasse B
Dieses Gerät erfüllt Teil 15 der FCC-Bestimmungen. Für den Betrieb gelten die folgenden zwei Bedingungen: (1) Das Gerät darf keine schädlichen
Störungen verursachen und (2) das Gerät muss Interferenzen vertragen können, darunter auch Störsignale, die unerwünschten Betrieb hervorrufen
können.
Hinweis: Dieses Gerät wurde getestet und entspricht den Grenzwerten für ein digitales Gerät der Klasse A gemäß Teil 15 der FCC-Vorschriften. Diese
Grenzwerte sollen einen angemessenen Schutz vor schädlichen Störungen bei Installation in einem Wohngebiet bieten. Dieses Gerät erzeugt, nutzt
und strahlt Hochfrequenzwellen aus, die bei unsachgemäßer, nicht den Anweisungen entsprechender Installation und Verwendung Störungen im
Rundfunkempfang verursachen können. Es gibt jedoch keine Garantie dafür, dass bei einer bestimmten Installation keine Störungen auftreten. Wenn
dieses Gerät schädliche Störungen des Radio- oder Fernsehempfangs verursacht, was durch Ein- und Ausschalten des Geräts festgestellt werden
kann, sollte der Benutzer versuchen,die Störung durch eine oder mehrere der folgenden Maßnahmen zu beheben:
• Richten Sie die Empfangsantenne neu aus oder verschieben Sie sie.
• Vergrößern Sie die Trennung zwischen dem Gerät und dem Empfänger.
• Schließen Sie das Gerät an eine Steckdose an, die zu einem anderen Stromkreis gehört als die mit dem Empfänger verbundene Steckdose.
• Wenden Sie sich an den Händler oder einen erfahrenen Radio-/Fernsehtechniker, um Hilfe zu erhalten.
Änderungen oder Modifikationen an diesem Gerät, die nicht ausdrücklich von Tripp Lite genehmigt wurden, können die Berechtigung des Benutzers
zum Betreiben dieses Geräts aufheben.
WEEE-Compliance-Informationen for Tripp-Lite-Kunden und Recycler (Europäische Union)
Die WEEE-Richtlinie und deren Ausführungsbestimmungen besagen, dass Kunden, die neue Elektro- oder Elektronikgeräte von Tripp Lite
kaufen, ein Anrecht auf Folgendes haben:
• Rücksendung von Altgeräten zum Recycling beim Kauf eines neuen, gleichwertigen Geräts (dies variiert je nach Land)
• Rücksendung der neuen Geräte zum Recyling, wenn ihr Lebenszyklus abgelaufen ist
Tripp Lite hat den Grundsatz, sich kontinuierlich zu verbessern. Spezifikationen können ohne Ankündigung geändert werden. Fotos und Illustrationen
können von den tatsächlichen Produkten leicht abweichen.
11. Garantie

46

47

48
TrippLite.Eaton.com/support
23-07-803 934754_RevB