


FLEXIDOME IP starlight 8000i Table of contents | en 3
Bosch Security Systems B.V.
Installation manual
2021-02 | V02 | F.01U.385.211
Table of contents
1
Safety 5
1.1 Safety message explanation 5
1.2 Safety precautions 5
1.3 Important safety instructions 5
1.4 Power connection in applications 6
1.5 Notices 6
2
Short information 9
3
System overview 10
3.1 Product description 10
3.2 Intended use 10
3.3 Application variants 10
3.4 Permanently disable WLAN 10
4
Preparing for installation 12
4.1 Unpacking 12
4.2 Contents 12
4.3 Wiring 14
4.3.1 Network and PoE power 14
4.3.2 24V AC / 12-26V DC power input 15
4.3.3 10-pin I/O connector 15
4.3.4 Grounding 16
5
In-box configuration 17
6
Hardware installation 18
6.1 Installing the mounting plate 19
6.1.1 Installing the mounting plate without conduit 20
6.1.2 Installing the mounting plate with conduit 21
6.2 Installing the camera base 23
6.2.1 Before the installation 23
6.2.2 Installation steps 26
6.3 Installing the camera module 29
6.4 LED status 30
6.5 Mounting accessories 31
7
Commissioning 34
8
Connection via the web browser 35
8.1 System requirements 35
8.2 Establishing the connection 35
8.3 Password protection in camera 35
9
Troubleshooting 37
9.1 Resolving problems 37
9.2 Testing the network connection 39
9.3 Customer service 39
10
Maintenance 40
10.1 Bubble handling 40
10.2 Bubble cleaning 40
10.3 Bubble replacement 40
10.4 Camera reset 41
11
Decommissioning 43
11.1 Transfer 43
11.2 Disposal 43


FLEXIDOME IP starlight 8000i Safety | en 5
Bosch Security Systems B.V.
Installation manual
2021-02 | V02 | F.01U.385.211
1 Safety
Read, follow, and retain for future reference all of the following safety instructions. Follow all
warnings before operating the device.
1.1 Safety message explanation
In this manual, the following symbols and notations are used to draw attention to special
situations:
Danger!
Indicates a hazardous situation which, if not avoided, will result in death or serious injury.
!
Warning!
Indicates a hazardous situation which, if not avoided, could result in death or serious injury.
!
Caution!
Indicates a hazardous situation which, if not avoided, could result in minor or moderate
injury.
i
Notice!
Indicates a situation which, if not avoided, could result in damage to the equipment or
environment, or data loss.
1.2 Safety precautions
!
Caution!
Installation must be made by qualified personnel and conform to ANSI/NFPA 70 (the National
Electrical Code
®
(NEC)), Canadian Electrical Code, Part I (also called CE Code or CSA C22.1),
and all applicable local codes. Bosch Security Systems accepts no liability for any damages or
losses caused by incorrect or improper installation.
1.3 Important safety instructions
– Clean only with a dry cloth. Do not use liquid cleaners or aerosol cleaners.
i
Notice!
Do not install the device near any heat sources, such as radiators, heaters, stoves, or other
equipment which produces heat.
– Do not spill liquids on the device before installation is completed.
i
Notice!
Protect the device from power surges.
– Adjust only those controls specified in the operating instructions.

6 en | Safety FLEXIDOME IP starlight 8000i
2021-02 | V02 | F.01U.385.211
Installation manual
Bosch Security Systems B.V.
– Operate the device only from the type of power source indicated on the label.
i
Notice!
Do not attempt to service this product. Refer all servicing to qualified service personnel.
– Install in accordance with the manufacturer's instructions in accordance with applicable
local codes.
– Use only attachments/accessories specified by the manufacturer.
– Protect all connection cables from possible damage, particularly at connection points.
All-pole power switch - Incorporate an all-pole power switch, with a contact separation of at
least 3mm / 0.12in, into the electrical installation of the building. If it is needed to open the
housing, use this all-pole switch as the main disconnect device for switching off the voltage to
the unit.
Camera signal - Protect the cable with a primary protector if the camera signal is beyond
42.7meters /140feet, in accordance with NEC800 (CEC Section 60).
Fuse rating - For security protection of the device, the branch circuit protection must be
secured with a maximum fuse rating of 16A. This must be in accordance with NEC800 (CEC
Section 60).
Outdoor signals - The installation for outdoor signals, especially regarding clearance from
power and lightning conductors and transient protection, must be in accordance with NEC725
and NEC800 (CEC Rule 16-224 and CEC Section 60).
Video loss - Video loss is inherent to digital video recording; therefore, Bosch Security
Systems cannot be held liable for any damage that results from missing video information.
To minimize the risk of losing information, we recommend multiple, redundant recording
systems, and a procedure to back up information.
1.4 Power connection in applications
24VAC / 12-26VDC power source: This unit is intended to operate with a limited power
source. The unit is intended to operate at 24VAC or 12-26VDC (if PoE is not available). User
supplied wiring must be in compliance with electrical codes (Class 2 power levels).
PoE: Use only approved PoE devices. Power-over-Ethernet can be connected at the same time
as a 24VAC or 12-26VDC power supply. The power supply can work as backup power source
in case of PoE power drops.
1.5 Notices
i
Notice!
This device is intended for use in public areas only.
U.S. federal law strictly prohibits surreptitious recording of oral communications.
UL Disclaimer
Underwriter Laboratories Inc. ("UL") has not tested the performance or reliability of the
security or signaling aspects of this product. UL has only tested fire, shock and/or casualty
hazards as outlined in Standard(s) for Safety for Information Technology Equipment, UL
60950-1, UL 62368-1, UL 60950-22. UL Certification does not cover the performance or
reliability of the security or signaling aspects of this product.

FLEXIDOME IP starlight 8000i Safety | en 7
Bosch Security Systems B.V.
Installation manual
2021-02 | V02 | F.01U.385.211
UL MAKES NO REPRESENTATIONS, WARRANTIES, OR CERTIFICATIONS WHATSOEVER
REGARDING THE PERFORMANCE OR RELIABILITY OF ANY SECURITY OR SIGNALING-RELATED
FUNCTIONS OF THIS PRODUCT.
FCC statement (USA)
1. This device complies with Part 15 of the FCC Rules. Operation is subject to the following
two conditions:
– This device may not cause harmful interference.
– This device must accept any interference received, including interference that may
cause undesired operation.
2. Changes or modifications not expressly approved by the party responsible for compliance
could void the user's authority to operate the equipment.
Note: This equipment has been tested and found to comply with the limits for a Class B digital
device, pursuant to Part 15 of the FCC Rules. These limits are designed to provide reasonable
protection against harmful interference in a residential installation. This equipment generates
uses and can radiate radio frequency energy and, if not installed and used in accordance with
the instructions, may cause harmful interference to radio communications. However, there is
no guarantee that interference will not occur in a particular installation. If this equipment does
cause harmful interference to radio or television reception, which can be determined by
turning the equipment off and on, the user is encouraged to try to correct the interference by
one or more of the following measures:
– Reorient or relocate the receiving antenna.
– Increase the separation between the equipment and receiver.
– Connect the equipment into an outlet on a circuit different from that to which the
receiver is connected.
– Consult the dealer or an experienced radio/TV technician for help.
IC statement (Canada)
This device complies with Industry Canada licence-exempt RSS standard(s). Operation is
subject to the following two conditions: (1) this device may not cause harmful interference,
and (2) this device must accept any interference received, including interference that may
cause undesired operation.
Le présent appareil est conforme aux CNR d'Industrie Canada applicables aux appareils radio
exempts de licence. L'exploitation est autorisée aux deux conditions suivantes:
(1) l'appareil ne doit pas produire de brouillage, et
(2) l'utilisateur de l'appareil doit accepter tout brouillage radioélectrique subi, même si le
brouillage est susceptible d'en compromettre le fonctionnement.
RF exposure statement (Canada)
The antennas used for this transmitter must be installed to provide a separation distance of at
least 20cm from all persons and must not be located or operating in conjunction with any
other antenna or transmitter.
Les antennes pour ce transmetteur doivent être installé en considérant une distance de
séparation de toute personnes d'au moins 20cm et ne doivent pas être localisé ou utilisé en
conflit avec tout autre antenne ou transmetteur.

8 en | Safety FLEXIDOME IP starlight 8000i
2021-02 | V02 | F.01U.385.211
Installation manual
Bosch Security Systems B.V.
Simplified EC DoC (European Union)
Hereby, Bosch declares that the radio equipment type FLEXIDOME IP starlight 8000i is in
compliance with Directive 2014/53/EU. The full text of the EU declaration of conformity is
available at the following internet address: www.boschsecurity.com / (Product Catalog) /
(Region) / (Country) / (Search for Product No.).
KC (South Korea)
Applicant name: Bosch Security Systems B.V.
Product name: FLEXIDOME IP starlight 8000i
Model name: FLEXIDOME IP starlight 8000i
Manufacturer name: Bosch Security Systems B.V.
Country of origin: Portugal
Manufactured year and month: https://www.boschsecurity.com/datecodes/
For KCC compliance, the maximum length of the DC power input cable must be 3meters
(118inches).
NBTC (Thailand)
This telecommunication equipment conforms to NBTC technical standard or requirement.
More information
For more information please contact the nearest Bosch Security Systems location or visit
www.boschsecurity.com.

FLEXIDOME IP starlight 8000i Short information | en 9
Bosch Security Systems B.V.
Installation manual
2021-02 | V02 | F.01U.385.211
2 Short information
This manual has been compiled with great care and the information it contains has been
thoroughly verified. The text was correct at the time of publication, however, the content can
change without notice. Bosch Security Systems accepts no liability for damage resulting
directly or indirectly from faults, incompleteness or discrepancies between this manual and
the product described.
Copyright
This manual is the intellectual property of Bosch Security Systems and is protected by
copyright.
All rights reserved.
Trademarks
All hardware and software product names used in this document are likely to be registered
trademarks and must be treated accordingly.
More information
For more information please contact the nearest Bosch Security Systems location or visit
www.boschsecurity.com.
https://www.boschsecurity.com/xc/en/product-catalog/
10 en | System overview FLEXIDOME IP starlight 8000i
2021-02 | V02 | F.01U.385.211
Installation manual
Bosch Security Systems B.V.
3 System overview
3.1 Product description
All FLEXIDOME IP starlight 8000i cameras have a unique 3-step concept for simple installation,
because with wireless commissioning there is no need to detach the bubble or manually point
the camera to the required field of view. Commissioning can also be done remotely, reducing
installation time by up to 75%.
The cameras capture images in exceptional detail (up to 4K ultra HD with starlight and high
dynamic range), and feature the latest bitrate management techniques, data security
measures and state-of-the art intelligent video analytics, delivering incredible accuracy in high
security applications and interpreting captured data for smart decision-making that goes
beyond security.
3.2 Intended use
The camera is designed to be integrated in professional IP video surveillance solutions as a
surveillance camera. Installation, commissioning and operation of the camera shall be carried
out by trained professionals only.
The use of surveillance cameras is restricted by national laws and regulations. Use the camera
accordingly.
3.3 Application variants
This device has 2 application variants:
– FLEXIDOME IP starlight 8000i - SD + WLAN (default).
– FLEXIDOME IP starlight 8000i - DUAL SD.
By default, the device has SD card slot 1 and its wireless function enabled which allows for
wireless commissioning via WLAN (IEEE 802.11b/g/n).
Switching to the DUAL SD application variant disables the wireless function to enable the
second SD card slot.
When the application variant is switched, the device reboots, but all settings are maintained.
i
Notice!
SD + WLAN mode
WLAN mode is used for wireless local commissioning with the Project Assistant app only and
cannot be used in standard operation.
3.4 Permanently disable WLAN
You can permanently disable the WLAN functionality in the device if required.
i
Notice!
This permanently disables the WLAN functionality.
You must send the device to a Bosch service center to re-enable the WLAN functionality.
To permanently disable the WLAN functionality, obey the following steps:
1. Navigate to the Configuration page.

FLEXIDOME IP starlight 8000i System overview | en 11
Bosch Security Systems B.V.
Installation manual
2021-02 | V02 | F.01U.385.211
2. Click Service.
3. Click Licenses.
4. Locate the Activation key field.
5. Enter the following key: 12-01.6B.01-CF47F87B-B082146B-D79F9999-
C40ED3E9-0E31AA55
6. Click Set.
The WLAN functionality is now permanently disabled.

12 en | Preparing for installation FLEXIDOME IP starlight 8000i
2021-02 | V02 | F.01U.385.211
Installation manual
Bosch Security Systems B.V.
4 Preparing for installation
4.1 Unpacking
This equipment should be unpacked and handled with care. If an item appears to have been
damaged in shipment, notify the shipper immediately.
Verify that all parts are included. If any items are missing, notify your Bosch Security Systems
sales or customer service representative.
The original packaging is the safest container in which to transport the unit and can be used if
returning the unit for service.
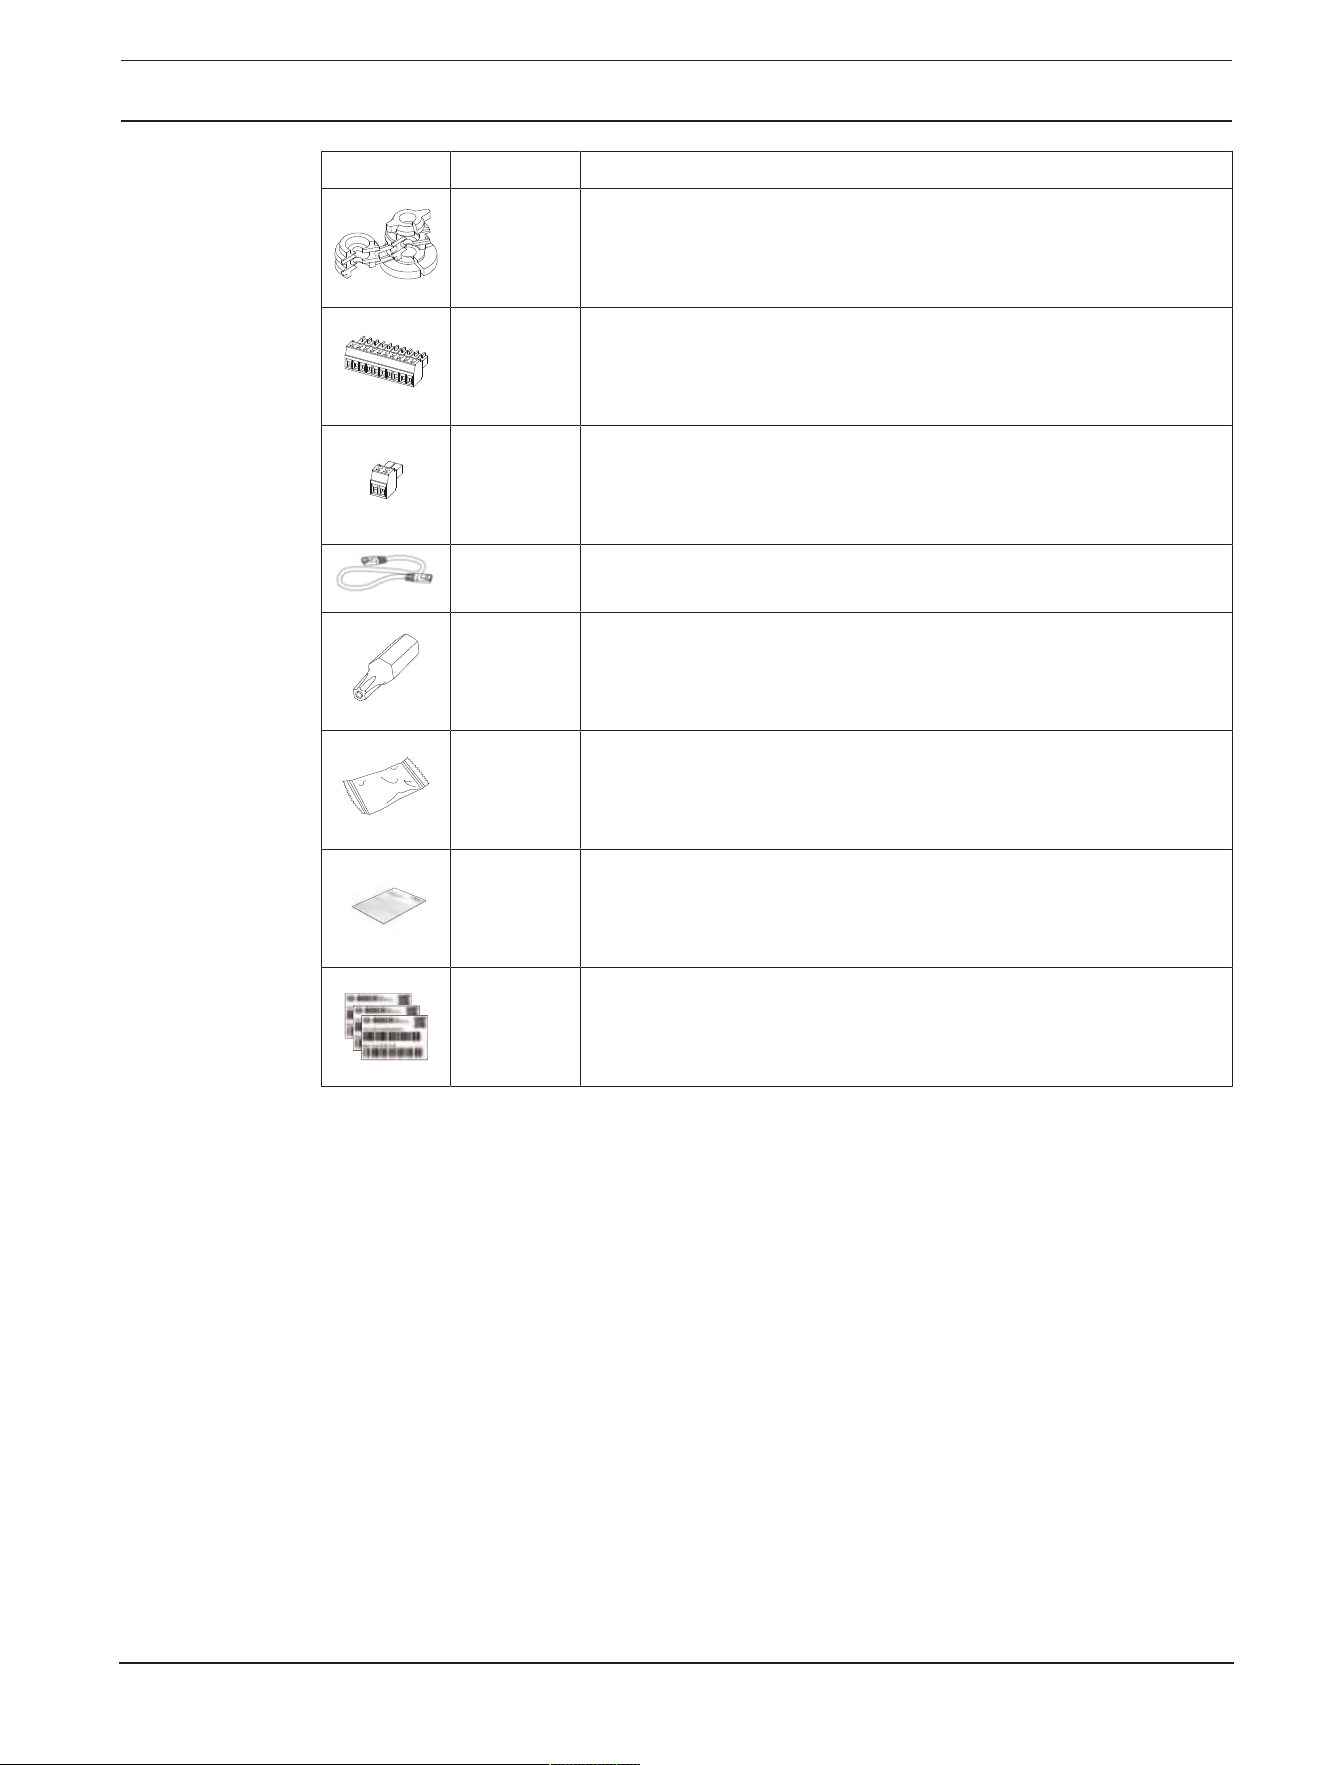
4.2 Contents
Quantity Component
1 Mounting plate
1 Camera module
1 Camera base
1 Conduit plate
1 Conduit cover: pre-installed on conduit plate
2 Conduit plate hole adapters: M25 (3/4in.) - pre-installed on
conduit plate - and M20 (1/2in.)
1 Conduit hole adapter rubber: for diameters less than M20
(1/2in.)
1 Screw
1 Washer: for mounting of conduit plate
FLEXIDOME IP starlight 8000i Preparing for installation | en 13
Bosch Security Systems B.V.
Installation manual
2021-02 | V02 | F.01U.385.211
Quantity Component
2 Grommet (1 spare): for waterproofing network cable
1 10-pin I/O connector
1 2-pin 24VAC / 12-26VDC input connector
1 CAT5e STP network patch cable (50cm / 19.7in.)
1 TR20 bit
1 Desiccant bag
Note: Do not open the bag before it is necessary to use its
content.
1 Quick installation guide
3 Identification label stickers
Make sure that:
– All parts are included and without damage.
– The necessary cables are ready for use (refer to
Wiring, page 14
for more information):
– Network cable.
– 24VAC / 12-26VDC (optional)
– Audio input cables (optional).
– External inputs (optional).

14 en | Preparing for installation FLEXIDOME IP starlight 8000i
2021-02 | V02 | F.01U.385.211
Installation manual
Bosch Security Systems B.V.
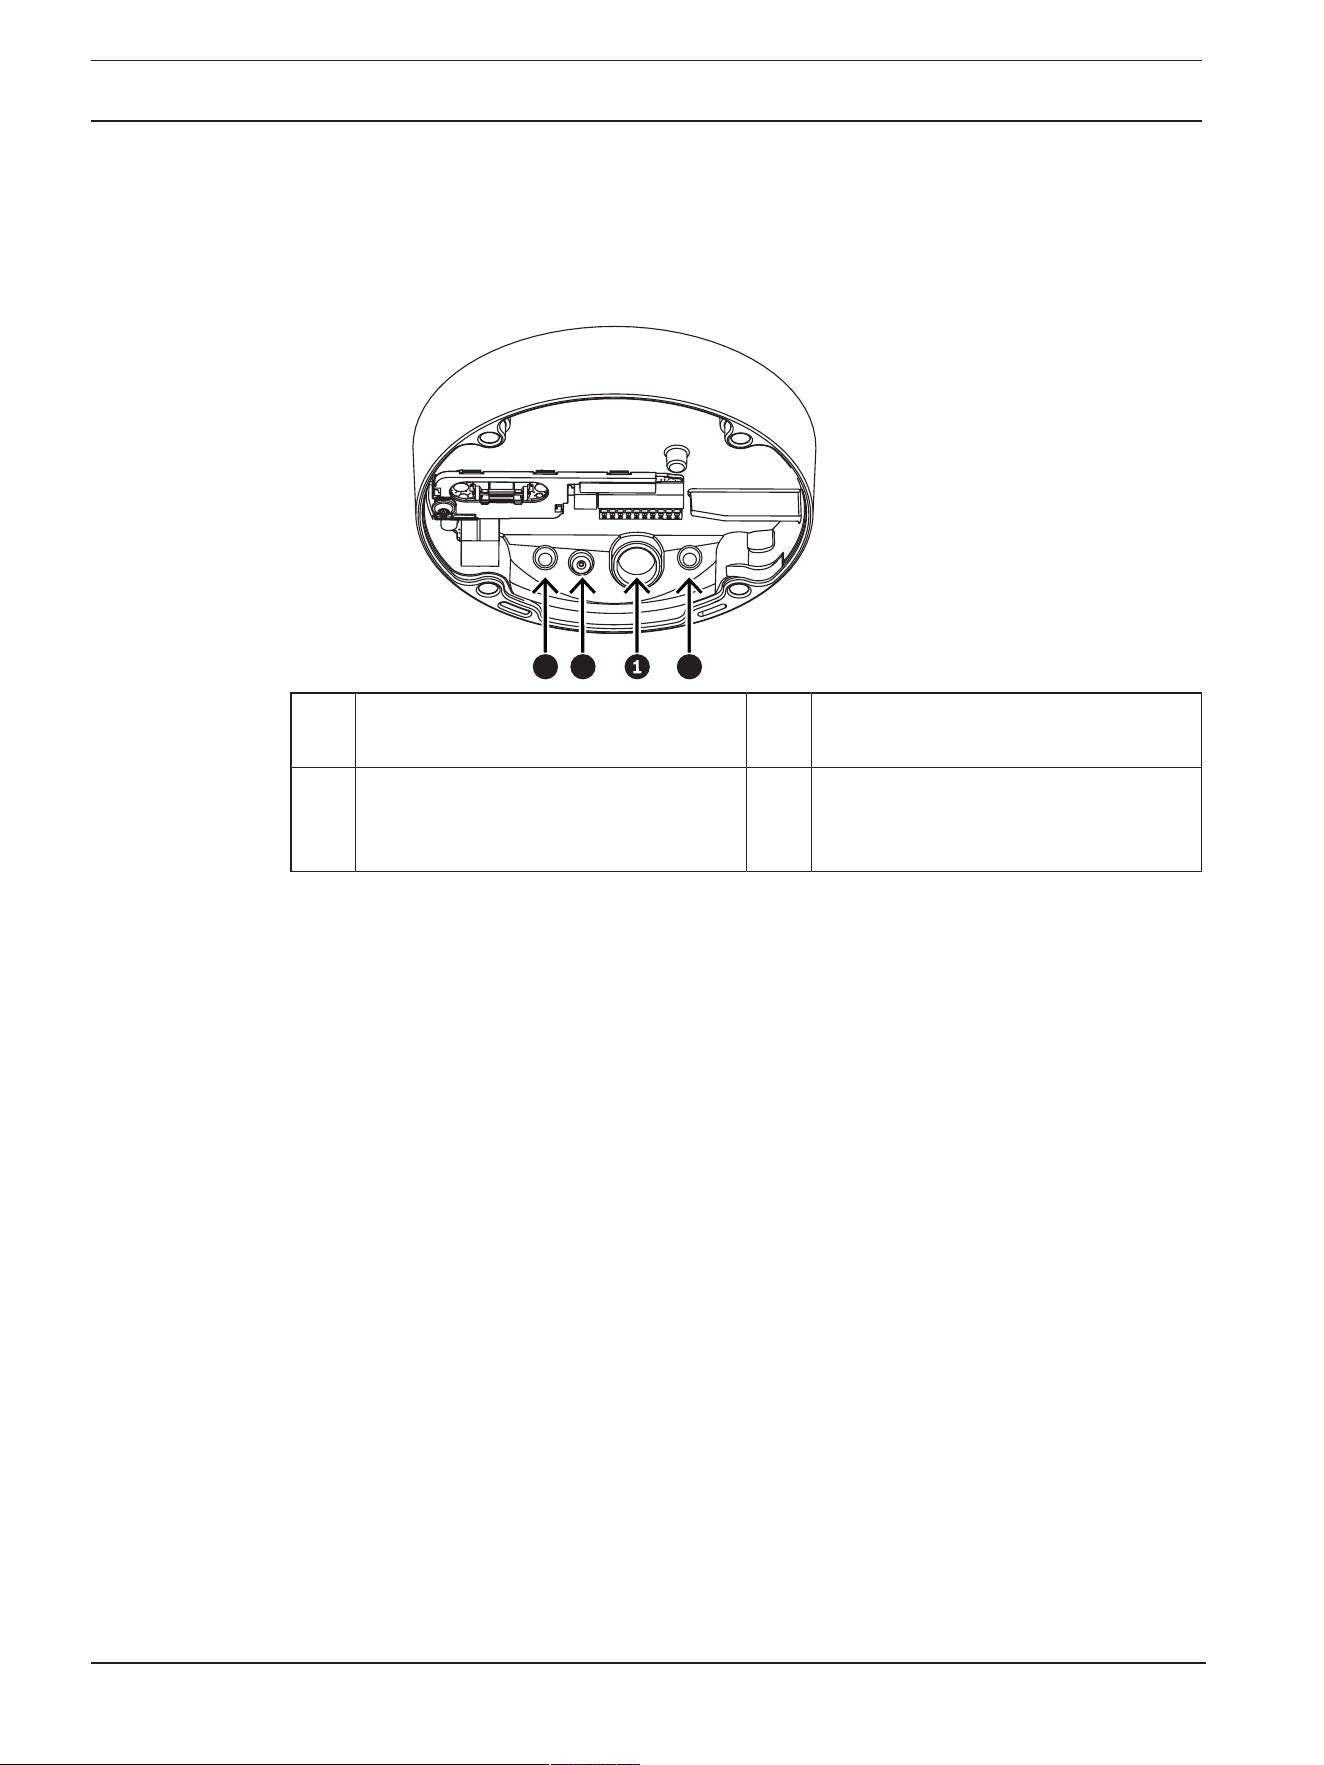
4.3 Wiring
1 10-pin I/O connector. 2 2-pin 24VAC / 12-26VDC power input
connector.
3 RJ45 network connector.
4.3.1 Network and PoE power
Connect the camera to a 10/100 Base-T network:
– Use STP Category 5e (or higher) cable with RJ45 connectors (the camera network socket
is AutoMDIX compliant).
– Power can be supplied to the camera via the Ethernet cable compliant with the Power-
over-Ethernet standard and/or via the 24VAC / 12-26VDC auxiliary power.
i
Notice!
Use only PoE approved devices.
Power-over-Ethernet (PoE) can be connected at the same time as a 24VAC / 12-26VDC power
supply. If auxiliary power (24VAC / 12-26VDC) and PoE is applied simultaneously, the camera
draws its power from PoE by default, and seamlessly switches to auxiliary input if PoE power
fails.

FLEXIDOME IP starlight 8000i Preparing for installation | en 15
Bosch Security Systems B.V.
Installation manual
2021-02 | V02 | F.01U.385.211
When PoE power returns, the camera seamlessly switches back to PoE as its default power
source.
4.3.2 24V AC / 12-26V DC power input
Connect a SELV-LPS or a SELV Class2 power supply with a rated supply voltage of 24VAC or
12-26VDC.
i
Notice!
When using a 24VAC power supply, do not make a ground connection with one of the 24VAC
supply leads. This will damage the camera.
4.3.3 10-pin I/O connector
Pin Connection
1 +12VDC out
2 GND
3 ALARM OUT
4 ALARM OUT
5 GND
6 ALARM IN 1
7 ALARM IN 2
8 GND
9 AUDIO IN
10 AUDIO OUT
12VDC power output
The 12VDC output can be enabled/disabled via the web interface, and controlled via the
Alarm Task Editor.
Maximum load of 50mA.
Alarm I/O
1. Input:
Use the alarm input to connect external alarm devices such as door contacts or sensors:
– TTL logic, +5V nominal, +40VDC maximum, DC coupled with 50kOhm pull-up to
+3.3V.
– Configurable as active low or active high.
Use a zero potential make-contact or switch as the actuator (with a bounce-free contact
system).
2. Output:
Use the alarm output for switching external devices such as lamps or sirens. The alarm
output switching capability has a maximum voltage of 30VAC or +40VDC; maximum 0.5A
continuous, 10VA.

16 en | Preparing for installation FLEXIDOME IP starlight 8000i
2021-02 | V02 | F.01U.385.211
Installation manual
Bosch Security Systems B.V.
Audio I/O
Connect audio devices to the audio input and audio output connectors.
The unit has full-duplex mono audio for two-way communication between a speaker or door
intercom system. The audio input signal is transmitted in synchronization with the video
signal.
1. Input:
Line input level (not suitable for direct microphone signal); impedance 18kOhm typical;
1Vrms maximum input voltage.
2. Output:
Line output level (not suitable for direct speaker connection); impedance 1.5kOhm
minimum; 0.85Vrms maximum output voltage.
Use shielded audio connection cable with advised maximum cable lengths for audio line input
and output levels.
4.3.4 Grounding
The camera is double-insulated and does not need a safety earth connection, but grounding is
recommended for outdoor applications.
Grounding provides improved surge protection (up to 1kV, 2 kA to ground (8/20 µs pulse)).
The grounding wire is not included in the box. Bosch recommends the use of a grounding wire
with a ring terminal.
The ring terminal must not have a thickness greater than 2mm (0.01in.).
i
Notice!
Use proper surge protection on cables that are routed outdoors, or close to large inductive
loads or electrical mains supply cables.

FLEXIDOME IP starlight 8000i In-box configuration | en 17
Bosch Security Systems B.V.
Installation manual
2021-02 | V02 | F.01U.385.211
5 In-box configuration
In-box configuration of the camera can be done via a wired or wireless connection with the
camera still inside the box, by using a mobile device or PC.
1. Connect a network cable with PoE, and wait 1 minute for the camera to power up.
2. A - Connect via wireless with the Project Assistant app by scanning the data matrix on the
box label or the QR code on the identification label stickers, and apply the required
configurations.
B - Connect and configure the camera via the wired network by using the web interface ,
the Project Assistant app or the Configuration Manager.
For more detail about the Project Assistant app, refer to
Commissioning, page 34
.

18 en | Hardware installation FLEXIDOME IP starlight 8000i
2021-02 | V02 | F.01U.385.211
Installation manual
Bosch Security Systems B.V.
6 Hardware installation
!
Caution!
Do not remove the bubble to move the camera lens manually.
The lens system is motorized for easy commissioning. Moving these parts manually will break
the gears and damage the camera. In order to move or focus the camera lens, always use the
motorized PTRZ controls mentioned in this manual. Removal of the bubble is only allowed for
bubble replacement.
Installation overview
The installation of the camera follows these steps:
1.
Installing the mounting plate, page 19
.
2.
Installing the camera base, page 23
.
3.
Installing the camera module, page 29
.

FLEXIDOME IP starlight 8000i Hardware installation | en 19
Bosch Security Systems B.V.
Installation manual
2021-02 | V02 | F.01U.385.211
6.1 Installing the mounting plate
The mounting plate is used to fix the camera to a flat surface. It offers different holes and
slots for a variety of fixing options.
5
3
1 10.2cm / 4in. Square junction box 2 Pole mount (NDA-U-PMAL/NDA-U-
PMAS)/Corner mount (NDA-U-CMA)
3 Single gang box or universal slot,
45mm / 1.8in to 85mm/3.3in
4 Double gang box
5 Ceiling/wall mount and pendant
interface plate (NDA-8000-PIP(W))
Note: Only options 1, 2, and 5 maintain
IK10+ rating
Installation options
The camera has two configurations for surface mounting:
– Refer to
Installing the mounting plate without conduit, page 20
, if the wires are not on
the outside of the surface.
– Refer to
Installing the mounting plate with conduit, page 21
, if the wires are on the
outside of the surface.
Additionally, the camera can cover various mounting options when combined with the
available accessories. See the
Mounting accessories, page 31
chapter for the available
accessories.
i
Notice!
The plugs and screws for surface mounting are not supplied with the camera.

20 en | Hardware installation FLEXIDOME IP starlight 8000i
2021-02 | V02 | F.01U.385.211
Installation manual
Bosch Security Systems B.V.
6.1.1 Installing the mounting plate without conduit
1. Remove the mounting plate from the box.
2. Position the mounting plate with the center hole on top of the cable exit on the surface,
and mark the positions of the screw holes on the surface.
– For a camera mounted on a wall: make sure that the mounting plate is oriented in a
90º angle, with the holes parallel to the floor, to allow for the use of a weather
protector if necessary.
3. Drill the 4 holes with the appropriate diameter drill to support your 5-6mm (0.2in.)
screws and plugs.
4. Install 4 plugs in the holes.
5. Put the cable through the center hole of the mounting plate.
6. Attach the mounting plate to the surface with 4 screws. Tighten the screws between 4
and 7Nm (3 and 5.2lbfft).

FLEXIDOME IP starlight 8000i Hardware installation | en 21
Bosch Security Systems B.V.
Installation manual
2021-02 | V02 | F.01U.385.211
6.1.2 Installing the mounting plate with conduit
– For a camera mounted on a wall: make sure that the mounting plate is oriented in a
90º angle, with the holes parallel to the floor, to allow for the use of a weather
protector if necessary.
1. Remove the conduit plate from the box.
2. Mark the position of the hole on the surface.
3. Drill the hole with the appropriate diameter drill.
4. Install a plug in the hole.
5. Select the applicable conduit plate adapter and install it on the conduit plate:
– If the conduit is M25 / ¾in., use the conduit plate adapter with the larger hole
(mounted by default).
– If the conduit is M20 / ½in., use the conduit plate adapter with the smaller hole.
– If the conduit or cable diameter is smaller than M20, use the rubber adapter with the
conduit plate adapter with the larger hole. The rubber must be perforated to put the
conduit or cable through.

22 en | Hardware installation FLEXIDOME IP starlight 8000i
2021-02 | V02 | F.01U.385.211
Installation manual
Bosch Security Systems B.V.
6. Put the cable through the hole of the conduit plate.
7. Attach the conduit plate with the conduit plate adapter to the surface with the washer
and a 5-6mm (0.2in.) screw. Tighten the screw between 2.5 and 4Nm (1.8lbfft and
3lbfft).
8. Remove the mounting plate from the box.
9. Mark the positions of the holes on the surface. The mounting plate has only one side
available for the conduit. Make sure to position it accordingly.
10. Drill the 4 holes with the appropriate diameter drill to support your 5-6mm (0.2in.)
screws and plugs.
11. Install 4 plugs in the holes.
12. Attach the mounting plate to the surface with 4 screws. Tighten the screws between 4
and 7Nm (3 and 5.2lbfft).

FLEXIDOME IP starlight 8000i Hardware installation | en 23
Bosch Security Systems B.V.
Installation manual
2021-02 | V02 | F.01U.385.211
13. Install the conduit cover on the conduit plate with the bolt. Tighten the screw between
1.4 and 2Nm (1lbfft and 1.5lbfft).
6.2 Installing the camera base
6.2.1 Before the installation
1. With the camera inside the box, remove the tapes from the sides of the camera base.
2. Remove the camera base from the box.
3. If it is not preferred for installation, remove the optional CAT5e patch cable (50cm /
19.7in.).
4. If the installation of the mounting plate was done with the conduit, remove the door on
the camera base as shown in the image. Keep the screw and lid.
24 en | Hardware installation FLEXIDOME IP starlight 8000i
2021-02 | V02 | F.01U.385.211
Installation manual
Bosch Security Systems B.V.
5. If there are auxiliary connections, puncture a hole in the rubber of the secondary cable
inlet (2) in the camera base to put them through. The diameter of the whole must be
between 5 and 8mm (0.2 and 0.3in.).
The network cable inlet (1) is for the network cable only.
33 2
1 Network cable inlet. 2 Secondary cable inlet for additional
cabling. It is waterproof if not in use.
3 Protective breathing vents. Do not
remove or break the sealing from these
holes.

FLEXIDOME IP starlight 8000i Hardware installation | en 25
Bosch Security Systems B.V.
Installation manual
2021-02 | V02 | F.01U.385.211
Grounding (optional)
To ground the camera:
1. Remove the screw from the bottom of the camera base.
2. Install the ring terminal on the screw.
3. Hold the camera base and attach the screw with the grounding cable.
0.07 inch
!
Warning!
Trained electricians only!
Work at electric appliances must only be carried out by qualified technicians.

26 en | Hardware installation FLEXIDOME IP starlight 8000i
2021-02 | V02 | F.01U.385.211
Installation manual
Bosch Security Systems B.V.
6.2.2 Installation steps
1. Put the network cable through the network cable inlet.
2. If necessary, put all auxiliary connections through the secondary cable inlet.
3. Attach the grommet to the network cable.
4. Grab the camera base with both hands and push the grommet into the network cable
inlet with both thumbs on the opposite sides of the network cable.
5. Make sure that the grommet is pushed in to its full length.

FLEXIDOME IP starlight 8000i Hardware installation | en 27
Bosch Security Systems B.V.
Installation manual
2021-02 | V02 | F.01U.385.211
6. Adjust the length of the network cable as necessary.
7. Connect the network cable to the network connector.
8. If required, do a loop with the cable on the hooks of the mounting plate.
Without conduit With conduit
9. Push the camera base against the mounting plate and turn the camera base in the
clockwise direction until you hear/feel a click. Make sure that the camera base is secured.

28 en | Hardware installation FLEXIDOME IP starlight 8000i
2021-02 | V02 | F.01U.385.211
Installation manual
Bosch Security Systems B.V.
Without conduit With conduit
10. If necessary, connect the auxiliary wires to the terminals supplied (refer to
Wiring, page
14
).
11. Connect the terminals to their related connectors.
Moisture protection
1. Remove the desiccant tablet from the bag.
After removing the desiccant tablet from the bag, installation must be completed in less
than 10 minutes.
2. Attach the desiccant tablet with the adhesive side facing the camera base. Make sure not
to cover the vents with the desiccant.

FLEXIDOME IP starlight 8000i Hardware installation | en 29
Bosch Security Systems B.V.
Installation manual
2021-02 | V02 | F.01U.385.211
6.3 Installing the camera module
1. Remove the camera module from the box.
– If necessary, install the SD card in SD slot 1.
– Press the SD card firmly until it latches into place in the slot.
– To remove the card, press it into the slot until it unlatches again.
– If more than one SD card is necessary, install the other SD card in SD slot 2.
2. Attach the camera module to the camera base and tighten the four screws between 2.5 to
4Nm (1.8 and 3lbfft). Make sure that the arrow on the camera module points in the
same direction as the red arrow on the camera base.
3. Remove the protective cover from the bubble.

30 en | Hardware installation FLEXIDOME IP starlight 8000i
2021-02 | V02 | F.01U.385.211
Installation manual
Bosch Security Systems B.V.
4. Make sure that all necessary wiring is done, and that energy is being supplied.
i
Notice!
Use full size SD cards for maximum reliability, and to eliminate the risk of bad connections in
a microSD to full size SD adapter. Bosch recommends the use of industrial SD cards with
health monitoring.
6.4 LED status
A status LED can be seen in the camera bubble on the opposite side of the camera lens.
Refer to the table below for the different status LED functions.
Status LED Meaning
Solid red Booting
Flashing red Resetting
Solid green Working, but stream is not being watched or
recorded
Flashing green Stream is being watched and/or recorded
Disable the status LED in the camera settings, if necessary.
1. Select Camera.
2. Select Installer menu.
3. Select Disabled in Camera LED.

FLEXIDOME IP starlight 8000i Hardware installation | en 31
Bosch Security Systems B.V.
Installation manual
2021-02 | V02 | F.01U.385.211
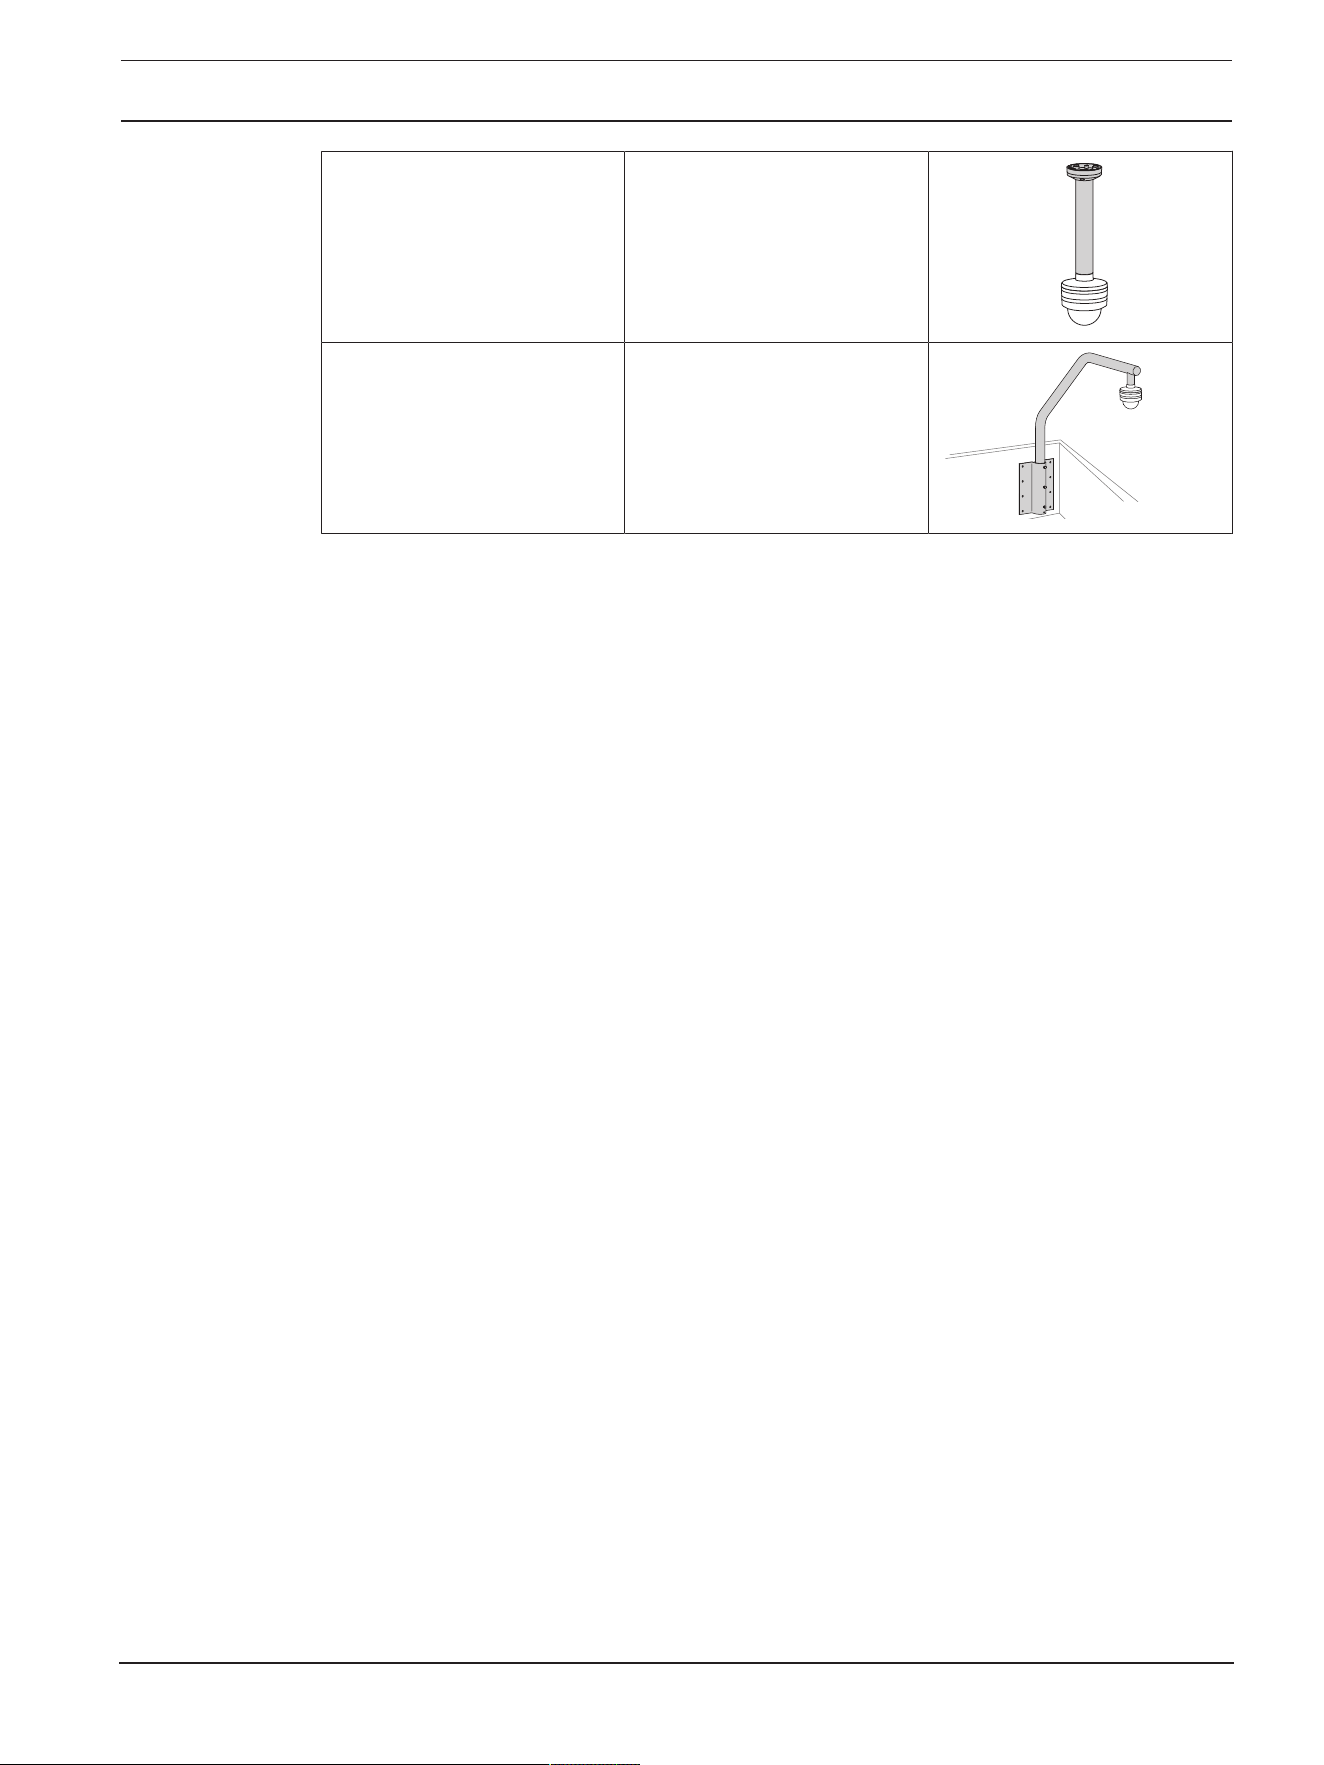
6.5 Mounting accessories
NDA-8000-PLEN Plenum-rated in-ceiling mount
kit for FLEXIDOME IP 8000i.
NDA-8000-IC In-ceiling mount kit.
NDA-8000-SP Optional soft ceiling support
for in-ceiling mount kit.
NDA-8000-WP On-camera weather protector
for FLEXIDOME IP 8000i.
NDA-8000-PIPW Pendant interface plate
including weather protector,
outdoor.
NDA-8000-PIP Pendant interface plate for
FLEXIDOME IP 8000i, indoor.

32 en | Hardware installation FLEXIDOME IP starlight 8000i
2021-02 | V02 | F.01U.385.211
Installation manual
Bosch Security Systems B.V.
NDA-8000-PC Paintable cover (4 pieces) for
FLEXIDOME IP 8000i.
NDA-U-PMAS Universal pole mount adapter,
white; small.
NDA-U-PSMB Surface mount box (SMB) for
wall mount or pipe mount.
NDA-U-PMAL Universal pole mount adapter,
white; large.
NDA-U-PAx Surveillance cabinet
NDA-U-WMT Universal wall mount for
dome cameras, white.
FLEXIDOME IP starlight 8000i Hardware installation | en 33
Bosch Security Systems B.V.
Installation manual
2021-02 | V02 | F.01U.385.211
NDA-U-PMT Universal pipe mount for
dome cameras, 31 cm, white.
NDA-U-RMT Universal roof mount for
dome cameras, white.

34 en | Commissioning FLEXIDOME IP starlight 8000i
2021-02 | V02 | F.01U.385.211
Installation manual
Bosch Security Systems B.V.
7 Commissioning
With the FLEXIDOME IP starlight 8000i remote commissioning functionality, only a PC or a
mobile device is needed to pan, tilt, roll, and zoom (PTRZ), and point the camera to the
required field of view - without ever having to remove the camera from the box.
Do the commissioning locally at the camera via WLAN using the Project Assistant app,
available for iOS, Windows or Android, or by connecting remotely to the camera via the
network using the Project Assistant app, the camera’s web interface, or the Configuration
Manager.
To commission the camera using the Project Assistant app:
1. Connect the network cable to the PoE.
2. Download the Project Assistant app.
3. Do the necessary steps to configure the device. Use the step-by-step instructional video
for help.
If required, re-commissioning can be done at any time via WLAN, if not disabled, or via the
network.
i
Notice!
The remote commissioning functionality (PTRZ) of the FLEXIDOME IP starlight 8000i and the
WLAN mode of the camera are designed as installation aid for first set-up or adjustments at a
later moment in time.
i
Notice!
Remote commissioning can be done down to temperatures of -40ºC / 104ºF.

FLEXIDOME IP starlight 8000i Connection via the web browser | en 35
Bosch Security Systems B.V.
Installation manual
2021-02 | V02 | F.01U.385.211
8 Connection via the web browser
This device can be accessed via a web browser to configure, control, receive live images, and
replay stored video.
For best experience, use Microsoft Internet Explorer browser with the Bosch MPEG-ActiveX
plugin. This enables these functions:
– Native Bosch video decoder.
– Video analytics overlays.
– Video analytics configuration.
– Live Page: snapshot and record to PC.
– Status icon overlays.
Optionally, these tools can be used to configure the device:
– Project Assistant app: user friendly software to change basic device configurations and
set fields of view. Available in iOS, Android, and Windows.
– Configuration Manager: advanced configuration software available for Windows.
Download the software from https://downloadstore.boschsecurity.com.
8.1 System requirements
The system recommendations are:
– Computer with Intel Skylake processor or better.
– Intel HD530 graphic card with performance that matches or is better than the resolution
of the device.
– Windows 7 (or later) operating system.
– Network access.
– Internet Explorer version 11 or later
- or -
Application software: VideoSecurityClient, BoschVideoClient, BVMS or Project
Assistant app.
8.2 Establishing the connection
The device must have a valid IP address to operate on the network and a compatible subnet
mask.
By default, DHCP is pre-set at the factory On plus Link-Local so a DHCP server assigns an IP
address or, if no DHCP server is available, a link local address (auto-IP) is assigned within the
range 169.254.1.0 to 169.254.254.255.
The Project Assistant app or Configuration Manager can be used to find the IP address.
Download the software from https://downloadstore.boschsecurity.com:
1. Start the web browser.
2. Enter the IP address of the device as the URL.
3. During the initial installation, confirm any security questions that show.
If a RADIUS server is used for network access control (802.1x authentication), you must
configure the device before the device can communicate with the network.
To configure the device, connect it directly to a computer using a network cable and then set
the service-level password.
8.3 Password protection in camera
The device is password-protected. The first time that any user accesses the device, the device
will prompt the user to set a password at the service level.

36 en | Connection via the web browser FLEXIDOME IP starlight 8000i
2021-02 | V02 | F.01U.385.211
Installation manual
Bosch Security Systems B.V.
The camera requires a strong password. Follow the prompts in the dialog box, which specifies
what is required. The system measures the strength of the password that you enter.
When you use Configuration Manager to access your device for the first time, you must set the
initial password of the device in Configuration Manager. The Users section (General > Unit
Access > Users) displays the message, "Before you can use this device you have to secure it
with an initial password."
Note: After you set the initial password, a "lock" icon appears next to the device name in the
Devices list in Configuration Manager.
You can also launch the device webpage directly. In the device webpage, an initial password
page appears, displaying input fields and a password strength gauge.
Enter the user name (“service”) and a password in the appropriate fields. Refer to the section
User Management for more information.
After a service-level password is set for the device, the device displays a dialog box that
prompts users to enter the user name (“service”) and the service-level password every time
that they access the device.
1. Fill in the fields User name and Password.
2. Click OK. If the password is correct, the desired page appears.
Note: New releases of software may require you to set a new and stronger password.

FLEXIDOME IP starlight 8000i Troubleshooting | en 37
Bosch Security Systems B.V.
Installation manual
2021-02 | V02 | F.01U.385.211
9 Troubleshooting
9.1 Resolving problems
The following table is intended to help identify the causes of malfunctions and correct them
where possible.
Malfunction Possible causes Solution
Unit does not operate. Power failure. Make sure that the power
supply is working properly.
Faulty cable connections. Do a check of all cables, plugs,
contacts, and connections.
Cabling between camera base
and camera module doesn’t
allow proper closing.
Re-install camera and make sure
that housing closes smoothly.
PTRZ does not work. Cables are not correctly
connected.
Separate camera module from
camera base and make sure
that all cables are properly
connected.
Motors have been used for long
and have overheated.
Pause any lens movement until
motors have cooled down.
Camera parts are out of place
or broken due to transportation.
Please contact your supplier or
system integrator, or go directly
to Bosch Security Systems
customer service.
PTRZ does not work
correctly.
Camera has lost calibration
during transportation.
Reset the PTR in the user
interface to reset the pan, tilt
and roll motors.
Reset the lens in the user
interface to reset the focus and
zoom of the lens.
If that does not work, please
contact your supplier or system
integrator, or go directly to
Bosch Security Systems
customer service.
No connection
established, no image
transmission.
Incorrect unit configuration. Check all configuration
parameters (reset to factory
default if necessary).
Faulty installation. Check all cables, plugs,
contacts and connections.
Wrong IP address. Check the IP addresses (ping).
Faulty data transmission within
the LAN.
Check the data transmission
with ping.

38 en | Troubleshooting FLEXIDOME IP starlight 8000i
2021-02 | V02 | F.01U.385.211
Installation manual
Bosch Security Systems B.V.
The maximum number of
connections has been reached.
Wait until there is a free
connection and call the
transmitter again.
Moisture/condensation
inside the bubble,
camera leaking.
Housing is not closed properly. Re-install camera and check for
proper closure.
Closing seals are damaged. Please contact your supplier or
system integrator, or go directly
to Bosch Security Systems
customer service.
Rubber grommet not placed
correctly.
Re-install rubber grommet.
Cable diameter or shape is not
as specified.
Re-install camera with proper
cabling.
Air vents are blocked due to
dirt/water.
Gently clean air vents.
Air vents are damaged or loose. Please contact your supplier or
system integrator, or go directly
to Bosch Security Systems
customer service.
Camera has been off for an
extensive period of time.
Turn camera on and leave it on
until condensation clears.
No audio transmission to
remote station.
Hardware fault. Check that all connected audio
units are operating correctly.
Faulty cable connections. Check all cables, plugs,
contacts and connections.
Incorrect configuration. Check audio parameters on the
Audio configuration and LIVE
page functions pages.
The audio voice connection is
already in use by another
receiver.
Wait until the connection is free
and then call the sender again.
The unit does not report
an alarm.
Alarm source is not selected. Select possible alarm sources
on the Alarm sources
configuration page.
No alarm response specified. Specify the desired alarm
response on the Alarm
connections configuration page;
if necessary change the IP
address.

FLEXIDOME IP starlight 8000i Troubleshooting | en 39
Bosch Security Systems B.V.
Installation manual
2021-02 | V02 | F.01U.385.211
The unit is not
operational after a
firmware upload.
Power failure during
programming by firmware file.
Have the unit checked by
Customer Service and replace if
necessary.
Incorrect firmware file. Enter the IP address of the unit
followed by /main.htm in your
Web browser and repeat the
upload.
Web browser contains
empty fields.
Active proxy server in network. Create a rule in the local
computer's proxy settings to
exclude local IP addresses.
9.2 Testing the network connection
The ping command can be used to check the connection between two IP addresses. This
allows testing whether a device is active in the network.
1. Open the DOS command prompt.
2. Type ping followed by the IP address of the device.
If the device is found, the response appears as "Reply from ... ", followed by the number of
bytes sent and the transmission time in milliseconds. Otherwise, the device cannot be
accessed via the network. This might be because:
– The device is not properly connected to the network. Check the cable connections in this
case.
– The device is not correctly integrated into the network. Check the IP address, subnet
mask, and gateway address.
9.3 Customer service
If a fault cannot be resolved, please contact your supplier or system integrator, or go directly
to Bosch Security Systems customer service.
The version numbers of the internal firmware can be viewed on a service page. Please note
this information before contacting customer service.
1. In the address bar of your browser, after the unit IP address, enter: /version
for example: 192.168.0.80/version
2. Write down the information or print out the page.

40 en | Maintenance FLEXIDOME IP starlight 8000i
2021-02 | V02 | F.01U.385.211
Installation manual
Bosch Security Systems B.V.
10 Maintenance
There are different types of bubbles available to choose from. All bubbles require special care
when handling and cleaning to avoid scratches.
10.1 Bubble handling
The bubble may be packaged with a protective plastic sheet. It is recommended that the
bubble remain stored this way until it is ready to install. Limit handling the bubble, as any
scratches can quickly affect visibility.
10.2 Bubble cleaning
If cleaning the bubble is required, use the following procedures and comply with all the
warnings listed below.
Cleaning the bubble interior
The extremely soft interior surface should not be cleaned by rubbing or dusting with a cloth.
Use clean dry compressed air, preferably from a spray can, to remove any dust from the
interior surface.
!
Warning!
Do not use alcohol-based solutions to clean the bubble. This will cause it to cloud and over
time cause stress aging, which makes the bubble brittle.
Cleaning the bubble exterior
The exterior of the bubble is hard coated for extra protection. If cleaning becomes necessary,
only use cleaning solutions and cloths suitable for cleaning safety glass lenses. Dry the bubble
thoroughly with a dry nonabrasive cloth to prevent water spots. Never scrub the bubble with
any abrasive material or cleaners.
Cautions
– Do not clean bubbles in the hot sun or on very hot days.
– Do not use abrasive or highly alkaline cleaners on the bubble.
– Do not scrape the bubble with razor blades or other sharp instruments.
– Do not use Benzene, Gasoline, Acetone, or Carbon Tetrachloride on the bubble.
10.3 Bubble replacement
i
Notice!
Yellowing of bubble
Bubble may become yellow overtime due to exposure to UV radiation like direct or indirect
sunlight.
In case the bubble gets damaged or yellow, it can be replaced by a clear bubble (NDA-8000-
CBL) or a tinted bubble (NDA-8000-TBL).

FLEXIDOME IP starlight 8000i Maintenance | en 41
Bosch Security Systems B.V.
Installation manual
2021-02 | V02 | F.01U.385.211
Clear bubbles offer maximum sensitivity by allowing as much light through as possible. Tinted
bubbles offer covertness by making it difficult to see from the outside the direction the
camera is facing.
For instructions on how to replace the bubble, refer to the respective Quick Installation Guide.
10.4 Camera reset
To reset the camera to factory settings:
1. Remove the camera module from the camera base.
2. Unscrew and remove the connection PCB from the camera base.
3. Attach the connection PCB to the camera module.
4. Connect a network cable with PoE or a 24VAC / 12-26VDC cable to power the camera
module.
5. Press tightly and hold the reset button on top of the SD card slot for 15 seconds. The
LED light by the reset button flashes in red.
6. Release the reset button.

42 en | Maintenance FLEXIDOME IP starlight 8000i
2021-02 | V02 | F.01U.385.211
Installation manual
Bosch Security Systems B.V.
7. Wait 60 seconds for the LED light to turn off and for the reset to be complete.
8. Remove the connection PCB from the camera module.
9. Disconnect the network or power cable from the camera module.
10. Re-install the connection PCB in the camera base.
11. Re-attach the camera module onto the camera base.

FLEXIDOME IP starlight 8000i Decommissioning | en 43
Bosch Security Systems B.V.
Installation manual
2021-02 | V02 | F.01U.385.211
11 Decommissioning
11.1 Transfer
The device should only be passed on together with this Installation manual.
11.2 Disposal

44 en | Technical data FLEXIDOME IP starlight 8000i
2021-02 | V02 | F.01U.385.211
Installation manual
Bosch Security Systems B.V.
12 Technical data
12.1 Dimensions
~71 mm (2.8 in)
~107mm (4.2 in)
~85 mm (3.3 in)
~175 mm (6.9 in)
~148 mm (5.8 in)
Figure12.1: FLEXIDOME IP 8000i dimensions
12.2 Specifications
NDE-8502-R / NDE-8502-RT
Mechanical
Dimensions (DxH) 175x148mm (6.9x5.7in)
Weight 2.2kg (4.85lbs)
Mounting Surface mount
Color White (RAL9003)
Motorized PTR range Pan: 0º to +361º;
Tilt: -3º to +86º (NDE-8502-R), -3º to +90º (NDE-8502-RT);
Roll: -95º to +95º
Dome bubble Polycarbonate, clear with UV blocking anti-scratch coating
Housing Aluminum with dehumidifying membranes and waterproof
connection area
NDE-8503-R / NDE-8503-RT
Mechanical
Dimensions (DxH) 175x148mm (6.9x5.7in)

FLEXIDOME IP starlight 8000i Technical data | en 45
Bosch Security Systems B.V.
Installation manual
2021-02 | V02 | F.01U.385.211
Mechanical
Weight 2.3kg (5.07lbs)
Mounting Surface mount
Color White (RAL9003)
Motorized PTR range Pan: 0º to +361º;
Tilt: -3º to +85º (NDE-8503-R), -3º to +90º (NDE-8503-RT);
Roll: -95º to +95º
Dome bubble Polycarbonate, clear with UV blocking anti-scratch coating
Housing Aluminum with dehumidifying membranes and waterproof
connection area
NDE-8504-R / NDE-8504-RT
Mechanical
Dimensions (DxH) 175x148mm (6.9x5.7in)
Weight 2.3kg (5.07lbs)
Mounting Surface mount
Color White (RAL9003)
Motorized PTR range Pan: 0º to +361º;
Tilt: -3º to +85º (NDE-8504-R), -3º to +90º (NDE-8504-RT);
Roll: -95º to +95º
Dome bubble Polycarbonate, clear with UV blocking anti-scratch coating
Housing Aluminum with dehumidifying membranes and waterproof
connection area
NDE-8502-RX/NDE-8502-RXT
Mechanical
Dimensions (DxH) 175x148mm (6.9x5.7in)
Weight 2.2kg (4.85lbs)
Mounting Surface mount
Color White (RAL9003)
Motorized PTR range Pan: 0º to +361º;
Tilt: -3º to +81º (NDE-8502-RX), -3º to +89º (NDE-8502-RXT);
Roll: -95º to +95º
Dome bubble Polycarbonate, clear with UV blocking anti-scratch coating
Housing Aluminum with dehumidifying membranes and waterproof
connection area
NDE-8503-RX/NDE-8503-RXT

46 en | Technical data FLEXIDOME IP starlight 8000i
2021-02 | V02 | F.01U.385.211
Installation manual
Bosch Security Systems B.V.
Mechanical
Dimensions (DxH) 175x148mm (6.9x5.7in)
Weight 2.3kg (5.07lbs)
Mounting Surface mount
Color White (RAL9003)
Motorized PTR range Pan: 0º to +361º;
Tilt: -3º to +81º (NDE-8503-RX), -3º to +89º (NDE-8503-RXT);
Roll: -95º to +95º
Dome bubble Polycarbonate, clear with UV blocking anti-scratch coating
Housing Aluminum with dehumidifying membranes and waterproof
connection area
Environmental
Operating temperature -50°C to +60°C (-58°F to +140°F) for continuous
operation;
Up to +74°C (+165°F) according to NEMA TS 2-2003
(R2008), para2.1.5.1 using fig.2.1 test profile
Storage temperature -30°C to +70°C (-22°F to +158°F)
Operating humidity 5% to 93% RH non condensing
5% to 100% RH condensing
Storage humidity Up to 98% RH
Impact resistance casing and
dome
IK10+ (50 joules)
Water/dust protection IP66, IP6K9K and NEMA Type 4X
Power
Input voltage PoE IEEE 802.3af / 802.3at Type1, Class3;
24VAC ±10%;
12-26VDC ±10%;
PoE and auxiliary power can be connected simultaneously for
redundant operation
Power Consumption
(typical / maximum)
PoE: 7W / 12.95W;
24VAC: 7.1W - 12VA / 13W - 25VA;
12-26VDC: 7.5W / 16W
Input/output
Power output +12VDC, max 50mA
Audio signal line in 10kOhm typical; 1Vrms max
Audio signal line out 1Vrms; 1.5kOhm typical
Alarm input 2 supervised inputs, dry contact or voltage operated (5-
40VDC); 2.2K end-of-line resistor

FLEXIDOME IP starlight 8000i Technical data | en 47
Bosch Security Systems B.V.
Installation manual
2021-02 | V02 | F.01U.385.211
Input/output
Alarm output 1 output, maximum: 30VAC or +40VDC, 0.5A continuous,
10VA
Ethernet Shielded RJ45
Surge protection Ethernet: 1kV, 2kA to ground (8/20µs pulse)
Fiber optics (sold separately) The Fiber Optic Ethernet Media Converter kit (VG4-
SFPSCKT) installed inside a Surveillance Cabinet (NDA-U-
PA0, NDA-U-PA1 or NDA-U-PA2) provides the fiber optic
interface to the mounted camera.
Network
Protocols IPv4, IPv6, UDP, TCP, HTTP, HTTPS, RTP/RTCP, IGMP V2/V3,
ICMP, ICMPv6, RTSP, FTP, ARP, DHCP, APIPA (Auto-IP, link
local address), NTP (SNTP), SNMP(V1,V3, MIB-II), 802.1x,
DNS, DNSv6, DDNS (DynDNS.org, selfHOST.de, no-ip.com),
SMTP, iSCSI, UPnP(SSDP), DiffServ(QoS), LLDP, SOAP,
Dropbox™, CHAP, digest authentication
Ethernet 10/100 Base-T
Interoperability ONVIF ProfileS; ONVIF Profile G; ONVIF Profile T
GB/T 28181
Camera installation
Mirror image On / Off
Rotate 0° / 90° upright / 180° / 270° upright
Camera LED Auto disable/Enable/Disable
Positioning Coordinates / Mounting height
Camera view wizard Motorized pan, tilt, roll, zoom, autofocus
Wireless commissioning IEEE 802.11b/g/n
NDE-8502-R / NDE-8502-RT
Video streaming
Video compression H.265; H.264; M- JPEG
Sensor modes 25fps, HDR, 1920 x 1080 (2MP)
30fps, HDR, 1920 x 1080 (2MP)
50fps, 1920 x 1080 (2MP)
60fps, 1920 x 1080 (2MP)
Streaming Multiple configurable streams in H.264, H.265 and M-JPEG,
configurable frame rate and bandwidth.
Regions of Interest (ROI)
Bosch Intelligent Streaming
Camera latency 67ms (2MP, 60fps)
48 en | Technical data FLEXIDOME IP starlight 8000i
2021-02 | V02 | F.01U.385.211
Installation manual
Bosch Security Systems B.V.
Video streaming
GOP structure IP, IBP, IBBP
Frame rate 1-60fps
Signal-to-Noise Ratio (SNR) >55dB
Video resolution (H x V)
Supported resolutions HD1080p1920x1080, 1.3MP1536x864,
HD720p1280x720, SD432p768x432,
D1(4:3)720x576, VGA(4:3) 640x480
NDE-8503-R / NDE-8503-RT
Video streaming
Video compression H.265; H.264; M- JPEG
Sensor modes 25fps, HDR, 3072 x 1728 (5.3MP)
30fps, HDR, 3072 x 1728 (5.3MP)
25fps, 3264 x 1840 (6MP)
30fps, 3264 x 1840 (6MP)
Streaming Multiple configurable streams in H.264, H.265 and M-JPEG,
configurable frame rate and bandwidth.
Regions of Interest (ROI)
Bosch Intelligent Streaming
Camera latency 120ms (6MP, 30fps)
GOP structure IP
Frame rate 1-30fps
Signal-to-Noise Ratio (SNR) >55dB
Video resolution (H x V)
Supported resolutions 6MP3264x1840, 5.3MP3072x1728, 4.1MP2688x1512,
3MP2304x1296, 2.8MP(4:3)1920x1440,
HD1080p1920x1080, 1.3MP1536x864, 1.3MP(5:4)
1280x1024, HD720p1280x720, SD432p768x432,
SD480p(4:3)720x480, VGA(4:3) 640x480
NDE-8504-R / NDE-8504-RT
Video streaming
Video compression H.265; H.264; M- JPEG
Sensor modes 20fps, HDR, 3840 x 2160 (8MP)
25fps, 3840 x 2160 (8MP)
30fps, 3840 x 2160 (8MP)
Streaming Multiple configurable streams in H.264, H.265 and M-JPEG,
configurable frame rate and bandwidth.
Regions of Interest (ROI)

FLEXIDOME IP starlight 8000i Technical data | en 49
Bosch Security Systems B.V.
Installation manual
2021-02 | V02 | F.01U.385.211
Video streaming
Bosch Intelligent Streaming
Camera latency 120ms (8MP, 30fps)
GOP structure IP
Frame rate 1-30fps
Signal-to-Noise Ratio (SNR) >55dB
Video resolution (H x V)
Supported resolutions 4KUHD3840x2160, 7.2MP3584x2016, 2.8MP(4:3)
1920x1440, HD1080p1920x1080, 1.3MP1536x864,
1.3MP(5:4) 1280x1024, HD720p1280x720,
SD432p768x432, SD480p(4:3)720x480, VGA(4:3)
640x480
NDE-8502-RX/NDE-8502-RXT
Video streaming
Video compression H.265; H.264; M- JPEG
Sensor modes 25fps, HDRX, 1920x1080 (2.1MP);
30fps, HDRX, 1920x1080 (2.1MP);
50fps, 1920x1080 (2.1MP);
60fps, 1920x1080 (2.1MP)
Streaming Multiple configurable streams in H.264, H.265 and M-JPEG,
configurable frame rate and bandwidth.
Regions of Interest (ROI);
Bosch Intelligent Streaming
Camera latency 67ms (60fps)
GOP structure IBBP
Frame rate 1-60fps
Signal-to-Noise Ratio (SNR) >55dB
Video resolution (H x V)
Supported resolutions HD1080p1920x1080, 1.3MP1536x864, 1.3MP(5:4)
1280x1024, HD720p 1280x720, SD432p 768x432,
SD480p(4:3) 720x480, VGA(4:3) 640x480
NDE-8503-RX/NDE-8503-RXT
Video streaming
Video compression H.265; H.264; M- JPEG
Sensor modes 25fps, HDRX, 2688x1520 (4.1MP);
30fps, HDRX, 2688x1520 (4.1MP);
50fps, 2688x1520 (4.1MP);

50 en | Technical data FLEXIDOME IP starlight 8000i
2021-02 | V02 | F.01U.385.211
Installation manual
Bosch Security Systems B.V.
Video streaming
60fps, 2688x1520 (4.1MP)
Streaming Multiple configurable streams in H.264, H.265 and M-JPEG,
configurable frame rate and bandwidth.
Regions of Interest (ROI);
Bosch Intelligent Streaming
Camera latency 67ms (60fps)
GOP structure IBBP
Frame rate 1-60fps
Signal-to-Noise Ratio (SNR) >55dB
Video resolution (H x V)
Supported resolutions 4.1MP 2688x1520, 3.7MP2560x1440, 2.8MP(4:3)
1920x1440, HD1080p1920x1080, 1.3MP1536x864,
1.3MP(5:4) 1280x1024, HD720p 1280x720, SD432p
768x432, SD480p(4:3) 720x480, VGA(4:3) 640x480
Audio streaming
Standard G.711, 8kHz sampling rate
L16, 16kHz sampling rate
AAC-LC, 48kbps at 16kHz sampling rate
AAC-LC, 80kbps at 16kHz sampling rate
Signal-to-Noise Ratio >50dB
Audio Streaming Full-duplex / half duplex
Local storage
Internal RAM 5s pre-alarm recording
Memory card slots Dual SDXC / SDHC / SD card slots, up to 2TB.
Dual SD-card slot
configurations
– Mirror (redundant storage)
– Failover (extended service interval)
– Extend (maximum retention time)
– Automatic Network Replenishment
Industrial SD cards Extreme lifetime and health monitoring support that provides
early service indication.
Data security
Crypto Coprocessor (TPM) RSA 2048 bit, AES/CBC 256 bit
PKI X.509 certificates
Encryption Full end-to-end encryption with supported VMS
Network: TLS1.0/1.2, AES128, AES256
Local storage: XTS-AES

FLEXIDOME IP starlight 8000i Technical data | en 51
Bosch Security Systems B.V.
Installation manual
2021-02 | V02 | F.01U.385.211
Data security
Video authentication checksum, MD5, SHA-1, SHA-256

52 en | Support and training FLEXIDOME IP starlight 8000i
2021-02 | V02 | F.01U.385.211
Installation manual
Bosch Security Systems B.V.
13 Support and training
Support
Access our support services at www.boschsecurity.com/xc/en/support/.
Bosch Security and Safety Systems offers support in these areas:
– Apps & Tools
– Building Information Modeling
– Commissioning
– Warranty
– Troubleshooting
– Repair & Exchange
– Product Security
Bosch Building Technologies Academy
Visit the Bosch Building Technologies Academy website and have access to training courses,
video tutorials and documents: www.boschsecurity.com/xc/en/support/training/

FLEXIDOME IP starlight 8000i Support and training | 53
Bosch Security Systems B.V.
Installation manual
2021-02 | V02 | F.01U.385.211

54 | Support and training FLEXIDOME IP starlight 8000i
2021-02 | V02 | F.01U.385.211
Installation manual
Bosch Security Systems B.V.


Bosch Security Systems B.V.
Torenallee 49
5617 BA Eindhoven
Netherlands
www.boschsecurity.com
© Bosch Security Systems B.V., 2021
202104061459