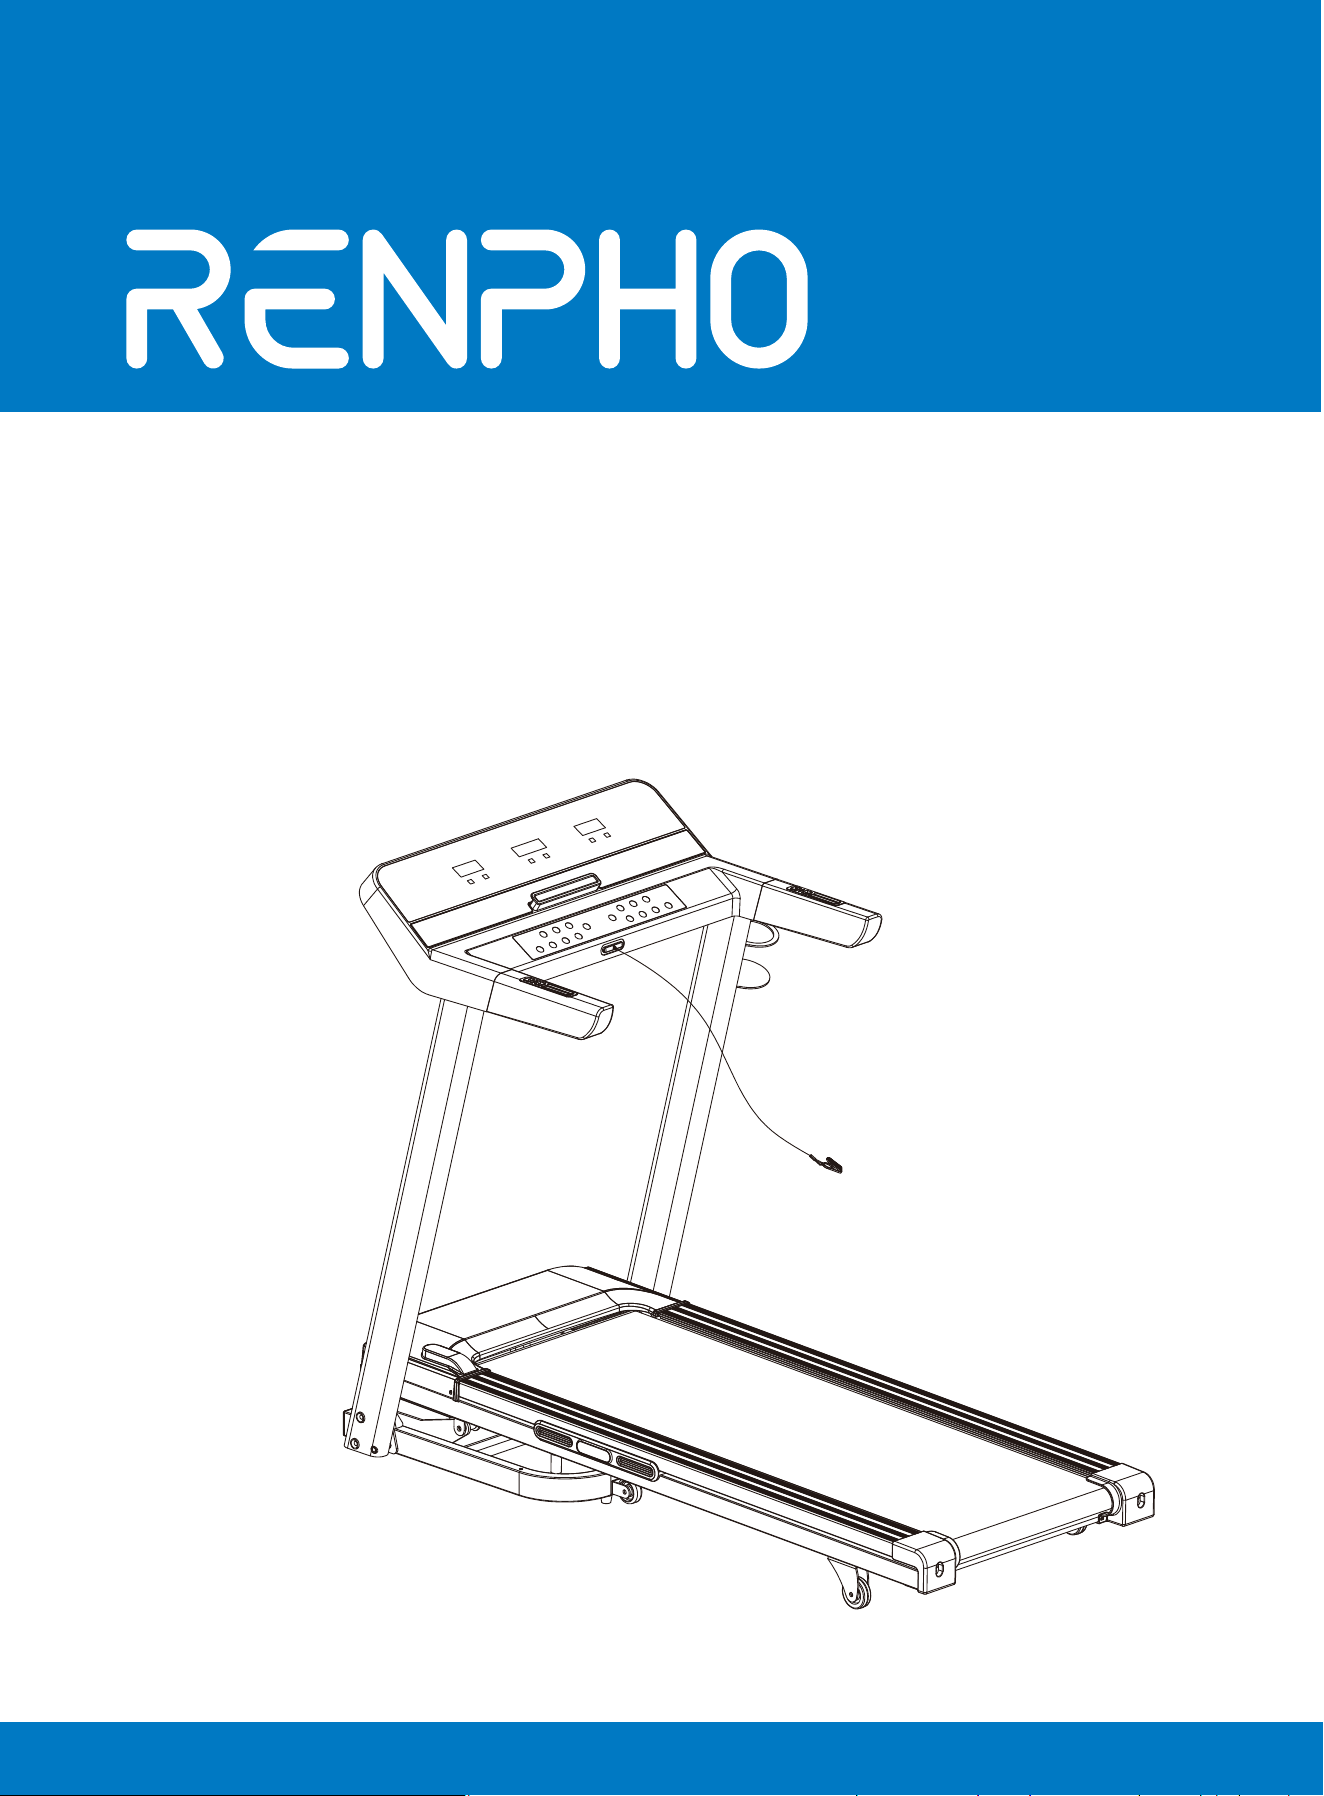
Smart
Treadmill
Model: R-Q004
User Manual

Special tips:
1. Before installation and operation, please read this user manual carefully.
2. Please save this manual for future reference.
3. Product may vary slightly from the item pictures due to model upgrades.
WARNING - Read all instructions before using this treadmill. It is important for
your treadmill to receive regular maintenance to prolong its lifespan. Failure to
regularly maintain your treadmill may void manufacturer's warranty.
Important Safety Instructions
DANGER – To reduce the risk of electric shock, disconnect your treadmill from the elec-
trical outlet prior to cleaning and/or service work.
DO NOT USE AN EXTENSION CORD: DO NOT ATTEMPT TO DISABLE THE GROUNDED
PLUG BY USING AN ADAPTER OR MODIFYING THE CORD OR PLUG IN ANY WAY.
1)Place the treadmill on a flat level surface with access to correct voltage and
frequency in a grounded outlet.
2)Do not operate treadmill on deeply padded, plush or shag carpet. Damage to
both carpet and treadmill may occur.
3)Do not block the rear of the treadmill. The minimum clearance area behind the
treadmill shall be no less than 1.25m/49inch. Allow a clearance of 0.5m/19inch on
each side of the treadmill.
4)Place the unit on a solid, level surface when in use.
5)Never allow children on or near the treadmill.
6)Read, understand, and test the emergency stop procedures before use. When
running, make sure the safety key is fastened on your clothing. It is for your
safety, should you fall or sustain an injury.
7)Keep hands away from all moving parts.
8)Do not operate the treadmill if it has a damaged cord or plug.
9)Keep the cord away from heated surfaces.
10)Do not operate where aerosol spray products are being used or where oxygen
is being administered. Sparks from the motor may ignite a highly flammable envi-
ronment.
11)Never drop or insert any object into any openings.
12)The treadmill is for consumer use only.
13)To disconnect, turn all controls to the off position, remove the safety key, and
then remove the plug from the outlet.
14)The pulse sensors are not medical devices. Various factors, including the
user’s movement, may affect the accuracy of heart rate readings. The heart rate
displayed may be inaccurate and should be used for reference only.
15)Use handrails provided; they are for your safety.
16)Wear proper shoes. High heels, dress shoes, sandals or bare feet are not
suitable for use on your treadmill. Quality athletic shoes are recommended to
avoid leg fatigue.
17)Do not wear loose or dangling clothing while using the treadmill.
18)Allowed temperature: 41 to 104.℉(5 to 40℃).
Remove the safety key after use to prevent unauthorized treadmill operation.
01
02 03 04 05 06
07 08 09 10 13
14 15 16 17 18 19
20 21 22 23 24 25
27 28

WARNING!
1)DO NOT use a ground fault circuit interrupt (GFCI) wall outlet with this treadmill.
Route the power cord away from any moving part of the treadmill including the
elevation mechanism and transport wheels.
2)DO NOT operate treadmill on Generator or UPS power supply.
3)DO NOT remove any cover without first disconnecting AC power.
4)DO NOT expose this treadmill to rain or moisture. This treadmill is not designed
for use outdoors, near a pool, or in any other high humidity environment.
5)DO NOT operate electrically powered treadmill in damp or wet locations.
Important Electrical Information
1)Use and move the machine on the flat surface and store in the cool, dry place.
2)Insert the power plug into the socket directly. Be sure to read the entire manual
before operating your machine.
3)Please be noted that changes in speed and incline are not immediately felt. Set
your desired speed or incline on the console and release the button.
4)Please exercise caution when participating in other activities concurrently while on
the treadmill; such as watching television, reading, etc. These distractions may cause
you to lose balance or stray from running in the centre of the belt; which may result in
serious injury.
5)To avoid losing balance and suffering unexpected injury, NEVER mount or dismount
the treadmill while the belt is in motion. Try using the treadmill at a lower setting and
familiarize yourself with the slower speed before you attempt a higher speed.
6)Always hold on to handrail when operating the control panel.
7)A safety key is provided with this machine. Removing the safety key will automati-
cally shut off the treadmill. Re-inserting the key will regain full operation.
8)The control panel buttons can recognize the gentle force from a finger tap. Avoid
exerting excess force on the console buttons.
9)This appliance is not intended for use by persons (including children) with reduced
physical, sensory or cognitive function, or lack of experience and knowledge, unless
they have been given supervision or instruction concerning use of the appliance by a
person responsible for their safety, Children should be supervised to ensure that they
do not play with the appliance.
10)Please consult your doctor if you have one of the following conditions:
a. Cardiopathy, hypertension, sugar diabetes, respiratory disease, smoking, and other
chronic diseases or complication diseases.
b. If you are over 35 years old and over 286lbs in weight.
c. Women who are currently pregnant or breastfeeding.
11)Please stop exercising immediately and consult your doctor when you feel dizzi-
ness, nausea, chest pain, shortness of breath or other symptoms.
12)Please stay hydrated and drink adequate water before, during and after workout.
Important Operation Instructions
Warning: Please consult your physician or health professional before starting any
workout regime, especially for the user over the age of 35 and/or with once-health
issue. We take no responsibility for any troubles or damage due to non-compliance.
01
02 03 04 05 06
07 08 09 10 13
14 15 16 17 18 19
20 21 22 23 24 25
27 28

1)Use and move the machine on the flat surface and store in the cool, dry place.
2)Insert the power plug into the socket directly. Be sure to read the entire manual
before operating your machine.
3)Please be noted that changes in speed and incline are not immediately felt. Set
your desired speed or incline on the console and release the button.
4)Please exercise caution when participating in other activities concurrently while on
the treadmill; such as watching television, reading, etc. These distractions may cause
you to lose balance or stray from running in the centre of the belt; which may result in
serious injury.
5)To avoid losing balance and suffering unexpected injury, NEVER mount or dismount
the treadmill while the belt is in motion. Try using the treadmill at a lower setting and
familiarize yourself with the slower speed before you attempt a higher speed.
6)Always hold on to handrail when operating the control panel.
7)A safety key is provided with this machine. Removing the safety key will automati-
cally shut off the treadmill. Re-inserting the key will regain full operation.
8)The control panel buttons can recognize the gentle force from a finger tap. Avoid
exerting excess force on the console buttons.
9)This appliance is not intended for use by persons (including children) with reduced
physical, sensory or cognitive function, or lack of experience and knowledge, unless
they have been given supervision or instruction concerning use of the appliance by a
person responsible for their safety, Children should be supervised to ensure that they
do not play with the appliance.
10)Please consult your doctor if you have one of the following conditions:
a. Cardiopathy, hypertension, sugar diabetes, respiratory disease, smoking, and other
chronic diseases or complication diseases.
b. If you are over 35 years old and over 286lbs in weight.
c. Women who are currently pregnant or breastfeeding.
11)Please stop exercising immediately and consult your doctor when you feel dizzi-
ness, nausea, chest pain, shortness of breath or other symptoms.
12)Please stay hydrated and drink adequate water before, during and after workout.
Warning: Please consult your physician or health professional before starting any
workout regime, especially for the user over the age of 35 and/or with once-health
issue. We take no responsibility for any troubles or damage due to non-compliance.
TechnicalParameters
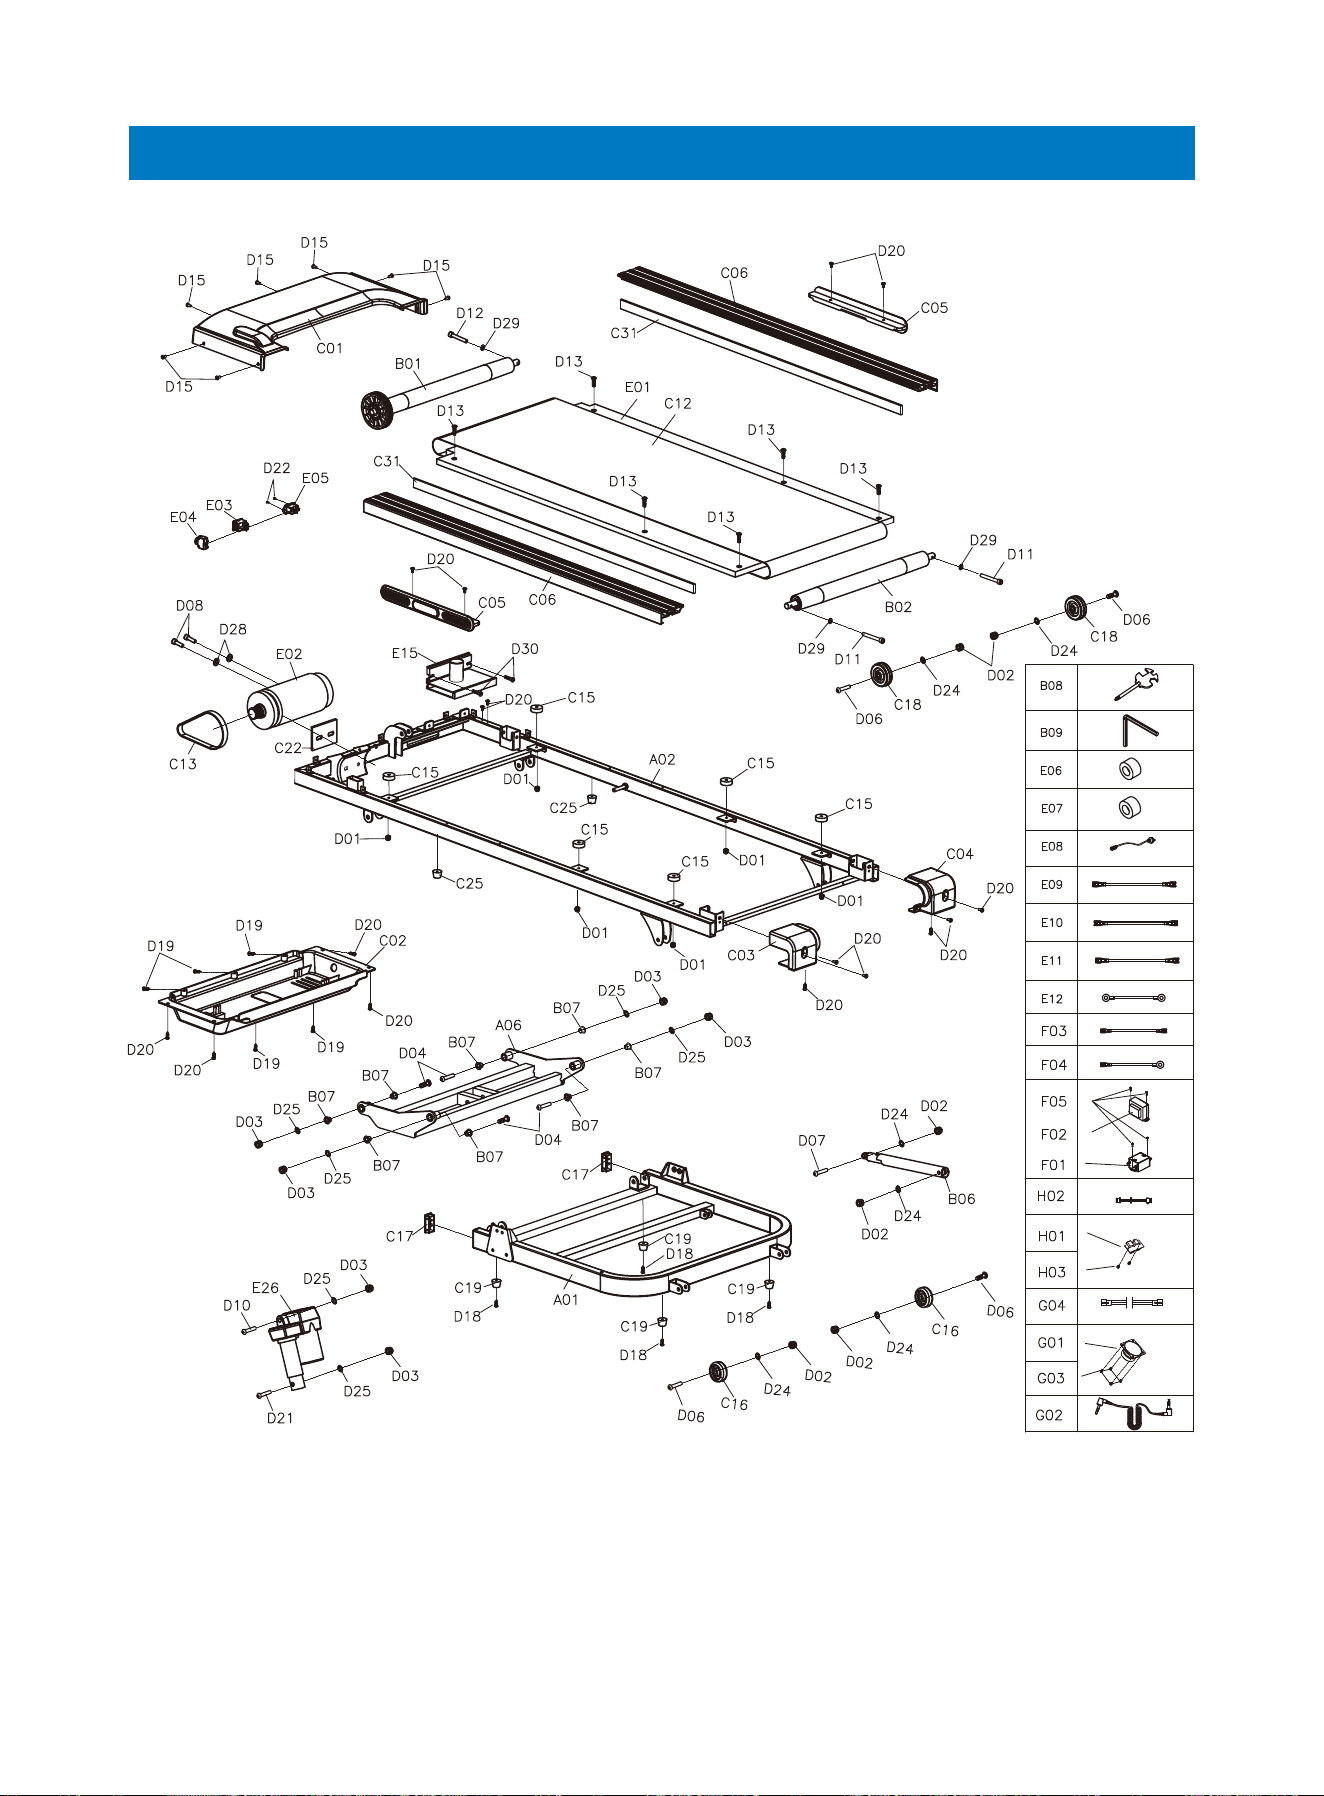
Parts List:
A B
C14 E08
A
B
C14
E08
B08
B09
D05
D09
D24
D15
Smart treadmill
Console
Safety key
Power supply cord
Wrench with screwdriver
S5 Allen wrench
M8*55 Bolt
M8*15 Bolt
Φ8 Lock washer
M5*12 Bolt
1
1
1
1
1
1
4
4
4
2
A DES. QTY
About the Renpho Smart Treadmill
01 02 03 04 05 06
07 08 09 10 13
14 15 16 17 18 19
20 21 22 23 24 25
27 28
Model R-Q004
Max. Capacity 286lbs
Speed 1-18km/h (0.6-11.0mph)
Overall Size about 61 x 31 x 46.7inch
Folded Size about 36 x 31 x 55.5inch
Product Weight about 145.5lbs
Assembly Instructions
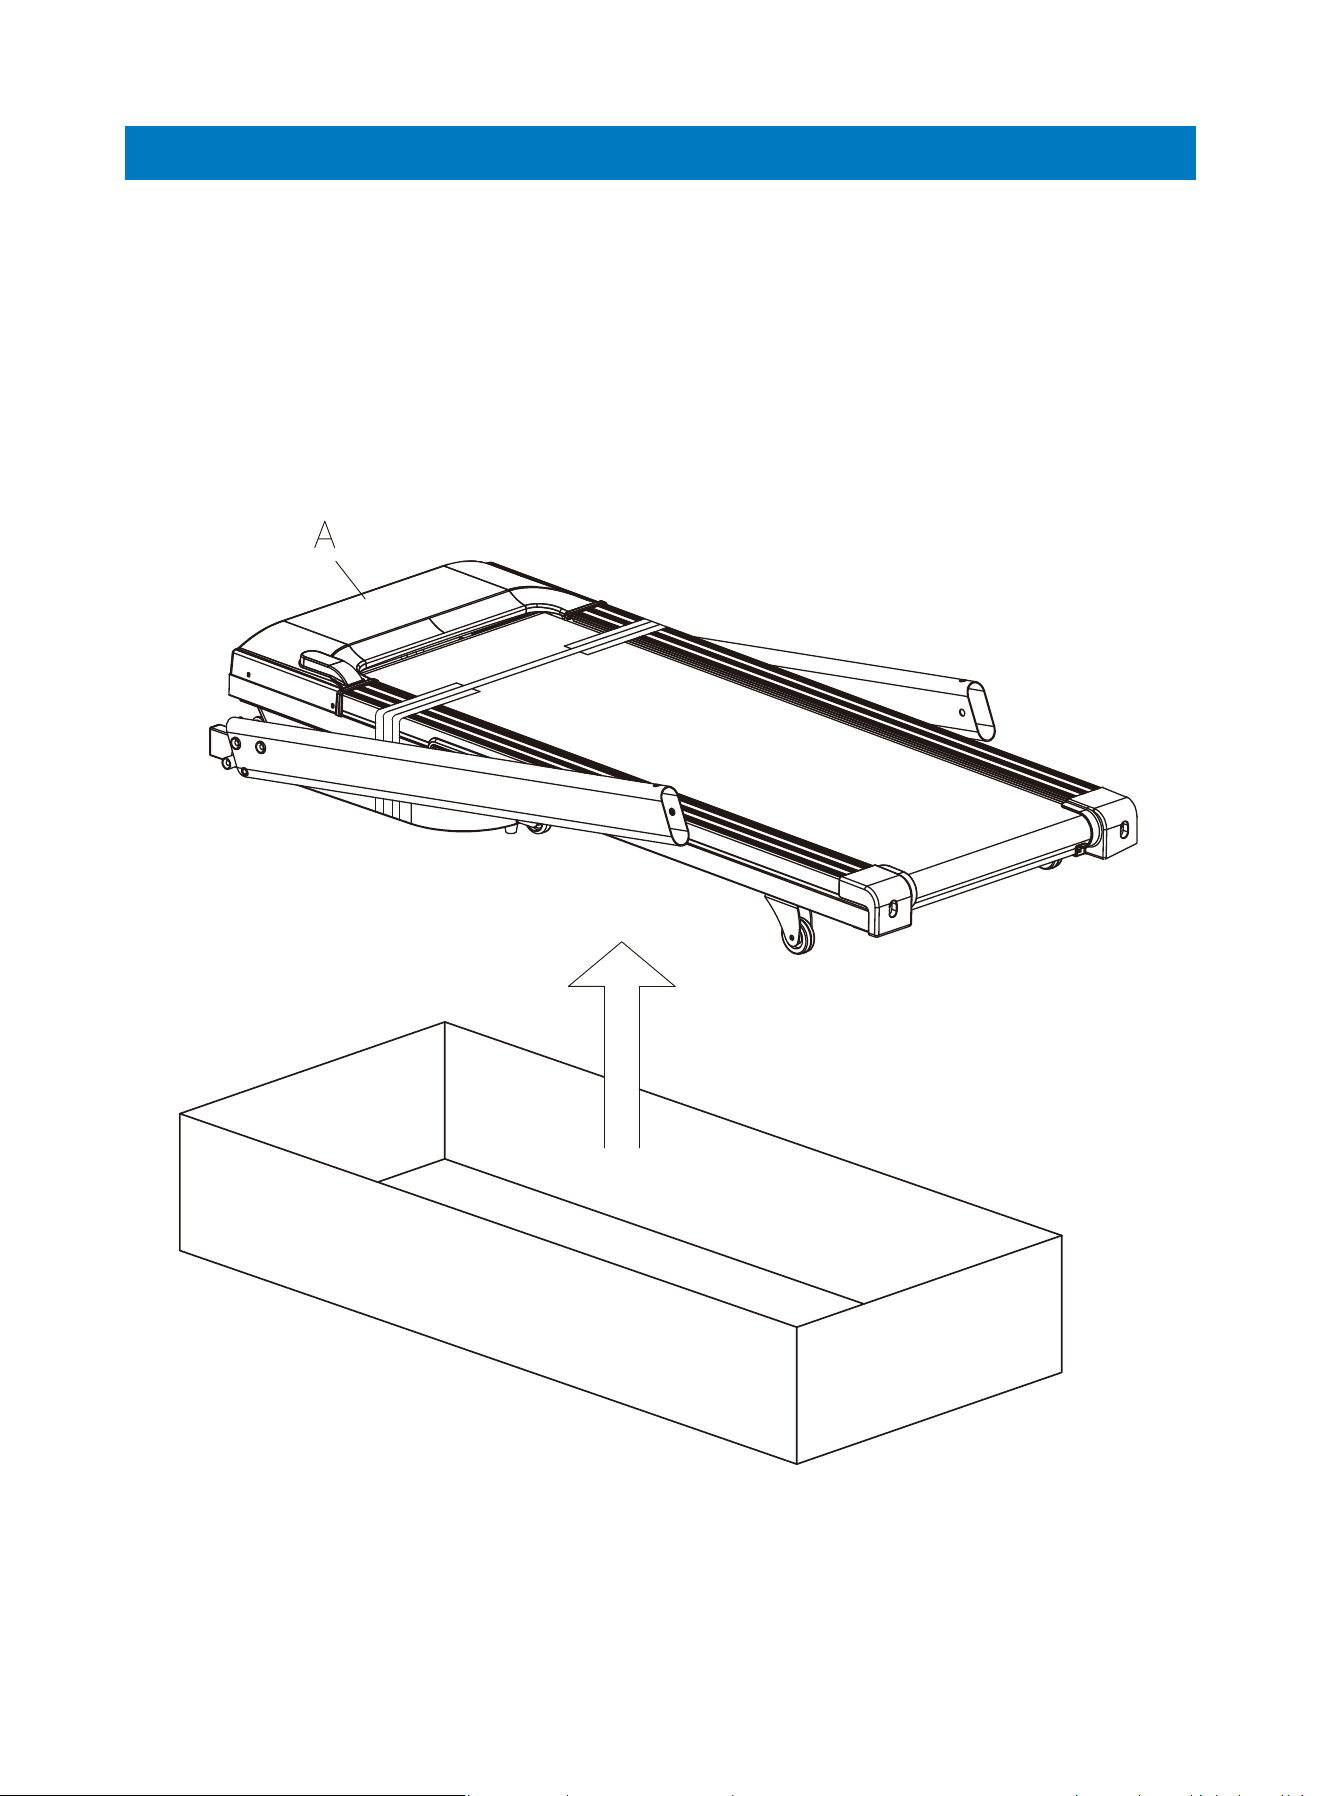
Step 1: Take out the treadmill and lay it on a flat surface.
01 02 03 04 05 06
07 08 09 10 13
14 15 16 17 18 19
20 21 22 23 24 25
27 28
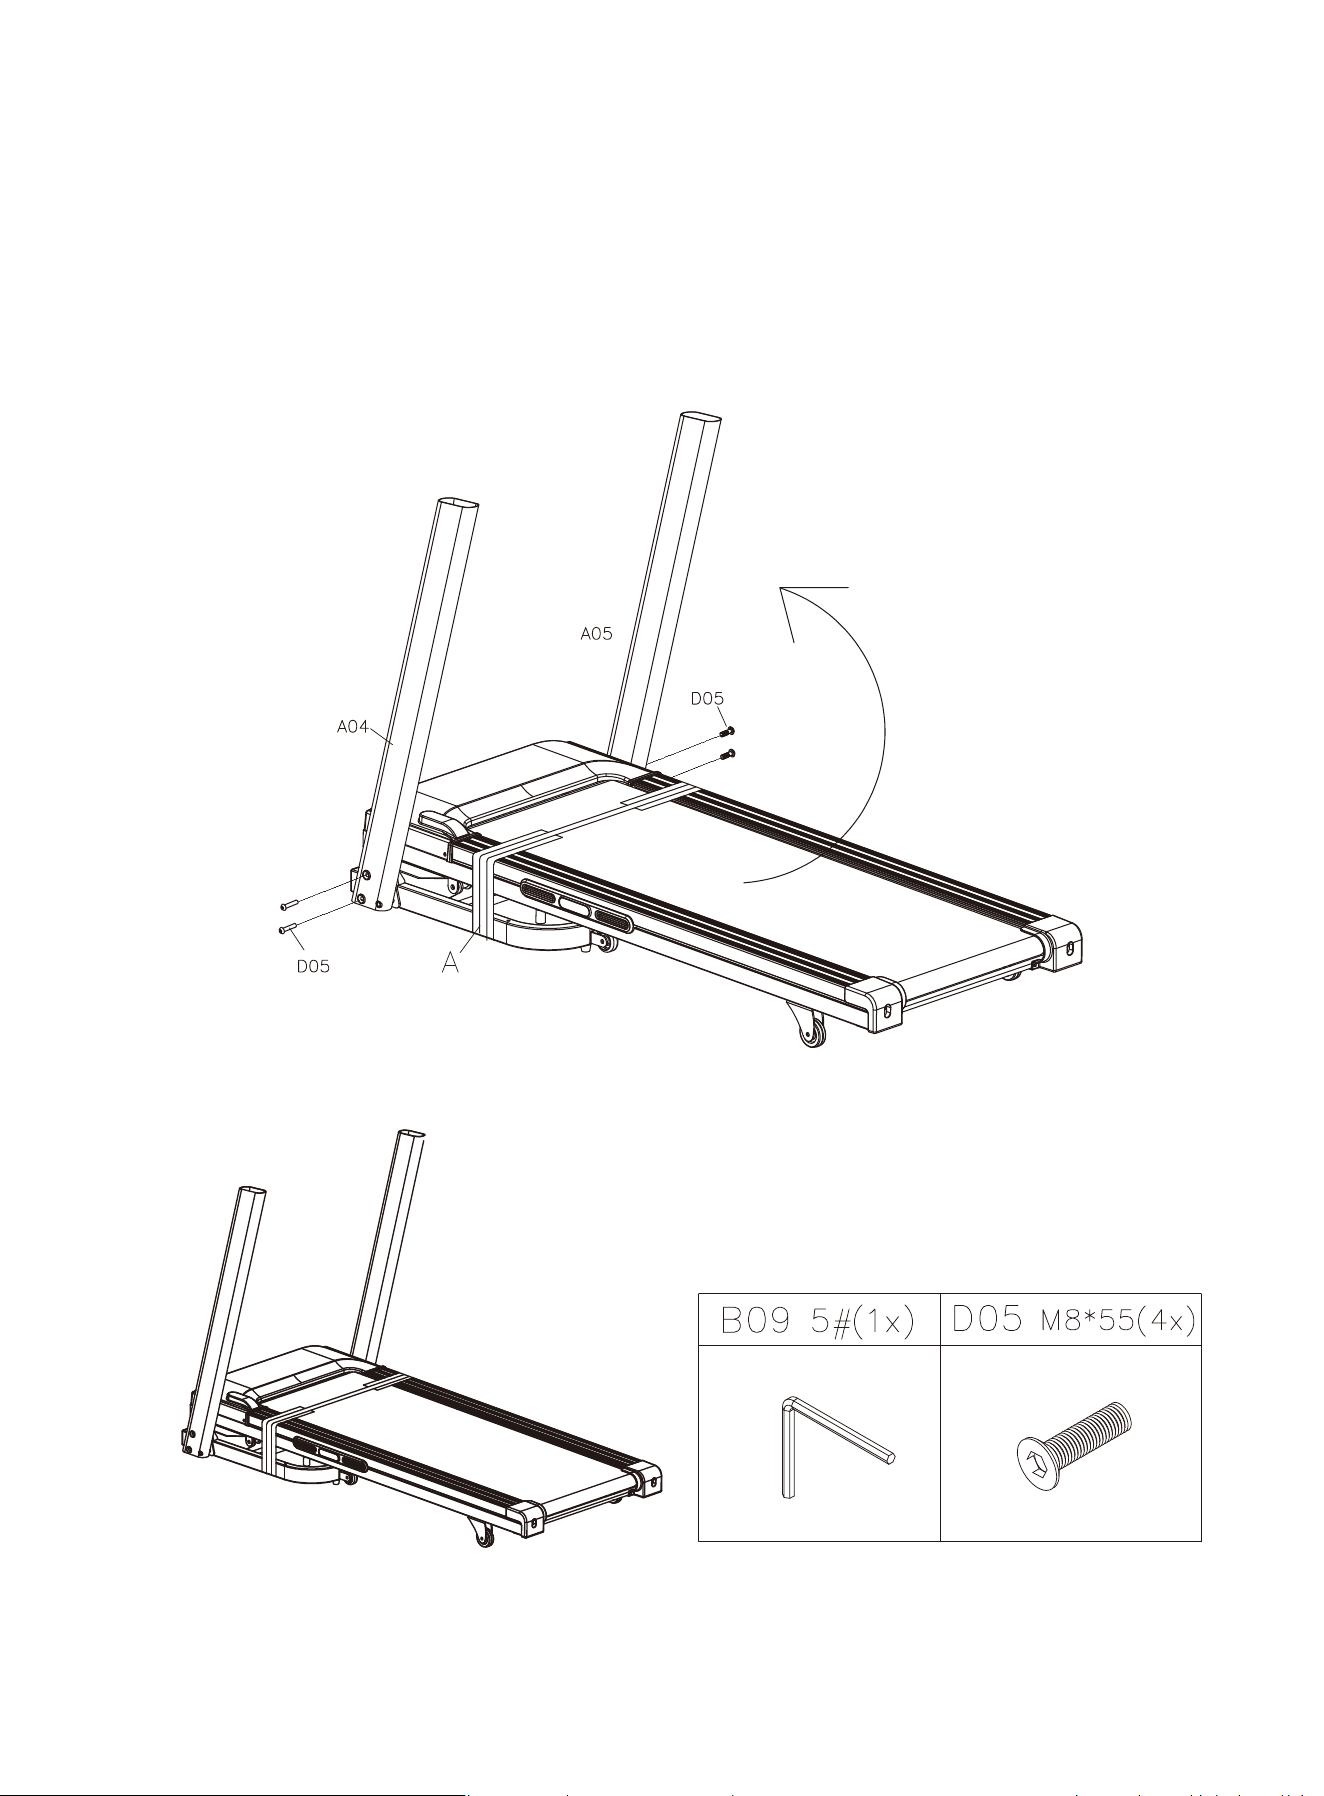
Step 2: Lift both tubes (A04 & A05) up. Then tighten the D05 M8*55 bolts
with B09 5# Allen wrench to fix the tube frames.
01 02 03 04 05 06
07 08 09 10 13
14 15 16 17 18 19
20 21 22 23 24 25
27 28
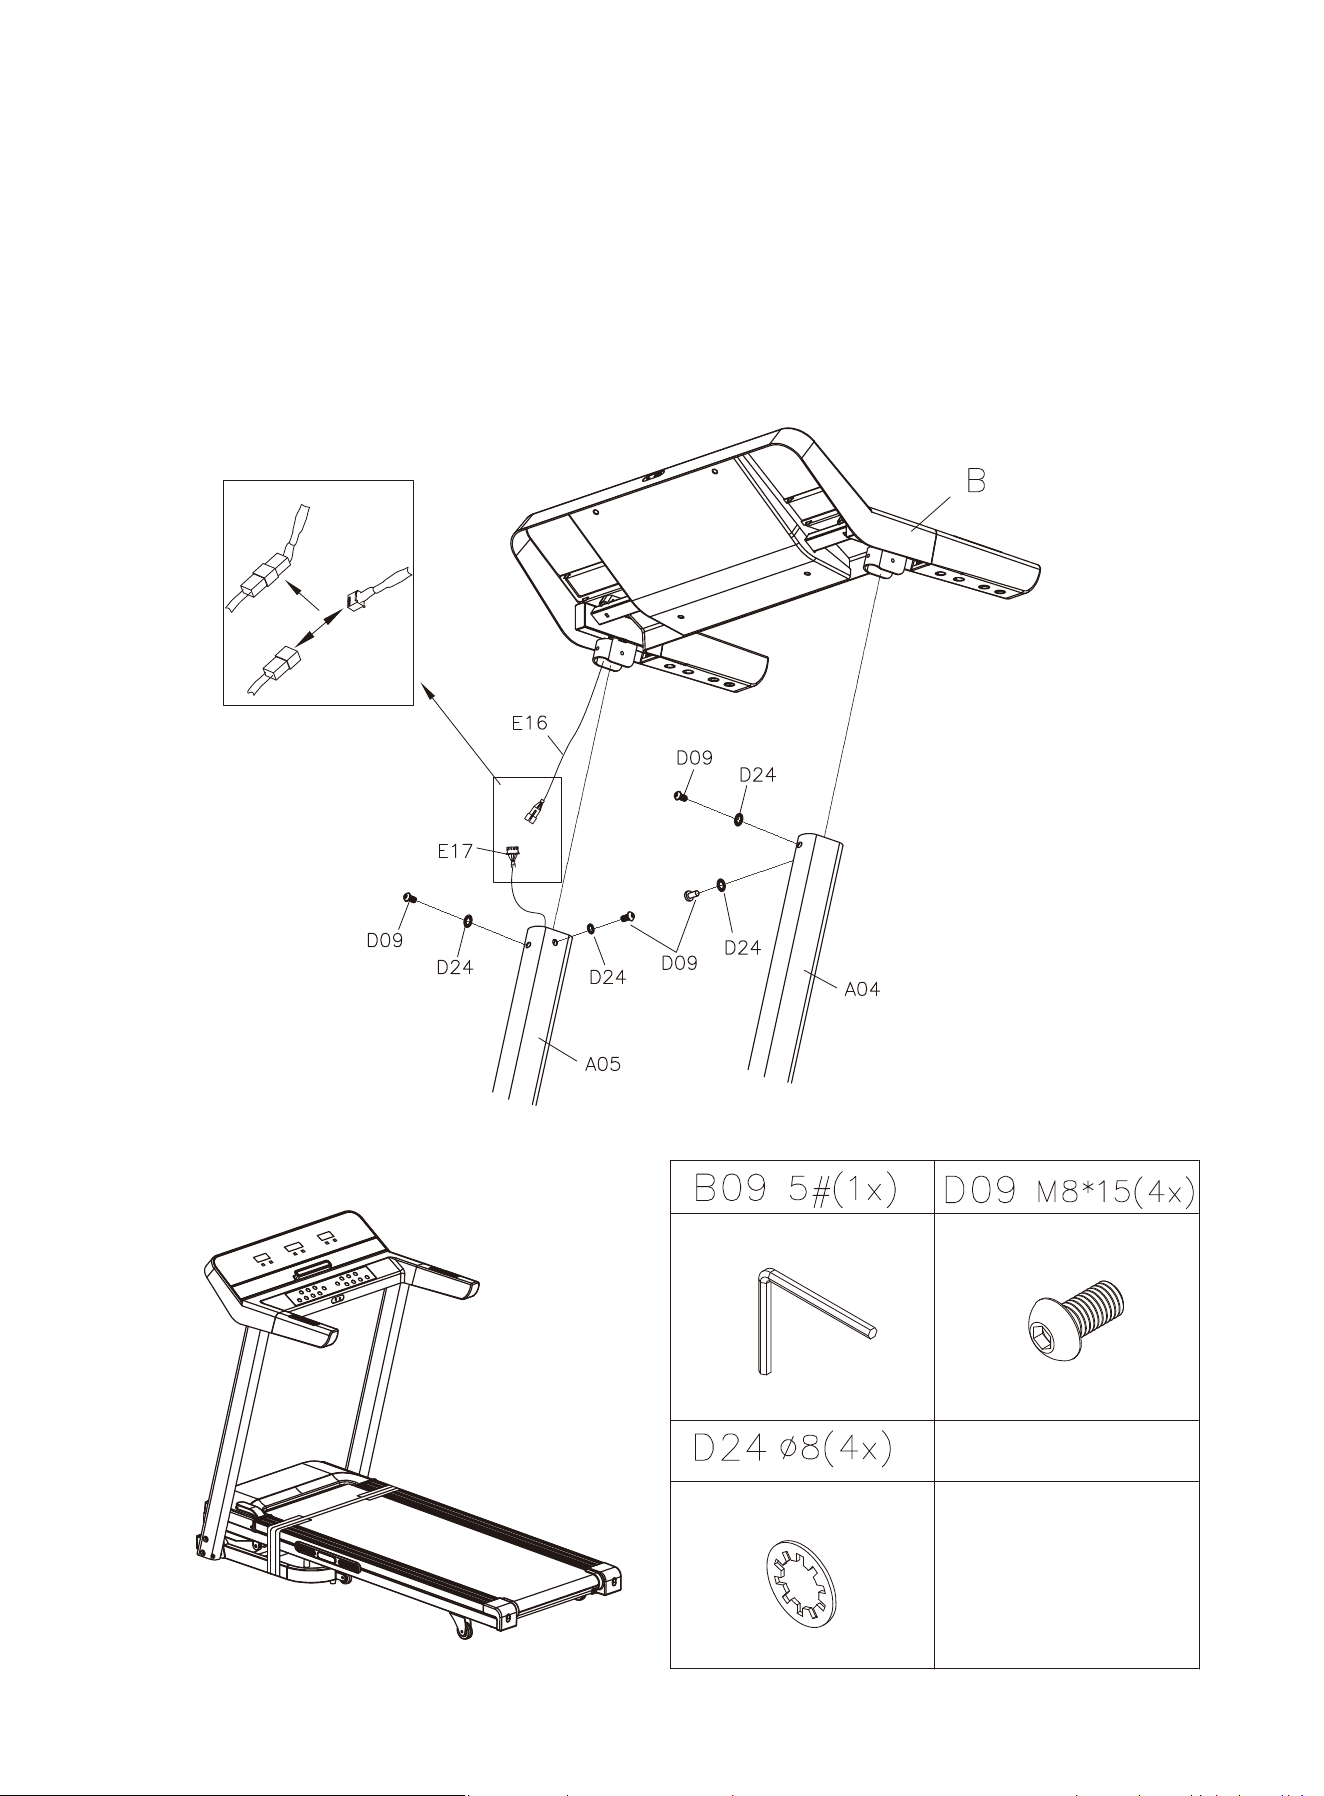
Step 3: Connect the console cable to the corresponding cable in the right tube
frame. To install the console, align D24 Φ8 washers with D09 M8*15 bolts to the
corresponding holes on the tube frames and then use B09 5# Allen wrench to tight-
en them.
01 02 03 04 05 06
07 08 09 10 13
14 15 16 17 18 19
20 21 22 23 24 25
27 28
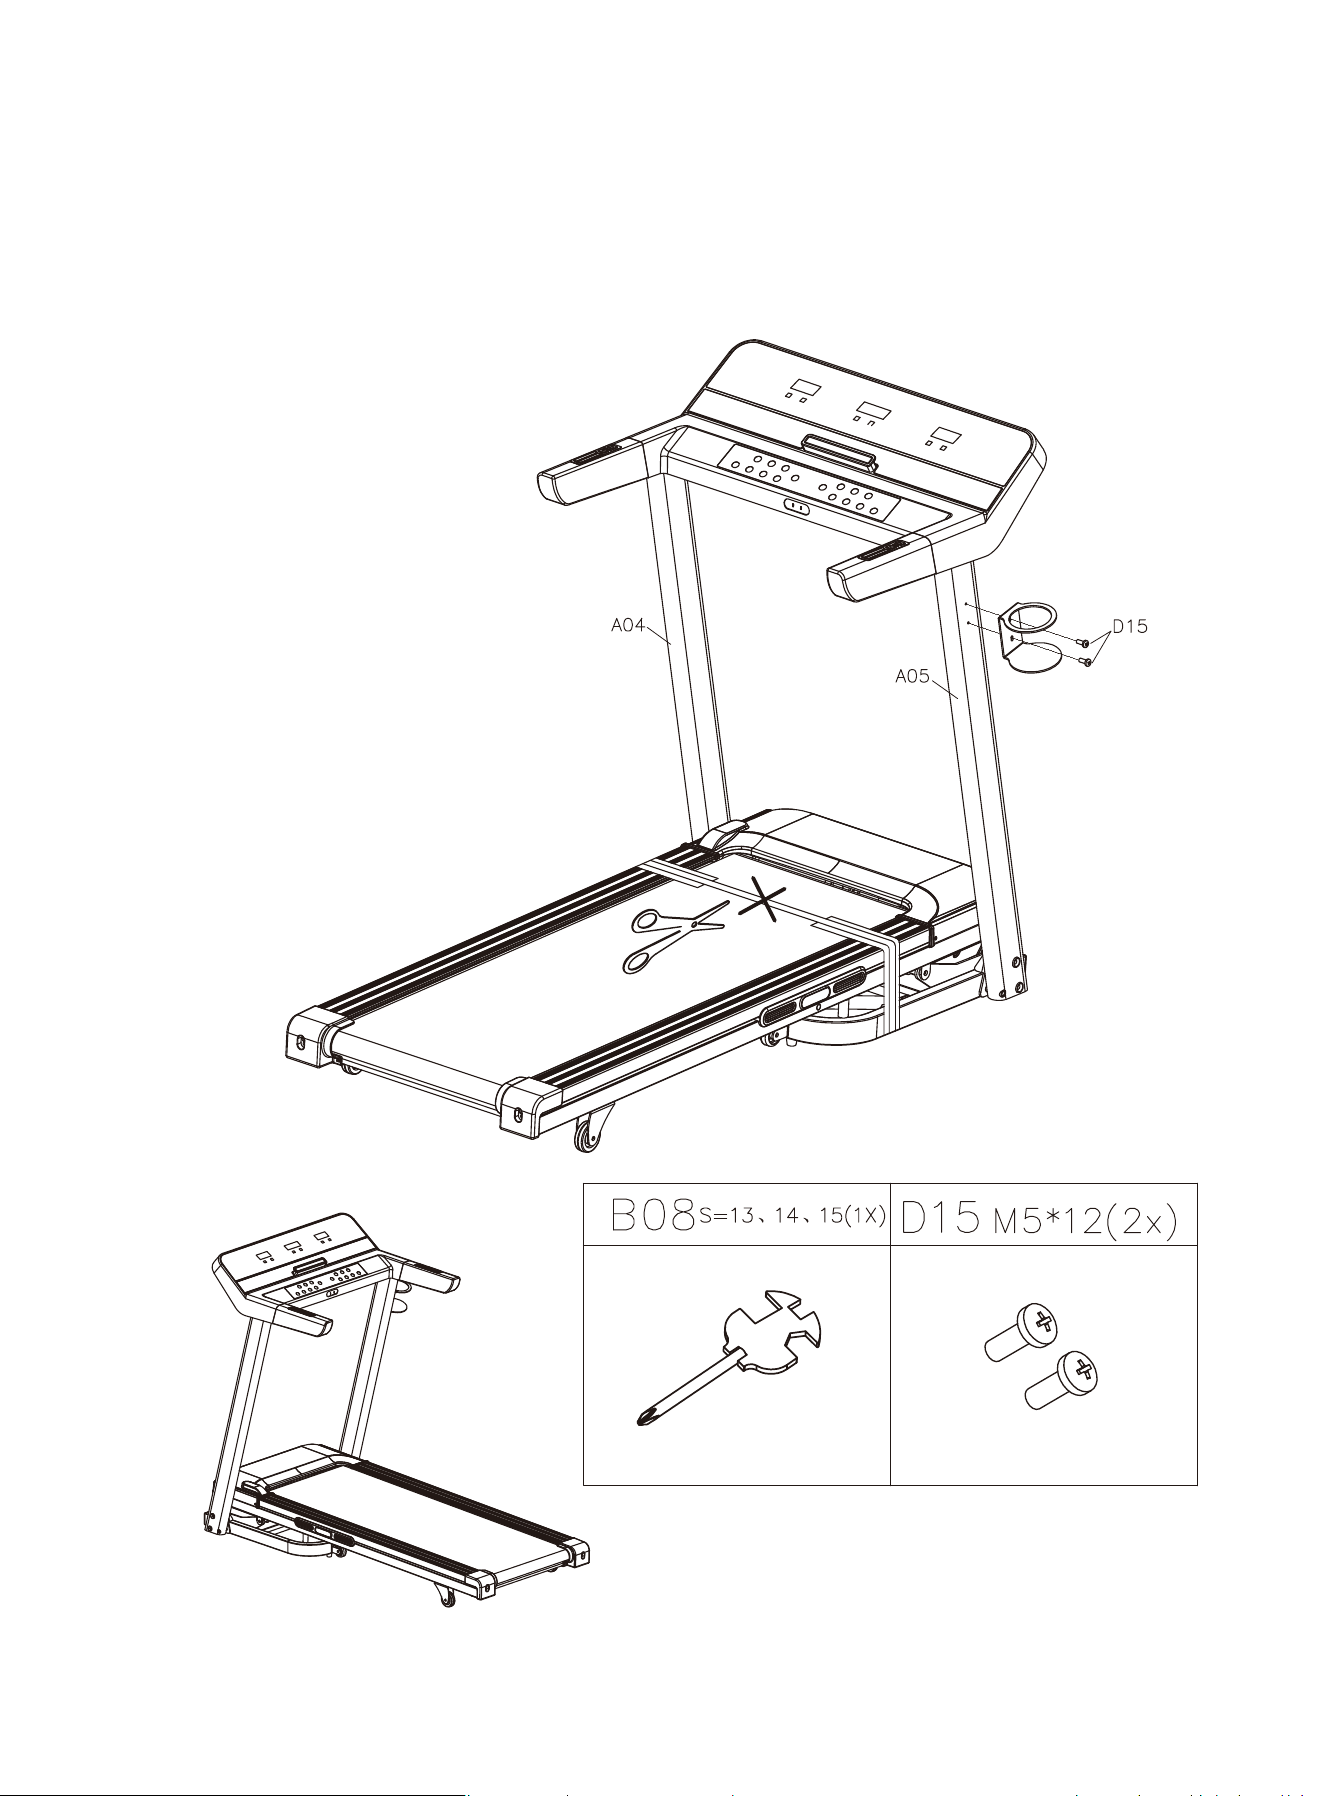
Step 4: Install the bottle holder. After you’ve completed the assembly, you may
remove the packing belt.
01 02 03 04 05 06
07 08 09 10 13
14 15 16 17 18 19
20 21 22 23 24 25
27 28
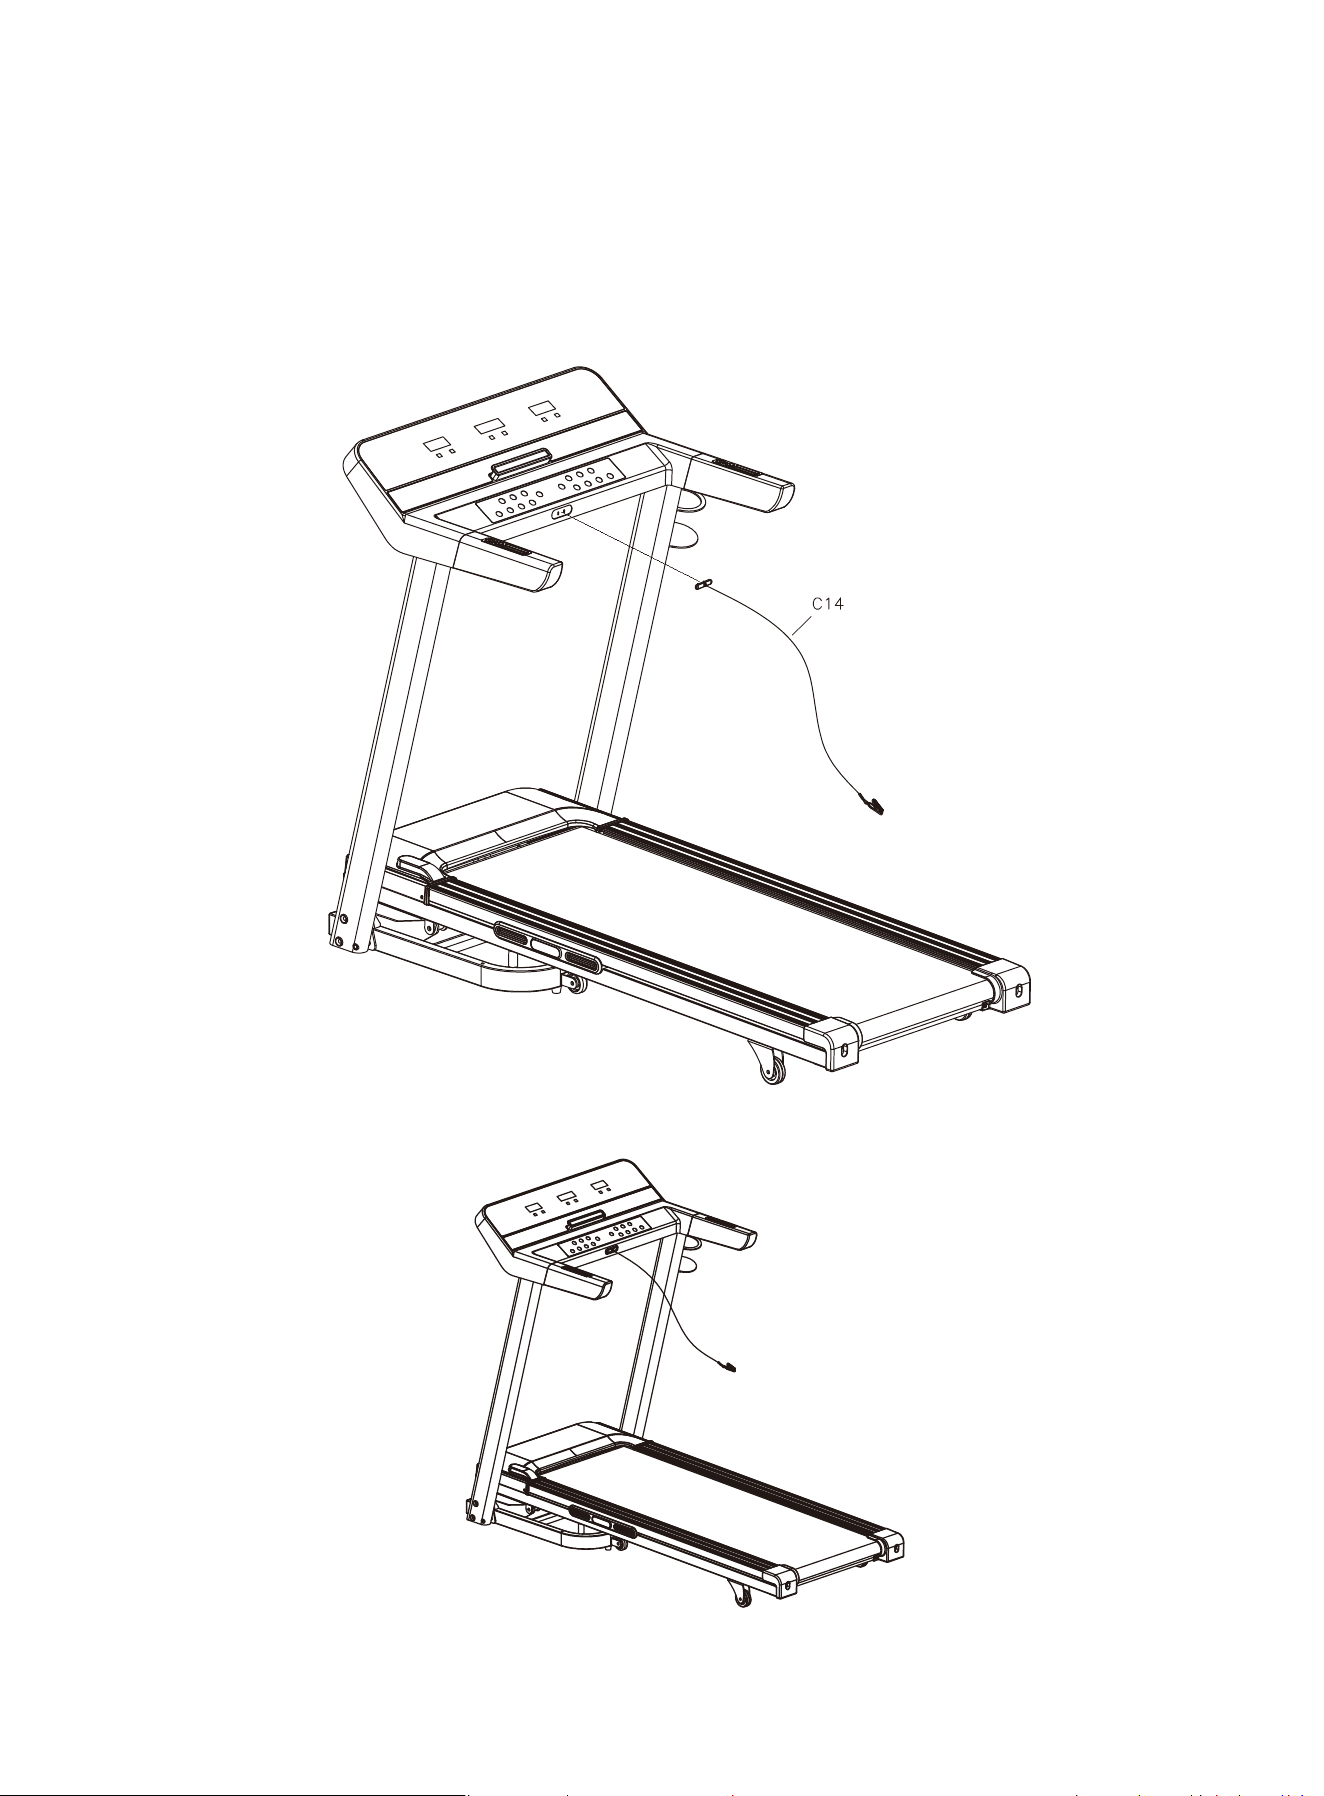
Step 5: Insert the safety key.
01 02 03 04 05 06
07
08 09 10 13
14 15 16 17 18 19
20 21 22 23 24 25
27 28
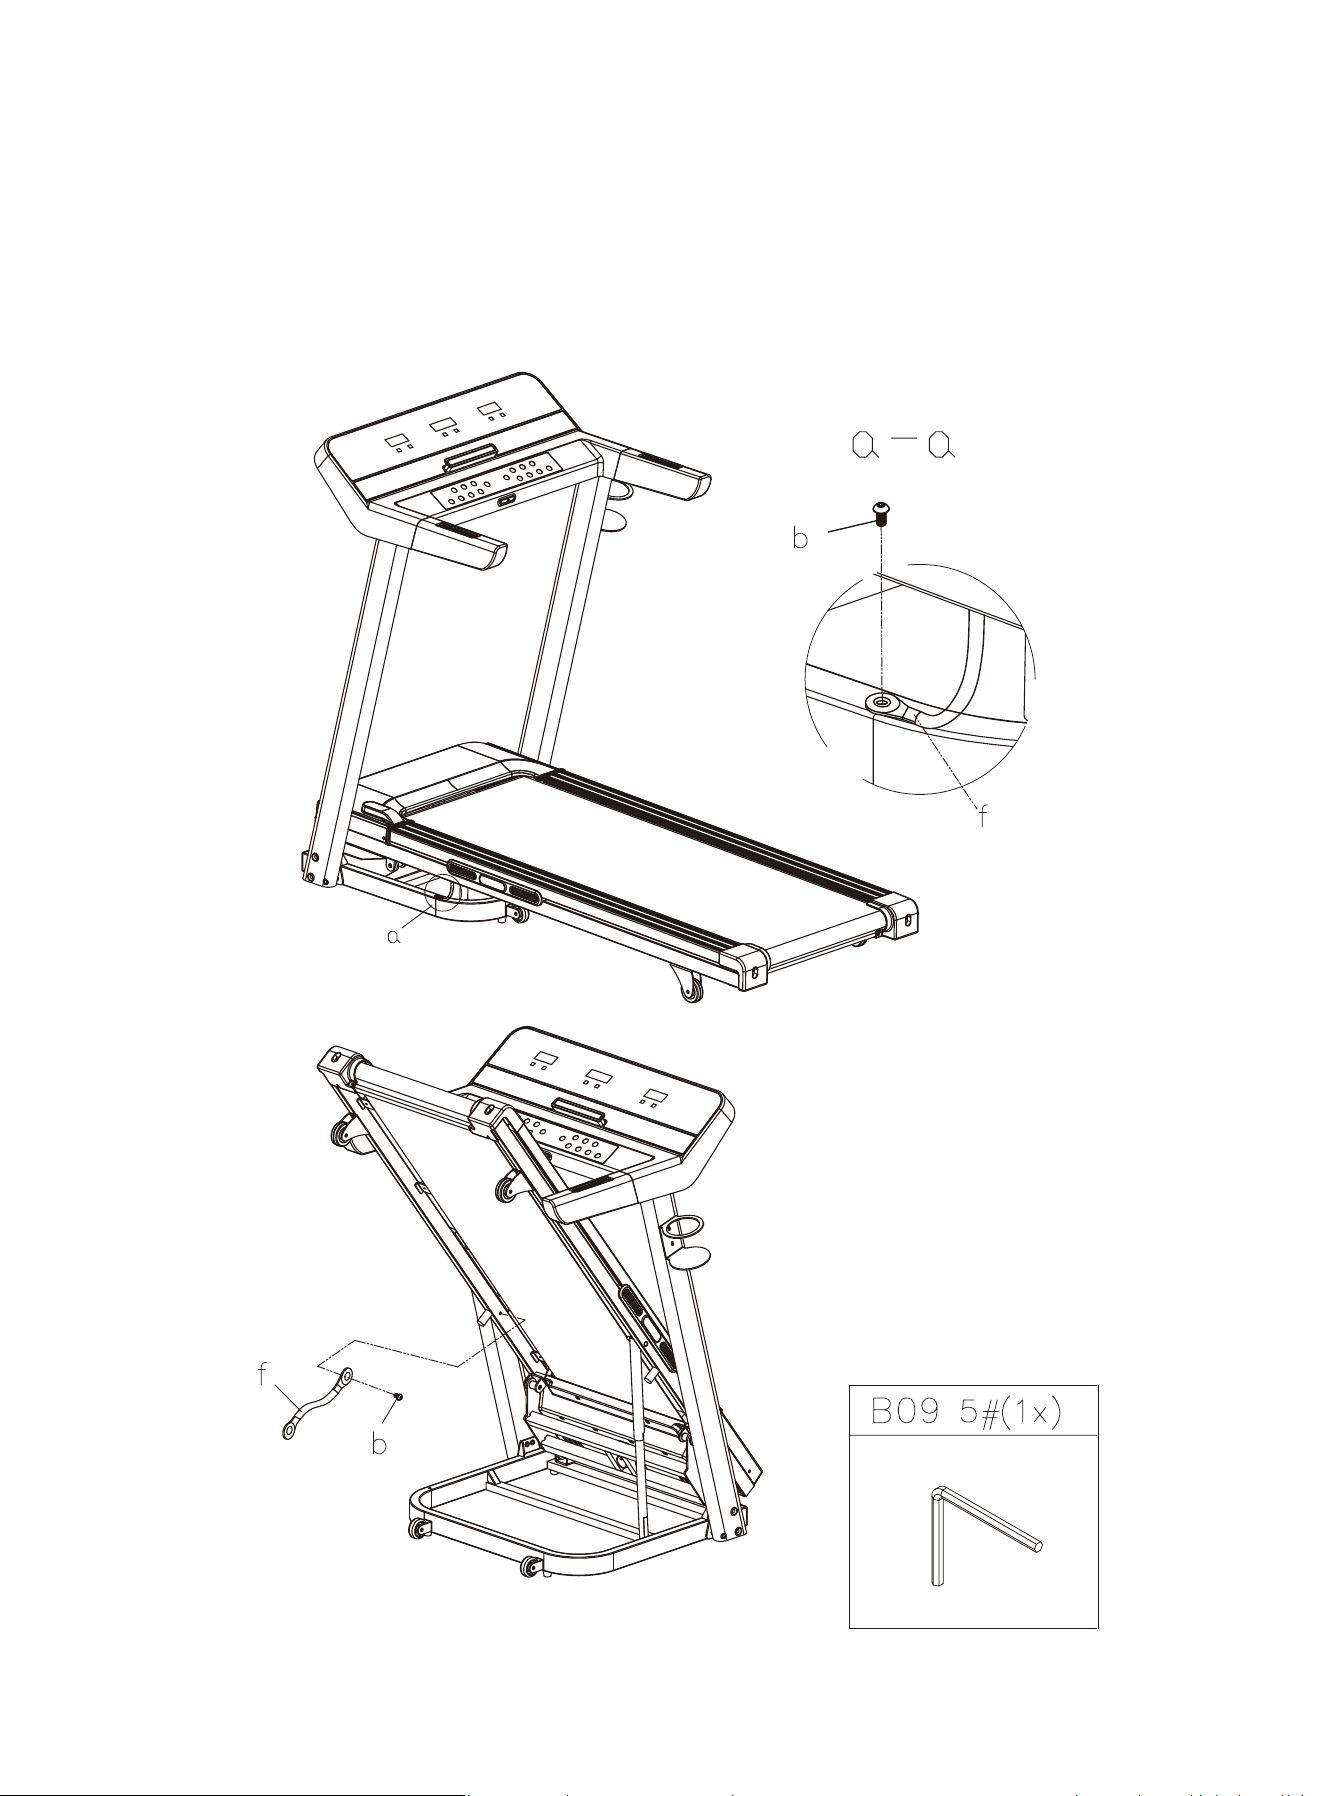
Step 6: Remove bolt A and safety block B using B09 #5 Allen wrench
01 02 03 04 05 06
07 08
09 10 13
14 15 16 17 18 19
20 21 22 23 24 25
27 28
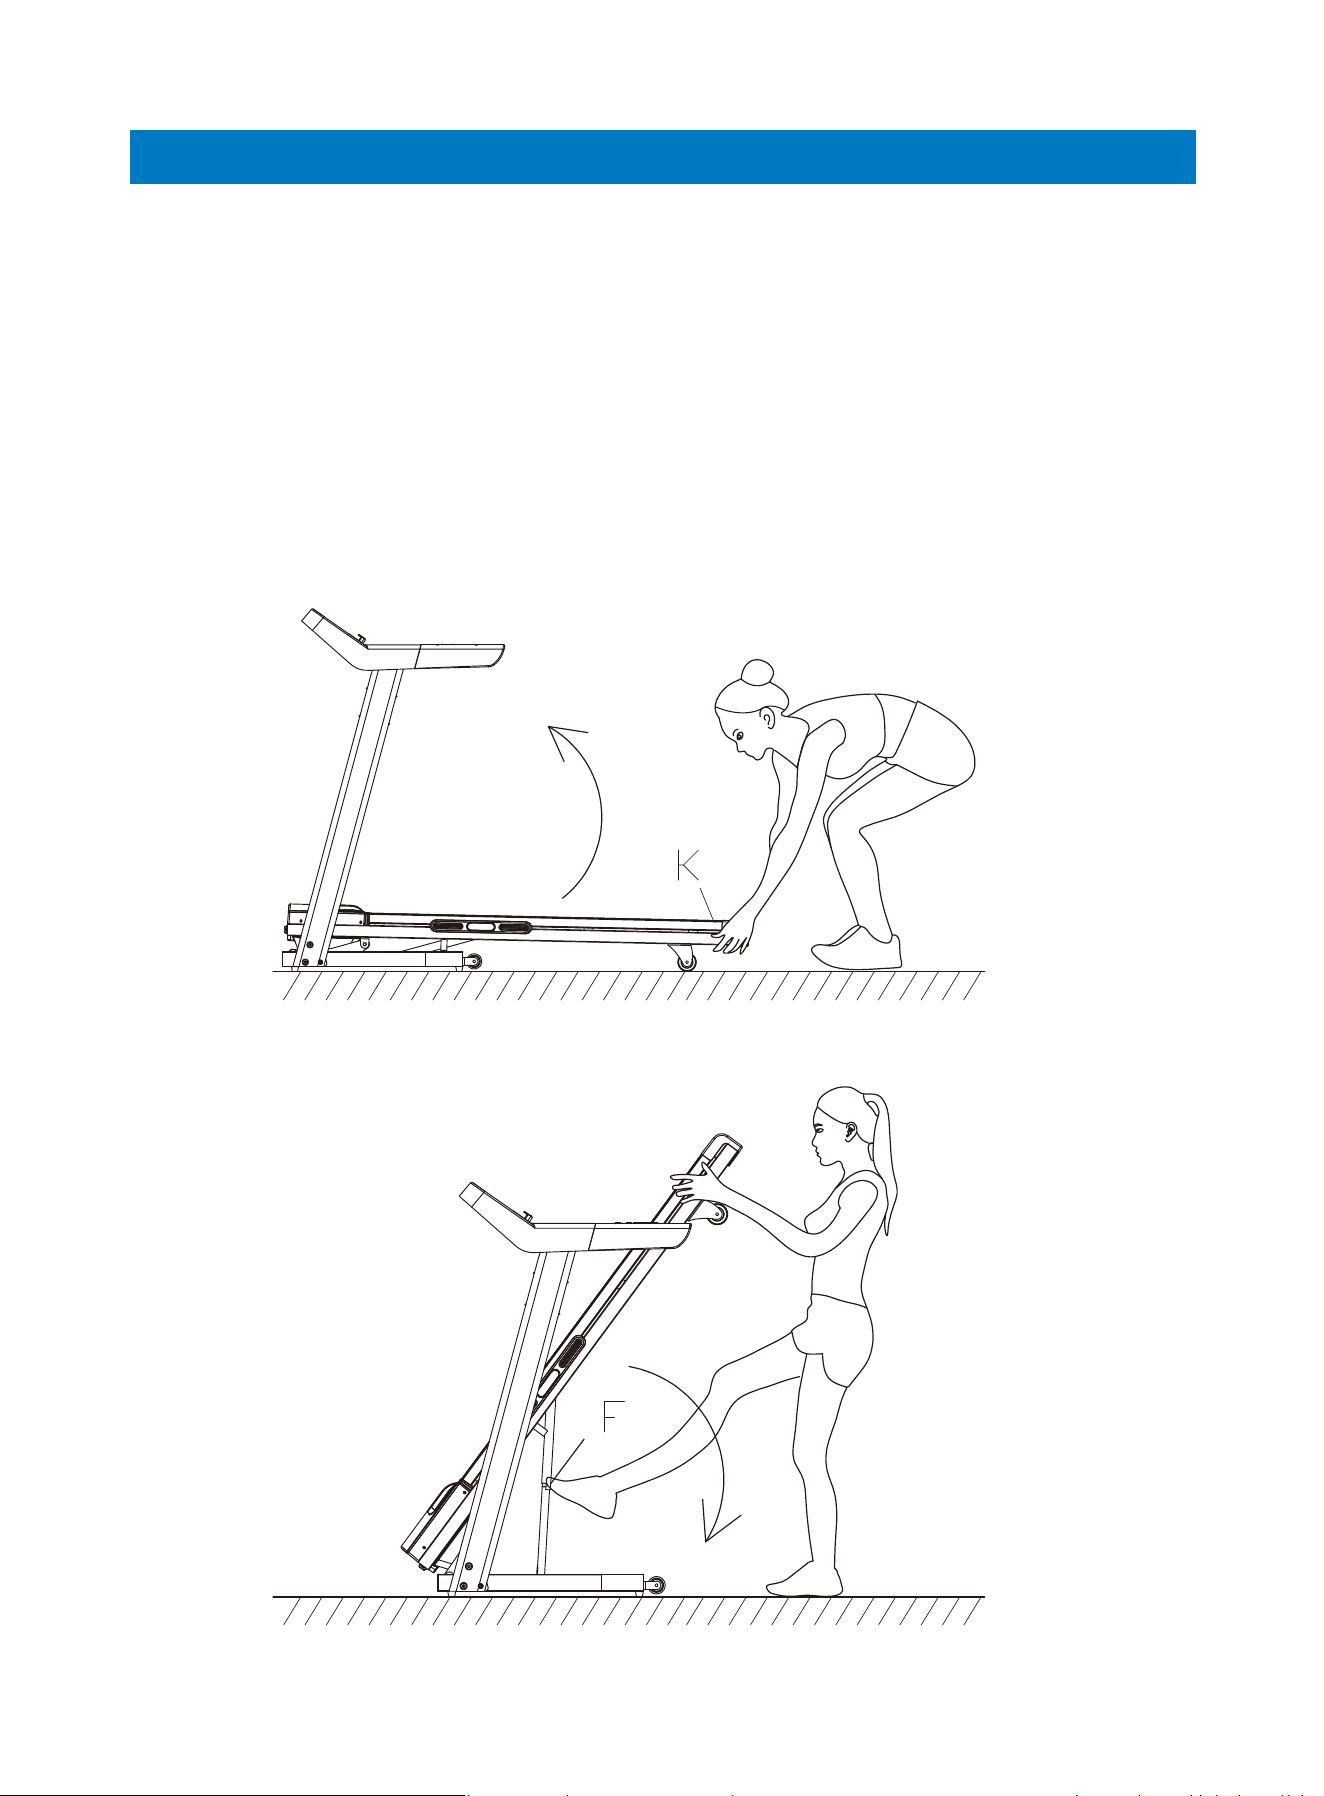
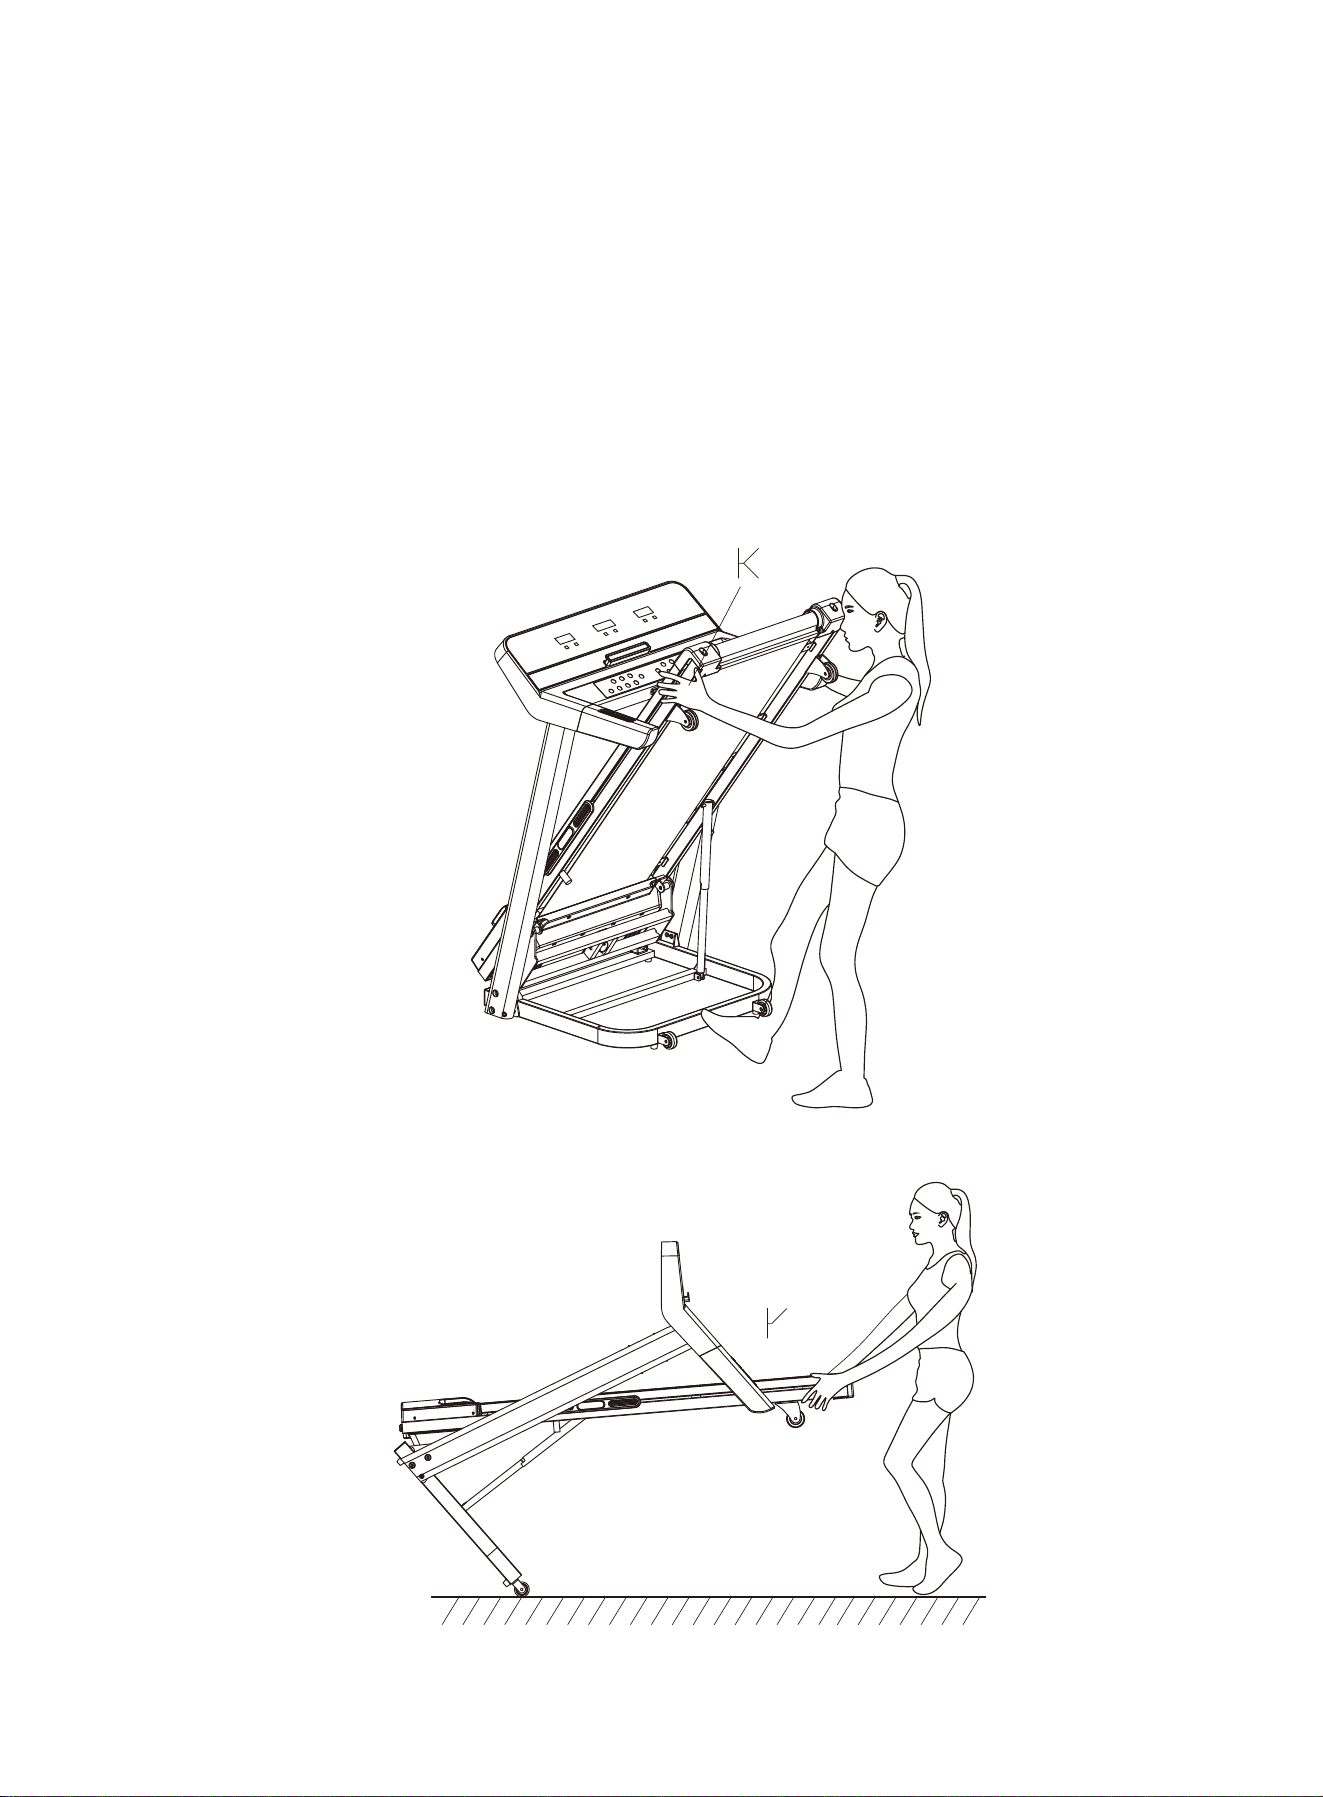
To fold the treadmill, lift the running board gently to the maximum until a click is
heard. To unfold it, use your foot to lightly push against the “F” point (see image C-1)
to unlock the folding mechanism.
Folding & Moving
Folding
01 02 03 04 05 06
07 08 09
10 13
14 15 16 17 18 19
20 21 22 23 24 25
27 28
01 02 03 04 05 06
07 08 09 10
11 13
14 15 16 17 18 19
20 21 22 23 24 25
27 28
If you want to move the treadmill, hold both sides of the running board to increase
the incline of the treadmill, then use your foot to push the base frame forward
through its rollers.
Moving
Warning:
This treadmill requires a right power source to ensure proper operation. For your
safety, as well as the safety of others, please verify that the power source is correct
before plugging the equipment. Any incorrect power source could cause significant
damage to the equipment and/or user.
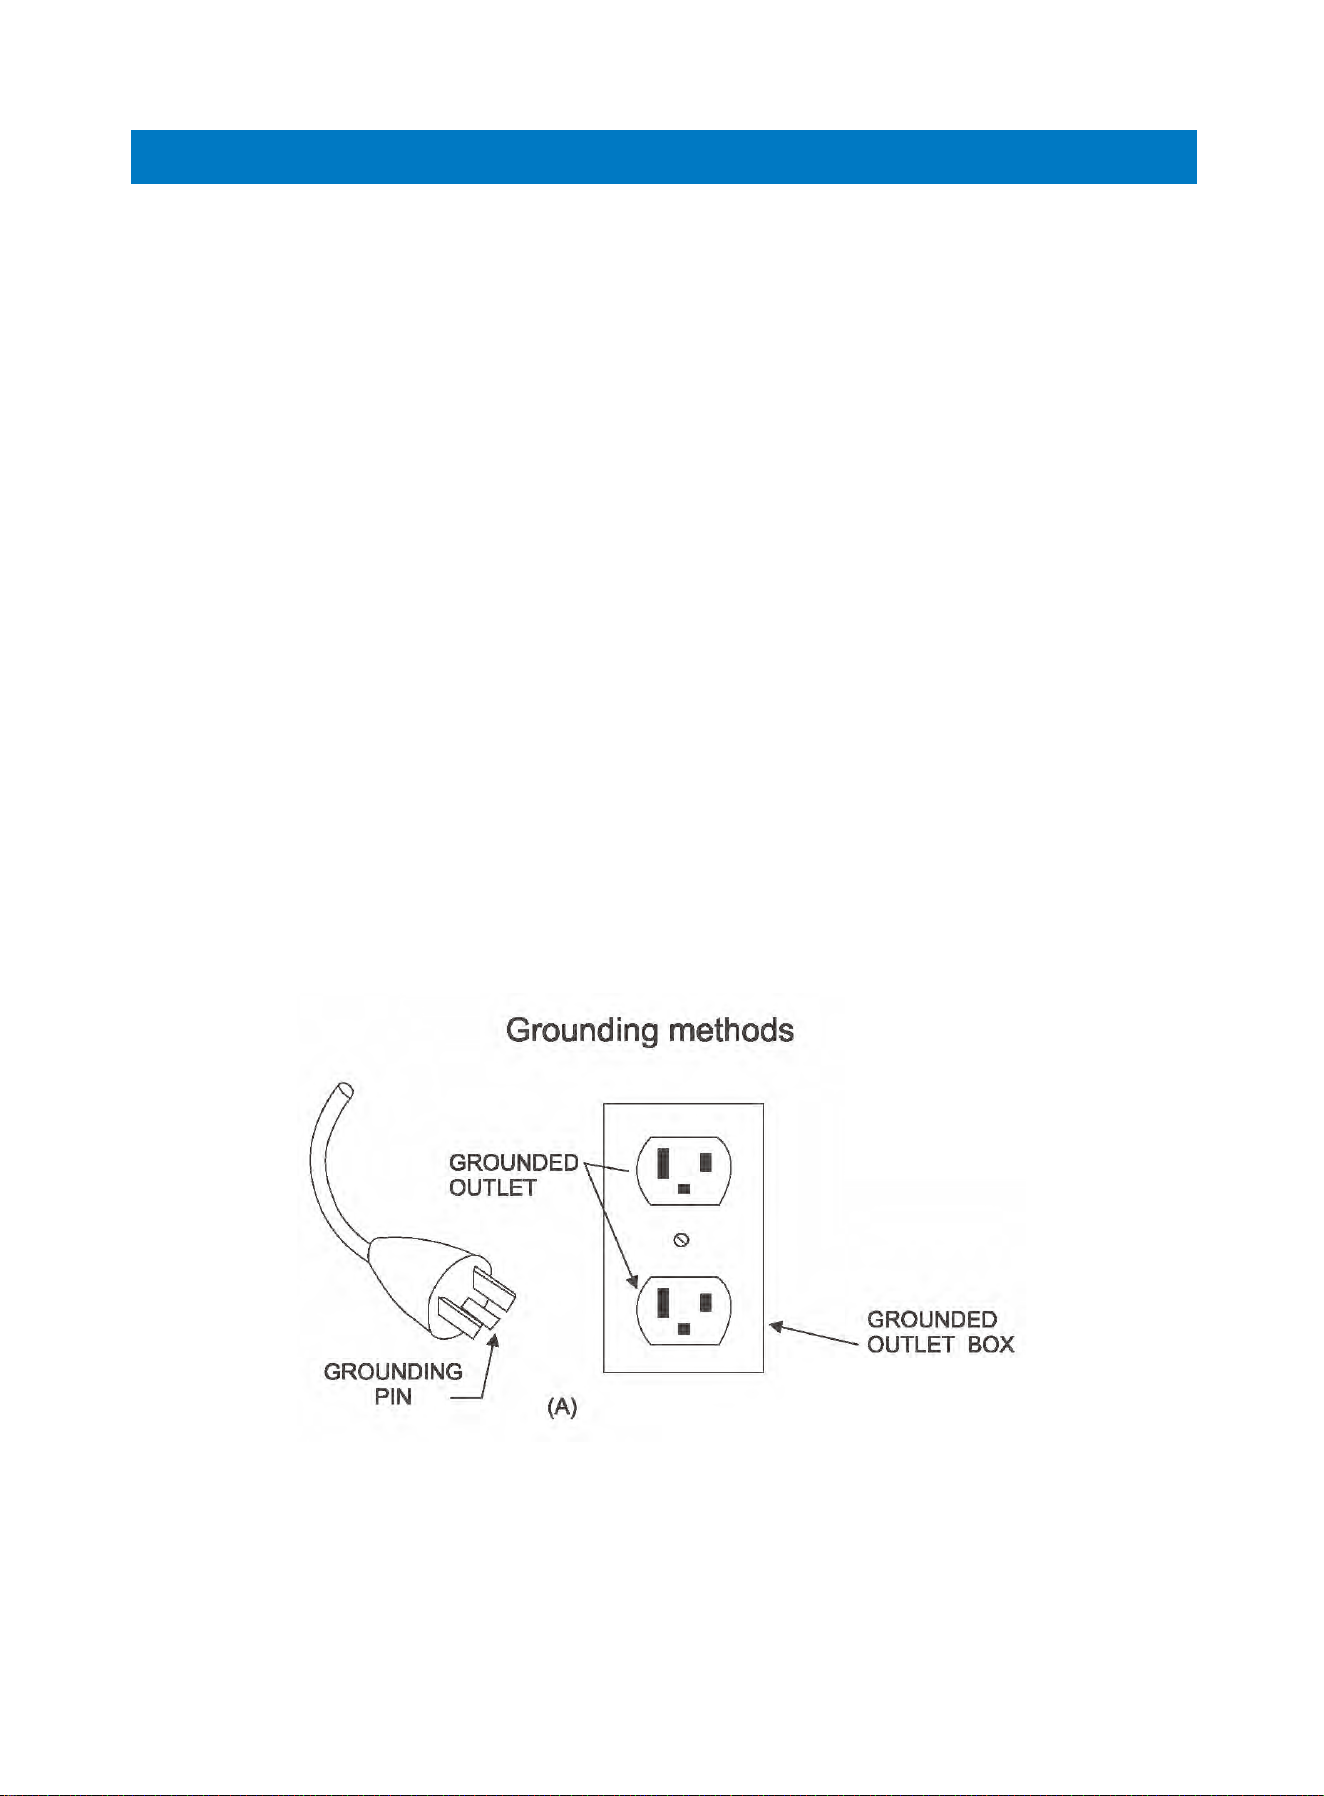
Grounding Methods:
This product must be grounded. Grounding provides the least resistance for electri-
cal current and will reduce the risk of electric shock. The plug must be plugged into
an appropriate outlet that is properly installed and grounded in accordance with all
local codes and ordinances.
This product is for use on a nominal circuit and has a grounding plug that looks like
the plug illustrated in the following sketch A. Make sure that the product is connect-
ed to an outlet which has the same configuration as the plug. Do not use an adapter
with this product.
Danger:
Improper connection of the equipment-grounding conductor can result in electric
shock. Check with a certified electrician if you are in doubt whether the product is
properly grounded. Do not modify the plug provided with the product. If it doesn’t fit
the outlet, have a proper outlet installed by an electrician.
Important Electrical Information
01 02 03 04 05 06
07 08 09 10
12 13
14 15 16 17 18 19
20 21 22 23 24 25
27 28

Console Display
Power Switch
Insert the power plug into the socket and switch on the machine. The treadmill boots
with a beep sound and the console enters standby mode (the console will display
0/0:00/0).
Safety Key
Insert the safety key before use. The treadmill works only when the safety key is insert-
ed. Make sure the end of the key clipped to your clothing. The safety key will unclip and
disable the treadmill in the event you sustain an injury (such as falling down) and can no
longer carry on with the exercise. Re-insert the key to regain full operation.
Console Buttons
START: Press this button, there will be a 3 second countdown displayed on the console.
After countdown, the treadmill will run at the speed of 1.0km/h (0.6mph).
STOP: Press this button once while the treadmill is in motion, it will slow down then stop
(the console will display “PAU”).
(Reset: Press this button twice in succession, the treadmill will reset and create a new
exercise record when you press "START" next time).
PROG: Press this button to select and cycle through preset programs (P01-P15), user
programs(U01-U03) and standby mode (0).
MODE: Press this button to set Time/Distance/Calories countdown.
SPEED +/-: Press this button to increase/reduce the speed (Press and hold the button
to rapidly increase/reduce the value).
INCLINE ^/ˇ: Press this button to adjust the incline of the running board (Press and hold
the button to rapidly increase/reduce the value).
3 6 9 12 (Left): Press these buttons to instantly set the incline to 3, 6, 9, 12.
2 4 6 8 (Right): Press these buttons to instantly set the speed to 2km/h, 4km/h, 6km/h,
8km/h (CA); 2mph, 4mph, 6mph, 8mph (US).
Note:
1. We recommend that you maintain a slow speed at the beginning of your workout and
hold on to the handrails until you feel comfortable and familiar with the treadmill.
2. To end your workout safely, press STOP button or pull out the safety key to stop the
treadmill.
3. The treadmill will return to standby mode if left idle for 30 seconds.
Operation Guide
Incline Heart RateSpeed Distance Time Calories
01 02 03 04 05 06
07 08 09 10
13
14 15 16 17 18 19
20 21 22 23 24 25
27 28

Quick Start
1. Insert the safety key and turn on the power switch (the console will enter standby
mode and display 0/0:00/0).
2. Press START button, there will be a 3 second countdown with beep sounds and
the treadmill will run at the speed of 1km/h (0.6mph).
3. Press SPEED +/- or INCLINE ^/ˇ button to adjust the speed and incline while run-
ning.
4. Press STOP button once to slow down and stop. Press it twice in succession to
reset the treadmill.
Countdown Mode
In standby state, press MODE button to set Time/Distance/Calories Countdown.
1. Press once to enter Time Countdown Setting (“Time” window will display flicker-
ing “15:00”). Press SPEED+/- or INCLINE ^/ˇ to button set the countdown time
from 5:00—99:00.
2. Press twice to enter Distance Countdown Setting (“Distance” window will display
flickering “1.00”). Press SPEED+/- or INCLINE ^/ˇ button to set the countdown
distance from 0.50—99.90.
3. Press three times to enter Calories Countdown Setting. (“Calories” window will
display flickering “50”). Press SPEED+/- or INCLINE ^/ˇ button to set the count-
down calories from 10—999.
Note:
Only one countdown option can be set at a time. Once setting is complete, press
“Start” button to begin workout after 3 second countdown. Press SPEED +/- or
INCLINE ^/ˇ button to adjust the speed and incline while running. Press STOP button
once to pause and twice to reset the treadmill.
Program
In standby state, press PROG button to select and cycle through 15 Preset Pro
grams(P01-P15) and 3 User Programs(U01-U03).
15 Preset Programs
1. P01-P15 are built-in preset programs. After selecting the specific program, the
“Time” window will display “10:00” and flicker (default preset time).
2. You can press SPEED +/- or INCLINE ^/ˇ button to adjust preset time (If not, press
Start button to begin the program directly).
3. Each program is divided into 10 exercise sections, and the time for each sec-
tion=preset time/10 (refer to the chart below).
4. Upon entering the next exercise section, there will be 3 beep sounds to notify
you. Speed and incline will then be changed according to your preset program.
5. You can press SPEED +/- or INCLINE ^/ˇ button to adjust the speed and incline
while running. Once treadmill enters the next exercise section, the console will
show initial exercise data of this section.
6. After finishing one program (10 exercise sections), the treadmill will stop slowly
and “End” will be displayed on the console accompanied by beep sounds. The
machine will return to standby state.
Detailed Instructions
01 02 03 04 05 06
07 08 09 10 13
14 15 16 17 18 19
20 21 22 23 24 25
27 28

Section
Set time/10 = exercise time of each section (Speed unit: km/h)
Program
12 9
P01
2 4 5
12 2
P02
26 5
12 2
P03
38 12
13 5
P04
8 10 9
12 2
P05
6 10 9
12 2
P06
28 5
22 5
P07
26 4
45 6
P08
2 4 4
3 5 3
P09
2 4 3
3 5 3
P10
23 3
44 3
P11
2 5 2
13 2
P12
2 5 3
3 5 6
P13
27 3
5 6 4
P14
26 3
5 6 6
P15
26 3
3 4
3
3
3
7
3
3
5
11
2
12
4
6
3
7
6
6
4
5
3
5
3
8
5
5
6
4
6
5
5
5
5
4
4
3
8
3
8
7
12
3
9
3
10
2
9
6
8
4
7
4
3
6
10
8
4
7
7
4
4
8
4
6
5
3
1
3
2
5
9
12
1
11
2
10
3
7
9
7
3
6
2
3
7
6
10
4
12
8
6
8
4
8
3
6
5
2
6
2
9
10
11
2
8
2
9
4
9
9
8
4
5
3
5
8
9
7
6
9
9
5
6
5
7
5
7
4
2
8
3
5
8
10
2
12
4
11
5
6
10
9
4
8
4
3
8
5
6
4
11
4
8
5
5
5
5
8
2
3
7
4
9
6
10
2
7
5
8
6
5
12
6
3
6
2
6
6
3
3
2
11
5
9
2
10
3
6 4
10
3
2
2
2
6
2
8
1
3
1
3
3
2
3
2
2
2
2
3
3
2
3
4
3
2
2
3
3
2
3
SPEED
INCLINE
SPEED
INCLINE
SPEED
INCLINE
SPEED
INCLINE
SPEED
INCLINE
SPEED
INCLINE
SPEED
INCLINE
SPEED
INCLINE
SPEED
INCLINE
SPEED
INCLINE
SPEED
INCLINE
SPEED
INCLINE
SPEED
INCLINE
SPEED
INCLINE
SPEED
INCLINE
Preset Program Chart:
01 02 03 04 05 06
07 08 09 10 13
14
15 16 17 18 19
20 21 22 23 24 25
27 28

01 02 03 04 05 06
07 08 09 10 13
14 15
16 17 18 19
20 21 22 23 24 25
27 28
Section
Program
P01
P02
P03
P04
P05
P06
P07
P08
P09
P10
P11
P12
P13
P14
P15
Set time/10 = exercise time of each section (Speed unit: mph)
1
1.2
1
1.2
1
1.9
1
5.0
1
3.7
1
1.2
2
1.2
4
1.2
3
1.2
3
1.2
4
1.2
1
1.2
3
1.2
5
1.2
5
1.2
3
2
2.5
2
3.7
2
5.0
3
6.2
2
6.2
2
5.0
2
3.7
5
2.5
5
2.5
5
1.9
4
3.1
3
3.1
5
4.3
6
3.7
6
3.7
4
3
1.9
3
4.3
3
1.9
5
6.8
2
7.4
4
3.7
3
4.3
6
3.7
4
3.1
3
3.1
3
5.0
5
3.1
6
2.5
6
3.1
5
3.1
5
4
2.5
3
5.0
3
5.0
7
7.4
3
5.6
3
6.2
2
5.6
6
5.0
4
4.3
4
1.9
6
6.2
8
2.5
7
4.3
4
2.5
8
2.5
6
5
1.9
1
1.9
2
3.1
9
7.4
1
6.8
2
6.2
3
4.3
9
4.3
3
3.7
2
1.9
7
3.7
10
2.5
12
5.0
6
5.0
4
5.0
3
6
3.1
2
3.7
2
5.6
10
6.8
2
5.0
2
5.6
4
5.6
9
5.0
4
3.1
3
3.1
8
5.6
7
3.7
9
5.6
5
3.7
5
4.3
5
7
2.5
2
5.0
3
3.1
8
6.2
2
7.4
4
6.8
5
3.7
10
5.6
4
5.0
4
1.9
8
3.1
6
2.5
11
2.5
8
3.1
5
3.1
5
8
1.2
3
4.3
4
5.6
6
6.2
2
4.3
5
5.0
6
3.1
12
3.7
3
3.7
2
3.7
6
1.9
3
1.2
11
3.1
9
1.2
10
1.9
6
9
3.1
2
3.1
2
7.4
5
5.6
2
5.6
2
3.1
5
2.5
6
2.5
3
1.9
3
1.9
3
1.2
2
1.9
6
1.9
4
1.9
6
1.9
4
10
1.9
2
1.2
2
3.7
2
5.0
1
1.9
1
1.9
3
1.2
3
1.2
2
1.2
2
1.9
3
1.2
3
2.5
3
1.2
2
1.9
3
1.2
3
SPEED
INCLINE
SPEED
INCLINE
SPEED
INCLINE
SPEED
INCLINE
SPEED
INCLINE
SPEED
INCLINE
SPEED
INCLINE
SPEED
INCLINE
SPEED
INCLINE
SPEED
INCLINE
SPEED
INCLINE
SPEED
INCLINE
SPEED
INCLINE
SPEED
INCLINE
SPEED
INCLINE

3 User Programs
In these programs (U01/U02/U03), you can customize your own programs by manu-
ally setting each of the 10 sections.
1. Press PROG button until you reach one of U01/U02/U03 and the “Time” window
will display flickering “10:00”.
2. Press SPEED+/- or INCLINE^/ˇ button to set the Total Workout Time and then
press Mode button to enter setting in each section(S-01, S-02......S-10).
3. Press SPEED+/- and INCLINE^/ˇ button to set the desired speed and time in the
section. Press Mode button to move to the next section or to skip through sec-
tions.
4. Once you’ve set the first section, you can set the value for the next section.
Repeat this process until you have completed all sections. The values you set will
not change unless edited (Only custom values of Speed and Incline are saved
while Time will return to 10:00 on the next startup).
5. Once you’ve finished setting your own program (when you reach the Total Workout
Time setting again), you can press START button to begin your workout. The
treadmill will run in the program you set.
6. You can press SPEED +/- or INCLINE ^/ˇ button to adjust speed and incline while
running. Once treadmill enters the next exercise section, the console will show
initial exercise data of this preset section.
7. Once the program is complete (10 sections), the treadmill will slow down and stop
accompanied by beep sounds.
Heart Rate Measurement
To measure your heart rate, hold the hand pulse sensors with both of your hands for
10 seconds. Stand still during measurement to ensure an accurate reading, and the
console will show user’s pulse value after about 5 seconds.
Note: This data is intended for reference only, not for medical guidance.
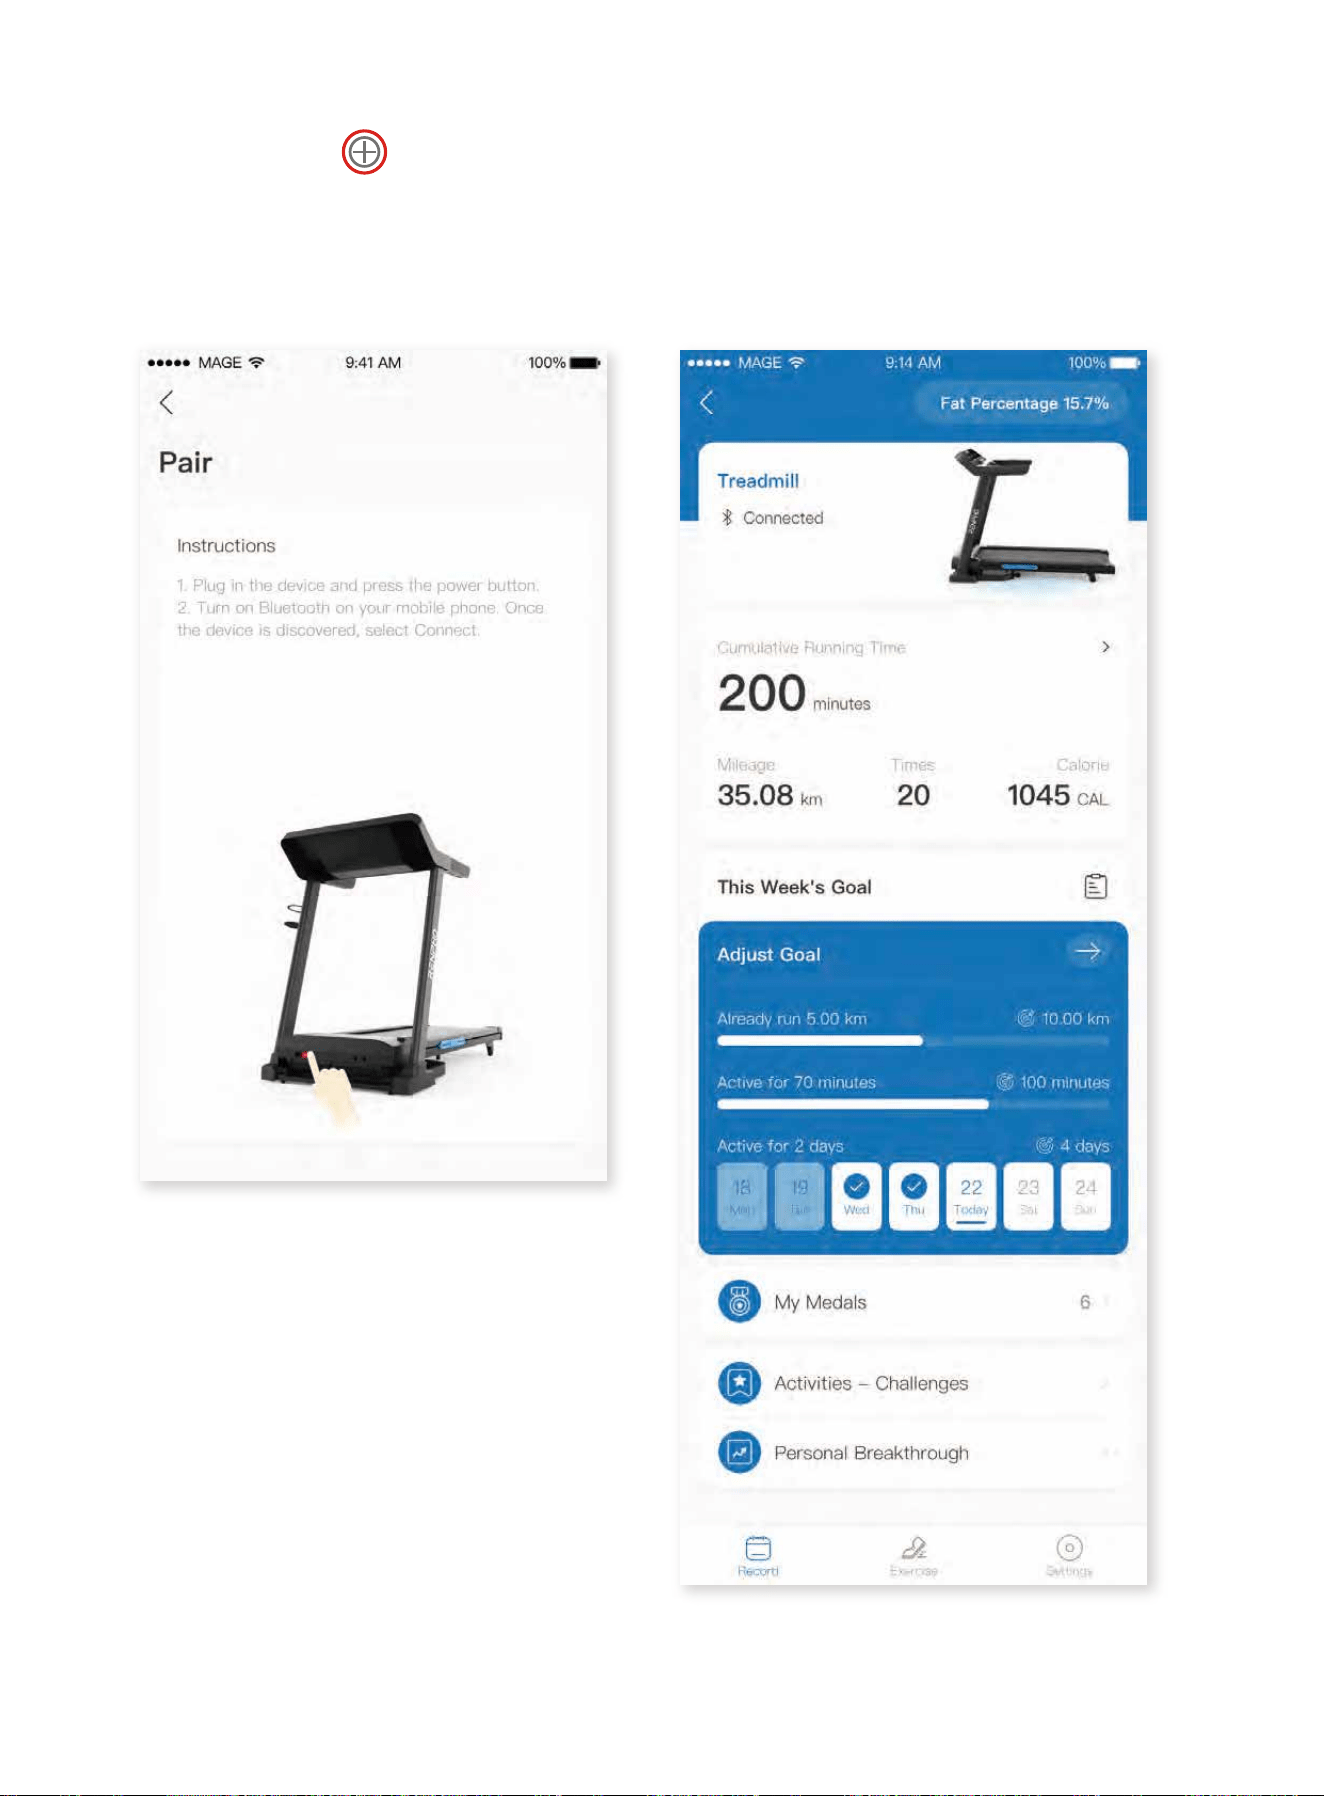
Bluetooth Connection
Activate the treadmill, enable Bluetooth on your smart phone, search for
SYMK and connect to play your own music on the treadmill. Open the "RENPHO
Health" app and connect to R-Q004 via Bluetooth to access smart features and
workouts.
Power Save Function
The treadmill has a power-saving function. Instandbystate, or at the state of
waiting for operation, if without any operation, the power-saving function will be
available after 10 minutes, and the console will turn off. To use the treadmill, press
any button to activate the console.
01 02 03 04 05 06
07 08 09 10 13
14 15 16
17 18 19
20 21 22 23 24 25
27 28
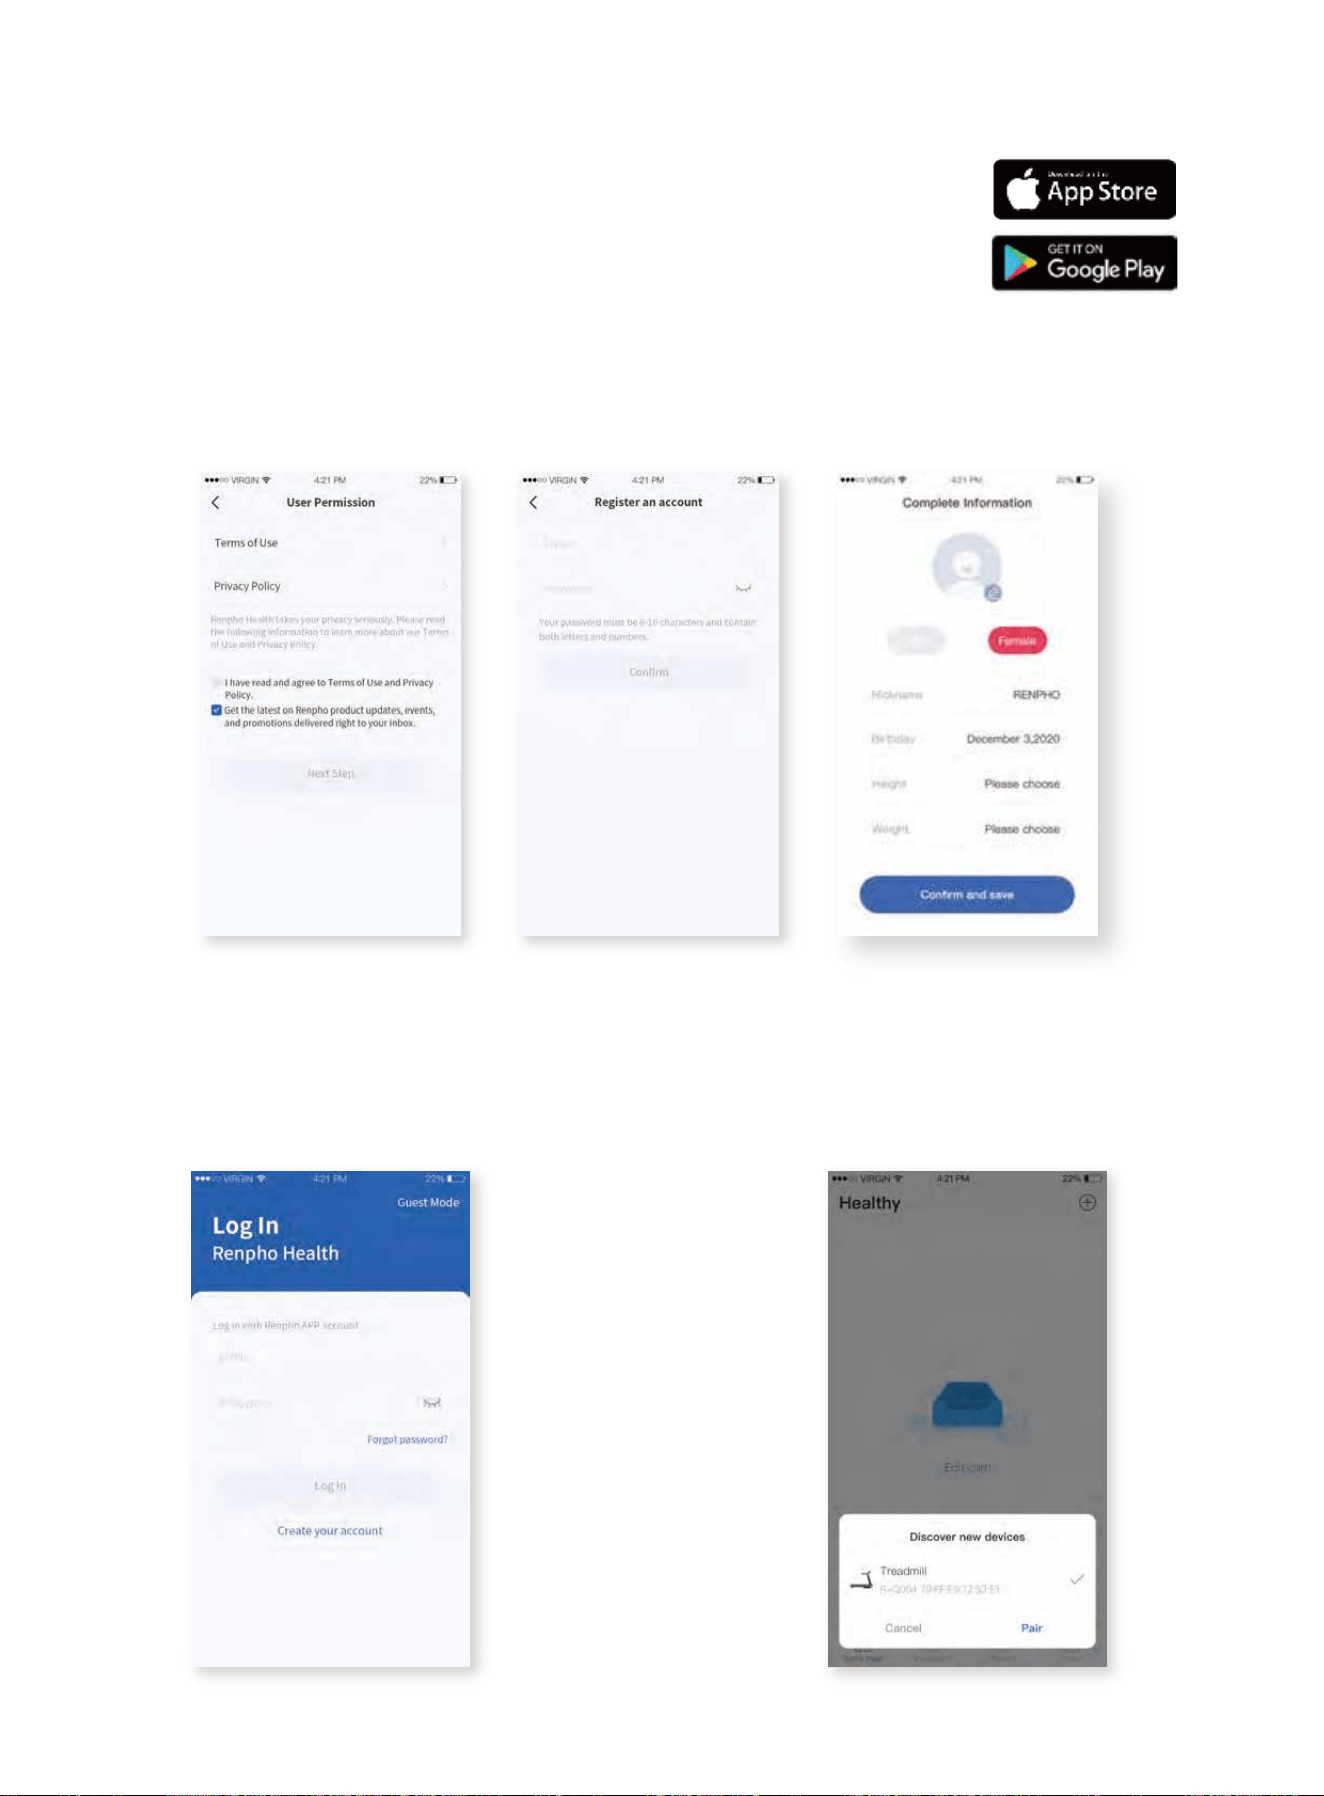
1. Application Download
Download and install the free "Renpho Health"
App to your smartphone.
3. Log in
Users can create a new account or log
in directly with an existing RENPHO
App account.
APP Instructions
01 02 03 04 05 06
07 08 09 10 13
14 15 16 17
18 19
20 21 22 23 24 25
27 28
2. Register
Use email address to register the account and complete the personal information;
this information is intended for calculation only.
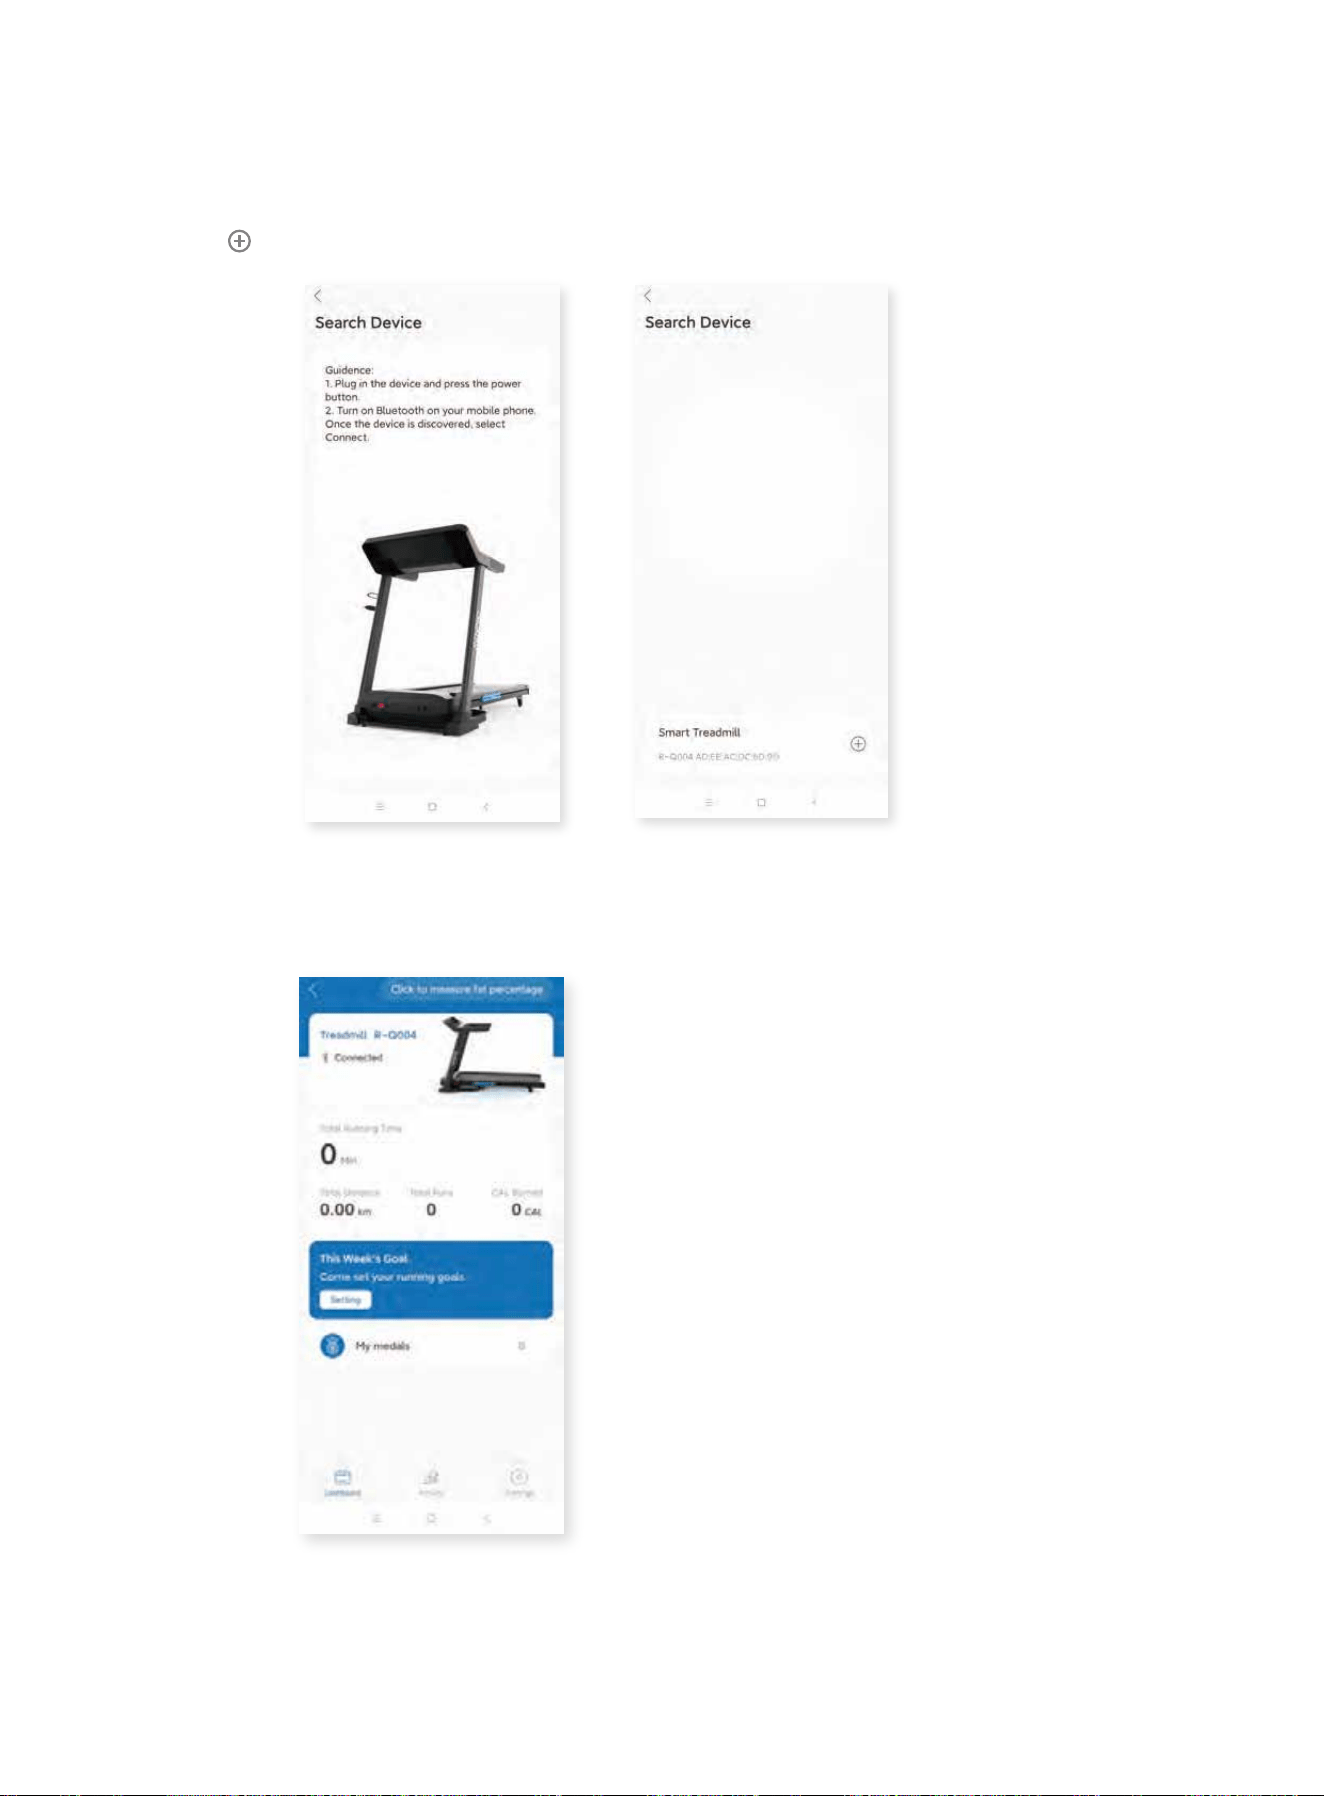
4. Add device
After logging in, if you turn on Bluetooth
on your smart phone and treadmill, the
window (as shown) will pop up and
remind you to connect the device.
Or you can click in the right corner to manually connect it.
1. Turn on Bluetooth on your smartphone.
2. Turn on the treadmill.
3. Click the device to connect.
5. After paring successfully, it will
enter the Home Page as shown. The
data will be synchronized with the
treadmill. Please check more
detailed instructions via www.ren-
phohealth.com.
01 02 03 04 05 06
07 08 09 10 13
14 15 16 17 18
19
20 21 22 23 24 25
27 28
R-Q004
General cleaning will help prolong the lifespan and performance of your treadmill.
Keep the unit clean and maintained by dusting the components on a regular basis.
Clean both sides of the running belt to prevent dust from accumulating underneath
the belt. Keep your running shoes clean so that dirt from your shoes does not wear
out the running board and belt. Clean the surface of the running belt with a clean
damp cloth.
To better maintain the treadmill and prolong its lifespan, it is recommended that the
machine should be powered off for 10 minutes after 2 hours of continuous use and
fully powered off whenever not in use.
Lubricating the Treadmill
IMPORTANT NOTE:
You will need to lubricate your treadmill before the first use.
Lubricating the running board and running belt is essential as the friction between
the two affects the function and lifespan of the treadmill, therefore it is recommend-
ed that the running board and belt should be inspected regularly.
WARNING: Always unplug the treadmill from the electrical outlet before cleaning,
lubricating or repairing the unit.
How to Lubricate:
1. Lift the belt up on one side and apply lubricant to the running deck.
2. Use a rag to thoroughly wipe the lubricant over the running deck. Repeat this
process for the other side.
3. Start the treadmill and let it run at the lowest speed for several minutes to allow
the lubricant to spread evenly over the running deck.
Maintenance & Care
Running
deck
01 02 03 04 05 06
07 08 09 10 13
14 15 16 17 18 19
20 21 22 23 24 25
27 28
The following timetable is recommended:
Light user (less than 3 hours/week) every six months
Medium user (3-5 hours/week) every three months
Heavy user (more than 5 hours/week) every two months
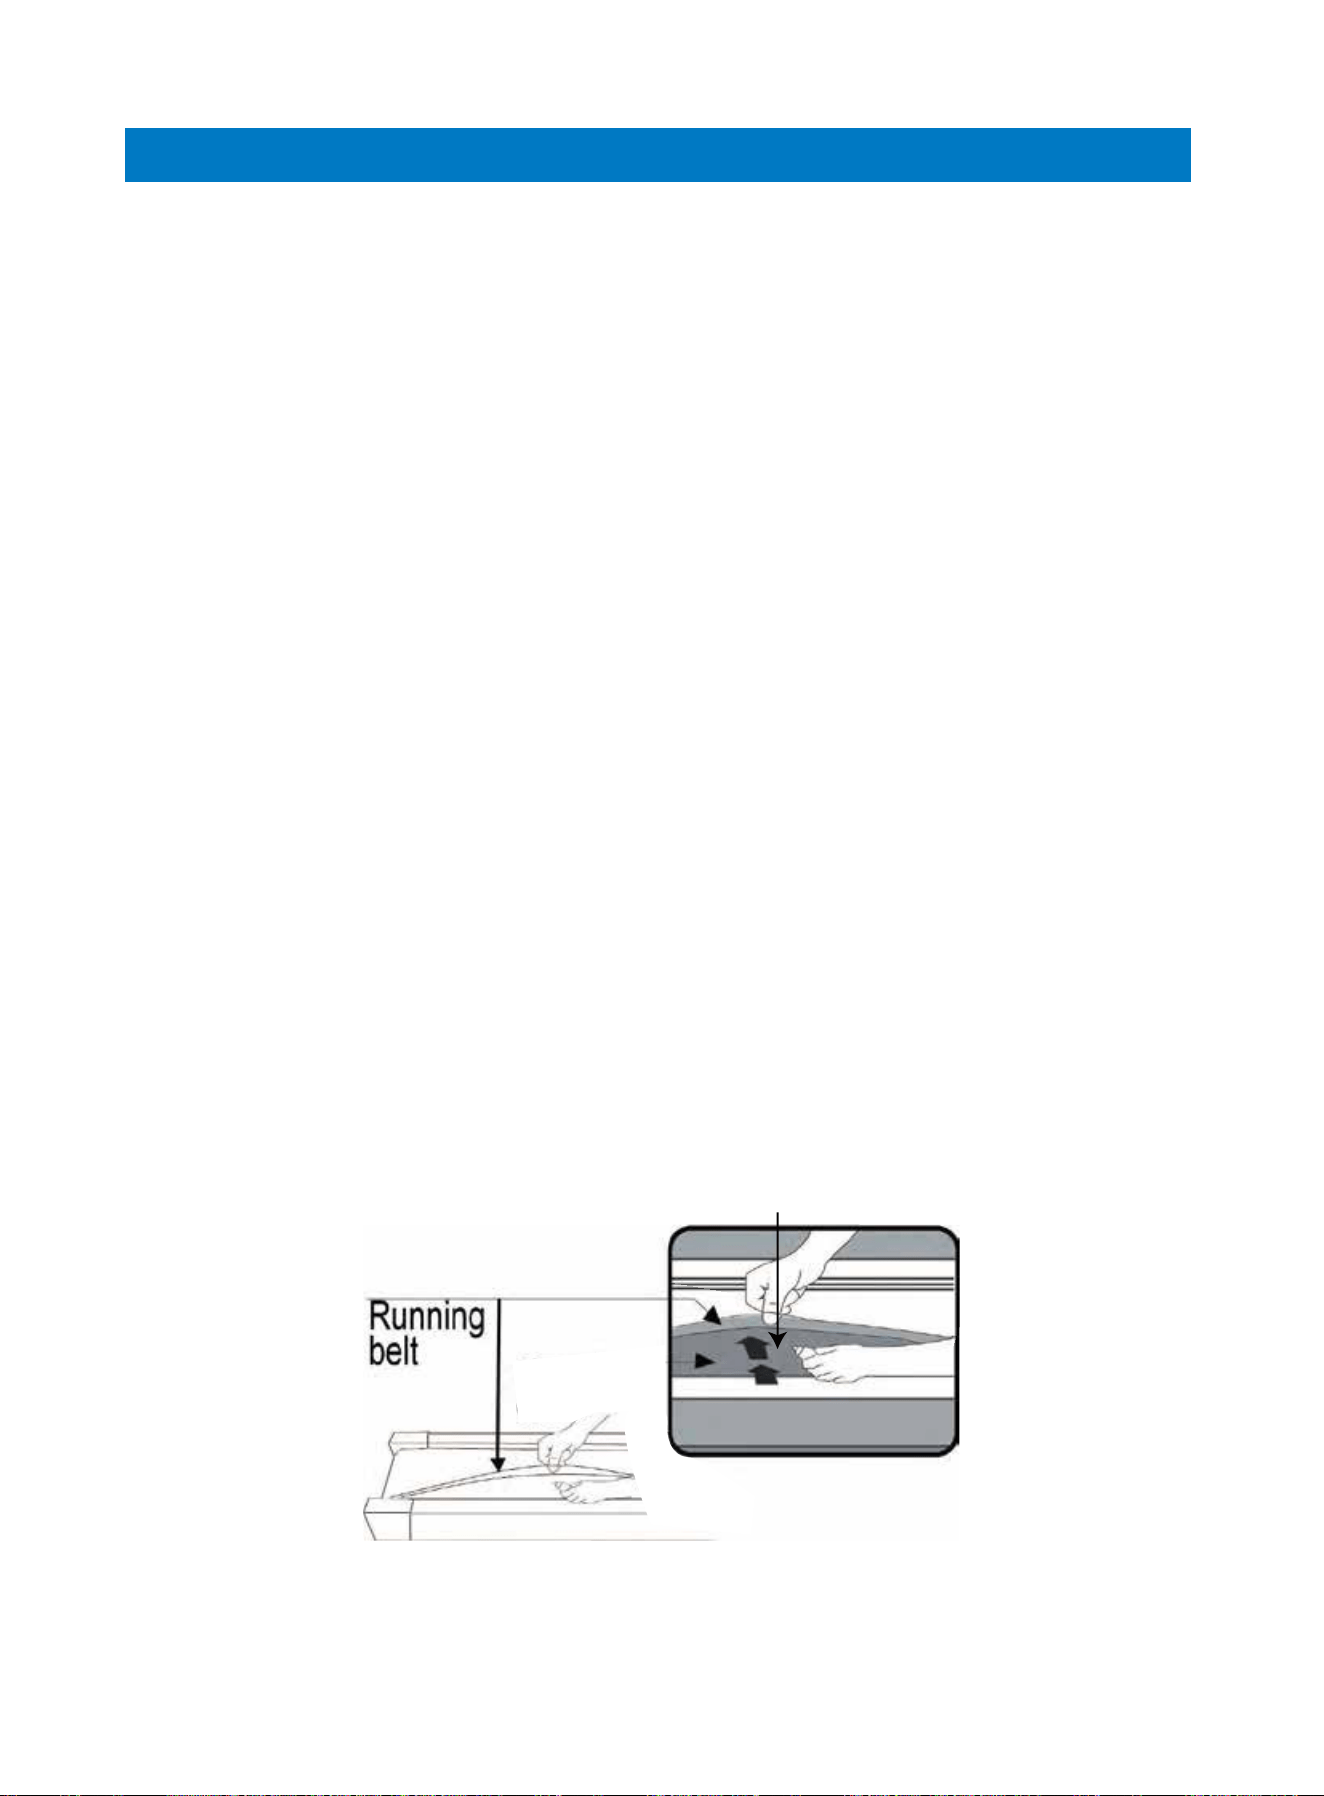
Centering the Running Belt
A loose Running Belt may cause you to fall when running. Likewise, if the Running
Belt is too tight, it may impact the motor’s performance as there will be too much
friction between the roller and running belt. The most suitable tightness for the belt
is 50-75mm pulled out from the Running Board.
Place the treadmill on the flat surface and set it at the speed of 6-8km/h (4-5mph)
to check if the Running Belt drifts.
Lubrication Reminder Function
Upon every 300km (186.4miles) of total running distance, a system beeping alert will
sound every 10 seconds and TIME window will display “OIL”. This means that your
treadmill needs to be lubricated with oil. Please add oil on both sides of the running
board as instructed. Once lubrication is complete, please hold the “STOP” button for
3 seconds to reset the system warning sound until the next 300km (186.4miles).
The moving parts should turn freely and quietly. Abnormality of moving parts will
affect the safety of the equipment. Inspect and tighten bolts regularly. To better
maintain the treadmill and prolong its lifespan, it is recommended that maintenance
should be done on a regular basis.
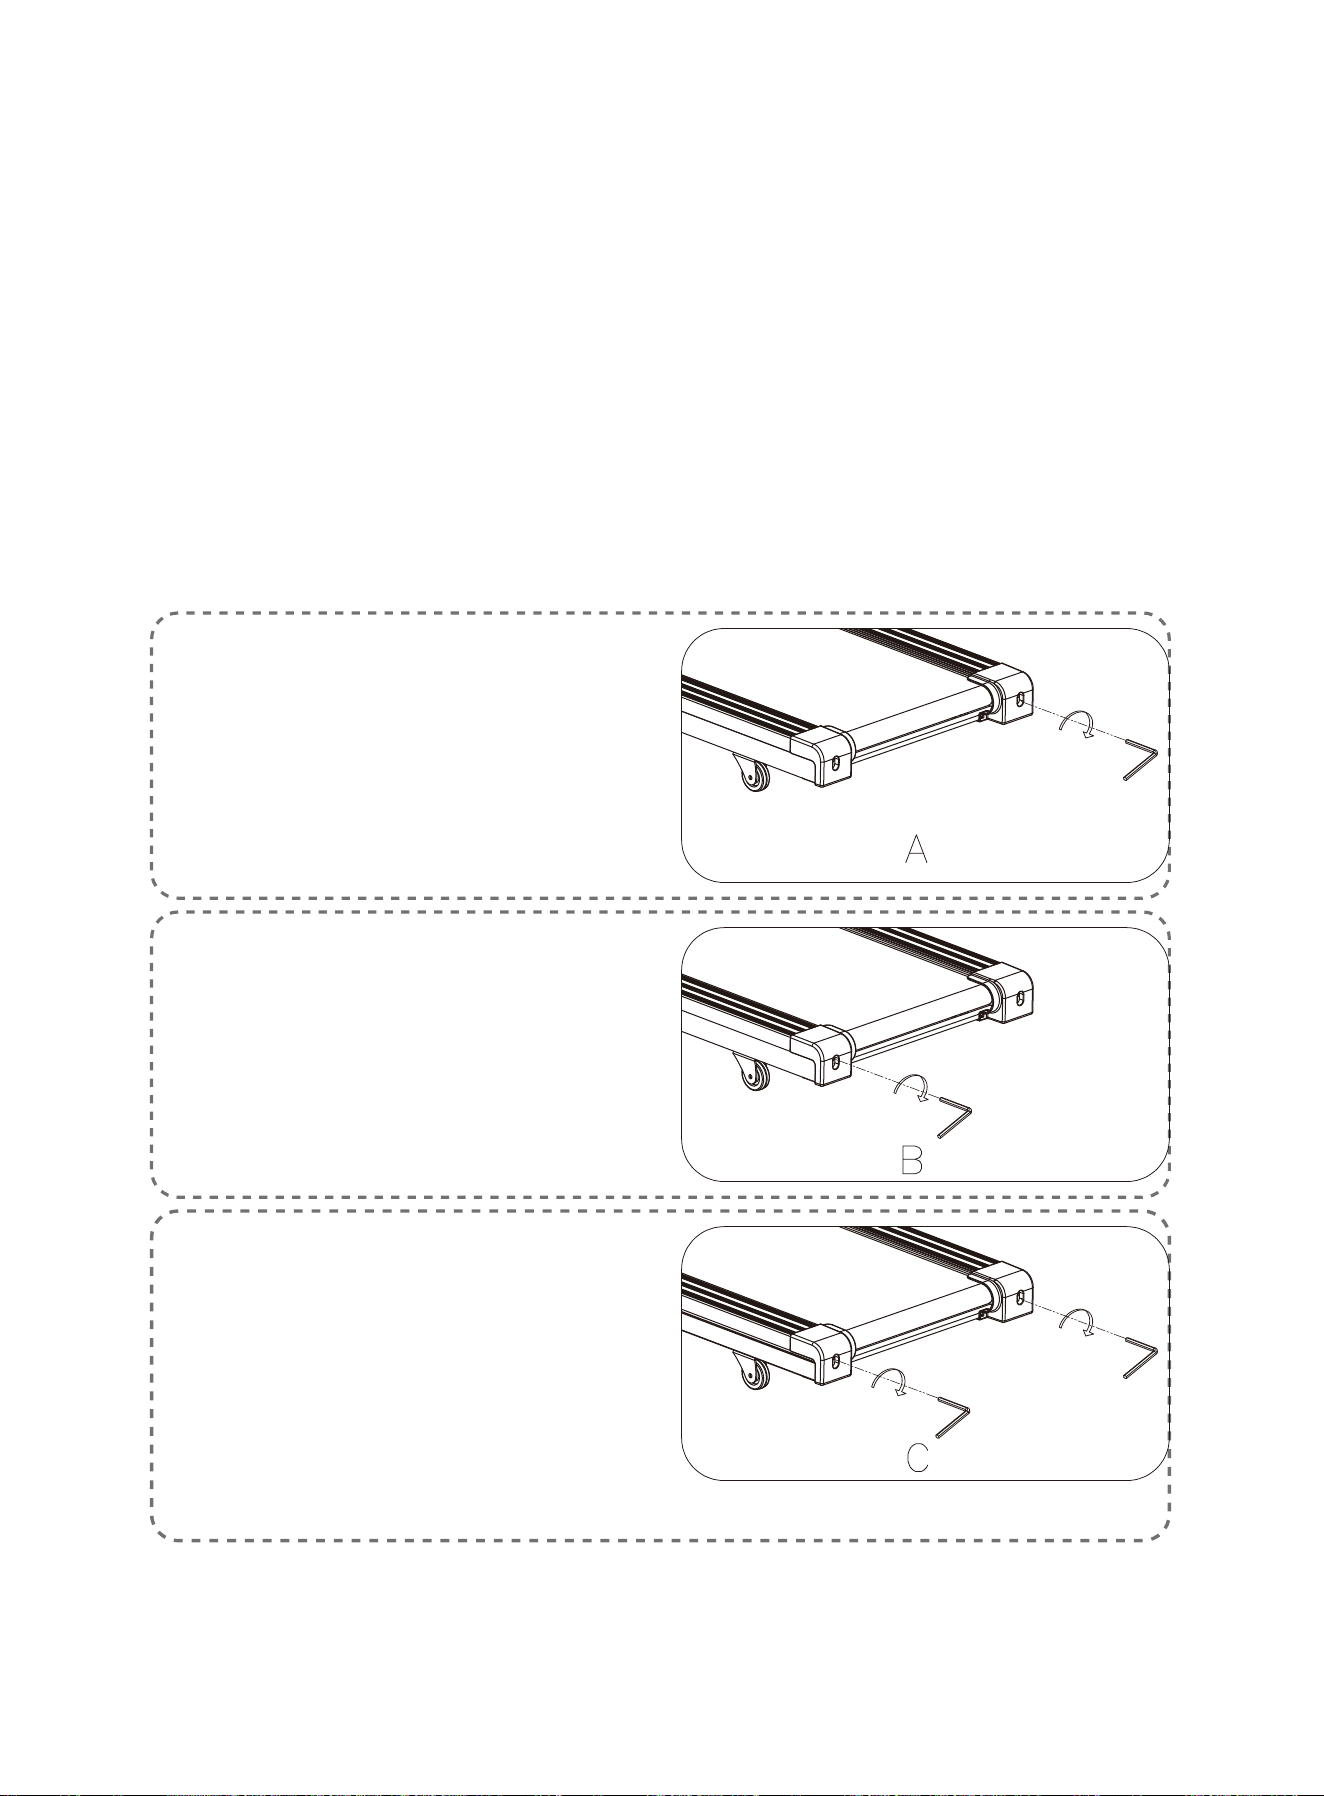
1. If the Running Belt moves to the
right, turn the adjusting bolt on the
right side ¼ circle clockwise, then
turn the left adjustment bolt ¼
circle counter-clockwise. If the belt
does not move, repeat this step
until it centers. Refer to figure A.
2. If the Running Belt moves to the
left, turn the adjusting bolts on the
left side ¼ circle clockwise, then
turn the right adjustment bolt ¼
circle counter-clockwise. If the belt
does not move, repeat this step
until it centers. Refer to figure B.
3. Over time the Running Belt will
loosen. To tighten the belt, turn the
adjusting bolts of both sides one
full circle clockwise, check the
tension of the belt. Continue this
process until belt is at the correct
tension. Make sure to adjust both
sides equally to ensure correct belt
alignment. Refer to figure C.
01 02 03 04 05 06
07 08 09 10 13
14 15 16 17 18 19
20
21 22 23 24 25
27 28

Possible Cause Suggested Action
Troubleshooting
Problem
Treadmill does
not start
Running belt
not centered
Console not
working
Running belt tension not
correct on the left or right
sides of the running board.
Wires from the console
and bottom control board
not properly connected.
Transformer is damaged.
Check wire connections
from the console to the
control board.
If the transformer is damaged,
contact customer service.
Not plugged in. Plug cord into outlet.
Safety Key not inserted. Insert Safety Key.
Tighten the adjustment bolts
on the left and right side of
the rear roller.
E01 or E13:
Message failure
Wires from the console
and bottom control board
not properly connected.
Check wire connections from
the console to the control
board. If the wire has been
punctured or damaged, you
will need to replace it. If the
problem is not rectified, you
may need to replace the
control board.
E02: Burst
clash protection
Incoming voltage is lower
than 50% of the required
voltage.
1. Check that the incoming
power supply is the correct
voltage.
2. Check the control board,
replace if damaged.
3. Check the motor, replace if
damaged.
E03: Speed
sensor failure
Speed sensor not plugged in
or wires from the sensor and
bottom control board not
properly connected.
Check speed sensor and
magnetic sensor, replace if
damaged.
E04: Incline
adjustment or
self-inspection
failure
The incline motor wire is not
connected or the motor is
damaged.
1. Check incline motor wires
to see if the motor is connect-
ed, replace if damaged.
2. Check the control board,
replace if damaged. After the
problem is fixed, press and
hold “Incline^/ˇ” buttons to
check if the incline can be
adjusted.
01 02 03 04 05 06
07 08 09 10 13
14 15 16 17 18 19
20 21
22 23 24 25
27 28

Problem
E05: Current
overload protec-
tion (self pro-
tecting system)
E06: Motor
abnormality
The motor wire is not con-
nected or the motor is dam-
aged.
E08: Control
board abnormali-
ty
The control board is not
connected.
Check the upper and middle
wires to see if the control
board is connected. If the
wire has been punctured or
damaged, you will need to
replace it. If the problem is
not rectified, you may need to
replace the control board.
E10: Motor
abnormality
The motor is damaged or a
moving part of the treadmill is
stuck and therefore the motor
is unable to rotate properly.
1. The torque is too high, please
adjust the torque to be lower.
2. Inspect moving parts of the
treadmill to ensure that they are
operating correctly.
3. Replace the motor if neces-
sary.
4. Lubricate the treadmill.
Check motor wires to see if
the motor is connected. If the
wire has been punctured or
damaged, you will need to
replace it. If the problem is
not rectified, you may need to
replace the motor.
The incoming voltage is too
low or too high. The control
board is damaged.
Restart the treadmill. Check
the incoming voltage to
ensure it is correct.
A moving part of the treadmill
is stuck and therefore the
motor is unable to rotate
properly.
1. Inspect moving parts of the
treadmill to ensure that they
are operating correctly.
2. Check the motor, listen for
strange noise and check for a
burning smell. Replace the
motor if necessary.
3. Check the control board,
replace if damaged.
4. Lubricate the treadmill.
Possible Cause Suggested Action
01 02 03 04 05 06
07 08 09 10 13
14 15 16 17 18 19
20 21 22
23 24 25
27 28
Assembly Parts List 1
01 02 03 04 05 06
07 08 09 10 13
14 15 16 17 18 19
20 21 22 23
24 25
27 28
Assembly Parts List 2
01 02 03 04 05 06
07 08 09 10 13
14 15 16 17 18 19
20 21 22 23 24
25
27 28
01 02 03 04 05 06
07 08 09 10 13
14 15 16 17 18 19
20 21 22 23 24 25
26 27 28
Blue cushion
Transportation wheel 2 Lockwasher φ10 6
C16 D25
NO. Part Description Part DescriptionRemarkQty NO. RemarkQty
Bottom frame 1 Cylindrical cushion 2
Main frame 1 Button 2
Console frame 1 Button+ 1
Right rear cover 1 Button- 1
Cushion 1 Incline handpulse seat 1
Incline frame 1 Speed handpulse seat 1
Front roller 1 Button Acrylic 3
Rear roller 1 Nut M6 6
Safety key seat shrapnel 2 Nut M86
Left handpulse sheet 2 Nut M10 6
Right handpulse sheet 2 Bolt 4
Air cylinder 1 Bolt M8 55 4
Incline frame sleeving 8 Bolt M8 40 L204
Wrench with screw driver S=13 14 15 1 Bolt M830 L15 1
#5 Allen wrench 5mm 1 Bolt M825 2
Speak
er net 1 Bolt M8154
Motor top cover 1 Bolt M10 45 L15 1
Motor bottom cover 1 Bolt M665 2
Left rear cover 1 Bolt M6 55 1
Right rear cover 1 Bolt M635 6
Cushion 2 Big flat washer φ6 φ12 1.0 8
Side rail 2 Bolt M5 12 9
Console top cover 1 Bolt M5 104
Console foam cover 1 Screw ST4.2*40 3
Left hand rail foam 1 Screw ST4.2*20 8
Right handrail foam 1 Screw ST4.2*12 13
Ipad holder 2 Screw ST4.2*12 14
Running be l t 1 Bolt M10 95 L25 1
Motor belt 1 Screw ST2.9*810
Safety key
1 Screw ST2.5*68
6 Lock washer φ810
A01 C25
A02 C26
A03 C27
A04 C28
A05 C29
A06 C30
B01 C31
B02 D01
B03 D02
B04 D03
B05 D04
B06 D05
B07 D06
B08 D07
B09 D08
B10 D09
C01 D10
C02 D11
C03 D12
C04 D13
C05 D14
C06 D15
C0
7 D16
C08 D17
C09 D18
C10 D19
C11 D20
C12 D21
C13 D22
C14 D23
C15 D24
*M1055 L20
*
*
、、 *
*
*
*
*
*
*
**
*
*
*
Parts List

Your RENPHO product purchase is covered by a one-year limited manufacturer
warranty from the date of delivery.
For warranty terms and conditions, please visit :
https://renpho.com/pages/warranty-terms-and-conditions
Note: Product registration is not required for the warranty. If you choose not to
register your product, it will not diminish the product warranty.
Warranty Policy
01 02 03 04 05 06
07 08 09 10 13
14 15 16 17 18 19
20 21 22 23 24 25
27 28
Square end cap 4Flat washer φ82
Adjustable wheel 2 Bolt M8 55 L20 2
Foot pad 4 Spring washer φ82
Console acrylic 1 Lock washer φ83
Ring protector plug 2
Cross recessd pan head
screw
M5*15 2
EVA PAD 1
Cross recessd pan head
self-drilling tapping screw
ST4.2*12 2
Socket 1
Cross recessd pan head
self-drilling tapping screw
ST4.2*12 1
Magnet ring 1 Running board 1
Magnet core 1 DC motor 1
Power wire 1 Square switch 1
AC single wire L200 brown2 Overload protector 1
AC single wire L350 brown2 Quick speed upper wire 1
AC single wire L350 blue 1 Quick incline buttom wire 1
Grounding wire Yellow & green 1 Quick incline upper wire 1
Magnet ring 1 Incline motor 1
Upper control board 1 Magnetic Sensors 1
Lower control board 1 Filter Optional parts 1
Singal upper wire 1
Inductance
1
Singal bottom wire 1 AC single wire 1
Hand pulse upper wire 1 Grounding wire 1
Hand pulse bottom wire 2 Screw 4
Touch button 1 USB Module 1
Safety key connection wire 1 USB wire 1
Quick speed buttom wire 1 Screw 2
Speaker 2 Screw 8
MP3 wire 1 Audio signal input wire 1
C17 D26
C18 D27
C19 D28
C20 D29
C21 D30
C22 D31
E05 D32
E06 E01
E07 E02
E08 E03
E09 E04
E10 E23
E11 E24
E12 E25
E13 E26
E14 E27
E15 F01
E16 F02
E17 F03
E18 F04
E19 F05
E2
0 H01
E21 H02
E22 H03
G01 G03
G02 G04
*

FCC Regulatory Compliance
This device complies with part 15 of the FCC Rules. Operation is subject to the following two conditions: (1)
This device may not cause harmful interference, and (2) this device must accept any interference received,
including interference that may cause undesired operation.
Warning: changes or modifications not expressly approved by the party responsible for compliance could
void the user’s authority to operate the equipment.
Note: This equipment has been tested and found to comply with the limits for a Class B digital device,
pursuant to Part 15 of the FCC Rules. These limits are designed to provide reasonable protection against
harmful interference in a residential installation. This equipment generates, uses and can radiate radio
frequency energy and, if not installed and used in accordance with the instructions, may cause harmful
interference to radio communications.
However, there is no guarantee that interference will not occur in a particular installation.
If this equipment does cause harmful interference to radio or television reception, which can be determined
by turning the equipment off and on, the user is encouraged to try to correct the interference by one or
more of the following measures:
- Reorient or relocate the receiving antenna.
- Increase the separation between the equipment and receiver.
- Connect the equipment into an outlet on a circuit different from that to which the receiver is connected.
- Consult the dealer or an experienced radio/TV technician for help.
RF Exposure Compliance
This equipment complies with FCC radiation exposure limits set forth for an uncontrolled environment. This
transmitter must not be co-located or operating in conjunction with any other antenna or transmitter.
ISED Regulatory compliance
This device contains licence-exempt transmitters that comply with Innovation, Science and Economic
Development Canada’s licence-exempt RSS(s).
Operation is subject to the following two conditions:
(1)This device may not cause interference.
(2)This device must accept any interference, including interference that may cause undesired operation of
the device.
Le présent appareil est conforme aux CNR d'Industrie Canada applicables aux appareils radio exempts de
licence. L'exploitation est autorisée aux deux conditions suivantes:
(1) l'appareil ne doit pas produire de brouillage, et
(2) l'utilisateur de l'appareil doit accepter tout brouillage radioélectrique subi, même si le
brouillage est susceptible d'en compromettre le fonctionnement.
This equipment complies with IC RSS-102 radiation exposure limits set forth for an uncontrolled environ-
ment.
Cet équipement est conforme aux limites d'exposition aux radiations IC CNR-102 établies pour un
environnement non contrôlé.
Customer Service
Please feel free to contact us if you have any questions or concerns. RENPHO Cus-
tomer Service Team guarantees a quick response and hassle-free solutions to any
issue you may have within business hours.
*For defective products or the return of items, please contact us with your order
number within the specified warranty period. DO NOT dispose of any product parts
as they may be required for inspection/repair.
01 02 03 04 05 06
07 08 09 10 13
14 15 16 17 18 19
20 21 22 23 24 25
27
28
TEL: 1(844) 417-0149(US ONLY)
Monday-Friday 9:00AM-4:30PM
1800 MY RENPHO (1800 69 7367) (AU ONLY)
Mon-Fri 9:00-5:00PM (GMT+10)
Email: suppor[email protected]
support-au@renpho.com

Download the App
1. Search
Search for "RENPHO Health" on App Store/Google Play or scan the QR code below
to download the app.
2. Register
Register with your email address and fill in your personal information (this is required
for calculating accurate health measurements).
111
Connect the Treadmill
3. Signing in
Log in with your RENPHO App account.
1. Activate Bluetooth on your smartphone and a pop-up window will appear to allow
you to pair your phone with the device.
222
Alternatively, click “Add device” on the right corner to connect manually.
1. Activate Bluetooth on your smartphone.
2. Power on the treadmill.
3. Click to connect.
2. After pairing successfully, you will be directed to the Home Page and the app will
be synchronized with the treadmill.
333

Using the Treadmill via App
3. Select the treadmill on the “Device” page to connect for next use. Swipe left and
click to delete to disconnect the device.
Note: The treadmill can be paired with one device only. If you want to connect the
treadmill with another device, please ensure it is disconnected from any prior
device.
1. Start Running
1.1 Click the “Activity” icon to enter the page and click “Start” on Manual Mode to
begin your workout.
444
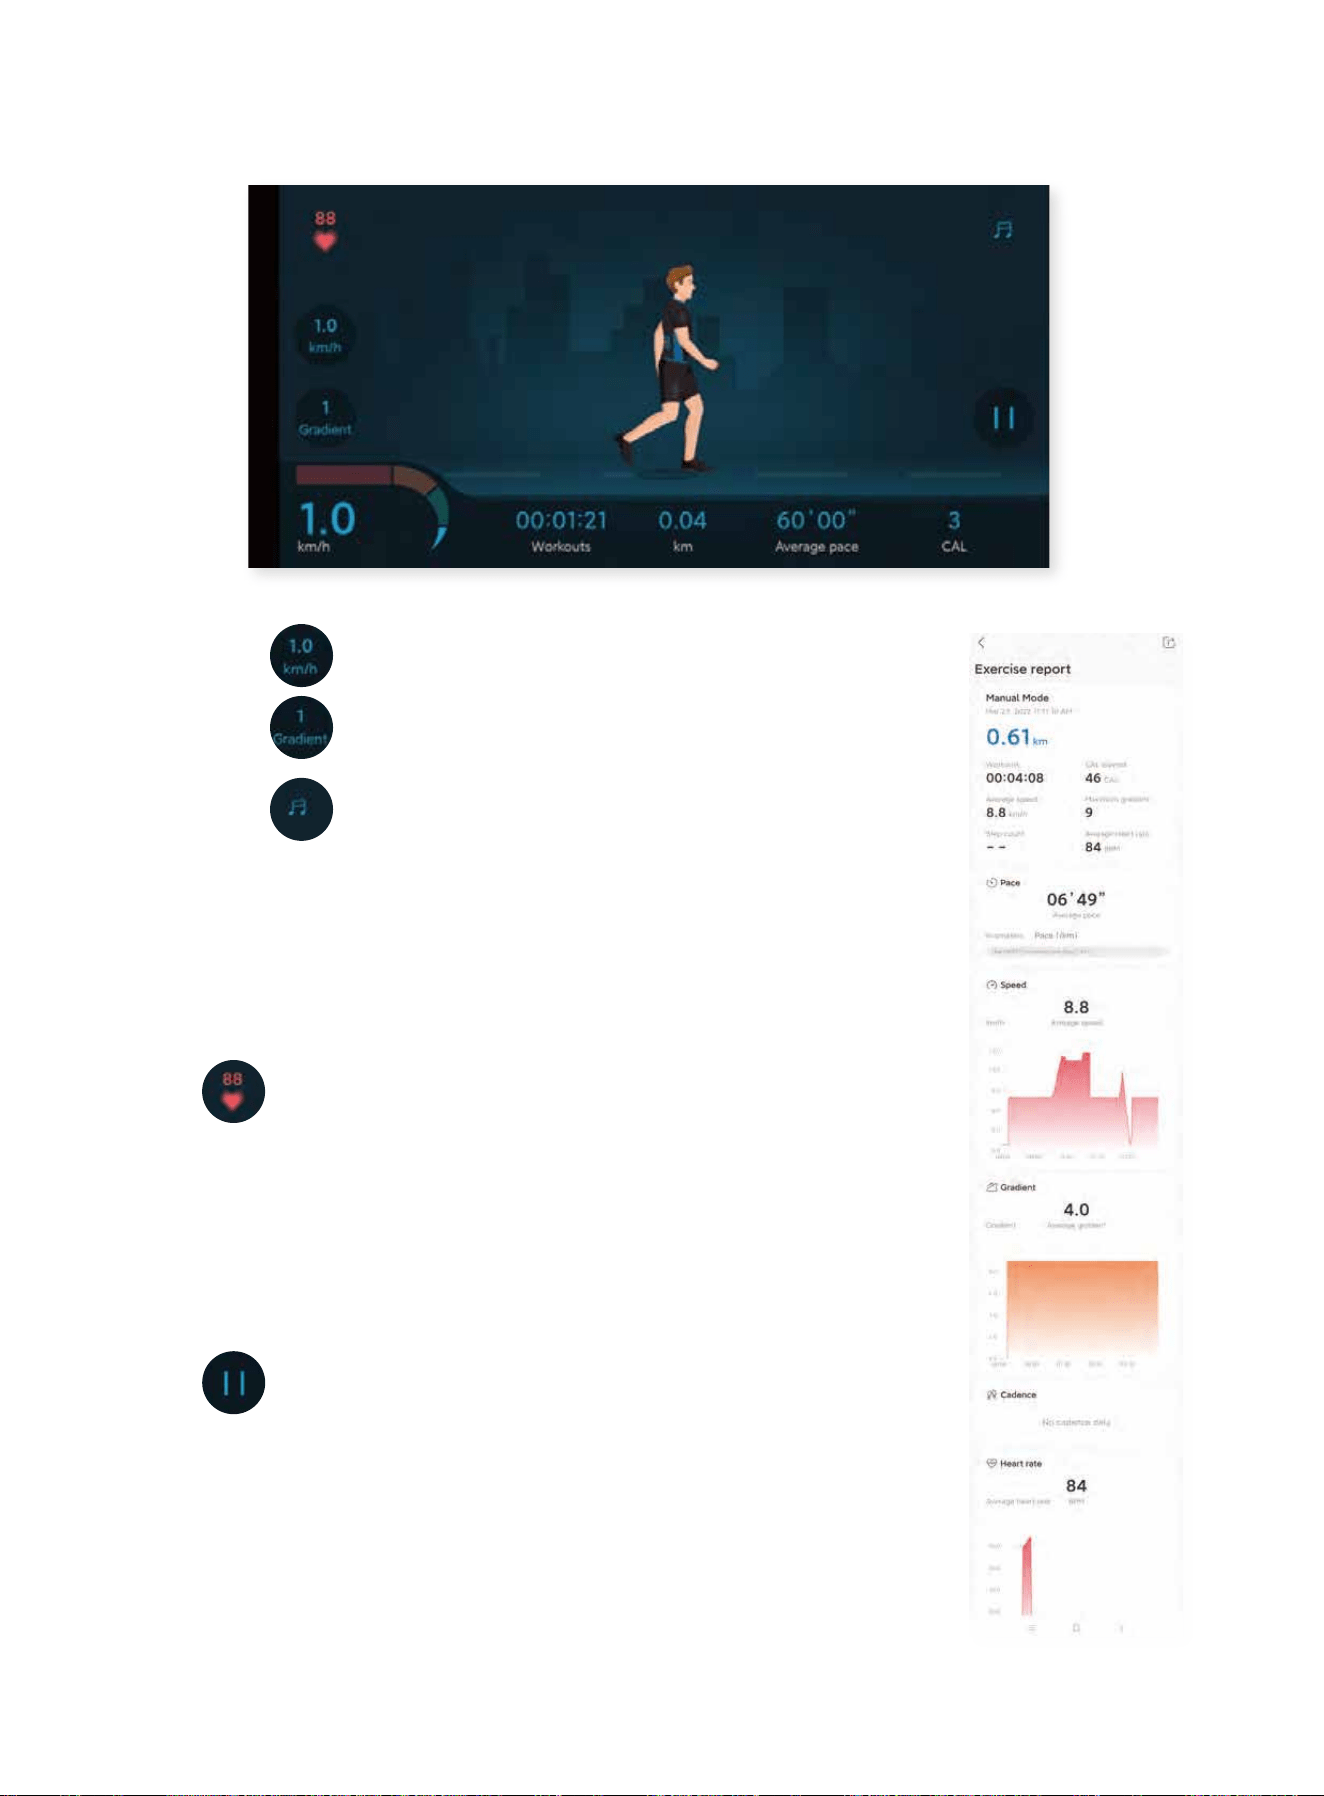
1.2 The following page will then be shown.
1.2.1 Click to adjust the running speed.
1.2.2 Click to adjust the incline of the running board.
1.2.3 Click to turn on/off the music.
Music: You can download and play 3 music tracks within the
app or search and connect to SYMK via Bluetooth to play
music from your smartphone.
1.2.4 : Hold the hand pulse sensors with both hands for
a few seconds. The icon will then appear to show your current
heart rate (Note: the data is for reference only and not for
medical guidance).
1.2.5 Click to pause or end your workout.
1.3 After you end the workout and save the data, it will show
an exercise report that you can share on social media.
555

2. Program Running
2.1 Click “Power Course” to select your unning program. There are 15 built-in preset
programs tailored for beginners, intermediate and advanced runners.
666
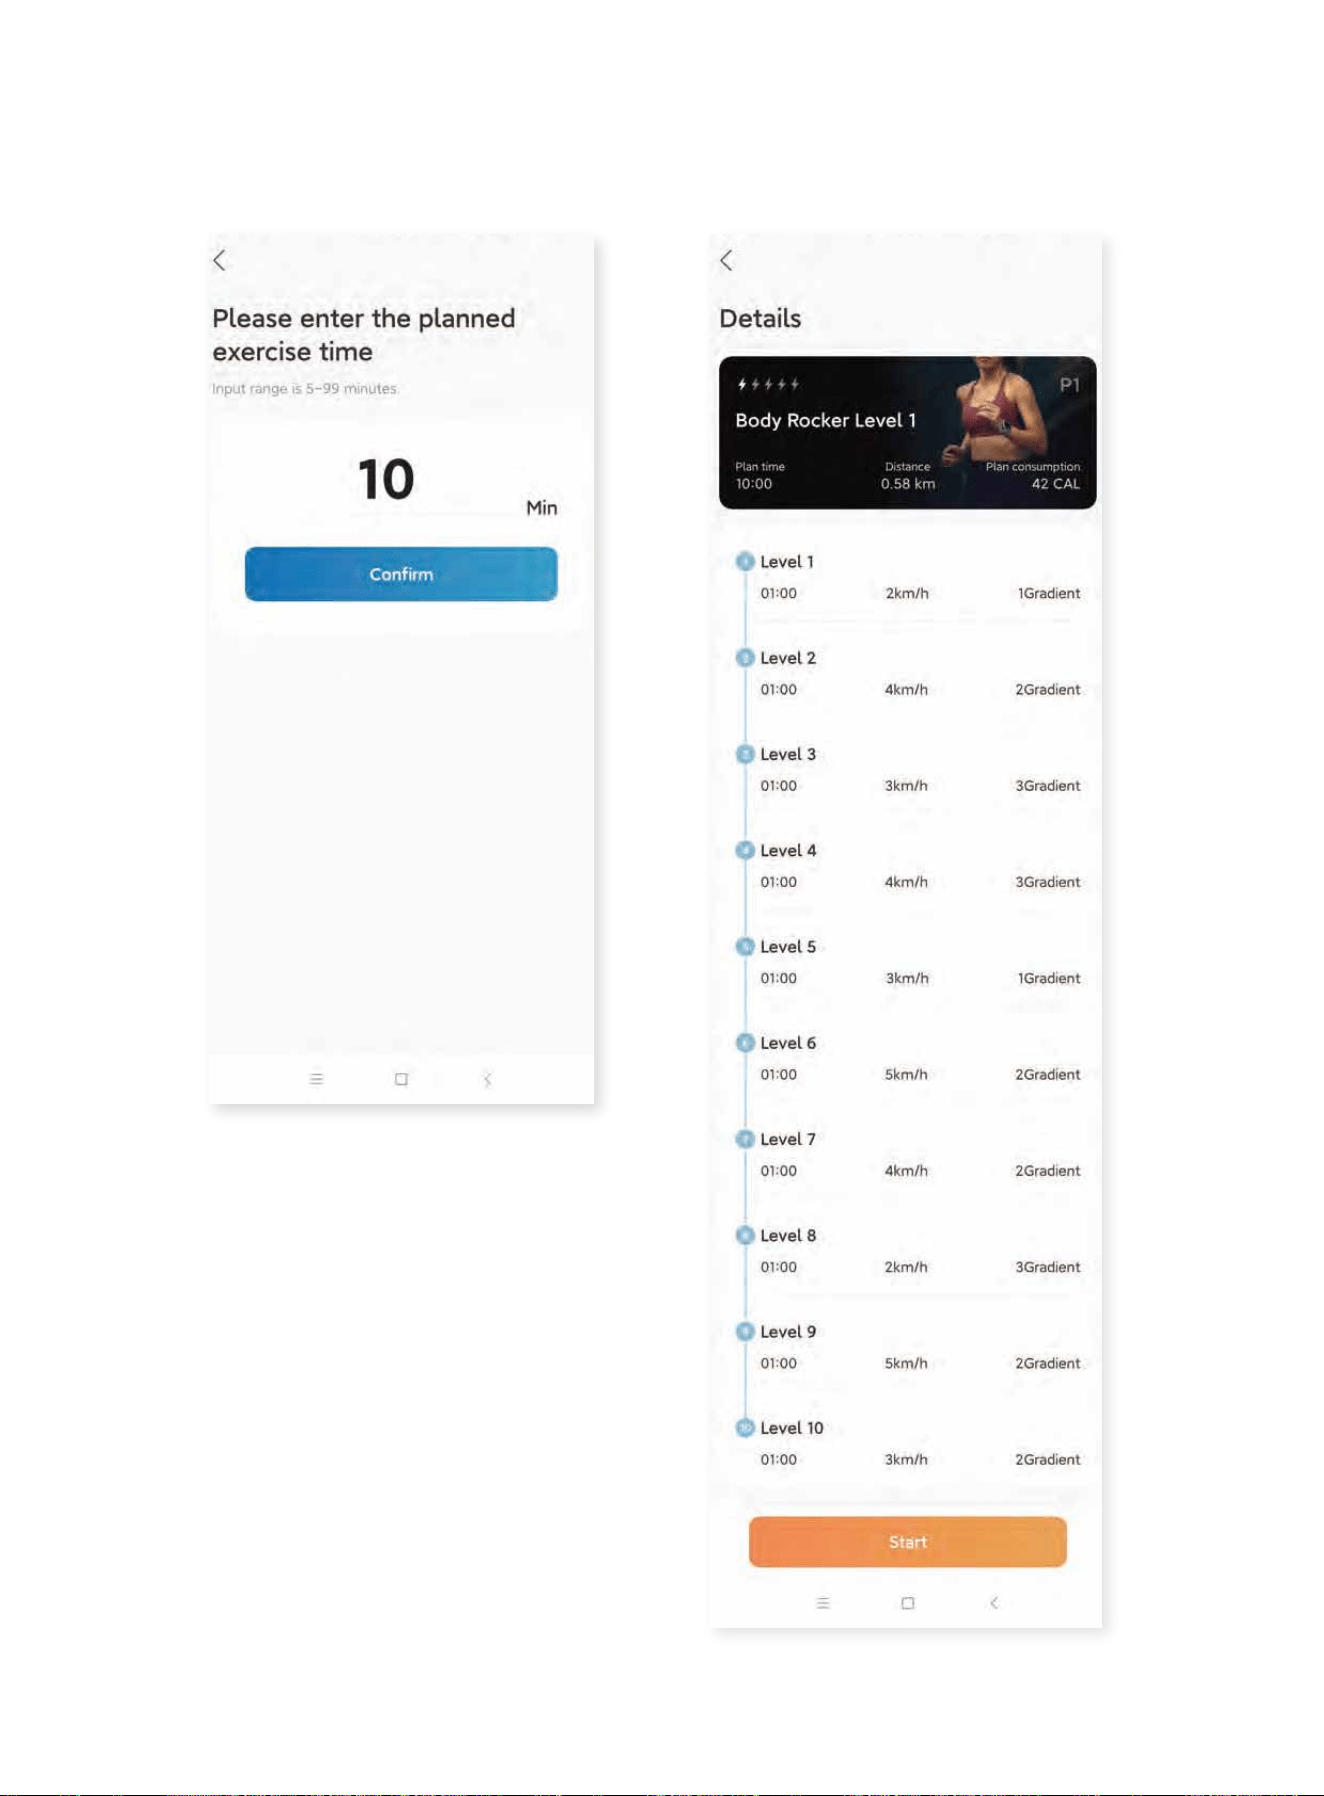
2.2 After selecting a specific program, set the planned exercise time and confirm the
details to start your run.
777

3. Countdown Running
Click “Target Exercise” to begin a countdown run which completes after completing
a preset “Distance” (running a set amount of km), “Workout” (running a set amount
of time) or “Calories” (burning a set amount of calories).
4. Customized Running
4.1 Click “Create Exercise” to enter the customized running. There are 3 programs
for you to create your own run by manually adjusting each of the 10 sections.
4.2 Select any of the custom options and input your settings to save your created
course.
888

4.3 Enter the following page and click “Edit” on the right corner.
4.4 Edit each section to your preference then save the data and click Start to run
your track.
999
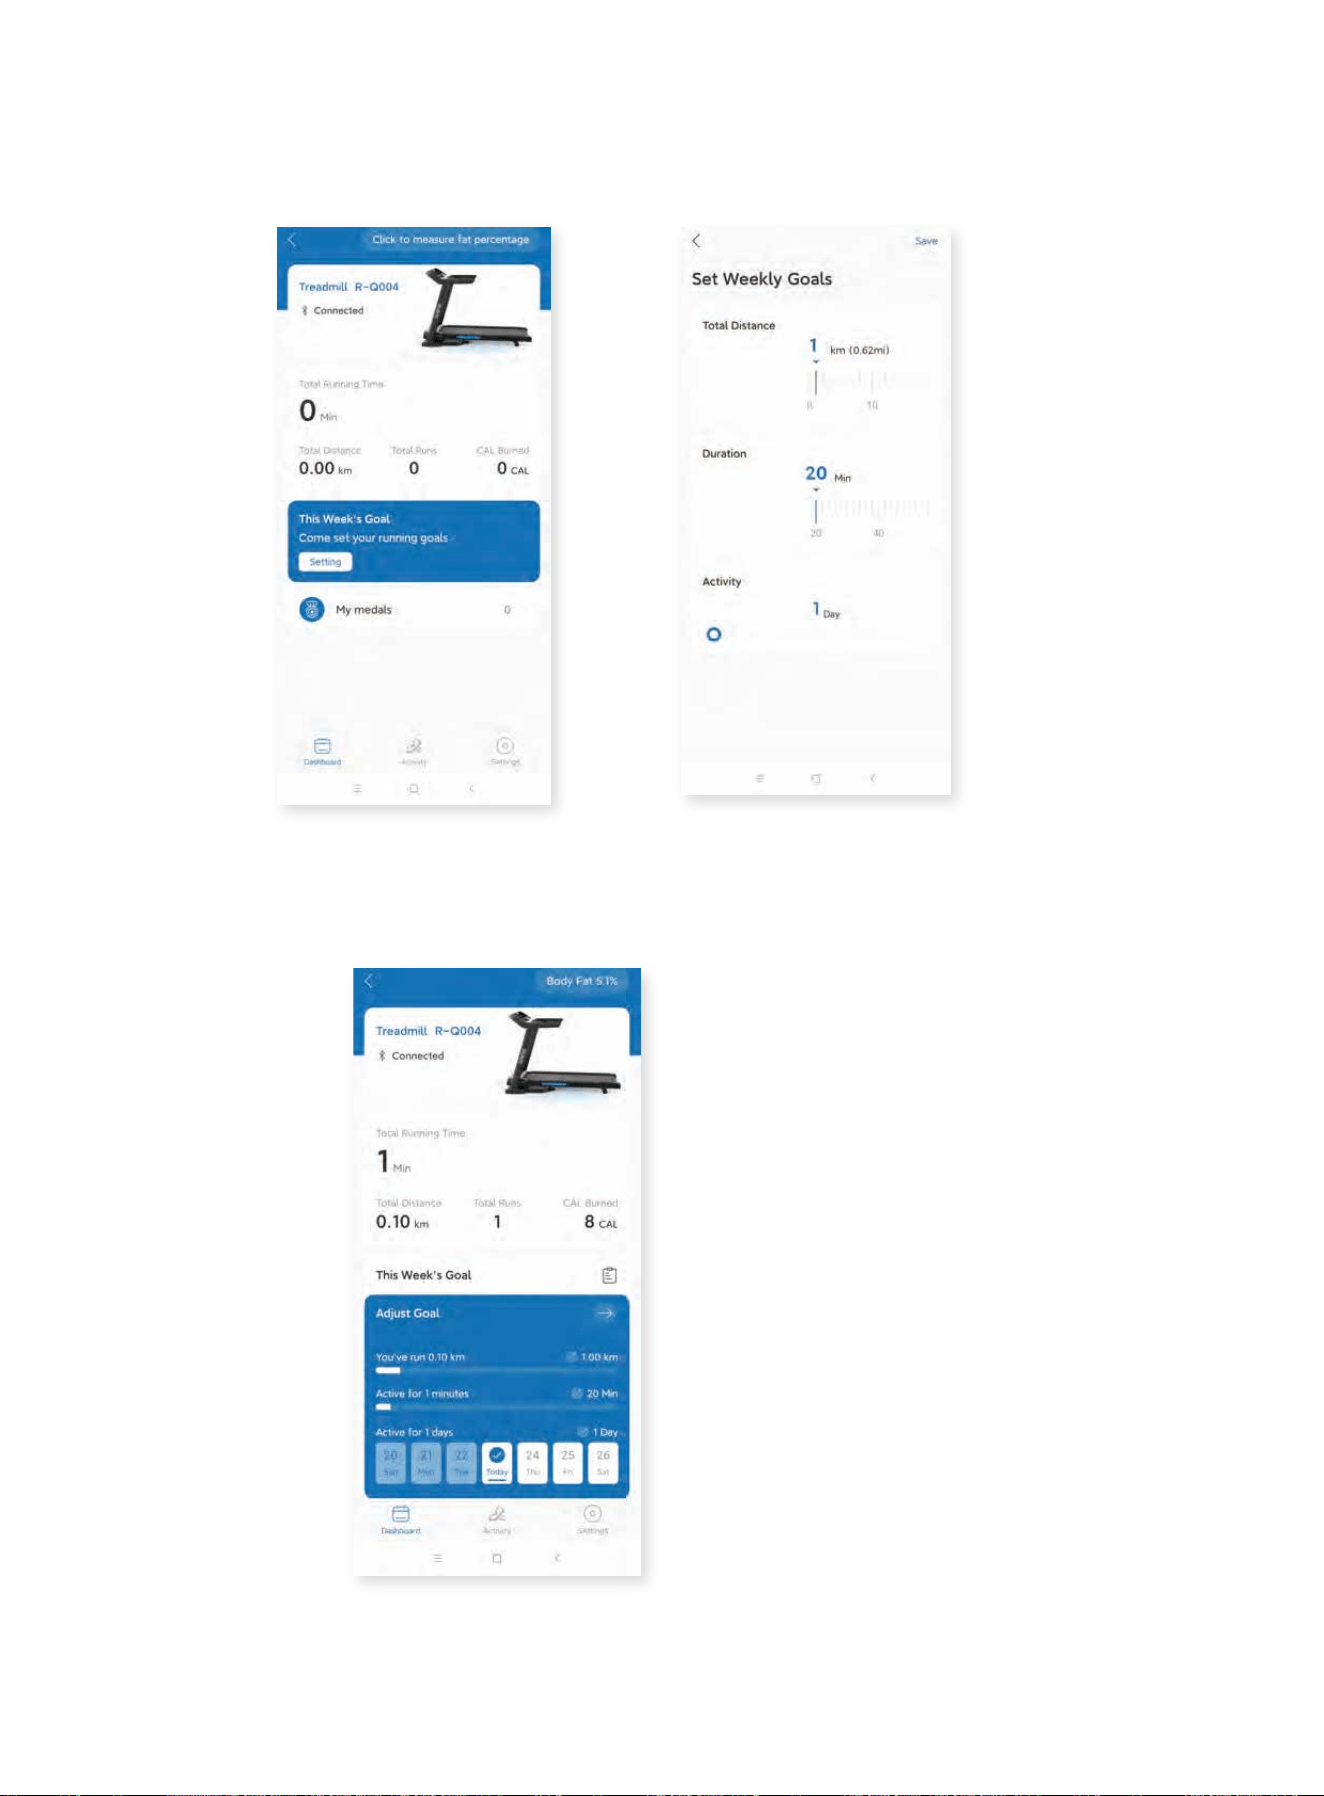
5. Set Weekly Running Goals
Click “setting” on the main page to set your weekly goals.
You can also go back to the main page and click “Adjust Goal” to customize the
existing plan to fit your desired workout progress.
101010
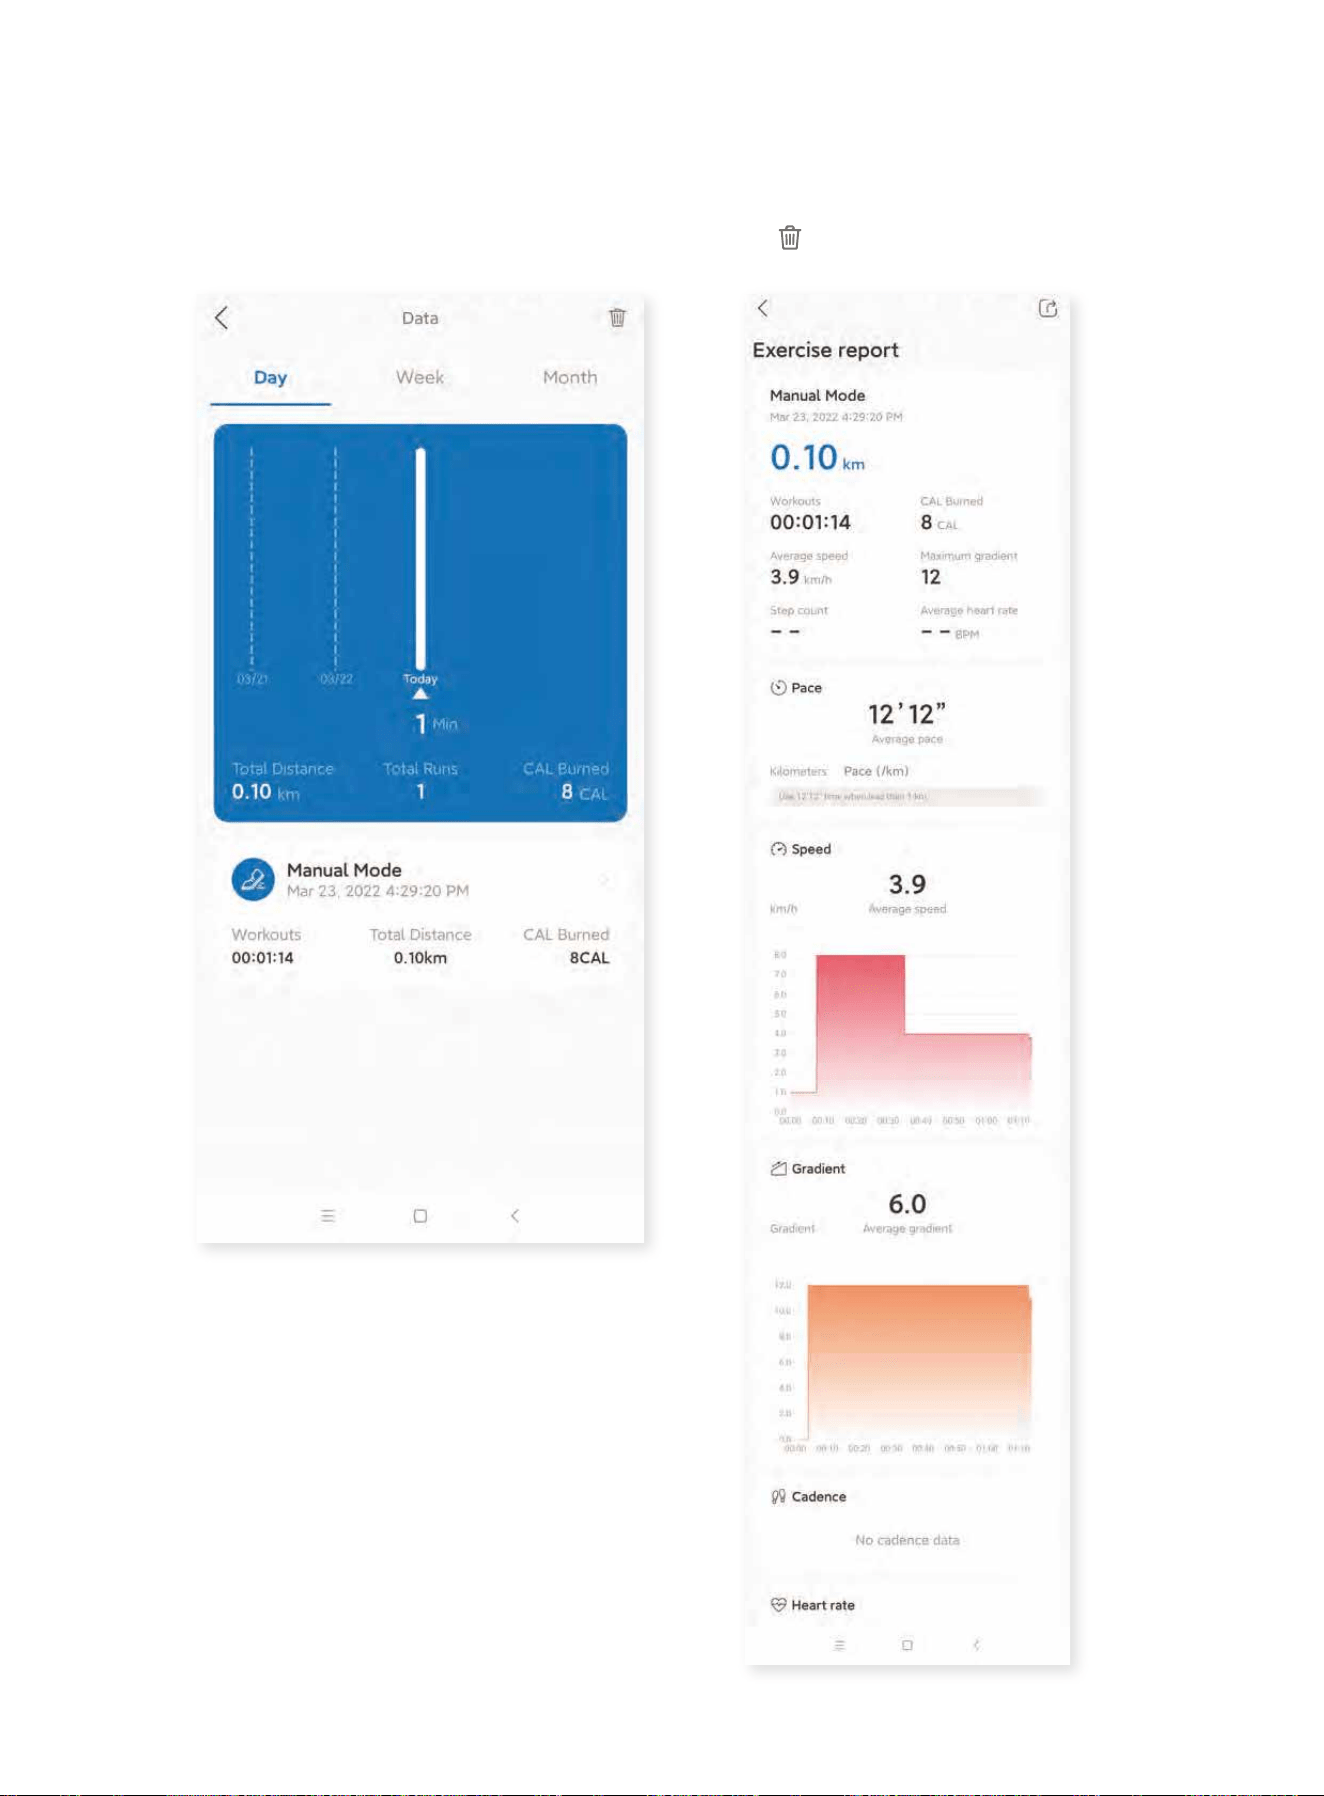
6. Check Running Progress
Click “Total Running Time” on the main page to check your historic running data in a
daily, weekly and monthly manner. Select specific data to check every detailed
exercise report. Go back to the main page and click to clear the data if desired.
111111

7. Fat Percentage Measurement
7.1 Click the icon on the right corner to enter the page.
7.2 Click “Start measuring” and confirm the personal information. Hold the hand
pulse sensors as pictured in the app for a few seconds and the result will be dis-
played on the page.
121212