OWNER’S MANUAL
MANUEL DU PROPRIÉTAIRE
*
*
*Trademark of Danby Products
* Marque de commerce de Danby Products
Danby Products Limited, Guelph, Ontario, Canada N1H 6Z9
Danby Products Inc. Findlay, Ohio, U.S.A. 45840
www.Danby.com
Printed in Turkey
Imprimé au Turquie
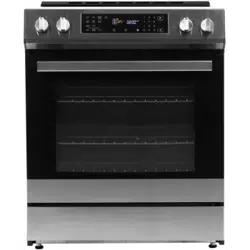
24” CONVECTION RANGE
Owner’s Manual..........................................1 - 22
CUISINIÈRE CONVECTION 24”
Manuel du propriétaire...............................23 - 44
MODEL • MODÈLE
DRCA240BSS2
2023.10.24

1
Welcome to the Danby family.
We are proud of our quality products and we believe in dependable service. We suggest
that you read this owner’s manual before plugging in your new appliance as it contains
important operation information, safety information, troubleshooting, and maintenance tips
to ensure the reliability and longevity of your appliance.
You are entitled to the warranty coverage as described in the owner’s manual provided with
your new appliance.
1. Please write down your appliance information below. You must keep the original proof
of purchase receipt to validate and receive warranty services.
2. Register your product online and receive a FREE 2 MONTH WARRANTY EXTENSION
after filling out a product survey, at www.danby.com/support/product-registration/
Need Help?
1. Read your Owner’s Manual for installation help, troubleshooting, and maintenance
assistance.
2. Visit www.Danby.com to access self-service tools, FAQs and much more by searching
your model number in the search bar.
3. For the quickest Customer Service, please fill out the web form at www.danby.com/
support. Your submission will go directly to an expert on your particular appliance.
Our average response times are between 20 minutes and 2 hours, during EST business
hours.
4. Call 1-800-263-2629 - please note that during peak hours, hold times can exceed one
hour.
Model Number: ____________________________________________________
Serial Number: ____________________________________________________
Date of Purchase: __________________________________________________
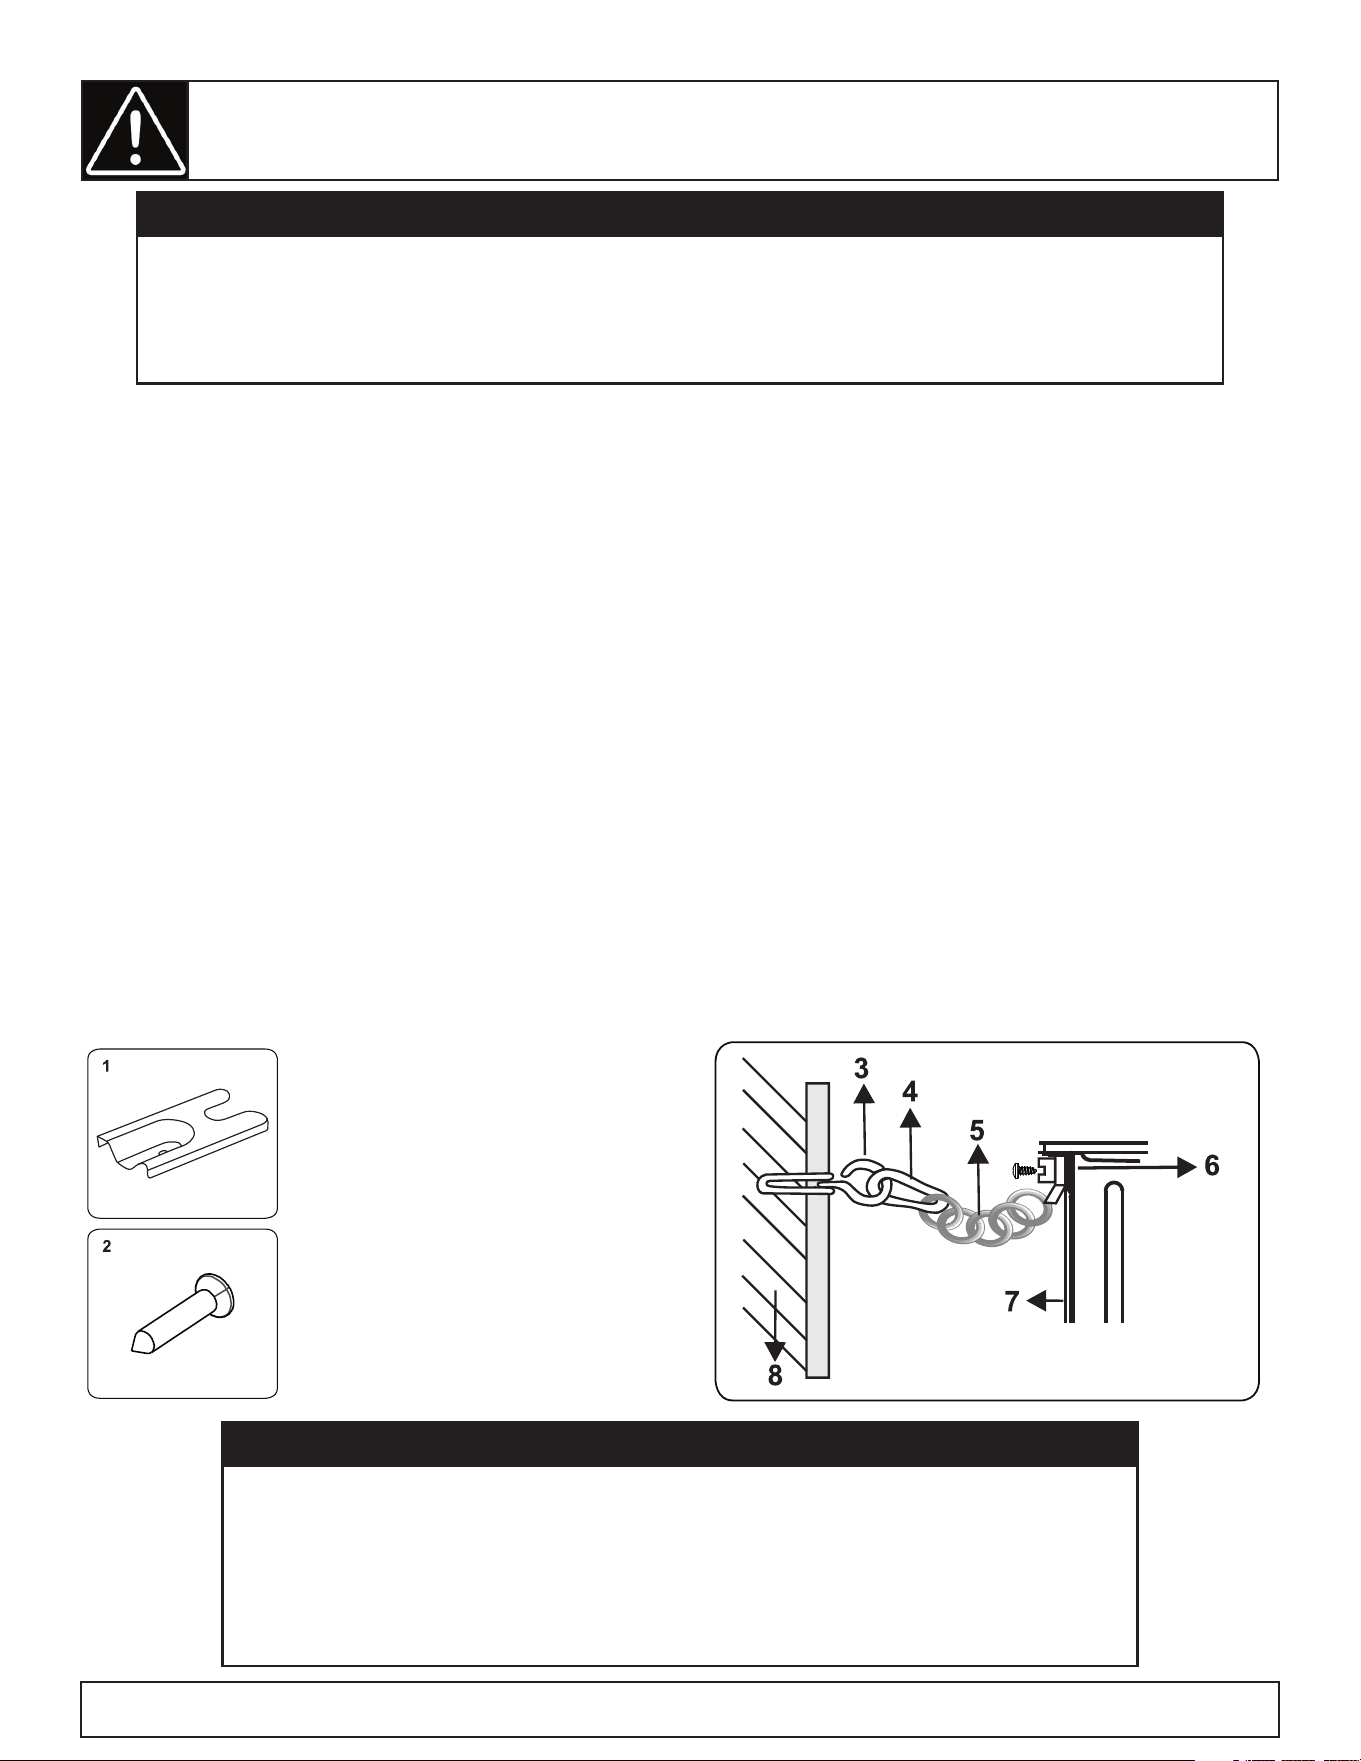
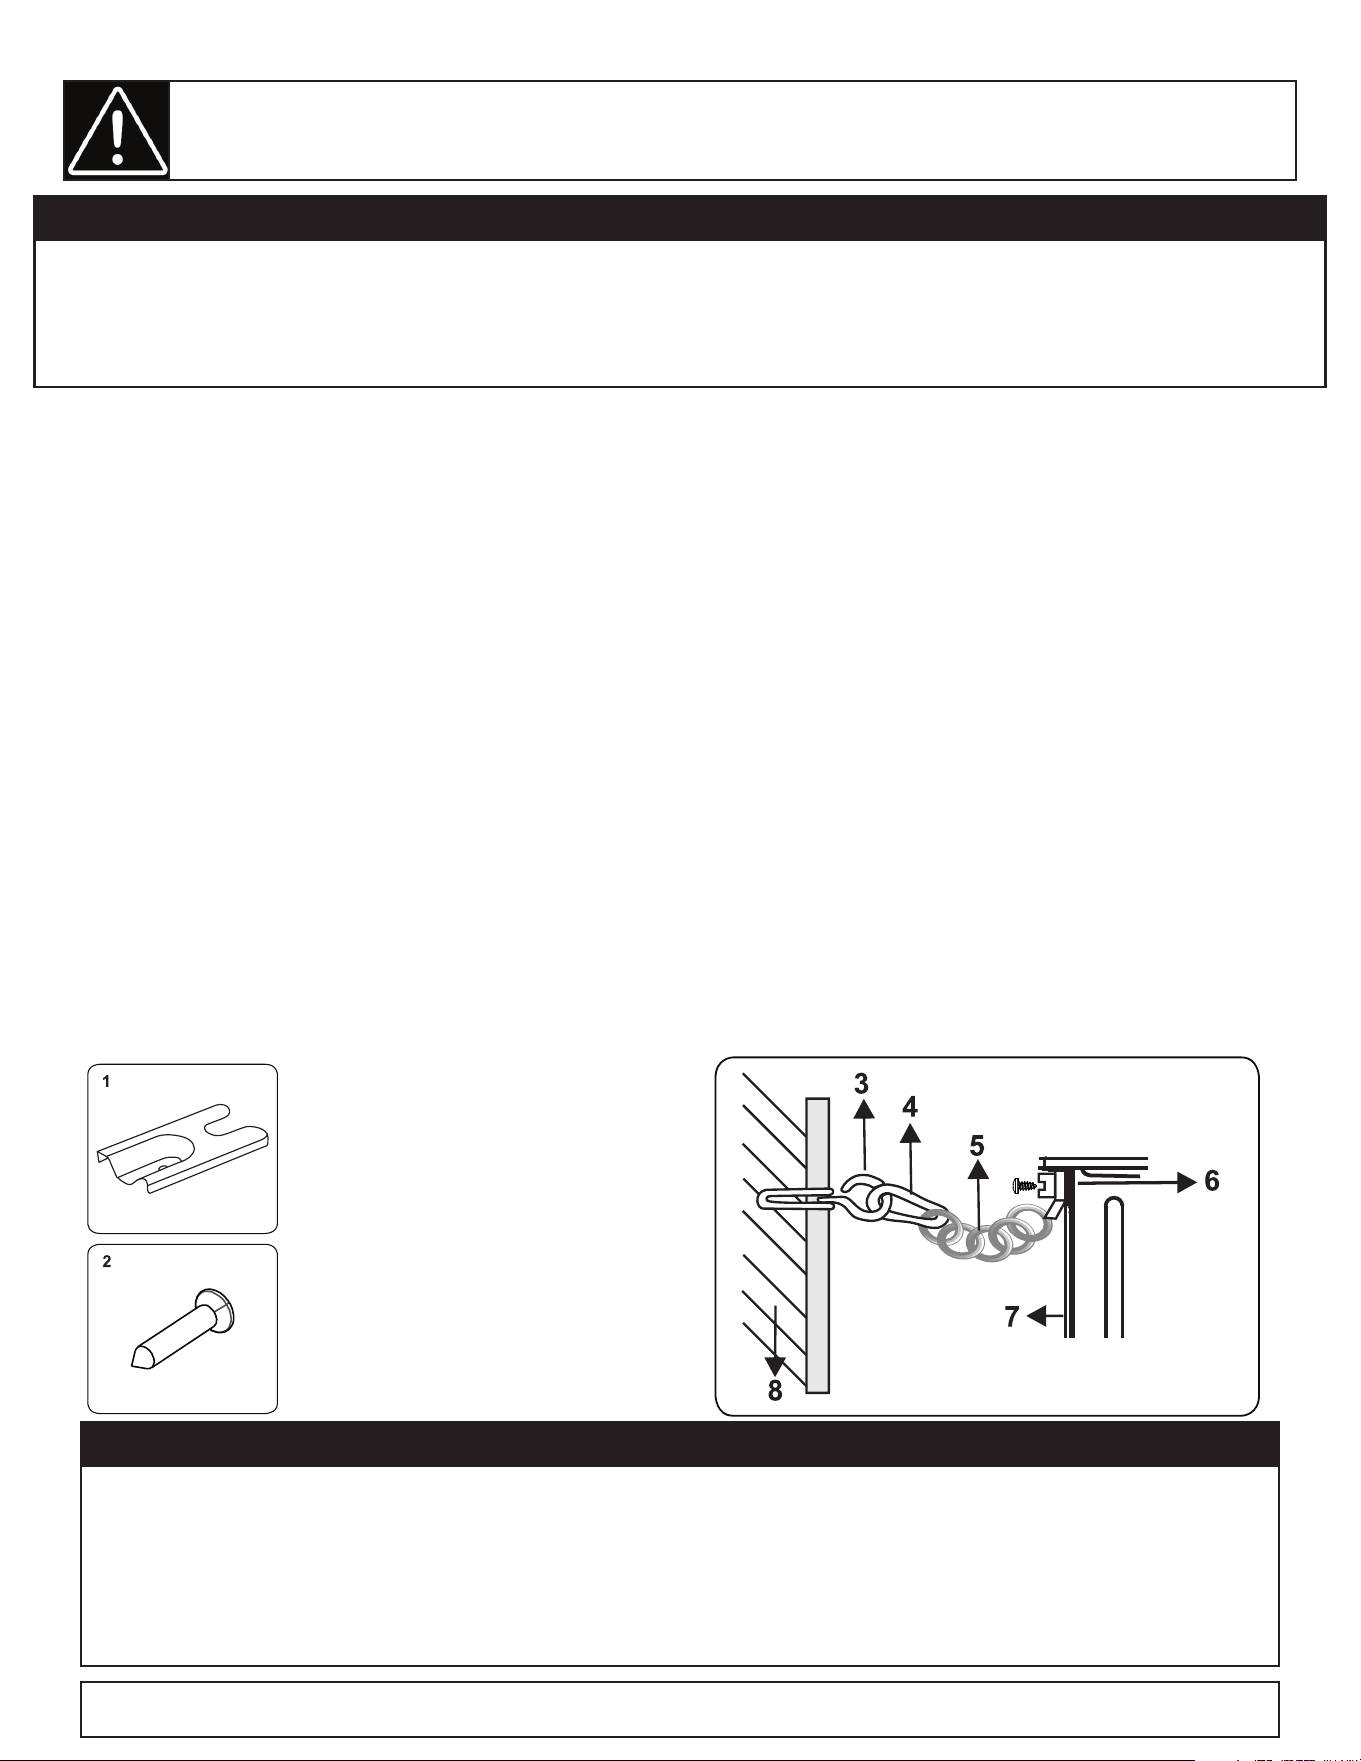
ANTI-TIP BRACKET
The anti-tip bracket can be installed on either the left or the right rear leg by following the instructions
below.
1. Place the anti-tip bracket on the floor where the range will be installed.
2. Mark the location of the hole in the anti-tip bracket.
3. Use a 5/16” drill bit to drill a hole in the floor and insert the provided plastic anchor.
4. Secure the bracket to the floor using the provided screw.
5. Use a wall plug to fasten the hook (1) to the kitchen wall and connect the safety chain (3) to the hook
with the help of the locking mechanism. The safety chain should be as short as practically possible to
avoid the cooker tilting forward.
6. Slide the range into position, ensuring that the anti-tip bracket is positioned over the rear foot of the
appliance as per the below images.
WARNING - TIP OVER HAZARD
• A child or adult can tip the appliance and be killed.
• Verify the anti-tip bracket has been properly installed to the floor.
• Ensure the anti-tip bracket is re-engaged when the range is moved.
• Do not operate the range without the anti-tip bracket in place and engaged.
• Failure to follow these instructions can result in death or serious burns to children or adults.
1. Anti-tip bracket
2. Screw
3. Hook
4. Locking mechanism
5. Safety chain
6. Tightly fix chain to back
of range
7. Back of range
8. Kitchen wall
ANTI-TIP DEVICE
To reduce the risk of the range tipping by abnormal usage or improper door loading, the range must
be secured by installing an anti-tip device. There are two difference anti-tip devices included with this
appliance.
Note: If the range is ever relocated the anti-tip bracket must be removed and installed at the new location.
WARNING
SUFFOCATION AND RISK OF CHILD ENTRAPMENT
To avoid the possibility of child entrapment please take the following
precautions before throwing out the appliance:
• Remove the oven door completely
• Never allow children to operate, play with or crawl inside the electric range
Important Safety Information
READ AND FOLLOW ALL SAFETY INSTRUCTIONS
SAVE THESE INSTRUCTIONS!
DANGER - GREASE FIRES
In the event of a fire, never pick up a flaming pot
or pan. Turn the burner off if it is safe to do so.
Extinguish the fire with a dry chemical or foam-
type extinguisher.
Do not use water on grease fires. Water will
spread the grease and will not extinguish the fire.
Smother the fire with a tight fitting pot lid, cookie
sheet or flat tray or use dry chemical or foam-type
extinguisher.
If there is a fire in the oven during baking,
smother the fire by closing the oven door and
turning the oven off or use dry chemical or foam-
type extinguisher.
DANGER - FIRE RISKNOTICE - BEFORE FIRST TIME USE
Before use of this range for the first time, the
heating elements have a protective coating, which
must be burned off before use. To do this:
• Open the oven door and set the temperature
control knob to 450°F.
• Turn the function selector to the bake
element and the broil element separately for
approximately 15 minutes.
• It is important to ensure adequate ventilation
during this period.
DO NOT TOUCH HEATING ELEMENTS OR
AREAS NEAR THEM
Heating elements on the surface or in the interior
of the appliance may be hot even though they are
dark in colour. Areas near the heating elements
may become hot enough to cause burns. During
and after use do not touch or let clothing or other
flammable materials contact the heating elements
or areas near them until they have had sufficient
time to cool. Surfaces of the appliance may
become hot enough to cause burns, among them
are the oven vent openings and surfaces near
these openings, oven doors and oven windows.
Important Safety Information
READ AND FOLLOW ALL SAFETY INSTRUCTIONS
SAVE THESE INSTRUCTIONS!
• It is recommended that this appliance be
connected to a separate circuit that is not
shared with any other appliance.
• Never clean appliance parts with flammable
fluids. These fumes can create a fire hazard
or explosion. Never use or store gasoline or
other flammable vapors or liquids inside or in
the proximity of this appliance, failing to do so
may result in a fire hazard or explosion.
• Before cleaning or servicing this appliance,
unplug the appliance completely from the
electrical outlet or disconnect the range power
supply at the household distribution panel by
removing the fuse or switching off the circuit
breaker. Failure to do so can result in electrical
shock or death.
• Do not attempt to repair or replace any part
of your appliance unless it is specifically
recommended in this manual. All other
servicing should be referred to a qualified
service technician.
• For your safety, this appliance should never be
used as a source of heat or as a space heater.
The stove top elements should not be operated
without proper cookware.
• All openings in the wall behind the appliance
and the floor under the appliance shall be
sealed.
• Keep the area around the appliance clear
and free from combustible materials, gasoline
and other flammable vapors. Always keep
combustible wall coverings, curtains or drapes
a safe distance from the range.
• Do not obstruct the flow of air around the
appliance.
• Always disconnect the electrical supply to the
appliance before servicing.
• Never use your appliance for warming or
heating the room.
• Storage in or on the appliance: flammable
materials should not be stored in an oven or
near surface burners.

4
GENERAL SAFETY REQUIREMENTS
Ensure the appliance is properly installed and grounded by a qualified technician.
Children should not be left alone or unattended in the area where the appliance is in use. Children should
never be allowed to sit or stand on any part of the appliance.
Do not store items of interest to children in cabinets above a range or on the back guard of a range.
Children climbing on the range to reach items could be seriously injured.
To eliminate the risk of burns or fire by reaching over heated surface units, cabinet storage space located
above the surface units should be avoided. If cabinet storage is to be provided, the risk can be reduced by
installing a range hood that projects horizontally a minimum of 5 inches (12.7 cm) beyond the bottom of
the cabinets.
Loose fitting or hanging garments should never be worn while using the appliance.
Use only dry pot holders. Moist or damp pot holders on hot surfaces may result in burns from steam. Do
not let the pot holder touch hot heating elements. Do not use a towel or other bulky cloth.
If power is lost to an electric cooktop while a surface element is ON, the surface element will turn back on
as soon as power is restored. In the event of power loss, failure to turn all surface element knobs to the OFF
position may result in ignition of items on or near the cooktop, leading to serious injury or death.
To avoid the possibility of a burn or an electric shock, always be certain that the controls for all surface
elements are at the OFF position, and that all coils are cool before attempting to lift or remove a coil
cooking element.
This range is designed and manufactured solely for the cooking of domestic (household) food and is not
suitable for any non domestic application and therefore should not be used in a commercial environment.
The range warranty will be void if the range is used within a non domestic environment.
WARNING
To reduce the risk of burns, do not move this
appliance while it is hot. To reduce the risk of
injury due to tipping of the appliance, verify
the re-installation of this appliance into the
anti-tipping device provided after returning the
appliance to the original installed position.
WARNING
The manufacturer declines all liability for injury to
persons or damage to property cause by incorrect
or improper use of the range.
Important Safety Information
READ AND FOLLOW ALL SAFETY INSTRUCTIONS
SAVE THESE INSTRUCTIONS!

SAVE THESE INSTRUCTIONS!
OVEN SAFETY REQUIREMENTS
Use care when opening the door. Allow hot air or
steam to escape before removing or replacing food.
Do not heat unopened food containers. Build up of
pressure may cause the container to burst and result
in injury.
Keep oven vents unobstructed.
Always place oven racks in the desired location
while the oven is cool. If the rack must be moved
while the oven is hot, do not let the pot holder
contact the hot heating element in the oven.
Do not use the oven if a heating element develops
a glowing spot during use or shows other signs
of damage. A glowing spot indicates the heating
element may fail and present a potential burn, fire,
or shock hazard. Turn the oven off immediately and
have the heating element replaced by a qualified
service technician.
Do not line the oven walls, racks or burner bowls
with aluminum foil.
Do not place shelves, pans, baking trays, broil trays
or other cooking utensils in the bottom of the oven
chamber. Always place on an oven shelf.
Never clean the oven with any high pressure steam
cleaning devices.
Do not leave anything on the top of the oven vent.
Never cover the oven vent opening with aluminum
foil or any other material.
COOK TOP SAFETY REQUIREMENTS
Use the proper pan size. This appliance is equipped
with four burners of different sizes. Select utensils
that have flat bottoms large enough to cover
the surface of the heating element. The use of
undersized utensils will expose a portion of the
heating element to direct contact and may result in
ignition of clothing. Proper relationship of utensil to
burner will also improve efficiency.
Never leave the appliance unattended while in use.
Boil over causes smoking and greasy spills can
ignite.
Never leave oil unattended while frying. If allowed
to heat beyond its smoking point, oil may ignite
resulting in fire that may spread to surrounding
cabinets. Use a deep fat thermometer whenever
possible to monitor oil temperature.
To avoid oil spillover and fire, use a minimum
amount of oil when shallow pan-frying and avoid
cooking frozen foods with excessive amounts of ice.
Only certain types of glass, ceramic, earthenware
or other glazed utensils are suitable for range top
service without breaking due to sudden change in
temperature.
To reduce risk of burns, ignition of flammable
materials and spillage due to unintentional contact,
the handle of a utensil should be positioned so
that it is turned inward and does not extend over
adjacent burners.
Do not cook on broken cooktop. If the cooktop
should break, cleaning solutions and spill overs
may penetrate the broken cooktop and create a
risk of electric shock. Contact a qualified technician
immediately.
Do not use a griddle or long pan on more than one
burner at once.
Important Safety Information
READ AND FOLLOW ALL SAFETY INSTRUCTIONS
5

Important Safety Information
READ AND FOLLOW ALL SAFETY INSTRUCTIONS
SAVE THESE INSTRUCTIONS!
6
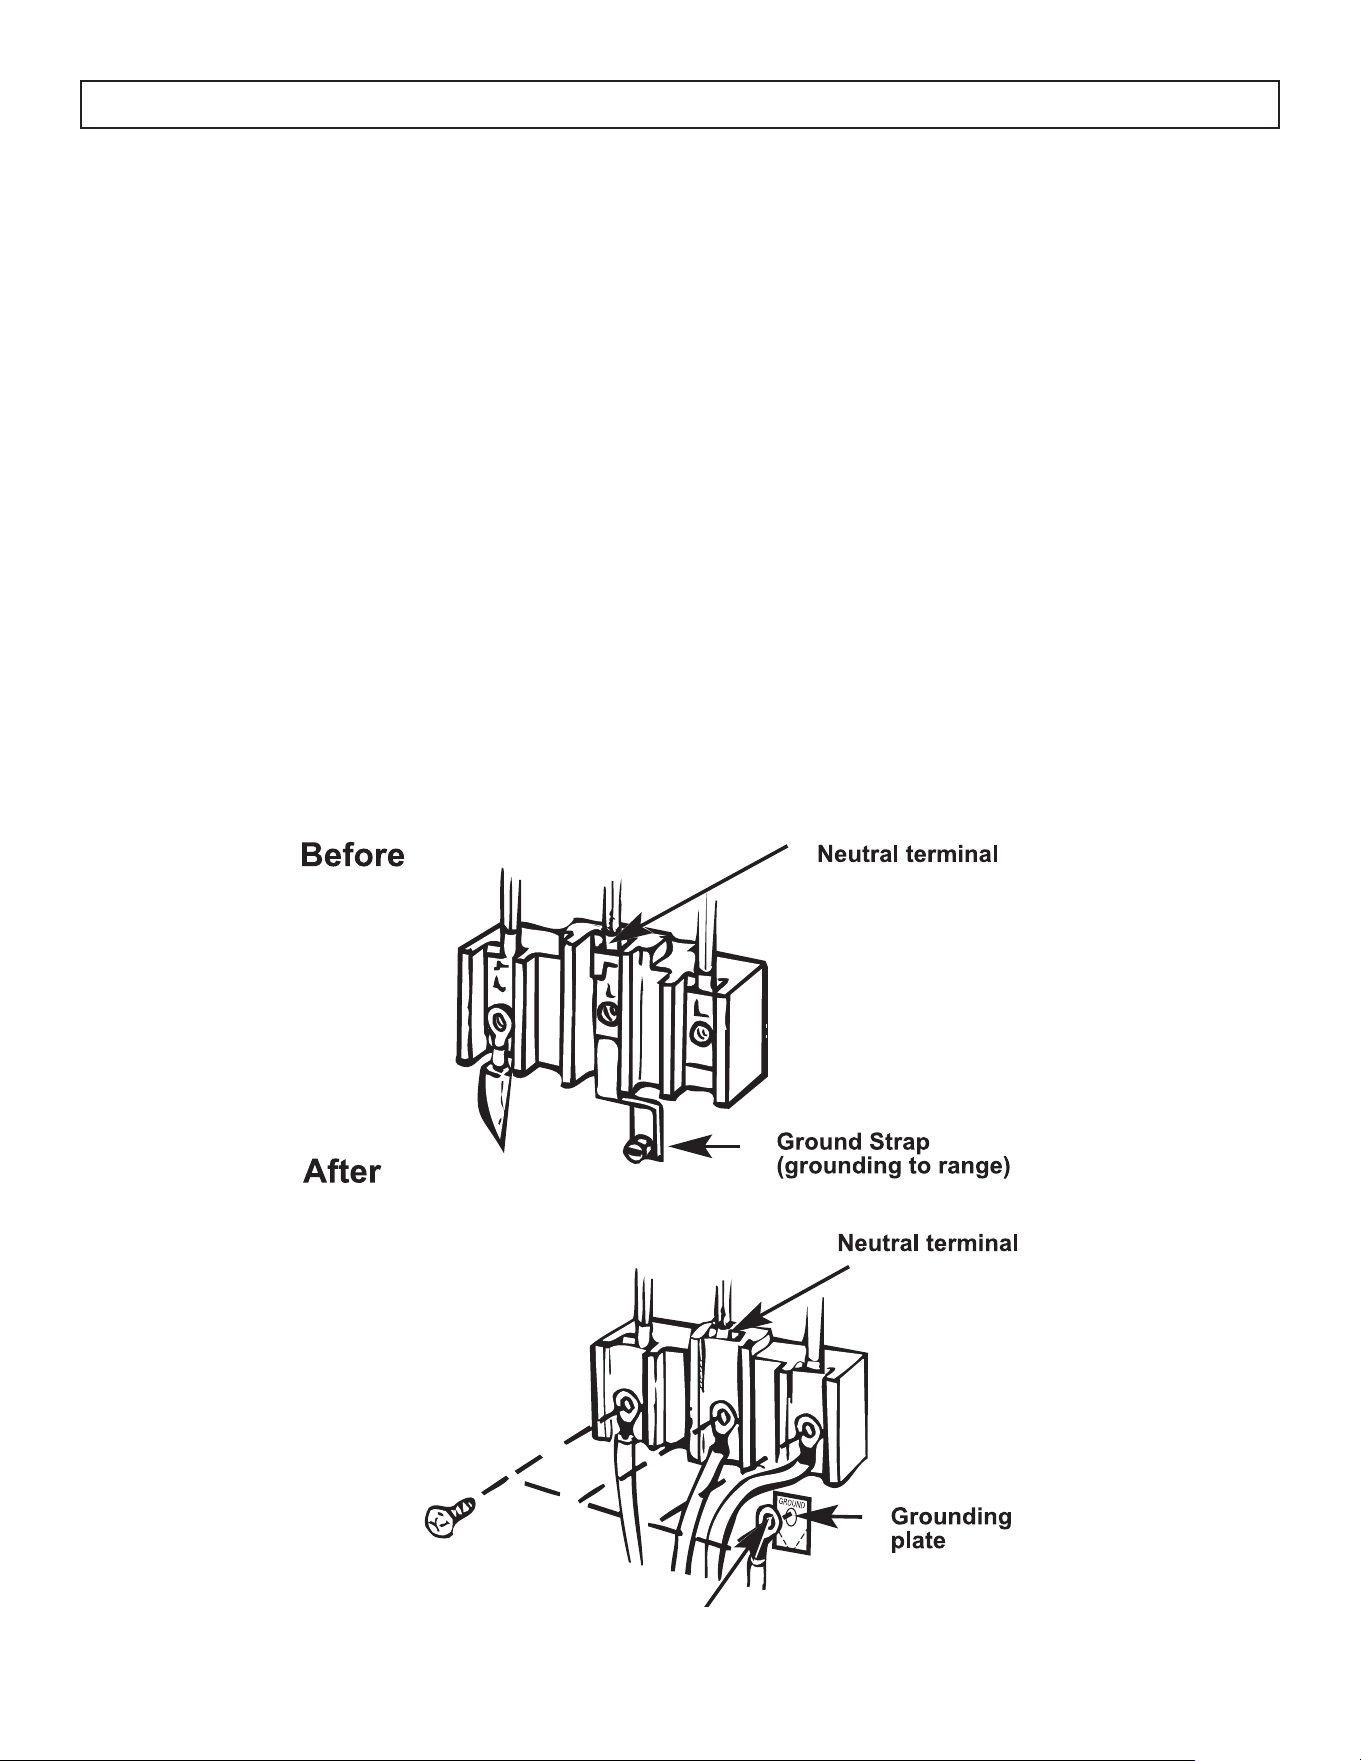
GROUNDING INSTRUCTIONS
For models sold in Canada only: DRCA240BSS2
This appliance must be grounded. Grounding reduces the risk of electrical shock by providing an escape
wire for the electrical current.
This appliance has a power cord that has a grounding wire with a 4-prong plug. The power cord must be
plugged into an outlet that is properly grounded. If the outlet is is not a 4-prong plug, it must be replaced
with a properly grounded 4-prong wall outlet. The rating plate indicates the voltage and frequency the
appliance is designed for.
WARNING - Improper use of the grounding plug can result in a risk of electric shock. Consult a qualified
electrician if the grounding instructions are not completely understood, or if doubt exists as to whether the
appliance is properly grounded.
Do not connect the appliance to extension cords, adapters or together with another appliance in the
same wall outlet.
Do not splice the power cord. Do not under any circumstances cut or remove the ground prong from the
power cord.
If the power supply cord is damaged, it must be replaced by the manufacturer, its service agent or similar
qualified person in order to avoid hazard.
Note: Turning the appliance off does not disconnect the appliance from the power supply.
It is recommended that the power cord and the plug be placed parallel with the floor so that the cord runs
parallel with the floor.
7
INSTALLATION INSTRUCTIONS
4-WIRE POWER CORD INSTALLATION
WARNING
The neutral wire of the supply circuit is connected to the neutral terminal located in the center of the
connector block. The power leads must be connected to the outside (brass coloured) terminals. The 4th
grounding lead must be connected to the frame of the range with the grounding plate and grounding
screw.
1. Remove the 3 screws from the connector block.
2. Remove the grounding screw and strap from the connector block middle location and the screw
connection to the frame of the range.
3. Insert screws through each power cord terminal ring and into the connector block until the screw
engages the nut. Be certain that the center wire is connected to the center screw of the connector block.
Tighten the screws securely.
4. Attach the ground wire to the frame of the range..
5. Replace the terminal block access plate.
8
OPERATING INSTRUCTIONS
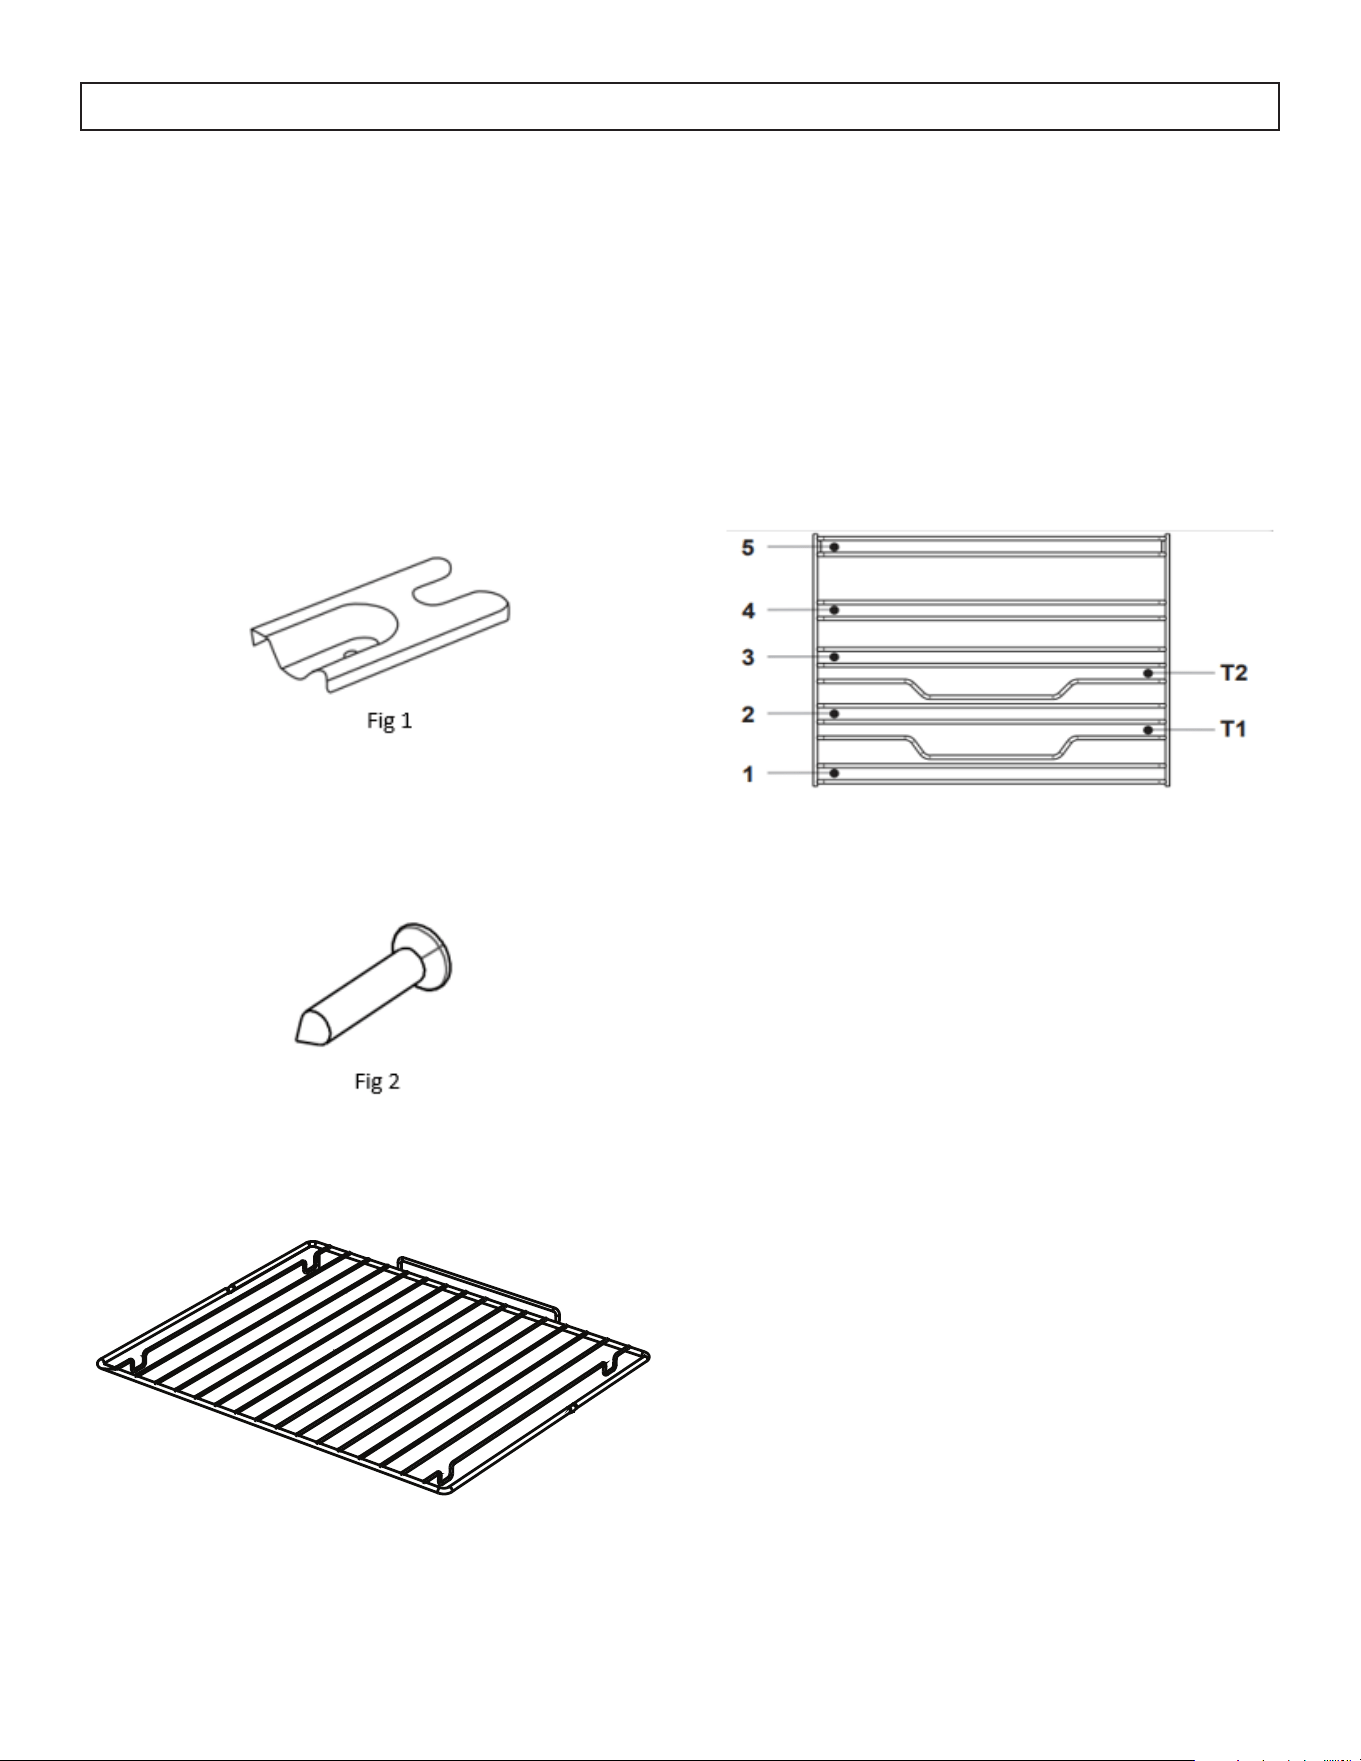
ACCESSORIES
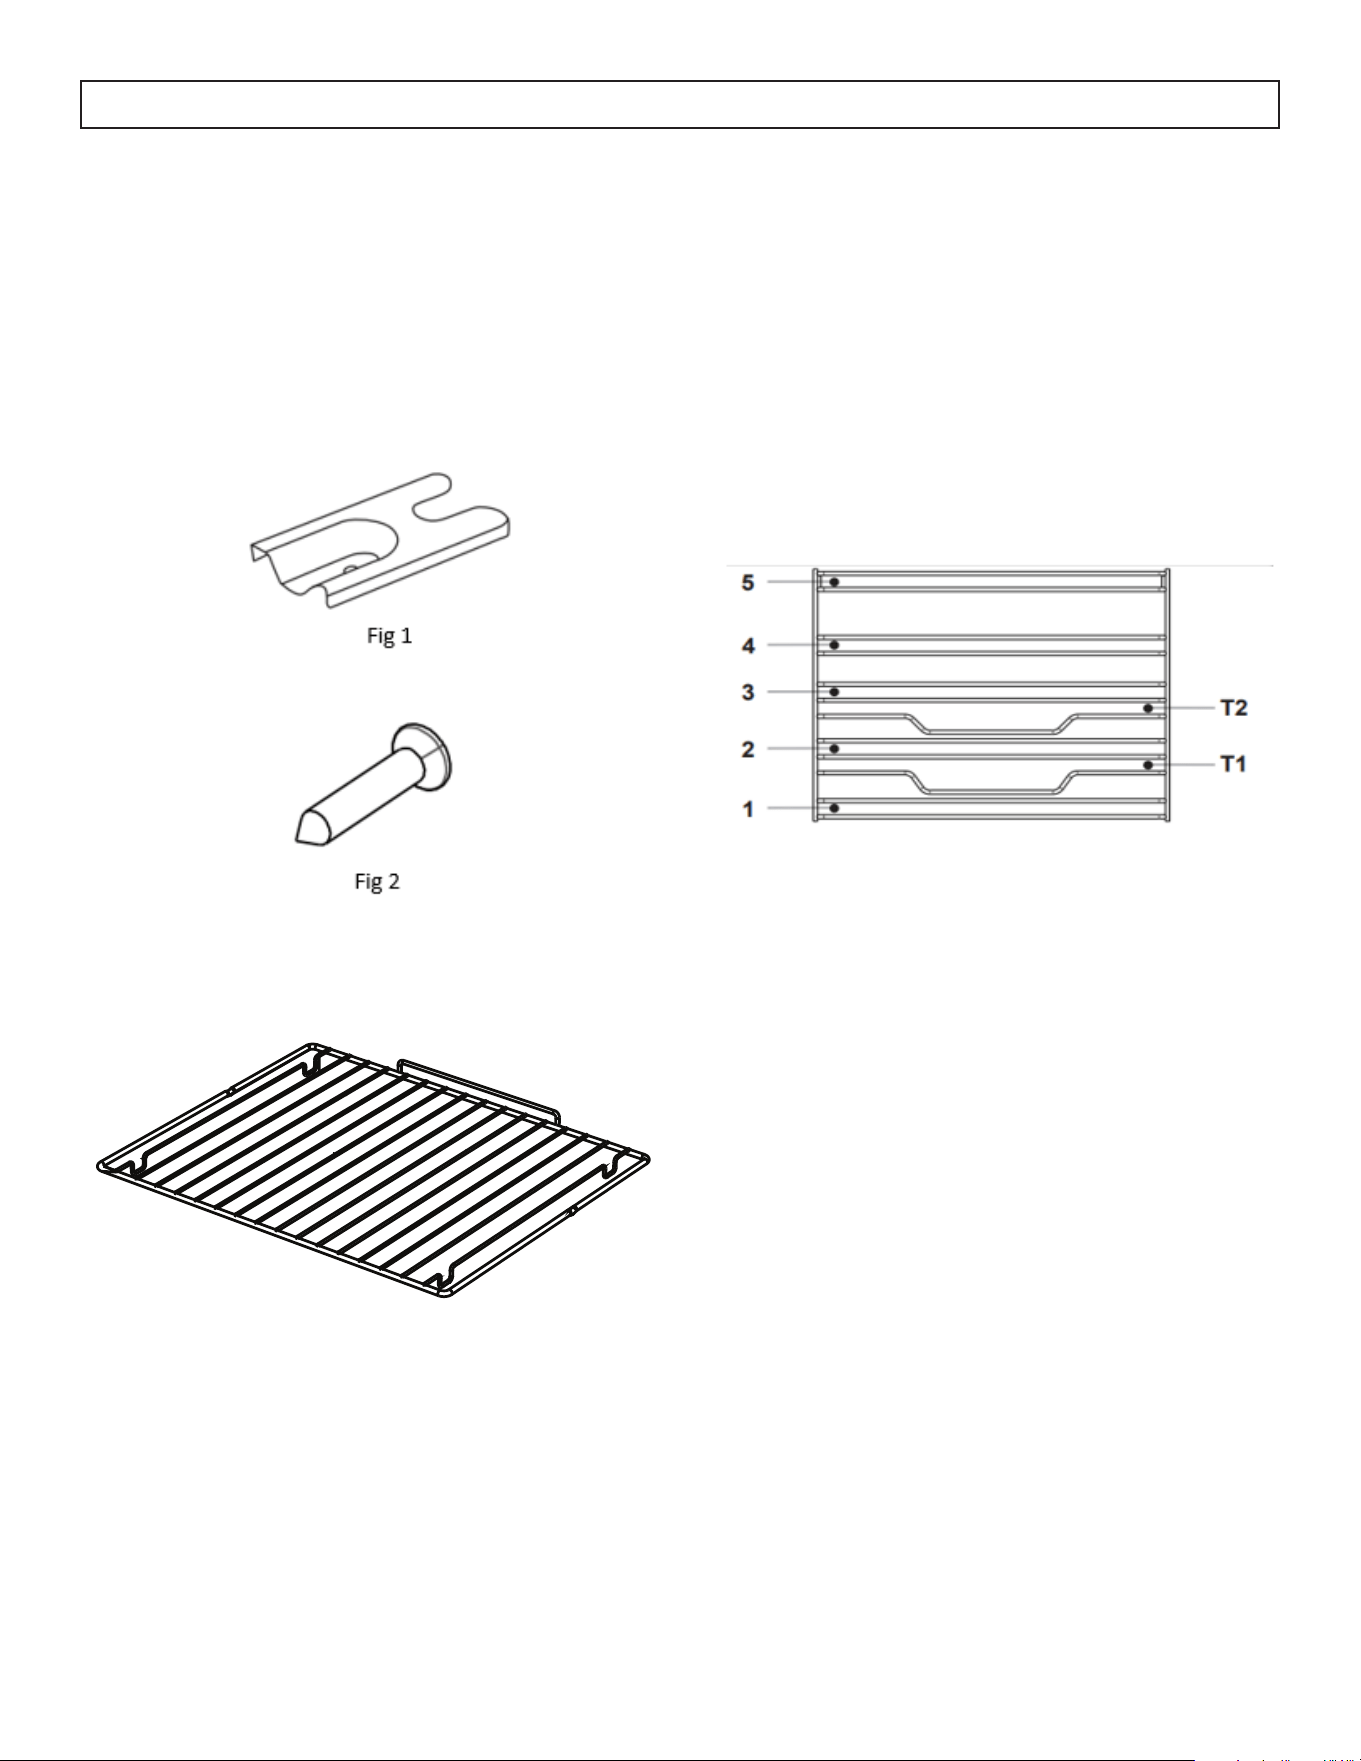
1. Anti-tip bracket (2 sets)
2. Screws (2 sets)
3. Chain (1 set in addition to 1 set pre-installed on
the unit)
4. Oven racks (x2)
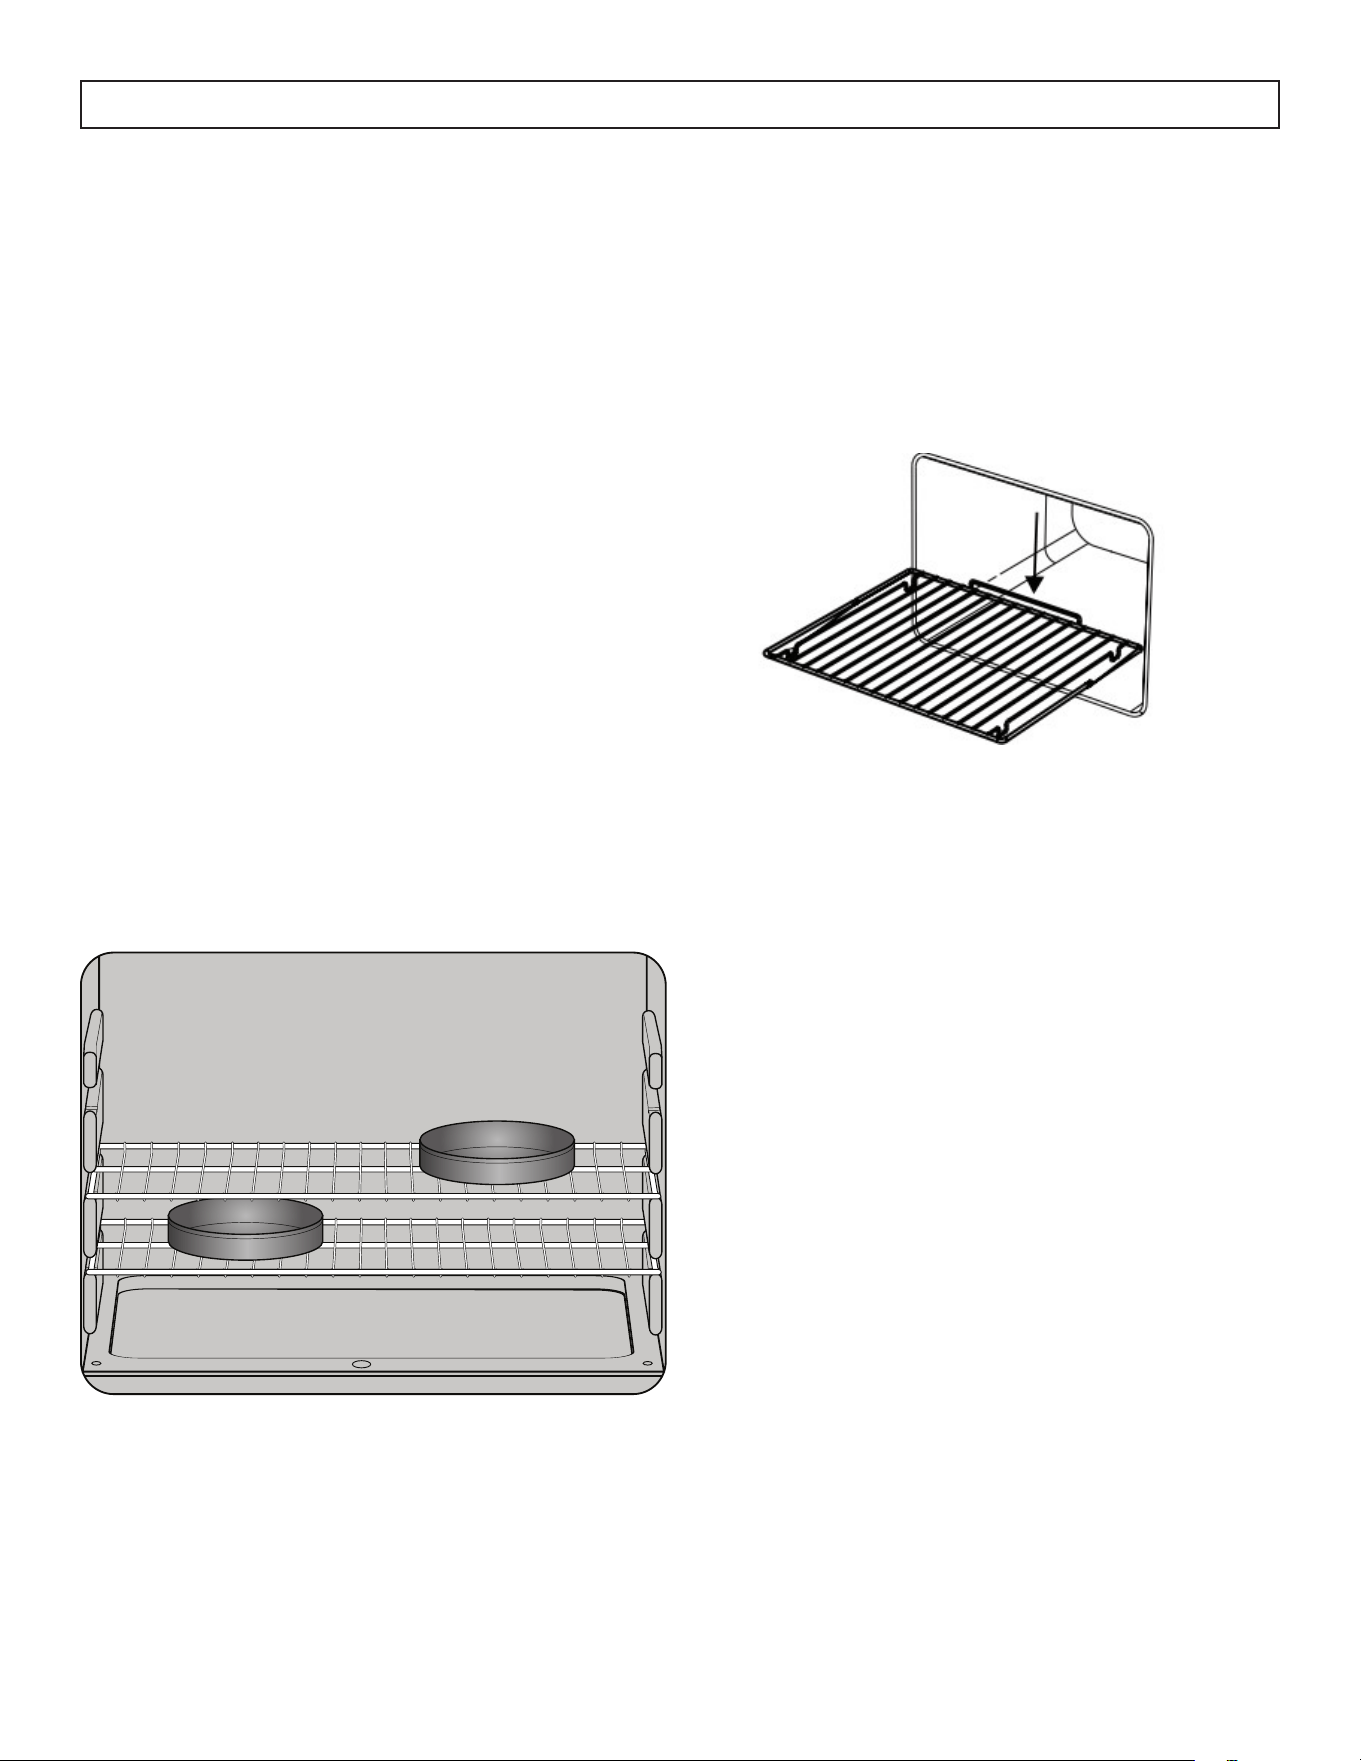
EASYFIX WIRE RACK
The wire rack has 5 positions. Insert the rack with
the back at the rear of the space.
Allow at least 1 cm space between the fan cover
and the rack.
Rack Rear
Rack Front
Fig 3
9
OPERATING INSTRUCTIONS
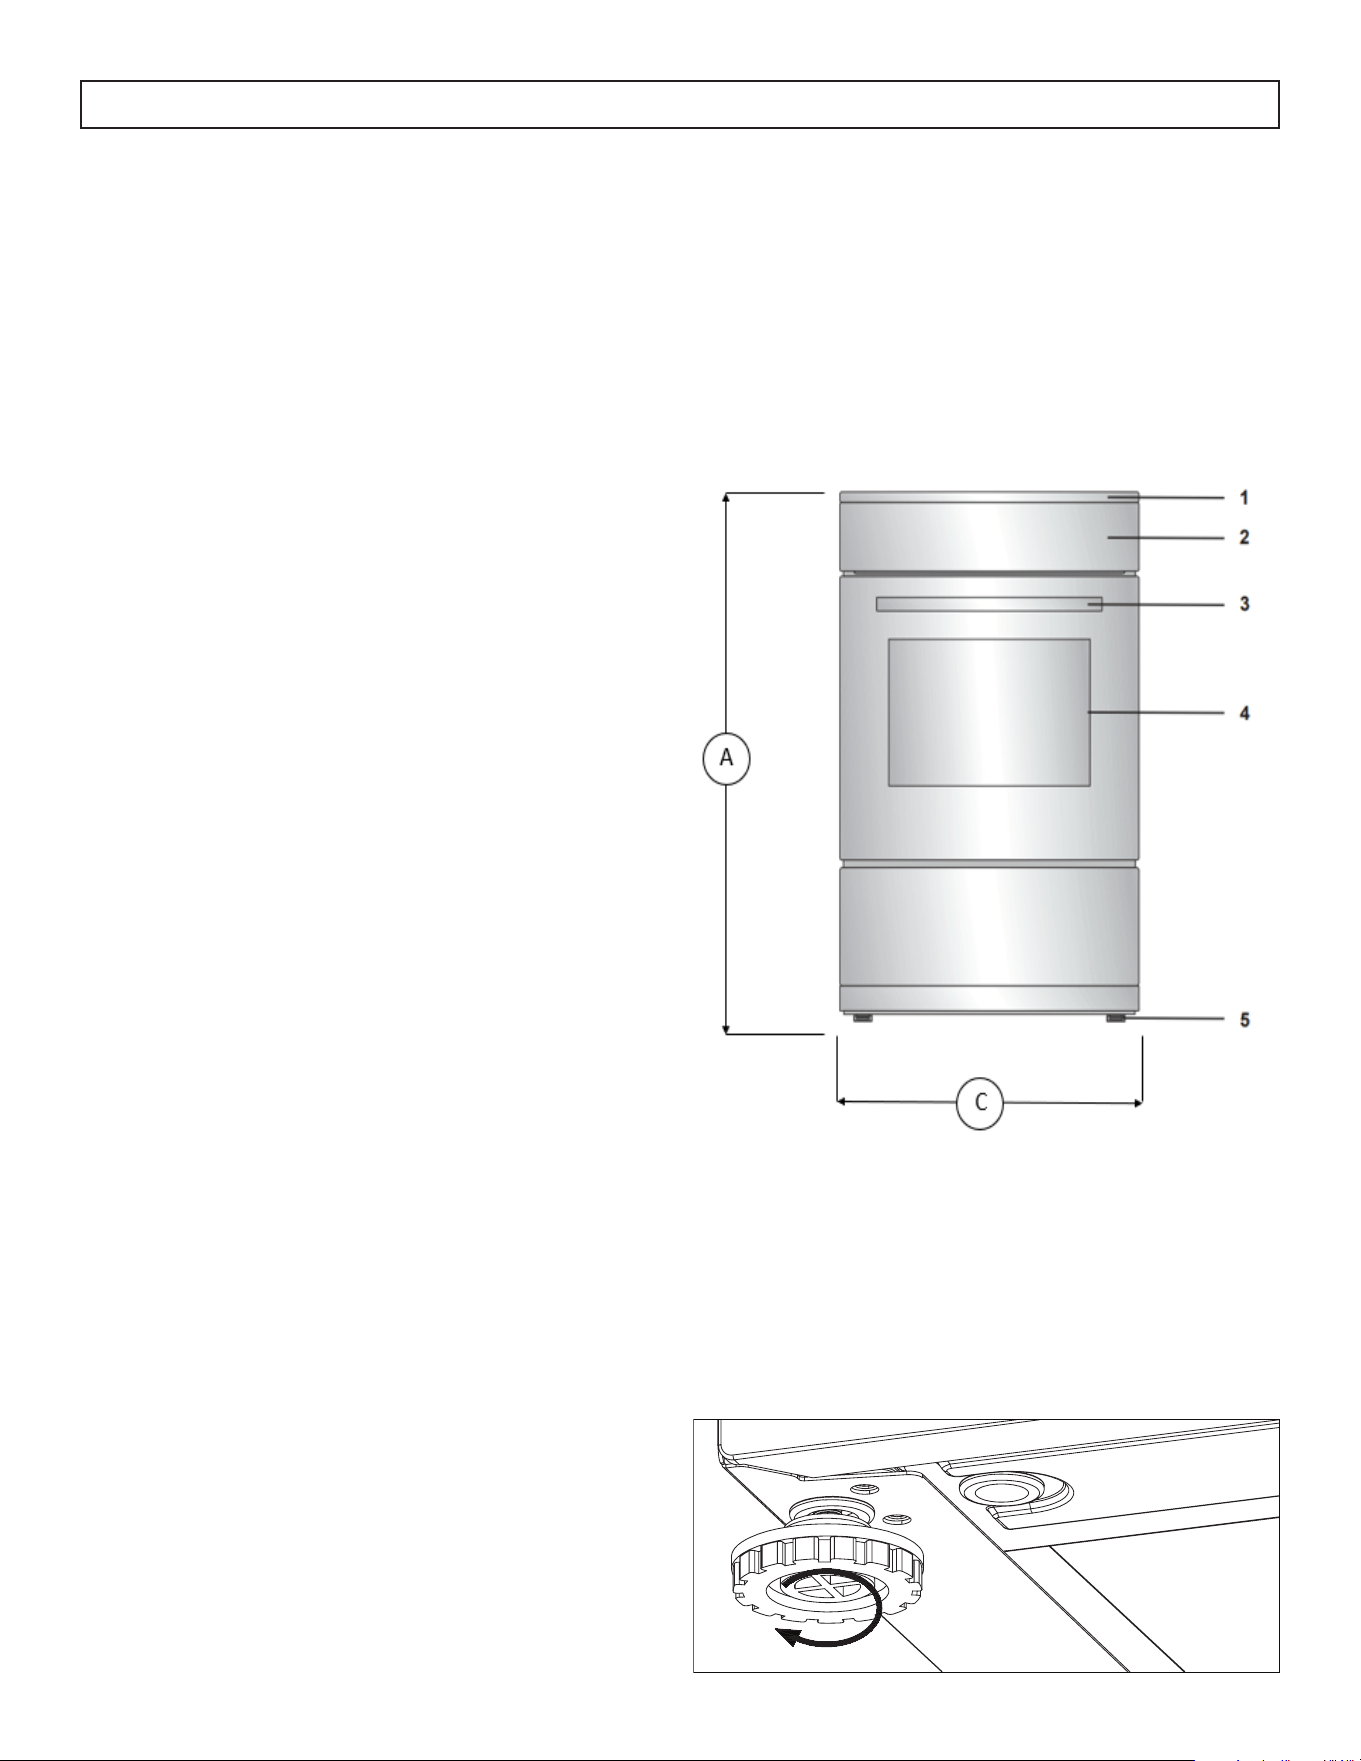
DIMENSIONS
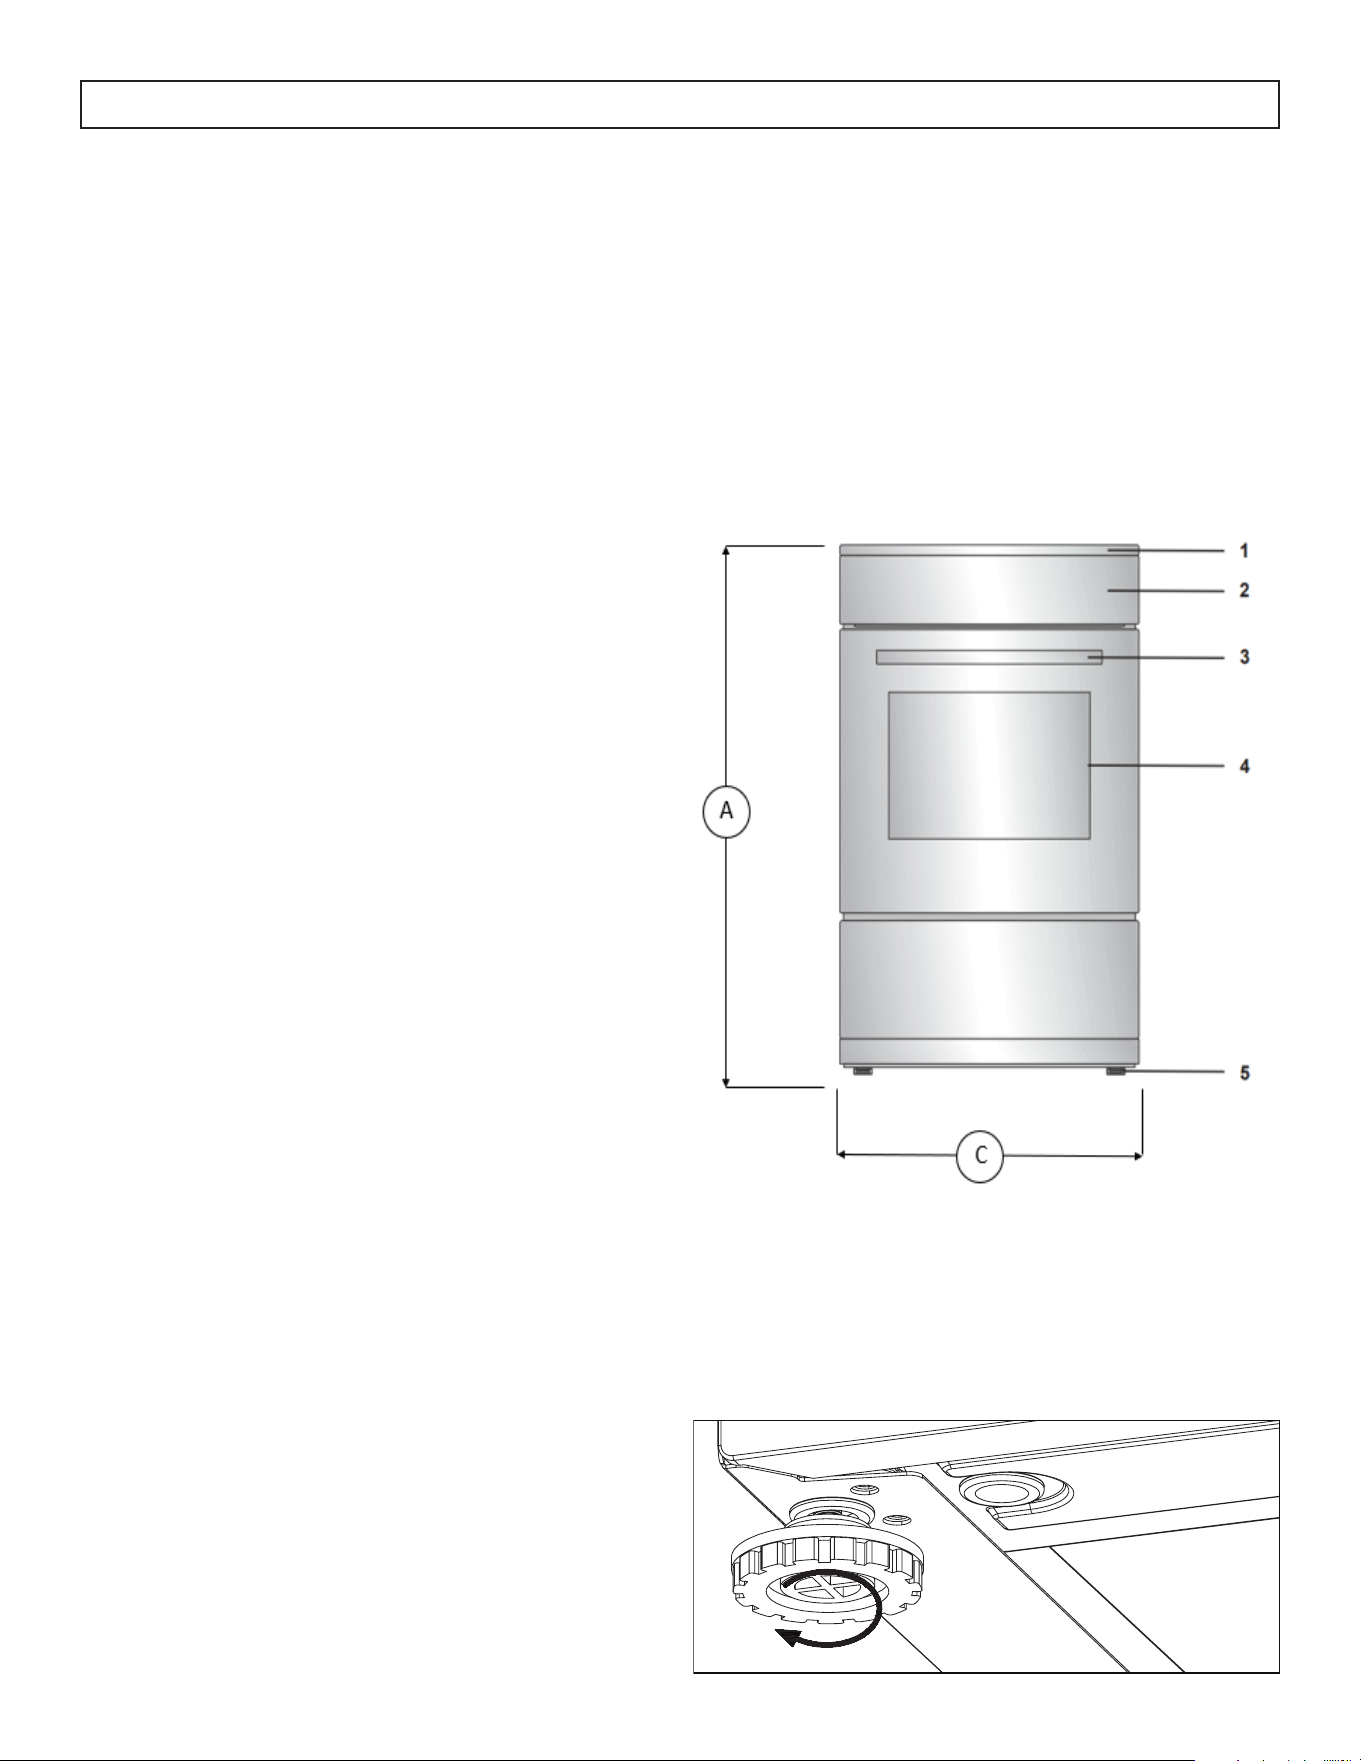
This dimensions of this appliance are:
A. 35.4 ~ 36.6 inches (90 ~ 93 cm) from the floor to the top of the cooktop.
B. 25.25 inches (64.2 cm) deep
C. 23.5 inches (59.5 cm) wide
LEVELING INSTRUCTIONS
The appliance must be level to operate safely and
properly. There are four leveling legs located at
the corners of the bottom of the appliance. Adjust
the leveling legs until the appliance is level. Use a
carpenter’s level to confirm.
It is the installer’s responsibility to comply with
installation clearances specified in the manual.
The minimum cabinet opening dimensions and
clearances must be used. The minimum spacings
must be maintained between the appliance cooking
surface and the horizontal surface above the
cooktop.
30 inches (65 cm) is the minimum clearance
between the top of the cooking surface and the
bottom of an unprotected wood or metal cabinet.
4 inches (10 cm) of space must be provided on both
sides of the range to provide proper air circulation.
LIST OF COMPONENTS
1. Cooktop
2. Control Panel
3. Oven Door Handle
4. Oven Door
5. Leveling Legs

WARNING
Make sure the handles of cookware do not stick
out over the edge of the range to avoid being
knocked over by accident. This also makes it more
difficult for children to reach hot cookware and
possibly injure themselves.
10
OPERATING INSTRUCTIONS
BEFORE BEGINNING
Carefully unpack the appliance and ensure there
is no damage to the oven, cooktop or structure
and that the oven door opens and closes properly.
Remove all packing materials such as plastic bags,
polystyrene foam, packing straps, etc. Keep packing
materials out of reach of children at all times to
prevent possible serious injury. The range has been
thoroughly tested for safe and efficient operation.
However, as with any appliance, there are specific
installation and safety precautions that must be
followed to ensure safe and satisfactory operation.
SURFACE COOKING CONTROLS
• The surface heating elements of the appliance
are designed for a variety of heat settings. MAX
indicates the highest setting. MIN indicates the
lowest setting.
• Changing to a higher heat setting will happen
faster than changing to a lower heat setting as it
will take time for the heat to dissipate.
• To use the surface burner, push the control knob
in and turn to the desired setting. The knob
only needs to be pushed in when moving out
of the “OFF” position. When the knob is in any
position other than “OFF”, it can be turned
without pushing in.
• Use medium or heavyweight cookware.
Aluminum cookware conducts heat faster than
other metals. Cast-iron and coated cast-iron
cookware is slow to absorb heat, but generally
cooks evenly at low or medium heat settings.
Steel pans may cook unevenly if not combined
with other metals.
• Do not overfill cookware with fat that may
spill over when adding food. Frosty foods
bubble vigorously. Watch foods frying at high
temperatures. Keep range and hood clean from
accumulated grease.
• To conserve the most cooking energy, pans
should be flat on the bottom, have straight
sides and tight- fitting lids. Match the size of the
saucepan to the size of the surface element. A
pan that extends more than an inch beyond the
edge of the drip pan traps heat, which causes
“crazing” (fine hairline cracks) on porcelain,
and discoloration ranging from blue to dark
gray on chrome drip pans.
• Only certain types of glass, ceramic,
earthenware or other glazed utensils are
suitable for use on the cooktop. Use low or
medium heat when using this type of cookware.
• Wipe spills with a damp cloth as soon as they
cool down. Be sure the control knob is set to
OFF.
• Never leave an empty pot or one that has boiled
dry on a hot surface element. The pot could
overheat and damage the pot or the surface of
the appliance. Always be sure that all control
knobs are turned to OFF and that the indicator
lights are off when the appliance is not in use.
• Ensure that the element is turned off when
cooking is finished. An indicator light will glow
when any heating element is turned on.
11
OPERATING INSTRUCTIONS
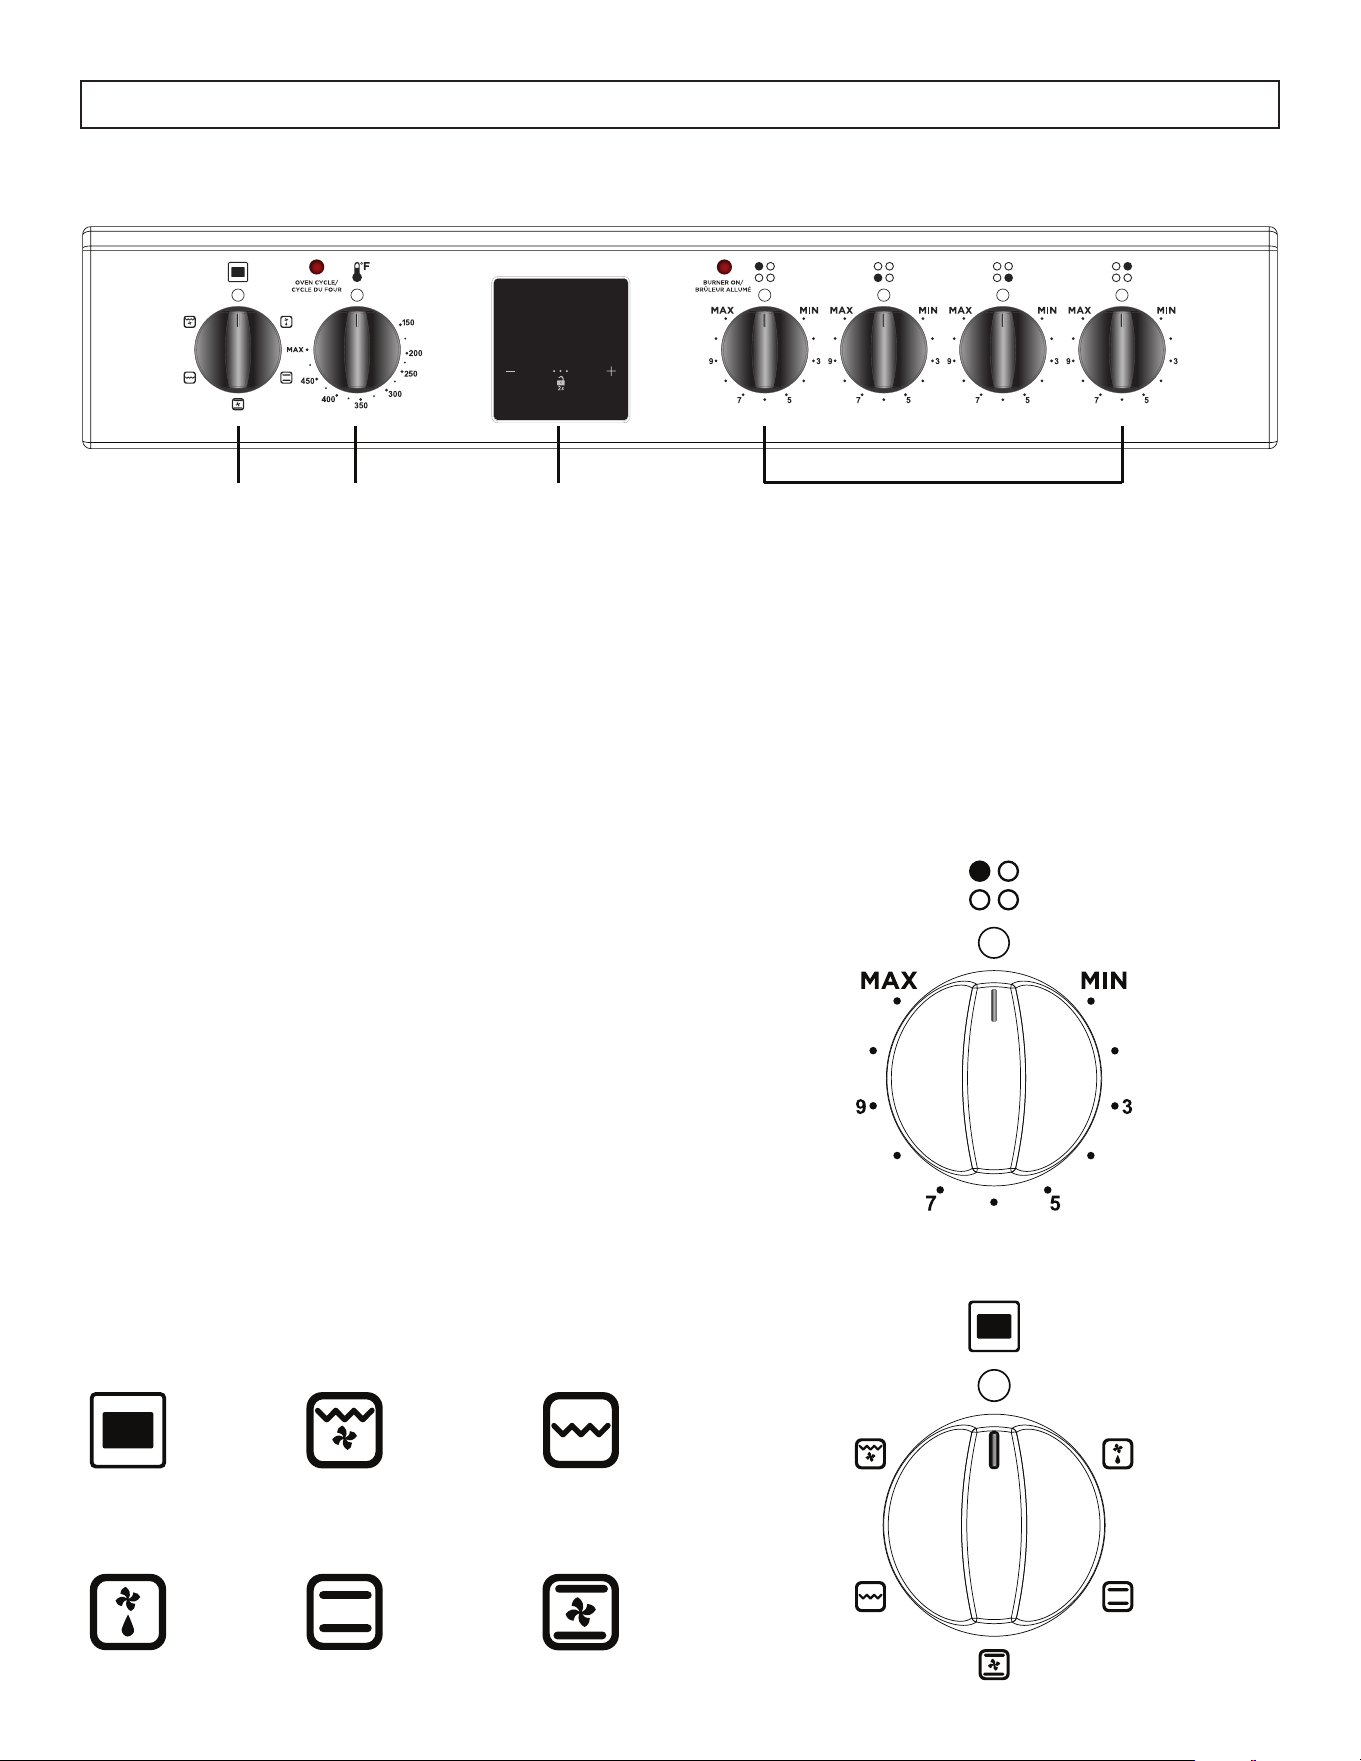
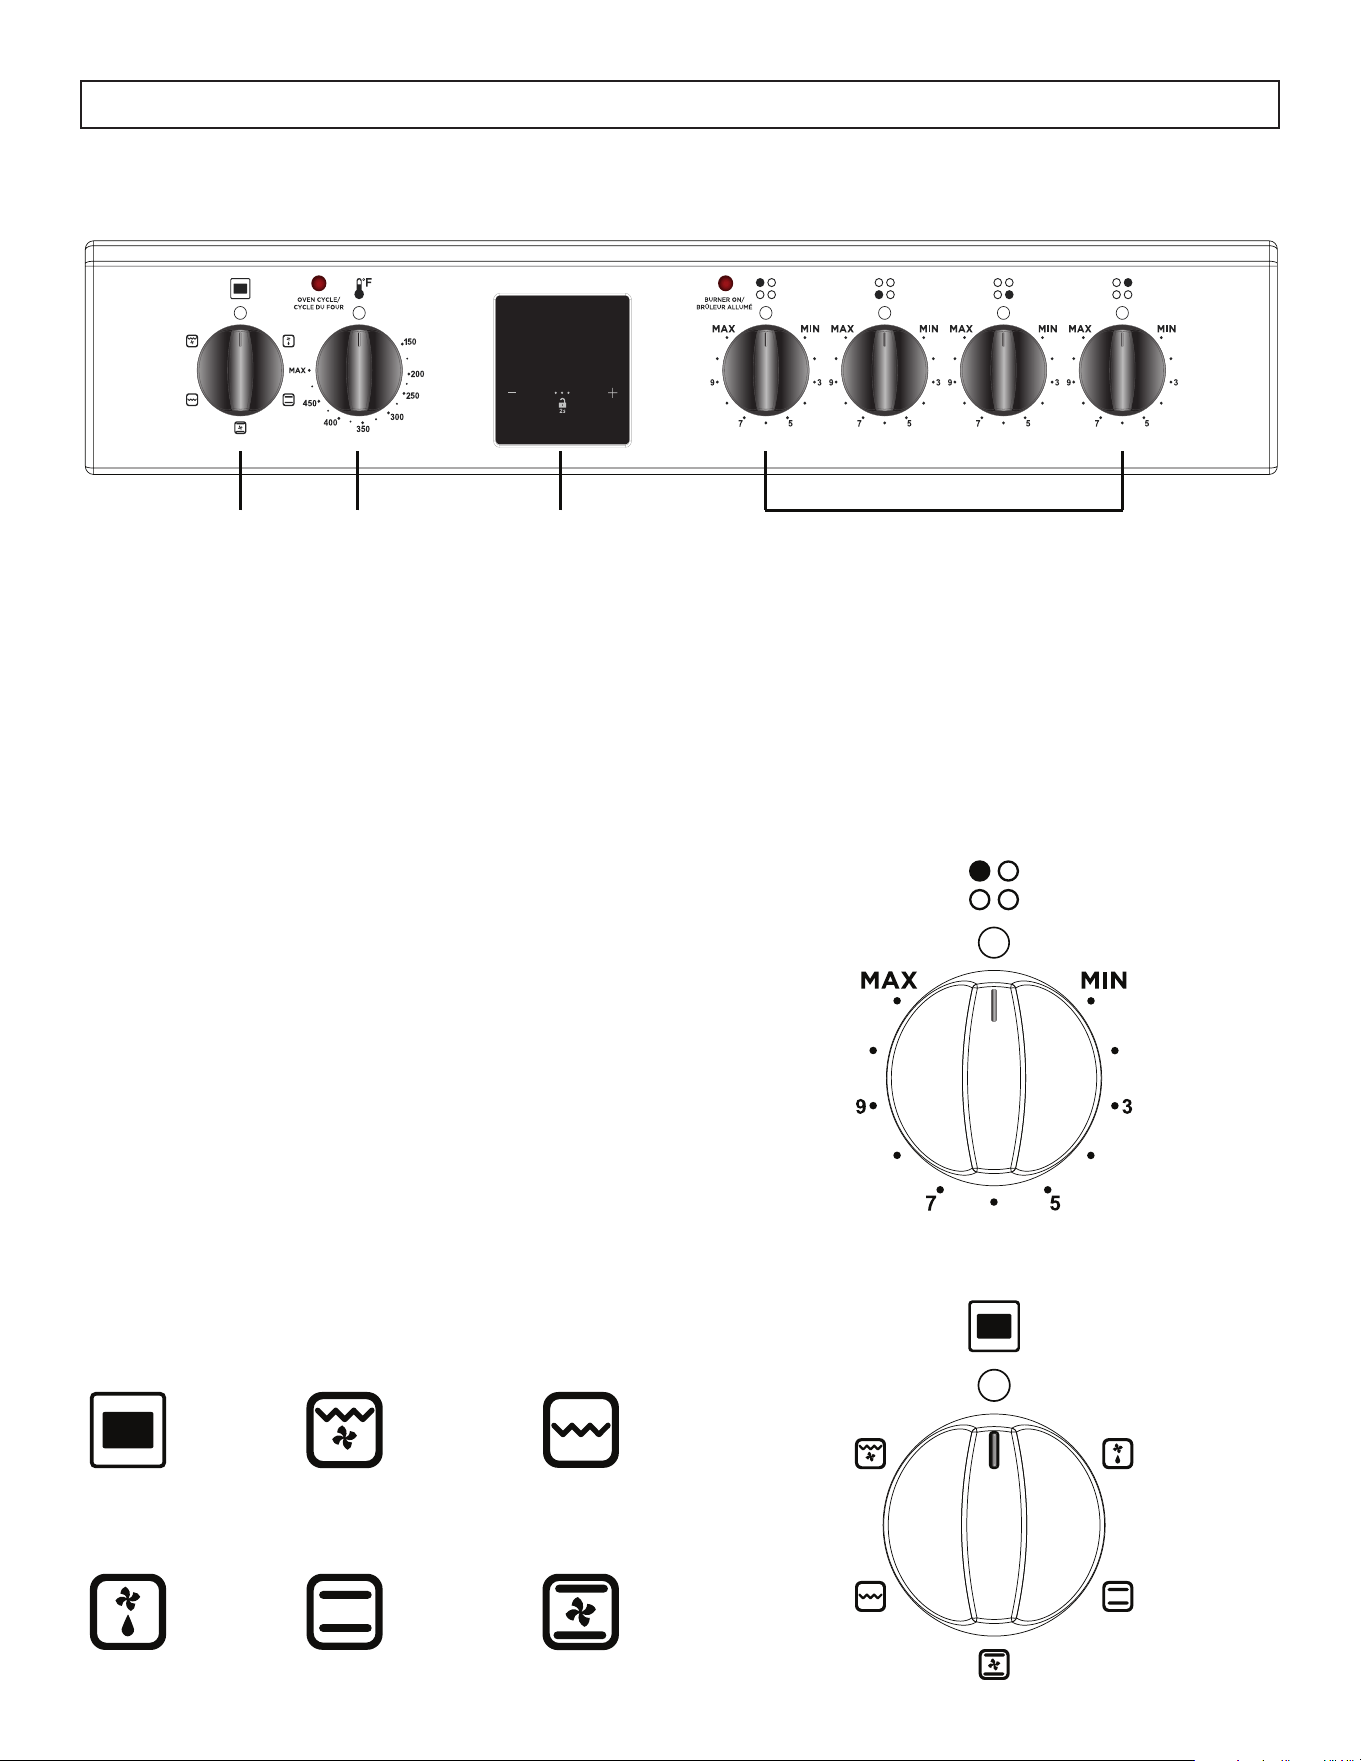
SURFACE COOKING KNOB
Never leave food unattended while cooking. Boil
overs cause smoking. Greasy spill overs may catch
fire.
NOTE
The icon above the knob indicates which burner the
knob controls.
OVEN COOKING CONTROLS
The oven has 6 available settings
CONTOL PANEL
CONTROL PANEL
1. Timer
2. Oven Function Control Knob
3. Oven Thermostat Knob
4. Surface Cooking Knob
12 3
4
On/Off
Defrost Bake
Convection
Bake
Convection
Roast
Broil

12
OPERATING INSTRUCTIONS
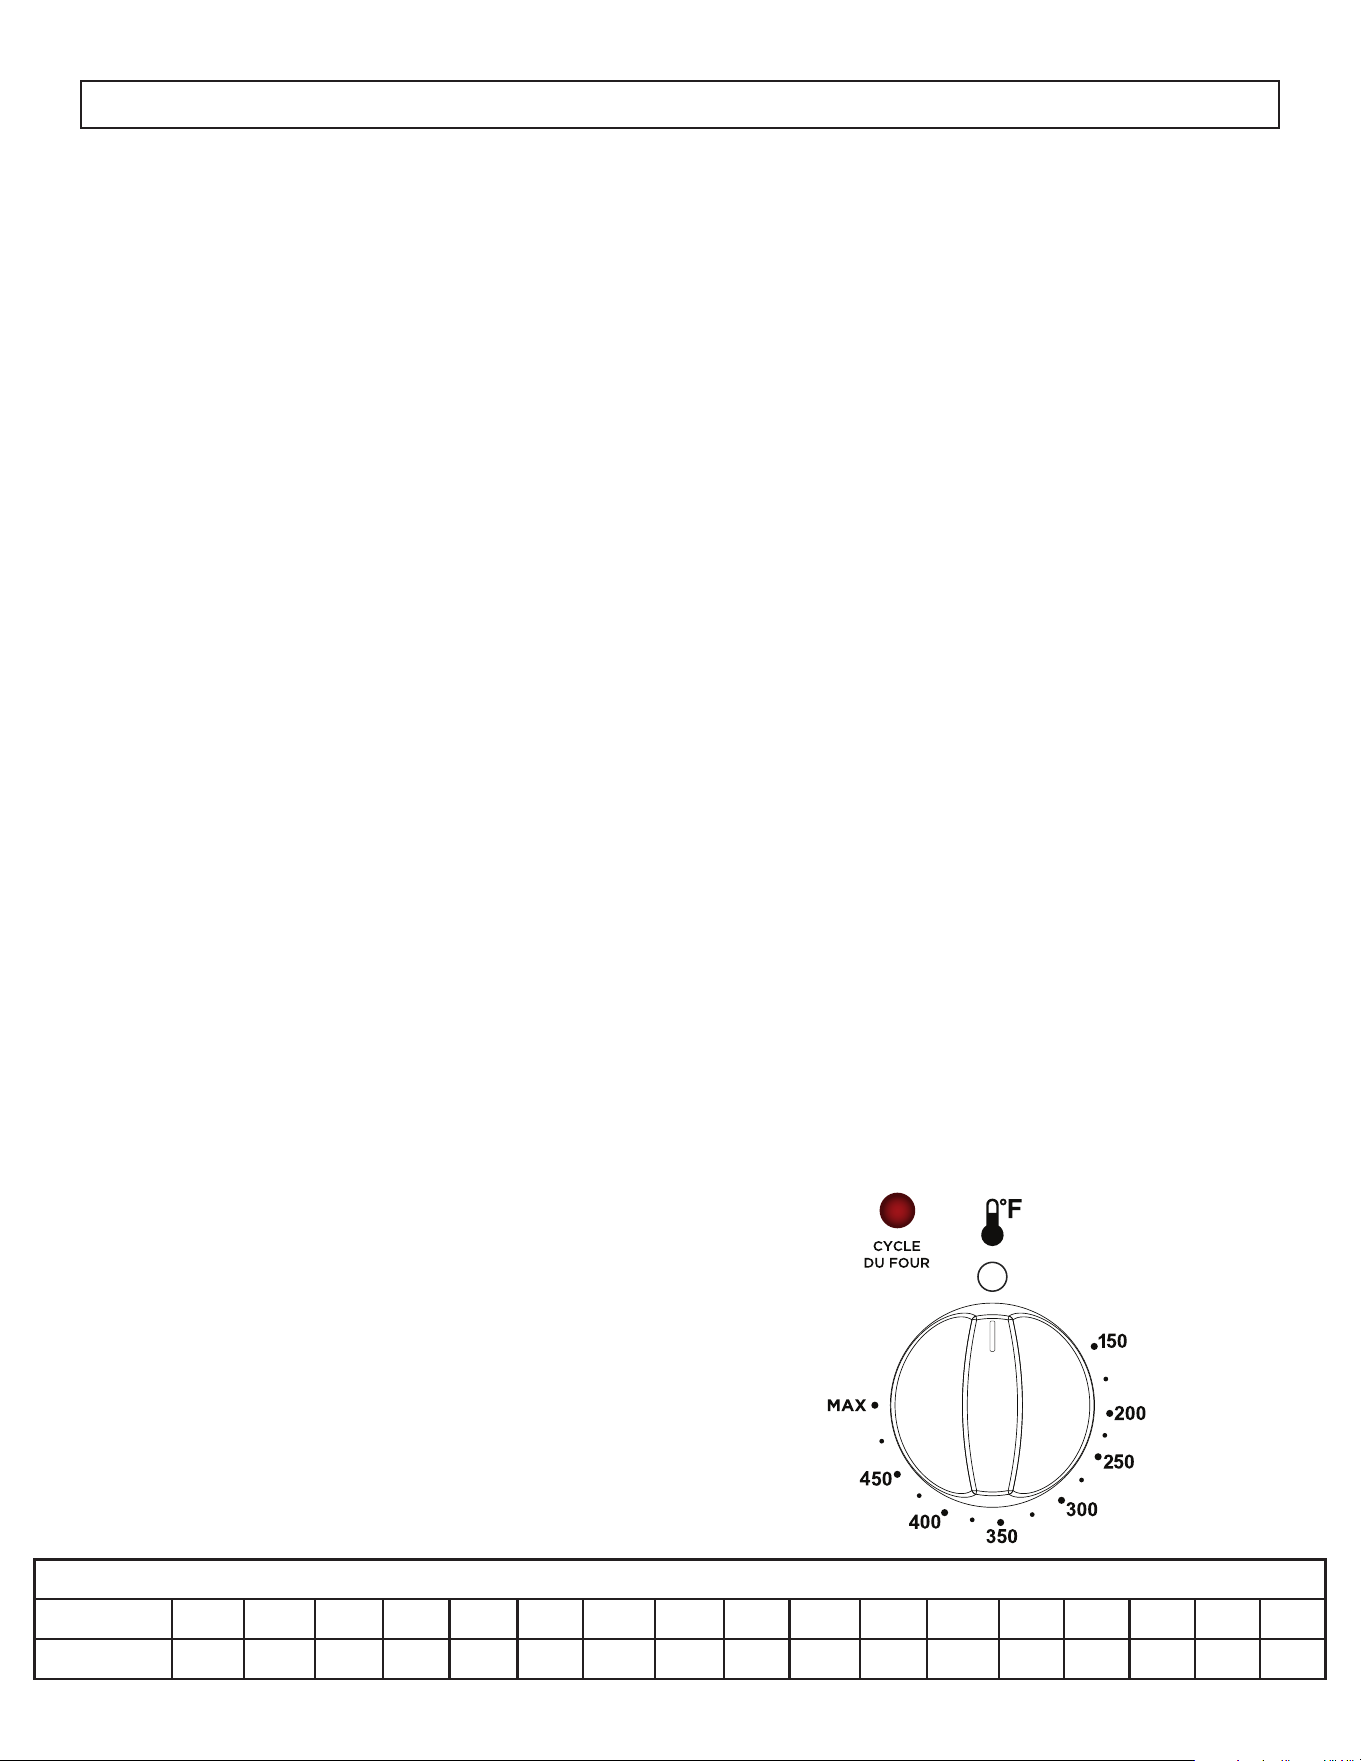
OVEN TEMPERATURE KNOB
The oven knob is used to choose the oven
cooking temperature and is marked in 25 degree
increments, from 200°F to 500°F (95°C to
260°C).
To use the oven, turn the function selector knob to
bake and turn the oven temperature knob to the
desired cooking temperature.
Temperature Conversions
Fahrenheit 140 150 170 200 250 275 300 325 350 375 400 425 450 475 500 525 550
Celsius 60 65 75 95 120 135 150 160 175 190 205 220 230 245 260 275 290
OVEN SETTINGS
On/Off
Indicates if the oven has been turned on to
commence cooking or off when cooking is complete.
Defrost
The oven’s thermostat and warning lights will
switch on and the fan will start to operate. To use
the defrost function, place your frozen food in the
oven on a shelf in the third slot from the bottom. It
is recommended that you place an oven tray under
the defrosting food to catch the water accumulated
during the process.
NOTE
This function WILL NOT cook or bake food, it will
only help to defrost the food.
Convection Bake
The oven’s thermostat and warning lights will switch
on, and the upper and lower heating elements and
fan will start operating. Cooking is carried out by
the lower and upper heating elements within the
oven and by the fan which provides air circulation,
for even baking and browning.
NOTE
Preheating the oven for 10 minutes is
recommended.
Bake
The oven’s thermostat and warning lights will switch
on, and the lower and upper heating elements will
begin operating. The Bake function emits heat,
ensuring even cooking of food.
NOTE
Preheating the oven for 10 minutes is recommended
and it is best to use only one shelf at a time in this
mode.
Convection Roast
The oven’s thermostat & warning lights will switch
on, and the upper element and fan will start
operating to sear meats while locking in juices and
flavors.
No Preheating required.
Broil
The oven’s thermostat & warning lights will switch
on, and the upper element is used to grill meats.
Use a broil pan placed on an oven rack positioned
close to the upper element. Set temperature to
450 °F LO Broil or 500 °F – HI Broil.
No Preheating required.
OVEN
CYCLE
13
OPERATING INSTRUCTIONS
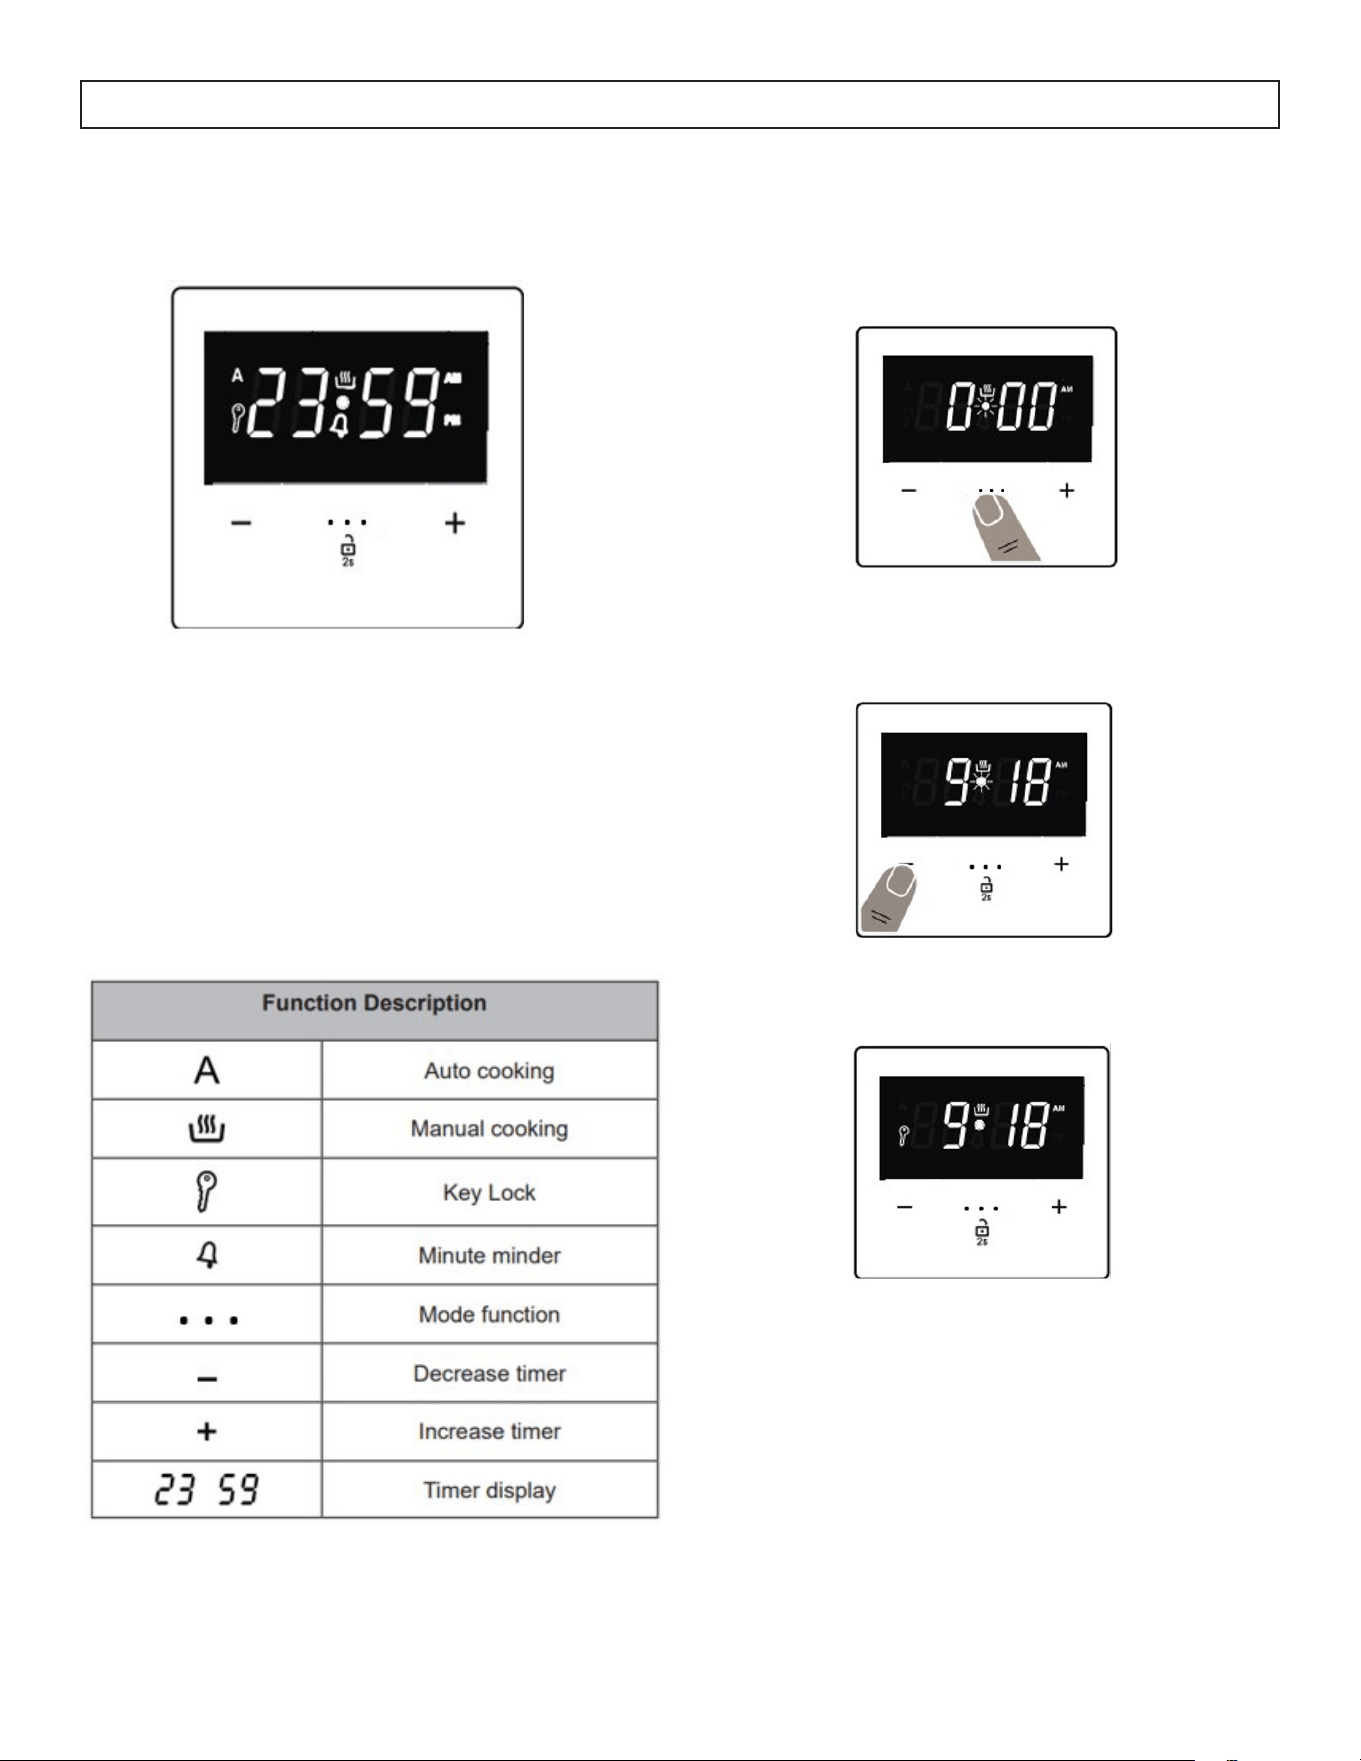
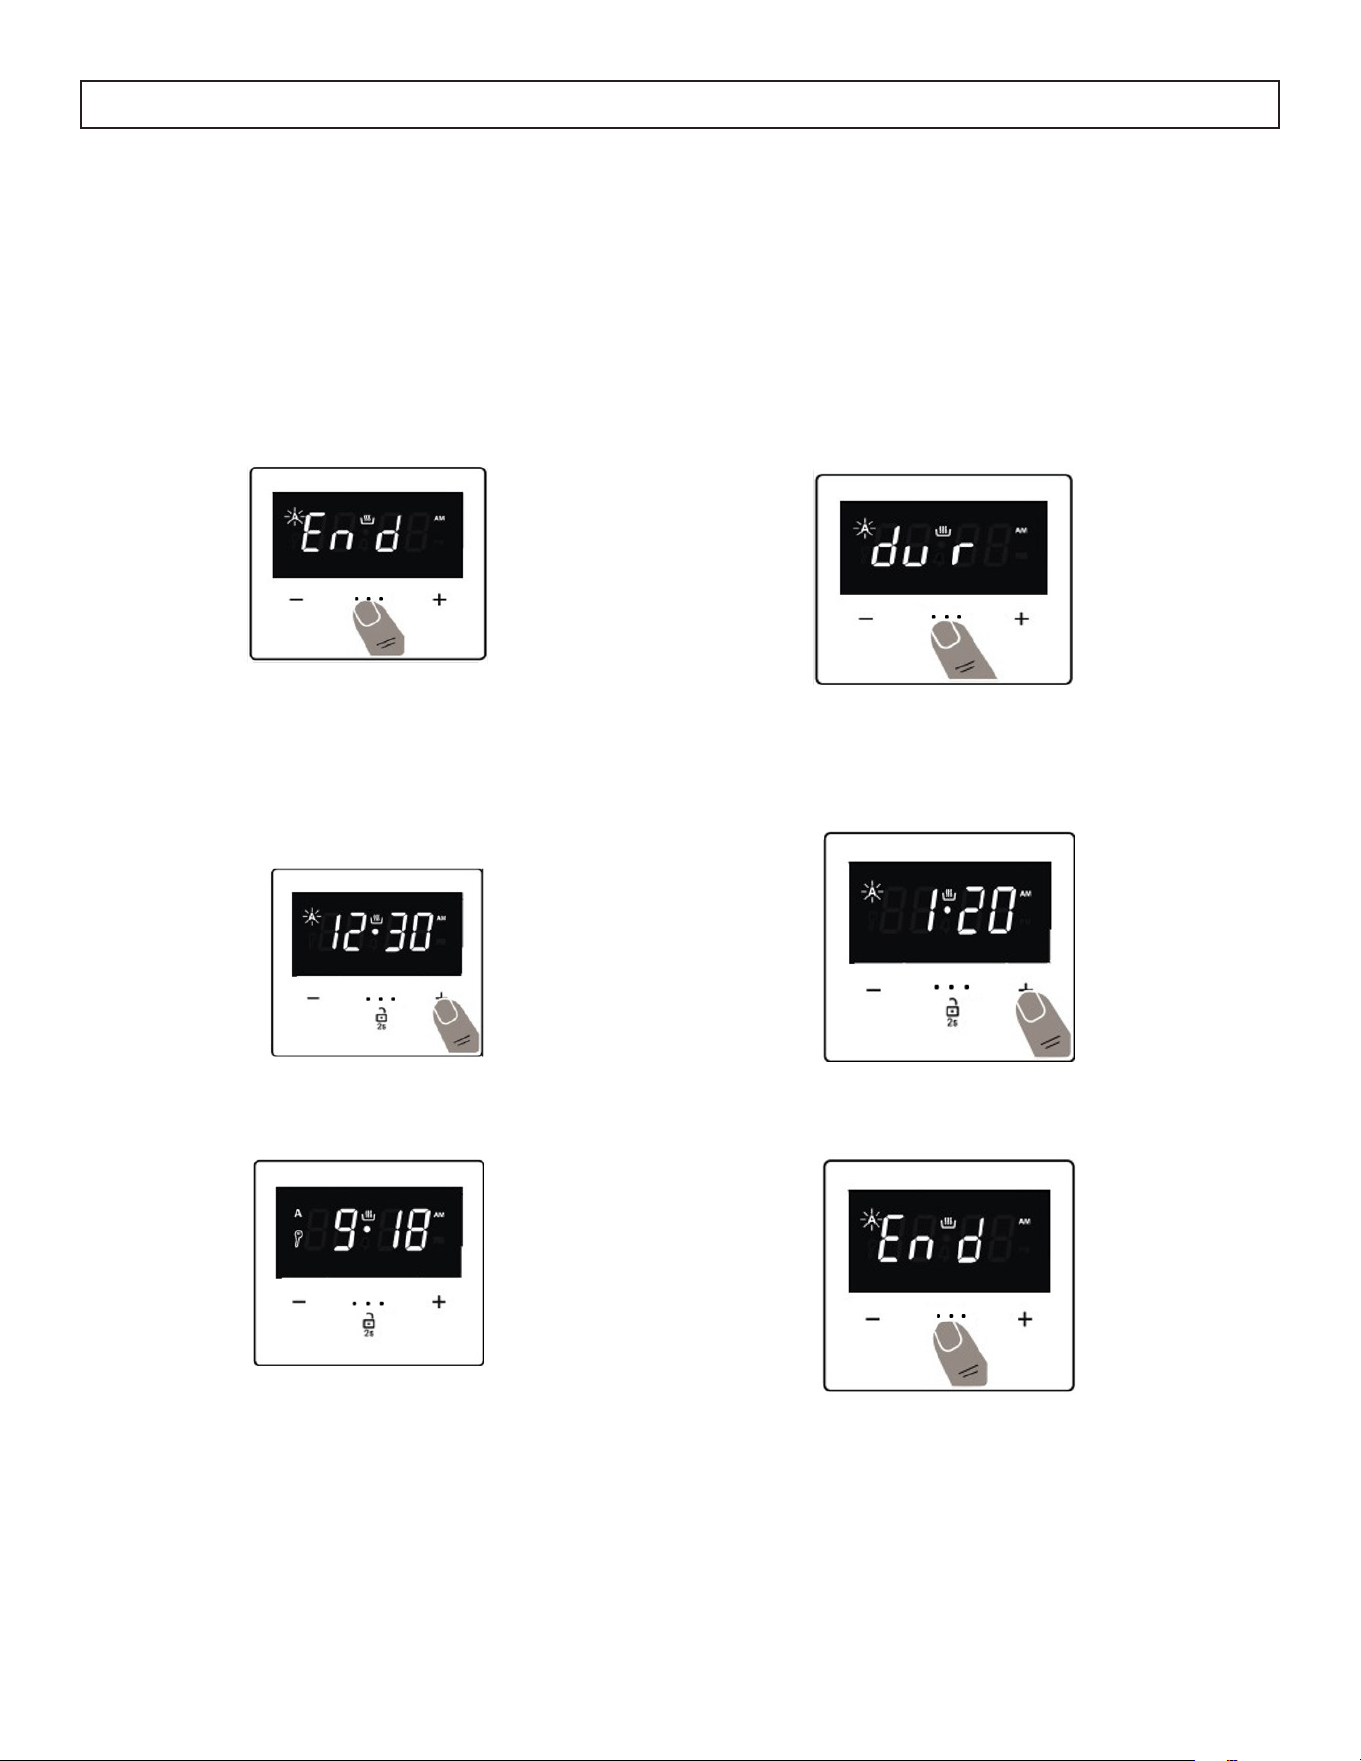
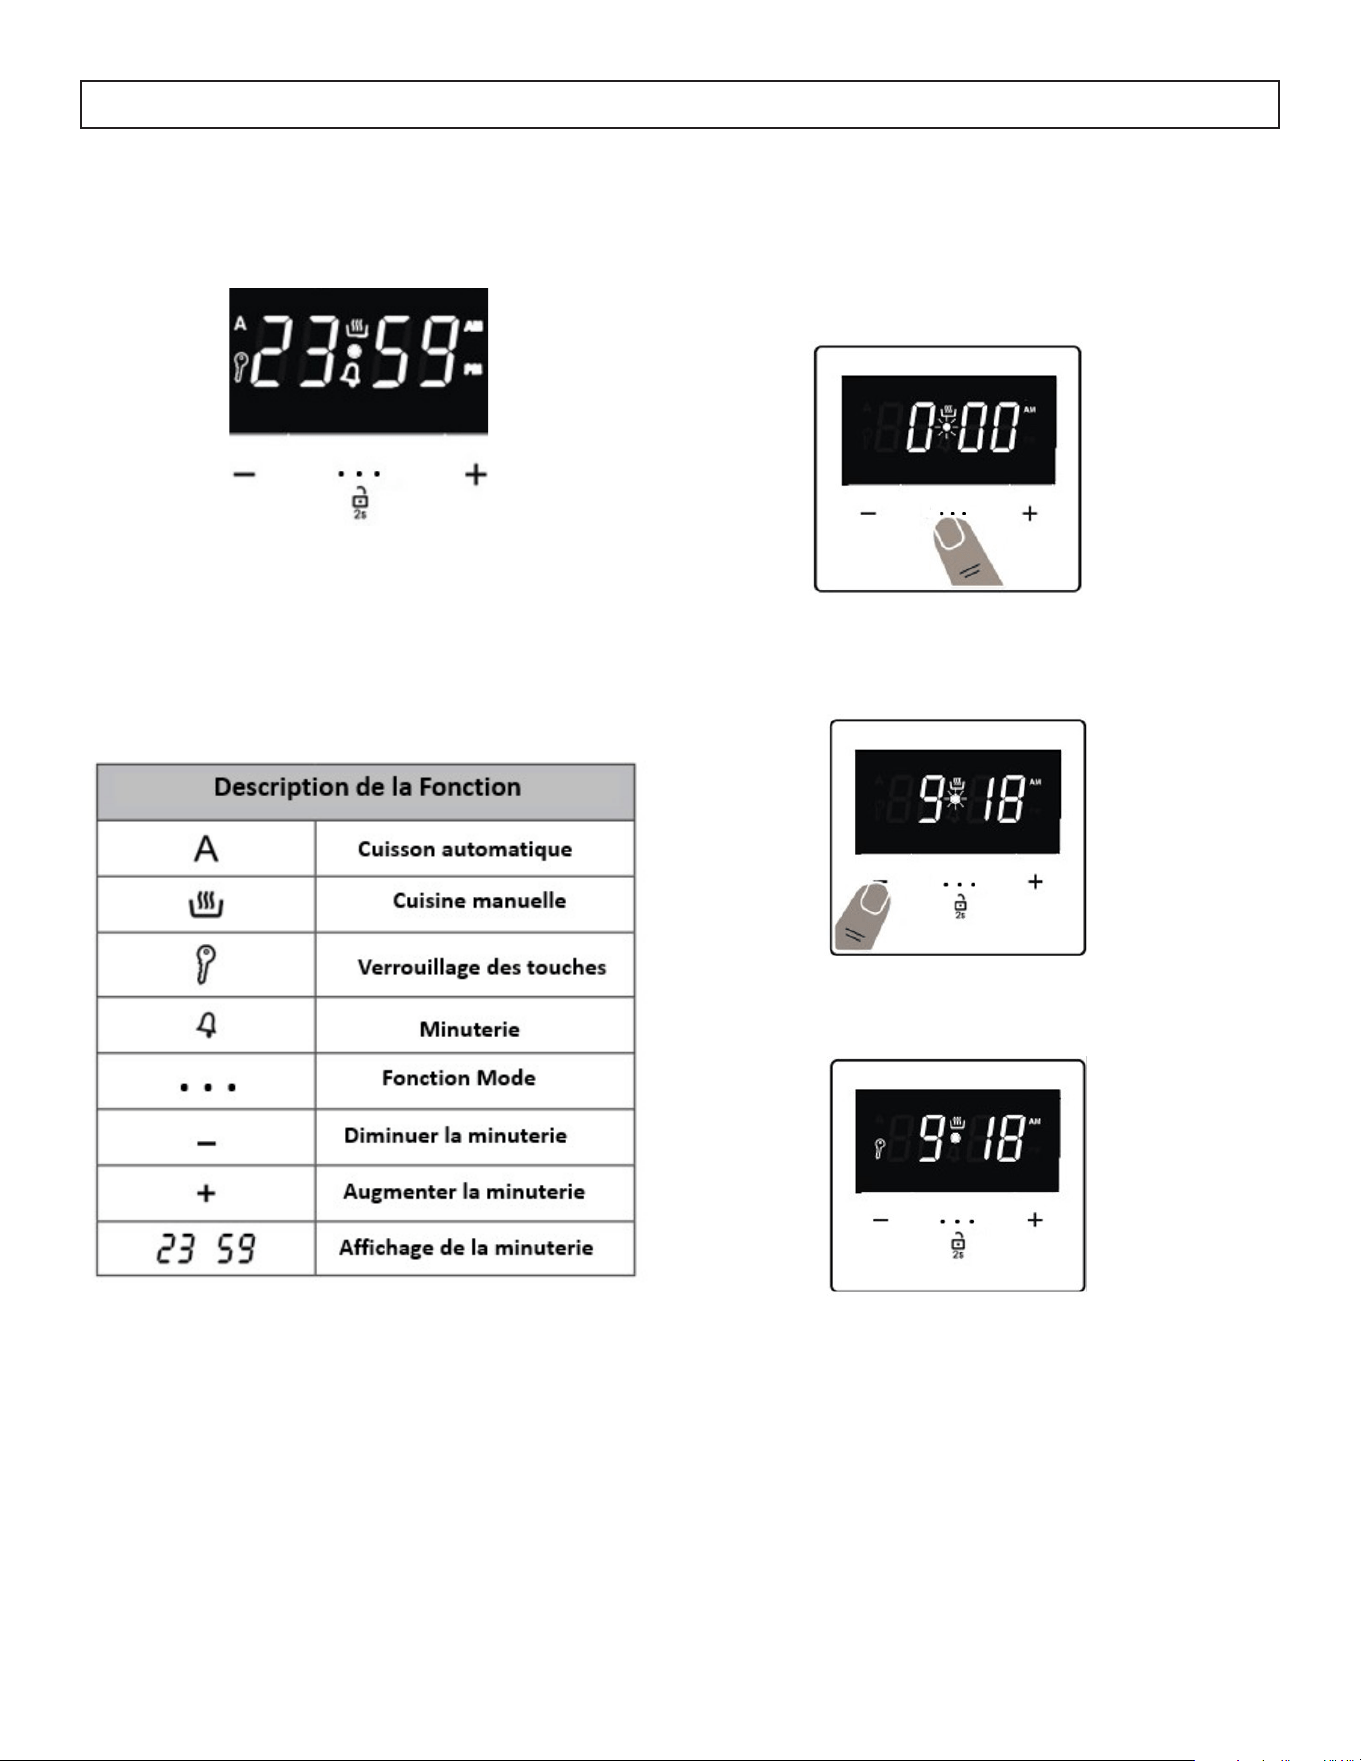
DIGITAL CLOCK
TIME ADJUSTMENT
The time must be set before you start using the oven.
Following the power connection, the Auto cooking
symbol and “00:00” or “12:00” will flash on the
Press the “. . .” button for 2 seconds to deactivate
the keylock and the dot in the middle of the screen
will start to flash.
Adjust the time while the dot is flashing using the
“+” and “-” buttons.
After a few seconds, the dot will stop flashing and
will remain illuminated.
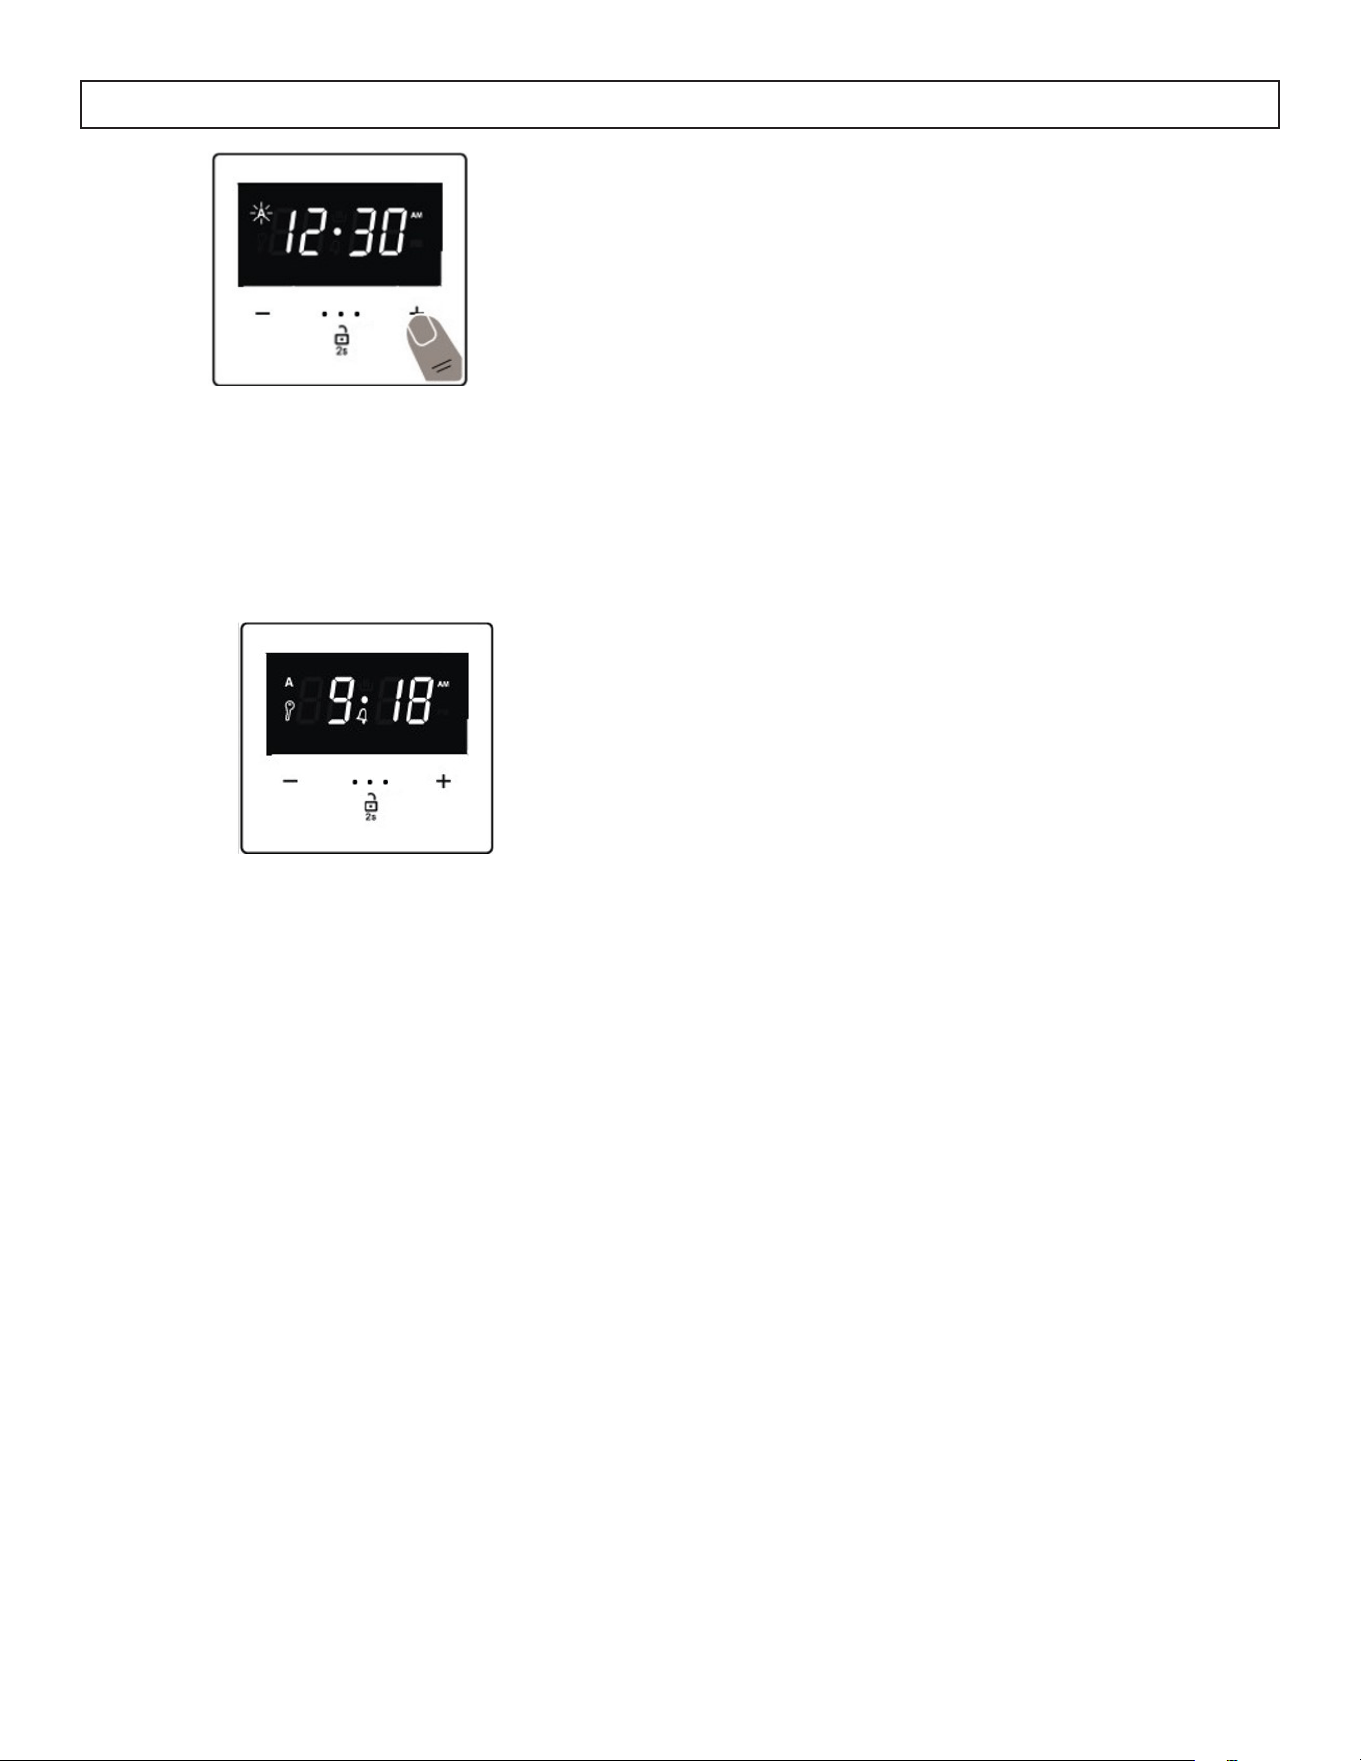
KEY LOCK
The Key Lock automatically activates after the timer
has not been used for 7 seconds. The symbol will
appear and remain illuminated. To unlock the timer
buttons, press and hold the “. . .” button for 2
seconds. Once unlocked, the desired operation can
be carried out.
14
OPERATING INSTRUCTIONS
AUDIBLE WARNING TIME ADJUSTMENT
The audible warning time can be set to any time
between “00:00” and “23:59” hours. The audible
warning time is for warning purposes only. The
oven WILL NOT be activated with this function.
Press the “. . .” button. The Timer symbol will begin
to flash and “000” will be displayed.
Select the desired time period using the “+” and “-”
buttons while the Timer symbol is flashing.
The Timer symbol will remain illuminated, the time
will be saved and the warning will be set.
When the timer reaches zero, an audible warning
will sound and the Timer symbol will flash on the
display. Press any key to stop the audible warning.
Press “. . .” for 2 seconds and the Timer symbol will
disappear. The clock will now be displayed.
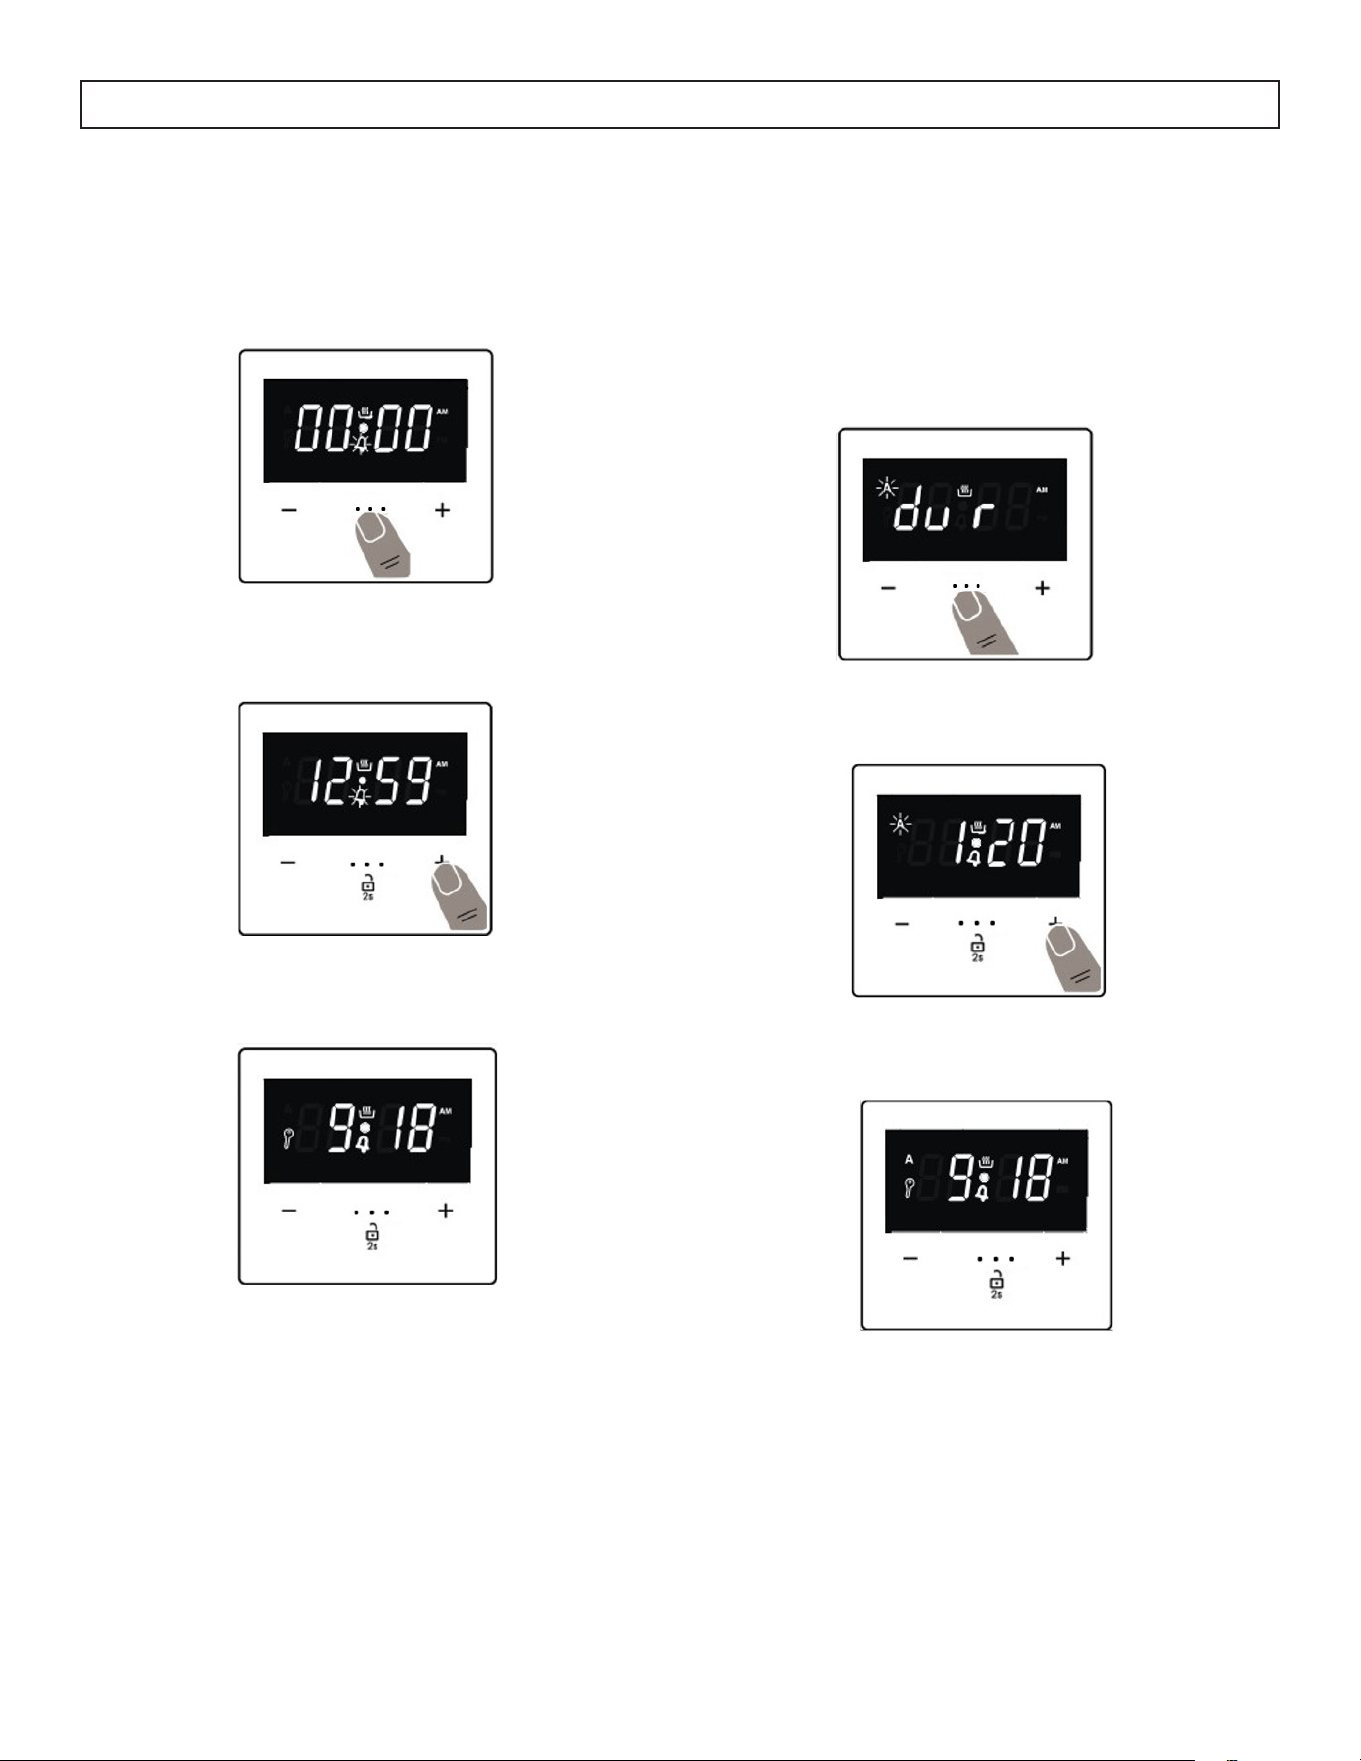
SEMI-AUTO COOKING TIMER
This function helps you to cook for a fixed period of
time. A time range between 0 and 10 hours can be
set. Prepare the food for cooking and put it into the
oven.
Select the desired cooking function and the
temperature using the control knobs.
Press “. . .” until you see “dur” symbol on the
display screen. The Auto Cooking symbol will flash.
Select the desired length of cooking time using the
“+” and “-” buttons.
The current time will reappear on the screen. The
Auto Cooking and Manual Cooking symbols will
remain illuminated.
When the timer reaches zero, the oven will switch
off and an audible warning will sound. The Auto
Cooking symbol will flash. Turn both controll knobs
to the “0” position and press any key on the timer to
stop the warning sound. Press “. . .” for 2 seconds,
the Auto Cooking symbol will disappear and the
timer will switch back to manual funtion.
OPERATING INSTRUCTIONS
The current time will reappear on the screen. The
Auto Cooking and Manual Cooking symbols will
remain illuminated.
SEMI-AUTOMATIC TIME AJDUSTMENT
(FINISHING TIME)
This function automatically starts the oven so that
cooking will finish at a set time. You can set an end
time of up to 10 hours after the current time of day.
Prepare the food for cooking and put it in the oven.
Select the desired cooking function and temperature
using the control knobs.
Press “. . .” until “End” appears on the display
screen.
The Auto Cooking symbol and the current time of
day will flash.
Use the “+” and “-” buttons to set the desired
finishing time.
When the timer reaches zero, the oven will switch
off and an audible warning will sound. The Auto
Cooking symbol will flash. Turn both control knobs
to the “0” position and press any key on the timer to
stop the warning sound. Press “. . .” for 2 seconds,
the Auto Cooking symbol will disappear and the
timer will switch back to manual funtion.
FULL-AUTOMATIC PROGRAM
This function is used to start cooking after a certain
period of time and for a certain duration. A time of
up to 23 hours and 59 minutes after the current time
of day can be set. Prepare the food for cooking and
put it in the oven.
Select the desired cooking function and the
temperture using the control knobs.
Press “. . .” until you see “dur” symbol on the
display screen. The Auto Cooking symbol will flash.
Select the desired length of cooking using the “+”
and “-” buttons.
Press “. . .” until “End” appears on the display
screen.
The Auto Cooking symbol and the current time of
day will flash.
15
OPERATING INSTRUCTIONS
Select the desired finishing time using the “+” and
“-” buttons. The Manual Cooking symbol will
disappear. Add the cooking period to the current
time of day. You can set a time of up to 23 hours
and 59 minutes after this.
The current time will reappear on the display and
the Auto Cooking symbol will remain illuminated.
The operating time will be calculated and the oven
will start. The Manual Cooking symbol will reappear
on the screen so that the cooking will finish at the
set finishing time. When the timer reaches zero, the
oven will switch off, an audible warning will sound
and the Auto Cooking symbol will flash. Turn both
control knobs to the “0” position and press any key
to stop the sound. The symbol will disappear and
the timer will switch back to manual function. Press
“. . .” for 2 seconds, the Auto Cooking symbol will
disappear and the timer will switch back to manual
function.
SOUND ADJUSTMENT
To adjust the volume of the audible warning sound,
while the current time of day is displayed, press “+”
and “-” buttons. The dot in the middle of the screen
will start to flash.
Press “. . .” to display the current volume level.
Pressing the “-” button displays a different volume
level which will also sound.
There are a total of three volume levels.
Once a volume level has been chosen, do not press
any other buttons.
After a short time, the selected volume level will be
saved.
16
17
OPERATING INSTRUCTIONS
OVEN BAKING AND ROASTING
1. Position the shelves in the oven. If cooking on
two shelves at the same time, stagger the pans
for the best heat circulation.
2. Close the oven door. Turn the function selector
knob to bake. Turn oven temperature knob to the
desired temperature.
3. Allow the oven to preheat if required.
4. Place the food on the center of the oven shelf.
Allow at least 2 inches between the end of the
pan and the oven wall or any adjacent pans.
5. Check the food regularly. Remove once done
and ensure the oven is turned off.
OVEN RACK INSTALLATION
The oven racks are designed with a front
and a rear.
When placing the oven rack, ensure the rear is
correctly positioned before pushing it into the oven.
REMOVABLE STORAGE DRAWER
To clean the lower storage drawer, pull it out until it
cannot be pulled any further and then lift upwards.
To replace the storage drawer in the appliance,
place the drawer on the side rails and push inward.
Important: Do not store flammable materials in the
drawer. This includes paper, plastic and cloth items,
such as cookbooks, plastic ware and towels as well
as flammable liquids, explosives and aerosol cans.
When the oven is in use, the drawer may become
hot. Do not touch the hot surface between the
bottom of the oven door and the top of the drawer
on the front of the oven or the upper surface of the
drawer cavity to avoid burns or injury.

18
Cooktop Maintenance
For everyday cleaning of marks, fingerprints and
non-sugary spillovers, apply a ceramic cooktop
cleaning product. Rinse and wipe dry with a clean
cloth or paper towel.
For boil overs, melts and hot sugary spills on the
cooktop, remove the spill or food item immediately
with a ceramic cooktop razor but beware hot
cooking surfaces. Hold the razor at a 45-degree
angle and scrape the spilled food to a cool area
of the cooktop, then clean it up with a dish cloth
or paper towel. Large spills should be removed
immediately to ensure they do not bake onto the
surface of the cooktop.
The control knobs are removable and can be
cleaned with a soft cloth and warm water.
For a burned-on residue
Let the cooktop cool, then, spread a few drops of
ceramic cooktop cleaning product on all the burned
residue area. Rub this area with a non-scratching
cleaning pad and if some residue remains, repeat
these steps.
For a heavy burned on residue
Let the cooktop cool, then use a ceramic cooktop
razor at a 45-degree angle and scrape to remove
the residue. After scraping the heavy residue,
spread a few drops of ceramic cooktop cleaning
product on all the burned residue area. Rub this
area with a non-scratching cleaning pad.
CARE & MAINTENANCE
Porcelain oven interior
With proper care, the porcelain enamel interior will
retain its finish for many years.
Soap and water can be used to clean the interior.
Heavy splattering or spills may require cleaning
with a mild abrasive cleaner.
Do not allow spills with high acid content such as
milk, tomatoes, fruit juices or pie filling, to remain
on the surface. They may cause dull spots even after
cleaning.
Household ammonia may make cleaning easier.
Place 1/2 cup of ammonia in a shallow glass pan
and leave in a cold oven over night. The ammonia
fumes will help loosen burned on grease and food.
Cautions about using spray-on oven
cleaners
Do not spray oven cleaner on the electrical controls
and switches as it could cause a short circuit and
result in sparking or fire.
Do not spray oven cleaner directly onto the oven
heating elements.
Do not allow a film from the oven cleaner to remain
on the temperature sensor as it could cause the oven
to heat improperly. The sensor is located on the rear
of the oven. Carefully wipe the bulb clean after each
oven cleaning, being careful not to move the sensor
since a change in its position could affect how the
oven bakes.
Do not spray oven cleaner on the outside of the
oven door, handles or any exterior surface of the
oven, cabinet or painted surfaces. The cleaner can
damage these surfaces.
Oven shelves
Clean the shelves with an abrasive cleaner or steel
wool. After cleaning, rinse the shelves with clean
water and dry with a clean cloth. Do not place the
shelves in a dishwasher.
Oven heating element
Do not clean the bake element. Any food residue
will burn off when the element is heated.
Control knobs
The control knobs may be removed for easier
cleaning. Make sure the knobs are in the “OFF”
position and then pull straight off the stems for
cleaning.
The knobs can be cleaned by hand. Make sure the
insides of the knobs are dry before replacing on the
appliance.
Painted surfaces
The painted surfaces include the sides, the control
panel and the door. Clean these with soap and
water or a vinegar and water solution.
Do not use commercial oven cleaners, cleansing
powders, steel wool or harsh abrasives on any
painted surface.
19
CARE & MAINTENANCE
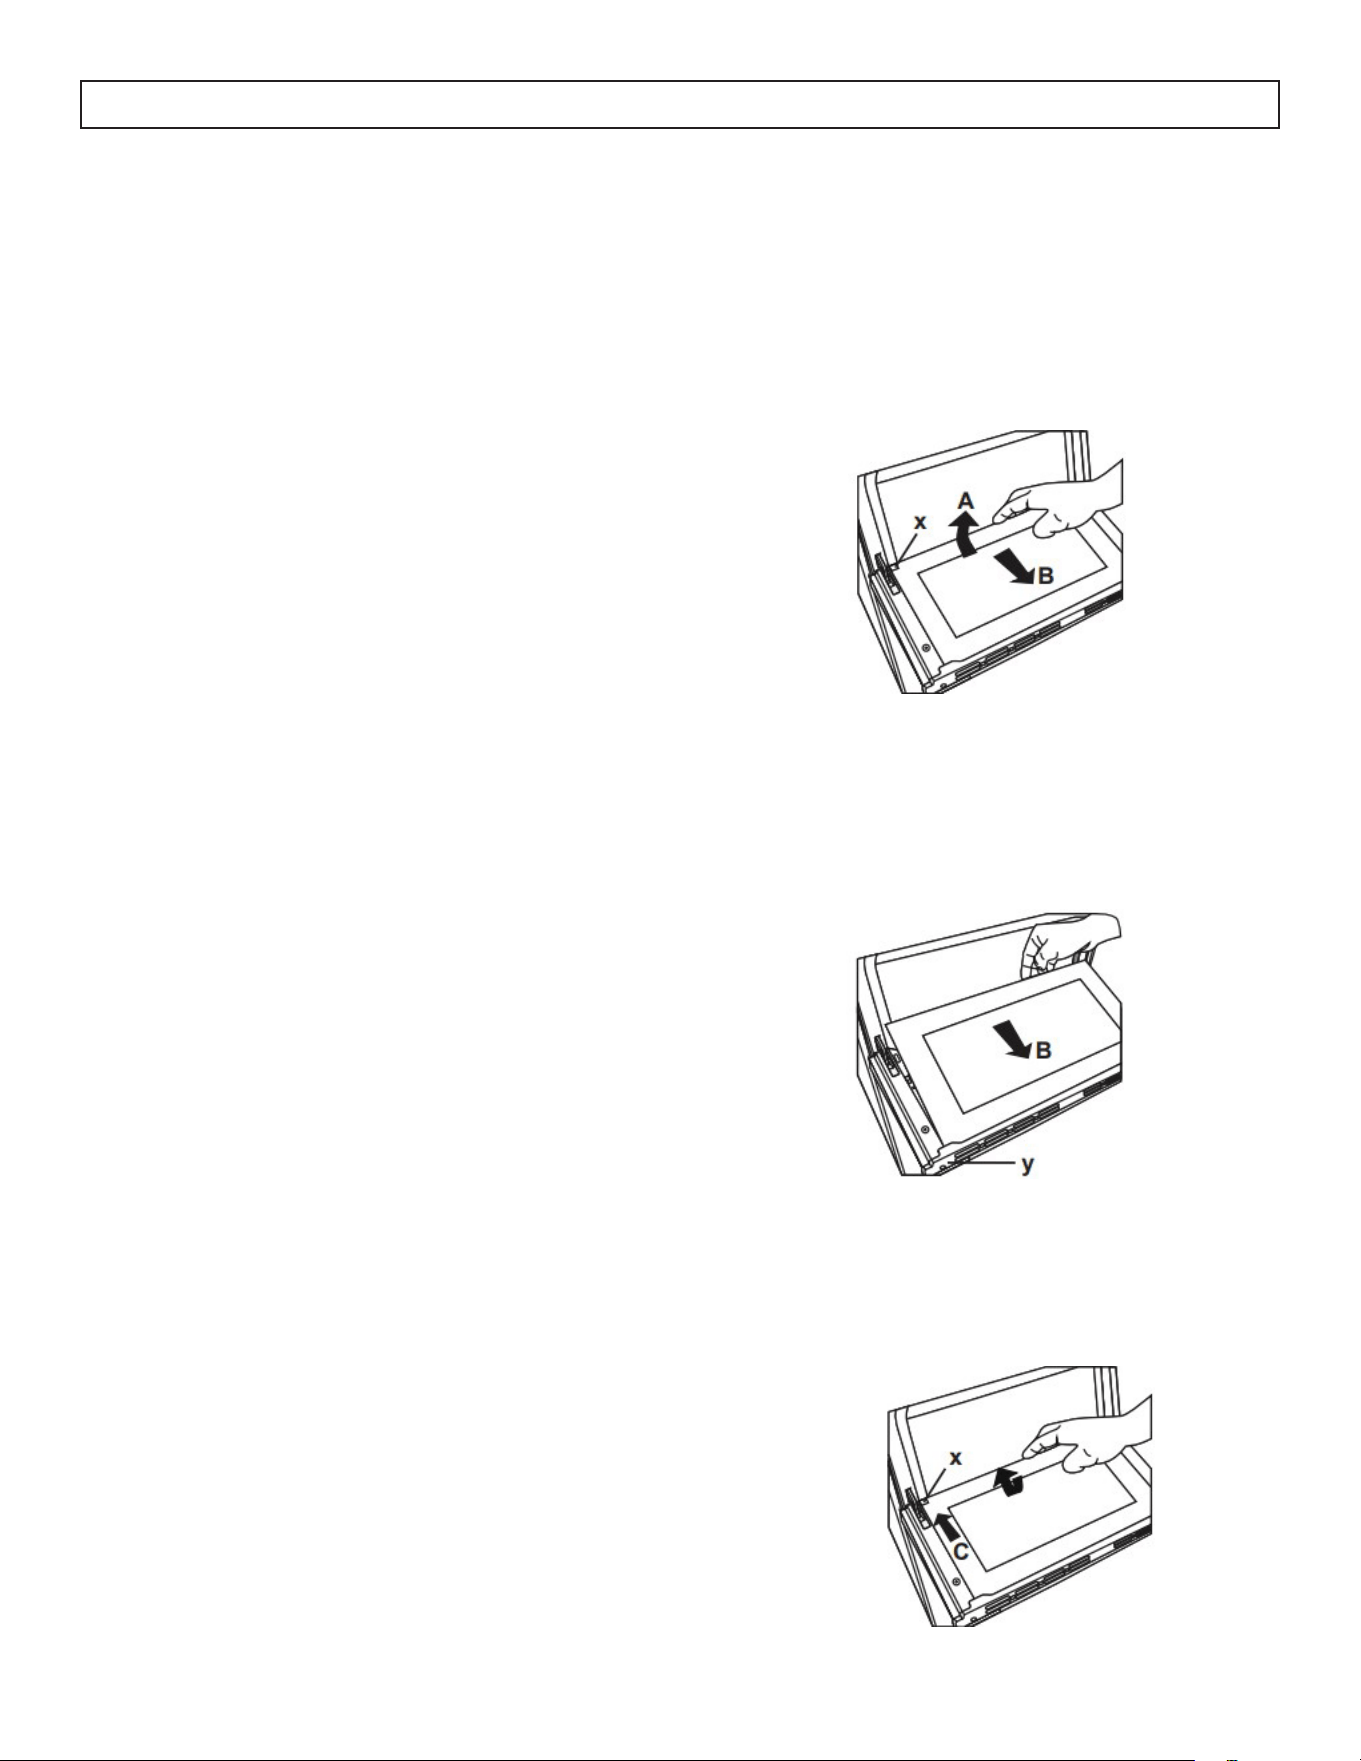
REMOVAL OF INNER GLASS
The oven door glass must be removed before
cleaning.
Push the glass in the direction of B and release from
the location bracket (x). Pull the glass out in the
direction of A.
REPLACEMENT OF INNER GLASS
Push the glass towwards and under the location
bracket (y) in the direction of B.
Place the glass under the location bracket (x) in the
direction of C.
20
CARE & MAINTENANCE
REMOVABLE OVEN DOOR
The oven door is removable but it is heavy. It
is recommended that at least two people work
together to remove it.
To remove the door:
1. Open the door to the full open position.
2. Pull the hinge locks up over the hinge hooks on
both sides.
3. Close the door until it almost reaches the fully
closed position and remove the door by pulling
it up and towards you
To replace the door:
1. Firmly grasp both sides of the door at the top.
2. Insert and seat the upper and lower hinge arms
into the oven slots.
3. Push the hinge locks down from the hinge hooks.
4. Close the oven door and make sure it is working
properly. If it seems uneven or does not close
completely, remove it again and repeat the steps
to replace it.
Note: Do not attempt to close the door until it is
properly installed. The hinges could be damaged.
OVEN LIGHT REPLACEMENT
Important: Before replacing the oven light bulb,
make sure the electrical power is disconnected from
the appliance. Failure to do so may result in electric
shock or burn.
Be sure to let the light cover and bulb cool
completely before replacing.
Removing the oven door can make this process
easier.
To replace the light bulb:
1. Remove the protective light cover. Do not remove
any screws to remove the light cover.
2. Do not touch the light bulb with a wet cloth.
Replace the light bulb with an appliance light
bulb suitable for high temperature and having
the same specifications: 240V, 15-25 Watt, Type
E14.
3. Replace the protective cover.
CARE & MAINTENANCE
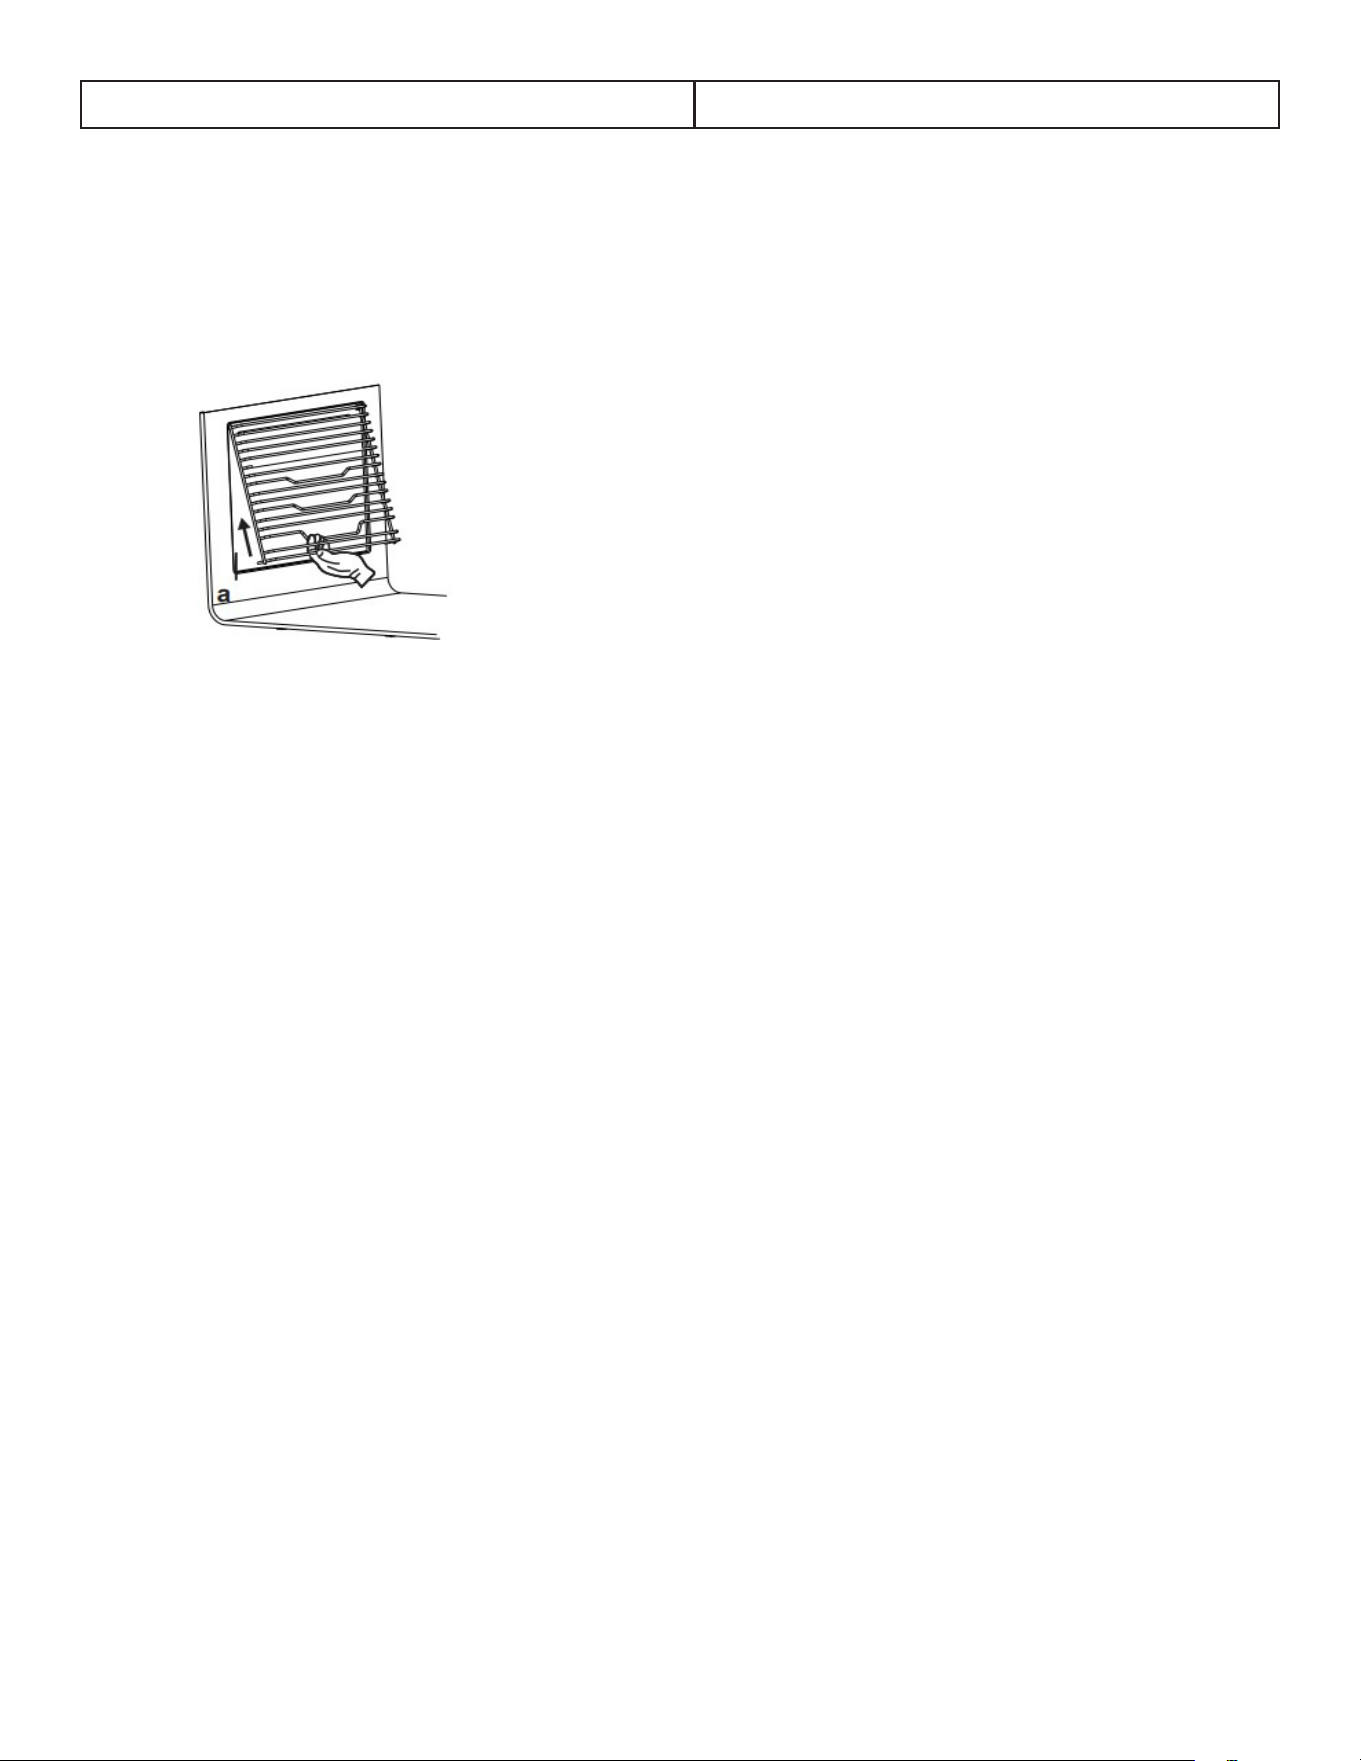
EASYFIX WIRE RACK
To remove the wire rack, pull the wire rack as
shown below to release it from the clips (a). After
releasing it from the clips, lift it up.

21
TROUBLESHOOTING
No power
• A fuse may be blown or the circuit breaker tripped
• Plug not fully inserted into the wall outlet
• If the timer was previously used and the control knobs were not returned to the “off” position, the oven
will not heat; return the knobs to the “off” position, wait 30 seconds and then reset the control knobs
Surface elements not working properly
• No power to the appliance
• The controls are not set correctly
Food does not bake or roast properly
• Oven temperature is not properly set
• Shelf position is incorrect
• Oven was not pre-heated
• Cookware is not suited for baking or roasting
Oven light does not work
• Light bulb is loose
• Light switch is not operating correctly
LIMITED IN-HOME APPLIANCE WARRANTY
This quality product is warranted to be free from manufacturer’s defects in material and workmanship, provided that the unit is used under the normal operating
conditions intended by the manufacturer.
This warranty is available only to the person to whom the unit was originally sold by Danby Products Limited (Canada) or Danby Products Inc. (U.S.A.) (hereafter
“Danby”) or by an authorized distributor of Danby, and is non-transferable.
TERMS OF WARRANTY
Plastic parts, are warranted for thirty (30) days only from purchase date, with no extensions provided.
First Year
During the rst twelve (12) months, any functional parts of this product found to be defective, will be repaired or replaced, at warrantor’s
option, at no charge to the ORIGINAL purchaser.
To obtain
Danby reserves the right to limit the boundaries of “In Home Service” to the proximity of an Authorized Service Depot. Any app liance
Service
requiring service outside the limited boundaries of “In Home Service” , it will be the consumer’s responsibility to transport the appliance (at
their own expense) to the original retailer (point of purchase) or a service depot for repair. See “Boundaries of In Home Serv ice”below.
Contact your dealer from whom your unit was purchased, or contact your nearest authorized Danby service depot, where service
must be performed by a qualied service technician.
If service is performed on the units by anyone other than an authorized service depot, or the unit is used for commercial appli cation, all
obligations of Danby under this warranty shall be void.
Boundaries of
If the appliance is installed in a location that is 100 kilometers (62 miles) or more from the nearest service center your unit must be
In Home Service
delivered to the nearest authorized Danby Service Depot, as service must only be performed by a technician qualied and certif ied for
warranty service by Danby. Transportation charges to and from the service location are not protected by this warranty and are t he
responsibility of the purchaser.
Nothing within this warranty shall imply that Danby will be responsible or liable for any spoilage or damage to food or other c ontents of this appliance, whether due
to any defect of the appliance, or its use, whether proper or improper.
EXCLUSIONS
Save as herein provided, Danby, there are no other warranties, conditions, representations or guarantees, express or implied, m ade or intended by Danby or its
authorized distributors and all other warranties, conditions, representations or guarantees, including any warranties, conditio ns, representations or guarantees
under any Sale of Goods Act or like legislation or statue is hereby expressly excluded. Save as herein provided, Danby shall no t be responsible for any damages
to persons or property, including the unit itself, howsoever caused or any consequential damages arising from the malfunction o f the unit and by the purchase of
the unit, the purchaser does hereby agree to indemnify and hold harmless Danby from any claim for damages to persons or propert y caused by the unit.
GENERAL PROVISIONS
No warranty or insurance herein contained or set out shall apply when damage or repair is caused by any of the following:
1) Power failure.
2) Damage in transit or when moving the appliance.
3) Improper power supply such as low voltage, defective house wiring or inadequate fuses.
4) Accident, alteration, abuse or misuse of the appliance such as inadequate air circulation in the room or abnormal operating con ditions
(extremely high or low room temperature).
5) Use for commercial or industrial purposes (ie. If the appliance is not installed in a domestic residence).
6) Fire, water damage, theft, war, riot, hostility, acts of God such as hurricanes, oods etc.
7) Service calls resulting in customer education.
8) Improper Installation (ie. Building-in of a free standing appliance or using an appliance outdoors that is not approved for out door application).
Proof of purchase date will be required for warranty claims; so, please retain bills of sale. In the event warranty service is required, present this document to our
AUTHORIZED SERVICE DEPOT.
Danby Products Limited
PO Box 1778, Guelph, Ontario, Canada N1H 6Z9
Telephone: (519) 837-0920 FAX: (519) 837-0449
Danby Products Inc.
PO Box 669, Findlay, Ohio, U.S.A. 45840
Telephone: (419) 425-8627 FAX: (419) 425-8629
04/09
1-800-263-2629
Warranty Service
In-home
Danby reserves the right to limit the boundaries of “In Home Service” to the proximity of an authorized service
depot. Any appliance requiring service outside the limited boundaries of “In Home Service”, will be the consumer’s
responsibility to transport at their own expense to the original point of purchase or a service depot for repair. If the
appliance is installed in a location that is 100 kilometers (62 miles) or more from the nearest service center, it must
be delivered to the nearest authorized Danby Service Depot by the purchaser.
Transportation charges to and from the service location are not protected by this warranty and are the
responsibility of the purchaser.
During the first twenty four (24) months, any functional parts of this product found to be defective, will be repaired
or replaced, at warrantor’s option, at no charge to the original purchaser.
Contact the dealer where the unit was purchased, or contact the nearest authorized Danby service depot, where
service must be performed by a qualified service technician. If service is performed on the unit by anyone other
than an authorized service depot, all obligations of Danby under this warranty shall be void.
First 24 months
To obtain service
Boundaries of
in-home service
LIMITED “IN HOME” WARRANTY
This quality product is warranted to be free from manufacturer’s defects in material and workmanship, provided that the unit is used
under the normal operating conditions intended by the manufacturer.
This warranty is available only to the person to whom the unit was originally sold by Danby Products Limited (Canada) or Danby
Products Inc. (U.S.A.) (hereafter “Danby”) or by an authorized distributor of Danby, and is non-transferable.
TERMS OF WARRANTY
Plastic parts are warranted for thirty (30) days from the date of purchase, with no extensions provided.
Nothing within this warranty shall imply that Danby will be responsible or liable for any spoilage or damage to food or other
contents of this appliance, whether due to any defect of the appliance, or its use, whether proper or improper.
EXCLUSIONS
Save as herein provided, by Danby, there are no other warranties, conditions, representations or guarantees, express or implied, made
or intended by Danby or its authorized distributors and all other warranties, conditions, representations or guarantees, including any
warranties, conditions, representations or guarantees under any Sale of Goods Act or like legislation or statute is hereby expressly
excluded. Save as herein provided, Danby shall not be responsible for any damages to persons or property, including the unit itself,
howsoever caused or any consequential damages arising from the malfunction of the unit and by the purchase of the unit, the
purchaser does hereby agree to indemnify and hold harmless Danby from any claim for damages to persons or property caused by
the unit.
GENERAL PROVISIONS
No warranty or insurance herein contained or set out shall apply when damage or repair is caused by any of the following:
1) Power failure.
2) Damage in transit or when moving the appliance.
3) Improper power supply such as low voltage, defective house wiring or inadequate fuses.
4) Accident, alteration, abuse or misuse of the appliance such as inadequate air circulation in the room or abnormal operating
conditions (ie. extremely high or low room temperature).
5) Use for commercial or industrial purposes (ie. If the appliance is not installed in a domestic residence).
6) Fire, water damage, theft, war, riot, hostility, acts of God such as hurricanes, floods etc.
7) Service calls resulting in customer education.
8) Improper Installation (ie. Building-in of a free standing appliance or using an appliance outdoors that is not approved for outdoor
application, including but not limited to: garages, patios, porches or anywhere that is not properly insulated or climate controlled).
Proof of purchase date will be required for warranty claims; retain bills of sale. In the event that warranty service is required, present
the proof of purchase to our authorized service depot.
Warranty Service
In Home
Danby Products Limited
PO Box 1778, Guelph, Ontario, Canada N1H 6Z9
Telephone: (519) 837-0920 FAX: (519) 837-0449
Danby Products Inc.
PO Box 669, Findlay, Ohio, U.S.A. 45840
Telephone: (419) 425-8627 FAX: (419) 425-8629
1-800-263-2629
04/17

23
Bienvenue dans la famille Danby.
Nous sommes fiers de nos produits de qualité et nous croyons en un service fiable. Nous
vous suggérons de lire ce manuel du propriétaire avant de brancher votre nouvel appareil
car il contient des informations de fonctionnement importantes, des informations de
sécurité, des conseils de dépannage et d’entretien pour assurer la fiabilité et la longévité de
votre appareil.
Vous avez droit à la couverture de la garantie décrite dans le manuel du propriétaire fourni
avec votre nouvel appareil.
1. Veuillez noter ci-dessous les informations relatives à votre appareil. Vous devez
conserver la preuve d’achat originale pour valider et bénéficier des services de
garantie.
2. Enregistrez votre produit en ligne et recevez une PROLONGATION DE GARANTIE
GRATUITE DE 2 MOIS après avoir rempli une enquête sur les produits, à l’adresse
www.danby.com/support/product-registration/
Besoin d’assistance?
1. Lisez votre manuel du propriétaire pour obtenir de l’aide à l’installation, au dépannage
et à la maintenance.
2. Visitez www.Danby.com pour accéder aux outils en libre-service, aux FAQ et bien plus
encore en recherchant votre numéro de modèle dans la barre de recherche.
3. Pour bénéficier du service client le plus rapide, veuillez remplir le formulaire Web à
l’adresse www.danby.com/support. Votre soumission ira directement à un expert de
votre appareil particulier. Nos temps de réponse moyens sont compris entre 20 minutes
et 2 heures, pendant les heures ouvrables EST.
4. Composez le 1-800-263-2629 - veuillez noter que pendant les heures de pointe, les
temps d’attente peuvent dépasser une heure.
Numéro de modèle : _______________________________________________
Numéro de serie : _________________________________________________
Date d’achat : _____________________________________________________
SUPPORT
Le support anti-basculement peut être installé sur la jambe arrière gauche ou droite en suivant les
instructions ci-dessous.
1. Placez le support anti-basculement sur le sol là où la cuisinière sera installée.
2. Marquez l’emplacement du trou dans le support anti-basculement.
3. Utilisez une mèche de 5/16 pouces pour percer un trou dans le sol et insérez l’ancrage en plastique
fourni.
4. Fixez le support au sol en utilisant la vis fournie.
5. Utilisez une cheville pour fixer le crochet (1) au mur de la cuisine et reliez la chaîne de sécurité (3) au
crochet à l’aide du mécanisme de verrouillage. La chaîne de sécurité doit être aussi courte que possible
pour éviter que la cuisinière ne bascule vers l’avant.
6. Faites glisser la cuisinière en position, en vous assurant que le support anti-basculement est positionné
sur le pied arrière de l’appareil, comme indiqué sur les images ci-dessous.
AVERTISSEMENT - RISQUE DE BASCULEMENT
• Un enfant ou un adulte peut faire basculer l’appareil et être tué.
• Vérifiez que le support anti-basculement a été correctement installé au sol.
• Assurez-vous que le support anti-basculement est réenclenché lorsque la cuisinière est déplacée.
• N’utilisez pas la cuisinière sans que le support anti-basculement soit en place et engagé.
• Le non-respect de ces instructions peut entraîner la mort ou des brûlures graves chez les enfants ou les adultes.
DISPOSITIF ANTI-BASCULEMENT
Pour réduire le risque de basculement de la cuisinière par une utilisation anormale ou un chargement
incorrect de la porte, la cuisinière doit être sécurisée en installant un dispositif anti-basculement. Deux
dispositifs anti-basculement différents sont inclus avec cet appareil.
Remarque : Si la cuisinière est déplacée, le support anti-basculement doit être retiré et installé au nouvel
emplacement.
ATTENTION
SUFFOCATION ET RISQUE DE PIÉGEAGE DE L’ENFANT
Pour éviter tout risque de piégeage d’enfants, veuillez prendre les précautions suivantes avant de jeter
l’appareil:
• Retirer complètement la porte du four
• Ne laissez jamais les enfants utiliser, jouer avec ou ramper à l’intérieur de la cuisinière électrique
CONSERVEZ CES INSTRUCTIONS!
Informations de sécurité importantes
LISEZ ET SUIVEZ TOUTES LES INSTRUCTIONS DE SÉCURITÉ
1. Support anti-basculement
2. Vis
3. Crochet
4. Mécanisme de verrouillage
5. Chaîne de sécurité
6. Bien sécurisez la chaîne au
dos de la cuisinière
7. Arrière de la cuisinière
8. Mur à l’arrière de la
cuisinière
DANGER - FEUX DE GRAISSE
En cas d’incendie, ne ramassez jamais une
casserole ou une poêle enflammée. Éteignez le
brûleur si vous pouvez le faire en toute sécurité.
Éteignez le feu avec un extincteur à poudre
chimique ou à mousse.
Ne pas utiliser d’eau sur les feux de graisse.
L’eau répandra la graisse et n’éteindra pas le feu.
Étouffez le feu avec un couvercle de casserole
bien ajusté, une plaque à biscuits ou un plateau
plat ou utilisez un extincteur à poudre chimique ou
à mousse.
S’il y a un feu dans le four pendant la cuisson,
étouffez le feu en fermant la porte du four et en
éteignant le four ou utilisez un extincteur à poudre
ou à mousse.
DANGER - RISQUE D’INCENDIEAVIS - AVANT LA PREMIÈRE UTILISATION
Avant la première utilisation de cette cuisinière, les
éléments chauffants ont un revêtement protecteur
qui doit être brûlé avant utilisation. Pour faire ça:
• Ouvrez la porte du four et réglez le bouton de
contrôle de la température sur 450°F.
• Tournez le sélecteur de fonction sur l’élément
de cuisson et l’élément de gril séparément
pendant environ 15 minutes.
• Il est important d’assurer une ventilation
adéquate pendant cette période.
NE PAS TOUCHER LES ÉLÉMENTS
CHAUFFANTS OU LES ZONES À
PROXIMITÉ
Les éléments chauffants à la surface ou à
l’intérieur de l’appareil peuvent être chauds même
s’ils sont de couleur foncée. Les zones proches des
éléments chauffants peuvent devenir suffisamment
chaudes pour provoquer des brûlures. Pendant et
après l’utilisation, ne touchez pas et ne laissez pas
de vêtements ou d’autres matériaux inflammables
entrer en contact avec les éléments chauffants ou
les zones proches d’eux jusqu’à ce qu’ils aient eu
suffisamment de temps pour refroidir. Les surfaces
de l’appareil peuvent devenir suffisamment
chaudes pour provoquer des brûlures, notamment
les ouvertures de ventilation du four et les surfaces
proches de ces ouvertures, les portes et les
fenêtres du four.
CONSERVEZ CES INSTRUCTIONS!
• Il est recommandé que cet appareil soit
connecté à un circuit séparé qui n’est partagé
avec aucun autre appareil.
• Ne nettoyez jamais les pièces de l’appareil
avec des liquides inflammables. Ces fumées
peuvent créer un risque d’incendie ou
d’explosion. N’utilisez ou n’entreposez jamais
d’essence ou d’autres vapeurs ou liquides
inflammables à l’intérieur ou à proximité de cet
appareil, le non-respect de cette consigne peut
entraîner un risque d’incendie ou d’explosion.
• Avant de nettoyer ou d’entretenir cet appareil,
débranchez complètement l’appareil de la
prise électrique ou débranchez l’alimentation
électrique de la cuisinière au niveau du
panneau de distribution domestique en retirant
le fusible ou en éteignant le disjoncteur. Le
non-respect de cette consigne peut entraîner un
choc électrique ou la mort.
• N’essayez pas de réparer ou de remplacer
une pièce de votre appareil à moins que cela
ne soit spécifiquement recommandé dans ce
manuel. Toute autre réparation doit être confiée
à un technicien de service qualifié.
• Pour votre sécurité, cet appareil ne doit jamais
être utilisé comme source de chaleur ou
comme chauffage d’appoint. Les éléments de
la cuisinière ne doivent pas être utilisés sans
ustensiles de cuisson appropriés.
• Toutes les ouvertures dans le mur derrière
l’appareil et le sol sous l’appareil doivent être
scellées.
• Gardez la zone autour de l’appareil dégagée
et exempte de matériaux combustibles,
d’essence et d’autres vapeurs inflammables.
Gardez toujours les revêtements muraux,
rideaux ou tentures combustibles à une
distance sécuritaire de la cuisinière.
• N’obstruez pas la circulation de l’air autour de
l’appareil.
• Débranchez toujours l’alimentation électrique
de l’appareil avant l’entretien.
• N’utilisez jamais votre appareil pour
réchauffer ou chauffer la pièce.
• Stockage dans ou sur l’appareil : les matériaux
inflammables ne doivent pas être stockés dans
un four ou à proximité de brûleurs de surface.
Informations de sécurité importantes
LISEZ ET SUIVEZ TOUTES LES INSTRUCTIONS DE SÉCURITÉ

EXIGENCES GÉNÉRALES DE SÉCURITÉ
Assurez-vous que l’appareil est correctement installé et mis à la terre par un technicien qualifié.
Les enfants ne doivent pas être laissés seuls ou sans surveillance dans la zone où l’appareil est utilisé. Les
enfants ne doivent jamais être autorisés à s’asseoir ou à se tenir debout sur une quelconque partie de
l’appareil.
Ne rangez pas d’articles susceptibles d’intéresser les enfants dans des armoires au-dessus d’une cuisinière
ou sur la protection arrière d’une cuisinière. Les enfants grimpant sur la cuisinière pour atteindre des objets
pourraient être gravement blessés.
Pour éliminer le risque de brûlures ou d’incendie en atteignant les unités de surface chauffées, les
espaces de rangement situés au-dessus des unités de surface doivent être évités. Si des armoires de
rangement doivent être fournies, le risque peut être réduit en installant une hotte de cuisinière qui dépasse
horizontalement d’au moins 5 pouces (12,7 cm) au-delà du bas des armoires.
Ne jamais porter de vêtements amples ou suspendus pendant l’utilisation de l’appareil.
N’utilisez que des maniques sèches. Des maniques humides ou humides sur des surfaces chaudes peuvent
provoquer des brûlures dues à la vapeur. Ne laissez pas la manique toucher les éléments chauffants
chauds. N’utilisez pas de serviette ou autre tissu volumineux.
Si l’alimentation d’une table de cuisson électrique est coupée alors qu’un élément de surface est allumé,
l’élément de surface se rallumera dès que l’alimentation sera rétablie. En cas de panne de courant, le fait
de ne pas tourner tous les boutons des éléments de surface en position OFF peut entraîner l’inflammation
d’articles sur ou à proximité de la table de cuisson, entraînant des blessures graves ou la mort.
Pour éviter la possibilité d’une brûlure ou d’un choc électrique, assurez-vous toujours que les commandes
de tous les éléments de surface sont en position OFF et que tous les serpentins sont froids avant de tenter
de soulever ou de retirer un élément de cuisson à serpentin.
Cette cuisinière est conçue et fabriquée uniquement pour la cuisson d’aliments domestiques (ménagers) et
ne convient à aucune application non domestique et ne doit donc pas être utilisée dans un environnement
commercial. La garantie de la cuisinière sera annulée si la cuisinière est utilisée dans un environnement
non domestique.
ATTENTION
Pour réduire les risques de brûlures, ne déplacez
pas cet appareil lorsqu’il est chaud. Pour
réduire le risque de blessure dû au basculement
de l’appareil, vérifiez la réinstallation de cet
appareil dans le dispositif anti-basculement fourni
après avoir remis l’appareil dans sa position
d’installation d’origine.
ATTENTION
Le fabricant décline toute responsabilité en
cas de blessures corporelles ou de dommages
matériels causés par une utilisation incorrecte ou
inappropriée de la cuisinière.
CONSERVEZ CES INSTRUCTIONS!
Informations de sécurité importantes
LISEZ ET SUIVEZ TOUTES LES INSTRUCTIONS DE SÉCURITÉ

CONSERVEZ CES INSTRUCTIONS!
EXIGENCES DE SÉCURITÉ DU FOUR
Soyez prudent lorsque vous ouvrez la porte. Laissez
l’air chaud ou la vapeur s’échapper avant de retirer
ou de remplacer les aliments.
Ne chauffez pas les contenants alimentaires non
ouverts. L’accumulation de pression peut faire
éclater le récipient et entraîner des blessures.
Gardez les évents du four dégagés.
Placez toujours les grilles du four à l’endroit désiré
pendant que le four est froid. Si la grille doit être
déplacée alors que le four est chaud, ne laissez
pas le support de casserole entrer en contact avec
l’élément chauffant chaud du four.
N’utilisez pas le four si un élément chauffant
développe une tache incandescente pendant
l’utilisation ou montre d’autres signes de
dommages. Un point lumineux indique que
l’élément chauffant peut tomber en panne et
présenter un risque potentiel de brûlure, d’incendie
ou d’électrocution. Éteignez immédiatement le
four et faites remplacer l’élément chauffant par un
technicien qualifié.
Ne recouvrez pas les parois du four, les grilles ou
les bols des brûleurs de papier d’aluminium.
Ne placez pas d’étagères, de casseroles, de
plaques à pâtisserie, de lèchefrites ou d’autres
ustensiles de cuisine au fond de la chambre du four.
Placez toujours sur une grille du four.
Ne nettoyez jamais le four avec des appareils de
nettoyage à vapeur à haute pression.
Ne laissez rien sur le dessus de l’évent du four. Ne
couvrez jamais l’ouverture de ventilation du four
avec du papier d’aluminium ou tout autre matériau.
EXIGENCES DE SÉCURITÉ SUR LA PLAQUE
DE CUISSON
Utilisez la bonne taille de casserole. Cet appareil
est équipé de quatre brûleurs de tailles différentes.
Sélectionnez des ustensiles dont le fond plat est
suffisamment grand pour couvrir la surface de
l’élément chauffant. L’utilisation d’ustensiles trop
petits exposera une partie de l’élément chauffant à
un contact direct et peut provoquer l’inflammation
des vêtements. Une bonne relation entre l’ustensile
et le brûleur améliorera également l’efficacité.
Ne laissez jamais l’appareil sans surveillance
pendant son utilisation. Bouillir provoque la fumée
et les déversements graisseux peuvent s’enflammer.
Ne laissez jamais l’huile sans surveillance pendant
la friture. Si on la laisse chauffer au-delà de
son point de fumée, l’huile peut s’enflammer et
provoquer un incendie qui peut se propager aux
armoires environnantes. Utilisez un thermomètre
à graisse profonde chaque fois que possible pour
surveiller la température de l’huile.
Pour éviter les déversements d’huile et les incendies,
utilisez une quantité minimale d’huile lorsque vous
faites frire dans une poêle peu profonde et évitez
de cuire des aliments congelés avec des quantités
excessives de glace.
Seuls certains types d’ustensiles en verre,
céramique, faïence ou autres émaillés conviennent
pour un service sur la table de cuisson sans se
casser en raison d’un changement brusque de
température.
Pour réduire les risques de brûlures, d’inflammation
de matériaux inflammables et de déversements dus
à un contact involontaire, la poignée d’un ustensile
doit être positionnée de sorte qu’elle soit tournée
vers l’intérieur et ne dépasse pas les brûleurs
adjacents.
Ne cuisinez pas sur une table de cuisson cassée.
Si la table de cuisson se brise, les solutions de
nettoyage et les déversements peuvent pénétrer
dans la table de cuisson cassée et créer un risque
de choc électrique. Contactez immédiatement un
technicien qualifié.
N’utilisez pas une plaque chauffante ou une longue
casserole sur plus d’un brûleur à la fois.
Informations de sécurité importantes
LISEZ ET SUIVEZ TOUTES LES INSTRUCTIONS DE SÉCURITÉ

CONSERVEZ CES INSTRUCTIONS!
28
INSTRUCTIONS DE MISE À LA TERRE
Pour les modèles vendus au Canada seulement : DRCA240BSS2
Cet appareil doit être mis à la terre. La mise à la terre réduit le risque de choc électrique en fournissant un
fil d’échappement pour le courant électrique.
Cet appareil est doté d’un cordon d’alimentation doté d’un fil de mise à la terre avec une fiche à 4
broches. Le cordon d’alimentation doit être branché dans une prise correctement mise à la terre. Si la prise
n’est pas une fiche à 4 broches, elle doit être remplacée par une prise murale à 4 broches correctement
mise à la terre. La plaque signalétique indique la tension et la fréquence pour lesquelles l’appareil est
conçu.
AVERTISSEMENT - Une mauvaise utilisation de la fiche de mise à la terre peut entraîner un risque de choc
électrique. Consultez un électricien qualifié si les instructions de mise à la terre ne sont pas entièrement
comprises ou si vous avez des doutes quant à la bonne mise à la terre de l’appareil.
Ne connectez pas l’appareil à des rallonges, des adaptateurs ou avec un autre appareil dans la même
prise murale.
Ne pas épisser le cordon d’alimentation. Ne coupez ou ne retirez en aucun cas la broche de mise à la
terre du cordon d’alimentation.
Si le cordon d’alimentation est endommagé, il doit être remplacé par le fabricant, son agent de service ou
une personne qualifiée similaire afin d’éviter tout danger.
Remarque : Éteindre l’appareil ne le déconnecte pas de l’alimentation électrique.
Il est recommandé de placer le cordon d’alimentation et la fiche parallèlement au sol afin que le cordon
soit parallèle au sol.
Informations de sécurité importantes
LISEZ ET SUIVEZ TOUTES LES INSTRUCTIONS DE SÉCURITÉ
29
INSTRUCTIONS D’INSTALLATION
AVERTISSEMENT
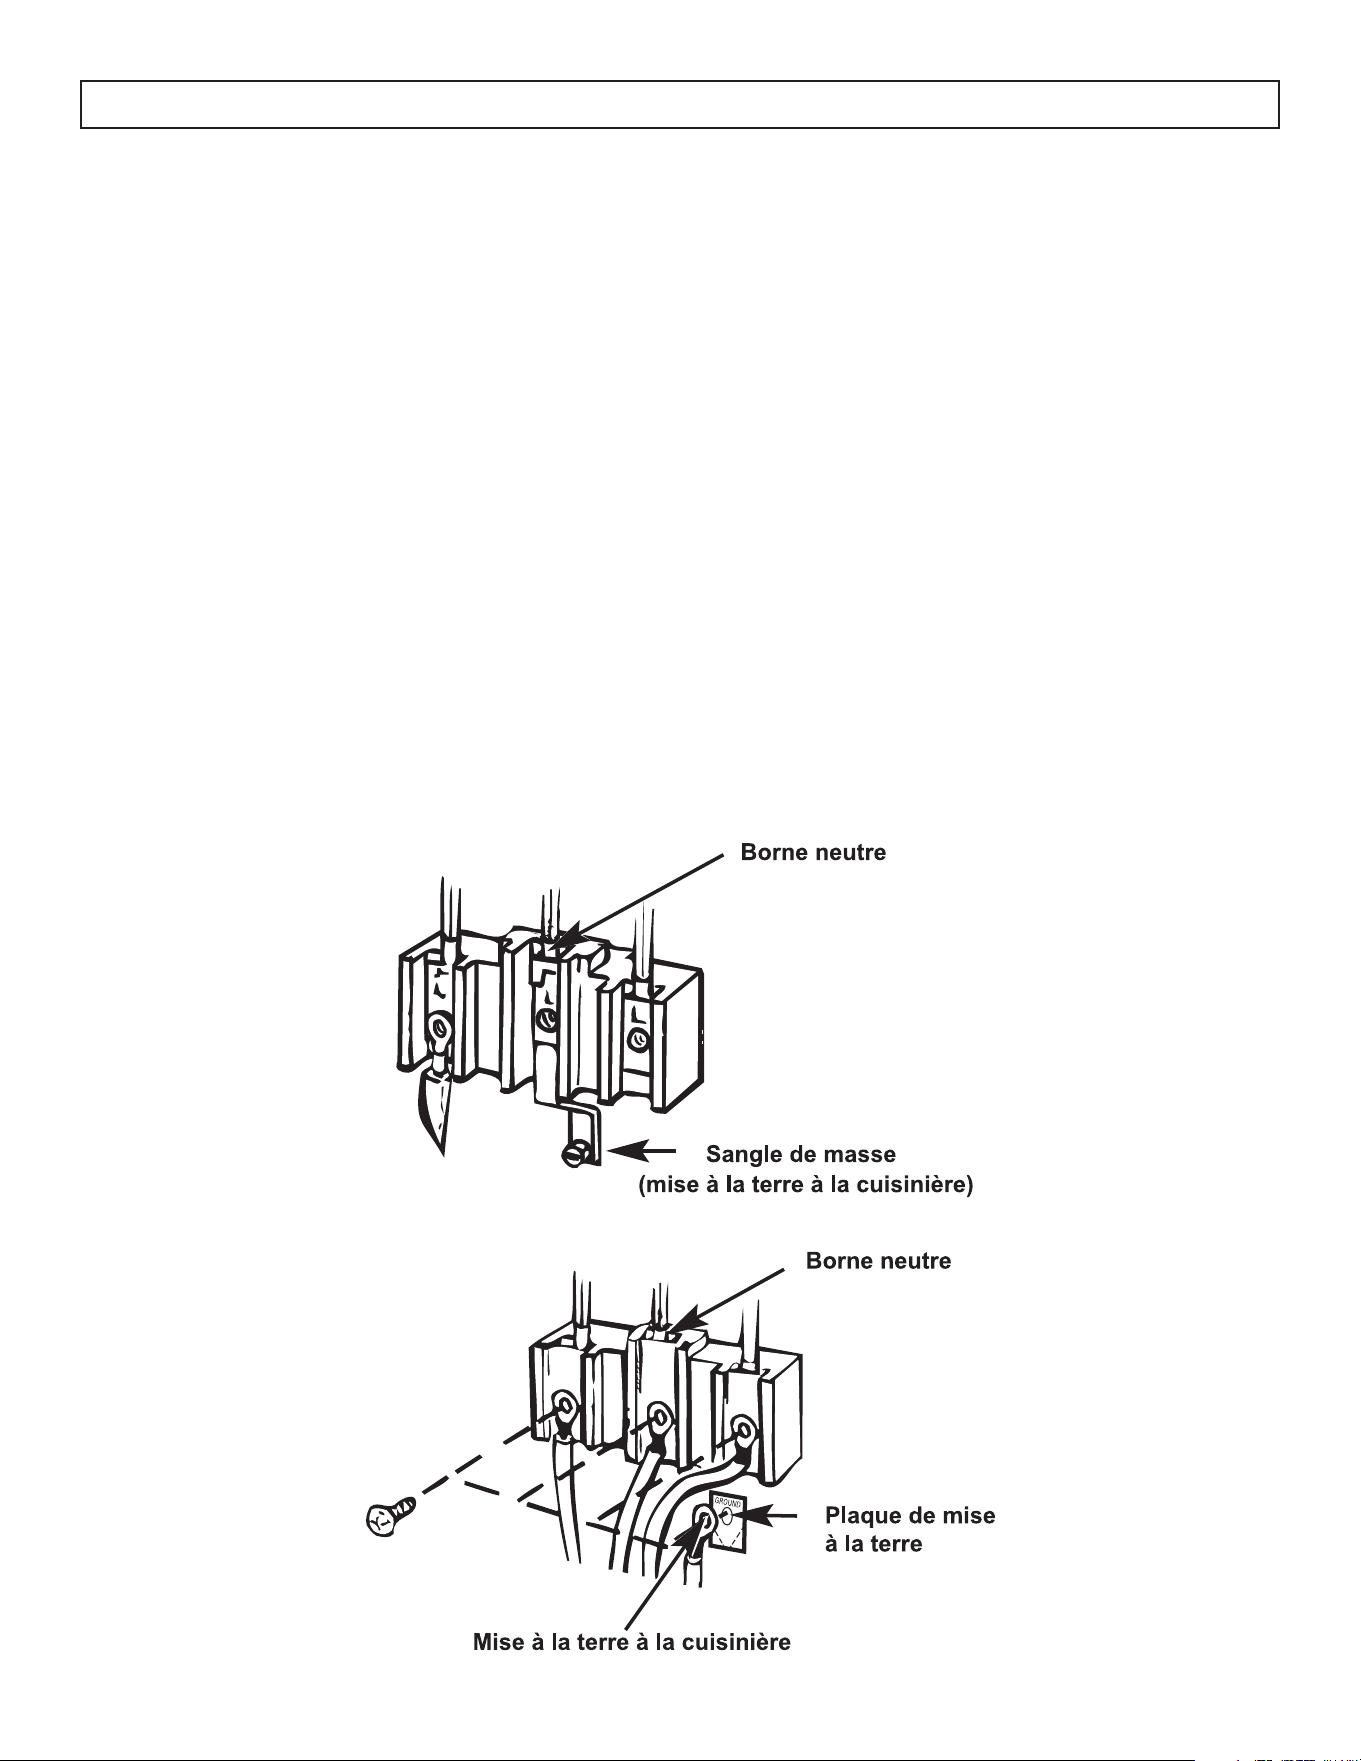
Le fil neutre du circuit d’alimentation est connecté à la borne neutre située au centre du bloc de connexion.
Les câbles d’alimentation doivent être connectés aux bornes extérieures (de couleur laiton). Le 4e fil de
mise à la terre doit être connecté au châssis de la cuisinière avec la plaque de mise à la terre et la vis de
mise à la terre.
1. Retirez les 3 vis du bloc de connecteur.
2. Retirez la vis de mise à la terre et la sangle de l’emplacement central du bloc de connexion et la
connexion à vis sur le cadre de la cuisinière.
3. Insérez les vis dans chaque anneau de borne du cordon d’alimentation et dans le bloc de connexion
jusqu’à ce que la vis s’engage dans l’écrou. Assurez-vous que le fil central est connecté à la vis centrale
du bloc connecteur. Bien serrer les vis.
4. Fixez le fil de terre au cadre de la cuisinière.
INSTALLATION DU CORDON D’ALIMENTATION À 4 FILS
30
ACCESSOIRES
1. Support anti-basculement (2 jeux)
2. Vis (2 jeux)
3. Chaîne (1 jeu en plus du jeu préinstallé sur
l’appareil)
4. Grilles de four (x2)
INSTRUCTIONS D’UTILISATION
CRÉMAILLÈRE EASYFIX
La grille a 5 positions. Insérez la grille avec le dos à
l’arrière de l’espace.
Laissez au moins 1 cm d’espace entre le capot du
ventilateur et la grille.
Arrière
Devant
Fig 3
DIMENSIONS
Les dimensions de cet appareil sont:
A. 35,4 ~ 36,6 pouces (90 ~ 93 cm) du sol au dessus de la table de cuisson.
B. 25,25 pouces (64,2 cm) de profondeur
C. 23,5 pouces (59,5 cm) de large
INSTRUCTIONS DE MISE À NIVEAU
L’appareil doit être de niveau pour fonctionner
correctement et en toute sécurité. Il y a quatre pieds
de nivellement situés aux coins du bas de l’appareil.
Réglez les pieds de nivellement jusqu’à ce que
l’appareil soit de niveau. Utilisez un niveau de
charpentier pour confirmer.
INSTRUCTIONS D’UTILISATION
31
Il est de la responsabilité de l’installateur de
se conformer aux dégagements d’installation
spécifiés dans le manuel. Les dimensions minimales
d’ouverture de l’armoire et les dégagements doivent
être utilisés. Les dégagements minimaux doivent être
respectés entre la surface de cuisson de l’appareil
et la surface horizontale au-dessus de la table de
cuisson.
30 pouces (65 cm) est le dégagement minimum
entre le haut de la surface de cuisson et le bas
d’une armoire en bois ou en métal non protégée.
Un espace de 4 pouces (10 cm) doit être prévu
des deux côtés de la cuisinière pour permettre une
bonne circulation de l’air.
LISTE DES COMPOSANTS
1. Table de cuisson
2. Panneau de configuration
3. Poignée de porte du four
4. Porte du four
5. Pieds réglables

ATTENTION
Assurez-vous que les poignées des ustensiles de
cuisine ne dépassent pas du bord de la cuisinière
pour éviter d’être renversées par accident. Cela
rend également plus difficile pour les enfants
d’atteindre les ustensiles de cuisine chauds et de
se blesser.
32
INSTRUCTIONS D’UTILISATION
AVANT DE COMMENCER
Déballez soigneusement l’appareil et assurez-
vous que le four, la table de cuisson ou la structure
ne sont pas endommagés et que la porte du
four s’ouvre et se ferme correctement. Retirez
tous les matériaux d’emballage tels que les
sacs en plastique, la mousse de polystyrène, les
sangles d’emballage, etc. Gardez les matériaux
d’emballage hors de portée des enfants en tout
temps pour éviter d’éventuelles blessures graves.
La gamme a été minutieusement testée pour un
fonctionnement sûr et efficace. Cependant, comme
pour tout appareil, il existe des précautions
d’installation et de sécurité spécifiques qui doivent
être suivies pour assurer un fonctionnement sûr et
satisfaisant.
COMMANDES DE CUISSON EN SURFACE
• Les éléments chauffants de surface de l’appareil
sont conçus pour une variété de réglages de
chaleur. MAX indique le réglage le plus élevé.
MIN indique le réglage le plus bas.
• Le passage à un réglage de chaleur plus élevé
se produira plus rapidement que le passage à
un réglage de chaleur plus faible car il faudra
du temps pour que la chaleur se dissipe.
• Pour utiliser le brûleur de surface, enfoncez le
bouton de commande et tournez-le jusqu’au
réglage désiré. Le bouton n’a besoin d’être
enfoncé que lorsque vous sortez de la position
“OFF”. Lorsque le bouton est dans n’importe
quelle position autre que “OFF”, il peut être
tourné sans enfoncer.
• Utilisez des ustensiles de cuisine de poids moyen
ou lourd. Les ustensiles de cuisine en aluminium
conduisent la chaleur plus rapidement que
les autres métaux. Les ustensiles de cuisine en
fonte et en fonte revêtue absorbent lentement
la chaleur, mais cuisent généralement
uniformément à des réglages de chaleur faibles
ou moyens. Les casseroles en acier peuvent
cuire de manière inégale si elles ne sont pas
combinées avec d’autres métaux.
• Ne remplissez pas trop les ustensiles de cuisson
avec de la graisse qui pourrait déborder
lors de l’ajout d’aliments. Les aliments glacés
bouillonnent vigoureusement. Surveillez les
aliments frire à haute température. Gardez
la cuisinière et la hotte exemptes de graisse
accumulée.
• Pour conserver le maximum d’énergie de
cuisson, les casseroles doivent avoir un fond
plat, des côtés droits et des couvercles bien
ajustés. Faites correspondre la taille de la
casserole à la taille de l’élément de surface.
Une casserole qui s’étend sur plus d’un pouce
au-delà du bord de l’élément emprisonne la
chaleur, ce qui provoque des “fissures” (fissures
fines) sur la vitrocéramique.
• Seuls certains types d’ustensiles en verre, en
céramique, en terre cuite ou autres émaillés
peuvent être utilisés sur la table de cuisson.
Utilisez une chaleur faible ou moyenne lorsque
vous utilisez ce type d’ustensiles de cuisine.
• Essuyez les déversements avec un chiffon
humide dès qu’ils refroidissent. Assurez-vous
que le bouton de commande est réglé sur OFF.
• Ne laissez jamais une casserole vide ou qui a
bouilli à sec sur un élément de surface chaud. La
casserole pourrait surchauffer et endommager
la casserole ou la surface de l’appareil.
Assurez-vous toujours que tous les boutons de
commande sont sur OFF et que les voyants sont
éteints lorsque l’appareil n’est pas utilisé.
• Assurez-vous que l’élément est éteint lorsque
la cuisson est terminée. Un voyant s’allume
lorsqu’un élément chauffant est allumé.
33
INSTRUCTIONS D’UTILISATION
PANNEAU DE COMMANDE
PANNEAU DE COMMANDE
1. Minuterie
2. Bouton de commande des fonctions du four
3. Bouton du thermostat du four
4. Bouton de surface de cuisson
BOUTON DE SURFACE DE CUISSON
Ne jamais laisser les aliments sans
surveillance pendant la cuisson. Les
débordements provoquent de la fumée. Les
déversements graisseux peuvent prendre
feu.
REMARQUE
L’icône au-dessus du bouton indique quel brûleur le
bouton contrôle.
COMMANDES DE CUISSON AU FOUR
Le four dispose de 6 réglages de four
12 3
4
Marche/
Arrêt
Décongélation Cuisson
Cuisson à
convection
Rôtissage à
convection
Gril
34
INSTRUCTIONS D’UTILISATION
Conversions de température
Fahrenheit 140 150 170 200 250 275 300 325 350 375 400 425 450 475 500 525 550
Celsius 60 65 75 95 120 135 150 160 175 190 205 220 230 245 260 275 290
FONCTIONS DE FOUR
Marche/Arrêt
Indique si le four a été allumé pour commencer la
cuisson ou éteint lorsque la cuisson est terminée.
Décongélation
Le thermostat et les voyants d’avertissement du
four s’allumeront et le ventilateur commencera
à fonctionner. Pour utiliser la fonction de
décongélation, placez vos aliments congelés dans
le four sur une grille dans la troisième fente à partir
du bas. Il est recommandé de placer une plaque
de four sous les aliments en décongélation pour
récupérer l’eau accumulée pendant le processus.
REMARQUE
Cette fonction NE FAIT PAS cuire ou cuire des
aliments, elle aidera seulement à décongeler les
aliments.
Gril
Le thermostat et les voyants d’avertissement du four
s’allumeront et la cuisson est effectué par l’élément
chauffant supérieur. Utilisez une lèchefrite sur une
tablette de four placée près de l’élément de gril.
Règlez la température à
450 °F – Gril (Minimum) ou 500 °F – Gril
(Maximum)
Aucun préchauffage necessaire
BOUTON DE TEMPÉRATURE DU FOUR
Le bouton du four est utilisé pour choisir la
température de cuisson du four et est marqué par
incréments de 25 degrés, de 200°F à 500°F (95°C
à 260°C).
Pour utiliser le four, tournez le bouton du sélecteur
de fonction sur cuisson et tournez le bouton de
température du four sur la température de cuisson
souhaitée.
Cuisson
Le thermostat et les voyants d’avertissement du four
s’allumeront et les éléments chauffants inférieur et
supérieur commenceront à fonctionner. La fonction
Cuisson émet de la chaleur, assurant une cuisson
uniforme des aliments.
REMARQUE
Il est recommandé de préchauffer le four pendant
10 minutes et il est préférable d’utiliser une seule
grille à la fois dans ce mode.
Cuisson à convection
Le thermostat et les voyants d’avertissement du four
s’allumeront, et les éléments chauffants supérieur et
inférieur ainsi que le ventilateur commenceront à
fonctionner. La cuisson est effectuée par les éléments
chauffants inférieur et supérieur à l’intérieur du four
et par le ventilateur qui assure la circulation de l’air,
pour une cuisson et brunissage égal.
REMARQUE
Il est recommandé de préchauffer le four pendant
10 minutes.
Rôtissage à convection
Le thermostat et les voyants d’avertissement du four
s’allumeront, et l’élément chauffant supérieur ainsi
que le ventilateur commenceront pour livrer des
viandes juteuses et savoureuses.
Aucun préchauffage nécessaire.
36
INSTRUCTIONS D’UTILISATION
HORLOGE DIGITALE
RÉGLAGE DE L’HEURE
L’heure doit être réglée avant de commencer à
utiliser le four. Après le branchement électrique, le
symbole Cuisson automatique et « 00:00 » ou «
Appuyez sur le bouton “. . .” pendant 2 secondes
pour désactiver le verrouillage et le point au milieu
de l’écran commencera à clignoter.
Réglez l’heure pendant que le point clignote à l’aide
des boutons « + » et « - ».
Après quelques secondes, le point cessera de
clignoter et restera allumé.
VERROUILLAGE DES TOUCHES
Le verrouillage des touches s’active
automatiquement après que la minuterie n’a pas été
utilisée pendant 7 secondes. Le symbole apparaîtra
et restera allumé. Pour déverrouiller les boutons
de la minuterie, appuyez et maintenez le bouton
“. . .” pendant 2 secondes. Une fois déverrouillé,
l’opération souhaitée peut être effectuée.
35
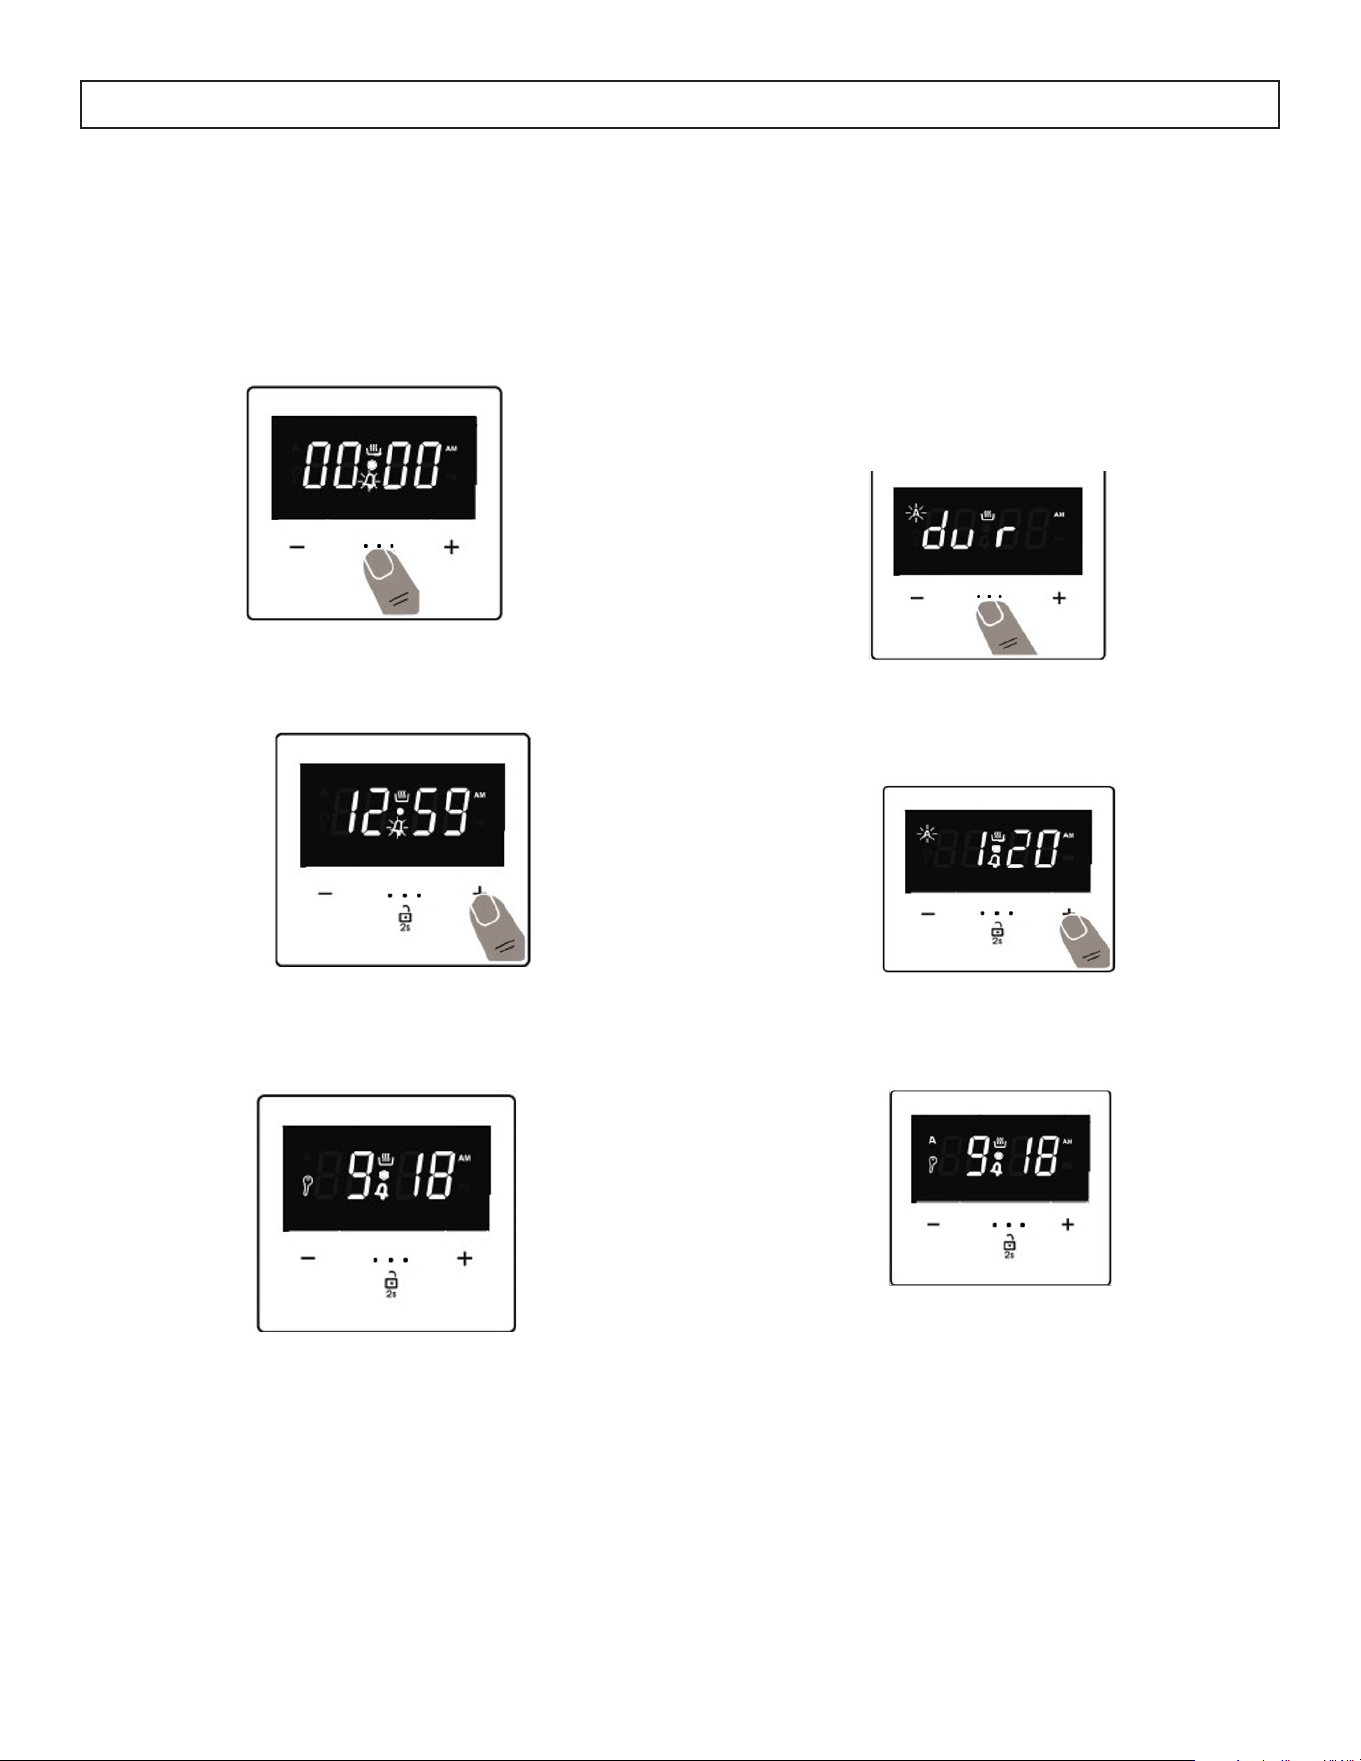
INSTRUCTIONS D’UTILISATION
RÉGLAGE DU TEMPS D’AVERTISSEMENT SONORE
L’heure de l’avertissement sonore peut être réglée à
n’importe quelle heure entre « 00:00 » et « 23:59
». Le délai d’avertissement sonore sert uniquement
à des fins d’avertissement. Le four NE SERA PAS
activé avec cette fonction.
Appuyez sur le bouton “. . .”. Le symbole Minuterie
commencera à clignoter et « 000 » s’affichera.
Sélectionnez la période souhaitée à l’aide des
touches « + » et « - ». pendant que le symbole
Minuterie clignote
Le symbole Minuterie restera allumé, l’heure sera
enregistrée et l’avertissement sera réglé.
Lorsque la minuterie atteint zéro, un avertissement
sonore retentit et le symbole Minuterie clignote
à l’écran. Appuyez sur n’importe quelle touche
pour arrêter l’avertissement sonore. Appuyez sur
“. . .” pendant 2 secondes et le symbole Minuterie
disparaîtra. L’horloge sera maintenant affichée.
MINUTERIE DE CUISSON SEMI-AUTOMATIQUE
Cette fonction vous aide à cuisiner pendant une
période de temps fixe. Une plage de temps
comprise entre 0 et 10 heures peut être définie.
Préparez les aliments pour la cuisson et mettez-les
au four.
Sélectionnez la fonction de cuisine désirée et la
température en utilisant les boutons de commande.
Appuyez sur le bouton “. . .” jusqu’à ce que vous
voyiez le symbole “dur” sur l’écran d’affichage. Le
symbole de Cuisson automatique clignotera.
Sélectionnez la durée de cuisson souhaitée à l’aide
des touches « + » et « - ».
L’heure actuelle réapparaît à l’écran. Les symboles
de Cuisson automatique et de Cuisson manuelle
resteront allumés.
Lorsque la minuterie atteint zéro, le four s’éteint
et un avertissement sonore retentit. Le symbole
de Cuisson automatique clignotera. Tournez les
deux boutons de commande en position “0” et
appuyez sur n’importe quelle touche de la minuterie
pour arrêter le son d’avertissement. Appuyez sur
“. . .” pendant 2 secondes, le symbole de Cuisson
automatique disparaîtra et la minuterie reviendra à
la fonction manuelle.
36
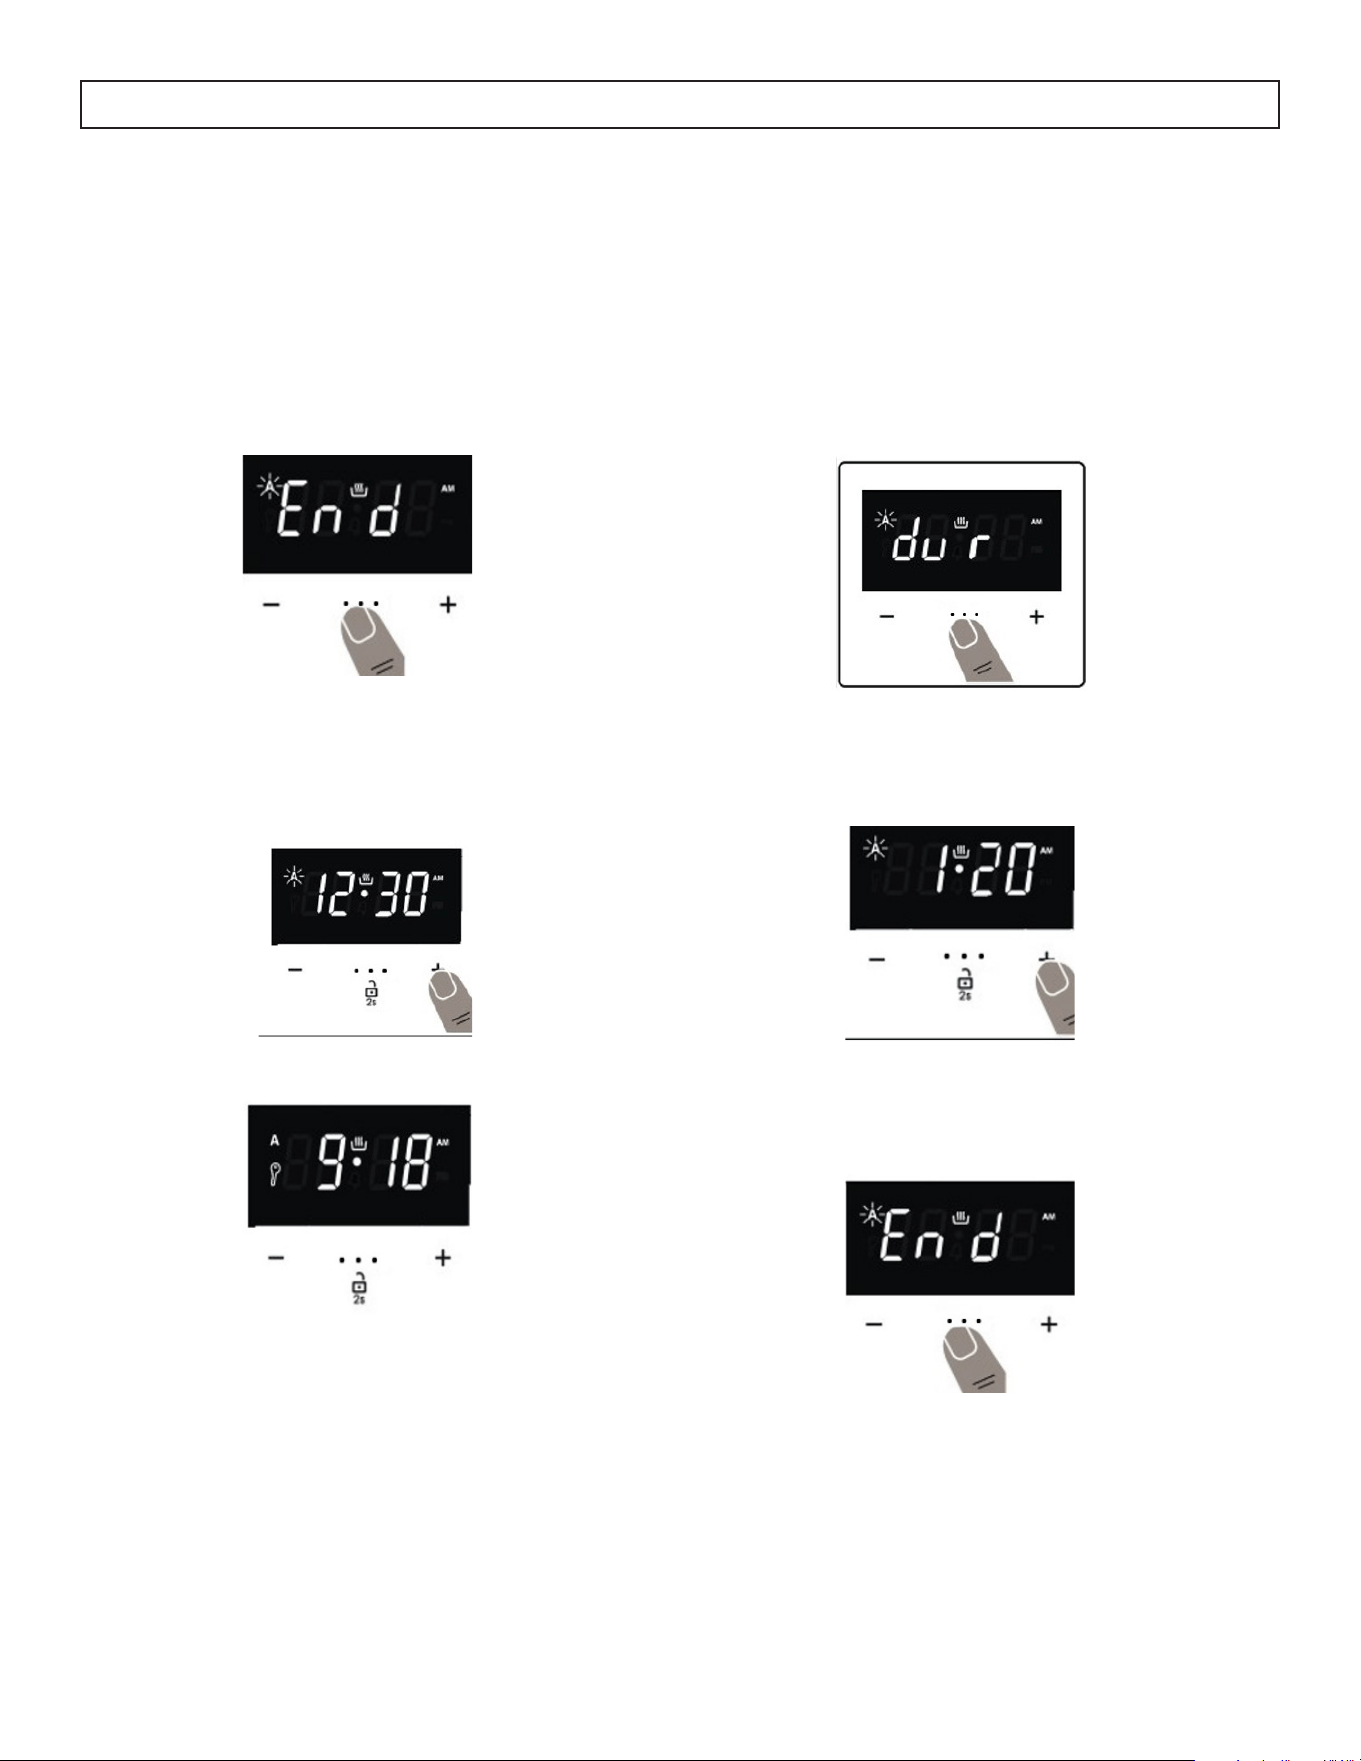
INSTRUCTIONS D’UTILISATION
AJUSTEMENT SEMI-AUTOMATIQUE DE L’HEURE
(TEMPS DE FIN)
Cette fonction démarre automatiquement le four afin
que la cuisson se termine à une heure définie. Vous
pouvez définir une heure de fin jusqu’à 10 heures
après l’heure actuelle de la journée. Préparez les
aliments pour la cuisson et mettez-les au four.
Sélectionnez la fonction de cuisson et la température
souhaitées à l’aide des boutons de commande.
Appuyez sur “. . .” jusqu’à ce que “End”
apparaisse sur l’écran d’affichage.
Le symbole de Cuisson automatique et l’heure
actuelle clignotent.
Utilisez les boutons “+” et “-” pour régler l’heure de
L’heure actuelle réapparaît à l’écran. Les symboles
de Cuisson automatique et de Cuisson manuelle
resteront allumés.
Lorsque la minuterie atteint zéro, le four s’éteint
et un avertissement sonore retentit. Le symbole
de Cuisson automatique clignotera. Tournez les
deux boutons de commande en position “0” et
appuyez sur n’importe quelle touche de la minuterie
pour arrêter le son d’avertissement. Appuyez sur
“. . .” pendant 2 secondes, le symbole de Cuisson
automatique disparaîtra et la minuterie reviendra à
la fonction manuelle.
PROGRAMME ENTIÈREMENT AUTOMATIQUE
Cette fonction permet de démarrer la cuisson après
un certain laps de temps et pour une certaine
durée. Une heure jusqu’à 23 heures et 59 minutes
après l’heure actuelle peut être réglée. Préparez les
aliments pour la cuisson et mettez-les au four.
Sélectionnez la fonction de cuisson souhaitée et la
température à l’aide des manettes de commande.
Appuyez sur “. . .” jusqu’à ce que vous voyiez le
symbole “dur” sur l’écran d’affichage. Le symbole
de Cuisson automatique clignotera.
Sélectionnez la durée de cuisson souhaitée à l’aide
des touches « + » et « - ».
Appuyez sur “. . .” jusqu’à ce que “End”
apparaisse sur l’écran d’affichage.
Le symbole de Cuisson automatique et l’heure
actuelle clignotent.
37
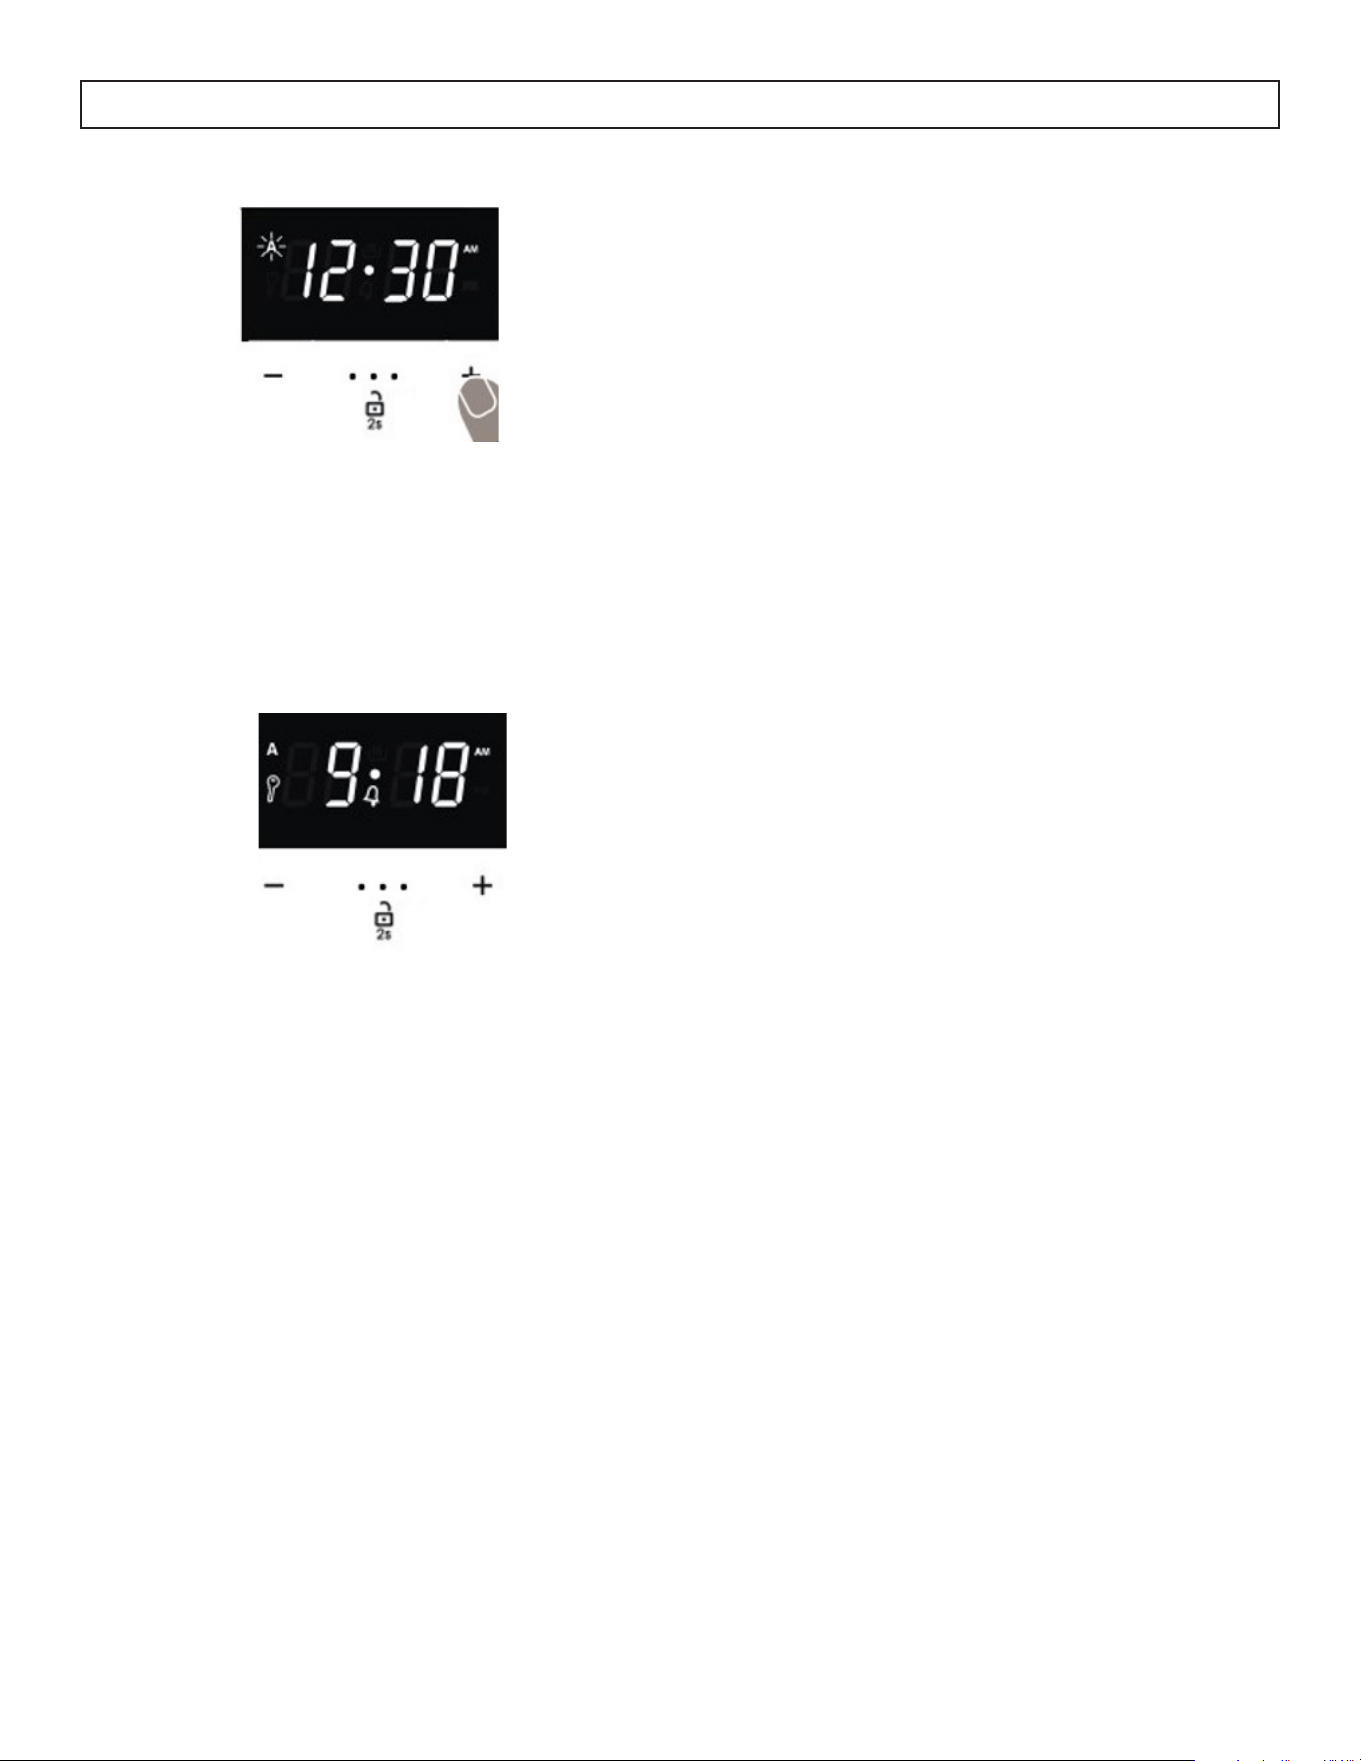
INSTRUCTIONS D’UTILISATION
Sélectionnez l’heure de fin souhaitée à l’aide des
touches « + » et « - ». Le symbole Cuisson manuelle
disparaîtra. Ajoutez la période de cuisson à l’heure
actuelle de la journée. Vous pouvez régler une
heure jusqu’à 23 heures et 59 minutes après cela.
L’heure actuelle réapparaîtra sur l’affichage et le
symbole de cuisson automatique restera allumé.
Le temps de fonctionnement sera calculé et le four
démarrera. Le symbole Cuisson manuelle réapparaît
à l’écran pour que la cuisson se termine à l’heure
de fin programmée. Lorsque la minuterie atteint
zéro, le four s’éteint, un avertissement sonore
retentit et le symbole de Cuisson automatique
clignote. Tournez les deux boutons de commande
en position “0” et appuyez sur n’importe quelle
touche pour arrêter le son. Le symbole disparaît et
la minuterie repasse en mode manuel. Appuyez sur
“. . .” pendant 2 secondes, le symbole de Cuisson
automatique disparaîtra et la minuterie eviendra en
mode manuel.
RÉGLAGE DU SON
Pour régler le volume de l’avertissement sonore,
lorsque l’heure actuelle est affichée, appuyez sur les
boutons « + » et « - ». Le point au milieu de l’écran
commencera à clignoter.
Appuyez sur “. . .” pour afficher le niveau de
volume actuel.
Appuyer sur le bouton « - » affiche un niveau de
volume différent qui retentira également.
Il y a un total de trois niveaux de volume.
Une fois qu’un niveau de volume a été choisi,
n’appuyez sur aucun autre bouton.
Après un court instant, le niveau de volume
sélectionné sera enregistré.
38
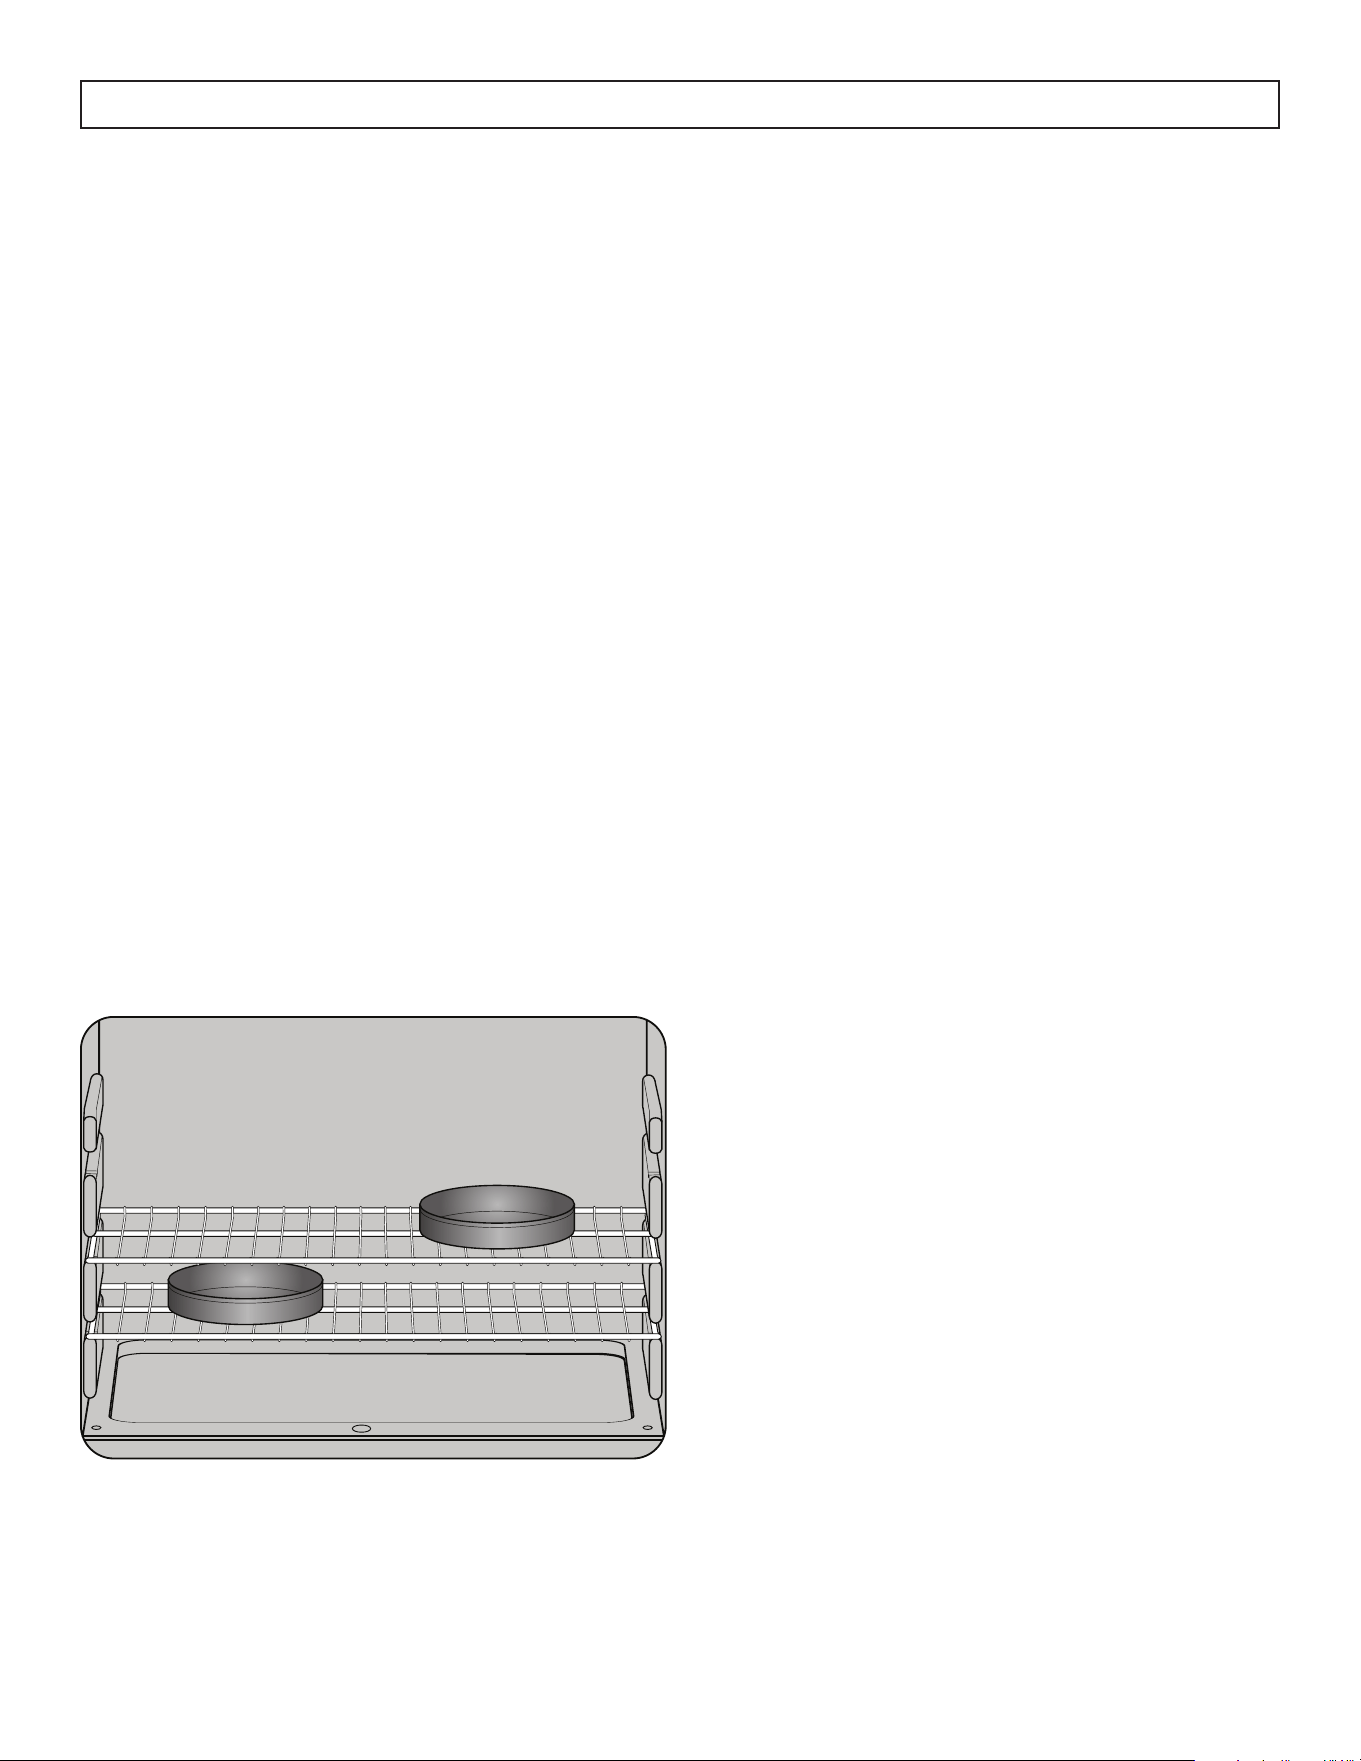
INSTRUCTIONS D’UTILISATION
CUISSON ET RÔTISSAGE AU FOUR
1. Positionnez les grilles dans le four. Si vous
cuisinez sur deux grilles en même temps,
décalez les casseroles pour une meilleure
circulation de la chaleur.
2. Fermez la porte du four. Tourner le bouton du
sélecteur de fonction pour cuire. Tourner le
bouton de température du four à la température
désirée.
3. Laisser le four préchauffer si nécessaire.
4. Placez les aliments au centre de la grille du
four. Laisser au moins 2 pouces entre l’extrémité
du plat et la paroi du four ou tout autre plat
adjacent.
5. Vérifiez régulièrement la nourriture. Retirez
une fois terminé et assurez-vous que le four est
éteint.
CONSEILS DE CUISSON ET DE RÔTISSAGE
• Suivez une recette testée et mesurez
soigneusement les ingrédients. Si vous utilisez
un mélange d’emballages, suivez les instructions
sur l’étiquette.
• N’ouvrez pas la porte du four pendant la
cuisson ou le rôtissage. La chaleur sera
perdue et le temps de cuisson devra peut-être
être prolongé. Si vous devez ouvrir la porte,
ouvrez-la partiellement et refermez-la le plus
rapidement possible.
• La torréfaction est une cuisson par chaleur
sèche. La viande tendre ou la volaille peuvent
être rôties à découvert. Les températures
de torréfaction, qui doivent être basses et
constantes, limitent les éclaboussures. Lors
du rôtissage, il n’est pas nécessaire de saisir,
d’arroser, de couvrir ou d’ajouter de l’eau à la
viande.
• Les rôtis de viande congelés peuvent être cuits
sans décongélation, mais prévoyez 10 à 25
minutes de temps supplémentaire par livre de
viande (10 minutes par livre pour les rôtis de
moins de 5 livres, plus de temps pour les gros
rôtis).
• Décongelez la volaille congelée avant de la rôtir
pour assurer une cuisson uniforme. Certaines
volailles congelées commerciales peuvent être
cuites avec succès sans décongélation. Suivez
les instructions données sur l’étiquette de
l’emballage.
39
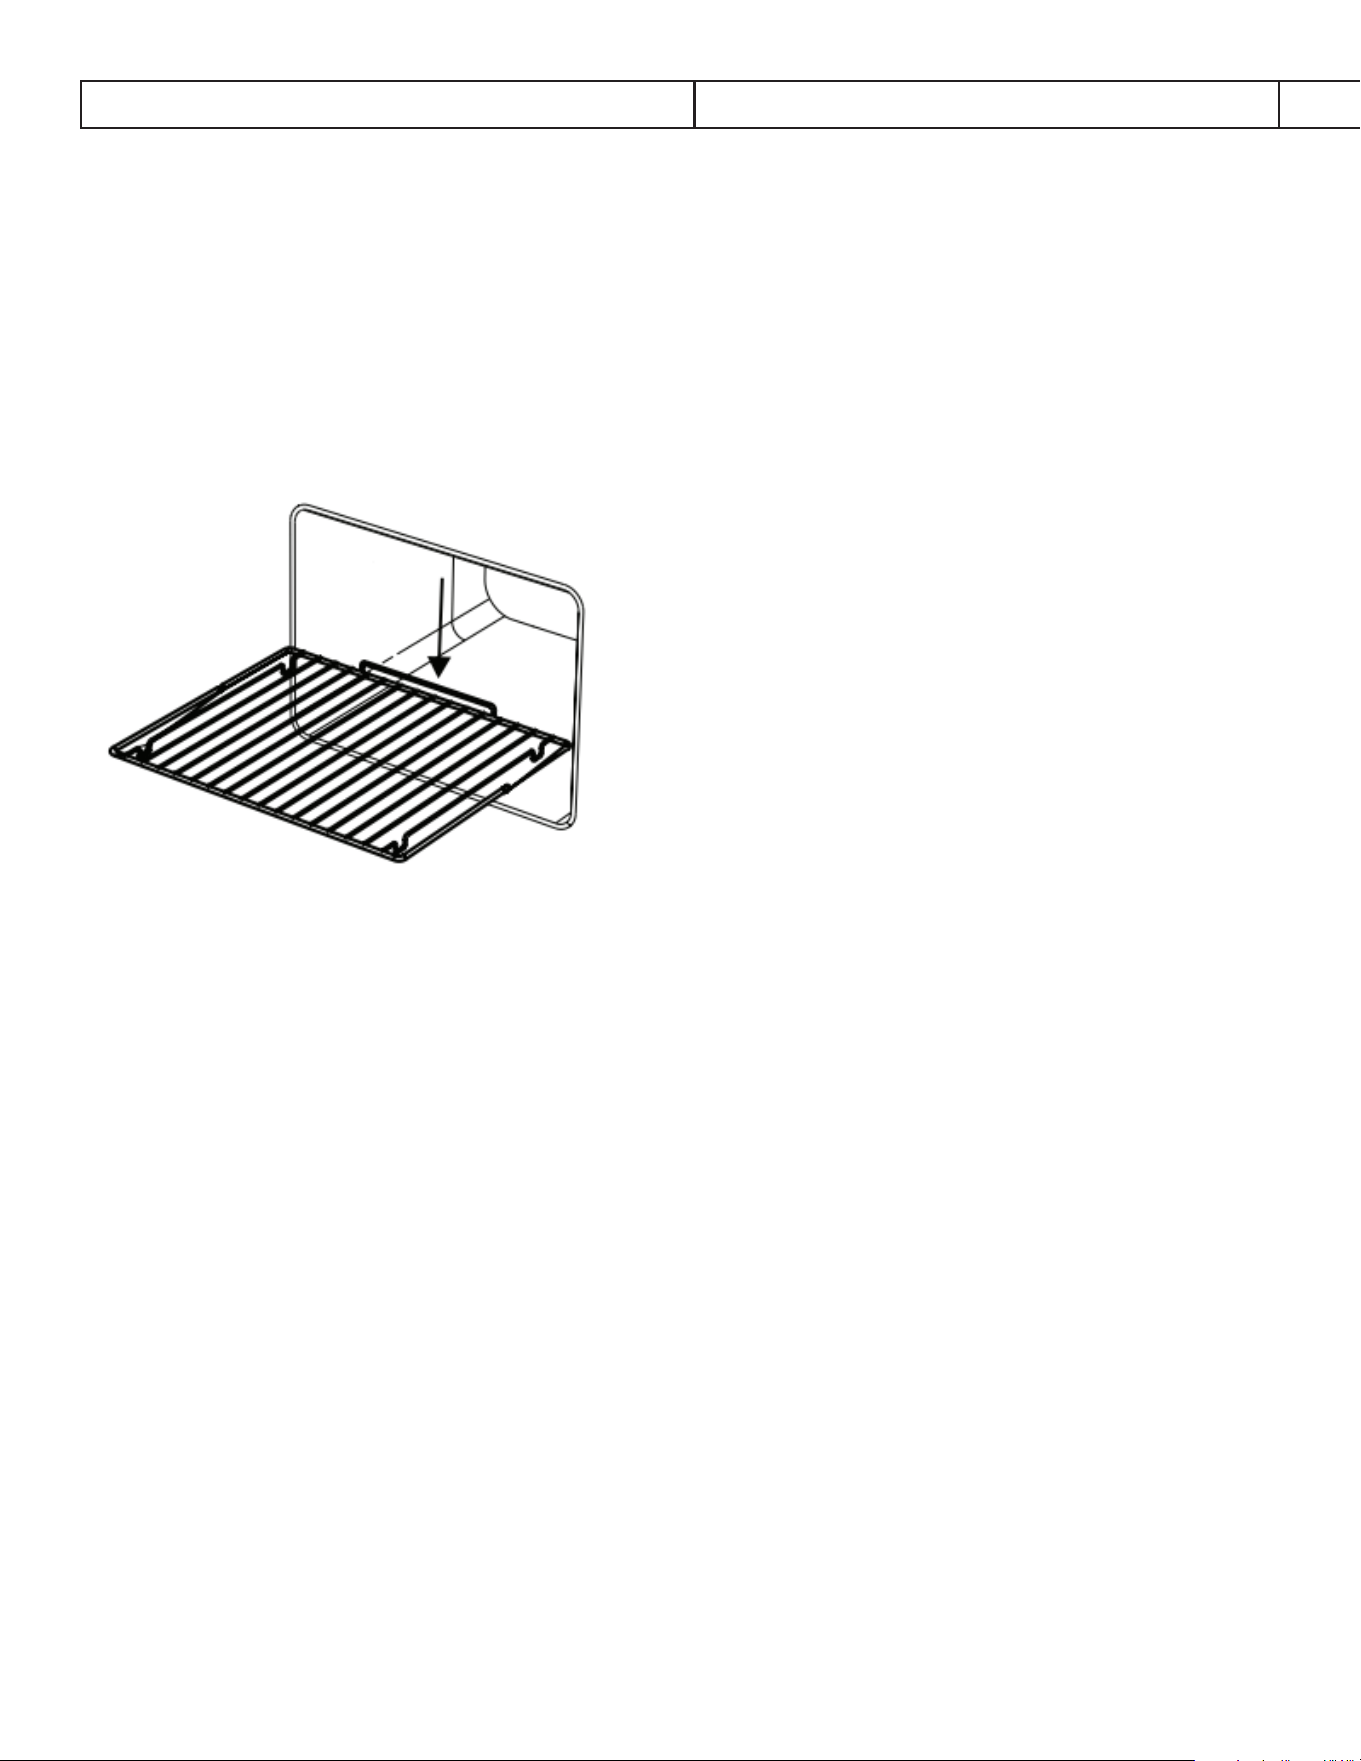
INSTRUCTIONS D’UTILISATION
INSTALLATION DES GRILLES DE FOUR
Les grilles de four sont conçues avec un
avant et un arrière.
Lorsque vous placez la grille au four, assurez-vous
que l’arrière est correctement positionné avant de la
placer dans le four.
TIROIR DE RANGEMENT AMOVIBLE
Pour nettoyer le tiroir de rangement inférieur, tirez-
le jusqu’à ce qu’il ne puisse plus être tiré, puis
soulevez-le.
Pour replacer le tiroir de rangement dans l’appareil,
placez l’étagère sur les rails latéraux et poussez vers
l’intérieur.
Important : Ne rangez pas de matériaux
inflammables dans le tiroir. Cela comprend les
articles en papier, en plastique et en tissu, tels que
les livres de cuisine, les articles en plastique et les
serviettes, ainsi que les liquides inflammables, les
explosifs et les bombes aérosols.
Lorsque le four est en marche, le tiroir peut devenir
chaud. Ne touchez pas la surface chaude entre le
bas de la porte du four et le haut du tiroir à l’avant
du four ou la surface supérieure de la cavité du
tiroir pour éviter les brûlures ou les blessures.
Entretien de la table de cuisson
Pour le nettoyage quotidien des marques, des
empreintes digitales et des éclaboussures non
sucrées, appliquez un produit nettoyant pour plaque
de cuisson en céramique. Rincer et essuyer avec un
chiffon propre ou une serviette en papier.
Pour les débordements, les fondus et les
déversements sucrés chauds sur la plaque de
cuisson, retirez immédiatement le déversement
ou l’aliment avec un rasoir pour céramique, mais
méfiez-vous des surfaces de cuisson chaudes.
Tenez le rasoir à un angle de 45 degrés et grattez
les aliments renversés dans une zone froide de
la plaque de cuisson, puis nettoyez-les avec un
torchon ou une serviette en papier. Les déversements
importants doivent être retirés immédiatement pour
s’assurer qu’ils ne cuisent pas sur la surface de la
plaque de cuisson.
Les boutons de commande sont amovibles et
peuvent être nettoyés avec un chiffon doux et de
l’eau tiède.
Pour un résidu brûlé
Laissez refroidir la plaque de cuisson, puis étalez
quelques gouttes de produit nettoyant pour plaque
de cuisson vitrocéramique sur toute la zone de
résidus brûlés. Frottez cette zone avec un tampon de
nettoyage qui ne raye pas et s’il reste des résidus,
répétez ces étapes.
Pour un lourd résidu brûlé
Laissez la table de cuisson refroidir, puis utilisez
un rasoir pour plaque de cuisson en céramique à
un angle de 45 degrés et grattez pour enlever les
résidus. Après avoir gratté les résidus lourds, étalez
quelques gouttes de produit nettoyant pour plaque
de cuisson vitrocéramique sur toute la zone de
résidus brûlés. Frottez cette zone avec un tampon de
nettoyage qui ne raye pas.
ENTRETIEN ET MAINTENANCE
40

Grilles de four
Nettoyez les étagères avec un nettoyant abrasif ou
de la laine d’acier. Après le nettoyage, rincez les
clayettes à l’eau claire et séchez-les avec un chiffon
propre. Ne placez pas les étagères dans un lave-
vaisselle.
Éléments chauffants du four
Ne nettoyez pas l’élément de cuisson. Tout résidu de
nourriture brûlera lorsque l’élément sera chauffé.
Boutons de commande
Les boutons de commande peuvent être retirés pour
faciliter le nettoyage. Assurez-vous que les boutons
sont en position « OFF », puis retirez directement les
tiges pour les nettoyer.
Les boutons peuvent être nettoyés à la main.
Assurez-vous que l’intérieur des boutons est sec
avant de les replacer sur l’appareil.
Surfaces peintes
Les surfaces peintes comprennent les côtés, le
panneau de commande et la porte. Nettoyez-
les avec de l’eau et du savon ou une solution de
vinaigre et d’eau.
N’utilisez pas de nettoyants pour four commerciaux,
de poudres nettoyantes, de laine d’acier ou
d’abrasifs agressifs sur les surfaces peintes.
41
ENTRETIEN ET MAINTENANCE
Intérieur du four en porcelaine
Avec des soins appropriés, l’intérieur en porcelaine
émaillée conservera sa finition pendant de
nombreuses années.
Du savon et de l’eau peuvent être utilisés pour
nettoyer l’intérieur. Les éclaboussures importantes
ou les déversements peuvent nécessiter un nettoyage
avec un nettoyant abrasif doux.
Ne laissez pas les déversements à haute teneur en
acide tels que le lait, les tomates, les jus de fruits
ou la garniture pour tarte rester sur la surface. Ils
peuvent causer des taches ternes même après le
nettoyage.
L’ammoniaque domestique peut faciliter le
nettoyage. Placer 1/2 tasse d’ammoniac dans une
casserole en verre peu profonde et laisser dans un
four froid pendant la nuit. Les vapeurs d’ammoniac
aideront à détacher la graisse et les aliments brûlés.
Précautions à propos de l’utilisation de
nettoyants pour four en aérosol
Ne vaporisez pas de nettoyant pour four sur les
commandes et les interrupteurs électriques car cela
pourrait provoquer un court-circuit et provoquer des
étincelles ou un incendie.
Ne vaporisez pas de nettoyant pour four
directement sur les éléments chauffants du four.
Ne laissez pas un film de nettoyant pour four sur le
capteur de température car cela pourrait entraîner
un mauvais chauffage du four. Le capteur est situé à
l’arrière du four. Essuyez soigneusement l’ampoule
après chaque nettoyage du four, en veillant à ne
pas déplacer le capteur car un changement de sa
position pourrait affecter la cuisson du four.
Ne vaporisez pas de nettoyant pour four sur
l’extérieur de la porte du four, les poignées ou
toute surface extérieure du four, le meuble ou les
surfaces peintes. Le nettoyant peut endommager ces
surfaces.
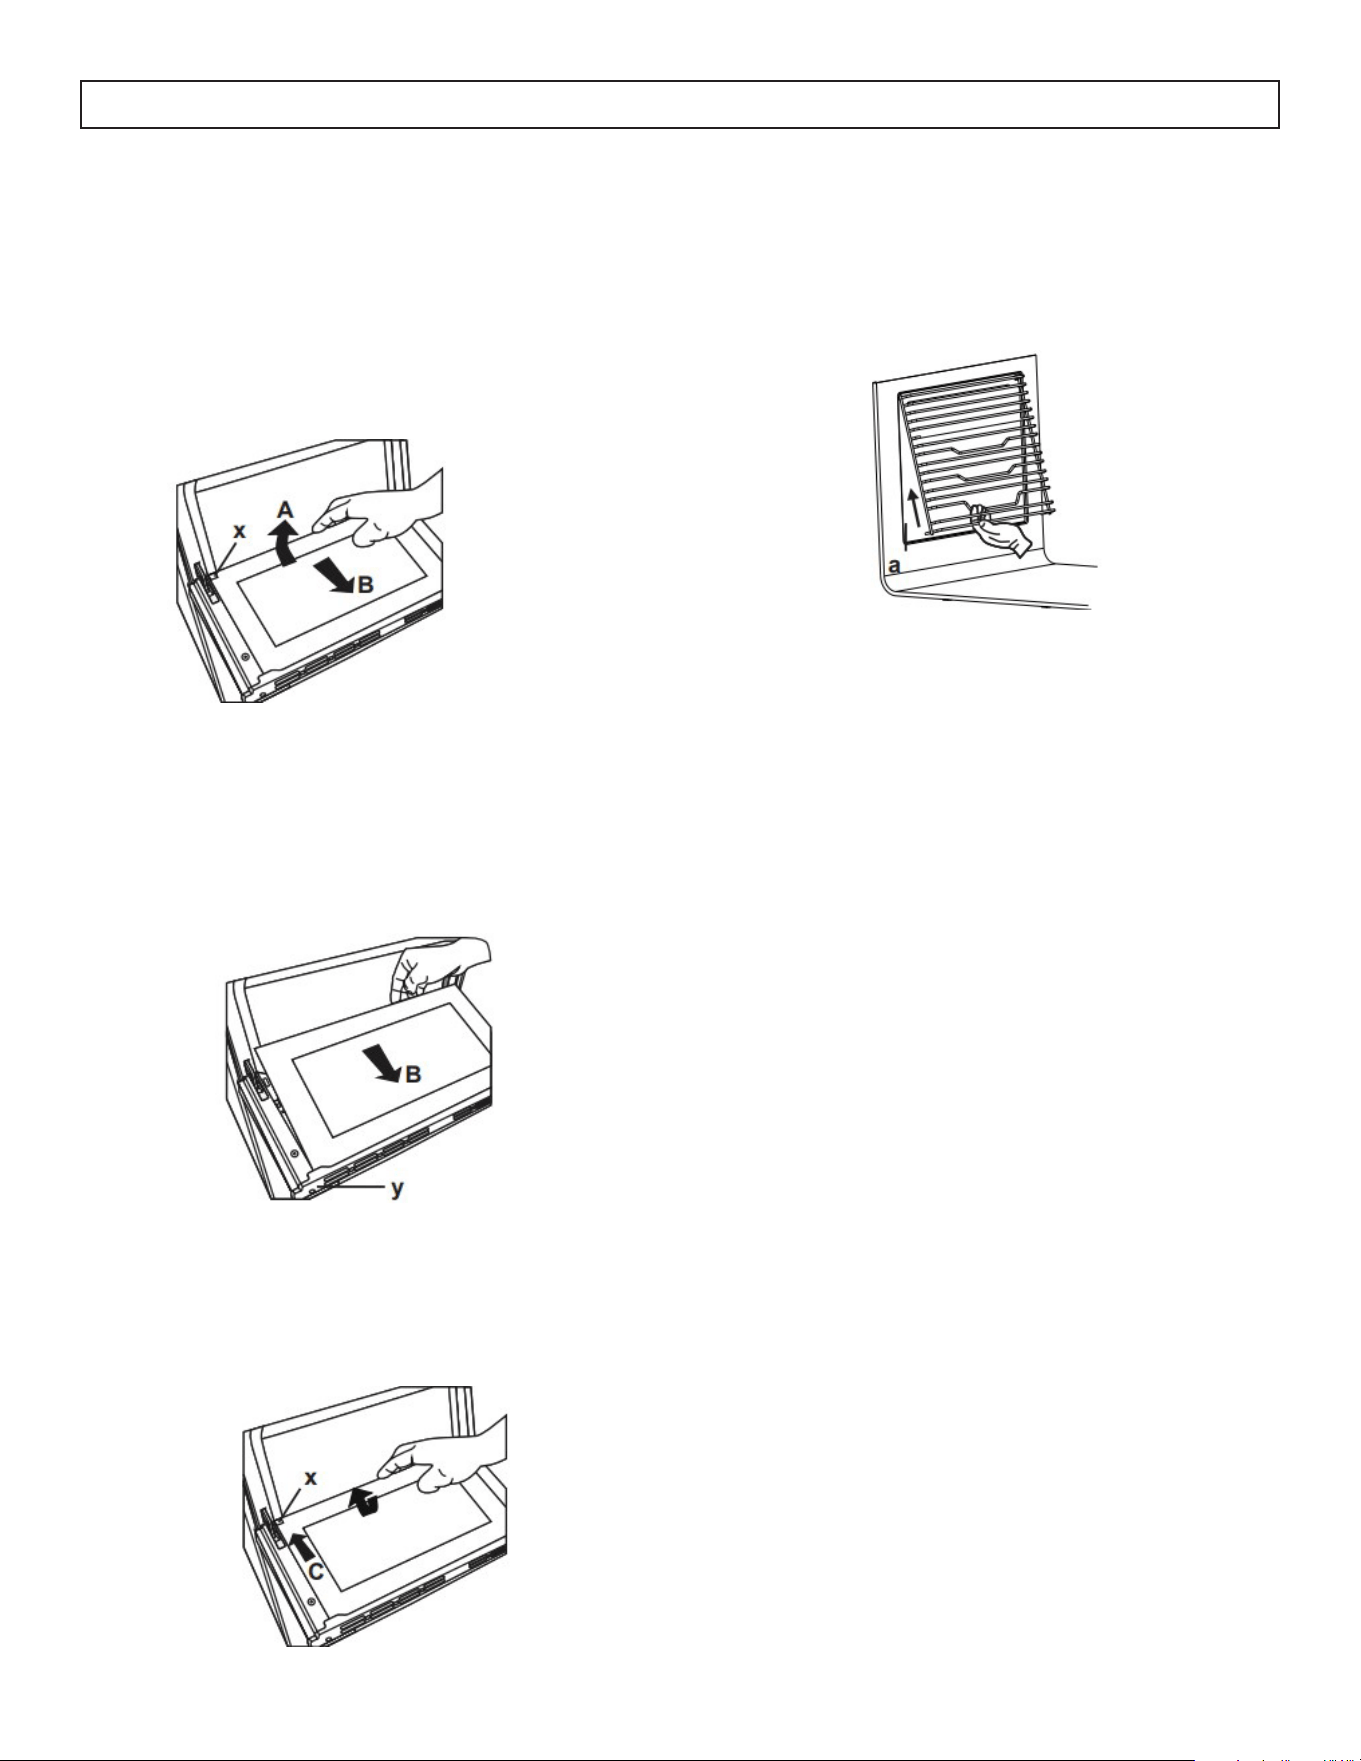
42
ENTRETIEN ET MAINTENANCE
CRÉMAILLÈRE EASYFIX
Pour retirer la grille métallique, tirez sur la grille
métallique comme illustré ci-dessous pour la
dégager des clips (a). Après l’avoir dégagé des
clips, soulevez-le.
RETRAIT DE LA VITRE INTÉRIEURE
La vitre de la porte du four doit être retirée avant le
nettoyage.
Poussez la vitre dans le sens de B et dégagez-la du
support de positionnement (x). Tirez la vitre dans le
sens de A.
Placez la vitre sous le support de positionnement (x)
dans la direction de C.
PORTE DE FOUR AMOVIBLE
La porte du four est amovible mais elle est lourde.
Il est recommandé qu’au moins deux personnes
travaillent ensemble pour le retirer.
Pour retirer la porte:
1. Ouvrez la porte en position complètement
ouverte.
2. Tirez les verrous de charnière vers le haut sur les
crochets de charnière des deux côtés.
3. Fermez la porte jusqu’à ce qu’elle atteigne
presque la position complètement fermée et
retirez la porte en la tirant vers le haut et vers
vous.
Pour remplacer la porte:
1. Saisissez fermement les deux côtés de la porte
en haut.
2. Insérez et installez les bras de charnière
supérieur et inférieur dans les fentes du four.
3. Poussez les verrous de charnière vers le bas à
partir des crochets de charnière.
4. Fermez la porte du four et assurez-vous qu’il
fonctionne correctement. S’il semble inégal
ou ne se ferme pas complètement, retirez-le à
nouveau et répétez les étapes pour le remplacer.
Remarque : N’essayez pas de fermer la porte
tant qu’elle n’est pas correctement installée. Les
charnières pourraient être endommagées.
REMPLACEMENT DE LA VITRE INTÉRIEURE
Poussez la vitre vers et sous le support de
positionnement (y) en direction de B.

43
DÉPANNAGE
Aucune puissance
• Un fusible peut être grillé ou le disjoncteur s’est
déclenché
• La fiche n’est pas complètement insérée dans la
prise murale
• Si la minuterie a déjà été utilisée et que les
boutons de commande n’ont pas été remis
en position « off », le four ne chauffera pas ;
remettre les boutons en position « off », attendre
30 secondes puis réinitialiser les boutons de
commande
Les éléments de surface ne fonctionnent pas
correctement
• L’appareil n’est pas alimenté
• Les commandes ne sont pas réglées correctement
Les aliments ne cuisent pas ou ne rôtissent
pas correctement
• La température du four n’est pas correctement
réglée
• La position de l’étagère est incorrecte
• Le four n’a pas été préchauffé
• Les ustensiles de cuisine ne conviennent pas à la
cuisson ou au rôtissage
La lumière du four ne fonctionne pas
• L’ampoule est desserrée
• L’interrupteur d’éclairage ne fonctionne pas
correctement
ENTRETIEN ET MAINTENANCE
REMPLACEMENT DE L’ÉCLAIRAGE DU FOUR
Important : Avant de remplacer l’ampoule du four,
assurez-vous que l’alimentation électrique est
débranchée de l’appareil. Le non-respect de cette
consigne peut entraîner un choc électrique ou des
brûlures.
Assurez-vous de laisser le couvercle de la lampe
et l’ampoule refroidir complètement avant de les
remplacer.
Le retrait de la porte du four peut faciliter ce
processus.
Pour remplacer l’ampoule:
1. Retirez le couvercle de protection de la lampe.
Ne retirez aucune vis pour retirer le couvercle
de la lampe.
2. Ne touchez pas l’ampoule avec un chiffon
humide. Remplacez l’ampoule par une
ampoule électroménager adaptée aux hautes
températures et ayant les mêmes caractéristiques
: 240V, 15-25 Watt, Type E14.
3. Replacez le capot de protection.
LIMITED IN-HOME APPLIANCE WARRANTY
This quality product is warranted to be free from manufacturer’s defects in material and workmanship, provided that the unit is used under the normal operating
conditions intended by the manufacturer.
This warranty is available only to the person to whom the unit was originally sold by Danby Products Limited (Canada) or Danby Products Inc. (U.S.A.) (hereafter
“Danby”) or by an authorized distributor of Danby, and is non-transferable.
TERMS OF WARRANTY
Plastic parts, are warranted for thirty (30) days only from purchase date, with no extensions provided.
First Year
During the rst twelve (12) months, any functional parts of this product found to be defective, will be repaired or replaced, at warrantor’s
option, at no charge to the ORIGINAL purchaser.
To obtain
Danby reserves the right to limit the boundaries of “In Home Service” to the proximity of an Authorized Service Depot. Any app liance
Service
requiring service outside the limited boundaries of “In Home Service” , it will be the consumer’s responsibility to transport the appliance (at
their own expense) to the original retailer (point of purchase) or a service depot for repair. See “Boundaries of In Home Serv ice”below.
Contact your dealer from whom your unit was purchased, or contact your nearest authorized Danby service depot, where service
must be performed by a qualied service technician.
If service is performed on the units by anyone other than an authorized service depot, or the unit is used for commercial appli cation, all
obligations of Danby under this warranty shall be void.
Boundaries of
If the appliance is installed in a location that is 100 kilometers (62 miles) or more from the nearest service center your unit must be
In Home Service
delivered to the nearest authorized Danby Service Depot, as service must only be performed by a technician qualied and certif ied for
warranty service by Danby. Transportation charges to and from the service location are not protected by this warranty and are t he
responsibility of the purchaser.
Nothing within this warranty shall imply that Danby will be responsible or liable for any spoilage or damage to food or other c ontents of this appliance, whether due
to any defect of the appliance, or its use, whether proper or improper.
EXCLUSIONS
Save as herein provided, Danby, there are no other warranties, conditions, representations or guarantees, express or implied, m ade or intended by Danby or its
authorized distributors and all other warranties, conditions, representations or guarantees, including any warranties, conditio ns, representations or guarantees
under any Sale of Goods Act or like legislation or statue is hereby expressly excluded. Save as herein provided, Danby shall no t be responsible for any damages
to persons or property, including the unit itself, howsoever caused or any consequential damages arising from the malfunction o f the unit and by the purchase of
the unit, the purchaser does hereby agree to indemnify and hold harmless Danby from any claim for damages to persons or propert y caused by the unit.
GENERAL PROVISIONS
No warranty or insurance herein contained or set out shall apply when damage or repair is caused by any of the following:
1) Power failure.
2) Damage in transit or when moving the appliance.
3) Improper power supply such as low voltage, defective house wiring or inadequate fuses.
4) Accident, alteration, abuse or misuse of the appliance such as inadequate air circulation in the room or abnormal operating con ditions
(extremely high or low room temperature).
5) Use for commercial or industrial purposes (ie. If the appliance is not installed in a domestic residence).
6) Fire, water damage, theft, war, riot, hostility, acts of God such as hurricanes, oods etc.
7) Service calls resulting in customer education.
8) Improper Installation (ie. Building-in of a free standing appliance or using an appliance outdoors that is not approved for out door application).
Proof of purchase date will be required for warranty claims; so, please retain bills of sale. In the event warranty service is required, present this document to our
AUTHORIZED SERVICE DEPOT.
Danby Products Limited
PO Box 1778, Guelph, Ontario, Canada N1H 6Z9
Telephone: (519) 837-0920 FAX: (519) 837-0449
Danby Products Inc.
PO Box 669, Findlay, Ohio, U.S.A. 45840
Telephone: (419) 425-8627 FAX: (419) 425-8629
04/09
1-800-263-2629
Warranty Service
In-home
S’adresser au détaillant qui a vendu l’appareil, ou à la station technique agréée de service la plus proche, où
les réparations doivent être effectuées par un technicien qualifié. Si les réparations sont effectuées par
quiconque autre que la station de service agréée où à des fins commerciales, toutes les obligations de Danby
en vertu de cette garantie seront annulées.
Pendant les premiers vingt quatre (24) mois, toutes les pièces fonctionnelles de ce produit qui s’avèrent
défectueuses seront réparées ou remplacées, selon le choix du garant, sans frais à l’acheteur initial.
Danby se réserve le droit de limiter les limites de « Service au domicile » à proximité d'un dépôt de service
agréé. Pour tout appareil nécessitant le service hors des limites de "Service à domicile" il sera la responsabilité
du consommateur de transporter à ses frais au point d'achat d’origine ou un dépôt de service pour la réparation.
Si l'appareil est installé à plus de 100 kilomètres (62 milles) du centre de service le plus proche, il doit être livré
à l'atelier de réparation autorisé par Danby le plus proche, car l'entretien doit uniquement être réalisé par un
technicien qualifié et certifié pour effectuer un entretien couvert par la garantie de Danby.
Les frais de transport entre votre domicile et le lieu de l'entretien ne sont pas couverts par la présente garantie
et doivent être acquittés par l'acheteur.
Pour bénéficier
du service
Limites de l’entretien
à domicile
GARANTIE LIMITÉE « À DOMICILE »
Cet appareil de qualité est garanti exempt de tout vice de matière première et de fabrication, s’il est utilisé dans les conditions
normales recommandées par le fabricant.
Cette garantie n’est offerte qu’à l’acheteur initial de l’appareil vendu par Danby Products Limited (Canada) ou Danby Products Inc.
(É.-U.) (ci-après « Danby ») ou par l’un de ses distributeurs agréés et elle ne peut être transférée.
CONDITIONS
Les pièces en plastique sont garanties pendant trente (30) jours seulement à partir de la date de l’achat, sans aucune prolongation
prévue.
Aucune partie de la garantie ne prévoit implicitement que le fabricant sera tenu responsable des dommages subis par les aliments ou
d’autres types de contenu, qu’ils soient causés par la défectuosité de l’appareil ou par son usage adéquat ou inadéquat.
EXCLUSIONS
En vertu de la présente, il n’existe aucune autre garantie, condition ou représentation, qu’elle soit exprimée ou tacite, de façon
manifeste ou intentionnelle, par Danby ou ses distributeurs agréés. De même, sont exclues toutes les autres garanties, conditions ou
représentations, y compris les garanties, conditions ou représentations en vertu de toute loi régissant la vente de produits ou de toute
autre législation ou règlement semblable. En vertu de la présente, Danby ne peut être tenue responsable en cas de blessures
corporelles ou de dégâts matériels, y compris à l’appareil, quelle qu’en soit les causes. Danby ne peut pas être tenue responsable
des dommages indirects dus au fonctionnement défectueux de l’appareil. En achetant l’appareil, l’acheteur accepte de tenir sans
reproche et de dégager Danby de toute responsabilité en cas de réclamation pour toute blessure corporelle ou tout dégât matériel
causé par cet appareil.
CONDITIONS GÉNÉRALES
La garantie ou assurance ci-dessus ne s’applique pas si les dégâts ou réparations sont dus aux cas suivants :
1) Panne de courant.
2) Dommages subis pendant le transport ou le déplacement de l’appareil.
3) Alimentation électrique incorrecte (tension faible, câblage défectueux, fusibles incorrects).
4) Accident, modification, emploi abusif ou incorrect de l’appareil tel qu'une circulation d'air inadéquate dans la pièce ou des
conditions de fonctionnement anormales (température extrêmement élevée ou basse).
5) Utilisation dans un but commercial ou industriel (à savoir, si l'appareil n'est pas installé dans un domicile résidentiel).
6) Incendie, dommages causés par l’eau, le vol, la guerre, une émeute, des hostilités, ou en cas de force majeure (ouragan,
inondation, etc.).
7) Visites d’un technicien pour expliquer le fonctionnement de l’appareil au propriétaire.
8) Installation inappropriée (par exemple, encastrement d'un appareil autoportant, ou utilisation extérieure d'un appareil non conçu à
cet effet, y compris, mais sans s'y limiter : les garages, les patios, les porches ou ailleurs, qui ne sont pas correctement isolés ou
climatisés).
La preuve de la date d'achat sera requise pour les réclamations de garantie; conserver la facture de vente. Dans le cas où un service
de garantie est requis, présentez la preuve d'achat à notre dépôt de service agréé.
Service sous garantie
Service au domicile
Danby Products Limited
PO Box 1778, Guelph, Ontario, Canada N1H 6Z9
Téléphone : (519) 837-0920 Télécopieur : (519) 837-0449
Danby Products Inc.
PO Box 669, Findlay, Ohio, U.S.A. 45840
Téléphone : (419) 425-8627 Télécopieur : (419) 425-8629
1-800-263-2629
02/18
Premiers 24 mois

NOTES / REMARQUES:
__________________________________________________________________________________________
__________________________________________________________________________________________
__________________________________________________________________________________________
__________________________________________________________________________________________
__________________________________________________________________________________________
__________________________________________________________________________________________
__________________________________________________________________________________________
__________________________________________________________________________________________
__________________________________________________________________________________________
__________________________________________________________________________________________
__________________________________________________________________________________________
__________________________________________________________________________________________
__________________________________________________________________________________________
__________________________________________________________________________________________
__________________________________________________________________________________________
__________________________________________________________________________________________
__________________________________________________________________________________________
__________________________________________________________________________________________
__________________________________________________________________________________________

Mod el • M odèle • Modelo
Printed in Turkey
Imprimé en Turquie
Danby Products Limited, Guelph, ON, Canada N1H 6Z9
Danby Products Inc., Findlay, Ohio, USA 45840
*Trademarks of Danby Products Limited and/or its subsidiaries
* Marques de commerce de Danby Products Limited et / ou de ses filiales