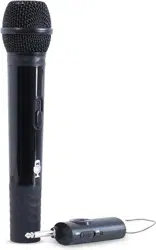
MICROPHONE OUTPUT
This unit
is able to connect to your favorite karaoke device. You can connect with
the included 3.5mm to 6.5mm cable.
Warning
- To avoid excessive over amplified sound output, it is recommended that the
volume control is initially adjusted to one third or less and then increased if
required.
Información importante sobre seguridad
1. Lea estas instrucciones. 2. Conserve estas instrucciones.
3. Preste atención a todas las advertencias. 4. Siga todas las instrucciones.
5. No utilice este artefacto cerca del agua. 6. Límpielo únicamente con un paño seco.
7. No obstruya las aberturas para ventilación. Instálelo de acuerdo con las instrucciones del
fabricante.
8. No instale cerca de fuentes de calor, como radiadores, rejillas de calefacción, estufas u otros
aparatos (incluso amplificadores) que produzcan calor.
9. Desenchufe este artefacto durante las tormentas eléctricas o cuando no se lo utilice
durante períodos prolongados.
10. Derive todas las reparaciones al personal de reparaciones calificado. Es necesario reparar el
artefacto cuando se encuentra dañado; por ejemplo, cuando el cable de suministro de
energía o el enchufe están dañados, cuando se derrama líquido sobre la unidad o caen
objetos dentro del mismo, cuando el producto ha estado expuesto a la lluvia o a la humedad,
cuando no funciona con normalidad o cuando se ha caído.
11. ADVERTENCIA: Para reducir el riesgo de incendio o descarga eléctrica, no exponga este
artefacto a la lluvia o la humedad. No coloque objetos llenos de agua, como jarrones, sobre el
aparato.
12. PRECAUCIÓN: Para reducir el riesgo de incendio o explosión no exponga las baterías al calor
excesivo, como al rayo del sol, fuego u otras fuentes de calor.
option 2 (return) SMM2097 US instruction sheet (Eng/Spa/Fre)
Date: 3 Jan 22
size: (each page) 65 (W) x 91 (H)mm
color: 1C black print
SMM2097
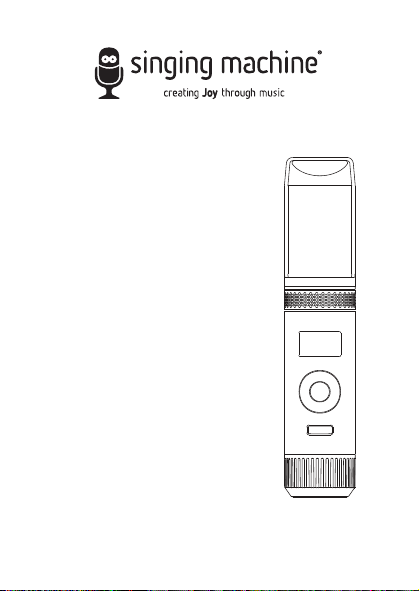
INSTRUCTION MANUAL
MANUAL DE INSTRUCCIONES
MODE D’EMPLOI
Please read before first using this unit.
Leer Antes de usar la Unidad.
Veuillez lire ce manuel avant d’utiliser cet appareil.
The Responsible Party
Company Name : The Singing Machine Company, Inc.
Address : 6301 NW 5th Way, Suite 2900, Fort Lauderdale,
FL33309, USA
Telephone : 954 -596-1000
Website : www.singingmachine.com
The Singing Machine Company, Inc.
4060 E Jurupa Street, Unit B, Ontario, CA 91761-1413 USA
PRINTED IN CHINA
IMPRESO EN CHINA
IMPRIMÉ EN CHINE
2097-2112-ESF01-US
Visit Our Website: www.singingmachine.com
Visite Nuestra Pagina de Internet: www.singingmachine.com
Visitez notre site Web : www.singingmachine.com
Important Safety Information
1. Read these Instructions. 2. Keep these Instructions.
3. Heed all Warnings. 4. Follow all Instructions.
5. Do not use this apparatus near water. 6. Clean only with a dry cloth.
7. Do not install near any heat sources such as radiators, heat registers, stoves, or other
apparatus (including amplifiers) that produce heat.
8. Only use attachments/accessories specified by the manufacturer.
9. Unplug this apparatus during lightning storms or when unused for long periods of time.
10. Refer all servicing to qualified service personnel. Servicing is required when the
apparatus has been damaged in any way, such as power-supply cord or plug is
damaged, liquid has been spilled or objects have fallen into the apparatus, the apparatus
has been exposed to rain or moisture, does not operate normally, or has been dropped.
11. WARNING: To reduce the risk of fire or electric shock, do not expose this apparatus to
rain or moisture. Do not place objects filled with water, such as a vase, on the
apparatus.
12. CAUTION: To reduce the risk of fire or explosion, do not expose batteries to excessive
heat such as sunshine, fire or other heat sources.
Specifications
MIC OUT SECTION .............................................................................. 3.5 mm Stereo line out jack
HEADPHONE SECTION ............................................................... 3.5 mm Stereo headphone jack
Impedance ............................................................................................................................... > 16 ohms
POWER SECTION
Battery ....................................................................................... Lithium ion battery 3.7 V 600 mAh
Input Power ..................................................................................................... Type C-USB DC 5V 1A
DIMENSIONS
Mic ...................................................................... 1.8 x 1.8 x 8.5 (inches) / 4.5 X 4.5 X 21.6 (cm)
WEIGHT (Mic only) ..................................................................................... 0.25 (kgs) / 0.55 (lbs)
SYSTEM REQUIREMENTS
Windows ............................................................................................................................... 10 or higher
MacOS .......................................................................................................................... 10.13 or higher
USB ........................................................................................................................................ 1.1/2.0/3.0
Manual
What’s in the box
Included
Type-C USB
Cable
The Singing Machine® is a registered trademark of The Singing Machine Co., Inc.
Singing Machine® es marca registrada de The Singing Machine Co., Inc.
Singing Machine® est une marque déposée de The Singing Machine Co., Inc.
Copyright © 2021 All Rights Reserved.
Derechos de autor © 2021 Todos los derechos reservados.
Droit d’auteur © 2021 Tous Droits Réservés
Warnings
CAUTION
RISK OF ELECTRIC SHOCK
DO NOT OPEN
CAUTION: TO REDUCE THE RISK OF ELECTRIC
SHOCK, DO NOT REMOVE COVER (OR BACK).
NO USER-SERVICEABLE PARTS INSIDE. REFER
SERVICING TO QUALIFIED SERVICE PERSONNEL.
DRIPPING WARNING: This product shall not be
exposed to dripping or splashing, and no objects
filled with liquids, such as vases, shall be placed on
the product.
Warnings: Changes or modifications to this unit
not expressly approved by the party responsible
for compliance could void the user’s authority to
operate the equipment.
To parents recommending that the adaptor be periodically examined for conditions that may
result in the risk of fire, electric shock, or injury to persons and that, in an event such conditions,
the adaptor should not be used until properly repaired.
FCC WARNING: This equipment may generate or use radio frequency energy. Changes or
modifications to this equipment may cause harmful interference unless the modifications are
expressly approved in the instruction manual. The user could lose the authority to operate this
equipment if an unauthorized change or modification is made.
This device complies with part 15 of the FCC Rules. Operation is subject to the following two
conditions: (1) This device may not cause harmful interference, and (2) this device must accept
any interference received, including interference that may cause undesired operation.
NOTE: This equipment has been tested and found to comply with the limits for a Class B digital
device, pursuant to part 15 of the FCC Rules. These limits are designed to provide reasonable
protection against harmful interference in a residential installation. This equipment generates,
uses and can radiate radio frequency energy and, if not installed and used in accordance with the
instructions, may cause harmful interference to radio communications. However, there is no
guarantee that interference will not occur in a particular installation. If this equipment does
cause harmful interference to radio or television reception, which can be determined by turning
the equipment off and on, the user is encouraged to try to correct the interference by one or
more of the following measures:
• Reorient or relocate the receiving antenna.
• Increase the separation between the equipment and receiver.
• Connect the equipment into an outlet on a circuit different from that to which the receiver is
connected.
• Consult the dealer or an experienced radio/TV technician for help.
Statement: The battery is not replaceable.
Specifications are subject to change without notice. Please retain the instructions for
further reference, as they contain important information.
Troubleshooting Guide
Should this unit exhibit a problem, check the following before seeking service:
No Power
• Power is not on; press the button to turn power on.
• Confirm that the unit is charged.
No Sound
• Make sure the mic is powered on.
• Microphone volume is set to minimum or muted; raise microphone volume by rotating
the MIC VOLUME ring.
• Volume on the external karaoke device is set to minimum or muted (if connected); raise
volume.
No Sound (If connected to a computer)
• Make sure the plug is firmly connected to the jack.
• Make sure the mic's volume has not been set to a low or muted setting.
• Make sure the computer's volume has not been set to a low or muted setting.
• The computer system does not meet the requirements of this unit; upgrade your
computer system.
• Make sure you select the device name, "Singing Machine Microphone" from your
computer's system preferences for (Mac) or settings for (PC).
• Make sure your Type-C USB cable is a data cable, it is strongly recommended to use the
included cable.
Microphone
CONNECTING HEADPHONES
For private listening or to monitor singing, use headphones (not included). Insert
headphones into the Headphones jack
w
.
Microphone plug
audio Cable
x
Operation
Press the button
x
to turn on the unit. Press and hold the button to turn
off the unit.
Press the FUNC or button
y
repeatedly to select different functions. The
display W will indicate your current operation for 10 seconds.
Before you get started
CHARGING THE UNIT
Insert the included Type-C USB cable into the unit’s Type-C
USB port
u
.
Plug the other end of the cable into the computer’s USB port
or USB charging device (not included). Charge the unit for 2
hours to ensure it is fully charged.
When the unit is charging, the battery level bar will flash. After the unit is fully
charged, the battery level bar will become a solid light.
NOTE: Please charge the unit, when you see the battery level bar is low or when
it has no battery level to display.
V
at
X
v
w
u
y y
NAME DESCRIPTION
Basic Pitch Silky smooth & balanced reverb & echo; a great all around go-to vocal
enhancer
Billie Eyelash Queue up Bad Guy & let it rip with this harmonized choir effect that is
perfect for Alternative and Rock singing
Phil the Air Tonight Heavy on the reverb & echo with delicate feedback & flanger effect
for a lovely
sound perfect for 80’s hits
Grunge Unmistakably gritty, great for rock, alt, pop and just making your
voice sound cool
Reggae-Tone Enhanced echo and choir makes voices shine especially while singing
reggae and reggaeton
Hip-Hop Big room echo & reverb with a smooth chorus
Oldtown Rd A touch of echo with added vocal boost that’s great for belting out
country tunes
Diva Take your voice to new heights with this octave booster
Doo-Wop Smooth harmony adds some bass backup to your voice
Electronica Punchy and unique, perfect for pop, EDM and making heads turn
Up to Mars Big echo and chorus good for a wide range of songs from ballads to
funk
Anthems Lots of echo and reverb for when your voice needs to be BIG
Nosebleed Seats Did someone say sold out stadium show?
Voice of an Angel Have your own angelic choir singing along with this lovely chorus
effect
4 of a Kind It’s like having a few more singers harmonize along with your vocals
Ballad Rock Crank up your favorite guilty pleasure ballad and rock it out for that
special someone in the audience
Bad Trip Wild & fun chorus effect
Laser Crazy & silly vocal laser beams
Warp Speed Bouncy & echos, lots of fun
Barry Deep Oh baby, that’s a deep voice
When EFFECT LEVEL is displayed use the or
buttons
V
to adjust the level of the voice effects.
Press the MUTE/OK button
U
to return to the main
display.
NOTE: Steps above will not work if VOICE EFFECTS is
turned off.
EFFECT LEVEL
MIC MODE
When MIC MODE is displayed, choose from 4
different mic modes using the or buttons
V
to
select. Press the MUTE/OK button
U
to return to the
main display.
Solo Singer: Picks up sound from front of microphone.
Group Singing: Picks up sound equally from all
directions.
Solo Podcast: Picks up sound from front of
microphone and is wider than Solo Singer.
Group Podcast: Picks up sound equally from all
directions and is wider than Group Singing.
To reduce the noise around you when you are singing
use the or button
V
when NOISE SUPPRESSION
is displayed. Press the MUTE/OK button
U
to return
to the main display.
NOISE SUPPRESSION
When HEADPHONE VOL is displayed use the or
buttons
V
to adjust the headphone volume. Press the
MUTE/OK button
U
to return to the main display.
WARNING:
• To avoid excessive over amplified sound output, it is
recommended that the volume control is initially
adjusted to one third or less and then increased if
required.
• Headphone volume will prompt when there are
headphones connected.
HEADPHONE VOL
To adjust the mic volume simply rotate the MIC
VOLUME ring
X
.
NOTE: You can lower the microphone volume until muted.
MICROPHONE VOL
U
W
When VOICE EFFECTS is displayed use the or
V
buttons to choose from 20 different voice effects
sure to keep the party going. Press the MUTE/OK
button
U
to return to the main display.
VOICE EFFECTS
When PERFECT PITCH is displayed use the or
button
V
to adjust the levels of the perfect pitch
effect. Use PERFECT PITCH to bring studio-like quality
to your voice. Press the MUTE/OK button
U
button
to return to the main display.
PERFECT PITCH
E7E6
E2E1 E4E3
E5
S2
Slide out the feet
ak
of fold-able stand to
stabilize the mic stand.
Untighten the Mic Stand adjustment cap
al
and
adjust the Mic Stand tube
am
. Retighten the cap
al
to keep in place.
Insert the Mic Clip
an
into the Foldable Stand and
tighten it. Press the clip
an
to insert the
microphone.
Connect your computer, favorite karaoke device
or headphones via the USB jack
u
, Microphone
jack
v
or headphone jack
w
.
NOTE: If the mic is connected to your computer
you can find the device name under "Singing
Machine Microphone".
SING, WORK, GAME, PODCAST &
VLOG LIKE NEVER BEFORE!
Pitch Lab
™
Vocal
Enhancements
Scan to learn more
Foldable Stand
Mic Clip
ak
am
an
al
S1
A
D
V
E
R
T
E
N
C
I
A
D
E
G
O
T
E
O
:
E
s
t
e
p
r
o
d
u
c
t
o
n
o
s
e
p
o
d
r
á
e
x
p
o
n
e
r
a
g
o
t
e
o
o
s
a
l
p
i
c
a
d
u
r
a
s
,
y
n
o
s
e
c
o
l
o
c
a
r
á
n
i
n
g
ú
n
o
b
j
e
t
o
l
l
e
n
o
c
o
n
l
í
q
u
i
d
o
s
,
c
o
m
o
j
a
r
r
o
n
e
s
,
e
n
c
i
m
a
d
e
l
p
r
o
d
u
c
t
o
.
A
d
v
e
r
t
e
n
c
i
a
s
:
L
o
s
c
a
m
b
i
o
s
o
m
o
d
i
f
i
c
a
c
i
o
n
e
s
e
f
e
c
t
u
a
d
a
s
a
e
s
t
a
u
n
i
d
a
d
q
u
e
n
o
f
u
e
r
o
n
e
x
p
r
e
s
a
m
e
n
t
e
a
p
r
o
b
a
d
o
s
p
o
r
l
a
p
a
r
t
e
r
e
s
p
o
n
s
a
b
l
e
d
e
l
c
u
m
p
l
i
m
i
e
n
t
o
,
p
o
d
r
í
a
n
a
n
u
l
a
r
l
a
a
u
t
o
r
i
d
a
d
d
e
l
u
s
u
a
r
i
o
p
a
r
a
o
p
e
r
a
r
e
l
e
q
u
i
p
o
.
S
e
r
e
c
o
m
i
e
n
d
a
a
l
o
s
p
a
d
r
e
s
r
e
v
i
s
a
r
p
e
r
i
ó
d
i
c
a
m
e
n
t
e
e
l
a
d
a
p
t
a
d
o
r
p
a
r
a
v
e
r
i
f
i
c
a
r
q
u
e
n
o
e
x
i
s
t
a
n
c
o
n
d
i
c
i
o
n
e
s
q
u
e
p
u
e
d
a
n
o
c
a
s
i
o
n
a
r
r
i
e
s
g
o
s
d
e
i
n
c
e
n
d
i
o
,
d
e
s
c
a
r
g
a
e
l
é
c
t
r
i
c
a
o
l
e
s
i
o
n
e
s
a
l
a
s
p
e
r
s
o
n
a
s
y
q
u
e
,
d
e
e
x
i
s
t
i
r
d
i
c
h
a
s
c
o
n
d
i
c
i
o
n
e
s
,
n
o
s
e
u
t
i
l
i
c
e
e
l
a
d
a
p
t
a
d
o
r
h
a
s
t
a
q
u
e
e
s
t
é
c
o
r
r
e
c
t
a
m
e
n
t
e
r
e
p
a
r
a
d
o
.
N
O
T
I
F
I
C
A
C
I
Ó
N
D
E
L
A
F
C
C
:
E
s
t
e
e
q
u
i
p
o
p
u
e
d
e
g
e
n
e
r
a
r
o
u
s
a
r
e
n
e
r
g
í
a
d
e
r
a
d
i
o
f
r
e
c
u
e
n
c
i
a
.
L
o
s
c
a
m
b
i
o
s
o
m
o
d
i
f
i
c
a
c
i
o
n
e
s
r
e
a
l
i
z
a
d
o
s
e
n
e
l
a
p
a
r
a
t
o
p
u
e
d
e
n
p
r
o
v
o
c
a
r
i
n
t
e
r
f
e
r
e
n
c
i
a
p
e
r
j
u
d
i
c
i
a
l
,
a
m
e
n
o
s
q
u
e
d
i
c
h
a
s
m
o
d
i
f
i
c
a
c
i
o
n
e
s
e
s
t
é
n
a
u
t
o
r
i
z
a
d
a
s
e
n
e
l
m
a
n
u
a
l
d
e
i
n
s
t
r
u
c
c
i
o
n
e
s
.
E
l
u
s
u
a
r
i
o
p
u
e
d
e
p
e
r
d
e
r
t
o
d
a
a
u
t
o
r
i
d
a
d
p
a
r
a
o
p
e
r
a
r
e
l
e
q
u
i
p
o
s
i
r
e
a
l
i
z
a
c
a
m
b
i
o
s
o
m
o
d
i
f
i
c
a
c
i
o
n
e
s
s
i
n
a
u
t
o
r
i
z
a
c
i
ó
n
.
E
s
t
e
a
p
a
r
a
t
o
c
u
m
p
l
e
c
o
n
l
a
p
a
r
t
e
1
5
d
e
l
a
s
N
o
r
m
a
s
d
e
l
a
F
C
C
.
E
l
f
u
n
c
i
o
n
a
m
i
e
n
t
o
e
s
t
á
s
u
j
e
t
o
a
l
a
s
d
o
s
c
o
n
d
i
c
i
o
n
e
s
q
u
e
f
i
g
u
r
a
n
a
c
o
n
t
i
n
u
a
c
i
ó
n
:
(
1
)
E
s
p
r
o
b
a
b
l
e
q
u
e
n
o
c
a
u
s
e
i
n
t
e
r
f
e
r
e
n
c
i
a
p
e
r
j
u
d
i
c
i
a
l
y
(
2
)
d
e
b
e
r
á
a
c
e
p
t
a
r
c
u
a
l
q
u
i
e
r
i
n
t
e
r
f
e
r
e
n
c
i
a
r
e
c
i
b
i
d
a
,
i
n
c
l
u
y
e
n
d
o
l
a
i
n
t
e
r
f
e
r
e
n
c
i
a
q
u
e
p
u
e
d
a
l
l
e
g
a
r
a
c
a
u
s
a
r
u
n
f
u
n
c
i
o
n
a
m
i
e
n
t
o
i
n
d
e
s
e
a
d
o
.
N
O
T
A
:
E
s
t
e
e
q
u
i
p
o
f
u
e
p
r
o
b
a
d
o
y
s
e
c
o
n
c
l
u
y
ó
q
u
e
c
u
m
p
l
e
c
o
n
l
o
s
l
í
m
i
t
e
s
e
s
t
a
b
l
e
c
i
d
o
s
p
a
r
a
l
o
s
d
i
s
p
o
s
i
t
i
v
o
s
d
i
g
i
t
a
l
e
s
C
l
a
s
e
B
,
d
e
a
c
u
e
r
d
o
c
o
n
e
l
A
p
a
r
t
a
d
o
1
5
d
e
l
a
s
n
o
r
m
a
s
d
e
l
a
F
C
C
.
E
s
t
o
s
l
í
m
i
t
e
s
f
u
e
r
o
n
p
e
n
s
a
d
o
s
p
a
r
a
p
r
o
p
o
r
c
i
o
n
a
r
p
r
o
t
e
c
c
i
ó
n
r
a
z
o
n
a
b
l
e
a
n
t
e
l
a
i
n
t
e
r
f
e
r
e
n
c
i
a
p
e
r
j
u
d
i
c
i
a
l
e
n
u
n
a
i
n
s
t
a
l
a
c
i
ó
n
r
e
s
i
d
e
n
c
i
a
l
.
E
s
t
e
e
q
u
i
p
o
g
e
n
e
r
a
,
u
s
a
y
p
u
e
d
e
e
m
i
t
i
r
e
n
e
r
g
í
a
d
e
r
a
d
i
o
f
r
e
c
u
e
n
c
i
a
y
,
s
i
n
o
s
e
l
o
i
n
s
t
a
l
a
y
u
t
i
l
i
z
a
d
e
c
o
n
f
o
r
m
i
d
a
d
c
o
n
l
a
s
i
n
s
t
r
u
c
c
i
o
n
e
s
,
p
u
e
d
e
c
a
u
s
a
r
i
n
t
e
r
f
e
r
e
n
c
i
a
p
e
r
j
u
d
i
c
i
a
l
a
l
a
s
c
o
m
u
n
i
c
a
c
i
o
n
e
s
r
a
d
i
a
l
e
s
.
N
o
o
b
s
t
a
n
t
e
,
n
o
e
x
i
s
t
e
n
i
n
g
u
n
a
g
a
r
a
n
t
í
a
d
e
q
u
e
n
o
s
e
p
r
o
d
u
z
c
a
i
n
t
e
r
f
e
r
e
n
c
i
a
e
n
u
n
a
i
n
s
t
a
l
a
c
i
ó
n
e
n
p
a
r
t
i
c
u
l
a
r
.
S
i
e
s
t
e
e
q
u
i
p
o
p
r
o
v
o
c
a
i
n
t
e
r
f
e
r
e
n
c
i
a
p
e
r
j
u
d
i
c
i
a
l
a
l
a
r
e
c
e
p
c
i
ó
n
d
e
r
a
d
i
o
o
t
e
l
e
v
i
s
i
ó
n
,
l
o
c
u
a
l
p
u
e
d
e
d
e
t
e
r
m
i
n
a
r
s
e
a
p
a
g
a
n
d
o
y
e
n
c
e
n
d
i
e
n
d
o
e
l
e
q
u
i
p
o
,
e
l
u
s
u
a
r
i
o
p
u
e
d
e
i
n
t
e
n
t
a
r
c
o
r
r
e
g
i
r
l
a
i
n
t
e
r
f
e
r
e
n
c
i
a
d
e
a
l
g
u
n
a
/
s
d
e
l
a
s
s
i
g
u
i
e
n
t
e
s
m
a
n
e
r
a
s
:
•
R
e
o
r
i
e
n
t
e
l
a
a
n
t
e
n
a
r
e
c
e
p
t
o
r
a
o
u
b
í
q
u
e
l
a
e
n
o
t
r
o
l
u
g
a
r
.
•
A
u
m
e
n
t
e
l
a
d
i
s
t
a
n
c
i
a
e
n
t
r
e
e
l
e
q
u
i
p
o
y
e
l
r
e
c
e
p
t
o
r
.
•
C
o
n
e
c
t
e
e
l
e
q
u
i
p
o
a
u
n
t
o
m
a
c
o
r
r
i
e
n
t
e
d
e
u
n
c
i
r
c
u
i
t
o
d
i
s
t
i
n
t
o
a
l
q
u
e
e
s
t
á
c
o
n
e
c
t
a
d
o
e
l
r
e
c
e
p
t
o
r
.
•
C
o
n
s
u
l
t
e
a
l
d
i
s
t
r
i
b
u
i
d
o
r
o
a
u
n
t
é
c
n
i
c
o
e
x
p
e
r
i
m
e
n
t
a
d
o
d
e
r
a
d
i
o
y
t
e
l
e
v
i
s
i
ó
n
p
a
r
a
q
u
e
l
o
a
s
e
s
o
r
e
.
z
ADVERTENCIAS
PRECAUCIÓN
RIESGO DE DESCARGA
ELÉCTRICA. NO ABRIR
PRECAUCIÓN: PARA REDUCIR EL RIESGO DE
DESCARGAS ELÉCTRICAS, NO QUITE LA CUBIERTA (NI
LA TAPA POSTERIOR) NO HAY PIEZAS REPARABLES
POR EL USUARIO DENTRO. DERIVE LAS REPARACIONES
A PERSONAL DE SERVICIO CALIFICADO.
Declaración: La batería no puede ser sustituida.
Las Especificaciones Están Sujetas A Cambios Sin Previo Aviso. Guarde las instrucciones para
referencia futura ya que contienen información importante.
Especificaciones
SECCIÓN DE SALIDA DE MICRÓFONO ... Conector de salida de línea estéreo de 3,5 mm
SECCIÓN DE AURICULARES ..................................... Toma de auriculares estéreo de 3.5 mm
Impedancia .......................................................................................................................... > 16 ohmios
ENERGÍA
Pila ............................................................................................. Pila de iones de litio 3.7 V 600 mAh
Potencia de entrada ....................................................................................... Tipo C-USB DC 5V 1A
Dimensiones
Micrófono ..................................................... 1,8 x 1,8 x 8,5 (pulgadas) / 4,5 X 4,5 X 21,6 (cm)
Peso (Solo micrófono) ........................................................................ 0,25 (kgs) / 0,55 (libras)
REQUISITOS DEL SISTEMA
Windows ............................................................................................................................. 10 o superior
MacOS ........................................................................................................................ 10.13 o superior
USB ........................................................................................................................................ 1.1/2.0/3.0
MIC MODE BATTERY LEVEL
MIC MUTE
NOISE
SUPPRESSION
VOICE EFFECTS
To instantly mute the mic simply press the MUTE/OK
button
U
. You can press the MUTE/OK button
U
again to un-mute or adjust the volume with the MIC
VOLUME ring
X
.
MUTE
MAIN DISPLAY

MICROPHONE OUTPUT
This unit
is able to connect to your favorite karaoke device. You can connect with
the included 3.5mm to 6.5mm cable.
Warning
- To avoid excessive over amplified sound output, it is recommended that the
volume control is initially adjusted to one third or less and then increased if
required.
Información importante sobre seguridad
1. Lea estas instrucciones. 2. Conserve estas instrucciones.
3. Preste atención a todas las advertencias. 4. Siga todas las instrucciones.
5. No utilice este artefacto cerca del agua. 6. Límpielo únicamente con un paño seco.
7. No obstruya las aberturas para ventilación. Instálelo de acuerdo con las instrucciones del
fabricante.
8. No instale cerca de fuentes de calor, como radiadores, rejillas de calefacción, estufas u otros
aparatos (incluso amplificadores) que produzcan calor.
9. Desenchufe este artefacto durante las tormentas eléctricas o cuando no se lo utilice
durante períodos prolongados.
10. Derive todas las reparaciones al personal de reparaciones calificado. Es necesario reparar el
artefacto cuando se encuentra dañado; por ejemplo, cuando el cable de suministro de
energía o el enchufe están dañados, cuando se derrama líquido sobre la unidad o caen
objetos dentro del mismo, cuando el producto ha estado expuesto a la lluvia o a la humedad,
cuando no funciona con normalidad o cuando se ha caído.
11. ADVERTENCIA: Para reducir el riesgo de incendio o descarga eléctrica, no exponga este
artefacto a la lluvia o la humedad. No coloque objetos llenos de agua, como jarrones, sobre el
aparato.
12. PRECAUCIÓN: Para reducir el riesgo de incendio o explosión no exponga las baterías al calor
excesivo, como al rayo del sol, fuego u otras fuentes de calor.
option 2 (return) SMM2097 US instruction sheet (Eng/Spa/Fre)
Date: 3 Jan 22
size: (each page) 65 (W) x 91 (H)mm
color: 1C black print
SMM2097
INSTRUCTION MANUAL
MANUAL DE INSTRUCCIONES
MODE D’EMPLOI
Please read before first using this unit.
Leer Antes de usar la Unidad.
Veuillez lire ce manuel avant d’utiliser cet appareil.
The Responsible Party
Company Name : The Singing Machine Company, Inc.
Address : 6301 NW 5th Way, Suite 2900, Fort Lauderdale,
FL33309, USA
Telephone : 954 -596-1000
Website : www.singingmachine.com
The Singing Machine Company, Inc.
4060 E Jurupa Street, Unit B, Ontario, CA 91761-1413 USA
PRINTED IN CHINA
IMPRESO EN CHINA
IMPRIMÉ EN CHINE
2097-2112-ESF01-US
Visit Our Website: www.singingmachine.com
Visite Nuestra Pagina de Internet: www.singingmachine.com
Visitez notre site Web : www.singingmachine.com
Important Safety Information
1. Read these Instructions. 2. Keep these Instructions.
3. Heed all Warnings. 4. Follow all Instructions.
5. Do not use this apparatus near water. 6. Clean only with a dry cloth.
7. Do not install near any heat sources such as radiators, heat registers, stoves, or other
apparatus (including amplifiers) that produce heat.
8. Only use attachments/accessories specified by the manufacturer.
9. Unplug this apparatus during lightning storms or when unused for long periods of time.
10. Refer all servicing to qualified service personnel. Servicing is required when the
apparatus has been damaged in any way, such as power-supply cord or plug is
damaged, liquid has been spilled or objects have fallen into the apparatus, the apparatus
has been exposed to rain or moisture, does not operate normally, or has been dropped.
11. WARNING: To reduce the risk of fire or electric shock, do not expose this apparatus to
rain or moisture. Do not place objects filled with water, such as a vase, on the
apparatus.
12. CAUTION: To reduce the risk of fire or explosion, do not expose batteries to excessive
heat such as sunshine, fire or other heat sources.
Specifications
MIC OUT SECTION .............................................................................. 3.5 mm Stereo line out jack
HEADPHONE SECTION ............................................................... 3.5 mm Stereo headphone jack
Impedance ............................................................................................................................... > 16 ohms
POWER SECTION
Battery ....................................................................................... Lithium ion battery 3.7 V 600 mAh
Input Power ..................................................................................................... Type C-USB DC 5V 1A
DIMENSIONS
Mic ...................................................................... 1.8 x 1.8 x 8.5 (inches) / 4.5 X 4.5 X 21.6 (cm)
WEIGHT (Mic only) ..................................................................................... 0.25 (kgs) / 0.55 (lbs)
SYSTEM REQUIREMENTS
Windows ............................................................................................................................... 10 or higher
MacOS .......................................................................................................................... 10.13 or higher
USB ........................................................................................................................................ 1.1/2.0/3.0
Manual
What’s in the box
Included
Type-C USB
Cable
The Singing Machine® is a registered trademark of The Singing Machine Co., Inc.
Singing Machine® es marca registrada de The Singing Machine Co., Inc.
Singing Machine® est une marque déposée de The Singing Machine Co., Inc.
Copyright © 2021 All Rights Reserved.
Derechos de autor © 2021 Todos los derechos reservados.
Droit d’auteur © 2021 Tous Droits Réservés
Warnings
CAUTION
RISK OF ELECTRIC SHOCK
DO NOT OPEN
CAUTION: TO REDUCE THE RISK OF ELECTRIC
SHOCK, DO NOT REMOVE COVER (OR BACK).
NO USER-SERVICEABLE PARTS INSIDE. REFER
SERVICING TO QUALIFIED SERVICE PERSONNEL.
DRIPPING WARNING: This product shall not be
exposed to dripping or splashing, and no objects
filled with liquids, such as vases, shall be placed on
the product.
Warnings: Changes or modifications to this unit
not expressly approved by the party responsible
for compliance could void the user’s authority to
operate the equipment.
To parents recommending that the adaptor be periodically examined for conditions that may
result in the risk of fire, electric shock, or injury to persons and that, in an event such conditions,
the adaptor should not be used until properly repaired.
FCC WARNING: This equipment may generate or use radio frequency energy. Changes or
modifications to this equipment may cause harmful interference unless the modifications are
expressly approved in the instruction manual. The user could lose the authority to operate this
equipment if an unauthorized change or modification is made.
This device complies with part 15 of the FCC Rules. Operation is subject to the following two
conditions: (1) This device may not cause harmful interference, and (2) this device must accept
any interference received, including interference that may cause undesired operation.
NOTE: This equipment has been tested and found to comply with the limits for a Class B digital
device, pursuant to part 15 of the FCC Rules. These limits are designed to provide reasonable
protection against harmful interference in a residential installation. This equipment generates,
uses and can radiate radio frequency energy and, if not installed and used in accordance with the
instructions, may cause harmful interference to radio communications. However, there is no
guarantee that interference will not occur in a particular installation. If this equipment does
cause harmful interference to radio or television reception, which can be determined by turning
the equipment off and on, the user is encouraged to try to correct the interference by one or
more of the following measures:
• Reorient or relocate the receiving antenna.
• Increase the separation between the equipment and receiver.
• Connect the equipment into an outlet on a circuit different from that to which the receiver is
connected.
• Consult the dealer or an experienced radio/TV technician for help.
Statement: The battery is not replaceable.
Specifications are subject to change without notice. Please retain the instructions for
further reference, as they contain important information.
Troubleshooting Guide
Should this unit exhibit a problem, check the following before seeking service:
No Power
• Power is not on; press the button to turn power on.
• Confirm that the unit is charged.
No Sound
• Make sure the mic is powered on.
• Microphone volume is set to minimum or muted; raise microphone volume by rotating
the MIC VOLUME ring.
• Volume on the external karaoke device is set to minimum or muted (if connected); raise
volume.
No Sound (If connected to a computer)
• Make sure the plug is firmly connected to the jack.
• Make sure the mic's volume has not been set to a low or muted setting.
• Make sure the computer's volume has not been set to a low or muted setting.
• The computer system does not meet the requirements of this unit; upgrade your
computer system.
• Make sure you select the device name, "Singing Machine Microphone" from your
computer's system preferences for (Mac) or settings for (PC).
• Make sure your Type-C USB cable is a data cable, it is strongly recommended to use the
included cable.
Microphone
CONNECTING HEADPHONES
For private listening or to monitor singing, use headphones (not included). Insert
headphones into the Headphones jack
w
.
Microphone plug
audio Cable
x
Operation
Press the button
x
to turn on the unit. Press and hold the button to turn
off the unit.
Press the FUNC or button
y
repeatedly to select different functions. The
display W will indicate your current operation for 10 seconds.
Before you get started
CHARGING THE UNIT
Insert the included Type-C USB cable into the unit’s Type-C
USB port
u
.
Plug the other end of the cable into the computer’s USB port
or USB charging device (not included). Charge the unit for 2
hours to ensure it is fully charged.
When the unit is charging, the battery level bar will flash. After the unit is fully
charged, the battery level bar will become a solid light.
NOTE: Please charge the unit, when you see the battery level bar is low or when
it has no battery level to display.
V
at
X
v
w
u
y y
NAME DESCRIPTION
Basic Pitch Silky smooth & balanced reverb & echo; a great all around go-to vocal
enhancer
Billie Eyelash Queue up Bad Guy & let it rip with this harmonized choir effect that is
perfect for Alternative and Rock singing
Phil the Air Tonight Heavy on the reverb & echo with delicate feedback & flanger effect
for a lovely
sound perfect for 80’s hits
Grunge Unmistakably gritty, great for rock, alt, pop and just making your
voice sound cool
Reggae-Tone Enhanced echo and choir makes voices shine especially while singing
reggae and reggaeton
Hip-Hop Big room echo & reverb with a smooth chorus
Oldtown Rd A touch of echo with added vocal boost that’s great for belting out
country tunes
Diva Take your voice to new heights with this octave booster
Doo-Wop Smooth harmony adds some bass backup to your voice
Electronica Punchy and unique, perfect for pop, EDM and making heads turn
Up to Mars Big echo and chorus good for a wide range of songs from ballads to
funk
Anthems Lots of echo and reverb for when your voice needs to be BIG
Nosebleed Seats Did someone say sold out stadium show?
Voice of an Angel Have your own angelic choir singing along with this lovely chorus
effect
4 of a Kind It’s like having a few more singers harmonize along with your vocals
Ballad Rock Crank up your favorite guilty pleasure ballad and rock it out for that
special someone in the audience
Bad Trip Wild & fun chorus effect
Laser Crazy & silly vocal laser beams
Warp Speed Bouncy & echos, lots of fun
Barry Deep Oh baby, that’s a deep voice
When EFFECT LEVEL is displayed use the or
buttons
V
to adjust the level of the voice effects.
Press the MUTE/OK button
U
to return to the main
display.
NOTE: Steps above will not work if VOICE EFFECTS is
turned off.
EFFECT LEVEL
MIC MODE
When MIC MODE is displayed, choose from 4
different mic modes using the or buttons
V
to
select. Press the MUTE/OK button
U
to return to the
main display.
Solo Singer: Picks up sound from front of microphone.
Group Singing: Picks up sound equally from all
directions.
Solo Podcast: Picks up sound from front of
microphone and is wider than Solo Singer.
Group Podcast: Picks up sound equally from all
directions and is wider than Group Singing.
To reduce the noise around you when you are singing
use the or button
V
when NOISE SUPPRESSION
is displayed. Press the MUTE/OK button
U
to return
to the main display.
NOISE SUPPRESSION
When HEADPHONE VOL is displayed use the or
buttons
V
to adjust the headphone volume. Press the
MUTE/OK button
U
to return to the main display.
WARNING:
• To avoid excessive over amplified sound output, it is
recommended that the volume control is initially
adjusted to one third or less and then increased if
required.
• Headphone volume will prompt when there are
headphones connected.
HEADPHONE VOL
To adjust the mic volume simply rotate the MIC
VOLUME ring
X
.
NOTE: You can lower the microphone volume until muted.
MICROPHONE VOL
U
W
When VOICE EFFECTS is displayed use the or
V
buttons to choose from 20 different voice effects
sure to keep the party going. Press the MUTE/OK
button
U
to return to the main display.
VOICE EFFECTS
When PERFECT PITCH is displayed use the or
button
V
to adjust the levels of the perfect pitch
effect. Use PERFECT PITCH to bring studio-like quality
to your voice. Press the MUTE/OK button
U
button
to return to the main display.
PERFECT PITCH
E7E6
E2E1 E4E3
E5
S2
Slide out the feet
ak
of fold-able stand to
stabilize the mic stand.
Untighten the Mic Stand adjustment cap
al
and
adjust the Mic Stand tube
am
. Retighten the cap
al
to keep in place.
Insert the Mic Clip
an
into the Foldable Stand and
tighten it. Press the clip
an
to insert the
microphone.
Connect your computer, favorite karaoke device
or headphones via the USB jack
u
, Microphone
jack
v
or headphone jack
w
.
NOTE: If the mic is connected to your computer
you can find the device name under "Singing
Machine Microphone".
SING, WORK, GAME, PODCAST &
VLOG LIKE NEVER BEFORE!
Pitch Lab
™
Vocal
Enhancements
Scan to learn more
Foldable Stand
Mic Clip
ak
am
an
al
S1
A
D
V
E
R
T
E
N
C
I
A
D
E
G
O
T
E
O
:
E
s
t
e
p
r
o
d
u
c
t
o
n
o
s
e
p
o
d
r
á
e
x
p
o
n
e
r
a
g
o
t
e
o
o
s
a
l
p
i
c
a
d
u
r
a
s
,
y
n
o
s
e
c
o
l
o
c
a
r
á
n
i
n
g
ú
n
o
b
j
e
t
o
l
l
e
n
o
c
o
n
l
í
q
u
i
d
o
s
,
c
o
m
o
j
a
r
r
o
n
e
s
,
e
n
c
i
m
a
d
e
l
p
r
o
d
u
c
t
o
.
A
d
v
e
r
t
e
n
c
i
a
s
:
L
o
s
c
a
m
b
i
o
s
o
m
o
d
i
f
i
c
a
c
i
o
n
e
s
e
f
e
c
t
u
a
d
a
s
a
e
s
t
a
u
n
i
d
a
d
q
u
e
n
o
f
u
e
r
o
n
e
x
p
r
e
s
a
m
e
n
t
e
a
p
r
o
b
a
d
o
s
p
o
r
l
a
p
a
r
t
e
r
e
s
p
o
n
s
a
b
l
e
d
e
l
c
u
m
p
l
i
m
i
e
n
t
o
,
p
o
d
r
í
a
n
a
n
u
l
a
r
l
a
a
u
t
o
r
i
d
a
d
d
e
l
u
s
u
a
r
i
o
p
a
r
a
o
p
e
r
a
r
e
l
e
q
u
i
p
o
.
S
e
r
e
c
o
m
i
e
n
d
a
a
l
o
s
p
a
d
r
e
s
r
e
v
i
s
a
r
p
e
r
i
ó
d
i
c
a
m
e
n
t
e
e
l
a
d
a
p
t
a
d
o
r
p
a
r
a
v
e
r
i
f
i
c
a
r
q
u
e
n
o
e
x
i
s
t
a
n
c
o
n
d
i
c
i
o
n
e
s
q
u
e
p
u
e
d
a
n
o
c
a
s
i
o
n
a
r
r
i
e
s
g
o
s
d
e
i
n
c
e
n
d
i
o
,
d
e
s
c
a
r
g
a
e
l
é
c
t
r
i
c
a
o
l
e
s
i
o
n
e
s
a
l
a
s
p
e
r
s
o
n
a
s
y
q
u
e
,
d
e
e
x
i
s
t
i
r
d
i
c
h
a
s
c
o
n
d
i
c
i
o
n
e
s
,
n
o
s
e
u
t
i
l
i
c
e
e
l
a
d
a
p
t
a
d
o
r
h
a
s
t
a
q
u
e
e
s
t
é
c
o
r
r
e
c
t
a
m
e
n
t
e
r
e
p
a
r
a
d
o
.
N
O
T
I
F
I
C
A
C
I
Ó
N
D
E
L
A
F
C
C
:
E
s
t
e
e
q
u
i
p
o
p
u
e
d
e
g
e
n
e
r
a
r
o
u
s
a
r
e
n
e
r
g
í
a
d
e
r
a
d
i
o
f
r
e
c
u
e
n
c
i
a
.
L
o
s
c
a
m
b
i
o
s
o
m
o
d
i
f
i
c
a
c
i
o
n
e
s
r
e
a
l
i
z
a
d
o
s
e
n
e
l
a
p
a
r
a
t
o
p
u
e
d
e
n
p
r
o
v
o
c
a
r
i
n
t
e
r
f
e
r
e
n
c
i
a
p
e
r
j
u
d
i
c
i
a
l
,
a
m
e
n
o
s
q
u
e
d
i
c
h
a
s
m
o
d
i
f
i
c
a
c
i
o
n
e
s
e
s
t
é
n
a
u
t
o
r
i
z
a
d
a
s
e
n
e
l
m
a
n
u
a
l
d
e
i
n
s
t
r
u
c
c
i
o
n
e
s
.
E
l
u
s
u
a
r
i
o
p
u
e
d
e
p
e
r
d
e
r
t
o
d
a
a
u
t
o
r
i
d
a
d
p
a
r
a
o
p
e
r
a
r
e
l
e
q
u
i
p
o
s
i
r
e
a
l
i
z
a
c
a
m
b
i
o
s
o
m
o
d
i
f
i
c
a
c
i
o
n
e
s
s
i
n
a
u
t
o
r
i
z
a
c
i
ó
n
.
E
s
t
e
a
p
a
r
a
t
o
c
u
m
p
l
e
c
o
n
l
a
p
a
r
t
e
1
5
d
e
l
a
s
N
o
r
m
a
s
d
e
l
a
F
C
C
.
E
l
f
u
n
c
i
o
n
a
m
i
e
n
t
o
e
s
t
á
s
u
j
e
t
o
a
l
a
s
d
o
s
c
o
n
d
i
c
i
o
n
e
s
q
u
e
f
i
g
u
r
a
n
a
c
o
n
t
i
n
u
a
c
i
ó
n
:
(
1
)
E
s
p
r
o
b
a
b
l
e
q
u
e
n
o
c
a
u
s
e
i
n
t
e
r
f
e
r
e
n
c
i
a
p
e
r
j
u
d
i
c
i
a
l
y
(
2
)
d
e
b
e
r
á
a
c
e
p
t
a
r
c
u
a
l
q
u
i
e
r
i
n
t
e
r
f
e
r
e
n
c
i
a
r
e
c
i
b
i
d
a
,
i
n
c
l
u
y
e
n
d
o
l
a
i
n
t
e
r
f
e
r
e
n
c
i
a
q
u
e
p
u
e
d
a
l
l
e
g
a
r
a
c
a
u
s
a
r
u
n
f
u
n
c
i
o
n
a
m
i
e
n
t
o
i
n
d
e
s
e
a
d
o
.
N
O
T
A
:
E
s
t
e
e
q
u
i
p
o
f
u
e
p
r
o
b
a
d
o
y
s
e
c
o
n
c
l
u
y
ó
q
u
e
c
u
m
p
l
e
c
o
n
l
o
s
l
í
m
i
t
e
s
e
s
t
a
b
l
e
c
i
d
o
s
p
a
r
a
l
o
s
d
i
s
p
o
s
i
t
i
v
o
s
d
i
g
i
t
a
l
e
s
C
l
a
s
e
B
,
d
e
a
c
u
e
r
d
o
c
o
n
e
l
A
p
a
r
t
a
d
o
1
5
d
e
l
a
s
n
o
r
m
a
s
d
e
l
a
F
C
C
.
E
s
t
o
s
l
í
m
i
t
e
s
f
u
e
r
o
n
p
e
n
s
a
d
o
s
p
a
r
a
p
r
o
p
o
r
c
i
o
n
a
r
p
r
o
t
e
c
c
i
ó
n
r
a
z
o
n
a
b
l
e
a
n
t
e
l
a
i
n
t
e
r
f
e
r
e
n
c
i
a
p
e
r
j
u
d
i
c
i
a
l
e
n
u
n
a
i
n
s
t
a
l
a
c
i
ó
n
r
e
s
i
d
e
n
c
i
a
l
.
E
s
t
e
e
q
u
i
p
o
g
e
n
e
r
a
,
u
s
a
y
p
u
e
d
e
e
m
i
t
i
r
e
n
e
r
g
í
a
d
e
r
a
d
i
o
f
r
e
c
u
e
n
c
i
a
y
,
s
i
n
o
s
e
l
o
i
n
s
t
a
l
a
y
u
t
i
l
i
z
a
d
e
c
o
n
f
o
r
m
i
d
a
d
c
o
n
l
a
s
i
n
s
t
r
u
c
c
i
o
n
e
s
,
p
u
e
d
e
c
a
u
s
a
r
i
n
t
e
r
f
e
r
e
n
c
i
a
p
e
r
j
u
d
i
c
i
a
l
a
l
a
s
c
o
m
u
n
i
c
a
c
i
o
n
e
s
r
a
d
i
a
l
e
s
.
N
o
o
b
s
t
a
n
t
e
,
n
o
e
x
i
s
t
e
n
i
n
g
u
n
a
g
a
r
a
n
t
í
a
d
e
q
u
e
n
o
s
e
p
r
o
d
u
z
c
a
i
n
t
e
r
f
e
r
e
n
c
i
a
e
n
u
n
a
i
n
s
t
a
l
a
c
i
ó
n
e
n
p
a
r
t
i
c
u
l
a
r
.
S
i
e
s
t
e
e
q
u
i
p
o
p
r
o
v
o
c
a
i
n
t
e
r
f
e
r
e
n
c
i
a
p
e
r
j
u
d
i
c
i
a
l
a
l
a
r
e
c
e
p
c
i
ó
n
d
e
r
a
d
i
o
o
t
e
l
e
v
i
s
i
ó
n
,
l
o
c
u
a
l
p
u
e
d
e
d
e
t
e
r
m
i
n
a
r
s
e
a
p
a
g
a
n
d
o
y
e
n
c
e
n
d
i
e
n
d
o
e
l
e
q
u
i
p
o
,
e
l
u
s
u
a
r
i
o
p
u
e
d
e
i
n
t
e
n
t
a
r
c
o
r
r
e
g
i
r
l
a
i
n
t
e
r
f
e
r
e
n
c
i
a
d
e
a
l
g
u
n
a
/
s
d
e
l
a
s
s
i
g
u
i
e
n
t
e
s
m
a
n
e
r
a
s
:
•
R
e
o
r
i
e
n
t
e
l
a
a
n
t
e
n
a
r
e
c
e
p
t
o
r
a
o
u
b
í
q
u
e
l
a
e
n
o
t
r
o
l
u
g
a
r
.
•
A
u
m
e
n
t
e
l
a
d
i
s
t
a
n
c
i
a
e
n
t
r
e
e
l
e
q
u
i
p
o
y
e
l
r
e
c
e
p
t
o
r
.
•
C
o
n
e
c
t
e
e
l
e
q
u
i
p
o
a
u
n
t
o
m
a
c
o
r
r
i
e
n
t
e
d
e
u
n
c
i
r
c
u
i
t
o
d
i
s
t
i
n
t
o
a
l
q
u
e
e
s
t
á
c
o
n
e
c
t
a
d
o
e
l
r
e
c
e
p
t
o
r
.
•
C
o
n
s
u
l
t
e
a
l
d
i
s
t
r
i
b
u
i
d
o
r
o
a
u
n
t
é
c
n
i
c
o
e
x
p
e
r
i
m
e
n
t
a
d
o
d
e
r
a
d
i
o
y
t
e
l
e
v
i
s
i
ó
n
p
a
r
a
q
u
e
l
o
a
s
e
s
o
r
e
.
z
ADVERTENCIAS
PRECAUCIÓN
RIESGO DE DESCARGA
ELÉCTRICA. NO ABRIR
PRECAUCIÓN: PARA REDUCIR EL RIESGO DE
DESCARGAS ELÉCTRICAS, NO QUITE LA CUBIERTA (NI
LA TAPA POSTERIOR) NO HAY PIEZAS REPARABLES
POR EL USUARIO DENTRO. DERIVE LAS REPARACIONES
A PERSONAL DE SERVICIO CALIFICADO.
Declaración: La batería no puede ser sustituida.
Las Especificaciones Están Sujetas A Cambios Sin Previo Aviso. Guarde las instrucciones para
referencia futura ya que contienen información importante.
Especificaciones
SECCIÓN DE SALIDA DE MICRÓFONO ... Conector de salida de línea estéreo de 3,5 mm
SECCIÓN DE AURICULARES ..................................... Toma de auriculares estéreo de 3.5 mm
Impedancia .......................................................................................................................... > 16 ohmios
ENERGÍA
Pila ............................................................................................. Pila de iones de litio 3.7 V 600 mAh
Potencia de entrada ....................................................................................... Tipo C-USB DC 5V 1A
Dimensiones
Micrófono ..................................................... 1,8 x 1,8 x 8,5 (pulgadas) / 4,5 X 4,5 X 21,6 (cm)
Peso (Solo micrófono) ........................................................................ 0,25 (kgs) / 0,55 (libras)
REQUISITOS DEL SISTEMA
Windows ............................................................................................................................. 10 o superior
MacOS ........................................................................................................................ 10.13 o superior
USB ........................................................................................................................................ 1.1/2.0/3.0
MIC MODE BATTERY LEVEL
MIC MUTE
NOISE
SUPPRESSION
VOICE EFFECTS
To instantly mute the mic simply press the MUTE/OK
button
U
. You can press the MUTE/OK button
U
again to un-mute or adjust the volume with the MIC
VOLUME ring
X
.
MUTE
MAIN DISPLAY
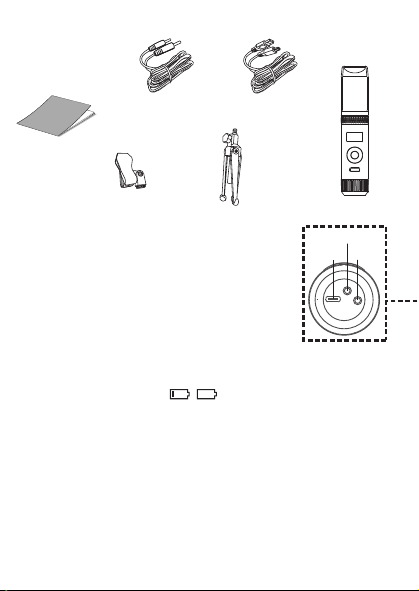
MICROPHONE OUTPUT
This unit
is able to connect to your favorite karaoke device. You can connect with
the included 3.5mm to 6.5mm cable.
Warning
- To avoid excessive over amplified sound output, it is recommended that the
volume control is initially adjusted to one third or less and then increased if
required.
Información importante sobre seguridad
1. Lea estas instrucciones. 2. Conserve estas instrucciones.
3. Preste atención a todas las advertencias. 4. Siga todas las instrucciones.
5. No utilice este artefacto cerca del agua. 6. Límpielo únicamente con un paño seco.
7. No obstruya las aberturas para ventilación. Instálelo de acuerdo con las instrucciones del
fabricante.
8. No instale cerca de fuentes de calor, como radiadores, rejillas de calefacción, estufas u otros
aparatos (incluso amplificadores) que produzcan calor.
9. Desenchufe este artefacto durante las tormentas eléctricas o cuando no se lo utilice
durante períodos prolongados.
10. Derive todas las reparaciones al personal de reparaciones calificado. Es necesario reparar el
artefacto cuando se encuentra dañado; por ejemplo, cuando el cable de suministro de
energía o el enchufe están dañados, cuando se derrama líquido sobre la unidad o caen
objetos dentro del mismo, cuando el producto ha estado expuesto a la lluvia o a la humedad,
cuando no funciona con normalidad o cuando se ha caído.
11. ADVERTENCIA: Para reducir el riesgo de incendio o descarga eléctrica, no exponga este
artefacto a la lluvia o la humedad. No coloque objetos llenos de agua, como jarrones, sobre el
aparato.
12. PRECAUCIÓN: Para reducir el riesgo de incendio o explosión no exponga las baterías al calor
excesivo, como al rayo del sol, fuego u otras fuentes de calor.
option 2 (return) SMM2097 US instruction sheet (Eng/Spa/Fre)
Date: 3 Jan 22
size: (each page) 65 (W) x 91 (H)mm
color: 1C black print
SMM2097
INSTRUCTION MANUAL
MANUAL DE INSTRUCCIONES
MODE D’EMPLOI
Please read before first using this unit.
Leer Antes de usar la Unidad.
Veuillez lire ce manuel avant d’utiliser cet appareil.
The Responsible Party
Company Name : The Singing Machine Company, Inc.
Address : 6301 NW 5th Way, Suite 2900, Fort Lauderdale,
FL33309, USA
Telephone : 954 -596-1000
Website : www.singingmachine.com
The Singing Machine Company, Inc.
4060 E Jurupa Street, Unit B, Ontario, CA 91761-1413 USA
PRINTED IN CHINA
IMPRESO EN CHINA
IMPRIMÉ EN CHINE
2097-2112-ESF01-US
Visit Our Website: www.singingmachine.com
Visite Nuestra Pagina de Internet: www.singingmachine.com
Visitez notre site Web : www.singingmachine.com
Important Safety Information
1. Read these Instructions. 2. Keep these Instructions.
3. Heed all Warnings. 4. Follow all Instructions.
5. Do not use this apparatus near water. 6. Clean only with a dry cloth.
7. Do not install near any heat sources such as radiators, heat registers, stoves, or other
apparatus (including amplifiers) that produce heat.
8. Only use attachments/accessories specified by the manufacturer.
9. Unplug this apparatus during lightning storms or when unused for long periods of time.
10. Refer all servicing to qualified service personnel. Servicing is required when the
apparatus has been damaged in any way, such as power-supply cord or plug is
damaged, liquid has been spilled or objects have fallen into the apparatus, the apparatus
has been exposed to rain or moisture, does not operate normally, or has been dropped.
11. WARNING: To reduce the risk of fire or electric shock, do not expose this apparatus to
rain or moisture. Do not place objects filled with water, such as a vase, on the
apparatus.
12. CAUTION: To reduce the risk of fire or explosion, do not expose batteries to excessive
heat such as sunshine, fire or other heat sources.
Specifications
MIC OUT SECTION .............................................................................. 3.5 mm Stereo line out jack
HEADPHONE SECTION ............................................................... 3.5 mm Stereo headphone jack
Impedance ............................................................................................................................... > 16 ohms
POWER SECTION
Battery ....................................................................................... Lithium ion battery 3.7 V 600 mAh
Input Power ..................................................................................................... Type C-USB DC 5V 1A
DIMENSIONS
Mic ...................................................................... 1.8 x 1.8 x 8.5 (inches) / 4.5 X 4.5 X 21.6 (cm)
WEIGHT (Mic only) ..................................................................................... 0.25 (kgs) / 0.55 (lbs)
SYSTEM REQUIREMENTS
Windows ............................................................................................................................... 10 or higher
MacOS .......................................................................................................................... 10.13 or higher
USB ........................................................................................................................................ 1.1/2.0/3.0
Manual
What’s in the box
Included
Type-C USB
Cable
The Singing Machine® is a registered trademark of The Singing Machine Co., Inc.
Singing Machine® es marca registrada de The Singing Machine Co., Inc.
Singing Machine® est une marque déposée de The Singing Machine Co., Inc.
Copyright © 2021 All Rights Reserved.
Derechos de autor © 2021 Todos los derechos reservados.
Droit d’auteur © 2021 Tous Droits Réservés
Warnings
CAUTION
RISK OF ELECTRIC SHOCK
DO NOT OPEN
CAUTION: TO REDUCE THE RISK OF ELECTRIC
SHOCK, DO NOT REMOVE COVER (OR BACK).
NO USER-SERVICEABLE PARTS INSIDE. REFER
SERVICING TO QUALIFIED SERVICE PERSONNEL.
DRIPPING WARNING: This product shall not be
exposed to dripping or splashing, and no objects
filled with liquids, such as vases, shall be placed on
the product.
Warnings: Changes or modifications to this unit
not expressly approved by the party responsible
for compliance could void the user’s authority to
operate the equipment.
To parents recommending that the adaptor be periodically examined for conditions that may
result in the risk of fire, electric shock, or injury to persons and that, in an event such conditions,
the adaptor should not be used until properly repaired.
FCC WARNING: This equipment may generate or use radio frequency energy. Changes or
modifications to this equipment may cause harmful interference unless the modifications are
expressly approved in the instruction manual. The user could lose the authority to operate this
equipment if an unauthorized change or modification is made.
This device complies with part 15 of the FCC Rules. Operation is subject to the following two
conditions: (1) This device may not cause harmful interference, and (2) this device must accept
any interference received, including interference that may cause undesired operation.
NOTE: This equipment has been tested and found to comply with the limits for a Class B digital
device, pursuant to part 15 of the FCC Rules. These limits are designed to provide reasonable
protection against harmful interference in a residential installation. This equipment generates,
uses and can radiate radio frequency energy and, if not installed and used in accordance with the
instructions, may cause harmful interference to radio communications. However, there is no
guarantee that interference will not occur in a particular installation. If this equipment does
cause harmful interference to radio or television reception, which can be determined by turning
the equipment off and on, the user is encouraged to try to correct the interference by one or
more of the following measures:
• Reorient or relocate the receiving antenna.
• Increase the separation between the equipment and receiver.
• Connect the equipment into an outlet on a circuit different from that to which the receiver is
connected.
• Consult the dealer or an experienced radio/TV technician for help.
Statement: The battery is not replaceable.
Specifications are subject to change without notice. Please retain the instructions for
further reference, as they contain important information.
Troubleshooting Guide
Should this unit exhibit a problem, check the following before seeking service:
No Power
• Power is not on; press the button to turn power on.
• Confirm that the unit is charged.
No Sound
• Make sure the mic is powered on.
• Microphone volume is set to minimum or muted; raise microphone volume by rotating
the MIC VOLUME ring.
• Volume on the external karaoke device is set to minimum or muted (if connected); raise
volume.
No Sound (If connected to a computer)
• Make sure the plug is firmly connected to the jack.
• Make sure the mic's volume has not been set to a low or muted setting.
• Make sure the computer's volume has not been set to a low or muted setting.
• The computer system does not meet the requirements of this unit; upgrade your
computer system.
• Make sure you select the device name, "Singing Machine Microphone" from your
computer's system preferences for (Mac) or settings for (PC).
• Make sure your Type-C USB cable is a data cable, it is strongly recommended to use the
included cable.
Microphone
CONNECTING HEADPHONES
For private listening or to monitor singing, use headphones (not included). Insert
headphones into the Headphones jack
w
.
Microphone plug
audio Cable
x
Operation
Press the button
x
to turn on the unit. Press and hold the button to turn
off the unit.
Press the FUNC or button
y
repeatedly to select different functions. The
display W will indicate your current operation for 10 seconds.
Before you get started
CHARGING THE UNIT
Insert the included Type-C USB cable into the unit’s Type-C
USB port
u
.
Plug the other end of the cable into the computer’s USB port
or USB charging device (not included). Charge the unit for 2
hours to ensure it is fully charged.
When the unit is charging, the battery level bar will flash. After the unit is fully
charged, the battery level bar will become a solid light.
NOTE: Please charge the unit, when you see the battery level bar is low or when
it has no battery level to display.
V
at
X
v
w
u
y y
NAME DESCRIPTION
Basic Pitch Silky smooth & balanced reverb & echo; a great all around go-to vocal
enhancer
Billie Eyelash Queue up Bad Guy & let it rip with this harmonized choir effect that is
perfect for Alternative and Rock singing
Phil the Air Tonight Heavy on the reverb & echo with delicate feedback & flanger effect
for a lovely
sound perfect for 80’s hits
Grunge Unmistakably gritty, great for rock, alt, pop and just making your
voice sound cool
Reggae-Tone Enhanced echo and choir makes voices shine especially while singing
reggae and reggaeton
Hip-Hop Big room echo & reverb with a smooth chorus
Oldtown Rd A touch of echo with added vocal boost that’s great for belting out
country tunes
Diva Take your voice to new heights with this octave booster
Doo-Wop Smooth harmony adds some bass backup to your voice
Electronica Punchy and unique, perfect for pop, EDM and making heads turn
Up to Mars Big echo and chorus good for a wide range of songs from ballads to
funk
Anthems Lots of echo and reverb for when your voice needs to be BIG
Nosebleed Seats Did someone say sold out stadium show?
Voice of an Angel Have your own angelic choir singing along with this lovely chorus
effect
4 of a Kind It’s like having a few more singers harmonize along with your vocals
Ballad Rock Crank up your favorite guilty pleasure ballad and rock it out for that
special someone in the audience
Bad Trip Wild & fun chorus effect
Laser Crazy & silly vocal laser beams
Warp Speed Bouncy & echos, lots of fun
Barry Deep Oh baby, that’s a deep voice
When EFFECT LEVEL is displayed use the or
buttons
V
to adjust the level of the voice effects.
Press the MUTE/OK button
U
to return to the main
display.
NOTE: Steps above will not work if VOICE EFFECTS is
turned off.
EFFECT LEVEL
MIC MODE
When MIC MODE is displayed, choose from 4
different mic modes using the or buttons
V
to
select. Press the MUTE/OK button
U
to return to the
main display.
Solo Singer: Picks up sound from front of microphone.
Group Singing: Picks up sound equally from all
directions.
Solo Podcast: Picks up sound from front of
microphone and is wider than Solo Singer.
Group Podcast: Picks up sound equally from all
directions and is wider than Group Singing.
To reduce the noise around you when you are singing
use the or button
V
when NOISE SUPPRESSION
is displayed. Press the MUTE/OK button
U
to return
to the main display.
NOISE SUPPRESSION
When HEADPHONE VOL is displayed use the or
buttons
V
to adjust the headphone volume. Press the
MUTE/OK button
U
to return to the main display.
WARNING:
• To avoid excessive over amplified sound output, it is
recommended that the volume control is initially
adjusted to one third or less and then increased if
required.
• Headphone volume will prompt when there are
headphones connected.
HEADPHONE VOL
To adjust the mic volume simply rotate the MIC
VOLUME ring
X
.
NOTE: You can lower the microphone volume until muted.
MICROPHONE VOL
U
W
When VOICE EFFECTS is displayed use the or
V
buttons to choose from 20 different voice effects
sure to keep the party going. Press the MUTE/OK
button
U
to return to the main display.
VOICE EFFECTS
When PERFECT PITCH is displayed use the or
button
V
to adjust the levels of the perfect pitch
effect. Use PERFECT PITCH to bring studio-like quality
to your voice. Press the MUTE/OK button
U
button
to return to the main display.
PERFECT PITCH
E7E6
E2E1 E4E3
E5
S2
Slide out the feet
ak
of fold-able stand to
stabilize the mic stand.
Untighten the Mic Stand adjustment cap
al
and
adjust the Mic Stand tube
am
. Retighten the cap
al
to keep in place.
Insert the Mic Clip
an
into the Foldable Stand and
tighten it. Press the clip
an
to insert the
microphone.
Connect your computer, favorite karaoke device
or headphones via the USB jack
u
, Microphone
jack
v
or headphone jack
w
.
NOTE: If the mic is connected to your computer
you can find the device name under "Singing
Machine Microphone".
SING, WORK, GAME, PODCAST &
VLOG LIKE NEVER BEFORE!
Pitch Lab
™
Vocal
Enhancements
Scan to learn more
Foldable Stand
Mic Clip
ak
am
an
al
S1
A
D
V
E
R
T
E
N
C
I
A
D
E
G
O
T
E
O
:
E
s
t
e
p
r
o
d
u
c
t
o
n
o
s
e
p
o
d
r
á
e
x
p
o
n
e
r
a
g
o
t
e
o
o
s
a
l
p
i
c
a
d
u
r
a
s
,
y
n
o
s
e
c
o
l
o
c
a
r
á
n
i
n
g
ú
n
o
b
j
e
t
o
l
l
e
n
o
c
o
n
l
í
q
u
i
d
o
s
,
c
o
m
o
j
a
r
r
o
n
e
s
,
e
n
c
i
m
a
d
e
l
p
r
o
d
u
c
t
o
.
A
d
v
e
r
t
e
n
c
i
a
s
:
L
o
s
c
a
m
b
i
o
s
o
m
o
d
i
f
i
c
a
c
i
o
n
e
s
e
f
e
c
t
u
a
d
a
s
a
e
s
t
a
u
n
i
d
a
d
q
u
e
n
o
f
u
e
r
o
n
e
x
p
r
e
s
a
m
e
n
t
e
a
p
r
o
b
a
d
o
s
p
o
r
l
a
p
a
r
t
e
r
e
s
p
o
n
s
a
b
l
e
d
e
l
c
u
m
p
l
i
m
i
e
n
t
o
,
p
o
d
r
í
a
n
a
n
u
l
a
r
l
a
a
u
t
o
r
i
d
a
d
d
e
l
u
s
u
a
r
i
o
p
a
r
a
o
p
e
r
a
r
e
l
e
q
u
i
p
o
.
S
e
r
e
c
o
m
i
e
n
d
a
a
l
o
s
p
a
d
r
e
s
r
e
v
i
s
a
r
p
e
r
i
ó
d
i
c
a
m
e
n
t
e
e
l
a
d
a
p
t
a
d
o
r
p
a
r
a
v
e
r
i
f
i
c
a
r
q
u
e
n
o
e
x
i
s
t
a
n
c
o
n
d
i
c
i
o
n
e
s
q
u
e
p
u
e
d
a
n
o
c
a
s
i
o
n
a
r
r
i
e
s
g
o
s
d
e
i
n
c
e
n
d
i
o
,
d
e
s
c
a
r
g
a
e
l
é
c
t
r
i
c
a
o
l
e
s
i
o
n
e
s
a
l
a
s
p
e
r
s
o
n
a
s
y
q
u
e
,
d
e
e
x
i
s
t
i
r
d
i
c
h
a
s
c
o
n
d
i
c
i
o
n
e
s
,
n
o
s
e
u
t
i
l
i
c
e
e
l
a
d
a
p
t
a
d
o
r
h
a
s
t
a
q
u
e
e
s
t
é
c
o
r
r
e
c
t
a
m
e
n
t
e
r
e
p
a
r
a
d
o
.
N
O
T
I
F
I
C
A
C
I
Ó
N
D
E
L
A
F
C
C
:
E
s
t
e
e
q
u
i
p
o
p
u
e
d
e
g
e
n
e
r
a
r
o
u
s
a
r
e
n
e
r
g
í
a
d
e
r
a
d
i
o
f
r
e
c
u
e
n
c
i
a
.
L
o
s
c
a
m
b
i
o
s
o
m
o
d
i
f
i
c
a
c
i
o
n
e
s
r
e
a
l
i
z
a
d
o
s
e
n
e
l
a
p
a
r
a
t
o
p
u
e
d
e
n
p
r
o
v
o
c
a
r
i
n
t
e
r
f
e
r
e
n
c
i
a
p
e
r
j
u
d
i
c
i
a
l
,
a
m
e
n
o
s
q
u
e
d
i
c
h
a
s
m
o
d
i
f
i
c
a
c
i
o
n
e
s
e
s
t
é
n
a
u
t
o
r
i
z
a
d
a
s
e
n
e
l
m
a
n
u
a
l
d
e
i
n
s
t
r
u
c
c
i
o
n
e
s
.
E
l
u
s
u
a
r
i
o
p
u
e
d
e
p
e
r
d
e
r
t
o
d
a
a
u
t
o
r
i
d
a
d
p
a
r
a
o
p
e
r
a
r
e
l
e
q
u
i
p
o
s
i
r
e
a
l
i
z
a
c
a
m
b
i
o
s
o
m
o
d
i
f
i
c
a
c
i
o
n
e
s
s
i
n
a
u
t
o
r
i
z
a
c
i
ó
n
.
E
s
t
e
a
p
a
r
a
t
o
c
u
m
p
l
e
c
o
n
l
a
p
a
r
t
e
1
5
d
e
l
a
s
N
o
r
m
a
s
d
e
l
a
F
C
C
.
E
l
f
u
n
c
i
o
n
a
m
i
e
n
t
o
e
s
t
á
s
u
j
e
t
o
a
l
a
s
d
o
s
c
o
n
d
i
c
i
o
n
e
s
q
u
e
f
i
g
u
r
a
n
a
c
o
n
t
i
n
u
a
c
i
ó
n
:
(
1
)
E
s
p
r
o
b
a
b
l
e
q
u
e
n
o
c
a
u
s
e
i
n
t
e
r
f
e
r
e
n
c
i
a
p
e
r
j
u
d
i
c
i
a
l
y
(
2
)
d
e
b
e
r
á
a
c
e
p
t
a
r
c
u
a
l
q
u
i
e
r
i
n
t
e
r
f
e
r
e
n
c
i
a
r
e
c
i
b
i
d
a
,
i
n
c
l
u
y
e
n
d
o
l
a
i
n
t
e
r
f
e
r
e
n
c
i
a
q
u
e
p
u
e
d
a
l
l
e
g
a
r
a
c
a
u
s
a
r
u
n
f
u
n
c
i
o
n
a
m
i
e
n
t
o
i
n
d
e
s
e
a
d
o
.
N
O
T
A
:
E
s
t
e
e
q
u
i
p
o
f
u
e
p
r
o
b
a
d
o
y
s
e
c
o
n
c
l
u
y
ó
q
u
e
c
u
m
p
l
e
c
o
n
l
o
s
l
í
m
i
t
e
s
e
s
t
a
b
l
e
c
i
d
o
s
p
a
r
a
l
o
s
d
i
s
p
o
s
i
t
i
v
o
s
d
i
g
i
t
a
l
e
s
C
l
a
s
e
B
,
d
e
a
c
u
e
r
d
o
c
o
n
e
l
A
p
a
r
t
a
d
o
1
5
d
e
l
a
s
n
o
r
m
a
s
d
e
l
a
F
C
C
.
E
s
t
o
s
l
í
m
i
t
e
s
f
u
e
r
o
n
p
e
n
s
a
d
o
s
p
a
r
a
p
r
o
p
o
r
c
i
o
n
a
r
p
r
o
t
e
c
c
i
ó
n
r
a
z
o
n
a
b
l
e
a
n
t
e
l
a
i
n
t
e
r
f
e
r
e
n
c
i
a
p
e
r
j
u
d
i
c
i
a
l
e
n
u
n
a
i
n
s
t
a
l
a
c
i
ó
n
r
e
s
i
d
e
n
c
i
a
l
.
E
s
t
e
e
q
u
i
p
o
g
e
n
e
r
a
,
u
s
a
y
p
u
e
d
e
e
m
i
t
i
r
e
n
e
r
g
í
a
d
e
r
a
d
i
o
f
r
e
c
u
e
n
c
i
a
y
,
s
i
n
o
s
e
l
o
i
n
s
t
a
l
a
y
u
t
i
l
i
z
a
d
e
c
o
n
f
o
r
m
i
d
a
d
c
o
n
l
a
s
i
n
s
t
r
u
c
c
i
o
n
e
s
,
p
u
e
d
e
c
a
u
s
a
r
i
n
t
e
r
f
e
r
e
n
c
i
a
p
e
r
j
u
d
i
c
i
a
l
a
l
a
s
c
o
m
u
n
i
c
a
c
i
o
n
e
s
r
a
d
i
a
l
e
s
.
N
o
o
b
s
t
a
n
t
e
,
n
o
e
x
i
s
t
e
n
i
n
g
u
n
a
g
a
r
a
n
t
í
a
d
e
q
u
e
n
o
s
e
p
r
o
d
u
z
c
a
i
n
t
e
r
f
e
r
e
n
c
i
a
e
n
u
n
a
i
n
s
t
a
l
a
c
i
ó
n
e
n
p
a
r
t
i
c
u
l
a
r
.
S
i
e
s
t
e
e
q
u
i
p
o
p
r
o
v
o
c
a
i
n
t
e
r
f
e
r
e
n
c
i
a
p
e
r
j
u
d
i
c
i
a
l
a
l
a
r
e
c
e
p
c
i
ó
n
d
e
r
a
d
i
o
o
t
e
l
e
v
i
s
i
ó
n
,
l
o
c
u
a
l
p
u
e
d
e
d
e
t
e
r
m
i
n
a
r
s
e
a
p
a
g
a
n
d
o
y
e
n
c
e
n
d
i
e
n
d
o
e
l
e
q
u
i
p
o
,
e
l
u
s
u
a
r
i
o
p
u
e
d
e
i
n
t
e
n
t
a
r
c
o
r
r
e
g
i
r
l
a
i
n
t
e
r
f
e
r
e
n
c
i
a
d
e
a
l
g
u
n
a
/
s
d
e
l
a
s
s
i
g
u
i
e
n
t
e
s
m
a
n
e
r
a
s
:
•
R
e
o
r
i
e
n
t
e
l
a
a
n
t
e
n
a
r
e
c
e
p
t
o
r
a
o
u
b
í
q
u
e
l
a
e
n
o
t
r
o
l
u
g
a
r
.
•
A
u
m
e
n
t
e
l
a
d
i
s
t
a
n
c
i
a
e
n
t
r
e
e
l
e
q
u
i
p
o
y
e
l
r
e
c
e
p
t
o
r
.
•
C
o
n
e
c
t
e
e
l
e
q
u
i
p
o
a
u
n
t
o
m
a
c
o
r
r
i
e
n
t
e
d
e
u
n
c
i
r
c
u
i
t
o
d
i
s
t
i
n
t
o
a
l
q
u
e
e
s
t
á
c
o
n
e
c
t
a
d
o
e
l
r
e
c
e
p
t
o
r
.
•
C
o
n
s
u
l
t
e
a
l
d
i
s
t
r
i
b
u
i
d
o
r
o
a
u
n
t
é
c
n
i
c
o
e
x
p
e
r
i
m
e
n
t
a
d
o
d
e
r
a
d
i
o
y
t
e
l
e
v
i
s
i
ó
n
p
a
r
a
q
u
e
l
o
a
s
e
s
o
r
e
.
z
ADVERTENCIAS
PRECAUCIÓN
RIESGO DE DESCARGA
ELÉCTRICA. NO ABRIR
PRECAUCIÓN: PARA REDUCIR EL RIESGO DE
DESCARGAS ELÉCTRICAS, NO QUITE LA CUBIERTA (NI
LA TAPA POSTERIOR) NO HAY PIEZAS REPARABLES
POR EL USUARIO DENTRO. DERIVE LAS REPARACIONES
A PERSONAL DE SERVICIO CALIFICADO.
Declaración: La batería no puede ser sustituida.
Las Especificaciones Están Sujetas A Cambios Sin Previo Aviso. Guarde las instrucciones para
referencia futura ya que contienen información importante.
Especificaciones
SECCIÓN DE SALIDA DE MICRÓFONO ... Conector de salida de línea estéreo de 3,5 mm
SECCIÓN DE AURICULARES ..................................... Toma de auriculares estéreo de 3.5 mm
Impedancia .......................................................................................................................... > 16 ohmios
ENERGÍA
Pila ............................................................................................. Pila de iones de litio 3.7 V 600 mAh
Potencia de entrada ....................................................................................... Tipo C-USB DC 5V 1A
Dimensiones
Micrófono ..................................................... 1,8 x 1,8 x 8,5 (pulgadas) / 4,5 X 4,5 X 21,6 (cm)
Peso (Solo micrófono) ........................................................................ 0,25 (kgs) / 0,55 (libras)
REQUISITOS DEL SISTEMA
Windows ............................................................................................................................. 10 o superior
MacOS ........................................................................................................................ 10.13 o superior
USB ........................................................................................................................................ 1.1/2.0/3.0
MIC MODE BATTERY LEVEL
MIC MUTE
NOISE
SUPPRESSION
VOICE EFFECTS
To instantly mute the mic simply press the MUTE/OK
button
U
. You can press the MUTE/OK button
U
again to un-mute or adjust the volume with the MIC
VOLUME ring
X
.
MUTE
MAIN DISPLAY
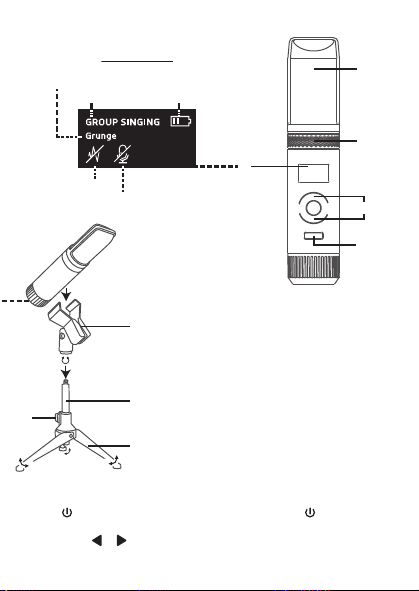
MICROPHONE OUTPUT
This unit
is able to connect to your favorite karaoke device. You can connect with
the included 3.5mm to 6.5mm cable.
Warning
- To avoid excessive over amplified sound output, it is recommended that the
volume control is initially adjusted to one third or less and then increased if
required.
Información importante sobre seguridad
1. Lea estas instrucciones. 2. Conserve estas instrucciones.
3. Preste atención a todas las advertencias. 4. Siga todas las instrucciones.
5. No utilice este artefacto cerca del agua. 6. Límpielo únicamente con un paño seco.
7. No obstruya las aberturas para ventilación. Instálelo de acuerdo con las instrucciones del
fabricante.
8. No instale cerca de fuentes de calor, como radiadores, rejillas de calefacción, estufas u otros
aparatos (incluso amplificadores) que produzcan calor.
9. Desenchufe este artefacto durante las tormentas eléctricas o cuando no se lo utilice
durante períodos prolongados.
10. Derive todas las reparaciones al personal de reparaciones calificado. Es necesario reparar el
artefacto cuando se encuentra dañado; por ejemplo, cuando el cable de suministro de
energía o el enchufe están dañados, cuando se derrama líquido sobre la unidad o caen
objetos dentro del mismo, cuando el producto ha estado expuesto a la lluvia o a la humedad,
cuando no funciona con normalidad o cuando se ha caído.
11. ADVERTENCIA: Para reducir el riesgo de incendio o descarga eléctrica, no exponga este
artefacto a la lluvia o la humedad. No coloque objetos llenos de agua, como jarrones, sobre el
aparato.
12. PRECAUCIÓN: Para reducir el riesgo de incendio o explosión no exponga las baterías al calor
excesivo, como al rayo del sol, fuego u otras fuentes de calor.
option 2 (return) SMM2097 US instruction sheet (Eng/Spa/Fre)
Date: 3 Jan 22
size: (each page) 65 (W) x 91 (H)mm
color: 1C black print
SMM2097
INSTRUCTION MANUAL
MANUAL DE INSTRUCCIONES
MODE D’EMPLOI
Please read before first using this unit.
Leer Antes de usar la Unidad.
Veuillez lire ce manuel avant d’utiliser cet appareil.
The Responsible Party
Company Name : The Singing Machine Company, Inc.
Address : 6301 NW 5th Way, Suite 2900, Fort Lauderdale,
FL33309, USA
Telephone : 954 -596-1000
Website : www.singingmachine.com
The Singing Machine Company, Inc.
4060 E Jurupa Street, Unit B, Ontario, CA 91761-1413 USA
PRINTED IN CHINA
IMPRESO EN CHINA
IMPRIMÉ EN CHINE
2097-2112-ESF01-US
Visit Our Website: www.singingmachine.com
Visite Nuestra Pagina de Internet: www.singingmachine.com
Visitez notre site Web : www.singingmachine.com
Important Safety Information
1. Read these Instructions. 2. Keep these Instructions.
3. Heed all Warnings. 4. Follow all Instructions.
5. Do not use this apparatus near water. 6. Clean only with a dry cloth.
7. Do not install near any heat sources such as radiators, heat registers, stoves, or other
apparatus (including amplifiers) that produce heat.
8. Only use attachments/accessories specified by the manufacturer.
9. Unplug this apparatus during lightning storms or when unused for long periods of time.
10. Refer all servicing to qualified service personnel. Servicing is required when the
apparatus has been damaged in any way, such as power-supply cord or plug is
damaged, liquid has been spilled or objects have fallen into the apparatus, the apparatus
has been exposed to rain or moisture, does not operate normally, or has been dropped.
11. WARNING: To reduce the risk of fire or electric shock, do not expose this apparatus to
rain or moisture. Do not place objects filled with water, such as a vase, on the
apparatus.
12. CAUTION: To reduce the risk of fire or explosion, do not expose batteries to excessive
heat such as sunshine, fire or other heat sources.
Specifications
MIC OUT SECTION .............................................................................. 3.5 mm Stereo line out jack
HEADPHONE SECTION ............................................................... 3.5 mm Stereo headphone jack
Impedance ............................................................................................................................... > 16 ohms
POWER SECTION
Battery ....................................................................................... Lithium ion battery 3.7 V 600 mAh
Input Power ..................................................................................................... Type C-USB DC 5V 1A
DIMENSIONS
Mic ...................................................................... 1.8 x 1.8 x 8.5 (inches) / 4.5 X 4.5 X 21.6 (cm)
WEIGHT (Mic only) ..................................................................................... 0.25 (kgs) / 0.55 (lbs)
SYSTEM REQUIREMENTS
Windows ............................................................................................................................... 10 or higher
MacOS .......................................................................................................................... 10.13 or higher
USB ........................................................................................................................................ 1.1/2.0/3.0
Manual
What’s in the box
Included
Type-C USB
Cable
The Singing Machine® is a registered trademark of The Singing Machine Co., Inc.
Singing Machine® es marca registrada de The Singing Machine Co., Inc.
Singing Machine® est une marque déposée de The Singing Machine Co., Inc.
Copyright © 2021 All Rights Reserved.
Derechos de autor © 2021 Todos los derechos reservados.
Droit d’auteur © 2021 Tous Droits Réservés
Warnings
CAUTION
RISK OF ELECTRIC SHOCK
DO NOT OPEN
CAUTION: TO REDUCE THE RISK OF ELECTRIC
SHOCK, DO NOT REMOVE COVER (OR BACK).
NO USER-SERVICEABLE PARTS INSIDE. REFER
SERVICING TO QUALIFIED SERVICE PERSONNEL.
DRIPPING WARNING: This product shall not be
exposed to dripping or splashing, and no objects
filled with liquids, such as vases, shall be placed on
the product.
Warnings: Changes or modifications to this unit
not expressly approved by the party responsible
for compliance could void the user’s authority to
operate the equipment.
To parents recommending that the adaptor be periodically examined for conditions that may
result in the risk of fire, electric shock, or injury to persons and that, in an event such conditions,
the adaptor should not be used until properly repaired.
FCC WARNING: This equipment may generate or use radio frequency energy. Changes or
modifications to this equipment may cause harmful interference unless the modifications are
expressly approved in the instruction manual. The user could lose the authority to operate this
equipment if an unauthorized change or modification is made.
This device complies with part 15 of the FCC Rules. Operation is subject to the following two
conditions: (1) This device may not cause harmful interference, and (2) this device must accept
any interference received, including interference that may cause undesired operation.
NOTE: This equipment has been tested and found to comply with the limits for a Class B digital
device, pursuant to part 15 of the FCC Rules. These limits are designed to provide reasonable
protection against harmful interference in a residential installation. This equipment generates,
uses and can radiate radio frequency energy and, if not installed and used in accordance with the
instructions, may cause harmful interference to radio communications. However, there is no
guarantee that interference will not occur in a particular installation. If this equipment does
cause harmful interference to radio or television reception, which can be determined by turning
the equipment off and on, the user is encouraged to try to correct the interference by one or
more of the following measures:
• Reorient or relocate the receiving antenna.
• Increase the separation between the equipment and receiver.
• Connect the equipment into an outlet on a circuit different from that to which the receiver is
connected.
• Consult the dealer or an experienced radio/TV technician for help.
Statement: The battery is not replaceable.
Specifications are subject to change without notice. Please retain the instructions for
further reference, as they contain important information.
Troubleshooting Guide
Should this unit exhibit a problem, check the following before seeking service:
No Power
• Power is not on; press the button to turn power on.
• Confirm that the unit is charged.
No Sound
• Make sure the mic is powered on.
• Microphone volume is set to minimum or muted; raise microphone volume by rotating
the MIC VOLUME ring.
• Volume on the external karaoke device is set to minimum or muted (if connected); raise
volume.
No Sound (If connected to a computer)
• Make sure the plug is firmly connected to the jack.
• Make sure the mic's volume has not been set to a low or muted setting.
• Make sure the computer's volume has not been set to a low or muted setting.
• The computer system does not meet the requirements of this unit; upgrade your
computer system.
• Make sure you select the device name, "Singing Machine Microphone" from your
computer's system preferences for (Mac) or settings for (PC).
• Make sure your Type-C USB cable is a data cable, it is strongly recommended to use the
included cable.
Microphone
CONNECTING HEADPHONES
For private listening or to monitor singing, use headphones (not included). Insert
headphones into the Headphones jack
w
.
Microphone plug
audio Cable
x
Operation
Press the button
x
to turn on the unit. Press and hold the button to turn
off the unit.
Press the FUNC or button
y
repeatedly to select different functions. The
display W will indicate your current operation for 10 seconds.
Before you get started
CHARGING THE UNIT
Insert the included Type-C USB cable into the unit’s Type-C
USB port
u
.
Plug the other end of the cable into the computer’s USB port
or USB charging device (not included). Charge the unit for 2
hours to ensure it is fully charged.
When the unit is charging, the battery level bar will flash. After the unit is fully
charged, the battery level bar will become a solid light.
NOTE: Please charge the unit, when you see the battery level bar is low or when
it has no battery level to display.
V
at
X
v
w
u
y y
NAME DESCRIPTION
Basic Pitch Silky smooth & balanced reverb & echo; a great all around go-to vocal
enhancer
Billie Eyelash Queue up Bad Guy & let it rip with this harmonized choir effect that is
perfect for Alternative and Rock singing
Phil the Air Tonight Heavy on the reverb & echo with delicate feedback & flanger effect
for a lovely
sound perfect for 80’s hits
Grunge Unmistakably gritty, great for rock, alt, pop and just making your
voice sound cool
Reggae-Tone Enhanced echo and choir makes voices shine especially while singing
reggae and reggaeton
Hip-Hop Big room echo & reverb with a smooth chorus
Oldtown Rd A touch of echo with added vocal boost that’s great for belting out
country tunes
Diva Take your voice to new heights with this octave booster
Doo-Wop Smooth harmony adds some bass backup to your voice
Electronica Punchy and unique, perfect for pop, EDM and making heads turn
Up to Mars Big echo and chorus good for a wide range of songs from ballads to
funk
Anthems Lots of echo and reverb for when your voice needs to be BIG
Nosebleed Seats Did someone say sold out stadium show?
Voice of an Angel Have your own angelic choir singing along with this lovely chorus
effect
4 of a Kind It’s like having a few more singers harmonize along with your vocals
Ballad Rock Crank up your favorite guilty pleasure ballad and rock it out for that
special someone in the audience
Bad Trip Wild & fun chorus effect
Laser Crazy & silly vocal laser beams
Warp Speed Bouncy & echos, lots of fun
Barry Deep Oh baby, that’s a deep voice
When EFFECT LEVEL is displayed use the or
buttons
V
to adjust the level of the voice effects.
Press the MUTE/OK button
U
to return to the main
display.
NOTE: Steps above will not work if VOICE EFFECTS is
turned off.
EFFECT LEVEL
MIC MODE
When MIC MODE is displayed, choose from 4
different mic modes using the or buttons
V
to
select. Press the MUTE/OK button
U
to return to the
main display.
Solo Singer: Picks up sound from front of microphone.
Group Singing: Picks up sound equally from all
directions.
Solo Podcast: Picks up sound from front of
microphone and is wider than Solo Singer.
Group Podcast: Picks up sound equally from all
directions and is wider than Group Singing.
To reduce the noise around you when you are singing
use the or button
V
when NOISE SUPPRESSION
is displayed. Press the MUTE/OK button
U
to return
to the main display.
NOISE SUPPRESSION
When HEADPHONE VOL is displayed use the or
buttons
V
to adjust the headphone volume. Press the
MUTE/OK button
U
to return to the main display.
WARNING:
• To avoid excessive over amplified sound output, it is
recommended that the volume control is initially
adjusted to one third or less and then increased if
required.
• Headphone volume will prompt when there are
headphones connected.
HEADPHONE VOL
To adjust the mic volume simply rotate the MIC
VOLUME ring
X
.
NOTE: You can lower the microphone volume until muted.
MICROPHONE VOL
U
W
When VOICE EFFECTS is displayed use the or
V
buttons to choose from 20 different voice effects
sure to keep the party going. Press the MUTE/OK
button
U
to return to the main display.
VOICE EFFECTS
When PERFECT PITCH is displayed use the or
button
V
to adjust the levels of the perfect pitch
effect. Use PERFECT PITCH to bring studio-like quality
to your voice. Press the MUTE/OK button
U
button
to return to the main display.
PERFECT PITCH
E7E6
E2E1 E4E3
E5
S2
Slide out the feet
ak
of fold-able stand to
stabilize the mic stand.
Untighten the Mic Stand adjustment cap
al
and
adjust the Mic Stand tube
am
. Retighten the cap
al
to keep in place.
Insert the Mic Clip
an
into the Foldable Stand and
tighten it. Press the clip
an
to insert the
microphone.
Connect your computer, favorite karaoke device
or headphones via the USB jack
u
, Microphone
jack
v
or headphone jack
w
.
NOTE: If the mic is connected to your computer
you can find the device name under "Singing
Machine Microphone".
SING, WORK, GAME, PODCAST &
VLOG LIKE NEVER BEFORE!
Pitch Lab
™
Vocal
Enhancements
Scan to learn more
Foldable Stand
Mic Clip
ak
am
an
al
S1
A
D
V
E
R
T
E
N
C
I
A
D
E
G
O
T
E
O
:
E
s
t
e
p
r
o
d
u
c
t
o
n
o
s
e
p
o
d
r
á
e
x
p
o
n
e
r
a
g
o
t
e
o
o
s
a
l
p
i
c
a
d
u
r
a
s
,
y
n
o
s
e
c
o
l
o
c
a
r
á
n
i
n
g
ú
n
o
b
j
e
t
o
l
l
e
n
o
c
o
n
l
í
q
u
i
d
o
s
,
c
o
m
o
j
a
r
r
o
n
e
s
,
e
n
c
i
m
a
d
e
l
p
r
o
d
u
c
t
o
.
A
d
v
e
r
t
e
n
c
i
a
s
:
L
o
s
c
a
m
b
i
o
s
o
m
o
d
i
f
i
c
a
c
i
o
n
e
s
e
f
e
c
t
u
a
d
a
s
a
e
s
t
a
u
n
i
d
a
d
q
u
e
n
o
f
u
e
r
o
n
e
x
p
r
e
s
a
m
e
n
t
e
a
p
r
o
b
a
d
o
s
p
o
r
l
a
p
a
r
t
e
r
e
s
p
o
n
s
a
b
l
e
d
e
l
c
u
m
p
l
i
m
i
e
n
t
o
,
p
o
d
r
í
a
n
a
n
u
l
a
r
l
a
a
u
t
o
r
i
d
a
d
d
e
l
u
s
u
a
r
i
o
p
a
r
a
o
p
e
r
a
r
e
l
e
q
u
i
p
o
.
S
e
r
e
c
o
m
i
e
n
d
a
a
l
o
s
p
a
d
r
e
s
r
e
v
i
s
a
r
p
e
r
i
ó
d
i
c
a
m
e
n
t
e
e
l
a
d
a
p
t
a
d
o
r
p
a
r
a
v
e
r
i
f
i
c
a
r
q
u
e
n
o
e
x
i
s
t
a
n
c
o
n
d
i
c
i
o
n
e
s
q
u
e
p
u
e
d
a
n
o
c
a
s
i
o
n
a
r
r
i
e
s
g
o
s
d
e
i
n
c
e
n
d
i
o
,
d
e
s
c
a
r
g
a
e
l
é
c
t
r
i
c
a
o
l
e
s
i
o
n
e
s
a
l
a
s
p
e
r
s
o
n
a
s
y
q
u
e
,
d
e
e
x
i
s
t
i
r
d
i
c
h
a
s
c
o
n
d
i
c
i
o
n
e
s
,
n
o
s
e
u
t
i
l
i
c
e
e
l
a
d
a
p
t
a
d
o
r
h
a
s
t
a
q
u
e
e
s
t
é
c
o
r
r
e
c
t
a
m
e
n
t
e
r
e
p
a
r
a
d
o
.
N
O
T
I
F
I
C
A
C
I
Ó
N
D
E
L
A
F
C
C
:
E
s
t
e
e
q
u
i
p
o
p
u
e
d
e
g
e
n
e
r
a
r
o
u
s
a
r
e
n
e
r
g
í
a
d
e
r
a
d
i
o
f
r
e
c
u
e
n
c
i
a
.
L
o
s
c
a
m
b
i
o
s
o
m
o
d
i
f
i
c
a
c
i
o
n
e
s
r
e
a
l
i
z
a
d
o
s
e
n
e
l
a
p
a
r
a
t
o
p
u
e
d
e
n
p
r
o
v
o
c
a
r
i
n
t
e
r
f
e
r
e
n
c
i
a
p
e
r
j
u
d
i
c
i
a
l
,
a
m
e
n
o
s
q
u
e
d
i
c
h
a
s
m
o
d
i
f
i
c
a
c
i
o
n
e
s
e
s
t
é
n
a
u
t
o
r
i
z
a
d
a
s
e
n
e
l
m
a
n
u
a
l
d
e
i
n
s
t
r
u
c
c
i
o
n
e
s
.
E
l
u
s
u
a
r
i
o
p
u
e
d
e
p
e
r
d
e
r
t
o
d
a
a
u
t
o
r
i
d
a
d
p
a
r
a
o
p
e
r
a
r
e
l
e
q
u
i
p
o
s
i
r
e
a
l
i
z
a
c
a
m
b
i
o
s
o
m
o
d
i
f
i
c
a
c
i
o
n
e
s
s
i
n
a
u
t
o
r
i
z
a
c
i
ó
n
.
E
s
t
e
a
p
a
r
a
t
o
c
u
m
p
l
e
c
o
n
l
a
p
a
r
t
e
1
5
d
e
l
a
s
N
o
r
m
a
s
d
e
l
a
F
C
C
.
E
l
f
u
n
c
i
o
n
a
m
i
e
n
t
o
e
s
t
á
s
u
j
e
t
o
a
l
a
s
d
o
s
c
o
n
d
i
c
i
o
n
e
s
q
u
e
f
i
g
u
r
a
n
a
c
o
n
t
i
n
u
a
c
i
ó
n
:
(
1
)
E
s
p
r
o
b
a
b
l
e
q
u
e
n
o
c
a
u
s
e
i
n
t
e
r
f
e
r
e
n
c
i
a
p
e
r
j
u
d
i
c
i
a
l
y
(
2
)
d
e
b
e
r
á
a
c
e
p
t
a
r
c
u
a
l
q
u
i
e
r
i
n
t
e
r
f
e
r
e
n
c
i
a
r
e
c
i
b
i
d
a
,
i
n
c
l
u
y
e
n
d
o
l
a
i
n
t
e
r
f
e
r
e
n
c
i
a
q
u
e
p
u
e
d
a
l
l
e
g
a
r
a
c
a
u
s
a
r
u
n
f
u
n
c
i
o
n
a
m
i
e
n
t
o
i
n
d
e
s
e
a
d
o
.
N
O
T
A
:
E
s
t
e
e
q
u
i
p
o
f
u
e
p
r
o
b
a
d
o
y
s
e
c
o
n
c
l
u
y
ó
q
u
e
c
u
m
p
l
e
c
o
n
l
o
s
l
í
m
i
t
e
s
e
s
t
a
b
l
e
c
i
d
o
s
p
a
r
a
l
o
s
d
i
s
p
o
s
i
t
i
v
o
s
d
i
g
i
t
a
l
e
s
C
l
a
s
e
B
,
d
e
a
c
u
e
r
d
o
c
o
n
e
l
A
p
a
r
t
a
d
o
1
5
d
e
l
a
s
n
o
r
m
a
s
d
e
l
a
F
C
C
.
E
s
t
o
s
l
í
m
i
t
e
s
f
u
e
r
o
n
p
e
n
s
a
d
o
s
p
a
r
a
p
r
o
p
o
r
c
i
o
n
a
r
p
r
o
t
e
c
c
i
ó
n
r
a
z
o
n
a
b
l
e
a
n
t
e
l
a
i
n
t
e
r
f
e
r
e
n
c
i
a
p
e
r
j
u
d
i
c
i
a
l
e
n
u
n
a
i
n
s
t
a
l
a
c
i
ó
n
r
e
s
i
d
e
n
c
i
a
l
.
E
s
t
e
e
q
u
i
p
o
g
e
n
e
r
a
,
u
s
a
y
p
u
e
d
e
e
m
i
t
i
r
e
n
e
r
g
í
a
d
e
r
a
d
i
o
f
r
e
c
u
e
n
c
i
a
y
,
s
i
n
o
s
e
l
o
i
n
s
t
a
l
a
y
u
t
i
l
i
z
a
d
e
c
o
n
f
o
r
m
i
d
a
d
c
o
n
l
a
s
i
n
s
t
r
u
c
c
i
o
n
e
s
,
p
u
e
d
e
c
a
u
s
a
r
i
n
t
e
r
f
e
r
e
n
c
i
a
p
e
r
j
u
d
i
c
i
a
l
a
l
a
s
c
o
m
u
n
i
c
a
c
i
o
n
e
s
r
a
d
i
a
l
e
s
.
N
o
o
b
s
t
a
n
t
e
,
n
o
e
x
i
s
t
e
n
i
n
g
u
n
a
g
a
r
a
n
t
í
a
d
e
q
u
e
n
o
s
e
p
r
o
d
u
z
c
a
i
n
t
e
r
f
e
r
e
n
c
i
a
e
n
u
n
a
i
n
s
t
a
l
a
c
i
ó
n
e
n
p
a
r
t
i
c
u
l
a
r
.
S
i
e
s
t
e
e
q
u
i
p
o
p
r
o
v
o
c
a
i
n
t
e
r
f
e
r
e
n
c
i
a
p
e
r
j
u
d
i
c
i
a
l
a
l
a
r
e
c
e
p
c
i
ó
n
d
e
r
a
d
i
o
o
t
e
l
e
v
i
s
i
ó
n
,
l
o
c
u
a
l
p
u
e
d
e
d
e
t
e
r
m
i
n
a
r
s
e
a
p
a
g
a
n
d
o
y
e
n
c
e
n
d
i
e
n
d
o
e
l
e
q
u
i
p
o
,
e
l
u
s
u
a
r
i
o
p
u
e
d
e
i
n
t
e
n
t
a
r
c
o
r
r
e
g
i
r
l
a
i
n
t
e
r
f
e
r
e
n
c
i
a
d
e
a
l
g
u
n
a
/
s
d
e
l
a
s
s
i
g
u
i
e
n
t
e
s
m
a
n
e
r
a
s
:
•
R
e
o
r
i
e
n
t
e
l
a
a
n
t
e
n
a
r
e
c
e
p
t
o
r
a
o
u
b
í
q
u
e
l
a
e
n
o
t
r
o
l
u
g
a
r
.
•
A
u
m
e
n
t
e
l
a
d
i
s
t
a
n
c
i
a
e
n
t
r
e
e
l
e
q
u
i
p
o
y
e
l
r
e
c
e
p
t
o
r
.
•
C
o
n
e
c
t
e
e
l
e
q
u
i
p
o
a
u
n
t
o
m
a
c
o
r
r
i
e
n
t
e
d
e
u
n
c
i
r
c
u
i
t
o
d
i
s
t
i
n
t
o
a
l
q
u
e
e
s
t
á
c
o
n
e
c
t
a
d
o
e
l
r
e
c
e
p
t
o
r
.
•
C
o
n
s
u
l
t
e
a
l
d
i
s
t
r
i
b
u
i
d
o
r
o
a
u
n
t
é
c
n
i
c
o
e
x
p
e
r
i
m
e
n
t
a
d
o
d
e
r
a
d
i
o
y
t
e
l
e
v
i
s
i
ó
n
p
a
r
a
q
u
e
l
o
a
s
e
s
o
r
e
.
z
ADVERTENCIAS
PRECAUCIÓN
RIESGO DE DESCARGA
ELÉCTRICA. NO ABRIR
PRECAUCIÓN: PARA REDUCIR EL RIESGO DE
DESCARGAS ELÉCTRICAS, NO QUITE LA CUBIERTA (NI
LA TAPA POSTERIOR) NO HAY PIEZAS REPARABLES
POR EL USUARIO DENTRO. DERIVE LAS REPARACIONES
A PERSONAL DE SERVICIO CALIFICADO.
Declaración: La batería no puede ser sustituida.
Las Especificaciones Están Sujetas A Cambios Sin Previo Aviso. Guarde las instrucciones para
referencia futura ya que contienen información importante.
Especificaciones
SECCIÓN DE SALIDA DE MICRÓFONO ... Conector de salida de línea estéreo de 3,5 mm
SECCIÓN DE AURICULARES ..................................... Toma de auriculares estéreo de 3.5 mm
Impedancia .......................................................................................................................... > 16 ohmios
ENERGÍA
Pila ............................................................................................. Pila de iones de litio 3.7 V 600 mAh
Potencia de entrada ....................................................................................... Tipo C-USB DC 5V 1A
Dimensiones
Micrófono ..................................................... 1,8 x 1,8 x 8,5 (pulgadas) / 4,5 X 4,5 X 21,6 (cm)
Peso (Solo micrófono) ........................................................................ 0,25 (kgs) / 0,55 (libras)
REQUISITOS DEL SISTEMA
Windows ............................................................................................................................. 10 o superior
MacOS ........................................................................................................................ 10.13 o superior
USB ........................................................................................................................................ 1.1/2.0/3.0
MIC MODE BATTERY LEVEL
MIC MUTE
NOISE
SUPPRESSION
VOICE EFFECTS
To instantly mute the mic simply press the MUTE/OK
button
U
. You can press the MUTE/OK button
U
again to un-mute or adjust the volume with the MIC
VOLUME ring
X
.
MUTE
MAIN DISPLAY
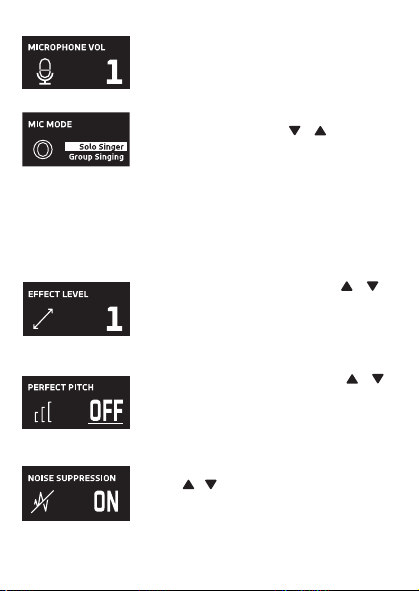
MICROPHONE OUTPUT
This unit
is able to connect to your favorite karaoke device. You can connect with
the included 3.5mm to 6.5mm cable.
Warning
- To avoid excessive over amplified sound output, it is recommended that the
volume control is initially adjusted to one third or less and then increased if
required.
Información importante sobre seguridad
1. Lea estas instrucciones. 2. Conserve estas instrucciones.
3. Preste atención a todas las advertencias. 4. Siga todas las instrucciones.
5. No utilice este artefacto cerca del agua. 6. Límpielo únicamente con un paño seco.
7. No obstruya las aberturas para ventilación. Instálelo de acuerdo con las instrucciones del
fabricante.
8. No instale cerca de fuentes de calor, como radiadores, rejillas de calefacción, estufas u otros
aparatos (incluso amplificadores) que produzcan calor.
9. Desenchufe este artefacto durante las tormentas eléctricas o cuando no se lo utilice
durante períodos prolongados.
10. Derive todas las reparaciones al personal de reparaciones calificado. Es necesario reparar el
artefacto cuando se encuentra dañado; por ejemplo, cuando el cable de suministro de
energía o el enchufe están dañados, cuando se derrama líquido sobre la unidad o caen
objetos dentro del mismo, cuando el producto ha estado expuesto a la lluvia o a la humedad,
cuando no funciona con normalidad o cuando se ha caído.
11. ADVERTENCIA: Para reducir el riesgo de incendio o descarga eléctrica, no exponga este
artefacto a la lluvia o la humedad. No coloque objetos llenos de agua, como jarrones, sobre el
aparato.
12. PRECAUCIÓN: Para reducir el riesgo de incendio o explosión no exponga las baterías al calor
excesivo, como al rayo del sol, fuego u otras fuentes de calor.
option 2 (return) SMM2097 US instruction sheet (Eng/Spa/Fre)
Date: 3 Jan 22
size: (each page) 65 (W) x 91 (H)mm
color: 1C black print
SMM2097
INSTRUCTION MANUAL
MANUAL DE INSTRUCCIONES
MODE D’EMPLOI
Please read before first using this unit.
Leer Antes de usar la Unidad.
Veuillez lire ce manuel avant d’utiliser cet appareil.
The Responsible Party
Company Name : The Singing Machine Company, Inc.
Address : 6301 NW 5th Way, Suite 2900, Fort Lauderdale,
FL33309, USA
Telephone : 954 -596-1000
Website : www.singingmachine.com
The Singing Machine Company, Inc.
4060 E Jurupa Street, Unit B, Ontario, CA 91761-1413 USA
PRINTED IN CHINA
IMPRESO EN CHINA
IMPRIMÉ EN CHINE
2097-2112-ESF01-US
Visit Our Website: www.singingmachine.com
Visite Nuestra Pagina de Internet: www.singingmachine.com
Visitez notre site Web : www.singingmachine.com
Important Safety Information
1. Read these Instructions. 2. Keep these Instructions.
3. Heed all Warnings. 4. Follow all Instructions.
5. Do not use this apparatus near water. 6. Clean only with a dry cloth.
7. Do not install near any heat sources such as radiators, heat registers, stoves, or other
apparatus (including amplifiers) that produce heat.
8. Only use attachments/accessories specified by the manufacturer.
9. Unplug this apparatus during lightning storms or when unused for long periods of time.
10. Refer all servicing to qualified service personnel. Servicing is required when the
apparatus has been damaged in any way, such as power-supply cord or plug is
damaged, liquid has been spilled or objects have fallen into the apparatus, the apparatus
has been exposed to rain or moisture, does not operate normally, or has been dropped.
11. WARNING: To reduce the risk of fire or electric shock, do not expose this apparatus to
rain or moisture. Do not place objects filled with water, such as a vase, on the
apparatus.
12. CAUTION: To reduce the risk of fire or explosion, do not expose batteries to excessive
heat such as sunshine, fire or other heat sources.
Specifications
MIC OUT SECTION .............................................................................. 3.5 mm Stereo line out jack
HEADPHONE SECTION ............................................................... 3.5 mm Stereo headphone jack
Impedance ............................................................................................................................... > 16 ohms
POWER SECTION
Battery ....................................................................................... Lithium ion battery 3.7 V 600 mAh
Input Power ..................................................................................................... Type C-USB DC 5V 1A
DIMENSIONS
Mic ...................................................................... 1.8 x 1.8 x 8.5 (inches) / 4.5 X 4.5 X 21.6 (cm)
WEIGHT (Mic only) ..................................................................................... 0.25 (kgs) / 0.55 (lbs)
SYSTEM REQUIREMENTS
Windows ............................................................................................................................... 10 or higher
MacOS .......................................................................................................................... 10.13 or higher
USB ........................................................................................................................................ 1.1/2.0/3.0
Manual
What’s in the box
Included
Type-C USB
Cable
The Singing Machine® is a registered trademark of The Singing Machine Co., Inc.
Singing Machine® es marca registrada de The Singing Machine Co., Inc.
Singing Machine® est une marque déposée de The Singing Machine Co., Inc.
Copyright © 2021 All Rights Reserved.
Derechos de autor © 2021 Todos los derechos reservados.
Droit d’auteur © 2021 Tous Droits Réservés
Warnings
CAUTION
RISK OF ELECTRIC SHOCK
DO NOT OPEN
CAUTION: TO REDUCE THE RISK OF ELECTRIC
SHOCK, DO NOT REMOVE COVER (OR BACK).
NO USER-SERVICEABLE PARTS INSIDE. REFER
SERVICING TO QUALIFIED SERVICE PERSONNEL.
DRIPPING WARNING: This product shall not be
exposed to dripping or splashing, and no objects
filled with liquids, such as vases, shall be placed on
the product.
Warnings: Changes or modifications to this unit
not expressly approved by the party responsible
for compliance could void the user’s authority to
operate the equipment.
To parents recommending that the adaptor be periodically examined for conditions that may
result in the risk of fire, electric shock, or injury to persons and that, in an event such conditions,
the adaptor should not be used until properly repaired.
FCC WARNING: This equipment may generate or use radio frequency energy. Changes or
modifications to this equipment may cause harmful interference unless the modifications are
expressly approved in the instruction manual. The user could lose the authority to operate this
equipment if an unauthorized change or modification is made.
This device complies with part 15 of the FCC Rules. Operation is subject to the following two
conditions: (1) This device may not cause harmful interference, and (2) this device must accept
any interference received, including interference that may cause undesired operation.
NOTE: This equipment has been tested and found to comply with the limits for a Class B digital
device, pursuant to part 15 of the FCC Rules. These limits are designed to provide reasonable
protection against harmful interference in a residential installation. This equipment generates,
uses and can radiate radio frequency energy and, if not installed and used in accordance with the
instructions, may cause harmful interference to radio communications. However, there is no
guarantee that interference will not occur in a particular installation. If this equipment does
cause harmful interference to radio or television reception, which can be determined by turning
the equipment off and on, the user is encouraged to try to correct the interference by one or
more of the following measures:
• Reorient or relocate the receiving antenna.
• Increase the separation between the equipment and receiver.
• Connect the equipment into an outlet on a circuit different from that to which the receiver is
connected.
• Consult the dealer or an experienced radio/TV technician for help.
Statement: The battery is not replaceable.
Specifications are subject to change without notice. Please retain the instructions for
further reference, as they contain important information.
Troubleshooting Guide
Should this unit exhibit a problem, check the following before seeking service:
No Power
• Power is not on; press the button to turn power on.
• Confirm that the unit is charged.
No Sound
• Make sure the mic is powered on.
• Microphone volume is set to minimum or muted; raise microphone volume by rotating
the MIC VOLUME ring.
• Volume on the external karaoke device is set to minimum or muted (if connected); raise
volume.
No Sound (If connected to a computer)
• Make sure the plug is firmly connected to the jack.
• Make sure the mic's volume has not been set to a low or muted setting.
• Make sure the computer's volume has not been set to a low or muted setting.
• The computer system does not meet the requirements of this unit; upgrade your
computer system.
• Make sure you select the device name, "Singing Machine Microphone" from your
computer's system preferences for (Mac) or settings for (PC).
• Make sure your Type-C USB cable is a data cable, it is strongly recommended to use the
included cable.
Microphone
CONNECTING HEADPHONES
For private listening or to monitor singing, use headphones (not included). Insert
headphones into the Headphones jack
w
.
Microphone plug
audio Cable
x
Operation
Press the button
x
to turn on the unit. Press and hold the button to turn
off the unit.
Press the FUNC or button
y
repeatedly to select different functions. The
display W will indicate your current operation for 10 seconds.
Before you get started
CHARGING THE UNIT
Insert the included Type-C USB cable into the unit’s Type-C
USB port
u
.
Plug the other end of the cable into the computer’s USB port
or USB charging device (not included). Charge the unit for 2
hours to ensure it is fully charged.
When the unit is charging, the battery level bar will flash. After the unit is fully
charged, the battery level bar will become a solid light.
NOTE: Please charge the unit, when you see the battery level bar is low or when
it has no battery level to display.
V
at
X
v
w
u
y y
NAME DESCRIPTION
Basic Pitch Silky smooth & balanced reverb & echo; a great all around go-to vocal
enhancer
Billie Eyelash Queue up Bad Guy & let it rip with this harmonized choir effect that is
perfect for Alternative and Rock singing
Phil the Air Tonight Heavy on the reverb & echo with delicate feedback & flanger effect
for a lovely
sound perfect for 80’s hits
Grunge Unmistakably gritty, great for rock, alt, pop and just making your
voice sound cool
Reggae-Tone Enhanced echo and choir makes voices shine especially while singing
reggae and reggaeton
Hip-Hop Big room echo & reverb with a smooth chorus
Oldtown Rd A touch of echo with added vocal boost that’s great for belting out
country tunes
Diva Take your voice to new heights with this octave booster
Doo-Wop Smooth harmony adds some bass backup to your voice
Electronica Punchy and unique, perfect for pop, EDM and making heads turn
Up to Mars Big echo and chorus good for a wide range of songs from ballads to
funk
Anthems Lots of echo and reverb for when your voice needs to be BIG
Nosebleed Seats Did someone say sold out stadium show?
Voice of an Angel Have your own angelic choir singing along with this lovely chorus
effect
4 of a Kind It’s like having a few more singers harmonize along with your vocals
Ballad Rock Crank up your favorite guilty pleasure ballad and rock it out for that
special someone in the audience
Bad Trip Wild & fun chorus effect
Laser Crazy & silly vocal laser beams
Warp Speed Bouncy & echos, lots of fun
Barry Deep Oh baby, that’s a deep voice
When EFFECT LEVEL is displayed use the or
buttons
V
to adjust the level of the voice effects.
Press the MUTE/OK button
U
to return to the main
display.
NOTE: Steps above will not work if VOICE EFFECTS is
turned off.
EFFECT LEVEL
MIC MODE
When MIC MODE is displayed, choose from 4
different mic modes using the or buttons
V
to
select. Press the MUTE/OK button
U
to return to the
main display.
Solo Singer: Picks up sound from front of microphone.
Group Singing: Picks up sound equally from all
directions.
Solo Podcast: Picks up sound from front of
microphone and is wider than Solo Singer.
Group Podcast: Picks up sound equally from all
directions and is wider than Group Singing.
To reduce the noise around you when you are singing
use the or button
V
when NOISE SUPPRESSION
is displayed. Press the MUTE/OK button
U
to return
to the main display.
NOISE SUPPRESSION
When HEADPHONE VOL is displayed use the or
buttons
V
to adjust the headphone volume. Press the
MUTE/OK button
U
to return to the main display.
WARNING:
• To avoid excessive over amplified sound output, it is
recommended that the volume control is initially
adjusted to one third or less and then increased if
required.
• Headphone volume will prompt when there are
headphones connected.
HEADPHONE VOL
To adjust the mic volume simply rotate the MIC
VOLUME ring
X
.
NOTE: You can lower the microphone volume until muted.
MICROPHONE VOL
U
W
When VOICE EFFECTS is displayed use the or
V
buttons to choose from 20 different voice effects
sure to keep the party going. Press the MUTE/OK
button
U
to return to the main display.
VOICE EFFECTS
When PERFECT PITCH is displayed use the or
button
V
to adjust the levels of the perfect pitch
effect. Use PERFECT PITCH to bring studio-like quality
to your voice. Press the MUTE/OK button
U
button
to return to the main display.
PERFECT PITCH
E7E6
E2E1 E4E3
E5
S2
Slide out the feet
ak
of fold-able stand to
stabilize the mic stand.
Untighten the Mic Stand adjustment cap
al
and
adjust the Mic Stand tube
am
. Retighten the cap
al
to keep in place.
Insert the Mic Clip
an
into the Foldable Stand and
tighten it. Press the clip
an
to insert the
microphone.
Connect your computer, favorite karaoke device
or headphones via the USB jack
u
, Microphone
jack
v
or headphone jack
w
.
NOTE: If the mic is connected to your computer
you can find the device name under "Singing
Machine Microphone".
SING, WORK, GAME, PODCAST &
VLOG LIKE NEVER BEFORE!
Pitch Lab
™
Vocal
Enhancements
Scan to learn more
Foldable Stand
Mic Clip
ak
am
an
al
S1
A
D
V
E
R
T
E
N
C
I
A
D
E
G
O
T
E
O
:
E
s
t
e
p
r
o
d
u
c
t
o
n
o
s
e
p
o
d
r
á
e
x
p
o
n
e
r
a
g
o
t
e
o
o
s
a
l
p
i
c
a
d
u
r
a
s
,
y
n
o
s
e
c
o
l
o
c
a
r
á
n
i
n
g
ú
n
o
b
j
e
t
o
l
l
e
n
o
c
o
n
l
í
q
u
i
d
o
s
,
c
o
m
o
j
a
r
r
o
n
e
s
,
e
n
c
i
m
a
d
e
l
p
r
o
d
u
c
t
o
.
A
d
v
e
r
t
e
n
c
i
a
s
:
L
o
s
c
a
m
b
i
o
s
o
m
o
d
i
f
i
c
a
c
i
o
n
e
s
e
f
e
c
t
u
a
d
a
s
a
e
s
t
a
u
n
i
d
a
d
q
u
e
n
o
f
u
e
r
o
n
e
x
p
r
e
s
a
m
e
n
t
e
a
p
r
o
b
a
d
o
s
p
o
r
l
a
p
a
r
t
e
r
e
s
p
o
n
s
a
b
l
e
d
e
l
c
u
m
p
l
i
m
i
e
n
t
o
,
p
o
d
r
í
a
n
a
n
u
l
a
r
l
a
a
u
t
o
r
i
d
a
d
d
e
l
u
s
u
a
r
i
o
p
a
r
a
o
p
e
r
a
r
e
l
e
q
u
i
p
o
.
S
e
r
e
c
o
m
i
e
n
d
a
a
l
o
s
p
a
d
r
e
s
r
e
v
i
s
a
r
p
e
r
i
ó
d
i
c
a
m
e
n
t
e
e
l
a
d
a
p
t
a
d
o
r
p
a
r
a
v
e
r
i
f
i
c
a
r
q
u
e
n
o
e
x
i
s
t
a
n
c
o
n
d
i
c
i
o
n
e
s
q
u
e
p
u
e
d
a
n
o
c
a
s
i
o
n
a
r
r
i
e
s
g
o
s
d
e
i
n
c
e
n
d
i
o
,
d
e
s
c
a
r
g
a
e
l
é
c
t
r
i
c
a
o
l
e
s
i
o
n
e
s
a
l
a
s
p
e
r
s
o
n
a
s
y
q
u
e
,
d
e
e
x
i
s
t
i
r
d
i
c
h
a
s
c
o
n
d
i
c
i
o
n
e
s
,
n
o
s
e
u
t
i
l
i
c
e
e
l
a
d
a
p
t
a
d
o
r
h
a
s
t
a
q
u
e
e
s
t
é
c
o
r
r
e
c
t
a
m
e
n
t
e
r
e
p
a
r
a
d
o
.
N
O
T
I
F
I
C
A
C
I
Ó
N
D
E
L
A
F
C
C
:
E
s
t
e
e
q
u
i
p
o
p
u
e
d
e
g
e
n
e
r
a
r
o
u
s
a
r
e
n
e
r
g
í
a
d
e
r
a
d
i
o
f
r
e
c
u
e
n
c
i
a
.
L
o
s
c
a
m
b
i
o
s
o
m
o
d
i
f
i
c
a
c
i
o
n
e
s
r
e
a
l
i
z
a
d
o
s
e
n
e
l
a
p
a
r
a
t
o
p
u
e
d
e
n
p
r
o
v
o
c
a
r
i
n
t
e
r
f
e
r
e
n
c
i
a
p
e
r
j
u
d
i
c
i
a
l
,
a
m
e
n
o
s
q
u
e
d
i
c
h
a
s
m
o
d
i
f
i
c
a
c
i
o
n
e
s
e
s
t
é
n
a
u
t
o
r
i
z
a
d
a
s
e
n
e
l
m
a
n
u
a
l
d
e
i
n
s
t
r
u
c
c
i
o
n
e
s
.
E
l
u
s
u
a
r
i
o
p
u
e
d
e
p
e
r
d
e
r
t
o
d
a
a
u
t
o
r
i
d
a
d
p
a
r
a
o
p
e
r
a
r
e
l
e
q
u
i
p
o
s
i
r
e
a
l
i
z
a
c
a
m
b
i
o
s
o
m
o
d
i
f
i
c
a
c
i
o
n
e
s
s
i
n
a
u
t
o
r
i
z
a
c
i
ó
n
.
E
s
t
e
a
p
a
r
a
t
o
c
u
m
p
l
e
c
o
n
l
a
p
a
r
t
e
1
5
d
e
l
a
s
N
o
r
m
a
s
d
e
l
a
F
C
C
.
E
l
f
u
n
c
i
o
n
a
m
i
e
n
t
o
e
s
t
á
s
u
j
e
t
o
a
l
a
s
d
o
s
c
o
n
d
i
c
i
o
n
e
s
q
u
e
f
i
g
u
r
a
n
a
c
o
n
t
i
n
u
a
c
i
ó
n
:
(
1
)
E
s
p
r
o
b
a
b
l
e
q
u
e
n
o
c
a
u
s
e
i
n
t
e
r
f
e
r
e
n
c
i
a
p
e
r
j
u
d
i
c
i
a
l
y
(
2
)
d
e
b
e
r
á
a
c
e
p
t
a
r
c
u
a
l
q
u
i
e
r
i
n
t
e
r
f
e
r
e
n
c
i
a
r
e
c
i
b
i
d
a
,
i
n
c
l
u
y
e
n
d
o
l
a
i
n
t
e
r
f
e
r
e
n
c
i
a
q
u
e
p
u
e
d
a
l
l
e
g
a
r
a
c
a
u
s
a
r
u
n
f
u
n
c
i
o
n
a
m
i
e
n
t
o
i
n
d
e
s
e
a
d
o
.
N
O
T
A
:
E
s
t
e
e
q
u
i
p
o
f
u
e
p
r
o
b
a
d
o
y
s
e
c
o
n
c
l
u
y
ó
q
u
e
c
u
m
p
l
e
c
o
n
l
o
s
l
í
m
i
t
e
s
e
s
t
a
b
l
e
c
i
d
o
s
p
a
r
a
l
o
s
d
i
s
p
o
s
i
t
i
v
o
s
d
i
g
i
t
a
l
e
s
C
l
a
s
e
B
,
d
e
a
c
u
e
r
d
o
c
o
n
e
l
A
p
a
r
t
a
d
o
1
5
d
e
l
a
s
n
o
r
m
a
s
d
e
l
a
F
C
C
.
E
s
t
o
s
l
í
m
i
t
e
s
f
u
e
r
o
n
p
e
n
s
a
d
o
s
p
a
r
a
p
r
o
p
o
r
c
i
o
n
a
r
p
r
o
t
e
c
c
i
ó
n
r
a
z
o
n
a
b
l
e
a
n
t
e
l
a
i
n
t
e
r
f
e
r
e
n
c
i
a
p
e
r
j
u
d
i
c
i
a
l
e
n
u
n
a
i
n
s
t
a
l
a
c
i
ó
n
r
e
s
i
d
e
n
c
i
a
l
.
E
s
t
e
e
q
u
i
p
o
g
e
n
e
r
a
,
u
s
a
y
p
u
e
d
e
e
m
i
t
i
r
e
n
e
r
g
í
a
d
e
r
a
d
i
o
f
r
e
c
u
e
n
c
i
a
y
,
s
i
n
o
s
e
l
o
i
n
s
t
a
l
a
y
u
t
i
l
i
z
a
d
e
c
o
n
f
o
r
m
i
d
a
d
c
o
n
l
a
s
i
n
s
t
r
u
c
c
i
o
n
e
s
,
p
u
e
d
e
c
a
u
s
a
r
i
n
t
e
r
f
e
r
e
n
c
i
a
p
e
r
j
u
d
i
c
i
a
l
a
l
a
s
c
o
m
u
n
i
c
a
c
i
o
n
e
s
r
a
d
i
a
l
e
s
.
N
o
o
b
s
t
a
n
t
e
,
n
o
e
x
i
s
t
e
n
i
n
g
u
n
a
g
a
r
a
n
t
í
a
d
e
q
u
e
n
o
s
e
p
r
o
d
u
z
c
a
i
n
t
e
r
f
e
r
e
n
c
i
a
e
n
u
n
a
i
n
s
t
a
l
a
c
i
ó
n
e
n
p
a
r
t
i
c
u
l
a
r
.
S
i
e
s
t
e
e
q
u
i
p
o
p
r
o
v
o
c
a
i
n
t
e
r
f
e
r
e
n
c
i
a
p
e
r
j
u
d
i
c
i
a
l
a
l
a
r
e
c
e
p
c
i
ó
n
d
e
r
a
d
i
o
o
t
e
l
e
v
i
s
i
ó
n
,
l
o
c
u
a
l
p
u
e
d
e
d
e
t
e
r
m
i
n
a
r
s
e
a
p
a
g
a
n
d
o
y
e
n
c
e
n
d
i
e
n
d
o
e
l
e
q
u
i
p
o
,
e
l
u
s
u
a
r
i
o
p
u
e
d
e
i
n
t
e
n
t
a
r
c
o
r
r
e
g
i
r
l
a
i
n
t
e
r
f
e
r
e
n
c
i
a
d
e
a
l
g
u
n
a
/
s
d
e
l
a
s
s
i
g
u
i
e
n
t
e
s
m
a
n
e
r
a
s
:
•
R
e
o
r
i
e
n
t
e
l
a
a
n
t
e
n
a
r
e
c
e
p
t
o
r
a
o
u
b
í
q
u
e
l
a
e
n
o
t
r
o
l
u
g
a
r
.
•
A
u
m
e
n
t
e
l
a
d
i
s
t
a
n
c
i
a
e
n
t
r
e
e
l
e
q
u
i
p
o
y
e
l
r
e
c
e
p
t
o
r
.
•
C
o
n
e
c
t
e
e
l
e
q
u
i
p
o
a
u
n
t
o
m
a
c
o
r
r
i
e
n
t
e
d
e
u
n
c
i
r
c
u
i
t
o
d
i
s
t
i
n
t
o
a
l
q
u
e
e
s
t
á
c
o
n
e
c
t
a
d
o
e
l
r
e
c
e
p
t
o
r
.
•
C
o
n
s
u
l
t
e
a
l
d
i
s
t
r
i
b
u
i
d
o
r
o
a
u
n
t
é
c
n
i
c
o
e
x
p
e
r
i
m
e
n
t
a
d
o
d
e
r
a
d
i
o
y
t
e
l
e
v
i
s
i
ó
n
p
a
r
a
q
u
e
l
o
a
s
e
s
o
r
e
.
z
ADVERTENCIAS
PRECAUCIÓN
RIESGO DE DESCARGA
ELÉCTRICA. NO ABRIR
PRECAUCIÓN: PARA REDUCIR EL RIESGO DE
DESCARGAS ELÉCTRICAS, NO QUITE LA CUBIERTA (NI
LA TAPA POSTERIOR) NO HAY PIEZAS REPARABLES
POR EL USUARIO DENTRO. DERIVE LAS REPARACIONES
A PERSONAL DE SERVICIO CALIFICADO.
Declaración: La batería no puede ser sustituida.
Las Especificaciones Están Sujetas A Cambios Sin Previo Aviso. Guarde las instrucciones para
referencia futura ya que contienen información importante.
Especificaciones
SECCIÓN DE SALIDA DE MICRÓFONO ... Conector de salida de línea estéreo de 3,5 mm
SECCIÓN DE AURICULARES ..................................... Toma de auriculares estéreo de 3.5 mm
Impedancia .......................................................................................................................... > 16 ohmios
ENERGÍA
Pila ............................................................................................. Pila de iones de litio 3.7 V 600 mAh
Potencia de entrada ....................................................................................... Tipo C-USB DC 5V 1A
Dimensiones
Micrófono ..................................................... 1,8 x 1,8 x 8,5 (pulgadas) / 4,5 X 4,5 X 21,6 (cm)
Peso (Solo micrófono) ........................................................................ 0,25 (kgs) / 0,55 (libras)
REQUISITOS DEL SISTEMA
Windows ............................................................................................................................. 10 o superior
MacOS ........................................................................................................................ 10.13 o superior
USB ........................................................................................................................................ 1.1/2.0/3.0
MIC MODE BATTERY LEVEL
MIC MUTE
NOISE
SUPPRESSION
VOICE EFFECTS
To instantly mute the mic simply press the MUTE/OK
button
U
. You can press the MUTE/OK button
U
again to un-mute or adjust the volume with the MIC
VOLUME ring
X
.
MUTE
MAIN DISPLAY
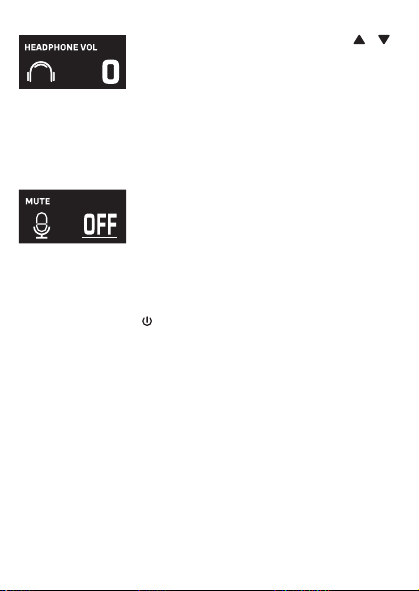
MICROPHONE OUTPUT
This unit
is able to connect to your favorite karaoke device. You can connect with
the included 3.5mm to 6.5mm cable.
Warning
- To avoid excessive over amplified sound output, it is recommended that the
volume control is initially adjusted to one third or less and then increased if
required.
Información importante sobre seguridad
1. Lea estas instrucciones. 2. Conserve estas instrucciones.
3. Preste atención a todas las advertencias. 4. Siga todas las instrucciones.
5. No utilice este artefacto cerca del agua. 6. Límpielo únicamente con un paño seco.
7. No obstruya las aberturas para ventilación. Instálelo de acuerdo con las instrucciones del
fabricante.
8. No instale cerca de fuentes de calor, como radiadores, rejillas de calefacción, estufas u otros
aparatos (incluso amplificadores) que produzcan calor.
9. Desenchufe este artefacto durante las tormentas eléctricas o cuando no se lo utilice
durante períodos prolongados.
10. Derive todas las reparaciones al personal de reparaciones calificado. Es necesario reparar el
artefacto cuando se encuentra dañado; por ejemplo, cuando el cable de suministro de
energía o el enchufe están dañados, cuando se derrama líquido sobre la unidad o caen
objetos dentro del mismo, cuando el producto ha estado expuesto a la lluvia o a la humedad,
cuando no funciona con normalidad o cuando se ha caído.
11. ADVERTENCIA: Para reducir el riesgo de incendio o descarga eléctrica, no exponga este
artefacto a la lluvia o la humedad. No coloque objetos llenos de agua, como jarrones, sobre el
aparato.
12. PRECAUCIÓN: Para reducir el riesgo de incendio o explosión no exponga las baterías al calor
excesivo, como al rayo del sol, fuego u otras fuentes de calor.
option 2 (return) SMM2097 US instruction sheet (Eng/Spa/Fre)
Date: 3 Jan 22
size: (each page) 65 (W) x 91 (H)mm
color: 1C black print
SMM2097
INSTRUCTION MANUAL
MANUAL DE INSTRUCCIONES
MODE D’EMPLOI
Please read before first using this unit.
Leer Antes de usar la Unidad.
Veuillez lire ce manuel avant d’utiliser cet appareil.
The Responsible Party
Company Name : The Singing Machine Company, Inc.
Address : 6301 NW 5th Way, Suite 2900, Fort Lauderdale,
FL33309, USA
Telephone : 954 -596-1000
Website : www.singingmachine.com
The Singing Machine Company, Inc.
4060 E Jurupa Street, Unit B, Ontario, CA 91761-1413 USA
PRINTED IN CHINA
IMPRESO EN CHINA
IMPRIMÉ EN CHINE
2097-2112-ESF01-US
Visit Our Website: www.singingmachine.com
Visite Nuestra Pagina de Internet: www.singingmachine.com
Visitez notre site Web : www.singingmachine.com
Important Safety Information
1. Read these Instructions. 2. Keep these Instructions.
3. Heed all Warnings. 4. Follow all Instructions.
5. Do not use this apparatus near water. 6. Clean only with a dry cloth.
7. Do not install near any heat sources such as radiators, heat registers, stoves, or other
apparatus (including amplifiers) that produce heat.
8. Only use attachments/accessories specified by the manufacturer.
9. Unplug this apparatus during lightning storms or when unused for long periods of time.
10. Refer all servicing to qualified service personnel. Servicing is required when the
apparatus has been damaged in any way, such as power-supply cord or plug is
damaged, liquid has been spilled or objects have fallen into the apparatus, the apparatus
has been exposed to rain or moisture, does not operate normally, or has been dropped.
11. WARNING: To reduce the risk of fire or electric shock, do not expose this apparatus to
rain or moisture. Do not place objects filled with water, such as a vase, on the
apparatus.
12. CAUTION: To reduce the risk of fire or explosion, do not expose batteries to excessive
heat such as sunshine, fire or other heat sources.
Specifications
MIC OUT SECTION .............................................................................. 3.5 mm Stereo line out jack
HEADPHONE SECTION ............................................................... 3.5 mm Stereo headphone jack
Impedance ............................................................................................................................... > 16 ohms
POWER SECTION
Battery ....................................................................................... Lithium ion battery 3.7 V 600 mAh
Input Power ..................................................................................................... Type C-USB DC 5V 1A
DIMENSIONS
Mic ...................................................................... 1.8 x 1.8 x 8.5 (inches) / 4.5 X 4.5 X 21.6 (cm)
WEIGHT (Mic only) ..................................................................................... 0.25 (kgs) / 0.55 (lbs)
SYSTEM REQUIREMENTS
Windows ............................................................................................................................... 10 or higher
MacOS .......................................................................................................................... 10.13 or higher
USB ........................................................................................................................................ 1.1/2.0/3.0
Manual
What’s in the box
Included
Type-C USB
Cable
The Singing Machine® is a registered trademark of The Singing Machine Co., Inc.
Singing Machine® es marca registrada de The Singing Machine Co., Inc.
Singing Machine® est une marque déposée de The Singing Machine Co., Inc.
Copyright © 2021 All Rights Reserved.
Derechos de autor © 2021 Todos los derechos reservados.
Droit d’auteur © 2021 Tous Droits Réservés
Warnings
CAUTION
RISK OF ELECTRIC SHOCK
DO NOT OPEN
CAUTION: TO REDUCE THE RISK OF ELECTRIC
SHOCK, DO NOT REMOVE COVER (OR BACK).
NO USER-SERVICEABLE PARTS INSIDE. REFER
SERVICING TO QUALIFIED SERVICE PERSONNEL.
DRIPPING WARNING: This product shall not be
exposed to dripping or splashing, and no objects
filled with liquids, such as vases, shall be placed on
the product.
Warnings: Changes or modifications to this unit
not expressly approved by the party responsible
for compliance could void the user’s authority to
operate the equipment.
To parents recommending that the adaptor be periodically examined for conditions that may
result in the risk of fire, electric shock, or injury to persons and that, in an event such conditions,
the adaptor should not be used until properly repaired.
FCC WARNING: This equipment may generate or use radio frequency energy. Changes or
modifications to this equipment may cause harmful interference unless the modifications are
expressly approved in the instruction manual. The user could lose the authority to operate this
equipment if an unauthorized change or modification is made.
This device complies with part 15 of the FCC Rules. Operation is subject to the following two
conditions: (1) This device may not cause harmful interference, and (2) this device must accept
any interference received, including interference that may cause undesired operation.
NOTE: This equipment has been tested and found to comply with the limits for a Class B digital
device, pursuant to part 15 of the FCC Rules. These limits are designed to provide reasonable
protection against harmful interference in a residential installation. This equipment generates,
uses and can radiate radio frequency energy and, if not installed and used in accordance with the
instructions, may cause harmful interference to radio communications. However, there is no
guarantee that interference will not occur in a particular installation. If this equipment does
cause harmful interference to radio or television reception, which can be determined by turning
the equipment off and on, the user is encouraged to try to correct the interference by one or
more of the following measures:
• Reorient or relocate the receiving antenna.
• Increase the separation between the equipment and receiver.
• Connect the equipment into an outlet on a circuit different from that to which the receiver is
connected.
• Consult the dealer or an experienced radio/TV technician for help.
Statement: The battery is not replaceable.
Specifications are subject to change without notice. Please retain the instructions for
further reference, as they contain important information.
Troubleshooting Guide
Should this unit exhibit a problem, check the following before seeking service:
No Power
• Power is not on; press the button to turn power on.
• Confirm that the unit is charged.
No Sound
• Make sure the mic is powered on.
• Microphone volume is set to minimum or muted; raise microphone volume by rotating
the MIC VOLUME ring.
• Volume on the external karaoke device is set to minimum or muted (if connected); raise
volume.
No Sound (If connected to a computer)
• Make sure the plug is firmly connected to the jack.
• Make sure the mic's volume has not been set to a low or muted setting.
• Make sure the computer's volume has not been set to a low or muted setting.
• The computer system does not meet the requirements of this unit; upgrade your
computer system.
• Make sure you select the device name, "Singing Machine Microphone" from your
computer's system preferences for (Mac) or settings for (PC).
• Make sure your Type-C USB cable is a data cable, it is strongly recommended to use the
included cable.
Microphone
CONNECTING HEADPHONES
For private listening or to monitor singing, use headphones (not included). Insert
headphones into the Headphones jack
w
.
Microphone plug
audio Cable
x
Operation
Press the button
x
to turn on the unit. Press and hold the button to turn
off the unit.
Press the FUNC or button
y
repeatedly to select different functions. The
display W will indicate your current operation for 10 seconds.
Before you get started
CHARGING THE UNIT
Insert the included Type-C USB cable into the unit’s Type-C
USB port
u
.
Plug the other end of the cable into the computer’s USB port
or USB charging device (not included). Charge the unit for 2
hours to ensure it is fully charged.
When the unit is charging, the battery level bar will flash. After the unit is fully
charged, the battery level bar will become a solid light.
NOTE: Please charge the unit, when you see the battery level bar is low or when
it has no battery level to display.
V
at
X
v
w
u
y y
NAME DESCRIPTION
Basic Pitch Silky smooth & balanced reverb & echo; a great all around go-to vocal
enhancer
Billie Eyelash Queue up Bad Guy & let it rip with this harmonized choir effect that is
perfect for Alternative and Rock singing
Phil the Air Tonight Heavy on the reverb & echo with delicate feedback & flanger effect
for a lovely
sound perfect for 80’s hits
Grunge Unmistakably gritty, great for rock, alt, pop and just making your
voice sound cool
Reggae-Tone Enhanced echo and choir makes voices shine especially while singing
reggae and reggaeton
Hip-Hop Big room echo & reverb with a smooth chorus
Oldtown Rd A touch of echo with added vocal boost that’s great for belting out
country tunes
Diva Take your voice to new heights with this octave booster
Doo-Wop Smooth harmony adds some bass backup to your voice
Electronica Punchy and unique, perfect for pop, EDM and making heads turn
Up to Mars Big echo and chorus good for a wide range of songs from ballads to
funk
Anthems Lots of echo and reverb for when your voice needs to be BIG
Nosebleed Seats Did someone say sold out stadium show?
Voice of an Angel Have your own angelic choir singing along with this lovely chorus
effect
4 of a Kind It’s like having a few more singers harmonize along with your vocals
Ballad Rock Crank up your favorite guilty pleasure ballad and rock it out for that
special someone in the audience
Bad Trip Wild & fun chorus effect
Laser Crazy & silly vocal laser beams
Warp Speed Bouncy & echos, lots of fun
Barry Deep Oh baby, that’s a deep voice
When EFFECT LEVEL is displayed use the or
buttons
V
to adjust the level of the voice effects.
Press the MUTE/OK button
U
to return to the main
display.
NOTE: Steps above will not work if VOICE EFFECTS is
turned off.
EFFECT LEVEL
MIC MODE
When MIC MODE is displayed, choose from 4
different mic modes using the or buttons
V
to
select. Press the MUTE/OK button
U
to return to the
main display.
Solo Singer: Picks up sound from front of microphone.
Group Singing: Picks up sound equally from all
directions.
Solo Podcast: Picks up sound from front of
microphone and is wider than Solo Singer.
Group Podcast: Picks up sound equally from all
directions and is wider than Group Singing.
To reduce the noise around you when you are singing
use the or button
V
when NOISE SUPPRESSION
is displayed. Press the MUTE/OK button
U
to return
to the main display.
NOISE SUPPRESSION
When HEADPHONE VOL is displayed use the or
buttons
V
to adjust the headphone volume. Press the
MUTE/OK button
U
to return to the main display.
WARNING:
• To avoid excessive over amplified sound output, it is
recommended that the volume control is initially
adjusted to one third or less and then increased if
required.
• Headphone volume will prompt when there are
headphones connected.
HEADPHONE VOL
To adjust the mic volume simply rotate the MIC
VOLUME ring
X
.
NOTE: You can lower the microphone volume until muted.
MICROPHONE VOL
U
W
When VOICE EFFECTS is displayed use the or
V
buttons to choose from 20 different voice effects
sure to keep the party going. Press the MUTE/OK
button
U
to return to the main display.
VOICE EFFECTS
When PERFECT PITCH is displayed use the or
button
V
to adjust the levels of the perfect pitch
effect. Use PERFECT PITCH to bring studio-like quality
to your voice. Press the MUTE/OK button
U
button
to return to the main display.
PERFECT PITCH
E7E6
E2E1 E4E3
E5
S2
Slide out the feet
ak
of fold-able stand to
stabilize the mic stand.
Untighten the Mic Stand adjustment cap
al
and
adjust the Mic Stand tube
am
. Retighten the cap
al
to keep in place.
Insert the Mic Clip
an
into the Foldable Stand and
tighten it. Press the clip
an
to insert the
microphone.
Connect your computer, favorite karaoke device
or headphones via the USB jack
u
, Microphone
jack
v
or headphone jack
w
.
NOTE: If the mic is connected to your computer
you can find the device name under "Singing
Machine Microphone".
SING, WORK, GAME, PODCAST &
VLOG LIKE NEVER BEFORE!
Pitch Lab
™
Vocal
Enhancements
Scan to learn more
Foldable Stand
Mic Clip
ak
am
an
al
S1
A
D
V
E
R
T
E
N
C
I
A
D
E
G
O
T
E
O
:
E
s
t
e
p
r
o
d
u
c
t
o
n
o
s
e
p
o
d
r
á
e
x
p
o
n
e
r
a
g
o
t
e
o
o
s
a
l
p
i
c
a
d
u
r
a
s
,
y
n
o
s
e
c
o
l
o
c
a
r
á
n
i
n
g
ú
n
o
b
j
e
t
o
l
l
e
n
o
c
o
n
l
í
q
u
i
d
o
s
,
c
o
m
o
j
a
r
r
o
n
e
s
,
e
n
c
i
m
a
d
e
l
p
r
o
d
u
c
t
o
.
A
d
v
e
r
t
e
n
c
i
a
s
:
L
o
s
c
a
m
b
i
o
s
o
m
o
d
i
f
i
c
a
c
i
o
n
e
s
e
f
e
c
t
u
a
d
a
s
a
e
s
t
a
u
n
i
d
a
d
q
u
e
n
o
f
u
e
r
o
n
e
x
p
r
e
s
a
m
e
n
t
e
a
p
r
o
b
a
d
o
s
p
o
r
l
a
p
a
r
t
e
r
e
s
p
o
n
s
a
b
l
e
d
e
l
c
u
m
p
l
i
m
i
e
n
t
o
,
p
o
d
r
í
a
n
a
n
u
l
a
r
l
a
a
u
t
o
r
i
d
a
d
d
e
l
u
s
u
a
r
i
o
p
a
r
a
o
p
e
r
a
r
e
l
e
q
u
i
p
o
.
S
e
r
e
c
o
m
i
e
n
d
a
a
l
o
s
p
a
d
r
e
s
r
e
v
i
s
a
r
p
e
r
i
ó
d
i
c
a
m
e
n
t
e
e
l
a
d
a
p
t
a
d
o
r
p
a
r
a
v
e
r
i
f
i
c
a
r
q
u
e
n
o
e
x
i
s
t
a
n
c
o
n
d
i
c
i
o
n
e
s
q
u
e
p
u
e
d
a
n
o
c
a
s
i
o
n
a
r
r
i
e
s
g
o
s
d
e
i
n
c
e
n
d
i
o
,
d
e
s
c
a
r
g
a
e
l
é
c
t
r
i
c
a
o
l
e
s
i
o
n
e
s
a
l
a
s
p
e
r
s
o
n
a
s
y
q
u
e
,
d
e
e
x
i
s
t
i
r
d
i
c
h
a
s
c
o
n
d
i
c
i
o
n
e
s
,
n
o
s
e
u
t
i
l
i
c
e
e
l
a
d
a
p
t
a
d
o
r
h
a
s
t
a
q
u
e
e
s
t
é
c
o
r
r
e
c
t
a
m
e
n
t
e
r
e
p
a
r
a
d
o
.
N
O
T
I
F
I
C
A
C
I
Ó
N
D
E
L
A
F
C
C
:
E
s
t
e
e
q
u
i
p
o
p
u
e
d
e
g
e
n
e
r
a
r
o
u
s
a
r
e
n
e
r
g
í
a
d
e
r
a
d
i
o
f
r
e
c
u
e
n
c
i
a
.
L
o
s
c
a
m
b
i
o
s
o
m
o
d
i
f
i
c
a
c
i
o
n
e
s
r
e
a
l
i
z
a
d
o
s
e
n
e
l
a
p
a
r
a
t
o
p
u
e
d
e
n
p
r
o
v
o
c
a
r
i
n
t
e
r
f
e
r
e
n
c
i
a
p
e
r
j
u
d
i
c
i
a
l
,
a
m
e
n
o
s
q
u
e
d
i
c
h
a
s
m
o
d
i
f
i
c
a
c
i
o
n
e
s
e
s
t
é
n
a
u
t
o
r
i
z
a
d
a
s
e
n
e
l
m
a
n
u
a
l
d
e
i
n
s
t
r
u
c
c
i
o
n
e
s
.
E
l
u
s
u
a
r
i
o
p
u
e
d
e
p
e
r
d
e
r
t
o
d
a
a
u
t
o
r
i
d
a
d
p
a
r
a
o
p
e
r
a
r
e
l
e
q
u
i
p
o
s
i
r
e
a
l
i
z
a
c
a
m
b
i
o
s
o
m
o
d
i
f
i
c
a
c
i
o
n
e
s
s
i
n
a
u
t
o
r
i
z
a
c
i
ó
n
.
E
s
t
e
a
p
a
r
a
t
o
c
u
m
p
l
e
c
o
n
l
a
p
a
r
t
e
1
5
d
e
l
a
s
N
o
r
m
a
s
d
e
l
a
F
C
C
.
E
l
f
u
n
c
i
o
n
a
m
i
e
n
t
o
e
s
t
á
s
u
j
e
t
o
a
l
a
s
d
o
s
c
o
n
d
i
c
i
o
n
e
s
q
u
e
f
i
g
u
r
a
n
a
c
o
n
t
i
n
u
a
c
i
ó
n
:
(
1
)
E
s
p
r
o
b
a
b
l
e
q
u
e
n
o
c
a
u
s
e
i
n
t
e
r
f
e
r
e
n
c
i
a
p
e
r
j
u
d
i
c
i
a
l
y
(
2
)
d
e
b
e
r
á
a
c
e
p
t
a
r
c
u
a
l
q
u
i
e
r
i
n
t
e
r
f
e
r
e
n
c
i
a
r
e
c
i
b
i
d
a
,
i
n
c
l
u
y
e
n
d
o
l
a
i
n
t
e
r
f
e
r
e
n
c
i
a
q
u
e
p
u
e
d
a
l
l
e
g
a
r
a
c
a
u
s
a
r
u
n
f
u
n
c
i
o
n
a
m
i
e
n
t
o
i
n
d
e
s
e
a
d
o
.
N
O
T
A
:
E
s
t
e
e
q
u
i
p
o
f
u
e
p
r
o
b
a
d
o
y
s
e
c
o
n
c
l
u
y
ó
q
u
e
c
u
m
p
l
e
c
o
n
l
o
s
l
í
m
i
t
e
s
e
s
t
a
b
l
e
c
i
d
o
s
p
a
r
a
l
o
s
d
i
s
p
o
s
i
t
i
v
o
s
d
i
g
i
t
a
l
e
s
C
l
a
s
e
B
,
d
e
a
c
u
e
r
d
o
c
o
n
e
l
A
p
a
r
t
a
d
o
1
5
d
e
l
a
s
n
o
r
m
a
s
d
e
l
a
F
C
C
.
E
s
t
o
s
l
í
m
i
t
e
s
f
u
e
r
o
n
p
e
n
s
a
d
o
s
p
a
r
a
p
r
o
p
o
r
c
i
o
n
a
r
p
r
o
t
e
c
c
i
ó
n
r
a
z
o
n
a
b
l
e
a
n
t
e
l
a
i
n
t
e
r
f
e
r
e
n
c
i
a
p
e
r
j
u
d
i
c
i
a
l
e
n
u
n
a
i
n
s
t
a
l
a
c
i
ó
n
r
e
s
i
d
e
n
c
i
a
l
.
E
s
t
e
e
q
u
i
p
o
g
e
n
e
r
a
,
u
s
a
y
p
u
e
d
e
e
m
i
t
i
r
e
n
e
r
g
í
a
d
e
r
a
d
i
o
f
r
e
c
u
e
n
c
i
a
y
,
s
i
n
o
s
e
l
o
i
n
s
t
a
l
a
y
u
t
i
l
i
z
a
d
e
c
o
n
f
o
r
m
i
d
a
d
c
o
n
l
a
s
i
n
s
t
r
u
c
c
i
o
n
e
s
,
p
u
e
d
e
c
a
u
s
a
r
i
n
t
e
r
f
e
r
e
n
c
i
a
p
e
r
j
u
d
i
c
i
a
l
a
l
a
s
c
o
m
u
n
i
c
a
c
i
o
n
e
s
r
a
d
i
a
l
e
s
.
N
o
o
b
s
t
a
n
t
e
,
n
o
e
x
i
s
t
e
n
i
n
g
u
n
a
g
a
r
a
n
t
í
a
d
e
q
u
e
n
o
s
e
p
r
o
d
u
z
c
a
i
n
t
e
r
f
e
r
e
n
c
i
a
e
n
u
n
a
i
n
s
t
a
l
a
c
i
ó
n
e
n
p
a
r
t
i
c
u
l
a
r
.
S
i
e
s
t
e
e
q
u
i
p
o
p
r
o
v
o
c
a
i
n
t
e
r
f
e
r
e
n
c
i
a
p
e
r
j
u
d
i
c
i
a
l
a
l
a
r
e
c
e
p
c
i
ó
n
d
e
r
a
d
i
o
o
t
e
l
e
v
i
s
i
ó
n
,
l
o
c
u
a
l
p
u
e
d
e
d
e
t
e
r
m
i
n
a
r
s
e
a
p
a
g
a
n
d
o
y
e
n
c
e
n
d
i
e
n
d
o
e
l
e
q
u
i
p
o
,
e
l
u
s
u
a
r
i
o
p
u
e
d
e
i
n
t
e
n
t
a
r
c
o
r
r
e
g
i
r
l
a
i
n
t
e
r
f
e
r
e
n
c
i
a
d
e
a
l
g
u
n
a
/
s
d
e
l
a
s
s
i
g
u
i
e
n
t
e
s
m
a
n
e
r
a
s
:
•
R
e
o
r
i
e
n
t
e
l
a
a
n
t
e
n
a
r
e
c
e
p
t
o
r
a
o
u
b
í
q
u
e
l
a
e
n
o
t
r
o
l
u
g
a
r
.
•
A
u
m
e
n
t
e
l
a
d
i
s
t
a
n
c
i
a
e
n
t
r
e
e
l
e
q
u
i
p
o
y
e
l
r
e
c
e
p
t
o
r
.
•
C
o
n
e
c
t
e
e
l
e
q
u
i
p
o
a
u
n
t
o
m
a
c
o
r
r
i
e
n
t
e
d
e
u
n
c
i
r
c
u
i
t
o
d
i
s
t
i
n
t
o
a
l
q
u
e
e
s
t
á
c
o
n
e
c
t
a
d
o
e
l
r
e
c
e
p
t
o
r
.
•
C
o
n
s
u
l
t
e
a
l
d
i
s
t
r
i
b
u
i
d
o
r
o
a
u
n
t
é
c
n
i
c
o
e
x
p
e
r
i
m
e
n
t
a
d
o
d
e
r
a
d
i
o
y
t
e
l
e
v
i
s
i
ó
n
p
a
r
a
q
u
e
l
o
a
s
e
s
o
r
e
.
z
ADVERTENCIAS
PRECAUCIÓN
RIESGO DE DESCARGA
ELÉCTRICA. NO ABRIR
PRECAUCIÓN: PARA REDUCIR EL RIESGO DE
DESCARGAS ELÉCTRICAS, NO QUITE LA CUBIERTA (NI
LA TAPA POSTERIOR) NO HAY PIEZAS REPARABLES
POR EL USUARIO DENTRO. DERIVE LAS REPARACIONES
A PERSONAL DE SERVICIO CALIFICADO.
Declaración: La batería no puede ser sustituida.
Las Especificaciones Están Sujetas A Cambios Sin Previo Aviso. Guarde las instrucciones para
referencia futura ya que contienen información importante.
Especificaciones
SECCIÓN DE SALIDA DE MICRÓFONO ... Conector de salida de línea estéreo de 3,5 mm
SECCIÓN DE AURICULARES ..................................... Toma de auriculares estéreo de 3.5 mm
Impedancia .......................................................................................................................... > 16 ohmios
ENERGÍA
Pila ............................................................................................. Pila de iones de litio 3.7 V 600 mAh
Potencia de entrada ....................................................................................... Tipo C-USB DC 5V 1A
Dimensiones
Micrófono ..................................................... 1,8 x 1,8 x 8,5 (pulgadas) / 4,5 X 4,5 X 21,6 (cm)
Peso (Solo micrófono) ........................................................................ 0,25 (kgs) / 0,55 (libras)
REQUISITOS DEL SISTEMA
Windows ............................................................................................................................. 10 o superior
MacOS ........................................................................................................................ 10.13 o superior
USB ........................................................................................................................................ 1.1/2.0/3.0
MIC MODE BATTERY LEVEL
MIC MUTE
NOISE
SUPPRESSION
VOICE EFFECTS
To instantly mute the mic simply press the MUTE/OK
button
U
. You can press the MUTE/OK button
U
again to un-mute or adjust the volume with the MIC
VOLUME ring
X
.
MUTE
MAIN DISPLAY
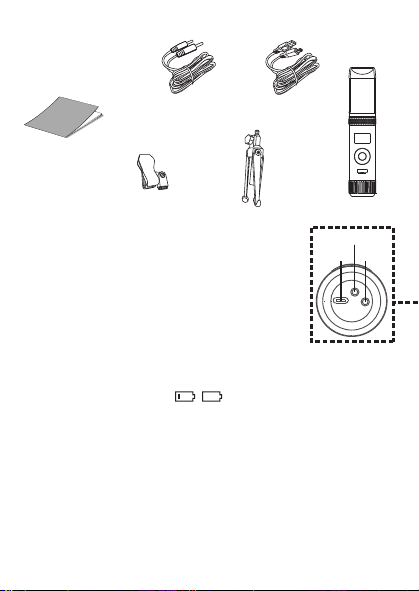
Cuando aparezca HEADPHONE VOL, utilice los botones o
V
para ajustar el volumen de los auriculares. Presione el
botón MUTE / OK
U
para regresar a la pantalla principal.
ADVERTENCIA
:
• Para evitar una salida de sonido sobreamplificada
excesiva, es recomendó que el control de volumen sea
inicialmente ajustado a un tercio o menos y luego
aumentado si requerido.
• El volumen de los auriculares se indicará cuando haya
auriculares conectados.
Les spécifications sont sujettes à changement sans avertissement préalable. Veuillez conserver les
instructions pour référence ultérieure, car elles contiennent des informations importantes.
F4F3F2
S5S4 S7S6
F1
F6F5 F7
S3
MISE EN GARDE
Mises en Garde
RISQUE DE CHOC ÉLECTRIQUE
NE PAS OUVRIR
Mises en Garde: AFIN DE RÉDUIRE LE RISQUE
D’ÉLECTROCUTION, NE PAS RETIRER LE
COUVERCLE (OU LE DOS DU BOÎTIER). AUCUNE
PIÈCE POUVANT ÊTRE RÉPARÉE PAR
L’UTILISATEUR NE SE TROUVE À L’INTÉRIEUR.
POUR TOUTE RÉPARATION, CONTACTER UN
TECHNICIEN COMPÉTENT.
AVERTISSEMENT D’ÉGOUTTEMENT : Ce produit ne doit
pas être exposé à l’égouttement ni aux éclaboussures et
aucun objet rempli de liquide, tel qu’un vase, ne doit être
placé sur le produit.
Avertissements:
Les modifications ou changements qui ne sont pas
expressément approuvés par la partie responsable de la
conformité peuvent entraîner l’annulation du droit donné
à l’utilisateur de se servir de cet appareil.
Pour les parents, il est recommandé d’examiner l’adaptateur périodiquement pour s’assurer qu’il ne puisse
pas causer d’incendie, d’électrocution ou de blessures; s’il est endommagé, n’utilisez pas l’adaptateur tant
qu’il n’aura pas été réparé.
MISE EN GARDE DE LA FCC: Cet appareil peut générer ou utiliser des fréquences radio. Les modifications
ou changements peuvent causer des interférences nuisibles, à moins que ces modifications ne soient
approuvées expressément dans ce mode d’emploi. L’utilisateur pourrait perdre l’autorité de faire
fonctionner cet équipement en cas de modification non autorisée.
Cet appareil répond aux exigences de l’alinéa 15 des règlementations FCC. Son utilisation est soumise aux
deux conditions suivantes : 1) Cet appareil ne peut pas causer d’interférence nuisible et 2), Cet appareil doit
accepter toute interférence reçue, incluant les interférences qui pourraient affecter son fonctionnement.
REMARQUE: Suite aux tests effectués, il est établi que cet appareil numérique de Classe B répond aux
exigences de l’alinéa 15 des réglementations FCC. Ces normes sont élaborées pour vous protéger contre
toute interférence nuisible en installation résidentielle. Cet appareil génère, utilise et peut émettre des
fréquences radio. Par conséquent, s’il n’est pas installé et utilisé en suivant les instructions, il peut causer des
interférences nuisibles aux communications radio. Cependant, aucune garantie n’est donnée concernant la
possibilité d’interférence avec une installation spécifique. Si une interférence se produisait en réception
radio et/ou de télédiffusion, lors de l’activation et la désactivation de l’appareil, nous vous recommandons
•Réorientez ou déplacez l’antenne de réception.
•Éloignez l’appareil du récepteur.
•Branchez l’appareil à une prise de courant différente de celle utilisée par le récepteur.
•En cas de problème, contactez le vendeur ou un technicien spécialisé en réception radio/TV.
Déclaration: La batterie ne peut pas être remplacée.
Spécifications
SECTION MIC OUT ...............................................................Prise de sortie ligne stéréo 3,5 mm
SECTION CASQUE .............................................................................. Prise casque stéréo 3,5 mm
Impédance ............................................................................................................................... > 16 ohms
SECTION D’ALIMENTATION
Batterie ..................................................................................... Batterie lithium-ion 3.7 V 600 mAh
Puissance d’entrée .......................................................................................... Type C-USB CC 5V 1A
DIMENSIONS
Microphone ..................................................... 1,8 x 1,8 x 8,5 (inches) / 4,5 X 4,5 X 21,6 (cm)
Poids (Micro uniquement) ............................................................................................. 0,25 (kgs)
CONFIGURATION REQUISE
Windows ........................................................................................................................ 10 ou supérieur
MacOS .................................................................................................................... 10.13 ou supérieur
USB ........................................................................................................................................ 1.1/2.0/3.0
Renseignements Importants de Sécurité
1. Lisez ces instructions. 2. Conservez ces instructions.
3. Respectez toutes les mises en garde. 4. Suivez toutes les consignes.
5. N’utilisez pas cet appareil à proximité de l’eau. 6. Nettoyez l’appareil uniquement avec un chiffon sec.
7. N’installez pas l’appareil à proximité de sources de chaleur telles que des radiateurs, des registres de chaleur,
des poêles ou tout autre appareil (y compris des amplificateurs) générant de la chaleur.
8. Utilisez uniquement les fixations/accessoires spécifiés par le fabricant.
9. Déconnectez cet appareil lors des orages et des longues périodes d’inutilisation.
10. Confiez toutes les réparations à un personnel qualifié. Vous devez faire réparer cet appareil s'il a été
endommagé de quelque façon que ce soit, comme lorsque le câble d’alimentation ou la prise ont été
endommagés, qu’un liquide a été renversé ou que des objets sont tombés sur ou dans l’appareil, que
l’appareil a été exposé à la pluie ou à l’humidité, qu’il ne fonctionne pas normalement ou qu’il a subi un choc.
11. AVERTISSEMENT : Pour réduire les risques d’incendie ou d’électrocution, n’exposez pas cet appareil à la pluie
ou à l’humidité. Ne déposez aucun récipient rempli de liquide, tel qu’un vase, sur l’appareil.
12. ATTENTION : Pour réduire les risques d’incendie ou d’explosion, n’exposez pas les batteries à une chaleur
excessive, comme celle des rayons de soleil, des flammes ou d’autres sources de chaleur.
Manual de
instrucciones
Contenido de la caja
Se incluyen
Cable USB
tipo C
Micrófono
CONECTAR LOS AURICULARES
Para escuchar en privado o supervisar el canto, use auriculares (no se incluyen). Introduzca
los auriculares en el conector de auriculares
w
.
Conector de micrófono
cable de audio
x
Funcionamiento
Presione el botón de
x
para encender la unidad. Presione y mantenga el botón para
apagar la unidad.
Presione el botón FUNC o
y
repetidamente para seleccionar las diferentes funciones.
La pantalla
W indicará su operación actual durante 10 segundos.
Antes de empezar
CARGA DE LA UNIDAD
Inserte el cable USB tipo C incluido en el puerto USB tipo C
u
de la
unidad.
Conecte el otro extremo del cable en el puerto USB de la
computadora o en otro aparato de carga USB (no incluido). Cargar la
unidad durante 2 horas para asegurarse de que esté totalmente
cargada.
Cuando la unidad se está cargando, la barra de nivel de batería parpadeará. Una
vez que la unidad esté completamente cargada, la barra de nivel de la batería se convertirá
en una luz fija.
NOTA: Cargue la unidad cuando vea que la barra de nivel de batería está baja o cuando no
tenga nivel de batería para mostrar.
V
at
X
SALIDA DE MICROFONO
Esta unidad puede conectarse a su dispositivo de karaoke favorito. Puede conectarse con el
cable de 3,5 mm a 6,5 mm incluido.
ADVERTENCIA:
• Para evitar una salida de sonido excesivamente amplificada, se recomienda que el control
de volumen se ajuste inicialmente a un tercio o menos y luego se aumente si es necesario.
v
w
u
y y
MODO MIC NIVEL DE BATERÍA
MICRÓFONO MUDO
SUPRESIÓN
DE RUIDO
U
W
Deslice las patas del soporte plegable
ak
para
estabilizar el soporte del micrófono.
Afloje la tapa de ajuste del soporte del micrófono
al
y
ajuste el tubo del soporte del micrófono
am
. Vuelva a
apretar la tapa
al
para mantenerla en su lugar.
Inserte el clip de micrófono
an
en el soporte plegable y
apriételo. Presione el clip
an
para insertar el micrófono.
Conecte su computadora, dispositivo de karaoke
favorito o auriculares a través del conector USB
u
,
conector de micrófono
v
o conector de auriculares
w
.
NOTA: Si el micrófono está conectado a su
computadora, puede encontrar el nombre del
dispositivo en "Micrófono de máquina cantante".
Soporte plegable
Clip de
micrófono
ak
am
an
al
Manuel
Contenu de la boîte
Contenu
Câble USB
de type C
Microphone
CONNEXION D’UN CASQUE D’ÉCOUTE
Pour une écoute dans le silence ou la vérification des chants, utilisez un casque d’écoute
(non compris). Branchez le casque d’écoute dans la prise pour casque d’écoute
w
.
Câble audio
prise microphone
x
Utilisation
Appuyez la bouton
x
pour allumer l'appareil. Maintenez enfoncée la touche pour
éteindre l’appareil.
Avant de commencer
CHARGE DE L’APPAREIL
Insérez le câble USB Type-C fourni dans le port USB Type-C
u
de
l'unité.
Branchez l'autre extrémité du câble dans un port USB d'un
ordinateur ou d'un autre périphérique de chargement USB (non
inclus). Chargez l'appareil pendant 2 heures pour vous assurer qu'il
est complètement chargé.
Lorsque l'appareil est en charge, la barre de niveau de batterie clignote. Une
fois que l'unité est complètement chargée, la barre de niveau de la batterie deviendra une
lumière fixe.
REMARQUE : Veuillez charger l'appareil lorsque vous voyez que la barre de niveau de
batterie est faible ou lorsqu'il n'y a pas de niveau de batterie à afficher.
V
at
X
SORTIE MICROPHONE
Cet appareil est capable de se connecter à votre appareil de karaoké préféré. Vous pouvez
vous connecter avec le câble de 3,5 mm à 6,5 mm inclus.
AVERTISSEMENT
- Pour éviter une sortie sonore trop amplifiée, il est recommandé que le contrôle du volume
soit initialement réglé à un tiers ou moins, puis augmenté si nécessaire.
v
w
u
y y
MODE MICRO NIVEAU DE BATTERIE
COUPER LE MICRO
SUPPRESSION
DU BRUIT
EFFETS VOCAUX
U
W
Faites glisser les pieds du support pliable
ak
pour
stabiliser le pied du micro.
Desserrez le capuchon de réglage du pied de micro
al
et ajustez le tube du pied de micro
am
. Resserrez le
capuchon pour le maintenir en place.
Insérez la pince micro
an
dans le support pliable et
serrez-la. Appuyez sur le clip
an
et pour insérer le
microphone.
Connectez votre ordinateur, votre appareil de karaoké
préféré ou vos écouteurs via la prise USB
u
, la prise
microphone
v
ou la prise casque
w
.
REMARQUE : Si le micro est connecté à votre
ordinateur, vous pouvez trouver le nom de l'appareil
sous "Singing Machine Microphone".
Support pliable
Clip de micro
ak
am
an
al
Guía de Resolución de Problemas
Si esta unidad presentara un problema, lea el siguiente cuadro antes de llamar al servicio
técnico:
No tiene corriente
• La unidad no está encendida; oprima el botón para encenderla.
• Confirme que la unidad está cargada.
No hay sonido
• Asegúrese de que el micrófono esté encendido
• El volumen del micrófono está ajustado al mínimo o silenciado; aumente el volumen del
micrófono girando el ANILLO MIC VOLUME.
• El volumen del dispositivo de karaoke externo está ajustado al mínimo o silenciado (si
está conectado); subir el volumen.
No hay sonido (Si está conectado a una computadora)
• Asegúrese de que el enchufe esté firmemente conectado a la toma.
• Asegúrese de que el volumen del micrófono no esté ajustado a un nivel bajo o silenciado.
• Asegúrese de que el volumen de la computadora no se haya configurado en un nivel bajo
o silenciado.
• El sistema informático no cumple con los requisitos de esta unidad; Actualice su sistema
informático.
• Asegúrese de seleccionar el nombre del dispositivo, "Micrófono de máquina cantante"
en las preferencias del sistema de su computadora para (Mac) o la configuración para
(PC).
• Asegúrese de que su cable USB tipo C sea un cable de datos; se recomienda
encarecidamente utilizer el cable incluido.
NOMBRE DESCRIPCION
Tono básico Reverberación y eco suaves como la seda y equilibrados; un gran
potenciador de voz para todos los aspectos
Billie Eyelash pone en cola a Bad Guy y deja que se rompa con este efecto de coro
armonizado que es perfecto para el canto alternativo y rock
Phil the Air Tonight Heavy en la reverberación y el eco con un delicado efecto de
retroalimentación y flanger para un sonido encantador perfecto para
los éxitos de los 80
Grunge Inconfundiblemente arenoso, ideal para rock, alt, pop y simplemente
para hacer que tu voz suene genial
Reggae-Tone El eco y el coro mejorados hacen que las voces brillen, especialmente al
cantar reggae y reggaeton.
Hip-Hop Eco y reverberación de Hip-Hop Big Room con un coro suave
Oldtown Rd Un toque de eco con un impulso vocal adicional que es ideal para tocar
melodías country
Diva Lleva tu voz a nuevas alturas con este amplificador de octava
Doo-Wop La armonía suave agrega un poco de respaldo de graves a su voz
Electrónica Punchy y única, perfecta para pop, EDM y hacer girar cabezas
Up to Mars Mucho eco y reverberación para cuando tu voz necesita ser GRANDE
Himnos Lots of echo and reverb for when your voice needs to be BIG
Asientos con ¿Alguien dijo que se agotaron las entradas para el espectáculo en el
hemorragia nasal estadio?
Voice of an Angel Tenga su propio coro angelical cantando junto con este encantador
efecto de coro
4 of a Kind Es como tener algunos cantantes más armonizando junto con tu voz
Ballad Rock Sube tu balada de placer culpable favorita y muévela para esa persona
especial de la audiencia
Bad Trip Efecto de coro salvaje y divertido
Rayos láser vocales locos y tontos con láser
Warp Speed Bouncy y ecos, mucha diversión
Barry Deep Oh baby, esa es una voz profunda
Cuando se muestre EFFECT LEVEL, utilice los botones o
V
para ajustar el nivel de los efectos de voz. Presione el
botón MUTE / OK
U
para regresar a la pantalla principal.
NOTA: Los pasos anteriores no funcionarán si VOICE
EFFECTS está desactivado.
NIVEL DE EFECTO
Cuando se muestre PERFECT PITCH, utilice el botón o
V
para ajustar los niveles del efecto de tono perfecto. Use
PERFECT PITCH para darle una calidad de estudio a su voz.
Presione el botón MUTE / OK
U
para regresar a la pantalla
principal.
TONO PERFECTO
Guide de dépannage
En cas de problème avec cet appareil, vérifiez les points suivants avant de le faire réparer :
Aucune alimentation
• L’appareil n’est pas sous tension; appuyez sur la touche pour allumer l’appareil..
• Confirmez que l’appareil est chargé.
Aucun son
• Assurez-vous que le micro est allumé.
• Le volume du microphone est réglé au minimum ou coupé ; augmentez le volume du
microphone en tournant la BAGUE MIC VOLUME.
• Le volume de l'appareil de karaoké externe est réglé au minimum ou coupé (s'il est
connecté) ; augmenter le volume.
Aucun son (Si connecté à un ordinateur)
• Assurez-vous que la fiche est fermement connectée à la prise.
• Assurez-vous que le volume du micro n'a pas été réglé sur un réglage bas ou coupé.
• Assurez-vous que le volume de l'ordinateur n'a pas été réglé sur un paramètre faible ou
coupé.
• Le système informatique ne répond pas aux exigences de cet appareil ; mettre à niveau
votre système informatique.
• Assurez-vous de sélectionner le nom de l'appareil « Singing Machine Microphone »
dans les préférences système de votre ordinateur pour (Mac) ou les paramètres pour
(PC).
• Assurez-vous que votre câble USB Type-C est un câble de données, il est fortement
recommandé d'utiliser le câble fourni.
NOM DESCRIPTION
Pitch de base Réverbération et écho soyeux et équilibrés ; un excellent rehausseur
vocal polyvalent
Billie Eyelash Queue up Bad Guy et laissez-le déchirer avec cet effet de choeur
harmonisé qui est parfait pour le chant alternatif et rock
Phil the Air Tonight Heavy sur la réverbération et l'écho avec un effet de rétroaction et de
flanger délicat pour un son charmant parfait pour les tubes des années
80
Grunge Incontestablement graveleux, idéal pour le rock, l'alt, la pop et juste
pour que votre voix sonne cool
Reggae-Tone L'écho et le chœur améliorés font briller les voix, en particulier lorsque
vous chantez du reggae et du reggaeton
Hip-Hop Écho et réverbération de grande pièce avec un chorus doux
Oldtown Rd Une touche d'écho avec une amplification vocale supplémentaire,
idéale pour entonner des airs country
Diva Portez votre voix vers de nouveaux sommets avec ce booster
d'octave L'harmonie z
Doo-Wop Smooth ajoute des basses à votre voix
Electronica Punch et unique, parfait pour la pop, l'EDM et faire tourner les têtes
Up to Mars Gros écho et chœur parfaits pour un large éventail de chansons, des
ballades au funk
Anthems Beaucoup d'écho et de réverbération pour quand votre voix doit être
GRANDE
Sièges à Quelqu'un a dit un spectacle à guichets fermés ?
saignement de nez
Voice of an Angel Faites chanter votre propre choeur angélique avec ce joli effet de
choeur
4 of a Kind C'est comme si quelques chanteurs supplémentaires s'harmonisaient
avec votre voix
Ballad Rock Montez votre ballade de plaisir coupable préférée et lancez-la pour
cette personne spéciale dans le public
Bad Trip Effet de choeur sauvage et amusant
Laser faisceaux laser vocaux fous et idiots
Warp Speed Bouncy & échos, beaucoup de plaisir
Barry Deep Oh bébé, c'est une voix grave
Lorsque VOICE EFFECTS s'affiche, utilisez les boutons
ou
V
pour choisir parmi 20 effets vocaux différents pour
garantir que la fête continue. Appuyez sur le bouton
MUTE/OK
U
pour revenir à l'affichage principal.
EFFETS VOCAUX
EFECTOS DE VOZ
MODO MIC
Cuando se muestre
MIC MODE, elija entre 4 modos de
micrófono diferentes usando los botones o
V
para
seleccionar. Presione el botón MUTE / OK
U
para
regresar a la pantalla principal.
Solo Singer: Capta el sonido de la parte frontal del
micrófono.
Canto en grupo: Capte el sonido por igual en todas las
direcciones.
Solo Podcast: Capta el sonido de la parte frontal del
micrófono y es más ancho que Solo Singer.
Podcast grupal: Capta el sonido por igual en todas las
direcciones y es más amplio que el canto grupal.
Para reducir el ruido que le rodea cuando está cantando, utilice
el botón o
V
cuando se muestre SUPRESIÓN DE
RUIDO. Presione el botón MUTE / OK
U
para regresar a la
pantalla principal.
NOISE SUPPRESSION
VOLUMEN DE LOS AURICULARES
Para ajustar el volumen del micrófono, simplemente gire el
anillo MIC VOLUME
X
.
NOTA: Puede bajar el volumen del micrófono hasta que esté
silenciado.
VOL DEL MICRÓFONO
Para silenciar instantáneamente el micrófono, simplemente
presione el botón MUTE / OK
U
. Puede presionar el botón
MUTE / OK
U
nuevamente para desactivar el silencio o
ajustar el volumen con el anillo MIC VOLUME
X
.
SILENCIO
MODE MICRO
Lorsque MIC MODE est affiché, choisissez parmi 4 modes
de micro différents à l'aide des boutons ou
V
pour
sélectionner. Appuyez sur le bouton MUTE/OK
U
pour
revenir à l'affichage principal.
Chanteur solo : Capte le son à l'avant du microphone.
Chant de groupe : Capte le son de manière égale dans
toutes les directions.
Podcast solo : Capte le son à l'avant du microphone et est
plus large que Solo Singer.
Podcast de groupe : Capte le son de manière égale dans
toutes les directions et est plus large que le chant de groupe.
Pour réduire le bruit autour de vous lorsque vous chantez,
utilisez le bouton ou
V
lorsque NOISE SUPPRESSION
est affiché. Appuyez sur le bouton MUTE/OK
U
pour
revenir à l'affichage principal.
SUPPRESSION DU BRUIT
Lorsque HEADPHONE VOL s'affiche, utilisez les boutons
ou pour régler le volume du casque. Appuyez sur le bouton
MUTE/OK
U pour revenir à l'affichage principal.
AVERTISSEMENT:
• Pour éviter une sortie de son trop amplifiée, il est
recommandé que le contrôle du volume soit initialement
ajusté à un tiers ou moins, puis augmenté si obligatoire.
• Le volume du casque s'affichera lorsqu'il y aura casque
connecté.
VOLUME CASQUE
Pour régler le volume du micro, tournez simplement la
BAGUE MIC VOLUME
X
.
REMARQUE : Vous pouvez baisser le volume du microphone
jusqu'à ce qu'il soit coupé.
VOL MICRO
NIVEAU D'EFFET
Lorsque EFFECT LEVEL est affiché, utilisez les boutons
ou
V
pour régler le niveau des effets vocaux. Appuyez
sur le bouton MUTE/OK
U
pour revenir à l'affichage
principal.
REMARQUE : Les étapes ci-dessus ne fonctionneront pas si
VOICE EFFECTS est désactivé.
Lorsque PERFECT PITCH s'affiche, utilisez le bouton ou
V
pour régler les niveaux de l'effet de hauteur parfaite.
Utilisez PERFECT PITCH pour apporter une qualité de studio
à votre voix. Appuyez sur le bouton MUTE/OK
U
pour
revenir à l'affichage principal.
EMPLACEMENT PARFAIT
Pour couper instantanément le micro, appuyez simplement
sur le bouton MUTE/OK
U
. Vous pouvez appuyer à
nouveau sur le bouton MUTE/OK
U
pour réactiver le son ou
régler le volume avec la bague bague MIC VOLUME
X
.
MUET
PANTALLA PRINCIPAL
AFFICHAGE PRINCIPAL
Cuando se muestre VOICE EFFECTS, use los botones o
V
para elegir entre 20 efectos de voz diferentes que
seguramente mantendrán la fiesta. Presione el botón MUTE
/ OK
U
para regresar a la pantalla principal.
EFECTOS DE VOZ
Appuyez plusieurs fois sur la touche FUNC ou
y
pour sélectionner les différentes
fonctions. L'écran
W indiquera votre opération en cours pendant 10 secondes.
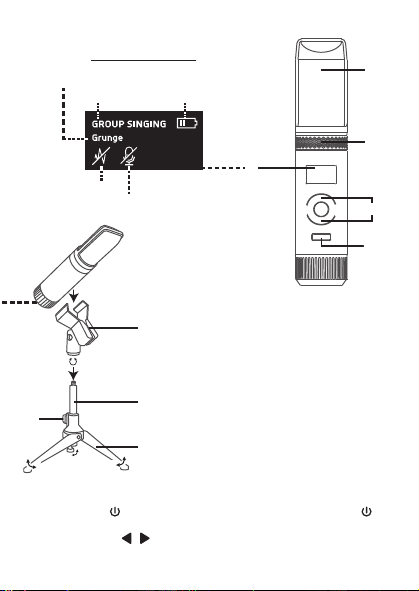
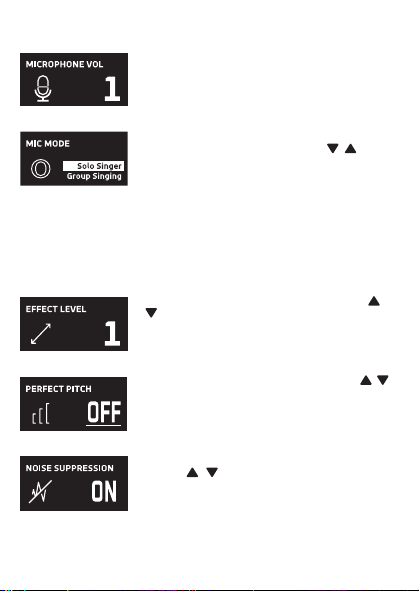
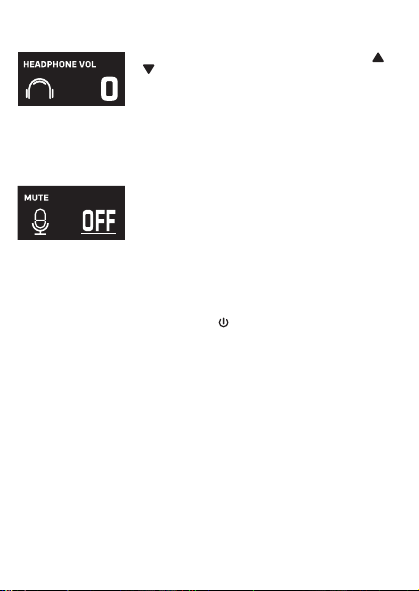
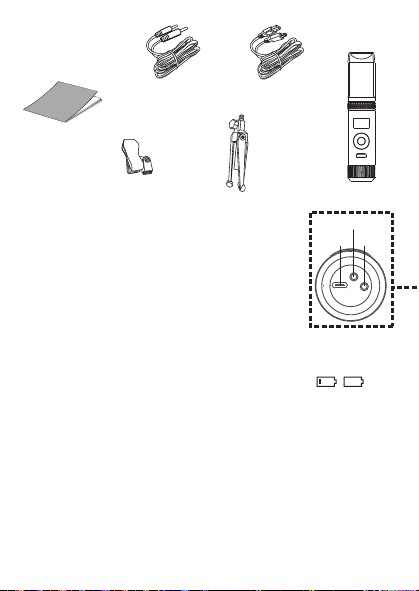
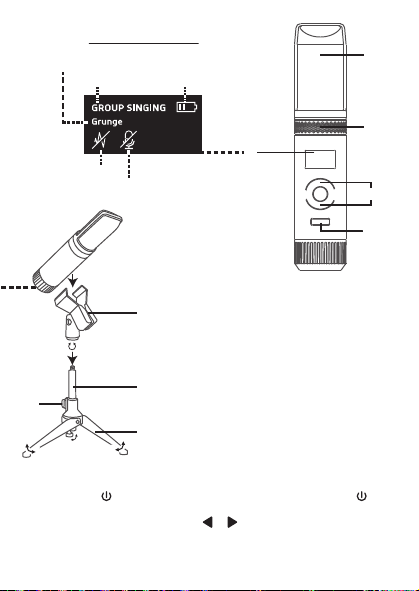
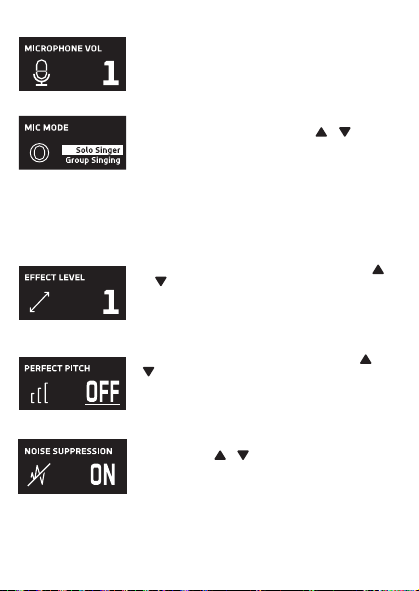
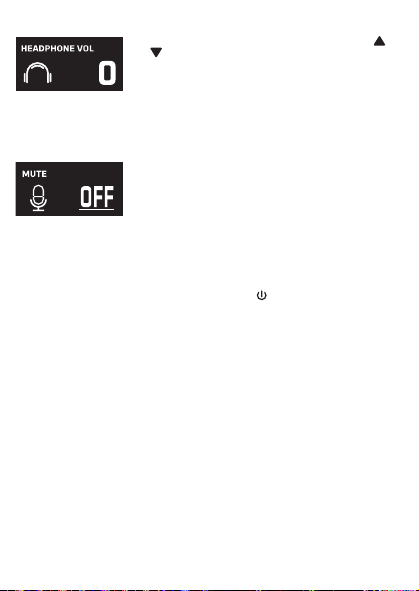