
User Guide


TOC i
Table of Contents
Introduction ................................................................................................................................ 1
Descriptions in the User Guide ........................................................................................... 1
Additional Information ......................................................................................................... 1
Location information .................................................................................................... 1
Limitations ................................................................................................................... 1
Get Started ................................................................................................................................ 2
Your Phone at a Glance ...................................................................................................... 2
Set Up Your Phone ............................................................................................................. 5
Insert the battery .......................................................................................................... 5
Charge the battery ....................................................................................................... 7
Charge the battery wirelessly ....................................................................................... 9
Remove the battery ..................................................................................................... 9
Install microSD card and reinstall SIM card ................................................................11
Turn Your Phone On and Off .............................................................................................12
Setup Wizard ..............................................................................................................13
Turn your screen on and off ........................................................................................13
Set up voicemail .........................................................................................................14
Phone Basics ............................................................................................................................15
Touchscreen Navigation ....................................................................................................15
Function Buttons ................................................................................................................17
Your Home Screen ............................................................................................................18
Home screen overview ...............................................................................................18
Manage the Home screens .........................................................................................19
Wallpaper & style ........................................................................................................21
Apps launcher .............................................................................................................22
Permission ..................................................................................................................22
Quick shortcuts ...........................................................................................................23
Status bar ...................................................................................................................24
Notifications panel ......................................................................................................25
Quick settings .............................................................................................................26

ii TOC
Enter Text ..........................................................................................................................26
Gboard .......................................................................................................................26
Glide typing.................................................................................................................29
Google voice typing ....................................................................................................29
Copy and paste text ....................................................................................................30
Phone Calls ..............................................................................................................................31
Make Phone Calls ..............................................................................................................31
Call using the phone dialpad .......................................................................................31
Call from Recents .......................................................................................................32
Call from Contacts ......................................................................................................32
Call using a speed dial number ...................................................................................32
Call emergency numbers ............................................................................................32
Call numbers with pauses ...........................................................................................33
Call using the plus (+) code ........................................................................................33
Receive Phone Calls ..........................................................................................................34
Use Voicemail Services .....................................................................................................34
Voicemail ....................................................................................................................34
Basic voicemail ...........................................................................................................35
Phone Call Options ............................................................................................................36
In-call options .............................................................................................................36
Caller ID .....................................................................................................................36
Call Waiting ................................................................................................................36
3-way calling ...............................................................................................................37
Call forwarding ............................................................................................................37
Set up speed dialing ...................................................................................................38
Recent Calls ......................................................................................................................39
View recent calls .........................................................................................................39
Recent calls options ....................................................................................................39
Delete recent calls ......................................................................................................40
Call Settings ......................................................................................................................40
Call rejection ...............................................................................................................40
Quick responses .........................................................................................................41
Auto answer................................................................................................................41

TOC iii
Power key ends call ....................................................................................................41
Noise reduction ...........................................................................................................42
Additional settings.......................................................................................................42
Video Calling ..............................................................................................................42
Wi-Fi Calling ...............................................................................................................42
Ringtone & vibrate ......................................................................................................43
Step-up ring volume ....................................................................................................43
Flashing light when ringing .........................................................................................43
Voicemail ....................................................................................................................43
Assisted dialing ...........................................................................................................43
Real Time Text ...........................................................................................................44
Hearing aids – telecoil mode .......................................................................................44
Call timer ....................................................................................................................44
Verizon Push To Talk Plus (PTT+) .....................................................................................45
Set up PTT+ ...............................................................................................................45
Contacts....................................................................................................................................46
Contacts List ......................................................................................................................46
Contacts list options ....................................................................................................46
Add a Contact ....................................................................................................................47
Assign a picture to a contact .......................................................................................47
Save a phone number ................................................................................................48
Delete a contact ..........................................................................................................48
Edit a contact ..............................................................................................................48
Contacts entry options ................................................................................................48
Add a Group Contact .........................................................................................................49
Delete a group contact ................................................................................................49
Edit a group contact ....................................................................................................50
Add a Contact to Favorites.................................................................................................50
ICE (In Case of Emergency) ..............................................................................................50
Synchronize Contacts ........................................................................................................51
Applications ..............................................................................................................................52
Google Apps ......................................................................................................................52
Create a Google Account ............................................................................................52

iv TOC
Sign in to your Google Account...................................................................................52
Chrome .......................................................................................................................53
Gmail ..........................................................................................................................53
Calendar .....................................................................................................................54
Google Play Store app ................................................................................................55
Google Maps ..............................................................................................................55
YouTube .....................................................................................................................56
YouTube Music ...........................................................................................................56
Files ............................................................................................................................56
Supported formats ......................................................................................................56
Messages ...................................................................................................................56
Connections ..............................................................................................................................58
Wi-Fi ..................................................................................................................................58
Turn Wi-Fi on and connect to a wireless network ........................................................58
Wi-Fi settings menu ....................................................................................................59
Bluetooth ...........................................................................................................................59
Turn Bluetooth on or off ..............................................................................................59
Change the device name ............................................................................................60
Pairing ........................................................................................................................60
Send and receive information .....................................................................................61
Supported Bluetooth profiles .......................................................................................61
Near Field Communication (NFC) Technology ...................................................................62
Turn NFC on or off ......................................................................................................62
Mobile Hotspot & Tethering ................................................................................................63
Turn Mobile Hotspot on or off .....................................................................................63
USB tethering .............................................................................................................63
Bluetooth tethering......................................................................................................64
Camera .....................................................................................................................................65
Use the Camera App .........................................................................................................65
Open or close the Camera app ...................................................................................65
Viewfinder screen .......................................................................................................65
Take a picture or record a video .................................................................................67
Action Overlay mode ..................................................................................................68

TOC v
Underwater mode .......................................................................................................69
Review screen ............................................................................................................70
Camera settings .........................................................................................................71
View Pictures and Videos Using Photos ............................................................................72
View pictures and videos ............................................................................................72
Work with Pictures .............................................................................................................72
Edit a picture ...............................................................................................................72
Share Pictures and Videos.................................................................................................73
Useful Tools ..............................................................................................................................74
Clock .................................................................................................................................74
Alarm ..........................................................................................................................74
Clock ..........................................................................................................................74
Timer ..........................................................................................................................74
Stopwatch ...................................................................................................................75
Bedtime ......................................................................................................................76
Calculator ..........................................................................................................................76
Flashlight ...........................................................................................................................76
Sound Recorder .................................................................................................................77
Record sound .............................................................................................................77
Play audio data ...........................................................................................................77
Stored sound list .........................................................................................................77
Voice Search .....................................................................................................................78
Outdoor ..............................................................................................................................78
Weather ......................................................................................................................78
Carkit Power On or Off .......................................................................................................79
Settings .....................................................................................................................................80
Network & Internet .............................................................................................................80
Internet .......................................................................................................................80
Calls & SMS ...............................................................................................................80
Use eSIM/dual SIM .....................................................................................................80
Mobile networks ..........................................................................................................81
Airplane mode ............................................................................................................82
Mobile Hotspot & tethering ..........................................................................................82

vi TOC
Data Saver .................................................................................................................82
Wi-Fi Calling ...............................................................................................................82
Virtual Private Networks (VPN) ...................................................................................82
Private DNS ................................................................................................................83
Adaptive connectivity ..................................................................................................83
Connected Devices ............................................................................................................83
USB ............................................................................................................................83
Pair new device ..........................................................................................................84
Saved devices ............................................................................................................84
Connection preferences ..............................................................................................84
Codec preferences .....................................................................................................85
Apps ..................................................................................................................................85
All apps .......................................................................................................................85
Default apps ...............................................................................................................85
Screen time ................................................................................................................85
Unused apps ..............................................................................................................85
App battery usage.......................................................................................................85
Special app access .....................................................................................................85
Notifications .......................................................................................................................85
App notifications .........................................................................................................86
Notification history ......................................................................................................86
Conversations .............................................................................................................86
Bubbles ......................................................................................................................86
Device & app notifications ...........................................................................................86
Notifications on lock screen ........................................................................................86
Do Not Disturb ............................................................................................................86
Flash notifications .......................................................................................................86
Wireless emergency alerts ..........................................................................................86
Other notification settings ...........................................................................................86
Battery ...............................................................................................................................86
Battery usage .............................................................................................................86
Battery Saver ..............................................................................................................87
Battery percentage .....................................................................................................87

TOC vii
Battery Care Mode ......................................................................................................87
Programmable Keys ..........................................................................................................87
Assign a function to Programmable keys ....................................................................87
Answer and end call ...................................................................................................88
Wake up device ..........................................................................................................88
Storage ..............................................................................................................................88
Device storage ............................................................................................................88
Portable storage .........................................................................................................88
Sound & Vibration ..............................................................................................................89
Volume settings ..........................................................................................................89
Do Not Disturb ............................................................................................................89
Phone ringtone ...........................................................................................................89
Live Caption................................................................................................................89
Media..........................................................................................................................89
Vibration pattern .........................................................................................................89
Vibration & haptics ......................................................................................................90
Default notification sound ............................................................................................90
Default alarm sound ....................................................................................................90
Other sounds and vibrations .......................................................................................90
Emergency dialpad tone .............................................................................................90
Display ...............................................................................................................................91
Brightness level ..........................................................................................................91
Adaptive brightness ....................................................................................................91
Lock screen ................................................................................................................91
Screen timeout ...........................................................................................................91
Dark theme .................................................................................................................91
Display size and text ...................................................................................................91
Night Light ..................................................................................................................91
Tap to turn on screen ..................................................................................................91
Glove touch mode.......................................................................................................92
Pocket mode ...............................................................................................................92
Auto-rotate screen ......................................................................................................92
Screen saver ..............................................................................................................92

viii TOC
Display quick settings .................................................................................................92
Wallpaper & Style ..............................................................................................................92
Accessibility .......................................................................................................................92
TalkBack .....................................................................................................................92
Select to Speak ..........................................................................................................93
Display size and text ...................................................................................................93
Color and motion ........................................................................................................94
Extra dim ....................................................................................................................95
Magnification ..............................................................................................................95
Accessibility menu ......................................................................................................96
Switch Access ............................................................................................................96
Timing controls ...........................................................................................................97
System controls ..........................................................................................................97
Vibration & haptics ......................................................................................................98
Real Time Text ...........................................................................................................99
Live Caption................................................................................................................99
Caption preferences ................................................................................................. 100
Audio description ...................................................................................................... 100
Hearing aids – telecoil mode ..................................................................................... 100
Flash notifications ..................................................................................................... 100
Audio adjustment ...................................................................................................... 100
Accessibility shortcuts ............................................................................................... 101
Text-to-speech output ............................................................................................... 101
Security & Privacy ............................................................................................................ 101
Security & privacy status........................................................................................... 102
App security .............................................................................................................. 102
Screen lock ............................................................................................................... 102
Face and fingerprint unlock ....................................................................................... 102
Account security ....................................................................................................... 104
Device finders ........................................................................................................... 104
System & updates..................................................................................................... 104
Privacy ...................................................................................................................... 104
More security & privacy ............................................................................................ 105

TOC ix
Location ........................................................................................................................... 106
Use location .............................................................................................................. 106
Recent access .......................................................................................................... 107
App location permissions .......................................................................................... 107
Location services ...................................................................................................... 107
Safety & Emergency ........................................................................................................ 107
Personal Safety ........................................................................................................ 107
Medical information ................................................................................................... 108
Emergency contacts ................................................................................................. 108
Emergency SOS ....................................................................................................... 109
Crisis alerts ............................................................................................................... 109
Emergency Location Service .................................................................................... 110
Earthquake alerts ..................................................................................................... 110
Unknown tracker alerts ............................................................................................. 110
Silence notifications while driving .............................................................................. 110
Wireless emergency alerts ........................................................................................ 110
Passwords & Accounts .................................................................................................... 111
Passwords ................................................................................................................ 111
Autofill service .......................................................................................................... 111
Set up a new account ............................................................................................... 111
Manage existing accounts ........................................................................................ 111
Automatically sync app data ..................................................................................... 111
Digital Wellbeing & Parental Controls .............................................................................. 112
Your Digital Wellbeing tools ...................................................................................... 112
Parental controls ....................................................................................................... 113
Google ............................................................................................................................. 113
System Updates .............................................................................................................. 113
System............................................................................................................................. 114
Languages ................................................................................................................ 114
Keyboard .................................................................................................................. 114
Gestures ................................................................................................................... 115
Date & time ............................................................................................................... 115
Backup ..................................................................................................................... 116

x TOC
Reset options ............................................................................................................ 116
About Phone .................................................................................................................... 117
Compliance information ............................................................................................ 117
Safety & warranty and user guide ............................................................................. 117
Contact Us .............................................................................................................................. 118
Support Center ................................................................................................................ 118
Drying Procedures .................................................................................................................. 119
Drying Your Phone .......................................................................................................... 119
Copyright & Trademarks ......................................................................................................... 120

Introduction 1
Introduction
Thank you for purchasing this Kyocera product. Please read this user guide carefully before
using the device to ensure safe and proper use.
Descriptions in the User Guide
Most descriptions in this user guide are based on your phone’s setup at the time of purchase.
Instructions for performing tasks in this guide may change depending on the version of software
or application on your phone. The status of individual settings may affect whether certain menus
for option settings are displayed or visible.
All screens in this guide are simulated. Actual displays may vary. Certain features, services, and
applications are network dependent and may not be available in all areas; additional terms,
conditions and/or charges may apply. Contact your service provider about feature availability
and functionality.
All features, functionality, and other specifications, as well as the information contained in this
guide are based upon the latest available information and are believed to be accurate at the
time of issuing. Kyocera International, Inc. reserves the right to change or modify any
information or specifications without notice or obligation.
For warranty service information, please refer to the Safety and warranty information linked from
your phone (see
Safety & warranty and User guide) or call the following telephone number from
anywhere in the continental United States: 1-800-349-4478.
Additional Information
Location information
This phone can determine its/your geographical location (location information) and can
associate location information with other data. For some services and applications, location
information must be turned on and you have to agree to its collection. Additionally, certain
services, applications, and programs are capable of accessing, collecting, storing, and using
location information and disclosing it to others. You should decide carefully when determining
whether location information should be made available to others.
Limitations
Kyocera does not authorize or approve the use or sale of its products in any country or region
subject to trade embargo by the U.S. government.
©2024 Kyocera Corporation. KYOCERA is a registered trademark of Kyocera Corporation. All
other trademarks are the property of their respective owners.
2 Get Started
Get Started
The following topics give you all the information you need to set up your phone and Verizon
service the first time.
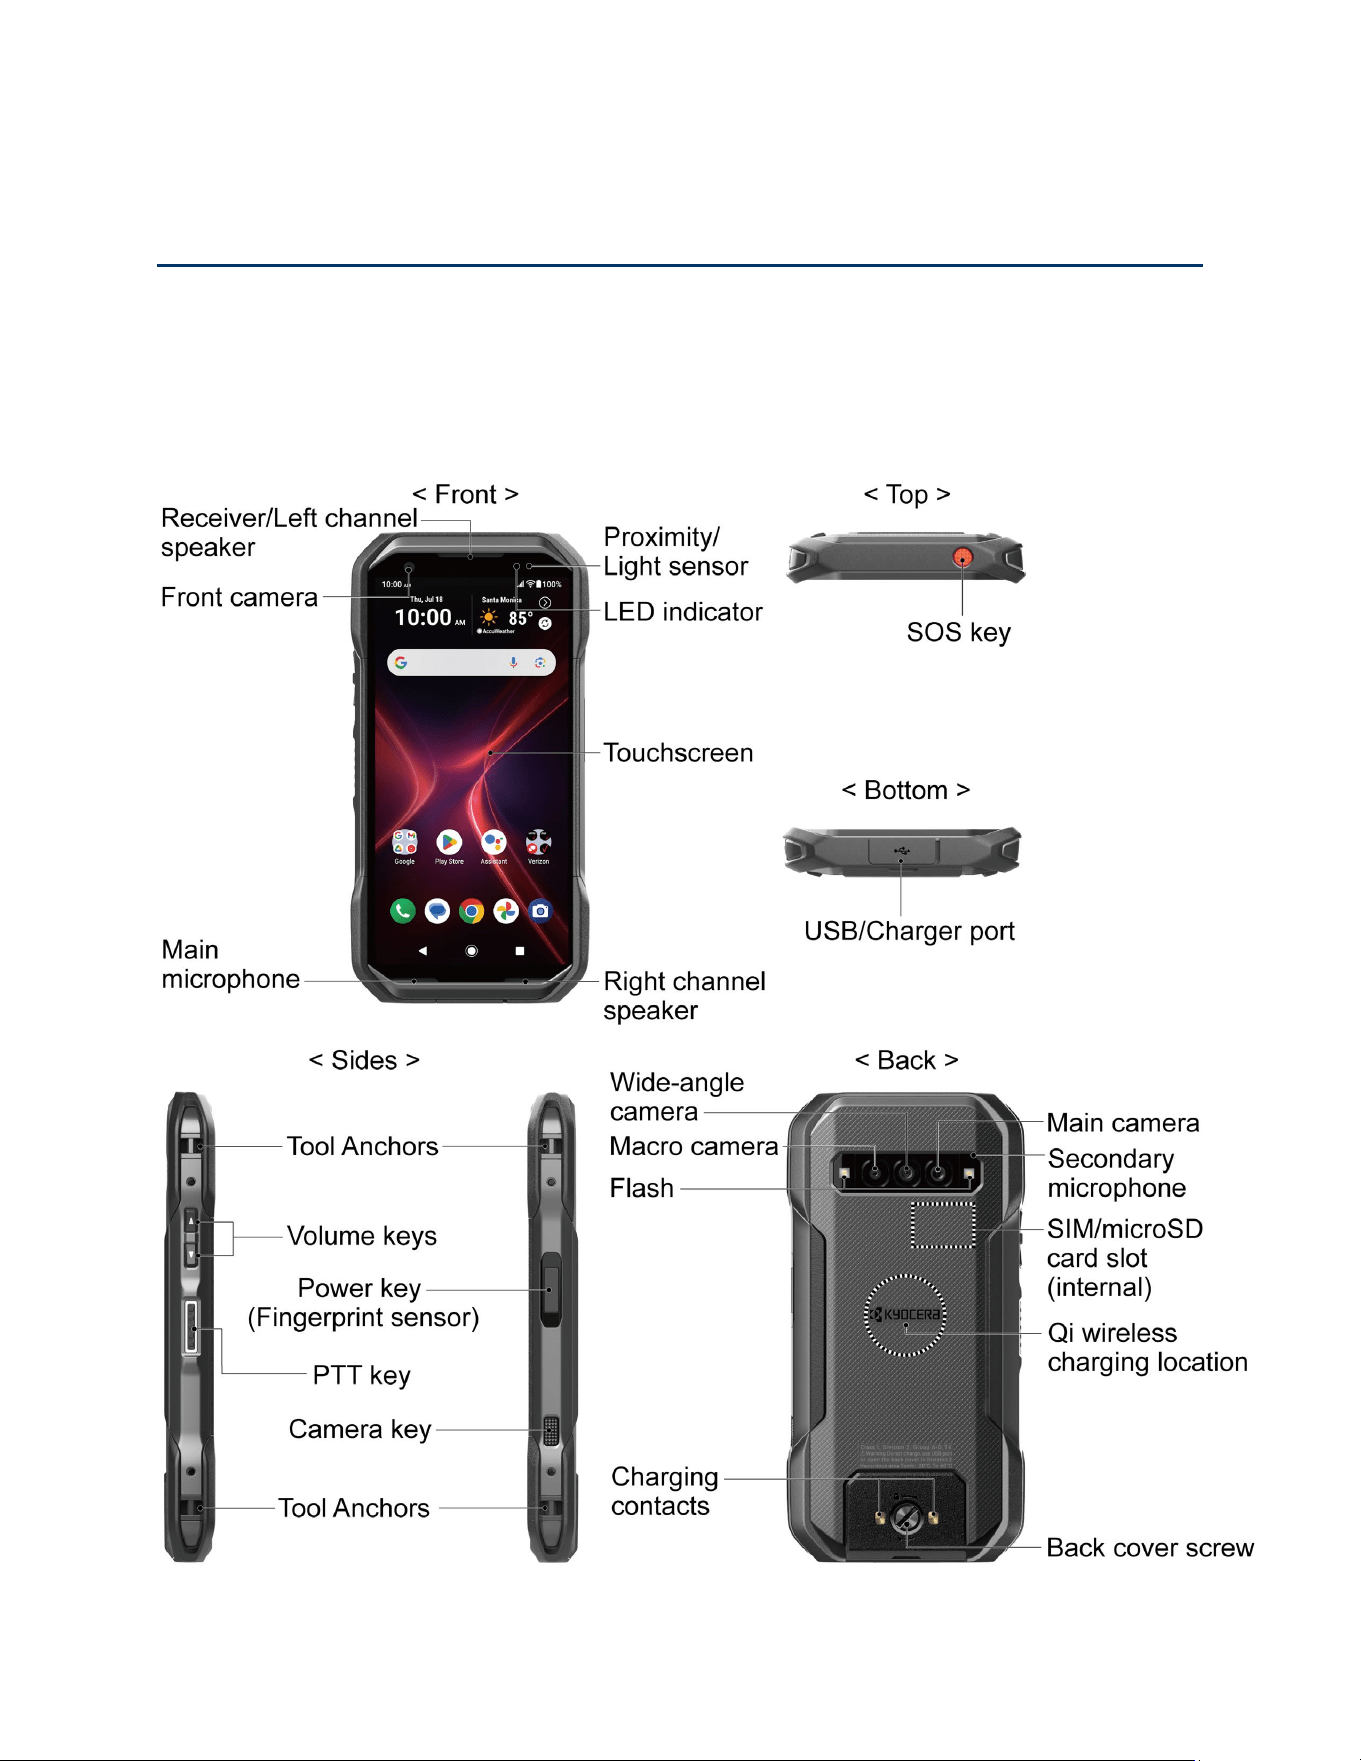
Your Phone at a Glance
The following illustration outlines your phone’s primary external features and keys.
Get Started 3
● Proximity/Light sensor detects how close an object is to the surface of the screen. This
is typically used to detect when your face is pressed up against the screen, such as
during a phone call. The amount of light in the surrounding environment is also detected
by this sensor and it is used, for example, to adjust the screen brightness.
● LED indicator displays a phone notification, charging status, or alert.
LED Indicator Battery status
RED Charging
GREEN Fully charged
● Touchscreen displays all the information needed to operate your phone. Use finger
gestures to navigate and interact with items on the screen. In Underwater mode, the
touch operation will be disabled.
● Right channel speaker lets you hear different ringtones and sounds. It also lets you
hear the caller’s voice in speakerphone mode.
● Main microphone transmits your voice for phone calls and voice-activated functions
and suppresses background noise during calls. It is also used when recording video
using the front camera and for stereo recording.
NOTE:
Do not cover the microphone area when using it for functions such as phone
calls.
● Front camera takes pictures and records videos while facing the screen and allows you
to video conference.
● Receiver/Left channel speaker lets you hear the caller’s voice, automated prompts,
ringtones, and sounds.
● SOS key is one of the programmable keys that can be assigned to frequently used
applications or functions for quick access. See
Programmable Keys. SOS related
features may be available through different applications. Contact your service provider
about feature availability and functionality.
● USB/Charger port allows you to connect the phone and a USB Type-C cable for use
with the charger adapter or other compatible accessories.
CAUTION!
Inserting a non-compliant accessory or cable into the USB Type-C
connector may damage the phone.
● Tool Anchors allow you to attach useful accessories.

4 Get Started
● Volume keys allow you to adjust the ringtone or media volume when you are not on a
call, or adjust the voice volume during a call.
● Power key lets you turn the phone on/off or turn the screen on/off, restart the phone,
capture screenshots, or set Lockdown mode. A fingerprint sensor is incorporated in this
key and used to unlock the phone with your fingerprint. See
Fingerprint.
● PTT key acts as a dedicated PTT key by activating the PTT+ application. See Verizon
Push To Talk Plus (PTT+)
. This key also functions as a programmable key that can be
assigned to frequently used applications or functions for quick access. See
Programmable Keys.
● Camera key lets you activate the front camera, the main camera or the wide-angle
camera. You can also assign frequently used applications or functions for quick access,
if you do not need to use it as camera key. See
Programmable Keys.
● Main camera lets you take pictures and videos as phone’s main camera.
● Secondary microphone is used when recording video using the main or wide-angle
camera and for stereo recording.
NOTE:
Do not cover the microphone area when using it for functions such as phone
calls.
● SIM/microSD card slot (internal) is located behind the back cover and allows you to
insert a nano SIM card and an optional microSD™ card. See
Install microSD card and
reinstall SIM card
.
● Qi wireless charging location indicates how to position the phone when using a Qi
wireless charger (sold separately). See
Charge the battery wirelessly.
● Back cover screw secures the back cover to the phone.
● Charging contacts allow you to connect to an optional multi-bay device charger that
can charge multiple phones simultaneously. These contacts are also used when
connecting to a specially designed optional carkit.
● Flash helps illuminate subjects in low-light environments when taking a picture or
recording a video. It can also work as an LED flashlight. See
Flashlight.
● Macro camera allows you to capture amazing close-up shots.
● Wide-angle camera lets you take pictures and videos in wide-angle mode.

Get Started 5
Set Up Your Phone
You must first install and charge the battery to begin setting up your phone.
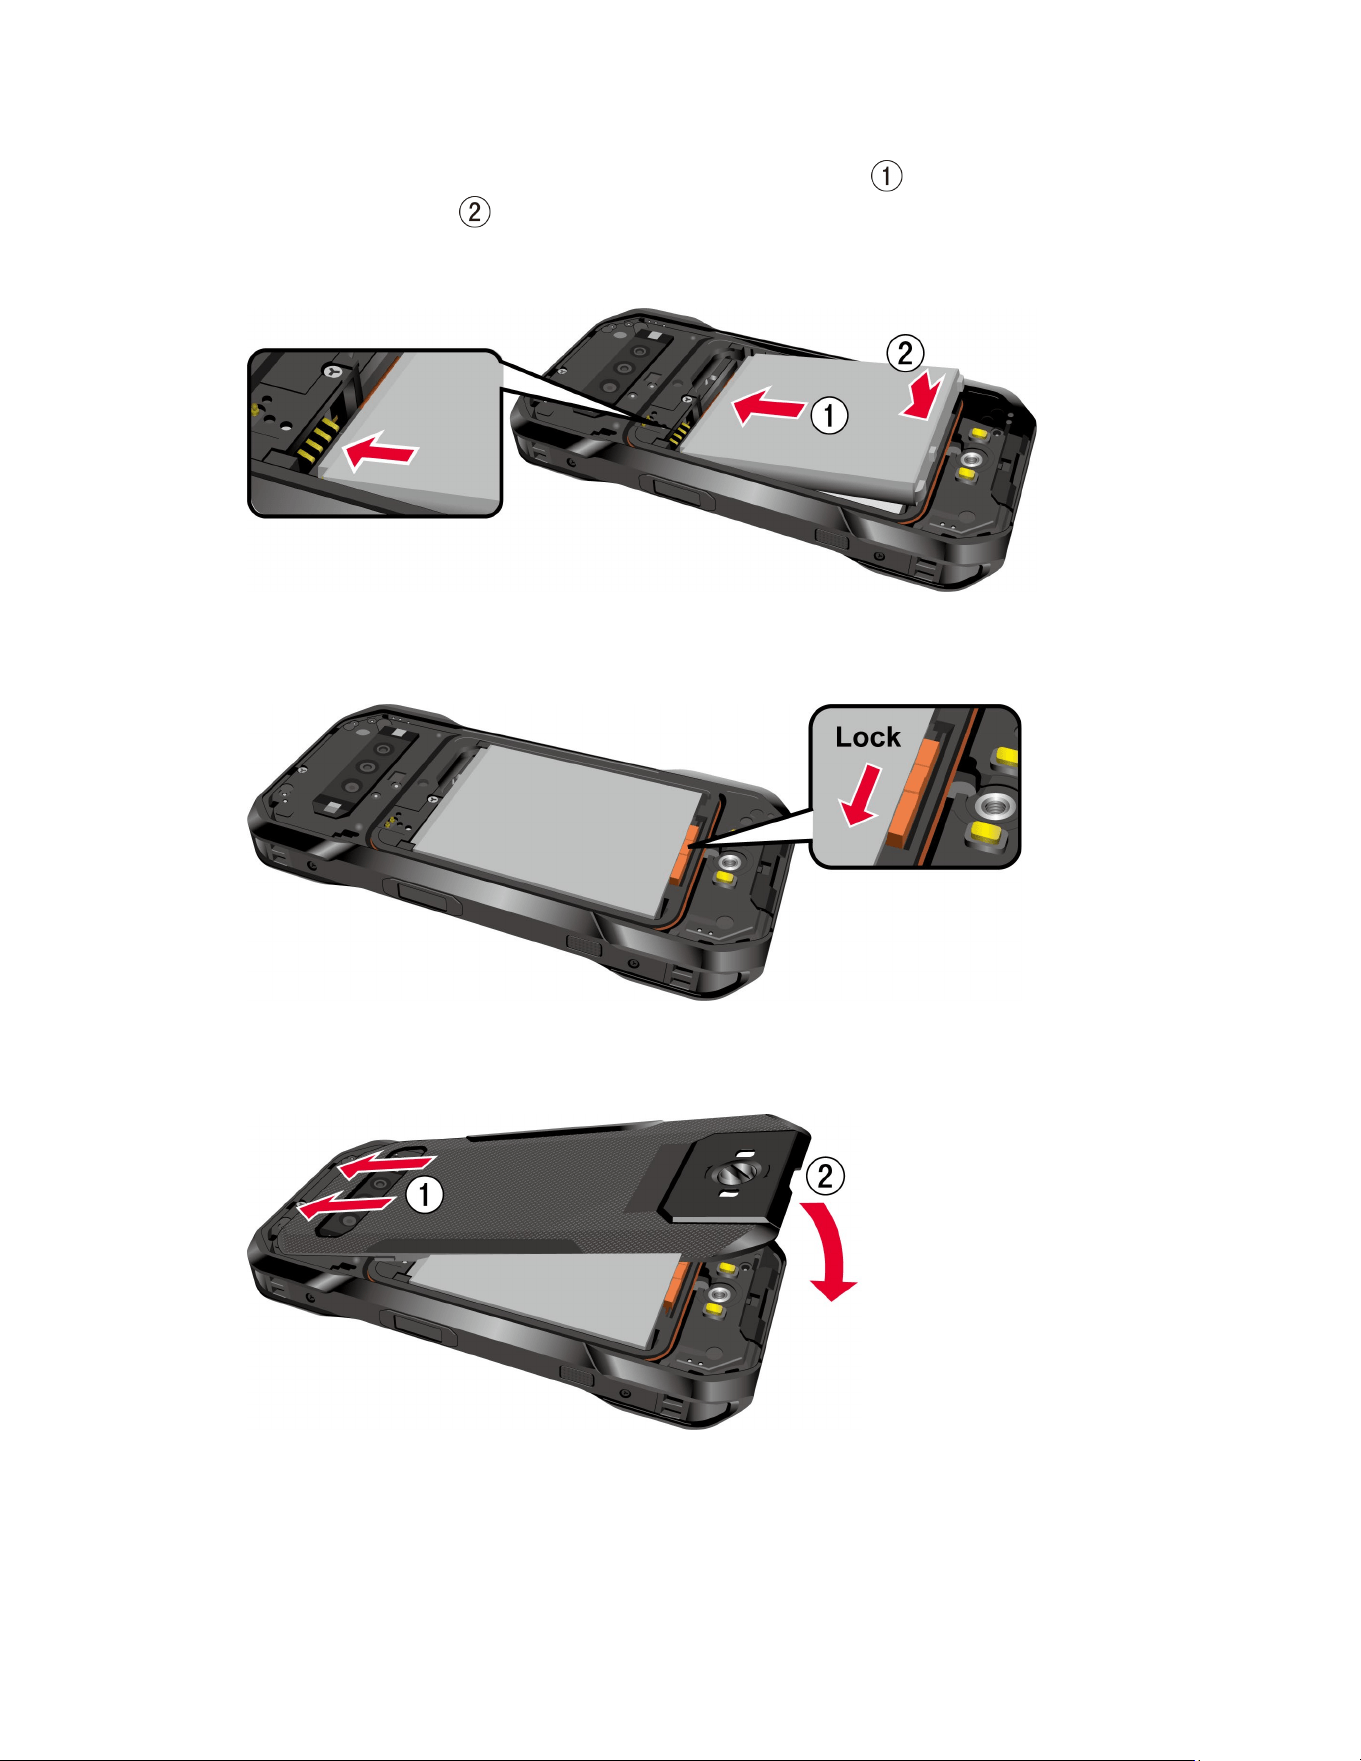
Insert the battery
1. Using a coin, rotate the back cover screw on the back of the phone counter-clockwise
several times to loosen it.
NOTE:
The back cover screw is permanently mounted on the cover and should not be
removed.
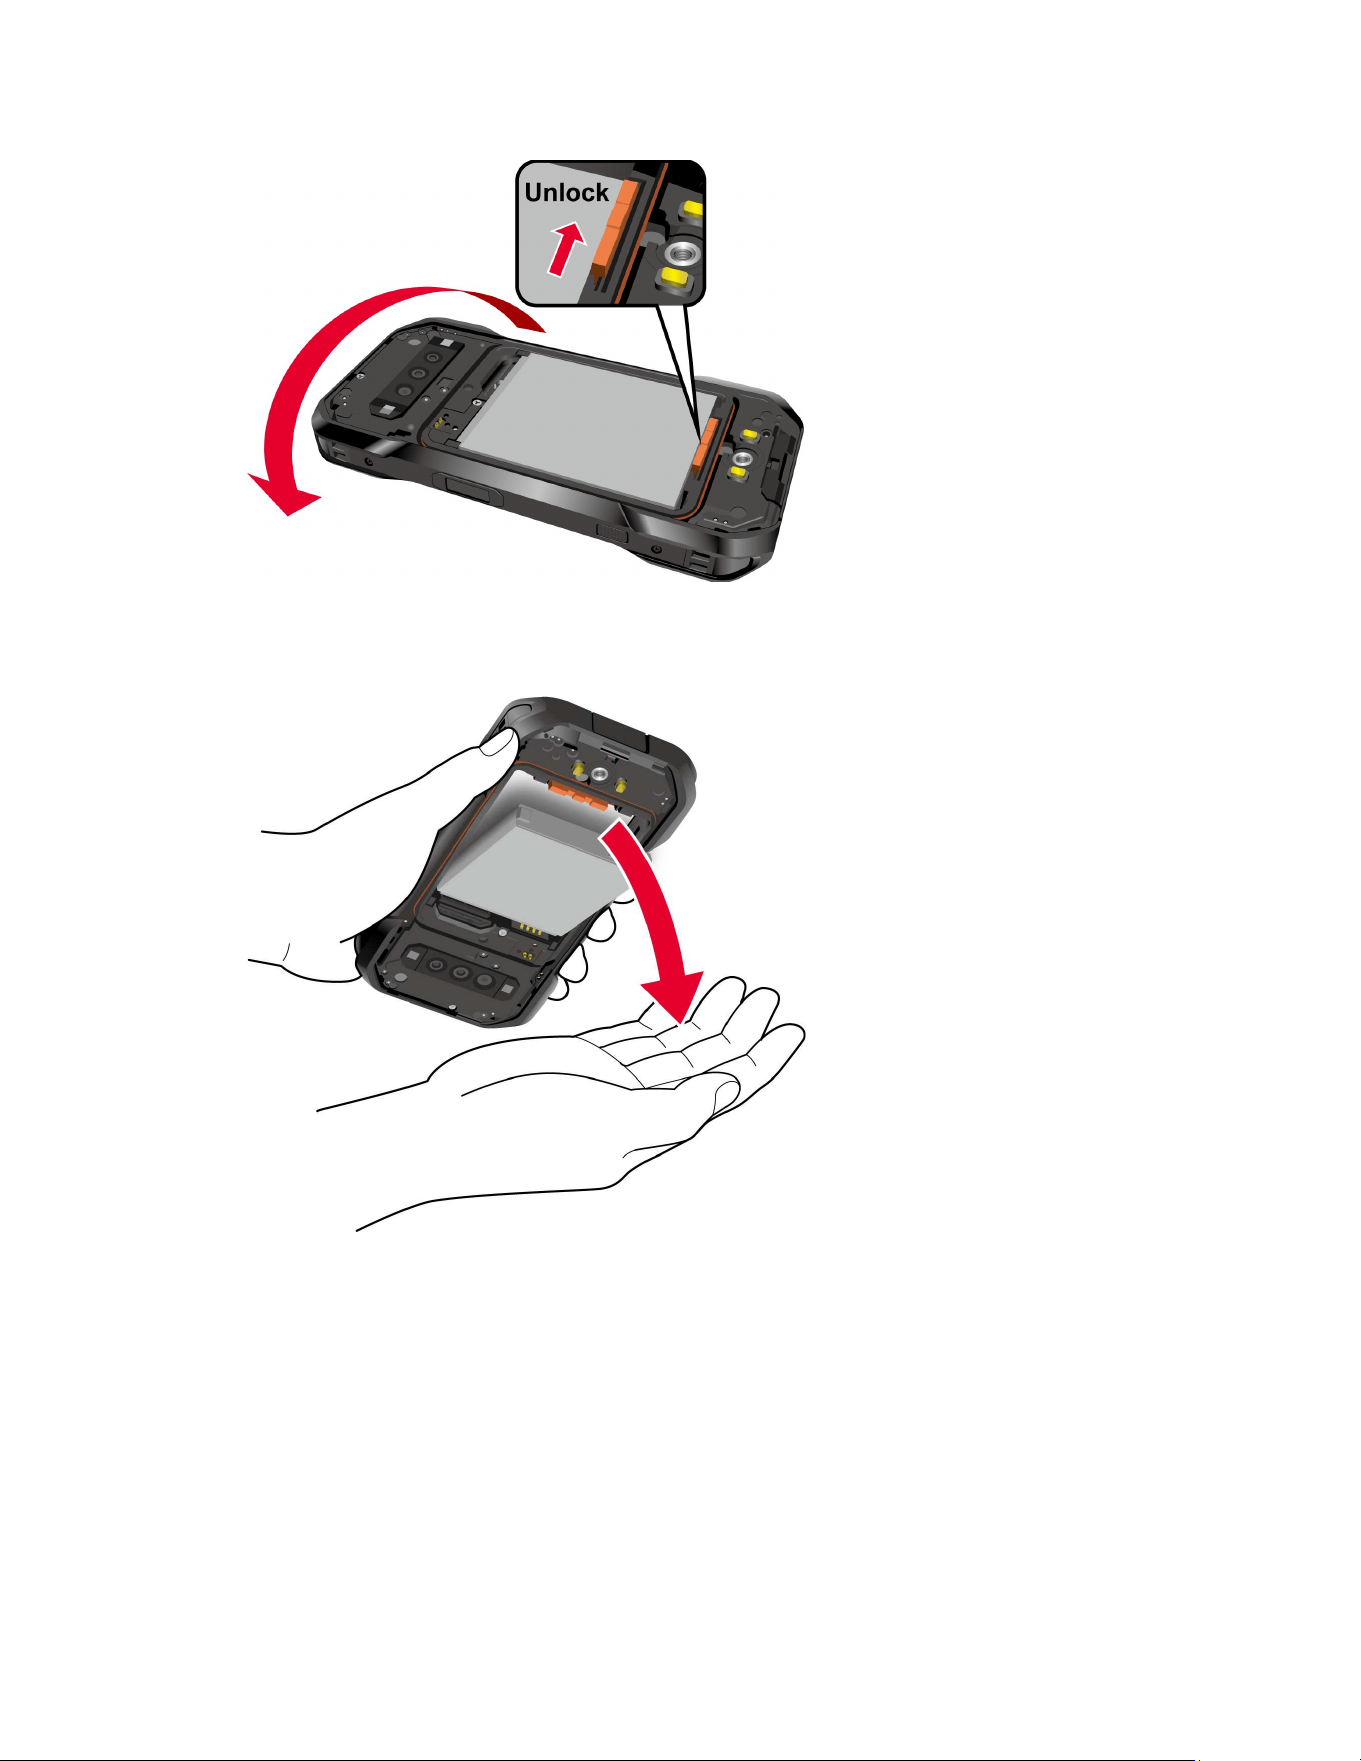
2. Insert your fingernail into the notch at the bottom of the back cover and lift the cover.
3. Unlock the battery latch by sliding it in the direction indicated by the arrow in the picture
below.
6 Get Started
4. Insert the battery, making sure to align the gold contacts ( ). Press down gently to
secure the battery ( ).
WARNING: Do not handle a damaged or leaking Li-ion battery as you can be burned.
5. Lock the battery latch by sliding it in the direction indicated by the arrow in the picture
below.
6. Insert the top edge of the back cover into place first before pressing the rest of the cover
down.
NOTE:
The back cover will not close properly unless the battery latch is in the locked
position.
Get Started 7
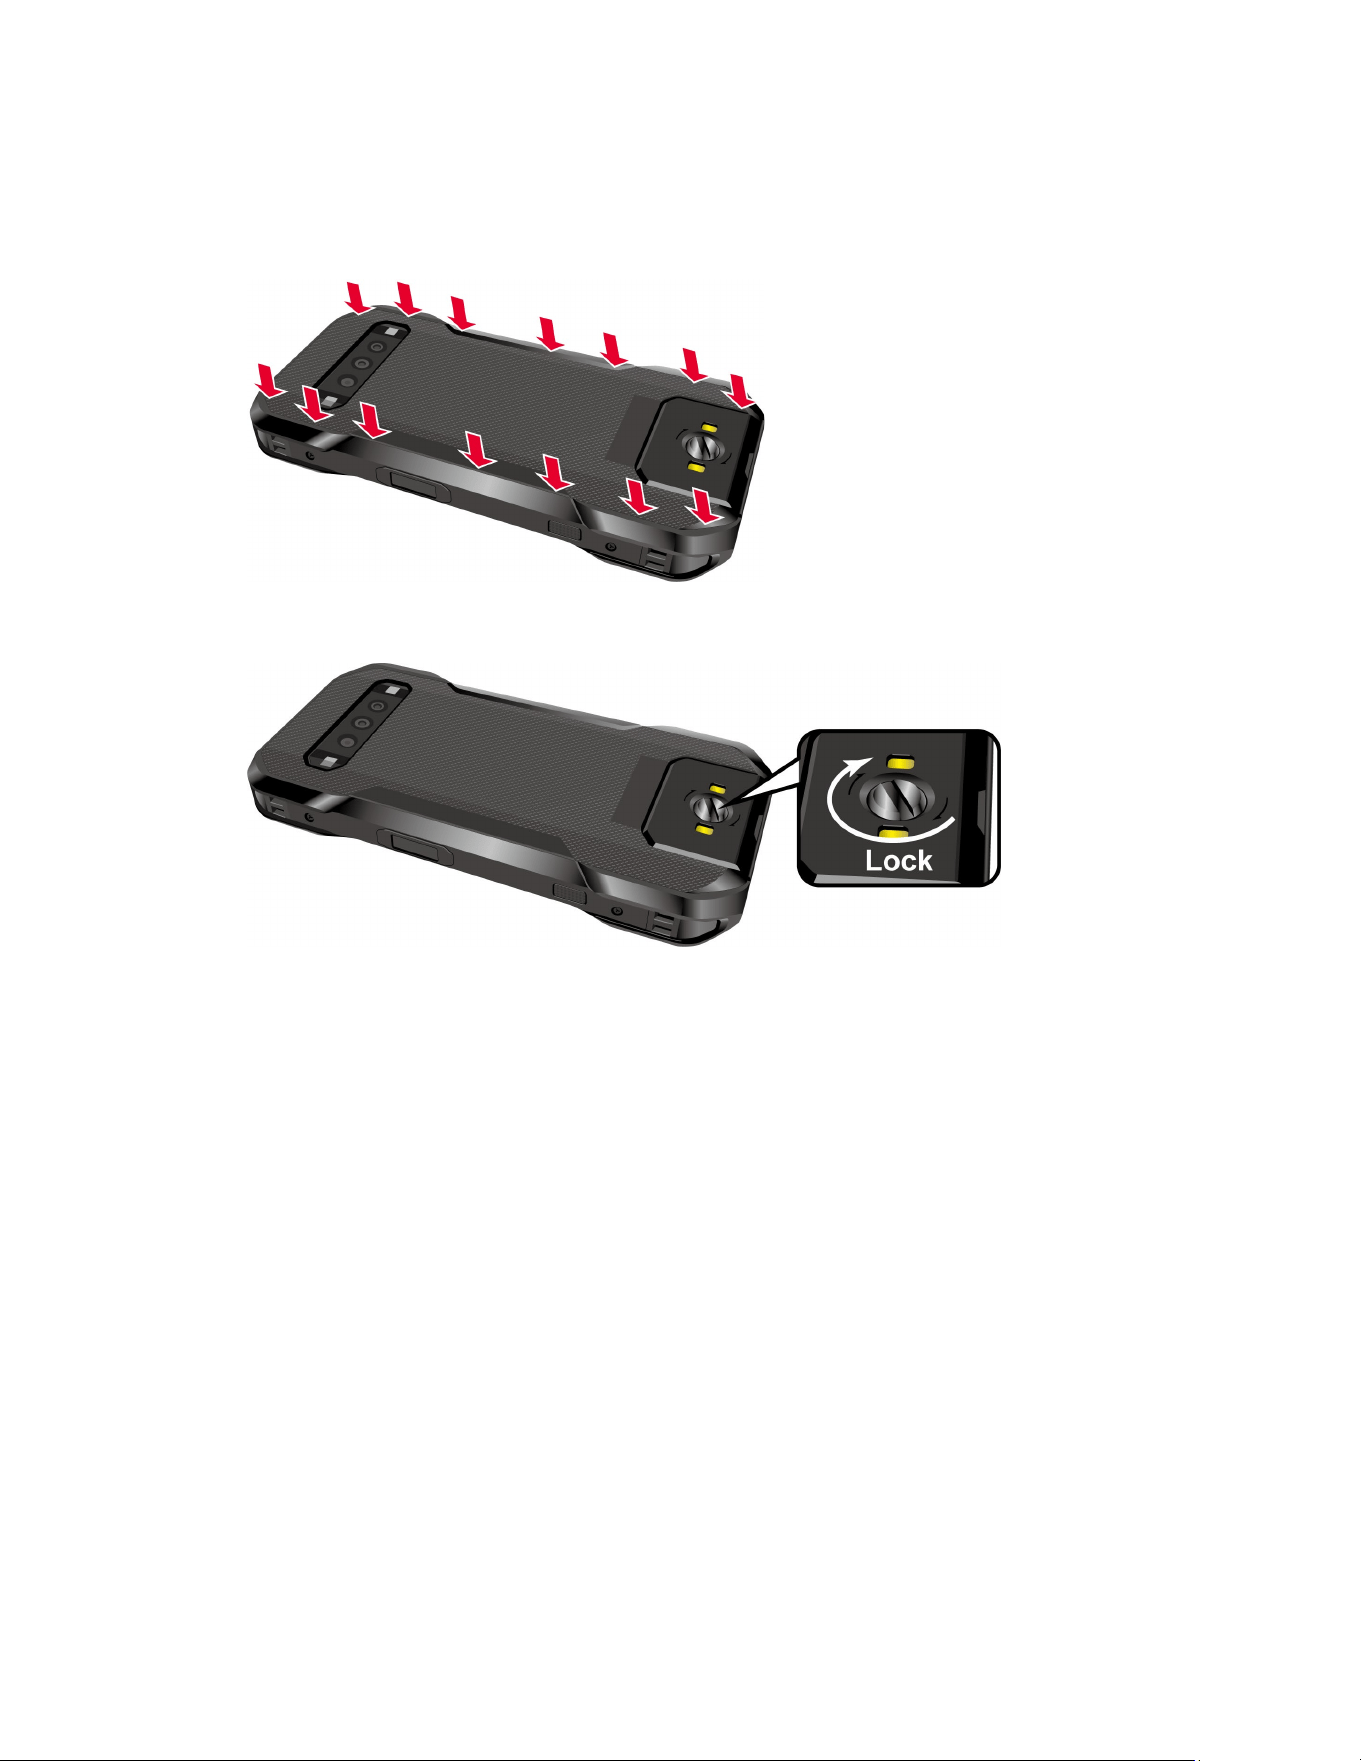
7. Press all around the edges of the back cover as shown below, starting at the top and
working your way down along each side, as shown below. Make sure all the tabs are
secure and there are no gaps between the cover and the phone.
8. Using a coin, rotate the back cover screw to secure it. Do not overtighten.
WARNING: Make sure the back cover is securely closed to ensure your phone's
waterproof seal is intact.
WARNING: Do not use the phone under water if the back cover or the USB/Charger
port cover are broken or open.
Charge the battery
Fully charge the battery before powering on the phone.
NOTE:
AC adapters are sold separately.
IMPORTANT:
Unplug the AC adapter from the electrical outlet when not in use to reduce the
environmental impact of charging.
WARNING: Use only Kyocera-recommended adapters and cables with your phone. Improper
handling of the charging port, as well as the use of an incompatible adapter or
cable, may cause damage to your device and void the warranty.
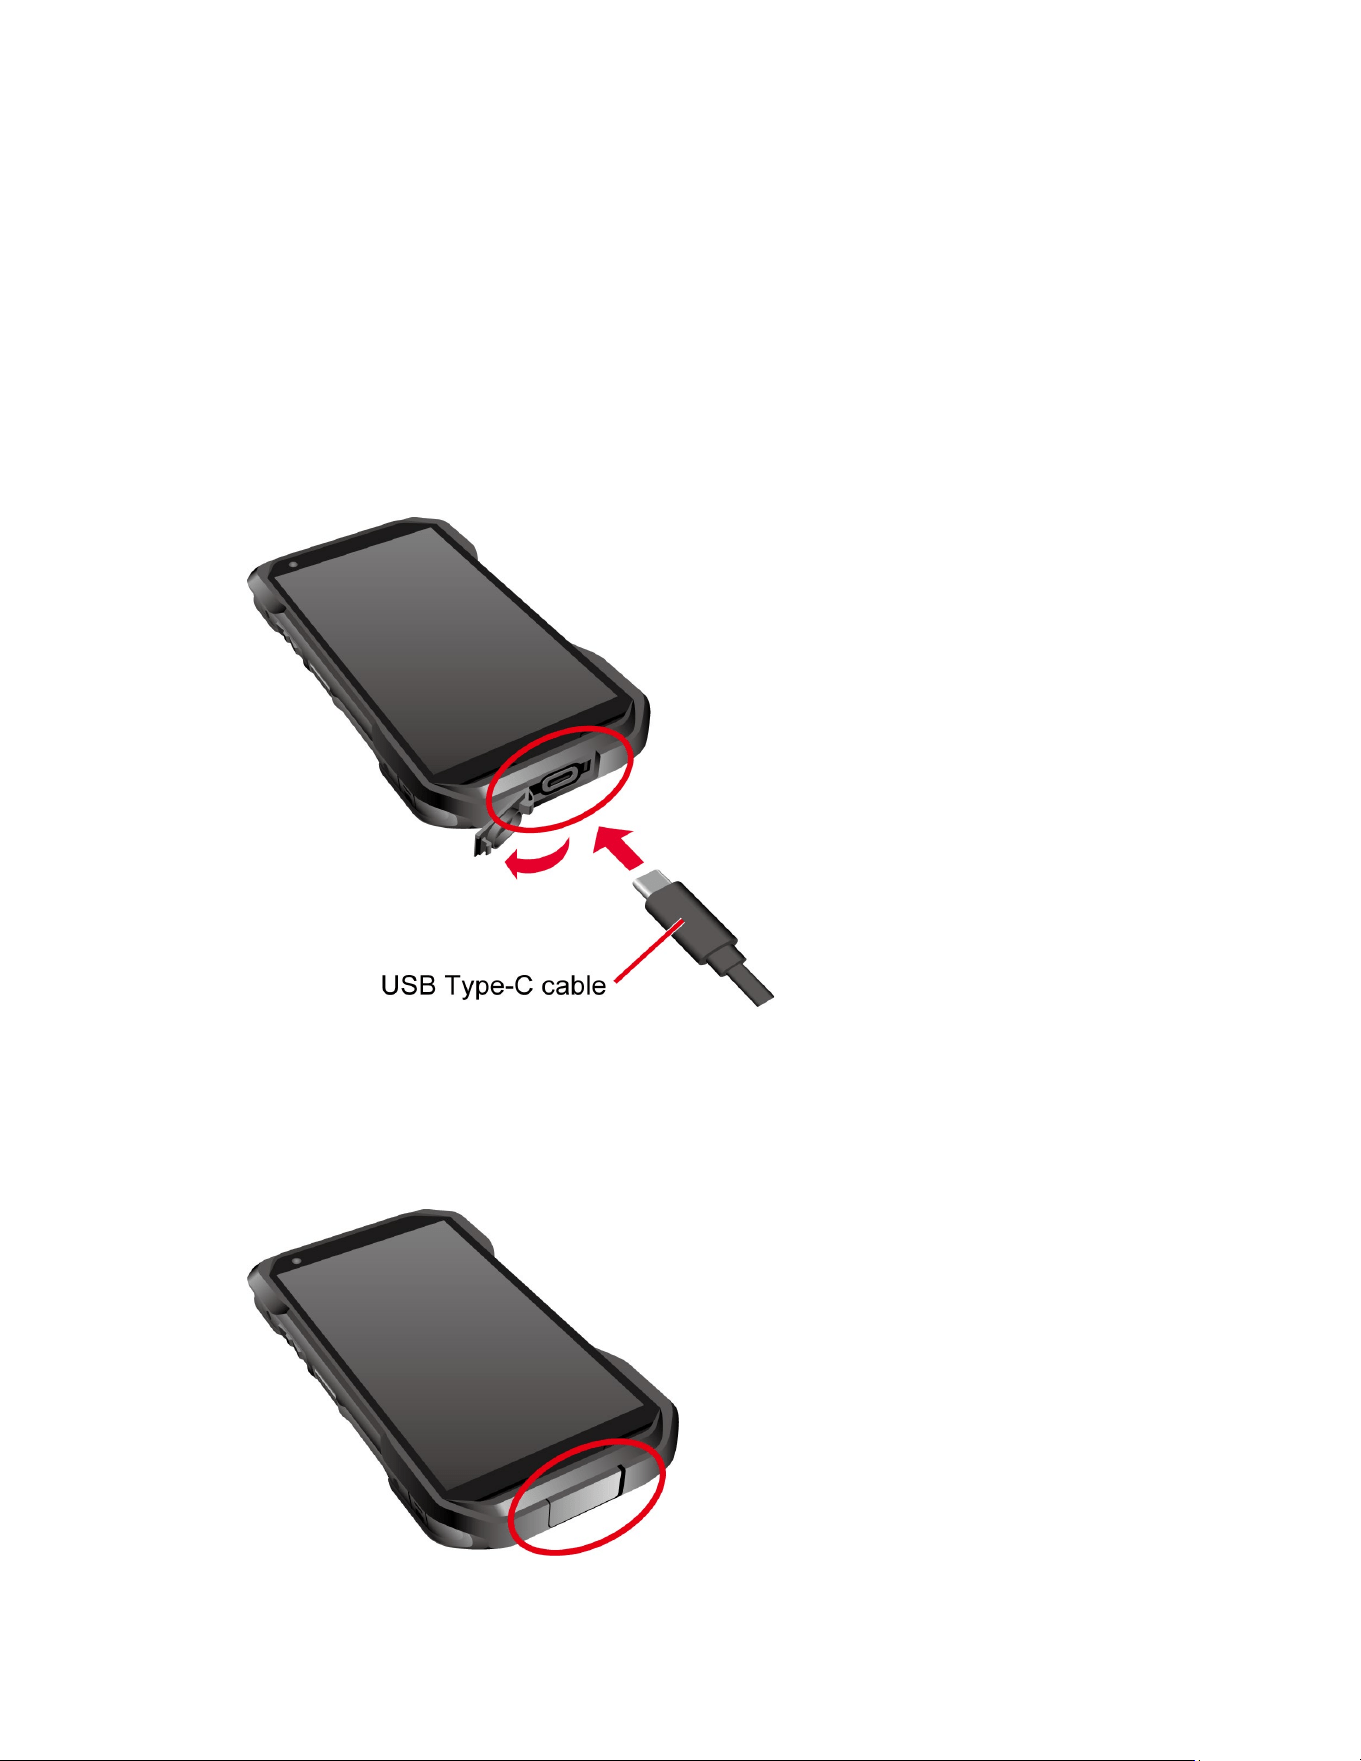
1. Open the USB/Charger port cover on the bottom of the phone.
8 Get Started
2. Insert the smaller end of the USB cable that came with your phone into the phone’s
USB/ Charger port.
3. Insert the other end of the cable into a compatible AC adapter and plug the adapter into
a power outlet.
TIP:
For the fastest charging times, use the optional Adaptive Fast Charging AC
adapter SCP-53ADT* (sold separately) and its dedicated cable SCP-27SDC*
(sold separately). *Part number: 5AAXAD080ULA- (adapter), 5AACCN000111A
(cable). For more information, visit
solutions.kyoceramobile.com/shop and
kyoceramobile.com/duraforce-pro-3/.
IMPORTANT:
Only insert a USB Type-C connector into the phone’s USB/Charger
port.
4. When charging is complete, remove the cable from the port and close the cover. Press
around the edges of the cover to ensure that it is securely closed.

Get Started 9
WARNING: Make sure the USB/Charger port cover is securely closed, when the port
is not in use, to keep the port clean and dry.
WARNING: Do not use the phone under water if the back cover or the USB/Charger
port cover are broken or open.
Charge the battery wirelessly
Your phone supports Qi and works with Qi-enabled chargers. Follow the steps below to charge
the battery using a wireless charger (sold separately).
1. Locate the charging location on your wireless charger by referring to the charger
documentation.
2. Place your phone so that the wireless charging location of your phone is directly
centered over, and touches, the charging location of your wireless charger.
Before starting wireless charging, please note the following:
● If the charging locations are not touching, the charging results will be poor.
● Make sure there is nothing between your phone and wireless charger, especially
anything metal.
● Your phone may become hot while charging the battery. This is normal.
● If charging doesn’t start after positioning your phone correctly, please try a different
wireless charger or use a Kyocera-approved AC adapter and USB data cable.
For more information on wireless charging, see your wireless charger documentation.
Remove the battery
If you need to remove the Battery, follow these steps:
1. Make sure the power is off so that you don’t lose any stored data.
2. Using a coin, rotate the back cover screw counter-clockwise several times to loosen it.
3. Insert your fingernail into the notch at the bottom of the back cover and lift the cover.
4. Unlock the battery latch by sliding it in the direction indicated by the arrow in the picture
below.
10 Get Started
5. Hold the phone with one hand and tap it gently against your other hand to dislodge the
battery.
CAUTION! Do not use screwdrivers or other tools when removing the battery in order
to avoid damage.
Get Started 11
Install microSD card and reinstall SIM card
Inserting a compatible microSD card into your phone will increase its storage capacity. Your
phone comes with a preinstalled SIM card. If you need to reinstall your SIM card, follow the
instructions below.
NOTE:
microSD cards are sold separately. Your phone supports a microSD card up to 1 TB.
1. Make sure the power is off so that you don’t lose any stored data.
2. Remove the back cover and the battery.
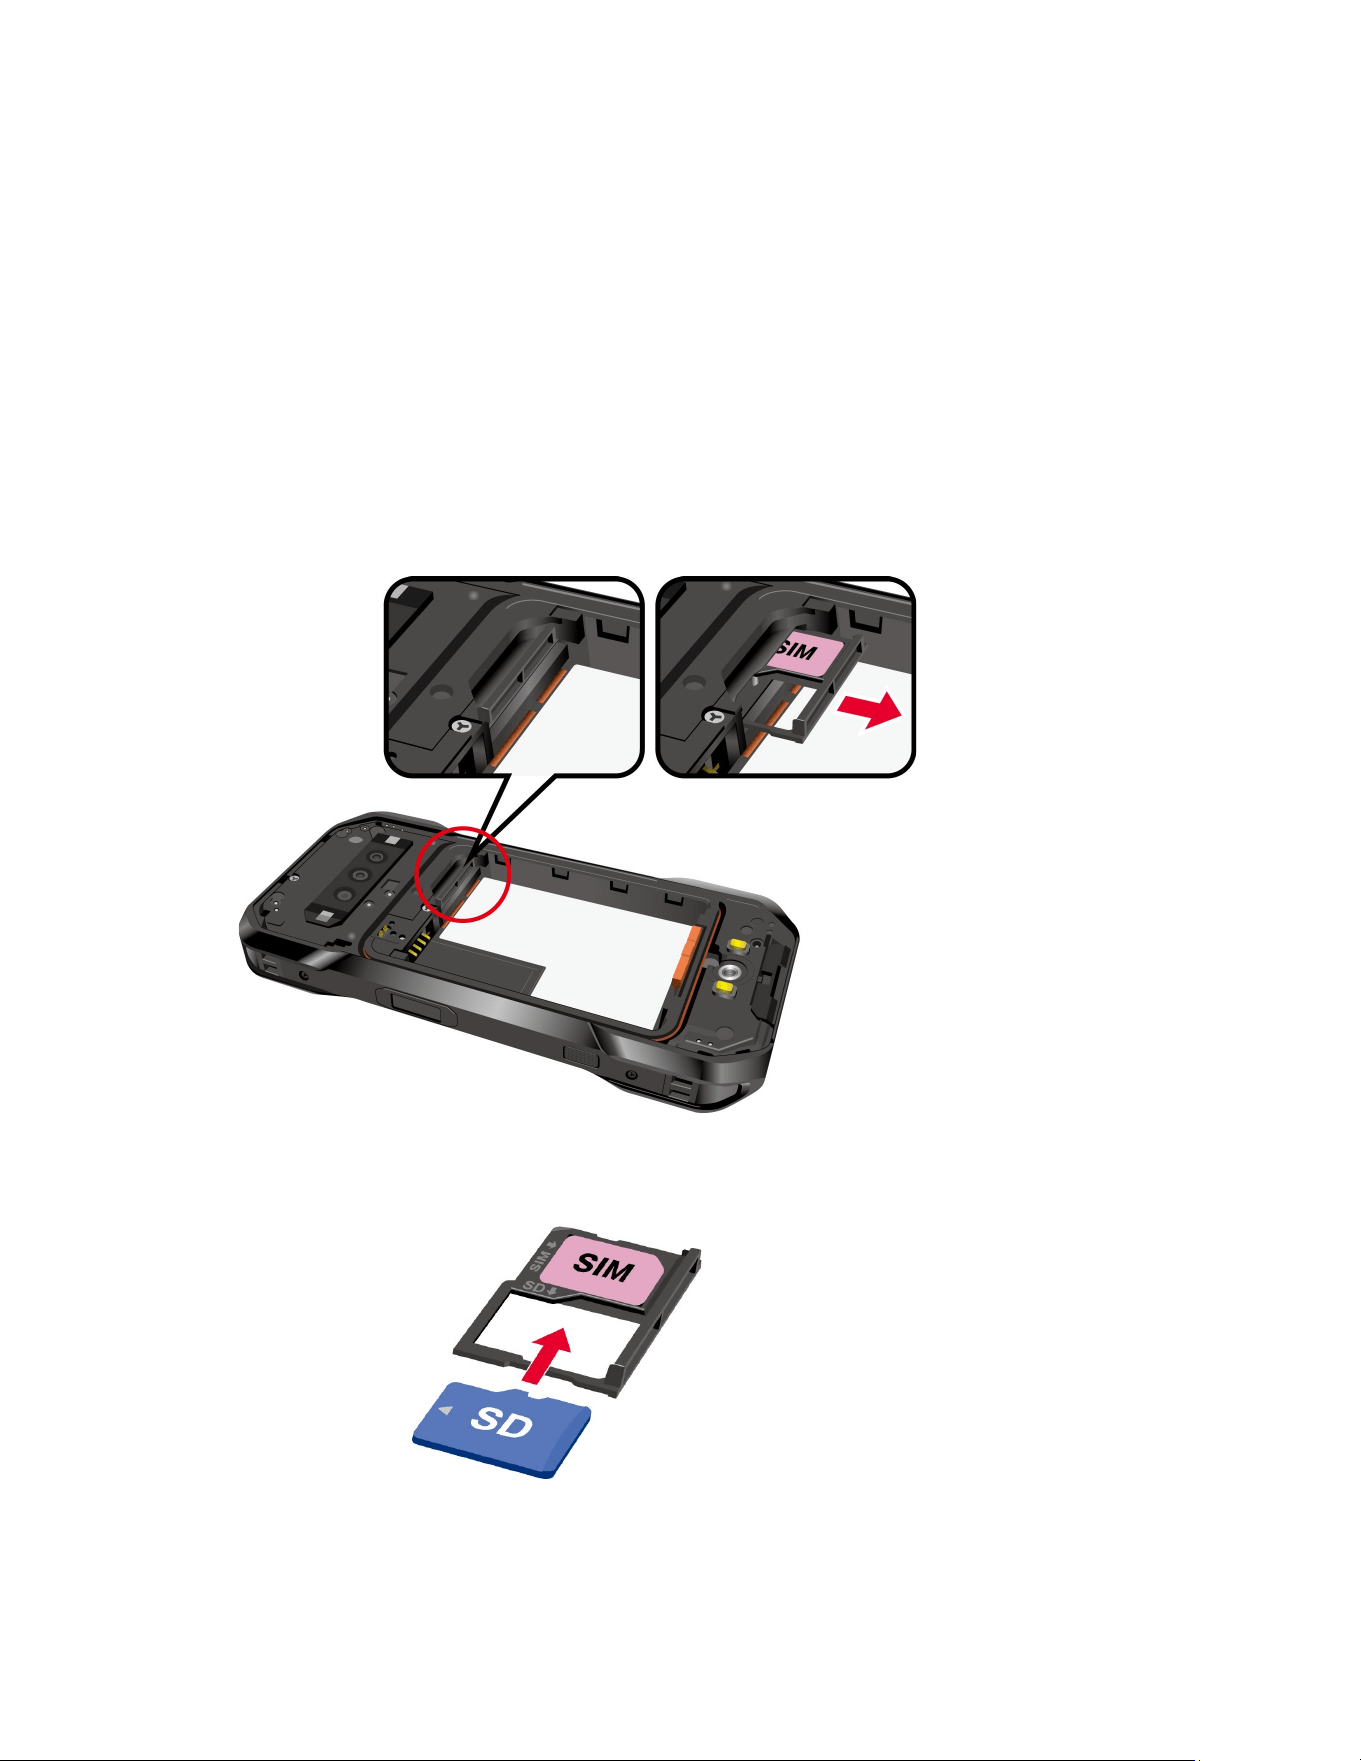
3. Locate the SIM/microSD card slot inside the battery compartment and pull the card tray
out of the slot.
4. Put the tray onto a flat surface and place a microSD card into the tray. Ensure the gold
contacts are facing down as shown.
NOTE:
If you need to reinstall a new SIM card, remove the original SIM card from the
tray and place your new SIM card into the tray with the gold contacts facing
down as shown.
12 Get Started
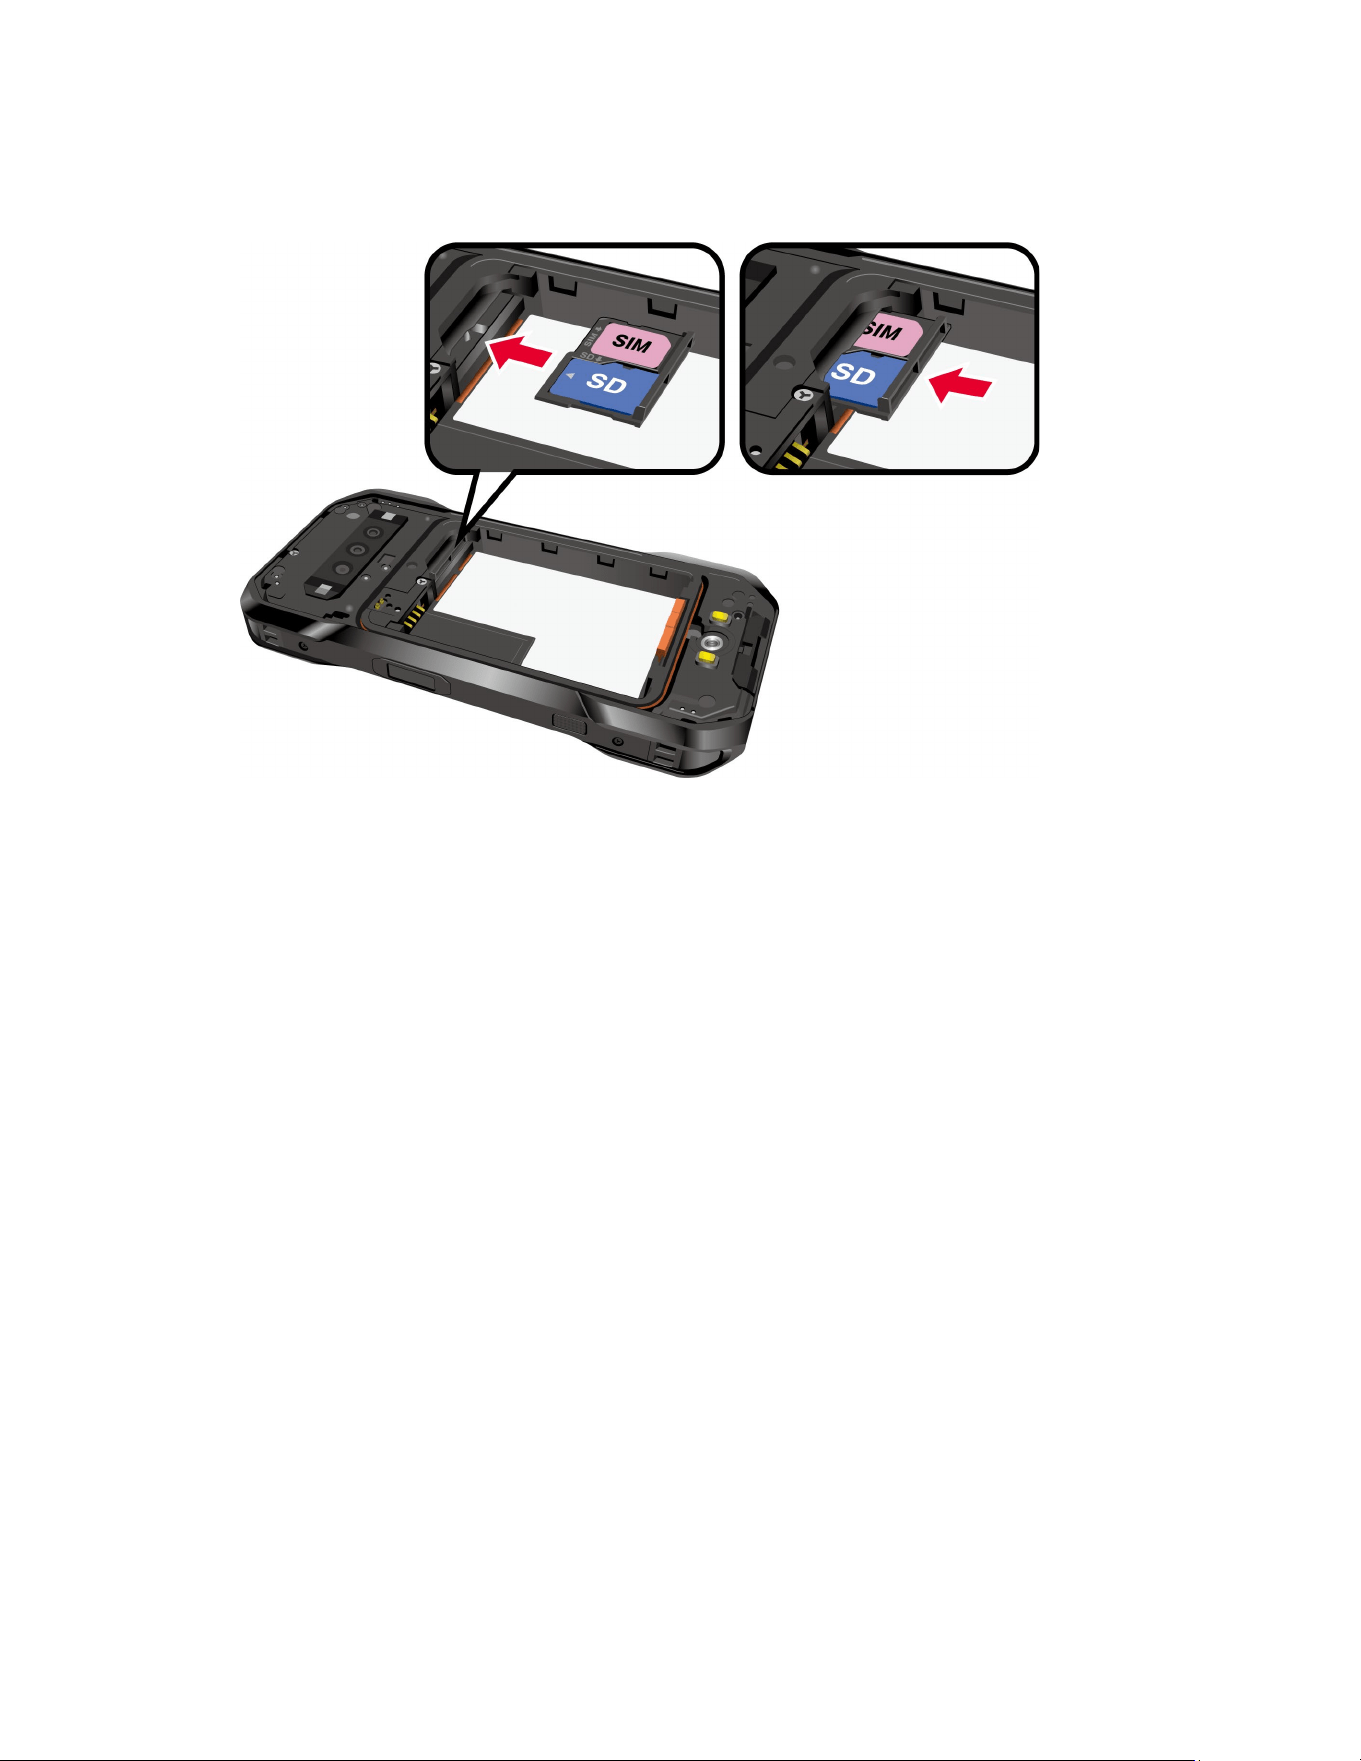
5. Insert the tray into the SIM/microSD card slot, being careful not to let the cards slide out.
Then gently push the tray back into the slot until it fits into place.
6. Place the battery back into its compartment, lock it in place by sliding the battery latch
and replace the back cover as shown in the Insert the battery section.
WARNING: Make sure you press all around the edges of the back cover to ensure
your phone's waterproof seal is intact.
7. Using a coin, rotate the back cover screw to secure it. Do not overtighten.
NOTE:
You can easily damage the microSD card by improper operation. Please be
careful when inserting, removing, or handling the microSD card.
NOTE:
Make sure your battery is fully charged before using the microSD card. Your
data may become damaged or unusable if the battery runs out while using the
microSD card.
Turn Your Phone On and Off
The instructions below explain how to turn your phone on and off.
To turn your phone On:
► Press and hold the Power key until the screen lights up.
To turn your phone Off:
1. Press and hold the Power key until the Power menu screen is displayed.

Get Started 13
2. Tap Power off to turn the phone off.
To restart your phone:
1. Press and hold the Power key until the Power menu screen is displayed.
2. Tap Restart to restart the phone.
To put your phone into Lockdown mode:
NOTE:
When Lockdown mode is enabled, only
Pattern
,
PIN
, and
Password
can be used to
unlock the phone and other unlock methods, such as
Fingerprint
,
Face Unlock
, and
Extend Unlock,
are completely disabled. This option will only be shown when a screen
lock method besides
None
or
Swipe
has been selected. For more information about
Screen lock, see
Screen lock.
1. Press and hold the Power key until the Power menu screen is displayed.
2. Tap Lockdown to enable Lockdown mode.
Setup Wizard
When you turn on your phone for the first time, the Setup Wizard starts automatically. Follow the
onscreen instructions to choose a default language, connect to a Wi-Fi network, choose the
device protection, set up accounts, and more.
Turn your screen on and off
Your phone allows you to quickly turn the screen off when not in use and to turn it back on when
you need it.
Turn the screen off when not in use
► To turn the screen off, quickly press the Power key. Pressing the Power key again or
receiving an incoming call will turn on your phone screen.
To save battery power, the phone screen automatically turns off after a certain period of time
when left idle. You will still be able to receive messages and calls while the phone screen is off.
NOTE:
For information on how to adjust the time before the screen turns off, see
Screen
timeout
.
Turn the screen on and start with swipe
1. Press the Power key to turn the screen on.
NOTE:
To set up a screen lock for security, see
Screen lock.
2. Touch and hold . The below screen appears by default.
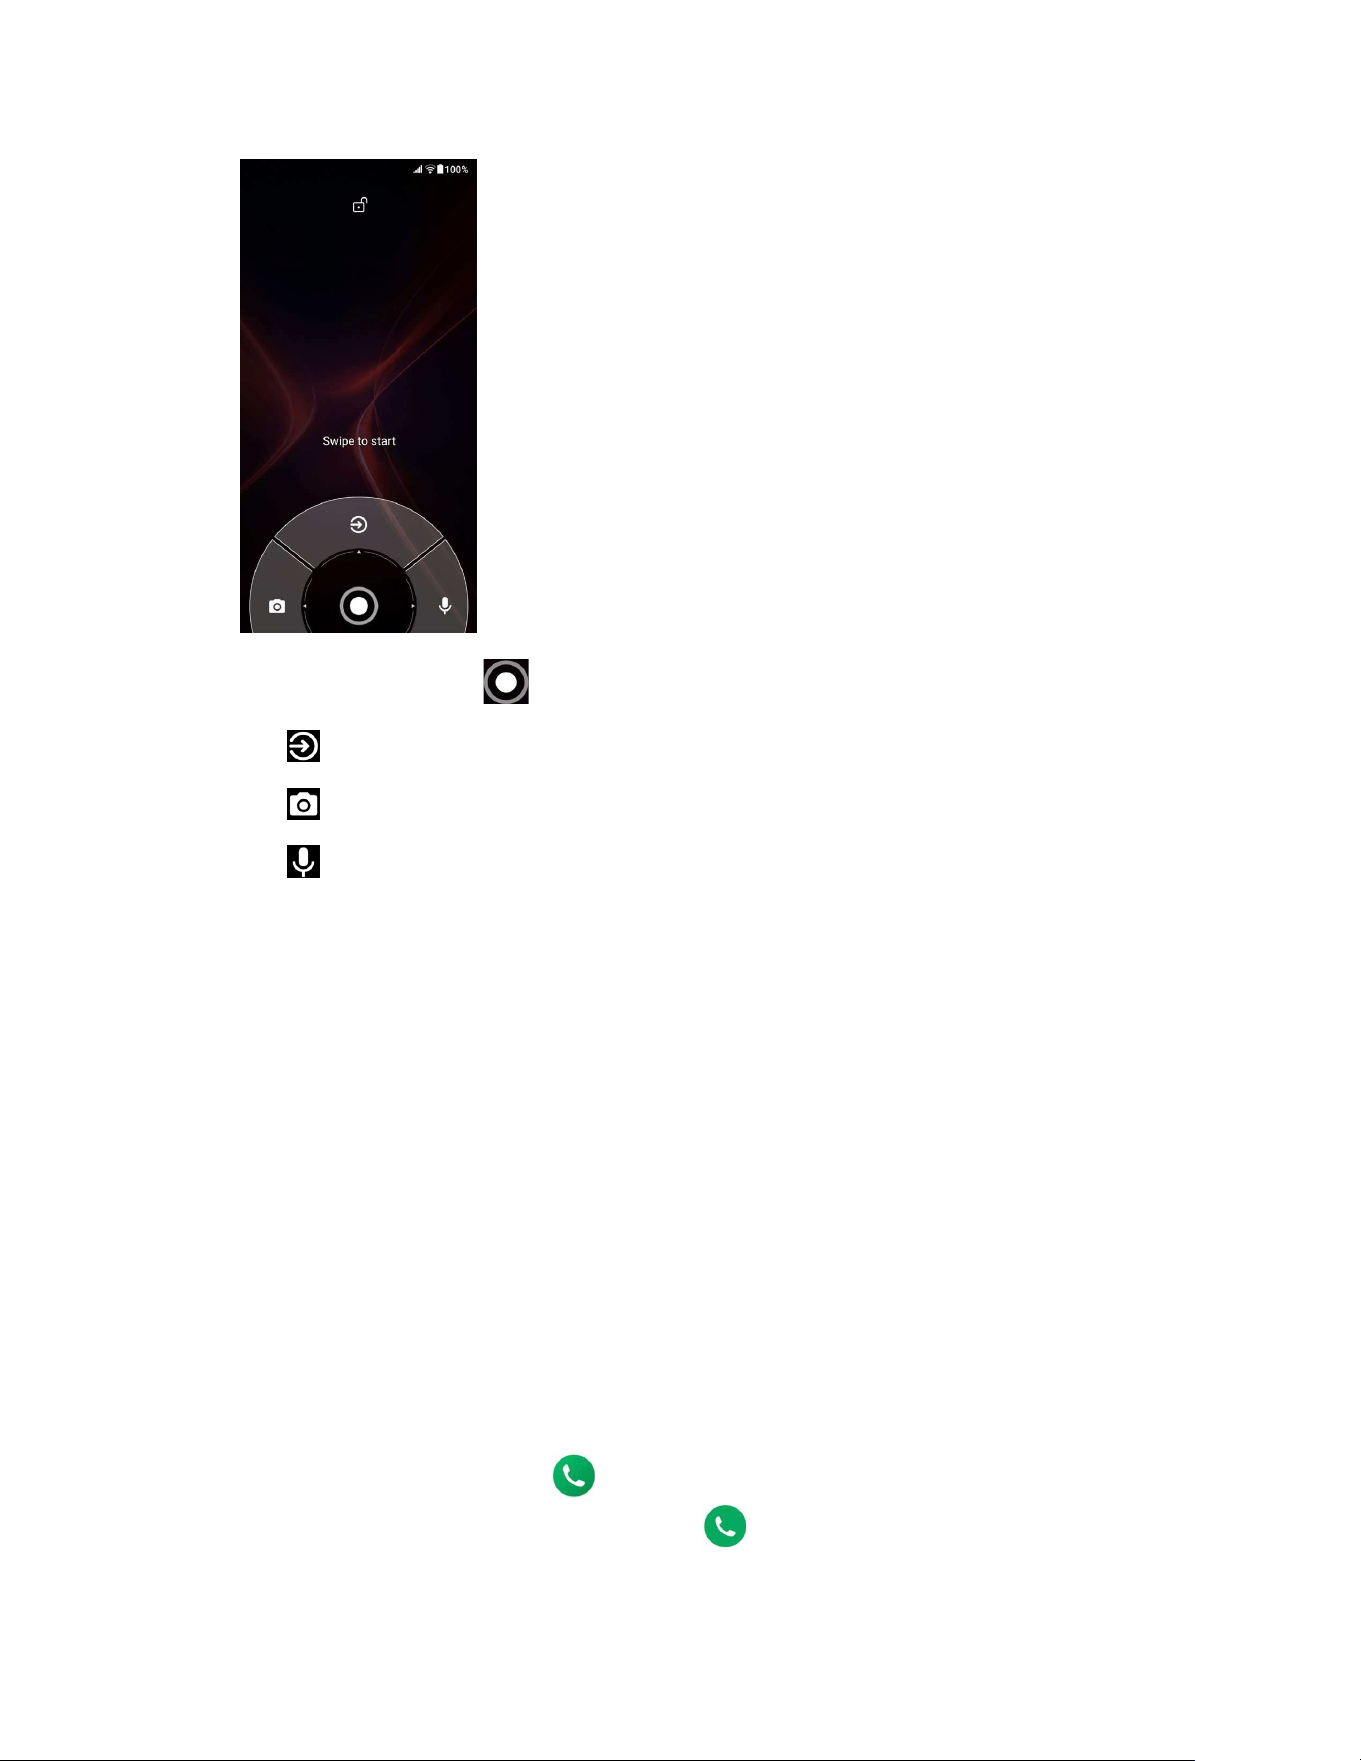
14 Get Started
3. On the screen, swipe toward:
to access the Home screen or the screen displayed before it was turned off.
to launch the Camera app.
to launch Google Assistant™.
NOTE:
You can change the shortcut options displayed at the bottom left and right of
this screen. See
Shortcuts.
Set up voicemail
Your phone provides both paid and free voicemail options to choose from. A visual voicemail
application
Voicemail
is a subscription-based service and allows you to manage your voicemail
directly from your phone rather than calling in to your voicemail mailbox. As a subscription-
based service, there is a charge for using
Voicemail
. You can also use a charge-free traditional
method to check your voicemail (basic voicemail). For more details, see
Voicemail or Basic
voicemail
.
Set up Voicemail
1. Swipe up on the Home screen and tap Voicemail.
2. Follow the onscreen instructions for setting language, password, greetings, etc.
Set up basic voicemail
1. From the Home screen, tap > Dialpad.
2. Touch and hold 1 or dial *86 and then tap .
3. When you hear the greeting, tap # to interrupt and follow the prompts.
Phone Basics 15
Phone Basics
Your phone is packed with features that simplify your life and expand your ability to stay
connected to the people and information that are important to you. The following topics will
introduce the basic functions and features of your phone.
Touchscreen Navigation
Your phone’s touchscreen lets you control actions through a variety of tap gestures.
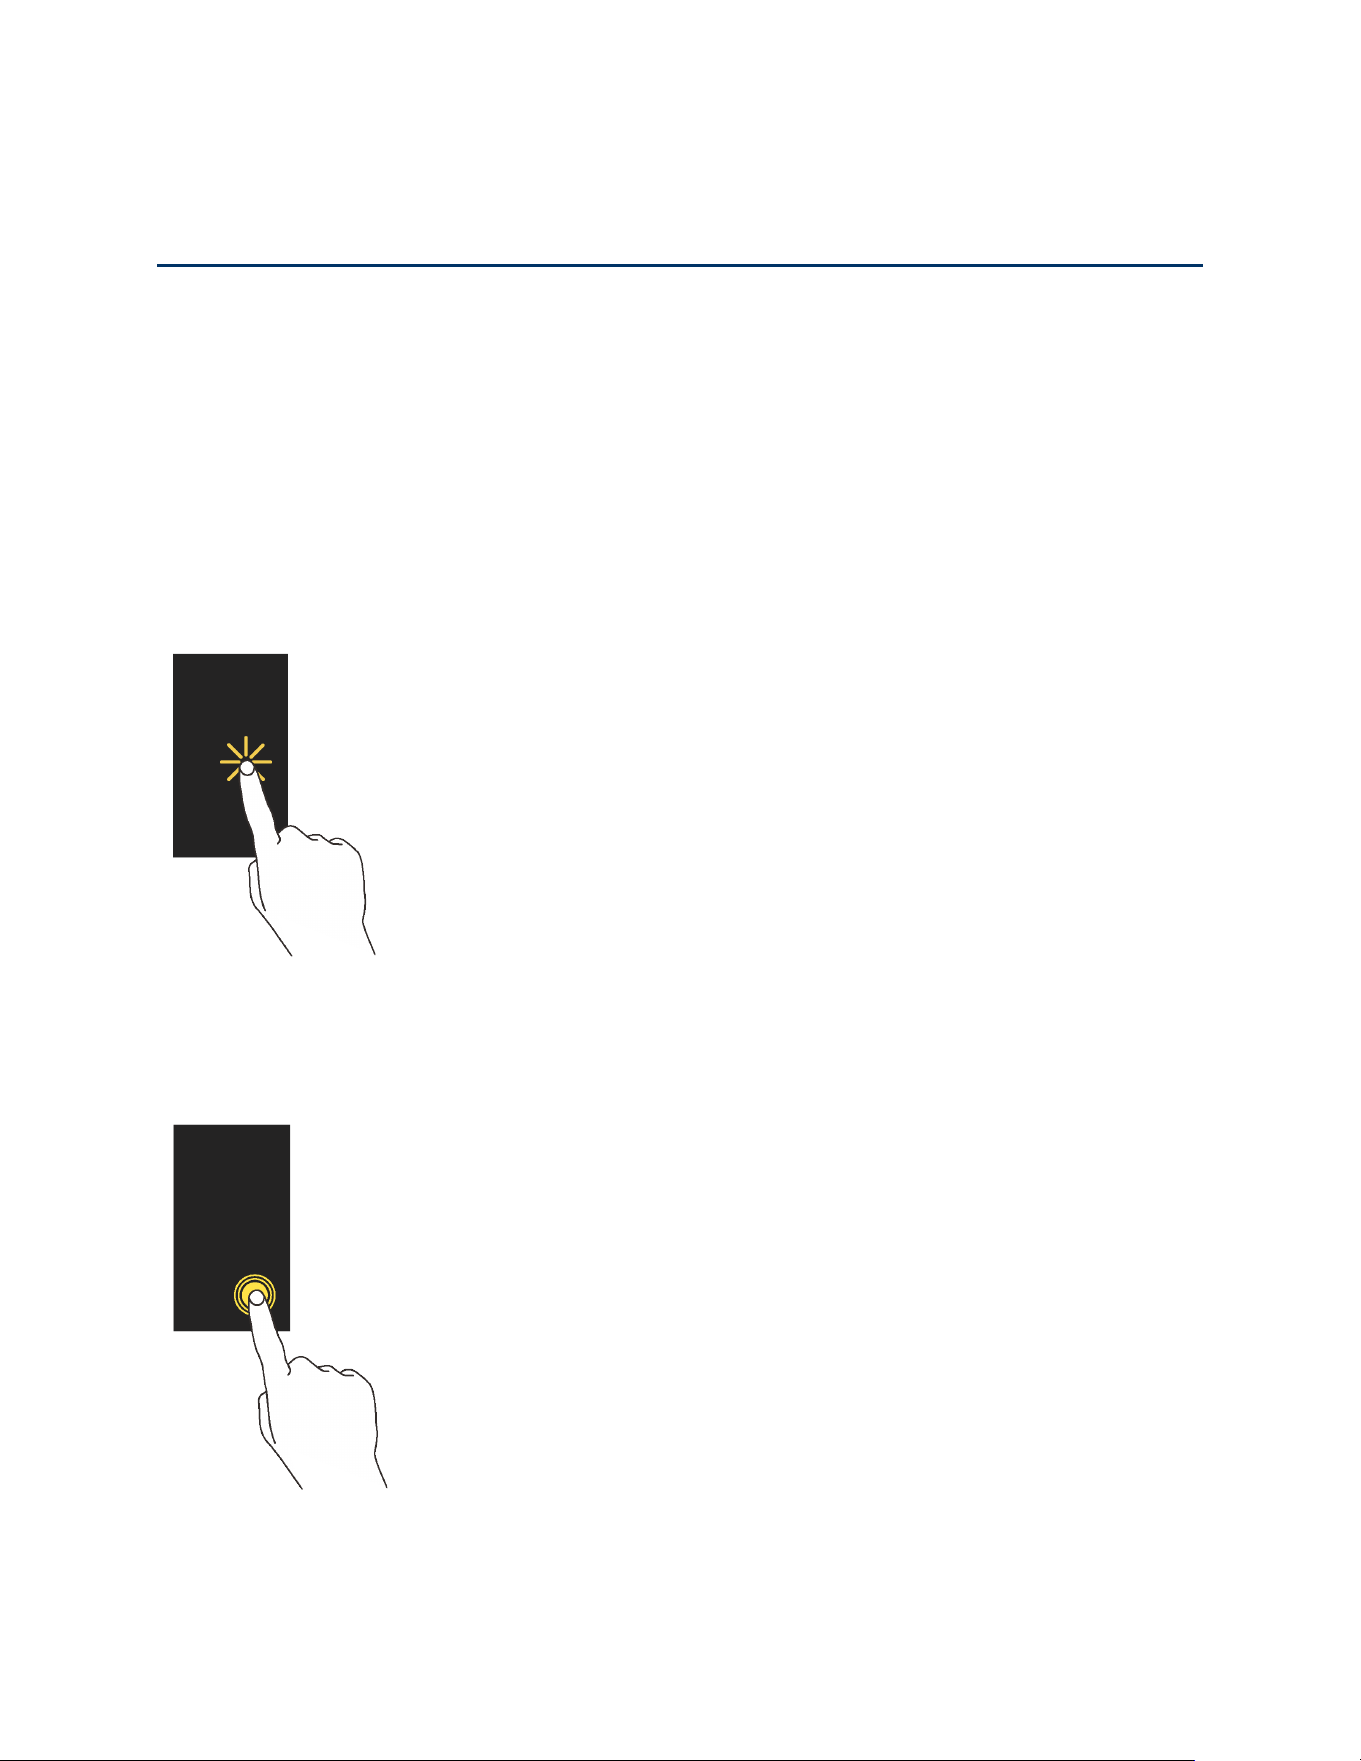
Tap:
Tap the screen with your finger to select or launch a menu, option, or application. A light
tap works best.
Touch and Hold: To open the available options for an item (for example, a keyboard), touch
and hold the item.
16 Phone Basics
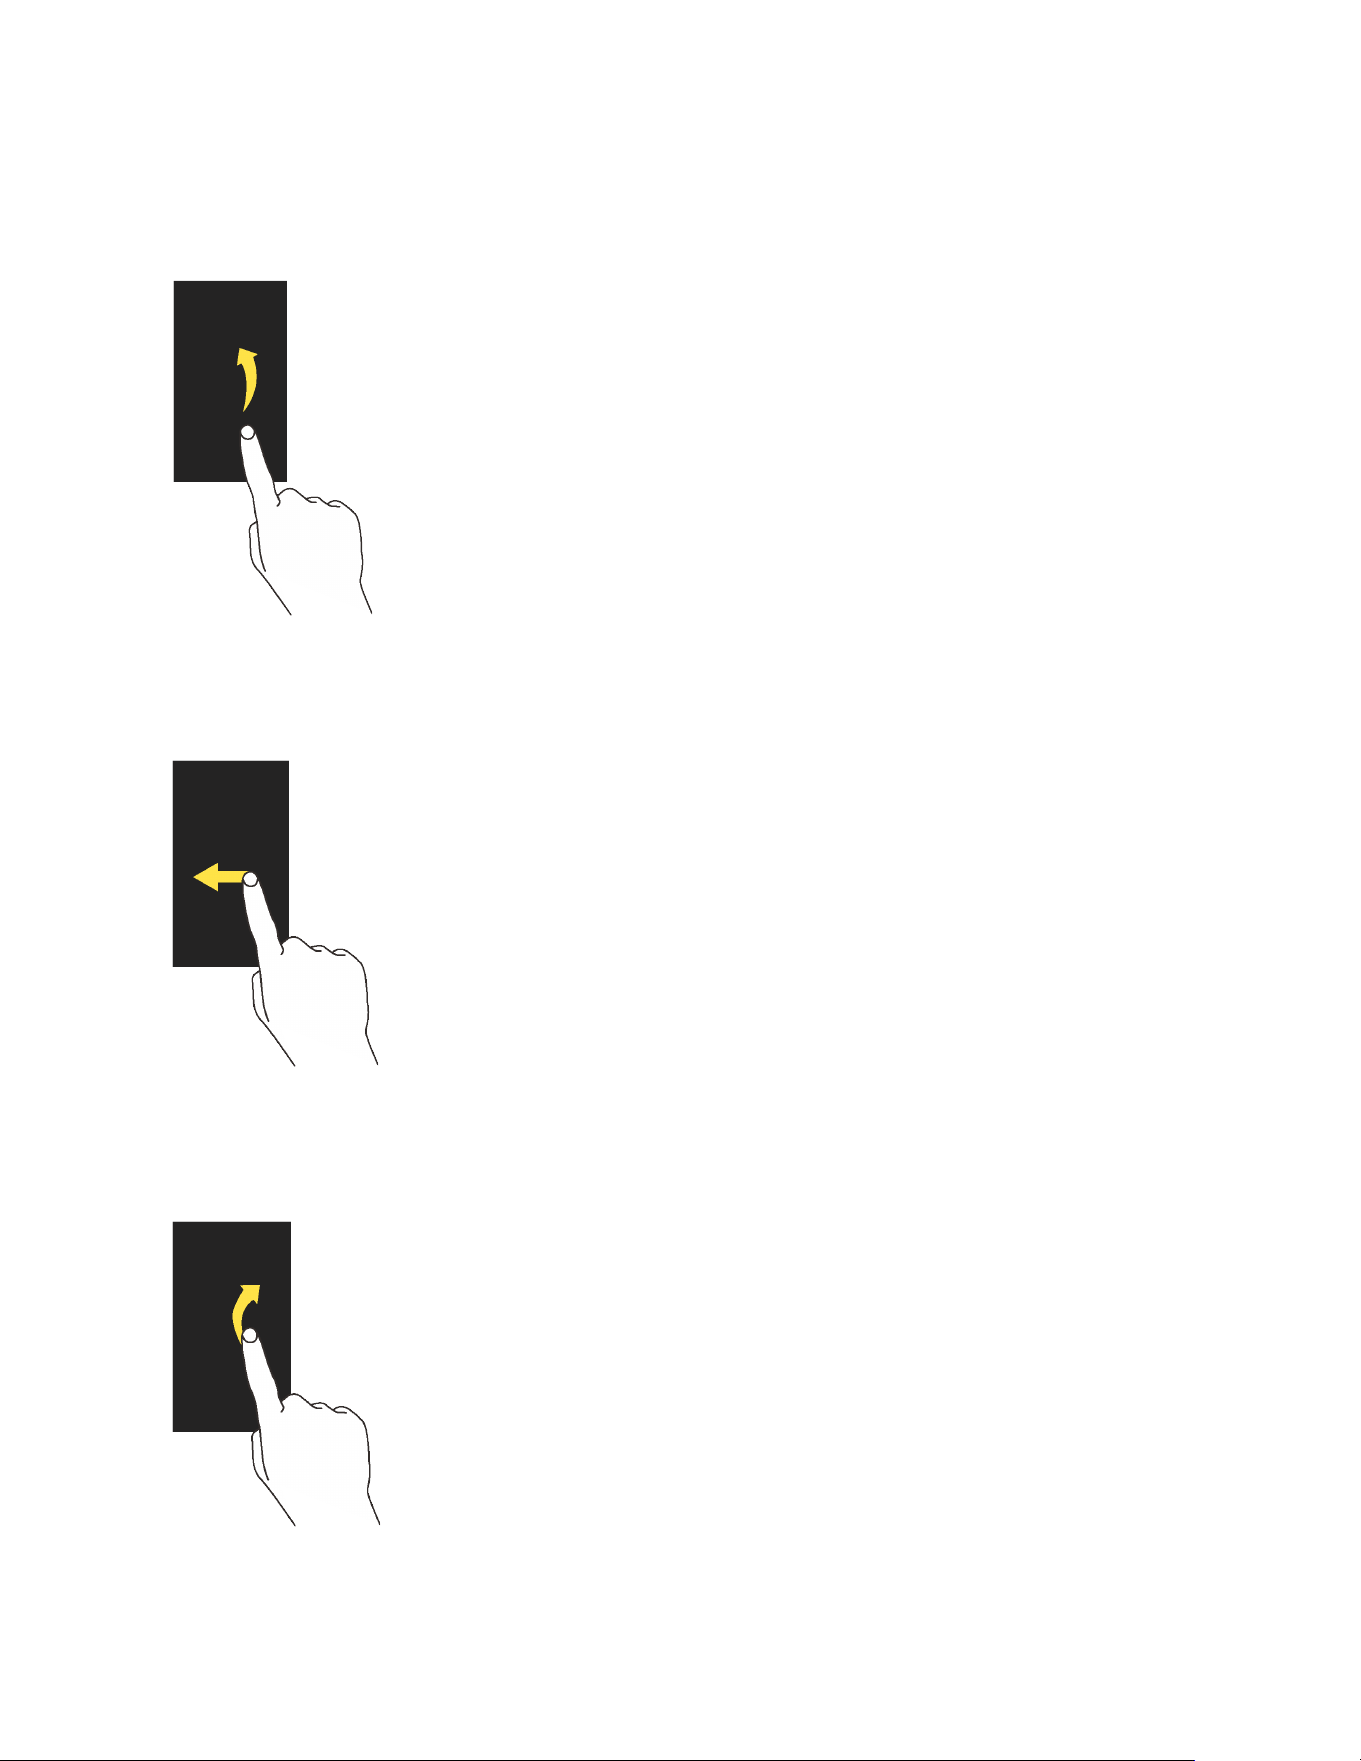
Drag: Touch and hold the item on the screen before you start to move it. Do not release your
finger until you have reached the target position.
Swipe or Slide: To swipe or slide means to quickly drag your finger vertically or horizontally
across the screen.
Flick: Flicking the screen is similar to swiping, except that you need to swipe your finger in light,
quick strokes.
Phone Basics 17
Pinch and Spread: Pinch the screen using your thumb and forefinger to zoom out, or spread
the screen to zoom in when viewing a picture or a Web page. (Move fingers inward to zoom out
and outward to zoom in.)
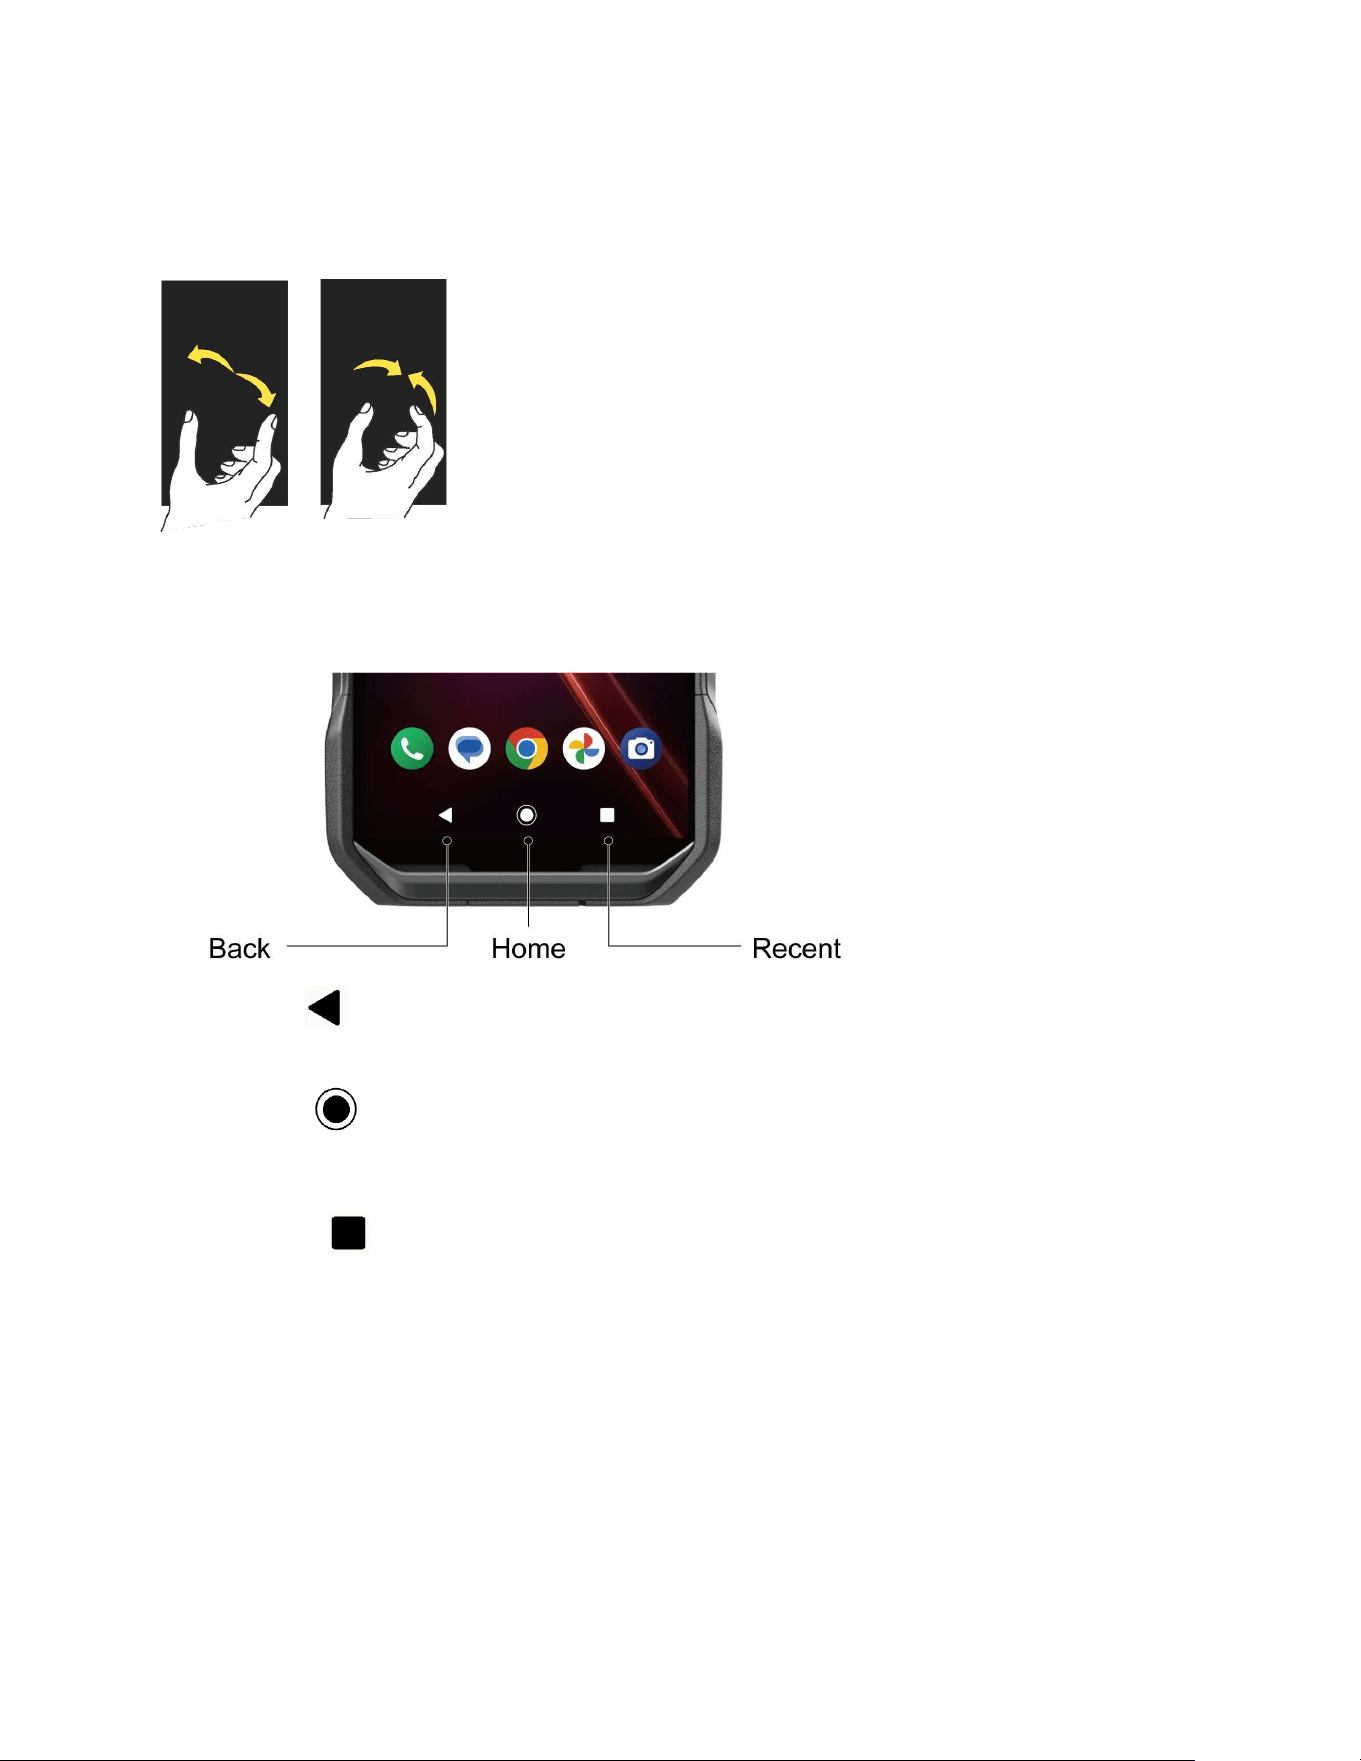
Function Buttons
You will find a row of three buttons that let you perform specific functions as below.
●
Back :
Tap to return to the previous screen or close a dialog box, options menu, the
Notifications panel, or onscreen keyboard.
●
Home
:
Tap to open the Home screen.
Touch and hold to launch Google Assistant.
●
Recent :
Tap to open a list of thumbnail images of screens you have worked with
recently. To open one, tap it. To remove a screen from the list, swipe it up. To capture a
screenshot of a listed screen, tap
Screenshot
displayed below the screen image. To
close all screens, swipe left to right to the end of the recent list and tap
Clear all
.
18 Phone Basics
Your Home Screen
The Home screen is the starting point for your phone’s applications, functions, and menus. You
can customize your Home screen by changing the wallpaper and by adding items, such as
application icons, shortcuts, folders, and widgets.
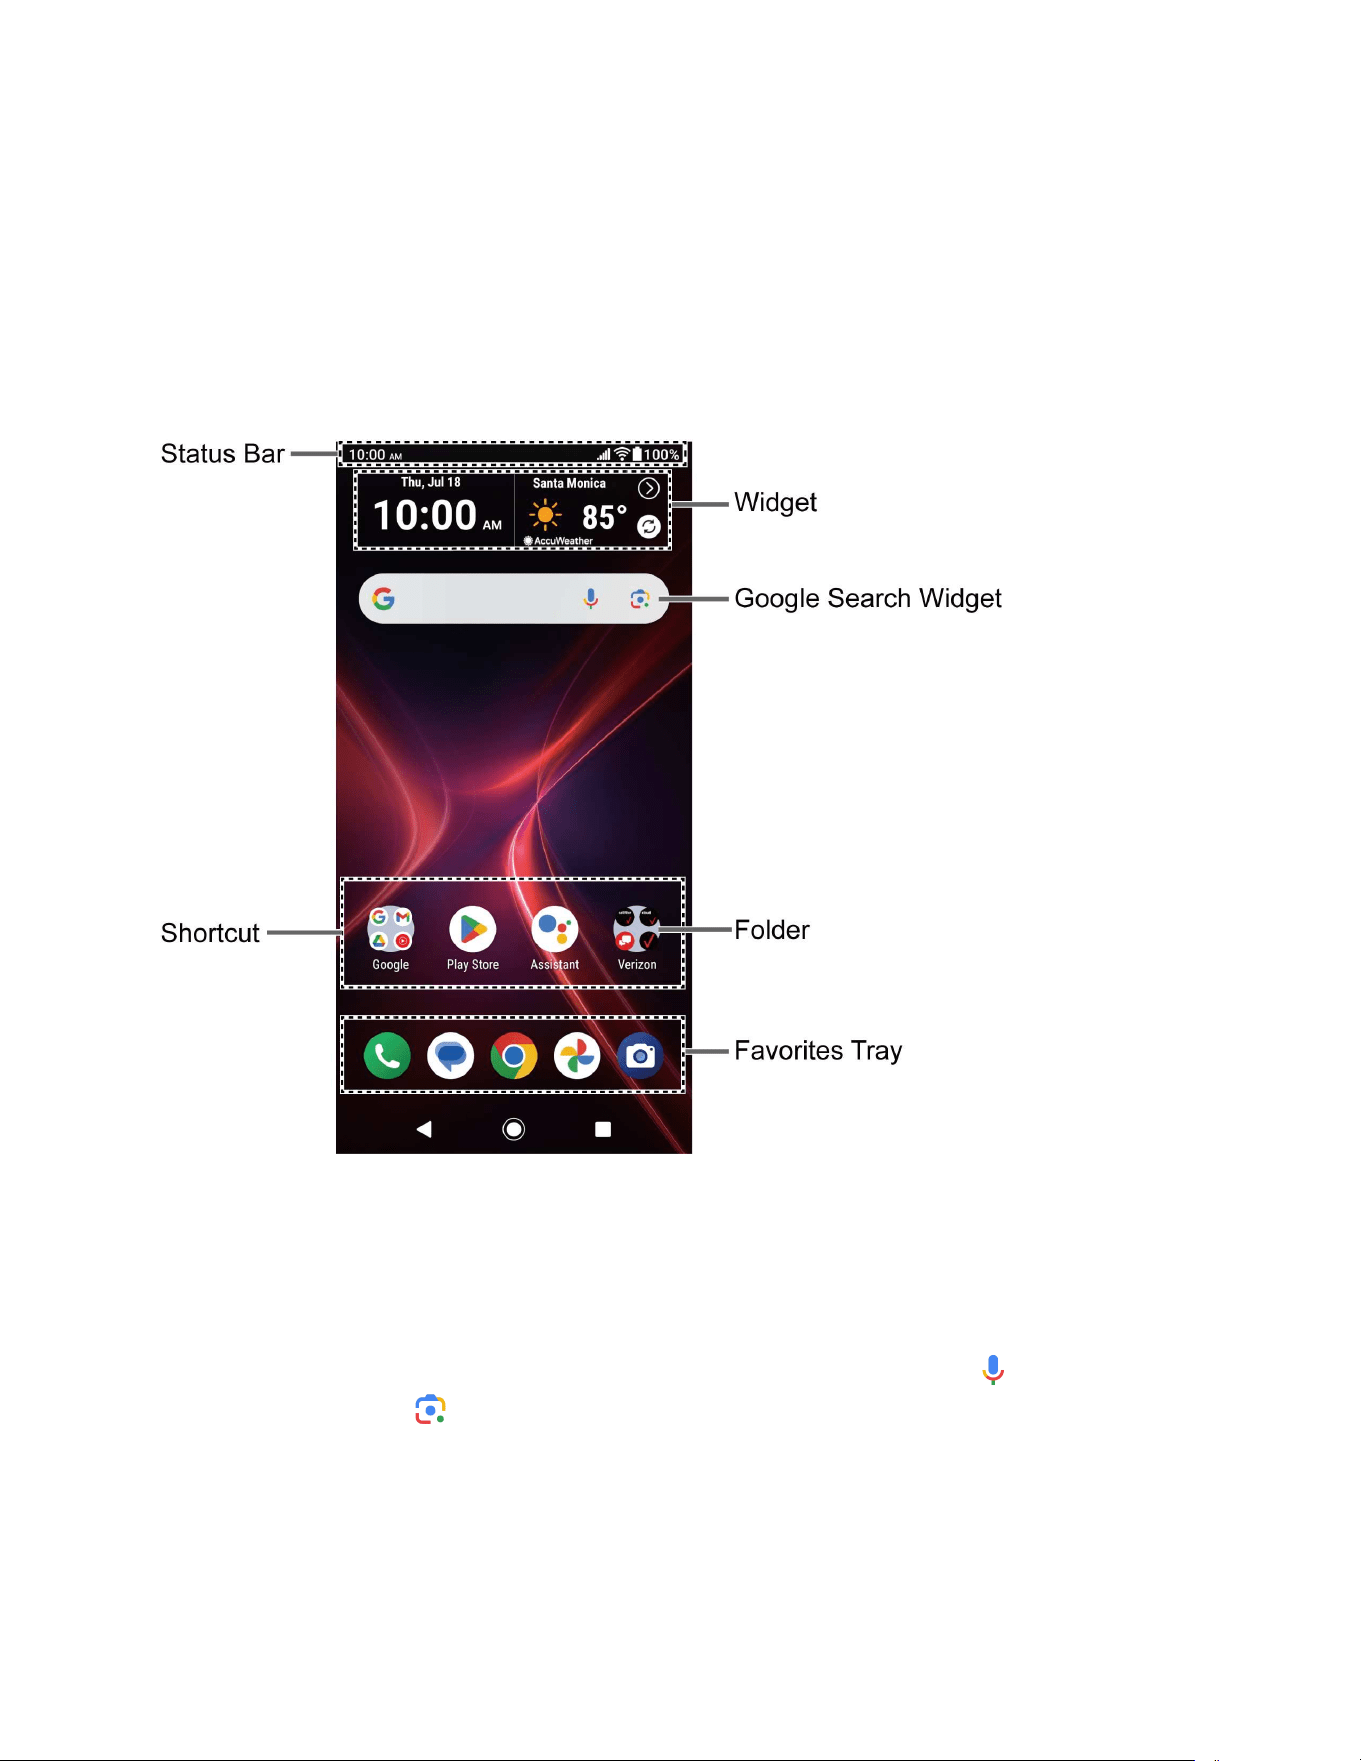
Home screen overview
The following illustration describes the basics of the Home screen.
●
Status Bar:
Displays the time, notification icons, and phone status icons. Slide down to
display the Notifications panel. See
Status bar.
●
Widget:
Allows users to access various useful programs.
●
Google Search Widget:
Allows you to enter text or spoken keywords for a quick search
on the phone or on the Internet. Tap the input field to enter text
,
tap to speak your
keyword, or tap to search with images by using the Google Lens™ app.
●
Folder:
Allows you to organize screen items. You can store multiple application icons as
a group. See
Use folders.

Phone Basics 19
● Favorites Tray: Contains up to five icons and appears on every Home screen.
●
Shortcut:
Allows you to quickly launch applications.
Manage the Home screens
Learn how to customize the Home screens.
Add widgets
To get useful information more easily, you can add widgets to your Home screens.
1. Touch and hold any empty area on the Home screen.
2. Tap Widgets.
3. Swipe the screen and tap to find the item you want to add to the Home screen.
4. Touch and hold the item and move your finger.
5. When you find the position to place it, release your finger.
TIP:
If you want to add the item to a different Home screen from the one you’re on,
keep moving your finger to either the left or right edge of the screen and it will
scroll to the next Home screen. By holding the item against the right edge of the
rightmost Home screen, you can create an additional Home screen.
Add shortcut icons
Place shortcuts for your favorite apps on the Home screen.
1. Swipe up on the Home screen and touch and hold the shortcut icon you want to add to
the Home screen.
2. Move your finger.
3. When you find the position to place it, release your finger.
Move or remove items
You can change and move the Home screen items.
► Touch and hold the item on the Home screen that you want to move or remove.
To move the item, drag it to a new area and release it.
To remove the item, drag it to
"Remove
" at the top of the screen and release it.
TIP:
If you remove all widgets and shortcut icons from any Home screen which is
not the main Home screen, that Home screen will be deleted. Please note that
shortcut icons in the favorites tray are not affected.

20 Phone Basics
Favorites tray
The favorites tray displays up to five icons and appears on every Home screen. You can replace
them with another icon you want to place there.
To add a new icon to the favorites tray:
1. Remove one of the icons from the favorites tray.
2. Touch and hold the icon of the app you wish to add, and drag it to the favorites tray.
3. Release your finger.
Use folders
Create and manage folders as necessary.
1. Touch and hold an app icon and drag it over another app icon.
2. Release your finger. Both icons are in a newly created folder.
TIP:
To add app icons to a folder, touch and hold the app icon, drag it over a folder.
3. Tap the folder > Edit Name. The keyboard opens, and you can name the folder. To
rename it, tap the name.
Home settings menu
Use these menus to configure your Home screen.
1. Touch and hold any empty area on the Home screen.
2. Tap Home settings.
3. The following options are available:
Notification dots
to change the Notification access setting, such as whether or not
to show the notification dots.
Add app icons to home screen
to have the phone automatically add a shortcut
icon to the Home screen when apps are installed.
Suggestions
to display suggested apps (e.g., recently used apps) at the top of the
Apps launcher. See
Apps launcher.
Swipe to access Google app
to display Google News Feed by swiping right from
the main Home screen.
Allow home screen rotation
to enable auto rotate for your home screen.

Phone Basics 21
Wallpaper & style
You can personalize your phone by changing the color tone of onscreen elements and
assigning your favorite background wallpaper.
► Touch and hold any empty area on the Home screen and then tap Wallpaper & style to
open the Wallpaper & style screen.
To change the wallpaper:
1. From the Wallpaper & style screen, tap Change wallpaper.
2. To use your own image, tap My photos and select an app.
– or –
Tap Abstract, Macro, or Landscape to use a preloaded image.
3. Select an image. The preview screen is displayed.
You can alternate the displayed preview by tapping
Home screen
and
Lock
screen
.
4. Tap .
5. Select Home screen, Lock screen, or Home and lock screens.
NOTE:
Available options vary depending on the current settings.
To enable Themed icons:
► From the Wallpaper & style screen, tap Home screen if necessary and tap the Themed
icons on/off icon to enable the function.
To customize your phone's color:
1. From the Wallpaper & style screen, tap to open the System colors screen.
2. The following options are available:
Tap
Wallpaper colors
, if necessary, to choose your theme color from the pallets
which the phone generates automatically based on your wallpaper choice.
Tap
Other colors
to choose your theme color from the basic color pallets that will
be available no matter which wallpaper you apply.
Tap the
Dark theme
on/off icon to turn on or off the function. For more information,
see
Dark theme.

22 Phone Basics
NOTE:
To reset your customized color setting, tap to return to the Wallpaper & style
screen and tap
Reset
in the upper right corner. Please note that once you exit the
Wallpaper & style screen, the reset button will not be displayed even if you return later,
and you will not be able to restore the color settings.
To customize your lock screen:
1. From the Wallpaper & style screen, tap Lock screen and scroll down to see the lock
screen settings menus.
2. The following options are available:
Clock color & size
to change the look of the lock screen clock.
Change wallpaper
to change the wallpaper. See
To change the wallpaper.
Shortcuts
to set the shortcuts displayed at the bottom left and right of the lock
screen.
Show notifications on the lock screen
to select whether to display the contents of
your notifications on the lock screen.
More lock screen options
to display more options, including
Privacy
,
Lock
screen message,
and
Double-line clock
.
Apps launcher
You can find and access numerous apps installed on your phone.
1. Swipe up from the bottom of the Home screen to open the Apps launcher.
2. Tap an app icon to open it.
– or –
Enter the name or keyword of the app you want to access in the search field, and then
select your desired app.
TIP:
You can change the order of the apps displayed in the Apps launcher by tapping
>
Sort
. Select
Alphabetical
or
Frequently used
, or tap
Custom
> >
Change
order
to change the icon position as you like.
Permission
When you launch an app or service for the first time or after an extended period of disuse, you
might be asked if you can permit its access to certain features of your device. For each request,
you can choose from the available options, including Allow, While using the app, Only this
time, or Don’t allow. If you want to manage the whole permission settings, go to the settings
menu as mentioned below.
Phone Basics 23
To check the permission status:
1. From the Apps launcher, tap Settings > Security & privacy > Privacy > Permission
manager.
2. Select a feature you want to check.
3. You can see a list of permission types and which apps have permission to access each
feature.
4. If you want to change the permission setting of an app, tap the app and select a
permission type you want to change. You can choose from options such as: Allow,
Allow all the time, Allow only while using the app, Ask every time, and Don’t
allow.
NOTE:
Available options vary depending on the feature.
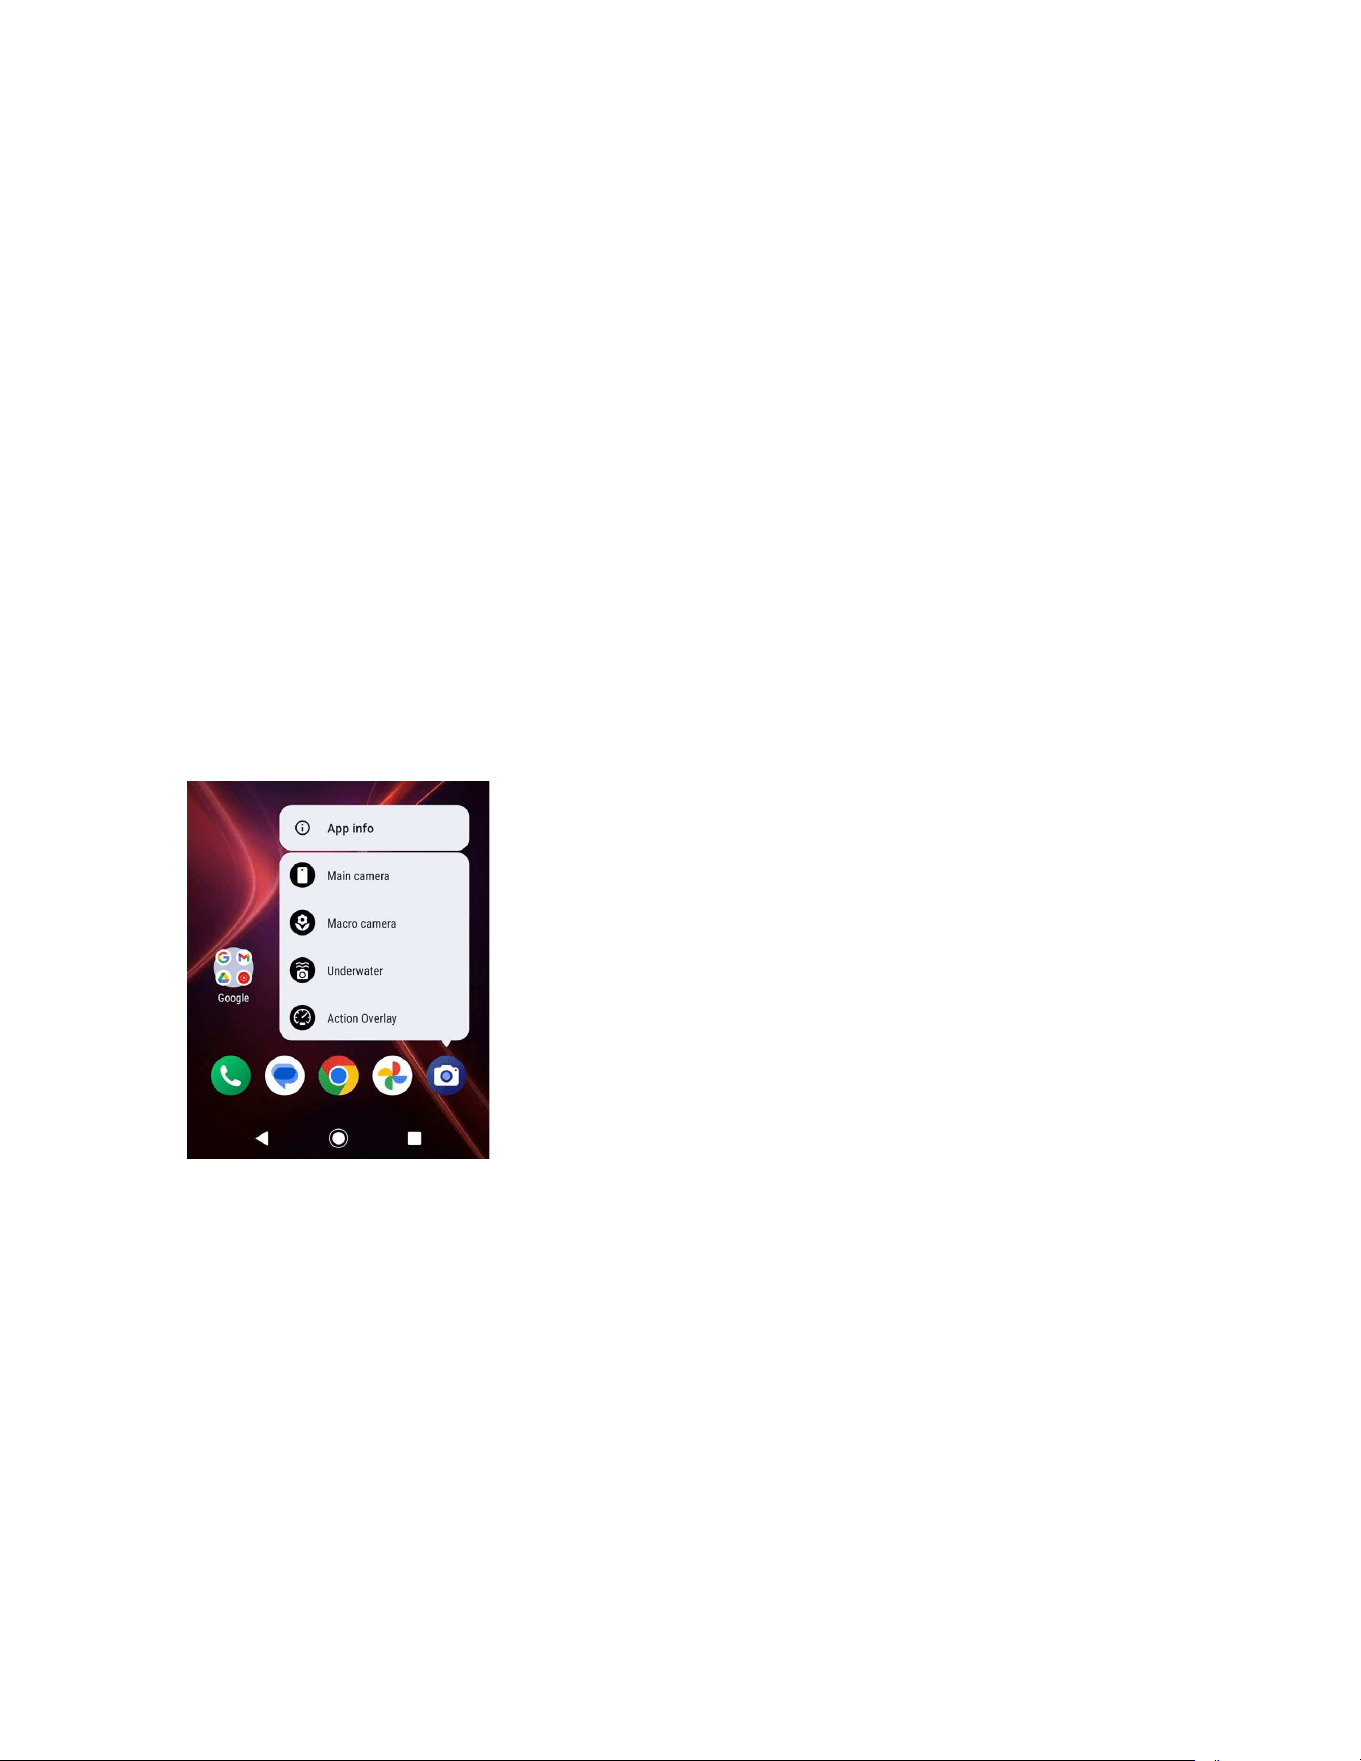
Quick shortcuts
By touching and holding an application icon, quick shortcuts will be displayed on the Home
screen.
1. Touch and hold an application icon to display the quick shortcuts available for that app.
2. Tap a shortcut to the menu that you want to go directly to.
TIP:
To create a quick shortcut icon and place it on the Home screen, touch and hold
instead, and put it where you want.
24 Phone Basics
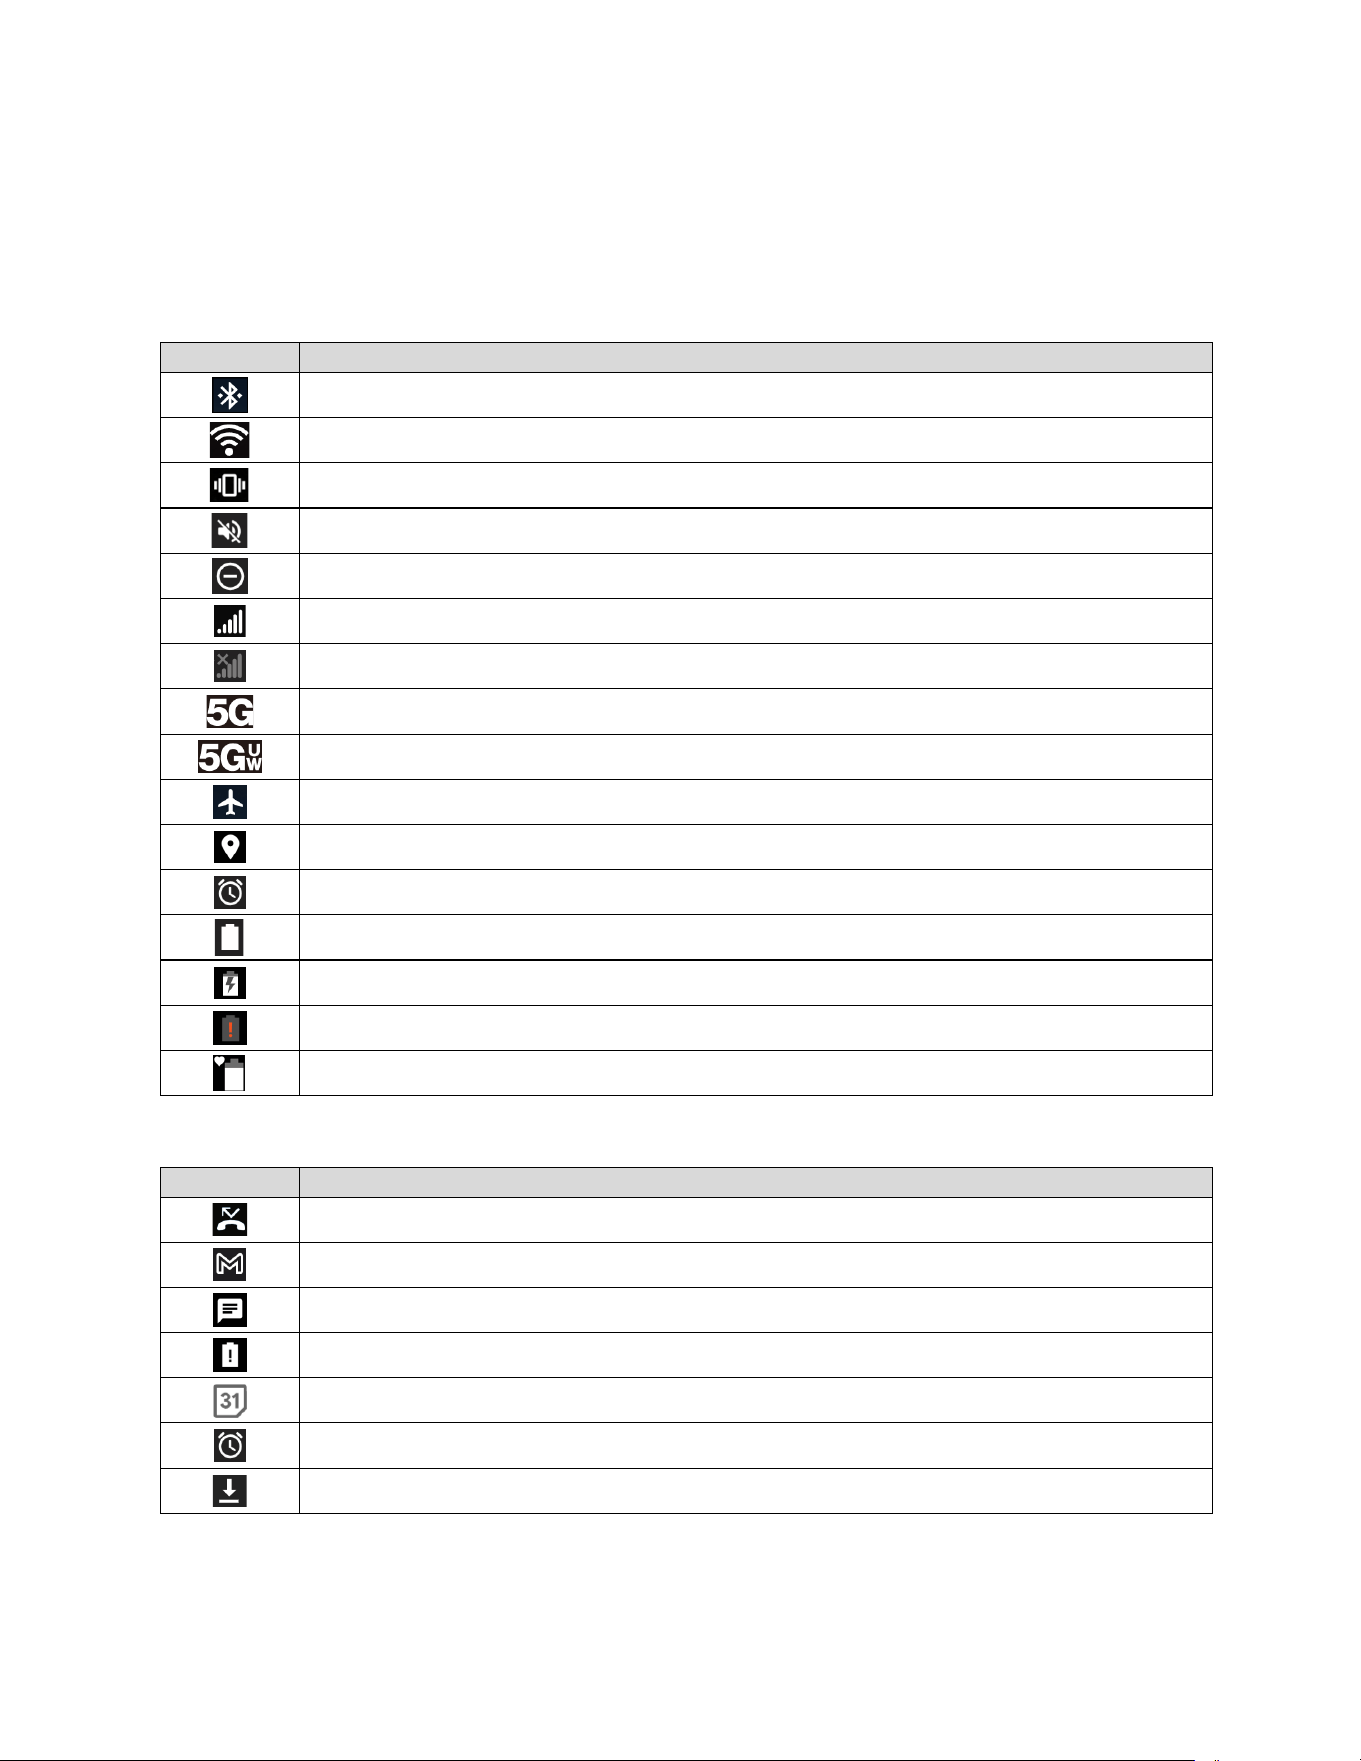
Status bar
The status bar at the top of the screen provides phone and service status information on the
right side and notification alerts on the left. The following tables show some examples:
Status icons
Icon
Status
Bluetooth
®
active
Wi-Fi
®
active
Vibrate
No Ring and Notification volume
Do not disturb
Network (full signal)
Network (no signal)
5G
5G UWB
Airplane mode
GPS active
Alarm set
Battery (full charge)
Battery (charging)
Battery (discharged)
Battery Care Mode
Notification icons
Icon
Status
Missed call
New mail
New message
Battery (low battery)
Event
Alarm
Downloading
Phone Basics 25
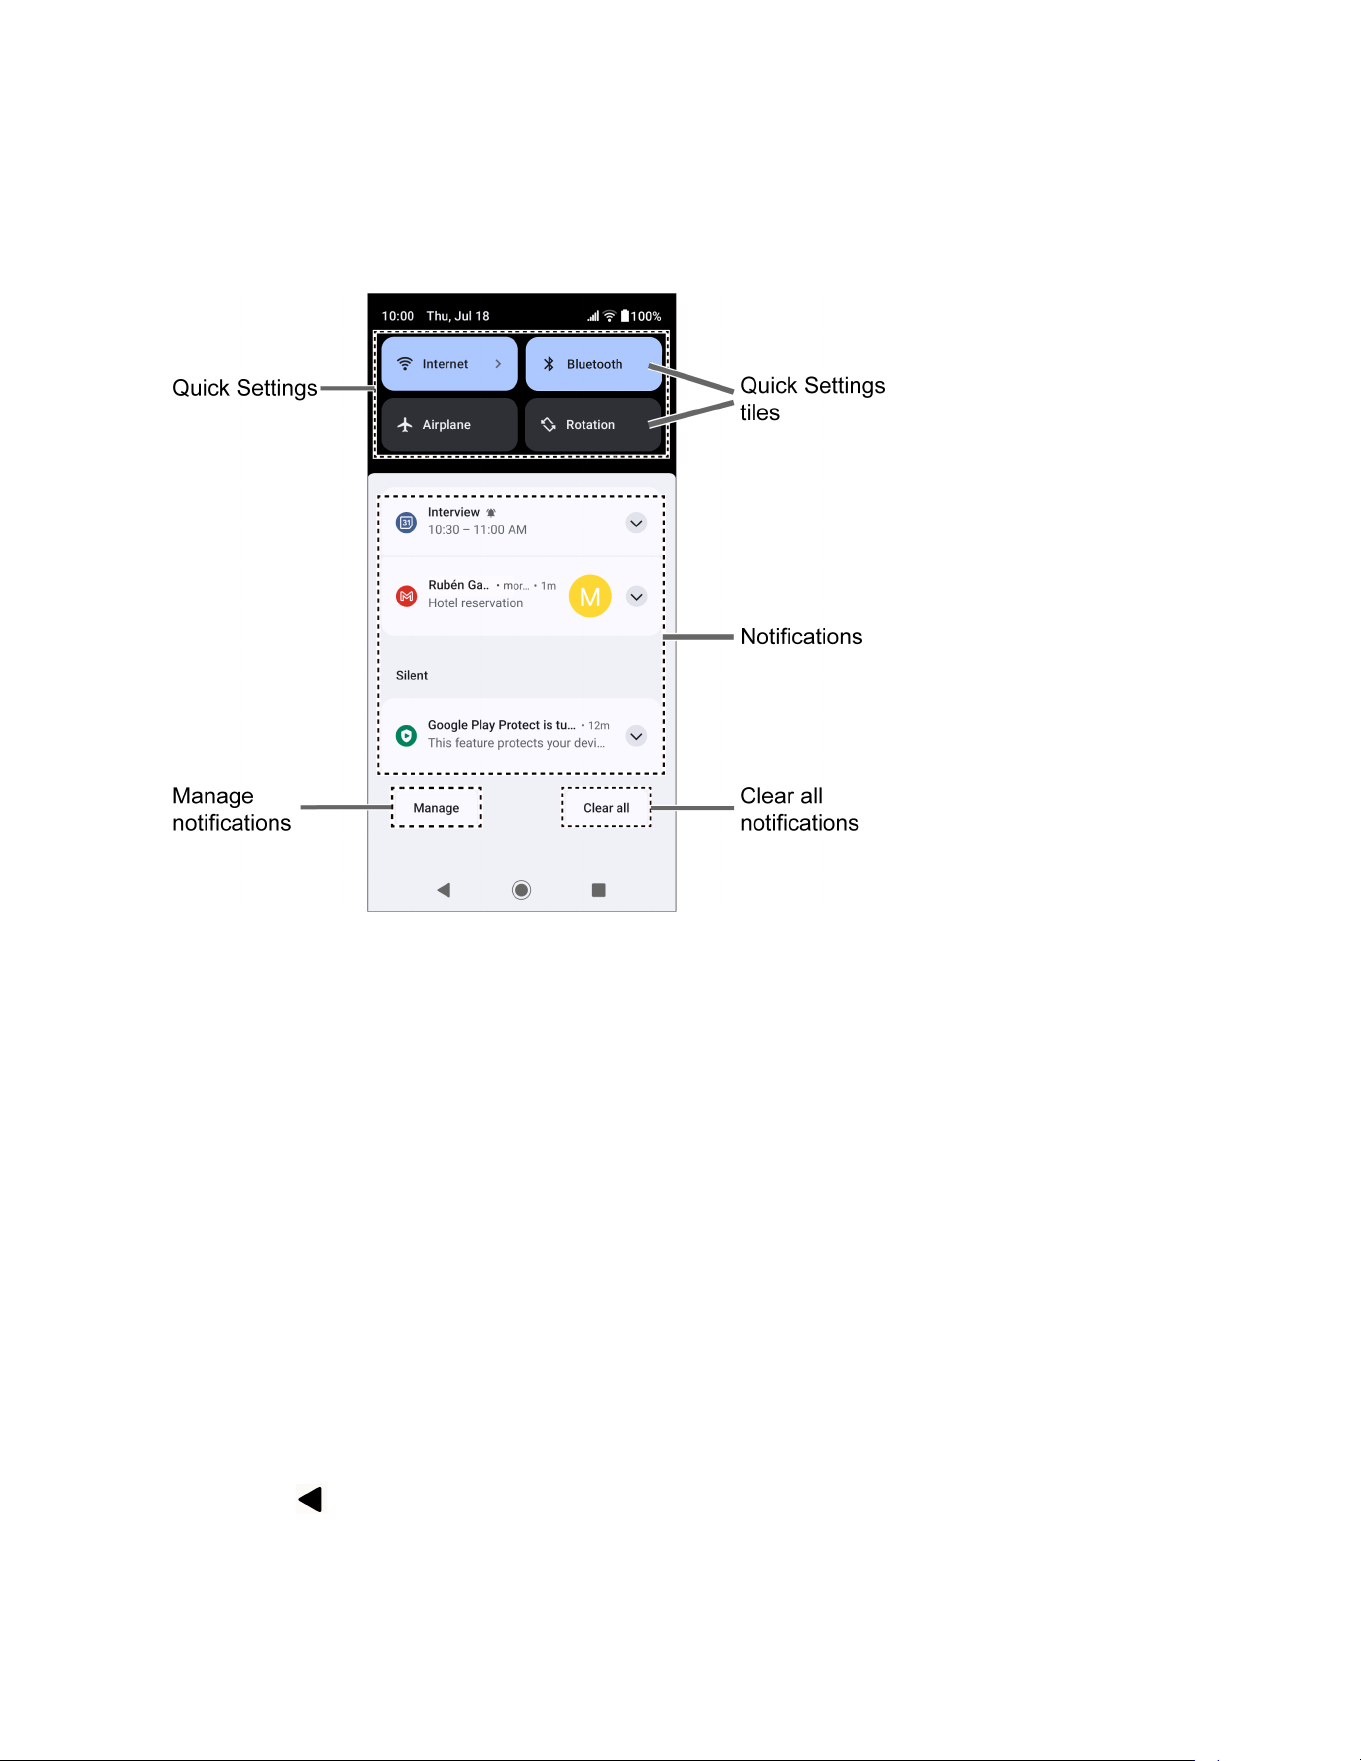
Notifications panel
You can open the Notifications panel to view the list of notifications you received, Wi-Fi
connection status, and more.
To open the Notifications panel:
► Slide the status bar down toward the bottom of the touchscreen.
To clear a single notification, swipe it away to the left or right.
To clear all deletable notifications, tap
Clear all
.
To select a notification method, touch and hold a notification. Select from the
options displayed.
To open the main Settings app for App notifications, tap
Manage
. For details, see
Notifications.
To close the Notifications panel:
► Swipe up from the bottom of the screen.
– or –
Tap
.
26 Phone Basics
Quick settings
The quick settings panels enable you to quickly access useful menu items.
1. Slide the status bar down toward the bottom of the touchscreen. To show more tiles
(items), slide the Quick Settings panel downward.
To adjust the screen brightness, drag the knob on the brightness slider left or
right.
2. Tap on a quick setting tile to enable or disable the feature.
Touch and hold a tile to access its settings menu.
To see the other panel, swipe the panel to the left.
To change the position of the tiles or add other tiles to the panels, tap to open
the Edit screen. Touch and hold the tile you want to move or add, and then drag it to
a different location and release your finger. The tiles in the area above the message
“
Hold and drag to add tiles
” will be displayed on the quick settings panels.
For quick access to the Settings screen or Power menu, tap or
respectively.
Enter Text
You can type on your phone using one of the available touchscreen keyboards or using your
voice. The keyboard appears automatically onscreen when you tap a text entry field and can be
used in either portrait or landscape mode.
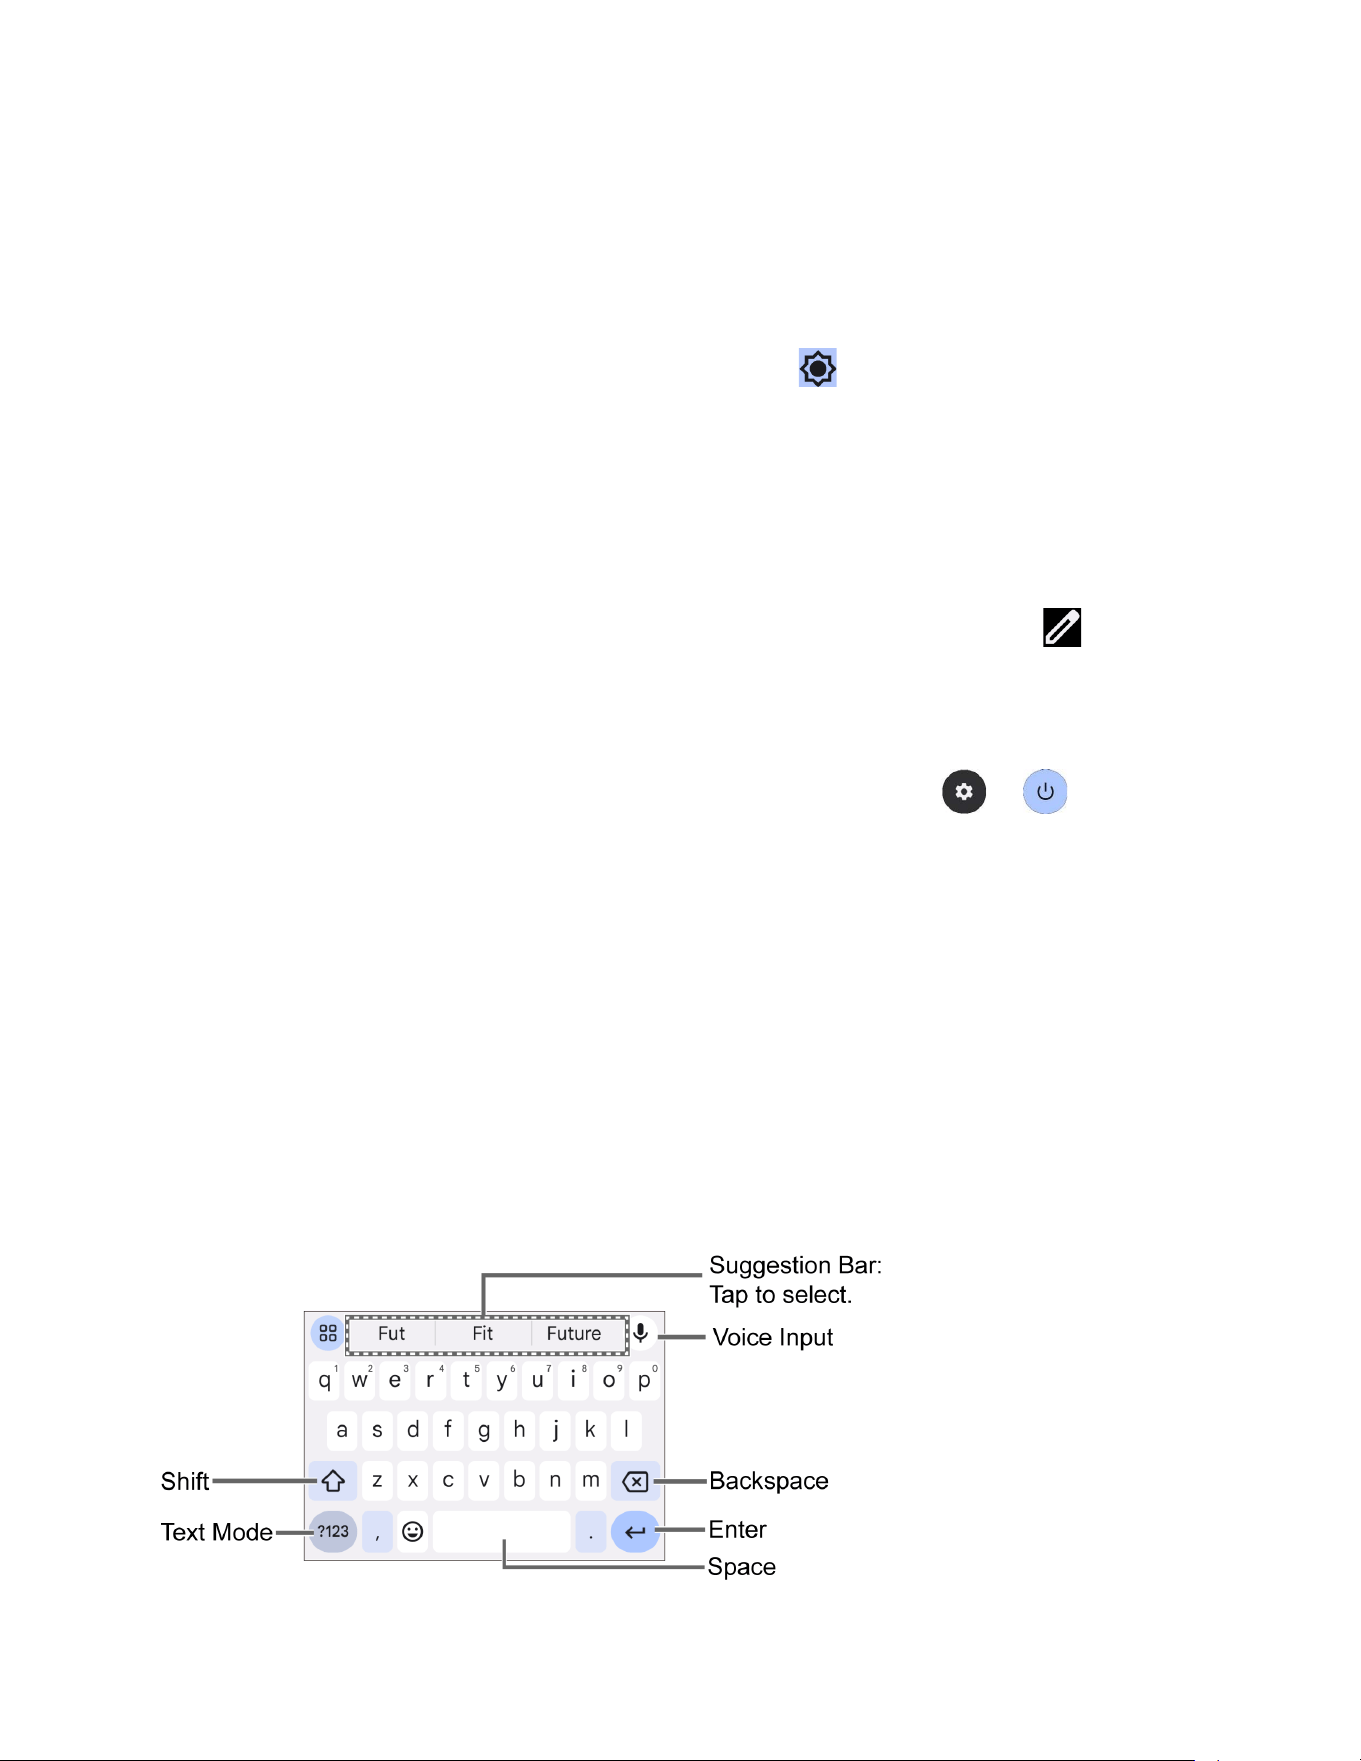
Gboard
Gboard offers a traditional QWERTY keyboard setup for entering text by tapping keys (like on a
computer), along with enhancements and options that allow you to enter text faster and more
accurately, such as continuous key input, personalized usage dictionaries, and more.
Gboard overview
Phone Basics 27
NOTE:
Key appearance may vary depending on the selected application or text field.
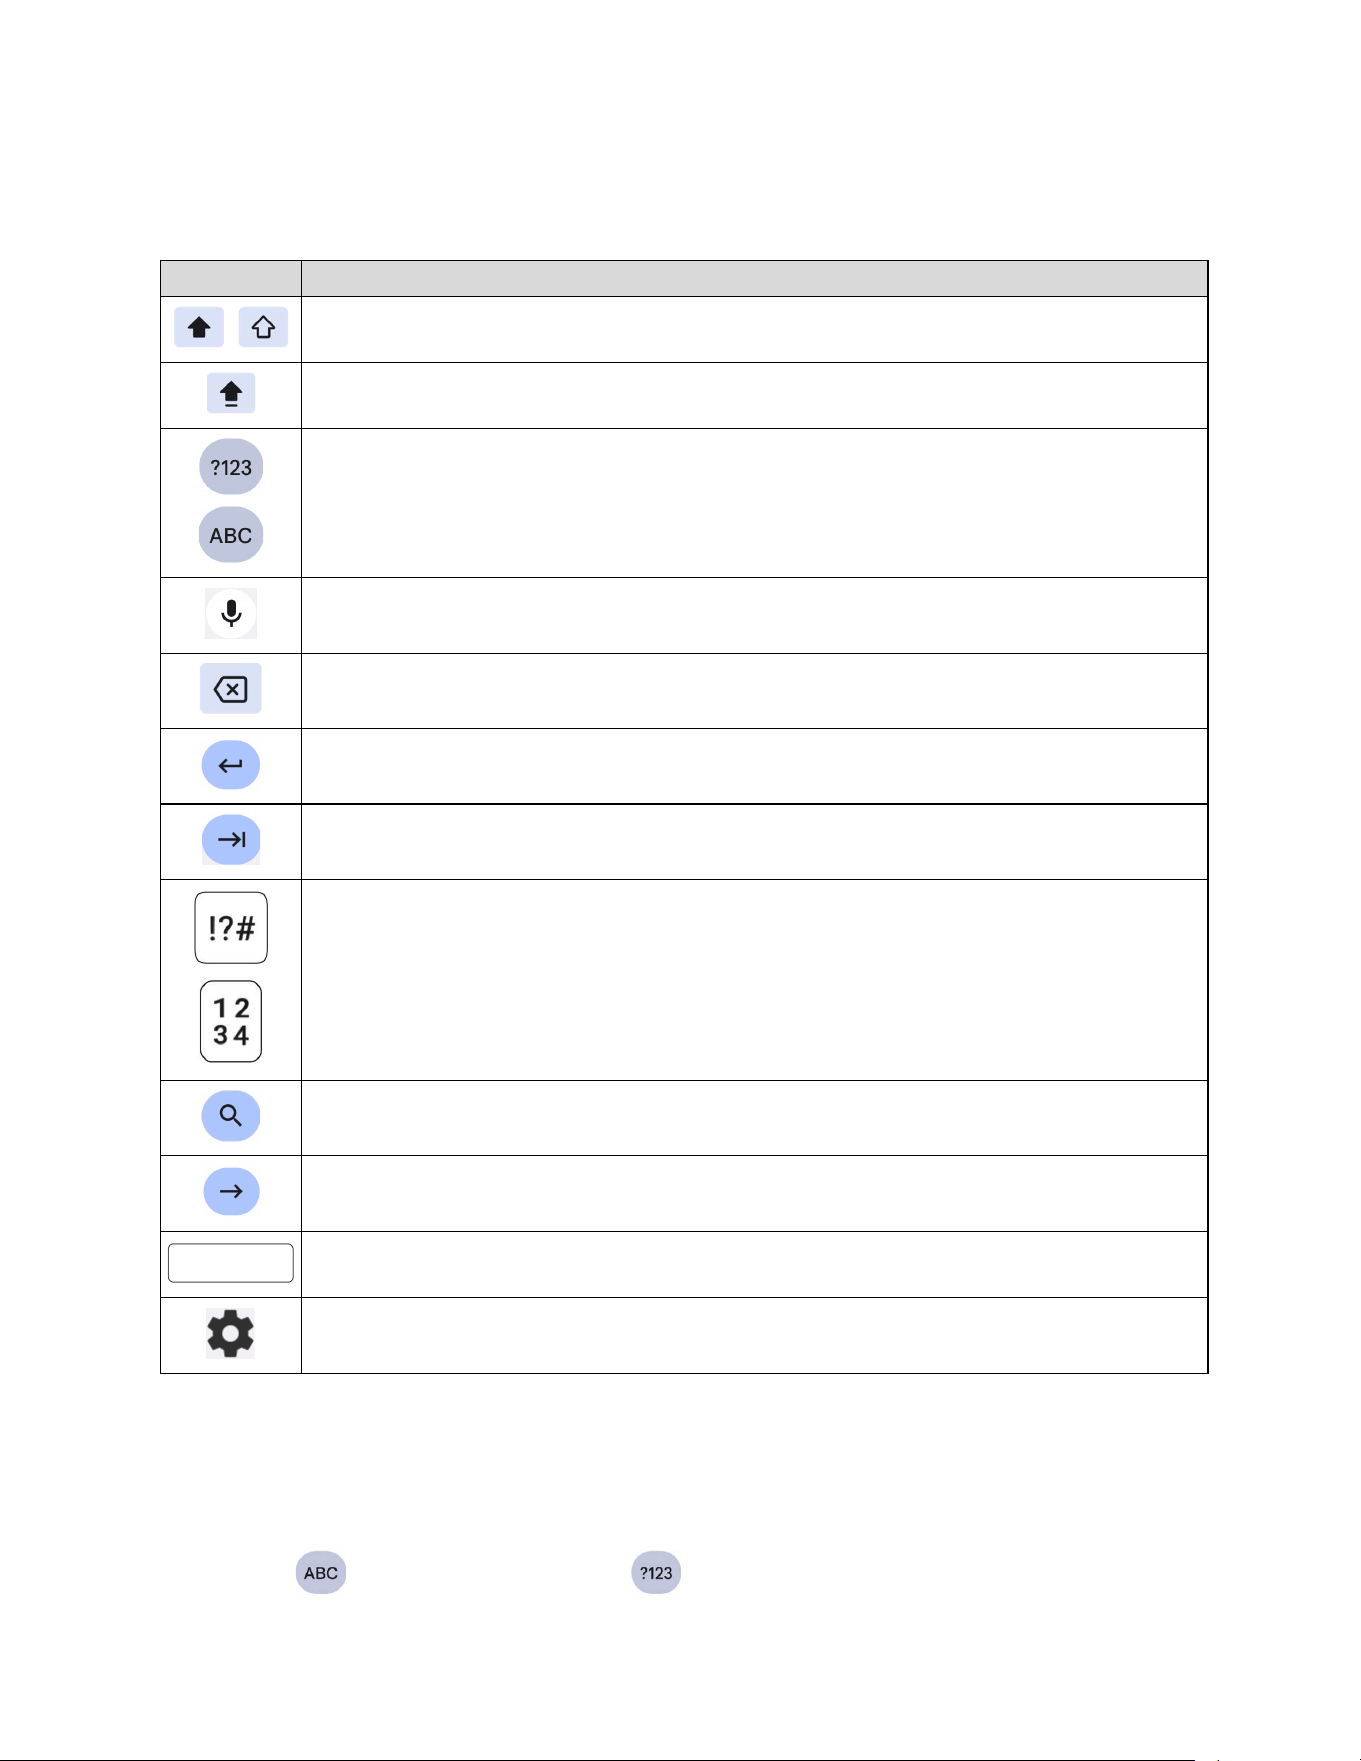
Some of the keys on the Gboard are given below:
Key
Description
Tap to toggle between lower case and upper case.
Double-tap the lower case or upper case shift key to set CAP LOCK.
Tap to toggle between the Alphabet keyboard and Number & Symbol keyboard.
Tap to enter text using your voice.
Tap to delete a character. Touch and hold to delete multiple characters.
Tap to confirm your entry or move to a new line.
Tap to go to the next text entry field.
Tap to toggle between the default Number & Symbol keyboard and additional
Number & Symbol keyboard.
Tap to see your search results.
Tap to go to a Web address.
Tap to insert a space. Touch and hold to select the keyboard type (if available).
Tap to open the Gboard settings menus, such as
Languages
,
Preferences
, etc.
Text mode
ABC mode is primarily used for entering letters while Number & Symbol mode is for numbers
and symbols.
► Tap to select ABC mode. Tap to select Number & Symbol mode.

28 Phone Basics
In ABC mode, tap to alter the capitalization:
(Unshifted) to enter all letters in lowercase.
(One-character-shifted) to capitalize only the first letter of a word.
You can select the caps lock by double-tapping or to make all letters in
uppercase.
(Caps lock) to enter all letters in uppercase.
In Number & Symbol mode, tap to display more symbols.
Some keys have alternate characters. In either mode, if a key displays an extra
character at the upper right corner, touch and hold the key to enter the character. Or
touch and long hold a key to call up a list of all the characters available on that key,
and slide your finger to the character you want to enter on the list.
Add a word to the user dictionary
You can use the user dictionary option to add new words to the dictionary.
1. Tap on the top of the Gboard, then tap Dictionary > Personal dictionary.
2. Select the language to be applied for Personal dictionary.
3. Tap .
4. Type the word you want to add.
5. Type the shortcut to bring up the typed word if you want and tap .
6. Tap . A list of words you have added to the dictionary is displayed.
Tap a word to edit it.
Tap a word > to delete it.

Phone Basics 29
Glide typing
Glide typing lets you enter words by drawing a path from letter to letter in one continuous
motion.
To enable or disable glide typing input feature:
1. Tap on the top of the Gboard, then tap Glide typing.
2. Tap Enable glide typing to turn on or off.
Google voice typing
Google™ voice typing uses Google voice recognition to convert speech to text.
NOTE:
If Gboard does not display the microphone icon , the voice input feature is not
enabled.
To enable or disable the voice input feature:
1. Tap on the top of the Gboard, then tap Voice typing.
2. Tap Use voice typing to turn on or off.
To enter text by speaking:
1. Tap the microphone icon on the keyboard.
2. When you see Speak now, say what you want to type.
30 Phone Basics
Copy and paste text
In applications that require text entry, such as Gmail, use the copy and paste functions to copy
and paste text from one application to the same application or another.
1. Open the application or received message that you want to copy text from.
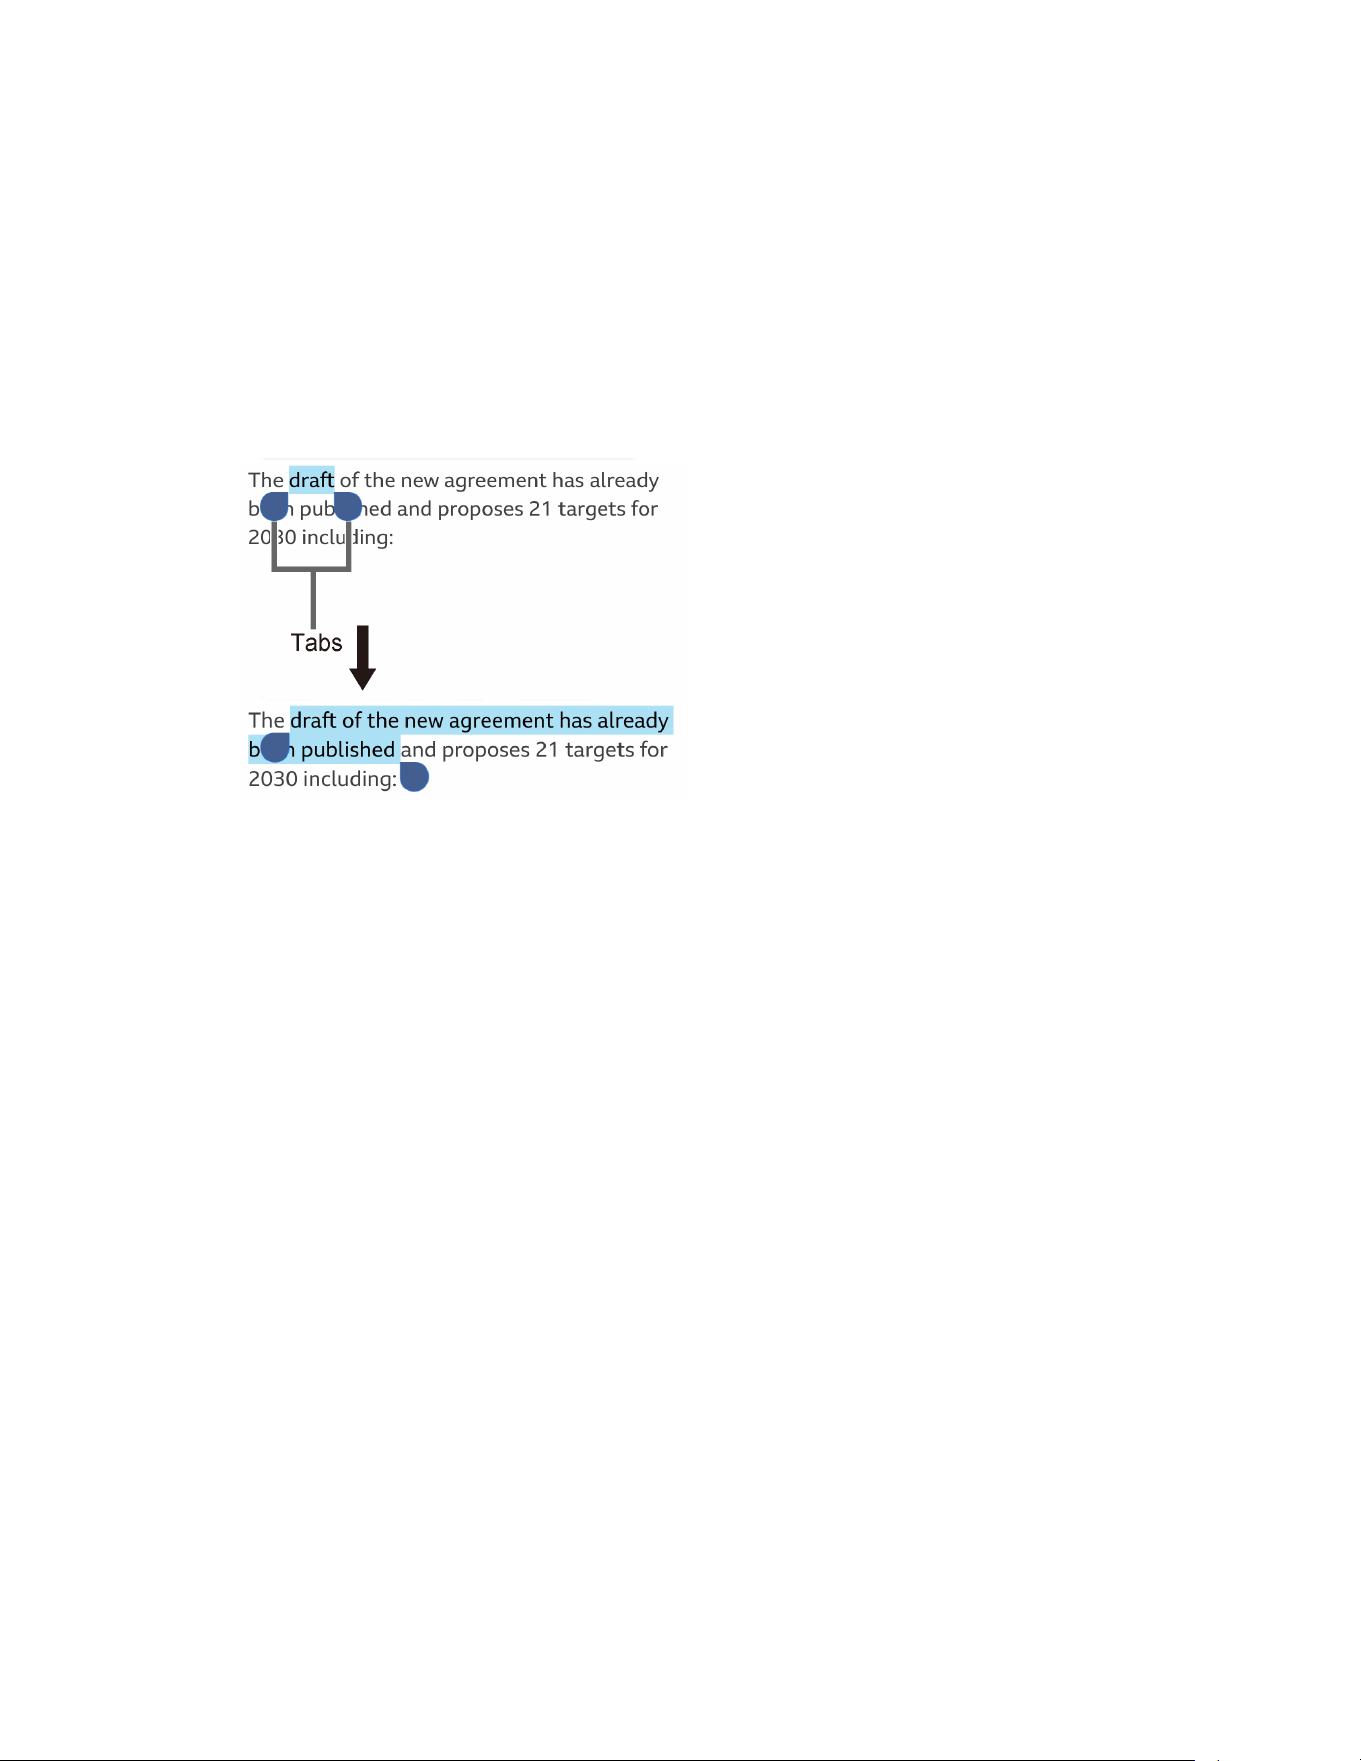
2. Touch and hold the text body you want to copy. Selection tabs appear, and the selected
words or characters are highlighted. Drag the tabs to expand or reduce the range of the
selected text if necessary.
TIP:
Tap
Select all
to select all the text.
3. Tap Copy.
4. Open the application that you want to paste the text into.
5. Touch and hold the text box where you want to paste the text to and tap Paste or Paste
as plain text.
Phone Calls 31
Phone Calls
With the Verizon network and your phone’s calling features, you can enjoy clear phone calls
across the country.
Make Phone Calls
There are several convenient ways to place calls from your phone.
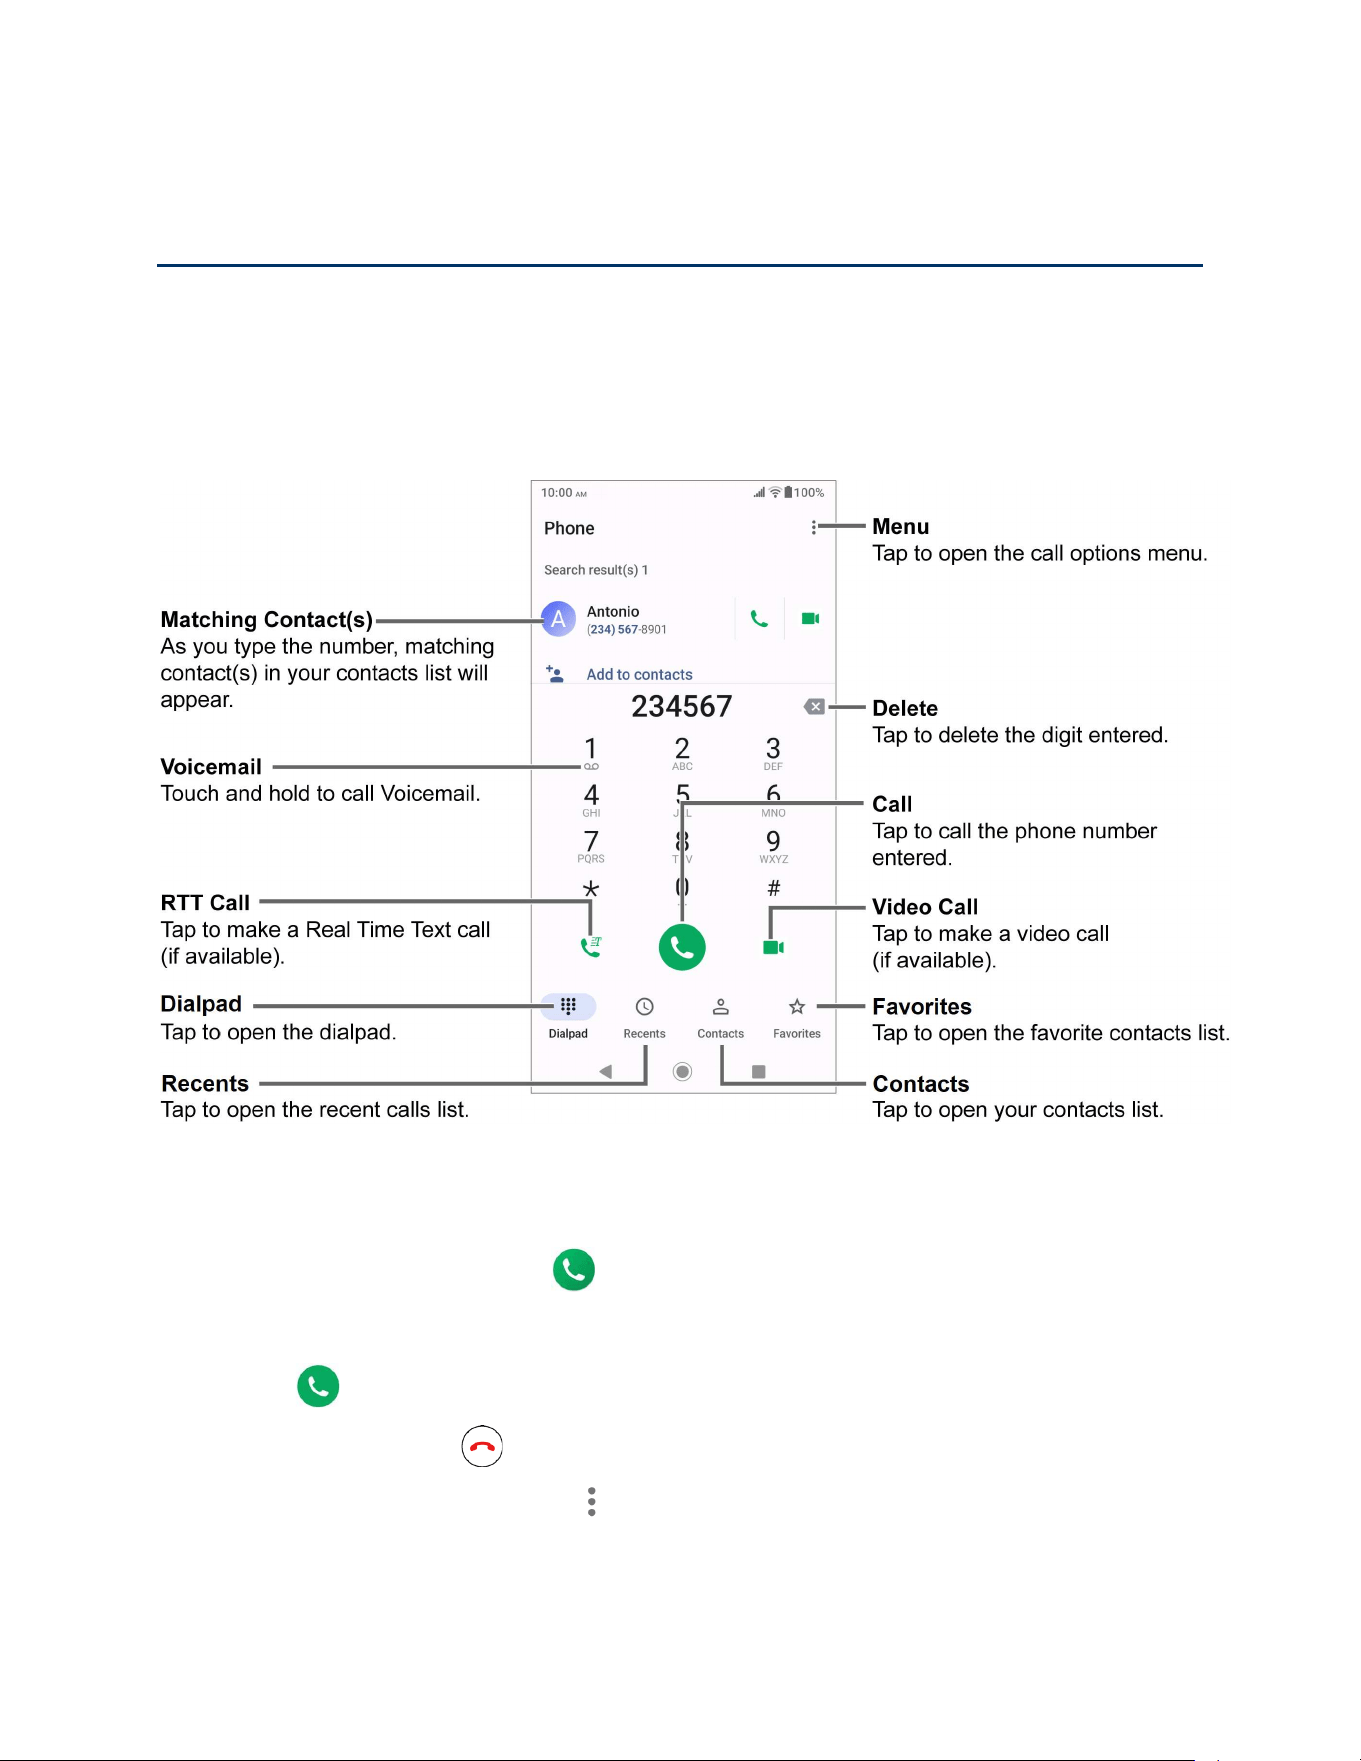
Call using the phone dialpad
The most "traditional" way to place a call is by using the phone dialpad.
1. From the Home screen, tap > Dialpad to display the dialpad.
2. Tap the number keys on the dialpad to enter the phone number.
3. Tap to call the number.
4. To end the call, tap .
For additional options, tap and select an option.
32 Phone Calls
Call from Recents
The recent calls list lets you quickly place calls to recent incoming, outgoing, or missed
numbers.
1. From the Home screen, tap > Recents to display the recent calls list.
2. Tap the phone icon next to the number or contact to place a call.
For additional options, tap the name or number.
Call from Contacts
You can place phone calls directly from entries in your contacts list.
1. From the Home screen, tap .
2. Tap Contacts to display your contacts list.
Tap to search your contacts.
3. Tap the contact you want to call.
4. Tap .
For additional information on Contacts, see
Contacts.
Call using a speed dial number
The Speed dial feature allows you to easily dial a number that you call frequently.
1. From the Home screen, tap > Dialpad.
2. For speed dial numbers 2-9, touch and hold the number on the dialpad.
– or –
For speed dial numbers 10-999999, use the dialpad to tap each digit in the speed dial
number, until the last digit. Tap and hold the last digit.
Call emergency numbers
You can place calls to 911 even if the phone screen is locked or your account is restricted.
Call the 911 emergency number
1. From the Home screen, tap > Dialpad.
2. Enter 911 and tap .
Phone Calls 33
Call the 911 emergency number when the screen is locked
1. Tap Emergency on the screen.
2. Enter 911 and tap .
Enhanced 911 (E911) Information
This phone features an embedded Global Positioning System (GPS) chip necessary for utilizing
E911 emergency location services where available.
When you place an emergency 911 call, the GPS feature of your phone seeks information to
calculate your approximate location. Depending on several variables, including availability and
access to satellite signals, it may take up to 30 seconds or more to determine and report your
approximate location.
IMPORTANT:
Always report your location to the 911 operator when placing an emergency call.
Some designated emergency call takers, known as Public Safety Answering
Points (PSAPs), may not be equipped to receive GPS location information from
your phone.
Call numbers with pauses
You can dial phone numbers with pauses for use with automated systems, such as Voicemail or
credit card billing numbers.
There are two types of pauses available on your phone:
●
Add pause:
Automatically sends the next set of numbers after two seconds.
● Add wait: Sends the next set of numbers when you tap Send in the pop-up window.
1. From the Home screen, tap > Dialpad.
2. Enter all or part of a number.
3. Tap > Add pause or Add wait.
4. Enter additional numbers.
5. Tap to dial the number.
Call using the plus (+) code
When placing international calls, Plus Code Dialing automatically enters the international access
code for your location (for example, 011 for international calls made from the U.S.).
1. From the Home screen, tap > Dialpad.

34 Phone Calls
2. Touch and hold 0 until you see a "+" on the display screen.
3. Enter the country code and phone number, and then tap . The phone automatically
prepends the access code for international dialing, followed by the country code and
phone number.
Receive Phone Calls
When you receive a phone call from a contact, the Incoming call screen appears and displays
the caller ID icon, name, and phone number of the calling party. When you receive a phone call
from someone who is not saved in Contacts, only the default caller ID icon and phone number
appear on the Incoming call screen.
NOTE:
If your phone is turned off, all calls automatically go to Voicemail.
To answer an incoming call:
► On the Incoming call screen, swipe .
To mute the ringing sound:
► Press the Volume key down to mute the ringtone without rejecting the call.
To send an incoming call to Voicemail:
► Swipe to send the call to your Voicemail inbox.
To reject an incoming call and send a text message:
► Tap to ignore the call and select a message to send to the caller.
NOTE:
You can edit the preset text messages through the Call settings menu. See
Quick
responses
.
Use Voicemail Services
Learn how to manage the voicemail features on your phone.
Voicemail
Voicemail displays a list of your messages and allows you to choose which message(s) to
listen to or delete. You must subscribe to Voicemail before using this feature.
Set up Voicemail
See Set up Voicemail.

Phone Calls 35
Review Voicemail
Voicemail
lets you easily access and select which message(s) you want to review.
1. From the Apps launcher, tap Voicemail.
2. From the Voicemail inbox, tap a message. Options such as Play, Stop, and more are
available.
Tap to display the option menu.
Configure Voicemail settings
You can access the settings for notifications and greetings as well as the storage location of the
messages.
1. From the Apps launcher, tap Voicemail > > Settings.
2. Tap the item you want and follow the onscreen instructions.
Basic voicemail
In addition to paid
Voicemail,
you can also access your voicemail freely through the basic
voicemail application. Your phone automatically transfers all unanswered calls to your voicemail
mailbox, even if your phone is in use or turned off.
Set up basic voicemail
Always use a password to protect against unauthorized access. Your basic voicemail mailbox is
not password protected until you create a password. See
Set up basic voicemail.
Voicemail notification
There are several different ways your phone may alert you to a new voicemail message.
● By sounding the assigned notification sound.
● By vibrating the phone.
● By displaying within the Notifications area of the status bar when new voicemail
messages are received.
Retrieve your voicemail messages
You can review your messages directly from your wireless phone or from any other touch-tone
phone.
To use your phone to access your messages:
1. From the Home screen, tap > Dialpad.
2. Touch and hold 1 or dial *86 and then tap . If prompted, enter your voicemail
password.

36 Phone Calls
To use another phone to access your messages:
1. Dial your wireless phone number.
2. If you hear a greeting, press or tap # to interrupt, and follow the prompts.
Phone Call Options
Your phone application provides many useful features and options to help you make the most of
your calling experience.
In-call options
While you’re on a call, you will see a number of options such as
Add call
,
End call
,
Mute
and
more on the screen. Tap an option to select it.
Caller ID
Caller ID identifies a caller before you answer the phone by displaying the number of the
incoming call. If you do not want your number displayed when you make a call, follow these
steps.
1. From the Home screen, tap > Dialpad.
2. Enter *67.
3. Enter a phone number.
4. Tap .
Call Waiting
When you’re on a call, Call Waiting alerts you to incoming calls by sounding beeps. Your phone
screen informs you that another call is coming in and displays the caller’s phone number (if
available).
To respond to an incoming call while you’re on a call:
► Swipe . This puts the first caller on hold and answers the second call.
To switch back to the first caller:
► Tap On hold.
NOTE:
For those calls where you don’t want to be interrupted, you can temporarily disable Call
Waiting by entering
*70
before placing your call.
Phone Calls 37
3-way calling
With 3-way calling, you can talk to two people at the same time. When using this feature, the
normal airtime rates will be charged for each of the two calls.
1. Enter a number on the dialpad and tap (or place a call from Recents or Contacts).
2. Once you have established the connection, tap Add call, and dial the second number
(or place the call from Recents or Contacts). This puts the first caller on hold and dials
the second number.
3. When you’re connected to the second party, tap Merge calls. Your conference call is
now in session.
4. To end the 3-way call, tap .
NOTE:
If one of the parties you called hangs up during your call, you and the remaining party
stay connected. If you initiated the call and are the first to hang up, all parties are
disconnected.
Call forwarding
Call forwarding lets you forward all your incoming calls to another phone number – even when
your phone is turned off. You can continue to make calls from your phone when you have
activated Call forwarding.
NOTE:
You will be charged for all forwarded calls according to your plan.
To activate Call forwarding:
1. From the Home screen, tap > Dialpad.
2. Enter *72.
3. Enter the area code and phone number to which you want your calls forwarded.
4. Tap .
To deactivate Call forwarding:
1. From the Home screen, tap > Dialpad.
2. Enter *73.
3. Tap .
38 Phone Calls
Set up speed dialing
You can save speed dial numbers in your phone’s speed dial memory.
To assign a speed dial number to a contact:
1. From the Home screen, tap > Dialpad > > Speed dial setup > .
2. Enter a speed dial number (up to 6 digits) you want to add.
3. Tap Unassigned to choose a contact.
4. Tap the contact to assign the speed dial number to and tap Save.
– or –
1. From the Home screen, tap > Dialpad.
2. For the speed dial number 2-9, touch and hold the number on the dialpad you want to
assign.
– or –
For the speed dial number 10-999999, use the dialpad to tap each digit in the speed dial
number, until the last digit. Tap and hold the last digit.
NOTE:
0, 1, 112, and 911 cannot be a speed dial number. You cannot assign saved
speed dial numbers to a contact.
3. Tap OK, and then tap a contact to assign.
To delete the assigned speed dial(s):
1. From the Home screen, tap > Dialpad > > Speed dial setup > .
2. Select the check box next to the contact(s) with the speed dial to delete.
Tap
Select all
to select all the assigned contacts.
3. Tap OK > OK.
– or –
1. From the Home screen, tap > Dialpad > > Speed dial setup.
2. Tap the contact with the speed dial to delete.
3. Tap Delete > OK.
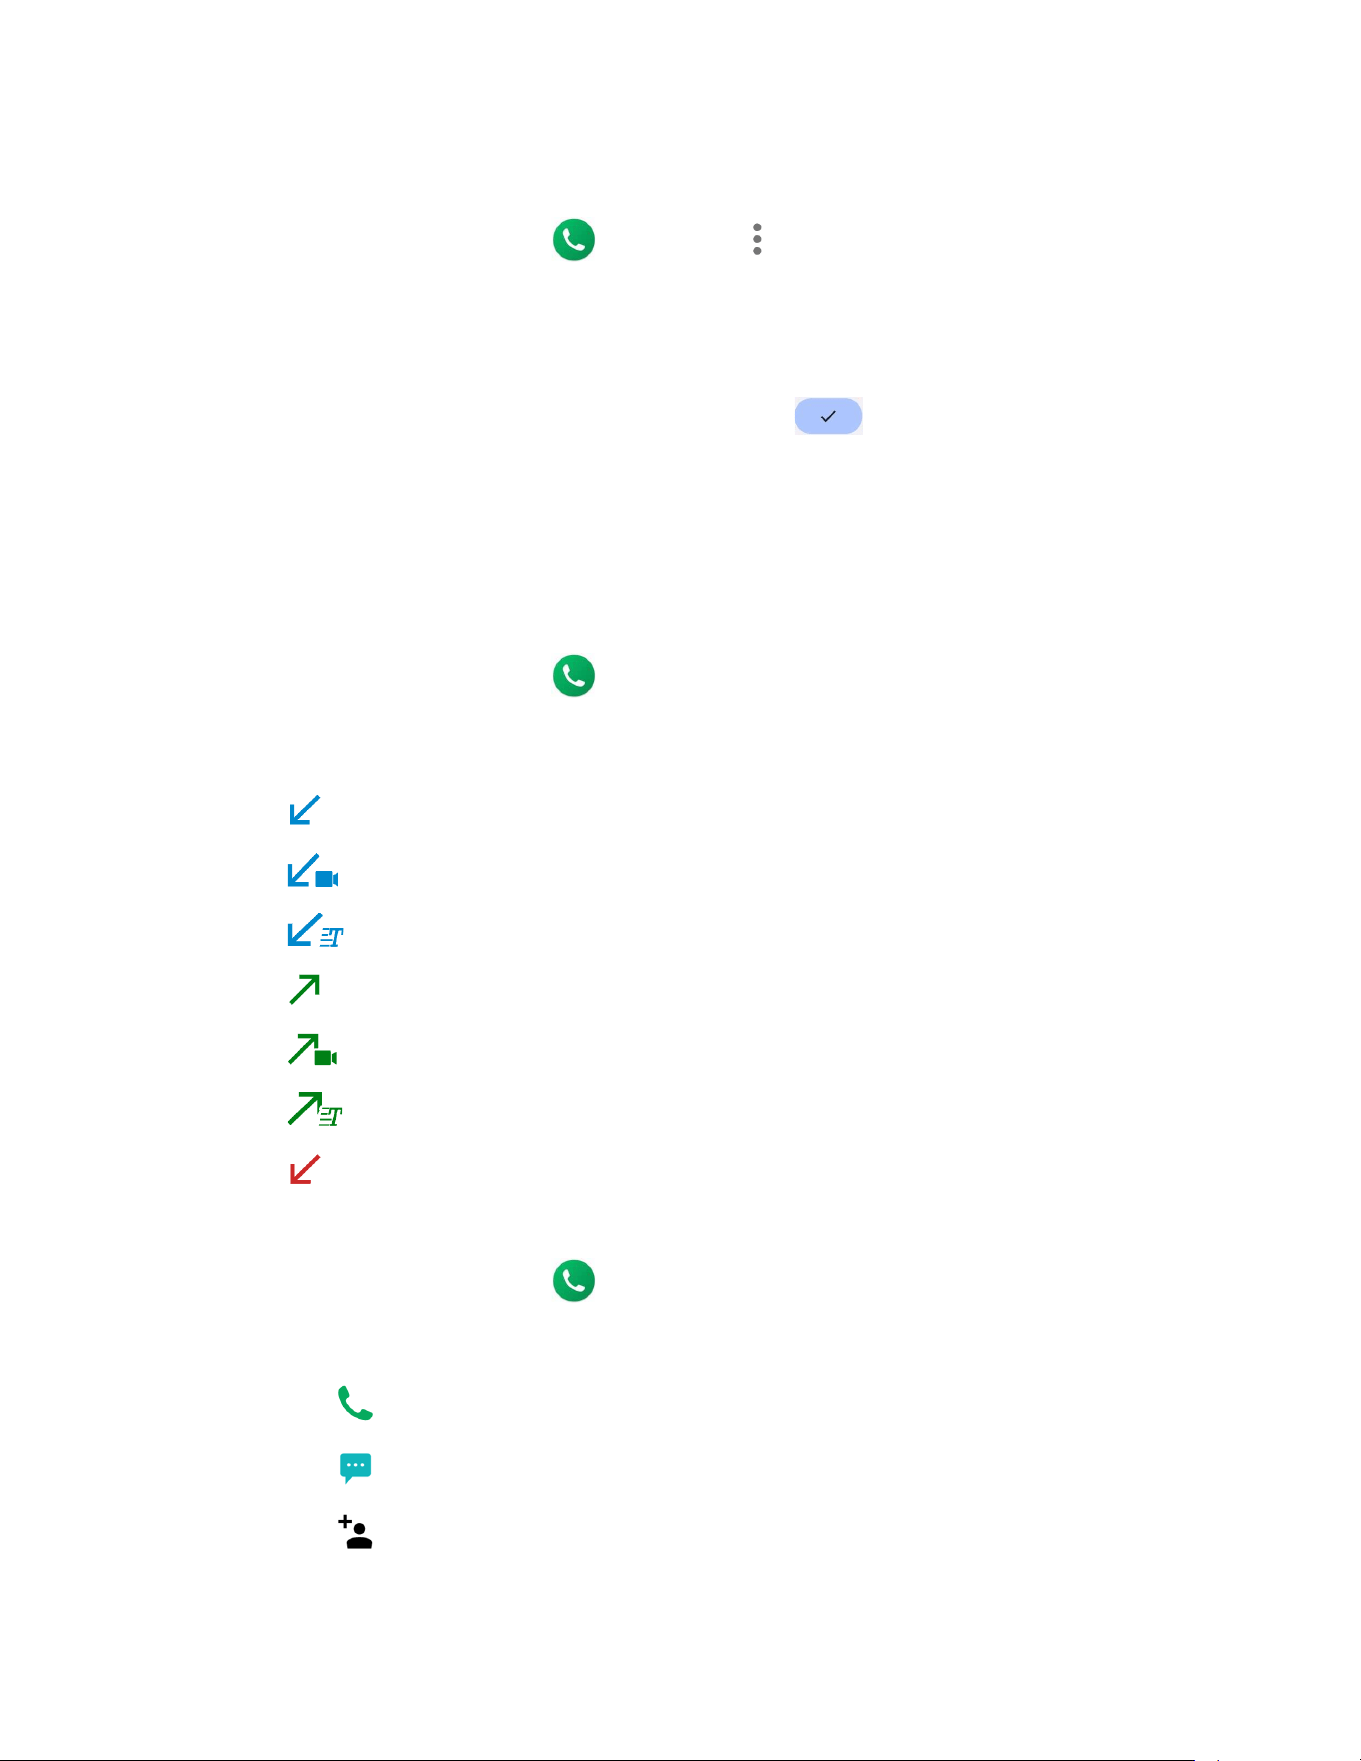
Phone Calls 39
To edit the assigned speed dial:
1. From the Home screen, tap > Dialpad > > Speed dial setup.
2. Tap the assigned contact with the speed dial to edit.
3. Tap Edit.
4. Edit the speed dial number (up to 6 digits) and tap > Save.
Recent Calls
The Recents tab of the Phone application lists up to 500 recent incoming, outgoing, and missed
calls.
View recent calls
► From the Home screen, tap > Recents.
You can determine if an entry was an incoming, outgoing, or a missed call from the
icons shown below.
: Incoming call
: Incoming Video call
: Incoming RTT call
: Outgoing call
: Outgoing Video call
: Outgoing RTT call
: Missed call
Recent calls options
1. From the Home screen, tap > Recents.
2. Tap an entry to view the contact.
Tap to call the number.
Tap to send a text message.
Tap to add the number to Contacts.
40 Phone Calls
Tap >
Delete from recents
to delete the call.
Tap >
Edit number before call
to edit the number before calling.
Tap >
Add to reject number
to add the number to the call reject list.
Delete recent calls
Use the menu option to delete your recent calls.
1. From the Home screen, tap > Recents.
2. Tap > Delete recent calls.
3. Tap the check box next to the calls you want to delete or tap Select all.
4. Tap OK > OK.
Call Settings
Your phone’s Call settings menu lets you configure your settings for the phone application.
► From the Home screen, tap > > Call settings to open the Call settings screen.
Call rejection
You can set your phone to reject incoming calls as follows:
► From the Call settings screen, tap Call rejection to open the Call rejection screen.
Tap
Unknown number
to turn on to reject calls from unknown number.
Tap , tap the input field below
Add
, enter a phone number you want to reject,
and then tap
Add
.
Tap >
Contacts
> a contact on the Choose a contact screen >
Add
.
Tap >
Recents
> a recent call on the Choose log(s) screen >
Add
.
To delete the rejected number(s):
1. From the Call rejection screen, tap .
2. Select the check box next to the rejected number(s) you want to delete.
Tap
Select all
to select all the rejected numbers.
3. Tap OK > OK.

Phone Calls 41
– or –
1. From the Call rejection screen, tap the rejected number you want to delete.
2. Tap Delete > OK.
To edit the rejected number:
1. From the Call rejection screen, tap the rejected number you want to edit.
2. Edit the rejected number and tap Edit.
Quick responses
You can add, delete, or modify the preset text messages to send when you select to reject an
incoming call and send a text message. Your phone can register up to seven messages.
1. From the Call settings screen, tap Quick responses.
2. Following options are available:
To edit a message, tap a message, edit it, and tap
OK
.
To add a new message, tap , enter text, and tap
OK
.
To delete a message, tap >
Delete
, select a message, and then tap
OK
>
OK
.
To restore the default messages, tap >
Reset to default
>
OK
.
Auto answer
Select when to answer incoming calls automatically with the headset.
1. From the Call settings screen, tap Auto answer.
2. Select Hands free or Speakerphone.
3. Select the delay time to automatically answer the phone.
You can set the delay time to: 2 seconds, 5 seconds, 10 seconds or Off.
Power key ends call
Set your phone to end calls by pressing the Power key.
► From the Call settings screen, tap the Power key ends call on/off icon to turn on or off.
NOTE:
This function does not work to reject incoming calls.

42 Phone Calls
Noise reduction
Your phone can suppress background noise to improve audio quality for the other party during
voice calls.
► From the Call settings screen, tap the Noise reduction on/off icon to turn on or off.
Additional settings
Caller ID
1. From the Call settings screen, tap Additional settings.
2. Tap Caller ID.
3. Select from Network default, Hide number, or Show number.
Video Calling
With this feature on, you can make or receive video calls.
1. From the Call settings screen, tap the Video Calling on/off icon to turn on or off.
2. Read the message and tap OK.
Wi-Fi Calling
Wi-Fi Calling allows you to make and receive phone calls over a Wi-Fi connection. You need to
activate Wi-Fi Calling manually if you want to use it.
NOTE:
Activation requires a valid US address for E911 functionality and a cellular data or Wi-Fi
network connection.
1. From the Call settings screen, tap Wi-Fi Calling.
– or –
From the Apps launcher, tap Settings > Network & internet > Wi-Fi Calling > Wi-Fi
Calling
.
2. Tap the on/off icon, enter the emergency location information (E911), and follow the
onscreen instructions to turn Wi-Fi Calling on.
To change your emergency location information, tap
Confirm or Update Current
Emergency Address
.
To set your preferred connection to be used when outside the Verizon network, tap
When Roaming
.

Phone Calls 43
Ringtone & vibrate
Phone ringtone and vibration pattern
Assign a ringtone or vibration pattern to your incoming calls.
1. From the Call settings screen, tap Ringtone & Vibrate > Phone ringtone or Vibration
pattern.
2. Tap a ringtone or vibration pattern in the available list and tap OK to assign the ringtone
or vibration.
Vibration and haptics
Change the vibration settings for your incoming calls. See Vibration & haptics for setting
procedure.
Step-up ring volume
Set your phone to raise the ring volume gradually from minimum to maximum.
► From the Call settings screen, tap the Step-up ring volume on/off icon to turn on or off.
Flashing light when ringing
Set your phone’s LED light to flash when ringing.
► From the Call settings screen, tap the Flashing light when ringing on/off icon to turn
on or off.
Voicemail
You can configure the Voicemail settings.
1. From the Call settings screen, tap Voicemail.
2. Configure the following settings:
Service
to review the Voicemail service carrier.
Voicemail number
to configure the phone number for accessing Voicemail, if
necessary.
Notifications
to configure the Notification category of Voicemails by tapping
Voicemails
on the Phone notifications screen.
Assisted dialing
Assisted dialing allows easy dialing of international calls while roaming in other countries. Your
default reference country is set to the United States of America.
1. From the Call settings screen, tap Assisted dialing.
2. Tap Assisted dialing on/off icon to turn on or off.
44 Phone Calls
3. Tap Reference country.
4. Tap the country name you want to set as the Reference country and tap to edit its
settings if necessary.
Real Time Text
Real Time Text (RTT) lets you use text to communicate during a phone call. RTT works without
any external TTY keyboards. During an RTT call, the person you are talking with can see you
type your message in real time. You can also call to Emergency services such as 911 through
RTT.
To change the Real Time Text settings:
1. From the Call settings screen, tap Real Time Text.
2. Tap Always visible to show the RTT option automatically for every call, or Visible
during calls.
To call using Real Time Text:
1. From the Home screen, tap > Dialpad.
2. Confirm if the RTT setting is set to Always visible.
3. Enter phone number.
4. Tap to make an RTT call.
5. When connected, type a message in the text field.
To answer an incoming call using Real Time Text:
► Swipe to answer an incoming call in RTT mode.
Hearing aids – telecoil mode
Hearing aid mode was designed for hearing aids that have a telecoil. To use the telecoil function
in your phone, you will need to set the Hearing aid mode to on.
► From the Call settings screen, tap the Hearing aids on/off icon to turn on or off.
Call timer
To view the call timer and call duration:
► From the Call settings screen, tap Call timer.

Phone Calls 45
Verizon Push To Talk Plus (PTT+)
With Verizon PTT+, you can quickly and reliably connect to an individual or group instantly with
a push of a key. For more information on PTT+, visit
verizon.com/push-talk-plus.
NOTE:
This service requires a subscription.
NOTE:
When activating the PTT+ application, the PTT key will be assigned for PTT use. See
Programmable Keys
.
Set up PTT+
1. Press the PTT key and tap Assign if you have not assigned any functions to the PTT
key.
– or –
From the Apps launcher, tap Settings > Programmable keys > PTT key.
2. Tap Single press > Push To Talk+ > OK.
When you assign the Push To Talk+ to the PTT key, all assigned applications or
functions to the PTT key are canceled and the key will function solely as a dedicated
PTT+ key.
3. Press the PTT key.
– or –
From the Home screen, tap Verizon > Push To Talk+.
4. Follow the onscreen instructions to give required permissions to the Push To Talk Plus
application.
5. Tap Yes to confirm the activation.
6. Read Terms & Conditions and tap .
7. Tap Yes to display the tutorials to learn how to start using the PTT+ app or No to skip
tutorial.
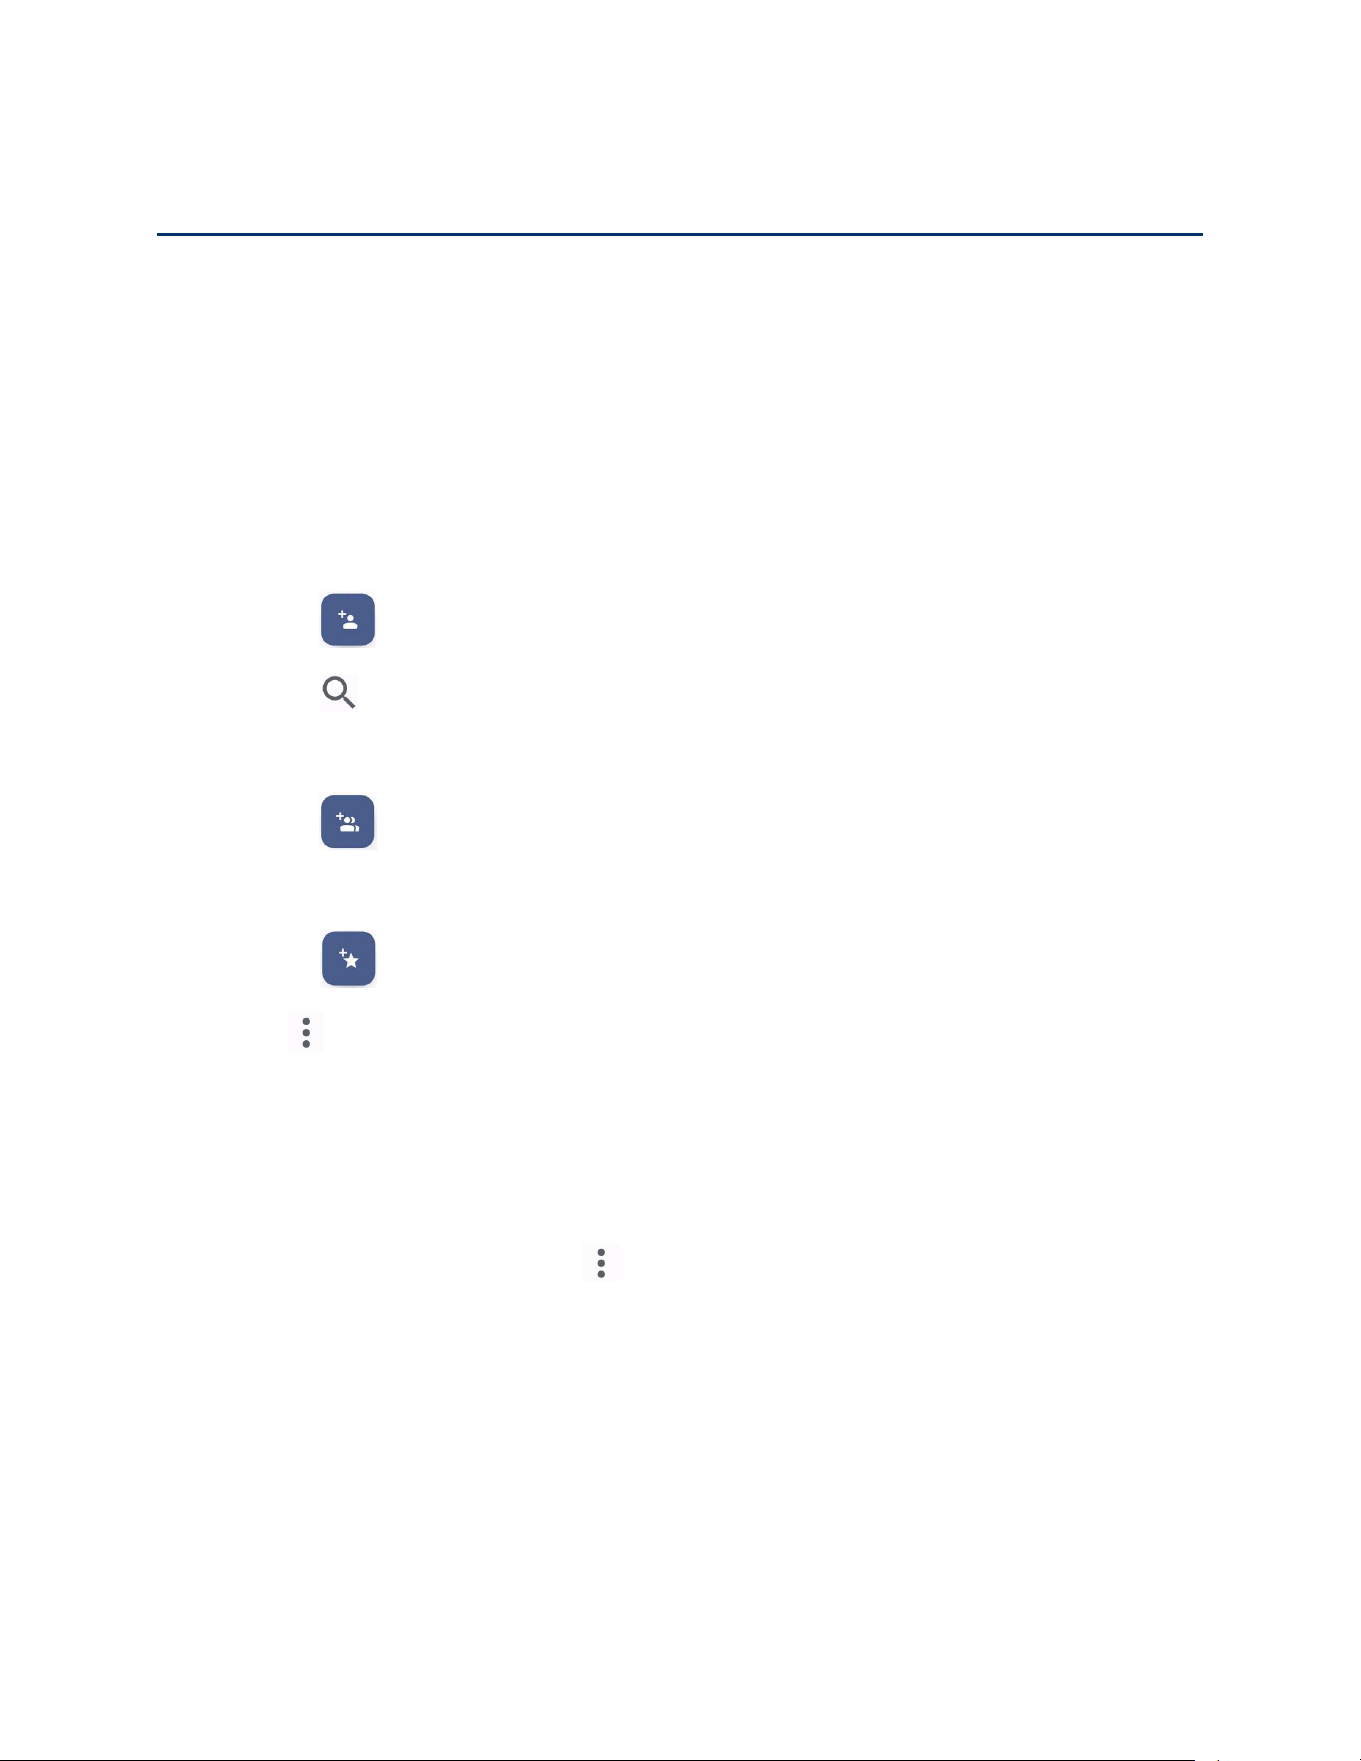
46 Contacts
Contacts
The Contacts application lets you store and manage contacts from a variety of sources,
including contacts you enter and save directly in your phone as well as contacts synchronized
with your Google Account, your PC, and compatible email programs.
Contacts List
Scroll through the list to view all your contacts. To see a specific entry, tap it.
► From the Apps launcher, tap Contacts to open the Contacts screen.
Contacts:
Tap to display the individual contacts list.
•
:
Tap to add a new individual contact. See
Add a Contact.
• : Tap to search a contact.
Groups:
Tap to display the group contacts list.
•
:
Tap to add a new group contact. See
Add a Group Contact.
Favorites:
Tap to display your favorite contacts list.
• : Tap to add a new favorite contact. See Add a Contact to Favorites.
:
Tap to display the contacts list options. See
Contacts list options to follow.
TIP:
You will see letters in alphabetical order when you drag the slider on the right of
the screen. Release your finger to display the entries starting with a specific letter
when you see it.
Contacts list options
► From the Contacts screen, tap .
Cloud:
Displays the contacts in the Cloud app.
Delete:
Allows you to select and delete the contacts.
Import/export:
Imports/exports contacts from/to Phone or SD card.
Share:
Shares contacts using Quick Share, Gmail, Bluetooth, Drive, etc.
Settings:
Opens the additional Settings screen related to Contacts.

Contacts 47
Add a Contact
Enter details such as name, phone numbers, email addresses, mailing addresses, and more.
NOTE:
We suggest that when you add phone numbers to your contact list, you add the area
code + the 7-digit number.
1. From the Contacts screen, tap Contacts to open the Contacts screen.
2. Tap .
3. You may be prompted to select an account to save your new contact to. Select one of
the following options:
Phone:
Stores your contact to your phone.
Select an account from the displayed list.
– or –
Tap
Add new account
to create a new account.
4. Enter the name, phone number, email address, etc., as you want.
Tap to assign a picture to the contact. See
Assign a picture to a contact.
Tap the account above name and select an option to change where to save the
contact.
5. When you have finished adding information, tap Save.
Assign a picture to a contact
You can assign a picture to a contact either by taking a new one or by using the one stored in
your phone’s internal storage, SD card, or Cloud. The following instructions show you how to
take and assign a new picture as an example.
1. From the Contacts screen, tap a contact to display it and tap .
2. Tap or the existing picture.
3. Tap Take photo or Take new photo.
4. Tap to take a picture, edit it if necessary, and then tap Save copy.
5. Tap Save to save the contact.

48 Contacts
Save a phone number
You can save a phone number to Contacts directly from the phone dialpad.
1. From the Home screen, tap > Dialpad.
2. Enter a phone number and tap Add to contacts.
3. To add the number to an existing contact, tap a contact, select a number type, and then
tap Save.
– or –
To add the number as a new contact, tap Create contact. Enter the name and any
additional information, and then tap Save.
Delete a contact
You can delete contacts from the Contacts screen.
1. From the Contacts screen, tap > Delete.
2. Select the check box next to the contact(s) you want to delete or tap Select all.
3. Tap Done > OK.
– or –
1. From the Contacts screen, tap a contact to display it.
2. Tap > Delete > OK.
Edit a contact
Once you’ve registered a contact, you can add or edit any of the information in the entry,
customize with a unique ringtone, and more.
1. From the Contacts screen, tap a contact and tap .
2. Tap any field you want to change or add.
3. Add or edit the information, and then tap Save.
Contacts entry options
1. From the Contacts screen, tap the contact you want to deal with.
2. Tap .

Contacts 49
Refresh
to refresh the contact information.
Share
to share the contact by using your preferred method.
Delete
to delete the entry.
Join
to merge the contact with another one.
Add shortcut to Home screen
to add a shortcut to the contact on the Home
screen.
Set ringtone
to assign a specific ringtone or vibration pattern for the contact.
All calls to voicemail
to send all calls from the contact to a Voicemail box.
Change account
to change the account you stored the contact in.
Add a Group Contact
Create a group contact with your individual contact entries in Contacts.
NOTE:
In order to create a group contact, you may first sync your phone with a Google or
corporate account. See
Synchronize Contacts for instructions on how to sync your
phone to an account.
1. From the Contacts screen, tap Groups to open the Groups screen.
2. Tap .
3. Select the account in which you want to create a group contact.
4. Enter the group’s name.
5. Tap Add/remove contacts and select the check box next to the contact(s) you want to
add to the group.
6. Tap Done.
Tap
Ringtone
or
Vibration
pattern
and follow the onscreen instructions to set a
ringtone or a vibration pattern if necessary.
7. Tap Save.
Delete a group contact
Delete the group contacts that you have created.
1. From the Groups screen, tap > Delete.

50 Contacts
2. Select the check box next to the group(s) you want to delete or tap Select all.
3. Tap Done > OK.
– or –
1. From the Groups screen, tap a group to display it.
2. Tap > Delete > OK.
Edit a group contact
Manage the group contacts that you have created.
1. From the Groups screen, tap a group contact and tap .
2. Edit it as necessary.
3. Tap Save.
Add a Contact to Favorites
The Favorites tab is a listing that can help you quickly access your most used or preferred
contacts entries.
1. From the Contacts screen, tap a contact.
2. Tap . The icon changes to when the contact is added to Favorites.
– or –
1. From the Contacts screen, tap Favorites.
2. Tap .
3. Select the check box next to the contact(s) that you want to add to your Favorites list.
4. Tap Done.
ICE (In Case of Emergency)
Registering ICE information might help rescue workers, such as paramedics, police, and
hospital personnel identify your primary contact.
NOTE:
You can quickly access your Emergency information by tapping
ICE – In Case of
Emergency
shown at the top of the contact list.

Contacts 51
To register an ICE contact and your medical information:
1. From the Contacts screen, tap ICE – In Case of Emergency to open the Emergency
information screen.
2. Tap Open Personal Safety and follow onscreen instruction. See Personal Safety.
Synchronize Contacts
Syncing data with your managed accounts lets you use your phone to add new contacts and
manage existing contacts on your online or remote accounts. Prior to syncing, you must have
an active Google or corporate account with associated contacts, and be signed into your
account with the phone.
With syncing, any contacts (with phone numbers, email addresses, pictures, etc.) are updated
and synced with your phone.
1. From the Contacts screen, tap > Settings > Accounts.
2. Tap Automatically sync app data to turn on if you set Contacts to sync on under
Account sync settings.
– or –
Tap a set account > Account sync and tap the on/off icon next to Contacts to turn it on
if you set Contacts to sync off under Account sync settings.
Your Contacts then reflects any updated contact information.
This update process works both ways. For example, any changes on the phone are
updated to your account contacts list after sync.

52 Applications
Applications
Your phone lets you enjoy a variety of apps installed on your phone or discover some exciting
new apps by browsing online app stores such as the Google Play™ Store. You can see all your
preloaded and downloaded apps in the Apps launcher.
Google Apps
You will need a Google Account to access several phone features such as Gmail™ and the
Google Play Store applications. Before you are able to access Google applications, you must
enter your account information. These applications sync between your phone and your online
Google Account. Visit
google.com for more information.
NOTE:
The actual display of the Google apps may vary depending on the application version
currently running on your phone.
Create a Google Account
If you do not already have a Google Account, you can create one online or by using your phone.
NOTE:
Although you need a Gmail account to use certain features on your phone, such as
Google Play Store, you do not need to use Gmail as the default account for your phone.
1. From the Apps launcher, tap Settings > Passwords & accounts to open the
Passwords & accounts screen.
2. Tap Add account > Google.
3. Tap Create account.
4. Follow the onscreen prompts to create your free account.
Sign in to your Google Account
If you have a Google Account but have not yet signed in with your phone, follow these
instructions.
1. From the Passwords & accounts screen, tap Add account > Google.
2. Enter your email address, and tap Next.
3. Enter your password, and tap Next.
4. Follow the onscreen prompts to sign in to your Google Account.
Applications 53
Chrome
Your phone’s Web browser Chrome™
gives you full access to both mobile and traditional
websites on the go, using data services or Wi-Fi data connections.
Launch Chrome
► From the Home screen, tap .
Tap on the top right of the screen to display the option menu.
Learn to navigate Chrome
Navigating through menus and websites during a data session is easy once you have learned a
few basics.
● Scrolling: In a single motion, touch and drag across or up and down a page.
● Selecting: Tap an item or onscreen link.
● Go back: Tap to go back one page.
● Go to a specific website: Enter the Web address at the top of the browser window.
For more information, please visit
support.google.com/chrome.
Gmail
You can use Google’s web-based mail service.
Access Gmail
► From the Home screen, tap Google > Gmail to open the Gmail screen.
Tap on the top left of the screen to display the option menu.
Send a Gmail message
1. From the Gmail screen, tap Compose.
2. Fill the To, Cc, Bcc, and Subject field as necessary.
3. Compose your message and then tap .
Read and reply to Gmail messages
1. From the Gmail screen, tap a message to display it.
2. Tap Reply, Reply all, or Forward.

54 Applications
3. Compose your message and then tap .
For more information, please visit
support.google.com/mail.
Calendar
Use Calendar to create and manage events, meetings, appointments, and tasks.
Access Calendar
► From the Home screen, tap Google > Calendar.
Tap on the top left of the screen to display the option menu.
Add an event
1. On any Calendar view, tap > Event.
2. Set event details as necessary, such as the title, date and time, its recurrence, and
more.
3. Tap Save to save the event in the calendar.
Add a task
1. On any Calendar view, tap > Task.
2. Set task details as necessary, such as the title, due date and time, and its recurrence.
3. Tap Save to save the task in the calendar.
Event reminders
If you have set notifications for your event, the upcoming event icon will appear in the
notifications area of the status bar to remind you of the upcoming event.
To view the reminder:
1. Slide the status bar down to open the Notifications panel.
2. Tap the event name to see the event.
View Calendar events
You can display the Calendar in monthly, weekly, each 3 days, daily, or schedule view.
To change the Calendar view:
► Tap displayed at the upper left corner, and tap Schedule, Day, 3 days, Week, or
Month.
For more information, please visit
support.google.com/calendar.

Applications 55
Google Play Store app
Google Play is a destination for discovering free and paid digital content, including Android™
apps, books, movies, music, and much more.
To access the Google Play Store app, you must first connect to the Internet using data services
or a Wi-Fi data connection and sign in to your Google Account.
Find and install an app
When you install apps from the Google Play Store and use them on your phone, they may
require access to your personal information (such as your location, contact data, and more) or
access to certain functions or settings of your phone. Download and install only apps that you
trust.
1. From the Home screen, tap Play Store.
Tap the account icon on the top right of the screen to display the option menu.
2. Find an app you want and tap it to open its details screen.
3. Tap Install (for free applications) or the price button (for paid applications).
NOTE:
If you have not set up your payment method on your Google Account, you are
prompted to add a payment option to complete your account setup.
4. Read the message thoroughly every time it appears and follow the onscreen
instructions to complete the installation or purchase.
WARNING: Read the notification carefully! Be especially cautious with applications
that have access to many functions or a significant amount of your data.
Once you tap Accept on this screen, you are responsible for the results of
using this item on your phone.
For more information, please visit support.google.com/play.
Google Maps
Use the Google Maps™ app to determine your location, find directions, browse local businesses
and attractions, rate and review places, and more.
NOTE:
Before using any location-based services, you must enable your phone’s GPS location
feature. See
Location.
Access Google Maps
► From the Home screen, tap Google > Maps.
Tap the account icon on the top right of the screen to display the option menu.
For more information, please visit
support.google.com/maps.

56 Applications
YouTube
YouTube™ is a video sharing website on which users can upload and share videos.
Access YouTube
► From the Home screen, tap Google > YouTube.
For more information, please visit
support.google.com/youtube.
YouTube Music
Access the YouTube Music app to enjoy your favorite music.
Access YouTube Music
► From the Home screen, tap Google > YT Music. The YouTube Music screen appears.
For more information, please visit
support.google.com/youtubemusic.
Files
You can manage the contents stored in the phone or on the microSD card (optional) quickly and
easily.
Access Files
► From the Home screen, tap Google > Files. The Categories menu screen appears.
For more information, please visit
support.google.com/files.
Supported formats
The following image, video and audio formats are supported by the phone.
● BMP, GIF, JPEG, PNG, WEBP, HEIC
● H.263, H.264 AVC, H.265 HEVC, MPEG-4 SP, VP8, VP9
● PCM, AAC, AAC+, eAAC+, AAC-ELD, MP3, AMR-NB, AMR-WB, FLAC, Vorbis, MIDI,
Opus
Messages
Google Messages is a simple, helpful messaging app and keeps your conversations safe and
secure with end-to-end encryption and real-time spam protection.
1. From the Home screen, tap > Next > Next.
2. On the Messages screen, tap Start chat. The New conversation screen opens.
3. Enter a phone number in the To field.


58 Connections
Connections
Your phone’s data capabilities let you wirelessly access the Internet or your corporate network
through a variety of connections, including Wi-Fi, Verizon 5G Ultra Wideband, 4G LTE, and
Virtual Private Networks (VPN).
The following topics address your phone’s data connections and the built-in Web browser.
Additional data-related features can be found in Applications and Useful Tools.
Wi-Fi
Wi-Fi provides wireless Internet access. To use your phone’s Wi-Fi, you need access to a
wireless access point or "hotspot."
The availability and range of the Wi-Fi signal depend on several factors, including infrastructure
and objects through which the signal passes.
► From the Apps launcher, tap Settings > Network & internet > Internet to open the
Internet screen.
Turn Wi-Fi on and connect to a wireless network
Use the Network & internet settings menu to enable your phone’s Wi-Fi radio and connect to an
available Internet network.
1. From the Internet screen, tap the on/off icon next to Wi-Fi to turn it on.
2. Tap the available network to connect.
If you selected an open network, you will be automatically connected to the network.
If you selected a network that is secured with a password, enter the password, and
then tap
Connect
.
NOTE:
If the wireless network you want to connect to is not in the list of detected
networks, tap
Add network
at the bottom of the list. Enter the wireless network
settings and tap
Save
.
If you selected the network that the phone is currently connected to, you will see
Network details showing the Wi-Fi network name, status, signal strength, frequency,
and more.
Depending on the network type and its security settings, you may also need to enter more
information or choose a security certificate.
When your phone is connected to a wireless network, the Wi-Fi icon appears in the status
bar and tells you the approximate signal strength. (The above icon indicates maximum signal
strength.)

Connections 59
NOTE:
The next time your phone connects to a previously accessed secured wireless network,
you will not be prompted to enter the password again, unless you reset your phone to
its factory default settings or you instruct the phone to forget the network.
NOTE:
Wi-Fi networks are self-discoverable, which means no additional steps are required for
your phone to connect to a Wi-Fi network. However, it may be necessary to provide a
user name and password for certain closed wireless networks.
Wi-Fi settings menu
The Wi-Fi settings menu lets you turn Wi-Fi on or off, set up and connect to available Wi-Fi
networks, and configure advanced Wi-Fi options.
► From the Internet screen, scroll down to see these items.
Add network
to add networks to the network list. Tap to add a Wi-Fi network
by scanning a QR code.
TIP:
If you want to connect to a hidden network, change the
Hidden network
to
Yes
in
Advanced options
.
Network preferences
to display the setting options related to Wi-Fi such as
Turn
on Wi-Fi automatically
,
Wi-Fi notifications
, and
Wi-Fi Direct
.
Non-carrier data usage
to show data usage through Wi-Fi connections over a
period of time.
Bluetooth
Bluetooth is a short-range communications technology that allows you to connect wirelessly to a
number of Bluetooth devices, such as headsets and hands-free car kits, and Bluetooth-enabled
handhelds, computers, printers, and wireless phones. The Bluetooth communication range is
usually approximately 30 feet.
Turn Bluetooth on or off
Use the settings menu to enable or disable your phone’s Bluetooth capabilities.
1. From the Apps launcher, tap Settings > Connected devices > Connection
preferences > Bluetooth to open the Bluetooth settings screen.
2. Tap the on/off icon next to Use Bluetooth to turn it on or off.
NOTE:
Turn off Bluetooth when not in use to conserve battery power, or in places where using
a wireless phone is prohibited, such as aboard an aircraft and in hospitals.

60 Connections
Change the device name
The device name identifies your phone to other devices.
1. From the Bluetooth settings screen, tap the on/off icon to turn Bluetooth on, if Bluetooth
is not turned on.
2. Tap Device name.
3. Edit the name for your phone in the dialog box, and then tap Rename.
Pairing
Pairing with other devices makes your phone ready for connecting to them.
Pair with other devices
NOTE:
Bluetooth on other devices must be turned on before pairing.
IMPORTANT:
Perform the pairing process at a secure location.
IMPORTANT:
Bluetooth accessories/peripherals MUST have a passkey to work with the
mobile device. If you need to pair with a device without a pre-defined passkey, it
is recommended to use a passcode of at least eight digits.
1. From the Apps launcher, tap Settings > Connected devices to open the Connected
devices screen.
2. Tap Pair new device.
Bluetooth turns on and shows you a list of nearby Bluetooth devices.
3. Tap the name you want to connect to in the Available devices list.
Your phone then automatically tries to pair with the device.
4. If necessary, tap Pair or enter the passcode.
To change the connected device name, tap to open the Device details screen,
tap to edit it, and then tap
Rename
.
NOTE:
The display may vary depending on the connected device.
Disconnect from or reconnect to other devices
Once the pairing is established, you can connect to or disconnect from the paired device easily.
► From the Connected devices screen, tap next to the paired device name >
Disconnect or Connect.

Connections 61
Unpair from other devices
Unpairing from other devices makes your phone forget its pairing connection with them. To
connect to the other devices again, you may need to enter or confirm a passcode.
► From the Connected devices screen, tap next to the paired device name > Forget >
Forget device.
NOTE:
The display may vary depending on the connected device.
Send and receive information
You can use Bluetooth to transfer information such as images or videos between your phone
and another Bluetooth-enabled device such as a phone or notebook computer.
To send information from your phone to another device:
1. Pair with the receiving device.
2. On the phone, open the application that contains the information or file you want to
send.
3. Tap the item you want to send and tap or Share > Bluetooth.
4. Tap the name of the receiving device.
5. On the receiving device, accept the download.
To receive information from another device:
1. Pair with the sending device.
2. On the sending device, send one or more files to your phone.
3. When your phone receives a file transfer request notification, slide down the
Notifications panel, tap the notification, and then tap Accept.
4. When a file is transferred, a notification will be displayed. To open the file, slide down
the Notifications panel, and then tap the relevant notification.
Supported Bluetooth profiles
HSP, HFP, SPP, OPP, PBAP, AVRCP, MAP, HID, PAN, A2DP, GATT, AVDTP, AVCTP,
GAVDP, HOGP, and DID are supported.
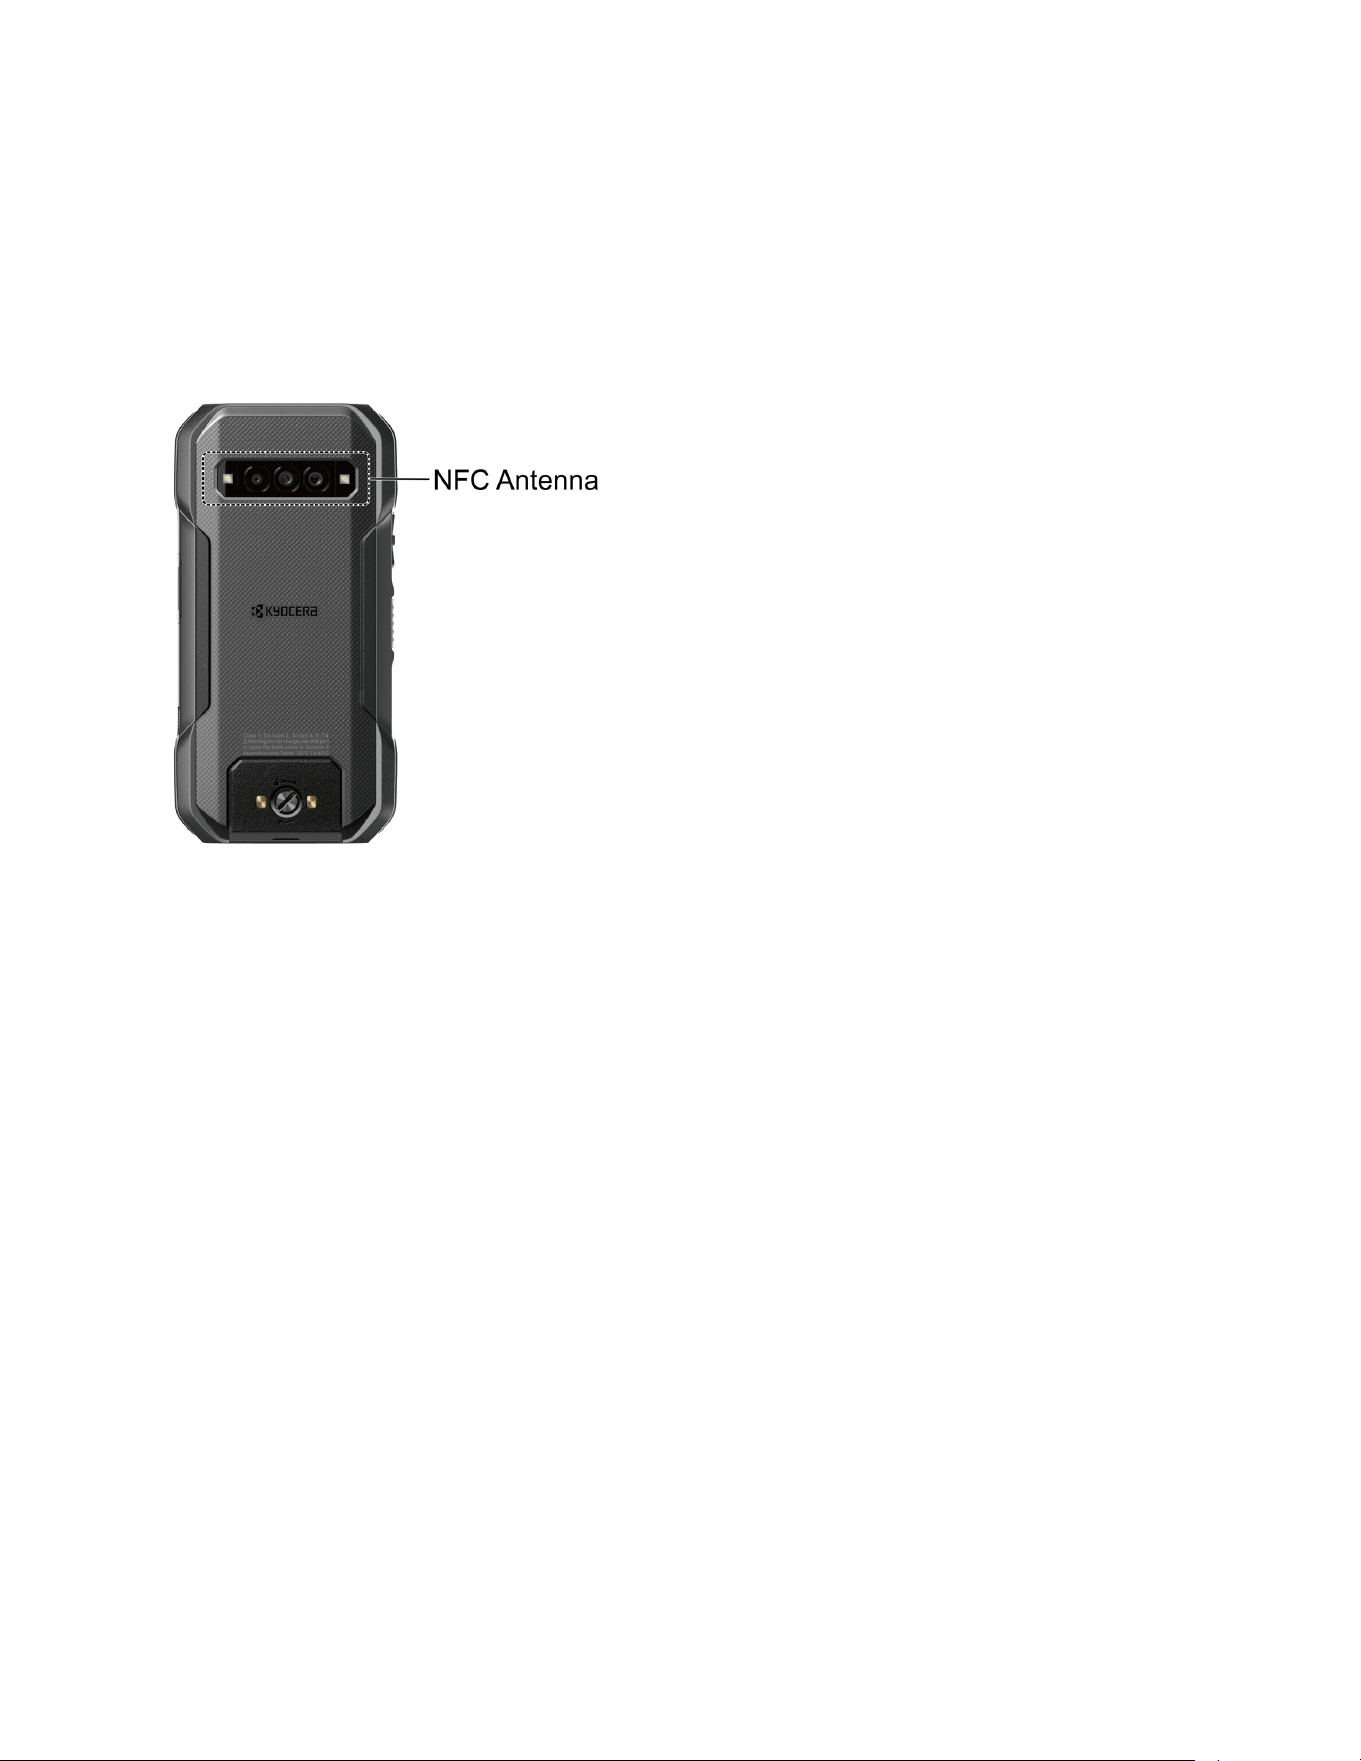
62 Connections
Near Field Communication (NFC) Technology
NFC (Near Field Communication) technology is a short-range, wireless technology that lets you
quickly and wirelessly exchange information between your phone and other NFC-enabled
devices. You can use this function to purchase goods or take a train in a contactless manner by
installing your preferred payment/transit apps in your phone and bringing your phone close to
the target NFC terminal.
Turn NFC on or off
Use the settings menu to enable or disable your phone’s NFC capabilities.
1. From the Connected devices screen, tap Connection preferences > NFC.
2. Tap the on/off icon next to Use NFC to turn it on or off.
3. The following options are available:
Require device unlock for NFC
to allow NFC payment and transit only when the
phone is unlocked.
Security reminders about NFC
to display reminders for using the NFC feature.
Contactless payments
to set the default payment app.

Connections 63
Mobile Hotspot & Tethering
Mobile Hotspot allows you to turn your phone into a Wi-Fi hotspot, while Tethering functionality
lets you share your phone's Internet connection with other devices. These features work best
when used in conjunction with 4G LTE or 5G data services.
NOTE:
Use of these services requires a subscription. Refer to the My Verizon website or
contact Verizon to add the appropriate add-on.
► From the Apps launcher, tap Settings > Network & internet > Mobile Hotspot &
tethering to open the Mobile Hotspot & tethering screen.
Turn Mobile Hotspot on or off
Use the settings menu to enable or disable your phone’s Mobile Hotspot capabilities.
IMPORTANT:
There may be charges for using Mobile Hotspot depending on your contract or
plan. Contact your service provider for details.
1. From the Mobile Hotspot & tethering screen, tap Mobile Hotspot.
2. Tap the on/off icon next to Use Mobile Hotspot to turn it on or off.
If Mobile Hotspot is not turned on in My Verizon Services settings, turn it on by
following onscreen instructions.
3. Change the name, password, or security type as necessary.
USB tethering
You can tether your phone to your computer with a USB cable and share your phone’s Internet
connection with your computer via USB.
1. Connect your phone to your computer via a USB cable.
2. A message will appear on the phone's screen asking you to allow access to your files.
Tap a link labeled Other USB options.
3. A list of USB options will appear. Select USB tethering.
4. The phone will launch the Mobile Hotspot & tethering settings menu. Tap the on/off
icon next to USB tethering to turn it on.
If Mobile Hotspot is not turned on in My Verizon Services settings, turn it on by
following onscreen instructions.

64 Connections
Bluetooth tethering
You can share your phone's Internet connection with Bluetooth devices via Bluetooth.
1. From the Mobile Hotspot & tethering screen, tap the on/off icon next to Bluetooth
tethering to turn it on.
If Mobile Hotspot is not turned on in My Verizon Services settings, turn it on by
following onscreen instructions.
2. Pair your phone with a Bluetooth device. If they are already paired, establish their
connection.
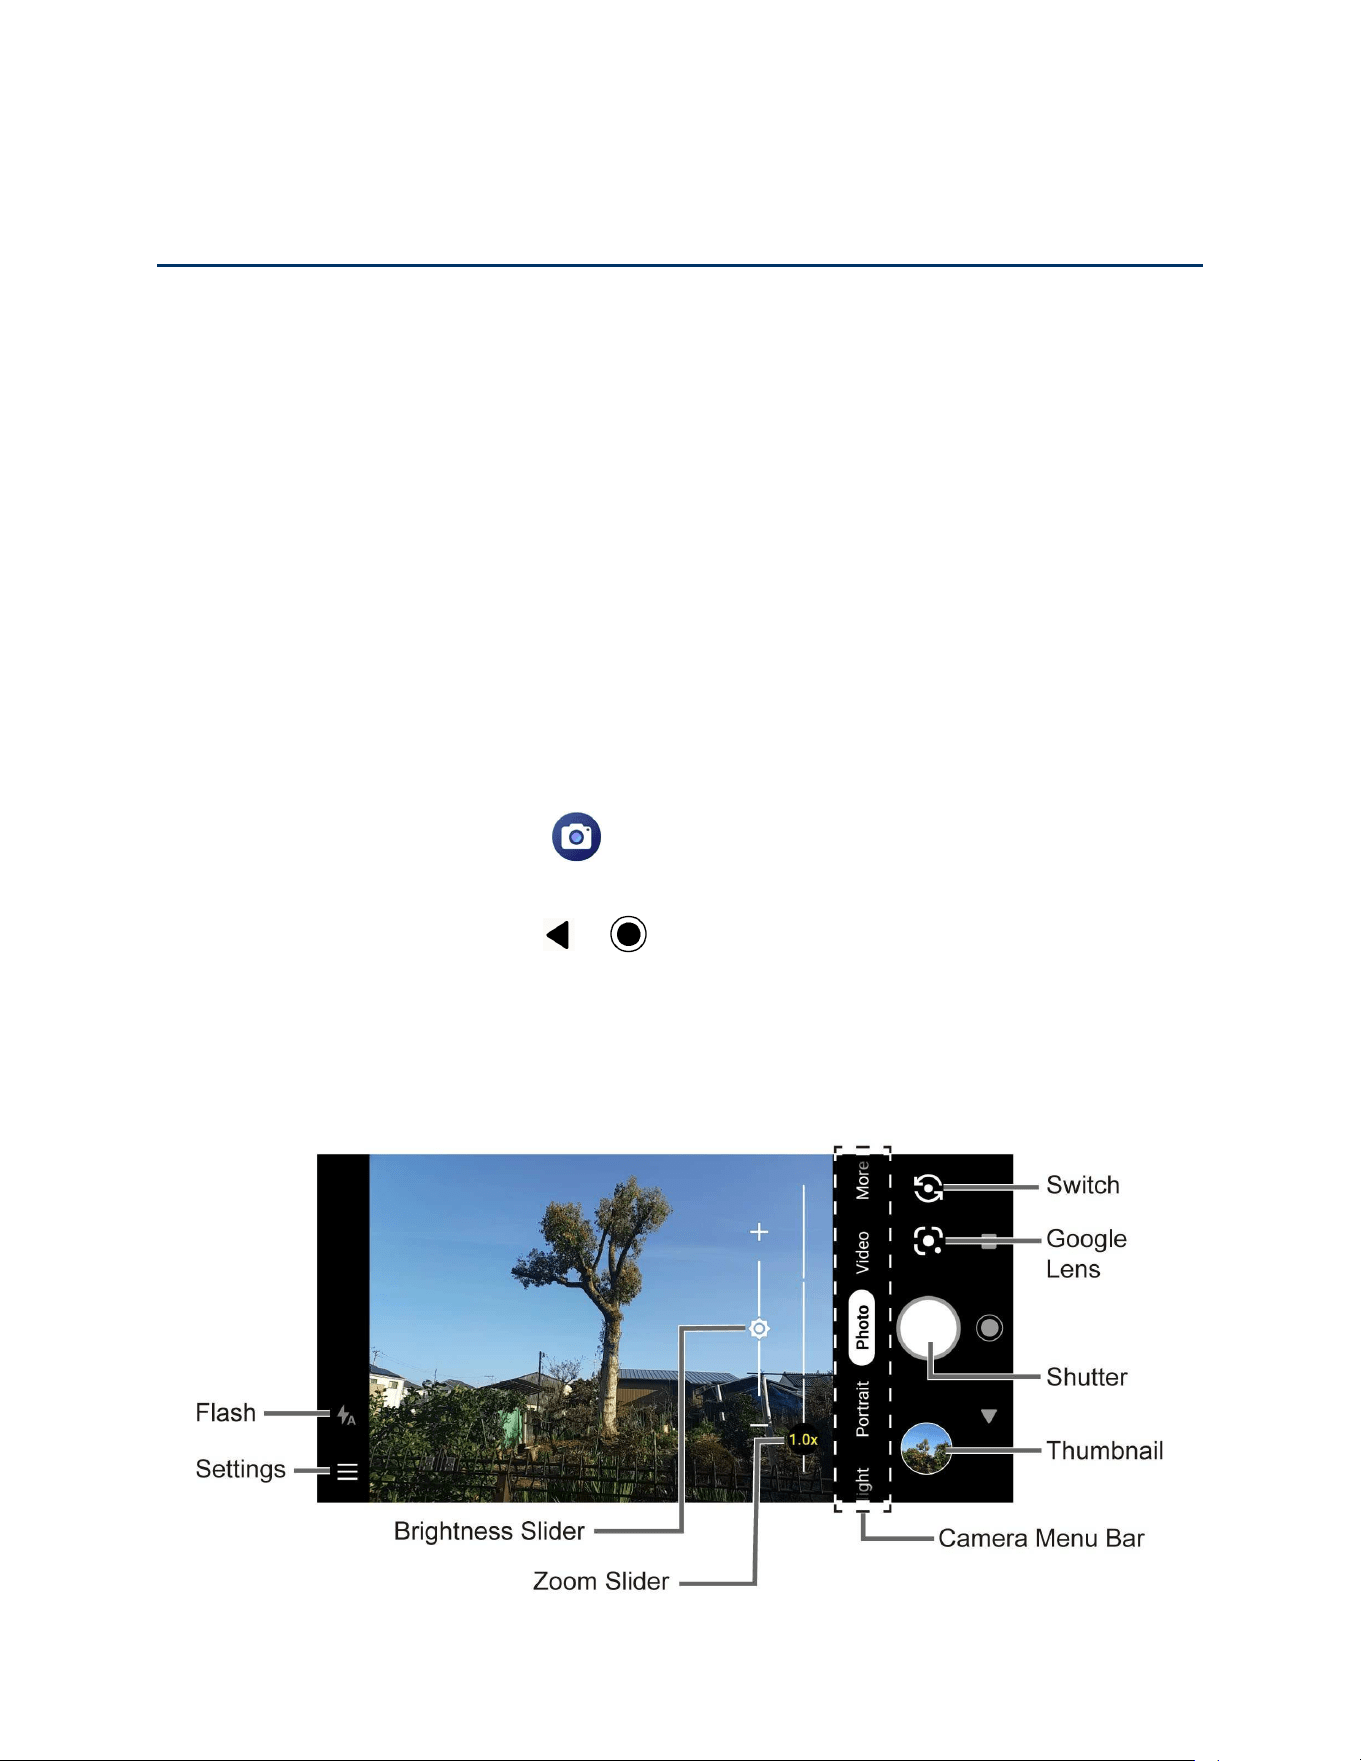
Camera 65
Camera
You can use the camera app to take and share a wide range of pictures and videos. Your phone
comes with four different types of cameras. A 64.0 megapixel main camera and an 8.0
megapixel front camera let you take high quality sharp pictures and videos. A super wide-angle
action camera allows you to take wide-angle shots while creating stable footage and offering
excellent still image quality (16.0 megapixel). With a 2.0 megapixel macro camera, you can
shoot amazing close-up photos.
Use the Camera App
The following topics show you how to take pictures and record videos.
Open or close the Camera app
The first step to take a picture or record a video is to open the camera app.
To open the Camera app:
► Press and hold the camera key on the lower right side of the phone.
– or –
From the Home screen, tap .
To close the Camera app:
► On the camera screen, tap or .
Viewfinder screen
The viewfinder screen lets you view your subject and provides controls and options for taking
pictures or recording videos.
Photo
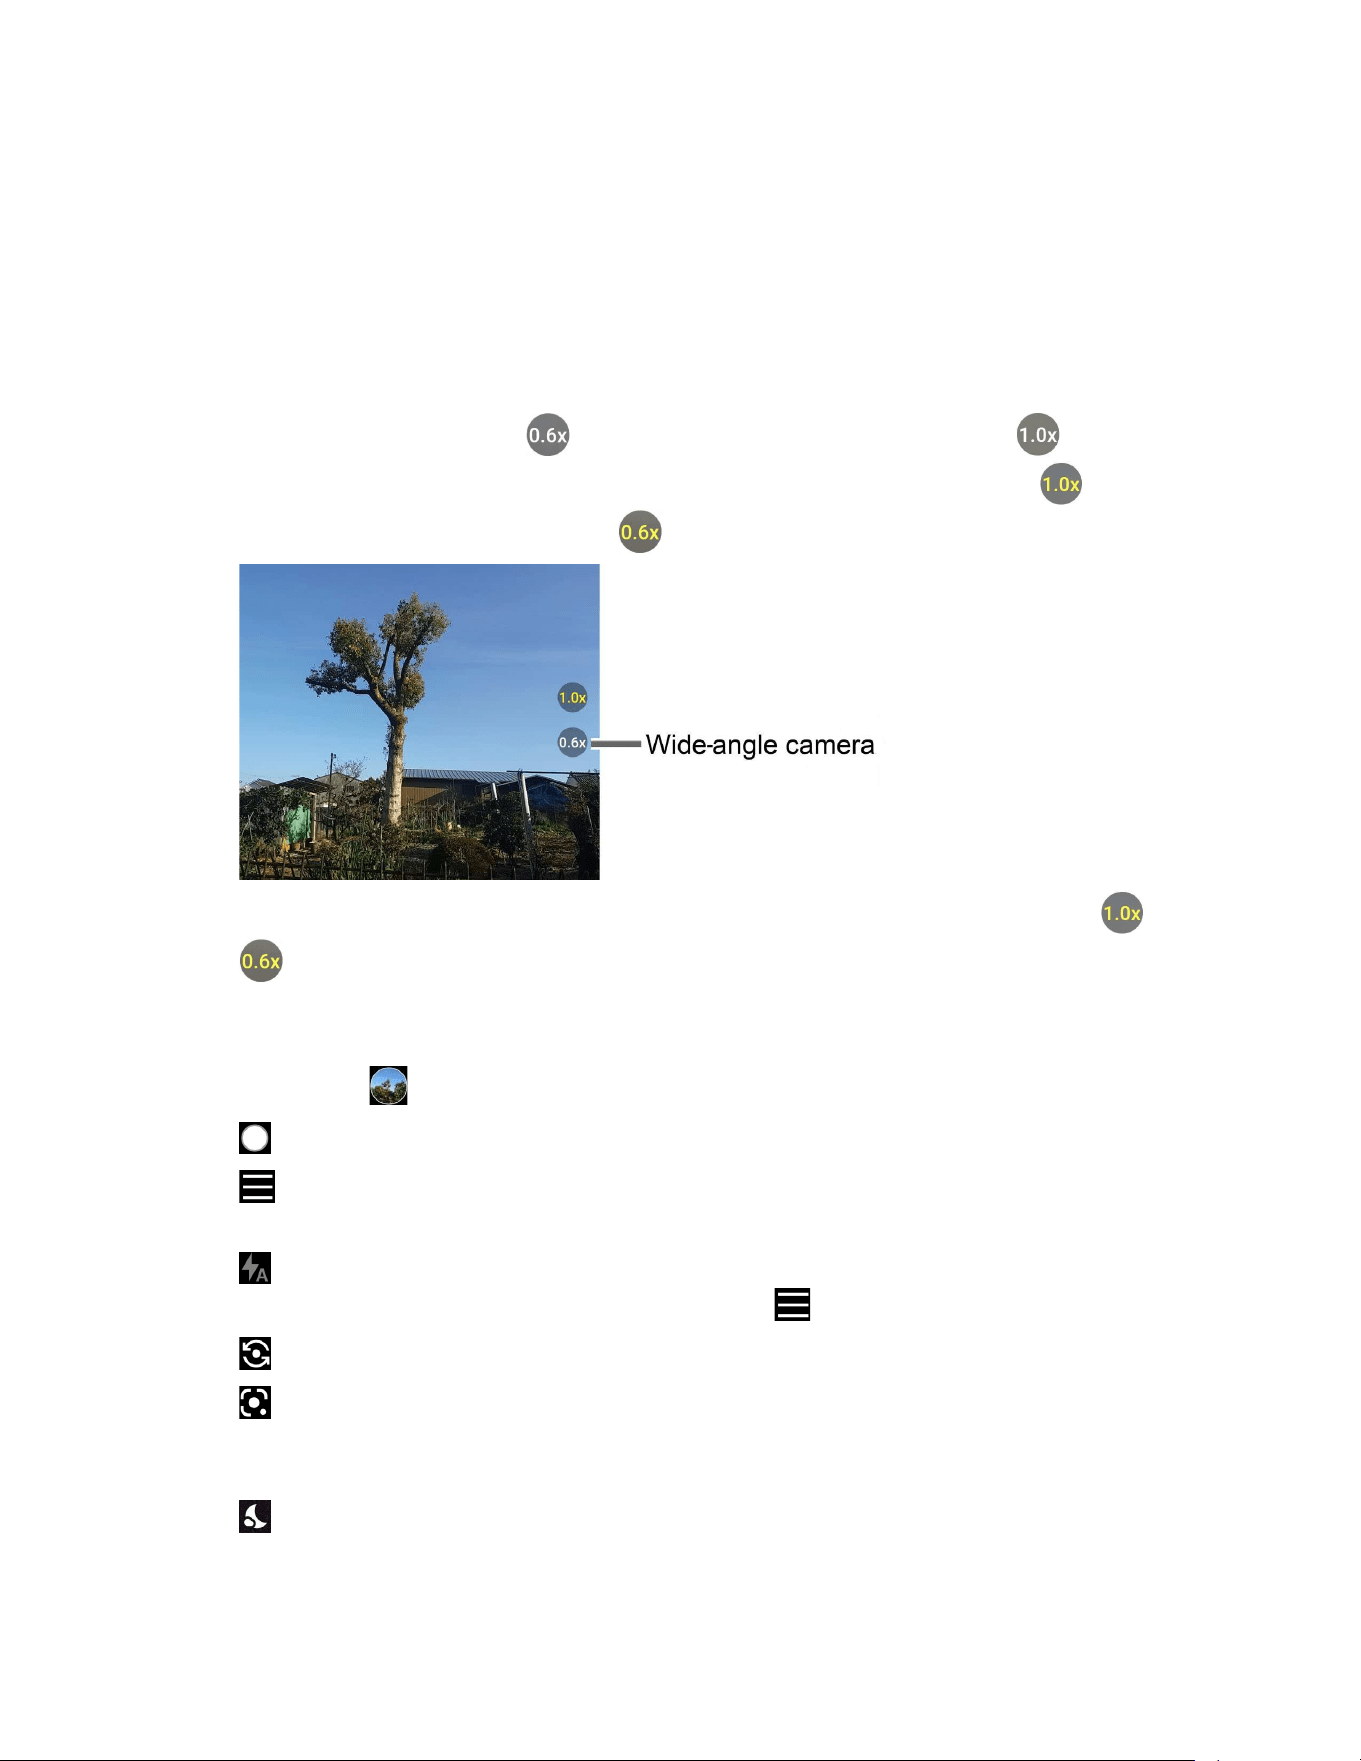
66 Camera
● Camera Menu Bar: Select a mode such as Night, Portrait, Photo, Video, and More by
sliding left or right. Macro, Pro photo, Panorama, Slow motion, Time lapse, Pro
video, Google Lens, Underwater, Action Overlay, and Multi camera are located
under More by default.
TIP:
You can change the modes which appear here from the
Edit modes
menu. To
access the
Edit modes
screen, touch and hold a camera mode name.
Underwater
and
Action Overlay
are only available under
More
.
● Wide-angle camera: Tap to switch to the wide-angle camera. Tap to switch
back to the main camera. A yellow label indicates which camera is active. indicates
that the main camera is active and indicates that the wide-angle camera is active.
● Zoom Slider: Adjusts your zoom level. Pinch the screen with two fingers or tap or
to display the zoom slider. The number will change to indicate the zoom level.
● Brightness Slider: Adjusts your brightness level. Tap the screen to display the
brightness slider.
●
Thumbnail :
Displays the thumbnail of the latest image. Tap to view and manage.
●
:
Takes a picture.
●
:
Pops up the basic camera settings panel. To open the detailed camera settings
screen, tap
More settings
. For more information, see
Camera settings.
●
:
Helps illuminate subjects in low-light environments. This icon will not appear when it
is set to Off (default). To change the settings, tap .
●
:
Switches between the main camera and the front camera.
●
:
Opens the Google Lens app. Aim the camera at an object and you can obtain a
variety of information about it by selecting an option, such as
Translate
,
Search
, and
Homework
. For more information, please visit
support.google.com/photos.
●
:
Tap to switch to Night mode. This icon will appear automatically when the device
detects low light. Only available in Photo mode.
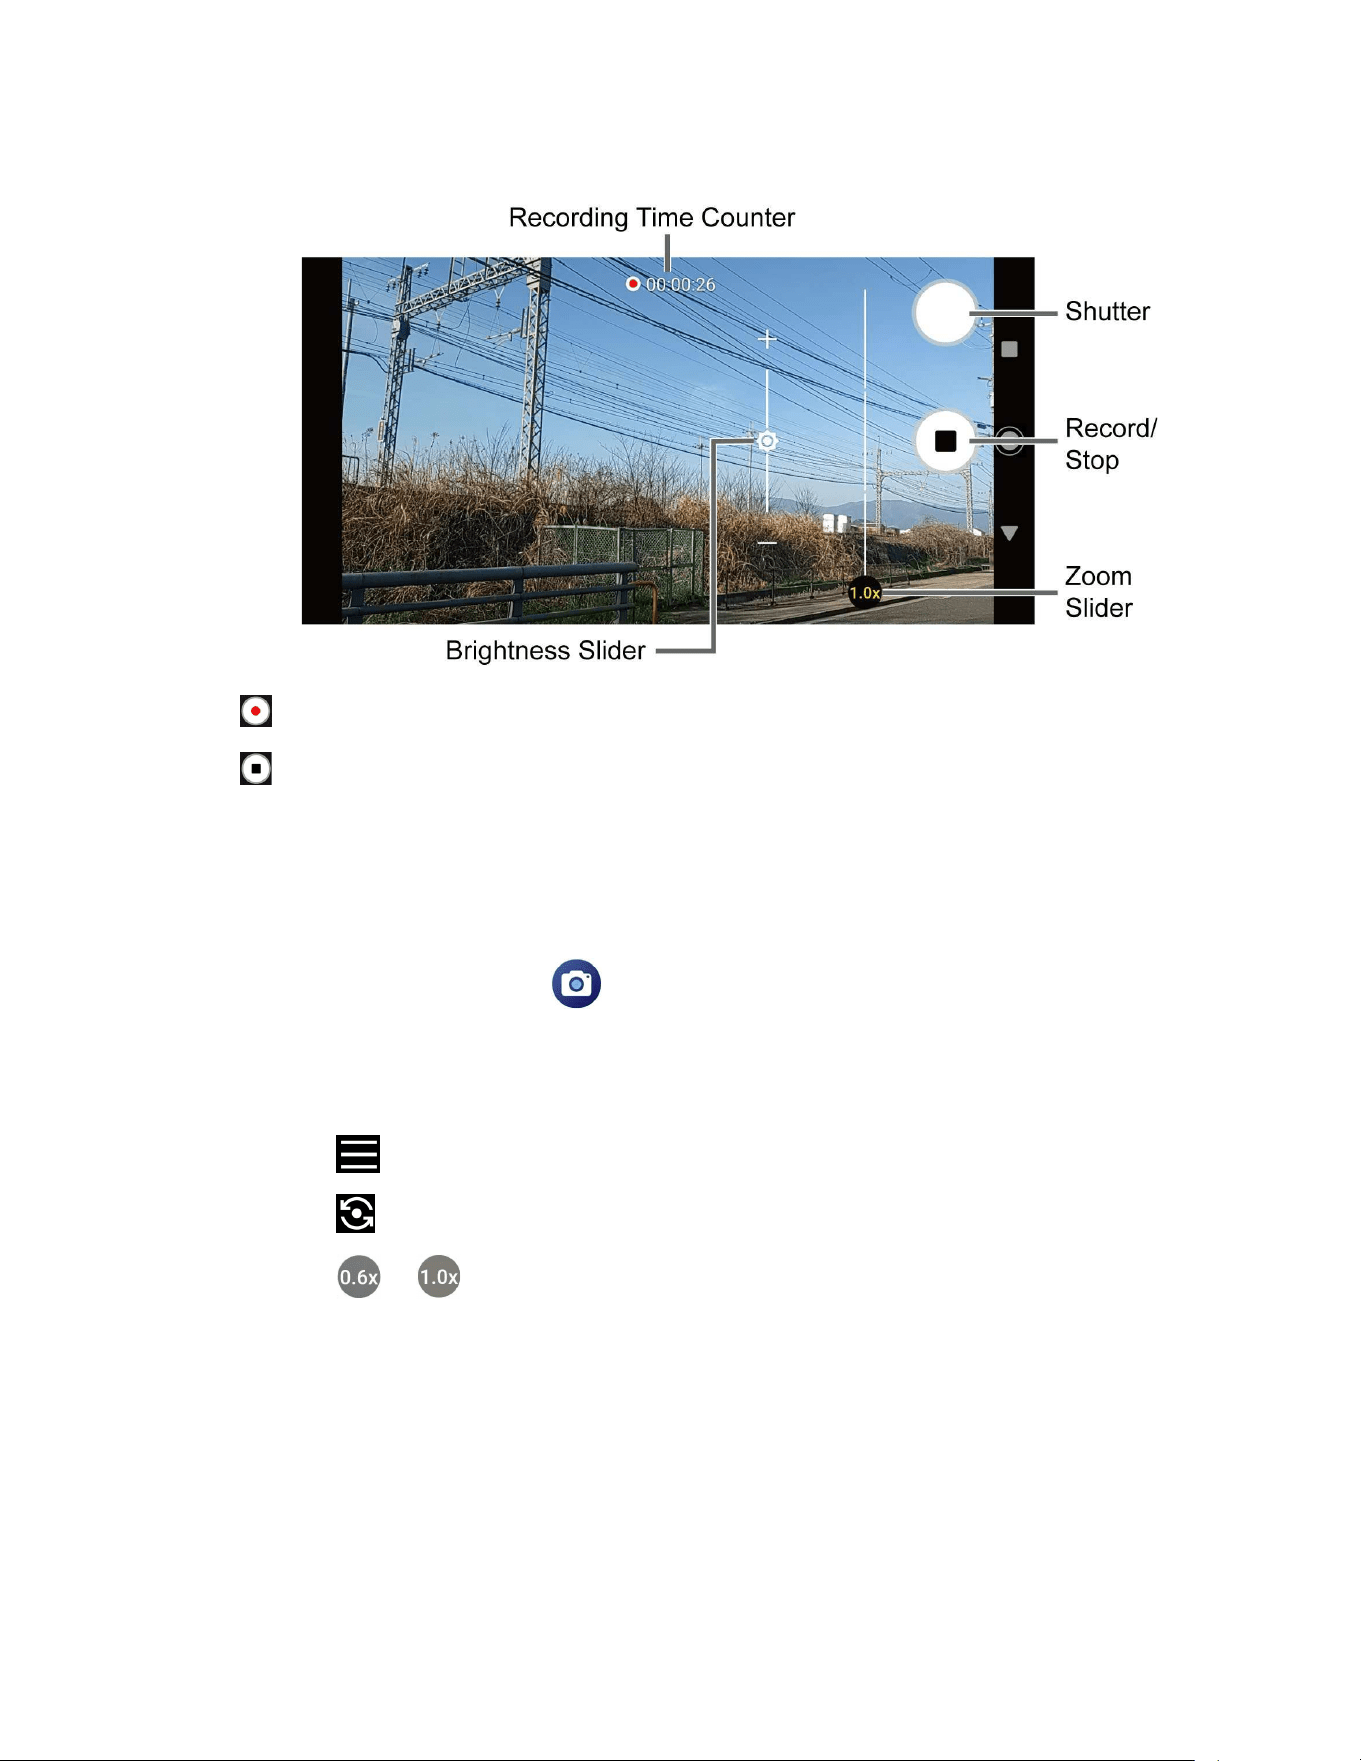
Camera 67
Video
●
:
Records a video.
●
:
Stops recording a video.
●
Recording Time Counter:
Displays the elapsed time while recording a video.
Take a picture or record a video
You can take high quality photos and videos with your phone's camera.
1. From the Home screen, tap .
2. Select Photo or Video on the camera menu bar.
3. Do the following to change the settings:
Tap
to change the camera settings as desired. See
Camera settings.
Tap to switch between the front camera and the main camera.
Tap or to switch between the main camera and the wide-angle camera.
See
Wide-angle camera.
Adjust your zoom level.
Adjust your brightness level if necessary.
Tap any point on the viewfinder to focus on that area.
4. Frame your subject on the screen.
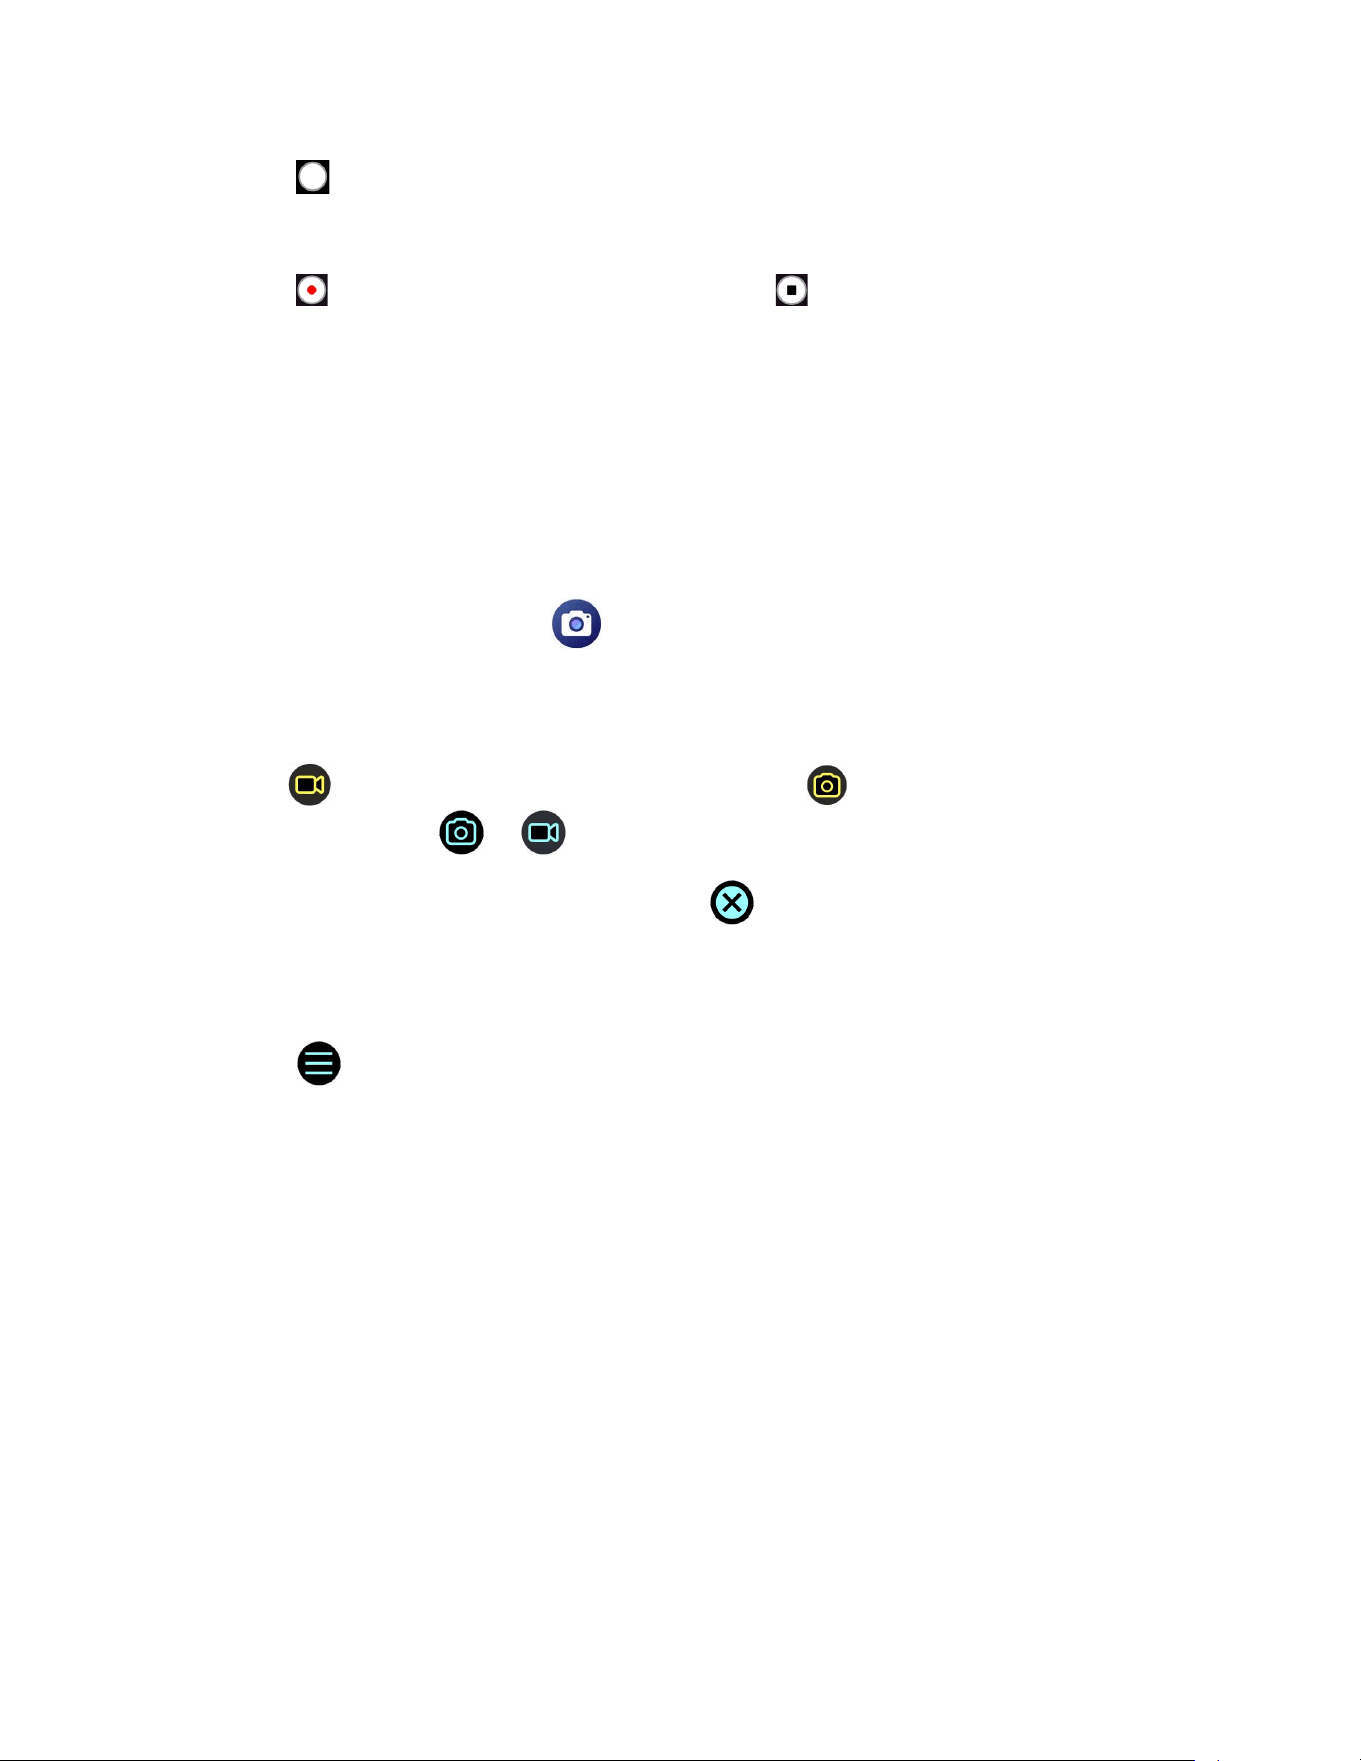
68 Camera
5. Tap to take a picture.
– or –
Tap to start recording. To stop recording, tap .
6. Tap the thumbnail icon to view the image you’ve just taken or recorded.
Action Overlay mode
You can take a photo or record a video with additional information such as elapsed time, travel
distance, speed, G-force, altitude, map, or weather.
WARNING: Do not operate the app while driving or riding a bicycle or motorcycle. If necessary,
stop moving first and operate the app with careful attention to safety.
► From the Home screen, tap > More > Action Overlay.
Action Overlay mode uses location information. You will be prompted to enable the
Location settings if they are disabled.
indicates that the video mode is active and indicates that the camera mode
is active. Tap or to toggle between the video and camera mode.
To close the Action Overlay mode, tap .
Action Overlay mode settings
You can configure the Action Overlay mode settings.
1. Tap , the basic camera settings panel will pop up. The following options are
available:
Mode
: Select
Standard
or
Bike
.
Light
: Select
Off
or
On
.
Aspect ratio
: Select
16:9
or
1:1
.
Image Stabilization
: Select
Off
or
On
. (Only available in video mode.)
Display settings
: Tap
Edit
to select or deselect the items to be displayed on the
Action Overlay screen.
2. Tap More Settings to open the detailed settings screen.

Camera 69
Underwater mode
You can take a picture or record video in the water. Your phone is immersible in water for up to
30 minutes at a depth not exceeding two meters (about 6.56 ft.).
WARNING: Avoid using the phone in saltwater. It is highly corrosive and can damage internal
components and degrade the audio performance over time.
1. From the Home screen, tap > More > Underwater.
2. In Underwater mode, the following physical keys are used instead of touchscreen icons.
The touchscreen is unavailable except thumbnail area.
Press the camera key to take photos or start/stop recording videos.
Press the volume key up or down to zoom in or out.
Long press the SOS key to switch between the camera and video mode.
Press the PTT key to turn the light on or off.
Long press the PTT key to exit the Underwater mode.
WARNING: Before immersing your phone in the water, make sure the back cover and
USB/Charger port cover are properly closed, with no foreign objects
obstructing the seal, to maintain the waterproof capability. The phone
should never be used under water if the back cover or USB/Charger port
cover is broken or open.
NOTE:
After using your phone under water, promptly rinse the phone gently in clean, fresh
water. The phone should be dried using a very specific procedure. See
Drying Your
Phone
.
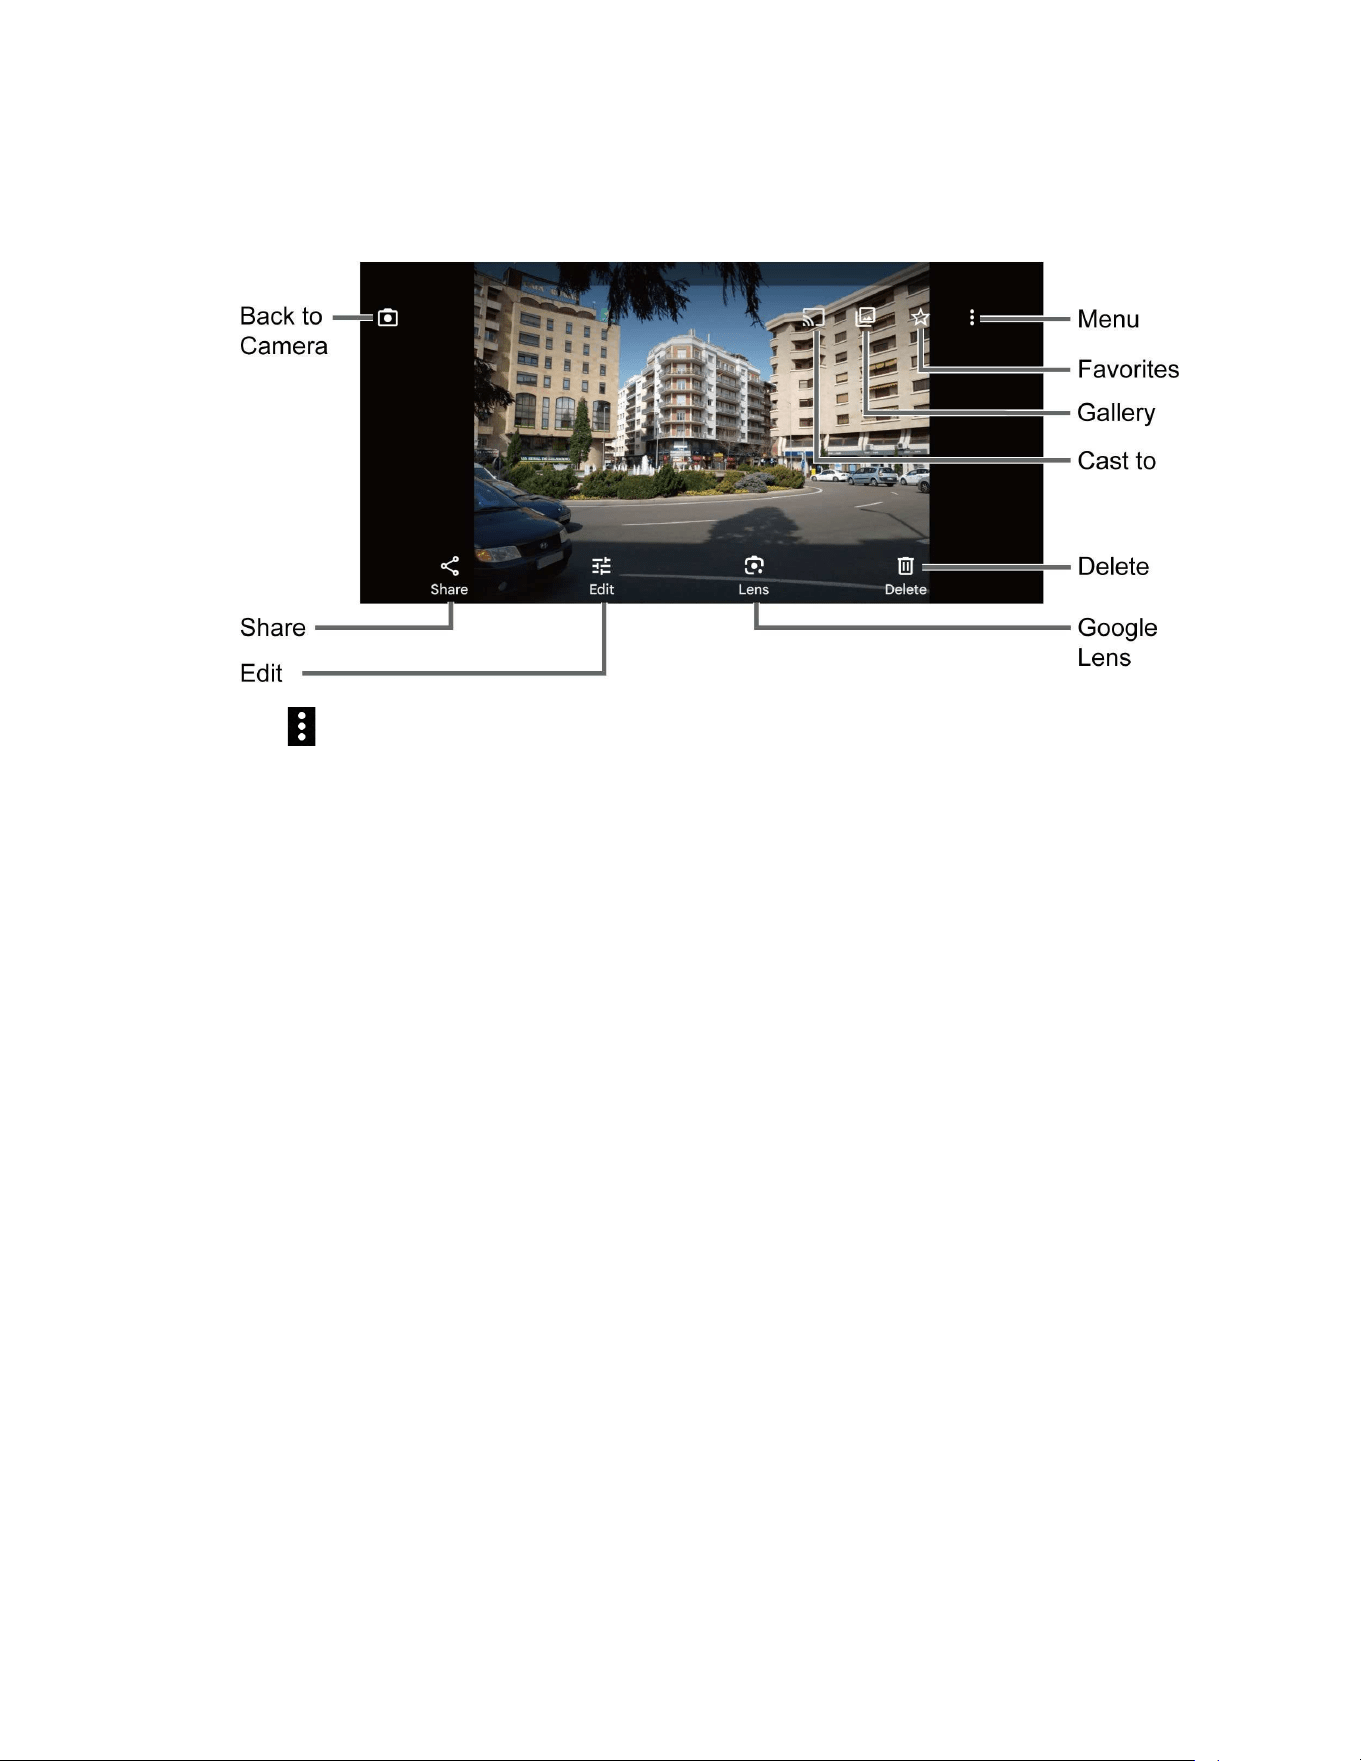
70 Camera
Review screen
After taking a picture or video, tap the thumbnail image to see the item in the review screen.
:
Displays available menus for the image. Available menus may vary:
• Back up now: Uploads the images to your Google Account. This menu displays
only for images not backed up.
• Loop video on: Select this option to see a video repeatedly. This menu displays
only when reviewing a video.
• View in: Opens the video by other apps.
• Add to album: Adds the selected picture/video to albums.
• Delete from device: Deletes the image from the device.
• Create: Lets you access some creation menus, such as Highlight video or
Collage.
• Order photo: Submits a print order of your photos to pick them up later at
nearby stores.
• Move to Locked Folder: Moves sensitive photos and videos to a folder
protected by your screen lock in the Photos app.
• Use as: Sets the picture as the contact photo or wallpaper.
• Slideshow: Starts the slideshow of the pictures stored in the Photos app.
• Print: Prints the selected picture.
• Help & feedback: Opens the Help window with the Feedback action.

Camera 71
:
Registers the image as Favorites.
:
Opens your phone's gallery app, such as
Photos
.
: Starts casting your photos or videos to your TV. This icon will appear only
when your phone is on the same Wi-Fi network as your Chromecast™ or TV with
Chromecast built-in.
:
Returns to the Camera.
Share:
Displays available applications to share your image.
Edit:
Displays the editing options. For details, see
Edit a picture.
Lens:
Opens the Google Lens app. You can obtain some interesting information
about your photos. For more information, please visit
support.google.com/photos.
Delete:
Deletes the currently displayed image. Tap
Delete
>
Move to trash
to
confirm the deletion.
Camera settings
You can adjust the settings of your camera.
1. Tapping on the viewfinder screen, the basic camera settings panel will pop up.
2. The following options are available. Some options are available for the main camera
only:
NOTE:
Available options may vary according to the subject and mode.
Photo:
Aspect ratio:
Select from
4:3
,
16:9
, and
1:1
.
Flash:
Select from
Off
,
On
,
Auto
, and
Light
.
Self timer:
Select from
Off
,
2 sec
,
5 sec
, or
10 sec
.
Video:
Aspect ratio:
Select
16:9
or
1:1
.
Resolution:
Select
4K
or
FHD
.
Frame rate:
Select
30fps
or
60fps
.
Flash:
Select from
Off
,
On
,
Auto
, and
Light
.
Pause:
Select from
Off
or
On
.
3. Tap More settings to open the detailed settings screen.

72 Camera
View Pictures and Videos Using Photos
Using the Google Photos™ application, you can view pictures and watch videos that you’ve
taken with your phone’s camera, downloaded, or copied onto your microSD card or phone’s
internal storage.
For pictures that are on your microSD card or phone’s internal storage, you can do basic editing
such as rotating and cropping. You can also easily assign a picture as your contact picture or
wallpaper and share pictures with your friends.
View pictures and videos
You can browse through the pictures and videos in grid view. Tap a picture or video to view.
1. From the Home screen, tap .
2. Scroll up or down to find a picture or video you want to view.
3. Tap an image of a picture or video you want to view.
For a video, it automatically starts playing. While playing, tapping the screen will
display the control options. Tap to pause or drag the dot on the timeline to
rewind or forward. Tap to resume.
For a picture, it displays the one you selected. When viewing, pinch & spread on the
screen to zoom in or out on the picture. You can also zoom in and out by tapping
quickly twice on the screen.
Work with Pictures
You can easily manage and retouch your pictures.
Edit a picture
Your phone has a built in editing tool and you can edit your pictures easily.
1. Tap a picture > Edit.
2. Tap Suggestions, Crop, Adjust, Filters, Markup, or More and edit your picture as
desired.
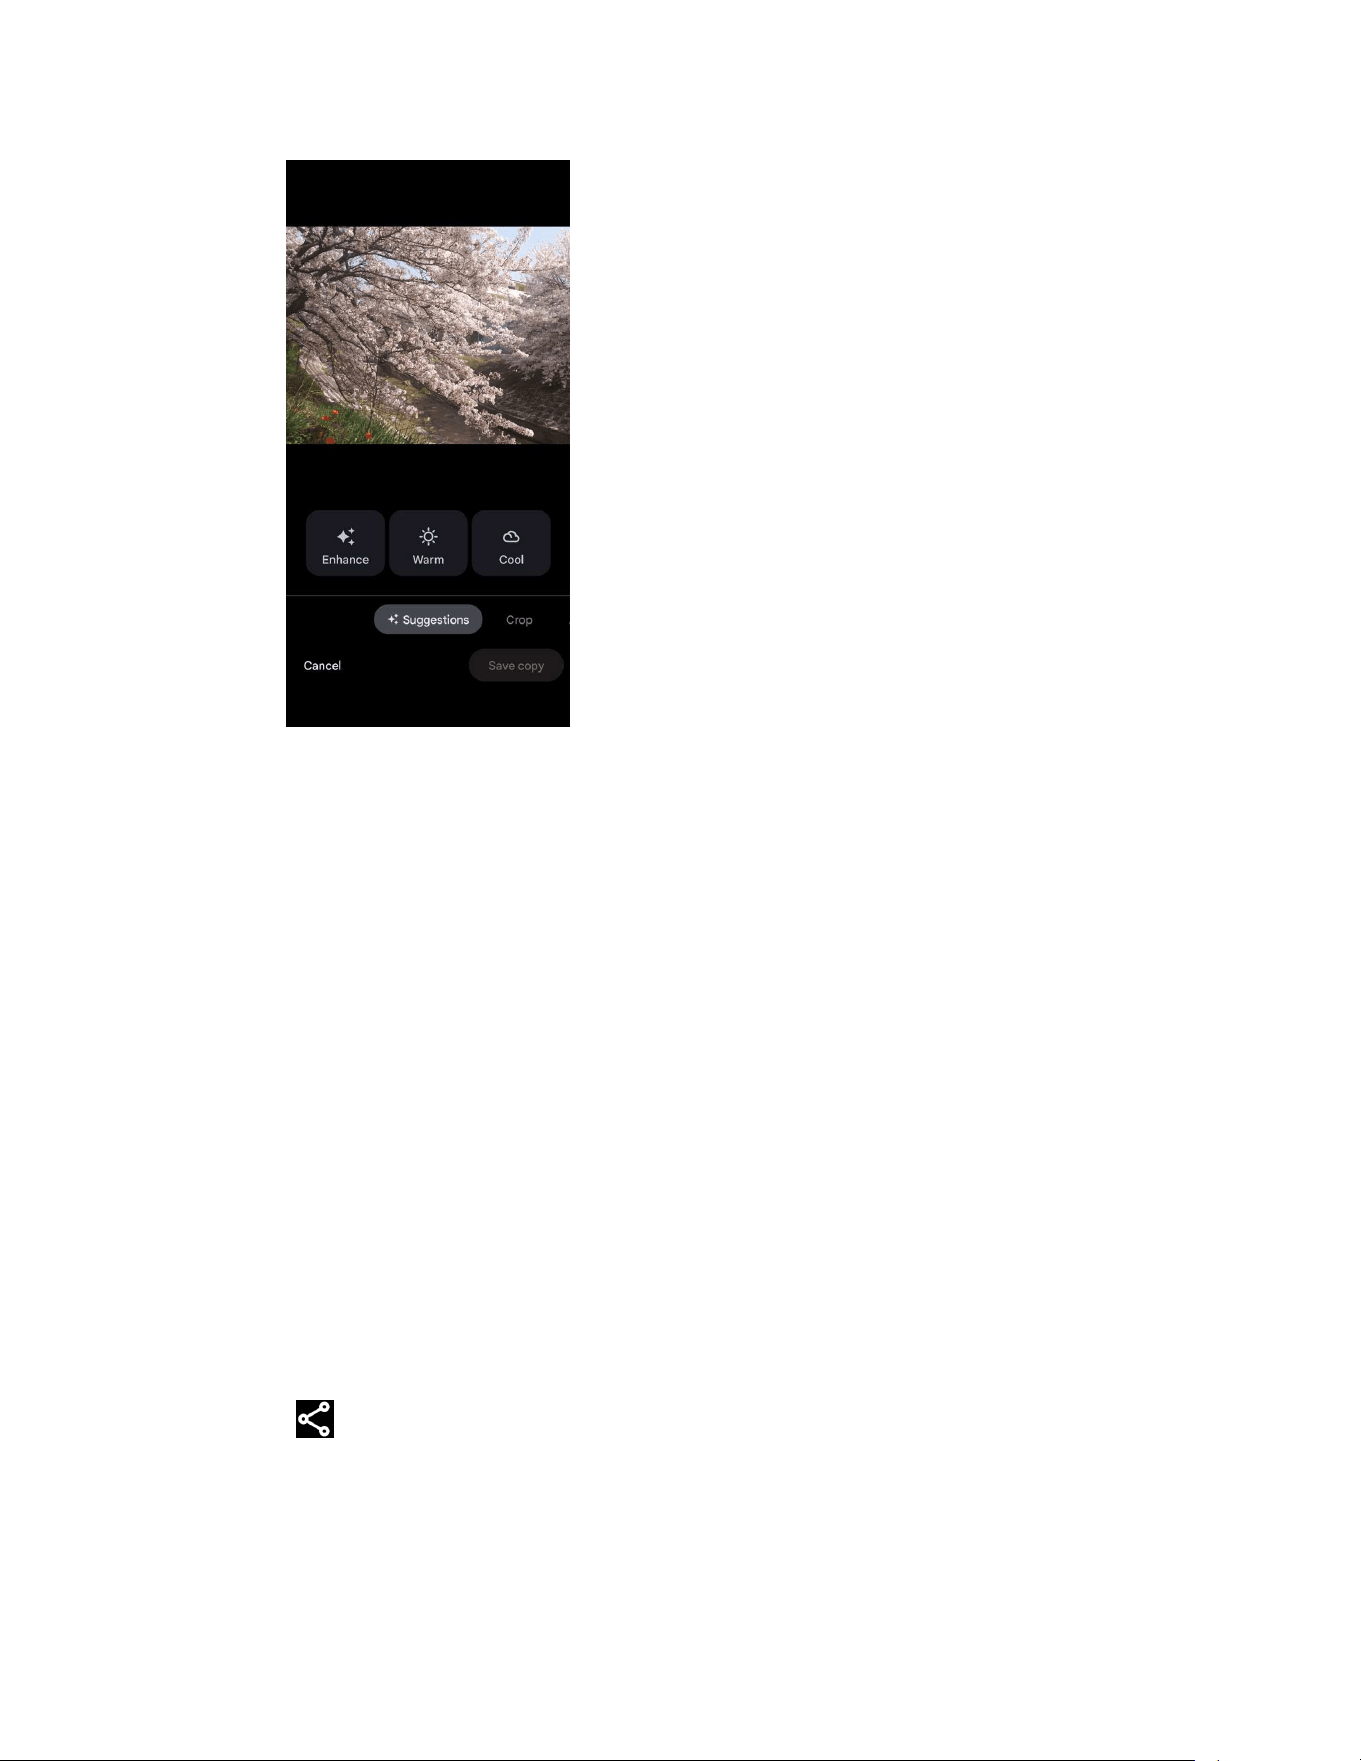
Camera 73
Suggestions:
Choose one of the suggested options for your picture.
Crop:
Crop or rotate the picture by using the available tools.
Adjust:
Apply some effects to adjust the picture.
Filters:
Apply color effects to the picture.
Markup:
Make your picture unique by drawing, highlighting, and adding text.
More:
Use Office Suite to edit the picture.
3. When finished, tap Save or Save copy.
Share Pictures and Videos
The Photos application lets you send pictures and videos using email or multimedia messages.
You can share pictures on your social networks. You can also send them to another phone or
your computer using Bluetooth.
1. Touch and hold the picture or video to place a check mark on it. Tap multiple pictures
and videos to select them.
2. Tap .
3. Tap one of the available sharing options, such as Gmail, Bluetooth, and Messages.
4. Follow the onscreen instructions to share.

74 Useful Tools
Useful Tools
Learn how to use many of your phone’s productivity-enhancing features.
Clock
The Clock application functions as a world clock that shows the date and time. You can also use
it to turn your phone into an alarm clock, a countdown timer, or a stopwatch.
Alarm
You can use your phone as an alarm clock.
1. From the Apps launcher, tap Clock > Alarm.
NOTE:
When you first open the alarms, two alarms are set up by default and ready for
you to customize. These alarms are turned off by default.
2. Tap an existing alarm time to change the settings.
– or –
Tap to add a new alarm.
3. Set the time and tap OK. You will see the on/off icon set to on next to the time you have
set.
4. Add a label, set repeat option, select an alarm sound, and turn on or off the vibration.
Tap on the top right of the screen to display the option menu.
Clock
You can add the time from around the globe on the Clock screen.
1. From the Apps launcher, tap Clock > Clock.
2. Tap and enter the city name in the search field. As you type, any matching city
from the list are displayed. Tap the city you want to display on the Clock screen.
Tap on the top right of the screen to display the option menu.
Timer
You can use your phone as a countdown timer.
1. From the Apps launcher, tap Clock > Timer.
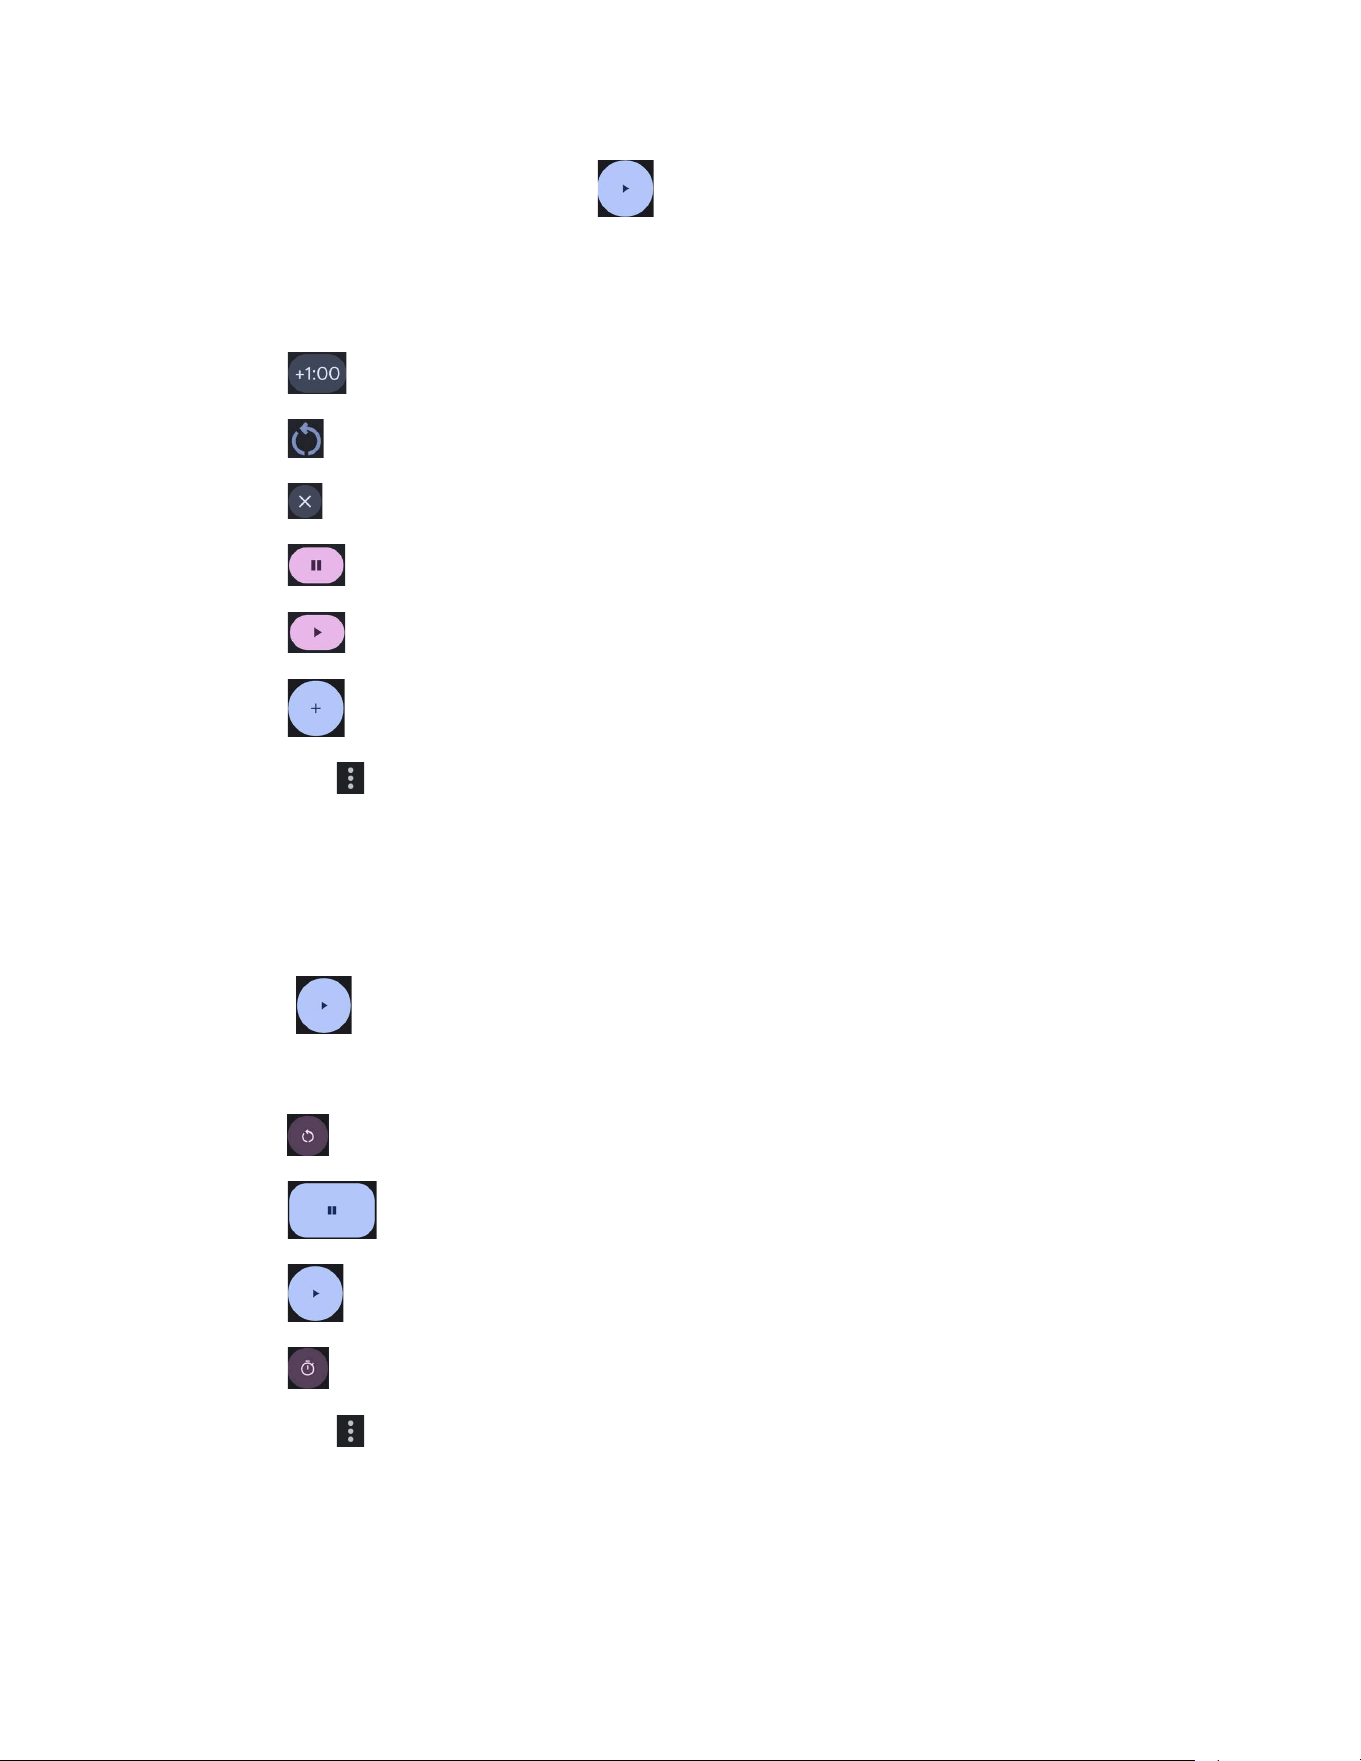
Useful Tools 75
2. Set the countdown time and tap to start the countdown.
3. The following options are available:
Tap the current label to change the description of the timer.
to add an additional minute to the remaining time.
to return to the start of the countdown.
to delete the timer.
to stop the countdown.
to resume the countdown.
to add a timer.
Tap on the top right of the screen to display the option menu.
Stopwatch
You can use your phone as a stopwatch.
1. From the Apps launcher, tap Clock > Stopwatch.
2. Tap to start the stopwatch.
3. The following options are available:
to reset the stopwatch.
to stop timing.
to resume timing.
to record the lap time.
Tap on the top right of the screen to display the option menu.

76 Useful Tools
Bedtime
Manage a healthy sleep schedule by using some convenient menus.
1. From the Apps launcher, tap Clock > Bedtime > Get started.
2. Set a wake-up time and the days to apply it and tap Next.
3. Set a bedtime and the days to apply it and tap Done.
4. The following options are available:
See recent bedtime activity
: Tap
Continue
to see your estimated time spent in
bed.
Listen to sleep sounds
: Tap
Choose a sound
to choose a sound which can help
you to fall asleep.
See your upcoming events
: Tap
Continue
to check your events on the next day.
Tap on the top right of the screen to display the option menu.
Calculator
Your phone has a convenient calculator that lets you perform basic mathematical equations.
1. From the Apps launcher, tap Calculator.
2. The following options are available:
Tap to clear a digit. To clear an entire number, tap .
Tap to access more advanced features.
Tap for more options.
Flashlight
Your phone’s camera flash can work as a flashlight.
WARNING: Do not shine the flashlight into anyone’s eyes, as doing so may compromise their
vision and cause an accident.
1. Slide the status bar down toward the bottom of the touchscreen and then slide the
Quick Settings panel downward.
2. Tap to turn the light on.
3. Tap to turn it off.

Useful Tools 77
4. Touch and hold the Flashlight button to open the Flashlight screen.
You can set
Blink speed
and
Brightness
.
Sound Recorder
The Sound Recorder app lets you record sound and save it as an audio file on your phone or
inserted microSD card.
Record sound
1. From the Apps launcher, tap Sound Recorder to open the Sound Recorder screen.
2. Tap > File format to select the format type.
3. Tap > Storage to select where to save the recorded data.
4. Tap to start recording.
Tap to pause recording. Tap to resume recording.
5. Tap to stop recording.
Play audio data
1. On the screen where you finished recording, tap .
– or –
From the Sound Recorder screen, tap and then tap a file.
2. The following options are available:
Drag the bar to rewind or fast-forward the data.
Tap to display the list of the stored files.
Tap to fast-forward the data. Tap to rewind.
Stored sound list
1. From the Sound Recorder screen, tap to display the list of the stored files.
2. The following options are available:
Tap to delete a file or files. Tap a file or files to select the file(s) you want to
delete and tap
OK
>
OK
. To select all files on the list, tap
Select all
.
Tap to display the option menu.

78 Useful Tools
Voice Search
Voice search allows you to find information on the Web as well as items and information on your
phone by speaking your search terms.
1. Tap on the Google Search Widget.
2. Speak clearly into the phone’s microphone when you see Listening... on the screen. If
an error occurs, try again.
– or –
Tap Search a song and play, sing or hum a song.
3. Tap a matching item from the onscreen list.
Outdoor
The Outdoor apps provide important and interesting information for your outdoor activities.
1. From the Home screen, swipe left and tap Outdoor.
2. The following apps are available:
Barometer:
Displays detailed Barometer information.
Compass:
Displays detailed Compass information.
Weather:
Displays the weather information in 6-hour increments. See Weather.
Weather
Your Weather widget can display a large variety of weather information.
To retrieve the current location information:
1. Tap Tap to start on the widget of the main Home screen.
2. Read the message and tap OK to enable data connection.
3. Follow the onscreen instructions to grant necessary permissions to the app.
4. Your phone will display the weather forecast for your current location.
To add a location:
1. Tap the weather image on the widget and then tap > .
2. Enter a location in the Search location field and tap on the Gboard. The matching
location(s) will be listed.

Useful Tools 79
3. Tap the location you want to add to the location list.
4. Tap the added location to access the details screen.
Carkit Power On or Off
This feature is useful for those who use PTT functions with a compatible hands-free carkit while
driving, such as bus and truck drivers.
NOTE:
The hands-free carkit is sold separately.
1. From the Apps launcher, tap Settings > Search settings.
2. Type “carkit” on the Search... field and then tap Carkit power on/off.
3. The following options are available:
Power on only:
The phone will be powered on automatically when you turn on your
vehicle's ignition. The phone must be powered off manually.
Power on and off:
The phone will be powered on and off automatically when you
turn on or off your vehicle's ignition.
Off:
The phone must be powered on and off manually.
NOTE:
This feature works only with specially designed carkits.

80 Settings
Settings
The following topics provide an overview of items you can change using your phone’s
Settings
menus.
Network & Internet
You can set up a function or change the settings of the features related to Network and Internet
such as Wi-Fi, mobile, and data usage.
► From the Apps launcher, tap Settings > Network & internet to open the Network &
internet screen.
Internet
Wi-Fi
The Wi-Fi settings menu lets you turn Wi-Fi on or off, set up and connect to available Wi-Fi
networks, and configure advanced Wi-Fi options. For more information about the Wi-Fi settings,
see
Wi-Fi.
Calls & SMS
Set your default network for calls and SMS when you’re using more than one SIM.
Use eSIM/dual SIM
In addition to your physical SIM installed in the card slot, you can also use eSIMs on your
phone. An eSIM is a digital SIM that enables you to activate a network service without using a
physical SIM.
NOTE
: When you’re using two or more SIMs, your phone’s screens for mobile network-related
functions, such as Phone, voicemail, and messaging, can be different from the ones
described in this guide because you may have options to choose or change which SIM
you want to use.
► From the Network & internet screen, tap SIM to open the SIM screen.
Add an eSIM
You can add mobile plans by activating a Verizon eSIM.
1. From the SIM screen, tap Add SIM.
2. Tap Verizon Wireless > Activate to activate an eSIM with Verizon’s mobile plan.
3. Tap Settings and tap the on/off icon next to Use SIM to turn it on.

Settings 81
Mobile networks
The Mobile network options let you enable your phone’s mobile data access, set your preferred
network mode, and select network operators for international use. When you’re using two or
more SIMs, you can configure the following network settings for each SIM.
► From the SIM screen, tap Verizon or a downloaded eSIM to open the mobile network
settings screen for your selected SIM.
Enable or disable SIM profile
You can enable or disable your installed eSIM as well as a physical SIM.
► From the mobile network settings screen, tap the on/off icon next to Use SIM to turn it
on or off.
SIM preferences
Set the default SIM for data, calls, and SMS when you’re using more than one SIM.
1. From the mobile network settings screen, tap Data preference, Calls preference, or
SMS preference.
2. Select your desired SIM.
Mobile data
Select whether to use a mobile network to access data.
Switch mobile data automatically
When you have set up multiple SIMs, you can set whether or not to automatically switch to
another SIM, such as when your phone is out of the service area for your preferred SIM. This
menu will be displayed only for SIMs that are not set as your data preference.
Roaming
You can allow or disallow your phone to use mobile data services while it is roaming.
Roaming state
You can view your roaming status.
App data usage
Shows data usage over mobile connections by app over a period of time.
Data warning & limit
Set a target date for each month to reset data for the usage cycle, data warning, and data limit.
WARNING: The usage displayed is measured by your phone. Your carrier’s data usage
accounting may differ and the usage in excess of your data plan limit can result in
charges. The data usage limit set in this menu is not guaranteed to prevent
additional charges.
NOTE
: Carrier data accounting may differ from device accounting.

82 Settings
Data during calls
You can set to use data during calls on a SIM not normally used for data.
Automatically select network
You can choose whether the network will be selected automatically or not.
Choose network
You can choose the network you want to use.
Network extenders
You can configure connections to a network extender nearby you.
Access Point Names
You can edit existing access points or add a new access point.
NOTE:
Access Points cannot be added when using a Verizon SIM.
Airplane mode
Airplane mode disconnects your phone from all networks, so that your phone cannot send or
receive any calls or access online information.
► From the Network & internet screen, tap the on/off icon next to Airplane mode to turn it
on or off. While in Airplane mode, the status bar will display .
Mobile Hotspot & tethering
For details on your phone’s Mobile Hotspot and tethering settings, see Mobile Hotspot &
Tethering
.
Data Saver
To help reduce data usage, Data saver prevents some apps from sending or receiving data in
the background. If you do not want some apps to be restricted, you can select them in the
Unrestricted data list.
Wi-Fi Calling
To use Wi-Fi Calling, first activate the feature. See Wi-Fi Calling.
Virtual Private Networks (VPN)
From your phone, you can add, set up, and manage virtual private networks (VPNs) that allow
you to connect and access resources inside a secured local network, such as your corporate
network. Depending on the type of VPN you are using at work, you may be required to enter
your login credentials or install security certificates before you can connect to your company’s
local network. You can get this information from your network administrator.
1. From the Network & internet screen, tap VPN.

Settings 83
2. Tap and enter VPN profile >
Save
.
3. Tap the VPN connection you have added.
4. When prompted, enter your login credentials, and then tap Connect.
When you are connected, a VPN connected icon appears in the notification area.
Private DNS
Private DNS is a way to secure queries and responses between your phone and a website
when your phone tries to get information from the website. You can configure your phone to
connect to a private host.
1. From the Network & internet screen, tap Private DNS.
2. Tap one of available Private DNS modes.
NOTE:
If you selected
Private DNS provider hostname
, enter the hostname you want
to use.
3. Tap Save.
Adaptive connectivity
You can save battery life by enabling this function. Your phone will automatically switch from 5G
to 4G when it thinks you wouldn’t benefit from faster network and will turn on 5G only when you
need increased speed, like when you stream or download videos.
Connected Devices
Your phone can connect to other devices as follows.
► From the Apps launcher, tap Settings > Connected devices to open the Connected
devices screen.
USB
Select which device will control the USB connection and the USB mode to be used during the
connection.
NOTE:
This menu appears only when the USB cable is connected between your phone and
another device such as a PC.
1. From the Connected devices screen, tap USB.
2. Tap the item you want to set.

84 Settings
Pair new device
You can pair your phone with other Bluetooth enabled devices via Bluetooth. For details on your
phone’s Bluetooth settings, see
Bluetooth.
Saved devices
View the list of devices to which the phone has previously connected via Bluetooth.
Connection preferences
You can see the status or configure the settings of listed devices or features.
Bluetooth
Your phone’s Bluetooth capabilities let you use wireless headsets, send and receive pictures
and files, and more. For details on your phone’s Bluetooth settings, see
Bluetooth.
NFC
The NFC (Near Field Communication) settings menu lets you turn NFC on or off. For more
information about the NFC settings, see
Near Field Communication (NFC) Technology.
Cast
You can connect your phone to devices that support Miracast to share displayed images via a
connected Wi-Fi network.
Printing
You can print data from your phone.
Chromebook
You can see the connection status between your phone and your Chromebook™ if you have
one.
Quick Share
Share photos, links, files, and more with a friend or family member using a compatible device
nearby, by simply tapping the share button. For more information, please visit
support.google.com/android/share.
Android Auto
You can use some practical apps on your car screen and control features like navigation and
maps, calls and text messages, and music by plugging your phone into your car’s Android Auto™
compatible USB port. For more information, please visit
support.google.com/androidauto.
Automatic detection of USB devices
When set to ON, a USB device you connect to your phone can be detected automatically. If
moisture or malfunction are detected in the USB port, this feature will be inactive and the
connected device, such as a mouse, a keyboard, or a display will not be available. Make sure
the USB port is completely dry before connecting.

Settings 85
Codec preferences
You can configure the settings related to Qualcomm® aptX™ audio.
Apps
You can configure the settings for the applications used on your phone.
► From the Apps launcher, tap Settings > Apps to open the Apps screen.
All apps
You can access the information of all apps installed on your phone.
► From the Apps screen, tap All apps and then tap an app you want to open the
information screen.
– or –
From the Apps screen, tap an app under Recently opened apps.
– or –
From the Apps screen, tap See all [XX] apps and then tap an app. ([xx] is the total
number of apps installed in your phone).
Default apps
If you have more than one app that does the same thing, you can pick which app to use by
default.
Screen time
Allows you to check screen time and set app timers to limit daily usage.
Unused apps
Displays the list of apps you have not used recently.
App battery usage
Allows you to set whether or not to restrict battery usage for each app.
Special app access
This menu allows you to set the special access right for some apps.
Notifications
You can manage the notification settings on this phone.
► From the Apps launcher, tap Settings > Notifications.

86 Settings
App notifications
Allows you to activate or deactivate notifications from individual applications.
Notification history
Shows recent and snoozed notifications.
Conversations
Allows you to configure notifications for new messages in your priority conversations.
Bubbles
Set whether or not to display conversations as floating icons on top of other apps.
Device & app notifications
Allows you to control which apps and devices can access notifications.
Notifications on lock screen
Select whether to display the contents of your notifications on the locked screen.
Do Not Disturb
Set to allow only selected contacts or apps to notify you based on an optional predefined
schedule. See
Do Not Disturb.
Flash notifications
See Flash notifications.
Wireless emergency alerts
See Wireless emergency alerts.
Other notification settings
You can set other notification functions including Hide silent notifications in status bar, Allow
notification snoozing, and LED indicator.
Battery
Monitor your phone’s battery usage through this settings menu. View which functions are
consuming your battery’s charge and at what percentage. Also, your phone shows you a
message about how well your apps are using the battery and suggests actions you can take if
apps are using too much battery.
► From the Apps launcher, tap Settings > Battery.
Battery usage
Shows how many hours and minutes the screen has been active since the last full charge.

Settings 87
Battery Saver
Allows you to control your phone’s battery usage by offering some useful setting options.
Battery percentage
Set to display or not display the remaining battery percentage in status bar.
Battery Care Mode
Allows you to extend the overall life span of your phone's battery by preventing it from being
charged above 85% of capacity.
IMPORTANT:
If the battery is frequently charged when it is nearly full, it will wear out faster,
reducing its cycle life. Battery cycle life is significantly increased when it is only
charged to 85% of its capacity. When Battery Care Mode is "On", the phone will
limit its fully charged state to 85% of capacity. When Battery Care Mode is “Off”,
the phone will charge the battery to 100% of capacity. Note that when Battery
Care Mode is “On”, it reduces your talk/standby time. However, Battery Care
Mode is recommended for those who want to extend the battery’s cycle life.
NOTE:
When Battery Care Mode is “On”, a battery icon accompanied by a heart will appear
in the status bar. After a full charge, the battery level will still show 100%. This indicates
100% of a full charge and not 100% of the battery’s capacity.
Programmable Keys
You can set what the PTT key, camera key, and SOS key will do for a single press, a double
press, and a long press.
► From the Apps launcher, tap Settings > Programmable keys to open the
Programmable keys screen.
Assign a function to Programmable keys
1. From the Programmable keys screen, select PTT key, Camera key, or SOS key.
2. Select Single press, Double press, or Press and hold.
3. Select a function or application you want to assign to the key.
Tap
Do nothing
if you do not want to assign any function to the key.
NOTE:
You can set a Programmable key to wake up your phone by tapping the on/off icon next
to
Wake up device
. This function will not be available when you select
Do nothing
in
step 3.

88 Settings
Answer and end call
You can answer and end calls with the programmable keys when you turn this option on.
1. From the Programmable keys screen, select PTT key, Camera key, or SOS key.
2. Tap the Answer and end call on/off icon to turn on or off the feature for the key.
Wake up device
If you turn this on and the screen is off, a long press on the programmable keys will turn on the
phone's screen.
1. From the Programmable keys screen, select PTT key, Camera key, or SOS key.
2. Tap the Wake up device on/off icon to turn on or off the feature for the key.
Storage
The Storage settings menu lets you manage the storage on your phone and provides options for
your microSD card or other portable storage medias.
1. From the Apps launcher, tap Settings > Storage to open the Storage screen.
2. Tap next to This device, SD card, or other to open the pull-down menu.
Tap
Free up space
to see some suggestions for freeing up space in your device
and portable storage.
Device storage
You can see the availability and usage details of storage on your phone.
► From the Storage screen, select This device from the pull-down menu (if not selected)
to see your internal storage information.
Portable storage
Manage your portable storage media, such as SD cards. You can see the card’s size and
available space, unmount or mount, view the card information and format (erase) the SD card.
1. From the Storage screen, select SD card from the pull-down menu to see your microSD
card storage information.
2. Tap to access the following options:
Rename
to change the name.
Eject
to unmount the microSD card or
Mount
to mount it.
NOTE:
It is important to unmount the card before removing it from your phone to
avoid corrupting the data on the card.
Format
to format the SD card.

Settings 89
IMPORTANT:
The formatting procedure erases all the data on the microSD card, after which
the files CANNOT be retrieved. To prevent the loss of important data, please
check the contents before you format the card.
Sound & Vibration
The Sound settings menu lets you control your phone’s sound.
► From the Apps launcher, tap Settings > Sound & vibration to open the Sound &
vibration screen.
Volume settings
Drag the slider to left or right as desired to adjust the Media volume, Call volume, Ring
volume, Notification volume, and Alarm volume.
Do Not Disturb
Sets some or all sounds and vibrations to be muted for a certain period of time you schedule.
1. From the Sound & vibration screen, tap Do Not Disturb.
2. Set available options if necessary.
Phone ringtone
Assign a ringtone to your incoming calls.
1. From the Sound & vibration screen, tap Phone ringtone.
2. Tap a ringtone in the available list.
– or –
Tap Add ringtone to select a sound file. After being added to the available list, tap it.
3. The ringtone briefly plays when selected.
4. Tap OK to assign the phone ringtone.
Live Caption
See Live Caption.
Media
Sets to show media player in the Quick Settings panel.
Vibration pattern
Select a vibration pattern for your phone.
1. From the Sound & vibration screen, tap Vibration pattern.

90 Settings
2. Tap a vibration pattern in the available list. Your phone briefly vibrates when selected.
3. Tap OK to assign the vibration pattern.
Vibration & haptics
Adjust your phone's vibration and haptic feedback intensities and other settings.
1. From the Sound & vibration screen, tap Vibration & haptics.
– or –
From the Home screen, tap > > Call settings > Ringtone & Vibrate >
Vibration & haptics.
2. To turn it on, tap the Use vibration & haptics on/off icon.
Tap
Vibrate first then ring gradually
to set the vibration for calls.
Drag the slider to left or right as desired to adjust the intensity of
Ring vibration
,
Notification vibration
,
Alarm vibration
,
Touch feedback
, and
Media vibration
.
Default notification sound
Select a sound for notifications. See Phone ringtone for setting procedure.
Default alarm sound
Select a sound for alarms. See Phone ringtone for setting procedure.
Other sounds and vibrations
Configure other sound and vibration settings according to your preferences.
● Tap the on/off icon to turn on or off such items as Dial pad tones, Screen locking
sound, Vibrate on keypress, etc.
Emergency dialpad tone
You can set the tone for the emergency dialing keypad which appears on the lock screen when
the lock screen is enabled.
1. From the Sound & vibration screen, tap Emergency dialpad tone.
2. Select from Silent, Tone, or Vibration.
NOTE:
When
Ring volume
is set to vibrate , the Emergency dialpad tone will not sound
even when
Tone
is set in this menu.

Settings 91
Display
Adjusting your phone’s display settings not only helps you see what you want, but it can also
help increase battery life.
► From the Apps launcher, tap Settings > Display to open the Display screen.
Brightness level
Manually adjust the screen brightness for the current lighting conditions by dragging the slider to
left or right.
Adaptive brightness
Enable or disable Adaptive brightness. If Adaptive brightness is enabled, it will automatically
adjust the brightness depending on the amount of light in your surroundings. If you adjust the
brightness manually, Adaptive brightness will learn from your selection and take that into
account for the future.
Lock screen
You can configure the lock screen display settings.
Screen timeout
Select the delay time before the screen automatically turns off.
Dark theme
See Dark theme.
Display size and text
You can adjust the display and font sizes by dragging the slider to left or right and set other text-
related options. See
Display size and text.
Night Light
Tints your screen amber and allows you to schedule the time when to turn on or off.
Tap to turn on screen
You can set to turn on the screen by simply tapping or double-tapping.
1. From the Display screen, tap Tap to turn on screen.
2. To turn it on, tap the Use Tap to turn on screen on/off icon.
3. Select Single tap or Double tap.
NOTE: Single tap
allows you to turn on the screen with a simpler operation than
Double tap
,
but increases the possibility of the screen being turned on unintentionally when the
phone is in a bag or pocket. Choose according to your preferences.

92 Settings
Glove touch mode
When Glove touch mode is set to on, the phone increases the sensitivity of the screen to
improve touch detection through the glove material.
Pocket mode
Set to prevent unintended touch operation in your pocket or bag.
Auto-rotate screen
Your phone is capable of automatically changing the orientation of some onscreen content. With
this feature, you can view the screen in either portrait or landscape orientation by turning the
phone sideways.
Screen saver
You can select a screen saver for your phone.
Display quick settings
Set to display or not display quick settings items in notifications panel.
Wallpaper & Style
Personalize your phone by selecting your favorite style. See Wallpaper & style.
Accessibility
The Accessibility menu lets you enable and manage accessibility-related applications.
► From the Apps launcher, tap Settings > Accessibility to open the Accessibility screen.
NOTE:
After selecting each Accessibility menu, scroll down to find information about
the feature and read it carefully before turning on the feature.
TalkBack
TalkBack provides spoken feedback to help visually impaired users.
NOTE:
When TalkBack is turned on, you need to take different actions to operate the
touchscreen. When you tap on an item, a green outline appears. Then, double tap the
item to select it. To slide the screen, slide with two fingers instead of one.
1. From the Accessibility screen, tap Talkback.
2. To turn it on, tap the Use TalkBack on/off icon, read the confirmation message and tap
Allow.

Settings 93
3. The first time you activate the feature, a series of tutorial screens may appear to explain
how to use the feature, including navigating the UI. It is suggested that you study that
tutorial if you are not already familiar with how to use Talkback. Tap on Next to outline
the button, then double tap it to proceed to the next page. When you select Finish in
the same manner on the last screen, the TalkBack feature will be set to on.
4. To turn TalkBack off, tap the Use TalkBack on/off icon, double tap it, tap Stop, and
then double tap it.
– or –
Press and hold both volume keys for a few seconds when the TalkBack shortcut is
turned on with the Hold volume keys option enabled.
– or –
Tap and double tap it when the TalkBack shortcut is turned on with the Tap
accessibility button option enabled.
Tap
TalkBack shortcut
to change the shortcut item.
Tap
Settings
to configure its settings.
Select to Speak
Select to Speak reads aloud any text that you can tap on such as documents, emails, text
messages, text on websites and text labels throughout the device interface.
1. From the Accessibility screen, tap Select to Speak.
2. To turn it on, tap the Select to Speak shortcut on/off icon, read the confirmation
message and tap Allow > Got it.
3. Tap and then tap the item you want to be read out. To hear multiple items, drag
your finger across the screen. Tap if you want to hear everything on the screen.
Tap
Select to Speak shortcut
to change the shortcut item.
Tap
Settings
to configure its settings.
Display size and text
► From the Accessibility screen, tap Display size and text to open the Display size and
text screen.
Font size
Adjust the font size on the screen.
► From the Display size and text screen, drag the slider left or right to adjust the font size.

94 Settings
Display size
Adjust the display size on the screen.
► From the Display size and text screen, drag the slider left or right to adjust the display
size.
Bold text
Changes to bold font to improve visibility.
High contrast text
Changes the color of all onscreen text to either dark or light to make it easier to read. The
specific text color shown will depend on the original text color.
Color and motion
► From the Accessibility screen, tap Color and motion to open the Color and motion
screen.
Color correction
Allows you to select a correction mode to adjust the color of the screen to suit your preference.
1. From the Color and motion screen, tap Color correction.
2. To turn it on, tap the Use color correction on/off icon.
3. Tap the desired correction mode.
4. Tap the Color correction shortcut on/off icon, read the confirmation message, and tap
Got it.
Tap
Color correction shortcut
to change the shortcut item.
Color inversion
Allows you to exchange the colors of the items on the screen. Light areas will appear dark and
dark areas appear light. For example, black text on a white screen becomes white text on a
black screen.
1. From the Color and motion screen, tap Color inversion.
2. To turn it on, tap the Use color inversion on/off icon.
3. Tap the Color inversion shortcut on/off icon, read the confirmation message, and tap
Got it.
Tap
Color inversion shortcut
to change the shortcut item.

Settings 95
Dark theme
Allows you to make your phone’s background darker. Some of the possible benefits of the dark
theme include conserving battery power, reducing eye strain, and facilitating use in low-light
environments.
1. From the Color and motion screen, tap Dark theme.
2. To turn it on, tap the Use Dark theme on/off icon.
3. Tap Schedule to set to switch the Dark theme on or off automatically based on a
schedule. The following options are available:
None
to turn it on or off manually.
Turns on at custom time
to set a
Start time
and an
End time
to suit your needs.
Turns on from sunset to sunrise
to turn it on every night.
Remove animations
Removes animations, for example, screens will no longer fade in and out when transitioning
from one app to another.
Large mouse pointer
Enlarges the size of the mouse pointer to make it easier to see.
Extra dim
Dims your screen beyond your phone's typical minimum brightness level in order to be more
comfortable to read.
1. From the Accessibility screen, tap Extra dim.
2. To turn it on, tap the Make screen extra dim on/off icon.
3. Drag the intensity slider left or right to adjust the light dimmer or brighter.
4. Tap the Keep on after device restarts on/off icon to maintain this setting even after
restarting the phone.
5. Tap the Extra dim shortcut on/off icon, read the confirmation message and tap Got it.
Tap
Extra dim shortcut
to change the shortcut item.
Magnification
Allows you to zoom the screen in and out by tapping, long pressing, pinching, or dragging with
two fingers.
1. From the Accessibility screen, tap Magnification.

96 Settings
2. To turn it on, tap the Magnification shortcut on/off icon, read the confirmation
message and tap Got it.
Tap
Magnification shortcut
to change the shortcut item.
Tap
Magnification type
to switch between full and partial screen to magnify.
Tap
Magnify typing
to use the magnifier to follow text as you type.
Tap
Keep on while switching apps
to keep the magnifier on when you swap apps.
Accessibility menu
Provides a large onscreen menu to control your phone.
1. From the Accessibility screen, tap Accessibility Menu.
2. To turn it on, tap the Accessibility Menu shortcut on/off icon, read the confirmation
message and tap Allow > Got it.
Tap
Accessibility Menu shortcut
to change the shortcut item.
Tap
Settings
to configure its settings.
Switch Access
Switch Access allows you to interact with your phone using one or more switches instead of the
touchscreen. Switch Access can be helpful if you cannot interact directly with the device. Use
switches to select items, scroll, type, and more.
1. From the Accessibility screen, tap Switch Access.
2. To turn it on, tap the Use Switch Access on/off icon, read the confirmation message
and tap Allow.
3. The setup guide automatically shows up, then follow the onscreen instructions to finish
set up.
4. Tap the Switch Access shortcut on/off icon, read the confirmation message and tap
Got it.
Tap
Switch Access shortcut
to change the shortcut item.
Tap
Settings
to configure its settings.

Settings 97
Timing controls
► From the Accessibility screen, tap Timing controls to open the Timing controls screen.
Touch & hold delay
Set the length of delay to be used in the touch and hold operation.
1. From the Timing controls screen, tap Touch & hold delay.
2. Select your desired setting.
Time to take action (Accessibility timeout)
Choose how long to show messages asking you to take action.
1. From the Timing controls screen, tap Time to take action (Accessibility timeout).
2. Select your desired setting.
NOTE:
This setting does not apply in all apps.
Autoclick (dwell timing)
You can set the cursor to take action automatically when the cursor stops moving for a certain
amount of time if you are using a mouse.
1. From the Timing controls screen, tap Autoclick (dwell timing).
2. Select your desired setting.
When you select
Custom
, tap the or icon at each end of the slider to set the
delay time longer or shorter.
System controls
► From the Accessibility screen, tap System controls to open the System controls
screen.
Navigation mode
Configure the system navigation options for your phone, such as how to display your Home
screen.
1. From the System controls screen, tap Navigation mode.
2. Select Gesture navigation or 3-button navigation.
Tap to set
Digital assistant
and
Back Sensitivity
for
Gesture navigation
.

98 Settings
One-handed mode
Shrinks the screen size and allows you to use your phone with just one thumb.
NOTE:
To use this feature, make sure that
Gesture navigation
is turned on in Navigation
mode settings. See
Navigation mode.
1. From the System controls screen, tap One-handed mode.
2. To turn it on, tap the Use one-handed mode on/off icon.
3. Swipe down from the bottom edge of the screen to use the one-handed mode.
4. Tap the One-handed mode shortcut on/off icon, read the confirmation message, and
tap Got it.
Select which action you want to take by using the shortcut,
Pull screen into reach
or
Show notifications
.
Tap
One-handed mode shortcut
to change the shortcut item.
Power button ends call
Set your phone to end calls when the Power key is pressed.
NOTE:
This function does not work to reject incoming calls.
Auto-rotate screen
Set whether or not to rotate the screen automatically when you change your phone’s orientation.
NOTE:
Regardless of whether this setting has been turned ON, the screen may not rotate in
some apps or menus. To enable rotation of the Home screen as well, use the Home
settings menu. See
Allow home screen rotation.
Vibration & haptics
Configure the vibration and haptic feedback settings for your phone.
1. From the Accessibility screen, tap Vibration & haptics.
2. To turn it on, tap the Use vibration & haptics on/off icon.
Tap
Vibrate first then ring gradually
to set the vibration for calls.
Drag the slider to left or right as desired to adjust the intensity of
Ring vibration
,
Notification vibration
,
Alarm vibration
,
Touch feedback
, and
Media vibration
.

Settings 99
Real Time Text
Real Time Text (RTT) lets you use text to communicate during a phone call. RTT works without
any external TTY keyboards. During an RTT call, the person you are talking with can see you
type your message in real time. You can also call to Emergency services such as 911 through
RTT.
To change the Real Time Text settings:
1. From the Accessibility screen, tap Real Time Text.
2. Tap Always visible to show the RTT option automatically for every call, or Visible
during calls.
To call using Real Time Text:
1. From the Home screen, tap > Dialpad.
2. Confirm if the RTT setting is set to Always visible.
3. Enter phone number.
4. Tap to make an RTT call.
5. When connected, type a message in the text field.
To answer an incoming call using Real Time Text:
► Swipe to answer an incoming call in RTT mode.
Live Caption
Live Caption detects speech on your device and automatically captions it on media like videos,
podcasts, phone and video calls, and audio messages.
1. From the Accessibility screen, tap Live Caption.
2. To turn it on, tap the Use Live Caption on/off icon.
To move the caption box, touch and hold it, then drag up or down.
To hide captions and turn off Live Caption, drag the caption box off the bottom of
your screen.
To expand or contract the caption box, double-tap it. This option does not work
while you’re on a call.
3. You can configure the following settings:
Tap
Languages
to add languages to be used for captions.

100 Settings
Tap the
Hide
profanity
on/off icon to hide or show vulgar language.
Tap the
Show sound labels
on/off icon to show or hide sound labels, such as
laughter and applause.
Tap the
Live Caption in volume control
on/off icon to show or hide the Live
Caption button when you press the volume keys. Then, you can turn off the function
by tapping .
Tap
Help
to visit Android Accessibility Help pages.
Caption preferences
You can customize the language and the style of the displayed captions.
1. From the Accessibility screen, tap Caption preferences.
2. To turn it on, tap the Show captions on/off icon.
3. Configure the settings under Caption size and style and More options according to
your needs.
Audio description
Enabling the Audio description, you can hear a description of what's happening onscreen in
supported movies and shows. Only available for apps that support Audio description.
Hearing aids – telecoil mode
Hearing aid mode was designed for hearing aids that have a telecoil. To use the telecoil function
in your phone, you will need to set the Hearing aid mode to on.
► From the Accessibility screen, tap the Hearing aids on/off icon to turn on or off.
Flash notifications
Allows you to set the camera light or the screen to flash when you receive notifications.
Audio adjustment
► From the Accessibility screen, tap Audio adjustment.
Mono audio
Set the audio output to mono when playing audio.
Audio balance
Adjust the audio balance by using the onscreen slider and by hearing a sound clip which will
play when you tap on the slider.

Settings 101
Accessibility shortcuts
► From the Accessibility screen, tap Accessibility shortcuts to open the Accessibility
shortcuts screen.
Accessibility button
Allows you to quickly access accessibility features from any screen.
1. From the Accessibility shortcuts screen, tap Accessibility button.
2. Configure the following settings:
Location
to select
Floating over other apps
or
Navigation bar
.
Size
to select
Small
or
Large
.
Fade when not in use
to set the button to become dim when not in use.
Transparency when not in use
to adjust the degree of the transparency of the
button when not in use.
NOTE:
If the
Navigation mode
is set to
Gesture navigation
in the
System controls
settings,
this menu will be called
Accessibility button & gesture
and some of the sub-menu
items will be different from those described here. See
Navigation mode.
Shortcut from lock screen
Set this on to allow the volume key shortcut to turn on the accessibility feature from the lock
screen.
Text-to-speech output
Your phone can convert text into speech in certain downloaded applications. You may select the
language you hear or adjust its speed.
1. From the Accessibility screen, tap Text-to-speech output.
2. Set Preferred engine, Language, Speech rate, and Pitch.
Play:
Play a short demonstration of the set speech synthesis.
Reset:
Reset both Speech rate and Pitch to default.
Tap to configure its settings if necessary.
Security & Privacy
The security and privacy settings show your phone’s status and provide options to improve the
overall security and privacy.
► From the Apps launcher, tap Settings > Security & privacy to open the Security &
privacy screen.

102 Settings
Security & privacy status
Alerts you when there are potential risks present by displaying message panels at the top of the
Security & privacy screen and recommending corrective measures to take.
App security
Shows you the results of the regular checks conducted by Google Play Protect on your apps
and device.
Screen lock
Allows you to lock your phone's screen and helps you to enhance its security capability.
► From the Security & privacy screen, tap Device unlock > Screen lock.
IMPORTANT:
Highest security level protection (password protection) and frequent change of
password are recommended to protect your phone and data from unauthorized
access.
NOTE:
When you change the screen lock option, you may be asked to choose how you want
notifications to show on the lock screen depending on the previous screen lock settings.
In that case, follow the onscreen instructions.
None:
There is no security.
Swipe
:
There is no security using the Swipe option.
Pattern
:
There is medium security using a Pattern. Follow the onscreen instructions
to set.
PIN
: There is medium to high security using a number of 4 or more digits. Follow the
onscreen instructions to set. A PIN of six digits or more is recommended for added
security and it allows you to set
Auto-confirm correct PIN
option.
Password
: There is high security using a strong password. Follow the onscreen
instructions to set.
NOTE:
You can open the screen lock settings screen by tapping next to
Screen lock
on
the Device unlock screen. The available menus may vary depending on the screen lock
option you have selected. will not be displayed when
None
or
Swipe
is selected.
Face and fingerprint unlock
► From the Security & privacy screen, tap Device unlock > Face & Fingerprint Unlock.
Face Unlock
You can use your face to unlock your phone. To set up face unlock, follow the onscreen
instructions.

Settings 103
IMPORTANT:
Face authentication technology does not guarantee completely accurate
personal authentication and identification. Kyocera assumes no responsibility for
any damages resulting from a third party using your device or inability to use
your device.
NOTES:
•
Using your face to unlock your phone is less secure than using a pattern, PIN, or
password. It may be possible for your phone to be unlocked by someone or something
with similar appearance to the registered user’s face.
•
Face unlock may not work properly in a dark environment.
•
Make sure your face is fully visible and not covered by any object, such as a mask, hat,
or sunglasses.
TIP
: You can combine face unlock with the lift to wake feature for a smoother unlock action.
Once both features are set up, just by lifting the phone from the table and bringing it up to
your face, the phone will be unlocked and ready to use. Tap
Face Unlock
and select the
check box next to
Lift to wake
up the device
or tap the
Lift to wake
on/off icon to turn it
on.
Fingerprint
Enabling this option allows you to touch the fingerprint sensor to unlock the screen. Follow the
onscreen instructions to set.
IMPORTANT:
Fingerprint authentication technology does not guarantee completely accurate
personal authentication and identification. Kyocera assumes no responsibility for
any damages resulting from a third party using your device or inability to use
your device.
NOTES:
•
Please remove the USB cable prior to registering your fingerprint for authentication.
•
If you fail fingerprint authentication five times, input your backup PIN, pattern, or
password.
•
Fingerprint cannot be used to unlock the screen after restarting the phone. You must
use your backup method, such as pattern, PIN, or password.
•
The fingerprint sensor is on the Power key. Before using the fingerprint sensor, make
sure the fingerprint sensor and your finger are clean and dry.
•
The fingerprint recognition performance depends on your usage. The phone may have
an issue in registering or recognizing fingerprints that have scars or worn down ridges,
or if there are scratches on the sensor surface.

104 Settings
Unlocking your phone
You can choose to use your face and fingerprint to unlock your phone.
Authentication in apps
You can choose to use your fingerprint as biometric credentials to sign in to apps.
Account security
You can check the security issues on your Google account.
Device finders
If you lose your phone, you can find or lock it, or erase its contents, by using the Find My Device
app.
System & updates
You can check for available security-related updates for your phone and install them.
Privacy
You can access and adjust all your privacy preferences from this menu.
► From the Security & privacy screen, tap Privacy.
Permission manager
Shows a list of permission types and which apps have or do not have that permission. You can
change an app’s permission setting through this menu. See
Permission.
Privacy dashboard
Shows which apps have used permissions recently.
Ads
Allows you to control Ad behavior and to avoid being targeted by ads based on your activity on
your phone.
Health Connect
You can use Health Connect as an on-device repository for your health and fitness data. It
allows you to share data between your favorite apps, with a single place to control what data
you want to share with these apps.
Data sharing updates for location
Shows you the apps that have changed the way they may share your location data.
Camera access
You can disable camera access on your phone.
Microphone access
You can disable microphone access on your phone. However, your microphone data may still
be shared when you call an emergency number.

Settings 105
Show clipboard access
Notifies you when apps access contents you have copied, such as text or images.
Show passwords
Set whether or not to briefly display the numbers or letters as you are entering a PIN or
Password.
Location access
Opens the Location settings screen. See Location.
Activity controls
Launches the activity controls within your Google account, so that you choose whether or not it
will save your activity on Google sites and apps.
More security & privacy
► From the Security & privacy screen, tap More security & privacy.
Notifications on lock screen
Select whether to display the contents of your notifications on the locked screen.
Show media on the lock screen
Sets the media player to stay open on the lock screen.
App content
Set to allow apps to send content to the Android system.
Android System Intelligence
You can learn about device learning services which offer you personalized suggestions by using
information from your phone or Google Account. This menu also allows you to select whether or
not to see smart text suggestions with your keyboard and clear collected analytics data from
your phone.
Autofill service from Google
Lets you fill in passwords, addresses, and other information from your Google Account with a
single tap.
Usage & diagnostics
Control whether or not your phone automatically sends diagnostic, device, and app usage data
to Google.
Extend Unlock
When you use Extend Unlock (formerly Smart Lock), you can keep your phone unlocked in
some situations, like when your phone is in your pocket or you’re near home.

106 Settings
Device admin apps
You can enable or disable the authority of certain applications to be a device administrator. If
disabled, you will typically lose some functionality in those applications, such as the ability to
sync new email or calendar events with your phone.
SIM lock
You can configure your SIM card lock settings and change the SIM PIN.
Encryption & credentials
To protect data in your phone, system data stored inside the phone is encrypted by default. You
can view or manage the credentials through this menu.
Trust agents
Manages trust agents for features like Smart Lock.
App pinning
Turn on to keep your current app in view on your phone.
Confirm SIM deletion
Set to perform an authentication check before erasing a downloaded SIM.
Covert mode
This feature makes your phone effectively unnoticeable even in a silent and dark environment
by shutting down completely all visible and audible alerts and notifications.
NOTE:
The sound and LEDs from Bluetooth devices connected to the phone may not be
disabled even when Covert mode is on.
Location
The Location services settings menu lets you decide whether to allow your phone to collect and
use your phone's location information. Some apps may require location services be turned on
for full functionality.
IMPORTANT:
Your wireless phone can determine its (and your) physical, geographical location
("Location Information") and can associate Location Information with other data.
Additionally, certain applications, services and programs are capable of
accessing, collecting, storing and using Location Information and disclosing
Location Information to others. You should use caution when determining
whether or not Location Information should be made available to others and you
should review any applicable third party privacy policies before providing access.
► From the Apps launcher, tap Settings > Location to open the Location screen.
Use location
Tap the on/off icon to turn location on or off.

Settings 107
Recent access
Shows the list of apps which have recently requested access to your location information.
App location permissions
For each app installed on your phone, you can select whether or not the app can access the
phone's location information.
Location services
Manage your phone’s location-based services provided by Google.
► From the Location screen, tap Location services.
Emergency Location Service
See Emergency Location Service.
Wi-Fi scanning/Bluetooth scanning
You can let your phone scan for nearby Wi-Fi networks or Bluetooth devices in order to help
apps and services get better location information.
You can also access other Google Location menus, such as Earthquake alerts, Google
Location Accuracy, Google Location History
™, and Google Location Sharing.
For more information about Google Location Services, visit
support.google.com/android/location.
Safety & Emergency
Use this feature to save and share your emergency information including your emergency
contacts and medical information. Also, you can set up some very helpful safety measures on
your phone.
► From the Apps launcher, tap Settings > Safety & emergency to open the Safety &
emergency screen
Personal Safety
Set up Personal Safety app.
1. From the Safety & emergency screen, tap Open Personal Safety.
2. Choose an account if required.
3. Tap Add contact to register your emergency contacts and tap Next.
4. Enter/edit your personal data, such as Name, Blood type, and Allergies, and tap
Done.

108 Settings
5. The following features are available. You may be required to update your location and
other permissions to use them:
Safety Check
to schedule a safety check on you and let your emergency contacts
know if anything is wrong.
Emergency Sharing
to let your emergency contacts view your location and receive
updates about where you are and your battery percentage.
Tap on the upper left corner of the screen to open the Safety settings screen.
For more information about Personal Safety app, visit
support.google.com/android/personal-
safety
.
Medical information
Register your medical information.
1. From the Safety & emergency screen, tap Medical information.
2. Add or edit your personal information.
IMPORTANT:
Emergency information you enter in this feature can help rescue workers, such
as paramedics, police, and hospital personnel identify you and your primary
contacts in an emergency. However, it is important to be aware that anyone who
picks up your phone can access your private information without unlocking your
phone.
Emergency contacts
To register your emergency contacts:
1. From the Safety & emergency screen, tap Emergency contacts.
2. Tap Add contact.
3. Tap a contact name you want to register as an emergency contact.
To remove a contact from the Emergency contacts, tap next to the contact you
want to remove.
To access your emergency information when the screen is locked:
1. Press the Power key to turn the screen on.
2. Touch and hold and swipe toward to access the lock screen.
3. Tap Emergency > In case of emergency.

Settings 109
4. If required, tap Tap to unlock and view info and unlock the phone by using your set
method.
Your medical information will be shown on the screen.
Tap next to the contact to make a call.
Emergency SOS
If you’re in an emergency situation, you can use your phone to trigger emergency actions like
calling for help.
To turn on Emergency SOS:
1. From the Safety & emergency screen, tap Emergency SOS.
2. Tap Turn on Emergency SOS.
3. The following settings are available:
Tap
Call emergency services
on/off icon to turn it on or off. When enabled, your
phone will call to the registered emergency service when Emergency SOS is
starting. To change the number to call for help, tap
Call emergency services
.
Tap
Share info with emergency contacts
on/off icon to turn it on or off. When
enabled, your phone will text your real-time location to emergency contacts.
Tap
Record emergency video
on/off icon to turn it on or off. When enabled, your
phone will record and share an emergency video.
4. To disable Emergency SOS, tap > Turn off Emergency SOS > Turn off.
To use Emergency SOS in an emergency situation:
IMPORTANT:
Emergency SOS may not work in airplane mode.
1. On your phone, press the Power key quickly 5 times or more.
2. A 5 second countdown begins before emergency actions are started. If you triggered
Emergency SOS by mistake, you can cancel the emergency actions during the
countdown.
3. After the 5 second countdown, emergency actions are started.
Crisis alerts
Get notified about natural disasters and public emergencies affecting your area.

110 Settings
Emergency Location Service
When the Emergency Location Service (ELS) feature is activated, your device will automatically
send your location to emergency responders when you call or text an emergency number.
1. From the Safety & emergency screen, tap Emergency Location Service.
2. Tap the Use Emergency Location Service on/off icon to turn it on or off.
Earthquake alerts
When an earthquake is detected nearby, you will get an alert with the initial estimated
magnitude and distance from your location.
IMPORTANT:
Earthquake alerts are not supported in all areas and not all earthquakes can be
detected.
Unknown tracker alerts
With this feature, you can identify Bluetooth trackers that have been placed near you or in your
belongings without your consent. When the phone detects someone else’s tracker device
traveling with you, a notification alerts you of it and tells you how to find it and what to do next.
For more information about Unknown tracker alerts, visit
support.google.com/android/unknowntrackers.
NOTE
: Only compatible trackers can be detected.
Silence notifications while driving
This feature automatically detects when you’re at the wheel and prevents any notifications from
distracting you by turning on Do Not Disturb feature.
Wireless emergency alerts
You can change the settings for Wireless Emergency Alerts (WEA). WEA is a public safety
system that allows you to receive geographically targeted, text-like messages warning you of
imminent threats to safety in your area, such as dangerous weather, missing children, and other
critical situations.
1. From the Safety & emergency screen, tap Wireless emergency alerts.
2. Tap the Allow alerts on/off icon to turn the emergency alerts on or off.
3. Configure the alert settings such as the types of alerts you want to receive (Extreme
threats, Severe threats, Public safety messages, etc.) and alert preferences.

Settings 111
Passwords & Accounts
Add and manage all your email, social networking, and picture and video sharing accounts and
save and manage your passwords.
► From the Apps launcher, tap Settings > Passwords & accounts to open the
Passwords & accounts screen.
Passwords
You can manage and protect your passwords you saved in your Google Account by using
Google Password Manager.
► From the Passwords & accounts screen, tap Google under Passwords and choose
your Google account.
For more information about Google Password Manager, visit
support.google.com/android/password.
Autofill service
You can fill in passwords, addresses, and other information saved to your Google Account with
a single tap.
Set up a new account
1. From the Passwords & accounts screen, tap Add account.
2. Tap an account type such as Google.
3. Follow the onscreen instructions to set up an account.
Depending on the account type, you may need to enter an email address or user
address, password, domain name, or other information. For corporate accounts,
contact your server administrator to determine what information you will need.
Manage existing accounts
► From the Passwords & accounts screen, tap the existing accounts shown as Accounts
for Owner.
NOTE:
Available settings menus may vary according to the account type.
Tap
Account
sync
to turn auto-sync on or off for each app in the list.
Tap
Remove account
to delete the account from your phone.
Automatically sync app data
Set whether or not to sync the data in your phone with the data stored on the Web.

112 Settings
Digital Wellbeing & Parental Controls
You can find some useful menus to create healthy and effective digital habits for you and your
family. It shows how you use your phone and how often you check it and offers some measures
to help you to disconnect from the phone or focus on what’s in front of you by minimizing
distractions.
► From the Apps launcher, tap Settings > Digital Wellbeing & parental controls to
open the Digital Wellbeing & parental controls screen.
Your Digital Wellbeing tools
Get a daily view of your digital habits, such as how frequently you use different apps, how many
notifications you receive, or how often you check your phone or unlock your device.
Dashboard
You can set daily timers to limit your use of each app.
1. From the Digital Wellbeing & parental controls screen, tap Dashboard.
2. Tap next to the app you want to limit.
If you don’t find it right away, tap
Show all
[xx]
apps
([xx] is the total number of
apps).
3. Choose how much time you can spend in that app, then tap OK.
Bedtime mode
This function allows you to silence your phone and fade your screen to grayscale based on your
set bedtime schedule.
Focus mode
Focus mode lets you pause distracting apps with a single tap so you can better focus your
attention. You can also set a schedule to turn on Focus mode automatically and reduce
distractions while you’re at work, school, or home.
Manage notifications
Configure notification settings for individual apps.
Do Not Disturb
See Do Not Disturb.
Heads Up
If you’re walking while using your phone, the phone warns you to stop using your phone and
focus on what’s around you.

Settings 113
NOTE:
This is only a complementary feature and it should not replace actually paying attention
to your surroundings. There may be cases where various factors prevent the system
from operating as expected.
Show icon in the app list
To find Digital Wellbeing on the Apps launcher as an app, turn this on.
Parental controls
You can manage a child’s account by setting the content restrictions or supervising their phone
remotely with the Family Link™ app. For more information, please visit
support.google.com/families.
Google
You can see your Google Account and a variety of information, such as security,
personalization, and other topics related to Google services.
► From the Apps launcher, tap Settings > Google.
Tap to display the option menu.
Tap to display the help menu.
System Updates
You can check for available software updates or the update status of your phone. You can
download and apply updates through the System update menu.
► From the Apps launcher, tap Settings > System updates.
Check for new system update:
Checks if there are any updates available for your
phone.
Show system update history:
Checks the update history.
Smart updates:
Allows Smart updates to install automatically.
Use Software Upgrade Assistant:
Updates the software by using Software
Upgrade Assistant via a USB cable
.
System update status:
Shows information about the most recent update that has
been applied, if any.

114 Settings
System
You can configure the settings for languages, time, and backup.
► From the Apps launcher, tap Settings > System to open the System screen.
Languages
Select a language for the phone’s system and individual apps and configure speech-related
features.
► From the System screen, tap Languages.
System Languages
You can set a language to use on your phone by selecting from the onscreen languages.
App languages
You can set a language to use for each app.
Regional preferences
Choose your preferred temperature unit and start date of the week.
Voice input
You can configure the Speech Services by Google.
On-device recognition
Set offline speech recognition language.
Text-to-speech output
See Text-to-speech output.
Keyboard
You can configure the settings for keyboards and other tools to use with your phone.
► From the System screen, tap Keyboard.
On-screen keyboard
You can change your keyboard settings and choose your languages.
Spell checker
This feature allows you to spell check text as you type it.
Personal dictionary
See Add a word to the user dictionary.
Pointer speed
You can set the pointer speed of a mouse being used with your phone.

Settings 115
Gestures
This menu allows you to interact with your phone using gestures.
► From the System screen, tap Gestures.
Quickly open camera
You can open the camera app by pressing the Power key twice when this function is set to on.
Navigation mode
See Navigation mode.
Lift to wake
This function allows you to turn the screen on by simply picking up your phone from the desk or
taking it out of your pocket.
One-handed mode
See One-handed mode.
Press and hold power button
Set your phone’s action when you press and hold the Power key.
Prevent ringing
Allows you to prevent ringing by pressing the Power key and Volume Up key together.
Date & time
Use the Date & time settings menu either to automatically use the network-provided date and
time or manually set these values, as well as select time and date format options.
1. From the System screen, tap Date & time.
2. Tap Set time automatically to turn off if necessary.
If set to on, you cannot set the date or time values manually.
3. Tap Set automatically to turn off the automatic time zone selection if necessary.
If set to on, you cannot set the time zone values manually.
Tap
Use location
to turn it off if you do not want to use the location to set time
zone.
4. Tap Time zone. Tap Region, select a region from the onscreen list, and then select a
time zone if necessary.
5. Tap Date. Tap the date on the onscreen calendar and tap OK.
6. Tap Time. Adjust the hour and minute by using the onscreen clock and tap AM or PM.
Tap OK when finished.

116 Settings
7. Tap Use locale default to turn off if you do not want to use locale default.
8. Tap Use 24-hour format to turn on to use the 24-hour format or turn it off to use 12-
hour format.
Backup
Back up your phone's data and settings with Google One™. Google Account is required.
► From the System screen, tap Backup.
To turn on the automatic backup function, tap the on/off icon next to
Backup by
Google One
.
NOTE:
To back up your pictures and videos, tap
Photos & videos
under
Backup
details
and tap the on/off icon next to
Back up
to turn it on.
To see backup storage details of your account or access Google One screen, tap
Manage storage
.
For more information on Google One, please visit
one.google.com.
Reset options
Some or all of the data in your phone's internal storage will be reset to default.
► From the System screen, tap Reset options to open the Reset options screen.
Reset mobile network settings
1. From the Reset options screen, tap Reset Mobile Network Settings.
2. Follow the onscreen instructions.
Reset Bluetooth & Wi-Fi
1. From the Reset options screen, tap Reset Bluetooth & Wi-Fi.
2. Follow the onscreen instructions.
Reset app preferences
1. From the Reset options screen, tap Reset app preferences.
2. Follow the onscreen instructions.
Erase eSIMs
1. From the Reset options screen, tap Erase eSIMs to erase SIM profiles downloaded to
the eSIM.
2. Follow the onscreen instructions.

Settings 117
Erase all data (factory reset)
All the data in your phone's internal storage will be reset to default.
TIP:
Before performing a factory data reset on your phone, you may want to unmount the
microSD card to avoid losing any data you may have stored on it. To unmount the SD
card, from the Apps launcher tap
Settings
>
Storage
>
This device
>
SD card
, then
tap
>
Eject
.
1. From the Reset options screen, tap Erase all data (factory reset).
2. Read the factory data reset information and tap Erase all data.
3. Enter your pattern, PIN, or password if required.
4. Tap Erase all data. Your phone will power down and reset itself, which may take up to
10 minutes.
NOTE:
Deleted data CANNOT be retrieved.
TIP:
If you are doing a factory data reset prior to discarding it or giving it away, it is
recommended that you remove your Google account and lock code first.
TIP:
You can confirm the last factory data reset date at the bottom of the screen.
About Phone
The About phone menu lets you access important phone information including device name,
your phone number, legal information, and more.
► From the Apps launcher, tap Settings > About phone to open the About phone screen.
Compliance information
Shows Compliance information on the screen.
► From the About phone screen, tap Compliance information.
Safety & warranty and user guide
You can access the Safety & warranty information or User Guide via the Internet.
► From the About phone screen, tap Safety & Warranty or User guide.

118 Contact Us
Contact Us
Support Center
The Support Center app makes it simple to get information about your product or to contact the
Kyocera support teams.
1. From the Apps launcher, tap Support Center.
2. The following options are available:
Tips & Tricks
to search or browse through helpful information on the Kyocera
website.
Contact us online
to contact Kyocera support teams via Live chat or Email.
Kyocera consumer support
to place a call to the Kyocera customer support.
Kyocera Business Select support
to place a call to the Kyocera Business Select
team.
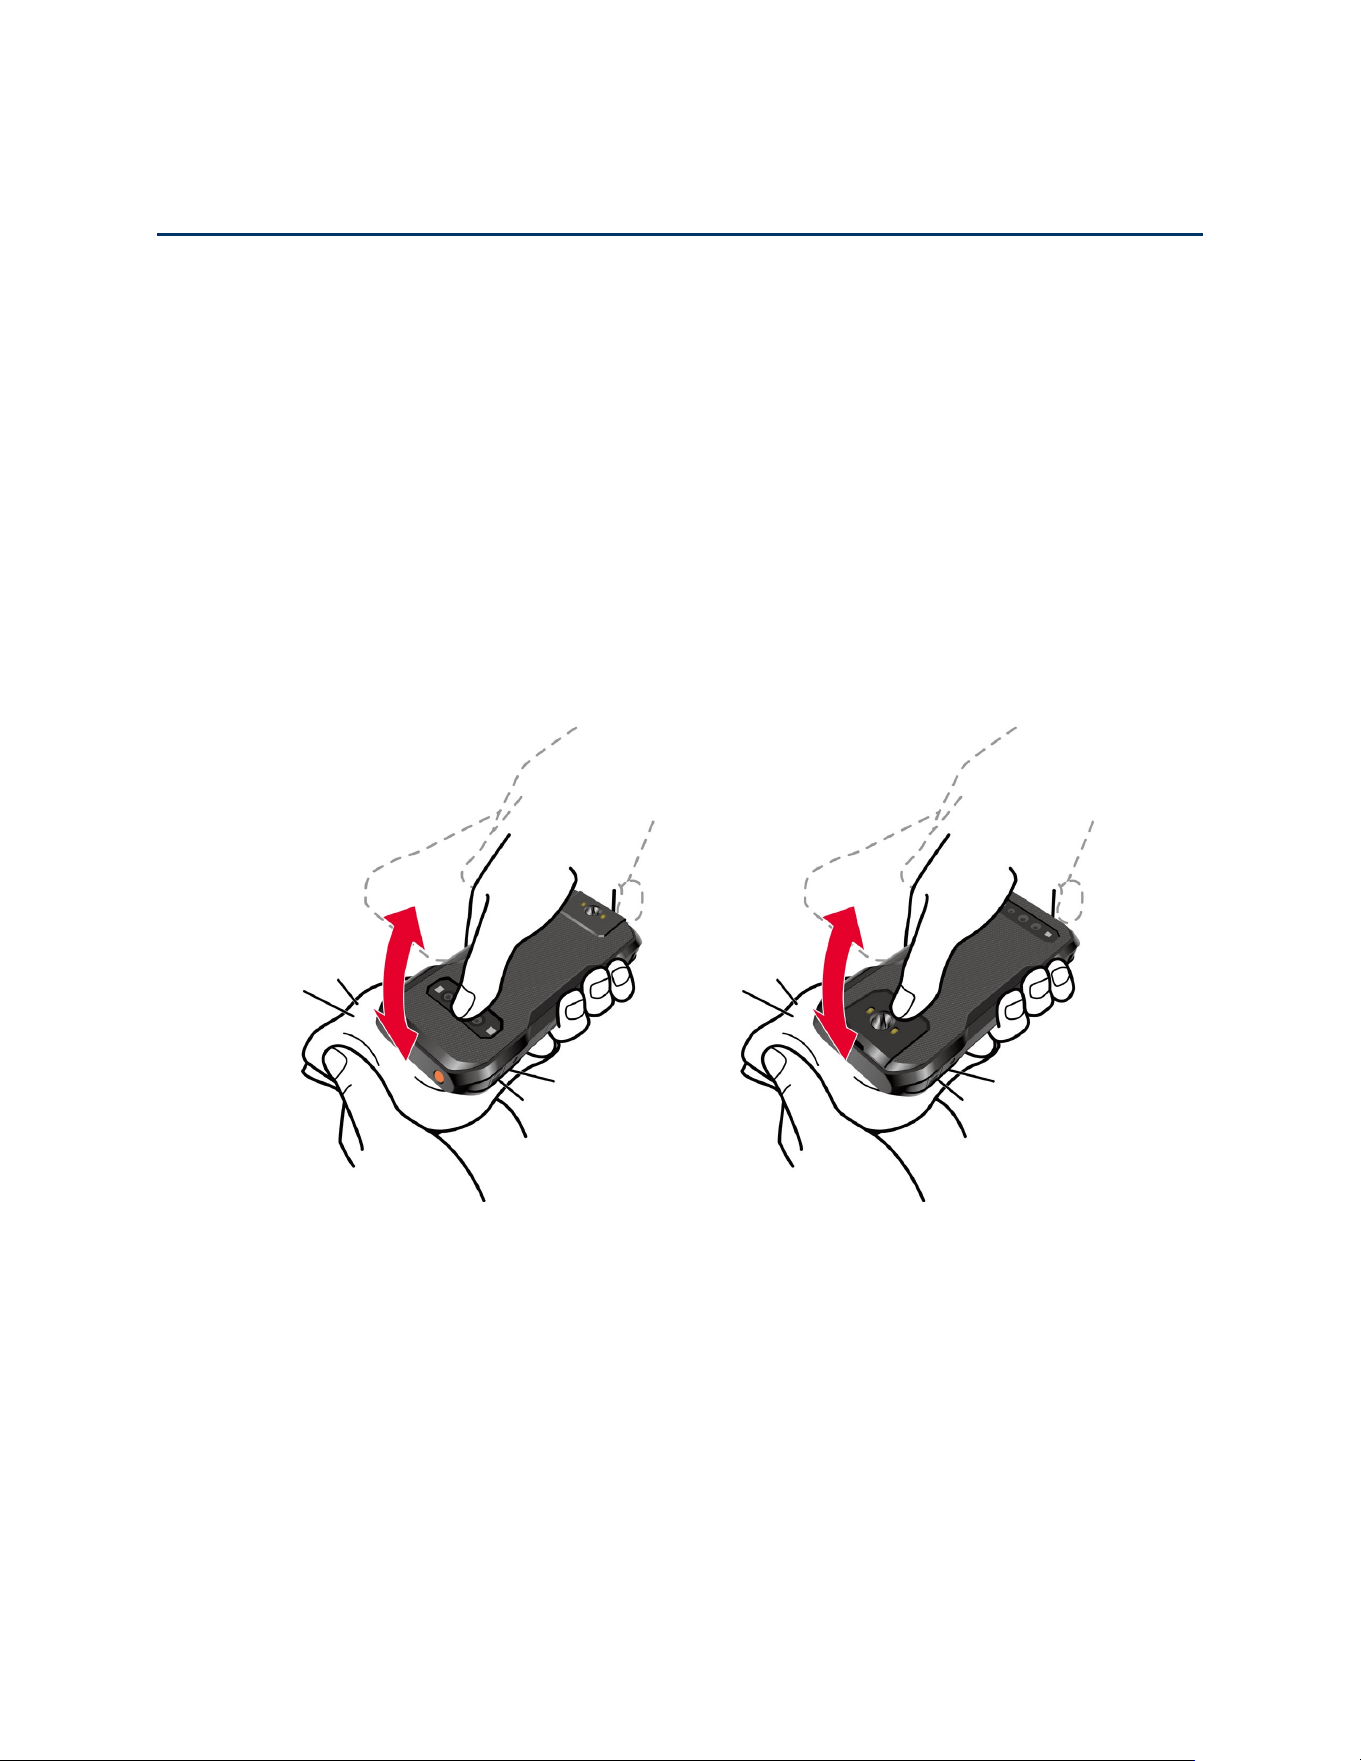
Drying Procedures 119
Drying Procedures
Please see the proper procedures below.
NOTE:
For the Procedures to follow in cleaning and disinfecting your phone, please visit
kyoceramobile.com/support/phone/cleaning_guide/.
Drying Your Phone
CAUTION!
If your phone has been submerged in water, for example to use the camera in
Underwater mode, rinse all surfaces of the phone thoroughly with clean, fresh
water before drying.
1. Wipe down all outside surfaces of your phone with a clean lint-free cloth.
2. Tap the phone firmly, but gently on a clean dry cloth to remove moisture from the
earpiece, microphone, and USB port. Repeat tapping each area about 20 times.
3. After removing all the water, let the phone dry completely at room temperature.
CAUTION!
Excessive heat may damage your phone; never use a hair dryer, an oven, or any
other appliance to dry out your phone.
NOTE:
If your phone still retains some moisture, audio quality and speaker performance may
be affected. Dry your phone completely before using it again.
120 Copyright & Trademarks
Copyright & Trademarks
© 2024 Kyocera Corporation. All rights reserved. KYOCERA is a registered trademark of
Kyocera Corporation. All other trademarks are the property of their respective owners.
Google, Android, Google Play, YouTube and other marks are trademarks of Google LLC.
The Bluetooth
®
word mark and logos are registered trademarks owned by Bluetooth SIG, Inc.
and any use of such marks by Kyocera Corporation is under license. Other trademarks and
trade names are those of their respective owners.
Bluetooth DID (Declaration ID): D063258
The ‘Qi’ symbol is a trademark of the Wireless Power Consortium.
microSD, microSDHC and microSDXC Logos are
trademarks of SD
-3C, LLC.
Covered by one or more claims of the HEVC patents listed at patentlist.accessadvance.com.

Index 121
Index
About Phone, 117
Accessibility, 92
hearing aids, 44, 100
Accessibility Button, 101
Accessibility Menu, 96
Account, 111
passwords, 111
set up, 111
Airplane Mode, 82
Alarm, 74
Applications, 52
Apps, 85
Apps Launcher, 22
Audio Balance, 100
Audio Description, 100
Autoclick, 97
Auto-rotate Screen, 92, 98
Backup, 116
Battery, 86
battery care mode, 87
charge, 7
charge wirelessly, 9
insert, 5
percentage, 87
remove, 9
Bedtime, 76
Bedtime Mode, 112
Bluetooth, 59
pairing, 60
send and receive, 61
supported profiles, 61
turn on or off, 59
Bold Text, 94
Calculator, 76
Calendar, 54
Camera, 65
action overlay mode, 68
camera key, 2, 4, 65
flash, 2, 4, 71
front camera, 2, 3, 66
macro camera, 2, 4
main camera, 2, 4
record a video, 67
review screen, 70
settings, 71
take a picture, 67
underwater mode, 69
viewfinder, 65
wide-angle camera, 2, 4, 66
Caption Preferences, 100
Carkit Power On or Off, 79
Chrome, 53
Clock, 74
Color Correction, 94
Color Inversion, 94
Compliance Information, 117
Connections, 58
Contact Us, 118
Contacts, 46
add, 47
assign a picture, 47
favorites, 50
group, 49
ICE (in case of emergency), 50
list, 46
Covert Mode, 106
Date & Time, 115

122 Index
Digital Wellbeing, 112
Display, 91
brightness level, 91
dark theme, 95
display size, 91
font size, 91
glove touch mode, 92
night light, 91
pocket mode, 92
screen timeout, 91
system colors, 21
wallpaper, 21
Display Size, 94
Drying Procedures, 119
Emergency Call, 32
Emergency Location Service (ELS), 110
eSIM, 80
add, 80
Extra Dim, 95
Factory Reset, 117
Files, 56
supported formats, 56
Flashlight, 76
Focus Mode, 112
Font Size, 93
Gboard, 26
glide typing, 29
text mode, 27
Gestures, 115
Gmail, 53
Google Account, 52, 113
Google Maps, 55
Google Play Store, 55
Google Voice Typing, 29
Heads Up, 112
Hearing Aids, 44, 100
High Contrast, 94
Home Screen, 18
function buttons, 17
manage, 19
overview, 18
quick shortcuts, 23
In Case of Emergency, 50
Keyboard, 114
Languages, 114
Large Mouse, 95
LED Indicator, 2, 3
Live Caption, 99
Location, 106
information, 106
permissions, 107
recent access, 107
Magnification, 95
Messages, 56
Microphone, 2
main, 3
secondary, 4
Mobile Hotspot, 63
Mobile Networks, 81
Mono Audio, 100
Navigation Mode, 97
NFC, 62
Notifications, 85
Notifications Panel, 25
One-handed Mode, 98
Outdoor, 78
Parental Controls, 113
Permission, 22
Personal Safety, 107
Phone
illustration, 2
restart, 13
turn off, 12
turn on, 12

Index 123
Phone Calls, 31
3-way calling, 37
auto answer, 41
call forwarding, 37
call rejection, 40
call waiting, 36
dialpad, 31
emergency numbers, 32
hearing aids, 44
make, 31
options, 36
quick responses, 41
real time text, 44, 99
receive, 34
recent calls, 39
settings, 40
speed dialing, 38
video calling, 42
Wi-Fi calling, 42
Photos, 72
edit a picture, 72
share, 73
view, 72
Power Key, 2, 4
Programmable Keys, 87
camera key, 2, 4, 87
PTT key, 2, 4, 87
SOS key, 2, 3, 87
Proximity/Light Sensor, 2, 3
Push To Talk Plus, 45
Qi Wireless Charging Location, 2, 4
Quick Settings, 26
Real Time Text, 44, 99
Reset Options, 116
Ringtone, 43, 89
Safety & Emergency, 107
crisis alerts, 109
earthquake alerts, 110
emergency contacts, 108
Emergency SOS, 109
medical information, 108
tracker alerts, 110
while driving, 110
Screen Lock, 102
face unlock, 102
fingerprint, 103
Screen On and Off, 13
SD Card
format, 88
install, 11
Security & Privacy, 101
encryption, 106
permission manager, 104
show passwords, 105
status, 102
Select to Speak, 93
Settings, 80
Setup Wizard, 13
SIM Card
lock, 106
reinstall, 11
Sound & Vibration, 89
do not disturb, 89
emergency dialpad tone, 90
haptics, 90
volume, 89
Sound Recorder, 77
Speed Dial Numbers, 32
Status Bar, 24
Stopwatch, 75
Storage, 88
Support Center, 118
Switch Access, 96
System Update, 113
TalkBack, 92
Tethering, 63, 64
Text Entry, 26
copy and paste, 30
Text-to-Speech Output, 101
Time to Take Action, 97
Timer, 74
Touch & Hold Delay, 97
Touchscreen Navigation, 15
USB Settings, 83
USB/Charger Port, 2, 3
Useful Tools, 74

124 Index
Vibration & Haptics, 90, 98
Vibration Pattern, 43, 89
Virtual Private Networks (VPN), 82
Voice Search, 78
Voicemail, 14, 34
Voicemail (Basic), 14, 35, 43
Volume Keys, 2, 4
Wallpaper, 21
Weather, 78
Wi-Fi, 58
connect, 58
settings, 59
turn on, 58
Wireless Emergency Alerts, 110
YouTube, 56
YouTube Music, 56