
User Guide


TOC i
Table of Contents
Introduction ................................................................................................................................ 1
Descriptions in the User Guide ........................................................................................... 1
Get Started ................................................................................................................................ 2
Phone Overview and Key Functions ................................................................................... 2
Set Up Your Phone ............................................................................................................. 7
Insert the Battery ......................................................................................................... 7
Charge the Battery ....................................................................................................... 8
Battery Capacity .......................................................................................................... 9
Remove the Battery ..................................................................................................... 9
Install a SIM Card and a microSD Card ......................................................................10
Turn Your Phone On and Off .............................................................................................12
Turn Your Phone On ...................................................................................................12
Turn Your Phone Off ...................................................................................................12
Setup Wizard .....................................................................................................................12
Phone Basics ............................................................................................................................13
Your Idle Screen ................................................................................................................13
Idle Screen Overview ..................................................................................................13
Status Bar ...................................................................................................................14
Notifications Screen ....................................................................................................16
Navigate Through the Menus .............................................................................................16
Select Menu Items ......................................................................................................16
Back Up Within a Menu ..............................................................................................17
Customize Main Menu Screen ....................................................................................17
App List ......................................................................................................................17
Enter Text ..........................................................................................................................18
Key Function ...............................................................................................................18
Select a Text Input Mode ............................................................................................18
Enter Text Using Prediction Mode ..............................................................................19
Enter Text Using Abc/ABC Mode ................................................................................19
Set Text Entry Options ................................................................................................19

ii TOC
Copy and Paste Text ..................................................................................................20
Phone Calls ..............................................................................................................................21
Make Phone Calls ..............................................................................................................21
Call Using the Phone keypad ......................................................................................21
Call from Call History ..................................................................................................21
Call from Call History with the phone closed ...............................................................21
Call from Contacts ......................................................................................................22
Call Using a Speed Dial Number ................................................................................22
Call a Phone Number with Pauses .............................................................................22
Call Emergency Numbers ...........................................................................................23
Call Using Real Time Text (RTT) ................................................................................23
Receive Phone Calls ..........................................................................................................23
Answer an Incoming Call with the Phone Open ..........................................................24
Answer an Incoming Call with the Phone Closed ........................................................24
Answer an Incoming Call in Speakerphone Mode .......................................................24
Mute the Ringing Sound and Stop the Vibration .........................................................24
Reject an Incoming Call and Send a Message ............................................................24
End Phone Calls ................................................................................................................24
Disconnect a Phone Call.............................................................................................24
Phone Call Options ............................................................................................................25
In-call Options .............................................................................................................25
Caller ID .....................................................................................................................25
Call Waiting ................................................................................................................26
3-Way Calling .............................................................................................................26
Call History ........................................................................................................................27
View Call History ........................................................................................................27
Call History Options ....................................................................................................28
Call Settings ......................................................................................................................28
Any Key Answer .........................................................................................................28
Noise Reduction .........................................................................................................28
Open/Close Flip ..........................................................................................................29
Auto Answer ...............................................................................................................29
Quick Responses........................................................................................................29

TOC iii
Set Up Speed Dialing .................................................................................................30
Call Forwarding ..........................................................................................................30
Additional Settings ......................................................................................................31
Voicemail Settings ......................................................................................................32
Fixed Dialing Numbers (FDN) .....................................................................................32
Call Rejection .............................................................................................................33
Call Timer ...................................................................................................................34
Contacts....................................................................................................................................35
Access Contacts List ..........................................................................................................35
Add a Contact ....................................................................................................................35
Contacts List ...............................................................................................................35
Contacts List Options ..................................................................................................36
Assign a Picture to a Contact ......................................................................................36
Add a Contact to Favorites .........................................................................................37
Save a Phone Number .......................................................................................................37
Edit a Contact ....................................................................................................................38
Edit Information for a Contact .....................................................................................38
Assign a Ringtone or Vibration Pattern to a Contact ...................................................38
Delete Contacts .................................................................................................................38
Delete a contact ..........................................................................................................38
Delete Multiple Contacts .............................................................................................39
Add a New Group ..............................................................................................................39
Edit a Group Contact .........................................................................................................40
Add or Remove a Contact Entry to or from a Group ....................................................40
Rename a Group ........................................................................................................40
Delete a Group ...........................................................................................................40
ICE (In Case of Emergency) Contacts ...............................................................................41
Register an ICE Contact .............................................................................................41
Remove an ICE Contact .............................................................................................41
Add Personal Information ...........................................................................................41
Access the Registered ICE Information When the Screen is Locked ..........................42
Accounts and Messaging ..........................................................................................................43
Email .................................................................................................................................43

iv TOC
Add an Email Account ................................................................................................43
Send an Email Message .............................................................................................43
View and Reply to Email .............................................................................................44
Manage Your Email Messages ...................................................................................45
Email Settings .............................................................................................................46
Message ............................................................................................................................46
Send a Message .........................................................................................................46
New Message Notification ..........................................................................................47
Read a Message ........................................................................................................47
Reply to a Message ....................................................................................................47
Delete a Message .......................................................................................................48
Messaging Settings ....................................................................................................48
Apps and Entertainment ............................................................................................................49
Music Player ......................................................................................................................49
Play Music ..................................................................................................................49
Music Player Options ..................................................................................................50
Use Playlists ...............................................................................................................51
File Manager ......................................................................................................................52
Open Files in File Manager .........................................................................................52
File Manager Options .................................................................................................52
Supported Formats .....................................................................................................53
Sound Recorder .................................................................................................................53
Sound Recorder Settings ............................................................................................53
Record Sound .............................................................................................................53
Play Audio Data ..........................................................................................................54
Sound List Options .....................................................................................................54
Connections ..............................................................................................................................55
Wi-Fi ..................................................................................................................................55
Turn Wi-Fi On and Connect to a Wireless Network .....................................................55
Check the Wireless Network Status ............................................................................56
Connect to a Different Wi-Fi Network ..........................................................................56
Connect to a Hidden Wi-Fi Network ............................................................................56
Wi-Fi Menu .................................................................................................................57

TOC v
Bluetooth ...........................................................................................................................57
Turn Bluetooth On or Off.............................................................................................57
Change the Device Name ...........................................................................................57
Pairing (Connect to Other Devices) ............................................................................58
Unpair from a Bluetooth Device ..................................................................................59
Send and Receive Information Using Bluetooth ..........................................................59
Virtual Private Networks (VPN) ..........................................................................................61
Prepare Your Phone for VPN Connection ...................................................................61
Add a VPN Connection ...............................................................................................61
Connect to or Disconnect from a VPN ........................................................................61
Browser .............................................................................................................................62
Launch the Browser ....................................................................................................62
Learn to Navigate the Web .........................................................................................62
Browser Menu ............................................................................................................64
Tethering ...........................................................................................................................65
USB Tethering ............................................................................................................65
Bluetooth Tethering ....................................................................................................65
Mobile Hotspot ...................................................................................................................66
Turn Mobile Hotspot On ..............................................................................................66
Camera and Video ....................................................................................................................67
Take Pictures or Record Videos.........................................................................................67
Take a Picture ............................................................................................................67
Record a Video ...........................................................................................................67
Camera Settings ................................................................................................................68
View Pictures and Videos Using Gallery ............................................................................69
Open or Close Gallery ................................................................................................69
View Pictures and Videos ...........................................................................................69
Gallery Options Menu .................................................................................................70
Share Pictures and Videos.................................................................................................71
Send Pictures and Videos ...........................................................................................71
Useful Tools ..............................................................................................................................72
Calculator ..........................................................................................................................72
Calendar ............................................................................................................................72

vi TOC
Add an Event to the Calendar .....................................................................................72
Calendar Event Alerts .................................................................................................73
View Calendar Events ................................................................................................74
Edit Calendar Events ..................................................................................................74
Alarm Clock .......................................................................................................................75
Set an Alarm ...............................................................................................................75
Alarms Options ...........................................................................................................75
Phone at Alarm Time ..................................................................................................75
Timer .................................................................................................................................76
Set a Timer .................................................................................................................76
Timer Options .............................................................................................................76
Stopwatch ..........................................................................................................................76
World Clock .......................................................................................................................77
Notepad .............................................................................................................................77
Write a Note ................................................................................................................77
View or Edit a Note .....................................................................................................78
Notepad Options .........................................................................................................78
Flashlight ...........................................................................................................................78
FM Radio ...........................................................................................................................79
Eco Mode ..........................................................................................................................79
Voice Commands ..............................................................................................................80
Activate the Voice Commands ....................................................................................80
Make a Voice Call Using Voice Commands ................................................................80
Send a Message Using Voice Commands ..................................................................81
Display a Contacts Entry’s Information Using Voice Commands .................................81
Check Phone Status Using Voice Commands ............................................................81
Open Menus Using Voice Commands ........................................................................81
Voice Commands Settings ..........................................................................................82
microSD Card ....................................................................................................................82
View the microSD Card Memory .................................................................................82
Unmount microSD Card ..............................................................................................83
Format microSD Card .................................................................................................83
Use the Phone’s microSD Card as a Media Device ....................................................83

TOC vii
Business Tools..........................................................................................................................84
Device Control ...................................................................................................................84
Enable Device Control Mode ......................................................................................84
Set Up Device Control ................................................................................................84
Carkit Power On or Off .......................................................................................................85
Settings .....................................................................................................................................86
Wireless & Networks Settings ............................................................................................86
Airplane Mode ............................................................................................................86
Wi-Fi Settings .............................................................................................................86
Bluetooth Settings.......................................................................................................86
Tethering Settings.......................................................................................................86
Mobile Hotspot Settings ..............................................................................................86
VPN Settings ..............................................................................................................86
Mobile network Settings ..............................................................................................86
Emergency Alerts ..............................................................................................................87
View an Emergency Alert ............................................................................................87
Emergency Alert Settings ...........................................................................................88
Accessibility .......................................................................................................................88
Readout ......................................................................................................................88
Speech Rate ...............................................................................................................88
Speech Pitch ..............................................................................................................89
Font Size ....................................................................................................................89
Color Inversion ...........................................................................................................89
Color Correction .........................................................................................................89
Persistent Alerts .........................................................................................................90
Captions .....................................................................................................................90
Mono Audio ................................................................................................................91
Real Time Text ...........................................................................................................91
Hearing Aid – Telecoil Mode .......................................................................................91
Sound Settings ..................................................................................................................92
Volume .......................................................................................................................92
Also Vibrate for Calls ..................................................................................................92
Phone Ringtone ..........................................................................................................92

viii TOC
Vibration Pattern .........................................................................................................92
Vibration Intensity .......................................................................................................92
Notification Sound.......................................................................................................93
Persistent Alerts .........................................................................................................93
Alarm Sound ...............................................................................................................93
Other Sounds and Vibrations ......................................................................................93
Display Settings .................................................................................................................94
Brightness Level .........................................................................................................94
Wallpaper ...................................................................................................................94
Display Backlight ........................................................................................................94
Key Backlight ..............................................................................................................94
Font Size ....................................................................................................................94
Notifications ................................................................................................................94
Main Clock ..................................................................................................................94
Outer Clock.................................................................................................................94
Main Menu ..................................................................................................................95
Menu Layout ...............................................................................................................95
Navi Key Guide ...........................................................................................................95
Programmable Keys ..........................................................................................................95
Set Programmable Keys .............................................................................................95
Set Navigation Key Shortcuts .....................................................................................95
Phone Settings ..................................................................................................................95
Language & Input Settings ..........................................................................................96
Pointer ........................................................................................................................96
Keyguard ....................................................................................................................96
Storage .......................................................................................................................96
USB Mode ..................................................................................................................96
Location Settings ........................................................................................................97
Security ......................................................................................................................97
Accounts Settings ..................................................................................................... 100
Date & Time Settings ................................................................................................ 101
Reset Your Phone and Phone Content ..................................................................... 101
Call Settings .................................................................................................................... 102

TOC ix
About Phone .................................................................................................................... 102
Software Update .............................................................................................................. 102
Support & Services ................................................................................................................. 104
Copyright & Trademarks ......................................................................................................... 105
Index ....................................................................................................................................... 106


Introduction 1
Introduction
Thank you for purchasing this Kyocera product. Please read this user guide carefully to ensure
safe and proper use.
Descriptions in the User Guide
Most descriptions in this user guide are based on your phone’s setup at the time of purchase.
Instructions to perform tasks in this guide may change depending on the version of software or
application on your phone. The status of individual settings may affect whether certain menus
for option settings are displayed or visible.
All screens in this guide are simulated. Actual displays may vary. Certain features, services, and
applications are network dependent and may not be available in all areas; additional terms,
conditions and/or charges may apply. Contact your service provider about feature availability
and functionality.
All features, functionality, and other specifications, as well as the information contained in this
guide are based upon the latest available information and are believed to be accurate at the
time of issuing. Kyocera International, Inc. reserves the right to change or modify any
information or specifications without notice or obligation.
For warranty service information, please refer to the Safety and Warranty Information linked
from your phone (see About Phone) or call the following telephone number from anywhere in
the continental United States: 1-800-349-4478.
This phone can determine its/your geographical location (location information) and can
associate location information with other data. For some services and applications, location
information must be turned on and you have to agree to its collection. Additionally, certain
services, applications, and programs are capable of accessing, collecting, storing, and using
location information and disclosing it to others. You should decide carefully when determining
whether location information should be made available to others.
©2022 Kyocera Corporation. KYOCERA and the Kyocera logo are registered trademarks of
Kyocera Corporation. DuraXA Equip is a trademark of Kyocera International. All other
trademarks are the property of their respective owners.
2 Get Started
Get Started
The following topics give you all the information you need to set up your phone.
Phone Overview and Key Functions
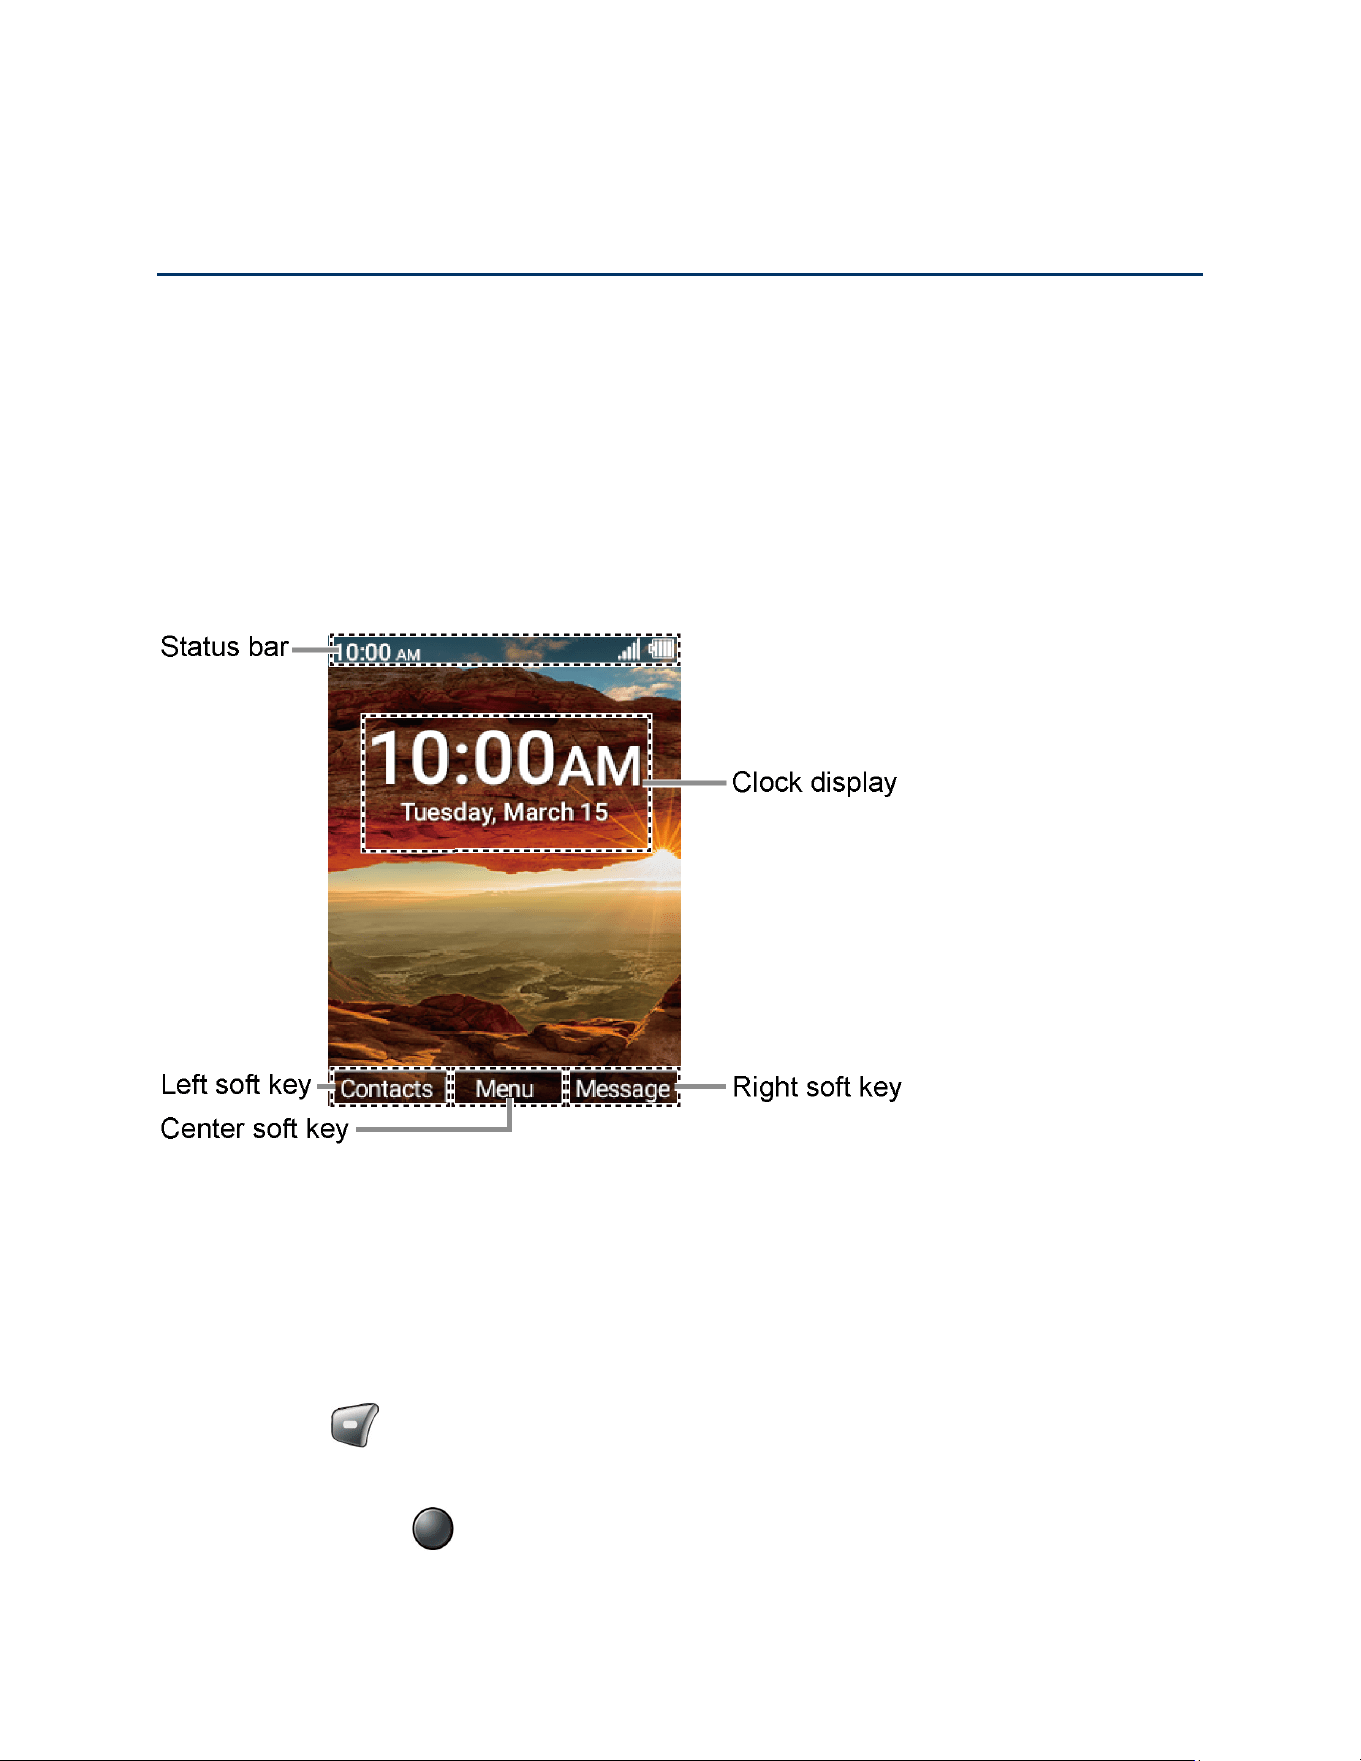
The following illustration outlines your phone’s primary external features and keys.
Note: Screen images are simulated. Actual displays may vary.

Get Started 3
● Earpiece: Lets you hear the caller and automated prompts.
Note: Do not apply any sheet or sticker to the earpiece area as it may compromise the
audio quality.
● Main screen: Displays all the information needed to operate your phone, such as the
call status, the Contacts list, the date and time, the signal strength, and the battery level.
● Left/Right soft keys ( / ): Let you select key actions or menu items
corresponding to the bottom left and right lines on the main screen.
● Navigation key: Lets you scroll through the phone’s menu options. This is one of the
programmable keys that can be assigned to frequently used applications or functions for
quick access. See Programmable Keys. You can easily see which items are assigned to
this key by displaying a guide on the Idle screen. See Navi Key Guide.
● Center soft key ( ): Lets you select key actions or menu items corresponding to the
bottom center lines on the main screen.
● Camera/Speaker key ( ): Lets you activate camera mode and take pictures and
videos. When you receive an incoming call, press to answer the call in speakerphone
mode. During a call, press to switch the speakerphone on or off.
● SEND key ( ): Allows you to place or receive calls, answer Call Waiting, use 3-way
Calling, or display recent call history.
● CLEAR/Back key ( ): Deletes characters from the display in text input mode.
When in a menu, pressing it returns you to the previous menu. This key also allows you
to return to the previous screen in a data session.
● Voice commands key ( ): Allows you to activate Voice Commands. See Voice
Commands.
● END/POWER key ( ): Lets you turn the phone on or off, end a call, or cancel your
input and return to the Idle screen.
● Keypad: Lets you enter numbers, letters, and characters, and perform functions.
● Microphone: Transmits your voice and ambient sound during voice calls and voice
recordings.
Note: Do not cover the microphone during a call.
4 Get Started
● Speakers: Let you hear the different ringtones and sounds. The speakers also let you
hear the caller’s voice in speakerphone mode.
● External speaker key ( ): Lets you place or receive calls in speakerphone mode
(with the phone closed), turn the speakerphone on and off during a call, or unlock the
keyguard (if configured). See Keyguard. This is one of the programmable keys that can
be assigned to frequently used applications or functions for quick access. See
Programmable Keys.
● Call list key ( ): Lets you display the recent call history (with the phone closed),
ignore an incoming call, end the ongoing call, or unlock the keyguard (if configured). You
can select a name or number from the call list and place the call with the phone closed
by using the external speaker key. See Call from Call History with the phone closed.
This is one of the programmable keys that can be assigned to frequently used
applications or functions for quick access. See Programmable Keys.
Get Started 5
● Camera: Lets you take pictures and videos.
● Internal microphone: Suppresses background noise improving audio quality for the
other party during voice calls except in speakerphone mode.
● Flashlight: Lets you illuminate dark areas as a built-in LED flashlight. It also helps you
to take pictures or record videos in low-light environments. See Flashlight.
● LED indicator: Displays a phone notification, charging status, or alert. It blinks when
your phone's battery level is low.
● Outer screen: Displays information such as the call status, the date and time, and the
signal and battery strength.
● SIM card slot (internal): Allows you to insert a SIM card. The SIM compartment is
behind the battery cover. See Install a SIM Card and a microSD Card.
● microSD card slot (internal): Allows you to insert a microSD card to support external
memory. The microSD compartment is behind the battery cover. See Install a SIM Card
and a microSD Card.
● Battery cover screw: Secures the battery cover to the phone.
● Charging contacts: Allow you to connect to an optional multi-bay battery charger that
can charge multiple phones simultaneously. These contacts are also used when
connecting to a specially designed optional carkit.
6 Get Started
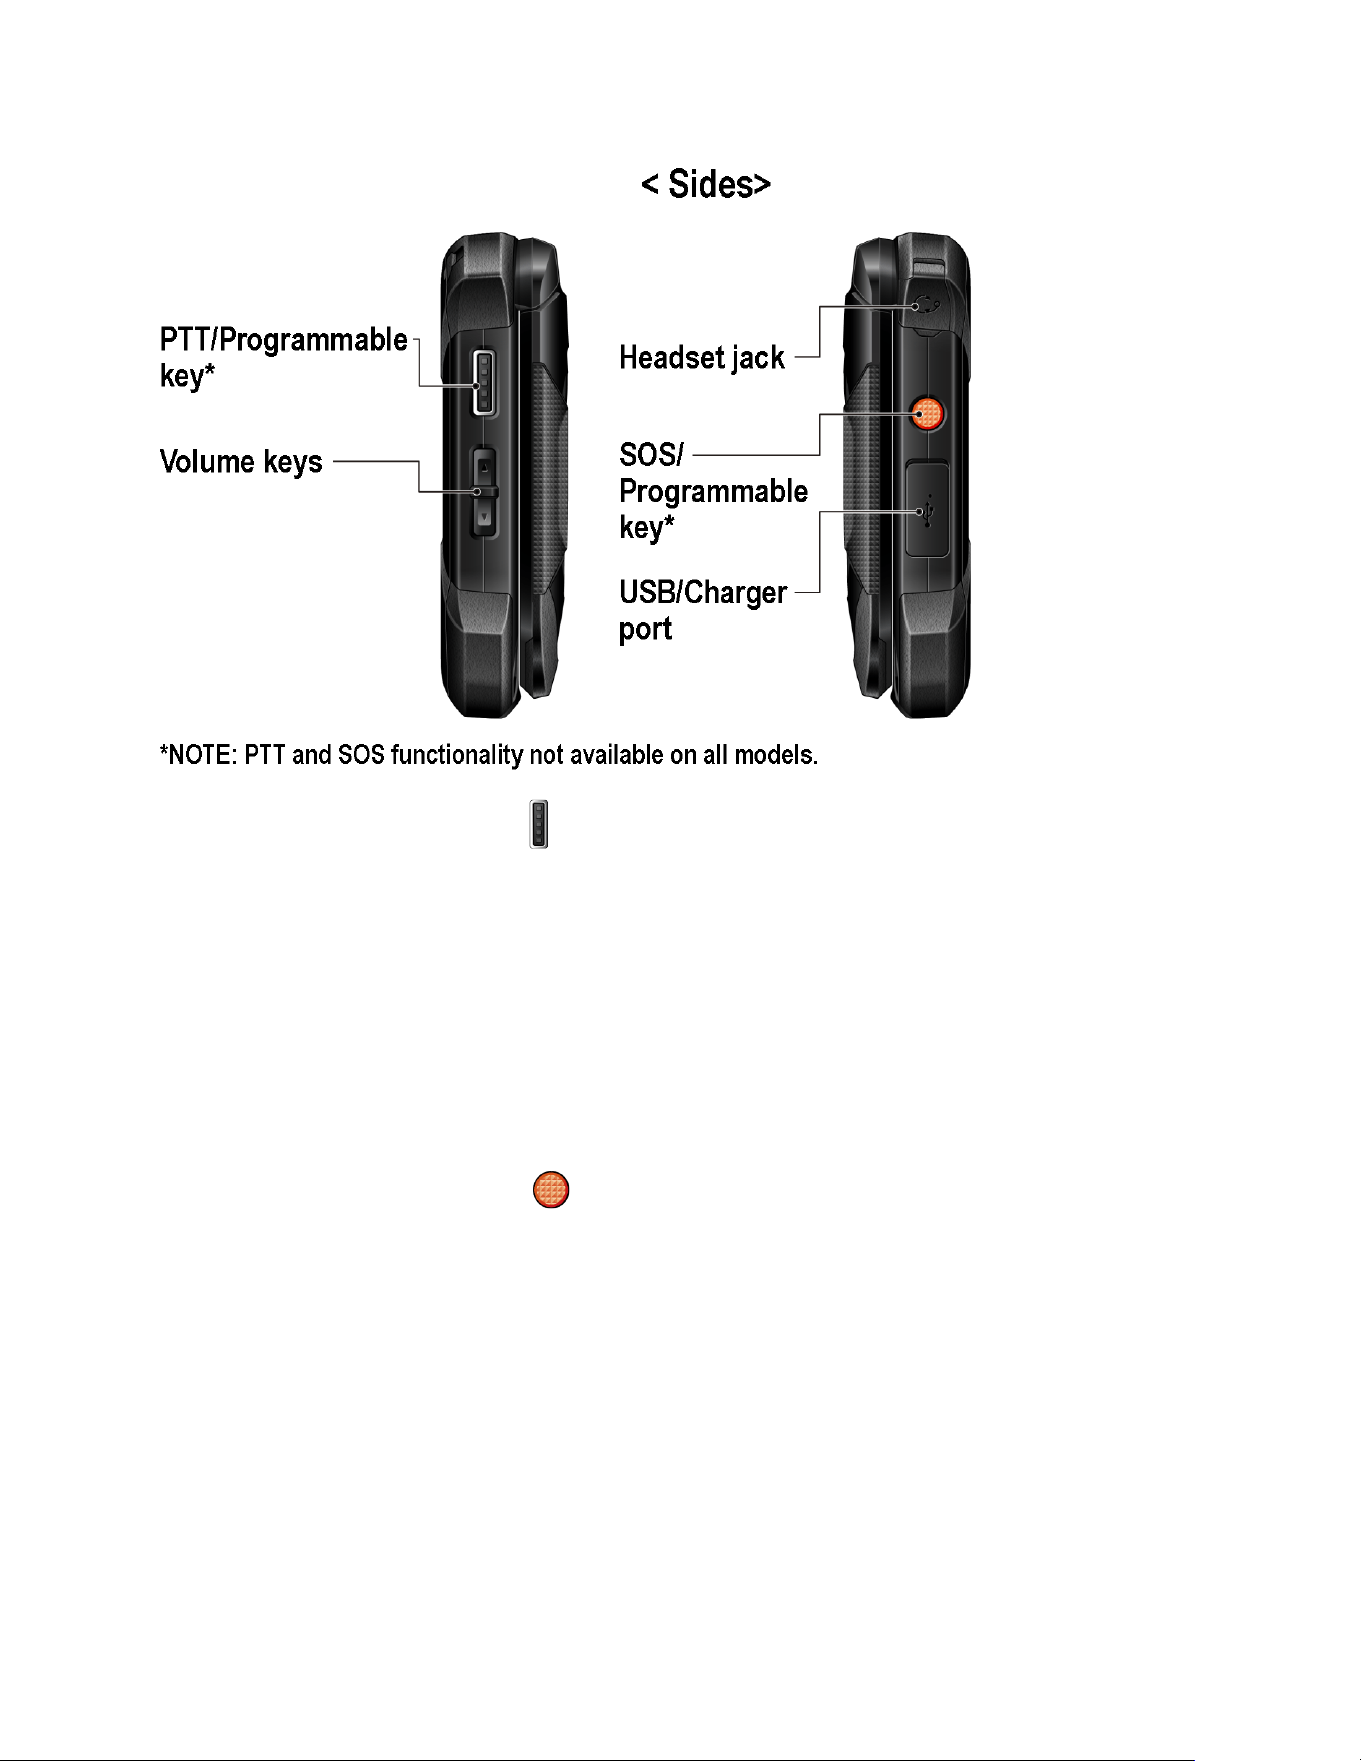
● PTT/Programmable key ( ): This is one of the programmable keys that can be
assigned to frequently used applications or functions for quick access. See
Programmable Keys.
● Volume keys: Allow you to adjust the master volume when you are not on a call or
adjust the voice volume during a call.
● Headset jack: A camlock headset jack that allows you to plug in an optional headset
and securely fasten it into the device for convenient, hands-free conversations.
CAUTION!
Inserting an accessory into the incorrect jack may damage the phone.
● SOS/Programmable key ( ): This is one of the programmable keys that can be
assigned to frequently used applications or functions for quick access. See
Programmable Keys.
● USB/Charger port: Allows you to connect the phone to a USB cable for use with the AC
adapter or other compatible accessories.
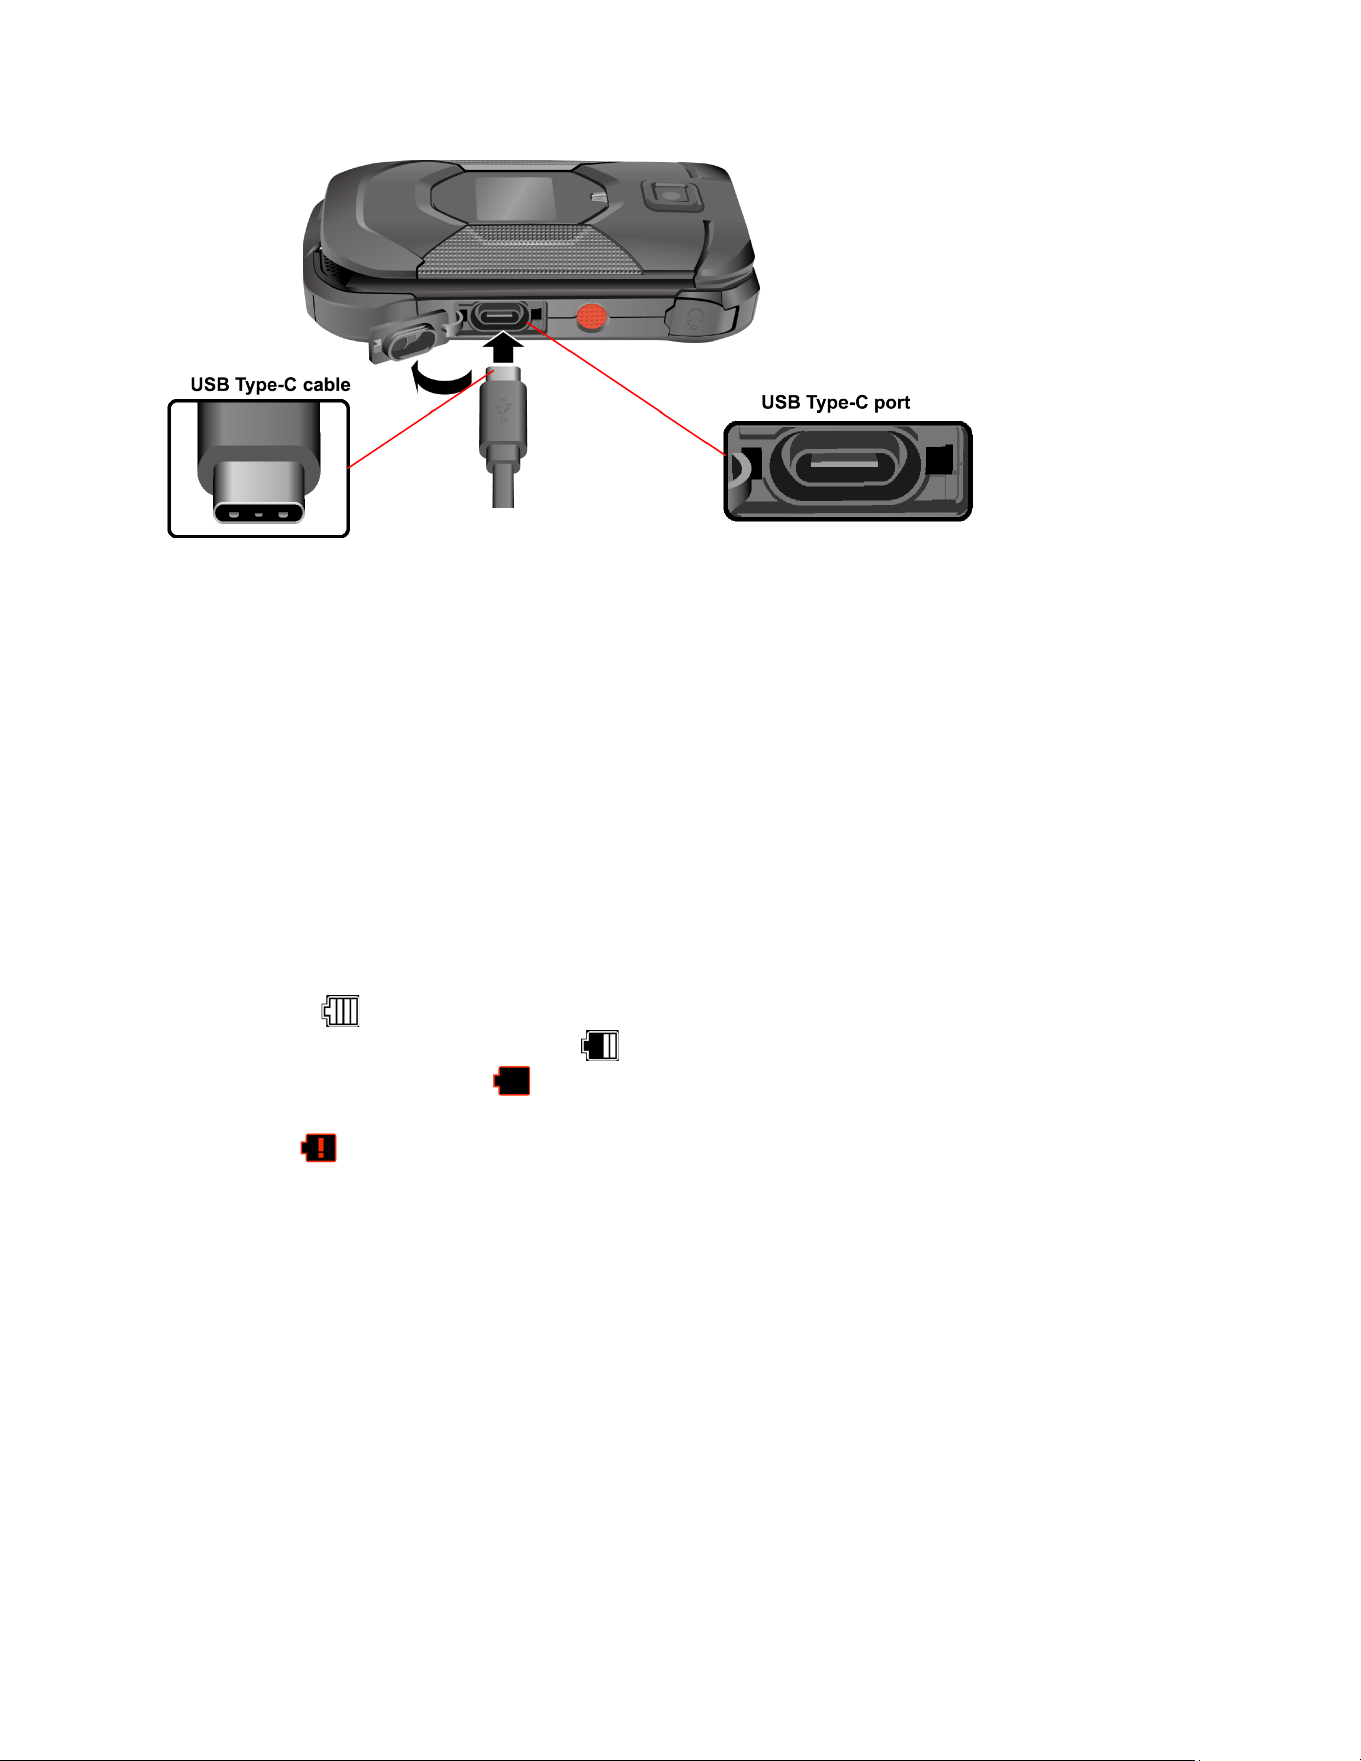
Important:
Only use a USB Type-C charger/cable for this phone.
Get Started 7
Set Up Your Phone
You must first install and charge the battery to begin setting up your phone.
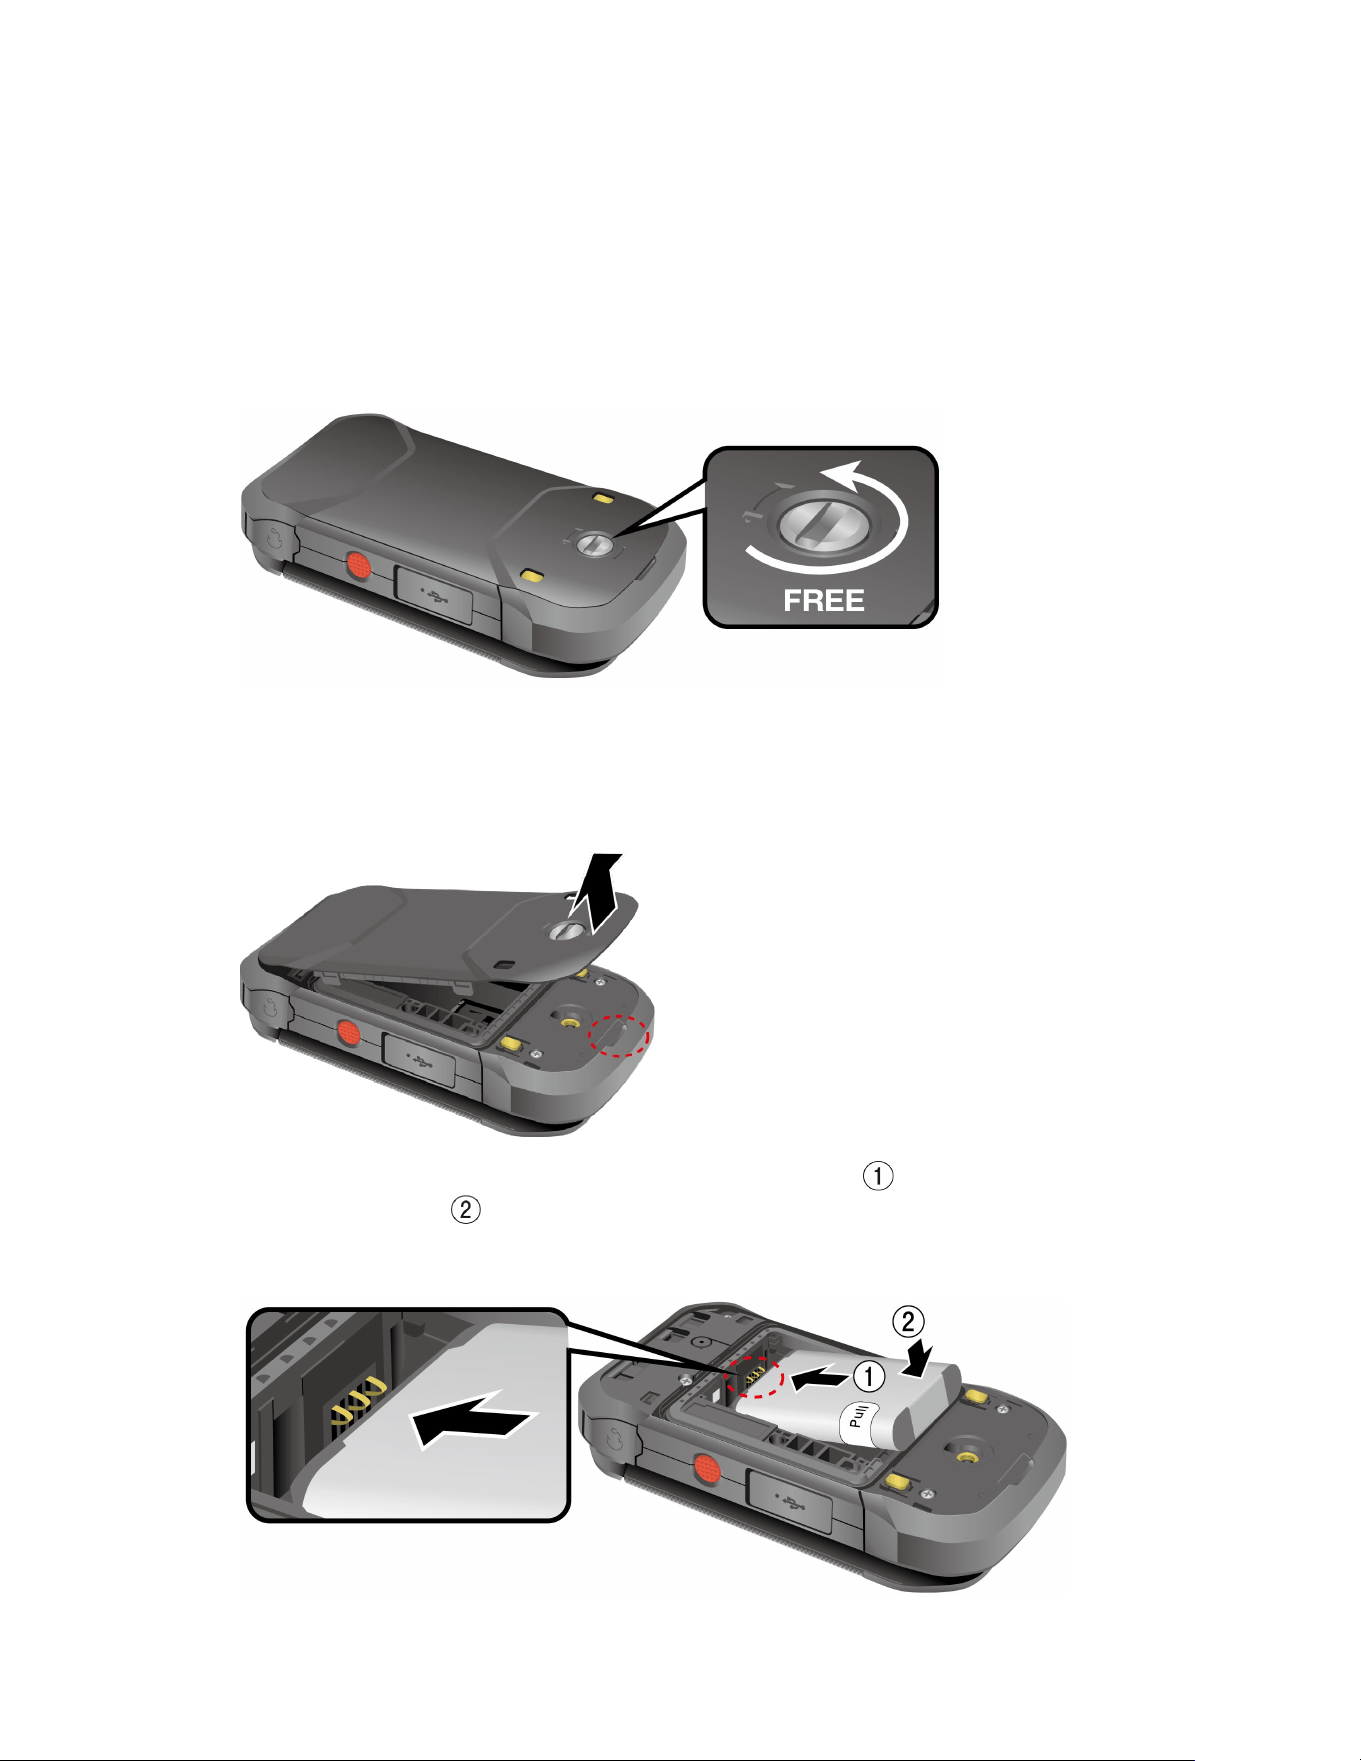
Insert the Battery
1. Using a coin, rotate the battery cover screw on the back of the phone counter-clockwise
several times to loosen it. (You should hear a click when the screw is loose.)
Note: The battery cover screw is permanently mounted on the cover and cannot be
removed.
2. Place your fingernail in the slit at the bottom of the battery cover and lift the battery
cover.
3. Insert the battery, making sure to align the gold contacts ( ). Press down gently to
secure the battery ( ).
Warning:
Do not handle a damaged or leaking Li-ion battery as you can be burned.
8 Get Started
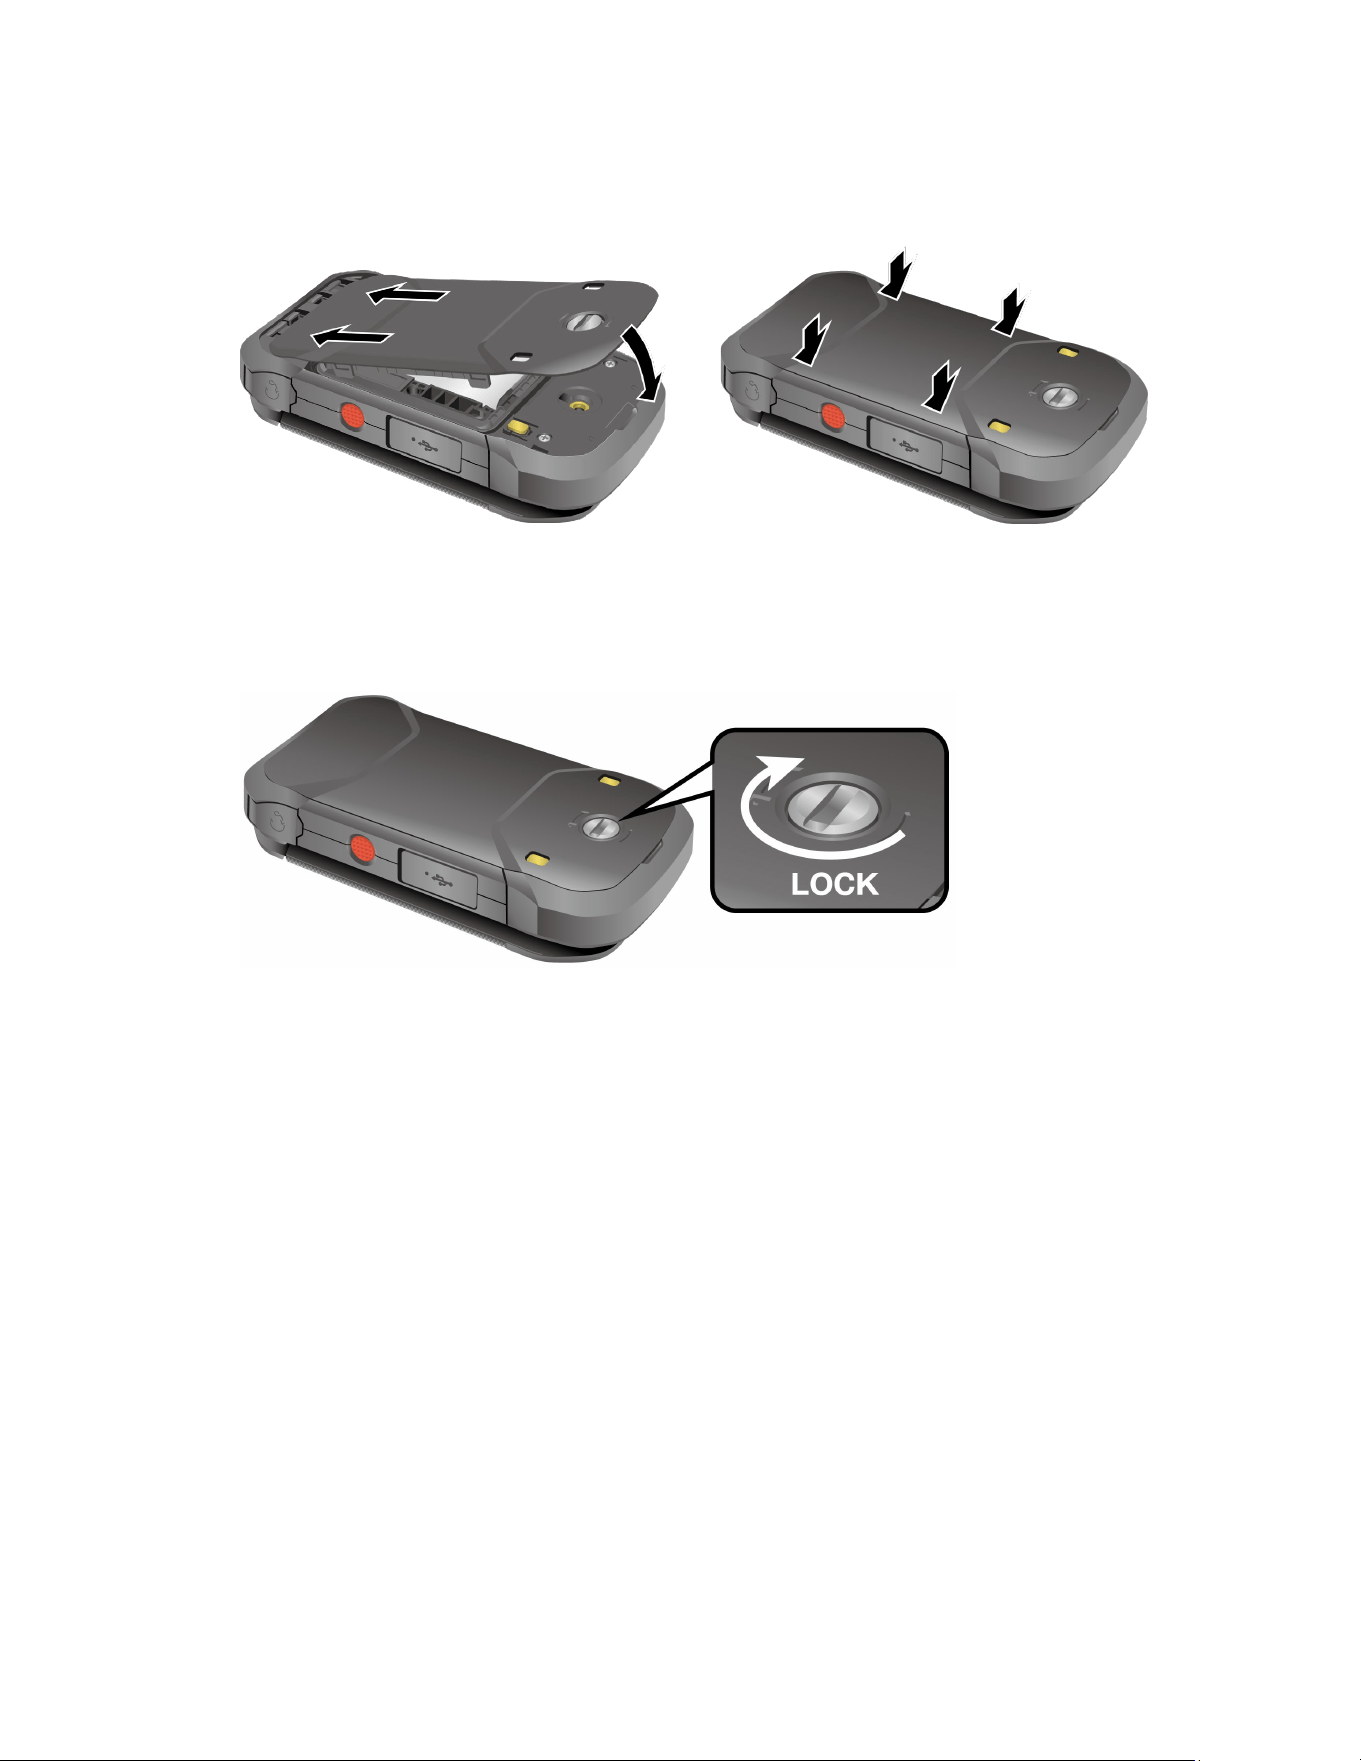
4. Replace the battery cover, making sure all the tabs are secure and there are no gaps
around the cover.
Warning:
Make sure you press all around the edges of the battery cover to ensure your
phone's waterproof seal is intact.
5. Using a coin, rotate the battery cover screw clockwise until it is tight.
Charge the Battery
Fully charge the battery before powering on the phone.
Important:
Unplug the charger from the electrical outlet when not in use to reduce the
environmental impact of charging.
Warning:
Please use only approved chargers and cables
with your phone. Improper handling
of the charging port, as well as the use of an incompatible charger or cable, may
cause damage to your device and void the warranty.
1. Open the USB/Charger port cover on the right side of the phone.
2. Plug the smaller end of the USB cable into the USB/Charger port.
Important:
Only use a USB Type-C charger/cable for this phone.
Get Started 9
3. Plug the other end of the USB cable into the AC adapter, and then plug it into an
electrical outlet. Be sure to use the AC adapter that came with your phone.
4. When charging is complete, remove the cable from the port and close the cover. Press
around the edges of the cover to ensure that it is securely closed.
Warning:
Make sure the USB/Charger port cover is securely closed when the port is
not in use.
Battery Capacity
Your phone is equipped with a Lithium ion (Li-ion) battery, so there are no negative effects from
charging the battery before it is fully drained.
For a quick check of your battery level, view the battery charge icon located on the right side of
the status bar. indicates that the phone is fully charged. The number of white bars
decreases as your battery discharges ( ). When your battery level becomes low (approx.
15%), the battery icon turns to and the phone sounds a warning tone, vibrates, and displays
a low battery message. When the battery drops to a more critical level (approx. 5%), the battery
icon turns to and starts blinking. The alert tone, vibration, and message will repeat when the
remaining battery reaches each lower level.
Note: Watch your phone’s battery level and charge the battery before it runs out of power.
Remove the Battery
If you need to remove the Battery, follow these steps:
1. Make sure the power is off so that you don’t lose any stored numbers or messages.
2. Insert a coin into the slot on the battery cover screw and turn it counter-clockwise to
open the battery cover.
3. Starting at the edge of the sticker, peel the visible portion until it is standing up from the
battery; then, use this portion to pull the battery out of its compartment.
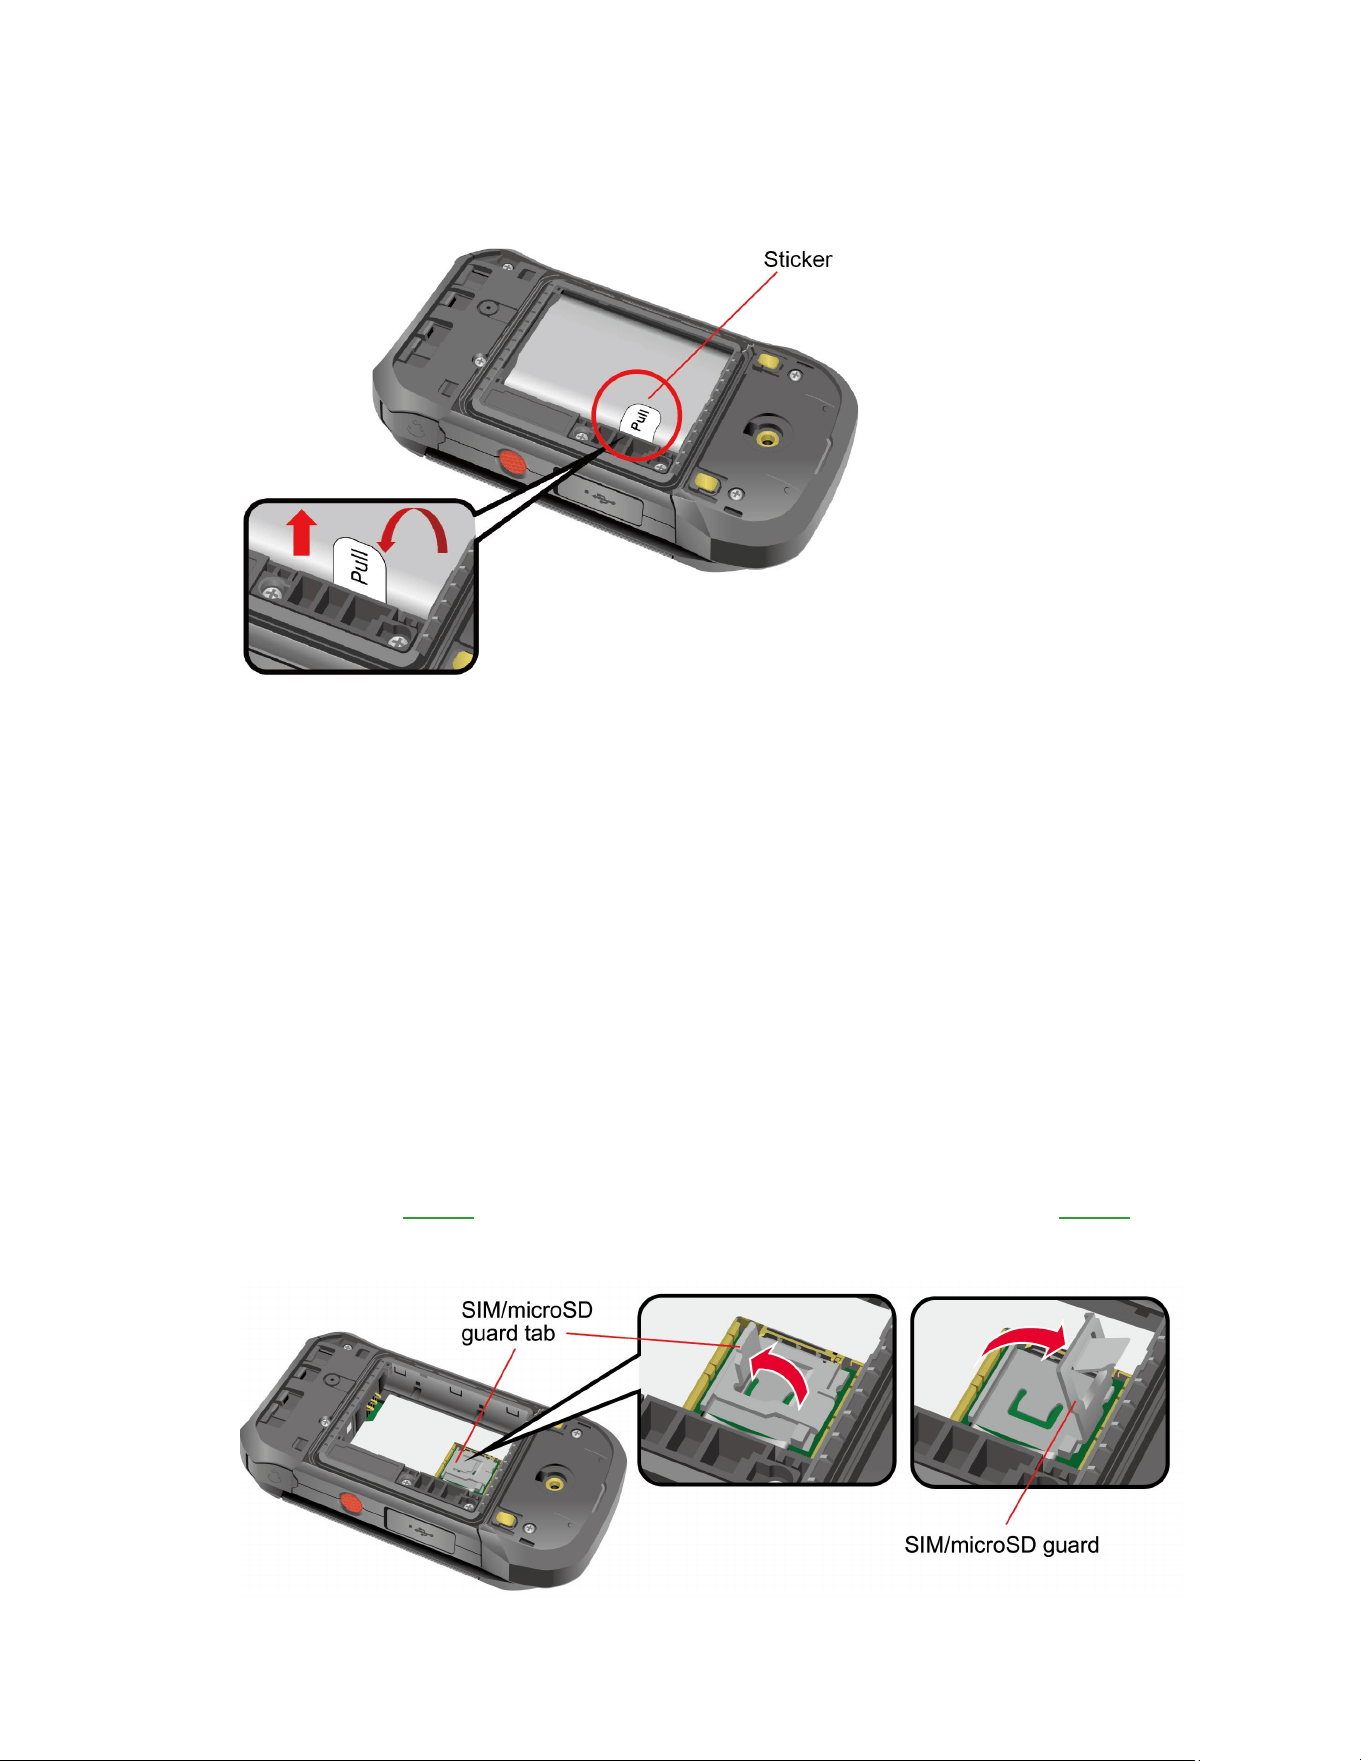
10 Get Started
Important:
Do not remove the sticker from the battery. It functions as a pull tab to
remove the battery.
Install a SIM Card and a microSD Card
A SIM card needs to be installed in your phone before starting the setup. Inserting a compatible
microSD™ card into your phone will increase the storage capacity. If you need to install or
replace a SIM card, or install a microSD card, follow the instructions below:
Note: The microSD card is sold separately.
Note: When you insert an optional SD card for the first time, it is recommended that you format
it on your phone. See Format microSD Card. More information about the microSD
feature, see microSD Card.
1. Remove the battery cover and the battery.
2. Lift the SIM/microSD guard tab by its edge until it stands up; then grip and pull the tab to
flip open the guard.
Note: Skip to step 4 if no SIM card is installed in your phone yet or skip to step 5 if you
do not need to install/replace the SIM card.
Get Started 11
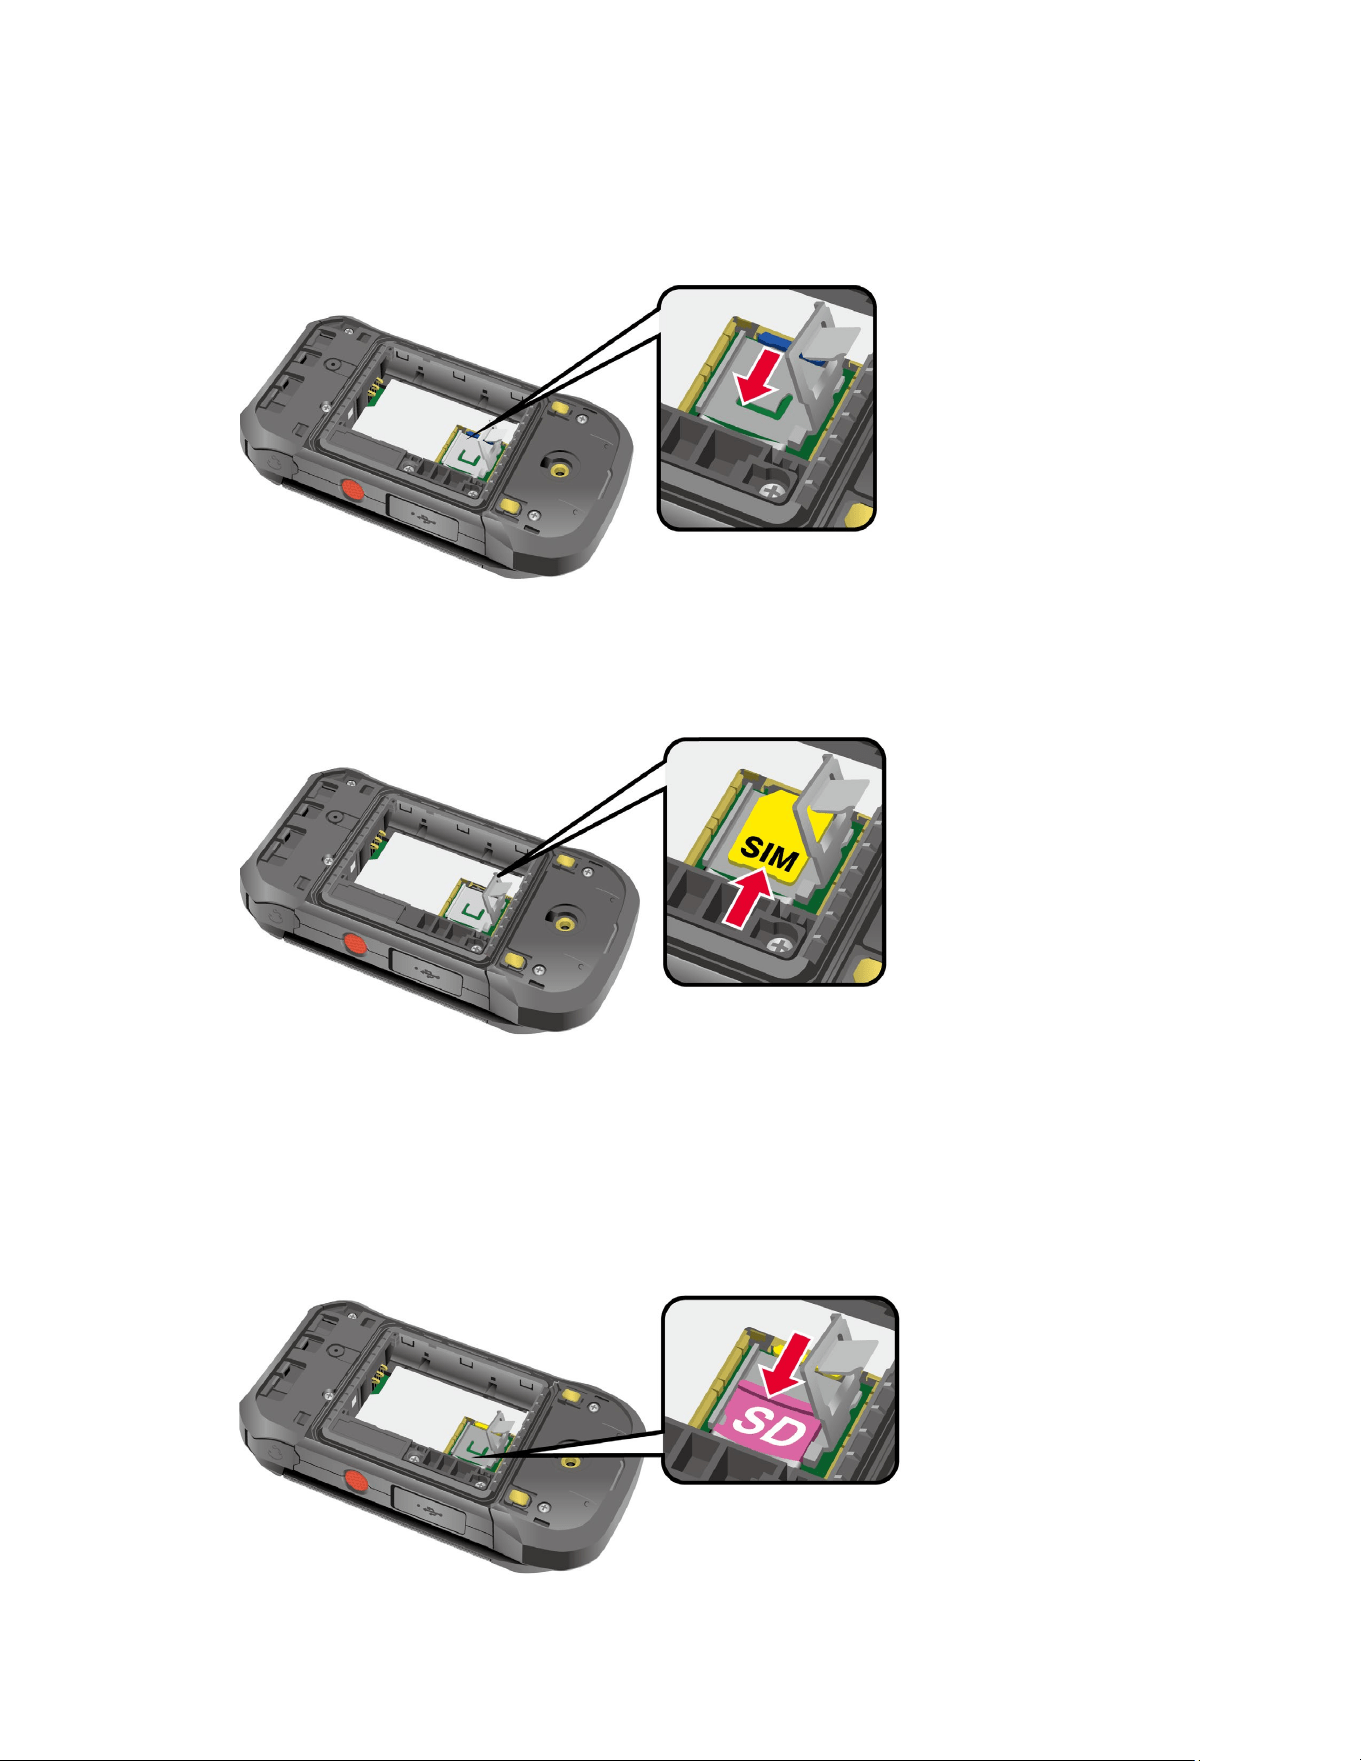
3. When a SIM card is already installed and you want to replace it, push the existing SIM
card with your finger and then release the pressure. The card ejects itself. Slide it out
from the slot.
4. Carefully insert your new SIM card into the SIM card slot, with the gold contacts facing
down and the cut off corner on the top left. Gently push the card in until it latches into
place.
Note: Please be careful to not insert the SIM card into the SD card slot.
5. Slide the microSD card into the slot with the gold contacts facing down. Gently push the
card in until it fits into place.
Note: You can easily damage the microSD card by improper operation. Please be
careful when inserting, removing, or handling the microSD card.

12 Get Started
6. Replace the SIM/microSD guard.
7. Place the battery back into its compartment and replace the battery cover.
Warning:
Make sure you press all around the edges of the battery cover to ensure your
phone's waterproof seal is intact.
8. Using a coin, rotate the battery cover screw clockwise until it is tight.
Turn Your Phone On and Off
The instructions below explain how to turn your phone on and off.
Turn Your Phone On
► Open the phone and press and hold the END/POWER key until the screen lights
up.
Turn Your Phone Off
► Open the phone and press and hold the END/POWER key until you see the
powering-down animation on the main screen.
Setup Wizard
When you turn on your phone for the first time, the Setup Wizard starts automatically. Follow the
onscreen instructions to choose a default language, etc. To activate your phone, contact your
service provider.
Important:
If you plan to use the Device Control feature, you need to follow the specific
procedure for the phone’s initial set-up before selecting a language option. See
Device Control.
Phone Basics 13
Phone Basics
Your phone is packed with features that simplify your life and expand your ability to stay
connected to the people and information that are important to you. The following topics will
introduce the basic functions and features of your phone.
Your Idle Screen
The Idle screen is the starting point for accessing your phone’s functions and menus.
Idle Screen Overview
The following illustration describes the basics of the Idle screen.
Note: Screen images are simulated. Actual displays may vary.
● Status bar: Displays the time and phone status icons.
● Clock display: Displays time and date. You can turn on or off this display from the
Display settings.
● Left soft key: Displays actions or menu items that you can select by pressing the Left
soft key .
● Center soft key: Displays actions or menu items that you can select by pressing the
Center soft key .

14 Phone Basics
● Right soft key: Displays actions or menu items that you can select by pressing the
Right soft key .
Status Bar
The status bar appears at the top of your phone’s display screen. It provides phone and service
status information on the right side and notification alerts on the left.
Status Icons
Icons Description
Bluetooth
®
connected
Wi-Fi active
Vibrate only
Master volume off (Mute)
Network (full signal)
Network (no signal)
4G LTE (data service)
4G (data service)
Airplane mode
Alarm set
Battery (current level)
Battery (low)
Battery (discharged)
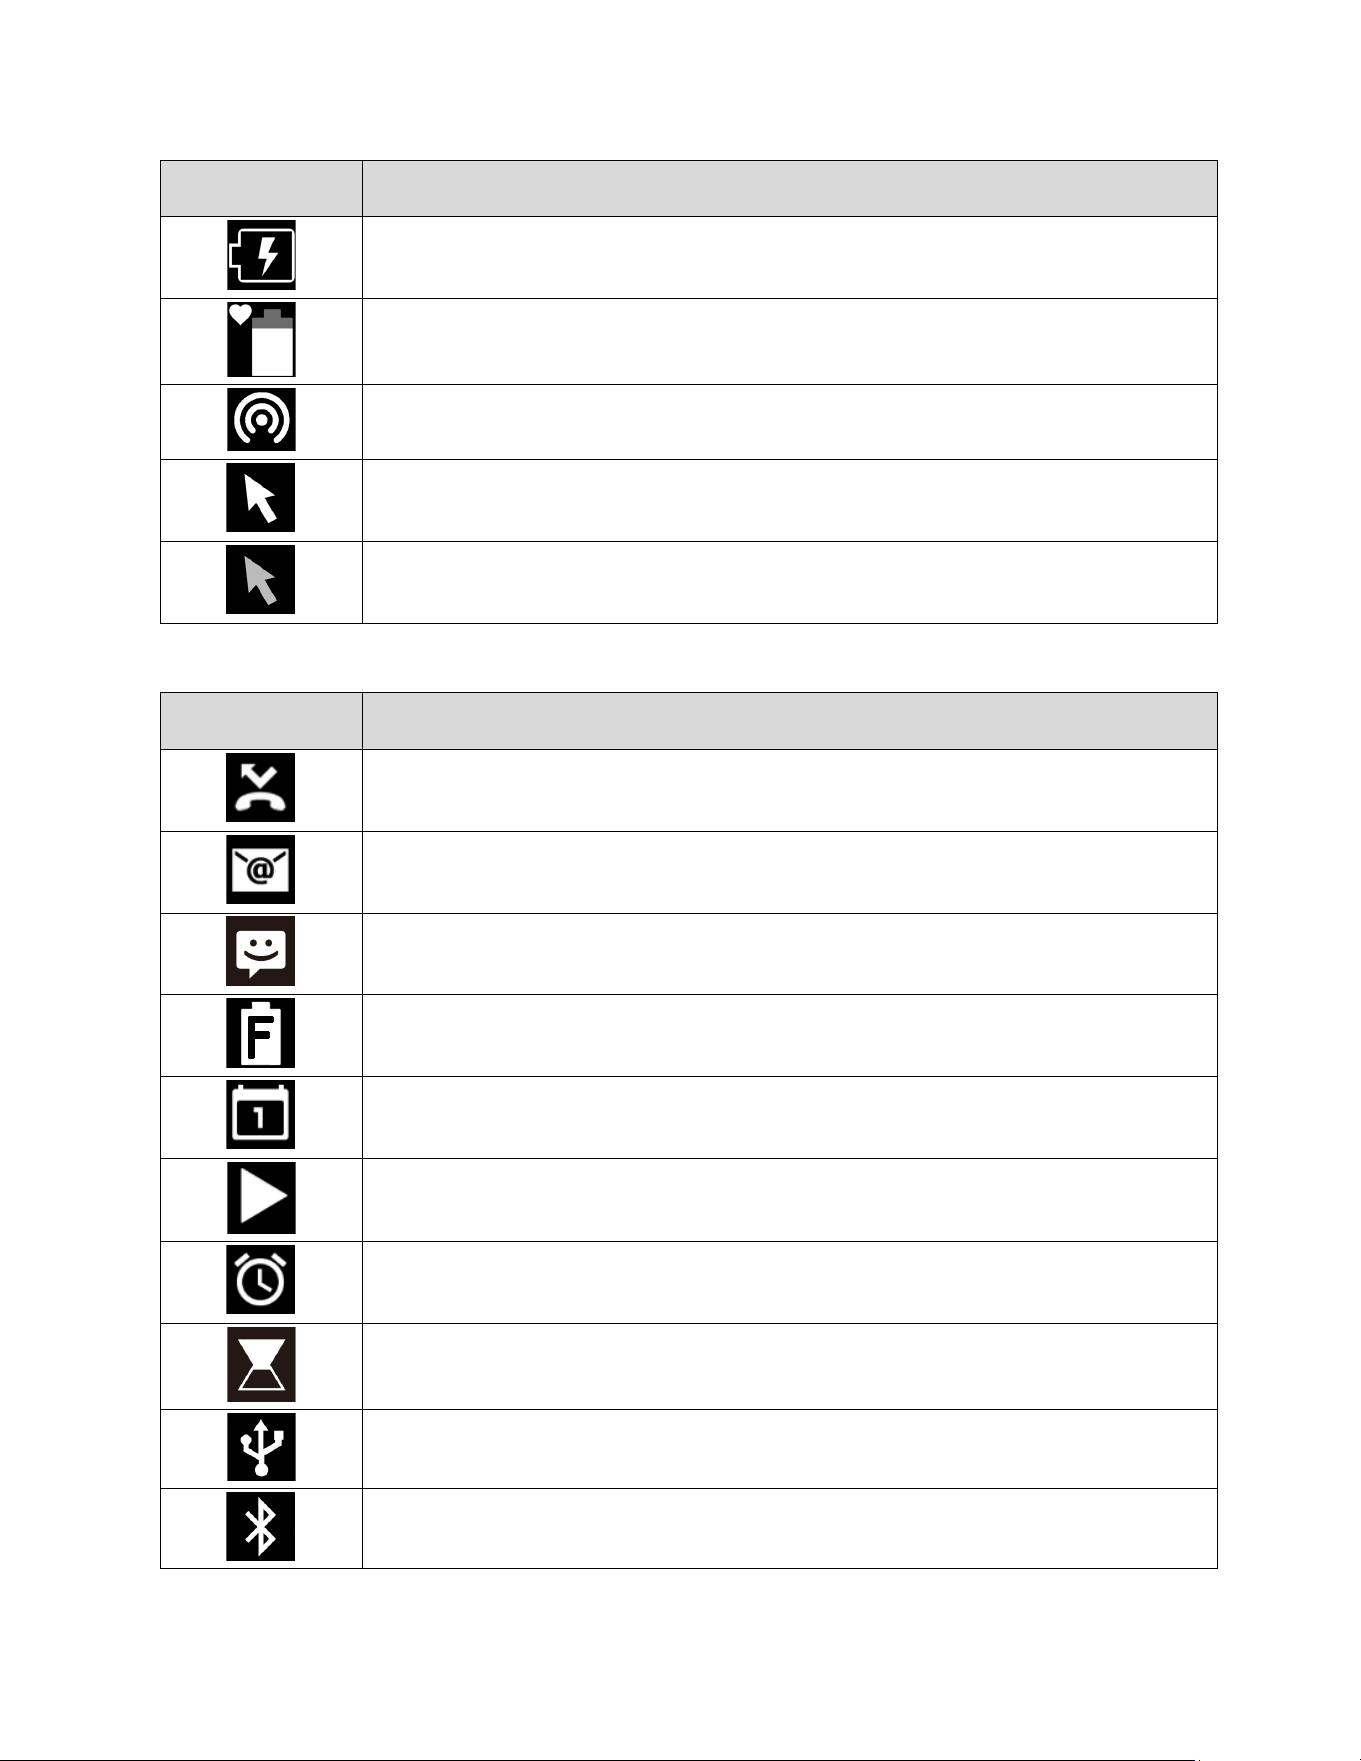
Phone Basics 15
Icons Description
Battery (charging)
Battery Care Mode
Mobile Hotspot
Pointer enabled
Pointer disabled
Notification Icons
Icons Description
Missed call
New email
New message
Battery (full charge)
Calendar event
Music application is running in the background
Alarm
Timer
USB Tethering
Bluetooth Tethering
16 Phone Basics
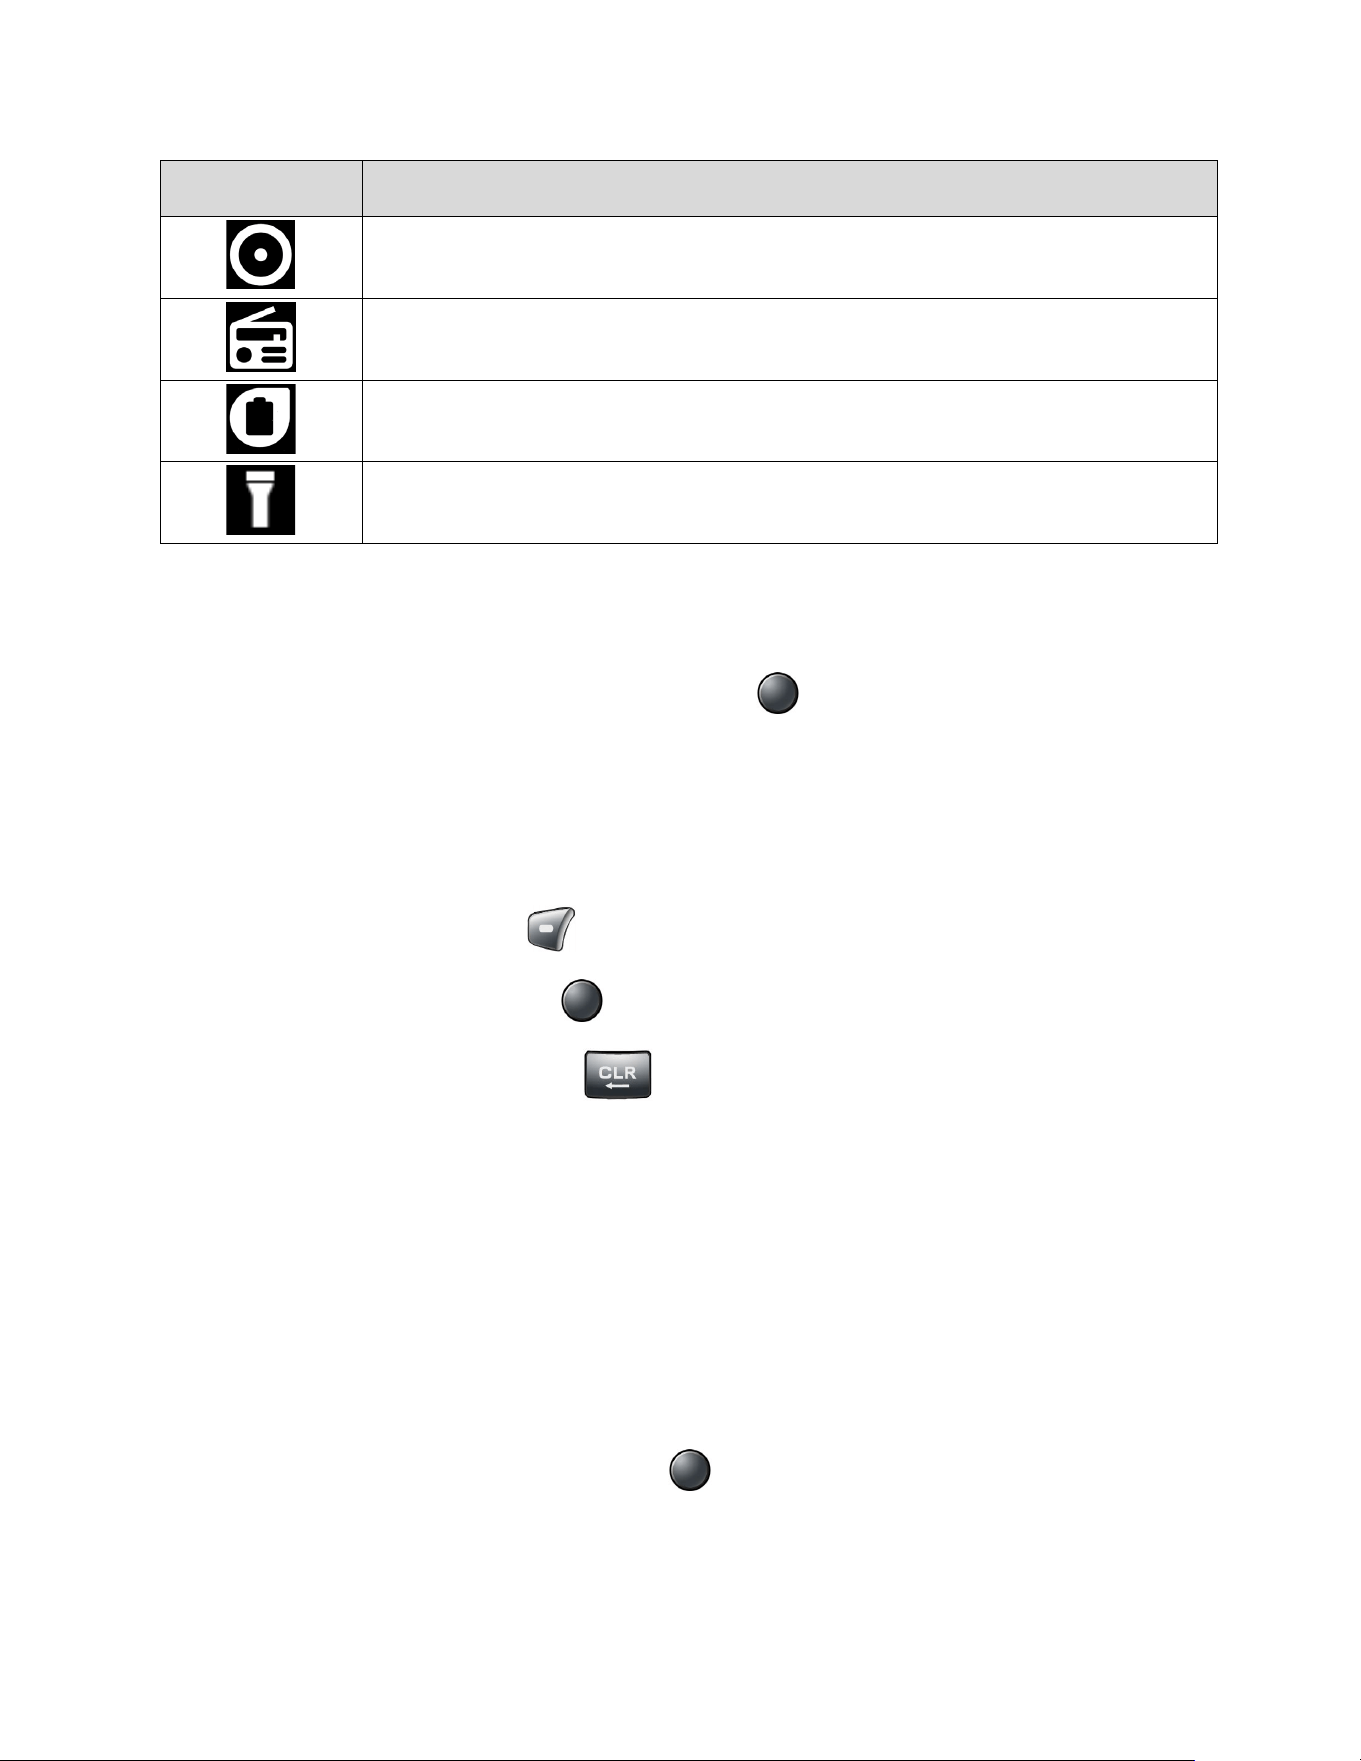
Icons Description
USB and Bluetooth tethering
FM radio
Eco mode
Flashlight
Notifications Screen
You can open the Notifications screen to view the list of notifications you received.
1. From the Idle screen, press the Center soft key [Menu] > Notifications.
– or –
From the Idle screen, press the Navigation key down.
2. Highlight a notification and select from following options. Available options may vary:
Press the Left soft key [Dismiss] to dismiss the notification.
Press the Center soft key [View] to display the details screen.
Press the CLEAR/Back key to keep the notification pending on the
Notifications screen.
Navigate Through the Menus
The Navigation key on your phone lets you scroll through on-screen items. To navigate through
a menu, press the Navigation key up or down.
Many menus feature a scroll bar on the right to help you keep track of your position in the menu.
Select Menu Items
As you navigate through the menu, menu options are highlighted. Select any option by
highlighting it and pressing the Center soft key [Select]. If the option is numbered, you can
also select it by pressing the corresponding number on the phone’s keypad.
For example, to view the Brightness level:

Phone Basics 17
1. From the Idle screen, press the Center soft key [Menu] to access the main menu.
2. Select Settings & tools by highlighting it and pressing the Center soft key [Select].
3. Select Settings by highlighting it and pressing the Center soft key [Select].
4. Select Display settings by highlighting it and pressing the Center soft key [Select].
5. Select Brightness level by highlighting it and pressing the Center soft key [Select].
For the purposes of this guide, the above steps condense into:
From the Idle screen, press the Center soft key [Menu] > Settings & tools > Settings >
Display settings > Brightness level.
Back Up Within a Menu
To go to the previous menu:
► Press the CLEAR/Back key .
To return to the Idle screen:
► Press the END/POWER key .
Customize Main Menu Screen
You can change the lineup and layout of the main menu screen as you like.
1. From the Idle screen, press the Center soft key [Menu] to access the main menu.
2. Press the Right soft key [Options].
3. The following options are available:
Menu layout: To select the screen layout Grid or List
Replace items: To replace items on the current main menu with others.
Position items: To change the position of the items on the main menu screen.
Reset Main menu: To reset the main menu screen to the default state.
App List
You can find and access numerous apps and functions installed in your phone on the
Application List screen.

18 Phone Basics
1. From the Idle screen, press the Center soft key [Menu] to access the main menu.
2. Press the Left soft key [App list].
3. Highlight an item you want to open and press the Center soft key [Select].
Enter Text
You can type on your phone using various input modes.
Key Function
For text entry, you can use the following keys as mentioned below.
● Press the CLEAR/Back key to delete characters from the display.
● Press to enter some frequently used symbols, such as period, comma, @, ?, !, /,
etc. Note that each time you press the key, the next symbol appears. This function is not
available in Prediction mode and 123 mode.
● Press the # SPACE key to enter a space.
● Press the Asterisk SHIFT key to change the capitalization style to Abc > ABC >
abc (ABC mode).
Select a Text Input Mode
You can type on your phone using various input modes.
1. From a screen where you can enter text, press the Left soft key to change the entry
mode.
2. Select the desired mode (Prediction, Abc, ABC, 123, Symbols, Smileys or
Emoticons) or following options:
Web shortcuts to enter Web shortcuts (for example, www., http://, or .com).
Select text to copy or cut selected text and save to the Paste list. See Copy and
Paste Text.
Paste list to paste copied or cut text in the paste list (if applicable). See Copy and
Paste Text.
Text options to display the text entry options menu. See Set Text Entry Options.
Phone Basics 19
Enter Text Using Prediction Mode
Prediction mode is an input text feature which predicts what you want to type and allow you to
enter text quicker and easier by suggesting words as you type.
1. From a screen where you can enter text, press the Left soft key to change the entry
mode.
2. Select the Prediction mode.
3. Press the corresponding keys once per letter to enter a word. (For example, to enter the
word “Happy,” press .) If you make a mistake, press
the CLEAR/Back key to erase a single character.
4. As you type, a word choice list opens. (The word may change as you type.). Highlight
the word you want to enter (“Happy”) by using the navigation key and press the Center
soft key [Select].
Enter Text Using Abc/ABC Mode
In Abc or ABC mode, also known as multi-tap entry, you press keys one, two, three, or four
times to enter the letters you see on the keypad.
1. From a screen where you can enter text, press the Left soft key to change the entry
mode.
2. Select the Abc or ABC text input mode. See Select a Text Input Mode.
3. Press the corresponding key repeatedly until the correct letter appears. For example, to
enter “ABC,” press once for “A,” twice for “B,” and three times for “C.”
After a character is entered, the cursor automatically advances to the next space after two
seconds or when you enter a character on a different key.
Set Text Entry Options
The text entry options menu allows you to specify additional features to use during the text entry
process.
1. From a screen where you can enter text, press the Left soft key > Text options.
2. Set the text entry function as you want by using the menus including Word complete,
Next word complete, My words, etc.

20 Phone Basics
Copy and Paste Text
You can copy or cut text and paste it in the text entry field:
1. In the text entry field, press the Left soft key > Select text.
2. Move the cursor next to the text you want to copy or cut and press the Center soft key
[Start].
3. Highlight the text you want to copy or cut by using the Navigation key.
4. Press the Center soft key [End] > Copy or Cut. The text is saved in the Paste List.
5. In the text entry field, move the cursor to the place where you want to paste the text and
press the Left soft key > Paste list.
6. Press the Navigation key to scroll to the text you want to paste and press the Center soft
key [Select].
Note: This feature is not available when you cannot select the text input mode.

Phone Calls 21
Phone Calls
With an available network and your phone’s calling features, you can enjoy clear phone calls
across the country.
Make Phone Calls
There are several convenient ways to place calls from your phone.
Call Using the Phone keypad
The most traditional way to place a call is by using the phone’s keypad.
1. Open the phone and enter a phone number. (If you make a mistake while dialing, press
the CLEAR/Back key to erase the numbers.)
2. Press the Center soft key [Call] or SEND key .
3. Press the END/POWER key when you are finished.
Call from Call History
Place a call to the numbers in your Call history.
1. From the Idle screen, press the SEND key .
2. Select an entry and press the SEND key .
Call from Call History with the phone closed
Place a call to the numbers in your Call history without opening the phone.
1. Press the Call list key with the phone closed.
Note: If the Call list key is disabled, see Keyguard.
2. Highlight an entry by using the Volume key up or down.
3. Press the External speaker key to start the call.

22 Phone Calls
Call from Contacts
You can place phone calls directly from entries in your Contacts list.
1. From the Idle screen, press the Left soft key [Contacts].
2. Select the entry you want to call.
3. Press the SEND key to dial the entry’s default phone number.
– or –
To dial another number from the same entry, press the Center soft key [View] to
select the entry, highlight a number, and then press the SEND key .
Call Using a Speed Dial Number
Speed dialing makes contacting friends and family easy. See Set Up Speed Dialing for
information on assigning speed dial numbers.
To use speed dial for locations 2–9:
► From the Idle screen, press and hold the appropriate key for approximately two seconds.
To use speed dial for locations 10–999999:
► From the Idle screen, enter the speed dial number you want to use and long press the
last digit key for approximately two seconds.
Call a Phone Number with Pauses
You can dial or save phone numbers with pauses for use with automated systems, such as
voicemail or credit card billing numbers.
There are two types of pauses available on your phone:
● 2-sec pause automatically sends the next set of numbers after two seconds.
● Wait will wait for your confirmation to send the rest of the digits when reached.
Note: You can have multiple pauses in a phone number and can combine two-second
and wait (hard) pauses.
To dial or save phone numbers with pauses:
1. Enter all or part of a number.
2. Press the Right soft key [Options] > Add 2-sec pause or Add wait.
Phone Calls 23
3. Enter additional numbers.
4. Press the SEND key to dial the number.
Call Emergency Numbers
You can place calls to 911 or 112 even if the phone screen is locked or your account is
restricted.
► Press or and press the SEND key .
Enhanced 911 (E911) Information
This phone features an embedded Global Positioning System (GPS) chip necessary for utilizing
E911 emergency location services where available.
When you place an emergency 911 call, the GPS feature of your phone seeks information to
calculate your approximate location. Depending on several variables, including availability and
access to satellite signals, it may take up to 30 seconds or more to determine and report your
approximate location.
Important:
Always report your location to the 911 operator when placing an emergency call.
Some designated emergency call takers, known as Public Safety Answering Points
(PSAPs), may not be equipped to receive GPS location information from your
phone.
Call Using Real Time Text (RTT)
Real Time Text (RTT) function is available with this phone. For details, see Real Time Text.
Receive Phone Calls
You can select the most convenient way to respond to a call.
Your phone notifies you of incoming calls in the following ways:
● The phone rings or vibrates.
● The LED indicator flashes.
● The backlight illuminates.
● The screen displays an incoming call message.
If the incoming call is from a number stored in your Contacts, the entry’s name is displayed. The
caller’s phone number may also be displayed, if available.

24 Phone Calls
Answer an Incoming Call with the Phone Open
► Press the SEND key or select Answer to answer an incoming call. (Depending
on your settings, you may also answer incoming calls by pressing other keys. See Any
Key Answer.)
Answer an Incoming Call with the Phone Closed
► When your phone rings or vibrates, press the External speaker key . (The call will be
answered in speakerphone mode.)
– or –
Open the phone to use the earpiece. See Answer incoming calls by opening the phone.
Answer an Incoming Call in Speakerphone Mode
► Press the Camera/Speaker key or the External speaker key .
Mute the Ringing Sound and Stop the Vibration
To mute the ringtone without rejecting the call:
► Press the Volume key down.
Reject an Incoming Call and Send a Message
► Select Send message on the screen.
End Phone Calls
When you are finished with a call, make sure that you disconnect correctly.
Disconnect a Phone Call
► Press the END/POWER key .
– or –
Press and hold the Call list key .
After you have finished your call, the phone will display the caller’s name (if already in your
Contacts), phone number (if available), and the duration of the call.

Phone Calls 25
Phone Call Options
Your phone application provides many useful features and options to help you make the most of
your calling experience.
In-call Options
Pressing the Right soft key [Options] during a call displays a list of available in-call
features. To select an option, highlight the option and press the Center soft key [Select].
● Add call to initiate a 3-way call.
● Go to contacts to open the Contacts screen.
● Go to Bluetooth settings to open the Bluetooth settings screen (if applicable).
● Use Bluetooth device to switch the call to a Bluetooth device (if applicable).
● Go to Idle screen to get to the Idle screen.
● Switch to RTT to change to RTT mode.
● RTT Help to display a help message of the RTT function.
Further options may also be available.
● Press the Center soft key [Mute/Unmute] to mute/unmute the microphone.
● Press the Left soft key [Hold] to place the current call on hold and [Unhold] to take
the call off hold.
● Press the Volume key up or down to adjust the receiver volume.
● Press the Camera/Speaker key or the External speaker key to turn the
speaker on. Press again to turn it off.
Warning:
Because of higher volume levels, do not place the phone near your ear
during speakerphone use.
Caller ID
Caller ID identifies a caller before you answer the phone by displaying the number of the
incoming call. If you do not want your number displayed when you make a call, follow these
steps:
1. From the Idle screen, press .

26 Phone Calls
2. Enter the number you want to call.
3. Press the SEND key .
Call Waiting
When you’re on a call, Call Waiting alerts you to incoming calls by sounding a beep. Your
phone’s screen informs you that another call is coming in and displays the caller’s phone
number (if available).
To turn Call waiting on or off:
1. From the Idle screen, press the Center soft key [Menu] > Settings & tools >
Settings > Call settings > Additional settings > Call waiting.
2. Select On or Off and press the Center soft key [Set].
To respond to an incoming call while you’re on a call and to put the first caller on hold:
► Select Hold & Answer.
To switch back to the first caller:
► Press the Left soft key [Swap].
To create a 3-way call between your existing calls:
► Press the Right soft key [Options] > Merge calls.
To respond to an incoming call while you’re on a call and to end the current call:
► Select End & Answer.
3-Way Calling
With 3-way calling, you can talk to two people at the same time. When using this feature, the
normal airtime rates will be charged for each of the calls.
To initiate a 3-way call:
1. Enter a number and press the SEND key .
2. Once you have established the connection, press the Right soft key [Options] >
Add call. (This puts the first caller on hold.)
3. Select Contacts, select a number, and then press the Center soft key [Select].

Phone Calls 27
– or –
Select Call history, highlight a number, press the Center soft key [View], and then
press the Center soft key [Call].
– or –
Select Enter phone#, enter a number directly, and then press the Center soft key
[Call].
4. When you’re connected to the second party, press the Right soft key [Options] >
Merge calls to begin your 3-way call.
5. To end a 3-way call, press the END/POWER key .
Note: If one of the people you called hangs up during your call, you and the remaining caller
stay connected. If you initiated the call and are the first to hang up, all callers are
disconnected.
Call History
The Call history keeps track of the calls placed, received, and missed on your phone.
View Call History
► From the Idle screen, press the Center soft key [Menu] > Call history > Missed
calls, Received calls, Dialed calls, or All calls.
– or –
From the Idle screen, press the SEND key .
– or –
Press the Call list key with the phone closed.
You can determine if an entry was a missed, received, or dialed call from the icons
shown below.
: Missed call
: Received call

28 Phone Calls
: Dialed call
Call History Options
1. From the Idle screen, press the Center soft key [Menu] > Call history > Missed
calls, Received calls, Dialed calls, or All calls.
– or –
From the Idle screen, press the SEND key .
2. Highlight an entry. The following options are available:
Press the SEND key to place a call to the contact. See Call from Call History.
Press the Left soft key [Message] to send a message.
Press the Center soft key [View] to display call details.
Press the Right soft key [Options] to access additional options.
Call Settings
Your phone’s Call settings menu lets you configure your Voicemail options and a number of
other settings for the phone application.
Any Key Answer
Set to answer incoming calls by pressing any key on your phone.
1. From the Idle screen, press the Center soft key [Menu] > Settings & tools >
Settings > Call settings > Any key answer.
2. Select On and press the Center soft key [Set].
Noise Reduction
Your phone can suppress the background noise to improve audio quality for the other party
during voice calls.
1. From the Idle screen, press the Center soft key [Menu] > Settings & tools >
Settings > Call settings > Noise reduction.
2. Select On and press the Center soft key [Set].

Phone Calls 29
Open/Close Flip
Answer incoming calls by opening the phone
1. From the Idle screen, press the Center soft key [Menu] > Settings & tools >
Settings > Call settings > Flip open/close > Open to answer.
2. Select On and press the Center soft key [Set].
End calls by closing the phone
1. From the Idle screen, press the Center soft key [Menu] > Settings & tools >
Settings > Call settings > Flip open/close > Close to end.
2. Select On and press the Center soft key [Set].
Auto Answer
Set your phone to automatically pick up incoming calls. Remember, your phone will answer calls
in auto-answer mode even if you are not present.
1. From the Idle screen, press the Center soft key [Menu] > Settings & tools >
Settings > Call settings > Auto answer.
2. Highlight an option and press the Center soft key [Select].
Hands free to answer calls automatically when the phone is connected to an
optional headset or hands-free device.
Speakerphone to answer calls automatically in speakerphone mode.
3. Highlight the amount of time you'd like your phone to wait before answering and press
the Center soft key [Set].
Quick Responses
You can modify the preset text messages which are available to send when you reject an
incoming call and send a text message.
1. From the Idle screen, press the Center soft key [Menu] > Settings & tools >
Settings > Call settings > Quick responses.
2. Highlight a message and press the Center soft key [Edit].
3. Edit it and press the Center soft key [Save].

30 Phone Calls
Tip: To restore the default messages, press the Left soft key [All reset] > Yes.
Set Up Speed Dialing
The phone allows you to save speed dial numbers up to "999,997". To make a call using speed
dial, see Call Using a Speed Dial Number.
Note: Speed dial location "0" is not valid and "1" is preset for Voicemail. Emergency numbers
such as 911 and 112 cannot be saved as a speed dial number.
Assign a speed dial location
1. From the Idle screen, press the Center soft key [Menu] > Settings & tools >
Settings > Call settings > Speed dial setup.
2. Press the Left soft key [Add] and enter a number from 2 to 999999 in the Speed
dial number field.
Note: If a number is entered that is already assigned to an existing contact (or is an
emergency number), you will be prompted to change the number.
3. Highlight Assigned contact field and press the Left soft key [Set].
4. Highlight a contact and press the Center soft key [Select].
5. Press the Center soft key [Save] to register the assignment.
Remove a number from a speed dial location
1. From the Idle screen, press the Center soft key [Menu] > Settings & tools >
Settings > Call settings > Speed dial setup.
2. Highlight the assigned contact you want to remove and press the Right soft key
[Remove].
3. Press the Left soft key [Yes].
Call Forwarding
Call forwarding lets you forward your incoming calls to another phone number—even when your
phone is turned off. You can continue to make calls from your phone when you have activated
Call forwarding.

Phone Calls 31
Activate Call forwarding
1. From the Idle screen, press the Center soft key [Menu] > Settings & tools >
Settings > Call settings > Call forwarding.
2. Select Always forward, When busy, When unanswered, or When unreachable.
3. Select Always forward, When busy, When unanswered, or When unreachable,
select On, and then press the Center soft key [Set].
4. Select Forwarding number, enter the number you want to forward your calls to, and
press the Center soft key [Save].
Deactivate Call forwarding
1. From the Idle screen, press the Center soft key [Menu] > Settings & tools >
Settings > Call settings > Call forwarding.
2. Select an option you want to deactivate.
3. Select Off and press the Center soft key [Set] > [Save].
Additional Settings
Caller ID
You can set whether or not to display your phone number when making outgoing calls.
1. From the Idle screen, press the Center soft key [Menu] > Settings & tools >
Settings > Call settings > Additional settings > Caller ID.
2. Highlight Network default, Hide number, or Show number.
3. Press the Center soft key [Set].
Call barring
Call barring allows you to prevent certain calls being made from or to your mobile phone.
1. From the Idle screen, press the Center soft key [Menu] > Settings & tools >
Settings > Call settings > Additional settings > Call barring.
2. Select All outgoing calls, International calls, INT’L calls except home, All incoming
calls, or Incoming when roaming.
3. To activate the call barring function, select Start regulation, enter a password if
necessary, and then press the Center soft key [OK].

32 Phone Calls
– or –
To deactivate the call barring function, select Stop regulation, enter the password if
necessary, and then press the Center soft key [OK].
Call waiting
Activate or deactivate Call waiting feature which alerts you to incoming calls when you are on
another call. See Call Waiting.
Voicemail Settings
You can configure the Voicemail settings.
Note: Voicemail service is one of the network services. Contact your SIM card provider for its
activation.
1. From the Idle screen, press the Center soft key [Menu] > Settings & tools >
Settings > Call settings > Voicemail.
2. Configure the following settings:
Voicemail number to configure the phone number for accessing Voicemail, if
necessary.
Sound to select the sound to ring for a new voicemail message.
Vibrate to select whether the phone vibrates when receiving a new voicemail
message.
Fixed Dialing Numbers (FDN)
This feature allows you to restrict your outgoing calls to the numbers included in the FDN list.
Emergency calls will not be affected by this setting.
Note: To use this feature you will have to enter your PIN2 number, which is associated with
your SIM card. If you do not know your number, please contact your service provider to
obtain it.
Enable FDN
1. From the Idle screen, press the Center soft key [Menu] > Settings & tools >
Settings > Call settings > Fixed Dialing Numbers.
2. Select Enable FDN.
3. Enter your PIN2 number and press the Center soft key [Save].
Tip: You can change the PIN2 number from the Change PIN2 menu.

Phone Calls 33
View and manage your FDN list
1. From the Idle screen, press the Center soft key [Menu] > Settings & tools >
Settings > Call settings > Fixed Dialing Numbers.
2. Select FDN list.
Press the Left soft key [Add] to add contacts to your FDN list.
Press the Center soft key [Edit] to edit contacts on your FDN list.
Press the Right soft key [Remove] to remove contacts from your FDN list.
Allow sending SMS
1. From the Idle screen, press the Center soft key [Menu] > Settings & tools >
Settings > Call settings > Fixed Dialing Numbers.
2. Select Allow sending SMS.
3. Select On and press the Center soft key [Set].
Call Rejection
You can set your phone to reject incoming calls from specific phone numbers.
Add a number to the call rejection list
1. From the Idle screen, press the Center soft key [Menu] > Settings & tools >
Settings > Call settings > Call rejection.
2. Press the Center soft key [Add] and enter numbers you want to reject.
3. Press the Center soft key [Save].
Delete a number from the call rejection list
1. From the Idle screen, press the Center soft key [Menu] > Settings & tools >
Settings > Call settings > Call rejection.
2. Highlight an entry and press the Left soft key [Remove].
3. Press the Left soft key [Yes].

34 Phone Calls
Add an item to the rejection list from call history
1. From the Idle screen, press the Center soft key [Menu] > Call history > Missed
calls, Received calls, Dialed calls, or All calls.
– or –
From the Idle screen, press the SEND key .
2. Highlight an entry and press the Right soft key [Options] > Add to call rejection.
3. Press the Center soft key [Save].
Call Timer
Your phone displays the duration of your last call, dialed calls, received calls, etc.
View Call timer
► From the Idle screen, press the Center soft key [Menu] > Settings & tools >
Settings > Call settings > Call Timer.
Reset Call timer
1. From the Idle screen, press the Center soft key [Menu] > Settings & tools >
Settings > Call settings > Call Timer.
2. Press the Center soft key [All reset].
3. Enter your passcode and press the Center soft key [OK]. See Edit Code.
4. Press the Left soft key [Yes].

Contacts 35
Contacts
The Contacts feature lets you store names, phone numbers and other information in your
phone’s memory.
Access Contacts List
There are a few ways to access the Contacts List.
► From the Idle screen, press the Left soft key [Contacts].
– or –
From the Idle screen, press the Center soft key [Menu] > Contacts.
Tip: Highlight an entry and press the Center soft key [View] to show the details.
Add a Contact
You can add contacts from the Contacts screen. Enter details such as name, phone numbers,
email addresses, mailing addresses, and more.
1. From the Idle screen, press the Left soft key [Contacts].
2. Press the Right soft key [Options] > Add new contact.
3. Enter the name, phone number, email address, ringtone, etc. as necessary, moving
through the entry fields by using the Navigation key.
Highlight to assign a picture to the contact. See Assign a Picture to a Contact.
4. When you have finished entering information for the entry, press the Center soft key
[Save].
Note: We suggest that when you add phone numbers to your contact list, you add the area
code + the 7 digit number.
Contacts List
Learn how to view and navigate through your phone’s Contacts list.
1. From the Idle screen, press the Left soft key [Contacts].

36 Contacts
2. Scroll through all the entries.
– or –
Highlight the Find contacts field and enter the first few letters of any part of an entry’s
name. Contacts with matching letters are listed. (The more letters you enter, the more
your search narrows.)
Contacts List Options
Various options are available in the Contacts list.
● Highlight Favorites and press the Center soft key [View] to display your favorite
contacts.
● Highlight Groups and press the Center soft key [View] to display the contact
groups you have created.
● Press the Right soft key [Options] to access the following menus:
Add new contact to add a new contact.
Delete to delete the selected contact.
Delete multiple to select contact(s) you want to delete.
Import/export to import or export your contacts from/to the Phone, microSD card,
and SIM card.
Share to share your contacts by using Message, Email, Bluetooth, etc.
Speed dial setup to open the speed dial setup screen. See Set Up Speed Dialing.
Settings to set the display method Sort by or View contact names.
Assign a Picture to a Contact
Assign a picture to display each time a certain contact calls you.
1. From the Idle screen, press the Left soft key [Contacts].
2. Highlight the appropriate contact and press the Center soft key [View].
3. Press the Center soft key [Edit].
4. Highlight the contacts icon and press the Left soft key [Set].

Contacts 37
5. To assign a new picture, select Take photo and take a picture.
– or –
To assign a stored picture, select Choose photo and select a picture.
6. Use the soft keys to edit the picture, if necessary.
7. Press the Center soft key [Save].
Add a Contact to Favorites
You can add your most used or preferred contact entries to the Favorites list.
1. From the Idle screen, press the Left soft key [Contacts].
2. Highlight the appropriate contact and press the Center soft key [View].
3. Press the Right soft key [Options] > Add to favorites.
(Favorite icon) will be displayed on the Contact details title bar.
Save a Phone Number
You can save a phone number to Contacts directly from the phone keypad.
1. From the Idle screen, enter a phone number.
2. Press the Right soft key [Options] > Add to contacts.
3. To add the number as a new contact, select Create new contact and then enter the
name and any additional information.
– or –
To add the number to an existing entry, select Add to existing and then select the
contact and change the number type for the new number if necessary.
4. When you have finished entering information for the entry, press the Center soft key
[Save].

38 Contacts
Edit a Contact
Once you’ve added a contact, you can edit any of the information in the entry, assign a caller ID
picture, customize with a unique ringtone, and more.
Edit Information for a Contact
Follow the instructions to edit information for an existing contact:
1. From the Idle screen, press the Left soft key [Contacts].
2. Highlight the entry you want to edit and press the Center soft key [View].
3. Press the Center soft key [Edit].
4. Highlight the information you wish to edit.
5. Edit the information, and then press the Center soft key [Save].
Assign a Ringtone or Vibration Pattern to a Contact
Know who’s calling or the sender of the new message without looking at your phone by
assigning a specific ringtone or vibrate to a contact.
1. From the Idle screen, press the Left soft key [Contacts].
2. Highlight the appropriate contact and press the Center soft key [View].
3. Press the Center soft key [Edit].
4. Use the Navigation key to scroll to the
Phone ringtone or Vibration pattern fields and
press the Left soft key [Set].
5. Highlight a ringtone or vibration pattern and press the Center soft key [Set] or [OK]
to assign it.
6. Press the Center soft key [Save].
Delete Contacts
You can delete existing entries from your Contacts.
Delete a contact
1. From the Idle screen, press the Left soft key [Contacts].

Contacts 39
2. Highlight the appropriate contact and press the Right soft key [Options] > Delete.
3. Press the Left soft key [Yes].
Delete Multiple Contacts
1. From the Idle screen, press the Left soft key [Contacts].
2. Press the Right soft key [Options] > Delete multiple.
3. Highlight the entry you want to delete and press the Center soft key [Select]. A
check mark will appear in the box next to the selected entry. Repeat this step if you want
to delete other entries.
4. Press the Left soft key [Delete].
5. Press the Left soft key [Yes].
Add a New Group
You can create a group by assigning Contacts entries as members.
1. From the Idle screen, press the Left soft key [Contacts] > Groups.
2. Press the Left soft key [New group].
– or –
Press the Right soft key [Options] > New group.
3. Enter the Group name.
4. Press the Right soft key [Options] > Add contact.
5. Highlight the entry you want to add to the group and press the Center soft key
[Select]. A check mark will appear in the box next to the selected entry.
6. Repeat step 5 to add other members.
7. When you have selected all the entries you want to add, press the Left soft key
[Done], and then press the Center soft key [Save].

40 Contacts
Edit a Group Contact
Manage the group contacts that you have created.
Add or Remove a Contact Entry to or from a Group
1. From the Idle screen, press the Left soft key [Contacts] > Groups.
2. Highlight the group you want to edit and press the Center soft key [View].
3. Press the Right soft key [Options] > Edit.
4. Press the Right soft key [Options] > Add contact. Then, select the entry you want
to add to the group and press the Left soft key [Done].
– or –
Highlight the entry you want to remove from the group and press the Right soft key
[Options] > Remove contact.
5. Press the Center soft key [Save].
Rename a Group
1. From the Idle screen, press the Left soft key [Contacts] > Groups.
2. Highlight the group you want to rename and press the Center soft key [View].
3. Press the Right soft key [Options] > Edit.
4. Change the name.
5. Press the Center soft key [Save].
Delete a Group
1. From the Idle screen, press the Left soft key [Contacts] > Groups.
2. Highlight the group you want to delete and press the Center soft key [View].
3. Press the Right soft key [Options] > Delete.
4. Press the Left soft key [Yes].

Contacts 41
ICE (In Case of Emergency) Contacts
Registering ICE information might help rescue workers, such as paramedics, police, and
hospital personnel, identify your primary contact or special medical needs you might have in
case of emergency.
Register an ICE Contact
You can register up to three contacts.
1. From the Idle screen, press the Left soft key [Contacts] > ICE - In Case of
Emergency.
2. Highlight a contact location (Contacts Name 1, Contacts Name 2, or Contacts Name
3) and press the Center soft key [Set].
3. Highlight an entry you want register as an ICE contact and press the Center soft key
[Set].
Remove an ICE Contact
1. From the Idle screen, press the Left soft key [Contacts] > ICE - In Case of
Emergency.
2. Highlight the ICE Contact you want to remove and press the Right soft key
[Remove].
3. Press the Left soft key [Yes].
Add Personal Information
You can register your own information, medical information, etc.
To enter or edit your personal information:
1. From the Idle screen, press the Left soft key [Contacts] > ICE - In Case of
Emergency.
2. Highlight Personal info, press the Center soft key [View], and then press the
Center soft key [Edit].
3. Enter or edit the necessary information and press the Center soft key [Save].

42 Contacts
Access the Registered ICE Information When the Screen is
Locked
► From the Idle screen, press the Left soft key [Emergency].
Highlight an ICE contact and press the Center soft key [Call] to place a call to the
contact.
Highlight Personal Info and press the Center soft key [Select] to display your
personal information.

Apps and Entertainment 43
Accounts and Messaging
Email
Use the Mail application to send and receive email from your webmail or other accounts using
POP3 or IMAP or access your Exchange ActiveSync account for your corporate email needs.
Add an Email Account
You can add several types of personal email accounts on your phone.
1. From the Idle screen, press the Center soft key [Menu] > Email, if you have not set
up any email accounts yet.
– or –
From the Idle screen, press the Center soft key [Menu] > Settings & tools >
Settings > Phone settings > Accounts > Add account.
2. Select a desired account.
3. Enter your email address and password, and then press the Right soft key [Next].
4. Configure the account options as necessary and press the Right soft key [Next].
5. Confirm the account details, edit as necessary, and press the Right soft key [Next].
Important:
If the account type you want to set up is not in the phone database, you will be
asked to enter more details. You should get all pertinent information for the email
account, such as incoming and outgoing server settings, before you proceed.
Note: If you want to set up a Microsoft
®
Exchange ActiveSync
®
account, contact your
company's Exchange Server administrator for required sign-in information.
Send an Email Message
Compose a Message
1. From the Idle screen, press the Center soft key [Menu] > Email.
2. Press the Left soft key [New email].
3. Enter email addresses directly in the To field.

44 Accounts and Messaging
As you enter email addresses, any matching addresses from your contacts list are
displayed. Highlight a match and press the Center soft key [Select] to enter the
address directly.
4. Enter the subject, and then compose your message.
5. After composing your message, press the Center soft key [Send] to send the
message.
Available Options
While composing a message, you can access the following options by pressing the Right soft
key [Options].
● Go to Contacts to select an email address from your contacts list
● Remove to remove an email address.
● Add to contacts to add the email address to your contact list.
● Attach to send data files with the message (e.g., picture, video, audio, etc.)
● Add Cc/Bcc to enter other recipients to the carbon copy (CC) or blind carbon copy
(BCC) field.
● Save as draft to save the message as a draft.
● Add preset message to add a preset message.
● Discard to discard the message.
● Formatting to add some effects on your mail. Fonts, Insert pictures, or Email body
background color.
● Priority to select a priority from Low, Normal, or High.
● Sensitivity to select a sensitivity level from Normal, Personal, Private, or Confidential.
View and Reply to Email
1. From the Idle screen, press the Center soft key [Menu] > Email.
If Inbox is not displayed, press the Right soft key [Options] > Manage folders
> Inbox.
2. Highlight the message you want to view and press the Center soft key [View].

Apps and Entertainment 45
3. Press the Left soft key [Reply] to reply to the sender of the message.
– or –
Press the Right soft key [Options] and select:
Reply all to reply to all recipients of the message.
Forward to forward the message.
4. After composing your message, press the Center soft key [Send] to send the
message.
Manage Your Email Messages
View Your Email Messages
1. From the Idle screen, press the Center soft key [Menu] > Email.
2. Press the Right soft key [Options] > Manage folders.
3. Highlight the folder you want to display and press the Center soft key [View].
4. Highlight the message you want to view and the Center soft key [View].
Delete Email Messages
1. From the Idle screen, press the Center soft key [Menu] > Email.
2. Highlight the message you want to delete and press the Right soft key [Options] >
Delete.
3. Press the Center soft key [Select].
A check mark will appear in the box next to the selected entry. Repeat this step to
delete other messages.
To select all entries in the folder, press the Right soft key [Options] > Select
all.
4. When you have selected all the entries you want to delete, press the Left soft key
[Done], and then press the Left soft key [Yes].

46 Accounts and Messaging
Manage Your Messages
1. From the Idle screen, press the Center soft key [Menu] > Email.
2. Highlight the message you want to manage and the Center soft key [View].
3. Press the Right soft key [Options].
4. The following options are available. (Available options may vary):
Move to folder: To move the message(s) to other folders. After finishing your
selection, press the Center soft key [Move].
Mark as unread: To mark the message as unread.
Add/Remove star: To mark or unmark the message(s) as starred.
Add/Remove flag: To mark or unmark the message(s) as flagged.
Reminder: To set or clear the reminder.
View details: To open the message details screen.
Email Settings
1. From the Idle screen, press the Center soft key [Menu] > Email.
2. Press the Right soft key [Options] > Settings.
3. Configure the detailed settings as necessary.
Message
You can send and receive instant text messages (SMS) and multimedia messages (MMS).
Send a Message
Quickly compose and send messages on your phone.
1. From the Idle screen, press the Right soft key [Message].
2. Press the Left soft key [New msg].
3. Enter a phone number in the To field.
As you type, any matching phone numbers from your contacts list are displayed.
Highlight a match and press the Center soft key to enter that number.

Apps and Entertainment 47
You can type a name saved in your Contacts to call up the phone number, or press
the Right soft key [Contacts] to access your Contacts.
4. When you are finished adding recipients, press the Navigation key down
to move to the
Type message field.
5. Compose a message.
To add an attachment, press the Right soft key [Options] > Attach and select a
picture, video, etc.
To remove an attachment, highlight the attachment field, press the Center soft key
[OK], highlight the attachment you want to remove, and then press the Left soft
key [Remove]. To add new attachment, highlight the Add new... and press the
Center soft key [Select].
You can select more options for composing messages by pressing the Right soft key
[Options], such as Add preset message, Save as draft, Discard, or Settings.
6. After composing your message, press the Center soft key [Send].
New Message Notification
Depending on your notification settings, the phone will play a ringtone, vibrate, or display the
notification screen to notify you of a new text or multimedia message.
Read a Message
► If you have a new message notification, highlight the notification and press the Center
soft key [View] on the notification screen to open it.
– or –
1. From the Idle screen, press the Right soft key [Message].
2. Highlight the message or message thread you want to read, and press the Center soft
key [View] to open it.
Reply to a Message
1. From the Idle screen, press the Right soft key [Message].
2. Highlight a message or message thread and press the Center soft key [View] to
open it.

48 Accounts and Messaging
3. Press the Left soft key [Reply].
4. Enter your reply message and attach files if desired.
5. Press the Center soft key [Send] to send a reply message.
Note: If you want to reply only to the sender when replying to a group message,
highlight the message and press the Right soft key [Options] > Reply to
sender only.
Delete a Message
1. While viewing a message thread, highlight a message you want to delete, press the
Right soft key [Options] > Delete.
2. When prompted to confirm, press the Left soft key [Yes].
Messaging Settings
The messages settings menu lets you control options for your text and MMS messages
including message limits, size settings, and notifications.
1. From the Idle screen, press the Right soft key [Message].
2. Press the Right soft key [Options] > Settings.
3. Configure the desired settings.

Apps and Entertainment 49
Apps and Entertainment
Features such as storing contacts, playing music, and managing files are accessible from your
phone.
Note: Available applications and services are subject to change at any time.
Music Player
Your phone’s built-in music player app lets you listen to and organize music files you have
loaded into your phone’s memory or microSD card.
Tip: For information about loading music onto your phone, see Use the Phone’s microSD Card
as a Media Device.
Play Music
1. From the Idle screen, press the Center soft key [Menu] > Multimedia > Music
player. You will find the following menus:
Now playing: Displays the Playback screen which shows you the music currently
playing (if available).
All songs: Displays all your music files in alphabetical order.
Playlists: Displays your playlists. See Use Playlists.
Artists, Albums, or Genres: Displays your music sorted by each category.
Shuffle all: Plays the music on your phone in shuffle mode.
2. Browse for the item you want to play.
If the music is in Playlists, Artists, Albums, or Genres, highlight an item and press
the Center soft key [View] to display the contents list.
3. Highlight an item and press the Center soft key [Play].
4. When the music starts to play on the Playback screen, the following control options are
available:
Press the Volume key up or down to adjust the volume level.
Press the Center soft key [Pause] to pause. Press the Center soft key
[Play] to resume playing.
By pressing the left Navigation key, you can do any of the following:

50 Apps and Entertainment
• Press once to go back to the start of the current item.
• Press twice to jump back to the start of the previous item.
• Long press to rewind the current item.
By pressing the right Navigation key, you can do any of the following:
• Press to jump to the start of the next item.
• Long press to fast-forward the current item.
Press the Left soft key [Minimize] to move the Playback screen to the
background. To restore the Playback screen, press the Center soft key [Menu]
on the Idle screen, and then select Notifications > Now playing.
Press the Right soft key [Options] for the following menus:
• Exit to return to the previous screen.
• Repeat to access the repeat options. Select from Repeat all, Repeat one, or
Off.
• Shuffle to turn the shuffle mode on or off.
• Details to display information about the music file.
Music Player Options
1. From the Idle screen, press the Center soft key [Menu] > Multimedia > Music
player.
2. Highlight All songs, Artists, Albums, or Genres, and then press the Center soft key
[View].
3. Highlight an item and press the Right soft key [Options]. Available menus may
vary:
Add to playlist to add the item to a playlist. See Use Playlists.
Delete to delete the item from the storage.
Warning:
You cannot retrieve the data once deleted.
Details to display the information about the item.

Apps and Entertainment 51
Use Playlists
Create and manage a playlist to organize your music.
Create a playlist
1. On the Music player app, browse for the item you want to add to the playlist.
2. Highlight the item and press the Right soft key [Options] > Add to playlist.
3. Select New playlist.
4. Enter the name of your new playlist and press the Center soft key [Save].
Add to an existing playlist
1. On the Music player app, browse for the item you want to add to the playlist.
2. Highlight the item and press the Right soft key [Options] > Add to playlist.
3. Highlight the playlist that you want to add the item to, and press the Center soft key
[Select].
Manage playlist
► From the Idle screen, press the Center soft key [Menu] > Multimedia > Music
player > Playlists.
Highlight a playlist and press the Right soft key [Options].
• Rename to change the playlist name.
• Delete to delete the playlist.
Highlight a playlist and press the Left soft key [View]. Then, highlight an item in
the playlist and press the Right soft key [Options].
• Move up or Move down to change the order.
• Remove to remove the item from the playlist.
• Delete to delete the item from the storage.
Warning:
You cannot retrieve the data once deleted.
• Details to display information about the item.

52 Apps and Entertainment
File Manager
File manager allows you to view, copy, move, and perform other housekeeping operations on
files such as pictures, videos, music, and applications stored in your phone or on the microSD
card.
Open Files in File Manager
1. From the Idle screen, press the Center soft key [Menu] > Multimedia > File
manager.
2. Highlight an option and press the Center soft key [Select].
Phone to access files stored in your phone’s memory.
SD card to access files stored on the microSD card.
3. Highlight a folder and press the Center soft key [Select].
4. Highlight a file and press the Center soft key [Select].
File Manager Options
When viewing files or folders in File manager, you can access the available options by pressing
the Right soft key [Options]. Available options may vary depending on the selected item:
● Set as ringtone to set a music file as your phone ringtone.
● Set as to assign an image to Contact photo or Wallpaper.
● Send to share the file by using Bluetooth, Email, or Message. Select Send one or
Send multiple.
● Copy to copy a file from the current folder to another folder in your phone or on the SD
card.
● Move to move a file from the current folder to another folder in your phone or on the SD
card.
● Delete to delete a file or folder.
Warning:
You cannot retrieve the data once deleted.
● Crop to trim the selected picture.
● Search to search for an item in File manager.
● Sort to sort folder contents by Date, Name, Size, or Type.

Apps and Entertainment 53
● Rename to change the name of the selected folder or file.
● Add folder to create a new folder.
● View mode to switch between Grid view and List view.
● Details to view information about the selected item.
Supported Formats
Following image, video and audio formats are supported by the phone:
● BMP, GIF, JPEG, PNG, WEBP
● H.263, H.264, MPEG-4, VP8, VP9
● AAC, AAC+, eAAC+, AMR-WB, AMR-NB, FLAC, MIDI, MP3, Vorbis, PCM (WAVE),
Opus
Sound Recorder
Use your phone’s Sound recorder to record brief memos to remind you of important events,
phone numbers, or grocery list items.
Sound Recorder Settings
1. From the Idle screen, press the Center soft key [Menu] > Multimedia > Sound
recorder.
2. Highlight Record and press the Right soft key [Options].
3. Configure the following settings:
File format: Select Normal or High quality.
Auto save to: Select the destination to save recorded data from Phone and SD
card (only available when you have inserted a microSD card into your phone).
Record Sound
1. From the Idle screen, press the Center soft key [Menu] > Multimedia > Sound
recorder > Record.
2. Press the Center soft key [Record] to start recording.
3. Press the Left soft key [Pause] or [Resume] to pause or resume recording.
4. To stop recording, press the Center soft key [Stop].

54 Apps and Entertainment
Play Audio Data
1. From the Idle screen, press the Center soft key [Menu] > Multimedia > Sound
recorder > List.
The recorded data will be listed separately for Phone and the SD card. If you want
to switch the list, press the Right soft key [Options] > Go to SD card or Go to
Phone.
2. Highlight an item you want to play and press the Center soft key [Play].
Sound List Options
Your phone offers several options for managing audio data you have recorded.
1. From the Idle screen, press the Center soft key [Menu] > Multimedia > Sound
recorder > List.
2. Highlight an item and press the Right soft key [Options] to display available
options:
Send to share the data by using Bluetooth, Email, or Message.
Edit title to edit the title of the data.
Sort by to sort the items by Date or Name.
Go to SD card/Go to Phone to switch between the data stored on the phone and
those stored on the SD card.
Details to display information about the data.
– or –
Press the Left soft key [Delete] to delete either the selected item or all items.
Select from This, Multiple, or All.
Warning:
You cannot retrieve the data once deleted.

Connections 55
Connections
Your phone’s data capabilities let you wirelessly access the Internet or your corporate network
through a variety of connections including Wi-Fi, 4G LTE and Virtual Private Networks (VPN).
Wi-Fi
Wi-Fi provides wireless Internet access. To use your phone’s Wi-Fi, you need access to a
wireless access point or "hotspot."
The availability and range of the Wi-Fi signal depend on several factors, including infrastructure
and objects through which the signal passes.
Turn Wi-Fi On and Connect to a Wireless Network
Use the Wireless & networks setting menu to enable your phone’s Wi-Fi radio and connect to an
available Wi-Fi network.
1. From the Idle screen, press the Center soft key [Menu] > Settings & tools >
Settings > Wireless & networks > Wi-Fi.
2. Highlight Wi-Fi and press the Center soft key [Select] > On.
The names of detected Wi-Fi networks are displayed.
3. Highlight a Wi-Fi network you want to connect to and press the Center soft key
[Select].
If you selected an open network, you will be automatically connected to the network.
If you selected a network that is secured with a password, enter the password, and
then press the Center soft key [Save].
Depending on the network type and its security settings, you may also need to enter more
information or choose a security certificate.
When your phone is connected to a Wi-Fi network, the Wi-Fi icon ( ) appears in the status
bar and tells you the approximate signal strength. (The above icon indicates maximum signal
strength.)
Note: The next time your phone connects to a previously accessed, secured wireless network,
you will not be prompted to enter the password again, unless you reset your phone to its
factory default settings or you instruct the phone to forget the network.

56 Connections
Check the Wireless Network Status
Check the status of your current wireless network, including link speed and signal strength,
through the Wi-Fi settings menu.
1. From the Idle screen, press the Center soft key [Menu] > Settings & tools >
Settings > Wireless & networks > Wi-Fi.
2. Highlight the wireless network that the phone is currently connected to and press the
Center soft key [Details]. You will see the signal strength, frequency, security, and
other details.
Note: If you want to remove the wireless network settings, press the Right soft key
[Forget]. You need to enter the settings again if you want to connect to this
wireless network.
Connect to a Different Wi-Fi Network
1. From the Idle screen, press the Center soft key [Menu] > Settings & tools >
Settings > Wireless & networks > Wi-Fi. Detected Wi-Fi networks are displayed.
2. Highlight another Wi-Fi network you want to connect to and press the Center soft key
[Select].
Note: If the wireless network you want to connect to is not in the list of detected
networks, select Add network. Enter the wireless network settings and press the
Center soft key [Save].
Connect to a Hidden Wi-Fi Network
1. From the Idle screen, press the Center soft key [Menu] > Settings & tools >
Settings > Wireless & networks > Wi-Fi.
2. Select Add network and enter Network name (SSID), Security, and Password (if
necessary) of your desired network.
3. Scroll down to Advanced options and press the Left soft key [Check].
4. Scroll to the bottom to Hidden network and press the Left soft key [Set].
5. Select Yes and press the Center soft key [Save].

Connections 57
Wi-Fi Menu
The Wi-Fi menu lets you set up and connect to available Wi-Fi networks and configure
advanced Wi-Fi options.
1. From the Idle screen, press the Center soft key [Menu] > Settings & tools >
Settings > Wireless & networks > Wi-Fi.
2. Scroll down the screen and you will find the following options:
Add network to add a new Wi-Fi network.
Advanced to display the settings menus and information related to Wi-Fi such as
Open network notification, IP address, and more.
Saved networks to display the saved networks list.
Bluetooth
Bluetooth is a short-range communications technology that allows you to connect wirelessly to a
number of Bluetooth devices, such as headsets, hands-free car kits, and Bluetooth-enabled
handhelds, computers, printers, and wireless phones. The Bluetooth communication range is
approximately 30 feet.
Turn Bluetooth On or Off
Use the settings menu to enable or disable your phone’s Bluetooth capabilities.
1. From the Idle screen, press the Center soft key [Menu] > Settings & tools >
Settings > Wireless & networks > Bluetooth > Bluetooth.
2. Highlight On or Off and press the Center soft key [Set] to turn Bluetooth on or off.
Note: Turn off Bluetooth when not in use to conserve battery power, or in places where using a
wireless phone is prohibited, such as aboard an aircraft and in hospitals.
Change the Device Name
The device name identifies your phone to other devices.
1. From the Idle screen, press the Center soft key [Menu] > Settings & tools >
Settings > Wireless & networks > Bluetooth.
2. If Bluetooth is not turned on, highlight On and press the Center soft key [Set] to turn
Bluetooth on.
3. Highlight Device name and press the Center soft key [Select].

58 Connections
4. Edit the name for your phone in the dialog box, and press the Center soft key
[Rename].
Pairing (Connect to Other Devices)
Pairing with other devices makes your phone ready for connecting to them.
Note: Other devices’ Bluetooth must be turned on before pairing.
Important:
Perform the pairing process at a secure location.
Important:
It is recommended to use a passcode of at least eight digits for pairing with a
device without a predefined PIN.
1. From the Idle screen, press the Center soft key [Menu] > Settings & tools >
Settings > Wireless & networks > Bluetooth.
2. If Bluetooth is not switched on, select Bluetooth > On to turn Bluetooth on.
3. Select Pair new device. Your phone will show a list of nearby Bluetooth devices.
4. Highlight the device name you want to connect and press the Center soft key
[Select]. Your phone then automatically tries to pair with it.
5. If prompted, enter the passcode supplied with the connecting device, and then press the
Left soft key [Pair].
To change the connection settings, select Paired devices, highlight the connected
device name and press the Right soft key [Edit].
▪ Highlight the Name field to change the connected device name.
▪ Mark or unmark the Use for check boxes to set the connection type.
▪ Press the Right soft key [Forget] to remove the connection.
The pairing and connection status is displayed below the device name in the Paired devices list.
When the Bluetooth headset or car kit is connected to your phone, the Bluetooth connected icon
is displayed in the status bar.
Note: Due to different specifications and features of other Bluetooth-compatible devices,
display and operations may be different, and functions such as transfer or exchange
may not be possible with all Bluetooth-compatible devices.

Connections 59
Unpair from a Bluetooth Device
Unpairing from other devices makes your phone forget its pairing connection with them. To
connect to the other devices again, you may need to enter or confirm a passcode again.
Disconnect a Bluetooth Device
1. From the Idle screen, press the Center soft key [Menu] > Settings & tools >
Settings > Wireless & networks > Bluetooth > Paired devices.
2. Highlight the device you want to disconnect and press the Center soft key [Select]
> OK.
Unpair from a Bluetooth Device
You can make your phone forget its pairing connection with another Bluetooth device. To
connect to the other device again, you may need to enter or confirm a passcode again.
1. From the Idle screen, press the Center soft key [Menu] > Settings & tools >
Settings > Wireless & networks > Bluetooth > Paired devices.
2. Highlight the device you want to unpair, press the Right soft key [Edit], and then
press the Right soft key [Forget].
Send and Receive Information Using Bluetooth
You can use Bluetooth to transfer information between your phone and another Bluetooth
enabled device such as a phone or notebook computer. The first time you transfer information
between your phone and another device, you need to enter or confirm a security passcode.
After that, your phone and the other device are paired, and you will not need to exchange
passcodes to transfer information in the future.
Send Information from Your Phone to Another Device
You can send the following types of information, depending on the device you are sending to:
1. Set the receiving device to discoverable mode. You may also need to set it to "Receive
Beams" or "Receive Files". Refer to the device’s documentation for instructions on
receiving information over Bluetooth.
2. On the phone, open the application that contains the information or file you want to send.
3. Follow the steps for the type of item you want to send. For example:
Pictures and videos (in Gallery): See Send Pictures and Videos.
4. If you are prompted to turn on Bluetooth, press the Left soft key [Turn on].

60 Connections
5. Highlight the name of the receiving device and press the Center soft key [Select].
6. If prompted, accept the connection on the receiving device, and enter the same
passcode on both your phone and the other device, or confirm the auto-generated
passcode.
7. On the receiving device, accept the file.
Receive Information from Another Device
Your phone is capable of receiving a wide variety of file types with Bluetooth, including pictures,
videos, music, or contacts.
1. From the Idle screen, press the Center soft key [Menu] > Settings & tools >
Settings > Wireless & networks > Bluetooth.
2. If Bluetooth is not switched on, select Bluetooth > On to turn Bluetooth on.
3. Select Pair new device and keep this screen open to make your phone visible to
unpaired devices.
4. On the sending device, send one or more files to your phone. Refer to the device’s
documentation for instructions on sending information over Bluetooth.
5. If prompted, enter the same passcode on both your phone and the other device, or
confirm the auto-generated passcode.
6. When your phone receives a file transfer request notification, press the Left soft key
[Accept].
7. When the file is transferred, a transfer complete notification is displayed on the
notification screen. To access the notification screen, press the END/POWER key
and press the Center soft key [Menu] > Notifications. Then, highlight the relevant
notification, press the Center soft key [View], and press again the Center soft key
[OK] or [Open] to open the received file.

Connections 61
Virtual Private Networks (VPN)
From your phone, you can add, set up, and manage virtual private networks (VPNs) that allow
you to connect and access resources inside a secured local network, such as your corporate
network.
Prepare Your Phone for VPN Connection
Depending on the type of VPN you are using at work, you may be required to enter your login
credentials or install security certificates before you can connect to your company’s local
network. You can get this information from your network administrator.
Before you can initiate a VPN connection, your phone must first establish a Wi-Fi or data
connection.
Add a VPN Connection
Use the Wireless & networks settings menu to add a VPN connection to your phone.
1. From the Idle screen, press the Center soft key [Menu] > Settings & tools >
Settings > Wireless & networks > VPN.
2. Press the Right soft key [Options] > Add profile and enter the information for the
VPN you want to add.
Note: If you are asked to set up a screen lock, follow the on-screen instructions to set
up a screen lock.
Information may include Name, Type, Server address, PPP encryption (MPPE),
Username, Password, etc.
Set up all options according to the security details you have obtained from your
network administrator.
3. Press the Center soft key [Save].
The VPN is then added to the VPNs section of the VPN settings screen.
Connect to or Disconnect from a VPN
Once you have set up a VPN connection, connecting to and disconnecting from the VPN is
easy.
Connect to a VPN
1. From the Idle screen, press the Center soft key [Menu] > Settings & tools >
Settings > Wireless & networks > VPN.

62 Connections
2. In the VPNs section, highlight the VPN you want to connect to, and press the Center soft
key [Select].
3. When prompted, enter your login credentials, and then press the Center soft key
[Connect]. When you are connected, a VPN connected icon appears in the status bar.
4. Open the Web browser to access resources such as intranet sites on your corporate
network.
Disconnect from a VPN
1. From the Idle screen, press the Center soft key [Menu] > Settings & tools >
Settings > Wireless & networks > VPN.
2. In the VPNs section, highlight the VPN you want to disconnect from, and press the
Center soft key [Select] > Disconnect.
Browser
Your phone’s Web browser gives you access to websites on the go, using data connections.
Launch the Browser
Launching the browser is as simple as opening the browser on your phone:
► From the Idle screen, press the Center soft key [Menu] > Browser. (The browser
menu will be displayed.)
Learn to Navigate the Web
Navigating through menus and websites during a data session is easy once you have learned a
few basics.
Selecting
To select on-screen items or links:
► Use the Navigation key to highlight an item and press the Center soft key .
Links, which are displayed as underlined text, allow you to jump to Web pages, select special
functions, or even place phone calls.
Pointer
When the pointer function is available, an arrow icon appears on the status bar.
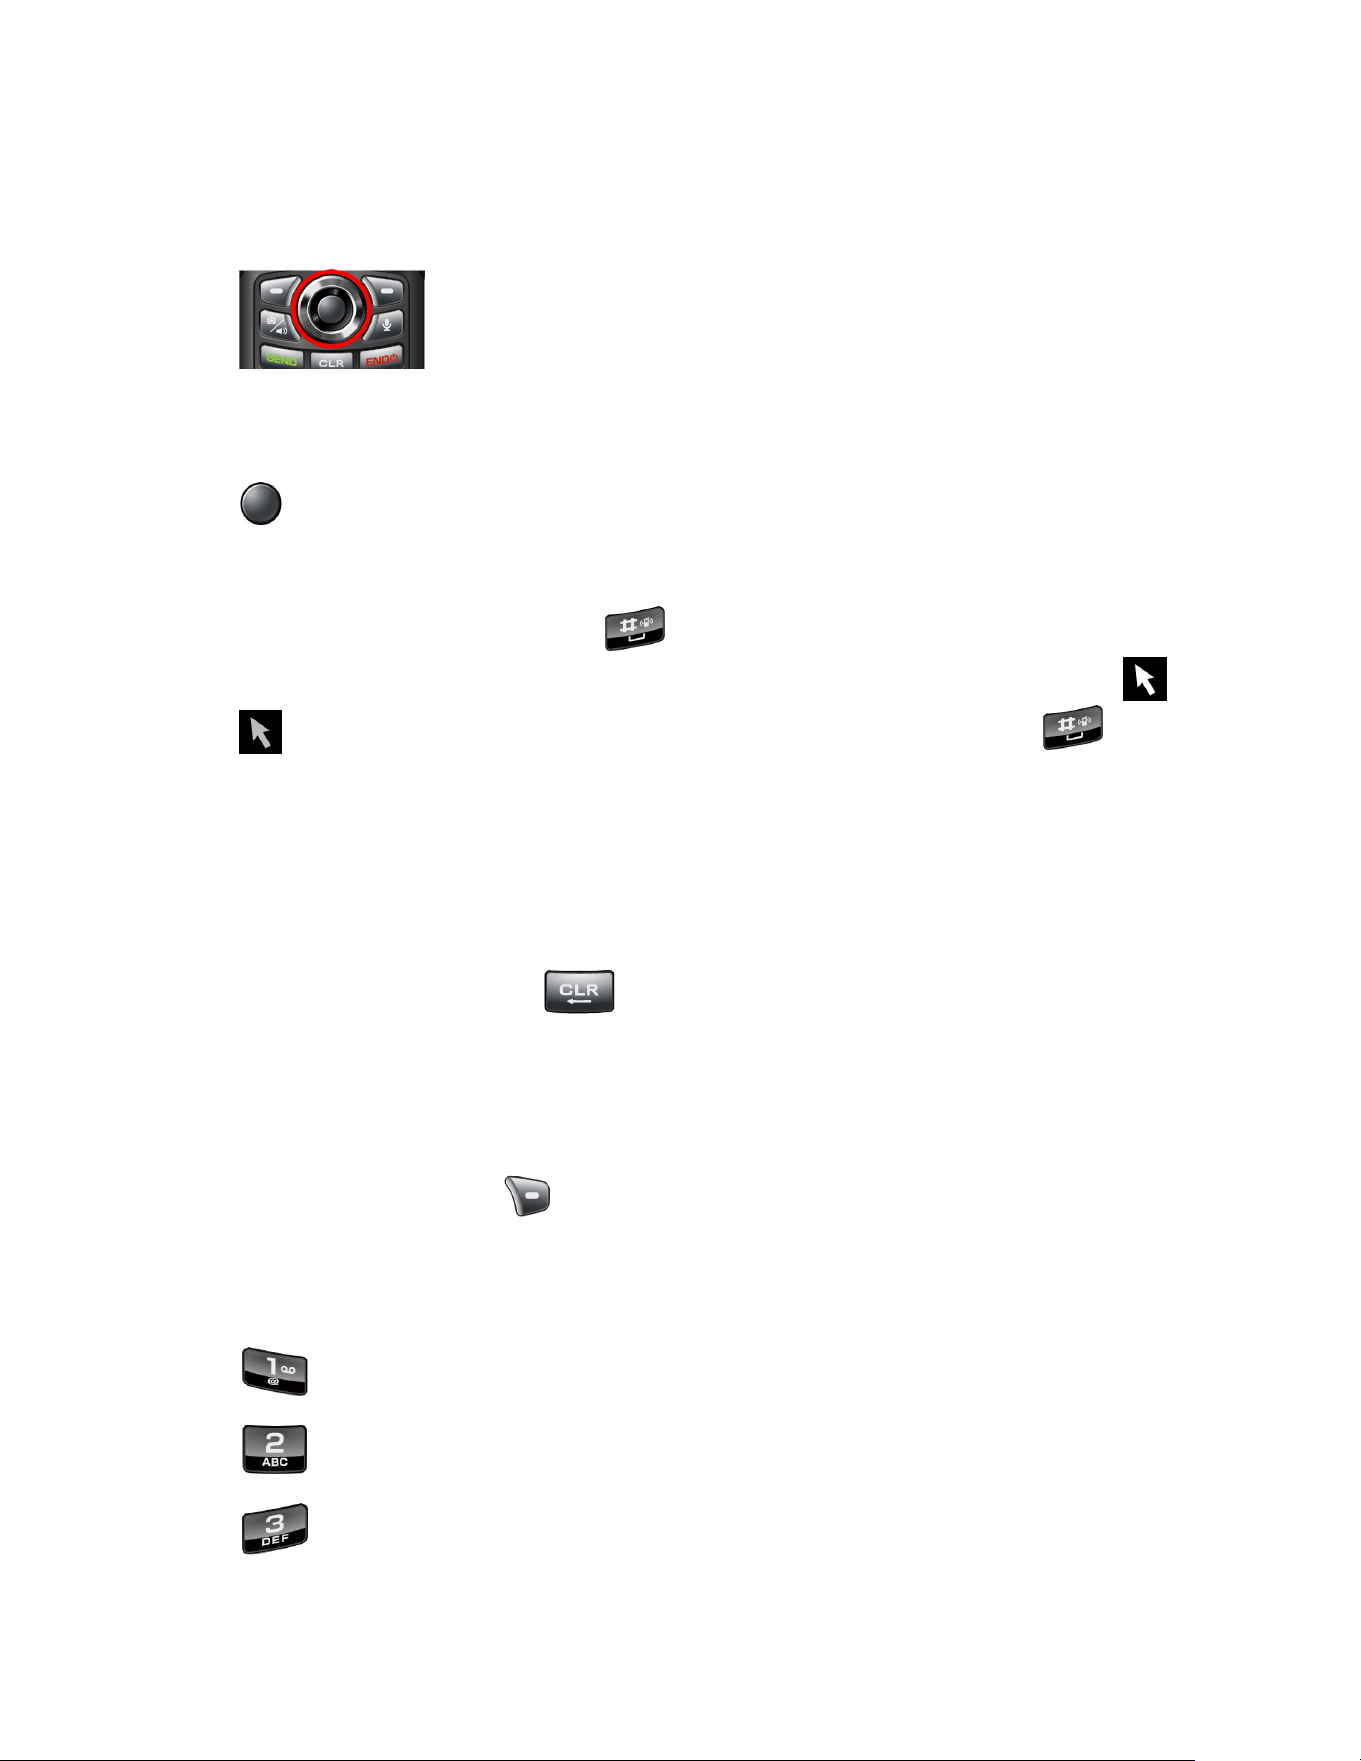
Connections 63
To move the on-screen pointer:
► Press the Navigation key up, down, left, or right.
To select on-screen items or links by using the pointer:
► Move the tip of the pointer on the selectable item or link and press the Center soft key
[Select] or [OK].
To disable the pointer:
► Press and hold the # SPACE key if you don’t need the pointer. The pointer will
disappear from the screen and the pointer icon on the status bar will change from to
. You can enable the pointer again by long pressing the # SPACE key .
Note: You can change the size or speed of the pointer under Phone settings menu. See
Pointer.
Go Back
To go back one page:
► Press the CLEAR/Back key on your phone. Repeat this process to keep going
back through your Web page history of recently visited pages.
Exit
To exit the browser:
► Press the Right soft key [Options] > Exit.
Keypad shortcut
Each key on the keypad can be used as a shortcut.
● : Zoom out
● : Scroll to top
● : Zoom in

64 Connections
● : Font size down
● : Search/Enter URL
● : Font size up
● : Previous tab
● : Scroll to bottom
● : Next tab
● : Keypad shortcut
Browser Menu
The browser menu offers additional options to expand your use of the Web on your phone.
Open the Browser Options:
► From any open Web page, press the Right soft key [Options].
Options available within the browser menu may include:
● Bookmarks/History to access and manage your bookmarks and history.
● Homepage to return to the home page.
● Search/Enter URL to launch a Web search or open a specific page by entering a URL.
● Save to bookmarks to add the currently viewed page to bookmarks.
● Send to send the URL to Email, Message, Notepad, or Bluetooth.
● Page operation to display some options related to currently viewing page such as Find
on page, Zoom in/Zoom out, Save image, and more.
● Refresh to reload the current Web page.
● Forward to return to a previously viewed page.
● Downloads to display a list of downloaded data.
● Settings to modify your Web settings.

Connections 65
● Keypad shortcut to display the keypad shortcut list.
● Exit to close the browser.
Tethering
You can share your phone's Internet connection via a USB cable or Bluetooth.
Note: Use of these services may require a subscription. Contact your service provider for
details.
USB Tethering
You can tether your phone to your computer with a USB cable and share your phone’s Internet
connection with your computer via USB.
1. Connect your phone to your computer via a USB cable.
2. A message will appear on the phone's screen asking you to allow access to your files.
Highlight Other USB options and press the Center soft key [Select].
3. A list of USB options will appear. Highlight USB tethering and press the Center soft key
[Set].
4. The phone will launch the USB tethering settings menu. Highlight On and press the
Center soft key [Set].
Bluetooth Tethering
You can share your phone's Internet connection with Bluetooth devices via Bluetooth.
1. From the Idle screen, press the Center soft key [Menu] > Settings & tools >
Settings > Wireless & networks > Tethering & Mobile Hotspot > Bluetooth
tethering.
2. Highlight On and press the Center soft key [Set].
3. Pair your phone with a Bluetooth device. If they are already paired, establish their
connection. See Pairing (Connect to Other Devices) for details.

66 Connections
Mobile Hotspot
Mobile Hotspot allows you to turn your phone into a Wi-Fi hotspot. The feature works best when
used in conjunction with 4G LTE data services.
Turn Mobile Hotspot On
Important:
Use of Mobile Hotspot may require a subscription. There may be charges for using
it depending on your contract or plan. Contact your service provider for details.
1. From the Idle screen, press the Center soft key [Menu] > Settings & tools >
Settings > Wireless & networks > Tethering & Mobile Hotspot > Mobile Hotspot >
Mobile Hotspot.
2. Highlight On and press the Center soft key [Set].
If necessary, change the name, password or security.

Camera and Video 67
Camera and Video
You can use the camera or video to take and share pictures and videos. Your phone comes
with a 5.0 megapixel camera with an autofocus feature.
Take Pictures or Record Videos
Taking pictures with your phone’s built-in camera is as simple as choosing a subject, aiming the
lens, and pressing a key. In addition, you can record, view, and send videos to your friends and
family with your phone’s built-in video camera. Recording a video is as easy as taking a picture.
Take a Picture
1. Open the phone and press the Camera/Speaker key to activate camera mode.
– or –
From the Idle screen, press the Center soft key [Menu] > Multimedia > Camera.
2. Use the main screen to set up your shot.
Zoom in and out by pressing the Navigation key up and down.
To change the camera settings, press the Right soft key [Settings]. See
Camera Settings.
3. Press the Center soft key [Take] to take the picture. The picture will automatically
be saved in the selected storage area. See Camera Settings.
4. Press the Camera/Speaker key to access the Gallery app.
5. To return to the Camera, press the CLEAR/Back key .
Record a Video
1. Open the phone and press the Camera/Speaker key to activate camera mode.
– or –
From the Idle screen, press the Center soft key [Menu] > Multimedia > Camera.
2. Use the main screen to set up your shot.

68 Camera and Video
Zoom in and out by pressing the Navigation key up and down.
To change the camera settings, press the Right soft key [Settings]. See
Camera Settings.
3. Press the Left soft key [Record] to begin recording.
4. Press the Center soft key [Stop] to stop recording. The video will automatically be
saved in the selected storage area. See Camera Settings.
5. Press the Camera/Speaker key to access the Gallery app.
6. To return to the Camera, press the CLEAR/Back key .
Camera Settings
You can change the settings for your camera.
1. Open the phone and press the Camera/Speaker key to activate camera mode.
– or –
From the Idle screen, press the Center soft key [Menu] > Multimedia > Camera.
2. Press the Right soft key [Settings].
3. The following options are available:
Camera size to select a picture size. Select from High (5M pixel), Normal (2M
pixel), or Low (0.1M pixel).
Video size to select a video size. Select from High (720p), Normal (480p), or Low
(240p).
Flash/Light to select a flash option. Select from Off, Auto (Camera only), or On.
Self-timer to activate the camera’s timer. Select from Off, 5 seconds, or 10
seconds.
Focus to select a focus mode. Select Continuous AF or Infinity.
Auto review to select whether or not to display for review after you take a picture.
Select Off or On.
Shutter sound to set a shutter sound. Select Off or On.

Camera and Video 69
Storage to select where to store your pictures and videos. Select Phone or SD card
(only available when you have inserted a microSD card into your phone).
View Pictures and Videos Using Gallery
Using the Gallery application, you can view pictures and watch videos that you’ve taken with
your phone’s camera, downloaded, or copied onto your microSD card or your phone’s internal
memory.
For pictures that are on your microSD card or your phone’s internal memory, you can do basic
editing such as cropping. You can also easily assign a picture as your contact picture or
wallpaper and share pictures and videos with your friends.
Open or Close Gallery
Open the Gallery App
► From the Idle screen, press the Center soft key [Menu] > Gallery.
– or –
From the camera screen, press the Camera/Speaker key .
Close the Gallery App
► While in the Gallery screen, press the END/POWER key .
View Pictures and Videos
You can browse through the pictures and videos in grid view by using the Navigation key.
1. From the Idle screen, press the Center soft key [Menu] > Gallery.
– or –
From the camera screen, press the Camera/Speaker key .
2. A thumbnail list will be displayed. Highlight an image by moving the blue frame with the
Navigation key left, right, up, or down. Press the Center soft key [View] to select.
To play a video, press the Center soft key [Play] and press the Center soft key
[Pause] to pause the video. Press the navigation key left to rewind or right to
forward the video.
3. While viewing a picture or video, the following options are available:

70 Camera and Video
Press the Left soft key [Guide] to display available key functions such as Full
screen, Rotate, Zoom out, Zoom in, etc.
Press the Right soft key [Options] to access the options menu. See Gallery
Options Menu.
Gallery Options Menu
Various options are available while viewing a picture or video.
1. From the Idle screen, press the Center soft key [Menu] > Gallery.
– or –
From the camera screen, press the Camera/Speaker key .
2. Press the Right soft key [Options] to access the following options:
Send to share the selected images by using Bluetooth, Email, or Message. See
Share Pictures and Videos.
Set as to set the currently selected picture as a contact photo or wallpaper.
Delete to delete the selected images. Select Delete one or Delete multiple.
• Delete one to delete the currently selected image. Confirm the deletion by
pressing the Left soft key [Yes].
• Delete multiple to select multiple images. Highlight images you want to delete
by moving the blue frame with the Navigation key and press the Center soft key
[Select]. A check mark will be placed on the selected images. After the
selection, press the Left soft key [Delete] > Yes.
Crop to trim the selected picture (only available for pictures). You can adjust the crop
size by using the Left soft key [Zoom out] or the Right soft key [Zoom in].
Press the Center soft key [Done] when finished.
Details to display information about the selected image, such as the file name, file
size, date, etc.
– or –

Camera and Video 71
Highlight a video and press the Center soft key [View]. Press the Right soft key
[Options] > Captions to add captions to the video or manage them.
Share Pictures and Videos
The Gallery application lets you send pictures and videos using email or multimedia messages.
You can also send them to another phone or your computer using Bluetooth. You can see some
of the examples for sharing your pictures and videos below.
Send Pictures and Videos
You can send several pictures, videos, or both using Bluetooth, Email or Message.
1. From the Idle screen, press the Center soft key [Menu] > Gallery.
– or –
From the camera screen, press the Camera/Speaker key .
2. Press the Right soft key [Options] > Send.
3. Select Send one or Send multiple.
Send one to only send the currently selected image.
Send multiple to select multiple images. Highlight images you want to send by
moving the blue frame with the Navigation key and press the Center soft key
[Select]. A check mark will be placed on the selected images. After the selection,
press the Left soft key [Send].
4. Select Bluetooth, Email, or Message.
5. If you have selected Bluetooth, you'll be asked to turn on Bluetooth on your phone and
connect to the receiving Bluetooth device so the files can be sent.
– or –
If you have selected Email or Message, fill in one or more recipients and compose your
message. Then press the Center soft key [Send].

72 Useful Tools
Useful Tools
Learn how to use many of your phone’s productivity-enhancing features.
Calculator
Your phone has a convenient calculator that lets you perform basic mathematical equations.
1. From the Idle screen, press the Center soft key [Menu] > Settings & tools >
General tools > Calculator.
2. Press number keys to enter numbers.
Press the appropriate Navigation key for an arithmetic option (
+ − × ÷
).
Press the Asterisk SHIFT key to enter a decimal point.
Press the # SPACE key to change the sign for a number to a negative.
Press the CLEAR/Back key to erase a single character.
Press the Left soft key [AC] to clear all numbers and/or signs.
Press the Right soft key [%] to enter a percent sign.
3. Press the Center soft key [=] for the total.
Calendar
Use Calendar to create and manage events, meetings, and appointments. Your Calendar helps
organize your time and reminds you of important events.
Add an Event to the Calendar
Add events to your calendar directly from the Calendar application.
Add an Event
1. From the Idle screen, press the Center soft key [Menu] > Settings & tools >
General tools > Calendar.
2. On any Calendar view, press the Right soft key [Options] > New event.

Useful Tools 73
3. Highlight a setting field you want to enter such as event name, start/end date & time,
location, etc., press the Left soft key [Set], and then enter the details as necessary.
4. When finished, press the Center soft key [Save].
Calendar Event Alerts
When your phone is turned on and you have an event alarm scheduled, your phone alerts you.
There are several ways your phone alerts you to scheduled events:
By playing the assigned ringtone or vibration type.
By showing the event icon on the status bar.
By showing the notification screen.
Event Reminders
If you have set at least one reminder for an event, the upcoming event icon will appear in the
notifications area of the status bar to remind you of the upcoming event.
To view, dismiss, or snooze the reminder:
1. From the Idle screen, press the Center soft key [Menu] > Notification.
2. Highlight the event name on the notification screen, press the Center soft key
[View], and then select the following options.
Press the Left soft key [Dismiss] to dismiss the reminder.
Press the Center soft key [Select] to access the event details screen.
Press the Right soft key [Options] to display the Schedule notification options.
• Select Snooze to postpone the event reminder for the set duration, or select Set
snooze duration to set the snooze interval.
Press the CLEAR/Back key to keep the reminder pending on the Notifications
screen.
To set reminder settings:
► On any Calendar view, press the Right soft key [Options] > Settings > General
settings > Notification settings > Notification or Default reminder time.

74 Useful Tools
View Calendar Events
You can display the Calendar in daily, weekly, monthly, or agenda view.
To open the calendar event details:
● In Agenda and Day views, highlight the calendar event you want to see and press the
Center soft key [View].
● In Week and Month views, highlight the date where the calendar event occurs and
press the Center soft key [Select] to open the Day view. Then, highlight the
calendar event you want to see and press the Center soft key [View].
To change the calendar view, press the Left soft key [Mode]. Each time you
press the key, Week, Month, Agenda views will appear alternately.
Note: You can access some useful options such as Go to Today and Search event by
pressing the Right soft key [Options].
Edit Calendar Events
1. From the Idle screen, press the Center soft key [Menu] > Settings & tools >
General tools > Calendar.
2. Open the calendar event details and press the Right soft key [Options].
3. The following options are available:
Edit to edit the event.
▪ If the event is a recurring event, select only this event, This and future
events, or All events. Available options may vary.
Delete to delete the event.
▪ If the event is a recurring event, select Only this event, This and future
events, or All events. Available options may vary.
Send via Email or Send via Bluetooth to share the event.

Useful Tools 75
Alarm Clock
Your phone comes with a built-in alarm that has multiple alarm capabilities.
Set an Alarm
1. From the Idle screen, press the Center soft key [Menu] > Settings & tools >
General tools > Alarm.
2. Highlight an alarm and press the Center soft key [Edit].
3. Scroll to the information field you want to enter.
4. Highlight a setting field you want to enter such as alarm on/off, time, repeat, etc., press
the Left soft key [Set], and then enter the details as necessary.
5. When finished, press the Center soft key [Save] to save your settings.
Alarms Options
1. From the Idle screen, press the Center soft key [Menu] > Settings & tools >
General tools > Alarm.
2. Highlight an alarm and press the Right soft key [Options].
3. The following options are available:
Turn on/Turn off to turn on or off the highlighted alarm.
Delete to delete the highlighted alarm.
Delete all to delete all alarms.
Note: Press the Left soft key [New alarm] to add a new alarm.
Phone at Alarm Time
● At the set alarm time, the phone notifies you by ringtone, vibration, or light.
● Stopping an alarm:
Press the Left soft key [Dismiss] to dismiss the alarm.
Press the Right soft key [Snooze] to postpone the alarm for the set duration.

76 Useful Tools
Timer
This feature allows you to use your phone as a timer to alert you when a specified period of time
has elapsed.
Set a Timer
1. From the Idle screen, press the Center soft key [Menu] > Settings & tools >
General tools > Timer.
2. Highlight a timer and press the Right soft key [Options] > Edit timer.
3. Edit the time and press the Center soft key [Set].
4. Press the Center soft key [Start] to start the timer.
Press the Center soft key [Stop] to stop the timer.
Press the Left soft key [Reset] to reset the timer.
Press the Center soft key [Dismiss] to dismiss the alarm when the setting time
is reached.
Timer Options
1. From the Idle screen, press the Center soft key [Menu] > Settings & tools >
General tools > Timer.
2. Press the Right soft key [Options].
3. The following options are available:
Add to add a timer.
Edit timer to edit the highlighted timer.
Delete to delete the highlighted timer.
Stopwatch
You can record split times or lap times with the built-in stopwatch.
1. From the Idle screen, press the Center soft key [Menu] > Settings & tools >
General tools > Stopwatch.

Useful Tools 77
2. Press the Left soft key [Mode] to select split timing or lap timing.
3. Press the Center soft key [Start] to start the stopwatch.
4. Press the Left soft key [Split/Lap] to record the time.
5. Press the Center soft key [STOP] to stop timing.
6. Press the Right soft key [Reset] to reset the stopwatch to zero.
World Clock
You can add the time from around the globe on the World Clock screen.
1. From the Idle screen, press the Center soft key [Menu] > Settings & tools >
General tools > World clock.
2. Press the Center soft key [Add].
3. Highlight the cities you want and press the Center soft key [Select].
4. Press the Left soft key [Done] when you are finished.
Tip: You can set to Daylight Savings Time on or off by pressing the Left soft key [DST
On] or [DST Off] (if available).
Notepad
Your phone offers a simple notepad to allow you to store your notes.
Write a Note
1. From the Idle screen, press the Center soft key [Menu] > Settings & tools >
General tools > Notepad.
2. Enter a note if there is no saved item.
– or –
Press the Right soft key [Options] > New note and enter a note.
3. Press the Center soft key [Save].

78 Useful Tools
View or Edit a Note
1. From the Idle screen, press the Center soft key [Menu] > Settings & tools >
General tools > Notepad.
2. Highlight a note and press the Center soft key [View].
– or –
Highlight a note and press the Left soft key [Edit].
Notepad Options
1. From the Idle screen, press the Center soft key [Menu] > Settings & tools >
General tools > Notepad.
2. Press the Right soft key [Options].
3. The following options are available:
New note to add a note.
Delete to delete the selected note.
Send via Email, Send via Bluetooth, or Send via Message to share the selected
note.
Search to search for a note.
Account to select an account to save notes.
Flashlight
Your phone is equipped with an LED flashlight.
Warning:
Do not shine the LED flashlight into anyone’s eyes, as doing so may compromise
their vision and cause an accident.
To turn the LED flashlight on or off:
1. From the Idle screen, press the Center soft key [Menu] > Settings & tools >
General tools > Flashlight. The LED flashlight turns on.
2. Press the Center soft key [Turn off] to turn the LED flashlight off.
Note: You cannot use the LED flashlight in certain situations, such as when the battery is very
low.

Useful Tools 79
FM Radio
You can listen to the radio through your phone's FM radio function.
Note: Plug an earphone (sold separately) into the headset jack before turning on the radio. It
functions as an antenna.
1. From the Idle screen, press the Center soft key [Menu] > Settings & tools >
General tools > FM radio. The FM radio will turn on and FM radio icon will appear in
the status bar.
If a message information screen is shown, select Don't show again or Close this
screen.
2. While FM radio turned on, the following options are available:
Press the Navigation key up or down to change the volume.
Press the Navigation key left or right to tune the radio.
Long press the Navigation key left or right to start auto tuning mode.
Press the END/POWER key to play in the background.
Press the CLEAR/Back key to end the radio application.
Press the Center soft key [Speaker] or [Earphone] to alternate output method.
Press the Left soft key [Favorites] to open the Favorites list.
Press the Right soft key [Options] to access the options menu.
Eco Mode
The Eco Mode allows you to save battery life while using your phone.
1. From the Idle screen, press the Center soft key [Menu] > Settings & tools >
General tools > Eco Mode.
2. Select On, Auto on (Battery level), Auto on (Timer) or Off.
Press the Right soft key [Options] to access the options menu.
Note: If you select Auto on, check the current battery level setting or timer setting
through options menu and edit it if necessary.

80 Useful Tools
Voice Commands
You can use your phone’s built-in Voice Commands software to dial a phone number or to
launch phone functions. All you have to do is to talk into the phone, and the system will
recognize your voice and complete tasks by itself.
Activate the Voice Commands
► From the Idle screen, press the Voice commands key .
The phone prompts you to say the name of the command you want to use. To complete your
task, simply follow the voice prompts.
Tip: Use Voice commands in a quiet environment so it can accurately recognize your
commands.
Available Voice Commands include:
● Call <Name or #> to call an entry in your Contacts list or a spoken phone number. See
Make a Voice Call Using Voice Commands for details.
● Send Text <Name or #> to send a message to an entry in your Contacts list or to a
spoken phone number. See Send a Message Using Voice Commands for details.
● Lookup <Name> to display the detail screen of an entry in your Contacts list. See
Display a Contacts Entry's Information Using Voice Commands for details.
● Check <Item> to check your phone’s status. See Check Phone Status Using Voice
Commands for details.
● Go to <Menu> to jump directly to menu items or applications. See Open Menus Using
Voice Commands for details.
Tip: During Voice commands operation, press the Left soft key [Help] to get instructions
for using this feature.
Make a Voice Call Using Voice Commands
1. From the Idle screen, press the Voice commands key .
2. When you hear “Say a command,” say “Call.”
3. When you hear “Say the name or number,” say a name or a phone number.
4. When you hear “Which location?,” say a number type (for example, “Mobile”).
5. When you hear “Did you say ‘Call...?’” followed by the name or number, say “Yes” to
confirm. Say “No” to change the selection or to try again.

Useful Tools 81
Send a Message Using Voice Commands
1. From the Idle screen, press the Voice commands key .
2. When you hear “Say a command,” say “Send Text” or “Send Message.”
3. When you hear “Say the name or number,” say a name or a phone number.
4. When you hear “Which location?,” say a number type (for example, “Mobile”). The phone
displays the text entry screen. See Send a Message for how to compose a message.
Display a Contacts Entry’s Information Using Voice Commands
1. From the Idle screen, press the Voice commands key .
2. When you hear “Say a command,” say “Lookup.”
3. When you hear “Say the name,” say a Contact’s name. The phone displays the detail
screen for that Contacts entry.
Check Phone Status Using Voice Commands
You can use Voice commands to obtain information about your phone's status, such as Time,
Signal Strength, Battery, and Volume.
1. From the Idle screen, press the Voice commands key .
2. When you hear “Say a command,” say “Check.”
3. When you hear “Which status item?,” say a command.
Open Menus Using Voice Commands
You can jump directly to many menu items or applications by saying “Go to” followed by a menu
option.
1. From the Idle screen, press the Voice commands key .
2. When you hear “Say a command,” say “Go to.”
3. When you hear “Which shortcut?,” say an application name (for example, “Call history”).
4. The phone opens the selected menu.
Tip: Say “More Options” to display additional application names.

82 Useful Tools
Voice Commands Settings
Configure the automatic speech recognition settings.
To change Voice commands confirmation:
1. From the Idle screen, press the Voice commands key .
2. Press the Right soft key [Settings] > Name Confirmation.
3. Highlight an option and press the Center soft key [Set].
Always Confirm to always ask for confirmation.
Never Confirm to never ask for confirmation.
To change the Voice commands dialing region:
1. From the Idle screen, press the Voice commands key .
2. Press the Right soft key [Settings] > Dialing Region.
3. Highlight an option and press the Center soft key [Set].
North America to recognize only numbers valid in North America.
Other to recognize any number regardless of location.
microSD Card
A microSD card is an optional accessory that allows you to store images, videos, music,
documents, and voice data on your phone. Your phone supports a microSD card that has up to
512 GB.
Note: You can easily damage the microSD card by improper operation. Please be careful
when inserting, removing, or handling the microSD card.
Note: Make sure your battery is fully charged before using the microSD card. Your data may
become damaged or unusable if the battery runs out while using the microSD card.
View the microSD Card Memory
► From the Idle screen, press the Center soft key [Menu] > Settings & tools >
Settings > Phone settings > Storage. You can see the storage information under SD
card.

Useful Tools 83
Unmount microSD Card
1. From the Idle screen, press the Center soft key [Menu] > Settings & tools >
Settings > Phone settings > Storage.
2. Highlight SD card and press the Right soft key [Unmount].
Format microSD Card
1. From the Idle screen, press the Center soft key [Menu] > Settings & tools >
Settings > Phone settings > Storage.
2. Highlight SD card and press the Left soft key [Erase].
3. Read the disclaimer, and press the Left soft key [Yes].
CAUTION!
The formatting procedure erases all the data on the microSD card, after which the
files CANNOT be retrieved. To prevent the loss of important data, please check the
contents before you format the card.
Use the Phone’s microSD Card as a Media Device
1. Connect your phone to your computer via a USB cable.
2. A message will appear on the phone's screen asking you to allow access to your files.
Highlight Other USB options and press the Center soft key [Select].
3. Highlight Media device (MTP) and press the Center soft key [Set]. See USB Mode.
4. On your computer, the connected phone is recognized as a portable media device.
Navigate to the device and select SD card.
5. Manage the data as you wish, unmount the phone as required by your computer's
operating system to safely remove your phone, and disconnect the phone from the
computer.

84 Business Tools
Business Tools
Your phone comes with some key business features.
To access the following menus:
► From the Idle screen, press the Center soft key [Menu] > Settings & tools >
Business tools.
Device Control
Device Control is a feature intended to support specialized business processes by allowing you
to restrict specific functionality. Use this feature if you want to disable certain functions.
Note: All settings including Device Control policy are erased when device is reset to factory
setting. If you need more advanced device control or customization for your devices,
please visit Kyocera Business Select. (https://kyoceramobile.com/business/business-
select/)
Enable Device Control Mode
You need to follow the procedure below at the initial phone setup in order to use the Device
Control feature after setup is complete.
1. When the Setup wizard starts, quickly press on
the language selection screen.
If you have already set up your phone in the normal manner, reset the phone by
using Reset phone menu under Phone settings to repeat the setup process. See
Reset Your Phone and Phone Content.
2. Read the information and press the Left soft key [Yes].
3. Complete the Setup wizard by following the on-screen instructions.
Set Up Device Control
You can restrict some functions such as Wi-Fi, Bluetooth, outgoing calls, etc.
1. From the Business tools screen, select Device Control.
2. Enter password and press the Center soft key [SignIn].
Note: The default password for the Device Control feature is 000000. You can change
it by pressing the Right soft key [Options] > Change password.

Business Tools 85
3. Select the function you want to control, highlight a menu, and press the Center soft key
[Edit].
4. Highlight On and press the Center soft key [Set].
5. Press the Left soft key [Done]. The review screen will be displayed.
6. Press the Left soft key [Yes] and then press the Center soft key [OK] to
activate the Device Control policy you have set up.
Tip: You can easily copy your Device Control policy to another device by using the QR
code and Wi-Fi functions. Press the Right soft key [Options] > Export policy
(sending device) or Import policy (receiving device). To use this function, Wi-Fi
should be enabled on both devices.
Carkit Power On or Off
This feature is useful for those who use the DuraXA Equip phone with a compatible hands-free
carkit.
Note: The hands-free carkit is sold separately.
1. From the Business tools screen, select Carkit power on/off.
2. The following options are available:
Power on only: The phone will be powered on automatically when you turn on your
vehicle's ignition. The phone must be powered off manually.
Power on and off: The phone will be powered on and off automatically when you
turn on or off your vehicle's ignition.
Off: The phone must be powered on and off manually
Note: This feature works only with carkits which use the phone's charging contacts and does
not support carkits designed to connect to the phone wirelessly or via the USB-C port.
.

86 Settings
Settings
The following topics provide an overview of items you can change using your phone’s Settings
menus.
Wireless & Networks Settings
Airplane Mode
Airplane Mode allows you to use many of your phone’s features, such as games and voice
memos, when you are on an airplane or in any other area where making or receiving calls or
data is prohibited. When you set your phone to Airplane Mode, it cannot send or receive any
calls, messages or access online information.
1. From the Idle screen, press the Center soft key [Menu] > Settings & tools >
Settings > Wireless & networks > Airplane mode.
2. Highlight On or Off and press the Center soft key [Set] to turn Airplane mode on or
off.
While in Airplane mode, the status bar will display the Airplane mode icon .
Wi-Fi Settings
For details on your phone’s Wi-Fi settings, see Wi-Fi.
Bluetooth Settings
For details on your phone’s Bluetooth settings, see Bluetooth.
Tethering Settings
For details on your phone’s tethering settings, see Tethering.
Mobile Hotspot Settings
For details on your phone’s Mobile Hotspot settings, see Mobile Hotspot.
VPN Settings
For details on your phone’s VPN settings, see Virtual Private Networks (VPN).
Mobile network Settings
This menu lets you configure the settings related to mobile data services.

Settings 87
► From the Idle screen, press the Center soft key [Menu] > Settings & tools >
Settings > Wireless & networks > Mobile network.
The following settings options are available.
Mobile data
Use the settings menu to enable or disable your phone’s mobile data access.
Data usage
The Data usage menu lets you view and manage your phone’s data usage.
Warning:
The usage displayed is measured by your phone. Your carrier’s data usage
accounting may differ and the usage in excess of your data limit plan can result in
charges. The data usage limit set in this menu is not guaranteed to prevent
additional charges.
International data roaming
You can enable or disable mobile data services when roaming.
Access Point Names
You can edit existing access points.
Network operators
You may select a network operator.
Note: This menu may not be available on your device.
Emergency Alerts
Your phone is compatible with federally supervised cell phone alert services which
send out broadcast SMS messages for public warning.
View an Emergency Alert
► If you have an Emergency Alert notification, press the Center soft key [Select] on
the notification screen to open it.
– or –
From the Idle screen, press the Center soft key [Menu] > Settings & tools >
Settings > Wireless & networks > Wireless emergency alerts.

88 Settings
Emergency Alert Settings
1. From the Idle screen, press the Center soft key [Menu] > Settings & tools >
Settings > Wireless & networks > Wireless emergency alerts.
2. Press the Left soft key [Settings].
Receive alerts to select which types of alerts you want to receive such as Extreme
Alert or AMBER Alert.
Notification settings to configure how you want to be notified.
Note: Presidential Alert is always grayed out (not selectable) and cannot be disabled.
Tip: For more information about Emergency Alerts, press the Left soft key [Help].
Accessibility
The Accessibility menu lets you enable and manage accessibility-related features.
Readout
Readout allows you to hear voice prompts and spoken numbers or key names as you press a
key, and also to hear menus and options, Contacts names, email addresses, URLs, etc., as you
highlight each item on-screen. (The default setting is Off.)
Turn On Readout
1. From the Idle screen, press the Center soft key [Menu] > Settings & tools >
Settings > Accessibility > Readout.
2. Select On and press the Center soft key [Set].
Note: When the media volume is set to Off, Voice readout does not work.
Speech Rate
You can adjust the rate at which on-screen text is spoken by the phone.
1. From the Idle screen, press the Center soft key [Menu] > Settings & tools >
Settings > Accessibility > Speech rate.
2. Select from Slow, Normal, or Fast.
3. Press the Center soft key [Set].

Settings 89
Speech Pitch
You can adjust the pitch at which on-screen text is spoken by the phone.
1. From the Idle screen, press the Center soft key [Menu] > Settings & tools >
Settings > Accessibility > Speech pitch.
2. Select from Very low, Low, Normal, High, or Very high.
3. Press the Center soft key [Set].
Font Size
Select the font size on the screen. This setting does not affect all screens.
1. From the Idle screen, press the Center soft key [Menu] > Settings & tools >
Settings > Accessibility > Font size.
2. Select from Normal, Large, or MagniFont.
3. Press the Center soft key [Set].
Color Inversion
Set the display color inversion on or off.
1. From the Idle screen, press the Center soft key [Menu] > Settings & tools >
Settings > Accessibility > Color inversion.
2. Select On or Off, and then press the Center soft key [Set].
Color Correction
Set the display color correction on or off, and select color correction mode.
Turn On or Off Color Correction
1. From the Idle screen, press the Center soft key [Menu] > Settings & tools >
Settings > Accessibility > Color correction > Color correction.
2. Select On or Off, and then press the Center soft key [Set].
Select Correction Mode
1. From the Idle screen, press the Center soft key [Menu] > Settings & tools >
Settings > Accessibility > Color correction > Correction mode.

90 Settings
2. Select from Deuteranomaly (red-green), Protanomaly (red-green), or Tritanomaly
(blue-yellow).
3. Press the Center soft key [Set].
Persistent Alerts
Select options for the Persistent alerts.
1. From the Idle screen, press the Center soft key [Menu] > Settings & tools >
Settings > Accessibility > Persistent alerts.
2. Press the Left soft key [Turn on] to turn Persistent alerts on.
3. The following options are available:
Audible tone: Set to On to beep when a notification is on the notification bar.
Vibrate: Set to On to vibrate when a notification is on the notification bar.
Blink LED: Set to On to blink the LED indicator when a notification is on the
notification bar.
Repeat interval: Sets the reminder interval.
Captions
You can customize the language and the style of the displayed captions.
1. From the Idle screen, press the Center soft key [Menu] > Settings & tools >
Settings > Accessibility > Captions.
2. Press the Left soft key [Turn on] to turn Captions on.
3. Configure the following settings:
Language: Select the language in which you want captions to appear.
Text size: Select the size for your caption text.
Caption style: Select the style and color for your caption. If you select Custom, you
can then select more options for texts, background color, or display.
Note: To preview the captions, press the Right soft key [Preview].

Settings 91
Mono Audio
Set the Mono audio on or off.
1. From the Idle screen, press the Center soft key [Menu] > Settings & tools >
Settings > Accessibility > Mono audio.
2. Select On or Off, and then press the Center soft key [Set].
Real Time Text
Real time text (RTT) lets you use text to communicate during a phone call. RTT works without
any external TTY keyboards. As you text during a RTT call, the person you are talking with can
see you type your message in real time.
Real Time Text Settings
1. From the Idle screen, press the Center soft key [Menu] > Settings & tools >
Settings > Accessibility > Real Time Text.
2. Select Always visible to show the RTT option automatically for every call, or Visible
during calls.
Call Using Real Time Text
1. Confirm if the RTT settings is set to Always visible.
2. Enter a phone number.
3. Press the Right soft key [Options] > Call with RTT.
4. When connected, type a message in the text field.
Answer an Incoming Call Using Real Time Text
► Select Answer with RTT to answer an incoming call in RTT mode.
Hearing Aid – Telecoil Mode
Hearing aid mode was designed for hearing aids that have a telecoil. To use the telecoil function
in your phone, you will need to set the Hearing aid mode to On.
1. From the Idle screen, press the Center soft key [Menu] > Settings & tools >
Settings > Accessibility > Hearing aid.
2. Select On or Off, and then press the Center soft key [Set].
Note: You may need to enable the telecoil in your hearing aid. See your hearing aid
manufacturer’s instructions.

92 Settings
Sound Settings
The Sound settings menu lets you customize your phone’s sounds.
Volume
Adjust your phone’s volume settings to suit your needs and your environment.
1. From the Idle screen, press the Center soft key [Menu] > Settings & tools >
Settings > Sound settings > Volume.
2. Select Master volume, In-call volume, Alarm volume, or Media volume.
3. Select a volume level by pressing the Navigation key up or down.
4. Press the Center soft key [Set] to save the setting.
Tip: You can adjust the Master volume when you are not on a call or adjust the In-call volume
during a call by using the Volume keys.
Also Vibrate for Calls
Set your phone to ring and vibrate simultaneously.
► From the Idle screen, press the Center soft key [Menu] > Settings & tools >
Settings > Sound settings > Also vibrate for calls > On or Off
Phone Ringtone
Assign a ringtone to your incoming calls.
1. From the Idle screen, press the Center soft key [Menu] > Settings & tools >
Settings > Sound settings > Phone ringtone.
2. Make your desired selection.
Vibration Pattern
Select a vibration pattern.
1. From the Idle screen, press the Center soft key [Menu] > Settings & tools >
Settings > Sound settings > Vibration pattern.
2. Make your desired selection.
Vibration Intensity
Select your phone's vibration intensity.

Settings 93
1. From the Idle screen, press the Center soft key [Menu] > Settings & tools >
Settings > Sound settings > Vibration intensity.
2. Select from Weak, Medium, or Strong and press the Center soft key [Set].
Notification Sound
Select a sound for notifications.
1. From the Idle screen, press the Center soft key [Menu] > Settings & tools >
Settings > Sound settings > Notification sound.
2. Make your desired selection.
Persistent Alerts
Set alerts such as beep, vibration, or LED blinking for notifications. See Persistent Alerts.
Alarm Sound
Assign a sound for alarms.
1. From the Idle screen, press the Center soft key [Menu] > Settings & tools >
Settings > Sound settings > Alarm sound.
2. Make your desired selection.
Other Sounds and Vibrations
► From the Idle screen, press the Center soft key [Menu] > Settings & tools >
Settings > Sound settings > Other sounds and vibrations.
Keypad Tone
Select a tone for the keypad.
Vibrate on Keypress
You can enable vibrate on keypress.
Battery Charging Tone
You can set a notification tone that will sound when battery charging starts.
Battery Charged Tone
You can set a notification tone that will sound when the battery is fully charged.

94 Settings
Display Settings
Adjusting your phone’s display settings not only helps you see what you want, but can also help
increase battery life.
► From the Idle screen, press the Center soft key [Menu] > Settings & tools >
Settings > Display settings.
Brightness Level
Adjust your screen’s brightness to suit your surroundings.
Wallpaper
Select and assign your phone’s background wallpaper.
1. From the Idle screen, press the Center soft key [Menu] > Settings & tools >
Settings > Display settings > Wallpaper.
2. Select Preloaded or Gallery.
3. Select an image. Press the Left soft key [Preview] to display the preview.
4. Press the Center soft key [Set] or [Select] > Done to assign it.
Display Backlight
Select the delay time before the display backlight automatically turns off.
Key Backlight
Select the delay time before the key backlight automatically turns off.
Font Size
Adjust the font size for the screen. This setting does not affect all screens.
Notifications
You can enable or disable notifications on the Idle screen and the Lock screen. When you
choose On, new email, new message, missed call, and voicemail notifications will be shown
there.
Main Clock
Select to turn on or off the clock display on the Idle screen.
Outer Clock
Select a clock display on the outer screen with the phone closed.

Settings 95
Main Menu
Configure the layout of your phone’s main menu. See Customize Main Menu Screen.
Menu Layout
Set your phone’s main menu to Grid view or List view.
Navi Key Guide
Select On to display the navigation key guide on the Idle screen.
Programmable Keys
You can assign specific functions to certain of your phone's physical keys. To call up the
assigned function, simply press the key.
Set Programmable Keys
1. From the Idle screen, press the Center soft key [Menu] > Settings & tools >
Settings > Programmable keys.
2. Select PTT key, SOS key, External speaker key, or Call list key.
3. Highlight an application/menu/function and press the Center soft key [Set].
Set Navigation Key Shortcuts
You can use the Navigation keys as shortcuts to access specific menu items directly from the
Idle screen. You can reassign the default shortcuts to the menu items you choose.
1. From the Idle screen, press the Center soft key [Menu] > Settings & tools >
Settings > Programmable keys > Navigation keys.
2. Highlight the Navigation key you wish to reassign and press the Center soft key
[Select].
3. Highlight an application/menu/function and press the Center soft key [Set].
Phone Settings
The Phone Settings menu allows you to configure your phone’s system settings.
► From the Idle screen, press the Center soft key [Menu] > Settings & tools >
Settings > Phone settings.

96 Settings
Language & Input Settings
Language
You can choose to display your phone’s on-screen menus in English, Spanish, or French.
Text Options
The text entry options menu allows you to specify additional features to use during the text entry
process.
Pointer
The pointer function is available in some apps such as Browser in which the pointer icon will
appear in the status bar. You can configure pointer functions with menus including Startup
confirm, Pointer size, and Pointer speed.
Note: You can hide the pointer by long pressing the # SPACE key .
Keyguard
Use this feature to lock the external keys while the phone is closed to prevent accidental key
presses.
► Select one of the following options:
On - Long press to temporarily disable the keyguard by pressing and holding the
External speaker key while the phone is closed.
On - Press 2 keys to temporarily disable the keyguard by pressing the Call list key
and the Volume down key sequentially while the phone is closed.
Off to disable the keyguard.
Storage
The Storage settings menu lets you manage the storage in your phone and provides options for
your microSD card.
Internal storage: View the total space and used space in your phone's internal
storage.
SD card: View total space and used space on an optional installed memory card. For
more information about the SD card options, see microSD Card.
USB Mode
The USB mode menu lets you select the connection mode you want to use. This menu appears
only when the USB cable is connected between your phone and another device such as a PC.

Settings 97
► Select one of the following options:
Charge only: Charges the battery.
Media device (MTP): Connects the phone as a media device and transfers media
files.
Photo transfer (PTP): Connects the phone as a digital camera device and transfers
only image files.
USB tethering: Lets the PC use your phone to connect to the Internet.
Location Settings
The Location menu lets you decide whether you allow your phone to collect and use location
information.
► Select one of the following settings:
High accuracy: Use GPS, Wi-Fi, and cellular networks to determine location.
Device only: Use GPS to determine your location.
E911 only: Only allow emergency personnel to locate you if you dial 9-1-1.
Security
The security settings menu lets you set the screen lock type and screen lock time, change your
security code, and use many options such as call restrictions, reset phone, encryption, etc.
Screen Lock Type
The Lock screen settings allow you to lock your phone's screen and enhance the security.
1. From the Idle screen, press the Center soft key [Menu] > Settings & tools >
Settings > Phone settings > Security > Screen lock type.
2. Choose the lock type:
None: Turn off the screen lock.
PIN: Enter four to sixteen digits PIN code to unlock.
Password: Enter four to sixteen letters, digits, or symbols to unlock.
Automatically Lock
Set the time delay to activate the screen lock feature after the device enters sleep mode. This
setting is available only when you have set a PIN or password as the screen lock type.

98 Settings
1. From the Idle screen, press the Center soft key [Menu] > Settings & tools >
Settings > Phone settings > Security > Automatically lock.
2. Make your desired selection.
Edit Code
You can change the passcode used to restrict your calls or reset your phone. See Call
Restrictions or Reset Your Phone and Phone Content.
1. From the Idle screen, press the Center soft key [Menu] > Settings & tools >
Settings > Phone settings > Security > Edit code.
2. Enter your passcode and press the Center soft key [OK].
3. Enter a new passcode and press the Center soft key [OK].
4. Enter the new passcode again to confirm and press the Center soft key [OK].
Call Restrictions
This allows you to restrict certain calls from or to your mobile phone.
1. From the Idle screen, press the Center soft key [Menu] > Settings & tools >
Settings > Phone settings > Security > Call restrictions.
2. Enter your passcode and press the Center soft key [OK].
3. Select Incoming calls or Outgoing calls.
4. Select from Allow all, Contacts only, or Block all.
Note: You can change the security passcode under Edit code menu. See Edit Code.
Show passwords
Allows you to see passwords as you type.
1. From the Idle screen, press the Center soft key [Menu] > Settings & tools >
Settings > Phone settings > Security > Show passwords.
2. Select On or Off, and then press the Center soft key [Set].
Device admin apps
View, activate, or deactivate device administrators.

Settings 99
1. From the Idle screen, press the Center soft key [Menu] > Settings & tools >
Settings > Phone settings > Security > Device admin apps.
2. Select an application you want to manage.
3. Read the on-screen information, highlight Activate/Deactivate this device admin app,
and then press the Center soft key .
Encrypt & credentials
You can encrypt the data on the SD card installed in your phone. You need to enter the PIN or
password for the screen lock for the operation. To set up a PIN or password, see Screen Lock
Type.
Warning:
Do not use the phone or remove the SD card during the encryption and decryption
processes as some or all of your data will be lost.
To encrypt the data on your SD card:
1. Charge the battery first. If the phone does not have sufficient battery charge, the
encryption process cannot be initiated.
2. With your phone connected to a power source, from the Idle screen, press the Center
soft key [Menu] > Settings & tools > Settings > Phone settings > Security >
Encryption & credentials > Encrypt SD card.
3. Read the message and press the Right soft key [Next].
4. Enter the PIN or password and press the Center soft key [OK].
5. Read the message and press the Center soft key [Encrypt]. The encryption
process starts.
To decrypt the data on your SD card:
1. Charge the battery first. If the phone does not have sufficient battery charge, the
decryption process cannot be initiated.
2. With your phone connected to a power source, from the Idle screen, press the Center
soft key [Menu] > Settings & tools > Settings > Phone settings > Security >
Encryption & credentials > Encrypt SD card.
3. Read the message and press the Right soft key [Next].
4. Enter the PIN or password and press the Center soft key [OK].

100 Settings
5. Read the message and press the Center soft key [Decrypt]. The decryption
process starts.
Manage credentials
1. From the Idle screen, press the Center soft key [Menu] > Settings & tools >
Settings > Phone settings > Security > Encryption & credentials.
2. The following settings are available:
Trusted credentials: Allows you to see the trusted credentials in your phone’s
system.
Install from SD card: Allows you to install encrypted certificates from the SD card.
Clear credentials: Clears all the credentials on your phone.
SIM card lock
Set up a PIN to lock your phone's SIM card (may not be available on your device).
1. From the Idle screen, press the Center soft key [Menu] > Settings & tools >
Settings > Phone settings > Security > SIM card lock.
2. The following settings are available:
Lock SIM card to require a PIN in order to use your phone.
Change SIM PIN to change your PIN code.
Accounts Settings
Add and manage accounts on your phone.
Set Up a New Account
1. From the Idle screen, press the Center soft key [Menu] > Settings & tools >
Settings > Phone settings > Accounts.
2. Highlight Add account and press the Center soft key [Select].
3. Select an account type.
4. Follow the instructions on the screen to set up an account.
Depending on the account type, you may need to enter an email address or user
address, password, domain name, or other information.

Settings 101
Manage Existing Accounts
1. From the Idle screen, press the Center soft key [Menu] > Settings & tools >
Settings > Phone settings > Accounts.
2. Highlight an account and press the Center soft key [Select]
Account settings to configure detailed settings.
Account sync to sync your accounts.
Remove account to remove the selected account from your phone.
Date & Time Settings
Use the Date & time settings menu either to automatically use the network-provided date and
time or manually set these values, as well as select time and date format options.
1. From the Idle screen, press the Center soft key [Menu] > Settings & tools >
Settings > Phone settings > Date & time.
2. Select Automatic time zone and select Off to set it off.
If set to On, you cannot set the time zone values manually.
3. Choose Select time zone and then select a time zone from the on-screen list. Scroll
down the list to view additional time zones. Press the Center soft key [Set] when
finished.
4. Select Automatic date & time and select Off to set it off.
If set to On, you cannot set the date or time values manually.
5. Select Set date. Adjust the month, date, and year by pressing the Navigation key up,
down, left, or right, or by using the keypad. Press the Center soft key [OK] when
finished.
6. Select Set time. Adjust the hour and minute and select AM or PM by pressing the
Navigation key up, down, left, or right, or by using the keypad. Press the Center soft key
[OK] when finished.
7. Select Use 24-hour format and select On to set to 24-hour format.
Reset Your Phone and Phone Content
This option lets you clear different types of personal information stored on your phone and reset
your phone to factory settings.

102 Settings
1. From the Idle screen, press the Center soft key [Menu] > Settings & tools >
Settings > Phone settings > Reset phone.
2. Enter your passcode and press the Center soft key [OK]. See Edit Code.
3. Read the message. If you also want to erase all data on the inserted SD card, scroll
down to highlight the Erase SD card check box, press the Center soft key [Check],
and then press the Right soft key [Next].
4. Enter your PIN or password, if required. See Screen Lock Type.
5. Press the Center soft key [Reset]. Your phone will power down and reset itself,
which may take up to 10 minutes.
Warning:
Deleted data CANNOT be retrieved.
Call Settings
Your phone's Call settings menu lets you configure your Voicemail options and a number of
other settings for the phone application. See Call Settings.
About Phone
The About phone menu lets you access and view important phone information including your
phone number, SIM status, compliance-related information, and more.
► From the Idle screen, press the Center soft key [Menu] > Settings & tools >
Settings > About phone.
Note: You can access the Safety & Warranty information via the Internet by selecting
Safety & Warranty.
Software Update
From time to time, updates may become available for your phone. You can download and apply
updates through the Software update menu.
► From the Idle screen, press the Center soft key [Menu] > Settings & tools >
Settings > Software update.
Check for update to check if there are any updates available for your phone.
Update notification to turn on or off the update notification.
Auto download to turn on or off automatic software updates.

Settings 103
Auto update time settings to set the starting time for automatic updates.

104 Support & Services
Support & Services
You can quickly access useful information for your mobile life with the menus below.
1. From the Idle screen, press the Center soft key [Menu] > Settings & tools >
Support & services.
2. The following options are available:
Call customer support to place a call to Kyocera customer support.
Call business support to place a call to Kyocera Business Select team.
Find accessories to search for the best accessories for your phone via the Internet.
Battery care to extend the overall life span of your phone's battery.
Important:
If the battery is frequently charged when it is nearly full, it will wear out
faster, reducing its cycle life. Battery cycle life is significantly increased
when it is only charged to 85%. When Battery Care Mode is "
On
", the
phone will limit its fully charged state to 85%. When Battery Care Mode is
“
Off
”, the phone will charge the battery to 100%. Note that when Battery
Care Mode is “
On
”, it reduces your talk/standby time. Battery Care Mode is
recommended to extend the battery cycle life if you have no problem with
the battery lasting throughout the day or you usually connect your phone to
a charger.
Note: When Battery Care Mode is On, a battery icon accompanied by a heart will
display in the Status bar. When this icon is displayed, it indicates that the battery
is considered fully (100%) charged when it reaches 85%.

Copyright & Trademarks 105
Copyright & Trademarks
© 2022 Kyocera Corporation. All rights reserved. KYOCERA is a registered trademark of
Kyocera Corporation. All other trademarks are the property of their respective owners.
The Bluetooth
®
word mark and logos are registered trademarks owned by Bluetooth SIG, Inc.
and any use of such marks by Kyocera Corporation is under license. Other trademarks and
trade names are those of their respective owners.
Wi‑Fi
®
is a registered trademark of the Wi-Fi Alliance.
microSD, microSDHC, and microSDXC Logos are trademarks of SD3C, LLC.

106 Index
Index
3-Way Calling, 26
Accessibility, 88
Captions, 90
Color, 89
Font size, 89
Hearing aid, 91
Mono audio, 91
Readout, 88
Real time text, 91
Telecoil mode, 91
Account
Create, 100
Email, 43
Manage, 101
Airplane Mode, 86
Alarm Clock, 75
Apps and Entertainment, 49
Battery
Capacity, 9
Care, 104
Charge, 8
Insert, 7
Remove, 9
Battery Care, 104
Bluetooth, 57
Pair, 58
Receive, 59
Send, 59
Turn on or off, 57
Unpair, 59
Bluetooth Tethering, 65
Browser, 62
Launch, 62
Navigate, 62
Options, 64
Pointer, 62
Business Support, 104
Business Tools, 84
Calculator, 72
Calendar, 72
Add an event, 72
Alerts, 73
Edit event, 74
View event, 74
Call
3-way calling, 26
Call waiting, 26
Caller ID, 25
Emergency numbers, 23
End, 24
From contacts, 22
From the call history list, 21
From the phone keypad, 21
History, 27
Make, 21
Noise reduction, 28
Options, 25
Quick responses, 29
Receive, 23
Restrictions, 98
RTT mode, 91
Speed dial numbers, 22
Using real time text, 91
With pauses, 22
With the phone closed, 21
Call History, 27
Options, 28
View, 27
Call Settings, 28
Any key answer, 28
Auto answer, 29
Call barring, 31
Call forwarding, 30
Call rejection, 33
Call timer, 34
Call waiting, 32

Index 107
Caller ID, 31
Fixed Dialing Numbers, 32
Noise reduction, 28
Open/Close flip, 29
Quick responses, 29
Set up speed dialing, 30
Voicemail, 32
Call Waiting, 26
Caller ID, 25
Camera, 67
Record a video, 67
Settings, 68
Take a picture, 67
Captions, 90
Carkit Power On or Off, 85
Connections, 55
Contacts, 35
Add, 35
Add group, 39
Add to favorites, 37
Assign, 36, 38
Delete, 38
Edit, 38
Edit group, 40
ICE (in case of emergency), 41
List, 35
Make call from, 22
Save a phone number, 37
Contacts List, 35
Options, 36
Customer Support, 104
Date & Time, 101
Device Control, 84
Display Settings, 94
Clock, 94
Font size, 94
Wallpaper, 94
Eco Mode, 79
Email, 43
Add account, 43
Manage, 45
Reply, 44
Send, 43
Settings, 46
View, 44
Emergency Alerts, 87
Emergency Call, 23
Enter Text, 18
Abc mode, 19
ABC mode, 19
Key function, 18
Prediction mode, 19
Text input mode, 18
File Manager, 52
Find Accessories, 104
Flashlight, 78
FM Radio, 79
Font Size, 89
Gallery, 69
Options, 70
ICE (In Case of Emergency), 41
Idle Screen, 13
Overview, 13
In-call Options, 25
Introduction, 1
Key Functions, 2
Keyguard, 96
Location, 97
Main Menu
App list, 17
Customize, 17
Menu
Navigate, 16
Message, 46
Delete, 48
Reply, 47
Send, 46
Settings, 48
Messaging, 43
microSD Card, 82
Format, 83
Install, 10
Unmount, 83
Use as a media device, 83
View memory, 82
Mobile Hotspot, 66
Mobile Network, 86
Multimedia

108 Index
File manager, 52
Music player, 49
Sound recorder, 53
Music Player, 49
Options, 50
Play, 49
Playlist, 51
Navigation Key Shortcuts, 95
Notepad, 77
Notifications, 16
Persistent Alerts, 90
Phone
Illustration, 2
Information, 102
Lock, 97
My phone number, 102
Reset, 101
Security passcode, 98
Turn off, 12
Turn on, 12
Update, 102
Phone Number
Save to contacts, 37
With pauses, 22
Phone Settings, 95
Pictures
Send, 71
Take, 67
View, 69
Pointer, 62, 96
Programmable Keys, 95
Readout, 88
Real Time Text, 91
Reset Phone, 101
Ringtone
Mute, 24
RTT Mode, 91
Security, 97
Call restrictions, 98
Decrypt, 99
Encrypt, 99
Passcode, 98
Screen lock, 97
Settings, 86
About phone, 102
Accessibility, 88
Data usage, 87
Display, 94
Language, 96
Phone, 95
Programmable keys, 95
Sound, 92
Volume, 92
Wireless & networks, 86
Setup Wizard, 12
SIM Card
Install, 10
Software Update, 102
Sound Recorder, 53
Sound Settings, 92
Ringtone, 92
Vibration, 92
Speed Dialing, 22
Status Bar, 14
Stopwatch, 76
Storage, 96
Support & Services, 104
Accessories, 104
Business solutions, 104
Customer service, 104
Telecoil Mode, 91
Tethering, 65
Bluetooth, 65
USB, 65
Text and Multimedia Messaging, 46
Text Entry
Copy and paste, 20
Options, 19
Timer, 76
USB Mode, 96
USB Tethering, 65
Useful Tools, 72
Videos
Record, 67
Send, 71
View, 69
Virtual Private Networks (VPN), 61
Voice Commands, 80

Index 109
Voicemail
Settings, 32
Volume, 92
VPN, 61
Wi-Fi, 55
Connect, 55
Options, 57
World Clock, 77