ALUMINIUM TELESCOPIC LADDER
MODEL NO: ATL09.V3, ATL11.V3, ATL13.V3
Thank you for purchasing a Sealey product. Manufactured to a high standard, this product will, if used according to these
instructions, and properly maintained, give you years of trouble free performance.
IMPORTANT: PLEASE READ THESE INSTRUCTIONS CAREFULLY. NOTE THE SAFE OPERATIONAL REQUIREMENTS, WARNINGS & CAUTIONS. USE
THE PRODUCT CORRECTLY AND WITH CARE FOR THE PURPOSE FOR WHICH IT IS INTENDED. FAILURE TO DO SO MAY CAUSE DAMAGE AND/OR
PERSONAL INJURY AND WILL INVALIDATE THE WARRANTY. KEEP THESE INSTRUCTIONS SAFE FOR FUTURE USE.
ATL09.V3,ATL11.V3,ATL13.V3 | Issue 1 14/05/20
Original Language Version
© Jack Sealey Limited
1. SAFETY
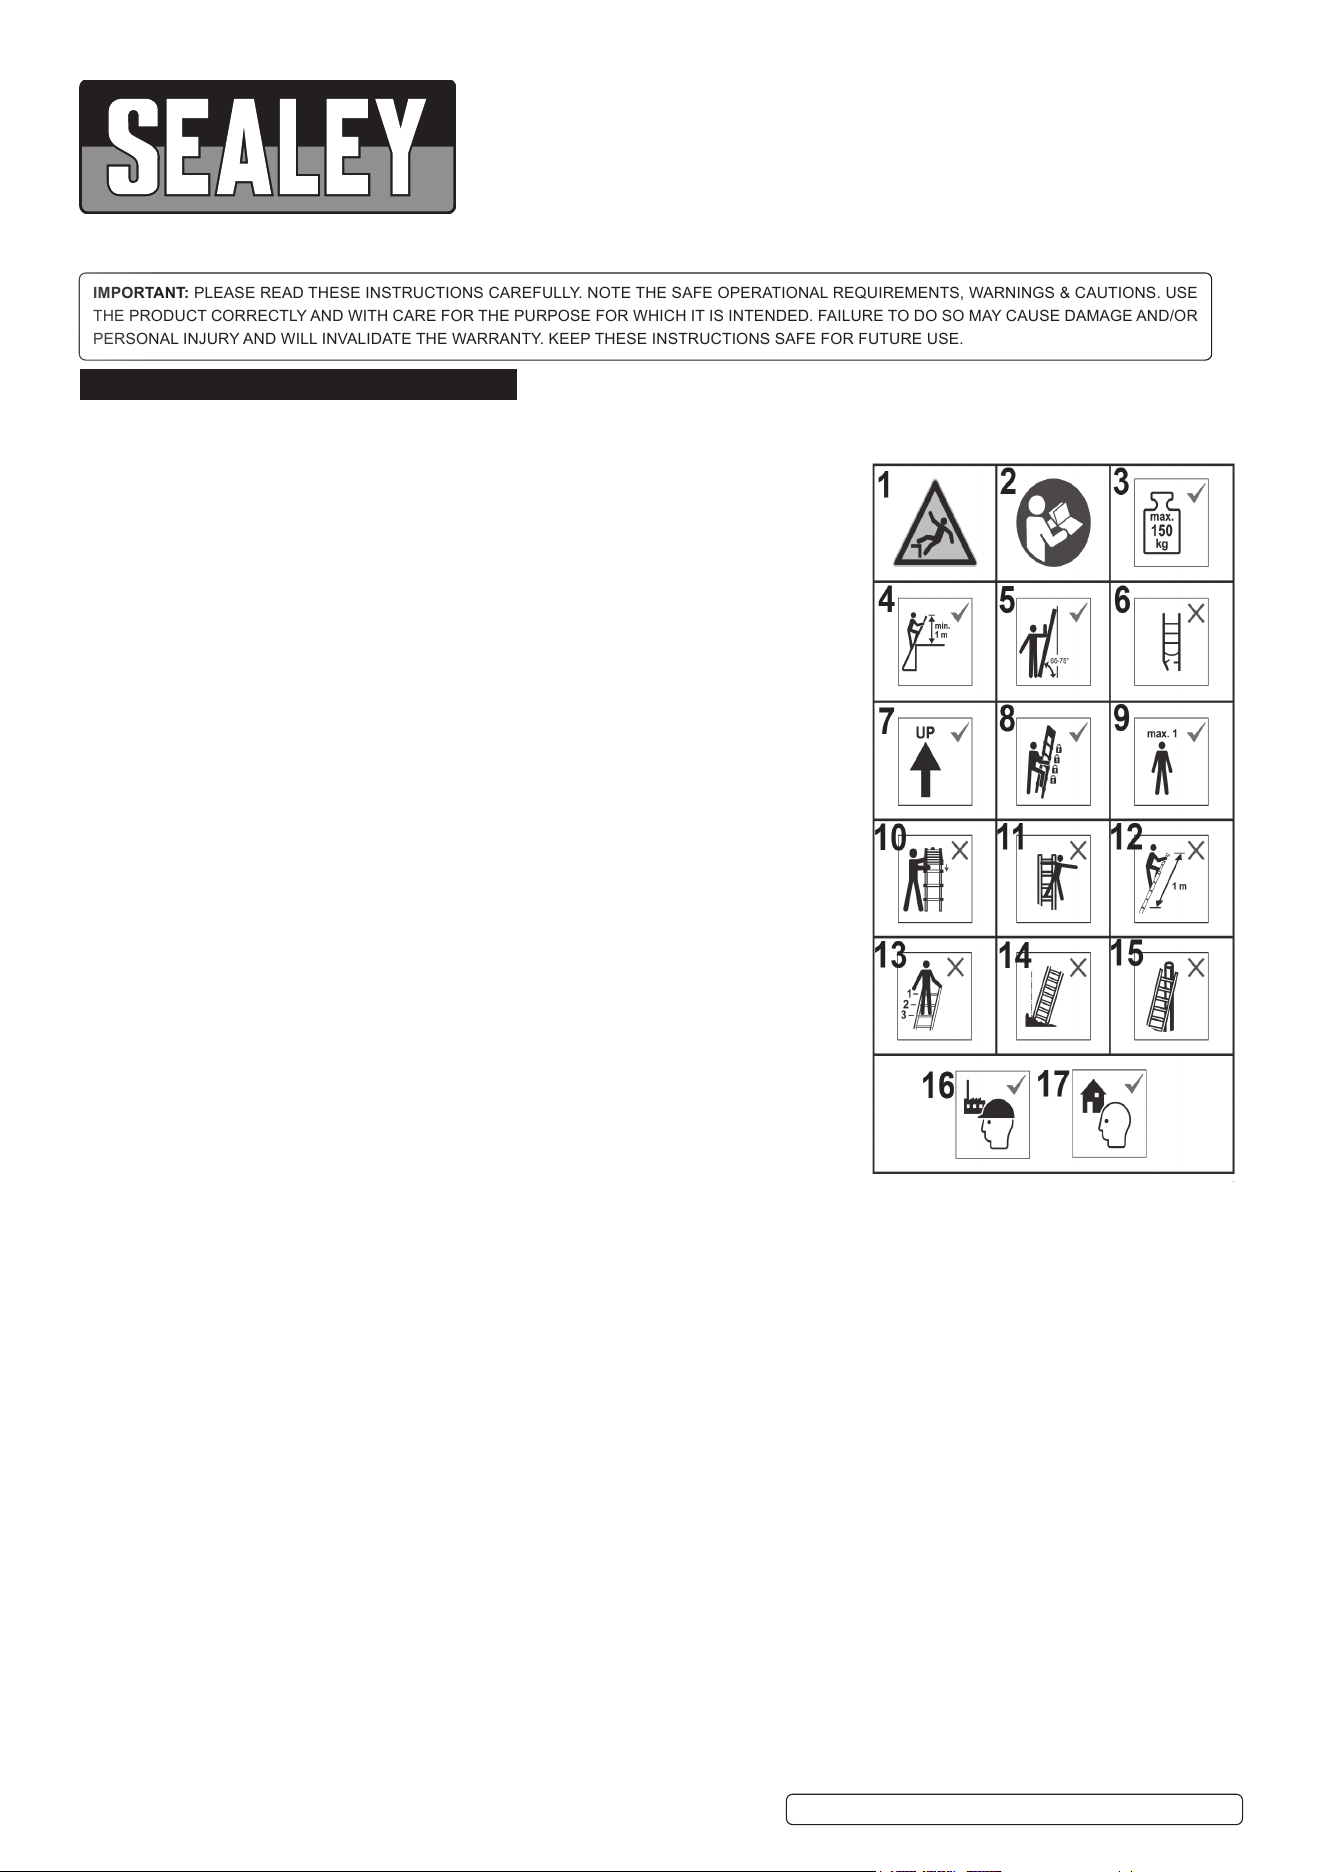
1.1. GENERAL SAFETY Numbers refer to diagram below.
WARNING! Risk of falling (1).
9 Refer to instruction manual (2).
9 Inspect ladder after delivery. Before every use check the ladder is not damaged and
is safe to use. DO NOT use a damaged ladder (6).
8 DO NOT exceed maximum load (3).
8 DO NOT use the ladder on an unlevel or unrm base (14).
8 DO NOT overeach (11).
8 DO NOT use on contaminated (by oil or water) ground.
9 Maximum number of users is one (9).
8 DO NOT ascend or descend unless you are facing the ladder.
8 DO NOT climb above the rung or tread indicated by the producer. The minimum
requirement shall always be DO NOT climb above the top 3 steps/rungs. (13)
9 Keep a secure grip on the ladder when ascending or descending. Maintain a
handhold whilst working from a ladder or take additional safety precautions if you can
not.
9 Avoid work that imposes a sideways load on ladders, such as side-on drilling through
solid materials.
8 DO NOT carry equipment which is heavy or difcult to handle while using a ladder.
8 DO NOT wear unsuitable footwear when climbing a ladder.
8 DO NOT use a ladder if you are not t enough. Certain medical conditions or
medication, alcohol or drug abuse could make ladder use unsafe.
8 DO NOT spend long periods on a ladder without regular breaks (tiredness is a risk).
9 Prevent damage of the ladder when transporting e.g. by fastening and, ensure they
are suitably placed to prevent damage.
9 Ensure the ladder is suitable for the task.
8 DO NOT use the ladder if contaminated, e.g. with wet paint, mud, oil or snow.
8 DO NOT use the ladder outside in adverse weather conditions, such as strong wind.
9 For professional use a risk assessment shall be carried out respecting the legislation
in the country of use.
9 When positioning the ladder take into account risk of collision with the ladder e.g.
from pedestrians, vehicles or doors. Secure doors (not re exits) and windows where
possible in the work area.
WARNING! ELECTRICITY HAZARDS Identify any electrical risks in the work
area, such as overhead lines or other exposed electrical equipment and DO NOT use the ladder use the ladder where
electrical risks occur.
9 Use non-conductive ladders for unavoidable live electrical work.
8 DO NOT use ladder as a bridge.
8 DO NOT step off the side of a standing ladder onto another surface.
8 DO NOT modify the ladder design.
8 DO NOT move a ladder while standing on it.
9 For outdoor use caution to the wind.
9 Check ladder is correct for professional/domestic use (16/17).
1.2. LEANING LADDERS
9 Leaning ladders with rungs shall be used at the correct angle (5).
9 Leaning ladders with steps shall be used so that the steps are in a horizontal position.
9 Ladders used for access to a higher level shall be extended at least 1m above the landing point and secured, if necessary (4).
9 Only use the ladder in the direction indicated, only if necessary due to the design of the ladder (7).
8 DO NOT lean the ladder against unsuitable surfaces (15).
9 Ladder shall never be moved from the top.
8 DO NOT stand on the top three steps/rungs of a leaning ladder. For telescopic ladders the last metre shall not be used.
9 Open the ladder fully before use.
9 Use the ladder with restraint devices engaged only.
9 Standing ladders shall not be used as a leaning ladder unless it is designed to do so.
9 Locking devices shall be checked and be fully secured before use if not operated automatically.
1.3. SAFETY REQUIREMENTS SPECIFIC TO TELESCOPIC LADDERS
9 All locking mechanisms for all extended rungs/steps shall be locked and checked before use (8).
9 Follow instructions for handling of locking mechanisms including indication of locked or unlocked position.
8 DO NOT bring your hands/ngers in rung area (area of shearing) when bringing the ladder in to its possible positions of use (10).
8 DO NOT stand on the last metre of a telescopic ladder (12).
2. INTRODUCTION
The Aluminium ladder extends and locks rung by rung allowing use at multiple heights. Innovative gas sprung lowering mechanism ensures user
safety while the ladder is lowered. Easy storage and transportation make these ideal for surveyors, tradesmen and domestic use. Lightweight,
corrosion resistant aluminium frame. Rubber feet offer increased stability while in use. Manufactured to EN131 with 150Kg capacity.
3. SPECIFICATIONS
Model No. ATL09.V3 ATL11.V3 ATL13.V3
Treads 9 11 13
Minimum Height 720mm 820mm 910mm
Maximum Height 2630mm 3270mm 3810mm
Capacity 150Kg 150Kg 150Kg
4. OPERATION
4.1. WORKING HEIGHT
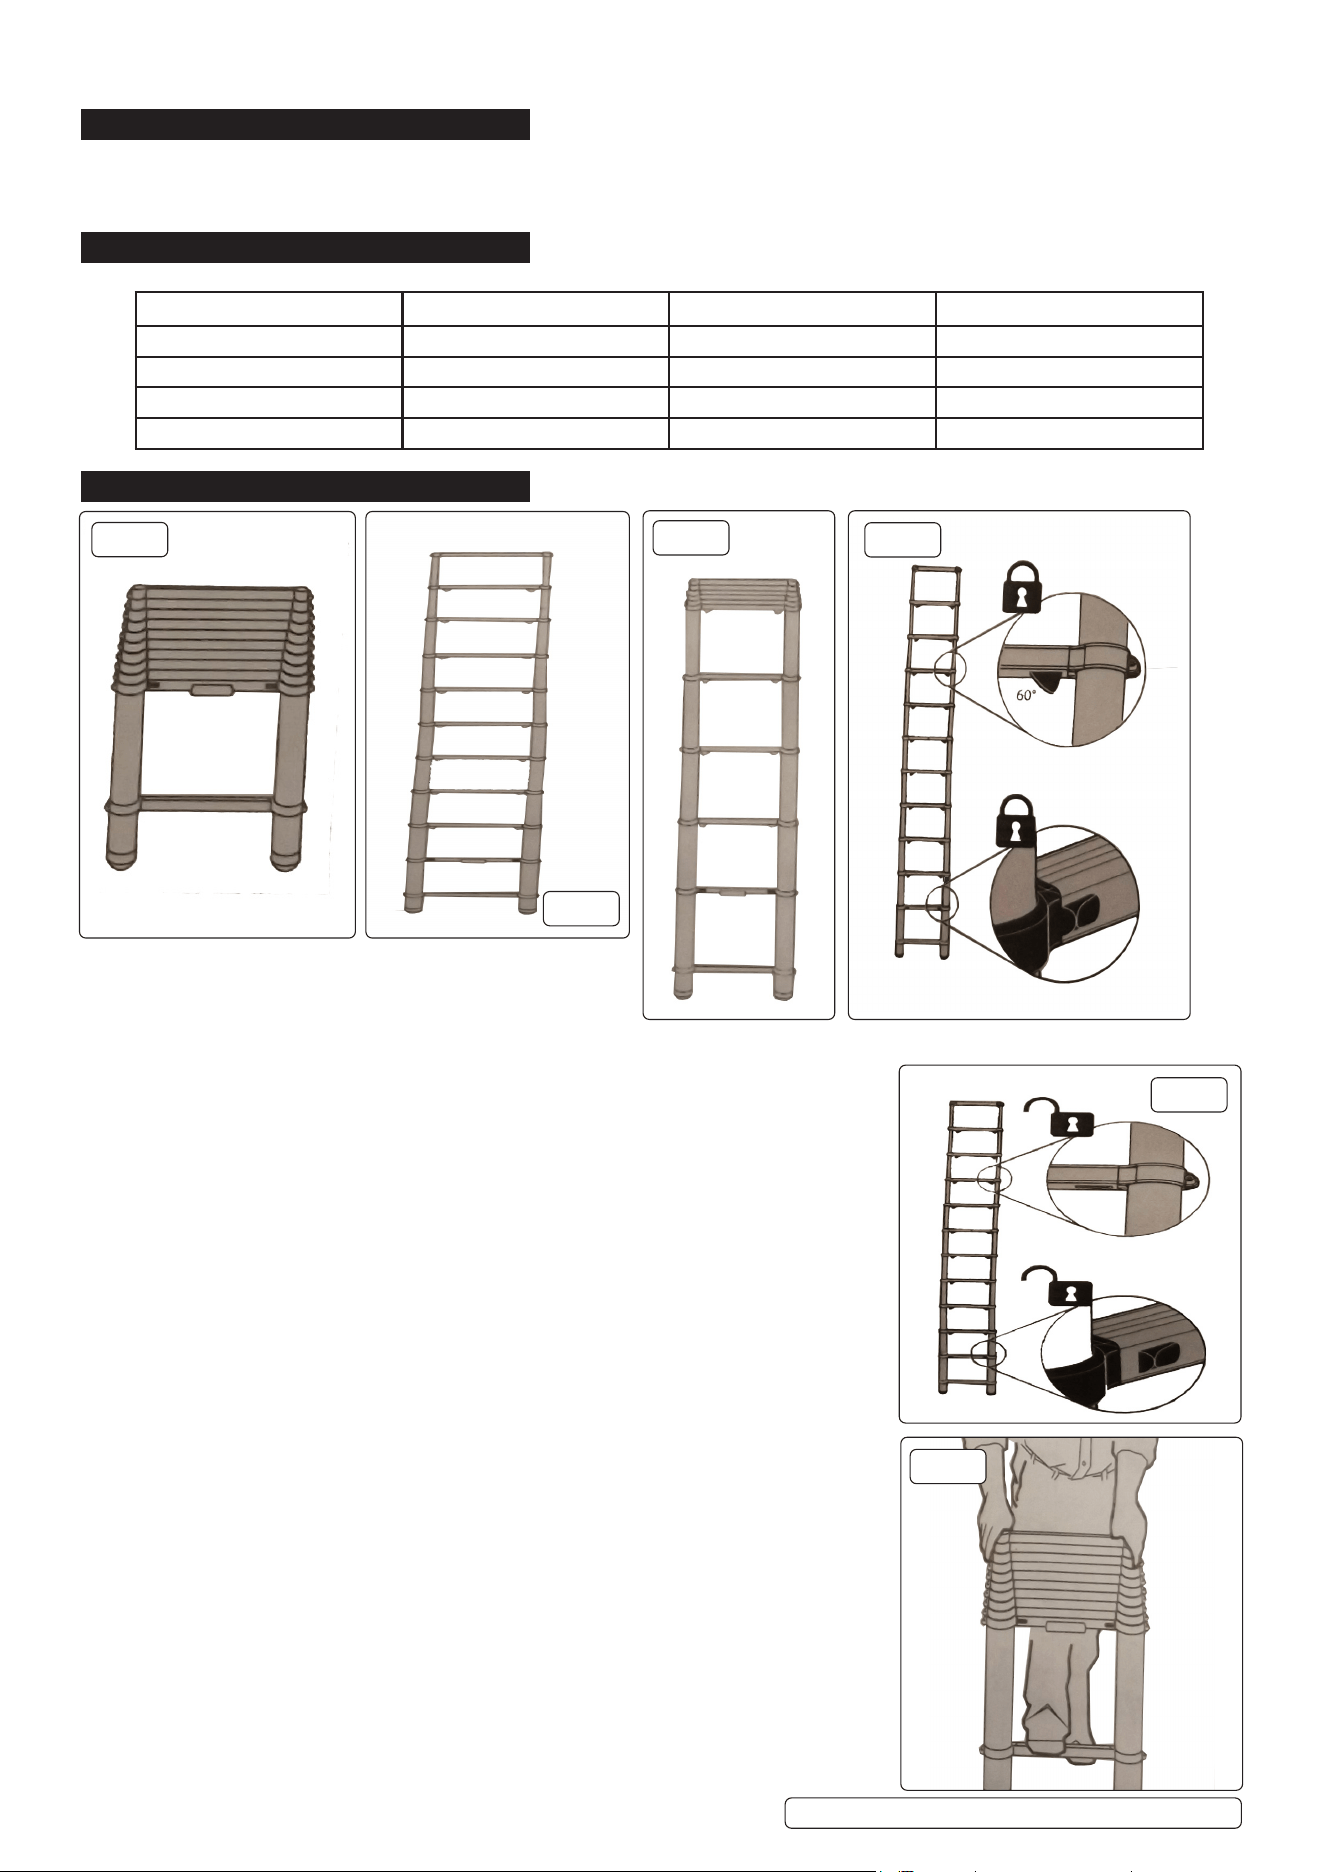
4.1.1. The ladder can be extended from a compact (g.1) to
either full length (g.2) or any intermediate length (g.3).
See section 3 for max./ min. lengths.
4.2. LOCKING MECHANISM
4.2.1. The ladder locks every rung with two steel locking pins that automatically spring into place
when the ladder is extended to the correct position.
4.2.2. Each locking pin is connected to a locking lever to indicate the locking status.
4.2.3. The locking levers drop down at an angle of 60 degrees or the sliding lock levers are at the
ends of the rungs this means the locking pins are engaged (g.4). If this is not the case the
locking pins are in the unlocked position. (g.5).
4.3. BEFORE USE
4.3.1. Check the ladder visually for damage.
4.3.2. Ensue the ladder is suitable for the job.
4.3.3. Carry out a risk assessment before using a ladder for work.
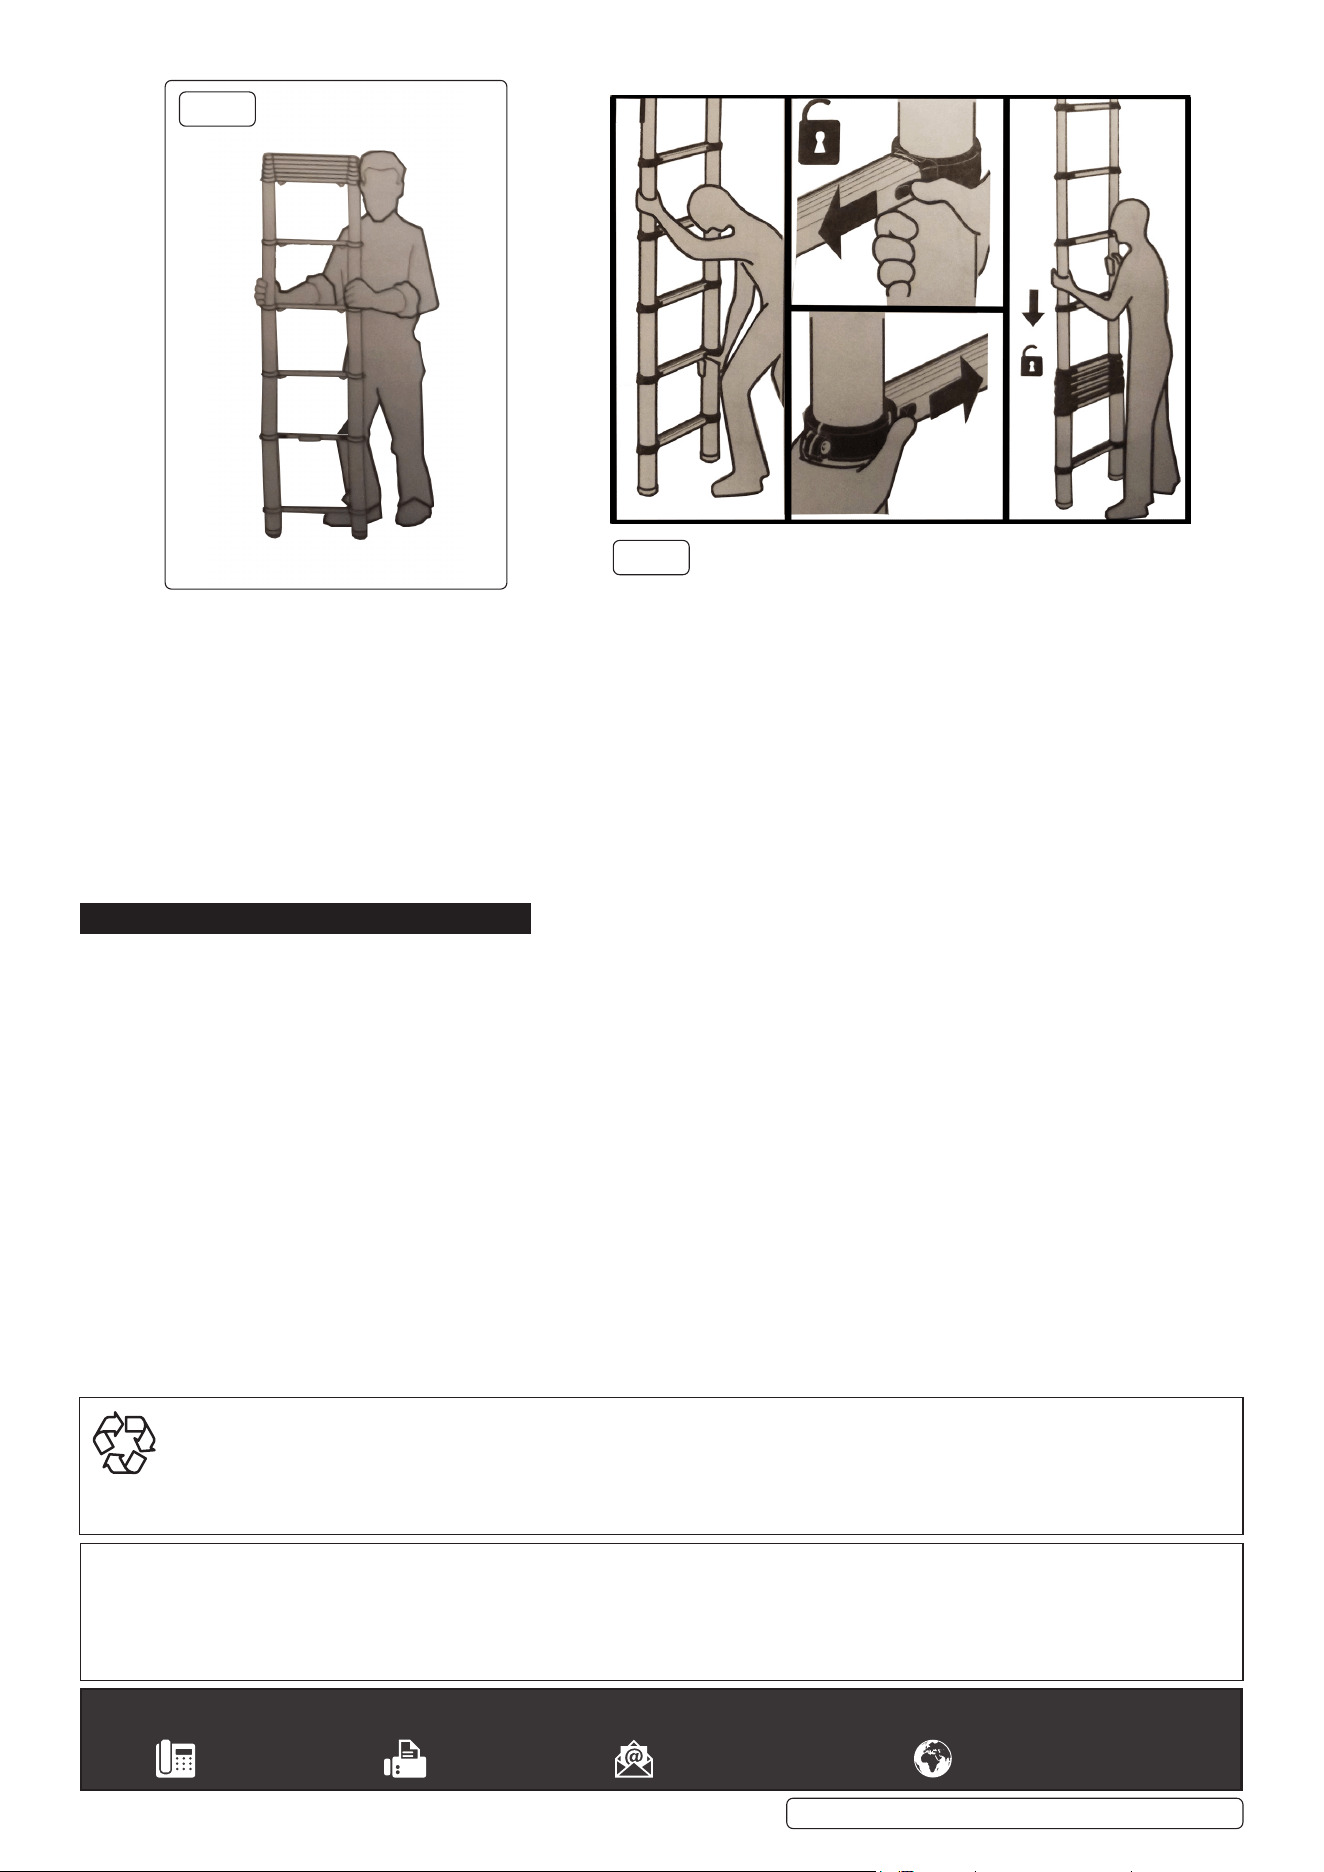
4.4. OPENING THE LADDER
4.4.1. The ladder is opened to its full length by placing it on a rm level surface.
During opening, stabilize the ladder by placing one foot on the lowest rung.
4.4.2. Open the ladder from the top by gripping the top rung with both hands.
Extend the top section fully. At the same time check that both locking levers are in the
locked position. (g.4).
4.4.3. continue opening section by section until the ladder is open to its full length (g.2).
Note! Check each locking lever is in the locked position.
4.5. INTERMEDIATE LENGTH
4.5.1. The ladder is opened to an intermediate length by placing it on a rm level surface during
opening stabilize the ladder with one foot. At the same time check that both locking levers
are placed on the lowest rung (g.6)
4.5.2. Leave some steps as a group that is not opened, grip the middle step with both hands.
Extend the section fully, then the next section fully. At the same time check that both
locking levers are in the locked position.
4.5.3. Continue opening a section at a time until the ladder is at the desired length.
All the other section should be opened completely (g.7).
ATL09.V3,ATL11.V3,ATL13.V3 | Issue 14/05/20
Original Language Version
© Jack Sealey Limited
g.1
g.2
g.3
g.4
g.5
g.6
4.6. CLOSING THE LADDER
4.6.1. Clean the ladder if required.
4.6.2. Hold the ladder upright ensuring that you do not catch your ngers when closing the ladder.
4.6.3. Start by releasing the sliding safety locks at the bottom (g.8). Release one lock at a time whilst holding the ladder with the other hand.
4.6.4. The rung section slides away as soon as both locks are released. Hold the telescopic tubes a small way up the ladder and close the
rung sections carefully.
4.6.5. Unlock and close the rest of the rungs, starting at the bottom and moving upwards one section at a time, holding with one hand and
releasing the lock with the other.
WARNING! DO NOT put hands between rungs when closing.
4.7. CHANGING THE LENGTH OF LADDER
4.7.1. Always close the ladder rst. (4.6)
4.7.2. Open the ladder to the desired length. (4.5)
5. MAINTENANCE
5.1. Repairs and maintenance shall be carried out by a competent person (with manufacturer’s training) and be in accordance with the
producer’s instructions.
5.1.1. Only use genuine parts to repair.
5.1.2. The collapsible tubes must be kept clean, remove paint spots, dirt, glue etc. before closing the ladder, keep the rungs clean.
5.1.3. If using liquid cleaners use only a small amount on a soft piece of cloth, ensure the tubes are dry before collapsing the ladder.
5.1.4. The plastic end caps should be always in place to prevent dirt entering the tubes.
5.1.5. The ladder should not be used without the rubber feet and plastic end caps
5.1.6. Always transport the ladder in the folded position to prevent damage to the tubes.
5.1.7. Avoid subjecting the ladder to rough treatment, as damage to the tubes will affect the ladders collapsible function.
5.2. STORAGE
5.2.1. Store out of direct sunlight.
ATL09.V3,ATL11.V3,ATL13.V3 | Issue 1 15/05/20
Original Language Version
© Jack Sealey Limited
g.8
g.7
Sealey Group, Kempson Way, Suffolk Business Park, Bury St Edmunds, Suffolk. IP32 7AR
01284757500 01284703534 sales@sealey.co.uk www.sealey.co.uk
Note: It is our policy to continually improve products and as such we reserve the right to alter data, specifications and component parts without prior
notice.
Important: No Liability is accepted for incorrect use of this product. Please note that other versions of this product are available. If you require
documentation for alternative versions, please email or call our technical team on technical@sealey.co.uk or 01284 757505.
Warranty: Guarantee is 12 months from purchase date, proof of which is required for any claim.
ENVIRONMENT PROTECTION
Recycle unwanted materials instead of disposing of them as waste. All tools, accessories and packaging should be sorted, taken to
a recycling centre and disposed of in a manner which is compatible with the environment. When the product becomes completely
unserviceable and requires disposal, drain any fluids (if applicable) into approved containers and dispose of the product and fluids
according to local regulations.