Loading ...
Loading ...
Cooling Down and Fan Operation
Optical performance of the RASA 8 will be best when it has reached thermal equilibrium with the
outside air. The greater the temperature difference between the astrograph and the outdoors, the
longer it will take to cool down. It is a good idea to store the astrograph in a cool area and keep it
outside for an hour or so before imaging.
The RASA 8 rear cell is equipped with an air cooling system utilizing a fan to facilitate cooling the
optics to the ambient temperature. The fan pulls air through the mesh vents located on the perimeter
of the rear cell. The mesh prevents dust from entering the astrograph. The supplied battery pack
powers the fan. It requires 8x AA batteries (not included). Install the batteries as indicated in the
plastic mold of the battery holder. Plug the battery pack into the jack near the fan to turn it on. When
ready to image, unplug the battery pack to turn the fan off.
Alternatively, the fan can be powered with a 12V DC power source supplying at least 100mA.
Connect to the fan jack with a 5.5 mm/2.1 mm tip positive DC power plug.
Focusing
The focuser moves the primary mirror forward and backward within the rear cell. The RASA
8 utilizes a redesigned focus system, called the Ultra-Stable Focus System, which minimizes
unwanted lateral movement of the primary mirror when focusing or slewing the astrograph.
To focus, turn the focus knob until the image appears sharp in your camera. If the knob will no
longer turn, the focuser has reached the end of its mechanical travel. In this case, rotate the knob in
the opposite direction until focus is achieved. A single turn of the focusing knob does not move the
primary mirror much; it takes about 30 turns to go through the entire range of focus. If focusing
on a dim object and the focus knob is turned too quickly, it is possible to go right through focus
without seeing the image. To avoid this problem, try first focusing on a bright star so the image is
visible even when out of focus.
Celestron offers a focus motor which is compatible with the RASA 8. A focus motor can be a great
convenience when astroimaging, as the focusing can be done from the same computer
that is
controlling the camera.
Attaching Accessories
The RASA 8 includes a CGE dovetail accessory bar which is also compatible with accessories
which work on Losmandy-D plates. The dovetail accessory bar can be used to mount an
optional guidescope.
A Celestron finderscope can be attached using the pairs of threaded holes in the rear cell of the
astrograph. These holes have Phillips-head screws in them when not in use.
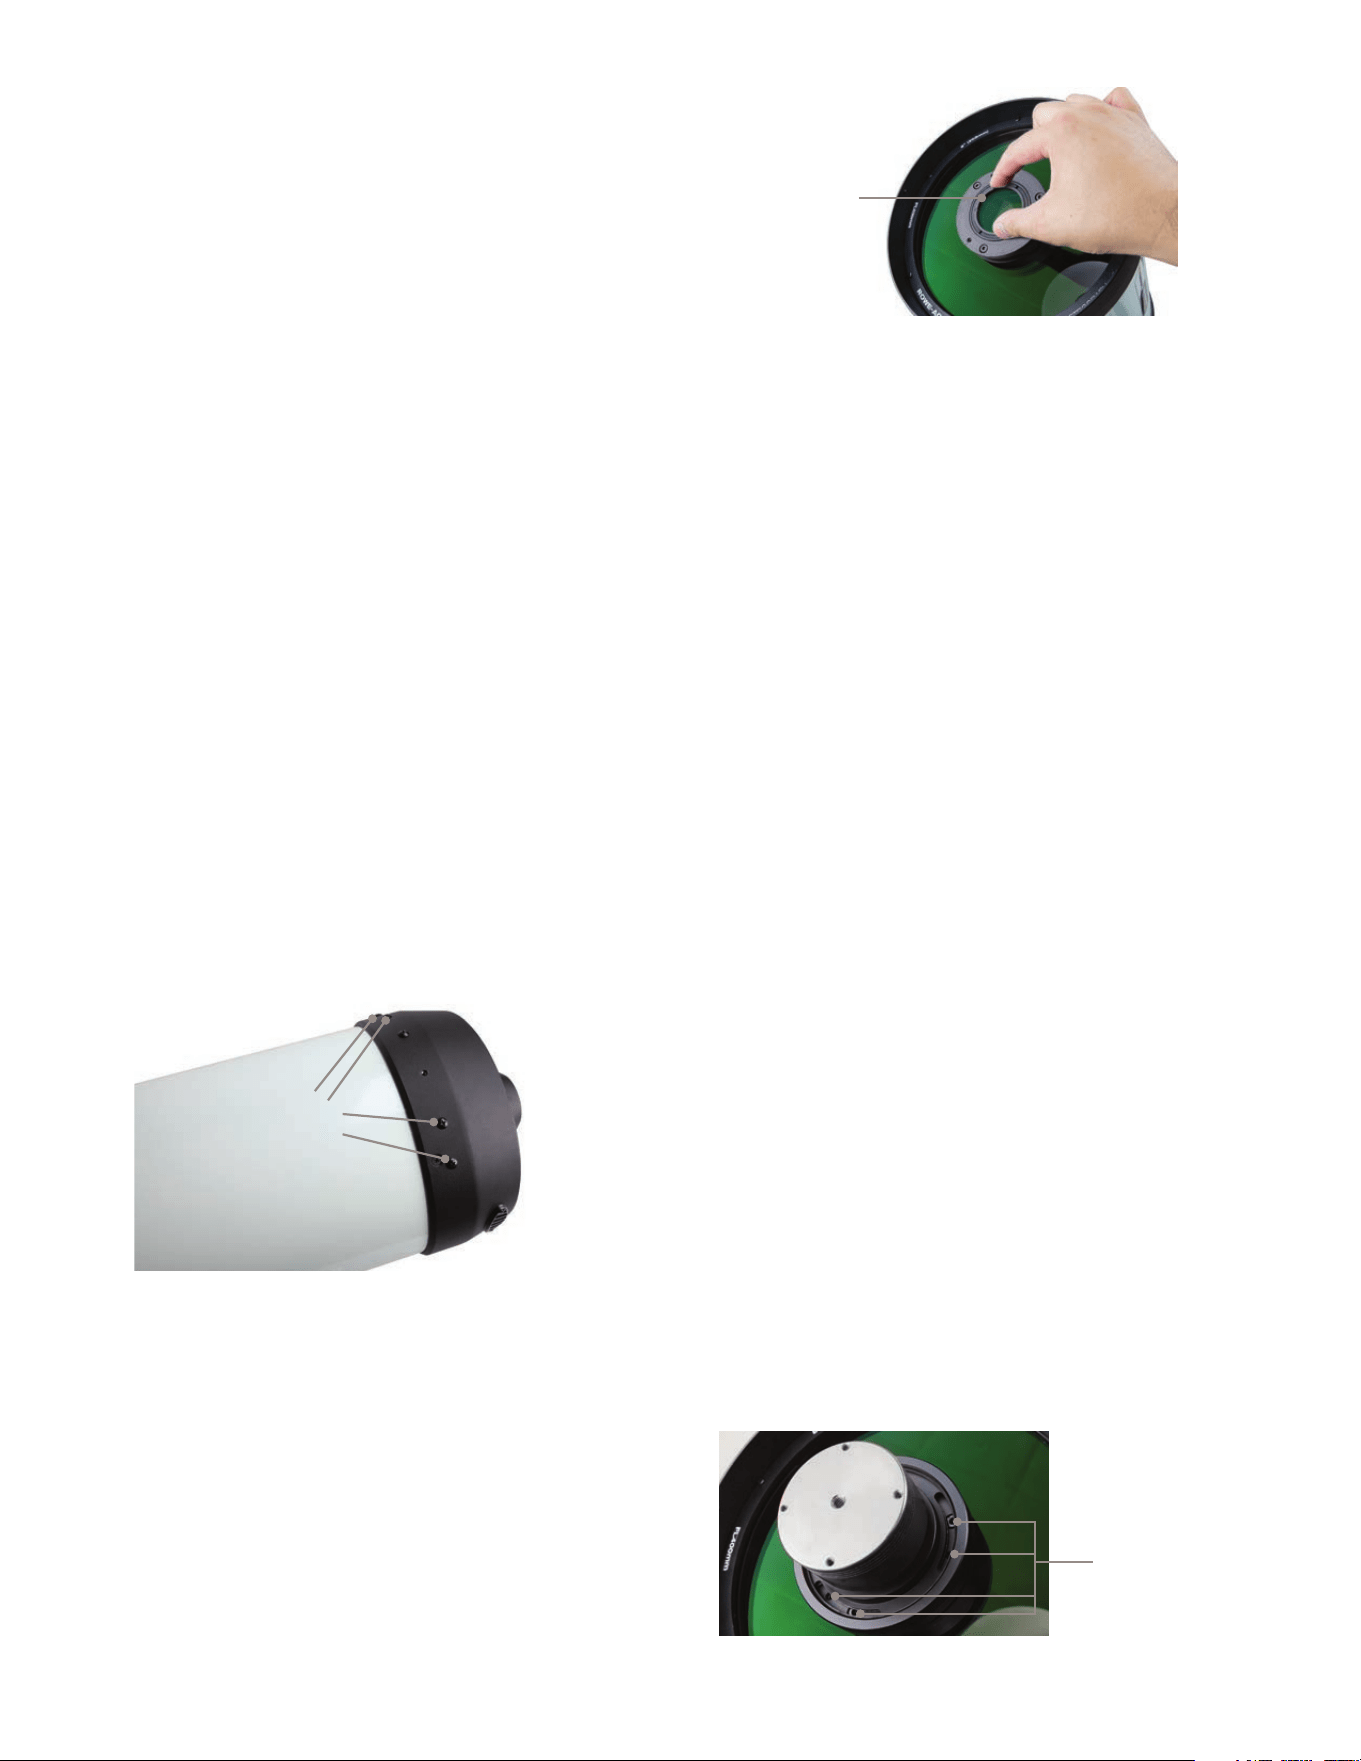
Removing the Optical Window
If using a filter somewhere in the light path, or if the camera has an optical window, it is
recommended to remove the optical window in the lens group cell. This maintains the best
optical performance of the astrograph.
To remove the optical window:
1. Remove the camera and camera adapter.
2. Carefully grasp the knurled edge of the optical window cell within the lens group cell, and begin
rotating it counter-clockwise. If the edge of the window cell cannot be grasped initially because
it is too recessed, use the slots in the window cell to begin rotating it.
3. Unthread the window cell completely, and carefully remove it from the lens group cell.
4. Store the optical window in a place where it will not get scratched or dirty.
Celestron offers a light pollution filter for the RASA 8 which conveniently mounts in place of the
optical window. This improves image contrast in skies which have significant light pollution.
Dew Prevention
The Schmidt corrector is especially susceptible to condensation because the glass is directly exposed
to the night sky. If the temperature of the astrograph drops below the dew point, dew may form on the
corrector within minutes. The easiest way to prevent dew is to add an optional 8” dew shield, which
shrouds the corrector and slows radiant cooling. If conditions are more severe, a dew heater can be
added to apply slight heat to the corrector to keep it dry all night.
Do not store the astrograph if covered in dew. Allow it to dry first without the dust cover on. Storing optics
when wet can promote mold growth on the optical surfaces.
Cleaning of the Optics
Dust, debris, and fingerprints on the optics will generally have little effect on imaging with the RASA 8.
However, if the external surfaces of the Schmidt corrector or the lens group become excessively dirty,
they should be cleaned. Dust can be removed with a blower bulb or an optical cleaning brush. Then, use
optical cleaning solution and lens cleaning tissue to remove any remaining debris or stains. Apply the
solution to the tissue and then apply the tissue to the lens. Use low pressure strokes, do not rub in circles.
When cleaning the corrector, strokes should go from the center to the outer edge. Use a new tissue for
each stroke so as not to spread any oils or debris.
To minimize the need for cleaning, keep the dust cover on the astrograph when it is not in use.
Cleaning the internal optical surfaces should only be done by the Celestron Repair Department. If your
RASA 8 needs internal cleaning, please call Celestron for a return authorization number and price quote.
Collimation
The RASA 8 optics are factory aligned, and should not normally need collimation adjustments. However,
adjustments can be made to the tilt of the lens group, if needed, to collimate the entire optical system.
The primary mirror and corrector are permanently aligned at the factory, and cannot be adjusted.
The astrograph must be collimated with a camera installed. Using a camera
that does not obstruct the
light path (i.e. the aperture of the Schmidt corrector) or that has a cylindrical body is recommended;
this makes it easier to see concentricity of the defocused star diffraction pattern.
Equipment needed:
3 mm Hex key
2 mm Hex key
Mount and camera set up, ready to image
1. Install the camera on the astrograph.
2. Slightly loosen the retaining ring and rotate the camera adapter so the three slotted
openings in the adapter allow access to the collimation screws. Retighten the retaining ring.
Mounting Holes
For Finderscope
Optical
Window Cell
Collimation
Screws
Loading ...
Loading ...
Loading ...