
CERTIFICATE OF WARRANTY
Model Number:
Modèle:
Modellnummer:
Sold To
Vendu à:
Verkauft an:
Country/Date:
Pays/Date :
Land/Datum:
Sold By:
Vendu par:
Verkauft durch:
Retailer Stamp:
Cachet du revendeur:
Stempel des Händlers:
Numero del modelo:
型号:
:
Vendido a:
售予:
:
País/Fecha:
国家/日期:
:
Vendido por:
出售方:
:
Sello del vendedor:
零售商印章:
:

English .......................................................................................................................Pg 04
Français...............................................................................................................Page 58
Deutsch ....................................................................................................................S. 102
Español ................................................................................................................Pág.148
中文 ............................................................................................................................第 194
.......................................................................................................... 238
INDEX
DETROIT, U.S.A
4
Shinola is a design brand with an unwavering commitment
to crafting lasting products, from watches to leather goods
and beyond. We celebrate timeless design and thoughtful
craftsmanship with products and stories that inspire people to
live well and be confident in a style that is uniquely their own.
ENGLISH
5
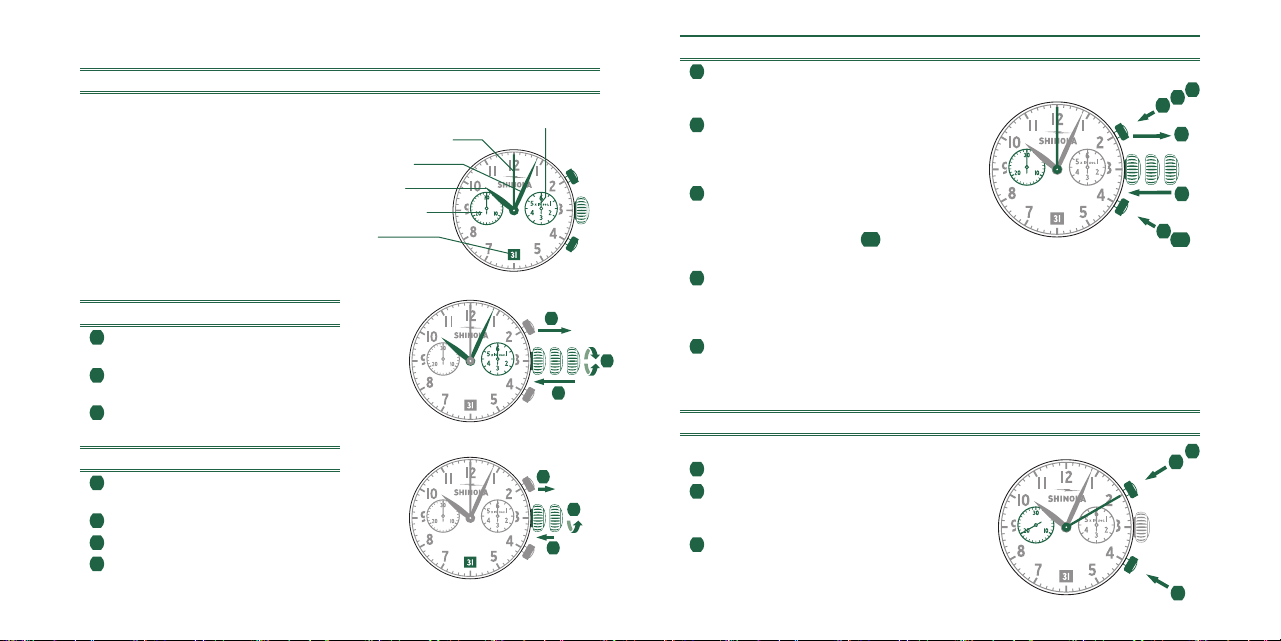
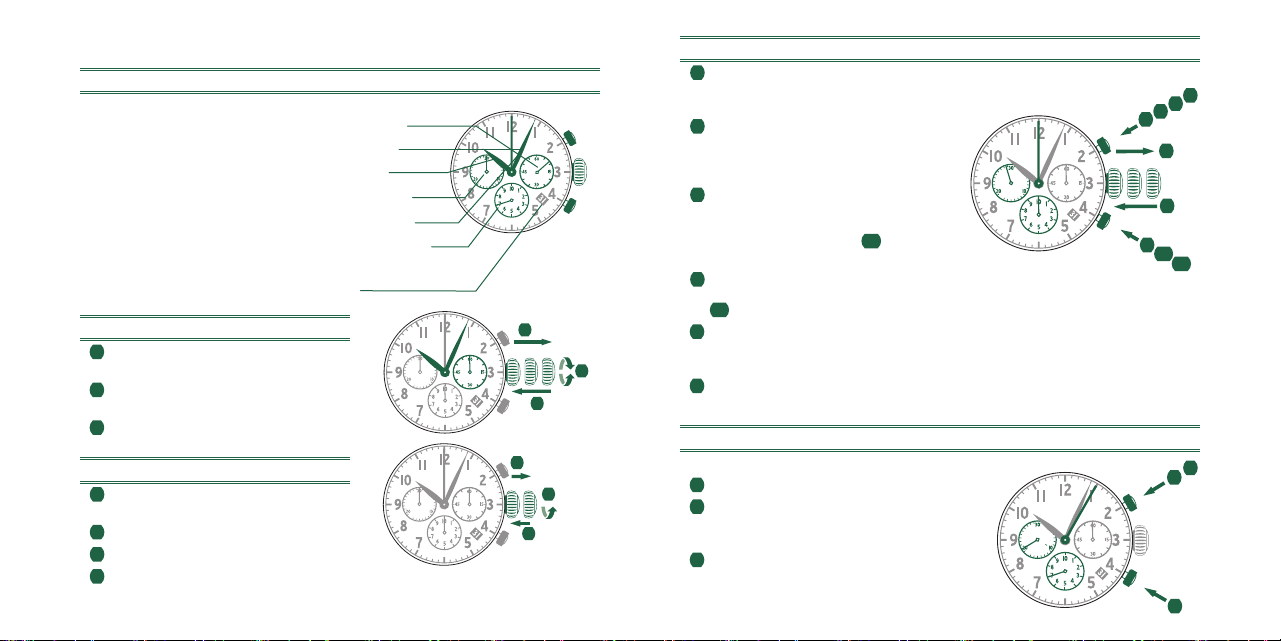
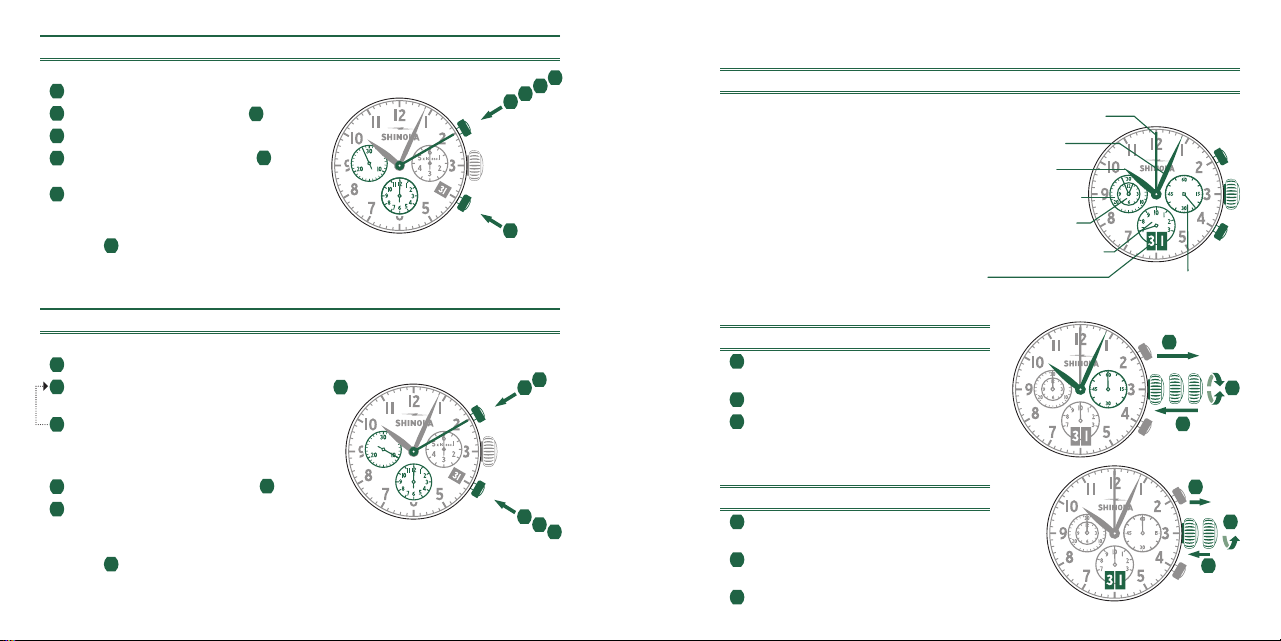
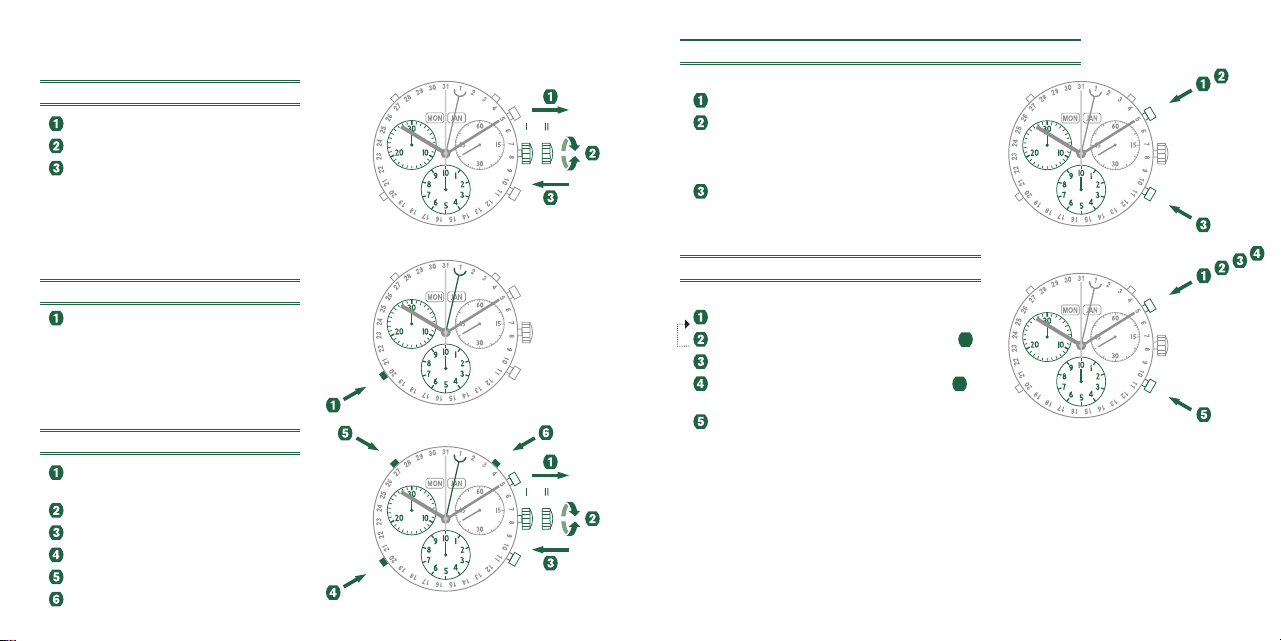
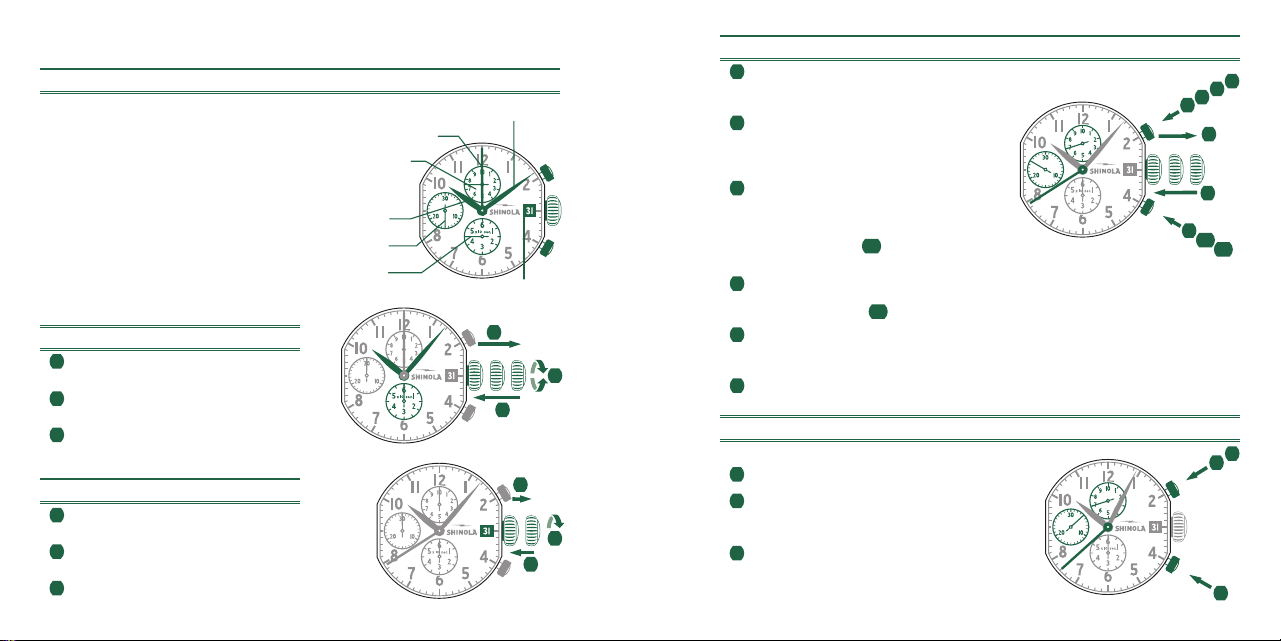
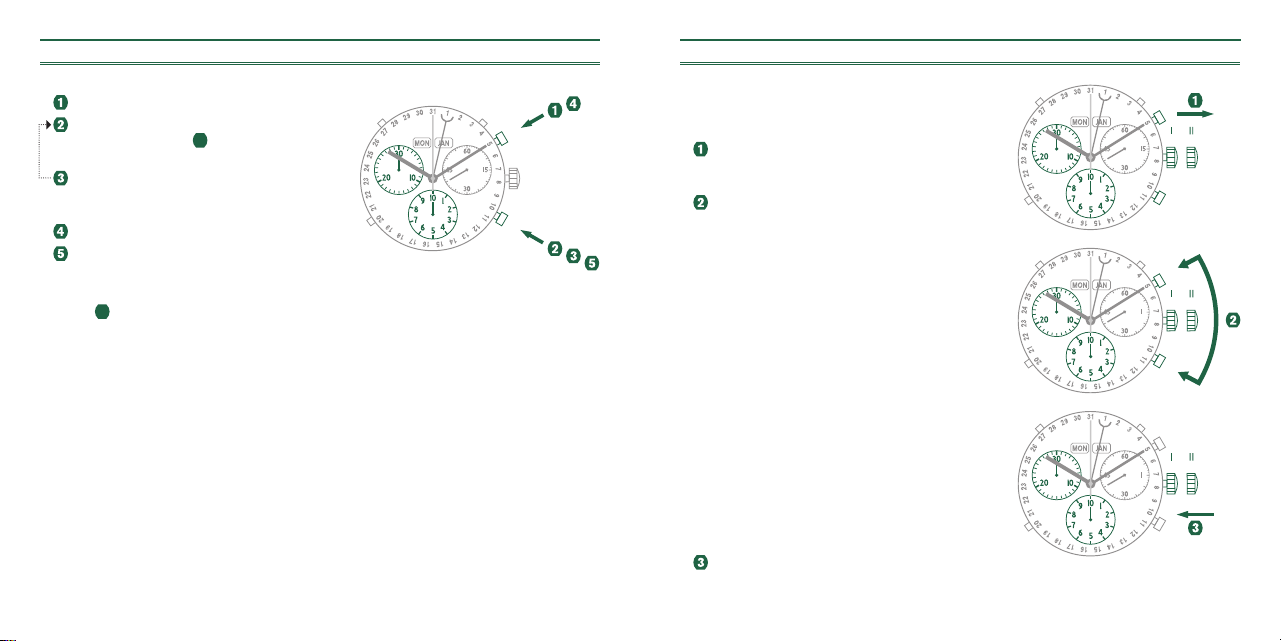
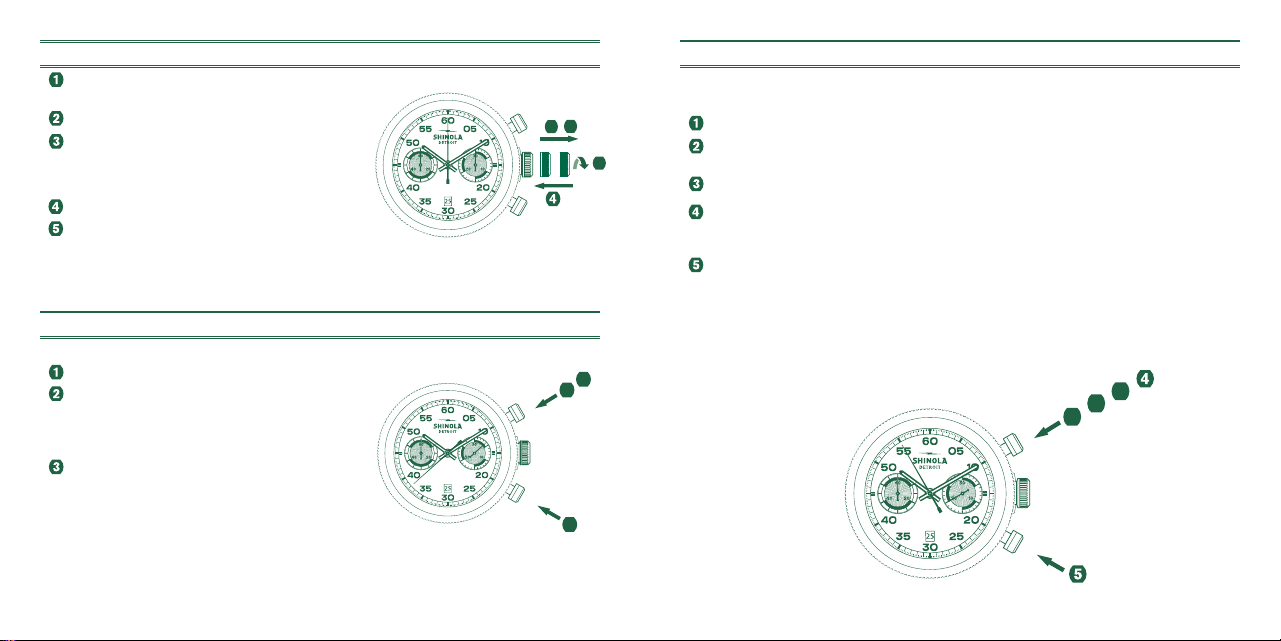
SCREW-DOWN CROWNS
CROWN FUNCTIONALITY
The components of your Shinola watch are made of the finest materials and have been rigorously inspected
to meet our strict criteria. Some Shinola watches feature a screw-down crown, which adds an extra level of
water-tightness. To safeguard your investment, it is important to understand how this type of crown works:
1
To make the crown operational, unscrew it from the case by turning it
counterclockwise until it releases. Once released, follow the instructions
for setting the time/date as described in the next sections.
2 To reseal the crown, press it in against the case until the threads engage,
and turn clockwise until tight. It is important to reseal your crown to
maintain water-tightness.
WATCH MODELS WITH DATE INDICATOR
PLEASE NOTE:
• If your watch features a date indicator, the date window might be in a different position from the one
depicted in this manual.
• Shinola timepieces have different movements. Depending on the movement, it may be necessary to adhere
to a specific time period when setting the date indicator. Before adjusting the date setting, please refer to
the instructions pertaining to the individual movement of the purchased timepiece.
CONFLICT-FREE DIAMONDS
Any diamonds used in Shinola watches have been purchased from legitimate sources not involved in funding
conflict and in compliance with United Nations resolutions. We hereby guarantee that these diamonds are
conflict-free, based on written guarantees provided by the supplier of these diamonds.
1
2
6
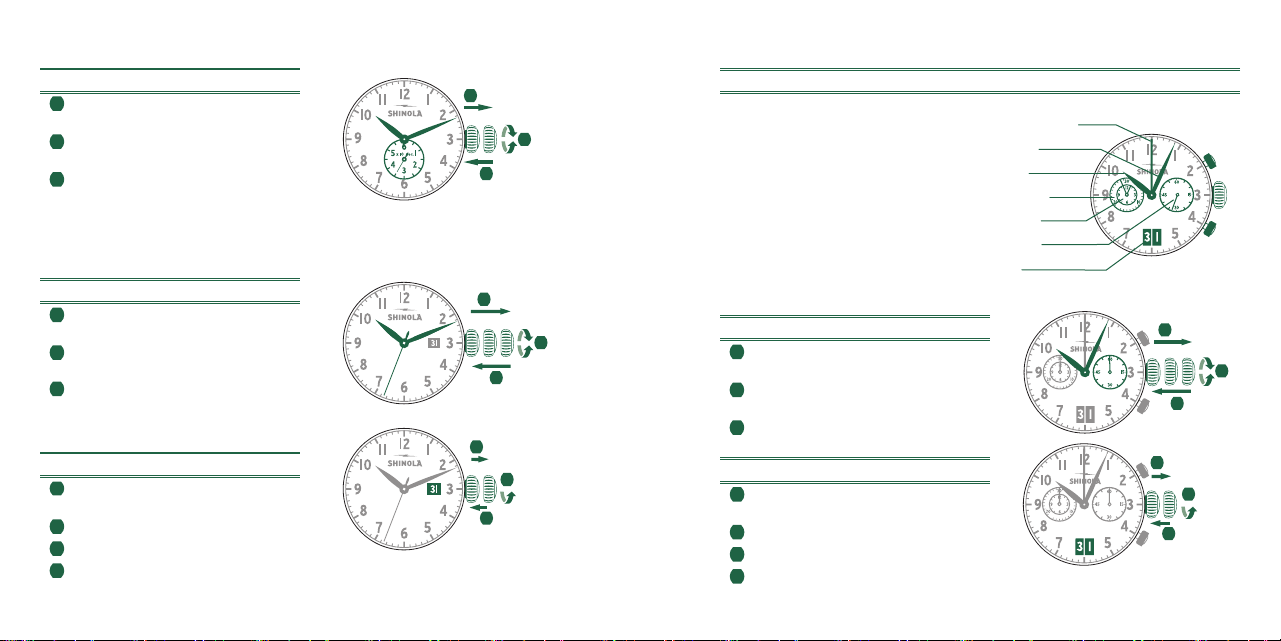
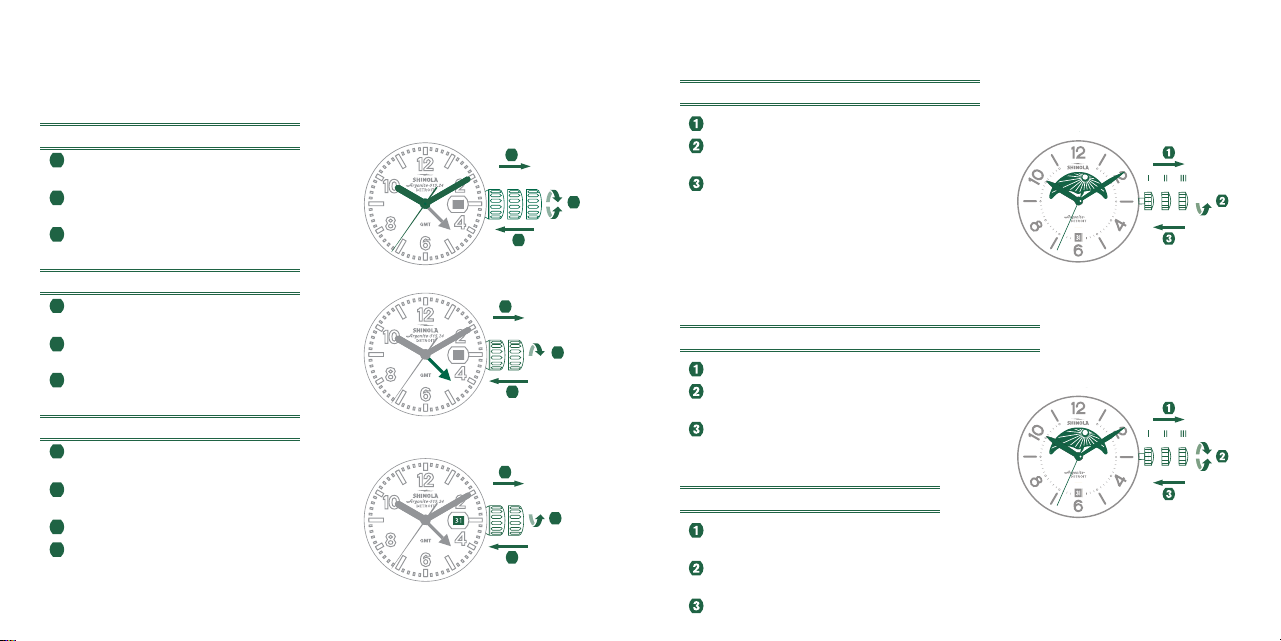
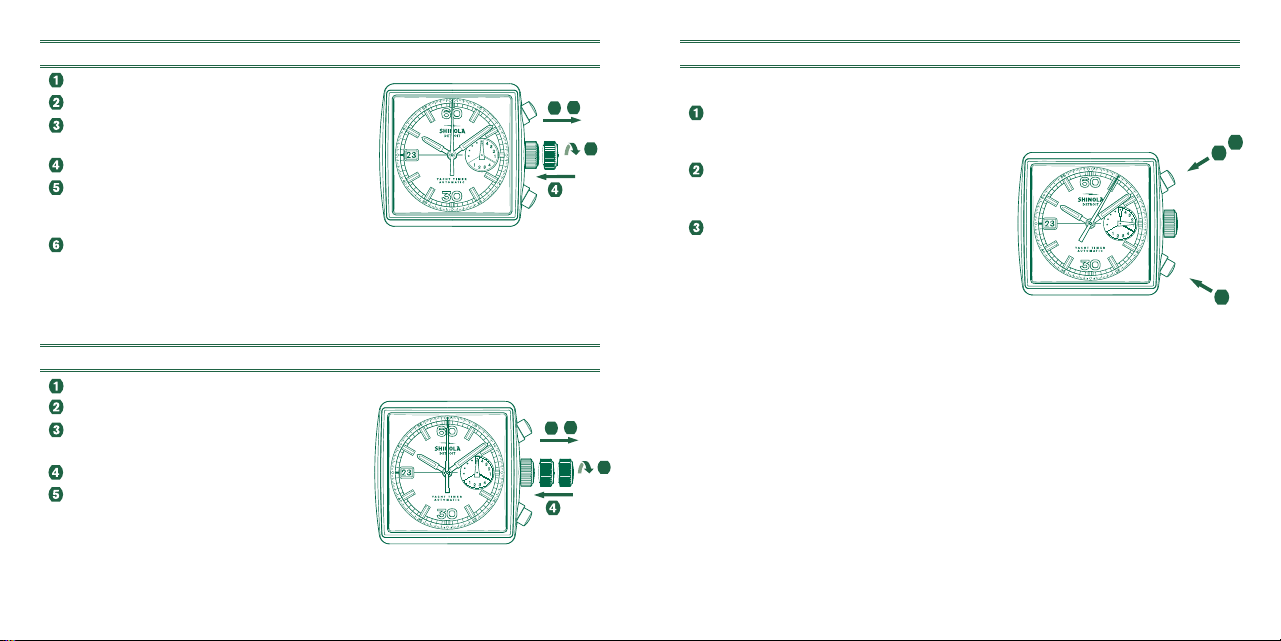
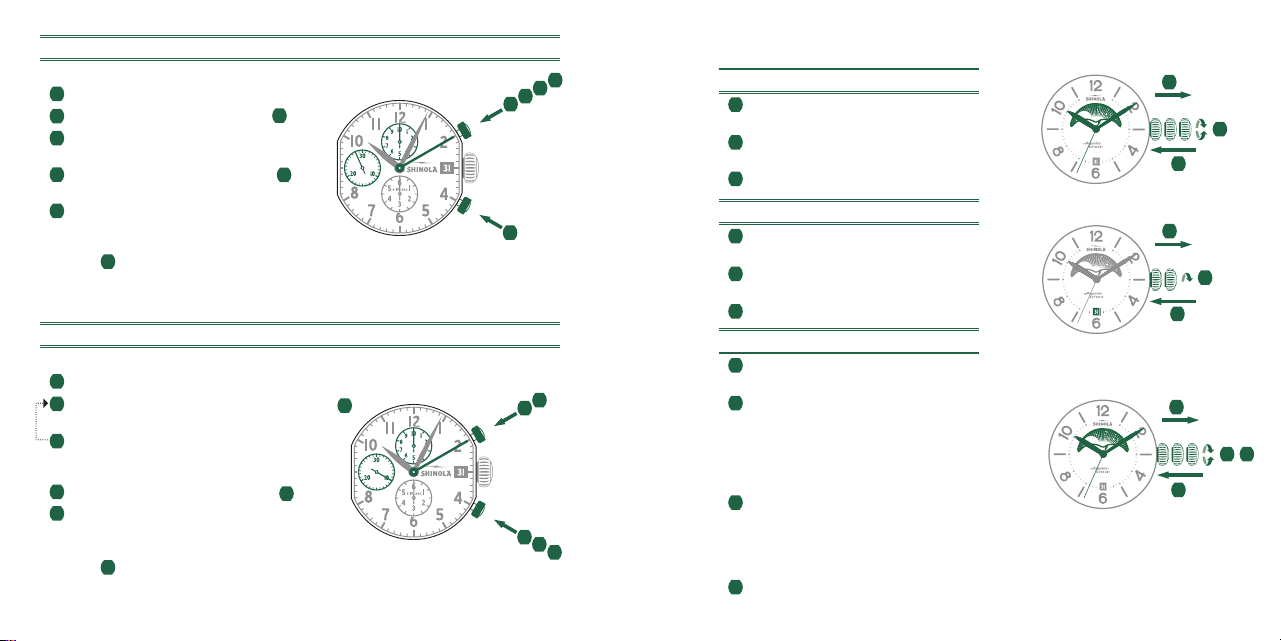
SINGLE TIME WITH DATE MODELS
SETTING THE TIME
1 Pull out the crown to position III.
(The watch stops.)
2 Turn the crown until you reach the
correct time.
3 Push the crown back into position I.
SETTING THE DATE
1 Pull out the crown to position II.
(The watch continues to run.)
2 Turn the crown until the correct date appears.
3 Push the crown back to position I.
4 If setting the date between 9:30 p.m. and 12:00 a.m., follow steps 1
through 3, but be sure to set the date to the following day.
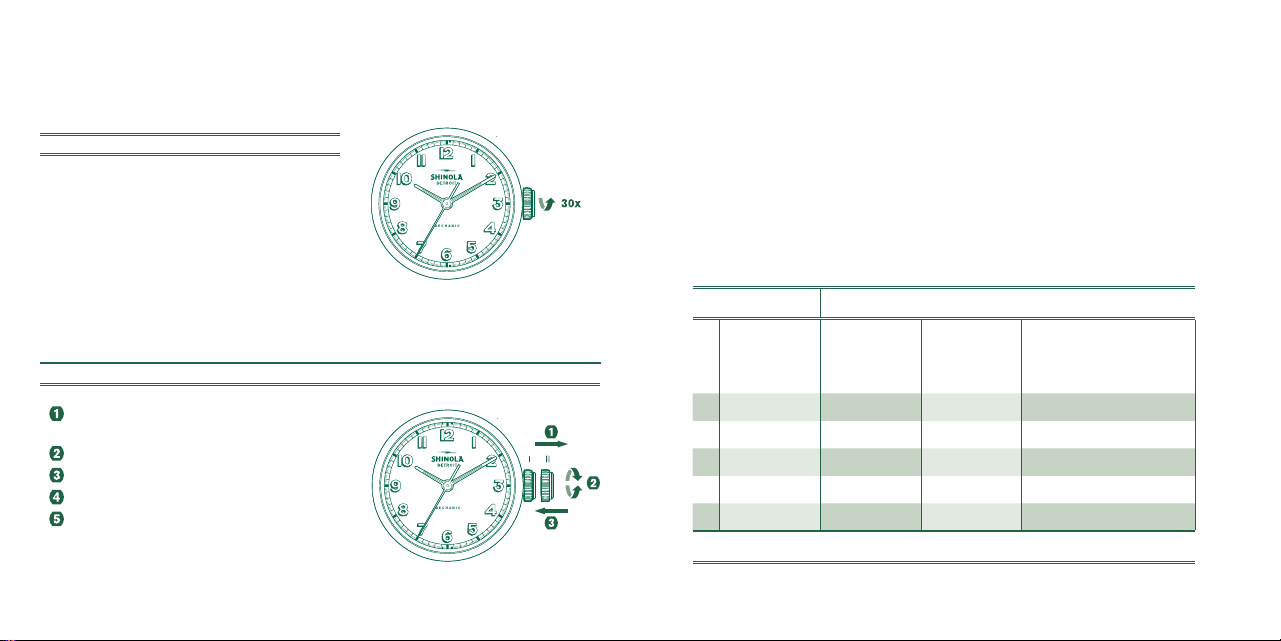
SINGLE TIME MODELS
SETTING THE TIME
1 Pull out the crown to position II.
(The watch stops.)
2 Turn the crown until you reach the
correct time.
3 Push the crown back to position I.
III
3
1
2
II IIII
3
1
2
III
1
2
3
7
SETTING THE TIME
1 Pull out the crown to position III.
(The watch stops.)
2 Turn the crown until you reach the
correct time.
3 Push the crown back to position I.
SETTING THE DATE
1 Pull out the crown to position II.
(The watch continues to run.)
2 Turn the crown until the correct date appears.
3 Push the crown back to position I.
4 If setting the date between 9:30 p.m. and 12:00 a.m., follow steps 1
through 3, but be sure to set the date to the following day.
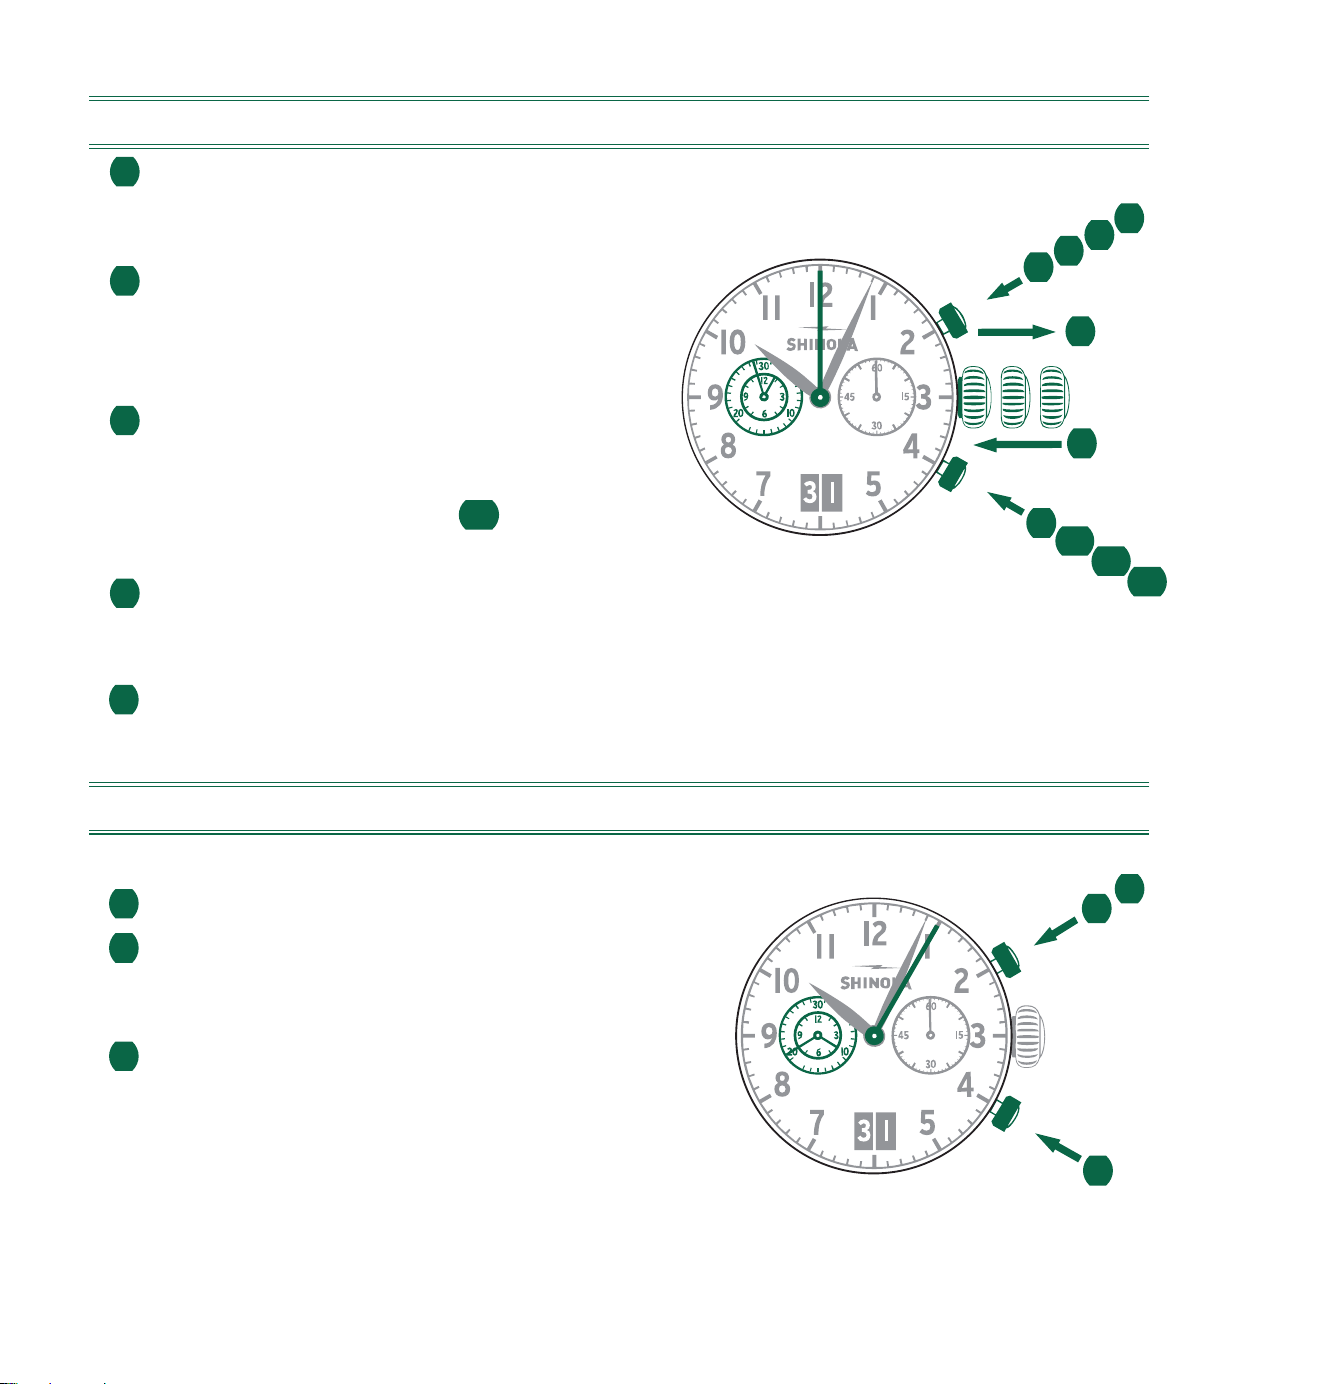
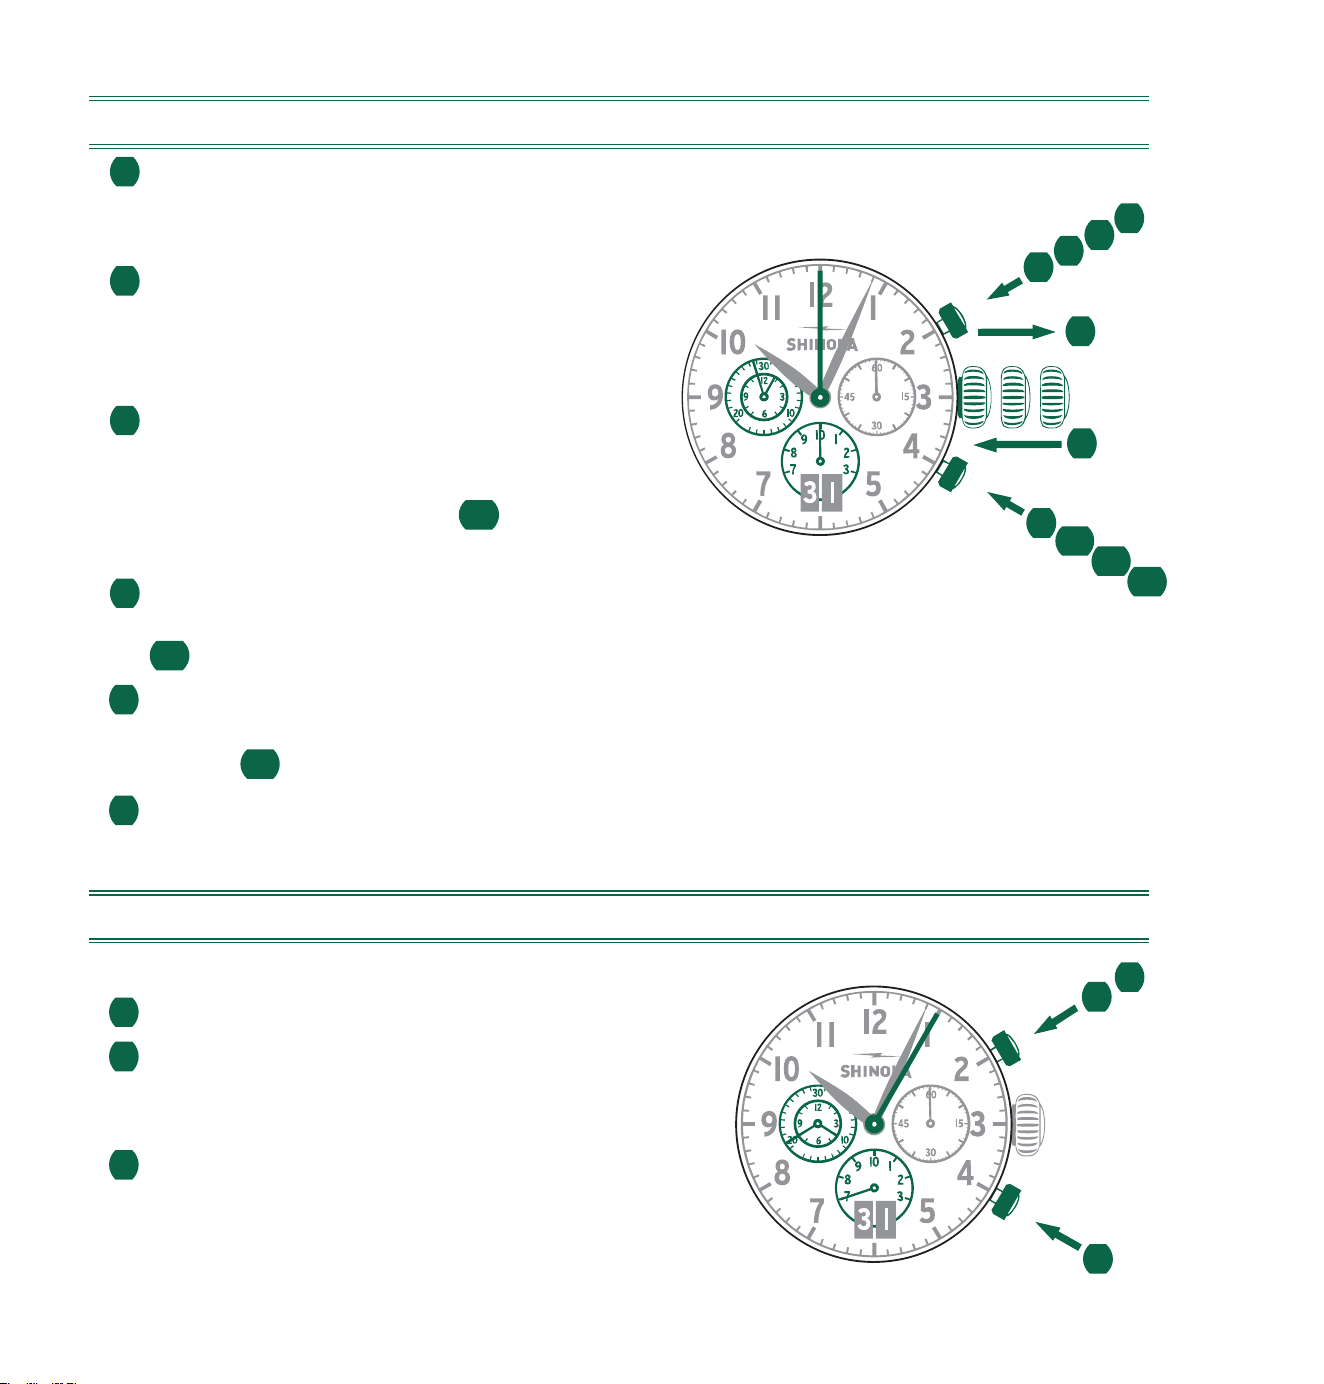
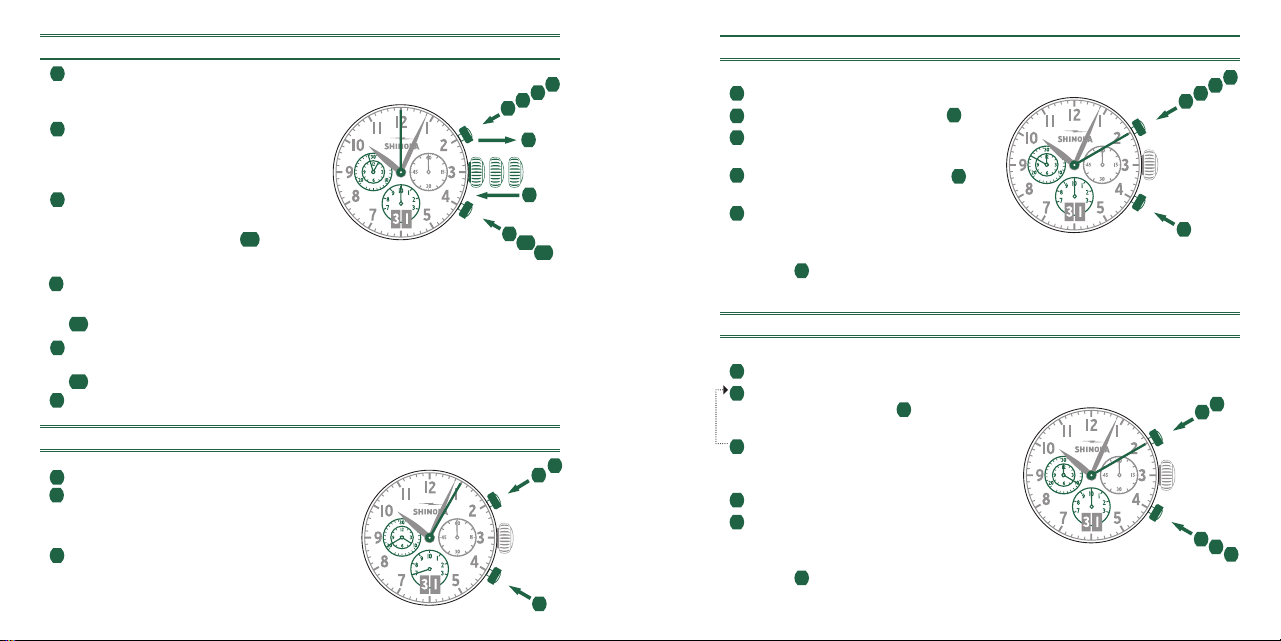
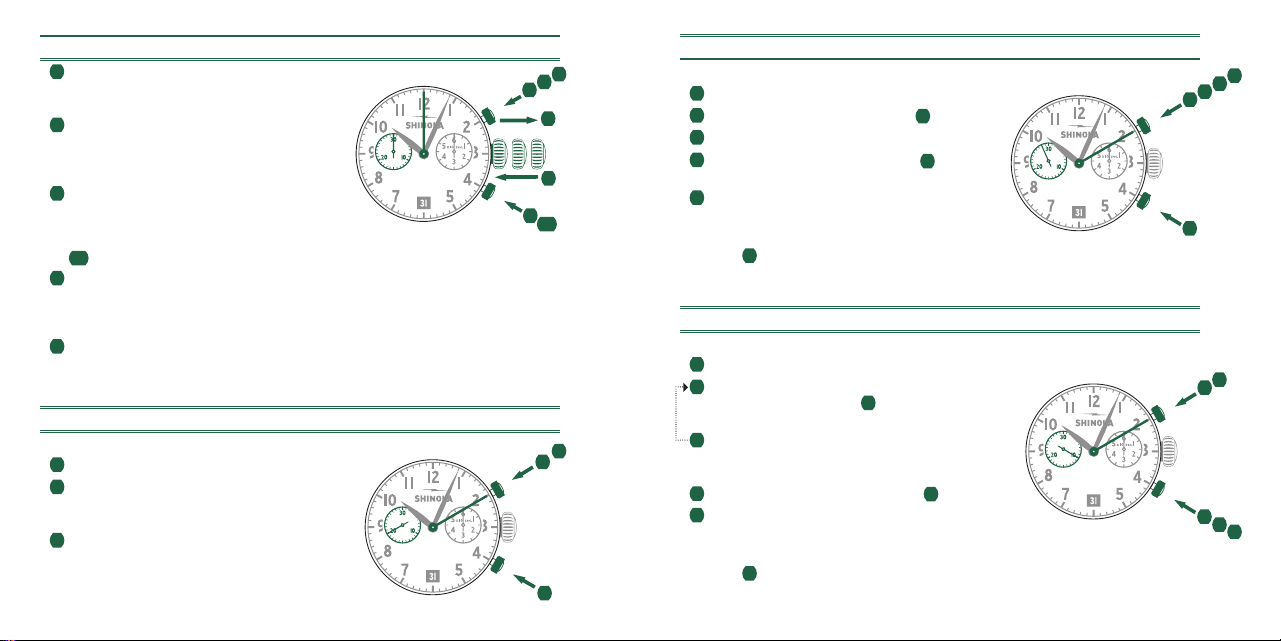
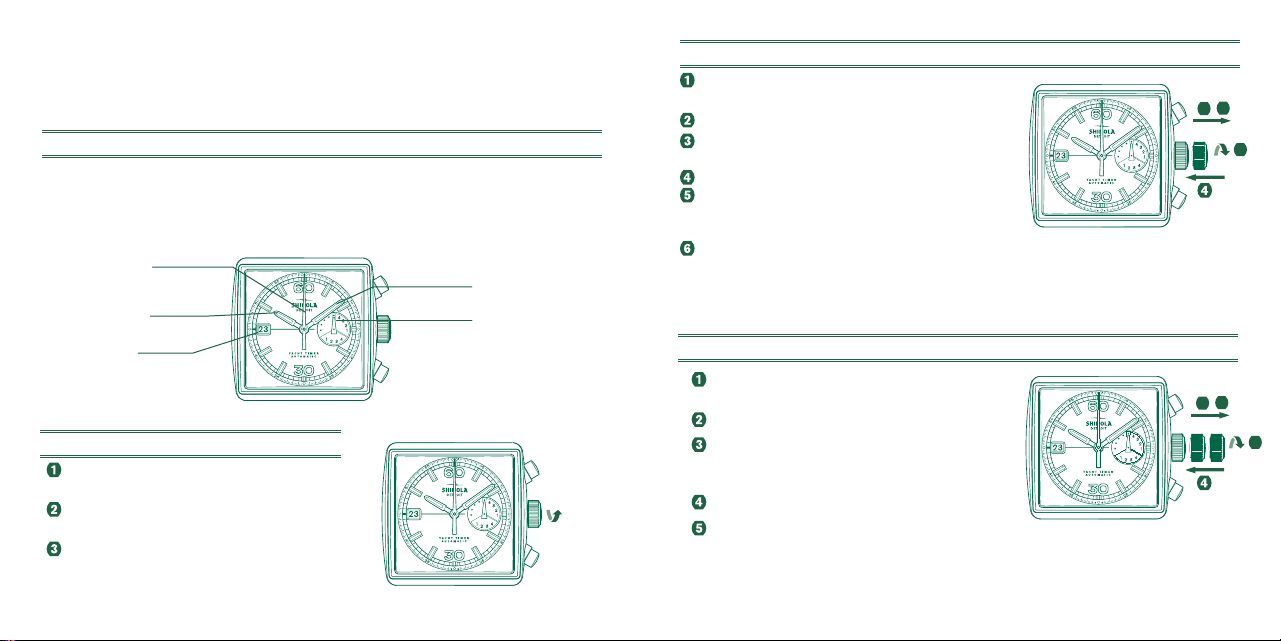
CHRONOGRAPH MODEL 5020.B
DESCRIPTION OF THE DISPLAY AND CONTROL BUTTONS
Please note:
Before using the chronograph functions,
please ensure that:
- the crown is in position
I
(= normal position).
- the four chronograph hands are
precisely at zero position following
activation of push-button B. If the
hands are not precisely at zero,
their positions must be adjusted.
(See the chapter
Adjusting the
Chronograph Hands to Zero
.)
A
B
I
Big date
Center stop-second
Minute hand
Hour hand
Minute counter
Hour counter
Second hand
II IIII
3
1
2
II
1
2
3
8
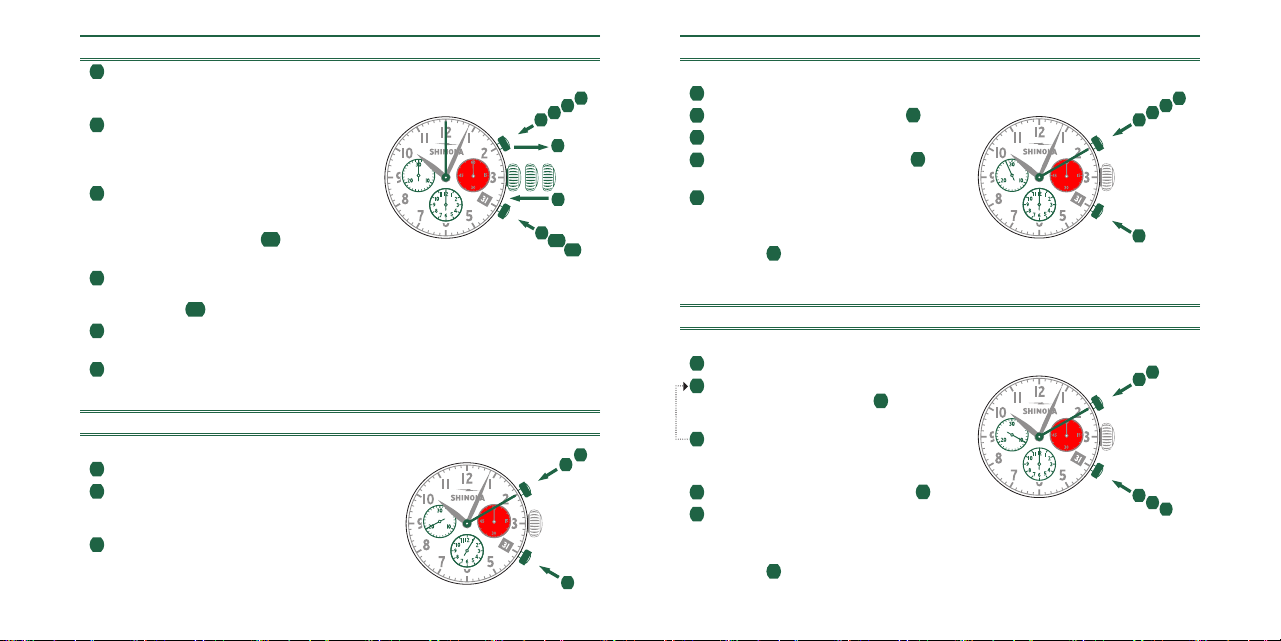
ADJUSTING THE CHRONOGRAPH HANDS TO ZERO
1 Pull crown out to position III.
(All four chronograph hands are in
their correct or incorrect zero position.)
2 Keep push-buttons A and B depressed
simultaneously for at least 2 seconds.
(The center stop-second rotates by
360° - corrective mode is activated.)
3 Press push-button A to single step the
center stop-second hand. Press and
hold push-button A to advance the center
stop-second hand quickly.
3b
Press
push-button B to advance to the next hand.
Press push-button A to single step the minute and the hour counter hands.
Press and hold push-button A to advance the minute and hour counter hands
quickly.
Return the crown to position I.
BASIC FUNCTION (START / STOP / RESET)
Example
1 Start: Press push-button A.
2 Stop: to stop the timing, press push-button A.
once more and read the four chronograph
counters: 4 hr. / 20 min. / 5 sec.
3 Zero positioning: Press push-button B.
(The four chronograph hands will
be reset to their zero positions.)
1
3
1
2
A
B
1
2
3
II IIII
1
2
3
4
5
6
A
2
B
3b
4b
4
5
5b
9
*
ACCUMULATED TIMING
Example
1 Start: start timing.
2 Stop: e.g., 15 min. 5 sec. following
1
.
3 Restart: timing is resumed.
4 *Stop: e.g., 10 min. 5 sec. following
3
.
The accumulated time = 25 min. 10 sec.
5 Reset: The three chronograph hands
are returned to their zero positions.
Please note:
* Following
4
, the accumulation of the timing can be
continued by pressing push-button A (Restart/Stop, Restart/Stop,…)
INTERMEDIATE OR INTERVAL TIMING
Example
1 Start: start timing.
2 Display interval:
e.g., 10 min. 10 sec. following 1 .
Timing continues in the background.
3 Making up the measured time:
the four chronograph hands are quickly
advanced to the ongoing measured time.
4 Stop: (Final time is displayed).
5 Reset: The three chronograph hands are
returned to their zero positions.
Please note:
* Following
3
, further intervals or intermediates can be
displayed by pressing B (display interval / make up measured time, …)
5
B
1
2
3
4
A
5
2
3
B
1
4
A
10
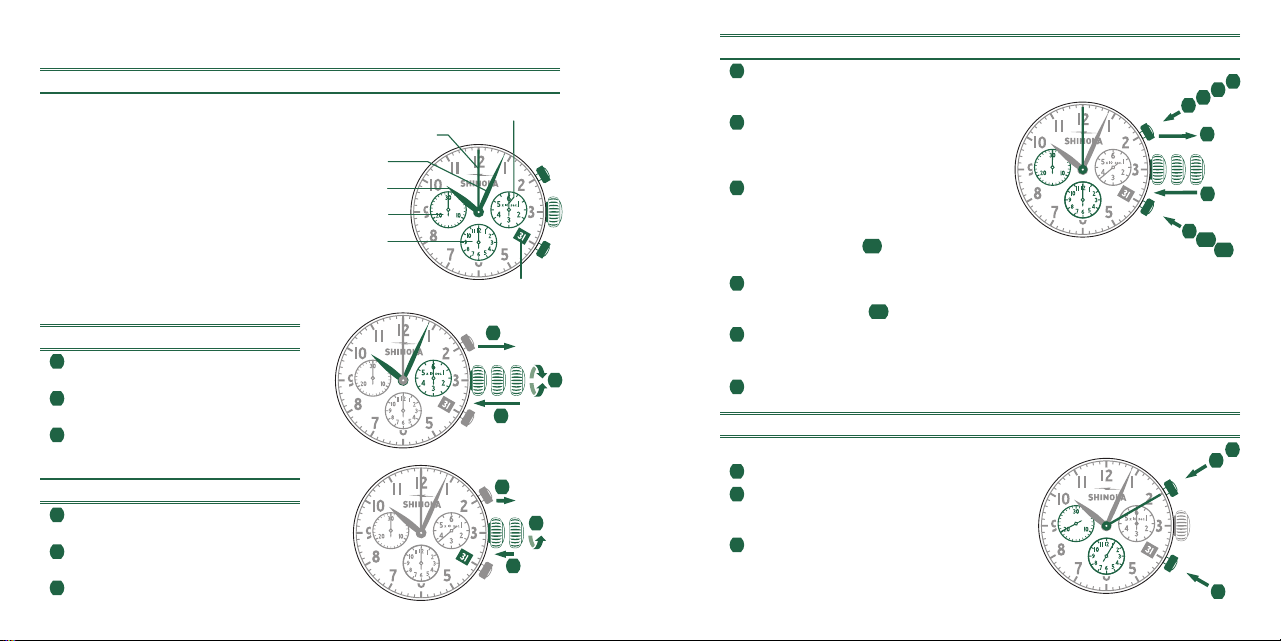
CHRONOGRAPH MODEL 5021.D
DESCRIPTION OF THE DISPLAY AND CONTROL BUTTONS
Please note:
Before using the chronograph functions,
please ensure that:
- the crown is in position I
(= normal position).
- the two chronograph hands are
precisely at zero position following
activation of push-button B. If the hands
are not precisely at zero, their positions
must be adjusted. (See the chapter
Adjusting the Chronograph Hands to Zero
.)
II IIII
3
1
2
SETTING THE TIME
1 Pull out the crown to position III.
(The watch stops.)
2 Turn the crown until you reach the
correct time.
3 Push the crown back to position I.
SETTING THE DATE
1 Pull out the crown to position II.
(The watch continues to run.)
2 Turn the crown until the correct date appears.
3 Push the crown back to position I.
4 If setting the date between 9:30 p.m. and 12:00 a.m.,
follow steps 1 through 3, but be sure to set the date to
the following day.
III
1
2
3
A
Second hand
Center stop-second
Minute hand
Hour hand
Minute counter
Date
B
I
11
ADJUSTING THE CHRONOGRAPH HANDS TO ZERO
1 Pull crown out to position III.
(All two chronograph hands are in
their correct or incorrect zero position.)
2 Keep push-buttons A and B depressed
simultaneously for at least 2 seconds.
(The center stop-second rotates by 360°
- corrective mode is activated.)
3 Press push-button A to single step the
center stop-second hand. Press and
hold push-button A to advance the center
stop-second hand quickly.
3b
Press
push-button B to advance to the next hand.
4 Press push-button A to single step the
minute counter hand. Press and
hold push-button A to advance the
minute counter hand quickly.
5 Return the crown to position I.
BASIC FUNCTION (START / STOP / RESET)
Example
1 Start: press push-button A.
2 Stop: to stop the timing, press push-button A
once more and read the two chronograph
counters: 20min / 10sec.
3 Zero positioning: Press push-button B.
(The two chronograph hands will
be reset to their zero positions.)
II IIII
1
2
3
4
5
2
A
B
3b
1
2
3
A
B
12
*
ACCUMULATED TIMING
Example
1 Start: start timing
2 Stop: e.g., 15 min. 5 sec. following
1
.
3 Restart: timing is resumed
4 *Stop: e.g., 13 min. 5 sec. following 3 .
The accumulated time = 28 min. 10 sec.
5 Reset: the three chronograph hands
are returned to their zero positions.
Please note:
* Following
4
, the accumulation of the timing can be
continued by pressing push-button A (Restart/Stop, Restart/Stop,…)
INTERMEDIATE OR INTERVAL TIMING
Example
1 Start: start timing.
2 Display interval:
e.g., 10 min. 10 sec. following
1
.
Timing continues in the background.
3 Making up the measured time:
the two chronograph hands are quickly
advanced to the ongoing measured time.
4 Stop: e.g., 28 min. 10 sec. following
1
.
5 Reset: the three chronograph hands
are returned to their zero positions.
Please note:
* Following
3
, further intervals or intermediates can be
displayed by pressing B (display interval / make up measured time, …)
1
5
2
3
4
A
B
2
3
5
B
1
4
A
13
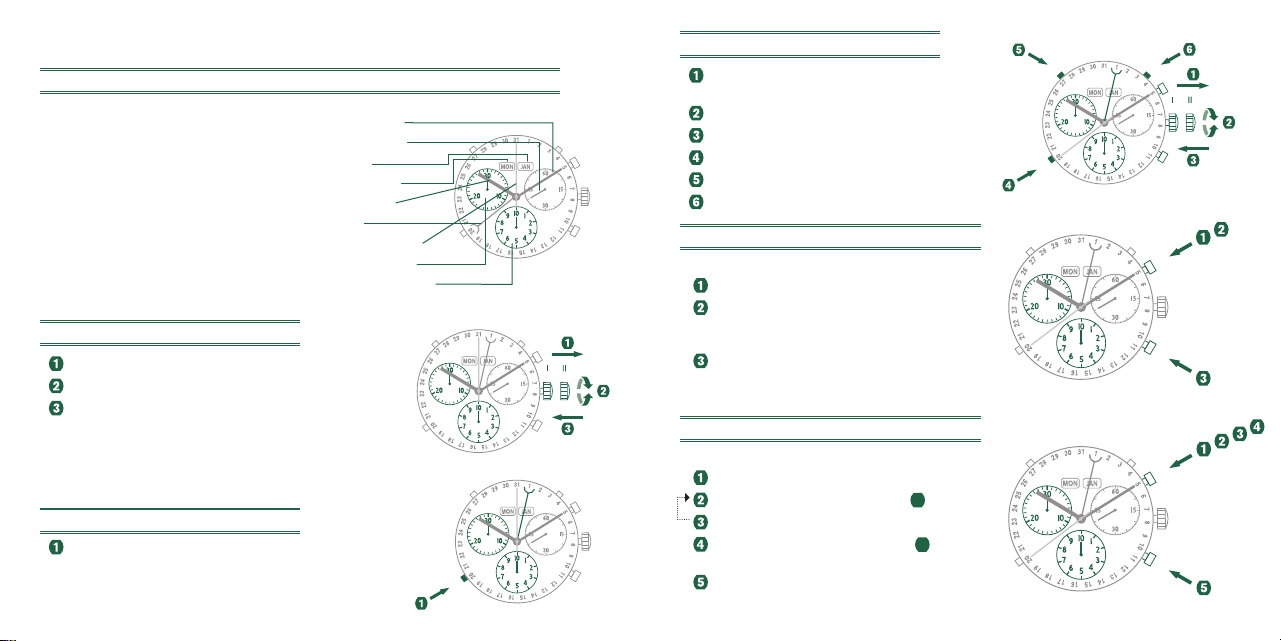
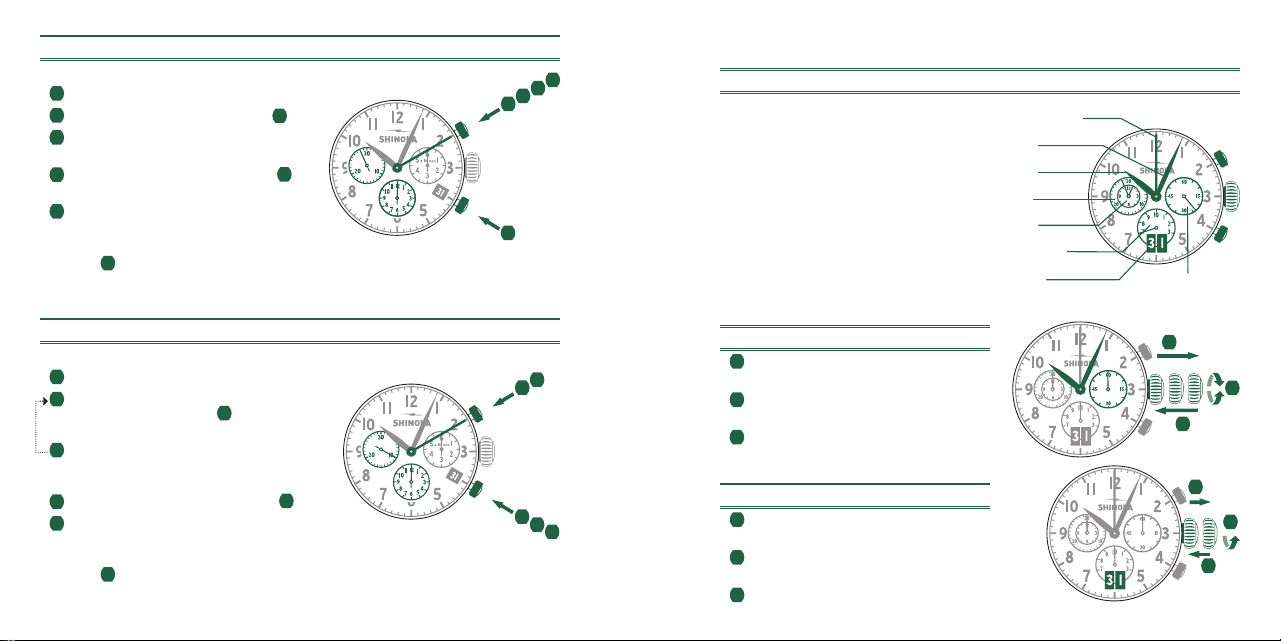
CHRONOGRAPH MODEL 5030.D
DESCRIPTION OF THE DISPLAY AND CONTROL BUTTONS
Please note:
Before using the chronograph functions,
please ensure that:
- the crown is in position I
(= normal position).
- the three chronograph hands are
precisely at zero position following
activation of push-button B. If the hands
are not precisely at zero, their positions
must be adjusted. (See the chapter
Adjusting the Chronograph Hands to Zero
.)
SETTING THE TIME
1 Pull out the crown to position III.
(The watch stops.)
2 Turn the crown until you reach the
correct time.
3 Push the crown back to position I.
SETTING THE DATE
1 Pull out the crown to position II.
(The watch continues to run.)
2 Turn the crown until the correct date appears.
3 Push the crown back to position I.
4 If setting the date between 9:00 p.m. and 12:00 a.m., follow steps 1
through 3, but be sure to set the date to the following day.
A
Second hand
Date
Center stop-second
Minute hand
Hour hand
Minute counter
Hour counter
B
III
1
2
3
II IIII
3
1
2
I
14
ADJUSTING THE CHRONOGRAPH HANDS TO ZERO
1 Pull crown out to position III.
(All three chronograph hands are in
their correct or incorrect zero position.)
2 Keep push-buttons A and B depressed
simultaneously for at least 2 seconds.
(The center stop-second rotates by 360°
- corrective mode is activated.)
3 Press push-button A to single step the
center stop-second hand. Press and
hold push-button A to advance the center
stop-second hand quickly.
3b
Press
push-button B to advance to the next hand.
4 Press push-button A to single step the hour counter hand.
Press and hold push-button A to advance the hour counter
hand quickly. 4b
Press push-button B to advance to the next hand.
5 Press push-button A to single step the minute counter hand. Press
and hold push-button A to advance the minute counter hand quickly.
6 Return the crown to position I.
BASIC FUNCTION (START / STOP / RESET)
Example
1 Start: press push-button A.
2 Stop: to stop the timing, press push-button A
once more and read the three chronograph
counters: 1h / 20min / 10sec.
3 Zero positioning: Press push-button B.
(The three chronograph hands will
be reset to their zero positions.)
II IIII
1
2
3
4
5
6
2
A
B
3b
4b
1
2
3
A
B
15
*
ACCUMULATED TIMING
Example
1 Start: start timing
2 Stop: e.g., 15 min. 5 sec. following
1
.
3 Restart: timing is resumed
4 *Stop: e.g., 13 min. 5 sec. following
3
.
The accumulated time = 28 min. 10 sec.
5 Reset: the three chronograph hands
are returned to their zero positions.
Please note:
* Following
4
, the accumulation of the timing can be
continued by pressing push-button A (Restart/Stop, Restart/Stop,…)
INTERMEDIATE OR INTERVAL TIMING
Example
1 Start: start timing.
2 Display interval:
e.g., 10 min. 10 sec. following
1
.
Timing continues in the background.
3 Making up the measured time:
the three chronograph hands are quickly
advanced to the ongoing measured time.
4 Stop: e.g., 28 min. 10 sec. following
1
.
5 Reset: the three chronograph hands
are returned to their zero positions.
Please note:
* Following
3
, further intervals or intermediates can be
displayed by pressing B (display interval / make up measured time, …)
1
5
2
3
4
A
B
2
3
5
B
1
4
A
16
A
B
Second Hand
Minute hand
Hour hand
Minute counter
Second counter
1
/
10
Second counter
Running for the first 30 sec.
Hour counter after 30 min.
Date
SETTING THE TIME
1 Pull out the crown to position III.
(The watch stops.)
2 Turn the crown until you reach the
correct time.
3 Push the crown back to position I.
SETTING THE DATE
1 Pull out the crown to position II.
(The watch continues to run.)
2 Turn the crown until the correct date appears.
3 Push the crown back to position I.
4 If setting the date between 9:00 p.m. and 12:00 a.m., follow steps 1
through 3, but be sure to set the date to the following day.
CHRONOGRAPH MODEL 5040.D
DESCRIPTION OF THE DISPLAY AND CONTROL BUTTONS
Please note:
Before using the chronograph functions,
please ensure that:
- the crown is in position
I
(= normal position).
- the four chronograph hands are
precisely at zero position following
activation of push-button B. If the
hands are not precisely at zero,
their positions must be adjusted.
(See the chapter
Adjusting the
Chronograph Hands to Zero
.)
II IIII
3
1
2
II
1
2
3
17
ADJUSTING THE CHRONOGRAPH HANDS TO ZERO
1 Pull crown out to position III.
(All four chronograph hands are in
their correct or incorrect zero position.)
2 Keep push-buttons A and B depressed
simultaneously for at least 2 seconds.
(The center stop-second rotates by
360° - corrective mode is activated.)
3 Press push-button A to single step the
center stop-second hand. Press and
hold push-button A to advance the center
stop-second hand quickly.
3b
Press
push-button B to advance to the next hand.
Press push-button A to single step the 1/10 second counter hand.
Press and hold push-button A to advance the 1/10 second hand quickly.
4b
Press push-button B to advance to the next hand.
Press push-button A to single step the minute counter hands.
Press and hold push-button A to advance the minute counter
hands quickly.
Return the crown to position I.
BASIC FUNCTION (START / STOP / RESET)
Example
1 Start: Press push-button A.
2 Stop: to stop the timing, press push-button A.
once more and read the three chronograph
counters: 7 hr. / 20 min. / 5 sec.
3 Zero positioning: Press push-button B.
(The three chronograph hands will
be reset to their zero positions.)
1
3
1
2
A
B
1
2
3
II IIII
1
2
3
4
5
6
A
2
B
3b
4b
6
4
5
18
*
ACCUMULATED TIMING
Example
1 Start: start timing.
2 Stop: e.g., 15 min. 5 sec. following
1
.
3 Restart: timing is resumed.
4 *Stop: e.g., 10 min. 5 sec. following
3
.
The accumulated time = 25 min. 10 sec.
5 Reset: The three chronograph hands
are returned to their zero positions.
Please note:
* Following
4
, the accumulation of the timing can be
continued by pressing push-button A (Restart/Stop, Restart/Stop,…)
INTERMEDIATE OR INTERVAL TIMING
Example
1 Start: start timing.
2 Display interval:
e.g., 10 min. 10 sec. following 1 .
Timing continues in the background.
3 Making up the measured time:
the three chronograph hands are quickly
advanced to the ongoing measured time.
4 Stop: (Final time is displayed).
5 Reset: The three chronograph hands are
returned to their zero positions.
Please note:
* Following
3
, further intervals or intermediates can be
displayed by pressing B (display interval / make up measured time, …)
5
B
1
2
3
4
A
5
2
3
B
1
4
A
19
SETTING THE TIME
1 Pull out the crown to position III.
(The watch stops.)
2 Turn the crown until you reach the
correct time.
3 Push the crown back to position I.
SETTING THE DATE
1 Pull out the crown to position II.
(The watch continues to run.)
2 Turn the crown until the correct date appears.
3 Push the crown back to position I.
4 If setting the date between 9:00 p.m. and 12:00 a.m., follow steps 1
through 3, but be sure to set the date to the following day.
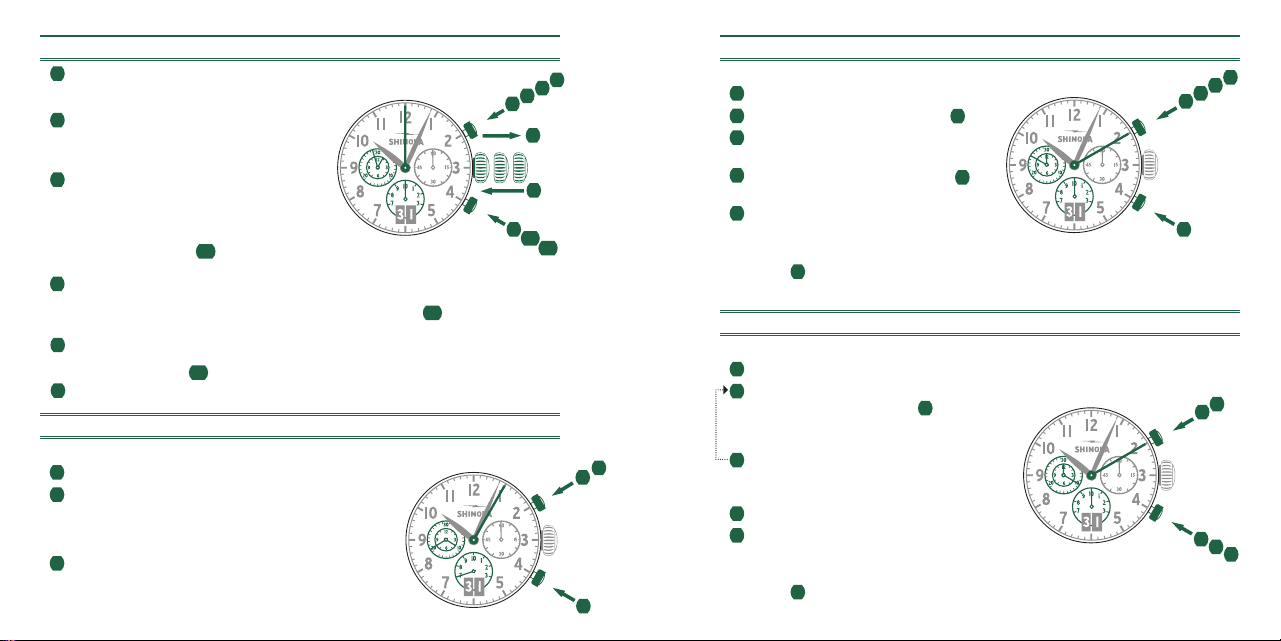
CHRONOGRAPH MODEL 5050.B
DESCRIPTION OF THE DISPLAY AND CONTROL BUTTONS
Please note:
Before using the chronograph functions,
please ensure that:
- the crown is in position
I
(= normal position).
- the four chronograph hands are
precisely at zero position following
activation of push-button B. If the
hands are not precisely at zero,
their positions must be adjusted.
(See the chapter
Adjusting the
Chronograph Hands to Zero
.)
A
B
I
Second hand
Big date
Center stop-second
Minute hand
Hour hand
Minute counter
Hour counter
1
/
10
Second counter
II IIII
3
1
2
II
1
2
3
20
ADJUSTING THE CHRONOGRAPH HANDS TO ZERO
1 Pull crown out to position III.
(All four chronograph hands are in
their correct or incorrect zero position.)
2 Keep push-buttons A and B depressed
simultaneously for at least 2 seconds.
(The center stop-second rotates by
360° - corrective mode is activated.)
3 Press push-button A to single step the
center stop-second hand. Press and
hold push-button A to advance the center
stop-second hand quickly.
3b
Press
push-button B to advance to the next hand.
Press push-button A to single step the 1/10 second counter hand.
Press and hold push-button A to advance the 1/10 second hand quickly.
4b
Press push-button B to advance to the next hand.
Press push-button A to single step the minute and the hour counter hands.
Press and hold push-button A to advance the minute and hour counter hands
quickly.
5b
Press push-button B to advance to the next hand.
Return the crown to position I.
BASIC FUNCTION (START / STOP / RESET)
Example
1 Start: Press push-button A.
2 Stop: to stop the timing, press push-button A.
once more and read the four chronograph
counters: 4 hr. / 20 min. / 5 sec. / 7⁄10 sec.
3 Zero positioning: Press push-button B.
(The four chronograph hands will
be reset to their zero positions.)
1
3
1
2
A
B
1
2
3
II IIII
1
2
3
4
5
6
A
2
B
3b
4b
6
4
5
5b
21
*
ACCUMULATED TIMING
Example
1 Start: start timing.
2 Stop: e.g., 15 min. 5 sec. following
1
.
3 Restart: timing is resumed.
4 *Stop: e.g., 10 min. 5 sec. following
3
.
The accumulated time = 25 min. 10 sec.
5 Reset: The four chronograph hands
are returned to their zero positions.
Please note:
* Following
4
, the accumulation of the timing can be
continued by pressing push-button A (Restart/Stop, Restart/Stop,…)
INTERMEDIATE OR INTERVAL TIMING
Example
1 Start: start timing.
2 Display interval:
e.g., 10 min. 10 sec. following 1 .
Timing continues in the background.
3 Making up the measured time:
the four chronograph hands are quickly
advanced to the ongoing measured time.
4 Stop: (Final time is displayed).
5 Reset: The four chronograph hands are
returned to their zero positions.
Please note:
* Following
3
, further intervals or intermediates can be
displayed by pressing B (display interval / make up measured time, …)
5
B
1
2
3
4
A
5
2
3
B
1
4
A
22
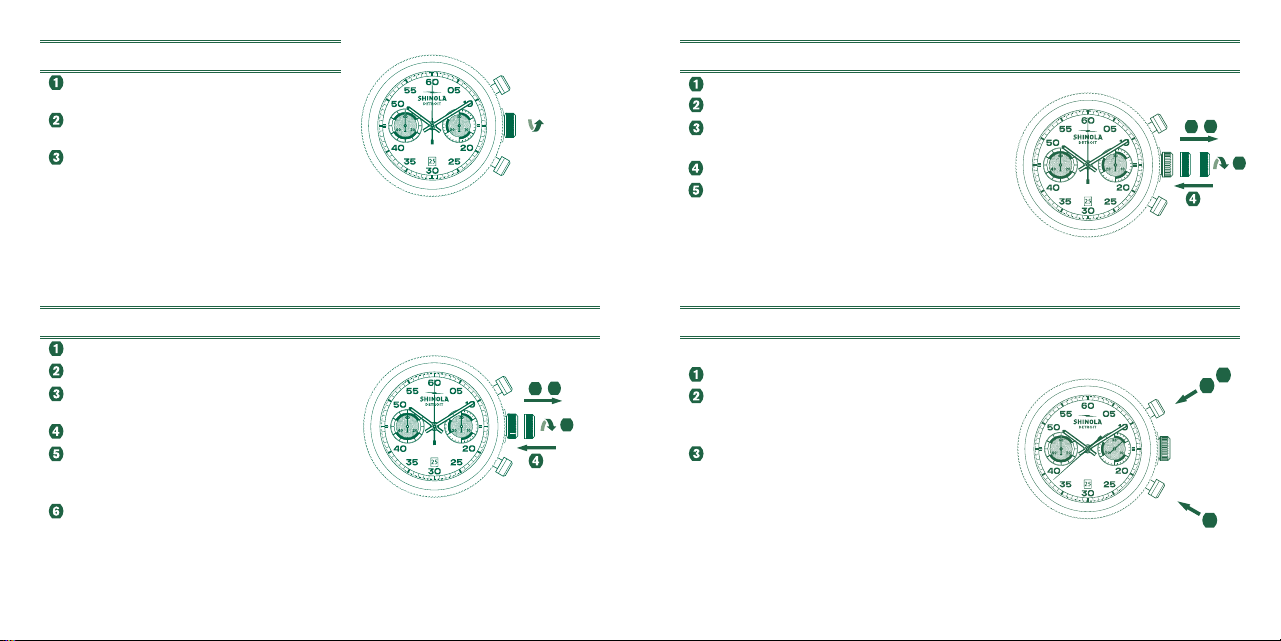
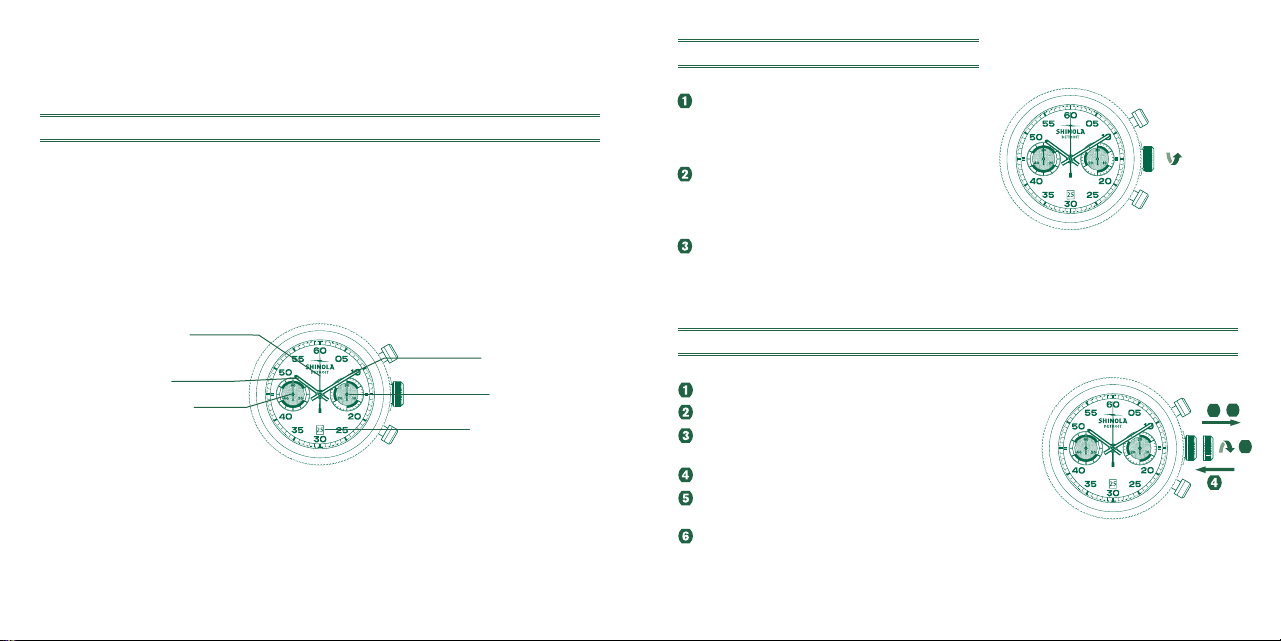
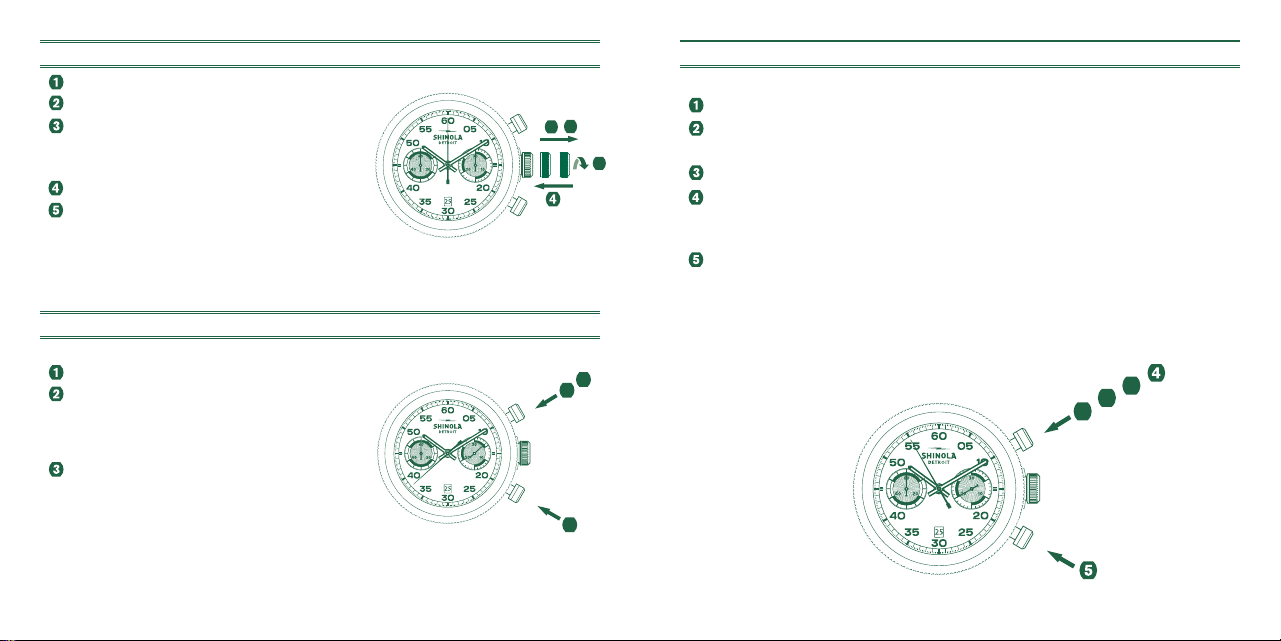
CHRONOGRAPH MODEL 3540.D
DESCRIPTION OF THE DISPLAY AND CONTROL BUTTONS
Please note:
Before using the chronograph functions,
please ensure that:
- the crown is in position
I
(= normal position).
- the three chronograph hands are
precisely at zero position following
activation of push-button B. If the
hands are not precisely at zero,
their positions must be adjusted.
(See the chapter
Adjusting the
Chronograph Hands to Zero
.)
SETTING THE TIME
1 Pull out the crown to position III.
(The watch stops.)
2 Turn the crown until you reach the
correct time.
3 Push the crown back into position I.
SETTING THE DATE
1 Pull out the crown to position II.
(The watch continues to run.)
2 Turn the crown counterclockwise until
the correct date appears.
3 Push the crown back into position I.
4 If setting the date between 8:30 p.m. and 12:00 a.m.,
follow steps 1 through 3, but be sure to set the date to the following day.
III
1
2
3
II IIII
3
1
2
A
Minute hand
Date
Center stop-second
1
/
10
Second counter
(Becomes an hour
counter after 30 minutes)
Hour hand
Minute counter
Second hand
B
I

23
ADJUSTING THE CHRONOGRAPH HANDS TO ZERO
1 Pull crown out to position III.
(All three chronograph hands are in
their correct or incorrect zero position.)
2 Keep push-buttons A and B depressed
simultaneously for at least 2 seconds.
(The center stop-second rotates by 360°
- corrective mode is activated.)
3 Press push-button A to single step the
center stop-second hand. Press and
hold push-button A to advance the center
stop-second hand quickly.
3b
Press
push-button B to advance to the next hand.
4 Press push-button A to single step the 1/10 second counter at 12H.
Press and hold push-button A to advance the hour counter
hand quickly.
4b
Press push-button B to advance to the next hand.
5 Press push-button A to single step the minute counter hand. Press
and hold push-button A to advance the minute counter hand quickly.
6 Return the crown to position I.
BASIC FUNCTION (START / STOP / RESET)
Example
1 Start: Press push-button A.
2 Stop: to stop the timing, press push-button A
once more and read the three chronograph
counters: 4 min. / 38 sec. / 7⁄10 sec.
3 Zero positioning: Press push-button B.
(The three chronograph hands will
be reset to their zero positions.)
1
2
3
A
B
II IIII
1
2
3
4
5
6
2
A
B
3b
4b
24
*
ACCUMULATED TIMING
Example
1 Start: start timing.
2 Stop: e.g., 15 min. 5 sec
.
following
1
.
3 Restart: timing is resumed.
4 *Stop: e.g., 13 min. 5 sec. following
3
.
The accumulated time = 28 min. 10 sec.
5 Reset: The three chronograph hands
are returned to their zero positions.
Please note:
* Following
4
, the accumulation of the timing can be
continued by pressing push-button A (Restart/Stop, Restart/Stop,…)
INTERMEDIATE OR INTERVAL TIMING
Example
1 Start: start timing.
2 Display interval:
e.g., 10 min. 10 sec. following
1
.
Timing continues in the background.
3 Making up the measured time:
the three chronograph hands are quickly
advanced to the ongoing measured time.
4 Stop: e.g., 10 min. 10 sec. following
1
.
5 Reset: The three chronograph hands are
returned to their zero positions.
Please note:
* Following
3
, further intervals or intermediates can be
displayed by pressing B (display interval / make up measured time, …)
1
5
2
3
4
A
B
1
2
4
3
5
A
B
25
708
II IIII
3
1
2
708
II IIII
3
4
1
2
708
III
3
1
2
MOON PHASE MODEL 708
SETTING THE MOON PHASE
1 Pull out the crown to position III
(the watch stops).
2 Turn the crown until you reach the correct moon position.
Be sure to match the position to accurate moon phase
(use a lunar calendar). The moon disc moves very slowly by
incrementally jumping every 24 hours (each date change).
3 As time function rotates on position III, the hands
will move while setting moon phase. Once accurate
moon phase is achieved, set the hour and minute
hands back to the correct time.
4 Be sure to reset the date indicator to correct date
(refer to SETTING THE DATE instructions above).
SETTING THE TIME
1 Pull out the crown to position III
(the watch stops).
2 Turn the crown until you reach the correct time.
3 Push the crown back into position I.
SETTING THE DATE
1 Pull out the crown to position II
(the watch continues to run).
2 Turn the crown until the correct date appears.
3 Push the crown back to position I.
4 Do not set the date between 9:30 p.m. and 12:00 a.m.
to ensure accuracy.
26
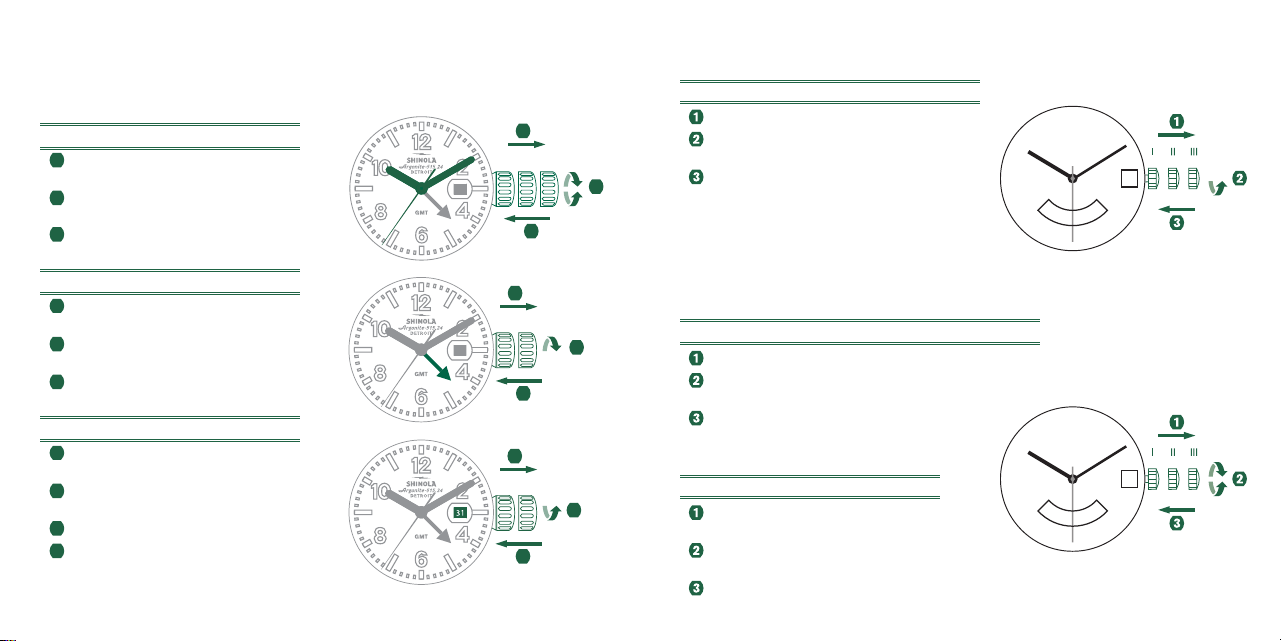
SETTING THE TIME
1 Pull out the crown to position III.
(The watch stops.)
2 Turn the crown until you reach the
correct time.
3 Push the crown back into position I.
SETTING THE 24-HOUR INDICATOR
1 Pull out the crown to position II.
(The watch continues to run.)
2 Turn the crown counterclockwise
until you reach the correct time.
3 Push the crown back to position I.
SETTING THE DATE
1 Pull out the crown to position II.
(The watch continues to run.)
2 Turn the crown clockwise until the
correct date appears.
3 Push the crown back to position I.
4 If performing a quick date setting between
10:30 p.m. and 12:00 a.m., follow steps 1
through 3, but be sure to set the date to the
following day, as there will be no change at midnight.
GMT MODEL 515.24H
If your 24-hour watch features a date indicator, the date window might be in a different position
from the one depicted in this manual.
3131
II IIII
3
1
2
3131
III
3
1
2
III
3
1
2

27
708
708
DAY & NIGHT (GMT) MODEL 515.24D
SETTING THE DATE
Pull out the crown to position II. (Watch still runs.)
Turn the crown clockwise until the
required date appears.
Push the crown back into position I.
NOTE: The date can also be corrected during
the day-changing phase between 10:30 pm and
12:00 a.m. The date of the following day has to
be set, because no automatic date change
takes place at midnight.
SETTING THE 24-HOUR DISPLAY
Pull out the crown to position II. (Watch still runs.)
Turn the crown counterclockwise until the
sun reaches the desired position.
Push the crown back into position I.
SETTING THE TIME
Pull out the crown to position III.
(The watch stops.)
Turn the crown until the current time is shown
(remember the 24-hour cycle).
Push the crown back into position I.

28
CHRONOGRAPH MODEL 5040.F
DESCRIPTION OF THE DISPLAY AND CONTROL BUTTONS
Please note:
Before using the chronograph functions,
please ensure that:
- the crown is in position
I
(= normal position).
- the three chronograph hands are
precisely at zero position following
activation of push-button B. If the
hands are not precisely at zero,
their positions must be adjusted.
(See the chapter
Adjusting the
Chronograph Hands to Zero
.)
SETTING THE TIME
Pull out the crown to position II. (The watch stops.)
Turn the crown until you reach the correct time.
Push the crown back into position I.
NOTE: In order to set the time to the exact second, 1 must
be pulled out when the second hand is in position «60».
Once the hour and minute hands have been set, 3 must be
pushed back into position I at the exact second.
SETTING THE DATE (QUICK MODE)
Press the corrector C once to adjust the
date 1 day forward.
NOTE: If setting the date between 9:00 p.m. and
12:20 a.m., be sure to set the date to the following day.
C
Minute Hand
Second hand
Month
Day of week
Hour Hand
Date
Second Counter
Minute Counter
1
/
10
Second counter
(hour counter after 30 min)
29
C
D E
BASIC FUNCTION ( START / STOP / RESET )
Example
Start: Press push-button A.
Stop: To stop the timing, press push-button A
once more and read the three chronograph
counters: 4 min. / 38 sec. / 7⁄10 sec.
Zero positioning: Press push-button B.
(The three chronograph hands will
be reset to their zero positions.)
ACCUMULATED TIMING
Example
Start: start timing.
Stop: e.g., 15 min. 5 sec
.
following
1
.
Restart: timing is resumed.
*Stop: e.g., 13 min. 5 sec. following
3
.
The accumulated time = 28 min. 10 sec.
Reset: The three chronograph hands
are returned to their zero positions.
A
B
A
B
SETTING TIME / DATE / DAY / MONTH
Pull out the crown to position II.
(The watch stops.)
Turn the crown until the current time is shown.
Push the crown back into position I.
Press the corrector C to advance the date hand.
Press the corrector D to advance the day.
Press the corrector E to advance the month.

30
INTERMEDIATE OR INTERVAL TIMING
Example
Start: Press push-button A.
Display interval:
e.g., 10 min. 10 sec. following
1
.
Timing continues in the background.
Making up the measured time:
The chronograph hands are quickly
advanced to the ongoing measured time.
Stop: Final time is displayed.
Reset: The three chronograph hands are
returned to their zero positions.
Please note:
* Following
3
, further intervals or intermediates can be
displayed by pressing B (display interval / make up measured time, …)
*
A
B
31
ADJUSTING THE CHRONOGRAPH HANDS TO ZERO POSITION
Example
One or several chronograph hands are not in
their correct zero positions and have to be
adjusted (e.g. following a battery change).
Pull out the crown to position II.
(All chronograph hands are in their correct
or incorrect zero position).
Keep push-buttons A and B depressed
simultaneously for at least 2 seconds then release
(the second counter hand rotates by 360º
—corrective mode is activated).
Adjusting the second counter hand:
Single step — press A 1x short
Continuous — press A long
Adjusting the next hand — press B
Adjusting the 1⁄10 second counter
hand (position 6h):
Single step — press A 1x short
Continuous — press A long
Adjusting the next hand — press B
Adjusting the minute counter (position 9h):
Single step — press A 1x short
Continuous — press A long
Returning the crown to position I.
(Termination of the chronograph hands
adjustment (can be carried out at any time).
A
B
32
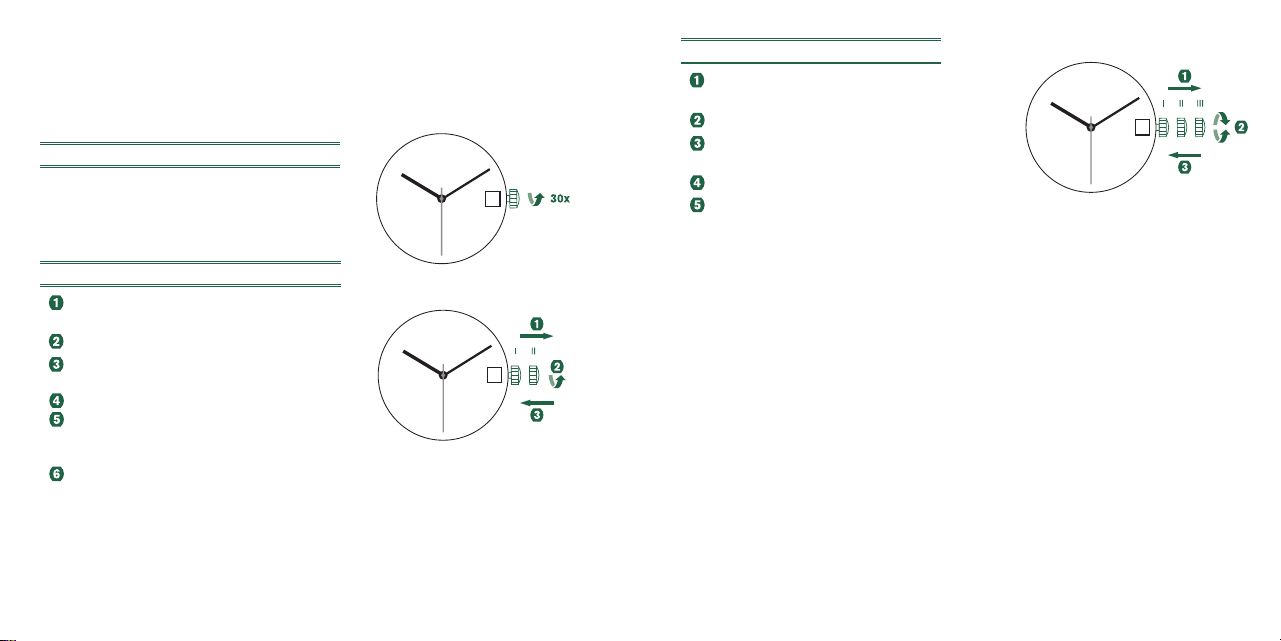
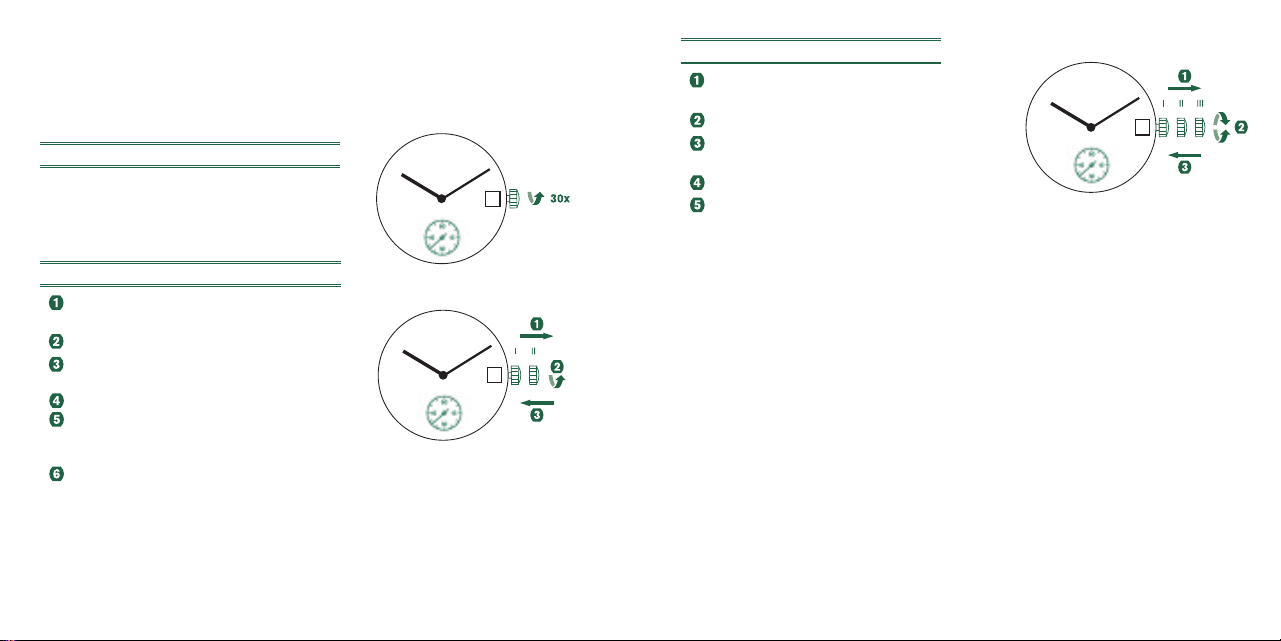
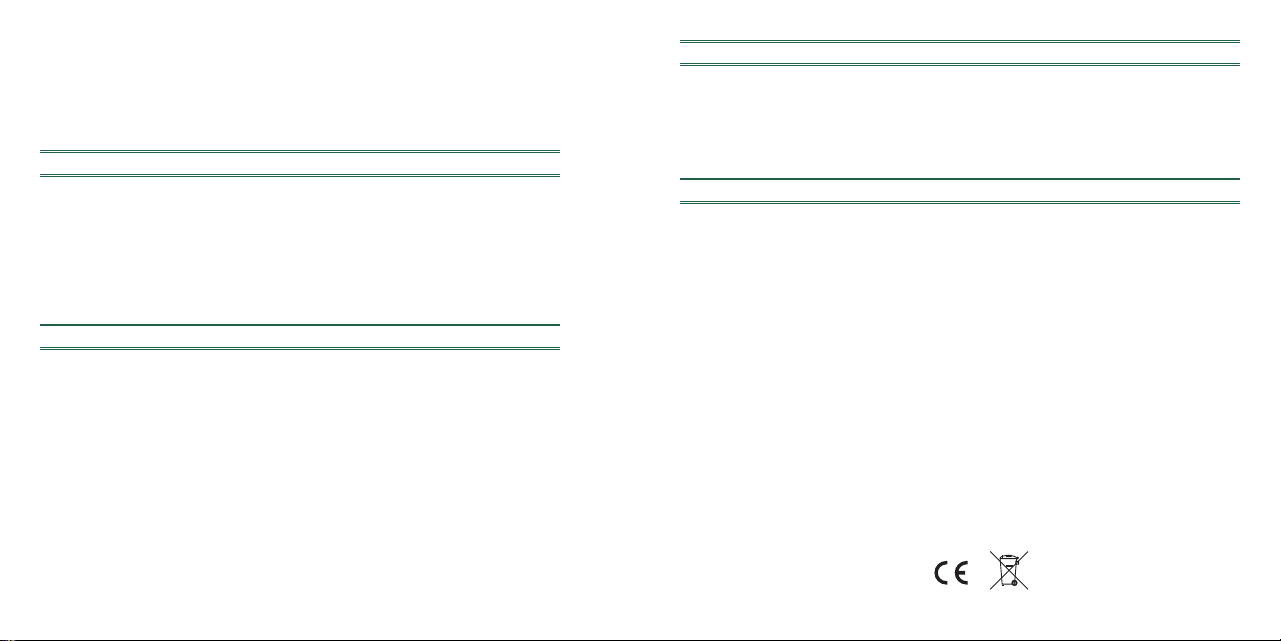
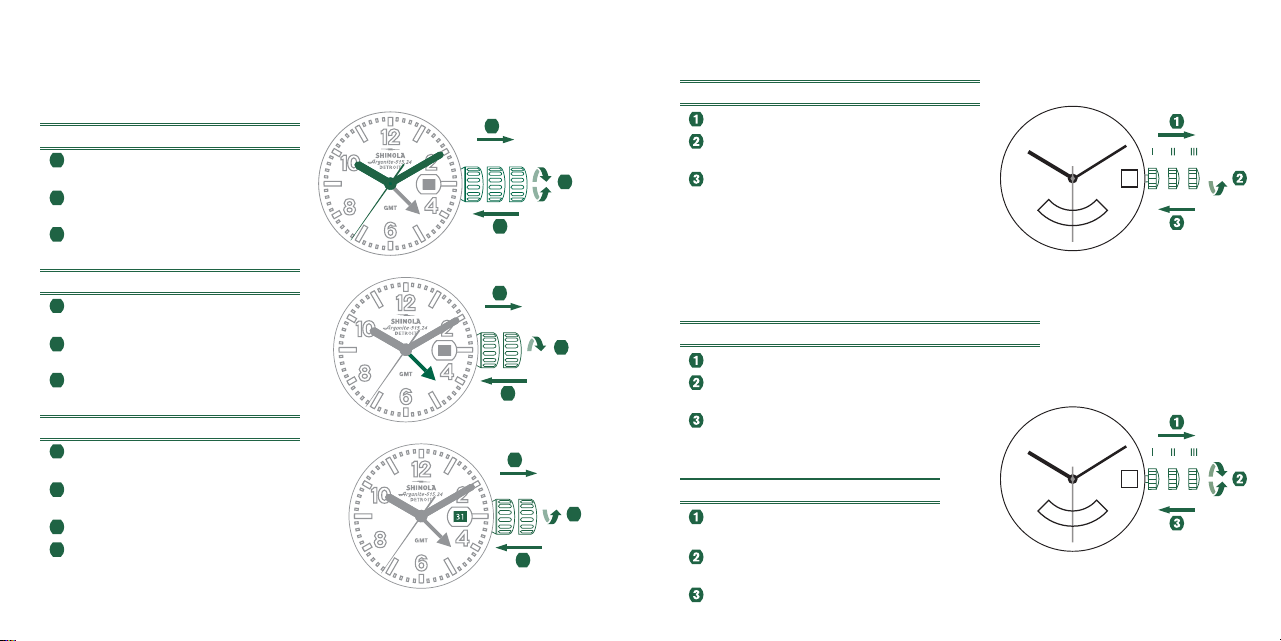
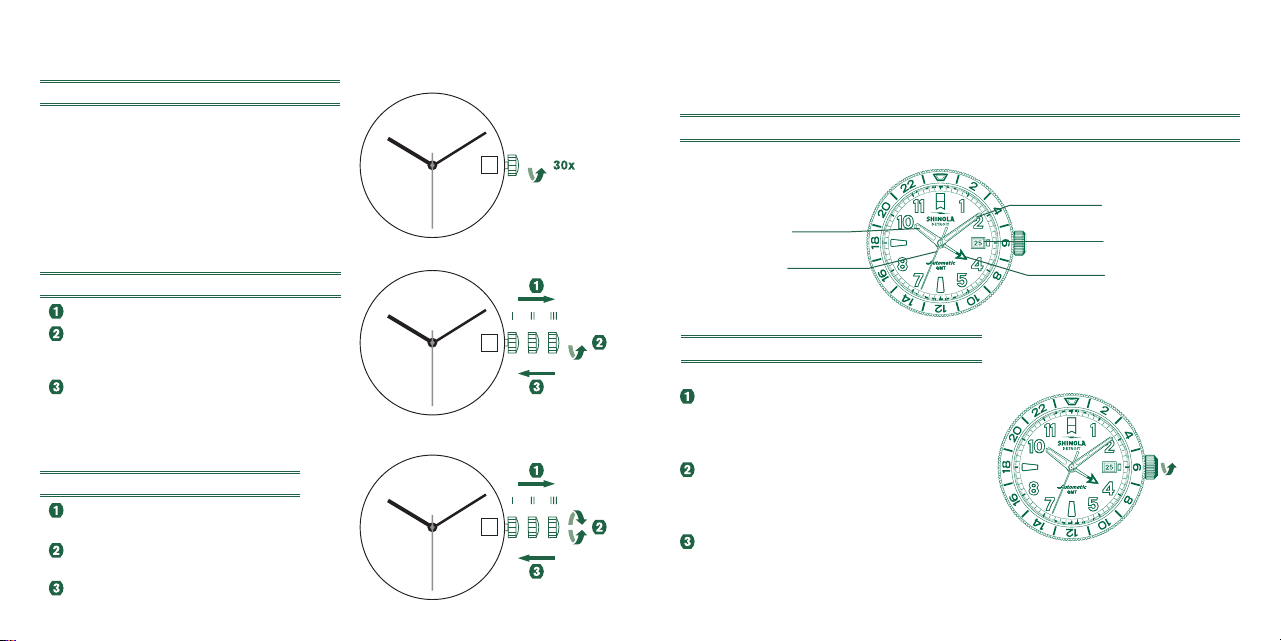
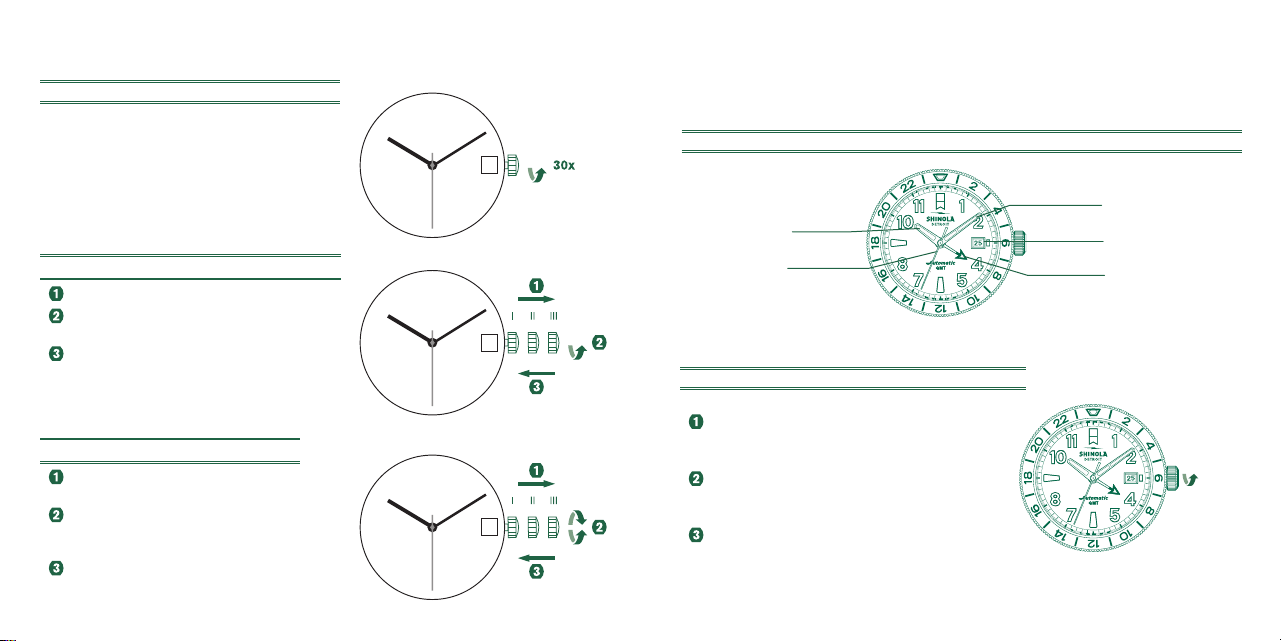
AUTOMATIC MODEL SW200-1
If your timepiece features a screw-down crown, you must first unscrew the crown
before you adjust any settings. Refer to page 5 for crown functionality.
WINDING WHILE STOPPED
The maximum power reserve can be restored by
turning the crown clockwise around 30 times.
SETTING THE DATE (QUICK MODE)
For screw-down crown, unscrew the crown to release
it into first position.
Pull out the crown to position II (watch still running)
.
Turn the crown clockwise until the required
date appears.
Push the crown back into position I.
If setting the date between 9:00 p.m. and 3:00 a.m.,
follow steps 1 through 3, but be sure to set the date
to the following day.
Remember to reseal the crown if it is a screw down.
To do so, press it against the case until the threads
engage. Then turn it clockwise until tight.
33
SETTING THE TIME
For screw-down crown, unscrew the crown to
release it into first position.
Pull out the crown to position III (the watch stopped).
Turn the crown until the current time is shown
(remember the 24-hour cycle).
Push the crown back into position I.
Remember to reseal the crown if it is a screw down.
To do so, press it against the case until the threads engage.
Then turn it clockwise until tight.
34
AUTOMATIC MODEL SW260-1
If your timepiece features a screw-down crown, you must first unscrew the crown
before you adjust any settings. Refer to page 5 for crown functionality.
WINDING WHILE STOPPED
The maximum power reserve can be restored by
turning the crown clockwise around 30 times.
SETTING THE DATE (QUICK MODE)
For screw-down crown, unscrew the crown to release
it into first position.
Pull out the crown to position II (watch still running)
.
Turn the crown clockwise until the required
date appears.
Push the crown back into position I.
If setting the date between 9:00 p.m. and 3:00 a.m.,
follow steps 1 through 3, but be sure to set the date
to the following day.
Remember to reseal the crown if it is a screw down.
To do so, press it against the case until the threads
engage. Then turn it clockwise until tight.
35
SETTING THE TIME
For screw-down crown, unscrew the crown to
release it into first position.
Pull out the crown to position III (the watch stopped).
Turn the crown until the current time is shown
(remember the 24-hour cycle).
Push the crown back into position I.
Remember to reseal the crown if it is a screw down.
To do so, press it against the case until the threads engage.
Then turn it clockwise until tight.
36
AUTOMATIC MODEL SW330-2
If your timepiece features a screw-down crown, you must first unscrew the crown
before you adjust any settings. Refer to page 5 for crown functionality.
DESCRIPTION OF THE DISPLAY AND CONTROL BUTTONS
Hour hand
Second hand
Minute hand
Date
GMT hand
WINDING WHILE STOPPED
Turn the crown counterclockwise until it releases
into position
I
.
Turn the crown clockwise 30-35 times to restore
the full power reserve.
Reseal the crown by pressing it against the case
and turning it slightly clockwise until it locks back
in position zero.
30x - 35x

37
SETTING THE DATE (QUICK MODE)
Unscrew the crown to release it into first position.
Pull out the crown to position II (watch still running).
Turn the crown counterclockwise until the
required date appears.
Push the crown back into position I.
If setting the date between 9:00 p.m. and 3:00 a.m.,
follow steps 1 through 3, but be sure to set the date
to the following day.
Remember to reseal the crown. To do so, press it against the
case until the threads engage. Then turn it clockwise until tight.
III
3
1 2
SETTING THE TIME
Unscrew the crown to release it into first position.
Pull out the crown to position III (the watch stopped).
Turn the crown counterclockwise until the current time
is shown (remember the 24-hour cycle).
Push the crown back into position I.
Remember to reseal the crown.
To do so, press it against the case until the threads
engage. Then turn it clockwise until tight.
II IIII
3
1
2
38
SETTING THE GMT TIME
Unscrew the crown to release it into first position.
Pull out the crown to position II (watch still running).
Turn the crown clockwise until the desired GMT time
is shown (remember the 24-hour cycle).
Push the crown back into position I.
Remember to reseal the crown.
To do so, press it against the case until the threads
engage. Then turn it clockwise until tight.
Please note:
* The GMT hand synchronizes to the hour hand.
GMT time will be shown more accurately if the
settings are happening at the top of any hour.
II IIII
3
1
2
39
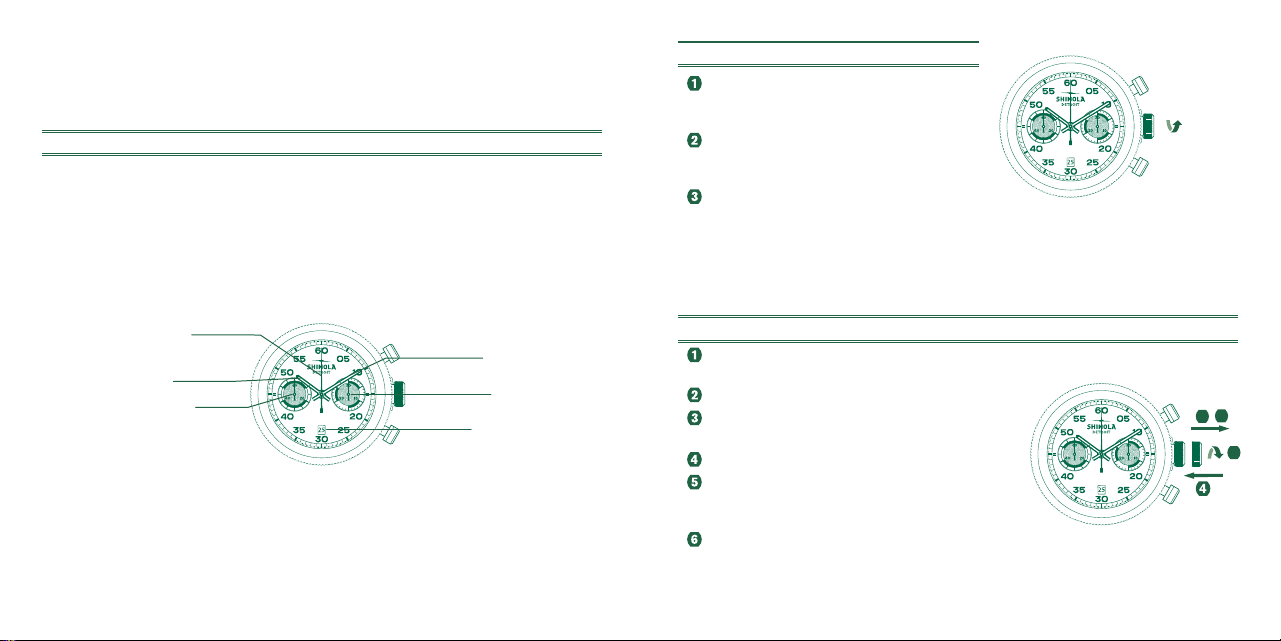
AUTOMATIC MODEL SW510 BH A
If your timepiece features a screw-down crown, you must first unscrew the crown
before you adjust any settings. Refer to page 5 for crown functionality.
DESCRIPTION OF THE DISPLAY AND CONTROL BUTTONS
Please note:
Before using the chronograph functions, please ensure that:
• The crown is in normal, locked position (position 0).
• The two chronograph hands are at zero position.
Second Counter
Hour hand
Second Hand
Minute hand
30 Minute Counter
Date
40
SETTING THE DATE (QUICK MODE)
Unscrew the crown to release it into first position.
Pull out the crown to position II (watch still running).
Turn the crown counterclockwise until the
required date appears.
Push the crown back into position I.
If setting the date between 9:00 p.m. and 3:00 a.m.,
follow steps 1 through 3, but be sure to set the date
to the following day.
Remember to reseal the crown. To do so, press it against the
case until the threads engage. Then turn it clockwise until tight.
III
3
1
2
WINDING WHILE STOPPED
Turn the crown counterclockwise until it releases
into position
I
.
Turn the crown clockwise 30-35 times to restore
the full power reserve.
Reseal the crown by pressing it against the case
and turning it slightly clockwise until it locks back
in position zero.
30x - 35x

41
SETTING THE TIME
Unscrew the crown to release it into first position.
Pull out the crown to position III (the watch stopped).
Turn the crown counterclockwise until the current time
is shown (remember the 24-hour cycle).
Push the crown back into position I.
Remember to reseal the crown.
To do so, press it against the case until the threads
engage. Then turn it clockwise until tight.
II IIII
3
1
2
BASIC FUNCTION ( START / STOP / RESET )
Example
Start: Press push-button
A
.
Stop: To stop the timing, press push-button
A
once
more and read the two chronograph counters:
e.g. 4 min. / 38 sec.
Zero positioning: Press push-button
B
.
(The two chronograph hands will be
reset to their zero positions.)
1
2
3
A
B
42
ACCUMULATED TIMING
Example
Start: Press push-button
A
.
Stop: To stop the timing, press push-button
A
once more and read the two chronograph
counters, e.g. 15 min. 5 sec.
Restart: Press push-button
A
to resume timing.
*Stop: Press push-button
A
to stop the timing and read the counters, e.g. 5 min. 50 sec.
The accumulated time = 20 min. 55 sec.
Reset: Press push-button
B
to return the two chronograph hands to their zero positions.
*Please Note: Following Step 4, the accumulation of timing can be continued by pressing
button
A
(Restart/Stop, Restart/Stop…)
1
2
3
A
B

43
AUTOMATIC MODEL SW511 BH C
If your timepiece features a screw-down crown, you must first unscrew the crown
before you adjust any settings. Refer to page 5 for crown functionality.
DESCRIPTION OF THE DISPLAY AND CONTROL BUTTONS
Please note:
Before using the chronograph functions, please ensure that:
• The crown is in normal, locked position (position 0).
• The large and small chronograph hands are at zero position.
Yacht Timer -
Large chronograph
Second hand
Hour hand
Date
Minute hand
Yacht Timer -
Small chronograph
Minute hand
WINDING WHILE STOPPED
Turn the crown counterclockwise until it releases
into position
I
.
Turn the crown clockwise 30-35 times to restore
the full power reserve.
Reseal the crown by pressing it against the case
and turning it slightly clockwise until it locks back
in position zero.
30x - 35x
44
SETTING THE DATE (QUICK MODE)
Unscrew the crown to release it into first position.
Pull out the crown to position II (watch still running).
Turn the crown counterclockwise until the
required date appears.
Push the crown back into position I.
If setting the date between 9:00 p.m. and 3:00 a.m.,
follow steps 1 through 3, but be sure to set the date
to the following day.
Remember to reseal the crown. To do so, press it against the
case until the threads engage. Then turn it clockwise until tight.
III
3
1
2
SETTING THE TIME
Unscrew the crown to release it into first position.
Pull out the crown to position III (the watch stopped).
Turn the crown counterclockwise until the current time
is shown (remember the 24-hour cycle).
Push the crown back into position I.
Remember to reseal the crown.
To do so, press it against the case until the threads
engage. Then turn it clockwise until tight.
II IIII
3
1
2
45
BASIC FUNCTION ( START / STOP / RESET )
Yacht Racing
Start: Press push-button
A
when the start race signal
is heard. This will begin the 5 minute countdown
to when the race begins.
Stop: To stop the timing, press push-button
A
once
more and read the two chronograph counters:
e.g. 4 min. / 5 sec.
Zero positioning: Press push-button
B
.
(The two chronograph hands will be reset to
their zero positions.)
*Please Note:
-
Do not cross the start line before the 5 minutes has
elapsed (marked by the first 5 minute countdown segment)
to avoid a false start.
-
If there is a false start, reset the chronograph
(press push-button A, then push-button B) and restart it
(push-button A).
1
2
3
A
B
46
SETTING THE TIME
For screw-down crown, unscrew the crown to
release it into first position.
Pull out the crown to position II (the watch stopped).
Turn the crown until the current time is shown.
Push the crown back into position I.
Remember to reseal the crown if it is a screw down.
To do so, press it against the case until the threads
engage. Then turn it clockwise until tight.
MECHANICAL MODEL SW210-1
If your timepiece features a screw-down crown, you must first unscrew the crown
before you adjust any settings. Refer to page 5 for crown functionality.
WINDING WHILE STOPPED
The maximum power reserve can be restored by
turning the crown clockwise around 30 times.
Please note:
-
Slow down winding speed after 20 turns.
Pay attention to the watch’s resistance.
Stop winding when you feel resistance.
-
DO NOT manually overwind the crown as it will damage the movement.
47
WATER RESISTANCE
All the Shinola timepieces are designed with a minimum water-resistance rating
of 3ATM (100ft / 30m).
The water-resistance of a timepiece protects the movement from dust, moisture, and
risk of damage to the movement should it be immersed in water. Please see chart for
guidelines for recommended exposure of various water ratings.
It is important not to attempt to adjust the position of the crown while the timepiece is
in contact with water. Water can enter the case causing damage to the movement. For
timepieces with screw-down crowns, it is important to ensure the crown is in the proper
position and completely locked before contact with water. For timepieces with chronograph
functions, do not engage the chronograph under water, as water may leak into
the case and cause damage to the movement.
INDICATION WATER-RELATED USE
Water-
Resistance
Characteristics
Light Spray,
Perspiration,
Light Rain, etc.
Swimming,
etc.
Skin Diving
(Diving without oxygen cylinder)
1
3ATM OK NO NO
2
5ATM OK NO NO
3
10ATM OK OK NO
4
20ATM OK OK OK
5
30ATM OK OK OK
ALWAYS SET THE CROWN IN THE NORMAL POSITION AND TIGHTEN SCREW LOCK CROWN COMPLETELY.
48
CARE AND PRECAUTION
Each Shinola timepiece is designed and manufactured to the highest of standards.
Unlike most other mechanical objects, a watch operates non-stop. In order to ensure
optimal performance and longevity from your Shinola timepiece, please review the
simple guidelines for care and precautions.
CARE
• Clean your watch with a soft cloth and water only. Do not submerge
your watch under water unless it is water rated.
• After saltwater use, rinse watch under tap water and wipe dry with a soft cloth.
• Metal bracelets should be cleaned periodically. Clean with a soft brush dipped
in mild soapy water and dry thoroughly with a soft cloth.
• We advise having your timepiece serviced every 2–3 years to maintain water
resistance and ensure long use and trouble free operation.
PRECAUTIONS
Your timepiece is a complex integration of parts and components brought together
by skilled craftsmen. There are certain actions or environmental situations that may
damage or impede your timepiece’s ability to perform optimally.
It is important to avoid the following conditions: extreme heat or cold, as well as
prolonged periods of exposure to direct sunlight, exposure to wet conditions that exceed
your timepiece’s water rating. (See caseback and chart).
Your timepiece should not be affected by magnetic fields generated by household items
such as televisions and stereos, but avoidance of other strong electric fields or static
electricity, which may interrupt mechanism, is suggested. It is also important to avoid
extreme shock or impact.

49
POWER SAVING MECHANISM
In order to extend the battery life of your watch when it¹s not in use, gently pull
the movement stem/crown out until you feel it click. This will reduce battery power
consumption by 70%. Please note that this is the same stem/crown position that is used
to perform a quick TIME SETTING. If your watch features a screw-down crown, follow
the instructions at the beginning of this manual to release the crown before pulling it out
all the way.
END OF BATTERY LIFE
(
EOL
)
Select quartz watches are equipped with a feature to indicate when the battery level is low.
When the battery gets to that stage, the second hand will jump 4 steps at a time, every
4 seconds. This behavior lowers the power consumption while still displaying the time
accurately and letting you know that it is time to change the battery.

50
QUARTZ LIMITED LIFETIME WARRANTY
At Shinola every watch is assembled in our Detroit factory and combines meticulous
hand-assembly with the most advanced technology available to ensure our watches
are both beautiful and built to last. We are so confident in our high-quality manufacturing
standards that select Shinola watches are warranted for life under our limited lifetime
warranty. It’s an industry-leading guarantee and a testament to our core values.
Terms and conditions of the Shinola Quartz Watch Limited Lifetime Service Warranty
IN ORDER TO QUALIFY FOR YOUR SHINOLA QUARTZ WATCH WARRANTY YOU MUST
REGISTER YOUR PRODUCT. THIS WARRANTY IS NOT TRANSFERRABLE AND MAY BE
VOIDED UNDER THE TERMS HEREOF.
1. The Shinola Quartz Watch Limited Lifetime Service Warranty covers all original
series watches: Birdy, Canfield, Cass, Guardian, Omaha, Runwell, Vinton, Duck.
This guarantee does not cover Detrola watches or Shinola Automatic watches.
The Shinola Quartz Watch Limited Lifetime Service Warranty covers defects to
material and workmanship under the natural useful life of the watch.
2. In case of defects caused by faulty workmanship covered by the limited lifetime
warranty, any defective component (subject to exclusions below) will be repaired or
the watch will be replaced free of charge.
3. Exclusions
a. All straps, including bracelets
b. Movement beyond its natural movement life (7 years for Quartz Movements)*
c. Battery
d. Watch plating (PVD plating)
e. Damage resulting from improper handling, lack of care, accidents or normal
wear and tear
f. Water damage
g. Pre-owned vintage watches sold in as-is condition

51
h. Re-furbished watches
* 7 years from the original date of purchase or date of most recent “Quartz Service” by Shinola,
whichever is later. For more information on submitting repairs & servicing requests, please see
the “Repairs & Servicing” section of the Shinola Helpdesk – linked here.
4. This Warranty shall be VOIDED IF:
a. The watch has been damaged by accident, negligence or persons as determined
by Shinola in its sole and absolute discretion.
b. If the watch battery is replaced by any service provider other than a Shinola authorized
repair center.
c. If the watch is repaired or engraved by any service provider other than Shinola.
5. If you have not registered your watch with Shinola this warranty does NOT apply.
6. If your watch requires complete replacement, and is covered by the warranty, Shinola shall
replace your watch with the same model. If the model is no longer in production, a watch of
equal value and similar style will be provided.
7. For service work that is not covered under this warranty, you will be notified of repairs needed
and applicable charges. Shinola will commence such repairs only upon your prior approval to
such charges or return the product, at your request.
REQUESTING WARRANTY AND OTHER WATCH REPAIR
Should you require a battery replacement, please complete a repair form by visiting us at
Shinola.com or a Shinola retail store, or search the store locator page on Shinola.com for an
“Authorized Battery Replacement Center” near you. Should you require work under warranty,
please complete a repair form by visiting us at Shinola.com or a Shinola retail store. While
they will not void the warranty, repairs and/or maintenance performed by Shinola’s authorized

52
repair partners is not covered under warranty; you will assume all cost associated with such
repairs; Shinola will not provide reimbursement. Do not send original packaging, as it will not be
returned. Shinola highly recommends you insure your parcel and adequately protect the watch
during shipment. Shinola is not responsible for product lost or damaged during shipment. For
service work that is not covered under this warranty, the service center may perform the services
you request for a charge dependent on watch style and type of work requested. Such charges
will be notified and agreed by you prior to performing the services.
The warranties and remedies above are exclusive and in lieu of all other warranties, terms
or conditions, express, implied or statutory, as to any matter whatsoever, including, without
limitation, warranties of merchantability, fitness for a particular purpose, accuracy, satisfactory
quality, title, and non-infringement, all of which are expressly disclaimed by Shinola. Shinola
shall not be liable for incidental, consequential, indirect, special or punitive damages or
liabilities of any kind arising out of or in connection with the sale or use of this product, whether
based in contract, tort (including negligence), strict product liability or any other theory, even
if Shinola has been advised of the possibility of such damages and even if any limited remedy
specified herein is deemed to have failed of its essential purpose. Shinola’s entire liability shall
be limited to replacement or repair at Shinola’s sole option. However, some countries, states,
or provinces do not allow the exclusion or limitation of implied warranties or the limitation of
incidental consequential damages so the above limitations and exclusions may be limited in their
application to you. When implied warranties may not be excluded in their entirety, they will be
limited to the duration of the applicable written warranty. This warranty gives you specific legal
rights; you may have other rights that may vary depending on local law. Your statutory rights are
not affected.
WE’RE HERE TO HELP
If you have any concerns or questions, don’t hesitate to contact us. There are three ways to get
in touch. Fill out the contact form on our website at Shinola.com, give us a call, or send us an
email.
Monday-Friday
9AM-5PM EST
1.844.SHINOLA
(1.844.744.6652)

53
AUTOMATIC LIMITED LIFETIME
WARRANTY
At Shinola every watch is assembled in our Detroit factory and combines meticulous hand-assembly
with the most advanced technology available to ensure our watches are both beautiful and built to
last. We are so confident in our high-quality manufacturing standards that select Shinola watches
are warranted for life under our limited lifetime warranty. It’s an industry-leading guarantee and a
testament to our core values.
Terms and conditions of the Shinola Automatic Watch Limited Lifetime Service Warranty
IN ORDER TO QUALIFY FOR YOUR SHINOLA AUTOMATIC WATCH WARRANTY YOU MUST
REGISTER YOUR PRODUCT. THIS WARRANTY IS NOT TRANSFERRABLE AND MAY BE
VOIDED UNDER THE TERMS HEREOF.
1. The Shinola Automatic Watch Limited Lifetime Service Warranty covers all original series
automatic watches: Runwell Automatic & Shinola Monster collection. This guarantee does not
cover Detrola watches or Shinola quartz watches.
The Shinola Automatic Watch Limited Lifetime Service Warranty covers defects to material
and workmanship under the natural useful life of the watch.
2. In case of defects caused by faulty workmanship covered by the limited lifetime warranty,
any defective component (subject to exclusions below) will be repaired or the watch will be
replaced free of charge.
3. Exclusions
a. All straps, including bracelets
b. Movement beyond its natural movement life (5 years for Automatic Movements)*
c. Watch plating (PVD plating)
54
d. Damage resulting from improper handling, lack of care, accidents or normal
wear and tear
e. Water damage
f. Pre-owned vintage watches sold in as-is condition
g. Re-furbished watches
* 5 years from the original date of purchase or date of most recent “Automatic Service” by Shinola,
whichever is later. For more information on submitting repairs & servicing requests, please see the
“Repairs & Servicing” section of the Shinola Helpdesk – linked here.
4. This Warranty shall be VOIDED IF:
a. The watch has been damaged by accident, negligence or persons as determined
by Shinola in its sole and absolute discretion.
b. If the watch is repaired, serviced, or engraved by any service provider other than
Shinola.
5. If you have not registered your watch with Shinola this warranty does NOT apply.
6. If your watch requires complete replacement, and is covered by the warranty, Shinola shall
replace your watch with the same model. If the model is no longer in production, a watch of
equal value and similar style will be provided.
7. For service work that is not covered under this warranty, you will be notified of repairs needed
and applicable charges. Shinola will commence such repairs only upon your prior approval to
such charges or return the product, at your request.
55
REQUESTING WARRANTY AND OTHER WATCH REPAIR
Should you require work under warranty, please complete a repair form by visiting us at Shinola.
com or a Shinola retail store. While they will not void the warranty, repairs and/or maintenance
performed by Shinola’s authorized repair partners is not covered under warranty; you will assume
all cost associated with such repairs; Shinola will not provide reimbursement. Do not send
original packaging, as it will not be returned. Shinola highly recommends you insure your parcel
and adequately protect the watch during shipment. Shinola is not responsible for product lost or
damaged during shipment. For service work that is not covered under this warranty, the service
center may perform the services you request for a charge dependent on watch style and type of
work requested. Such charges will be notified and agreed by you prior to performing the services.
The warranties and remedies above are exclusive and in lieu of all other warranties, terms or
conditions, express, implied or statutory, as to any matter whatsoever, including, without limitation,
warranties of merchantability, fitness for a particular purpose, accuracy, satisfactory quality, title,
and non-infringement, all of which are expressly disclaimed by Shinola. Shinola shall not be
liable for incidental, consequential, indirect, special or punitive damages or liabilities of any kind
arising out of or in connection with the sale or use of this product, whether based in contract, tort
(including negligence), strict product liability or any other theory, even if Shinola has been advised
of the possibility of such damages and even if any limited remedy specified herein is deemed to
have failed of its essential purpose. Shinola’s entire liability shall be limited to replacement or repair
at Shinola’s sole option. However, some countries, states, or provinces do not allow the exclusion
or limitation of implied warranties or the limitation of incidental consequential damages so the
above limitations and exclusions may be limited in their application to you. When implied warranties
may not be excluded in their entirety, they will be limited to the duration of the applicable written
warranty. This warranty gives you specific legal rights; you may have other rights that may vary
depending on local law. Your statutory rights are not affected.
56
WE’RE HERE TO HELP
If you have any concerns or questions, don’t hesitate to contact us. There are three ways to get
in touch. Fill out the contact form on our website at Shinola.com, give us a call, or send us an
email.
Monday-Friday
9AM-5PM EST
custo[email protected]
1.844.SHINOLA
(1.844.744.6652)
57
58
FRANÇAIS
Née à Detroit, Shinola est une marque de design qui s’engage de manière
indéfectible à créer des produits durables : des montres, des objets en
cuir et même un hôtel. Nous mettons à l’honneur le design intemporel et le
savoir-faire délicat avec des produits et des histoires qui donnent envie aux
gens de profiter de la vie et de s’affirmer avec leur propre style.
59
1
2
COURONNES VISSÉES
FONCTIONNEMENT DE LA COURONNE
Les composants de votre montre Shinola sont élaborés à partir de matériaux de premier
choix et font l’objet d’un examen rigoureux. Certaines montres Shinola comportent
une couronne vissée, garantissant une étanchéité optimale. Pour protéger votre
investissement, il est important de comprendre le fonctionnement de ce type de
couronne:
1 Pour actionner la couronne, dévissez-la dans le sens inverse
des aiguilles d’une montre jusqu’à la détacher du boîtier.
• Ensuite, réglez la date et l’heure en suivant les consignes décrites
dans les sections ci-dessous.
2 Pour replacer la couronne, enfoncez-la dans le boîtier jusqu’ à
entendre un clic, puis vissez-la à fond dans le sens des aiguilles
d’une montre.
MONTRES AVEC CADRAN DATE
REMARQUE :
• La position du cadran Date varie en fonction de la montre et peut présenter des
différences avec l’exemple décrit dans ce manuel.
• Les montres Shinola ont des mouvements différents. Selon le mouvement, il peut être
nécessaire de respecter une période spécifique lors de la configuration de l’indicateur
de date. Avant d’ajuster le réglage de date, bien vouloir vous référer aux instructions
relatives au mouvement individuel de la montre achetée.
DIAMANTS LIBRES DE CONFLIT
Tout diamant utilisé dans la fabrication des montres Shinola a été acquis auprès de
sources légales non impliquées dans le financement des conflits et en vertu des
décisions des Nations Unies. Nous garantissons par la présente que ces diamants sont
libres de conflit, sur le fondement des garanties écrites et délivrées par les fournisseurs
de ces diamants.
60
MODÈLES HEURE SIMPLE ET DATE
RÉGLER L’HEURE
1 Tirer la couronne en position III.
(La montre s’arrête.)
2 Tourner la couronne jusqu’à
l’heure exacte.
3 Enfoncer la couronne en position I.
RÉGLER LA DATE
1 Tirer la couronne en position II.
(La montre continue de fonctionner.)
2 Tourner la couronne jusqu’à ce que la date
du jour apparaisse.
3 Enfoncer la couronne en position I.
MODÈLES HEURE SIMPLE
RÉGLER L’HEURE
1 Tirer les couronnes en position II.
(La montre s’arrête.)
2 Tourner la couronne jusqu’à
l’heure exacte.
3 Enfoncer la couronne en position I.
II IIII
3
1
2
III
1
2
3
III
3
1
2
61
II IIII
3
1
2
CHRONOGRAPHE 5021.D
DESCRIPTION DU CADRAN ET DES BOUTONS DE CONTRÔLE
Remarque :
Avant d’utiliser les fonctions
de chronographe, veiller à ce que :
- la couronne soit en position
I
(= position normale).
- les deux aiguilles du chronographe se
trouvent précisément sur le zéro après
l’activation du bouton-poussoir B. Si les
aiguilles ne se trouvent pas précisément
sur le zéro, leur position doit être ajustée.
(Se reporter au chapitre Régler les
aiguilles du chronographe sur zéro.)
RÉGLER L’HEURE
1 Tirer la couronne en position
III
.
(La montre s’arrête.)
2 Tourner la couronne jusqu à
l’heure exacte.
3 Enfoncer la couronne en position I.
RÉGLER LA DATE
1 Tirer la couronne en position II
.
(La montre continue de fonctionner.)
2 Tourner la couronne jusqu’à ce que la date
du jour apparaisse.
3 Enfoncer la couronne en position I.
A
Aiguille des secondes
Arrêt des secondes central
Aiguille des minutes
Aiguille des heures
Compteur de minutes
Date
B
III
1
2
3
I
62
RÉGLER LES AIGUILLES DU CHRONOGRAPHE SUR ZÉRO
1 Tirer la couronne en position III. (Les deux
aiguilles du chronographe se trouvent en
bonne ou en mauvaise position sur le zéro.)
2 Appuyer simultanément sur les boutons-
poussoirs A et B pendant au moins 2 secondes.
(L’arrêt des secondes central effectue une
rotation de 360°. Le mode de correction
est activé.)
3 Appuyer sur le bouton-poussoir A pour faire
avancer l’arrêt des secondes central
progressivement. Maintenir le bouton-poussoir A
enfoncé pour faire avancer l’arrêt des secondes
central rapidement. 3b
Maintenir le bouton-poussoir
B enfoncé pour avancer jusqu’à l’aiguille suivante.
4 Appuyer sur le bouton-poussoir A pour faire avancer l’aiguille du compteur
des minutes progressivement. Maintenir le bouton-poussoir A et le maintenir
enfoncé pour faire avancer l’aiguille du compteur des minutes rapidement.
5 Remettre la couronne en position I.
FONCTIONS DE BASE (DÉMARRER / ARRÊTER / RÉINITIALISER)
Exemple
1 Démarrer : appuyer sur le bouton-poussoir A.
2 Arrêter : pour arrêter la mesure du temps écoulé,
appuyer à nouveau sur le bouton-poussoir A
et lire les deux compteurs du
chronographe : 20 min/10 s.
3 Positionnement sur le zéro : appuyer sur
le bouton-poussoir B. (Les deux aiguilles du
chronographe se replaceront sur le zéro.)
II IIII
1
2
3
4
5
2
A
B
3b
1
2
3
A
B
63
*
MESURE DU TEMPS ACCUMULÉ
Exemple
1 Démarrer : lancer la mesure du temps
2 Arrêter : p. ex. 15 min 5 s après
1
.
3 Redémarrer : la mesure du temps reprend
4 *Arrêter : p. ex. 13 min 5 s après 3 .
Temps accumulé : 28 min 10 s.
5 Réinitialiser : les trois aiguilles
du chronographe se replacent sur le zéro.
Remarque :
* Après 4 , la mesure du temps accumulé peut être relancée
en appuyant sur le bouton-poussoir A (redémarrer/arrêter, redémarrer/arrêter, etc.)
MESURE DU TEMPS INTERMÉDIAIRE OU À INTERVALLES
Exemple
1 Démarrer : lancer la mesure du temps.
2 Afficher l’intervalle :
p. ex., 10 min 10 s après
1
.
La mesure du temps se poursuit en arrière-plan.
3 Établir le temps mesuré :
les deux aiguilles du chronographe sont rapidement
avancées vers le temps actuellement mesuré.
4 Arrêter : p. ex. 28 min 10 s après
1
.
5 Réinitialiser : les trois aiguilles
du chronographe se replacent sur le zéro.
Remarque :
* Après
3
, il est possible d’afficher des intervalles ou des intermédiaires
supplémentaires en appuyant sur B (afficher l’intervalle/établir le temps mesuré, etc.)
1
5
2
3
4
A
B
2
3
5
B
1
4
A
64
CHRONOGRAPHE 5030.D
DESCRIPTION DU CADRAN ET DES BOUTONS DE CONTRÔLE
Remarque:
Avant d’utiliser les fonctions de
chronographe, veiller à ce que:
- la couronne soit en position I
(= position normale).
- les trois aiguilles du chronographe
se trouvent précisément sur le zéro
après l’activation du bouton-poussoir B.
Si les aiguilles ne se trouvent pas
précisément sur le zéro, leur position
doit être ajustée. (Se reporter au chapitre
Régler les aiguilles du chronographe sur zéro
.)
RÉGLER L’HEURE
1 Tirer
la couronne
en position III.
(La montre s’arrête.)
2 Tourner
la couronne
jusqu’à
l’heure exacte.
3 Enfoncer
la couronne
en position I.
RÉGLER LA DATE
1 Tirer
la couronne
en position II.
(La montre continue de fonctionner.)
2 Tourner
la couronne
jusqu’à ce que la date
du jour apparaisse.
3 Enfoncer
la couronne
en position I.
III
1
2
3
II IIII
3
1
2
Arrêt des secondes central
Aiguille des minutes
Aiguille des heures
Compteur des minutes
Compteur des heures
A
Aiguille des secondes
Date
B
I
65
RÉGLER LES AIGUILLES DU CHRONOGRAPHE SUR ZÉRO
1 Tirer la couronne en position III.
(Les trois aiguilles du chronographe se trouvent
en bonne ou en mauvaise position sur le zéro.)
2 Appuyer simultanément sur les
boutons-poussoirs A et B pendant au moins
2secondes. (L’arrêt des secondes central
effectue une rotation de 360°- le mode
de correction est activé.)
3 Appuyer sur le bouton-poussoir A pour
faire avancer l’arrêt des secondes central
progressivement. Maintenir le bouton-poussoir A
enfoncé pour faire avancer l’arrêt des secondes central rapidement.
3b
Appuyer sur le bouton-poussoir B pour selectionner l’aiguille auivante.
4 Appuyer sur le bouton-poussoir A pour faire avancer l’aiguille du compteur
des heures progressivement. Maintenir le bouton-poussoir A enfoncé pour
faire avancer l’aiguille du compteur des heures rapidement.
4b
Maintenir
le bouton-poussoir B enfoncé pour selectionner l’aiguille suivante.
5 Appuyer sur le bouton-poussoir A pour faire avancer l’aiguille du compteur
des minutes progressivement. Appuyer sur le bouton-poussoir A et le maintenir
enfoncé pour faire avancer l’aiguille du compteur des minutes rapidement.
6 Remettre
la couronne
en position I.
FONCTIONS DE BASE (DÉMARRER / ARRÊTER / RÉINITIALISER)
Exemple
1 Démarrer: appuyer sur le bouton-poussoir A.
2 Arrêter: pour arrêter la mesure du temps écoulé,
appuyer à nouveau sur le bouton-poussoir A
et lire les trois compteurs du
chronographe: 1h / 20min / 10s
3 Positionnement sur le zéro: appuyer sur
le bouton-poussoir B. (Les trois aiguilles
du chronographe se replaceront sur le zéro.)
II IIII
1
2
3
4
5
3
2
A
3b
4b
1
2
3
A
B
B
66
*
MESURE DU TEMPS ACCUMULÉ
Exemple
1 Démarrer: lancer la mesure du temps.
2 Arrêter: p. ex. 15 min 5 s après
1
.
3 Redémarrer: la mesure du temps reprend.
4 *Arrêter: p. ex., 13 min 5 s après
3
.
Temps accumulé: 28min 10s
5 Réinitialiser: les trois aiguilles
du chronographe se replacent sur le zéro.
Remarque:
* Après
4
, la mesure du temps accumulé peut être relancée en appuyant
sur le bouton-poussoir A (redémarrer/arrêter, redémarrer/arrêter, etc.).
MESURE DU TEMPS INTERMÉDIAIRE OU À INTERVALLES
Exemple
1 Démarrer: lancer la mesure du temps.
2 Afficher l’intervalle: p. ex., 10 min 10 s après 1
.
La mesure du temps se poursuit en arrière-plan.
3 Établir le temps mesuré:
les trois aiguilles du chronographe sont
rapidement avancées vers le temps
actuellement mesuré.
4 Arrêter: p. ex., 28 min 10 s après
1
.
5 Réinitialiser: les trois aiguilles
du chronographe se replacent sur le zéro.
Remarque:
* Après
3
, il est possible d’afficher des intervalles ou intermédiaires
supplémentaires en appuyant sur B (afficher l’intervalle, établir le temps mesuré, etc.).
1
5
2
3
4
A
B
2
3
5
B
1
4
A
67
RÉGLER L’HEURE
1 Tirer le remontoir en positionIII.
(La montre s’arrête.)
2 Tourner le remontoir jusqu’à l’heure exacte.
3 Enfoncer le remontoir en positionI.
RÉGLER LA DATE
1 Tirer le remontoir en positionII.
(La montre continue de fonctionner.)
2 Tourner le remontoir jusqu’à ce que la date du
jour apparaisse.
3 Enfoncer le remontoir en positionI.
CHRONOGRAPHE 5050.B
DESCRIPTION DU CADRAN ET DES BOUTONS DE CONTRÔLE
Remarque:
avant d’utiliser les fonctions du
chronographe, vérifiez que:
- le remontoir est en position
I
(=position normale).
- les quatreaiguilles du chronographe
sont précisément sur le zéro après
l’activation du bouton-poussoir B. Si
les aiguilles ne sont pas précisément
sur le zéro, il faut régler leur position.
(Voir le chapitre
Régler les aiguilles du
chronographe sur zéro
.)
A
B
I
Aiguille des
secondes
Date
Arrêt des secondes central
Aiguille des minutes
Aiguille des heures
Compteur des minutes
Compteur des heures
Compteur des
1
/
10
de seconde
II IIII
3
1
2
II
1
2
3
68
RÉGLER LES AIGUILLES DU CHRONOGRAPHE SUR ZÉRO
1 Tirer le remontoir en positionIII. (Les quatre
aiguilles du chronographe se trouvent en
bonne ou en mauvaise position sur le zéro.)
2 Appuyer simultanément sur les boutons-
poussoirs A et B pendant au moins deux
secondes. (L’arrêt des secondes central
effectue une rotation de 360° - le mode de
correction est activé.)
3 Appuyer sur le bouton-poussoir A pour faire
avancer l’arrêt des secondes central
progressivement. Maintenir le bouton-poussoir
A enfoncé pour faire avancer l’arrêt des
secondes central rapidement.
3b
Appuyer
le bouton-poussoir B pour passer à l’aiguill
suivante.
4
Appuyer sur le bouton-poussoir A pour faire avancer progressivement l’aiguille du
compteur de 1/10 de seconde. Appuyer sur le bouton-poussoir A et le maintenir
enfoncé pour faire avancer rapidement l’aiguille du compteur de 1/10 de seconde.
4b
Appuyer sur le bouton-poussoir B pour avancer jusqu’à l’aiguille suivante.
5 Appuyer sur le bouton-poussoir A pour faire avancer les aiguilles du compteur des
minutes et des heures progressivement. Maintenir le bouton-poussoir A enfoncé
pour faire avancer les aiguilles du compteur des minutes et des heures rapidement.
4b
Appuyer le bouton-poussoir B pour passer à l’aiguille suivante.
6 Remettre le remontoir en positionI.
FONCTIONS DE BASE (DÉMARRER / ARRÊTER / RÉINITIALISER)
Exemple
1 Démarrer: appuyer sur le bouton-poussoir A.
2 Arrêter: pour arrêter la mesure du temps écoulé,
appuyer à nouveau sur le bouton-poussoir A et lire
les quatrecompteurs du chronographe:
4h / 20min / 5s / 7⁄10s
3 Positionnement sur le zéro: appuyer sur
le bouton-poussoir B. (Les quatreaiguilles du
chronographe seront repositionnées sur le zéro.)
1
3
1
2
A
B
1
2
3
5
II IIII
1
2
3
4
5
6
A
2
B
3b
4b
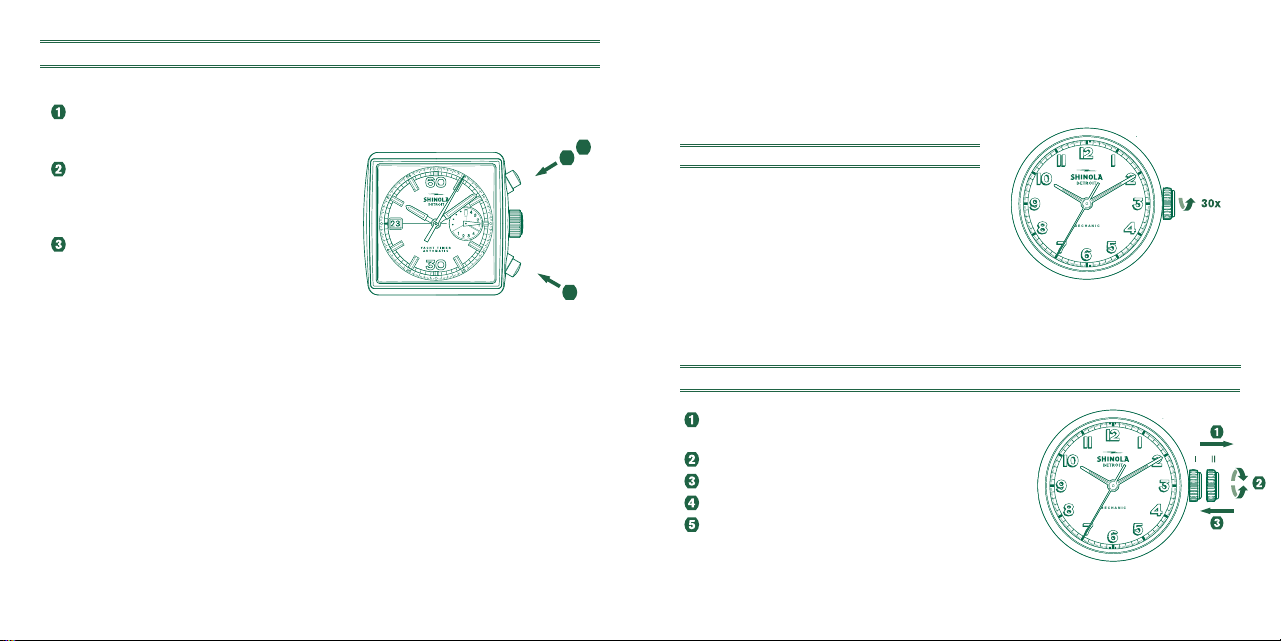
69
*
MESURE DU TEMPS ACCUMULÉ
Exemple
1 Démarrer: lancer la mesure du temps.
2 Arrêter: p.ex., 15min et 5s après
1
.
3 Redémarrer: la mesure du temps écoulé
reprend.
4 *Arrêter: p.ex., 10min et 5s après
3
.
Temps accumulé: 25min et 10s
5 Réinitialiser: les quatreaiguilles du
chronographe reviennent sur le zéro.
Remarque:
* Après
4
, la mesure du temps accumulé peut être relancée en appuyant sur le
bouton-poussoir A (redémarrer/arrêter, redémarrer/arrêter, etc.)
MESURE DU TEMPS INTERMÉDIAIRE OU À INTERVALLES
Exemple
1 Démarrer: lancer la mesure du temps.
2 Afficher l’intervalle:
p.ex., 10min et 10s après
1
.
La mesure du temps se poursuit en arrière-plan.
3 Établir le temps mesuré: les quatreaiguilles
du chronographe sont rapidement avancées
vers le temps actuellement mesuré.
4 Arrêter: le temps total s’affiche.
5 Réinitialiser: les quatreaiguilles du
chronographe reviennent sur le zéro.
Remarque:
* Après
3
, il est possible d’afficher des intervalles ou intermédiaires en appuyant
sur B (afficher l’intervalle/établir le temps mesuré, etc.)
5
B
1
2
3
4
A
5
2
3
B
1
4
A
70
CHRONOGRAPHE 3540.D
DESCRIPTION DU CADRAN ET DES BOUTONS DE CONTRÔLE
Remarque:
Avant d’utiliser les fonctions de
chronographe, veiller à ce que:
- la couronne soit en position
I
(= position normale).
- les trois aiguilles du chronographe
se trouvent précisément sur
le zéro après l’activation du
bouton-poussoir B. Si les aiguilles
ne se trouvent pas précisément
sur le zéro, leur position doit
être ajustée. (Se reporter au
chapitre
Régler les aiguilles du
chronographe sur zéro
.)
RÉGLER L’HEURE
1 Tirer la couronne en position III.
(La montre s’arrête.)
2 Tourner la couronne jusqu’à
l’heure exacte.
3 Enfoncer la couronne en position I.
RÉGLER LA DATE
1 Tirer la couronne en position II.
(La montre continue de fonctionner.)
2 Tourner la couronne jusqu’à ce que
la date du jour apparaisse.
3 Enfoncer la couronne en position I.
III
1
2
3
II IIII
3
1
2
A
Aiguille des minutes
Date
Arrêt des secondes central
I
/
I0
de seconde
(Devient un compteur
d’heures après 30minutes)
Aiguille des heures
Compteur de minutes
Aiguille des secondes
B
I
71
RÉGLER LES AIGUILLES DU CHRONOGRAPHE SUR ZÉRO
1 Tirer la couronne en position III. (Les trois aiguilles
du chronographe se trouvent en bonne ou en
mauvaise position sur le zéro.)
2 Appuyer simultanément sur les
boutons-poussoirs A et B pendant au moins
2secondes. (L’arrêt des secondes central
effectue une rotation de 360° - le mode
de correction est activé.)
3 Appuyer sur le bouton-poussoir A pour
faire avancer l’arrêt des secondes central
progressivement. Maintenir le bouton-poussoir A
enfoncé pour faire avancer l’arrêt des secondes central rapidement.
3
b
Appuyer sur le bouton-poussoir B pour avancer jusqu’à l’aiguille suivante.
4 Appuyer sur le bouton-poussoir A pour faire avancer l’aiguille du compteur
des heures progressivement. Maintenir le bouton-poussoir A enfoncé pour
faire avancer l’aiguille du compteur des heures rapidement.
4b
Maintenir
le bouton-poussoir B enfoncé pour avancer jusqu’à l’aiguille suivante.
5 Appuyer sur le bouton-poussoir A pour faire avancer l’aiguille du compteur
des minutes progressivement. Appuyer sur le bouton-poussoir A et le maintenir
enfoncé pour faire avancer l’aiguille du compteur des minutes rapidement.
6 Remettre la couronne en position I.
FONCTIONS DE BASE (DÉMARRER / ARRÊTER / RÉINITIALISER)
Exemple
1
Démarrer: appuyer sur le bouton-poussoir A.
2 Arrêter: pour arrêter la mesure du temps écoulé,
appuyer à nouveau sur le bouton-poussoir A
et lire les trois compteurs du
chronographe: 4min / 38s / 7/10s
3 Positionnement sur le zéro: appuyer sur
le bouton-poussoir B. (Les trois aiguilles
du chronographe se replaceront sur le zéro.)
1
2
3
A
B
II IIII
1
2
3
4
5
6
2
A
B
3b
4b

72
*
MESURE DU TEMPS ACCUMULÉ
Exemple
1 Démarrer: lancer la mesure du temps écoulé.
2 Arrêter: p. ex. 15 min 5 s après
1
.
3 Redémarrer: la mesure du temps
écoulé reprend.
4 *Arrêter: p. ex., 13 min 5 s après
3
.
Temps accumulé: 28min 10s
5 Réinitialiser: les trois aiguilles
du chronographe se replacent sur le zéro.
Remarque:
* Après
4
, la mesure du temps accumulé peut être relancée en appuyant
sur le bouton-poussoir A (redémarrer/arrêter, redémarrer/arrêter, etc.)
MESURE DU TEMPS INTERMÉDIAIRE OU À INTERVALLES
Exemple
1 Démarrer: lancer la mesure du temps écoulé.
2 Afficher l’intervalle: p. ex., 10
min
10
s
après
1
.
La mesure du temps se poursuit en arrière-plan.
3 Établir le temps mesuré:
les trois aiguilles du chronographe sont rapidement
avancées vers le temps actuellement mesuré.
4 Arrêter: p. ex., 28 min 10 s après
1
.
5 Réinitialiser:
les trois aiguilles
du chronographe se replacent sur le zéro.
Remarque:
* Après
3
, il est possible d’afficher des intervalles ou intermédiaires
supplémentaires en appuyant sur B (afficher l’intervalle, établir le temps mesuré, etc.).
1
5
2
3
4
A
B
1
2
4
3
5
A
B

73
708
708
708
II
II
II
III
III
I
I
I
3
3
4
3
1
1
1
2
2
2
MODÈLE PHASE DE LUNE 708
RÉGLER LES PHASES DE LA LUNE
1 Tirez la couronne en position III (la montre s’arrête).
2 Tournez la couronne jusqu’à atteindre la bonne
position de la lune. Assurez-vous de placer avec
précision la position de la lune par rapport à la
position réelle de celle-ci (utilisez un calendrier
lunaire). Le disque de lune se déplace très
lentement en sautant progressivement toutes
les 24 heures (à chaque changement de date).
3 Étant donné que la fonction heure peut être réglée
en position III, les aiguilles se déplaceront pendant
le réglage de la phase de la lune. Une fois que la
phase de la lune a été bien réglée, replacez laiguilles
de l’heure et des minutes sur la bonne heure (référez-vous
aux instructions RÉGLER L’HEURE ci-dessus).
4 Assurez-vous de remettre l’indicateur de date à la date correcte
(référez-vous aux instructions RÉGLER LA DATE ci-dessus).
RÉGLER L’HEURE
1 Tirez la couronne en position III.
(La montre s’arrête.)
2 Tournez la couronne dans le sens horaire
jusqu’à atteindre l’heure correcte.
3 Remettez la couronne en position I.
RÉGLER LA DATE
1 Tirez la couronne en position II.
(La montre continue de fonctionner).
2 Tournez la couronne jusqu’à ce que la
date correcte apparaisse.
3 Remettez la couronne en position I.

74
RÉGLAGE DE L’HEURE
1 Tirez la couronne en positon III.
(La montre s’arrête.)
2 Tournez la couronne jusqu’à
obtenir l’heure voulue.
3 Pressez la couronne en position I.
RÉGLAGE SUR 24 HEURES
1 Tirez la couronne en positon II.
(La montre tourne.)
2 Tournez la couronne dans le sens
antihoraire jusqu’à l’heure correcte.
3 Pressez la couronne en position I.
RÉGLAGE DE LA DATE
1 Tirez la couronne en positon II.
(La montre tourne.)
2 Tournez la couronne jusqu’à
atteindre la date souhaitée.
3 Pressez la couronne en position I.
4 Si vous effectuez un réglage de l’heure entre
22h30 et 12h00, suivez les étapes 1 à 3, mais
assurez vous de mettre la date du jour suivant,
car il n’y aura pas de changement à minuit.
MODÈLE GMT 515.24H
Si votre montre de 24 heures est équipée d’un indicateur de date, la fenêtre de date peut se
situer ailleur que sur celle décrite dans ce manuel.
3131
3131
II
II
II
IIII
I
I
3
3
3
1
1
1
2
2
2

75
JOUR & NUIT (GMT) MODÈLE 515.24D
RÉGLAGE RAPIDE DE LA DATE
Tirez la couronne en positon II. (La montre tourne.)
Tournez la couronne dans le sens horaire
jusqu’à ce que la date souhaitée apparaisse.
Pressez la couronne en position I.
REMARQUE : La date peut également être
réglée pendant la phase de changement de
jour entre 22 heures et minuit. La date du jour
suivant doit être réglée, car aucun changement
de date automatique n’aura lieu à minuit.
RÉGLAGE RAPIDE DE L’INDICATEUR D’HEURE
Tirez la couronne en positon II. (La montre tourne.)
Tournez la couronne dans le sens antihoraire
jusqu’à ce que la date souhaitée soit affichée.
Pressez la couronne en position I.
RÉGLAGE DE L’HEURE
Tirez la couronne en positon III.
(La montre s’arrête.)
Tournez la couronne jusqu’à ce que l’heure actuelle
s’affiche (rappelez-vous du cycle de 24 heures).
Pressez la couronne en position I.
76
MODÈLE CHRONOGRAPHE 5040.F
RÉGLAGE DE L’HEURE
Tirez la couronne en positon II. (La montre s’arrête.)
Tournez la couronne jusqu’à obtenir l’heure souhaitée.
Pressez la couronne en position I.
REMARQUE : Afin de régler l’heure à la seconde
exacte, la couronne doit être en position 1 lorsque
le deuxième cadran est sur la position « 60 ». Après
avoir réglé l’aiguille des heure, 3 il faut repousser la
couronne en position I à la seconde exacte.
RÉGLAGE DE LA DATE (MODE RAPIDE)
Appuyez une fois sur le bouton C pour
régler la date souhaitée, un jour en avance.
REMARQUE : La date du jour suivant doit
être réglée au cours de la phase de changement
de date, entre 21h00 et 12h20
approximativement.
RÉGLAGE HEURE / DATE / JOUR / MOIS
Tirez la couronne en positon II.
(La montre s’arrête.)
Tournez la couronne jusqu’à ce que l’heure actuelle.
Pressez la couronne en position I.
Appuyer sur le bouton C pour faire avancer le jour.
Appuyer sur le bouton D pour avancer la date.
Appuyer sur le bouton E pour avancer le mois.
C
C
D E
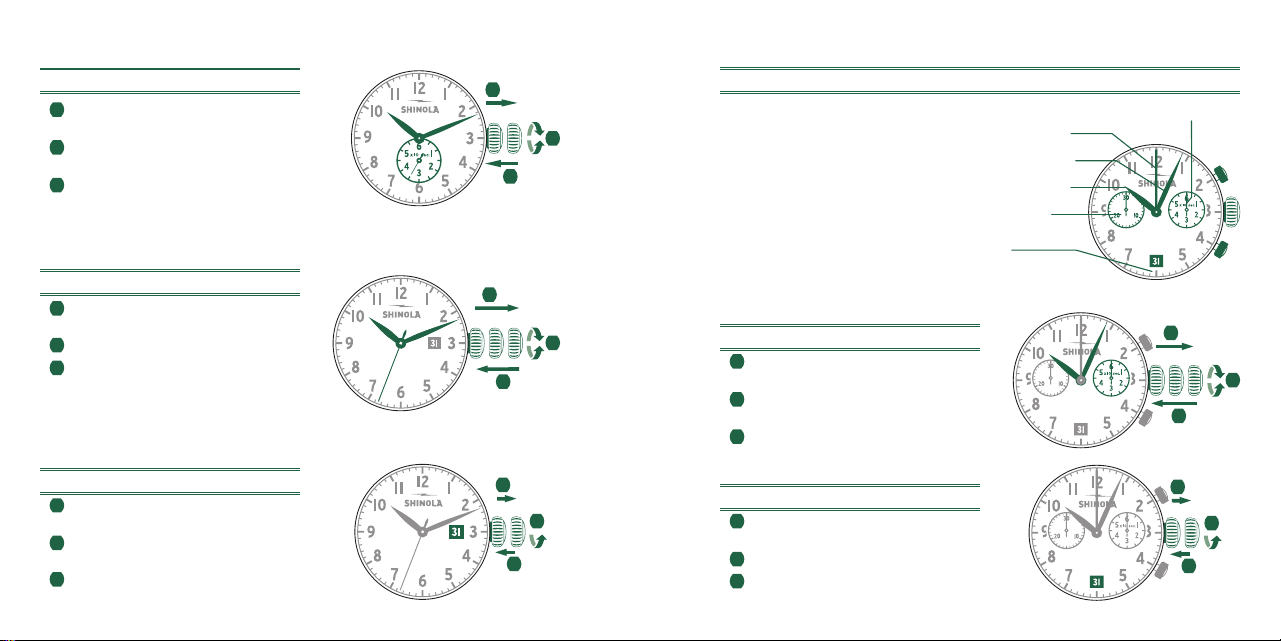
77
FONCTIONS DE BASE (DÉMARRER/ ARRÊTER / REMISE À ZÉRO)
Exemple
Démarrer : Appuyez sur le bouton A.
Arrêter : Pour arrêter le chronométrage,
appuyez à nouveau sur le bouton A
et lisez les trois cadrans du chronographe :
4 min. / 38 sec. / 7⁄10 sec.
Remise à zéro : Appuyez sur le bouton B.
(Les trois aiguilles du chronographe
seront remises à zéro.)
TEMPS CUMULÉ
Exemple
Démarrer : démarrer le chronométrage.
Arrêter : par exemple, , 15 min. 5 sec
.
puis
1
.
Redémarrer : reprise du chronométrage.
*Arrêter: par exemple, 13 min. 5 sec. puis
3
.
Temps accumulé = 28 min. 10 sec.
Remise à zéro : Les trois aiguilles du chronographe
seront remises à zéro.
A
B
A
B
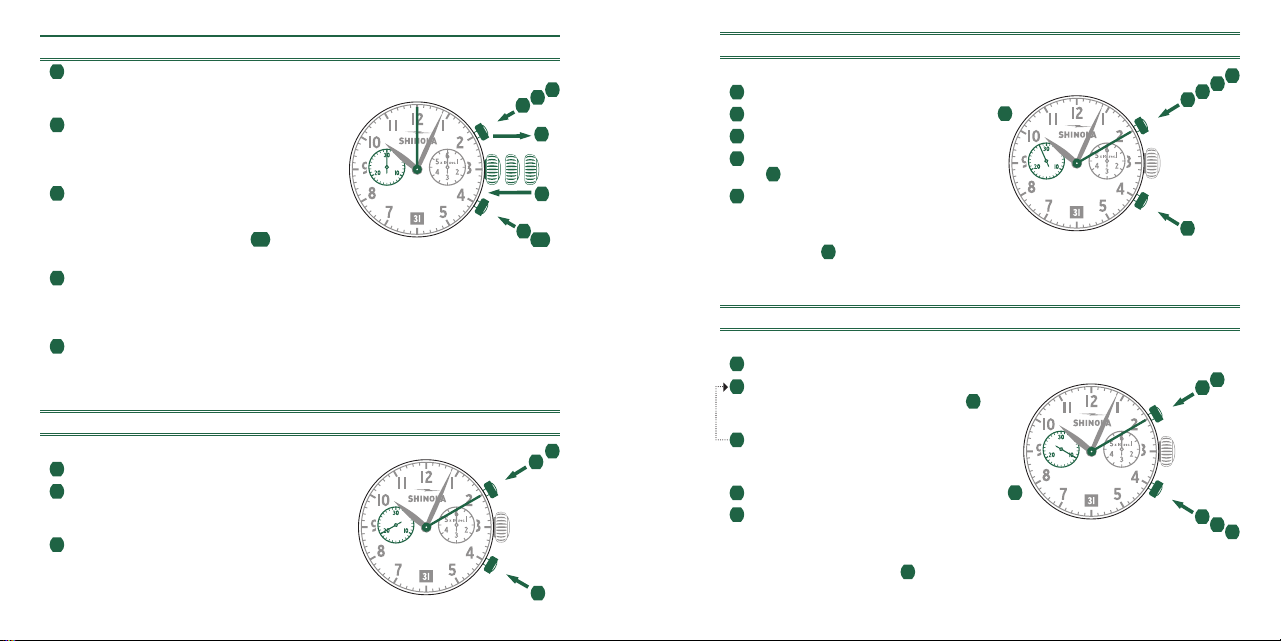
78
CHRONOMÉTRAGE INTERMÉDIAIRE OU À INTERVALE
Exemple
Démarrer : Appuyez sur le bouton poussoir A.
Afichage d’intervalle :
p. ex., 10 min. 10 sec. Suivant
1
.
Le chronométrage continue à l’arrière-plan.
Totalisation du temps écoulé :
Les aiguilles du chronographe sont rapidement
avancées au temps mesuré en cours.
Arrêter : Le temps final est affiché.
Remise à zéro : Les trois aiguilles du
chronographe seront remises à zéro.
Remarque :
* D’autres
3
, intervalles ou intermédiaires peuvent être affichés en
appuyant sur le bouton B (affichage d’intervalle / mesure des valeurs, …)
*
A
B

79
REMISE À ZÉRO DES AIGUILLES DU CHRONOGRAPHE
Exemple
Une ou plusieurs aiguilles du chronographe ne sont
pas dans leur position zéro et doivent être ajustées
(par exemple suite à un changement de batterie)
Tirez la couronne en positon II.
(toutes les aiguilles sont correctement
positionnées ou dans leur position zéro).
Maintenez les boutons A et B enfoncés
simultanément pendant au moins 2 secondes puis
relâchez-les (la deuxième aiguille tourne de 360º
—le mode de réglage est activé).
Réglage de la seconde aiguille :
Appuyez A 1 fois brièvement
Appuyez longuement sur A
Réglez la prochaine aiguille — appuyez sur B
Réglage de l’aiguille du compteur
de secondes 1⁄10 (position 6h) :
Appuyez A 1 fois brièvement
Appuyez longuement sur A
Réglez la prochaine aiguille — appuyez sur B
Réglage de l’aiguille des minutes
(position 9h) :
Appuyez A 1 fois brièvement
Appuyez longuement sur A
Tirer la couronne en positon I.
(Finalisation du réglage des aiguilles du
chronographe peut se faire à tout moment).
A
B

80
MODÈLE ARGOMATIC R150
REMONTAGE LORS DE L’ARRÊT
La réserve de fonctionnement maximale peut être
obtenue en tournant la couronne dans le sens
des aiguilles aux alentours de 30 fois.
RÉGLAGE RAPIDE DE LA DATE
Tirez la couronne en positon II. (La montre tourne.)
Tournez la couronne dans le sens inverse
des aiguilles jusqu’à ce que la date
souhaitée apparaisse.
Pressez la couronne en position I.
RÉGLAGE DE L’HEURE
Tirez la couronne en positon III.
(La montre s’arrête.)
Tournez la couronne jusqu’à ce que l’heure actuelle
s’affiche (rappelez-vous du cycle de 24 heures).
Pressez la couronne en position I.
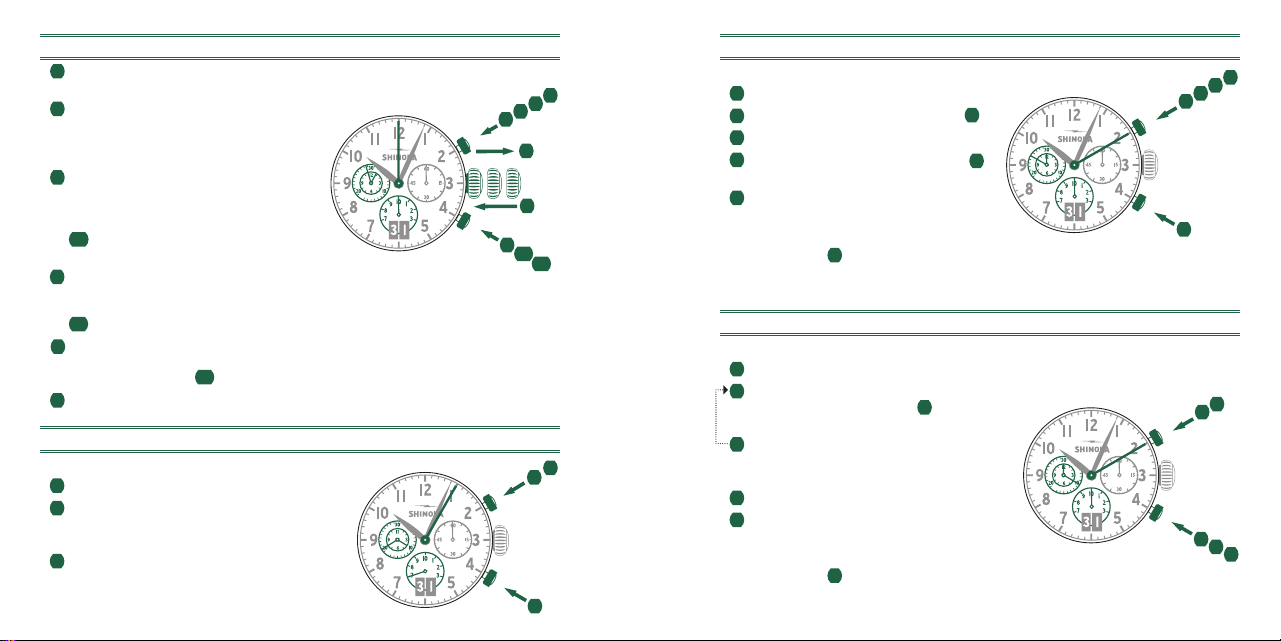
81
30-35fois
MODÈLE AUTOMATIQUE SW330-2
Si votre montre a une couronne vissée, vous devez d’abord dévisser la couronne avant
d’effectuer les réglages. Voir page 5 pour les fonctions de la couronne.
DESCRIPTION DE L’AFFICHAGE ET DES BOUTONS DE RÉGLAGE
REMONTAGE À L’ARRÊT
Tournez la couronne dans le sens inverse des
aiguilles d’une montre jusqu’à qu’elle soit en
position
I
.
Tournez la couronne 30-35 fois dans le sens
des aiguilles d’une montre pour remonter
complètement la montre.
Reverrouillez la couronne en la pressant contre
le boîtier et la tournant légèrement dans le sens
des aiguilles d’une montre jusqu’à ce qu’elle soit à
nouveau en position 0.
Petite aiguille
Trotteuse
Grande aiguille
Date
AiguilleGMT
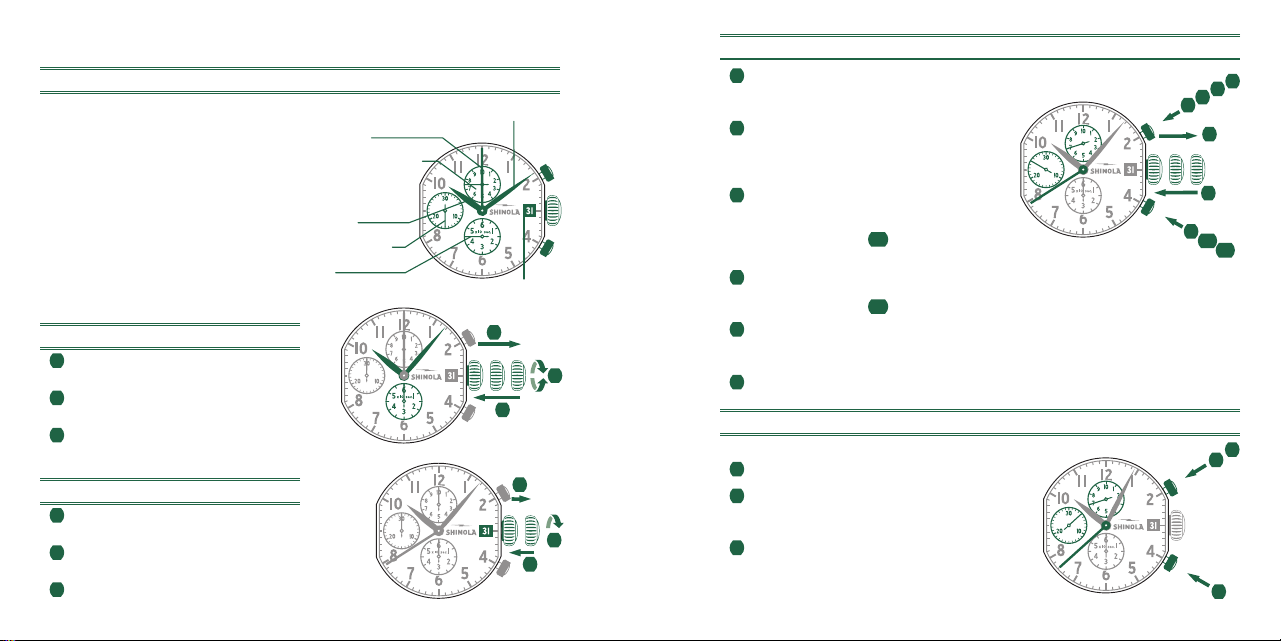
82
III
3
1
2
II IIII
3
1
2
RÉGLAGE DE LA DATE (MODE RAPIDE)
Tournez la couronne pour la mettre sur la première position.
Tirez la couronne en positionII (avec la montre en marche).
Tournez la couronne dans le sens inverse des aiguilles
d’une montre jusqu’à ce que la date désirée s’affiche.
Remettez la couronne en position I.
Si vous réglez la date entre 21h00 et 3h00, suivez les
étapes1 à 3, mais veillez à régler la date sur le jour suivant.
N’oubliez pas de reverrouiller la couronne. Pour cela, appuyez
la couronne contre le boîtier jusqu’à l’enclenchement de la vis.
Vissez ensuite la couronne dans le sens des aiguilles d’une
montre jusqu’à ce qu’elle soit bien serrée.
RÉGLAGE DE L’HEURE
Tournez la couronne pour la mettre sur la première position.
Tirez la couronne en positionIII (montre à l’arrêt).
Tournez la couronne dans le sens inverse des aiguilles d’une
montre jusqu’à ce que l’heure actuelle s’affiche (n’oubliez
pas le cycle de 24heures).
Remettez la couronne en positionI.
N’oubliez pas de reverrouiller la couronne.
Pour cela, appuyez la couronne contre le boîtier jusqu’à
l’enclenchement de la vis. Vissez ensuite la couronne dans le sens des
aiguilles d’une montre jusqu’à ce qu’elle soit bien serrée.
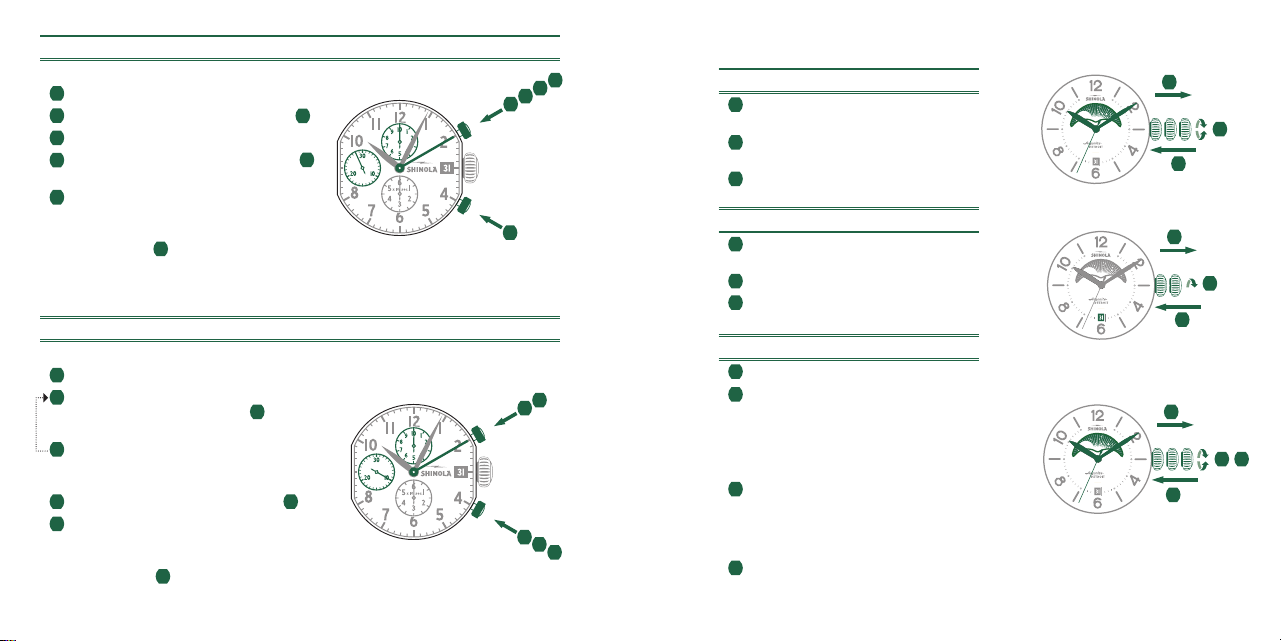
83
II IIII
3
1
2
RÉGLAGE DE L’HEURE GMT
Tournez la couronne pour la mettre sur la première position.
Tirez la couronne en position II (avec la montre en marche).
Tournez la couronne dans le sens des aiguilles d’une
montre jusqu’à ce que l’heureGMT désirée s’affiche
(n’oubliez pas le cycle de 24heures).
Remettez la couronne en position I.
N’oubliez pas de reverrouiller la couronne. Pour
cela, appuyez la couronne contre le boîtier jusqu’à
l’enclenchement de la vis. Vissez ensuite la couronne dans
le sens des aiguilles d’une montre jusqu’à ce qu’elle soit
bien serrée.
Remarque :
* l’aiguilleGMT se synchronise sur la petite aiguille.
L’heureGMT s’affichera avec plus de précision si
vous faites les réglages au début de l’heure.
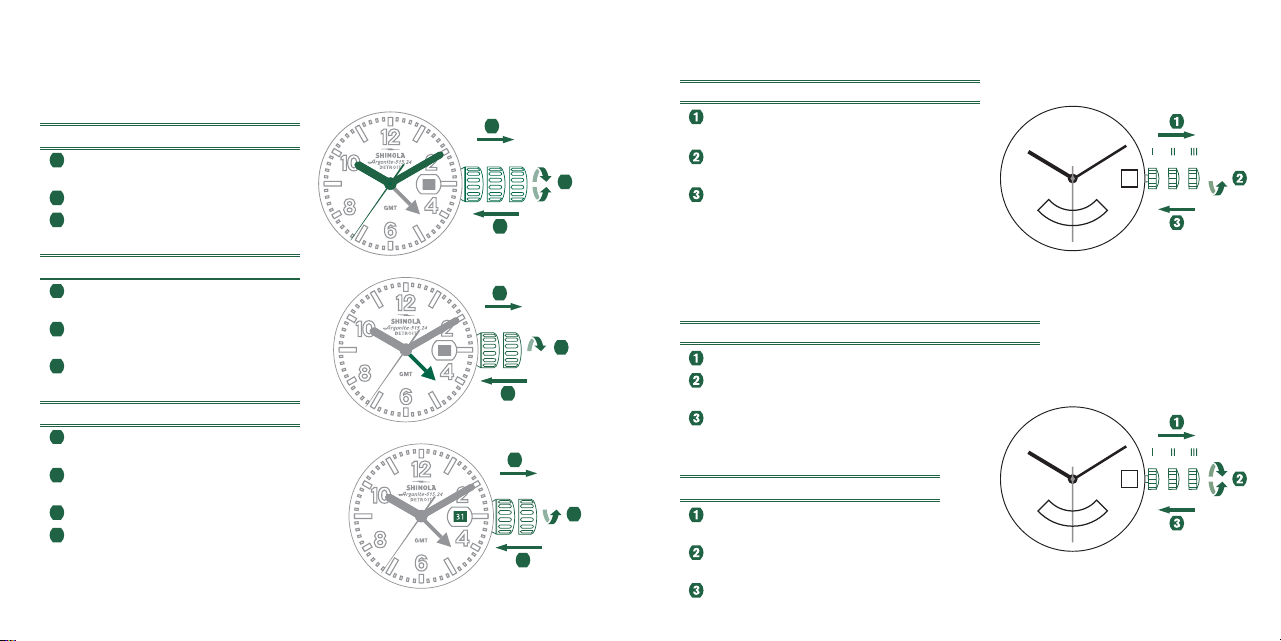
84
MODÈLE AUTOMATIQUE SW510 BH A
Si votre montre a une couronne vissée, vous devez d’abord dévisser la couronne avant
d’effectuer les réglages. Voir page 5 pour les fonctions de la couronne.
DESCRIPTION DE L’AFFICHAGE ET DES BOUTONS DE RÉGLAGE
Remarque:
Avant d’utiliser le chronographe, vérifiez que:
• La couronne est en position normale, verrouillée (position 0).
• Les deux aiguilles du chronographe sont sur 0.
Deuxième compteur
Petite aiguille
Trotteuse
Grande aiguille
Compteur 30
minutes
Date
85
REMONTAGE À L’ARRÊT
Tournez la couronne dans le sens inverse des
aiguilles d’une montre jusqu’à qu’elle soit en
position
I
.
Tournez la couronne 30-35 fois dans le sens
des aiguilles d’une montre pour remonter
complètement la montre.
Reverrouillez la couronne en la pressant contre
le boîtier et la tournant légèrement dans le sens
des aiguilles d’une montre jusqu’à ce qu’elle soit à
nouveau en position 0.
RÉGLAGE DE LA DATE (MODE RAPIDE)
Tournez la couronne pour la mettre en position I.
Tirez la couronne en position II (montre fonctionnant toujours).
Tournez la couronne dans le sens inverse des aiguilles
d’une montre jusqu’à ce que la date requise apparaisse.
Remettez la couronne en position I.
Si vous réglez la date entre 21h et 3h, suivez les étapes
1 à 3 mais veillez à régler la date sur le jour suivant.
N’oubliez pas de reverrouiller la couronne. Pour cela, pressez
la couronne contre le boîtier jusqu’à l’enclenchement de la vis.
Vissez ensuite la couronne dans le sens des aiguilles d’une
montre jusqu’à ce qu’elle soit bien serrée.
III
3
1
2
30x - 35x
86
FONCTIONS DE BASE (MARCHE / ARRÊT / REMISE À ZÉRO)
Exemple
Marche: Appuyez sur le poussoir A.
Arrêt: Pour arrêter le chronométrage,
appuyez à nouveau sur le poussoir A et lisez
les deux compteurs du chronographe :
ex : 4 min. / 38 sec.
Remise à zéro : Appuyez sur le poussoir B.
(Les deux aiguilles du chronographe seront
remises à 0).
1
2
3
A
B
RÉGLAGE DE L’HEURE
Tournez la couronne pour la mettre en position I.
Tirez la couronne en position III (montre à l’arrêt).
Tournez la couronne dans le sens inverse des aiguilles
d’une montre jusqu’à ce que l’heure actuelle s’affiche
(n’oubliez pas le cycle de 24 heures).
Remettez la couronne en position I.
N’oubliez pas de reverrouiller la couronne. Pour
cela, pressez la couronne contre le boîtier jusqu’à
l’enclenchement de la vis. Vissez ensuite la couronne
dans le sens des aiguilles d’une montre jusqu’à ce
qu’elle soit bien serrée.
II IIII
3
1
2
87
TEMPS ADDITIONNÉS
Exemple
Marche : Appuyez sur le poussoir A.
Arrêt : Pour arrêter le chronométrage, appuyez à nouveau sur le poussoir A et lisez les deux
compteurs du chronographe : par exemple 15 min et 5 sec.
Remise à zéro : Appuyez sur le poussoir A pour reprendre le chronométrage.
*Arrêt : Appuyez sur le poussoir A pour arrêter le chronométrage et lisez les compteurs :
5 min et 50 sec. Temps additionné = 20 min et 55 sec.
Remise à zéro: Appuyez sur le poussoir B pour remettre les deux aiguilles du
chronographe à 0.
*Remarque: Après l’étape 4, le temps peut encore être additionné en appuyant sur
le poussoir A (Remise à zéro/Arrêt, Remise à zéro/Arrêt...)
1
2
3
A
B
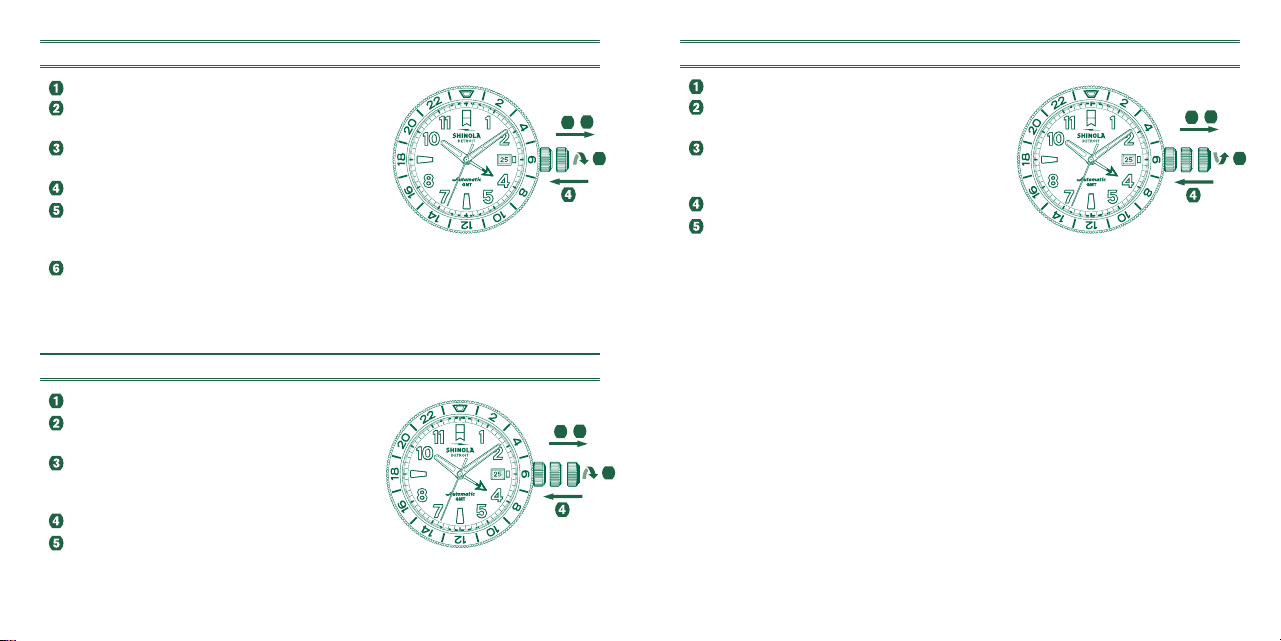
88
MODÈLE AUTOMATIQUE SW511 BH C
Si votre montre a une couronne vissée, vous devez d’abord dévisser la couronne avant
d’effectuer les réglages. Voir page 5 pour les fonctions de la couronne.
DESCRIPTION DE L’AFFICHAGE ET DES BOUTONS DE RÉGLAGE
Remarque:
Avant d’utiliser le chronographe, vérifiez que:
• La couronne est en position normale, verrouillée (position0).
• La grande et la petite aiguilles du chronographe sont sur 0.
REMONTAGE À L’ARRÊT
Tournez la couronne dans le sens inverse des aiguilles
d’une montre jusqu’à qu’elle soit en position
I
.
Tournez la couronne 30-35fois dans le sens des
aiguilles d’une montre pour remonter complètement la
montre.
Reverrouillez la couronne en l’appuyant contre le boîtier
et en la tournant légèrement dans le sens des aiguilles
d’une montre jusqu’à ce qu’elle soit à nouveau en
position0.
30-35fois
Chronomètre de régate -
Grand chronographe
Trotteuse
Petite aiguille
Date
Grande aiguille
Chronomètre de régate -
Grande aiguille
de chronographe
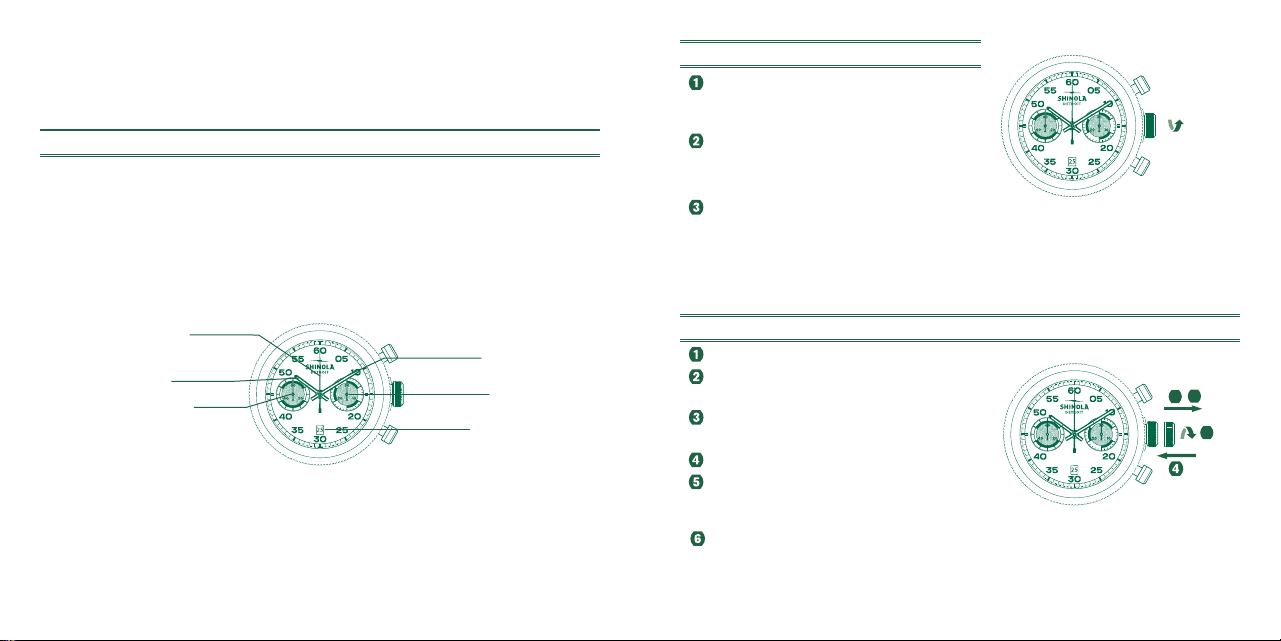
89
II IIII
3
1
2
III
3
1
2
RÉGLAGE DE LA DATE (MODE RAPIDE)
Tournez la couronne pour la mettre sur la première position.
Tirez la couronne en positionII (avec la montre en marche).
Tournez la couronne dans le sens inverse des aiguilles d’une
montre jusqu’à ce que la date désirée s’affiche.
Remettez la couronne en positionI.
Si vous réglez la date entre 21h00 et 3h00,
suivez les étapes1 à 3, mais veillez à régler la date sur le
jour suivant.
N’oubliez pas de reverrouiller la couronne. Pour
cela, appuyez la couronne contre le boîtier jusqu’à
l’enclenchement de la vis.
RÉGLAGE DE L’HEURE
Tournez la couronne pour la mettre sur la première position.
Tirez la couronne en positionIII (montre à l’arrêt).
Tournez la couronne dans le sens inverse des aiguilles
d’une montre jusqu’à ce que l’heure actuelle s’affiche
(n’oubliez pas le cycle de 24heures).
Remettez la couronne en positionI.
N’oubliez pas de reverrouiller la couronne.
Pour cela, appuyez la couronne contre le boîtier jusqu’à
l’enclenchement de la vis. Vissez ensuite la couronne dans
le sens des aiguilles d’une montre jusqu’à ce qu’elle soit
bien serrée.
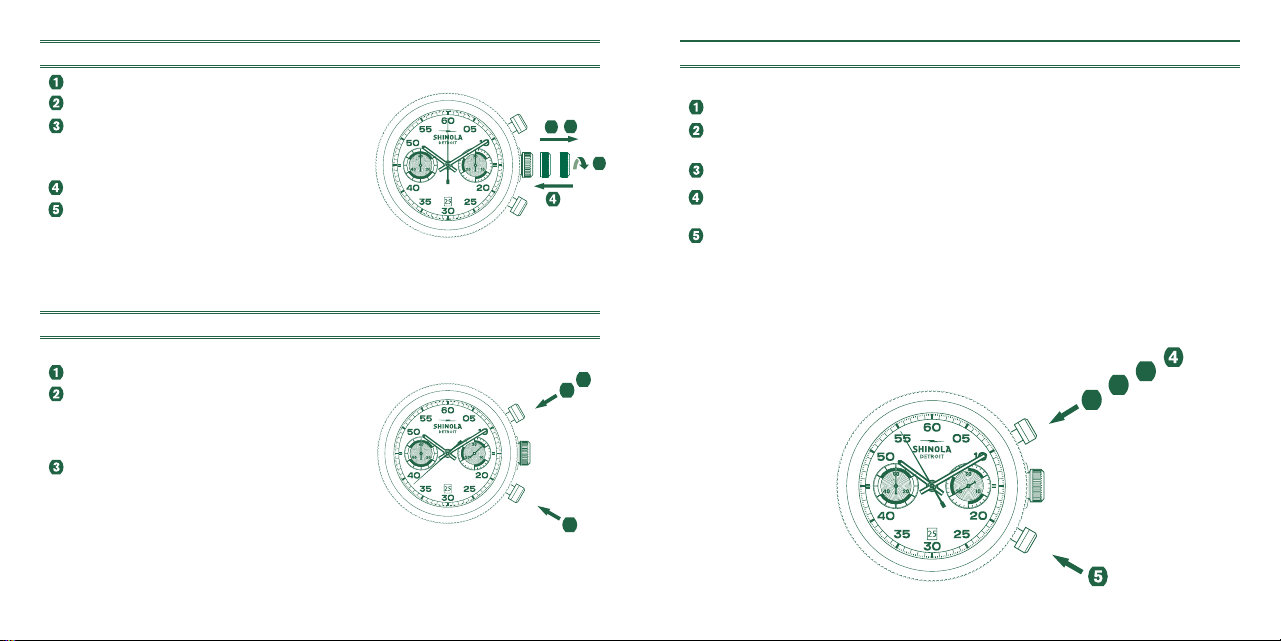
90
1
2
3
A
B
FONCTIONS DE YACHT (MARCHE / ARRÊT / REMISE À ZÉRO)
Régate
Départ: Appuyez sur le poussoir
A
lorsque vous entendez le
signal de départ de la course. Le compte à rebours de 5minutes
jusqu’au départ de la course commencera.
Arrêt: Pour arrêter le chronométrage, appuyez à nouveau sur le
poussoir
A
et lisez les deux compteurs du chronographe:
ex: 4min/5sec
Remise à zéro: Appuyez sur le poussoir
B
.
(Les deux aiguilles du chronographe seront remises à 0).
*Remarque:
-
ne franchissez pas la ligne de départ avant que les 5minutes
se soient écoulées (indiqué par le premier segment du décompte
de 5minutes) afin d’éviter tout faux départ.
-
En cas de faux départ, réinitialisez le chronographe (appuyez
sur le poussoirA, puis sur le poussoirB) et redémarrez-le
(poussoirA).
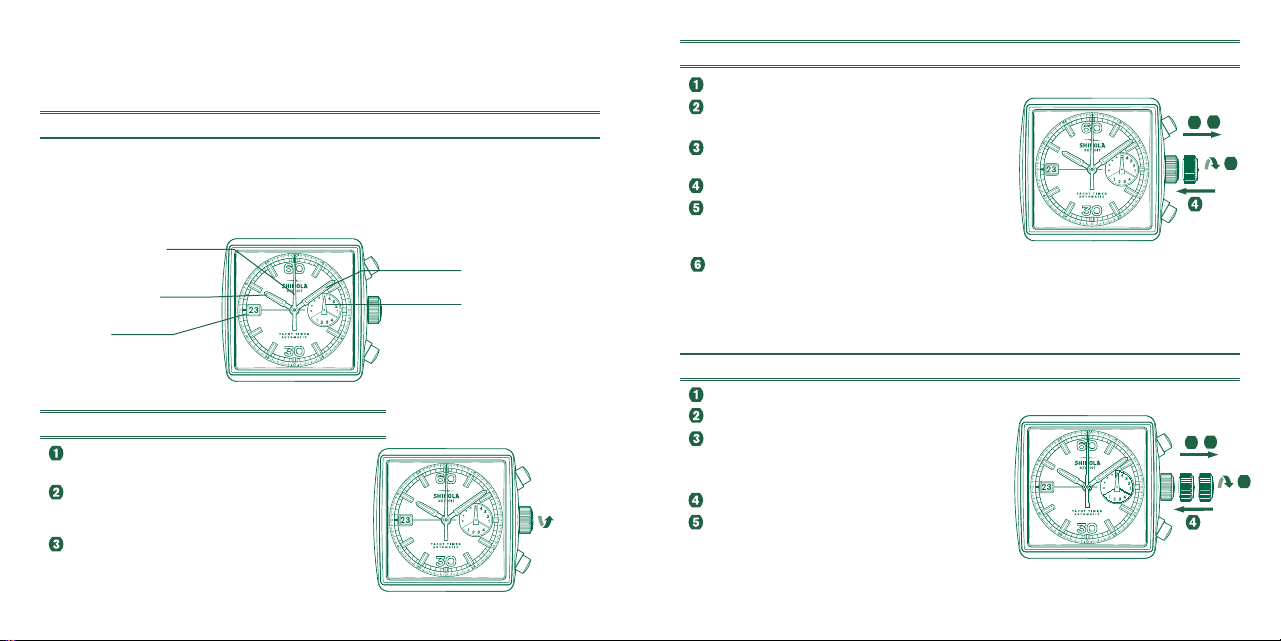
91
RÉGLAGE DE L’HEURE
Tournez la couronne vissée pour la mettre en position sur la
première position.
Tirez la couronne en positionII (montre à l’arrêt).
Tournez la couronne jusqu’à ce que l’heure actuelle s’affiche.
Remettez la couronne en positionI.
N’oubliez pas de reverrouiller la couronne vissée.
Pour cela, appuyez la couronne contre le boîtier jusqu’à
l’enclenchement de la vis. Vissez ensuite la couronne dans le sens
des aiguilles d’une montre jusqu’à ce qu’elle soit bien serrée.
MODÈLE MÉCANIQUE SW210-1
Si votre montre a une couronne vissée, vous devez d’abord dévisser la couronne avant
d’effectuer les réglages. Voir page 5 pour les fonctions de la couronne.
REMONTAGE À L’ARRÊT
Pour remonter totalement la montre, tournez la
couronne environ 30fois dans le sens des aiguilles
d’une montre.
Remarque:
-
remontez plus lentement après 20tours.
Prêtez attention à la résistance de la montre.
Arrêtez de la remonter lorsque vous sentez une résistance.
-
Ne remontez PAS trop la couronne manuellement afin de ne pas abîmer le mouvement.
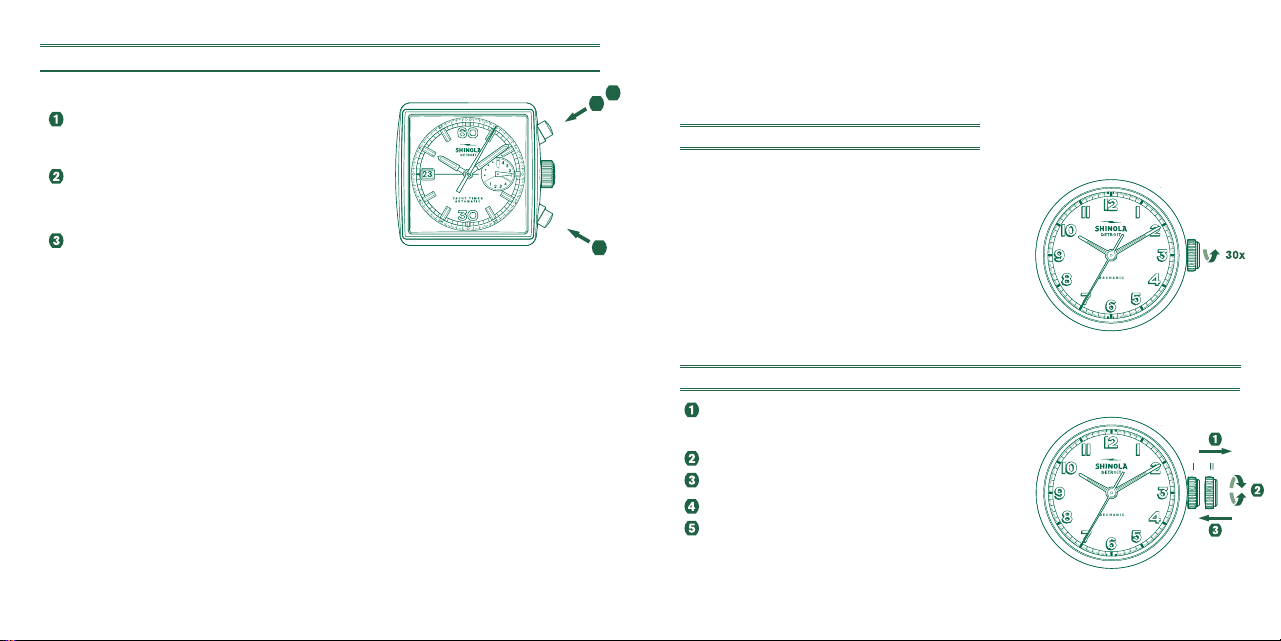
92
RESISTANCE À L’EAU
Toutes les montres Shinola sont conçues pour une résistabce à l’eau minimale de 3ATM
(100ft / 30m).
L’étanchéité à l’eau de la montre la protège contre la poussière, l’humidité et
l’endommagement du mécanisme intérieur s’il est immergé dans l’eau. Veuillez consulter
le tableau afin de prendre connaissance des niveaux de résistance à l’eau.
Il est important de ne pas régler la couronne pendant que la montre est en contact avec
l’eau. L’eau peut pénétrer dans le boîtier endommageant le mécanisme. Pour les montres
à couronnes vissées, il est important de s’assurer que la couronne est bien positionnée et
complètement verrouillée avant de la mettre dans l’eau. Pour les montres chronographe, il
ne faut pas manipuler le chronographe sous l’eau, car l’eau pourrait pénétrer dans le boîtier
et causer des dommages au mécanisme de la montre.
INDICATION UTILISATION AVEC L’EAU
Caractéristiques de
l’étanchéité
Vaporisation légère,
transpiration, pluie
légère, etc..
Natation, etc.
Apnée sous-marine
(plongée sans bouteille d’oxygène)
1
3ATM OK NON NON
2
5ATM OK NON NON
3
10ATM OK OK NON
4
20ATM OK OK OK
5
30ATM OK OK OK
RÉGLEZ TOUJOURS LA COURONNE EN POSITON FERMÉE ET VISSEZ-LA COMPLÈTEMENT.

93
ENTRETIEN ET PRÉCAUTIONS
Chaque montre Shinola est conçue et fabriquée dans le respect des normes les plus
strictes. Contrairement à la plupart des objets mécaniques, une montre fonctionne en
permanence. Pour garantir une performance optimale et la longévité de votre montre
Shinola, veuillez prendre connaissance des consignes d’entretien et des précautions
d’utilisation.
ENTRETIEN
• Nettoyer votre montre avec un chiffon doux et de l’eau uniquement. Ne pas immerger
votre montre, à moins qu’elle soit étanche.
• Après tout contact avec de l’eau salée, rincer la montre à l’eau de ville puis l’essuyer à
l’aide d’un chiffon doux.
• Le bracelet en métal doit faire l’objet d’un nettoyage régulier. Nettoyer le bracelet à
l’aide d’une brosse souple préalablement trempée dans de l’eau savonneuse, puis bien
essuyer à l’aide d’un chiffon doux.
• Pour jouir d’une utilisation durable et sans incident de votre montre, nous vous
recommandons de la faire entretenir tous les 18 à 24mois.
PRÉCAUTIONS
Votre montre est le fruit d’un assemblage complexe de divers composants et pièces, réalisé
par des artisans. Certaines actions ou situations risquent d’endommager votre montre ou
de l’empêcher de fonctionner de façon optimale.
Il importe par conséquent d’éviter les conditions suivantes: températures extrêmement
basses ou élevées, ainsi que les longues périodes d’exposition à la lumière directe du
soleil, ou encore l’exposition à des conditions d’humidité supérieure à l’étanchéité nominale
de votre montre. (Se reporter au dos du boîtier et au tableau correspondant.)
Votre montre ne doit en principe pas être affectée par les champs magnétiques générés par les
appareils domestiques tels que les télévisions et chaînes stéréo. Toutefois, il convient d’éviter
les champs magnétiques puissants (ou l’électricité statique) qui pourraient, eux, provoquer
l’interruption du mécanisme. Il convient en outre d’éviter tout choc ou impact violent.

94 95
MÉCANISME D•’ÉCONOMIE D’ÉNERGIE
Lorsque vous ne vous servez pas de votre montre, tirez doucement la tige de
mouvement/ la couronne jusqu’à entendre un clic pour prolonger la durée de vie de la
pile. Ceci permet de réduire la consommation d’énergie de la pile de 70 %. Remarque
: la position de la tige/ de la couronne permet également d’effectuer le réglage rapide
de l’heure. Si votre montre comporte une couronne vissée, dévissez-la en suivant la
procédure décrite au début de ce manuel avant de le tirer entièrement.
FIN DE VIE DE LA PILE
Votre montre vous prévient lorsque la pile est bientôt épuisée. Lorsque la pile arrive en fin
de vie, l’aiguille des secondes progresse de 4 crans toutes les 4 secondes. Cette fonction
réduit la consommation d’énergie de la pile et vous informe qu’il est temps de changer la
pile tout en maintenant l’affichage exact de l’heure.

94 95
GARANTIE À VIE LIMITÉE DU QUARTZ
Chez Shinola, chaque montre est assemblée dans notre usine de Detroit, alliant assemblage
à la main méticuleux et technologie de pointe afin de s’assurer que nos montres sont à la
fois belles et conçues pour durer. Nous avons tellement confiance en nos standards de
fabrication haute qualité que certaines de nos montres Shinola sont garanties à vie par notre
garantie à vie limitée. C’est une garantie innovante, témoignant de nos valeurs fondamentales.
Conditions générales de la garantie à vie limitée de la montre à quartz Shinola
POUR BÉNÉFICIER DE LA GARANTIE DE VOTRE MONTRE À QUARTZ SHINOLA, VOUS
DEVEZ ENREGISTRER VOTRE PRODUIT. CETTE GARANTIE EST NON TRANSFÉRABLE ET
PEUT ÊTRE ANNULÉE SELON LES CONDITIONS DES PRÉSENTES.
1. La garantie à vie limitée de la montre à quartz Shinola couvre toutes les montres
originales des séries : Birdy, Canfield, Cass, Guardian, Omaha, Runwell, Vinton, Duck.
Cette garantie ne couvre ni les montres Detrola ni les montres automatiques Shinola.
La garantie à vie limitée de la montre à quartz Shinola couvre les défauts de matériaux
et défauts de fabrication selon la durée de vie utile naturelle de la montre.
La garantie à vie limitée de la montre à quartz Shinola couvre les défauts de matériaux
et défauts de fabrication selon la durée de vie utile naturelle de la montre.
2. En cas de défaillance due à un défaut de fabrication couvert par la garantie à vie
limitée, tout composant défectueux (sauf exceptions ci-dessous) sera réparé ou la
montre sera remplacée gratuitement.
3. Exceptions
a. Tous les bracelets
b. Mouvement au-delà de sa durée de vie naturelle (7 ans pour les mouvements
à quartz)*
c. Pile

96 97
d. Placage de la montre (placage PVD)
e. Dommages résultant d’une mauvaise manipulation, d’un manque d’entretien,
d’accidents ou de l’usure normale
f. Dégât des eaux
g. Relojes antiguos usados vendidos tal cual están
h. Montres reconditionnées
*7 ans depuis la date d’achat originale ou la date la plus récente d’entretien du quartz par
Shinola, la dernière de ces dates s’appliquant. Pour en savoir plus sur les demandes de
réparation et d’entretien, veuillez consulter la section « Repairs & Servicing » du service
d’assistance Shinola (lien ici).
4. Cette garantie sera ANNULÉE SI:
a. La montre a été endommagée par un accident, un acte de négligence ou des
personnes, comme déterminé par Shinola, à sa seule et entière discrétion.
b. La pile est remplacée par un prestataire de service autre qu’un centre de réparation
agréé par Shinola.
c. La montre est réparée ou gravée par un prestataire de service autre que Shinola.
5. Si vous n’avez pas enregistré votre montre auprès de Shinola, cette garantie n’est PAS
applicable.
6. Si votre montre doit être remplacée complètement, et si elle est couverte par la garantie,
Shinola l’échangera contre le même modèle. Si le modèle n’est plus produit, une montre
d’une valeur équivalente et de style similaire sera fournie.
7. Pour l’entretien non couvert par cette garantie, vous serez informé des réparations
nécessaires et des frais applicables. Shinola ne commencera ces réparations qu’avec
votre approbation préalable de ces frais ou retournera le produit, sur demande.

96 97
DEMANDE DE RÉPARATIONS SOUS GARANTIE OU D’AUTRES RÉPARATIONS
Si vous devez changer la pile, veuillez remplir un formulaire de réparation en vous rendant
sur notre site Shinola.com ou dans un magasin Shinola, vous pouvez aussi chercher un centre
de changement de pile agréé près de chez vous avec le localisateur de magasin sur le site
Shinola.com. Si vous avez besoin de réparations sous garantie, veuillez remplir un formulaire
de réparation en vous rendant sur notre site Shinola.com ou dans un magasin Shinola.
Même si cela n’entraîne pas l’annulation de la garantie, les réparations et/ou l’entretien par
les réparateurs agréés de Shinola ne sont pas sous garantie, tous les coûts associés à ces
réparations seront à votre charge, Shinola n’effectuera pas de remboursement. N’envoyez pas
l’emballage d’origine, car celui-ci ne sera pas renvoyé. Shinola vous recommande vivement
d’assurer votre colis et de protéger correctement la montre lors de l’envoi.
Shinola n’est pas responsable des produits perdus ou endommagés pendant le transport.
Pour l’entretien non couvert par cette garantie, le centre d’entretien peut effectuer les services
nécessaires à des prix variables selon le type de montre et de service. Avant d’effectuer ces
services, vous serez informé de leurs prix et devrez donner votre accord.
Les garanties et engagements ci-dessus sont exclusifs et remplacent toutes les autres
garanties et conditions, expresses, tacites ou légales, de quelque nature que ce soit, y
compris, mais sans s’y limiter, les garanties de commerciabilité, l’adaptation à des fins
particulières, la précision, la qualité acceptable, le titre et la non-contrefaçon, qui sont tous
expressément exclus par Shinola. Shinola ne pourra être tenue responsable des dégâts
accidentels, indirects, spéciaux et punitifs ou des responsabilités de toute sorte résultant de
la vente et de l’utilisation de ce produit ou en rapport avec celles-ci, que ce soit sur la base ou
non d’un contrat, d’un préjudice (y compris la négligence), d’une responsabilité stricte du fait
des produits ou de toute autre théorie, même si Shinola a été informée de la possibilité de tels
dommages et même si tout engagement limité précisé ici est considéré comme n’ayant pas
rempli son objectif principal
L’entière responsabilité de Shinola se limite au remplacement et à la réparation, à la seule
discrétion de Shinola. Cependant, certains pays, états ou régions, n’autorisent pas l’exclusion
ou la limitation de garanties tacites ou la limitation des dommages accidentels indirects, par
conséquent l’application des limitations et exclusions ci-dessus peut être limitée. Lorsque

98 99
les garanties tacites ne peuvent être exclues en totalité, elles se limiteront à la durée de la
garantie écrite applicable. Cette garantie vous donne des droits légaux spécifiques, vous pouvez
bénéficier d’autres droits selon la législation locale. Vos droits légaux ne sont pas affectés.
NOUS SOMMES LÀ POUR VOUS AIDER
Si vous avez des questions, n’hésitez pas à nous contacter. Vous pouvez nous contacter de trois
manières différentes. Remplissez le formulaire de contact sur notre site Internet Shinola.com,
appelez-nous ou envoyez-nous un e-mail.
Lundi-Vendredi
9h-17h Heure normale de l’Est
custo[email protected]
1.844.SHINOLA
(1.844.744.6652)
98 99
GARANTIE À VIE LIMITÉE
DE LA MONTRE AUTOMATIQUE
Chez Shinola, chaque montre est assemblée dans notre usine de Detroit, alliant assemblage à la
main méticuleux et technologie de pointe afin de s’assurer que nos montres sont à la fois belles et
conçues pour durer. Nous avons tellement confiance en nos standards de fabrication haute qualité
que certaines de nos montres Shinola sont garanties à vie par notre garantie à vie limitée. C’est une
garantie innovante, témoignant de nos valeurs fondamentales.
Conditions générales de la garantie à vie limitée de la montre automatique Shinola
POUR BÉNÉFICIER DE LA GARANTIE DE VOTRE MONTRE AUTOMATIQUE SHINOLA, VOUS DEVEZ
ENREGISTRER VOTRE PRODUIT. CETTE GARANTIE EST NON TRANSFÉRABLE ET PEUT ÊTRE
ANNULÉE SELON LES CONDITIONS DES PRÉSENTES.
1. La garantie à vie limitée de la montre automatique Shinola couvre toutes les montres
automatiques originales des séries : Runwell Automatic et Shinola Monster. Cette garantie
ne couvre ni les montres Detrola ni les montres à quartz Shinola.
La garantie à vie limitée de la montre automatique Shinola couvre les défauts de matériaux
et défauts de fabrication selon la durée de vie utile naturelle de la montre.
2. En cas de défaillance due à un défaut de fabrication couvert par la garantie à vie limitée,
tout composant défectueux (sauf exceptions ci-dessous) sera réparé ou la montre sera
remplacée gratuitement.
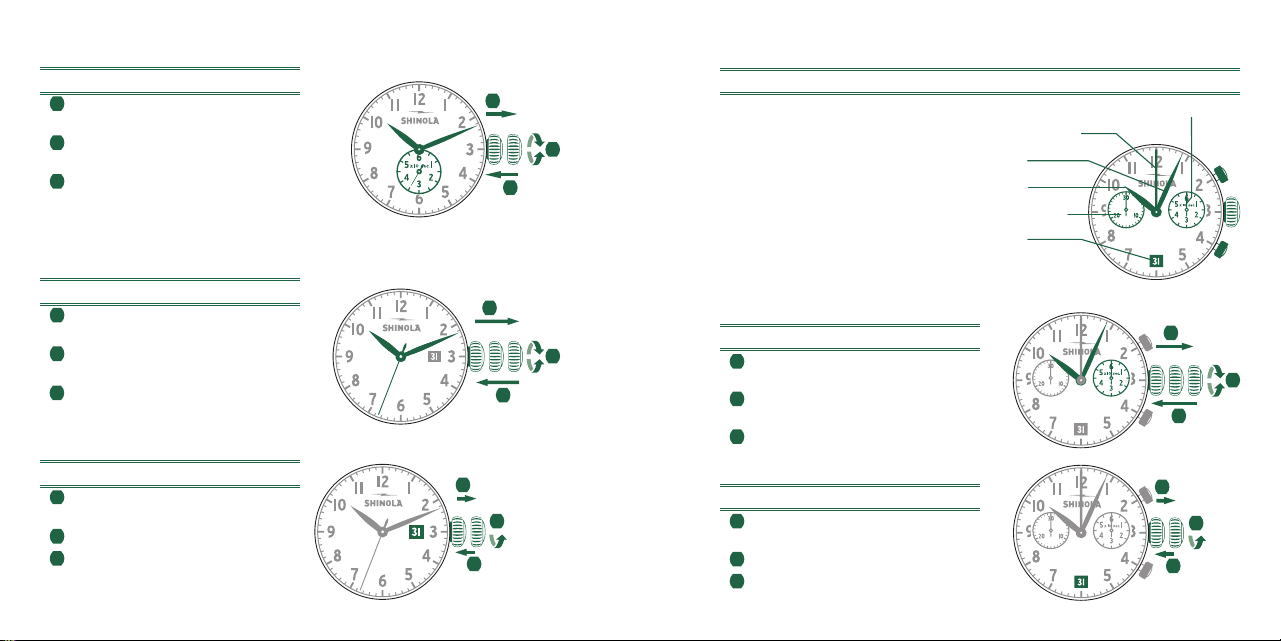
100 101
3. Exceptions
a. Tous les bracelets
b. Mouvement au-delà de sa durée de vie naturelle (5 ans pour les mouvements
automatiques)*
c. Placage de la montre (placage PVD)
d. Dommages résultant d’une mauvaise manipulation, d’un manque d’entretien,
d’accidents ou de l’usure normale
e. Dégât des eaux
f. Montres vintage de seconde main vendues en l’état
g. Montres reconditionnées
*5 ans depuis la date d’achat originale ou la date la plus récente d’entretien de montre automatique
par Shinola, la dernière de ces dates s’appliquant. Pour en savoir plus sur les demandes
de réparation et d’entretien, veuillez consulter la section « Repairs & Servicing » du service
d’assistance Shinola (lien ici).
4. Cette garantie sera ANNULÉE SI :
a. La montre a été endommagée par un accident, un acte de négligence ou des
personnes, comme déterminé par Shinola, à sa seule et entière discrétion.
b. La montre est réparée, entretenue ou gravée par un prestataire de service autre
que Shinola.
5. Si vous n’avez pas enregistré votre montre auprès de Shinola, cette garantie n’est
PAS applicable.
6. Si votre montre doit être remplacée complètement, et si elle est couverte par la garantie, Shinola
l’échangera contre le même modèle. Si le modèle n’est plus produit, une montre d’une valeur
équivalente et de style similaire sera fournie.
7. Pour l’entretien non couvert par cette garantie, vous serez informé des réparations nécessaires
et des frais applicables. Shinola ne commencera ces réparations qu’avec votre approbation
préalable de ces frais ou retournera le produit, sur demande.
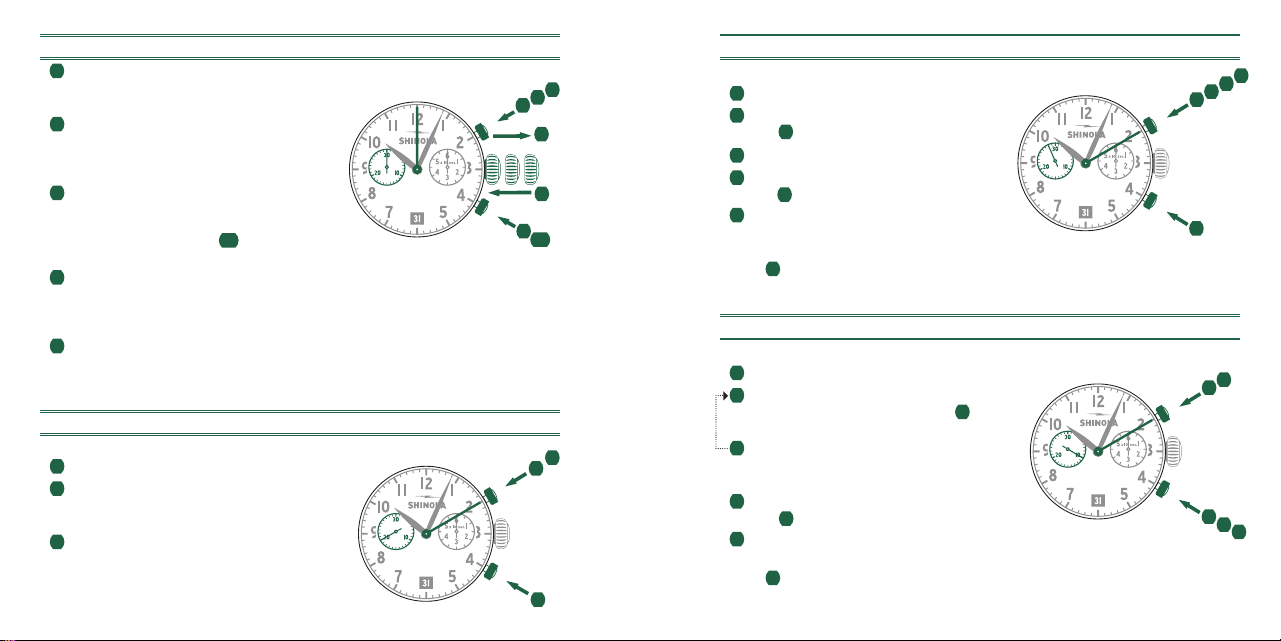
100 101
DEMANDE DE RÉPARATIONS SOUS GARANTIE OU D’AUTRES RÉPARATIONS
Si vous avez besoin de réparations sous garantie, veuillez remplir un formulaire de réparation
en vous rendant sur notre site Shinola.com ou dans un magasin Shinola. Même si cela n’entraîne
pas l’annulation de la garantie, les réparations et/ou l’entretien par les réparateurs agréés de
Shinola ne sont pas sous garantie, tous les coûts associés à ces réparations seront à votre
charge, Shinola n’effectuera pas de remboursement. N’envoyez pas l’emballage d’origine, car
celui-ci ne sera pas renvoyé. Shinola vous recommande vivement d’assurer votre colis et de
protéger correctement la montre lors de l’envoi. Shinola n’est pas responsable des produits
perdus ou endommagés pendant le transport. Pour l’entretien non couvert par cette garantie,
le centre d’entretien peut effectuer les services nécessaires à des prix variables selon le type
de montre et de service. Avant d’effectuer ces services, vous serez informé de leurs prix et
devrez donner votre accord.
Les garanties et engagements ci-dessus sont exclusifs et remplacent toutes les autres garanties
et conditions, expresses, tacites ou légales, de quelque nature que ce soit, y compris, mais sans
s’y limiter, les garanties de commerciabilité, l’adaptation à des fins particulières, la précision, la
qualité acceptable, le titre et la non-contrefaçon, qui sont tous expressément exclus par Shinola.
Shinola ne pourra être tenue responsable des dégâts accidentels, indirects, spéciaux et punitifs
ou des responsabilités de toute sorte résultant de la vente et de l’utilisation de ce produit ou en
rapport avec celles-ci, que ce soit sur la base ou non d’un contrat, d’un préjudice (y compris la
négligence), d’une responsabilité stricte du fait des produits ou de toute autre théorie, même
si Shinola a été informée de la possibilité de tels dommages et même si tout engagement
limité précisé ici est considéré comme n’ayant pas rempli son objectif principal. L’entière
responsabilité de Shinola se limite au remplacement et à la réparation, à la seule discrétion de
Shinola. Cependant, certains pays, états ou régions, n’autorisent pas l’exclusion ou la limitation
de garanties tacites ou la limitation des dommages accidentels indirects, par conséquent
l’application des limitations et exclusions ci-dessus peut être limitée. Lorsque les garanties
tacites ne peuvent être exclues en totalité, elles se limiteront à la durée de la garantie écrite
applicable. Cette garantie vous donne des droits légaux spécifiques, vous pouvez bénéficier
d’autres droits selon la législation locale.
Vos droits légaux ne sont pas affectés.
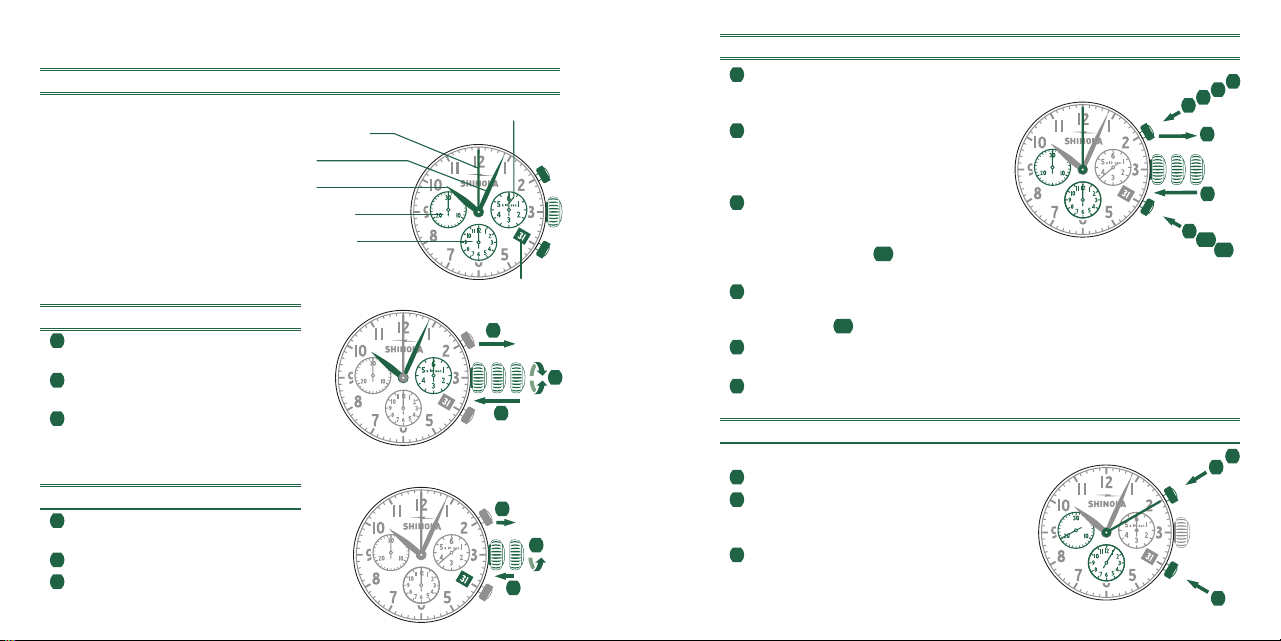
102
DEUTSCH
Shinola ist eine in Detroit gegründete Designmarke, die sich beharrlich
der handwerklichen Herstellung langlebiger Produkte widmet, die von
Armbanduhren bis hin zu Lederwaren und sogar einem Hotel reichen.
Wir zelebrieren zeitloses Design und überlegte Handwerkskunst mit
Produkten und Geschichten, die Menschen dazu anregen, gut zu leben
und sich in einem Stil wohlzufühlen, der ganz ihr eigener ist.
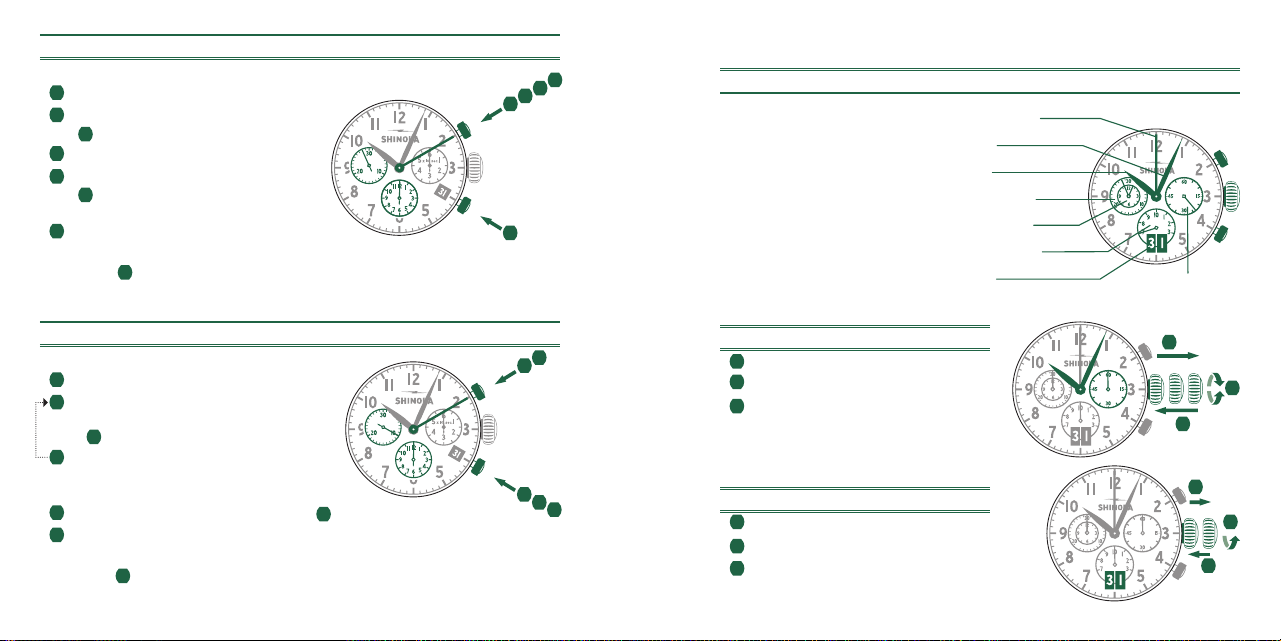
103
VERSCHRAUBTE KRONEN
FUNKTIONSWEISE DER KRONE
Die Komponenten Ihrer Shinola-Uhr sind aus feinsten Materialien gefertigt und wurden
umfassend getestet, um sicherzustellen, dass sie unsere strikten Kriterien erfüllen. Einige
Shinola-Uhren sind mit einer verschraubten Krone ausgestattet, die die Wasserfestigkeit
noch erhöht. Zum Schutz Ihres wertvollen Produkts ist es wichtig, mit der Funktionsweise
dieser Art von Krone vertraut zu sein:
1 Um die Krone betriebsfähig zu machen, lösen Sie die
Verschraubung mit dem Gehäuse, indem Sie sie entgegen
dem Uhrzeigersinn drehen, bis sich die Arretierung löst.
• Folgen Sie dann den Anweisungen zum Einstellen der
Zeit/des Datums in den nachfolgenden Abschnitten.
2 Zum erneuten Verschrauben der Krone drücken Sie sie in das
Gehäuse hinein, bis die Gewinde in Eingriff kommen, und drehen
sie dann im Uhrzeigersinn fest.
UHRMODELLE MIT DATUMSANZEIGE
BITTE BEACHTEN:
• Wenn Ihre Uhr eine Datumsanzeige hat, kann sich das Datumsfenster
an einer anderen Position befinden, als in dieser Anleitung gezeigt ist.
• Shinola-Uhren haben unterschiedliche Uhrwerke. Je nach Uhrwerk kann es notwendig
sein, beim Einstellen der Datumsanzeige einen bestimmten Zeitraum einzuhalten.
Bevor Sie die Datumseinstellung ändern, lesen Sie bitte die Anweisungen zum
individuellen Uhrwerk der gekauften Uhr.
KONFLIKTFREIE DIAMANTEN
Alle in Shinola-Uhren verwendeten Diamanten stammen aus legitimierten Quellen,
die keine Konflikte finanzieren und mit den Bestimmungen der Vereinten Nationen
übereinstimmen. Hiermit garantieren wir, dass diese Diamanten gemäss der schriftlichen
Garantien des Lieferanten konfliktfrei sind.
1
2
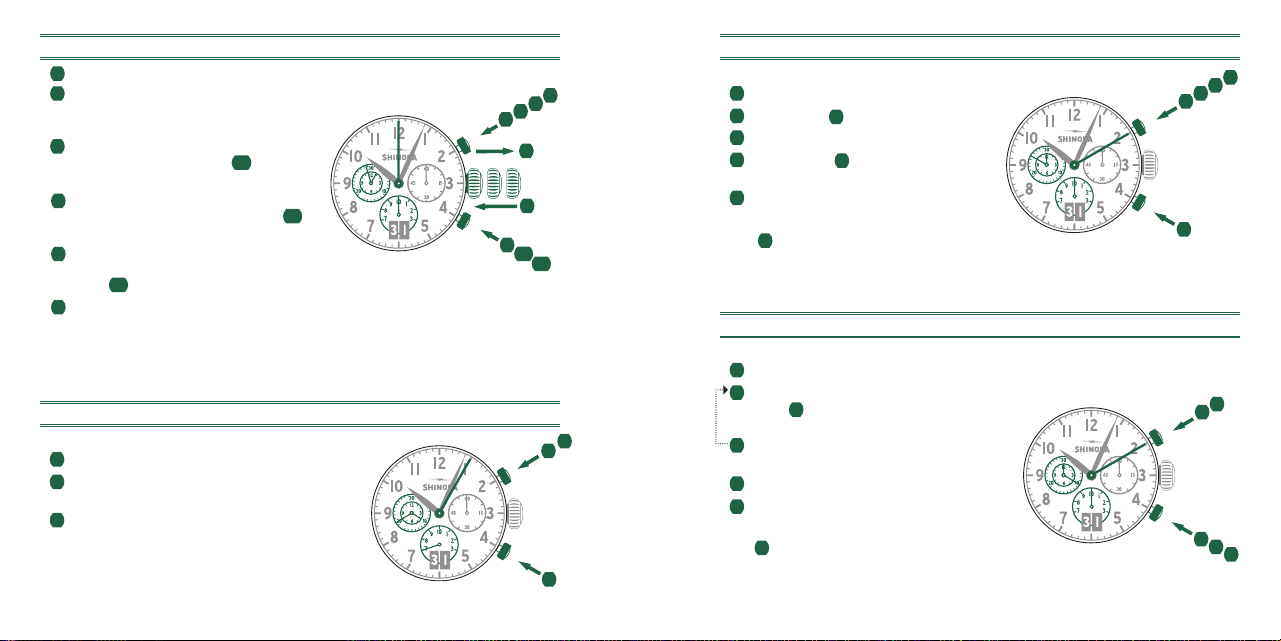
104
III
3
1
2
II IIII
3
1
2
III
1
2
3
III
3
1
2
EINZELZEITMODELLE MIT DATUM
EINSTELLEN DER ZEIT
1 Ziehen Sie die Krone in Position III.
(Die Uhr stoppt.)
2 Drehen Sie die Krone, bis die richtige
Zeit erreicht ist.
3 Drücken Sie die Krone wieder in Position I.
EINSTELLEN DES DATUMS
1 Ziehen Sie die Krone in Position II.
(Die Uhr läuft weiter.)
2 Drehen Sie die Krone, bis das richtige
Datum angezeigt wird.
3 Drücken Sie die Krone wieder in Position I.
EINZELZEITMODELLE
EINSTELLEN DER ZEIT
1 Ziehen Sie die Krone in Position II.
(Die Uhr stoppt.)
2 Drehen Sie die Krone, bis die richtige
Zeit erreicht ist.
3 Drücken Sie die Krone wieder in Position I.
III
3
1
2
II IIII
3
1
2
III
1
2
3
III
3
1
2
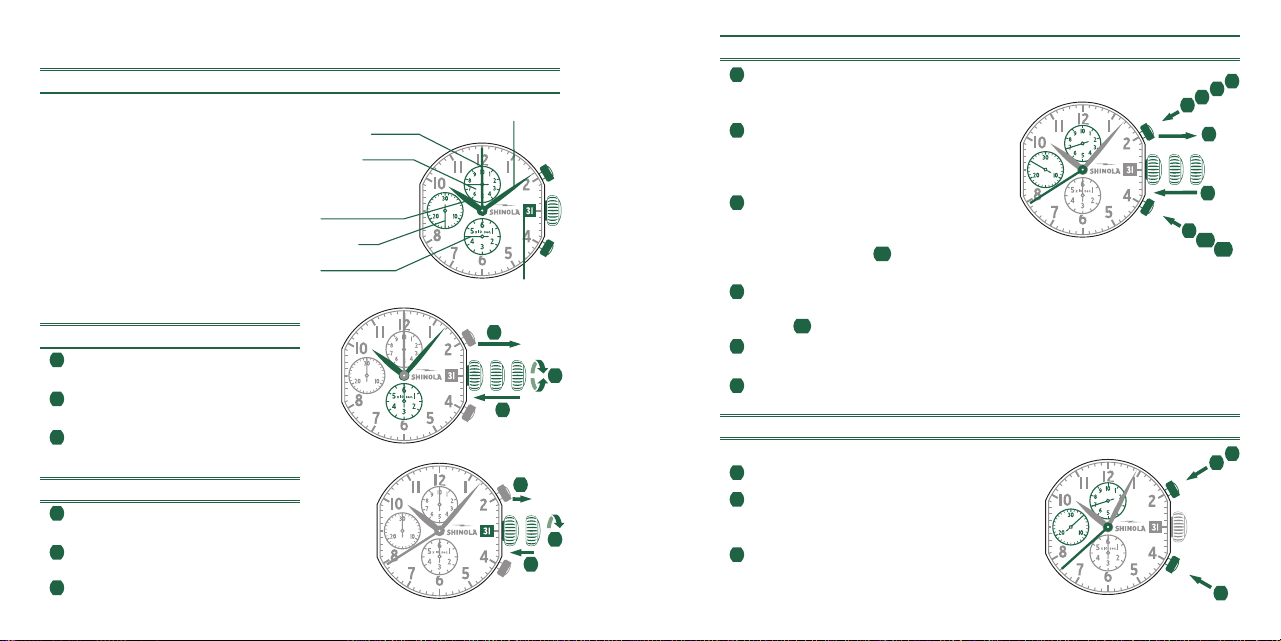
105
II IIII
3
1
2
CHRONOGRAPH MODELL 5021.D
BESCHREIBUNG DER ANZEIGE- UND BEDIENELEMENTE
Bitte beachten:
Vor Verwendung der Chronograph-Funktionen
sollten Sie Folgendes sicherstellen:
- die Krone befindet sich in Position I
(= normale Position).
- die zwei Chronograph-Zeiger befinden
sich nach Aktivierung des Drückers B
genau in der Nullposition. Falls sich
die Zeiger nicht genau bei Null befinden,
muss ihre Position eingestellt werden. (Siehe
Kapitel
Einstellen der Chronograph-Zeiger auf Null.
)
EINSTELLEN DER ZEIT
1 Ziehen Sie die Krone in Position III.
(Die Uhr stoppt.)
2 Drehen Sie die Krone, bis die richtige Zeit
erreicht ist.
3 Drücken Sie die Krone wieder in Position I.
EINSTELLEN DES DATUMS
1 Ziehen Sie die Krone in Position II.
(Die Uhr läuft weiter.)
2 Drehen Sie die Krone, bis das richtige Datum
angezeigt wird.
3 Drücken Sie die Krone wieder in Position I.
A
Zweiter Zeiger
Zentrumstoppsekunde
Minutenzeiger
Stundenzeiger
Minutenzähler
Datum
B
III
1
2
3
I
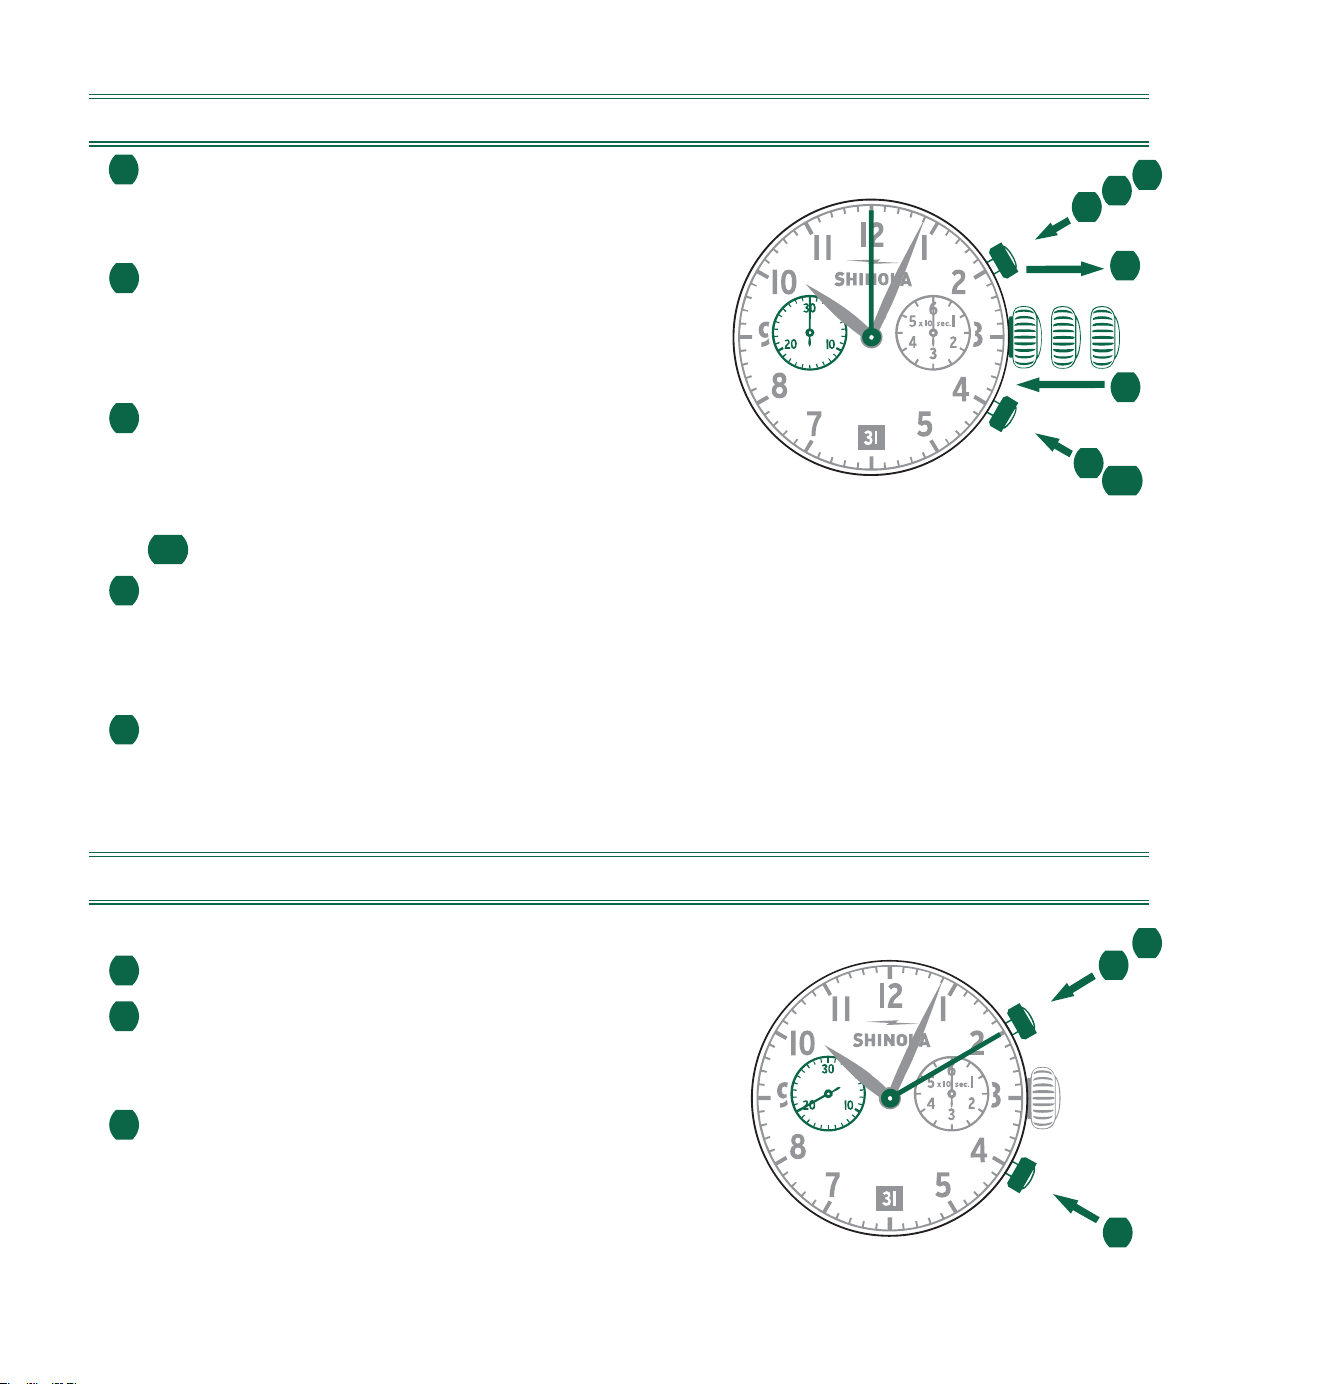
106
EINSTELLEN DER CHRONOGRAPH-ZEIGER AUF NULL
1 Ziehen Sie die Krone in Position III.
(Beide Chronograph-Zeiger befinden sich
in der richtigen oder falschen Nullposition.)
2 Halten Sie die Drücker A und B gleichzeitig
mindestens 2 Sekunden lang gedrückt.
(Die Zentrumstoppsekunde dreht sich um
360° – der Korrekturmodus ist aktiviert.)
3 Drücken Sie Drücker A, um den
Zentrumstoppsekundenzeiger in Einzelschritten
zu bewegen. Halten Sie Drücker A gedrückt, um den
Zentrumstoppsekundenzeiger schnell vorwärts zu bewegen.
3b
Drücken Sie Drücker
B
, um zum nächsten Zeiger zu gehen.
4 Drücken Sie Drücker A, um den
Minutenzählerzeiger in Einzelschritten zu bewegen.
Halten Sie Drücker A gedrückt, um den
Minutenzählerzeiger schnell vorwärts zu bewegen.
5 Stellen Sie die Krone wieder in Position I.
GRUNDLEGENDE FUNKTION (STARTEN/STOPPEN/ZURÜCKSETZEN)
Beispiel
1 Starten: Drücken Sie Drücker A.
2 Stoppen:
Drücken Sie zum Stoppen der Zeitmessung
Drücker A noch einmal und lesen Sie die beiden
Chronographen-Zähler ab: 20 Min. / 10 Sek.
3 Nullpositionierung: Drücken Sie Drücker B.
(Die beiden Chronograph-Zeiger werden
auf ihre Nullpositionen zurückgesetzt.)
II IIII
1
2
3
4
5
2
A
B
3b
1
2
3
A
B
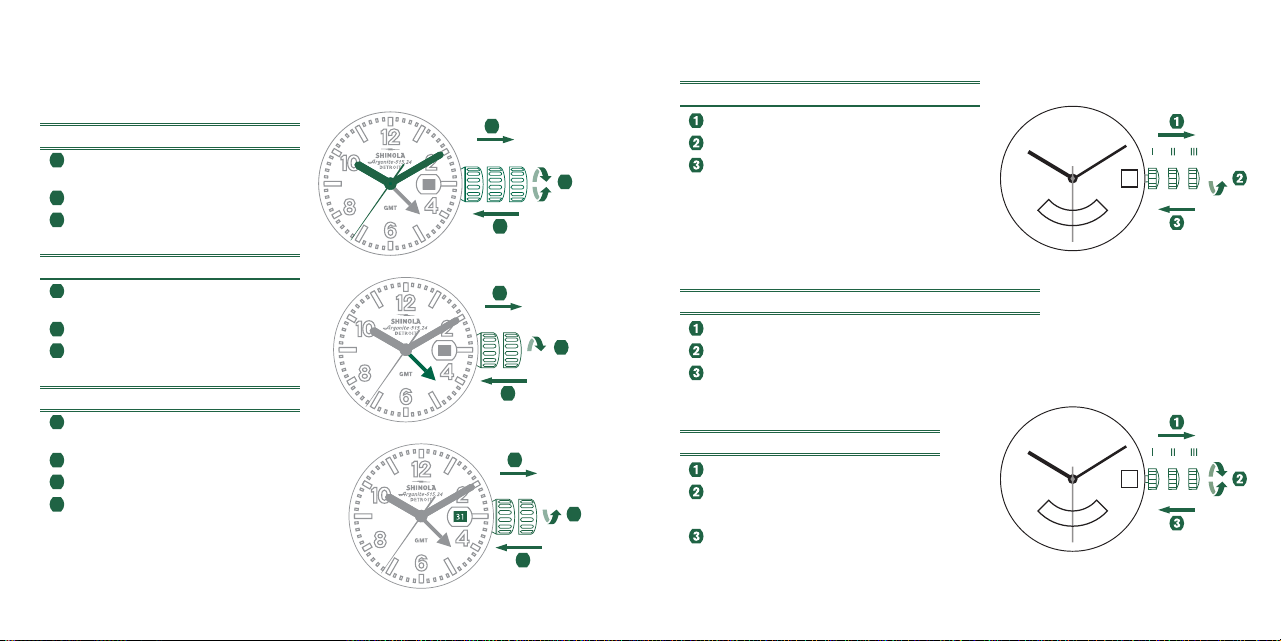
107
*
AUFADDIERTE ZEITMESSUNG
Beispiel
1 Starten: Startet die Zeitmessung
2 Stoppen: z. B. 15 Min. 5 Sek. nach
1
.
3 Neustarten:
Die Zeitmessung wird wieder aufgenommen
4 *Stoppen: z. B. 13 Min. 5 Sek. nach
3
.
Die aufaddierte Zeit = 28 Min. 10 Sek.
5 Zurücksetzen:
Die drei Chronograph-Zeiger werden
in ihre Nullpositionen zurückgestellt.
Bitte beachten:
* Nach
4
kann die Aufaddierung der Zeitmessung durch Drücken
des Drückers A (Neustarten/Stoppen, Neustarten/Stoppen, …) fortgesetzt werden.
ZWISCHEN- ODER INTERVALLZEITMESSUNG
Beispiel
1 Starten: Startet die Zeitmessung.
2 Intervall anzeigen:
z. B. 10 Min. 10 Sek. nach
1
.
Die Zeitmessung wird im Hintergrund fortgesetzt.
3 Messzeit aufholen:
Die beiden Chronograph-Zeiger gehen schnell
zur laufend gemessenen Zeit.
4 Stoppen: z. B. 28 Min. 10 Sek. nach
1
.
5 Zurücksetzen: Die drei Chronograph-Zeiger
werden in ihre Nullpositionen zurückgestellt.
Bitte beachten:
* Nach
3
können weitere Intervalle oder Zwischenzeiten durch
Drücken von B (Intervall anzeigen/Messzeit aufholen ...) angezeigt werden
1
5
2
3
4
A
B
2
3
5
B
1
4
A
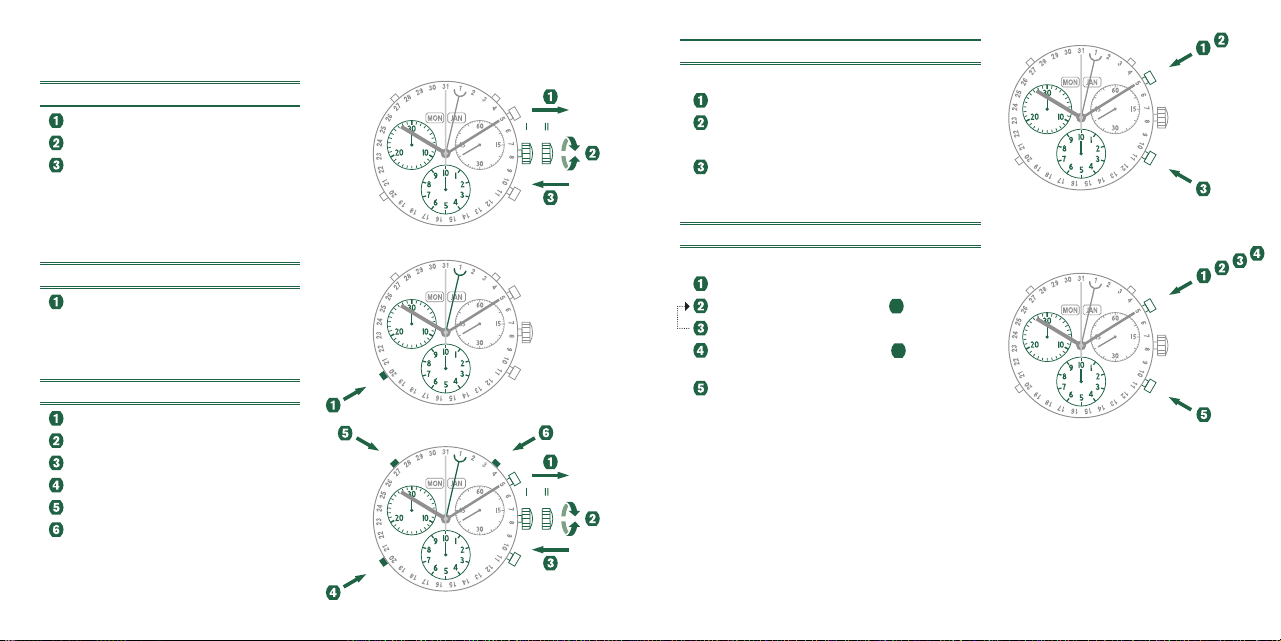
108
II IIII
3
1
2
CHRONOGRAPH MODELL 5030.D
BESCHREIBUNG DER ANZEIGE- UND BEDIENELEMENTE
Bitte beachten:
Vor Verwendung der Chronograph-
Funktionen sollten Sie Folgendes
sicherstellen:
- die Krone befindet sich in Position I
(= normale Position).
- die drei Chronograph-Zeiger befinden sich
nach Aktivierung des Drückers B genau
an der Nullposition. Falls sich die Zeiger
nicht genau bei Null befinden, muss ihre
Position eingestellt werden. (Siehe Kapitel
Einstellen der Chronograph-Zeiger auf Null
.)
EINSTELLEN DER ZEIT
1 Ziehen Sie die Krone in Position
III
.
(Die Uhr stoppt.)
2 Drehen Sie die Krone, bis die richtige
Zeit erreicht ist.
3 Drücken Sie die Krone wieder in Position I.
EINSTELLEN DES DATUMS
1 Ziehen Sie die Krone in Position II.
(Die Uhr läuft weiter.)
2 Drehen Sie die Krone, bis das richtige
Datum angezeigt wird.
3 Drücken Sie die Krone wieder in Position I.
III
1
2
3
A
Zweiter Zeiger
Datum
Zentrumstoppsekunde
Minutenzeiger
Stundenzeiger
Minutenzähler
Stundenzähler
B
I
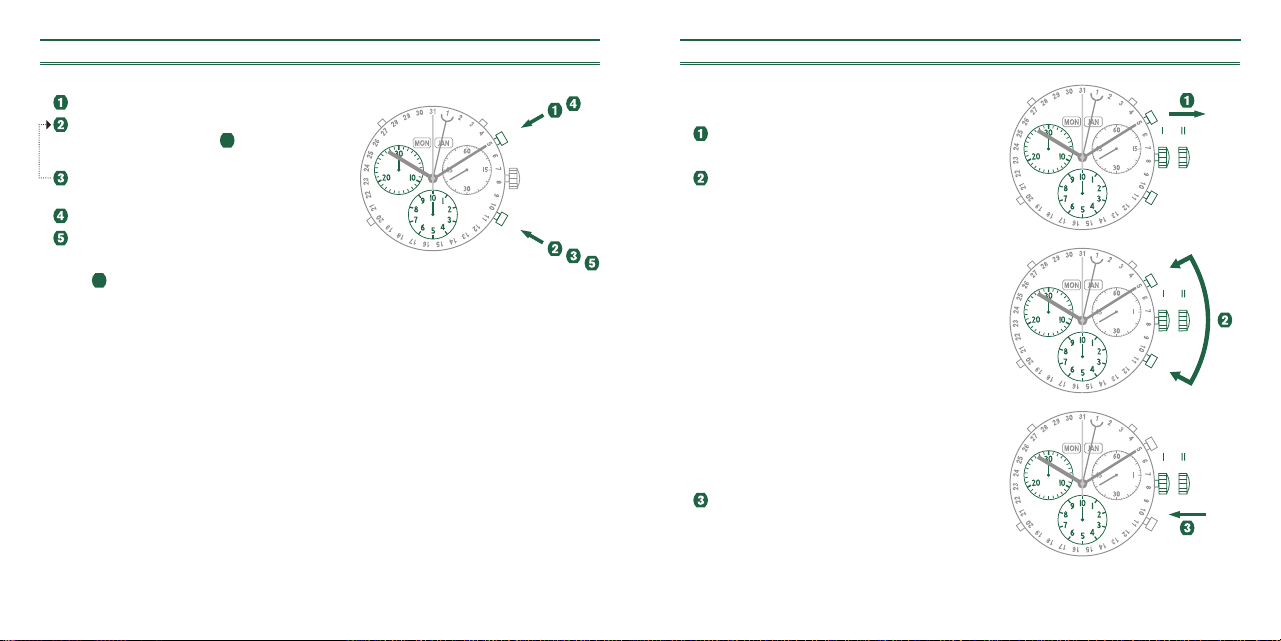
109
EINSTELLEN DER CHRONOGRAPH-ZEIGER AUF NULL
1 Ziehen Sie die Krone in Position III.
(Alle drei Chronograph-Zeiger befinden sich
in der richtigen oder falschen Nullposition.)
2 Halten Sie Drücker A und B gleichzeitig
mindestens 2 Sekunden lang gedrückt.
(Die Zentrumstoppsekunde dreht sich um 360°
– der Korrekturmodus ist aktiviert.)
3
Drücken Sie Drücker A, um den
Zentrumstoppsekundenzeiger in Einzelschritten
zu bewegen. Halten Sie Drücker A gedrückt,
um den Zentrumstoppsekundenzeiger schnell
vorwärts zu bewegen.
3b
Drücken Sie Drücker B,
um zum nächsten Zeiger zu gehen.
4 Drücken Sie Drücker A, um den Stundenzählerzeiger in Einzelschritten
zu bewegen. Halten Sie Drücker A gedrückt, um den Stundenzählerzeiger schnell
vorwärts zu bewegen.
4b
Drücken Sie Drücker B, um zum nächsten Zeiger zu gehen.
5 Drücken Sie Drücker A, um den Minutenzählerzeiger in Einzelschritten
zu bewegen. Drücken Sie Drücker A und halten Sie ihn gedrückt, um den
Minutenzählerzeiger schnell vorwärts zu bewegen.
6 Stellen Sie die Krone wieder in Position I.
GRUNDLEGENDE FUNKTION
(
STARTEN/STOPPEN/ZURÜCKSETZEN
)
Beispiel
1 Starten: Drücken Sie Drücker A.
2 Stoppen:
Drücken Sie zum Stoppen der Zeitmessung
Drücker A noch einmal und lesen Sie die drei
Chronographen-Zähler ab: 1 Std. / 20 Min. / 10 Sek.
3 Nullpositionierung: Drücken Sie Drücker B.
(Die drei Chronograph-Zeiger werden
auf ihre Nullpositionen zurückgesetzt.)
II IIII
1
2
3
4
5
6
2
A
B
3b
4b
1
2
3
A
B
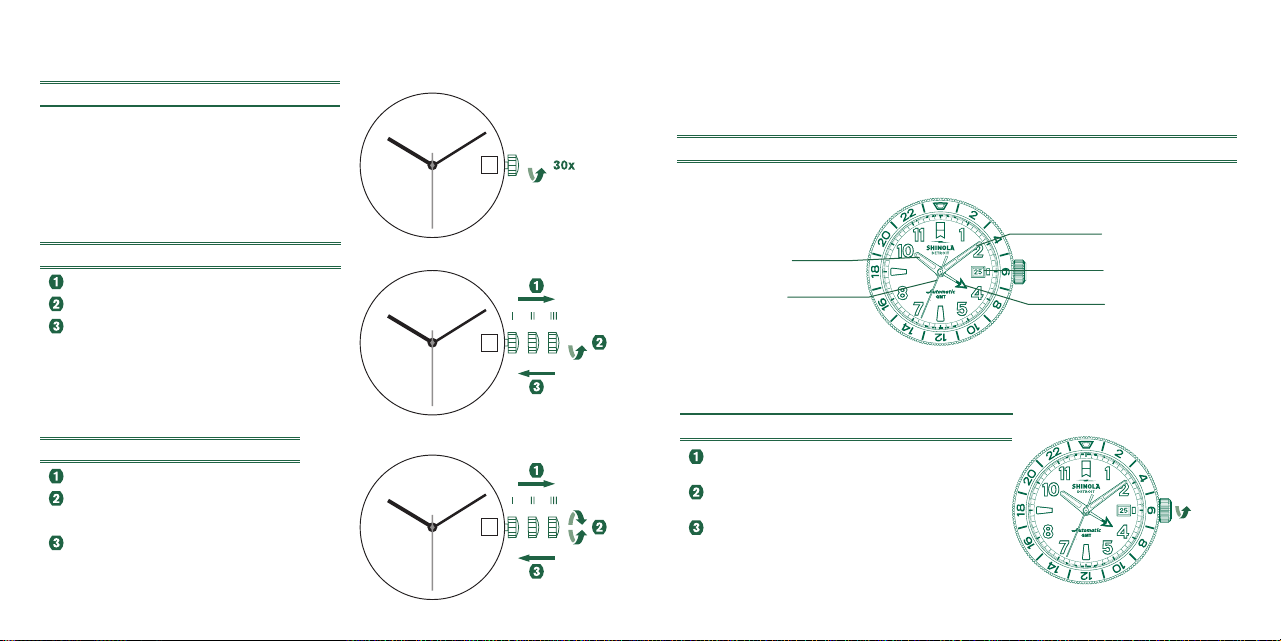
110
*
AUFADDIERTE ZEITMESSUNG
Beispiel
1 Starten: Startet die Zeitmessung.
2 Stoppen: z.B. 15 Min. 5 Sek. nach
1
.
3 Neu starten: Die Zeitmessung wird
wiederaufgenommen.
4 *Stoppen: z.B. 13 Min. 5 Sek
.
nach
3
.
Die aufaddierte Zeit = 28 Min. 10 Sek.
5 Zurücksetzen: Die drei Chronograph-Zeiger
werden in ihre Nullposition zurückgestellt.
Bitte beachten:
* Nach
4
kann die Aufaddierung der Zeitmessung durch Drücken
von Drücker A (Neu starten/Stoppen, Neu starten/Stoppen...) fortgesetzt werden.
ZWISCHEN- ODER INTERVALLZEITMESSUNG
Beispiel
1 Starten: Startet die Zeitmessung.
2 Intervall anzeigen:
z.B. 10 Min. 10 Sek. nach
1
.
Die Zeitmessung wird im Hintergrund fortgesetzt.
3 Messzeit aufholen:
Die drei Chronograph-Zeiger gehen schnell
zur laufend gemessenen Zeit.
4 Stoppen: z.B. 28 Min. 10 Sek. nach
1
.
5 Zurücksetzen: Die drei Chronograph-Zeiger
werden in ihre Nullpositionen zurückgestellt.
Bitte beachten:
* Nach
3
können weitere Intervalle oder Zwischenzeiten durch
Drücken von B (Intervall anzeigen/Messzeit aufholen...) angezeigt werden.
1
5
2
3
4
A
B
2
3
5
B
1
4
A
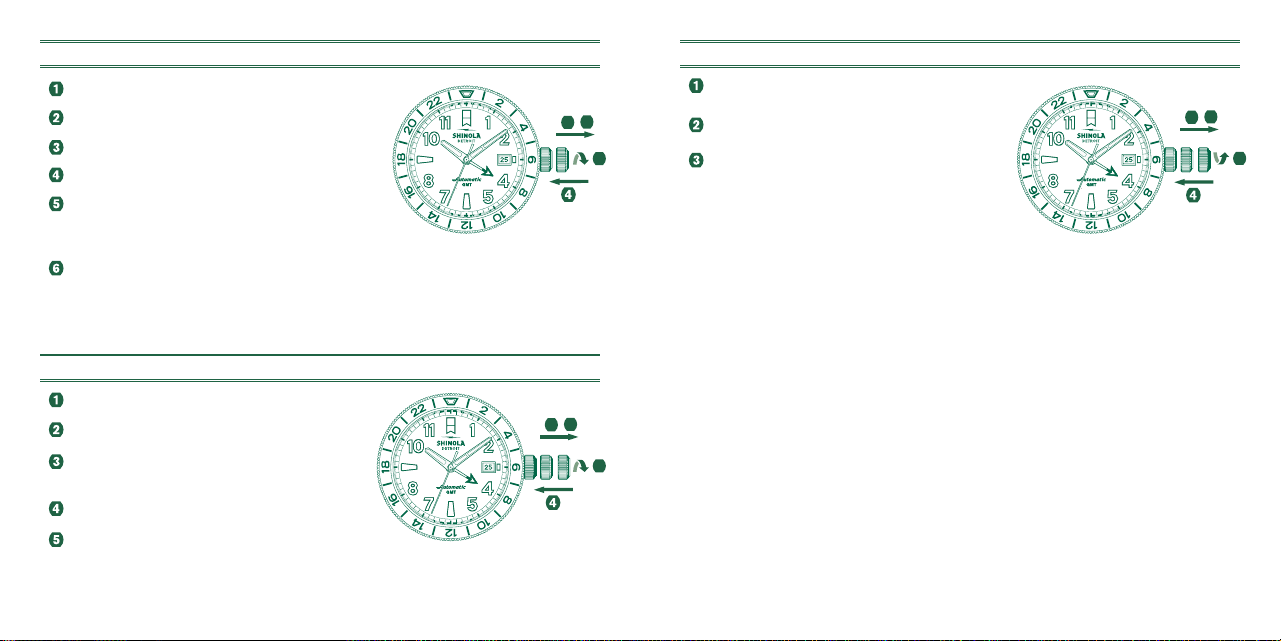
111
EINSTELLEN DER ZEIT
1 Ziehen Sie die Krone in Position III.
(Die Uhr stoppt.)
2 Drehen Sie die Krone, bis die richtige Zeit
erreicht ist.
3 Drücken Sie die Krone wieder in Position I.
EINSTELLEN DES DATUMS
1 Ziehen Sie die Krone in Position II.
(Die Uhr beginnt zu laufen.)
2 Drehen Sie die Krone, bis das richtige Datum
angezeigt wird.
3 Drücken Sie die Krone wieder in Position I.
CHRONOGRAPH MODELL 5050.B
BESCHREIBUNG DER ANZEIGE- UND DER BEDIENELEMENTE
Bitte beachten:
Vor Verwendung der Chronograph-
Funktionen sollten Sie folgendes
sicherstellen:
- die Krone befindet sich in Position
I
(= Ausgangsposition).
- die vier Chronograph-Zeiger befinden
sich nach Aktivierung des Drückers B
genau an der Nullposition. Falls sich die
Zeiger nicht genau bei Null befinden,
muss ihre Position eingestellt werden.
(siehe Kapitel
Einstellen der
Chronograph-Zeiger auf Null
)
A
B
I
SekundenzeigerGroßes Datum
Zentrumstoppsekunde
Minutenzeiger
Stundenzeiger
Minutenzähler
Stundenzähler
1
/
10
Sekundenzähler
1
II IIII
3
2
II
1
2
3
1
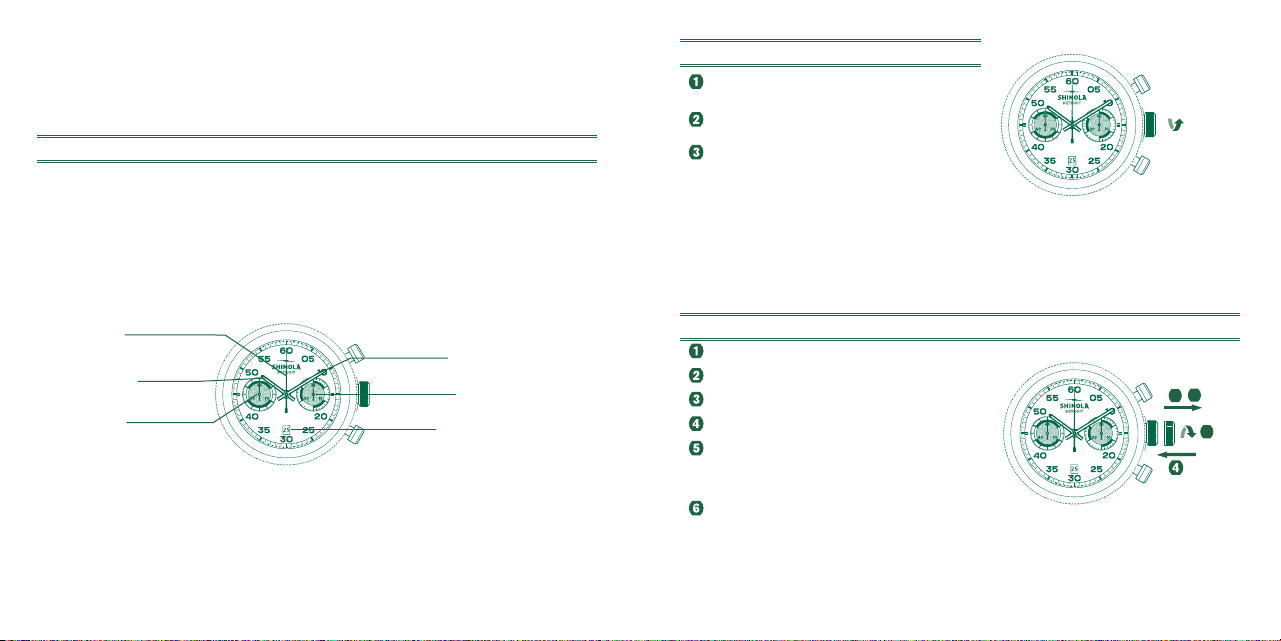
112
EINSTELLEN DER CHRONOGRAPH-ZEIGER AUF NULL
1 Ziehen Sie die Krone in Position III.
(Alle vier Chronograph-Zeiger befinden sich in der
richtigen oder falschen Nullposition.)
2 Halten Sie Drücker A und B weiter
gleichzeitig mindestens 2 Sekunden lang
gedrückt. Die Zentrumstoppsekunde dreht sich
um 360°– der Korrekturmodus ist aktiviert.
3 Drücken Sie Drücker A, um den
Zentrumstoppsekundenzeiger in
Einzelschritten zu bewegen. Halten
Sie Drücker A gedrückt, um den
Zentrumstoppsekundenanzeiger schnell
vorwärts zu bewegen.
3b
Drücken Sie Drücker B,
um zum nächsten Zeiger zu gehen.
4
Drücken Sie Druckknopf A, um den Zeiger des 1/10-Sekunden-Zählers in
Einzelschritten zu bewegen. Drücken und halten Sie Druckknopf A, um den Zeiger
des 1/10-Sekunden-Zählers schnell vorwärts zu bewegen.
4b
Drücken Sie
Druckknopf B, um zum nächsten Zeiger zu gehen.
5
Drücken Sie Drücker A, um den Minuten- und den Stundenzählerzeiger in Einzelschritten
zu bewegen. Halten Sie Drücker A gedrückt, um den Minuten- und Stundenzähler schnell
vorwärts zu bewegen.
4b
Drücken Sie Drücker B, um zum nächsten Zeiger zu gehen.
6
Stellen Sie die Krone wieder in Position I.
GRUNDLEGENDE FUNKTION (STARTEN/STOPPEN/ZURÜCKSETZEN)
Beispiel
1 Starten: Drücken Sie Drücker A.
2 Stoppen: Drücken Sie zum Stoppen der Zeitmessung
Drücker A noch einmal und lesen Sie die drei
Chronographen-Zähler ab: 4Std. / 20Min. / 5Sek. /
7⁄10Sek.
3 Nullpositionierung: Drücken Sie Drücker B. (Die
vier Chronograph-Zeiger werden auf ihre Nullposition
zurückgesetzt)
1
2
3
II IIII
1
2
3
4
5
6
A
2
B
3b
4b
1
3
1
2
A
B
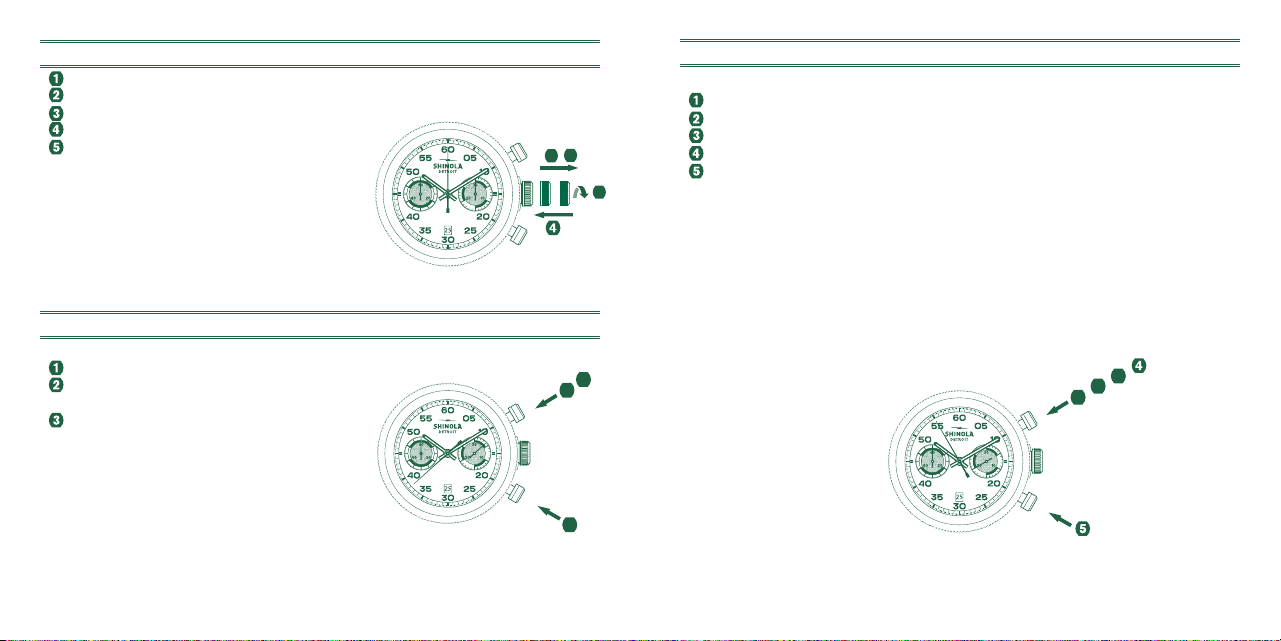
113
*
AUFADDIERTE ZEITMESSUNG
Beispiel
1 Starten: Startet die Zeitmessung.
2 Stop: z.B. 15Min. und 5Sek. nach
1
.
3 Neu starten: Die Zeitmessung wird
wiederaufgenommen.
4 *Stop: z.B. 10 Min. und 5 Sek. nach
3
.
Die aufaddierte Zeit = 25Min. und 10Sek.
5 Zurücksetzen: Die vier Chronograph-Zeiger
werden auf ihre Nullposition zurückgesetzt
Bitte beachten:
* Nach
4
kann die Aufaddierung der Zeitmessung durch Drücken von Drücker A
(Neu starten/Stoppen, Neu starten/Stoppen...) fortgesetzt werden.
ZWISCHEN- ODER INTERVALLZEITMESSUNG
Beispiel
1 Starten: Startet die Zeitmessung.
2 Intervall anzeigen:
z.B. 10Min. und 10Sek. nach 1 .
Die Zeitmessung wird im Hintergrund
fortgesetzt.
3 Messzeit aufholen: Die vier Chronograph-
Zeiger gehen schnell zur laufend gemessenen
Zeit.
4 Stoppen: (Die letzte Zeit wird angezeigt).
5 Zurücksetzen: Die vier Chronograph-Zeiger
werden auf ihre Nullposition zurückgesetzt.
Bitte beachten:
* Nach
3
können weitere Intervalle oder Zwischenzeiten durch Drücken von B
(Intervall anzeigen/Messzeit aufholen...) angezeigt werden.
5
B
1
2
3
4
A
5
2
3
B
1
4
A
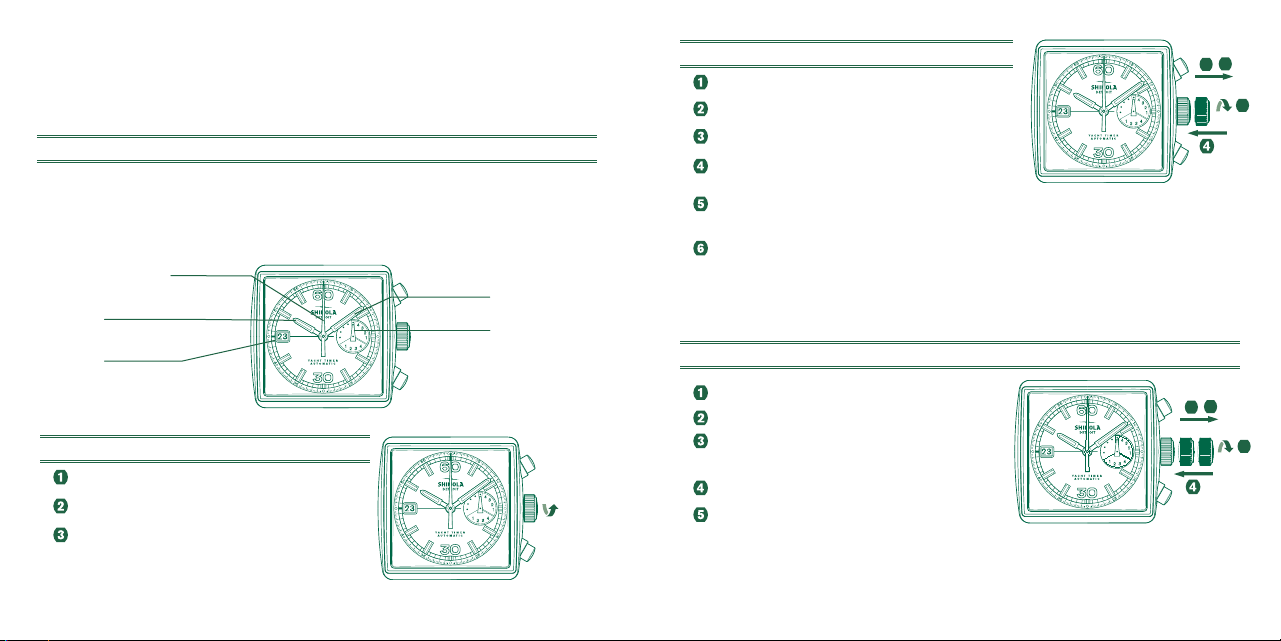
114
CHRONOGRAPH MODELL 3540.D
BESCHREIBUNG DER ANZEIGE- UND BEDIENELEMENTE
EINSTELLEN DER ZEIT
1 Ziehen Sie die Krone in Position III.
(Die Uhr stoppt.)
2 Drehen Sie die Krone, bis die richtige
Zeit erreicht ist.
3 Drücken Sie die Krone wieder in Position I.
EINSTELLEN DES DATUMS
1 Ziehen Sie die Krone in Position II,
bis das richtige Datum angezeigt wird
2 Drehen Sie die Krone entgegen dem Uhrzeigersinn,
bis das richtige Datum angezeigt wird.
3 Drücken Sie die Krone wieder in Position I.
III
1
2
3
II IIII
3
1
2
A
Minutenzeiger
Datum
Zentrumstoppsekunde
I
/
I0
Sekundenzähler
(Wird nach 30 Minuten
zum Stundenzähler.)
Stundenzeiger
Minutenzähler
Zweiter Zeiger
B
I
Bitte beachten:
Vor Verwendung der Chronograph-
Funktionen sollten Sie Folgendes
sicherstellen:
- die Krone befindet sich in Position I
(= normale Position).
-
die drei Chronograph-Zeiger befinden sich
nach Aktivierung des Drückers B genau
an der Nullposition. Falls sich die Zeiger
nicht genau bei Null befinden, muss ihre
Position eingestellt werden. (Siehe Kapitel
Einstellen der Chronograph-Zeiger auf Null
.)
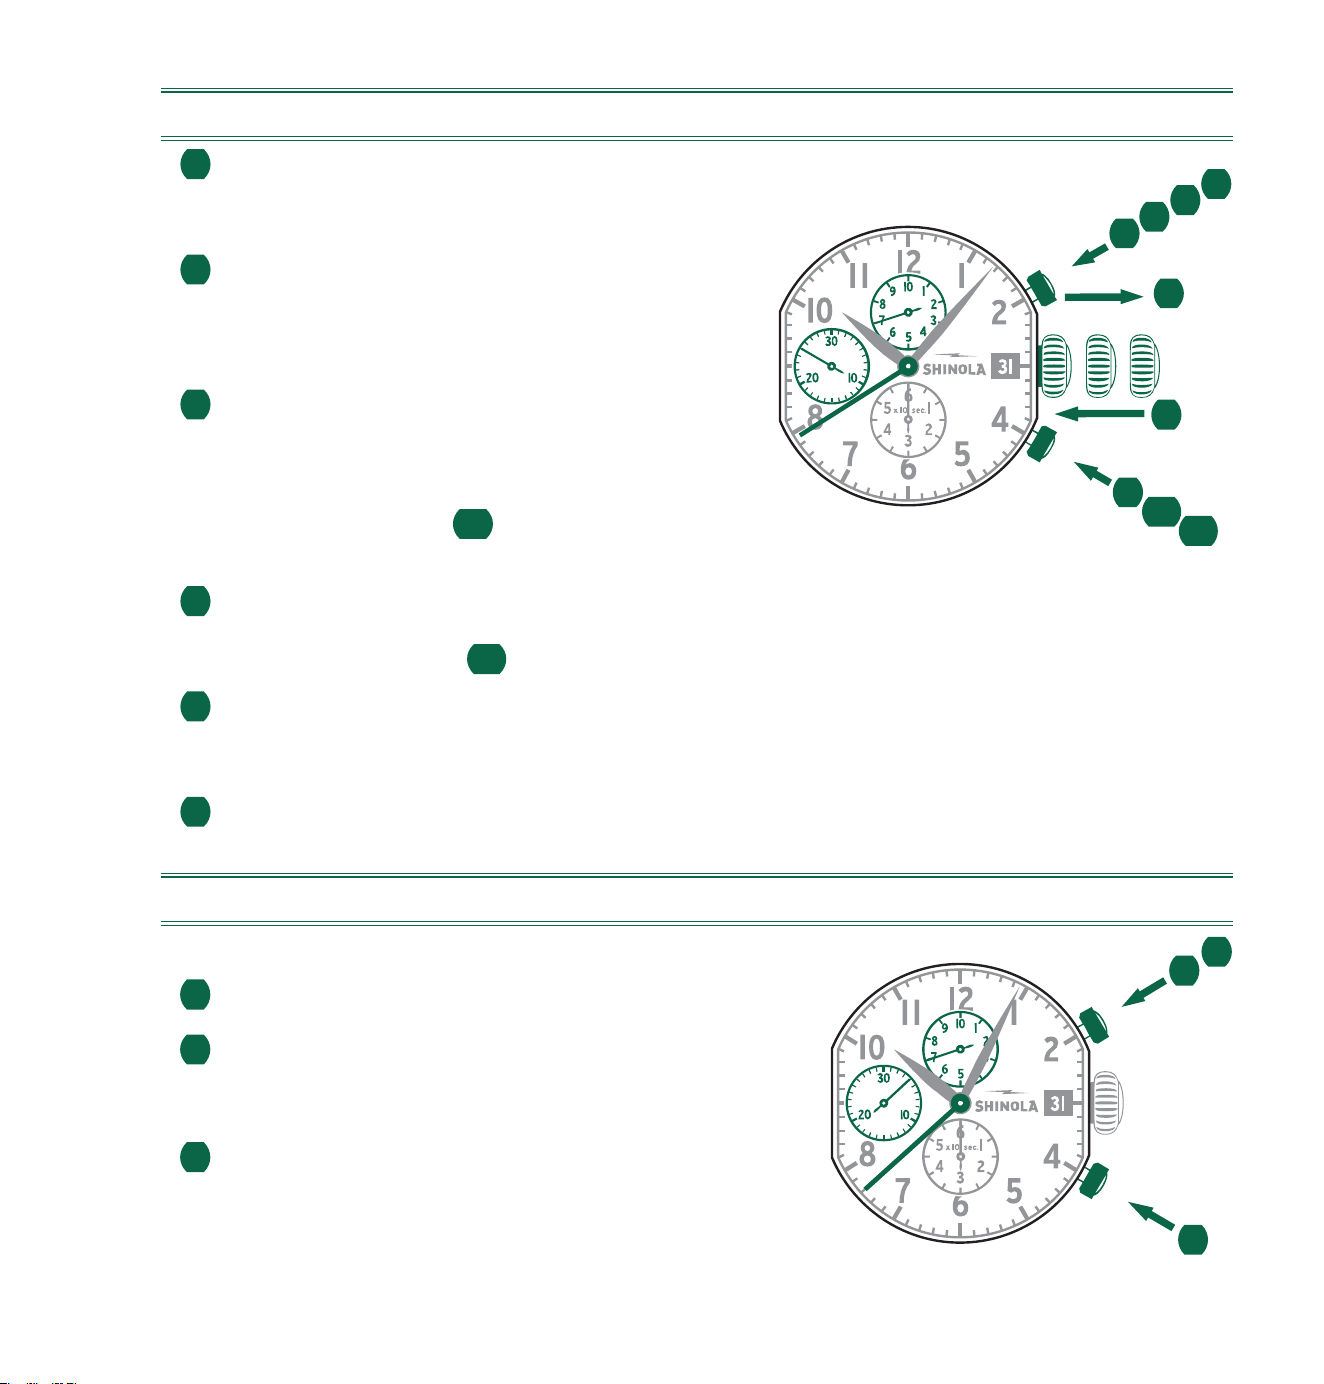
115
EINSTELLEN DER CHRONOGRAPH-ZEIGER AUF NULL
1 Ziehen Sie die Krone in Position III.
(Alle drei Chronograph-Zeiger befinden sich
in der richtigen oder falschen Nullposition.)
2 Halten Sie Drücker A und B gleichzeitig
mindestens 2 Sekunden lang gedrückt.
(Die Zentrumstoppsekunde dreht sich um 360°
– der Korrekturmodus ist aktiviert.)
3
Drücken Sie Drücker A, um den
Zentrumstoppsekundenzeiger in Einzelschritten
zu bewegen. Halten Sie Drücker A gedrückt,
um den Zentrumstoppsekundenzeiger schnell
vorwärts zu bewegen.
3b
Drücken Sie Drücker B,
um zum nächsten Zeiger zu gehen.
4 Drücken Sie Drücker A, um den Stundenzählerzeiger in Einzelschritten
zu bewegen. Halten Sie Drücker A gedrückt, um den Stundenzählerzeiger schnell
vorwärts zu bewegen.
4b
Drücken Sie Drücker B, um zum nächsten Zeiger zu gehen.
5 Drücken Sie Drücker A, um den Minutenzählerzeiger in Einzelschritten
zu bewegen. Halten Sie Drücker A gedrückt, um den Minutenzählerzeiger
schnell vorwärts zu bewegen.
6 Stellen Sie die Krone wieder in Position I.
GRUNDLEGENDE FUNKTION
(
STARTEN/STOPPEN/ZURÜCKSETZEN
)
Beispiel
1 Starten: Drücken Sie Drücker A.
2 Stoppen:
Drücken Sie zum Stoppen der Zeitmessung
Drücker A noch einmal und lesen Sie die drei
Chronographen-Zähler ab: 4 Min. / 38 Sek. / 7⁄10 Sek.
3 Nullpositionierung: Drücken Sie Drücker B.
(Die drei Chronograph-Zeiger werden
auf ihre Nullpositionen zurückgesetzt.)
1
2
3
A
B
II IIII
1
2
3
4
5
6
2
A
B
3b
4b
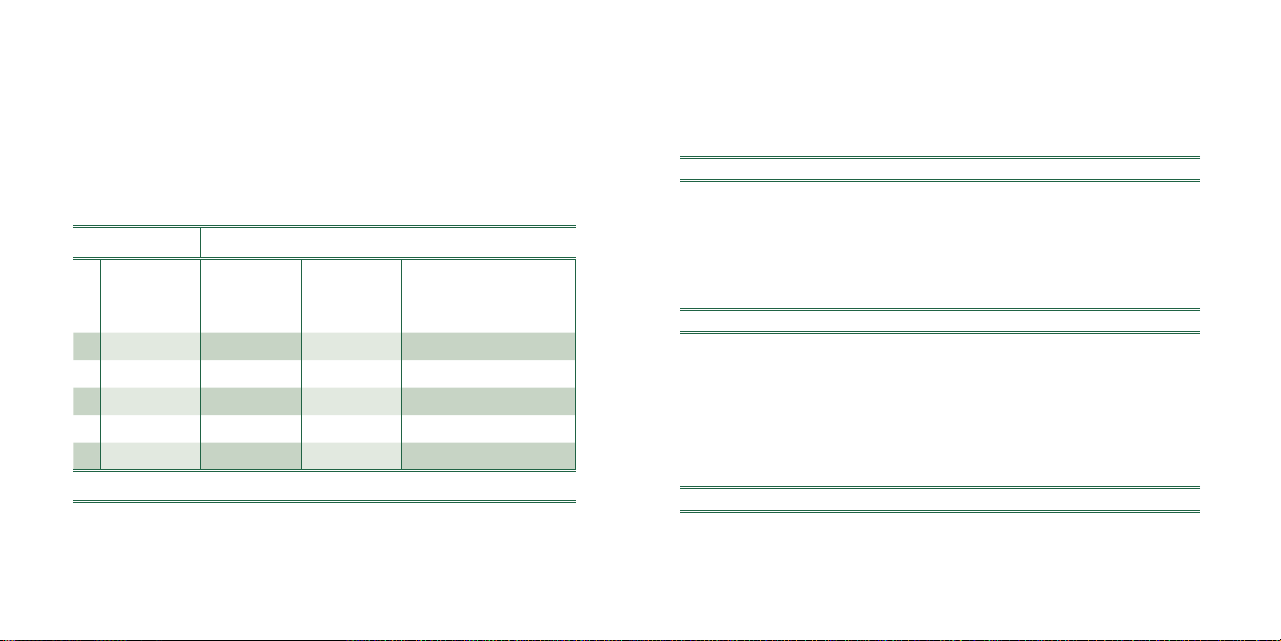
116
1
2
4
3
5
A
B
*
AUFADDIERTE ZEITMESSUNG
Beispiel
1 Starten: Startet die Zeitmessung.
2 Stoppen: z.B. 15 Min. 5 Sek. nach
1
.
3 Neu starten: Die Zeitmessung
wird wieder aufgenommen.
4 *Stoppen: z.B. 13 Min. 5 Sek. nach
3
.
Die aufaddierte Zeit = 28 Min. 10 Sek.
5 Zurücksetzen: Die drei Chronograph-Zeiger
werden in ihre Nullpositionen zurückgestellt.
Bitte beachten:
* Nach
4
kann die Aufaddierung der Zeitmessung durch Drücken
von Drücker A (Neu starten/Stoppen, Neu starten/Stoppen...) fortgesetzt werden.
ZWISCHEN- ODER INTERVALLZEITMESSUNG
Beispiel
1 Starten: Startet die Zeitmessung.
2 Intervall anzeigen: z.B. 10 Min. 10 Sek. nach
1
.
Die Zeitmessung wird im Hintergrund fortgesetzt.
3 Messzeit aufholen:
Die drei Chronograph-Zeiger gehen schnell
zur laufend gemessenen Zeit.
4 Stoppen: z.B. 28 Min. 10 Sek. nach
1
.
5 Zurücksetzen: Die drei Chronograph-Zeiger
werden in ihre Nullpositionen zurückgestellt.
Bitte beachten:
* Nach
3
können weitere Intervalle oder Zwischenzeiten durch
Drücken von B (Intervall anzeigen/Messzeit aufholen...) angezeigt werden.
1
5
2
3
4
A
B

117
708
708
708
II
II
II
III
III
I
I
I
3
3
4
3
1
1
1
2
2
2
MONDPHASE MODELL 708
MONDPHASE EINSTELLEN
1 Ziehen Sie das Rädchen bis zu Position III heraus
(die Uhr stoppt).
2 Drehen Sie das Rädchen, bis Sie die gewünschte
Mondposition erreichen. Achten Sie darauf, dass
die Position exakt der Mondphase entspricht (nutzen
Sie einen Mondkalender). Die Mondscheibe bewegt
sich sehr langsam, springt aber alle 24 Stunden (bei
jeder Datumsänderung) stufenweise.
3 Wenn sie die Zeitanzeige durch Bewegen der Zeiger
drehen, wird dadurch die Mondphase eingestellt. Wenn
Sie die genaue Mondphase erreichen, stellen Sie die Zeiger
wieder auf die richtige Uhrzeit ein (siehe die Anweisungen unter
ZEIT EINSTELLEN oben).
4 Achten Sie darauf, dass die Sie die Datumsanzeige wieder auf das richtige
Datum einstellen (siehe die Anweisungen oben unter DATUM EINSTELLEN.)
UHRZEIT EINSTELLEN
1 Ziehen Sie das Rädchen bis zu Position III heraus
(die Uhr stoppt).
2 Drehen Sie das Rädchen im Uhrzeigersinn,
bis Sie die gewünschte Zeit erreichen.
3 Drücken Sie das Rädchen zurück in Position I.
DATUM EINSTELLEN
1 Ziehen Sie das Rädchen bis zu Position II heraus
(die Uhr läuft weiter).
2 Drehen Sie das Rädchen, bis das gewünschte
Datum erscheint.
3 Drücken Sie das Rädchen zurück in Position I.

118
EINSTELLEN DER ZEIT
1 Ziehen Sie die Krone auf Position III.
(Die Uhr stoppt.)
2 Drehen Sie die Krone, bis Sie die
richtige Zeit erreichen.
3 Schieben Sie die Krone wieder in Position I.
EINSTELLEN DER 24-STUNDEN ANZEIGE
1 Ziehen Sie die Krone auf Position II.
(Die Uhr läuft weiter.)
2 Drehen Sie die Krone gegen den Uhrzeigersinn,
bis Sie die richtige Zeit erreicht haben.
3 Schieben Sie die Krone wieder auf Position I.
EINSTELLEN DES DATUMS
1 Ziehen Sie die Krone auf Position II.
(Die Uhr läuft weiter.)
2 Drehen Sie die Krone im Uhrzeigersinn,
bis das richtige Datum erscheint.
3 Schieben Sie die Krone wieder auf Position I.
4 Bei einer Schnelleinstellung zwischen 10:30 Uhr
und 12:00 Uhr, folgen Sie den Schritten 1 bis 3,
stellen Sie aber sicher, dass das Datum auf dem
nächsten Tag steht, da es keine Umstellung um Mitternacht geben wird.
GMT MODELL 515.24H
Wenn Ihre 24-Stunden-Uhr eine Datumsanzeige besitzt, befindet sich das Datumsfenster
möglicherweise in einer anderen Position als die in diesem Handbuch dargestellte.
3131
3131
II
II
II
IIII
I
I
3
3
3
1
1
1
2
2
2

119
TAG & NACHT (GMT) MODELL 515.24D
DATUMS-SCHNELLKORREKTUR
Ziehen Sie die Krone auf Position II. (Uhr läuft weiter.)
Drehen Sie die Krone im Uhrzeigersinn, bis das
gewünschte Datum erscheint.
Schieben Sie die Krone wieder in Position I.
HINWEIS: Das Datum kann auch während der
Tageswechselphase zwischen 22 Uhr und Mitternacht
korrigiert werden. Das Datum des folgenden Tages
muss gesetzt werden, da keine automatische
Datumsänderung um Mitternacht erfolgt.
DATUMS-SCHNELLKORREKTUR FÜR 24-STUNDEN-ANZEIGE
Ziehen Sie die Krone auf Position II. (Uhr läuft weiter.)
Drehen Sie die Krone gegen den Uhrzeigersinn,
bis das gewünschte Datum erscheint.
Schieben Sie die Krone wieder in Position I.
EINSTELLEN DER ZEIT
Ziehen Sie die Krone in die Position III.
(Die Uhr stoppt.)
Drehen Sie die Krone, bis die aktuelle Uhrzeit angezeigt
wird (Beachten Sie den 24-Stunden-Zyklus).
Schieben Sie die Krone wieder in Position I.

120
CHRONOGRAPH MODELL 5040.F
EINSTELLEN DER ZEIT
Drehen Sie die Krone auf Position II. (Die Uhr stoppt.)
Drehen Sie die Krone, bis Sie die richtige Zeit erreichen.
Schieben Sie die Krone wieder in Position I.
HINWEIS: Um die Zeit auf die genaue Sekunde zu
setzen, muss 1 herausgezogen werden, wenn der
Sekundenzeiger in Position «60» steht. Sobald die Stunden-
und Minutenzeiger eingestellt sind, muss 3 an der genauen
Sekunde wieder in die Position I geschoben werden.
EINSTELLEN DES DATUMS (SCHNELLMODUS)
Drücken Sie den Korrekturknopf C einmal, um das
Datum 1 Tag vorwärts einzustellen.
HINWEIS: Das Datum für den folgenden Tag muss
während der Datumsänderungsphase zwischen
ca. 21:00 Uhr und 00:20 eingestellt werden.
ZEIT / DATUM / TAG / MONAT EINSTELLEN
Ziehen Sie die Krone auf Position II.
(Die Uhr stoppt.)
Drehen Sie die Krone, bis Sie die aktuelle
Zeit erreichen.
Schieben Sie die Krone wieder in Position I.
Drücken Sie den Korrekturknopf C, um die
Datumszeiger vor zu stellen.
C
C
D E
121
Drücken Sie den Korrekturknopf D, um den
Tag vor zu stellen.
Drücken Sie den Korrekturknopf E, um den
Monat vor zu stellen.
GRUNDFUNKTIONEN (START / STOP / RESET)
Beispiel
Start: Drücken Sie die Taste A.
Stopp: Um die Zeitmessung zu stoppen, drücken
Sie erneut die Taste A und lesen Sie die drei
Anzeigen ab: 4 min. / 38 Sek. / 7/10 Sek.
Nullpositionierung: Drücken Sie die Taste B.
(Die drei Uhrzeiger werden auf ihre Nullpositionen
zurückgesetzt.)
AKKUMULIERTE MESSUNG
Beispiel
Start: Startzeitpunkt.
Stopp: z.B. 15 min. 5 Sek.
1
folgend.
Neustart: Timing wird wieder aufgenommen.
*Stopp: z.B. 13 min. 5 Sek.
3
folgend.
Die akkumulierte Zeit = 28 min. 10 Sek.
Reset: Die drei Uhrzeiger werden an ihre
Nullpositionen gesetzt.
A
B
A
B
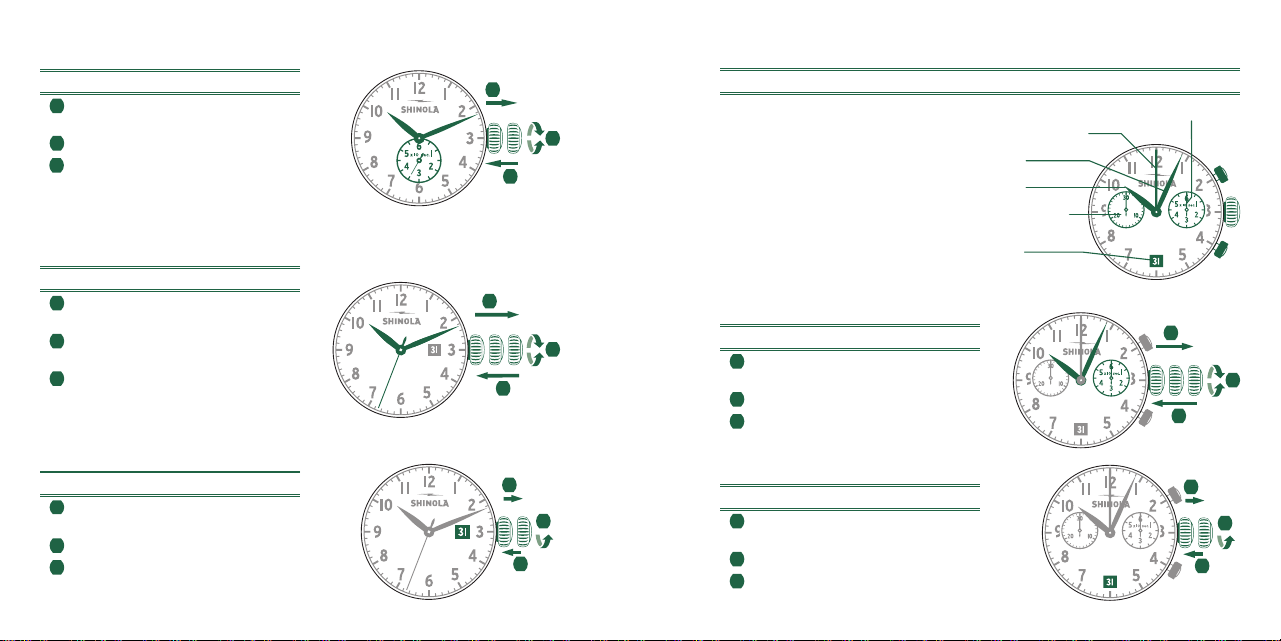
122
ZWISCHENZEITEN
Beispiel
Start: Taste A drücken.
Anzeigeintervall:
z.B. 10 min. 10 Sek.
1
folgend .
Die Messung läuft im Hintergrund weiter.
Feststellen der gemessenen Zeit:
Die Uhrzeiger werden auf die gemessene
Laufzeit gestellt
Stopp: Endzeit wird angezeigt.
Reset: Die drei Zeiger werden auf ihre
Nullpositionen gesetzt.
Bitte beachten Sie:
* Nach
3
, werden weitere Intervalle oder Zwischenstufen
durch Drücken von B angezeigt (Anzeigeintervall / Messzeit, ...)
*
A
B
123
EINSTELLUNG DER ZEIGER AUF NULLPOSITION
Beispiel
Eine oder mehrere Uhrzeiger sind nicht in ihrer
korrekten Nullposition und müssen angepasst
werden (z. B. nach einem Batteriewechsel).
Ziehen Sie die Krone auf Position II.
(Alle Uhrzeiger befinden sich in der korrekten
NullPosition).
Halten Sie die Knöpfe A und B gleichzeitig
mindestens 2 Sekunden lang gedrückt und lassen
Sie sie los (der kleine Zeiger dreht sich um 360 °
– Korrekturmodus ist aktiviert).
Anpassen des kleinen Zeigers:
Einzelschritt — Drücken Sie A 1x kurz
Kontinuierlich — Drücken Sie A lange
Zum Einstellen der nächsten
Zeiger — Drücken Sie B
Einstellen des 1/10 Sekunden Zeigers
(Position 6 Uhr):
Einzelschritt — Drücken Sie A 1x kurz
Kontinuierlich — Drücken Sie A lange
Zum Einstellen der nächsten Zeiger — Drücken Sie B
Einstellen des Minutenzählers
(Position 9 Uhr):
Einzelschritt — Drücken Sie A 1x kurz
Kontinuierlich — Drücken Sie A lang
Stellen Sie die Krone zurück auf Position I.
(Beenden der Uhrzeiger-Einstellung
(kann jederzeit durchgeführt werden).
A
B
124
ARGOMATIC MODEL R150
AUFZIEHEN AUSWÄHLEN
Die maximale Laufzeit kann durch 30-maliges Drehen
der Krone im Uhrzeigersinn wiederhergestellt werden.
SCHNELLE DATUMSKORREKTUR
Ziehen Sie die Krone auf Position II. (Uhr läuft weiter.)
Drehen Sie die Krone gegen den Uhrzeigersinn,
bis das gewünschte Datum erscheint.
Schieben Sie die Krone wieder in Position I.
ZEITEINSTELLUNG
Ziehen Sie die Krone in die Position III.
(Die Uhr stoppt.)
Drehen Sie die Krone, bis die aktuelle
Uhrzeit angezeigt wird (Beachten Sie den
24-Stunden-Zyklus).
Schieben Sie die Krone wieder in Position I.
125
AUTOMATIK MODELL SW330-2
Wenn Ihre Uhr mit einer verschraubten Krone ausgestattet ist, müssen Sie zuerst die Krone
aufschrauben, bevor Sie Einstellungen vornehmen können. Informationen zur Funktionsweise
der Krone finden Sie auf Seite 5.
BESCHREIBUNG DER ANZEIGE- UND BEDIENELEMENTE
AUFZIEHEN, WENN DIE UHR STEHT
Drehen Sie die Krone gegen den Uhrzeigersinn, bis sie
Position
I
erreicht.
Drehen Sie die Krone 30 bis 35 Mal im Uhrzeigersinn,
bis die volle Laufzeit wiederhergestellt ist.
Zum erneuten Verschrauben der Krone drücken Sie
sie in das Gehäuse hinein, und drehen Sie sie leicht im
Uhrzeigersinn, bis sie in Position Null einrastet.
Stundenzeiger
Sekundenzeiger
Minutenzeiger
Datumsfenster
GMT-Zeiger
30x-35x
126
III
3
1
2
EINSTELLEN DES DATUMS (SCHNELLMODUS)
Lösen Sie die Verschraubung der Krone, um sie in
Position I zu bringen.
Ziehen Sie die Krone in Position II (die Uhr läuft noch).
Drehen Sie die Krone gegen den Uhrzeigersinn,
bis das gewünschte Datum erscheint.
Schieben Sie die Krone wieder in Position I.
Bei einer Einstellung zwischen 21:00und 3:00Uhr, führen Sie
die Schritte 1 bis 3 aus, aber stellen Sie sicher, dass das
Datum auf den nächsten Tag eingestellt ist.
Vergessen Sie nicht, die Krone wieder loszulassen. Drücken
Sie sie dazu gegen das Gehäuse, bis die Gewinde einrasten.
Drehen Sie sie dann im Uhrzeigersinn fest.
EINSTELLEN DER UHRZEIT
Lösen Sie die Verschraubung der Krone, um sie in
Position I zu bringen.
Ziehen Sie die Krone in Position III (die Uhr steht still).
Drehen Sie die Krone gegen den Uhrzeigersinn, bis
die aktuelle Uhrzeit angezeigt wird (beachten Sie den
24-Stunden-Zyklus).
Schieben Sie die Krone wieder in Position I.
Vergessen Sie nicht, die Krone wieder loszulassen.
Drücken Sie sie dazu gegen das Gehäuse, bis
die Gewinde einrasten. Drehen Sie sie dann im
Uhrzeigersinn fest.
II IIII
3
1
2
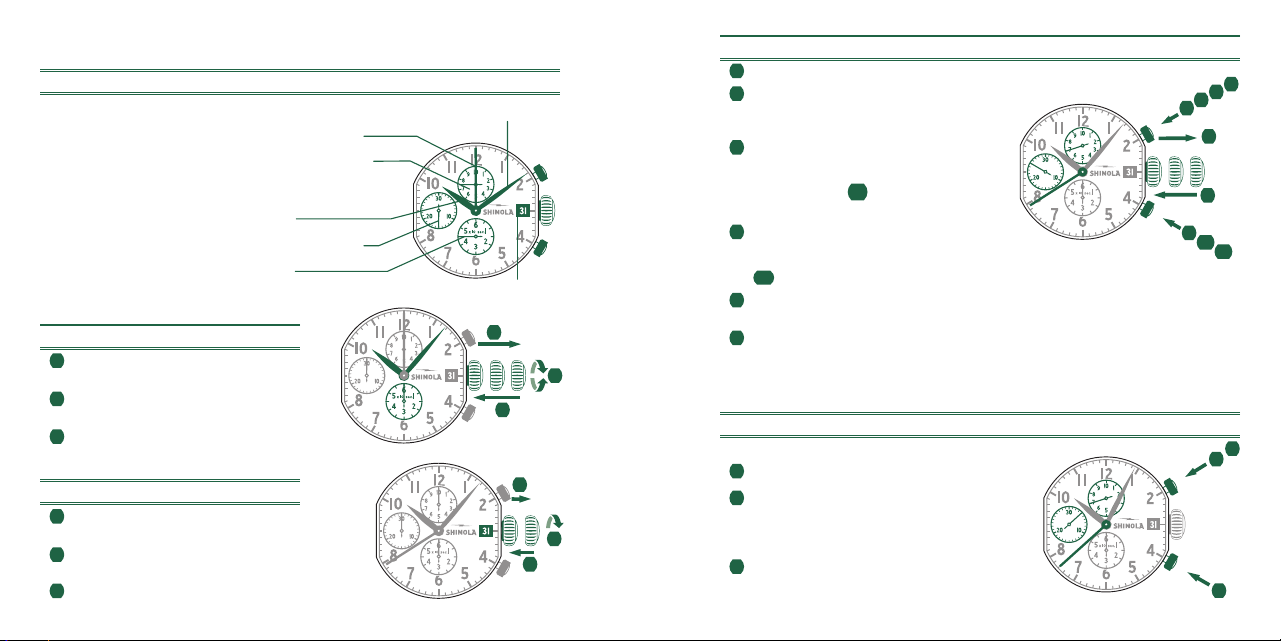
127
II IIII
3
1
2
EINSTELLEN DER GMT-ZEIT
Lösen Sie die Verschraubung der Krone, um sie in
Position I zu bringen.
Ziehen Sie die Krone in PositionII (die Uhr läuft noch).
Drehen Sie die Krone im Uhrzeigersinn, bis die
gewünschte GMT-Uhrzeit angezeigt wird
(beachten Sie den 24-Stunden-Zyklus).
Schieben Sie die Krone wieder in PositionI.
Vergessen Sie nicht, die Krone wieder loszulassen
Drücken Sie sie dazu gegen das Gehäuse, bis die
Gewinde einrasten. Drehen Sie sie dann im
Uhrzeigersinn fest.
Hinweis:
* Der GMT-Zeiger bewegt sich synchron zum Stundenzeiger.
Die GMT-Uhrzeit wird genauer, wenn die Einstellung zu einer
beliebigen vollen Stunde erfolgt.
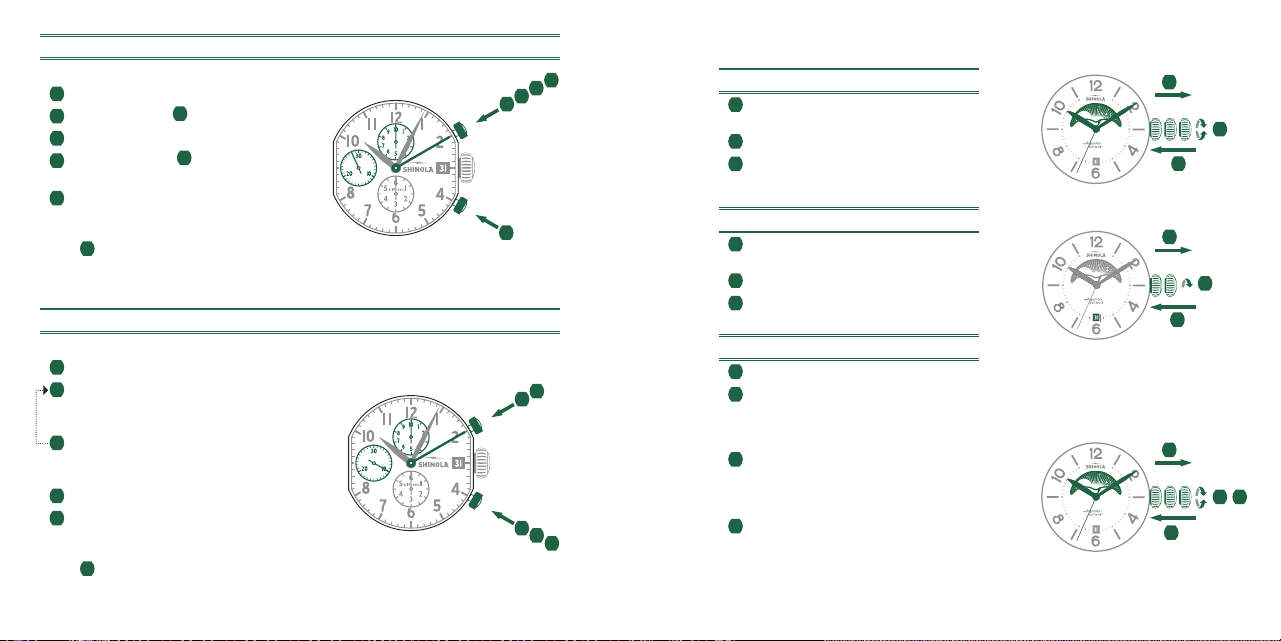
128
AUTOMATIK MODELL SW510 BH A
Wenn Ihre Uhr mit einer verschraubten Krone ausgestattet ist, müssen Sie zuerst die Krone
aufschrauben, bevor Sie Einstellungen vornehmen können. Informationen zur Funktionsweise
der Krone finden Sie auf Seite 5.
BESCHREIBUNG DER ANZEIGE- UND BEDIENELEMENTE
Hinweis:
Vor Verwendung der Chronograph-Funktionen sollten Sie sicherstellen, dass:
• sich die Krone in der normalen, verriegelten Position (Position 0) befindet;
• sich die beiden Chronograph-Zeiger in der Nullposition befinden.
Sekundenzähler
Stundenzeiger
Sekundenzeiger
Minutenzeiger
30-Minuten-Zähler
Datumsfenster
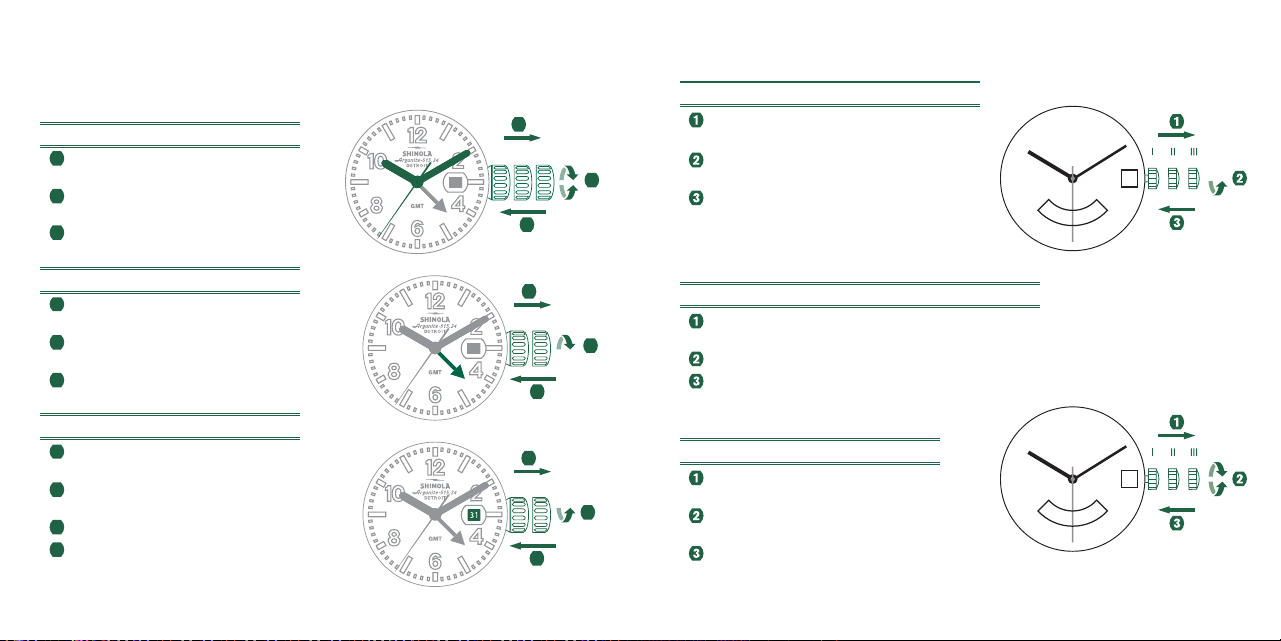
129
AUFZIEHEN
Drehen Sie die Krone gegen den Uhrzeigersinn,
bis sie Position I erreicht.
Drehen Sie die Krone 30 bis 35 Mal im Uhrzeiger-
sinn, bis die volle Laufzeit wiederhergestellt ist
Zum erneuten Verschrauben der Krone drücken
Sie sie in das Gehäuse hinein, und drehen Sie
sie leicht im Uhrzeigersinn, bis sie in Position Null
einrastet.
EINSTELLEN DES DATUMS (SCHNELLMODUS)
Lösen Sie die Verschraubung der Krone, um sie in
Position I zu bringen.
Ziehen Sie die Krone in Position II (die Uhr läuft noch).
Drehen Sie die Krone gegen den Uhrzeigersinn,
bis das gewünschte Datum erscheint.
Schieben Sie die Krone wieder in Position I.
Bei einer Einstellung zwischen 21:00 und 3:00 Uhr,
führen Sie die Schritte 1 bis 3 aus, aber stellen Sie sicher,
dass das Datum auf den nächsten Tag eingestellt ist.
Vergessen Sie nicht, die Krone wieder loszulassen.
Drücken Sie sie dazu gegen das Gehäuse, bis die Gewinde
einrasten. Drehen Sie sie dann im Uhrzeigersinn fest.
III
3
1
2
30x - 35x
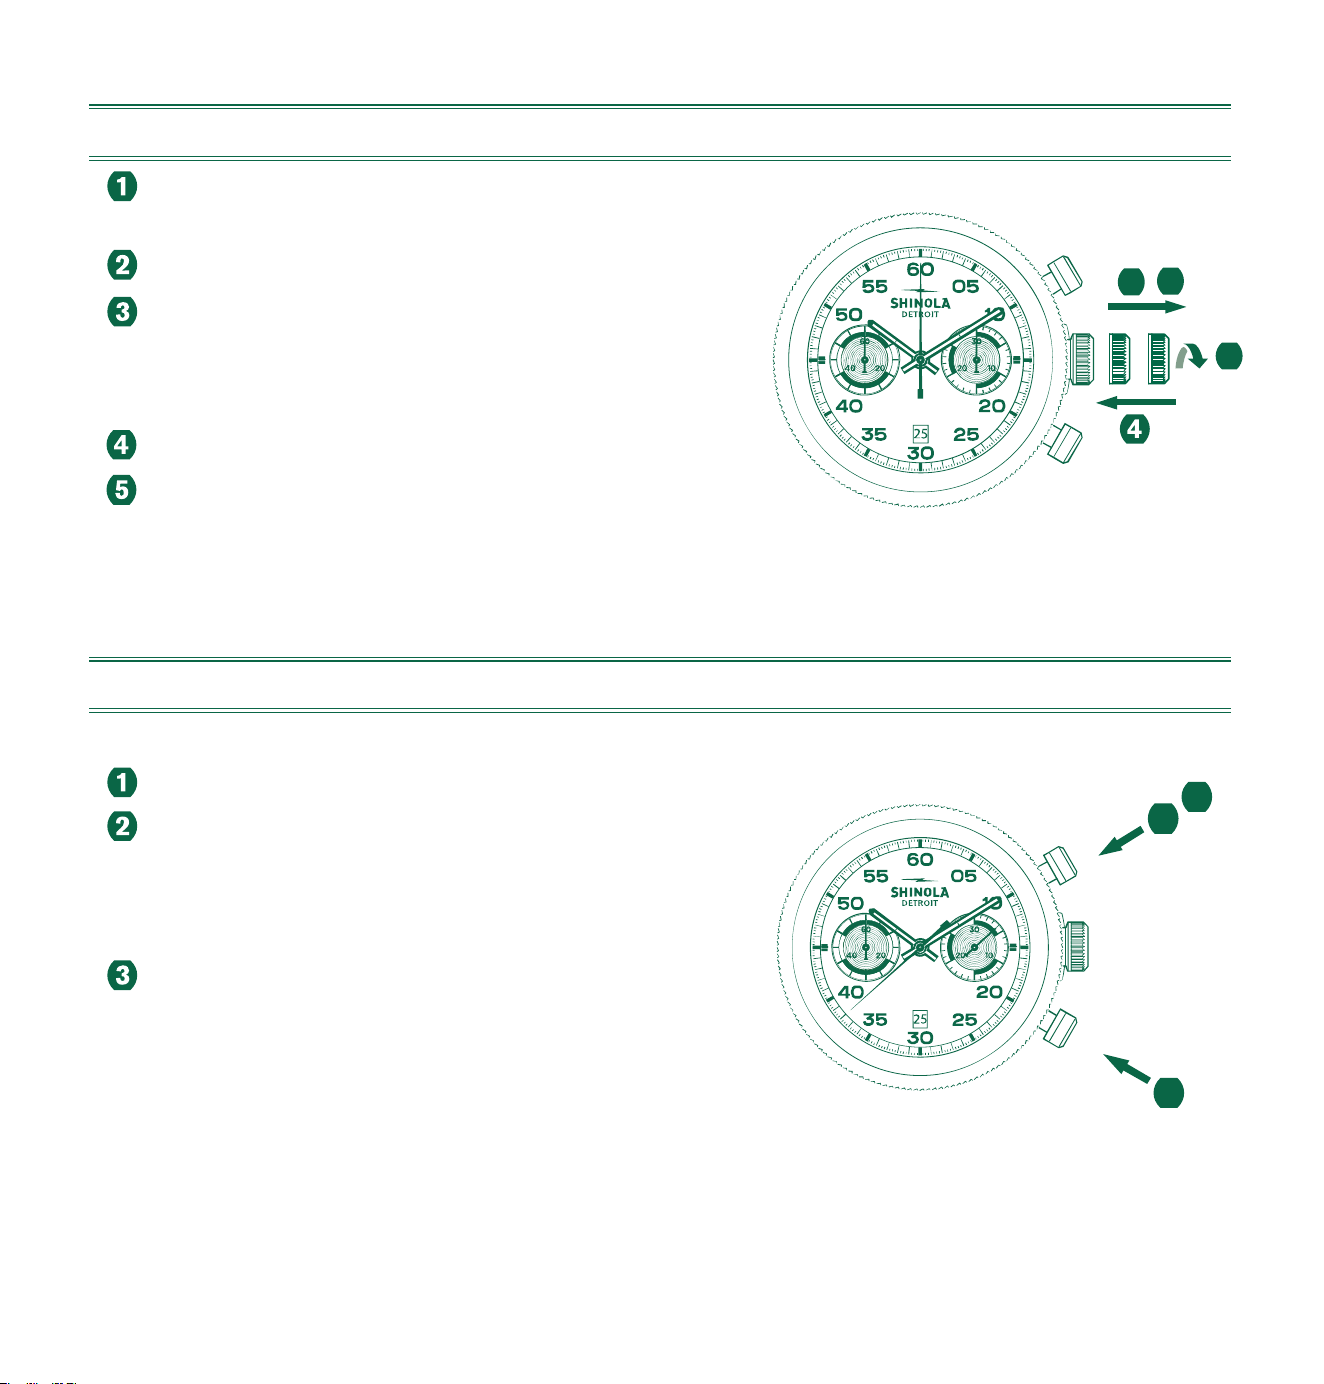
130
GRUNDFUNKTIONEN (STARTEN / STOPPEN / ZURÜCKSETZEN)
Beispiel
Starten: Drücken Sie Drücker A.
Stoppen: Um die Zeitmessung zu stoppen, drücken
Sie erneut Drücker A und lesen Sie die beiden
Chronograph-Zähler ab: z. B. 4 Min. / 38 Sek.
Nullpositionierung: Drücken Sie Drücker B.
(Die beiden Chronograph-Zeiger werden auf ihre
Nullpositionen zurückgesetzt.)
1
2
3
A
B
EINSTELLEN DER ZEIT
Lösen Sie die Verschraubung der Krone, um sie in
Position I zu bringen.
Ziehen Sie die Krone in Position III (die Uhr steht still).
Drehen Sie die Krone gegen den Uhrzeigersinn, bis
die aktuelle Uhrzeit angezeigt wird (beachten Sie den
24-Stunden-Zyklus).
Schieben Sie die Krone wieder in Position I.
Vergessen Sie nicht, die Krone wieder loszulassen.
Drücken Sie sie dazu gegen das Gehäuse, bis
die Gewinde einrasten. Drehen Sie sie dann im
Uhrzeigersinn fest.
II IIII
3
1
2

131
AKKUMULIERTE MESSUNG
Beispiel
Starten: Drücken Sie Drücker A.
Stoppen: Um die Zeitmessung zu stoppen, drücken Sie erneut Drücker A und lesen
Sie die beiden Chronograph-Zähler ab, z. B. 15 Min. / 5 Sek.
Neustarten: Drücken Sie Drücker A, um die Zeitmessung fortzusetzen.
*Stoppen: Drücken Sie Drücker A, um die Zeitmessung zu stoppen und die Zähler abzulesen,
z. B. 5 min. / 50 Sek. Die aufaddierte Zeit = 20 Min. 55 Sek.
Zurücksetzen: Drücken Sie Drücker B, um die beiden Chronograph-Zeiger auf ihre
Nullpotionen zurückzustellen.
*Hinweis: Nach Schritt 4 kann die Aufaddierung der Zeitmessung durch
Drücken von Drücker A fortgesetzt werden (Neustarten / Stoppen, Neustarten / Stoppen ...)
1
2
3
A
B
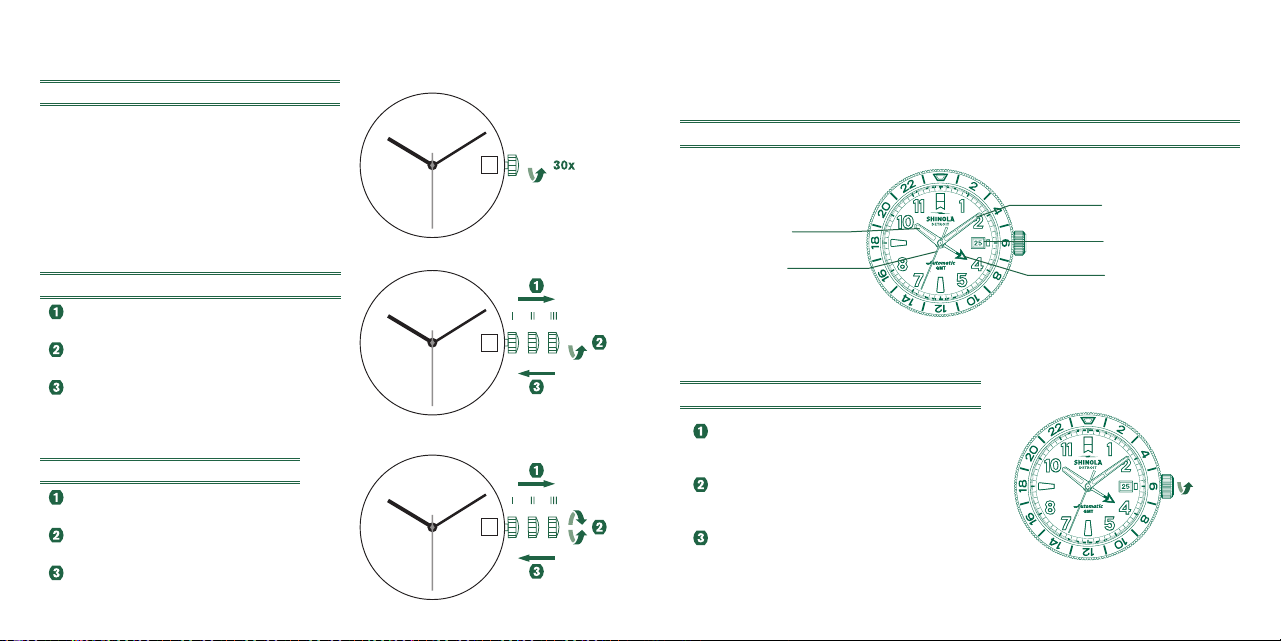
132
AUTOMATIK MODELL SW511 BH C
Wenn Ihre Uhr mit einer verschraubten Krone ausgestattet ist, müssen Sie zuerst die Krone
aufschrauben, bevor Sie Einstellungen vornehmen können. Informationen zur Funktionsweise
der Krone finden Sie auf Seite 5.
BESCHREIBUNG DER ANZEIGE- UND BEDIENELEMENTE
Hinweis:
Vor Verwendung der Chronograph-Funktionen sollten Sie sicherstellen, dass:
• sich die Krone in der normalen, verriegelten Position (Position 0) befindet;
• sich die der große und kleine Chronograph-Zeiger in der Nullposition befinden.
Sekundenzeiger
großer Chronograph
Stundenzeiger
Datumsfenster
Minutenzeiger
Yacht-Timer –
Minutenzeiger
kleiner Chronograph
AUFZIEHEN, WENN DIE UHR STEHT
Drehen Sie die Krone gegen den Uhrzeigersinn, bis sie
PositionI erreicht.
Drehen Sie die Krone 30bis 35Mal im Uhrzeigersinn,
bis die volle Laufzeit wiederhergestellt ist.
Zum erneuten Verschrauben der Krone drücken Sie
sie in das Gehäuse hinein und drehen sie leicht im
Uhrzeigersinn, bis sie wieder in Position Null einrastet.
30x-35x
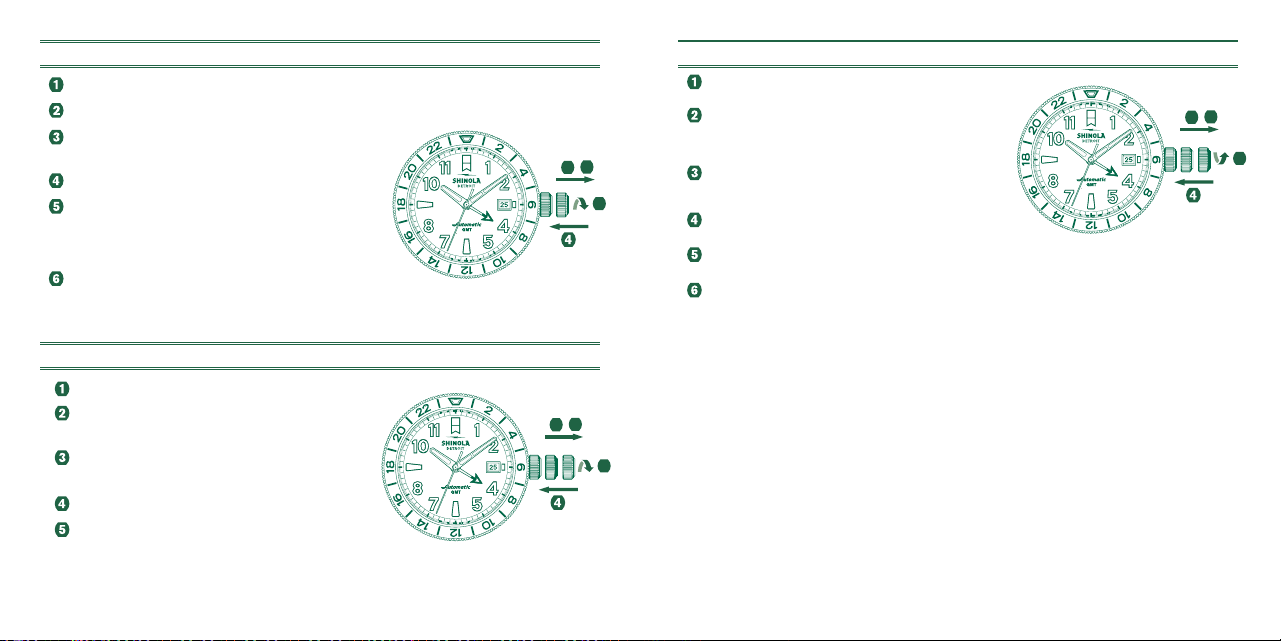
133
EINSTELLEN DER UHRZEIT
Lösen Sie die Verschraubung der Krone, um sie in
PositionI zu bringen.
Ziehen Sie die Krone in Position
III
(die Uhr steht still).
Drehen Sie die Krone gegen den Uhrzeigersinn, bis die
aktuelle Uhrzeit angezeigt wird (beachten Sie den
24-Stunden-Zyklus).
Schieben Sie die Krone wieder in PositionI.
Vergessen Sie nicht, die Krone wieder loszulassen.
Drücken Sie sie dazu gegen das Gehäuse, bis die Gewinde
einrasten. Drehen Sie sie dann im Uhrzeigersinn fest.
III
3
1
2
EINSTELLEN DES DATUMS (SCHNELLMODUS)
Lösen Sie die Verschraubung der Krone, um sie in Position
I
zu bringen.
Ziehen Sie die Krone in PositionII (die Uhr läuft noch).
Drehen Sie die Krone gegen den Uhrzeigersinn, bis das
gewünschte Datum erscheint.
Schieben Sie die Krone wieder in PositionI.
Bei einer Einstellung zwischen 21:00und 3:00Uhr,
führen Sie die Schritte 1 bis 3 aus, aber stellen Sie sicher,
dass das Datum auf den nächsten Tag eingestellt ist.
Vergessen Sie nicht, die Krone wieder loszulassen. Drücken
Sie sie dazu gegen das Gehäuse, bis die Gewinde
einrasten. Drehen Sie sie dann im Uhrzeigersinn fest.
II IIII
3
1
2
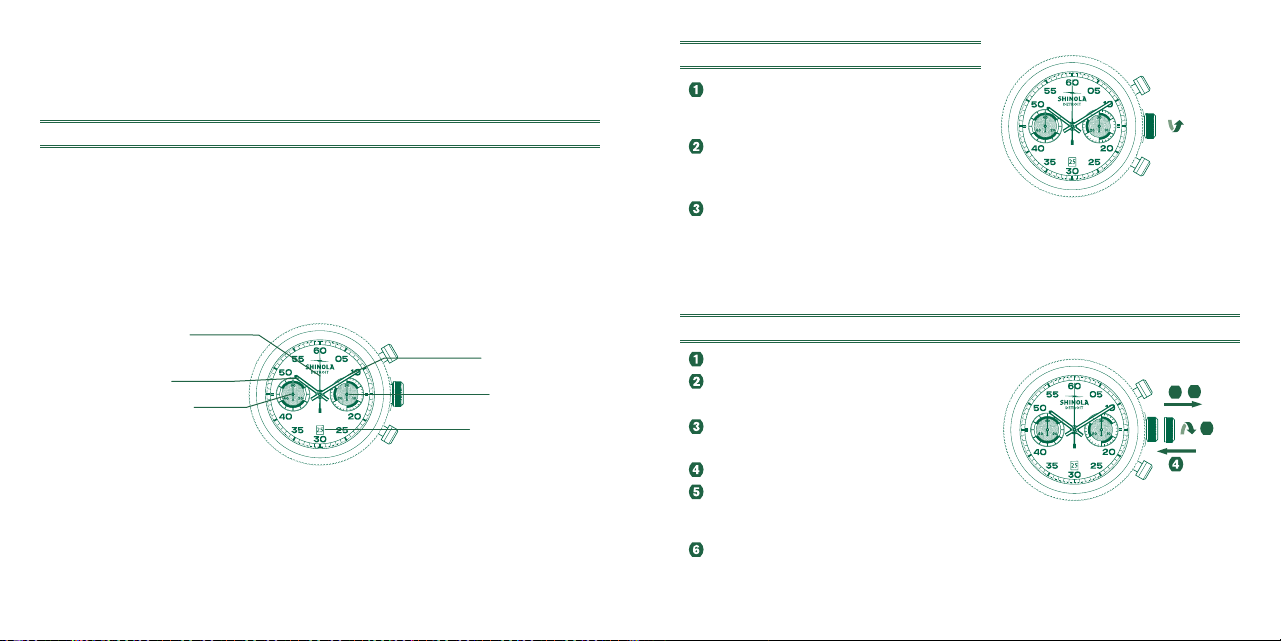
134
1
2
3
A
B
GRUNDFUNKTIONEN (START/STOPP/ZURÜCKSETZEN)
Segelregatta
Start: Drücker
A
drücken, wenn das Regatta-
Startsignal zu hören ist. Dadurch startet der 5-Minuten-
Countdown bis zum Beginn der Regatta.
Stopp: Um die Zeitmessung zu stoppen, drücken
Sie erneut Drücker
A
und lesen Sie die beiden
Chronograph-Zähler ab:
z. B. 4 Min./5 Sek.
Nullpositionierung: Drücken Sie Drücker
B
.
(Die beiden Chronograph-Zeiger werden auf ihre
Nullpositionen zurückgesetzt.)
*Hinweis:
-
Sie dürfen nicht die Startlinie überqueren, solange
die 5Minuten nicht verstrichen sind (dies ist im ersten
5-Minuten-Countdownabschnitt erkennbar), um einen
Fehlstart zu vermeiden.
-
Falls ein Fehlstart auftritt, setzen Sie den
Chronographen zurück (erst DrückerA, dann DrückerB
drücken) und starten die Zeit erneut (DrückerA).
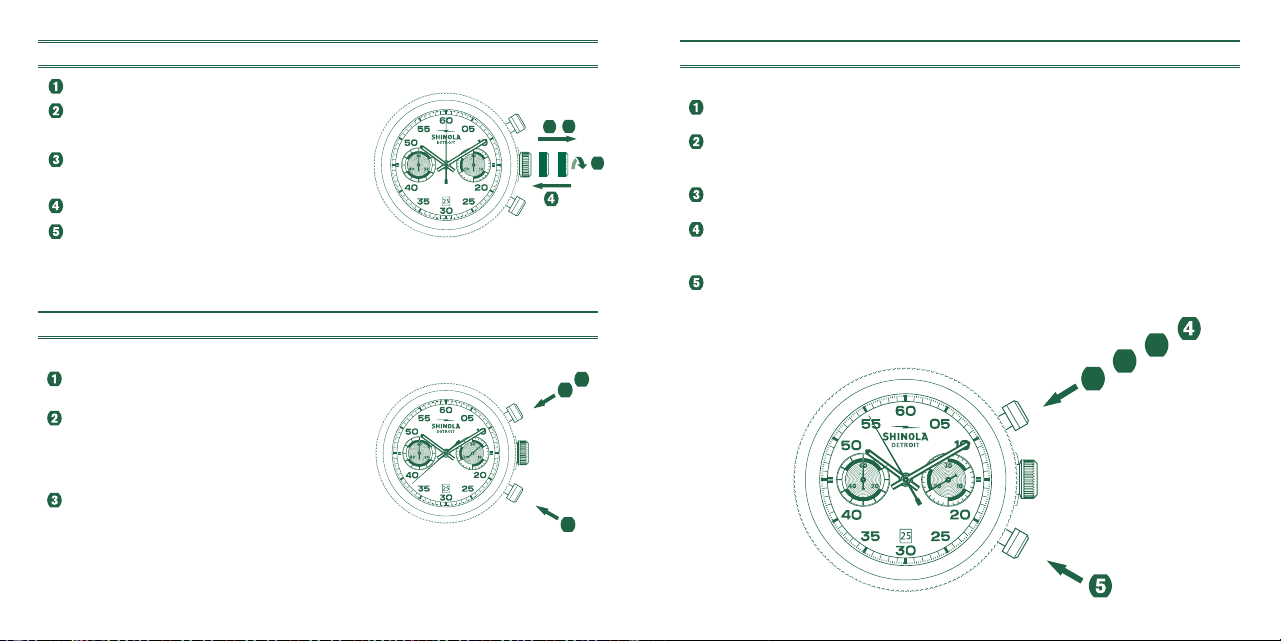
135
EINSTELLEN DER UHRZEIT
Lösen Sie bei einer verschraubten Krone die Verschraubung der
Krone, um sie in PositionI zu bringen.
Ziehen Sie die Krone in PositionII (die Uhr steht still).
Drehen Sie die Krone, bis die aktuelle Uhrzeit angezeigt wird.
Schieben Sie die Krone wieder in PositionI.
Vergessen Sie nicht, die Krone im Falle einer verschraubten
Krone wieder loszulassen. Drücken Sie sie dazu gegen das
Gehäuse, bis die Gewinde einrasten. Drehen Sie sie dann im
Uhrzeigersinn fest.
MECHANISCHES MODELL SW210-1
Wenn Ihre Uhr mit einer verschraubten Krone ausgestattet ist, müssen Sie zuerst die Krone auf-
schrauben, bevor Sie Einstellungen vornehmen können. Informationen zur Funktionsweise der Krone
finden Sie auf Seite5.
AUFZIEHEN, WENN DIE UHR STEHT
Die maximale Laufzeit erreichen Sie, indem Sie
die Krone etwa 30Mal im Uhrzeigersinn drehen.
Hinweis:
-
Drehen Sie die Krone nach 20Umdrehungen langsamer.
Achten Sie auf den Widerstand an der Krone.
Wenn Sie Widerstand spüren, drehen Sie nicht weiter.
-
ÜBERDREHEN SIE die Krone NICHT, da dadurch das Uhrwerk beschädigt wird.
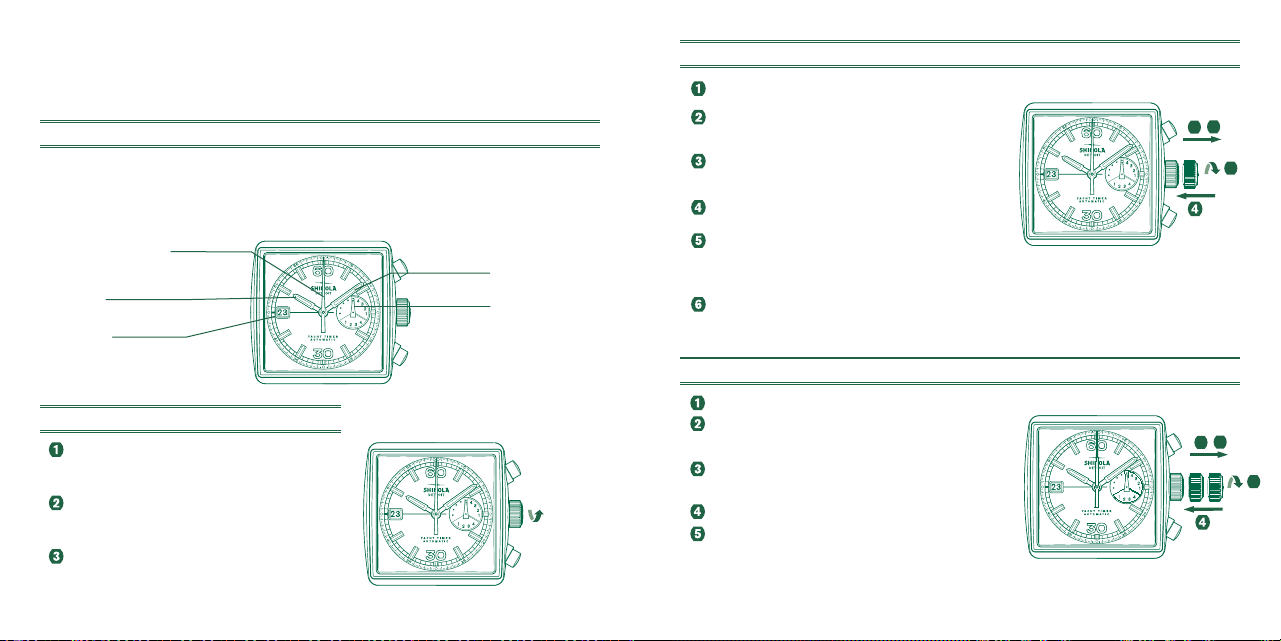
136
WASSERBESTÄNDIGKEIT
Alle Shinola-Uhren sind auf eine minimale Wasserbeständigkeit von 3ATM (100ft / 30m)
ausgelegt.
Die Wasserresistenz schützt das Uhrwerk vor Staub, Feuchtigkeit und Gefahr der
Beschädigung des Uhrwerks, sollte sie in Wasser eintauchen. Bitte beachten Sie den
Leitfaden für empfohlenes Verhalten in verschiedenen Wasserumgebungen.
Es ist wichtig, nicht zu versuchen, die Position der Krone anzupassen, während die Uhr mit
Wasser in Berührung kommt, da Wasser eindringen und das Uhrwerk beschädigen kann.
Es ist wichtig, Uhren mit verschraubten Kronen so zu sichern, dass die Krone in der richtigen
Position und vollständig verriegelt ist, bevor sie mit Wasser in Berührung kommt.
INDIKATION WASSERBEZOGENER GEBRAUCH
Wasserresistenz-
Verhalten
Wassernebel, Schweiß,
leichter Regen usw.
Schwimmen, usw.
auchen
(ohne Sauerstoffflasche)
1
3ATM OK NEIN NEIN
2
5ATM OK NEIN NEIN
3
10ATM OK OK NEIN
4
20ATM OK OK OK
5
30ATM OK OK OK
IMMER DIE KRONE IN NORMALPOSITION UND MIT FESTSTELLSCHRAUBE VOLLSTÄNDIG VERRIEGELN.
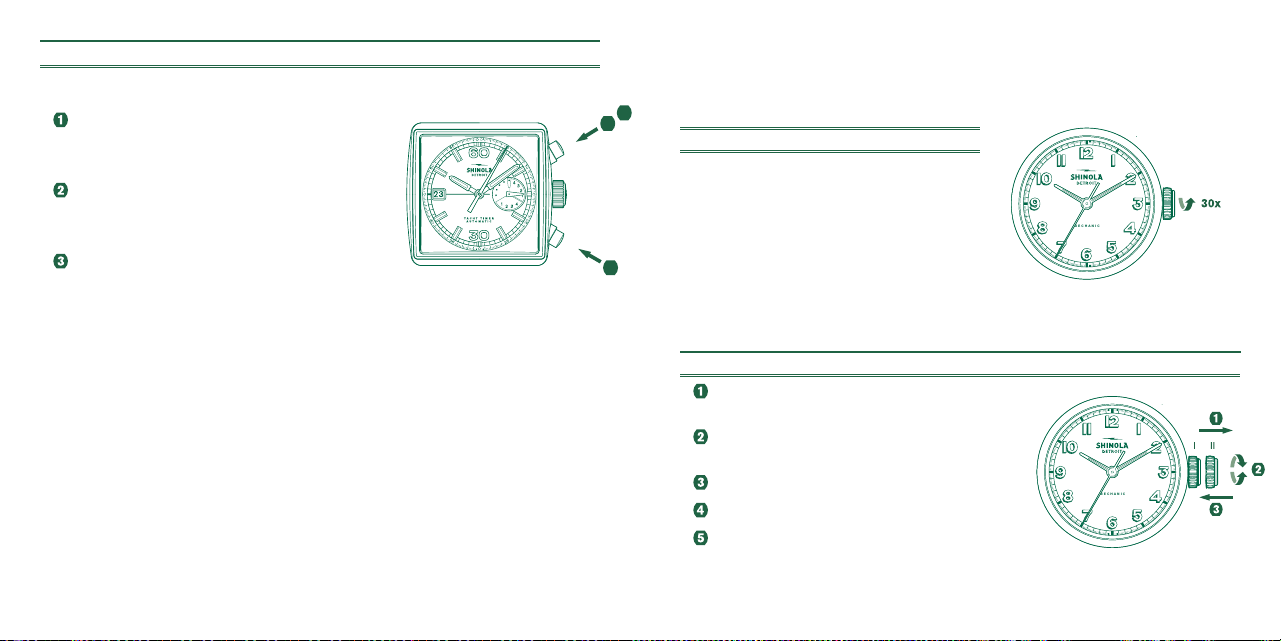
137
PFLEGE UND VORSICHTSMASSNAHMEN
Jeder Shinola-Zeitmesser ist gemäß höchsten Standards entwickelt und gefertigt. Anders
als andere mechanische Gegenstände ist eine Uhr pausenlos in Betrieb. Um optimale
Leistung und Langlebigkeit Ihres Shinola-Zeitmessers sicherzustellen, sollten sie die
einfachen Richtlinien für die Pflege und die Vorsichtsmaßnahmen beachten.
PFLEGE
• Reinigen Sie Ihre Uhr nur mit einem weichen Tuch und Wasser. Tauchen Sie Ihre Uhr
nicht in Wasser, außer sie ist wasserbeständig.
• Spülen Sie die Uhr nach der Verwendung in Salzwasser mit Leitungswasser ab und
trocknen Sie sie mit einem weichen Tuch.
• Metallarmbänder sollten regelmäßig gereinigt werden. Reinigen Sie sie mit einer
weichen Bürste, die Sie in mildes Seifenwasser getaucht haben, und trocknen Sie
sie mit einem weichen Tuch sorgfältig ab.
• Sie sollten Ihren Zeitmesser alle 18 bis 24 Monate warten lassen, um einen langen
Gebrauch und einen störungsfreien Betrieb sicherzustellen.
VORSICHTSMASSNAHMEN
Ihr Zeitmesser besteht aus komplexen Teilen und Komponenten, die von fachkundigen
Handwerkern zusammengebaut wurden. Es gibt bestimmte Handlungen oder
Umweltsituationen, die die optimale Funktion Ihres Zeitmessers beeinträchtigen oder behindern
können.
Sie sollten die folgenden Bedingungen vermeiden: extreme Hitze oder Kälte. Außerdem
sollten Sie den Zeitmesser nicht längere Zeit dem Sonnenlicht oder Nässe aussetzen, die die
Wasserbeständigkeit des Zeitmessers übersteigt. (Siehe Rückseite und Tabelle)
Ihr Zeitmesser sollten durch Magnetfelder nicht beeinflusst werden, die durch Haushaltsgeräte
erzeugt werden, zum Beispiel Fernseh- und Stereogeräte. Es wird jedoch empfohlen,
starke elektrische oder statische Felder zu vermeiden, die den Mechanismus stören können.
Außerdem sollten starke Erschütterungen und Stöße vermieden werden.
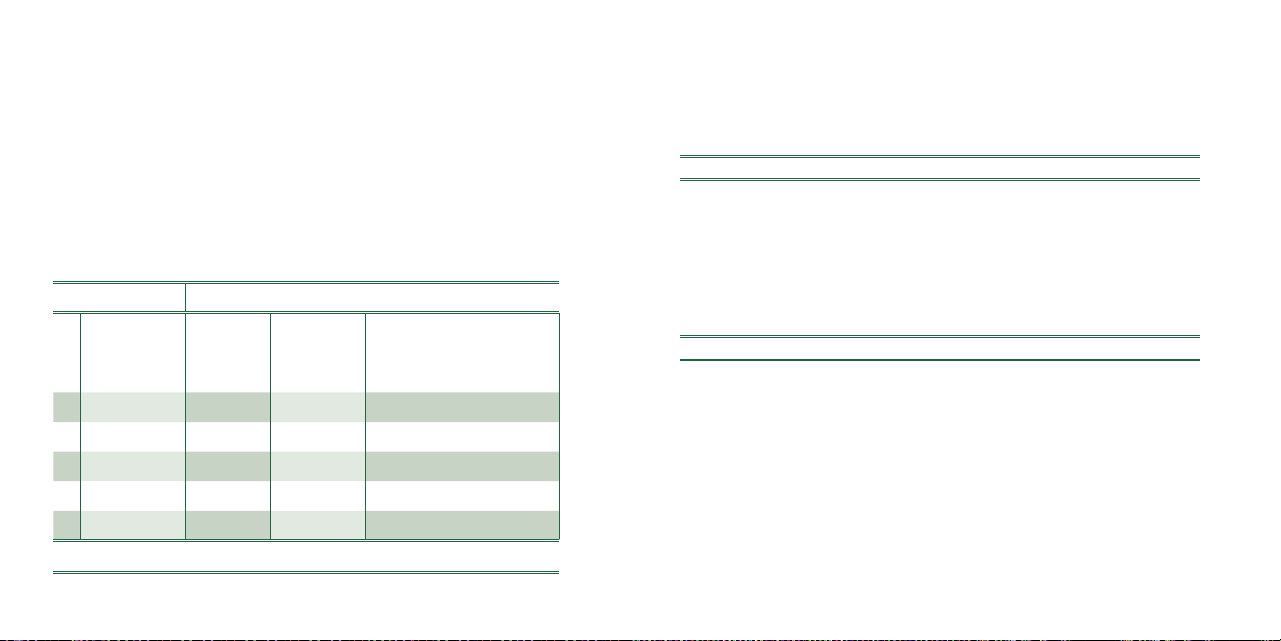
138 139
STROMSPARMECHANISMUS
Um die Batterielaufzeit Ihrer Uhr zu verlängern, ziehen Sie die Aufzugswelle/Krone vorsichtig
heraus, bis Sie ein Klicken spüren. So sinkt der Stromverbrauch der Batterie um 70 %. Bitte
beachten Sie, dass dies dieselbe Aufzugswellen-/Kronenposition ist, die für eine SCHNELLEIN-
STELLUNG DER ZEIT verwendet wird. Wenn Ihre Uhr über eine verschraubte Krone verfügt,
folgen Sie den Anweisungen am Anfang dieser Anleitung zum Lösen der Krone, bevor Sie sie
ganz herausziehen.
ENDE DER BATTERIELEBENSDAUER (EOL)
Ihre Uhr ist mit einer Funktion ausgestattet, die anzeigt, wenn die Batterie bald entladen ist. Wenn
der Ladezustand der Batterie niedrig ist, springt der zweite Zeiger alle 4 Sekunden um 4 Schritte
weiter. Durch diese Maßnahme sinkt der Stromverbrauch, die Zeit wird weiterhin richtig angezeigt
und Sie werden darauf hingewiesen, dass Sie die Batterie wechseln sollten.
138 139
QUARTZ-ARMBANDUHR MIT BEGRENZTER
LEBENSLANGER GARANTIE
Bei Shinola wird jede Armbanduhr im eigenen Werk in Detroit zusammengesetzt. Akribische
Handmontage wird mit der fortschrittlichsten Technik kombiniert, die verfügbar ist, um
sicherzustellen, dass unsere Uhren sowohl schön als auch haltbar sind. Wir vertrauen so sehr auf
unsere hochwertigen Herstellungsstandards, dass ausgewählte Shinola Armbanduhren im Rahmen
unserer begrenzten lebenslangen Garantie eine Garantie auf Lebenszeit haben.
Es ist eine in der Branche führende Garantie und ein Beleg für unsere Kernwerte.
Shinola Quartz Watch: Garantiebedingungen der begrenzten lebenslangen Service-Garantie
UM DIE GARANTIE FÜR IHRE SHINOLA QUARTZ WATCH IN ANSPRUCH ZU NEHMEN,
MÜSSEN SIE IHR PRODUKT REGISTRIEREN. DIESE GARANTIE IST NICHT ÜBERTRAGBAR
UND KANN GEMÄSS DIESEN BEDINGUNGEN FÜR UNGÜLTIG ERKLÄRT WERDEN.
1. Die begrenzte lebenslange Service-Garantie für die Shinola Quartz Watch gilt für alle
Uhren der folgenden Originalserien: Birdy, Canfield, Cass, Guardian, Omaha, Runwell,
Vinton, Duck. Diese Garantie gilt nicht für Detrola Armbanduhren und Shinola Automatic
Armbanduhren.
Die begrenzte lebenslange Service-Garantie für die Shinola Quartz Watch deckt
Materialfehler und Verarbeitungsfehler ab, die während der natürlichen Nutzungsdauer
der Armbanduhr auftreten.
2. Bei Mängeln, die durch fehlerhafte Verarbeitung verursacht wurden und von der begrenzten
lebenslangen Garantie abgedeckt sind, wird das betreffende mangelhafte Teil (vorbehaltlich
der nachstehenden Ausnahmen) repariert oder die Uhr wird kostenlos ersetzt

140 141
3. Ausgeschlossen sind:
a. Alle Bänder, einschließlich Armbänder
b. Uhrwerk über die natürliche Lebensdauer des Uhrwerks hinaus
(7 Jahre für Quarz-Uhrwerke)*
c. Batterie
d. Uhrgalvanik (PVD-Beschichtung)
e. Schäden, die eine Folge von unsachgemäßer Handhabung, mangelnder Sorgfalt,
Unfällen oder normaler Abnutzung sind.
f. Wasserschäden
g. Überholte Armbanduhren
h. Re-furbished watches
* 7 Jahre ab dem ursprünglichen Kaufdatum oder dem Datum der letzten „Quarz-Wartung“
von Shinola, wobei das spätere Datum gilt. Weitere Informationen über die Einreichung
von Reparatur- und Wartungsanfragen finden Sie auf dem Shinola Helpdesk im Abschnitt
„Reparaturen und Wartung“ – zu dem Sie über diesen Link gelangen.
4. Diese Garantie wird UNGÜLTIG, WENN:
a. Die Uhr nach alleinigem und absolutem Ermessen von Shinola durch einen Unfall,
durch Nachlässigkeit oder durch Personen beschädigt wurde.
b. Wenn die Batterie der Armbanduhr von einem anderen Dienstanbieter als einem
von Shinola autorisierten Reparaturbetrieb ausgetauscht wird.
c. Wenn die Armbanduhr von einem anderen Dienstanbieter als von Shinola repariert
oder graviert wird.
5. Falls Sie Ihre Armbanduhr nicht bei Shinola registriert haben, gilt diese Garantie NICHT.
6. Falls Ihre Armbanduhr vollständig ersetzt werden muss und von der Garantie abgedeckt
ist, wird Shinola Ihre Uhr durch das gleiche Modell ersetzen. Sollte das Modell nicht länger
produziert werden, wird eine Uhr von gleichem Wert und ähnlichem Stil zur Verfügung gestellt.

140 141
7. Bei nicht von dieser Garantie abgedeckten Wartungsarbeiten werden Ihnen die notwendigen
Reparaturen und die dafür anfallenden Kosten mitgeteilt. Shinola wird mit solchen
Reparaturen erst beginnen, nachdem Sie die Kosten genehmigt haben, oder das Produkt auf
Ihre Aufforderung hin zurückgeben.
GARANTIE- UND ANDERE REPARATUR EINER UHR BEANTRAGEN
Sollten Sie einen Batterieaustausch benötigen, füllen Sie bitte unter Shinola.com oder in
einem Ladengeschäft von Shinola ein Reparaturformular aus. Sie können unter Shinola.com
auch auf der Seite Filialfinder nach einem „autorisierten Batterieaustauschzentrum“ in Ihrer
Nähe suchen. Sollten Sie Garantiearbeiten benötigen, füllen Sie bitte unter Shinola.com
oder in einem Ladengeschäft von Shinola ein Reparaturformular aus. Reparaturen und/oder
Wartungen, die von Shinolas autorisierten Reparaturpartnern durchgeführt werden, machen
die Garantie zwar nicht ungültig, aber sie sind nicht von der Garantie abgedeckt. Sie werden
alle mit solchen Reparaturen verbundenen Kosten übernehmen müssen und Shinola wird
diese nicht erstatten. Senden Sie keine Originalverpackungen, da diese nicht zurückgeschickt
werden. Shinola empfiehlt Ihnen, Ihr Paket zu versichern und die Uhr für den Versand
angemessen zu schützen.
Shinola haftet nicht für Produkte, die während des Versands verloren gehen oder
beschädigt werden. Bei nicht von dieser Garantie abgedeckten Wartungsarbeiten kann das
Service-Center je nach Stil der Uhr und Art der angefragten Arbeiten eine Gebühr für die
Durchführung der von Ihnen angefragten Arbeiten berechnen. Solche Gebühren werden Ihnen
mitgeteilt und von Ihnen genehmigt, bevor die Arbeiten durchgeführt werden.
Die oben angegebenen Garantien und Rechtsbehelfe gelten ausschließlich und anstelle
aller anderen ausdrücklichen, stillschweigenden oder gesetzlich vorgeschriebenen Garantien
und Garantiebedingungen, einschließlich und ohne Einschränkung, der Zusicherung der
allgemeinen Gebrauchsfähigkeit, der Eignung für einen bestimmten Zweck, der Genauigkeit,
der zufriedenstellenden Qualität, des Eigentumsrechts und der Nichtverletzung von Rechten,
die Shinola ausdrücklich jede Haftung ablehnt. Shinola haftet nicht für Nebenschäden,
Folgeschäden, indirekte Schäden, Sonderschäden oder Strafschadensersatz und Ansprüche
jedweder Art, die sich aus oder in Verbindung mit dem Verkauf oder der Nutzung dieses
Produktes ergeben, unabhängig davon, ob sie auf einem Vertrag, einer unerlaubten Handlung

142 143
WIR SIND FÜR SIE DA, UM ZU HELFEN
Bitte kontaktieren Sie uns, wenn Sie Bedenken oder Fragen haben. Sie können auf drei Wegen
Kontakt zu uns aufnehmen. Füllen Sie das Kontaktformular auf unserer Website unter Shinola.
com aus, rufen Sie uns an, oder senden Sie uns eine E-Mail.
Montags bis freitags
09:00 Uhr bis 17:00 Uhr EST
customerservice@shinola.com
1.844.SHINOLA
(1.844.744.6652)
(einschließlich Fahrlässigkeit), strikter Produkthaftung oder einer anderen Theorie beruhen,
auch wenn Shinola auf die Möglichkeit solcher Schäden hingewiesen wurde und auch wenn
ein hierin angegebenes beschränktes Rechtsmittel als seinen ursprünglichen Zweck verfehlend
erachtet wird. Shinolas ganze Haftung beschränkt sich nach alleinigem Ermessen von Shinola
auf den Ersatz oder die Reparatur. In einigen Ländern, Staaten oder Provinzen ist es jedoch
nicht erlaubt, stillschweigende Garantien auszuschließen oder einzuschränken, oder Neben- und
Folgeschäden zu begrenzen, deshalb kann es sein, dass die oben genannten Einschränkungen
und Ausschlüsse nur begrenzt auf Sie Anwendung finden. Wenn stillschweigende Garantien
nicht vollständig ausgeschlossen werden können, sind sie auf die Dauer der geltenden
schriftlichen Garantie beschränkt. Diese Garantie gibt Ihnen spezifische Rechte; es kann sein,
dass Sie weitere Rechte haben, die abhängig von der lokalen Gesetzgebung variieren. Ihre
gesetzlichen Rechte sind nicht betroffen.

142 143
AUTOMATIC WATCH: BEGRENZTE
LEBENSLANGE GARANTIE
Bei Shinola wird jede Armbanduhr im eigenen Werk in Detroit zusammengesetzt. Akribische
Handmontage wird mit der fortschrittlichsten Technik kombiniert, die verfügbar ist, um sicherzustellen,
dass unsere Uhren sowohl schön als auch haltbar sind. Wir vertrauen so sehr auf unsere
hochwertigen Herstellungsstandards, dass ausgewählte Shinola Armbanduhren im Rahmen unserer
begrenzten lebenslangen Garantie eine Garantie auf Lebenszeit haben. Es ist eine in der Branche
führende Garantie und ein Beleg für unsere Kernwerte.
Shinola Automatic Watch: Garantiebedingungen der begrenzten lebenslangen Service-Garantie
UM DIE GARANTIE FÜR IHRE SHINOLA AUTOMATIC WATCH IN ANSPRUCH ZU NEHMEN, MÜSSEN
SIE IHR PRODUKT REGISTRIEREN. DIESE GARANTIE IST NICHT ÜBERTRAGBAR UND KANN GEMÄSS
DIESEN BEDINGUNGEN FÜR UNGÜLTIG ERKLÄRT WERDEN.
1. Die begrenzte lebenslange Service-Garantie für die Shinola Automatic Watch gilt für alle
Automatikuhren der folgenden Originalserien: Runwell Automatic und Shinola Monster
Kollektion. Diese Garantie gilt nicht für Detrola Armbanduhren und Shinola Quartz
Armbanduhren.
Die begrenzte lebenslange Service-Garantie für die Shinola Automatic Watch deckt
Materialfehler und Verarbeitungsfehler ab, die während der natürlichen Nutzungsdauer der
Armbanduhr auftreten.
2. Bei Mängeln, die durch fehlerhafte Verarbeitung verursacht wurden und von der begrenzten
lebenslangen Garantie abgedeckt sind, wird das betreffende mangelhafte Teil (vorbehaltlich
der nachstehenden Ausnahmen) repariert oder die Uhr wird kostenlos ersetzt.

144 145
3. Ausgeschlossen sind:
a. Alle Bänder, einschließlich Armbänder
b. Uhrwerk über die natürliche Nutzungsdauer des Uhrwerks hinaus (5 Jahre für
Automatik-Uhrwerke)*
c. Uhrgalvanik (PVD-Beschichtung)
d. Schäden, die eine Folge von unsachgemäßer Handhabung, mangelnder Sorgfalt,
Unfällen oder normaler Abnutzung sind.
e. Wasserschäden
f. Gebrauchte Vintage-Uhren, die im Istzustand verkauft werden
g. Überholte Armbanduhren
* 5 Jahre ab dem ursprünglichen Kaufdatum oder dem Datum der letzten „Automatik-Wartung“ von
Shinola, wobei das spätere Datum gilt. Weitere Informationen über die Einreichung von Reparatur-
und Wartungsanfragen finden Sie auf dem Shinola Helpdesk im Abschnitt „Reparaturen und
Wartung“ – zu dem Sie über diesen Link gelangen.
4. Diese Garantie wird UNGÜLTIG, WENN:
a. Die Uhr nach alleinigem und absolutem Ermessen von Shinola durch einen Unfall, durch
Nachlässigkeit oder durch Personen beschädigt wurde.
b. Wenn die Armbanduhr von einem anderen Dienstanbieter als von Shinola repariert,
gewartet oder graviert wird.
5.Falls Sie Ihre Armbanduhr nicht bei Shinola registriert haben, gilt diese Garantie NICHT.
6. Falls Ihre Armbanduhr vollständig ersetzt werden muss und von der Garantie abgedeckt ist,
wird Shinola Ihre Uhr durch das gleiche Modell ersetzen. Sollte das Modell nicht länger
produziert werden, wird eine Uhr von gleichem Wert und ähnlichem Stil zur Verfügung gestellt.
7. Bei nicht von dieser Garantie abgedeckten Wartungsarbeiten werden Ihnen die notwendigen
Reparaturen und die dafür anfallenden Kosten mitgeteilt. Shinola wird mit solchen Reparaturen
erst beginnen, nachdem Sie die Kosten genehmigt haben, oder das Produkt auf Ihre
Aufforderung hin zurückgeben.

144 145
GARANTIE- UND ANDERE REPARATUR EINER UHR BEANTRAGEN
Sollten Sie Garantiearbeiten benötigen, füllen Sie bitte unter Shinola.com oder in einem
Ladengeschäft von Shinola ein Reparaturformular aus. Reparaturen und/oder Wartungen, die von
Shinolas autorisierten Reparaturpartnern durchgeführt werden, machen die Garantie zwar nicht
ungültig, aber sie sind nicht von der Garantie abgedeckt. Sie werden alle mit solchen Reparaturen
verbundenen Kosten übernehmen müssen und Shinola wird diese nicht erstatten. Senden Sie keine
Originalverpackungen, da diese nicht zurückgeschickt werden. Shinola empfiehlt Ihnen, Ihr Paket zu
versichern und die Uhr für den Versand angemessen zu schützen. Shinola haftet nicht für Produkte,
die während des Versands verloren gehen oder beschädigt werden. Bei nicht von dieser Garantie
abgedeckten Servicearbeiten kann das Service-Center je nach Stil der Uhr und Art der angefragten
Arbeiten eine Gebühr für die Durchführung der von Ihnen angefragten Arbeiten berechnen. Solche
Gebühren werden Ihnen mitgeteilt und von Ihnen genehmigt, bevor die Arbeiten durchgeführt
werden.
Die oben angegebenen Garantien und Rechtsbehelfe gelten ausschließlich und anstelle
aller anderen ausdrücklichen, stillschweigenden oder gesetzlich vorgeschriebenen Garantien
und Garantiebedingungen, einschließlich und ohne Einschränkung, der Zusicherung der
allgemeinen Gebrauchsfähigkeit, der Eignung für einen bestimmten Zweck, der Genauigkeit, der
zufriedenstellenden Qualität, des Eigentumsrechts und der Nichtverletzung von Rechten, für die
Shinola ausdrücklich jede Haftung ablehnt. Shinola haftet nicht für Nebenschäden, Folgeschäden,
indirekte Schäden, Sonderschäden oder Strafschadensersatz und Ansprüche jedweder Art, die sich
aus oder in Verbindung mit dem Verkauf oder der Nutzung dieses Produktes ergeben, unabhängig
davon, ob sie auf einem Vertrag, einer unerlaubten Handlung (einschließlich Fahrlässigkeit), strikter
Produkthaftung oder einer anderen Theorie beruhen, auch wenn Shinola auf die Möglichkeit solcher
Schäden hingewiesen wurde und auch wenn ein hierin angegebenes beschränktes Rechtsmittel
als seinen ursprünglichen Zweck verfehlend erachtet wird. Shinolas ganze Haftung beschränkt
sich nach alleinigem Ermessen von Shinola auf den Ersatz oder die Reparatur. In einigen Ländern,
Staaten oder Provinzen ist es jedoch nicht erlaubt, stillschweigende Garantien auszuschließen oder
einzuschränken, oder Neben- und Folgeschäden zu begrenzen, deshalb kann es sein, dass die
oben genannten Einschränkungen und Ausschlüsse nur begrenzt auf Sie Anwendung finden. Wenn
stillschweigende Garantien nicht vollständig ausgeschlossen werden können, sind sie auf die Dauer
der geltenden schriftlichen Garantie beschränkt. Diese Garantie gibt Ihnen spezifische Rechte; es
kann sein, dass Sie weitere Rechte haben, die abhängig von der lokalen Gesetzgebung variieren.
Ihre gesetzlichen Rechte sind nicht betroffen.

146
WIR SIND FÜR SIE DA, UM ZU HELFEN
Bitte kontaktieren Sie uns, wenn Sie Bedenken oder Fragen haben. Sie können auf drei Wegen
Kontakt zu uns aufnehmen. Füllen Sie das Kontaktformular auf unserer Website unter Shinola.
com aus, rufen Sie uns an, oder senden Sie uns eine E-Mail.
Montags bis freitags
09:00 Uhr bis 17:00 Uhr EST
custo[email protected]
1.844.SHINOLA
(1.844.744.6652)

147

148
ESPAÑOL
Shinola es una marca de diseño que nació en Detroit y que se dedica
en cuerpo y alma a la creación de productos duraderos, desde relojes
a artículos de cuero o incluso un hotel. Celebramos el diseño atemporal y
la artesanía consciente con productos e historias que inspiran a la gente a
vivir bien y a tener confianza en sí misma con un estilo totalmente personal.
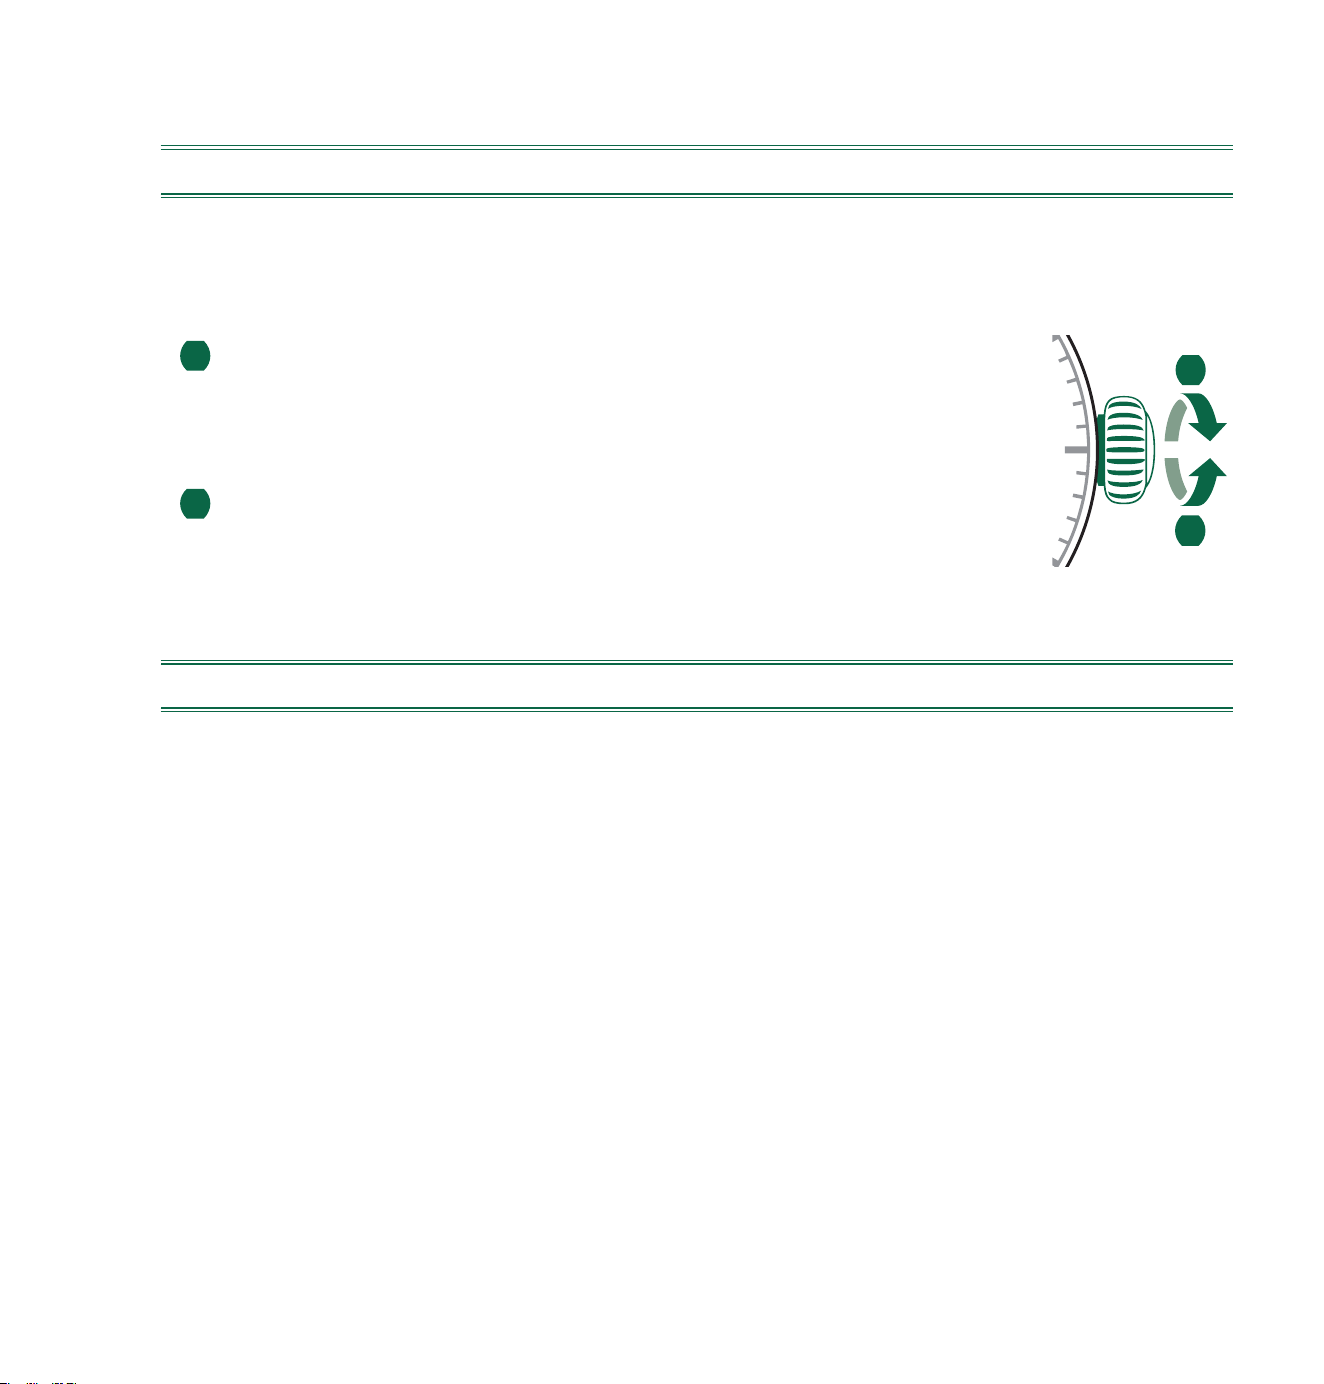
149
CORONAS A ROSCA
FUNCIONALIDAD DE LA CORONA
Los componentes de su reloj Shinola están hechos de los mejores materiales y se han
inspeccionado rigurosamente para cumplir con nuestros estrictos criterios. Algunos relojes
Shinola presentan una corona a rosca, lo cual añade un nivel extra de impermeabilidad al agua.
Para proteger su inversión, es importante comprender cómo trabaja este tipo de corona:
1 Para que la corona sea operativa, desenrósquela de la caja girándola
en el sentido contrario a las agujas del reloj hasta que se libere.
• Una vez liberada, siga las instrucciones para ajustar la hora y la fecha,
como se describe en las secciones siguientes.
2 Para sellar de nuevo la corona, presiónela contra la caja hasta que
se acople la rosca y gírela en el sentido de las agujas del reloj
hasta que esté apretada.
MODELOS CON INDICADOR DE FECHA
TENGA EN CUENTA LO SIGUIENTE:
• Si su reloj tiene un indicador de fecha, la ventana de la fecha podría estar en una
posición diferente a la indicada en este manual.
• Los relojes Shinola tienen diferentes movimientos. Dependiendo del movimiento,
puede que sea necesario ajustarse a un período de tiempo específico al configurar
el indicador de fecha. Antes de ajustar la configuración de fecha, se ruega leer las
instrucciones correspondientes al movimiento individual del reloj adquirido.
DIAMANTES LIBRES DE CONFLICTO
Todo diamante utilizado para fabricar los relojes Shinola ha sido adquirido ante fuentes
legales no implicadas en la financiación de conflictos y conforme a las resoluciones de
las Naciones Unidas. Garantizamos por la presente que dichos diamantes son libres de
conflicto, en base a las garantías escritas expedidas por los suministradores de dichos
diamantes.
1
2
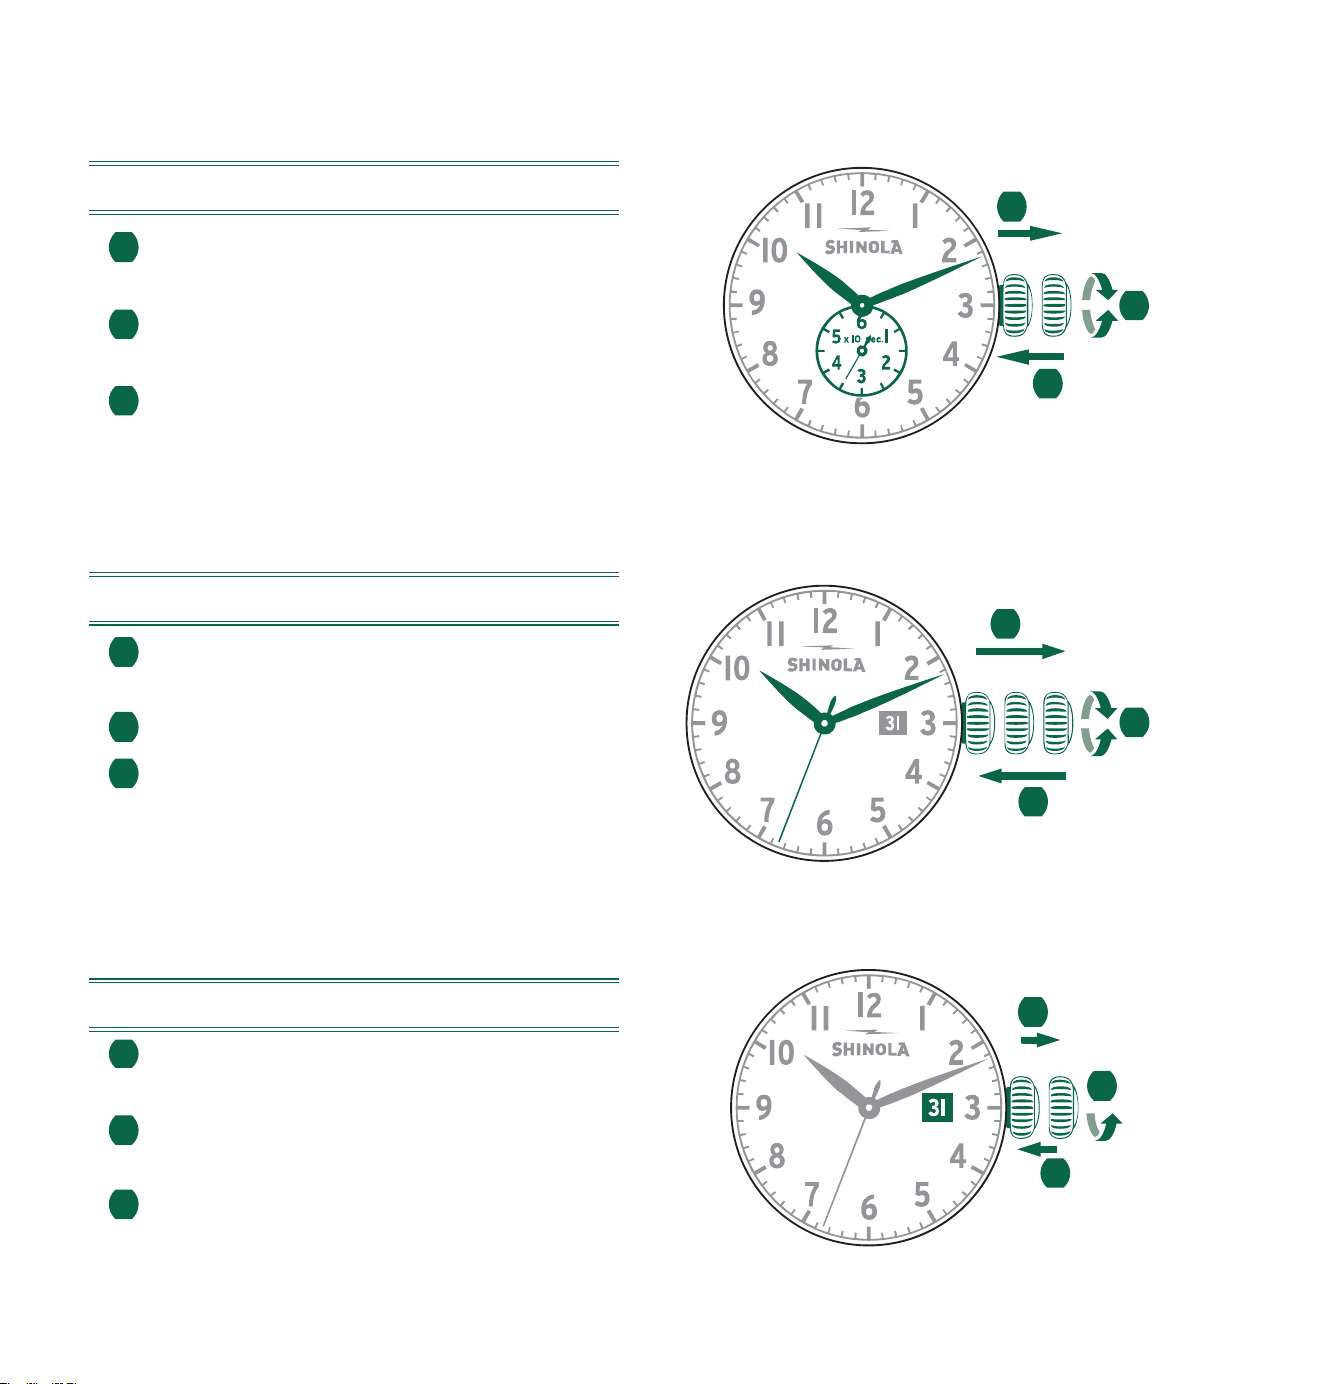
150
MODELOS DE HORA ÚNICA Y FECHA
CONFIGURACIÓN DE LA HORA
1 Tire de la corona hasta la posición III.
(El reloj se detendrá).
2
Gire la corona hasta llegar a la hora correcta.
3 Empuje la corona de nuevo a la posición I.
CONFIGURACIÓN DE LA FECHA
1 Tire de la corona hasta la posición II.
(El reloj continuará en funcionamiento).
2 Gire la corona hasta que aparezca
la fecha correcta.
3 Empuje la corona de nuevo a la posición I.
MODELOS DE HORA ÚNICA
CONFIGURACIÓN DE LA HORA
1 Tire de la corona hasta la posición II.
(El reloj se detendrá).
2 Gire la corona hasta llegar a la
hora correcta.
3 Empuje la corona de nuevo a la posición I.
II IIII
3
1
2
III
1
2
3
III
3
1
2
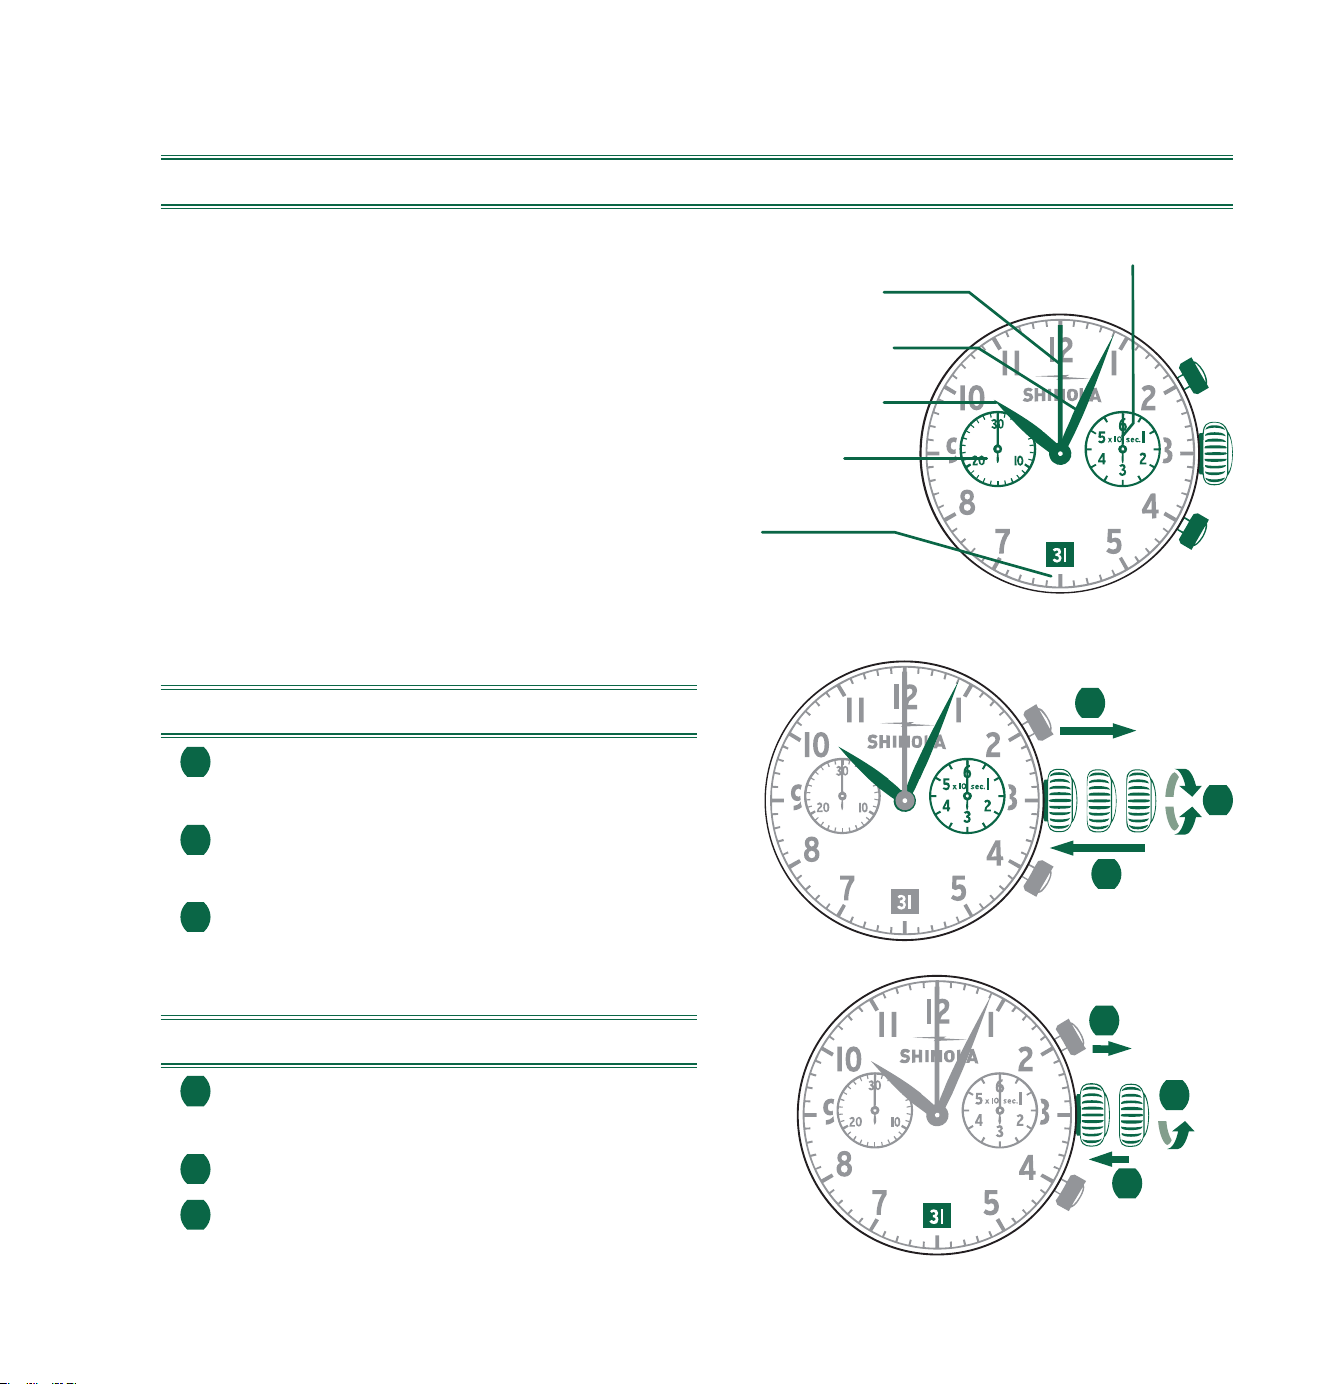
151
II IIII
3
1
2
CRONÓGRAFO 5021.D
DESCRIPCIÓN DE LA PANTALLA Y DE LOS BOTONES DE CONTROL
Tenga en cuenta lo siguiente:
Antes de usar las funciones del cronógrafo,
asegúrese de que:
- la corona esté en la posición I
(= posición normal).
- las dos agujas del cronógrafo estén
exactamente en la posición cero siguiendo
a la activación del pulsador B. Si las agujas
no están exactamente en cero, deben
ajustarse sus posiciones. (Consulte el capítulo
Ajuste de las agujas del cronógrafo en cero
.)
CONFIGURACIÓN DE LA HORA
1 Tire de la corona hasta la posición III.
(El reloj se detendrá).
2 Gire la corona hasta llegar
a la hora correcta.
3 Empuje la corona de nuevo a la posición I.
CONFIGURACIÓN DE LA FECHA
1 Tire de la corona hasta la posición II.
(El reloj continuará en funcionamiento).
2 Gire la corona hasta que aparezca la fecha correcta.
3 Empuje la corona de nuevo a la posición I.
A
Segundero
Aguja ratrapante
Aguja de minutos
Aguja de horas
Contador de
minutos
Fecha
B
III
1
2
3
I
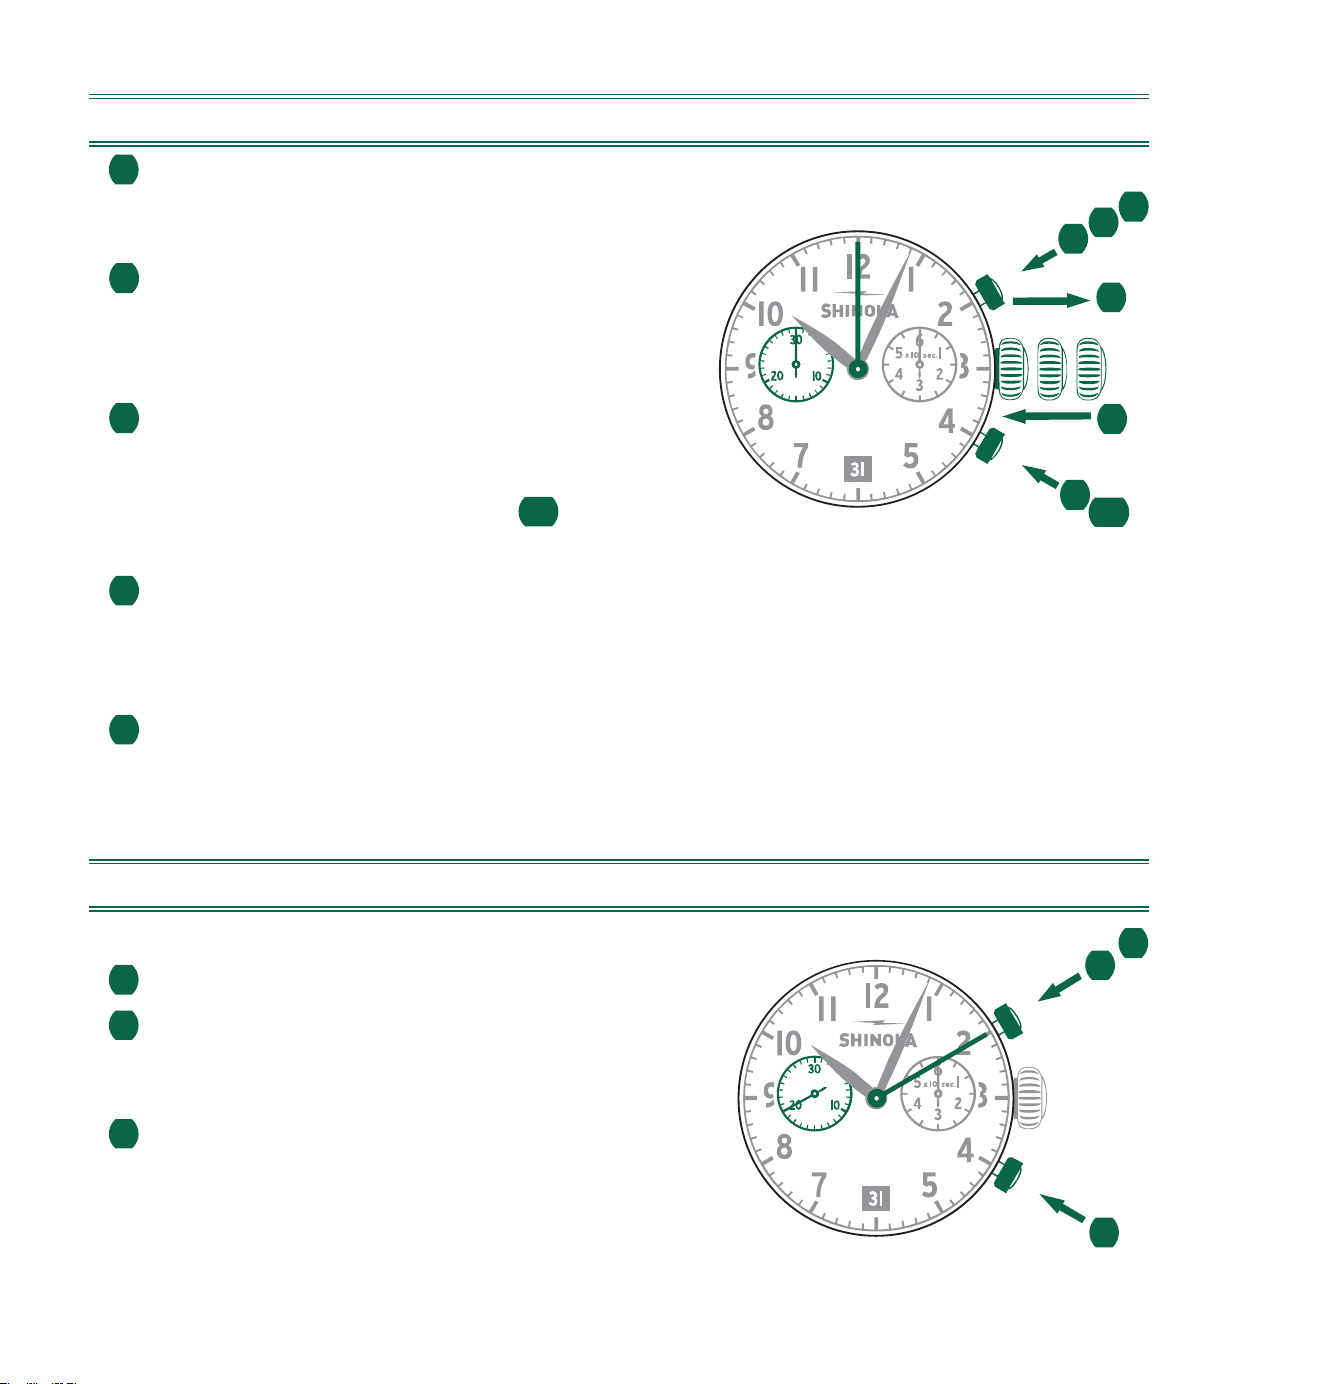
152
AJUSTE DE LAS AGUJAS DEL CRONÓGRAFO EN CERO
1 Tire de la corona hasta la posición III.
(Las dos agujas del cronógrafo están
en su posición cero correcta o incorrecta).
2 Mantenga oprimidos los pulsadores A y B
simultáneamente durante al menos 2
segundos. (La aguja ratrapante gira 360°;
el modo correctivo está activado).
3 Presione el pulsador A para que avance
un paso la aguja ratrapante. Mantenga
presionado el pulsador A para que la aguja
ratrapante avance rápidamente.
3b
Presione
el pulsador B para avanzar a la siguiente aguja.
4 Presione el pulsador A para que avance un paso
paso la aguja del contador de minutos. Mantenga
presionado el pulsador A para que la aguja
del contador de minutos avance rápidamente.
5 Devuelva la corona a la posición I.
FUNCIÓN BÁSICA (INICIO/PARADA/ REINICIO)
Ejemplo
1 Inicio: presione el pulsador A.
2 Parada: Para detener el cronometraje, presione
el pulsador A una vez más y lea los dos
contadores del cronógrafo: 20 min. / 10 seg.
3 Posicionamiento en cero: Presione el pulsador
B. (Las dos agujas del cronógrafo volverán a sus
posiciones cero).
II IIII
1
2
3
4
5
2
A
B
3b
1
2
3
A
B
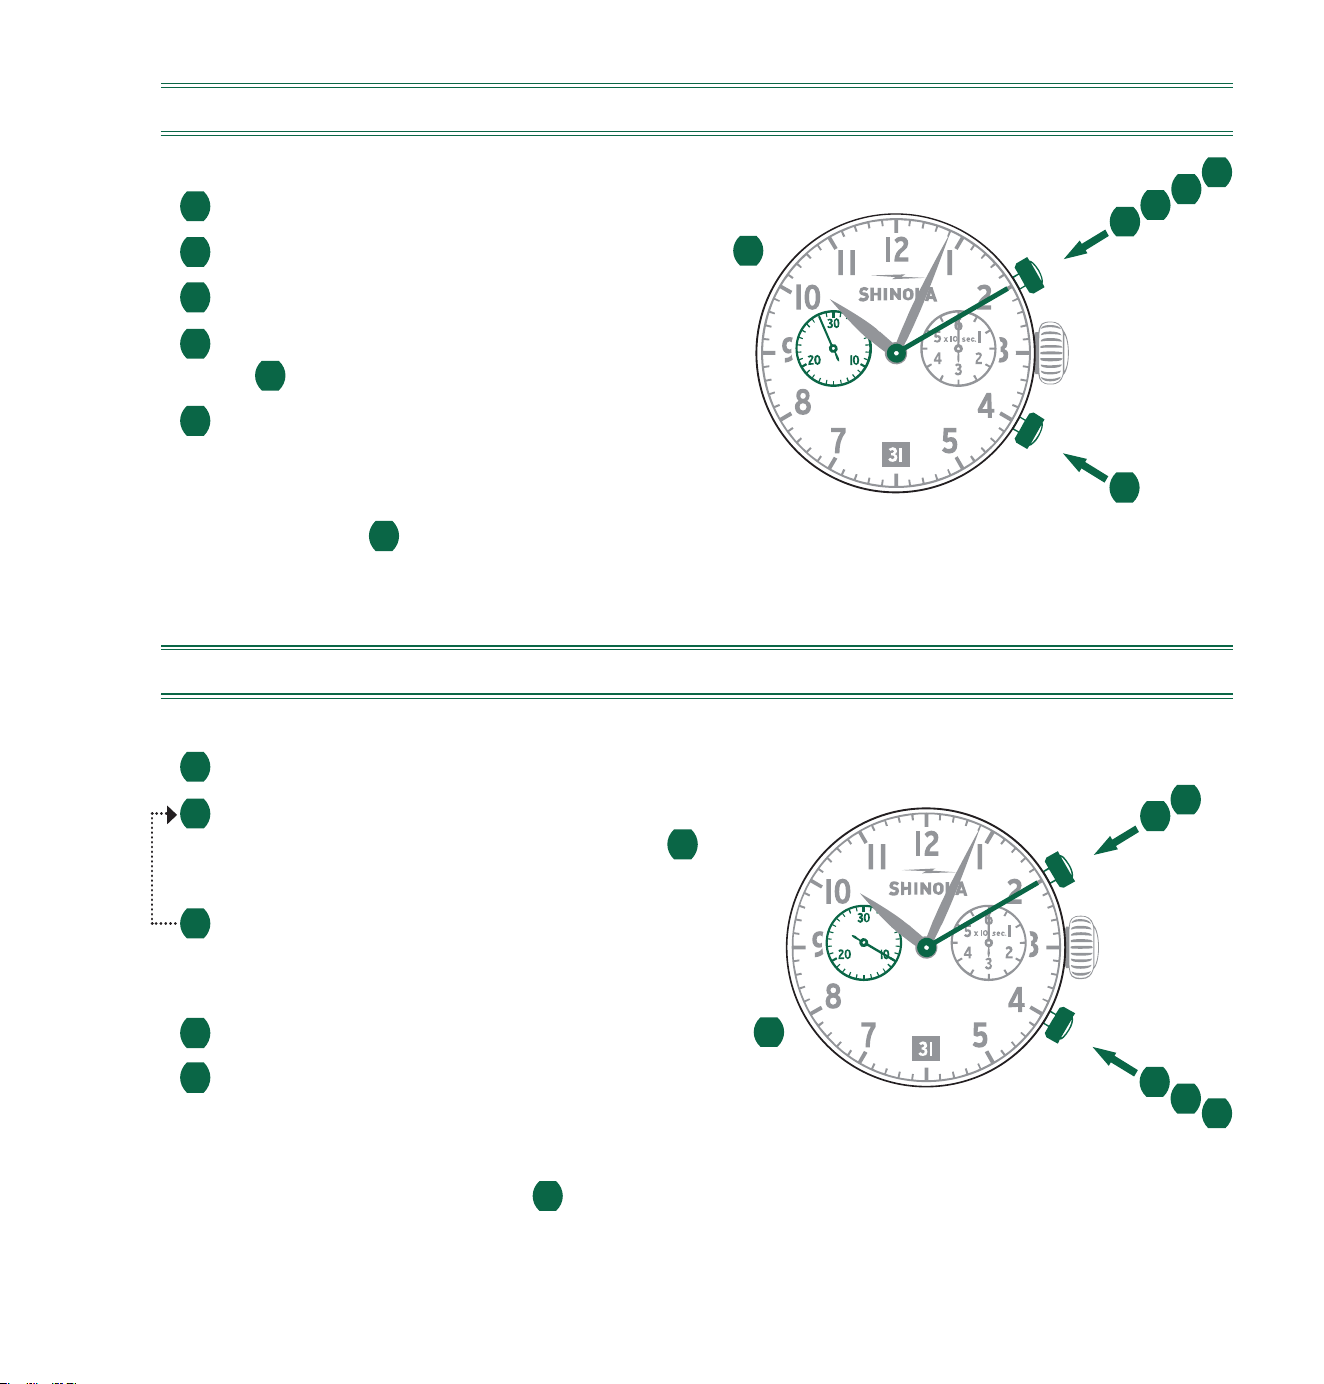
153
*
TIEMPO ACUMULADO
Ejemplo
1 Inicio: comenzar el cronometraje
2 Parada: por ejemplo, 15 min. 5 s después de
1
.
3 Reinicio: se reanuda el cronometraje
4 *Parada: por ejemplo, 13 min. 5 s después
de
3
Tiempo acumulado = 28 min. y 10 s.
5 Reinicio: las tres agujas del cronógrafo
retornan a sus posiciones cero.
Tenga en cuenta lo siguiente:
* Después de
4
, la acumulación del cronometraje puede continuar
presionando el pulsador A (Reinicio/Parada, Reinicio/Parada…)
CRONOMETRAJE DEL INTERMEDIO O INTERVALO
Ejemplo
1 Inicio: comenzar el cronometraje.
2 Mostrar intervalo:
por ejemplo, 10 min. 10 s después de
1
.
El cronometraje continúa en el fondo.
3 Conformación del tiempo medido:
las dos agujas del cronógrafo avanzan
rápidamente al tiempo medido en curso.
4 Parada: por ejemplo, 28 min. 10 s después de
1
.
5 Reinicio: las tres agujas del cronógrafo
retornan a sus posiciones cero.
Tenga en cuenta lo siguiente:
* Los intervalos después de
3
, adicionales o intermedios pueden mostrarse
presionando B (mostrar intervalo / conformar el tiempo medido…)
1
5
2
3
4
A
B
2
3
5
B
1
4
A
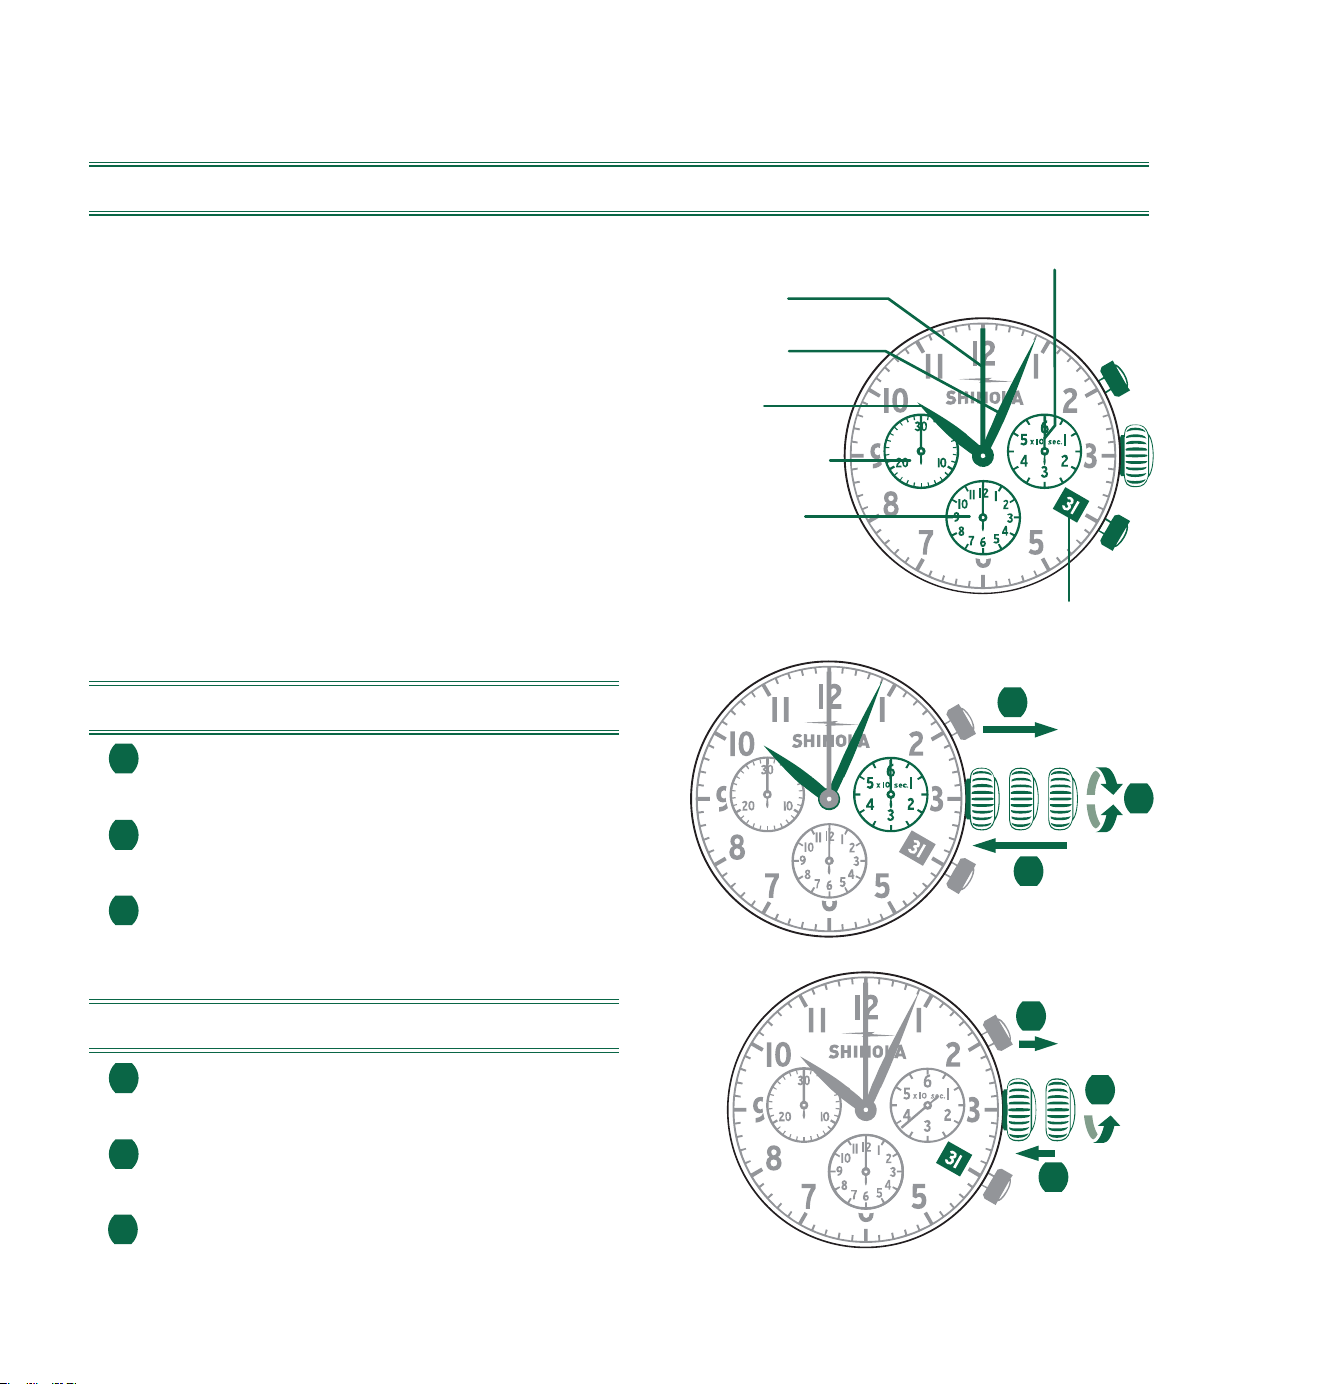
154
CRONÓGRAFO MODELO 5030.D
DESCRIPCIÓN DE LA PANTALLA Y DE LOS BOTONES DE CONTROL
Tenga en cuenta lo siguiente:
Antes de usar las funciones del
cronógrafo, asegúrese de que:
- la corona esté en la posición I
(= posición normal);
- las tres agujas del cronógrafo estén
exactamente en la posición cero tras
la activación del pulsador B. Si las
agujas no están en cero, se deberán
ajustar sus posiciones. (Véase el capítulo
Ajuste de las agujas del cronógrafo en cero
).
CONFIGURACIÓN DE LA HORA
1 Tire de la corona hasta la posición III.
(El reloj se detendrá).
2 Gire la corona hasta llegar a la
hora correcta.
3 Empuje la corona de nuevo a la posición I.
CONFIGURACIÓN DE LA FECHA
1 Tire de la corona hasta la posición II.
(El reloj continuará en funcionamiento).
2 Gire la corona hasta que aparezca
la fecha correcta.
3 Empuje la corona de nuevo a la posición I.
III
1
2
3
II IIII
3
1
2
A
Segundero
Fecha
Aguja ratrapante
Aguja de minutos
Aguja de horas
Contador de minutos
Contador de horas
B
I
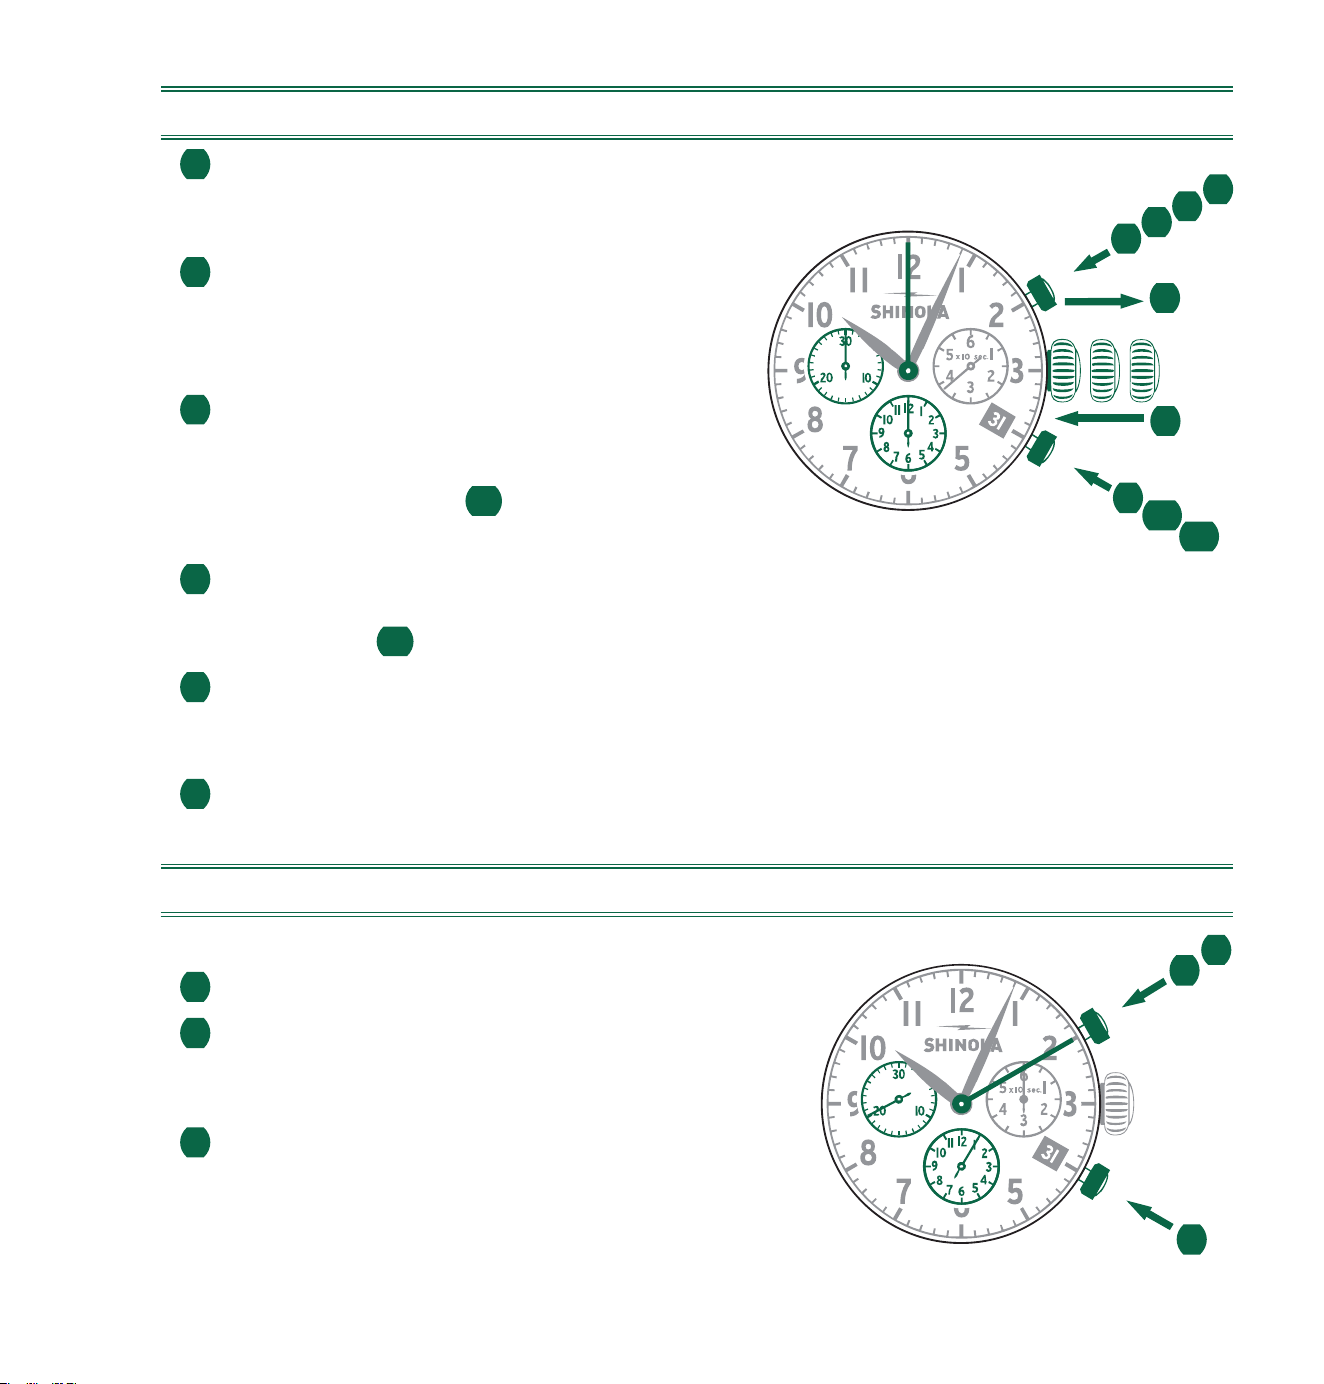
155
AJUSTE DE LAS AGUJAS DEL CRONÓGRAFO EN CERO
1 Tire de la corona hasta la posición III.
(Las tres agujas del cronógrafo están en
su posición cero correcta o incorrecta).
2
Mantenga los pulsadores A y B presionados
simultáneamente durante al menos
2 segundos. (La aguja ratrapante
gira 360°: se ha activado el modo correctivo).
3 Presione el pulsador A para sincronizar
la aguja ratrapante. Mantenga presionado
el pulsador A para que la aguja ratrapante
avance rápidamente.
3b
Presione el
pulsador B para pasar a la siguiente aguja.
4 Presione el pulsador A para sincronizar la aguja del contador de horas.
Mantenga presionado el pulsador A para que el contador de horas avance
rápidamente. 4b.
Presione el pulsador B para avanzar a la siguiente aguja.
5 Presione el pulsador A para sincronizar la aguja del contador de minutos.
Mantenga presionado el pulsador A para que el contador de minutos
avance rápidamente.
6 Devuelva la corona a la posición I.
FUNCIÓN BÁSICA
(
INICIO/PARADA/REINICIO
)
Ejemplo
1 Inicio: Presione el pulsador A.
2 Parada: Para detener el cronometraje, presione
el pulsador A una vez más y lea los tres
contadoresdel cronógrafo: 1 h / 20min/10s.
3 Posicionamiento en cero: Presione
el pulsador B. (Las tres agujas del
cronógrafo volverán a sus posiciones cero).
II IIII
1
2
3
4
5
6
2
A
B
3b
4b
1
2
3
A
B
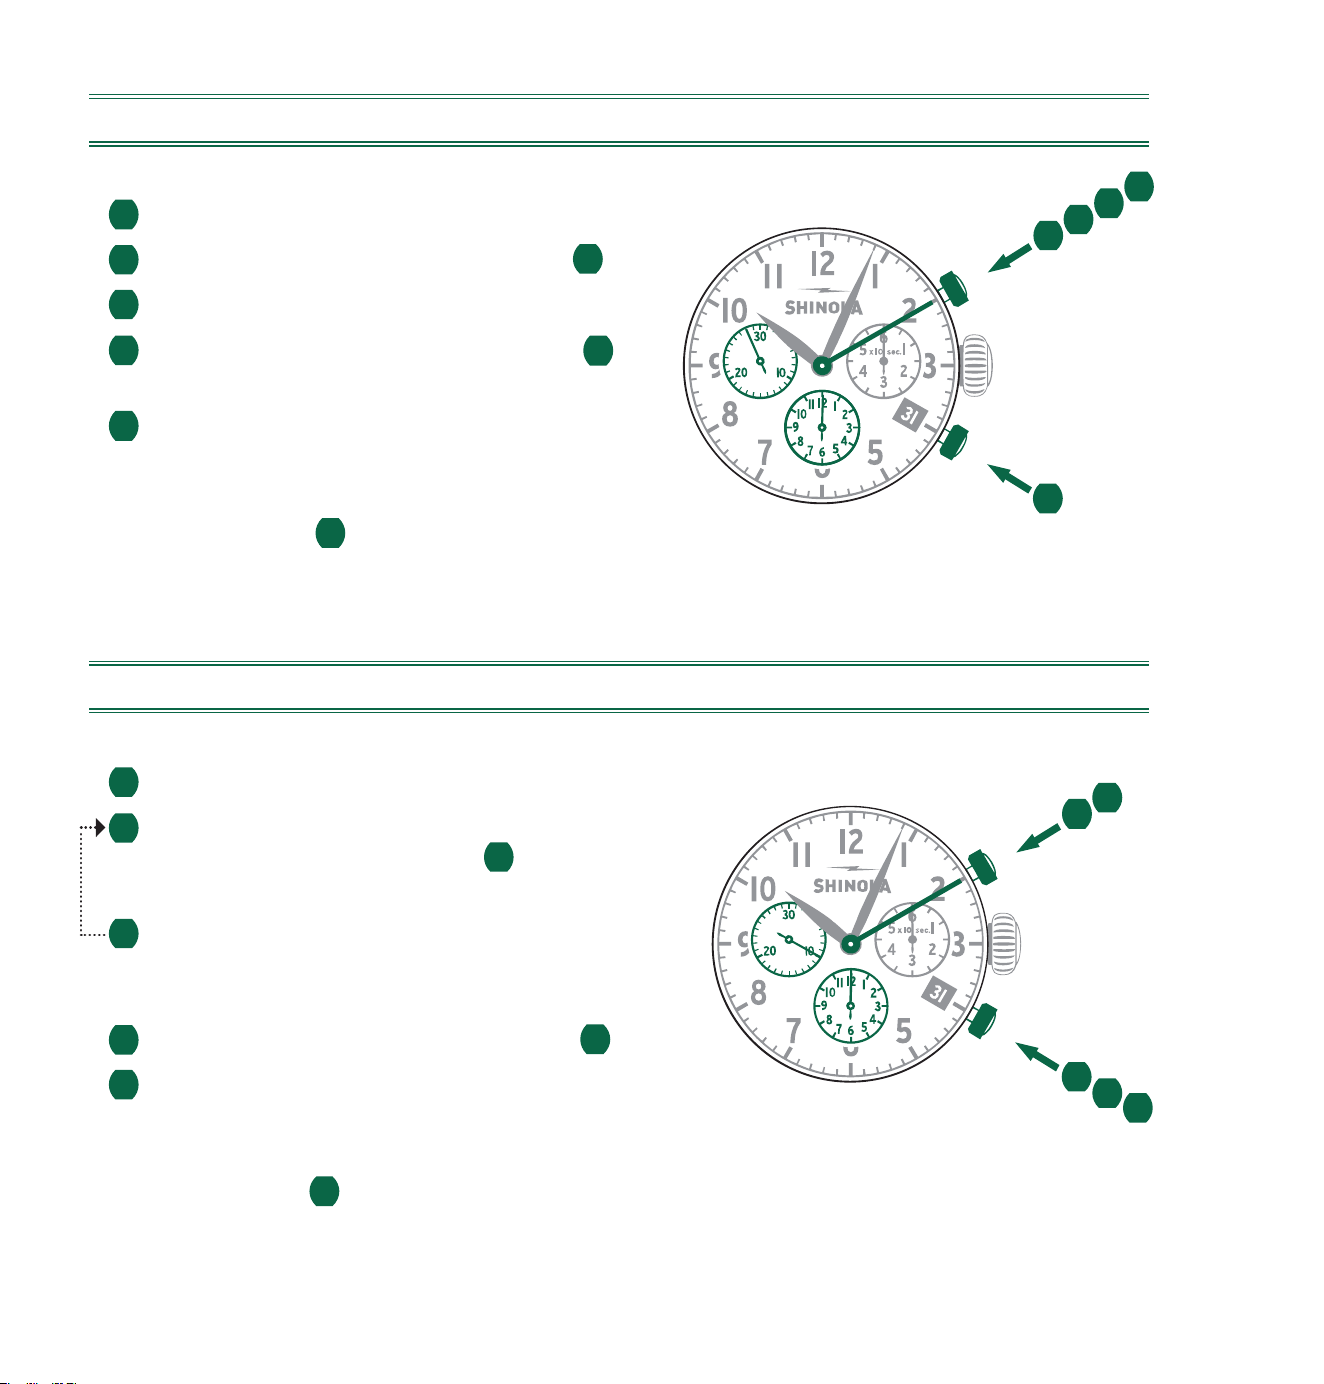
156
*
TIEMPO ACUMULADO
Ejemplo
1
Inicio: Comenzar el cronometraje
.
2
Parada: P. ej.,
15 min y 5 s
despué
s de
1
.
3
Reinicio: Se reanuda el cronometraje
.
4
* Parada: P. ej.,
13 min y 5 s
después de
3
.
Tiempo acumulado = 28 min y 10 s
.
5
Reinicio: Las tres agujas del cronógrafo
vuelven a sus posiciones cero.
Tenga en cuenta lo siguiente:
* Despué
s de
4
, se podrá continuar la acumulación de tiempo
presionando el pulsador
A (Reinicio/Parada, Reinicio/Parada…).
CRONOMETRAJE DEL INTERMEDIO O INTERVALO
Ejemplo
1
Inicio: Comenzar el cronometraje
.
2
Visualizar intervalo:
P. ej.,
10 min y 10 s
después de
1
.
El cronometraje continúa en el fondo.
3
Compensar el tiempo cronometrado:
Las tres agujas del cronógrafo avanzan
rápidamente hasta el tiempo cronometrado
.
4
Parada: P. ej.,
28 min y 10 s
después de
1
.
5
Reinicio: Las tres agujas del cronógrafo
vuelven a sus posiciones cero.
Tenga en cuenta lo siguiente:
* Después de
3
,
se podrán visualizar más intervalos o intermedios
presionando
B (visualizar intervalo/compensar el tiempo cronometrado…).
1
5
2
3
4
A
B
2
3
5
B
1
4
A
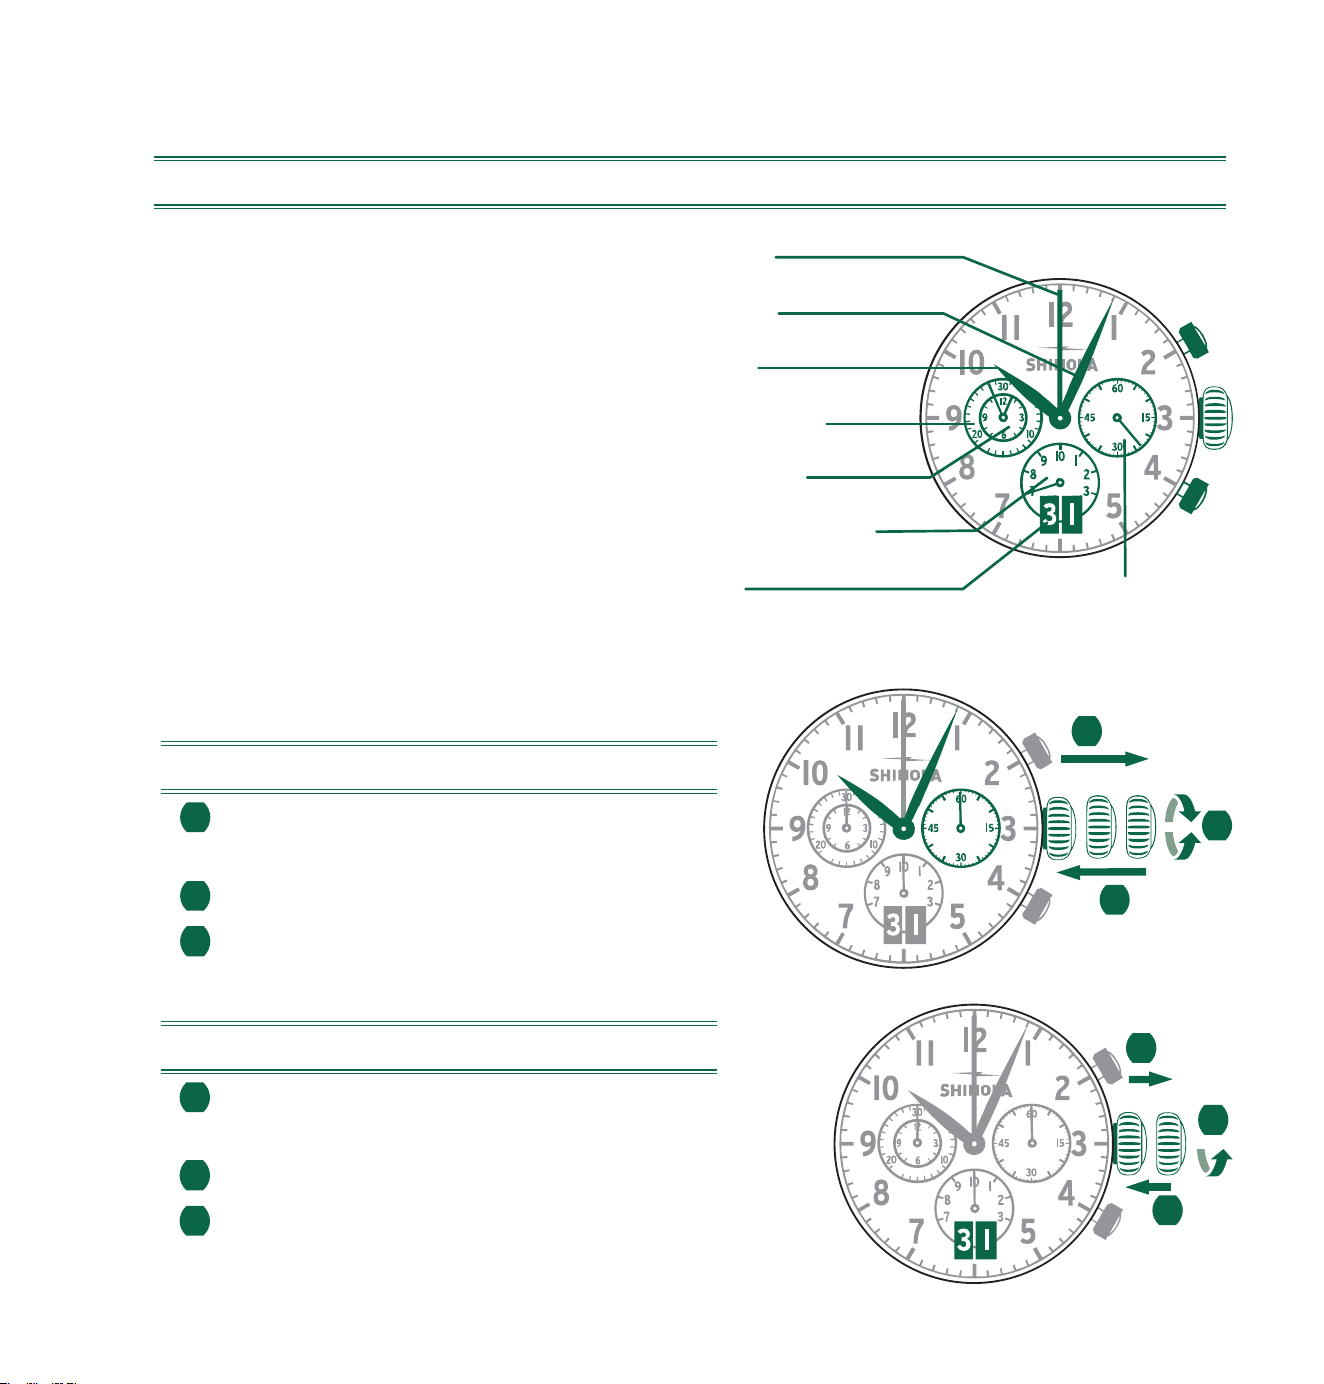
157
CONFIGURACIÓN DE LA HORA
1 Tire de la corona hasta la posición III.
(El reloj se detendrá).
2 Gire la corona hasta llegar a la hora correcta.
3 Empuje la corona hasta la posición I.
CONFIGURACIÓN DE LA FECHA
1 Tire de la corona hasta la posición II.
(El reloj continuará en funcionamiento).
2 Gire la corona hasta que aparezca la fecha correcta.
3 Empuje la corona hasta la posición I.
CRONÓGRAFO MODELO 5050.B
DESCRIPCIÓN DE LA PANTALLA Y DE LOS BOTONES DE CONTROL
Tenga en cuenta lo
siguiente:
antes de usar las funciones del
cronógrafo, asegúrese de que:
- la corona esté en la posición
I
(= posición normal).
- las cuatro agujas del cronógrafo
se encuentran exactamente en la
posición de cero tras la activación
del pulsador B. Si las agujas no
están en esta posición, ajústelas.
(Consulte el apartado
Ajuste de las
agujas del cronógrafo en cero
).
A
B
I
SegunderoFecha grande
Aguja ratrapante
Aguja de minutos
Aguja de horas
Contador de minutos
Contador de horas
Contador de
1
/
10
de segundo
II IIII
3
1
2
II
1
2
3
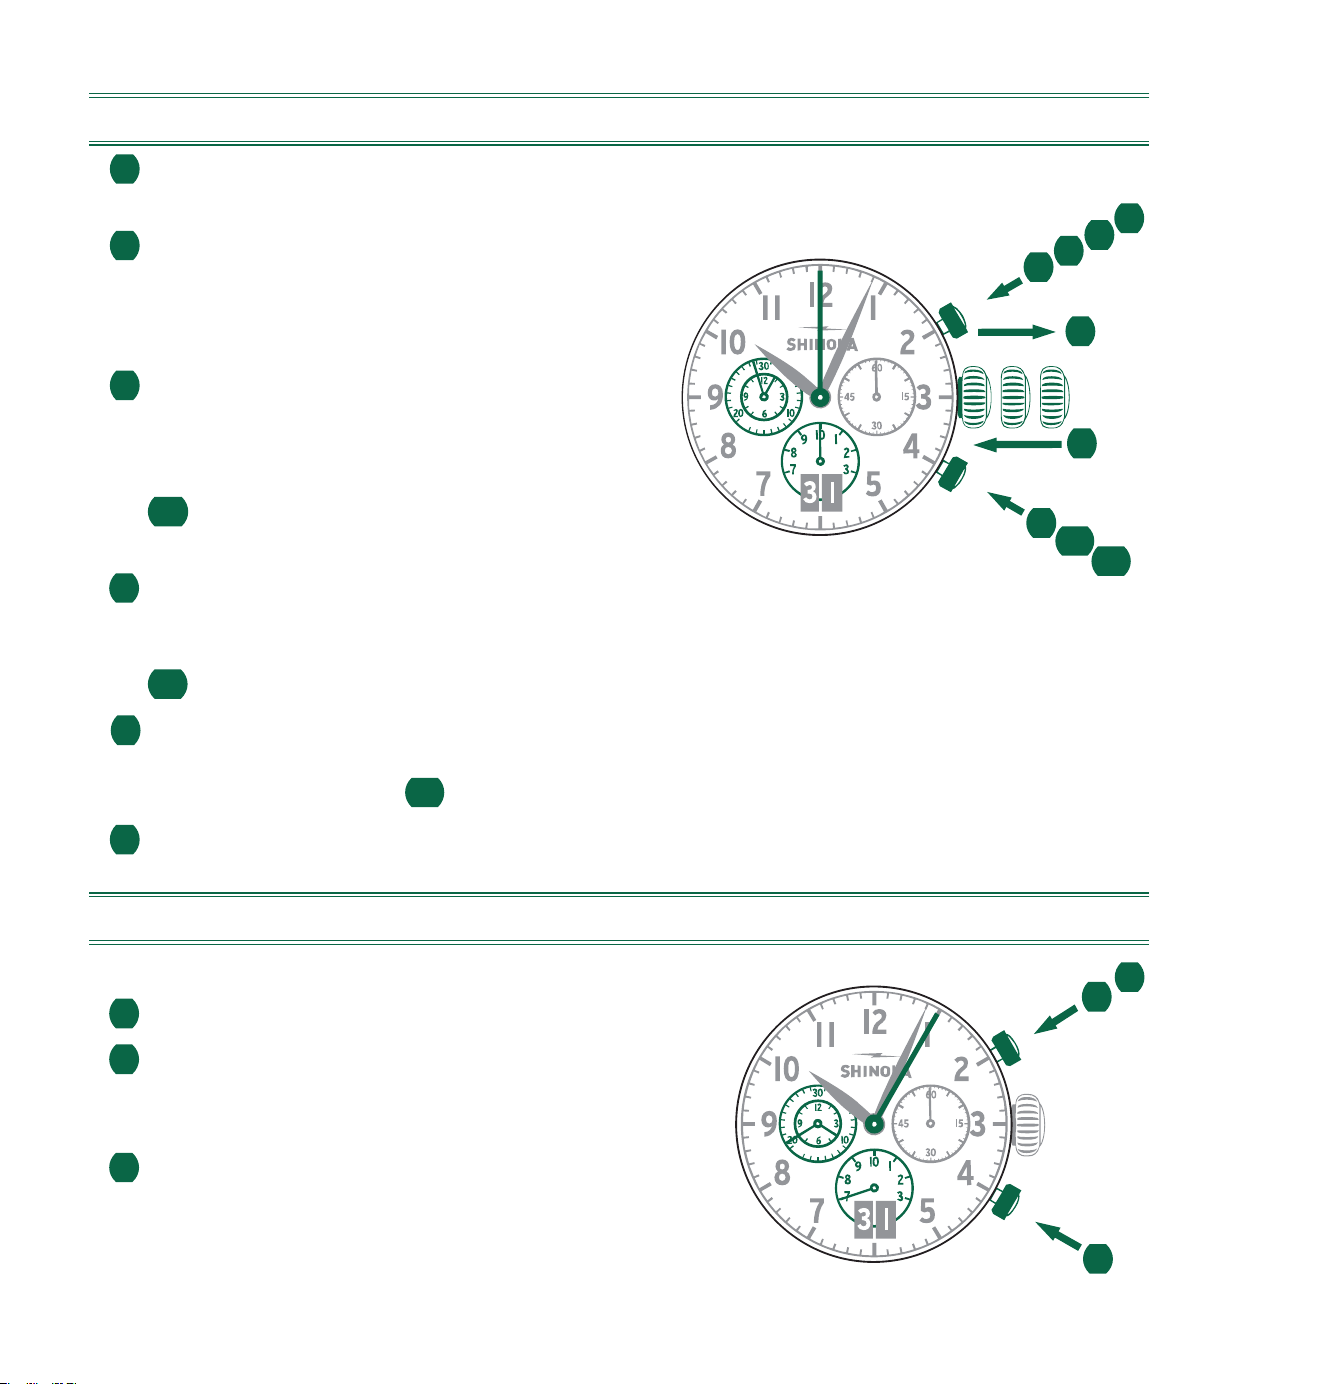
158
AJUSTE DE LAS AGUJAS DEL CRONÓGRAFO EN CERO
1 Tire de la corona hasta la posición III. (Todas las agujas se encuentran en su posición
cero correcta o incorrecta).
2 Mantenga los pulsadores A y B presionados
simultáneamente durante al menos dos
segundos. (La aguja ratrapante gira 360°: se
activará el modo correctivo).
3 Presione el pulsador A para mover la aguja
ratrapante con avances individuales.
Mantenga presionado el pulsador A para
avanzar la aguja ratrapante rápidamente.
3b
Presione el pulsador B para avanzar a la
siguiente aguja.
4
Presione el pulsador A para sincronizar la
aguja del contador de 1 décima de segundo. Presione y mantenga presionado
el pulsador A para avanzar la aguja de 1 décima de segundo rápidamente.
4b
Presione el pulsador B para avanzar a la siguiente aguja.
5
Presione el pulsador A para mover el contador de minutos y el de horas con avances
individuales. Mantenga pulsado el pulsador A para avanzar el contador de minutos
y horas rápidamente.
4b
Presione el pulsador B para avanzar a la siguiente aguja.
5 Coloque la corona en la posición I.
FUNCIÓN BÁSICA (INICIO/PARADA/REINICIO)
Ejemplo
1 Inicio: presione el pulsador A.
2 Parada: para detener el cronometraje, presione
el pulsador A otra vez y lea los cuatro contadores
del cronógrafo: 4h / 20min / 5s / 7⁄10s
3 Posicionamiento en cero: presione el
pulsador B. (Las agujas volverán a la posición
cero).
1
3
1
2
A
B
1
2
3
II IIII
1
2
3
4
5
6
A
2
B
3b
4b
6
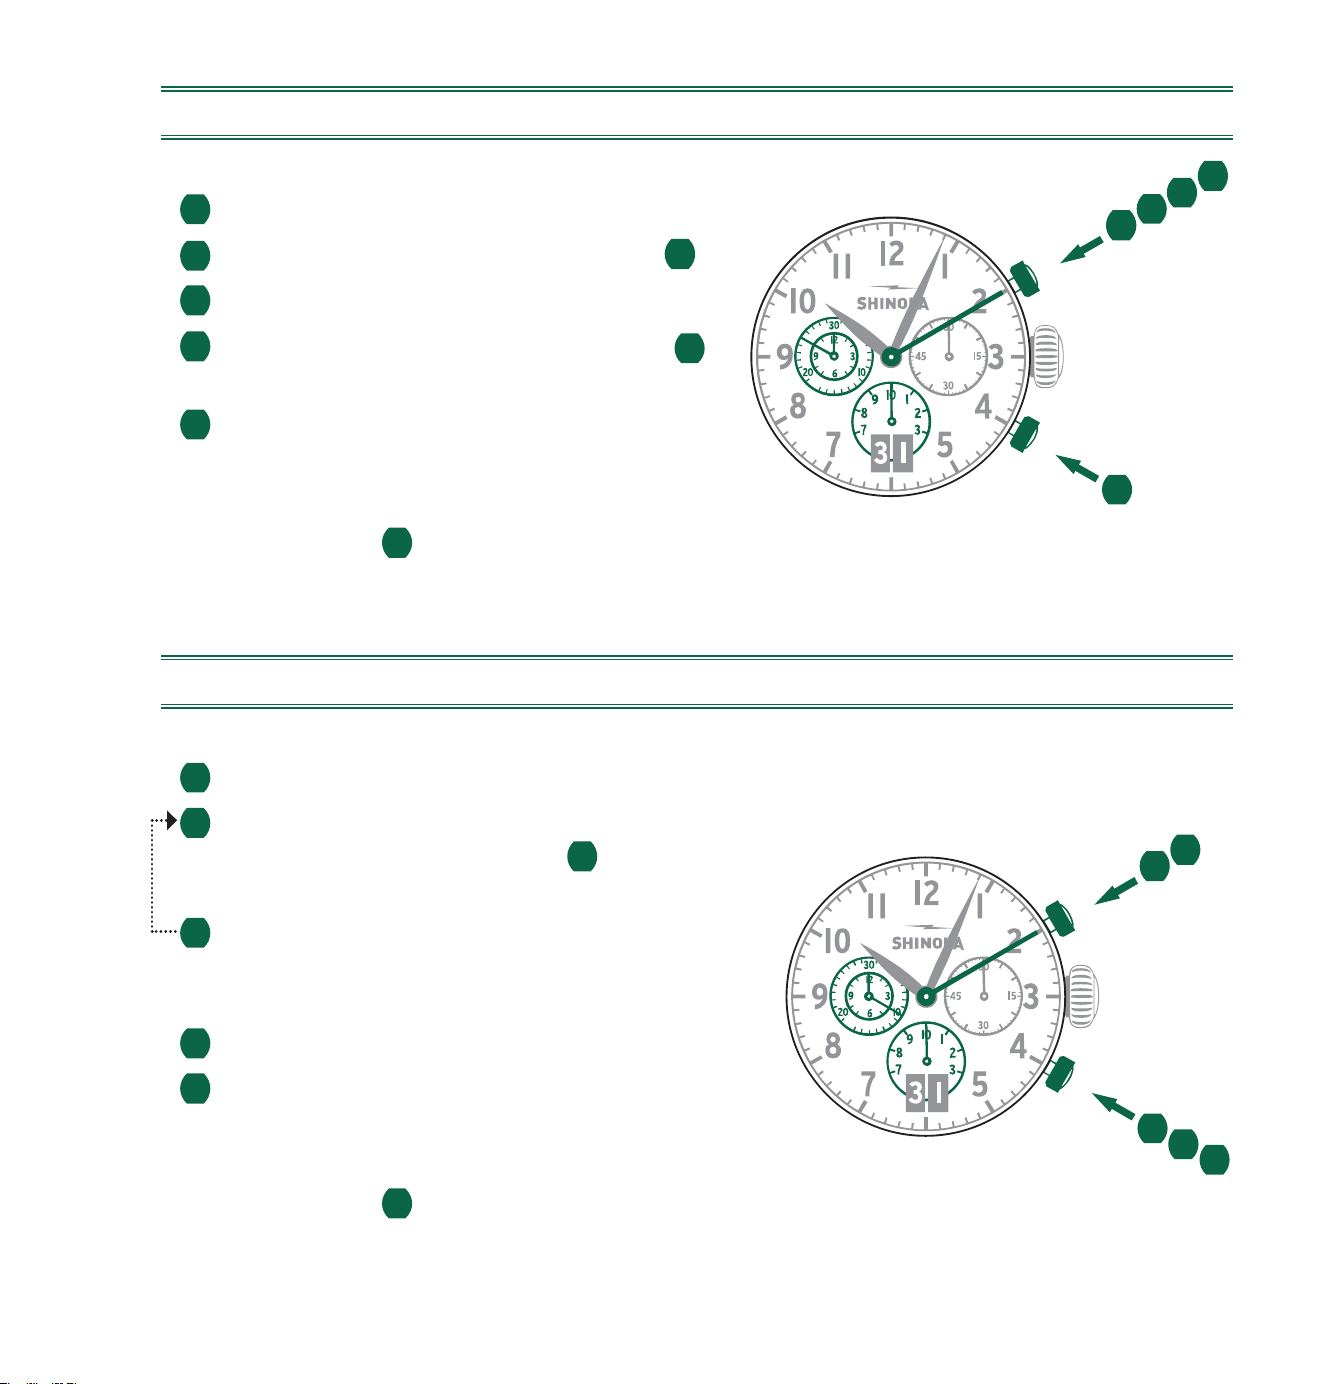
159
*
TIEMPO ACUMULADO
Ejemplo
1 Inicio: comenzar el cronometraje.
2 Parada: p. ej., 15min, 5s después de
1
.
3 Reinicio: se reanuda el cronometraje.
4 *Parada: p. ej., 10min, 5s después de
3
.
Tiempo acumulado = 25min y 10s
5 Reinicio: las cuatro agujas vuelven a la
posición cero.
Tenga en cuenta lo siguiente:
* después de
4
, es posible seguir
acumulando tiempos al presionar el pulsador A (Reinicio/Parada, Reinicio/Parada…).
CRONOMETRAJE DEL INTERMEDIO O INTERVALO
Ejemplo
1 Inicio: comenzar el cronometraje.
2 Visualizar intervalo:
p. ej., 10min, 10sdespués de 1 .
El cronometraje continúa en el fondo.
3 Compensación del tiempo cronometrado:
las cuatro agujas avanzan rápidamente hasta
situarse en el tiempo cronometrado.
4 Parada: (se visualiza el tiempo final).
5 Reinicio: las cuatro agujas vuelven a la
posición cero.
Tenga en cuenta lo siguiente:
* después de
3
, los siguientes intervalos o períodos intermedios se pueden visualizar
al presionar el pulsador B (visualizar intervalo/compensar el tiempo cronometrado…).
5
B
1
2
3
4
A
5
2
3
B
1
4
A
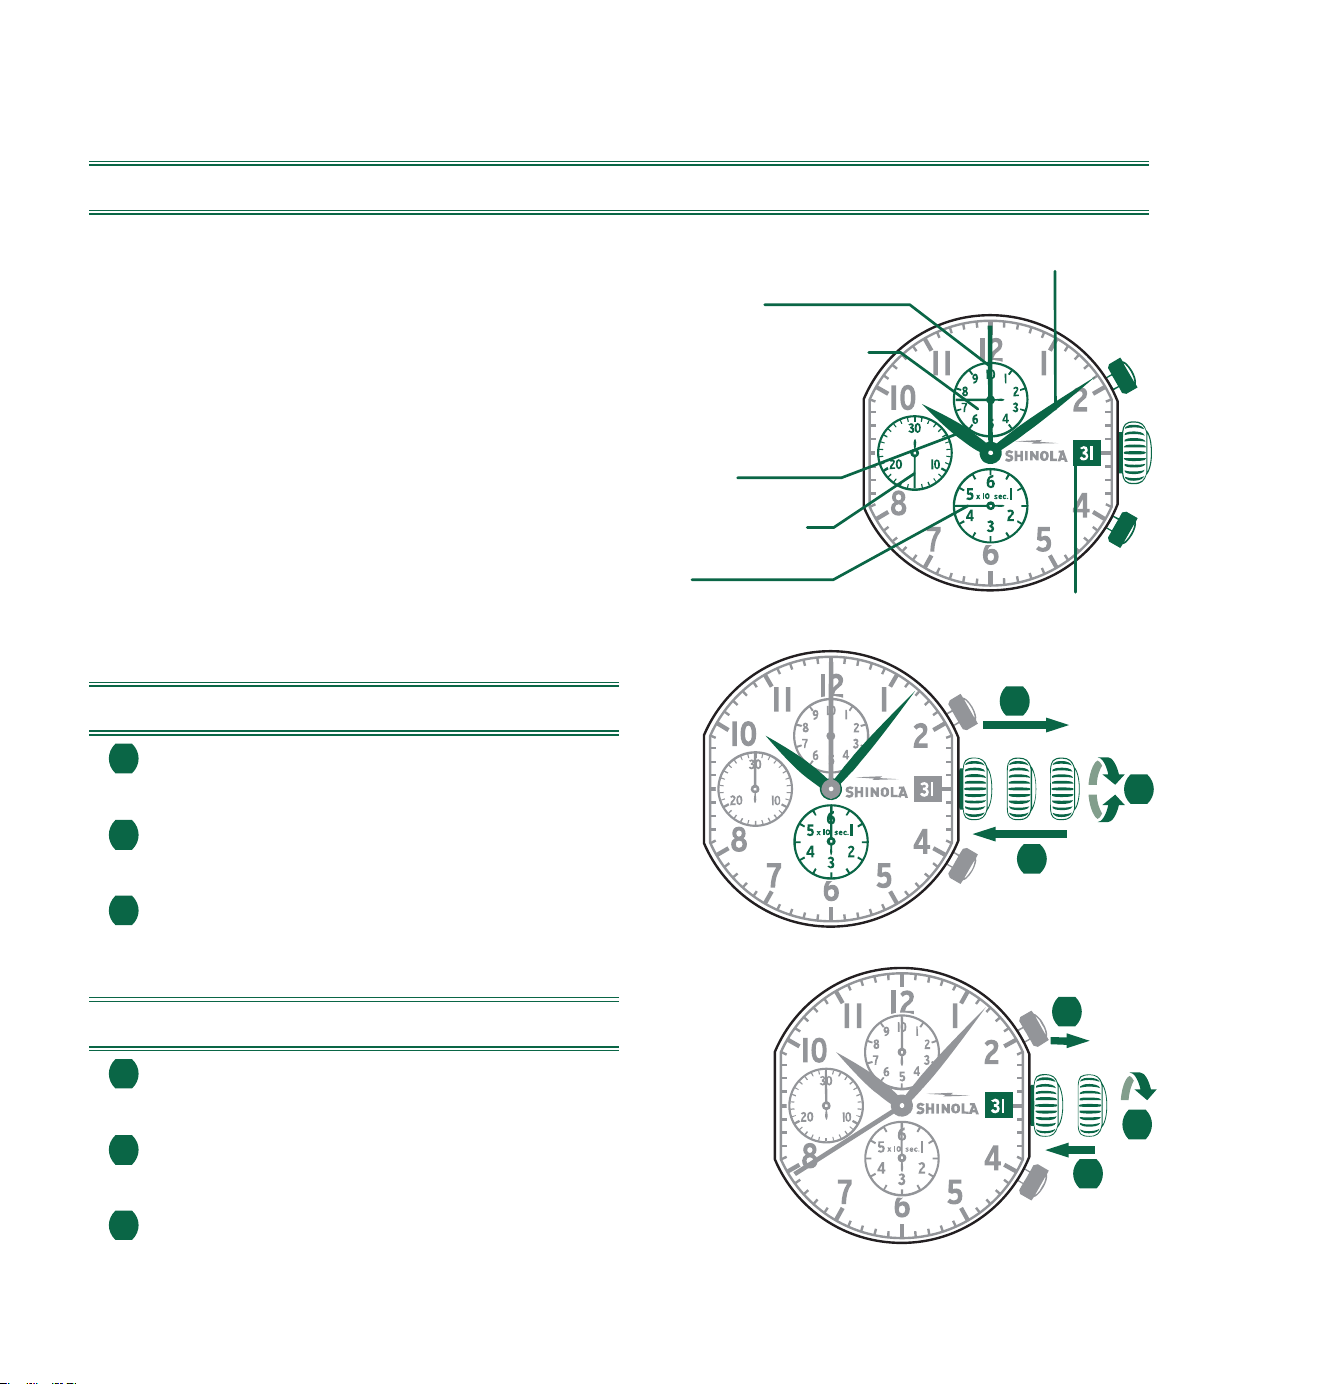
160
CRONÓGRAFO MODELO 3540.D
DESCRIPCIÓN DE LA PANTALLA Y DE LOS BOTONES DE CONTROL
Tenga en cuenta lo siguiente:
Antes de usar las funciones del
cronógrafo, asegúrese de que:
- la corona esté en la posición
I
(= posición normal);
- las tres agujas del cronógrafo estén
exactamente en la posición cero tras
la activación del pulsador B. Si las
agujas no están en cero, se deberán
ajustar sus posiciones. (Véase el
capítulo
Ajuste de las agujas del
cronógrafo en cero
).
CONFIGURACIÓN DE LA HORA
1 Tire de la corona a la posición III.
(El reloj se detendrá).
2 Gire la corona hasta llegar a la
hora correcta.
3 Empuje la corona de nuevo a la posición I.
CONFIGURACIÓN DE LA FECHA
1 Tire de la corona hasta la posición II.
(El reloj continuará en funcionamiento).
2 Gire la corona en sentido contrario a las agujas
del reloj hasta que aparezca la fecha correcta.
3 Empuje la corona de nuevo a la posición I.
III
1
2
3
II IIII
3
1
2
A
Aguja de minutos
Fecha
Aguja ratrapante
Contador de
I
/
I0
de segundo
(Se convierte en un
contador de horas
después de 30 minutos)
Aguja de horas
Contador de minutos
Segundero
B
I
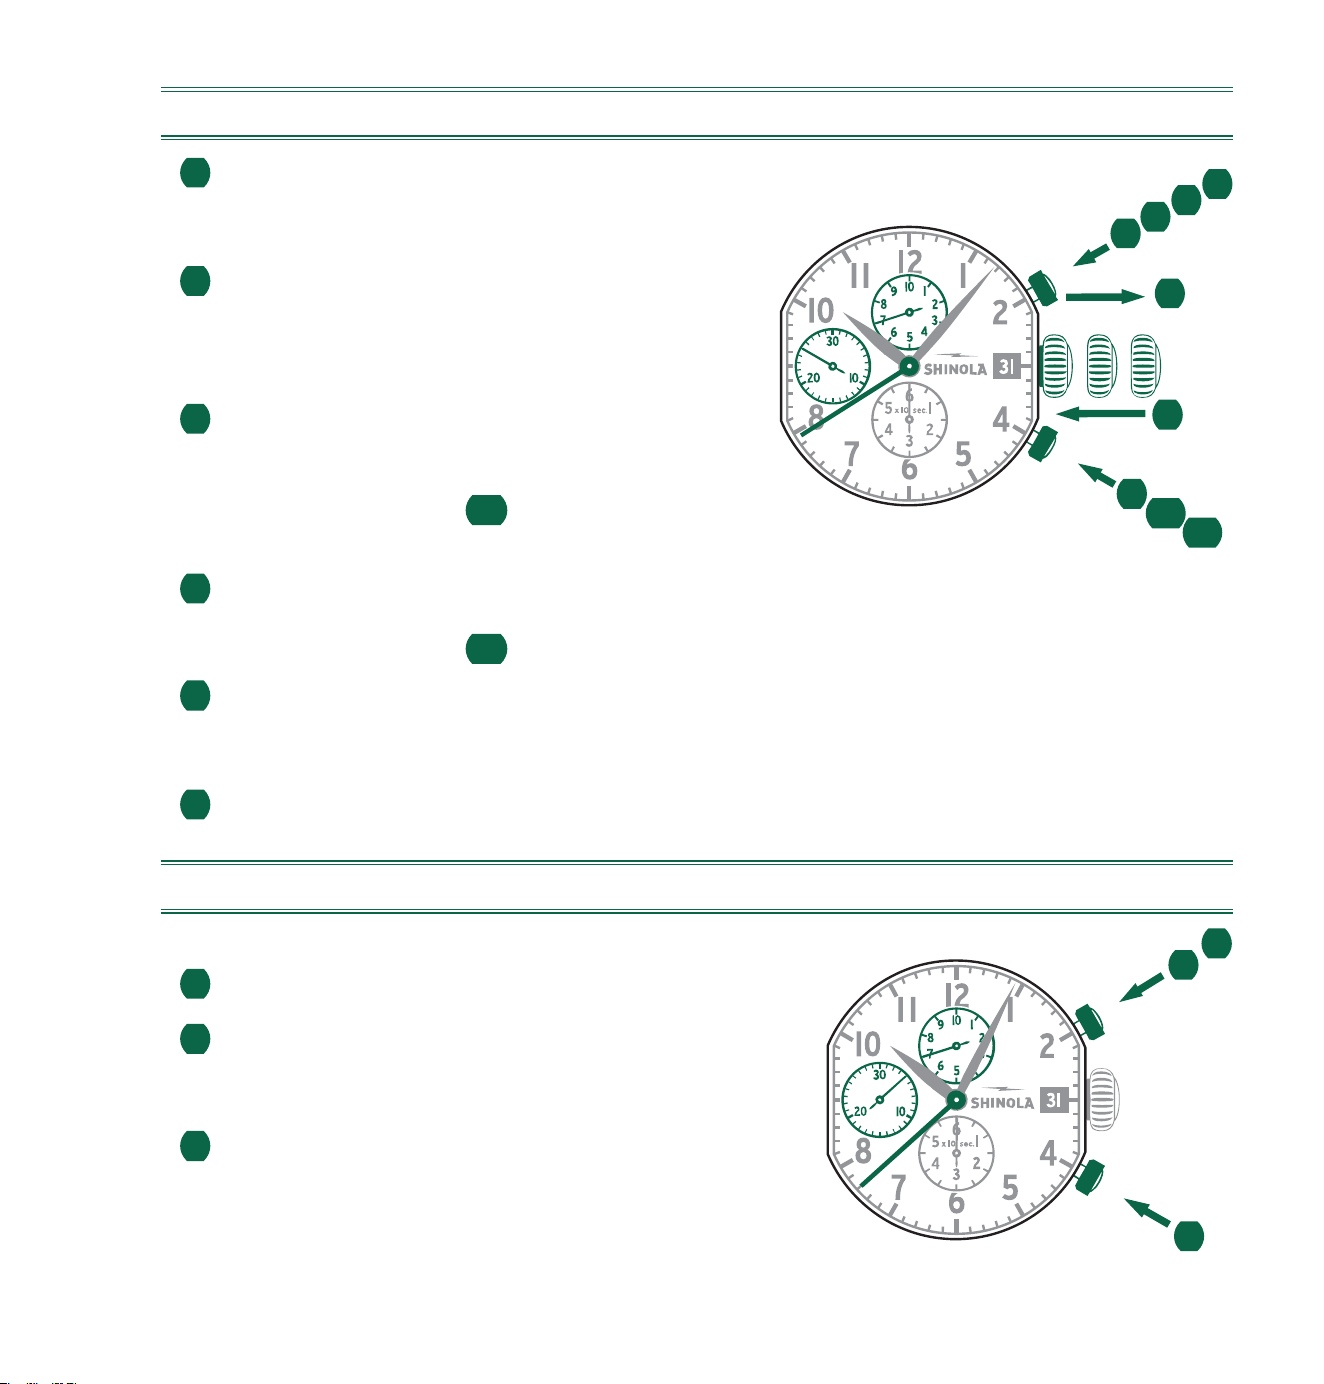
161
AJUSTE DE LAS AGUJAS DEL CRONÓGRAFO EN CERO
1 Tire de la corona hasta la posición III.
(Las tres agujas del cronógrafo están en
su posición cero correcta o incorrecta).
2 Mantenga los pulsadores A y B presionados
simultáneamente durante al menos
2 segundos. (La aguja ratrapante gira 360°:
se ha activado el modo correctivo).
3 Presione el pulsador A para sincronizar
la aguja ratrapante. Mantenga presionado
el pulsador A para que la aguja ratrapante
avance rápidamente.
3b
Presione
el pulsador B para pasar a la siguiente aguja.
4 Presione el pulsador A para sincronizar la aguja del contador de horas.
Mantenga presionado el pulsador A para que la aguja del contador de horas
avance rápidamente.
4b
Presione el pulsador B para pasar a la siguiente aguja.
5 Presione el pulsador A para sincronizar la aguja del contador de minutos.
Mantenga presionado el pulsador A para que el contador de minutos
avance rápidamente.
6 Devuelva la corona a la posición I.
FUNCIÓN BÁSICA
(
INICIO/PARADA/REINICIO
)
Ejemplo
1 Inicio: Presione el pulsador A.
2 Parada: Para detener el cronometraje, presione
el pulsador A una vez más y lea los tres
contadores del cronógrafo: 4 min / 38s / 7⁄10s.
3 Posicionamiento en cero: Presione el
pulsador B. (Las tres agujas del cronógrafo
volverán a sus posiciones cero).
1
2
3
A
B
II III
1
2
3
4
5
6
2
A
B
3b
4b

162
*
TIEMPO ACUMULADO
Ejemplo
1 Inicio: Comenzar el cronometraje.
2 Parada: P. ej., 15 min y 5 s después de
1
.
3 Reinicio: Se reanuda el cronometraje.
4 * Parada: P. ej., 13 min y 5 s después de
3
.
Tiempo acumulado = 28 min y 10 s.
5 Reinicio: Las tres agujas del cronógrafo
vuelven a sus posiciones cero.
Tenga en cuenta lo siguiente:
* Después de
4
, se podrá continuar la acumulación de tiempo
presionando el pulsador A (Reinicio/Parada, Reinicio/Parada…).
CRONOMETRAJE DEL INTERMEDIO O INTERVALO
Ejemplo
1 Inicio: Comenzar el cronometraje.
2 Visualizar el intervalo:
P. ej., 10 min y 10 s después de
1
.
El cronometraje continúa en el fondo.
3 Compensar el tiempo cronometrado:
Las tres agujas del cronógrafo se mueven
rápidamente hasta el tiempo cronometrado.
4 Parada:
P. ej., 28 min y 10 s después de
1
.
5 Reinicio: Las tres agujas del cronógrafo
vuelven a sus posiciones cero.
Tenga en cuenta lo siguiente:
* Después de
3
, se podrán visualizar más intervalos o intermedios
presionando B (visualizar intervalo/compensar el tiempo cronometrado…).
1
5
2
3
4
A
B
1
2
4
3
5
A
B
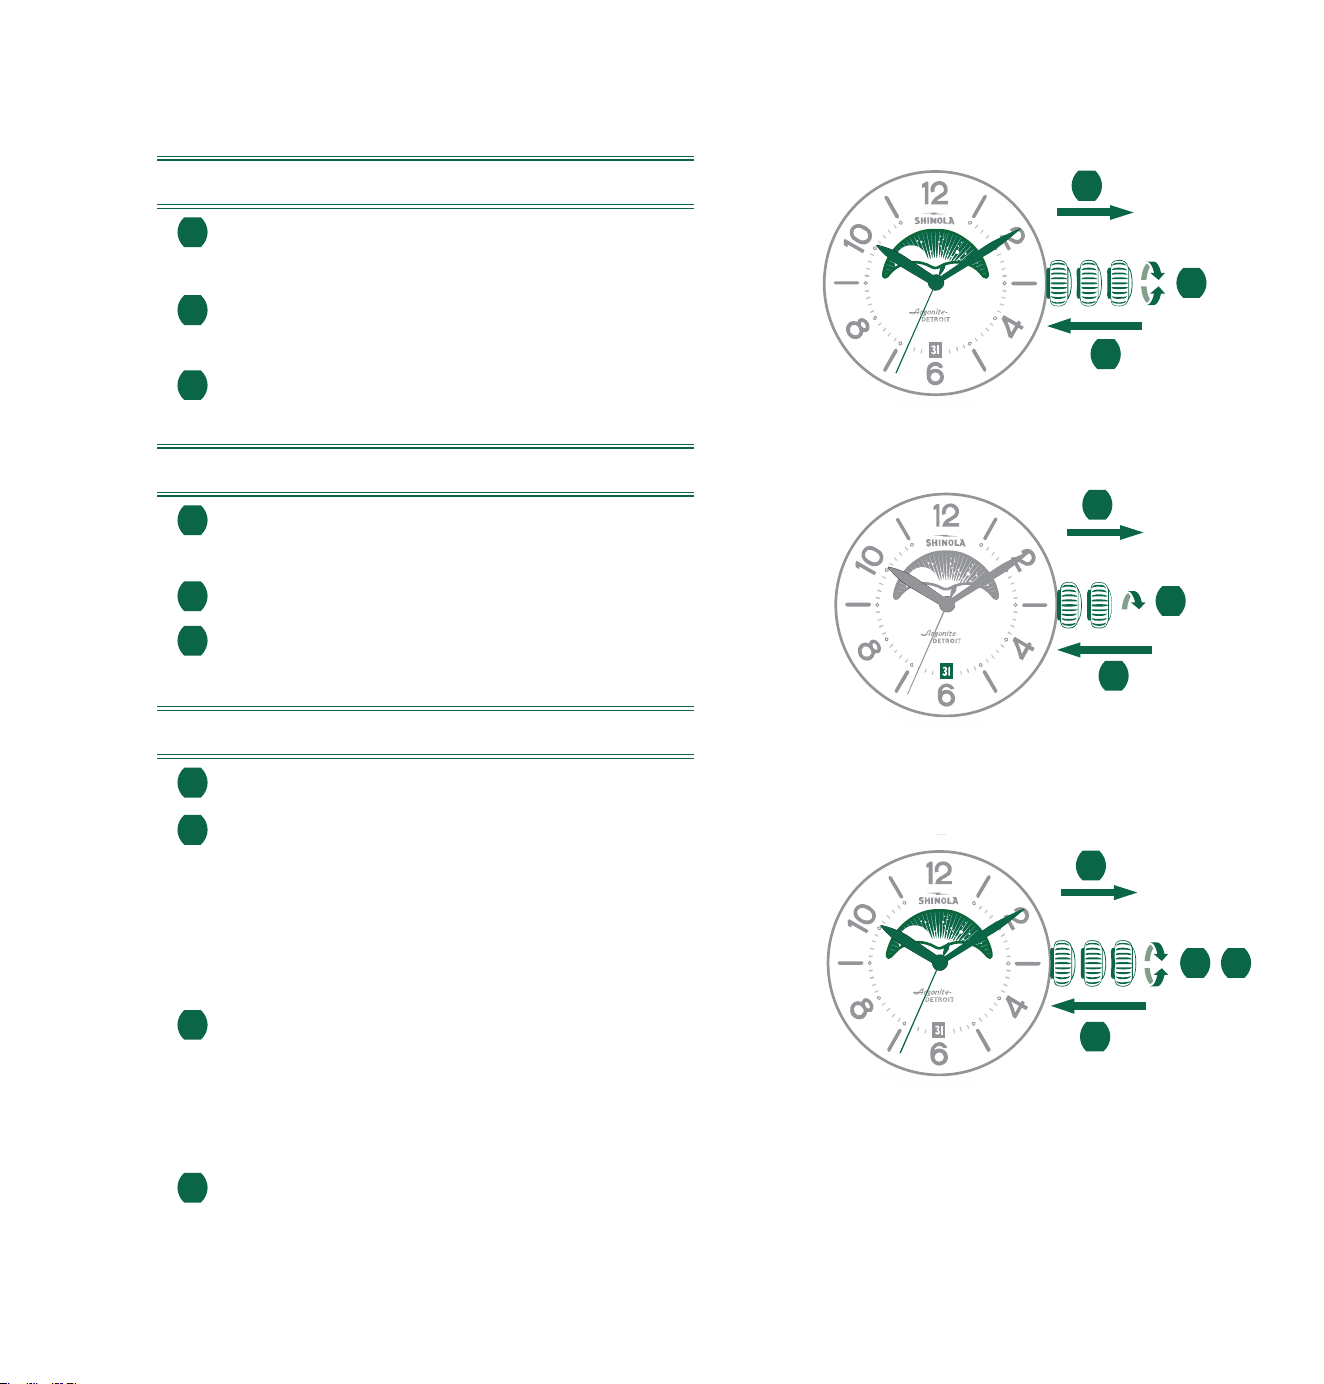
163
708
708
708
II
II
II
III
III
I
I
I
3
3
4
3
1
1
1
2
2
2
MODELO FASE LUNAR 708
AJUSTE DE LA FASE LUNAR
1 Tire de la corona hasta la posición III. (El reloj se detendrá).
2 Gire la corona hasta llegar a la posición correcta
de la luna. Asegúrese de que coincida con la posición
correcta de la fase lunar (utilizar un calendario lunar).
El disco de la luna se mueve muy lentamente.
Cambiará gradualmente cada 24 horas
(cada fecha de cambio).
3 A medida que la función de tiempo gira en la
posición III, las manos se moverán mientras se ajusta
la fase lunar. Una vez que logre ajustar una fase lunar
precisa, ajuste la hora y los minutos de vuelta a la hora correcta
(consulte las instrucciones “AJUSTE DE LA HORA” indicadas anteriormente).
4 Asegúrese de restablecer el indicador de fecha a la fecha correcta
(consulte las instrucciones “AJUSTE DE LA FECHA” indicadas anteriormente).
AJUSTE DE LA HORA
1 Tire de la corona hasta la posición III.
(El reloj se detendrá).
2 Gire la corona hacia la derecha hasta llegar
a la hora correcta.
3 Empuje la corona de nuevo hasta la posición I.
AJUSTE DE LA FECHA
1 Tire de la corona hasta la posición II.
(El reloj sigue funcionando).
2 Gire la corona hasta que aparezca la fecha correcta.
3 Empuje la corona de nuevo a la posición I.
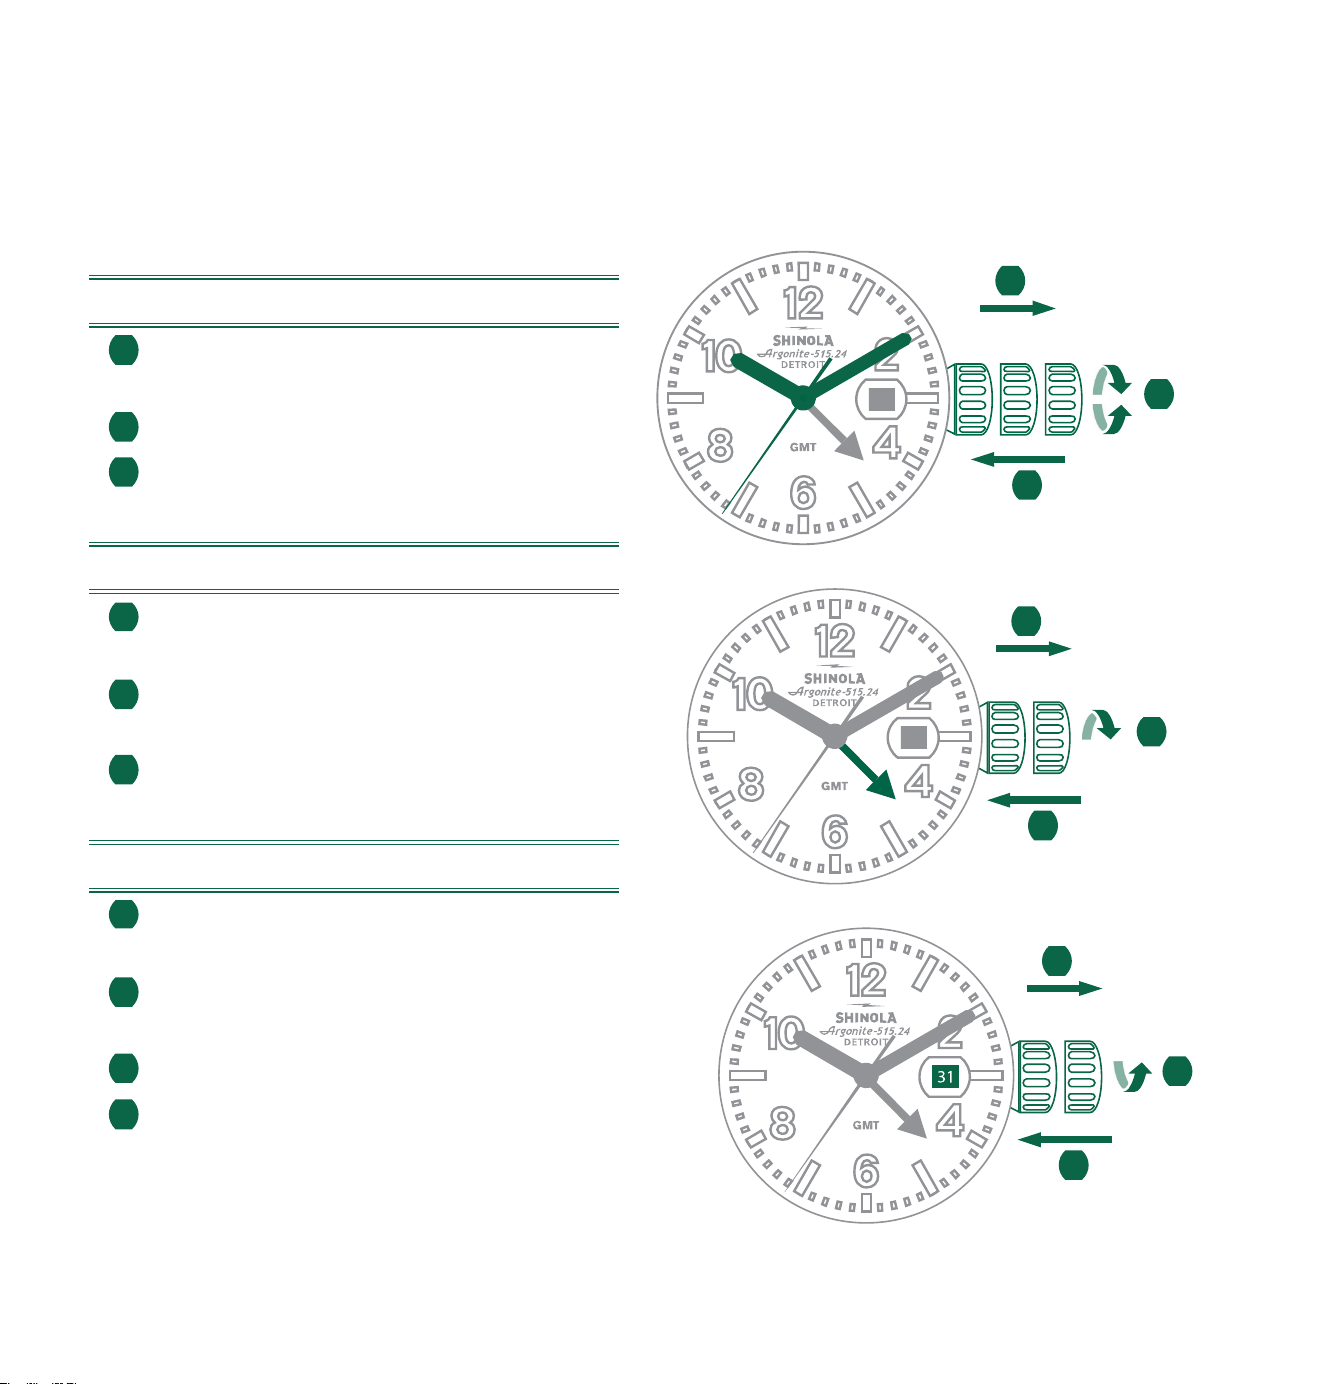
164
AJUSTAR LA HORA
1 Extraiga la corona hasta la posición III.
(El reloj se detiene).
2 Gire la corona hasta lograr la hora exacta.
3 Empuje la corona hasta la posición I.
AJUSTAR EL INDICADOR DE 24 HORAS
1 Extraiga la corona hasta la posición I.
(El reloj continúa funcionando).
2 Gire la corona en sentido antihorario
hasta lograr la hora exacta.
3 Empuje la corona hasta la posición I.
AJUSTAR LA FECHA
1 Extraiga la corona hasta la posición II.
(El reloj continúa funcionando).
2 Gire la corona en sentido horario hasta
lograr la fecha exacta.
3 Empuje la corona hasta la posición I.
4 Si se realiza un ajuste rápido de fecha entre
las 10 p.m. y las 12 a.m., siga los pasos del
1 al 3, pero asegúrese de fijar la fecha del día
siguiente, ya que no habrá cambios en la medianoche.
GMT MODELO 515.24H
Si su reloj de 24 horas posee un indicador de fecha, la ventana de la fecha podría estar en una
posición distinta a la representada en este manual.
3131
3131
II
II
II
IIII
I
I
3
3
3
1
1
1
2
2
2
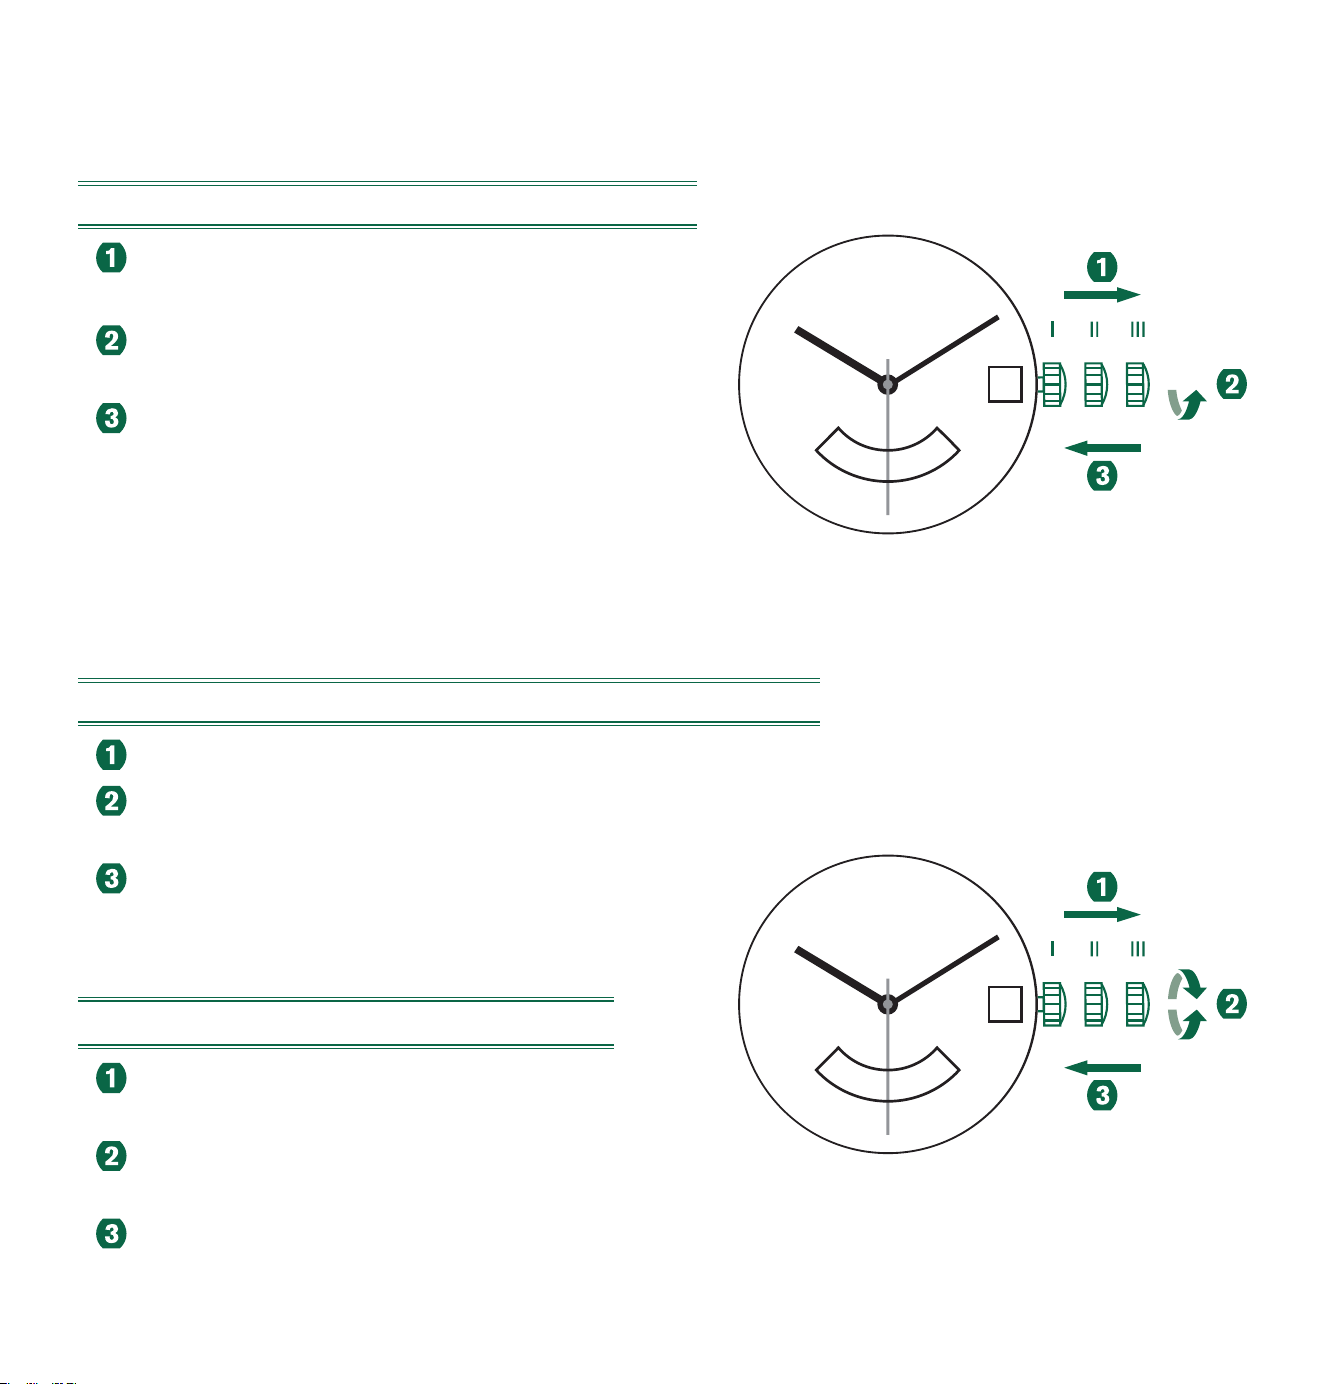
165
DÍA Y NOCHE (GMT) MODELO 515.24D
AJUSTE RÁPIDO DE LA FECHA
Extraiga la corona hasta la posición II.
(El reloj sigue funcionando).
Gire la corona en sentido horario hasta
lograr la fecha deseada.
Empuje la corona hasta la posición I.
NOTA: La fecha también se puede corregir en la
fase de cambio de día entre las 10 p.m. y la
medianoche. Se debe fijar la fecha del día siguiente,
porque no se realizará el cambio automático en la medianoche.
AJUSTE RÁPIDO PARA LA VISUALIZACION DE 24 HORAS
Extraiga la corona hasta la posición II. (El reloj sigue funcionando).
Gire la corona en sentido antihorario hasta
lograr la fecha deseada.
Empuje la corona hasta la posición I.
AJUSTAR LA HORA
Extraiga la corona hasta la posición III.
(El reloj se detiene).
Gire la corona hasta que la hora actual
se muestre (recuerde el ciclo de 24 horas).
Empuje la corona hasta la posición I.
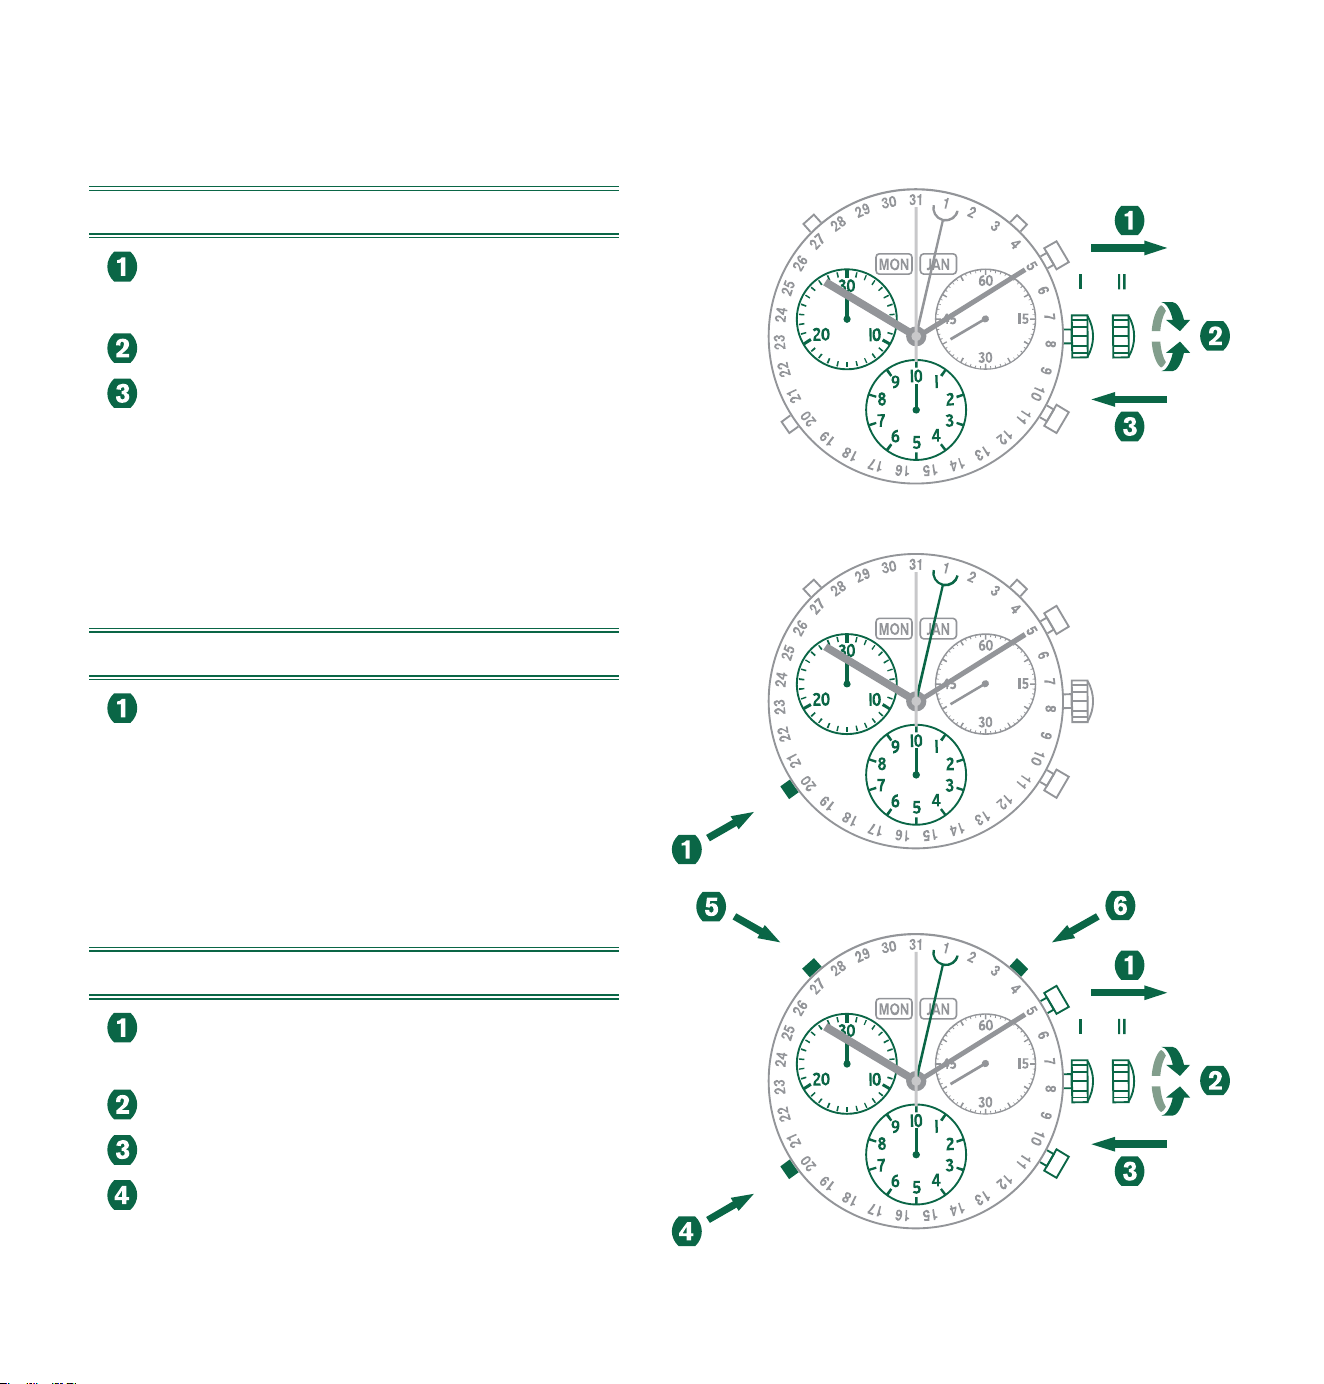
166
CRONÓGRAFO MODELO 5040.F
AJUSTAR LA HORA
Extraiga la corona hasta la posición II.
(El reloj se detiene).
Gire la corona hasta lograr la hora exacta.
Empuje la corona hasta la posición I.
NOTA: Para fijar la hora en el segundo exacto, (1)
la corona debe ser extraída cuando el segundero está
en la posición «60». Una vez ajustado el horario y el minutero,
(3) la corona debe ser empujada a la posición I
en el segundo exacto.
AJUSTAR LA FECHA (MODO RÁPIDO)
Presione el corrector C una vez para
adelantar la fecha un día.
NOTA: La fecha del día siguiente debe
ajustarse durante la fase de cambio de día,
aproximadamente entre las 9:00 p.m.
y las 12:20 a.m.
AJUSTAR HORA, FECHA, DÍA Y MES
Extraiga la corona hasta la posición II.
(El reloj se detiene).
Gire la corona hasta que se muestre la hora actual.
Empuje la corona hasta la posición I.
Presione el corrector C para
avanzar la aguja de fecha.
C
C
D E
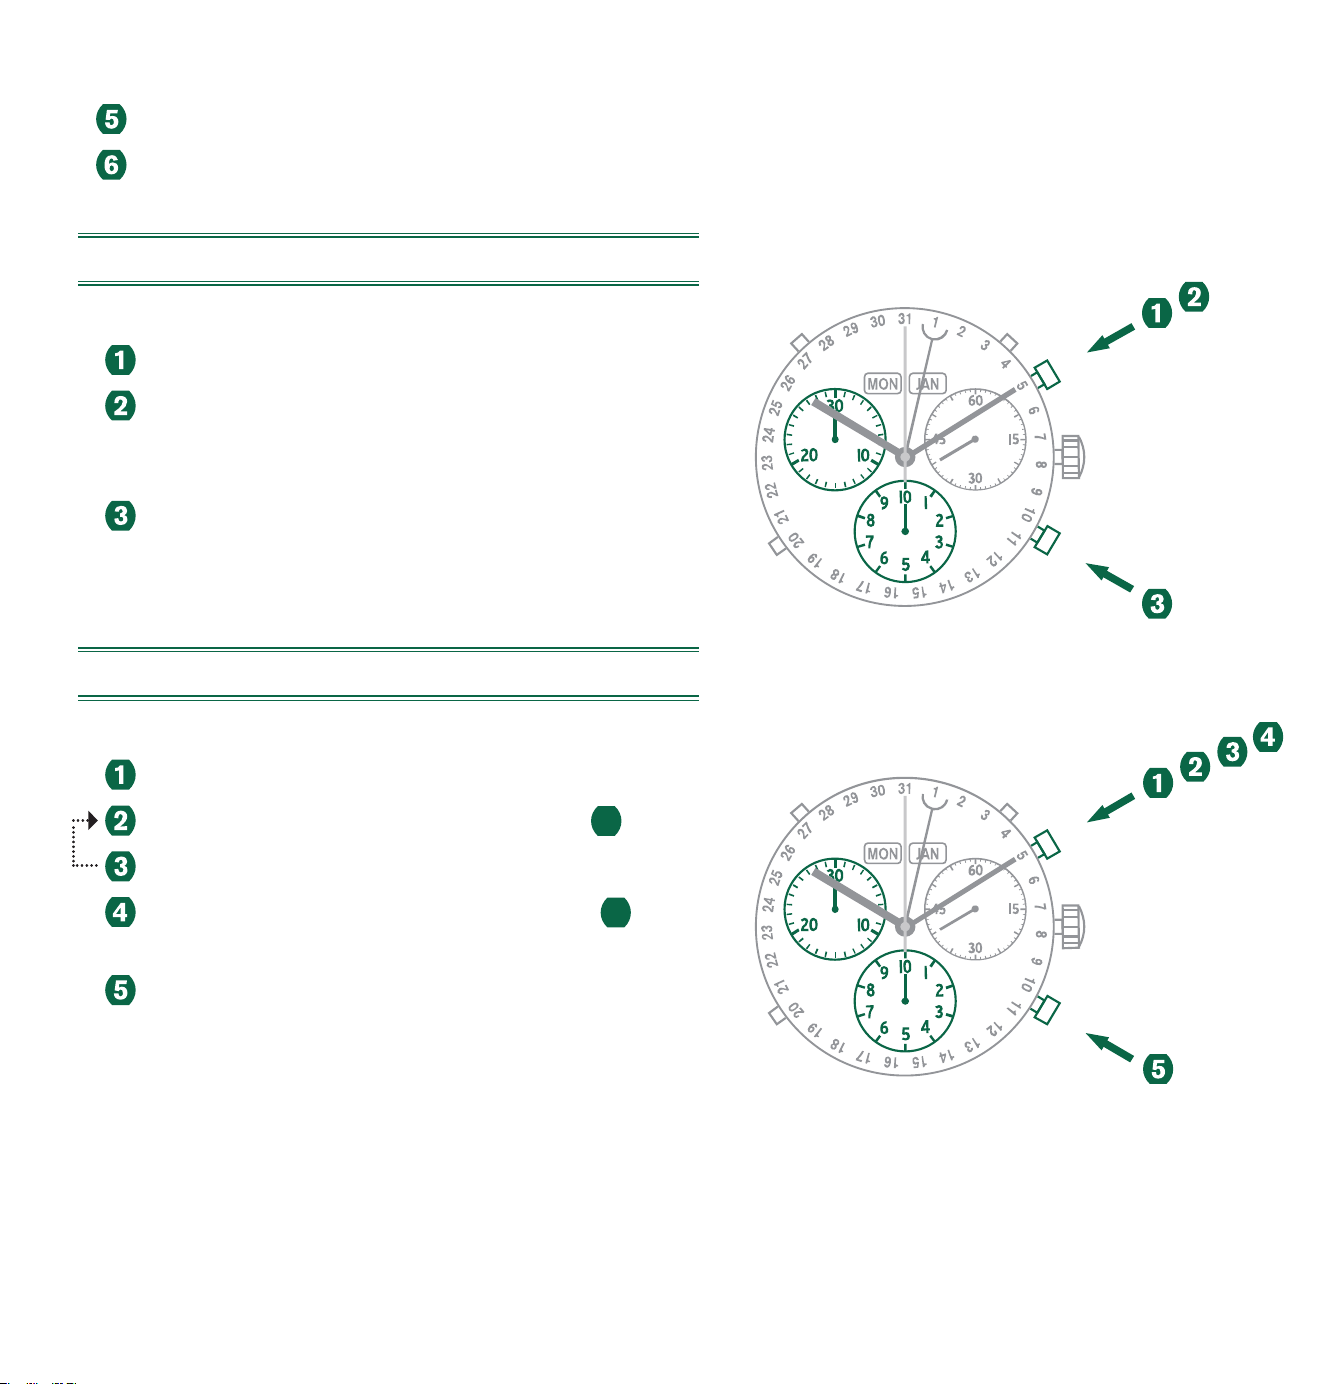
167
Presione el corrector D para avanzar el día.
Presione el corrector E para avanzar el mes.
FUNCIÓN BÁSICA (INICIO, PAUSA, REINICIO)
Ejemplo
Inicio: Presione el botón A.
Pausa: Para detener el cronometraje, presione
el botón A una vez más y lea los tres contadores
del cronógrafo: 4 min 38 s 7⁄10 s
Posicionamiento cero: Presione el botón B.
(Las tres agujas del cronógrafo regresarán a
su posición cero).
CRONOMETRAJE ACUMULADO
Ejemplo
Inicio: Comienza el cronometraje.
Pausa: p. ej., 15 min 5 s después de
1
.
Reinicio: Se reanuda el cronometraje.
*Pausa: p .ej., 13 min 5 s después de
3
.
El tiempo acumulado = 28 min 10 s
Reinicio: Las tres agujas del cronógrafo
regresan a su posición cero.
A
B
A
B
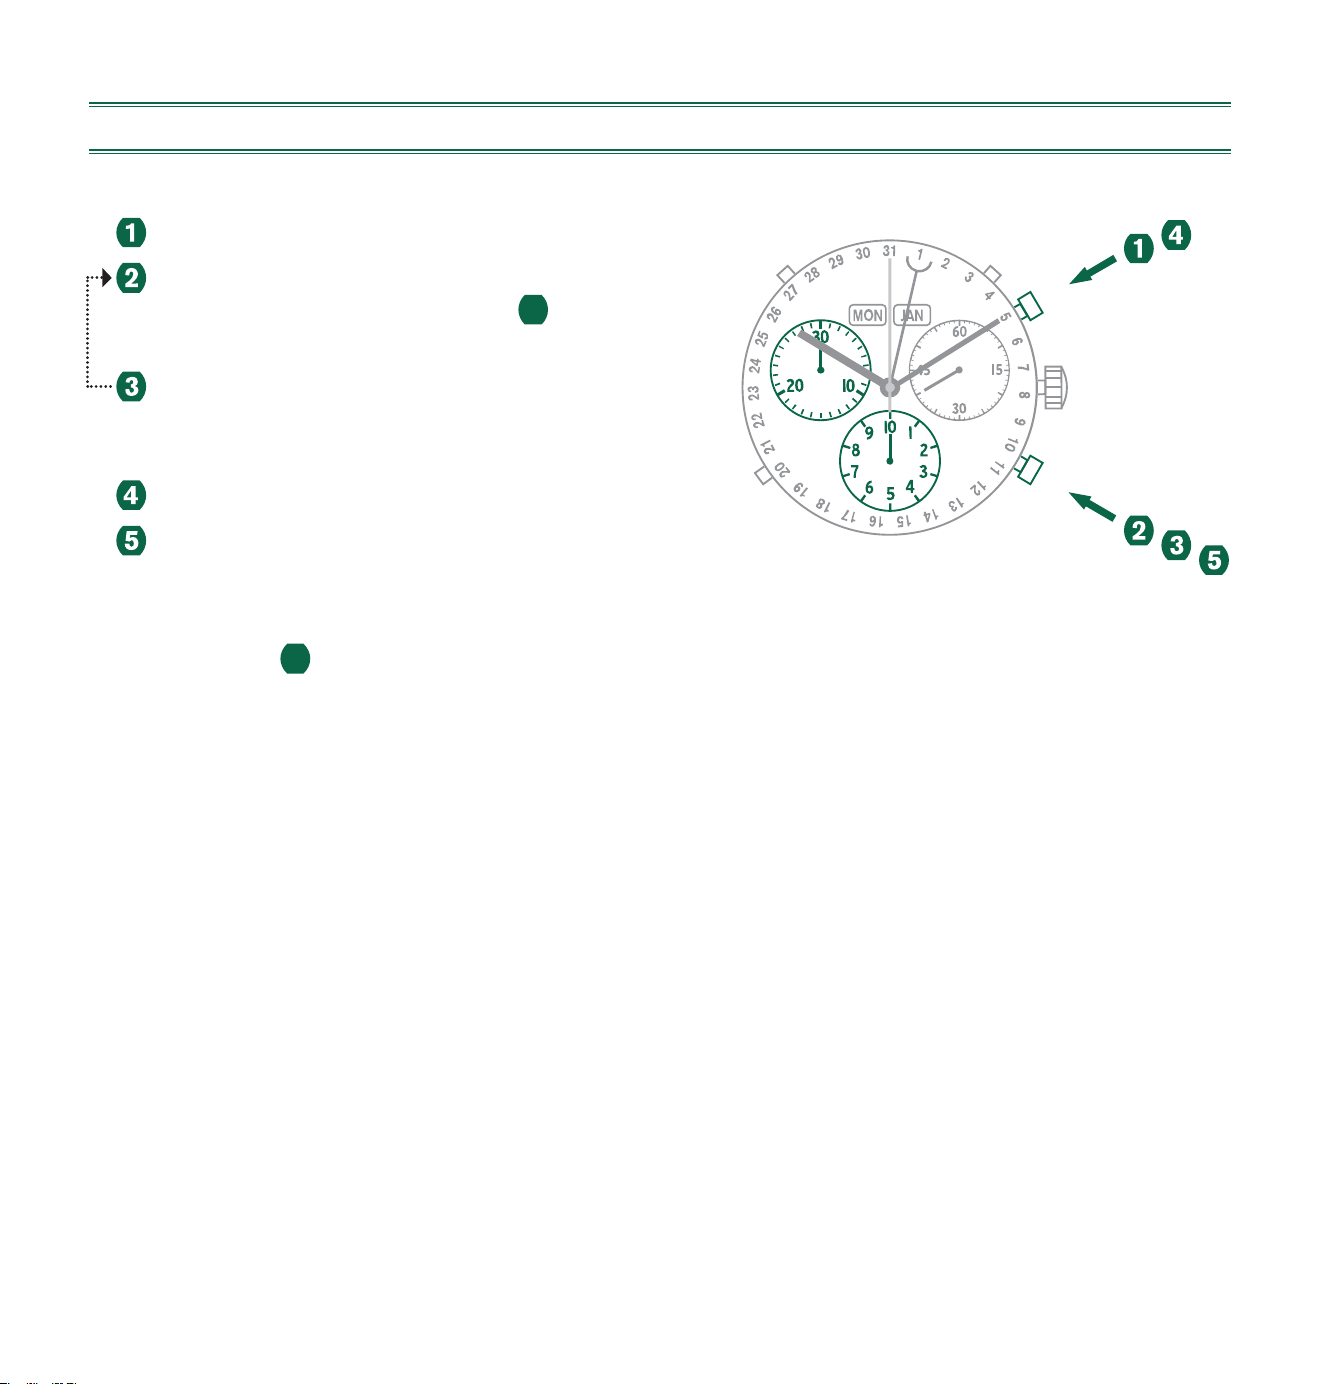
168
TEMPORIZADOR DE INTERVALOS
Ejemplo
Inicio: Presione el botón A.
Visualización del intervalo:
p. ej. 10 min 10 s después de
1
.
El cronometraje continúa en segundo plano.
Composición del tiempo medido:
Las agujas del cronógrafo avanzan rápidamente
hasta el tiempo medido en curso.
Pausa: Se visualiza el tiempo final.
Reinicio: Las tres agujas del cronómetro regresan
a su posición cero.
Tenga en cuenta:
* Después de
3
, otros intervalos pueden mostrarse al presionar B
(visualización del intervalo / composición del tiempo medido…).
*
A
B
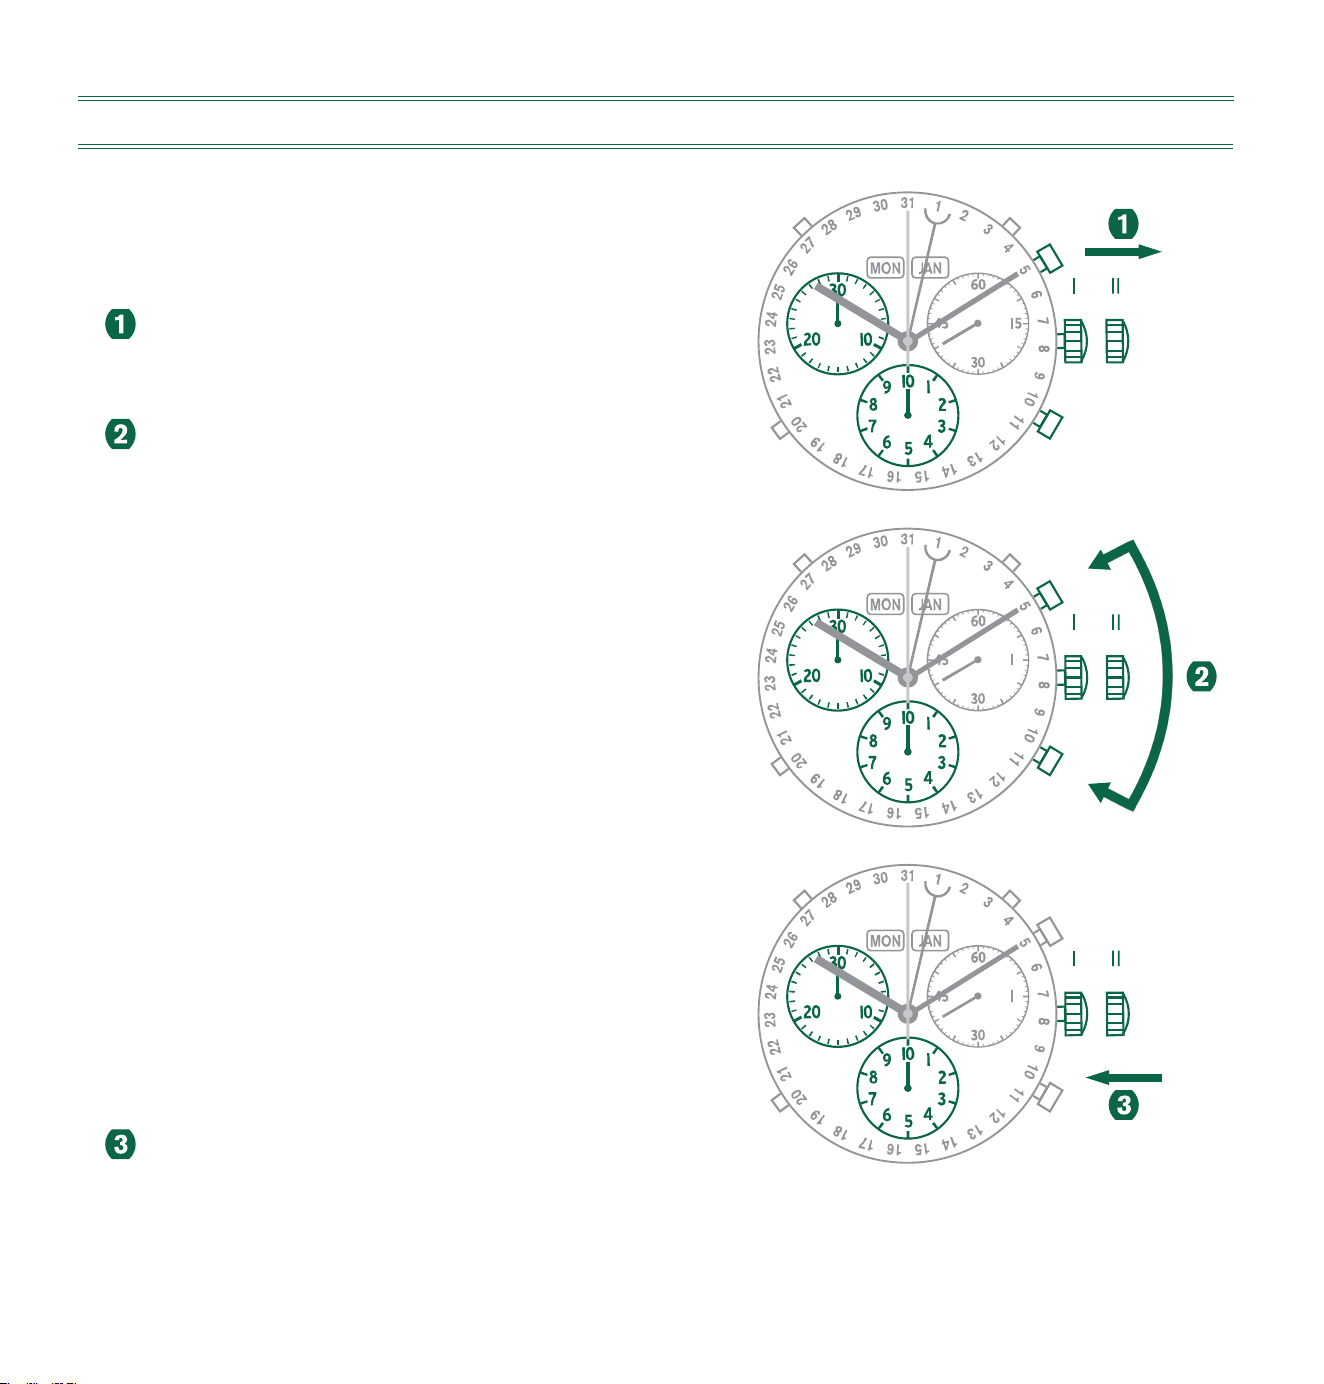
169
AJUSTAR LAS AGUJAS DEL CRONÓGRAFO A LA POSICIÓN CERO
Ejemplo
Una o varias de las agujas del cronógrafo no están
en su posición cero correcta y deben ser ajustadas
(p. ej., después de un cambio de batería).
Extraiga la corona a la posición II.
(Todas las agujas del cronógrafo están en su
correcta o incorrecta posición cero).
Mantenga presionados simultáneamente los botones
A y B durante al menos dos segundos y luego
suéltelos (el reloj de segundos gira 360º,
el modo correctivo está activado).
Ajuste del reloj de segundos:
Único paso — presione A 1x brevemente
Continuo — presione A prolongadamente
Ajuste de la siguiente aguja — presionar B
Ajuste del reloj de segundos 1⁄10
(posición 6 h):
Único paso — presione A 1x brevemente
Continuo — presione A prolongadamente
Ajuste de siguiente aguja — presionar B
Ajuste del contador de minutos
(posición 9h):
Único paso — presione A 1x brevemente
Continuo — presione A prolongadamente
Regrese la corona a la posición I.
(La finalización del ajuste de las agujas del cronógrafo
puede ser realizado en cualquier momento).
A
B
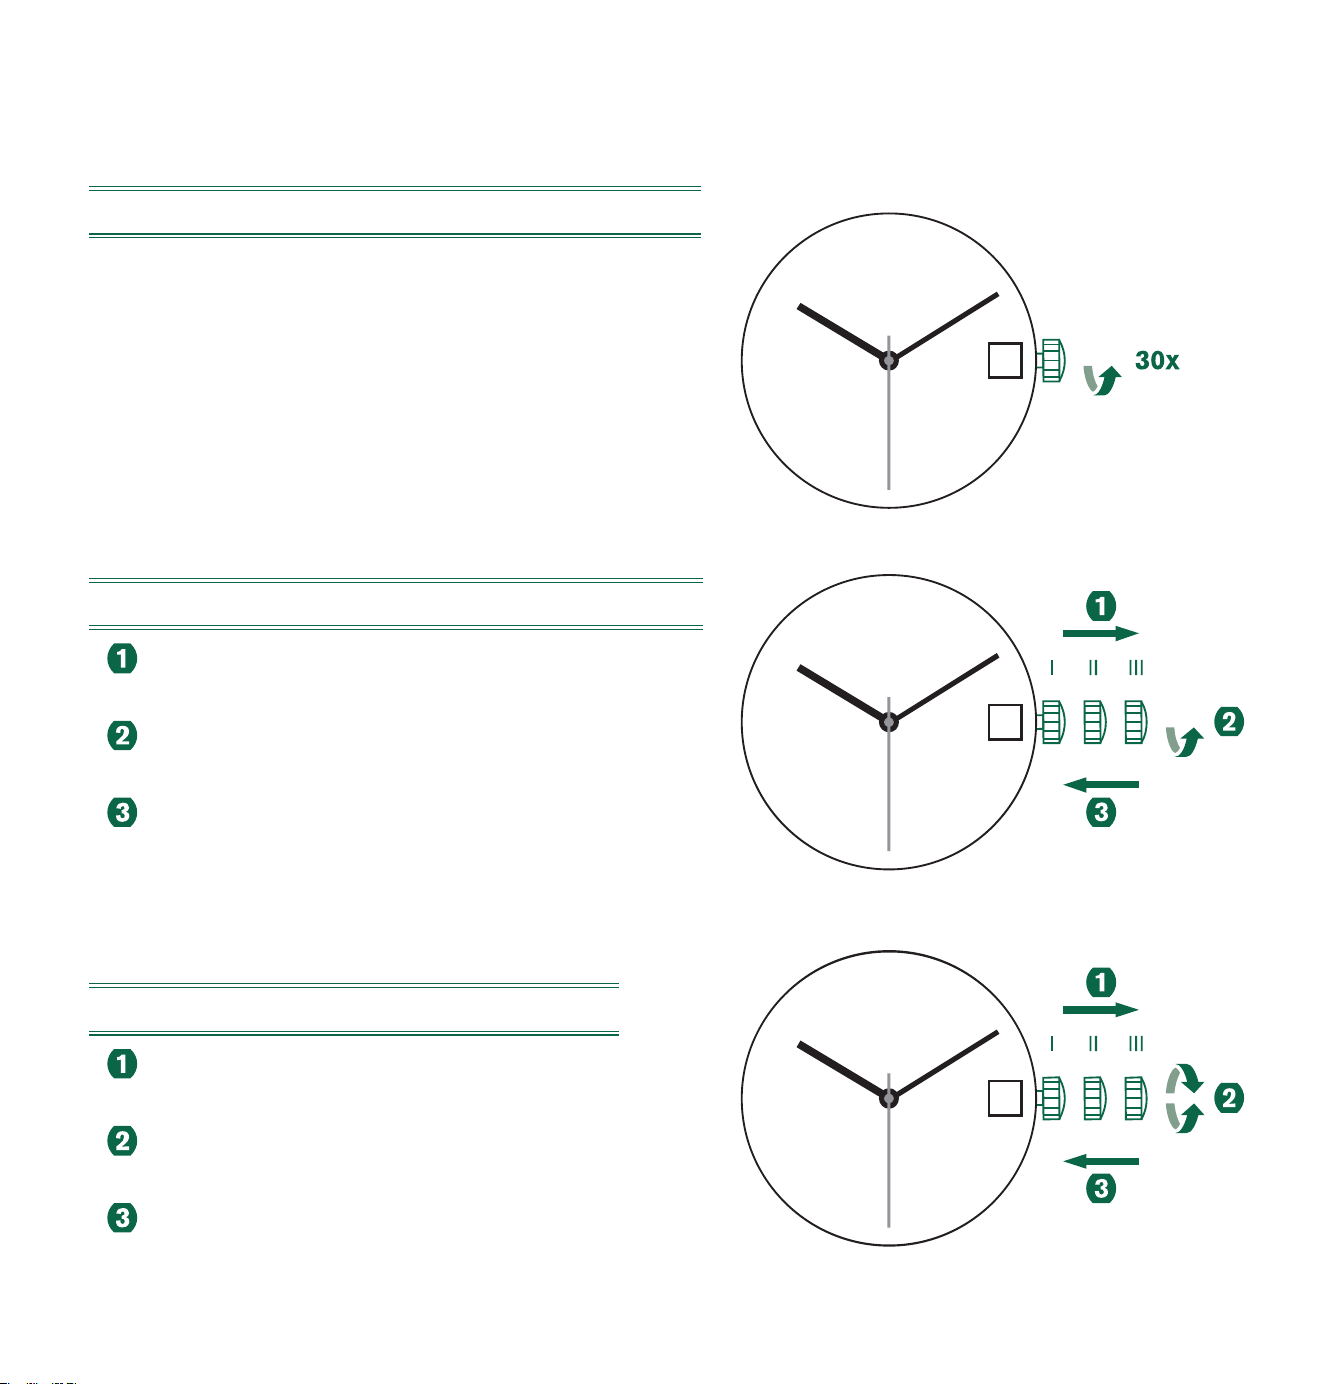
170
ARGOMATIC MODELO R150
DAR CUERDA MIENTRAS ESTÉ PARADO
La reserva máxima de energía puede ser restaurada
al girar la corona en sentido horario aproximadamente
de 30 veces.
CORRECCIÓN RÁPIDA DE LA FECHA
Extraiga la corona hasta la posición II.
(El reloj sigue funcionando).
Gire la corona en sentido antihorario hasta que
aparezca la fecha deseada.
Empuje la corona hasta la posición I.
AJUSTAR LA HORA
Extraiga la corona hasta la posición III.
(El reloj se detiene).
Gire la corona hasta que se muestre la hora actual
(recuerde el ciclo de 24 horas).
Empuje la corona hasta la posición I.
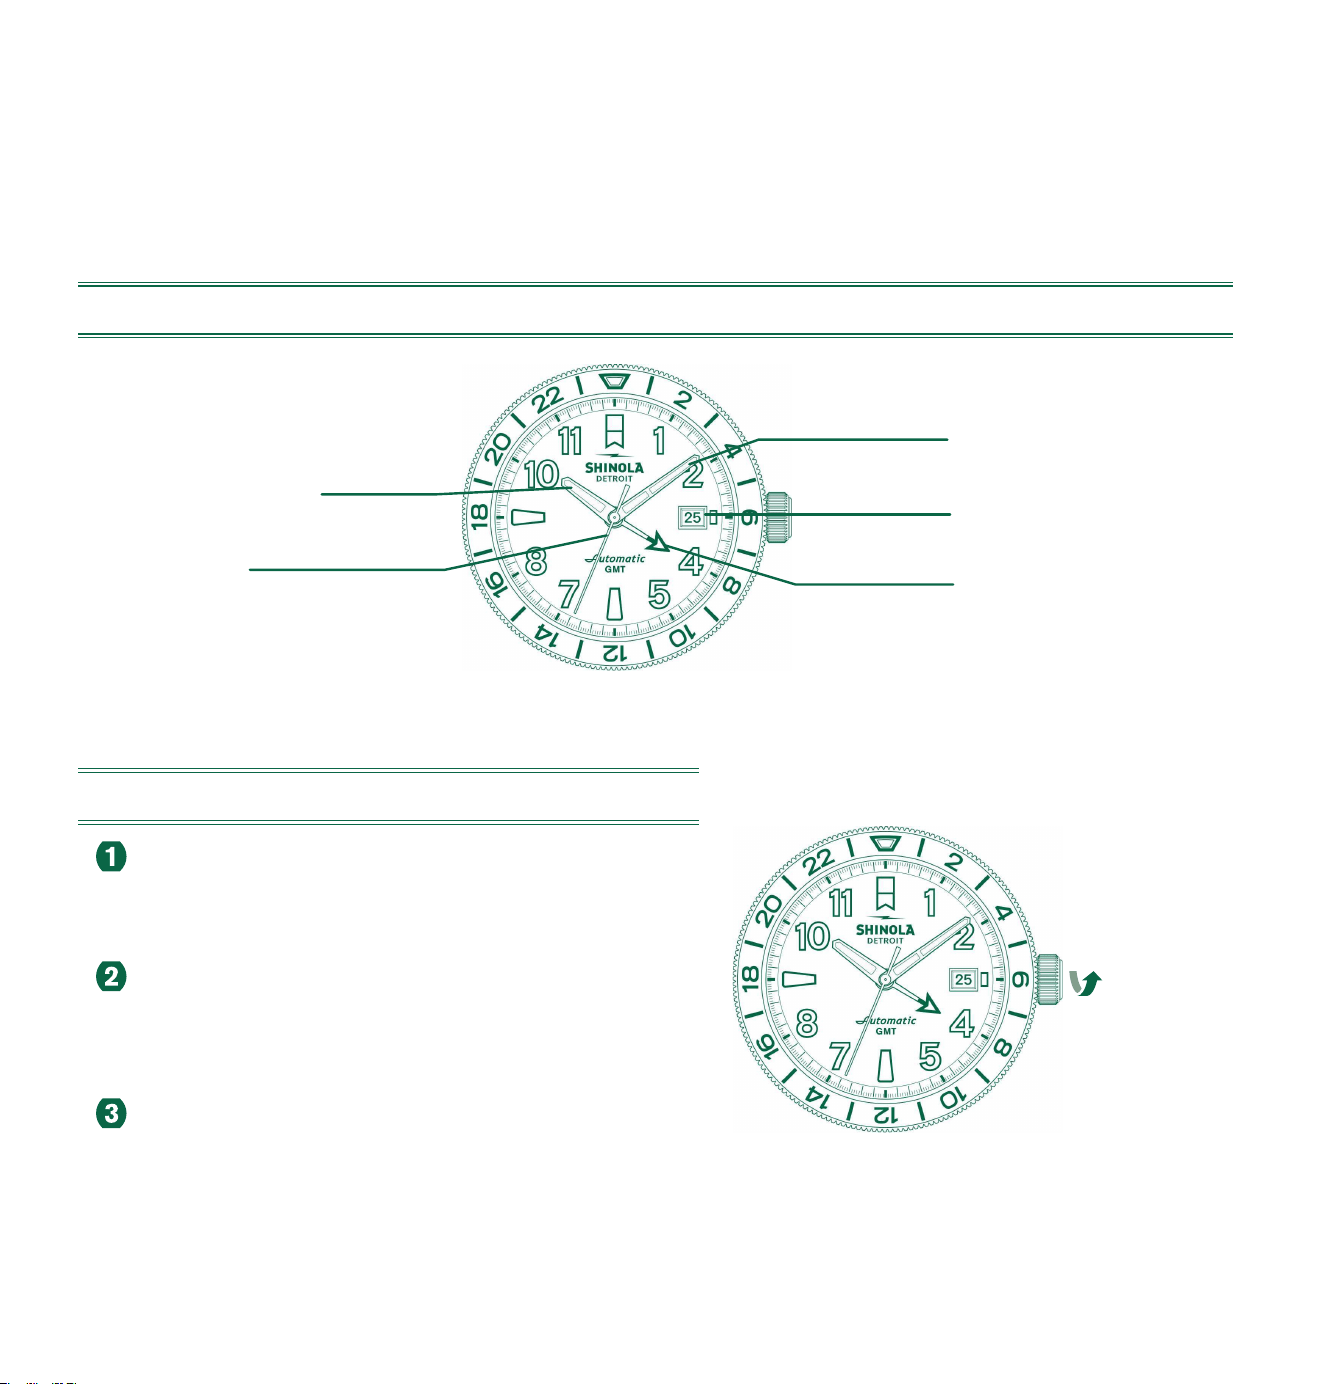
171
MODELO AUTOMÁTICO SW330-2
Si su reloj tiene una corona desenroscable, primero debe desenroscarla antes de hacer ningún
ajuste. Consulte la página 5 para ver las características de la corona.
DESCRIPCIÓN DE LA PANTALLA Y LOS BOTONES DE CONTROL
DAR CUERDA AL RELOJ MIENTRAS ESTÁ PARADO
Gire la corona en el sentido contrario a las agujas
del reloj hasta que llegue a la posición
I
.
Gire la corona en el sentido de las agujas del reloj
entre 30 y 35 veces para restablecer totalmente la
reserva de marcha.
Vuelva a cerrar la corona presionándola
contralacaja y girándola ligeramente en el sentido
de lasagujas del reloj hasta que quede bloqueada
de nuevo en la posición cero.
30x - 35x
Aguja de las horas
Segundero
Minutero
Fecha
Aguja GMT
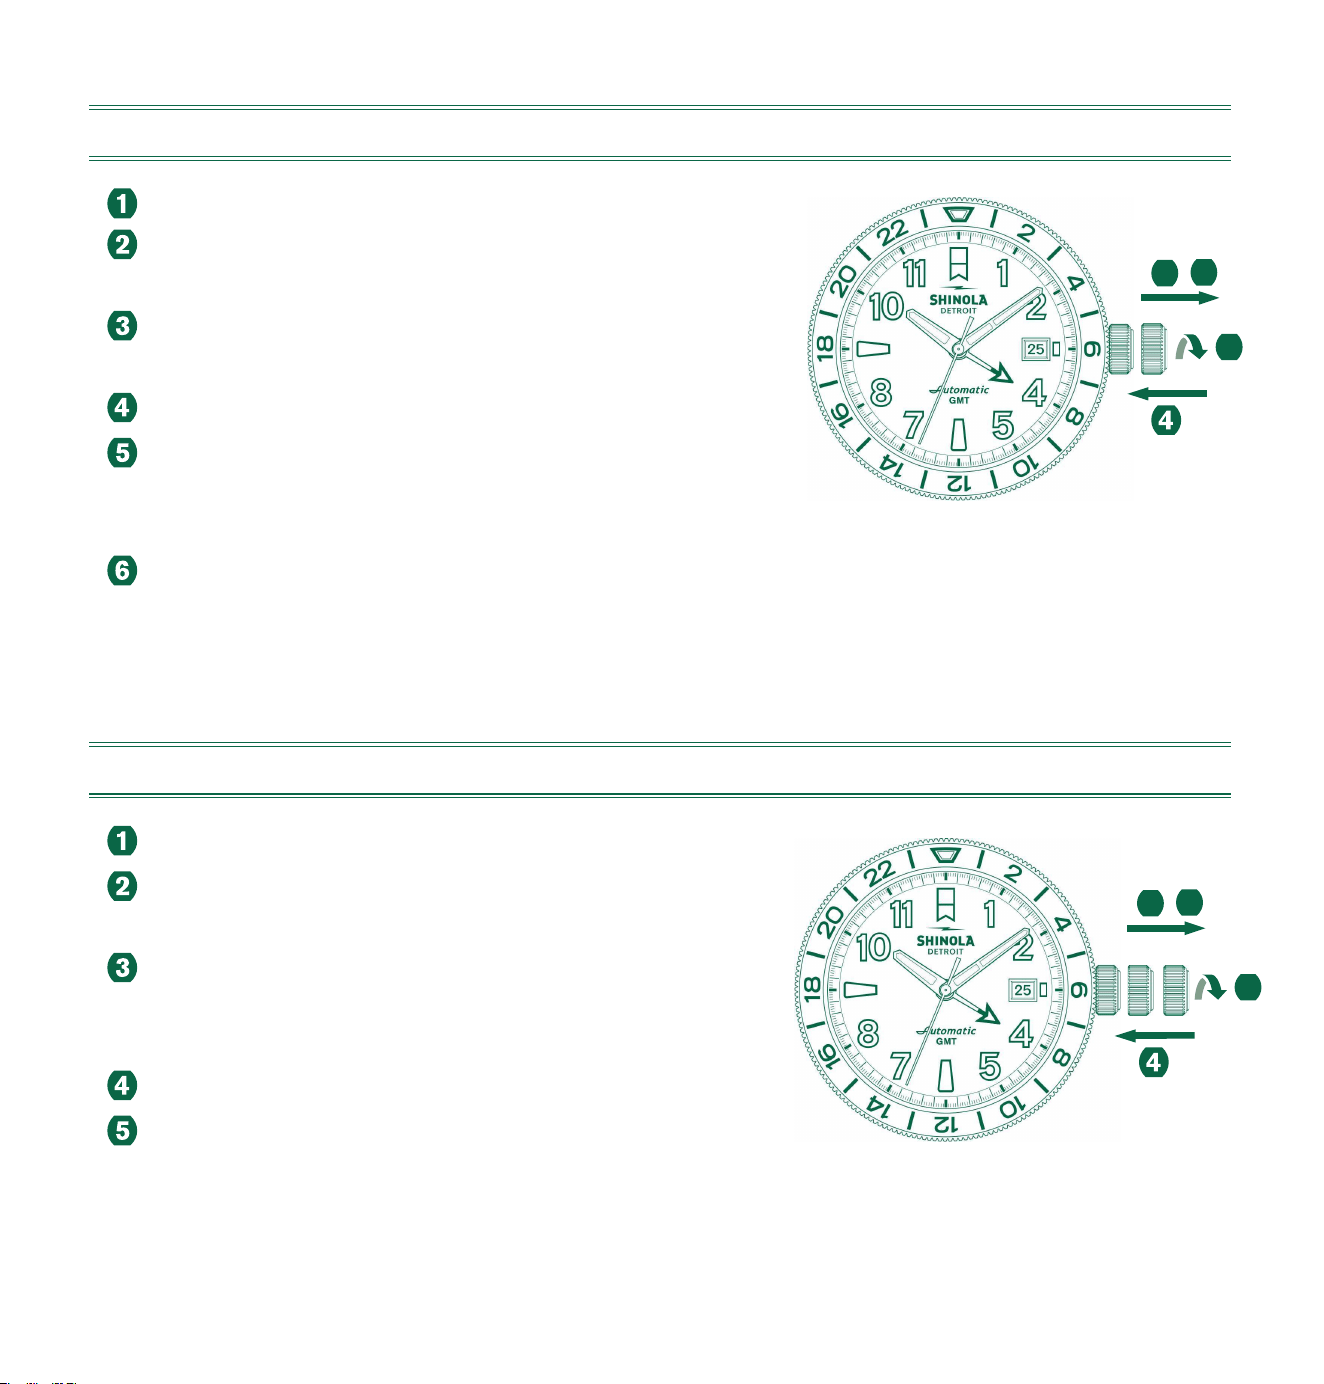
172
CONFIGURAR LA HORA (MODO RÁPIDO)
Desenrosque la corona hasta que llegue a la posición I.
Saque la corona hasta la posición II
(con el reloj en funcionamiento).
Gire la corona en el sentido contrario a las agujas
del reloj hastaque aparezca la fecha requerida.
Vuelva a colocar la corona en la posición I.
Si quiere establecer la hora entre las 9:00 p.m. y las 3:00
a.m., siga los pasos 1 a 3, pero debe asegurarse de
establecer la hora en el día siguiente.
Recuerde volver a cerrar la corona. Para ello, presiónela contra
la caja hasta que la rosca encaje. Después, gírela en el sentido
de las agujas del reloj hasta que quede bien apretada.
CONFIGURAR LA HORA
Desenrosque la corona hasta que llegue a la posición I.
Saque la corona hasta la posición III
(con el reloj parado).
Gire la corona en el sentido contrario a las agujas del
reloj hasta que aparezca la hora actual
(recuerde el ciclo de 24 h).
Vuelva a colocar la corona en la posición I.
Recuerde volver a cerrar la corona. Para ello, presiónela
contra la caja hasta que la rosca encaje. Después, gírela
en el sentido de las agujas del reloj hasta que quede bien
apretada.
III
3
1 2
II IIII
3
1
2
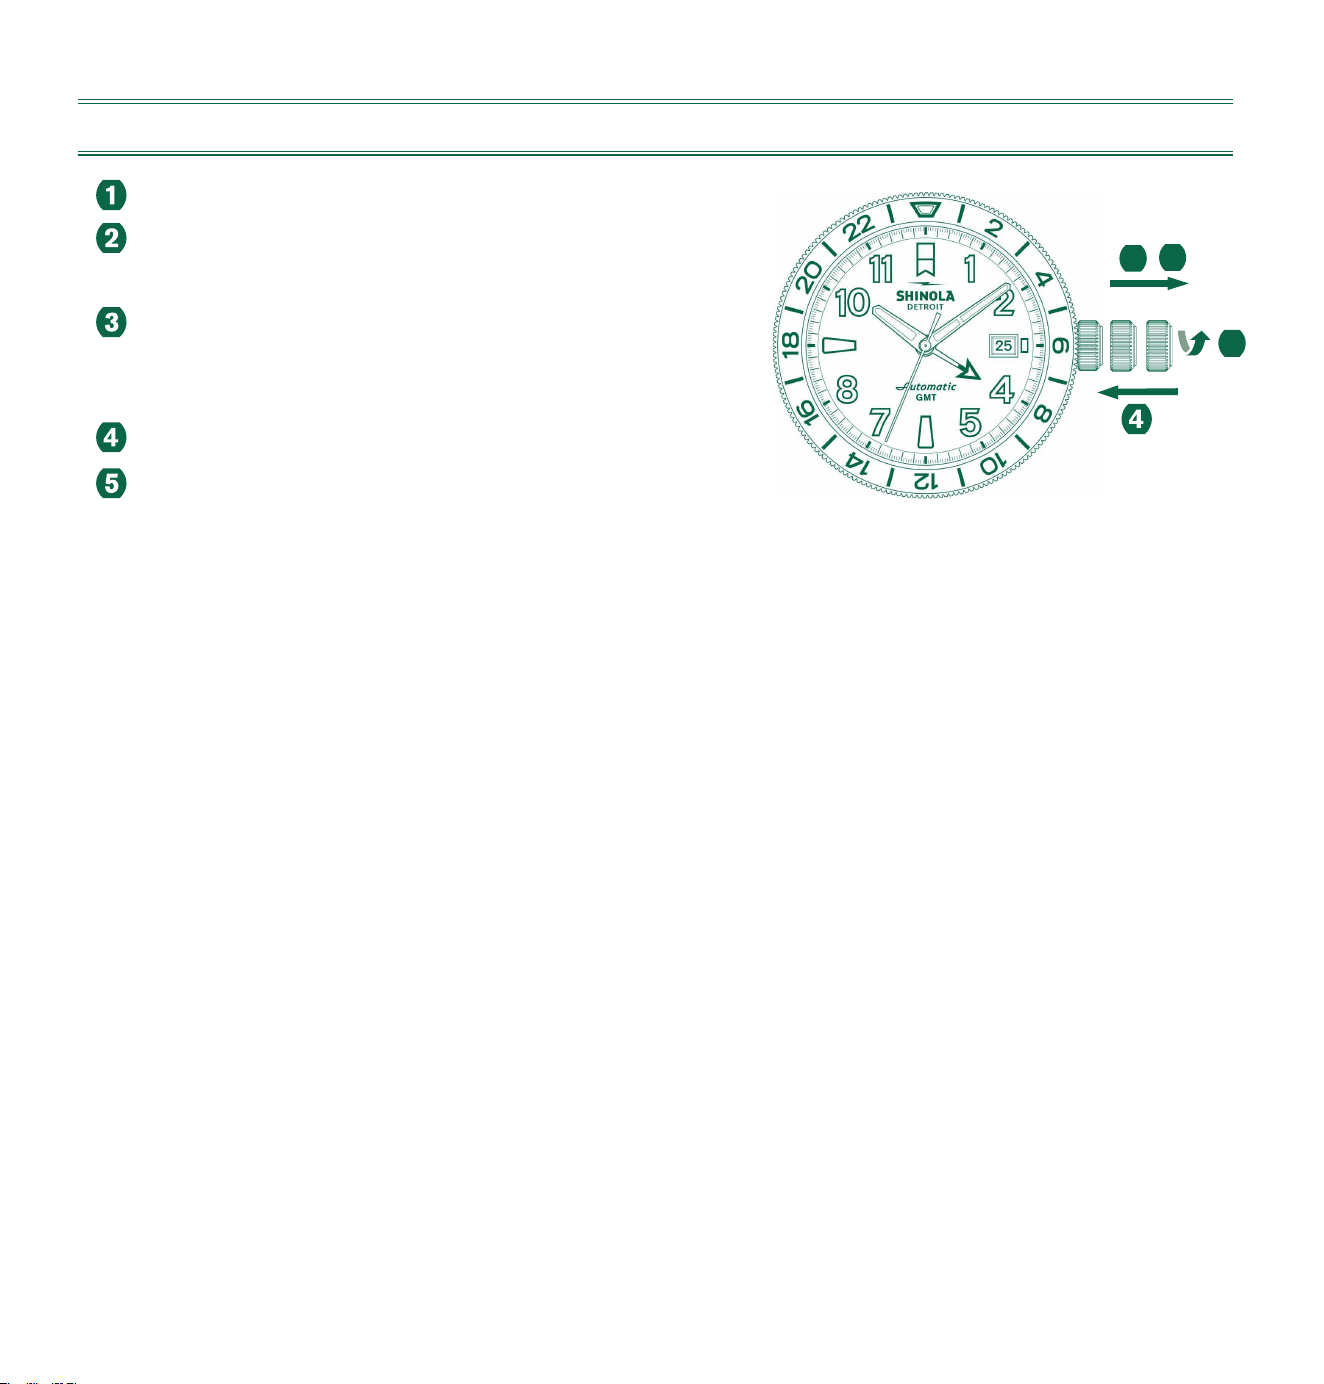
173
II IIII
3
1
2
CONFIGURAR LA HORA GMT
Desenrosque la corona hasta que llegue a la posición I.
Saque la corona hasta la posición II
(con el reloj en funcionamiento).
Gire la corona en el sentido contrario a las agujas
del reloj hasta que aparezca la hora GMT que
desee (recuerde el ciclo de 24h).
Vuelva a colocar la corona en la posición I.
Recuerde volver a cerrar la corona.
Para ello, presiónela contra la caja hasta que la rosca encaje.
Después, gírela en el sentido de las agujas del reloj hasta que
quede bien apretada.
Nota:
* La aguja GMT se sincroniza con la aguja de las horas.
La hora GMT se mostrará con mayor precisión si
el reloj se ajusta en una hora en punto.
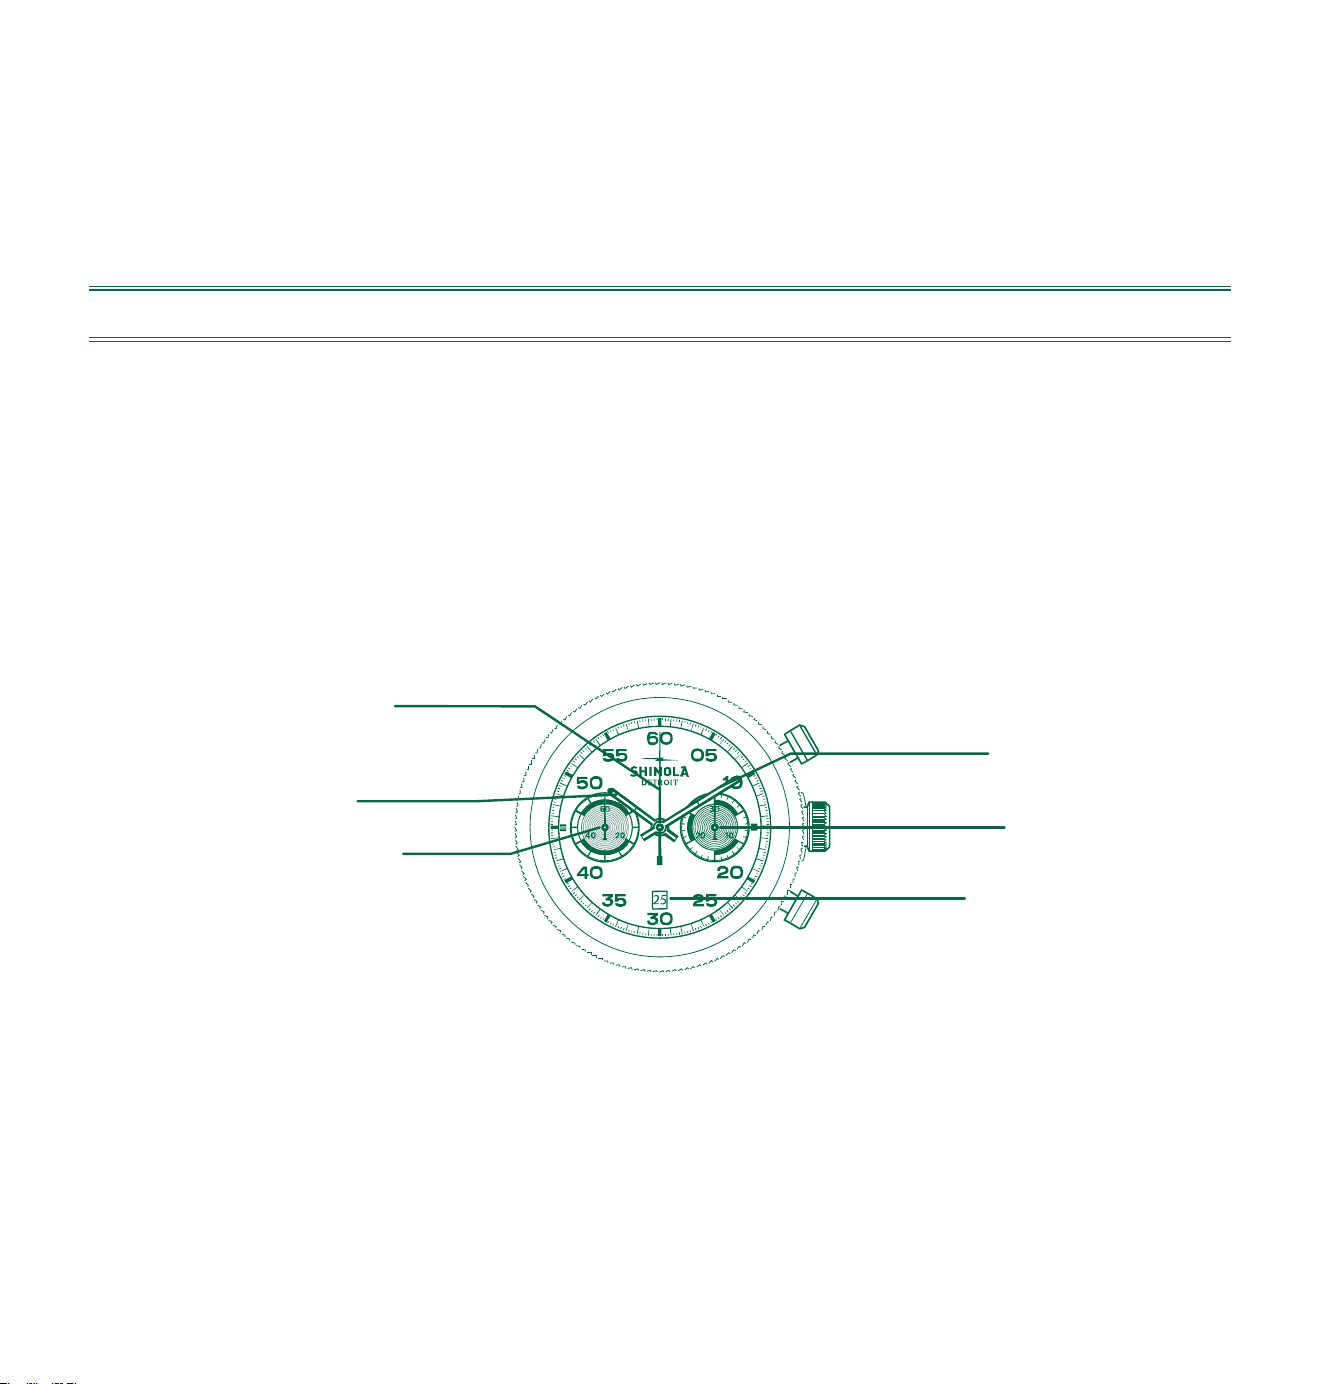
174
MODELO AUTOMÁTICO SW510 BH A
Si su reloj tiene una corona desenroscable, primero debe desenroscarla antes de hacer ningún
ajuste. Consulte la página 5 para ver las características de la corona.
DESCRIPCIÓN DE LA PANTALLA Y LOS BOTONES DE CONTROL
Nota:
Antes de usar las funciones del cronógrafo, asegúrese de que:
• La corona está en la posición normal, bloqueada (posición 0).
• Las dos manillas del cronógrafo están en la posición cero.
.
Segundero
Aguja de
las horas
Aguja de los
segundos
Minutero
Esfera de 30
minutos
Fecha

175
DAR CUERDA AL RELOJ MIENTRAS ESTÁ PARADO
Gire la corona en el sentido contrario a las agujas
del reloj hasta que llegue a la posición I.
Gire la corona en el sentido de las agujas del reloj
entre 30 y 35 veces para restablecer totalmente la
reserva de marcha.
Vuelva a cerrar la corona presionándola con-
tralacaja y girándola ligeramente en el sentido de
lasagujas del reloj hasta que quede bloqueada de
nuevo en la posición cero.
CONFIGURAR LA HORA (MODO RÁPIDO)
Desenrosque la corona hasta que llegue a la posición I.
Saque la corona hasta la posición II (con el reloj en
funcionamiento).
Gire la corona en el sentido contrario a las agujas
del reloj hastaque aparezca la fecha requerida.
Vuelva a colocar la corona en la posición I.
Si se configura la hora entre las 09:00 pm y las
03.00 am, siga los pasos 1 a 3, pero asegúrese de
configurar la fecha en el día siguiente.
Recuerde volver a cerrar la corona. Para ello, presiónela contra
la caja hasta que la rosca encaje. Después, gírela en el sentido
de las agujas del reloj hasta que quede bien apretada.
III
3
1
2
30x - 35x

176
FUNCIONAMIENTO BÁSICO (PONER EN MARCHA/ DETENER/RESTABLECER)
Ejemplo
Poner en marcha: Pulse el botón A.
Detener: Para detener el cronometraje, pulse el
botón A de nuevo y mire las dos esferas del cronógrafo:
Por ejemplo, 4 min/38 s.
Posición cero: Pulse el botón B. (Las dos manillas
del cronógrafo volverán a la posición cero).
1
2
3
A
B
CONFIGURAR LA HORA
Desenrosque la corona hasta que llegue a la posición I.
Saque la corona hasta la posición III (el reloj parado).
Gire la corona en el sentido contrario a las agujas del
reloj hasta que aparezca la hora actual (recuerde el
ciclo de 24 h).
Vuelva a colocar la corona en la posición I.
Recuerde volver a cerrar la corona. Para ello,
presiónela contra la caja hasta que la rosca encaje.
Después, gírela en el sentido de las agujas del reloj
hasta que quede bien apretada.
II IIII
3
1
2
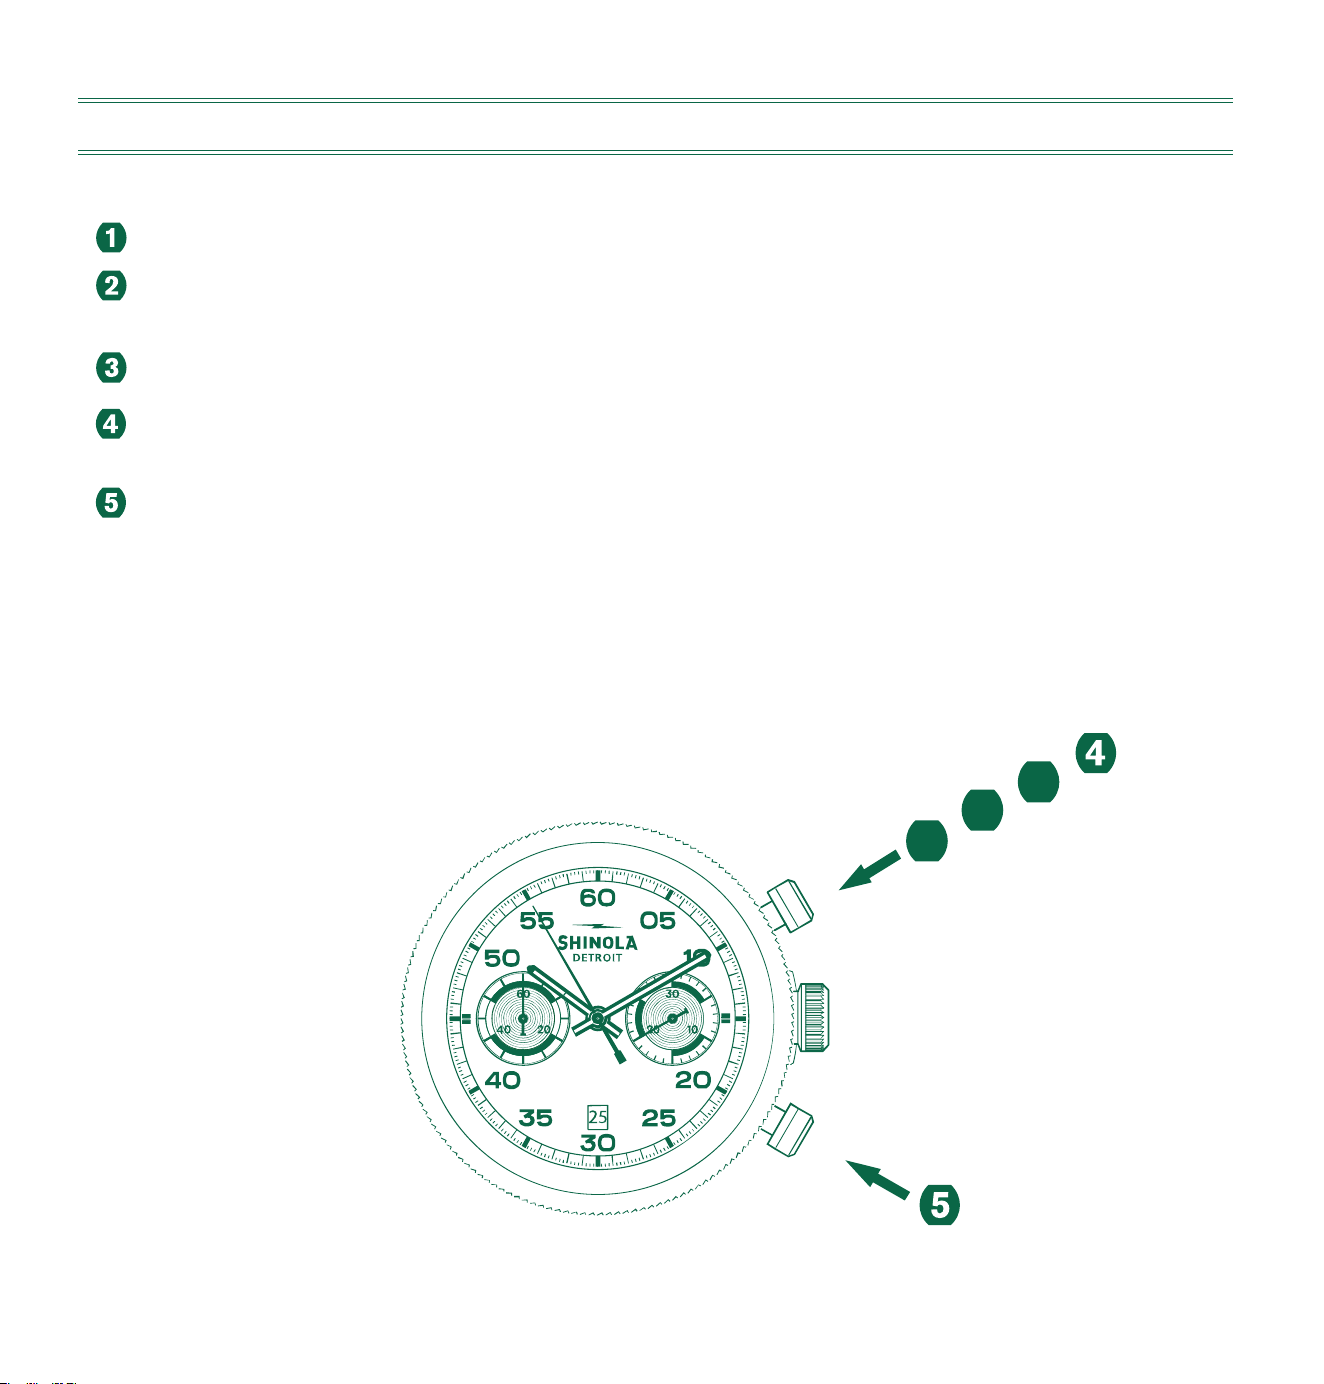
177
CRONOMETRAJE ACUMULATIVO
Ejemplo
Poner en marcha: Pulse el botón A.
Detener: Para detener el cronometraje, pulse el botón A de nuevo y mire las dos
esferas del cronógrafo, por ejemplo, 15 min, 5 s.
Reiniciar: Pulse el botón A para volver a poner en marcha el cronometraje.
*Detener: Pulse el botón A para detener el cronometraje y mirar las esferas, por ejemplo,
5 min, 50 s. El cronometraje acumulativo = 20 min, 55 s.
Restablecer: Pulse el botón B para devolver las dos manillas del cronógrafo a la posición cero.
*Nota: Tras el paso 4, puede continuar con la acumulación del cronometraje presionando
el botón A (Reiniciar/detener, Reiniciar/detener).
1
2
3
A
B

178
MODELO AUTOMÁTICO SW511 BH C
Si su reloj tiene una corona desenroscable, primero debe desenroscarla antes de hacer ningún
ajuste. Consulte la página 5 para ver las características de la corona.
DESCRIPCIÓN DE LA PANTALLA Y LOS BOTONES DE CONTROL
Nota:
Antes de usar las funciones del cronógrafo, asegúrese de que:
• La corona está en la posición normal, bloqueada (posición 0).
• La manilla larga y la pequeña del cronógrafo están en la posición cero.
DAR CUERDA AL RELOJ MIENTRAS ESTÁ PARADO
Gire la corona en el sentido contrario a las agujas del
reloj hasta que lleguea la posición I.
Gire la corona en el sentido de las agujas del reloj
entre 30 y 35 veces para restablecer totalmente la
reserva de marcha.
Vuelva a cerrar la corona presionándola contra la caja
y girándola ligeramente en el sentido de las agujas del
reloj hasta que quede bloqueada de nuevo
en la posición cero.
30x - 35x
Cronómetro para regatas -
Cronógrafo grande
Segundero
Aguja de las horas
Fecha
Minutero
Cronómetro para regatas -
Cronógrafo pequeño
Minutero
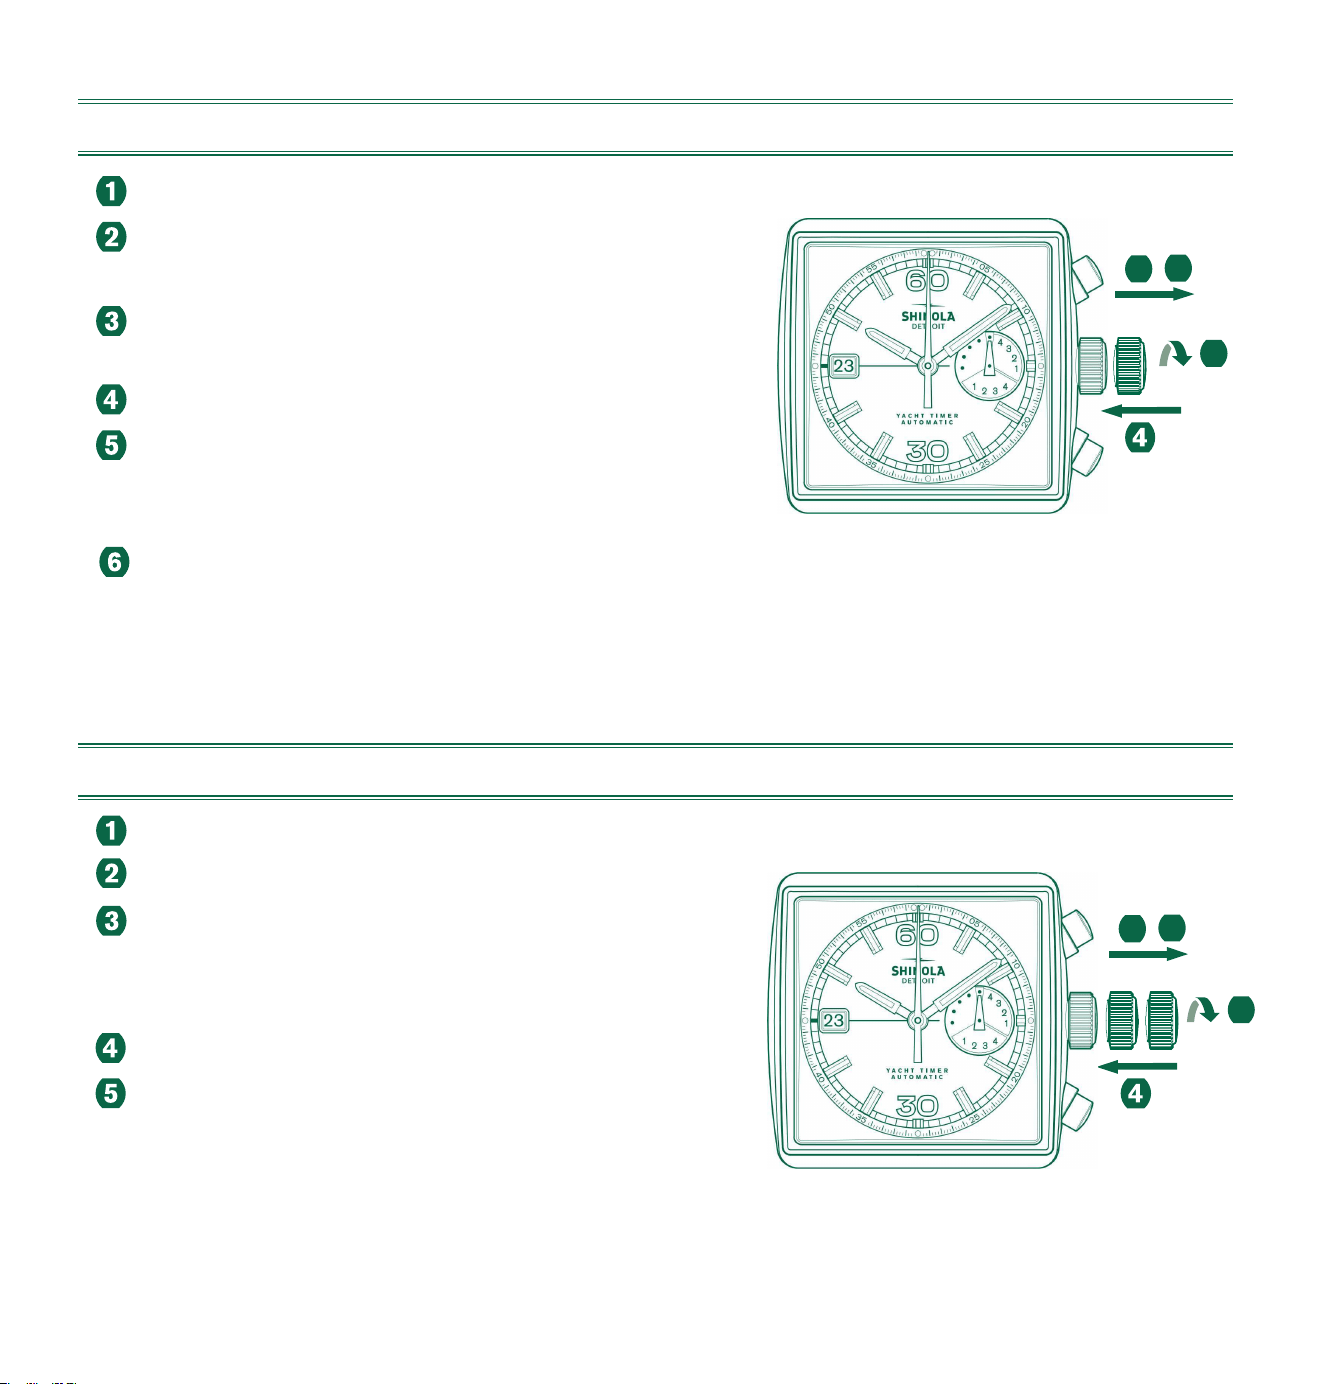
179
CONFIGURAR LA HORA (MODO RÁPIDO)
Desenrosque la corona hasta que llegue a la posición I.
Saque la corona hasta la posición II
(con el reloj en funcionamiento).
Gire la corona en el sentido contrario a las agujas del
reloj hasta que aparezca la fecha requerida.
Vuelva a colocar la corona en la posición I.
Si quiere establecer la hora entre las 9:00 p.m. y las
3:00 a.m., siga los pasos 1 a 3, pero debe asegurarse
de establecer la hora en el día siguiente.
Recuerde volver a cerrar la corona. Para ello, presiónela contra
la caja hasta que la rosca encaje. Después, gírela en el sentido
de las agujas del reloj hasta que quede bien apretada.
III
3
1 2
II IIII
3
1
2
CONFIGURAR LA HORA
Desenrosque la corona hasta que llegue a la posición I.
Saque la corona hasta la posición III (el reloj parado).
Gire la corona en el sentido contrario a las agujas del
reloj hasta que aparezca la hora actual (recuerde el
ciclo de 24 h).
Vuelva a colocar la corona en la posición I.
Recuerde volver a cerrar la corona. Para ello,
presiónela contra la caja hasta que la rosca encaje.
Después, gírela en el sentido de las agujas del reloj
hasta que quede bien apretada.
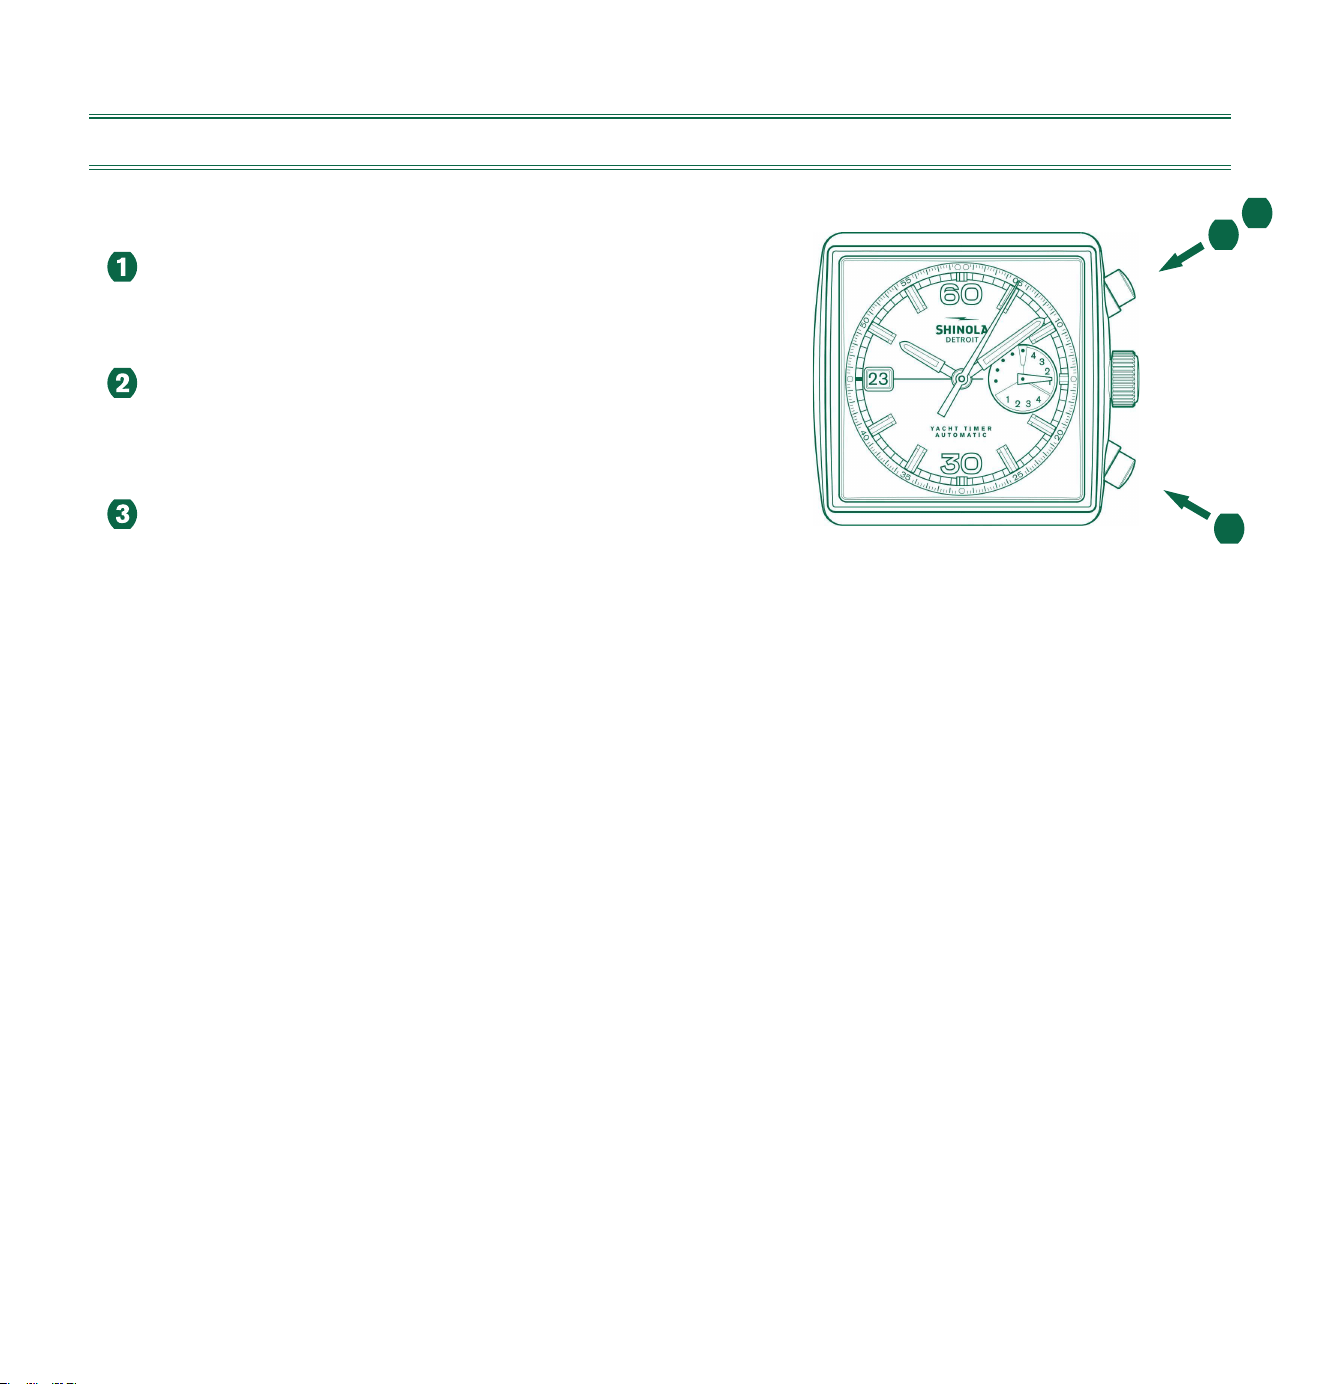
180
FUNCIONAMIENTO BÁSICO (PONER EN MARCHA/ DETENER/RESTABLECER)
Modo Regata
Poner en marcha: Pulse el botón
A
cuando suene
la señal de comienzo de la carrera. Comenzará una
cuenta atrás de 5 minutos hasta que empiece la carrera.
Detener: Para detener el cronometraje, pulse el
botón A de nuevo y mire las dos esferas del cronógrafo:
por ejemplo, 4 min/5 s.
Posición cero: Pulse el botón B.
(Las dos manillas del cronógrafo
volverán a la posición cero).
*Nota:
-
No cruce la línea de salida antes de que hayan transcurrido
los 5 minutos (marcados por el primer segmento de la cuenta atrás de 5 minutos)
para evitar una salida falsa.
-
Si se produce una salida falsa, restablezca el cronógrafo
(pulse el botón A, después el botón B) y reinícielo (pulse el botón A).
1
2
3
A
B
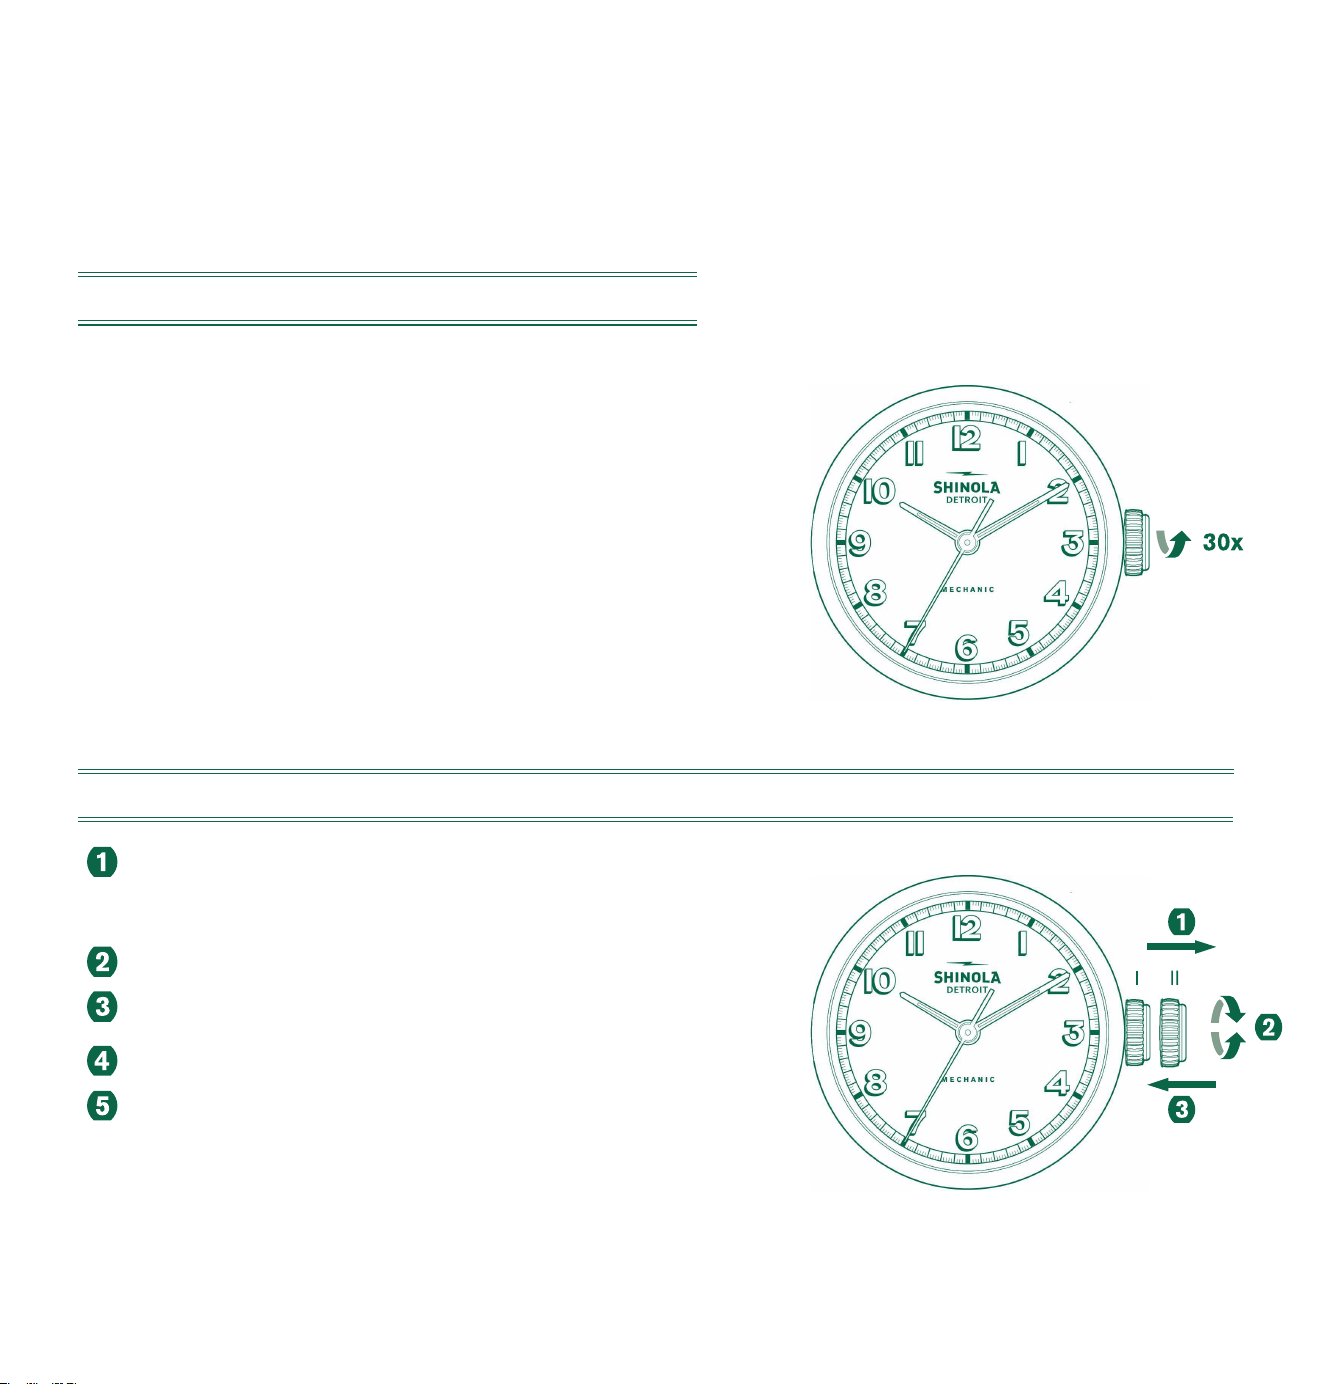
181
CONFIGURAR LA HORA
Si la corona es desenroscable, desenrosque la corona hasta
que llegue a la posición I.
Saque la corona hasta la posición II (con el reloj parado).
Gire la corona hasta que aparezca la hora actual.
Vuelva a colocar la corona en la posición I.
Recuerde volver a cerrar la corona si es una corona
desenroscable. Para ello, presiónela contra la caja
hasta que la rosca encaje. Después, gírela en el sentido
de las agujas del reloj hasta que quede bien apretada.
MODELO MECÁNICO SW210-1
Si su reloj tiene una corona desenroscable, primero debe desenroscarla antes de hacer ningún
ajuste. Consulte la página 5 para ver las características de la corona.
DAR CUERDA AL RELOJ MIENTRAS ESTÁ PARADO
La reserva de marcha máxima se puede restablecer si gira
la corona en el sentido de las agujas del reloj unas 30 veces.
Nota:
-
Dé cuerda al reloj más despacio después de 20 vueltas.
Preste atención a la resistencia del reloj.
Deje de dar cuerda cuando sienta resistencia.
-
NO dé cuerda en exceso o se dañará el movimiento.
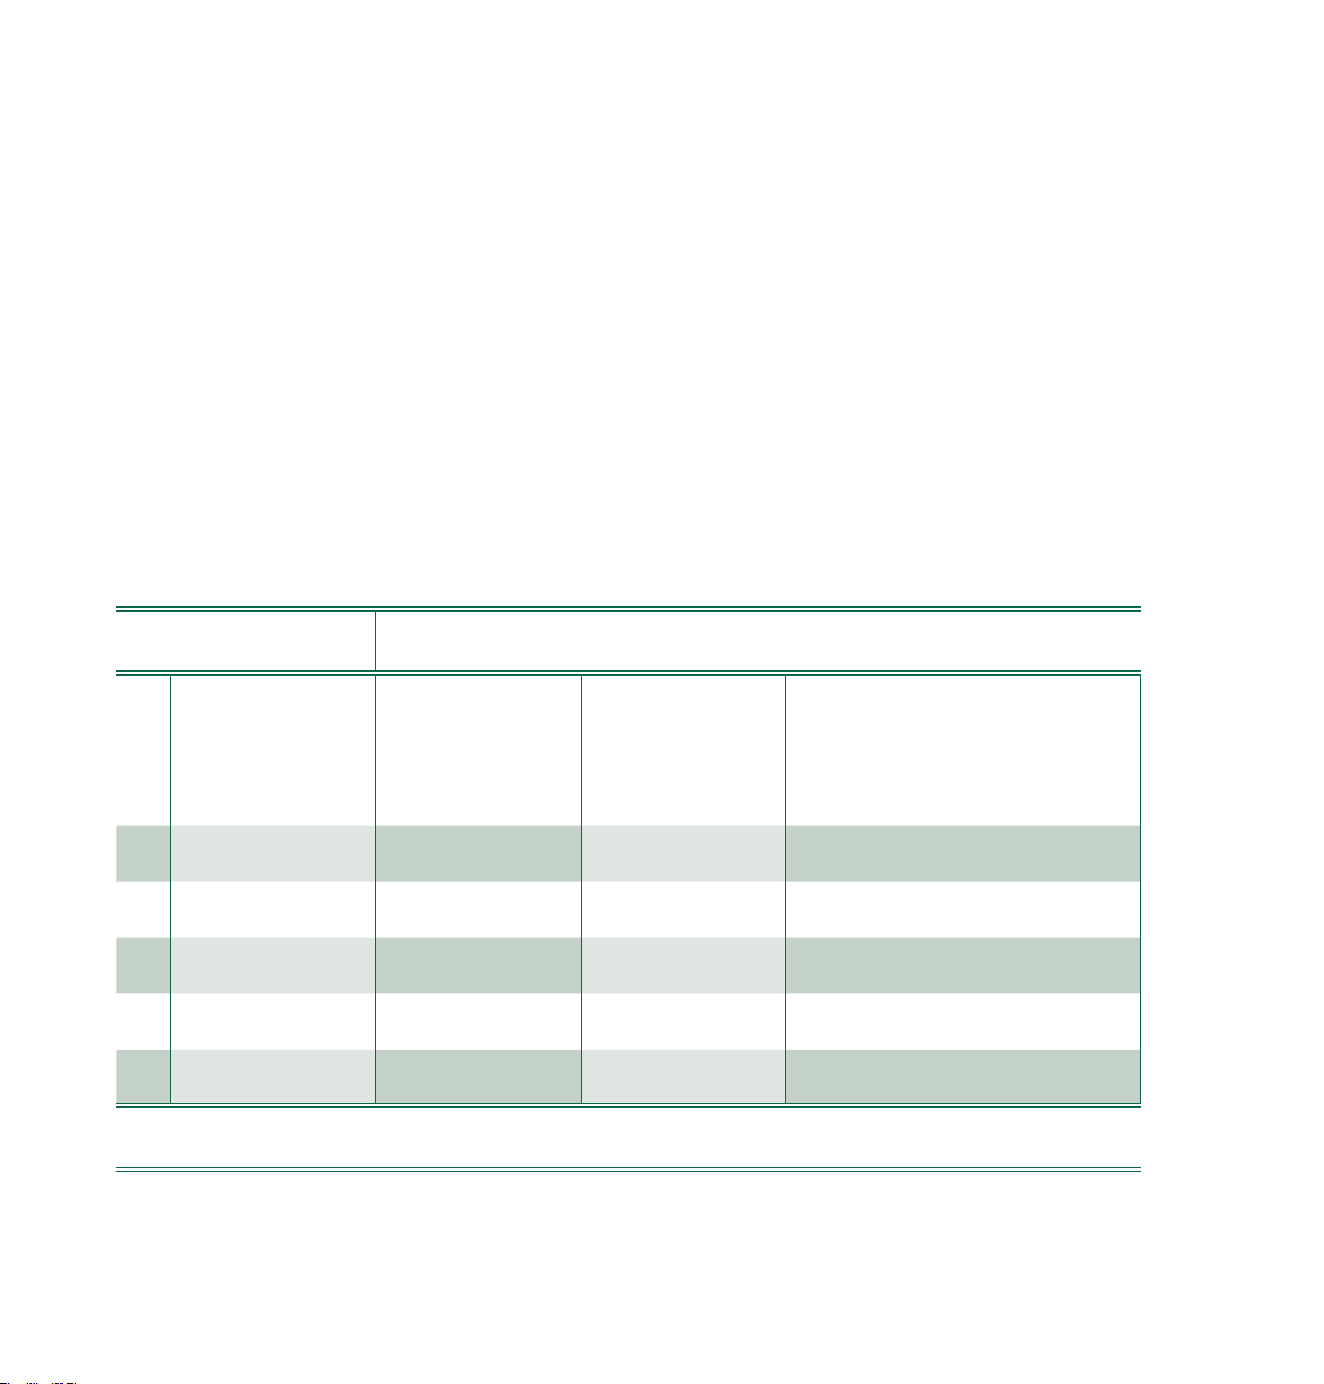
182
RESISTENCIA AL AGUA
Todos los relojes Shinola están diseñados con un grado mínimo de resistencia al agua de
3 atm (100 pies / 30 m).
La resistencia al agua de un reloj protege al mecanismo del polvo, la humedad y el riesgo
de daño si este se sumergiera en el agua. Por favor, lea la tabla para las indicaciones
sobre la exposición recomendada en distintas clasificaciones de agua.
Es importante no intentar ajustar la posición de la corona mientras el reloj esté en contacto
con el agua, ya que el agua puede entrar en la caja, causándole daños al mecanismo. En
el caso de relojes con coronas enroscadas, es importante comprobar que la corona esté
en la posición correcta y completamente cerrada antes de entrar en contacto con el agua.
Para relojes con funciones de cronógrafo, no sumerja el cronógrafo en el agua, ya que éste
puede infiltrarse en la caja del reloj y dañar el mecanismo.
INDICACIÓN TIPO DE USO EN EL AGUA
Características de
resistencia al agua
Ligero rocío,
transpiración,
llovizna, etc.
Natación, etc.
Buceo
(Sumergirse sin cilindro de oxígeno)
1
3ATM SÍ NO NO
2
5ATM SÍ NO NO
3
10ATM SÍ SÍ NO
4
20ATM SÍ SÍ SÍ
5
30ATM SÍ SÍ SÍ
SIEMPRE COLOQUE LA CORONA EN SU POSICIÓN NORMAL Y AJUSTE EL TORNILLO COMPLETAMENTE.

183
CUIDADOS Y PRECAUCIÓN
Cada reloj Shinola se diseña y se fabrica siguiendo los más altos estándares.
A diferencia de otros objetos mecánicos, un reloj funciona sin detenerse. Para
asegurar el funcionamiento y la longevidad óptimos de su reloj Shinola, consulte
las sencillas directrices para el cuidado y precauciones.
CUIDADOS
• Limpie su reloj únicamente con un paño suave y agua. No sumerja
su reloj en agua, a menos que esté clasificado como resistente al agua.
• Después de usarlo en agua salada, enjuague el reloj con agua
del grifo y séquelo cuidadosamente con un paño suave.
• Las pulseras metálicas deberían limpiarse periódicamente.
Utilice un cepillo suave sumergido en agua ligeramente jabonosa
y seque las correas minuciosamente con un paño suave.
• Aconsejamos que lleve su reloj a una revisión cada 18-24 meses
para asegurar un uso duradero y un funcionamiento sin incidencias.
PRECAUCIONES
Su reloj es una integración compleja de piezas y componentes reunidos por expertos
artesanos. Hay ciertas acciones o situaciones ambientales que pueden dañar su reloj
o impedir la capacidad de este para funcionar óptimamente.
Es importante evitar las siguientes condiciones: calor o frío extremo, así como períodos
prolongados de exposición a la luz directa del sol o a condiciones de humedad que
excedan el nivel de agua aconsejado para su reloj. (Véase la parte posterior de la caja y el
gráfico).
Su reloj no debería verse afectado por los campos magnéticos generados por artículos
del hogar, como televisores y estéreos, aunque se recomienda evitar los campos
eléctricos o la electricidad estática fuertes, que pueden interrumpir el mecanismo.
También es importante evitar un choque o impacto extremo.
184 185
MECANISMO DE AHORRO DE ENERGÍA
Para extender la vida de la batería de su reloj cuando no esté en uso, tire suavemente
hacia afuera del vástago/corona del movimiento hasta que sienta un clic. Esto reducirá
el consumo de la batería en un 70%. Tenga en cuenta que esta es la misma posición del
vástago/corona utilizada para ejecutar una CONFIGURACIÓN DE LA HORA rápida.
Si su reloj tiene una corona a rosca, siga las instrucciones dadas al comienzo de este
manual para liberar la corona antes de tirar de ella totalmente.
FIN DE LA VIDA DE LA BATERÍA (
EOL
)
Su reloj está equipado con una funcionalidad para indicar cuándo está bajo el nivel de
la batería. Cuando la batería llega a esta etapa, el segundero saltará 4 pasos de una
vez, cada 4 segundos. Este comportamiento disminuye el consumo de energía al mismo
tiempo que continúa mostrando la hora exacta y le permite saber que es hora de cambiar
la batería.

184 185
GARANTÍA LIMITADA DE POR VIDA
DE RELOJES DE CUARZO
Todos los relojes de Shinola se montan en nuestra fábrica de Detroit y combinan un
meticuloso trabajo manual de montaje con la tecnología más avanzada del mercado
para conseguir piezas bonitas a la par que duraderas. Estamos tan seguros de nuestros
estándares de fabricación de alta calidad que algunos de nuestros relojes tienen una garantía
de por vida con nuestras garantías limitadas de por vida. Se trata de un tipo de garantía
pionera en el sector y un buen ejemplo de nuestros valores principales.
Condiciones de la garantía limitada de servicio de mantenimiento de por vida de los relojes
de cuarzo de Shinola
PARA PODER DISFRUTAR DE LA GARANTÍA DE SU RELOJ DE CUARZO SHINOLA,
DEBE REGISTRAR SU PRODUCTO. ESTA GARANTÍA ES INTRANSFERIBLE Y PODRÍA
ANULARSE EN VIRTUD DE LAS SIGUIENTES CONDICIONES.
1. La garantía limitada de servicio de mantenimiento de por vida de los relojes de
cuarzo Shinola cubre a todos los relojes de las series originales: Birdy, Canfield,
Cass, Guardian, Omaha, Runwell, Vinton, Duck.
Esta garantía no cubre a los relojes Detrola ni a los relojes automáticos Shinola.
La garantía garantía limitada de servicio de mantenimiento de por vida de Shinola
cubre los defectos en los materiales y la mano de obra durante la vida útil natural
del reloj.
2. En caso de que se detecten defectos provocados por una mano de obra defectuosa
que se incluyan en la cobertura de la garantía limitada de por vida, dichas piezas
defectuosas (sujeto a las siguientes exclusiones) se repararán o el reloj se cambiará
por otro sin coste algo.

186 187
3. Exclusiones
a. Todas las correas, incluidas las pulseras.
b. El movimiento una vez transcurrida su vida natural de movimiento (7 años en el caso de
los movimientos de cuarzo).*
c. Pila.
d. Chapado del reloj (chapado PVD).
e. Los daños derivados de un manejo inadecuado, falta de celo, accidentes o el desgaste
normal de su uso.
f. Daños provocados por el agua.
g. Relojes antiguos usados vendidos tal cual están
h. Relojes restaurados.
* 7 años desde la fecha original de compra o desde la última reparación del cuarzo realizada
por Shinola, lo que sea posterior. Si desea obtener más información sobre las solicitudes de
reparaciones y servicio de mantenimiento, consulte el apartado del servicio de asistencia de
Shinola «Reparaciones y servicio de mantenimiento», al que podrá acceder desde aquí.
4. La presente garantía se ANULARÁ EN CASO DE:
a. El reloj haya sufrido algún daño causado por un accidente, una negligencia o la acción
humana, que quedará determinado por Shinola a su entera discreción.
b. Otro proveedor ajeno al centro de reparaciones autorizado de Shinola cambie
la pila del reloj.
c. Otro proveedor ajeno a Shinola repare o grabe el reloj.
5. Si no ha registrado su reloj en Shinola, esta garantía NO será aplicable.
6. En caso de que el reloj tenga que ser sustituido en su totalidad y esta garantía cubra dicha
sustitución, Shinola sustituirá su reloj por otro del mismo modelo. Si el modelo ya no se
fabrica, se le facilitará otro de un valor y estilo similar.
7. En caso de que su reloj necesite algún tipo de servicio de mantenimiento que no esté
incluido en esta garantía, se le indicará el tipo de reparación necesaria y los costes que
conlleva. Shinola únicamente comenzará a realizar dichas reparaciones una vez que usted
apruebe dichos costes o procederá a devolverle el producto si así lo desea.

186 187
SOLICITUD DE LA GARANTÍA Y OTRAS REPARACIONES DEL RELOJ
En caso de que necesite que le cambien la pila, rellene el formulario de reparación que podrá
encontrar en Shinola.com o en los puntos de venta de Shinola, o haga una búsqueda en
la página de localizador de puntos de venta de Shinola.com para encontrar un «centro de
sustitución de pilas autorizado» que se encuentre cerca de usted. En caso de que necesite
alguna reparación incluida en la garantía, debe rellenar el formulario de reparación de
Shinola.com o adquirirlo en un punto de venta de Shinola. Aunque no invalidan la garantía,
las reparaciones y servicios de mantenimiento realizados por los socios autorizados para
la realización de los mismos no están cubiertos por esta garantía, por lo que los gastos
derivados de los mismos correrán de su cuenta y Shinola no se los reembolsará. No envíe
el embalaje original, ya que no se le devolverá. Shinola le recomienda encarecidamente que
contrate un seguro para el envío y que proteja adecuadamente el reloj para el mismo.
Shinola no se hace responsable de la pérdida del producto o de los posibles daños que
sufra durante el envío. Para aquellos servicios de mantenimiento que no estén incluidos
en esta garantía, el centro de mantenimiento podrá realizar los arreglos necesarios por un
determinado coste en función del estilo del reloj y del tipo de tarea necesaria. Dichos costes
se le notificarán y tendrá que aceptarlos antes de la realización de dichos servicios de
mantenimiento.
Las garantías y medidas anteriores son exclusivas y sustituyen a cualquier otra garantía o
condición, expresa, implícita o legal, en lo que respecta a cualquier tema relacionado, incluido,
de forma enunciativa pero no limitativa, garantías de comercialización, adecuación para
un fin particular, precisión, calidad satisfactoria, títulos y no incumplimiento, de las cuales
no se hace cargo expresamente Shinola. Shinola no se responsabilizará de ningún daño o
responsabilidad incidental, consecuencial, indirecto, especial o punitivo de ningún tipo que
surja o esté relacionado con la venta o uso de este producto, ya sea en virtud de un contrato,
acto ilícito extracontractual (negligencia), responsabilidad estricta del producto o cualquier
otra teoría, incluso en aquellos casos en los que se haya advertido a Shinola de la posibilidad
de dichos daños y aunque se considere que alguna de las medidas especificadas aquí han
fallado su objetivo principal. La responsabilidad total de Shinola se limitará a la sustitución o
reparación de Shinola a criterio exclusivo de Shinola. No obstante, algunos países, estados o
provincias no permiten la exclusión o limitación de garantías implícitas o la limitación de daños
consecuenciales accidentales, por lo que las limitaciones y exclusiones anteriores podrán no

188 189
ESTAMOS AQUÍ PARA AYUDARLE
Si tiene alguna duda o pregunta, estamos a su disposición. Puede ponerse en contacto con
nosotros de tres formas. Rellene el formulario de contacto en nuestro sitio web en Shinola.com,
llámenos o envíenos un correo electrónico.
Lunes a viernes
De 09:00 a 17:00 h (EST)
customerservice@shinola.com
1.844.SHINOLA
(1.844.744.6652)
afectarle. En aquellos casos en los que las garantías implícitas no se excluyan en su totalidad,
se limitarán a la duración de la garantía escrita aplicable. Esta garantía le confiere derechos
concretos, podrá tener otros derechos en virtud de su legislación local. Sus derechos legales no
se verán afectados.

188 189
GARANTÍA LIMITADA DE POR VIDA
DE RELOJES AUTOMÁTICOS
Todos los relojes de Shinola se montan en nuestra fábrica de Detroit y combinan un meticuloso
trabajo manual de montaje con la tecnología más avanzada del mercado para conseguir piezas
bonitas a la par que duraderas. Estamos tan seguros de nuestros estándares de fabricación de
alta calidad que algunos de nuestros relojes tienen una garantía de por vida con nuestras garantías
limitadas de por vida. Se trata de un tipo de garantía pionera en el sector y un buen ejemplo de
nuestros valores principales.
Condiciones de la garantía limitada de servicio de mantenimiento de por vida de los relojes
automáticos Shinola
PARA PODER DISFRUTAR DE LA GARANTÍA DE SU RELOJ AUTOMÁTICO SHINOLA, DEBE REGISTRAR
SU PRODUCTO. ESTA GARANTÍA ES INTRANSFERIBLE Y PODRÍA ANULARSE EN VIRTUD DE LAS
SIGUIENTES CONDICIONES.
1. La garantía limitada de servicio de mantenimiento por vida de los relojes automáticos Shinola
cubre a todos los relojes automáticos de las series originales: Runwell Automatic y Shinola
Monster. Esta garantía no cubre a los relojes Detrola ni a los relojes de cuarzo Shinola.
La garantía limitada de servicio de mantenimiento por vida de los relojes automáticos Shinola
cubren los defectos en los materiales y la mano de obra durante la vida útil natural del reloj.
2. En caso de que se detecten defectos provocados por una mano de obra defectuosa que se
incluyan en la cobertura de la garantía limitada de por vida, dichas piezas defectuosas (sujeto
a las siguientes exclusiones) se repararán o el reloj se cambiará por otro sin coste algo.

190 191
3. Exclusiones
a. Todas las correas, incluidas las pulseras.
b. El movimiento una vez transcurrida su vida natural de movimiento (5 años en el caso de
los movimientos automáticos).*
c. Chapado del reloj (chapado PVD).
d. Los daños derivados de un manejo inadecuado, falta de celo, accidentes o el desgaste
normal de su uso.
e. Daños provocados por el agua.
f. Relojes vintage de segunda
g. Relojes restaurados.
* 5 años desde la fecha original de compra o desde la última revisión de mantenimiento del
mecanismo automático realizada por Shinola, lo que sea posterior. Si desea obtener más
información sobre las solicitudes de reparaciones y servicio de mantenimiento, consulte el
apartado del servicio de asistencia de Shinola «Reparaciones y servicio de mantenimiento», al que
podrá acceder desde aquí.
4. La presente garantía se ANULARÁ EN CASO DE QUE:
a. El reloj haya sufrido algún daño causado por un accidente, una negligencia o la acción
humana, que quedará determinado por Shinola a su entera discreción
b. Otro proveedor ajeno a Shinola repare, revise o grabe el reloj.
5. Si no ha registrado su reloj en Shinola, esta garantía NO será aplicable.
6. En caso de que el reloj tenga que ser sustituido en su totalidad y esta garantía cubra dicha
sustitución, Shinola sustituirá su reloj por otro del mismo modelo. Si el modelo ya no se fabrica,
se le facilitará otro de un valor y estilo similar.
7. En caso de que su reloj necesite algún tipo de servicio de mantenimiento que no esté incluido
en esta garantía, se le indicará el tipo de reparación necesaria y los costes que conlleva. Shinola
únicamente comenzará a realizar dichas reparaciones una vez que usted apruebe dichos costes
o procederá a devolverle el producto si así lo desea.

190 191
SOLICITUD DE LA GARANTÍA Y OTRAS REPARACIONES DEL RELOJ
En caso de que necesite alguna reparación incluida en la garantía, debe rellenar el formulario de
reparación de Shinola.com o adquirirlo en un punto de venta de Shinola. Aunque no invalidan la
garantía, las reparaciones y servicios de mantenimiento realizados por los socios autorizados para
la realización de los mismos no están cubiertos por esta garantía, por lo que los gastos derivados
de los mismos correrán de su cuenta y Shinola no se los reembolsará. No envíe el embalaje
original, ya que no se le devolverá. Shinola le recomienda encarecidamente que contrate un seguro
para el envío y que proteja adecuadamente el reloj para el mismo. Shinola no se hace responsable
de la pérdida del producto o de los posibles daños que sufra durante el envío. Para aquellos
servicios de mantenimiento que no estén incluidos en esta garantía, el centro de mantenimiento
podrá realizar los arreglos necesarios por un determinado coste en función del estilo del reloj y
del tipo de tarea necesaria. Dichos costes se le notificarán y tendrá que aceptarlos antes de la
realización de dichos servicios de mantenimiento.
Las garantías y medidas anteriores son exclusivas y sustituyen a cualquier otra garantía o
condición, expresa, implícita o legal, en lo que respecta a cualquier tema relacionado, incluido,
de forma enunciativa pero no limitativa, garantías de comercialización, adecuación para un fin
particular, precisión, calidad satisfactoria, títulos y no incumplimiento, de las cuales no se hace
cargo expresamente Shinola. Shinola no se responsabilizará de ningún daño o responsabilidad
incidental, consecuencial, indirecto, especial o punitivo de ningún tipo que surja o esté relacionado
con la venta o uso de este producto, ya sea en virtud de un contrato, acto ilícito extracontractual
(negligencia), responsabilidad estricta del producto o cualquier otra teoría, incluso en aquellos
casos en los que se haya advertido a Shinola de la posibilidad de dichos daños y aunque se
considere que alguna de las medidas especificadas aquí han fallado su objetivo principal. La
responsabilidad total de Shinola se limitará a la sustitución o reparación de Shinola a criterio
exclusivo de Shinola. No obstante, algunos países, estados o provincias no permiten la exclusión
o limitación de garantías implícitas o la limitación de daños consecuenciales accidentales, por lo
que las limitaciones y exclusiones anteriores podrán no afectarle. En aquellos casos en los que las
garantías implícitas no se excluyan en su totalidad, se limitarán a la duración de la garantía escrita
aplicable. Esta garantía le confiere derechos concretos, podrá tener otros derechos en virtud de su
legislación local. Sus derechos legales no se verán afectados.

192
ESTAMOS AQUÍ PARA AYUDARLE
Si tiene alguna duda o pregunta, estamos a su disposición. Puede ponerse en contacto con
nosotros de tres formas. Rellene el formulario de contacto en nuestro sitio web en Shinola.com,
llámenos o envíenos un correo electrónico.
Lunes a viernes
De 09:00 a 17:00 h (EST)
custo[email protected]
1.844.SHINOLA
(1.844.744.6652)

193

194
中文
设计品牌Shinola诞生于美国底特律,坚持致力于创作经久耐用的产品,无论
是腕表、皮具,甚至是酒店。我们通过各种各样的产品和事迹,来颂扬历久
不衰的设计和精湛娴熟的技艺,激励着人们去营造更好的生活,并为自己独
特的风格感到自豪。
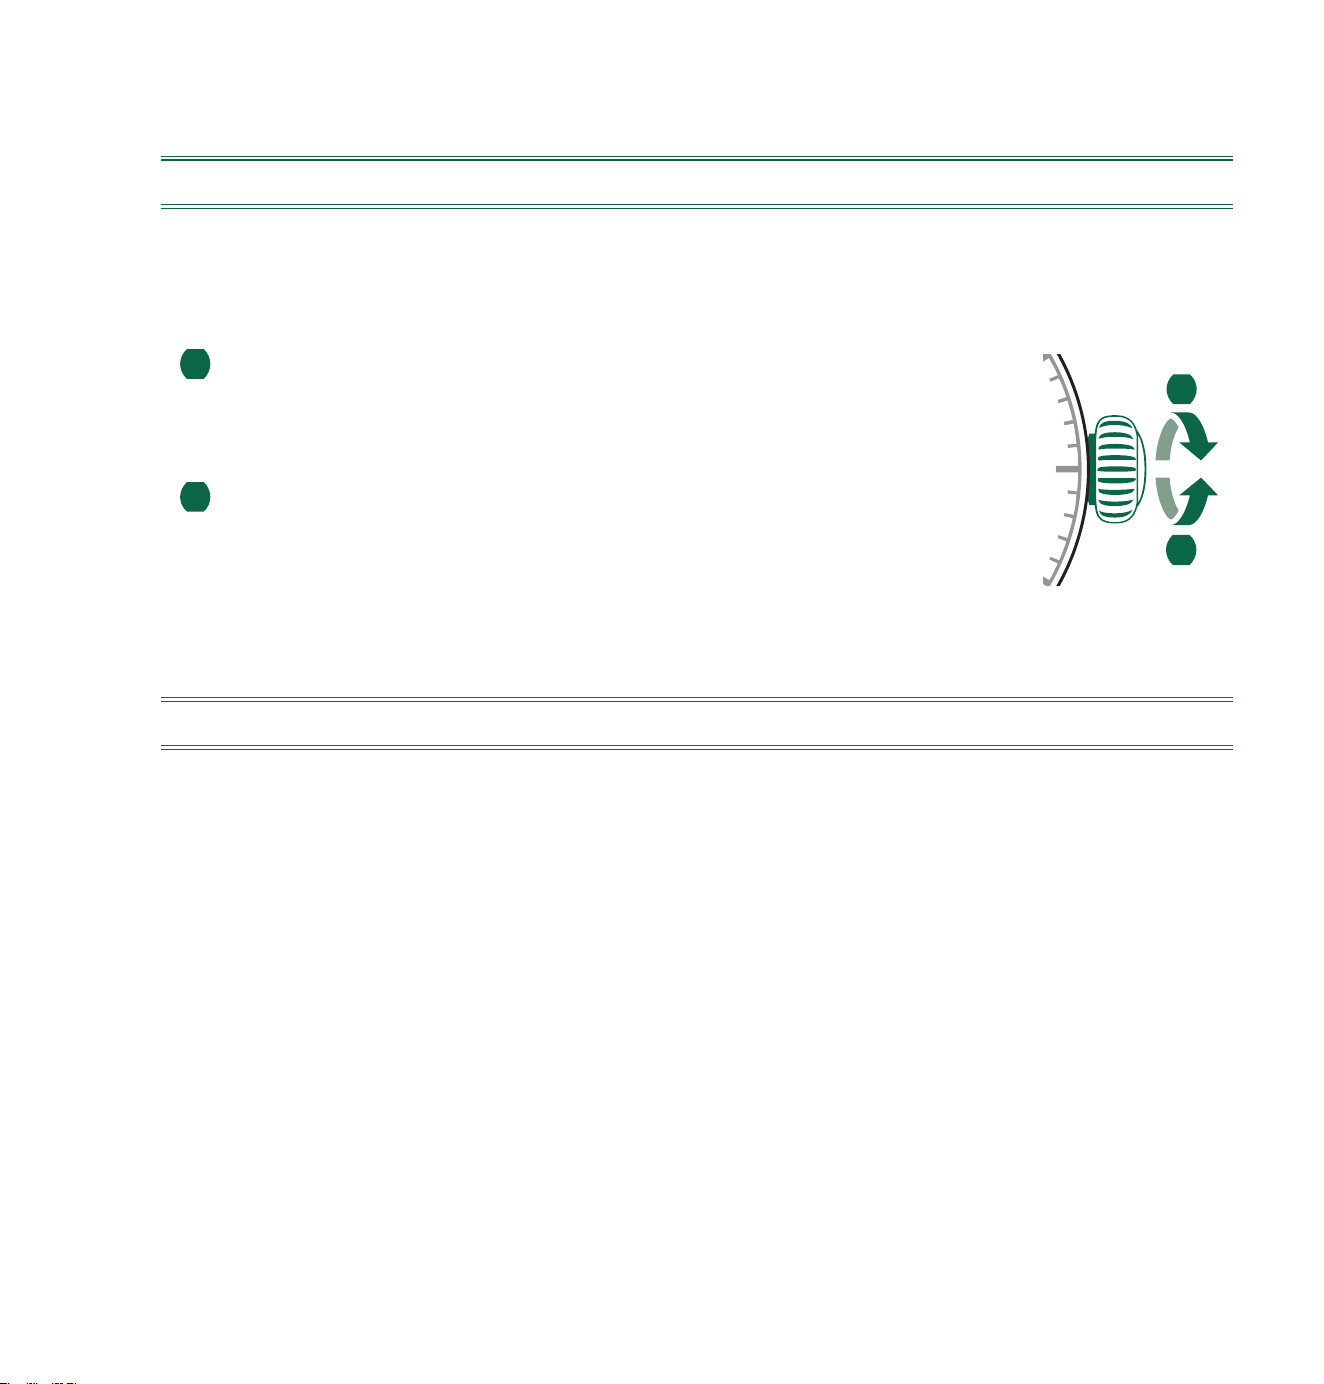
195
螺旋表冠
表冠功能
Shinola手表组件由最优质的材料制成,经过严格的检查,从而满足我们的严格标准。
一些Shinola手表具有螺旋表冠,额外提高了水密性等级。为了保护您的投资,了解此
类表冠的工作原理非常重要:
1 如需让表冠工作,请将其从表壳拧松,
方法是逆时针旋转表冠直至松开。
• 松开后,请按照以下部分关于时间/日期设定的说明进行操作。
2 如需重新密封表冠,请将其压入表壳,直至螺车纹啮合,
并顺时针旋转直至旋紧。
带日期显示的手表款型
请注意:
• 如果您的手表具有日期显示,日期窗口的位置可能与本手册所描述的位置不同。
• Shinola钟表提供不同表芯。不同錶芯在设置日期标示时,可能需要遵从特定时间
段。在调整日期前,请参阅已购买的钟表錶芯说明。
钻石来源正规,不涉及冲突问题
Shinola手表所选用的每一颗钻石都是通过正规途径购进,不涉及资金冲突,符合联合
国决议的要求。在此,我们承诺这些钻石来源正规,不涉及任何冲突问题,并可以出具
钻石供应商提供的书面保证。
1
2
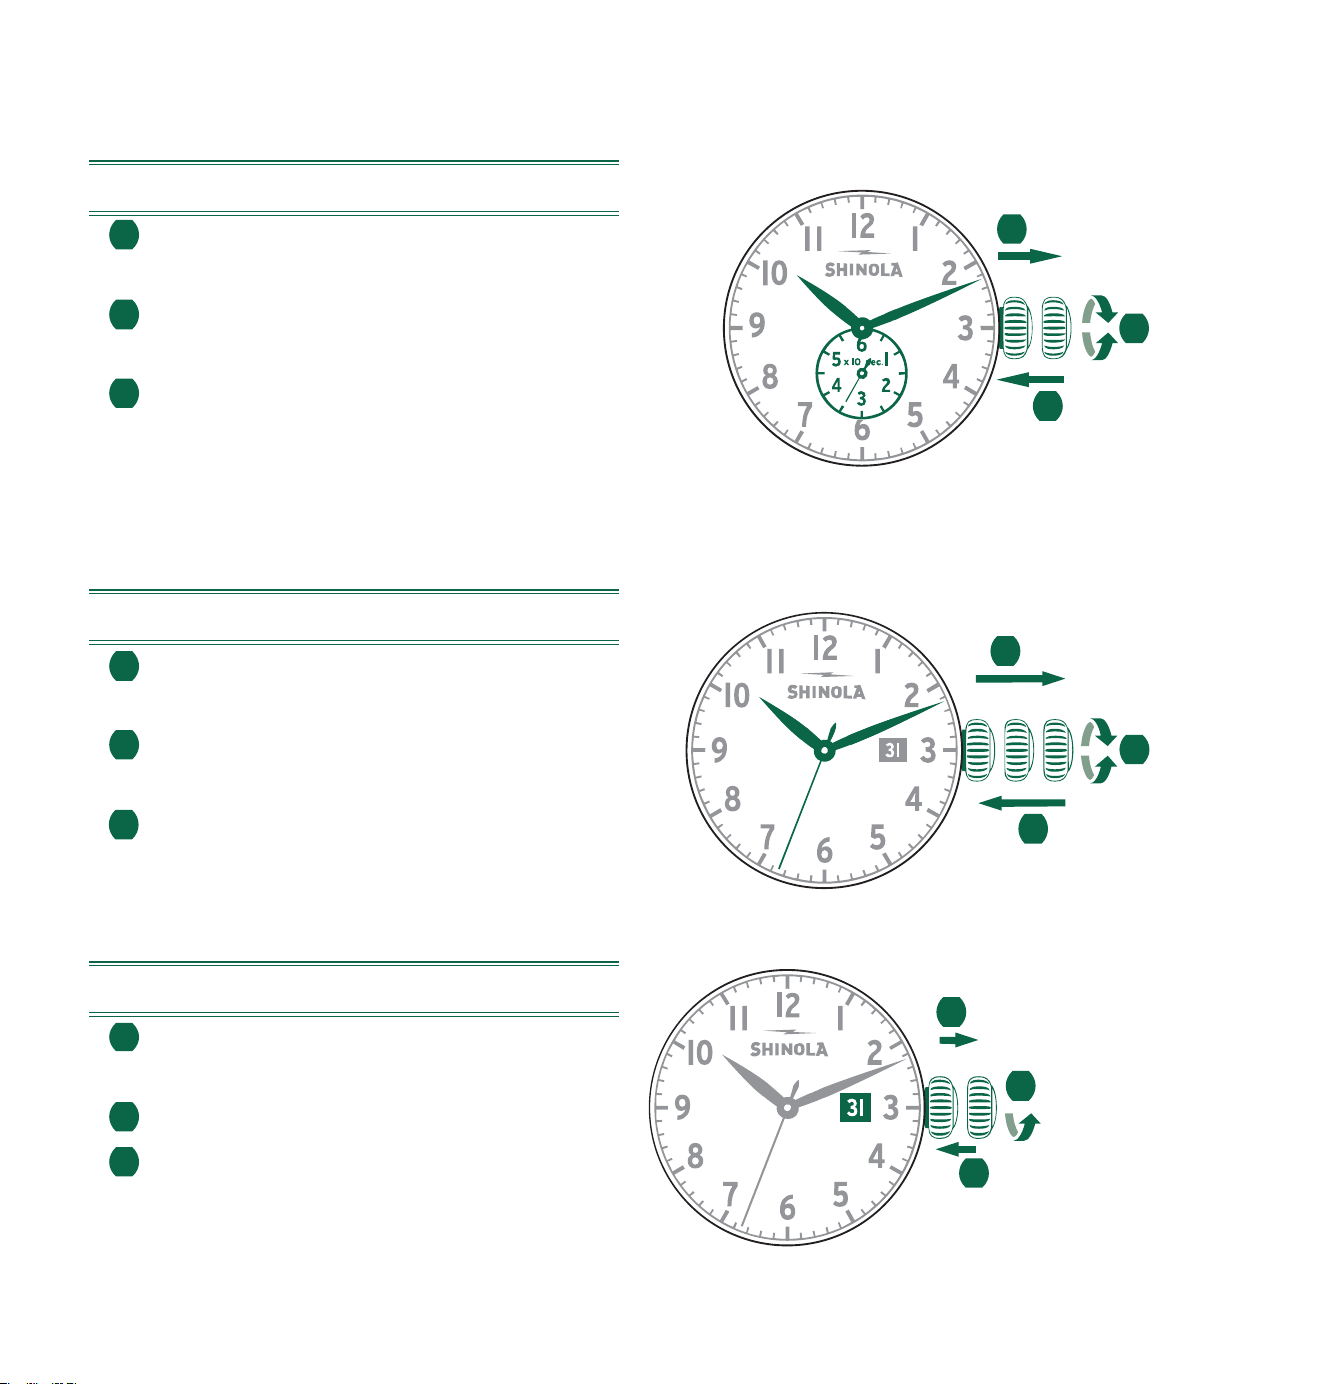
196
单一时间与日期款型
设定时间
1 拔出表冠至位置III。
(手表停止走动。)
2 旋转表冠,直至指针指到
正确的时间。
3 将表冠推回位置I。
设定日期
1 拔出表冠至位置II。
(手表继续走动。)
2 旋转表冠直至显示正确的日期。
3 将表冠推回位置I
。
单一时间款型
设定时间
1 拔出表冠至位置II。
(手表停止走动。)
2 旋转表冠,直至指针指到
正确的时间。
3 将表冠推回位置I。
III
3
1
2
II IIII
3
1
2
III
1
2
3

197
II IIII
3
1
2
码表款型5021.D
时间显示和控制按钮的说明
请注意:
在使用码表功能前,
请确保:
-表冠处于位置I
(正常位置)。
-在触发按钮B
后,码表的两个指针正好处于零点位置。
如果指针并没有准确地处于零点位置,
则必须调整指针的位置。(参见“调整码
表指针至零点位置”一章。)
设定日期
1 拔出表冠至位置III。
(手表停止走动。)
2 旋转表冠,直至指针
指到正确的时间。
3 将表冠推回位置 I。
设定日期
1 拔出表冠至位置II。
(手表继续走动。)
2 旋转表冠直至显示正确的日期。
3 将表冠推回位置 I。
A
秒针
中心停秒指针
分针
时针
分钟计时器
日期
B
III
1
2
3
I
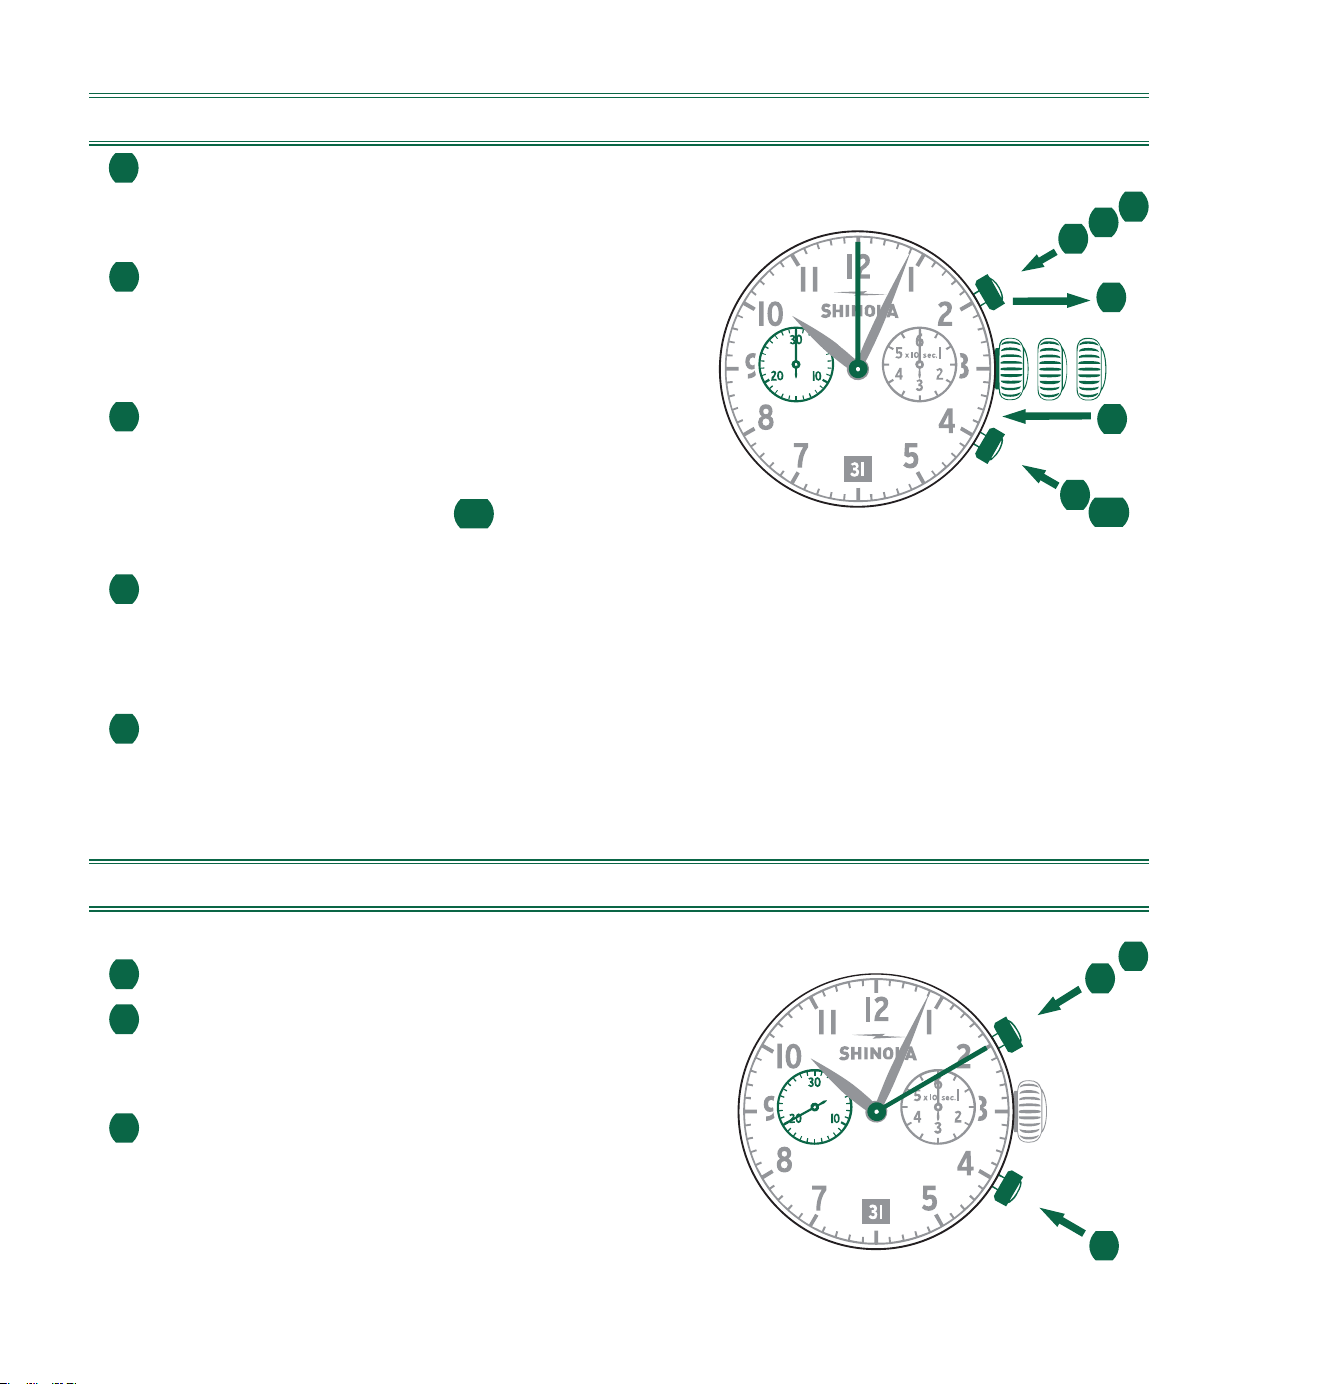
198
调整码表指针至零点位置
1 拔出表冠至位置III.
码表的两个指针处于
正确或不正确的零点位置。)
2 同时按住按钮A和B不放,
持续至少2秒钟。
(中心停秒指针旋转360°-已
激活纠正模式。)
3 按下按钮A单步转动
中心停秒指针。按下并
中心停秒指针。按下并A
快速转动中心停秒指针。
3b
按下按钮B进入下一指针的纠正。
4 按下按钮A单步
转动分钟计时器指针。按下
并保持按住按钮A快速
转动分钟计时器指针。
5 将表冠推回位置I。
基本功能(开始/停止/重置)
示例
1 开始:按下按钮A。
2 停止:要停止计时,再次按下按钮A
并读出两个码表计时器
数值:20分/10秒
3 位置归零:按下按钮B
。
(码表的两个指针
将重置到零点位置。)
II IIII
1
2
3
4
5
2
A
B
3b
1
2
3
A
B
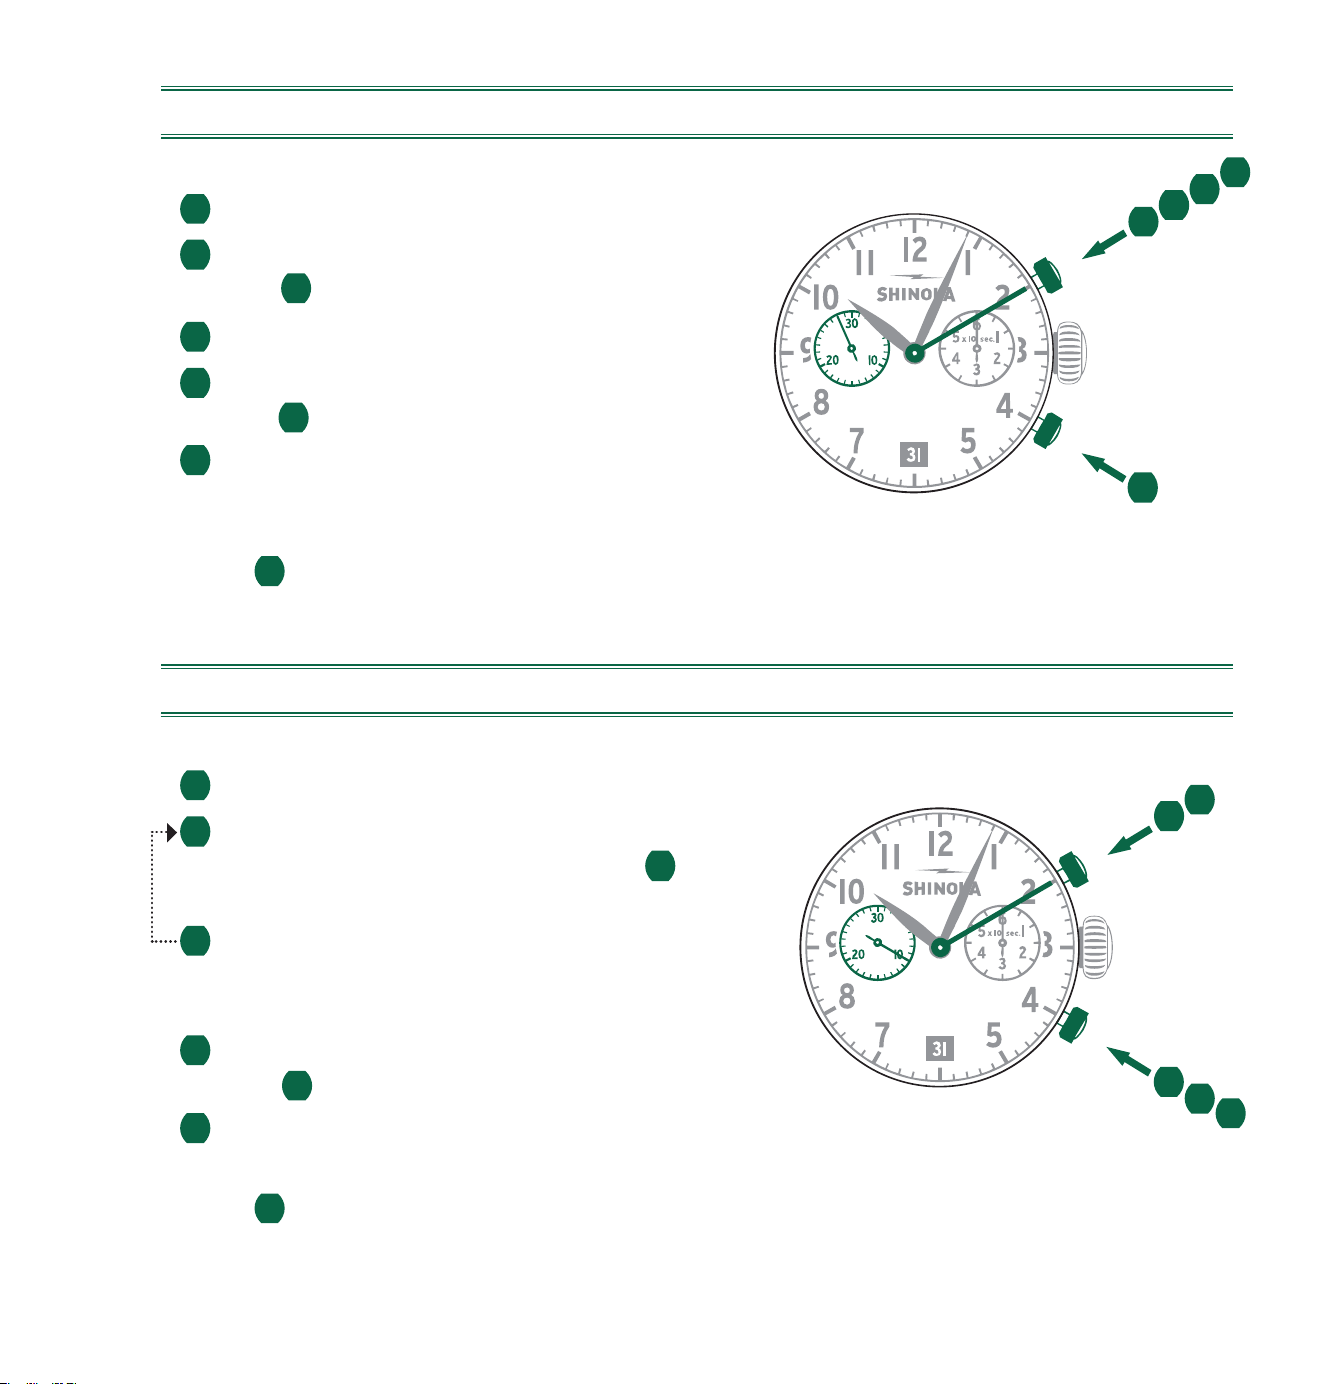
199
*
累计计时
示例
1 开始:开始计时
2 停止:例如,计时时间为15分钟5秒
(第
1
步完成之后)。
3 重新开始:继续计时
4 *停止:例如,再次计时时间为13分钟5秒
(第 3
步完成之后)累计时间=28分钟10秒。
5 重置:码表的三个指针
即返回零点位置。
请注意:
*第
4
步完成之后,可以通过按下按钮A
(重新开始/停止,重新开始/停止,…)继续累计计时
中间或间隔计时
示例
1 开始:开始计时。
2 显示间隔时间:
显示计时时间为10分钟10秒(第
1
步完。
成之后)计时继续在后台进行。
3 补偿测量时间:
码表的三个指针快速转动到
正在进行中的测量时间。
4 停止:例如,计时时间为28分钟10秒
(第
1
步完成之后)。
5 重置:码表的三个指针即返回零点位置。
请注意:
*第
3
步完成之后,可通过按下按钮B
显示下一个间隔或中间时间(显示间隔时间/补偿测量时间,…)
1
5
2
3
4
A
B
2
3
5
B
1
4
A
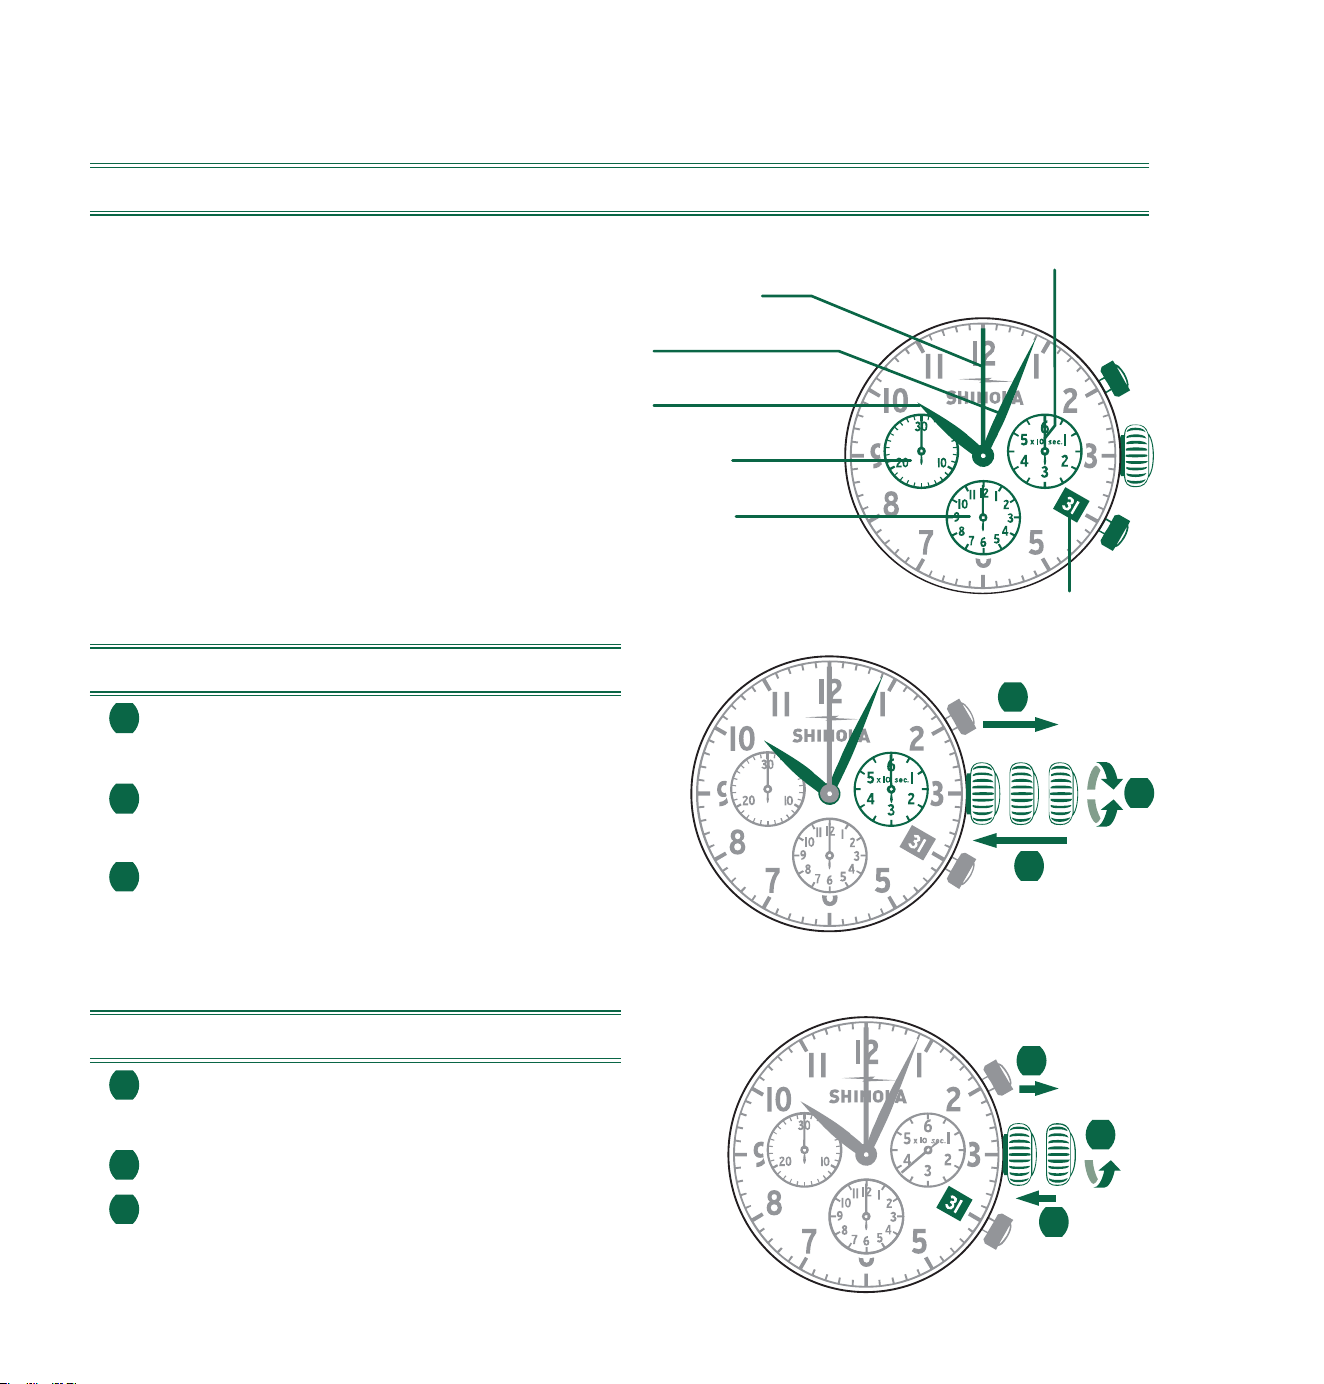
200
码表款型 5030.D
时间显示和控制按钮的说明
请注意:
在使用码表功能前,请确保:
- 表冠处于位置I
(正常位置)。
- 在触发按钮B后,码表的三个指针处
于零点位置。如果指针并没有准确地处
于零点位置,则必须调整指针的位置。
(参见
调整码表指针至零点位置
一章。)
设定时间
1 拔出表冠至位置III。
(手表停止走动。)
2 旋转表冠,直至指针指到
正确的时间。
3 将表冠推回位置I。
设定日期
1 拔出表冠至位置II。
(手表继续走动。)
2 旋转表冠直至显示正确的日期。
3 将表冠推回位置I。
A
秒针
日期
中心停秒指针
分针
时针
分钟计时器
小时计时器
B
I
II IIII
3
1
2
III
1
2
3
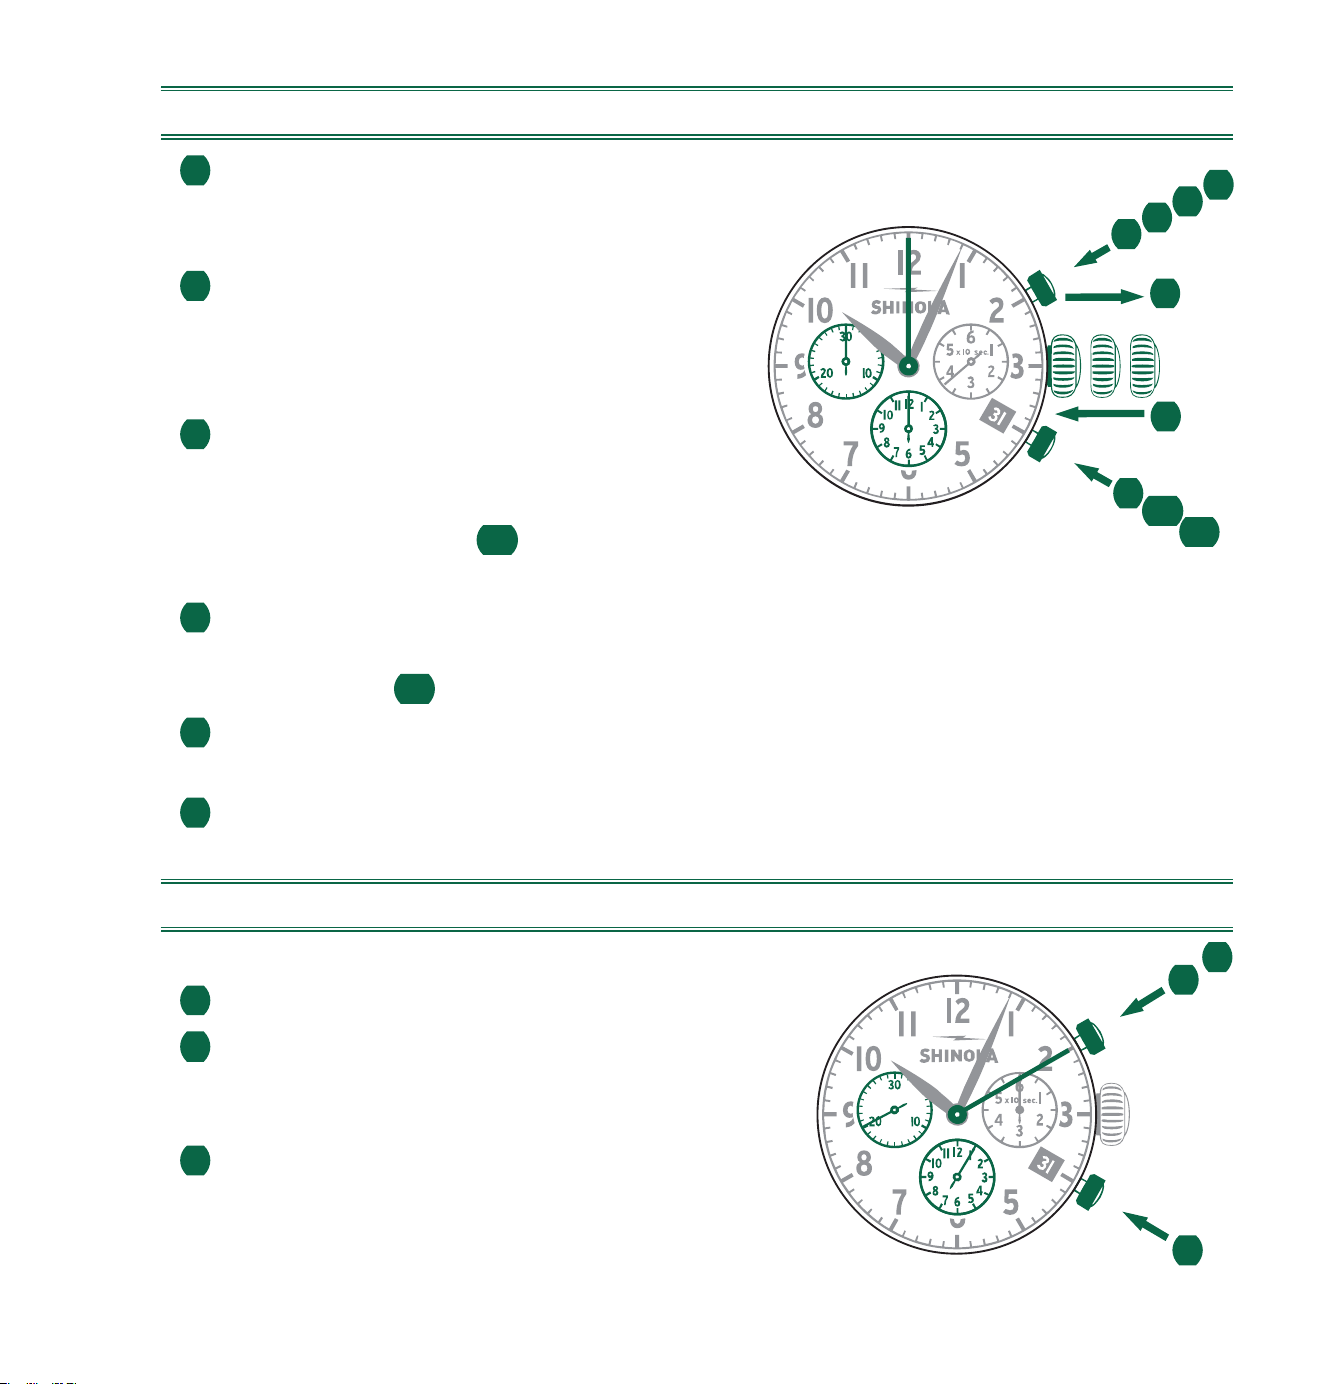
201
调整码表指针至零点位置
1 拔出表冠至位置III。
(码表的三个指针都
处于正确或不正确的零点位置。)
2 同时按住按钮A和B不放
并至少保持按住2秒钟。
(中心停秒指针旋转360°
-已激活纠正模式。)
3 按下按钮A单步转动
中心停秒指针。按下并
保持按住按钮A快速
转动中心停秒指针。
3b
按下
按钮B进入下一指针的纠正。
4 按下按钮A单步转动小时计时器指针。
按下并保持按住按钮A快速转动小时
计时器指针。
4b
按下按钮B进入下一指针的纠正。
5 按下按钮A单步转动分钟计时器指针。按下
并保持按住按钮A快速转动分钟计时器指针。
6 将表冠推回位置I。
基本功能(开始/停止/重置)
示例
1 开始:按下按钮A。
2 停止:要停止计时,再次按下按钮A
并读出三个码表
计时器数值:1小时/20分钟/10秒
3 位置归零:按下按钮B。
(码表的三个指针将
重置到零点位置。)
II IIII
1
2
3
4
5
6
2
A
B
3b
4b
1
2
3
A
B
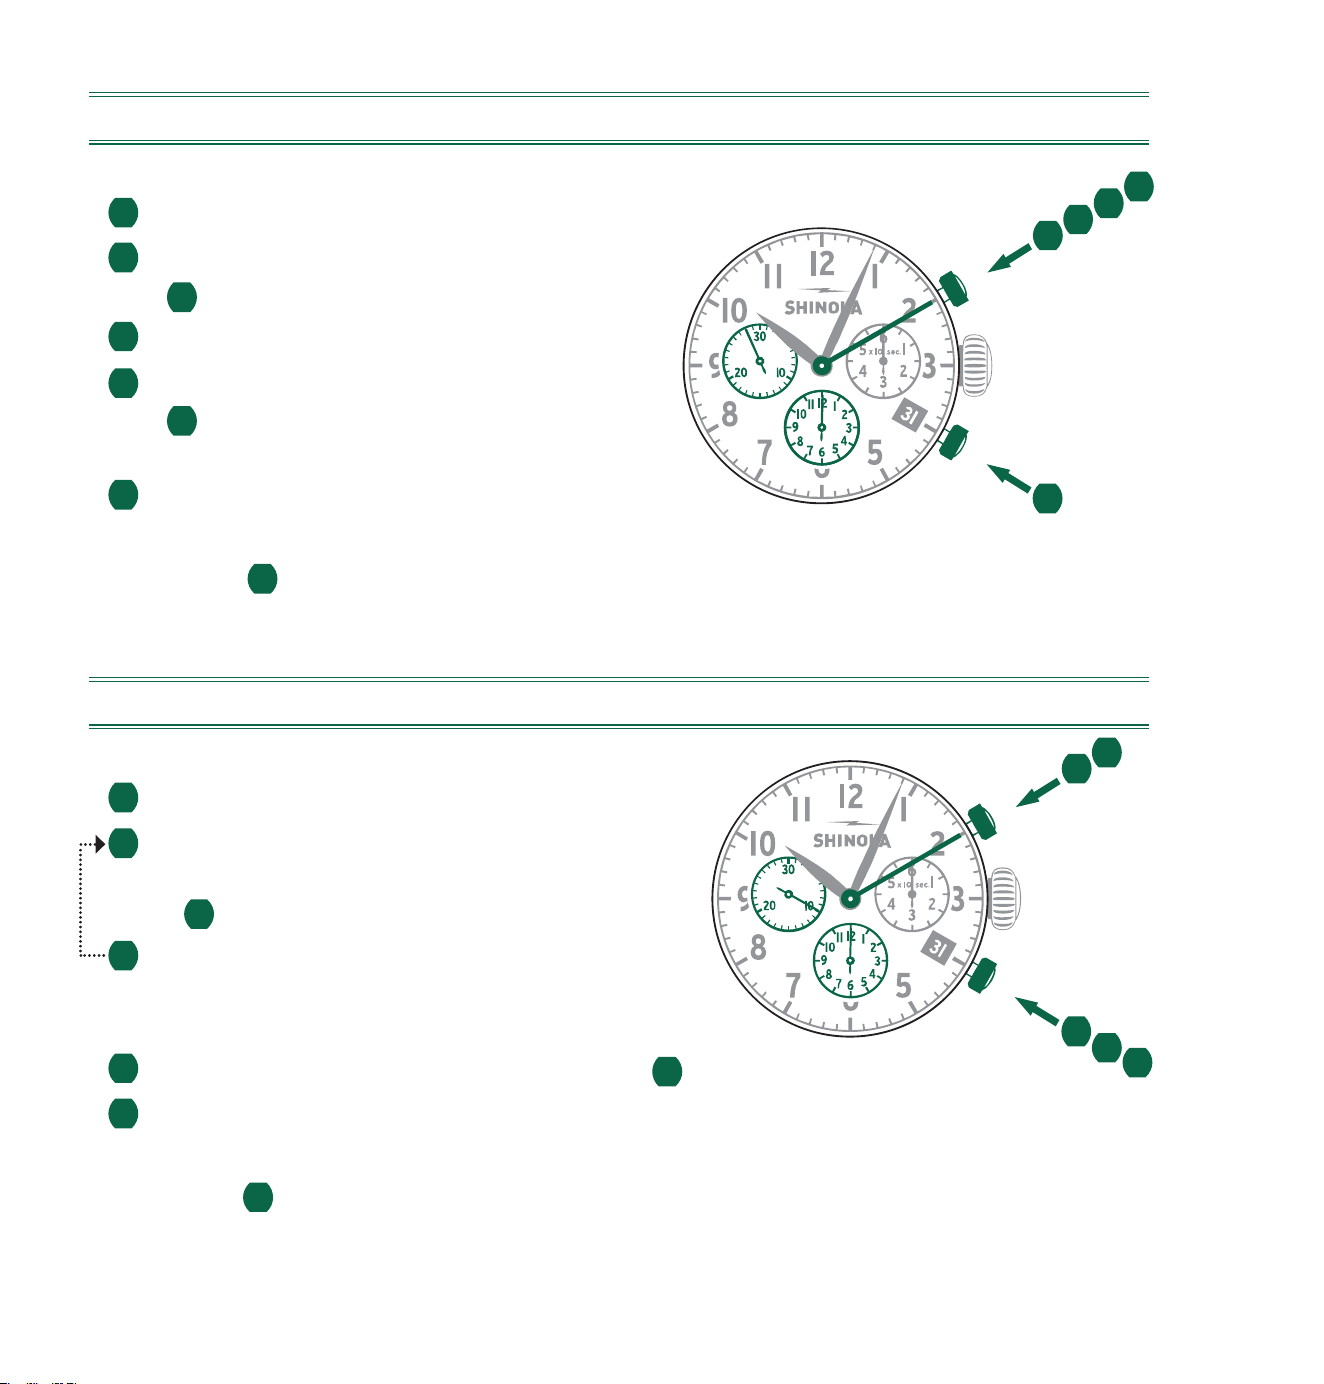
202
*
累计计时
示例
1 开始:开始计时
2 停止:例如,计时时间为
15分钟5秒
(
1
完成之后)。
3 重新开始:继续计时。
4 *
停止:例如,再次计时时间为
13分钟5秒
(
3
完成之后)。
累计时间=28分钟10秒
5 重置:码表的三个指针
即返回零点位置。
请注意:*
4
完成之后,可以通过按下按钮
A(重新开始/停止,重新开始/停止,…)继续累计计时
中间或间隔计时
示例
1 开始:开始计时。
2 显示间隔时间:
例如,显示计时时间为
10分钟10秒
(
1
完成之后)。计时继续在后台进行。
3 补偿测量时间:
码表的三个指针快速
转动到正在进行中的测量时间。
4 例如,显示计时时间为28分钟10秒(第
1
步完成之后)。
5 重置:码表的三个指针
即返回零点位置。
请注意:*
3
完成之后,可通过按下按钮
B显示下一个间隔或中间时间(显示间隔时间/补偿测量时间,…)
1
5
2
3
4
A
B
2
3
5
B
1
4
A
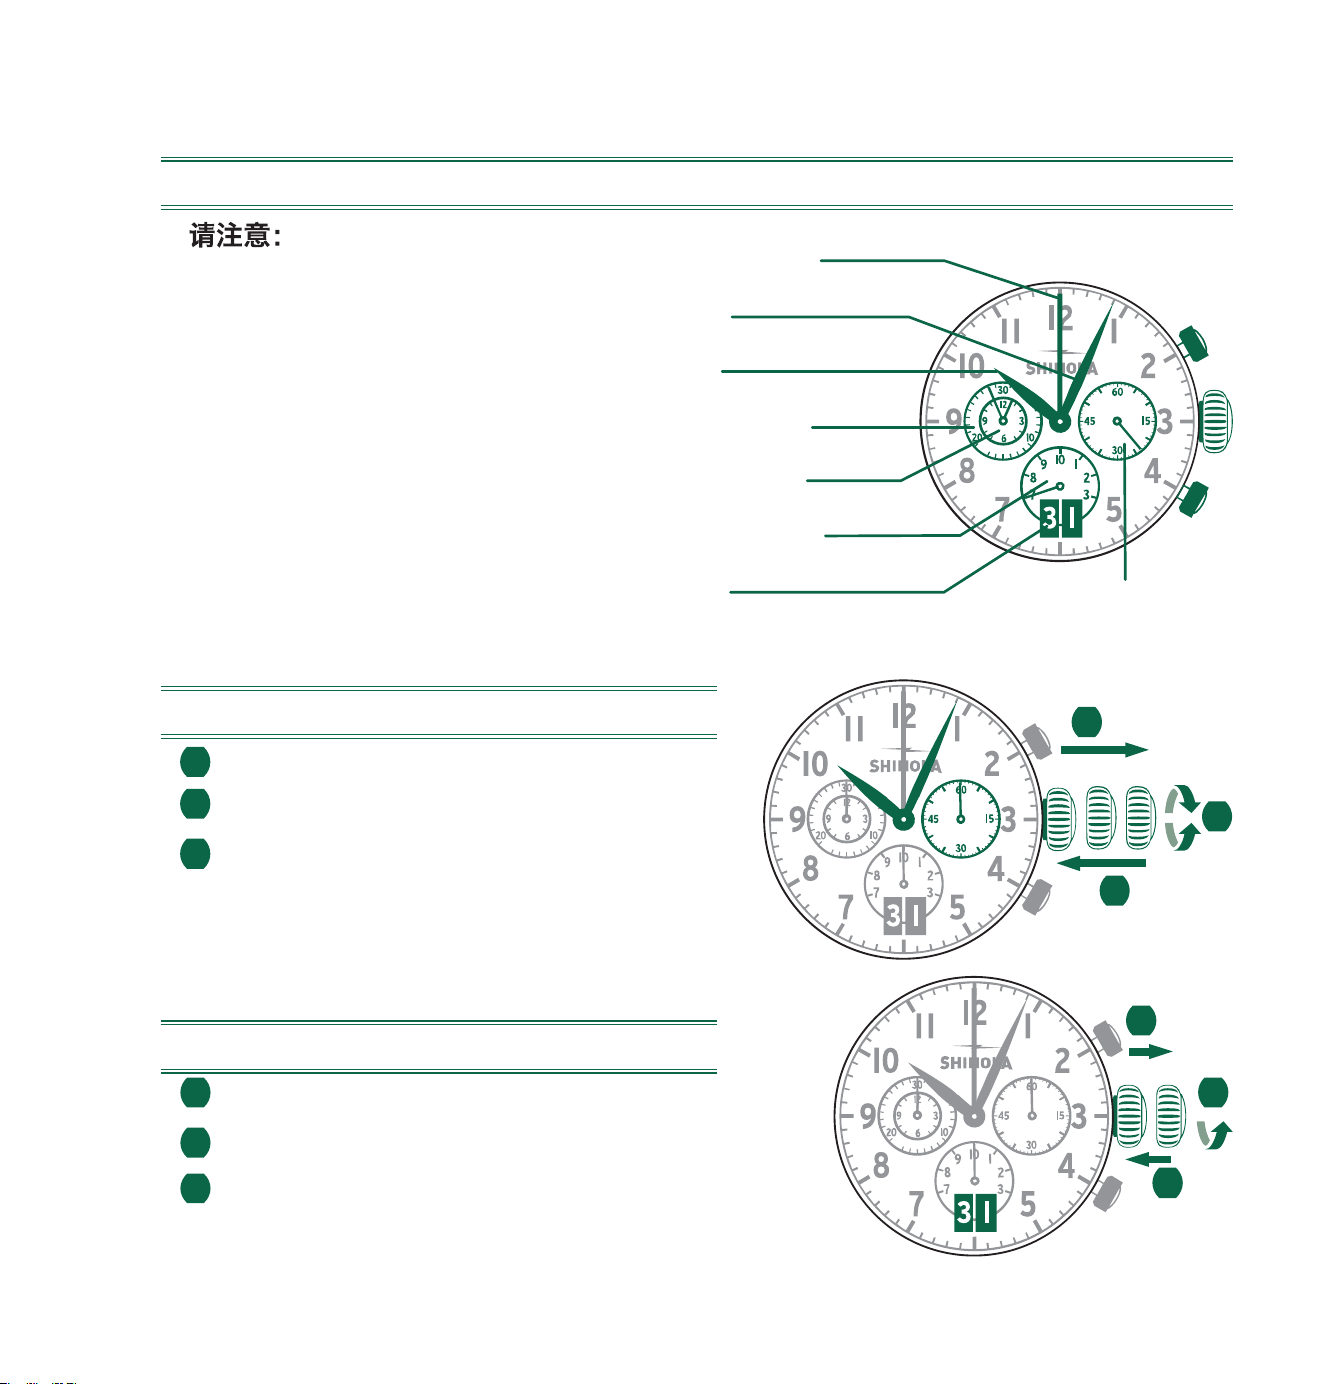
203
设定时间
1 拔出表冠至位置III。(手表停止走动。)
2 旋转表冠,直至指针指到正确的时间。
3 将表冠推回位置I。
设定日期
1 拔出表冠至位置II。(手表继续走动。)
2 旋转表冠直至显示正确的日期。
3 将表冠推回位置I。
5050.B型码表
时间显示和控制按钮的使用说明
在使用码表功能前,请确保:
-表冠处于位置
I
(正常位置)。
-码表的四个指针在激活按钮B后准确
地处于零点位置。如果指针并没有准
确处于零点位置,则必须调整指针的
位置。(参见
调整码表指针至零点位
置
一章。)
A
B
I
秒针
日历
中心停秒指针
分针
时针
分钟计时器
小时计时器
1
/
10
秒计时器
II IIII
3
1
2
II
1
2
3

204
调整码表指针至零点位置
1 拔出表冠至位置III。(码表的所有四个指针处于正确或不正确的零点位置。)
2 按住按钮A 和B 不放,并至少 2秒
钟。(中心停秒指针旋转360° 已激活纠
正模式。)
3 按下按钮A单步转动 。按住按
钮A快速转动心停秒指针。
3b
按下按钮B
进入下一指针的纠正。
4
按下按钮A,单步转动1/10秒计时器指针。
按住按钮A快速转动1/10秒指针。
4b
按
下按钮B 进入下一指针的校准。
5
按下按钮A单步转动 和
。按住按钮A快速转动 和
指针。
4b
按下按钮B进入下一指针的校准。
6
将表冠推回位置I。
基本功能(开始/停止/重置)
1 :按下按钮A。
2 :要停止计时,再次按下按钮A并读取码表四
个指针的计时器:4小时/20分/5秒/7/10秒
3 :按下按钮B。(码表的四个指针将重置
到零点位置。)
1
3
1
2
A
B
1
2
3
II IIII
1
2
3
4
5
6
A
2
B
3b
4b
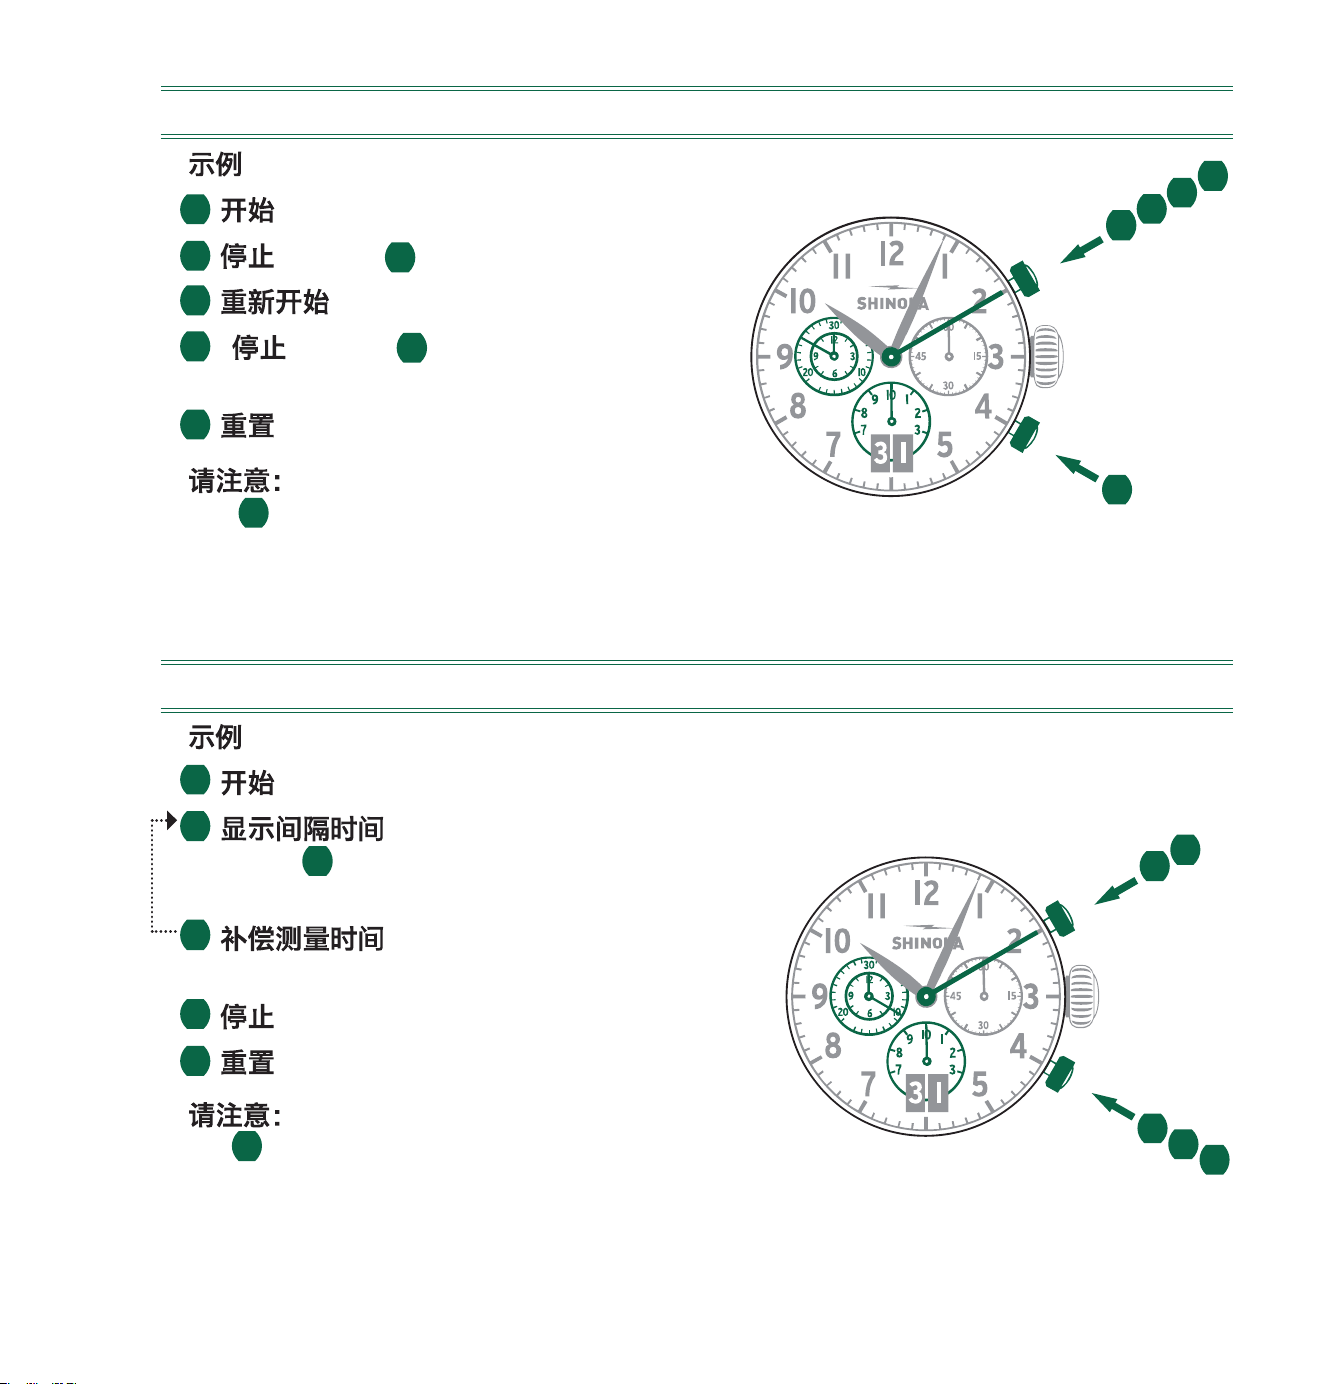
205
*
累计计时
1
:开始计时。
2
:例如,
1
之后15分5秒。
3
:继续计时。
4
* :例如,
3
之后10分5秒。
累计时间=25分钟10秒
5
:码表的四个指针即返回零点位置。
*
4
完成之后,可以通过按下按钮A(重新
开始/停止,重新开始/停止,…)继续累积计时
中间或间隔计时
1 :开始计时。
2 :
例如,
1
之后10分10秒。
计时继续在后台进行。
3 :码表的四个指针快速转动到正
在进行中的测量时间。
4 :(即显示最终时间)。
5 :码表的四个指针即返回零点位置。
*
3
完成之后,可通过按下按钮B显示下一个
间隔或中间时间(显示间隔时间/补偿测量时
间,…)
5
B
1
2
3
4
A
5
2
3
B
1
4
A
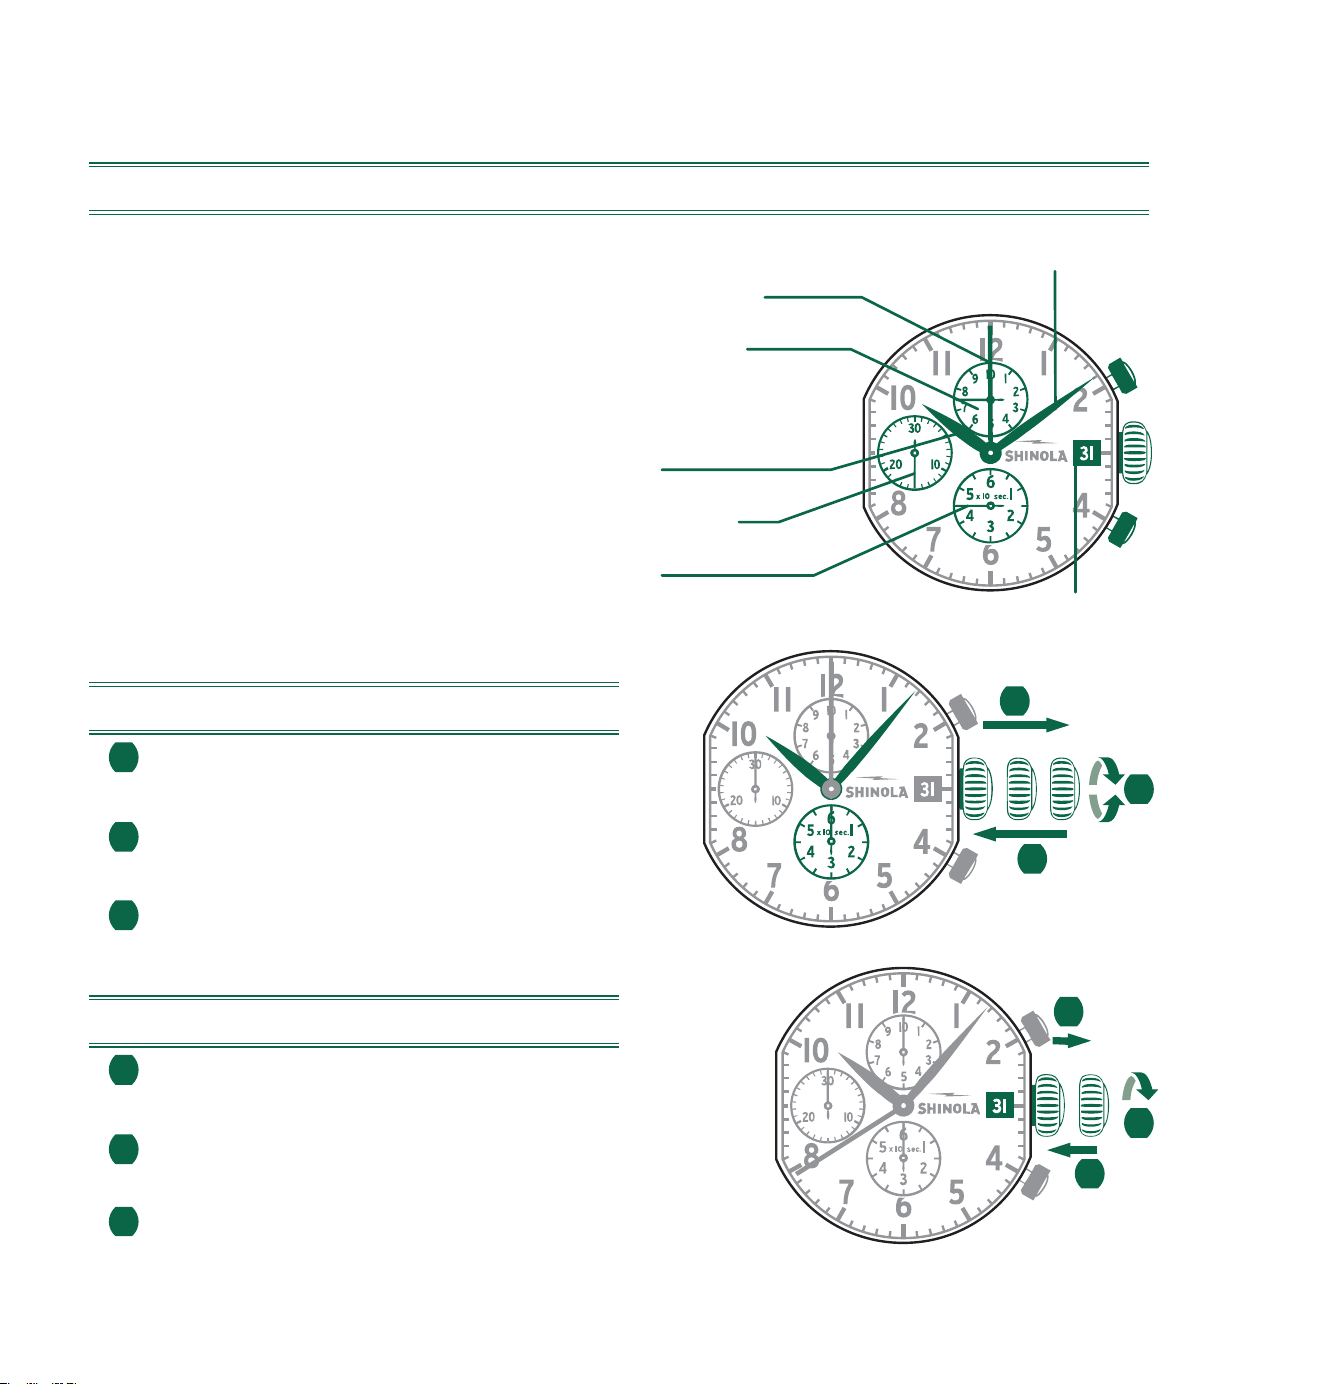
206
码表款型3540.D
时间显示和控制按钮的说明
请注意:
在使用码表功能前,
请确保:
- 表冠处于位置
I
(正常位置)。
- 在触发
按钮B后,码表的三个指针处于
零点位置。如果指针并没有准确地
处于零点位置,则必须调整指针的位置。
(参见
调整码表指针至零点位置
一章。)
设定时间
1 拔出表冠至位置III。
(手表停止走动。)
2 旋转表冠,直至指针指到
正确的时间。
3 将表冠推回位置I。
设定日期
1 拔出表冠至位置II。
(手表继续走动。)
2 逆时针旋转表冠直至显示
正确的日期。
3 将表冠推回位置I。
A
分针
日期
中心停秒指针
I
/
I0
秒计时器
(30分钟过后变成
小时计时器)
时针
分钟计时器
秒针
B
I
III
1
2
3
II IIII
3
1
2
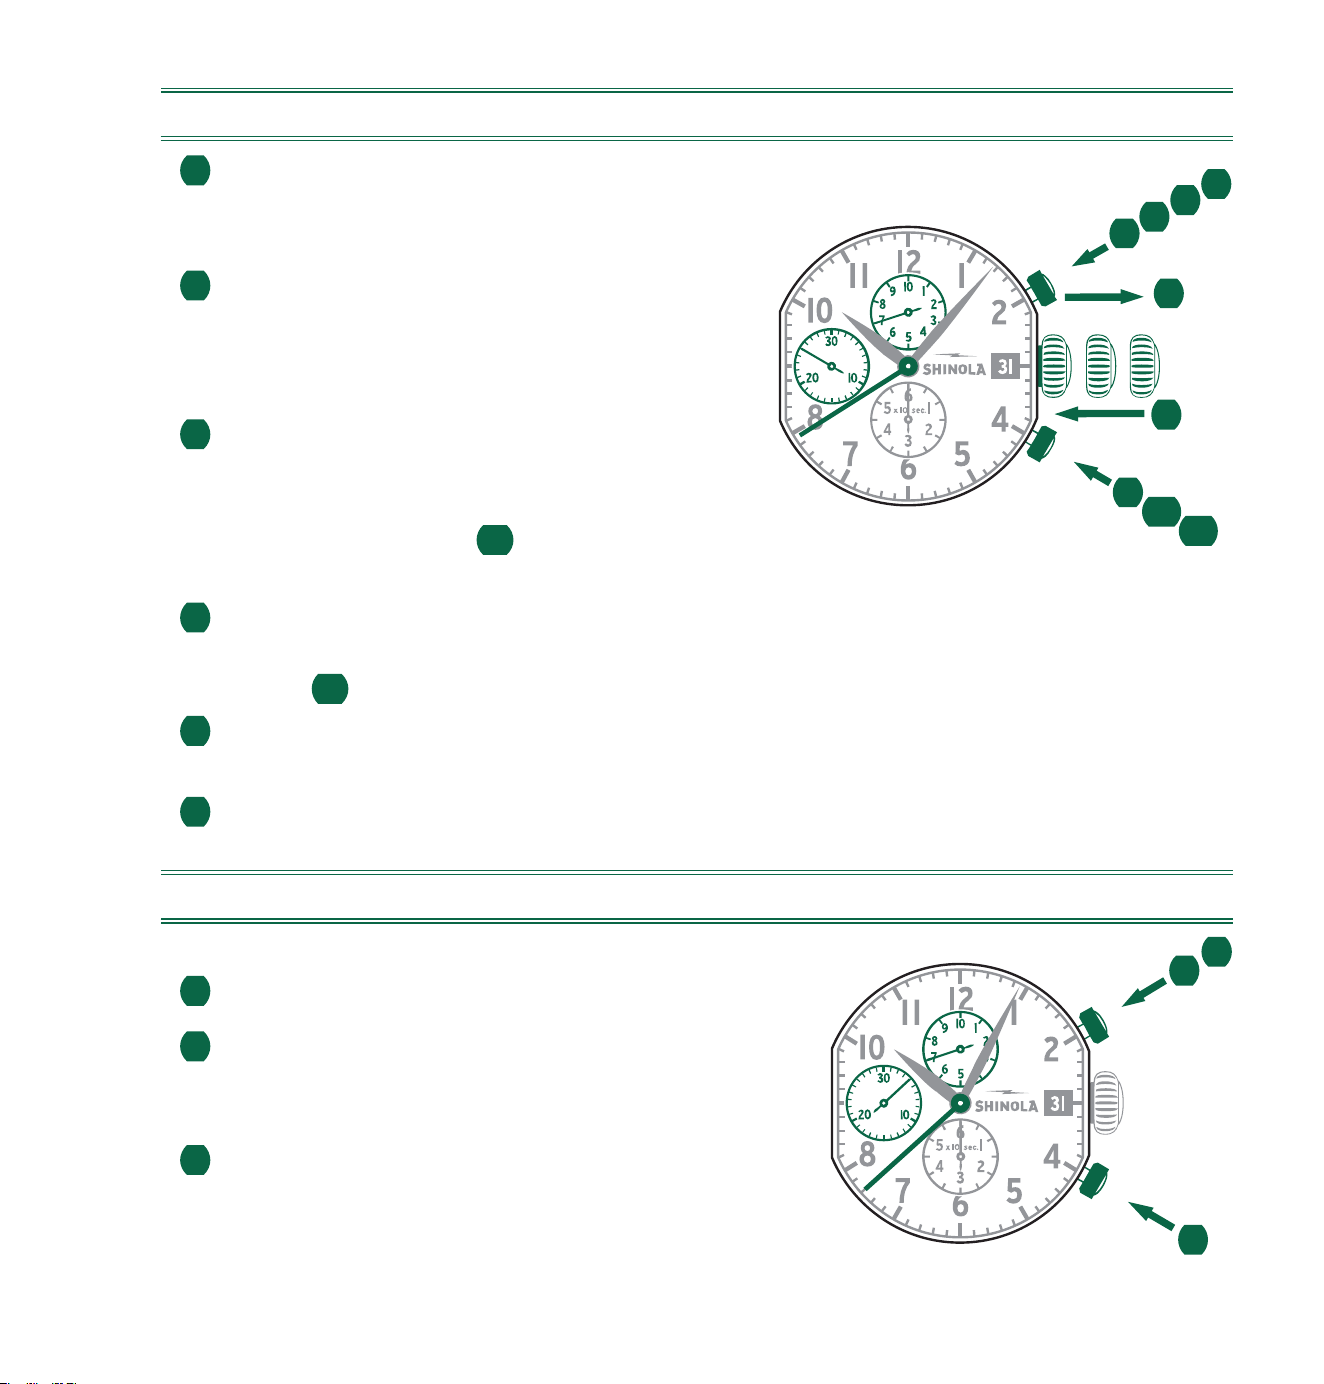
207
调整码表指针至零点位置
1 拔出表冠至位置III。
(码表的三个指针
处于正确或不正确的零点位置。)
2 同时按住按钮A和B不放
并至少保持按住2秒钟。
(中心停秒指针旋转360°
-已激活纠正模式。)
3 按下按钮A单步转动
中心停秒指针指针。按下并
保持按住按钮A快速
转动中心停秒指针。
3b
按下
按钮B进入下一指针的纠正。
4 按下按钮A单步转动小时计时器指针。
按下并保持按住按钮A快速转动小时计时器
指针。
4b
按下按钮B进入下一指针的纠正。
5 按下按钮A单步转动分钟计时器指针。按下
并保持按住按钮A快速转动分钟计时器指针。
6 将表冠推回位置I。
基本功能(开始/停止/重置)
示例
1 开始:按下按钮A。
2 停止:要停止计时,再次按下按钮A
并读出三个码表
计时器数值:4分/38秒/7/10秒
3 位置归零:按下按钮B。
(码表的三个指针将
重置到零点位置。)
1
2
3
A
B
II IIII
1
2
3
4
5
6
2
A
B
3b
4b
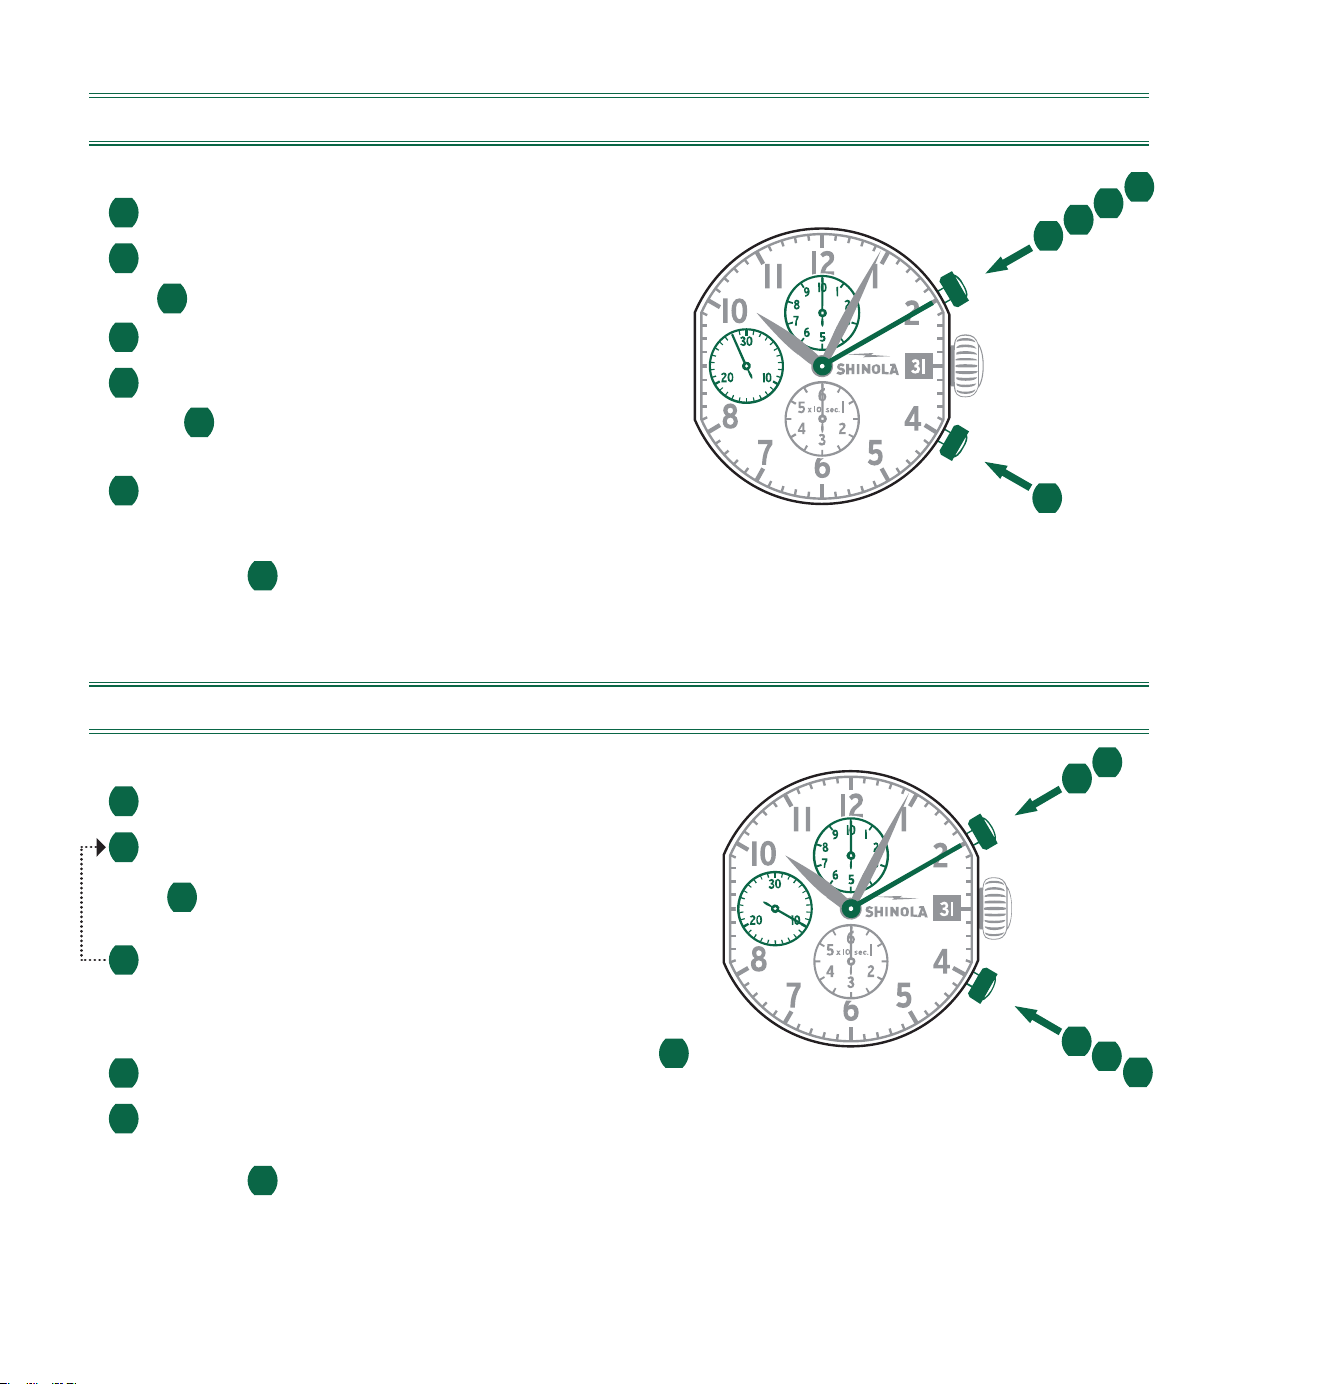
208
*
累计计时
示例
1 开始:开始计时。
2 停止:例如,计时时间为
15分钟5秒
1
完成之后)。
3 重新开始:继续计时。
4
*停止:例如,再次计时时间为
13分钟5秒
(
3
完成之后)。
累计时间=28分钟10秒
5 重置:码表的三个指针
即返回零点位置。
请注意:*
4
完成之后,可以通过按下按钮
A(重新开始/停止,重新开始/停止,…)继续累计计时
中间或间隔计时
示例
1 开始:开始计时。
2 显示间隔时间:
例如,显示计时时间为
10分钟10秒
(
1
完成之后)。计时继续在后台进行。
3 补偿测量时间:
码表的三个指针快速
转动到正在进行中的测量时间。
4 例如,显示计时时间为28分钟10秒(第
1
步完成之后)。
5 重置:码表的三个指针
即返回零点位置。
请注意:*
3
完成之后,可通过按下按钮
B显示下一个间隔或中间时间(显示间隔时间/补偿测量时间,…)
1
2
4
3
5
A
B
1
5
2
3
4
A
B
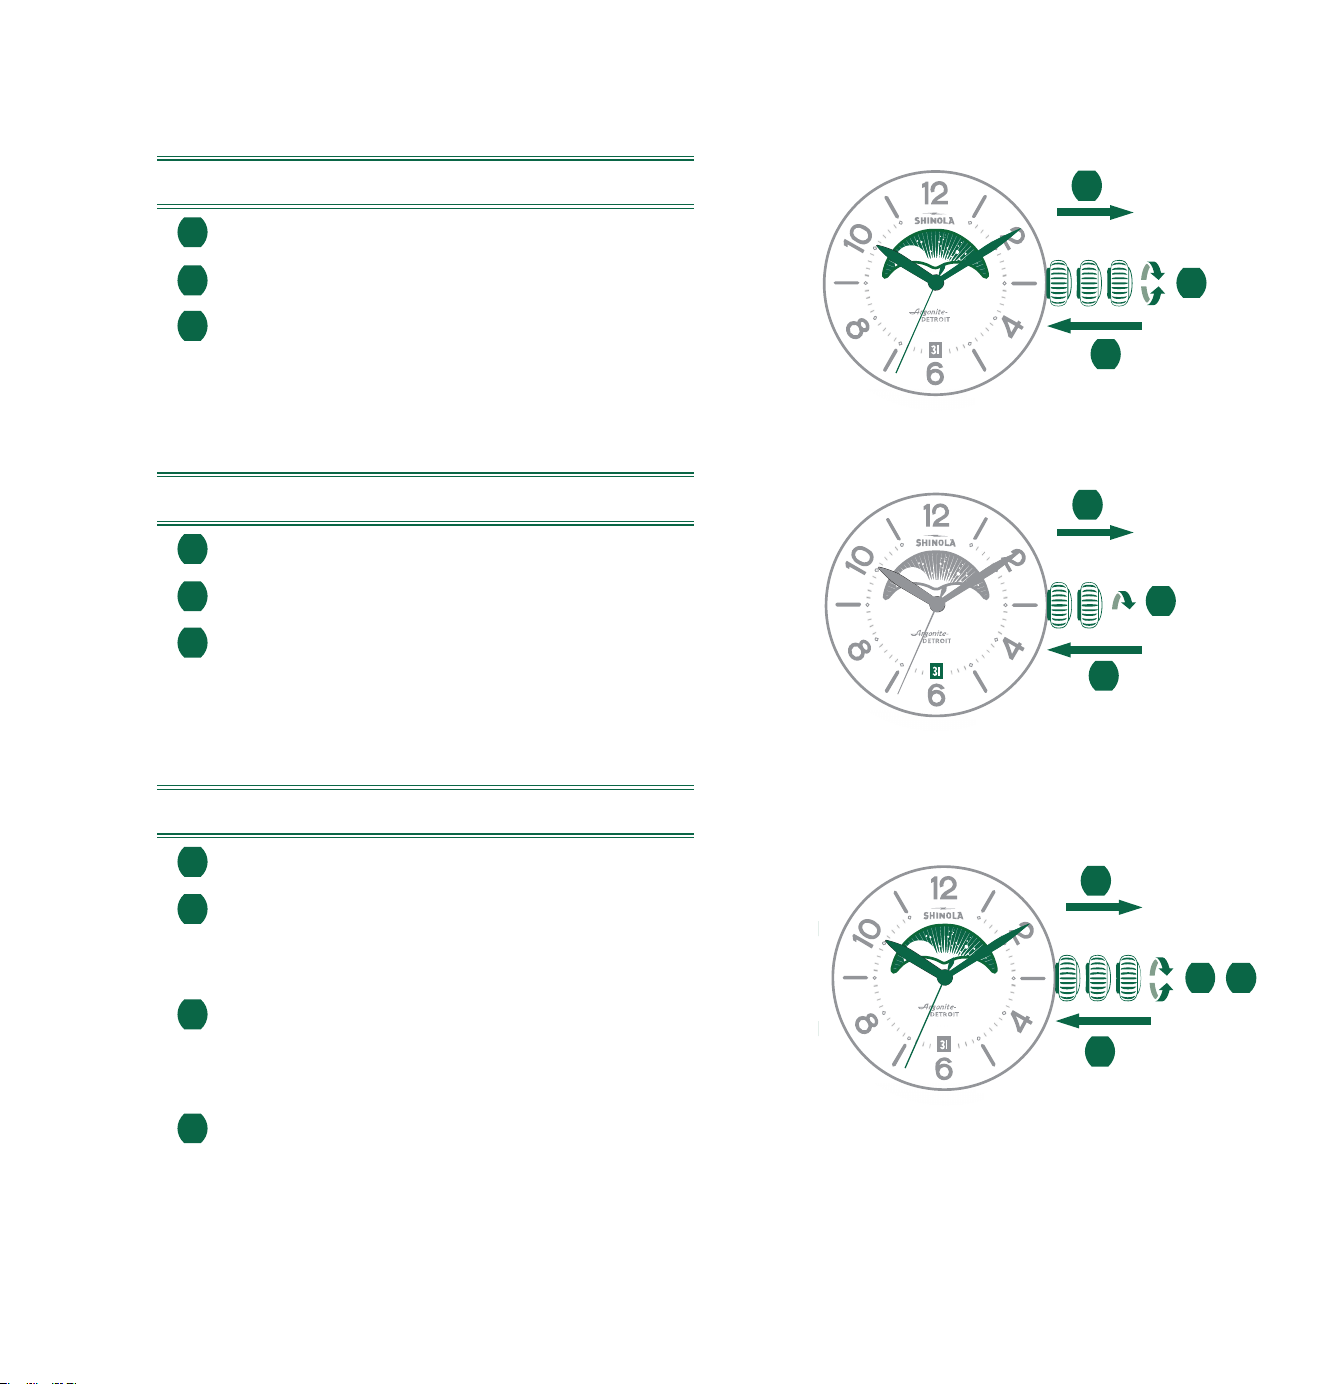
209
708
708
II
II
IIII
I
3
3
1
1
2
2
708
II IIII
3
4
1
2
月相表型号 708
设置月相
1 拔出表冠至III位置(手表停止走动)。
2 旋转表冠,直至显示正确的月亮位置。确保使之
与精确的月相匹配(使用月历)。月相盘走动十
分缓慢,每累计24小时跳动一次(每天变动)。
3 由于时间功能在III位置调转,因此设置月相时
指针也会移动。调准月相后,将时针和分针设置
回到正确的时间(参阅上述的“设置时间”)。
4 确保将日历指示重新设置为正确的日期(参阅上
述“设置日期”)。
设置时间
1 拔出表冠至III位置。(手表停止走动。)
2 旋转表冠,直至正确的时间。
3 按压表冠,回到I位置。
设置日期
1 拔出表冠至II位置。(手表依然走动。)
2 旋转表冠,直至出现正确的日期。
3 按压表冠,回到I位置。
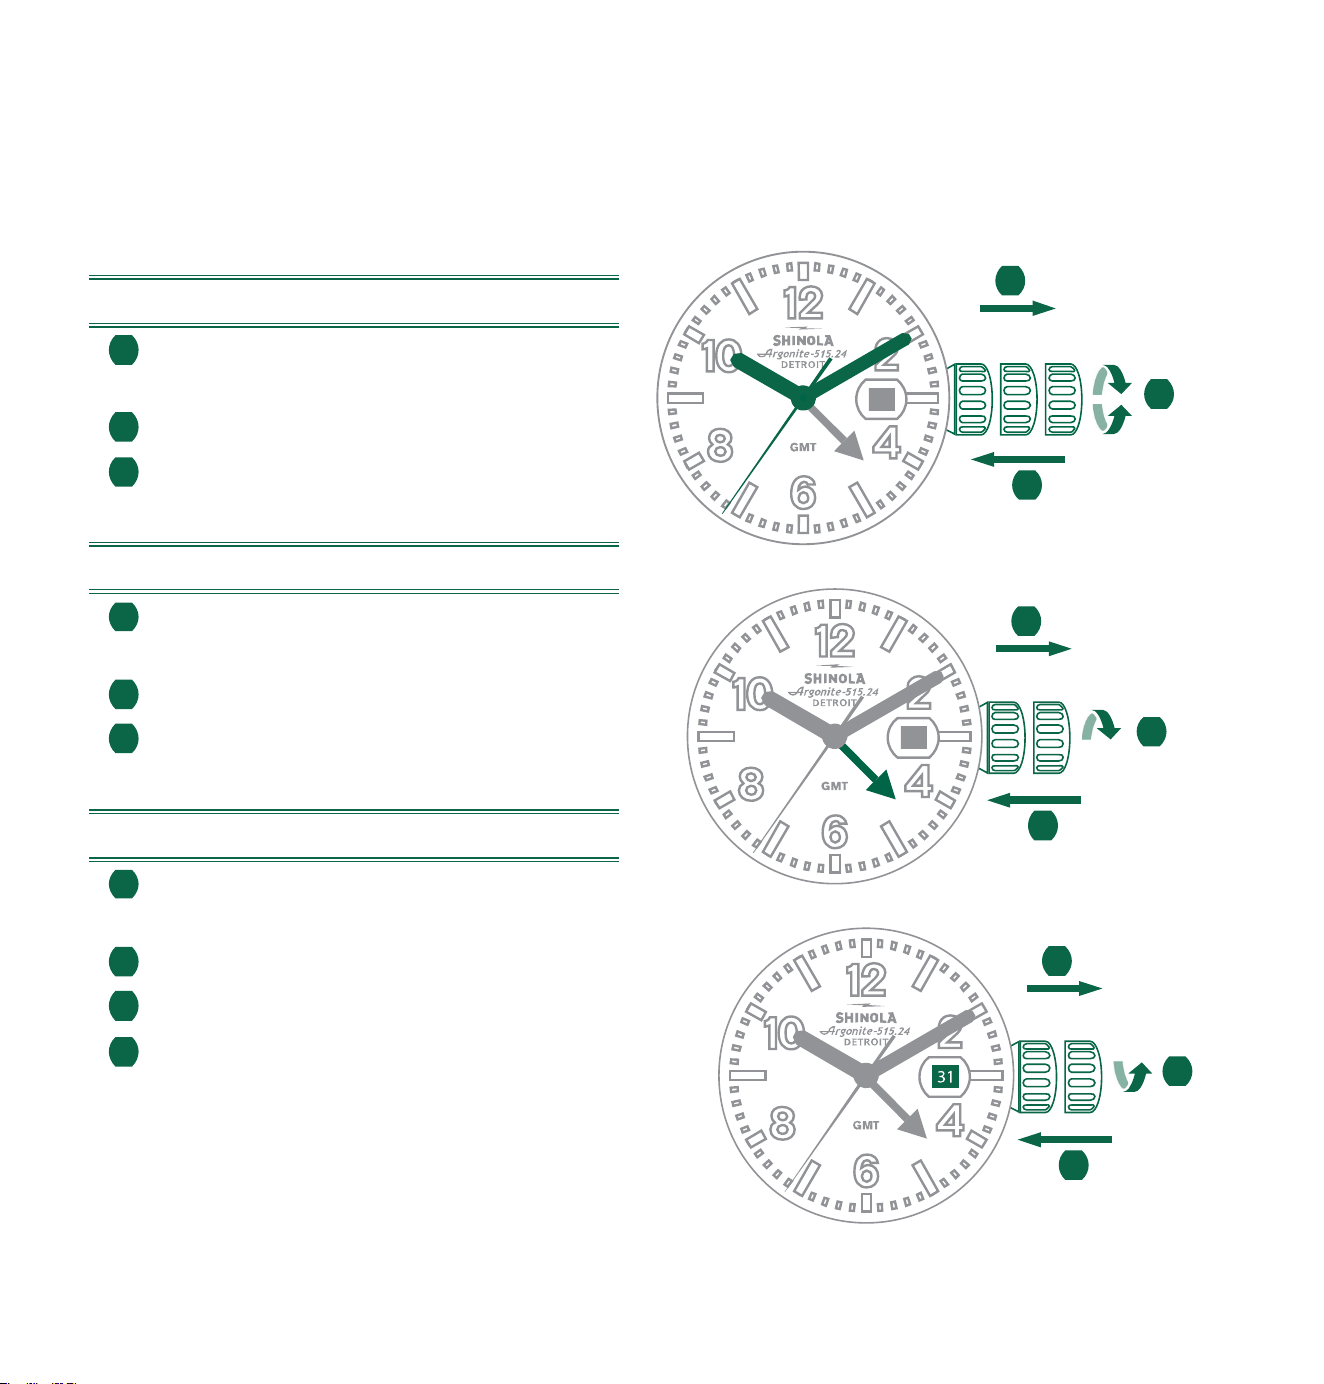
210
设置时间
1 将表冠拉出到位置 III。
(手表停止。)
2 转动表冠直到您达到正确的时间。
3 将表冠推回到位置I。
设置24小时显示器
1 将表冠拉出到位置 II。
(手表继续运行。)
2 逆时针转动表冠,直至您达到正确的时间
3 将表冠推回到位置I。
设置日期
1 将表冠拉出到位置II。
(手表继续运行。)
2 顺时针转动表冠,直到正确的日期出现。
3 将表冠推回位置 I。
4 如果在下午10时30分和中午12点之间
执快速的日期设置,请按照步骤1到3,
但请务必将日期设置为第二天的日期,
因为在午夜时将不会发生变化。
林威治标准时间模型515.24H
如果您的24小时手表具有日期显示器,则日期窗口可能与本手册中描述的位置不同
3131
3131
II
II
II
IIII
I
I
3
3
3
1
1
1
2
2
2
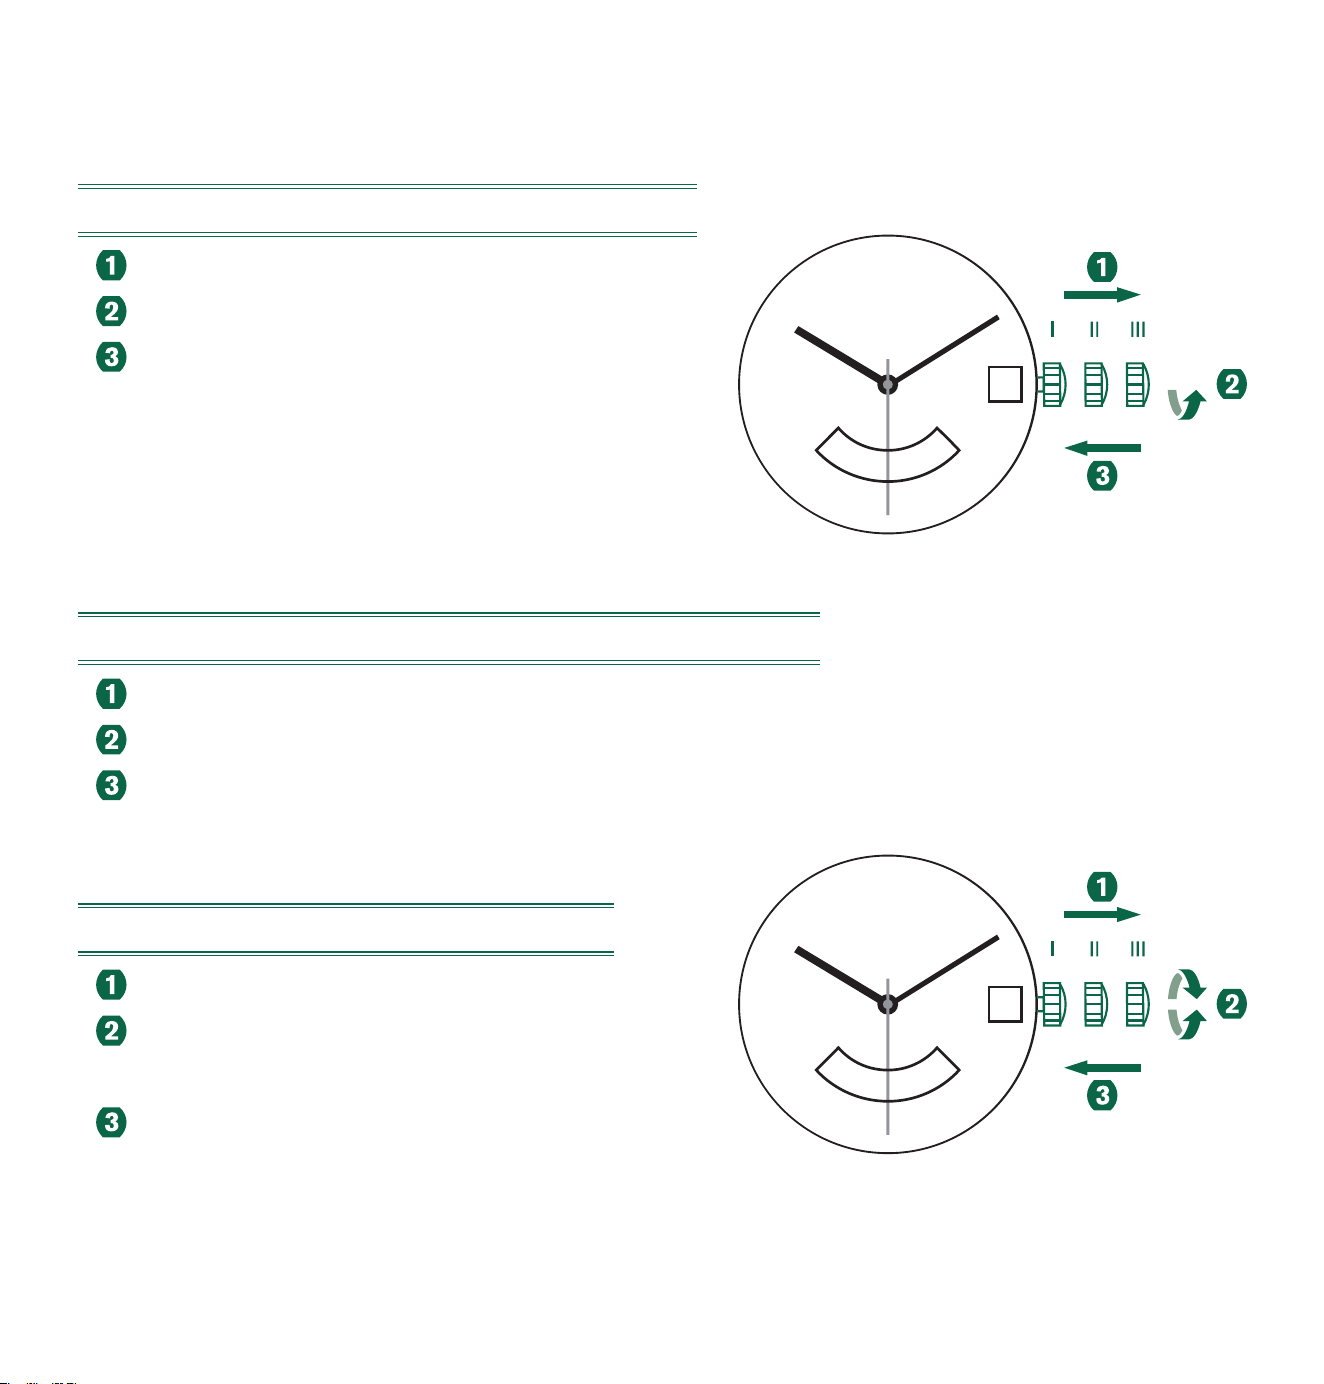
211
早上&晚上(格林威治标准时间)型号515.24D
日期的快速更正
将表冠拉出到位置II。(手表仍然运行。)
顺时针转动表冠,直到所需的日期出现。
将表冠推回到位置I。
注意:日期也可以在下午10点和午夜之间的
白天变化阶段被更正。第二天的日期必须被设置,
因为在午夜将不会进行自动更改日期。
24小时显示器的快速更正
将表冠拉出到位置 II。(手表仍然运行。)
逆时针转动表冠,直到正确的日期出现。
将表冠推回到位置 I。
设置时间
将表冠拉出到位置 III。(手表停止。)
转动表冠直到显示当前的时间
(请记住24小时循环)。
将表冠推回到位置 I。
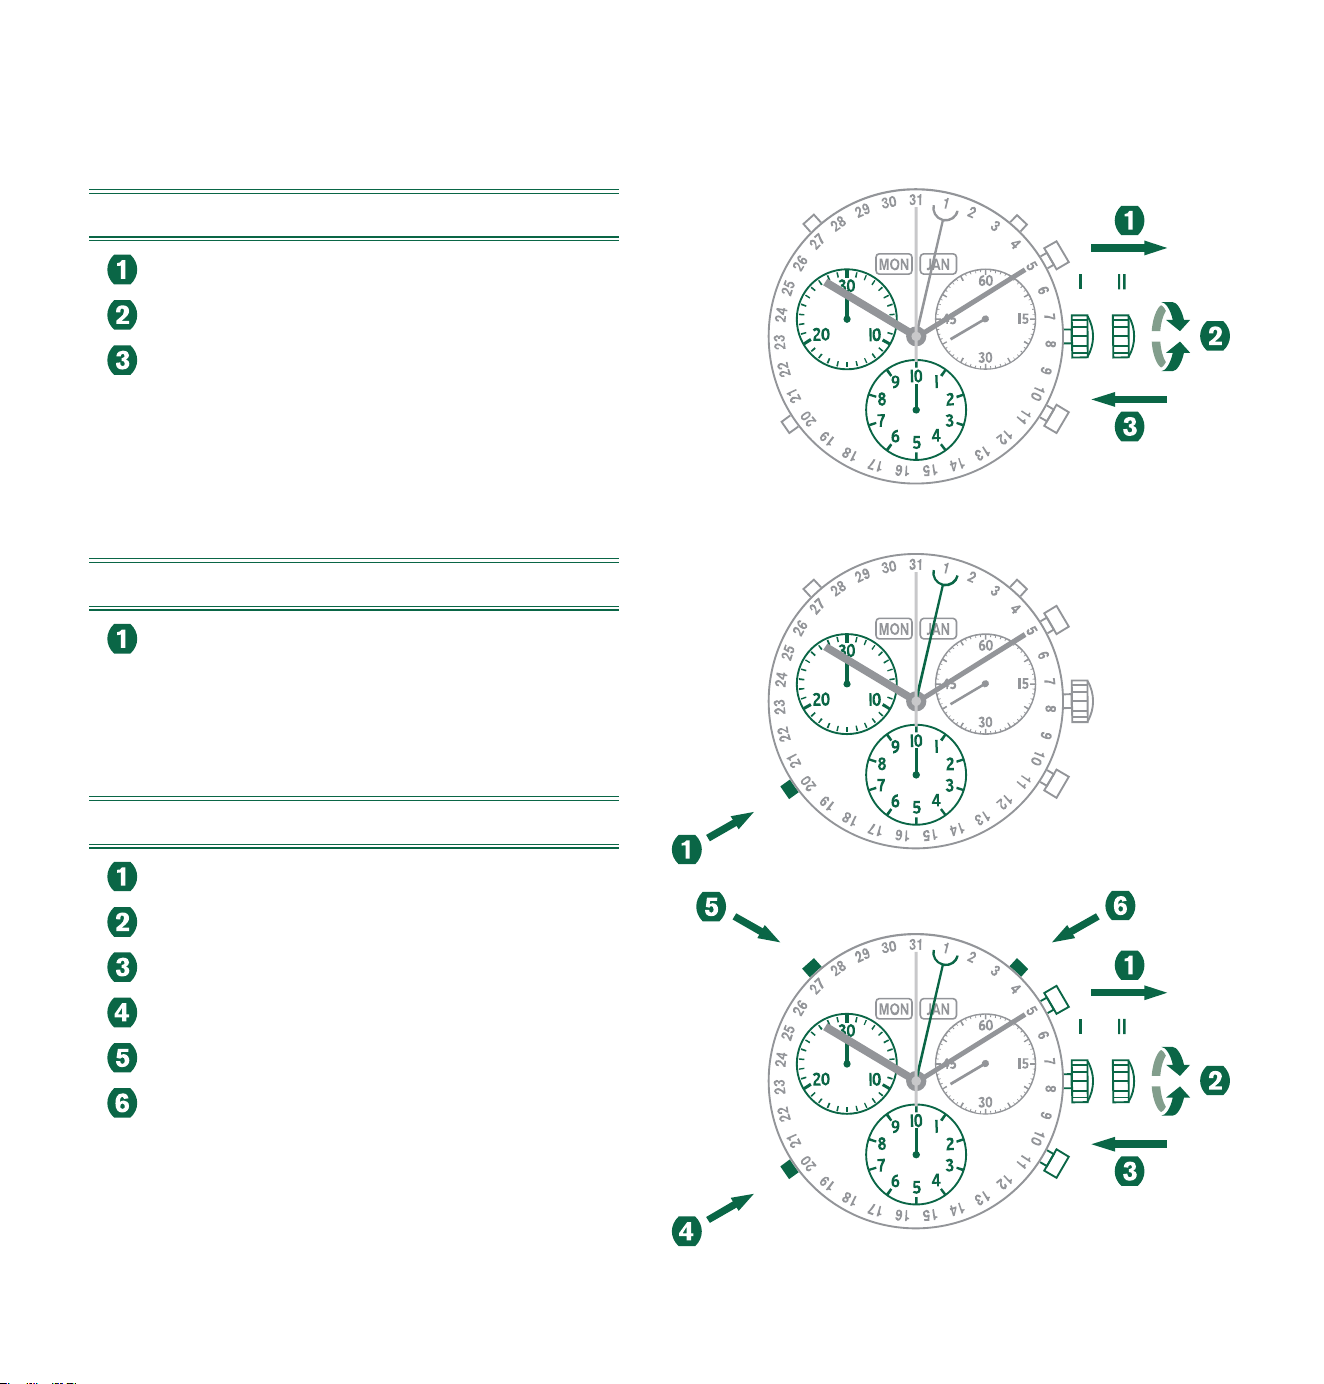
212
计时码表型号 5040.F
设置时间
将表冠拉出到位置II。(手表停止)
转动表冠,直至达到正确的时间。
将表冠推回到位置I。
注意:为了将时间设置为确切的秒数,1必
须在秒针位于“60”时拉出。一旦小时和分钟的
手已经被设置,3必须在准确的秒数被推回到位置I。
设置日期(快速模式)
按校正器C 一次以把日期调前1天。.
注意:第二天的日期必须在约晚上9点和
上午12时20分的日期更改阶段设置。
设置时间/日期/日/月
将表冠拉出到位置II。(手表停止)
转动表冠直到显示当前的时间。
将表冠推回到位置 I。
按校正器C 以前进日期指针。
按校正器D 来前进天数。
按校正器 E来前进月份。
C
C
D E
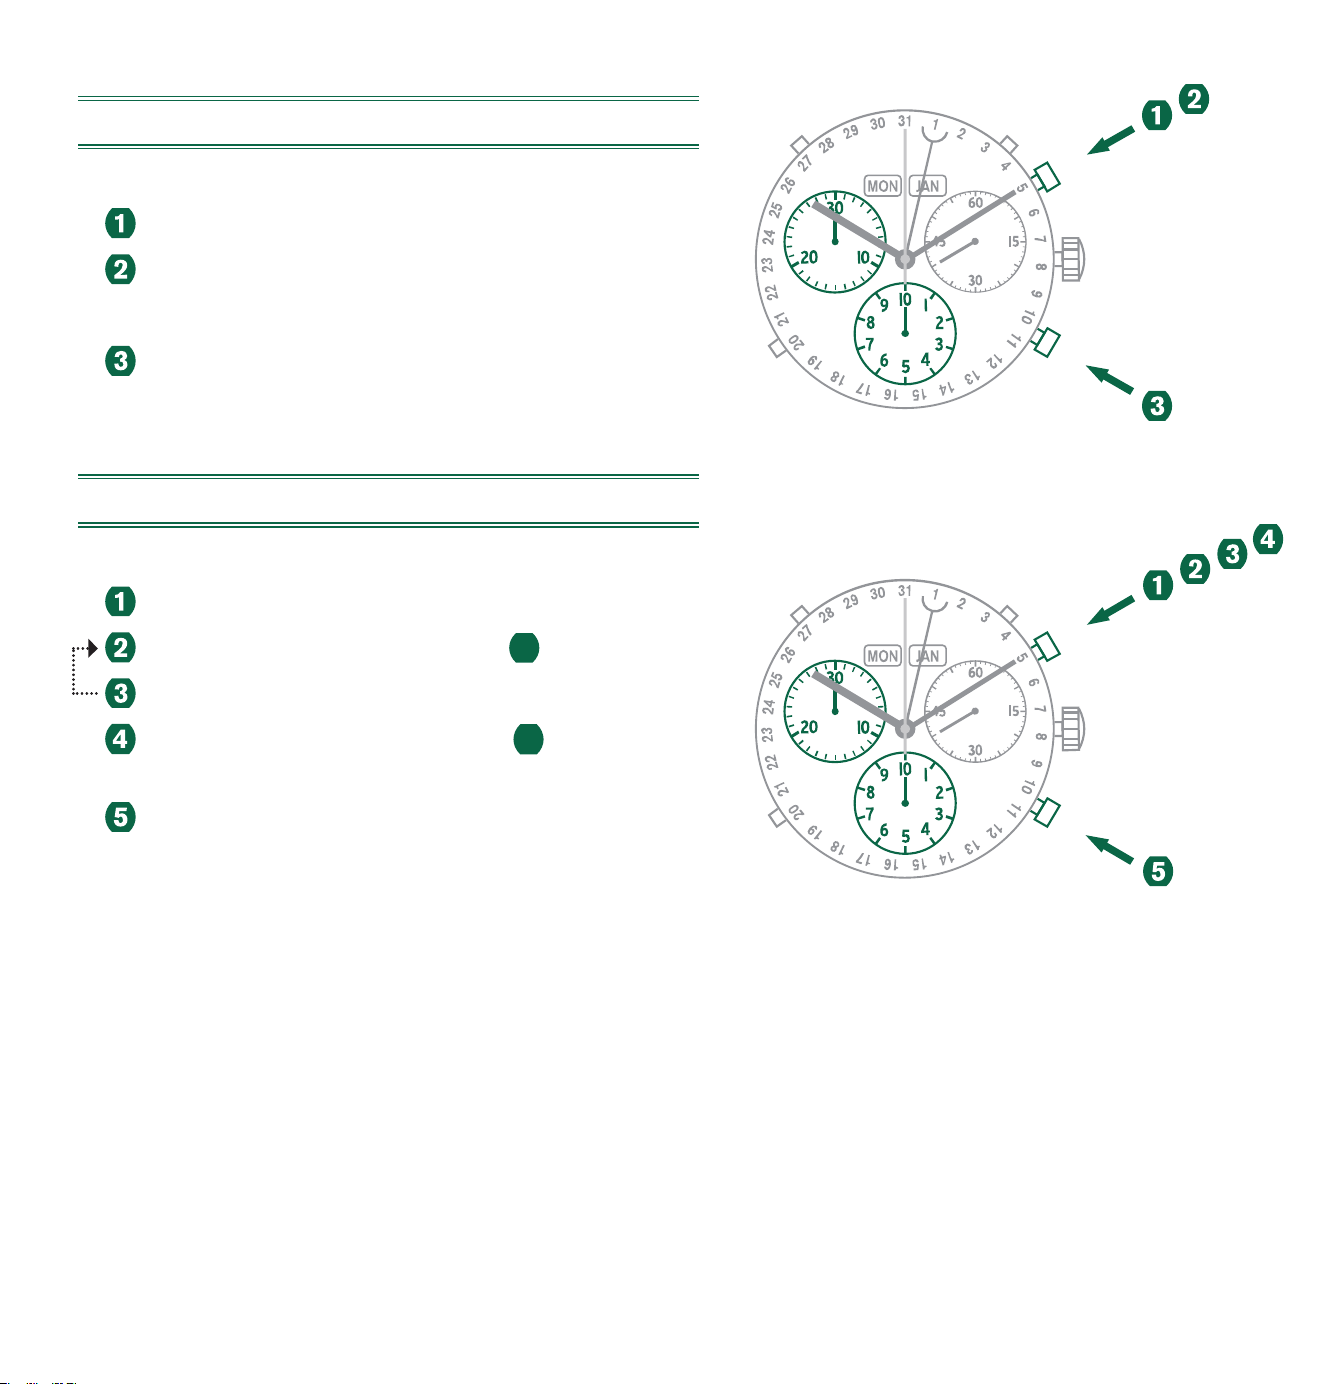
213
基本功能(启动/停止/重置)
例如
开始: 按按钮 A。
停止:要停止计时,再次按下按钮A,
并读取三个计时码表:4分钟/38秒/7/10秒
零定位:按按钮 B.(三个计时指码表的针
重置到零的位置。)
累积的计时
例如
始:开始计时。
停止:例如15分钟5秒。跟着
1
。
重启:计时恢复。
*停止:例如13分钟5秒。跟着
3
。
累计时间=28分钟10秒
重置:三个计时指码表的针返回到零的位置。
A
B
A
B
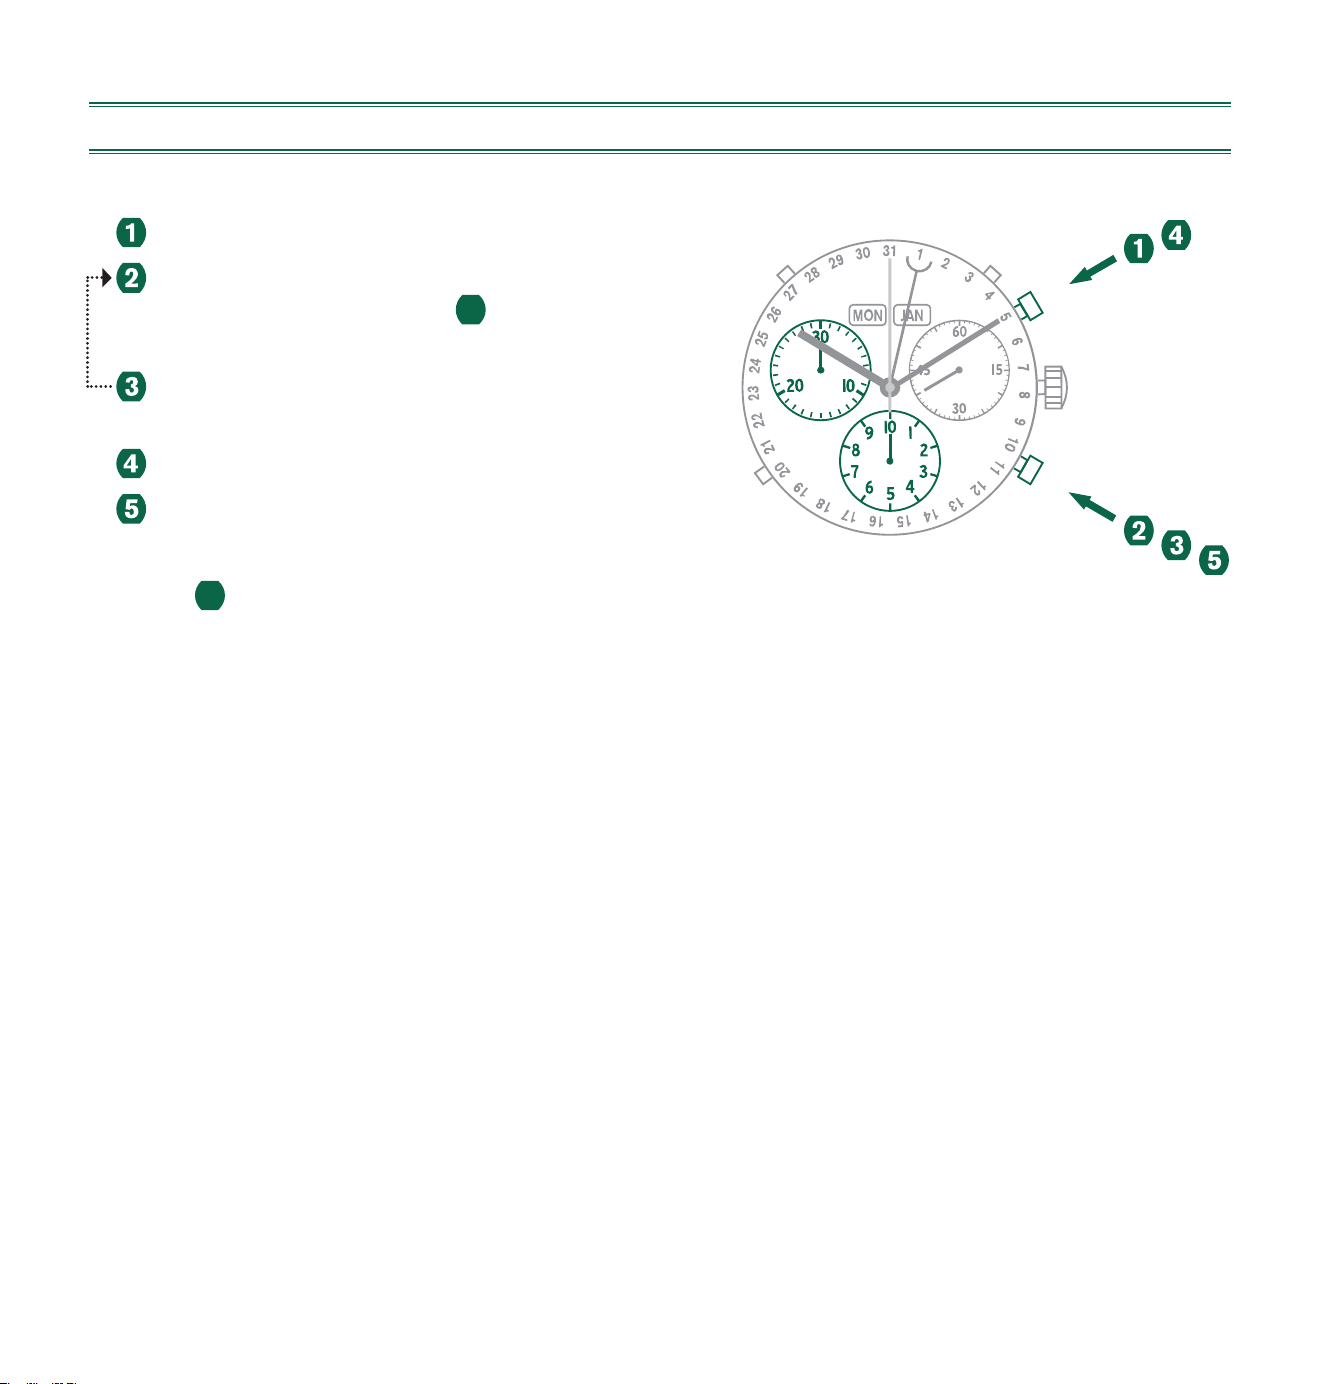
214
中间体或间隔计时
例如
开始:按按钮A。
显示间隔:
例如,10分钟10秒。跟着
1
.
计时将在后台继续
乔到测量时间:
计时码表的指针将快速前进到正在测量的时间。
停止:最终时间被显示。
重置:三个计时码表的指针返回到零的位置。.
请注意:
* 步骤
3
,以后,接下来的间隔或中间体可以通过按B来被显示
(显示间隔/补充测量时间,...)
*
A
B
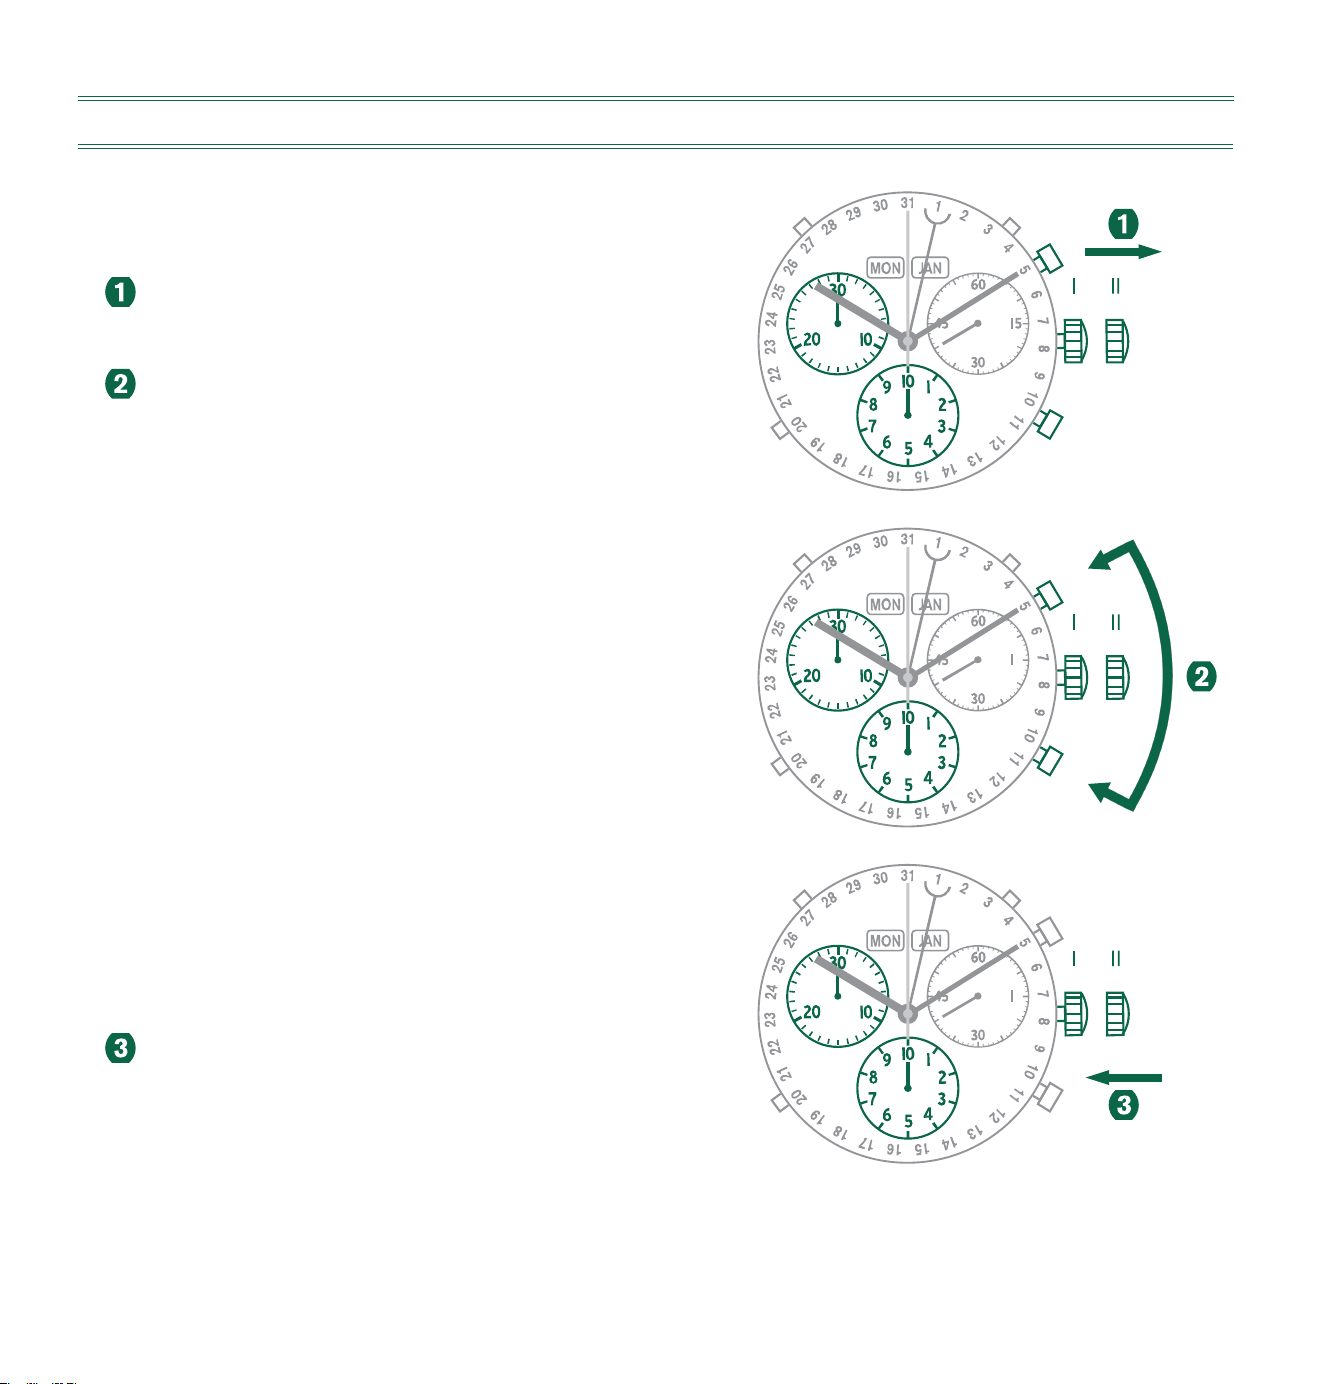
215
调整计时码表指针到零的位置
例如
一个或几个计时码表指针不在其正确的零的位置,
并且必须进行调整(例如,在更换电池后)。
将表冠拉出到位置 II。(所有的计时码表指针都
是处于正确的或不正确的零位置)。
把按钮A 和 B 同时按下至少2秒,然后释放
(第二个计数器指针转了360度
—校正模式被激活)。
调整第二个计数器指针:
单个步骤—按A1x短
连续—按A 长
调整下一个指针—按B
调整1/10的第二个计数器指针(6h位置):
单个步骤—按A 1x短
连续—按A 长
调整下一个指针—按B
调整分钟计数器(9h位置):
单个步骤—按A 1x短
连续—按A 长
把表冠放回位置
I。
(终止计时码表手调整(可随时进行)。
A
B
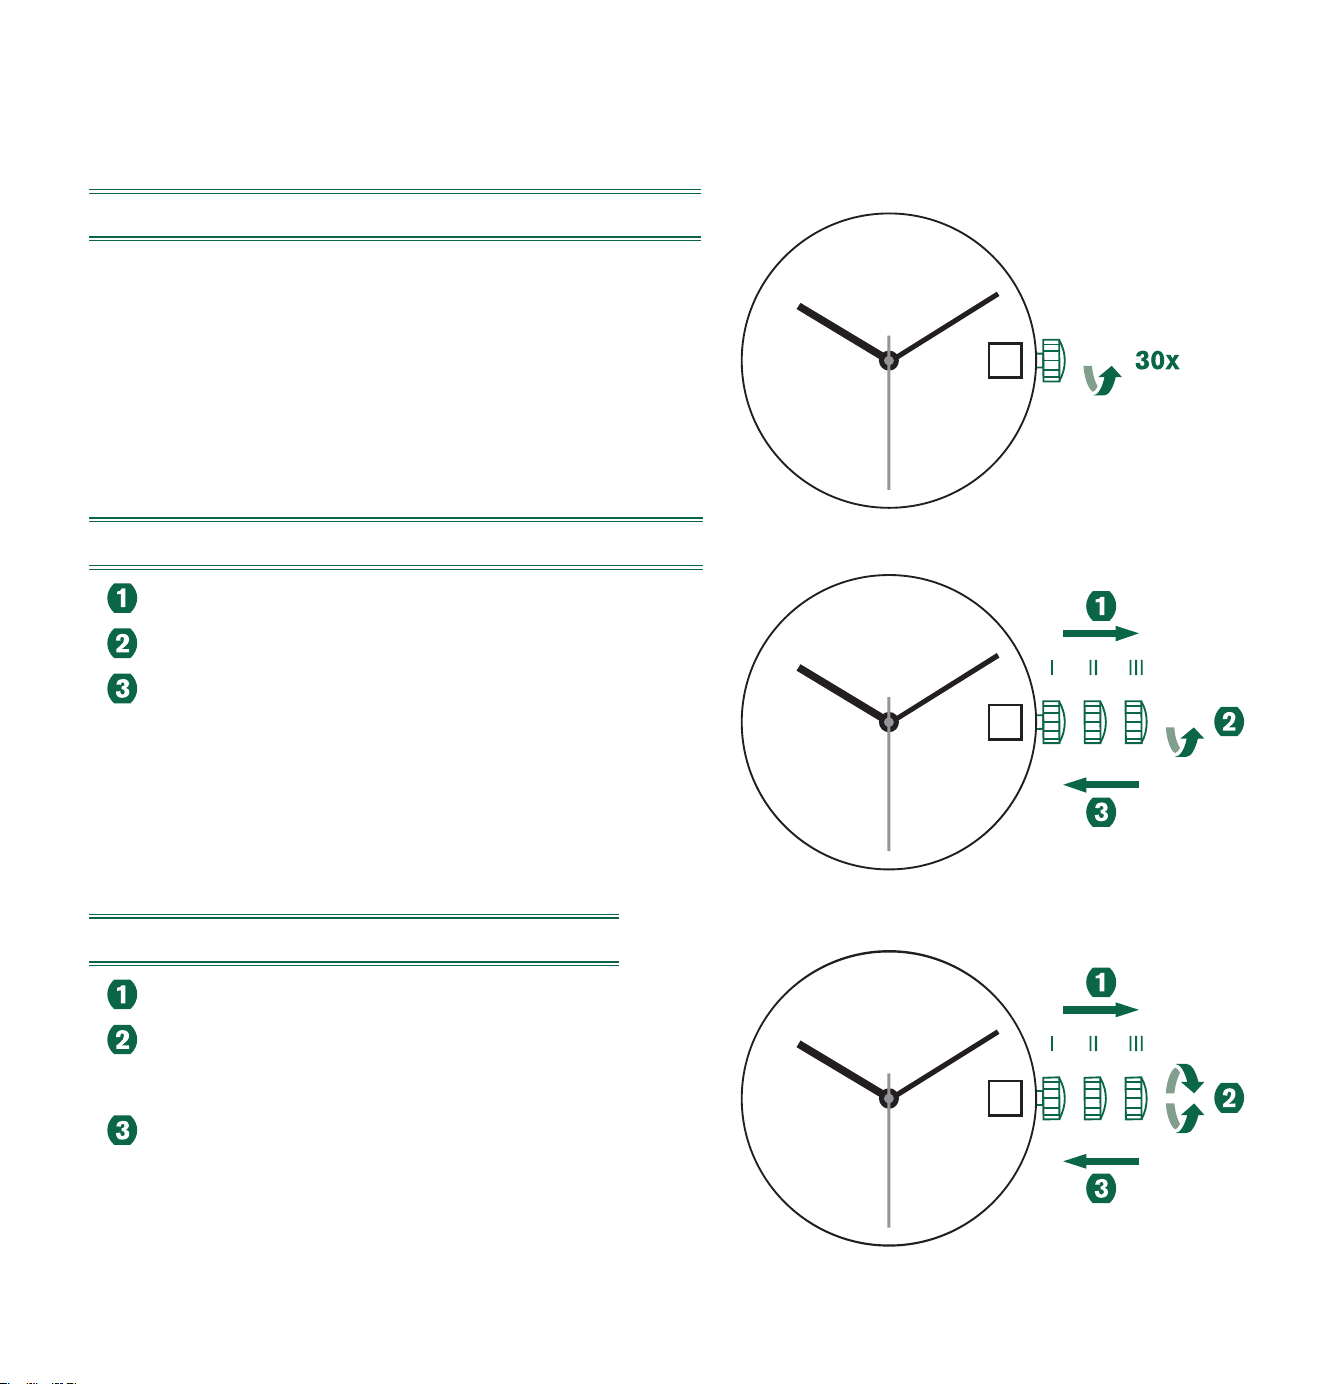
216
ARGOMATIC型号R150
停走时上链
通过将表冠顺时针旋转约30次即可恢复全部动力储备。
日期的快速更正
将表冠拔出到位置II。(手表仍然运行。)
逆时针转动表冠,直到正确的时间出现。
将表冠推回到位置 I。
设置时间
将表冠拉出到位置 III。(手表停止。)
转动表冠直到显示当前的时间
(请留意24小时制)。
将表冠推回到位置I。
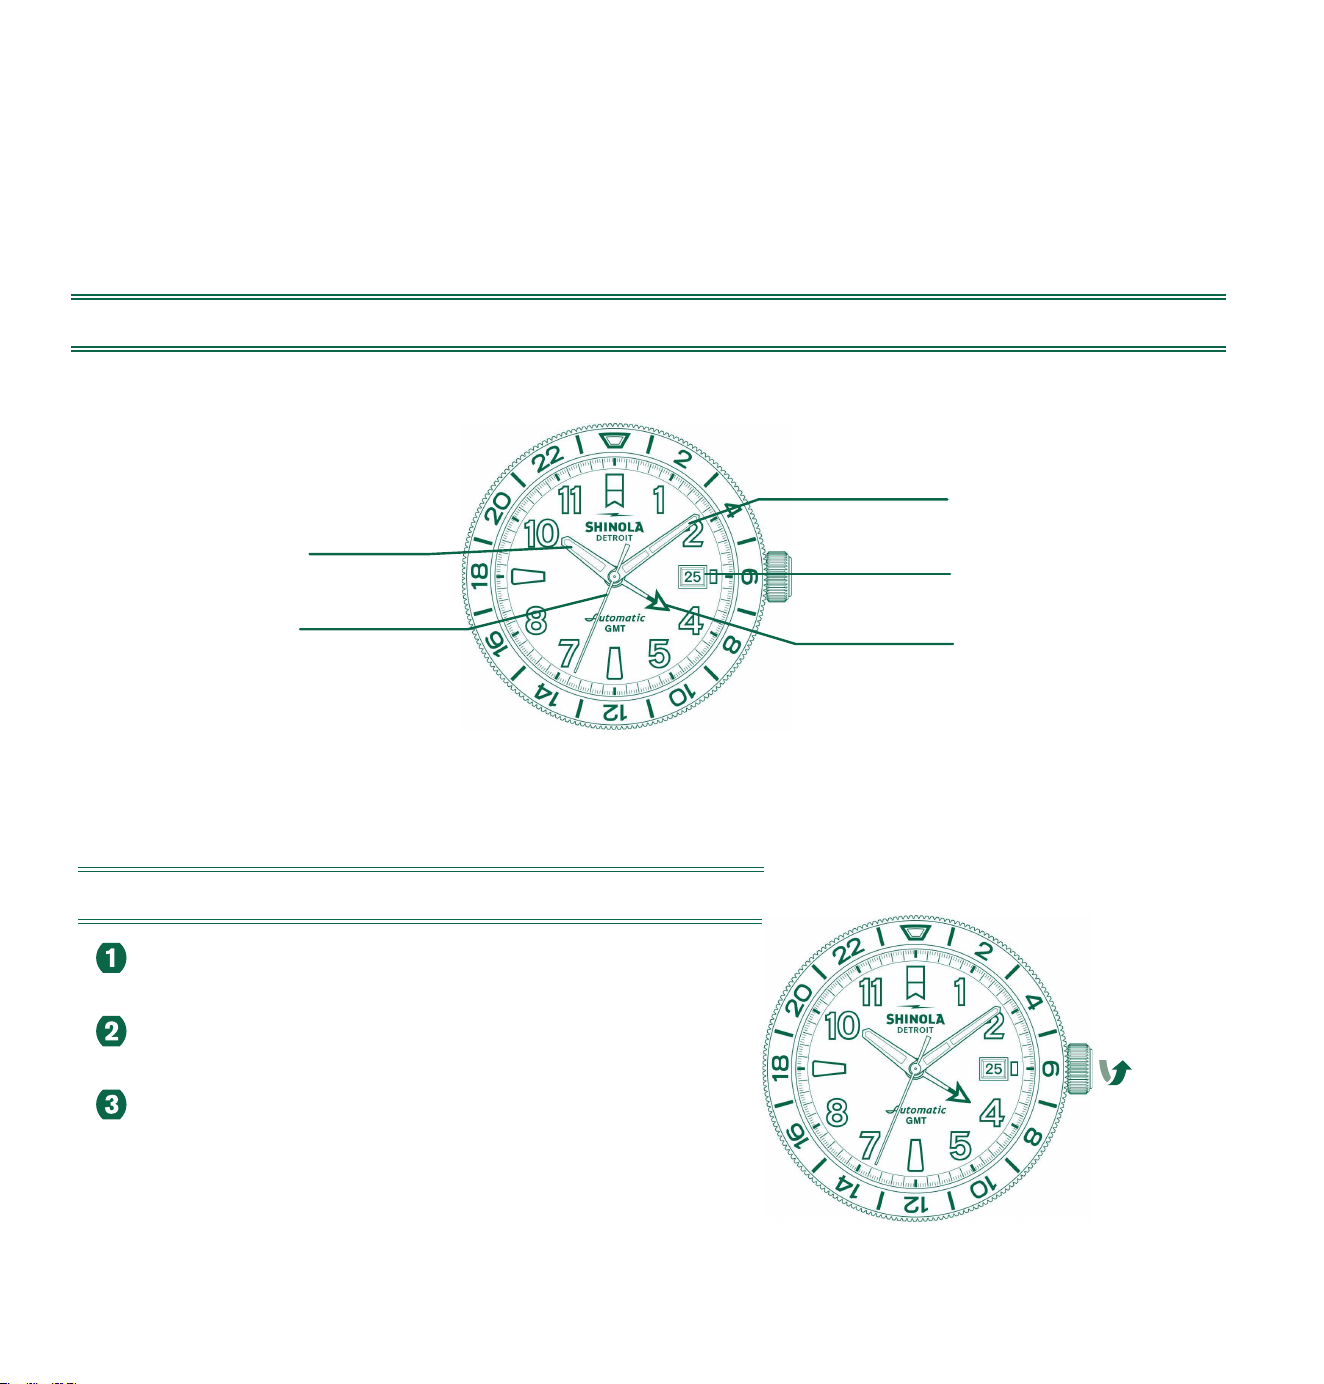
217
自动腕表型号SW330-2
如果您的腕表配有旋入式表冠,则必须首先卸下表冠,再调整任何设置。请参考第5页的
表冠功能。
显示表盘和控制按键说明
时针
秒针
分针
日期
GMT指针
停走时上链
逆时针旋转表冠,直至其进入位置I。
顺时针旋转表冠30至35次,以恢复全部动力储备。
对着表壳按压表冠,并轻轻顺时针旋转表冠,直至
其回到起始位置锁定。
30x - 35x
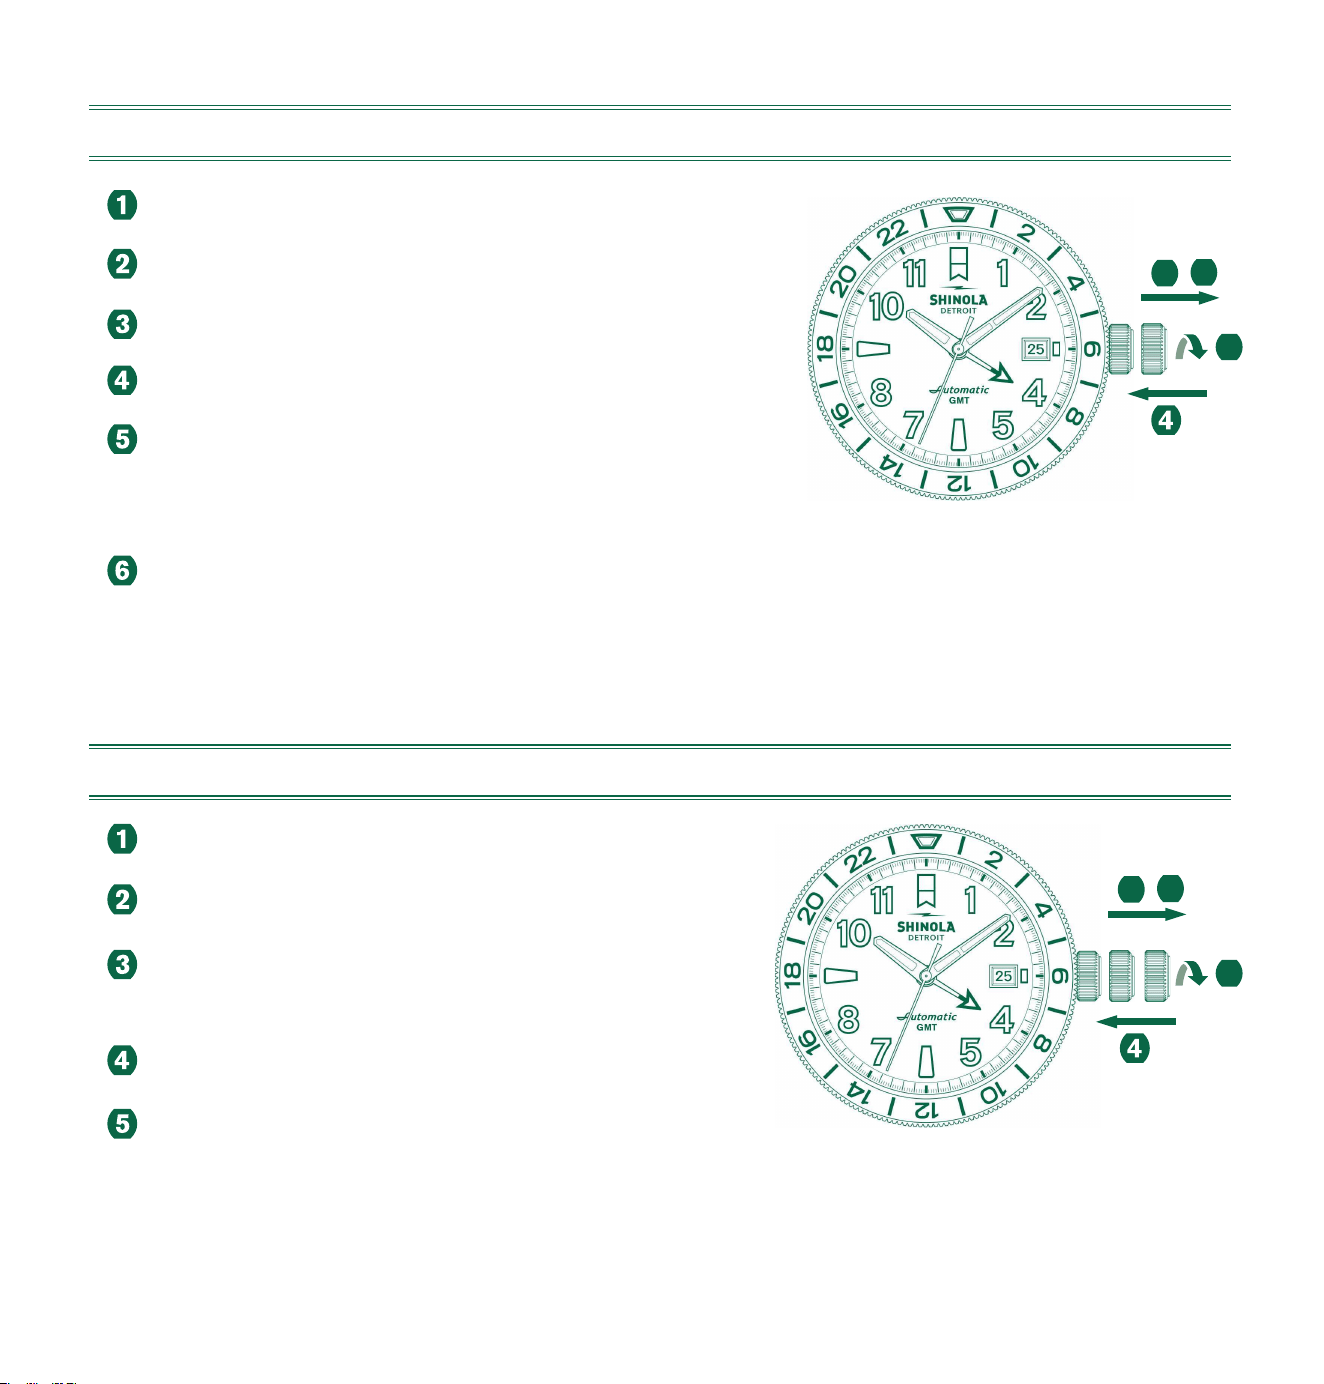
218
设置日期(快捷模式)
拧松表冠至位置I。
将表冠拔起至位置II(腕表仍在运转)。
逆时针旋转表冠,直至出现正确日期。
将表冠推回位置I。
'在晚上9点至凌晨3点设置日期,
请按步骤1至步骤3依序操作,
但务必将日期设为次日日期。
请记得重新锁定表冠。只需对着表壳按压表冠,直至
螺丝扣合,然后顺时针拧紧表冠即可。
设置时间
拧松表冠至位置I。
将表冠拔起至位置III(腕表已停走)。
逆时针旋转表冠,直至显示出当前时间
(请留意24小时制)。
将表冠推回位置II。
请记得重新锁定表冠。
如何锁定,只需对着表壳按压表冠,直至螺丝扣合,
然后顺时针拧紧表冠即可。
III
3
1 2
II IIII
3
1
2

219
设置GMT时间
拧松表冠至位置I。
将表冠拔起至位置II(腕表仍在运转)。
顺时针旋转表冠,直至显示出当前GMT时间
(请留意24小时制)。
将表冠推回位置I。
请记得重新锁定表冠。
如何锁定,只需对着表壳按压表冠,直至螺丝扣合,
然后顺时针拧紧表冠即可。
请注意:
* GMT指针需与时针同步。
在任一小时刚一开头时把GMT设置调好,显示
GMT时间会更精确。
II IIII
3
1
2
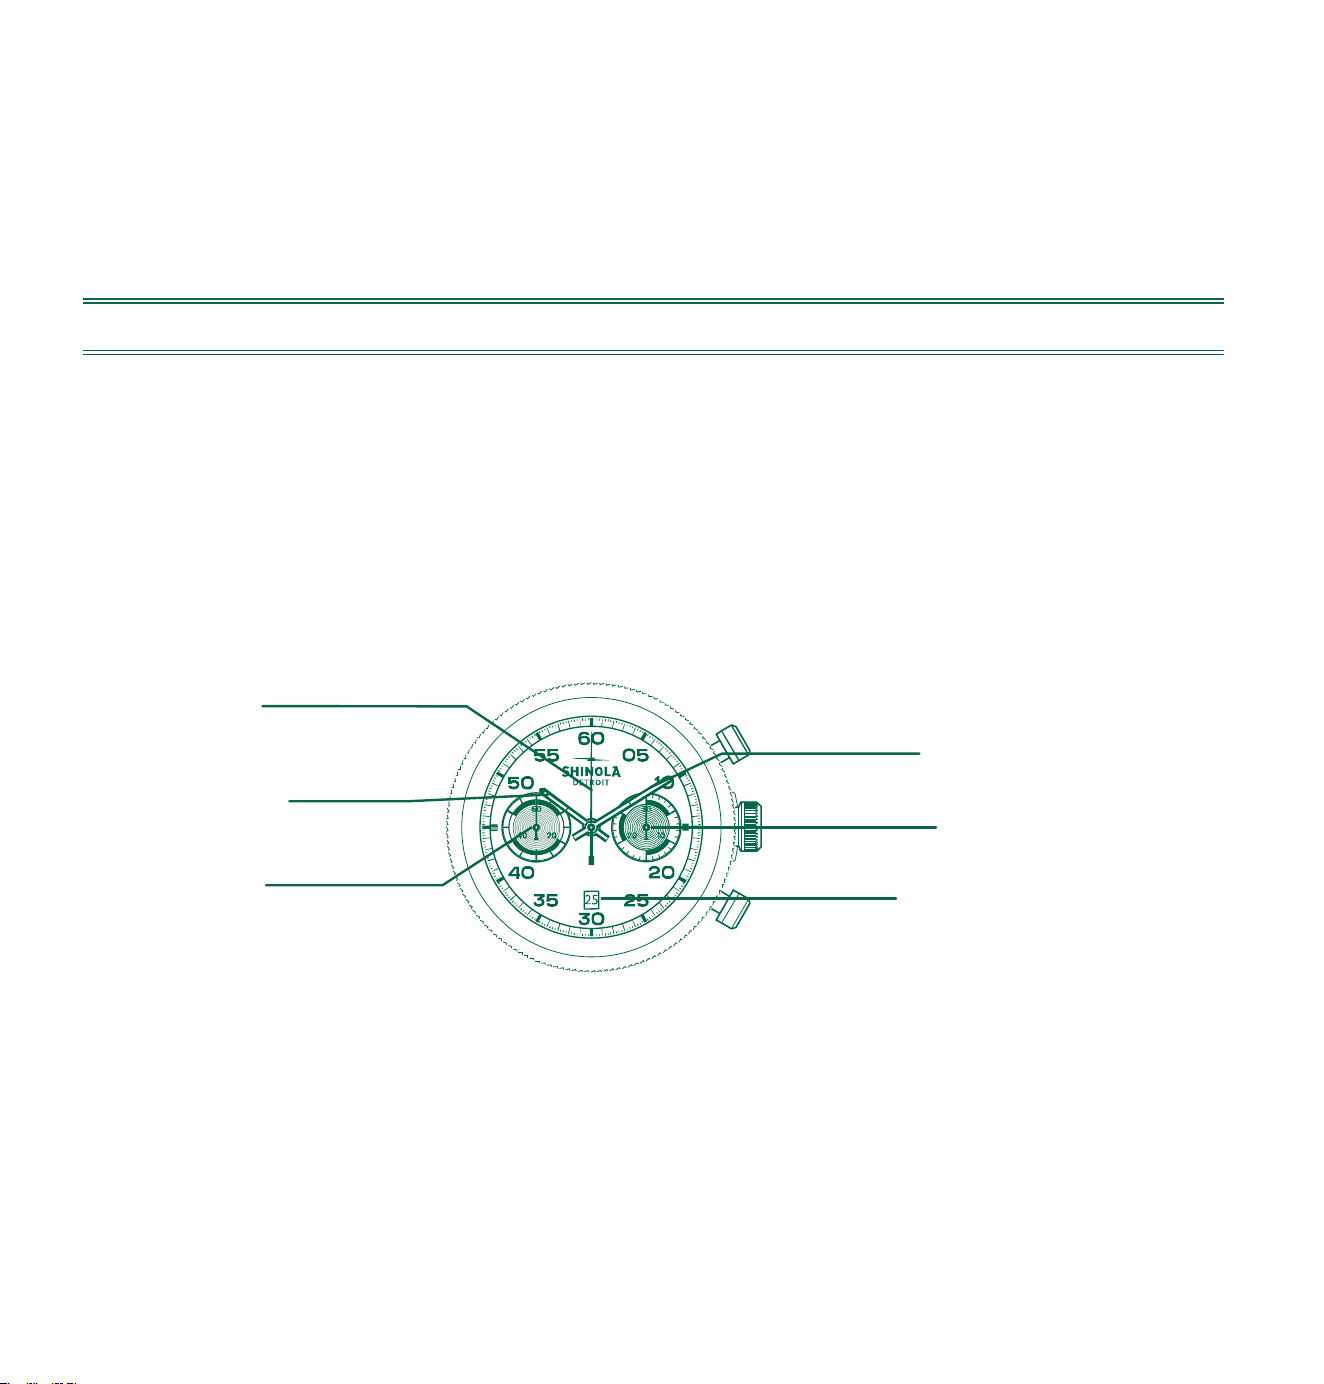
220
自动腕表型号SW510 BH A
如果您的腕表配有旋入式表冠,则必须首先卸下表冠,再调整任何设置。请参考第5页的
表冠功能。
显示表盘和控制按键说明
请注意:
使用计时腕表功能之前,请确保:
•表冠处于正常锁定位置(起始位置)
•两根指针处于起始位置。
秒表
时针
秒针
分针
30分计时器
日期
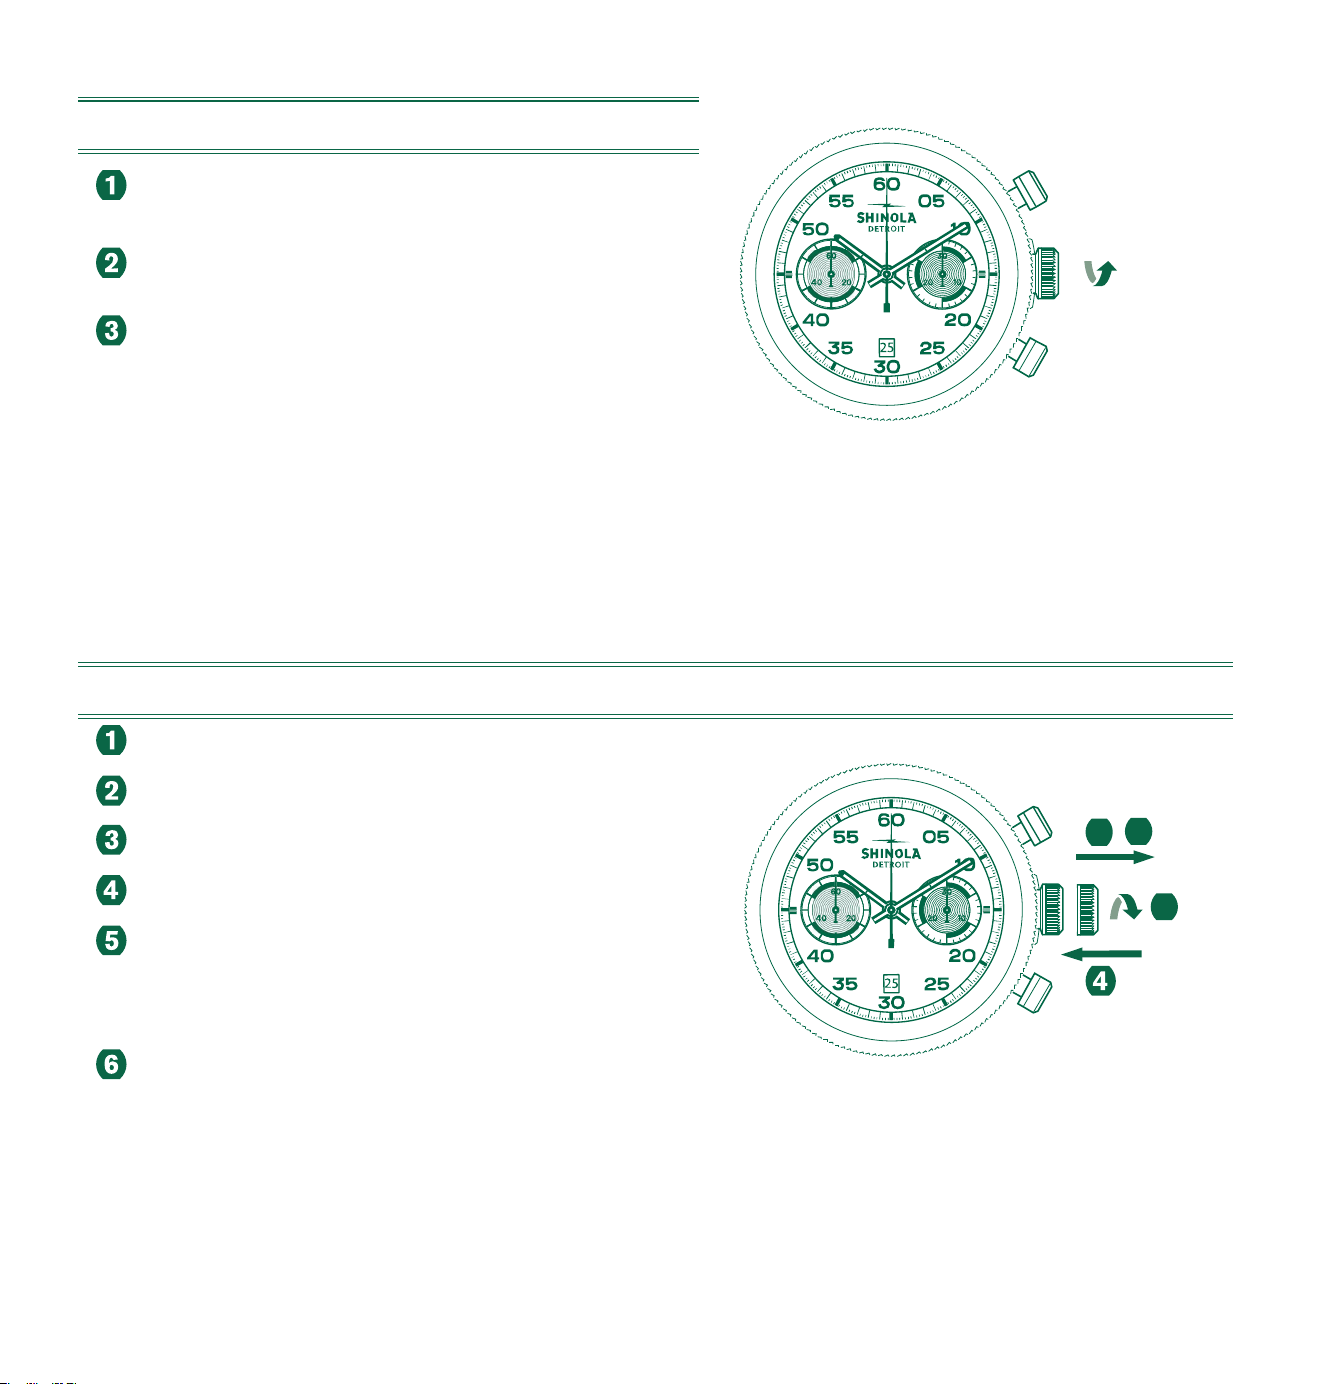
221
停走时上链
逆时针旋转表冠,直至其进入位置I。
顺时针旋转表冠30至35次,以恢复全部动力储
备。
对着表壳按压表冠,并轻轻顺时针旋转表冠,直
至其回到起始位置锁定
设置日期(快捷模式)
拧松表冠至位置I。
将表冠拔起至位置II(腕表仍在运转)。
逆时针旋转表冠,直至出现正确日期。
将表冠按压回位置I。
在晚上9点至凌晨3点设置日期,
请按步骤1至步骤3依序操作,
但务必将日期设为次日日期。
请记得重新锁定表冠。只需对着表壳按压表冠,
直至螺丝扣合,然后顺时针拧紧表冠即可。
III
3
1
2
30x - 35x
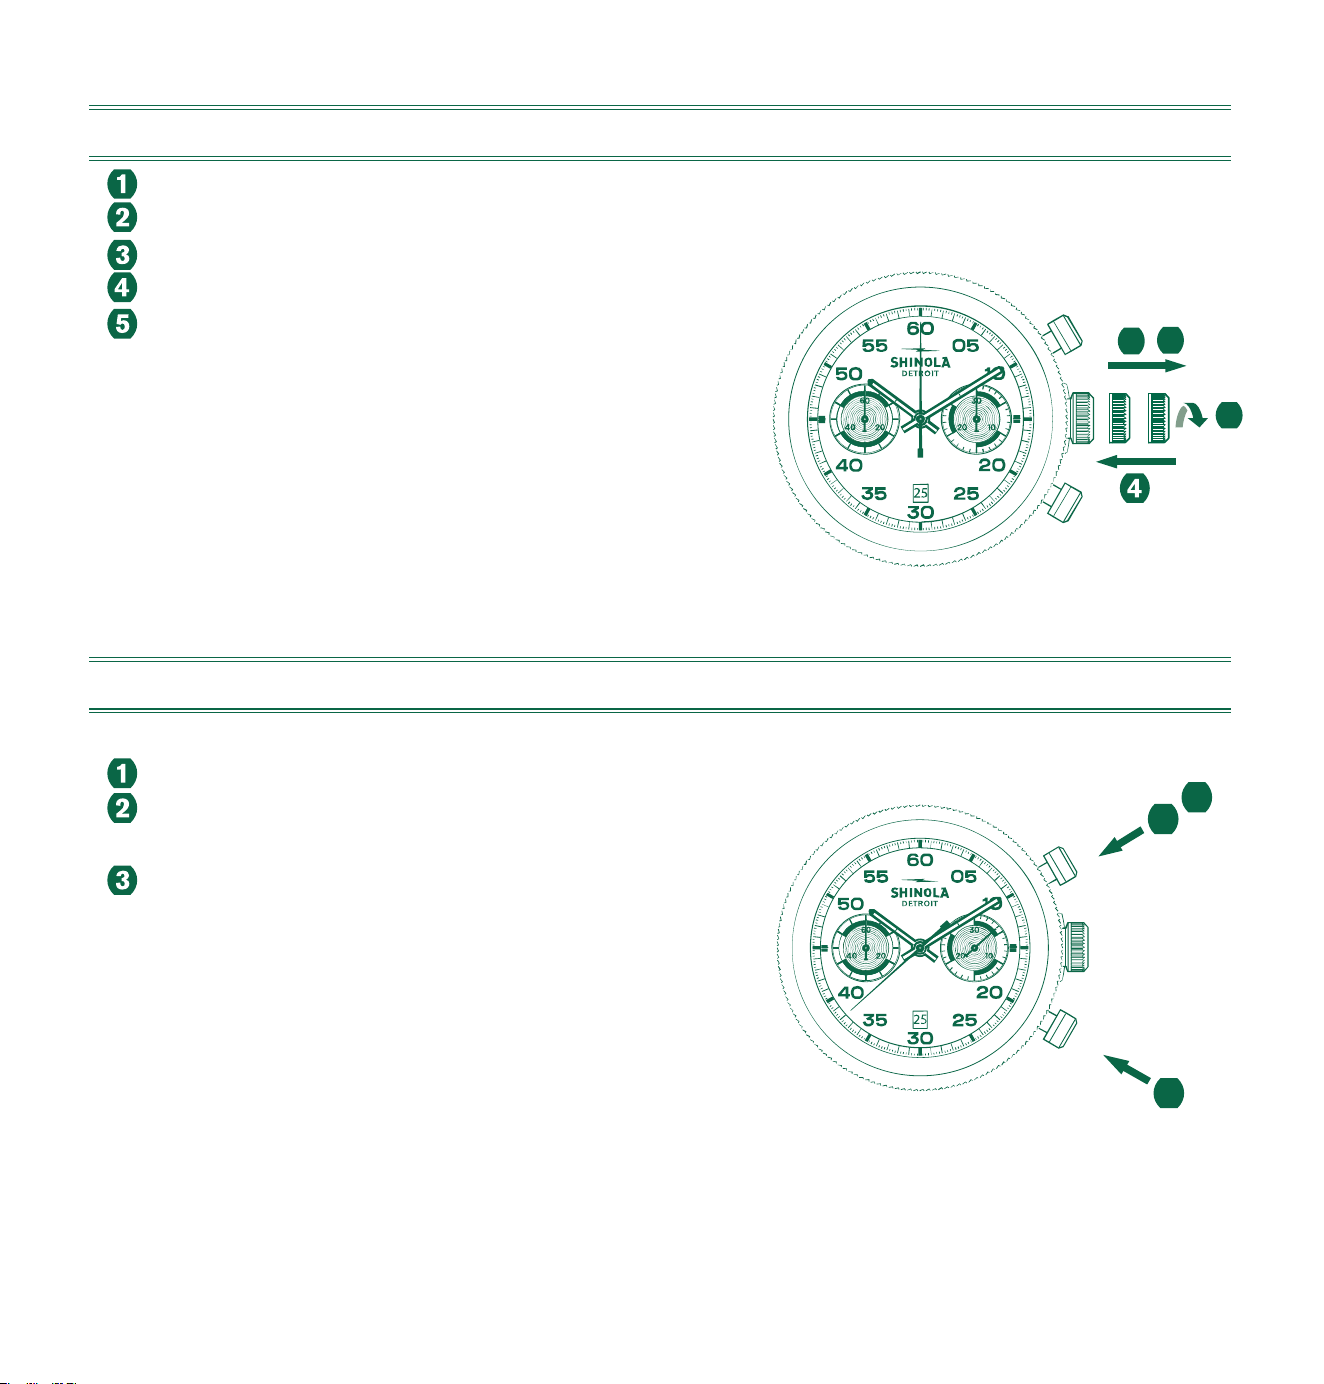
222
基本功能(开始/停止/重置)
示例
开始:按下按钮A。
停止:若需停止计时,再次按下按钮A,并读取两个
计时器数值,如4分/38秒。
回归起始位置:按下按钮B。(两根计时指针将重置
到起始位置。)
1
2
3
A
B
设置时间
拧松表冠至位置I。
将表冠拔起至位置III(腕表已停走)。
逆时针旋转表冠,直至显示当前时间(请留意24小时制)。
将表冠按压回位置I。
请记得重新锁定表冠。只需对着表壳按压表冠,
直至螺丝扣合,然后顺时针拧紧表冠即可。
II IIII
3
1
2
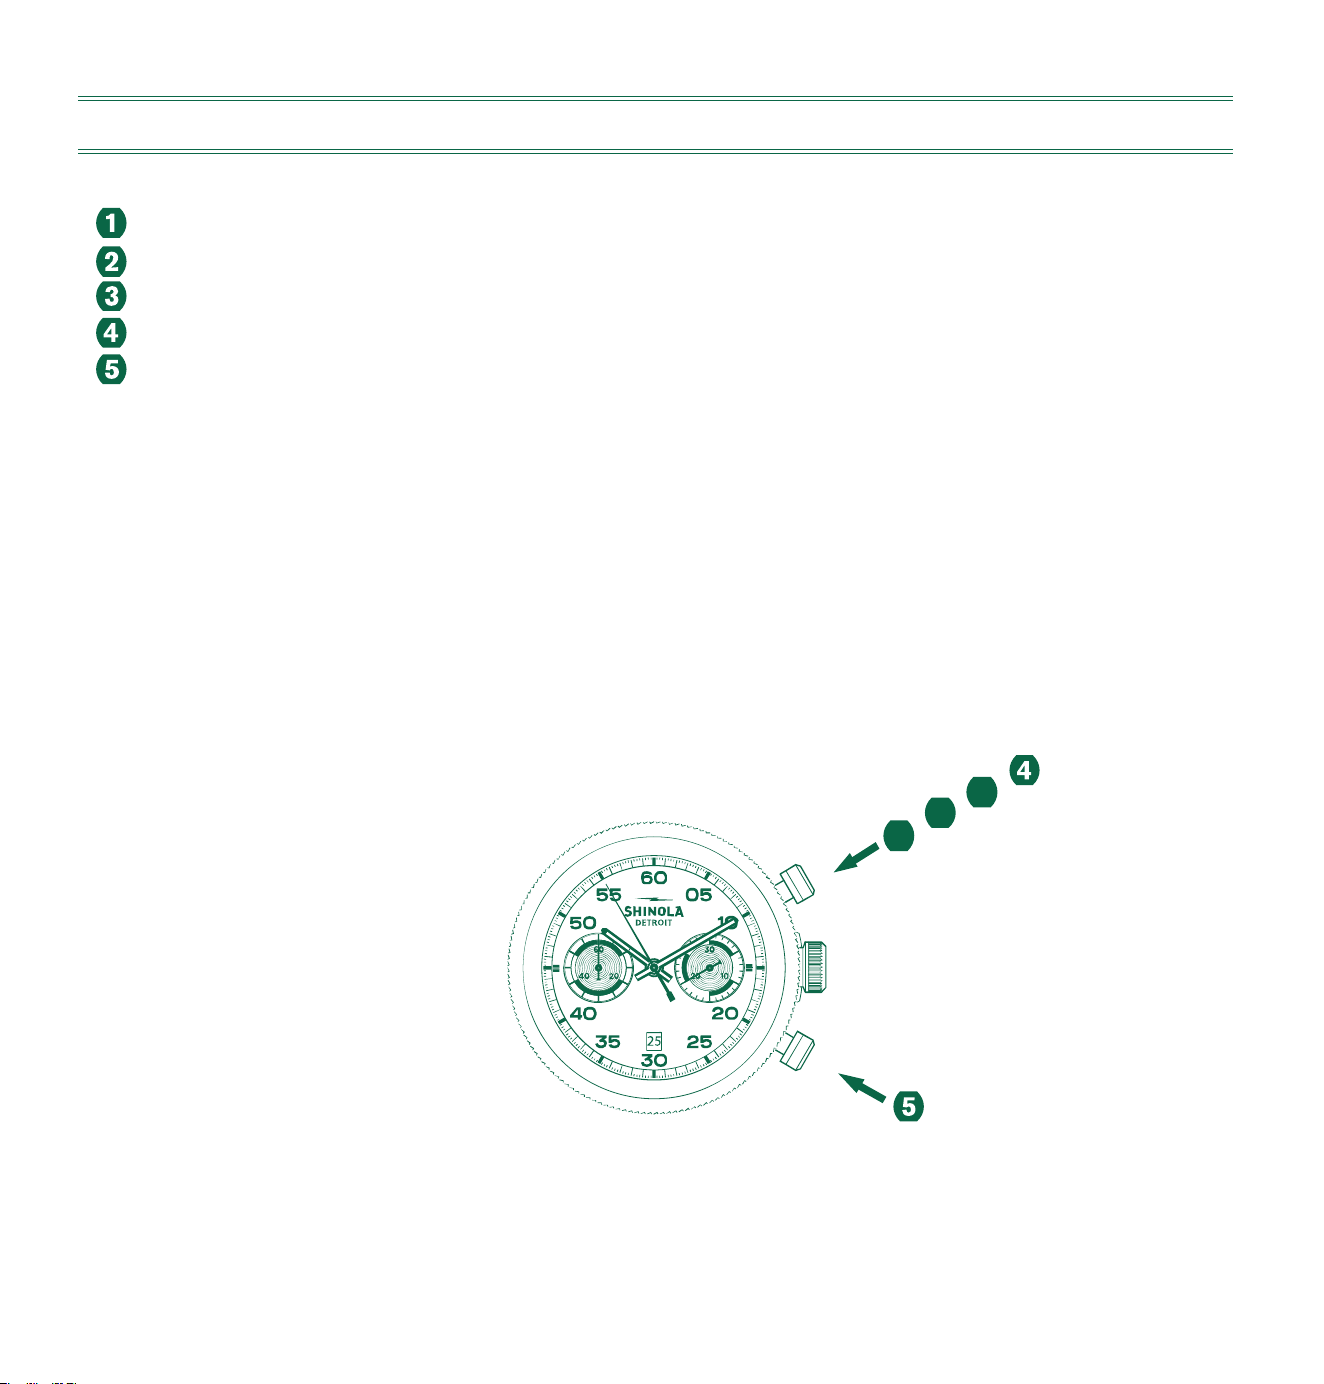
223
累计计时
示例
开始:按下按钮A。
停止:若需停止计时,再次按下按钮A,并读取两个计时器数值,如15分5秒。
重新开始:按下按钮A恢复计时。
*停止:按下按钮A停止计时,并读取数值,如5分50秒。累计时间=20分55秒
重置:按下按钮B将两根计时指针重置到起始位置。
*请注意:从第4步开始,可以按下按钮A来继续累计计时(重新开始/停止、重新开始/停止……)
1
2
3
A
B
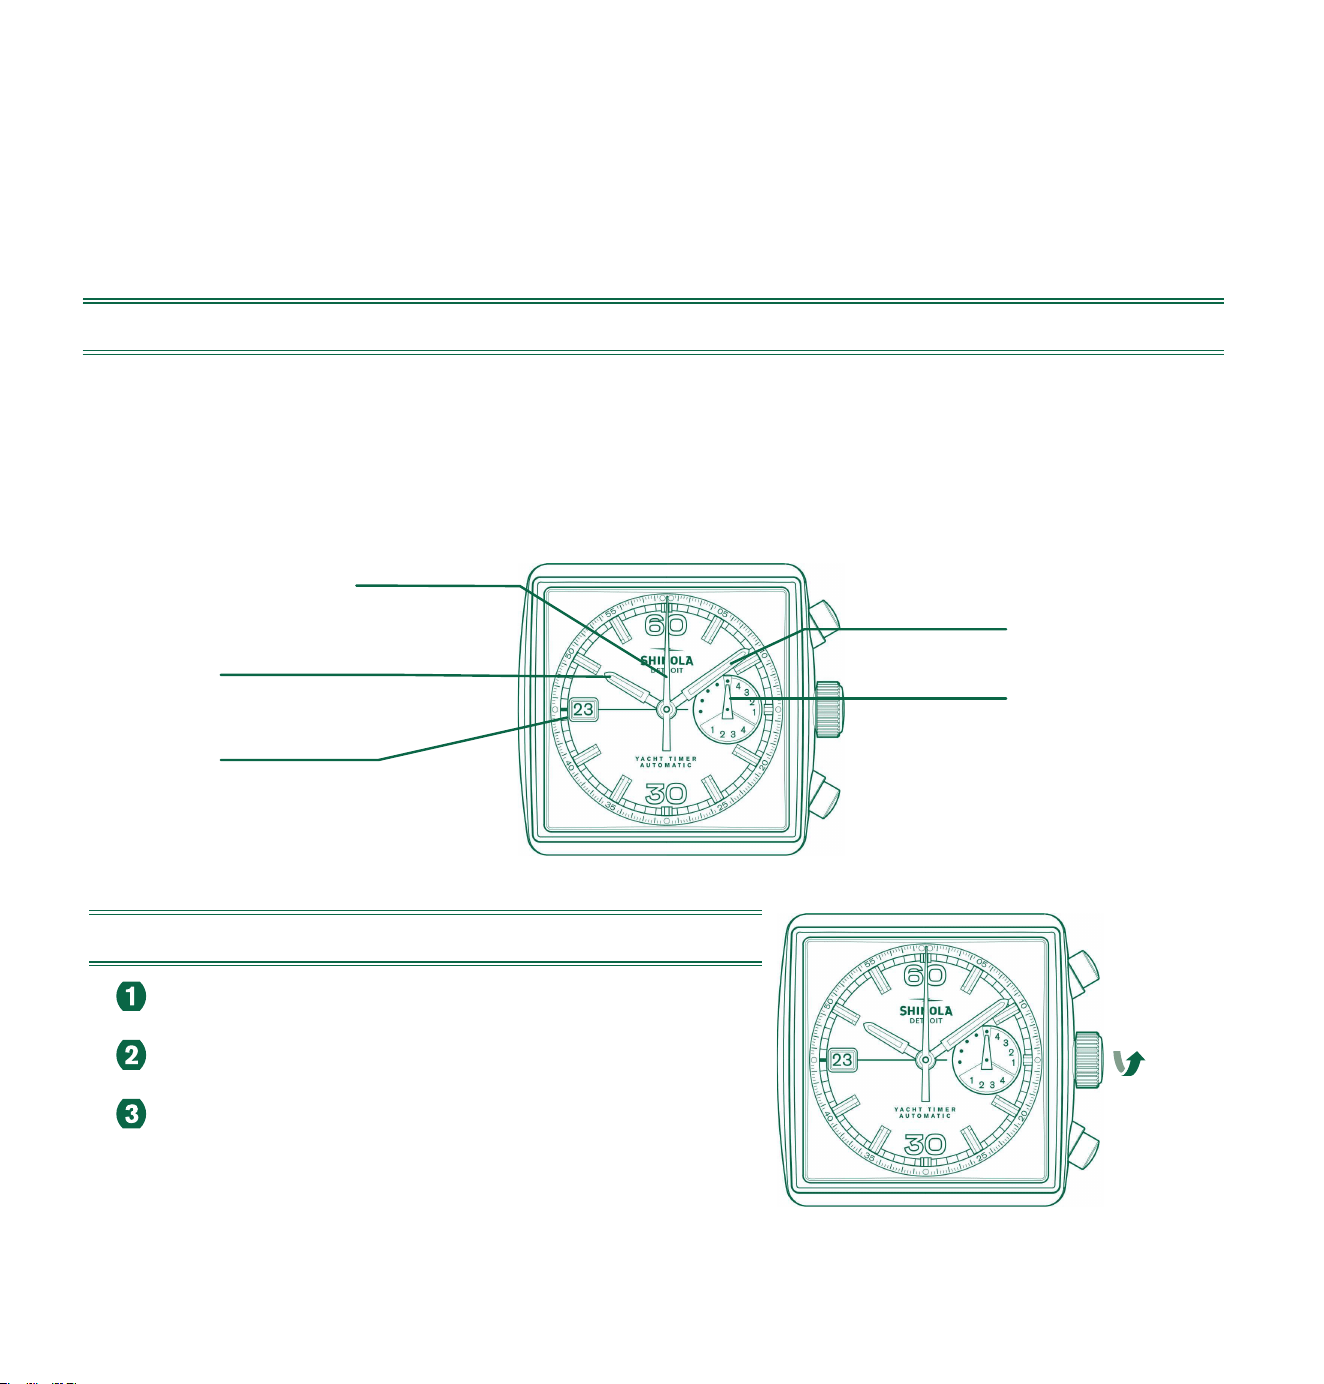
224
自动腕表型号SW511 BH C
如果您的腕表配有旋入式表冠,则必须首先卸下表冠,再调整任何设置。请参考第5页的
表冠功能。
显示表盘和控制按键说明
请注意:
使用计时腕表功能之前,请确保:
•表冠处于正常锁定位置(起始位置)
•大小两根计时指针处于起始位置
游艇倒计时腕表-
大计时
秒针
时针
日期
分针
游艇倒计时腕表-
小计时
分针
停走时上链
逆时针旋转表冠,直至其进入位置I。
顺时针旋转表冠30至35次,以恢复全部动力储备。
对着表壳按压表冠,并轻轻顺时针旋转表冠,直至
其回到起始位置锁定。
30x - 35x
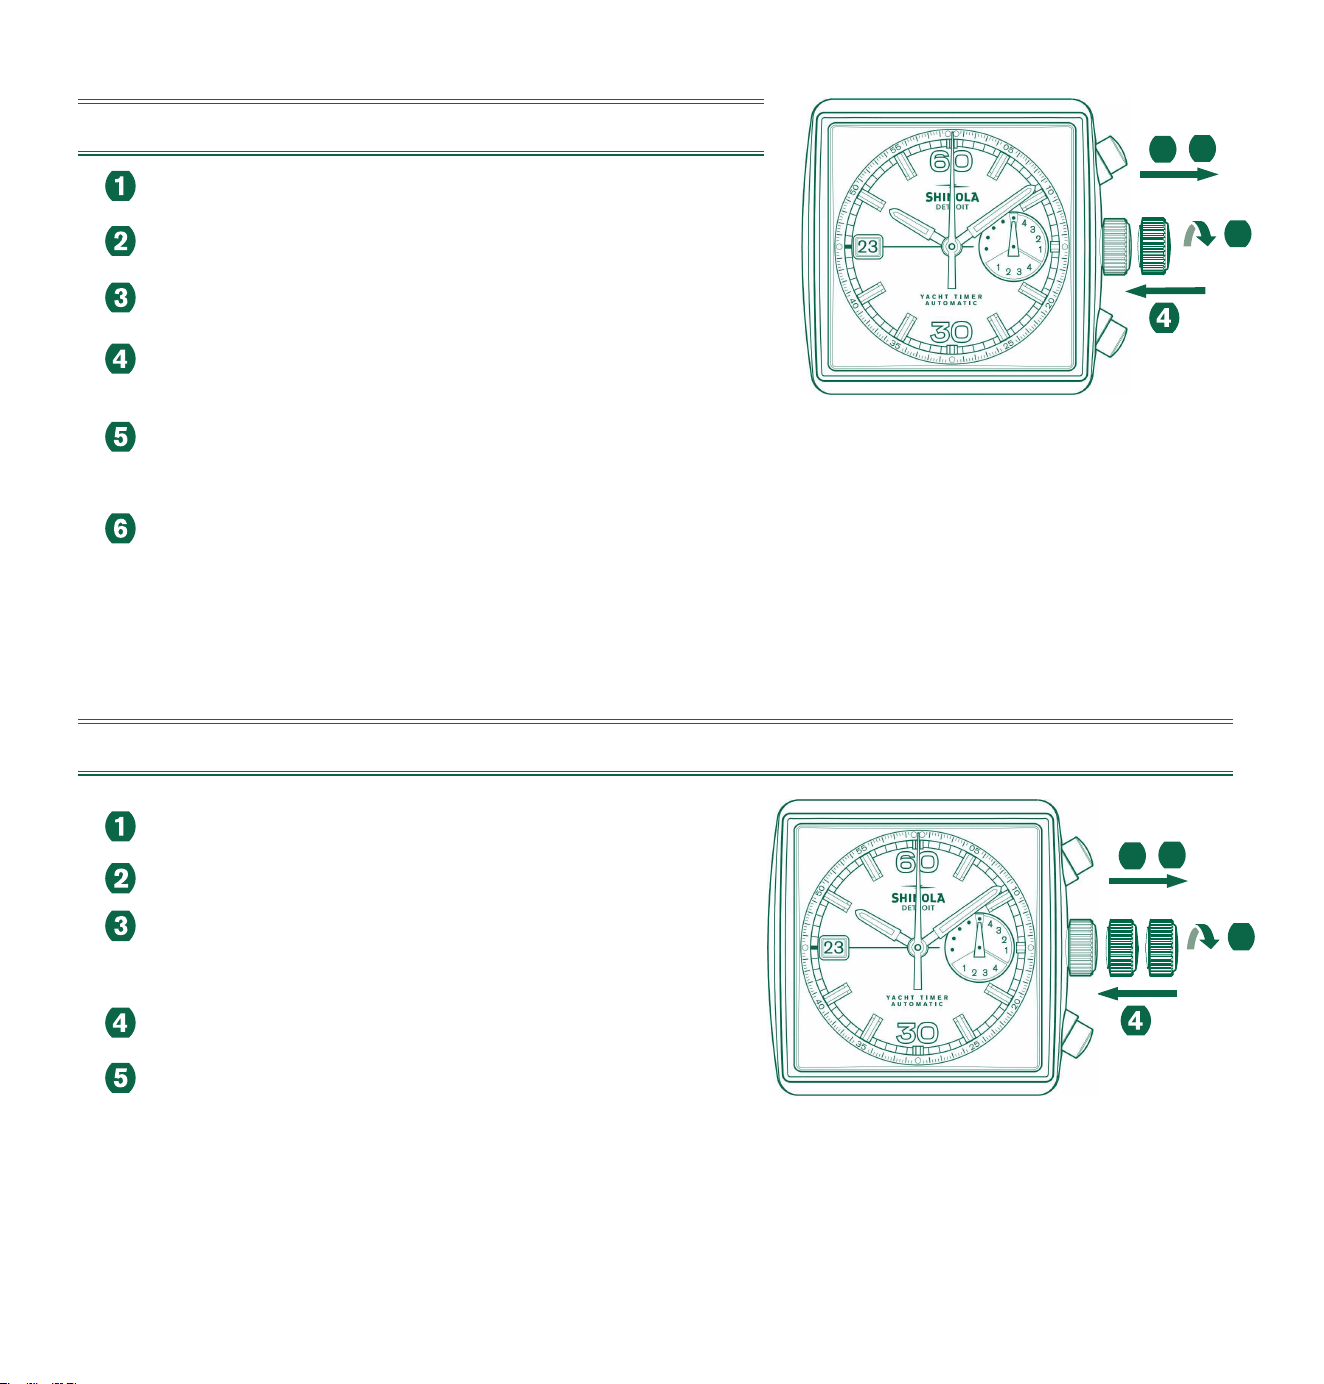
225
设置时间
拧松表冠至位置
I
。
将表冠拔起至位置
III
(腕表已停走)。
逆时针旋转表冠,直至显示出当前时间
(请留意24小时制)。
将表冠推回位置
I
。
请记得重新锁定表冠。
如何锁定,只需对着表壳按压表冠,直至螺丝扣
合,然后顺时针拧紧表冠即可。
III
3
1 2
II IIII
3
1
2
设置日期(快捷模式)
拧松表冠至位置I。
将表冠拔起至位置
II
(腕表仍在运转)。
逆时针旋转表冠,直至出现正确日期。
将表冠推回位置
I
。
在晚上9点至凌晨3点设置日期,请按步骤1至步骤3依序操作,
但务必将日期设为次日日期。
请记得重新锁定表冠。如何锁定,只需对着表壳按
压表冠,直至螺丝扣合,然后顺时针拧紧表冠即可。
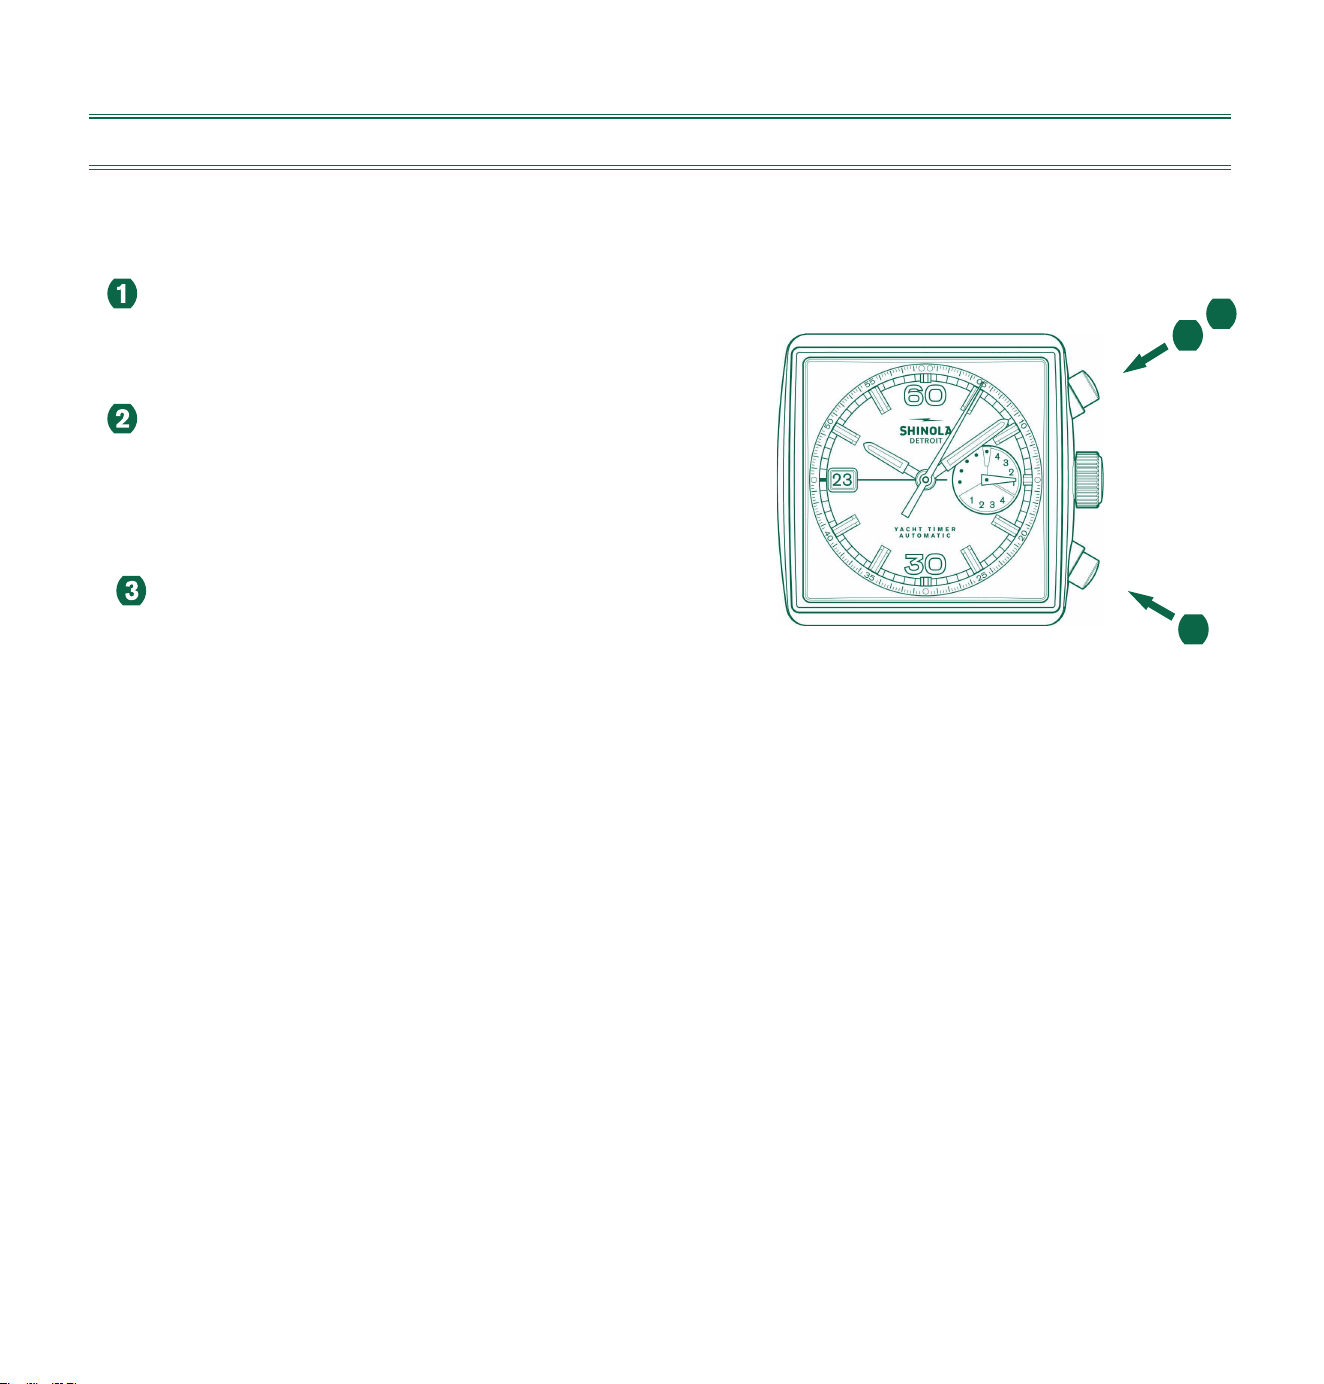
226
基本功能(开始/停止/重置)
游艇赛
开始:听到比赛开始信号,按下按钮A。这样即可启
动五分钟的比赛倒计时。
停止:若需停止计时,再次按下按钮A,
并读取两个计时器的数值,如:
4分/5秒
回归起始位置:按下按钮B。
(两根计时指针将重置到起始位置。)
*请注意:
- 5分钟的预备时间(即第一个5分钟的倒计时)没有结束,
切勿越过起航线,以免抢航。
- 若不慎抢航,请重设计时器(按下按钮A,然后再按按钮B),
重新开始(按钮A)。
1
2
3
A
B
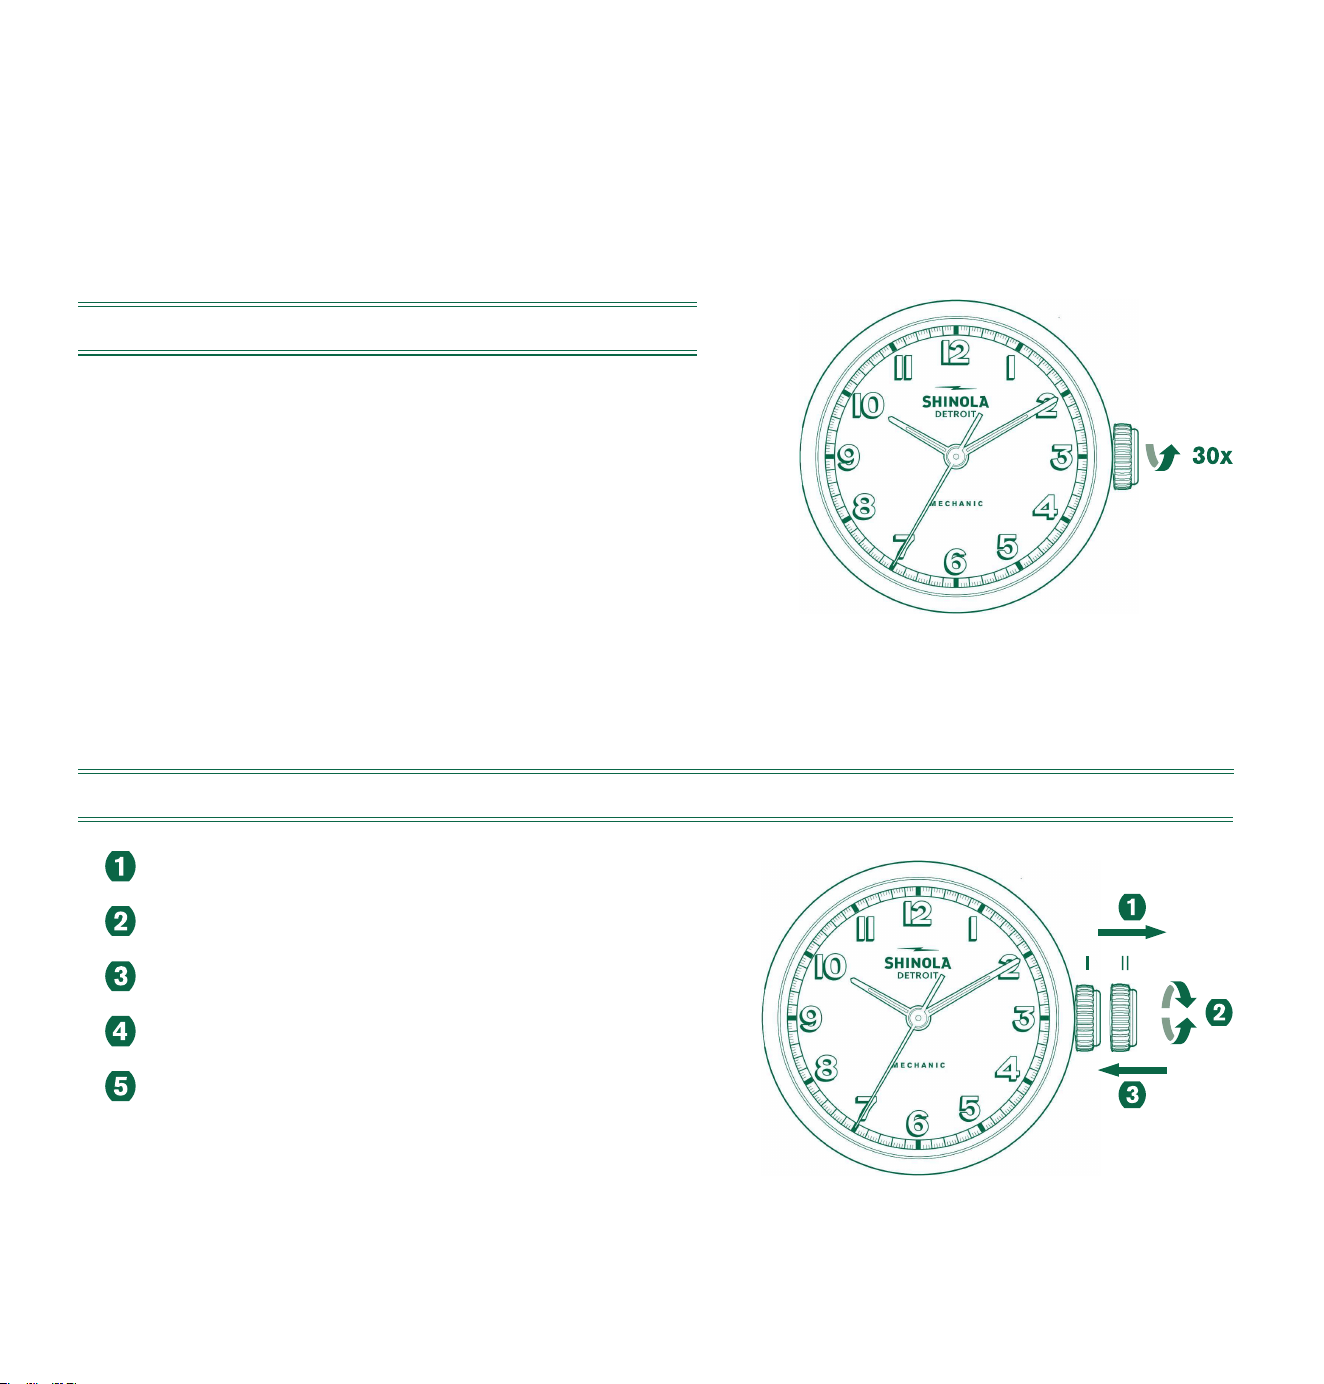
227
机械腕表型号SW210-1
如果您的腕表配的是旋入式表冠,则调整任何设置之前,必须先卸下表冠。
请参考第5页的表冠功能。
停走时上链
要恢复最大动力储备,将表冠顺时针旋转30次左右即可。
请注意:
- 旋转20次之后,须放缓上链速度。
上链时须留意表的阻力。
感到阻力之后,须停止上链。
- 切勿手动上链过度,以免腕表运行失准。
设置时间
旋入式表冠,将其拧松至位置I。
将表冠拔起至位置II(腕表已停走)。
旋转表冠,直至显示出当前时间。
将表冠推回位置I。
若是旋入式表冠,记得重新锁定表冠。
如何锁定,只需对着表壳按压表冠,直至螺丝扣合,
然后顺时针拧紧表冠即可。
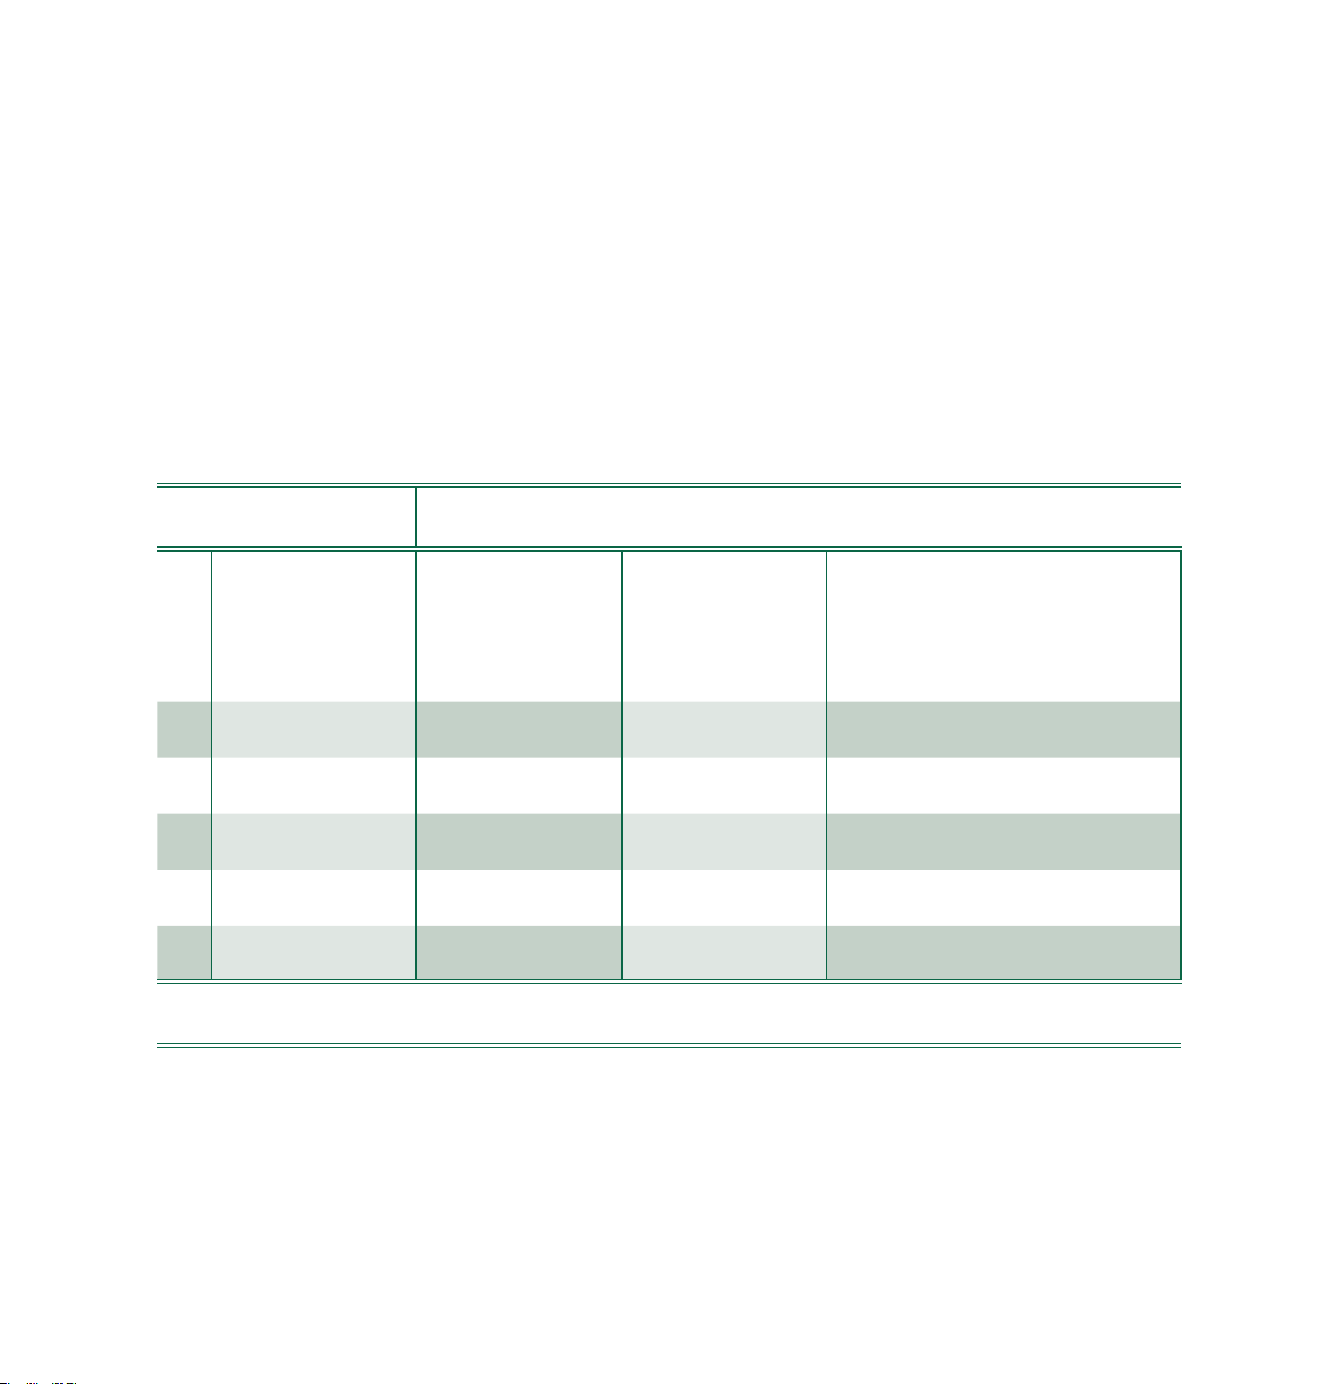
228
防水性
所有Shinola钟表被设计的最低防水等级为3大气压(100英尺/30米)
手表的防水性能保护机芯免受灰尘,湿气,以及当钟表被浸入水中可能会对机芯造成的
损害。请参阅各种接触水的程度建议指南的图表。
当钟表与水接触时,不要试图调整表冠的位置。水可能会进入造成机芯损坏的情况。对
于带有拧紧表冠的钟表,务必确保表冠在与水接触之前处于正确的位置并完全锁定。对
于具有计时功能的钟表,请勿将计时码表放在水下,因为水可能会从外壳里泄漏并导致
机芯损坏。
指示 水相关的用途
防水性特征
浅喷,汗,小
雨等
游泳等 浮潜(不使用氧气瓶潜水)
1
3 大气压 可以 不可以 不可以
2
5 大气压 可以 不可以 不可以
3
10 大气压 可以 可以 不可以
4
20 大气压 可以 可以 可以
5
30 大气压 可以 可以 可以
始终将表冠设置到正常位置的标志,并完全拧紧螺丝锁。

229
养护与预防措施
Shinola的每一块手表都按照最高的标准进行设计和制造。不同于其它机械物体,手表
不会停止运行。为了确保您的Shinola手表具有最佳性能和更长的寿命,请查阅养护
和预防措施简要指南。
养护
• 只可用软布和清水清洁手表。勿将手表浸入水中,除非手表具有防水特性。
• 在接触盐水以后,先用自来水冲洗手表然后用软布将手表擦干。
• 金属表带应该定期清洁。先用蘸了淡肥皂水的软刷清洁,然后用软布彻底擦干。
• 我们建议每18–24个月给手表做一次养护,以确保更长的使用寿命以及无故障运
行。
预防措施
手表是由技术娴熟的钟表匠装配零部件和组件,而构成的复杂集合体。某些行为或环境
状况可能会损坏或妨碍手表,使其无法以最佳状态运行。
切记避免以下情况:极热或极冷的环境,以及长时间受阳光直接照射,暴露于超过手表
防水等级的潮湿环境。(参见表壳背面和图表)。
不要将手表与能产生磁场的家用电器放在一起,例如电视机和音响。另外,我们建议
避免手表接触其它强电场或静电,以免妨碍手表的机械装置。此外,切记避免强烈的
震动或碰撞。
省电机制
为了在不使用的情况下延长手表的电池寿命,轻轻拨出活动柄/表冠直至感觉到滴
答声。这将降低70%的电量消耗。请注意,该柄/表冠位置还用于进行快速
“时间设定”。如果您的手表具有螺旋表冠,请按照本手册开头部分的说明在完
全拨出表冠前将其松开。
230 231
电池寿命结束(
EOL
)
您的手表配有指示电量较低的功能。当电池到达该阶段时,秒针一次会跳4步,每4秒
钟跳一次。这样可降低电量消耗,同时依然正确地显示时间,并让您知道应该更换电
池。

230 231
石英腕表有限终身保修
Shinola的每一块腕表均在我们的底特律工厂组装,结合了精巧的手工艺和最先进的技
术,确保腕表既精致美观,又持久耐用。我们对于自己高品质的制造标准充满信心,因
此Shinola的精选腕表将在有限终身保修范围内享受终身保修服务。这样的保证领先于
行业,也是我们核心价值观的证明。
SHINOLA石英腕表有限终身服务保修条款和条件
请注册您的产品,以便获取SHINOLA石英腕表保修服务资格。此
保修服务不可转移,且根据其条款可能会作废。
1.Shinola石英腕表有限终身服务保修覆盖所有原创系列腕表:Birdy、Caneld、
Cass、Guardian、Omaha、Runwell、Vinton、Duck。
此保障不包含Detrola腕表或Shinola自动腕表。
Shinola石英腕表有限终身服务保修覆盖腕表自然使用寿命内出现的材料缺陷或工
艺缺陷。
2.如果在有限终身保修范围内,出现由于工艺问题导致的缺陷,我们将为您免费维修任
何缺陷零件(除以下零件之外),或免费更换腕表。
3.保修除外项目
a. 所有的表带,包括表链
b. 超过自然机芯寿命的机芯(石英机芯寿命为7年)*
c. 电池
d. 腕表镀膜(PVD镀膜)
e. 因为佩戴不当、缺乏护理、意外或正常磨损导致的损坏
f. 遇水损坏
g. 按购买时状况出售的二手古董腕表
h.翻新腕表

232 233
*自最初购买之日起或自Shinola最近一次“石英腕表服务”日期起的7年,以较晚日期为准。
有关提交维修和服务申请的更多信息,请参阅Shinola帮助台的“维修和服务”部分-链接。
4.出现以下情况时,此保修作废:
a.根据Shinola酌情判定,腕表因意外、疏忽或人为原因损坏。
b.腕表电池由除Shinola认证维修中心外的其他任何服务提供商更换。
c.腕表由除Shinola之外的其他任何服务提供商进行维修或雕刻。
5.如果您尚未与Shinola注册您的腕表,则此保修服务不适用。
6.如果您的腕表需要整体更换,并且属于此保修范围内,Shinola将为您更换同型号的腕表。
如果相关型号已停产,我们将为您提供风格类似的相同价值腕表。
7.针对此保修范围外的服务,我们将告知您所需维修内容和相应的费用。Shinola仅在您事先
接受此类费用的情况下进行维修,或根据您的要求返还产品。
保修及其他腕表维修申请
若需更换电池,请访问Shinola.com或前往Shinola零售店,并填写维修申请表。您也可以
访问Shinola.com的门店查找页面,寻找离您附近的“授权电池更换中心”。若需保修范围
内的维修服务,请访问Shinola.com或前往Shinola零售店,填写维修申请表。虽然不会导
致保修服务作废,但是由Shinola的授权维修合作伙伴进行的维修和/或维护服务不属于保修
范围,您将承担与此类维修相关的所有费用,Shinola不提供报销。请勿寄送原始包装,否
则不予退还。Shinola强烈建议您为您的包裹投保,并在运输期间妥善保护腕表。Shinola对
于运输过程中的产品遗失或损坏不承担任何负责。针对此保修范围外的服务,服务中心可能
会执行您的服务申请,并根据腕表款式和服务类型收取费用。服务进行之前,我们将告知您
相关费用,并征求您的同意。
上述保修服务和补救措施具有排他性,将代替所有其他明示、暗示或法定的保修、条款或条
件,包括但不限于所有Shinola明确否认的对适销性、特定用途的适用性、准确性、满意质
量、所有权和不侵权担保。无论是基于合同、侵权行为(包括疏忽)、严格产品责任或任何

232 233
我们竭诚为您提供帮助
如果您有任何疑虑或问题,请随时与我们联系。您可以通过三种方式与我们取得联
系。填写我们官网Shinola.com上的联系表格、向我们致电或发送邮件。
周一至周五
东部标准时间早9点至晚5点
customerservice@shinola.com
1.844.SHINOLA
(1.844.744.6652)
其他理论,Shinola对因销售或使用本产品而引起或与之相关的任何形式的附带、后果性、间
接、特殊或惩罚性赔偿或责任概不负责,即使Shinola已被告知此类损害的可能性,即使此处
指定的任何有限补救措施未能达到其本质目的。Shinola的所有责任仅限于根据Shinola的唯一
选择进行更换或维修。但是某些国家/地区、州或省份禁止排除或限制对默示担保或者附带后
果性损害的责任,因此上述限制条款可能对您的适用程度有限。若无法完全排除默示担保,那
么此类保修将仅限于书面保修期限。本保修条款为您提供了特定的法律权利,根据当地法律,
您可能还享有其他权利。您的法定权利不受影响

234 235
自动腕表有限终身保修
Shinola的每一块腕表均在我们的底特律工厂组装,结合了精巧的手工艺和最先进的技术,确
保腕表既精致美观,又持久耐用。我们对于自己高品质的制造标准充满信心,因此Shinola的
精选腕表将在有限终身保修范围内享受终身保修服务。这样的保证领先于行业,也是我们核
心价值观的证明。
Shinola自动腕表有限终身服务保修条款和条件
请注册您的产品,以便获取SHINOLA自动腕表保修服务资格。此保修
服务不可转移,且根据其条款可能会作废。
1.Shinola自动腕表有限终身服务保修覆盖所有原创系列自动腕表:RunwellAutomatic系列
和ShinolaMonster系列。此保障不包含Detrola腕表或Shinola石英腕表。
Shinola自动腕表有限终身服务保修覆盖腕表自然使用寿命内出现的材料缺陷或工艺缺陷。
2.如果在有限终身保修范围内,出现由于工艺问题导致的缺陷,我们将为您免费维修任何缺陷
零件(除以下零件之外),或免费更换腕表。
3.保修除外项目
a.所有的表带,包括表链
b.超过自然机芯寿命的机芯(自动腕表机芯寿命为5年)*
c.腕表镀膜(PVD镀膜)
d.因为佩戴不当、缺乏护理、意外或正常磨损导致的损坏
e.遇水损坏
f.按购买时状况出售的二手古董腕表
g.翻新腕表

234 235
*自最初购买之日起或自Shinola最近一次“自动腕表服务”日期起的5年,以较晚日期为准。
有关提交维修和服务申请的更多信息,请参阅Shinola帮助台的“维修和服务”部分-链接。
4.出现以下情况时,此保修失效:
a.根据Shinola酌情判定,腕表因意外、疏忽或人为原因损坏。
b.腕表由除Shinola之外的其他任何服务提供商进行维修、服务或雕刻。
5.如果您尚未与Shinola注册您的腕表,则此保修服务不适用。
6.如果您的腕表需要整体更换,并且属于此保修范围内,Shinola将为您更换同型号的腕表。
如果相关型号已停产,我们将为您提供风格类似的相同价值腕表。
7.针对此保修范围外的服务,我们将告知您所需维修内容和相应的费用。Shinola仅在您事先
接受此类费用的情况下进行维修,或根据您的要求返还产品。
保修及其他腕表维修申请
若需保修范围内的维修服务,请访问Shinola.com或前往Shinola零售店,填写维修申请表。
虽然不会导致保修服务作废,但是由Shinola的授权维修合作伙伴进行的维修和/或维护服
务不属于保修范围,您将承担与此类维修相关的所有费用,Shinola不提供报销。请勿寄送
原始包装,否则不予退还。Shinola强烈建议您为您的包裹投保,并在运输期间妥善保护腕
表。Shinola对于运输过程中的产品遗失或损坏不承担任何负责。针对此保修范围外的服务,
服务中心可能会执行您的服务申请,并根据腕表款式和服务类型收取费用。服务进行之前,我
们将告知您相关费用,并征求您的同意。
上述保修服务和补救措施具有排他性,将代替所有其他明示、暗示或法定的保修、条款或条
件,包括但不限于所有Shinola明确否认的对适销性、特定用途的适用性、准确性、满意质
量、所有权和不侵权担保。无论是基于合同、侵权行为(包括疏忽)、严格产品责任或任何
其他理论,Shinola对因销售或使用本产品而引起或与之相关的任何形式的附带、后果性、间
接、特殊或惩罚性赔偿或责任概不负责,即使Shinola已被告知此类损害的可能性,即使此处
指定的任何有限补救措施未能达到其本质目的。Shinola的所有责任仅限于根据Shinola的唯一
选择进行更换或维修。但是某些国家/地区、州或省份禁止排除或限制对默示担保或者附带后
果性损害的责任,因此上述限制条款可能对您的适用程度有限。若无法完全排除默示担保,那

236
我们竭诚为您提供帮助
如果您有任何疑虑或问题,请随时与我们联系。您可以通过三种方式与我们取得联
系。填写我们官网Shinola.com上的联系表格、向我们致电或发送邮件。
周一至周五
东部标准时间早9点至晚5点
1.844.SHINOLA
(1.844.744.6652)
么此类保修将仅限于书面保修期限。本保修条款为您提供了特定的法律权利,根据当地法律,
您可能还享有其他权利。您的法定权利不受影响。

237
238
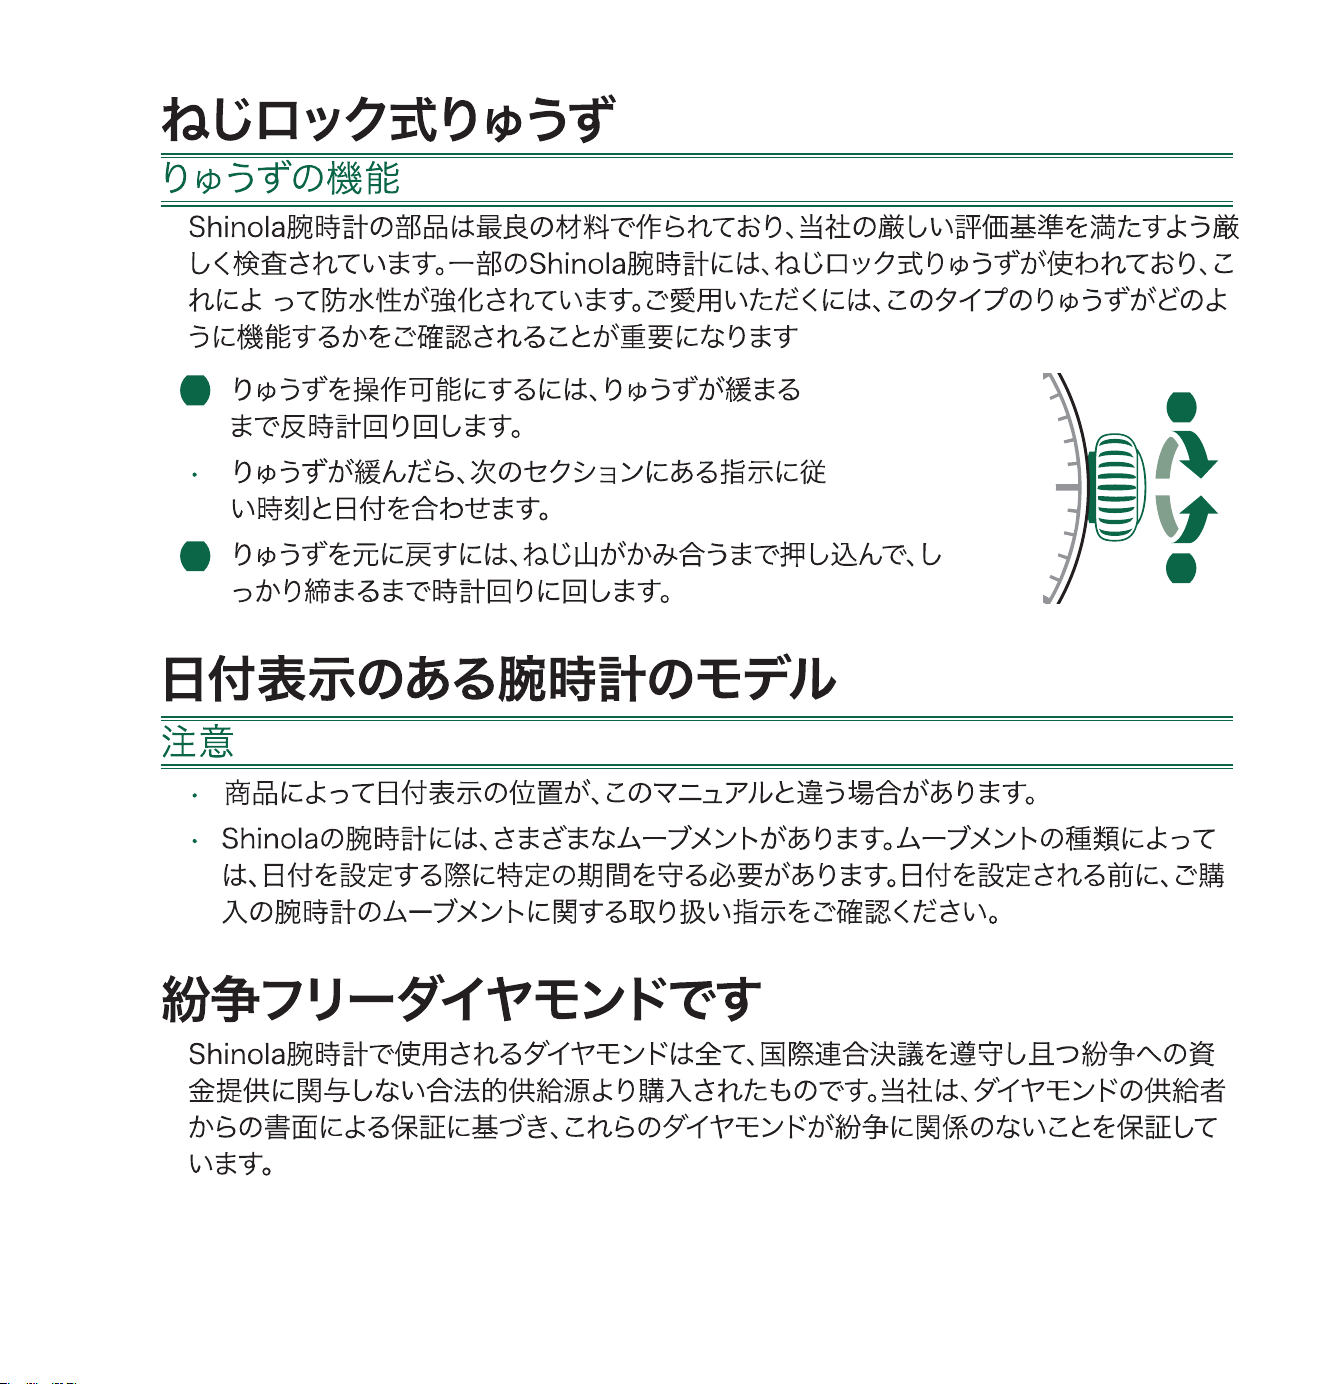
239
1
2
1
2
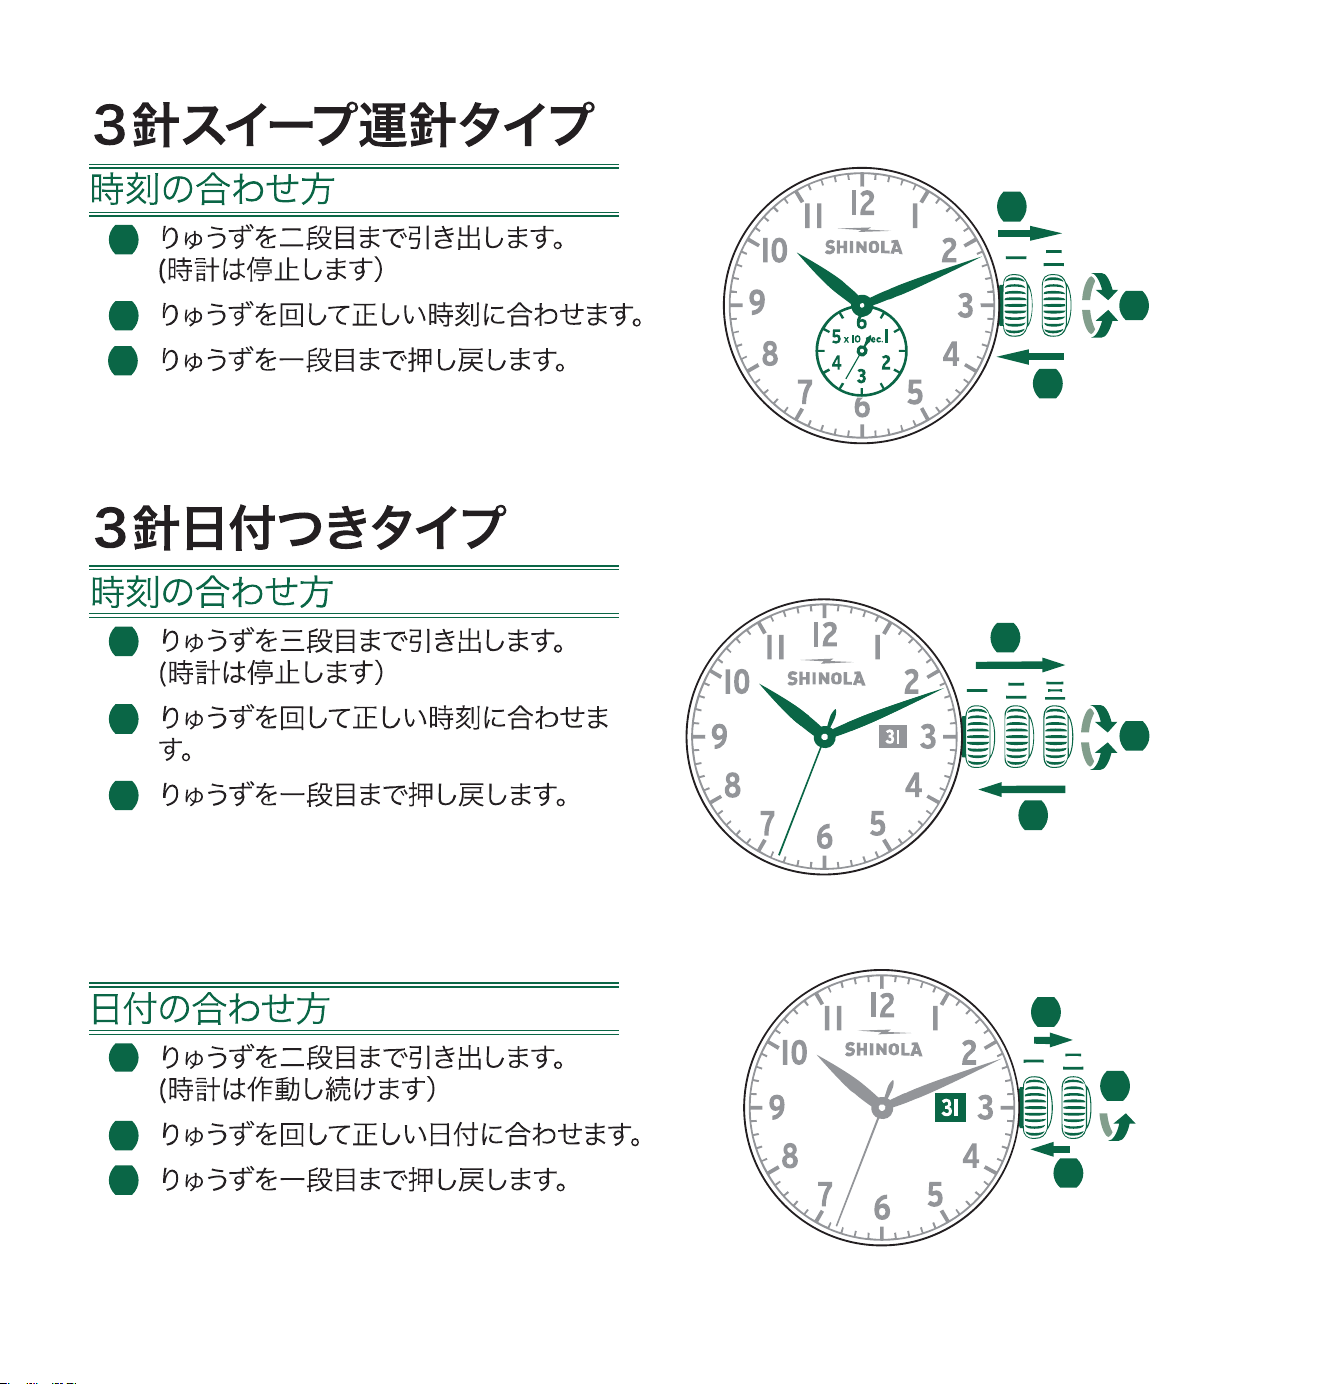
240
1
2
3
1
2
3
1
2
3
3
1
2
3
1
2
1
2
3
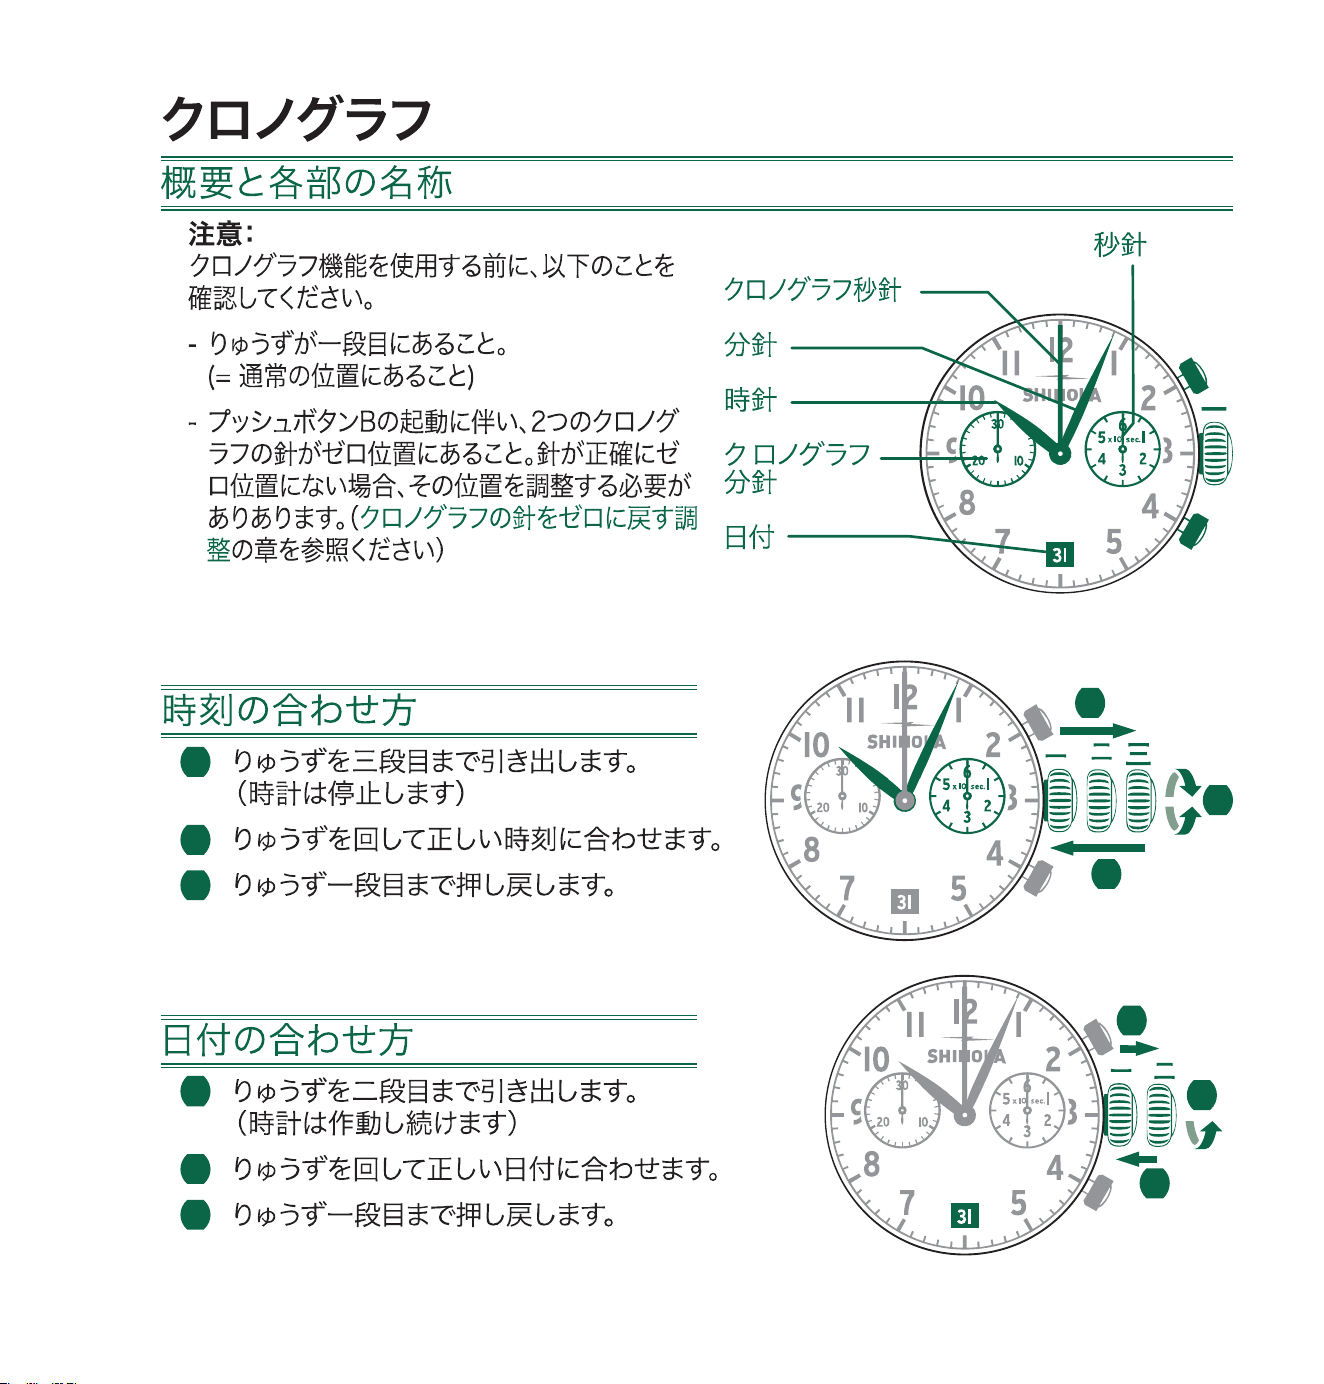
241
3
1
2
5021.D
1
2
3
1
2
3
A
B
1
2
3
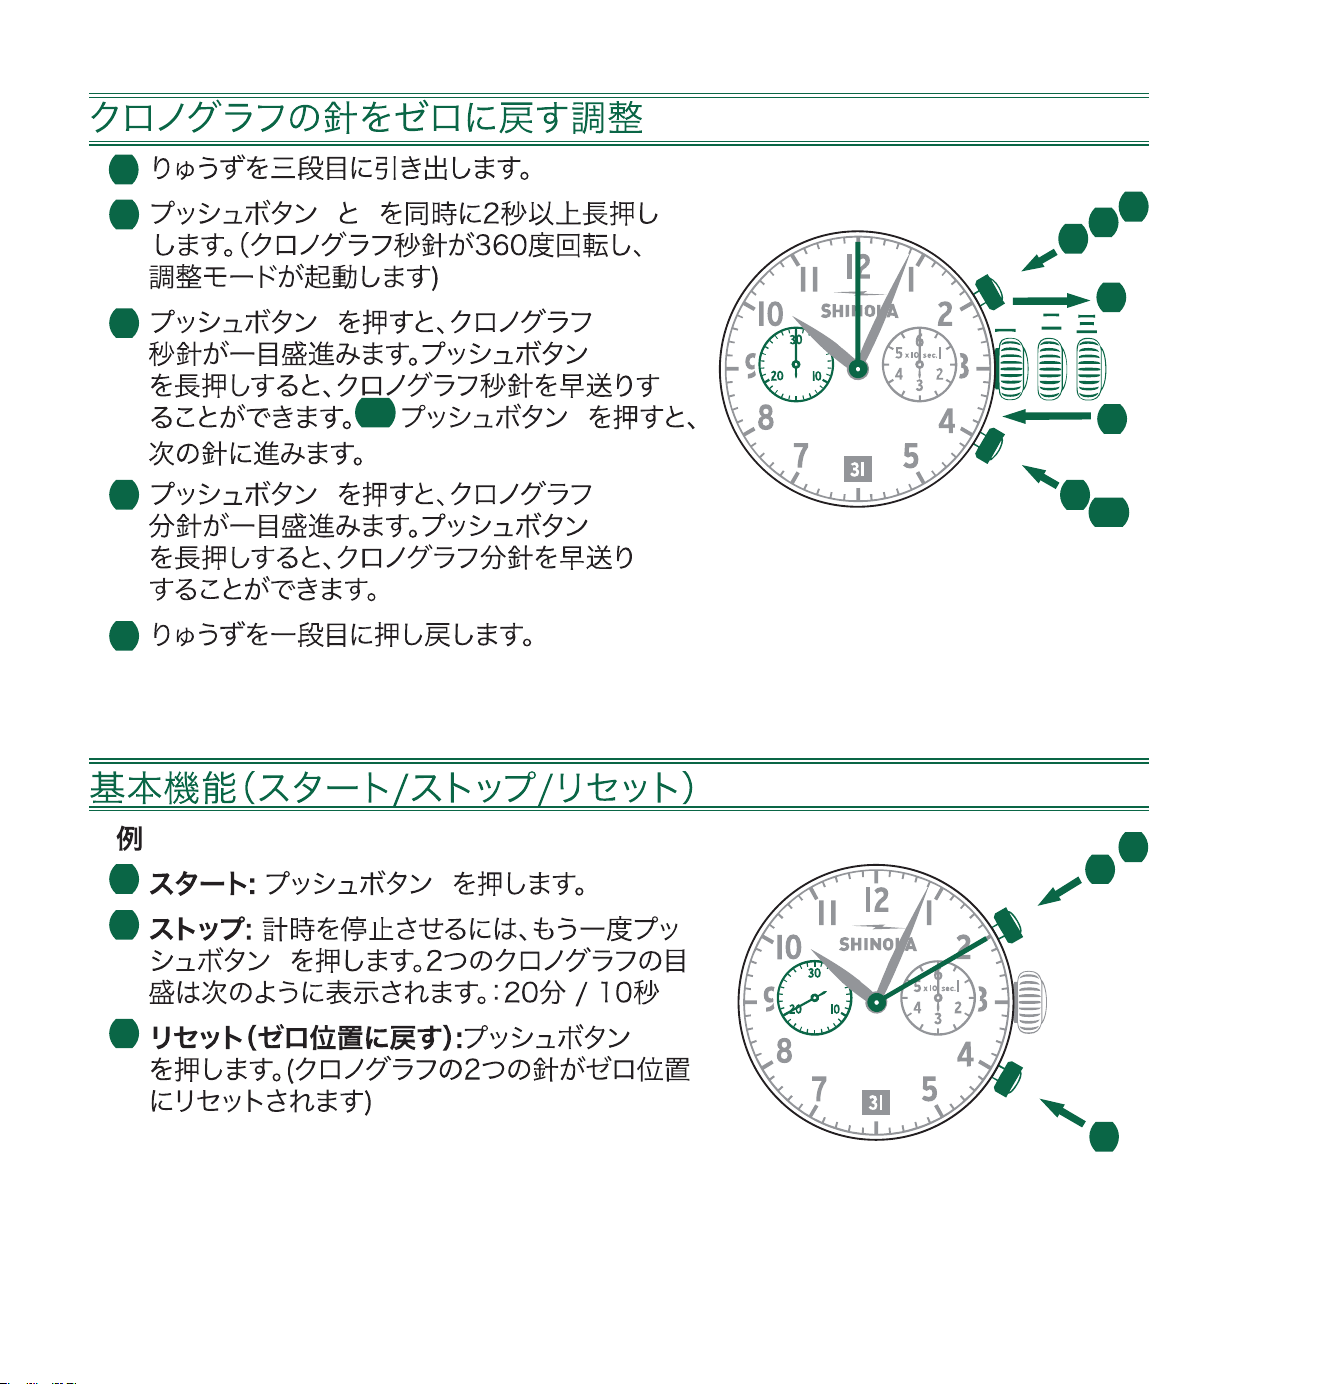
242
1
2 A B
3 A
A
3b
B
4 A
A
5
1 A
2
A
3 B
1
2
3
4
5
2
A
B
3b
1
2
3
A
B
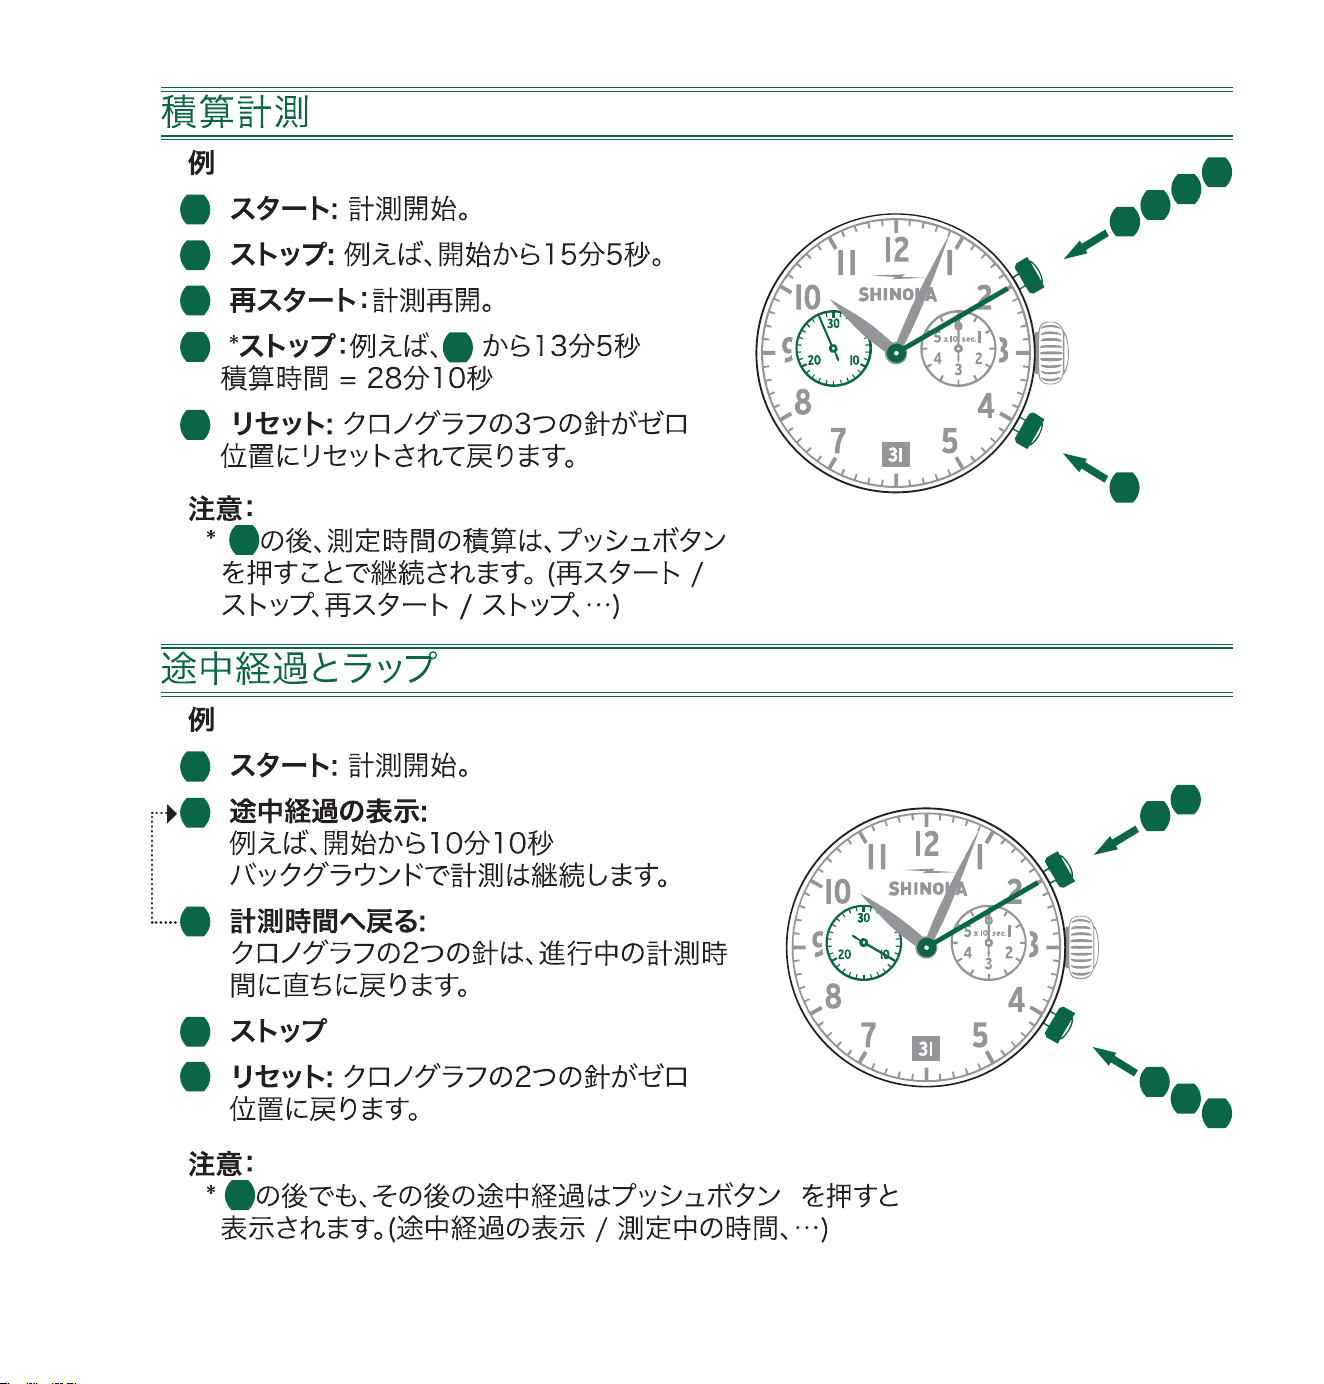
243
*
1
2
3
4
3
5
4
A
1
2
3
4
5
3
B
1
5
2
3
4
A
B
2
3
5
B
1
4
A
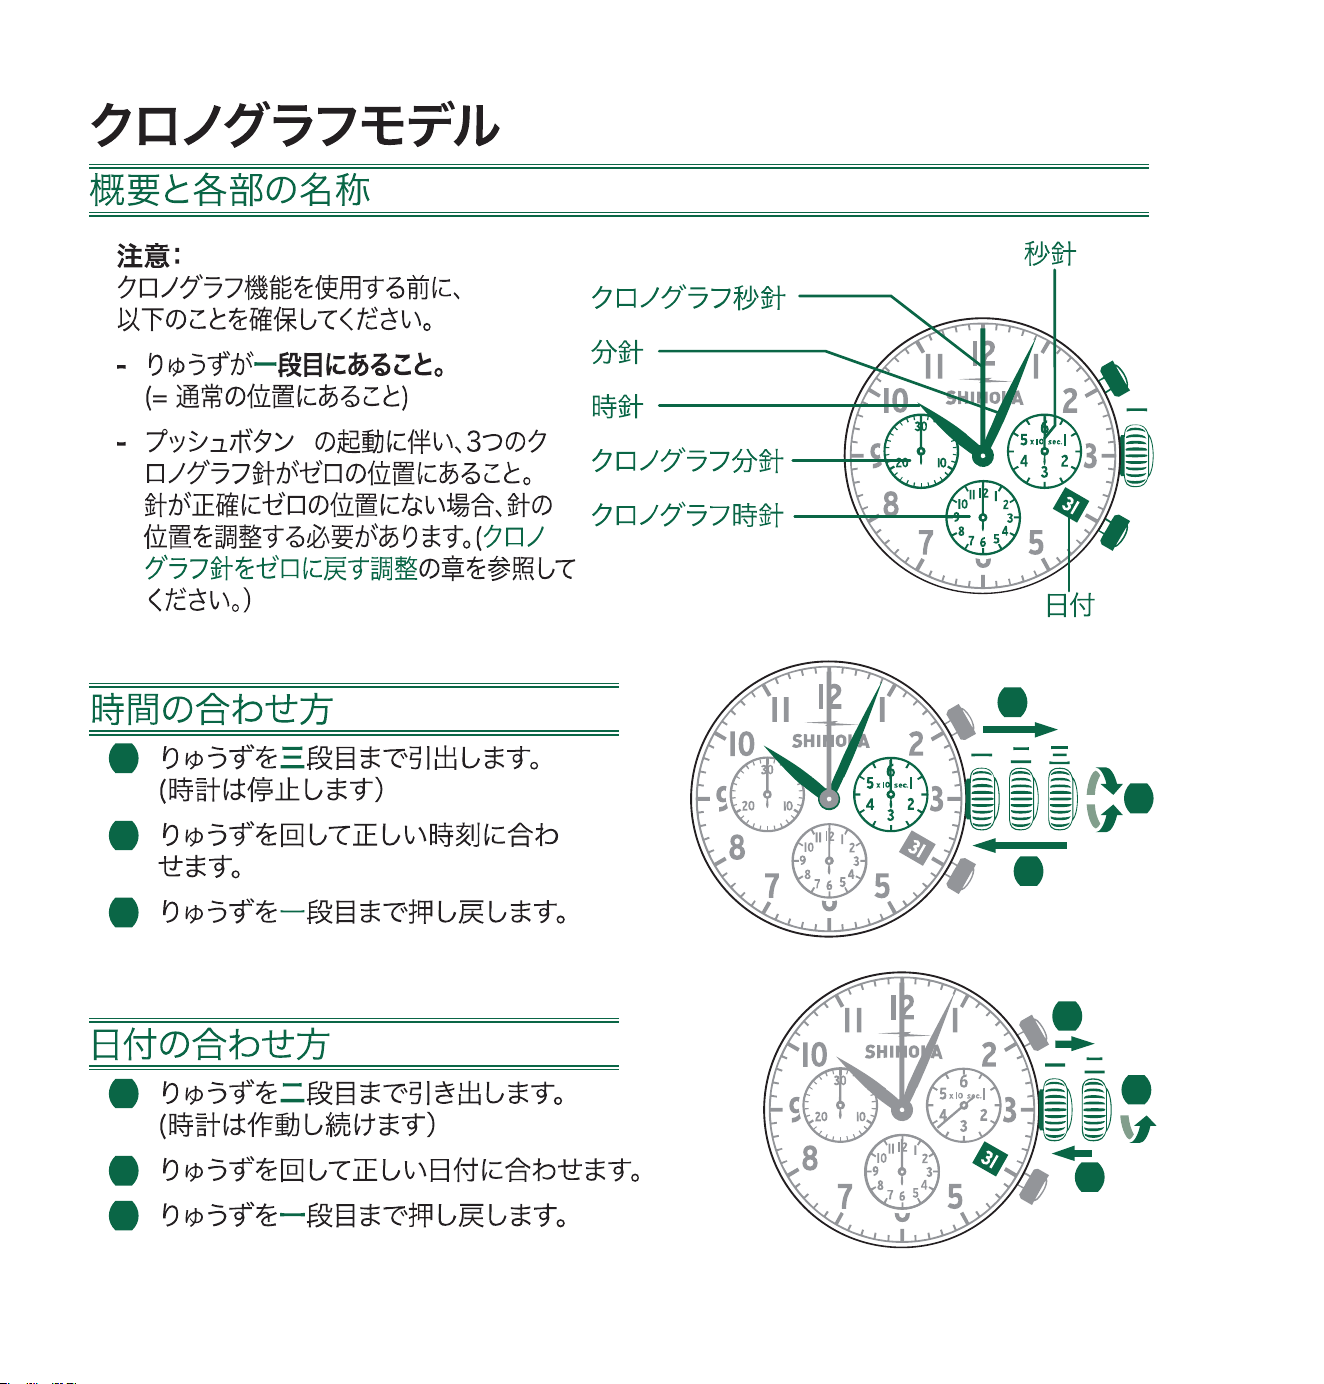
244
5030.D
B
1
2
3
1
2
3
1
2
3
3
1
2
A
B
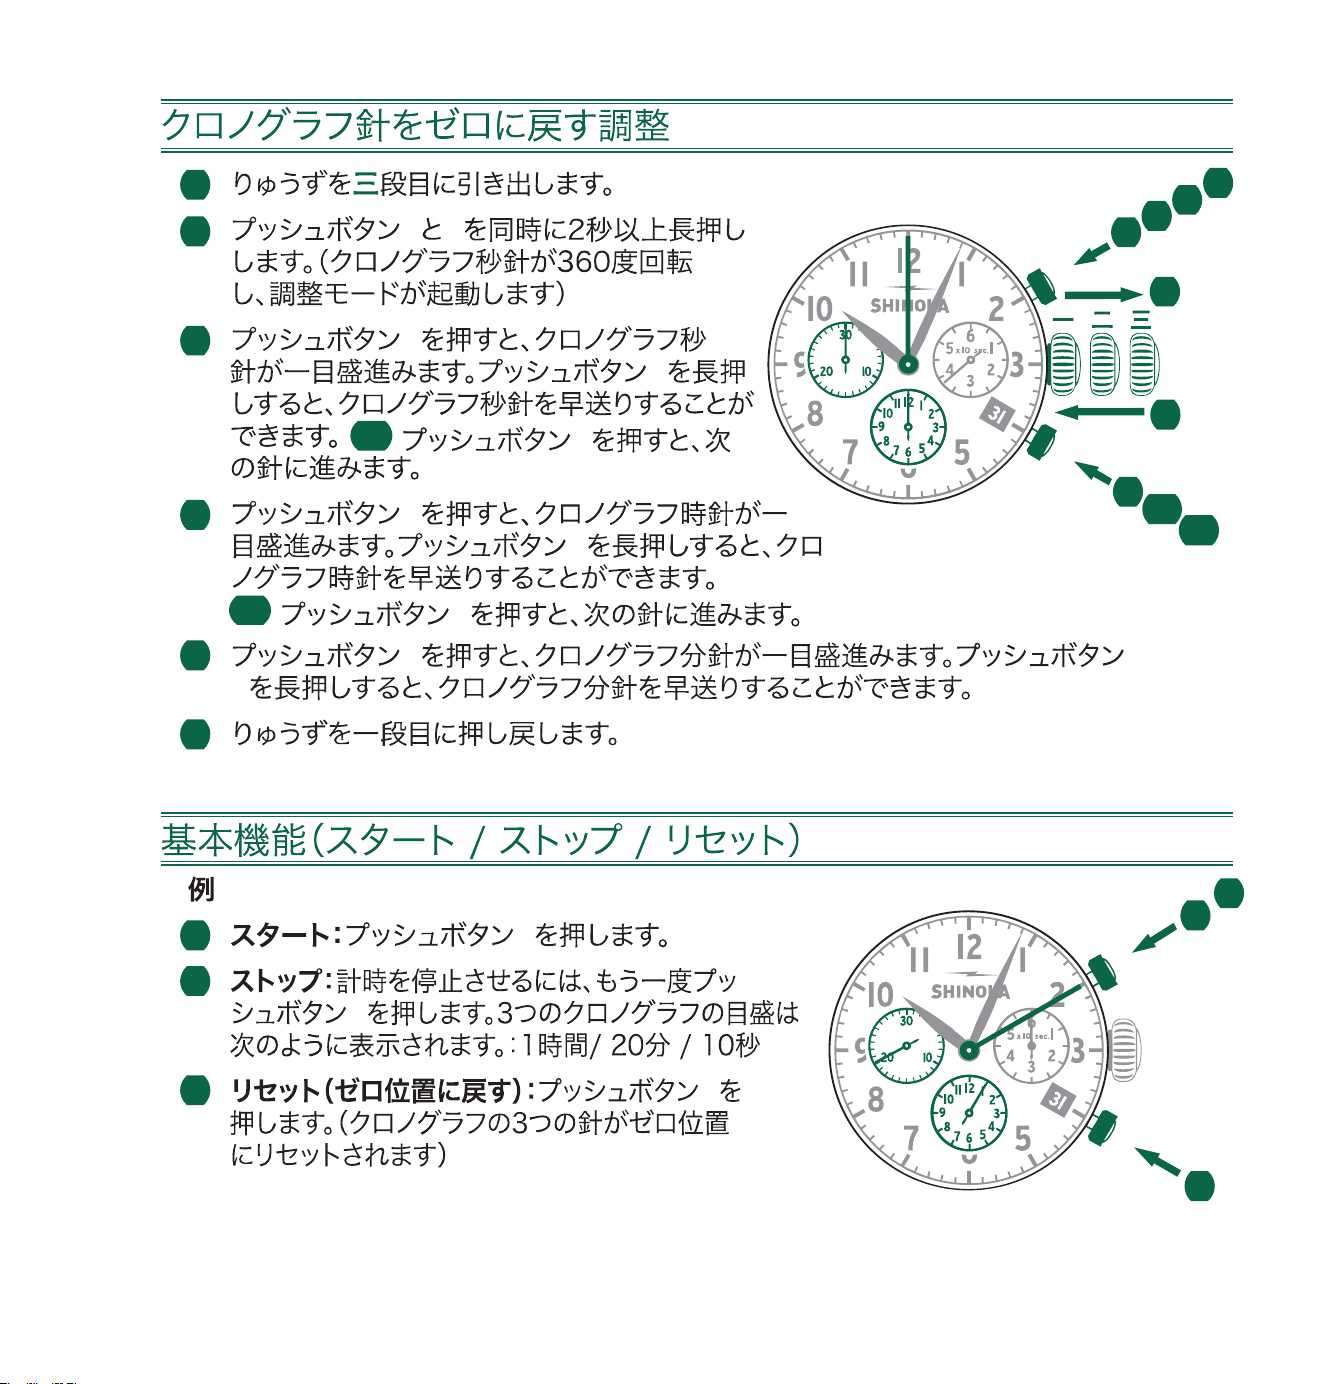
245
1
2 A B
3 A
A
3b
B
4 A
A
4b
B
5 A
A
6
1 A
2
A
3 B
1
2
3
A
B
1
2
3
4
5
6
2
A
B
3b
4b
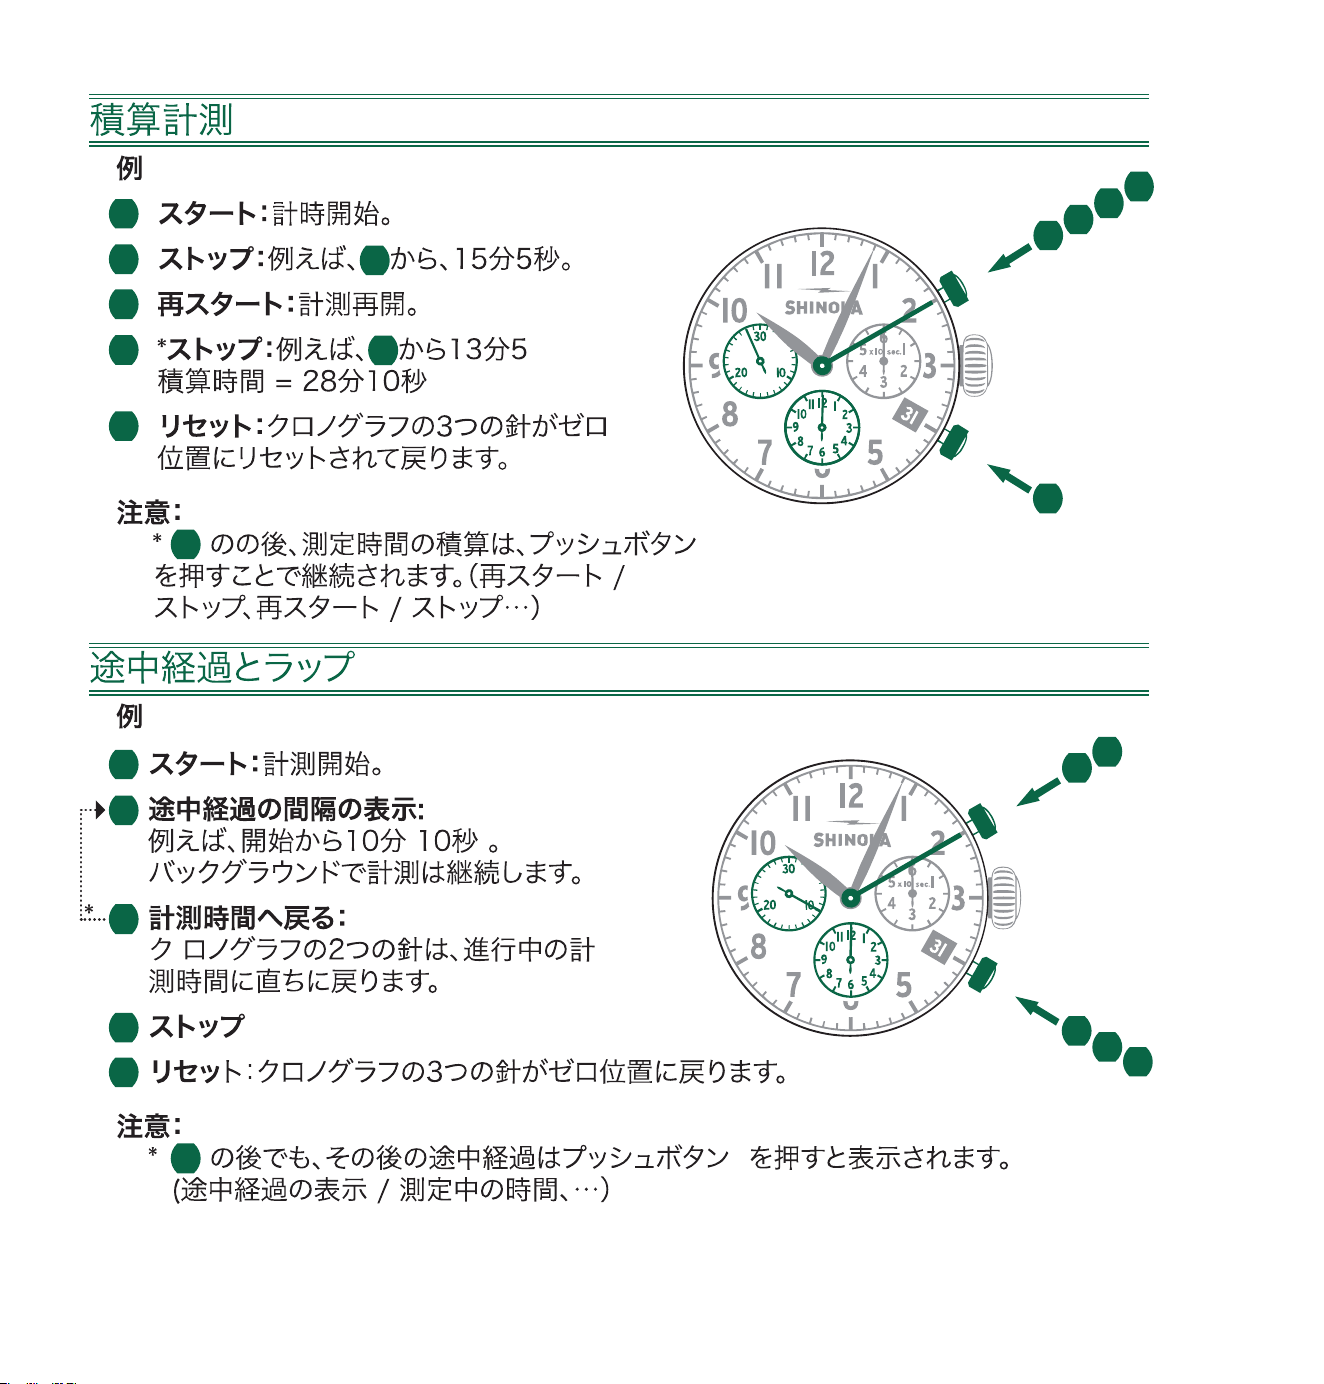
246
1
2
1
3
4 3
5
4
A
1
2
3
4
5
3
B
1
5
2
3
4
A
B
2
3
5
B
1
4
A
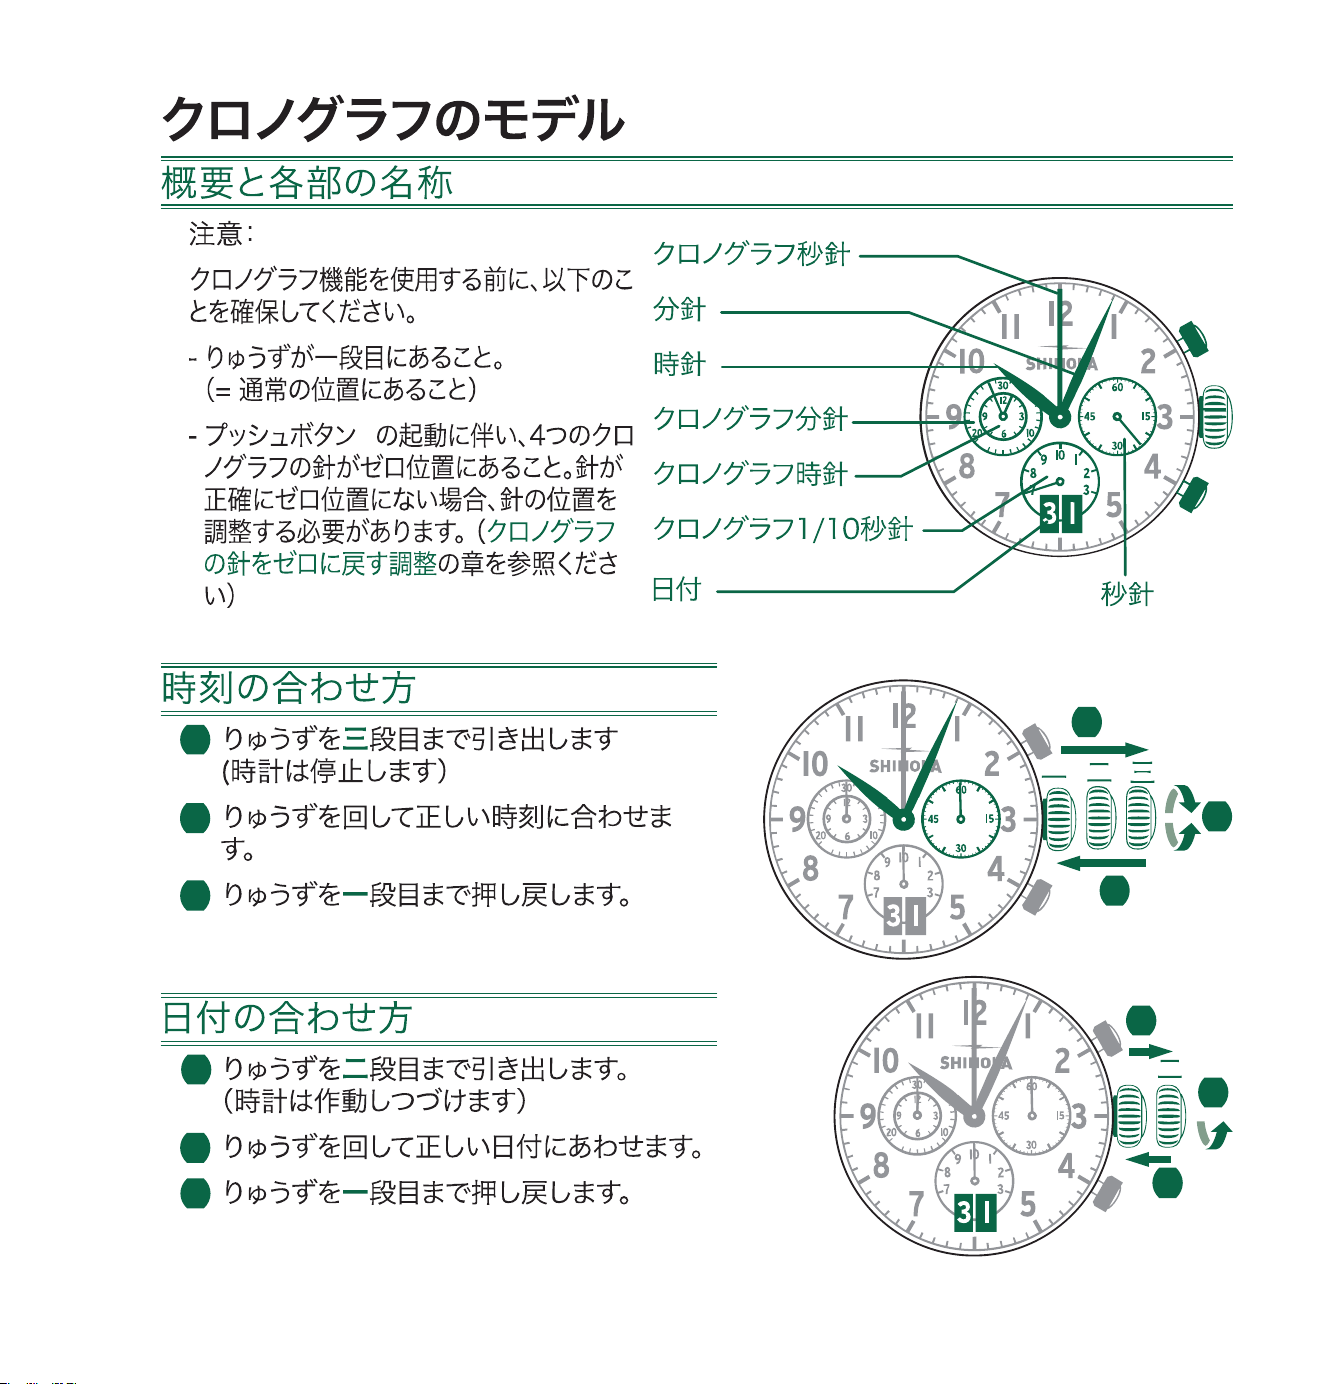
247
1
2
3
1
2
3
5050.B
B
A
B
3
1
2
1
2
3
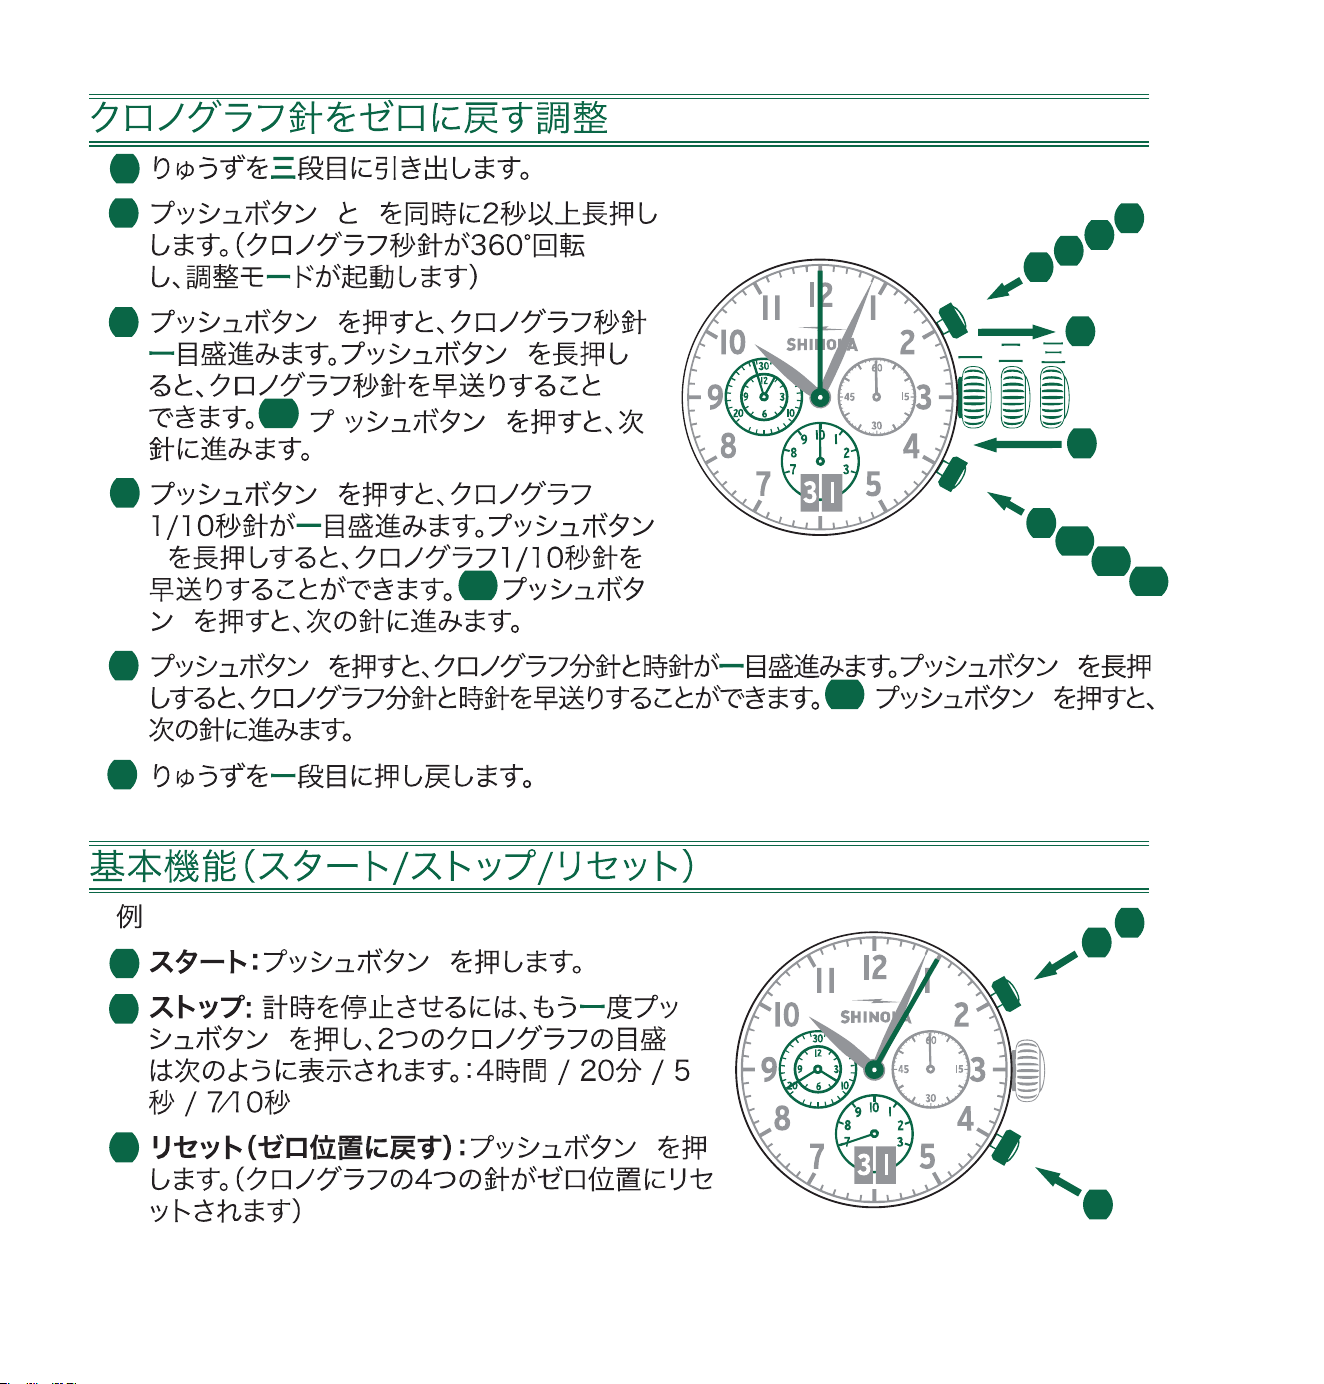
248
A B
A
A
3b
B
A
A
4b
B
A A
5b
B
6
1 A
2
A
3 B
1
3
1
2
A
B
1
2
3
4
5
1
2
3
4
5
6
A
2
B
3b
4b
5b
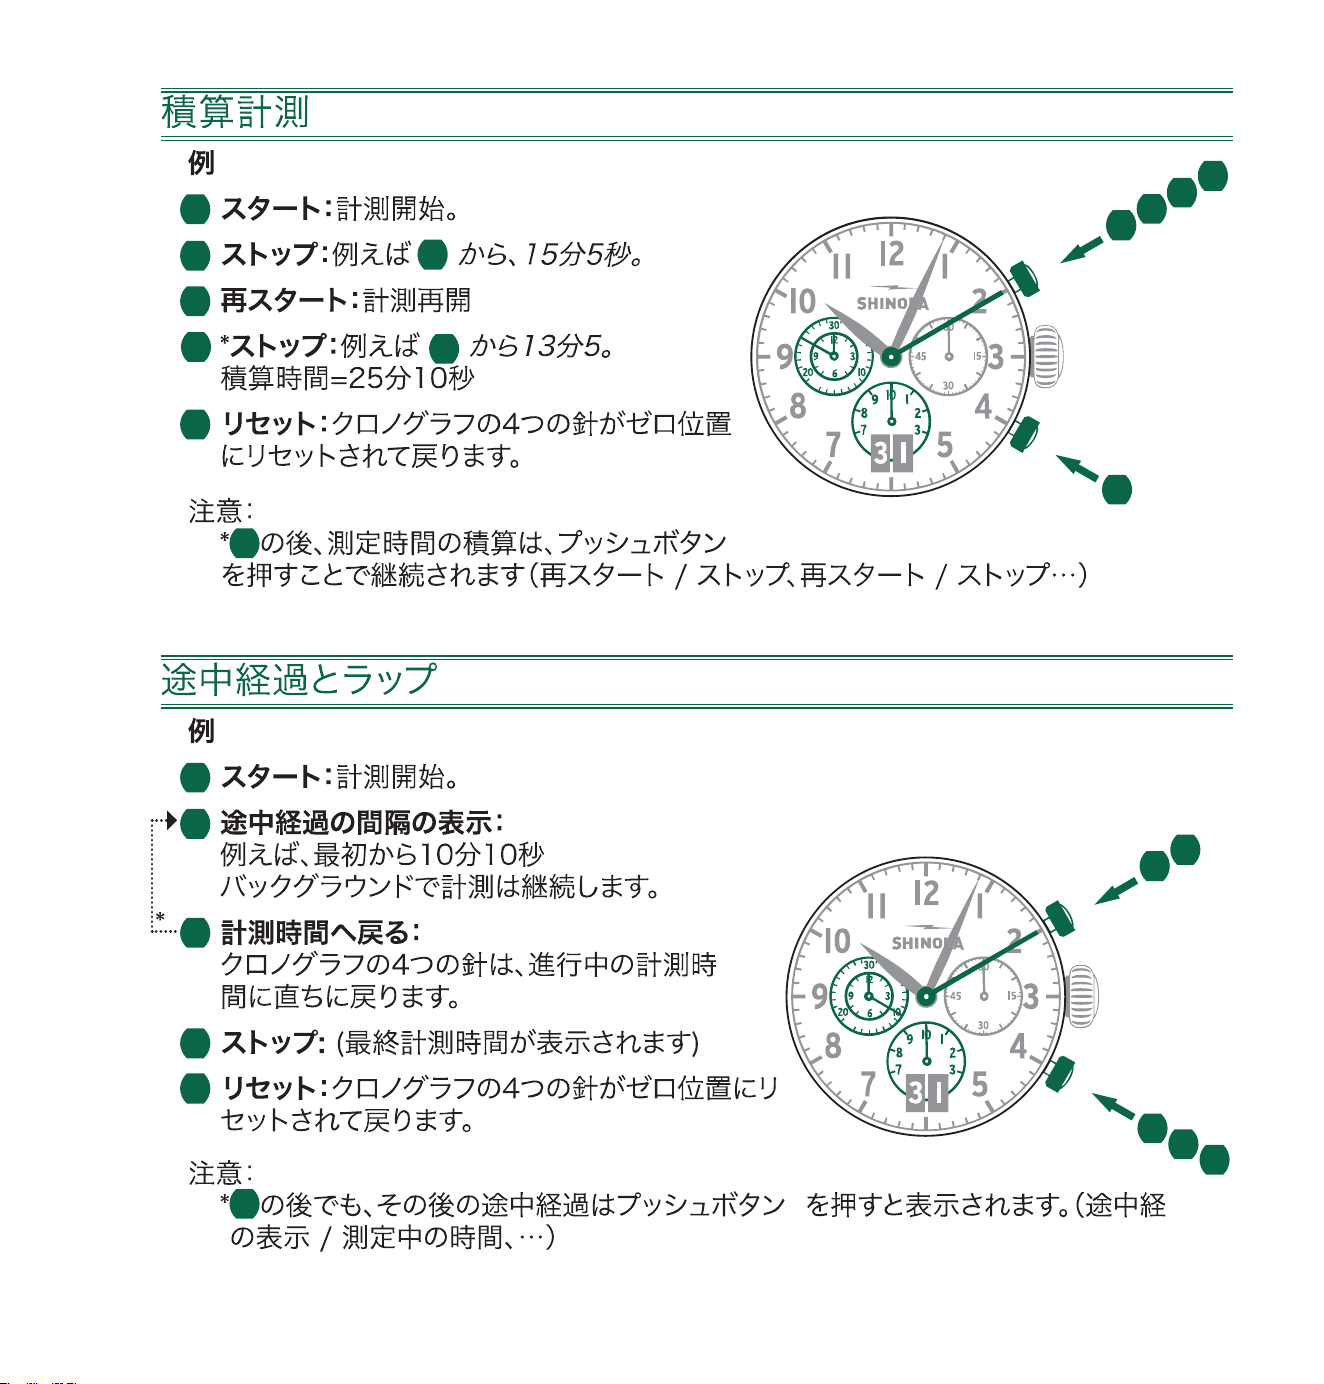
249
1
2
1
3
4
3
5
4
A
1
2
3
4
5
3
B
5
B
1
2
3
4
A
5
2
3
B
1
4
A
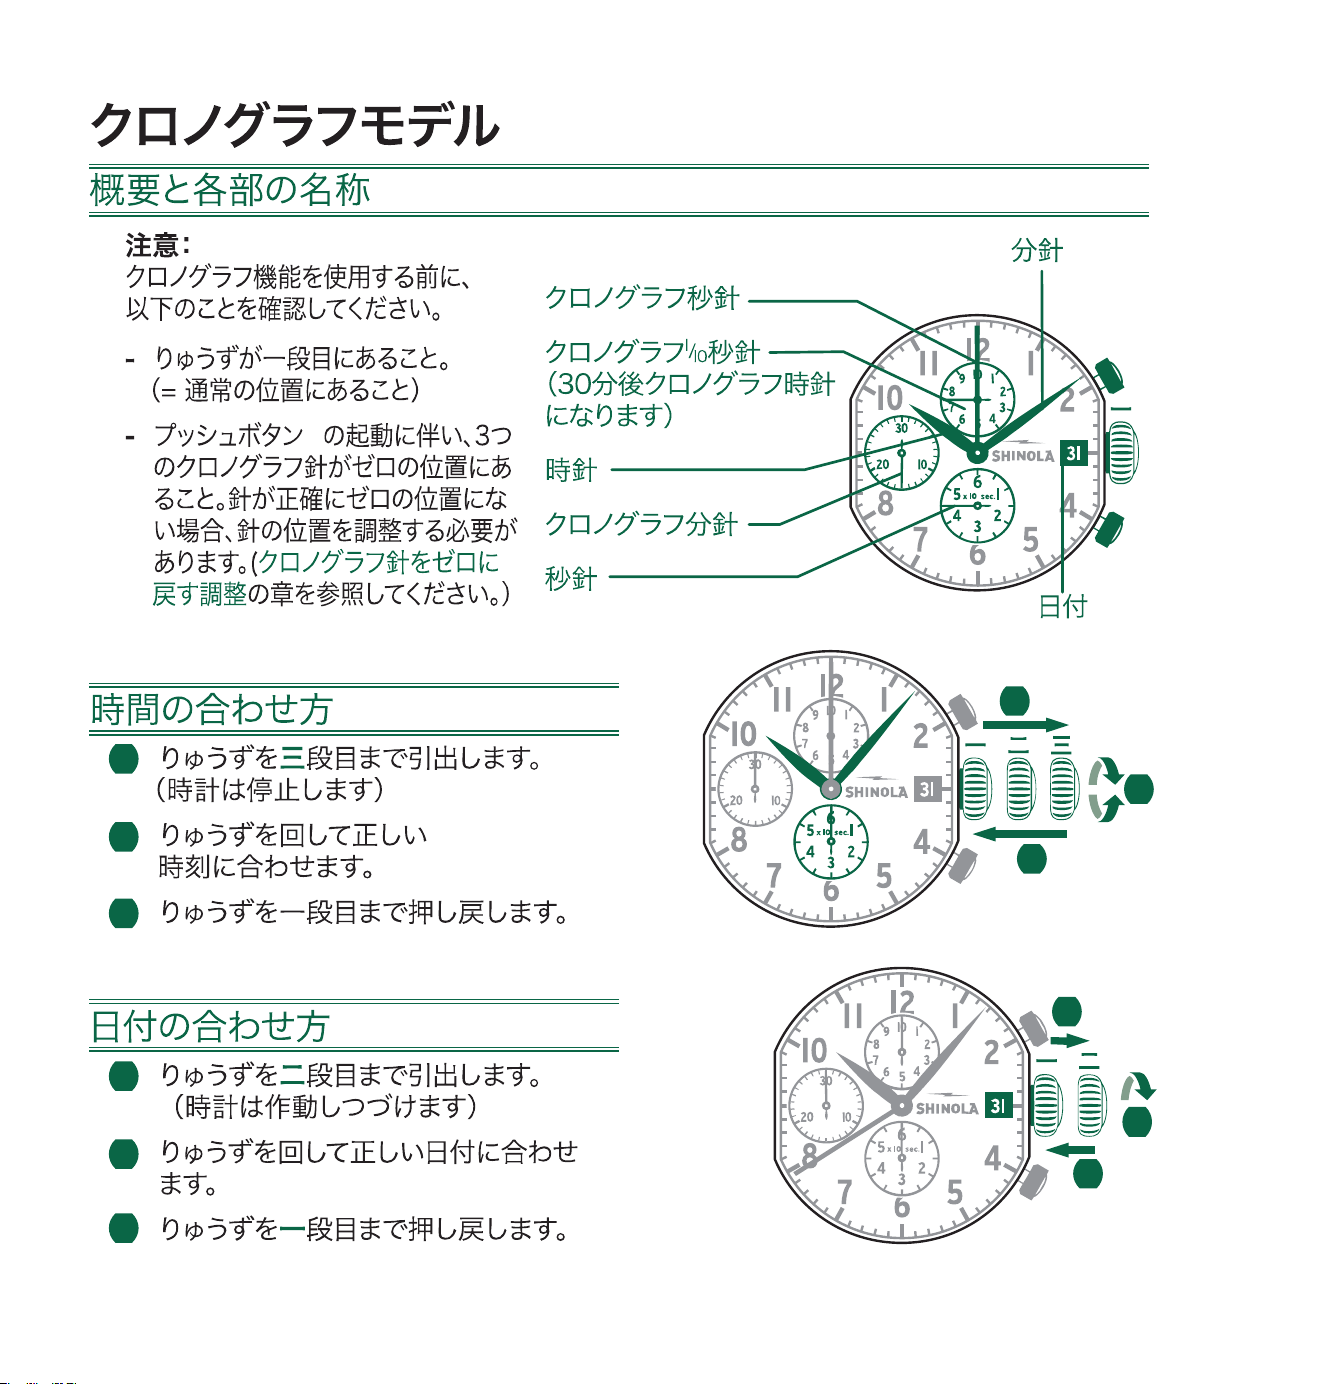
250
3540.D
B
1
2
3
1
2
3
1
2
3
3
1
2
A
B
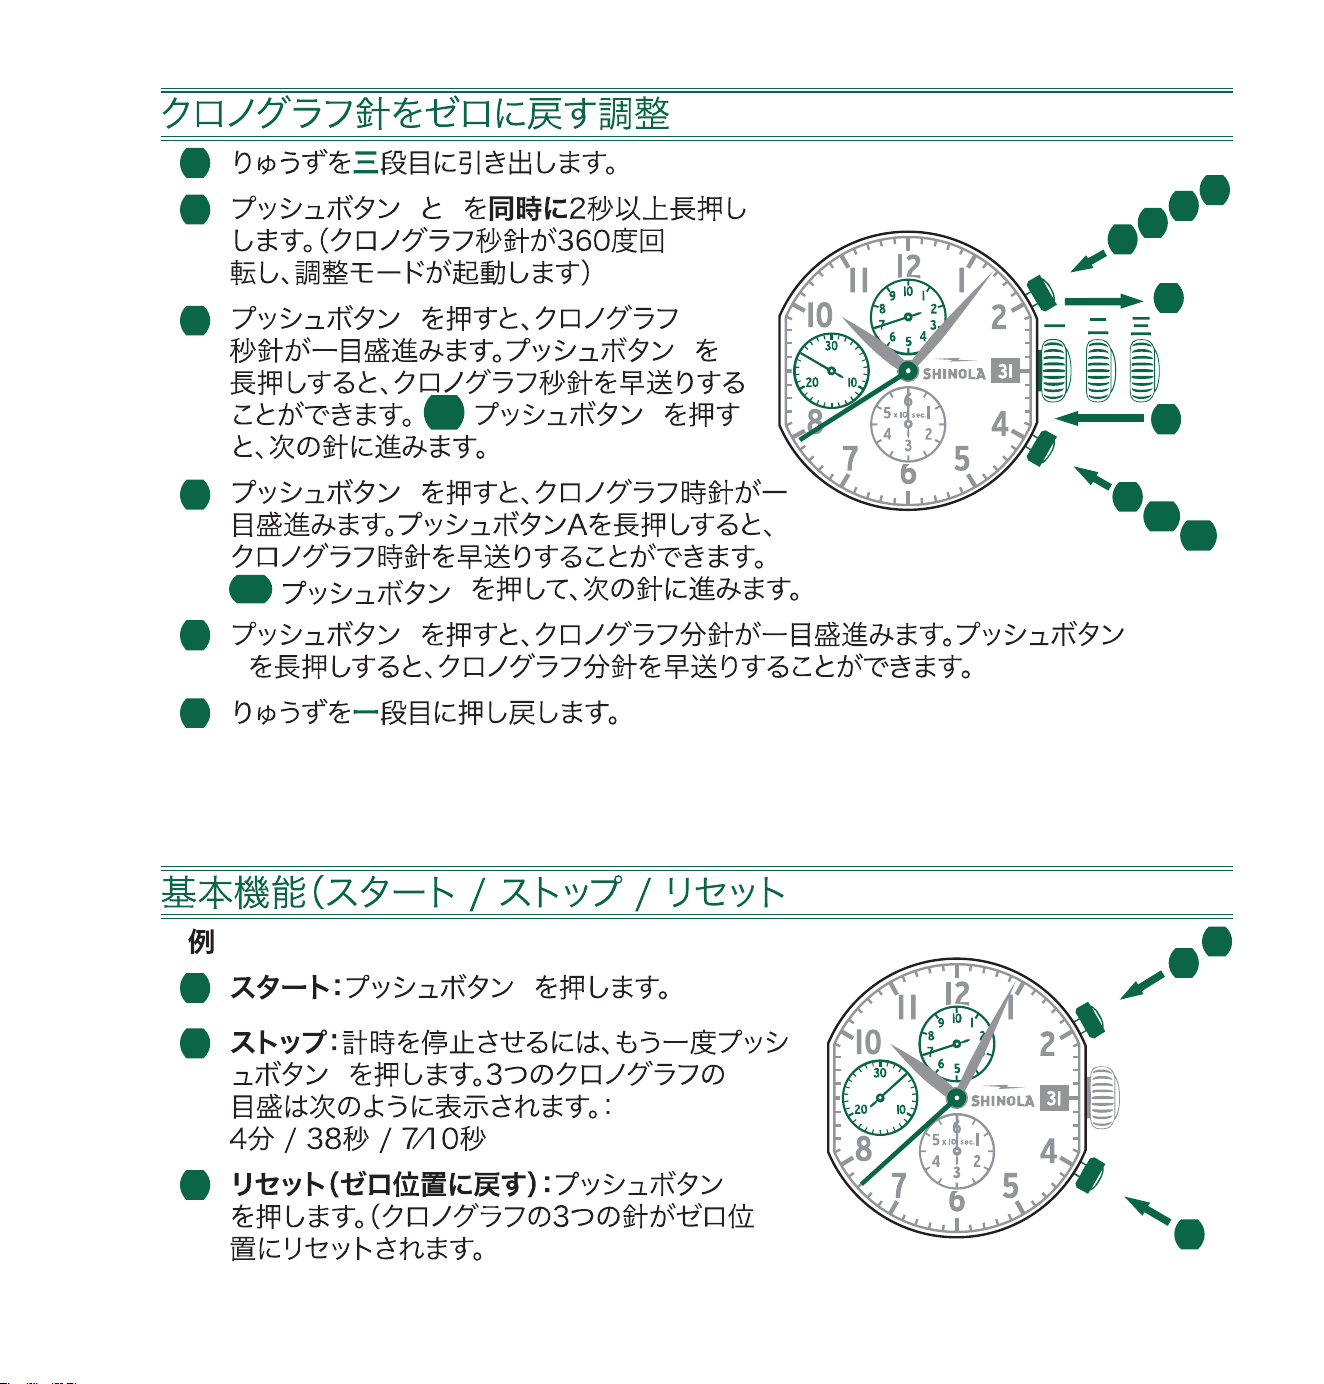
251
1
2 A B
3 A
A
3b
B
4 A
4b
B
5 A
A
6
1 A
2
A
3 B
1
2
3
A
B
1
2
3
4
5
6
2
A
B
3b
4b
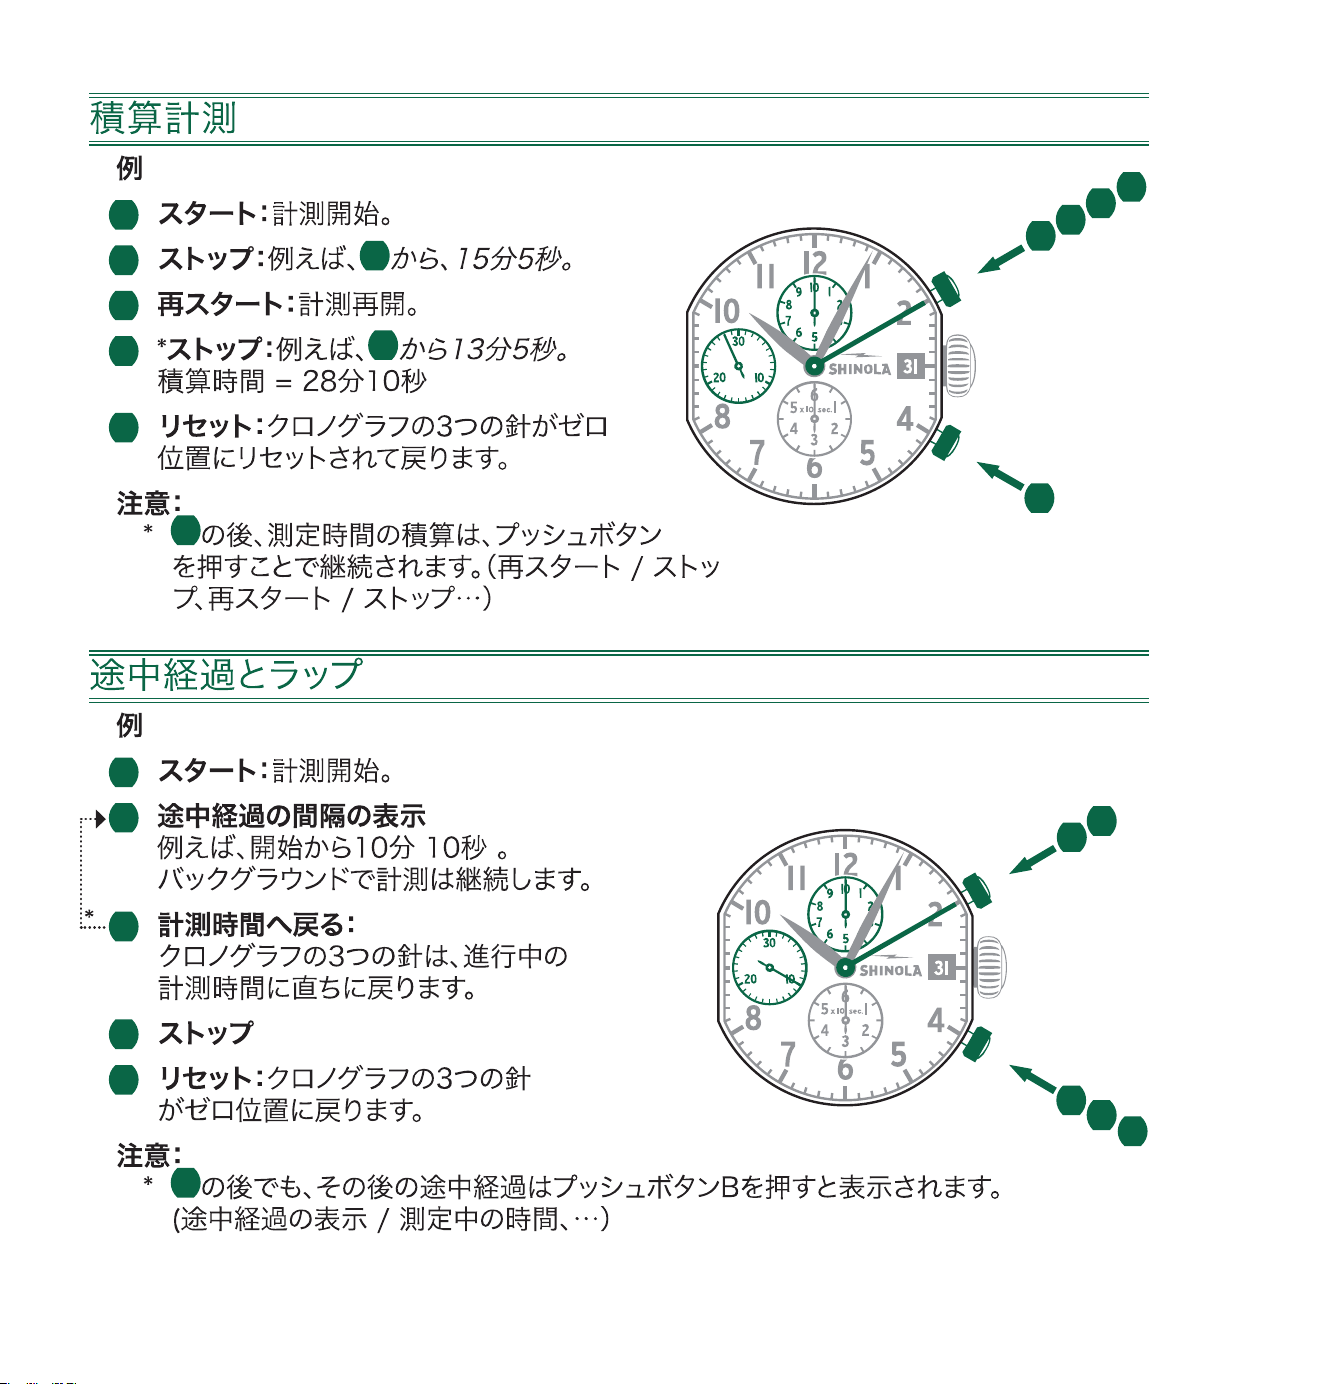
252
1
2
1
3
4
3
5
4
A
1
2
3
4
5
3
1
5
2
3
4
A
B
1
2
4
3
5
A
B

253
708
708
708
II
II
II
III
III
I
I
I
3
3
4
3
1
1
1
2
2
2
708
1
2
3
4
1
2
3
1
2
3
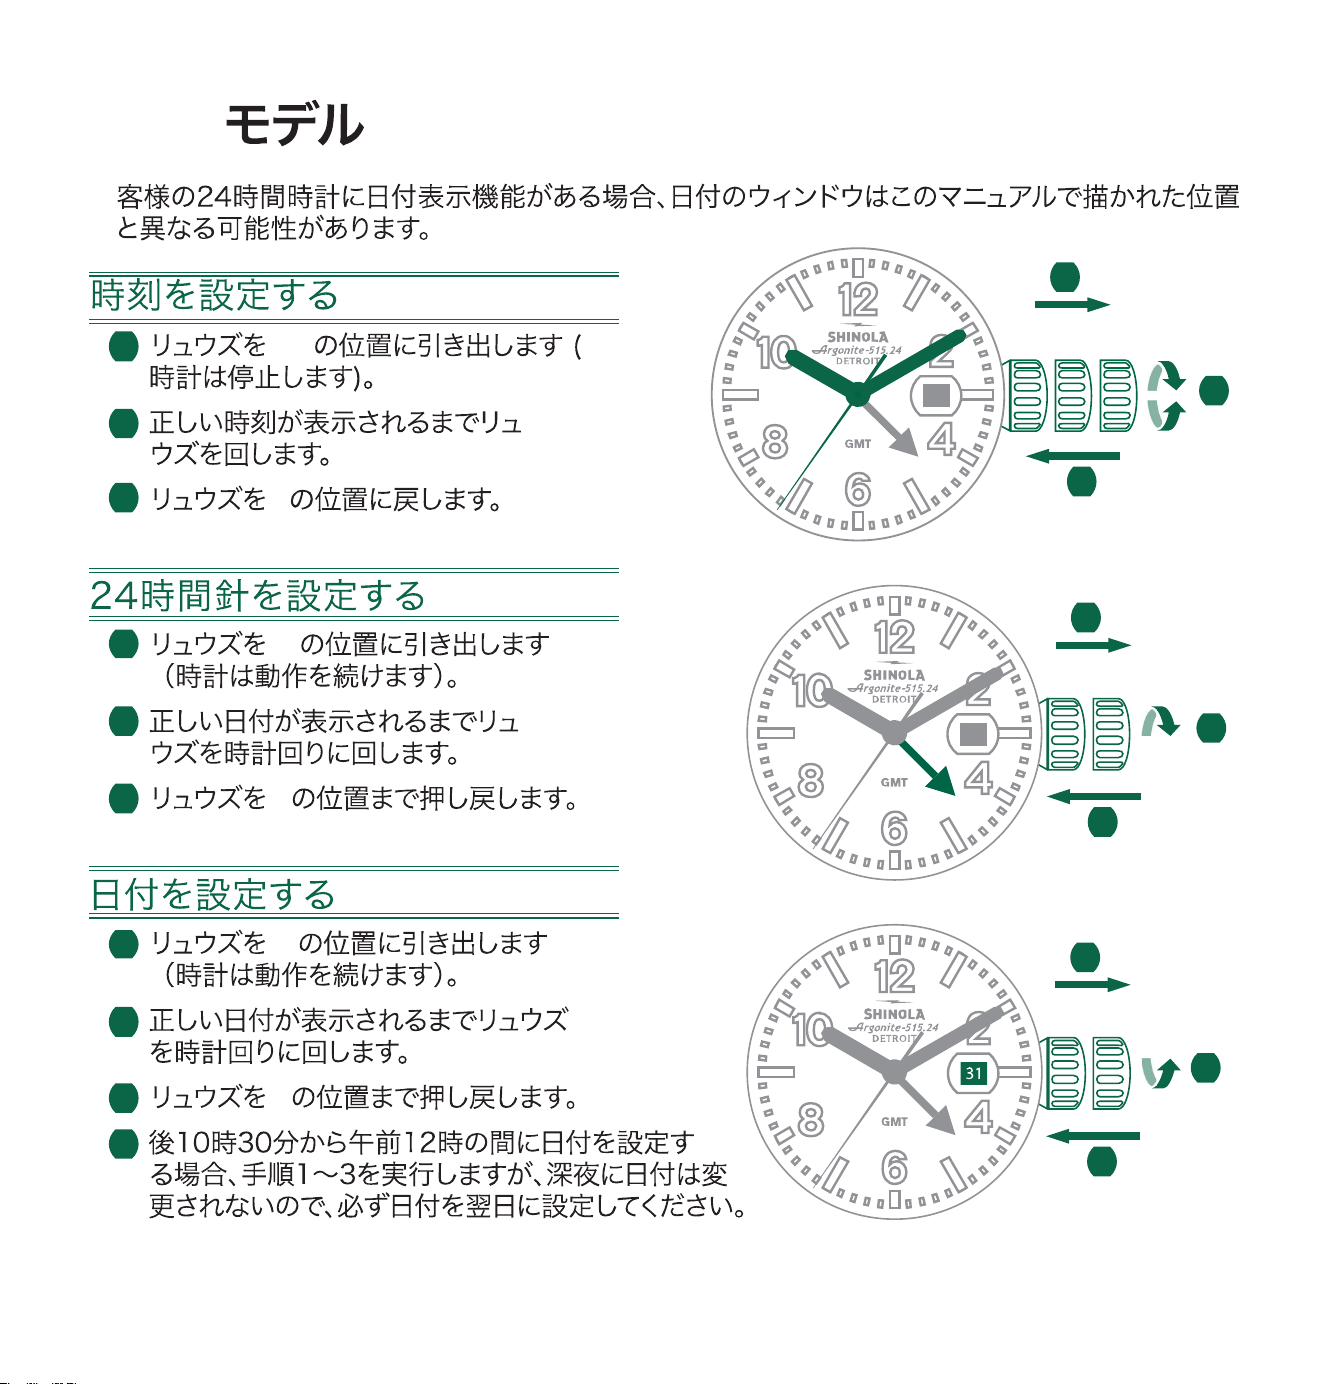
254
1 III.
2
3 I
1 II
2
3 I
1 II
2
3 I
4
GMT 515.24H
3131
3131
II
II
II
IIII
I
I
3
3
3
1
1
1
2
2
2
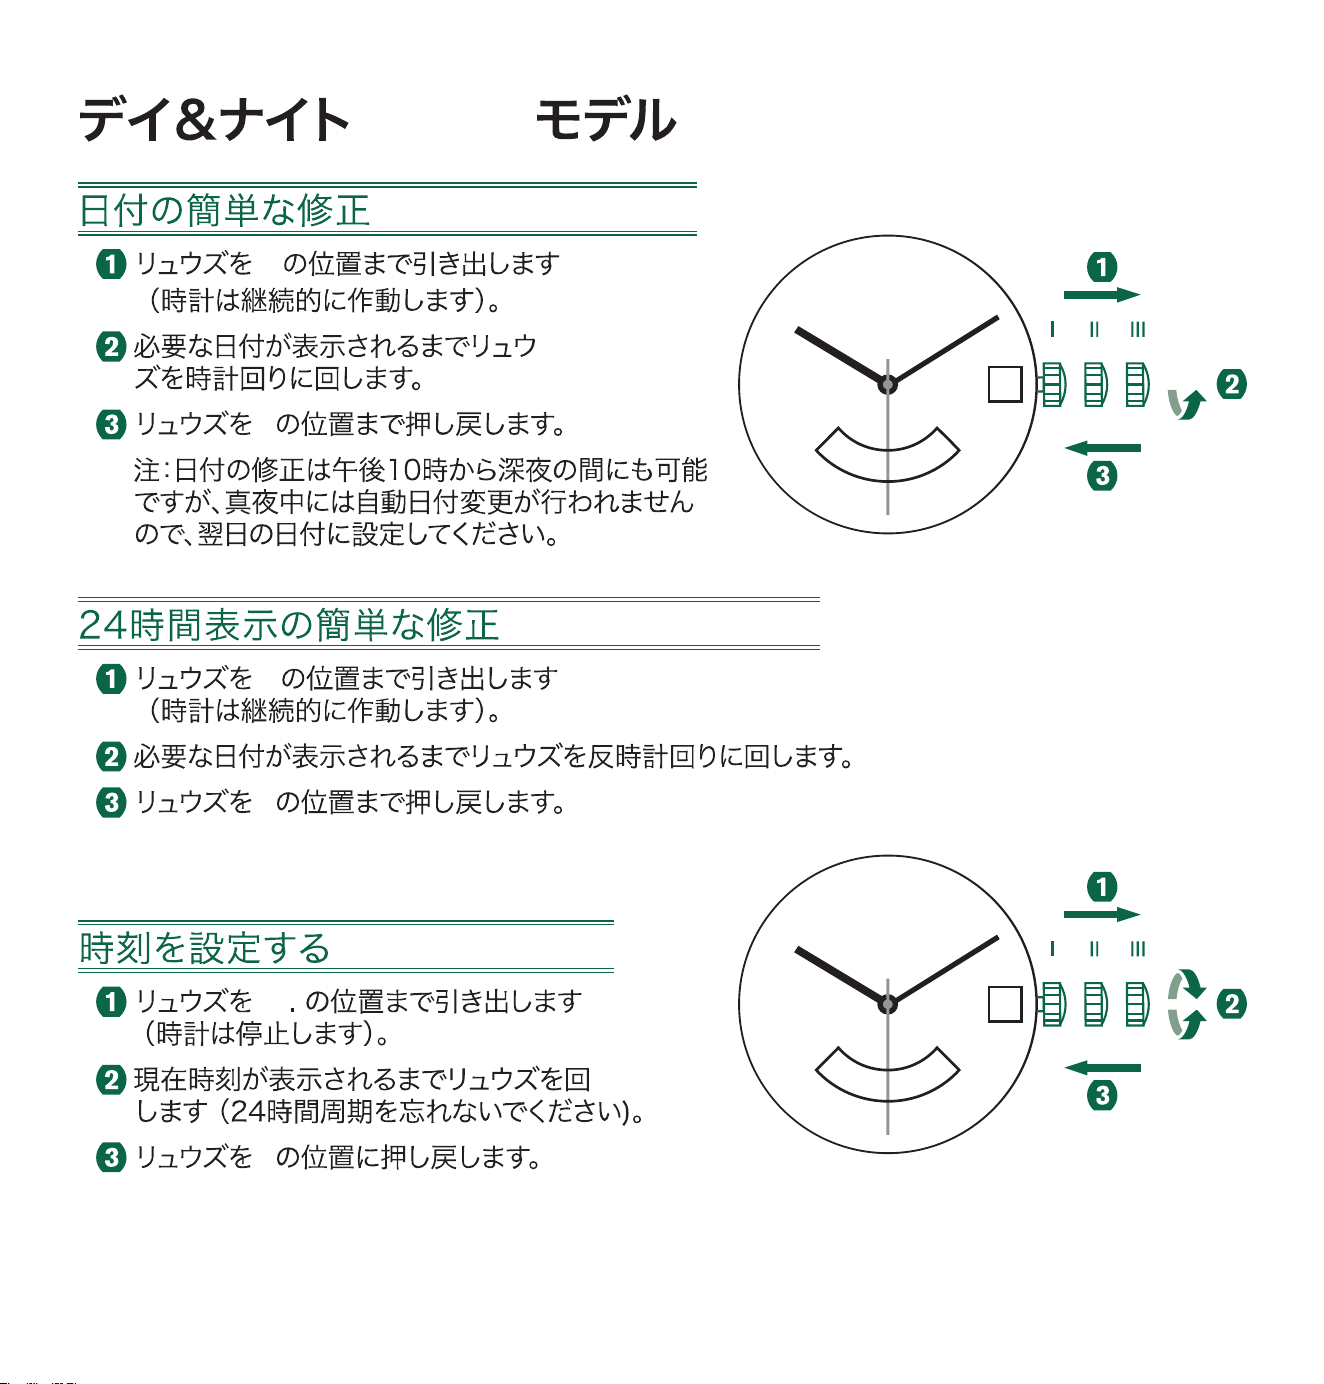
255
(GMT) 515.24D
II
I
II
I
III
I
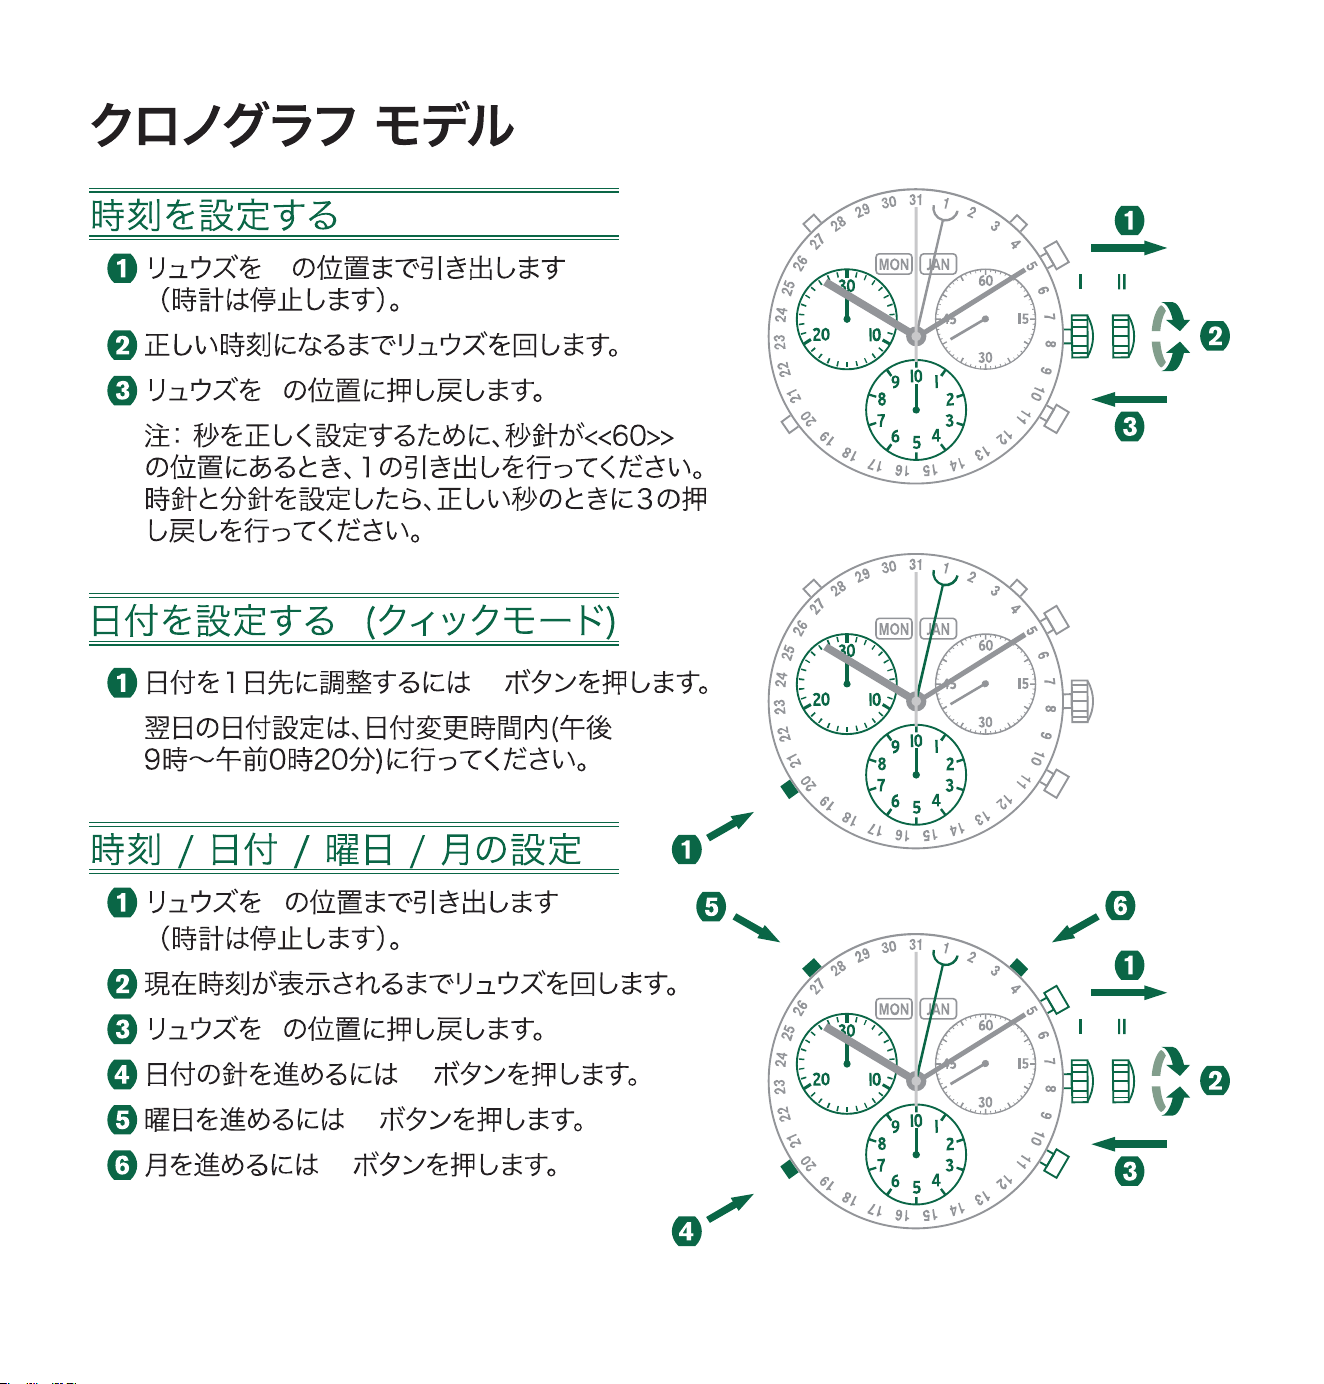
256
5040.F
II
I
C
II
I
C
D
E
C
C
D E
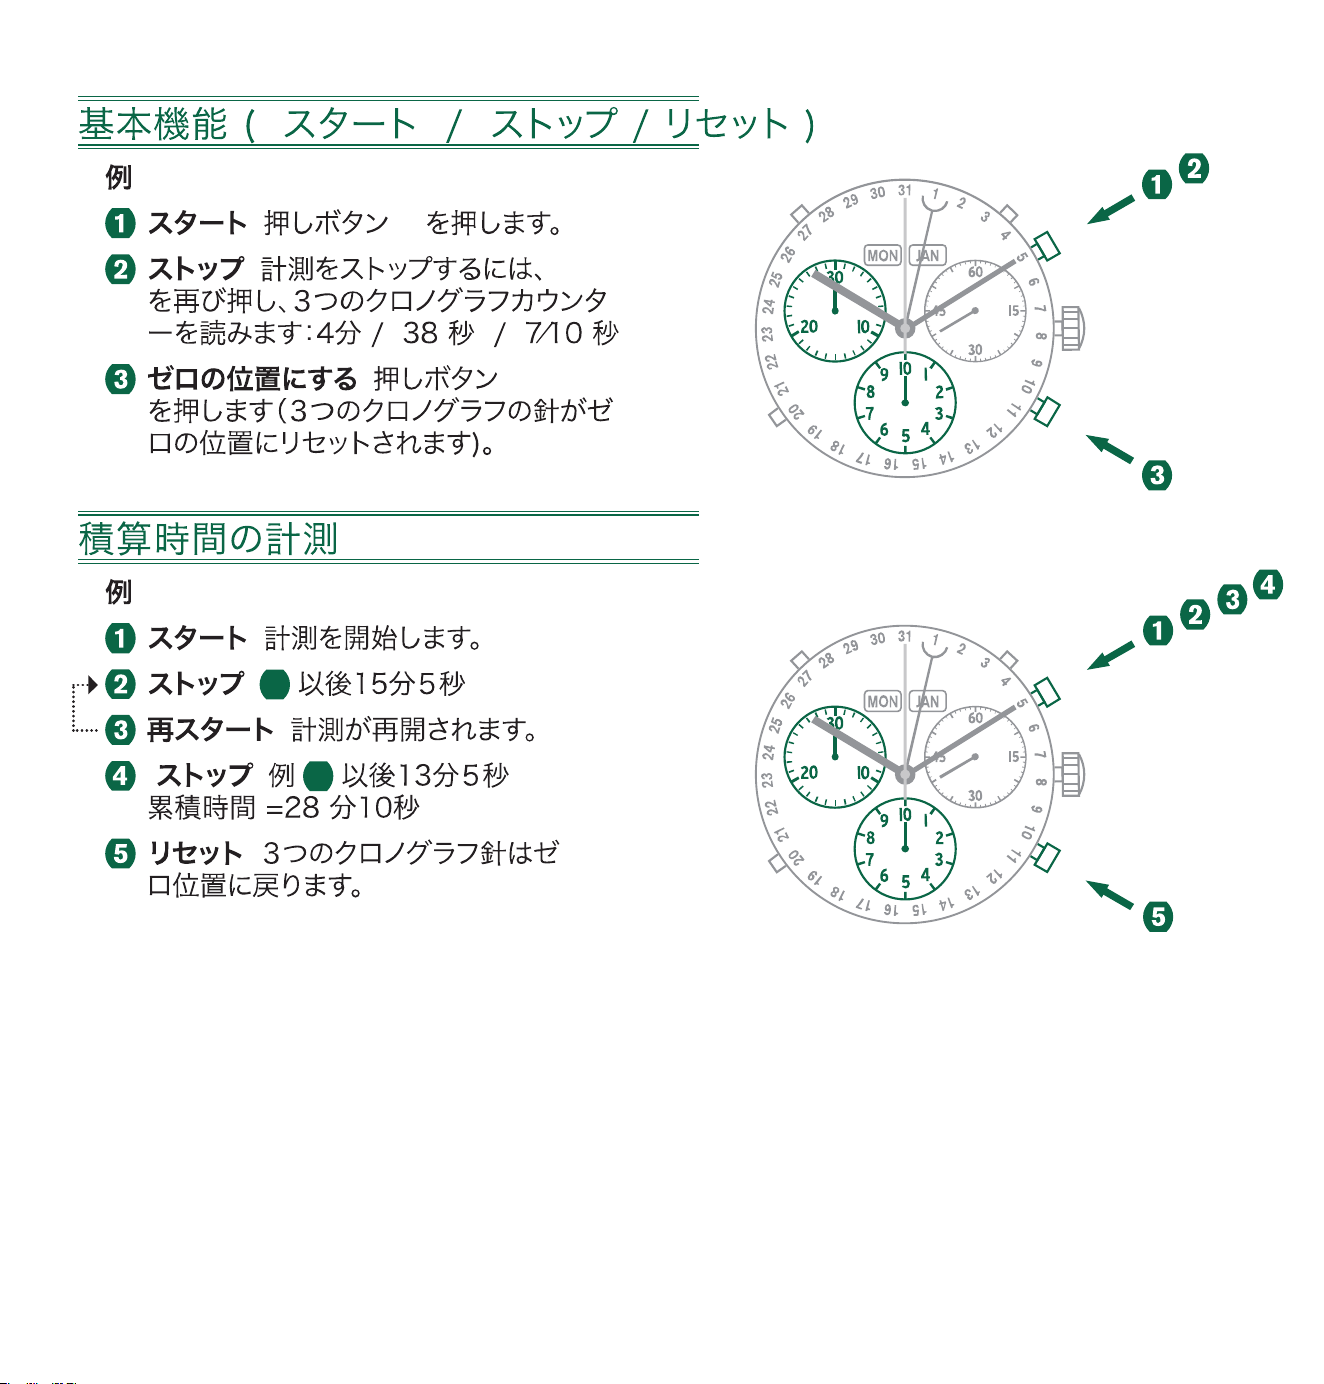
257
: A
: A
: B
:
:
1
:
* :
3
:
A
B
A
B
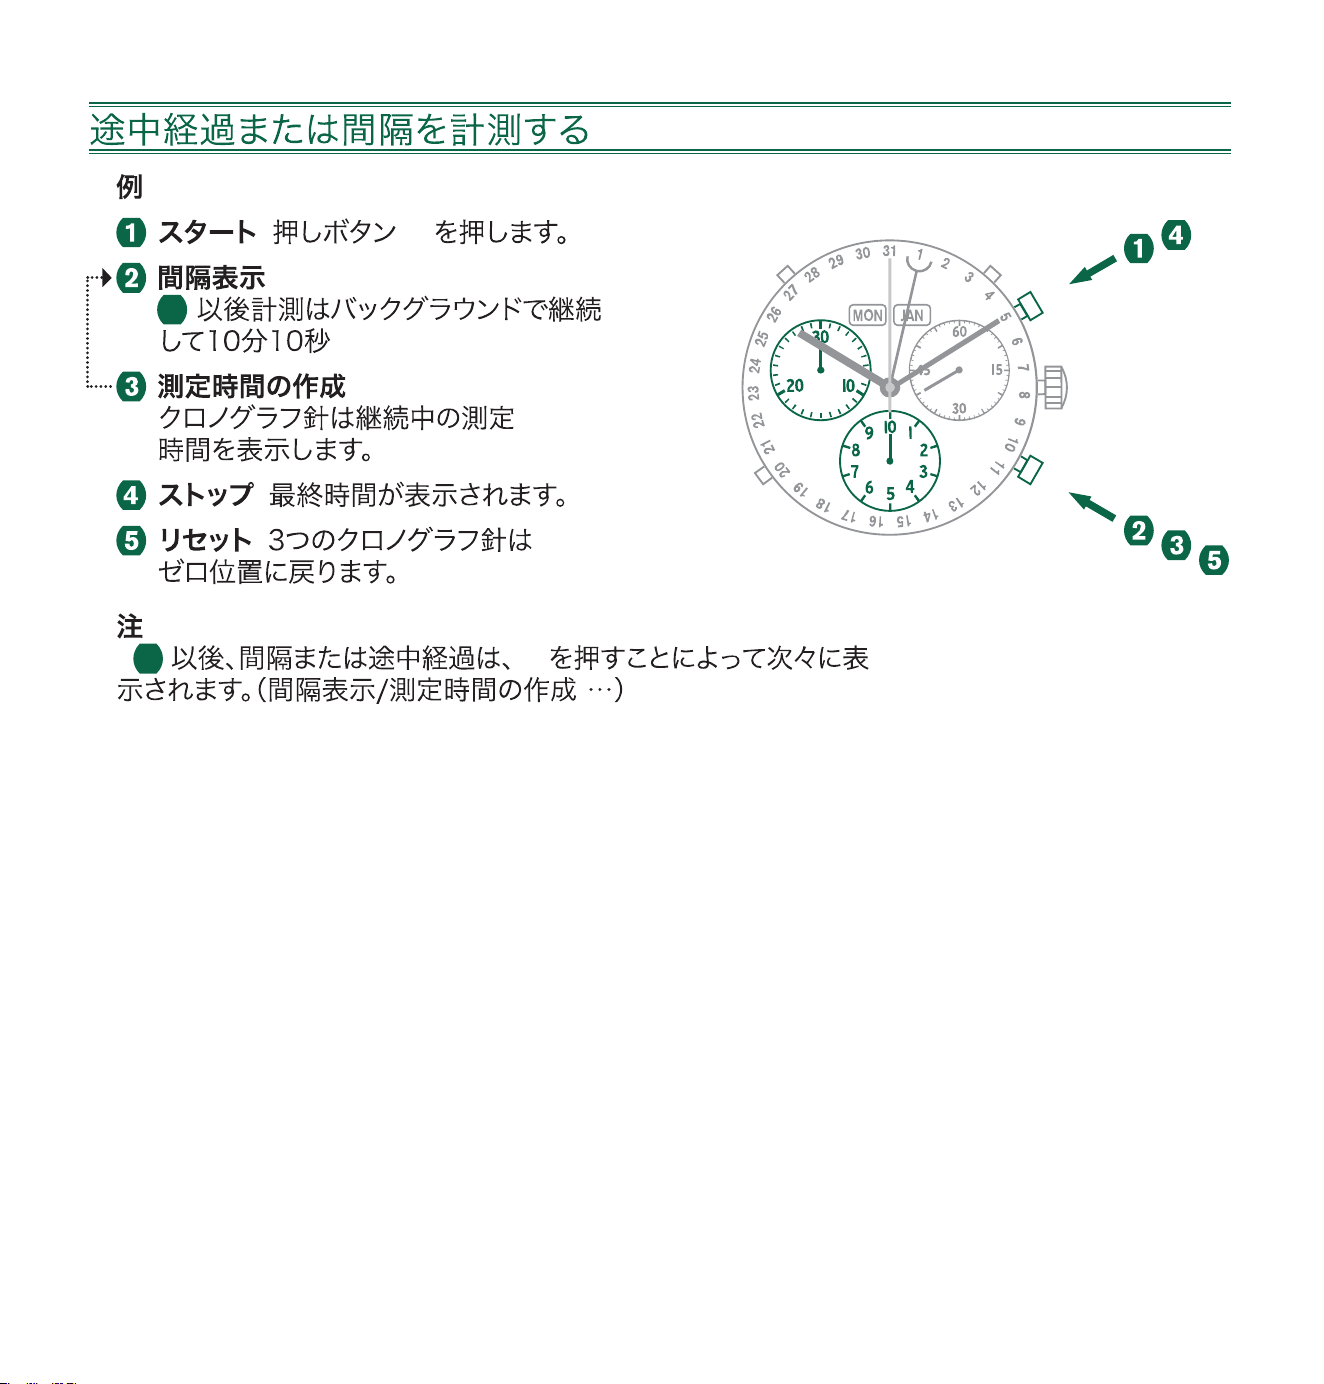
258
: A
:
1
:
:
:
:
*
3
B
*
A
B
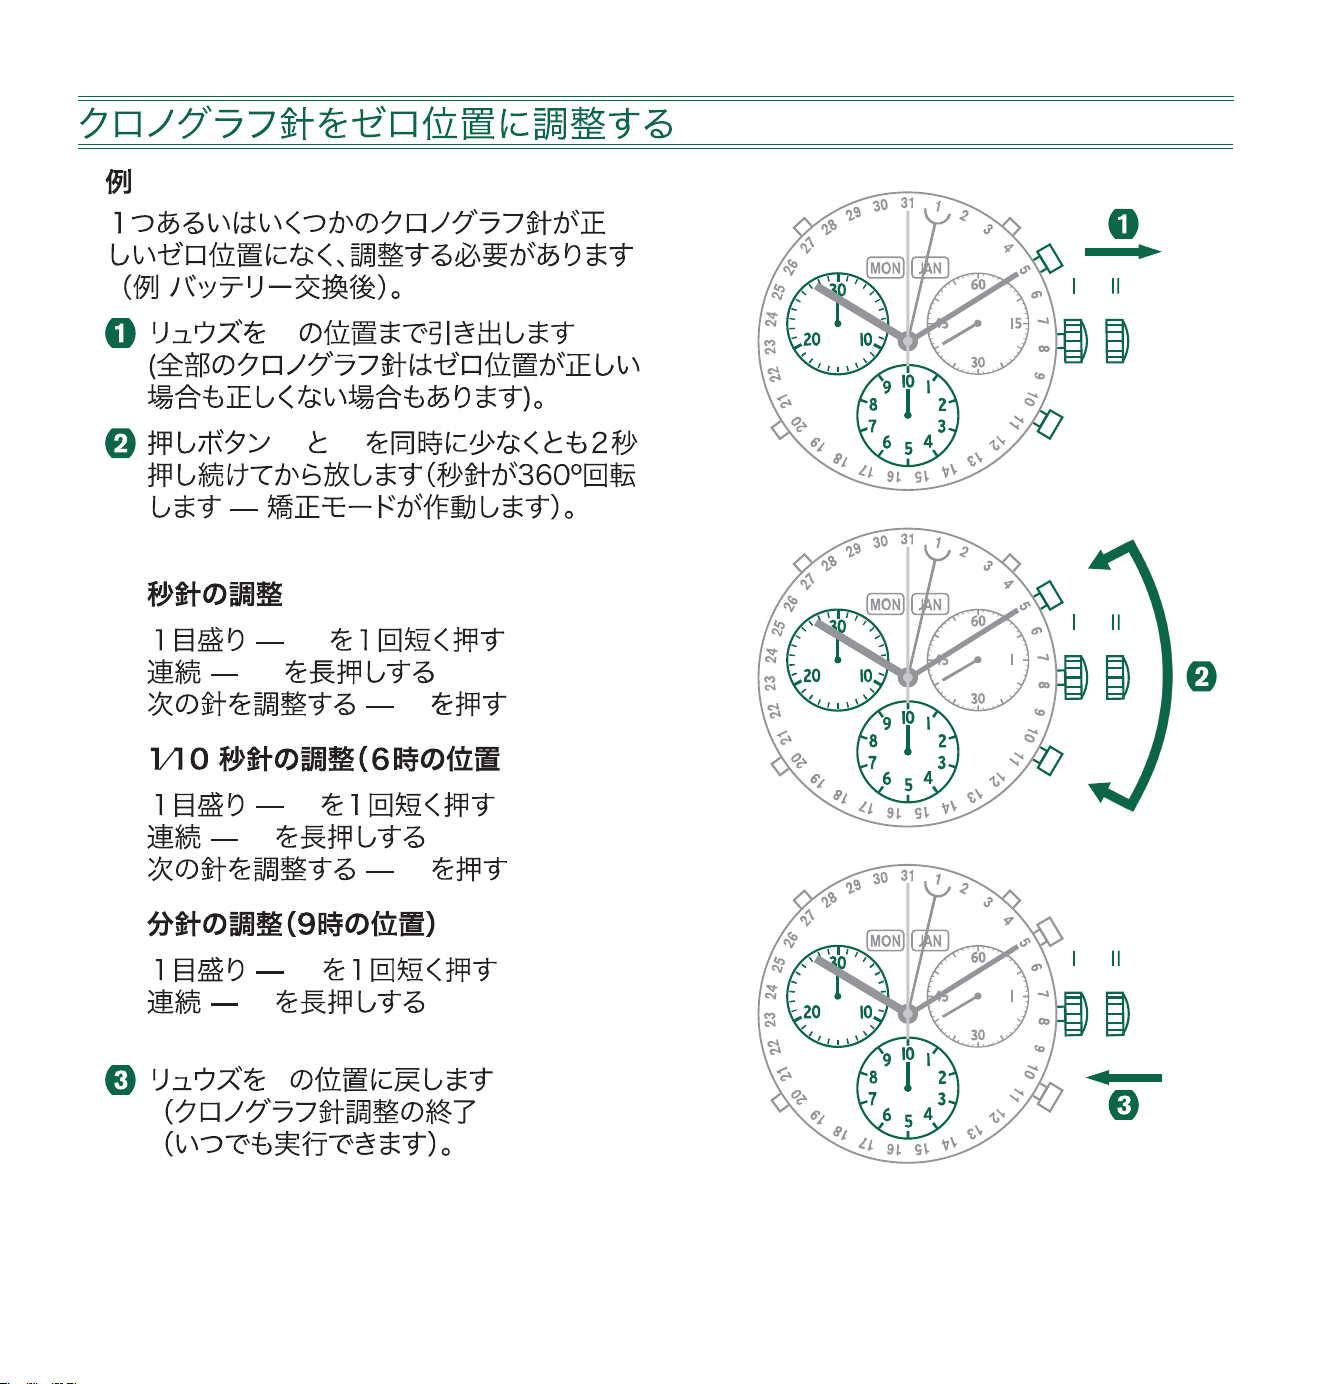
259
II
A B
:
A
A
B
:
A
A
B
:
A
A
I
A
B
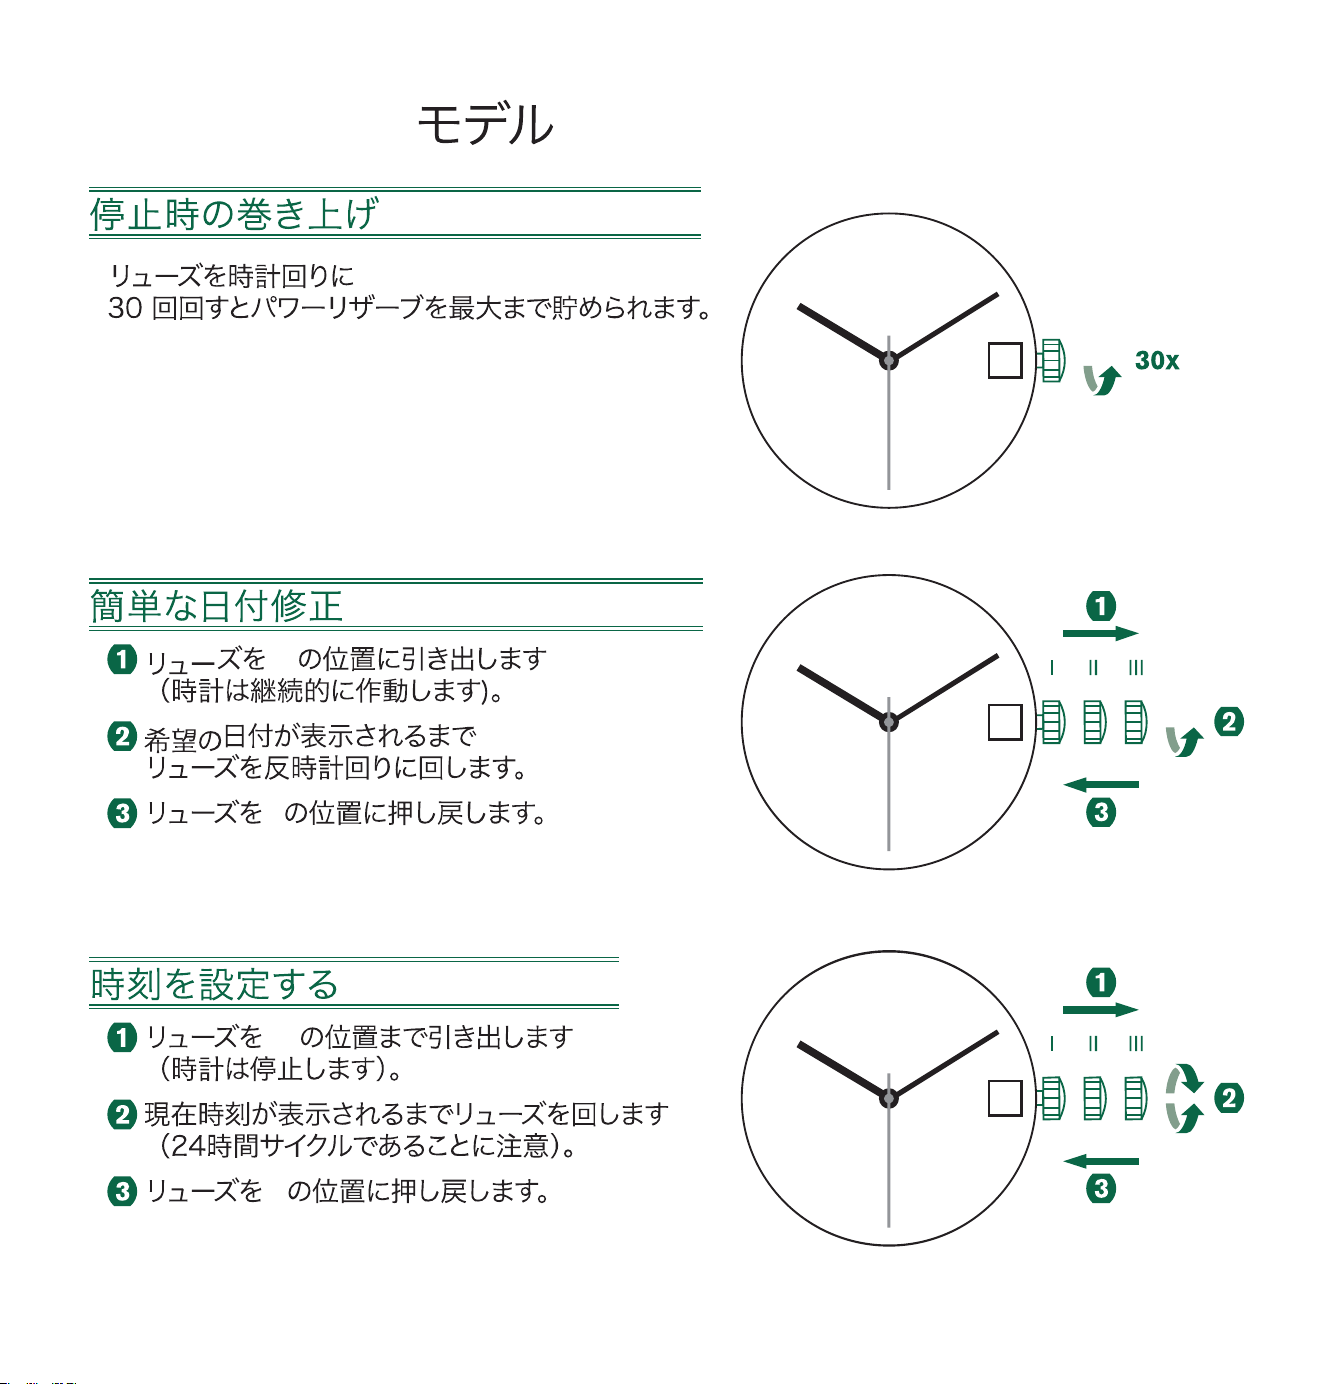
260
ARGOMATIC R150
II
I
III
I
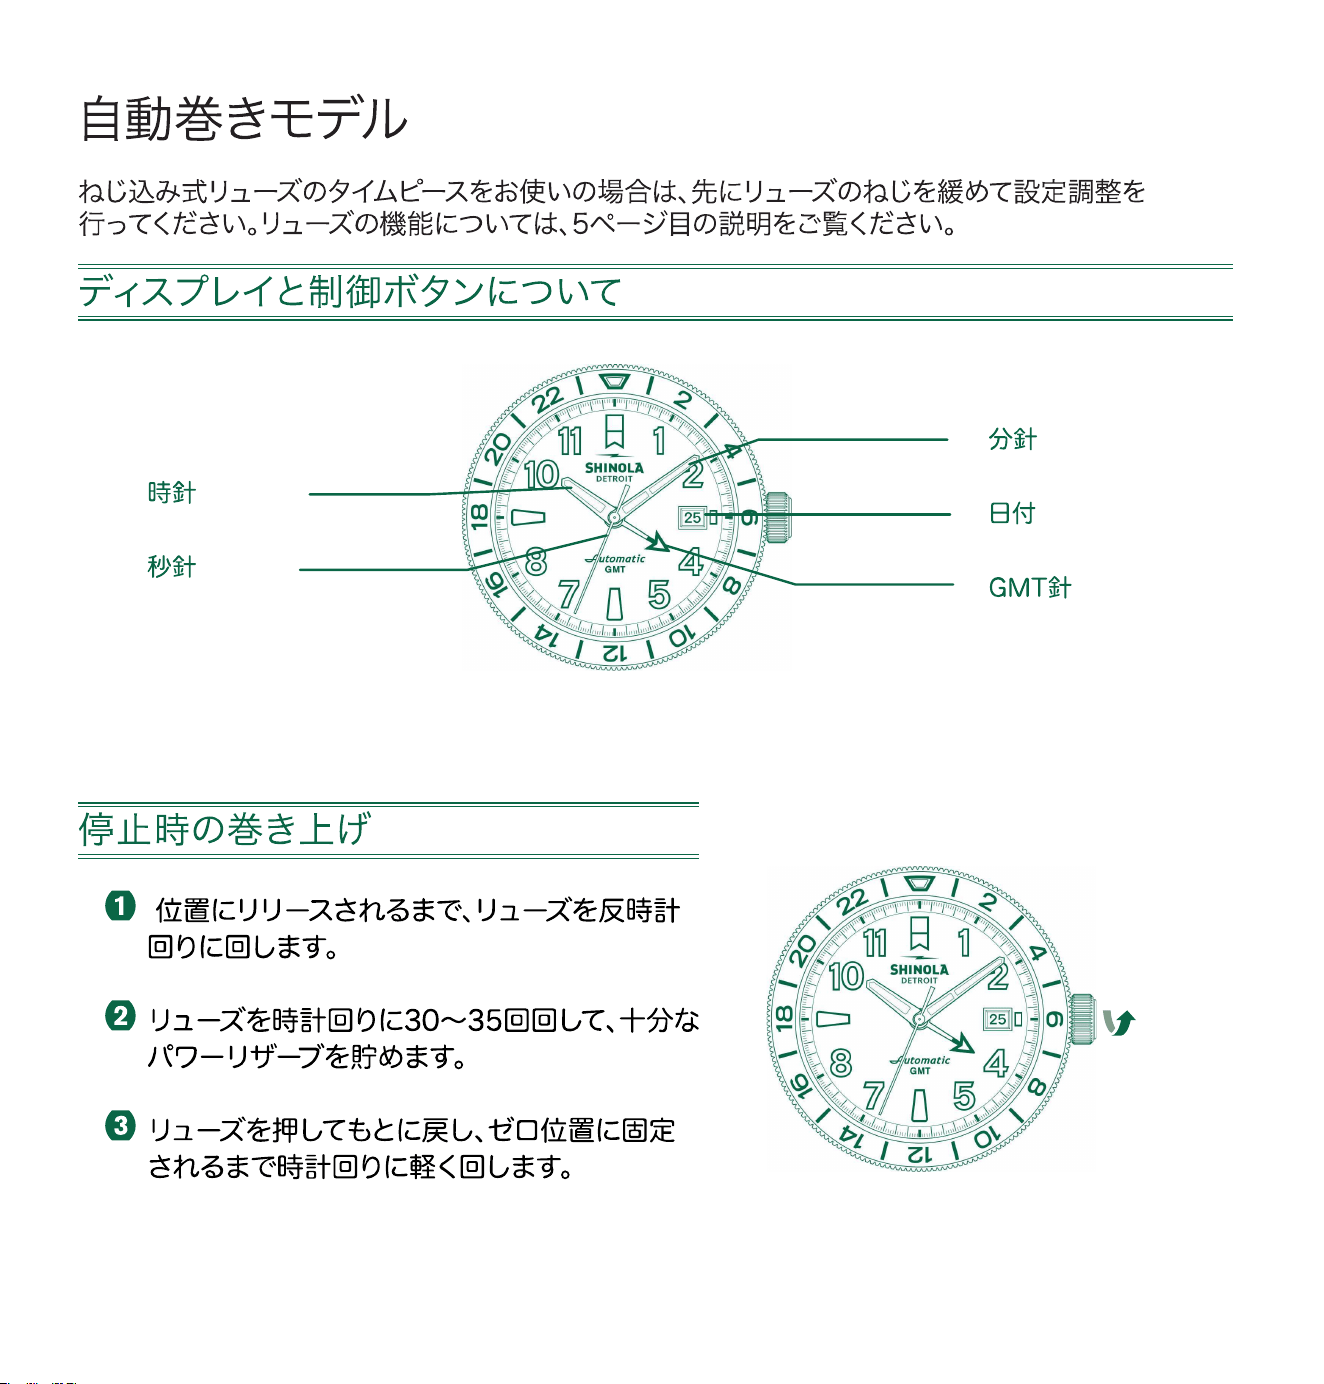
261
SW330-2
I
30x - 35x
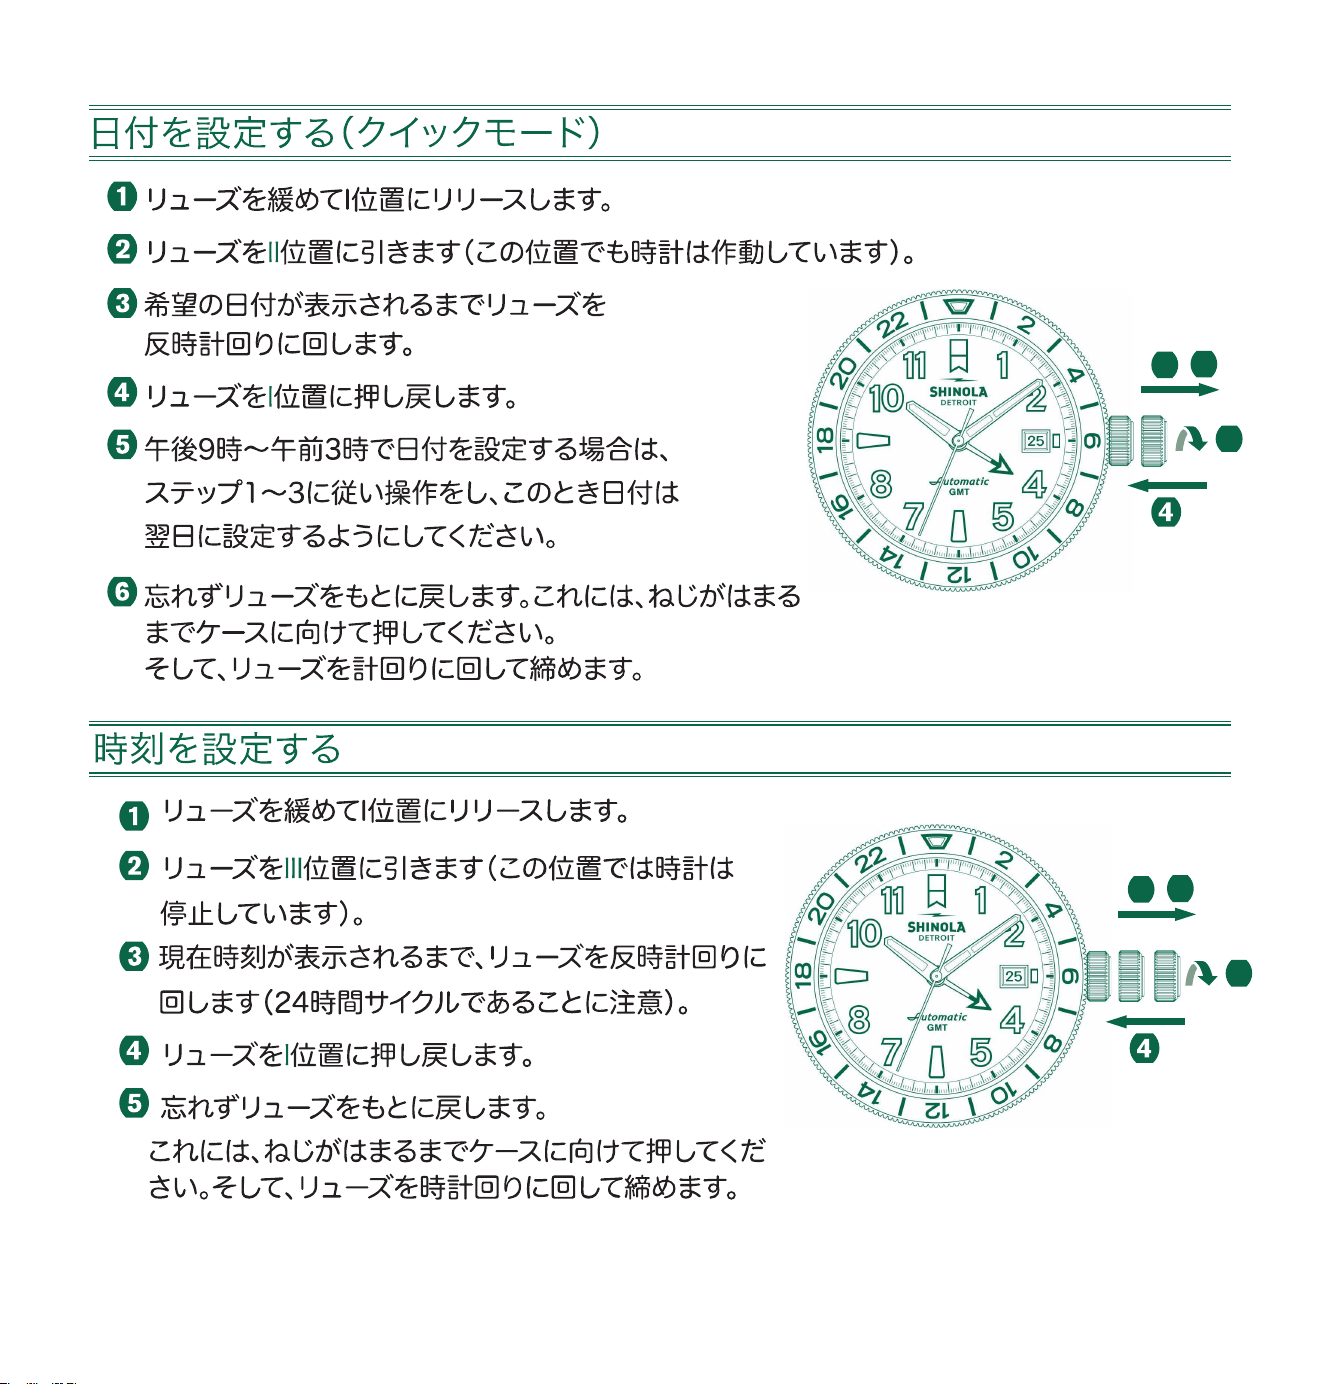
262
III
3
1 2
II IIII
3
1
2
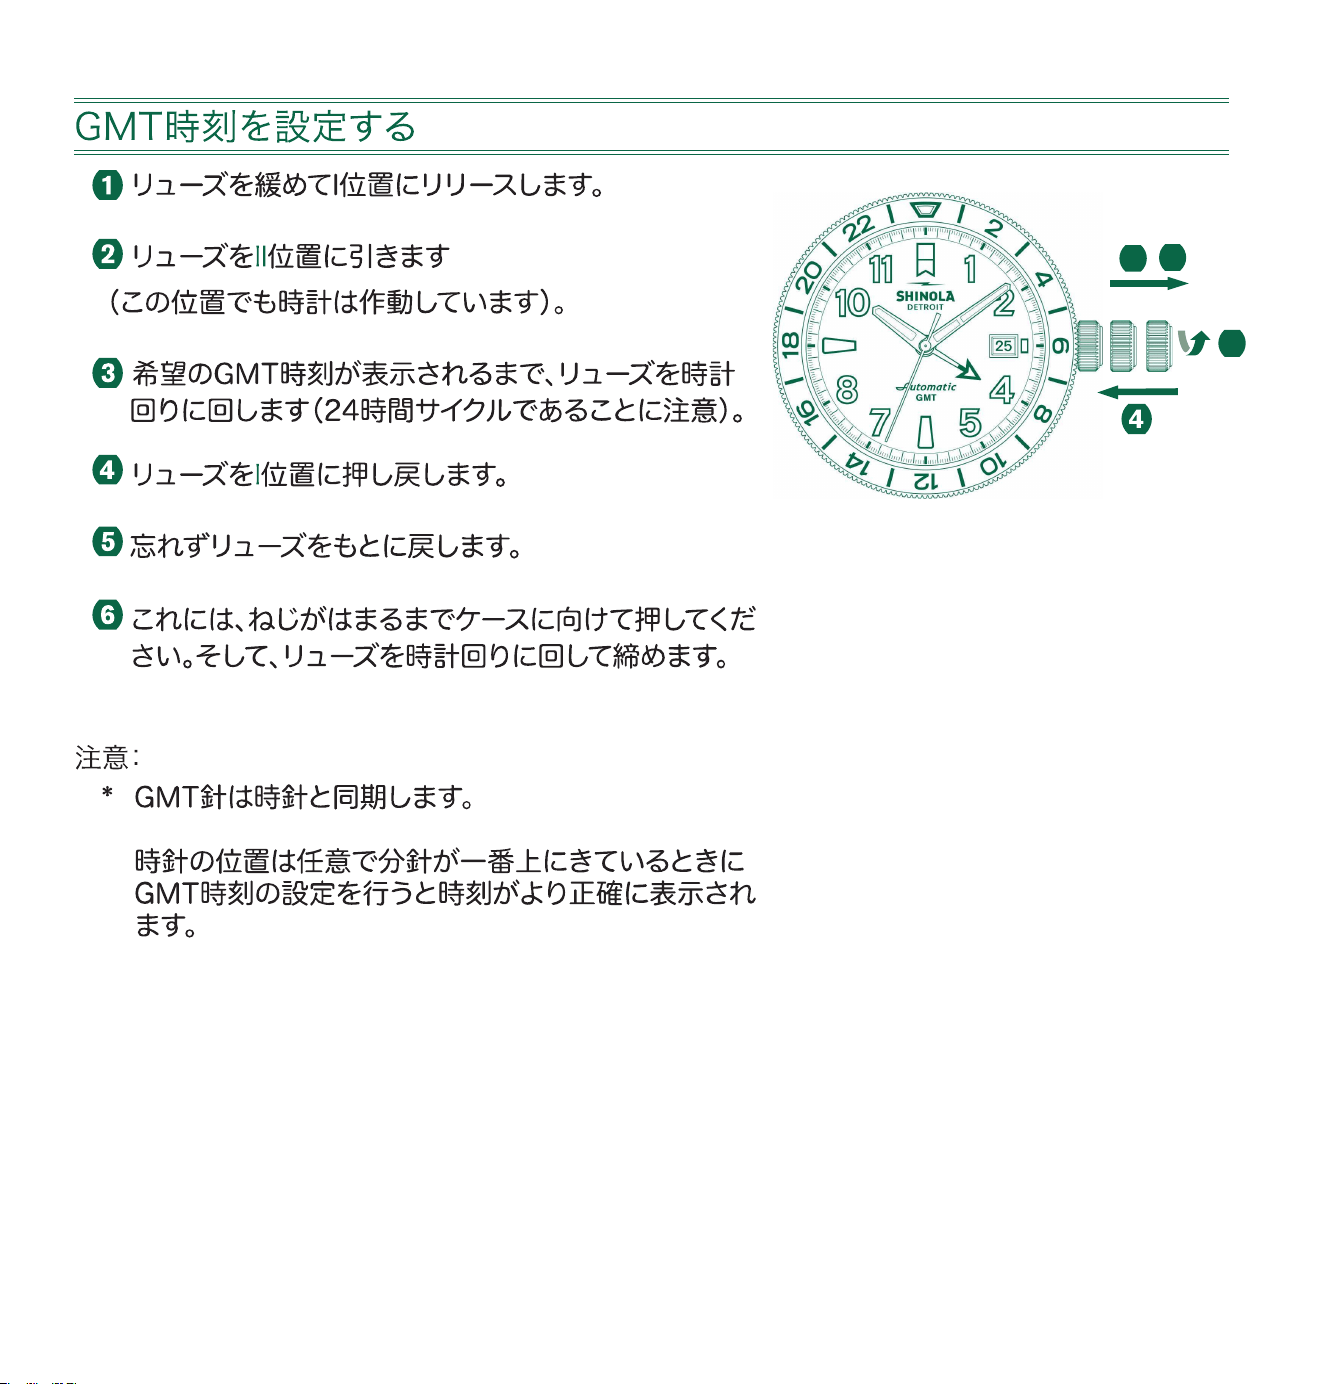
263
II IIII
3
1
2
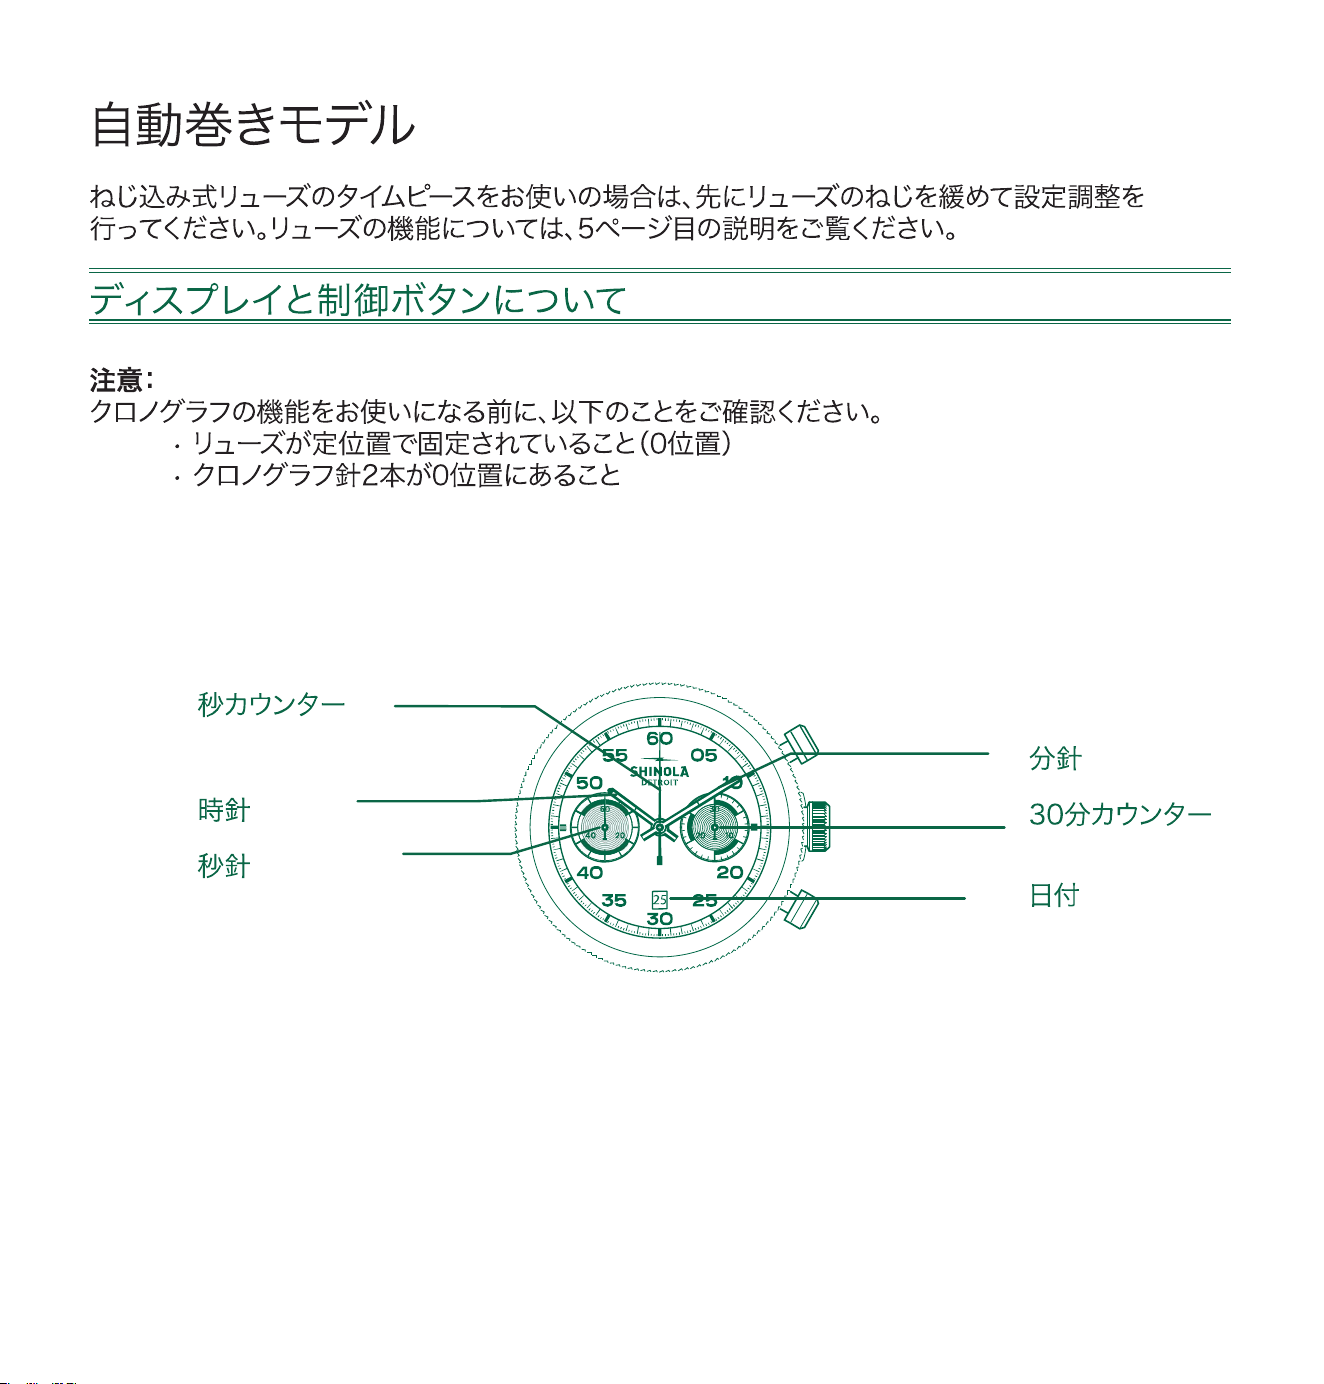
264
SW510 BH A
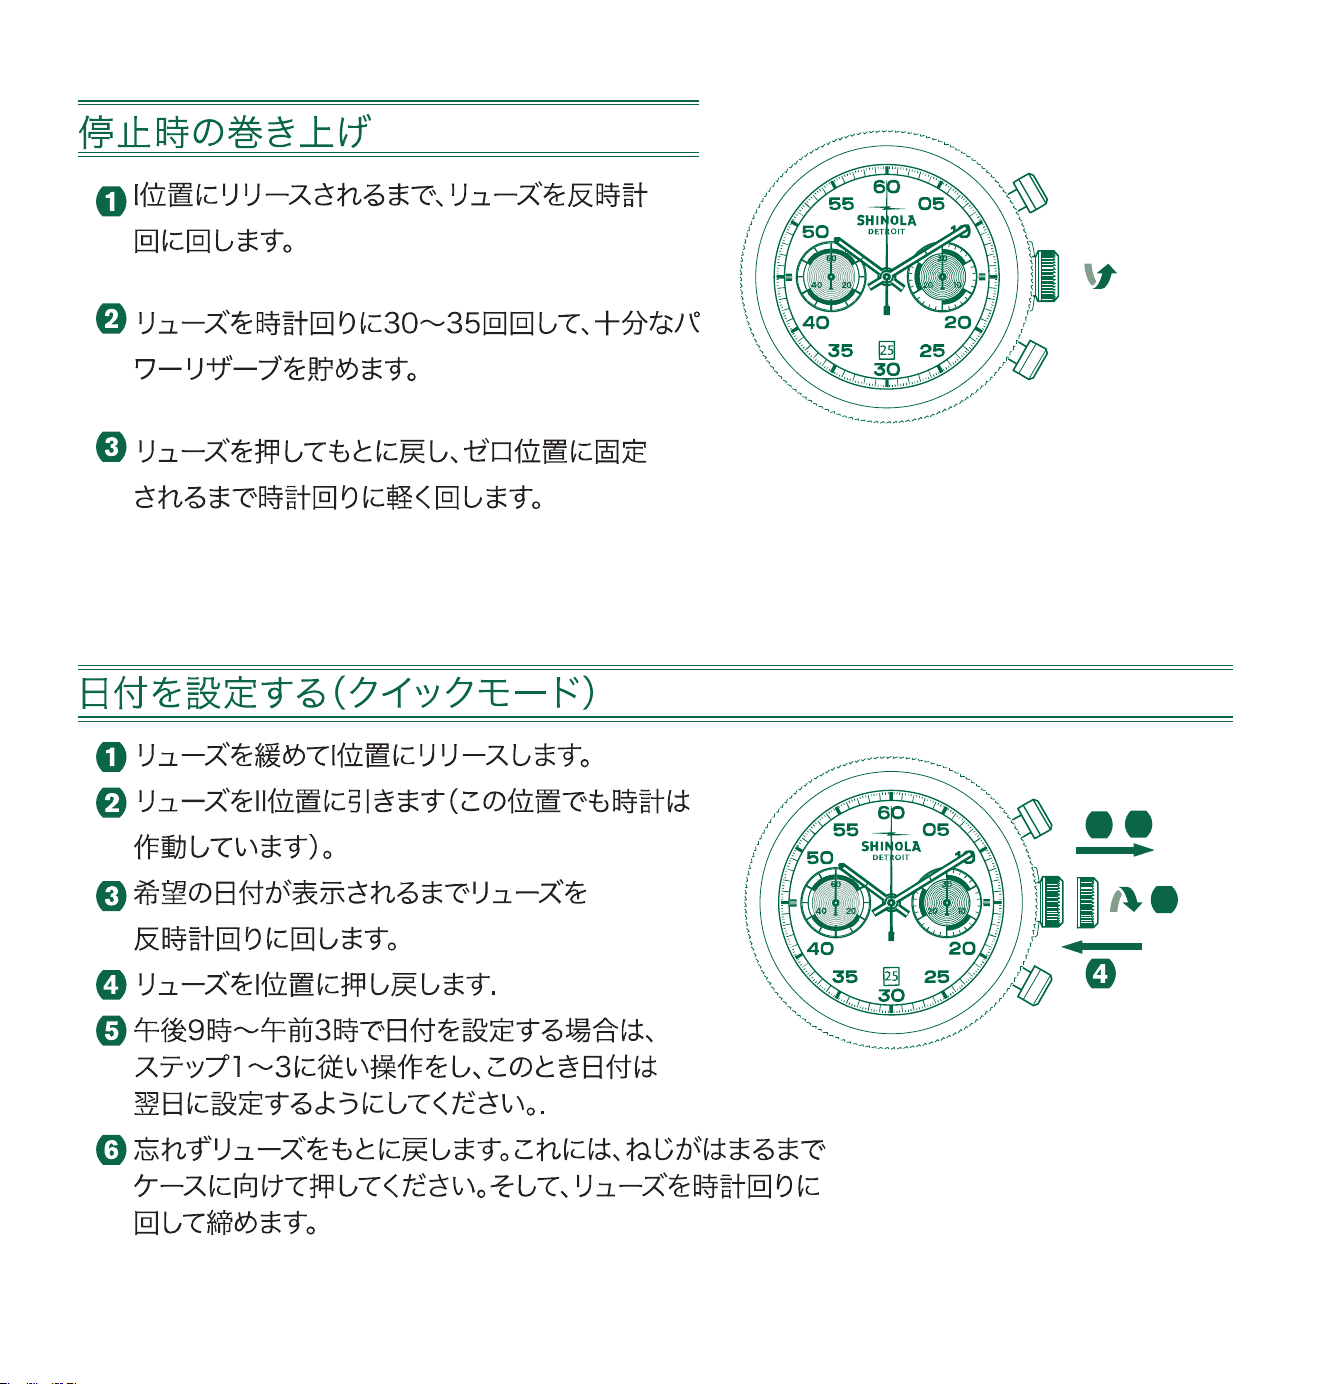
265
30x - 35x
III
3
1 2
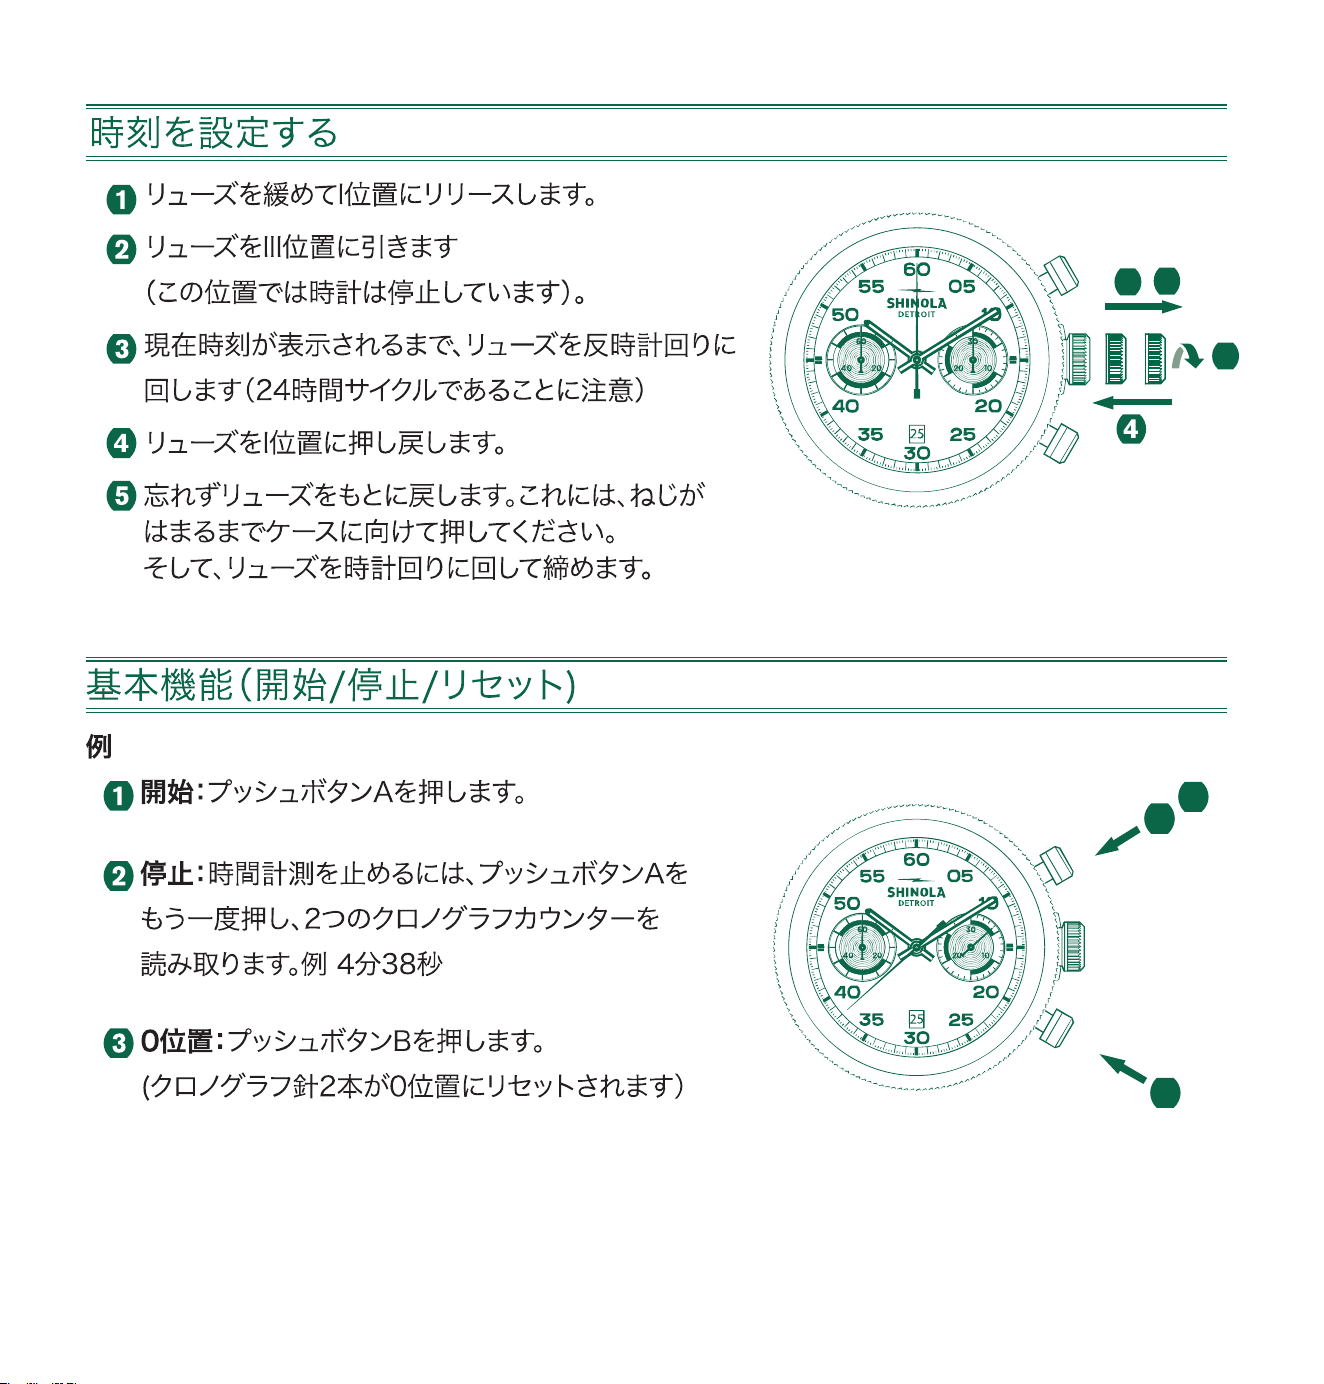
266
1
2
3
A
B
II IIII
3
1
2
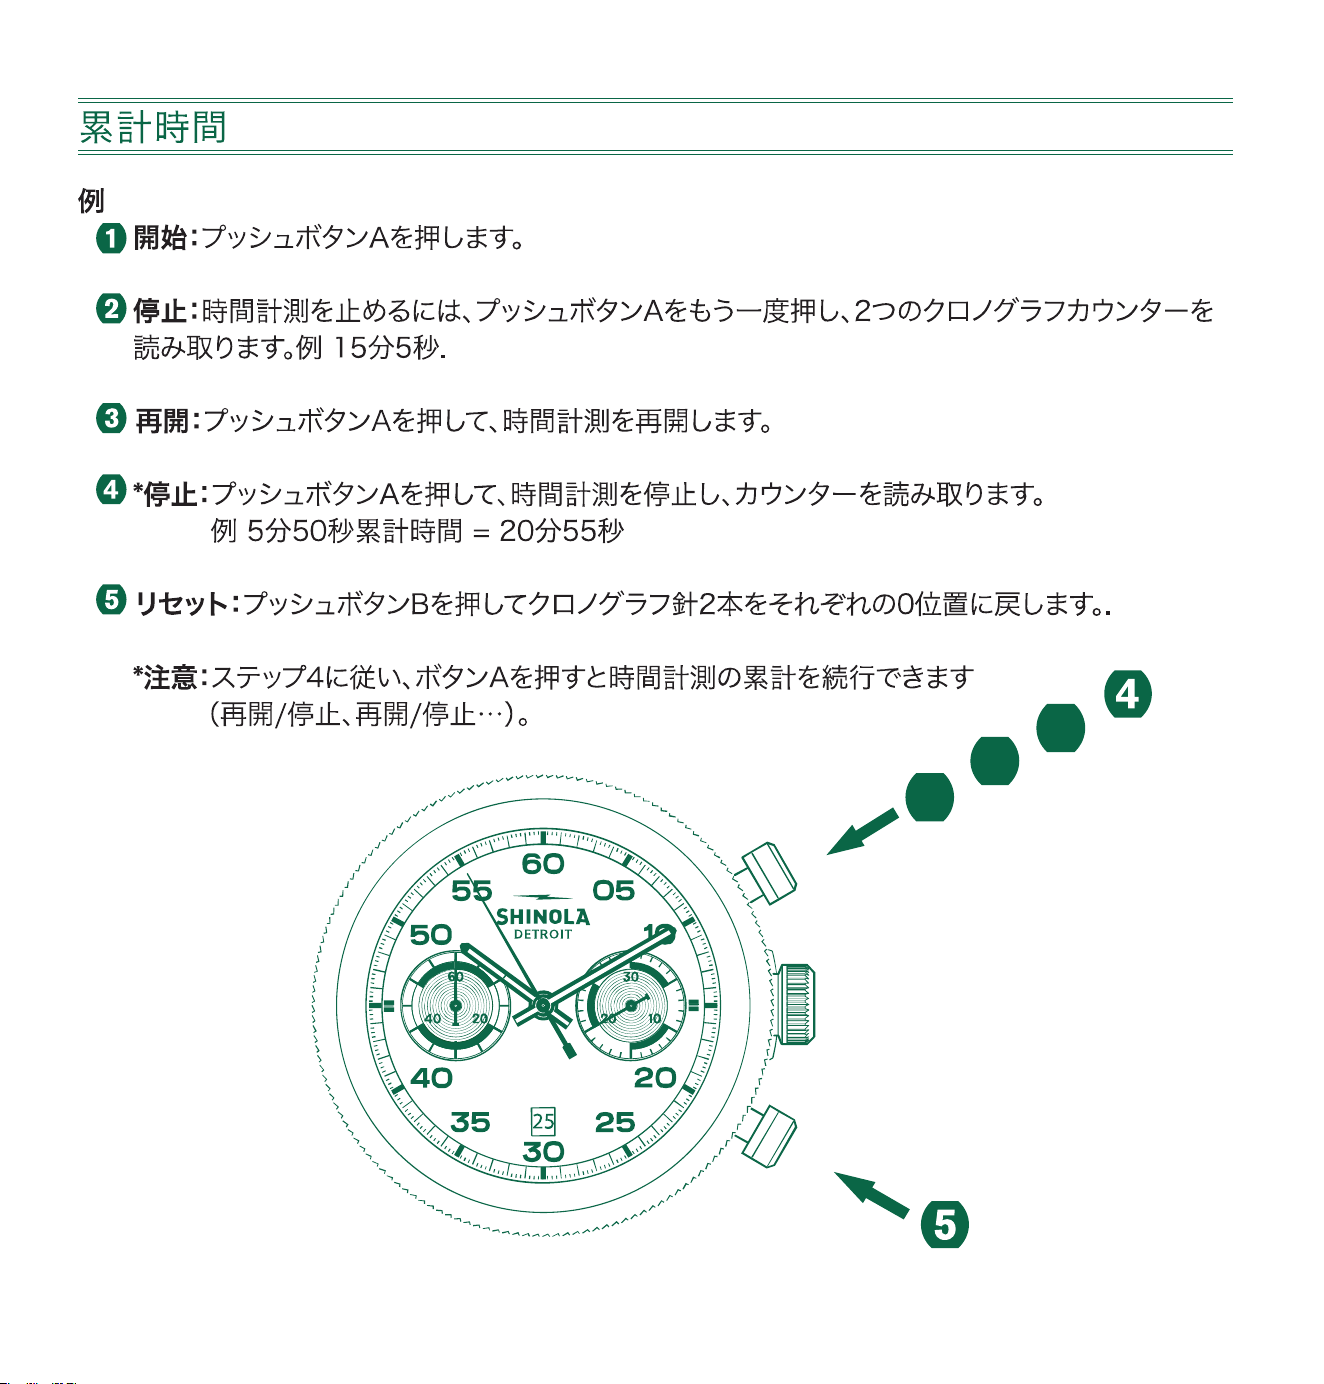
267
1
2
3
A
B
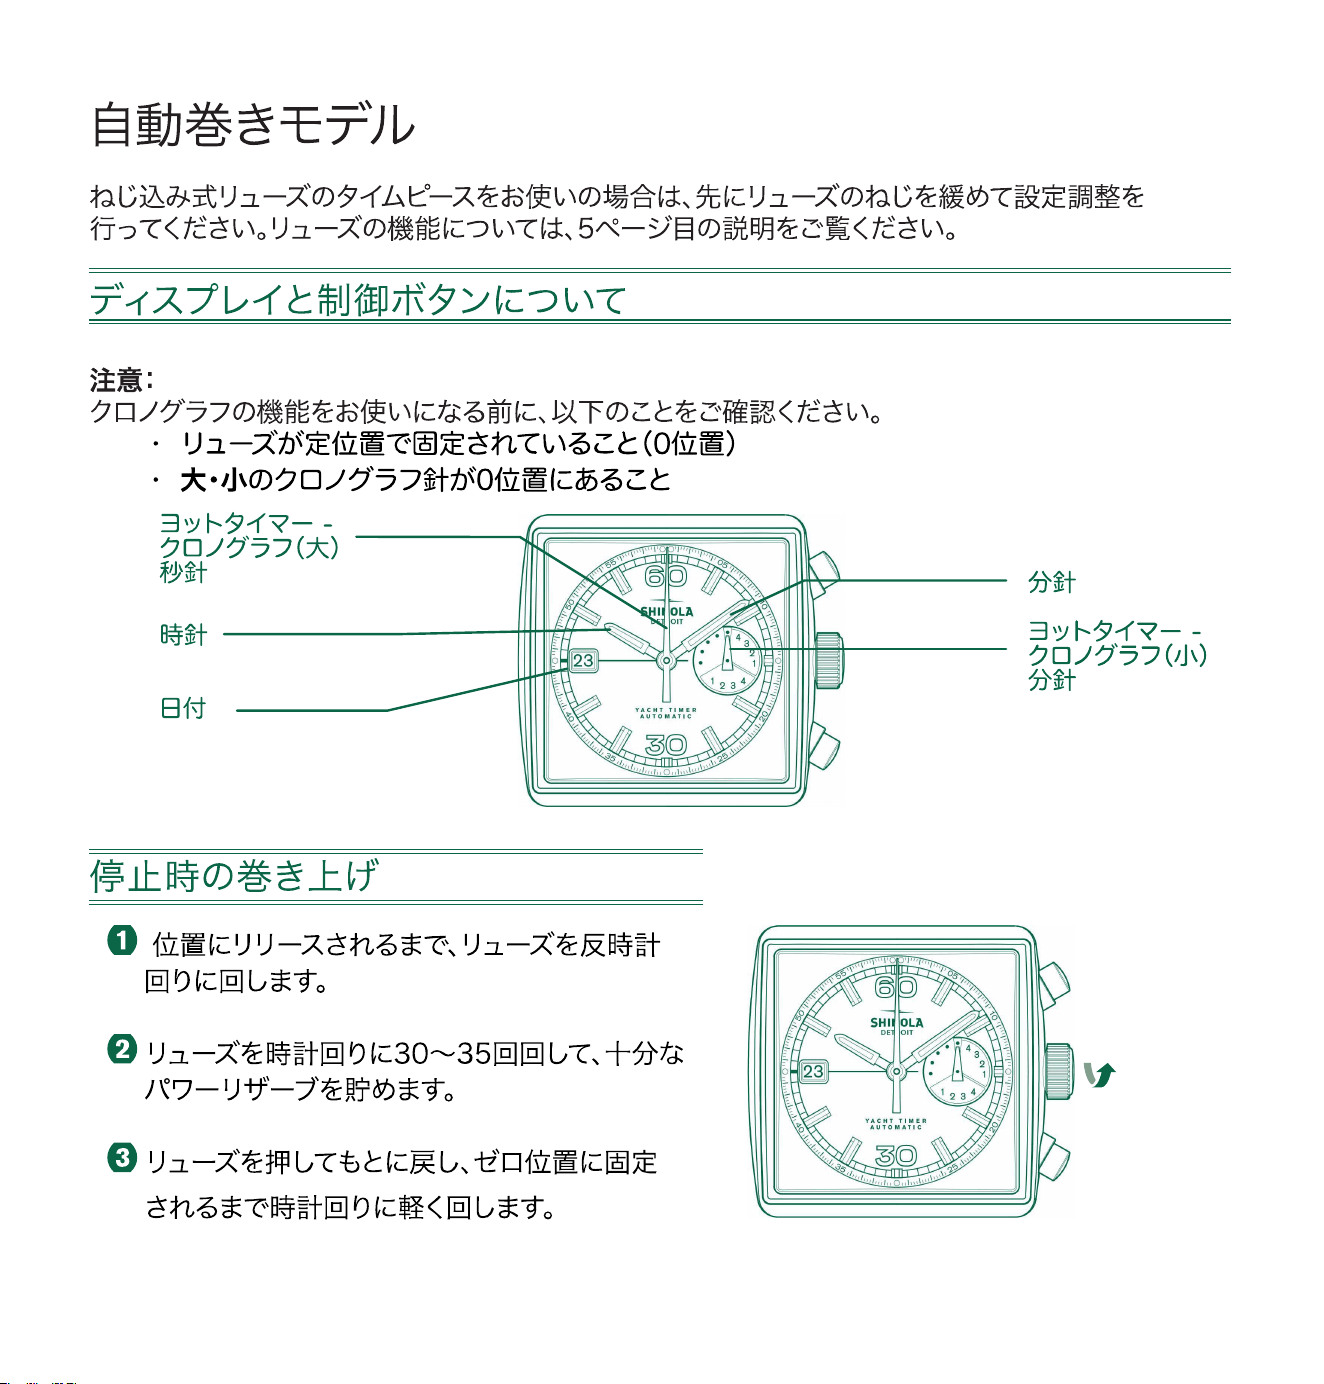
268
SW511 BH C
I
30x - 35x
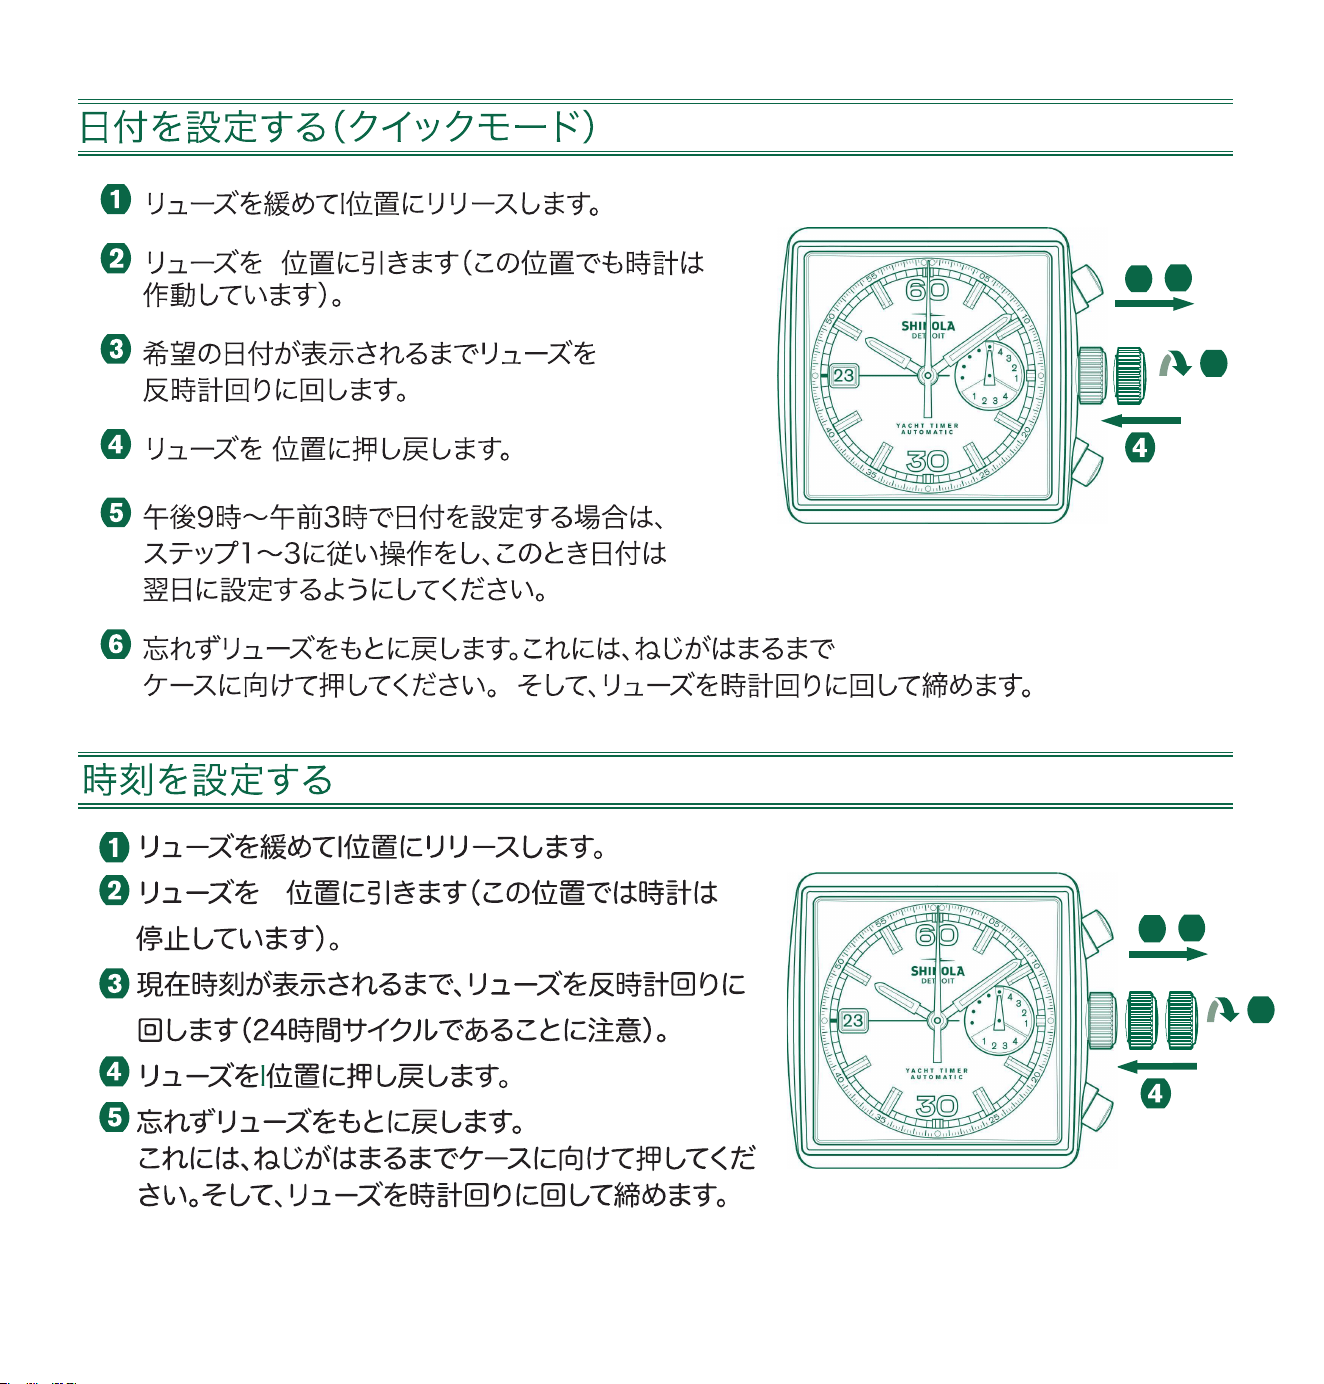
269
II
I
III
III
3
1
2
II IIII
3
1
2

270
1
2
3
A
B
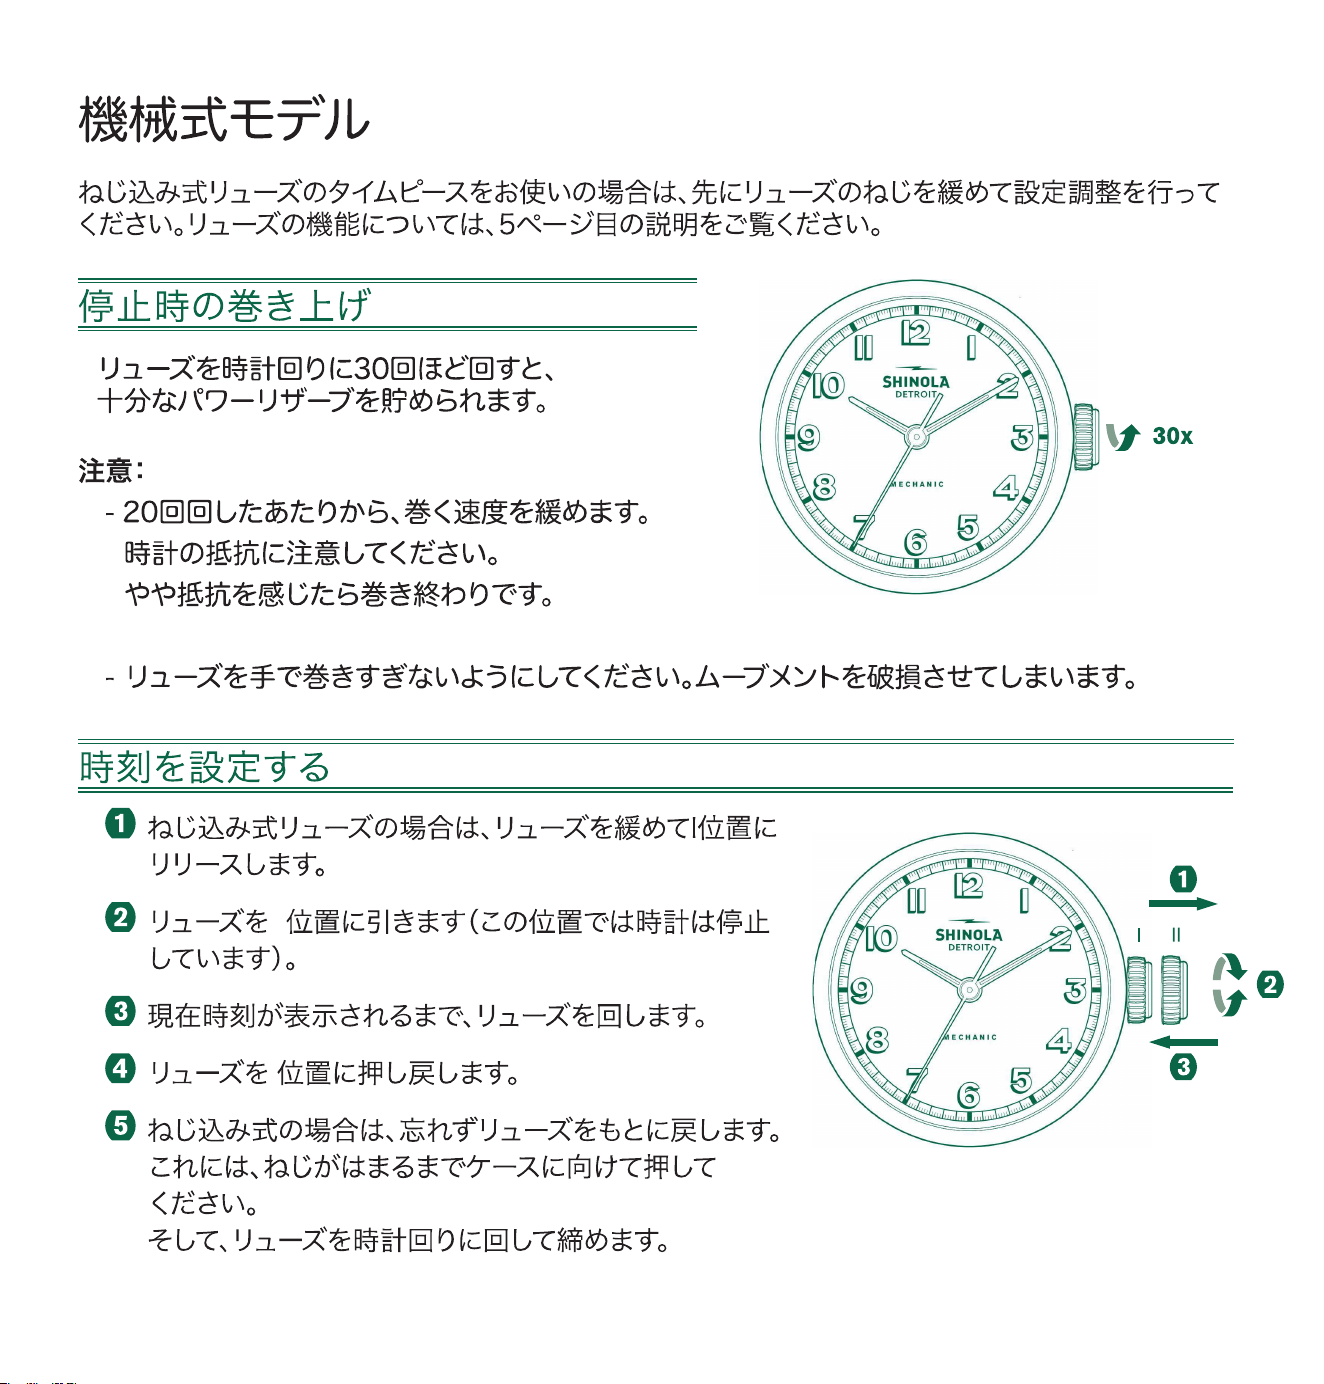
271
II
I
SW210-1
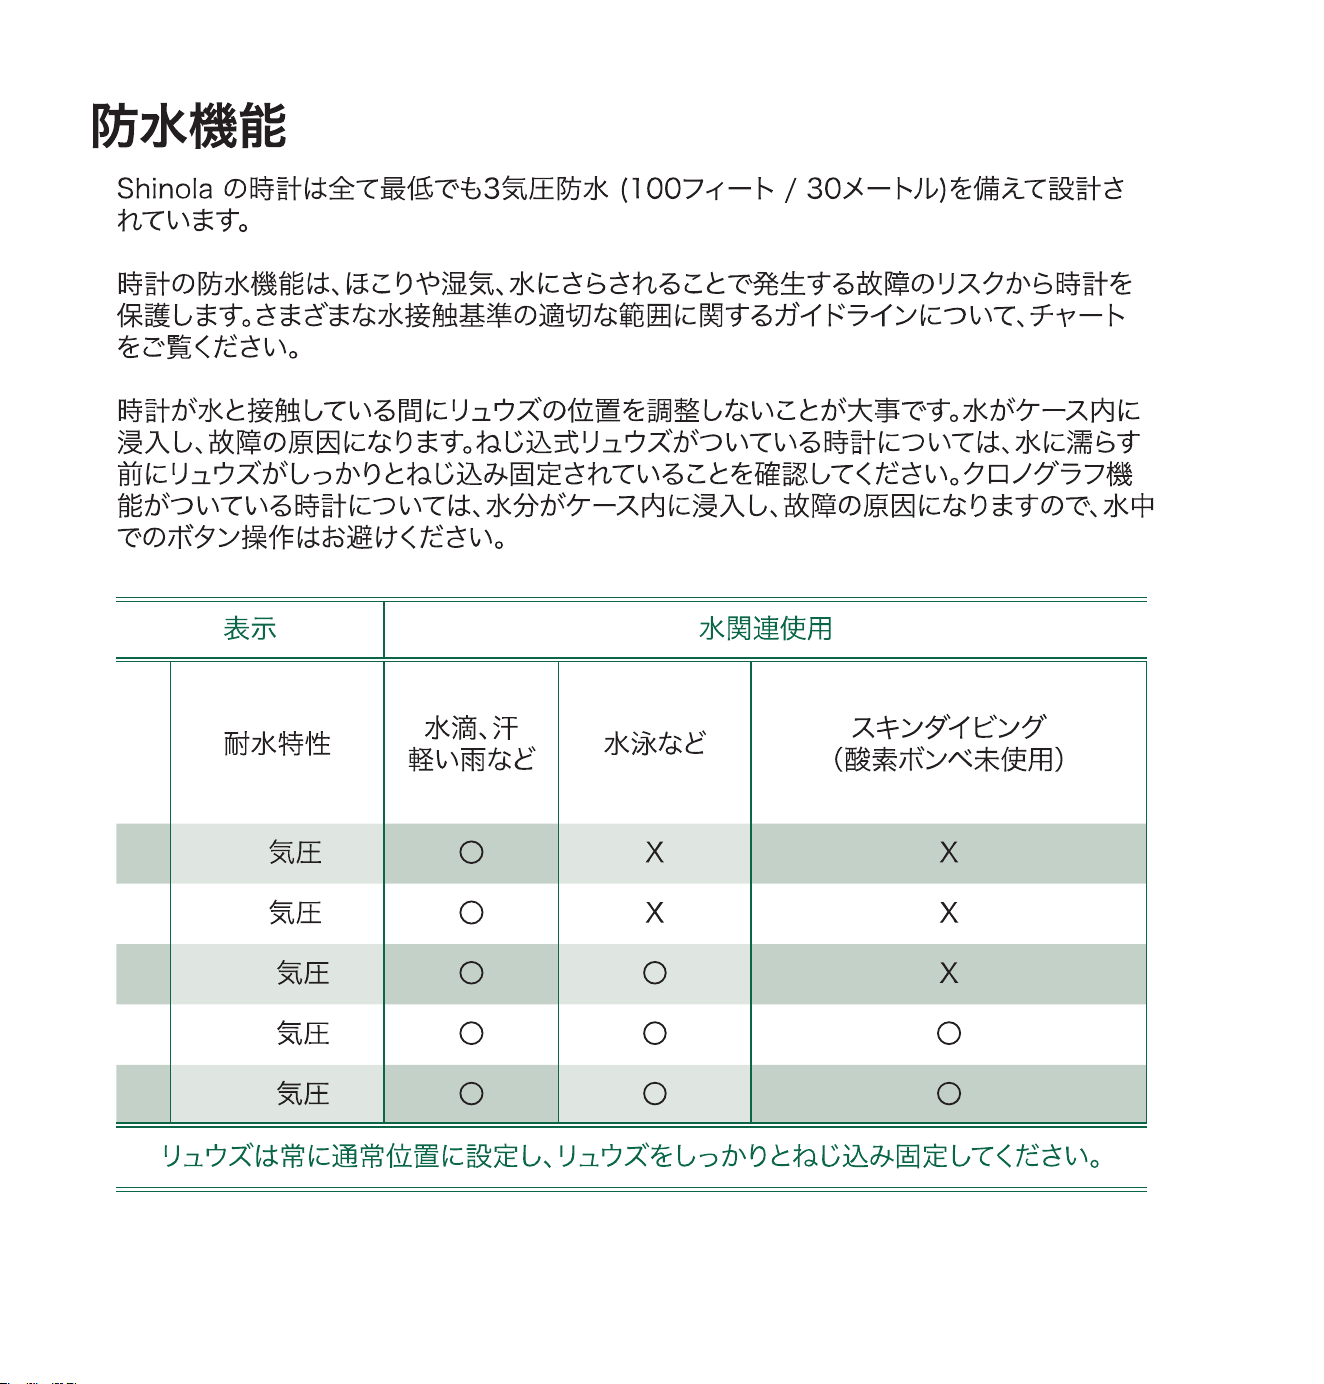
272
1
3
2
5
3
10
4
20
5
30
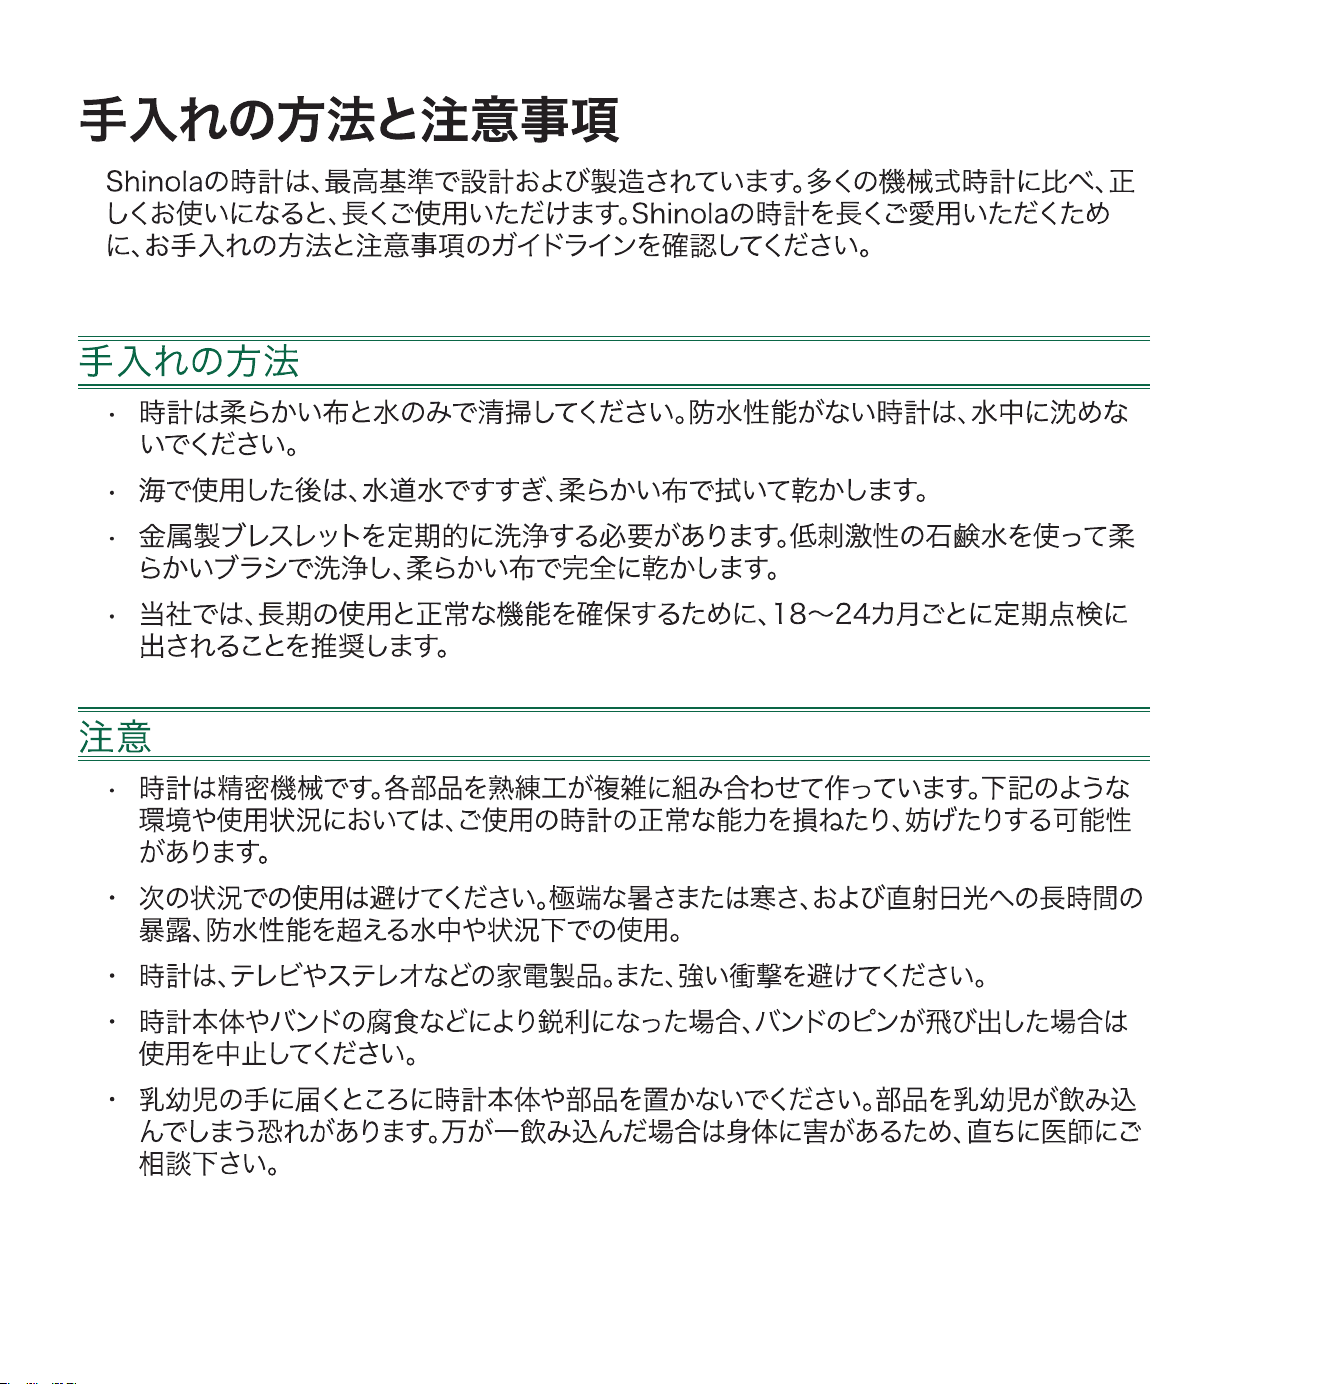
273

274
(
EOL
)
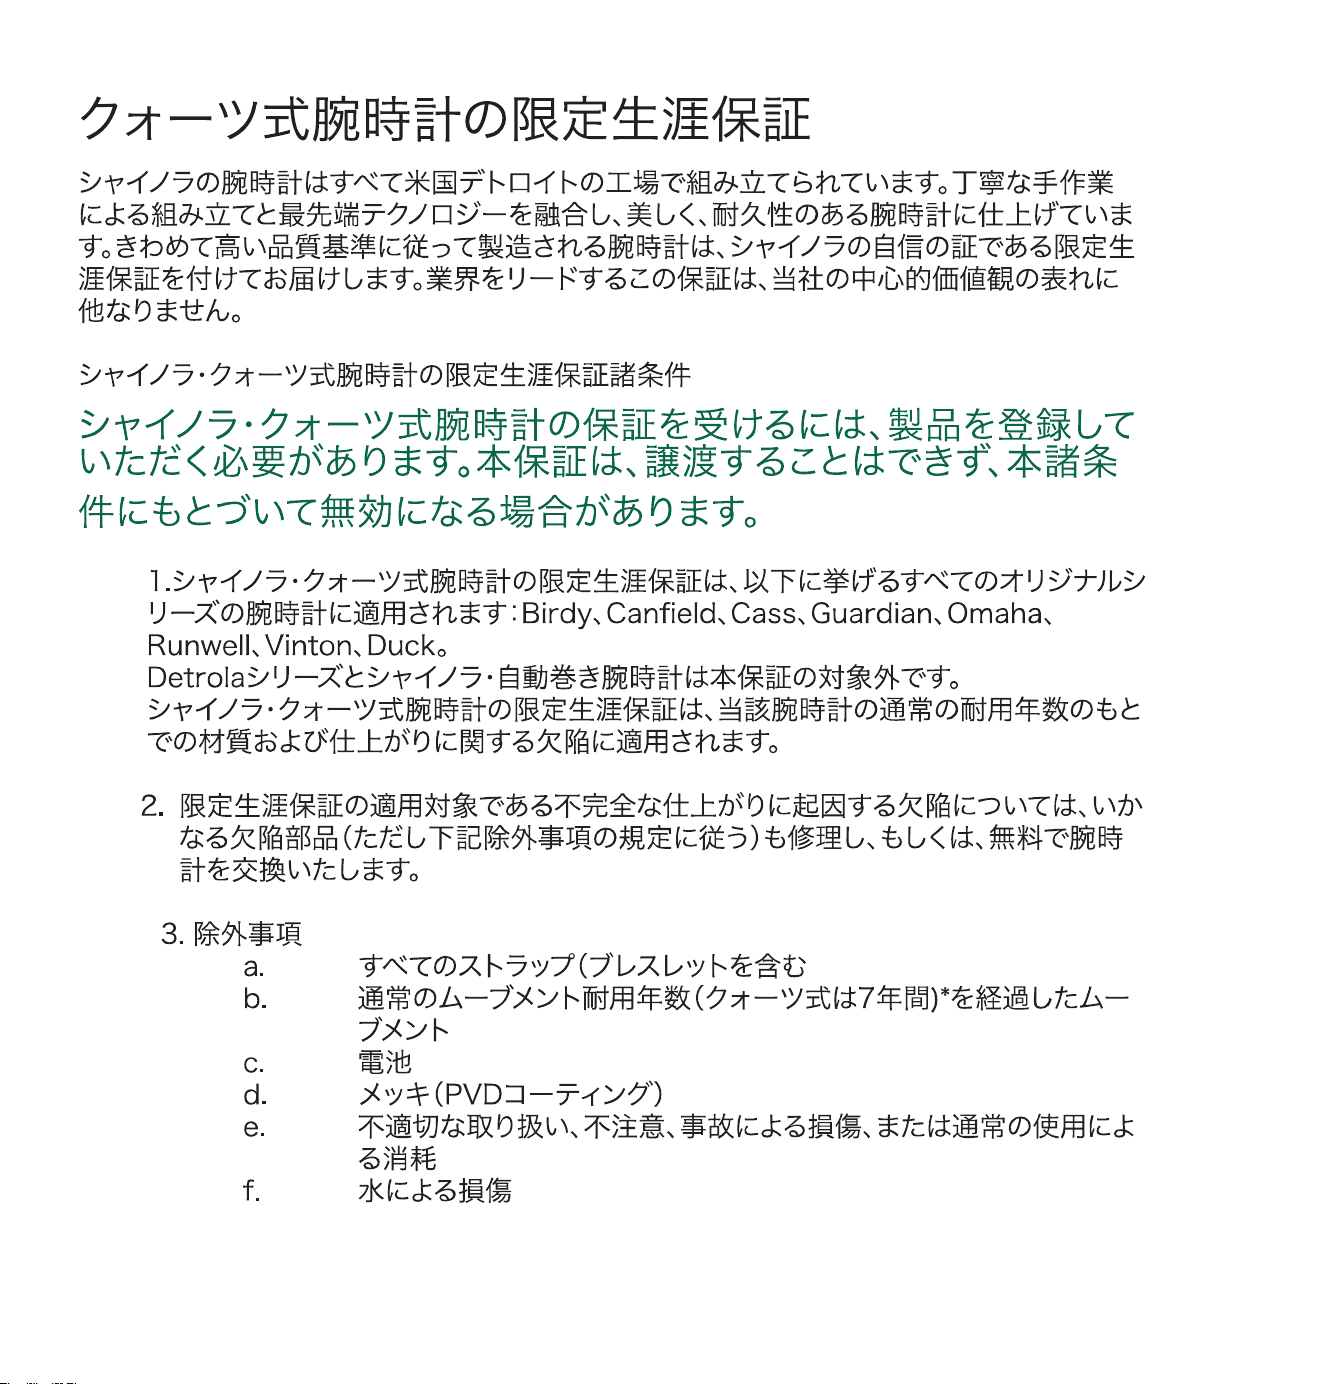
275
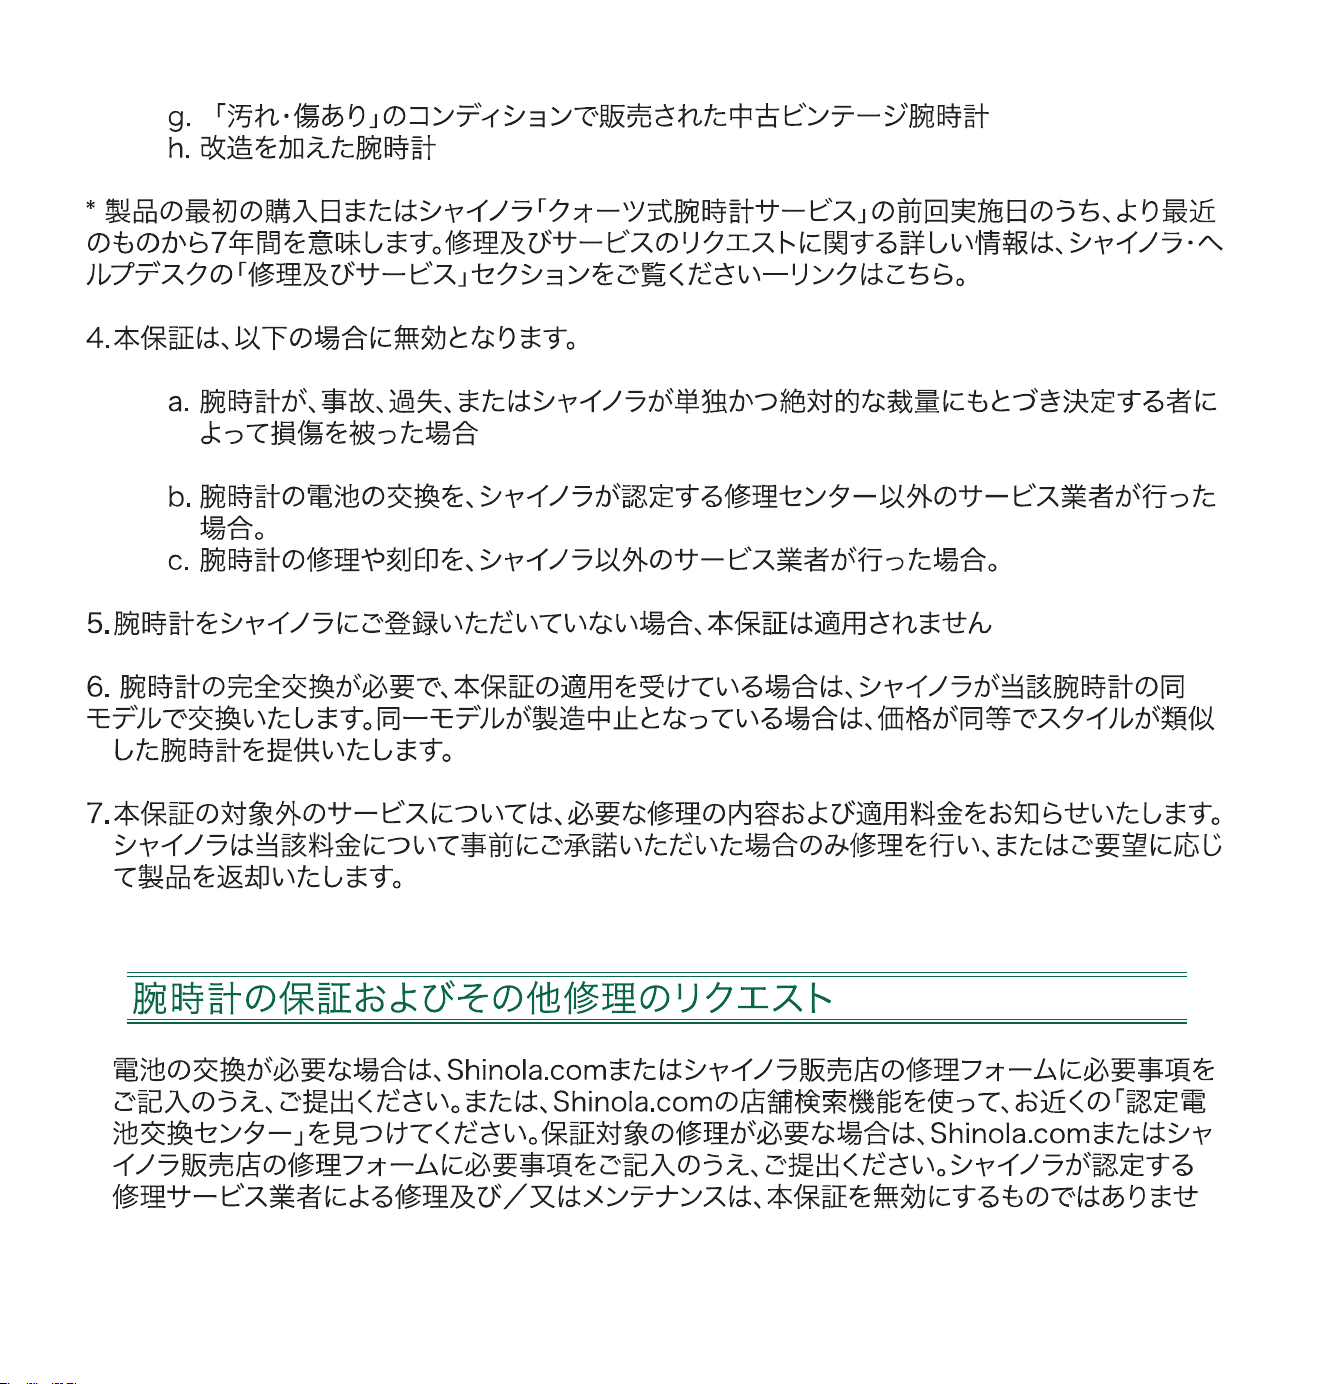
276
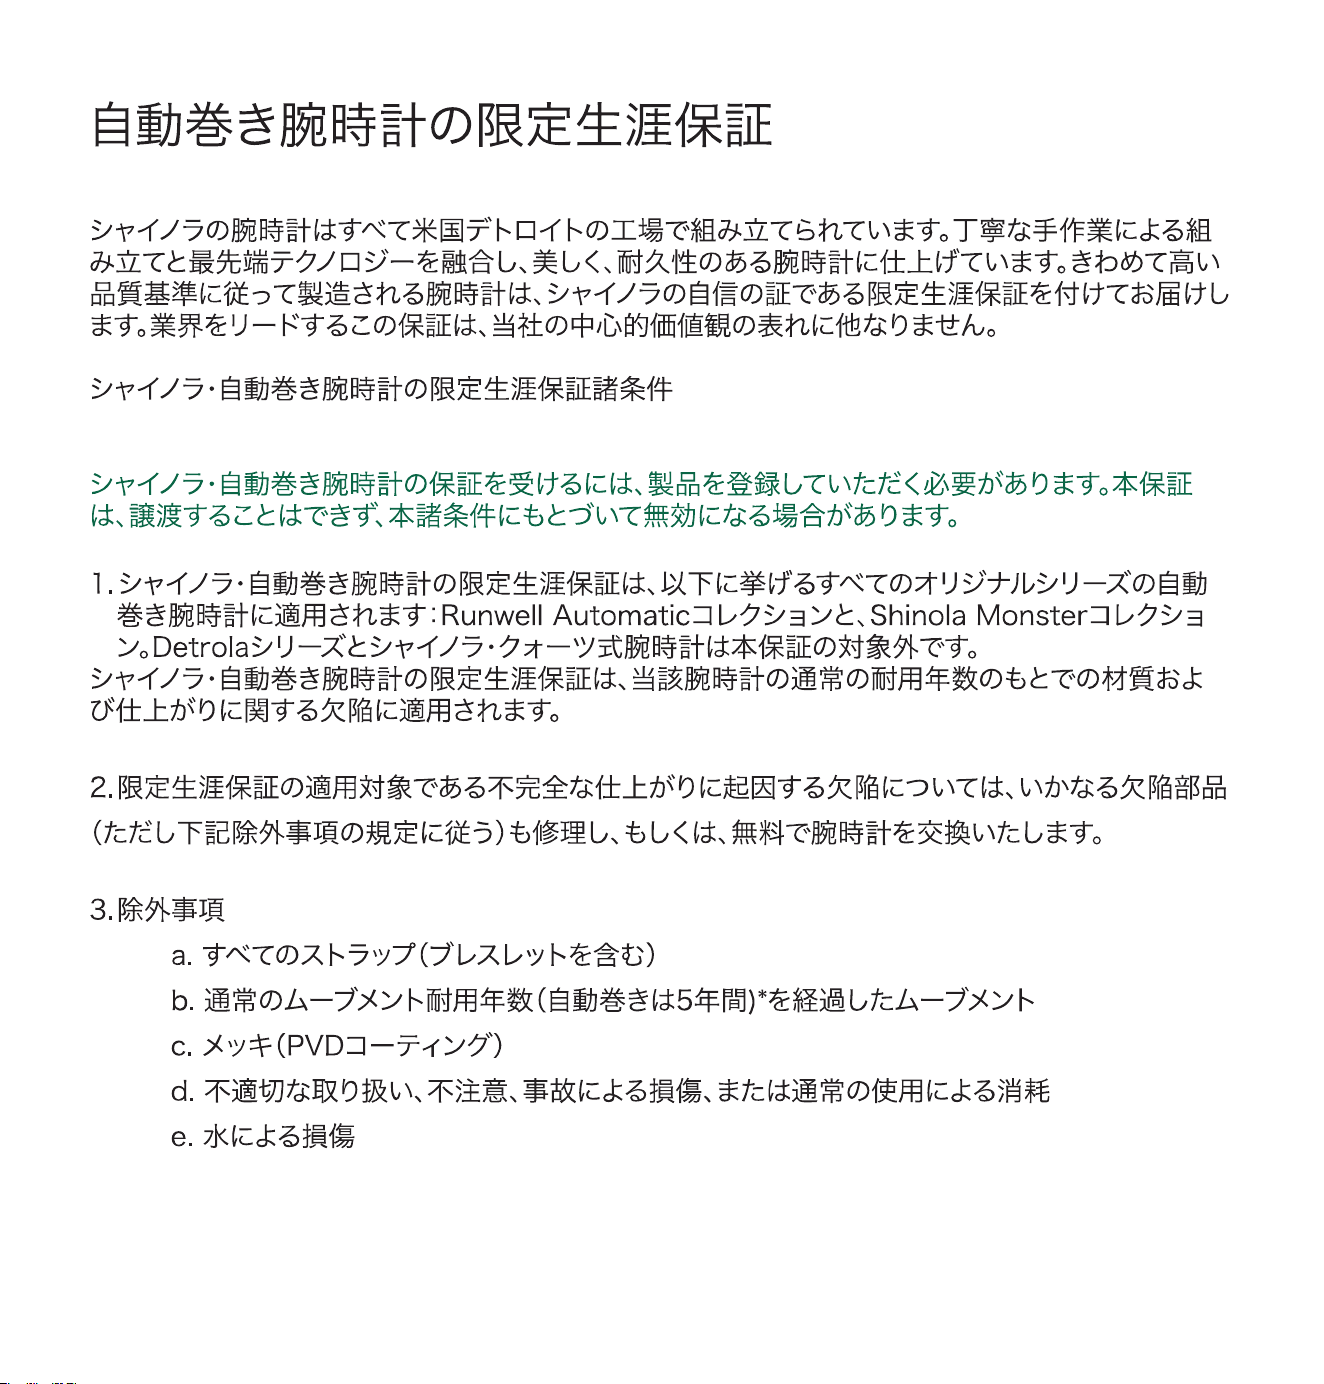
278 279

278 279
280 281

280 281