MSFT42RW6BL
USER MANUAL
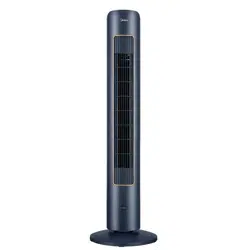
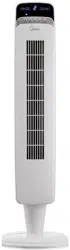
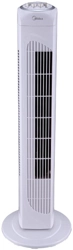
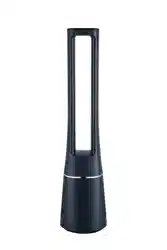
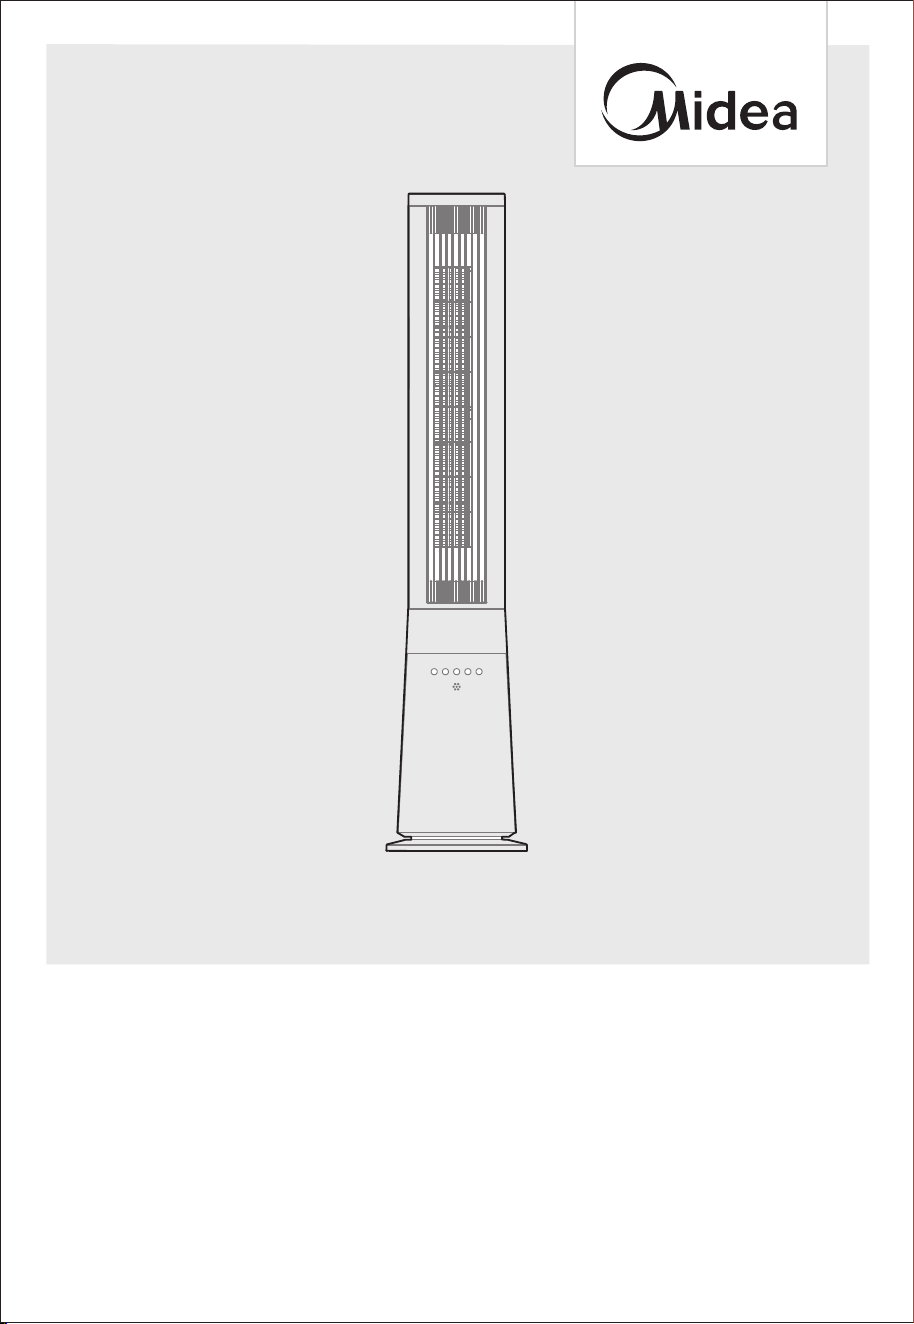
DETACHABLE TOWER FAN
Warning notices: Before using this product, please read this manual carefully and keep it for future reference.
The design and specifications are subject to change without prior notice for product improvement.
Consult with your dealer or manufacturer for details.
The diagram above is just for reference. Please take the appearance of the actual product as the standard.
THANK YOU LETTER
Thank you for choosing Midea! Before using your new Midea product, please read
this manual thoroughly to ensure that you know how to operate the features and
functions that your new appliance offers in a safe way.
CONTENTS
0
02
1
06
07
08
1 6
1 5
1 0
1 7
1 2
THANK YOU LETTER
SAFETY INSTRUCTIONS
SPECIFICATIONS
PRODUCT OVERVIEW
PRODUCT INSTALLATION
OPERATION INSTRUCTIONS
CLEANING AND MAINTENANCE
TROUBLESHOOTING
TRADEMARKS, COPYRIGHTS AND LEGAL STATEMENT
DATA PROTECTION NOTICE
01
EN
02
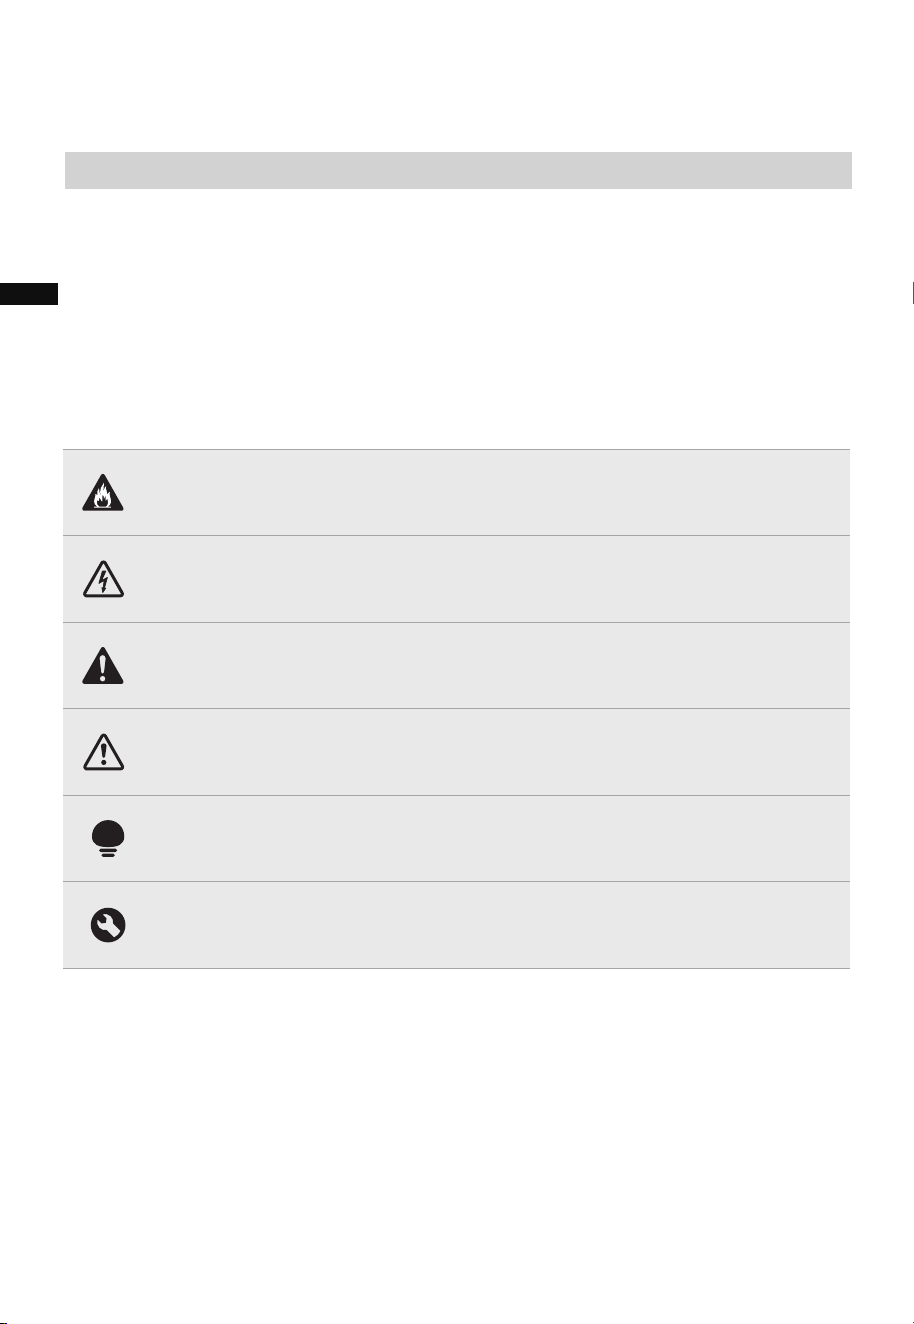
Danger
This symbol indicates that there are dangers to the life and health of
persons due to extremely flammable gas.
Warning of electrical voltage
This symbol indicates that there is a danger to life and health of
persons due to voltage.
Warning
The signal word indicates a hazard with a medium level of risk which, if
not avoided, may result in death or serious injury.
Caution
The signal word indicates a hazard with a low degree of risk which, if
not avoided, may result in minor or moderate injury.
Attention
The signal word indicates important information (e.g. damage to
property), but not danger.
Observe instructions
This symbol indicates that a service technician should only operate and
maintain this appliance in accordance with the operating instructions.
The following safety guidelines are intended to prevent unforeseen risks or damage from
unsafe or incorrect operation of the appliance. Please check the packaging and appliance
on arrival to make sure everything is intact to ensure safe operation. If you find any
damage, please contact the retailer or dealer. Please note modifications or alterations to
the appliance are not allowed for your safety concern. Unintended use may cause
hazards and loss of warranty claims.
Read these operating instructions carefully and attentively before using/commissioning the
unit and keep them in the immediate vicinity of the installation site or unit for later use!
Intended Use
Explanation of Symbols
SAFETY INSTRUCTIONS
EN
CAUTION
●
●
●
●
●
●
●
Read rules for safe operation and instructions carefully.
This appliance is not intended for use by persons
(including children) with reduced physical, sensory or
mental capabilities, or lack of experience and
knowledge, unless they have been given supervision or
instruction concerning use of the appliance by a person
responsible for their safety. Children should be
supervised to ensure that they do not play with the
appliance.
Keep electrical appliances out of reach from Children or
infirm persons. Do not let them use the appliances
without supervision.
Never insert fingers, pencils, or any other object
through the grille when fan is running.
Disconnect fan when moving from one location to
another.
Be sure fan is on a stable surface when operating to
avoid overturning.
Indoor and household use only.
03
IMPORTANT SAFETY INSTRUCTIONS
READ AND SAVE
THESE INSTRUCTIONS
EN
WARNING
●
●
●
●
●
●
●
●
●
If the supply cord is damaged, it must be replaced by
manufacturer or its service agent or a similarly qualified
person in order to avoid a hazard.
To protect against the risk of electrical shock, do not
immerse the unit, cord or plug in water or other liquid.
Unplug or disconnect the appliance from the power
supply before servicing.
WARNING: To Reduce The Risk Of Fire Or Electric
Shock, Do Not Use This Fan With Any Solid-State
Speed Control Device.
To Reduce The Risk Of Fire, Electric Shock Or Injury To
Persons, Do Not Use Replacement Parts That Have Not
Been Recommended By The Manufacturer (e.g.Parts
Made At Home Using A 3D Printer).
When the appliance is not in use and before cleaning,
unplug the appliance from the outlet.
When the fan was assembled, the rotor blade guard
shall not be taken off anymore.
- Prior to cleaning, unplug the fan.
- The rotor guard shall not be dissembled/opened to
clean the rotor blades.
- Wipe the fan enclosure and rotor blade guard with a
slightly damp cloth.
This appliance has a polarized plug (one blade is wider
than the other). To reduce the risk of electric shock,
this plug is intended to fit into a polarized outlet only
one way. If the plug does not fit fully into the outlet,
reverse the plug. If it still does not fit, contact a
qualified electrician. Do not attempt to defeat this
safety feature.
Ensure that the fan is switched off from the supply
mains before removing the guard.
04
EN
WARNING
●
This product employs overload protection (fuse). A
blown fuse indicates an overload or short-circuit
situation. If the fuse blows, unplug the product from the
outlet. Replace the fuse as per the user servicing
instructions (follow product marking for proper fuse
rating) and check the product. If the replacement fuse
blows, a short-circuit may be present and the product
should be discarded or returned to an authorized
service facility for examination and/or repair.
a) Do not operate any fan with a damaged cord or
plug. Discard fan or return to an authorized service
facility for examination and/or repair.
b) Do not run cord under carpeting. Do not cover cord
with throw rugs, runners, or similar coverings. Do not
route cord under furniture or appliances. Arrange
cord away from traffic area and where it will not be
tripped over.
05
EN

SPECIFICATIONS
MSFT42RW6BLProduct Model
Voltage
Power
120V~
40W
Frequency 60Hz
06
EN
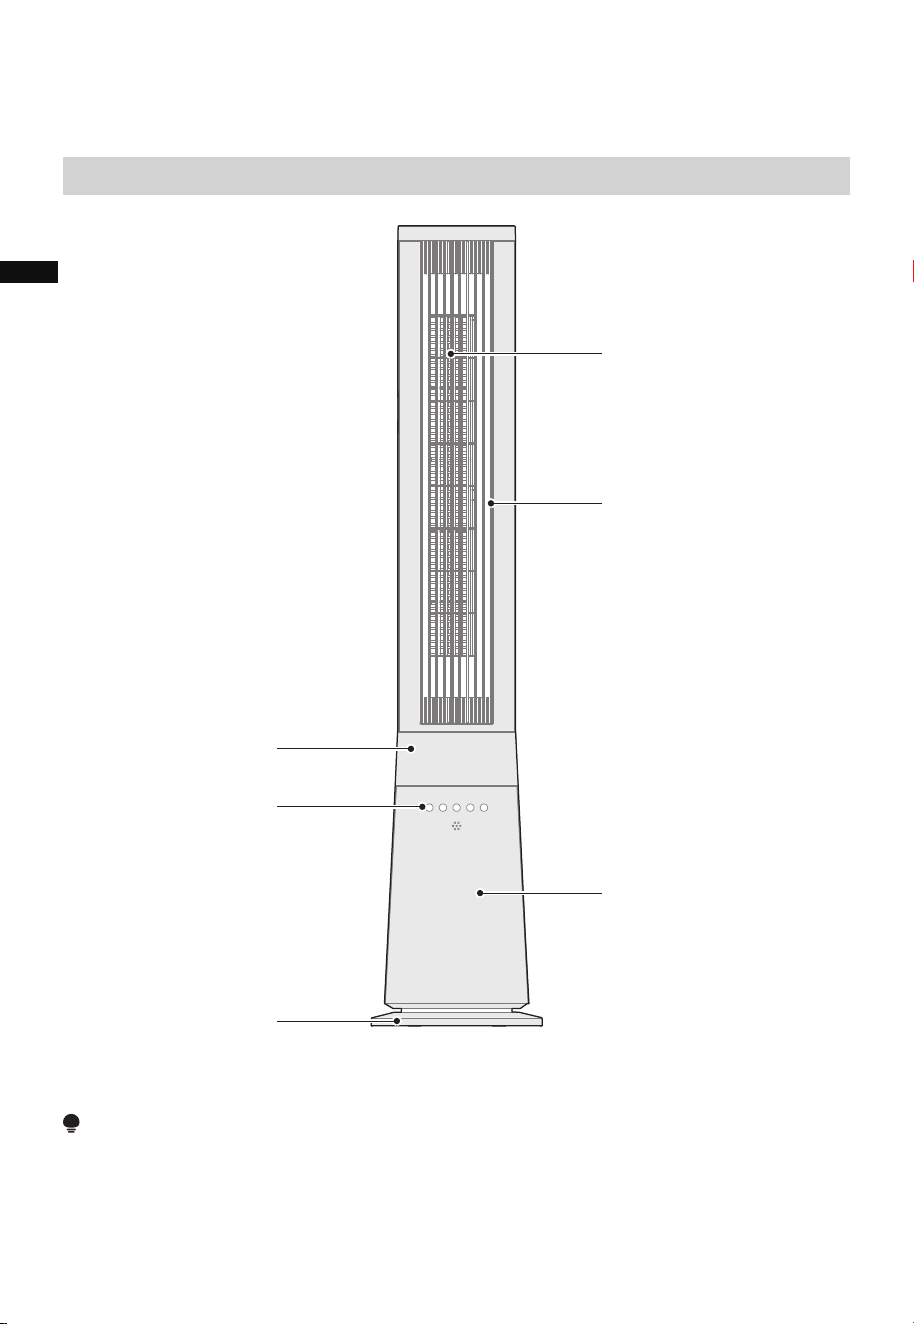
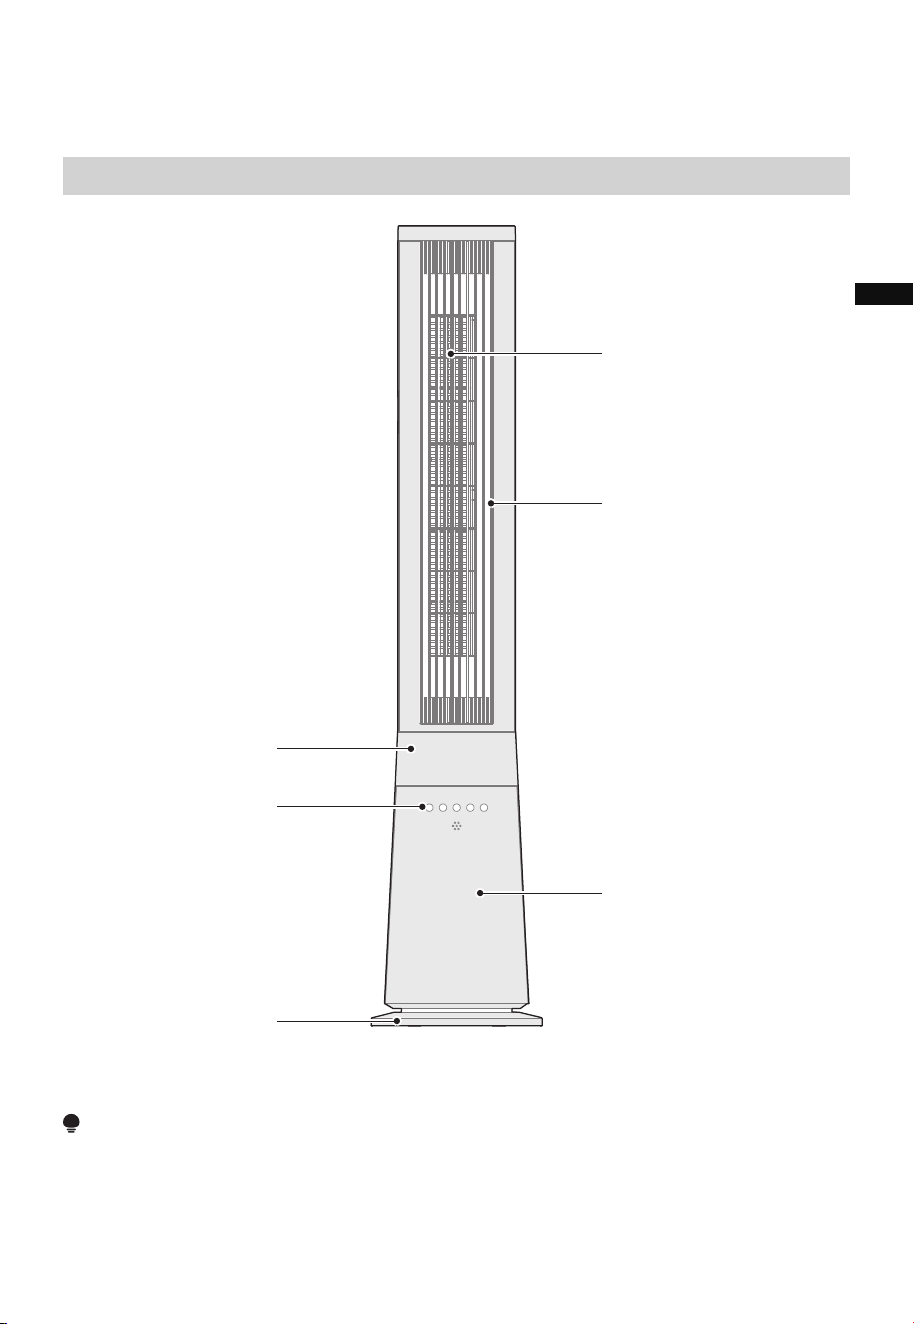
PRODUCT OVERVIEW
Part Name
Digital Display
Operation Panel
Base
Tower Motor Base
Air Outlet Grille
Fan Body
NOTE
All the pictures in this manual are for explanation purpose only. Any discrepancy between
the real object and the illustration in the drawing shall be subject to the real subject.
07
EN
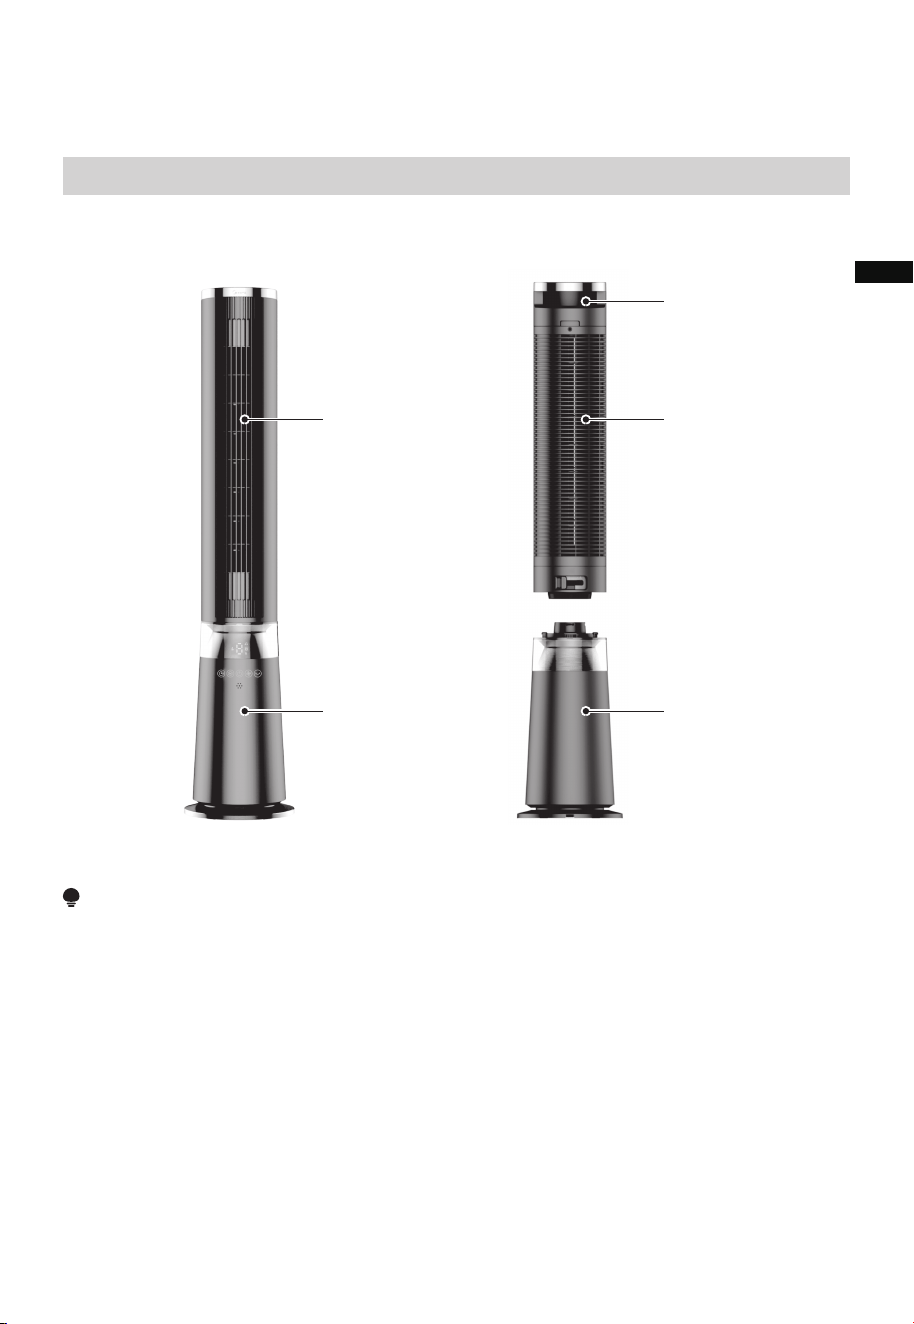
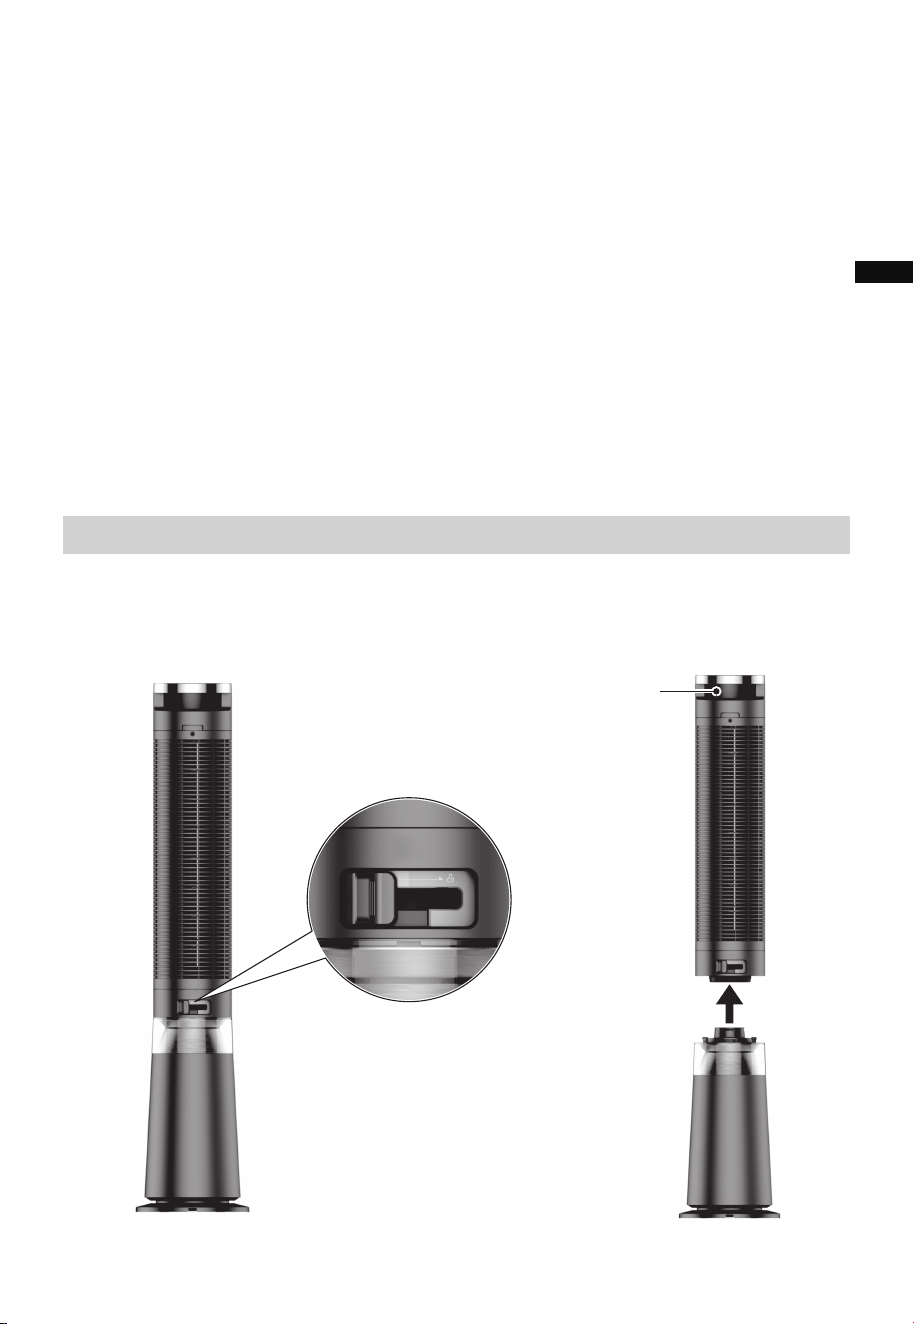
PRODUCT INSTALLATION
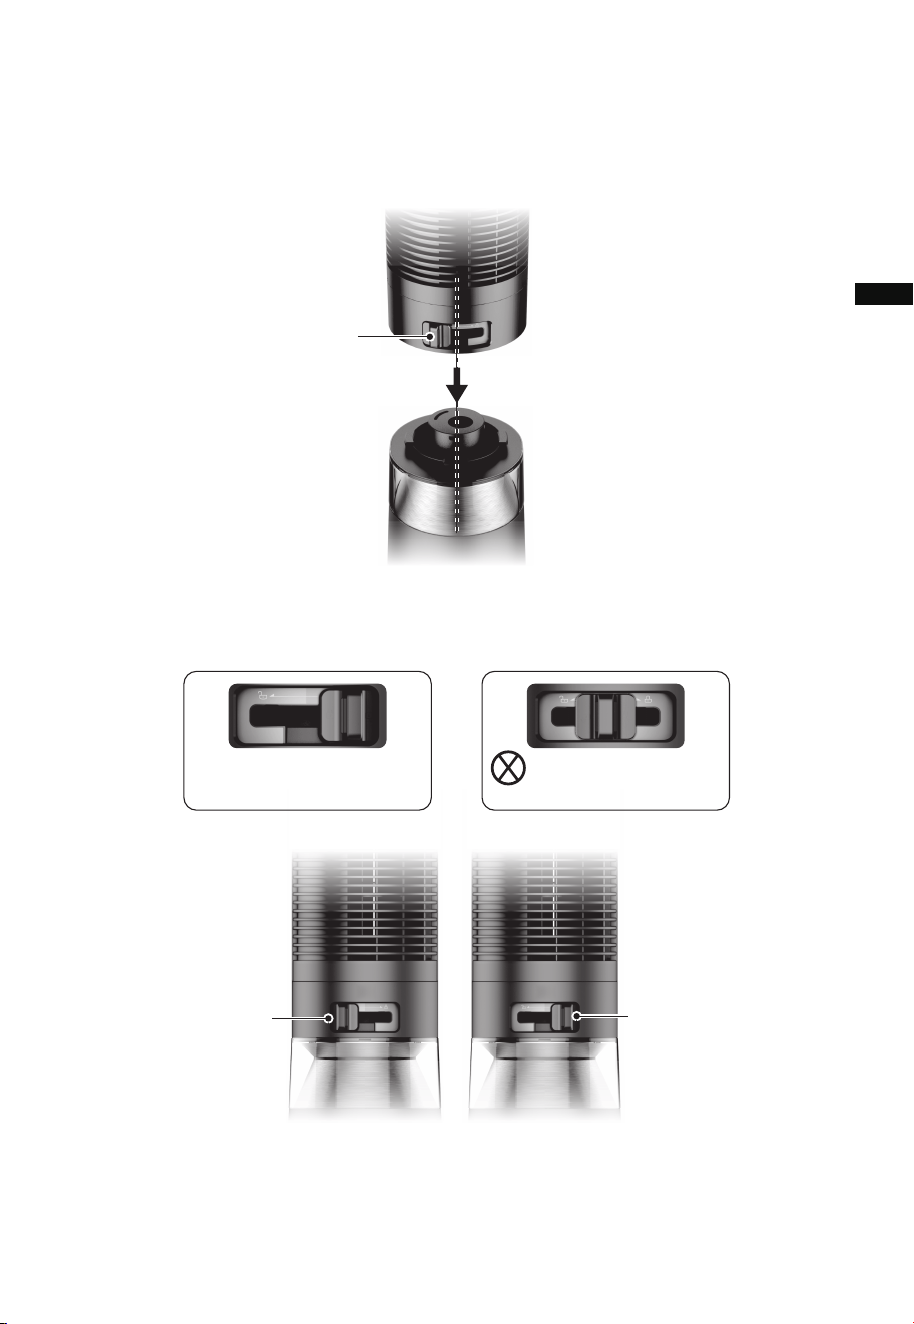
NOTE
Make sure that both the body and the base are aligned on the back to avoid a
front-to-back situation.
Installation Procedures
1
To install, please hold the molded handle on the back of the machine body and install it in
alignment with the back of the base.
08
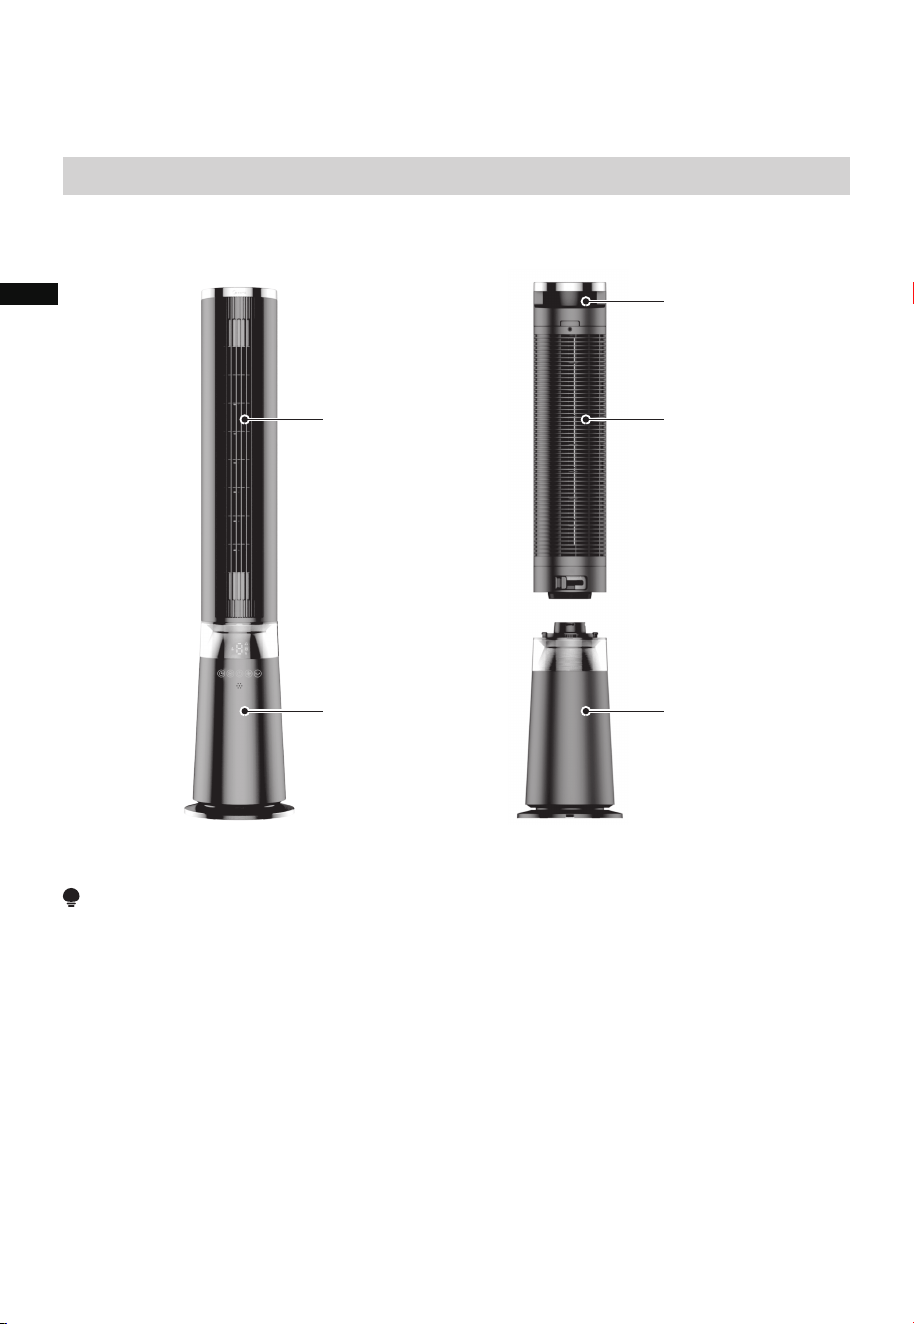
Front View
Front of the base
(with display)
Back View
Molded Handle
Back of the base
(without display)
EN
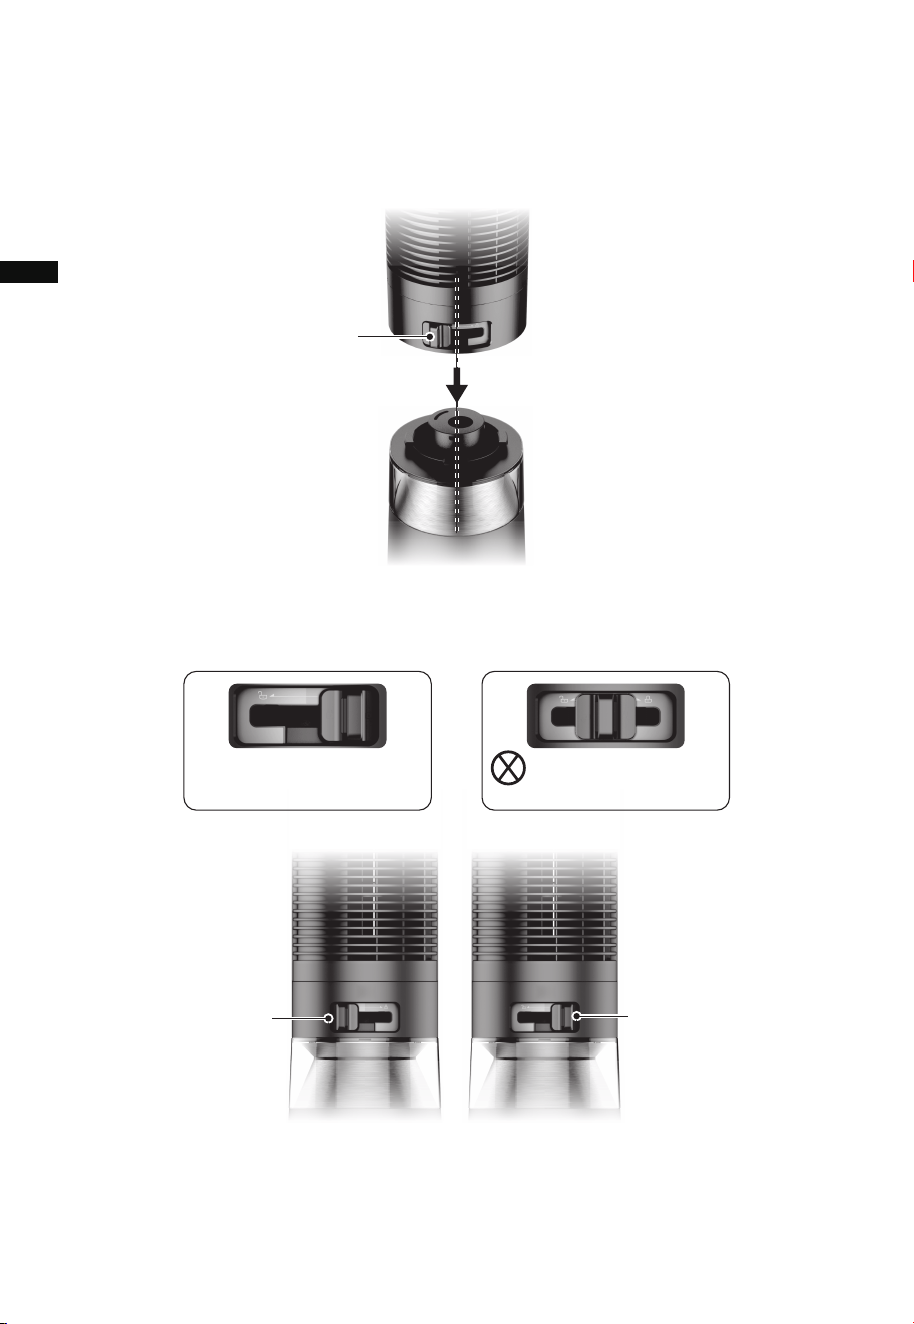
The latch must be in
the leftmost position
when installed in
alignment.
Unlock
(leftmost in the
latch position)
2
When aligning the body with the base, please keep the vertical direction the same. In case
of alignment failure, rotate the body slightly from side to side until the alignment is
successful.
To test for successful alignment:
Check if there’s no gap between the body and the base.
3 Once the body is successfully aligned, turn the latch from the leftmost to the rightmost
side. The machine is ready for use when a beep is heard after 1 sec of power-on.
09
Lock
(rightmost in the
latch position)
Do not use the machine
with the latch in the
middle position
Power-on
EN
OPERATION INSTRUCTIONS
Preparation Before Use
• Remove the blue non-transferable tape from the body before use.
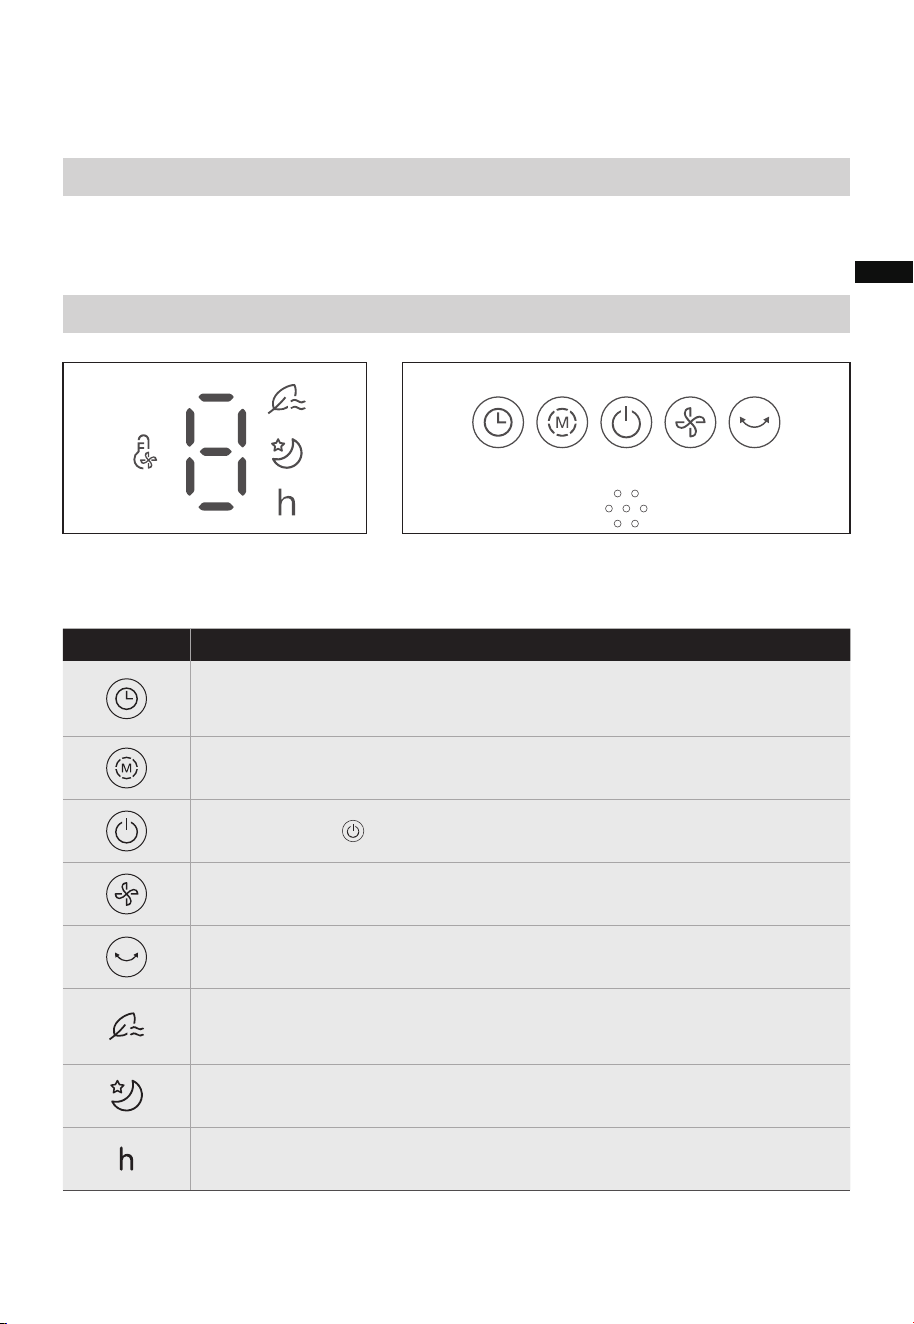
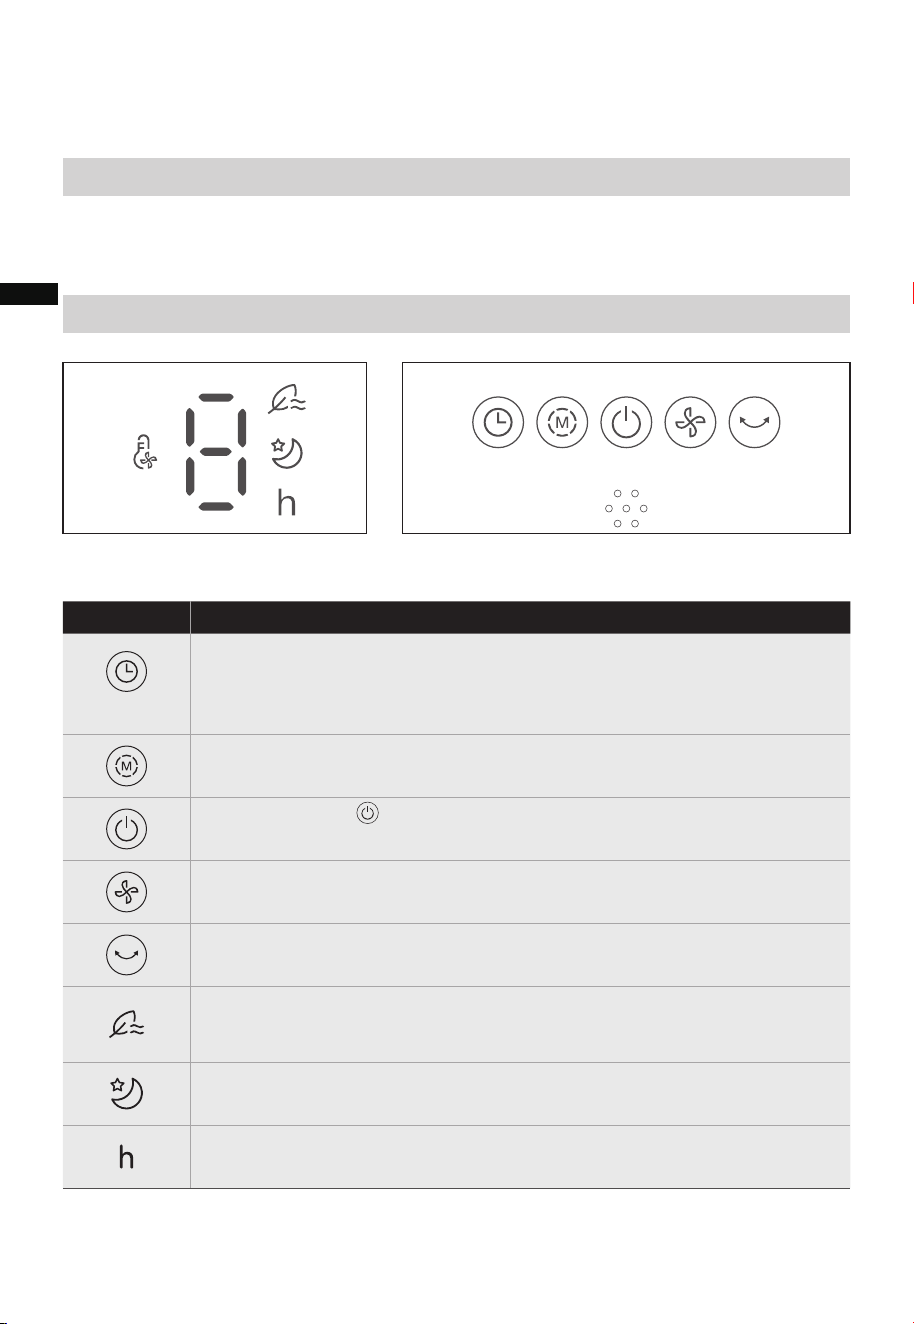
Instructions for Operation of Body
DescriptionButton
In the power-on state, you can set the schedule off time in 1-9 hours;
In standby mode (powered on but not switched on), you can set the
schedule on time in 1-9 hours.
Click this key to switch the wind type (natural wind,sleep wind, ECO
mode,normal wind).
Click this key to switch the wind speed (cycle according to the
sequence of 1~5 ).
This icon lights up in Sleep mode.
This Icon lights up when the Timer function is switched on.
Click this key to switch on/off the Oscillation mode.
This icon lights up in natural mode.The fan automatically adjusts the
wind speed according to a set program, three levels(1, 2 and 3) are
available.
Click on the “ ” key (ON/Standby) to switch on or standby.
10
Display panel Operation panel
EN
11
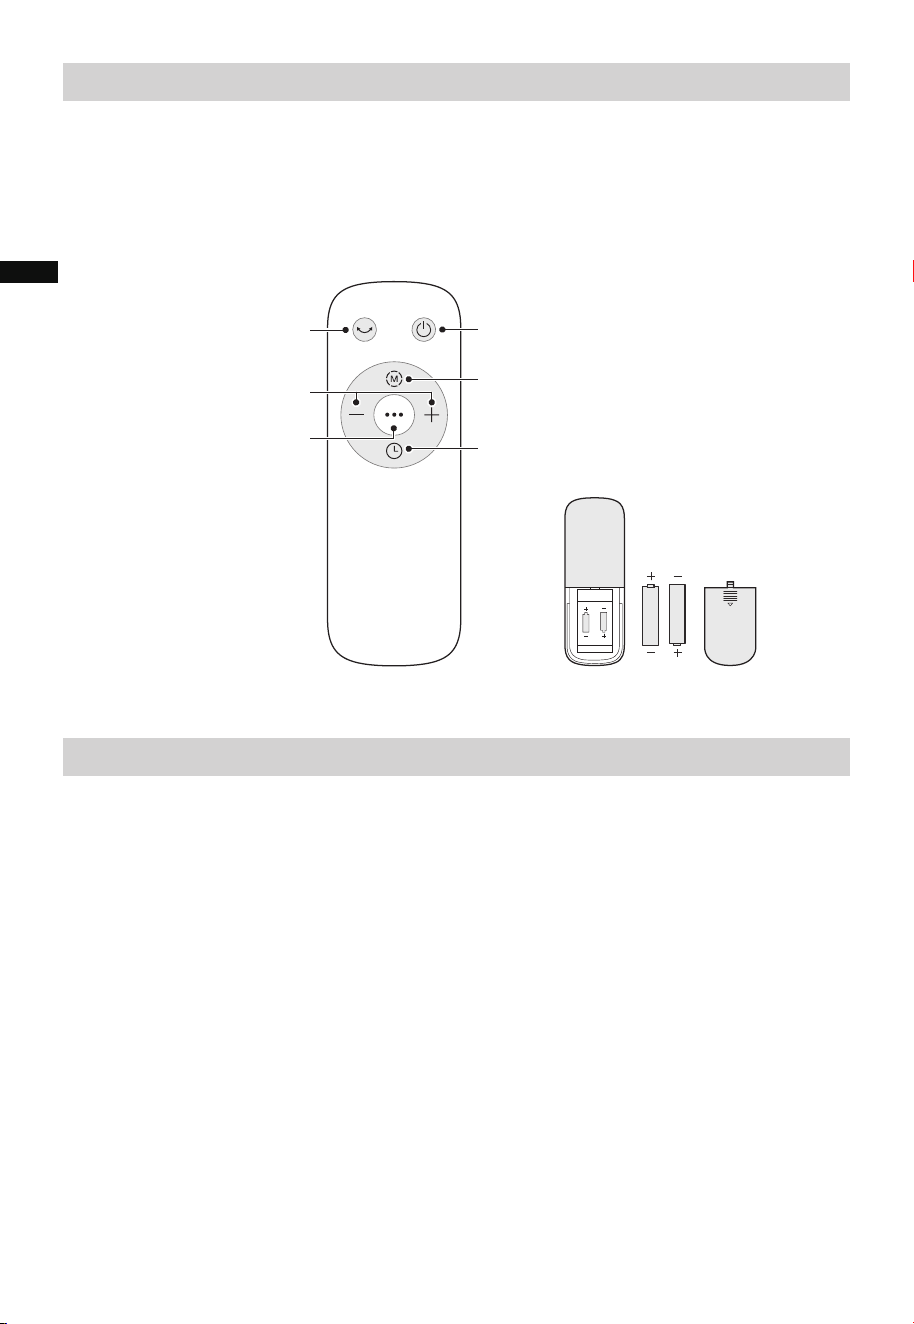
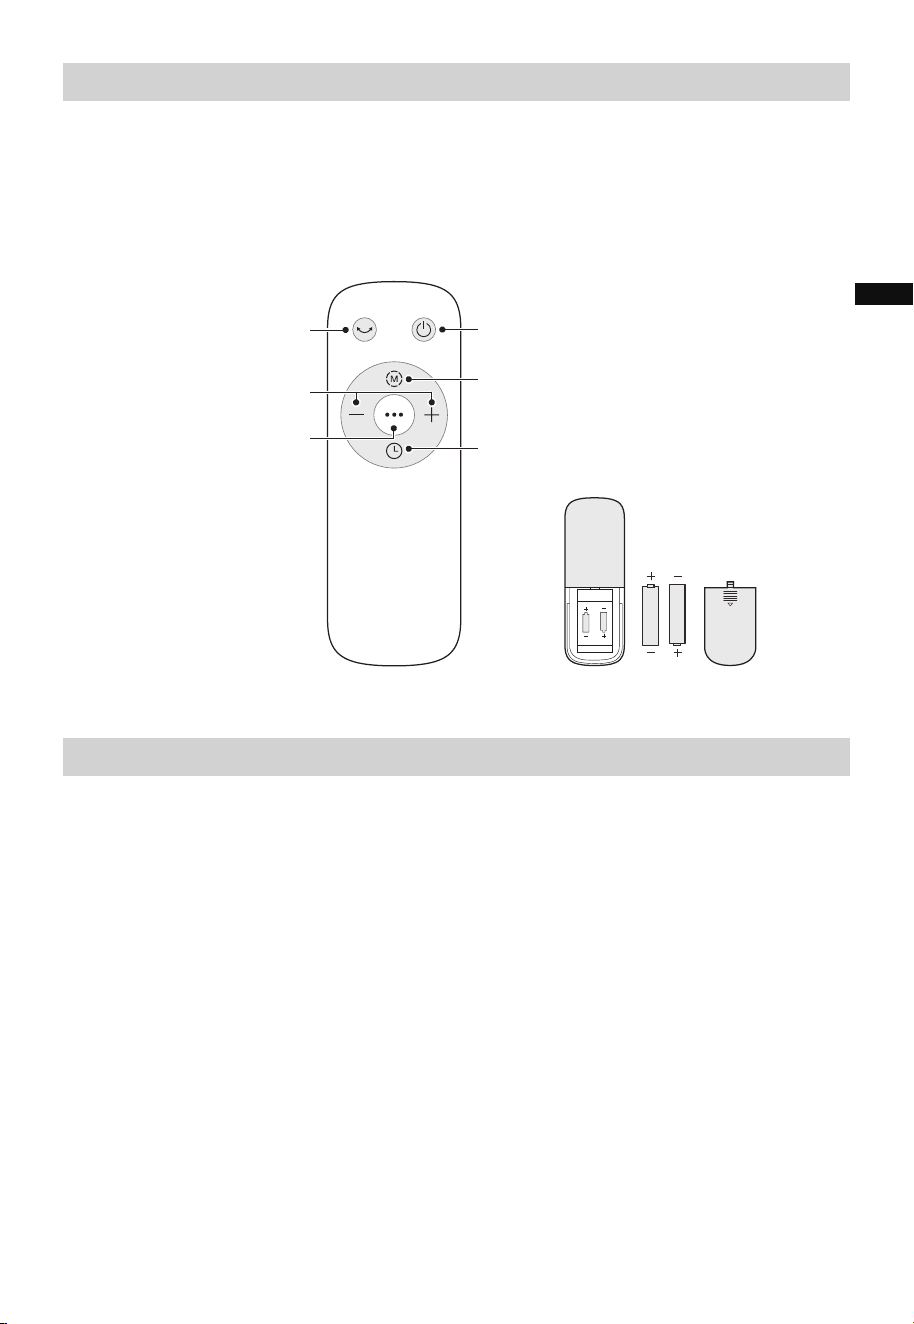
Remote Control
BATTERY WARNING AS BELOW
• Use manganese or alkaline batteries of type “AAA”.
• DO NOT use rechargeable batteries.
• DO NOT dispose of batteries in fire, batteries may explode or leak.
• DO NOT mix old and new batteries.
• DO NOT mix alkaline, standard (carbon-zinc) or rechargeable (nickel-cadmium) batteries.
• Pay attention to poles (+ and -) of the batteries.
• The remote control should typically be used in front of the product with a deviation
angle of 30 degrees.
• The battery contains many heavy metals, acids and bases, etc., which may threaten
human health; Waste batteries should be recycled separately.
• The schematic diagram of the remote control is for illustration only, please refer to the
actual product.
Startup/Standby
Press “+, -” to set the
Enable/disable ECO mode
(wind changes and adjusts
to temperature)
wind speed or timer
Set the timed shutdown
/startup
Start up or shut down
oscillating
Switch the wind mode (natural wind,
sleep wind, ECO mode, normal wind)
AAA Battery. 1.5V
Battery
(Batteries not included)
EN
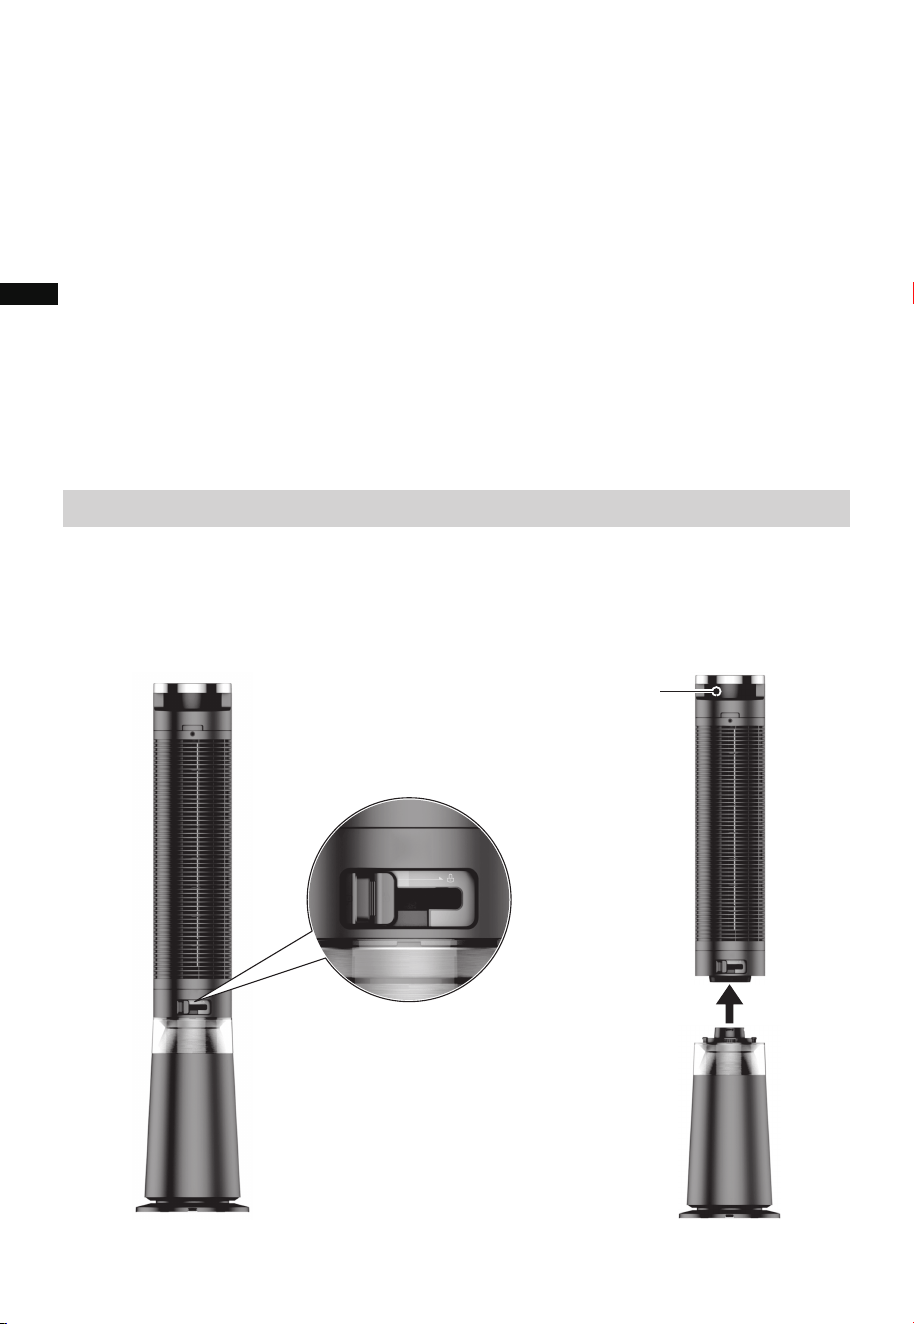
Cleaning Instructions
1. How to disassemble the fan body from the motor base
Before detaching the body from base, turn off the power switch and unplug it, then turn
the latch on the back to the far left, hold the back of the body by the molded handle and
lift vertically upwards to detach the body from the base.
CLEANING AND MAINTENANCE
The fan requires minimal maintenance. Do not try to fix it by yourself. Refer it to
qualified service personnel if service is needed.
1. Before cleaning and assembling, unplug the fan power.
2. To ensure adequate air circulation to the motor, keep vents at the rear of the motor
free of dust.
Do not disassemble the fan to remove dust. Please wipe the exterior parts with a soft
cloth soaking a mild detergent.
3. Do not use any abrasive detergent or solvents to avoid scratching the surface.
4. Do not use any of the following as a cleaner: gasoline, thinner.
5. Do not allow water or any other liquid entering into the motor housing or interior
parts.
6. Be sure to unplug from the electrical supply source before cleaning.
7. Plastic parts should be cleaned with a soft cloth moisten with mild soap. Thoroughly
remove soapsuds with dry cloth.
12
Molded Handle
EN
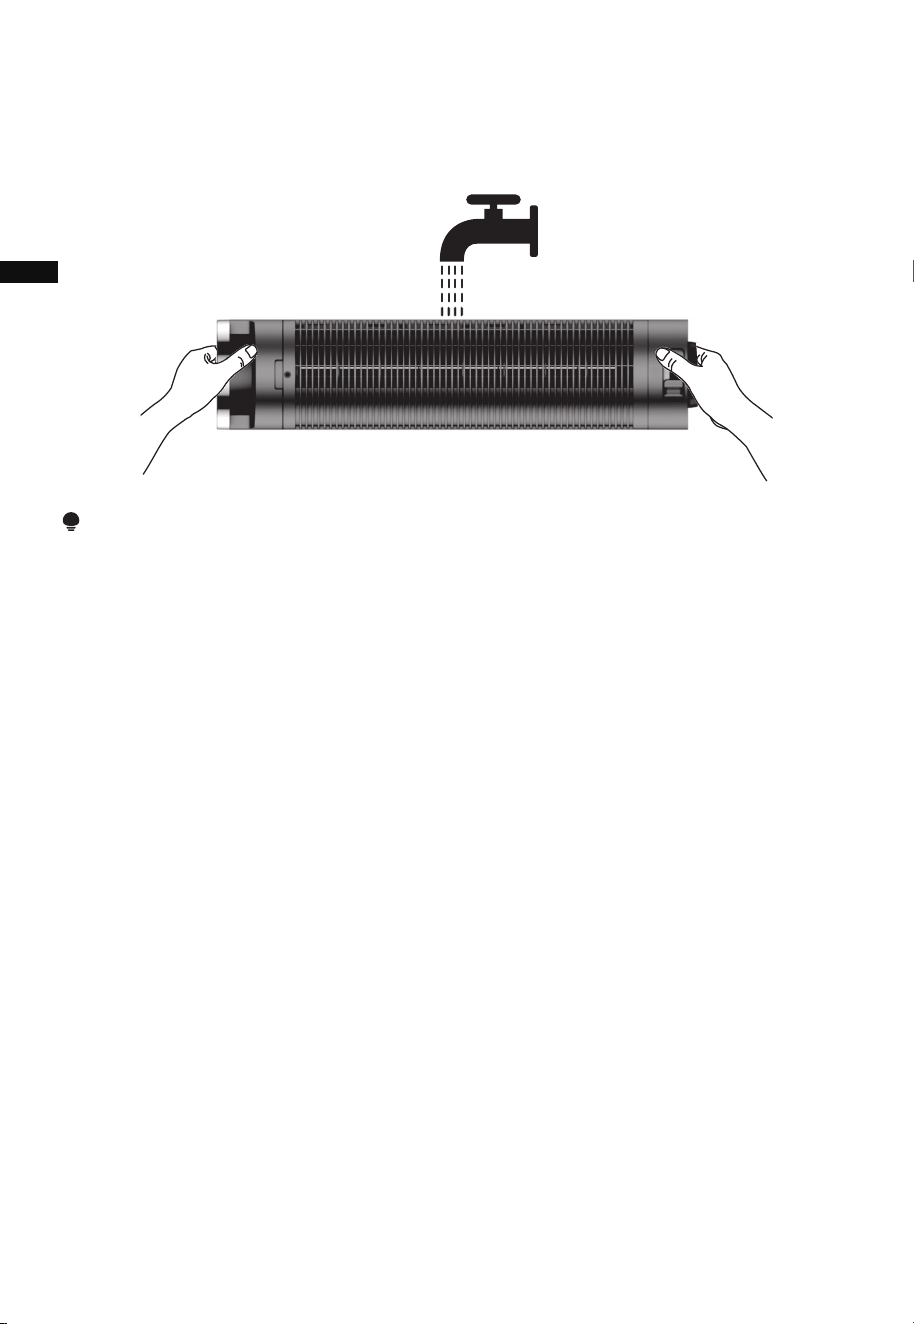
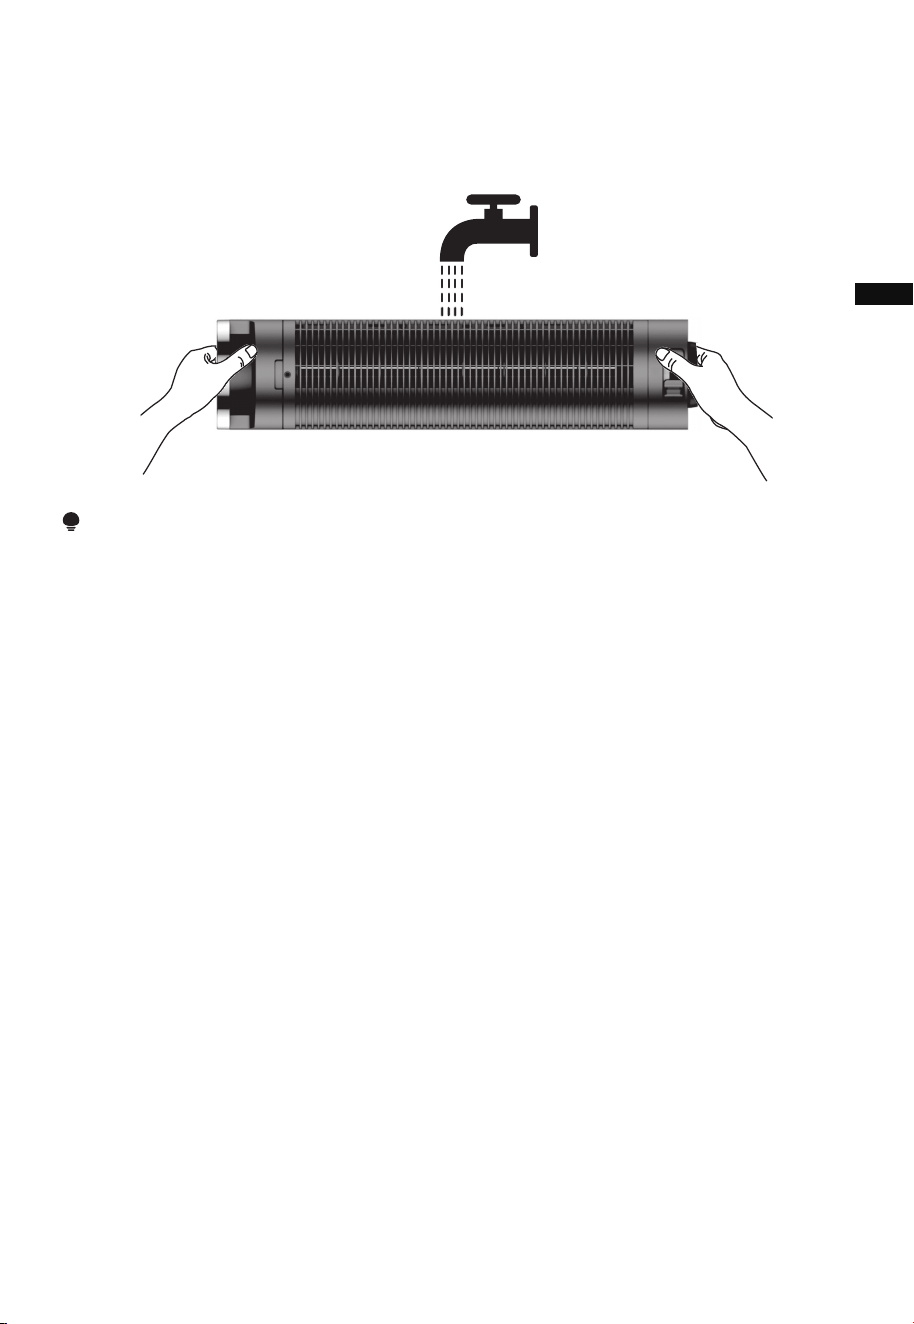
2. Cleaning
Rinsing:
Position the fan body securely and rinse it throughly under a water tap or shower head.
After rinsing, gently shake the excess water out of the fan body and leave it to drain until
it is dry before re-installing the fan body on to the tower motor base and plugging-in the
fan.
13
NOTE
When cleaning the fan body it must be detached from the motor base.
EN
14
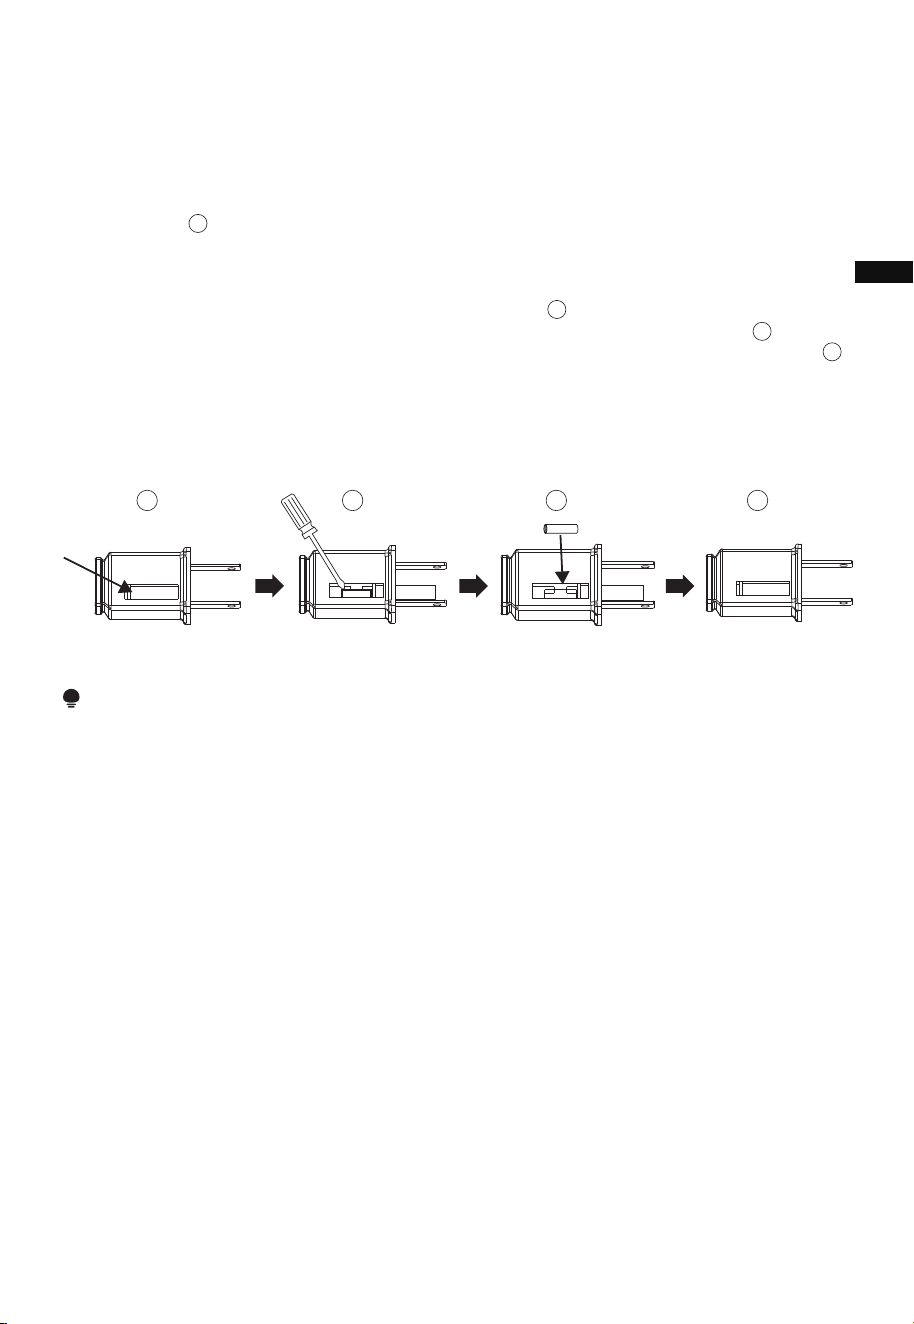
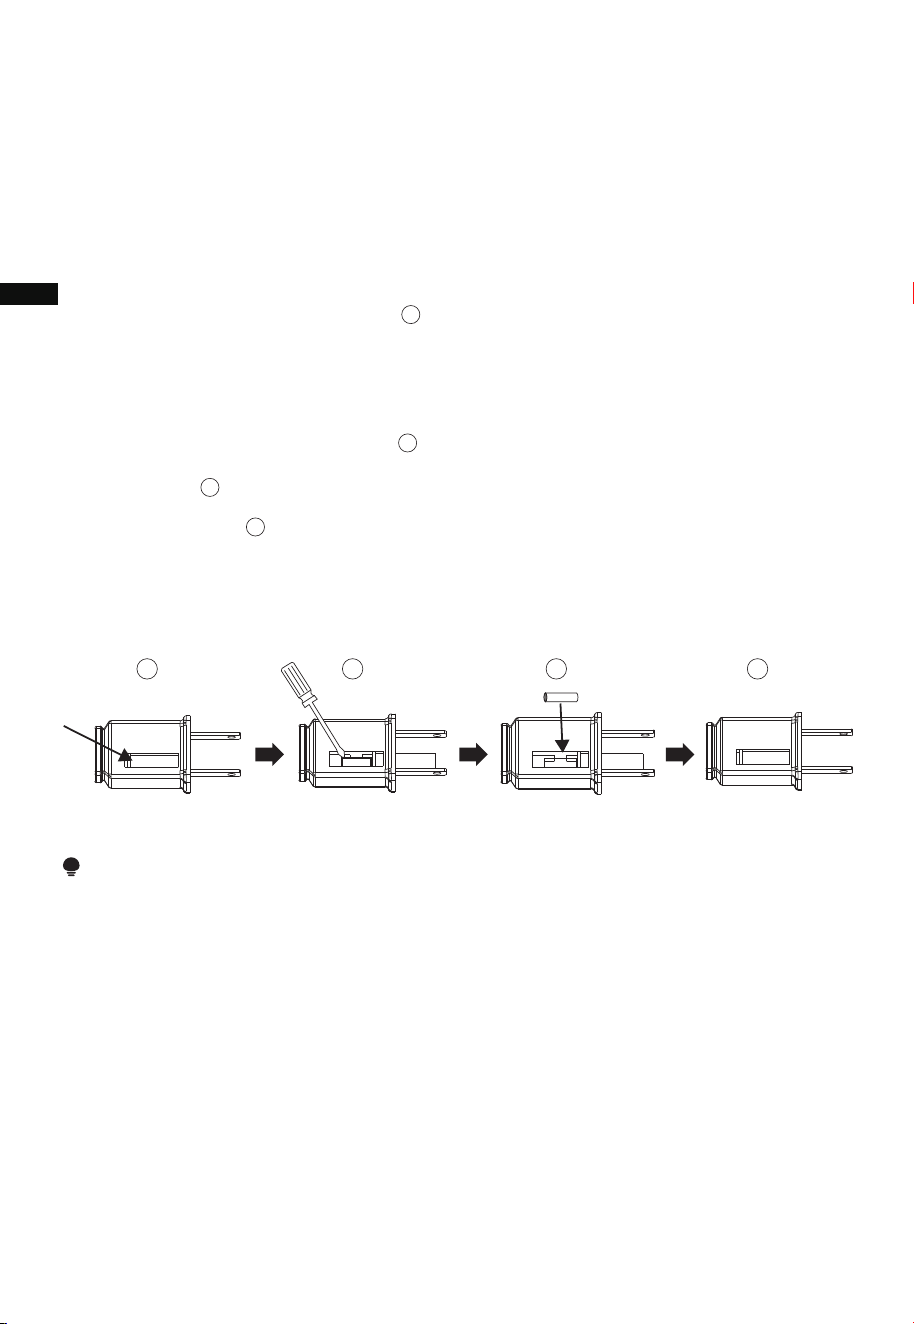
a)Grasp plug and remove from the receptacle or other outlet device. Do not unplug by
pulling on cord.
b)Open fuse cover. Slide open fuse access cover on top of attachment plug towards
blades.(Fig. )
c)Remove fuse carefully. Insert the tip of your tool into fuse slot(close with the terminal),
then remove the fuse gradually and slowly, but do not overexert. If you encounter
resistance, gently work on loosening the fuse. When one side of the fuse has been
released, then you can get the fuse out entirely.(Fig. )
d)Risk of fire (fix spacing). Replace fuse only with 2.5 Amp, 125 Volt fuse.(Fig. )
e)Close fuse cover. Slide closed the fuse access cover on top of attachment plug.(Fig. )
f )Risk of fire (fix spacing). Do not replace attachment plug. Contains a safety device
(fuse)that should not be removed. Discard product if the attachment plug is damaged.
g)If the fan suddenly does not work during normal operation, please check whether it is
a problem with the fuse.
USER SERVICING INSTRUCTIONS
NOTE
2
3
41
1
2
3
4
• When you replace the fuse, please do not operate suddenly or overexert, or else the product may
become damaged.
EN
15
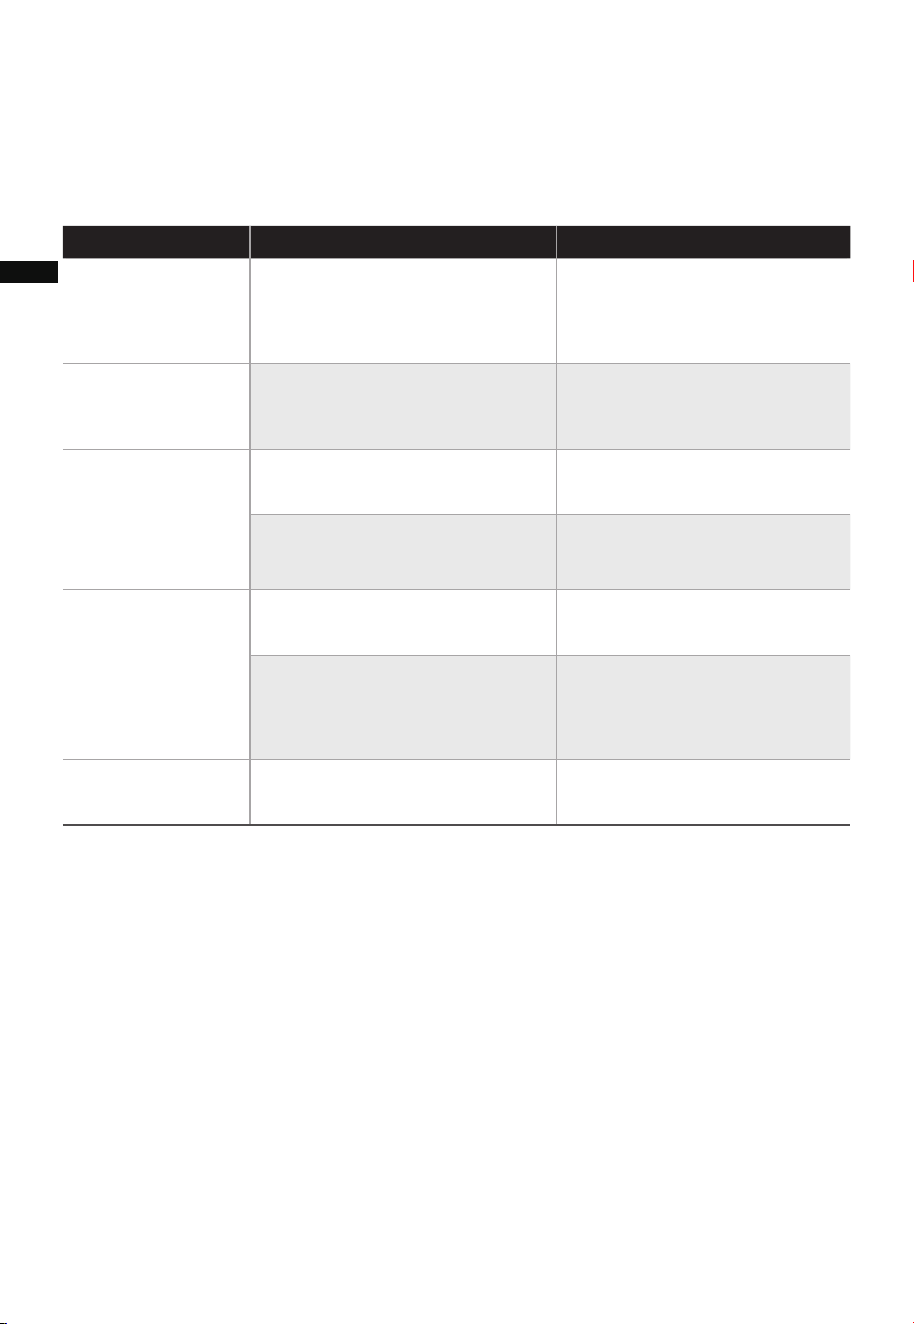
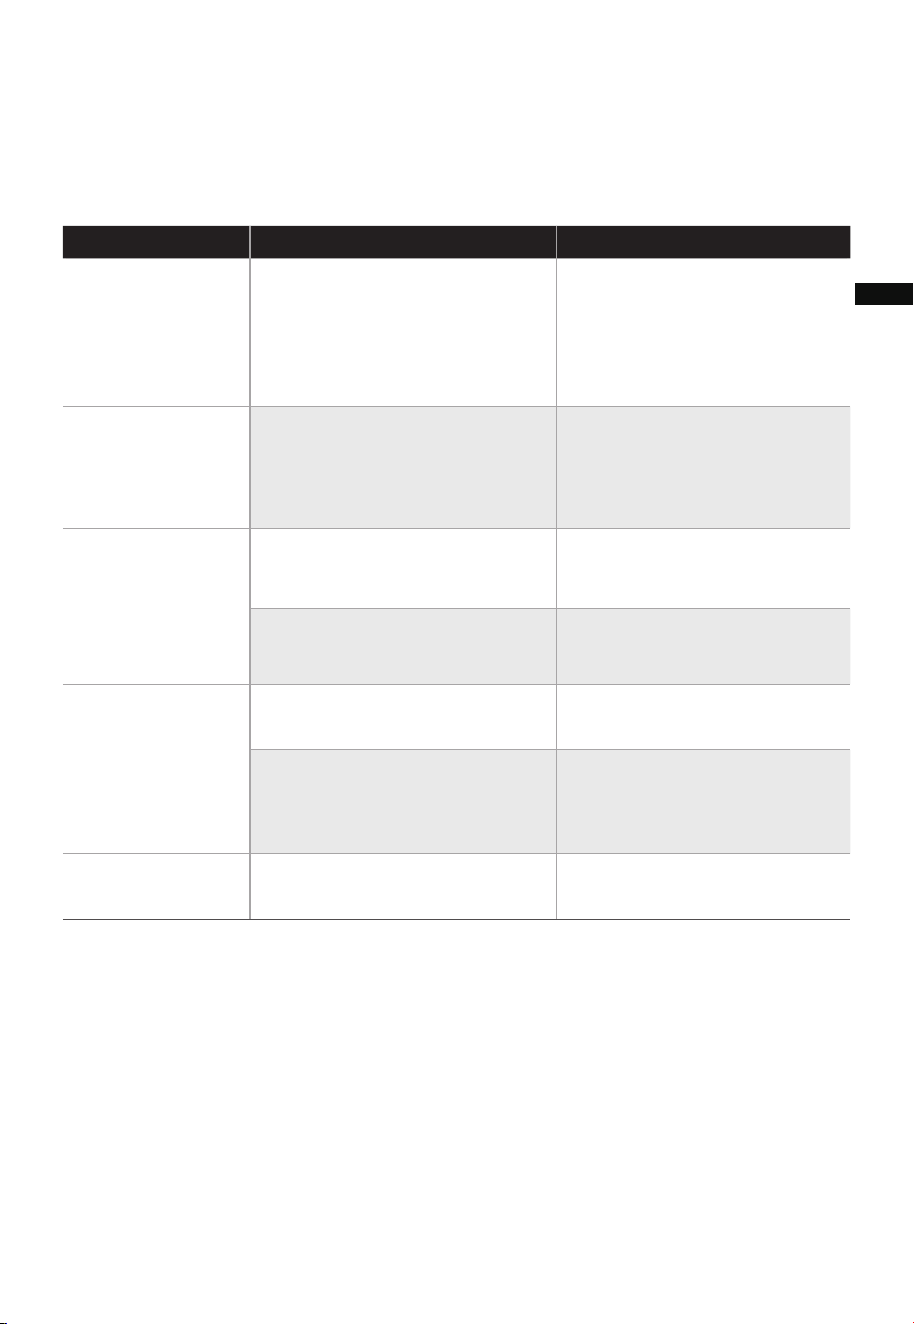
TROUBLESHOOTING
If the appliance encounters any errors or malfunctions, the following table
contains possible causes and solutions for resolving an error or malfunction.
Solution
Cause SolutionProblem
The power cable is not
plugged in or has poor contact.
Make sure the plug is properly
inserted into the socket.
The switch on the body is
not turned on.
Turn on the switch on the
body.
The battery needs replacing. Replace the battery.
●
●
●
The remote is being used more
than 16ft away from the fan.
●
The machine does
not work properly
The panel shows
EU
The remote does
not work
Use the remote closer to the
fan and make sure it is
pointing directly at the display
panel.
Please send to after-sales
maintenance.
• Abnormal communication
fault.
The machine
plugged in but
NOT powering ON.
The machine
suddenly shuts-off
during working.
Check that the power plug is
fully and properly inserted into
the power outlet, and re-insert
if needed.
Please send to after-sales
maintenance.
• Plug improperly inserted into
power outlet.
• The temperature exceeds the
threshold of the motor
thermal cut-off.
EN
16
logo, word marks, trade name, trade dress and all versions there of are
trademarks, copyrights and other intellectual property rights, and all goodwill derived
valuable assets of Midea Group and/or its affiliates (“Midea”), to which Midea owns
from using any part of an Midea trademark. Use of Midea trademark for commercial
purposes without the prior written consent of Midea may constitute trademark
infringement or unfair competition in violation of relevant laws.
This manual is created by Midea and Midea reserves all copyrights thereof. No entity or
individual may use, duplicate, modify, distribute in whole or in part this manual, or
bundle or sell with other products without the prior written consent of Midea.
All the described functions and instructions were up to date at the time of printing this
manual. However, the actual product may vary due to improved functions and designs.
TRADEMARKS, COPYRIGHTS
AND LEGAL STATEMENT
EN

17
DATA PROTECTION NOTICE
For the provision of the services agreed with the customer,
we agree to comply without restriction with all stipulations of applicable data protection
law, in line with agreed countries within which services to the customer will be delivered,
as well as, where applicable, the EU General Data Protection Regulation (GDPR).
Generally, our data processing is to fulfill our obligation under contract with you and for
product safety reasons, to safeguard your rights in connection with warranty and
product registration questions. In some cases, but only if appropriate data protection is
ensured, personal data might be transferred to recipients located outside of the
European Economic Area.
Further information are provided on request. You can contact our Data Protection
Officer via [email protected]. To exercise your rights such as right to object your
personal data being processed for direct marketing purposes, please contact us via
[email protected]. To find further information, please follow the QR Code.
EN

CONTENIDO
AGRADECIMIENTOS
¡Gracias por elegir Midea! Antes de utilizar su nuevo dispositivo Midea, lea
atentamente este manual para asegurarse de que sabe cómo manejar las
características y funciones que le ofrece su nuevo electrodoméstico de forma
segura.
0
02
1
06
07
08
1 6
1 5
1 0
1 7
1 2
01
--------------------------------------------------------------
------------------------------------
--------------------------------------------------------------
----------------------------------------
----------------------------------------
----------------------
------------------------------------------
-----------------------------------------------
-------------------
AGRADECIMIENTOS
INSTRUCCIONES DE SEGURIDAD
ESPECIFICACIONES
DESCRIPCIÓN DEL PRODUCTO
INSTALACIÓN DEL PRODUCTO
INSTRUCCIONES DE FUNCIONAMIENTO
LIMPIEZA Y MANTENIMIENTO
SOLUCIÓN DE PROBLEMAS
MARCAS, DERECHOS DE AUTOR Y DECLARACIÓN LEGALA
VISO SOBRE LA PROTECCIÓN DE DATOS
ES
Peligro
Advertencia de tensión eléctrica
Advertencia
Precaución
Atención
Respetar las instrucciones
Uso Adecuado
Simbología
INSTRUCCIONES DE SEGURIDAD
Las siguientes directrices de seguridad tienen por objeto evitar riesgos imprevistos o
daños derivados de un funcionamiento inseguro o incorrecto del dispositivo.
Compruebe el embalaje y el aparato a su llegada para asegurarse de que todo está
intacto para garantizar un funcionamiento seguro. Si encuentra algún daño, póngase en
contacto con el vendedor o distribuidor. Por favor, tenga en cuenta que las
modificaciones o alteraciones en el aparato no están permitidas por su seguridad.
El uso inadecuado puede causar peligros y la pérdida de los derechos de garantía.
Lea atentamente este manual de instrucciones antes de utilizar/poner en marcha el
dispositivo y guárdelo en las inmediaciones del lugar de instalación o del dispositivo
para su uso posterior.
Este símbolo indica que existe peligro para la vida y la salud de las personas
debido a la existencia de gas extremadamente inflammable.
Este símbolo indica que existe un peligro para la vida y la salud de las personas
debido a la tensión
Este símbolo representa un peligro con un nivel de riesgo medio que, si no se
evita, puede provocar la muerte o lesiones graves.
Este símbolo indica un peligro con un grado de riesgo bajo que, si no se evita,
puede provocar lesiones leves o moderadas.
Este símbolo indica información importante (por ejemplo, daños materiales), pero
no peligro.
Este símbolo indica que un técnico de servicio sólo debe operar y mantener este
aparato de acuerdo con las instrucciones de funcionamiento.
02
ES
PRECAUCIÓN
03
INSTRUCCIONES DE SEGURIDAD
IMPORTANTES
LEA Y CONSERVE ESTAS
INSTRUCCIONES
• Lea atentamente las normas de funcionamiento
seguro y las instrucciones.
• Este aparato no está diseñado para ser utilizado por
personas (incluyendo niños) con capacidades físicas,
sensoriales o mentales reducidas, o con falta de expe-
riencia y conocimientos, a menos que hayan recibido
supervisión o instrucciones sobre el uso del mismo por
parte de una persona responsable de su seguridad.
Los niños deben ser supervisados para garantizar que
no jueguen con el dispositivo.
• Mantenga los aparatos eléctricos fuera del alcance de
los niños o de las personas personas con problemas
de salud. No permita que utilicen los aparatos sin
supervisión.
• No introduzca nunca dedos, lápices o cualquier otro
objeto a través de la rejilla cuando el ventilador esté
en funcionamiento.
• Desconecte el ventilador cuando se traslade de un
lugar a otro.
• Asegúrese de que el ventilador esté sobre una superfi-
cie estable cuando esté en funcionamiento para evitar
que vuelque.
• Sólo para uso doméstico y en interiores.
ES
ADVERTENCIA
04
• Si el cable de alimentación está dañado, debe ser
sustituido por el fabricante o su representante de
servicio técnico o una persona con calificación similar
a fin de evitar un peligro.
• Para evitar el riesgo de descarga eléctrica, no sumerja
la unidad, el cable o el enchufe en agua u otro líquido.
• Desenchufe o desconecte el aparato de la fuente de
alimentación antes de realizarle mantenimiento.
• Para reducir el riesgo de incendio o choque eléctrico,
no use este ventilador con ningún tipo de dispositivo
de control de velocidad en estado sólido.
• Para reducir el riesgo de incendio, electrocución o
lesiones personas, no utilice piezas de repuesto que
no hayan sido. No utilice piezas de repuesto no
recomendadas por el fabricante (por ejemplo, piezas
fabricadas en casa con una impresora 3D).
• Cuando el aparato no esté en uso y antes de limpiarlo,
desenchúfelo de la toma de corriente.
• Una vez que el ventilador esté ensamblado, la protec-
ción de las aspas del rotor no debe quitarse más.
- Antes de la limpieza, desenchufe el ventilador.
- El protector del rotor no debe ser desmontado/abi-
erto para limpiar las palas del rotor.
- Limpie la carcasa del ventilador y el protector de las
palas del rotor con un paño ligeramente húmedo.
• Este aparato tiene un enchufe polarizado (una clavija
es más ancha que la otra). Para reducir el riesgo de
descarga eléctrica, este enchufe está pensado para encajar
en una toma de corriente polarizada sólo en un sentido. Si
el enchufe no encaja completamente en la toma de
corriente, invierta el enchufe. Si sigue sin encajar, póngase
en contacto con un electricista especializado. No intente
anular esta característica de seguridad.
ES
ADVERTENCIA
05
• Asegúrese de que el ventilador esté desconectado de
la red eléctrica antes de retirar la protección.
• Este producto dispone de una protección contra
sobrecargas (fusible). Un fusible fundido es señal de
una situación de sobrecarga o cortocircuito. Si el fus-
ible se funde, desenchufe el producto de la toma de
corriente. Sustituya el fusible de acuerdo con las
instrucciones de mantenimiento del usuario (siga las
indicaciones del producto para conocer la capacidad
del fusible) y compruebe los productos. Si el fusible
de repuesto se funde, puede haber un cortocircuito y
el producto debe ser desechado o devuelto a un servi-
cio técnico autorizado para su examen y/o reparación.
(a) No haga funcionar ningún ventilador con un cable
o enchufedañado. Deseche elventilador o llévelo a
un serviciotécnico autorizado para que lo exam-
ineny/o lo reparen.
(b) No pase el cable por debajo dela alfombra. No
cubra el cable con alfombras, correderas o reves-
timientos similares. No pase el cable por debajo
delos muebles o electrodomésticos. Coloque el
cable lejos del áreade tráfico y delos lugares
donde se pueda tropezar con él.
ES

ESPECIFICACIONES
MSFT42RW6BLModelo de producto
Voltaje
Potencia
120V~
40W
Frecuencia 60Hz
06
ES
DESCRIPCIÓN DEL PRODUCTO
Nombre de las piezas
Base
Tower Motor Base
Rejilla de salida de aire
Cuerpo del ventilador
NOTA
07
Pantalla digital
Panel de funciona-
miento
Todas las ilustraciones de este manual son meramente explicativas. Cualquier discrepan-
cia entre el objeto real y la ilustración del dibujo estará sujeta al objeto real.
ES
INSTALACIÓN DEL PRODUCTO
NOTA
Instalación
1
08
Vista frontal
Asegúrese de que tanto el cuerpo como la base están alineados en la parte posterior
para evitar problemas en la parte delantera.
Para instalar, por favor, sujete el mango moldeado en la parte posterior del cuerpo de
la unidad e instálelo alineado con la parte posterior de la base.
Parte frontal de
la base (con
pantalla)
Mango
moldeado
Vista trasera
Parte trasera
de la base (sin
pantalla)
ES
2
3
09
Encendido
Cuando alinee el cuerpo del ventilador con su base, asegúrese de que ambos estén en la
misma dirección vertical. Si detecta que no están alineados correctamente, gire el cuerpo
del ventilador suavemente de un lado a otro hasta que encaje de manera adecuada y
precisa en la base.
Compruebe que no exista espacio entre el cuerpo y la base.
Para comprobar que la alineación es correcta:
Después de alinear correctamente el cuerpo, mueva el seguro desde la izquierda hacia la
derecha. La unidad estará lista para su uso cuando escuche un pitido un segundo después
de encenderla
El seguro debe
estar a la izquierda
cuando esté
instalado.
No utilice la unidad con
el seguro en la posición
central
Desbloquear
(a la izquierda en la
posición de
bloqueo)
Bloquear
(más a la derecha
en la posición de
cierre)
ES
Antes de utilizer el dispositivo
• Retire la cinta adhesiva azul intransferible del cuerpo antes de utilizarlo.
Instrucciones para el manejo de la unidad
DescripciónBotón
10
Panel de visualización Panel de funcionamiento
INSTRUCCIONES DE FUNCIONAMIENTO
En la modalidad de encendido, puede programar el apagado automático
para que se realice entre 1 y 9 horas. En la modalidad de espera, cuando el
aparato está encendido, pero no en funcionamiento, es posible programar
el encendido para que ocurra en un intervalo de 1 a 9 horas.
Pulse este botón para cambiar el tipo de viento (viento natural, viento
en reposo, modo ECO, viento normal).
Pulse el botón “ ” (Encendido/En espera) para encender o poner en
espera la unidad.
Pulse esta tecla para cambiar la velocidad del viento (ciclo según la
secuencia de 1~5 ).
Pulse este botón para activar/desactivar la modalidad de oscilación.
El ventilador ajusta automáticamente la velocidad del viento según un
programa establecido, con tres niveles disponibles (1, 2 y 3).
Este icono se ilumina en el modo de reposo.
Este icono se enciende cuando la función Temporizador está activada.
ES
11
Control remoto
ADVERTENCIA SOBRE LAS BATERÍAS
Baterías AAA de 1,5V
Baterías
(Baterías no incluidas)
• El control remoto debe utilizarse normalmente delante del producto con un ángulo de
desviación de 30 grados.
• La batería contiene muchos metales pesados, ácidos y bases, etc., que pueden poner en
peligro la salud humana; las baterías usadas deben reciclarse por separado.
• El diagrama esquemático del control remoto es sólo ilustrativo; consulte el producto
real.
Activar o desactivar la
oscilación
Encendido/En espera
Cambiar la modalidad del viento (viento
natural, viento en reposo, modo ECO,
viento normal)
Programar el apagado/encendido
temporizado
Pulse "+, -" para ajustar
la velocidad del viento o
el temporizador
Activar/desactivar el
modo ECO (el viento
cambia y se ajusta a la
temperatura)
• Utilice baterías de manganeso o alcalinas del tipo "AAA" .
• NO utilice baterías recargables.
• NO tire las baterías al fuego, podrían explotar o tener fugas.
• NO mezcle baterías viejas y nuevas.
• NO mezcle baterías alcalinas, estándar (carbono-zinc) o recargables (níquel-cadmio).
• Preste atención a los polos (+ y -) de las baterías.
ES
Intrucciones de limpieza
1. Cómo desmontar el cuerpo del ventilador de la base del motor
LIMPIEZA Y MANTENIMIENTO
12
Mango moldeado
El ventilador requiere de poco mantenimiento. No intente hacer las reparaciones
usted mismo. Consulte con personal de servicio técnico calificado si necesita realizar
algún tipo de mantenimiento al producto.
1. Antes de limpiar y armar el producto, este debe estar desconectado.
2. Para asegurar una circulación de aire adecuada en el motor, mantenga las aperturas
de ventilación traseras del motor libres de polvo. No desarme el ventilador para
eliminar el polvo.
3. Limpie las partes externas con un trapo suave humedecido con detergente suave.
4. No use detergentes abrasivos o solventes para evitar rayar la superficie del produc-
to. No use los siguientes productos para limpiar: gasolina, diluyente o similares.
5. No permita que ingrese agua u otros líquidos a la carcasa del motor o partes internas.
6. Asegúrese de desconectar la unidad del suministro eléctrico antes de limpiarla.
7. Las piezas plásticas deben ser limpiadas con un paño suave humedecido con detergen-
te suave. La capa de jabóndebe ser eliminada por completo con un trapo seco.
Antes de separar el cuerpo de la base, apague el interruptor de encendido y
desenchúfelo, luego mueva el seguro de la parte posterior hacia el extremo izquierdo,
sujete la parte posterior del cuerpo por el mango moldeado y levántelo verticalmente
hacia arriba para separar el cuerpo de la base.
ES
2. Limpieza
13
NOTA
Para limpiar el cuerpo del ventilador, debe separarlo de la base del motor.
Enjuague:
Coloque bien el cuerpo del ventilador y enjuáguelo a fondo bajo el grifo o la ducha.
Después de enjuagarlo, sacuda suavemente el exceso de agua y déjelo escurrir hasta que
se seque antes de volver a instalarlo en la base del motor de la torre y enchufar el
ventilador.
ES
14
NOTA
2
3
41
1
• Cuando cambie el fusible, por favor, no lo accione de forma repentina ni haga un
esfuerzo excesivo, o de lo contrario el producto se dañará o causará un accidente.
INSTRUCCIONES DE
MANTENIMIENTO PARA EL
USUARIO
a) Sujete el enchufe y retírelo del receptáculo o de otro dispositivo de salida. No desen-
chufe tirando del cable.
b) Abra la tapa del fusible. Deslice la tapa de acceso a los fusibles en la parte superior
del enchufe hacia las clavijas. (Fig. )
c) Retire el fusible con cuidado. Inserte la punta de su herramienta en la ranura del
fusible (cierre con el terminal), y luego apriete el fusible de forma gradual y lenta,
pero sin excederse. Si siente que está apretado, puede intentarlo varias veces y
premiar el fusible poco a poco. Cuando un lado del fusible haya sido premiado,
entonces podrá
sacar el fusible por completo. (Fig. )
d) Riesgo de incendio. Sustituya el fusible sólo por un fusible de 2,5 amperios y 125
voltios. (Fig. )
e) Cierre la tapa del fusible. Deslice la tapa de acceso a los fusibles en la parte superior
del enchufe. (Fig. )
f) Riesgo de incendio. No sustituya el enchufe del accesorio. Contiene un dispositivo de
seguridad (fusible) que no debe retirarse. Deseche el producto si el enchufe está
dañado.
g) Si el ventilador no funciona repentinamente durante el funcionamiento normal,
compruebe si se trata de un problema con el fusible.
2
3
4
ES
15
SOLUCIÓN DE PROBLEMAS
Solution
Causa SoluciónProblema
Si el aparato presenta errores o fallos de funcionamiento, la siguiente tabla contiene
las posibles causas y soluciones para resolver un error o avería.
El dispositivo está
enchufado, pero
NO enciende.
• El enchufe no está bien
conectado en el tomacorrien-
te.
Compruebe que el enchufe de
alimentación esté
completa y correctamente
insertado en la toma de
corriente, y vuelva a insertarlo
si es necesario.
Envíe el dispositivo al servicio
de mantenimiento postventa.
Compruebe que el enchufe
esté bien insertado en la toma
de corriente.
Encienda el interruptor del
cuerpo de la unidad.
Sustituya las baterías.
Acerque el control remoto al
ventilador y asegúrese de que
apunte directamente a la
pantalla.
Envíe el dispositivo al servicio
de mantenimiento postventa.
• La temperatura supera el
umbral de desconexión
térmica del motor.
• El cable de alimentación no
está enchufado o tiene mal
contacto.
• El interruptor del aparato no
está encendido.
• Hay que cambiar las baterías.
• El control remoto se está
utilizando a más de 5 metros
del ventilador.
• allo de comunicación anormal.
El dispositivo se
apaga repentina-
mente durante el
funcionamiento.
El dispositivo no
funciona correcta-
mente
El control remoto
no funciona
El panel muestra
EU
ES
MARCAS, DERECHOS DE AUTOR
Y DECLARACIÓN LEGAL
El logotipo de , las marcas denominativas, el nombre comercial, la imagen
comercial y todas las versiones de los mismos son activos valiosos del Grupo Midea y/o
sus asociados ("Midea"), de los que Midea es titular de marcas comerciales, derechos de
autor y otros derechos de propiedad intelectual, así como de todo el fondo de comercio
derivado del uso de cualquier parte de una marca comercial de Midea. El uso de la
marca Midea con fines comerciales sin el consentimiento previo por escrito de Midea
puede constituir una infracción de la marca o de la competencia desleal en violación de
las leyes pertinentes.
Este manual ha sido creado por Midea y Midea se reserva todos los derechos de autor
del mismo. Ninguna entidad o individuo puede utilizar, duplicar, modificar, distribuir en
todo o en parte este manual, ni agrupar o vender con otros productos sin el
consentimiento previo por escrito de Midea.
Todas las funciones e instrucciones descritas estaban actualizadas en el momento de
imprimir este manual. Sin embargo, el producto real puede variar debido a la mejora de
sus funciones y diseños.
16
ES
Para la prestación de los servicios acordados con el cliente, nos comprometemos a
cumplir sin restricciones todas las estipulaciones de la legislación aplicable en materia
de protección de datos, en consonancia con los países acordados en los que se
prestarán los servicios al cliente, así como, en su caso, el Reglamento General de
Protección de Datos de la UE (GDPR).
Por lo general, nuestro tratamiento de datos tiene por objeto cumplir nuestra
obligación contractual con usted y, por razones de seguridad del producto,
salvaguardar sus derechos en relación con la garantía y las cuestiones de registro del
producto. En algunos casos, pero sólo si se garantiza una protección adecuada de los
datos, los datos personales podrían transferirse a destinatarios situados fuera del
Espacio Económico Europeo.
Puede solicitar más información al respecto. Puede ponerse en contacto con nuestro
encargado de la protección de datos a través de [email protected]. Para ejercer
sus derechos, como el de oponerse al tratamiento de sus datos personales con fines de
marketing directo, póngase en contacto con nosotros a través de
[email protected]. Para obtener más información, siga el código QR.
AVISO SOBRE LA PROTECCIÓN
DE DATOS
17
ES