
52" LCD HD TV
NS-LCD52HD-09
User Guide


3
www.insignia-products.com
Insignia NS-LCD52HD-09
52” LCD HD TV
Contents
Introduction . . . . . . . . . . . . . . . . . . . . . . . . . . . . . . . . . . . . . . . . . . . . . . . . . . . . . . . . . . . 3
Safety information . . . . . . . . . . . . . . . . . . . . . . . . . . . . . . . . . . . . . . . . . . . . . . . . . . . . . . 5
Features. . . . . . . . . . . . . . . . . . . . . . . . . . . . . . . . . . . . . . . . . . . . . . . . . . . . . . . . . . . . . . 7
Accessories . . . . . . . . . . . . . . . . . . . . . . . . . . . . . . . . . . . . . . . . . . . . . . . . . . . . . . . . . . . . . . . 7
Front . . . . . . . . . . . . . . . . . . . . . . . . . . . . . . . . . . . . . . . . . . . . . . . . . . . . . . . . . . . . . . . . . . . . . 7
Remote. . . . . . . . . . . . . . . . . . . . . . . . . . . . . . . . . . . . . . . . . . . . . . . . . . . . . . . . . . . . . . . . . . . 7
Setting up your TV . . . . . . . . . . . . . . . . . . . . . . . . . . . . . . . . . . . . . . . . . . . . . . . . . . . . . . 8
Installing remote control batteries . . . . . . . . . . . . . . . . . . . . . . . . . . . . . . . . . . . . . . . . . . . . . . 8
Connecting your TV to a power outlet . . . . . . . . . . . . . . . . . . . . . . . . . . . . . . . . . . . . . . . . . . . 9
Connecting an outside antenna . . . . . . . . . . . . . . . . . . . . . . . . . . . . . . . . . . . . . . . . . . . . . . . . 9
Connecting cable TV . . . . . . . . . . . . . . . . . . . . . . . . . . . . . . . . . . . . . . . . . . . . . . . . . . . . . . . . 9
Connecting to an external signal source . . . . . . . . . . . . . . . . . . . . . . . . . . . . . . . . . . . . . . . . . 9
Connecting a computer . . . . . . . . . . . . . . . . . . . . . . . . . . . . . . . . . . . . . . . . . . . . . . . . . . . . . 10
Using your TV . . . . . . . . . . . . . . . . . . . . . . . . . . . . . . . . . . . . . . . . . . . . . . . . . . . . . . . . 10
Turning your TV on and off . . . . . . . . . . . . . . . . . . . . . . . . . . . . . . . . . . . . . . . . . . . . . . . . . . . 10
Selecting the TV signal source. . . . . . . . . . . . . . . . . . . . . . . . . . . . . . . . . . . . . . . . . . . . . . . . 11
Setting up the channel list . . . . . . . . . . . . . . . . . . . . . . . . . . . . . . . . . . . . . . . . . . . . . . . . . . . 11
Changing channels. . . . . . . . . . . . . . . . . . . . . . . . . . . . . . . . . . . . . . . . . . . . . . . . . . . . . . . . . 11
Selecting a digital sub-channel. . . . . . . . . . . . . . . . . . . . . . . . . . . . . . . . . . . . . . . . . . . . . . . . 11
Adjusting the volume . . . . . . . . . . . . . . . . . . . . . . . . . . . . . . . . . . . . . . . . . . . . . . . . . . . . . . . 11
Displaying status information . . . . . . . . . . . . . . . . . . . . . . . . . . . . . . . . . . . . . . . . . . . . . . . . . 11
Checking the DTV signal strength . . . . . . . . . . . . . . . . . . . . . . . . . . . . . . . . . . . . . . . . . . . . . 11
Adding a channel label . . . . . . . . . . . . . . . . . . . . . . . . . . . . . . . . . . . . . . . . . . . . . . . . . . . . . . 12
Freezing the picture . . . . . . . . . . . . . . . . . . . . . . . . . . . . . . . . . . . . . . . . . . . . . . . . . . . . . . . . 12
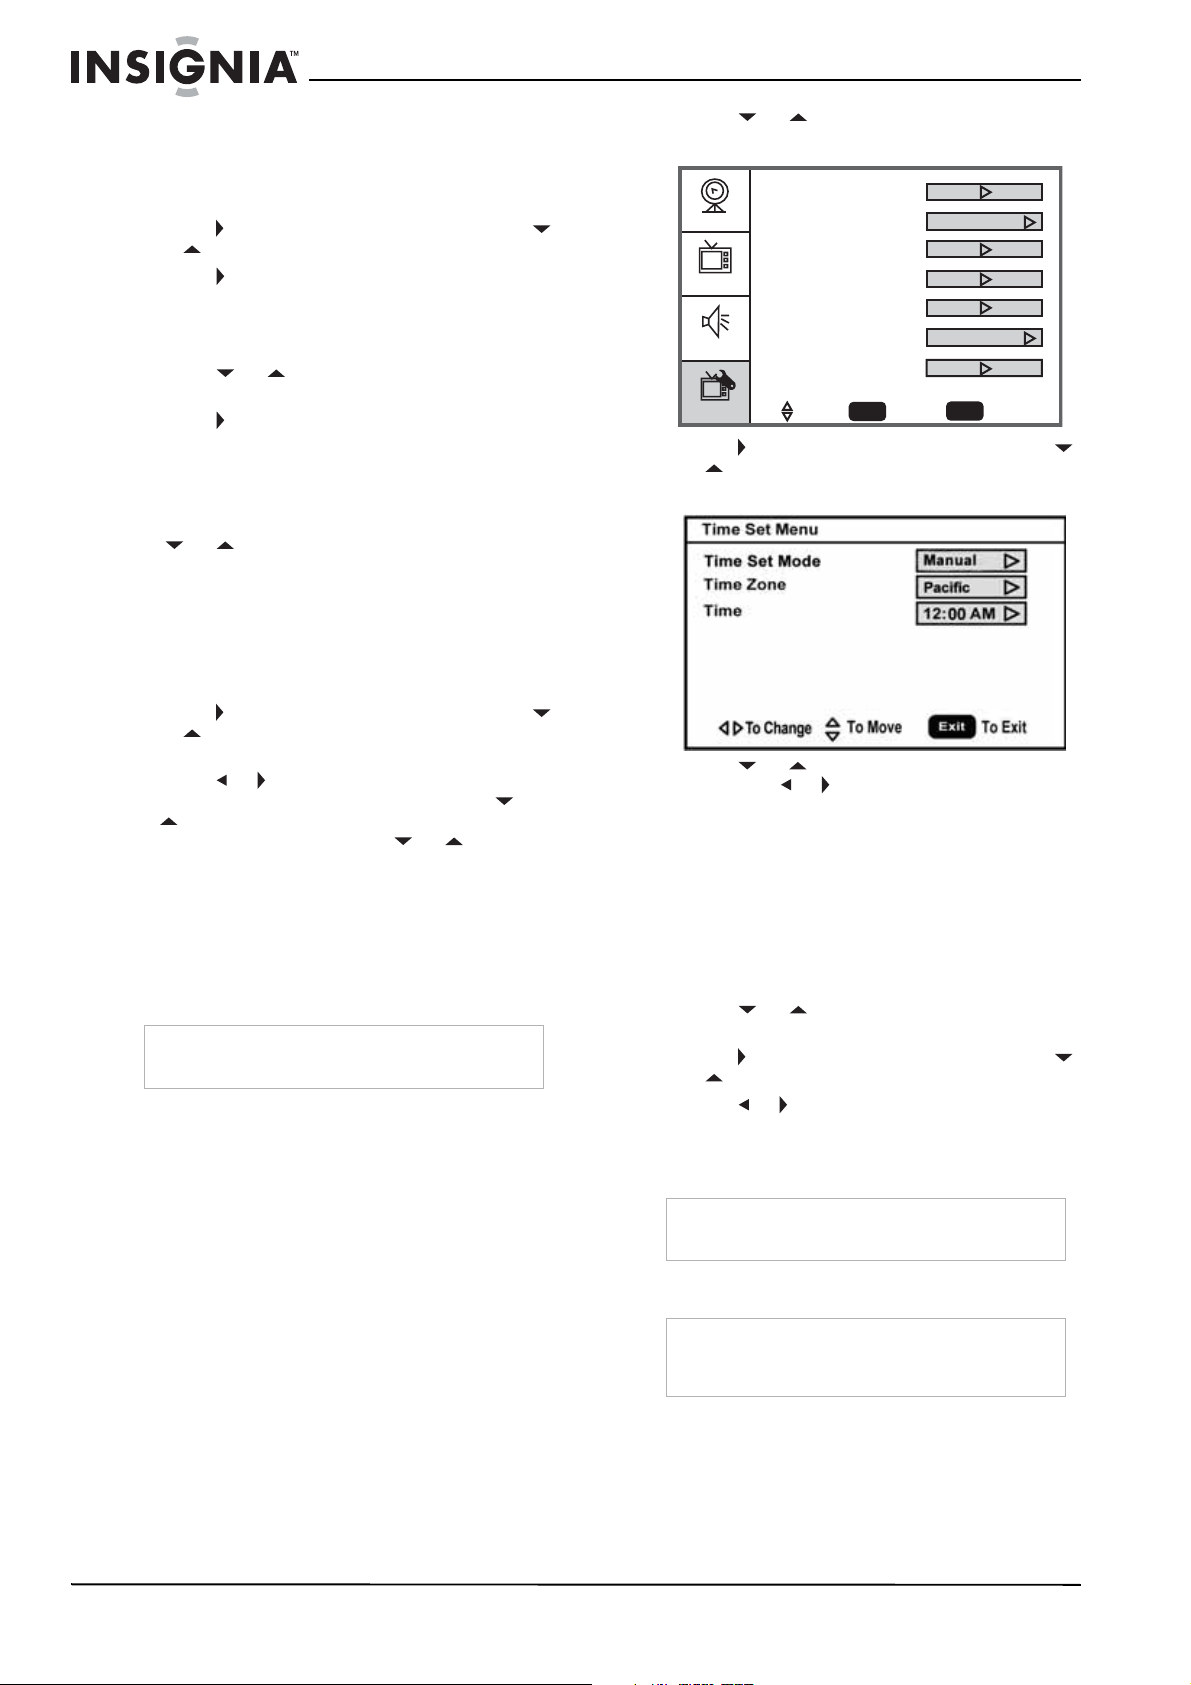
Setting the clock . . . . . . . . . . . . . . . . . . . . . . . . . . . . . . . . . . . . . . . . . . . . . . . . . . . . . . . . . . . 12
Setting the sleep timer . . . . . . . . . . . . . . . . . . . . . . . . . . . . . . . . . . . . . . . . . . . . . . . . . . . . . . 12
Viewing closed captions . . . . . . . . . . . . . . . . . . . . . . . . . . . . . . . . . . . . . . . . . . . . . . . . . . . . . 12
Setting parental controls. . . . . . . . . . . . . . . . . . . . . . . . . . . . . . . . . . . . . . . . . . . . . . . . . . . . . 13
Using the on-screen menu . . . . . . . . . . . . . . . . . . . . . . . . . . . . . . . . . . . . . . . . . . . . . . . . . . . 14
On-screen menus. . . . . . . . . . . . . . . . . . . . . . . . . . . . . . . . . . . . . . . . . . . . . . . . . . . . . . . . . . 14
Maintaining. . . . . . . . . . . . . . . . . . . . . . . . . . . . . . . . . . . . . . . . . . . . . . . . . . . . . . . . . . .15
Cleaning your TV . . . . . . . . . . . . . . . . . . . . . . . . . . . . . . . . . . . . . . . . . . . . . . . . . . . . . . . . . . 15
Troubleshooting . . . . . . . . . . . . . . . . . . . . . . . . . . . . . . . . . . . . . . . . . . . . . . . . . . . . . . . 16
Appendix A. . . . . . . . . . . . . . . . . . . . . . . . . . . . . . . . . . . . . . . . . . . . . . . . . . . . . . . . . . . 16
Attaching a wall mount bracket to your TV . . . . . . . . . . . . . . . . . . . . . . . . . . . . . . . . . . . . . . . .16
Appendix B. . . . . . . . . . . . . . . . . . . . . . . . . . . . . . . . . . . . . . . . . . . . . . . . . . . . . . . . . . . 17
Programming your remote control . . . . . . . . . . . . . . . . . . . . . . . . . . . . . . . . . . . . . . . . . . . . . .17
Troubleshooting remote control programming . . . . . . . . . . . . . . . . . . . . . . . . . . . . . . . . . . . . .20
Manufacturer’s codes . . . . . . . . . . . . . . . . . . . . . . . . . . . . . . . . . . . . . . . . . . . . . . . . . . . . . . . .21
Specifications. . . . . . . . . . . . . . . . . . . . . . . . . . . . . . . . . . . . . . . . . . . . . . . . . . . . . . . . . 31
Legal notices . . . . . . . . . . . . . . . . . . . . . . . . . . . . . . . . . . . . . . . . . . . . . . . . . . . . . . . . . 31
One-Year Limited Warranty . . . . . . . . . . . . . . . . . . . . . . . . . . . . . . . . . . . . . . . . . . . . . . 33
Introduction
Congratulations on your purchase of a high-quality Insignia product. Your NS-LCD52HD-09 represents the
state of the art in HD television design, and is designed for reliable and trouble-free performance.
4
Insignia NS-LCD52HD-09 52” LCD HD TV
www.insignia-products.com
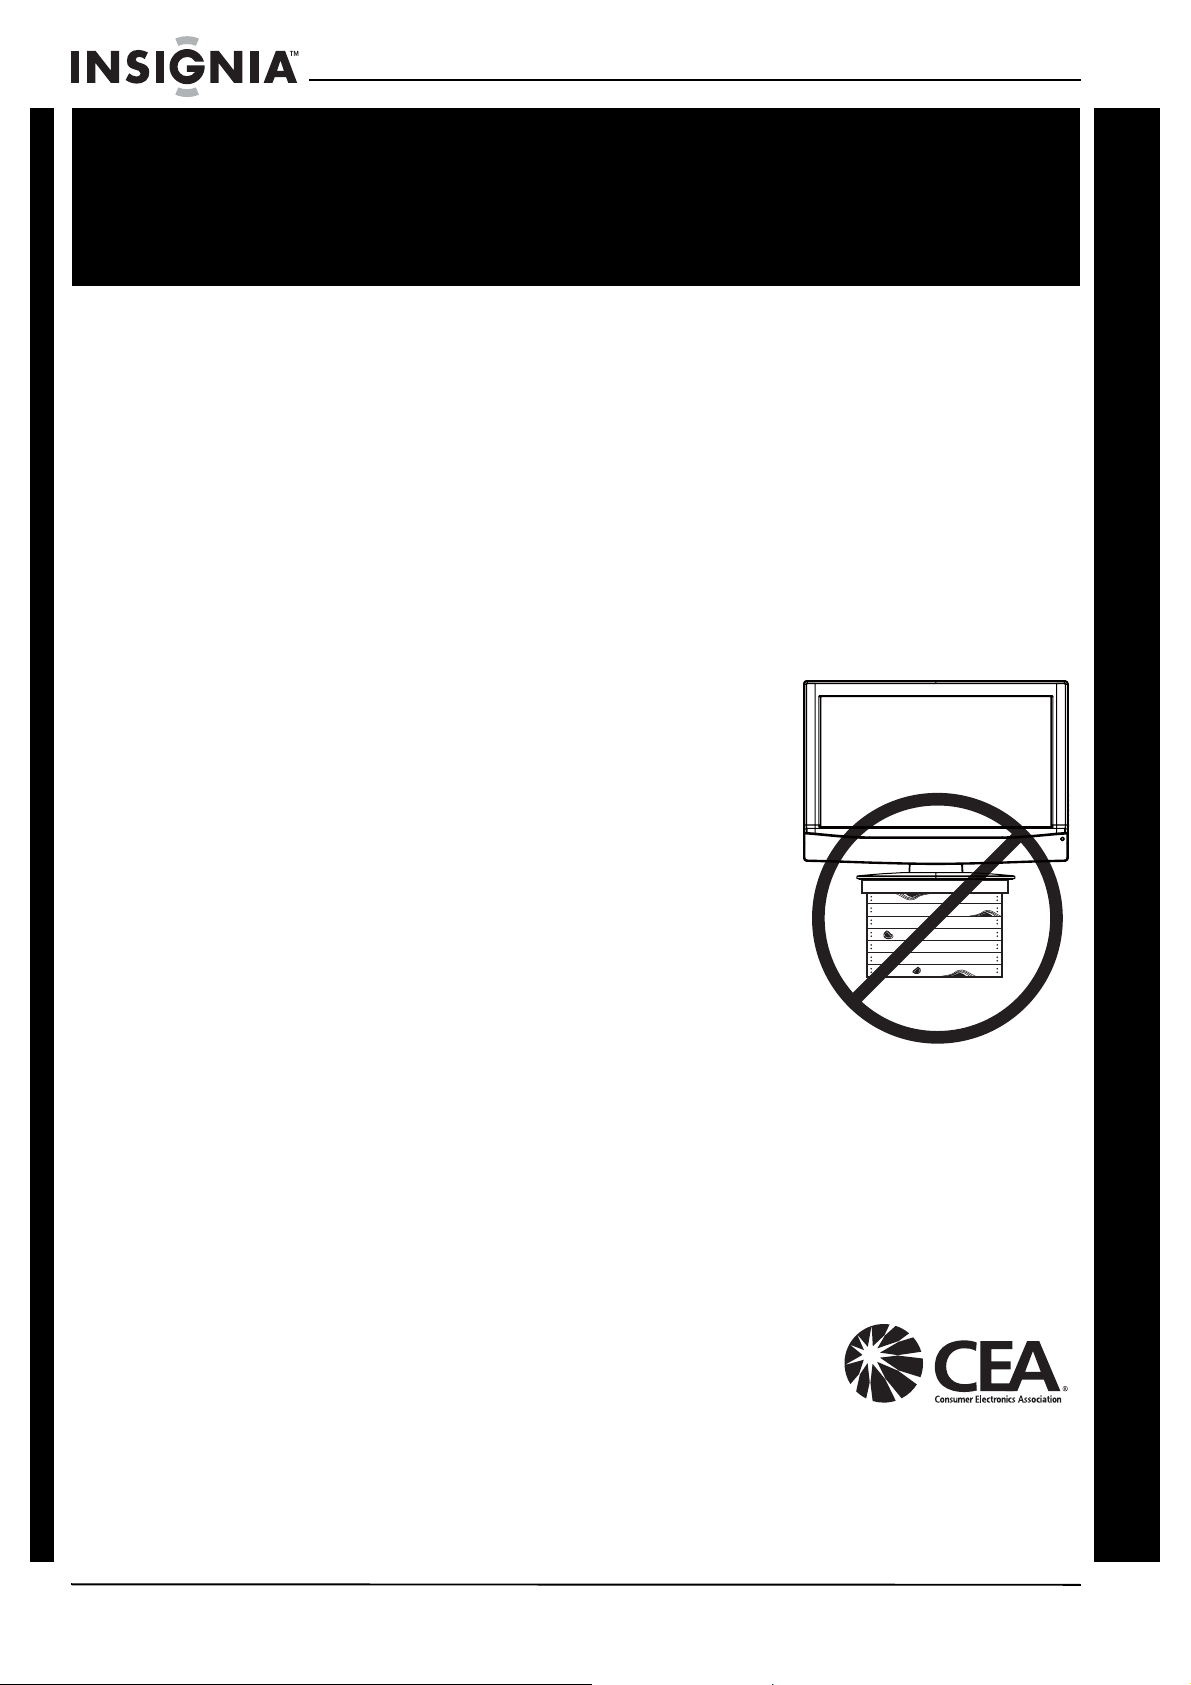
As you enjoy your new product, keep
these safety tips in mind
The issue
The home theater entertainment experience is a growing trend, and larger TVs are
popular purchases. However, TVs are not always supported on the proper stands or
installed according to the manufacturer’s recommendations. We and the consumer
electronics industry are committed to making home entertainment enjoyable and safe.
TVs that are inappropriately placed on dressers, bookcases, shelves, desks,
speakers, chests, or carts may fall over and cause injury.
Tune into safety
• One size of TV stand does not fit all. Use only a TV
stand rated for the weight of your TV.
• Carefully read and understand all enclosed
instructions for proper use of this product.
• Don’t let children to climb on or play with
entertainment system furniture and TVs.
• Don’t place TVs on furniture that can easily be used
as steps, such as a chest of drawers.
• Remember that children can become excited while
watching a program, especially on a “larger-than-life”
TV. Make sure that you place or install the TV where it
cannot be pushed, pulled over, or knocked down.
• Make sure that you route all cords and cables so that
they cannot be pulled or grabbed by curious children.
Wall mounting
If you decide to wall mount your TV, always:
• One size of wall mount does not fit all. Use only a wall mount rated for the weight
of your TV and that has been recommended by this TV manufacturer, listed in this
manual, or otherwise listed by an independent laboratory (such as UL, CSA, or
ETL) as suitable for your TV.
• Follow all instructions supplied by the TV and wall mount manufacturers.
• If you have any doubts about your ability to safely wall mount your TV, get help
from a professional installer.
• Make sure that the wall where you are mounting the TV is
appropriate. Some wall mounts are not designed to be
mounted to walls backed with steel studs or cinder blocks.
If you are unsure, ask a professional installer.
• TVs can be heavy. At least two people are required for safe wall mount installation.
f
CHILD SAFETY
It makes a difference how and where you use
your flat panel display
5
Insignia NS-LCD52HD-09 52” LCD HD TV
www.insignia-products.com
Safety information
Read instructions
Read all of the safety and operating instructions
before you use your TV.
Retain instructions
Retain safety and operating instructions for
future reference.
Follow warnings and instructions
Follow all warnings on your TV and in the
operating instructions. Follow all operating and
use instructions.
Water and moisture
Do not use your TV near water. For example, do
not use it near a bath tub, wash bowl, kitchen
sink, laundry tub, in a wet basement, or near a
swimming pool.
Cleaning
Unplug your TV before cleaning. Do not use
liquid or aerosol cleaners. Use only a soft,
lint-free cloth to clean the exterior of your TV.
Ventilation
Slots and openings in the cabinet and the back
or bottom are provided for ventilation, reliable
operation, and protection from overheating.
These openings must not be blocked or covered.
Do not block the openings by placing your TV on
a bed, sofa, rug, or other similar surface. Do not
place your TV near or over a radiator or heat
register. Do not place your TV in a built-in
installation, such as a bookcase or rack, unless
you provide correct ventilation or follow the
manufacturer’s instructions.
Heat
Make sure that your TV is located away from
heat sources such as radiators, heat registers,
stoves, or other products (including amplifiers)
that produce heat.
Grounding or polarization
Do not defeat the safety purpose of the polarized
or grounding-type plug. A polarized plug has two
blades with one wider than the other. A
grounding type plug has two blades and a
grounding prong. The wide blade or grounding
prong are provided for your safety. If the plug
does not fit, contact an electrician to replace the
obsolete outlet.
Power cord protection
Route power cords so that they are not likely to
be walked on or pinched by items placed on or
against them. Pay particular attention to cords at
plugs, convenience receptacles, and the point
where they exit from your TV.
Accessories
Use only attachments/accessories
recommended by Insignia.
Stand
Do not place your TV on an unstable
cart, stand, tripod, bracket, or table.
Your TV may fall, causing serious
personal injury and serious damage
to your TV. Use only with a cart,
stand, tripod, bracket, or table recommended by
the manufacturer, or sold with your TV. If you
mount your TV to the wall, follow the
manufacturer’s instructions and use a mounting
accessory recommended by the manufacturer.
Your TV and cart combination should be moved
with care. Quick stops, excessive force, and
uneven surfaces may cause your TV and cart
combination to overturn.
Lightning
For added protection for your TV’s receiver
during a lightning storm, or when it is left
unattended and unused for long periods of time,
unplug it from the power outlet and disconnect
the antenna or cable system. This helps prevent
damage to your TV from lightning and power line
surges.
Servicing
Do not attempt to service your TV yourself
because opening or removing covers may
expose you to dangerous voltage or other
hazards. Refer all servicing to qualified service
personnel.
Replacement parts
When replacement parts are required, make
sure that the service technician uses
replacement parts specified by the manufacturer
that have the same characteristics as the
Warning
To reduce the risk of electric shock, do not remove the cover or
back. There are no user-serviceable parts inside. Refer
servicing to qualified service personnel.
To reduce the risk of fire or electric shock, do not expose your
TV to rain or moisture.
Caution
To prevent electric shock, match the wide blade on the power
cord plug to the wide slot on an electric outlet. If the plug does
not fit, consult a licensed electrician to replace the obsolete
outlet. Do not modify the power cord plug, or you will defeat
this safety feature.
This symbol indicates that dangerous voltage
constituting a risk of electric shock is present
within your TV. This label is located on the back
of your TV.
This symbol indicates that there are important
operating and maintenance instructions in the
literature accompanying your TV.
Warnings
Your TV contains tin-lead solder and a fluorescent lamp
containing a small amount of mercury. Disposal of these
materials may be regulated for environmental reasons. For
disposal or recycling information, contact your local authorities
or the Electronic Industries Alliance at www.eia.org.
Your TV should not be exposed to dripping or splashing, and
no objects filled with liquids, such as vases, should be placed
on the TV.

6
Insignia NS-LCD52HD-09 52” LCD HD TV
www.insignia-products.com
original part. Unauthorized substitutions may
result in fire, electric shock, personal injury, or
other hazards.
Overloading
Do not overload power outlets and extension
cords because this can result in a risk of fire or
electric shock.
Object and liquid entry
Never push objects of any kind into your TV
through openings because objects may touch
dangerous voltage points or short out parts that
could result in a fire or electric shock. Never spill
liquid of any kind on your TV.
Damage requiring service
Unplug this TV from the power outlet and refer
servicing to qualified service personnel under
the following conditions:
• When the power supply cord or plug is
damaged or frayed.
• If liquid has been spilled or objects have
fallen into your TV.
• If your TV has been exposed to rain or water.
• If your TV does not operate normally by
following the operating instructions. Adjust
only those controls that are covered by the
operating instructions because incorrect
adjustment of other controls may result in
damage and will often require extensive work
by a qualified technician to restore your TV to
its normal operation.
• If your TV has been dropped or damaged in
any way.
• When your TV exhibits a distinct change in
performance.
Safety check
After completing any service or repair to this TV,
ask the service technician to perform routine
safety checks to determine that your TV is in
correct operating condition.
Power source
Operate your TV only from the type of power
source indicated on the marking label. If you are
not sure of the type of power supplied to your
home, consult your TV dealer or local power
company.
Screen protection
Your TV’s screen is made of glass. Do not drop
your TV or hit the glass screen. If the screen
breaks, be careful of broken glass.
Non-active pixels
The LCD panel contains almost 3 million thin film
transistors, which provide exceptionally sharp
video quality. Occasionally, a few non-active
pixels may appear on the screen as a fixed blue,
green, or red point. These non-active pixels do
not adversely affect the performance of your TV,
and are not considered defects.
Outdoor antenna grounding
If an outside antenna or cable system is
connected to your TV, make sure that the
antenna or cable system is grounded to provide
some protection against voltage surges and
built-up static charges. Article 810 of the
National Electrical Code, ANSI/NFPA No. 70,
provides information with respect to correct
grounding of the mast and supporting structure,
grounding of the lead-in wire to an antenna
discharge unit, size of grounding conductors,
location of the antenna-discharge unit,
connection to grounding electrodes, and
requirements for the grounding electrode.
Note to CATV system installer
This reminder is provided to call the CATV
system installer’s attention to Article 820-40 of
the NEC that provides guidelines for correct
grounding and in particular, specifies that the
cable ground must be connected to the
grounding system of the building as close to the
point of cable entry as practical.
Mobile telephone warning
To avoid interference with your TV picture and
sound, operating problems, or even damage,
keep your mobile telephone away from the TV.
End of life directives
Your new TV contains materials which can be
recycled and reused. At the end of your TV’s life,
specialized companies can dismantle the
discarded TV to concentrate the reusable
materials and to minimize the amount of
materials to be disposed of. Dispose of your old
TV according to local regulations.
Disconnect
An apparatus with CLASS I construction shall be
connected to an AC power outlet with a
protective earthing connection. Where the AC
plug or an appliance coupler is used as the
disconnect device, the disconnect device shall
remain readily operable.
1 Electric service equipment
2 Power service grounding electrode system
3 Ground clamps
4 Grounding conductors
5 Antenna discharge unit
6 Grounding clamp
7 Antenna lead-in wire
6
7
5
2
1
3
4
7
Insignia NS-LCD52HD-09 52” LCD HD TV
www.insignia-products.com
Features
Accessories
Make sure that the following accessories are
provided in the packaging:
• Remote control and batteries (2-AA)
• AC power cord
• PC audio cable
•VGA cable
• User guide
• Quick Start Guide
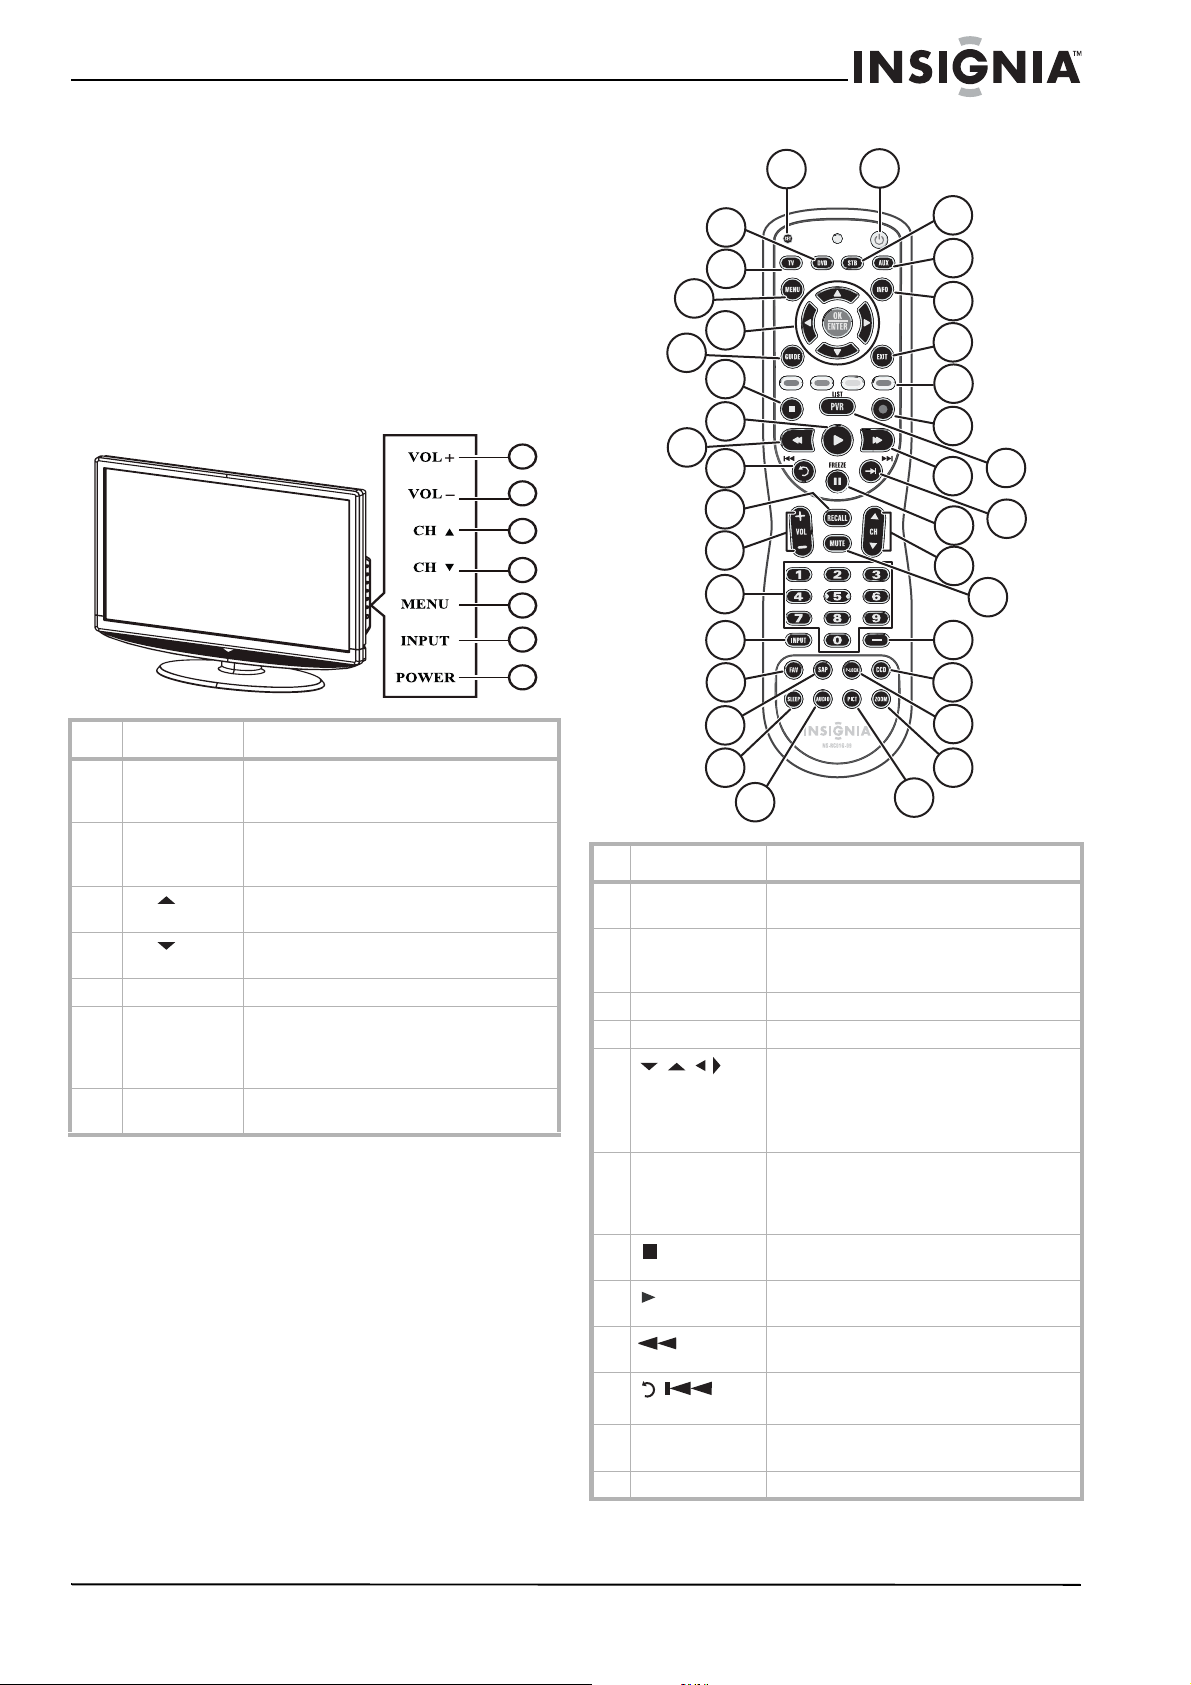
Front
1
Remote
# Button Description
1 VOL + Press to increase the volume. In Menu
mode, functions as the right arrow to go to
the next menu or increase a setting.
2 VOL – Press to decrease the volume. In Menu
mode, functions as the left arrow to go to a
previous menu or decrease a setting.
3
CH
Press to go to the next higher channel. In
Menu mode, functions as the up arrow.
4
CH
Press to go to the next lower channel. In
Menu mode, functions as the down arrow.
5 MENU Press to show the on-screen menu.
6 INPUT Press to show the input source menu, then
use the arrow keys to cycle through the
available input sources. In Menu mode,
functions as the OK/ENTER key.
7 POWER Press to turn on your TV or put it into
Standby mode.
1
2
3
5
6
4
7
# Button Description
1 SET Press to program your remote control to
control other devices.*
2 DVD Press to control your DVD player. Your
remote control must be programmed
first.*
3 TV Press to control your TV.
4 MENU Press to open the on-screen menu.
5
OK/ENTER
Press the arrows to move down, up, left,
or right in the on-screen menu.
Press the OK/ENTER button to confirm
changes or to toggle options on and off in
the on-screen menu.
6 GUIDE Press to display the program guide for the
selected device if your device supports this
feature. This TV does not support program
guide.
7
(stop)
Press to stop playback on DVD, DVR, PVR,
or CD devices.*
8
(play)
Press to start playback on DVD, DVR, PVR,
or CD devices.*
9
(fast back)
Press to fast backward on DVD, DVR, PVR,
or CD devices.*
10
/ (skip
back)
In DVD, DVR, PVR, or CD mode, press to
skip back to the previous title or track.*
11 RECALL In TV mode, press to return to the previous
channel.
12 VOL + or – Press to adjust the volume up or down.
1
19
2
3
4
13
5
6
20
21
22
23
24
8
9
25
26
27
14
32
11
31
12
10
7
28
15
16
17
30
29
33
34
35
18
36
TV VIDEO
COMP
HDMI
8
Insignia NS-LCD52HD-09 52” LCD HD TV
www.insignia-products.com
* For information on programming your remote
control to control other devices, see
“Programming your remote control” on
page 17.
Using the remote control
To use the remote control:
• Point the remote control towards the remote
sensor on the front of your TV.
Setting up your TV
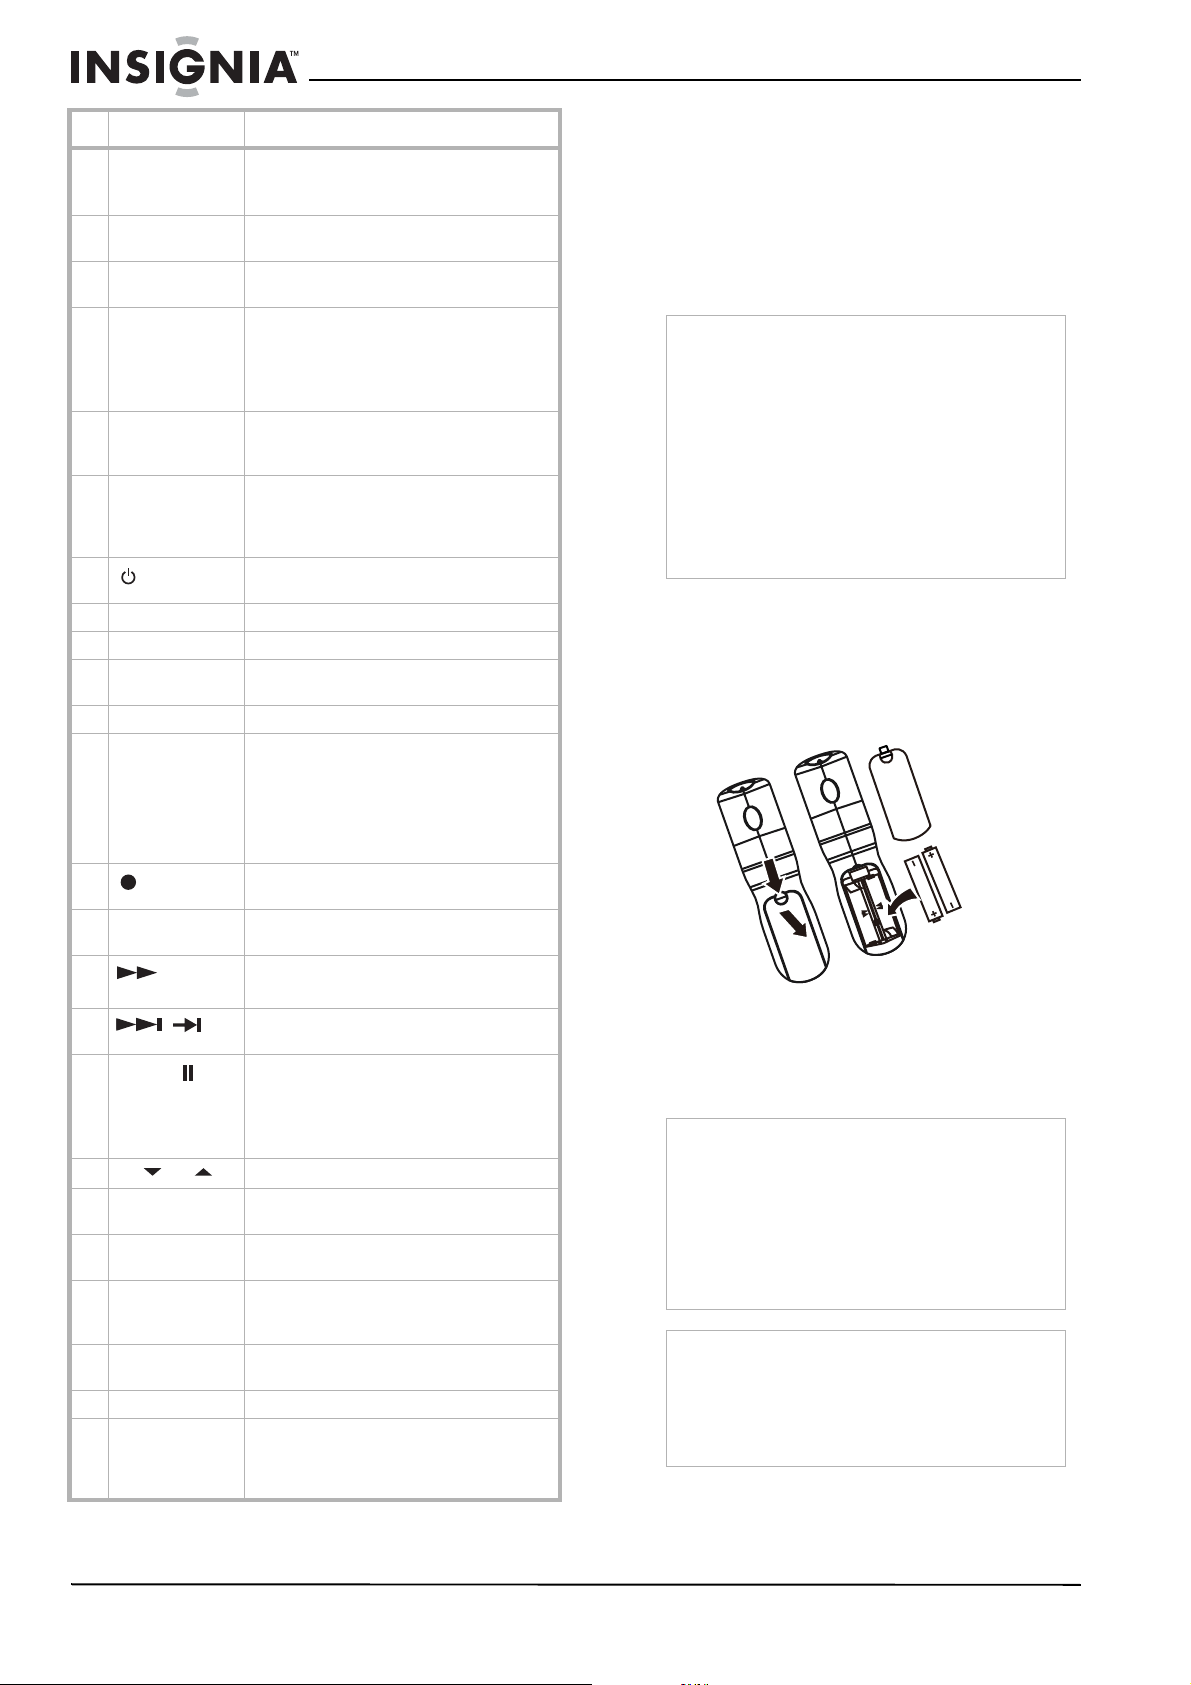
Installing remote control batteries
To install the remote control batteries:
1 Remove the battery cover.
2 Insert two AA batteries into the battery
compartment. Make sure that you match the
+ and – symbols on the batteries with the +
and – symbols in the battery compartment.
3 Replace the cover.
13 [Number
buttons]
Press to enter channel numbers.
In the on-screen menu, press to enter your
parental control’s password.
14 INPUT Press to cycle through the available input
sources on the active device.
15 FAV Press to switch between the Favorite and
Normal modes.
16 SAP Press to select one of the preset audio
mode in NTSC mode. You can select
MONO, STEREO, or SAP.
In ATSC mode, press to select the audio
language.
17 SLEEP Press to set the sleep timer. For more
information, see “Setting the sleep timer”
on page 12.
18 AUDIO Press to select the bass and treble
adjustment. Lets you adjust the bass and
treble without opening the on screen
menu.
19
POWER
Press to turn on your TV, or the active
device, or put it into Standby mode.
20 STB Press to control your set top box.*
21 AUX Press to control your auxiliary device.*
22 INFO Press to current channel and program
information.
23 EXIT Press to close the on-screen menu.
24 TV, VIDEO,
COMP, and HDMI
(color buttons)
TV: Press to select TV source.
VIDEO: Press to toggle between S-Video
and Composite source modes.
COMP: Press to select Component source
mode.
HDMI: Press to select HDMI mode.
25
(record)
In DVD, DVR, PVR, or CD mode, press to
begin recording.*
26 LIST/PVR Press to list all the recorded programs in
PVR/STB.*
27
(fast
forward)
Press to fast forward on DVD, DVR, PVR,
or CD devices.*
28
/
In DVD, DVR, PVR, or CD mode, press to
skip forward to the next title or track.*
29
FREEZE
Press to freeze the video image. Press
again to unfreeze the image.
Note: Do not freeze the video image for
long periods of time. You may damage the
TV screen.
30
CH
or
Press to change TV channels.
31 MUTE Press to mute the sound. Press again to
restore the sound.
32 — Use with 0-9 number buttons and
OK/ENTER key to select digital channels.
33 CCD Press to turn closed captions on and off.
For more information, see “Viewing closed
captions” on page 12.
34 P-LOCK Press to activate or deactivate parental
control lock.
35 ZOOM Press to select the display aspect ratio.
36 PICT Press to select the brightness or contrast
adjustment. Lets you adjust the brightness
and contrast without opening the on
screen menu.
# Button Description
Notes
• Do not expose the remote control to shock or
liquids.
• Do not use the remote control in an area with
high humidity.
• Do not place the remote control in direct
sunlight.
• Do not place objects, such as furniture,
between the remote control and the remote
sensor.
• The remote control may not work if direct
sunlight or bright light shines on the remote
sensor. Either move your TV or change the
angle at which you use the remote control.
Caution
• Batteries (battery pack or batteries installed)
should not be exposed to excessive heat, such
as sunshine, heater registers, or fire.
• Battery chemicals can cause a rash. If the
batteries leak, clean the battery compartment
with a cloth. If chemicals touch your skin, wash
immediately.
• Make sure that batteries are disposed of
correctly. Do not burn or incinerate.
Notes
• Do not mix batteries of different types.
• Do not mix old and new batteries.
• Remove batteries when the charge is depleted.
• If the remote control is not going to be used for
an extended period of time, remove the
batteries.
9
Insignia NS-LCD52HD-09 52” LCD HD TV
www.insignia-products.com
Connecting your TV to a power outlet
To connect your TV to a power outlet:
• Plug the power cord into a power outlet.
Connecting an outside antenna
Antenna cables come in two types: 75 ohm and
300 ohm.
• If your antenna cable has a 75 ohm
connector, connect the cable to the coaxial
jack on the back of your TV.
• If your antenna cable has a 300 ohm
connector, connect the cable to a
300-75 ohm adapter (not included), connect
the adapter to a 75 ohm cable, then connect
the other end of the 75 ohm connector to the
coaxial jack on the back of your TV.
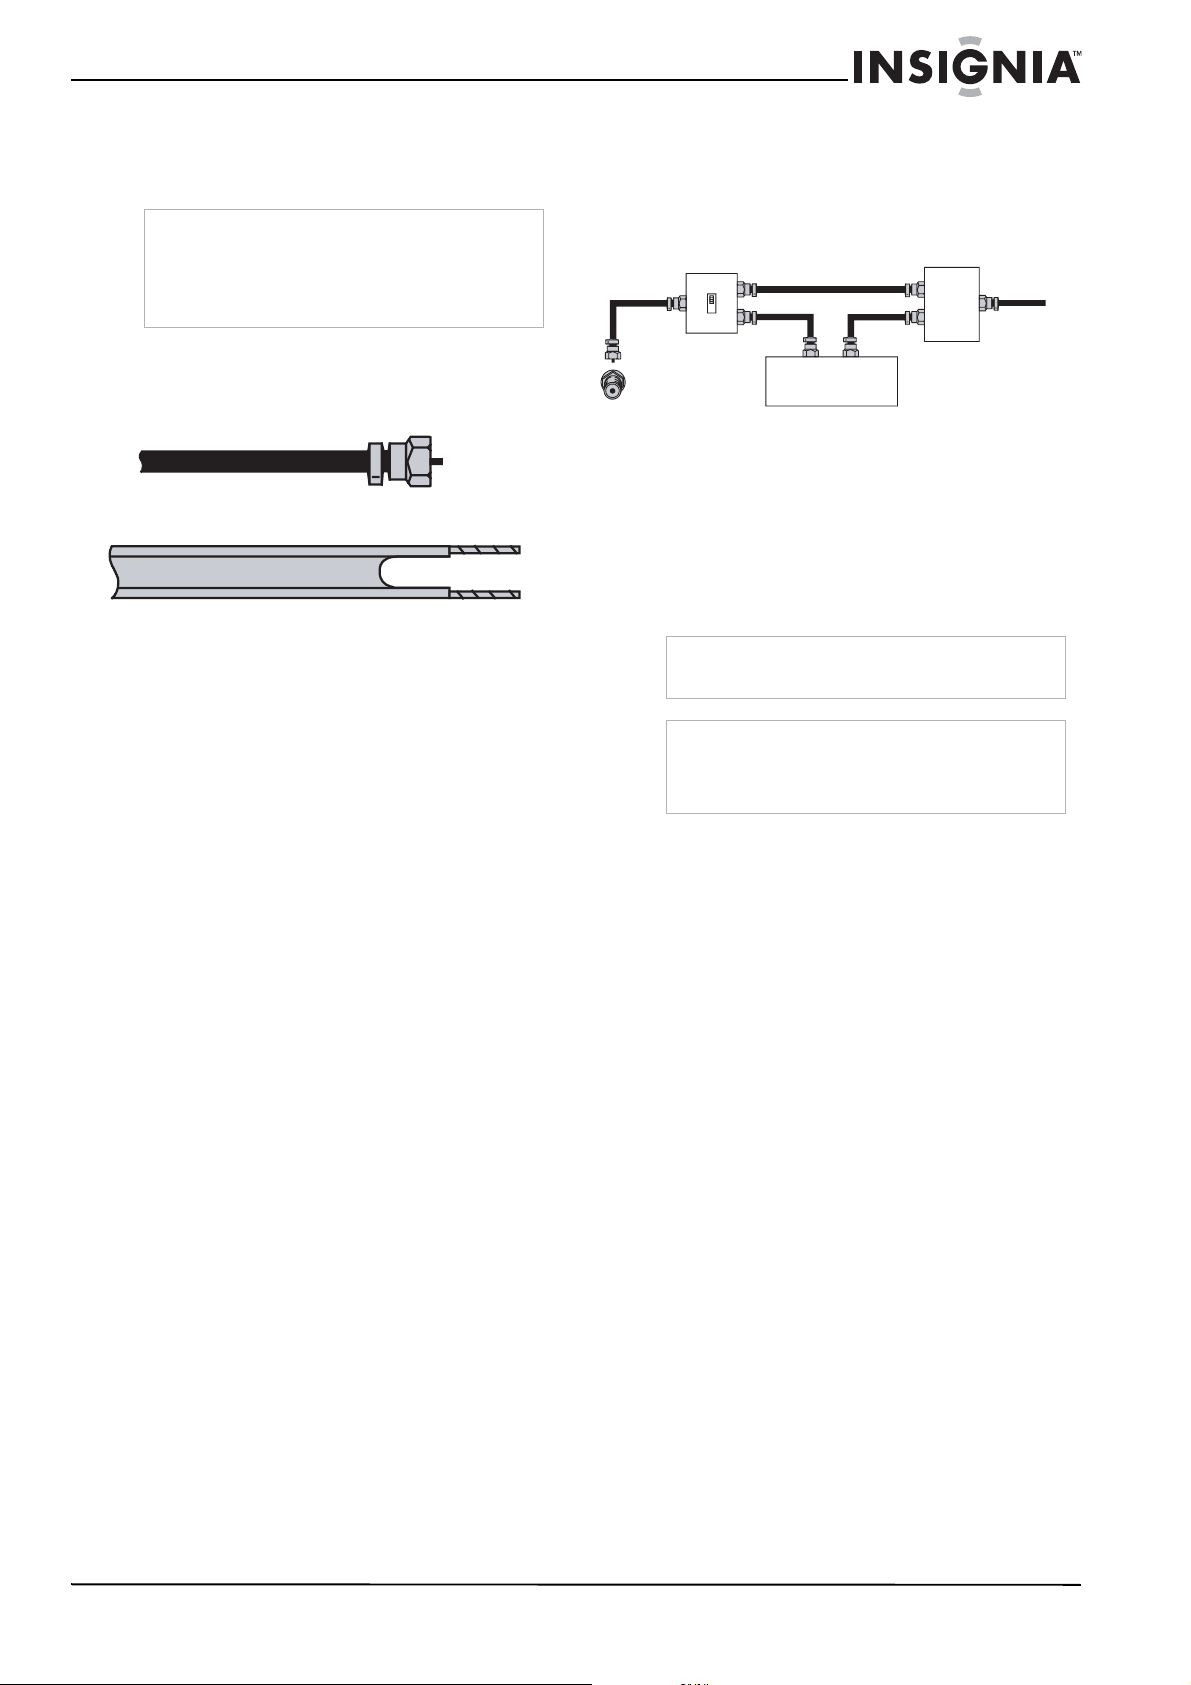
Connecting cable TV
Your TV has a 75 ohm jack for connecting cable
TV.
Some cable TV providers scramble the signals
for “premium” (pay) channels. To view these
channels, you need a converter/descrambler
box.
If you do not have a converter/descrambler box,
you can connect your cable TV directly to your
TV. If you have a converter/descrambler box, you
can connect your cable TV using an RF switch
(not supplied). For more information about
connecting a converter/descrambler box, contact
your cable TV provider.
To connect cable TV without a
converter/descrambler box:
1 Connect one end of a 75 ohm cable to the
coaxial jack on the back of your TV.
2 Connect the other end of the cable to the
cable TV wall outlet.
To connect cable TV with a
converter/descrambler box:
• Use the following illustration to connect a
converter/descrambler box. (The RF switch
and the signal splitter are not provided.)
Set the RF switch to the A position to watch
unscrambled channels controlled by your TV
remote control. Set the RF switch to the B
position to watch scrambled channels
controlled by the converter/descrambler
controls.
Connecting to an external signal source
You can connect a DVD, VCD, VCR, or STB
using a variety of methods, including composite
cables, component cables, an S-Video cable, or
an HDMI cable. The S-Video cable does not
carry sound. If you use an S-Video cable, you
need to use audio cables to connect the audio
output.
To connect an external signal source:
1 For composite video—Plug the audio/video
cable into the AUDIO L, AUDIO R, and
VIDEO in jacks on the back of your TV.
- OR -
For S-Video—Plug in the audio cables as
described above, then plug one end of an
S-Video cable into the S-Video jack on the
back of your TV and the other end into the
S-Video jack on the external signal source.
- OR -
For component video—Plug the Y, Pb, and
Pr video cables and the Audio L and Audio R
cables into the component input jacks.
- OR -
For HDMI—Plug one end of an HDMI cable
into the back of the TV and the other end into
the external signal source.
2 Turn on your TV.
3 Turn on the external signal source.
4 Press the INPUT button repeatedly to select
the external signal source you want to watch.
Notes
• Make sure that you use the correct type of
power. See the label on your TV.
• If you do not intend to use your TV for an
extended period of time, unplug the power cord
from the power outlet.
75 ohm cable
300 ohm cable
Warning
Make sure that you turn off and unplug your TV
before connecting devices.
Note
For better video, use the S-Video jack if your
source has an S-Video connection. For best video,
use the HDMI jack if your source has an HDMI
connection.
RF switch
Cable converter/descrambler box
Two-set signal splitter
Out
In
A
B
TV
10
Insignia NS-LCD52HD-09 52” LCD HD TV
www.insignia-products.com
For information on operating the external
signal source, refer to the user guide for that
device.
When using an HDMI-DVI adapter to pass the
DVI signal to HDMI input, use the L/R connector
to the right side of HDMI1 as audio input.
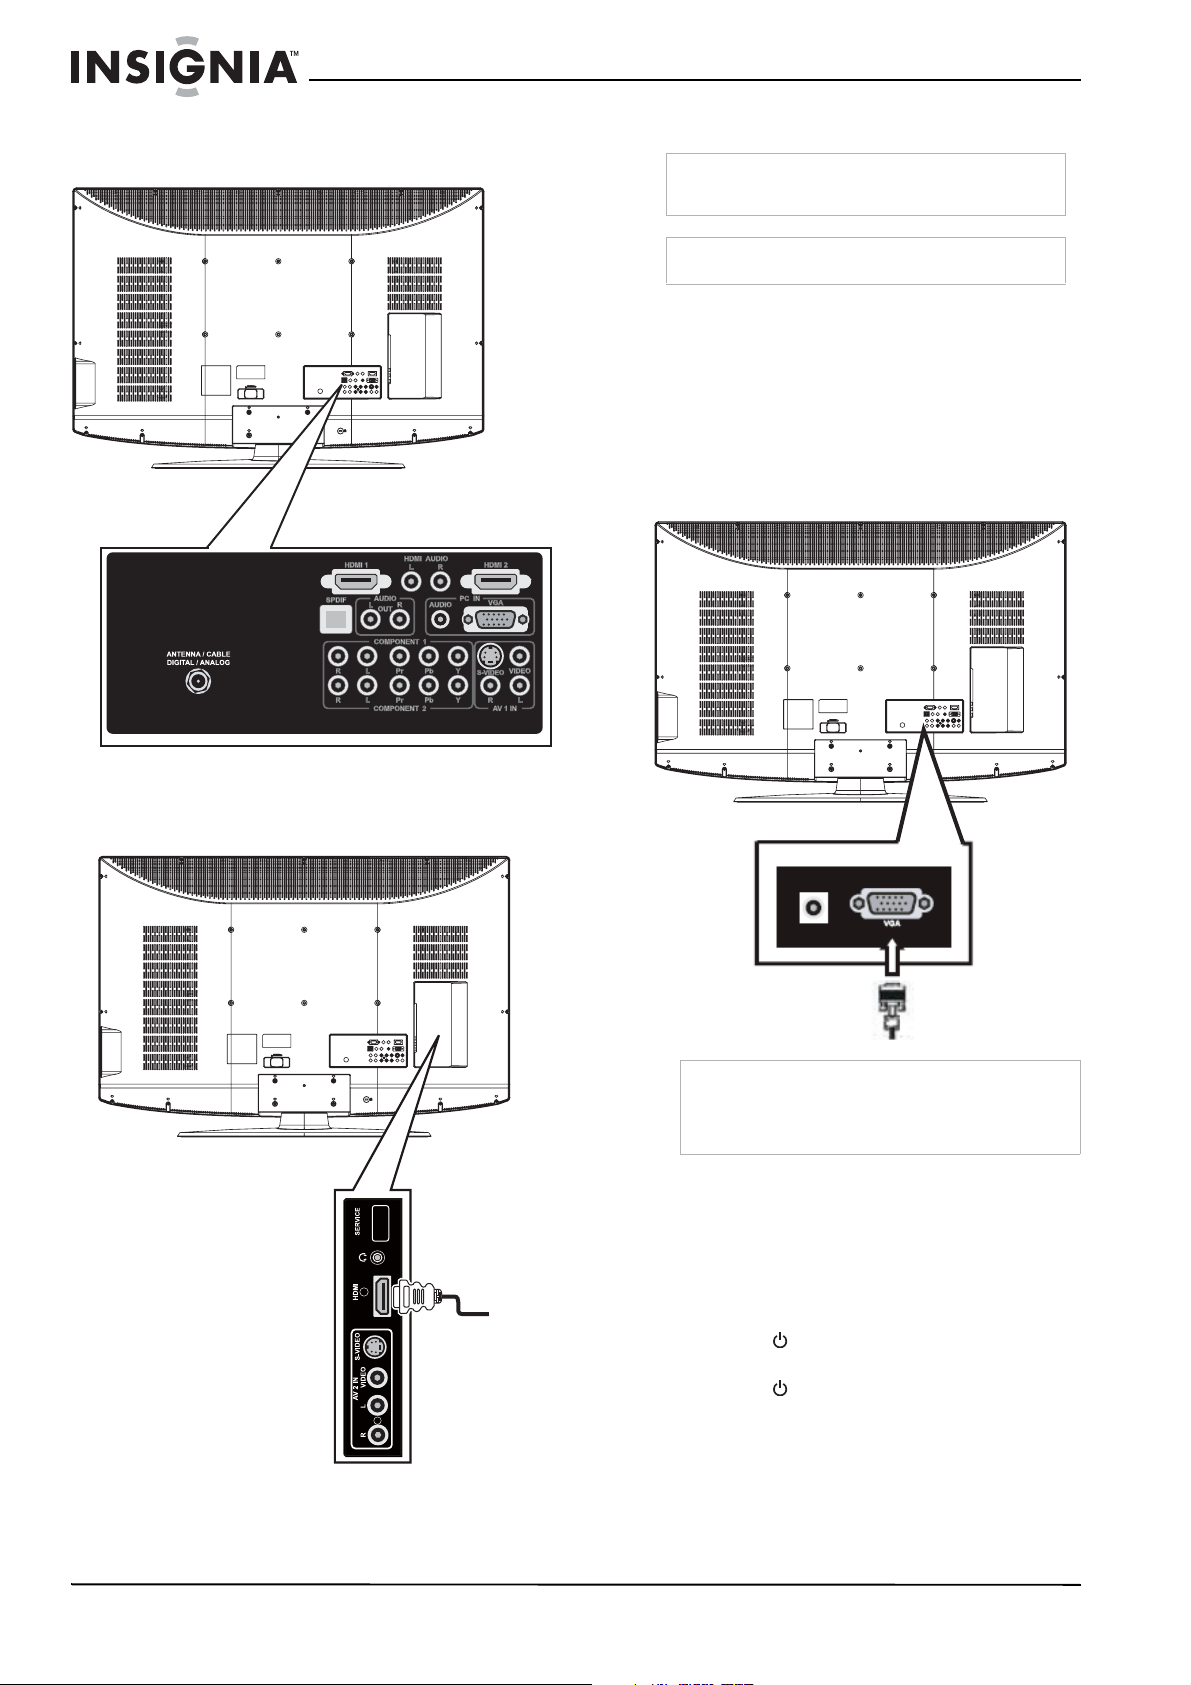
Connecting a computer
To connect a computer using VGA:
1 Plug a VGA cable from your computer into
the VGA jack on the back of your TV.
2 Plug an audio cable from your computer’s
audio out jack into the AUDIO jack on the
back of your TV.
3 Plug in and turn on your TV.
4 Press the INPUT button repeatedly to select
the VGA input source.
Using your TV
Turning your TV on and off
To turn your TV on and off:
1 Make sure that the power cord is connected
to your TV and a power outlet.
2 Press the button to turn on your TV. The
power indicator LED turns blue.
3 Press the button again to return your TV
to standby. The power indicator LED turns
red.
Manufactured under license from Dolby Laboratories.
“Dolby” and the double-D symbol are trademarks of
Dolby Laboratories.
TV
SPDIF
3
HDMI jack
S-Video and
composite
video input
Headphone jack
Audio input
Warning
Make sure that you turn off and unplug your TV
before installing devices.
Note
Many newer computers have HDMI output.
Note
When the computer goes into standby mode, your
TV turns off. If your TV does not turn on when you
“wake” your computer, press the POWER button
on your TV or remote control.
VGA cable
11
Insignia NS-LCD52HD-09 52” LCD HD TV
www.insignia-products.com
Selecting the TV signal source
To select the TV signal source:
• With the TV on, press the INPUT button on
either the TV or the remote to choose from:
• TV
• Composite rear (Video 1)
• Composite side (Video 2)
• S-Video rear (Video 3)
• S-Video side (Video 4)
• Component 1 (Video 5)
• Component 2 (Video 6)
• VGA (Video 7)
• HDMI1 (Video 8)
• HDMI2 (Video 9)
• HDMI3 (Video 10)
You can also press VIDEO to choose between
Composite rear, Composite side, S-Video rear,
and S-Video side (Video 1~4), press COMP to
choose between Component1 and Component2
(Video 5~6), or press HDMI to choose between
HDMI1, HDMI2, and HDMI3 (Video 8~10).
Setting up the channel list
After you select your TV source, if you selected
antenna or cable you need to set up the channel
list. When you set up your channel list, your TV
searches for all available channels in your area
and stores a list of these channels. When you
press the CH or buttons, your TV skips
the channels that do not have a signal.
Automatically setting up channels
To automatically set up the channel list:
1 Press the MENU button. The Main on-screen
display menu opens with Setup highlighted.
2 Press to enter the sub-menu, then press
or to highlight Auto Ch Search.
3 Press OK/ENTER or to start the search.
Manually adding or deleting channels from the
channel list
After you create a channel list using the Auto Ch
Search option, you can manually add or delete
channels from the channel list.
To add or delete channels:
1 Press MENU. The Main OSD (On-Screen
Display) menu opens with Setup highlighted.
2 Press to enter the sub-menu, then press
or to highlight Manual Channel Set. The
Channel Setup Table opens.
3 Press or to select a channel, then
press OK/ENTER to toggle between
viewable and not viewable.
4 Press MENU or EXIT to close the menu.
Changing channels
To change channels:
• Press CH or on the remote control to
go to the next lower or higher channel.
- OR -
Press the number buttons to directly select a
channel (for example, if you want channel 83,
press 8, then press 3).
- OR -
Press RECALL to go to the last viewed
channel.
Selecting a digital sub-channel
Most digital TV channels have more than one
channel. The main channel carries the signal for
the main TV program. The sub-channels carry
signals for additional or alternate programming,
such as a radio or news broadcast.
For example, if the main channel number is 8,
the sub-channel number might be 8-1, 8-2, or
8-3.
To select a sub-channel:
1 Press the number buttons for the main
channel (for example 8).
2 Press –, then press the sub-channel button
(for example 1).
Adjusting the volume
To adjust the volume:
• Press VOL – or VOL + to decrease or
increase the volume.
• Press MUTE to turn off the sound. Press
MUTE again to turn the sound back on.
Displaying status information
To display status information:
• Press INFO. Your TV displays status
information, such as the channel number or
signal source.
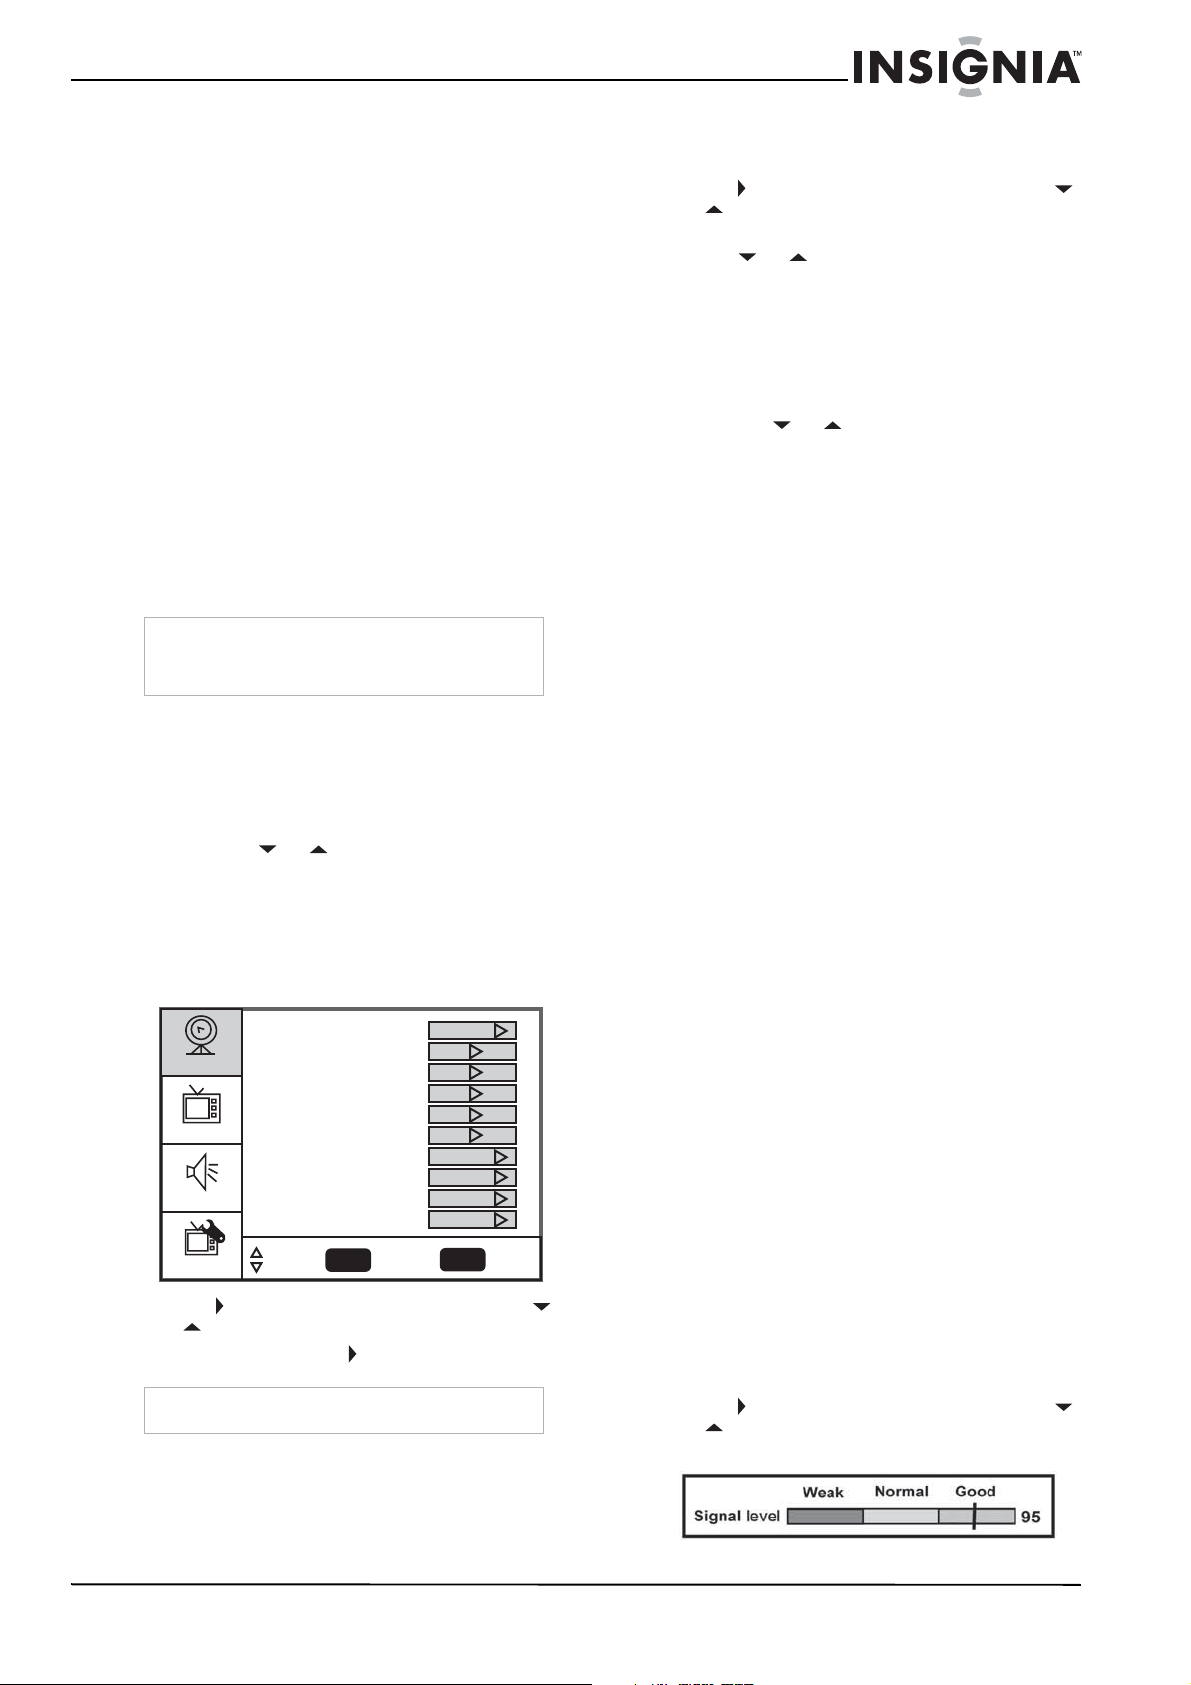
Checking the DTV signal strength
To check the DTV signal strength:
1 Press MENU. The Main OSD (On-Screen
Display) menu opens with Setup highlighted.
2 Press to enter the sub-menu, then press
or to highlight DTV Signal. The DTV
Signal meter opens.
3 Press MENU or EXIT to close the menu.
Note
HDMI, the HDMI logo, and High-Definition
Multimedia Interface are trademarks or registered
trademarks of HDMI Licensing LLC.
Note
You can press the EXIT button to stop the search.
Setup
Video
Audio
Feature
Tuning Band
DTV Signal
Auto Ch Search
Add On Ch Search
Manual Channel Set
Channel Labels
Menu Language
Auto Zoom
Aspect Ratio
Favorite Channel Mode
Enter
Exit
To SelectTo Move To Exit
Cable
English
Normal
Off
Off
12
Insignia NS-LCD52HD-09 52” LCD HD TV
www.insignia-products.com
Set up your Favorite Channel List
To set up your Favorite channel list:
1 Press MENU. The Main OSD (On-Screen
Display) menu opens with Setup highlighted.
2 Press to enter the sub-menu, then press
or to highlight Favorite Channel.
3 Press to activate Favorite Channel Mode.
With Favorite Channel Mode ON, "Manual
Channel Set" becomes "Favorite Channel
Set."
4 Press or to highlight Favorite Channel
Set.
5 Press to open the channel list.
6 Press OK/ENTER to set your Favorite
Channel.
7 Press EXIT to close the setting.
When Favorite Channel Mode is ON, pressing
CH or will only go through your Favorite
Channels.
Adding a channel label
To add a label to a channel:
1 Press MENU. The Main OSD (On-Screen
Display) menu opens with Setup highlighted.
2 Press to enter the sub-menu, then press
or to highlight Channel Labels. The
Channel Label
menu opens.
3 Press or to move the cursor to the
channel field or label field, then press or
to select a channel while the cursor is in
the channel field, or press or to select
the character while the cursor is in the label
field.
4 Press OK/ENTER to return to the previous
menu.
Freezing the picture
You can freeze (still) the screen image.
To freeze or unfreeze the picture:
• Press FREEZE.
Setting the clock
To set the clock:
1 Press MENU. The Main OSD (On-Screen
Display) menu opens with Setup highlighted.
2 Press or repeatedly to highlight
Feature. The
Feature
menu opens.
3 Press to enter the sub-menu, then press
or to highlight Time Set. The
Time Set
menu opens.
4 Press or to move to the different fields,
then press or to change the settings.
5 Press MENU or EXIT to close the menu.
Setting the sleep timer
The sleep timer lets you select the amount of
time before your TV turns off automatically.
To set the sleep timer:
1 Press MENU. The Main OSD (On-Screen
Display) menu opens with Setup highlighted.
2 Press or repeatedly to highlight
Feature. The
Feature
menu opens.
3 Press to enter the sub-menu, then press
or to highlight Sleep Timer.
4 Press or to select the amount of time
(Off, 5 min, 10 min, 15 min, 30 min, 45 min,
60 min, 90 min, 120 min, 180 min, or 240
min). To turn off the timer, select Off.
Viewing closed captions
To view closed captions:
• Press the CCD button repeatedly to select a
closed caption option. You can select:
• On
• Off
• On When Mute
Caution
To protect your TV, do not freeze the screen image
for long periods of time.
Note
You can also press the SLEEP button to set the
sleep timer.
Note
To select or customize digital closed captions, use
the
Digital Captions
or
Digital Closed Caption
sub-menus in the
Feature
menu.
Setup
Video
Audio
Feature
Enter
To SelectTo Move To Exit
Exit
Time Set
Off
Service 1
Sleep Timer
Advanced Video Menu
Password Set
Parental Control
Digital Captions
Digital Closed Captions
13
Insignia NS-LCD52HD-09 52” LCD HD TV
www.insignia-products.com
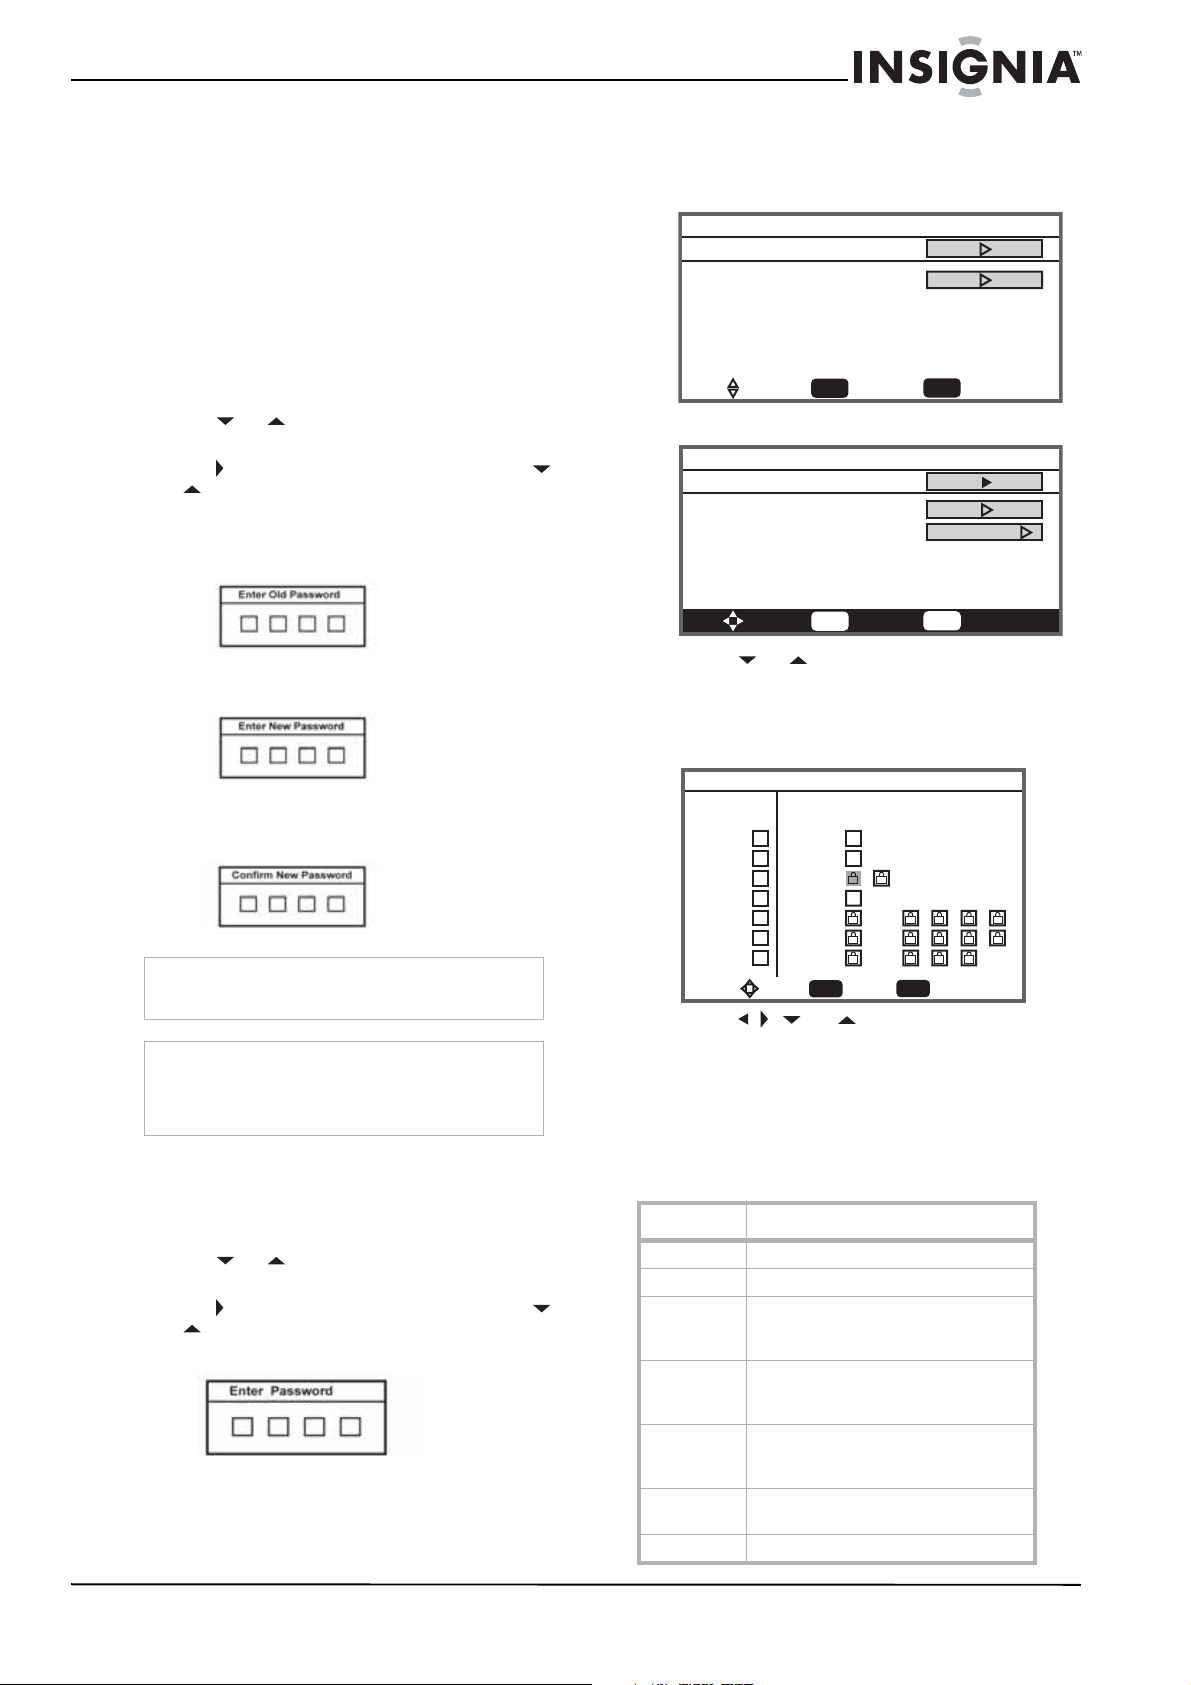
Setting parental controls
Your TV has a V-chip that lets you control the
type of programs your children can watch.
Parental controls include two ratings: MPAA
(based on age) and TV Parental Guidelines
(based on content and age). A TV program may
have an MPAA or TV Parental Guidelines rating,
so you should set controls for both ratings.
Before you can select ratings, you need to set up
a parental controls password.
To set up a password:
1 Press MENU. The Main OSD (On-Screen
Display) menu opens with Setup highlighted.
2 Press or repeatedly to highlight
Feature. The
Feature
menu opens.
3 Press to enter the sub-menu, then press
or to highlight Password Set.
4 Press the number buttons to enter the old
password. If you have not set a password,
enter 0000. Press OK/ENTER to continue.
5 Press the number buttons to enter a new
password. Press OK/ENTER to continue.
6 Press the number buttons to enter the new
password again, to confirm. Press
OK/ENTER to continue.
Setting the Parental Control level
To set the Parental Control level:
1 Press MENU. The Main OSD (On-Screen
Display) menu opens with Setup highlighted.
2 Press or repeatedly to highlight
Feature. The
Feature
menu opens.
3 Press to enter the sub-menu, then press
or to highlight Parental Control. The
Password screen opens.
4 Press the number buttons to enter the
password. Press OK/ENTER to continue.
The
Parental Control Menu
opens.
5 Press or to select USA Parental
Locks, Canadian Parental Locks, or
Advanced Rating (for digital channels only),
then press OK/ENTER. The
Controls Menu
that you have selected opens.
6 Press , , , or to move to a rating, then
press OK/ENTER to select the rating.
7 When you block a rating, that rating and all
higher ratings are blocked.
8 Press MENU or EXIT button to close the
menu.
American MPAA ratings
Caution
Write down your password and save it for future
use.
Note
If you forget your password, enter 3448 for the old
password, then enter a new password. This
password always remains valid for resetting your
password.
Rating Description
NONE Not rated.
G General audiences.
PG Parental guidance suggested. Some
material may not be suitable for
children.
PG-13 Parental guidance strongly suggested.
Some material may not be suitable for
children under 13 years of age.
R Restricted. Not suitable for children
under 17 years of age unless
accompanied by a parent or guardian.
NC-17 Not suitable for children under 17
years of age.
XAdults only.
Parental Control Menu
USA Parental Locks
Canadian Parental Locks
Enter
To SelectTo Move To Exit
Exit
Parental Control Menu
USA Parental Locks
Canadian Parental Locks
Advanced Rating Off
Enter
To SelectTo Move To Exit
Exit
For analog channels
For digital channels
MPAA TV RATING
USA Parental Locks
Enter
To SelectTo Move To Exit
Exit
NONE
G
PG
PG-13
R
NC-17
X
NONE
ALL FV L S V D
TV-Y
TV-Y7
TV-G
TV-PG
TV-14
TV-MA
14
Insignia NS-LCD52HD-09 52” LCD HD TV
www.insignia-products.com
Canadian English Ratings
Canadian French Ratings
TV Parental Guidelines ratings
Some of the age-based TV Parental Guidelines
ratings also have content-based ratings.
Using the on-screen menu
Your TV has an on-screen menu that lets you
adjust TV settings, such as video and audio
settings.
To use the on-screen menu:
1 Press MENU. The Main OSD (On-Screen
Display) menu opens with Setup highlighted.
2 Press or repeatedly to select a menu
item.
3 Press or to enter a sub-menu.
4 Press OK/ENTER or to confirm an
adjustment or toggle a setting.
5 Press MENU or EXIT to close the on-screen
menu.
On-screen menus
Rating Description
EExempt programming
CChildren
C8+ Children over 8 years old
G General audience
PG Parental guidance
14+ Over 14 years old
18+ Adult programming
Rating Description
EExempt programming
G General audience
8ans+ Over 8 years old
13ans+ Over 13 years old
16ans+ Over 16 years old
18ans+ Over 18 years, only for adult viewing
Rating Description
NONE Not rated.
TV-Y All children.
TV-Y7 Children over seven years of age.
TV-G General audiences.
TV-PG Parental guidance suggested.
TV-14 Parents strongly cautioned.
TV-MA Mature audiences only.
Rating Description
FV Fantasy violence.
L Adult language.
S Sexual situations.
V Violence.
D Sexually suggestive dialog.
On-screen
menu
Options
Setup
(Options may vary
in different
modes)
Tuning Band–Selects the TV antenna source
(Air or Cable).
DTV Signal–Displays the digital TV signal
strength. For more information, see “Checking
the DTV signal strength” on page 11.
Auto Ch Search–Automatically sets up a list of
the channels available in your area. For more
information, see “Automatically setting up
channels” on page 11.
Add On Ch Search–Lets you add new channels
without going through the entire list of
available channels.
Manual Channel Set–Lets you add or delete
channels from the channel list. For more
information, see “Manually adding or deleting
channels from the channel list” on page 11.
Channel Labels–Lets you add a label to a
channel. For more information, see “Adding a
channel label” on page 12.
Menu Language–Selects the language for the
on-screen menu. You can select English,
French, or Spanish.
Auto Zoom–Select On (default) or Off. When
Auto Zoom is On there is an “Auto” option
under “Aspect Ratio.” If you choose "Auto,"
your TV selects the proper aspect ratio
automatically. This feature is only available in
TV mode.
Aspect Ratio–Selects the screen aspect ratio:
Normal, Wide, Zoom, Cinema, or Auto (only
available in TV mode with Auto Zoom set to
On). You can also press the ZOOM button to
select the aspect ratio.
Favorite Channel mode–Lets you edit your
favorite channel list. Use the FAV button on the
remote to toggle this mode on or off.
Setup
Video
Audio
Feature
Tuning Band
DTV Signal
Auto Ch Search
Add On Ch Search
Manual Channel Set
Channel Labels
Menu Language
Auto Zoom
Aspect Ratio
Favorite Channel Mode
Enter
Exit
To SelectTo Move To Exit
Cable
English
Normal
Off
Off
15
Insignia NS-LCD52HD-09 52” LCD HD TV
www.insignia-products.com
Maintaining
• Do not use your TV in areas that are too hot
or too cold, because the cabinet may warp or
the screen may malfunction.
• Storage temperatures are 32° to 122°F
(0° to 50°C).
• Working temperatures are 41° to 104°F
(5° to 40°C).
• Do not place your TV in direct sunlight or
near a heat source.
Cleaning your TV
Clean the screen and cabinet with a soft,
lint-free cloth. If the screen or cabinet is
especially dirty, moisten a soft, lint-free cloth in a
weak detergent solution, squeeze the excess
Video
(Options may vary
in different
modes.)
Contrast–Increases the picture level to adjust
the white areas of the picture. Decreases the
picture level to adjust the black areas of the
picture. (0~100)
Brightness–Increases the brightness to add
more light to dark areas of the picture.
Decreases the brightness to add more dark to
light areas of the picture. (0~100)
Sharpness–Increases the sharpness for a
cleaner and clearer image. Decreases the
sharpness for a smoother picture. (-50~50)
Color–Adjusts the overall color of the picture.
(0 ~ 100)
Tint–Increases the color level to add more
green to skin tones. Decreases the color level
to add more purple to skin tones. (R50~G50)
Backlight–Adjusts the backlight level (0~10).
Settings–Restores the settings to factory
default.
Audio
(Options may vary
in different
modes.)
Audio Language–Selects an alternate language
if the program has more than one language
available. Only available in ATSC TV mode.
Bass–Adjusts the low sounds (bass).
Treble–Adjusts the high sounds (treble).
Balance–Adjusts the right and left speaker
volumes.
Digital Audio Output–Selects the audio mode
for the digital audio optical jack.
• RAW: AC-3 in - AC-3 out/PCM in - PCM
out.
• PCM: AC-3 in - PCM out/PCM in - PCM
out.
TV Speaker–Turns the internal TV speaker On
(default) or Off. It will not affect the digital
audio output, the headphone output, and the
composite audio output.
Settings–Restores the settings to factory
default.
On-screen
menu
Options
Feature
(Options may vary
in different
modes)
Time Set–Sets the clock. For more
information, see “Setting the clock” on page
12.
Sleep Timer–Sets the sleep timer. For more
information, see “Setting the sleep timer” on
page 12.
Advanced Video Set–
• Noise Reduction–Select from Low,
Mid, High, and Off
• Color Temperature–Select from
Normal, Warm, and Cool
• 3D Y/C filter–Choose from On (default)
or Off
• Dynamic Contrast–Choose from On or
Off
• Setting–Restores the settings to factory
default
Password Set–Lets you set the password for
Parental Control options. The default password
is 0000. See “Setting parental controls” on
page 13.
Parental Control–Accesses V-chip controls.
For more information, see “Setting parental
controls” on page 13.
Digital Caption–Sets the digital caption type.
Choose from Service 1-6, Text 1-4, and CC 1-4.
Closed Caption Options–Customizes closed
captions for digital broadcasting systems. You
can adjust Size, Font, Text Color, Text Opacity,
Background Color, Background Opacity, Edge
Effect, and Edge Color.
Component Set–Only available in component
mode. Lets you set Horizontal Position
(0~100), Vertical Position (0~100), Clock
(0 ~ 100), and Phase (0~100). The Settings
option restores the settings to factory default.
VGA Set–Only available in VGA mode. Lets you
set Horizontal Position (0~100), Vertical
Position (0~100), Clock (0~100), and Phase
(0 ~ 100). You can also select Auto Adjust to
automatically adjust the settings. The Settings
option restores the settings to factory default.
Audio Only–Lets you turn off the picture. When
Audio Only is turned on, the screen is turned
off and only audio is available. This feature is
available only in TV mode.
Input Label–Lets you change the Input label
that displays on the screen. You can use
“Preset” to reset to the default setting.
On-screen
menu
Options
16
Insignia NS-LCD52HD-09 52” LCD HD TV
www.insignia-products.com
moisture from the cloth, then wipe the screen or
cabinet with the cloth. Use a clean cloth to dry
the screen or cabinet.
Troubleshooting
Appendix A
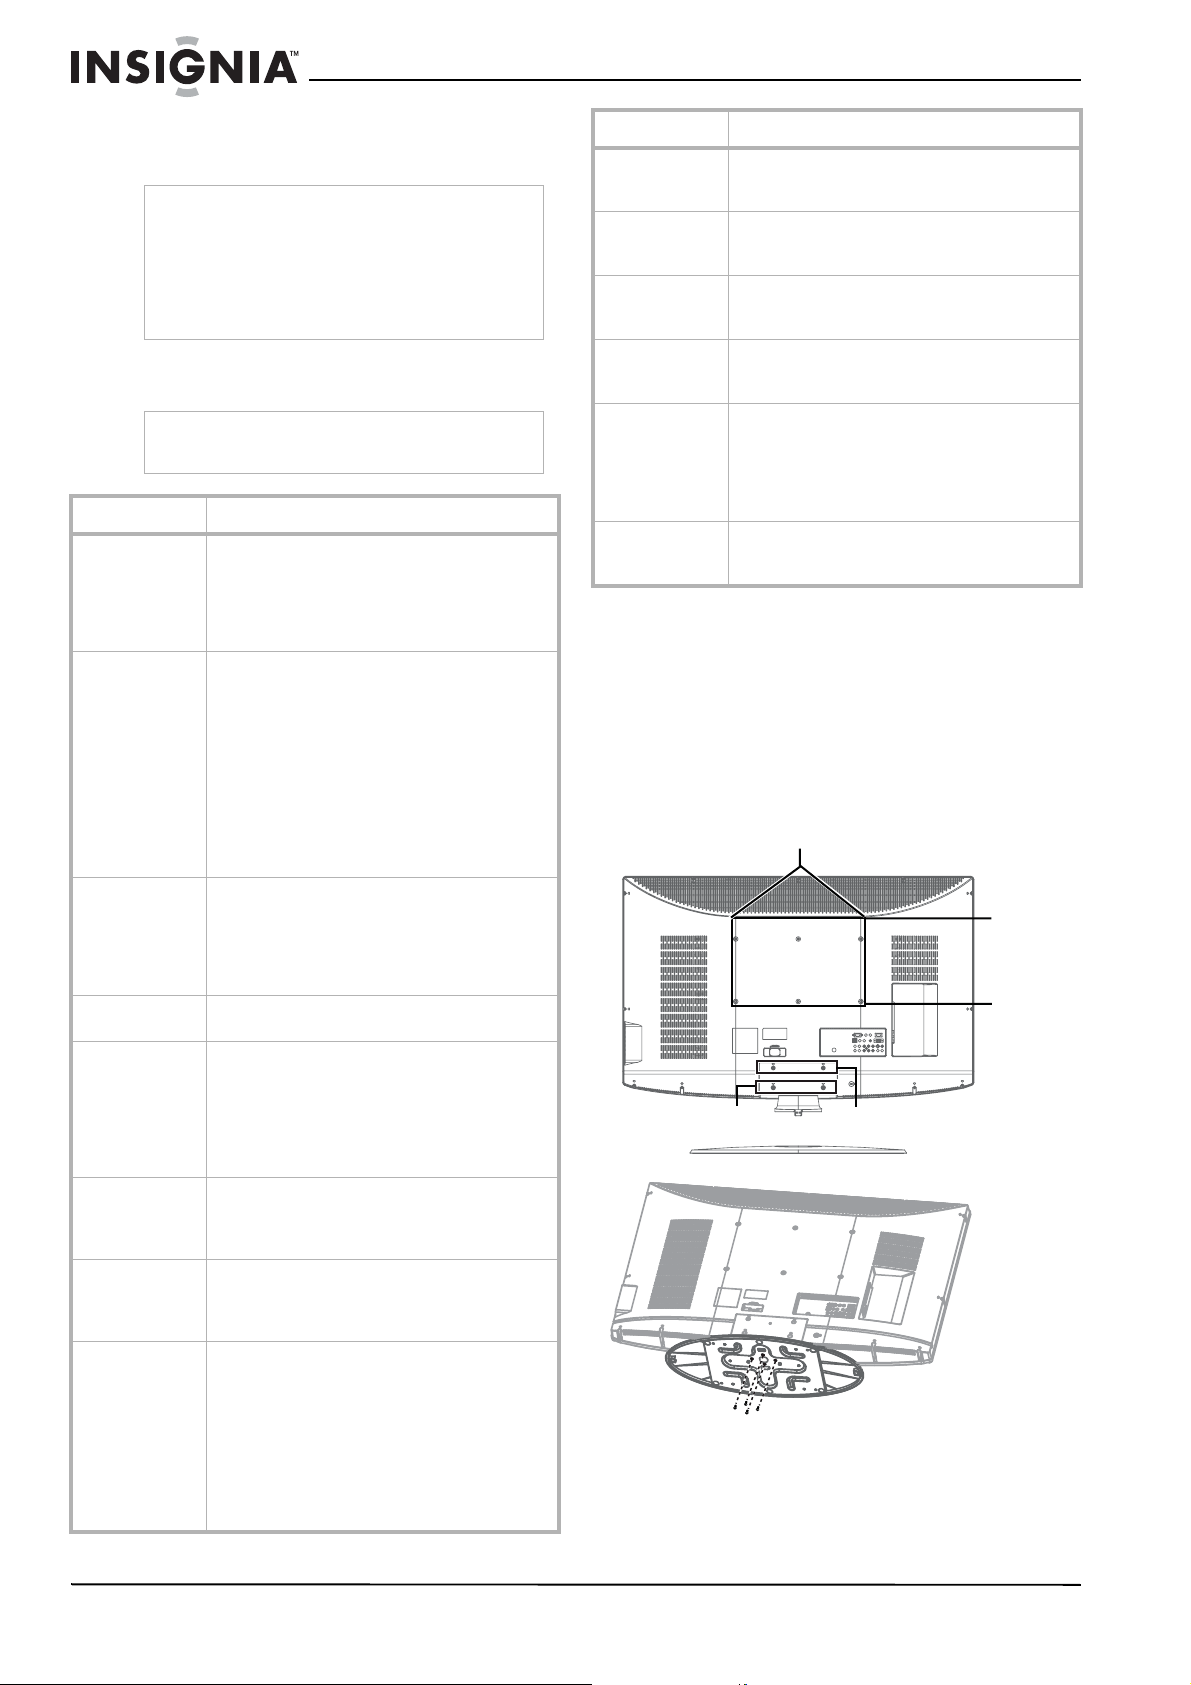
Attaching a wall mount bracket to your TV
To attach a wall mount bracket to your TV:
1 Remove the four M4 and two T4 screws
holding your TV to the stand.
2 Secure the wall mount bracket to the back of
your TV using six M6 screws, as indicated in
the illustration.
This apparatus is intended to be supported by
UL Listed wall mount bracket.
Caution
Avoid the following, because it may cause damage
to your TV:
• Cleaning your TV with volatile substances,
such as insect sprays, solvents, and thinners.
• Leaving items made from rubber or PVC in
contact with your TV for long periods.
• Letting liquids drip into the cabinet
Warning
Do not try to repair your TV yourself. Refer all
service to a qualified service technician.
Symptom Possible solution
No power • Make sure that the power cord is
correctly connected to your TV and a
power outlet.
• Unplug the power cord, wait 60 seconds,
then plug the cord back in and turn on
your TV.
No picture • Make sure that the video cables are
connected securely to the back of your
TV.
• Adjust the contrast and brightness.
• Make sure that the correct video mode is
selected.
• Make sure that the incoming signal is
compatible.
• Make sure the antenna is connected
correctly.
• Check the closed caption settings. Some
TEXT modes can block the screen.
Good picture but
no sound
• Increase the volume.
• Make sure that the sound is not muted.
• Make sure that the correct audio mode is
selected.
• Make sure that the TV Speaker option is
set to On in the Audio menu.
Good sound but
poor color
• Adjust the contrast, color, and brightness
settings.
Poor picture • Make sure that the room is not too
bright. Light reflecting off the screen can
make the picture difficult to see.
• If an S-VHS camera or a camcorder is
connected while another connected
device is turned on, the picture may be
poor. Turn off one or more devices.
Horizontal dotted
line
• Your TV may be too close to another
electrical device, such as a hair dryer or
neon light. Turn off the device or move
your TV.
“Ghost” or
double image
• This may be caused by obstructions to
the antenna, such as high-rise buildings
or hills. Use of a highly directional
antenna may improve the picture quality.
Remote control
does not work
• Press the TV button.
• Replace the batteries. Make sure that the
+ and – symbols on the batteries align
with the + and – symbols in the battery
compartment.
• Clean the remote sensor on the front of
your TV.
• Bright or fluorescent lighting may
interfere with the remote control signal.
Turn off the light or move your TV.
Snowy picture or
noise
• Make sure that the A/V and antenna
cables are connected correctly and
securely.
VGA picture is
not stable or
synchronized
• Make sure that you have selected the
correct VGA mode on your computer.
No output from
one of the
speakers
• Adjust the balance in the
Sound
menu.
Control buttons
do not work
• Unplug the power cord, wait a few
seconds, then plug the cord back in and
turn on your TV.
After images
appear
• Do not display a still image, such as a
logo, game, or computer image, for an
extended period of time. This can cause
a permanent after image to be burned
into the screen. This type of damage is
not covered by your warranty.
Picture has a few
bright or dark
dots
• A few bright or dark dots on an LCD
screen is normal. It does not affect the
operation of this TV.
Symptom Possible solution
Attach wall bracket
Remove stand
200 mm
400 mm
Remove M4 screws
Remove T4 screws
Attach wall
bracket here
Remove stand
200 mm
400 mm
Remove M4 screws
Remove T4 screws

17
Insignia NS-LCD52HD-09 52” LCD HD TV
www.insignia-products.com
Appendix B
Programming your remote control
To program your remote to control home theater
devices, follow these steps.
Before proceeding, find the codes for the
devices you want to program in “Manufacturer’s
codes” and write them down or highlight them.
To program your remote control:
1 Turn on the device (for example, a DVD
player) and, if needed, load media such as a
DVD.
2 Press the device key on the remote for the
device that you want to program (TV, DVD,
STB, or AUX).
3 Press and hold SET until the red LED blinks
twice, then release.
4 Enter the first five-digit code for the device
and brand that you wish to program. The LED
blinks once as each digit is entered. If the
code is valid, the LED blinks twice.
5 Aim the remote at the device and press
(power). The device should turn off. If it does
not, repeat Steps 3–5, trying each code for
your brand until you find one that works. If
you cannot find a code that works, see
“Searching for your code” below.
6 Repeat Steps 1 to 5 for the other devices you
want to control. For future reference, write
down each working device code.
Searching for your code
If your device does not respond to the remote
control after trying all codes listed for your brand,
or if your brand is not listed, try searching for
your code.
To search for your code:
1 Turn on the device you want to control.
2 Press the desired device key (TV, DVD, STB,
or AUX) once.
3 Press and hold SET until the red LED blinks
twice, then release.
4 Enter 9 9 1. The LED blinks twice.
5 Press the device group number for your
device type (see table below).
• 0—Cable (cable converters, video
accessories, satellite receivers)
• 1—TV (TVs)
• 2—VCR (VCRs, DVD players)
• 3—Audio (audio amplifiers, audio
amps/tuners, CD players)
6 Aim the remote at the device and press
(power). The remote sends IR codes from its
library to the selected device, starting with
the most popular code first. If the device
responds, go to Step 8.
7 If the device does not respond, press CH
and the remote tests the next code for that
device type. Continue to press CH until the
device turns off.
8 Now that you have found the correct code,
press SET to save the code that worked for
your device. The LED blinks twice to indicate
that the code has been saved.
9 To search for other device codes, repeat
Steps 1 to 8.
Checking the codes
If you have set up the remote using the
procedure in “Searching for your code”, you may
need to find out which five-digit code is operating
your equipment.
To find out which code is assigned to your
TV (for example):
1 Press TV once.
2 Press and hold SET until the red LED blinks
twice, then release.
3 Enter 9 9 0. The LED blinks twice.
4 To view the code for the first digit, press 1.
Count the red LED blinks (for example, three
blinks = 3), then write down the number in the
appropriate code listing at the top of this
column.
5 Repeat Step 4 for the four remaining digits,
using 2 for the second digit, 3 for the third
digit, 4 for the fourth digit, and 5 for the fifth
digit.
6 To check for other device codes, repeat Steps
1 through 5, substituting the device key for
the device you would like to check.
Using learning
This universal remote control includes a learning
feature (some models may not include this) so
you can add functions that are unique to your
home entertainment devices (such as VCR
Tracking Up or Down). However, there are some
considerations to keep in mind.
Precautions
• Your original remote controls must be in
working order for learning to work properly.
• Learned keys are mode-specific, so each one
can store a unique function for each mode.
• Do not use the following keys for learning:
Device Keys, SET, or Record (•).
• Learning capacity is approximately 42 to 75
keys, depending on the code being learned.
• Certain device functions are not learnable,
including multi-frequency types, some high
frequency functions, and other unusual
formats.
Note
If the LED does not blink twice, repeat steps 2 to 4
and try entering the code again.
Note
Press CH
to try the previous code.
Note
If the LED does not blink, the code digit is 0.

18
Insignia NS-LCD52HD-09 52” LCD HD TV
www.insignia-products.com
• For optimum learning, avoid high levels of
ambient light such as natural sunlight or
energy-efficient fluorescent lights.
Programming a learned key
To program a learned key:
1 Place your Insignia remote control
head-to-head (about 2" apart) from your
original remote control (the one that came
with the device). Also, locate the key (on your
original remote control) that you want the
Insignia remote control to learn. Press the
mode key you wish to learn functions on.
2 Press and hold SET until the LED blinks
twice, then release.
3 Enter 9 7 5. The LED blinks twice.
4 Press the key on the remote you wish to
program. The feedback LED stays lit for three
seconds, indicating that the remote is ready
to learn.
5 On the original remote, press and hold the
key to be learned. Continue holding the key
on the original remote until the Insignia’s LED
blinks twice.
6 Repeat Steps 4 and 5 to program another
key. Once you have completed programming
all the keys you want, press and hold SET
until the LED blinks twice to save all data
learned.
Deleting a single learning key
This process returns the key to its original
programming for the mode you select. You can
also delete learned programming by teaching a
different function to the key (see “Programming a
Learned Key” above).
To delete a single learned key:
1 Press the mode key that you wish to remove
the learned key from.
2 Press and hold SET until the LED blinks
twice, then release.
3 Enter 9 7 6. The LED blinks twice.
4 Press the key containing the learned function
to be deleted, twice. The LED blinks twice
and programming ends.
Deleting all learned keys in a specific mode
To delete all learned keys in a specific mode:
1 Press and hold SET until the LED blinks
twice, then release.
2 Press 9 7 6. The LED blinks twice.
3 Press a mode key twice (for example, TV,
DVD, STB, or AUX) to clear all the learned
keys for that mode. The LED blinks twice and
programming ends.
Changing volume lock
The Insignia universal remote control comes
preset to allow independent volume control of
each selected device (global volume unlock).
However, you may change the volume lock
setting to global volume lock so that one device's
volume controls volume in all other modes. After
that, you can perform Individual volume unlock
on a selected device to set its volume control for
independent operation or global volume unlock
to remove all volume locking.
To lock volume control to one mode (global
volume lock):
1 Press and hold SET until the red LED blinks
twice, then release.
2 Enter 9 9 3, the LED blinks twice.
3 Press the mode key for the device you want
to control (for example, TV).
4 The LED blinks twice. Now when you press
VOL+, VOL-, or Mute, the selected device
controls the volume regardless of the current
mode.
To unlock all volume control (restoring global
unlock):
1 Press and hold SET until the red LED blinks
twice, then release.
2 Enter 9 9 3, the LED blinks twice.
3 Press VOL+. The LED blinks four times.
Volume is independently controlled for all
programmed devices.
To unlock a single device’s volume control:
1 Press the desired device mode key (TV, DVD,
STB, or AUX).
2 Press and hold SET until the red LED blinks
twice, then release.
3 Enter 9 9 3. The LED blinks twice.
4 Press VOL-. The red LED blinks four times.
Volume is independently controlled for the
selected devices.
Note
Please have your original remote controls handy
before programming learning.
Notes
If more than 10 seconds pass between key
presses, the remote exits programming.
If the LED displays one long flash instead, either
your batteries are low, or the Insignia remote
control has a memory fault. In either case, the
remote cannot learn a new key.
Note
If the red LED displays one long blink, a learning
error has occurred. Try repeating this step again
until a successful capture occurs. If the function is
still not captured, press and hold SET to exit
programming and review the Precautions” above.
If needed, also see “Troubleshooting remote
control programming” on page 20. After reviewing,
start programming again at Step 1.
Notes
If more than 10 seconds pass between key
presses, the remote exits programming.
If the LED displays one long flash instead, either
your batteries are low, or the Insignia remote
control has a memory fault. In either case, the
remote cannot learn a new key.
Notes
If more than 10 seconds pass between key
presses, the remote exits programming.
If the LED displays one long flash instead, either
your batteries are low, or the Insignia remote
control has a memory fault. In either case, the
remote cannot learn a new key.

19
Insignia NS-LCD52HD-09 52” LCD HD TV
www.insignia-products.com
Programming channel lock
Channel control can be locked so that the
Insignia remote controls a single device’s
channel-changing functions, regardless of
operating mode. This is often enabled by users
who watch all broadcast TV through one device
(for example, a cable set-top box). The affected
keys are 1 through 0, CH , CH , and
RECALL.
To lock all channel controls to one device:
1 Press the mode key that relates to the device
that you use for channel changing control.
2 Press and hold SET until the mode LED
blinks twice, then release.
3 Enter 9 7 3.The mode LED blinks twice.
4 Press CH once. The mode LED blinks
twice.
Now, regardless of what mode you select, the
channel keys will only change channels on
the assigned device.
To unlock channel locks:
1 Press and hold SET until the mode LED
blinks twice, then release.
2 Enter 9 7 3. The mode LED blinks twice.
3 Press CH once. The mode LED blinks four
times.
Now the channel functions will correlate to
the active mode (for example, press CH in
TV mode and the TV changes channel
accordingly).
Using keymover
Your Insignia universal remote control includes a
keymover feature that lets you map (or copy)
keys from one mode (such as source mode) to
another mode (such as destination mode) or to a
different key in the same mode.
To move keys in the same device mode:
1 Press the desired device key (TV, DVD, STB,
or AUX).
2 Press and hold SET until the LED blinks
twice, then release.
3 Press 9 9 4. The LED blinks twice.
4 Press the key you want to move.
5 Press the new key that should perform the
function. The LED blinks twice.
6 Repeat Steps 1-5 to move additional keys.
To move keys to a different device mode:
1 Press and hold SET until the LED blinks
twice, then release.
2 Press 9 9 4. The LED blinks twice.
3 Press the device key that contains the
function you want to move (for example,
DVD).
4 Press the key you want to move (such as
Play).
5 Press the device key that you want to move
the function to. (such as TV).
6 Press the key in the new mode that should
perform the function (for example, Play). The
LED blinks twice.
7 Repeat Steps 1-6 to move additional keys.
To restore all keymoved data in a specific
mode:
1 Press and hold SET until the LED blinks
twice, then release.
2 Press 9 9 4. The LED blinks twice.
3 Press the device key you wish to remove all
keymoved data from twice. The LED blinks
twice.
4 Repeat for each device you want to restore.
To restore original key function:
1 Press the device key for which you wish to
remove the keymoved data from a specific
key.
2 Press and hold SET until the LED blinks
twice, then release.
3 Enter 9 9 4. The LED blinks twice.
4 Press the key you wish to remove the
keymoved data from twice. The LED blinks
twice.
5 Repeat Steps 1-4 for additional keys you
wish to remove.
Programming macros
Your Insignia universal remote control includes
the ability to program any key (other than the
SET key) with a macro function. Each one can
be set up to perform a pre-programmed set of
sequential key presses with the press of a single
key. A macro can be used to control a home
theater operation, to set a favorite channel, or for
other functions you would like to control with one
key press. Each macro key can hold up to 15 key
presses, total.
To program a mode-independent macro:
1 Press and hold SET until the red LED blinks
twice, then release.
2 Press 9 9 5. The LED blinks twice.
3 Press the key you want to assign to a macro.
4 Enter the series of commands you want the
macro to execute (up to 15 commands).
5 Press and hold SET until the red LED blinks
twice, then release.
Now, when you press the preset macro key,
the remote sends the series of commands
you have entered, regardless of what mode
you are in. For example, you could program a
macro key to turn on both your TV and cable
box and select a particular channel.
6 To clear the macro, repeat Steps 1-5, but do
not enter a series of commands at Step 4.
Note
Do not use any of the Device Keys, (power),
RECORD, or SET as a source or destination key.
Note
Programming a new macro over an existing one
erases the original macro.

20
Insignia NS-LCD52HD-09 52” LCD HD TV
www.insignia-products.com
To program a mode-dependent macro:
1 Press the device mode key (TV, DVD, STB,
or AUX).
2 Press and hold SET until the LED blinks
twice, then release.
3 Press 9 7 8. The LED blinks twice.
4 Press the key you wish to assign to a macro.
5 Enter the series of commands you want the
macro to execute (up to 15 commands).
6 Press and hold SET until the red LED blinks
twice, then release.
Now, when you press the macro key, the
remote sends the series of commands you
have entered, but only if you are in the mode
you selected in Step 1. For example, you
could program the macro key to turn on both
your TV and cable box and select a particular
channel, but only if you are in TV mode. If you
are in DVD mode, this key does not execute
the macro you set up in TV mode.
7 To clear the macro, repeat Steps 1-6, but do
not enter a series of commands at Step 5.
Troubleshooting remote control
programming
Problem: The LED does not blink when you
press a key.
Solution: Try pressing different keys. Replace
the batteries with two new AA batteries.
Problem: The LED blinks when you press a key,
but the device does not respond.
Solution: Make sure that the remote control is
aimed at your device and is not more than 40
feet away.
Problem: The LED blinks one long blink while in
SET mode.
Solution: An entry error has occurred (for
example, wrong key). Try entering the sequence
again.
Problem: The remote control does not control
devices or commands are not working properly.
Solution: Try all listed codes for the device.
Make sure the device operates with an infrared
remote control.
Problem: No volume on a device.
Solution: See “Changing volume lock” on page
18, and make sure that the volume is not locked
to a different mode already.
Problem: Channels do not change correctly
when directly entering digits to change channels.
Solution: If the original remote control required
you to press Enter to change channels, press
Enter on this remote after entering the channel
number.
21
Insignia NS-LCD52HD-09 52” LCD HD TV
www.insignia-products.com
Manufacturer’s codes
Setup Codes for Audio Amplifiers
00113 ,77503mocdA
02223mehtnA
47603esoB
29803revraC
16513dnarbaruD
74603nalE
87003EG
29803nodraK/namraH
13303CVJ
29803tsaoC tfeL
16513xxoneL
29803ztn
araM
15203hsotnIcM
59303erialudoM
46203CEN
32803 ,59303sumitpO
29803spilihP
32803reenoiP
29803oiduA kloP
5930
3kcahSoidaR
32803ACR
59303citsilaeR
46203eruhS
51803 ,98603ynoS
87003ngisednuoS
13303rotciV
87003sdraW
33103
,45303ahamaY
Setup Codes for Audio Accessories
60113nairuccA
65013 ,70603gnisnaL cetlA
51113elppA
27803evitaerC
55113OLD
31123XPG
19813niffirG
60113kceDi
25
123emoHi
31123eviLi
19413egremI
71913troPi
93313hcspilK
19413ztnaraM
91123xeromeM
60113oiduA rotinoM
46413alo
rotoM
50613ifinmO
82813ukoR
71913ecnanoS
12023 ,01813 ,90813ahamaY
Setup Codes for Audio Receivers
13503CDA
61603mocdA
14613 ,88313 ,98013 ,12103 ,98103 ,50413awiA
21513 ,44203iakA
09313oclA
77013CMA
36513s
kroW aideM noihpmA
36513WMA
47013 ,90613manA
58113mehtnA
47713 ,03413 ,75213latigiD xepA
98113macrA
98113ci
nortoiduA
09313xovoiduA
04803 ,02803 ,20703K & B
20703KB
33913 ,14813 ,92613 ,35213 ,93603 ,92213esoB
9810
3nriaC
Cambridge Soundworks 31370
13503cinortepaC
98213 ,98013 ,12103 ,98103 ,98113revraC
98313yboC
41003sehtaM sitruC
05213ooweaD
75
823 ,60313 ,24113 ,40113 ,12103 ,06313noneD
13503nosremE
10813rehsiF
36403drarraG
98103gidnurG
14223 ,6031
3 ,40313 ,98213 ,19803 ,98103 ,01103nodraK/namraH
10813 ,37213ihcatiH
31023eviLi
19403leknI
57123 ,96123
,39813 ,77013 ,03013aingisnI
50813 ,02313 ,89213 ,24803 ,53103argetnI
85223ynohpmySi
60313 ,01103LB
J
93223 ,17813 ,59413 ,47313 ,47003 ,85013CV
J
09313ikasawaK
72013 ,68103 ,77003 ,07513 ,31313doowneK
82413 ,21413 ,09313HLK
79413 ,66313ssoK
67013nocix
eL
79123 ,39213GL
98103nniL
79413oediV diuqiL
,66213 ,98013 ,13503 ,19303 ,98103 ,96213 ,98113xovangaM
31514
9
8213 ,98013 ,19803 ,98103 ,96213 ,98113ztnaraM
98213hsotnIcM
98103 ,98113agemorciM
22
Insignia NS-LCD52HD-09 52” LCD HD TV
www.insignia-products.com
Setup Codes for Audio Receivers (continued)
39313ihsibustiM
98013cigamcisuM
98113dayryM
55513 ,79003 ,31313ihcimakaN
98313tnecroN
98313avoN
50913 ,5081
3 ,13513 ,02313 ,89213 ,24803 ,53103oyknO
47013 ,13503 ,68103 ,12103 ,41003 ,47003 ,32013sumitpO
79413
,66313nortirO
19303waltuO
,84513 ,61313 ,88213 ,57213 ,76303 ,81513 ,80313cinosanaP
31633, 31763, 31764
66213 ,98013 ,1980
3 ,19303 ,98103 ,96213 ,98113spilihP
,32113 ,03603 ,13503 ,44203 ,05103 ,41003 ,32013reenoiP
31384, 31935
80513dio
raloP
98213 ,98103oiduA kloP
45213nacsorP
90613kcahSoidaR
,09313 ,32113 ,47013 ,13503 ,45213 ,90613 ,320
13ACR
31511
68103 ,12103 ,90613citsilaeR
98103xoveR
96813oiR
00513 ,40313 ,59213gnusmaS
56123naegnaS
98013 ,9810
3 ,98113iusnaS
10813 ,96413 ,15213oynaS
68213 ,68103prahS
65513egamI reprahS
96123 ,50913 ,35613 ,77013 ,19403doowrehS
96123eltsacweN doowrehS
96813eulB cinoS
58113sreitnorF cinoS
,
85113 ,47403 ,22613 ,95713 ,85213 ,14413 ,85013ynoS
31406, 31558, 31658, 31758, 31822, 31858
32013scinohpoeretS
31313erifnuS
82513 ,09313 ,47013
,36403caeT
33613 ,81513 ,80313scinhceT
98113snerohT
88713 ,32113 ,24803 ,53103abihsoT
09313rerutneV
47003
rotciV
41003 ,98103sdraW
60413MX
,13313 ,67213 ,67113 ,67303 ,68103 ,67103 ,32013ahamaY
31375, 31376, 31476, 31815, 32061
39213 ,75803hti
neZ
Setup Codes for Cable Converters
44100 ,80000kraM-A
80000 ,30000 ,73200CBA
30000esahpuccA
73200nrocA
73200noitcA
73200evitcA
68520BDA
99800ts
aciremA
22810 ,20610onimA
73200rehcrA
67200CCB
99800htuoS lleB
30000moceleT hsitirB
80000yrutneC
28910 ,7780
0 ,77810ocsiC
38800retsamraelC
38800xaMraelC
38800xoB looC
38800xamlooC
78120 ,78110oegiD
67400rotceriD
6720
0etagsoF
44100EG
30000 ,67200 ,01800 ,67400tnemurtsnI lareneG
30000retlarbiG
38800IMG
44100ratSdloG
37200 ,
90000nilmaH
90000 ,80000 ,30000ihcatiH
20610orciM 3i
01800 ,67400thgisnI
30000 ,67200 ,01800 ,67400dlorre
J
00000xeromeM
30000ihsibustiM
28910 ,60110 ,78110 ,67200 ,01800 ,67400 ,67310alorotoM
38800hcetitluM
2281
0 ,20610oiryM
80000noisiV avoN
80000xelpavoN
28910 ,80000 ,73200 ,77800 ,77810ecaP
28910 ,70100 ,44100 ,8
0000 ,00000cinosanaP
52500 ,80000 ,00000nogaraP
00000yenneP
71300 ,50310spilihP
33500 ,44100 ,77800 ,7781
0reenoiP
00000rasluP
00000rasauQ
38800kcahSoidaR
65210ACR
37200 ,97200 ,67200lageR
00000ocnuR
28910 ,44100 ,
30000gnusmaS
,80000 ,00000 ,30000 ,73200 ,77400 ,77800 ,77810atnaltA cifitneicS
01982
20610nijeS
60010ynoS
44
100recurpS
30000mocratS
67200elbacrepuS
38800xamrepuS
65210nosmoh
T
30000xro
T
00000abihso
T
38800ratsir
T
30000 ,67200elbaC detinU
80000 ,30000 ,67200scinortcelE SU
388002V
00000yawoediV
38800retsamweiV
38800nois
iV
38800weiV xetroV
99800 ,52500 ,00000htineZ
23
Insignia NS-LCD52HD-09 52” LCD HD TV
www.insignia-products.com
Setup Codes for Cable/PVR Combos
99800tsaciremA
22810onimA
28910 ,77810ocsiC
78120 ,78110oegiD
01800tnemurtsnI lareneG
01800dlorreJ
,78110
,01800 ,67310alorotoM 01106, 01982
22810oiryM
28910 ,73200 ,77810ecaP
77810reenoiP
65210ACR
28910 ,77810atnaltA cifitne
icS
60010ynoS
67200elbacrepuS
65210nosmoh
T
99800htineZ
Setup Codes for CD Players
02403hcraeseR citsuocA
75103awiA
75103macrA
75103hcraeseR oiduA
02403retsemruB
75103nriaC
92003sbaL oiduA a
inrofilaC
Cambridge Soundworks 30157
75103revraC
23003sehtaM sitruC
43003noneD
00003KKD
75103scinortcelE XMD
00003rehsiF
02403 ,39303d
rarraG
23003axxeneG
75103gidnurG
37103relfaH
37103 ,75103 ,00103nodraK/namraH
23003ihcatiH
08103 ,75103leknI
10103argetnI
27003
,23003CVJ
09103 ,82003 ,92003 ,00003 ,62603doowneK
11713 ,81313HLK
75103llerK
75103nniL
47203 ,83003 ,751
03xovangaM
53403 ,08103 ,83003 ,75103 ,92003 ,62603ztnaraM
75103iustaM
06603 ,09203 ,65203hsotnIcM
92003S
CM
02403 ,23003 ,00003xeromeM
75103agemorciM
00003oriM
75103noissiM
3003 ,00003erialudoM 2, 30087, 30180, 30420
02403CTM
75103dayry
M
75103MSN
10103 ,72313oyknO
02403 ,39303 ,78003 ,23003 ,00003sumitpO
25703 ,88303 ,92003cinosanaP
02403dn
uosaraP
92003yenneP
47203 ,75103 ,62603spilihP
78013 ,23003 ,26013reenoiP
75103oiduA kloP
02403deecorP
7510
3notorP
75103DEQ
75103dauQ
92003rasauQ
02403 ,08103 ,23003 ,00003kcahSoidaR
02403 ,35003 ,23003 ,26013ACR
Setup Codes for CD Players (continued)
02403 ,08103 ,78003 ,23003 ,00003citsilaeR
75103xoveR
53403naskoR
02403 ,75103letoR
75103EAS
75103 ,00003i
usnaS
78003 ,00003oynaS
08103prahS
08103doowrehS
75103sreitnorF cinoS
58103 ,46313 ,00103 ,00003 ,09403yno
S
75103nedguS
75103ainavlyS
08103cinohpmyS
75103neraLcM GA
T
23003ydna
T
02403 ,39303macsa
T
02403 ,39303 ,08103 ,09403cae
T
92003scinhce
T
75103oiduA eluh
T
27003rotciV
78003 ,35003 ,75103 ,23003sdraW
29213 ,63003 ,09403ahamaY
00003xroY
Setup Codes for DVD Players
93502 ,30502BAL D3
61412 ,27012 ,57602nairuccA
61012tnevdA
89602yeerfA
14602awiA
98012 ,99802 ,07702 ,5070
2 ,59602iakA
71702 ,27602ablA
09702oclA
96802orgellA
27802skroW aideM noihpmA
27802WMA
,79702 ,69702 ,4970
2 ,55702 ,71702 ,27602 ,33502latigiD xepA
20830, 21004, 21020, 21056, 21061, 21100
32012ogrrA
70412 ,86112latigiD eripsA
98412ratsA
22112 ,12112
,27012 ,17012 ,14012 ,09702 ,71702xovoiduA
27012 ,17012noixA
26602 ,55602K & B
42212KBB
17512ngiseD otnaC
leB
71702tknupualB
17502edaraP eulB
59602ykS eulB
32022 ,59812esoB
15602tdnarB
86802 ,59602cinoskorB
09402s
baL oiduA ainrofilaC
02012laitseleC
40012 ,27602xertneC
13802aeniC
96802 ,33802 ,67802noisiVeniC
77212 ,59
602 ,30012nezitiC
17502enotrialC
77112 ,70112 ,68012 ,77012 ,87702yboC
13802giarC
93502 ,30502evitaerC
780
12sehtaM sitruC
,20512 ,92112 ,71112 ,42012 ,32012 ,47802 ,61802emoHrebyC
21537
50702nortyC
,27112 ,96112 ,
96802 ,33802 ,07702 ,50702 ,48702ooweaD
21234, 21242
07702iasnaD
27802ketyaD
07702acceD
85222 ,43602 ,09402noneD
24
Insignia NS-LCD52HD-09 52” LCD HD TV
www.insignia-products.com
Setup Codes for DVD Players (continued)
87702revneD
70412yaseD
83712xaMlatigiD
27602xertigiD
07212 ,57602yensiD
50702oDiViD
58012 ,86012 ,57602lauD
72112dnarbaruD
125020002DVD
30012emohortcelE
86212 ,12802 ,57602 ,19502nosremE
19502esirpretnE
93502 ,3050
2ovitnE
07702reznE
86212 ,12802ASE
15602eniltsriF
07602rehsiF
43312 ,86212 ,57602ianuF
85112 ,77012 ,37012yawetaG
71702 ,51802 ,22502EG
,33802 ,38702 ,14702 ,51702 ,
71702 ,44702 ,37502oediV oG
20869, 21044, 21075, 21099, 21158, 21304, 21730
27012 ,17012noisiV oG
96802 ,14702ratSdloG
09702snamdooG
15602 ,09402etneida
rG
71702llihneerG
50702 ,93502gidnurG
20702 ,28502nodraK/namraH
13802yttiK olleH
74212 ,46602 ,37502ihcati
H
27602reketiH
88512 ,00512xamuH
84312oLi
71702laitinI
86212aingisnI
96712 ,72602 ,17502argetnI
38702TRI
2070
2LBJ
61012nesneJ
59602BMJ
05512 ,57212 ,46112 ,76802 ,32602 ,85502CVJ
09702ikasawaK
43502 ,09402doowneK
941
12 ,02012 ,09702 ,71702HLK
33502ssolK
16012 ,15602ssoK
89702 ,72602cinosaL
33512nosceL
72112xxoneL
96802 ,1
4702 ,19502GL
83712 ,65612 ,04412 ,61412 ,85112 ,85012nOetiL
14702 ,11502eweoL
38702xigoL
57602 ,15602cin
osangaM
,45312 ,86212 ,12802 ,57602 ,64602 ,93502 ,30502xovangaM
21506
57602 ,93502 ,30502ztnaraM
37212 ,335
12hsotnIcM
15602noideM
07212 ,13802 ,59602xeromeM
38022 ,22502tfosorciM
25702otaniM
71702 ,93802ketniM
1250
2 ,12512ihsibustiM
14702DAN
07702okiaN
96802 ,58702CEN
71702aseN
20412hceTxxeN
56212 ,70112 ,27802 ,30012tn
ecroN
96712 ,72602 ,30502oyknO
42212 ,57502oppO
17502sumitpO
Setup Codes for DVD Players (continued)
15602nortirO
27602cinoslaP
,26412 ,26312 ,30702 ,23602 ,17502 ,09402 ,30502cinosanaP
21490, 21641, 21762
57602oclihP
,7621
2 ,06212 ,45802 ,57602 ,64602 ,93502 ,30502spilihP
21340, 21354, 22056, 22084
42012csiDonaiP
,21512 ,06412 ,23602 ,13602 ,24102
,17502 ,52502reenoiP
21571
68012 ,16012 ,02012dioraloP
93502oiduA kloP
07702dnaltroP
83712 ,27012 ,57602naidis
erP
61012amirP
27602deecorP
22502nacsorP
87702noisiVorP
15602ratsewQ
14702ettenoidaR
17502kcahSoidaR
,23112
,22012 ,22802 ,09702 ,71702 ,17502 ,22502ACR
21769
17502citsilaeR
25702coeR
96802oiR
87112 ,32602letoR
40012 ,3
2802awoR
15602abaS
25702 ,89602opmaS
,44012 ,99802 ,02802 ,99102 ,44702 ,37502 ,09402gnusmaS
21075
59602iusna
S
43312 ,37802 ,59602 ,57602 ,07602oynaS
38702redienhcS
25702regiawhcS
85112ecneicS yrosneS
05222 ,65212 ,
25702 ,57602 ,03602prahS
71112egamI reprahS
77012 ,34012 ,07702doowrehS
77012eltsacweN doowrehS
93802 ,33
502cinosnihS
48702trA milS
99012 ,96802 ,38702 ,51702 ,37502eulB cinoS
61512 ,13412 ,07012 ,33012 ,46802
,33512 ,33502ynoS
22112avoS
12802nacsrepuS
71702AVS
86212 ,12802 ,57602ainavlyS
43312 ,86212 ,12802 ,5760
2cinohpmyS
07702gnuta
T
09702 ,71702 ,17502cae
T
30702 ,09402scinhce
T
07702akinhce
T
13012nipare
T
15602noive
T
17502latigiD ateh
T
11502 ,22502nosmoh
T
88512 ,21512 ,30512ovi
T
,30512 ,45112 ,54012 ,59602 ,93502 ,37502 ,30502abihso
T
21510, 21588, 21769
07702xaminU
19502musrevinU
93502 ,30502stpecnoC nabrU
93802cigoL SU
62212 ,46012V
09702rerutneV
62212 ,460
12oiziV
38022 ,22502xobX
54502 ,93502 ,09402ahamaY
27802awakamaY
96802 ,14702 ,19502 ,30502htineZ
48702sue
Z
56212eceoZ
25
Insignia NS-LCD52HD-09 52” LCD HD TV
www.insignia-products.com
Setup Codes for DVD Players (Blu Ray and HD-DVD)
Setup Codes for DVD/PVR Combos
Controlled by the DVD
Setup Codes for Home Automation
85222noneD
96712argetnI
14702GL
38022tfosorciM
96712oyknO
14612cinosanaP
48022spilihP
24102reenoiP
96712ACR
99
102gnusmaS
05222prahS
61512ynoS
96712abihso
T
38022xobX
03712oediV oG
88512 ,00512xamuH
14702GL
09402cinosanaP
04312spilihP
21512 ,13602reenoiP
22502ACR
65
212prahS
07012 ,33012ynoS
57602ainavlyS
21512ovi
T
88512 ,01512 ,30512abihso
T
51213ketuccA
61713anamA
16813 ,51213 ,64803erianoiB
49713etiL-aD
09123reparD
33313eriadigirF
04203EG
73513ra
tSdloG
51213semloH
73513eromneK
09813 ,64803oksaL
73513GL
48103reilothgiL
79513 ,93213 ,81303 ,79503nortuL
7
6103ketimraM
76103llA roF enO
48103SCP
04203kcahSoidaR
79023hcraeseR neercS
76103metsyS ytiruceS
64803egamI
reprahS
48103cniLtramS
76103lasrevinU
7610301X lasrevinU
23313looplrihW
51213eremdniW
7610301X
Satellite Receivers and DVR/PVR Systems
Setup Codes for Satellite Receivers
27700ratSahplA
07110 ,57700uVsserpxE lleB
61200larrapahC
60810taslooC
90110latigidssorC
,74200 ,24110 ,93
610 ,93600 ,66500 ,29300 ,77310VTceriD
00749, 01749, 00819, 01856, 01076, 01108, 00099,
01109, 01392, 01414, 01442, 01443, 01444, 01609,
01640
57710 ,07110 ,57700 ,50510metsyS krowteN hsiD
57710 ,57700 ,5
0510orphsiD
57710 ,07110 ,57700 ,50510ratsohcE
57710 ,57700uvsserpxE
12810ratS cetroF
77310ianuF
66500 ,29
300EG
96800tnemurtsnI lareneG
57710 ,57700IOG
91800 ,94700ihcatiH
57700notsuoH
57710 ,57700STH
Hughes Network Systems 01142, 00749, 01749, 01442, 01443, 01444
09710xamuH
9
9000avonnI
96800dlorre
J
57710 ,07110 ,57700CV
J
41410 ,62210GL
22700xovangaM
96800hsotnIcM
94700ihsibustiM
96800alorotoM
99000tasteN
96800leveL txeN
10700 ,
74200cinosanaP
70810tasnaP
,22700 ,67010 ,91800 ,57700 ,94710 ,94700 ,24110spilihP
00099, 01442
96800ratsemirP
66500
,29300nacsorP
96800 ,57700 ,66500kcahSoidaR
,29310 ,34100 ,55800 ,57700 ,24110 ,66500 ,29300ACR
01442
90610
,24410 ,90110 ,80110 ,67210 ,24110 ,77310gnusmaS
99000YKS
04610 ,93610 ,93600ynoS
96800eciohC ratS
96800
,27700karT ratS
66500 ,29300nosmoh
T
44410 ,34410 ,24410 ,24110ovi
T
58210 ,09700 ,94710 ,94700abihso
T
04610 ,29310VTetamitlU
60810tasartlU
22700nedinU
96800moo
V
65810htineZ
26
Insignia NS-LCD52HD-09 52” LCD HD TV
www.insignia-products.com
Setup Codes for TVs
45001 ,74001kraM-A
30811nairuccA
74001nacsuccA
37801 ,03001noitcA
08101 ,36401 ,39001 ,15001 ,71001 ,4500
1 ,74001larimdA
24801 ,71801 ,51801 ,38701 ,16701tnevdA
00001irutnevdA
05101angA
29001okiA
,57611 ,27601
,65001 ,54101 ,03001 ,20701 ,21801 ,06001iakA
11676, 11935
34801 ,00701nortablA
27601ediflA
03001norellA
77101 ,05101
rodassabmA
08101noitcA aciremA
06001 ,00001hgiH naciremA
15701orpmA
77101 ,17101dartsmA
08101 ,00001nortmA
08101manA
56311 ,03001 ,08101COA
32611inmoA
71211 ,09801 ,76701 ,56701 ,97801 ,84701 ,65101latigiD xepA
8
3711 ,13511ratsA
08101caniduA
,73911 ,57801 ,64801 ,20801 ,32601 ,29001 ,08101 ,15401xovoiduA
11951, 11952
17101aru
tnevA
73911noixA
08101cinosyaB
03001 ,87101 ,71001kramuaeB
03001rocleB
39001 ,45101 ,45001llewoH & lleB
513
11 ,21211 ,23011QneB
39801thgilxoB
08101drofdarB
65001 ,03001 ,87101doowkcorB
53911 ,77101 ,08101 ,36401
,63201cinoskorB
90311ngis:dyB
65001 ,03001eldnaC
29001 ,03001 ,87101 ,71001trahepaC
03001elavinraC
45001re
vraC
00001ytirbeleC
56701areleC
38701 ,76701 ,56701 ,65101gnohgnahC
29001 ,15401lareniC
74001ketiC
,17101
,03001 ,06001 ,08101 ,36401 ,15401 ,00001 ,45001nezitiC
10092, 10056, 11935
08101noiralC
65001 ,29001 ,03001cissalC
03001 ,
87101 ,06001 ,71001 ,45001 ,74001emytroloC
74001 ,74411snoituloS laicremmoC
65001otrecnoC
87101cinoC
0810
1cetnoC
17101 ,08101giarC
17101 ,03001 ,08101 ,00001 ,45001yelsorC
27601 ,65001 ,08101 ,39001nworC
27601g
natsuM nworC
,08101 ,39001 ,15401 ,15001 ,00001 ,45101 ,45001 ,74001sehtaM sitruC
10060, 10702, 10178, 10030, 10145, 10166, 10056, 10466,
11147, 11347
08101CXC
62311norty
C
,27601 ,16601 ,32601 ,65711 ,16611 ,29001 ,87101 ,15401ooweaD
11755
29001notyaD
65001 ,29001 ,03001 ,87101
nortyaD
36811 ,30411 ,46211 ,87111 ,08011lleD
54101noneD
27801efiL latigiD
46111noisiV maerD
87101 ,08101
,71001tnomuD
43011 ,17101 ,87101 ,08101 ,36401dnarbaruD
47701 ,02701 ,39001niwD
01811 ,58711 ,08711 ,364
11xenyD
06001notaE
Setup Codes for TVs (continued)
00001dnabortcelE
55711 ,32611hpargortcelE
65001 ,03001 ,87101 ,05101 ,36401 ,00001 ,45101emohortcelE
771
01 ,87101dlaremE
,87101 ,05101 ,08101 ,36401 ,63201 ,15401 ,45101 ,74001nosremE
10171, 10177, 10623, 11394, 11963
22411xerpmE
56311 ,31801 ,03001noisivn
E
04801 ,33801nospE
36911 ,17101 ,21801ASE
00001 ,45101 ,45001rehsiF
39001ssertroF
35801 ,90801 ,38601usti
juF
36911 ,17211 ,17101 ,08101 ,00001ianuF
08101hceterutuF
55711 ,65711yawetaG
,03001 ,87101 ,06001 ,154
01 ,15001 ,00001 ,74001 ,74411EG
11147, 11347
74001inimeG
03001 ,00001 ,71001retlarbiG
68801oediV oG
73911noisiV oG
45
111 ,65001 ,03001 ,87101 ,45001 ,74001ratSdloG
65001 ,35001etneidarG
38601 ,27601 ,60701gidnurG
08101ydn
urG
08101ypnurG
43011reiaH
87101 ,08101 ,63201kramllaH
54711 ,15311 ,84311eerpsnnaH
03001 ,87101 ,06001 ,0
8101 ,00001nosdivaD yelraH
45001nodraK/namraH
08101dravraH
39001ymrevaH
71001tikhtaeH
56801soileH
15401ytti
K olleH
24611 ,20511 ,49411drakcaP ttelweH
84701esnesiH
,65001 ,54101 ,54111 ,15001 ,00001 ,71001 ,4500
1 ,74001ihcatiH
11445, 11643
24611 ,20511 ,49411PH
49211 ,91211 ,56801 ,94801iadnuyH
09911 ,48611 ,30611 ,68211oLi
87
101 ,08101 ,63201amI
45001ytinifnI
46111sucoFnI
09911 ,30611laitinI
,08711 ,01711 ,14611 ,46511 ,71511 ,
62311 ,40211 ,17101aingisnI
11963, 12002
54101 ,71001qetnI
45001LBJ
00001BCJ
71801 ,51801 ,16701nesneJ
03001LIJ
03001na
tuJ
47711 ,35211 ,13701 ,05601 ,03001 ,35001 ,45001CVJ
08101 ,71001pmaK
03001ohsawaK
06001 ,08101CEK
03001
,08101doowneK
76701 ,56701 ,08101 ,65101HLK
03001ssolK
02701 ,08101aknoK
03001 ,08101 ,36401VTK
45101kraL
,65801 ,00701 ,65001 ,03001 ,87101 ,06001 ,56211 ,45001GL
11154, 11178, 11423, 11993
65001 ,03001 ,08101 ,63201s'dyolL
65001 ,08101 ,63201kigoL
65001namxuL
,39001 ,15001 ,65101 ,00001 ,45101 ,71001 ,45001 ,74001IXL
10060, 10053, 10178, 10030, 10171, 10166, 10056
65001
,29001 ,03001 ,39001 ,65101 ,00001 ,45001cinosangaM
,08101 ,15001 ,05201 ,00001 ,45101 ,45001 ,45411
,74001xovangaM
10060, 10030, 10171, 10092, 10706, 10802, 11198, 11254,
11365, 11755, 11866, 11963, 11990
27
Insignia NS-LCD52HD-09 52” LCD HD TV
www.insignia-products.com
Setup Codes for TVs (continued)
71001citsejaM
89311 ,45111 ,55801 ,40701 ,03001 ,45001 ,45411ztnaraM
77101 ,65001iustaM
05601 ,15001 ,05
201atihsustaM
75711 ,55711 ,41711 ,11211 ,26701 ,65711tnexaM
00701rewopageM
65001 ,54101 ,87101 ,74001no
rtageM
65001 ,03001 ,87101 ,05101 ,08101 ,36401 ,45101xeromeM
03001 ,87101 ,05101AGM
87101ygolonhceT NGM
05101suineG orciM
65001 ,15001 ,71001 ,74001dnaldiM
09911 ,30611ketniM
,86801 ,63801 ,03001 ,87101 ,051
01 ,05211 ,39001 ,45101ihsibustiM
11392
34801 ,00701noisivinoM
05101 ,39001 ,15001 ,45001alorotoM
65001 ,2900
1 ,03001 ,06001 ,08101CTM
08101hcetitluM
65111 ,66801 ,65001 ,66101 ,87101 ,65101DAN
,89311 ,28801 ,407
01 ,79401 ,65001 ,03001 ,87101 ,74001CEN
11704
55711 ,26701VTteN
65001hceT weN
29001 ,03001 ,87101okkiN
29001
,03001 ,87101odokkiN
03001ihsiN
56311 ,42801 ,84701tnecroN
68211orciM doowroN
29001CTN
00001noyN
01611 ,133
11 ,04211 ,44111aivelO
08101awnO
,66101 ,03001 ,87101 ,05101 ,08101 ,39001 ,05201 ,45101sumitpO
10056, 10650
84311amotpO
39001acinotpO
77101 ,36411 ,87101 ,08101 ,36401 ,63201 ,71001noirO
29001ecaP
,05601 ,03001 ,63201
,15001 ,05201 ,65101 ,00001 ,45001cinosanaP
11291, 11310, 11410, 11480, 11941
60701adnaP
03001 ,06001cinoxaP
06001 ,65101ECP
,03001 ,8710
1 ,06001 ,15001 ,05201 ,65101 ,00001 ,74001yenneP
10056, 11347
32511sretteP
54101 ,03001 ,36401 ,45001oclihP
,45211
,45111 ,09601 ,65001 ,17101 ,03001 ,45001 ,45411spilihP
11744, 11867
65001 ,03001 ,87101 ,06001 ,15001toliP
75411
,89311 ,06211 ,66801 ,97601 ,66101reenoiP
69411ranalP
,32511 ,14311 ,82311 ,62311 ,41311 ,67211 ,56801
,56701dioraloP
11766, 12002
29001 ,15401dnaltroP
77101 ,08101 ,63201noisicerP
58711 ,71801 ,51801 ,38701 ,16701amir
P
71701 ,00701notecnirP
15001 ,05201msirP
74311 ,66401 ,74001 ,74411nacsorP
66401 ,87101notorP
29001 ,7100
1rasluP
29001 ,87101resluP
87101 ,05101ztrauQ
05601 ,15001 ,05201rasauQ
74001tibbaR
65001 ,03001 ,87101 ,05101 ,08101 ,45101 ,74001kcahSoidaR
,20021 ,87101 ,39001 ,15001 ,000
01 ,45001 ,74001 ,74411ACR
11958, 11781, 11547, 11347, 11247, 11147, 11047, 10774,
10679, 10090
65001 ,03001 ,87101 ,05101 ,08101 ,45101 ,74001citsilaeR
32611DHnoituloveR
92611 ,89311 ,29211 ,30601 ,79401 ,03001 ,06001 ,71001ocnuR
55711 ,26701 ,65711 ,03001 ,74001opmaS
,87
101 ,20701 ,21801 ,06001 ,45101 ,71001 ,45001 ,74001gnusmaS
10030, 10056, 10587, 10766, 10814, 11060, 11575
03001 ,06001yknaS
53911 ,90411 ,03001 ,060
01 ,36401iusnaS
,99701 ,88001 ,17101 ,36401 ,00001 ,45101 ,45001 ,74001oynaS
10893, 11142, 11755
Setup Codes for TVs (continued)
06001ellivaS
99511 ,06311 ,71211 ,87801ertpecS
87101hctocS
11711 ,77101 ,03001 ,87101 ,08101 ,63201ttocS
,39001 ,15001 ,65101 ,00001 ,45101 ,71001 ,45001 ,74001sraeS
10060, 10053, 10178, 10030, 10171, 10166, 10056
15311oceleS
,15801 ,81801 ,98601 ,88601
,19401 ,08101 ,39001 ,45001prahS
11602
39001aihC gnehS
87101ikavihS
54101snemeiS
03001 ,39001 ,74001erutangiS
03001 ,87101nospmiS
29001 ,06001regniS
00001eparD raloS
32611 ,31801eloS
58611 ,43801 ,35001 ,05101 ,0000
1 ,00111 ,45101 ,71001ynoS
65001 ,87101 ,08101ngisednuoS
25911avoS
62811 ,02511oyoS
87101 ,65101noisivart
cepS
17101weiverauqS
17101 ,451010002RS
08101SSS
08101 ,63201etilratS
34801ecneirepxE oidutS
46801 ,39001na
csrepuS
00001emerpuS
450010002VS
27801 ,17801 ,07801 ,56801 ,78501 ,84701AVS
,17101 ,03001 ,87101 ,15001
,00001 ,45101 ,45001 ,74001ainavlyS
10092, 10056, 11271, 11314, 11394, 11864, 11963
17101 ,87101 ,08101 ,00001cinohpmyS
01611 ,13311 ,04211 ,44111xat
nyS
39001ydna
T
68211 ,65711 ,15001 ,00001gnuta
T
98601 ,60701 ,45101cae
T
15001 ,05201 ,45001scinhce
T
03001xovonhce
T
40021 ,74801weivhce
T
65001 ,06001 ,15001 ,05201doowhce
T
04011oce
T
65001 ,29001 ,87101 ,06001 ,05101 ,08101 ,36401 ,45001akinke
T
71001rolocele
T
65001 ,20701neknufele
T
65001 ,87101 ,74001samoh
T
74001 ,74411nosmoh
T
77101 ,65001 ,87101 ,08101 ,63201KM
T
71001iCN
T
65101moco
T
,54101 ,54111 ,06001 ,56211 ,05101 ,65101 ,65211 ,45101abihso
T
10166, 12006, 11935, 11704, 11656, 11635, 11524, 11356,
11164, 11156, 10845, 10832, 10822, 10650
15001noisiveto
T
87101aknemoyo
T
15001 ,05201enoteur
T
32711hceTur
T
36401SV
T
29001artlU
74001lasrevinU
77101musrevinU
68211cigoL SU
55711 ,58801 ,46801 ,65711V
03001hcraeseR rotceV
350
01rotciV
92611 ,89311 ,29211 ,45001norkidiV
87101hcetdiV
,55711 ,04611 ,72611 ,87511 ,03311 ,58801 ,468
01 ,75801cinosweiV
12014
06001gnikiV
48611eroiV
55711 ,58801 ,46801 ,85711 ,65711oiziV
,63201 ,39001 ,15001 ,
00001 ,45101 ,71001 ,45001 ,74001sdraW
10178, 10030, 10166, 10056, 10866, 11156
65101nocyaW
87101notleW
21711 ,77511 ,28211 ,09801 ,98801 ,58801
,15401 ,00001esuohgnitseW
98801 ,32601 ,36401 ,63201 ,15401esuohgnitseW etihW
28
Insignia NS-LCD52HD-09 52” LCD HD TV
www.insignia-products.com
Setup Codes for TVs (continued)
08101 ,36401 ,63201 ,15401dlroW
56311esyW
17101 ,08101 ,451010001-RX
62511 ,93801 ,33801 ,96701 ,03001ah
amaY
03001xroY
,87101 ,21801 ,56211 ,36401 ,39001 ,00001 ,71001 ,74001htineZ
10030, 11145, 10145, 10171, 10092
Setup Codes for TV/DVD Combination
Controlled by the DVD
Controlled by the TV
61012tnevdA
59602iakA
03802latigiD xepA
22112 ,12112 ,17012xovoiduA
17012noixA
59602cinoskorB
59602nezitiC
8
6212 ,57602nosremE
86212ASE
86212ianuF
17012noisiV oG
74212ihcatiH
86212aingisnI
61012nesne
J
86212xovangaM
09412cinosanaP
06212 ,45802spilihP
61012amirP
22012ACR
99802gnusmaS
59602iusnaS
22112avoS
86212
,57602ainavlyS
59602abihso
T
30811nairuccA
53911 ,57611iakA
25911 ,15911 ,73911xovoiduA
73911noixA
53911cinoskorB
53911nezitiC
01811xenyD
36911 ,49311nosremE
36911ASE
36911ianuF
09911oLi
09911laitinI
20021 ,36911aingisnI
39911GL
09911 ,
36911 ,66811xovangaM
41711tnexaM
09911ketniM
14911cinosanaP
20021 ,66711 ,32511dioraloP
20021 ,85911ACR
539
11iusnaS
25911avoS
36911 ,46811 ,49311ainavlyS
40021weivhceT
60021 ,53911 ,53611 ,42511abihsoT
Controlled by the VCR
Setup Codes for TV/VCR/DVD Combination
Controlled by the DVD
Controlled by the VCR
97412 ,97402cinoskorB
87212nezitiC
53012sehtaM sitruC
87212ooweaD
97412 ,87212 ,39502 ,97402nosremE
00002i
anuF
06012 ,53012 ,70802EG
73212ratSdloG
00002nosdivaD yelraH
00002ihcatiH
73012GL
00002s'dyolL
87212 ,39502
cinosangaM
18712 ,39502 ,00002xovangaM
26212 ,73212 ,26112 ,73012 ,26102xeromeM
70802ihsibustiM
26212 ,26
112 ,39502 ,26102sumitpO
97412 ,97402noirO
26212 ,26112 ,53012 ,26102cinosanaP
73212 ,53012yenneP
26112 ,
53012 ,26102rasauQ
73012 ,00002kcahSoidaR
06012 ,53012 ,70802ACR
41012gnusmaS
97412 ,97402 ,00002iusnaS
73
212 ,00002sraeS
23212 ,00002ynoS
18712ainavlyS
39502 ,00002cinohpmyS
00002samohT
54112 ,54802abihsoT
97412
,97402 ,00002htineZ
99802iakA
86802cinoskorB
12802nosremE
12802ASE
43312ianuF
12802xovangaM
26412 ,26312cino
sanaP
23112ACR
03602prahS
12802nacsrepuS
12802ainavlyS
12802cinohpmyS
54012abihsoT
70802prahS
Setup Codes for TV/VCR Combination
Controlled by the TV
08101noitcA aciremA
08101xovoiduA
63201nosremE
29
Insignia NS-LCD52HD-09 52” LCD HD TV
www.insignia-products.com
Setup Codes for VCRs
64002 ,00002 ,73002kraM-A
27912SBA
00002nairuccA
97402 ,90202 ,93002 ,84002 ,06002larimdA
00002 ,73002aru
tnevdA
00002 ,73002awiA
90202ablA
27912erawneilA
93002orgellA
18002 ,53002hgiH naciremA
00002dartsmA
53002ar
tsA
83002 ,73002xovoiduA
00002sivA
97402 ,64002 ,00002 ,93002 ,84002 ,53002llewoH & lleB
97412 ,97402 ,90
202 ,12102 ,48102cinoskorB
73002xilaC
83002 ,73002eldnaC
53002nonaC
18002 ,53002revraC
87212 ,97402 ,90202
,00002 ,73002 ,53002nezitiC
73002cissalC
54002 ,53002 ,06002emytroloC
00002tloC
73002giarC
00002noiretirC
94102 ,00002 ,18002 ,53002yelsorC
53012 ,00002 ,26102 ,53002 ,06002sehtaM sitruC
27912rewoPrebyC
87212 ,
64002 ,54002 ,73002ooweaD
73002nortyaD
27912lleD
24002 ,18002noneD
93702VTceriD
00002lauD
83002 ,93002dnarb
aruD
00002hcetanyD
90202 ,34002 ,00002 ,73002 ,06002emohortcelE
73002cinohportcelE
12102 ,48102dlaremE
230
02xeremE
,97402 ,90202 ,34002 ,12102 ,00002 ,48102 ,73002nosremE
20593, 21278, 21479, 21593
64002 ,00002 ,93002rehsiF
33002 ,5300
2ijuF
00002ustijuF
39512 ,39502 ,00002 ,73002ianuF
00002drarraG
27912yawetaG
,53012 ,70802 ,94102 ,00002
,84002 ,53002 ,06002EG
21060
06002inimeG
00002 ,73002axxeneG
41602oediV oG
73212 ,83002 ,00002 ,93002 ,73002 ,53002ratSdloG
00002 ,180
02 ,73002snamdooG
00002etneidarG
24002 ,18002adanarG
18002gidnurG
00002nosdivaD yelraH
83002 ,18002nodraK/
namraH
64002retrauqdaeH
27912drakcaP ttelweH
00002 ,53002Q-IH
98002 ,24002 ,00002 ,54002 ,73002 ,53002ihc
atiH
27912sretupmoC drawoH
27912PH
Hughes Network Systems 20042, 20739
93702xamuH
27912hsuH
00002ketyH
27912REWOPYUBi
53002yalpeR tnatsnI
Setup Codes for VCRs (continued)
76002nesne
J
26112 ,76002CV
J
73002CEK
64002 ,83002 ,76002doowneK
73002 ,53002kadoK
00002VTK
73012 ,83002 ,73002GL
27912syskniL
83002 ,00
002s'dyolL
18002eweoL
00002kigoL
64002roxuL
76002 ,24002 ,00002 ,73002IXL
87212 ,39502 ,00002 ,73002cinosa
ngaM
,94102 ,00002 ,18002 ,93002 ,84002 ,73002 ,53002xovangaM
20563, 20593, 20618, 21593, 21781
83002 ,18002 ,53002ztnaraM
73002atraM
902
02 ,73002iustaM
26112 ,18002 ,26102 ,53002atihsustaM
27912CP retneC aideM
53002IEM
,90202 ,00002 ,93002
,84002 ,73002 ,26102 ,53002xeromeM
20046, 20479, 21037, 21162, 21237, 21262
73002zteM
34002 ,06002AGM
27912tfosorciM
27912dniM
24002atloniM
70802 ,
34002 ,76002 ,24002 ,00002 ,84002 ,06002ihsibustiM
84002 ,53002alorotoM
00002CTM
00002XTM
00002 ,93002hce
titluM
83002 ,76002CEN
73002okkiN
73002odokkiN
27912aideM sueviN
27912etaghtroN
26102 ,53002supmylO
,39502
,00002 ,84002 ,73002 ,26102 ,53002 ,26012sumitpO
21162, 21262
97412 ,97402 ,90202 ,12102 ,00002 ,48102noirO
53002am
anaP
,61602 ,41602 ,52202 ,00002 ,26102 ,53002 ,26012cinosanaP
21035, 21162, 21262
,76002 ,24002 ,00002 ,18002 ,73002 ,2
6102 ,53002yenneP
20038, 21035, 21237
24002xatneP
97402 ,90202 ,00002 ,18002 ,53002oclihP
,90202 ,00002 ,54002 ,18002 ,840
02 ,26102 ,53002spilihP
20616, 20618, 20739, 21081, 21181
73002toliP
76002 ,24002 ,18002 ,26102reenoiP
18002oiduA kloP
39512naidiserP
06012
,06002nacsorP
00002cetorP
93002rasluP
64002retrauQ
64002 ,53002ztrauQ
,53002rasauQ 20162, 21035, 21162
,73012 ,64002 ,00002
,84002 ,73002 ,26102 ,53002kcahSoidaR
21162
73002xidaR
73002xednaR
,94102 ,24002 ,00002 ,54002 ,84002 ,53002 ,06002ACR
20807, 20880, 21035, 21060
,64002 ,12102 ,00002 ,84002 ,73002 ,
26102 ,53002citsilaeR
21162
61602 ,41602VTyalpeR
27912noisivaciR
93002ocnuR
41012 ,93702 ,83002 ,00002 ,54002
,06002gnusmaS
93002 ,84002yknaS
97412 ,97402 ,90202 ,76002 ,00002iusnaS
30
Insignia NS-LCD52HD-09 52” LCD HD TV
www.insignia-products.com
Setup Codes for VCRs (continued)
97402 ,64002 ,00002oynaS
34002 ,12102 ,54002 ,48102ttocS
,33002 ,93002 ,84002 ,73002 ,26102 ,53002 ,06
002sraeS
20045, 20000, 20042, 20067, 20043, 20209, 20046,
21237
84802 ,70802 ,00002 ,23002 ,84002prahS
00002 ,93002motnihS
73002snemeiS
,64002 ,94102 ,00002
,84002 ,73002 ,53002 ,06002erutangiS
20479
73002regniS
02eulB cinoS 614, 20616
64002ehpargonoS
,63602 ,64002 ,76002 ,000
02 ,33002 ,23002 ,53002ynoS
21032, 21232, 21972
00002retsamdnuoS
279129 kcatS
24002STS
000020002VS
00002AVS
18712 ,39512 ,3950
2 ,34002 ,00002 ,18002 ,53002ainavlyS
39512 ,39502 ,00002cinohpmyS
27912xametsyS
27912smetsyS ragaT
00002
ydnaT
73002okihsaT
76002 ,00002 ,18002 ,84002gnutaT
76002 ,00002caeT
00002 ,73002 ,26102 ,53002scinhceT
00
002 ,73002 ,53002akinkeT
97402noiveT
00002samohT
06002nosmohT
69912 ,93702 ,63602 ,81602oviT
00002KMT
73002XINT
,54112 ,80012 ,54802 ,90202 ,34002 ,00002 ,54002abihs
oT
21972, 21996
73002noisivetoT
27912hcuoT
73002xirT
54002artlU
54002rotceV
83002 ,48102hcraeseR rotceV
76002rotciV
54002
stpecnoC oediV
73002cigamoediV
00002cinosoediV
27912cinosweiV
00002nialliV
27912oodooV
,54002 ,33002 ,1800
2 ,84002 ,73002 ,53002 ,06002sdraW
20000, 20042, 20043, 20038, 20149, 20046, 20479
39502eladefrahW
97402 ,90202 ,00002esuohgnitseW etihW
97402 ,90202dl
roW
00002 ,530020001-RX
83002ahamaY
97412 ,97402 ,90202 ,00002 ,33002 ,93002 ,73002htineZ
27912puorG TZ
Setup Codes for Video Accessories
54020eriW2
27210SBA
58120DH sseccA
35610nairuccA
27210erawneilA
18410onimA
54020 ,85800T&TA
93710olaffuB
5032
0iTSAC
27210rewoPrebyC
68120 ,13710 ,45510kniL-D
30320maertS latigiD
36510nospE
27210yawetaG
76210 ,27210dr
akcaP ttelweH
27210sretupmoC drawoH
76210 ,27210PH
27210hsuH
27210REWOPYUBi
51410aingisnI
18410tcennoClooK
5
1410GL
56310 ,27210syskniL
27210CP retneC aideM
94020 ,27210tfosorciM
27210dniM
89910 ,36310 ,85800aloroto
M
63020raegteN
27210aideM sueviN
27210etaghtroN
02110cinosanaP
01010reenoiP
27210noisivaciR
68410ukoR
09410 ,
09110gnusmaS
85800atnaltA cifitneicS
62110ecneicS yrosneS
01010prahS
65410CMS
46310 ,42310 ,27210ynoS
27210
9 kcatS
18410tseWeruS
36510ainavlyS
27210xametsyS
27210smetsyS raga
T
27210abihso
T
27210hcuo
T
92310 ,27210cinosweiV
62110oiziV
27210oodooV
89220UDUV
94020xobX
51410htineZ
27210puorG TZ
31
Insignia NS-LCD52HD-09 52” LCD HD TV
www.insignia-products.com
Specifications
Design and specifications are subject to change
without notice.
Legal notices
FCC Part 15
This device complies with Part 15 of the FCC Rules.
Operation of this product is subject to the following two
conditions: (1) this device may not cause harmful
interference, and (2) this device must accept any interference
received, including interference that may cause undesired
operation.
This equipment has been tested and found to comply within
the limits for a class B digital device, pursuant to Part 15 of
the FCC Rules. These limits are designed to provide
reasonable protection against harmful interference in a
residential installation. This equipment generates, uses, and
can radiate radio frequency energy and, if not installed and
used in accordance with the instructions, may cause harmful
interference to radio communications. However, there is no
guarantee that interference will not occur in a particular
installation. If this equipment does cause harmful
interference to radio or television reception, which can be
determined by turning the equipment off and on, the user is
encouraged to try to correct the interference by one or more
of the following measures:
• Reorient or relocate the receiving antenna.
• Increase the separation between the equipment and
receiver.
• Connect the equipment into an outlet on a circuit
different from that to which the receiver is connected.
• Consult the dealer or an experienced technician for
help.
Modifications
The FCC requires the user to be notified that any changes or
modifications made to this device that are not expressly
approved by Insignia may void the user’s authority to operate
the equipment.
Cables
Connections to this device must be made with shielded
cables with metallic RF/EMI connector hoods to maintain
compliance with FCC Rules and Regulations.
Canadian notice
This Class B digital apparatus meets all requirements of the
Canadian Interference-Causing Equipment Regulations.
Avis Canadian
Cat apparel numerous de la classed B respected toutes les
exigencies du règlement sur le materiel brouilleur du
Canada.
Copyright
© 2008 Insignia. Insignia and the Insignia logo are
trademarks of Best Buy Enterprise Services, Inc. Other
brands and product names are trademarks or registered
trademarks of their respective holders. Specifications and
features are subject to change without notice or obligation.
For service and support call (877) 467-4289.
Dolby
Manufactured under license from Dolby Laboratories.
“Dolby” and the double-D symbol are trademarks of Dolby
Laboratories.
Analog standard NTSC
Digital standard ATSC, 8-VSB, Clear-QAM
Screen 52-inch
Channel coverage VHF: 2-13
UHF: 14-69
CATV: Mid band - A-8 ~ A-1, A ~ I
Super band - J ~ W
Hyper band - AA ~ ZZ, AAA, BBB
Ultra band - 65 ~ 94, 100 ~ 135
Power source AC 100-240 V ~ 50-60 Hz, 4.0 A
Power
consumption
<350 W with TV on
<1 W in standby mode
Audio power 10 W + 10 W internal speaker
S-Video input Y:1 V (p-p), 75 ohm, negative sync
C:0.286 V (p-p) (burst signal), 75 ohm
Video/audio input Video:1 V (p-p), 75 ohm, negative sync
Audio:500 mV (rms)
Component input Y:1 V (p-p), 75 ohm, including sync
Pr/Cr:±0.35 V (p-p), 75 ohm
Pb/Cb:±0.35 V (p-p), 75 ohm
Audio:500 mV (rms)
Suggested resolutions:1080i, 720p, 480p,
480i
HDMI input 3 HDMI input terminals
HDCP compliant
E-EDID compliant
Suggested scan rates:1080p, 1080i, 720p,
480p, 480i
VGA input D-Sub 15-pin terminal
E-EDID compliant
Suggested scan rates:640×480 /60 Hz,
800×600 /60 Hz, 1024×768 /60 Hz,
1920×1080 /60 Hz
Audio input: Headphone mini-jack for stereo
Accessories Power cord
User guide
Quick start guide
Remote control
VGA cable
PC audio cable
Batteries (2 AA)

32
Insignia NS-LCD52HD-09 52” LCD HD TV
www.insignia-products.com

33
Insignia NS-LCD52HD-09 52” LCD HD TV
www.insignia-products.com
One-Year Limited Warranty
Insignia Products (“Insignia”) warrants to you, the
original purchaser of this new NS-LCD52HD-09
(“Product”), that the Product shall be free of defects in
the original manufacture of the material or workmanship
for a period of one (1) year from the date of your
purchase of the Product (“Warranty Period”). This
Product must be purchased from an authorized dealer of
Insignia brand products and packaged with this warranty
statement. This warranty does not cover refurbished
Product. If you notify Insignia during the Warranty Period
of a defect covered by this warranty that requires
service, terms of this warranty apply.
How long does the coverage last?
The Warranty Period lasts for 1 year (365 days) from the
date you purchased the Product. The purchase date is
printed on the receipt you received with the Product.
What does this warranty cover?
During the Warranty Period, if the original manufacture of
the material or workmanship of the Product is
determined to be defective by an authorized Insignia
repair center or store personnel, Insignia will (at its sole
option): (1) repair the Product with new or rebuilt parts;
or (2) replace the Product at no charge with new or
rebuilt comparable products or parts. Products and parts
replaced under this warranty become the property of
Insignia and are not returned to you. If service of
Products or parts are required after the Warranty Period
expires, you must pay all labor and parts charges. This
warranty lasts as long as you own your Insignia Product
during the Warranty Period. Warranty coverage
terminates if you sell or otherwise transfer the Product.
How to obtain warranty service?
If you purchased the Product at a retail store location,
take your original receipt and the Product to the store
you purchased it from. Make sure that you place the
Product in its original packaging or packaging that
provides the same amount of protection as the original
packaging. If you purchased the Product from an online
web site, mail your original receipt and the Product to the
address listed on the web site. Make sure that you put
the Product in its original packaging or packaging that
provides the same amount of protection as the original
packaging.
To obtain in-home warranty service for a television with a
screen 25 inches or larger, call 1-888-BESTBUY. Call
agents will diagnose and correct the issue over the
phone or will have an Insignia-approved repair person
dispatched to your home.
Where is the warranty valid?
This warranty is valid only to the original purchaser of the
product in the United States, Canada, and Mexico.
What does the warranty not cover?
This warranty does not cover:
• Customer instruction
• Installation
• Set up adjustments
• Cosmetic damage
• Damage due to acts of God, such as lightning
strikes
• Accident
•Misuse
•Abuse
• Negligence
• Commercial use
• Modification of any part of the Product, including
the antenna
• Plasma display panel damaged by static
(non-moving) images applied for lengthy periods
(burn-in).
This warranty also does not cover:
• Damage due to incorrect operation or maintenance
• Connection to an incorrect voltage supply
• Attempted repair by anyone other than a facility
authorized by Insignia to service the Product
• Products sold as is or with all faults
• Consumables, such as fuses or batteries
• Products where the factory applied serial number
has been altered or removed
REPAIR REPLACEMENT AS PROVIDED UNDER THIS
WARRANTY IS YOUR EXCLUSIVE REMEDY.
INSIGNIA SHALL NOT BE LIABLE FOR ANY
INCIDENTAL OR CONSEQUENTIAL DAMAGES FOR
THE BREACH OF ANY EXPRESS OR IMPLIED
WARRANTY ON THIS PRODUCT, INCLUDING, BUT
NOT LIMITED TO, LOST DATA, LOSS OF USE OF
YOUR PRODUCT, LOST BUSINESS OR LOST
PROFITS. INSIGNIA PRODUCTS MAKES NO OTHER
EXPRESS WARRANTIES WITH RESPECT TO THE
PRODUCT, ALL EXPRESS AND IMPLIED
WARRANTIES FOR THE PRODUCT, INCLUDING, BUT
NOT LIMITED TO, ANY IMPLIED WARRANTIES OF
AND CONDITIONS OF MERCHANTABILITY AND
FITNESS FOR A PARTICULAR PURPOSE, ARE
LIMITED IN DURATION TO THE WARRANTY PERIOD
SET FORTH ABOVE AND NO WARRANTIES,
WHETHER EXPRESS OR IMPLIED, WILL APPLY
AFTER THE WARRANTY PERIOD. SOME STATES,
PROVINCES AND JURISDICTIONS DO NOT ALLOW
LIMITATIONS ON HOW LONG AN IMPLIED
WARRANTY LASTS, SO THE ABOVE LIMITATION MAY
NOT APPLY TO YOU. THIS WARRANTY GIVES YOU
SPECIFIC LEGAL RIGHTS, AND YOU MAY ALSO
HAVE OTHER RIGHTS, WHICH VARY FROM STATE
TO STATE OR PROVINCE TO PROVINCE.
Contact Insignia:
For customer service please call 1-877-467-4289
www.insignia-products.com
Distributed by Best Buy Purchasing, LLC
7601 Penn Avenue South, Richfield, Minnesota, U.S.A.
55423-3645
© 2008 Best Buy Enterprise Services, Inc.
All rights reserved. INSIGNIA is a trademark of Best Buy
Enterprise Services, Inc. Registered in some countries.
All other products and brand names are trademarks of
their respective owners.

34
Insignia NS-LCD52HD-09 52” LCD HD TV
www.insignia-products.com

35
Insignia NS-LCD52HD-09 52” LCD HD TV
www.insignia-products.com

TM
ENGLISH
08-1503
www.insignia-products.com (877) 467-4289
Distributed by Best Buy Purchasing, LLC
7601 Penn Avenue South, Richfield, MN USA 55423-3645
© 2008 Best Buy Enterprise Services, Inc.
All rights reserved. INSIGNIA is a trademark of Best Buy Enterprise Services, Inc. Registered in some countries.
All other products and brand names are trademarks of their respective owners.