
12" TABLE FAN
MODEL 1PAFD12
OWNER’S MANUAL

2
SAFETY & PRECAUTIONS
SAFETY
SAFETY GUIDELINES
When using any electrical appliances, basic
safety precautions should always be followed.
Failure to follow these safety guidelines may
result in personal injury, property damage,
re or shock.
WARNING
• Do not use this fan with any solid
state speed control device.
• This unit has a polarized plug (one
blade is wider than the other). To reduce
the risk of electric shock, this plug is
intended to t in a polarized outlet only
one way. If the plug does not t into the
outlet, reverse the plug. If it still does not
t, contact a qualied electrician. Do not
attempt to bypass this safety feature.
• Use only a dedicated, grounded 115-
120V AC outlet, making sure this unit is
plugged in rmly and completely. Plug
and unplug the unit with dry hands only.
• This fan is not intended to be used
by children or persons with reduced
physical, sensory or mental capabilities,
without adult instructions or supervision.
• Do not leave the fan running unattended.
SAVE THESE INSTRUCTIONS
FOR FUTURE REFERENCE
IMPORTANT SAFETY INFORMATION
1. Important information about the cord
and plug below:
• This fan employs an overload protection
fuse in the plug. A blown fuse indicates
an overload or short-circuit. If the fuse
blows, unplug the fan from the outlet.
Replace the fuse according to the User
Servicing Instructions (on page 3),
plug the unit back in and turn it on. If
the fuse blows again, the fan may have
a short-circuit; leave it unplugged and
contact Customer Service.
• Check the power cord and plug
for damage. If the cord or plug are
damaged, contact Customer Service
before using the unit.
• Do not cover the cord with carpeting,
throw rugs, runners, or similar
coverings. Do not run the cord under
furniture or appliances. Keep the cord
away from any areas where it can be
stepped on or tripped over.
2. The fan should only be operated under
the rated voltage.
3. The fan must be assembled before
plugging it into the wall outlet.
4. Never insert ngers, pencils, or any
other objects through the guard when
the fan is running.
5. Unplug the fan when moving it from
one place to another, before removing
the guards for cleaning, and when it’s
not in use.
6. Position the fan on a stable, level surface
to avoid overturning during operation.
7. Do not use fan in window; rain may
create an electric shock hazard.
3
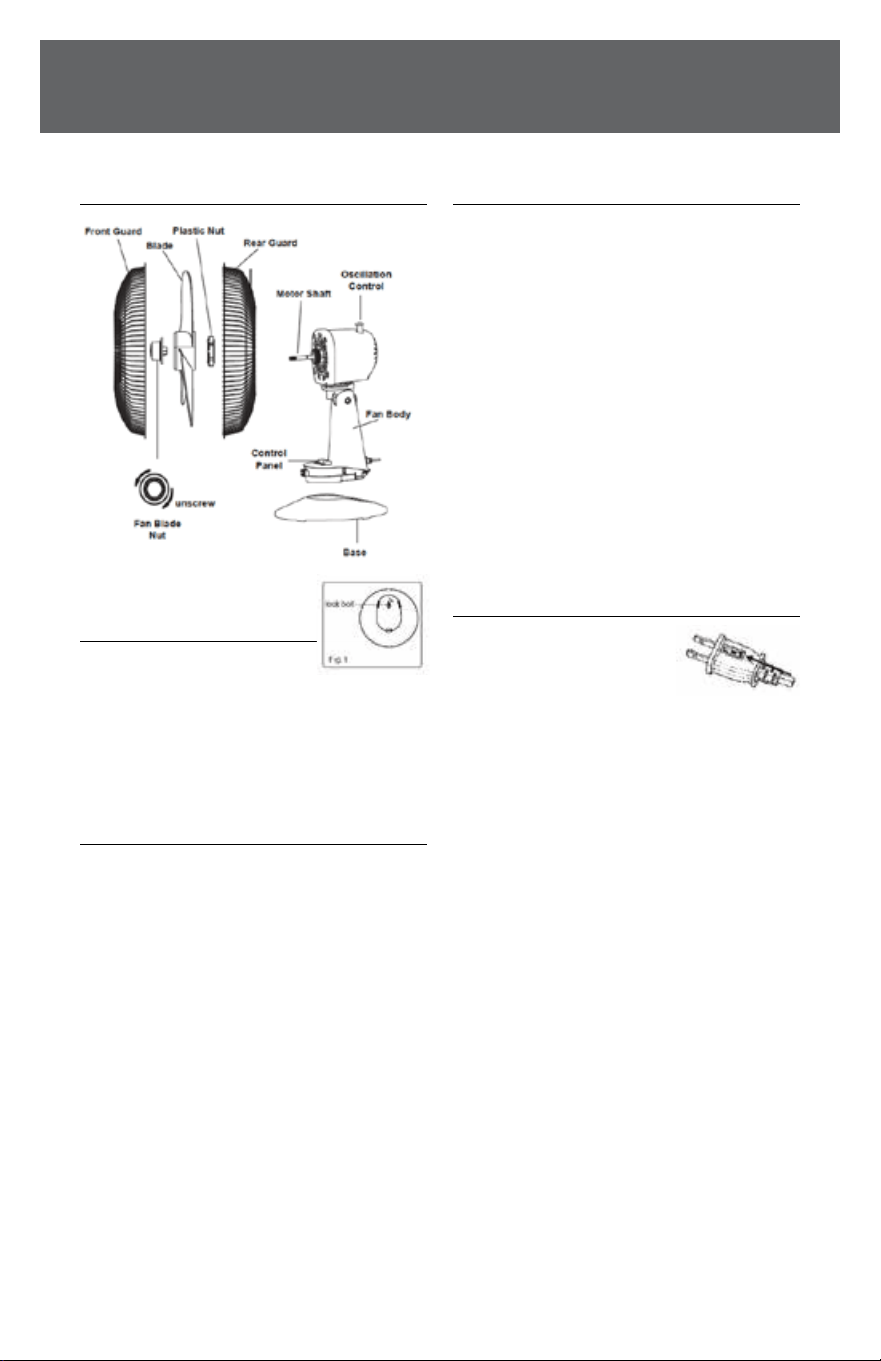
PARTS / OPERATION
PARTS DIAGRAM
BASE ASSEMBLY
1. Match the locking tab to
the base, clicking it into position.
2. Turn the lock bolt clockwise (to the right)
to secure the base (Fig. 1).
ASSEMBLY OF BLADE AND GUARD
1. Take the fan blade nut out of the bag,
then remove the plastic nut by turning
it counterclockwise (to the left).
2. Set the rear guard into the proper
position with the handle up.
3. Screw the plastic nut clockwise,
until the guard is securely attached.
4. Install the blade onto the shaft until
the retaining pin ts into the notch
on the blade.
5. Screw the fan blade nut onto the
motor shaft counterclockwise.
6. Mount the front guard and join both
guards together using the clips.
OPERATION INSTRUCTIONS
Speed Control: Change the speed using
the button switches on the Control Panel.
(0-O 1-Low 2-Medium 3-High)
Oscillation Control: To make the fan
oscillate, push down the knob located on
top of the motor housing. To stop the
oscillation, pull up on the knob once the
desired position is reached.
Tilting Control: Tilt the fan head forward
or backward to adjust the vertical angle
of airow. A clicking noise will sound when
adjusting the tilt, this is normal.
USER SERVICING INSTRUCTIONS
1. Grip the plug and remove
it from the outlet. Never
pull on the cord to remove it.
2. Open the fuse cover by sliding the access
cover found on top of the plug towards
the blades.
3. Remove the fuse carefully by pushing the
fuse from one side to the other, or turning
the fuse holder over.
4. Risk of re: Use only 2.5 Amp, 125 Volt
fuses (provided) as replacements.
5. Close fuse cover by sliding the access
cover on top of the plug to hide it.
6. Risk of re: Do not replace the plug as it
contains a safety device (fuse) that should
not be removed. Contact customer service
if the plug, or cord, is damaged.
Notice: To avoid the risk of damage or
personal injury, when replacing a fuse,
don’t plug in or turn on the unit until the
access cover has been closed.
If you’re unable to insert the fuse into
the plug, make sure it’s being inserted
the correct way.

844-4PA-AIRE | 844-472-2473 | support@perfectaire.us
CANADA SUPPORT 877-997-2473 | supportcanada@perfectaire.us
www.perfectaire.us
Printed in China | 0822_M989
MAINTENANCE INSTRUCTIONS
The fan contains no serviceable parts. To reduce the risk of electrical shock,
do not attempt to open the motor.
• Before cleaning and assembling, make sure the fan is unplugged.
• To ensure adequate air ow to the motor, keep the vents on the motor
housing free from dust, dander, etc. Once unplugged, use a vacuum to
clean these vents. Do not disassemble the fan to remove any dust.
• Clean the outer surfaces using a mild detergent or solvents to avoid damage
to the surface. Do not use the following cleansers: gasoline, alcohol, thinner.
• Do not allow water or other liquids to get into the motor housing or interior parts.
CLEANING
• Turn o and unplug the unit from the wall outlet before cleaning.
• Clean plastic parts with mild soap and water using a soft cloth or sponge,
gently removing all soap lm with clean water.
• Do not allow water or other liquids to get inside the motor or interior parts.
• Dry all parts completely before reassembling the fan and plugging it back in.
NOTE: Proof of purchase is required for all warranty claims.
NOTE: As a result of continual improvements, the design and specications of the
product within may dier slightly to the unit illustrated on the packaging.
SCAN CODE TO
LEAVE A REVIEW
THANK
YOU FOR
YOUR
PURCHASE!
As a small
business,
reviews are
everything!
5401 Dansher Road
Countryside, IL 60525