USER'S MANUAL/HANDBUCH/MANUEL DE L'UTILISATEUR
/MANUAL DEL USUARIO/MANUALE UTENTE/INSTRUKCJA OBSŁUGI
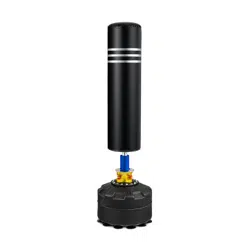
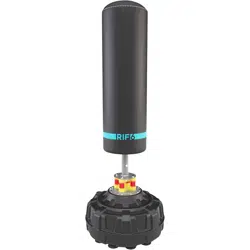
Boxing Bag With Stand/Boxbirne mit Standfuß/Sac de Frappe sur Pied/
Saco de Boxeo con Soporte/Sacco da Boxe con Supporto/
Worek treningowy na stojaku
SP37558
EN DE FR ES IT PL
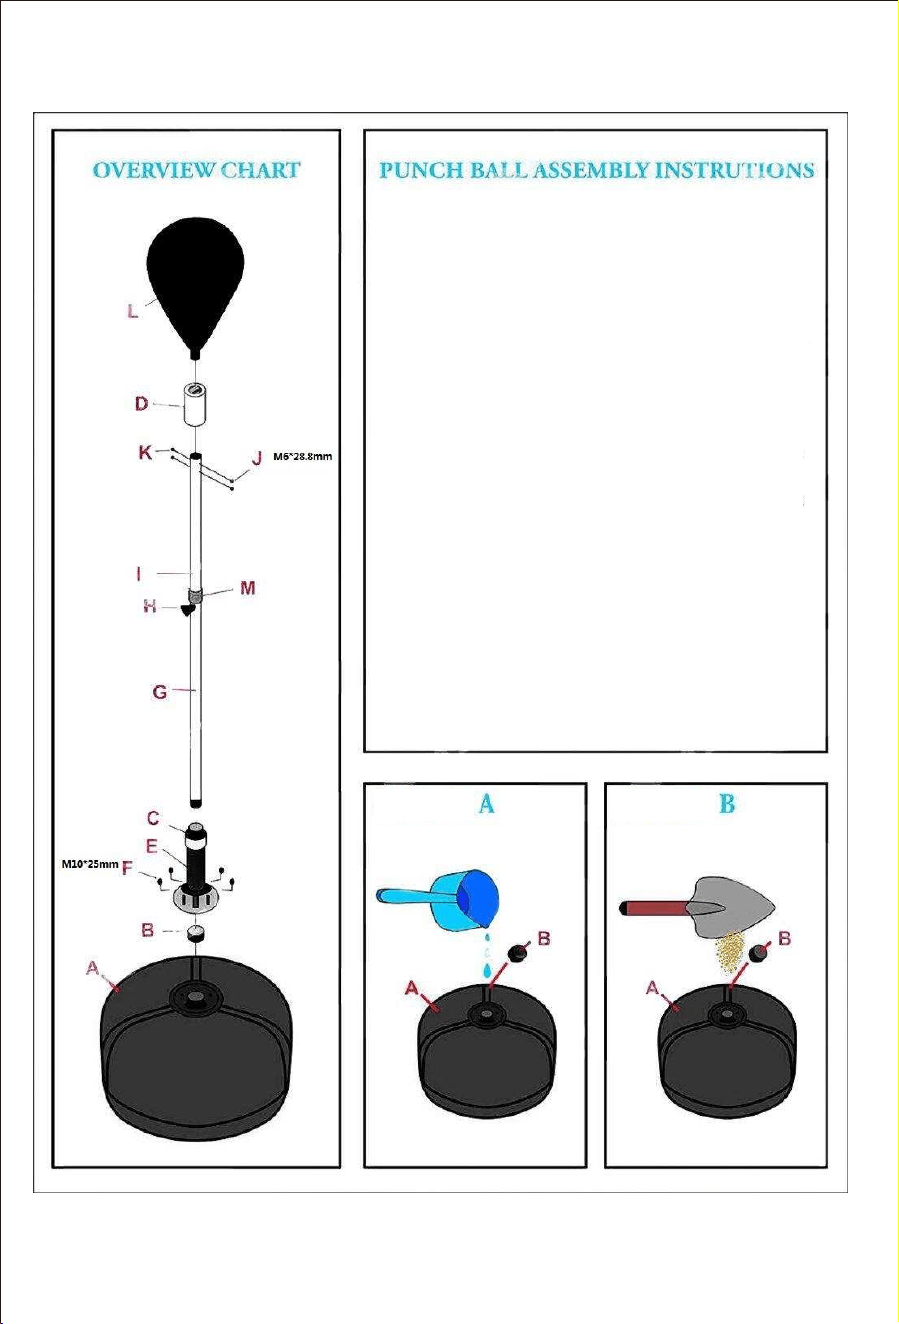
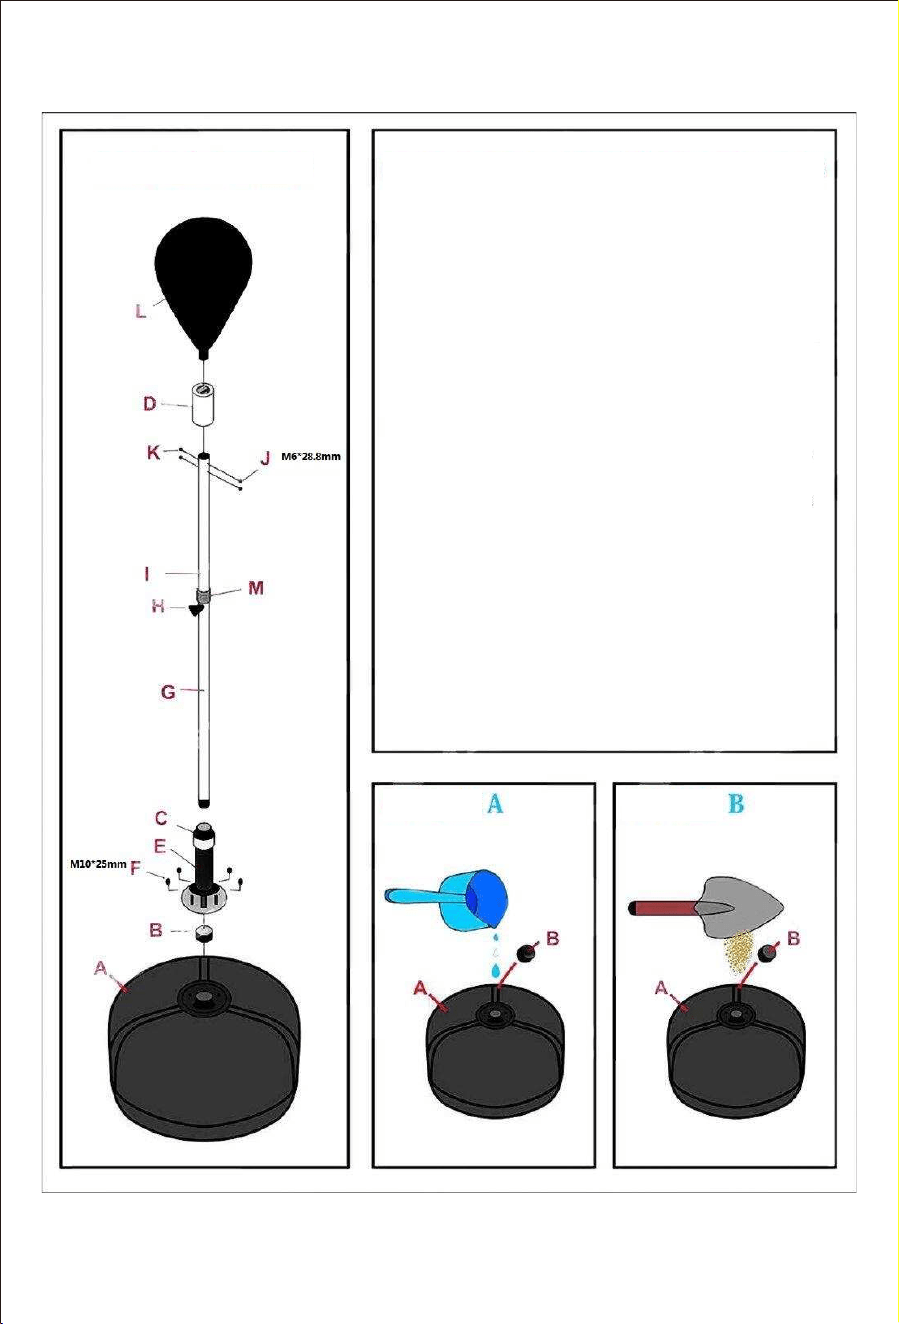
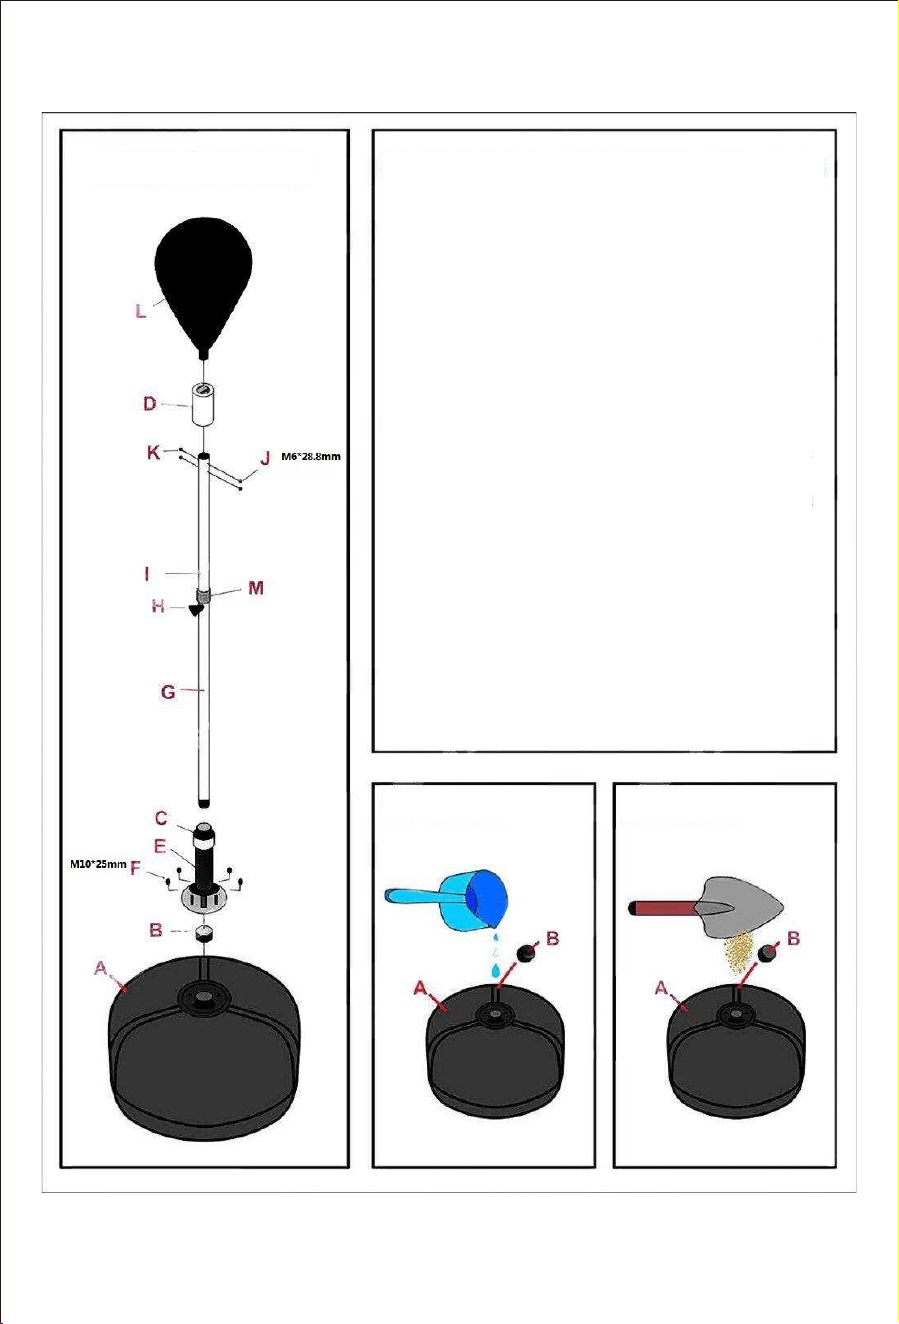
STEP 1. Open the Cap (B) on the Base (A). Fill
the Base (A) with water or sand, and then close
the Cap (B). As shown in FIGURE A and
FIGURE B.
STEP 2. Remove the Cover (C) first. Then fix the
Spring (E) to the top of the Base (A) with four
Screws (F). Replace the Cover (C) on the top of
the Spring (E). As shown in OVERVIEW
CHART.
STEP 3. Slide the Foam (D) to the top of the
Inner Adjustable Tube (I) first, and then install the
Inner Adjustable Tube (I) into the Lower Tube (B)
with the Knob (H) to adjust the height with the
Knob (H). As shown in OVERVIEW CHART.
STEP 4. Slide the Punching Ball (L) to the Inner
Adjustable Tube (I) from the top and tighten with
Screws (J) and Nuts (K). As shown in
OVERVIEW CHART.
※ Do not use the Boxing stand when any other
item is on your hands (eg. Ring).
FIGURE
FIGURE
02

SCHRITT 1. Öffnen Sie die Kappe (B) an der
Basis (A). Füllen Sie die Basis (A) mit Wasser
oder Sand und schließen Sie die Kappe (B). Wie
in Fig. A und Fig. B gezeigt.
SCHRITT 2. Entfernen Sie zuerst die Abdeckung
(C). Befestigen Sie dann die Feder (E) mit vier
Schrauben (F) oben an der Basis (A). Bringen Sie
die Abdeckung (C) oben auf der Feder (E) wieder
an. Wie in ÜBERSICHTSTABELLE gezeigt.
SCHRITT 3. Schieben Sie den Schaum (D) zuerst
auf die Oberseite des inneren verstellbaren Rohrs
(I) und installieren Sie dann das innere
verstellbare Rohr (I) mit dem Knopf (H) in das
untere Rohr (B), um die Höhe mit einzustellen
den Knopf (H). Wie in ÜBERSICHTSTABELLE
gezeigt.
SCHRITT 4. Schieben Sie die Stanzkugel (L) von
oben auf das innere verstellbare Rohr (I) und
ziehen Sie sie mit den Schrauben (J) und Muttern
(K) fest. Wie in ÜBERSICHTSTABELLE
gezeigt.
※ Verwenden Sie den Boxständer nicht, wenn
sich ein anderer Gegenstand an Ihren Händen
befindet (z. B. Ring).
BILD
BILD
ÜBERBLICK MONTAGEANLEITUNG FÜR BOXBIRNE
03
ÉTAPE 1. Ouvrez le capuchon (B) de la base (A).
Remplissez la base (A) avec de l’eau ou du sable,
puis fermez le capuchon (B). Comme le montrent
les FIGURE A et FIGURE B.
ÉTAPE 2. Retirez d’abord le couvercle (C). Fixez
ensuite le ressort (E) au sommet de la base (A) à
l’aide de quatre vis (F). Replacez le couvercle (C)
sur le dessus du ressort (E). Comme indiqué dans
la VUE D’ENSEMBLE.
ÉTAPE 3. Faites d’abord glisser la mousse (D)
vers le haut du tube intérieur réglable (I), puis
installez le tube intérieur réglable (I) dans le tube
inférieur (B) avec le bouton (H) pour régler la
hauteur avec le bouton (H). Comme indiqué dans
la VUE D’ENSEMBLE.
ÉTAPE 4. Faites glisser le ballon de frappe (L)
vers le tube intérieur réglable (I) par le haut et
serrez avec les vis (J) et les écrous (K). Comme
indiqué dans la VUE D’ENSEMBLE.
※ N’utilisez pas ce produit lorsqu’un autre objet
est sur les mains (par exemple, une bague).
FIGURE
FIGURE
VUE D’ENSEMBLE INSTRUTIONS D’ASSEMBLAGE
04

PASO 1. Abra la tapa (B) en la base (A). Llene la
base (A) con agua o arena y luego cierre la tapa
(B). Como se muestra en la FIGURA A y la
FIGURA B.
PASO 2. Quite la cubierta (C) primero. Luego fije
el resorte (E) a la parte superior de la base (A)
con cuatro tornillos (F). Vuelva a colocar la
cubierta (C) en la parte superior del resorte (E).
Como se muestra en el DIAGRAMA GENERAL.
PASO 3. Primero deslice la espuma (D) hacia la
parte superior del tubo interior ajustable (I) y
luego instale el tubo interior ajustable (I) en el
tubo inferior (B) con la perilla (H) para ajustar la
altura con la perilla (H). Como se muestra en el
DIAGRAMA GENERAL.
PASO 4. Deslice la bola de boxeo (L) hacia el
tubo interior ajustable (I) desde la parte superior y
apriete con tornillos (J) y tuercas (K). Como se
muestra en el DIAGRAMA GENERAL.
※ No utilice este producto cuando tenga en las
manos cualquier otro objeto (por ejemplo, un
anillo).
FIGURA
FIGURA
DIAGRAMA GENERAL INSTRUCCIONES DE MONTAJE
05

PASSO 1: Aprire il tappo (B) sulla base (A).
Riempire la base (A) con acqua o sabbia, e poi
chiudere il tappo (B). Come mostrato nella
FIGURA A e nella FIGURA B.
PASSO 2: Rimuovere prima il coperchio (C). E
poi fissare la molla (E) alla parte superiore della
base (A) con quattro viti (F). Riposizionare il
coperchio (C) sulla parte superiore della molla
(E). Come mostrato nel GRAFICO DI
PANORAMICA.
PASSO 3: Far scorrere prima la schiuma (D) sulla
parte superiore del tubo interno regolabile (I), e
poi installare il tubo interno regolabile (I) nel tubo
inferiore (B) con la manopola (H) per regolare
l'altezza con la manopola (H). Come mostrato nel
GRAFICO DI PANORAMICA.
PASSO 4: Far scorrere la palla (L) sul tubo
interno regolabile (I) dall'alto e serrare con le viti
(J) e i dadi (K). Come mostrato nel GRAFICO DI
PANORAMICA.
※ Non utilizzare il prodotto quando qualsiasi
altro oggetto è sulle mani (es. Anello).
FIGURA
FIGURA
GRAFICO DI
PANORAMICA
ISTRUZIONI DI MONTAGGIO
06
Krok 1. Otwórz korek podstawy (B) (A). Napełnij
podstawę (A) wodą lub piaskiem, a następnie
zamknij korek (B). Patrz: RYS A i RYS B.
Krok 2. Najpierw zdejmij pokrywę (C). Następnie
przymocuj sprężynę (E) do górnej części
podstawy (A) za pomocą czterech śrub (F). Załóż
osłonę (C) na górę sprężyny (E). Patrz: Schemat
części
Krok 3. Najpierw wsuń piankę (D) na górę
regulowanej rurki wewnętrznej (I), a następnie
zainstaluj rurkę (I) w dolnej rurce (B) za pomocą
przycisku (H), aby wyregulować wysokość. Patrz:
Schemat części
Krok 4. Wsuń worek (L) w kierunku regulowanej
rury wewnętrznej (I) od góry i dokręć śrubami (J)
i nakrętkami (K). Patrz: Schemat części
※ Nie używaj tego produktu, gdy masz na rękach
inny przedmiot (na przykład pierścionek).
RYSUNEK A
RYSUNEK B
SCHEMAT CZĘŚCI INSTRUKCJA MONTAŻU
07

UNITED STATES
CANADA
UNITED KINGDOM
GERMANY
FRANCE
ITALY
SPAIN
JAPAN
RUSSIA
AUSTRALIA
With your inspiring rating, COSTWAY will be more consistent to offer you EASY
SHOPPING EXPERIENCE, GOOD PRODUCTS and EFFICIENT SERVICE!
Mit Ihrer inspirierenden Bewertung wird COSTWAY konsistenter sein, um Ihnen
EIN SCHÖNES EINKAUFSERLEBNIS, GUTE PRODUKTE und EFFIZIENTEN
SERVICE zu bieten!
Avec votre évaluation inspirante, COSTWAY continuera à fournir une
EXPÉRIENCE D’ACHAT PRATIQUE, des PRODUITS DE QUALITÉ et un
SERVICE EFFICACE !
Con su calificación inspiradora, COSTWAY será más consistente para ofrecerle
EXPERIENCIA DE COMPRA FÁCIL, BUENOS PRODUCTOS y SERVICIO
EFICIENTE.
Con la tua valutazione incoraggiante, COSTWAY sarà più coerente per offrirti
ESPERIENZA DI ACQUISTO FACILE, BUONI PRODOTTI e SERVIZIO
EFFICIENTE!
Dzięki twojej opinii COSTWAY będzie mógł oferować jeszcze WYGODNIEJSZE
ZAKUPY, LEPSZE PRODUKTY i SPRAWNIEJSZĄ OBSŁUGĘ KLIENTA.
US office: Fontana
UK office: Ipswich
DE office: FDS GmbH, Neuer Höltigbaum 36, 22143 Hamburg, Deutschland
FR office : 26 RUE DU VERTUQUET, 59960 NEUVILLE EN FERRAIN, FRANCE