
Online User's Guide
MFC-J1205W
MFC-J1215W
© 2021 Brother Industries, Ltd. All rights reserved.

Table of Contents
Before You Use Your Machine ............................................................................................................. 1
Definitions of Notes ........................................................................................................................................ 2
Notice - Disclaimer of Warranties (USA and Canada) ................................................................................... 3
Trademarks .................................................................................................................................................... 4
Open Source Licensing Remarks .................................................................................................................. 5
Copyright and License ................................................................................................................................... 6
Important Notes.............................................................................................................................................. 7
Introduction to Your Machine............................................................................................................... 8
Before Using Your Machine ........................................................................................................................... 9
Control Panel Overview ............................................................................................................................... 10
LED Patterns and Indications ...................................................................................................................... 12
Access Brother Utilities (Windows) .............................................................................................................. 13
Uninstall the Brother Software and Drivers (Windows) ...................................................................... 14
USB Port Location on Your Brother Machine............................................................................................... 15
Paper Handling.................................................................................................................................... 16
Load Paper................................................................................................................................................... 17
Load Paper in the Paper Tray ............................................................................................................ 18
Unprintable Area ................................................................................................................................ 31
Paper Settings.................................................................................................................................... 32
Acceptable Print Media ...................................................................................................................... 35
Load Documents .......................................................................................................................................... 41
Load Documents on the Scanner Glass ............................................................................................ 42
Unscannable Area.............................................................................................................................. 43
Print ...................................................................................................................................................... 44
Print from Your Computer (Windows)........................................................................................................... 45
Print a Photo (Windows)..................................................................................................................... 46
Print a Document (Windows).............................................................................................................. 47
Cancel a Print Job (Windows) ............................................................................................................ 48
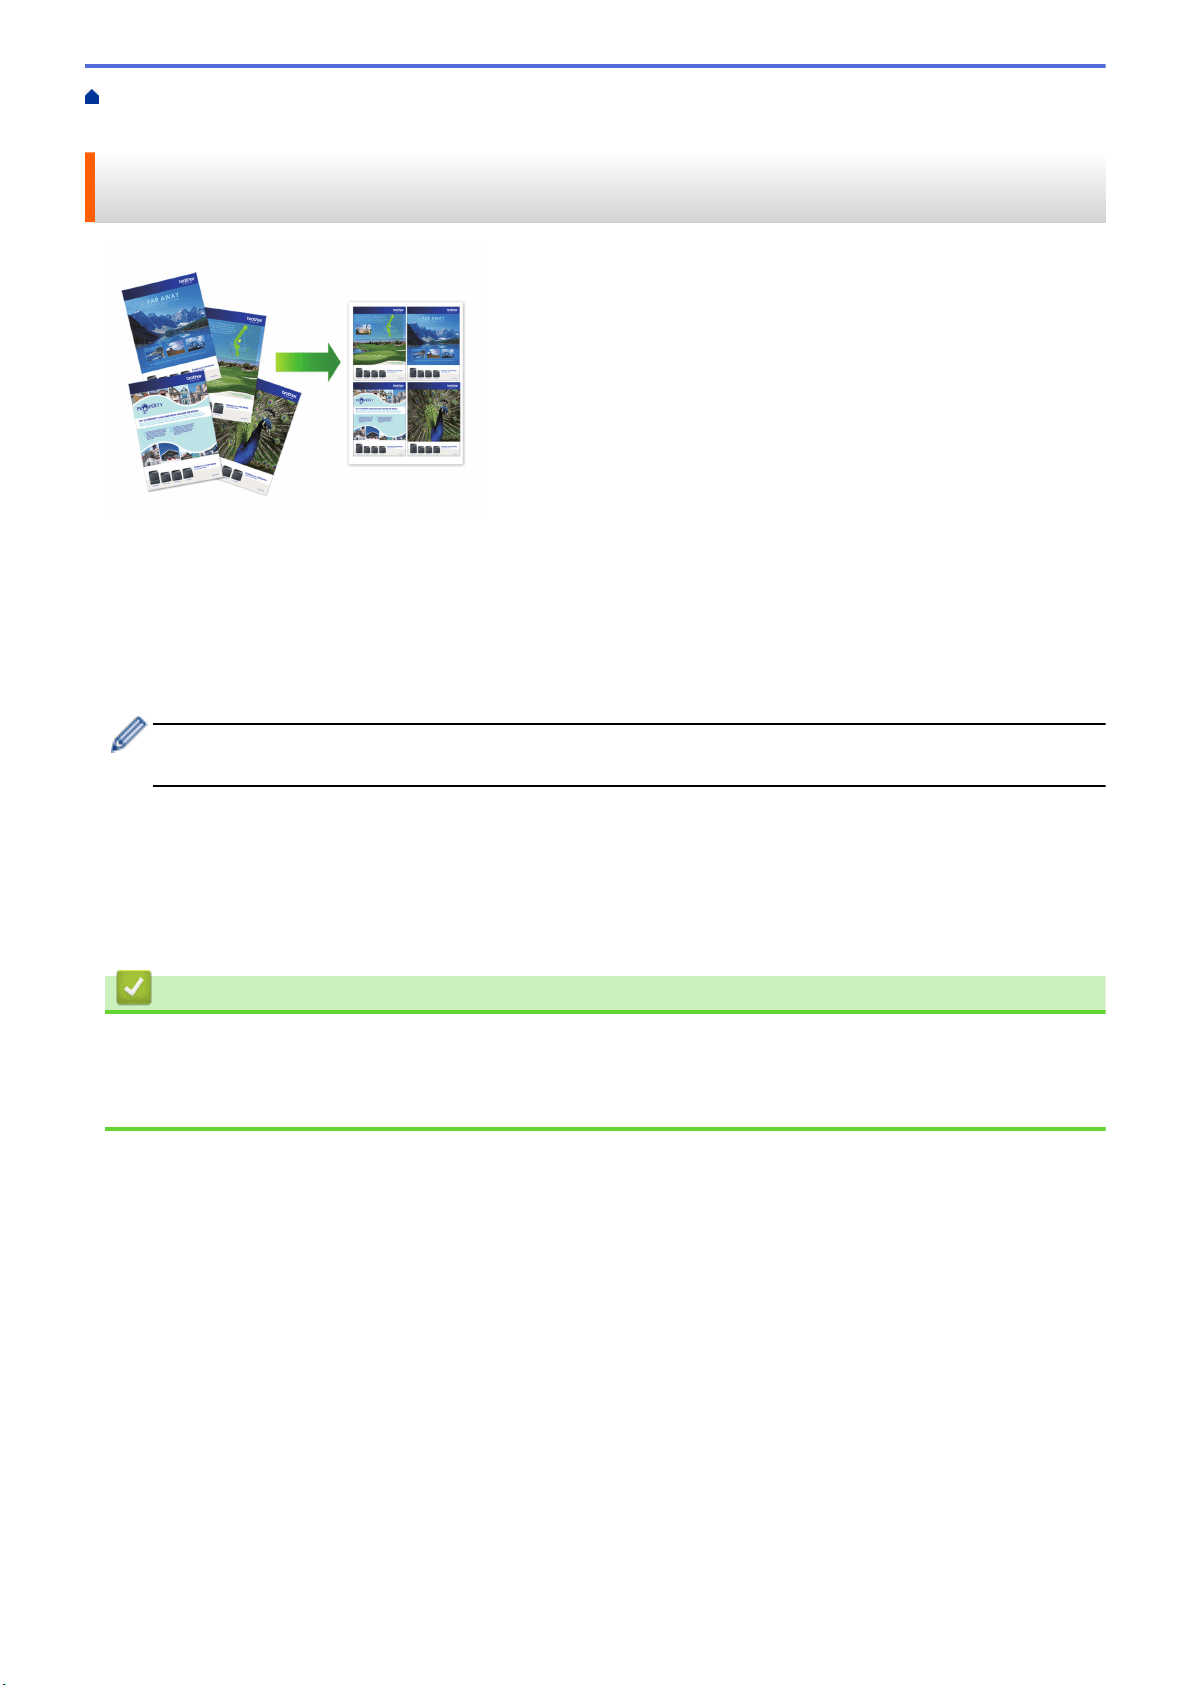
Print More Than One Page on a Single Sheet of Paper (N in 1) (Windows)...................................... 49
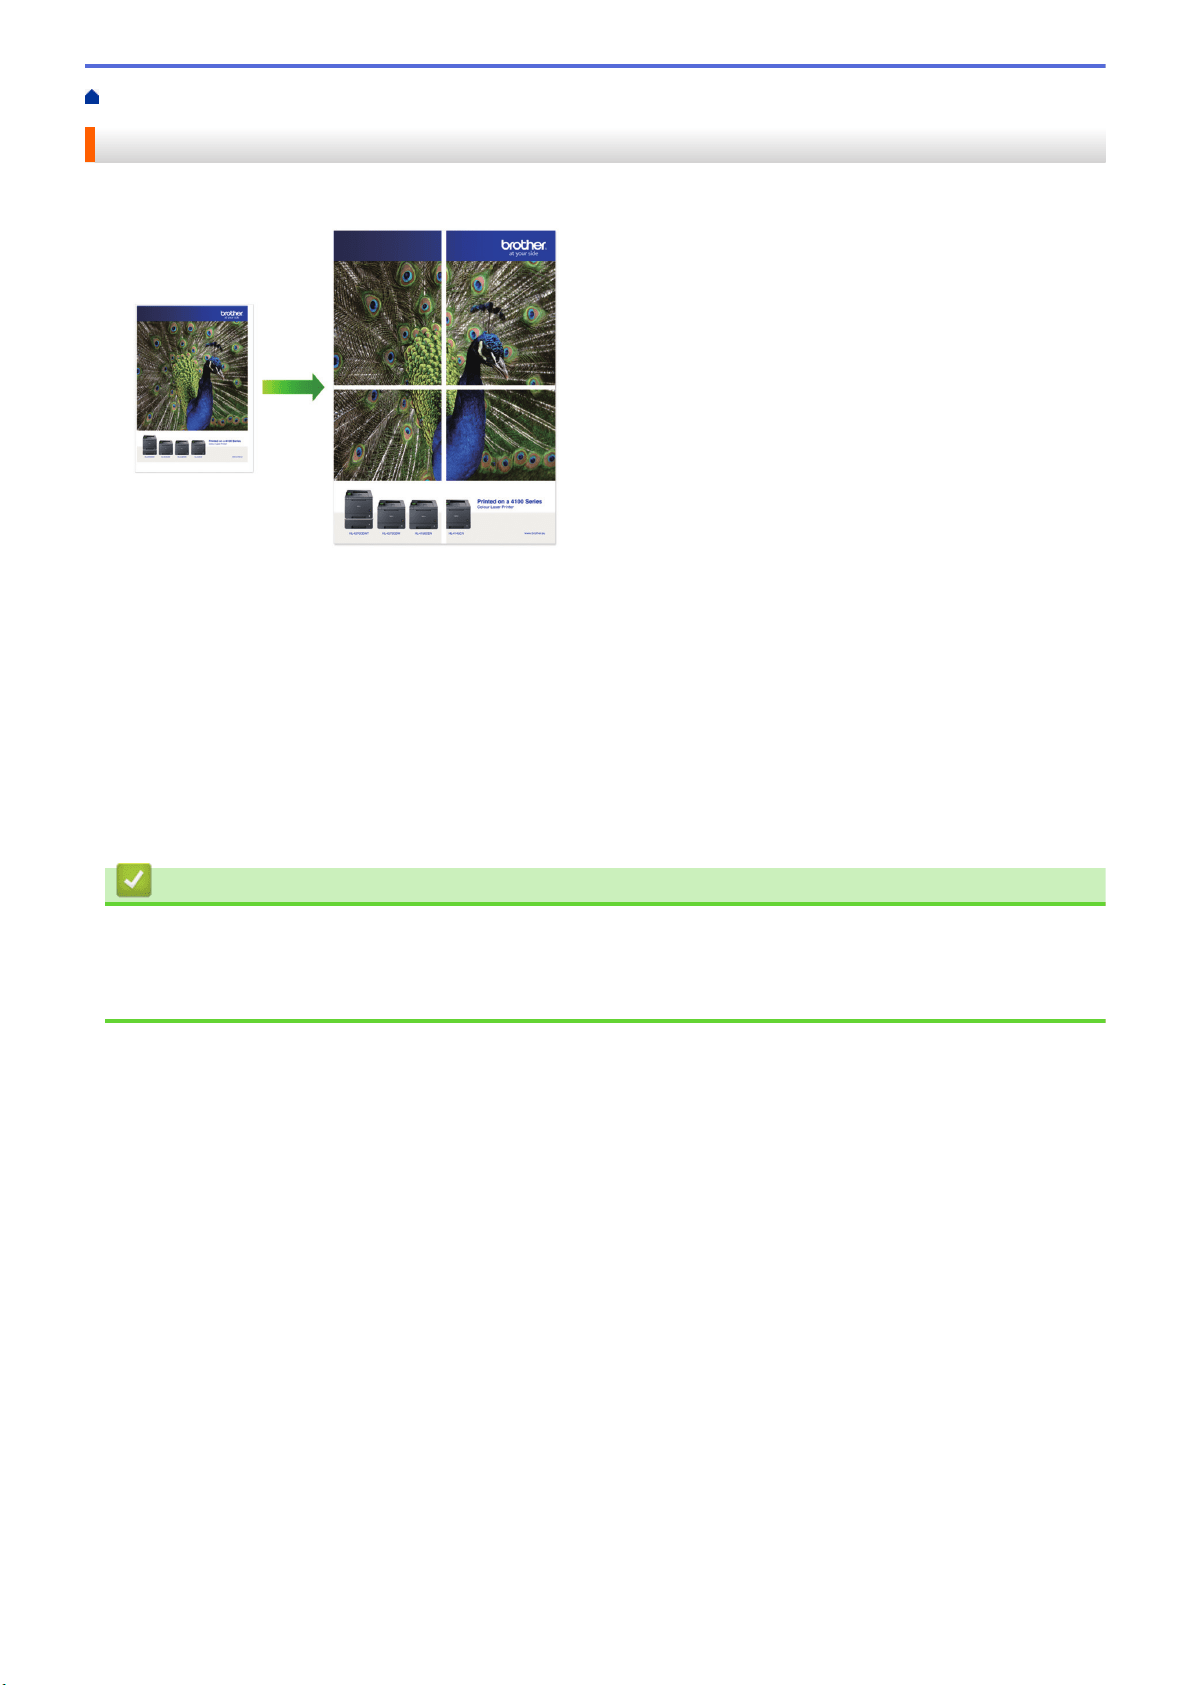
Print as a Poster (Windows)............................................................................................................... 50
Print on Both Sides of the Paper Manually (Manual 2-sided Printing) (Windows) ............................. 51
Print as a Booklet Manually (Windows).............................................................................................. 54
Print a Color Document in Grayscale (Windows) ............................................................................... 56
Prevent Smudged Printouts and Paper Jams (Windows) .................................................................. 57
Use a Preset Print Profile (Windows) ................................................................................................. 58
Change the Default Print Settings (Windows) .................................................................................... 61
Print Settings (Windows) .................................................................................................................... 62
Print from Your Computer (Mac) .................................................................................................................. 66
Print Using Brother iPrint&Scan (Windows/Mac) ......................................................................................... 67
Print Photos or Documents Using Brother iPrint&Scan (Windows/Mac)............................................ 68
Print More Than One Page on a Single Sheet of Paper Using Brother iPrint&Scan (N in 1)
(Windows/Mac)................................................................................................................................... 70
Print a Color Document in Grayscale Using Brother iPrint&Scan (Windows/Mac) ............................ 71
Print an Email Attachment............................................................................................................................ 72
Scan...................................................................................................................................................... 73
Home > Table of Contents
i

Scan Using the Buttons on Your Brother Machine....................................................................................... 74
Scan Using the Buttons on Your Brother Machine ............................................................................. 75
Scan to an Editable Text File Using OCR........................................................................................... 78
Save Scanned Data as an Email Attachment .................................................................................... 79
Web Services for Scanning on Your Network (Windows 7, Windows 8.1, and Windows 10) ............ 80
Scan Using Brother iPrint&Scan (Windows/Mac) ........................................................................................ 84
Scan from Your Computer (Windows).......................................................................................................... 85
Scan Using Nuance
™
PaperPort
™
14SE or Other Windows Applications......................................... 86
Scan Using Windows Fax and Scan .................................................................................................. 91
Scan from Your Computer (Mac).................................................................................................................. 94
Copy ..................................................................................................................................................... 95
Copy Overview............................................................................................................................................. 96
Copy a Document ....................................................................................................................................... 97
Copy Using Brother Mobile Connect............................................................................................................ 98
Copy an ID Card................................................................................................................................. 99
Make Page Layout Copies (N in 1 or Poster)................................................................................... 100
Copy Settings ................................................................................................................................... 102
Network .............................................................................................................................................. 104
Supported Basic Network Features ........................................................................................................... 105
Configure Network Settings ....................................................................................................................... 106
Configure Network Settings Using the Control Panel....................................................................... 107
Wireless Network Settings ......................................................................................................................... 108
Use the Wireless Network ................................................................................................................ 109
Use Wireless Direct.......................................................................................................................... 116
Enable/Disable Wireless LAN .......................................................................................................... 119
Print the WLAN Report..................................................................................................................... 120
Network Features....................................................................................................................................... 123
Print the Network Configuration Report............................................................................................ 124
Reset the Network Settings to Factory Settings............................................................................... 125
Brother Management Tools........................................................................................................................ 126
Security .............................................................................................................................................. 127
Before Using Network Security Features ................................................................................................... 128
Configure Certificates for Device Security ................................................................................................. 129
Supported Security Certificate Features .......................................................................................... 130
Step by Step Guide for Creating and Installing a Certificate ............................................................ 131
Create a Self-signed Certificate ....................................................................................................... 132
Create CSR and Install a Certificate from a Certificate Authority (CA) ............................................ 133
Import and Export the Certificate and Private Key ........................................................................... 137
Manage Multiple Certificates ............................................................................................................ 140
Use SSL/TLS ............................................................................................................................................. 141
Introduction to SSL/TLS ................................................................................................................... 142
Manage Your Network Machine Securely Using SSL/TLS............................................................... 145
Print Documents Securely Using SSL/TLS ...................................................................................... 150
Mobile Connect ................................................................................................................................. 152
AirPrint ....................................................................................................................................................... 153
AirPrint Overview.............................................................................................................................. 154
Before Using AirPrint (macOS) ........................................................................................................ 155
Home > Table of Contents
ii

Print Using AirPrint ........................................................................................................................... 156
Scan Using AirPrint (macOS)........................................................................................................... 159
Mopria
™
Print Service and Mopria
™
Scan................................................................................................. 160
Brother Mobile Connect ............................................................................................................................. 161
Brother iPrint&Scan for Windows and Mac ................................................................................... 162
Brother iPrint&Scan Overview for Windows and Mac ................................................................................ 163
Troubleshooting ................................................................................................................................ 164
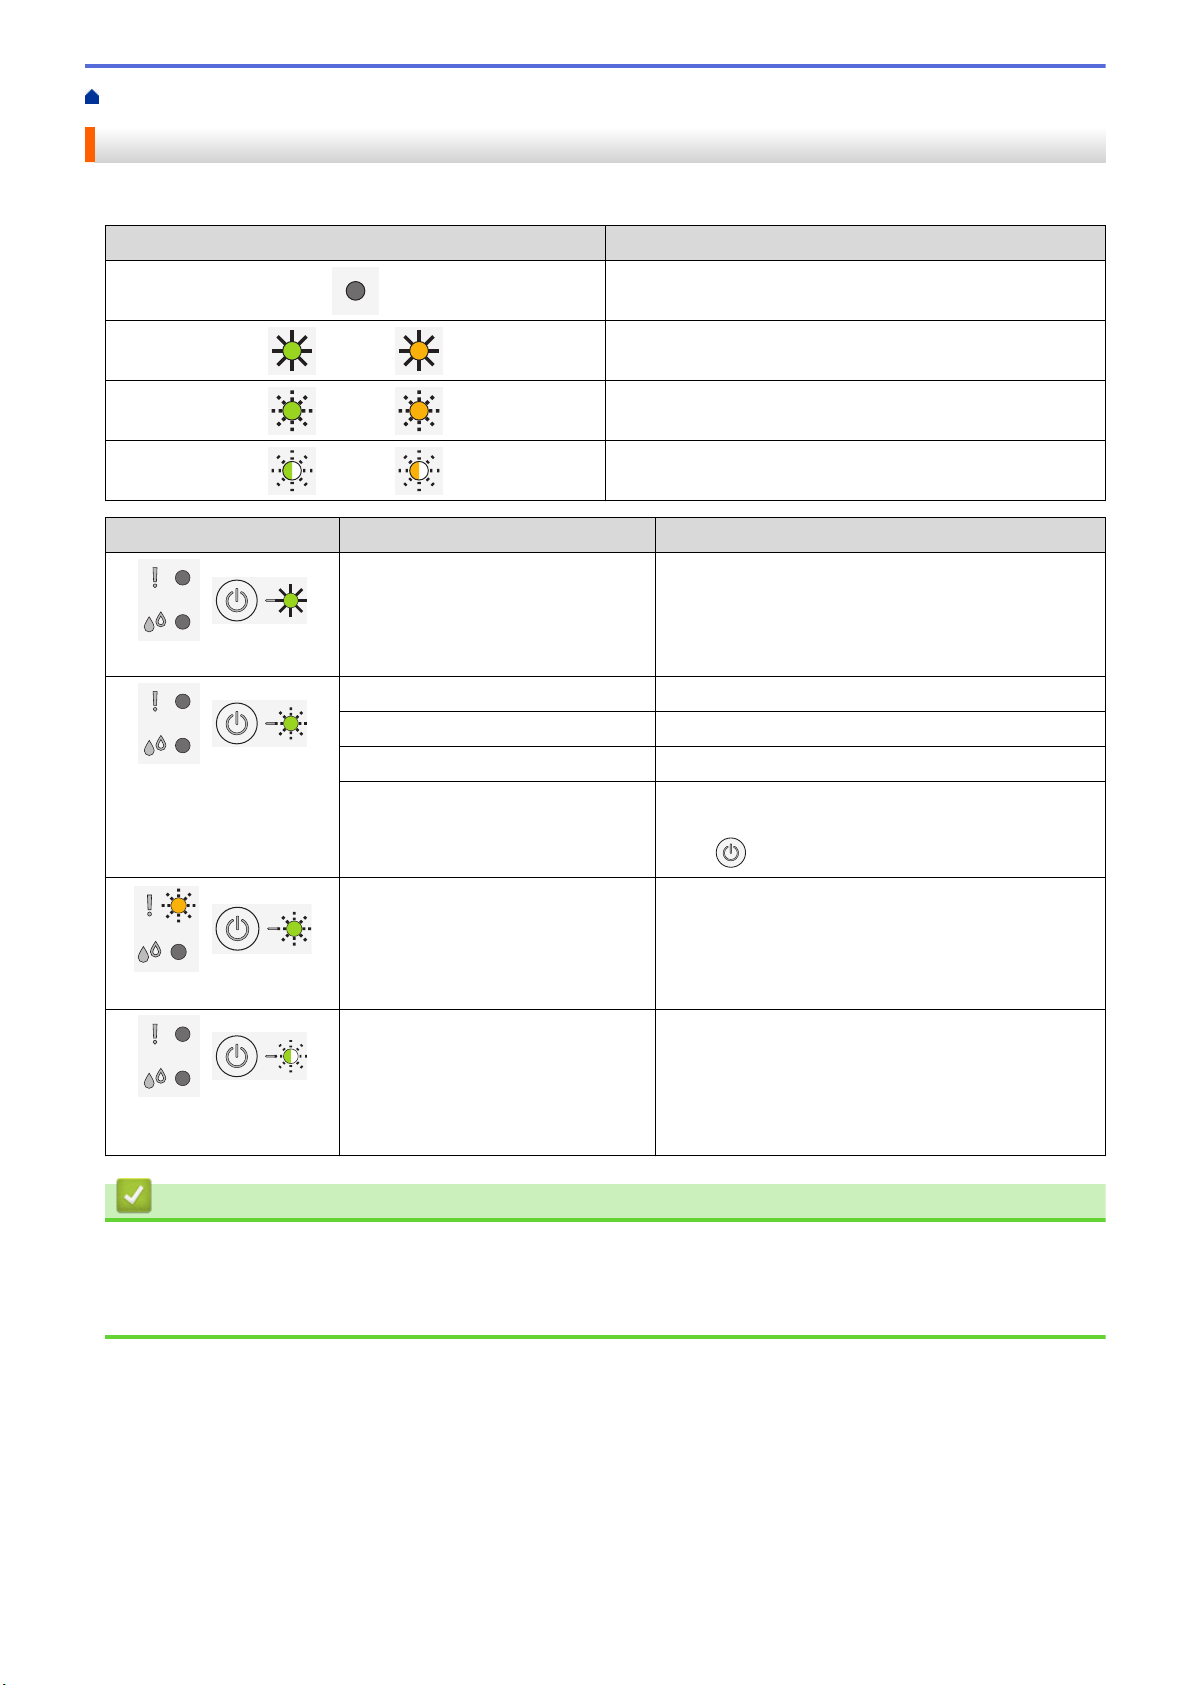
Error and Maintenance LED Indications .................................................................................................... 165
Printer Jam or Paper Jam .......................................................................................................................... 169
Paper is Jammed Inside the Machine .............................................................................................. 170
If You Are Having Difficulty with Your Machine .......................................................................................... 172
Paper Handling and Printing Problems ............................................................................................ 173
Other Problems ................................................................................................................................ 179
Network Problems ............................................................................................................................ 180
AirPrint Problems ............................................................................................................................. 187
Check the Machine Information ................................................................................................................. 188
Reset Your Machine................................................................................................................................... 189
Routine Maintenance ........................................................................................................................ 190
Replace the Ink Cartridges......................................................................................................................... 191
Clean Your Brother Machine ...................................................................................................................... 194
Clean the Scanner............................................................................................................................ 195
Clean the Print Head from Your Brother Machine ............................................................................ 196
Clean the Print Head Using Web Based Management .................................................................... 197
Clean the Print Head from Your Computer (Windows)..................................................................... 198
Clean the Outside of the Machine .................................................................................................... 200
Clean the Machine's Printer Platen .................................................................................................. 201
Clean the Paper Feed Rollers .......................................................................................................... 202
Clean the Base Pad ......................................................................................................................... 203
Clean the Paper Pick-up Rollers ...................................................................................................... 204
Check Your Brother Machine ..................................................................................................................... 205
Check the Print Quality..................................................................................................................... 206
Monitor Machine Status from Your Computer (Windows) ................................................................ 207
Monitor Machine Status Using Brother iPrint&Scan (Windows/Mac) ............................................... 212
Check the Print Alignment from Your Brother Machine.............................................................................. 214
Check the Print Alignment Using Web Based Management...................................................................... 215
Change the Print Options to Improve Your Print Results ........................................................................... 216
Pack and Ship Your Machine ..................................................................................................................... 217
Machine Settings............................................................................................................................... 219
Change Machine Settings Using Web Based Management ...................................................................... 220
What is Web Based Management?.................................................................................................. 221
Access Web Based Management .................................................................................................... 222
Set or Change a Login Password for Web Based Management...................................................... 224
General Settings............................................................................................................................... 225
In the Event of Power Failure (Memory Storage)....................................................................................... 231
Appendix............................................................................................................................................ 232
Specifications ............................................................................................................................................. 233
Home > Table of Contents
iii

Supply Specifications ................................................................................................................................. 237
Brother Help and Customer Support.......................................................................................................... 238
Home > Table of Contents
iv

Home > Before You Use Your Machine > Definitions of Notes
Definitions of Notes
We use the following symbols and conventions throughout this User's Guide:
WARNING
WARNING indicates a potentially hazardous situation which, if not avoided, could
result in death or serious injuries.
CAUTION
CAUTION indicates a potentially hazardous situation which, if not avoided, may
result in minor or moderate injuries.
IMPORTANT
IMPORTANT indicates a potentially hazardous situation which, if not avoided, may
result in damage to property or loss of product functionality.
NOTE
NOTE specifies the operating environment, conditions for installation, or special
conditions of use.
Tips icons indicate helpful hints and supplementary information.
Electrical Hazard icons alert you to possible electrical shock.
Bold Bold style identifies buttons on the machine's control panel or computer screen.
Italics Italicized style emphasizes an important point or refers you to a related topic.
Related Information
• Before You Use Your Machine
2

Home > Before You Use Your Machine > Notice - Disclaimer of Warranties (USA and Canada)
Notice - Disclaimer of Warranties (USA and Canada)
BROTHER’S LICENSOR(S), AND THEIR DIRECTORS, OFFICERS, EMPLOYEES OR AGENTS
(COLLECTIVELY BROTHER’S LICENSOR) MAKE NO WARRANTIES, EXPRESS OR IMPLIED, INCLUDING
WITHOUT LIMITATION THE IMPLIED WARRANTIES OF MERCHANTABILITY AND FITNESS FOR A
PARTICULAR PURPOSE, REGARDING THE SOFTWARE. BROTHER’S LICENSOR(S) DOES NOT
WARRANT, GUARANTEE OR MAKE ANY REPRESENTATIONS REGARDING THE USE OR THE RESULTS
OF THE USE OF THE SOFTWARE IN TERMS OF ITS CORRECTNESS, ACCURACY, RELIABILITY,
CURRENTNESS OR OTHERWISE. THE ENTIRE RISK AS TO THE RESULTS AND PERFORMANCE OF THE
SOFTWARE IS ASSUMED BY YOU. THE EXCLUSION OF IMPLIED WARRANTIES IS NOT PERMITTED BY
SOME STATES IN THE USA AND SOME PROVINCES IN CANADA. THE ABOVE EXCLUSION MAY NOT
APPLY TO YOU.
IN NO EVENT WILL BROTHER’S LICENSOR(S) BE LIABLE TO YOU FOR ANY CONSEQUENTIAL,
INCIDENTAL OR INDIRECT DAMAGES (INCLUDING DAMAGES FOR LOSS OF BUSINESS PROFITS,
BUSINESS INTERRUPTION, LOSS OF BUSINESS INFORMATION, AND THE LIKE) ARISING OUT OF THE
USE OR INABILITY TO USE THE SOFTWARE EVEN IF BROTHER’S LICENSOR HAS BEEN ADVISED OF
THE POSSIBILITY OF SUCH DAMAGES. BECAUSE SOME STATES IN THE USA AND SOME PROVINCES IN
CANADA DO NOT ALLOW THE EXCLUSION OR LIMITATION OF LIABILITY FOR CONSEQUENTIAL OR
INCIDENTAL DAMAGES, THE ABOVE LIMITATIONS MAY NOT APPLY TO YOU. IN ANY EVENT BROTHER’S
LICENSOR’S LIABILITY TO YOU FOR ACTUAL DAMAGES FROM ANY CAUSE WHATSOEVER, AND
REGARDLESS OF THE FORM OF THE ACTION (WHETHER IN CONTRACT, TORT (INCLUDING
NEGLIGENCE), PRODUCT LIABILITY OR OTHERWISE), WILL BE LIMITED TO $50.
Related Information
• Before You Use Your Machine
3

Home > Before You Use Your Machine > Trademarks
Trademarks
Apple, App Store, AirPrint, Mac, iPad, iPhone, iPod touch, macOS, iPadOS and Safari are trademarks of Apple
Inc., registered in the United States and other countries.
Nuance and PaperPort are trademarks or registered trademarks of Nuance Communications, Inc. or its affiliates
in the United States and/or other countries.
Wi-Fi
®
and Wi-Fi Alliance
®
are registered trademarks of Wi-Fi Alliance
®
.
WPA
™
, WPA2
™
, and Wi-Fi Protected Setup
™
are trademarks of Wi-Fi Alliance
®
.
Android, Google Play and Google Chrome are trademarks of Google LLC.
The Bluetooth
®
word mark is a registered trademark owned by Bluetooth SIG, Inc. and any use of such marks by
Brother Industries, Ltd. is under license. Other trademarks and trade names are those of their respective owners.
Mopria
™
and the Mopria
™
Logo are registered and/or unregistered trademarks and service marks of Mopria
Alliance, Inc. in the United States and other countries. Unauthorized use is strictly prohibited.
Each company whose software title is mentioned in this manual has a Software License Agreement specific to its
proprietary programs.
Any trade names and product names of companies appearing on Brother products, related documents
and any other materials are all trademarks or registered trademarks of those respective companies.
Related Information
• Before You Use Your Machine
4

Home > Before You Use Your Machine > Open Source Licensing Remarks
Open Source Licensing Remarks
This product includes open-source software.
To view Open Source Licensing Remarks and Copyright Information, go to your model's Manuals page at
support.brother.com/manuals.
Related Information
• Before You Use Your Machine
5

Home > Before You Use Your Machine > Copyright and License
Copyright and License
©2021 Brother Industries, Ltd. All rights reserved.
This product includes software developed by the following vendors:
This product includes the “KASAGO TCP/IP” software developed by ZUKEN ELMIC, Inc.
Related Information
• Before You Use Your Machine
6

Home > Before You Use Your Machine > Important Notes
Important Notes
• Check support.brother.com for Brother driver and software updates.
• To keep your machine performance up to date, check support.brother.com for the latest firmware upgrade.
Otherwise, some of your machine's functions may not be available.
• Do not use this product outside the country of purchase as it may violate the wireless telecommunication and
power regulations of that country.
• When replacing or disposing of your machine, Brother strongly recommends resetting it to its factory settings
to remove all personal information.
• Windows 10 in this document represents Windows 10 Home, Windows 10 Pro, Windows 10 Education and
Windows 10 Enterprise.
• Windows Server 2008 in this document represents Windows Server 2008 and Windows Server 2008 R2.
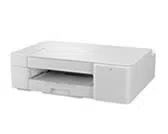
• In this User's Guide, the illustrations of the MFC-J1205W are used unless otherwise specified.
• The screens in this User's Guide are for illustration purposes only and may differ from the actual screens.
• Unless otherwise specified, the screens in this manual are from Windows 10 and macOS v10.15.x. Screens
on your computer may vary depending on your operating system.
• The contents of this guide and the specifications of this product are subject to change without notice.
• In this document XXX-XXXX represents your machine's model name.
Related Information
• Before You Use Your Machine
Related Topics:
• Reset Your Machine
7


Home > Introduction to Your Machine > Before Using Your Machine
Before Using Your Machine
Before attempting any printing operation, confirm the following:
• Make sure you have installed the correct software and drivers for your machine.
• For USB cable users: Make sure the interface cable is physically secure.
Selecting the correct type of paper
For high quality printing, it is important to select the correct type of paper. Be sure to read the information about
acceptable paper before buying paper, and to determine the printable area depending on the settings in the
printer driver or in the application you use to print.
Firewall (Windows)
If your computer is protected by a firewall and you are unable to network print or network scan, you may need to
configure the firewall settings. If you are using the Windows Firewall and you installed the drivers using the steps
in the installer, the necessary firewall settings have been already set. If you are using any other personal firewall
software, see the User's Guide for your software or contact the software manufacturer.
Related Information
• Introduction to Your Machine
9
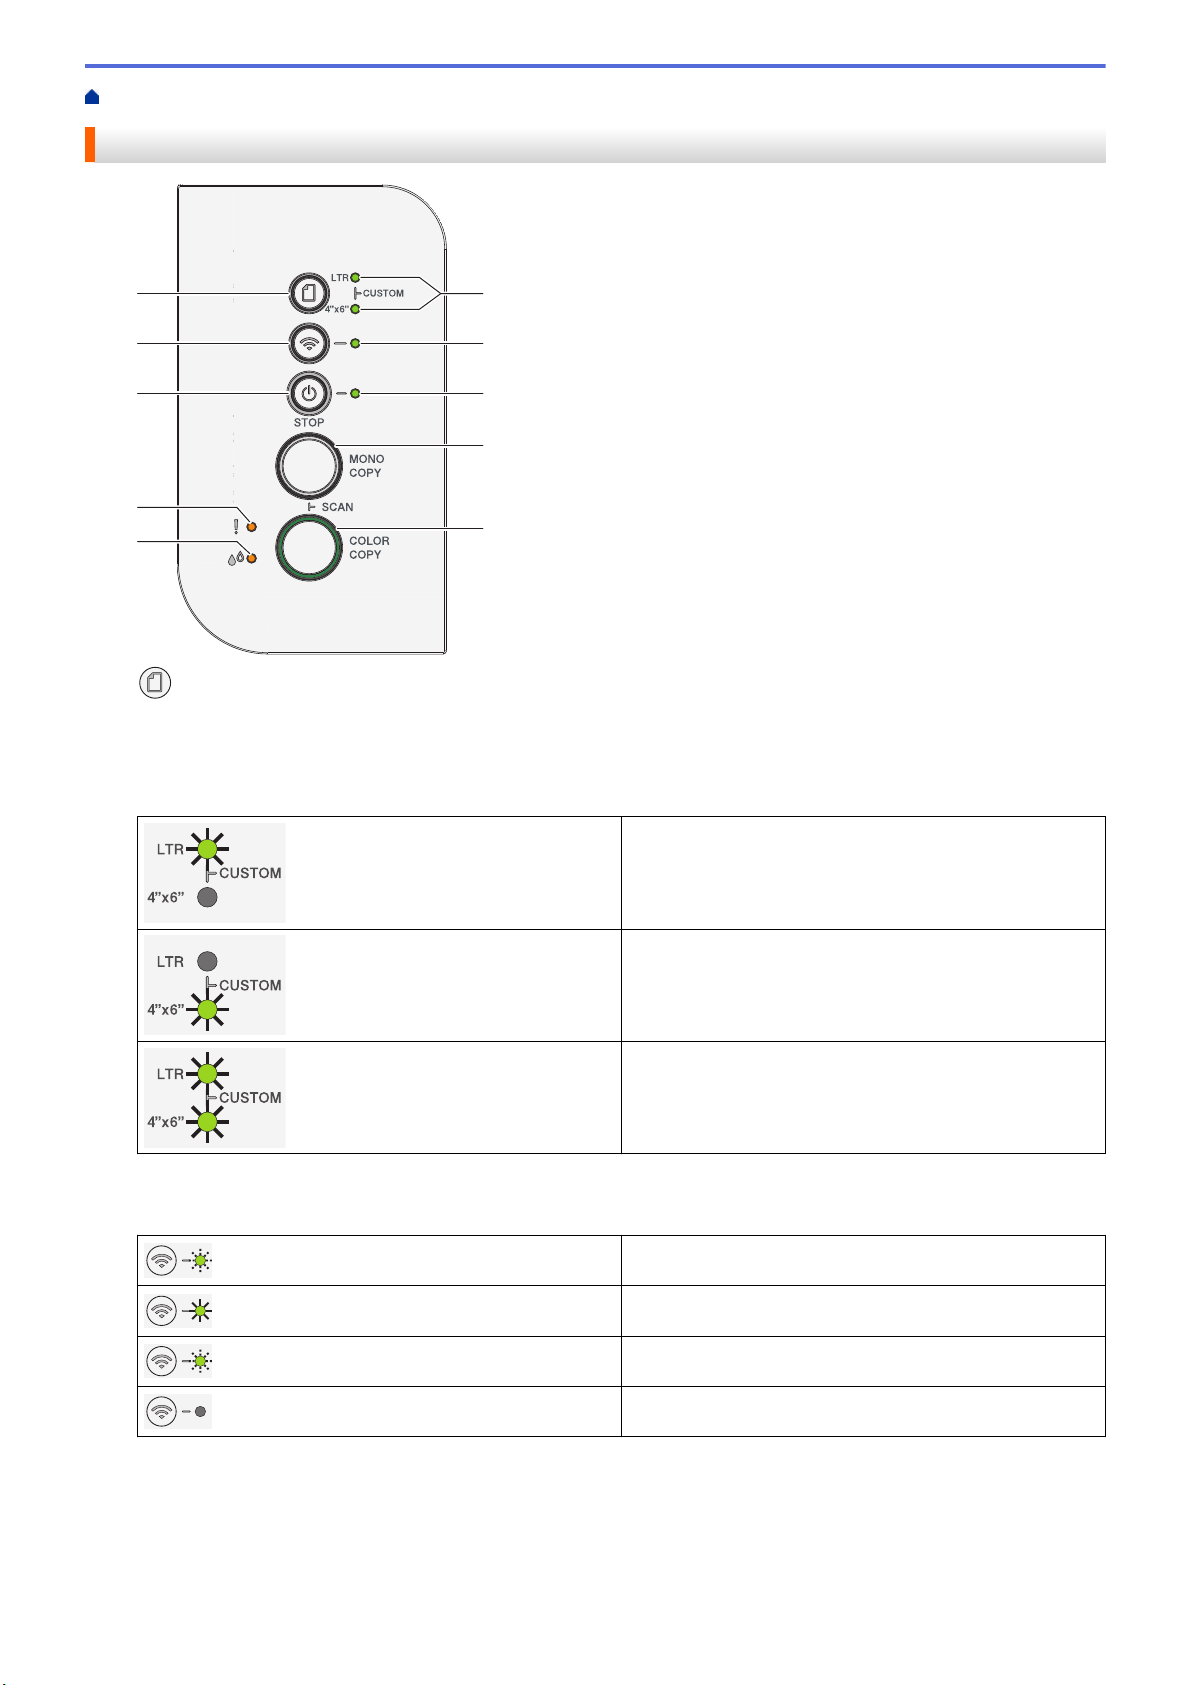
Home > Introduction to Your Machine > Control Panel Overview
Control Panel Overview
4
10
9
1
7
8
2
3
6
5
1.
(Paper)
Press this button to set the Paper Size and Paper Type settings.
2. LTR LED/4" x 6" LED
Indicates the Paper Size and Paper Type setting selected.
• Paper type: Plain
• Paper size: Letter
(For printing standard documents)
• Paper type: Other glossy
• Paper size: 4” x 6”
(For printing photos)
Custom Settings
3. Wi-Fi LED
Indicates the wireless network status.
Connecting (Blinking)
Connected (Lit)
Disconnected (Blinking slowly)
Off
4. Power LED
Indicates the machine's status.
5. MONO COPY
• Press to start making copies in black and white.
10

• Press simultaneously with COLOR COPY to start scanning documents (in color or black and white,
depending on the scan setting).
• Press simultaneously with (STOP) to access the Reset Mode.
6. COLOR COPY
Press to start making copies in full color.
7. Ink LED
Indicates when the machine detects an ink error or is in Maintenance Mode.
8. Warning LED
Indicates when the machine detects an error or is in Reset Mode.
9.
(STOP) Power On/Off
• Press to stop an operation.
• Press to exit from a selected mode.
• Press
(STOP) to turn on the machine.
Press and hold down (STOP) to turn off the machine and cancel all of the remaining operations. The
Power LED blinks and stays on for a few seconds before turning itself off.
If you turn off the machine using
(STOP), it will still clean the print head periodically to maintain print
quality. To prolong print head life, provide better ink efficiency, and maintain print quality, keep your
machine connected to a power source at all times.
10. (Wi-Fi)
• Press the button by itself or simultaneously with another button to configure the wireless settings or print
network reports. Use only when the machine is idle.
• Press this button and COLOR COPY simultaneously to restart the Wi-Fi if you cannot connect to your
wireless network.
• Press simultaneously with
(STOP) to access the Wi-Fi Mode.
Related Information
• Introduction to Your Machine
11
Home > Introduction to Your Machine > LED Patterns and Indications
LED Patterns and Indications
The LEDs on your machine's control panel light up or blink to indicate machine status.
LED Description
The LED is off.
The LED is lit.
The LED is blinking.
The LED is blinking slowly and faintly.
LED Status Description
(Lit)
Standby The machine is ready to print.
(Blinking)
Busy The machine is processing a print job.
Warming Up (Low Temperature) The machine is warming up.
Cooling Down (High Temperature) The machine is cooling down.
Data Remaining There is print data in the machine's memory. To
cancel the job and clear it from machine memory,
press (STOP).
(Blinking alternately)
Job Canceled The machine is canceling the print job.
(Blinking slowly and
faintly)
Sleep In Sleep mode (Power Save mode), the machine
acts as if it is turned off, but it can still receive data.
When you send a print job, the machine wakes up.
Related Information
• Introduction to Your Machine
Related Topics:
• Error and Maintenance LED Indications
12
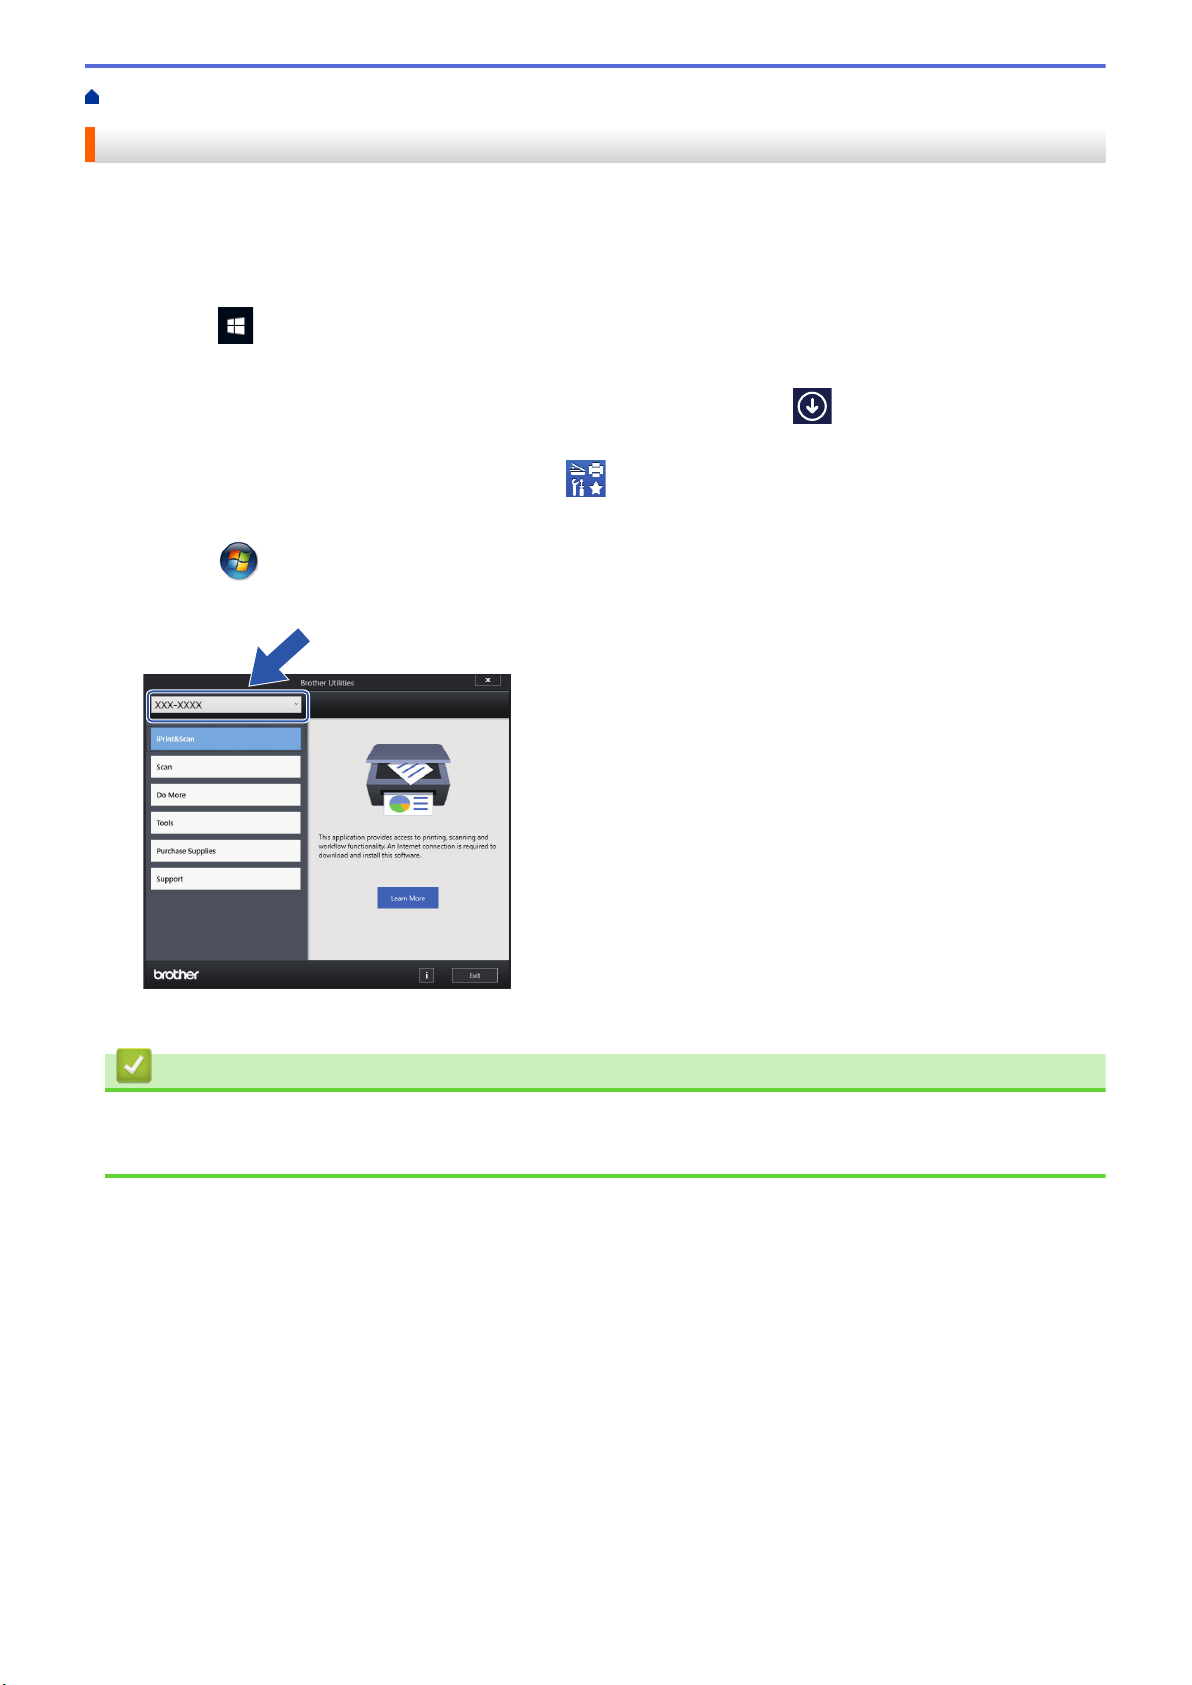
Home > Introduction to Your Machine > Access Brother Utilities (Windows)
Access Brother Utilities (Windows)
Brother Utilities is an application launcher that offers convenient access to all Brother applications installed on
your computer.
1. Do one of the following:
• Windows 10
Click
> Brother > Brother Utilities.
• Windows 8.1
Move your mouse to the lower left corner of the Start screen and click (if using a touch-based
device, swipe up from the bottom of the Start screen to bring up the Apps screen).
When the Apps screen appears, tap or click (Brother Utilities).
• Windows 7
Click
(Start) > All Programs > Brother > Brother Utilities.
2. Select your machine.
3. Select the operation you want to use.
Related Information
• Introduction to Your Machine
• Uninstall the Brother Software and Drivers (Windows)
13
Home > Introduction to Your Machine > Access Brother Utilities (Windows) > Uninstall the Brother Software
and Drivers (Windows)
Uninstall the Brother Software and Drivers (Windows)
1. Do one of the following:
• Windows 10
Click
> Brother > Brother Utilities.
• Windows 8.1
Move your mouse to the lower left corner of the Start screen and click (if using a touch-based
device, swipe up from the bottom of the Start screen to bring up the Apps screen).
When the Apps screen appears, tap or click
(Brother Utilities).
• Windows 7
Click (Start) > All Programs > Brother > Brother Utilities.
2. Click the drop-down list, and then select your model name (if not already selected). Click Tools in the left
navigation bar, and then click Uninstall.
Follow the instructions in the dialog box to uninstall the software and drivers.
Related Information
• Access Brother Utilities (Windows)
14
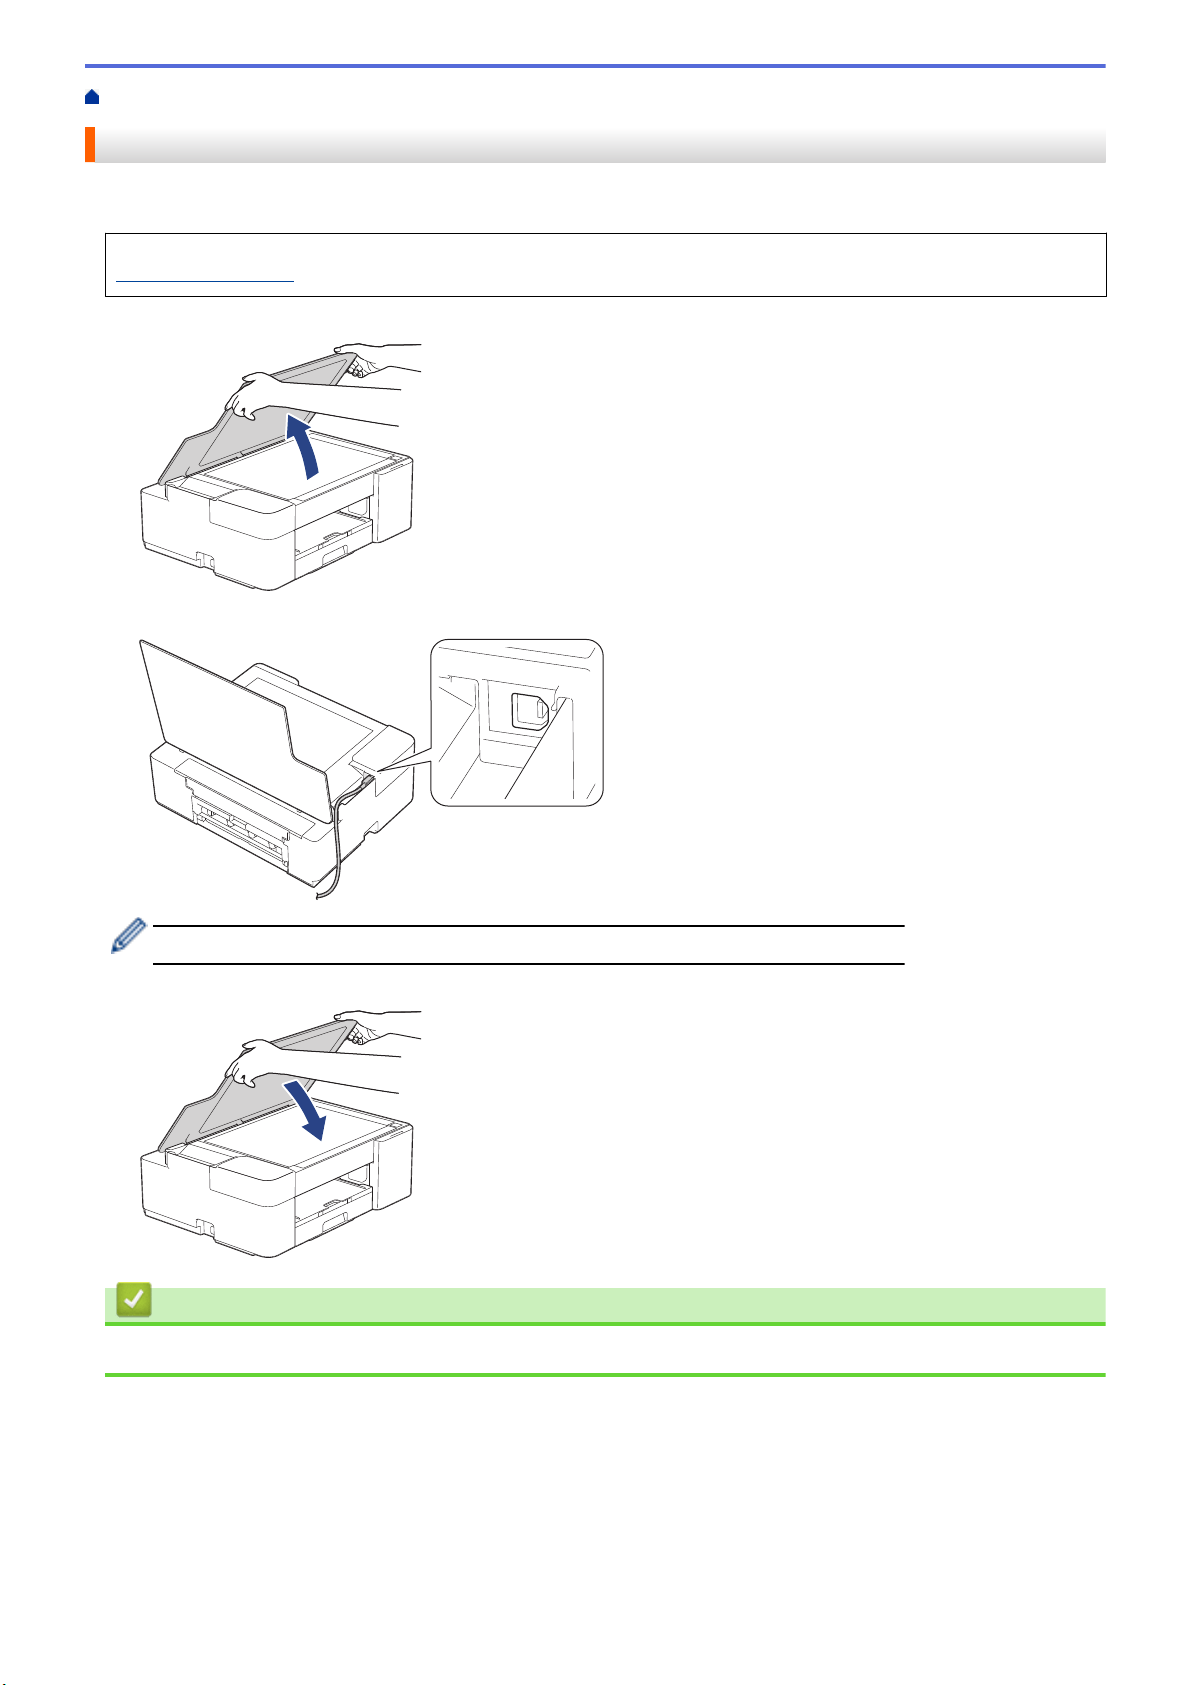
Home > Introduction to Your Machine > USB Port Location on Your Brother Machine
USB Port Location on Your Brother Machine
The USB port is located under the document cover.
To install the driver and software necessary to use your machine, go to your model's Downloads page at
support.brother.com.
1. Lift the document cover.
2. Locate the correct port under the document cover as shown.
Carefully guide the cable through the cable channel and out the back of the machine.
3. Gently close the document cover.
Related Information
• Introduction to Your Machine
15


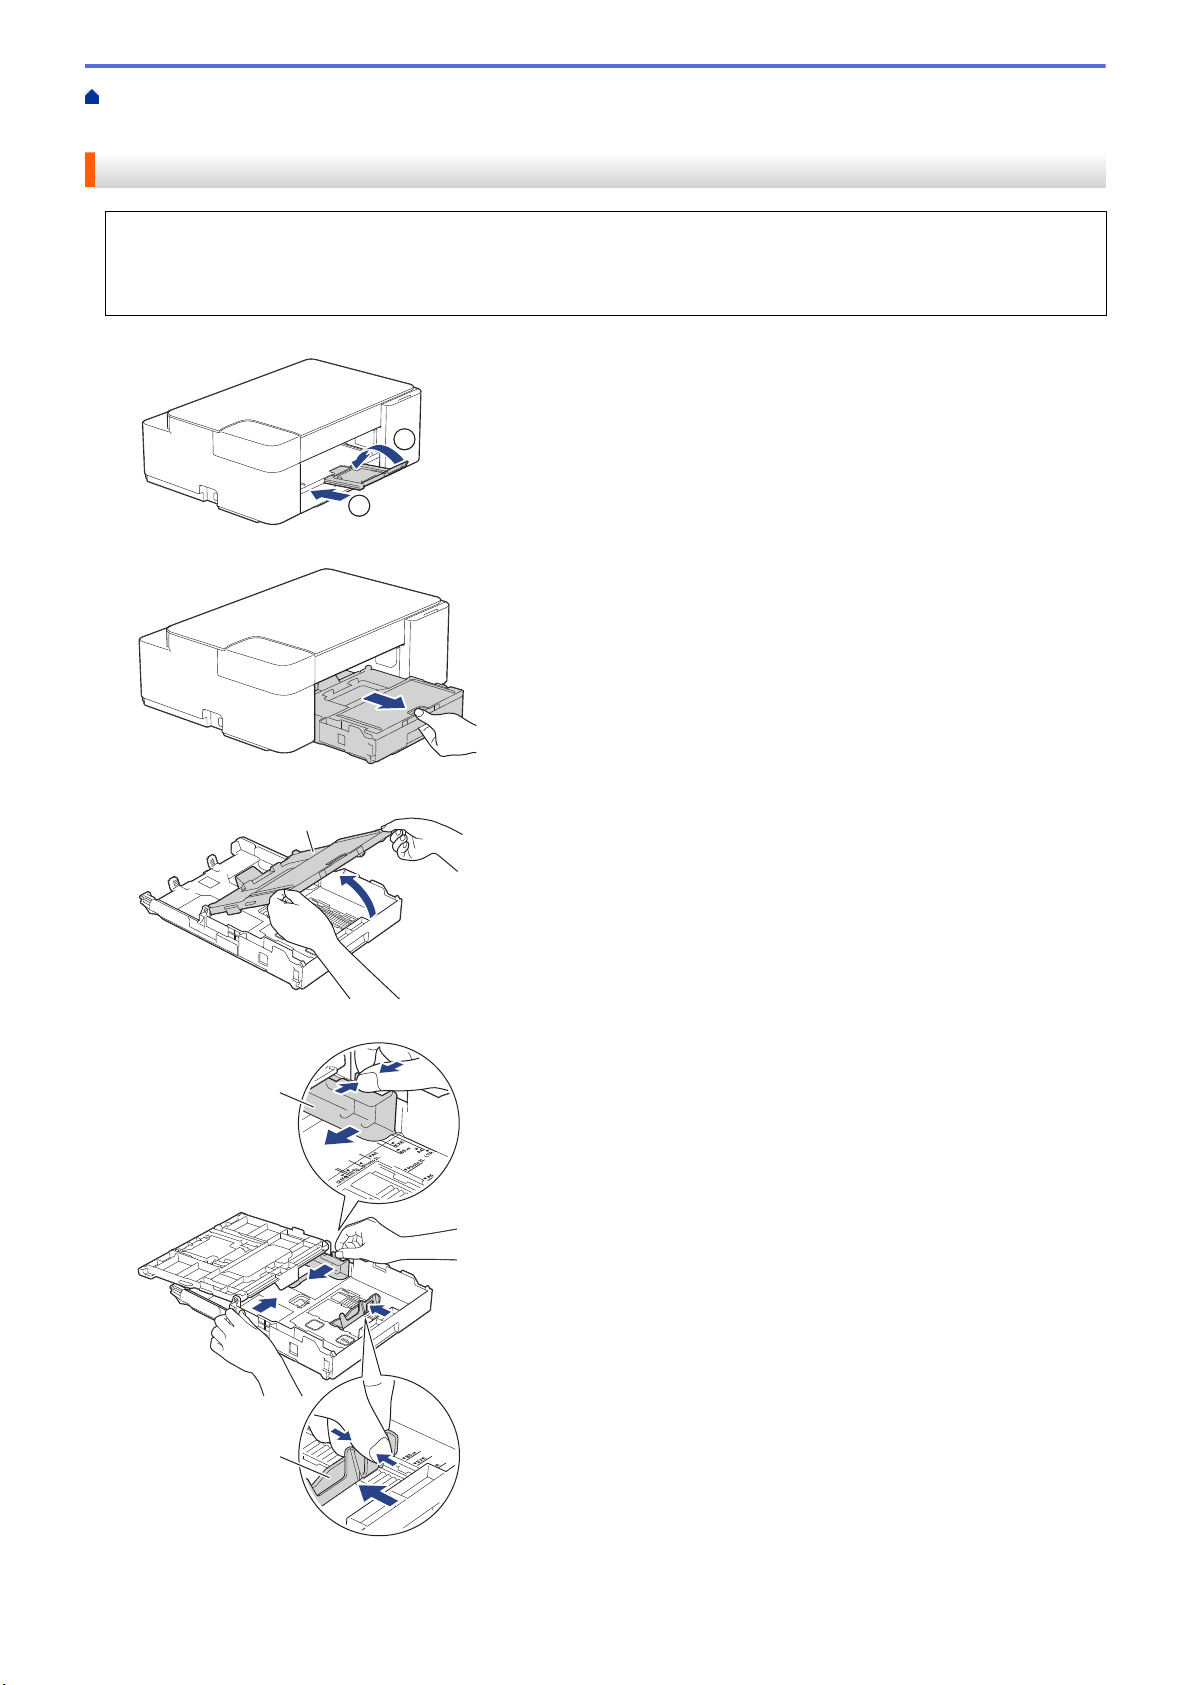
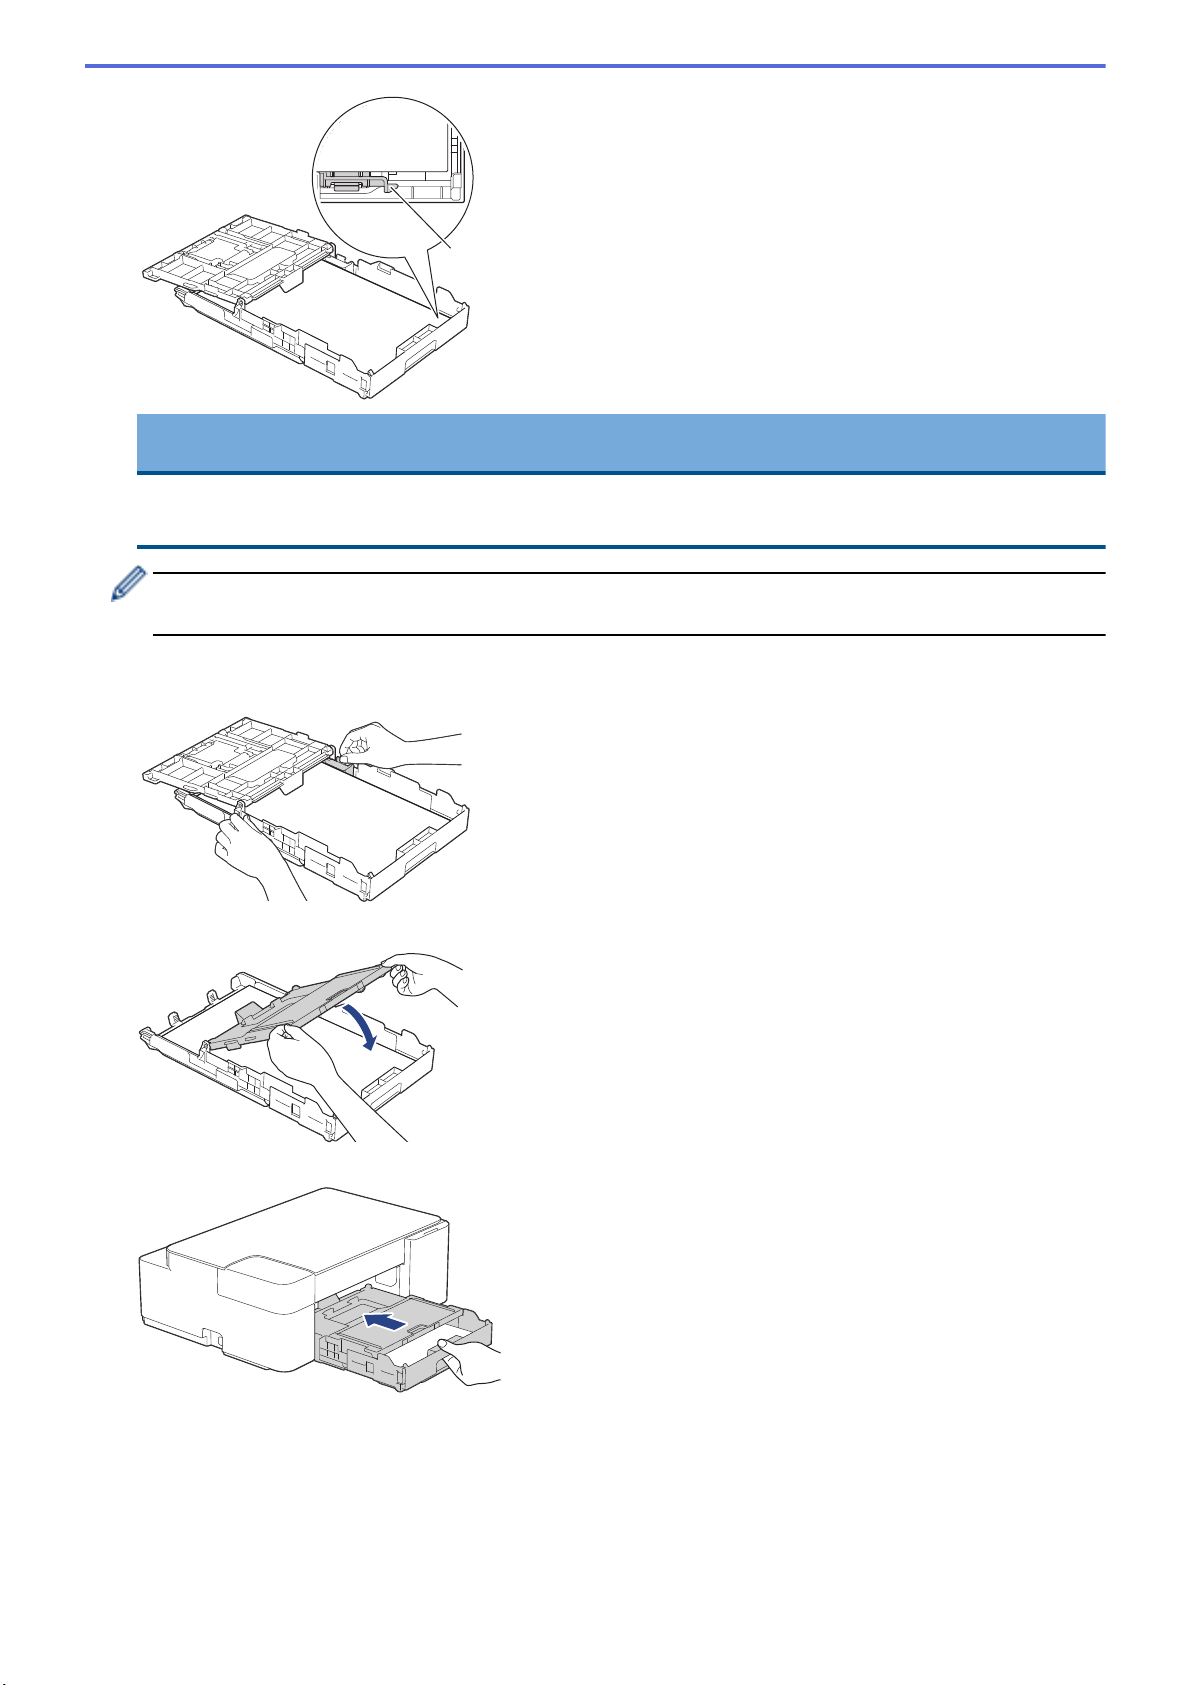
Home > Paper Handling > Load Paper > Load Paper in the Paper Tray > Load Cut-Sheet Paper or Photo
2L Paper in the Paper Tray
Load Cut-Sheet Paper or Photo 2L Paper in the Paper Tray
• Load only one size and type of paper in the paper tray at a time.
• When you load a different paper size in the tray, you must change the Paper Size setting in the machine or
the paper size setting on your computer.
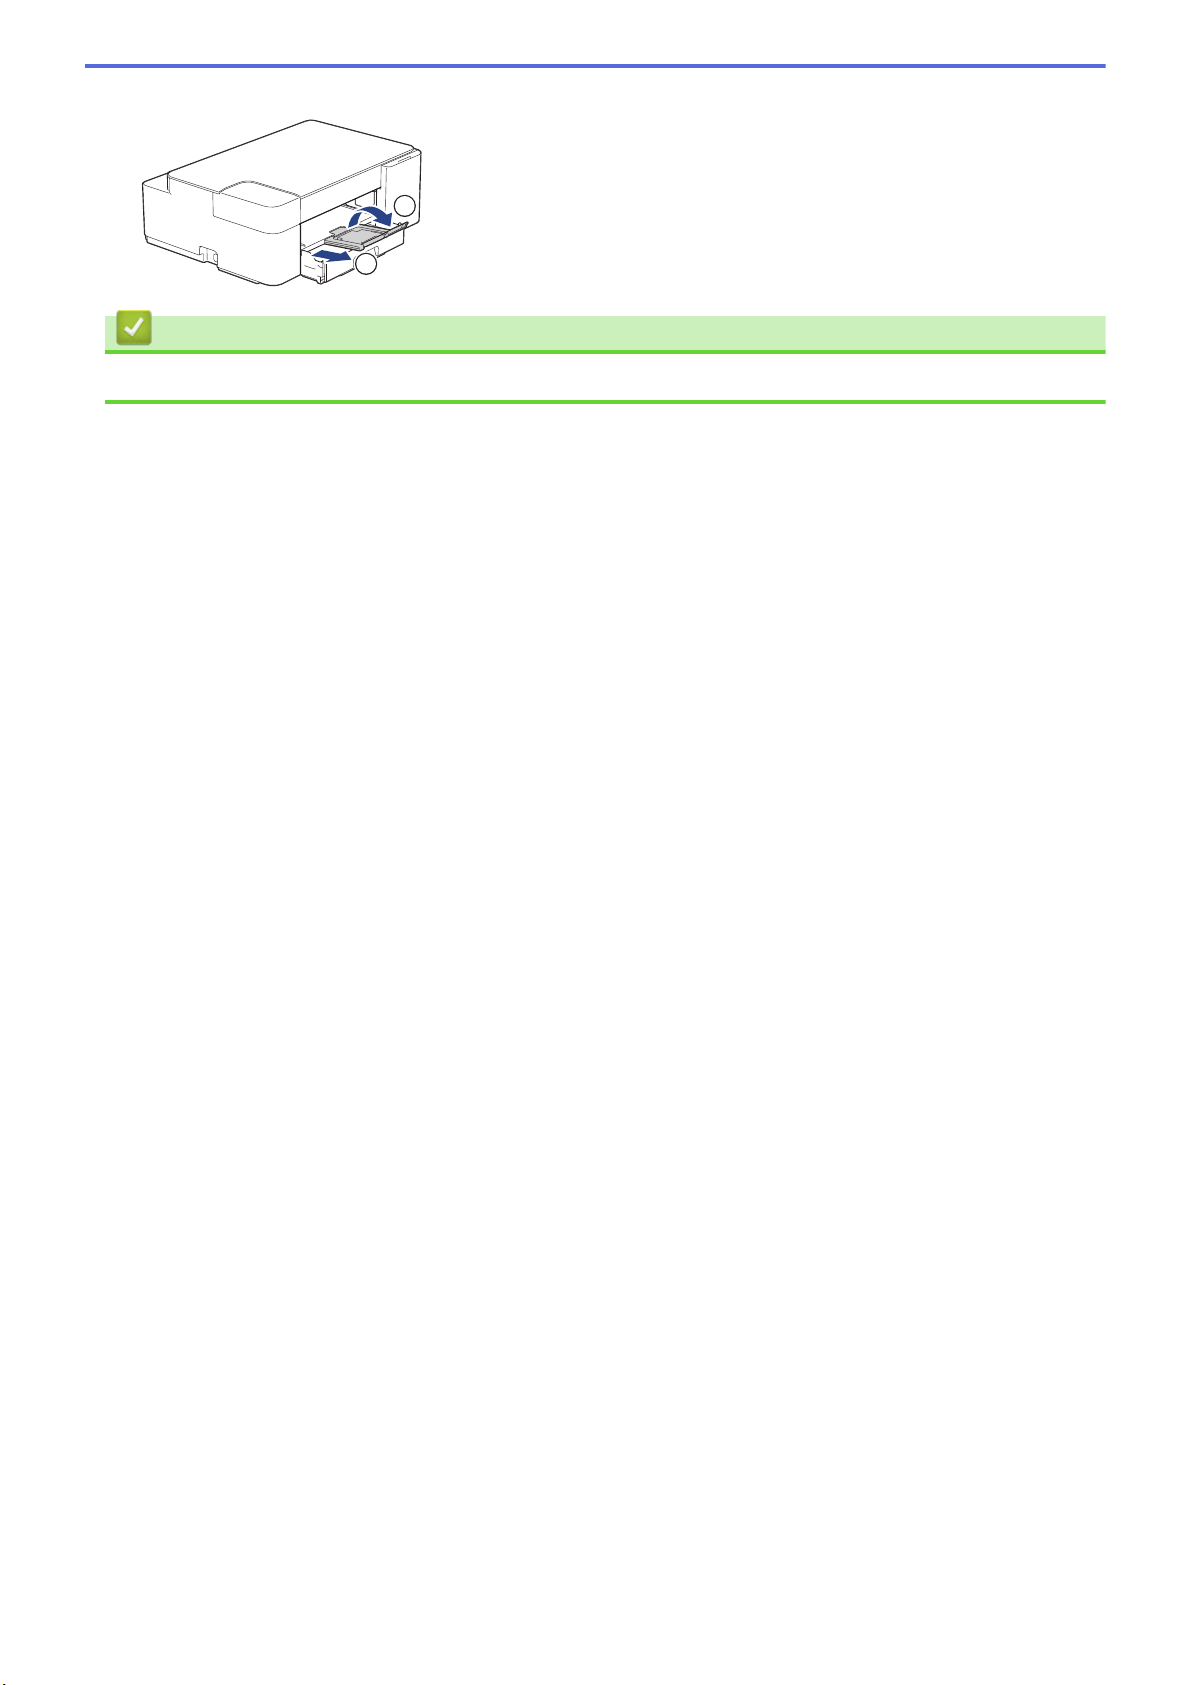
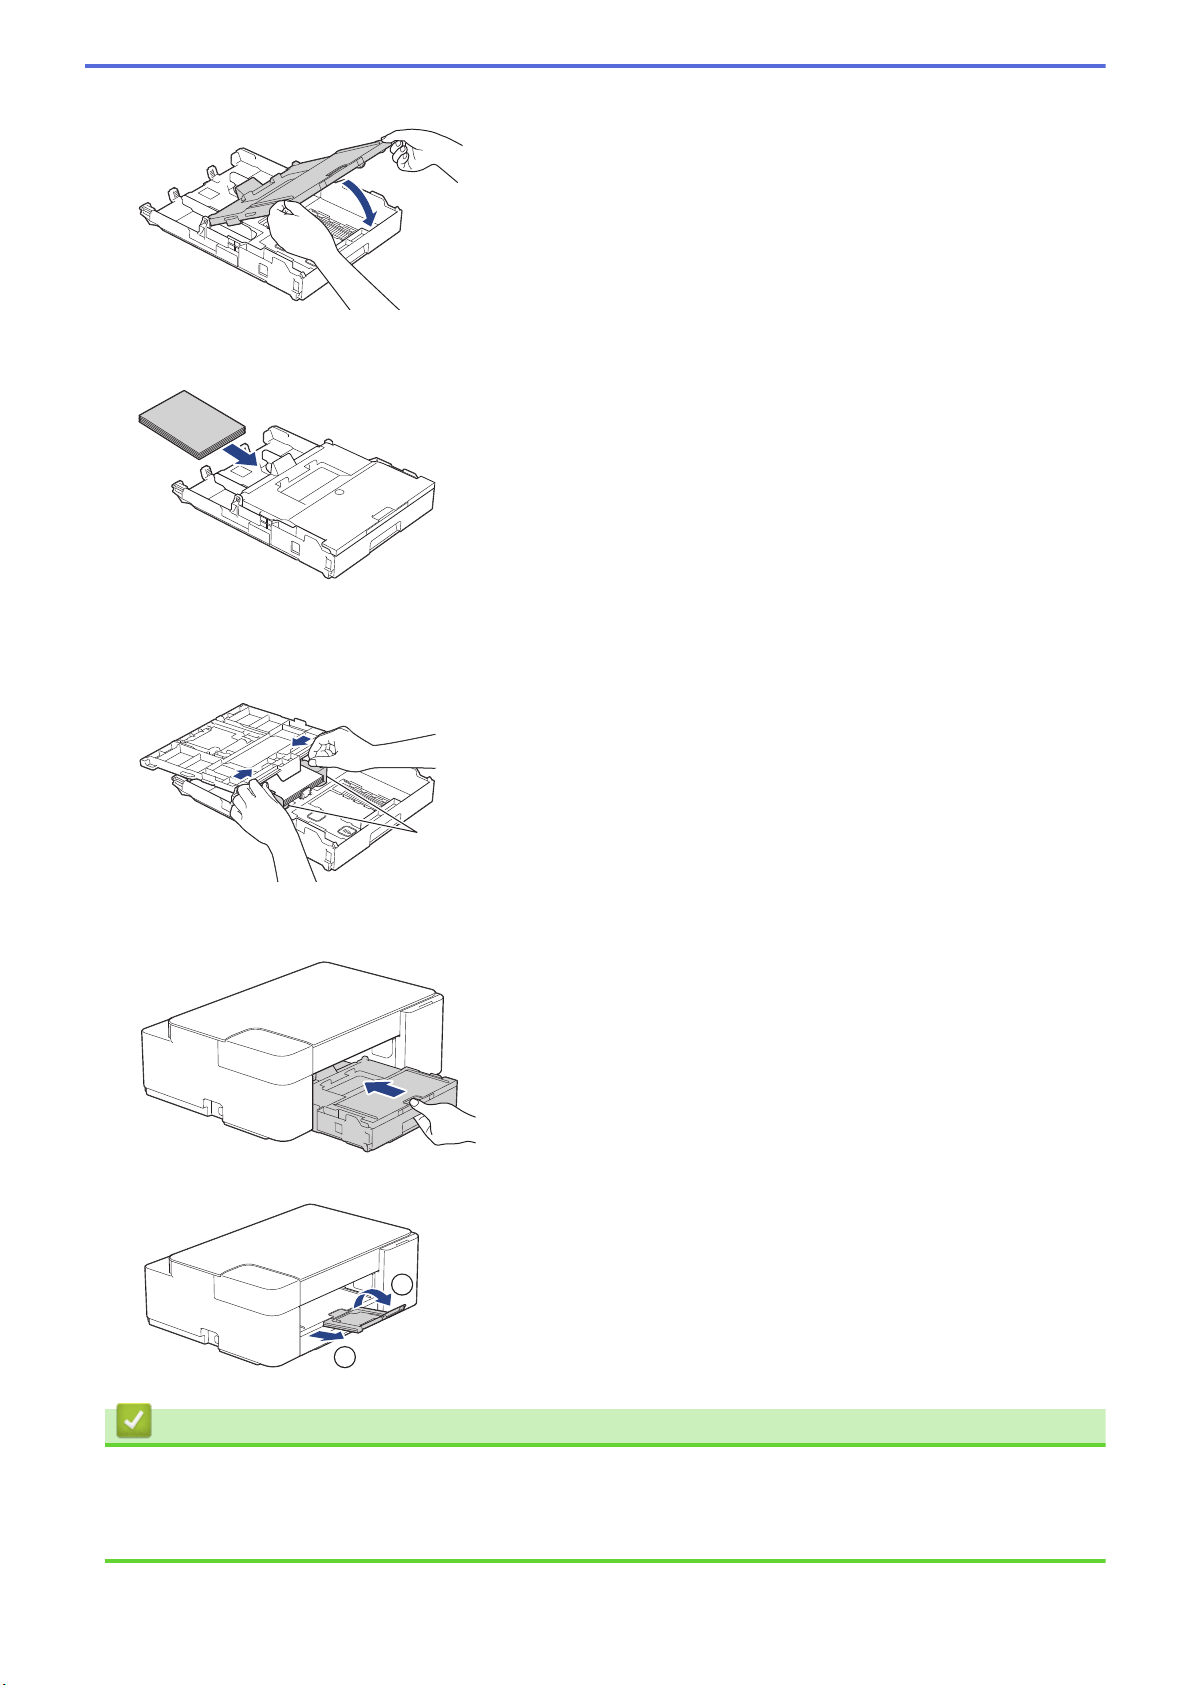
1. If the paper support flap (1) is open, close it, and then close the paper support (2).
2
1
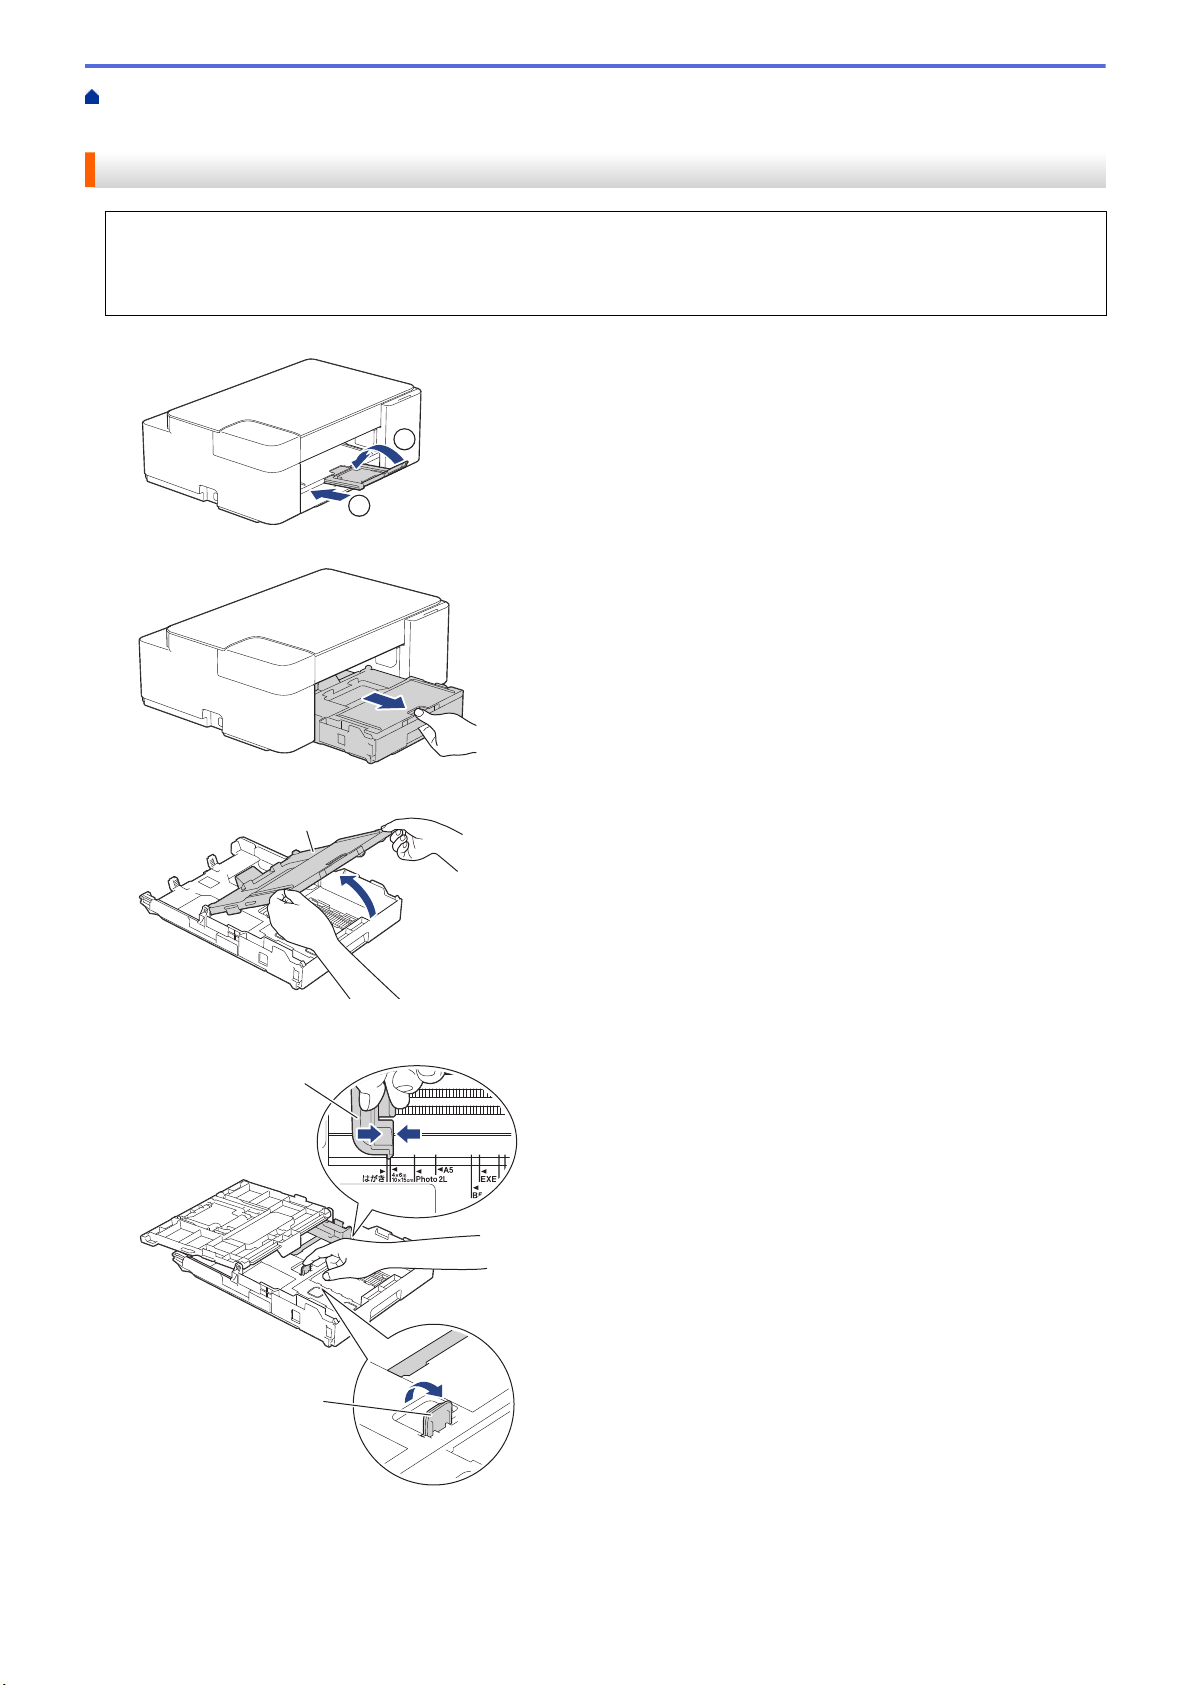
2. Pull the paper tray completely out of the machine.
3. Lift the output paper tray cover (1).
1
4. Gently press and slide the paper width guides (1) and then the paper length guide (2) to fit the paper size.
1
2
19
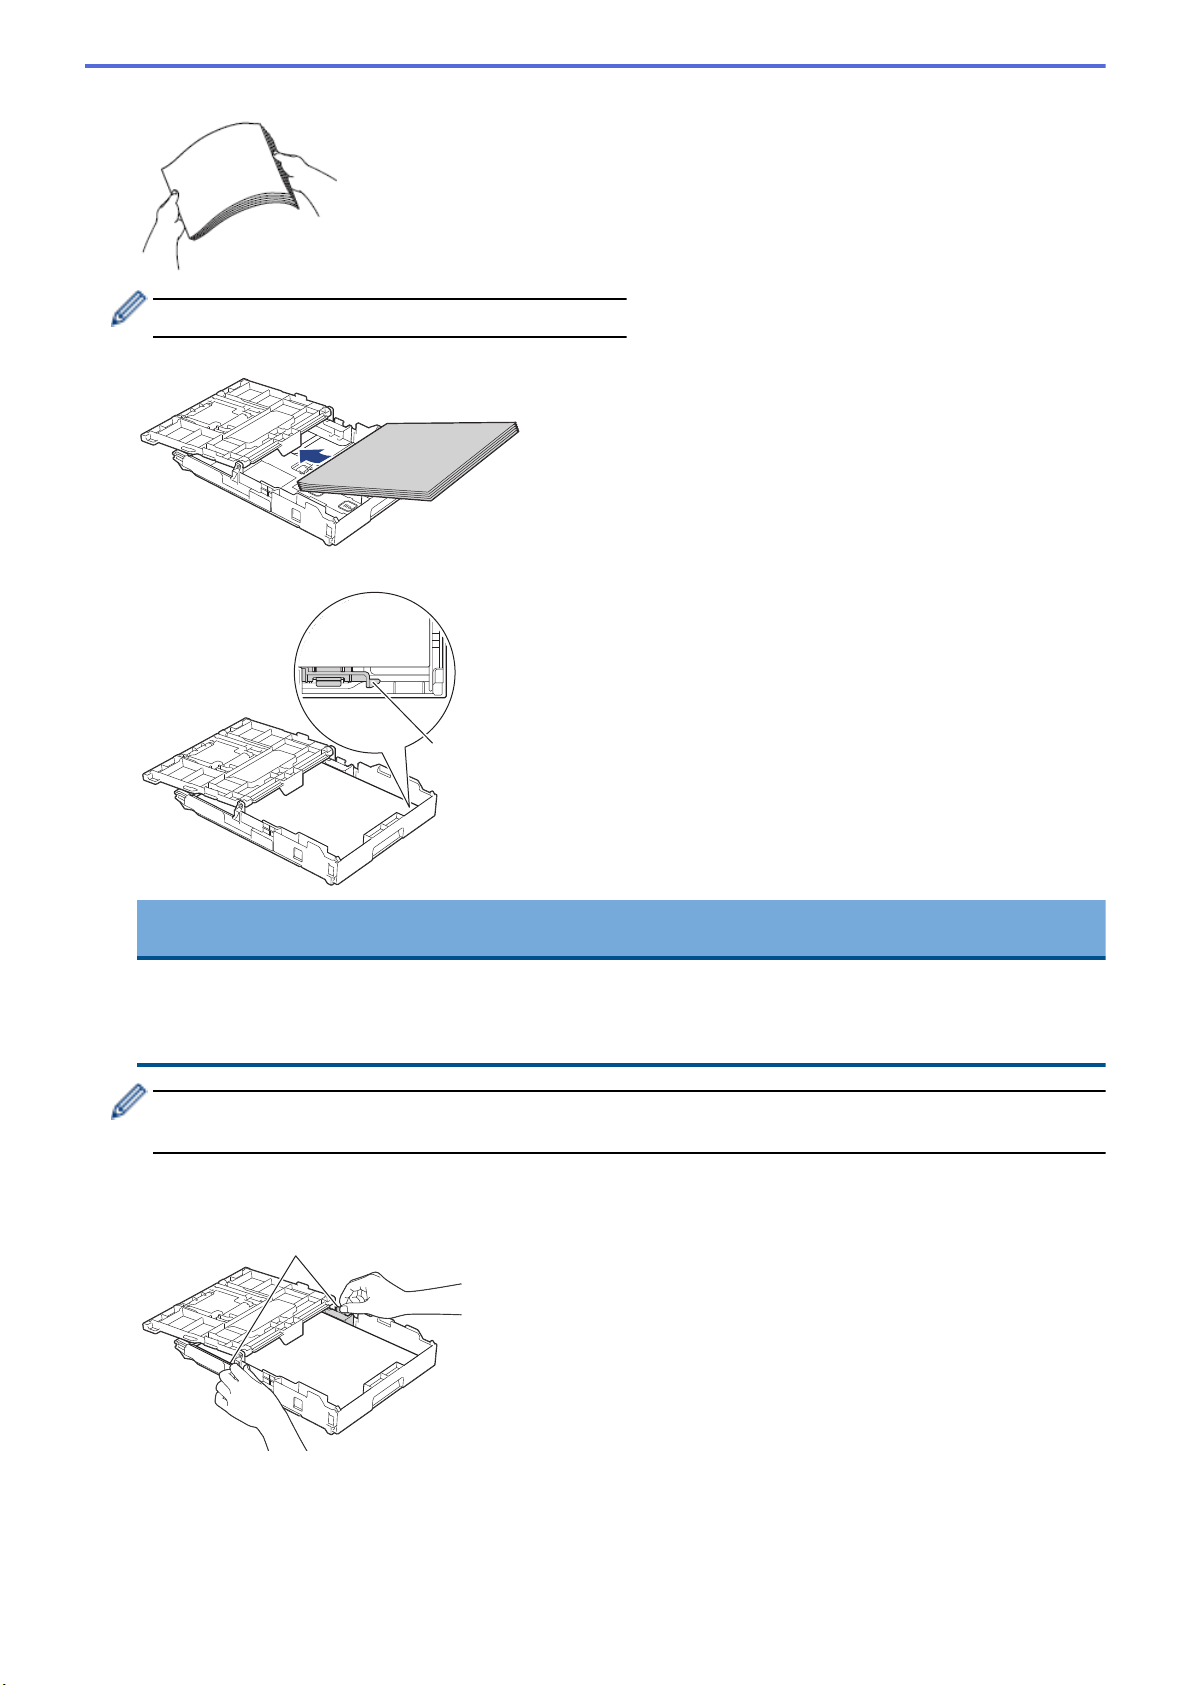
5. Fan the stack of paper well to avoid paper jams and misfeeds.
Always make sure the paper is not curled or wrinkled.
6. Gently load paper in the paper tray with the printing surface face down.
Make sure the paper is flat in the tray and the paper length guide (1) touches the edges of the paper.
1
IMPORTANT
• Be careful not to push the paper in too far; it may lift at the back of the tray and cause paper feed
problems.
• Loading more than 20 sheets of Photo 2L (5" x 7")/(13 x 18 cm) paper may cause paper jams.
To add paper before the tray is empty, remove the paper from the tray and combine it with the paper you
are adding. Always fan the stack of paper well to prevent the machine from feeding multiple pages.
7. Gently adjust the paper width guides (1) to fit the paper.
Make sure the paper width guides touch the edges of the paper.
1
20
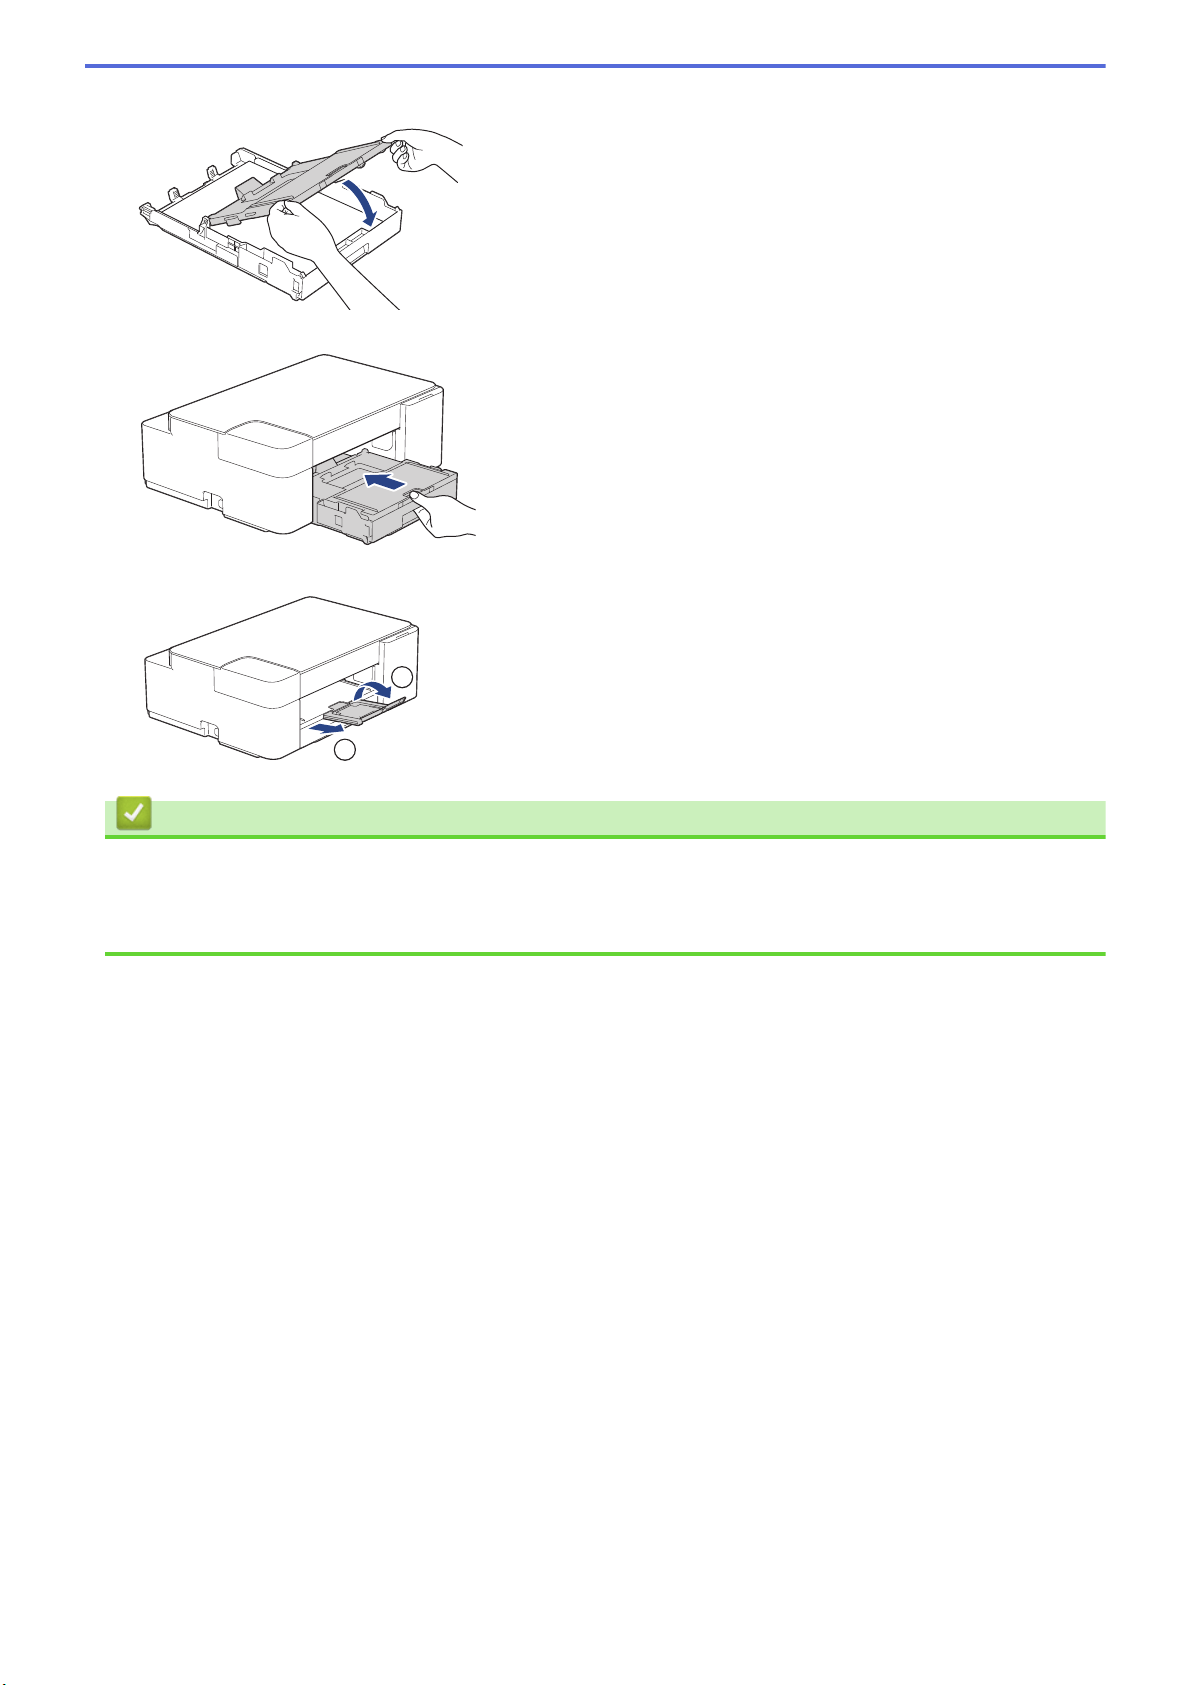
8. Close the output paper tray cover.
9. Slowly push the paper tray completely into the machine.
10. Pull out the paper support (1) until it locks into place, and then unfold the paper support flap (2).
1
2
Related Information
• Load Paper in the Paper Tray
Related Topics:
• Choose the Right Print Media
21
Home > Paper Handling > Load Paper > Load Paper in the Paper Tray > Load Legal Size Paper in the
Paper Tray
Load Legal Size Paper in the Paper Tray
• Load only one size and type of paper in the paper tray at a time.
• When you load a different paper size in the tray, you must change the Paper Size setting in the machine or
the paper size setting on your computer.
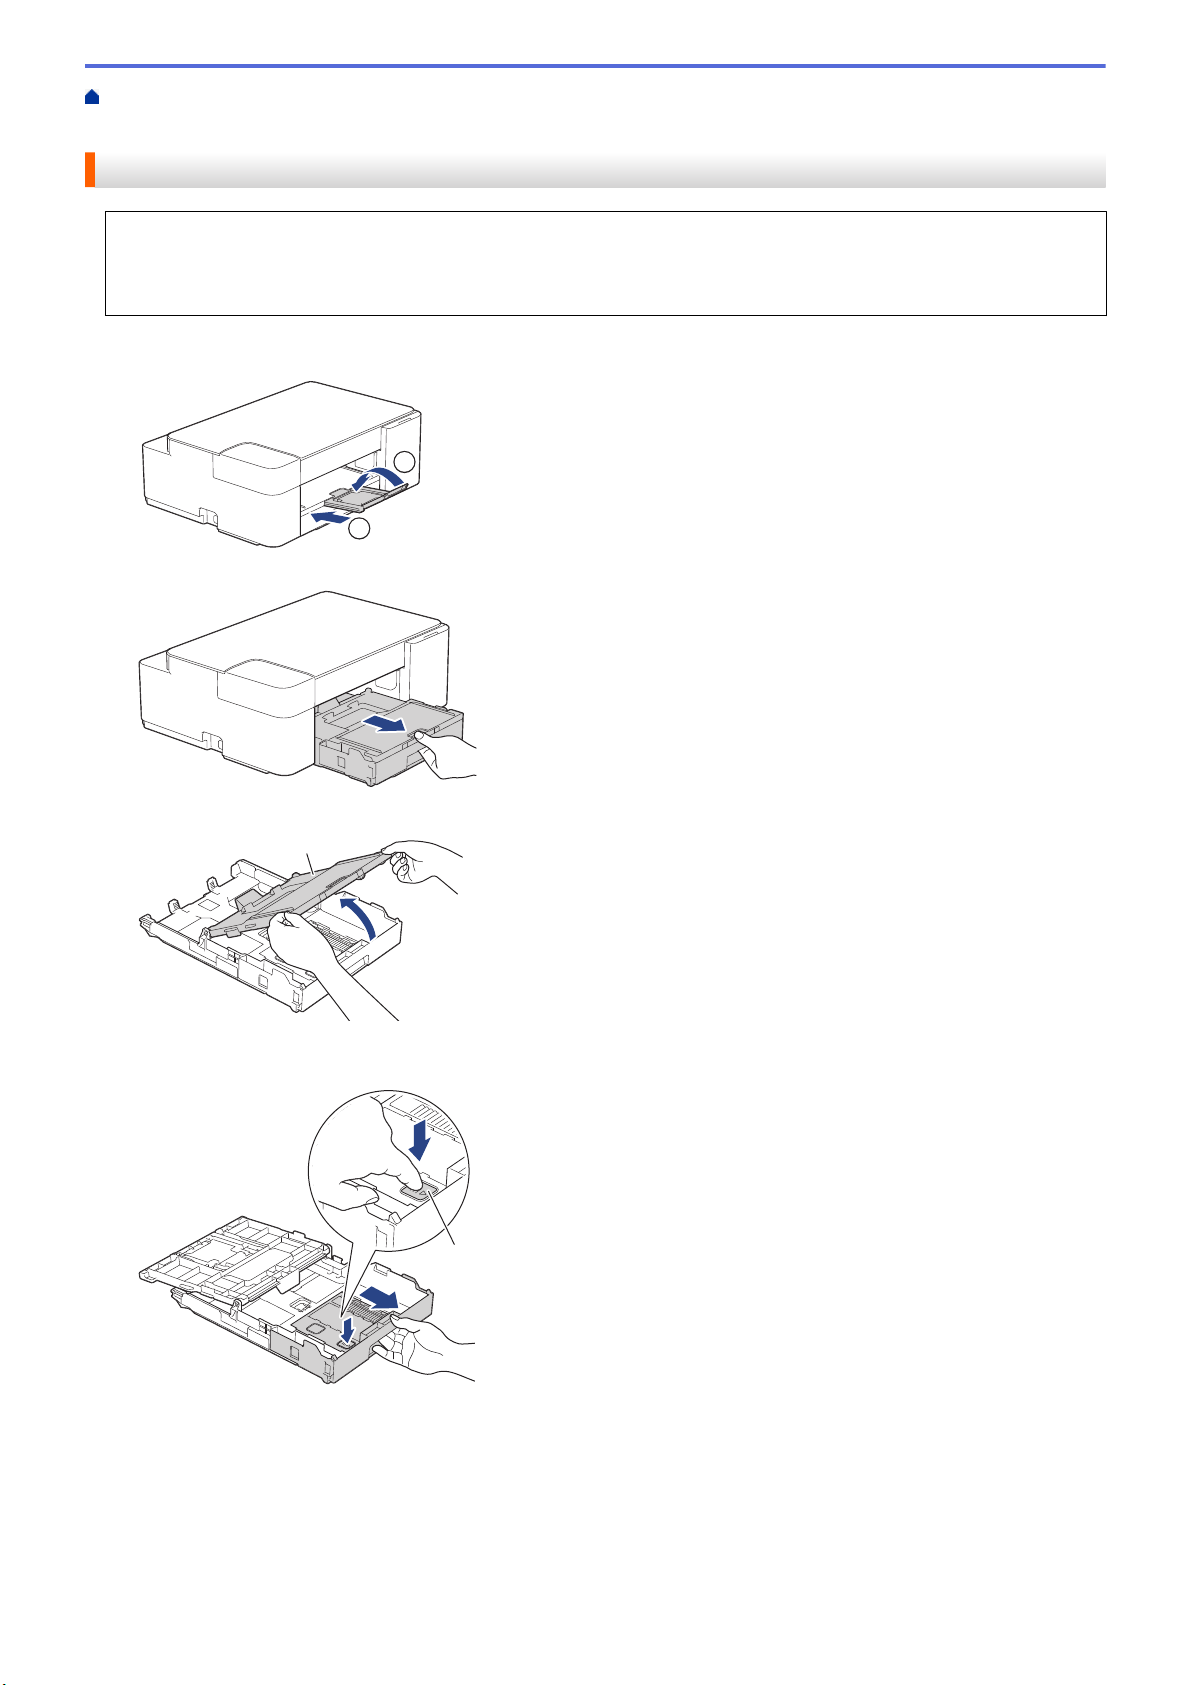
1. If the paper support flap (1) is open, close it, and then close the paper support (2).
2
1
2. Pull the paper tray completely out of the machine.
3. Lift the output paper tray cover (1).
1
4. Press the square paper tray expansion button (1) and slide out the paper tray until the square paper tray
expansion button locks into the square LGL hole.
1
22
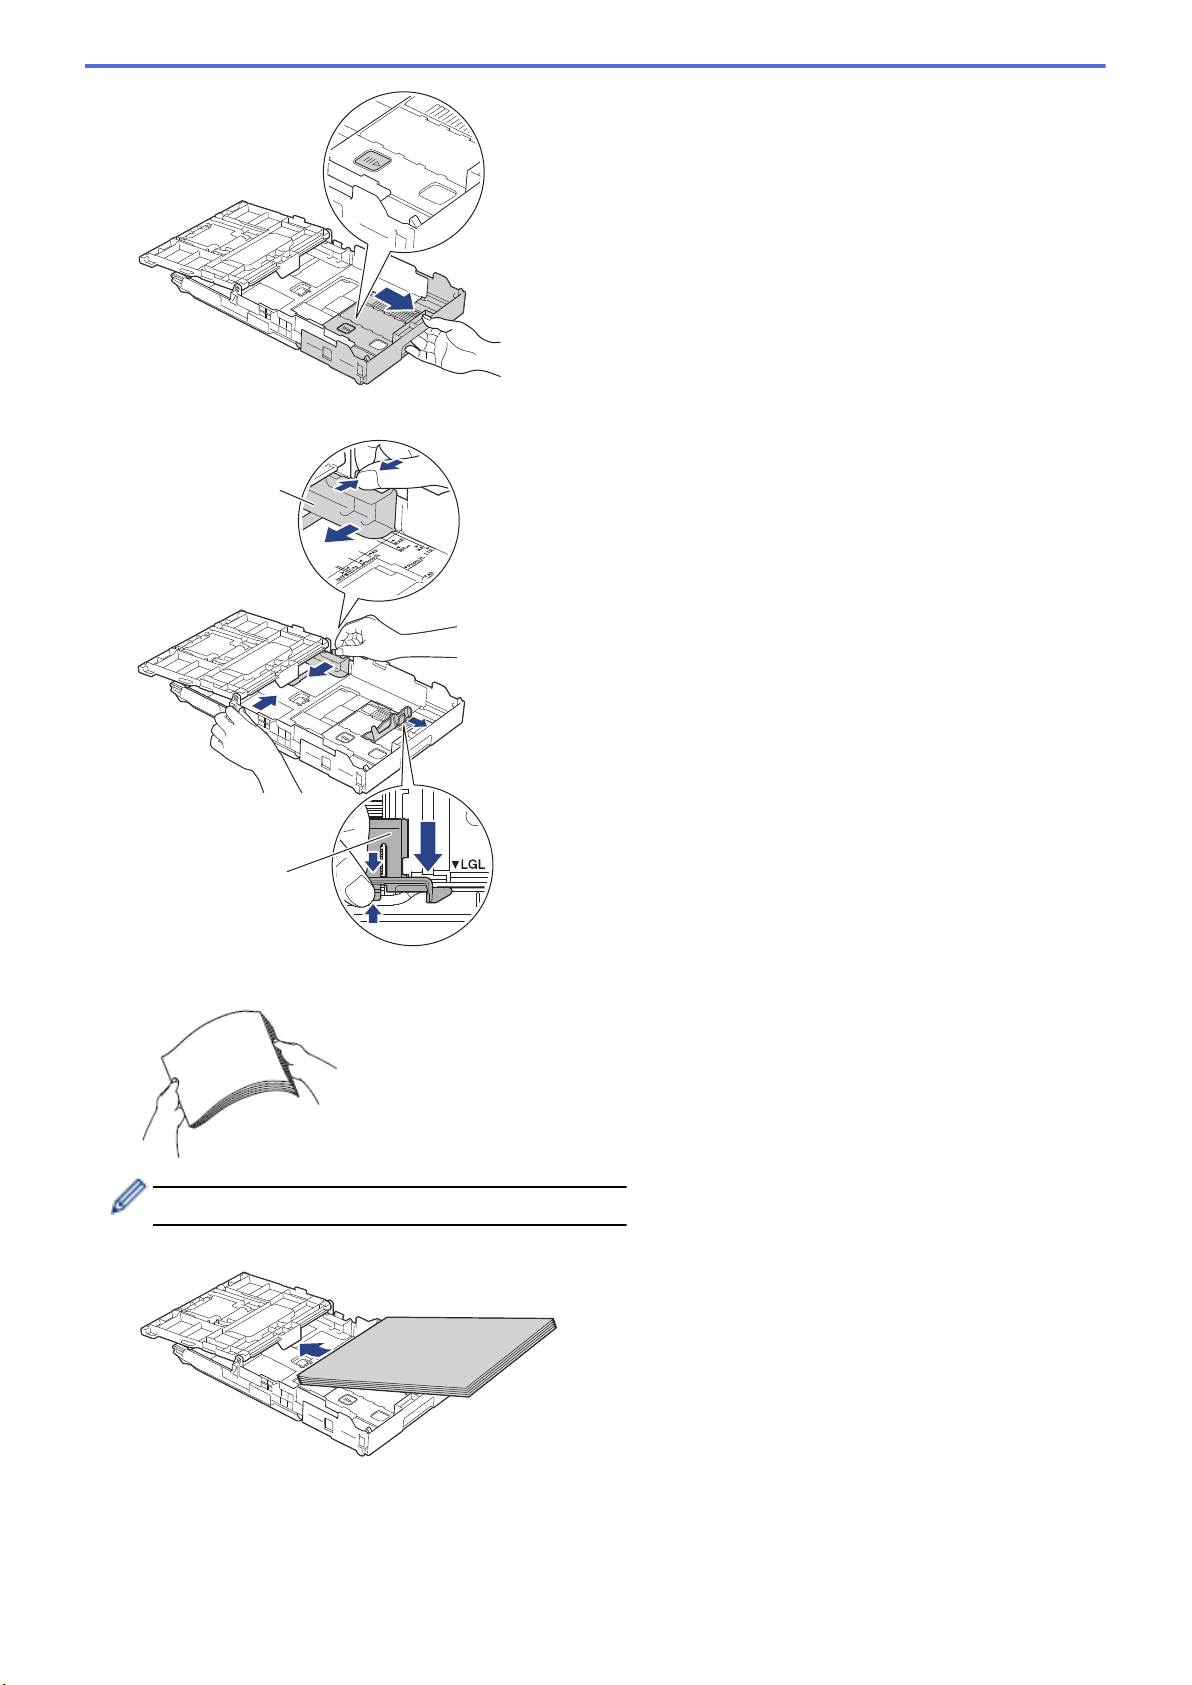
5. Gently press and slide the paper width guides (1) and the paper length guide (2) to fit the paper size.
1
2
6. Fan the stack of paper well to avoid paper jams and misfeeds.
Always make sure the paper is not curled or wrinkled.
7. Gently load paper in the paper tray with the printing surface face down.
Make sure the paper is flat in the tray and the paper length guide (1) touches the edges of the paper.
23
1
IMPORTANT
Be careful not to push the paper in too far; it may lift at the back of the tray and cause paper feed
problems.
To add paper before the tray is empty, remove the paper from the tray and combine it with the paper you
are adding. Always fan the stack of paper well to prevent the machine from feeding multiple pages.
8. Gently adjust the paper width guides to fit the paper.
Make sure the paper guides touch the edges of the paper.
9. Close the output paper tray cover.
10. Slowly push the paper tray completely into the machine.
24
Home > Paper Handling > Load Paper > Load Paper in the Paper Tray > Load Photo Paper in the Paper
Tray
Load Photo Paper in the Paper Tray
• Load only one size and type of paper in the paper tray at a time.
• When you load a different paper size in the tray, you must change the Paper Size setting in the machine or
the paper size setting on your computer.
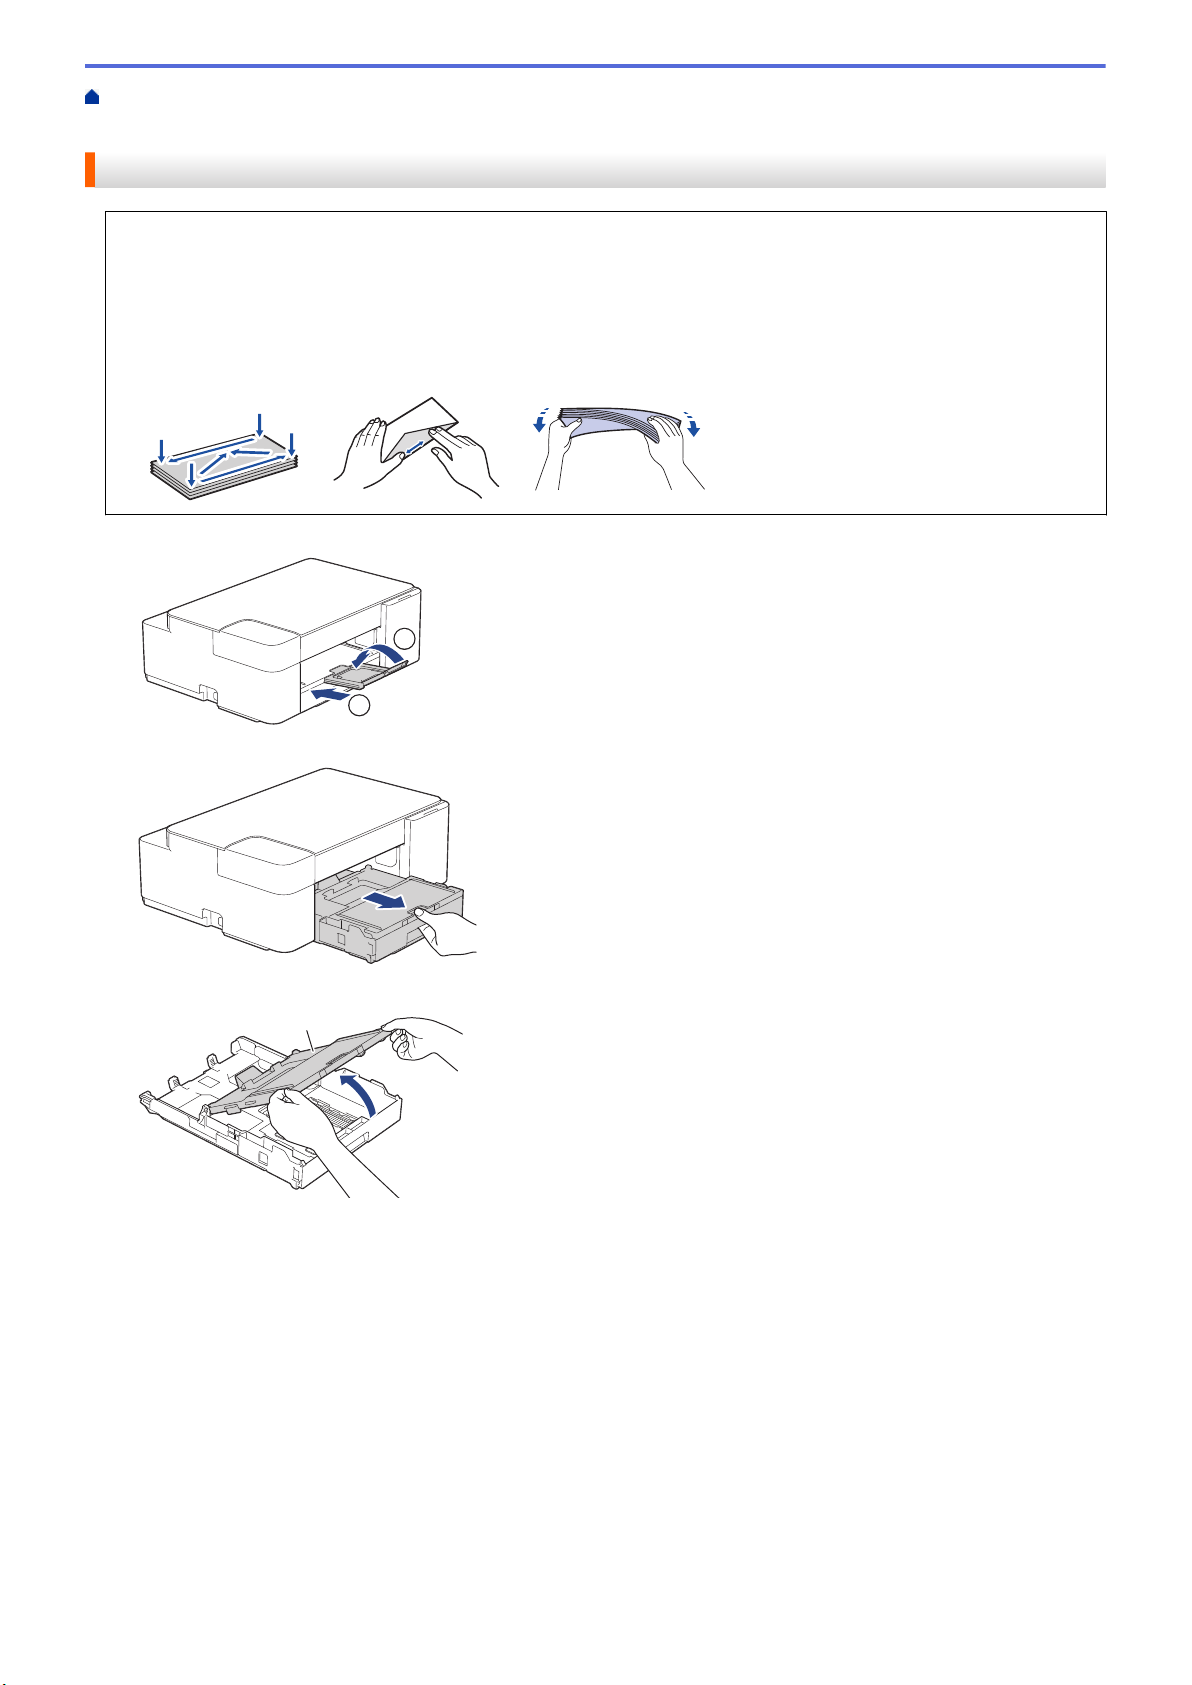
1. If the paper support flap (1) is open, close it, and then close the paper support (2).
2
1
2. Pull the paper tray completely out of the machine.
3. Lift the output paper tray cover (1).
1
4. Gently press and slide the paper width guides (1) to fit the paper size, and then lift the stopper (2).
1
2
26
5. Close the output paper tray cover.
6. Load up to 20 sheets of photo paper with the printing surface face down.
Loading more than 20 sheets of photo paper may cause paper jams.
7. Lift the output paper tray cover.
8. Gently adjust the paper width guides (1) to fit the paper.
Make sure the paper width guides touch the edges of the paper and the paper is flat in the tray.
1
9. Close the output paper tray cover.
10. Slowly push the paper tray completely into the machine.
11. Pull out the paper support (1) until it locks into place, and then unfold the paper support flap (2).
1
2
Related Information
• Load Paper in the Paper Tray
Related Topics:
• Choose the Right Print Media
27
Home > Paper Handling > Load Paper > Load Paper in the Paper Tray > Load Envelopes in the Paper
Tray
Load Envelopes in the Paper Tray
• You can load envelopes in a variety of sizes. See Related Information: Paper Type and Paper Size for
Each Operation.
• When you load envelopes in the tray, you must change the Paper Size setting in the machine or the paper
size setting on your computer.
• Before loading envelopes in the tray, press the corners and sides of the envelopes to make them as flat as
possible.
1. If the paper support flap (1) is open, close it, and then close the paper support (2).
2
1
2. Pull the paper tray completely out of the machine.
3. Lift the output paper tray cover (1).
1
28
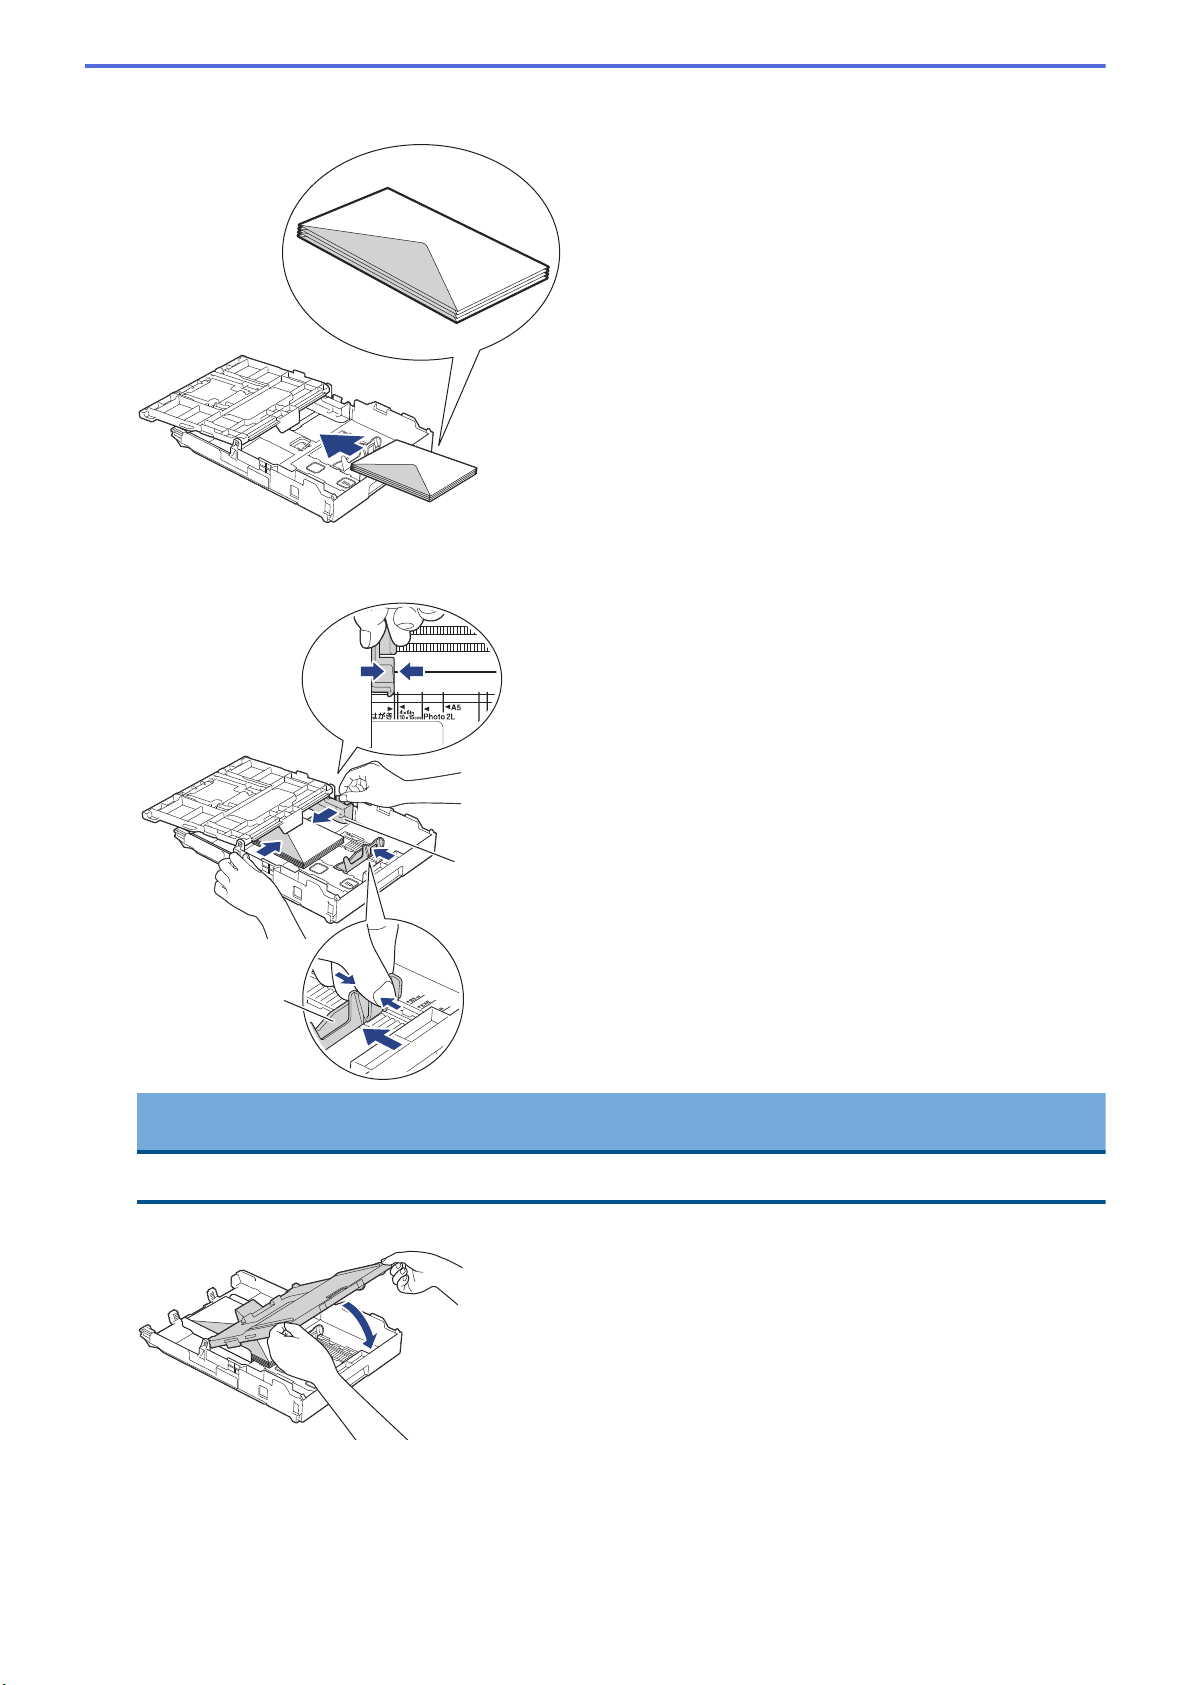
4. Load up to 10 envelopes in the paper tray with the printing surface face down. Loading more than 10
envelopes may cause paper jams.
5. Gently press and slide the paper width guides (1) and paper length guide (2) to fit the size of the envelopes.
Make sure the envelopes are flat in the tray.
2
1
IMPORTANT
If envelopes are multi-feeding, load one envelope in the paper tray at a time.
6. Close the output paper tray cover.
29
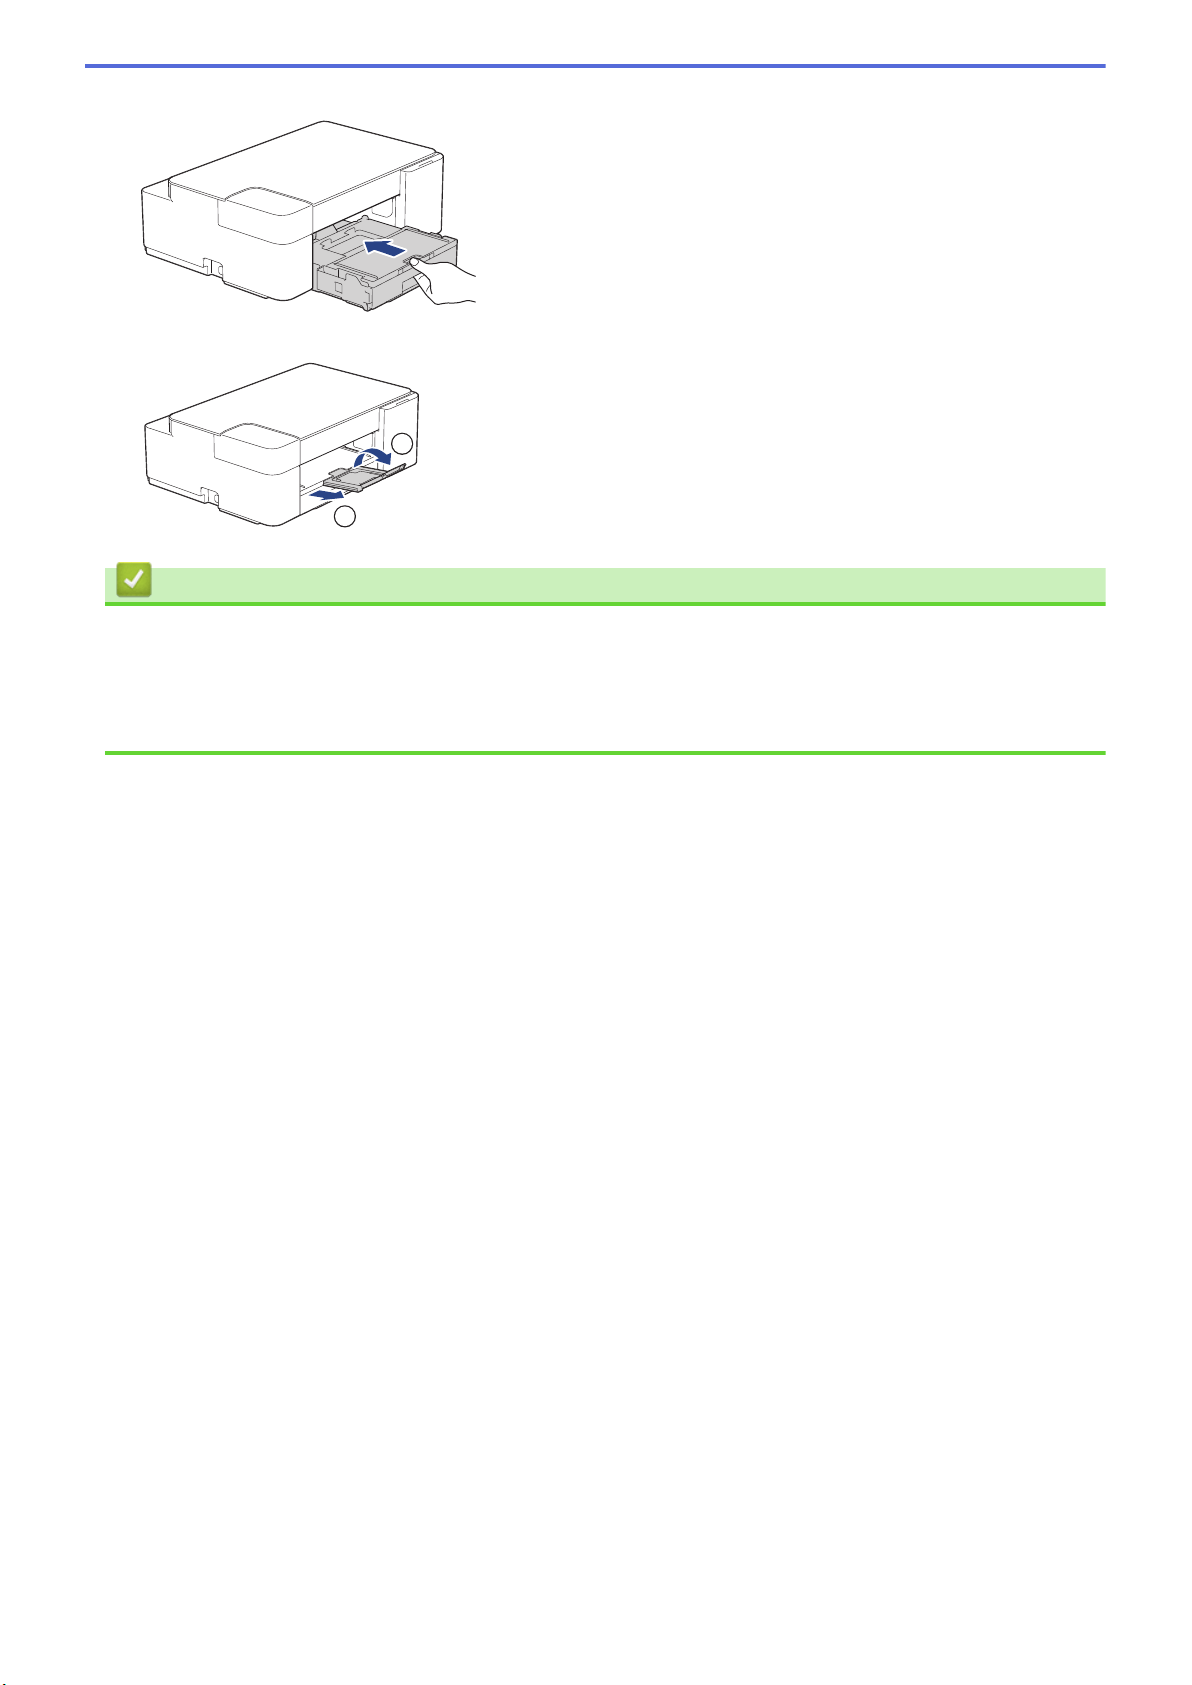
7. Slowly push the paper tray completely into the machine.
8. Pull out the paper support (1) until it locks into place, and then unfold the paper support flap (2).
1
2
Related Information
• Load Paper in the Paper Tray
Related Topics:
• Choose the Right Print Media
• Paper Type and Paper Size for Each Operation
30
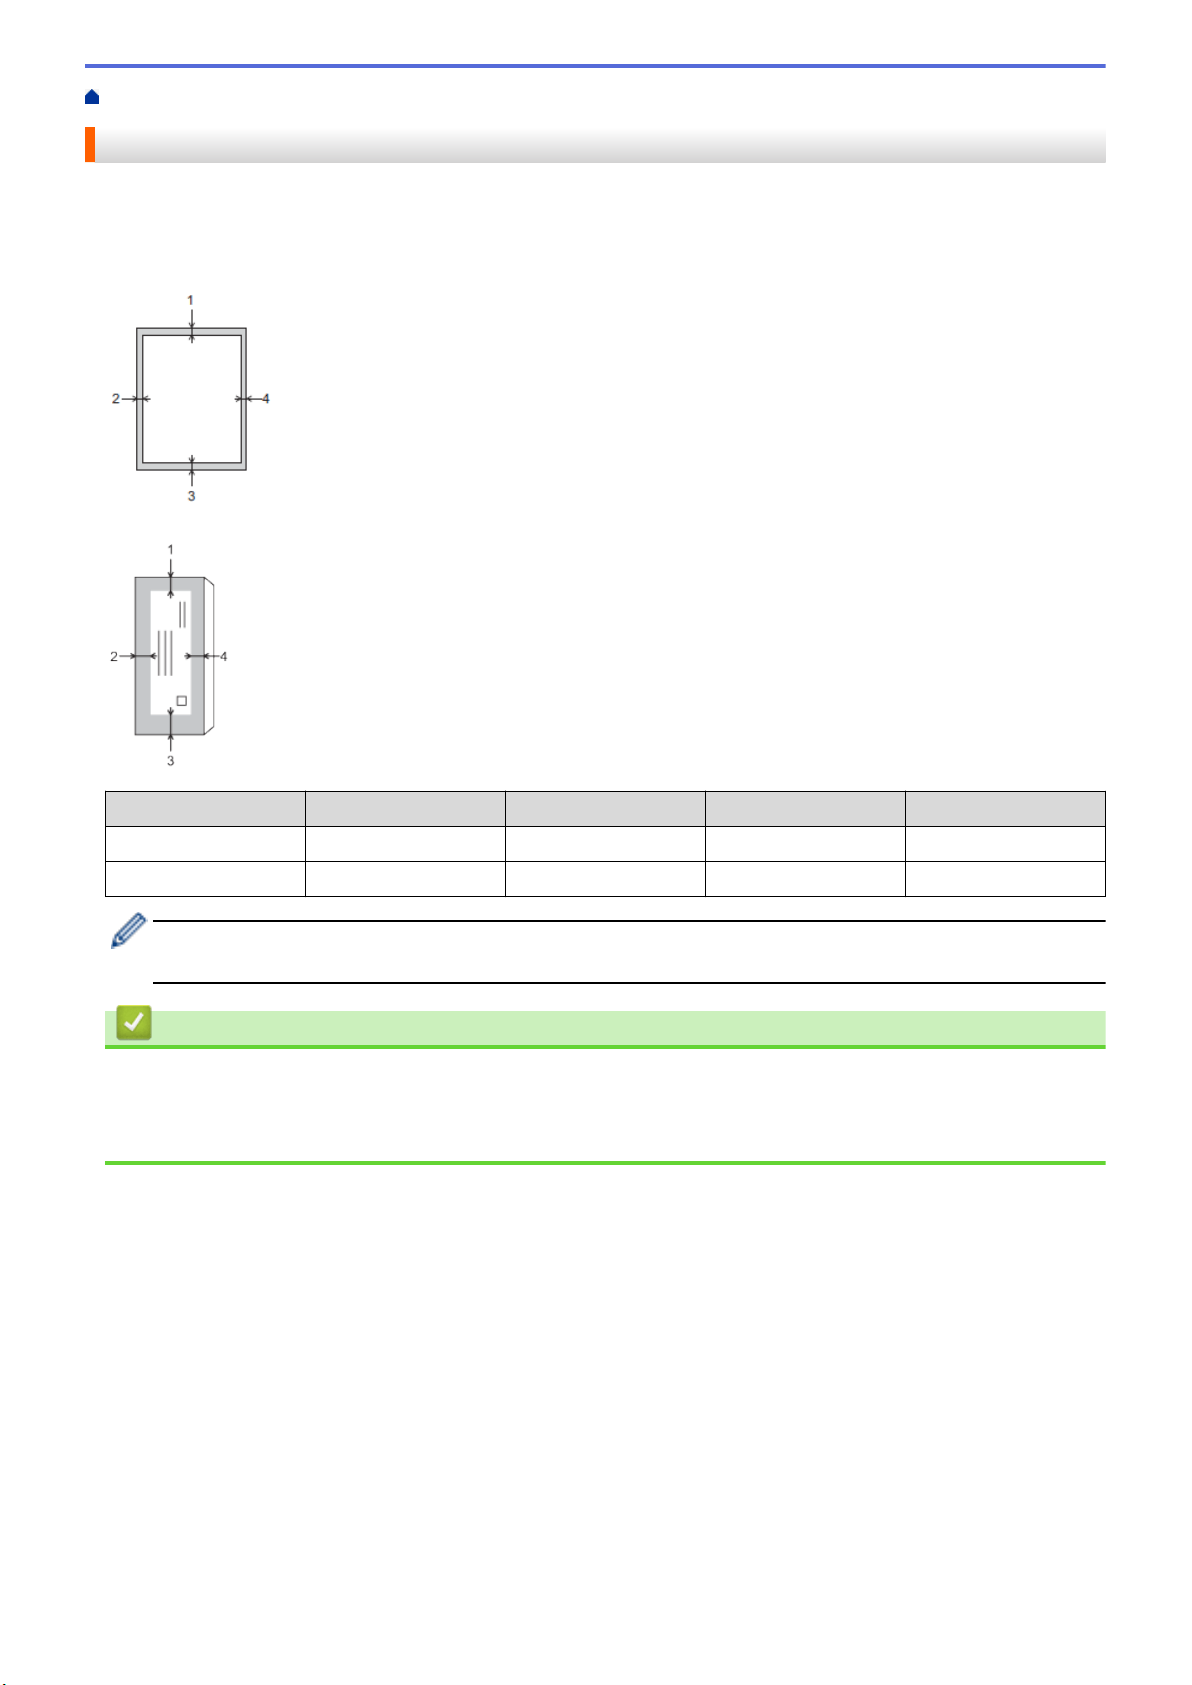
Home > Paper Handling > Load Paper > Unprintable Area
Unprintable Area
The unprintable area depends on the settings in the application you are using. The figures below show the
unprintable areas on cut-sheet paper and envelopes. The machine can print in the shaded areas of cut-sheet
paper only when the Borderless print feature is available and turned on.
Cut-Sheet Paper
Envelopes
Top (1)
Left (2) Bottom (3) Right (4)
Cut-Sheet 0.12 in. (3 mm) 0.12 in. (3 mm) 0.12 in. (3 mm) 0.12 in. (3 mm)
Envelopes 0.47 in. (12 mm) 0.12 in. (3 mm) 0.47 in. (12 mm) 0.12 in. (3 mm)
The Borderless print feature is not available for envelopes, 2-sided printing and some paper sizes, such as
Legal and Executive.
Related Information
• Load Paper
Related Topics:
• Paper Handling and Printing Problems
31


Home > Paper Handling > Load Paper > Paper Settings > Change the Paper Size and Paper Type
Change the Paper Size and Paper Type
You can select Letter size with plain paper, 4” x 6” size with other glossy paper, or custom size paper by pressing
(Paper).
• When Letter size with plain paper is selected, LTR LED lights up.
• When 4” x 6” size with other glossy paper is selected, 4" x 6" LED lights up.
• When custom size paper is selected, both LTR LED and 4" x 6" LED light up.
Related Information
• Paper Settings
• Customize the Paper Size and Paper Type
Related Topics:
• Copy a Document
• Acceptable Print Media
33
Home > Paper Handling > Load Paper > Paper Settings > Change the Paper Size and Paper Type
> Customize the Paper Size and Paper Type
Customize the Paper Size and Paper Type
1. Start Brother Mobile Connect on your mobile device.
2. Tap your model name on the top of the screen.
3. Tap All Machine Settings.
Web Based Management appears.
4. If required, type the password in the Login field, and then tap Login.
The default password to manage this machine’s settings is located on the back of the machine and marked
"Pwd".
5. Go to the navigation menu, and then tap Print > Paper Tray (Custom).
Start from , if the navigation menu is not shown on the left side of the screen.
6. Select the Paper Type and Paper Size options you want to use.
7. Tap Submit.
Related Information
• Change the Paper Size and Paper Type
Related Topics:
• Access Web Based Management
• Acceptable Print Media
• Brother Mobile Connect
34

Home > Paper Handling > Load Paper > Acceptable Print Media
Acceptable Print Media
The print quality can be affected by the type of paper you use in the machine.
To get the best print quality for the settings you have selected, always set the Paper Type to match the type of
paper you load.
You can use plain paper, inkjet paper (coated paper), glossy paper, recycled paper, and envelopes.
We recommend testing various paper types before buying large quantities.
For best results, use Brother paper.
• When you print on inkjet paper (coated paper) and glossy paper, be sure to select the correct print media in
the printer driver or in the application you use to print.
• When you print on photo paper, load one extra sheet of the same photo paper in the paper tray.
• When using photo paper, remove each sheet at once to prevent smudging or paper jams.
• Avoid touching the printed surface of the paper immediately after printing; the surface may not be completely
dry and may stain your fingers.
Related Information
• Load Paper
• Recommended Print Media
• Handle and Use Print Media
• Choose the Right Print Media
Related Topics:
• Paper Handling and Printing Problems
• Change the Paper Size and Paper Type
• Customize the Paper Size and Paper Type
35
Home > Paper Handling > Load Paper > Acceptable Print Media > Recommended Print Media
Recommended Print Media
For the best print quality, we recommend using the Brother paper listed in the table.
Brother paper may not be available in all countries.
Brother paper
Paper Type
Item
Premium Plus Glossy Photo
Letter BP71GLTR
4" x 6" BP71GP20
Related Information
• Acceptable Print Media
36
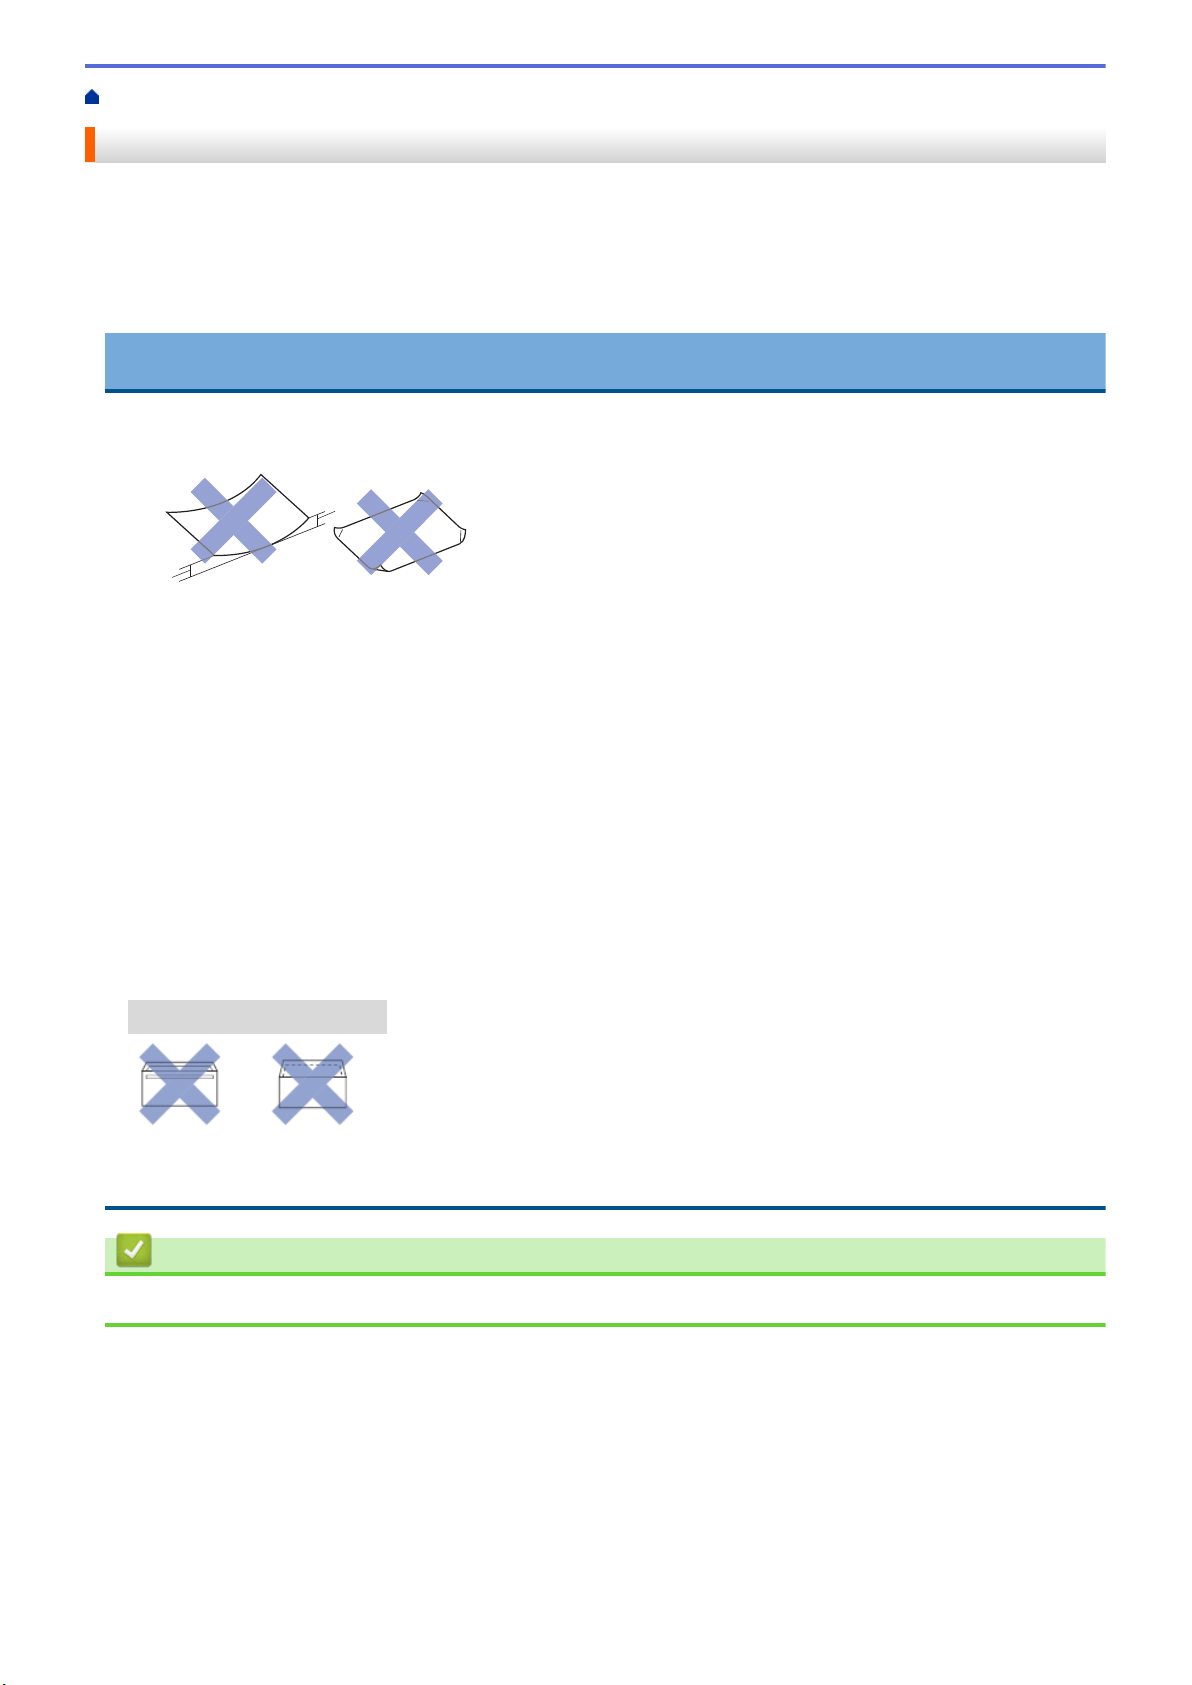
Home > Paper Handling > Load Paper > Acceptable Print Media > Handle and Use Print Media
Handle and Use Print Media
• Store paper in its original packaging and keep it sealed. Keep the paper flat and away from moisture, direct
sunlight and heat.
• Avoid touching the shiny (coated) side of photo paper.
• Some envelope sizes require that you set margins in the application. Make sure you do a test print first before
printing many envelopes.
IMPORTANT
DO NOT use the following types of paper:
• Damaged, curled, wrinkled, or irregularly shaped
1
1
1. 0.08 in. (2 mm) or greater curl may cause jams to occur.
• Extremely shiny or highly textured
• Paper that cannot be arranged uniformly when stacked
• Paper made with a short grain
DO NOT use envelopes that:
• Are loosely constructed
• Have windows
• Are embossed (have raised writing on them)
• Have clasps or staples
• Are pre-printed on the inside
• Are self-adhesive
• Have double flaps
Self-adhesive
Double flaps
You may experience paper feed problems caused by the thickness, size and flap shape of the envelopes you
are using.
Related Information
• Acceptable Print Media
37

Home > Paper Handling > Load Paper > Acceptable Print Media > Choose the Right Print Media
Choose the Right Print Media
• Paper Type and Paper Size for Each Operation
• Paper Capacity of the Paper Tray
• Load Cut-Sheet Paper or Photo 2L Paper in the Paper Tray
• Load Photo Paper in the Paper Tray
• Load Envelopes in the Paper Tray
38

Home > Paper Handling > Load Paper > Acceptable Print Media > Choose the Right Print Media > Paper
Type and Paper Size for Each Operation
Paper Type and Paper Size for Each Operation
Paper Type Paper Size Usage
Copy Printer
Cut-Sheet Letter 8 1/2 x 11 in. (215.9 x
279.4 mm)
Yes Yes
A4 8.3 x 11.7 in. (210 x 297
mm)
Yes Yes
Legal 8 1/2 x 14 in. (215.9 x
355.6 mm)
- Yes
Mexico Legal 8.5 x 13.38 in. (215.9 x
339.85 mm)
- Yes
India Legal 8.46 x 13.58 in. (215 x
345 mm)
- Yes
Folio 8 1/2 x 13 in. (215.9 x
330.2 mm)
- Yes
Executive 7 1/4 x 10 1/2 in. (184.1
x 266.7 mm)
Yes Yes
A5 5.8 x 8.3 in. (148 x 210
mm)
Yes Yes
A6 4.1 x 5.8 in. (105 x 148
mm)
- Yes
Cards Photo 4 x 6 in. (10 x 15 cm) Yes Yes
Photo 2L 5 x 7 in. (13 x 18 cm) - Yes
Index Card 5 x 8 in. (13 x 20 cm) - Yes
Envelopes C5 Envelope 6.4 x 9 in. (162 x 229
mm)
- Yes
DL Envelope 4.3 x 8.7 in. (110 x 220
mm)
- Yes
Com-10 4 1/8 x 9 1/2 in. (104.7 x
241.3 mm)
- Yes
Monarch 3 7/8 x 7 1/2 in. (98.4 x
190.5 mm)
- Yes
Related Information
• Choose the Right Print Media
Related Topics:
• Load Envelopes in the Paper Tray
39
Home > Paper Handling > Load Paper > Acceptable Print Media > Choose the Right Print Media > Paper
Capacity of the Paper Tray
Paper Capacity of the Paper Tray
Paper Size Paper Types No. of sheets Weight Thickness
Paper Tray Letter, A4,
Legal, Mexico
Legal, India
Legal, Folio,
Executive, A5,
A6, Envelopes
(C5, Com-10,
DL, Monarch),
Photo (4" x
6")/(10 x 15 cm),
Photo 2L (5" x
7")/(13 x 18 cm),
Index card (5" x
8")/(13 x 20 cm)
Plain Paper,
Recycled Paper
150
1
17 to 32 lb (64 to 120
g/m²)
3 to 6 mil (0.08 to
0.15 mm)
Inkjet Paper 20 17 to 53 lb (64 to 200
g/m²)
3 to 10 mil (0.08 to
0.25 mm)
Glossy Paper
2
,
Photo
2
20 Up to 58 lb (Up to
220 g/m²)
Up to 10 mil (Up to
0.25 mm)
Index Card 30 Up to 32 lb (Up to
120 g/m²)
Up to 6 mil (Up to
0.15 mm)
Envelopes 10 20 to 25 lb (80 to 95
g/m²)
Up to 20 mil (Up to
0.52 mm)
1
When using plain paper 20 lb (80 g/m²).
2
BP71 69 lb (260 g/m²) paper is specially designed for Brother inkjet machines.
Related Information
• Choose the Right Print Media
40

Home > Paper Handling > Load Documents > Load Documents on the Scanner Glass
Load Documents on the Scanner Glass
Use the scanner glass to copy or scan one page at a time.
Document Sizes Supported
Length:
Up to 11.7 in. (297 mm)
Width: Up to 8.5 in. (215.9 mm)
Weight: Up to 4.4 lb (2 kg)
1. Lift the document cover.
2. Place the document face down in the lower right corner of the scanner glass as shown in the illustration.
3. Close the document cover.
IMPORTANT
If you are scanning a book or thick document, DO NOT forcefully close or press on the document cover.
Related Information
• Load Documents
Related Topics:
• Copy a Document
• Other Problems
42
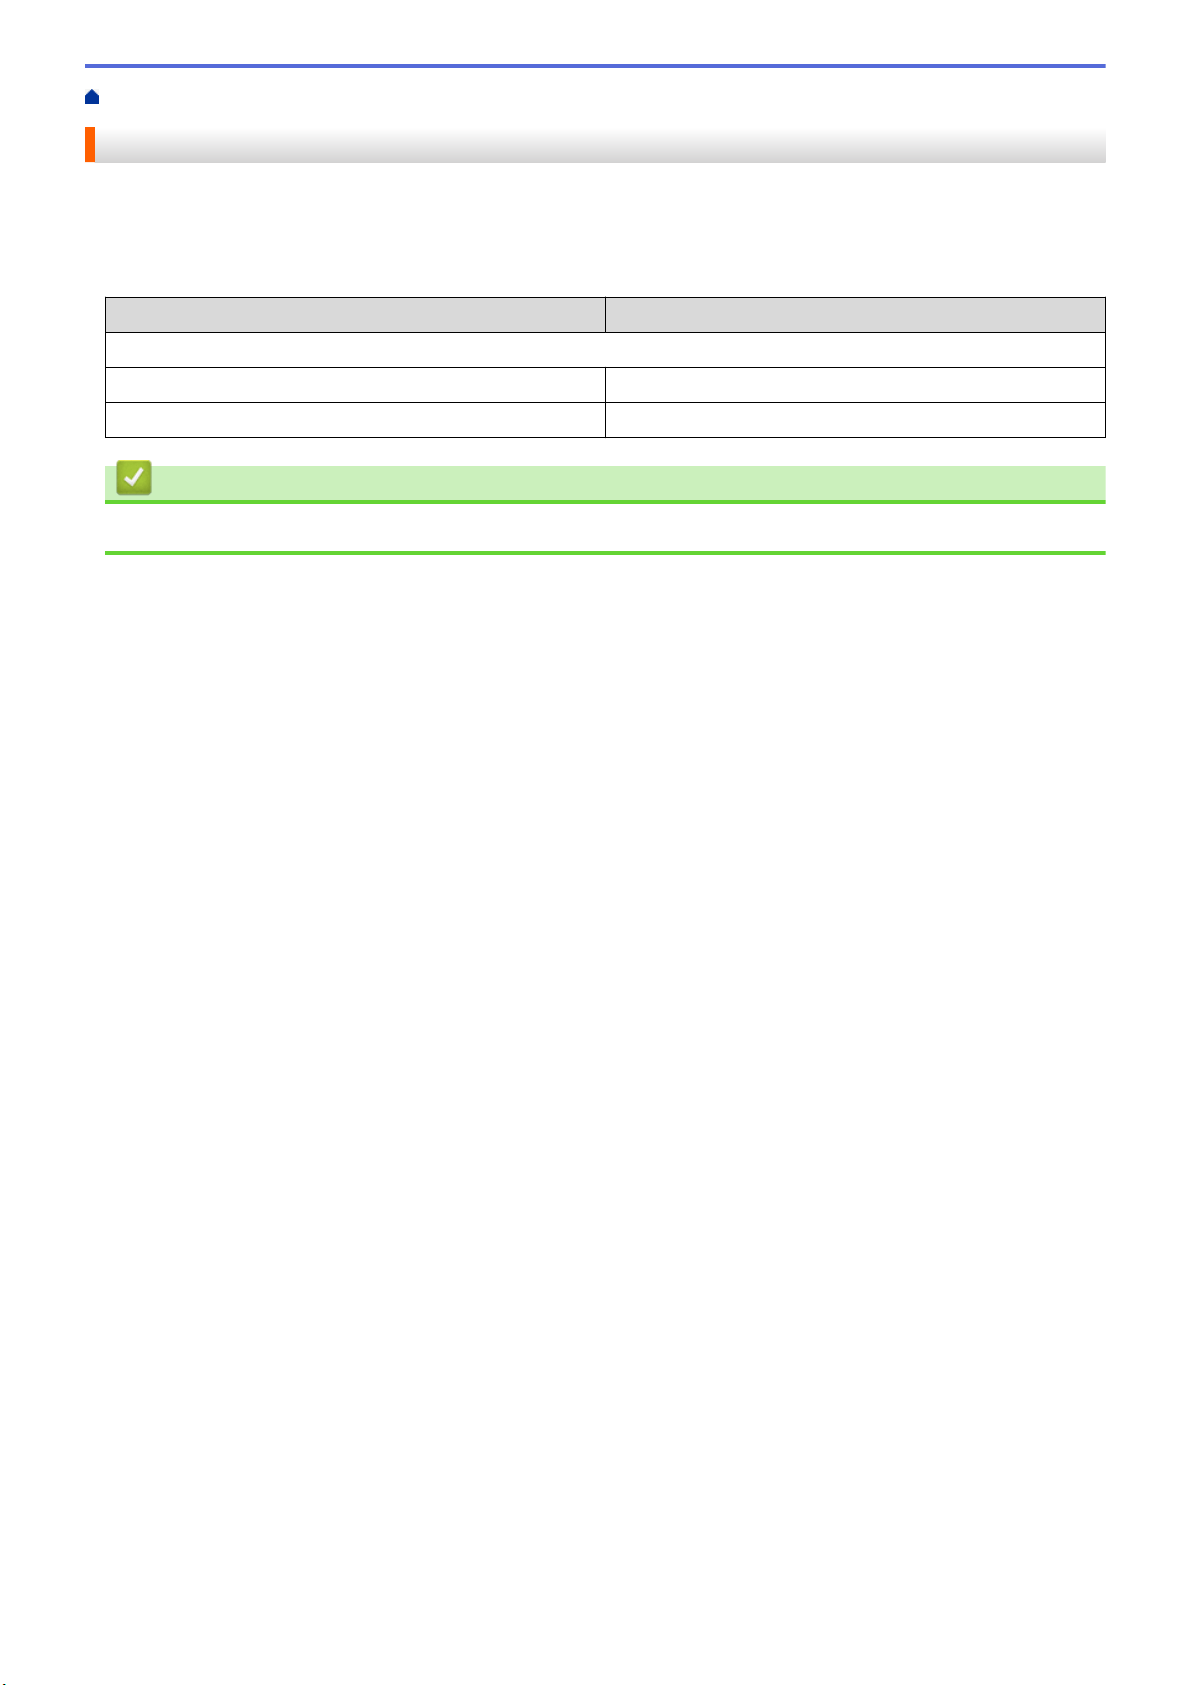
Home > Paper Handling > Load Documents > Unscannable Area
Unscannable Area
The unscannable area of a page depends on the settings in the application you are using. The figures below
show the typical unscannable measurements.
Usage Document Size Top (1)
Bottom (3)
Left (2)
Right (4)
Copy All paper sizes 0.12 in. (3 mm) 0.12 in. (3 mm)
Scan 0.04 in. (1 mm) 0.04 in. (1 mm)
Related Information
• Load Documents
43


Home > Print > Print from Your Computer (Windows)
Print from Your Computer (Windows)
• Print a Photo (Windows)
• Print a Document (Windows)
• Cancel a Print Job (Windows)
• Print More Than One Page on a Single Sheet of Paper (N in 1) (Windows)
• Print as a Poster (Windows)
• Print on Both Sides of the Paper Manually (Manual 2-sided Printing) (Windows)
• Print as a Booklet Manually (Windows)
• Print a Color Document in Grayscale (Windows)
• Prevent Smudged Printouts and Paper Jams (Windows)
• Use a Preset Print Profile (Windows)
• Change the Default Print Settings (Windows)
• Print Settings (Windows)
45
Home > Print > Print from Your Computer (Windows) > Print a Photo (Windows)
Print a Photo (Windows)
1. Select the print command in your application.
2. Select Brother XXX-XXXX Printer (where XXX-XXXX is the name of your model), and then click the printing
properties or preferences button.
The printer driver window appears.
3. Make sure you have loaded the correct media in the paper tray.
IMPORTANT
• For best results, use Brother paper.
• When you print on photo paper, load one extra sheet of the same photo paper in the paper tray.
4. Click the Basic tab.
5. Click the Media Type drop-down list, and then select the type of paper you are using.
IMPORTANT
To get the best print quality for the settings you have selected, always set the Media Type option to
match the type of paper you load.
6. Click the Paper Size drop-down list, and then select your paper size.
7. Select the Borderless checkbox, if needed.
8. For Color / Grayscale, select Color.
9. In the Orientation field, select the Portrait or Landscape option to set the orientation of your printout.
If your application contains a similar setting, we recommend that you set the orientation using the
application.
10. Type the number of copies (1-999) you want in the Copies field.
11. Change other printer settings, if needed.
12. Click OK.
13. Complete your print operation.
Related Information
• Print from Your Computer (Windows)
Related Topics:
• Print Settings (Windows)
46
Home > Print > Print from Your Computer (Windows) > Print a Document (Windows)
Print a Document (Windows)
1. Select the print command in your application.
2. Select Brother XXX-XXXX Printer (where XXX-XXXX is the name of your model), and then click the printing
properties or preferences button.
The printer driver window appears.
3. Make sure you have loaded the correct size paper in the paper tray.
4. Click the Basic tab.
5. Click the Media Type drop-down list, and then select the type of paper you are using.
IMPORTANT
To get the best print quality for the settings you have selected, always set the Media Type option to
match the type of paper you load.
6. Click the Paper Size drop-down list, and then select your paper size.
7. For Color / Grayscale, select the Color or Grayscale option.
8. In the Orientation field, select the Portrait or Landscape option to set the orientation of your printout.
If your application contains a similar setting, we recommend that you set the orientation using the
application.
9. Type the number of copies (1-999) you want in the Copies field.
10. To print multiple pages on a single sheet of paper or print one page of your document on multiple sheets,
click the Multiple Page drop-down list, and then select your options.
11. Change other printer settings, if needed.
12. Click OK.
13. Complete your print operation.
Related Information
• Print from Your Computer (Windows)
Related Topics:
• Print Settings (Windows)
47

Home > Print > Print from Your Computer (Windows) > Cancel a Print Job (Windows)
Cancel a Print Job (Windows)
If a print job was sent to the print queue and did not print, or was sent to the print queue in error, you may have to
delete it to allow subsequent jobs to print.
1. Double-click the printer icon in the task tray.
2. Select the print job you want to cancel.
3. Click the Document menu.
4. Select Cancel.
5. Click Yes.
Related Information
• Print from Your Computer (Windows)
Related Topics:
• Monitor Machine Status from Your Computer (Windows)
48
Home > Print > Print from Your Computer (Windows) > Print More Than One Page on a Single Sheet of
Paper (N in 1) (Windows)
Print More Than One Page on a Single Sheet of Paper (N in 1)
(Windows)
1. Select the print command in your application.
2. Select Brother XXX-XXXX Printer (where XXX-XXXX is the name of your model), and then click the printing
properties or preferences button.
The printer driver window appears.
3. Click the Basic tab.
4. In the Orientation field, select the Portrait or Landscape option to set the orientation of your printout.
If your application contains a similar setting, we recommend that you set the orientation using the
application.
5. Click the Multiple Page drop-down list, and then select the 2 in 1, 4 in 1, 9 in 1, or 16 in 1 option.
6. Click the Page Order drop-down list, and then select your page order.
7. Click the Border Line drop-down list, and then select your border line type.
8. Change other printer settings, if needed.
9. Click OK, and then complete your print operation.
Related Information
• Print from Your Computer (Windows)
Related Topics:
• Print Settings (Windows)
49
Home > Print > Print from Your Computer (Windows) > Print as a Poster (Windows)
Print as a Poster (Windows)
Enlarge your print size and print the document in poster mode.
1. Select the print command in your application.
2. Select Brother XXX-XXXX Printer (where XXX-XXXX is the name of your model), and then click the printing
properties or preferences button.
The printer driver window appears.
3. Click the Basic tab.
4. Click the Multiple Page drop-down list, and then select the 1 in 2x2 Pages or 1 in 3x3 Pages option.
5. Change other printer settings, if needed.
6. Click OK.
7. Complete your print operation.
Related Information
• Print from Your Computer (Windows)
Related Topics:
• Print Settings (Windows)
50
Home > Print > Print from Your Computer (Windows) > Print on Both Sides of the Paper Manually (Manual
2-sided Printing) (Windows)
Print on Both Sides of the Paper Manually (Manual 2-sided Printing)
(Windows)
The machine prints all the odd-numbered pages on one side of the paper first. Then, a pop-up message on your
computer screen instructs you to reload the odd pages into the machine so it can print the even-numbered
pages.
• Before reloading the paper, fan and straighten it to avoid paper jams.
• Very thin or thick paper is not recommended.
• If the paper is thin, it may wrinkle.
• The 2-sided printing function may not be suitable for all types of documents and images. If you experience
repeat paper jams or poor print quality during 2-sided printing, we recommend using 1-sided printing.
1. Select the print command in your application.
2. Select Brother XXX-XXXX Printer (where XXX-XXXX is the name of your model), and then click the printing
properties or preferences button.
The printer driver window appears.
3. Click the Basic tab.
4. In the Orientation field, select the Portrait or Landscape option to set the orientation of your printout.
If your application contains a similar setting, we recommend that you set the orientation using the
application.
5. Click the 2-sided / Booklet drop-down list, and then select 2-sided (Manual).
6. Click the 2-sided Settings button.
7. Select one of the options from the 2-sided Type menu.
When 2-sided is selected, four types of 2-sided binding are available for each orientation:
Option for Portrait Description
Long Edge (Left)
Long Edge (Right)
51
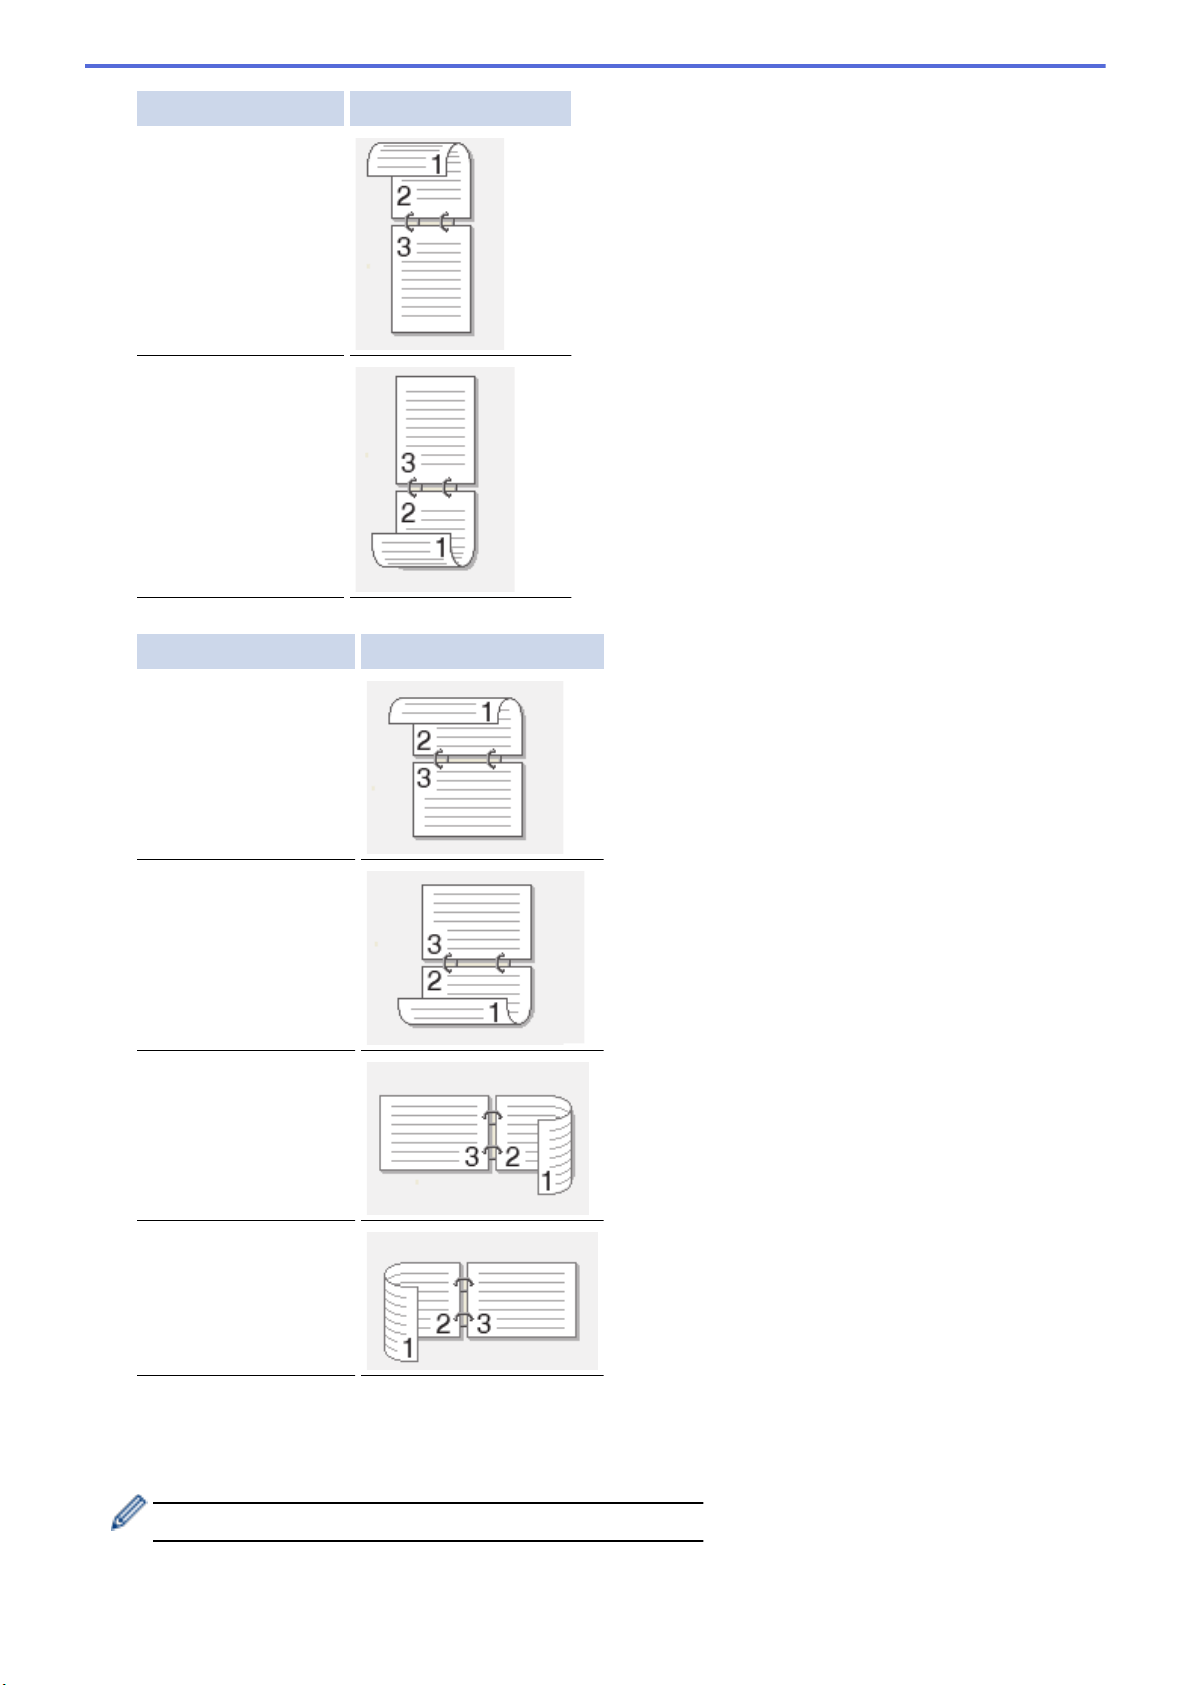
Option for Portrait Description
Short Edge (Top)
Short Edge (Bottom)
Option for Landscape Description
Long Edge (Top)
Long Edge (Bottom)
Short Edge (Right)
Short Edge (Left)
8. Select the Binding Offset checkbox to specify the offset for binding in inches or millimeters.
9. Click OK to return to the printer driver window.
10. Change other printer settings, if needed.
The Borderless feature is not available when using this option.
11. Click OK, and then start printing.
52

12. Click OK to print the first side of the pages.
The machine prints all the odd numbered pages first. Then, the printing stops and a pop-up message on your
computer screen instructs you to reload the paper.
13. Reload the paper.
14. Click OK.
The even numbered pages will be printed.
If the paper is not feeding correctly, it may be curled. Remove the paper, straighten it, and put it back in the paper
tray.
Related Information
• Print from Your Computer (Windows)
Related Topics:
• Print as a Booklet Manually (Windows)
53
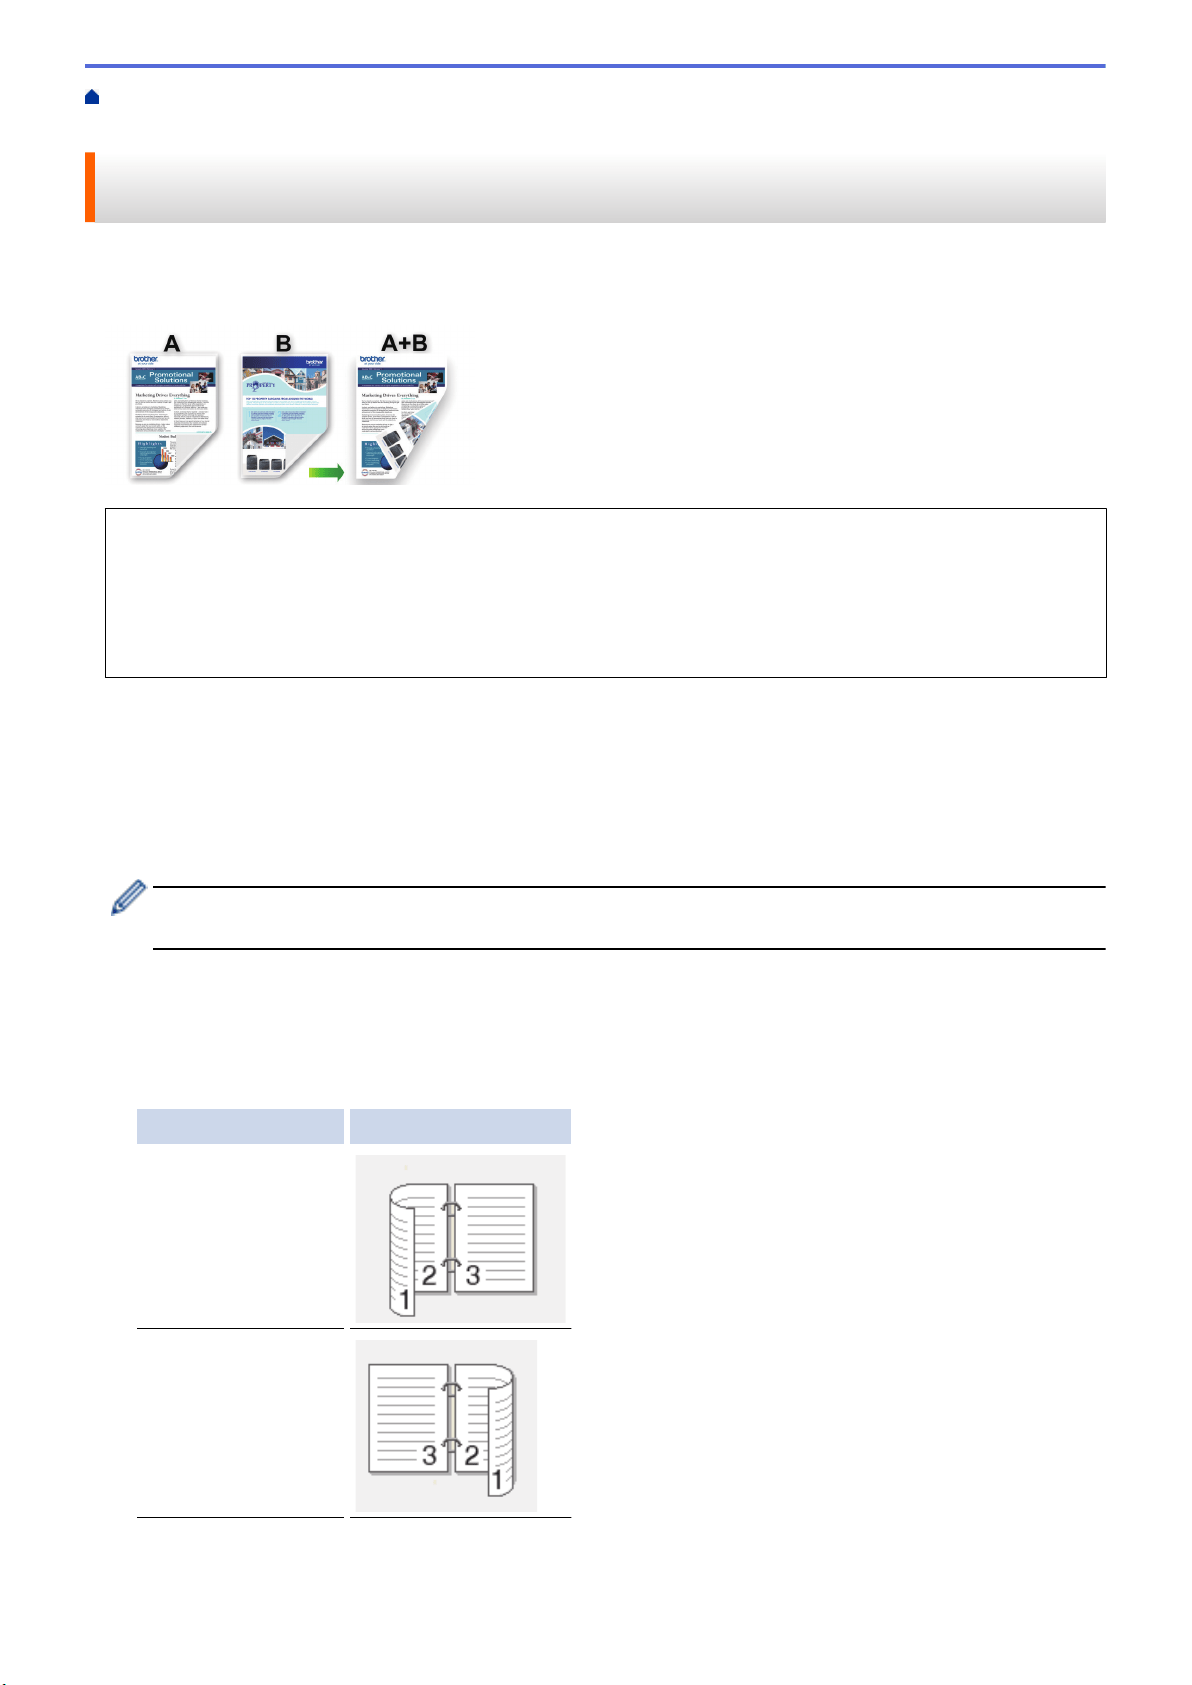
Home > Print > Print from Your Computer (Windows) > Print as a Booklet Manually (Windows)
Print as a Booklet Manually (Windows)
Use this option to print a document in booklet format using 2-sided printing. The document's pages will be
arranged according to the correct page number and will allow you to fold at the center of the print output without
having to change the order of the printed pages.
• Before reloading the paper, fan and straighten it to avoid paper jams.
• Very thin or thick paper is not recommended.
• If the paper is thin, it may wrinkle.
• The 2-sided printing function may not be suitable for all types of documents and images. If you experience
repeat paper jams or poor print quality during 2-sided printing, we recommend using 1-sided printing.
1. Select the print command in your application.
2. Select Brother XXX-XXXX Printer (where XXX-XXXX is the name of your model), and then click the printing
properties or preferences button.
The printer driver window appears.
3. Click the Basic tab.
4. In the Orientation field, select the Portrait or Landscape option to set the orientation of your printout.
If your application contains a similar setting, we recommend that you set the orientation using the
application.
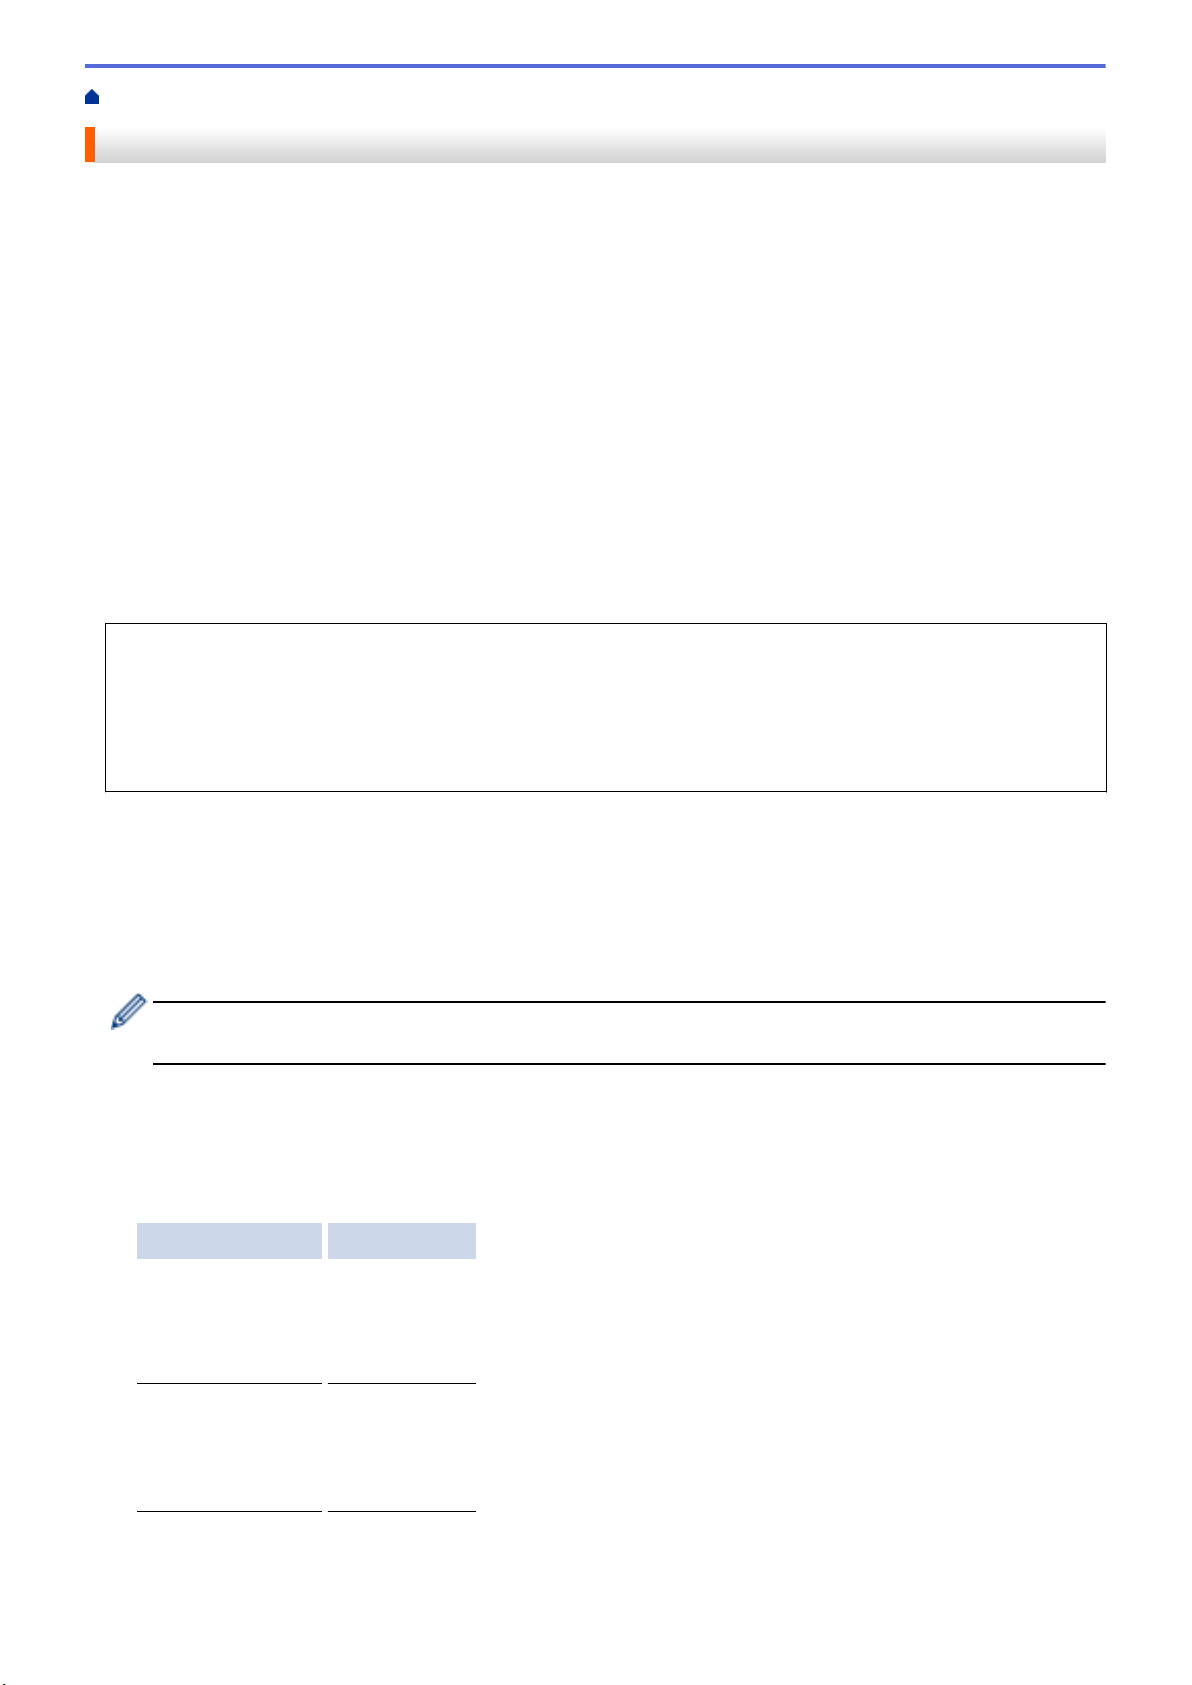
5. Click the 2-sided / Booklet drop-down list, and then select the Booklet (Manual) option.
6. Click the 2-sided Settings button.
7. Select one of the options from the 2-sided Type menu.
There are two types of 2-sided binding directions available for each orientation:
Option for Portrait Description
Left Binding
Right Binding
54
Option for Landscape Description
Top Binding
Bottom Binding
8. Select one of the options from the Booklet Printing Method menu.
Option Description
All Pages at
Once
Every page is printed in booklet format (four pages to every piece of paper, two pages per
side). Fold your printout in the middle to create the booklet.
Divide into
Sets
This option prints the whole booklet in smaller individual booklet sets, allowing you to fold at
the center of the smaller individual booklet sets without having to change the order of the
printed pages. You can specify the number of sheets in each smaller booklet set (from
1-15). This option can be helpful when folding a printed booklet that has a large number of
pages.
9. Select the Binding Offset checkbox to specify the offset for binding in inches or millimeters.
10. Click OK to return to the printer driver window.
11. Change other printer settings, if needed.
The Borderless feature is not available when using this option.
12. Click OK, and then start printing.
13. Click OK to print the first side of the pages.
The machine prints all the odd numbered pages first. Then, the printing stops and a pop-up message on your
computer screen instructs you to reload the paper.
14. Reload the paper.
15. Click OK.
The even numbered pages are printed.
If the paper is not feeding correctly, it may be curled. Remove the paper, straighten it, and put it back in the paper
tray.
Related Information
• Print from Your Computer (Windows)
Related Topics:
• Print on Both Sides of the Paper Manually (Manual 2-sided Printing) (Windows)
55

Home > Print > Print from Your Computer (Windows) > Print a Color Document in Grayscale (Windows)
Print a Color Document in Grayscale (Windows)
Grayscale mode makes the print processing speed faster than color mode. If your document contains color,
selecting Grayscale mode prints your document in 256 levels of grayscale.
1. Select the print command in your application.
2. Select Brother XXX-XXXX Printer (where XXX-XXXX is the name of your model), and then click the printing
properties or preferences button.
The printer driver window appears.
3. Click the Basic tab.
4. For Color / Grayscale, select Grayscale.
5. Change other printer settings, if needed.
6. Click OK.
7. Complete your print operation.
Related Information
• Print from Your Computer (Windows)
56

Home > Print > Print from Your Computer (Windows) > Prevent Smudged Printouts and Paper Jams
(Windows)
Prevent Smudged Printouts and Paper Jams (Windows)
Some types of print media may need more drying time. Change the Reduce Smudge option if you have
problems with smudged printouts or paper jams.
1. Select the print command in your application.
2. Select Brother XXX-XXXX Printer (where XXX-XXXX is the name of your model), and then click the printing
properties or preferences button.
The printer driver window appears.
3. Click the Advanced tab.
4. Click the Other Print Options button.
5. Select the Reduce Smudge option on the left side of the screen.
6. Select one of the following options:
Media Type
Option Description
Plain Paper Off / On Select Off to print at normal speed, using a
standard amount of ink.
Select On to print at a slower speed, using less
ink. Printouts may be lighter than they appear in
Print Preview.
Glossy Paper Off / On Select Off to print at normal speed, using a
standard amount of ink.
Select On to print at a slower speed, using less
ink. Printouts may be lighter than they appear in
Print Preview.
7. Click OK to return to the printer driver window.
8. Click OK.
9. Complete your print operation.
Related Information
• Print from Your Computer (Windows)
Related Topics:
• Paper Handling and Printing Problems
• Change the Print Options to Improve Your Print Results
57
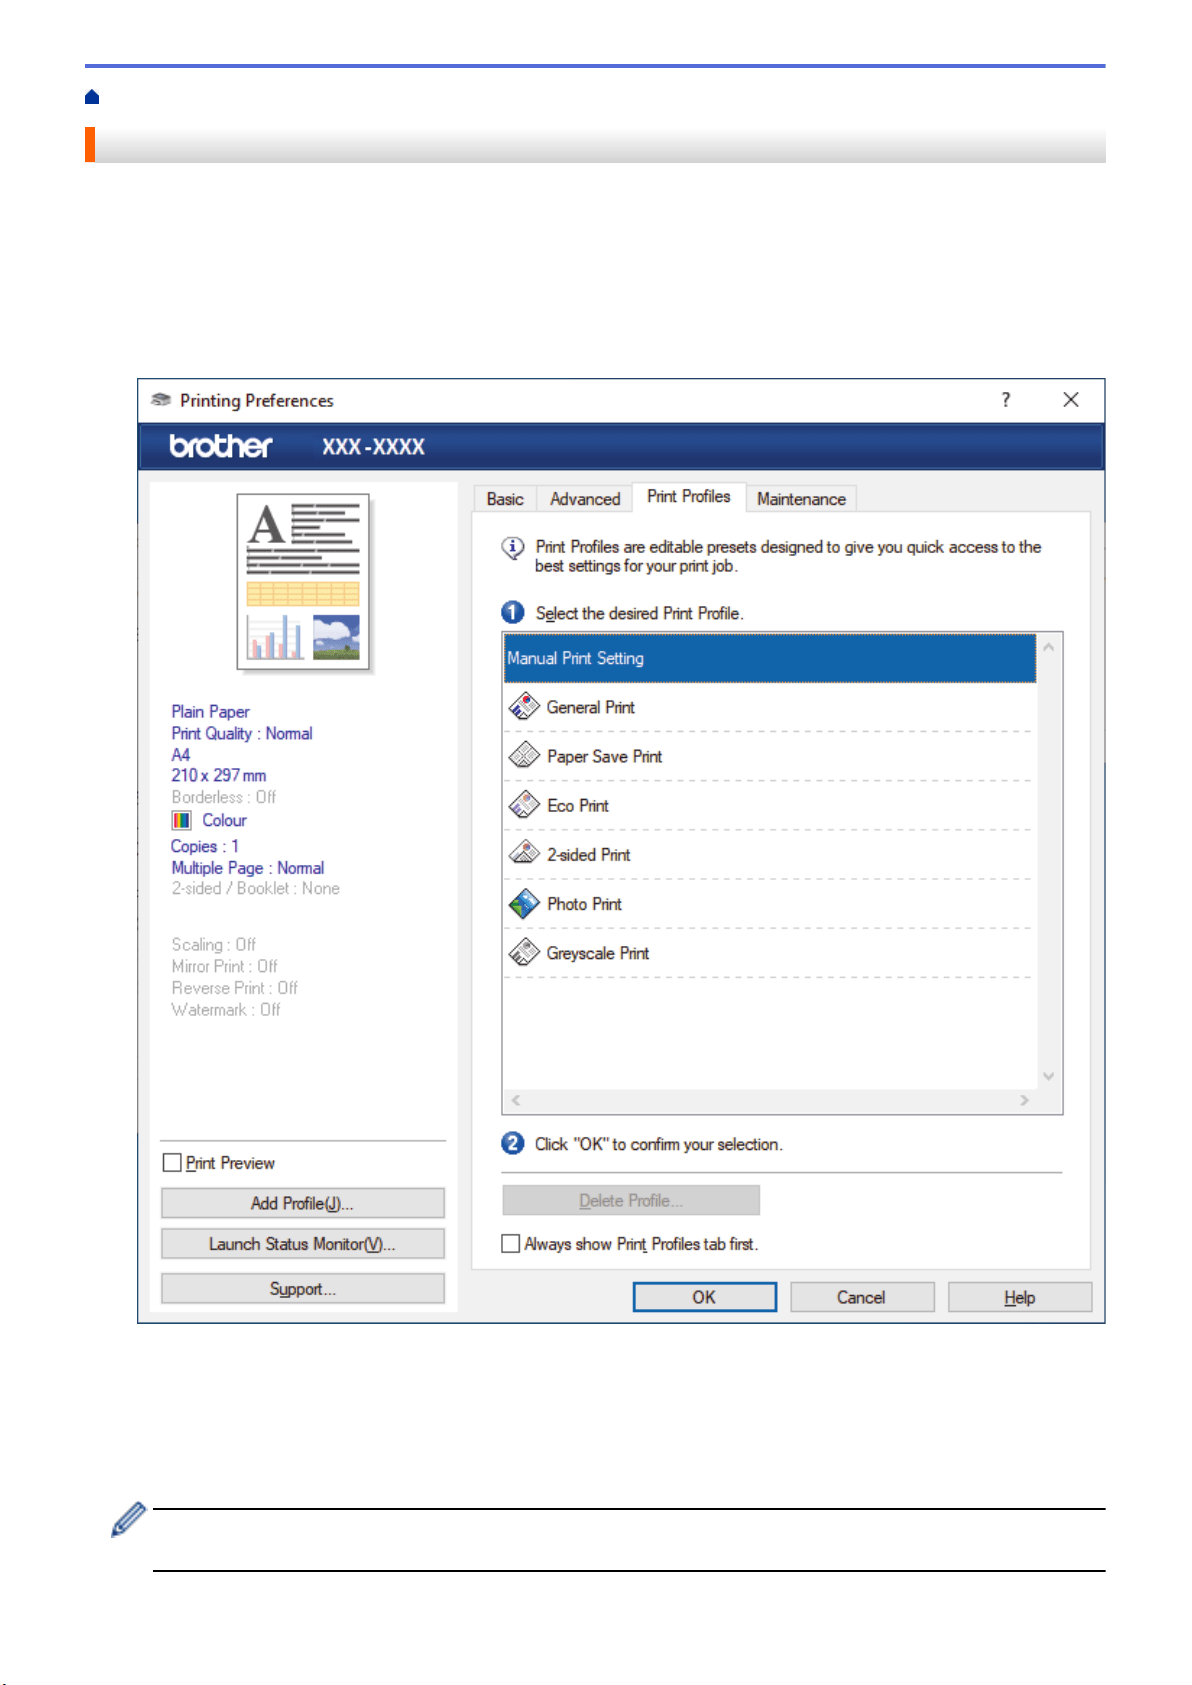
Home > Print > Print from Your Computer (Windows) > Use a Preset Print Profile (Windows)
Use a Preset Print Profile (Windows)
Print Profiles are presets designed to give you quick access to frequently-used printing configurations.
1. Select the print command in your application.
2. Select Brother XXX-XXXX Printer (where XXX-XXXX is the name of your model), and then click the printing
properties or preferences button.
The printer driver window appears.
3. Click the Print Profiles tab.
4. Select your profile from the print profile list.
The profile settings are shown on the left side of the printer driver window.
5. Do one of the following:
• If the settings are correct for your print job, click OK.
• To change the settings, go back to the Basic or Advanced tab, change settings, and then click OK.
To display the Print Profiles tab at the front of the window the next time you print, select the Always show
Print Profiles tab first. checkbox.
58


Home > Print > Print from Your Computer (Windows) > Use a Preset Print Profile (Windows) > Create or
Delete Your Print Profile (Windows)
Create or Delete Your Print Profile (Windows)
Add up to 20 new print profiles with customized settings.
1. Select the print command in your application.
2. Select Brother XXX-XXXX Printer (where XXX-XXXX is the name of your model), and then click the printing
properties or preferences button.
The printer driver window appears.
3. Do one of the following:
To create a new print profile:
a. Click the Basic tab and the Advanced tab, and configure the print settings you want for the new Print
Profile.
b. Click the Print Profiles tab.
c. Click Add Profile.
The Add Profile dialog box appears.
d. Type the new profile name in the Name field.
e. Click the icon you want to use to represent this profile from the icon list.
f. Click OK.
The new Print Profile name is added to the list in the Print Profiles tab.
To delete a print profile that you created:
a. Click the Print Profiles tab.
b. Click Delete Profile.
The Delete Profile dialog box appears.
c. Select the profile you want to delete.
d. Click Delete.
e. Click Yes.
f. Click Close.
Related Information
• Use a Preset Print Profile (Windows)
60
Home > Print > Print from Your Computer (Windows) > Change the Default Print Settings (Windows)
Change the Default Print Settings (Windows)
When you change an application's print settings, the changes only apply to documents printed with that
application. To change print settings for all Windows applications, you must configure the printer driver
properties.
1. Do one of the following:
• For Windows Server 2008
Click
(Start) > Control Panel > Hardware and Sound > Printers.
• For Windows 7 and Windows Server 2008 R2
Click (Start) > Devices and Printers.
• For Windows 8.1
Move your mouse to the lower right corner of your desktop. When the menu bar appears, click Settings,
and then click Control Panel. In the Hardware and Sound group, click View devices and printers.
• For Windows 10, Windows Server 2016 and Windows Server 2019
Click
> Windows System > Control Panel. In the Hardware and Sound group, click View devices
and printers.
• For Windows Server 2012
Move your mouse to the lower right corner of your desktop. When the menu bar appears, click Settings,
and then click Control Panel. In the Hardware group, click View devices and printers.
• For Windows Server 2012 R2
Click Control Panel on the Start screen. In the Hardware group, click View devices and printers.
2. Right-click the Brother XXX-XXXX Printer icon (where XXX-XXXX is the name of your model), and then
select Printer properties. If printer driver options appear, select your printer driver.
The printer properties dialog box appears.
3. Click the General tab, and then click the Printing Preferences... or Preferences... button.
The printer driver dialog box appears.
4. Select the print settings you want to use as defaults for all of your Windows programs.
5. Click OK.
6. Close the printer properties dialog box.
Related Information
• Print from Your Computer (Windows)
Related Topics:
• Print Settings (Windows)
61
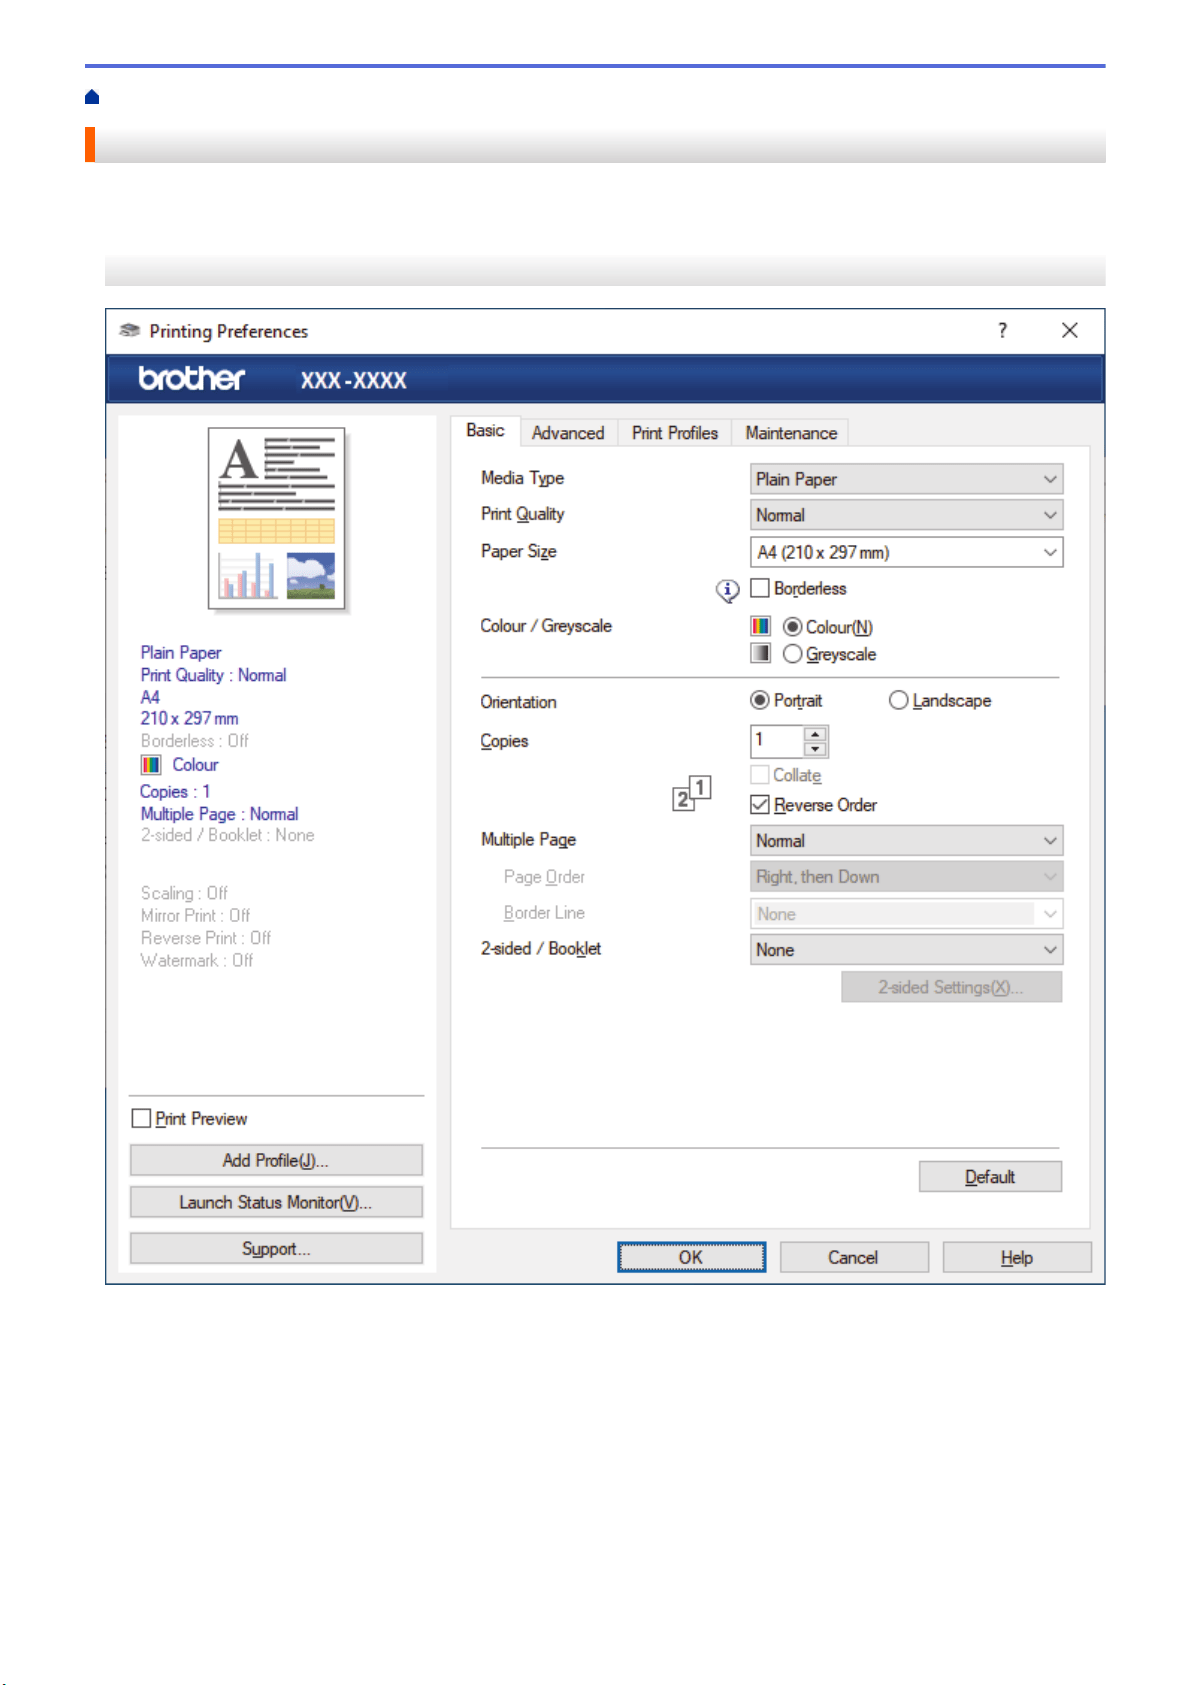
Home > Print > Print from Your Computer (Windows) > Print Settings (Windows)
Print Settings (Windows)
>> Basic Tab
>> Advanced Tab
Basic Tab
1. Media Type
Select the media type you want to use. To achieve the best print results, the machine automatically adjusts its
print settings according to the selected media type.
2. Print Quality
Select the print quality you want. Because print quality and speed are related, the higher the quality, the
longer it will take to print the document.
3. Paper Size
Select the paper size you want to use. You can either choose from standard paper sizes or create a custom
paper size.
62

Borderless
Select this option to print photos without borders. Because the image data is created slightly larger than
the paper size you are using, this will cause some cropping of the photo edges.
You may not be able to select the Borderless option for some combinations of media type and quality, or
from some applications.
4. Color / Grayscale
Select color or grayscale printing. The print speed is faster in grayscale mode than it is in color mode. If your
document contains color and you select grayscale mode, your document will be printed using 256 levels of
grayscale.
5. Orientation
Select the orientation (portrait or landscape) of your printout.
If your application contains a similar setting, we recommend that you set the orientation using the application.
6. Copies
Type the number of copies (1-999) that you want to print in this field.
Collate
Select this option to print sets of multi-page documents in the original page order. When this option is
selected, one complete copy of your document will print, and then reprint according to the number of
copies you choose. If this option is not selected, then each page will print according to the number of
copies chosen before the next page of the document is printed.
Reverse Order
Select this option to print your document in reverse order. The last page of your document will be printed
first.
7. Multiple Page
Select this option to print multiple pages on a single sheet of paper, or print one page of your document on
multiple sheets.
Page Order
Select the page order when printing multiple pages on a single sheet of paper.
Border Line
Select the type of border to use when printing multiple pages on a single sheet of paper.
8. 2-sided / Booklet
Select this option to print on both sides of the paper, or print a document in booklet format using 2-sided
printing.
2-sided Settings button
Click this button to select the type of 2-sided binding. Four types of 2-sided bindings are available for each
orientation.
63
Advanced Tab
1. Color Enhancement (True2Life)
Select this option to use the Color Enhancement feature. This feature analyzes your image to improve its
sharpness, white balance and color density. This process may take several minutes depending on the image
size and your computer's specifications.
2. Scaling
Select these options to enlarge or reduce the size of the pages in your document.
Fit to Paper Size
Select this option to enlarge or reduce the document pages to fit a specified paper size. When you select
this option, select the paper size you want from the drop-down list.
Free [ 25 - 400 % ]
Select this option to enlarge or reduce the document pages manually. When you select this option, type a
value into the field.
3. Mirror Print
Select this option to reverse the printed image on the page horizontally from left to right.
64

4. Reverse Print
Select this option to rotate the printed image 180 degrees.
5. Use Watermark
Select this option to print a logo or text on your document as a watermark. Select one of the preset
watermarks, add a new watermark, or use an image file you have created.
6. Header-Footer Print
Select this option to print the date, time and PC login user name on the document.
7. Other Print Options button
Advanced Color Settings
Select the method that the machine uses to arrange dots to express halftones.
The printout color can be adjusted to achieve the closest match to what appears on your computer screen.
Advanced Quality Settings
Select this option to print your documents at the highest quality.
Reduce Smudge
Some types of print media may need more drying time. Change this option if you have problems with
smudged printouts or paper jams.
Retrieve Printer's Color Data
Select this option to optimize the print quality using the machine's factory settings, which are set
specifically for your Brother machine. Use this option when you have replaced the machine or changed the
machine's network address.
Print Archive
Select this option to save the print data as a PDF file to your computer.
Related Information
• Print from Your Computer (Windows)
Related Topics:
• Error and Maintenance LED Indications
• Paper Handling and Printing Problems
• Print a Photo (Windows)
• Print a Document (Windows)
• Print More Than One Page on a Single Sheet of Paper (N in 1) (Windows)
• Print as a Poster (Windows)
• Use a Preset Print Profile (Windows)
• Change the Default Print Settings (Windows)
• Change the Print Options to Improve Your Print Results
65


Home > Print > Print Using Brother iPrint&Scan (Windows/Mac)
Print Using Brother iPrint&Scan (Windows/Mac)
• Print Photos or Documents Using Brother iPrint&Scan (Windows/Mac)
• Print More Than One Page on a Single Sheet of Paper Using Brother iPrint&Scan (N in
1) (Windows/Mac)
• Print a Color Document in Grayscale Using Brother iPrint&Scan (Windows/Mac)
67

Home > Print > Print Using Brother iPrint&Scan (Windows/Mac) > Print Photos or Documents Using Brother
iPrint&Scan (Windows/Mac)
Print Photos or Documents Using Brother iPrint&Scan (Windows/Mac)
1. Make sure you have loaded the correct media in the paper tray.
IMPORTANT
For photo printing:
• For best results, use Brother paper.
• When you print on photo paper, load one extra sheet of the same photo paper in the paper tray.
2. Start Brother iPrint&Scan.
• Windows
Launch (Brother iPrint&Scan).
• Mac
In the Finder menu bar, click Go > Applications, and then double-click the iPrint&Scan icon.
The Brother iPrint&Scan screen appears.
3. If your Brother machine is not selected, click the Select your Machine button, and then select your model
name from the list. Click OK.
4. Click Print.
5. Do one of the following:
• Windows
Click Photo or Document.
• Mac
Click Photo or PDF.
6. Select the file you want to print, and then do one of the following:
• Windows
Click Next.
• Mac
Click Open.
68
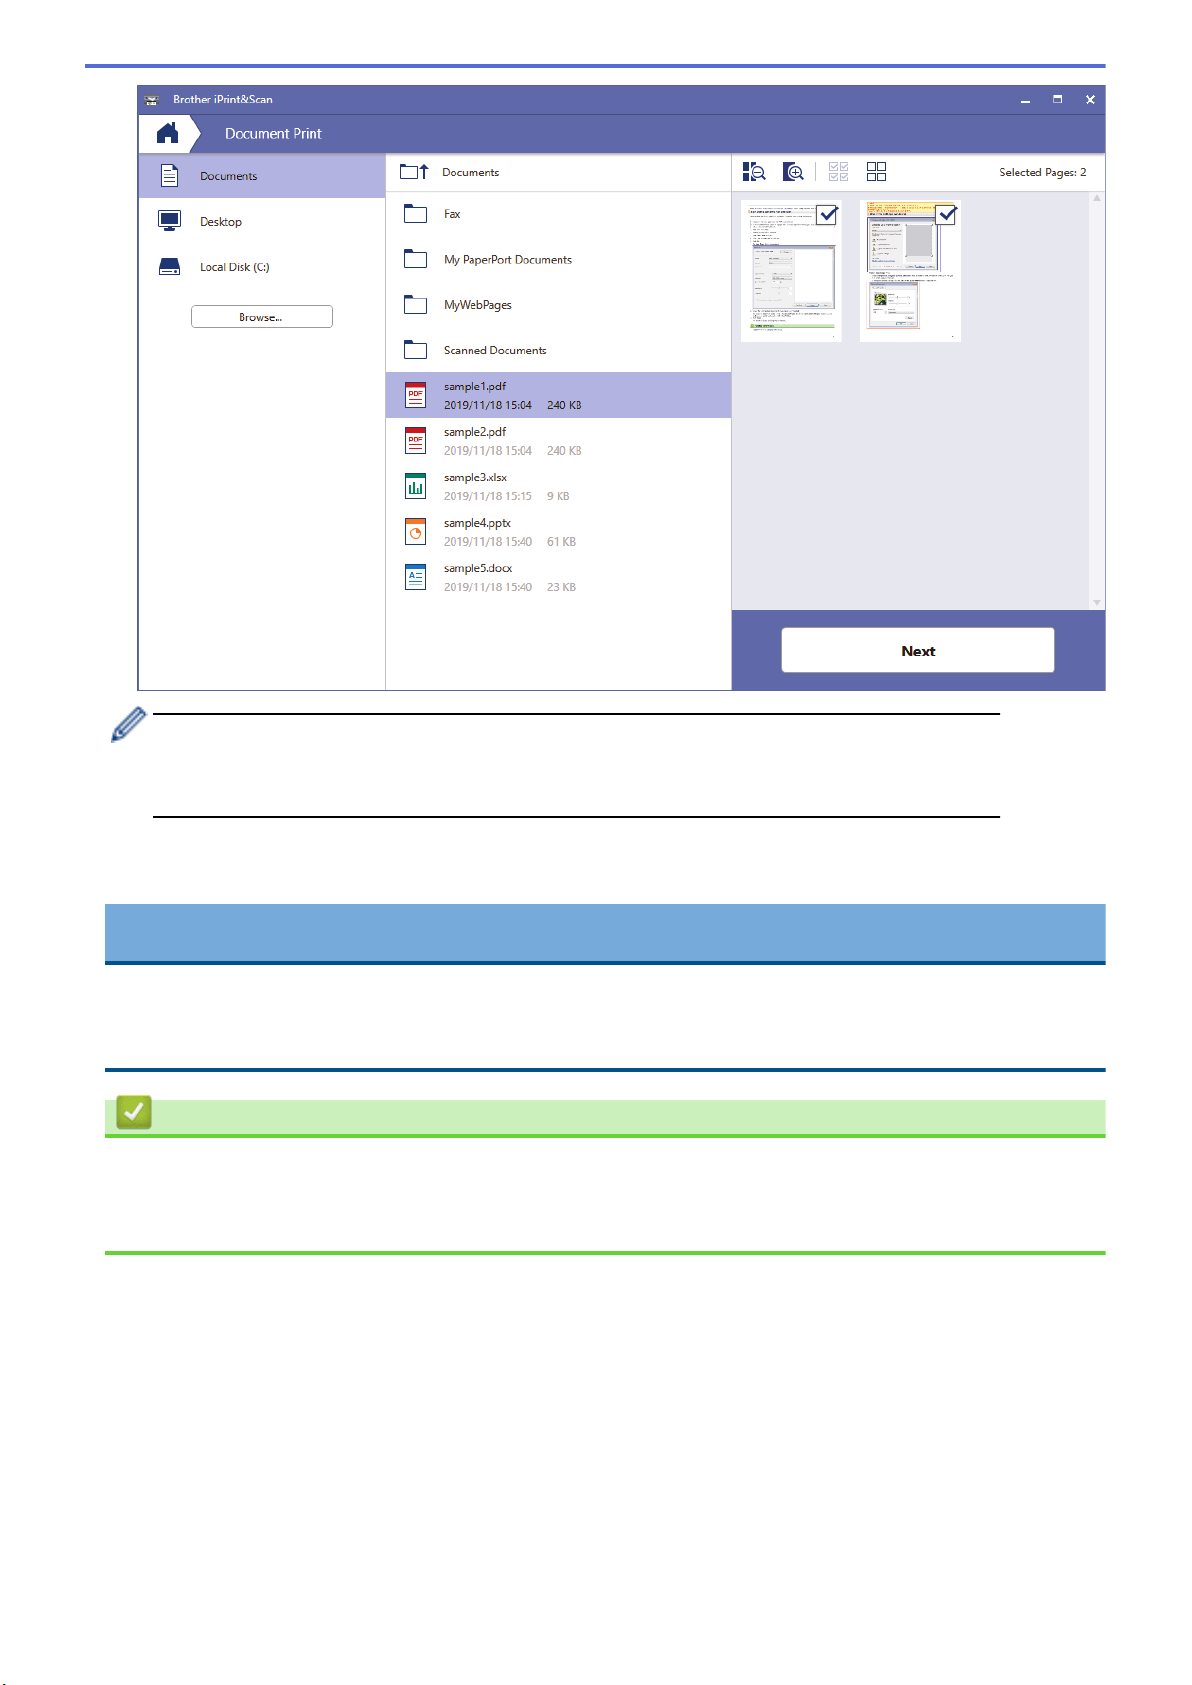
• The actual screen may differ depending on the version of the application.
• Use the latest application. See Related Information.
• When printing documents with many pages, you can also select the pages you want to print.
7. Change other printer settings, if needed.
8. Click Print.
IMPORTANT
For photo printing:
To get the best print quality for the settings you have selected, always set the Media Type option to match
the type of paper you load.
Related Information
• Print Using Brother iPrint&Scan (Windows/Mac)
Related Topics:
• Brother iPrint&Scan Overview for Windows and Mac
69
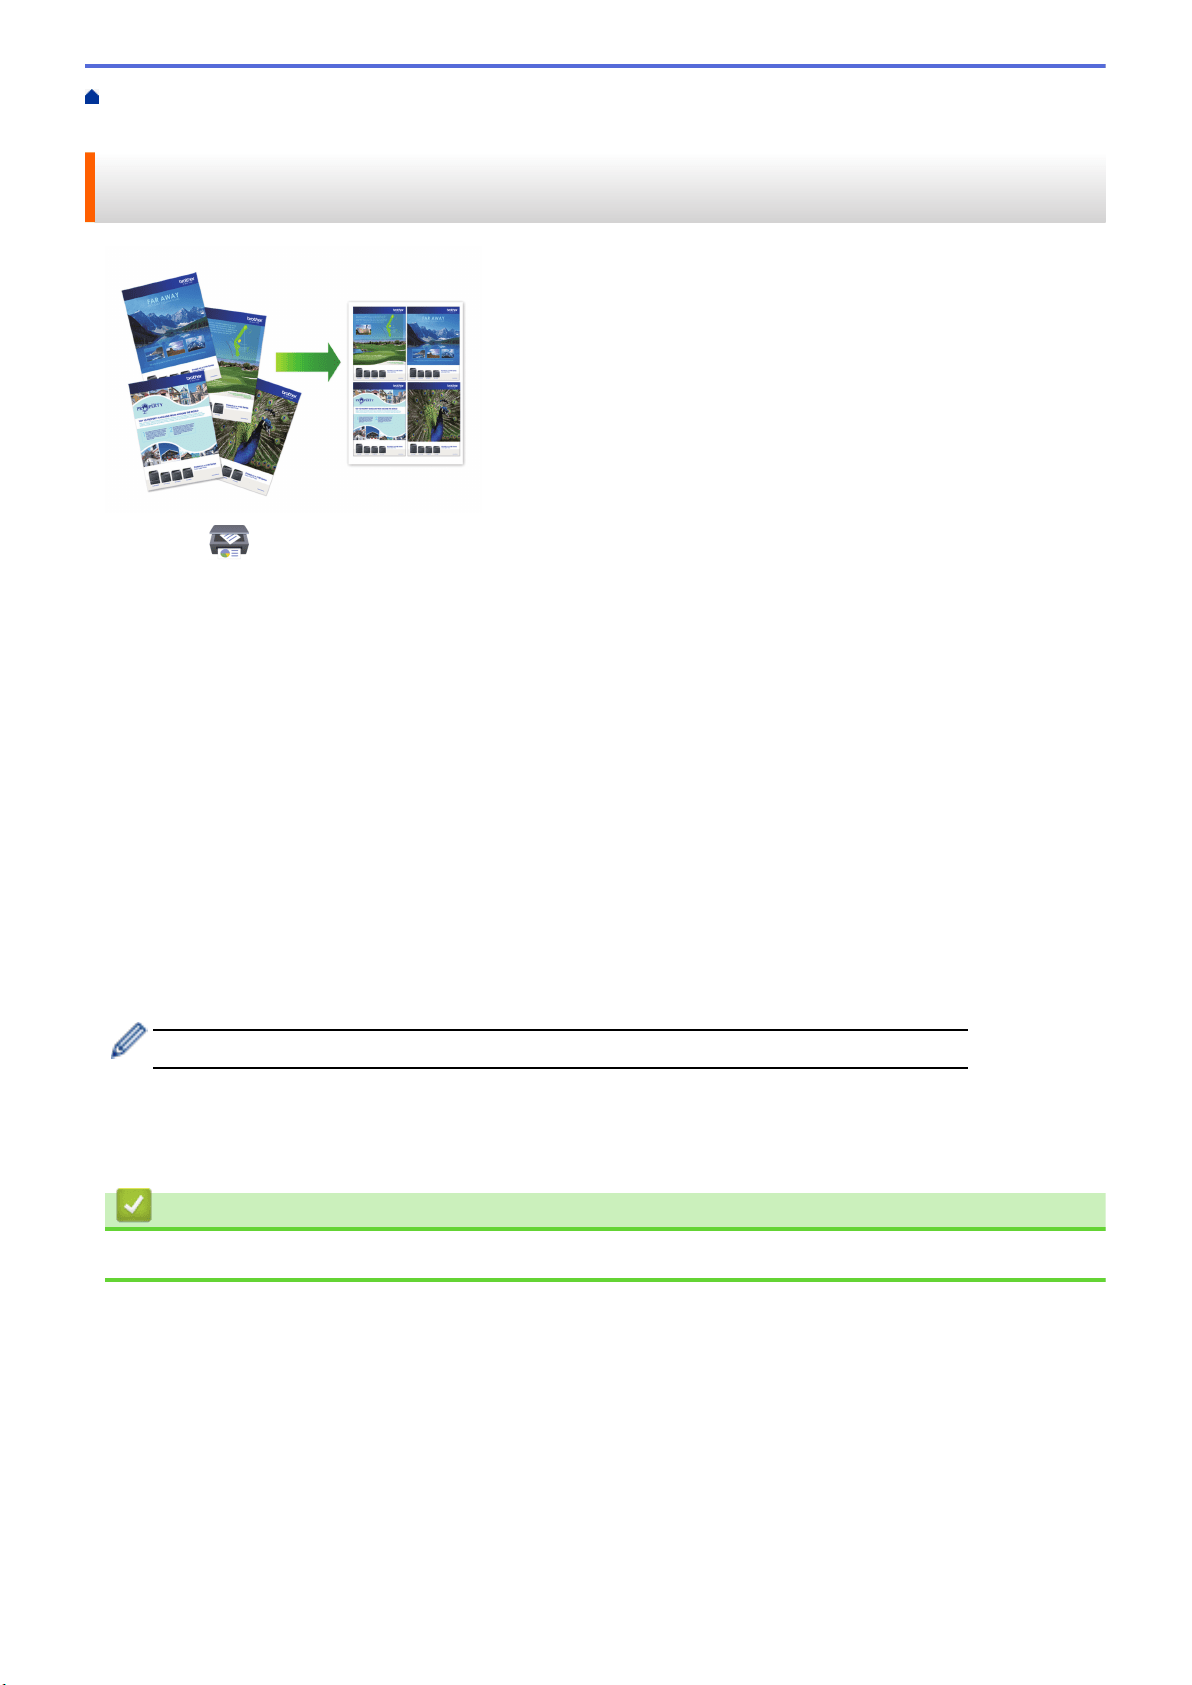
Home > Print > Print Using Brother iPrint&Scan (Windows/Mac) > Print More Than One Page on a Single
Sheet of Paper Using Brother iPrint&Scan (N in 1) (Windows/Mac)
Print More Than One Page on a Single Sheet of Paper Using Brother
iPrint&Scan (N in 1) (Windows/Mac)
1. Launch (Brother iPrint&Scan).
The Brother iPrint&Scan screen appears.
2. If your Brother machine is not selected, click the Select your Machine button, and then select your model
name from the list. Click OK.
3. Click Print.
4. Do one of the following:
• Windows
Click Document.
• Mac
Click PDF.
5. Select the file you want to print, and then do one of the following:
• Windows
Click Next.
• Mac
Click Open.
When printing documents with many pages, you can also select the pages you want to print.
6. Click the Layout drop-down list, and then select the number of pages to print on each sheet.
7. Change other printer settings, if needed.
8. Click Print.
Related Information
• Print Using Brother iPrint&Scan (Windows/Mac)
70
Home > Print > Print Using Brother iPrint&Scan (Windows/Mac) > Print a Color Document in Grayscale
Using Brother iPrint&Scan (Windows/Mac)
Print a Color Document in Grayscale Using Brother iPrint&Scan
(Windows/Mac)
Grayscale mode makes the print processing speed faster than color mode. If your document contains color,
selecting Grayscale mode prints your document in 256 levels of grayscale.
1. Start Brother iPrint&Scan.
• Windows
Launch (Brother iPrint&Scan).
• Mac
In the Finder menu bar, click Go > Applications, and then double-click the iPrint&Scan icon.
The Brother iPrint&Scan screen appears.
2. If your Brother machine is not selected, click the Select your Machine button, and then select your model
name from the list. Click OK.
3. Click Print.
4. Do one of the following:
• Windows
Click Photo or Document.
• Mac
Click Photo or PDF.
5. Select the file you want to print, and then do one of the following:
• Windows
Click Next.
• Mac
Click Open.
When printing documents with many pages, you can also select the pages you want to print.
6. Click the Color / Mono drop-down list, and then select the Mono option.
7. Change other printer settings, if needed.
8. Click Print.
Related Information
• Print Using Brother iPrint&Scan (Windows/Mac)
71

Home > Print > Print an Email Attachment
Print an Email Attachment
You can print files by emailing them to your Brother machine.
• You can attach up to 10 documents, 20 MB in total, to an email.
• This feature supports the following formats:
- Document files: PDF, TXT, and Microsoft Office files
- Image files: JPEG, BMP, GIF, PNG, and TIFF
• The machine prints both the email content and attachments by default. To print only email attachments,
change the settings as necessary.
1. Start Brother Mobile Connect on your mobile device.
2. Tap your model name on the top of the screen.
3. Tap All Machine Settings.
Web Based Management appears.
4. If required, type the password in the Login field, and then tap Login.
The default password to manage this machine’s settings is located on the back of the machine and marked
"Pwd".
5. Go to the navigation menu, and then tap Online Functions > Online Functions Settings.
Start from
, if the navigation menu is not shown on the left side of the screen.
6. Tap the I accept the terms and conditions button and continue the setting.
7. Tap Email Print > General Settings.
8. Tap Enable.
The machine prints the Instruction Sheet.
9. Send your email to the email address included on the sheet. The machine prints the email attachments.
Related Information
• Print
Related Topics:
• Access Web Based Management
• Brother Mobile Connect
72


Home > Scan > Scan Using the Buttons on Your Brother Machine
Scan Using the Buttons on Your Brother Machine
• Scan Using the Buttons on Your Brother Machine
• Scan to an Editable Text File Using OCR
• Save Scanned Data as an Email Attachment
• Web Services for Scanning on Your Network (Windows 7, Windows 8.1, and Windows
10)
74
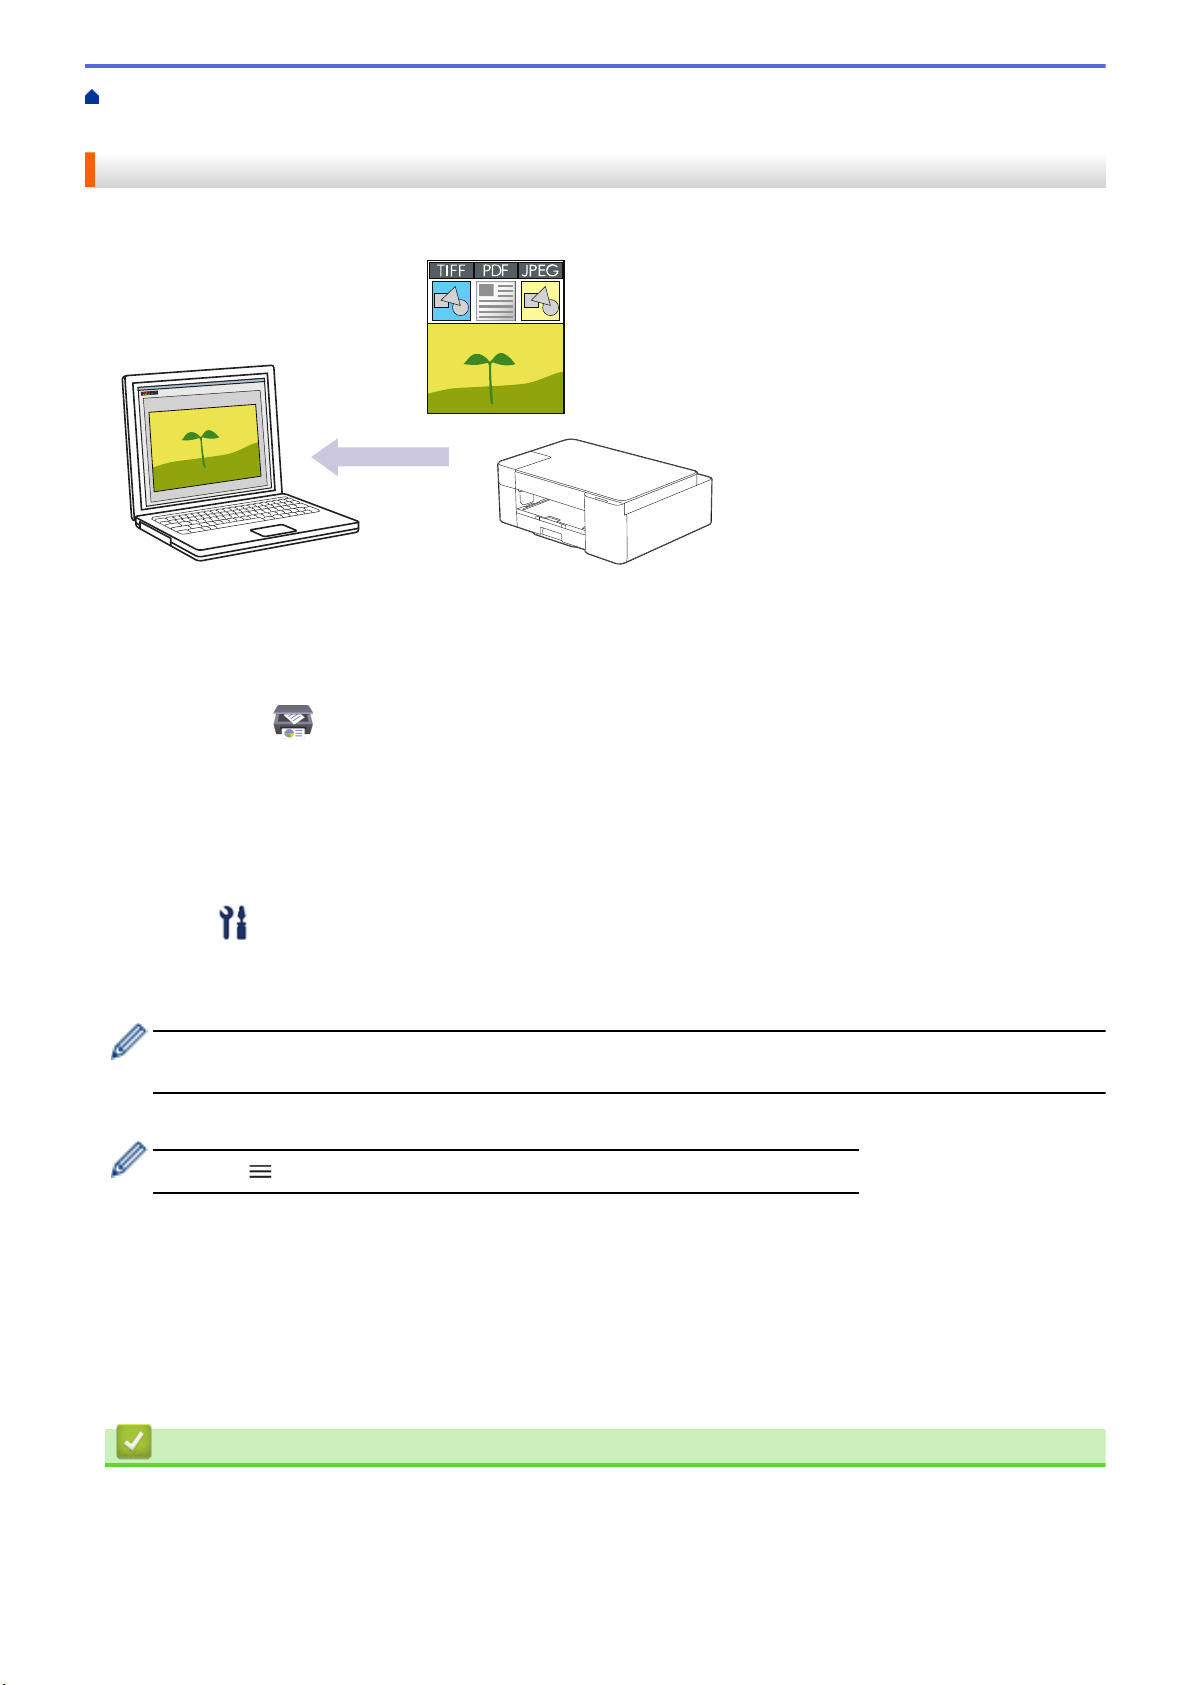
Home > Scan > Scan Using the Buttons on Your Brother Machine > Scan Using the Buttons on Your
Brother Machine
Scan Using the Buttons on Your Brother Machine
Send scanned photos or graphics directly to your computer.
1. Before scanning for the first time, do the following:
a. Start Brother iPrint&Scan.
• Windows
Launch
(Brother iPrint&Scan).
• Mac
In the Finder menu bar, click Go > Applications, and then double-click the iPrint&Scan icon.
The Brother iPrint&Scan screen appears.
b. If your Brother machine is not selected, click the Select your Machine button, and then select your model
name from the list. Click OK.
c. Click
(Machine Settings).
d. Click All Settings.
e. If required, type the password in the Login field, and then click Login.
The default password to manage this machine’s settings is located on the back of the machine and marked
"Pwd".
f. Go to the navigation menu, and then click Scan > Scan to PC.
Start from
, if the navigation menu is not shown on the left side of the screen.
g. Select the scan type you want to use from the Scan to drop-down list.
h. Select the computer name where you want to send data from the PC Name drop-down list.
i. Click Submit.
2. Load your document.
3. Press MONO COPY and COLOR COPY simultaneously.
If you are requested to select a scanning application, select Brother iPrint&Scan from the list.
Related Information
• Scan Using the Buttons on Your Brother Machine
• Change Scan Settings Using Brother iPrint&Scan
75


Home > Scan > Scan Using the Buttons on Your Brother Machine > Scan Using the Buttons on Your
Brother Machine > Change Scan Settings Using Brother iPrint&Scan
Change Scan Settings Using Brother iPrint&Scan
Brother iPrint&Scan allows you to change the machine's Scan Button settings.
1. Start Brother iPrint&Scan.
• Windows
Launch
(Brother iPrint&Scan).
• Mac
In the Finder menu bar, click Go > Applications, and then double-click the iPrint&Scan icon.
The Brother iPrint&Scan screen appears.
2. If your Brother machine is not selected, click the Select your Machine button, and then select your model
name from the list. Click OK.
3. Click the Machine Scan Settings button, and then follow the on-screen instructions to change the scan
settings, such as document size, color, and resolution.
Related Information
• Scan Using the Buttons on Your Brother Machine
77
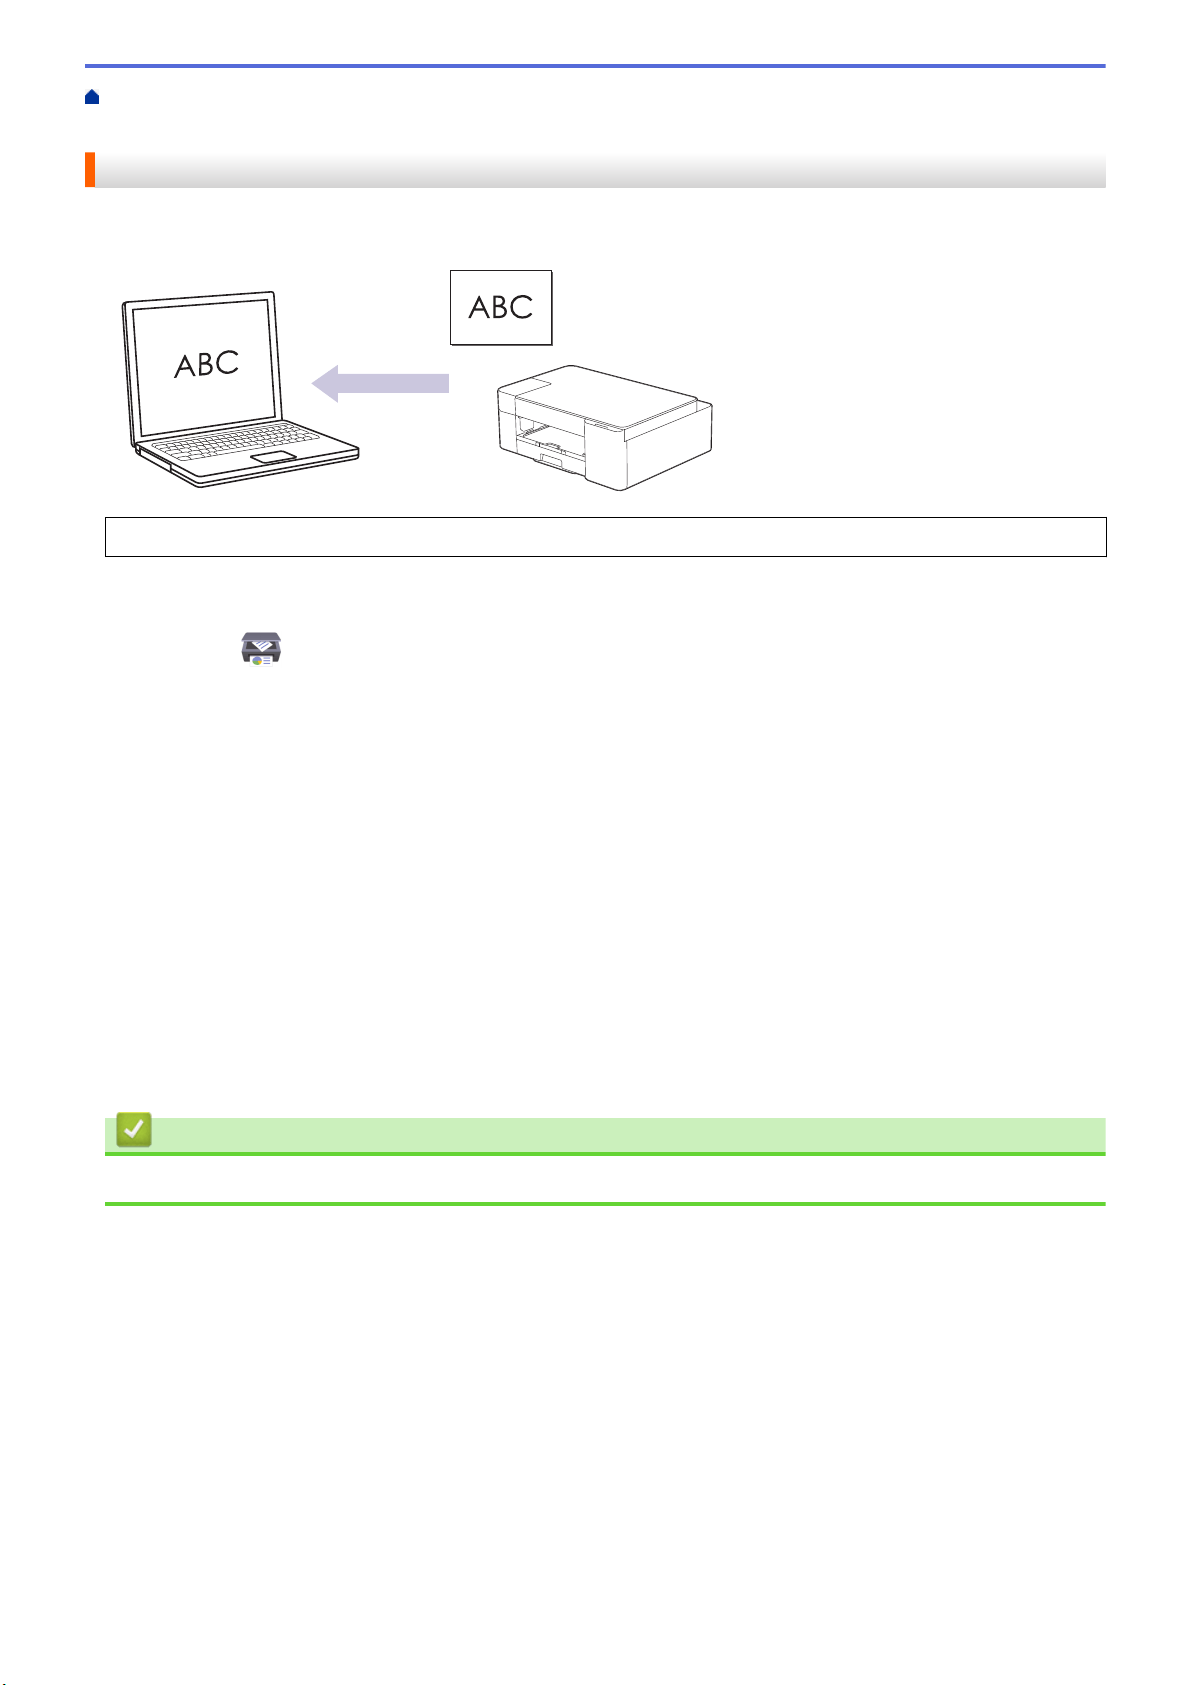
Home > Scan > Scan Using the Buttons on Your Brother Machine > Scan to an Editable Text File Using
OCR
Scan to an Editable Text File Using OCR
Your machine can convert characters in a scanned document to text using optical character recognition (OCR)
technology. You can edit this text using your preferred text-editing application.
The Scan to OCR feature is available for certain languages.
1. Start Brother iPrint&Scan.
• Windows
Launch
(Brother iPrint&Scan).
• Mac
In the Finder menu bar, click Go > Applications, and then double-click the iPrint&Scan icon.
The Brother iPrint&Scan screen appears.
2. Click Machine Scan Settings.
3. Click OCR.
4. Configure the scan settings, and then click OK.
5. Do one of the following:
• Windows
Click Close.
• Mac
Click OK.
6. Load your document.
7. Press MONO COPY and COLOR COPY simultaneously.
Related Information
• Scan Using the Buttons on Your Brother Machine
78

Home > Scan > Scan Using the Buttons on Your Brother Machine > Save Scanned Data as an Email
Attachment
Save Scanned Data as an Email Attachment
Send the scanned data from your machine to your email application as an attachment.
To scan to email using the machine's Scan Button, make sure you select one of these applications in Brother
iPrint&Scan:
• Windows: Microsoft Outlook
• Mac: Apple Mail
For other applications and Webmail services, use the Scan to Image or Scan to File feature to scan a
document, and then attach the scanned file to an email message.
1. Start Brother iPrint&Scan.
• Windows
Launch
(Brother iPrint&Scan).
• Mac
In the Finder menu bar, click Go > Applications, and then double-click the iPrint&Scan icon.
The Brother iPrint&Scan screen appears.
2. Click Machine Scan Settings.
3. Click E-mail.
4. Configure the scan settings, and then click OK.
5. Do one of the following:
• Windows
Click Close.
• Mac
Click OK.
6. Load your document.
7. Press MONO COPY and COLOR COPY simultaneously.
Related Information
• Scan Using the Buttons on Your Brother Machine
79

Home > Scan > Scan Using the Buttons on Your Brother Machine > Web Services for Scanning on Your
Network (Windows 7, Windows 8.1, and Windows 10)
Web Services for Scanning on Your Network (Windows 7, Windows 8.1,
and Windows 10)
The Web Services protocol enables Windows 7, Windows 8.1 and Windows 10 users to scan using a Brother
machine on the network. You must install the driver via Web Services.
• Use Web Services to Install Drivers Used for Scanning (Windows 7, Windows 8.1, and
Windows 10)
• Scan Using Web Services from Your Machine (Windows 7, Windows 8.1, and Windows
10)
• Configure Scan Settings for Web Services
80
Home > Scan > Scan Using the Buttons on Your Brother Machine > Web Services for Scanning on Your
Network (Windows 7, Windows 8.1, and Windows 10) > Use Web Services to Install Drivers Used for
Scanning (Windows 7, Windows 8.1, and Windows 10)
Use Web Services to Install Drivers Used for Scanning (Windows 7,
Windows 8.1, and Windows 10)
• Make sure you have installed the correct software and drivers for your machine.
• Verify that the host computer and the Brother machine are on the same subnet, or that the router is
correctly configured to pass data between the two devices.
• You must configure the IP address on your Brother machine before you configure this setting.
1. Do one of the following:
• Windows 10
Click
> Windows System > Control Panel. In the Hardware and Sound group, click Add a device.
• Windows 8.1
Move your mouse to the lower right corner of your desktop. When the menu bar appears, click Settings >
Change PC settings > PC and devices > Devices > Add a device.
The machine's Web Services Name appears.
• Windows 7
Click
(Start) > Control Panel > Network and Internet > View network computers and devices.
The machine's Web Services Name appears with the printer icon.
Right-click the machine you want to install.
• The Web Services Name for the Brother machine is your model name and the MAC Address (Ethernet
Address) of your machine (for example, Brother XXX-XXXX (where XXX-XXXX is the name of your
model) [XXXXXXXXXXXX] (MAC Address / Ethernet Address)).
• Windows 8.1/Windows 10
Move your mouse over the machine name to display the machine's information.
2. Do one of the following:
• Windows 8.1/Windows 10
Select the machine you want to install, and then follow the on-screen instructions.
• Windows 7
Click Install in the displayed menu.
To uninstall drivers, click Uninstall or (Remove device).
Related Information
• Web Services for Scanning on Your Network (Windows 7, Windows 8.1, and Windows 10)
81

Home > Scan > Scan Using the Buttons on Your Brother Machine > Web Services for Scanning on Your
Network (Windows 7, Windows 8.1, and Windows 10) > Scan Using Web Services from Your Machine
(Windows 7, Windows 8.1, and Windows 10)
Scan Using Web Services from Your Machine (Windows 7, Windows 8.1,
and Windows 10)
If you have installed the driver for scanning via Web Services, you can access the Web Services scanning menu
using Web Based Management.
If the insufficient memory error occurs, select a smaller size in the Paper size setting or a lower resolution in
the Resolution (DPI) setting.
1. Launch (Brother iPrint&Scan).
The Brother iPrint&Scan screen appears.
2. If your Brother machine is not selected, click the Select your Machine button, and then select your model
name from the list. Click OK.
3. Click
(Machine Settings).
4. Click All Settings.
5. If required, type the password in the Login field, and then click Login.
The default password to manage this machine’s settings is located on the back of the machine and marked
"Pwd".
6. Go to the navigation menu, and then click Scan > Scan to PC.
Start from
, if the navigation menu is not shown on the left side of the screen.
7. Select the WS Scan option from the Scan to drop-down list.
8. Select the computer name where you want to send data from the PC Name drop-down list.
9. Click Submit.
10. Load your document.
11. Press MONO COPY and COLOR COPY simultaneously.
Related Information
• Web Services for Scanning on Your Network (Windows 7, Windows 8.1, and Windows 10)
Related Topics:
• Change Scan Settings Using Brother iPrint&Scan
• Access Web Based Management
82
Home > Scan > Scan Using the Buttons on Your Brother Machine > Web Services for Scanning on Your
Network (Windows 7, Windows 8.1, and Windows 10) > Configure Scan Settings for Web Services
Configure Scan Settings for Web Services
1. Do one of the following:
• Windows 10
Click
> Windows System > Control Panel. In the Hardware and Sound group, click View devices
and printers.
• Windows 8.1
Move your mouse to the lower right corner of your desktop. When the menu bar appears, click Settings,
and then click Control Panel. In the Hardware and Sound group, click View devices and printers.
• Windows 7
Click
(Start) > Devices and Printers.
2. Right-click the machine icon, and then select Scan profiles.... The Scan Profiles dialog box appears.
3. Select the scan profile you want to use.
4. Make sure the scanner selected in the Scanner list is a machine that supports Web Services for scanning,
and then click the Set as Default button.
5. Click Edit....
The Edit Default Profile dialog box appears.
6. Select the Source, Paper size, Color format, File type, Resolution (DPI), Brightness and Contrast
settings.
7. Click the Save Profile button.
These settings will be applied when you scan using the Web Services protocol.
If you are requested to select a scanning application, select Windows Fax and Scan from the list.
Related Information
• Web Services for Scanning on Your Network (Windows 7, Windows 8.1, and Windows 10)
83
Home > Scan > Scan Using Brother iPrint&Scan (Windows/Mac)
Scan Using Brother iPrint&Scan (Windows/Mac)
1. Start Brother iPrint&Scan.
• Windows
Launch (Brother iPrint&Scan).
• Mac
In the Finder menu bar, click Go > Applications, and then double-click the iPrint&Scan icon.
The Brother iPrint&Scan screen appears.
2. If your Brother machine is not selected, click the Select your Machine button, and then select your model
name from the list. Click OK.
3. Click the Scan icon, and then follow the on-screen instructions to scan your documents.
Related Information
• Scan
Related Topics:
• Change Scan Settings Using Brother iPrint&Scan
84

Home > Scan > Scan from Your Computer (Windows)
Scan from Your Computer (Windows)
There are several ways you can use your computer to scan photos and documents on your machine. Use the
software applications we provide or use your favorite scanning application.
•
Scan Using Nuance
™
PaperPort
™
14SE or Other Windows Applications
• Scan Using Windows Fax and Scan
85
Home > Scan > Scan from Your Computer (Windows) > Scan Using Nuance
™
PaperPort
™
14SE or Other
Windows Applications
Scan Using Nuance
™
PaperPort
™
14SE or Other Windows Applications
You can use the Nuance
™
PaperPort
™
14SE application for scanning.
• To download the Nuance
™
PaperPort
™
14SE application, click (Brother Utilities), select Do More in
the left navigation bar, and then click PaperPort.
• Nuance
™
PaperPort
™
14SE supports Windows 7, Windows 8.1, Windows 10 Home, Windows 10 Pro,
Windows 10 Education and Windows 10 Enterprise.
• For detailed instructions on using each application, click the application's Help menu, and then click
Getting Started Guide in the Help ribbon.
The instructions for scanning in these steps are for PaperPort
™
14SE. For other Windows applications, the
steps will be similar. PaperPort
™
14SE supports both TWAIN and WIA drivers; the TWAIN driver
(recommended) is used in these steps.
Depending on the model of your machine, Nuance
™
PaperPort
™
14SE may not be included. If it is not included,
you can use other software applications that support scanning.
1. Load your document.
2. Start PaperPort
™
14SE.
Do one of the following:
• Windows 10
Click
> Nuance PaperPort 14 > PaperPort.
• Windows 8.1
Click (PaperPort).
• Windows 7
Using your computer, click
(Start) > All Programs > Nuance PaperPort 14 > PaperPort.
3. Click the Desktop menu, and then click Scan Settings in the Desktop ribbon.
The Scan or Get Photo panel appears on the left side of the screen.
4. Click Select.
5. From the available Scanners list, select TWAIN: TW-Brother XXX-XXXX or TWAIN: TW-Brother XXX-XXXX
LAN (where XXX-XXXX is the name of your model).
6. Select the Display scanner dialog box checkbox in the Scan or Get Photo panel.
7. Click Scan.
The Scanner Setup dialog box appears.
86
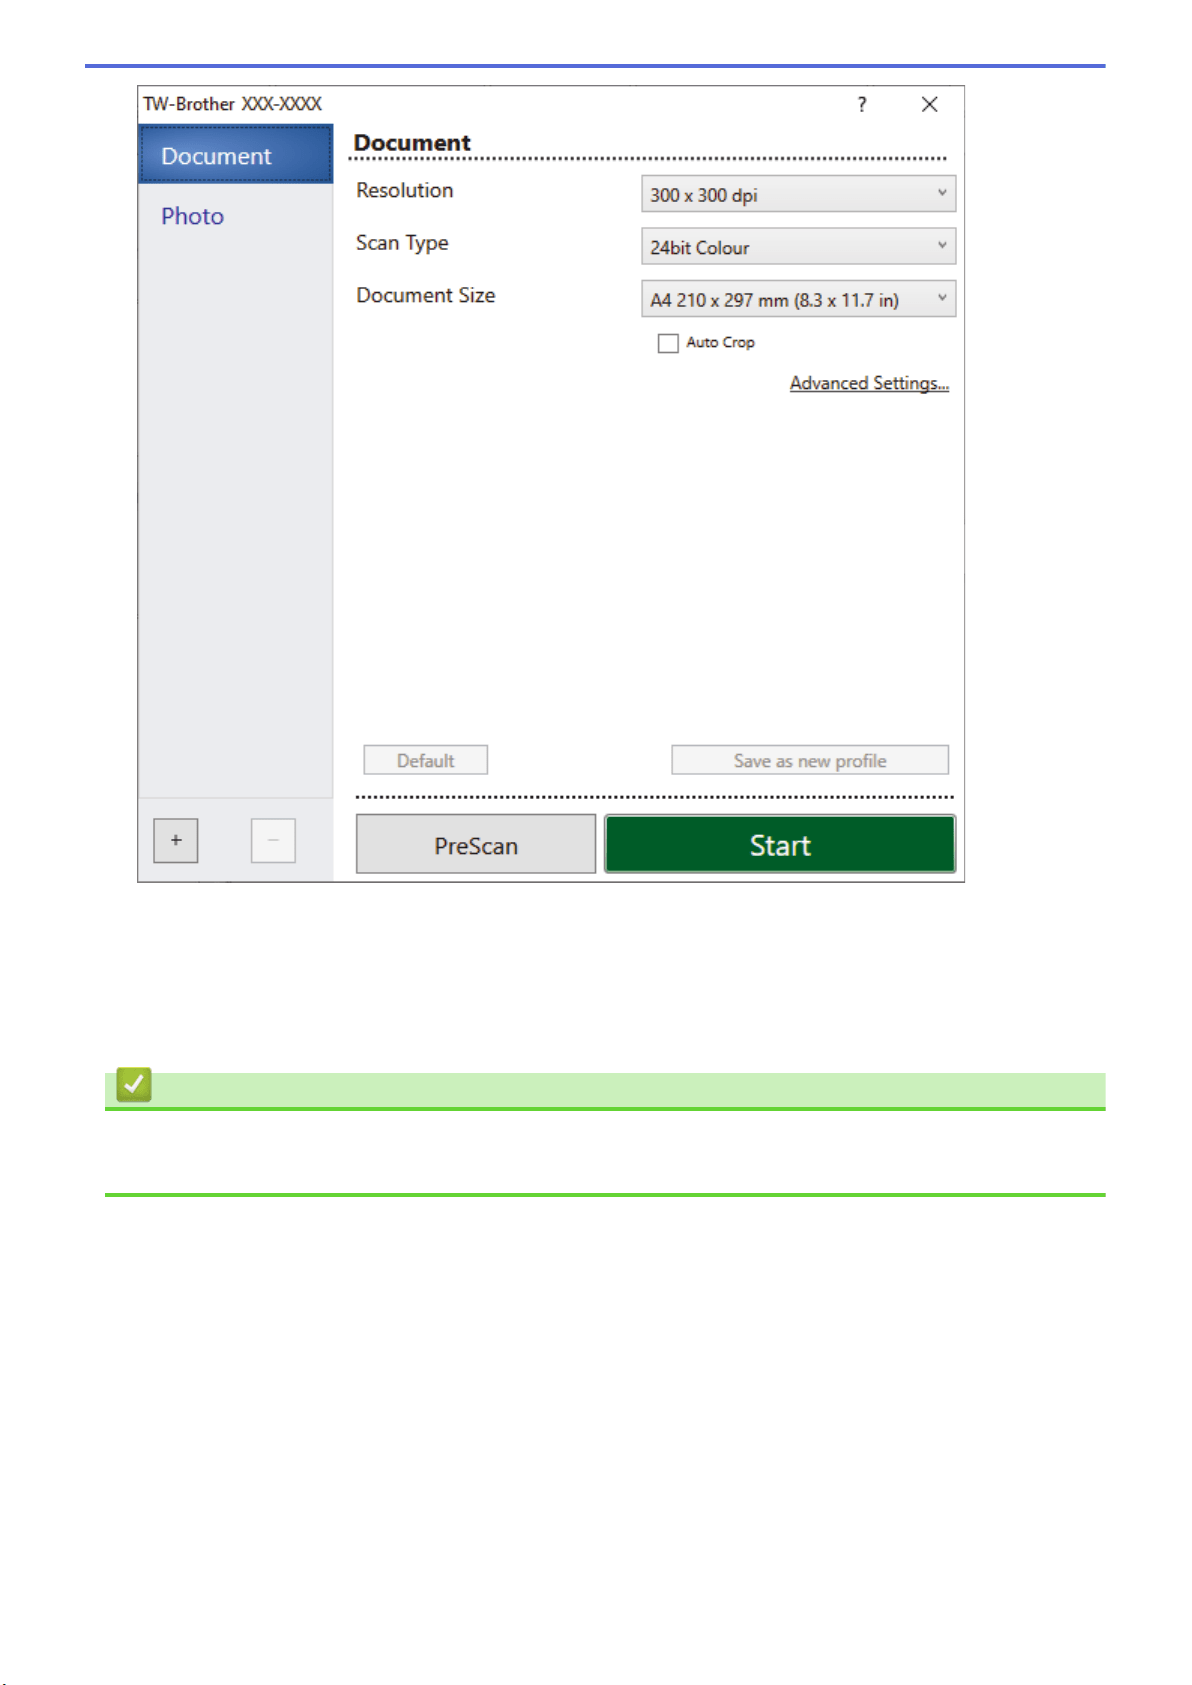
8. Adjust the settings in the Scanner Setup dialog box, if needed.
9. Click the Document Size drop-down list, and then select your document size.
10. Click PreScan to preview your image and crop unwanted portions before scanning.
11. Click Start.
The machine starts scanning.
Related Information
• Scan from Your Computer (Windows)
• TWAIN Driver Settings (Windows)
87
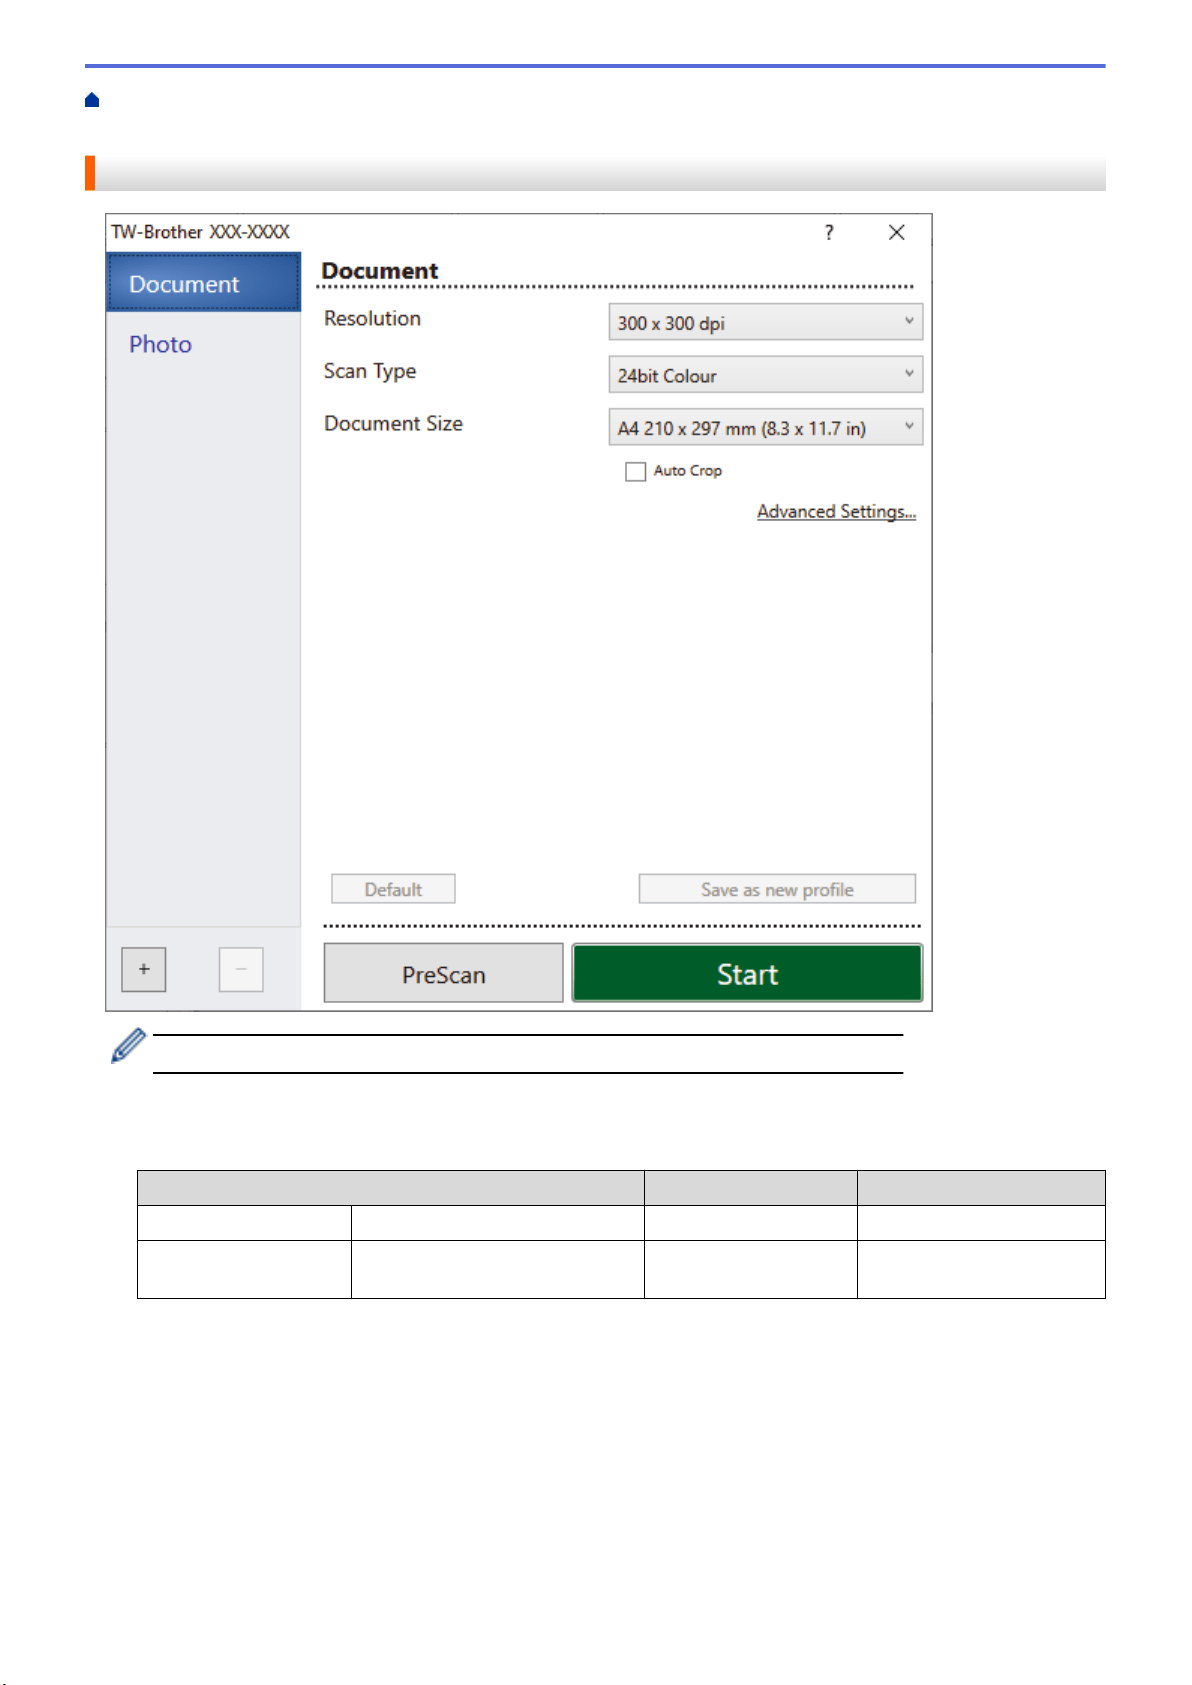
Home > Scan > Scan from Your Computer (Windows) > Scan Using Nuance
™
PaperPort
™
14SE or Other
Windows Applications > TWAIN Driver Settings (Windows)
TWAIN Driver Settings (Windows)
Note that the item names and assignable values will vary depending on the machine.
1. Scan
Select the Photo or Document option depending on the type of document you want to scan.
Scan (Image Type)
Resolution Scan Type
Photo Use for scanning photo images. 300 x 300 dpi 24bit Color
Document Use for scanning text
documents.
300 x 300 dpi 24bit Color
2. Resolution
Select a scanning resolution from the Resolution drop-down list. Higher resolutions take more memory and
transfer time, but produce a finer scanned image.
3. Scan Type
Select from a range of scan color depths.
• Black & White
Use for text or line art images.
88

• Gray (Error Diffusion)
Use for photographic images or graphics. (Error Diffusion is a method for creating simulated gray
images without using true gray dots. Black dots are put in a specific pattern to give a gray
appearance.)
• True Gray
Use for photographic images or graphics. This mode is more accurate because it uses up to 256
shades of gray.
• 24bit Color
Use to create an image with the most accurate color reproduction. This mode uses up to 16.8 million
colors to scan the image, but it requires the most memory and has the longest transfer time.
4. Document Size
Select the exact size of your document from a selection of preset scan sizes.
If you select Custom, the Custom Document Size dialog box appears and you can specify the document
size.
5. Auto Crop
Scan multiple documents placed on the scanner glass. The machine will scan each document and create
separate files or a single multi-page file.
6. Advanced Settings
Configure advanced settings by clicking the Advanced Settings link in the Scanner Setup dialog box.
• Document Correction
- Auto Deskew
Set the machine to correct document skewing automatically as the pages are scanned from the
scanner glass.
- Margin Settings
Adjust your document's margins.
- Rotate Image
Rotate the scanned image.
- Edge Fill
Fill in the edges on four sides of the scanned image using the selected color and range.
• Image Quality
- Diffusion Adjustment -Gray
Adjust the diffusion when selecting the Gray (Error Diffusion) option from the Scan Type drop-down
list.
- Color Tone Adjustment
Adjust the color tone.
- Background Processing
• Remove Bleed-through / Pattern
Prevent bleed-through.
• Remove Background Color
Remove the base color of documents to make the scanned data more legible.
- Color Drop
Select a color to remove from the scanned image.
- Edge Emphasis
Sharpen the characters in the original.
- Reduce Noise
Improve and enhance the quality of your scanned images with this selection. The Reduce Noise
option is available when selecting the 24bit Color option and the 300 x 300 dpi, 400 x 400 dpi, or
600 x 600 dpi scan resolution.
• B&W Image Quality
89

- B&W Threshold Adjustment
Adjust the threshold to generate a black and white image.
- Character Correction
Correct the broken or incomplete characters of the original to make them easier to read.
- B&W Inversion
Invert black and white in the black and white image.
• Feed Control
Continuous Scan
Select this option to scan multiple pages. After a page is scanned, select whether to continue scanning or
finish.
Related Information
• Scan Using Nuance
™
PaperPort
™
14SE or Other Windows Applications
90

Home > Scan > Scan from Your Computer (Windows) > Scan Using Windows Fax and Scan
Scan Using Windows Fax and Scan
Windows Fax and Scan application is another option that you can use for scanning.
Windows Fax and Scan uses the WIA scanner driver.
1. Load your document.
2. Launch Windows Fax and Scan.
3. Click File > New > Scan.
4. Select the scanner you want to use.
5. Click OK.
The New Scan dialog box appears.
6. Adjust the settings in the dialog box, if needed.
The scanner resolution can be set to a maximum of 1200 dpi. If you want to scan at higher resolutions, use
the Scanner Utility software from Brother Utilities.
7. Click Scan.
The machine starts scanning the document.
Related Information
• Scan from Your Computer (Windows)
• WIA Driver Settings (Windows)
91
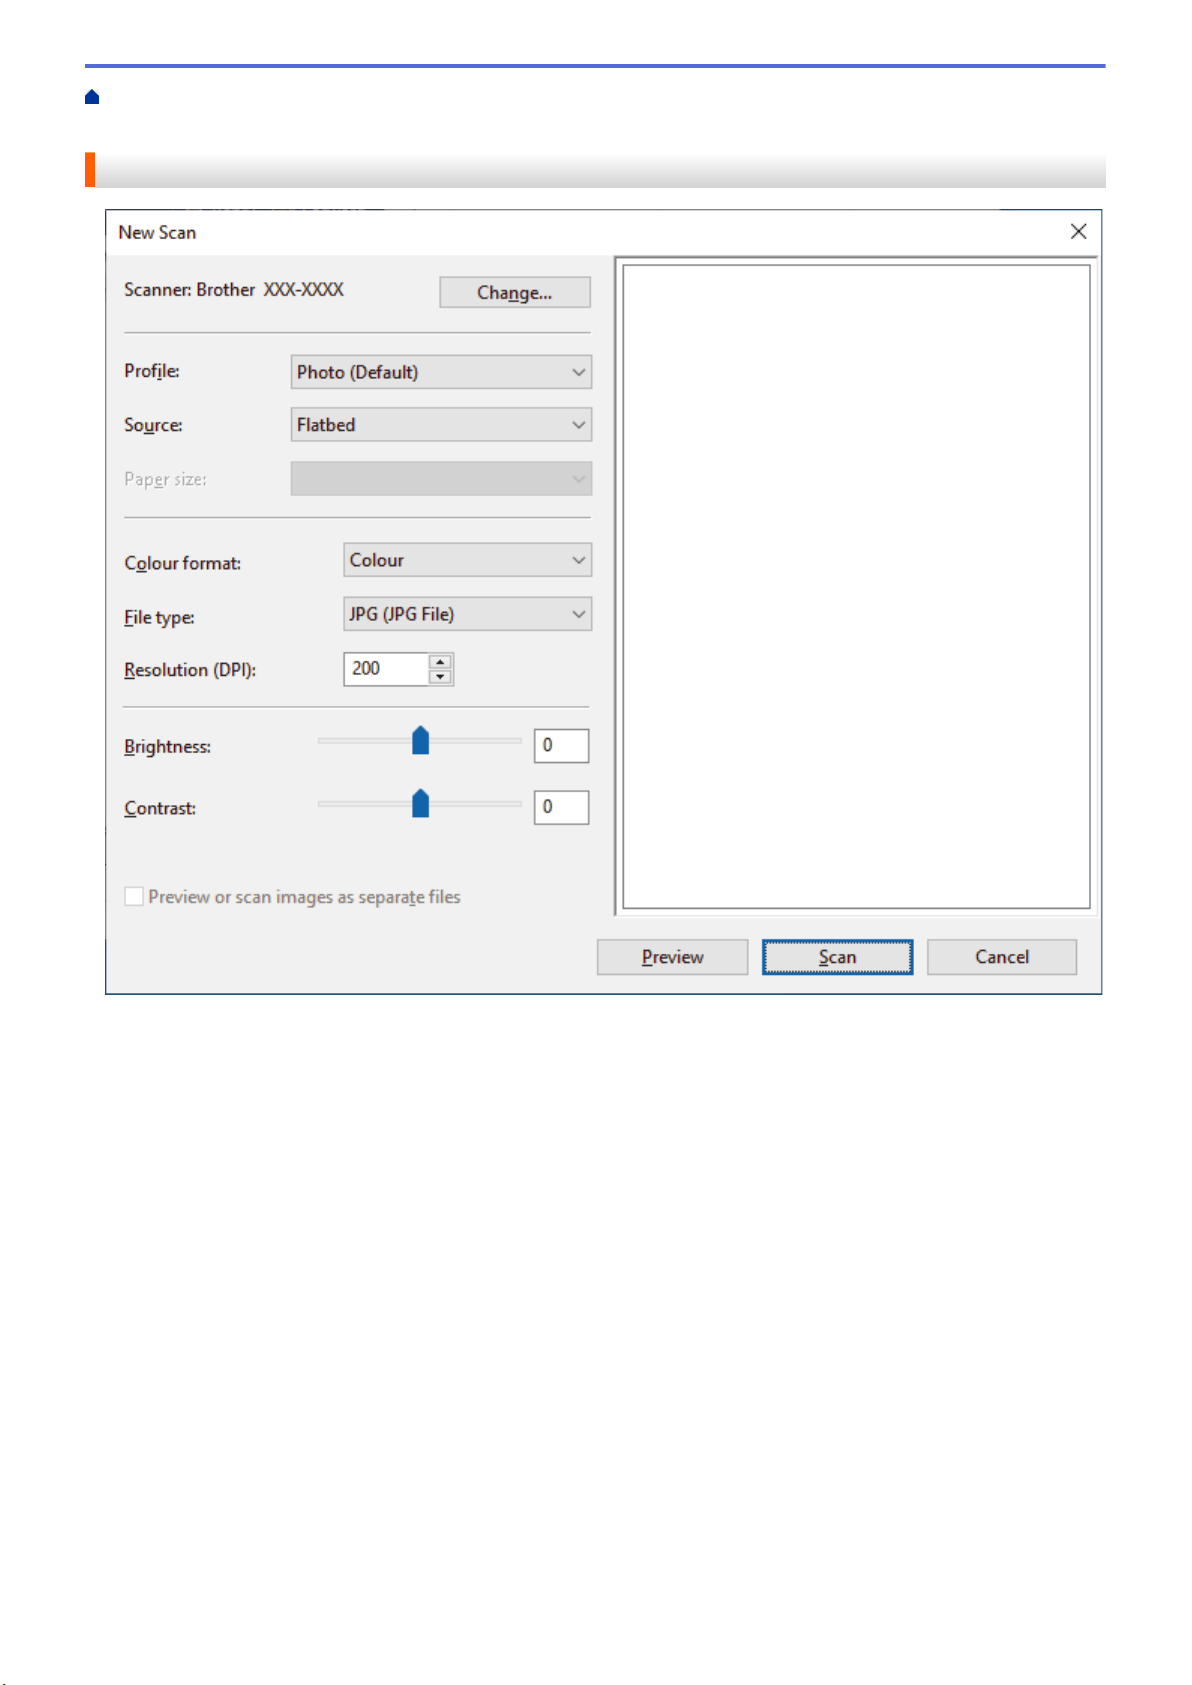
Home > Scan > Scan from Your Computer (Windows) > Scan Using Windows Fax and Scan > WIA Driver
Settings (Windows)
WIA Driver Settings (Windows)
Profile
Select the scan profile you want to use from the Profile drop-down list.
Source
Select the Flatbed or Feeder (Scan one side) option from the drop-down list.
Paper size
The Paper size option is available if you select the Feeder (Scan one side) as the Source option.
Color format
Select a scan color format from the Color format drop-down list.
File type
Select a file format from the File type drop-down list.
Resolution (DPI)
Set a scanning resolution in the Resolution (DPI) field. Higher resolutions take more memory and transfer
time, but produce a finer scanned image.
Brightness
Set the Brightness level by dragging the slider to the right or left to lighten or darken the image. If the
scanned image is too light, set a lower brightness level and scan the document again. If the image is too dark,
92

set a higher brightness level and scan the document again. You can also type a value in the field to set the
brightness level.
Contrast
Increase or decrease the Contrast level by moving the slider to the right or left. An increase emphasizes dark
and light areas of the image, while a decrease reveals more details in gray areas. You can also type a value in
the field to set the contrast level.
Related Information
• Scan Using Windows Fax and Scan
93


Home > Copy > Copy Overview
Copy Overview
To make copies, do one of the following:
• Use the Brother Mobile Connect application.
• Use your machine's MONO COPY/COLOR COPY button.
Available Copy Options MONO COPY/COLOR COPY Brother Mobile Connect
Number of Copies Yes Yes
Color/Mono Yes Yes
Quality Yes Yes
Page Layout 2in1 ID No Yes
2in1 No Yes
4in1 No Yes
Poster No Yes
Enlarge/Reduce Fit to Page No Yes
A4→A5 No Yes
Other Settings No Yes
Paper Size No Yes
Paper Type No Yes
Density No Yes
Quality No Yes
Remove Background Color No Yes
You can also use the Brother iPrint&Scan application for Windows/Mac. The available copy options may
differ depending on the application.
Related Information
• Copy
Related Topics:
• What is Web Based Management?
• Brother Mobile Connect
96

Home > Copy > Copy a Document
Copy a Document
1. Make sure you have loaded the correct size paper in the paper tray.
2. Load your document.
3. Press MONO COPY or COLOR COPY.
• If you want to copy with the best quality, press and hold MONO COPY or COLOR COPY for two
seconds.
• To make multiple copies, press MONO COPY or COLOR COPY as many times as you want to make
copies.
• To make multiple copies with the best quality:
a. Press and hold MONO COPY or COLOR COPY for two seconds to make the first copy.
b. Press MONO COPY or COLOR COPY once for each additional copy.
• To interrupt copying, press
(STOP).
Related Information
• Copy
Related Topics:
• Load Documents on the Scanner Glass
• Copy Settings
• Change the Paper Size and Paper Type
97


Home > Copy > Copy Using Brother Mobile Connect > Copy an ID Card
Copy an ID Card
Use the 2 in 1 ID feature to copy both sides of an identification card onto one page, keeping the original card
size.
• Make sure the paper size is set to Letter or A4.
• You may copy an identification card to the extent permitted under applicable laws. For more detailed
information, see the Product Safety Guide.
1. Place your identification card face down near the lower-right corner of the scanner glass as shown.
2 in 1 ID (Vertical)
2 in 1 ID (Horizontal)
a
b
c
d
a
a
b
c
d
a
a. 0.12 in. (3 mm) or greater (bottom, right)
b. 5.4 in. (137 mm)
c. 2 in 1 ID (Vertical): 8.4 in. (213 mm)
2 in 1 ID (Horizontal): 4.1 in. (105 mm)
d. Scannable area
2. Start Brother Mobile Connect on your mobile device.
3. Tap Copy.
4. Select the 2in1 ID Vertical or 2in1 ID Horizontal option from the Page Layout list.
5. Tap Copy.
The machine starts scanning one side of the identification card.
6. After the machine has scanned the first side, the Power LED blinks slowly. Turn over the identification card
and tap Continue to scan the other side.
Related Information
• Copy Using Brother Mobile Connect
Related Topics:
• Copy Settings
• Brother Mobile Connect
99
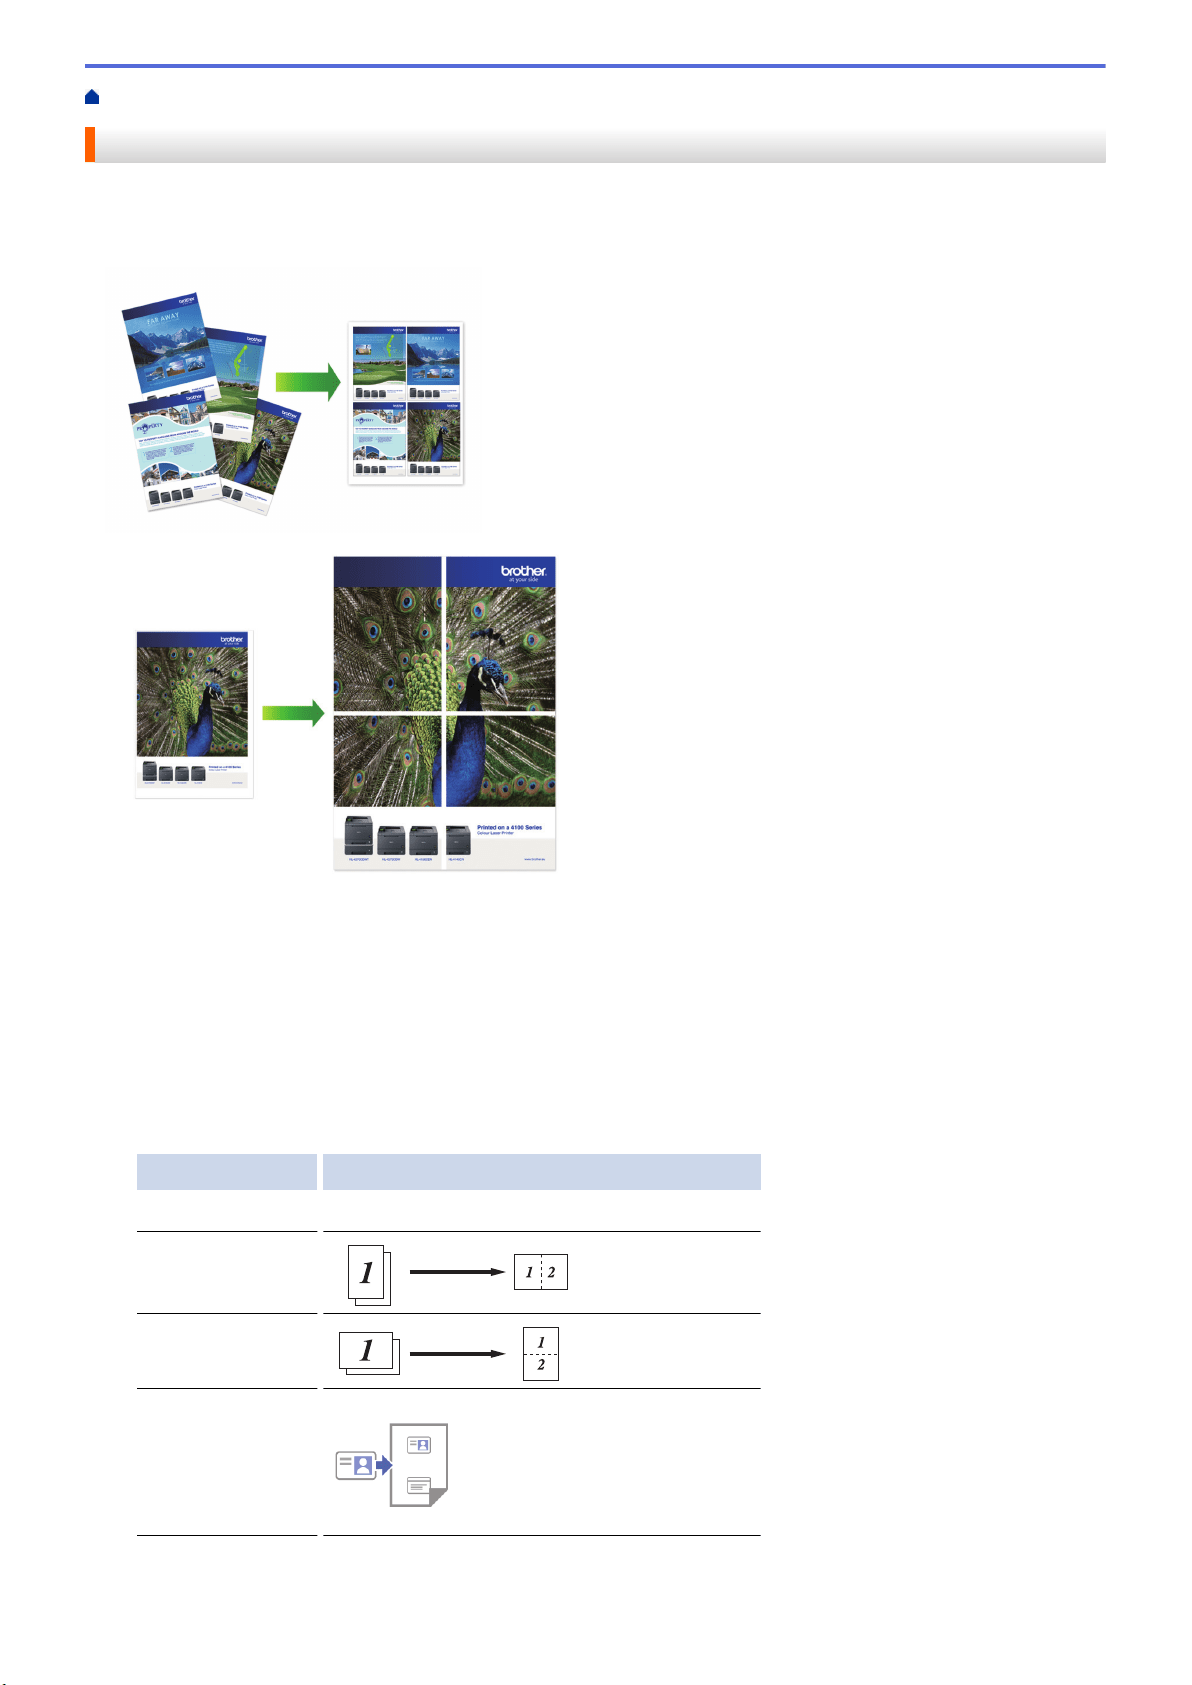
Home > Copy > Copy Using Brother Mobile Connect > Make Page Layout Copies (N in 1 or Poster)
Make Page Layout Copies (N in 1 or Poster)
The N in 1 copy feature saves paper by copying two or four pages of your document onto one page of the copy.
The poster feature divides your document into sections, then enlarges the sections so you can assemble them
into a poster.
• Make sure the paper size is set to Letter, A4, or Executive.
• Poster copy is not available for Executive size paper.
• You can make only one Poster copy at a time.
1. Load your document.
2. Start Brother Mobile Connect on your mobile device.
3. Tap Copy.
4. Select the Page Layout option you want.
Option Description
Normal -
2in1 (Portrait)
2in1 (Landscape)
2in1 ID Vertical
100
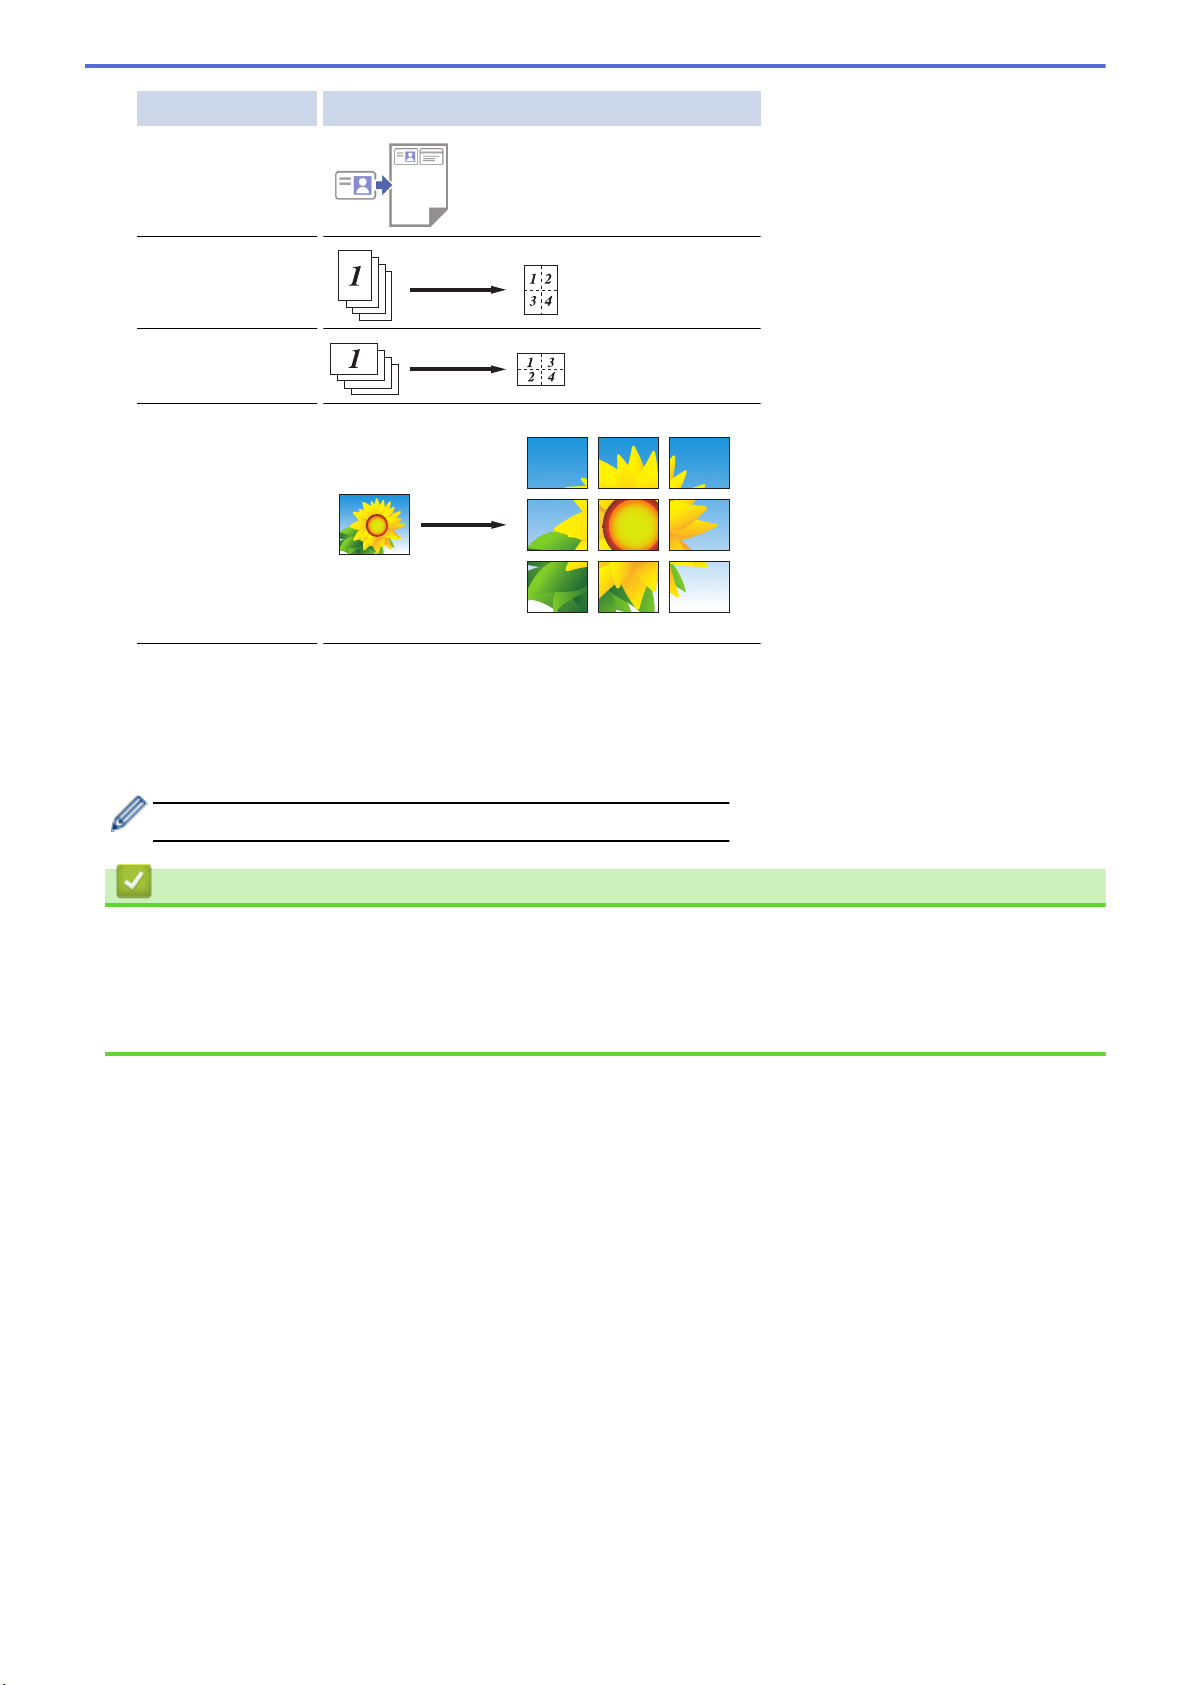
Option Description
2in1 ID Horizontal
4in1 (Portrait)
4in1 (Landscape)
Poster (3x3)
5. Tap Copy.
6. To make a N in 1 copy, do the following:
a. Place the next page on the scanner glass, and then tap Continue to scan the page.
b. After scanning all the pages, tap Finish.
You can also use the Brother iPrint&Scan application for copying.
Related Information
• Copy Using Brother Mobile Connect
Related Topics:
• Copy Settings
• Brother Mobile Connect
101
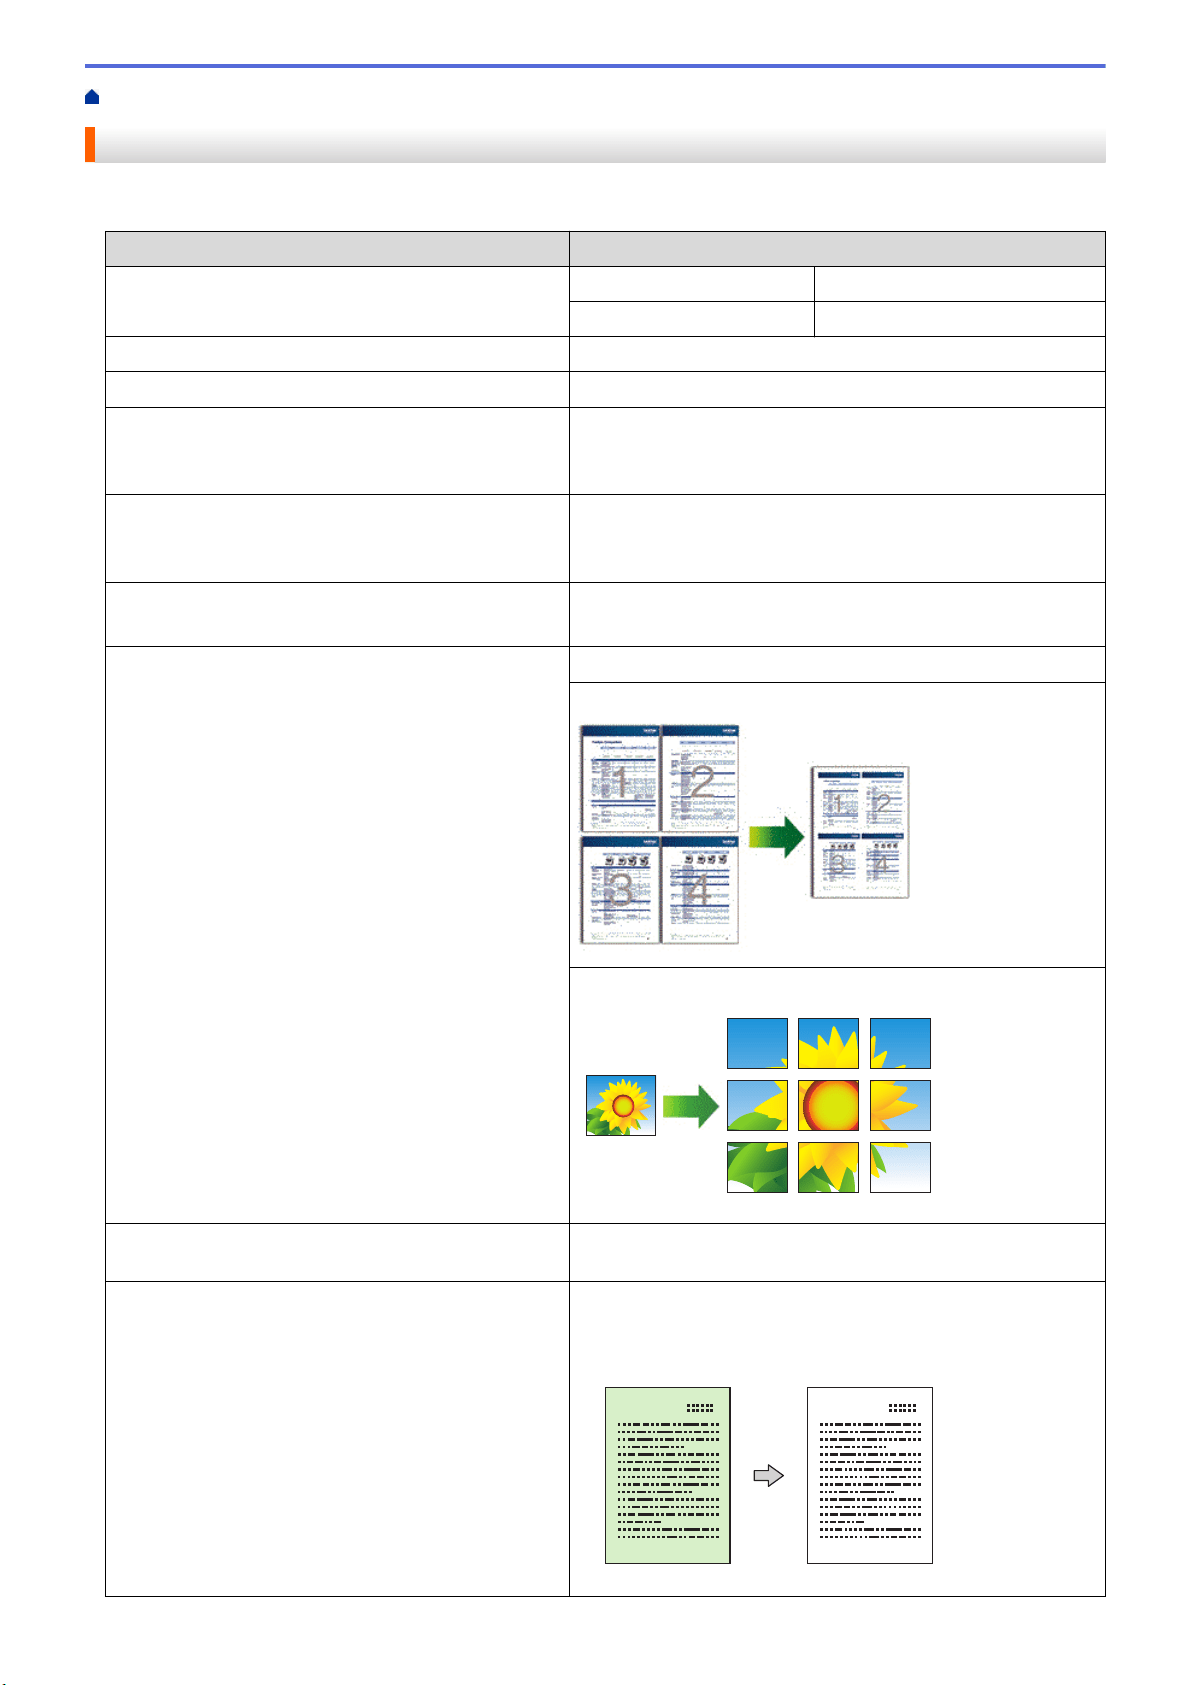
Home > Copy > Copy Using Brother Mobile Connect > Copy Settings
Copy Settings
You can configure the copy settings in the Copy screen.
Option Description
Color/Mono Color Makes copies in full color.
Mono Makes copies in black and white.
Copies Enter the number of copies (1-99).
Quality Select the Copy resolution for your type of document.
Media Type Select a paper type.
If copying on special paper, set the machine for the type of
paper you are using to get the best print quality.
Paper Size Select a paper size.
If copying on paper other than Letter size, you must change
the Paper Size setting.
Density Increase the density to make the text darker.
Decrease the density to make the text lighter.
Page Layout Make N in 1, 2 in 1 ID, or Poster copies.
4 in1
Poster
Enlarge/Reduce Select an option to enlarge or reduce the size of the pages in
your document.
Remove Background Color Removes the document's background color in copies. The
white becomes more apparent. This saves some ink and may
make certain copies easier to read.
102


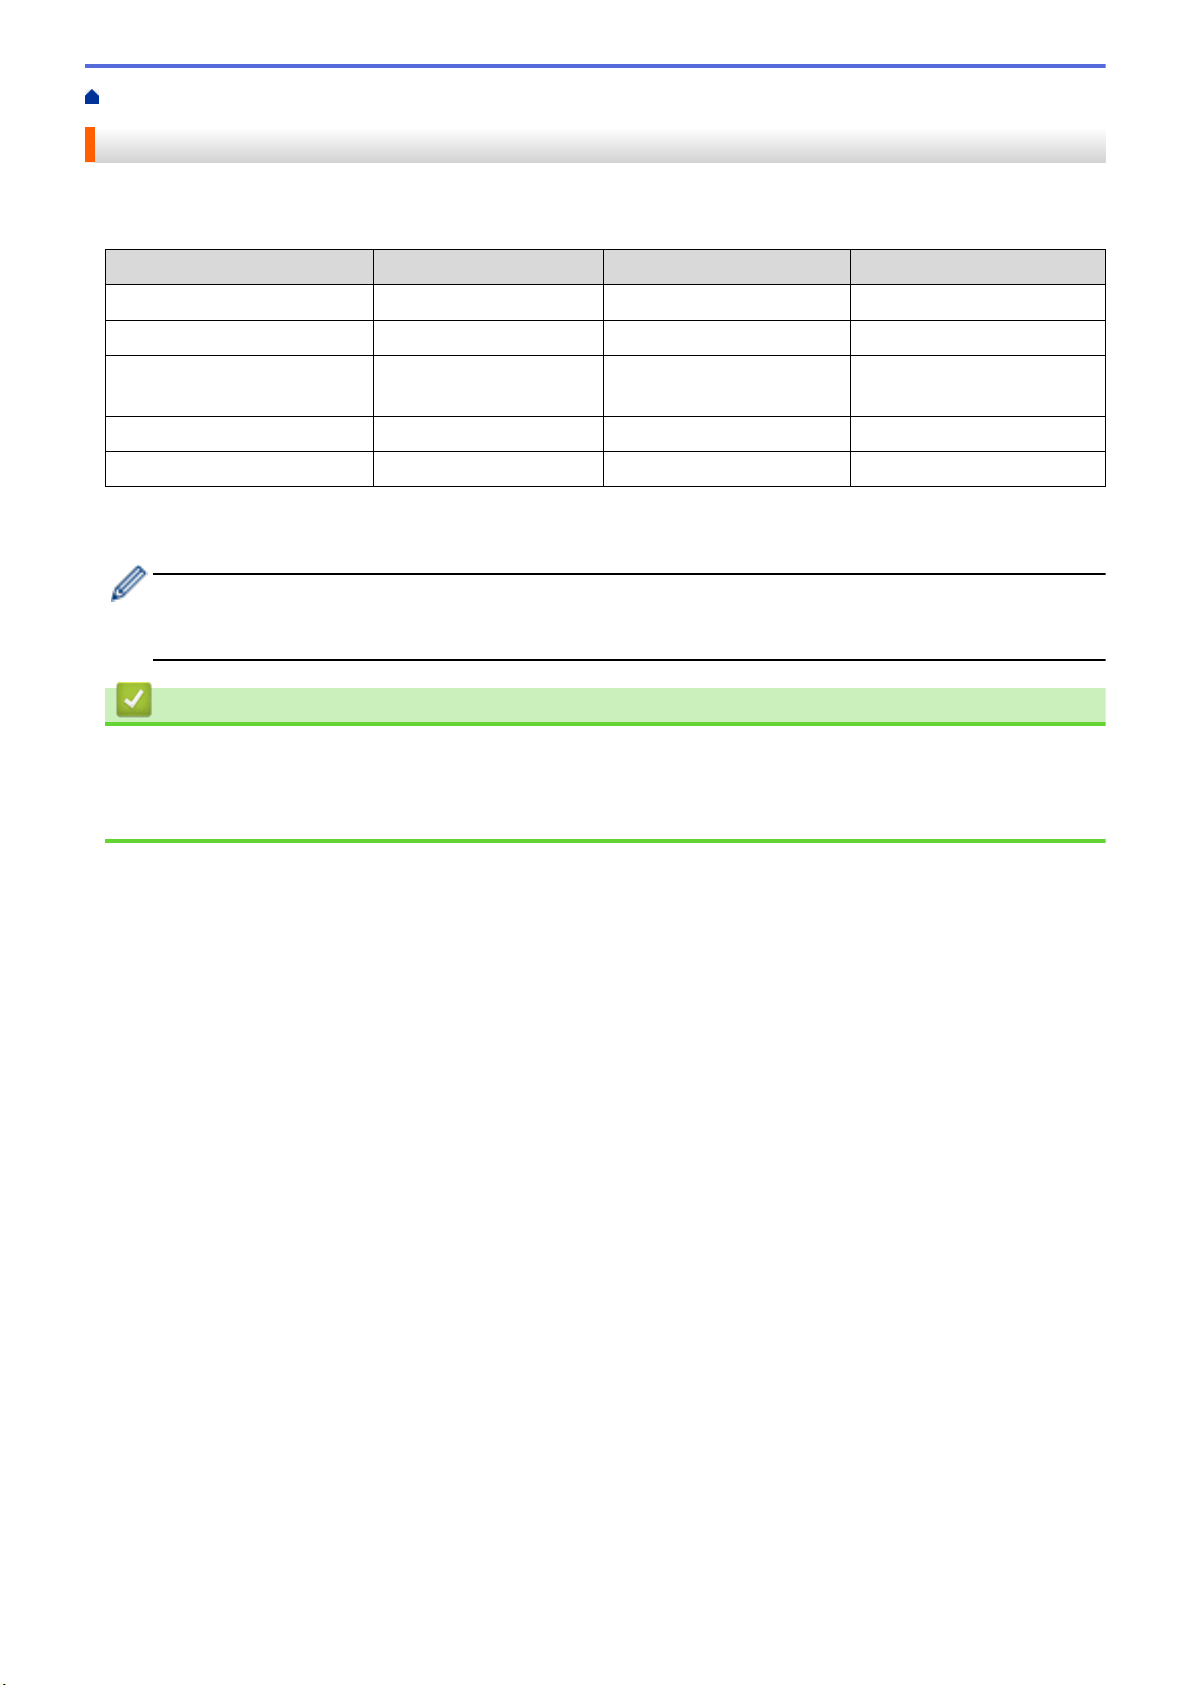
Home > Network > Supported Basic Network Features
Supported Basic Network Features
The print server supports various features depending on the operating system. Use this table to see which
network features and connections are supported by each operating system.
Operating Systems Windows Windows Server macOS
Printing Yes Yes Yes
Scanning Yes No Yes
Web Based Management
1
Yes Yes Yes
Status Monitor Yes No No
Driver Deployment Wizard Yes Yes No
1
The default password to manage this machine’s settings is located on the back of the machine and marked "Pwd". We recommend
immediately changing the default password to protect your machine from unauthorized access.
When connecting your machine to an outside network such as the Internet, make sure your network
environment is protected by a separate firewall or other means in order to prevent information leaks due to
inadequate settings or unauthorized access by malicious third parties.
Related Information
• Network
Related Topics:
• Set or Change a Login Password for Web Based Management
105

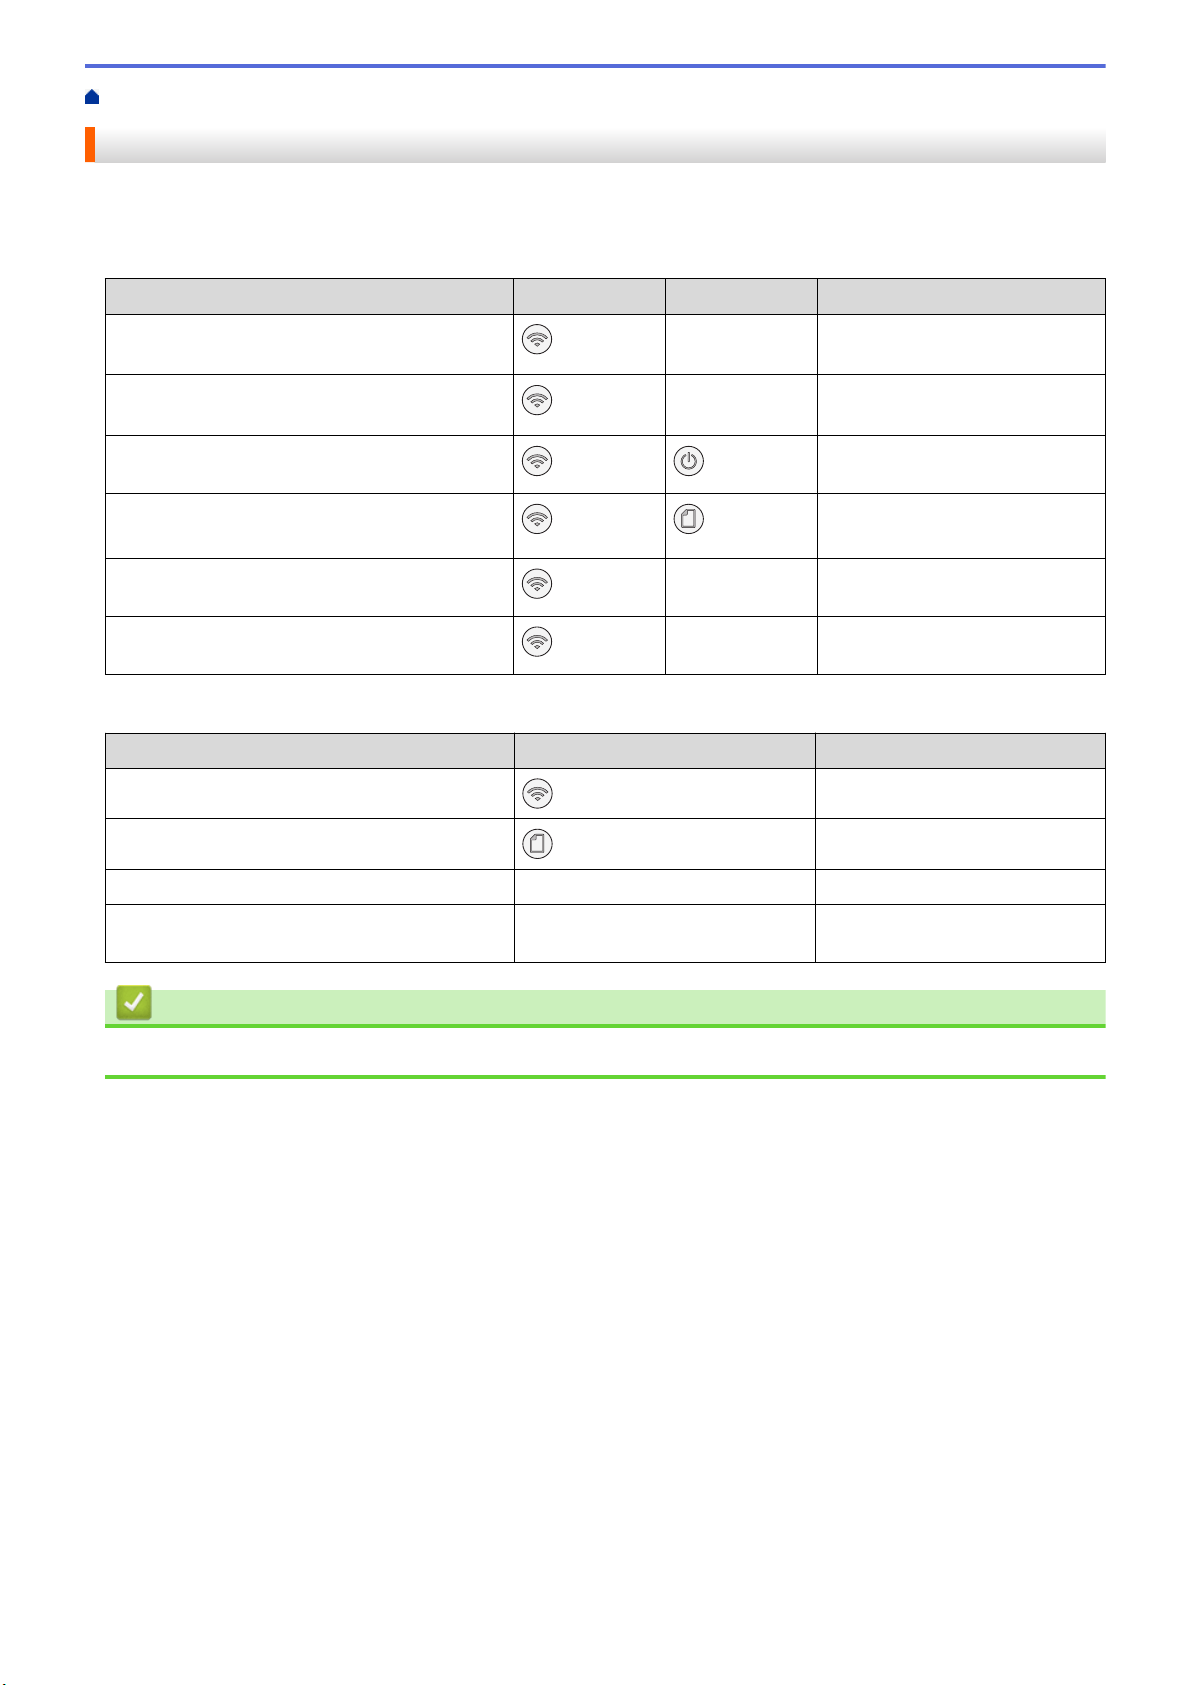
Home > Network > Configure Network Settings > Configure Network Settings Using the Control Panel
Configure Network Settings Using the Control Panel
To configure the machine for your network, use the control panel buttons.
Network Settings
Function
Button 1 Button 2 Instructions
Enable the One Push Method of Wi-Fi
Protected Setup
™
(WPS).
(Wi-Fi)
- Press the button three times.
Enable the PIN Method of Wi-Fi Protected
Setup
™
(WPS).
(Wi-Fi)
- Press the button five times.
Enter Wi-Fi Mode.
(Wi-Fi) (STOP)
Press the buttons
simultaneously.
Set Wireless Direct to On.
Print the Wireless Direct Information Sheet.
(Wi-Fi) (Paper)
Press the buttons
simultaneously.
Print the Network Configuration Report Sheet.
(Wi-Fi)
MONO COPY Press the buttons
simultaneously.
Restart Wi-Fi and Wireless Direct. Use this
function to solve wireless network problems.
(Wi-Fi)
COLOR COPY Press the buttons
simultaneously.
Wi-Fi Mode
Function
Button Instructions
Print the WLAN Report.
(Wi-Fi)
Press the button once.
Enable or disable Wireless Direct.
(Paper)
Press the button once.
Enable or disable Wi-Fi. MONO COPY Press the button once.
Reset the Network settings. COLOR COPY Press and hold the button for
two seconds.
Related Information
• Configure Network Settings
107


Home > Network > Wireless Network Settings > Use the Wireless Network
Use the Wireless Network
• Before Configuring Your Machine for a Wireless Network
• Configure Your Machine for a Wireless Network Using the Setup Wizard from Your
Computer
• Configure Your Machine for a Wireless Network Using the Setup Wizard from Your
Mobile Device
• Configure Your Machine for a Wireless Network Using the One Push Method of Wi-Fi
Protected Setup
™
(WPS)
• Configure Your Machine for a Wireless Network Using the PIN Method of Wi-Fi Protected
Setup
™
(WPS)
109
Home > Network > Wireless Network Settings > Use the Wireless Network > Before Configuring Your
Machine for a Wireless Network
Before Configuring Your Machine for a Wireless Network
Before attempting to configure a wireless network, confirm the following:
• To achieve optimum results with normal everyday document printing, place your machine as close to the
wireless LAN access point/router as possible with minimal obstructions. Large objects and walls between the
two devices and interference from other electronic devices can affect the data transfer speed of your
documents.
Due to these factors, wireless may not be the best method of connection for all types of documents and
applications. If you are printing large files, such as multi-page documents with mixed text and large graphics,
you may want to consider selecting USB for the fastest print speed.
• If there is a signal in the vicinity, wireless LAN allows you to freely make a LAN connection. However, if
security settings are not correctly configured, the signal may be intercepted by malicious third-parties,
possibly resulting in:
- Theft of personal or confidential information
- Improper transmission of information to parties impersonating the specified individuals
- Dissemination of transcribed communication contents that were intercepted
Make sure you know your wireless router/access point's Network Name (SSID) and Network Key
(Password). If you cannot find this information, consult the manufacturer of your wireless router/access
point, your system administrator, or Internet provider. Brother cannot provide this information.
Related Information
• Use the Wireless Network
110

Home > Network > Wireless Network Settings > Use the Wireless Network > Configure Your Machine for a
Wireless Network Using the Setup Wizard from Your Computer
Configure Your Machine for a Wireless Network Using the Setup Wizard
from Your Computer
1. Do one of the following:
• Windows
Download the installer from your model's Downloads page at
support.brother.com.
• Mac
a. Download the installer from your model's Downloads page at support.brother.com.
b. Start the installer, and then double-click the Start Here Mac icon.
2. Follow the on-screen instructions.
3. Select Wireless Network Connection (Wi-Fi), and then click Next.
4. Follow the on-screen instructions.
You have completed the wireless network setup.
Related Information
• Use the Wireless Network
111

Home > Network > Wireless Network Settings > Use the Wireless Network > Configure Your Machine for a
Wireless Network Using the Setup Wizard from Your Mobile Device
Configure Your Machine for a Wireless Network Using the Setup Wizard
from Your Mobile Device
1. Do one of the following:
• Android
™
devices
Download and install Brother Mobile Connect from Google Play
™
.
• All iOS or iPadOS supported devices including iPhone, iPad and iPod touch
Download and install Brother Mobile Connect from the App Store.
2. Start Brother Mobile Connect, and then follow the on-screen instructions to connect your mobile device to
your Brother machine.
Related Information
• Use the Wireless Network
112

Home > Network > Wireless Network Settings > Use the Wireless Network > Configure Your Machine for a
Wireless Network Using the One Push Method of Wi-Fi Protected Setup
™
(WPS)
Configure Your Machine for a Wireless Network Using the One Push
Method of Wi-Fi Protected Setup
™
(WPS)
If your wireless access point/router supports WPS (Push Button Configuration), you can use (Wi-Fi) on your
machine's control panel to configure your wireless network settings.
1. Press
(Wi-Fi) three times.
The Wi-Fi LED starts blinking.
2. Press the WPS button on your wireless access point/router.
If your wireless device is connected successfully, the Power LED and Wi-Fi LED are lit.
You have completed the wireless network setup. To install the drivers and software necessary to use your
machine, go to your model's Downloads page at
support.brother.com.
Related Information
• Use the Wireless Network
113
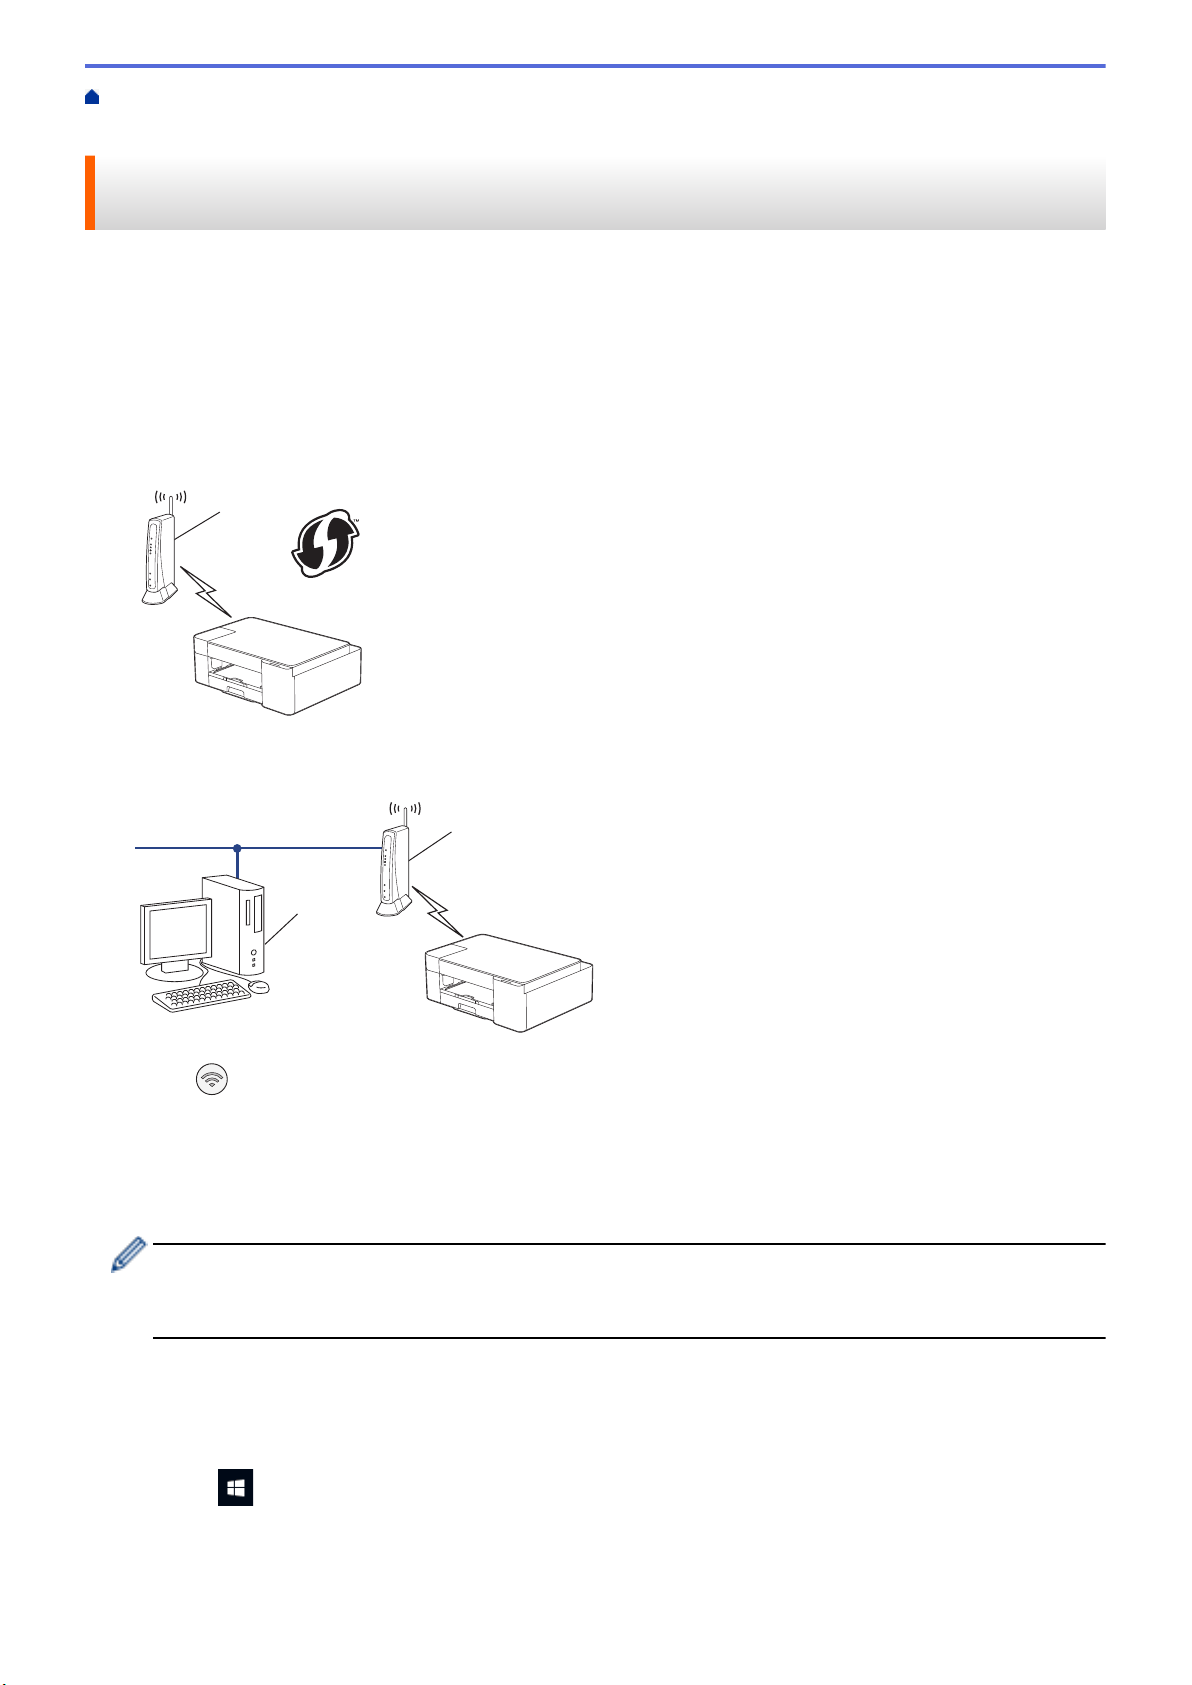
Home > Network > Wireless Network Settings > Use the Wireless Network > Configure Your Machine for a
Wireless Network Using the PIN Method of Wi-Fi Protected Setup
™
(WPS)
Configure Your Machine for a Wireless Network Using the PIN Method
of Wi-Fi Protected Setup
™
(WPS)
If your wireless LAN access point/router supports WPS, you can use the Personal Identification Number (PIN)
Method to configure your wireless network settings.
The PIN Method is one of the connection methods developed by the Wi-Fi Alliance
®
. By submitting a PIN
created by an Enrollee (your machine) to the Registrar (a device that manages the wireless LAN), you can set up
the wireless network and security settings. For more information on how to access WPS mode, see the
instructions provided with your wireless access point/router.
Type A
Connection when the wireless LAN access point/router (1) doubles as the Registrar.
1
Type B
Connection when another device (2), such as a computer, is used as the Registrar.
1
2
1. Press (Wi-Fi) five times.
The Wi-Fi LED starts blinking, and the machine prints an eight-digit PIN.
2. Using a computer connected to the network, in your browser's address bar, type the IP address of the device
you are using as the Registrar. (For example: http://192.168.1.2)
3. Go to the WPS settings page and type the PIN, and then follow the on-screen instructions.
• The Registrar is usually the wireless LAN access point/router.
• The settings page may differ depending on the brand of wireless LAN access point/router. For more
information, see the instructions supplied with your wireless LAN access point/router.
If you are using a Windows 7, Windows 8.1, or Windows 10 computer as a Registrar, complete the
following steps:
4. Do one of the following:
• Windows 10
Click
> Windows System > Control Panel. In the Hardware and Sound group, click Add a device.
• Windows 8.1
Move your mouse to the lower right corner of your desktop. When the menu bar appears, click Settings >
Control Panel > Hardware and Sound > Devices and Printers > Add a device.
114
• Windows 7
Click (Start) > Devices and Printers > Add a device.
• To use a Windows 7, Windows 8.1, or Windows 10 computer as a Registrar, you must register it to your
network in advance. For more information, see the instructions supplied with your wireless LAN access
point/router.
• If you use Windows 7, Windows 8.1, or Windows 10 as a Registrar, you can install the printer driver
after the wireless configuration by following the on-screen instructions. To install the driver and software
necessary to use your machine, go to your model's Downloads page at support.brother.com.
5. Select your machine and click Next.
6. Type the PIN, and then click Next.
7. (Windows 7) Select your network, and then click Next.
8. Click Close.
Related Information
• Use the Wireless Network
115

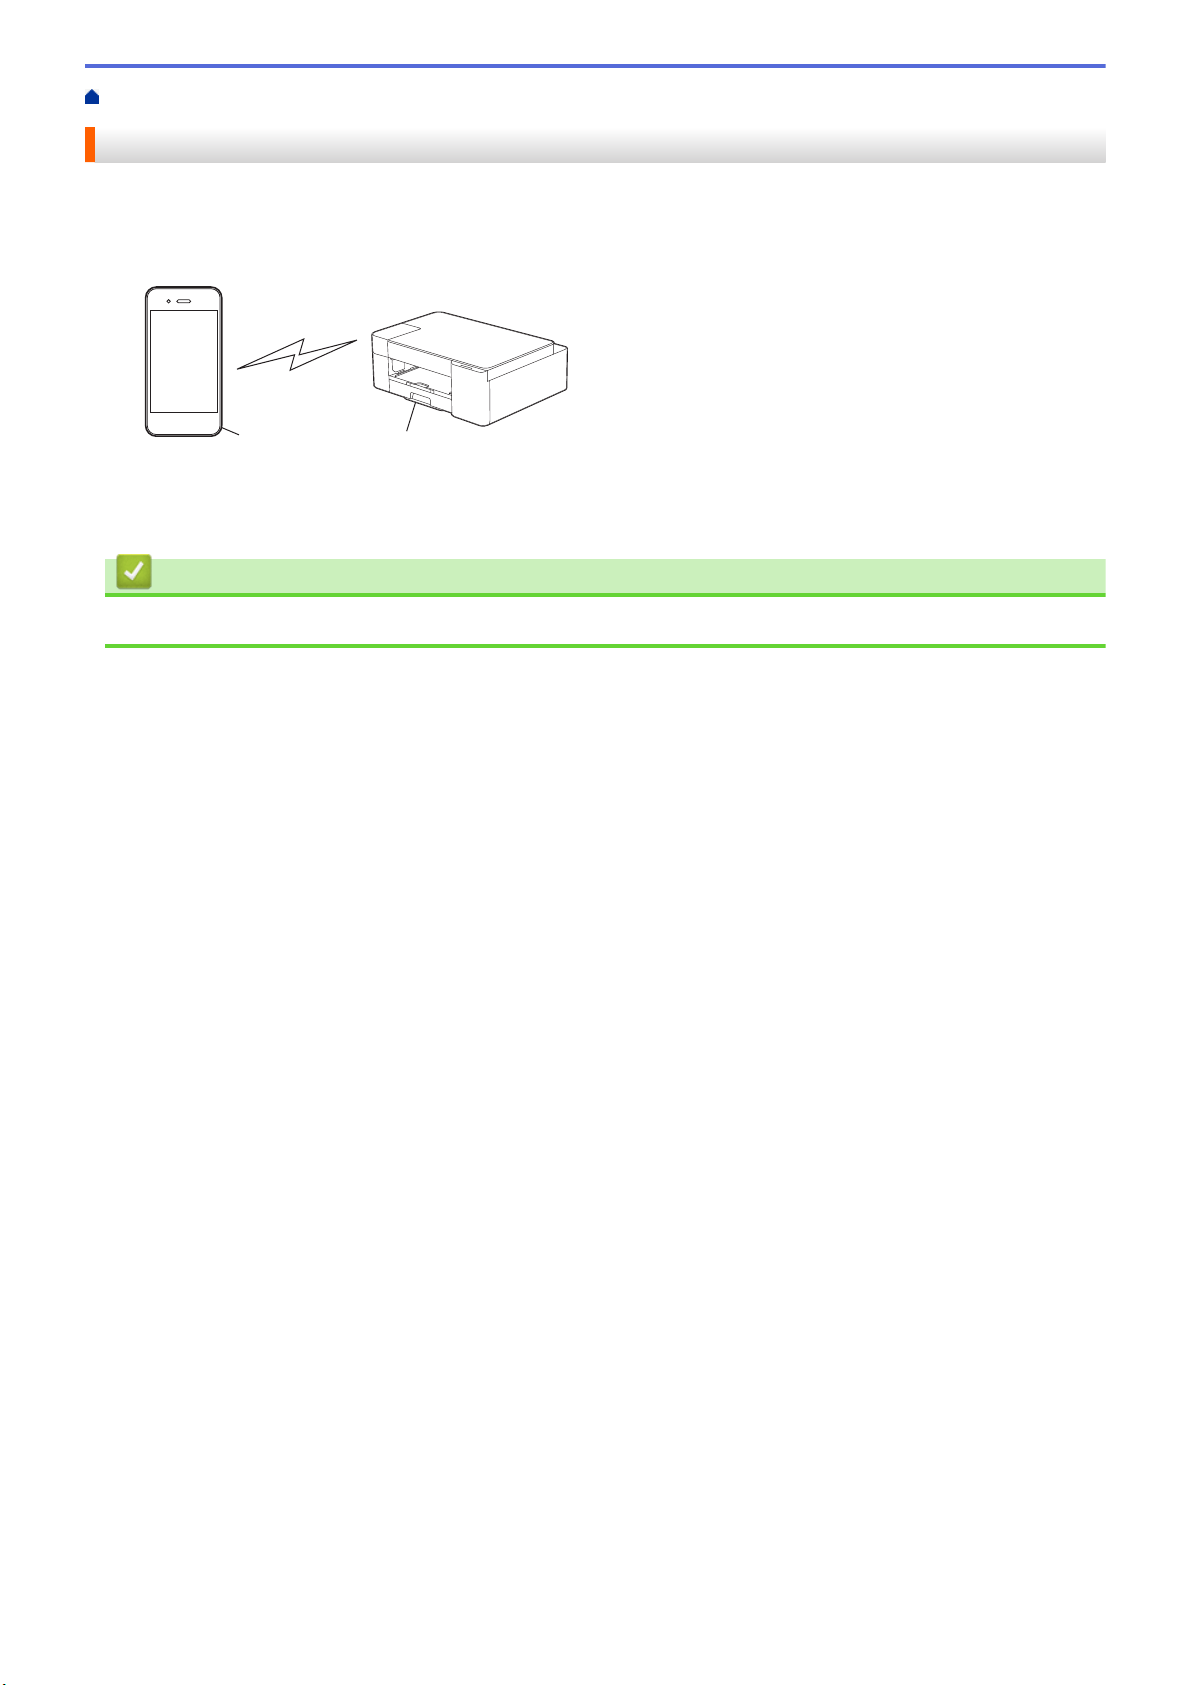
Home > Network > Wireless Network Settings > Use Wireless Direct > Wireless Direct Overview
Wireless Direct Overview
Wireless Direct allows you to configure a secured wireless network between your Brother machine and your
wireless device (computer, smartphone, tablet, or similar), without using a wireless router/access point. You can
configure a wireless network by manually setting a Network Name (SSID) and Network Key (Password).
1 2
1. Wireless device
2. Your Brother machine
Related Information
• Use Wireless Direct
117

Home > Network > Wireless Network Settings > Use Wireless Direct > Configure Your Wireless Direct
Network
Configure Your Wireless Direct Network
1. Press (Wi-Fi) and (Paper) simultaneously.
Wireless Direct is enabled and the machine starts printing the Wireless Direct Information Sheet.
2. Activate the Wi-Fi function on your wireless device and search for your Brother machine.
3. Select your Brother machine's SSID (Network Name) on your wireless device (DIRECT-xxxxx-xxxx_BRxxxx).
4. Enter the Network Key (Password) when prompted.
• The SSID and Network Key are printed on the Wireless Direct Information Sheet.
• To disable Wireless Direct:
a. Press
(Wi-Fi) and (STOP) simultaneously.
The Power LED, Warning LED, and Ink LED light up for one second, and then the Wi-Fi LED
starts blinking.
b. Press (Paper).
Related Information
• Use Wireless Direct
118

Home > Network > Wireless Network Settings > Enable/Disable Wireless LAN
Enable/Disable Wireless LAN
1. Press (Wi-Fi) and (STOP) simultaneously.
The Power LED, Warning LED, and Ink LED light up for one second, and then the Wi-Fi LED starts
blinking.
2. Press MONO COPY to enable Wi-Fi.
• When Wi-Fi is enabled, the Power LED blinks once, and then the Power LED and Wi-Fi LED are lit.
• When Wi-Fi is disabled, the Power LED blinks twice, and then the Power LED is lit.
Related Information
• Wireless Network Settings
119

Home > Network > Wireless Network Settings > Print the WLAN Report
Print the WLAN Report
The WLAN Report shows your machine's wireless status. If the wireless connection fails, check the error code on
the printed report.
1. Press (Wi-Fi) and (STOP) simultaneously.
The Power LED, Warning LED, and Ink LED light up for one second, and then the Wi-Fi LED starts
blinking.
2. Press
(Wi-Fi).
Your Brother machine starts printing the WLAN Report.
Related Information
• Wireless Network Settings
• Wireless LAN Report Error Codes
Related Topics:
• If You Are Having Difficulty with Your Machine's Network
120
Home > Network > Wireless Network Settings > Print the WLAN Report > Wireless LAN Report Error
Codes
Wireless LAN Report Error Codes
If the Wireless LAN Report shows that the connection failed, check the error code on the printed report and see
the corresponding instructions in the table:
Error Code
Problem and Recommended Solutions
TS-01 The WLAN (Wi-Fi) is not enabled.
Check the following points and try to set up your wireless connection again:
• Enable the WLAN setting on your machine.
• If a network cable is connected to your machine, disconnect it.
TS-02 The wireless router/access point cannot be detected.
Check the following points and try to set up your wireless connection again:
• Make sure the wireless router/access point is on.
• Temporarily place your machine closer to the wireless router/access point when you are
configuring the wireless settings.
• If your wireless router/access point is using MAC address filtering, confirm that the MAC
address of the machine is allowed in the filter. You can find the MAC address by printing the
Network Configuration Report.
• If you manually entered the Network Name (SSID) and security information (authentication
method/encryption method), the information may be incorrect. Check the Network Name and
security information again and re-enter the correct information.
• Restart your wireless router/access point. If you cannot find the Network Name (SSID) and
security information, see the documentation provided with your wireless router/access point,
or contact the router manufacturer, your system administrator, or Internet service provider.
TS-04
Your machine does not support the authentication and encryption methods used by the selected
wireless router/access point.
For infrastructure mode (Most common)
Change the authentication and encryption methods of the wireless router/access point. Your
machine supports the following authentication and encryption methods:
• WPA-Personal:
TKIP / AES
• WPA2-Personal:
TKIP / AES
• Open:
WEP / NONE (without encryption)
• Shared key:
WEP
If your issue is not solved, the Network Name (SSID) or security settings you entered may be
incorrect. Check that all wireless network settings are correct for your network.
TS-05
The Network Name (SSID) and Network Key (Password) are incorrect.
Check the following points and try to set up your wireless connection again:
• Confirm the Network Name (SSID) and Network Key (Password).
• If your Network Key contains upper-case and lower-case letters, make sure you type them
correctly.
• If you cannot find the Network Name (SSID) and security information, see the documentation
provided with your wireless router/access point, or contact the router manufacturer, your
system administrator, or Internet service provider.
• If your wireless router/access point uses WEP encryption with multiple WEP keys, write
down and use only the first WEP key.
121

Error Code Problem and Recommended Solutions
TS-06 The wireless security information (authentication method/encryption method/Network Key
(Password)) is incorrect.
Check the following points and try to set up your wireless connection again:
• Confirm the Network Key. If your Network Key contains upper-case and lower-case letters,
make sure you type them correctly.
• Confirm whether the authentication method entered and the authentication method or
encryption method supported by the wireless router/access point are the same.
• If the network key, authentication method, and encryption method have been confirmed,
restart your wireless router/access point and the machine.
• If your wireless router/access point's Stealth Mode is on, you may need to disable it to
connect to the wireless network.
If you cannot find the Network Name (SSID) and security information, see the documentation
provided with your wireless router/access point, or contact the router manufacturer, your system
administrator, or Internet service provider.
TS-07
The machine cannot detect a wireless router/access point that has WPS (Wi-Fi Protected Setup)
enabled.
Check the following points and try again:
• To check if your wireless router/access point supports WPS, look for the WPS symbol
displayed on the router/access point. For more information, see the documentation provided
with your wireless router/access point.
• To set up your wireless connection using WPS, you must configure both your machine and
the wireless router/access point. For more information, see the user's guide.
• If you do not know how to set up your wireless router/access point using WPS, see the
documentation provided with your wireless router/access point, or contact the router
manufacturer, your system administrator, or Internet service provider.
TS-08
Two or more wireless routers or access points that have WPS enabled are detected.
Check the following points and try again:
• Make sure that only one wireless router/access point within range has WPS enabled, and
then try to connect again.
• Try to connect again after a few minutes to avoid interference from other access points/
routers.
How to confirm wireless security information (SSID/authentication method/encryption method/Network Key)
of your WLAN access point/router:
1. The default security settings may be provided on a label attached to the WLAN access point/router. Or
the manufacturer's name or model number of the WLAN access point/router may be used as the default
security settings.
2. See the documentation provided with your WLAN access point/router for information on how to find the
security settings.
• If the WLAN access point/router is set to not broadcast the SSID, the SSID will not automatically be
detected. You will have to manually enter the SSID name.
• The Network key may also be described as the Password, Security Key, or Encryption Key.
If you do not know the SSID and wireless security settings of your WLAN access point/router or how to
change the configuration, see the documentation provided with your WLAN access point/router, ask the
manufacturer of your access point/router or ask your Internet provider or network administrator.
Related Information
• Print the WLAN Report
Related Topics:
• If You Are Having Difficulty with Your Machine's Network
• Print the Network Configuration Report
122

Home > Network > Network Features > Print the Network Configuration Report
Print the Network Configuration Report
The Network Configuration Report lists the network configuration, including the network print server settings.
• Node Name: The Node Name appears on the current Network Configuration Report. The default Node
Name is "BRWxxxxxxxxxxxx" (where "xxxxxxxxxxxx" is your machine's MAC Address / Ethernet
Address.)
• If the IP Address on the Network Configuration Report shows 0.0.0.0, wait for one minute and try
printing it again.
• You can find your machine's settings, such as the IP address, subnet mask, node name, and MAC
Address on the report, for example:
- IP address: 192.168.0.5
- Subnet mask: 255.255.255.0
- Node name: BRN000ca0000499
- MAC Address: 00-0c-a0-00-04-99
1. Press (Wi-Fi) and MONO COPY simultaneously.
The machine starts printing the Network Configuration Report.
Related Information
• Network Features
Related Topics:
• Access Web Based Management
• Check Your Machine's Network Settings
• Use the Network Connection Repair Tool (Windows)
• If You Are Having Difficulty with Your Machine's Network
124
Home > Network > Network Features > Reset the Network Settings to Factory Settings
Reset the Network Settings to Factory Settings
You can use the buttons on the control panel to reset your machine to its factory settings. This resets all
information, such as the password and IP address.
You can also reset the print server to its factory settings using Web Based Management.
1. Press (Wi-Fi) and (STOP) simultaneously.
The Power LED, Warning LED, and Ink LED light up for one second, and then the Wi-Fi LED starts
blinking.
2. Press and hold COLOR COPY for two seconds.
3. Wait until the machine restarts and the Power LED indicator lights up before disconnecting the machine from
the power source.
Related Information
• Network Features
125


Home > Security > Before Using Network Security Features
Before Using Network Security Features
Your machine employs some of the latest network security and encryption protocols available today. These
network features can be integrated into your overall network security plan to help protect your data and prevent
unauthorized access to the machine.
We recommend disabling the FTP and TFTP protocols. Accessing the machine using these protocols is not
secure.
Related Information
• Security
128

Home > Security > Configure Certificates for Device Security
Configure Certificates for Device Security
You must configure a certificate to manage your networked machine securely using SSL/TLS. You must use Web
Based Management to configure a certificate.
• Supported Security Certificate Features
• Step by Step Guide for Creating and Installing a Certificate
• Create a Self-signed Certificate
• Create CSR and Install a Certificate from a Certificate Authority (CA)
• Import and Export the Certificate and Private Key
• Manage Multiple Certificates
129
Home > Security > Configure Certificates for Device Security > Supported Security Certificate Features
Supported Security Certificate Features
Your machine supports the use of multiple security certificates, which allows secure authentication and
communication with the machine. The following security certificate features can be used with the machine:
SSL/TLS communication
The Brother machine supports the following:
• Pre-installed certificate
Your machine has a pre-installed self-signed certificate. This certificate enables you to use SSL/TLS
communication without creating or installing a different certificate.
The pre-installed self-signed certificate protects your communication up to a certain level. We recommend
using a certificate that is issued by a trusted organization for better security.
• Self-signed certificate
This print server issues its own certificate. Using this certificate, you can easily use the SSL/TLS
communication without creating or installing a different certificate from a CA.
• Certificate from a Certificate Authority (CA)
There are two methods for installing a certificate from a CA. If you already have a certificate from a CA or if
you want to use a certificate from an external trusted CA:
- When using a Certificate Signing Request (CSR) from this print server.
- When importing a certificate and a private key.
• If you are going to use SSL/TLS communication, we recommend contacting your system administrator
first.
• When you reset the print server back to its default factory settings, the certificate and the private key
that are installed will be deleted. If you want to keep the same certificate and the private key after
resetting the print server, export them before resetting, and then reinstall them.
Related Information
• Configure Certificates for Device Security
130

Home > Security > Configure Certificates for Device Security > Step by Step Guide for Creating and
Installing a Certificate
Step by Step Guide for Creating and Installing a Certificate
There are two options when choosing a security certificate: use a self-signed certificate or use a certificate from a
Certificate Authority (CA).
Option 1
Self-Signed Certificate
1. Create a self-signed certificate using Web Based Management.
2. Install the self-signed certificate on your computer.
Option 2
Certificate from a CA
1. Create a Certificate Signing Request (CSR) using Web Based Management.
2. Install the certificate issued by the CA on your Brother machine using Web Based Management.
3. Install the certificate on your computer.
Related Information
• Configure Certificates for Device Security
131
Home > Security > Configure Certificates for Device Security > Create a Self-signed Certificate
Create a Self-signed Certificate
1. Start your web browser.
2. Type "https://machine's IP address" in your browser's address bar (where "machine's IP address" is the
machine's IP address).
For example:
https://192.168.1.2
If you are using a Domain Name System or enable a NetBIOS name, you can type another name, such as
"SharedPrinter" instead of the IP address.
For example:
https://SharedPrinter
If you enable a NetBIOS name, you can also use the node name.
For example:
https://brnxxxxxxxxxxxx
The NetBIOS name can be found in the Network Configuration Report.
3. If required, type the password in the Login field, and then click Login.
The default password to manage this machine’s settings is located on the back of the machine and marked
"Pwd".
4. Go to the navigation menu, and then click Network > Security > Certificate.
Start from
, if the navigation menu is not shown on the left side of the screen.
5. Click Create Self-Signed Certificate.
6. Enter a Common Name and a Valid Date.
• The length of the Common Name is less than 64 bytes. Enter an identifier, such as an IP address, node
name, or domain name to use when accessing this machine through SSL/TLS communication. The node
name is displayed by default.
• A warning will appear if you use the IPPS or HTTPS protocol and enter a different name in the URL than
the Common Name that was used for the self-signed certificate.
7. Select your setting from the Public Key Algorithm drop-down list. The default setting is RSA(2048bit).
8. Select your setting from the Digest Algorithm drop-down list. The default setting is SHA256.
9. Click Submit.
Related Information
• Configure Certificates for Device Security
Related Topics:
• Access Web Based Management
• Print the Network Configuration Report
132

Home > Security > Configure Certificates for Device Security > Create CSR and Install a Certificate from a
Certificate Authority (CA)
Create CSR and Install a Certificate from a Certificate Authority (CA)
If you already have a certificate from an external trusted CA, you can store the certificate and private key on the
machine and manage them by importing and exporting. If you do not have a certificate from an external trusted
CA, create a Certificate Signing Request (CSR), send it to a CA for authentication, and install the returned
certificate on your machine.
• Create a Certificate Signing Request (CSR)
• Install a Certificate on Your Machine
133
Home > Security > Configure Certificates for Device Security > Create CSR and Install a Certificate from a
Certificate Authority (CA) > Create a Certificate Signing Request (CSR)
Create a Certificate Signing Request (CSR)
A Certificate Signing Request (CSR) is a request sent to a Certificate Authority (CA) to authenticate the
credentials contained within the certificate.
We recommend installing a Root Certificate from the CA on your computer before creating the CSR.
1. Start your web browser.
2. Type "https://machine's IP address" in your browser's address bar (where "machine's IP address" is the
machine's IP address).
For example:
https://192.168.1.2
If you are using a Domain Name System or enable a NetBIOS name, you can type another name, such as
"SharedPrinter" instead of the IP address.
For example:
https://SharedPrinter
If you enable a NetBIOS name, you can also use the node name.
For example:
https://brnxxxxxxxxxxxx
The NetBIOS name can be found in the Network Configuration Report.
3. If required, type the password in the Login field, and then click Login.
The default password to manage this machine’s settings is located on the back of the machine and marked
"Pwd".
4. Go to the navigation menu, and then click Network > Security > Certificate.
Start from
, if the navigation menu is not shown on the left side of the screen.
5. Click Create CSR.
6. Type a Common Name (required) and add other information about your Organization (optional).
• Your company details are required so that a CA can confirm your identity and verify it to the outside
world.
• The length of the Common Name must be less than 64 bytes. Enter an identifier, such as an IP
address, node name, or domain name to use when accessing this printer through SSL/TLS
communication. The node name is displayed by default. The Common Name is required.
• A warning will appear if you type a different name in the URL than the Common Name that was used for
the certificate.
• The length of the Organization, the Organization Unit, the City/Locality and the State/Province must
be less than 64 bytes.
• The Country/Region should be a two character ISO 3166 country code.
• If you are configuring an X.509v3 certificate extension, select the Configure extended partition
checkbox, and then select Auto (Register IPv4) or Manual.
7. Select your setting from the
Public Key Algorithm drop-down list. The default setting is RSA(2048bit).
8. Select your setting from the Digest Algorithm drop-down list. The default setting is SHA256.
9. Click Submit.
The CSR appears on your screen. Save the CSR as a file or copy and paste it into an online CSR form
offered by a Certificate Authority.
134

10. Click Save.
• Follow your CA's policy regarding the method to send a CSR to your CA.
• If you are using the Enterprise root CA of Windows Server 2008/2008 R2/2012/2012 R2/2016/2019, we
recommend using the Web Server for the certificate template to securely create the Client Certificate.
For more detailed information, visit support.brother.com, to see the FAQs & Troubleshooting page of
your model.
Search for "SSL".
Related Information
• Create CSR and Install a Certificate from a Certificate Authority (CA)
Related Topics:
• Access Web Based Management
• Print the Network Configuration Report
135
Home > Security > Configure Certificates for Device Security > Create CSR and Install a Certificate from a
Certificate Authority (CA) > Install a Certificate on Your Machine
Install a Certificate on Your Machine
When you receive a certificate from a CA, follow the steps below to install it into the print server:
Only a certificate issued with your machine's CSR can be installed onto the machine. When you want to create
another CSR, make sure that the certificate is installed before creating another CSR. Create another CSR only
after installing the certificate on the machine. If you do not, the CSR you create before installing will be invalid.
1. Start your web browser.
2. Type "https://machine's IP address" in your browser's address bar (where "machine's IP address" is the
machine's IP address).
For example:
https://192.168.1.2
If you are using a Domain Name System or enable a NetBIOS name, you can type another name, such as
"SharedPrinter" instead of the IP address.
For example:
https://SharedPrinter
If you enable a NetBIOS name, you can also use the node name.
For example:
https://brnxxxxxxxxxxxx
The NetBIOS name can be found in the Network Configuration Report.
3. If required, type the password in the Login field, and then click Login.
The default password to manage this machine’s settings is located on the back of the machine and marked
"Pwd".
4. Go to the navigation menu, and then click Network > Security > Certificate.
Start from
, if the navigation menu is not shown on the left side of the screen.
5. Click Install Certificate.
6. Browse to the file that contains the certificate issued by the CA, and then click Submit.
The certificate has been created successfully and saved in your machine's memory successfully.
To use SSL/TLS communication, the Root Certificate from the CA must be installed on your computer. Contact
your network administrator.
Related Information
• Create CSR and Install a Certificate from a Certificate Authority (CA)
Related Topics:
• Access Web Based Management
• Print the Network Configuration Report
136

Home > Security > Configure Certificates for Device Security > Import and Export the Certificate and
Private Key
Import and Export the Certificate and Private Key
Store the certificate and private key on your machine and manage them by importing and exporting them.
• Import a Certificate and Private Key
• Export the Certificate and Private Key
137
Home > Security > Configure Certificates for Device Security > Import and Export the Certificate and
Private Key > Import a Certificate and Private Key
Import a Certificate and Private Key
1. Start your web browser.
2. Type "https://machine's IP address" in your browser's address bar (where "machine's IP address" is the
machine's IP address).
For example:
https://192.168.1.2
If you are using a Domain Name System or enable a NetBIOS name, you can type another name, such as
"SharedPrinter" instead of the IP address.
For example:
https://SharedPrinter
If you enable a NetBIOS name, you can also use the node name.
For example:
https://brnxxxxxxxxxxxx
The NetBIOS name can be found in the Network Configuration Report.
3. If required, type the password in the Login field, and then click Login.
The default password to manage this machine’s settings is located on the back of the machine and marked
"Pwd".
4. Go to the navigation menu, and then click Network > Security > Certificate.
Start from
, if the navigation menu is not shown on the left side of the screen.
5. Click Import Certificate and Private Key.
6. Browse to the file you want to import.
7. Type the password if the file is encrypted, and then click Submit.
The certificate and private key are imported to your machine.
Related Information
• Import and Export the Certificate and Private Key
Related Topics:
• Access Web Based Management
• Print the Network Configuration Report
138

Home > Security > Configure Certificates for Device Security > Import and Export the Certificate and
Private Key > Export the Certificate and Private Key
Export the Certificate and Private Key
1. Start your web browser.
2. Type "https://machine's IP address" in your browser's address bar (where "machine's IP address" is the
machine's IP address).
For example:
https://192.168.1.2
If you are using a Domain Name System or enable a NetBIOS name, you can type another name, such as
"SharedPrinter" instead of the IP address.
For example:
https://SharedPrinter
If you enable a NetBIOS name, you can also use the node name.
For example:
https://brnxxxxxxxxxxxx
The NetBIOS name can be found in the Network Configuration Report.
3. If required, type the password in the Login field, and then click Login.
The default password to manage this machine’s settings is located on the back of the machine and marked
"Pwd".
4. Go to the navigation menu, and then click Network > Security > Certificate.
Start from
, if the navigation menu is not shown on the left side of the screen.
5. Click Export shown with Certificate List.
6. Enter the password if you want to encrypt the file.
If a blank password is used, the output is not encrypted.
7. Enter the password again for confirmation, and then click Submit.
8. Click Save.
The certificate and private key are exported to your computer.
You can also import the certificate to your computer.
Related Information
• Import and Export the Certificate and Private Key
Related Topics:
• Access Web Based Management
• Print the Network Configuration Report
139
Home > Security > Configure Certificates for Device Security > Manage Multiple Certificates
Manage Multiple Certificates
The Multiple Certificate feature allows you to use Web Based Management to manage each certificate installed
on your machine. In Web Based Management, navigate to the Certificate screen to view certificate content,
delete, or export your certificates.
Maximum Number of Certificates Stored on Brother Machine
Self-signed Certificate or
Certificate Issued by a CA
2
We recommend storing fewer certificates than allowed, reserving an empty spot in case of certificate expiration.
When a certificate expires, import a new certificate into the reserved spot, and then delete the expired certificate.
This ensures that you avoid configuration failure.
Related Information
• Configure Certificates for Device Security
140


Home > Security > Use SSL/TLS > Introduction to SSL/TLS
Introduction to SSL/TLS
Secure Socket Layer (SSL) or Transport Layer Security (TLS) is an effective method of protecting data sent over
a local or wide area network (LAN or WAN). It works by encrypting data, such as a print job, sent over a network,
so anyone trying to capture it will not be able to read it.
SSL/TLS will work with other forms of security such as WPA keys and firewalls.
Related Information
• Use SSL/TLS
• Brief History of SSL/TLS
• Benefits of Using SSL/TLS
142

Home > Security > Use SSL/TLS > Introduction to SSL/TLS > Brief History of SSL/TLS
Brief History of SSL/TLS
SSL/TLS was originally created to secure web traffic information, particularly data sent between web browsers
and servers. For example, when you use Internet Explorer for Internet Banking and you see https:// and the little
padlock icon in the web browser, you are using SSL. SSL grew to work with additional applications, such as
Telnet, printer, and FTP software, in order to become a universal solution for online security. Its original design
intentions are still being used today by many online retailers and banks to secure sensitive data, such as credit
card numbers, customer records, etc.
SSL/TLS uses extremely high levels of encryption and is trusted by banks all over the world.
Related Information
• Introduction to SSL/TLS
143

Home > Security > Use SSL/TLS > Introduction to SSL/TLS > Benefits of Using SSL/TLS
Benefits of Using SSL/TLS
The primary benefit of using SSL/TLS is to guarantee secure printing over an IP network by restricting
unauthorized users from reading data sent to the machine. SSL's key selling point is that it can be used to print
confidential data securely. For example, an HR department in a large company may be printing wage slips on a
regular basis. Without encryption, the data contained on these wages slips can be read by other network users.
However, with SSL/TLS, anyone trying to capture the data will see a confusing page of code and not the actual
wage slip.
Related Information
• Introduction to SSL/TLS
144

Home > Security > Use SSL/TLS > Manage Your Network Machine Securely Using SSL/TLS
Manage Your Network Machine Securely Using SSL/TLS
• Configure a Certificate for SSL/TLS and Available Protocols
• Access Web Based Management Using SSL/TLS
• Install the Self-signed Certificate for Windows users with Administrator Rights
• Configure Certificates for Device Security
145
Home > Security > Use SSL/TLS > Manage Your Network Machine Securely Using SSL/TLS > Configure a
Certificate for SSL/TLS and Available Protocols
Configure a Certificate for SSL/TLS and Available Protocols
Configure a certificate on your machine using Web Based Management before you use SSL/TLS
communication.
1. Start your web browser.
2. Type "https://machine's IP address" in your browser's address bar (where "machine's IP address" is the
machine's IP address).
For example:
https://192.168.1.2
If you are using a Domain Name System or enable a NetBIOS name, you can type another name, such as
"SharedPrinter" instead of the IP address.
For example:
https://SharedPrinter
If you enable a NetBIOS name, you can also use the node name.
For example:
https://brnxxxxxxxxxxxx
The NetBIOS name can be found in the Network Configuration Report.
3. If required, type the password in the Login field, and then click Login.
The default password to manage this machine’s settings is located on the back of the machine and marked
"Pwd".
4. Go to the navigation menu, and then click Network > Network > Protocol.
Start from
, if the navigation menu is not shown on the left side of the screen.
5. Click HTTP Server Settings.
6. Select the certificate you want to configure from the Select the Certificate drop-down list.
7. Click Submit.
8. Click Yes to restart your print server.
Related Information
• Manage Your Network Machine Securely Using SSL/TLS
Related Topics:
• Access Web Based Management
• Print the Network Configuration Report
• Print Documents Securely Using SSL/TLS
146
Home > Security > Use SSL/TLS > Manage Your Network Machine Securely Using SSL/TLS > Access
Web Based Management Using SSL/TLS
Access Web Based Management Using SSL/TLS
To manage your network machine securely, you must use management utilities with security protocols.
• To use HTTPS protocol, HTTPS must be enabled on your machine. The HTTPS protocol is enabled by
default.
• You can change the HTTPS protocol settings using the Web Based Management screen.
1. Start your web browser.
2. Type "https://machine's IP address" in your browser's address bar (where "machine's IP address" is the
machine's IP address).
For example:
https://192.168.1.2
3. If required, type the password in the Login field, and then click Login.
The default password to manage this machine’s settings is located on the back of the machine and marked
"Pwd".
4. You can now access the machine using HTTPS.
Related Information
• Manage Your Network Machine Securely Using SSL/TLS
Related Topics:
• Access Web Based Management
• Print the Network Configuration Report
147
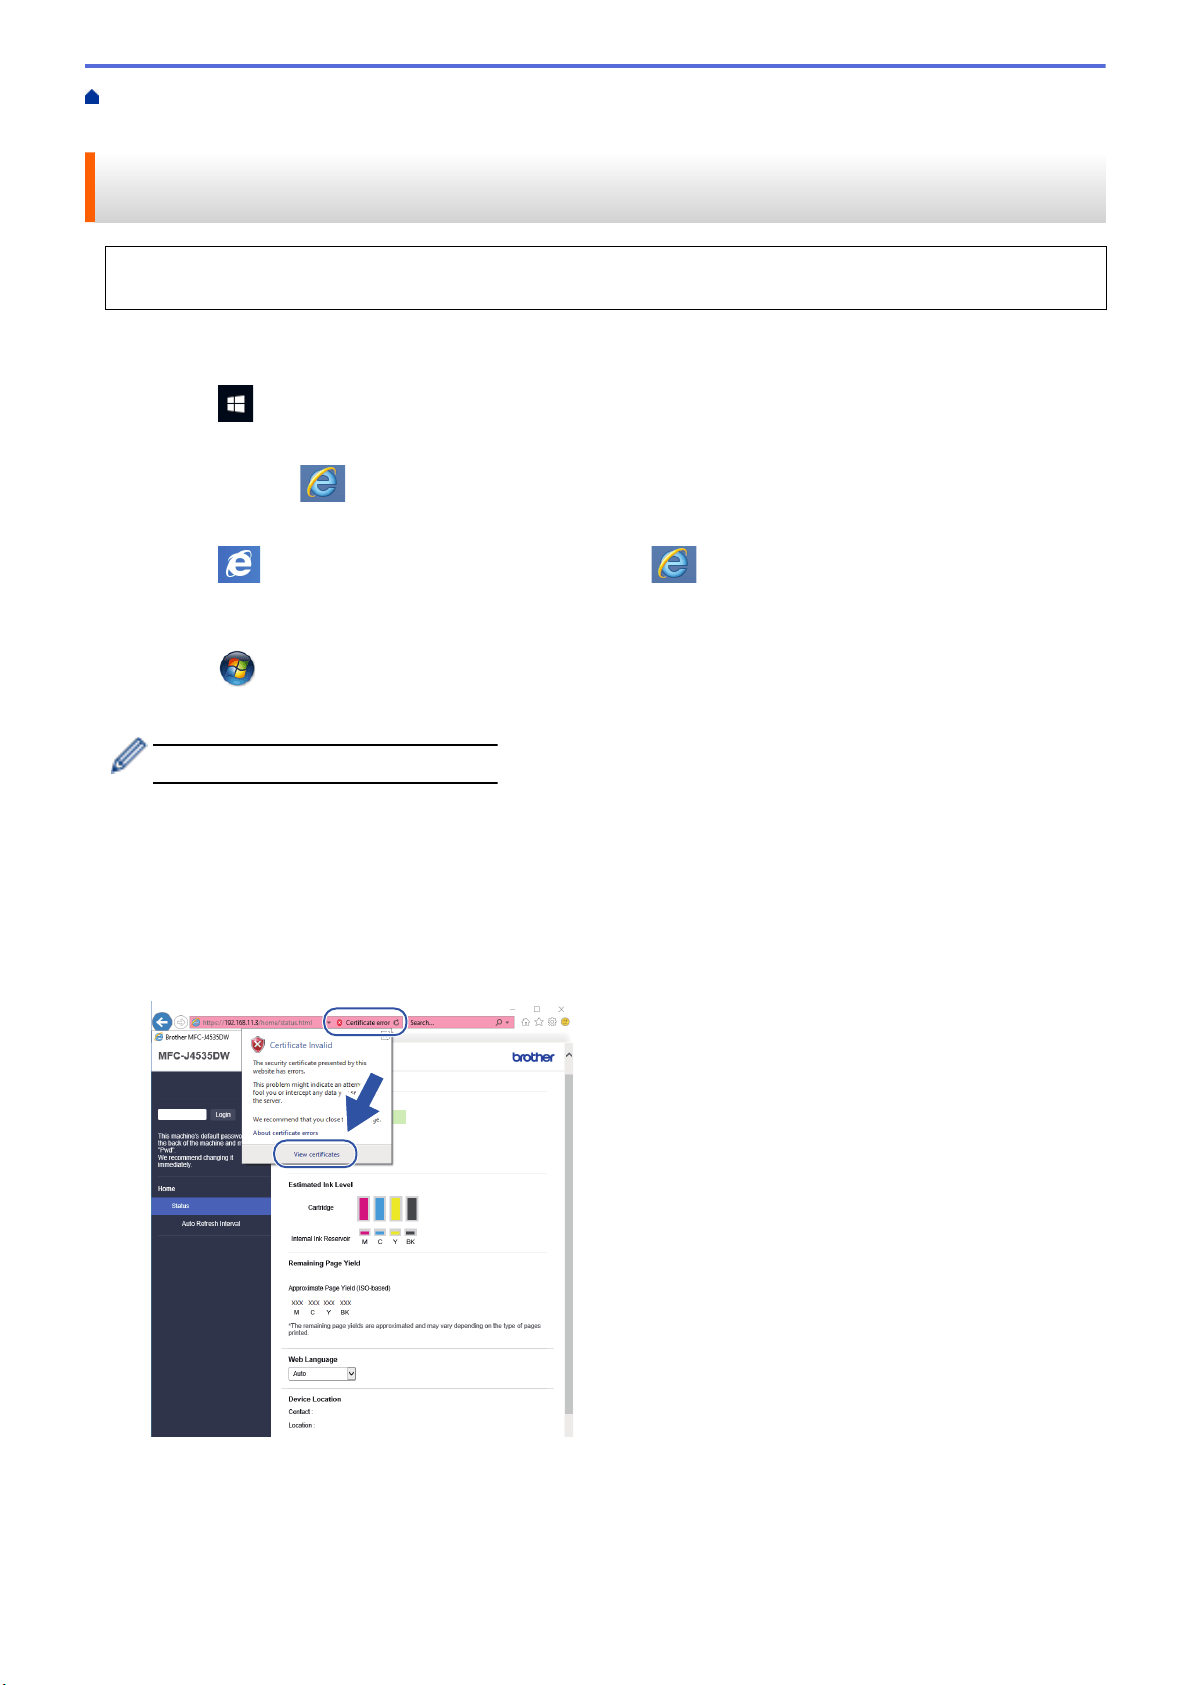
Home > Security > Use SSL/TLS > Manage Your Network Machine Securely Using SSL/TLS > Install the
Self-signed Certificate for Windows users with Administrator Rights
Install the Self-signed Certificate for Windows users with Administrator
Rights
The following steps are for Microsoft Internet Explorer. If you use another web browser, consult the
documentation for your web browser to get help with installing certificates.
1. Do one of the following:
• Windows 10, Windows Server 2016, and Windows Server 2019
Click > Windows Accessories.
• Windows 8.1
Right-click the
(Internet Explorer) icon on the taskbar.
• Windows Server 2012 and Windows Server 2012 R2
Click
(Internet Explorer), and then right-click the (Internet Explorer) icon that appears on the
taskbar.
• Windows 7 and Windows Server 2008
Click
(Start) > All Programs.
2. Right-click Internet Explorer, and then click Run as administrator.
If the More option appears, click More.
If the User Account Control screen appears, click Yes.
3. Type "https://machine's IP address" in your browser's address bar to access your machine (where "machine's
IP address" is the machine's IP address or the node name that you assigned for the certificate).
4. Click More information.
5. Click Go on to the webpage (not recommended).
6. Click Certificate error, and then click View certificates.
7. Click Install Certificate….
8. When the Certificate Import Wizard appears, click Next.
9. Select Place all certificates in the following store, and then click Browse….
10. Select Trusted Root Certification Authorities, and then click OK.
148


Home > Security > Use SSL/TLS > Print Documents Securely Using SSL/TLS > Print Documents Using
SSL/TLS
Print Documents Using SSL/TLS
To print documents securely with IPP protocol, use the IPPS protocol.
1. Start your web browser.
2. Type "https://machine's IP address" in your browser's address bar (where "machine's IP address" is the
machine's IP address).
For example:
https://192.168.1.2
If you are using a Domain Name System or enable a NetBIOS name, you can type another name, such as
"SharedPrinter" instead of the IP address.
For example:
https://SharedPrinter
If you enable a NetBIOS name, you can also use the node name.
For example:
https://brnxxxxxxxxxxxx
The NetBIOS name can be found in the Network Configuration Report.
3. If required, type the password in the Login field, and then click Login.
The default password to manage this machine’s settings is located on the back of the machine and marked
"Pwd".
4. Go to the navigation menu, and then click Network > Network > Protocol.
Start from
, if the navigation menu is not shown on the left side of the screen.
5. Make sure the IPP checkbox is selected.
If the IPP checkbox is not selected, select the IPP checkbox, and then click Submit.
Restart your machine to activate the configuration.
After the machine restarts, return to the machine's web page, type the password, go to the navigation
menu, and then click Network > Network > Protocol.
6. Click HTTP Server Settings.
7. Select the HTTPS (Port 443) checkbox in the IPP, and then click Submit.
8. Restart your machine to activate the configuration.
Communication using IPPS cannot prevent unauthorized access to the print server.
Related Information
• Print Documents Securely Using SSL/TLS
Related Topics:
• Access Web Based Management
• Print the Network Configuration Report
151


Home > Mobile Connect > AirPrint > AirPrint Overview
AirPrint Overview
AirPrint is a printing solution for Apple operating systems that allows you
to wirelessly print photos, email, web pages and documents from your
iPad, iPhone, iPod touch and Mac computer without the need to install a
driver.
AirPrint also lets you scan documents to your Mac computer.
For more information, visit Apple’s website.
Use of the Works with Apple badge means that an accessory has been
designed to work specifically with the technology identified in the badge
and has been certified by the developer to meet Apple performance
standards.
Related Information
• AirPrint
154

Home > Mobile Connect > AirPrint > Before Using AirPrint (macOS)
Before Using AirPrint (macOS)
Before printing using macOS, add your machine to the printer list on your Mac computer.
1. Select System Preferences from the Apple menu.
2. Click Printers & Scanners.
3. Click the + icon below the Printers pane on the left.
The Add screen appears.
4. Select your machine, and then select AirPrint from the Use pop-up menu.
5. Click Add.
Related Information
• AirPrint
155

Home > Mobile Connect > AirPrint > Print Using AirPrint > Print from iPad, iPhone, or iPod touch
Print from iPad, iPhone, or iPod touch
The procedure used to print may vary by application. Safari is used in the example below.
1. Make sure your machine is turned on.
Make sure you have loaded the correct paper in the paper tray and change the paper settings for the paper
tray on your machine.
2. Use Safari to open the page that you want to print.
3. Tap
or .
4. Tap Print.
5. Make sure your machine is selected.
6. If a different machine (or no printer) is selected, tap Printer.
A list of available machines appears.
7. Tap your machine's name in the list.
8. Select the options you want, such as the number of pages to print and 2-sided printing (if supported by your
machine).
9. Tap Print.
Related Information
• Print Using AirPrint
157

Home > Mobile Connect > AirPrint > Print Using AirPrint > Print Using AirPrint (macOS)
Print Using AirPrint (macOS)
The procedure used to print may vary by application. Safari is used in the example below. Before printing,
make sure your machine is in the printer list on your Mac computer.
1. Make sure your machine is turned on.
Make sure you have loaded the correct paper in the paper tray and change the paper settings for the paper
tray on your machine.
2. On your Mac computer, use Safari to open the page that you want to print.
3. Click the File menu, and then select Print.
4. Make sure your machine is selected. If a different machine (or no printer) is selected, click the Printer pop-up
menu, and then select your machine.
5. Select the desired options, such as the number of pages to print and 2-sided printing (if supported by your
machine).
6. Click Print.
Related Information
• Print Using AirPrint
Related Topics:
• Before Using AirPrint (macOS)
158

Home > Mobile Connect > AirPrint > Scan Using AirPrint (macOS)
Scan Using AirPrint (macOS)
Before scanning, make sure your machine is in the scanner list on your Mac computer.
1. Load your document.
2. Select System Preferences from the Apple menu.
3. Click Printers & Scanners.
4. Select your machine from the scanner list.
5. Click the Scan tab, and then click the Open Scanner… button.
The Scanner screen appears.
6. If you place the document in the ADF, select Use Document Feeder checkbox, and then select the size of
your document from the scan size setting pop-up menu.
7. Select the destination folder or destination application from the destination setting pop-up menu.
8. Click Show Details to change the scanning settings if needed.
You can crop the image manually by dragging the mouse pointer over the portion you want to scan when
scanning from the scanner glass.
9. Click Scan.
Related Information
• AirPrint
159
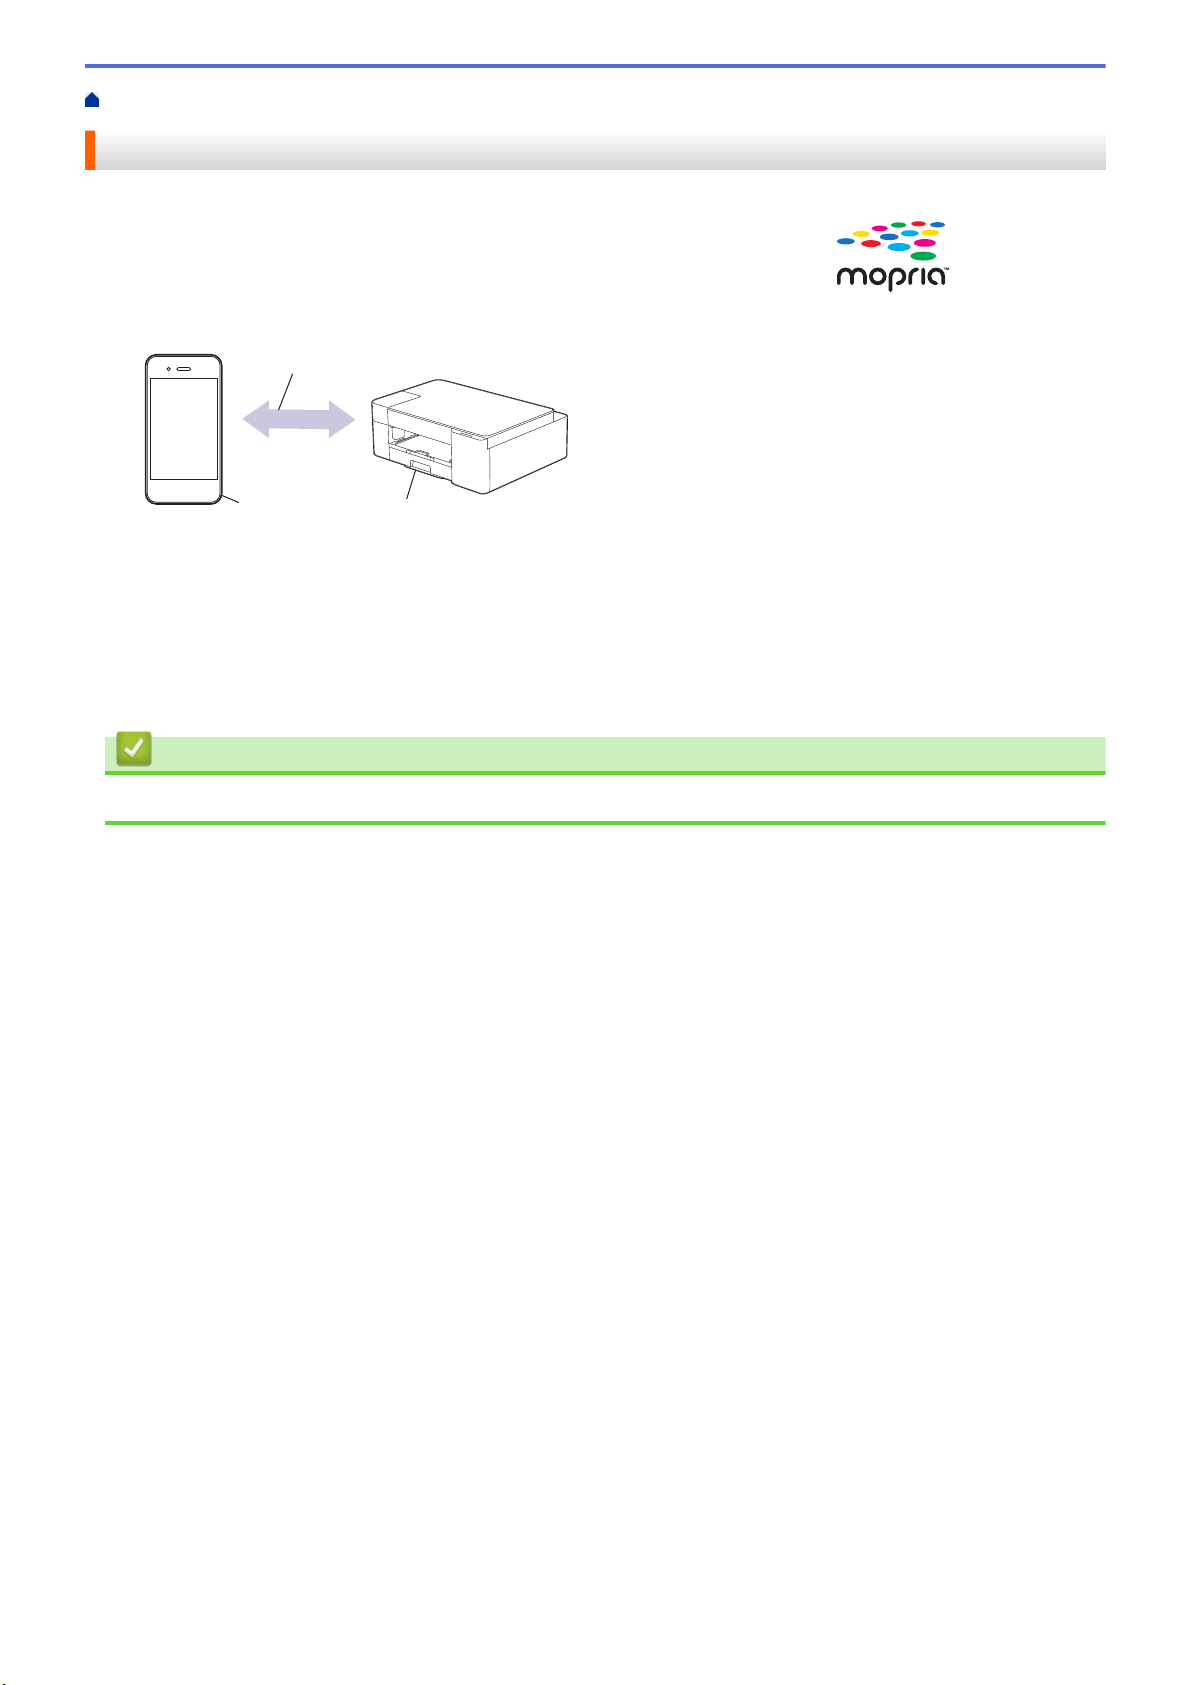
Home > Mobile Connect > Mopria
™
Print Service and Mopria
™
Scan
Mopria
™
Print Service and Mopria
™
Scan
Mopria
™
Print Service is a print feature and Mopria
™
Scan is a scan feature on
Android
™
mobile devices developed by the Mopria Alliance
™
. With this service,
you can connect to the same network as your machine to print and scan without
additional setup.
1 3
2
1. Android
™
Mobile Device
2. Wi-Fi
®
Connection
3. Your Machine
You must download the Mopria
™
Print Service or Mopria
™
Scan from Google Play
™
and install it on your
Android
™
device. Before using this service, you must turn it on.
Related Information
• Mobile Connect
160

Home > Mobile Connect > Brother Mobile Connect
Brother Mobile Connect
Use Brother Mobile Connect to print and scan from your mobile device.
• For Android
™
devices
Brother Mobile Connect allows you to use your Brother machine's features directly from your Android
™
device.
Download and install Brother Mobile Connect from Google Play
™
.
• For all iOS or iPadOS supported devices including iPhone, iPad, and iPod touch
Brother Mobile Connect allows you to use your Brother machine's features directly from your iOS or iPadOS
device.
Download and install Brother Mobile Connect from the App Store.
Related Information
• Mobile Connect
Related Topics:
• Configure Your Machine for a Wireless Network Using the Setup Wizard from Your Mobile Device
161

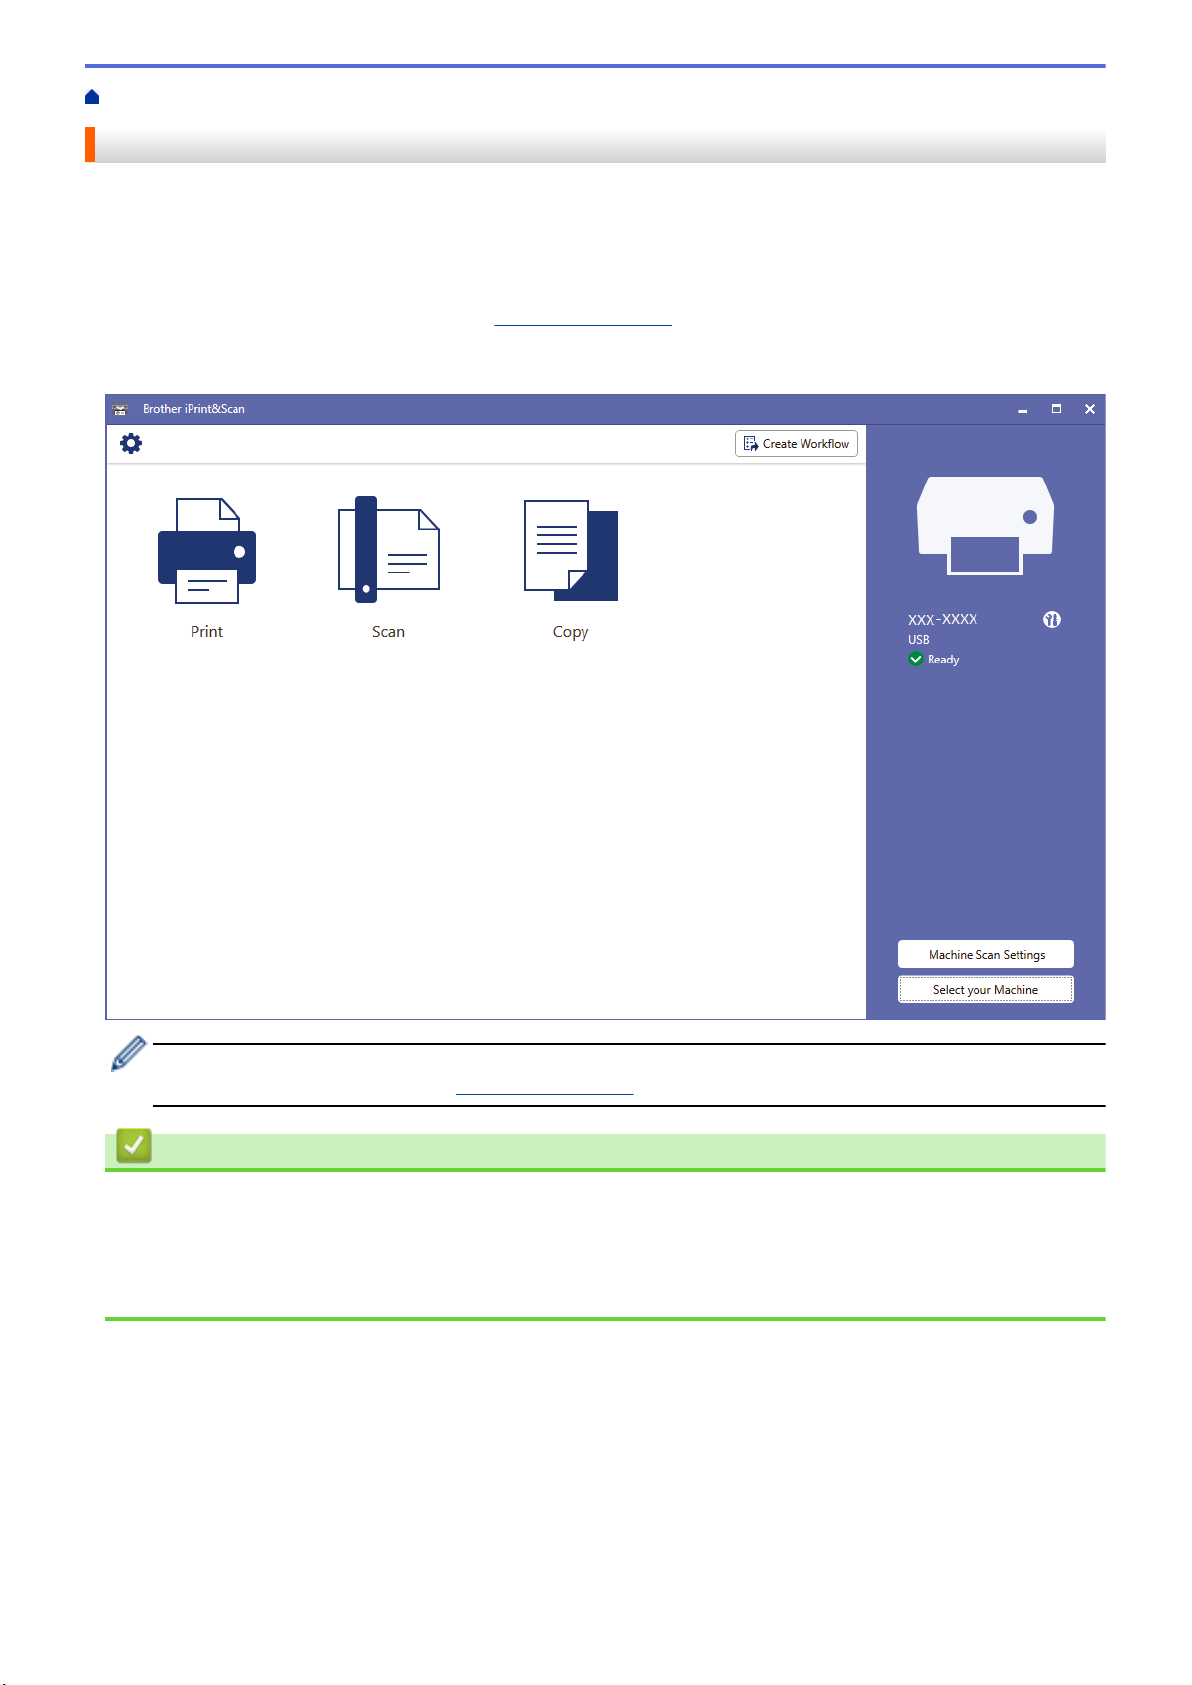
Home > Brother iPrint&Scan for Windows and Mac > Brother iPrint&Scan Overview for Windows and Mac
Brother iPrint&Scan Overview for Windows and Mac
Use Brother iPrint&Scan for Windows and Mac to print and scan from your computer.
The following screen shows an example of Brother iPrint&Scan for Windows. The actual screen may differ
depending on the version of the application.
• For Windows
Go to your model's Downloads page at
support.brother.com to download the latest application.
• For Mac
Download and install Brother iPrint&Scan from the App Store.
If prompted, install the driver and software necessary to use your machine. Download the installer from
your model's Downloads page at support.brother.com.
Related Information
• Brother iPrint&Scan for Windows and Mac
Related Topics:
• Monitor Machine Status Using Brother iPrint&Scan (Windows/Mac)
• Scan Using Brother iPrint&Scan (Windows/Mac)
163

Home > Troubleshooting
Troubleshooting
If you think there is a problem with your machine, first check each of the items below, then try to identify the
problem, and follow our troubleshooting tips.
You can correct most problems yourself. If you need additional help, visit support.brother.com for the latest FAQs
and troubleshooting tips:
1. Visit support.brother.com.
2. Click FAQs & Troubleshooting and search for your model name.
First, check the following:
• The machine's power cord is connected correctly and the machine's power is on.
• All of the machine's protective parts have been removed.
• The ink cartridges are installed correctly.
• The Jam Clear Cover is fully closed.
• Paper is inserted correctly in the paper tray.
• The interface cables are securely connected to the machine and the computer, or the wireless connection is
set up on both the machine and your computer.
• (For network models) The access point (for wireless), router, or hub is turned on and its link indicator is
blinking.
If you did not solve the problem with the checks, identify the problem by checking the LED patterns and
indications, and then see Related Information.
Related Information
• Error and Maintenance LED Indications
• Printer Jam or Paper Jam
• If You Are Having Difficulty with Your Machine
• Check the Machine Information
• Reset Your Machine
Related Topics:
• Paper Handling and Printing Problems
• Other Problems
• Network Problems
164
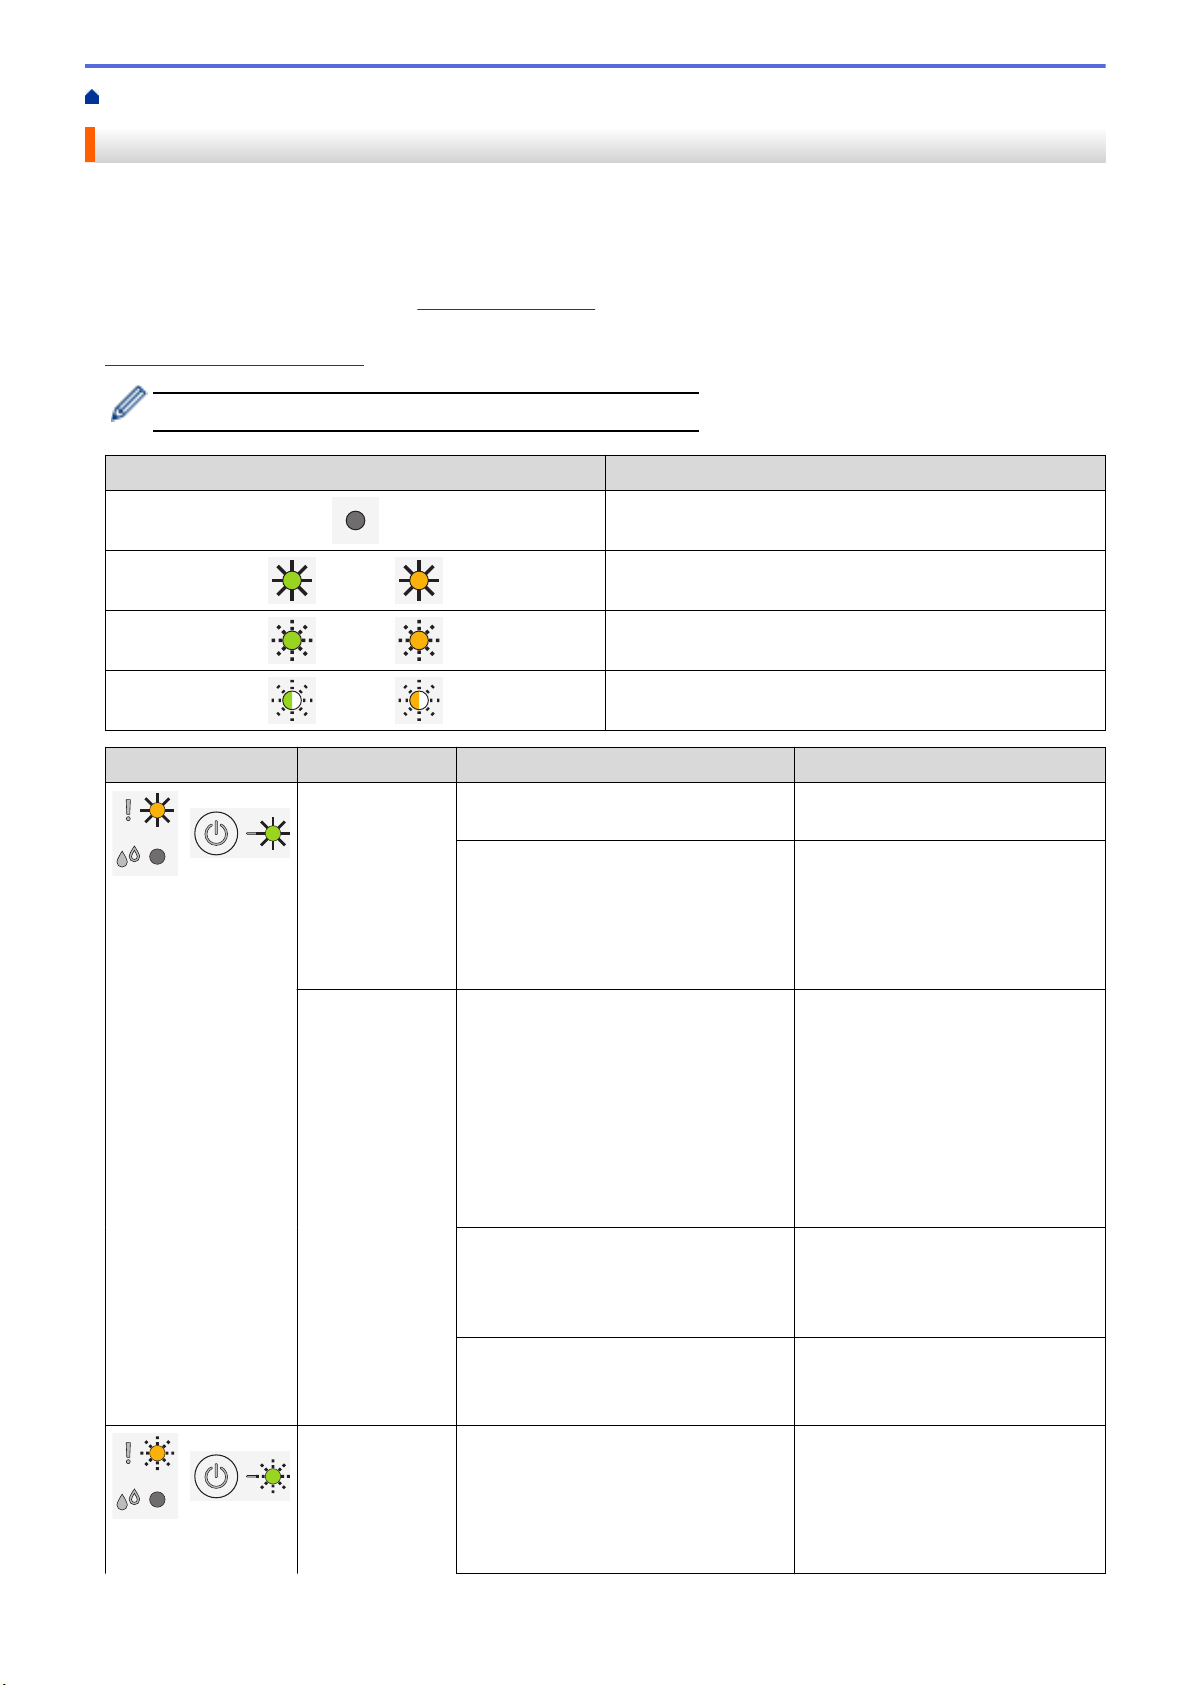
Home > Troubleshooting > Error and Maintenance LED Indications
Error and Maintenance LED Indications
As with any sophisticated office product, errors may occur and supply items may have to be replaced. If this
happens, your machine identifies the error or required routine maintenance and indicates this with the LEDs on
the control panel. The LED indications are explained in this table.
You can correct most errors and perform routine maintenance yourself. If you need more tips, go to your model's
FAQs & Troubleshooting page at support.brother.com.
If you use the Brother Refresh EZ Print Subscription Service, check the additional LED indications at
EZPrintLED.Brother-usa.com.
Related Information references are at the bottom of this page.
LED Description
The LED is off.
The LED is lit.
The LED is blinking.
The LED is blinking slowly and faintly.
LED Status Cause Action
Tray not detected The paper tray is not completely
inserted.
Slowly push the paper tray
completely into the machine.
Paper or a foreign object has
prevented the paper tray from being
inserted correctly.
Pull the paper tray out of the
machine, and remove the jammed
paper or foreign object. If you
cannot find or remove the jammed
paper, see Related Information:
Printer Jam or Paper Jam.
No paper fed The machine is out of paper or paper
is not correctly loaded in the paper
tray.
Do one of the following:
• Refill the paper tray, and then
press MONO COPY or COLOR
COPY.
• Remove and reload the paper,
and then press MONO COPY
or COLOR COPY.
See Related Information: Load
Paper.
The Jam Clear Cover is not closed
correctly.
Make sure the Jam Clear Cover is
closed evenly at both ends.
See Related Information: Paper is
Jammed Inside the Machine.
Paper dust has accumulated on the
surface of the paper pick-up rollers.
Clean the paper pick-up rollers.
See Related Information: Clean the
Paper Pick-up Rollers.
(blinking
simultaneously)
Paper jam The paper is jammed in the machine. Gently remove the jammed paper.
See Related Information: Printer
Jam or Paper Jam.
Make sure the paper guides are set
to the correct paper size.
165
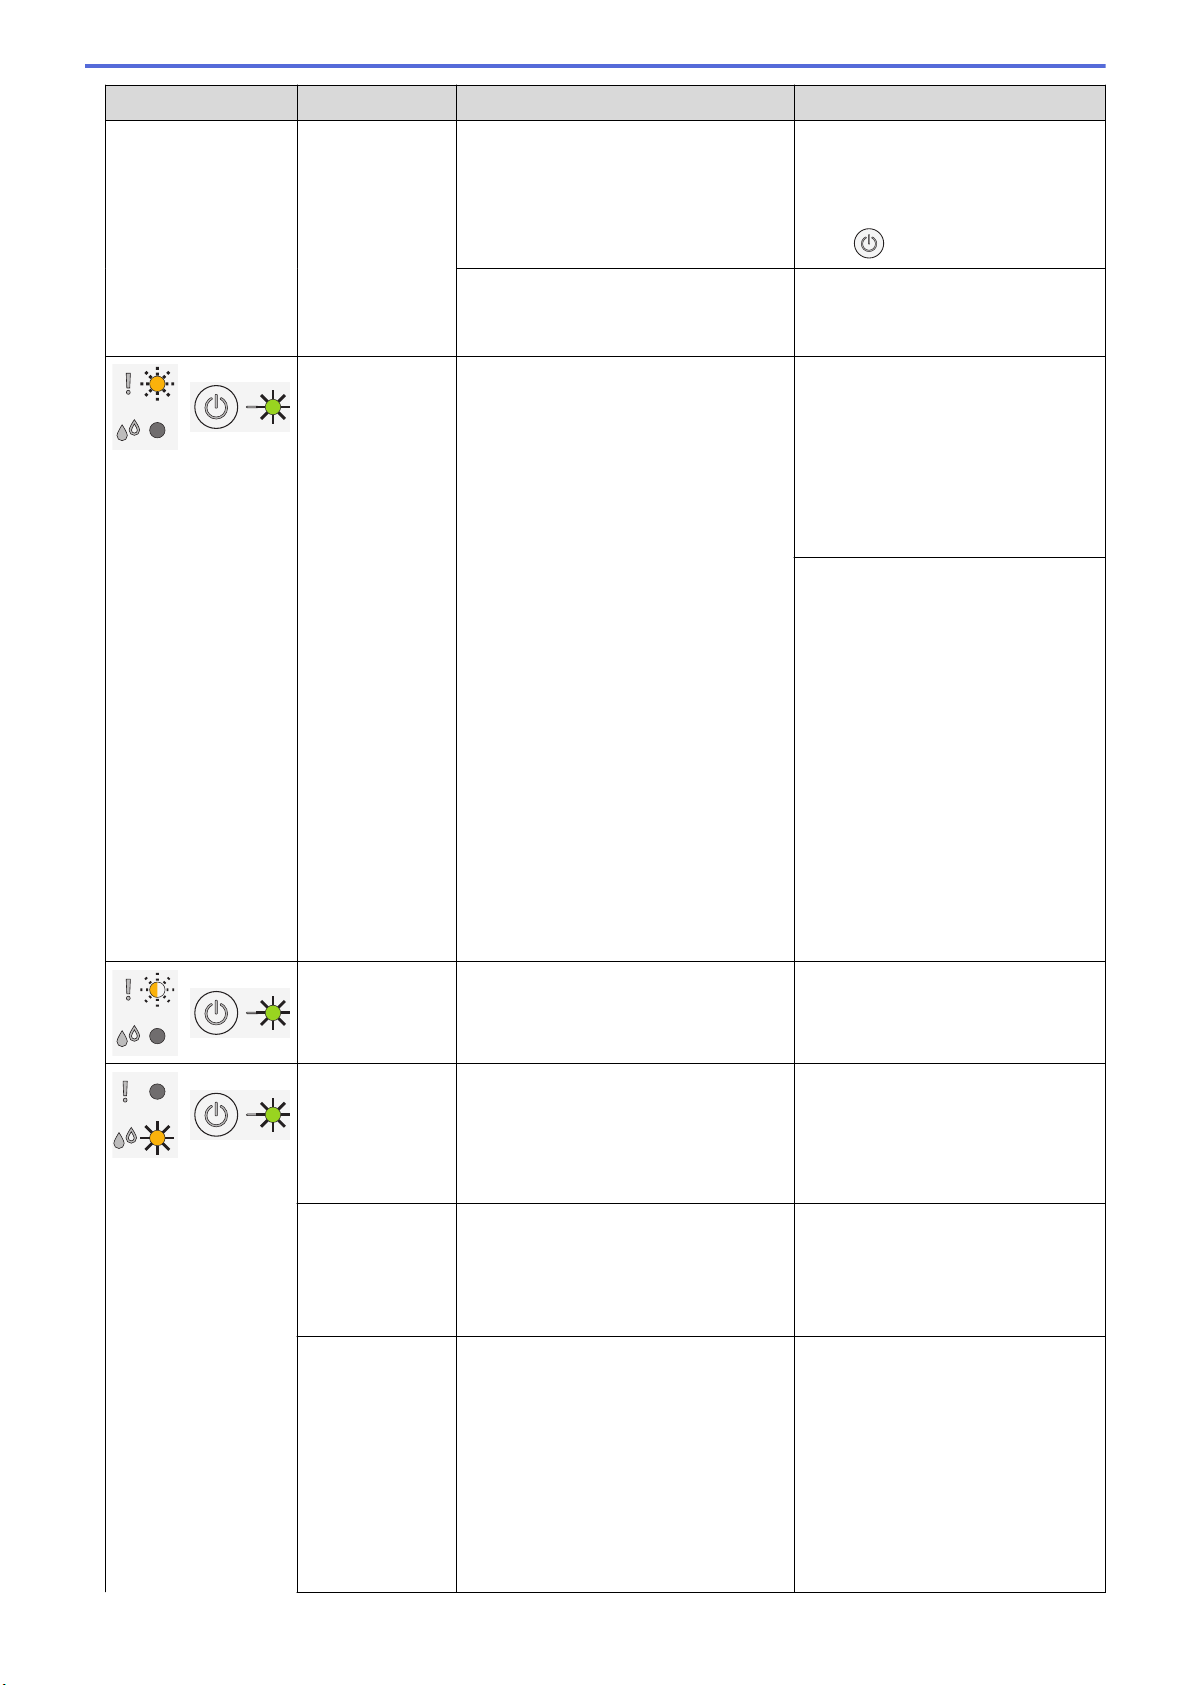
LED Status Cause Action
DO NOT extend the paper tray
when you load A5 or smaller size
paper.
After completing these actions,
press
(STOP).
Paper dust has accumulated on the
surface of the paper pick-up rollers.
Clean the paper pick-up rollers.
See Related Information: Clean the
Paper Pick-up Rollers.
Wrong paper
size
The paper size setting does not match
the size of paper in the tray.
-OR-
You did not set the paper guides in the
tray to the indicators for the paper size
you are using.
If you are printing from your
computer, make sure the paper
size you selected in the printer
driver or in the application you use
to print matches the size of paper
in the tray.
See Related Information: Print
Settings (Windows).
1. Check that the paper size you
chose in the machine matches
the size of the paper in the tray.
See Related Information:
Change the Paper Size and
Paper Type .
2. Make sure you loaded the
paper in a Portrait position, by
setting the paper guides at the
indicators for your paper size.
See Related Information: Load
Paper.
3. After you have checked the
paper size and the paper
position, press MONO COPY or
COLOR COPY.
Cover open
The ink cartridge cover is not locked in
the closed position.
Firmly close the ink cartridge cover
until it locks into place.
Replace Ink One or more of the ink cartridges have
reached the end of their lives. The
machine will stop all print operations.
Replace the ink cartridges.
See Related Information: Replace
the Ink Cartridges.
You can still scan even if the ink is
low or needs to be replaced.
No cartridge An ink cartridge is not installed
correctly.
Remove the ink cartridge and re-
install it slowly and firmly until it
locks into place.
See Related Information: Replace
the Ink Cartridges.
Black and white
print only
One or more of the color ink cartridges
have reached the end of their lives.
You can use the machine in black and
white mode for approximately four
weeks depending on the number of
pages you print.
While Power LED and Ink LED light
up, each operation works in the
following way:
• Printing
Replace the ink cartridges.
See Related Information: Replace
the Ink Cartridges.
Although the Cause column lists
options for using the machine after
this error appears, you will not be
able to use the machine until you
replace one or more of the ink
cartridges under the following
condition:
166
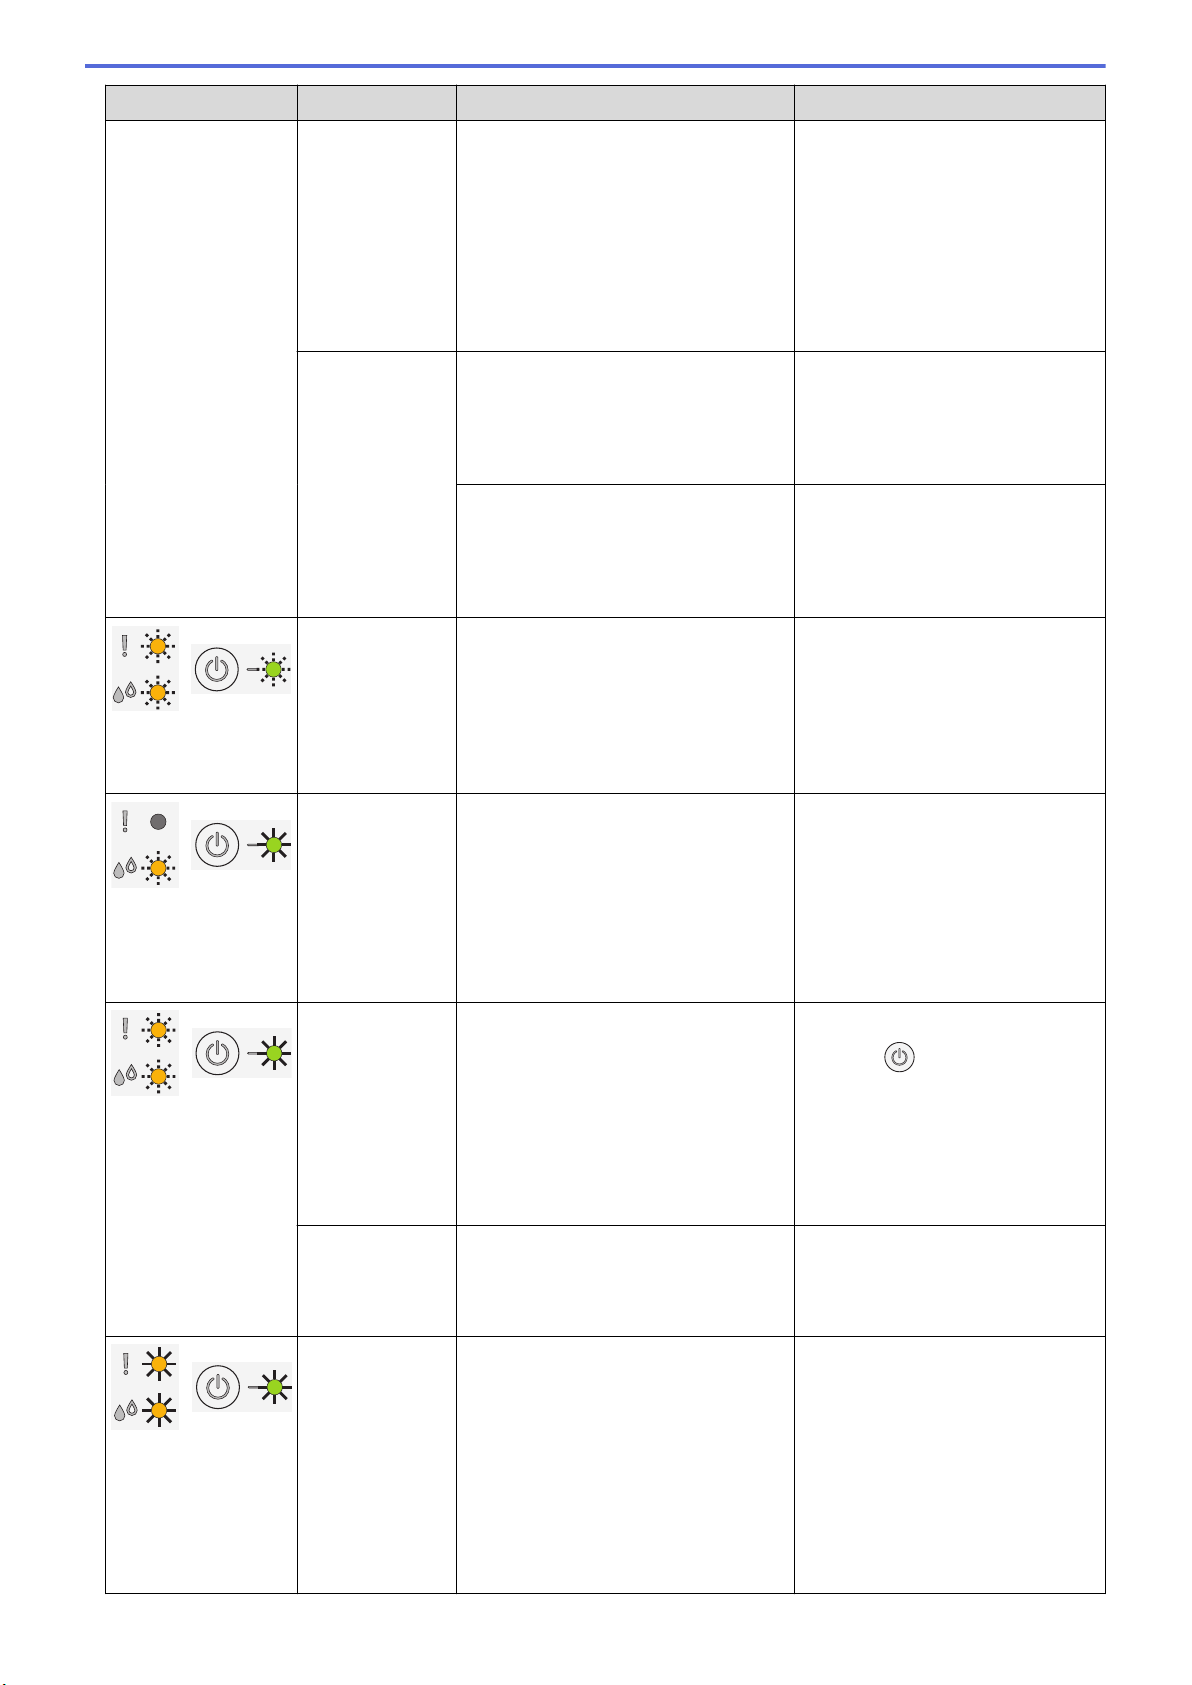
LED Status Cause Action
If the media type is set to Plain
Paper and you selected
Grayscale in the printer driver, you
can use the machine as a black
and white printer.
• Copying
If the paper type is set to Plain
Paper, you can make copies in
black and white.
If you unplug the machine or
remove the ink cartridge.
Cannot detect An ink cartridge is not installed
correctly.
Take out the new ink cartridge and
re-install it slowly and firmly until it
locks into place.
See Related Information: Replace
the Ink Cartridges.
The wrong Brother model ink cartridge
was installed.
Check the model numbers of the
ink cartridges and install the correct
ink cartridges.
See Related Information: Replace
the Ink Cartridges.
Cannot Initialize /
Cannot Start
Cannot Clean
Cannot Change
Cannot Print
Cannot Scan
The machine has a mechanical
problem.
Disconnect the machine from the
power for several minutes, and
then reconnect it.
Ink low The ink level is low. You can continue printing until one
or more of the ink cartridges reach
the end of their lives. (The Ink LED
will stop blinking and remain lit.)
See Related Information: Replace
the Ink Cartridges.
You can still scan even if the ink is
low or needs to be replaced.
Out of memory
The machine's memory is full. If a copy operation is in progress:
• Press
(STOP) and wait until
the other operations that are in
progress finish, and then try
again.
• Press MONO COPY or COLOR
COPY to copy the pages
scanned so far.
(Blinking three
times)
Operation
rejected
The machine cannot perform this
operation now.
Wait a few minutes, and then try
again.
InkBox full The ink absorber box is full. These
components are periodic maintenance
items that may require replacement
after a period of time to ensure
optimum performance from your
Brother machine. Because these
components are periodic maintenance
items, the replacement is not covered
under the warranty. The need to
replace these items and the time
period before replacement is
The ink absorber box must be
replaced. Call Brother Customer
Service or a Brother Authorized
Service Center to have your
machine serviced.
167
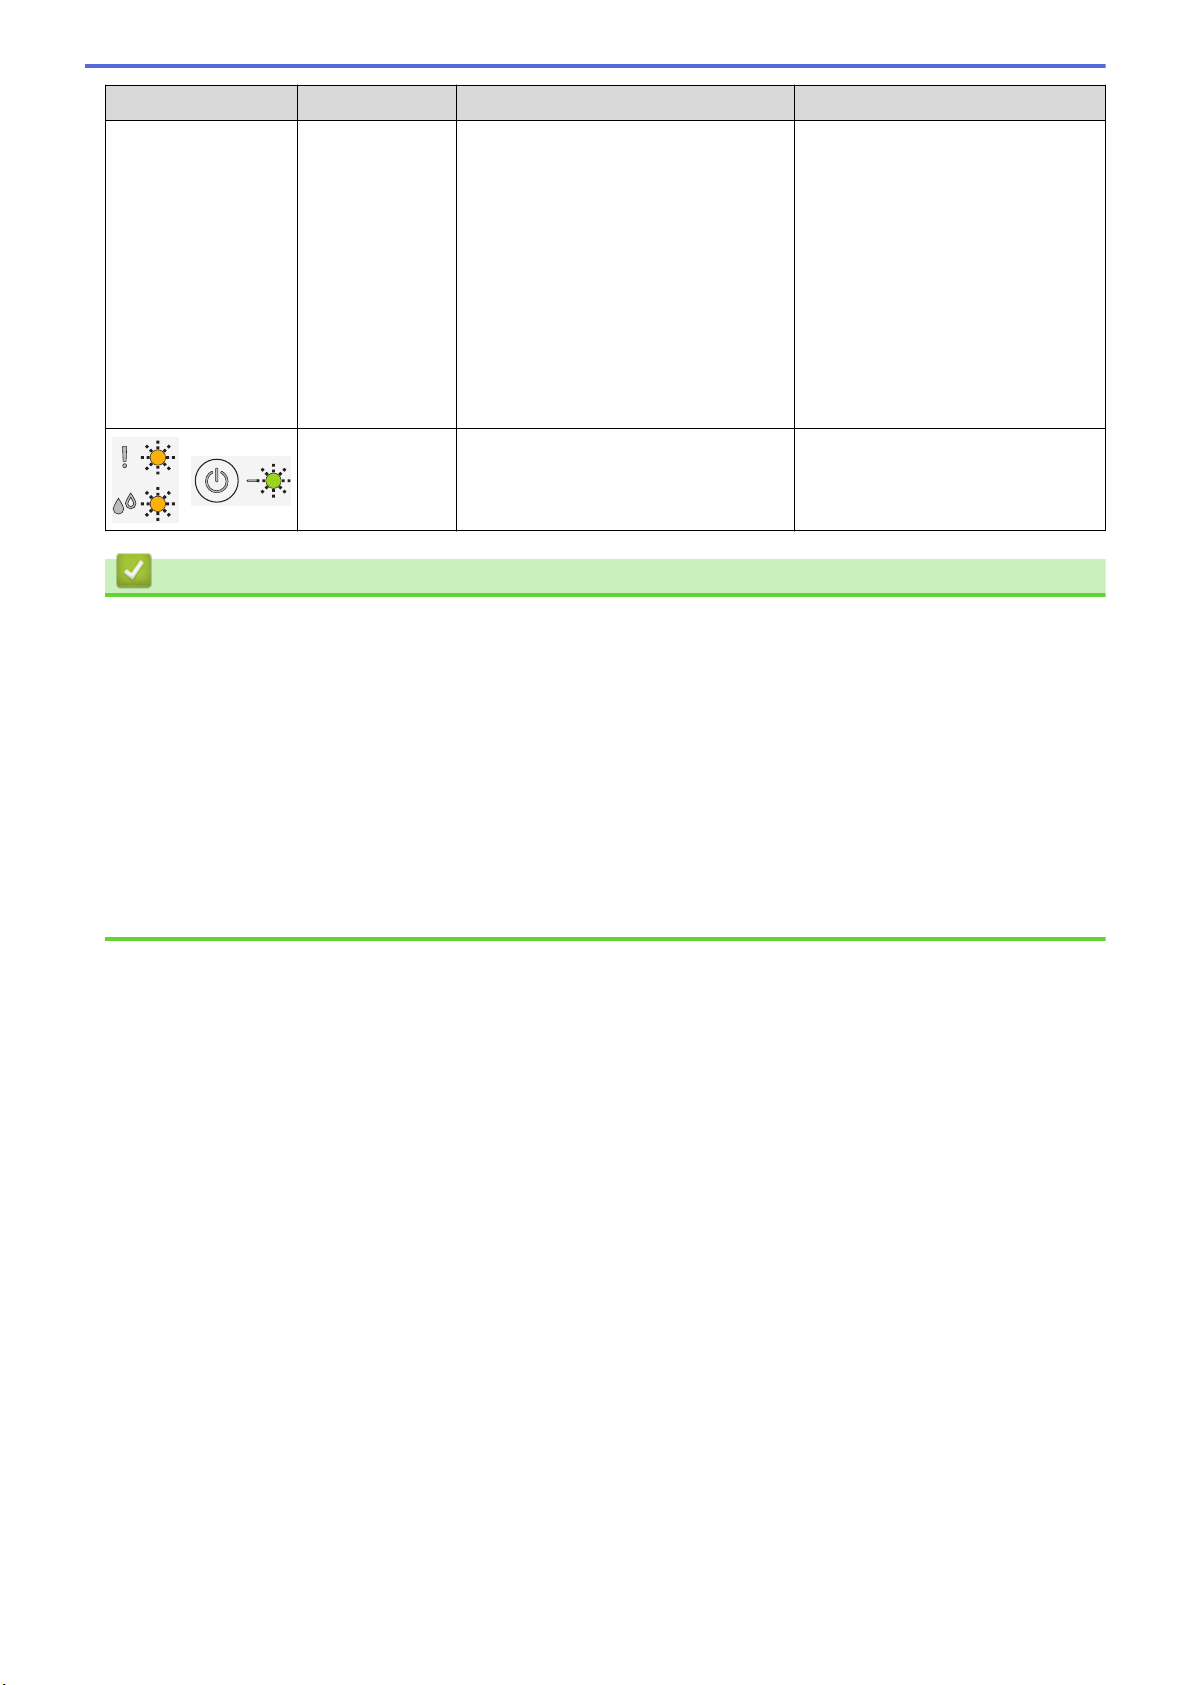
LED Status Cause Action
dependent on the number of purges
and flushes required to clean the ink
system. These boxes acquire
amounts of ink during the different
purging and flushing operations. The
number of times a machine purges
and flushes for cleaning varies
depending on different situations. For
example, frequently powering the
machine on and off will cause
numerous cleaning cycles since the
machine automatically cleans upon
power up.
Machine error
The machine has a mechanical
problem.
Disconnect the machine from the
power for several minutes, and
then reconnect it.
Related Information
• Troubleshooting
Related Topics:
• Load Paper
• Printer Jam or Paper Jam
• Clean the Paper Pick-up Rollers
• Print Settings (Windows)
• Paper is Jammed Inside the Machine
• Replace the Ink Cartridges
• Change the Paper Size and Paper Type
• LED Patterns and Indications
168

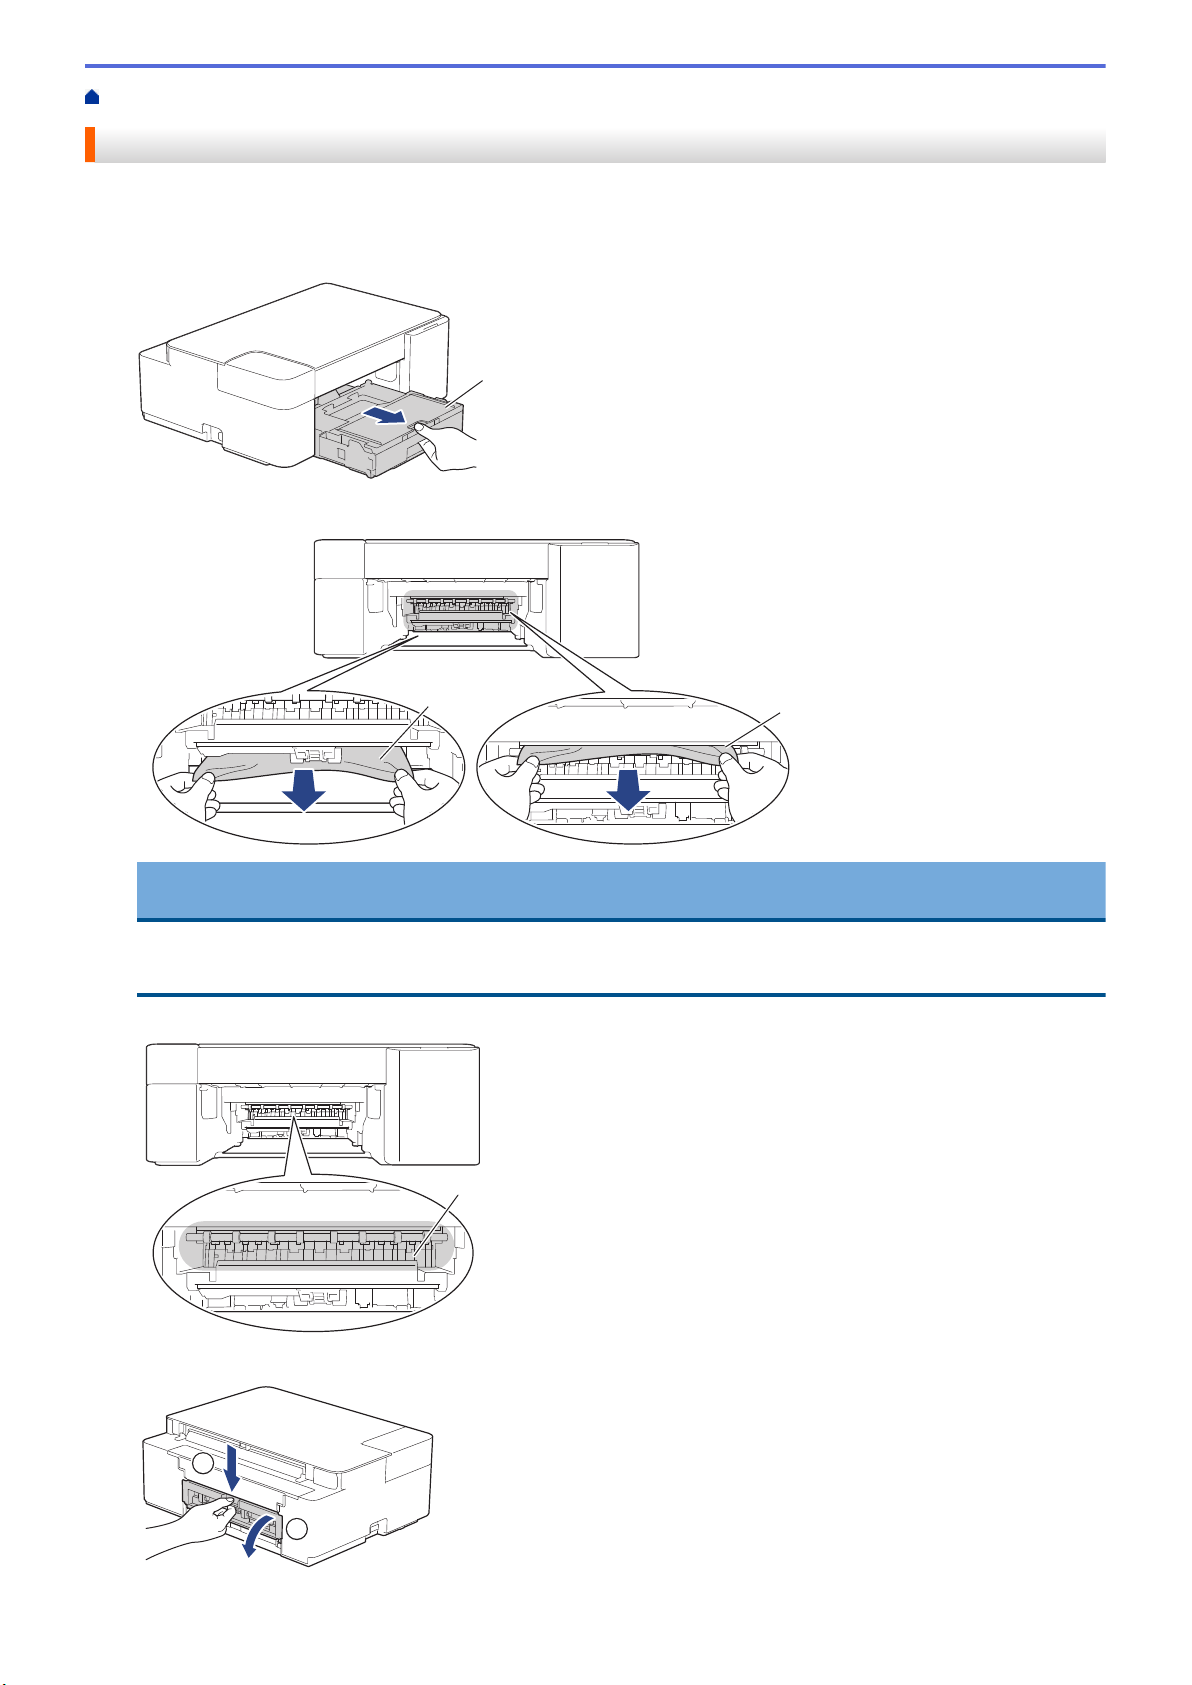
Home > Troubleshooting > Printer Jam or Paper Jam > Paper is Jammed Inside the Machine
Paper is Jammed Inside the Machine
If the paper is jammed, follow these steps:
1. Unplug the machine from the AC power outlet.
2. Pull the paper tray (1) completely out of the machine.
1
3. Slowly pull the jammed paper (1) out of the machine.
1
1
IMPORTANT
Be careful, as ink can easily get on your hands. If ink gets on your skin or clothing, immediately wash it
off with soap or detergent.
4. Make sure you look carefully inside (1) for any scraps of paper.
1
5. Push down on the Jam Clear Cover (1) on the back of the machine, and then open it (2).
1
2
170
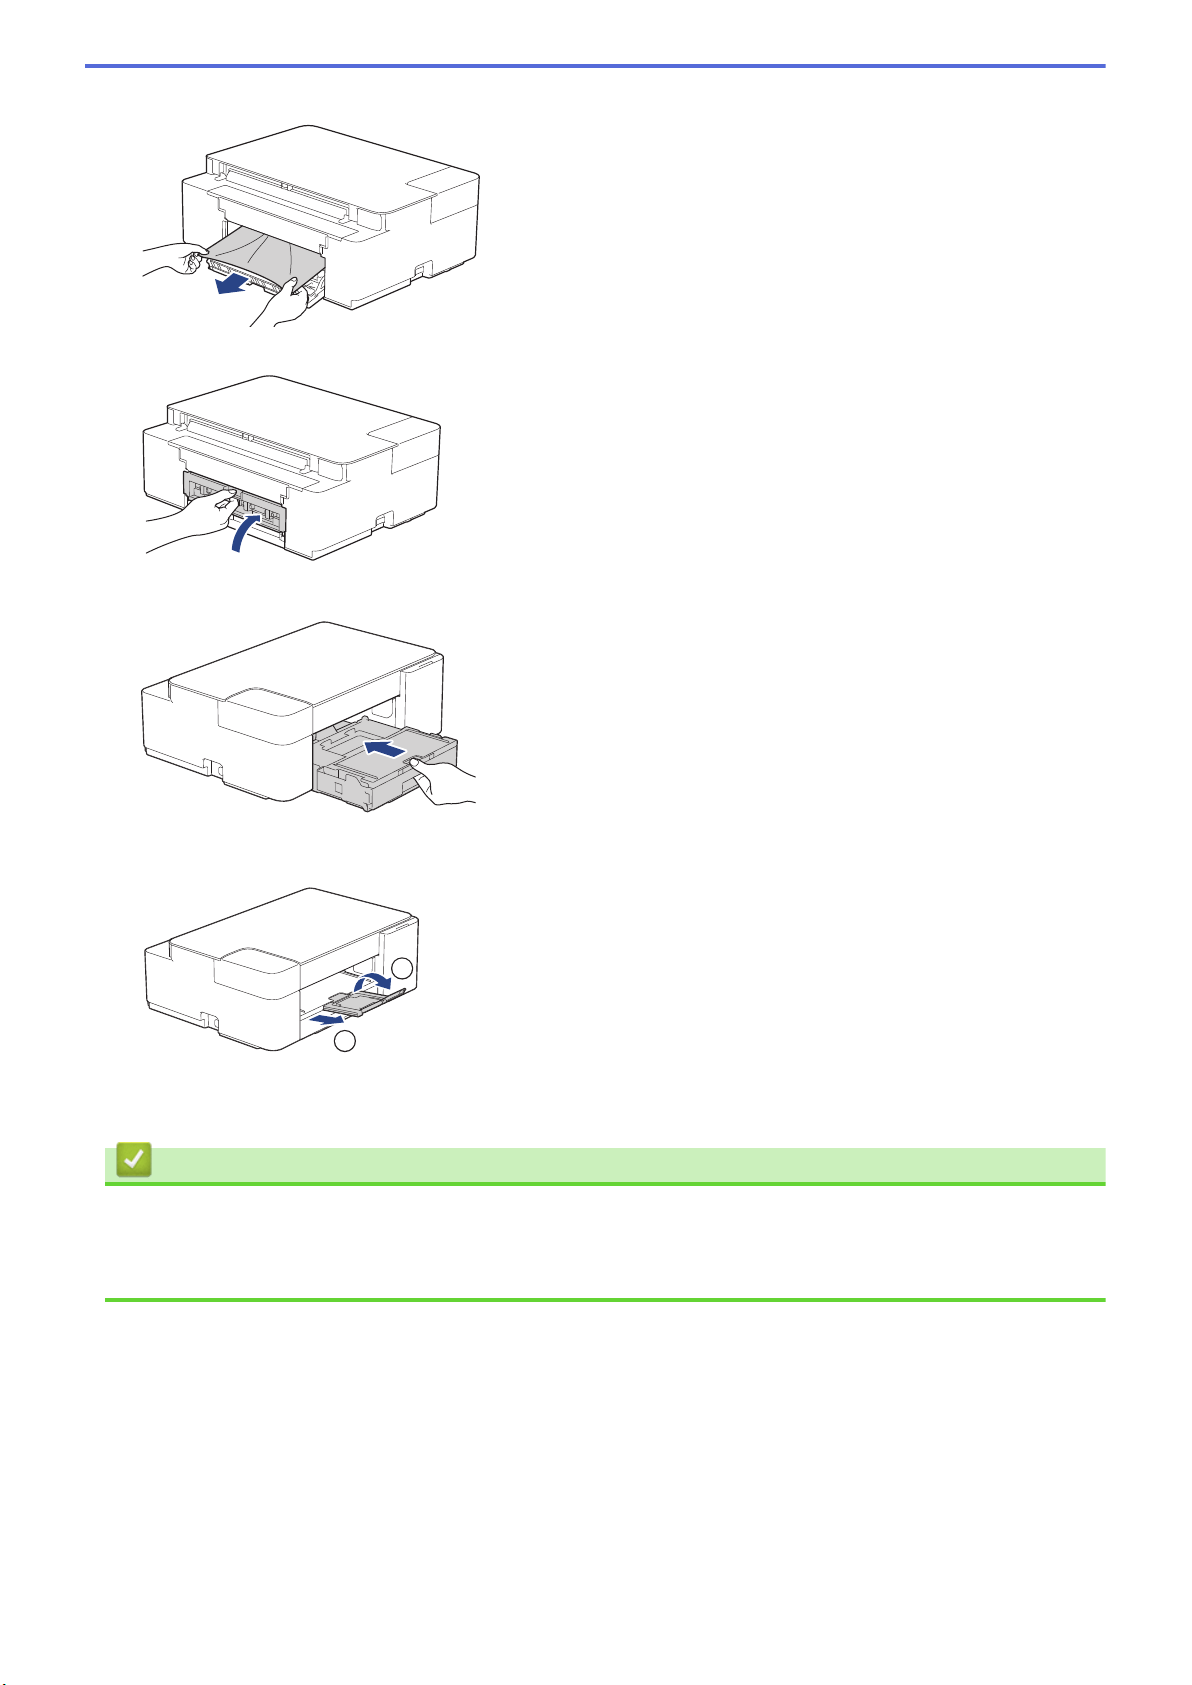
6. Slowly pull the jammed paper out of the machine.
7. Close the Jam Clear Cover. Make sure the cover is closed completely.
8. Push the paper tray firmly back in the machine.
9. While holding the paper tray in the machine, pull out the paper support (1) until it locks into place, and then
unfold the paper support flap (2).
1
2
10. Reconnect the power cord.
Related Information
• Printer Jam or Paper Jam
Related Topics:
• Error and Maintenance LED Indications
171

Home > Troubleshooting > If You Are Having Difficulty with Your Machine
If You Are Having Difficulty with Your Machine
For technical help, you must call the country where you bought the machine. Calls must be made from
within that country.
If you think there is a problem with your machine, check the following topics. You can correct most problems
yourself.
If you need additional help, go to your model's FAQs & Troubleshooting page at
support.brother.com.
• Paper Handling and Printing Problems
• Other Problems
• Network Problems
• AirPrint Problems
172
Home > Troubleshooting > If You Are Having Difficulty with Your Machine > Paper Handling and Printing
Problems
Paper Handling and Printing Problems
If, after reading this table, you still need help, see the latest FAQs & Troubleshooting tips at
support.brother.com.
>> Printing Difficulties
>> Print Quality Difficulties
>> Paper Handling Difficulties
Printing Difficulties
Difficulties
Suggestions
No printout (Windows)
Check that the correct printer driver has been installed and selected.
Check to see if the machine's LEDs are indicating an error.
See Related Information: Error and Maintenance LED Indications.
Check that the machine is online:
• Windows 10, Windows Server 2016, and Windows Server 2019
Click
> Windows System > Control Panel. In the Hardware and Sound
group, click View devices and printers. Right-click the Brother XXX-XXXX
Printer (where XXX-XXXX is the name of your model). Click See what’s
printing. If printer driver options appear, select your printer driver. Click
Printer in the menu bar and make sure Use Printer Offline is not selected.
• Windows 8.1
Move your mouse to the lower right corner of your desktop. When the menu
bar appears, click Settings > Control Panel. In the Hardware and Sound
group, click View devices and printers. Right-click the Brother XXX-XXXX
Printer (where XXX-XXXX is the name of your model). Click See what's
printing. If printer driver options appear, select your printer driver. Click
Printer in the menu bar and make sure Use Printer Offline is not selected.
• Windows Server 2012 R2
Click Control Panel on the Start screen. In the Hardware group, click View
devices and printers. Right-click the Brother XXX-XXXX Printer (where
XXX-XXXX is the name of your model). Click See what’s printing. If printer
driver options appear, select your printer driver. Click Printer in the menu bar
and make sure Use Printer Offline is not selected.
• Windows Server 2012
Move your mouse to the lower right corner of your desktop. When the menu
bar appears, click Settings > Control Panel. In the Hardware group, click
View devices and printers. Right-click the Brother XXX-XXXX Printer
(where XXX-XXXX is the name of your model). Click See what's printing. If
printer driver options appear, select your printer driver. Click Printer in the
menu bar and make sure Use Printer Offline is not selected.
• Windows 7 and Windows Server 2008 R2
Click
(Start) > Devices and Printers. Right-click Brother XXX-XXXX
Printer (where XXX-XXXX is the name of your model) and click See what's
printing. If printer driver options appear, select your printer driver. Click
Printer in the menu bar. Make sure Use Printer Offline is not selected.
• Windows Server 2008
Click
(Start) > Control Panel > Hardware and Sound > Printers. Right-
click Brother XXX-XXXX Printer (where XXX-XXXX is the name of your
model). Make sure Use Printer Online is not listed. If it is listed, click this
option to set the driver Online.
One or more ink cartridges have reached the end of their life.
173
Difficulties Suggestions
See Related Information: Replace the Ink Cartridges.
If old, unprinted data remains in the printer driver spooler, it will prevent new print
jobs from printing. Open the printer icon and delete all data as follows:
• Windows 10, Windows Server 2016, and Windows Server 2019
Click > Windows System > Control Panel. In the Hardware and Sound
group, click View devices and printers > Printers.
• Windows 8.1
Move your mouse to the lower right corner of your desktop. When the menu
bar appears, click Settings > Control Panel. In the Hardware and Sound
group, click View devices and printers > Printers.
• Windows Server 2012 R2
Click Control Panel on the Start screen. In the Hardware group, click View
devices and printers > Printers.
• Windows Server 2012
Move your mouse to the lower right corner of your desktop. When the menu
bar appears, click Settings > Control Panel. In the Hardware group, click
View devices and printers > Printers.
• Windows 7 and Windows Server 2008 R2
Click /Start > Devices and Printers > Printers and Faxes.
• Windows Server 2008
Click (Start) > Control Panel > Hardware and Sound > Printers.
• Mac
Click the System Preferences > Printers & Scanners.
The headers or footers appear
when the document is displayed
on the screen but do not appear
when the document is printed.
There is an unprintable area on the top and bottom of the page. Adjust the top
and bottom margins in your document to allow for this.
See Related Information: Unprintable Area.
Cannot perform ‘Page Layout’
printing.
(Windows )
Check that the paper size setting in the application and in the printer driver are
the same.
See Related Information: Change the Paper Size and Paper Type .
Print speed is too slow. (Windows)
Try changing the printer driver setting. The highest resolution needs longer data
processing, sending, and printing time. Try the other quality settings in the printer
driver as follows:
In the printer driver, clear the Color Enhancement (True2Life) checkbox on the
Advanced tab.
Turn the Borderless feature off. Borderless printing is slower than normal printing.
See Related Information: Print Settings (Windows).
Turn off the Quiet Mode setting. Print speed is slower in Quiet Mode. See
Related Information: Reduce Printing Noise.
Make sure the Media Type setting in the printer driver or in the application you
use to print matches the type of paper you are using.
See Related Information: Change the Paper Size and Paper Type .
See Related Information: Print Settings (Windows).
Print Quality Difficulties
Difficulties
Suggestions
Poor print quality Check the print quality.
174
Difficulties Suggestions
See Related Information: Check the Print Quality.
Make sure the Media Type setting in the printer driver or in the application you
use to print matches the type of paper you are using.
See Related Information: Print Settings (Windows).
Make sure your ink cartridges are fresh. The following may cause ink to clog:
• The expiration date written on the cartridge package has passed.
• The ink cartridge may not have been stored correctly before use.
Make sure you are using one of the recommended types of paper.
See Related Information: Acceptable Print Media.
The recommended environment for your machine is between 68 °F to 91.4 °F
(20°C to 33°C).
White lines appear in text or
graphics.
Clean the print head.
See Related Information: Clean the Print Head from Your Brother Machine.
See Related Information: Clean the Print Head Using Web Based Management.
See Related Information: Clean the Print Head from Your Computer (Windows).
Check and adjust the print alignment. See Related Information: Check the Print
Alignment from Your Brother Machine, Check the Print Alignment Using Web
Based Management.
Try using the recommended types of paper.
See Related Information: Acceptable Print Media.
To prolong print head life, provide the best ink cartridge economy and maintain
print quality, we do not recommend frequently unplugging the machine and/or
leaving the machine unplugged for extended periods of time. We recommend
using (STOP) to power down the machine. Using (STOP) allows minimal
power to the machine, resulting in periodic, but less frequent, cleaning of the print
head.
Dark lines appear at regular
intervals.
Check and adjust the print alignment.
See Related Information: Check the Print Alignment from Your Brother Machine.
See Related Information: Check the Print Alignment Using Web Based
Management.
The machine prints blank pages. Check the print quality.
See Related Information: Check the Print Quality.
To prolong print head life, provide the best ink cartridge economy and maintain
print quality, we do not recommend frequently unplugging the machine and/or
leaving the machine unplugged for extended periods of time. We recommend
using (STOP) to power down the machine. Using (STOP) allows minimal
power to the machine, resulting in periodic, but less frequent, cleaning of the print
head.
Characters and lines are blurred.
Check the printing alignment.
See Related Information: Check the Print Alignment from Your Brother Machine.
See Related Information: Check the Print Alignment Using Web Based
Management.
Change the print options.
See Related Information: Change the Print Options to Improve Your Print
Results.
175
Difficulties Suggestions
Printed text or images are
skewed.
Make sure the paper is loaded correctly in the paper tray and the paper guides
are adjusted correctly.
See Related Information: Load Paper.
Make sure the Jam Clear Cover is closed correctly.
There are smudges or stains at
the top center of the printed page.
Make sure the paper is not too thick or curled.
See Related Information: Acceptable Print Media.
Printing appears dirty or ink
seems to run.
Make sure you are using the recommended types of paper. Do not handle the
paper until the ink is dry.
See Related Information: Acceptable Print Media.
Make sure the printing surface is face down in the paper tray.
If you are using photo paper, make sure the glossy side of the photo paper is
face down in the tray and you have set the correct paper type. If you are printing
a photo from your computer, set the Media Type in the printer driver or in the
application you use to print.
Ink is smudged or wet when using
glossy photo paper.
Be sure to check the front and back of the paper. Place the glossy surface
(printing surface) face down.
See Related Information: Change the Paper Size and Paper Type .
If you use glossy photo paper, make sure the paper type setting is correct.
Stains appear on the reverse side
or at the bottom of the page.
Make sure the printer platen is not dirty with ink.
See Related Information: Clean the Machine's Printer Platen.
Make sure you are using the paper support flap.
See Related Information: Load Paper.
Make sure the paper feed rollers are not dirty with ink.
See Related Information: Clean the Paper Feed Rollers.
The printouts are wrinkled. (Windows)
In the printer driver, select the Advanced tab, click Other Print Options, and
then click Advanced Color Settings. Clear the Bi-Directional Printing
checkbox.
Paper Handling Difficulties
Difficulties
Suggestions
The machine does not feed paper. Make sure the paper tray is pushed in all the way until it locks into place.
Make sure the Jam Clear Cover at the back of the machine is closed.
If the Power LED and the Warning LED are still blinking, see Related
Information: Error and Maintenance LED Indications.
If the paper tray is empty, load a new stack of paper into the paper tray.
If there is paper in the paper tray, make sure it is straight. If the paper is curled,
straighten it. Sometimes it is helpful to remove the paper, turn the stack over and
put it back in the paper tray.
Reduce the amount of paper in the paper tray, and then try again.
Clean the paper pick-up rollers.
See Related Information: Clean the Paper Pick-up Rollers.
Make sure that the paper is within specifications for the machine.
See Related Information: Paper Capacity of the Paper Tray.
Photo paper does not feed
correctly.
When you print on photo paper, load one extra sheet of the same photo paper in
the paper tray.
Machine feeds multiple pages. • Make sure the paper is loaded correctly in the paper tray.
176
Difficulties Suggestions
• Remove all the paper from the tray and fan the stack of paper well, then put it
back in the tray.
• Make sure you do not push the paper in too far.
See Related Information: Load Paper.
Make sure the Jam Clear Cover is closed correctly.
See Related Information: Printer Jam or Paper Jam.
Make sure the Base Pad in the paper tray is not dirty.
See Related Information: Clean the Base Pad.
There is a paper jam. See Related Information: Printer Jam or Paper Jam.
Make sure the paper guides are set to the correct paper size.
Use the jam prevention settings.
For copying:
See Related Information: Change the Print Options to Improve Your Print
Results.
For printing:
See Related Information: Change the Print Options to Improve Your Print
Results.
See Related Information: Prevent Smudged Printouts and Paper Jams
(Windows).
The paper jams when you use 2-
sided print.
If paper jams occur frequently during 2-sided printing, the paper feed rollers may
be stained with ink. Clean the paper feed rollers.
See Related Information: Clean the Paper Feed Rollers.
Related Information
• If You Are Having Difficulty with Your Machine
Related Topics:
• Troubleshooting
• Unprintable Area
• Check the Print Quality
• Acceptable Print Media
• Clean the Print Head from Your Brother Machine
• Clean the Print Head Using Web Based Management
• Clean the Print Head from Your Computer (Windows)
• Load Paper
• Clean the Machine's Printer Platen
• Clean the Paper Feed Rollers
• Clean the Paper Pick-up Rollers
• Printer Jam or Paper Jam
• Print Settings (Windows)
• Prevent Smudged Printouts and Paper Jams (Windows)
• Clean the Base Pad
• Reduce Printing Noise
• Change the Paper Size and Paper Type
• Replace the Ink Cartridges
• Change the Print Options to Improve Your Print Results
• Error and Maintenance LED Indications
• Check the Print Alignment Using Web Based Management
177

Home > Troubleshooting > If You Are Having Difficulty with Your Machine > Other Problems
Other Problems
>> Copying Difficulties
>> Scanning Difficulties
>> Software Difficulties
Copying Difficulties
Difficulties
Suggestions
Black marks or spots appear in
copies.
Black marks or spots on copies are typically caused by dirt or correction fluid on
the scanner glass. Clean the scanner glass and white plastic above it.
See Related Information: Clean the Scanner.
Copies are blank. Make sure you are loading the document correctly.
See Related Information: Load Documents on the Scanner Glass.
Fit to Page does not work
correctly.
Make sure the document is not skewed on the scanner glass. Reposition the
document and try again.
Copy speed is too slow. To copy with normal quality, briefly press MONO COPY or COLOR COPY (do not
press and hold). If you press and hold MONO COPY or COLOR COPY for two
seconds, the machine makes a copy of the best quality, which will take more
time.
Scanning Difficulties
Difficulties
Suggestions
TWAIN or WIA errors appear
when starting to scan. (Windows)
Make sure the Brother TWAIN or WIA driver is selected as the primary source in
your scanning application. For example, in Nuance
™
PaperPort
™
14SE, click
Desktop > Scan Settings > Select to choose the Brother TWAIN/WIA driver.
OCR does not work. Try increasing the scanning resolution.
Software Difficulties
Difficulties
Suggestions
Cannot print. Uninstall the drivers (Windows) and the Brother software and reinstall the latest
version of both.
“The device is busy.” appears on
the computer screen.
Make sure the machine's LEDs are not indicating any errors.
Related Information
• If You Are Having Difficulty with Your Machine
Related Topics:
• Troubleshooting
• Clean the Scanner
• Load Documents on the Scanner Glass
• Change the Print Options to Improve Your Print Results
179

Home > Troubleshooting > If You Are Having Difficulty with Your Machine > Network Problems > Use the
Network Connection Repair Tool (Windows)
Use the Network Connection Repair Tool (Windows)
Use the Network Connection Repair Tool to fix the Brother machine's network settings. It will assign the correct
IP address and Subnet Mask.
Make sure your machine is turned on and is connected to the same network as your computer.
1. Launch (Brother Utilities), and then click the drop-down list and select your model name (if not already
selected).
2. Click Tools in the left navigation bar, and then click Network Connection Repair Tool.
3. Follow the on-screen instructions.
4. Check the diagnosis by printing the Network Configuration Report.
The Network Connection Repair Tool will start automatically if you select the Enable Connection Repair
Tool option in the Status Monitor. Right-click the Status Monitor screen, and then click Other Settings >
Enable Connection Repair Tool. This is not recommended when your network administrator has set the
IP address to Static, since it will automatically change the IP address.
If the correct IP address and the Subnet Mask are still not assigned even after using the Network Connection
Repair Tool, ask your network administrator for this information.
Related Information
• Network Problems
Related Topics:
• Print the Network Configuration Report
• If You Are Having Difficulty with Your Machine's Network
181

Home > Troubleshooting > If You Are Having Difficulty with Your Machine > Network Problems > If You Are
Having Difficulty with Your Machine's Network
If You Are Having Difficulty with Your Machine's Network
For technical help, you must call the country where you bought the machine. Calls must be made from
within that country.
If you think there is a problem with your machine, check the following topics. You can correct most problems
yourself.
If you need additional help, go to your model's FAQs & Troubleshooting page at support.brother.com.
>> I Cannot Complete the Wireless Network Setup Configuration
>> My Brother Machine Cannot Print or Scan over the Network
>> I Want to Check that My Network Devices are Working Correctly
I Cannot Complete the Wireless Network Setup Configuration
Turn your wireless router off and back on. Then, try to configure the wireless settings again. If you are unable to
resolve the problem, follow the instructions below:
Investigate the problem using the WLAN Report.
Cause
Action Interface
Your security settings (SSID/
Network Key) are not
correct.
Confirm the security settings using Wireless Setup Helper. For
more information and to download the utility, go to your model's
Downloads page at support.brother.com.
Select and confirm that you are using the correct security settings.
- See the instructions supplied with your wireless LAN access
point/router for information on how to find the security settings.
- The manufacturer's name or model number of the wireless LAN
access point/router may be used as the default security settings.
- Consult with the access point/router manufacturer, your Internet
provider, or network administrator.
Wireless
Your Brother machine's MAC
address is not allowed.
Confirm that the Brother machine's MAC Address is allowed in the
filter.
Wireless
Your wireless LAN access
point/router is in stealth
mode (not broadcasting the
SSID).
• Enter the correct SSID name or Network Key manually.
• Check the SSID name or the Network Key in the instructions
supplied with your wireless LAN access point/router and
reconfigure the wireless network setup.
Wireless
For Windows
If your wireless connection has been interrupted, and you have checked and tried all of the above, we
recommend using the Network Connection Repair Tool.
My Brother Machine Cannot Print or Scan over the Network
If you can no longer print or scan via the network, press
(Wi-Fi) and COLOR COPY simultaneously to restart
the Wi-Fi.
Cause
Action Interface
Your security software
blocks your machine's
access to the network.
(The Network scanning
feature does not work. )
• Windows
Configure the third-party Security/Firewall Software to allow
Network scanning. To add port 54925 for Network scanning, type
the information below:
- In Name:
Type any description, for example Brother NetScan.
- In Port number:
Wireless
183
Cause Action Interface
Type 54925.
Type 137.
Type 161.
- In Protocol:
UDP is selected.
See the instruction manual that came with your third-party
Security/Firewall Software or contact the software manufacturer.
• Mac
(Brother iPrint&Scan)
In the Finder menu bar, click Go > Applications, and then double-
click the Brother iPrint&Scan icon. The Brother iPrint&Scan
window appears. Click the Select your Machine button, and then
follow the on-screen instructions to reselect your network machine.
Your security software
blocks your machine's
access to the network.
Some security software might block access without showing a security
alert dialog box even after successful installation.
To allow access, see the instructions for your security software or ask
the software manufacturer.
Wireless
Your Brother machine was
not assigned an available
IP address.
• Confirm the IP address and the Subnet Mask.
Verify that both the IP addresses and Subnet Masks of your
computer and the Brother machine are correct and located on the
same network.
For more information about how to verify the IP address and the
Subnet Mask, ask your network administrator.
• Windows
Confirm the IP address and the Subnet Mask using the Network
Connection Repair Tool.
• Mac
Check your network devices using the ping command. For more
information on how to confirm your network settings, see Related
Information:Check Network Devices Using the Ping Command.
Wireless
The failed print job is still
in your computer's print
queue. (Windows)
• If the failed print job is still in your computer's print queue, delete it.
• Otherwise, double-click the printer icon in the following folder and
cancel all documents:
- Windows 10, Windows Server 2016, and Windows Server 2019
Click > Windows System > Control Panel. In the
Hardware and Sound group, click View devices and printers.
- Windows 8.1
Move your mouse to the lower right corner of your desktop.
When the menu bar appears, click Settings > Control Panel.
In the Hardware and Sound group, click View devices and
printers.
- Windows Server 2012 R2
Click Control Panel on the Start screen. In the Hardware
group, click View devices and printers.
- Windows Server 2012
Move your mouse to the lower right corner of your desktop.
When the menu bar appears, click Settings > Control Panel.
In the Hardware group, click View devices and printers >
Printers.
- Windows 7 and Windows Server 2008 R2
Click
(Start) > Devices and Printers.
- Windows Server 2008
Click Start > Control Panel > Printers.
Wireless
184

Cause Action Interface
- Mac
Click System Preferences > Printers & Scanners.
Your Brother machine is
not connected to the
wireless network.
Print the WLAN Report to check the error code on the printed report. Wireless
If you have checked and tried all of the above, but your Brother machine still cannot print and scan, uninstall the
drivers (Windows) and the Brother software and reinstall the latest version of both.
I Want to Check that My Network Devices are Working Correctly
Check
Action Interface
Check that your Brother
machine, access point/
router, or network hub is
turned on.
Check the following:
• The power cord is connected correctly and the Brother machine is
turned on.
• The access point/router or hub is turned on and its link indicator is
blinking.
• All protective packaging has been removed from the machine.
• The ink cartridges are installed correctly.
• The document cover and Jam Clear Cover are fully closed.
• Paper is inserted correctly in the paper tray.
Wireless
Check that you can
"ping" the Brother
machine from your
computer.
Ping the Brother machine from your computer using the IP address or
the node name in the Windows command prompt or Mac Terminal
application:
ping <ipaddress> or <nodename>.
• Successful: Your Brother machine is working correctly and
connected to the same network as your computer.
• Unsuccessful: Your Brother machine is not connected to the same
network as your computer.
Windows:
Ask your administrator about the IP address and the subnet mask, and
then use the Network Connection Repair Tool.
Mac:
Confirm that the IP address and the Subnet Mask are set correctly.
Wireless
Check that your Brother
machine is connected to
the wireless network.
Print the WLAN Report to check the error code on the printed report. Wireless
If you have checked and tried all of the above but you are still having problems, see the instructions supplied with
your wireless LAN access point/router to find the SSID (Network Name) and the Network Key (Password)
information and set them correctly.
Related Information
• Network Problems
• Check Network Devices Using the Ping Command
Related Topics:
• Print the WLAN Report
• Print the Network Configuration Report
• Use the Network Connection Repair Tool (Windows)
• Wireless LAN Report Error Codes
185

Home > Troubleshooting > If You Are Having Difficulty with Your Machine > Network Problems > If You Are
Having Difficulty with Your Machine's Network > Check Network Devices Using the Ping Command
Check Network Devices Using the Ping Command
Check the IP addresses of both your computer and your Brother machine, and then confirm whether the network
is operating correctly.
>> Configure the IP Address on your computer (Windows)
>> Configure the IP Address on your computer (Mac)
>> Configure the IP Address on your Brother machine
Configure the IP Address on your computer (Windows)
1. Do one of the following:
• Windows 10
Click
> Windows System > Command Prompt.
• Windows 8.1
Move your mouse to the lower right corner of your desktop. When the menu bar appears, click Search >
Command Prompt.
• Windows7
Click (Start) > All Programs > Accessories > Command Prompt.
2. Type "ipconfig" and then press the Enter key on your keyboard.
3. Confirm the values for the IPv4 address and subnet mask.
4. Type "exit" and then press the Enter key on your keyboard.
Configure the IP Address on your computer (Mac)
1. Select System Preferences from the Apple menu.
2. Click Network > Advanced > TCP/IP.
3. Confirm the values for the IPv4 address and subnet mask.
Configure the IP Address on your Brother machine
Print the Network Configuration Report, and confirm the values for the IP address and subnet mask.
Check the IP addresses for both your computer and your Brother machine. Confirm that the network address
portions are the same. For example, if the subnet mask is "255.255.255.0", it is normal for only the host address
portions to be different.
Network Address
Host Address
IP Address 192.168.100. 250 Set the final number, which corresponds to "0" in the
subnet mask, to 1–254.
Subnet Mask 255.255.255. 0 Usually, there are no problems when the subnet mask is
"255.255.255.0". Use the same value for all of your
computers.
Related Information
• If You Are Having Difficulty with Your Machine's Network
186
Home > Troubleshooting > If You Are Having Difficulty with Your Machine > AirPrint Problems
AirPrint Problems
Difficulty Suggestions
My machine is not displayed in the printer list. Make sure your machine is turned on.
Confirm the network settings.
Move the mobile device closer to the wireless access
point/router, or to your machine.
I cannot print. Make sure your machine is turned on.
Confirm the network settings.
I am trying to print a multiple-page document from an iOS
device, but ONLY the first page is printing.
Make sure you are running the latest OS version.
Related Information
• If You Are Having Difficulty with Your Machine
187
Home > Troubleshooting > Check the Machine Information
Check the Machine Information
1. Start Brother Mobile Connect on your mobile device.
2. Tap your model name on the top of the screen.
3. Tap All Machine Settings.
Web Based Management appears.
4. If required, type the password in the Login field, and then tap Login.
The default password to manage this machine’s settings is located on the back of the machine and marked
"Pwd".
5. Go to the navigation menu, and then tap General > Maintenance Information.
Start from , if the navigation menu is not shown on the left side of the screen.
6. Check your Brother machine's serial number, firmware version, and page counter.
You can also check your Brother machine's serial number and firmware version with the check sheet.
Related Information
• Troubleshooting
Related Topics:
• Access Web Based Management
• Check the Print Quality
• Brother Mobile Connect
188
Home > Troubleshooting > Reset Your Machine
Reset Your Machine
The following reset functions are available.
>> Machine Reset
>> Network
>> All Settings
Machine Reset
You can reset all the machine’s settings that you have changed, such as Date and Time.
1. Press (STOP) and MONO COPY simultaneously.
The Power LED, Warning LED, and Ink LED light up for one second, and then the Warning LED starts
blinking.
2. Press and hold MONO COPY for two seconds.
3. Wait until the machine restarts and the Power LED indicator lights up before disconnecting the machine from
the power source.
Network
Reset the print server back to its default factory settings (includes Password and IP Address information).
1. Press (Wi-Fi) and (STOP) simultaneously.
The Power LED, Warning LED, and Ink LED light up for one second, and then the Wi-Fi LED starts
blinking.
2. Press and hold COLOR COPY for two seconds.
3. Wait until the machine restarts and the Power LED indicator lights up before disconnecting the machine from
the power source.
All Settings
Use this reset function to reset all machine's settings to the settings originally set at the factory.
Brother strongly recommends you perform this operation when you dispose of the machine.
1. Press
(STOP) and MONO COPY simultaneously.
The Power LED, Warning LED, and Ink LED light up for one second, and then the Warning LED starts
blinking.
2. Press and hold COLOR COPY for two seconds.
3. Wait until the machine restarts and the Power LED indicator lights up before disconnecting the machine from
the power source.
Related Information
• Troubleshooting
189

Home > Routine Maintenance
Routine Maintenance
• Replace the Ink Cartridges
• Clean Your Brother Machine
• Check Your Brother Machine
• Check the Print Alignment from Your Brother Machine
• Check the Print Alignment Using Web Based Management
• Change the Print Options to Improve Your Print Results
• Pack and Ship Your Machine
190
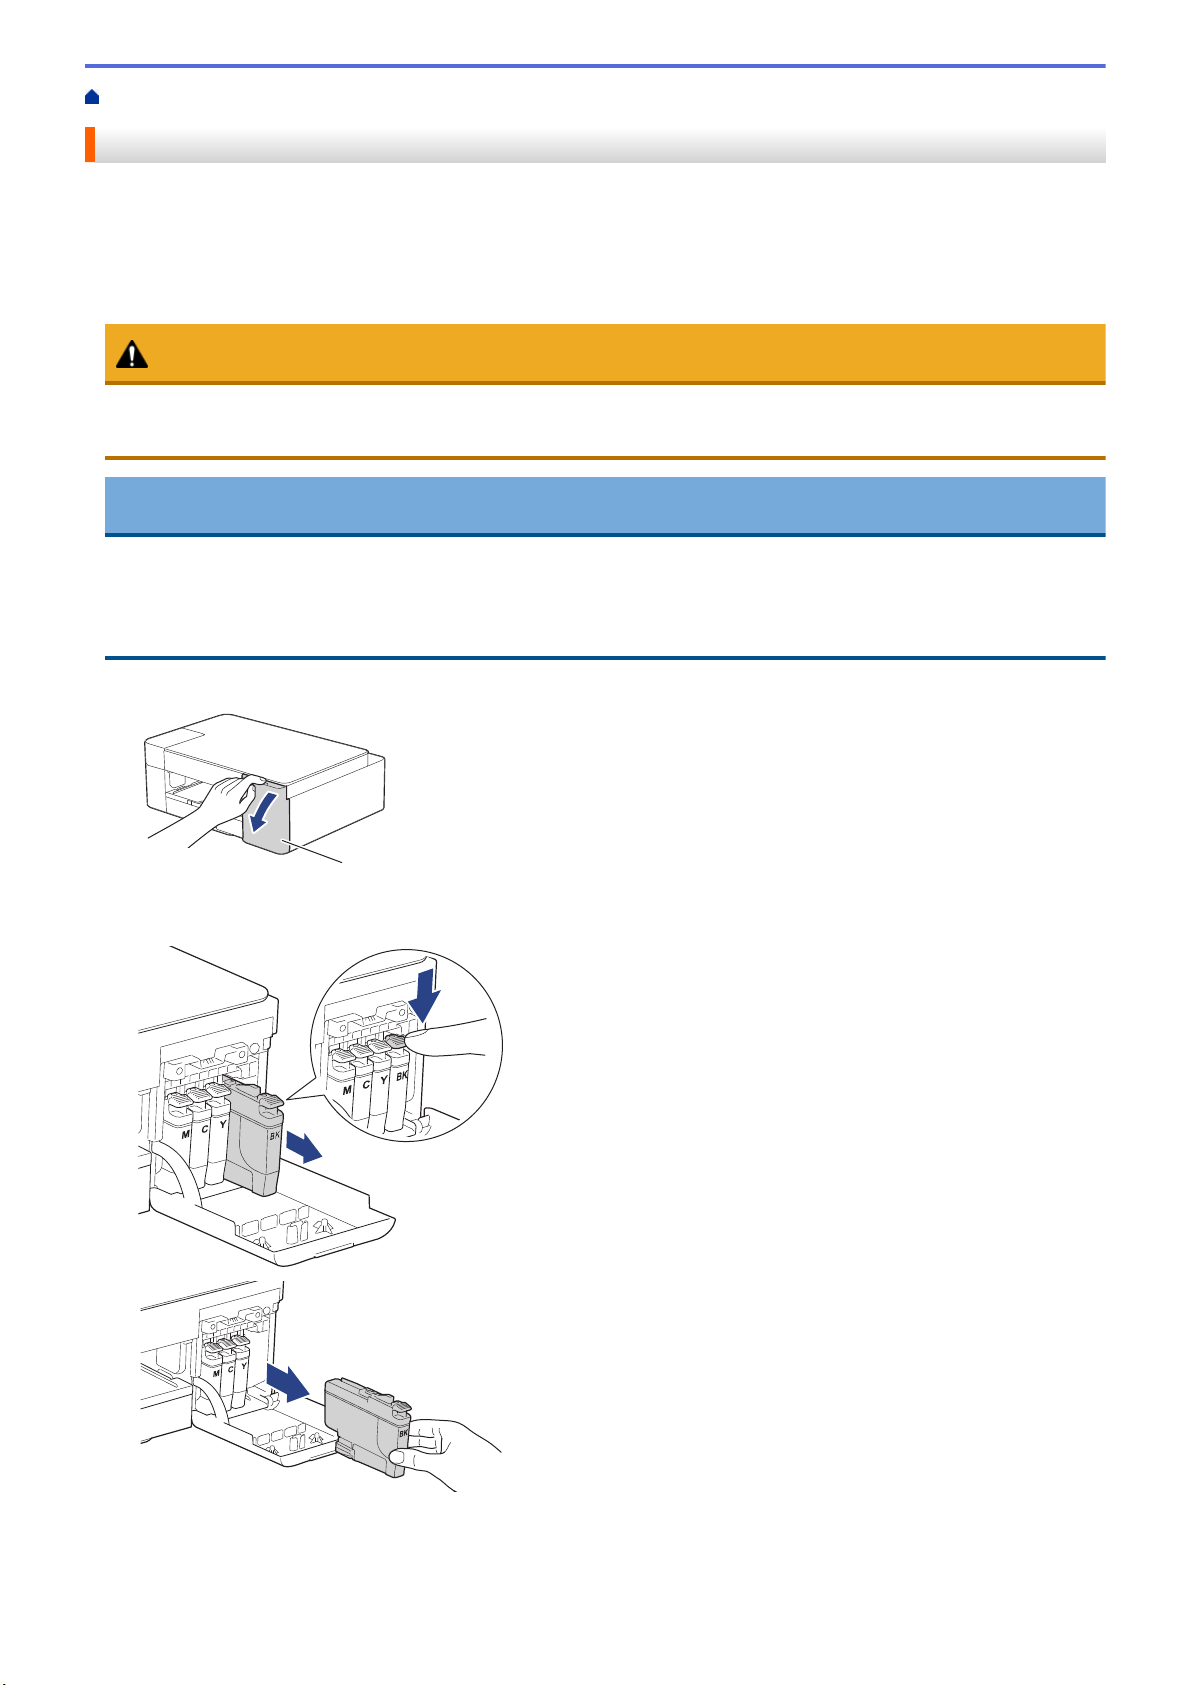
Home > Routine Maintenance > Replace the Ink Cartridges
Replace the Ink Cartridges
Your Brother machine is equipped with an ink dot counter. The ink dot counter automatically monitors the level of
ink in each of the four ink cartridges. When the machine detects that an ink cartridge is running out of ink, the
LEDs will light up or blink.
Even though the machine tells you to replace an ink cartridge, there will be a small amount of ink left in the ink
cartridge.
CAUTION
If the ink gets into your eye, rinse it with water immediately. If left as is, it may cause redness or mild
inflammation of the eye. In case of any abnormality, consult with your doctor.
IMPORTANT
We recommend using genuine Brother supplies to ensure stable print quality and performance. Although not
all non-genuine supplies may cause quality issues, it is possible that some may adversely affect print quality
or cause machine malfunction. Brother may charge for repairing your machine if it is proven that non-genuine
supplies caused the damage, even if the machine is still covered by the warranty.
1. Open the ink cartridge cover (1).
1
2. Press the lock release lever to release the ink cartridge and remove the ink cartridge from the machine, as
shown in the illustration.
3. Open the new ink cartridge bag, and take out the ink cartridge.
191
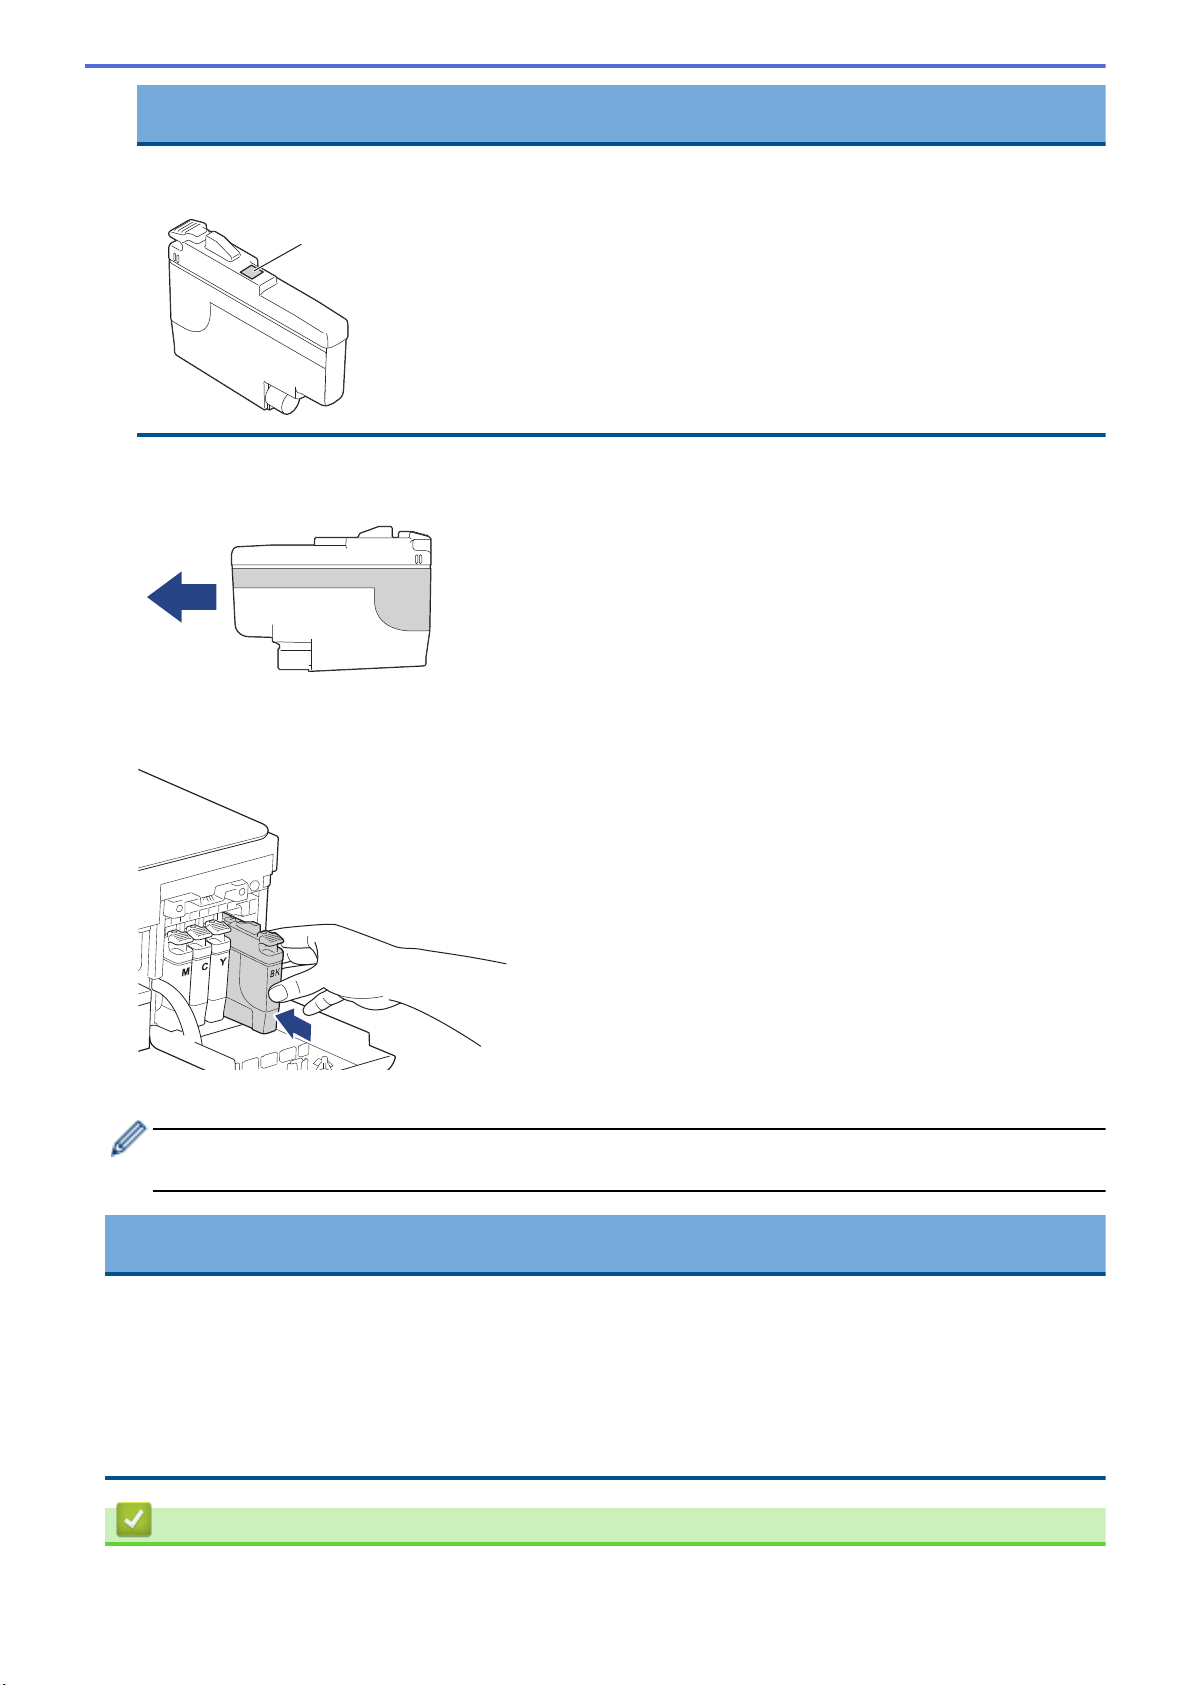
IMPORTANT
DO NOT touch the ink cartridge in the area indicated (1); this can prevent the machine from detecting the
cartridge.
1
4. Insert the ink cartridge in the direction of the arrow on the label.
Each color has its own correct position.
5. Gently push the area marked “PUSH” until the ink cartridge locks into place, and then close the ink cartridge
cover.
The machine resets the ink dot counter.
If the machine does not detect the ink cartridge after you install it, check that the ink cartridge is installed
correctly. Remove the ink cartridge and reinstall it slowly until it locks into place.
IMPORTANT
• DO NOT shake the ink cartridges. If ink stains your skin or clothing, wash with soap or detergent at once.
• DO NOT remove ink cartridges if you do not need to replace them; otherwise, the machine will not know
the ink quantity left in the cartridge.
• DO NOT touch the ink cartridge insertion slots; the ink may stain your skin.
• Use unopened ink cartridges by the expiration date written on the ink cartridge package.
• DO NOT dismantle or tamper with the ink cartridge; this can cause the ink to leak out of the ink cartridge.
Related Information
• Routine Maintenance
192


Home > Routine Maintenance > Clean Your Brother Machine
Clean Your Brother Machine
• Clean the Scanner
• Clean the Print Head from Your Brother Machine
• Clean the Print Head Using Web Based Management
• Clean the Print Head from Your Computer (Windows)
• Clean the Outside of the Machine
• Clean the Machine's Printer Platen
• Clean the Paper Feed Rollers
• Clean the Base Pad
• Clean the Paper Pick-up Rollers
194
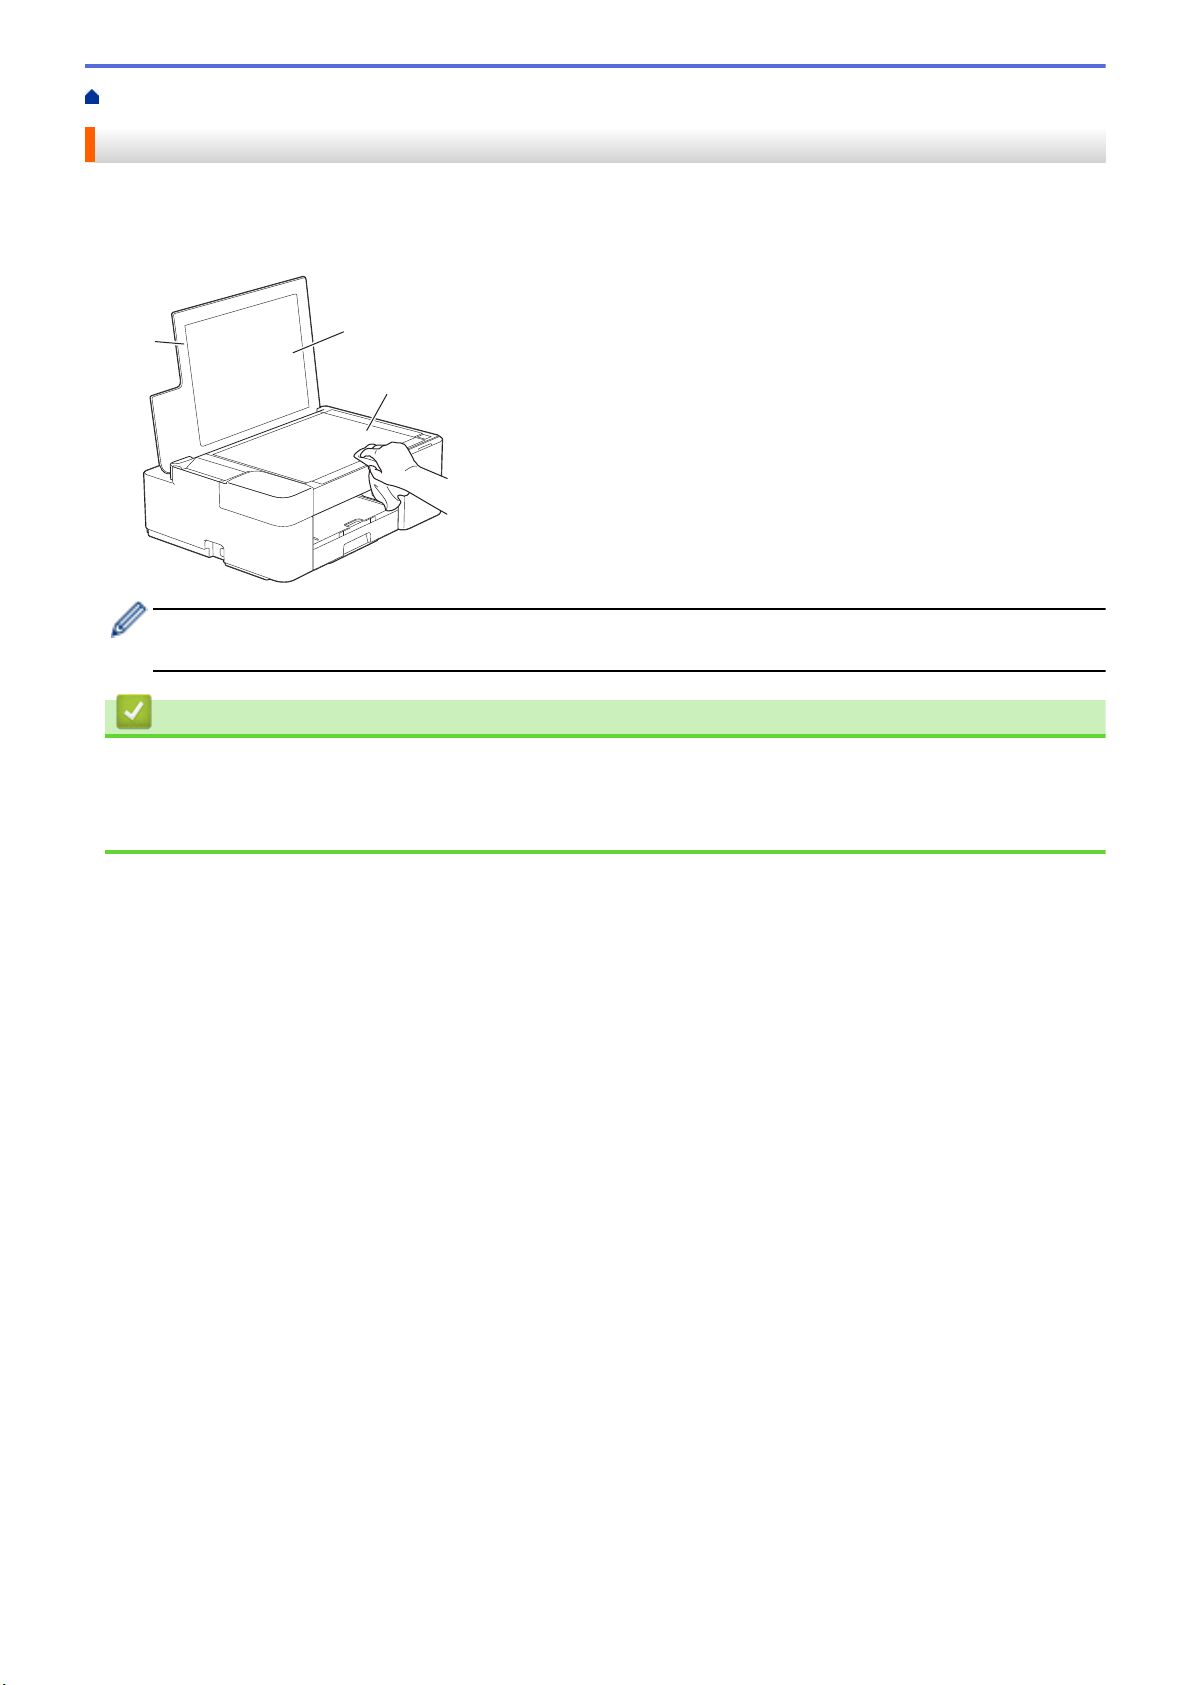
Home > Routine Maintenance > Clean Your Brother Machine > Clean the Scanner
Clean the Scanner
1. Unplug the machine from the AC power outlet.
2. Lift the document cover (1). Clean the scanner glass (2) and the white plastic (3) with a soft lint-free cloth
moistened with water.
1
3
2
If you feel dirt or debris, clean the glass again. You may need to repeat the cleaning process three or four
times. To test, make a copy after each cleaning attempt.
Related Information
• Clean Your Brother Machine
Related Topics:
• Other Problems
195
Home > Routine Maintenance > Clean Your Brother Machine > Clean the Print Head from Your Brother
Machine
Clean the Print Head from Your Brother Machine
To maintain good print quality, the machine automatically cleans the print head when needed. If there is a print
quality problem, start the cleaning process manually.
• Clean the print head if there is a horizontal line or a blank space in the text or graphics on printed pages.
Depending on the problem color, select to clean Black only or all four colors at once.
• Cleaning the print head consumes ink.
• Cleaning too often uses ink unnecessarily.
IMPORTANT
DO NOT touch the print head. Touching the print head may cause permanent damage and may void the print
head's warranty.
1. Press (STOP) and (Paper) simultaneously.
The Power LED, Warning LED, and Ink LED light up for one second, and then the Ink LED starts blinking.
2. Do one of the following:
• To clean all four colors, press COLOR COPY. After the cleaning, the machine prints the check sheet.
• To clean black only, press MONO COPY. After the cleaning, the machine prints the check sheet.
NOTE
If you clean the print head several times and the print has not improved, try the Special cleaning method. The
Special cleaning method uses the most power in cleaning the print heads, but also consumes the most ink.
1. Press
(STOP) and (Paper) simultaneously.
2. Press and hold MONO COPY and COLOR COPY simultaneously, for five seconds.
The machine starts cleaning.
• The Special cleaning method requires a large amount of ink to clean the print head.
• Use the Special cleaning method only if you previously cleaned the print head several times and the
print quality did not improve.
• You can also clean the print head from your computer.
Related Information
• Clean Your Brother Machine
Related Topics:
• Paper Handling and Printing Problems
• Clean the Print Head Using Web Based Management
• Clean the Print Head from Your Computer (Windows)
196
Home > Routine Maintenance > Clean Your Brother Machine > Clean the Print Head Using Web Based
Management
Clean the Print Head Using Web Based Management
To maintain good print quality, the machine automatically cleans the print head when needed. If there is a print
quality problem, start the cleaning process manually.
1. Start Brother Mobile Connect on your mobile device.
2. Tap your model name on the top of the screen.
3. Tap All Machine Settings.
Web Based Management appears.
4. If required, type the password in the Login field, and then tap Login.
The default password to manage this machine’s settings is located on the back of the machine and marked
"Pwd".
5. Go to the navigation menu, and then tap General > Print Head Cleaning.
Start from , if the navigation menu is not shown on the left side of the screen.
6. Select the Normal, Strong, or Strongest option for the cleaning strength you want. The Special option uses
the most power in cleaning the print head, but also consumes the most ink.
7. Tap Start.
• The Special option requires a large amount of ink to clean the print head.
• Use the Special option only if you previously used the Strongest option and the print quality did not
improve.
8. Tap Yes.
The machine starts cleaning.
(Windows) You can also clean the print head using the printer driver.
Related Information
• Clean Your Brother Machine
Related Topics:
• Paper Handling and Printing Problems
• Clean the Print Head from Your Brother Machine
• Clean the Print Head from Your Computer (Windows)
• Access Web Based Management
• Brother Mobile Connect
197

Home > Routine Maintenance > Clean Your Brother Machine > Clean the Print Head from Your Computer
(Windows)
Clean the Print Head from Your Computer (Windows)
To maintain good print quality, the machine automatically cleans the print head when needed. If there is a print
quality problem, start the cleaning process manually.
1. Do one of the following:
• For Windows 10, Windows Server 2016, and Windows Server 2019
Click
> Windows System > Control Panel. In the Hardware and Sound group, click View devices
and printers.
• For Windows 8.1
Move your mouse to the lower right corner of your desktop. When the menu bar appears, click Settings,
and then click Control Panel. In the Hardware and Sound group, click View devices and printers.
• For Windows Server 2012 R2
Click Control Panel on the Start screen. In the Hardware group, click View devices and printers.
• For Windows Server 2012
Move your mouse to the lower right corner of your desktop. When the menu bar appears, click Settings,
and then click Control Panel. In the Hardware group, click View devices and printers.
• For Windows 7 and Windows Server 2008 R2
Click
(Start) > Devices and Printers.
• For Windows Server 2008
Click (Start) > Control Panel > Hardware and Sound > Printers.
2. Right-click the Brother XXX-XXXX Printer icon (where XXX-XXXX is the name of your model), and then
select Printing preferences. If printer driver options appear, select your printer driver.
The printer driver dialog box appears.
3. Click the Maintenance tab.
4. Select one of the following options:
Option Description
Check Print Quality... Use to print the test page and check the print quality.
Print Head Cleaning... Use to start the cleaning process manually. Select if a line or blank spaces
appear in text or graphics on the test page.
5. Do one of the following:
• If you selected the Check Print Quality... option, click Start.
The machine prints the test page.
• If you selected the Print Head Cleaning... option, select the Black only, Color only, or All option for the
cleaning type, and then click Next.
6. Select the Normal, Strong, or Strongest option for the cleaning strength, and then click Next.
7. Click Start.
The machine starts cleaning.
Related Information
• Clean Your Brother Machine
Related Topics:
• Paper Handling and Printing Problems
• Clean the Print Head from Your Brother Machine
198

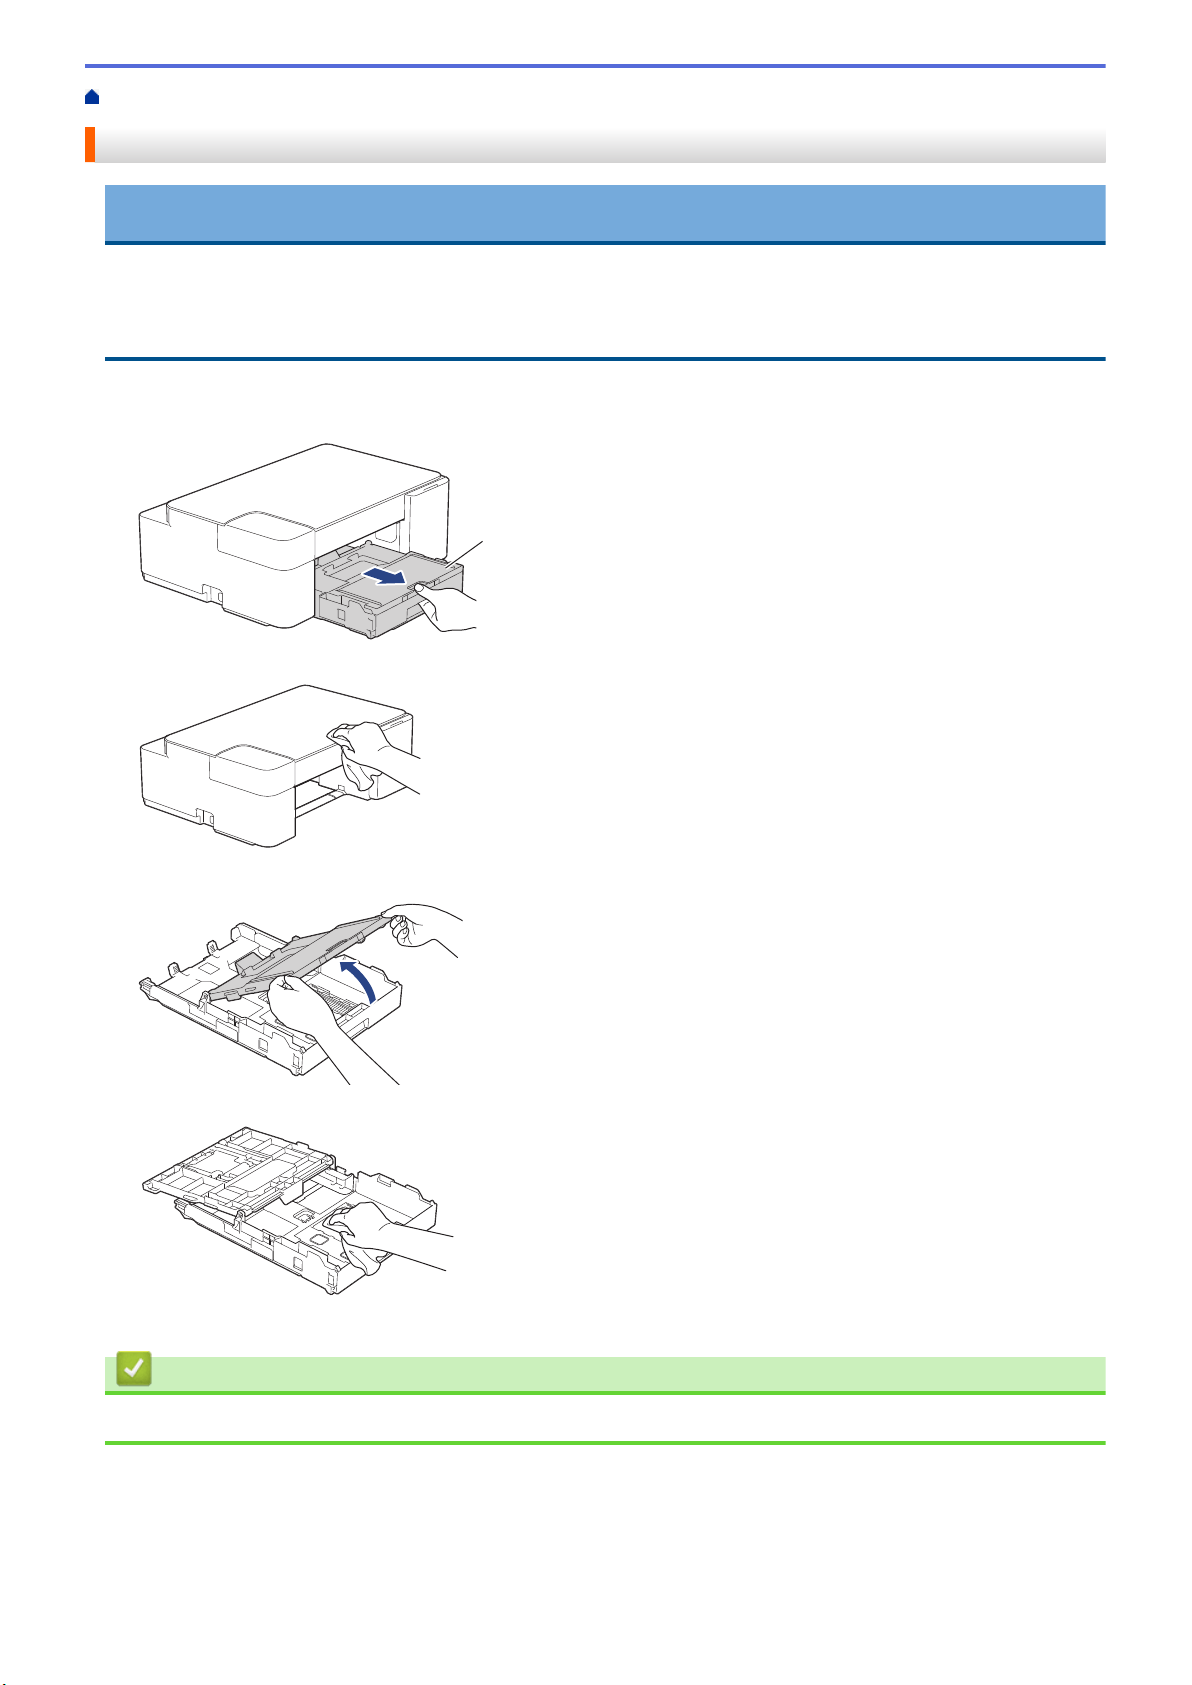
Home > Routine Maintenance > Clean Your Brother Machine > Clean the Outside of the Machine
Clean the Outside of the Machine
IMPORTANT
• Cleaning with volatile liquids such as thinner or benzine will damage the outside surface of the machine.
• DO NOT use cleaning materials that contain ammonia.
• DO NOT use isopropyl alcohol to remove dirt from the control panel. It may crack the panel.
1. If the paper support flap is open, close it, and then close the paper support.
2. Pull the paper tray (1) completely out of the machine.
1
3. Wipe the outside of the machine with a dry, lint-free cloth to remove dust.
4. Lift the output paper tray cover and remove anything that is stuck inside the paper tray.
5. Wipe the inside and the outside of the paper tray with a dry, lint-free cloth to remove dust.
6. Close the output paper tray cover and slowly push the paper tray completely into the machine.
Related Information
• Clean Your Brother Machine
200
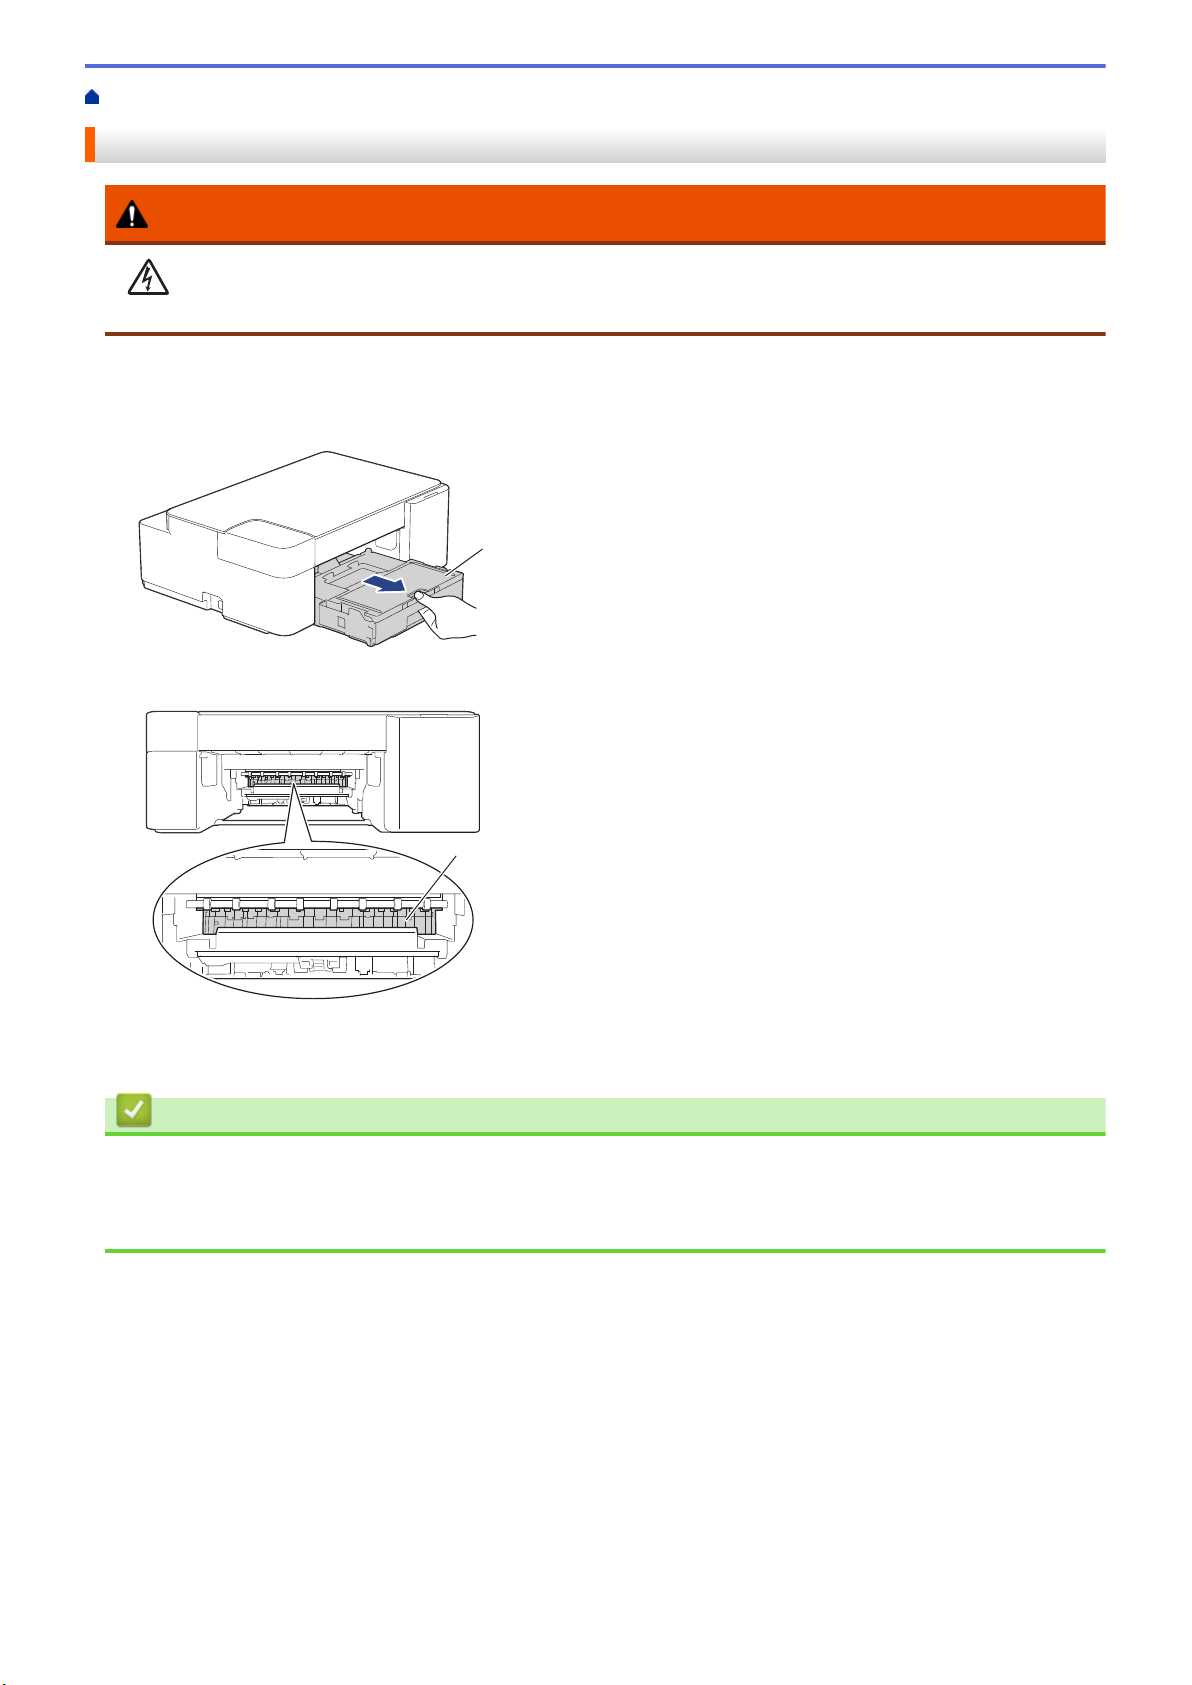
Home > Routine Maintenance > Clean Your Brother Machine > Clean the Machine's Printer Platen
Clean the Machine's Printer Platen
WARNING
Be sure to unplug the machine from the AC power outlet before cleaning the printer platen to avoid an
electrical shock.
1. Unplug the machine from the AC power outlet.
2. If the paper support flap is open, close it, and then close the paper support.
3. Pull the paper tray (1) completely out of the machine.
1
4. Clean the machine’s printer platen (1) and the area around it, wiping off scattered ink with a dry, soft lint-free
cloth.
1
5. Slowly push the paper tray completely into the machine.
6. Reconnect the power cord.
Related Information
• Clean Your Brother Machine
Related Topics:
• Paper Handling and Printing Problems
201
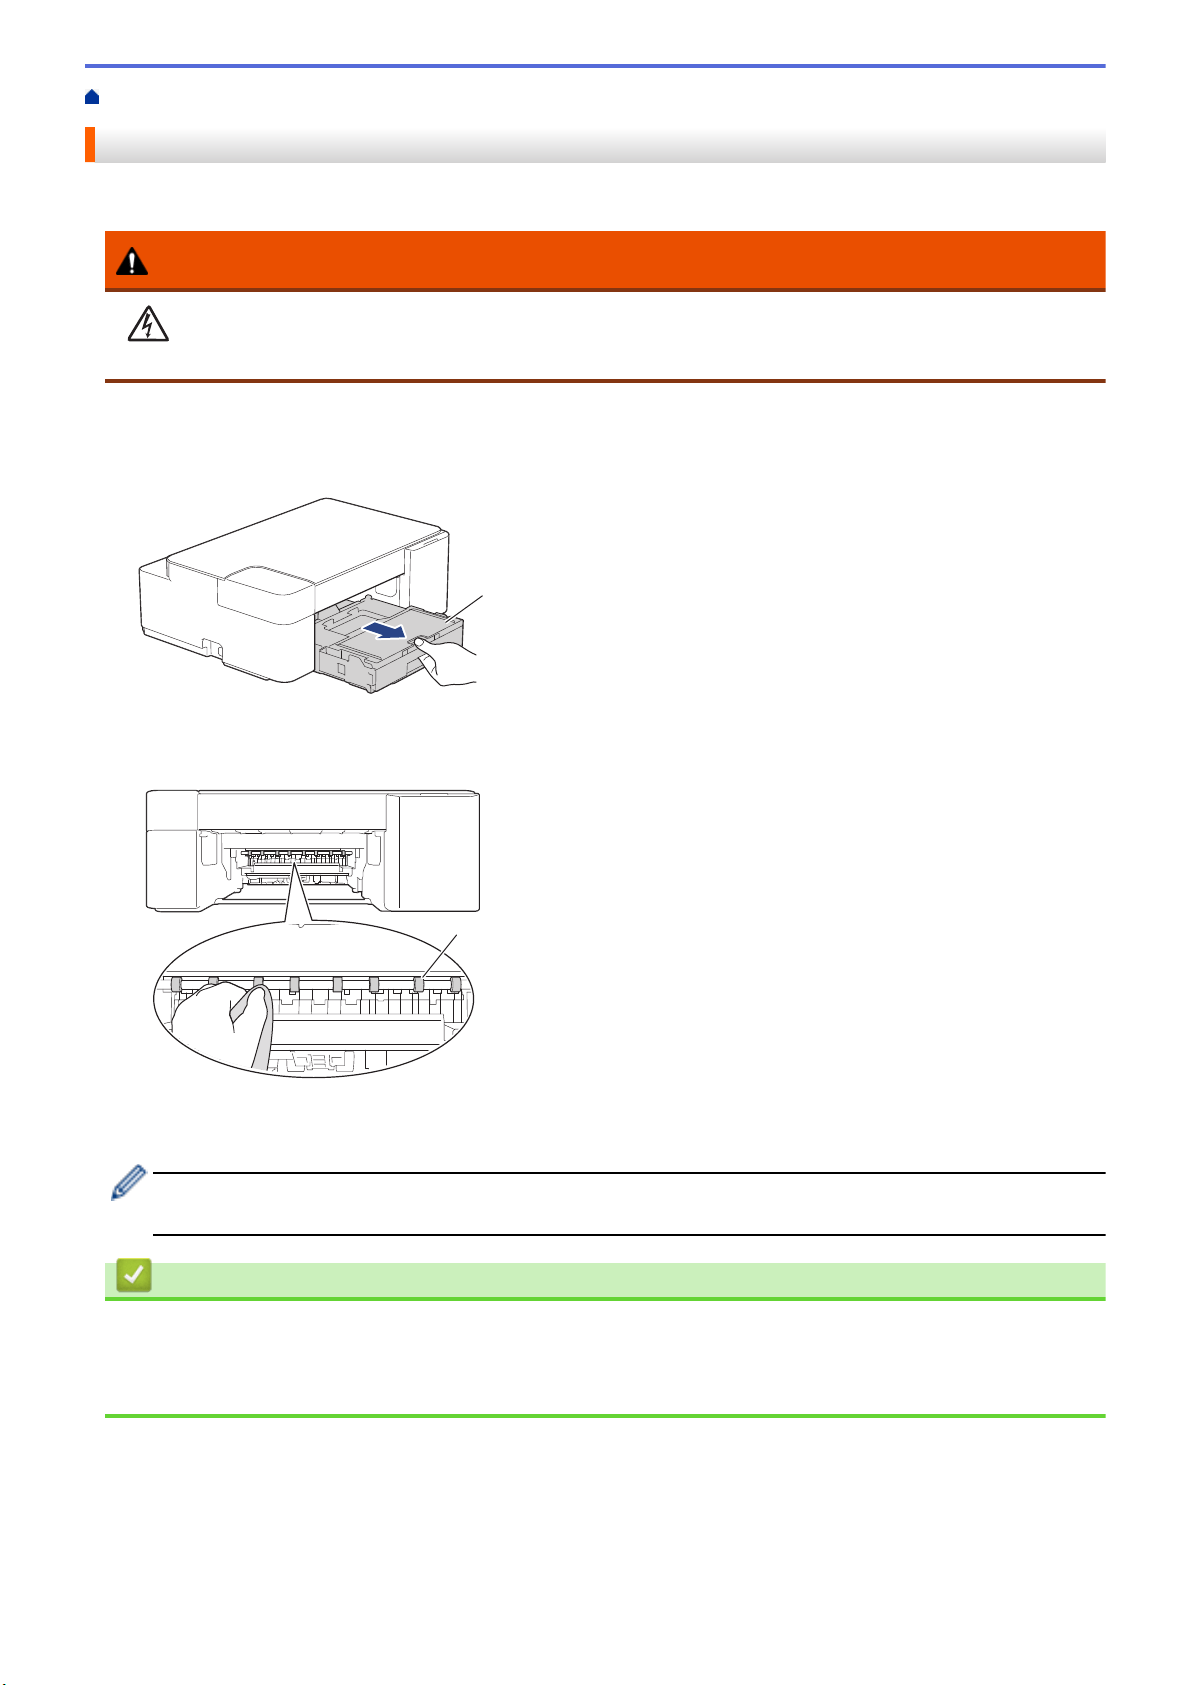
Home > Routine Maintenance > Clean Your Brother Machine > Clean the Paper Feed Rollers
Clean the Paper Feed Rollers
If the paper feed rollers are stained with ink or have a buildup of paper dust, it may cause paper feed problems.
WARNING
Be sure to unplug the machine from the AC power outlet before cleaning the paper feed rollers to avoid
an electrical shock.
1. Unplug the machine from the AC power outlet.
2. If the paper support flap is open, close it, and then close the paper support.
3. Pull the paper tray (1) completely out of the machine.
1
4. Clean the front and back sides of the Paper Feed Rollers (1) with a soft lint-free cloth moistened with water,
using a side-to-side motion. After cleaning, wipe the rollers with a dry, soft lint-free cloth to remove all
moisture.
1
5. Slowly push the paper tray completely into the machine.
6. Reconnect the power cord.
Do not use the machine again until the rollers are dry. Using the machine before the rollers are dry may
cause paper feed problems.
Related Information
• Clean Your Brother Machine
Related Topics:
• Paper Handling and Printing Problems
202
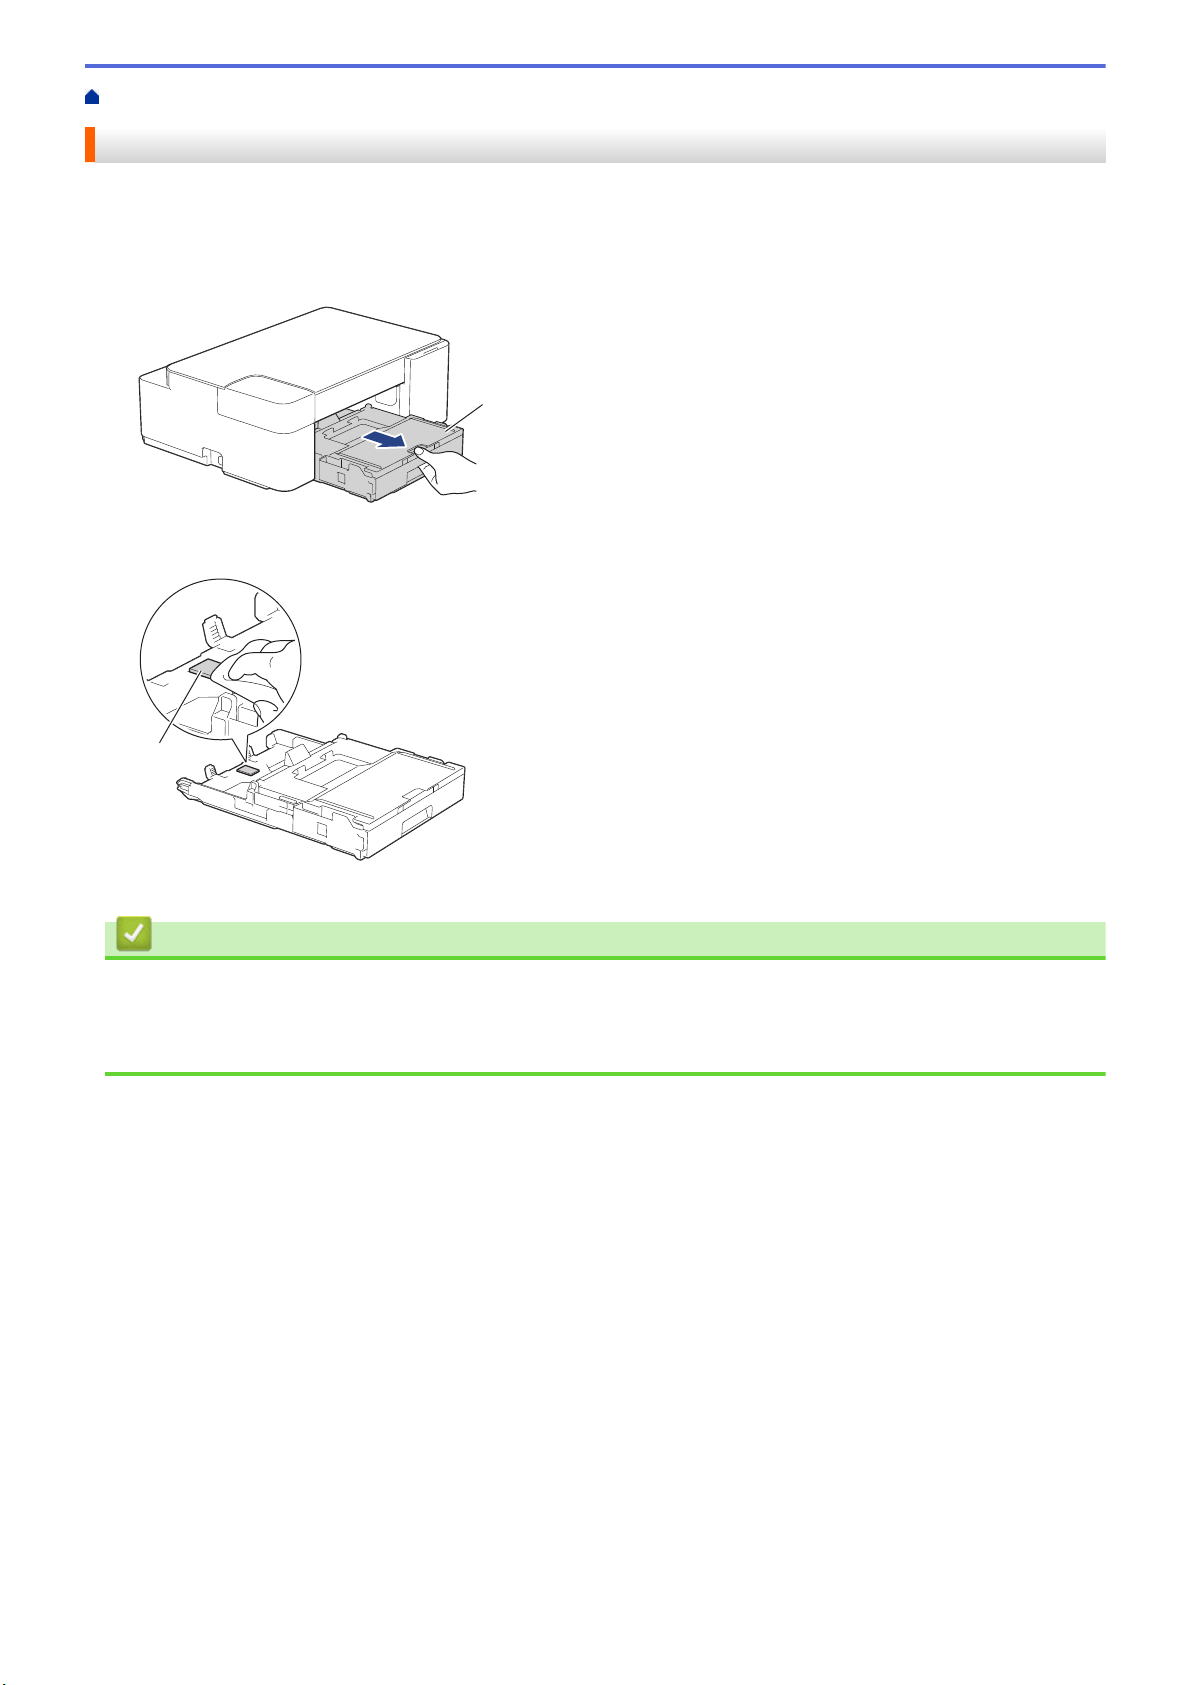
Home > Routine Maintenance > Clean Your Brother Machine > Clean the Base Pad
Clean the Base Pad
Cleaning the Base Pad periodically may prevent the machine from feeding multiple sheets of paper when there
are only a few sheets of paper left in the tray.
1. If the paper support flap is open, close it, and then close the paper support.
2. Pull the paper tray (1) completely out of the machine.
1
3. Clean the Base Pad (1) with a soft lint-free cloth moistened with water.
After cleaning, wipe the pad with a dry, soft lint-free cloth to remove all moisture.
1
4. Slowly push the paper tray completely into the machine.
Related Information
• Clean Your Brother Machine
Related Topics:
• Paper Handling and Printing Problems
203
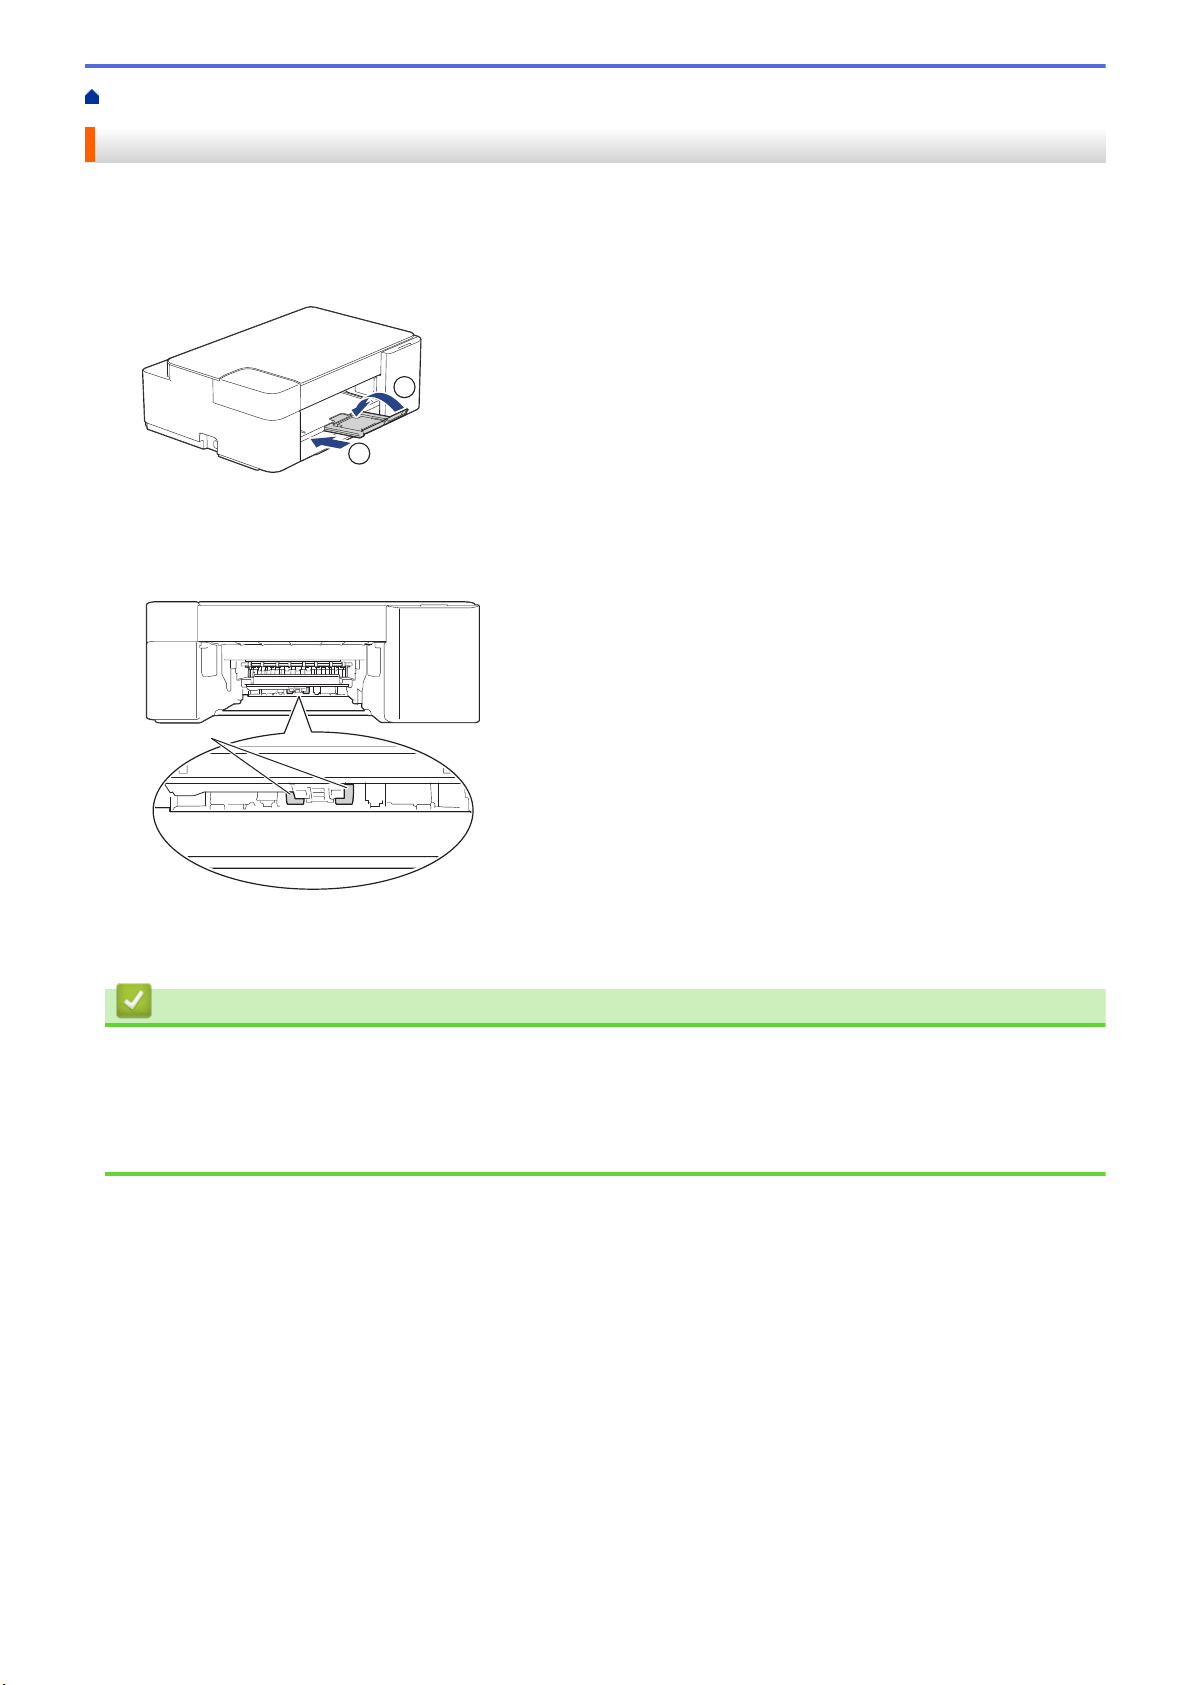
Home > Routine Maintenance > Clean Your Brother Machine > Clean the Paper Pick-up Rollers
Clean the Paper Pick-up Rollers
Cleaning the paper pick-up rollers periodically may prevent paper jams by ensuring that paper feeds correctly.
1. Unplug the machine from the AC power outlet.
2. If the paper support flap (1) is open, close it, and then close the paper support (2).
2
1
3. Pull the paper tray completely out of the machine.
4. Clean the Paper Pick-up Rollers (1) with a soft lint-free cloth moistened with water. Slowly turn the rollers so
that the whole surface is cleaned. After cleaning, wipe the rollers with a dry, soft lint-free cloth to remove all
moisture.
1
5. Slowly push the paper tray completely into the machine.
6. Reconnect the power cord.
Related Information
• Clean Your Brother Machine
Related Topics:
• Error and Maintenance LED Indications
• Paper Handling and Printing Problems
204

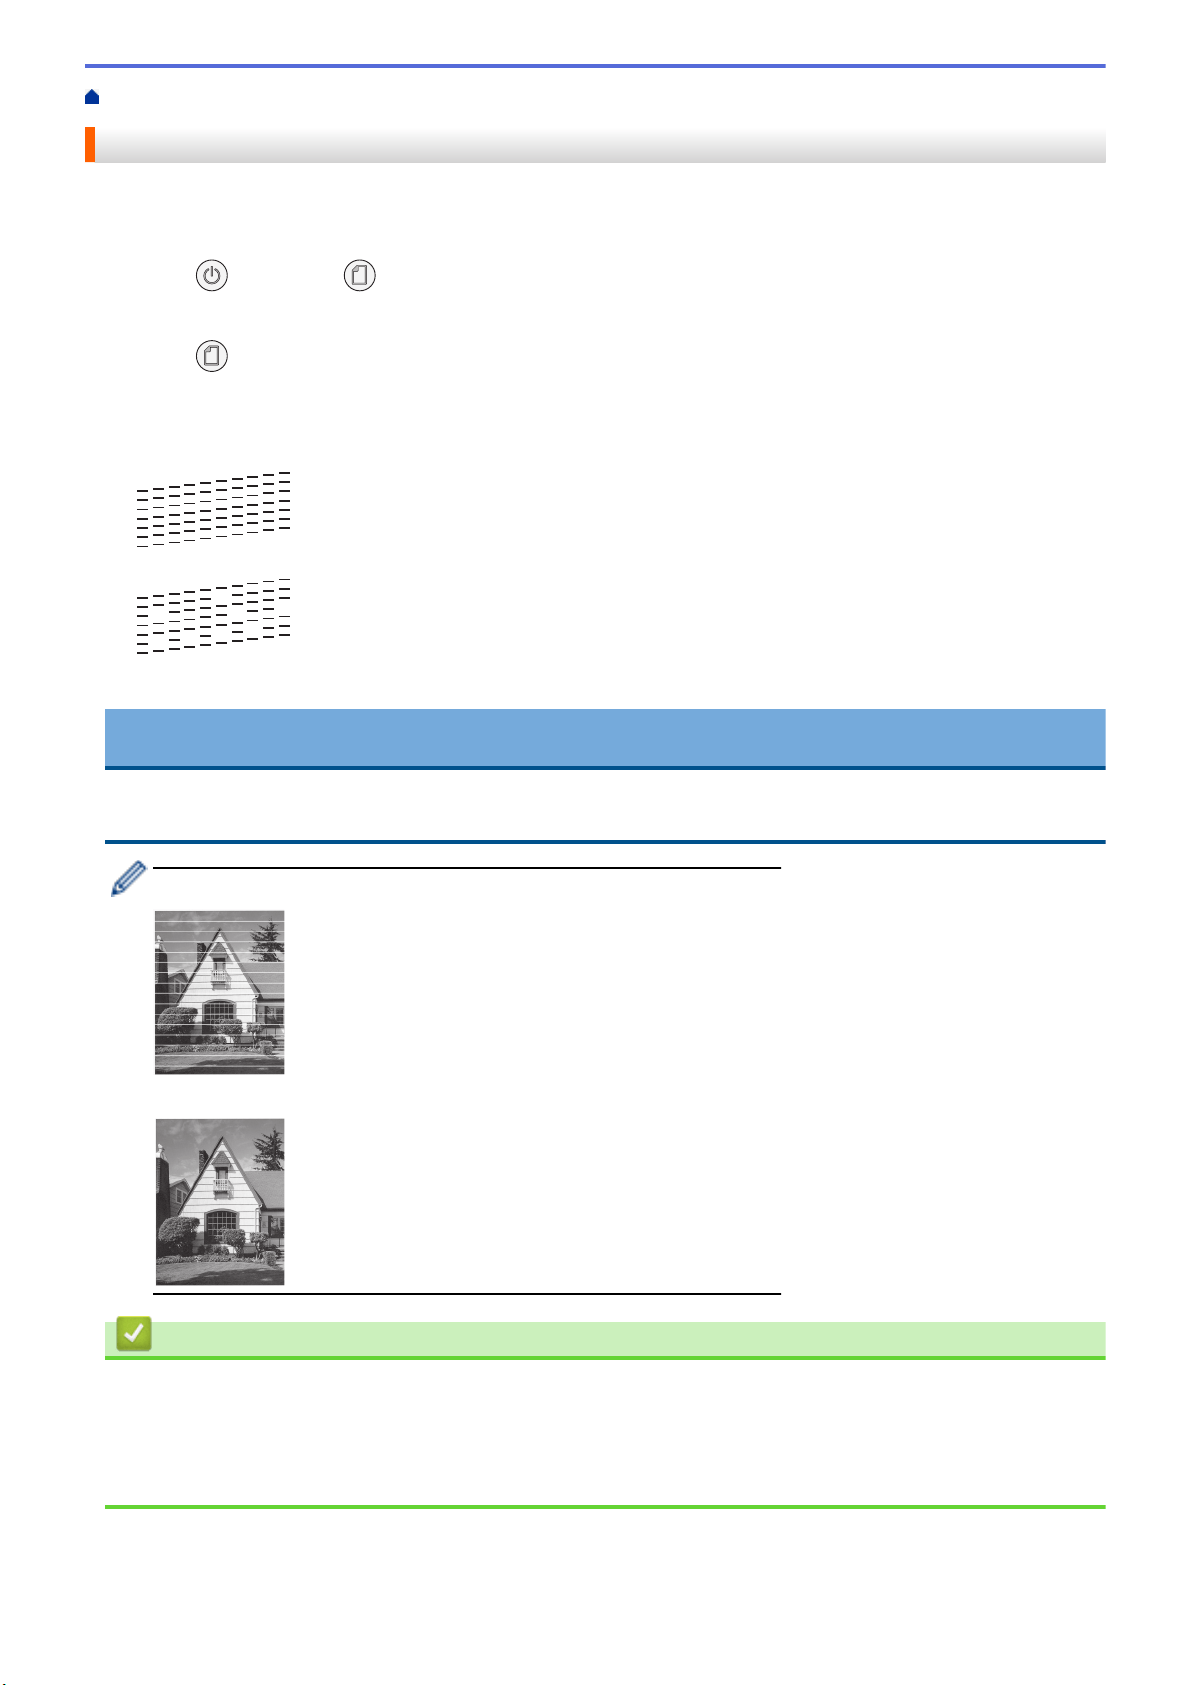
Home > Routine Maintenance > Check Your Brother Machine > Check the Print Quality
Check the Print Quality
If faded or streaked colors and text appear or if text is missing on your printouts, the print head nozzles may be
clogged. Print the check sheet and look at the nozzle check pattern.
1. Press
(STOP) and (Paper) simultaneously.
The Power LED, Warning LED, and Ink LED light up for one second, and then the Ink LED starts blinking.
2. Press
(Paper).
The machine prints the check sheet.
3. Check the quality of the four color blocks on the sheet.
OK
Poor
4. If the quality is poor, clean the print head. See Related Information.
IMPORTANT
DO NOT touch the print head. Touching the print head may cause permanent damage and may void the print
head's warranty.
When a print head nozzle is clogged, the printed sample looks like this:
After the print head nozzle is cleaned, the horizontal lines are gone:
Related Information
• Check Your Brother Machine
Related Topics:
• Paper Handling and Printing Problems
• Clean the Print Head from Your Brother Machine
206
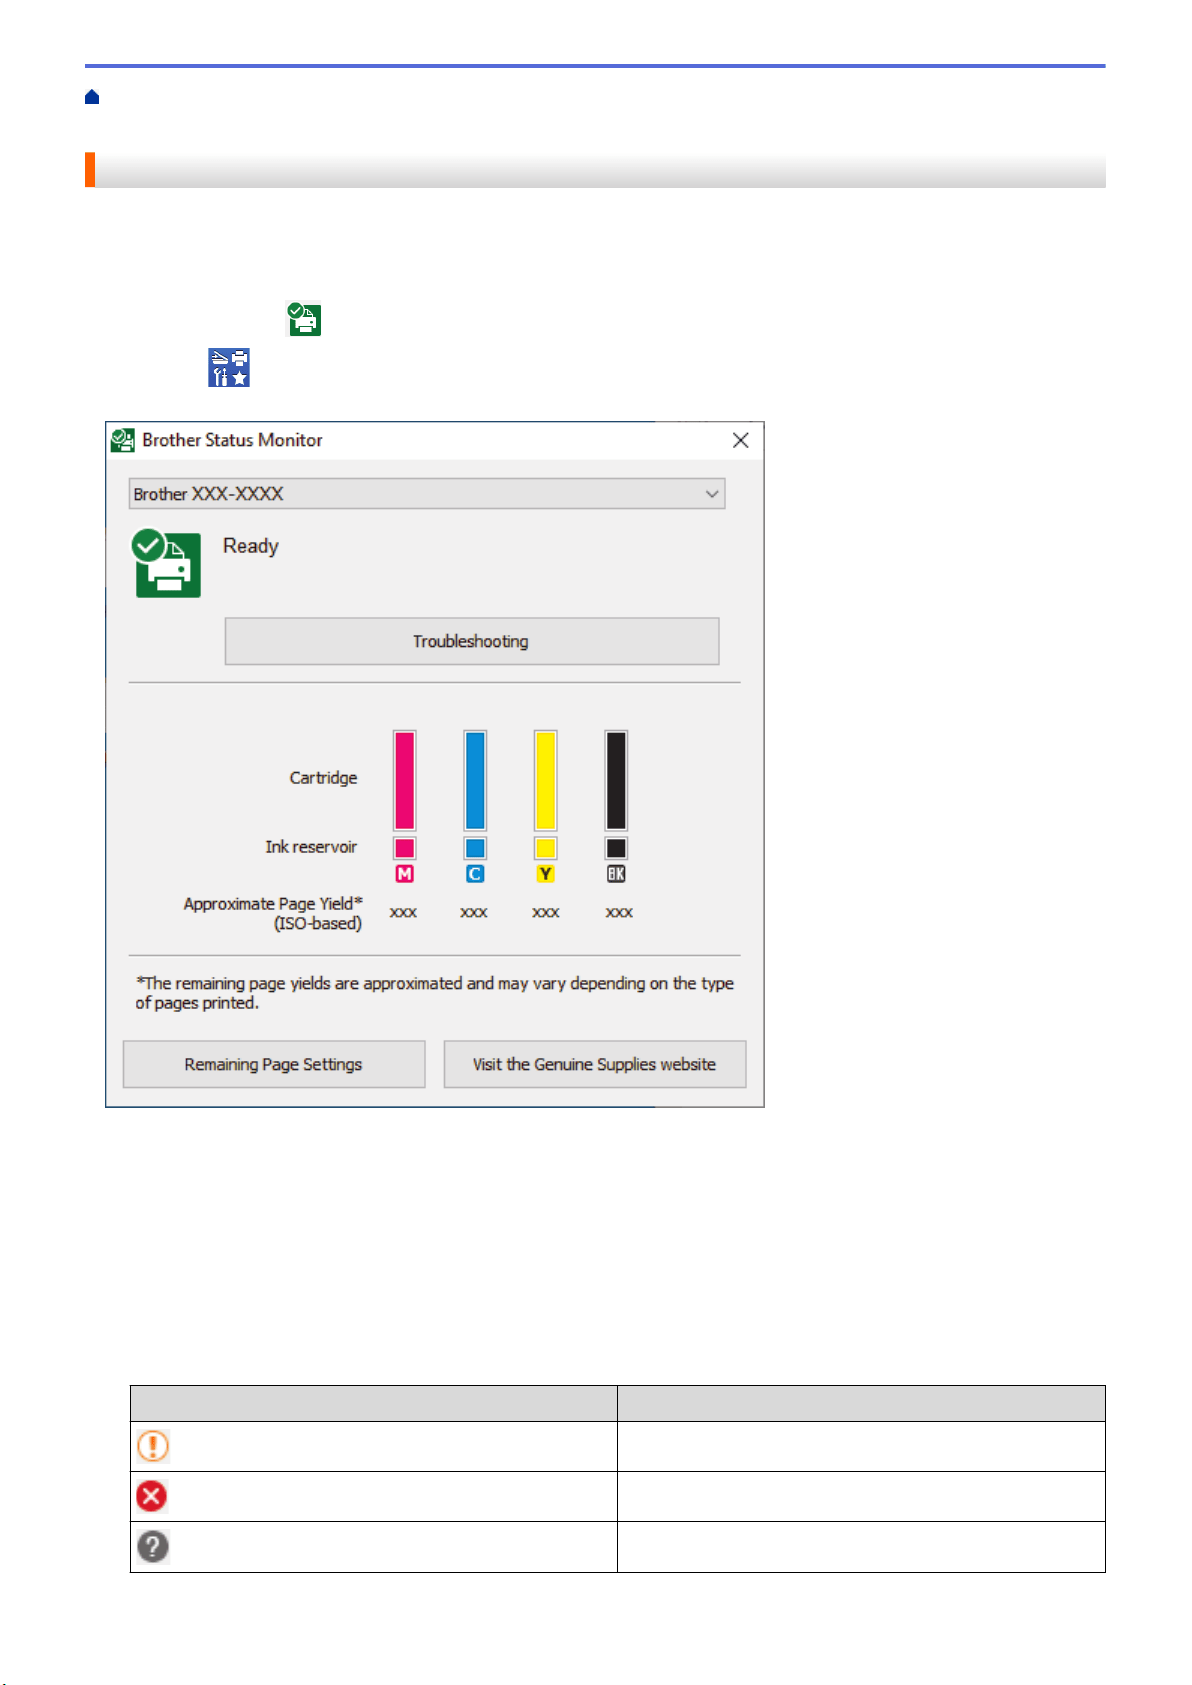
Home > Routine Maintenance > Check Your Brother Machine > Monitor Machine Status from Your
Computer (Windows)
Monitor Machine Status from Your Computer (Windows)
The Status Monitor utility is a configurable software tool for monitoring the status of one or more machines; it
allows you to get immediate notification of errors.
Do one of the following:
- Double-click the
icon in the task tray.
- Launch
(Brother Utilities), and then click the drop-down list and select your model name (if not already
selected). Click Tools in the left navigation bar, and then click Status Monitor.
Troubleshooting
Click the Troubleshooting button to access the troubleshooting website.
Remaining Page Settings
Click the Remaining Page Settings button to change the display settings for the approximate page yield.
Visit the Genuine Supplies website
Click the Visit the Genuine Supplies website button for more information on Brother genuine supplies.
Error icons
Icon
Description
The ink level is low.
The ink cartridge needs to be replaced.
There is a problem with the ink cartridge.
207

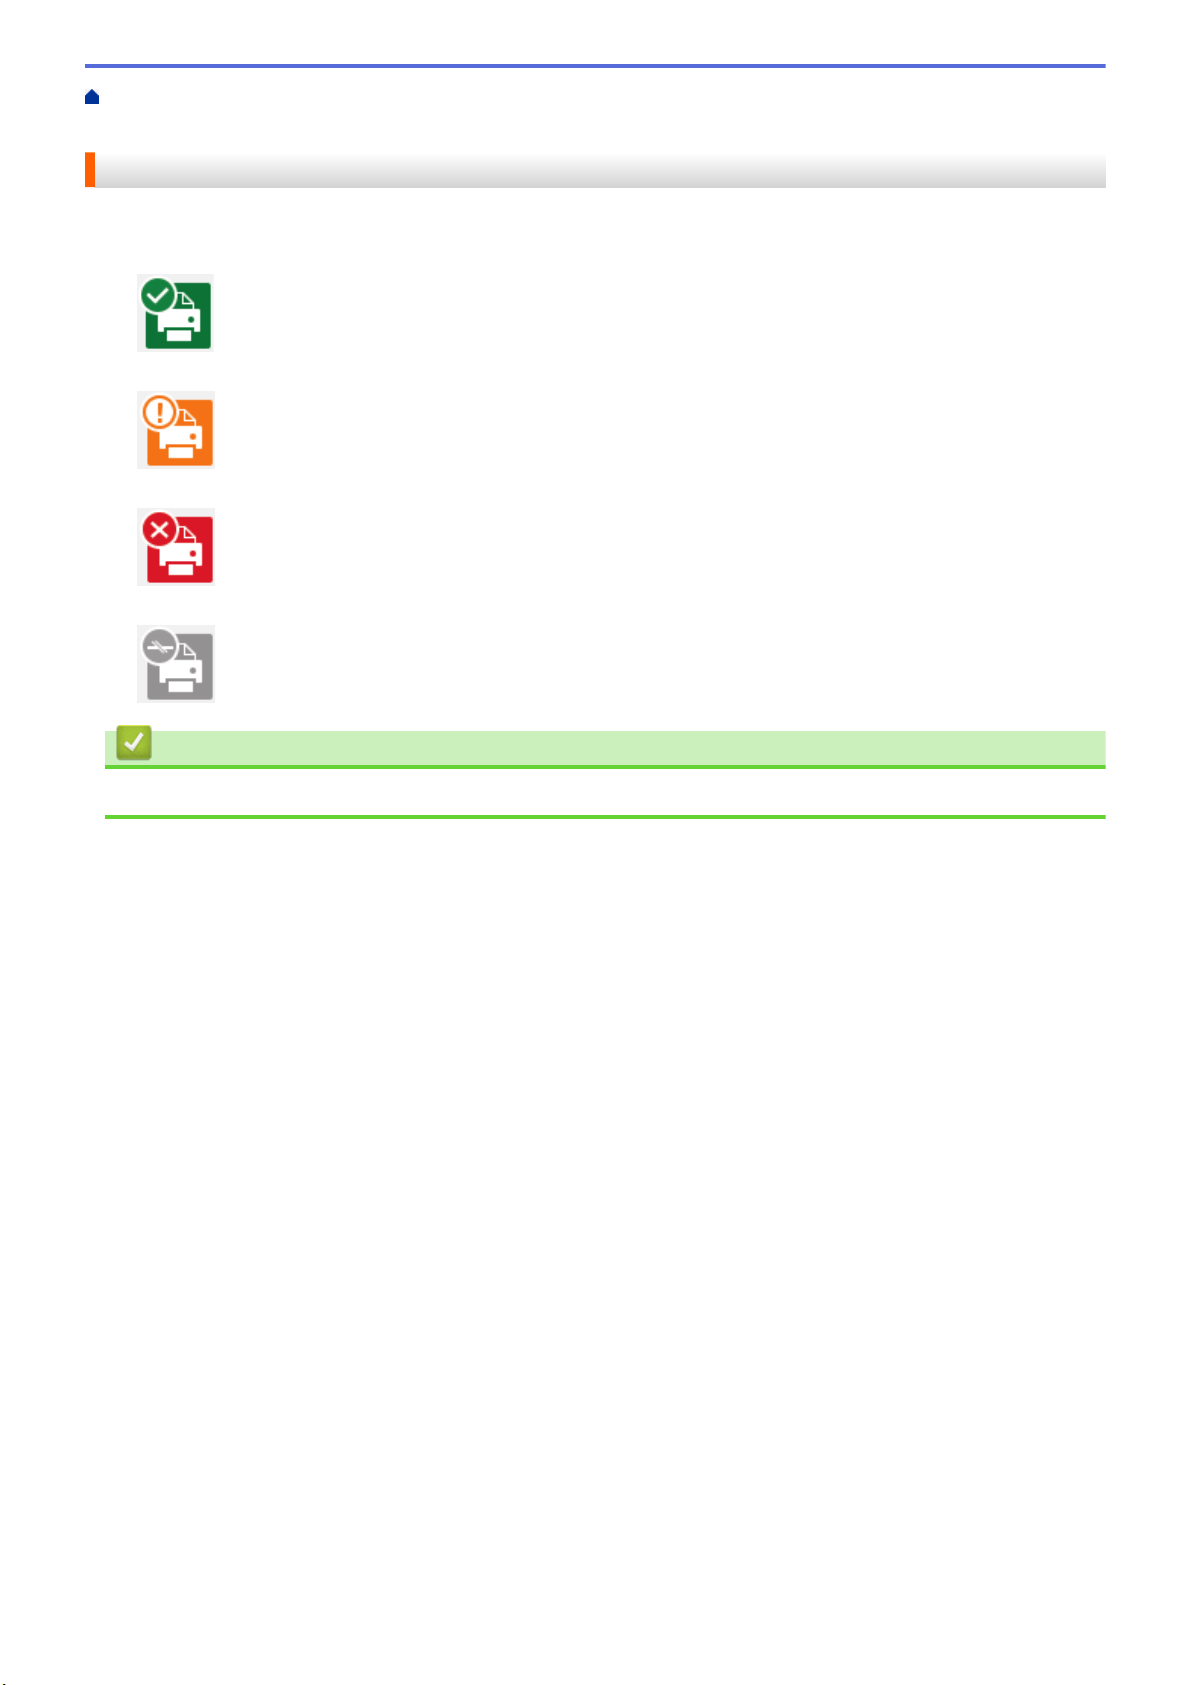
Home > Routine Maintenance > Check Your Brother Machine > Monitor Machine Status from Your
Computer (Windows) > Status Monitor Indicators and What They Mean (Windows)
Status Monitor Indicators and What They Mean (Windows)
When you start up your computer, the Brother Status Monitor icon appears on the task tray.
• A green icon indicates the normal stand-by condition.
• A yellow icon indicates a warning.
• A red icon indicates an error has occurred.
• A gray icon indicates the machine is offline.
Related Information
• Monitor Machine Status from Your Computer (Windows)
209
Home > Routine Maintenance > Check Your Brother Machine > Monitor Machine Status from Your
Computer (Windows) > Turn Off the Show Status Monitor Feature (Windows)
Turn Off the Show Status Monitor Feature (Windows)
The Show Status Monitor feature lets you know if there is a problem with a device that your computer is
monitoring. The default setting is Only when printing from this PC. To turn it off, follow these steps:
1. Right-click the (Brother Status Monitor) icon or window, select the Status Monitor Settings option, and
then click Options.
The Options window appears.
2. Click the Basic tab, and then select Off for Show Status Monitor.
3. Click OK.
Even if the Show Status Monitor feature is turned off, you can check the machine’s status at any time by
displaying the Status Monitor.
Related Information
• Monitor Machine Status from Your Computer (Windows)
210

Home > Routine Maintenance > Check Your Brother Machine > Monitor Machine Status from Your
Computer (Windows) > Turn Off the Status Monitor (Windows)
Turn Off the Status Monitor (Windows)
1. Right-click the (Brother Status Monitor) icon or window, and then select Exit.
2. Click OK.
Related Information
• Monitor Machine Status from Your Computer (Windows)
211
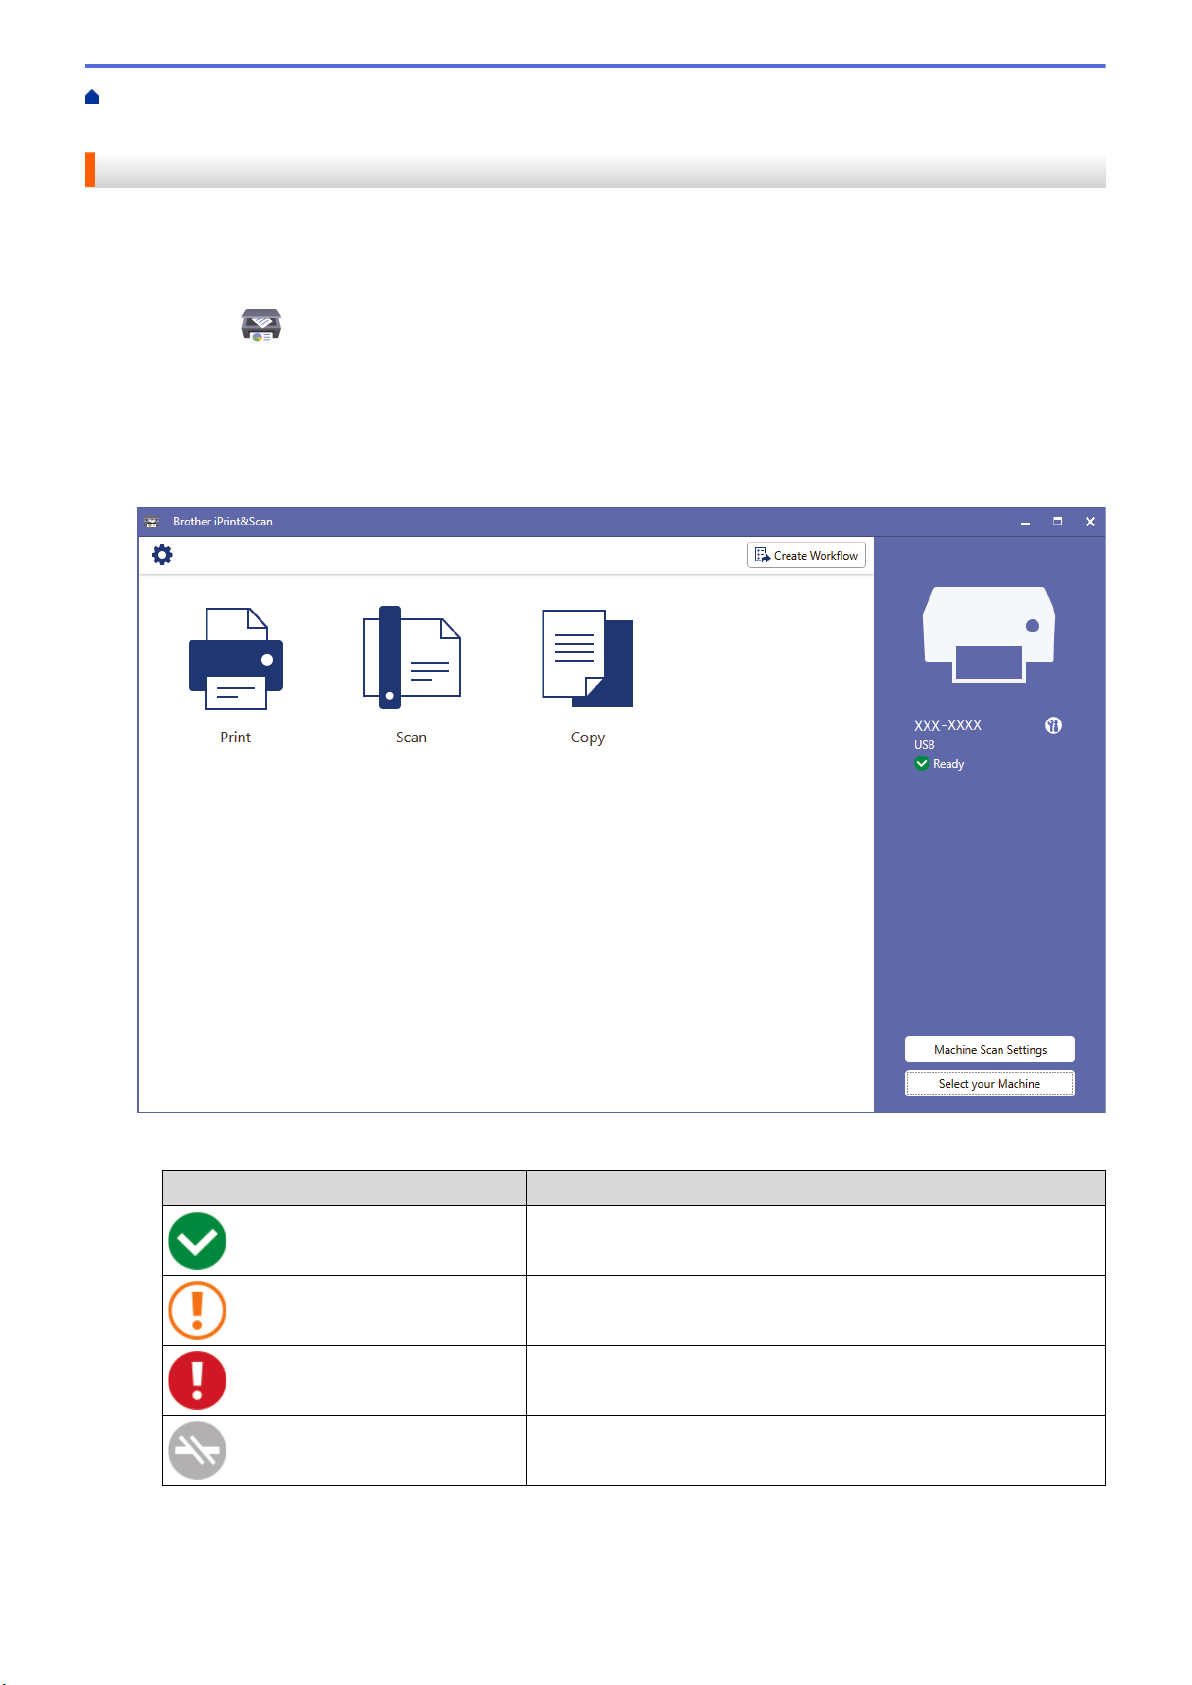
Home > Routine Maintenance > Check Your Brother Machine > Monitor Machine Status Using Brother
iPrint&Scan (Windows/Mac)
Monitor Machine Status Using Brother iPrint&Scan (Windows/Mac)
Brother iPrint&Scan allows you to monitor your Brother machine's status.
1. Start Brother iPrint&Scan.
• Windows
Launch
(Brother iPrint&Scan).
• Mac
In the Finder menu bar, click Go > Applications, and then double-click the iPrint&Scan icon.
The Brother iPrint&Scan screen appears.
2. If your Brother machine is not selected, click the Select your Machine button, and then select your model
name from the list. Click OK.
Status icons
Icon
Description
A green icon indicates the normal stand-by condition.
A yellow icon indicates a warning.
A red icon indicates an error has occurred.
A gray icon indicates the machine is offline.
212
Error icons
Icon Description
The ink level is low.
The ink cartridge needs to be replaced.
There is a problem with the ink cartridge.
• The actual screen may differ depending on the version of the application.
• The remaining ink amount is approximate and may differ from the actual amount of remaining ink.
Related Information
• Check Your Brother Machine
Related Topics:
• Brother iPrint&Scan Overview for Windows and Mac
213
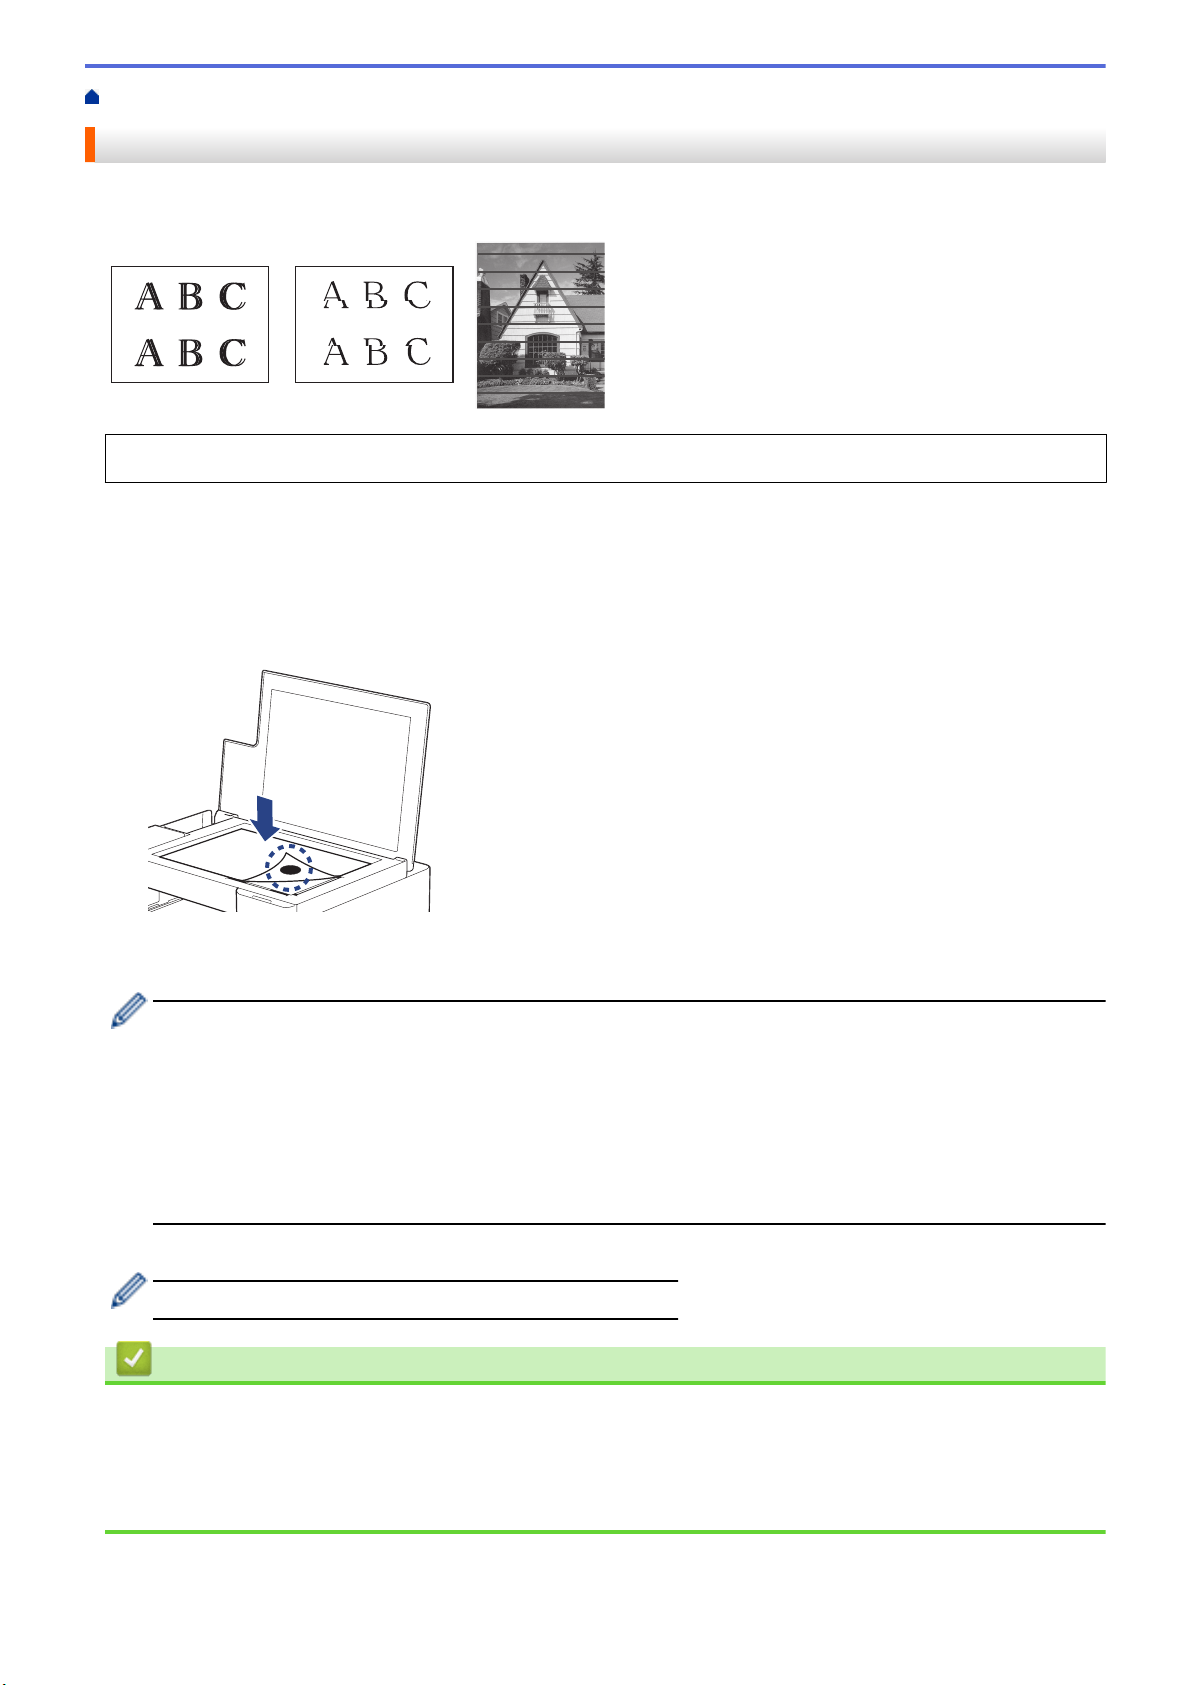
Home > Routine Maintenance > Check the Print Alignment from Your Brother Machine
Check the Print Alignment from Your Brother Machine
After transporting the machine, adjust the print alignment if the text is blurred or images become faded, and
adjust the paper feed to reduce dark lines.
Before starting to check the print alignment, check the print quality. See Related Information.
1. Turn off the machine.
2. Press and hold MONO COPY and turn on the machine, then hold MONO COPY until the check sheet is
printed.
The Power LED blinks, and then the machine prints the check sheet.
3. When the Power LED blinks slowly, place the check sheet on the scanner glass so that the mark on the
check sheet is in the lower right corner.
4. Press MONO COPY or COLOR COPY.
The Power LED blinks while the machine starts scanning and performs automatic adjustment.
Immediately after scanning is finished, the LED indicates the adjustment results:
• When adjustment is OK:
The Power LED blinks quickly three times, and the machine returns to the standby condition.
• When there is an adjustment error:
The Warning LED and Ink LED blink quickly three times, and the machine returns to the standby
condition.
You need to try this adjustment one more time from the beginning.
5. If the print quality has not improved, try the print adjustment again.
You can also check the print alignment from your computer.
Related Information
• Routine Maintenance
Related Topics:
• Check the Print Alignment Using Web Based Management
• Check the Print Quality
214
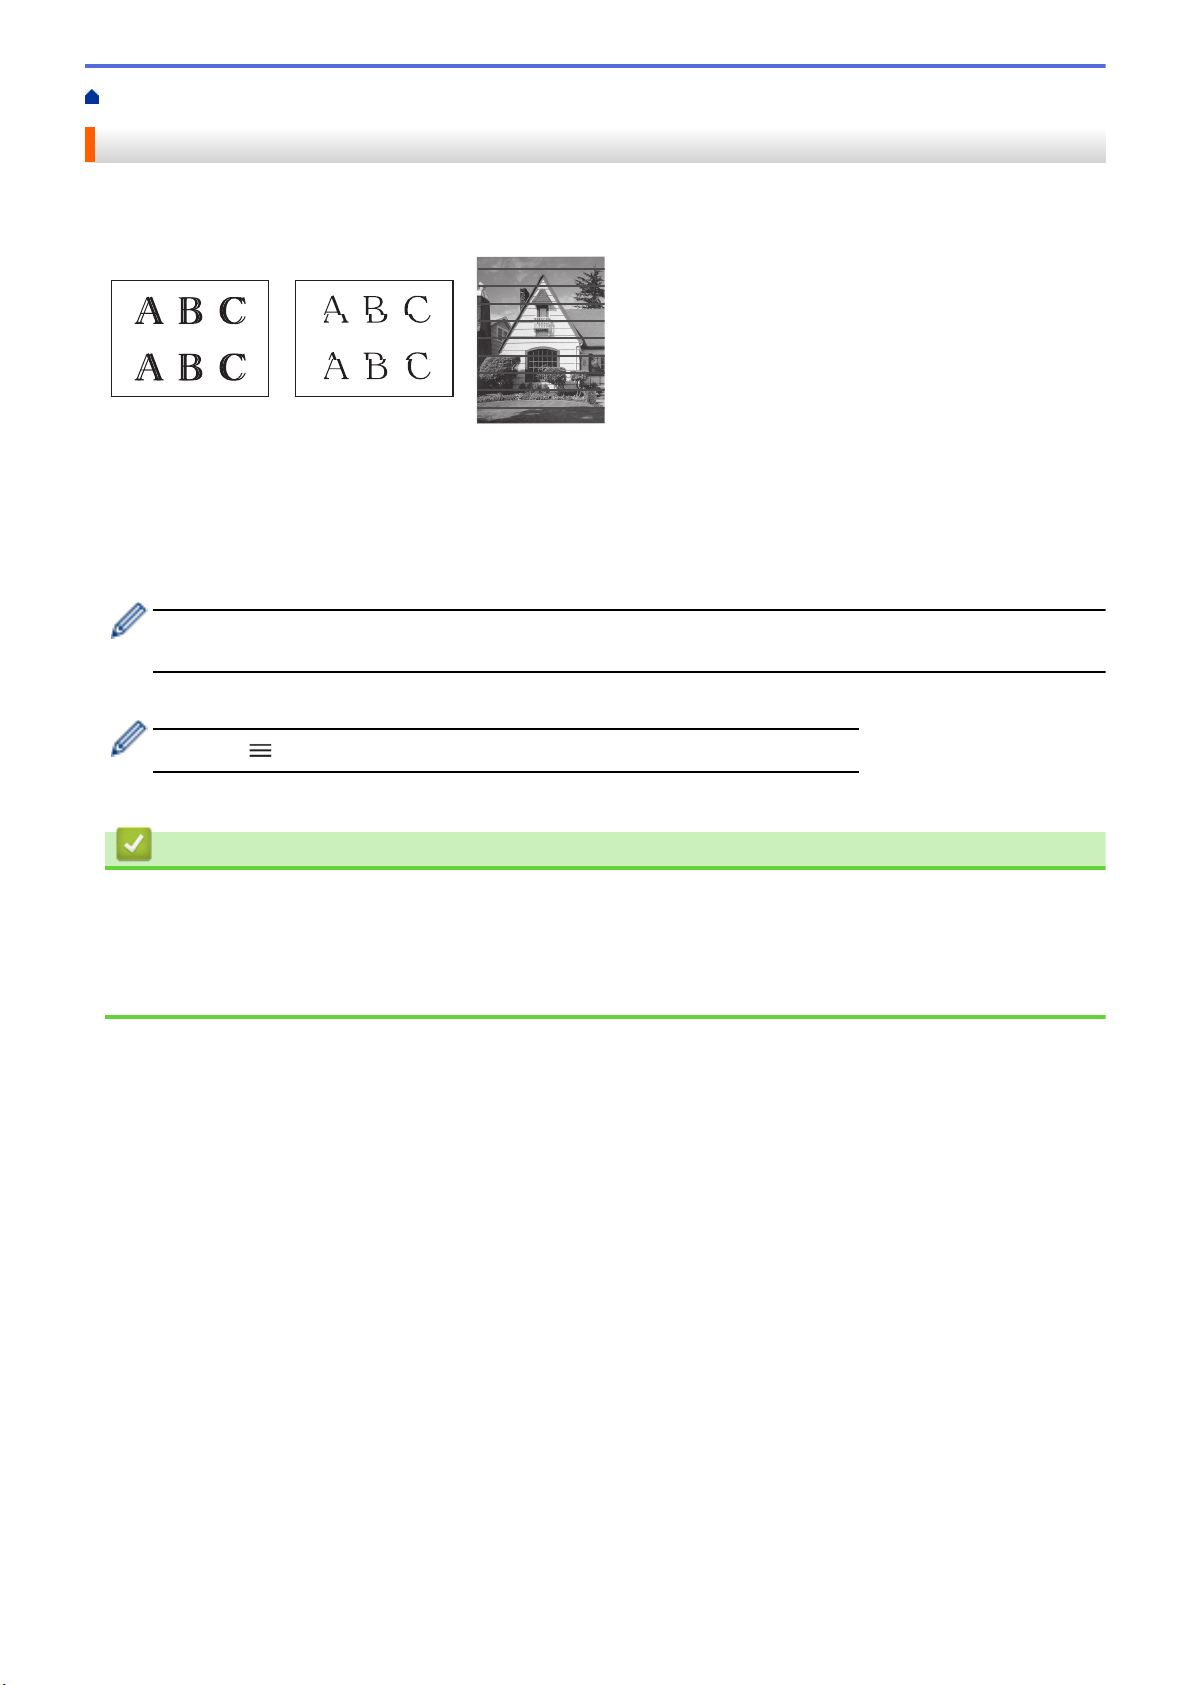
Home > Routine Maintenance > Check the Print Alignment Using Web Based Management
Check the Print Alignment Using Web Based Management
After transporting the machine, adjust the print alignment if the text is blurred or images become faded, and
adjust the paper feed to reduce dark lines.
1. Start Brother Mobile Connect on your mobile device.
2. Tap your model name on the top of the screen.
3. Tap All Machine Settings.
Web Based Management appears.
4. If required, type the password in the Login field, and then tap Login.
The default password to manage this machine’s settings is located on the back of the machine and marked
"Pwd".
5. Go to the navigation menu, and then tap General > Alignment.
Start from
, if the navigation menu is not shown on the left side of the screen.
6. Follow the on-screen instructions.
Related Information
• Routine Maintenance
Related Topics:
• Access Web Based Management
• Brother Mobile Connect
215
Home > Routine Maintenance > Change the Print Options to Improve Your Print Results
Change the Print Options to Improve Your Print Results
If your printouts do not look the way you expect, change the print settings on your Brother machine to improve
printout quality. Print speed may be slower when using these settings.
• These instructions allow you to improve your print results when you are using your machine for copying
or printing from a mobile device.
• If you are experiencing poor print quality when printing from your computer, change your printer driver
settings.
1. Start Brother Mobile Connect on your mobile device.
2. Tap your model name on the top of the screen.
3. Tap All Machine Settings.
Web Based Management appears.
4. If required, type the password in the Login field, and then tap Login.
The default password to manage this machine’s settings is located on the back of the machine and marked
"Pwd".
5. Go to the navigation menu, and then tap General > Print Options.
Start from
, if the navigation menu is not shown on the left side of the screen.
6. Configure the Reduce Smudging settings if you have problems with smudged printouts or paper jams.
7. Select On for Enhance Print if you have problems with blurred printouts.
8. Tap Submit.
Related Information
• Routine Maintenance
Related Topics:
• Other Problems
• Prevent Smudged Printouts and Paper Jams (Windows)
• Print Settings (Windows)
• Access Web Based Management
• Paper Handling and Printing Problems
• Brother Mobile Connect
216

Home > Routine Maintenance > Pack and Ship Your Machine
Pack and Ship Your Machine
• When you transport the machine, use the packing materials that came with your machine. Do not tip or turn
the product upside down. If you do not pack the machine correctly, any damage that may occur in transit may
not be covered by your warranty.
• The machine should be adequately insured with the carrier.
IMPORTANT
It is important to allow the machine to “park” the print head after a print job. Listen carefully to the machine
before unplugging it to make sure that all mechanical noises have stopped. Not allowing the machine to finish
this parking process may lead to print problems and possible damage to the print head.
1. Unplug the machine from the AC power outlet.
2. Lift the document cover.
3. Unplug the interface cable from the machine, if it is connected.
4. Close the document cover.
5. Open the ink cartridge cover.
6. Press the ink release levers to release the ink cartridges and then take out the ink cartridges.
7. Wrap the machine in the bag.
8. Pack the machine in the original carton with the original packing material as shown below.
Do not pack the used ink cartridge in the carton.
217
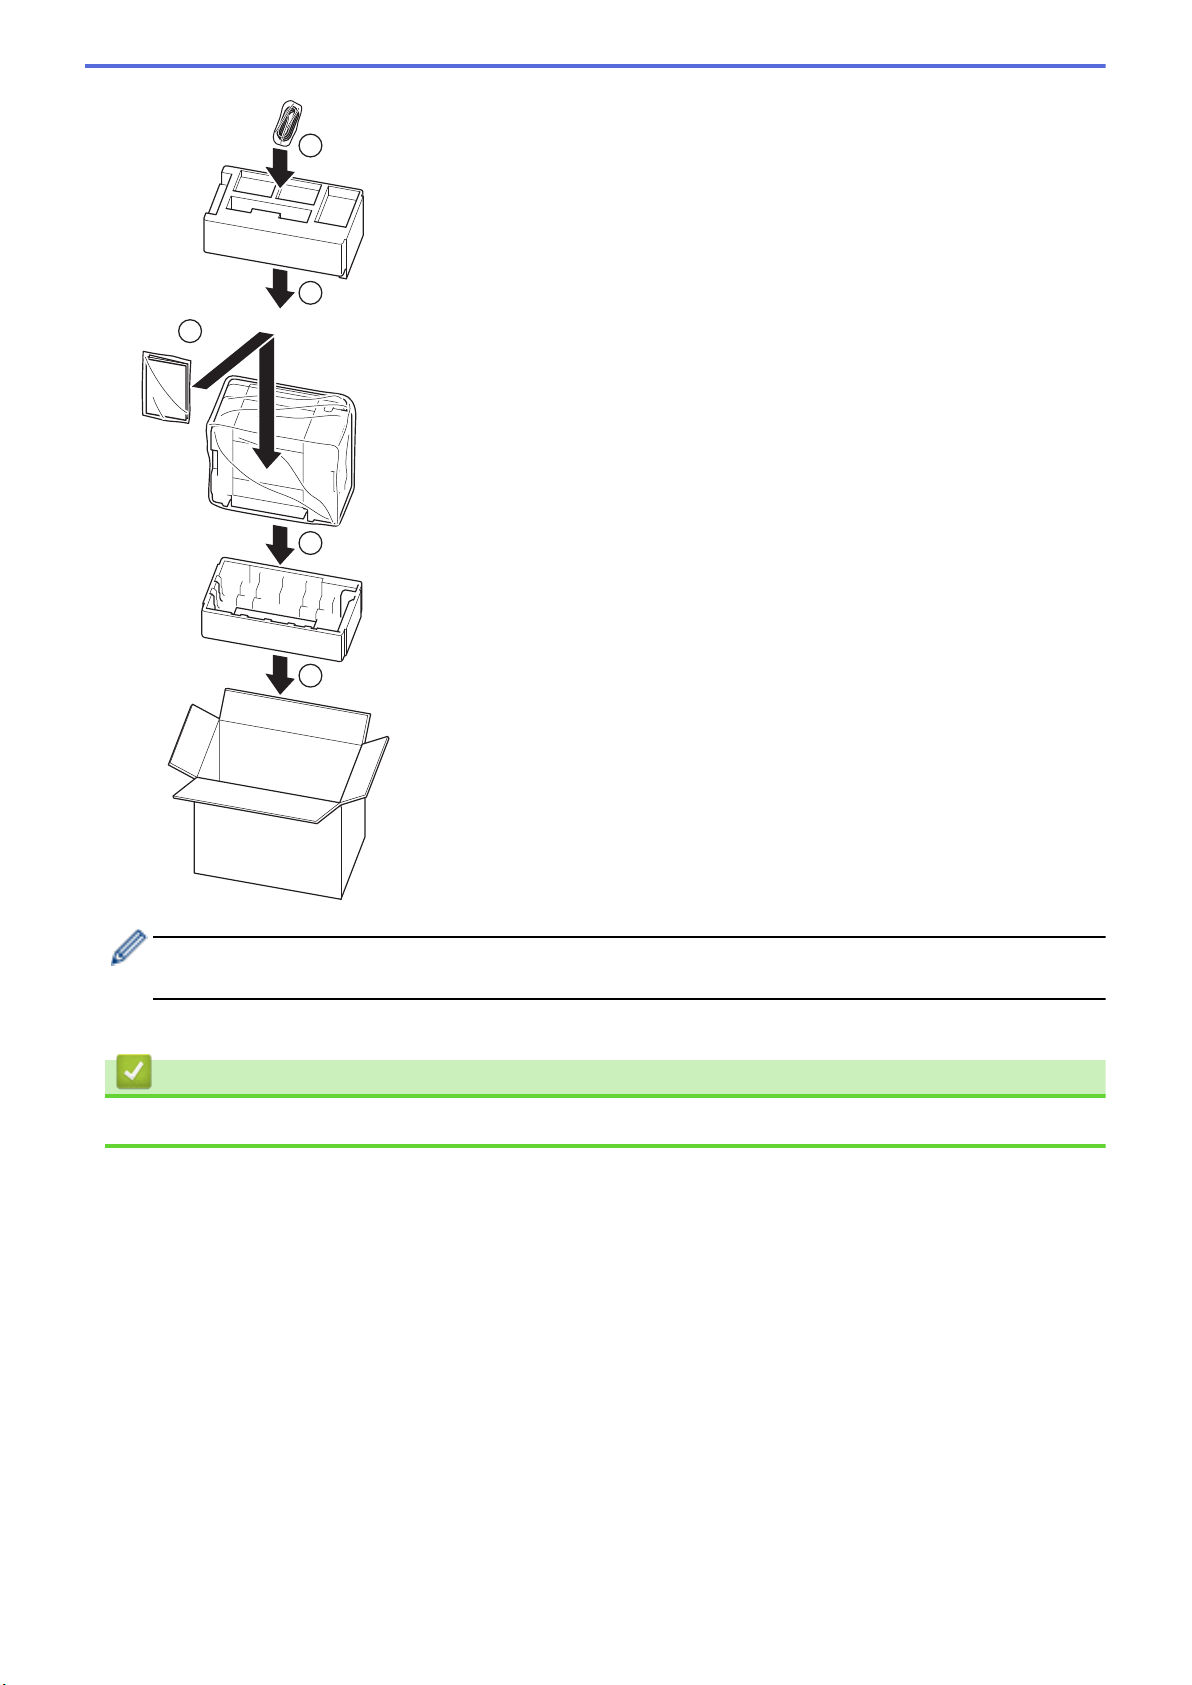


Home > Machine Settings > Change Machine Settings Using Web Based Management
Change Machine Settings Using Web Based Management
Web Based Management is a utility that uses a standard web browser to manage your machine using the Hyper
Text Transfer Protocol (HTTP) or Hyper Text Transfer Protocol over Secure Socket Layer (HTTPS).
• What is Web Based Management?
• Access Web Based Management
• Set or Change a Login Password for Web Based Management
• General Settings
220

Home > Machine Settings > Change Machine Settings Using Web Based Management > What is Web
Based Management?
What is Web Based Management?
Web Based Management is a utility that uses a standard web browser to manage your machine using the Hyper
Text Transfer Protocol (HTTP) or Hyper Text Transfer Protocol over Secure Socket Layer (HTTPS).
• We recommend Microsoft Internet Explorer 11/Microsoft Edge for Windows, Safari 10/11 for Mac,
Google Chrome
™
for Android (4.x or later), and Google Chrome
™
/Safari for iOS (10.x or later). Make
sure that JavaScript and Cookies are always enabled in whichever browser you use.
• You must use the TCP/IP protocol on your network and have a valid IP address programmed into the
print server and your computer.
The actual screen may differ from the screen shown above.
Related Information
• Change Machine Settings Using Web Based Management
221
Home > Machine Settings > Change Machine Settings Using Web Based Management > Access Web
Based Management
Access Web Based Management
• We recommend Microsoft Internet Explorer 11/Microsoft Edge for Windows, Safari 10/11 for Mac, Google
Chrome
™
for Android (4.x or later), and Google Chrome
™
/Safari for iOS (10.x or later). Make sure that
JavaScript and Cookies are always enabled in whichever browser you use.
• The default password to manage this machine’s settings is located on the back of the machine and marked
"Pwd". We recommend immediately changing the default password to protect your machine from
unauthorized access.You can also find the default password in the Network Configuration Report.
• If the password is entered incorrectly several times, you will not be able to log in for a while. The lockout
settings can be changed in Web Based Management.
• Up to eight computers or mobile devices can be logged in to Web Based Management at the same time. If
you log in a ninth device, the first device will be logged out.
• We recommend using the HTTPS security protocol when configuring settings using Web Based
Management. If you use HTTP when configuring settings using Web Based Management, follow the
screen prompts to switch to a secure HTTPS connection.
• When you use HTTPS for Web Based Management configuration, your browser will display a warning
dialog box. To avoid displaying the warning dialog box, you can install a self-signed certificate to use
SSL/TLS communication. For more detailed information, see Related Information.
>> Start from Brother Mobile Connect
>> Start from Brother iPrint&Scan (Windows/Mac)
>> Start from Your Web Browser
>> Start from Brother Utilities (Windows)
Start from Brother Mobile Connect
You need to install and set up Brother Mobile Connect on your mobile device.
1. Start Brother Mobile Connect on your mobile device.
2. Tap your model name on the top of the screen.
3. Tap All Machine Settings.
Web Based Management appears.
4. If required, type the password in the Login field, and then tap Login.
5. If you want to pin the navigation menu on the left side of the screen, tap
and then tap .
You can now change the machine settings.
Start from Brother iPrint&Scan (Windows/Mac)
1. Start Brother iPrint&Scan.
• Windows
Launch
(Brother iPrint&Scan).
• Mac
In the Finder menu bar, click Go > Applications, and then double-click the iPrint&Scan icon.
The Brother iPrint&Scan screen appears.
2. If your Brother machine is not selected, click the Select your Machine button, and then select your model
name from the list. Click OK.
3. Click
(Machine Settings).
4. Click All Settings.
Web Based Management appears.
222
5. If required, type the password in the Login field, and then click Login.
6. If you want to pin the navigation menu on the left side of the screen, click and then click .
You can now change the machine settings.
Start from Your Web Browser
1. Start your web browser.
2. Type "https://machine's IP address" in your browser's address bar (where "machine's IP address" is the
machine's IP address).
For example:
https://192.168.1.2
If you are using a Domain Name System or enable a NetBIOS name, you can type another name, such as
"SharedPrinter" instead of the IP address.
For example:
https://SharedPrinter
If you enable a NetBIOS name, you can also use the node name.
For example:
https://brnxxxxxxxxxxxx
The NetBIOS name can be found in the Network Configuration Report.
3. If required, type the password in the Login field, and then click Login.
4. If you want to pin the navigation menu on the left side of the screen, click
and then click .
You can now change the machine settings.
Start from Brother Utilities (Windows)
1. Launch (Brother Utilities), and then click the drop-down list and select your model name (if not already
selected).
2. Click Tools in the left navigation bar, and then click Machine Settings.
Web Based Management appears.
3. If required, type the password in the Login field, and then click Login.
4. If you want to pin the navigation menu on the left side of the screen, click
and then click .
You can now change the machine settings.
If you change the protocol settings, you must restart the machine after clicking Submit to activate the
configuration.
After configuring the settings, click Logout.
Related Information
• Change Machine Settings Using Web Based Management
Related Topics:
• Print the Network Configuration Report
• Create a Self-signed Certificate
• Install the Self-signed Certificate for Windows users with Administrator Rights
• Brother Mobile Connect
223
Home > Machine Settings > Change Machine Settings Using Web Based Management > Set or Change a
Login Password for Web Based Management
Set or Change a Login Password for Web Based Management
The default password to manage this machine’s settings is located on the back of the machine and marked
"Pwd". We recommend immediately changing the default password to protect your machine from unauthorized
access.
1. Start Brother Mobile Connect on your mobile device.
2. Tap your model name on the top of the screen.
3. Tap All Machine Settings.
Web Based Management appears.
4. Do one of the following:
• If you have previously set your own password, type it, and then tap Login.
• If you have not previously set your own password, type the default login password, and then tap Login.
5. Go to the navigation menu, and then tap Administrator > Login Password.
Start from , if the navigation menu is not shown on the left side of the screen.
6. Following the on-screen guidelines, type your password in the Enter New Password field.
7. Retype the password in the Confirm New Password field.
8. Tap Submit.
You can also change the lockout settings in the Login Password menu.
Related Information
• Change Machine Settings Using Web Based Management
Related Topics:
• Brother Mobile Connect
224

Home > Machine Settings > Change Machine Settings Using Web Based Management > General
Settings > Set Sleep Mode Countdown
Set Sleep Mode Countdown
The Sleep Mode (or Power Save Mode) setting can reduce power consumption. When the machine is in Sleep
Mode, it acts as if it is turned off. The machine will wake up and start printing when it receives a print job. Use
these instructions to set a time delay (countdown) before the machine enters Sleep Mode.
• The timer will restart if any operation is carried out on the machine, such as receiving a print job.
• The factory setting is five minutes.
1. Start Brother Mobile Connect on your mobile device.
2. Tap your model name on the top of the screen.
3. Tap All Machine Settings.
Web Based Management appears.
4. If required, type the password in the Login field, and then tap Login.
The default password to manage this machine’s settings is located on the back of the machine and marked
"Pwd".
5. Go to the navigation menu, and then tap General > Sleep Time.
Start from
, if the navigation menu is not shown on the left side of the screen.
6. Enter the Sleep Time field (1-60).
7. Tap Submit.
Related Information
• General Settings
Related Topics:
• Set the Machine to Power Off Automatically
• Access Web Based Management
• Brother Mobile Connect
226
Home > Machine Settings > Change Machine Settings Using Web Based Management > General
Settings > Set the Machine to Power Off Automatically
Set the Machine to Power Off Automatically
The Auto Power Off feature can reduce power consumption. Set the amount of time that the machine must be in
Sleep Mode before it automatically powers off. When this feature is set to off, you must power off the machine
manually.
To turn on the machine after the Auto Power Off feature has turned it Off, press (STOP).
The machine does not power off automatically when:
• The machine is connected to a wireless network.
• Wi-Fi is set to On.
1. Start Brother Mobile Connect on your mobile device.
2. Tap your model name on the top of the screen.
3. Tap All Machine Settings.
Web Based Management appears.
4. If required, type the password in the Login field, and then tap Login.
The default password to manage this machine’s settings is located on the back of the machine and marked
"Pwd".
5. Go to the navigation menu, and then tap General > Auto Power Off.
Start from
, if the navigation menu is not shown on the left side of the screen.
6. Tap the Auto Power Off drop-down list, and then select the option you want.
7. Tap Submit.
Related Information
• General Settings
Related Topics:
• Set Sleep Mode Countdown
• Access Web Based Management
• Brother Mobile Connect
227
Home > Machine Settings > Change Machine Settings Using Web Based Management > General
Settings > Set the Date and Time
Set the Date and Time
Make sure the date and time setting is set correctly using Web Based Management, so the machine's time
matches the time being used by the server providing authentication.
1. Start Brother Mobile Connect on your mobile device.
2. Tap your model name on the top of the screen.
3. Tap All Machine Settings.
Web Based Management appears.
4. If required, type the password in the Login field, and then tap Login.
The default password to manage this machine’s settings is located on the back of the machine and marked
"Pwd".
5. Go to the navigation menu, and then tap Administrator > Date&Time.
Start from , if the navigation menu is not shown on the left side of the screen.
6. In the Date fields, enter the date.
7. Select either 12h Clock or 24h Clock as your Clock Type (available only for certain countries).
8. In the Time fields, enter the time.
9. Tap Submit.
Related Information
• General Settings
Related Topics:
• Access Web Based Management
• Brother Mobile Connect
228
Home > Machine Settings > Change Machine Settings Using Web Based Management > General
Settings > Reduce Printing Noise
Reduce Printing Noise
The Quiet Mode setting can reduce printing noise. When Quiet Mode is turned on, the print speed becomes
slower.
The factory setting is Off.
1. Start Brother Mobile Connect on your mobile device.
2. Tap your model name on the top of the screen.
3. Tap All Machine Settings.
Web Based Management appears.
4. If required, type the password in the Login field, and then tap Login.
The default password to manage this machine’s settings is located on the back of the machine and marked
"Pwd".
5. Go to the navigation menu, and then tap Print > Print.
Start from , if the navigation menu is not shown on the left side of the screen.
6. Select On (or Off) in the Quiet Mode option.
7. Tap Submit.
Related Information
• General Settings
Related Topics:
• Paper Handling and Printing Problems
• Access Web Based Management
• Brother Mobile Connect
229

Home > Machine Settings > Change Machine Settings Using Web Based Management > General
Settings > Change the Language Printed in the Reports and Sheets
Change the Language Printed in the Reports and Sheets
Change the language printed in the reports and sheets if needed.
This feature is not available for some countries.
1. Start Brother Mobile Connect on your mobile device.
2. Tap your model name on the top of the screen.
3. Tap All Machine Settings.
Web Based Management appears.
4. If required, type the password in the Login field, and then tap Login.
The default password to manage this machine’s settings is located on the back of the machine and marked
"Pwd".
5. Go to the navigation menu, and then tap General > Local Language.
Start from , if the navigation menu is not shown on the left side of the screen.
6. Select your language from the Local Language drop-down list.
7. Tap Submit.
Related Information
• General Settings
Related Topics:
• Access Web Based Management
• Brother Mobile Connect
230


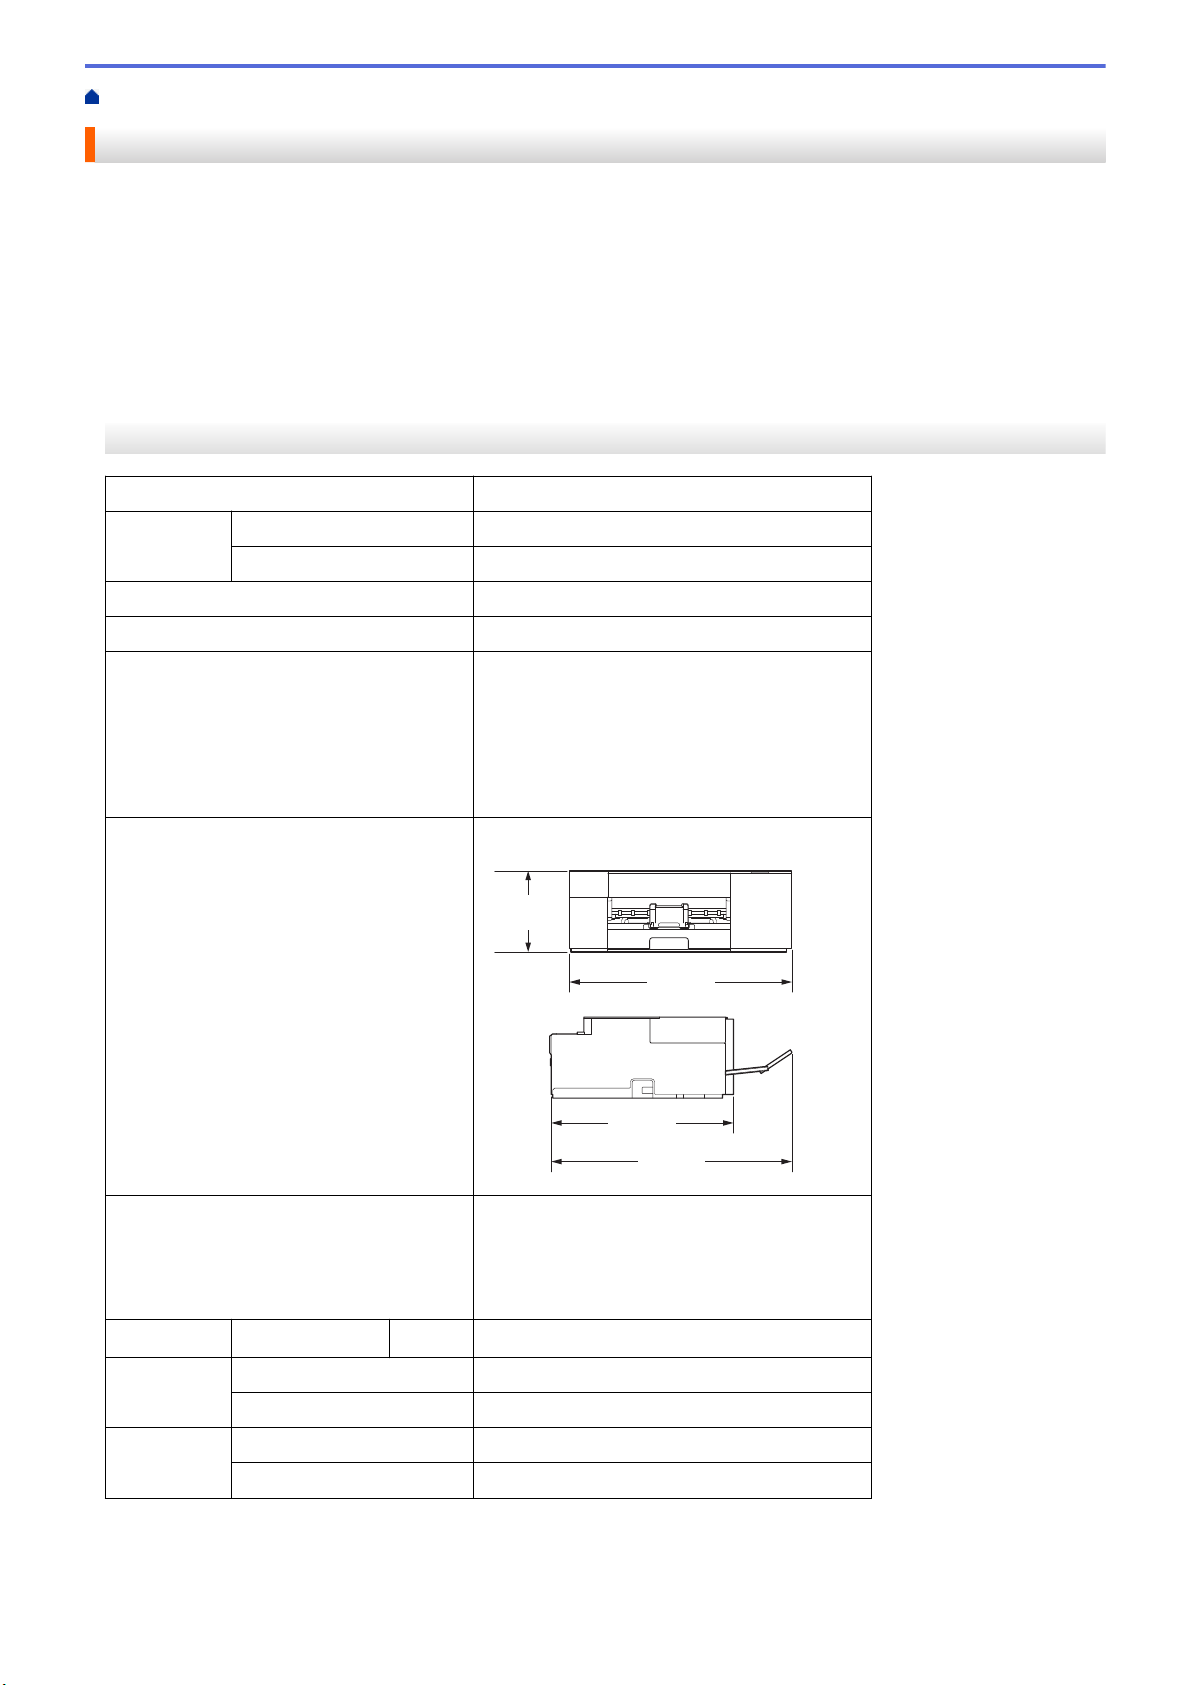
Home > Appendix > Specifications
Specifications
>> General Specifications
>> Document Size Specifications
>> Print Media Specifications
>> Copy Specifications
>> Scanner Specifications
>> Printer Specifications
>> Interface Specifications
>> Network Specifications
>> Computer Requirements Specifications
General Specifications
Printer Type
Inkjet
Print Head Black Piezo with 210 nozzles x 1
Color Piezo with 70 nozzles x 3
Memory Capacity 128 MB
Power Source AC 110 to 120 V 50/60 Hz
Power Consumption
1
MFC-J1205W/MFC-J1215W
Copying
2
: Approx. 13 W
Ready
3
: Approx. 2.5 W
Sleep
3
: Approx. 0.8 W
Power Off
3 4
: Approx. 0.2 W
Dimensions
MFC-J1205W/MFC-J1215W
14.1 in.
(359 mm)
18.8 in.
(477 mm)
17.1 in.
(435 mm)
6.3 in.
(161 mm)
Weights • MFC-J1205W/MFC-J1215W
14.3 lb (6.5 kg)
• MFC-J1205W XL/MFC-J1215W XL
14.6 lb (6.6 kg)
Noise Level Sound Pressure Printing
56 dB (A) (Approx.)
5
Temperature Operating 50 to 95 °F (10 to 35°C)
Best Print Quality 68 to 91.4 °F (20 to 33°C)
Humidity Operating 20 to 80% (without condensation)
Best Print Quality 20 to 80% (without condensation)
1
Measured when the machine is connected to the USB interface. Power consumption varies slightly depending on the usage environment
or part wear.
2
When single-sided printing, resolution: standard / document: ISO/IEC 24712 printed pattern.
233
3
Measured according to IEC 62301 Edition 2.0.
4
Even when the machine is turned off, it will automatically turn itself on periodically for print head maintenance, and then turn itself off.
5
Noise depends on printing conditions.
Document Size Specifications
Document Size Scanner Glass Width Max. 8.5 in. (215.9 mm)
Scanner Glass Length Max. 11.7 in. (297 mm)
Print Media Specifications
Paper Input
Paper Tray
Paper Type
1
Plain Paper, Inkjet Paper (coated paper), Glossy Paper, Recycled
Paper
Paper Size Letter, A4, Legal, Mexico Legal, India Legal, Folio, Executive, A5,
A6, Envelopes (C5, Com-10, DL, Monarch), Photo (4" x 6")/(10 x 15
cm), Photo 2L (5" x 7")/(13 x 18 cm), Index card (5" x 8")/(13 x 20
cm)
Maximum Paper
Capacity
Up to 150 sheets of 20 lb (80 g/m²) plain paper
Paper Output
1
Up to 50 sheets of 20 lb (80 g/m²) Plain Paper (face up print delivery
to the output paper tray)
1
For glossy paper, remove any printed pages from the output paper tray immediately to avoid smudging.
Copy Specifications
Color/Black
Yes/Yes
Copy Width
8.26 in. (210 mm)
1
Multiple Copies Up to 99 pages
Enlarge/Reduce
25% to 400% (in increments of 1%)
2
Resolution Prints up to 1200 × 1800 dpi
1
When copying on Letter size paper.
2
When copying using Brother iPrint&Scan Desktop and Brother Mobile Connect.
Scanner Specifications
Color/Black
Yes/Yes
TWAIN Compliant Yes
(Windows 7 SP1 / Windows 8.1 / Windows 10)
WIA Compliant Yes
(Windows 7 SP1 / Windows 8.1 / Windows 10)
Color Depth 30 bit color processing (Input)
24 bit color processing (Output)
Gray Scale 10 bit color processing (Input)
8 bit color processing (Output)
Resolution
Up to 19200 × 19200 dpi (interpolated)
1 2
Up to 1200 × 2400 dpi (optical)
Scanning Width and Length
(Single-sided document)
Width: Up to 8.42 in. (213.9 mm)
Length: Up to 11.61 in. (295 mm)
234
1
Maximum 1200 × 1200 dpi scanning with the WIA driver in Windows 7 SP1, Windows 8.1 and Windows 10 (resolution up to 19200 ×
19200 dpi can be selected using the scanner utility).
2
The scanning range may decrease as the scanning resolution increases.
Printer Specifications
Resolution Up to 1200 × 6000 dpi (Windows only)
Printing Width
1
8.26 in. (210 mm)
Borderless
2
: 8.50 in. (216 mm)
Borderless Letter, A4, A6, Photo (4" x 6")/(10 x 15 cm), Photo 2L (5" x 7")/(13 x 18 cm), Index card (5" x
8")/(13 x 20 cm)
Print Speed See your model's page on your local Brother website.
1
When printing on Letter size paper.
2
When the Borderless feature is set to On.
Interface Specifications
USB
1 2
Use a USB 2.0 interface cable that is no longer than 6 feet (2 m).
Wireless LAN IEEE 802.11b/g/n (Infrastructure)
IEEE 802.11g/n (Wireless Direct)
1
Your machine has a USB 2.0 Hi-Speed interface. The machine can also be connected to a computer that has a USB 1.1 interface.
2
Third party USB ports are not supported.
Network Specifications
You can connect your machine to a network for Network Printing and Network Scanning.
Network Security (Wireless) SSL/TLS (IPPS, HTTPS)
Wireless Network Security SSID (32 characters), WEP 64/128
bit, WPA-PSK (TKIP/AES), WPA2-
PSK (TKIP/AES)
Wireless Setup Support Utility WPS Yes
Computer Requirements Specifications
Supported Operating Systems And Software Functions
Computer Platform &
Operating System Version
PC Interface Processor
Hard Disk Space to Install
1
USB
2
WLAN (Wi-
Fi)
For Drivers For
Applications
(Including
Drivers)
Windows
Operating
System
Windows 7 SP1
3 4
5
Windows 8.1
3 4
Printing
Scanning
32 bit (x86) or
64 bit (x64)
processor
650 MB 1.3 GB
Windows 10 Home
3 4
Windows 10 Pro
3 4
Windows 10
Education
3 4
235
Windows 10
Enterprise
3 4
Windows Server
2008
5
N/A Printing 50 MB N/A
Windows Server
2008 R2
5
Windows Server
2012
Windows Server
2012 R2
Windows Server
2016
Windows Server
2019
64 bit (x64)
processor
Mac
Operating
System
6
macOS v10.14.6
macOS v10.15.x
macOS v11
Printing
Scanning
64 bit
processor
N/A 550 MB
1
An Internet connection is required to install the software if the Brother installation disc is not supplied.
2
Third party USB ports are not supported.
3
For WIA, 1200 x 1200 resolution. Brother Scanner Utility enables enhancing up to 19200 x 19200 dpi.
4
Nuance
™
PaperPort
™
14SE supports Windows 7 SP1, Windows 8.1, Windows 10 Home, Windows 10 Pro, Windows 10 Education and
Windows 10 Enterprise.
5
Windows 7 SP1 / Windows Server 2008 / Windows Server 2008 R2 supported by Extend Security Updates until Jan 10, 2023.
6
macOS Disclaimer
AirPrint capable: Printing or scanning via macOS requires the use of AirPrint. Mac drivers are not provided for this machine.
For the latest driver updates, go to your model's Downloads page at support.brother.com.
All trademarks, brand and product names are the property of their respective companies.
Related Information
• Appendix
236
Home > Appendix > Supply Specifications
Supply Specifications
>> MFC-J1205W/MFC-J1215W
>> MFC-J1205W XL/MFC-J1215W XL
MFC-J1205W/MFC-J1215W
Ink
The machine uses individual Black, Yellow, Cyan and Magenta ink cartridges that are separate
from the print head assembly.
Service Life of Ink
Cartridge
The first time you install the ink cartridges, the machine will use extra ink to fill the ink delivery
tubes. This is a one-time process that enables high-quality printing.
Actual yield of initial cartridges will be approximately 147% of replacement LC404 Black, and
87% of replacement LC404 Color Series, due to ink system initialization
1
.
Replacement
Supplies
<Black> LC404BK
<Yellow> LC404Y
<Cyan> LC404C
<Magenta> LC404M
Black - Approximately 750 pages
1
Yellow, Cyan and Magenta - Approximately 750 pages
1
1
All replacement cartridges will provide an approximate page yield stated in accordance with ISO/IEC 24711. For more page yield
information, see www.brother.com/pageyield.
MFC-J1205W XL/MFC-J1215W XL
Ink
The machine uses individual Black, Yellow, Cyan and Magenta ink cartridges that are separate
from the print head assembly.
Service Life of Ink
Cartridge
The first time you install the ink cartridges, the machine will use extra ink to fill the ink delivery
tubes. This is a one-time process that enables high-quality printing.
Actual yield of initial cartridges will be approximately 287% of replacement LC404 Black, and
173% of replacement LC404 Color Series, due to ink system initialization
1
.
Replacement
Supplies
<Black> LC404BK
<Yellow> LC404Y
<Cyan> LC404C
<Magenta> LC404M
Black - Approximately 750 pages
1
Yellow, Cyan and Magenta - Approximately 750 pages
1
1
All replacement cartridges will provide an approximate page yield stated in accordance with ISO/IEC 24711. For more page yield
information, see
www.brother.com/pageyield.
Related Information
• Appendix
237
Home > Appendix > Brother Help and Customer Support
Brother Help and Customer Support
IMPORTANT
For technical help, you must call the country where you bought the machine. Calls must be made from
within that country.
>> FAQs (Frequently Asked Questions)
>> For Customer Service
>> Ordering Accessories and Supplies
FAQs (Frequently Asked Questions)
For more information on your Brother machine, visit the Brother support website at support.brother.com. For
additional help and tips, go to your model's FAQs & Troubleshooting page; for the latest drivers and software,
go to your model's Downloads page.
For Customer Service
In USA:
www.brother-usa.com/support (Self-Service/Email/Chat)
1-877-BROTHER (1-877-276-8437)
In Canada:
www.brother.ca/support
(Self-Service Videos, Email, Chat, Facebook and Twitter Help)
Service Center Locator (USA only)
For the location of a Brother authorized service center, call 1-877-BROTHER (1-877-276-8437) or visit
www.brother-usa.com/support.
Service Center Locations (Canada only)
For the location of a Brother authorized service center, visit www.brother.ca/support.
Ordering Accessories and Supplies
We recommend Genuine Brother supplies, which are available at most Brother retailers. If you cannot find the
supplies you need and have a Visa, MasterCard, Discover, American Express credit card, or PayPal account,
you can order directly from Brother. Visit us online for a complete selection of the Brother accessories and
supplies that are available for purchase.
NOTE
In Canada, only Visa and MasterCard are accepted.
In USA:
1-877-BROTHER (1-877-276-8437)
www.brother-usa.com/support
In Canada:
www.brother.ca
238

Brother International Corporation
200 Crossing Boulevard
P.O. Box 6911
Bridgewater, NJ 08807-0911 USA
Brother International Corporation (Canada) Ltd.
1 rue Hôtel de Ville,
Dollard-des-Ormeaux, QC, Canada H9B 3H6
USA/CAN
Version C