
不属于印刷内容印刷
规格:A5
材质:80g双胶
封面彩色,内容黑白
注:无色号,按图纸效果印刷

User Manual
60 cm Built-in Electric Oven
Model Code: TRO605SS; TRO605BK
User Manual
60 cm Built-in Electric Oven
Model Code: TRO601SS
Please read this manual carefully before using, and keep it for future reference.
P a g e | 2
ONLINE: TRINITYAPPLIANCES.COM.AU
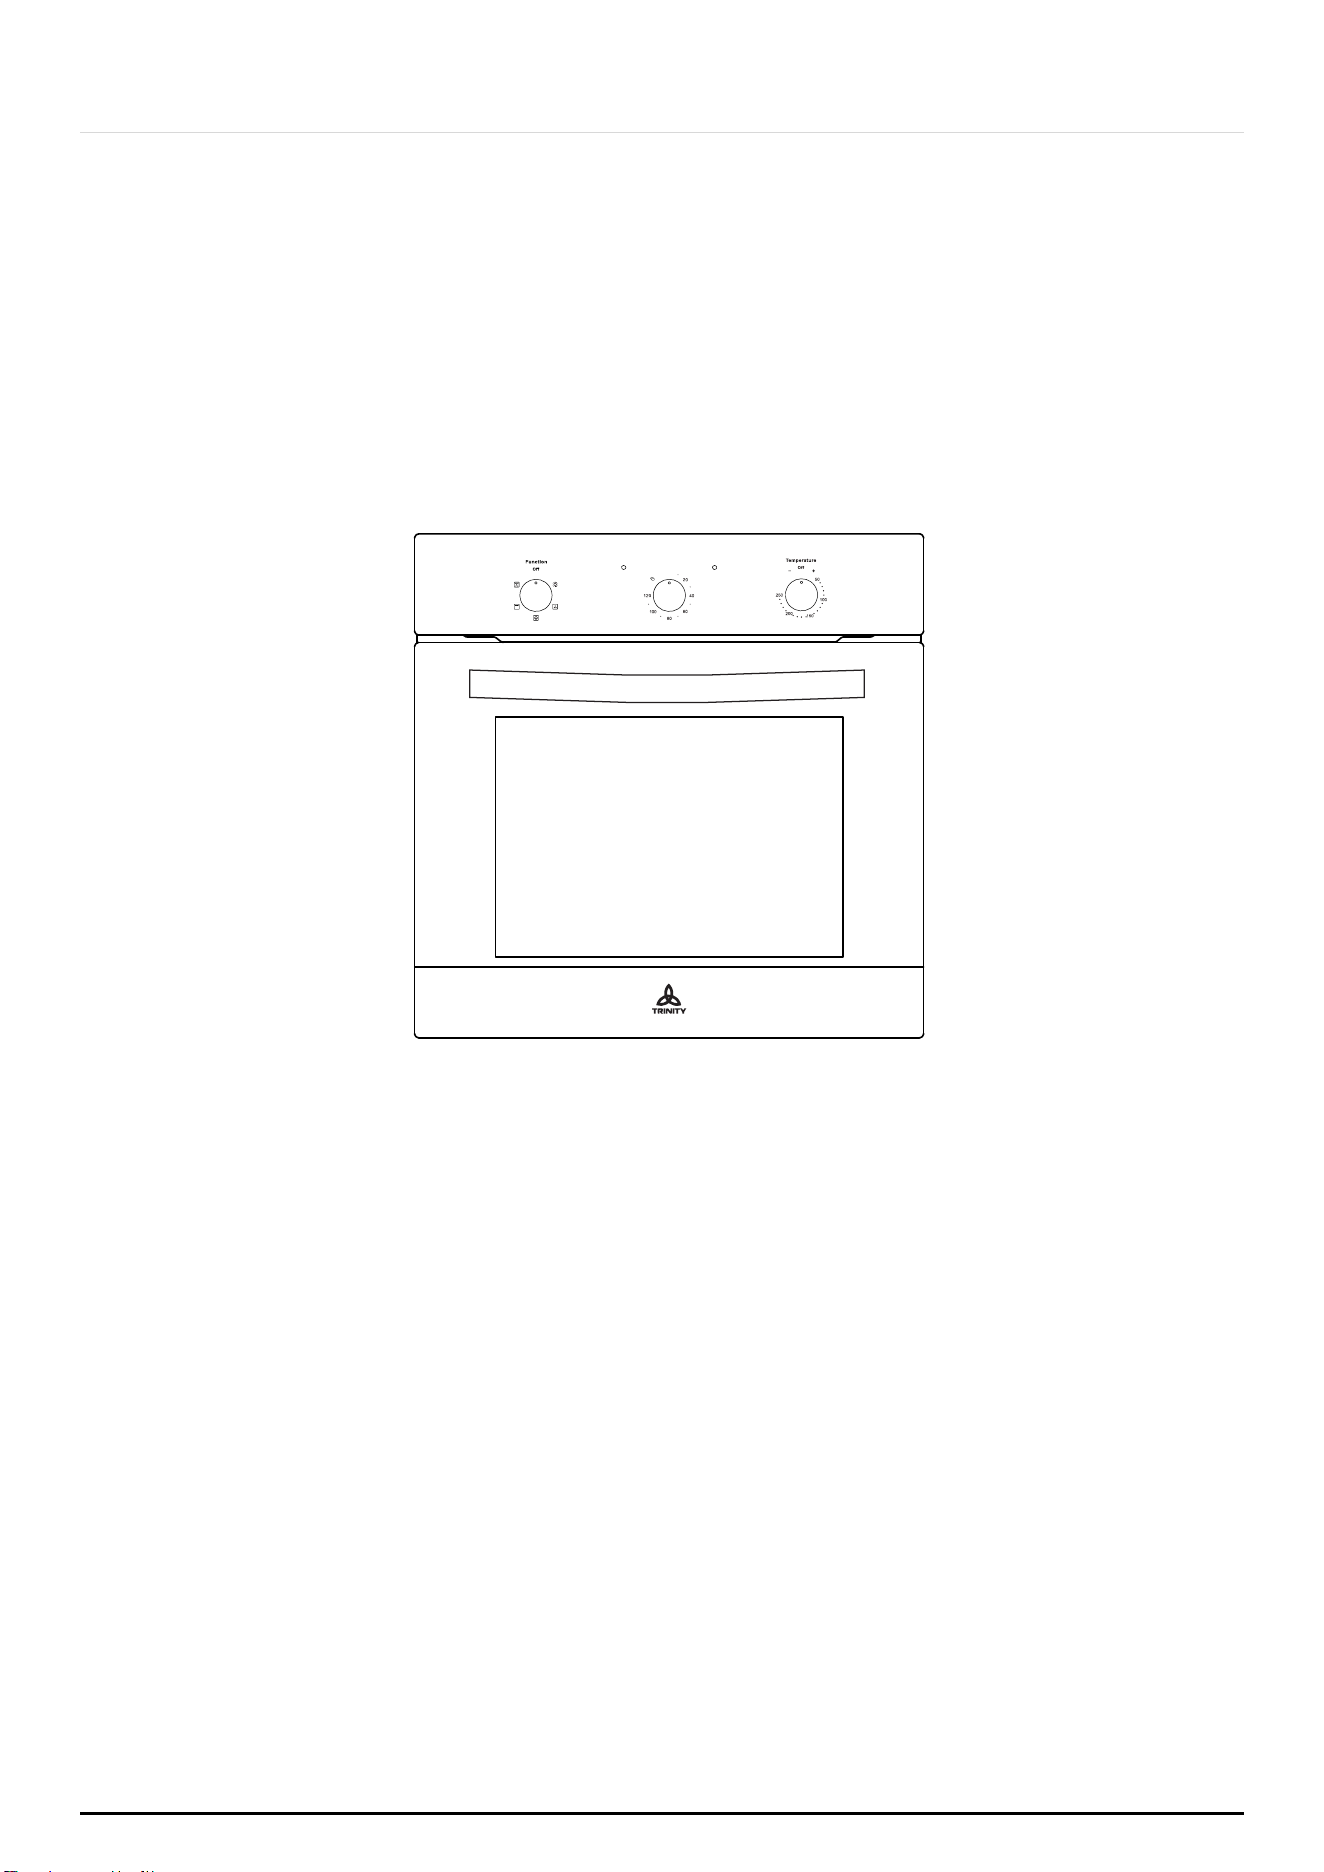
INSTRUCTION MANUAL
60cm Built-in Electric Oven
Models: TRO601SS
NOTE: This oven has a large cavity.
Preheating for about 10 minutes is recommended before cooking.
Tim e
Off

P a g e | 3
ONLINE: TRINITYAPPLIANCES.COM.AU
CONTENTS
1 PACKAGE .......................................................................................................................................4
1.1 IMPORTANT - CHECK FOR ANY DAMAGE OR MARKS ...................................................... 4
1.2 HANDLING ............................................................................................................................... 4
1.3 BEFORE USING YOUR NEW APPLIANCE ...............................................................................4
2 SAFETY WARNINGS ........................................................................................................................5
2.1 IMPORTANT INFORMATION ................................................................................................... 5
2.2 GENERAL WARNINGS .............................................................................................................5
2.3 INSTALLATION ADVICE ........................................................................................................... 5
2.4 USAGE CONDITIONS AND RESTRICTIONS............................................................................6
2.5 ELECTRICAL SAFETY ................................................................................................................ 7
3 PRODUCT OVERVIEW ................................................................................................................... 9
3.1 INTRODUCING THE OVEN ......................................................................................................9
4 INSTALLATION .............................................................................................................................. 13
4.1 PREPARING THE CABINET .....................................................................................................13
4.2 FASTENING THE OVEN ..........................................................................................................14
4.3 ELECTRICAL CONNECTION ................................................................................................. 15
5 OPERATION ..................................................................................................................................17
5.1 OVEN FUNCTIONS AND OPERATION................................................................................. 17
5.2 FIRST TIME USE OVEN ............................................................................................................ 20
5.3 NORMAL USE ......................................................................................................................... 20
5.4 ENERGY SAVING TIPS ........................................................................................................... 20
6 COOKING GUIDELINES ...............................................................................................................21
6.1 SELECTION RECOMMENDATIONS ...................................................................................... 21
7 CLEANING AND MAINTENANCE .............................................................................................. 24
7.1 KEEP YOUR OVEN IN SHAPE ................................................................................................ 24
7.2 STEAM CLEANING .................................................................................................................24
7.3 REPLACING OVEN LAMP .....................................................................................................25
7.4 DISASSEMBLING/ASSEMBLING OVEN DOOR ....................................................................25
7.5 CLEANING OVEN GLASS ..................................................................................................... 26
8 TROUBLESHOOTING .................................................................................................................... 27
9 TECHNICAL SPECIFICATIONS .....................................................................................................29
10 DISPOSAL ...................................................................................................................................30
11 CUSTOMER CARE ..................................................................................................................... 31

P a g e | 4
ONLINE: TRINITYAPPLIANCES.COM.AU
1 PACKAGE
1.1 IMPORTANT - CHECK FOR ANY DAMAGE OR MARKS
Please thoroughly inspect your goods at the delivery time, if you notice any damage to
your goods:
Please notify the delivery team at the time of delivery and do NOT accept
damaged product.
Please notify us immediately as the problem can be instantly solved and damaged
product return to the courier office.
When you open the package and find the appliance is damaged or marked, you must
report it within 24 hours. Do not install or connect the item, keep the package as original, if
you wish to claim for damage/marks under the manufacturer’s warranty. This does not
affect your statutory rights.
Evidence of damage will be required.
1.2 HANDLING
Do not use the door and/or handle to carry or move the appliance.
Carry out the movement and transportation in the original packaging.
Pay maximum attention to the appliance while loading/unloading and handling.
Make sure that the packaging is securely closed during handling and transportation.
Protect from external factors (such as humidity, water, etc.) that may damage the
packaging.
Be careful not to damage the appliance due to bumps, crashes, drops, etc. while
handling and transporting and not to break or deform it during operation.
1.3 BEFORE USING YOUR NEW APPLIANCE
Read this guide, taking special note of the ‘Safety Warnings’ section.
Remove any protective film that may still be on your appliance.
This instruction manual has been prepared jointly for multiple models. Some of the
specifications explained in the manual, may not be included in your appliance. Pay
attention to the explanations with illustrations while reading the manual.
NOTE:
This instruction manual has been prepared jointly for multiple models. Some of the
specifications explained in the manual, may be slightly different or not be included in your
appliance. Pay attention to the explanations with illustrations while reading the manual.

P a g e | 5
ONLINE: TRINITYAPPLIANCES.COM.AU
2 SAFETY WARNINGS
2.1 IMPORTANT INFORMATION
Read this manual thoroughly before you start using the appliance.
The safety precautions instructions reduce the risk of fire, electric shock and injury when
correctly complied to.
Please take notice of all warnings, follow the instructions, basic precautions and accident
prevention measures when using this appliance.
NOTE: This appliance should be installed by a licensed electrician or warranty will be
voided.
2.2 GENERAL WARNINGS
Cooking process shall always be supervised.
Never try to put out the fire with water. Only shut down the device circuit and then
cover the flame with a cover or a fire blanket.
Do not heat closed cans and glass jars. The pressure may lead jars to explode.
Be careful when using alcohol in your foods. Alcohol will evaporate at high
temperatures and may catch fire to cause a fire if it comes in contact with hot
surfaces.
After each use, check if the unit is turned off.
If the appliance is faulty or has a visible damage, do not operate the appliance.
Do not touch the plug with wet hands. Do not pull the cord to plug off, always hold
the plug.
The packaging materials are dangerous for children. Keep packaging materials
away from the reach of children.
2.3 INSTALLATION ADVICE
Make sure that furniture and housing are able to withstand high temperatures
from the use of the oven.
Vinyl and laminate kitchen furniture are prone to heat damage or being
discoloured from the heat. We assume no liability from any damaged cause by this
appliance being installed in close proximity to the materials or furniture that
cannot handle the heat. Make sure the room has plenty of ventilation as heat,
steam and moisture will be produced from the oven while in use. If the oven will be
used for long periods of time, extra ventilation is needed.
Make sure that no cables come into contact with were the oven can get hot.
Do not install oven next to soft furnishings or curtains.
If power cord is damaged, it must be replaced immediately by a qualified
electrician to avoid hazard.

P a g e | 6
ONLINE: TRINITYAPPLIANCES.COM.AU
2.4 USAGE CONDITIONS AND RESTRICTIONS
Supervision over children is to ensure that they do not play with the appliance.
Never allow them to use, play with or crawl inside the appliance. Cleaning and
maintenance must not be done by children.
This appliance is not to be used by persons (including children) with reduced
physical, sensory or mental capabilities, or lack of experience and knowledge,
unless they are being supervised or been given instructions on how to use of the
appliance in a safe way and understand the hazards with using this appliance
incorrectly.
Never leave the oven unattended while in use, oils and fats may catch fire while
cooking.
Only for indoor domestic use only. It is not to be used for industrial or commercial
use.
Do not use this product for anything other than its intended purpose, and only use
it as described in this manual. Do not attempt to alter or modify this appliance.
In use, the door window may become hot. Make sure not to touch it or that no
children or pets come into contact with the door window.
Damage or malfunction caused from foreign objects is not covered by your
warranty to the appliance.
This oven is not to be used by an external timer or a complete separate control
system.
Make sure you turn off the oven before you commence cleaning.
Do not use the oven for heating an area or drying clothes.
Make sure you do not use the oven if any part has been damaged or does not
work correctly. It must only be repaired by a qualified technician. An incorrect
repair could expose you to risk of electric shock, fire or injury. If you continue to
use the product in such a condition it could cause a fire or electrocution.
Incorrect use can result in property damage, injury or death. We assume no
liability for misuse of the appliance or noncompliance with these instructions.
Oven door must stay closed when using the grill function. Oven handle is not a
towel drier. Do not hang towels, etc. on the oven handle during use.
While cooking, don’t place pans, oven trays, plates or aluminium foils, other
cookware on the base of your oven. The accumulated heat may damage the
base of the oven.
Make sure to always place items on shelves provided. Do not place the baking
paper on the base of the oven. Never use it at higher oven temperatures than the
maximum usage temperature indicated on your baking paper. To lower the risk of
touching the oven heater elements, remove excess parts of the baking paper that
hang over from the accessory or container.
Place the oven shelves and a tray correctly on the wire racks.The shelve or tray shall
be between two rails and balanced.
Make sure when removing anything from the oven, always use an oven mitt.

P a g e | 7
ONLINE: TRINITYAPPLIANCES.COM.AU
Do not use aluminium anywhere within the oven grills or to cover the grill pan or
wrap heated items under the grill. Aluminium foil is highly reflective and can cause
damage to the grill element.
Do not lift or move appliance by the oven door or handle, this may cause
damage to the appliance or injure the person attempting to lift appliance.
Clean the oven on a regular basis so oils and fats do not build up, as this can
cause a fire risk. Do not use harsh cleaners or metal scrapers to clean door glass.
Do not steam clean anything that's part of the oven, when cleaning oven make
sure no part of it is immersed in water or other liquid.
Do not touch hot surfaces. The heating element and other parts inside the oven
become extremely hot. Make sure you take care when handling food and to
always use oven mitts. Keep children well away from the oven.
When opening the oven door, make sure to avoid contact with hot parts of the
oven and steam.
There is a danger of fire when you leave items inside the oven for too long,
especially if an item is left for the next time use.
Do not use the appliance with its front door glass removed or broken.
When the door is open, do not place any heavy object on the door or allow
children to sit on it. You may cause the oven to overturn or the door hinges to be
damaged.
Do not use abrasive cleaners or sharp metal scrapers to clean the glass as the
scratches that may occur on the surface of the door glass may cause the glass to
break.
This appliance is for household use only, don’ use it outdoors.
2.5 ELECTRICAL SAFETY
Plug the appliance in a grounded socket protected by a fuse conforming to the
values specified in the technical specifications chart.
Have a licensed electrician set grounding equipment and install the oven. The
warranty will be voided and manufacture won’t be responsible for the damages
occurred due to improper installation and using the product without grounding
according to the local regulations.
The circuit breaker switches of the oven shall be placed so that end user can reach
them when the oven is installed.
The power supply cord (the cord with plug) shall not contact the hot parts of the
appliance.
The rear surface of the oven also heats up when the oven is operated. Electrical
connections shall not touch the rear surface, otherwise the connections may be
damaged.
Do not tighten the connecting cables to the oven door and do not run them over
hot surfaces. If the cord melts, this may cause the oven to short circuit and even a
fire.
Unplug the unit during installation, service, maintenance, cleaning and repair.
Cut off all supply circuit connections before accessing the terminals.

P a g e | 8
ONLINE: TRINITYAPPLIANCES.COM.AU
If the power supply cable is damaged, it must be replaced by its manufacturer or
authorized technical service or any other personnel qualified at the same level.
Appliance is equipped with a type ‘’Y’’ cord cable.
Make sure the plug is inserted firmly into wall socket to avoid sparks.
Do not use steam cleaners for cleaning the appliance, otherwise electric shock
may occur.
An omnipolar switch capable to disconnect power supply to the appliance is
required for installation. Disconnection from power supply shall be provided with a
switch or an integrated fuse, circuit breaker installed on fixed power supply
according to wiring regulations and building code.
UsefulTips:
Safety Switches and RCD’s
An electric oven is required to have a safety switch or an RCD installed along with it. They
are located on a final sub-circuit in domestic and residential buildings and connected
when new ovens are installed. If a new switchboard is installed or if any rewiring occurs in
the kitchen then a new circuit will need to be connected to the cooker control unit.
Arc Fault Protection Devices
These are installed to help prevent an electrical fire from starting due to an arc fault. This
type of fault occurs between two conductors and will often create a large amount of
heat leading to fires. These arc fault protection devices will be connected to the electric
oven through the electrical switchboard.
Isolation Switches
Isolation switches are mandatory to be installed with electric cookers to help with future
tasks. An isolation switch allows an electrician to disconnect the power to a specific
system. This is to help an electrician work to repair or perform maintenance work on the
oven and still have power to other electrical systems. They are installed and mounted next
to the oven and for the electrician to easily access it.
Hardwired Electric Ovens
Ovens which run on electricity are hardwired if they have a rating of over 3kw. If the oven
has less than 3kw then it can be plugged into a dedicated circuit. Hardwired ovens are
always recommended as they are safer and more reliable.
An oven which is hardwired means the cables are furnished with the product with no plug
in. The oven is directly installed in the building connecting to its own dedicated circuit.
Plug in an Electric Oven
If the oven is safe to be plugged into an electrical outlet then it can be installed this way.
An electric oven will often have higher power requirements which means it cannot be
installed into regular power-points. A 220-240 volt outlet is needed for electric powered
ovens for it to run safely.
It is strongly recommended that an electrician still performs the installation to ensure the
oven is properly installed. The system might be incorrectly installed and there are more
steps to perform than simply plugging in the appliance. Mostly due to the amount of
electrical wiring involved.
P a g e | 9
ONLINE: TRINITYAPPLIANCES.COM.AU
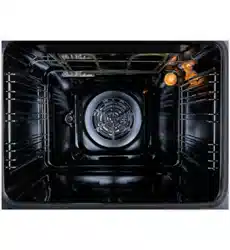
3 PRODUCT OVERVIEW
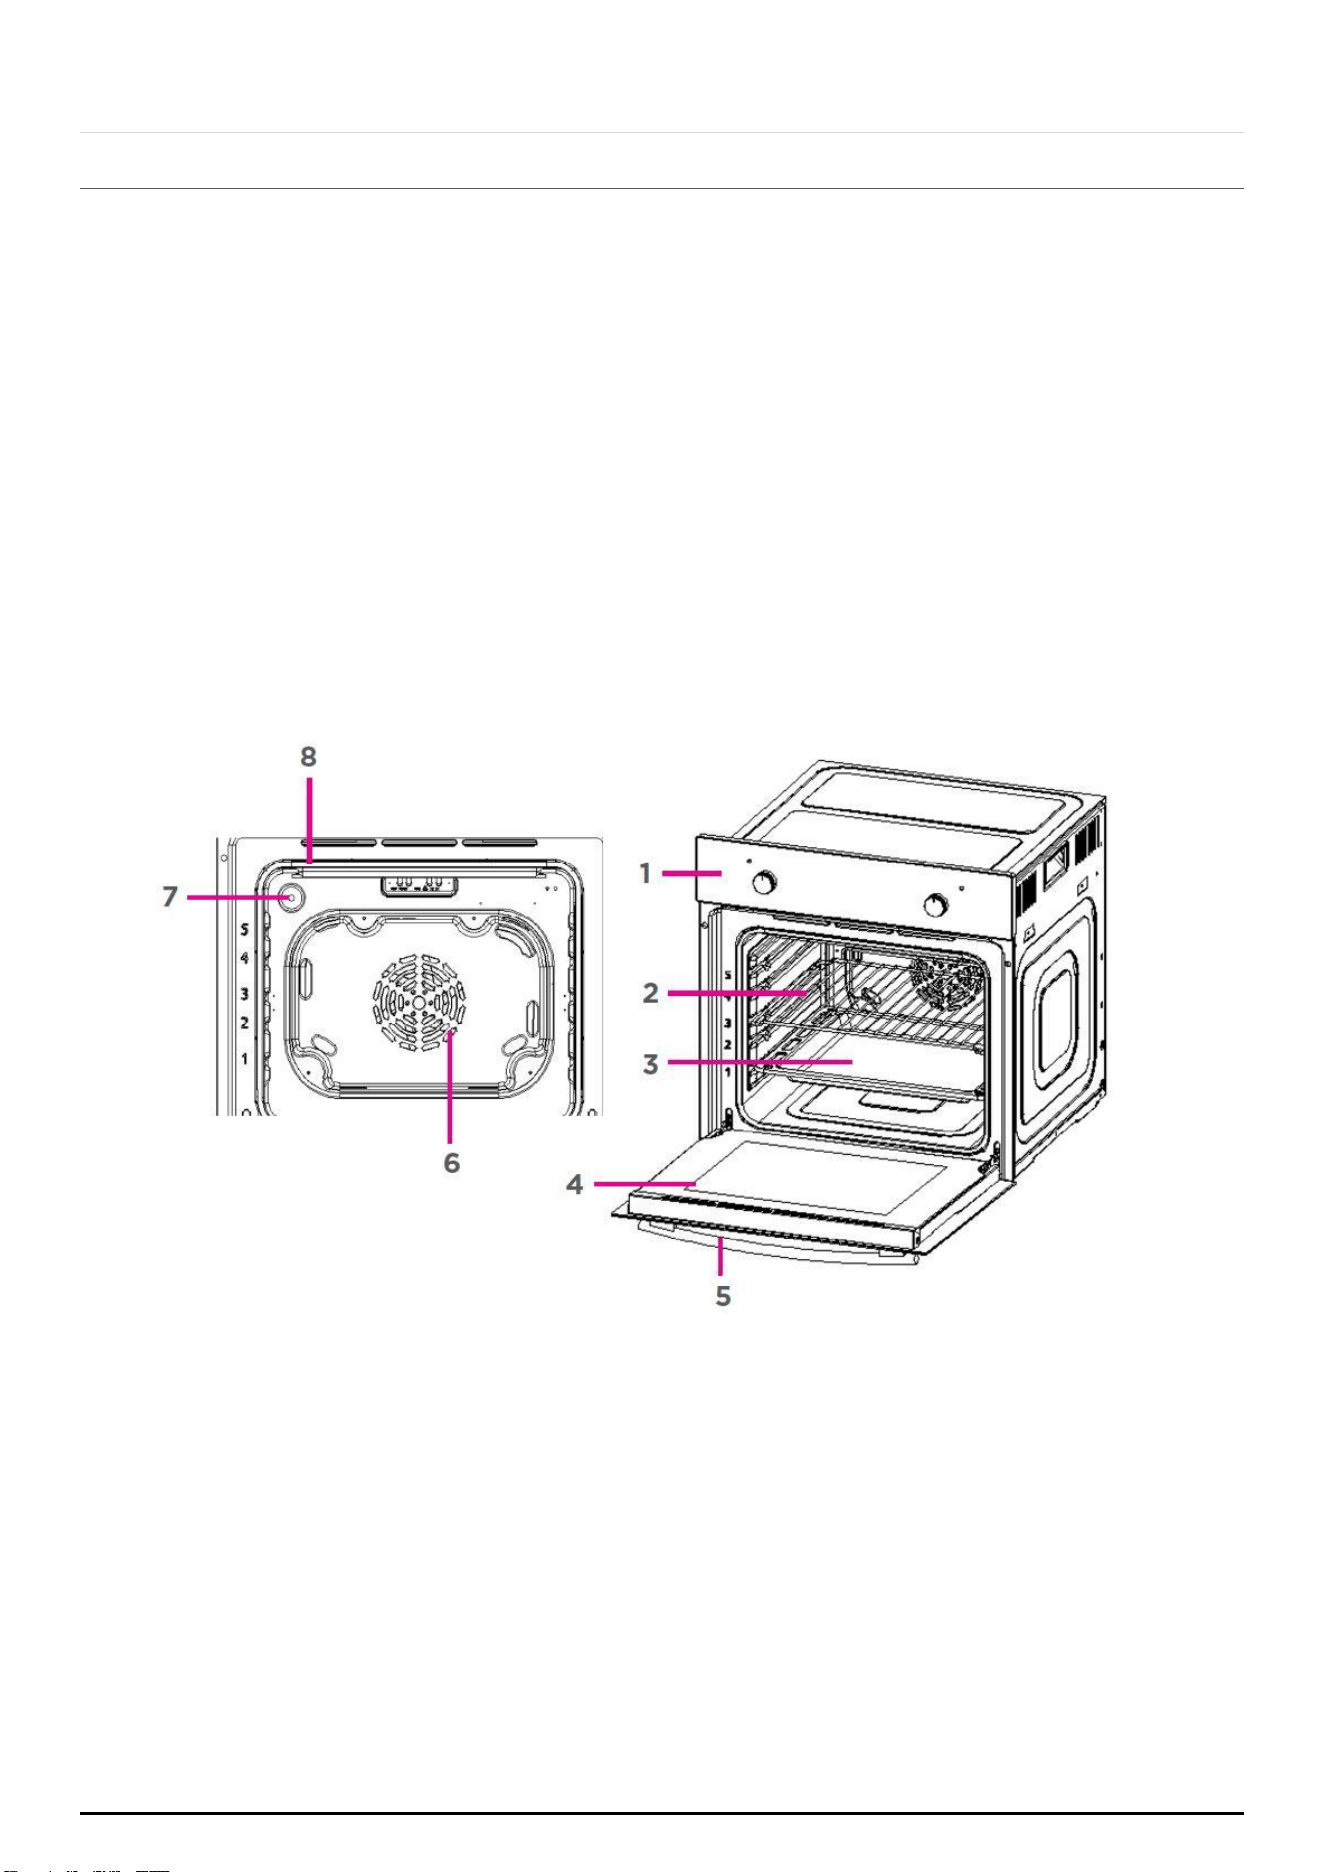
3.1 INTRODUCING THE OVEN
The oven large capacity offers the option of cooking on multi shelves at the
same time and cooking large meals which would not be possible in a
traditional oven.
The first time you use your appliance, heat the empty oven with its door closed
at the temperature 180C for a half an hour. Make sure that the room is
ventilated before switching the oven off and opening the oven door. The
appliance may remit a slightly unpleasant odour caused by protective
substances burning away.
Never put objects directly on the bottom of the oven or cover it with aluminium
foil as this will prevent the enamel coating from being damaged. Place
cookware on the oven racks.
1. Control Panel
2. Wire Shelf
3. Tray
4. Door
5. Handle
6. Fan Motor (behind steel place)
7. Lamp
8. Grill Heating Element
P a g e | 10
ONLINE: TRINITYAPPLIANCES.COM.AU
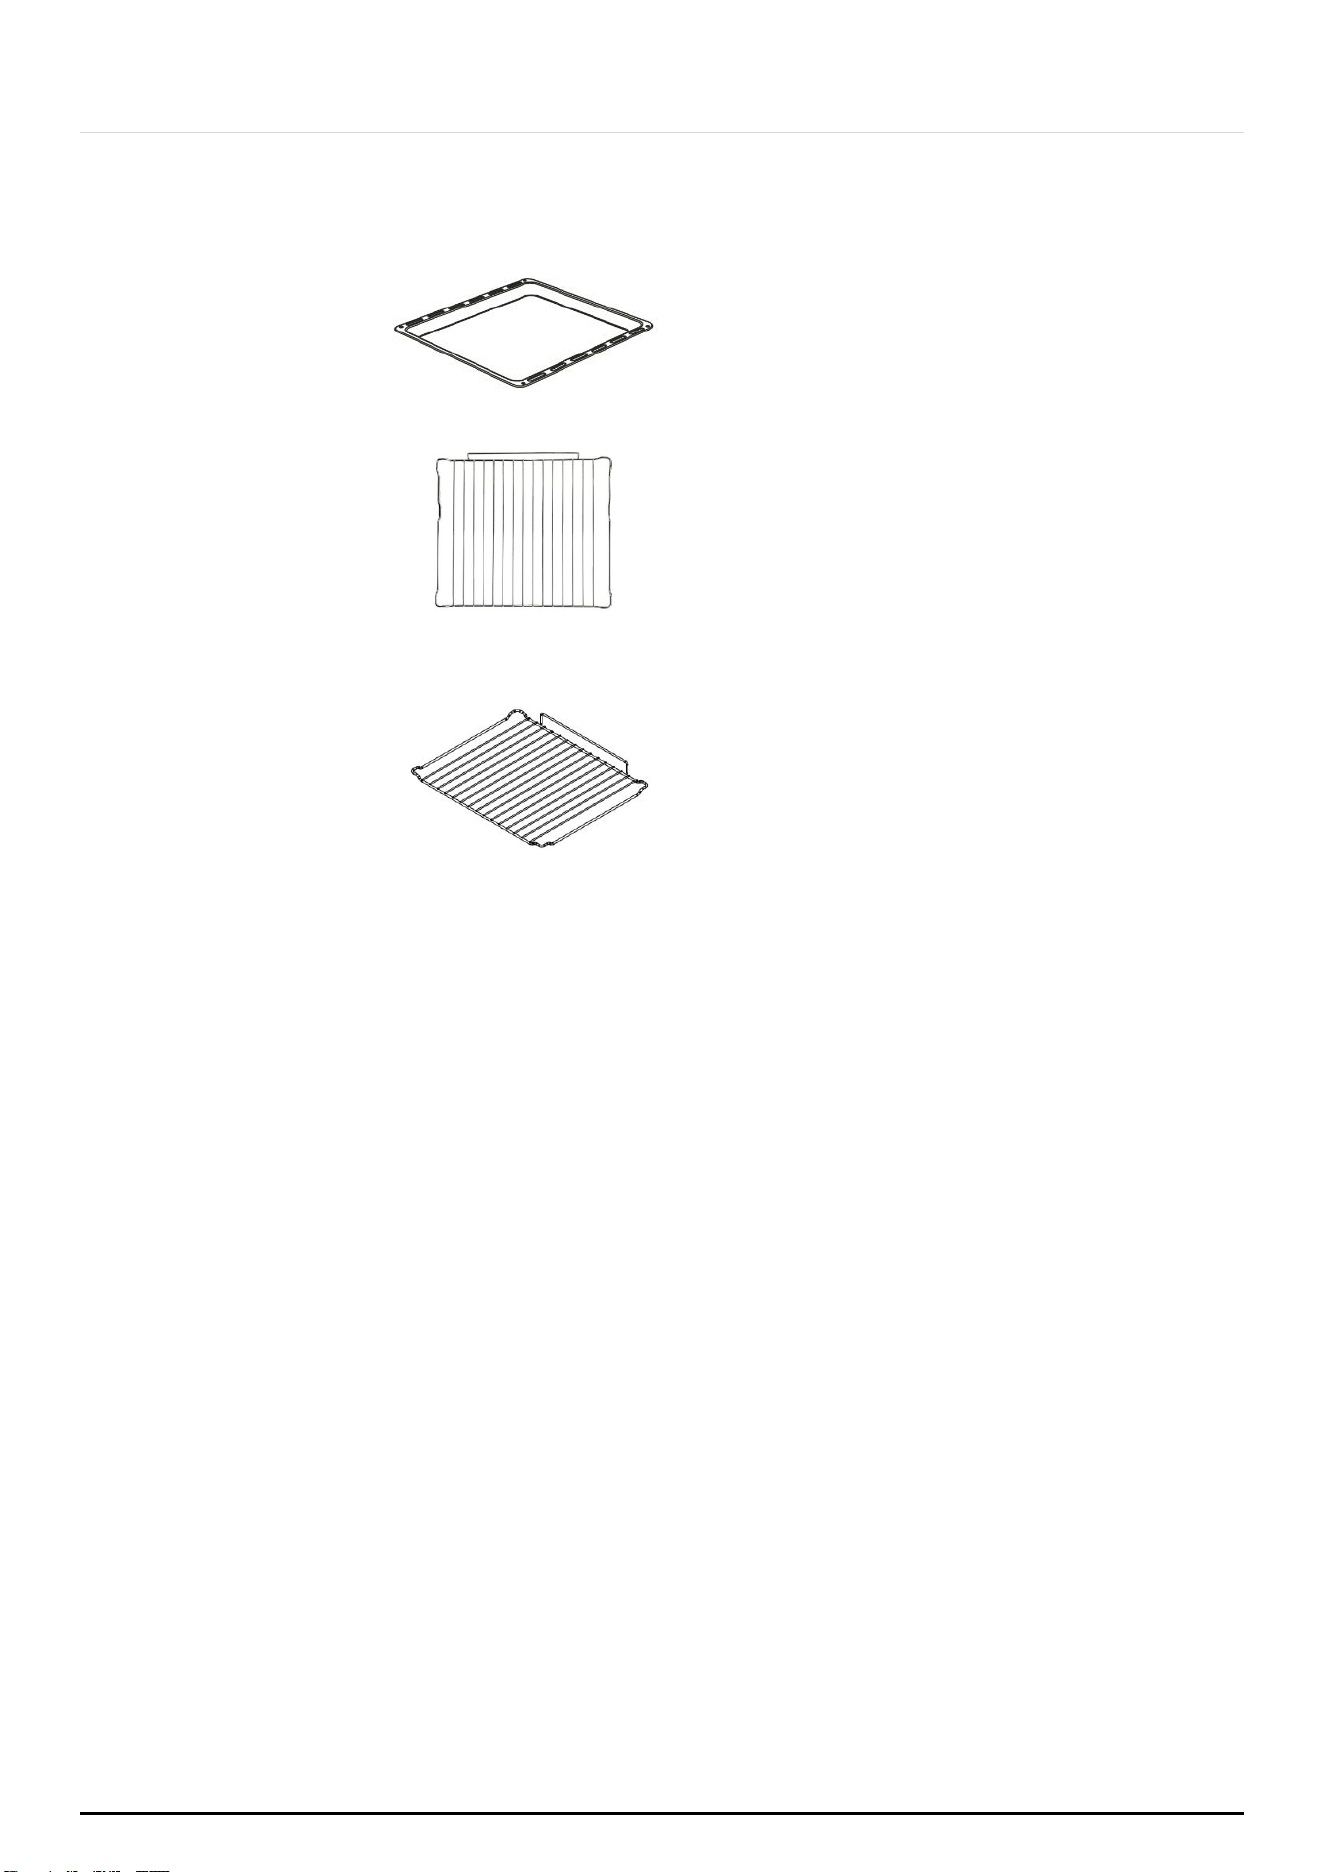
OPTIONAL ACCESSORIES for multiple models, yours can be different :
Tray
Big Shelf
Grill Rack
P a g e | 11
ONLINE: TRINITYAPPLIANCES.COM.AU
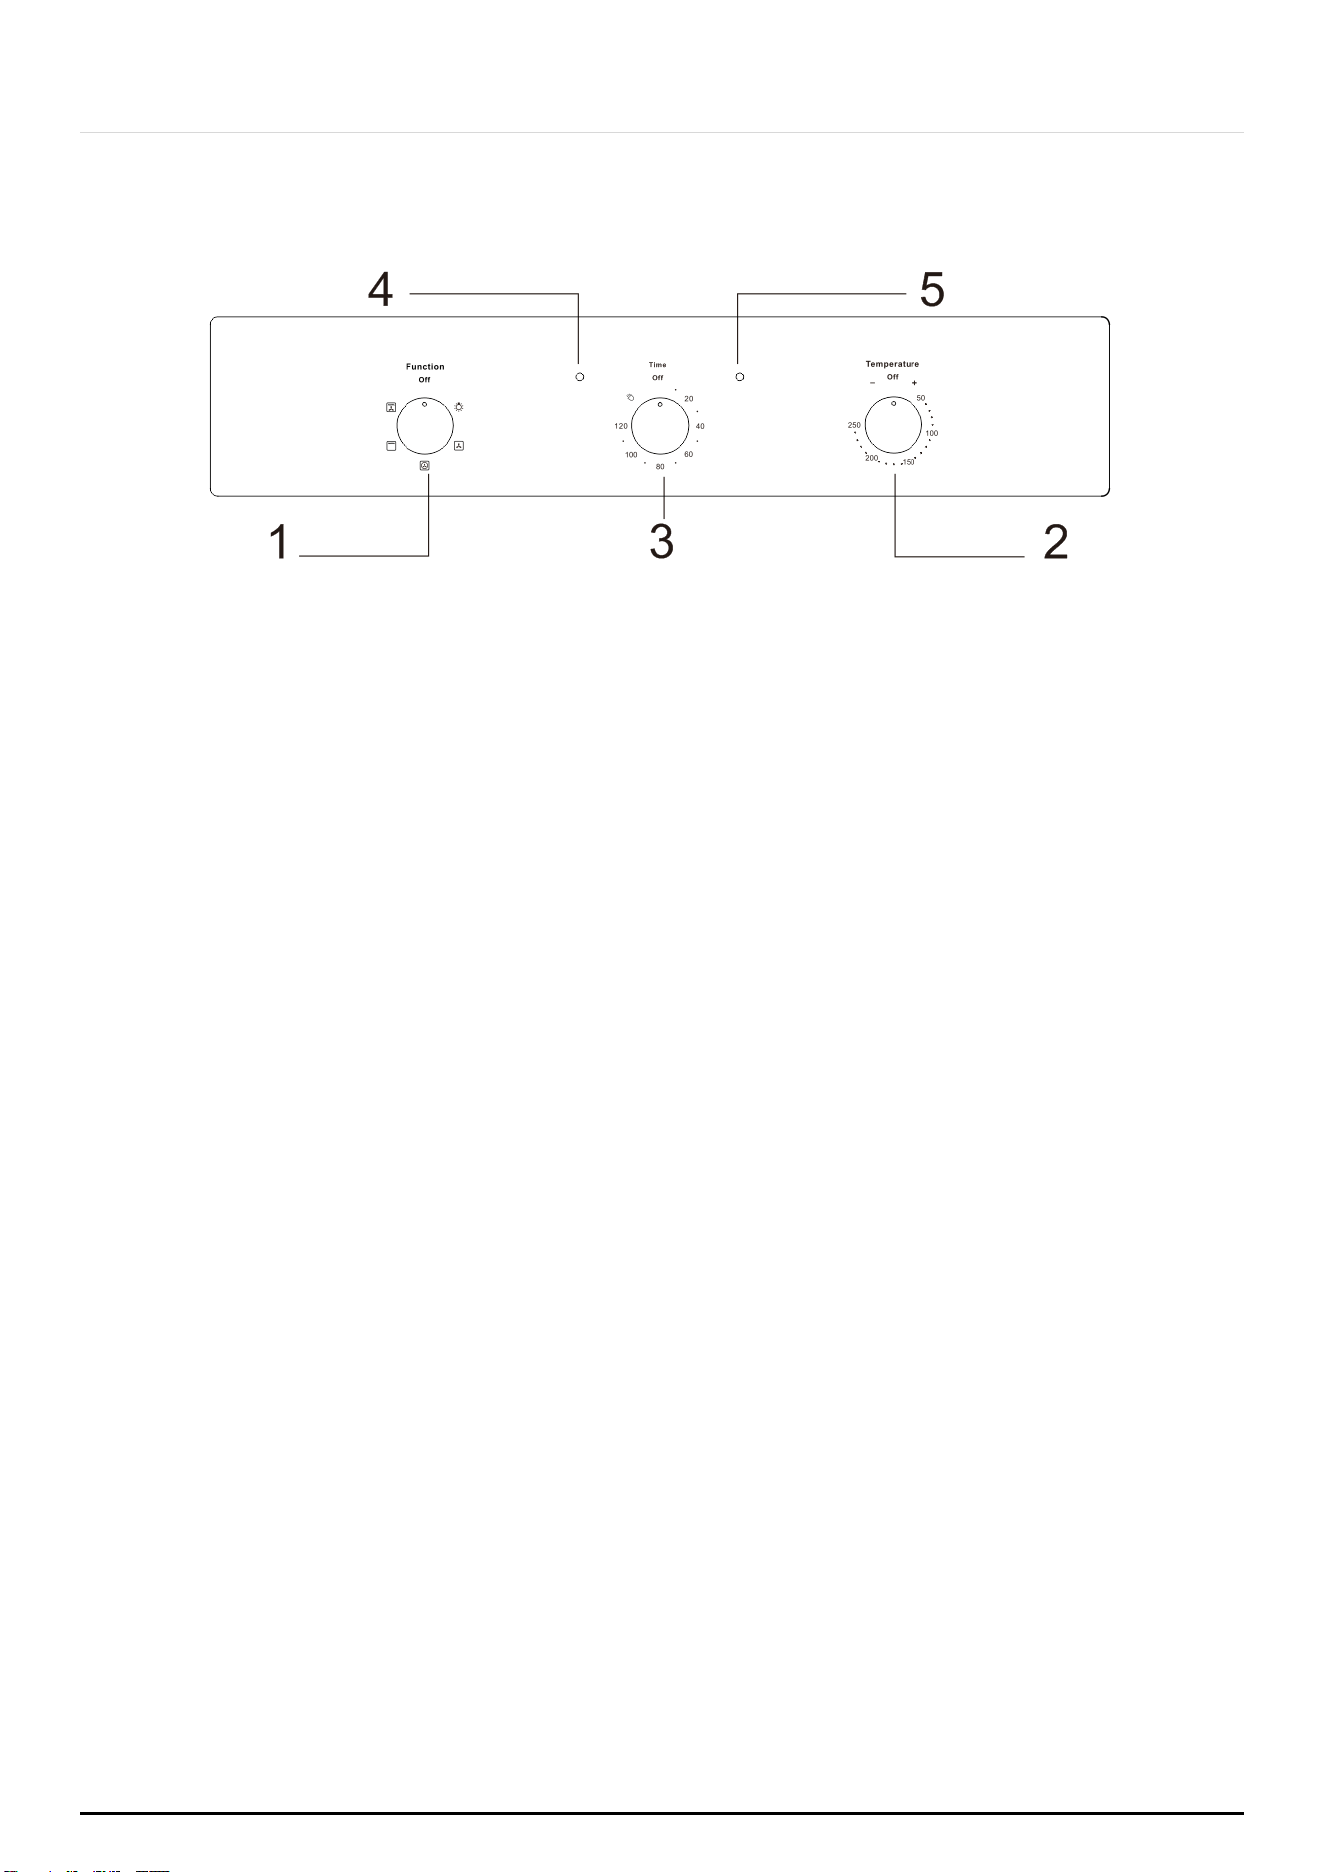
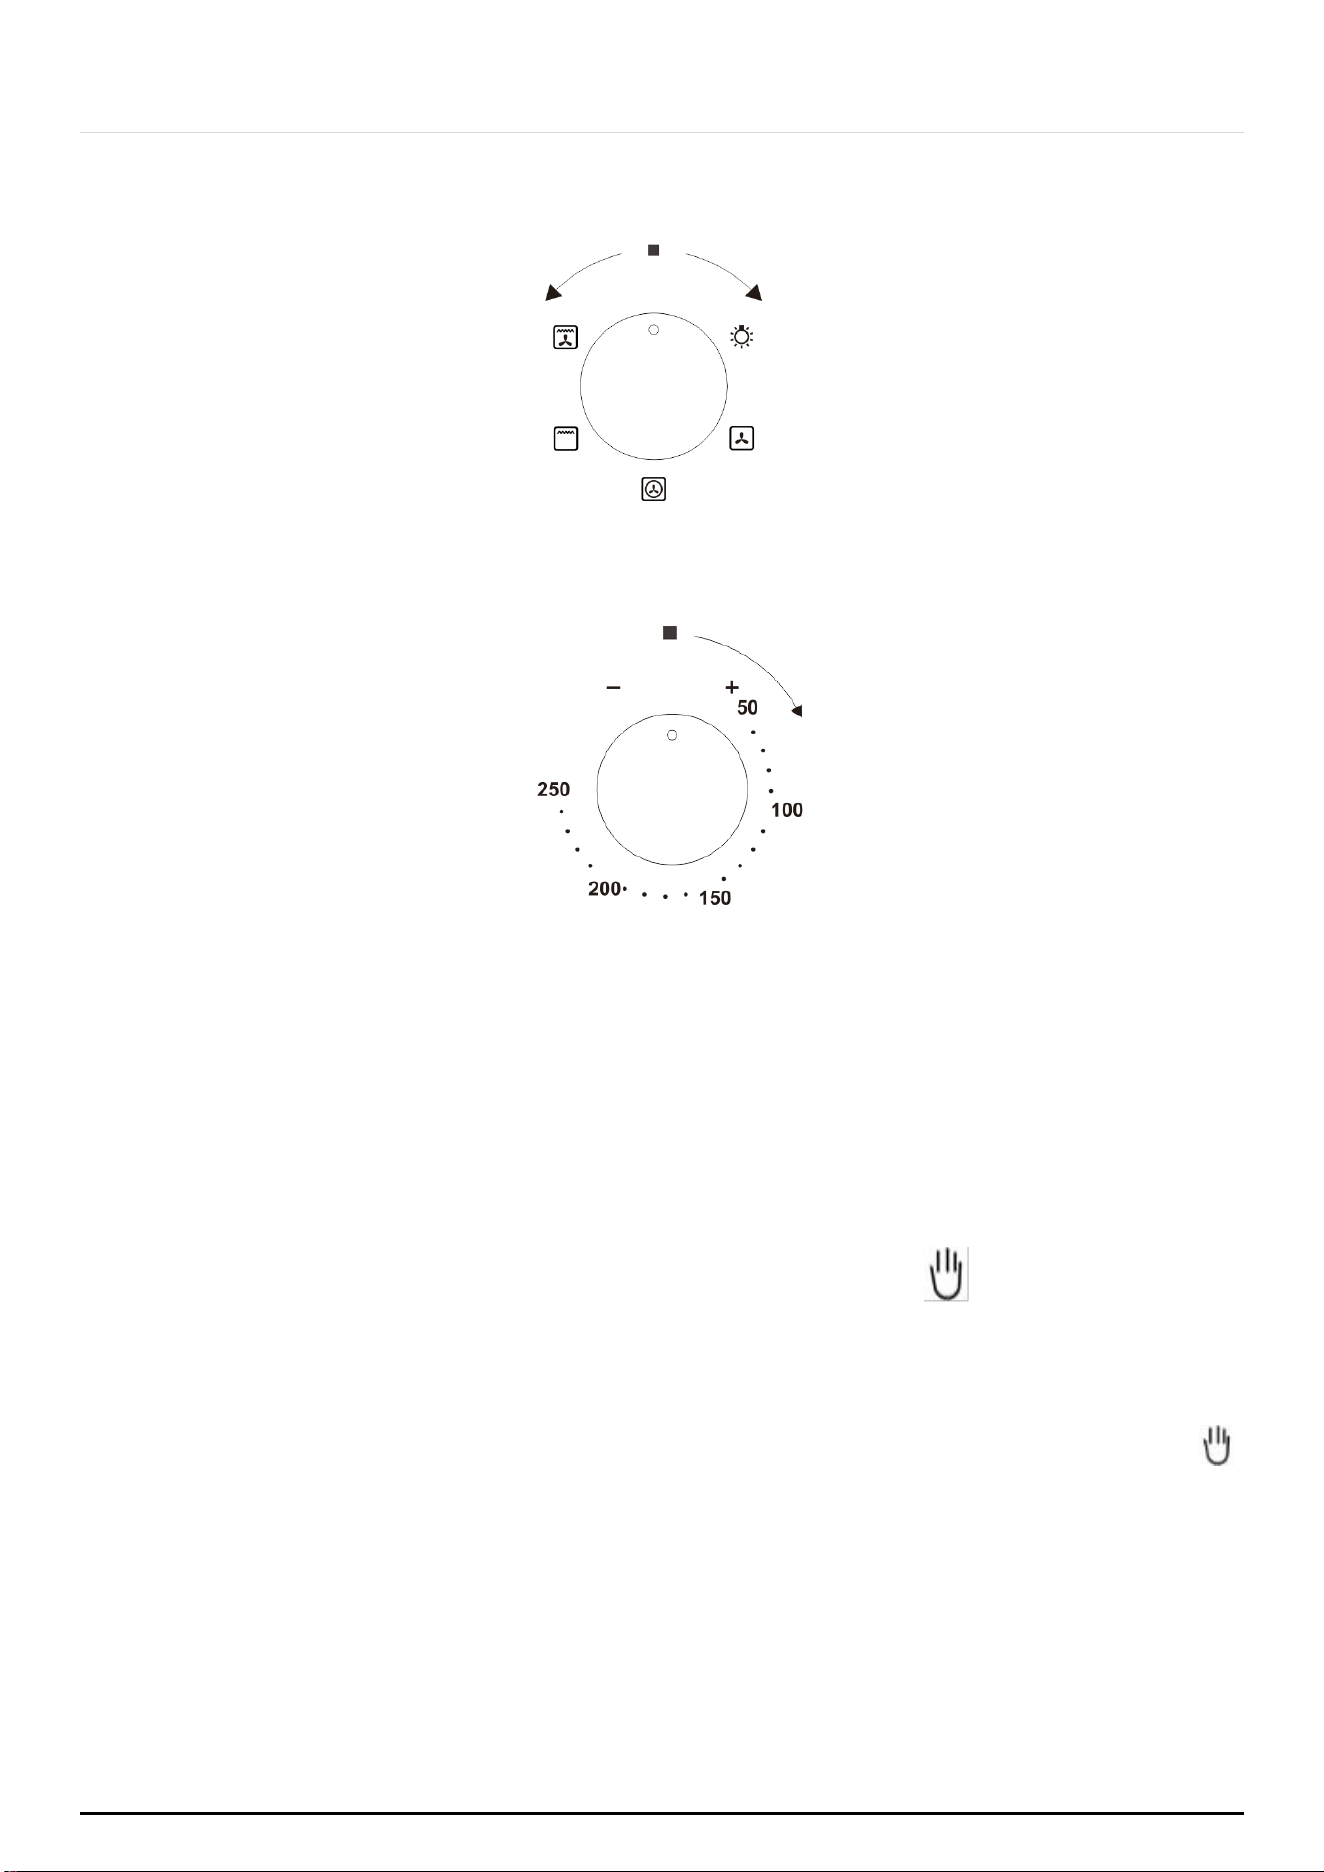
CONTROL PANEL:
1) Oven function selector knob
2) Thermostat control knob
3) Timer
4) Oven operating light
5) Power indicator light
P a g e | 12
ONLINE: TRINITYAPPLIANCES.COM.AU
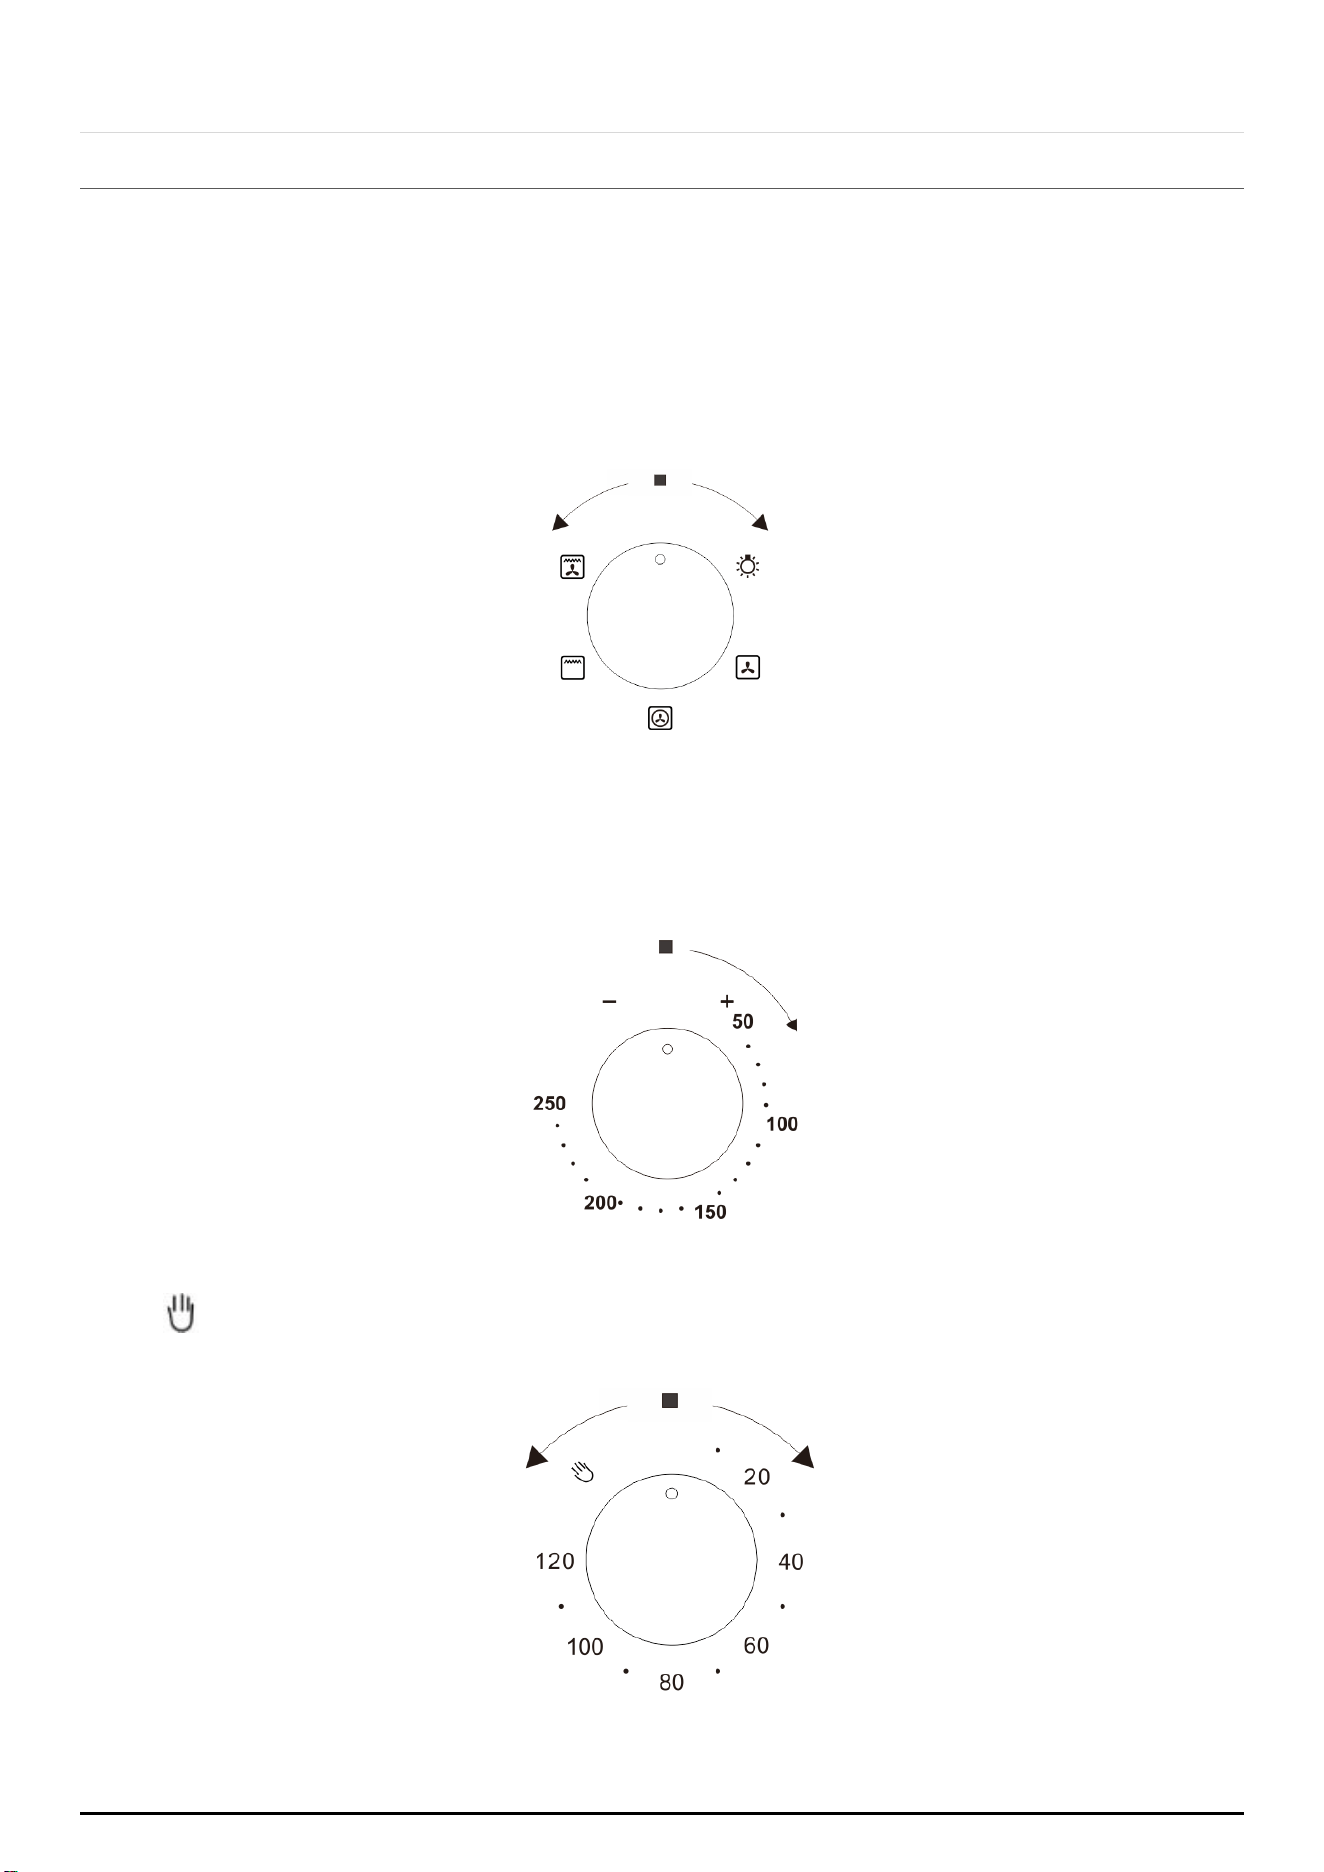
FUNCTION SELECTOR
There are 5 options when deciding what to use:
TEMPERATURE SELECTOR
Turn the temperature regulator knob clockwise to set the required temperature.
The oven function must be set alongside temperature selection.
TIMER SELECTOR
Turn the timer regulator knob clockwise to set the required working time.
The oven function must be set alongside temperature selection.
The timer can be used of an oven cooking function for a time period of up to 120 minutes.
Set the timer by turning the knob clockwise to the required time.
The time period that has been set will expire when the knob reaches zero, a brief audible
signal will sound.
Manual operation mode
Turn the control knob clockwise to the manual operation symbol
. So that the cooking
time can be no limited.
Note:
To make the oven working, the timer must be set a time or set to the manual function
.
Without set the timer, the oven will not be working.
P a g e | 13
ONLINE: TRINITYAPPLIANCES.COM.AU
4 INSTALLATION
WARNING: Check for any damage on the product before installing it.
Do not have product installed if it's damaged. Damaged products pose danger for your
safety.
The power supply to the appliance must be cut off before any adjustments or
maintenance work is done on it.
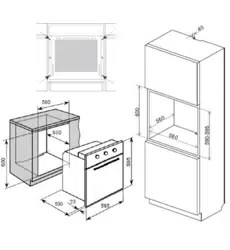
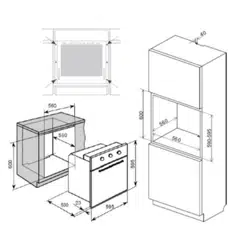
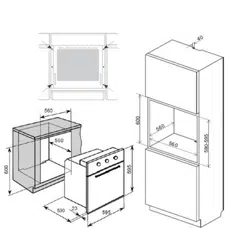
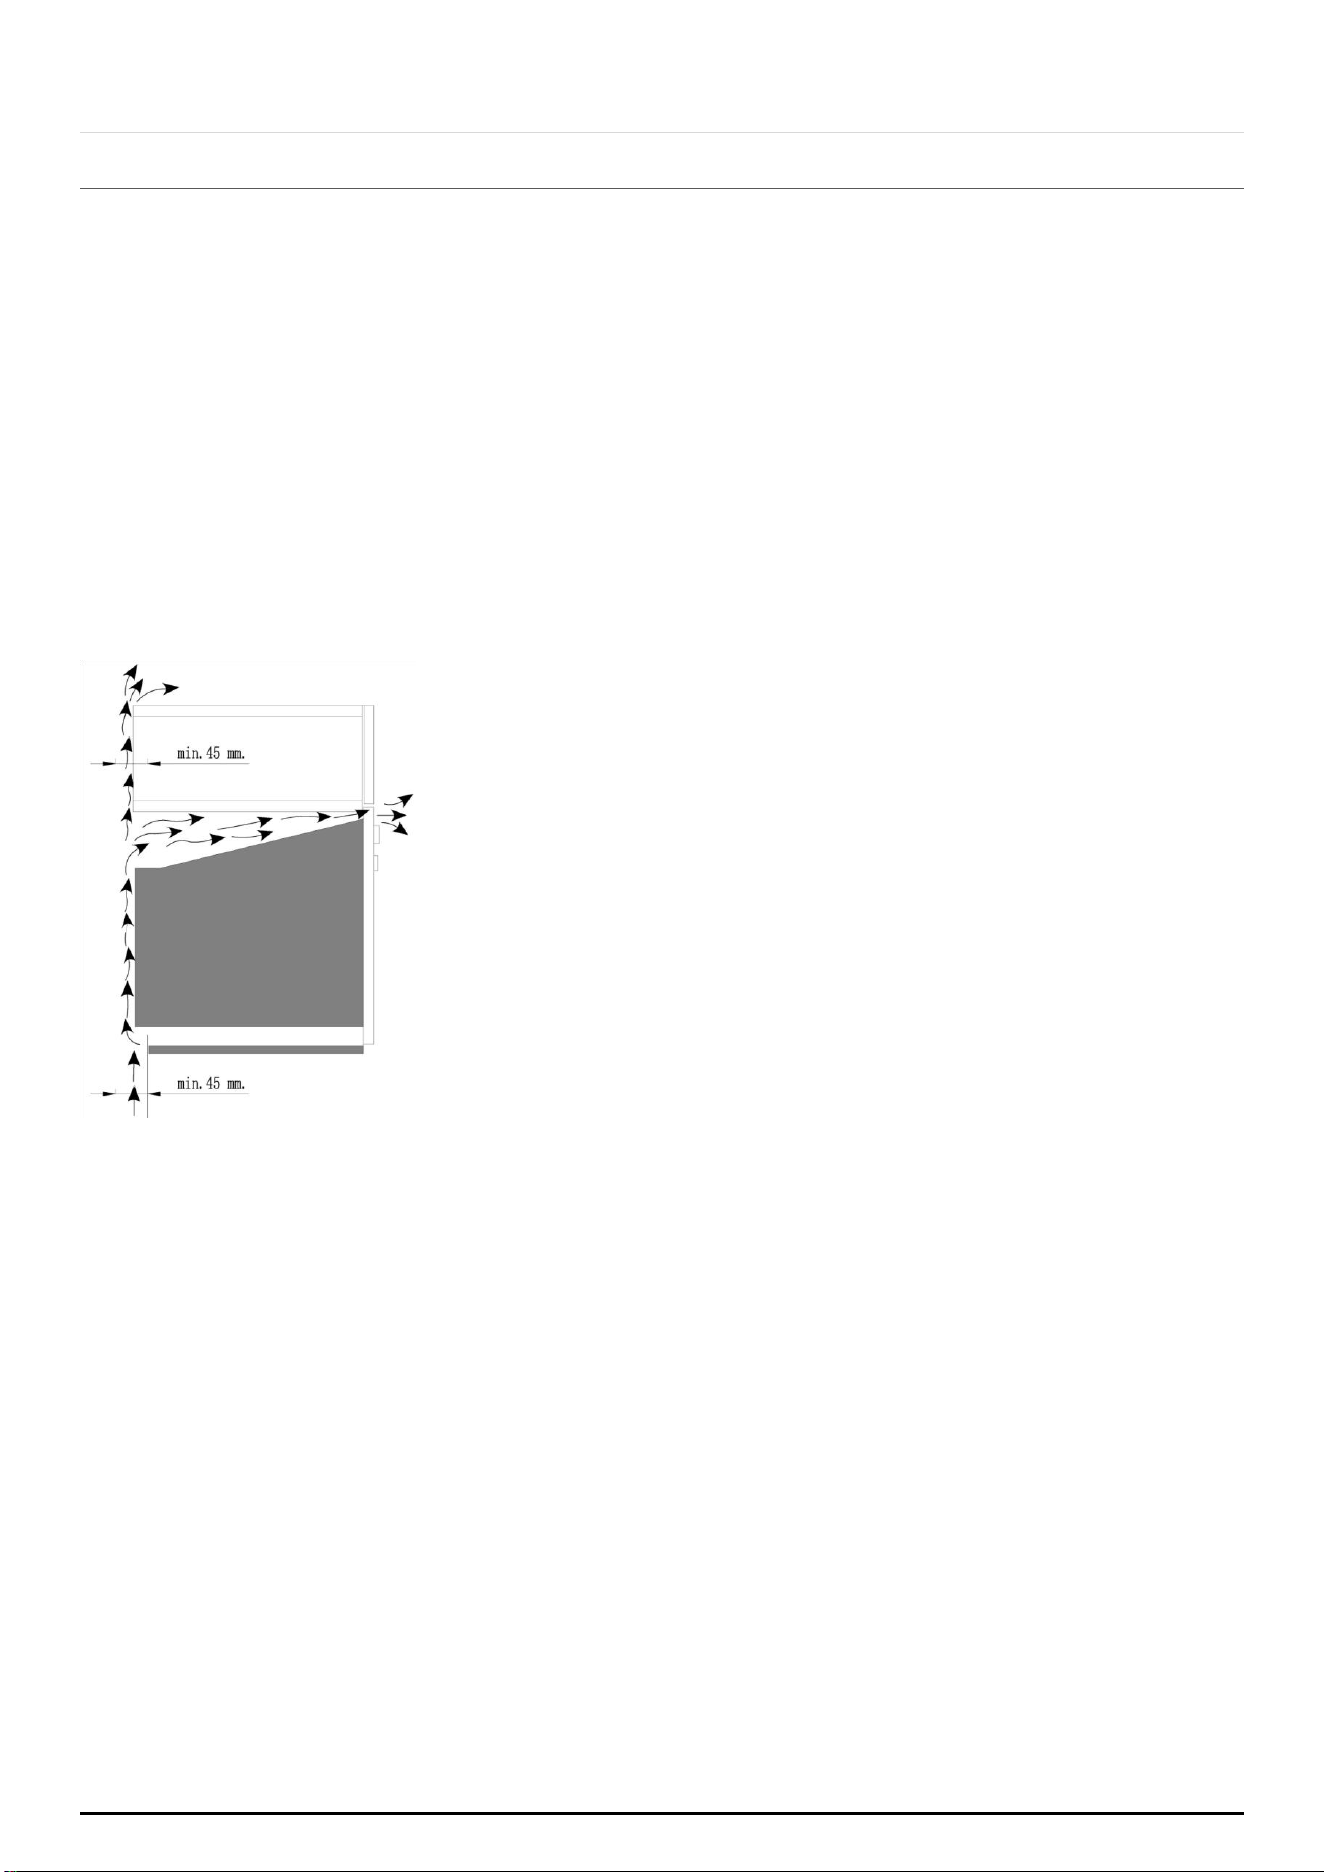
4.1 PREPARING THE CABINET
To ensure the proper working order of the built-in oven, the cabinet must be of a suitable
size.
The sizes of the cabinet for installing the oven under a benchtop or in a column unit are
shown below.
To provide adequate ventilation, there must be appropriate
ventilation openings in the front bottom and the top part of
the cabinet. Cooling fan shall take extra steam out and
prevent outer surfaces of appliance from overheating during
operation of oven. This is a necessary condition for better
appliance operation and better cooking. Cooling fan shall
continue operation after cooking is finished. Fan shall
automatically stop after cooling is completed. A clearance
must be left behind the enclosure where you'll place the
appliance for efficient and good operation. This clearance
shouldn't be ignored as it's required for ventilation system of
the appliance to operate.
The unit panels next to the cooker must be heat resistant. In the case of veneered wood
units, glues must be resistant to a temperature of 120℃.
Do not install the product next to refrigerators or coolers. The heat emitted by the product
increases the energy consumption of cooling devices.
In accordance with safety standards, once the appliance has been mounted, there must
be no possible contact with electrical parts. Any protective parts must be secured so that
they can only be removed with the use of tools.
P a g e | 14
ONLINE: TRINITYAPPLIANCES.COM.AU
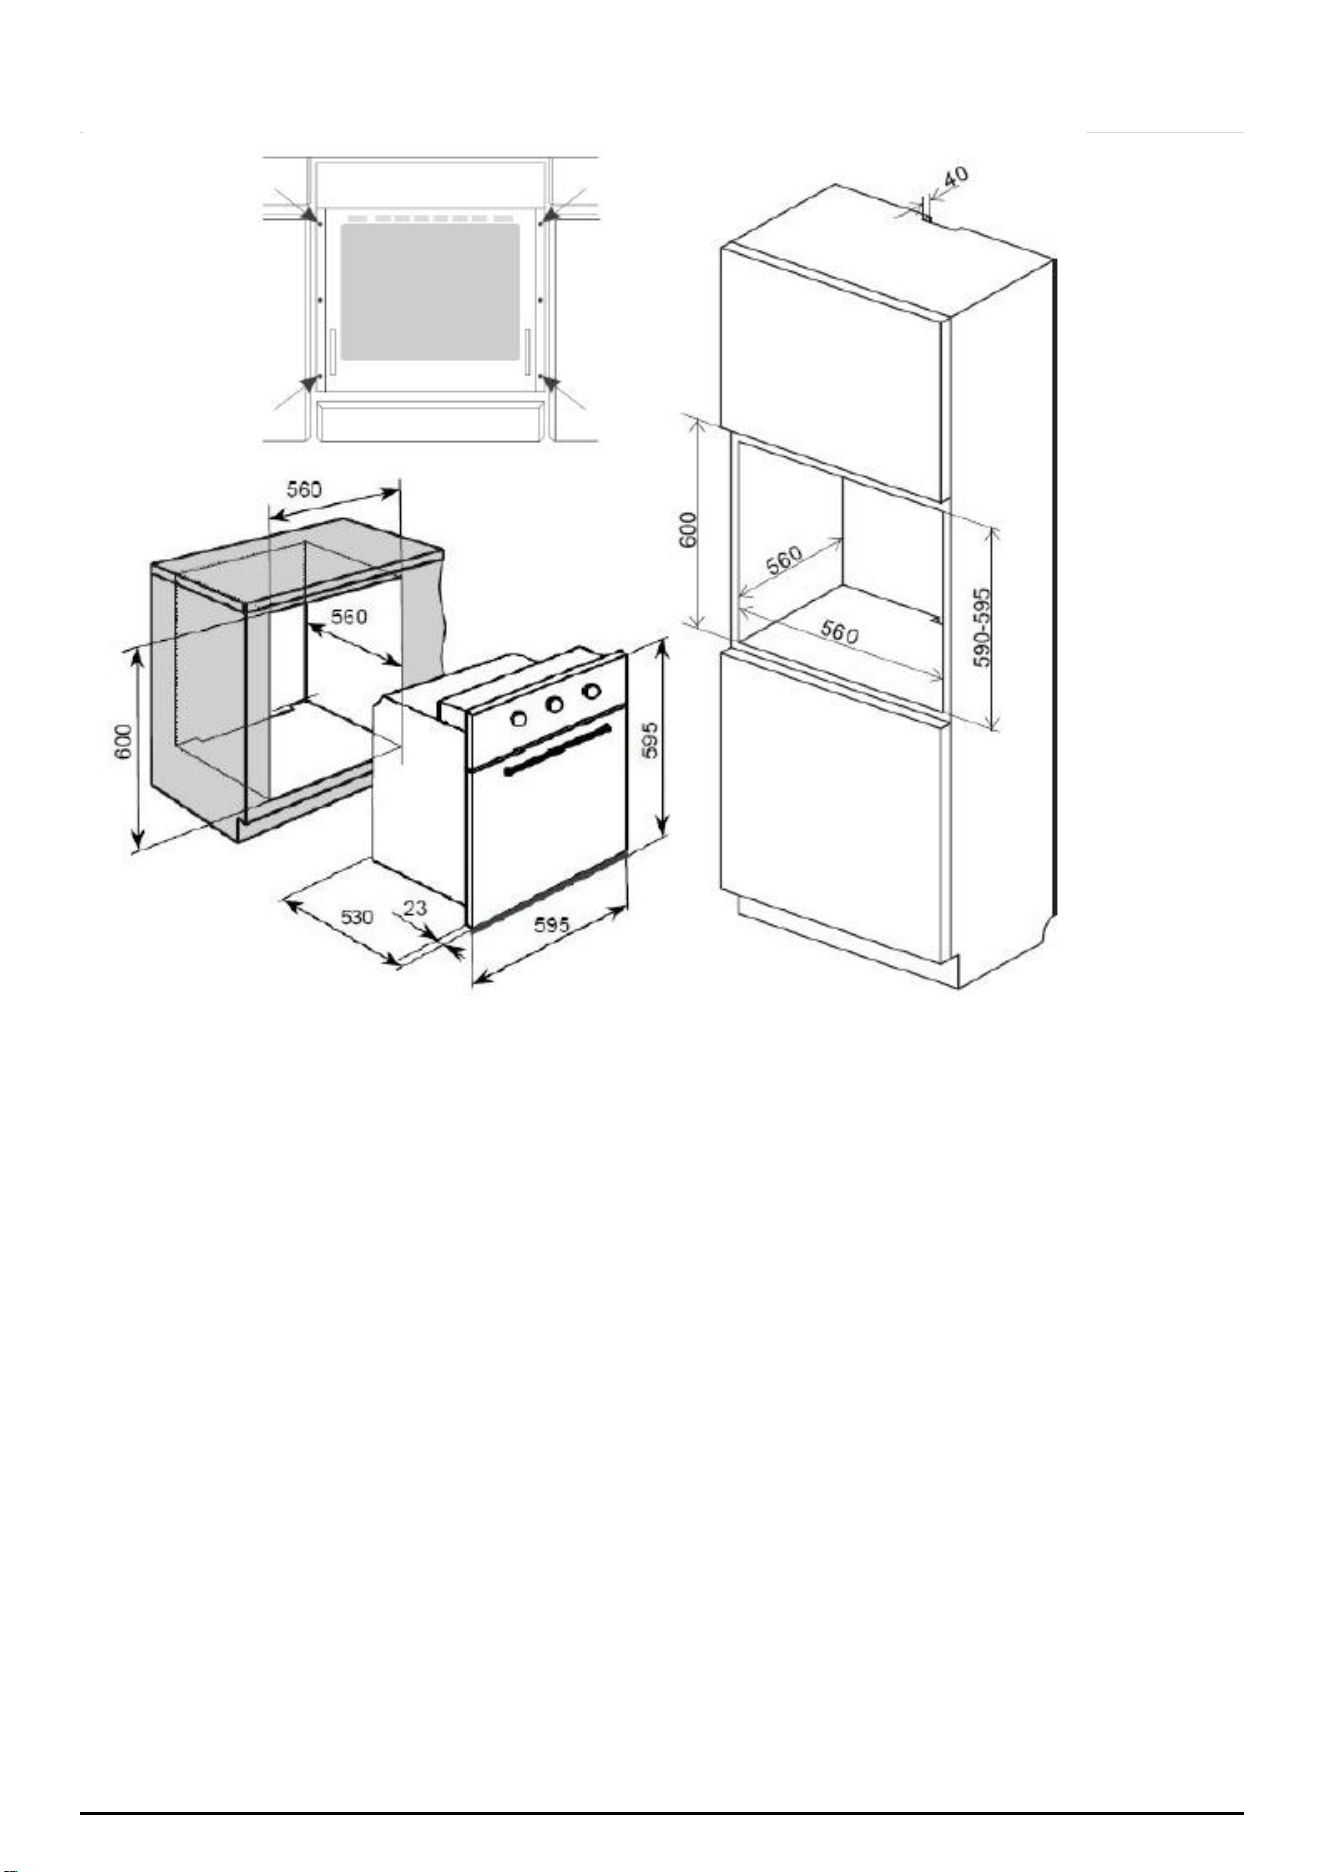
Product Dimensions Aperture Dimensions
Height: 595mm 600mm
Width: 595mm 560mm
Depth: 530mm 560mm (min)
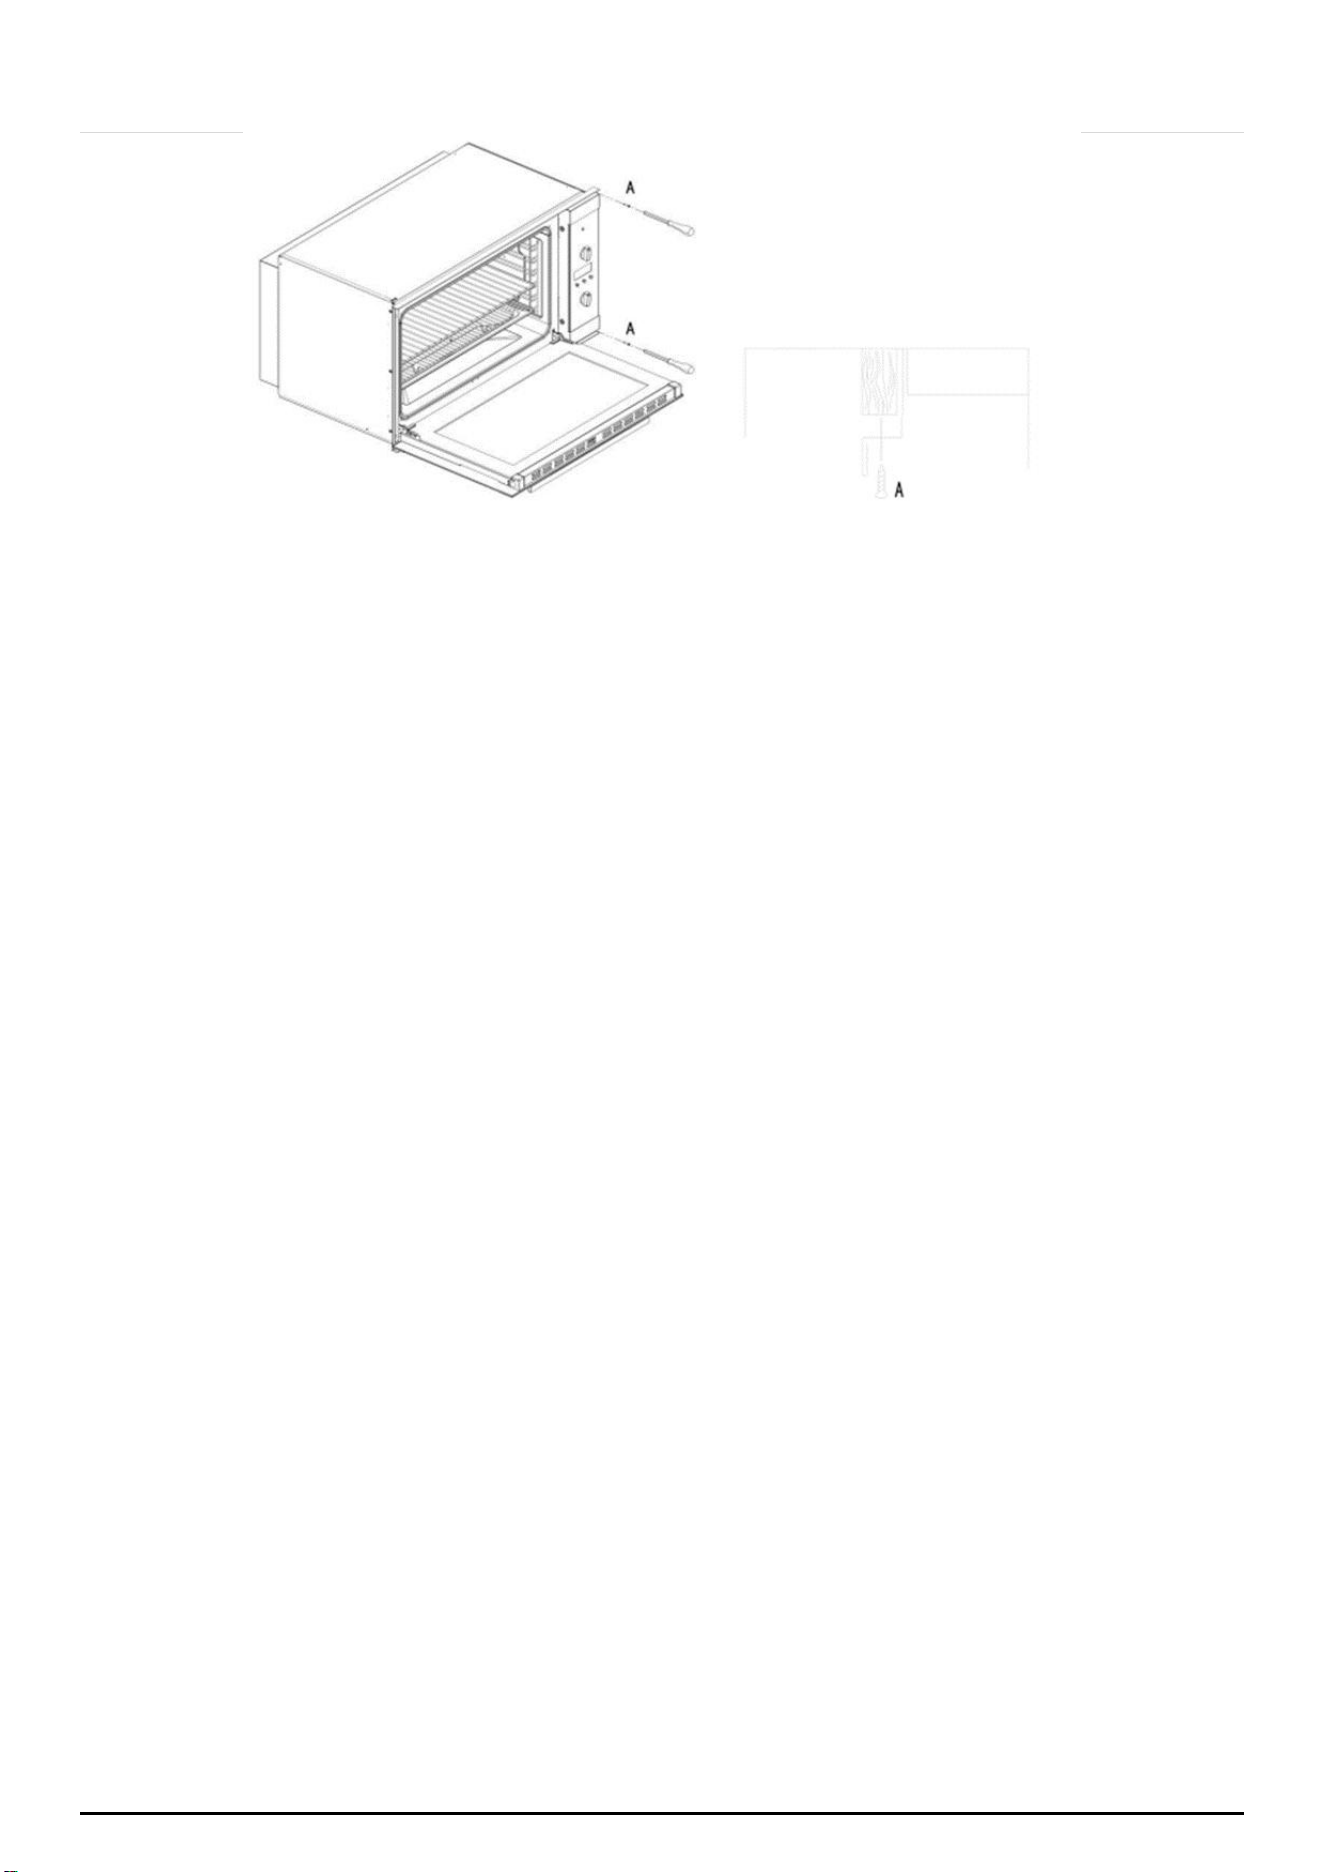
4.2 FASTENING THE OVEN
Do not use door and/or handle to carry or move the product.
Place the oven into the cabinet with two or more people. Ensure that oven's frame
and front edge of the furniture match uniformly.
Supply cord must NOT be under the oven, squeeze in between oven and furniture
or bend.
Open the oven door and fasten the oven to the cabinet using four screws“A” as
shown in below diagram. Screws mustn't be over tightened. Otherwise, screw
sockets might be worn.
Check that oven doesn't move after mounting. If oven isn't mounted in
accordance with instructions, there is a risk of tilt over during operation.
P a g e | 15
ONLINE: TRINITYAPPLIANCES.COM.AU
4.3 ELECTRICAL CONNECTION
IMPORTANT!
This appliance should be installed and connected to the power supply by a licensed
electrician or warranty void.
The connection must be in accordance with the current versions of the following:
AS/NZS 3000 Wiring Rules
Electricity Safety Regulations 2010
The installation instructions within this user manual
Wiring requirements:
The oven MUST be installed in compliance with:
Wiring connections in AS/NZS 3000 Wiring Rules.
Local regulations, building codes, other statutory regulations and standards.
Make sure supply voltage corresponds with your mains supply voltage.
This appliance must be earthed.
Connection to the power supply:
Below connection information is for reference only.
The oven comes pre-terminated with the fitted cord and appropriately rated plug.
The socket-outlet fitted connection to the final sub-circuit in the fixed wiring that is
intended to supply this appliance is preferable. If the power point is fitted it must be
accessible with the appliance installed.
The oven supplied with the fitted cord and no plug fitted.
The junction connection using appropriately rated terminals and a junction box
must be arranged to the final sub-circuit in the fixed wiring that is intended to supply
this appliance.
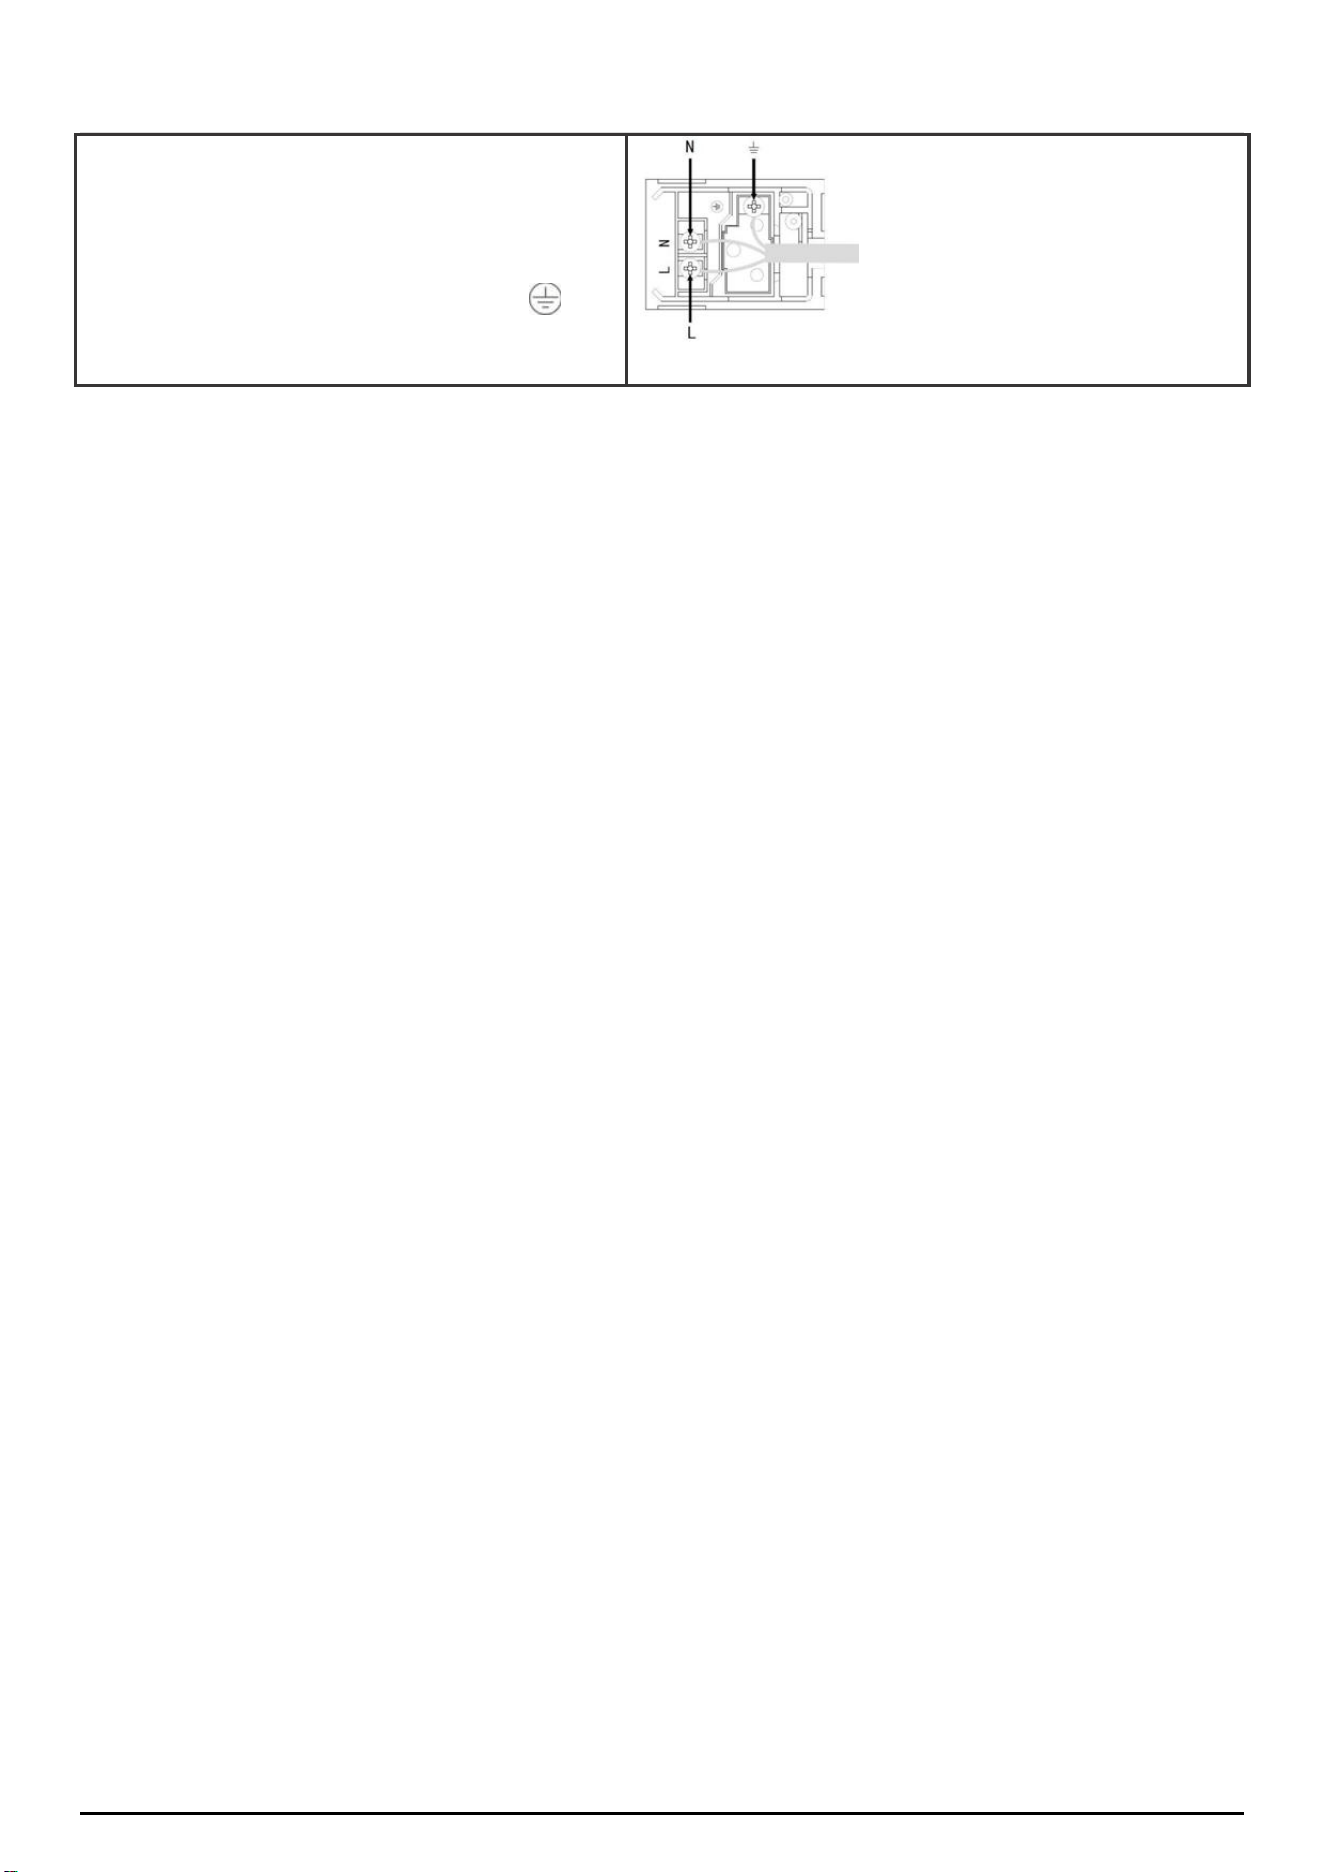
The hard wiring connection:
Remove terminal cover plate from rear panel of the oven.
Fit wires through and connect to the appropriate terminals.
Engage wires into plastic clip. Secure plastic clip.
Replace cover plate onto rear panel.
Connection Diagram
P a g e | 16
ONLINE: TRINITYAPPLIANCES.COM.AU
220-240 V earthed one-phase connection
L (Brown) wire to terminal marked “L”
N (Blue) wire to terminal marked “N”
E (Yellow-Green)wire to PE terminal
Connecting the electricity supply cable to the mains
Ovens equipped with a three-pole power supply cable are designed to operate
with alternating current at the voltage and frequency indicated on the data
plate located on the appliance.
The Data Plate located on the oven frame behind the door gives information about
rating.
A functional, rated current power switch MUST be provided near the appliance in an
accessible position (AS/NZS 3000- Clause 4.7.1).
Wiring must not be bent or compressed and must be protected against
mechanical failure (AS/NZS 3000 - Clause 3.9).
Disconnection in the fixed wiring must occur in accordance with the AS/NZS 3000 wiring
rules.
The oven MUST be properly earthed.
This oven must be connected with cable of 75°Crating minimum.
This product has passed the insulation resistance test after manufacture. If the resistance
readingis low at installation, it is probably caused by moisture from the atmosphere
being absorbed by the elements after the range has been produced.(pass at 0.01 M
AS/NZS 3000 Wiring Rules Clause8.3.6.2).
Connecting to the mains services and commissioning
This appliance must be installed by a licensed electrician, according to all codes and
regulations of:
Electrical supply authorities.
Building regulations.
Local government and council authorities.
AS/NZS 5601.1 (particular attention to clause 6.10.1,including figure 6.3 and subclause
6.10.1.11).
AS/NZS 3000 (particular attention to clauses 4.7.1and 3.9)
P a g e | 17
ONLINE: TRINITYAPPLIANCES.COM.AU
5 OPERATION
5.1 OVEN FUNCTIONS AND OPERATION
Operation of the oven is controlled by the function knobs, temperature controller and a
timer.
To set required function turn the knob to the selected position.
Oven switch ON / OFF
To turn the oven on, the function, temperature and time must be selected.
To set required temperature turn the knob to the selected temperature position.
To set required timer turn the knob to the selected time or to the manual function
.
P a g e | 18
ONLINE: TRINITYAPPLIANCES.COM.AU
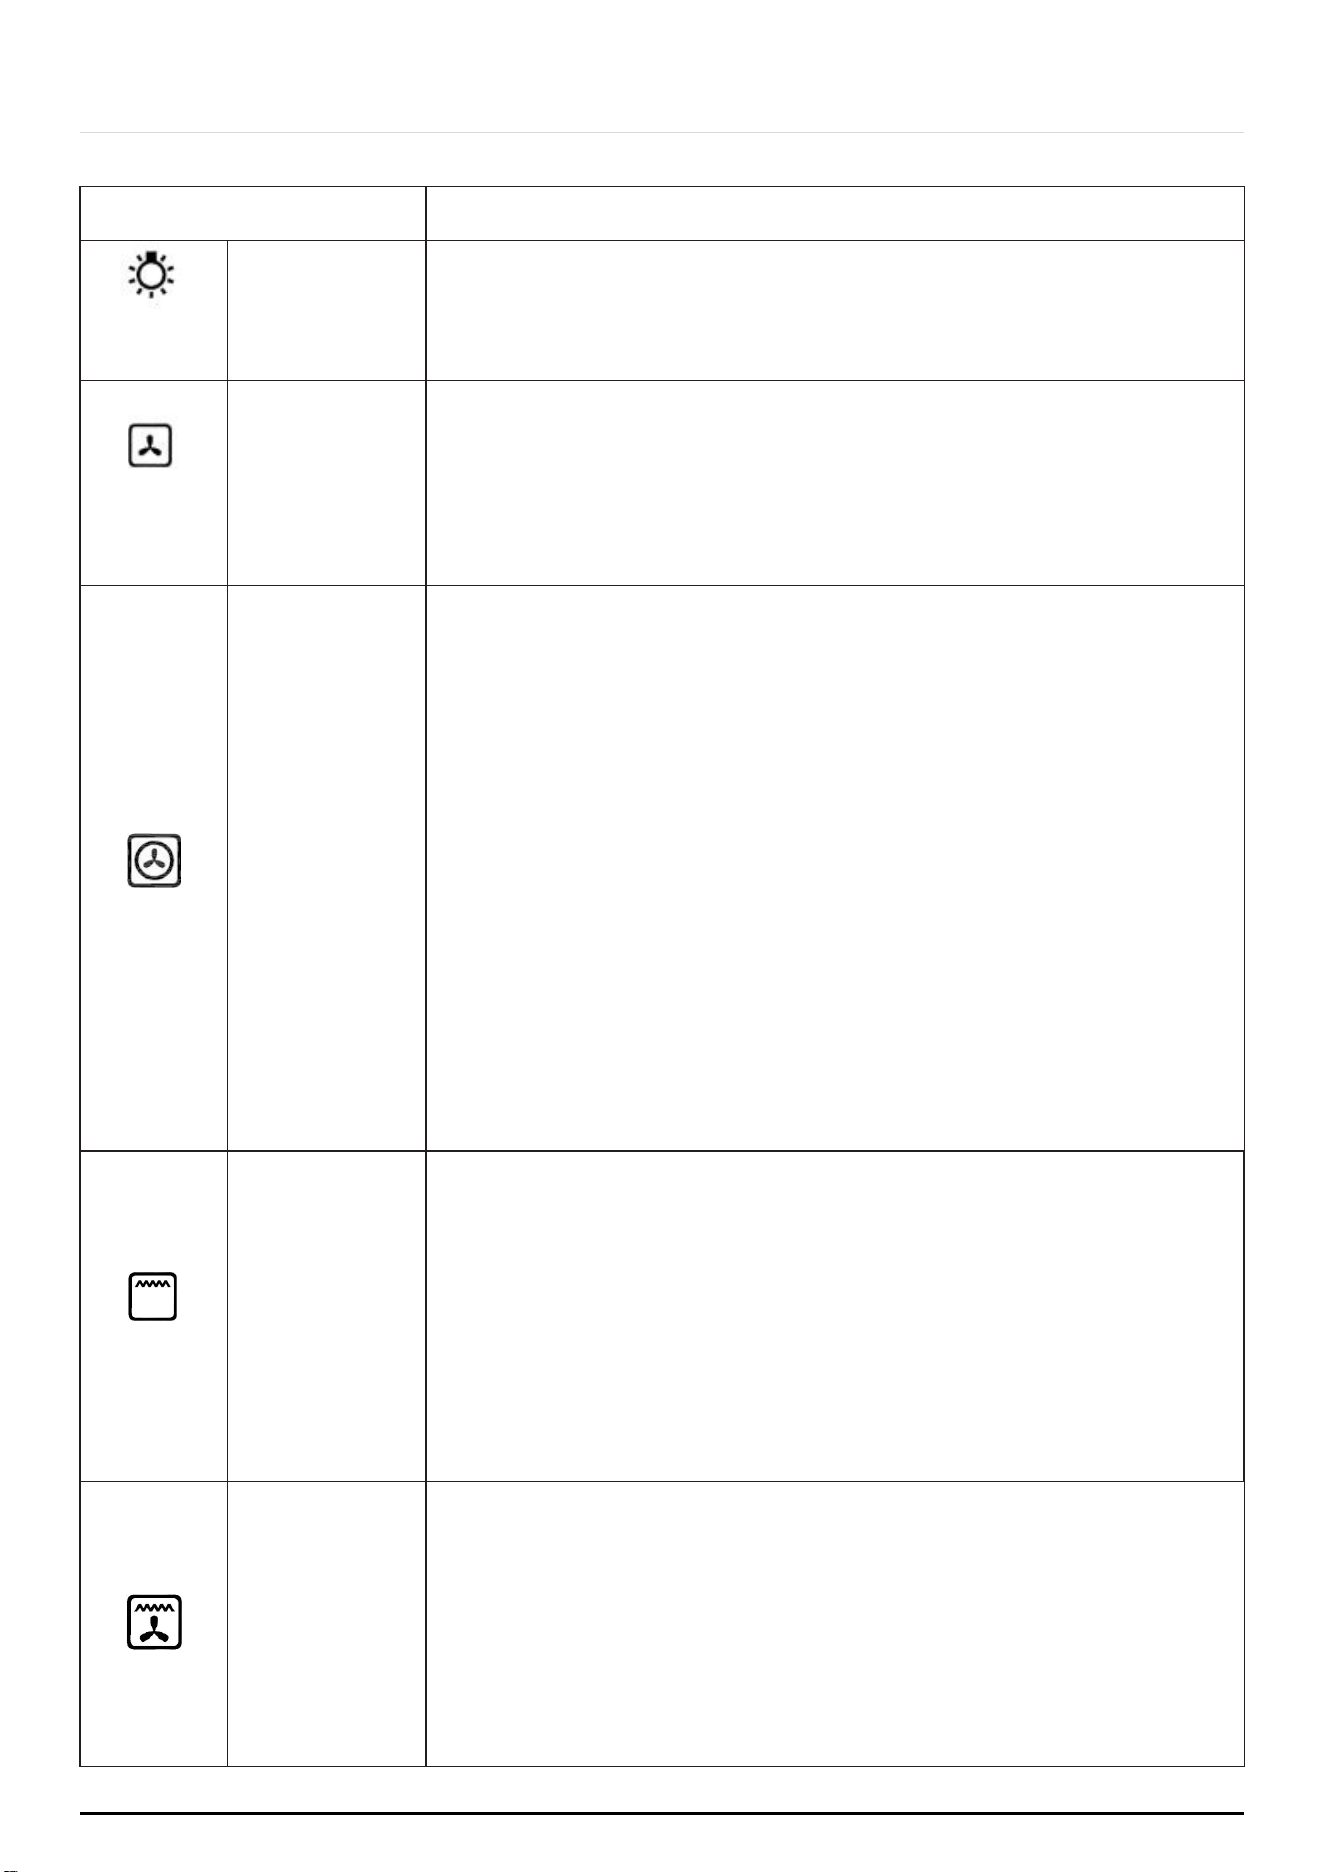
OVEN FUNCTIONS
Function Description
Light
Oven Light
Separate light control allows the light to be switched on, even
when the oven is not in cooking function.The lightilluminates
cavity, useful when cleaning. It may requires use of the timer to
activate the light feature.
Defrost
Defrosting
Select this function to thaw more delicate foods. In this
mode the room temperature air used. Useful for the gentle
defrosting of frozen food. Only the alarm function can be
used with the defrost oven function. None of the other timer
modes will work with the defrost function.
Fan Forced
Back element
with fan on
This method of cooking uses the heat from the circular
element distributed by the fan. This fan circulates the hot air
around the cavity so the food can be put in different places
and still be cooked at the same time. Useful, for multi-shelf
cooking, reheating cooked foods, pastries and complete
oven meals. It will cook at a lower temperature and be
faster than baking.
The excellent heat distribution makes it possible to use lower
temperatures when cooking roasts. This results in less loss of
juices, meat which is more tender and a decrease in the loss
of weigh for the roast. The ventilated mode is especially
suited for cooking fish, which can be prepared with the
addition of a limited amount of condiments, thus
maintaining their flavour and appearance. The ventilated
mode can also be used to thaw white or red meat, fish and
bread by setting the desired temperature.
Grill
Grill
This function uses the inner part of the top element, which
directs heat downwards onto the food. Can be used for
grilling portions of bacon, toast and meatproducts such as
steak, sausages, chicken and fish. The high, direct grill
temperature immediately browns meat, thus stopping juice
dispersion and keeping meat more tender. The grill is
particularly recommended for cooking dishes requiring a
high superficial temperature. Useful for grilling and toasting
bread, open sandwiches etc. and browning baked dishes.
Fan Grill
Fan & Grill
This setting uses the top heat combined with hot air
circulation and is suitable where quick browning is required
and “sealing” the juices in, such as steaks, hamburgers,
some vegetables etc.
Useful for grilling thicker cuts of meat such as rolls and
roulades, chicken. Lower temperatures can be used than
when using the Grill function, as the fan distributes the heat
to the food straight away.

P a g e | 19
ONLINE: TRINITYAPPLIANCES.COM.AU
Can be used for grilling meat products such as steak,
sausages, chicken and fish. This will allow the heat to
penetrate into the food and helps avoid food surface
overcooked.

P a g e | 20
ONLINE: TRINITYAPPLIANCES.COM.AU
5.2 FIRST TIME USE OVEN
Here are the things you must do at first use of your:
1. Remove labels or accessories attached inside the oven remove protective film on
front side of the appliance.
2. Remove dust and package residues by wiping inside of the oven with a damp cloth.
Inside of oven must be empty. Plug the cable of appliance into the electrical
socket.
3. Set the thermostat button to the temperature 180°C and run the oven for about half
an hour with its door closed. Meanwhile a slight smoke and smell might occur and
that’s a normal.
4. Wipe inside of the oven with a slightly warm water with detergent after it becomes
cold and then dry with a clean cloth. Now you can use your oven.
5.3 NORMAL USE
1. Adjust thermostat button and temperature at which you want to cook to start
cooking.
2. You can set cooking time to any desired time by using the timer. Timer will turn off
heaters when time expired.
3. Cooling system of the appliance will continue to operate after cooking is
completed. Do not cut the power of appliance in this situation which is required for
appliance to cool down. System will shut down after cooling is completed.
5.4 ENERGY SAVING TIPS
Following details will help use your product ecologically and economically:
Use dark coloured and enamel containers that conduct the heat better in the oven.
Do not open the oven door frequently while cooking. The oven will not lose heat.
Try not to cook multiple dishes simultaneously in the oven. You may cook at the
same time multiple dishes.
Turn off the oven a few minutes before the expiration time of cooking. In this case,
do not open the oven door.
Defrost the frozen food before cooking.
NOTE: This oven has a large cavity.
Preheating for about 10 minutes is recommended before cooking.

P a g e | 21
ONLINE: TRINITYAPPLIANCES.COM.AU
6 COOKING GUIDELINES
6.1 SELECTION RECOMMENDATIONS
The following table shows the information of food types and identified their cooking values.
Cooking times can vary depending on the network voltage, quality of raw food to be
cooked, quantity and temperature. Dishes to cook by using these values might not
appeal to your taste. You can set various values for obtaining different tastes and results
appealing to your taste by making tests.
Preheating
According to the specific recipes, the oven often recommended to be preheated before
placing the food into it. If the oven must be preheated the"Turbo back heater and fan"
mode is an energy safe option. Once the food has been placed in the oven. The most
appropriate cooking mode can then be selected.
Using the grill
The multi-function oven offers you three different grilling modes. Use the “Grill"setting for
grilling in perfect mode small portions like toasted sandwiches, hotdogs, etc., to
perfection. The
"
Maxi Grill
"
position is the best for grilling foods rapidly.
For a better distribution of heat, not only to brown the surface but also to cook the bottom
part, select
"
Maxi Grill fan forced
"
function. This mode can also be used for browning
foods at the end of the cooking process.
Always use the grill with the oven door closed. This will allow you both to attain excellent
results and to save energy. When using any of the three grilling modes, it is recommended
that the thermostat knob be turned to the 175℃, as it is the most efficient way to use the
grill. When utilizing the grill, place the rack at the lower levels. To catch grease or fat and
prevent smoke, place a dripping-pan at the bottom rack level.
Baking pastries
When baking pastries, always place them in the oven after it has been preheated. Make
sure you wait until the oven has been preheated thoroughly, the indicator red "E"light
will turn off. Do not open the door while the pastry is cooking in order to prevent it from
dropping. Batters must not be too runny, as this will result in prolonged cooking times.
Possible issues when baking and optional solutions:
Issue Solution
Pastry is too dry Increase the temperature by 10℃ and reduce the
cooking time.
Pastry dropped Use less liquid or lower the temperature by 10℃.

P a g e | 22
ONLINE: TRINITYAPPLIANCES.COM.AU
Pastry is too dark on top Place it on a lower rack, lower the temperature, and
increase the cooking time.
Cooked well on the inside but
sticky on the outside
Use less liquid, lower the temperature, and increase
the cooking time.
The pastry sticks to the pan Grease the pan well and sprinkle it with a dusting of
flour.
Used more than one level and
pastry not all at the same
cooking point
Use a lower temperature setting. It is not necessary to
remove the food from all the racks at the same time.
Cooking Pizza
When cooking pizza use of the fan forced modes is common:
Lower,upper heating element with fan or Turbo back heater fan forced
Preheat the oven for about 7-10 minutes.
Use a light aluminium pizza pan, placing it on the shelved supplied with the
oven. If the tray is used, this will extend the cooking time, making it difficult to
get a crispy crust.
Do not open the oven door frequently while the pizza is cooking.
If the pizza has a lot of toppings, it is recommended that the cheese be placed
on top halfway through the cooking process.
Cooking Fish and Meat
Meat must weigh at least 1 Kg in order to prevent it from drying out. When cooking white
meat, fowl and fish, use low temperature settings (150℃-220℃). For red meat that should
be well done on the outside while tender and juicy in the inside, it is a good idea to start
with a high temperature setting (200℃-220℃) for a short time, then turn the oven down
afterwards. In general, the larger the roast, the lower the temperature setting to allow
cook the food from inside. Place the meat on the centre of the rack and place the
tray/dripping pan beneath it to catch the fat.
Make sure that the shelves and trays are properly inserted and in the centre of the oven. If
you would like to increase the amount of heat from below, use the low rack heights. For
savory roasts, especially duck and wild game meats, dress the meat with lard or bacon on
the top.Cooking times may vary according to the nature of the foods, its homogeneity
and volume.

P a g e | 23
ONLINE: TRINITYAPPLIANCES.COM.AU
Cooking in oven tips:
Fault Cause Solution
The upper crust is dark and
the lower part too pale
Not enough
heat from the
bottom
Use the natural convection
position
Use deeper baking tins
Lower the temperature
Put the food on a lower shelf
The lower part is dark and
the upper crust too pale
Excessive
heat from the
bottom
Use the natural convection
position
Use lower side tins
Lower the temperature
Put the food on a higher
shelf
The outside is over cooked
and the inside not cooked
enough
Too high
temperature
Lower the temperature and
increase cooking time
The outside is too dry even
though of the right color
Too low
temperature
Increase the temperature
and reduce cooking time.

P a g e | 24
ONLINE: TRINITYAPPLIANCES.COM.AU
7 CLEANING AND MAINTENANCE
7.1 KEEP YOUR OVEN IN SHAPE
Don’t clean the appliance when it still hot! The inside and external surface of the
oven should preferably be cleaned by damp cloth when it is cooled down.
If you use your oven for an extended period of time, condensation may form. Dry it
using a soft cloth.
Do not clean inner parts, panel, trays and other parts of the product with hard tools
such as bristle brush, wire wool or knife. Do not use abrasive, scratching materials
or detergent.
Rinse after wiping the parts at inner parts of the product with soapy cloth, then dry
thoroughly with a soft cloth.
Clean glass surfaces with special glass cleaning material.
Do not clean your oven with steam cleaners.
Never use combustibles like acid, thinner and gas while cleaning your product.
Do not wash any part of the product in dishwasher.
Use dish-washing liquid, warm water and a soft cloth for stubborn dirt, then dry off
the area you have just cleaned with a dry cloth or a paper towel.
There is a rubber seal surrounding the oven opening which guarantees its perfect
functioning. Check the condition of this seal on a regular basis. If necessary, clean it
and avoid using abrasive products or objects to do so. Should it become damaged,
please contact your nearest After-sales Service Centre. We recommend you avoid
using the oven until it has been repaired.
Never line the oven bottom with aluminium foil, as the consequent accumulation of
heat could compromise the cooking and damage the enamel.
7.2 STEAM CLEANING
1. Pour 250ml of water (1 glass) into a bowl placed in the oven on the first level from
the bottom.
2. Close the oven door.
3. Set the temperature knob to 50℃, and the function knob to bottom heater position.
4. Heat the oven chamber for approximately 30 minutes.
5. Open the oven door, wipe the chamber inside with a cloth or sponge and wash
using warm water with washing liquid.
Caution!Possible moisture or water resides under the cooker can result from steam
cleaning. After cleaning the oven chamber wipe it dry.
P a g e | 25
ONLINE: TRINITYAPPLIANCES.COM.AU
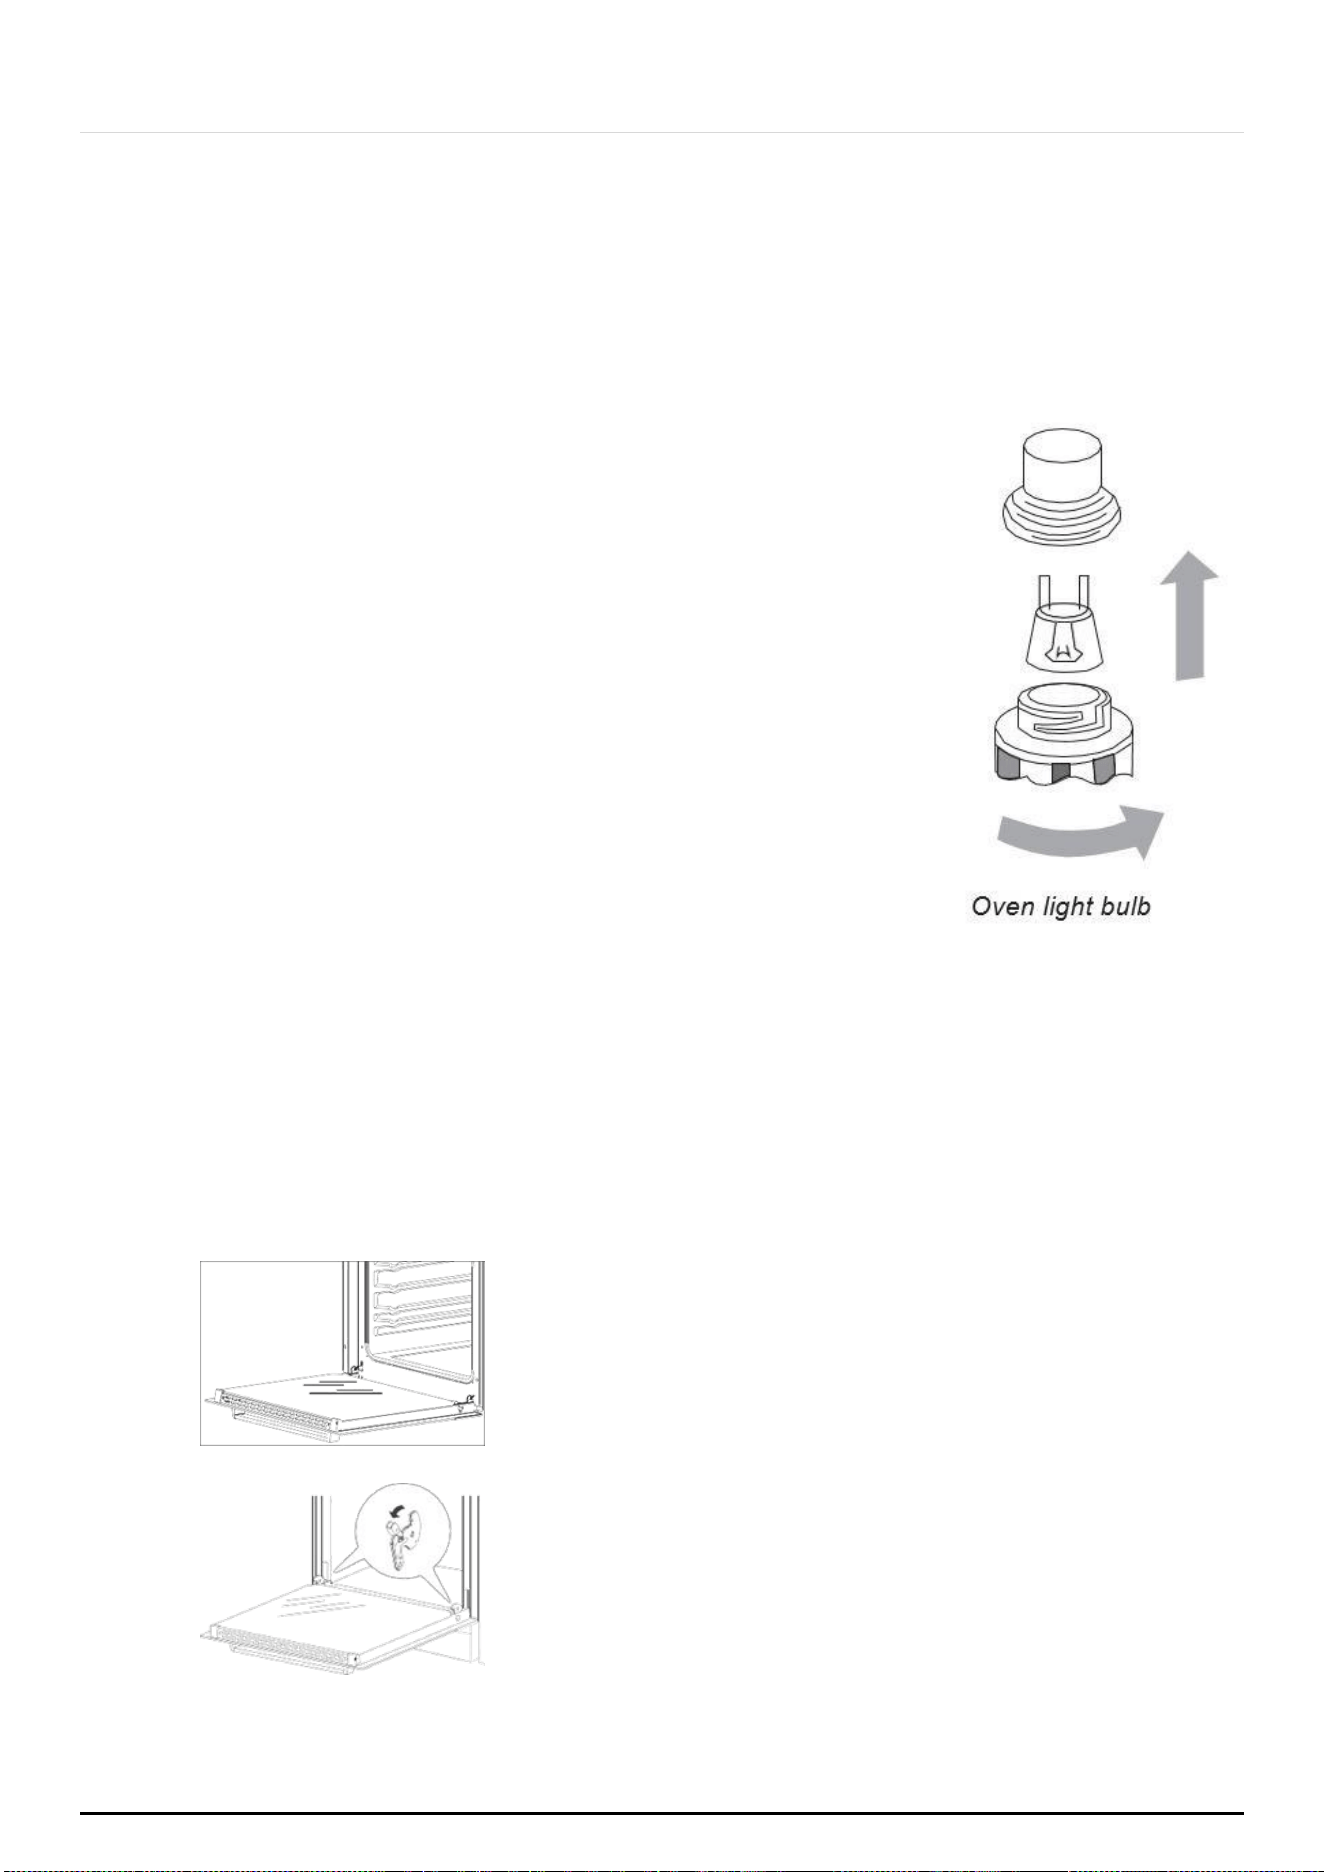
7.3 REPLACING OVEN LAMP
WARNING: First disconnect the power of appliance and ensure that appliance is cold.
Remove the power plug from electrical socket or disconnect the power supply by tripping
off circuit breaker (opening circuit) or removing fuse.
To avoid the possibility of an electric shock ensure that the appliance is switched off
before replacing the bulb.
1. Set all control knobs to the position off ”0” and disconnect
the mains power.
2. Unscrew and wash the lamp cover and then wipe it dry.
3. Unscrew the light bulb from the socket, replace the bulb
with a new high temperature bulb (300℃) of the following
specification:
voltage 230 V
power 25 W
bulb “G9”
4. Screw the bulb in, making sure it is properly inserted
into the ceramic socket.
5. Screw in the lamp cover.
7.4 DISASSEMBLING/ASSEMBLING OVEN DOOR
To make it easier to clean the inside of your oven, the oven door can be removed, by
proceeding as follows:
Removing the doors
a. The oven door should be fully open.
b. The latch hinges completely lifted.
P a g e | 26
ONLINE: TRINITYAPPLIANCES.COM.AU
c. Gently close the oven door until you hear the sound of engagement, once they
reach a clamping position, with both hands holding the door and continue to
push, pull up at the same time so that the hinge bolt removed from the oven.
d. After cleaning, the hinge needs to be aligned with the oven door latch; push gently
until they clip into place.
e. Push the latch down to its original position with the oven door fully open.
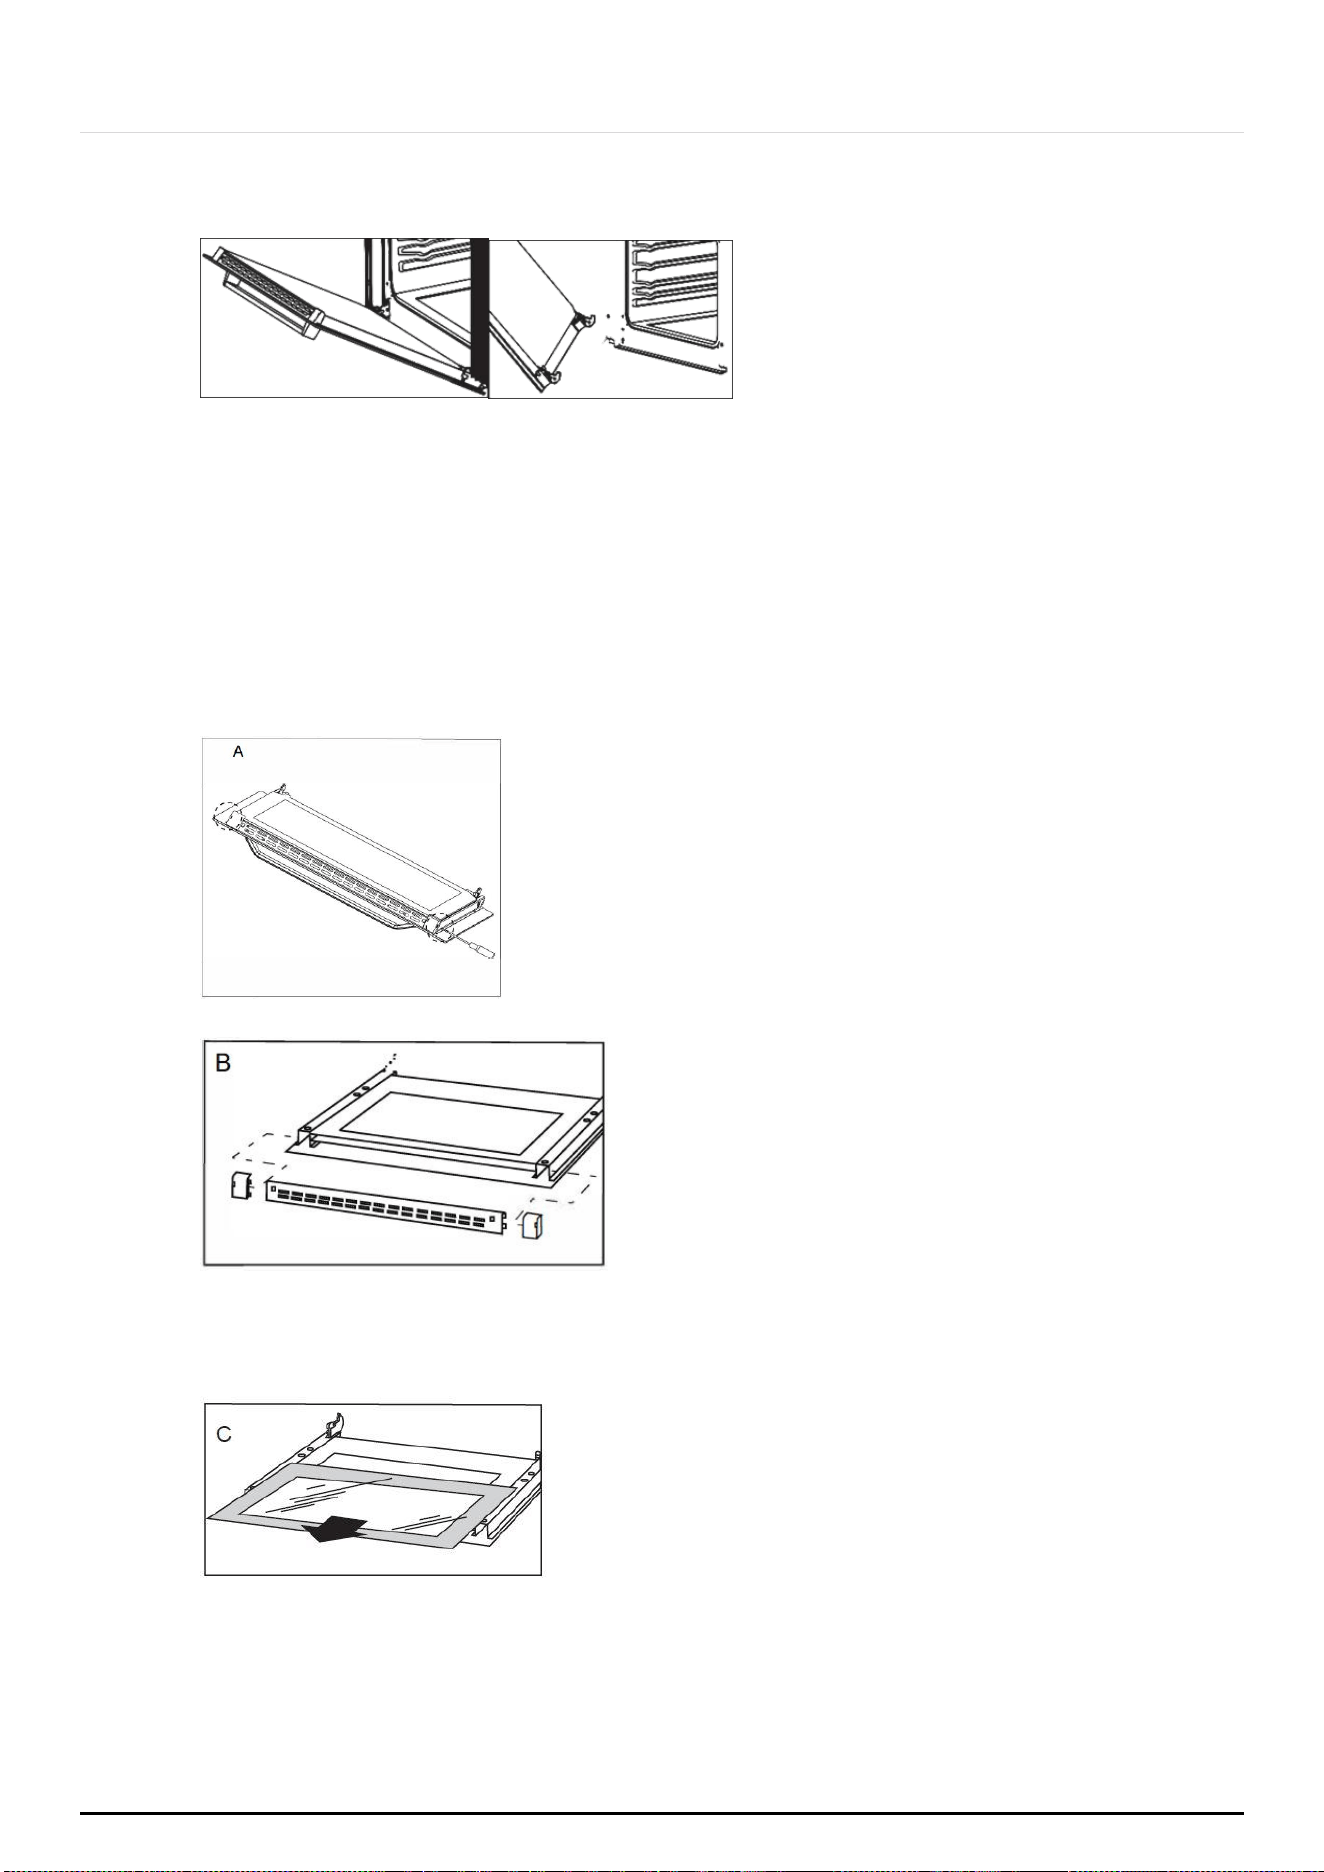
7.5 CLEANING OVEN GLASS
Remove the inner glass panel
a. Glass door has two plastic fixed blocks. Use a slotted screwdriver to insert into the
hole of the plastic fixed block and gently pry it .
b. Remove the fixed block and the top ends of the plastic ventilation grid.
c. The inner glass pulled out from beneath plastic fixed block. After cleaning, the inner
glass insert the following plastic fixed block, then install the above plastic
mounting block .

P a g e | 27
ONLINE: TRINITYAPPLIANCES.COM.AU
IMPORTANT:Remember where the glass panel been removed from and reassemble the
door correctly. Do not mix the glasses or rearrange the order.
8 TROUBLESHOOTING
You may solve the problems you may encounter with your product by checking the
following points.
Check the table below and try out the suggestions.
Problem
Possible Cause
What to Do
Oven does not
operate
Power supply not
available
Check for power supply.
Check household fuse box.
Replace the fuse or reset the circuit
breaker.
Oven is not in
“Operation” mode
Check that a cooking function and
temperature has been selected.
Oven stops during
cooking
Plug comes out from
the wall socket
Re-install the plug into wall socket.
Turnsoff during
cooking
Too long continuous
operation.
Let the oven cool down after long
cooking cycles.
Check for any abnormal sound from
the cooling fan assembly.
Cooling fan not
operating
Listen the sound from the cooling fan.
Oven not installed in a
location with good
ventilation
Make sure clearances specified in
operating instructions are maintained.
More than one plugs
in a wall socket
Use only one plug for each wall socket.
The grill and top
oven element is not
working, or cuts out
for long periods of
time during use.
Prevent overheating
Allow oven to cool down for 2 hours.
Once its temperature normal, check
whether appliance is working properly.
Outer surface of the
ovengets very hot
during operation.
Oven not installed in a
location with good
ventilation
Make sure clearances specified in
operating instructions are maintained.
Oven door is not
opening properly
Food residues
jammed between the
door and internal
cavity
Clean the oven well and try to re-open
the door.
Internal light is dim or
does not operate
Foreign object
covering the lamp
during cooking
Clean internal surface of the oven and
check again. Make sure light bulb is
not loose, try to move and tighten it.

P a g e | 28
ONLINE: TRINITYAPPLIANCES.COM.AU
Lamp might be failed
Replace with a lamp of same
specifications.
Electric shock when
touching the oven
No proper grounding
Make sure power supply is grounded
properly.
Ungrounded wall
socket is used
Water dripping
Water or steam may
generate under
certain conditions
depending on the
water content of
food being cooked.
This is not a fault of
the appliance
Let the oven cool down and then wipe
dry with a cloth. Don’t leave food in
oven after finished cooking, especially
with closed door and the oven has
been switched off.
Steam coming out
from a gaps of the
oven door
Moisture
condensation
remaining inside the
oven
The cooling fan
continues to operate
after cooking is
finished
The fan operates for a
certain period for
ventilation of internal
cavity of the oven
A cooling fan is fitted inside the
appliance to cool inside and external
surface down. This is not a fault of the
appliance but normal operation
function.
Oven does not heat
Oven door is open
Close the door and restart.
Oven controls not
correctly adjusted
Read the section regarding operation
of the oven and reset the oven.
Fuse tripped or circuit
breaker turned off
Replace the fuse or reset the circuit
breaker. If this is repeating frequently,
call an electrician.
Smoke coming out
during operation
When operating the
oven for the first time
Smoke comes out from the heaters.
This is not a fault. After 2-3 cycles, there
will be no more smoke.
Food on heater
Let the oven to cool down and clean
food residues from the ground of the
oven and surface of upper heater.
When operating the
oven burnt or plastic
odour coming out
Plastic or other not
heat resistant
material are being
used
Use suitable, heat resistant accessories.
Oven does not cook
well
Oven door is opened
frequently during
cooking
Do not open oven door frequently, if
the food you are cooking does not
require turning. If you open the door
frequently internal temperature drops
and therefore cooking result will be
influenced.
P a g e | 29
ONLINE: TRINITYAPPLIANCES.COM.AU
9 TECHNICAL SPECIFICATIONS
58 Iitres NETT
595mm x 595mm x 530mm (WxDxH)
Approx. 27.5kg
220-240V~ 50/60 Hz
max.1.8 kw
A
Note:The values provided with the appliance or its accompanying documents are
laboratory readings in accordance with the respective standards. These values may differ
depending on the use and ambient conditions.Figures in this guide are schematic and
may not be exactly match your product. We continually strive to improve our products.
The specifications and designs might be changed without notice.
Electric oven size
Oven size
Weight
Voltage rating
Power rating
Energy rating
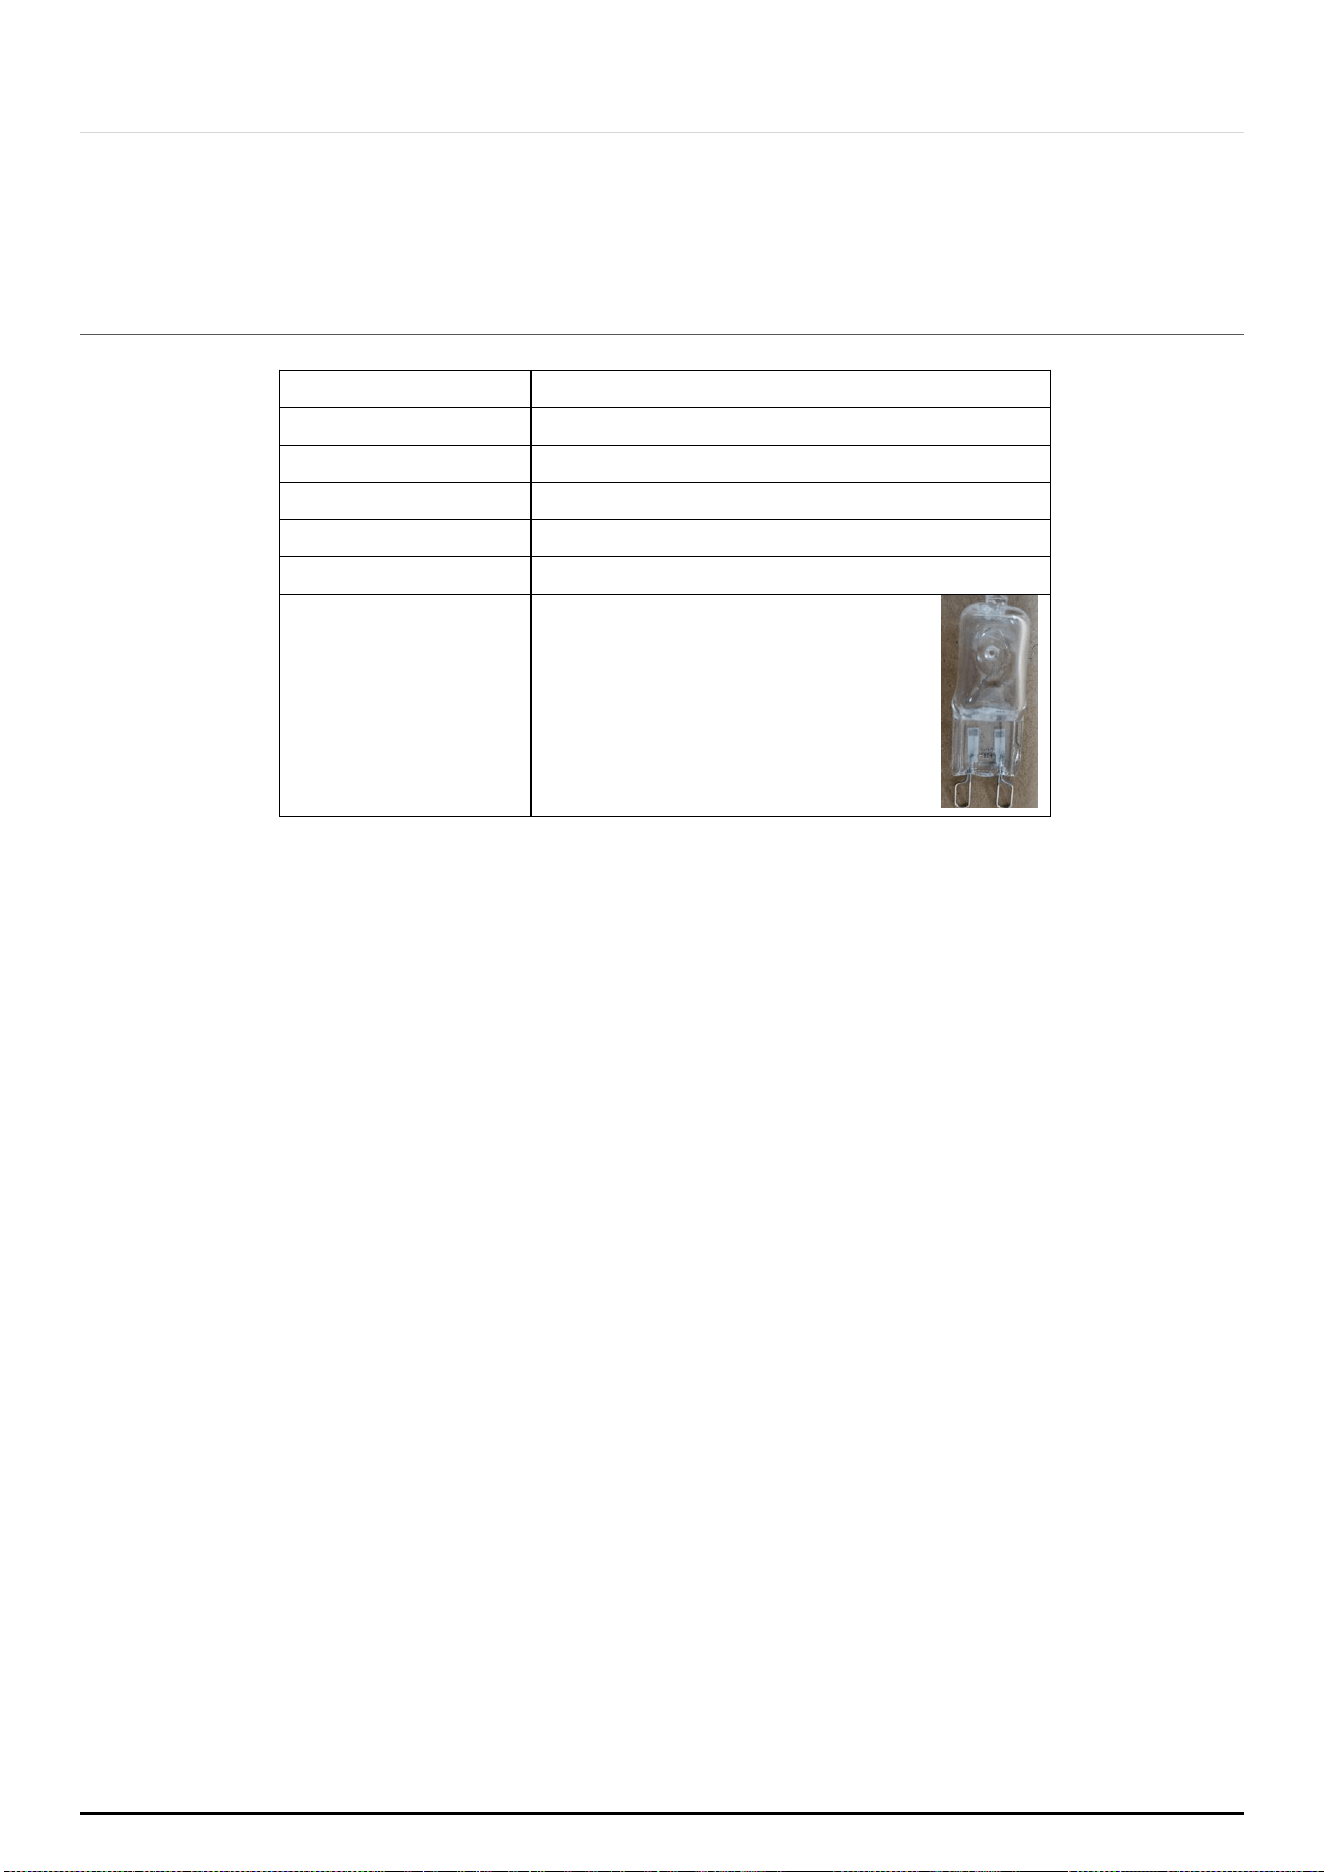
Oven Light Bulb
1 G9 Push Pin Halogen 25W

P a g e | 30
ONLINE: TRINITYAPPLIANCES.COM.AU
10DISPOSAL
This appliance requires special waste disposal. For further
information regarding the treatment, recovery and recycling of this
product please contact your local council, household waste
disposal service or the store where you purchased it.
The packaging materials are recyclable.

P a g e | 31
ONLINE: TRINITYAPPLIANCES.COM.AU
11CUSTOMER CARE
Please be advised that without the proof of purchase, your warranty may not
be valid, keep the receipt.
For your convenience, please record:
STORE NAME/CONTACT DETAILS: ...............................................
PURCHASE DATE: ..........................................................................
PRODUCT MODEL N: ….................................................................
PRODUCT SERIAL N: .......................................................................
The warranty will be voided, if not installed by a licensed professional.
For your own protection, please record installer’s details:
Installer’s Trade Name:..................................................................
Trade Licence N: ............................................................................
Date of Installation: …....................................................................
Installation Receipt:.......................................................................
For further information on the appliance, service, spare parts or to obtain dimension
and installation information, please contact our customer service or visit website.
Please have above information and documents on hands before contacting customer
service
Email: info@trinityappliances.com.au
Web: trinityappliances.com.au